Embed Size (px)
Citation preview

Form RZ 422, P/N 150491, Page 1
FOR YOUR SAFETY
The use and storage of gasoline or otherflammable vapors and liquids in opencontainers in the vicinity of this appliance ishazardous.
WARNING: Gas-fired appliances are not designedfor use in hazardous atmospheres containingflammable vapors or combustible dust, inatmospheres containing chlorinated orhalogenated hydrocarbons, or in applications withairborne silicone substances. See Hazard Levels,below. GENERAL
Installation should be done by a qualified agency in accordancewith the instructions in this manual and in compliance with allcodes and requirements of authorities having jurisdiction. Theinstructions in this manual apply to the duct furnace modelslisted below.
WARNING: Improper installation, adjustment,alteration, service, or maintenance can causeproperty damage, injury or death. Read theinstallation, operation, and maintenanceinstructions thoroughly before installing orservicing this equipment.
Table of ContentsParagraph No. ..... Page No.
Installation and Operation ........................... 1-27 ...................... 1-16Check Installation and Start-Up .................. 28 ......................... 17Service/Maintenance/Troubleshooting ....... 29-32 .................... 18-20
FOR YOUR SAFETYIf you smell gas:1. Open windows.2. Don't touch electrical switches.3. Extinguish any open flame.4. Immediately call your gas supplier.
APPLIES TO: Installation/Operation/Service
Model Series X
Indoor Duct Furnaces
INSTALLATION FORM RZ 422
Dimensions ............................................... 3Disconnect Switch .................................. 11Duct Connections ..................................... 7Optional Ductstat ................................... 14ECO Control ........................................... 11Electrical Supply and Connections ......... 11Optional Electronic Modulation .............. 15Optional Fan Control ............................. 12Gas Piping and Pressures ......................... 9GENERAL ............................................... 1HAZARD INTENSITY LEVELS ............ 1Installation Codes ..................................... 2Limit Control .......................................... 11MAINTENANCE ................................... 18Optional Mechanical Modulation .......... 15
Air Flow Requirements ............................. 8Blocked Vent Switch ............................... 12Blower Connections ................................. 8Burner Air Adjustment ............................ 16Burner Rack Removal .............................. 18Burners .................................................... 16Bypass Duct ............................................. 9Carryover System .................................... 16Check Installation and Start-Up ............. 17CHLORINE ............................................... 4Cleaning Pilot and Main Burners ............ 18Cleaning the Heat Exchanger ................... 18Clearances .................................................. 2Combustion Air Requirements .................. 4Condensate Drain, Option CS1 ................ 6
Index by Page NumberMounting the Furnace .............................. 4Pilot and Ignition Systems ...................... 16Reversing Air Flow .................................... 3SERVICE ................................................. 18Start-Up .................................................. 17Suspending the Furnace ............................. 4Thermostat ............................................. 11Troubleshooting ...................................... 19Optional Two-Stage Operation .............. 14Uncrating .................................................. 2Valve ....................................................... 14Power Venting (Option CA) ..................... 6Venting Requirements ................................ 5Warranty ................................................... 2WIRING DIAGRAMS ..................... 12-14
�����������������
Model Characteristics
XIndoor, Gravity-Vented, Standard CFM, 80% Thermal Efficient
HXIndoor, Gravity-Vented, High CFM, 80% Thermal Efficient
HAZARD INTENSITY LEVELS
1. DANGER: Failure to comply will result in severe
personal injury or death and/or property damage.
2. WARNING: Failure to comply could result in severe
personal injury or death and/or property damage.
3. CAUTION: Failure to comply could result in minor
personal injury and/or property damage.
References: Replacement Parts, Form RZ 705; Gas Conversion, Form RZ 703

Form 422, Page 2
3. Uncrating and PreparationThis furnace was test operated and inspected at the factory priorto crating and was in operating condition. If the furnace has in-curred any damage in shipment, document the damage with thetransporting agency and immediately contact your Reznor dis-tributor.
Check the rating plate for the gas specifications and electricalcharacteristics of the furnace to be sure that they are compatiblewith the gas and electric supplies at the installation site. Read thisbooklet and become familiar with the installation requirements ofyour particular furnace. If you do not have knowledge of localrequirements, check with the local gas company or any other localagencies who might have requirements concerning this installa-tion. Before beginning, make preparations for necessary supplies,tools, and manpower.
Check to see if there are any field-installed options that need to beassembled to the furnace prior to installation.
Option Parts -- Some gas control options will have parts eithershipped loose with the heater or shipped separately. If your unitis equipped with any of the gas control options listed below, besure these parts are available at the job site.
1. Installation CodesThe duct furnaces covered in this manual are design-certified by the CanadianStandards Association to ANSI Z83.8a and CAN/CGA 2.6 for use witheither natural or propane gas. The type of gas for which the furnace isequipped and the correct firing rate are shown on the rating plate attached tothe unit. Electrical characteristics are shown on the unit rating plate.
These units must be installed in accordance with local building codes. In theabsence of local codes, in the United States, the unit must be installed inaccordance with the National Fuel Gas Code (latest edition). A Canadianinstallation must be in accordance with the CAN/CGA B149.1 and B149.2Installation Code for Gas Burning Appliances and Equipment. These codesare available from CSA Information Services, 1-800-463-6727. Local authori-ties having jurisdiction should be consulted before installation is made toverify local codes and installation procedure requirements.
Special Installations (Aircraft Hangars/Garages)Installations in aircraft hangars should be in accordance with ANSI/NFPANo. 409 (latest edition), Standard for Aircraft Hangars; in public garages inaccordance with ANSI/NFPA No. 88A (latest edition), Standard for ParkingStructures; and for repair garages in accordance with ANSI/NFPA No. 88B(latest edition), Standard for Repair Garages. ANSI/NFPA-88 (latest edition)specifies overhead heaters must be installed at least eight feet above the floor.In Canada, installations in aircraft hangars should be in accordance with therequirements of the enforcing authorities, and in public garages in accordancewith CAN/CGA B149 codes.
WARNING: These duct furnaces are not certified orapproved for use in drying or process applications. If aduct furnace is to be used in a drying or processapplication, contact the factory for applicationguidelines and manufacturer's authorization. Withoutfactory authorization, the warranty is void, and themanufacturer disclaims any responsibility for the ductfurnace and/or the application.
WARNING: To ensure safety, follow lightinginstructions located on outlet box cover. See HazardLevels, Page 1.
2. WarrantyRefer to limited warranty information on the warranty card in the "Owner'sEnvelope".
WARRANTY: Warranty is void if......a. Furnaces are used in atmospheres containing flammable va-
pors or atmospheres containing chlorinated or halogenatedhydrocarbons or any contaminant (silicone, aluminium oxide,etc.) that adheres to the spark ignition flame sensing probe onfurnaces equipped with optional spark pilot.
b. Wiring is not in accordance with the diagram furnished withthe heater.
c. Unit is installed without proper clearances to combustible ma-terials or located in a confined space without proper ventila-tion and air for combustion. (See Paragraphs 4 and 7.)
d. Furnace air throughput is not adjusted within the range speci-fied on the rating plate.
e. Duct furnace is installed in a process or drying applicationwithout factory authorization. (Any use in a process or dryingapplication voids CSA certification.)
4. ClearancesClearance to combustibles is defined as the minimum distancefrom the heater to a surface or object that is necessary to ensurethat a surface temperature of 90°F above the surrounding ambienttemperature is not exceeded. Clearance is also required to sides offurnace for combustion air space and for convenient installationand burner control service.
Option AG7 Thermostat, P/N 48033
Option AG3, AG6, AG8 Control Switch, P/N 29054Option AG9 Remote Temperature Selector, P/N 48042 Control Switch, P/N 29054Option AG15 Remote Temperature Selector, P/N 115848 Stage Adder Module, P/N 115849 Control Switch, P/N 29054Option AG16 Remote Temperature Selector, P/N 115848 Stage Adder Module, P/N 115849 Remote Display Module, P/N 115852 Control Switch, P/N 29054
Heating - Gas Control Option
Makeup Air - Gas Control Options
Required Clearances
Sides Bottom
Control OppositeTo
CombustiblesTo Non-
Combustibles
6" (152mm)
See Note6"
(152mm)3" (76mm) 0
Top
NOTE: To have sufficient space to remove the drawer-type burner rack, the clearance on the control side of the furnace must be the width of the furnace plus 6" (152mm).
Other shipped-separate options could include a power venter, agas shutoff valve, a condensate drain fitting, a thermostat, a differ-ent control switch, or a disconnect switch.

Form RZ 422, P/N 150491, Page 3
5. Dimensions
�
�
� � � �
�
� �
��� ����� ��
��� ������ �
����������
����������
�����������������������������
��������� !""�#
$%��&
'(�)��*
'++����'+
�)(�*'++����'+
���������� ������������������������������
������ �
�������
� ������ ��
������ �
����+)���,'�)��'+-'��.�!��*'��)�
��-�'/
������
����������
�������
������
$'"�0��/ ,�-�� �1� .�'+� �)+1)�1�*'+��'��)+1�!�+������((� �1�
6. Instructions for Reversing Airflow by Changing Directional AirBaffles in the Heat Exchanger
Duct furnaces (for high CFM units, see note below) are equipped withdirectional air baffles between the heater exchanger tubes. Facing the con-trol compartment of the furnace, the standard direction of airflow is fromleft to right. Installations requiring direction of airflow from right to leftwhen facing the control compartment will require repositioning of thedirectional air baffles at the installation site. Change the position of bafflesas follows (See Figure 2):1) Remove Screws "A".2) Lift each baffle slightly and slide forward removing each individual
baffle completely from the heat exchanger.3) Remove the top baffle support. Re-use screws "B" and install the top
baffle support on the opposite end of the heat exchanger.4) Re-install the bottom baffle support and brackets on the opposite end
of the heat exchanger.5) Reverse Steps 1 and 2 - re-installing all of the baffles.
NOTE: Models factory-built for high CFM capability contain only thetop baffle support shown in Figure 2. To reverse air flow, move the topbaffle support. The top baffle support must always be on the entering airside of the unit.
Figure 2 -HeatExchangerDirectionalAirBaffles
$'"�)--�� !""'��
���/(�
'��'&)--��� !""'��
�)�2�
�(
�����(�%
)�3�
�������'+�'-���-�'/
���/�*4�3%�
,�-�
���/(�
���/�
*
Dimensions (inches)S ize A B D E G H J K P Q Flue75 19-1/4 32-1/4 12-1/2 14 30-1/4 2 9-5/8 13-3/4 3-1/2 20-3/4 5" Round
100 19-1/4 32-1/4 12-1/2 14 30-1/4 2 9-5/8 13-3/4 3-1/2 20-3/4 6" Round
125 22 32-1/4 15-1/4 16-3/4 30-1/4 2 11 16-1/2 3-1/2 20-3/4 7" Oval
150, 175 27-1/2 32-1/4 20-3/4 22-1/4 30-1/4 2 13-3/4 22 3-1/2 20-3/4 8" Oval
200, 225 33 35-1/4 26-1/4 27-3/4 31-3/4 3-1/2 16-1/2 27-1/2 5 19-1/4 8" Round
250, 300 41-1/4 35-1/4 34-1/2 36 31-3/4 3-1/2 20-5/8 35-3/4 5 19-1/4 10" Oval
350 46-3/4 35-1/4 40 41-1/2 31-3/4 3-1/2 23-5/8 41-1/4 5 19-1/4 12" Oval
400 52-1/4 35-1/4 45-1/2 47 31-3/4 3-1/2 26-1/8 46-3/4 5 19-1/4 12" Oval
Dimensions (mm)Size A B D E G H J K P Q Flue75 489 819 318 356 768 51 244 349 89 527 127 Round
100 489 819 318 356 768 51 244 349 89 527 152 Round
125 559 819 387 425 768 51 279 419 89 527 178 Oval
150, 175 699 819 527 565 768 51 349 559 89 527 203 Oval
200, 225 838 895 667 705 806 89 419 699 127 489 203 Round
250, 300 1048 895 876 914 806 89 524 908 127 489 254 Oval
350 1188 895 1016 1054 806 89 600 1048 127 489 305 Oval
400 1327 895 1156 1194 806 89 664 1187 127 489 305 Oval
Figure 1 - Model XDimensions - inches (mm)

Form 422, Page 4
8. Suspending or Mounting theFurnace
LocationBefore installing the furnace, check the supporting structure to be usedto verify that it has sufficient load-carrying capacity to support theweight of the unit.
Net Weight
Size 75 100 125 150 175 200 225 250 300 350 400
lbs 150 150 163 182 186 224 231 276 286 320 355
kg 68 68 74 83 84 102 105 125 130 145 161
WARNING: Avoid installing a furnace inextremely drafty areas. Extreme drafts canshorten the life of the heat exchanger and/or causesafety problems.
Suspending the FurnaceThese duct furnaces have two-point suspension. See hanger centerlinedimensions in Paragraph 5, page 3.At each suspension point, the furnace is factory-equipped with a free-turning, female, 1" (NPT), pipe hanger. Suspend by connecting thepipe hanger to a 1" threaded pipe. See Figure 4 (left side). As an alter-native method, the factory-installed pipe hanger may be removed andthe heater suspended as illustrated on the right in Figure 4.
Figure 4 - Suspending the Furnace
Mounting the FurnaceA minimum of 3" (76mm) clearance is required from the bottom of theunit to a combustible surface. See Figure 5 for illustration of availablesupport feet (P/N 10680 - 4 required) or Figure 6 for an illustration offield-fabricated supports.
�)+1)�1�((�&5�# 6+(�)�����4�"�)��1�((�&5�#�7���"��.�)+3� 8)(%���9!��((�&5�#
�7���"�
$%��)1�1 '�2��
8)(%���9!�((�&5�#
���7�4'1
� �)+1)�1�((�&5�#4�&':�1�
���((��%�'!3%�%��(�1��")+��
��)����$'"
ChlorineThe presence of chlorine vapors in the combustion air of gas-firedheating equipment presents a potential corrosion hazard. Chlorine will,when exposed to flame, precipitate from the compound, usually freonor degreaser vapors, and go into solution with any condensation that ispresent in the heat exchanger or associated parts. The result is hydro-chloric acid which readily attacks all metals including 300 grade stain-less steel.
Care should be taken to separate these vapors from the combustionprocess. This may be done by wise location of the furnace with regardto exhausters or prevailing wind direction. Remember, chlorine is heavierthan air. This fact should be kept in mind when determining installationlocations of heating equipment and building exhaust systems.
*'+-�+�1 ")��
��� ������
��� ������
Figure 3 -Confined Space: Aspace whose volumeis less than 50 cubicfeet per 1000 BTUHof the installedappliance input rating
7. Combustion Air RequirementsThese duct furnaces are designed to take combustion air from the spacein which the furnace is installed. The air that enters into the combustionprocess is vented to the outdoors. Sufficient air must enter the equip-ment location to replace the air exhausted through the vent system.Modern construction methods involve the greater use of insulation,improved vapor barriers and weather-stripping, with the result thatbuildings generally are much tighter structurally than they have been inthe past. The combustion air supply for gas-fired equipment can beaffected by these construction conditions because infiltration that wouldhave existed in the past may not be adequate. Extensive use of exhaustfans aggravates the situation. In the past the filtration of outside airassumed in heat loss calculations (one air change per hour) was as-sumed to be sufficient. However, current construction methods maynow require the introduction of outside air through wall openings orducts.
Requirements for combustion air and ventilation air depend uponwhether the unit is located in a confined or unconfined space. An "un-confined space" is defined as a space whose volume is not less than 50cubic feet per 1000 BTUH of the installed appliance. Under all condi-tions, enough air must be provided to ensure there will not be a negativepressure condition within the equipment room or space. A positive sealmust be made in all return-air connections and ducts. Even a slight leakcan create a negative pressure condition in a confined space and affectcombustion.
Do not install a unit in a confined space without providing wall open-ings leading to and from the space. Provide openings near the floor andceiling for ventilation and air for combustion as shown in Figure 3,depending on the combustion air source as noted in Items 1, 2, and 3below the illustration.
Add total BTUH of all appliances in the confined space and divide byfigures below for square inch free area size of each (top and bottom)opening.
1. Air from inside the building -- openings 1 square inch free area per1000 BTUH. Never less than 100 square inches free area for eachopening. See (1) in Figure 3.
2. Air from outside through duct -- openings 1 square inch free areaper 2000 BTUH. See (2) in Figure 3.
3. Air direct from outside -- openings 1 square inch free area per 4000BTUH. See (3) in Figure 3.
NOTE: For further details on supplying combustion air to a confinedspace, see the National Fuel Gas Code ANSI Z223.1a (latest edition ).
WARNING: These furnaces are designed to takecombustion air from the space in which the unit isinstalled and are not designed for connection tooutside combustion air intake ducts. Connectingoutside air ducts voids the warranty and couldcause hazardous operation. See Hazard Levels,Page 1.

Form RZ 422, P/N 150491, Page 5
�7�;��7�;����7+3���6�'+�,�3
�7�;��7�;����7<��)����)��
*)5�+���,�3
�7�����&&�
�����7���&&�
*)5�+���,�3
���7�9!�(,'�2/)(%��(
")���(
����;��������;���)1
'��(
+3���6�'+�,�3
������ ���7����)�)+���%'��(��+)+3�����'+���3�)+1��)5�+�����3
�=��7����&&��&�+�&!&�%��3%��-'����)�)+����'��'&5!(��5��(>�$%������'&&�+1�1%��3%���(��7�����&&��-'��"�!&5�+3�)+1�(��:���
�7����&&�
Figure 5 - Support Feet, P/N 10680(4 required)
Figure 6 - Field-Fabricated Support
Figure 7 -Horizontal orVertical FlueConnection
9. VentingFurnaces have the following vent outlet sizes:
Model Size and Configuration ofSize Horizontal/Vertical Vent Outlet
75 5" Round
100 6" Round
125 7" Oval
150, 175 8" Oval
200, 225 8" Round
250, 300 10" Oval
350, 400 12" Oval
To change flue connectionfrom horizontal to vertical:(1)remove screws; (2) reverse position; and (3) re-fasten.
%�""�+3�'���,!3
���((��)+��4��)�+�+3� ���/
��9������������?!���1�
.!�+)��
�7���&&�
NOTE: Drawing is not proportional;comply with dimensions as written.
DANGER: Failure to provide proper ventingcould result in death, serious injury, and/orproperty damage. This furnace must beinstalled with a vent connection and propervent to the outside of the building. Install ventin accordance with Part 7, Venting ofEquipment, of the National Fuel Gas Code,ANSI Z223.1 (latest edition) or applicableprovision of national, state or local codes. ACanadian installation must be in accordancewith the CAN/CGA B149.1 and B149.2,Installation Code for Gas Burning Appliancesand Equipment, and applicable local codes.Also, follow venting recommendations listedbelow.
Safe operation of any gravity-vented gas-firedequipment requires a properly operating ventsystem, correct provision for the combustionair (See Paragraph 7) and regular maintenanceand inspection (See page 18). See HazardLevels, Page 1.
Venting Requirements1. Provide a minimum clearance of 18" between the drafthood relief opening
and any obstruction. Do not expose the relief opening to wind draftsfrom any source such as from an overhead door or adjacent air handlingequipment.
2. The unit is equipped with a built-in draft diverter, consequently an exter-nal draft diverter MUST NOT be installed in the vent connector or anyinternal alterations made. Do not install a manual damper or other fixedrestriction in the vent connector.
3. Vent pipe should be a minimum of 24 gauge galvanized steel or other non-corrosive material. Double wall, Type B vent such as Metalbestos orAmerivent is recommended. (NOTE: Double-wall pipe is not available in9" diameter.) Where it is necessary to run the vent pipe through anexterior wall of combustible materials, a suitable thimble must be used.The vent pipe shall have a clearance of at least six inches (152mm) fromcombustible materials, or as is specified by the double-wall vent pipemanufacturer.
4. With the outlet on the heater in the horizontal position, it is recom-mended that a 12-18" (305-457mm) piece of straight pipe be connectedto the flue collar before installing an elbow. The horizontal vent pipe runshould have a uniform rise of at least 1/4" per foot of horizontal run in thedirection of discharge. The length of the lateral run must not exceedlengths shown in the vent tables of the National Fuel Gas Code or theCanadian Installation Code for Gas Burning Appliances (See Tables 1and 2, page 6).
5. Lateral runs should be supported every six feet using a non-combustiblematerial, such as strap steel or chain. Do not rely on the drafthood orheater for support of either horizontal or vertical vent pipe.

Form 422, Page 6
Figure 8 - Condensate Drain, Option CS1 (P/N 31765)
Seal holes in bottom pan. Terminate drain outside ofbuilding. Periodic cleaning of the condensate collector anddisposal system is required.
10. Condensate Drain, OptionCS1
Condensate can form in the heat exchanger of furnaces installed asmakeup air units or when installed downstream from a cooling coil.Under these conditions, a drain flange, Option CS1, may be installed onthe furnace bottom as shown in Figure 8 When using Option CS1, sealall corners and the four square holes in the bottom pan edge.
'��'&�'-��%��.!�+)���*)(�+3
@���;�������'���)+1�9!�
���7���"��8)(���9!�
�)(2��
9. Venting (cont'd)Venting Requirements (cont'd)
6. Vent connectors serving Category I heaters shall not be connectedinto any portion of a mechanical draft system operating under posi-tive pressure.
7. Where it is necessary to use a long run of vent pipe, or where thevent pipe is exposed to cold air, condensation within the pipe mayoccur. There are two ways to overcome or eliminate this problem.
(a) Prevent condensation by insulating the pipe so that the tem-perature of the flue products never drops below 250°F.
(b) Use double-wall, Type B vent pipe which is recommended forthe reduction or elimination of condensate problems. Whereextreme conditions are present and condensate is anticipated,install a trap for collecting condensate.
8. The vent connection may be made into a suitable permanent chim-ney or into a gas vent. The effective area of the vent connector, gasvent or chimney when connected to a single appliance shall not beless than the area of the appliance drafthood outlet or in accordancewith approved venting methods. The effective area of the gas ventor chimney when connected to more than one appliance shall not beless than the area of the largest vent connector plus 50% of the areasof additional vent connectors or in accordance with approved vent-ing methods.
Minimum permissible height of the vertical vent is five feet provid-ing no horizontal vent pipe connector is used. If a horizontal ventconnector is necessary, consult Tables 1 and 2 above or the NationalFuel Gas Code or the Canadian Installation Code for Gas BurningAppliances, for the maximum permissible length of a horizontalpipe run (vent connector) for a given vertical height of gas vent.
The gas vent or chimney should extend at least three feet (1M)above the highest point where it passes through a roof of a buildingand at least two feet (.6M) higher than any portion of a building orobstruction within a horizontal distance of ten feet (3M). Install asuitable weather cap on the end of the vent pipe to prevent rain orsnow from entering the open end.
9. If the heater is installed in a space served by a large exhaust fan, besure that the exhaust fan does not affect the operation of the heateror the satisfactory venting of its products of combustion.
If a negative pressure exists, as evidenced by a downdraft, a fac-tory-designed mechanical motor drive venter (Option CA) shouldbe installed. In severe negative pressure conditions, makeup airequipment may be necessary.
Optional Power Venting (Option CA)To install a gravity-vented furnace in an area where horizontal ventingis required or where negative building pressure inhibits gravity venting,include an optional power venter in the application. Use only a powerventer provided by the furnace manufacturer and carefully follow theinstructions included in the optional venter package. Use the venteradapter provided to connect the power venter to the heater. DO NOTINSTALL THE POWER VENTER WITHOUT THE VENTERADAPTER.
With an Option CA power venter installed, the furnace may be ventedeither horizontally or vertically. Do not exceed the maximum vent lengthsshown in Table 3.
TABLE 1 - Maximum Horizontal Run for Double Wall Type B Connector and Double-Wall Type B VentVent Diameter
ft M ft M ft M ft M ft M ft M
6' (1.8M) 6 1.8 6 1.8 6 1.8 6 1.8 6 1.8 6 1.8
8' (2.4M) 8 2.4 8 2.4 16 4.9 16 4.9 16 4.9 16 4.9
10' (3.0M) 10 3 16 4.9 20 6.1 20 6.1 20 6.1 20 6.1
15' (4.6M) 16 4.9 16 4.9 30 9.1 30 9.1 30 9.1 30 9.1
20' (6.1M) 20 6.1 30 9.1 30 9.1 30 9.1 30 9.1 30 9.1
30' (9.1M) 20 6.1 40 12.2 40 12.2 40 12.2 40 12.2 40 12.2
7" 8" 10" 12"
Vertical Height of
Vent5" 6"
TABLE 2 - Maximum Horizontal Run for Single Wall Metal Pipe Vent Diameter
ft M ft M ft M ft M ft M ft M ft M
6' (1.8M) 2 .6M ) 2 0.6 2 0.6 2 0.6 2 0.6 2 0.6 2 0.6
8' (2.4M) 5 7.6M) 5 7.6 10 3 10 3 10 3 10 3 10 3
10' (3.0M) 5 7.6M) 10 3 15 4.6 15 4.6 15 4.6 15 4.6 15 4.6
15' (4.6M) 5 7.6M) 10 3 15 4.6 20 6.1 20 6.1 20 6.1 20 6.1
20' (6.1M) - 10 3 15 4.6 20 6.1 20 6.1 20 6.1 20 6.1
8" 9" 10" 12"5" 6" 7"Vertical
Height of Vent
75 - 150 175 200 225 250 300 350 400
ft 100 75 50 35 30 15M 30 23 15 11 9 4.6ft 100 100 100 92
M 30 30 30
4"
6"
TABLE 3 - Maximum Vent Length (ft or M) for Furnace with Optional Power VenterVent Pipe
Diameter

Form RZ 422, P/N 150491, Page 7
11. Duct Connections
NOTE: A minimum horizontal duct length of 18 (457mm) inches isrequired at the furnace discharge before any vertical rise is made in frontof the drafthood relief opening. This is required to prevent interferencewith the built-in drafthood.
Requirements and Suggestions for Connectingand Installing Ducts• Type of Ductwork - The type of duct installation to be used de-
pends in part on the type of construction of the roof (whether woodjoist, steelbar joist, steel truss, pre-cast concrete) and the ceiling(whether hung, flush, etc.).
• Ductwork Material - Rectangular duct should be constructed ofnot lighter than No. 26 U.S. gauge galvanized iron or No. 24 B & Sgauge aluminum.
• Ductwork Structure - All duct sections 24 inches or wider, andover 48 inches in length, should be cross broken on top and bottomand should have standing seams or angle-iron braces. Joints shouldbe S and drive strip, or locked.
• Through Masonry Walls - No warm air duct should come in con-tact with masonry walls. Insulate around all air duct through ma-sonry walls with not less than 1/2" (1" is recommended) of insula-tion.
• Through Unheated Space - Insulate all exposed warm air ductspassing through an unheated space with at least 1/2" (1" is recom-mended) of insulation.
• Duct Supports - Suspend all ducts securely from building mem-bers. Do not support ducts from unit duct connections.
• Duct Sizing - Proper sizing of the supply air ductwork is neces-sary to ensure a satisfactory heating installation. The recognizedauthority for such information is the Air Conditioning ContractorsAssociation, 1228 17th Street N.W., Washington, D.C. 20036. Amanual covering duct sizing in detail may be purchased directlyfrom them.
• Removable Panels - The ducts should have removable access pan-els on both upstream and downstream sides of the furnace. Theseopenings must be accessible when the furnace is in service andshould be a minimum of 6" x 10" in size so smoke or reflected lightmay be observed inside the casing to indicate the presence of leaksin the heat exchanger. The covers for the openings must be attachedin such a manner as to prevent leakage. See Figure 10.
• Horizontal Discharge Duct Length - A minimum horizontal ductrun of 18" (457mm) is required before turns or branches are madein the duct system to prevent interference with the built-indrafthood..
• Supply Air Duct/Furnace Horizontal Connection - The sealbetween the furnace and the duct must be mechanical. Duct connec-tion should be made with "U" type flanges on the top and bottom ofthe connecting duct. Slide the duct over the flanges of the heater
Figure 9 - Duct ConnectionDimensions (inches and
millimeters)Size G
inches mm75, 100 12-1/2 318
125 15-1/4 387
150, 175 20-3/4 527
200, 225 26-1/4 667
250, 300 34-1/2 876
350 40 1016
400 45-1/2 1156
�
�������
������
�����
Figure 11 -Install "U"Channel onSides of DuctConnection
��)��� �!��
���((��)+���+��!��
�7����&&�
��7�����&&�
��
�
�AB7�*%)++��
.!�+)��
�!��
AB7�*%)++���'-,�3%���)!3��<��)�
Figure 10 - Connecting Supply Air Duct to the Furnace(1) Flanges on the furnace (heat exchanger) turn out as shown. (2)Shape duct connection as shown -- "U" on top and bottom; "L" onsides. (3) Slide "U" channels over furnace top and bottom flangesmaking connection. (4) Form "U" channels to seal sides. Drill andlock with sheetmetal screws.
giving an airtight fit. Provide "U" type channels for the other sideflanges to ensure tight joints. Use sheetmetal screws to fasten ductsand "U" channels to the furnace flange. See Figures 10 and 11.
• Return Air Duct/Furnace Connection - All return air ducts shouldbe attached and sealed to return air flanges to provide airtight con-nection.
• Return Air Duct/Grill Size - Make certain that return air ductingor grills have a free area equal to the return duct size connection.
CAUTION: Joints where ducts attach to furnacemust be sealed securely to prevent air leakageinto drafthood or burner rack area. Leakage cancause poor combustion, pilot problems, shortenheat exchanger life and cause poor performance.See Hazard levels, Page 1.
Form 422, Page 8
Figure 12
������*'!"��+3
�)+��1�$�)+(���'+
!33�(��1�5�'/����'++����'+(�-'��(��)�3%���%�'!3%�)��-�'/>�B(�����%���&��%'1-'��3''1�)����':��)3��)+1��--����+��'"��)��'+>
��C
�7�����&&�
4�&'��
��7����&&�&�+�&!&
$!�+�+3�0)+�(
�7���&
&�
�7���&&��7���&&�
�7�����&&�
�7�����&&�
D
��C
E
9'�)��D
9'�)��
F9G$�H�AD7�(%'!�1+�:���5����((��%)+�����AE7
9G$�H�AD7�(%'!�1+�:���5����((�%)+�����AE7
9G$�H�+3���AF7(%'!�1�+�:���5�&'�����%)+���C
�
�GG��GG4 �GG4
StraightThroughAir
WithElbowsUp orDown
13. Duct Furnace Blower ConnectionsRequirements: Proper arrangements of blower and duct furnace with respect to angle of approach of the duct connection and the arrangement ofthe discharge opening of the blower are shown. Blowers should be bottom horizontal discharge when coupled to the duct furnace. When a tophorizontal discharge blower is connected to the duct furnace, be sure that sufficient length of duct is provided to permit even flow of air at the endof the duct. Or, baffles may be inserted between the blower and the heater to assure an even flow of air across the heat exchanger.
WARNING: The furnace must be installed on the positive pressure side of the air-circulating blower. SeeHazard Levels, Page 1.
Pressure Drop Table for 80% Thermal Efficient Duct Furnace with Standard CFM CapabilitySizeTemp Rise CFM P.D. CFM P.D. CFM P.D. CFM P.D. CFM P.D. CFM P.D. CFM P.D. CFM P.D. CFM P.D. CFM P.D. CFM P.D.
50°F 1105 0.23 1475 0.43 1840 0.50 2210 0.38 2580 0.52 2945 0.42 3315 0.53 3685 0.40 4420 0.58 5160 0.65 5895 0.6760°F 920 0.15 1225 0.29 1535 0.33 1840 0.26 2150 0.35 2455 0.28 2765 0.36 3070 0.28 3685 0.39 4300 0.44 4915 0.4570°F 790 0.10 1050 0.21 1315 0.25 1580 0.19 1840 0.26 2105 0.22 2370 0.27 2630 0.23 3160 0.29 3685 0.31 4210 0.3280°F 690 0.06 920 0.15 1150 0.21 1380 0.15 1610 0.19 1840 0.17 2070 0.22 2300 0.22 2765 0.25 3225 0.25 3685 0.2590°F 610 0.04 815 0.11 1020 0.18 1225 0.12 1430 0.16 1635 0.14 1840 0.17 2045 0.21 2455 0.22 2865 0.23 3275 0.19
Pressure Drop Table for 80% Thermal Efficient Duct Furnace with Higher CFM Capability (Model Prefix "H")SizeTemp Rise CFM P.D. CFM P.D. CFM P.D. CFM P.D. CFM P.D. CFM P.D. CFM P.D. CFM P.D. CFM P.D. CFM P.D. CFM P.D.
20°F 2765 0.62 3685 1.08 4605 1.16 5530 0.85 6450 1.19 7370 1.00 8295 1.28 9215 0.90 11060 1.26 12900 1.23 14745 1.23
30°F 1840 0.28 2455 0.50 3070 0.53 3685 0.39 4300 0.54 4915 0.45 5530 0.58 6140 0.41 7370 0.57 8600 0.56 9830 0.56
40°F 1380 0.16 1840 0.28 2300 0.28 2765 0.21 3225 0.29 3685 0.25 4145 0.31 4605 0.22 5530 0.32 6450 0.31 7370 0.31
50°F 1105 0.12 1475 0.16 1840 0.21 2210 0.15 2580 0.18 2945 0.16 3315 0.21 3685 0.15 4420 0.21 5160 0.19 5895 0.19
60°F 920 0.10 1225 0.14 1535 0.15 1840 0.12 2150 0.15 2455 0.12 2765 0.15 3070 0.11 3685 0.15 4300 0.14 4915 0.15
75°F 735 0.10 980 0.12 1225 0.12 1475 0.11 1720 0.12 1965 0.11 2210 0.12 2455 0.08 2945 0.11 3440 0.11 3930 0.11
400
75
75
400
100 125 150 175 200 225 250 300 350
300 350250150 175 200 225100 125
12. Duct Furnace Air Flow RequirementsThe duct furnace must be installed on the positive pressure side of the field supplied blower. The air throughput must be within the CFM range statedon the heater rating plate. The air distribution must be even over the entire heat exchanger. Turning vanes should be used in elbows or turns in the airinlet to ensure proper air distribution (See Paragraph 13). If it is determined that the blower CFM is greater than allowed or desirable, see Paragraph14 for instructions on determining the correct size of bypass duct required. To determine temperature rise, the inlet and outlet air temperatures shouldbe measured at points not affected by heat radiating from the heat exchanger. The following charts (on page 8) show the approved temperature riserange with the required CFM and the internal pressure drop for each size of unit.
Form RZ 422, P/N 150491, Page 9
WithElbowsRightor Left
15. Gas Piping and PressuresWARNING: This appliance is equipped for amaximum gas supply pressure of 1/2 pound, 8ounces, or 14 inches water column. Supplypressure higher than 1/2 pound requiresinstallation of an additional service regulatorexternal to the unit.
PRESSURE TESTING SUPPLY PIPINGTest Pressures Above 1/2 PSI: Disconnect the heater andmanual valve from the gas supply line which is to be tested. Capor plug the supply line.
Test Pressures Below 1/2 PSI: Before testing, close the manualvalve on the heater.
All piping must be in accordance with requirements outlined in theNational Fuel Gas Code ANSI/Z223.1a (latest edition), published bythe American Gas Association or CAN/CGA-B149.1 and B149.2,published by the Canadian Gas Association (See Paragraph 1). Gassupply piping installation should conform with good practice andwith local codes.
Duct furnaces for natural gas are orificed for operation with gas hav-ing a heating value of 1000 (+ or - 50) BTUH per cubic ft. If the gas atthe installation does not meet this specification, consult the factoryfor proper orificing.
Pipe joint compounds (pipe dope) shall be resistant to the actionof liquefied petroleum gas or any other chemical constituents ofthe gas being supplied.
Install a ground joint union and manual shutoff valve upstream of theunit control system, as shown in Figure 15. The 1/8" plugged tappingin the shutoff valve provides connection for supply line pressure testgauge. The National Fuel Gas Code requires the installation of a trapwith a minimum 3" drip leg. Local codes may require a minimum dripleg longer than 3" (typically 6").
Gas connection sizes are included in the Dimensional Tables in Para-graph 5. After all connections are made, disconnect the pilot supplyat the control valve and bleed the system of air. Reconnect the pilotline and leak-test all connections by brushing on a soap solution.
$!�+�+3�0)+�(
�7���&
&�
�7���&&��7���&&�
�7�����&&�
�7�����&&�F
9G$�H�+3���AF7(%'!�1�+�:���5�&'�����%)+���C
D
��C
9'�)�� 9'�)��
�GG�
�GG4 �GG4
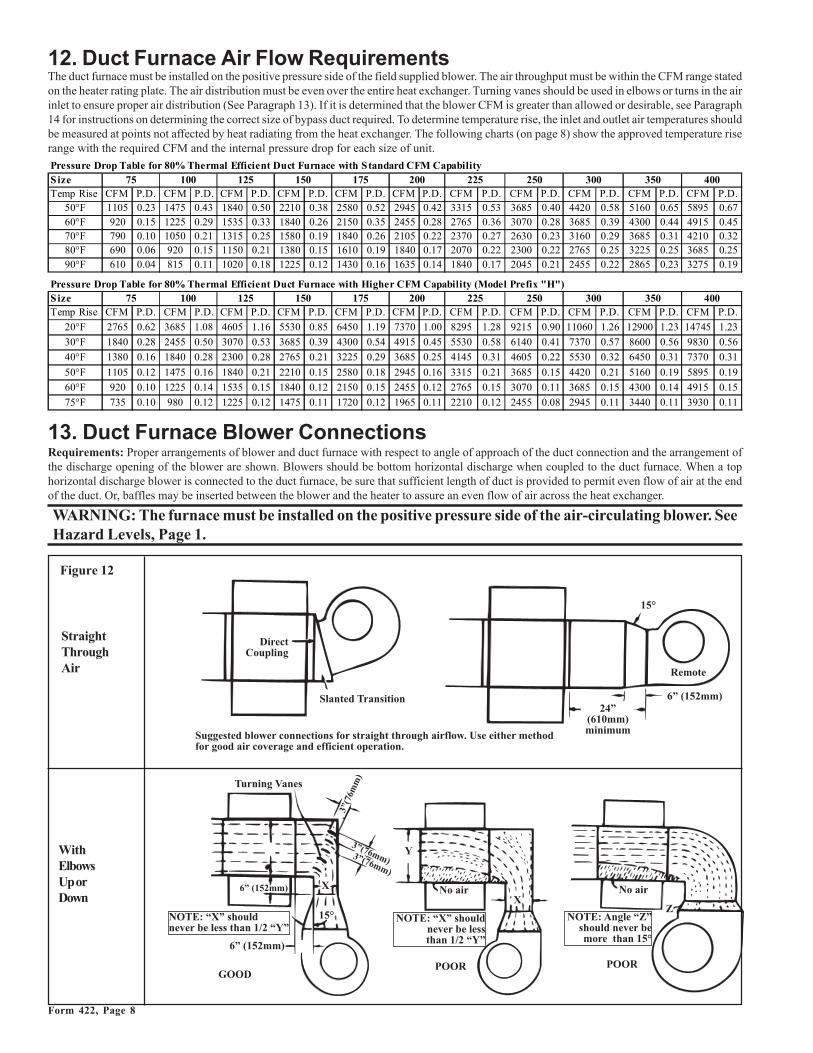
14. Constructing Bypass DuctWhen the CFM of air throughput is greater than desirable or permissiblefor the unit, a bypass duct may be constructed. Follow these instructionsto determine the correct size of the bypass duct.
$'"�0��/'-�.!�+)��
*'+��'�� �1�
#")((��!��
�7����&&��&�+�&!&
Figure 13 - Bypass Duct
Directions for Sizing Bypass Duct1) From the tables in Paragraph 12, find the pressure drop (P.D.) and the
allowable CFM for the furnace that is being installed.Example: Standard Size 150 @ 50oF temperature rise
P.D. .38CFM 2210
2) Subtract the allowable CFM from the actual CFM of the installationto determine how much air must be diverted through the bypass duct.
Example: Blower CFM 3000Allowable CFM -2210Bypass CFM 790
3) Go to the column in the Bypass CFM Chart that is closest to thepressure drop through the heater. Move down in that column untilyou find the CFM closest to the answer in Step 2).
Example: P.D. .40Bypass CFM 900
4) Move to the left column to find out the required size of the bypassduct.
Example: Bypass Duct Size is 3" (76mm)
Bypass CFMPressure Drop through the Furnace
inches mm 0.10 0.15 0.20 0.25 0.30 0.35 0.40 0.45 0.50
3" 76 490 530 610 700 780 830 900 960 10104" 102 630 750 870 980 1090 1160 1250 1310 14005" 127 850 1010 1190 1300 1410 1520 1640 1730 18106" 152 1050 1290 1480 1650 1800 1940 2090 2200 23207" 178 1250 1510 1760 1960 2180 2320 2500 2650 28008" 203 1490 1810 2100 2350 2560 2760 2940 3110 32909" 229 1700 2100 2400 2700 2970 3200 3400 3600 3800
10" 254 1920 2350 2760 3090 3650 4020 4300 4550 4800
"A"Width
Figure 12 (cont'd)
Depth of the bypass duct is 18" (457mm) on both inlet and outletends. Bypass duct must be located on side opposite controls and 2"from the heat exchanger side panel.
NOTE: Not all capacities are covered in this chart. If your installa-tion is not covered, the correct size may be determined by consultingthe factory representative.

Form 422, Page 10
.�'&��)(� !""�#
.�'&�)( !""�#
�7����"�,�3
9G$�H*'++����'+((%'/+�)���5#�%���+(�)����>
$'�*'+��'�(
<)+!)��)(�0)�:�
6&&�1�)���#�!"(���)&�'-��%��3)((!""�#��'++����'+I��+(�)���)�&)+!)�(%!�'--�:)�:��/��%�)����7�9�$"�!33�1��)"�)���((�5���-'����(�3)!3���'++����'+>
��'!+1��'�+��B+�'+
Figure 15 - SupplyPiping Connection
Gas Connection to Single-Stage Valve (Not Gas Supply Line Size)
Unit Size 75-250 300-400
Natural Gas 1/2" 3/4"Propane Gas 1/2" 1/2"
$%��&'(�)��8��� <)+!)�� %!�'--�0)�:�/��%����7�9�$�"�!33�1�)"�&!(��5���+(�)���1)5':���%��!+����)(�+3>
,�+��0'��)3�� !""�#�
�!+���'+';
$'��)(�*'+��'�()+1�!�+��
��'!+1�'�+�B+�'+
$'"�0��/
�1��0��/
�7�����&&�������7����&&�
�����7�����&&������7�����&&�
���7����&&��1�)> �����7�;������7����;��&&�
Sizing GasSupply Lines
Capacity of PipingCubic Feet per Hour based on 0.3" w.c. Pressure Drop
Specific Gravity for Natural Gas -- 0.6 (Natural Gas -- 1000 BTU/Cubic Ft)Specific Gravity for Propane Gas -- 1.6 (Propane Gas -- 2550 BTU/Cubic Ft)
Length Diameter of Pipeof 1/2" 3/4" 1" 1-1/4" 1-1/2" 2"
Pipe Natural Propane Natural Propane Natural Propane Natural Propane Natural Propane Natural Propane20' 92 56 190 116 350 214 730 445 1100 671 2100 128130' 73 45 152 93 285 174 590 360 890 543 1650 100740' 63 38 130 79 245 149 500 305 760 464 1450 88550' 56 34 115 70 215 131 440 268 670 409 1270 77560' 50 31 105 64 195 119 400 244 610 372 1105 67470' 46 28 96 59 180 110 370 226 560 342 1050 641
80' 43 26 90 55 170 104 350 214 530 323 990 60490' 40 24 84 51 160 98 320 195 490 299 930 567
100' 38 23 79 48 150 92 305 186 460 281 870 531125' 34 21 72 44 130 79 275 168 410 250 780 476150' 31 19 64 39 120 73 250 153 380 232 710 433175' 28 17 59 36 110 67 225 137 350 214 650 397
200' 26 16 55 34 100 61 210 128 320 195 610 372Note: When sizing supply lines, consider possibilities of future expansion and increased requirements.
Refer to National Fuel Gas Code for additional information on line sizing.
Figure 14 - Gas Connections
Manifold or Orifice Pressure SettingsMeasuring manifold gas pressure cannot be done until the heater is inoperation. It is included in the steps of the "Check-Test-Start" proce-dure in Paragraph 28. The following warnings and instructions apply.
WARNING: Manifold gas pressure must neverexceed 3.5" w.c. for natural gas and 10" w.c. forpropane gas.
For Natural Gas: Manifold gas pressure is regulated by the combina-tion valve to 3.5" w.c. Inlet pressure to the valve must be a minimum of5" w.c. or as noted on the rating plate and a maximum of 14" w.c.NOTE: Always check the rating plate for minimum gas supplypressure. Minimum supply pressure requirements vary based on thesize of the burner and the gas control option. Most units require aminimum of 5" w.c. of natural gas as stated above, but Sizes 350 and400 with electronic modulation require a minimum of 6" w.c. naturalgas supply pressure. Sizes 300 and 350 with mechanical modulationrequire 7" w.c.
For Propane Gas: Manifold gas pressure is regulated by the combina-tion valve to 10" w.c. Inlet pressure to the valve must be a minimum of11" w.c. and a maximum of 14" w.c.
15. Gas Piping and Pressures (cont'd)WARNING: All components of a gas supply systemmust be leak tested prior to placing equipment inservice. NEVER TEST FOR LEAKS WITH ANOPEN FLAME. Failure to comply could result inpersonal injury, property damage or death.

Form RZ 422, P/N 150491, Page 11
16. Electrical Supply andConnections
All electrical wiring and connections, including electrical groundingMUST be made in accordance with the National Electric Code ANSI/NFPA No. 70 (latest edition) or, in Canada, the Canadian ElectricalCode, Part I-C.S.A. Standard C22.1. In addition, the installer should beaware of any local ordinances or gas company requirements that mightapply.
Check the rating plate on the heater for the supply voltage and currentrequirements. A separate line voltage supply with fused disconnectswitch should be run directly from the main electrical panel to thefurnace, making connection to leads in the junction box. All externalwiring must be within approved conduit and have a minimum tempera-ture rise of 60°C. Conduit from the disconnect switch must be run so asnot to interfere with the service panels of the furnace.
CAUTION: If any of the original wire as suppliedwith the appliance must be replaced, it must bereplaced with wiring material having a temperaturerating of at least 105°C, except for limit control,energy cutoff, and sensor lead wires which mustbe 150°C. See Hazard Levels, Page 1.
If the heater has field-installed options that require electrical connec-tions, consult the instruction sheet and wiring diagram supplied in theoption package.
Specific wiring diagrams that include standard and factory-installedoptions are included with the heater. Typical wiring diagrams are onthe pages 12-14.
Disconnect SwitchA disconnect switch is a required part of this installation. Switches areavailable, as options or parts, or may be purchased locally. When or-dered as an optional component, the disconnect switch is shippedseparately.
The disconnect switch may be fusible or non-fusible. When providingor replacing fuses in a fusible disconnect switch, use dual element timedelay fuses and size according to 1.25 times the maximum total inputamps.
When installing, be careful that the conduit and switch housing are clearof furnace panels and inspection plates. Allow at least four feet ofservice room between the disconnect switch and removable panels.
Before attempting to measure or adjust manifold gas pressure, the inlet(supply) pressure must be within the specified range for the gas beingused both when the heater is in operation and on standby. Incorrectinlet pressure could cause excessive manifold gas pressure immediatelyor at some future time.
Instructions to Check Manifold Pressure:1) With the manual valve (on the combination valve) positioned toprevent flow to the main burners, connect a manometer to the 1/8" pipeoutlet pressure tap in the valve. NOTE: A manometer (fluid-filled gauge)is recommended rather than a spring type gauge due to the difficulty ofmaintaining calibration of a spring type gauge.
2) Open the valve and operate the heater. Measure the gas pressure tothe manifold. Normally adjustments should not be necessary to thefactory preset regulator.
If adjustment is necessary, set pressure to correct settings by turningthe regulator screw IN (clockwise) to increase pressure. Turn regulatorscrew OUT (counterclockwise) to decrease pressure.
Consult the valve manufacturer's literature provided with the furnacefor more detailed information.
Control ThermostatA thermostat is not standard equipment but is an installation require-ment. Use either an optional thermostat available with the heater or afield-supplied thermostat. Install according to the thermostatmanufacturer's instructions.
A 24 volt thermostat must be used to actuate low voltage gas controls.If line voltage from the thermostat to the unit is desired, consult thefactory representative.
Wiring between the thermostat and the heater must be suitable for atemperature rise of 60°C. Labeled thermostat leads are provided in theheater junction box for connection of thermostat wiring.
Thermostats should be located five feet above the floor on an insidewall, not in the path of warm or cold air currents and not in cornerswhere air may be pocketed. Do NOT install on cold air walls. Forspecific connection details, refer to the instructions with the thermo-stat.
If more than one unit is cycled from one thermostat, separately acti-vated relays must be substituted at unit thermostat connections.
CAUTION: Make sure the thermostat has anadequate VA rating for the total requirements. Addcoil rating of all relays and match thermostat rating.See Hazard Levels, Page 1.
Low voltage (24 volt) thermostats are equipped with heat anticipatorswhich level out unit cycling for optimum temperature control. Set an-ticipator at full load control AMPS.
24 Volt Controls - Maximum Amps
(24 volt Transformer has 20 VA capacity)
Single-Stage Valve .6Two-Stage Valve .6Maxitrol System .5Spark Ignition System .1Fan Control Heater .12Time Delay Relay Heater .1
Relay Coil .12
WARNING: If you turn off the power supply, turnoff the gas. See Hazard Levels, Page 1.
17. Limit and Energy CutoffControls
The heater is equipped with a non-adjustable high limit switch whichshuts off the gas in the event of motor failure, lack of air due to dirtyfilters, or restrictions at the inlet or outlet of the unit. See Paragraph 28for limit control check.
The ECO control is calibrated to open at a much higher temperaturethan the limit control, acting as a super high limit and providing redun-dant safety control.
WARNING: An ECO circuit interruption is a majorfailure caused by a malfunction of the primarysafety control or miswiring, and will requirecorrection of the cause of failure and thereplacement of the limit control and wiring and theoptional fan control (if equipped) before the furnacecan be returned to service.

Form 422, Page 12
An ECO interruption can be caused by the failure of the automatic resetlimit in combination with the following:
1) Automatic gas valve stuck in the open position.
2) Restricted airflow over the heat exchanger due to motor failure, loosefan blade, broken blower belt, or defective fan control.
3) Failed or ruptured gas pressure regulator.
4) Improper wiring.
18. Optional Fan Control1. An optional fan control provides the following:
(a) A 45-second delay of blower operation to prevent the discharge ofcold air.
(b) Blower operation as long as the unit is hot.2. The fan control provides additional safety by keeping the blower in
operation in the event that the gas valve fails to close when the thermo-stat is satisfied.
3. To be sure that the blower can continue to operate, the power supplyto the furnace MUST NOT be interrupted except when servicing theunit.
4. If the customer wants the furnace off at night, the gas valve circuitSHOULD BE OPENED by a single pole switch wired in series withthe thermostat. Some thermostats are provided with this feature. Mul-tiple units controlled from a single thermostat are shut off in the samemanner. For proper operation, be sure the fan control wiring is ob-served.
17. Energy Cutoff Control (cont'd) 19. Blocked Vent SwitchThe blocked vent switch is a heat-activated, manually reset, safetydevice that interrupts the electric supply to the gas valve when thevent is 100% blocked. The sensor is located near the relief openingof the drafthood. The reset button is located inside the control com-partment by the drafthood side.
If the sensor detects heated flue gases in the drafthood relief openingarea, the blocked vent safety device will activate to shut down thefurnace. The cause of the switch shutting down the furnace must bedetermined and corrected. The blocked vent switch is designed toactivate when the vent is blocked but may also be affected by anegative building pressure or an inadequate vent system.
After the problem has been corrected, remove the furnace controlcompartment panel and push the manual reset button on the blockedvent switch to restart the heater. Replace the panel.
NOTE: Effective April 1991, gravity-vented duct furnaces areequipped with a blocked vent shutoff system. Duct furnaces manu-factured prior to April 1991 do not include a blocked vent switch.
WARNING: In the event the blocked ventsensor causes the heater to shutoff, determinethe correct the cause. Failure to do so couldresult in personal injury or death.
����������
�
�
��
��
��
��
��
��
�
�
�����������
����������
�������������
����
��������������������������
�������
��
� �
���!������������
���!�����������
�� �
�"�"
# #
������������
�
��� ������ ������������
������������������� !������
�
��������
��
��
��
��
��
��
�
��
�" ���
� �� ���������
����"���$���������
������������
#
�
��������
���$��$���� ������ �
���� #
%����������&������
��
��
#
# ��
�"#
� �$�!��������
�"
�
��$
����$���
�������������
�
��
�!�������������������������������� �'�� �������� ������ �� ���$��$�(
�!���������������������������)���� ��������������(����� �'�� ����
�������� ���*�����
�!����������� ���� ���������������������������������!
������������!
����� ������������������!
���$����$���� ���������#������$������������������#������$���� �!�!��������������������������������������������������������'�����
�!�������������� ������������������������#���'��������������������������+
�!�������������� ��������������������#�����������������+
�!�������������� �������������������������������������+
��������������������������
����
�����������������(�����������
�����
�!���������+�������#����������� ��������������������������������������������������������(������������������������������� ������������$�� ������������������� �������������� ���� ������!(��)������������� #��������������"���$�������������������������������� ��� ������!
!������,�� �!��������$����������������� ��������!!������,��� �!������������������������������ ��������!
�#�������+�������!�������������� ����������������� ������������������������������������
�������������$!�,�
������-���������-��������-��� �����-� #������-�#���� ��-������-��������-�������"�-��"����� �����
����������������������������������� �������������������'��� ���������������,�� �!�� ���������������,��� �!�� ���������������,��� �!
�������������������
������#������
�����������
���������������#������
TYPICAL WIRING DIAGRAMS
Furnace with Standard Match-Lit Pilot and Standard Single-Stage Gas Valve, W.D. 113235

Form RZ 422, P/N 150491, Page 13
�������� ���*������!���������������������������������������� !�!���������������(����������������������� ���$��$��!�!����������������������������������������� !�!���������������������������!
���������#������������������������$��$���������#�������������"
�������������������#������������ �������������������������!%������ ���� �������������&!
%�&������ �'�� ������ ���������������������������� ���$��$���� ���� ������!
�!������������ ����������$����������������������������������!%�&���-���� �'�� ������ �����!%�&����� �'�� ����� ���$��$�!
!��������������������������������� �������������!������������!�!���������������������������)���� ��������������(����� �'�� ����
%�&�������������"������������������������������������������!
����+�������������������)��� ������������ ����������������������
��!����������*������������ � �-�����"�����������(������������������������������������� ���������%�����)!&���������"�����
!������,��� �!������������������������������ ��������!������$����$���� ���������#������$������������������#������$���� �!�!����������������������������������������������'��������������������'�
������������������� �������������� ���� ������!(��)�������������"���$�������������������(������������������������������� ������������$�� �!���������+�������#����������� ����������������������������������������
����
�!�������������� ��������������������#�����������������+������������
�!�������������� ������������������������������������+������������������
������������������������
���������������������������������������� ��� ������!
!������,�� �!�������������$����������������� ��������!
�!�������������� ������������#�������!
��������������
����
�!�������������� ������������������������#���'��������������������������+
�!�!�,����������$!�,�
�
�
�
��
��
��
��
��
��
�
�
�����������
����������
�������������
����
��������������������������
�������
��
� �
���!������������
���!�����������
�� �
�"�"
# #
������������
�
��� ������ ������������
������������������� !�����
�
��������
��
��
��
��
��
�
��
�"
�
��
�"
�" ���
� �� �
��
���!
��
���#��� �� -�
��
���"���
� ������
�������� ���!
����������
� �-�
�
�
�
�
�
�����
���
� �����
�����
������������
��
�"
��
��
�����������������
����"���$���������
������������
#
��������
� �$�!��������
�"
�
����$���
�������������
�
�����
�!�!��������������
���������� ���$��$�
�
����
�
�
#
��
��$
#
����
�����
�"
��������������#����
���������� ���$��$�
��
�����
����$��-��
������$
�� �$-�$�����
����
������-���������-��������-��� �����-� #������-�#���� ��-������-��������-�������"�-��"����� �����
����������������������������������� �������������������'��� ���������������,�� �!�� ���������������,��� �!�� ���������������,��� �!
�������������������
������#������
�����������
���������������#������
)-�)-�)-��)��� �-��������������
����������������������������������� �������������������'��� ���������������,�� �!�� ���������������,��� �!�� ���������������,��� �!
�������������������
������-���������-��������-��� �����-� #������-�#���� ��-������-��������-�������"�-��"����� �����
�����$���
�������������������������
��
��
�������
�"
� �$�!�������������������
��
�
���!�����������
���!��������������
� �
�
��$
����
�" ���� �
��
������
����������
��������
��
���$��$������������������� �
������������
�
���� #
%����������&���-��� �
�
��
�� �
��
�" ��
��
���
��� �
��� �
��
��
������������������� !������
���!����������������*�� ��������
��
��
��
#
#
������������$����������
����"��������������
�
# # # #
�" #
��
��
��
��
��
��
�
�
��
�
��
��
��
��
��
��
�
�
�
�$�!���)���������������#�������������������$������
���$����$���� ���������#������$������������������#������$���� �!�!��������������������������������������������������������'�����
�!�������������� ������������������������#���'��������������������������+
�!�������������� ������������������������������������*�������!����
�����������������(�����������(���������������������������
�����
�!���������+�������#����������� ��������������������������������������������������������(������������������������������� ������������$�� ������������������� �������������� ���� ������!(��)�������������"��$����������������������������������������������� ��� ������!
!������,�� �!��������$����������������� ��������!!������,��� �!������������������������������ ��������!
�#�������+�������!�������������� ����������������� ������������������������������������
�!�������� +������������������������������������.�������������������#���������������#������#����������������-����� !
�!������������������#���������������/���/���������!�!����������� ���� ���������������������������������!�!������������������#���������������/����/���������!
�������� ���*�����
!������������������#���������������/���/����������������������!%�&�������������"������������������������������������������!
�!��������� ����������������������������������� �'�� ������������ �� ���$��$�!�!���������������������������)���� ������������������� �'�� �����������������!�!���� ����� ����������������������������������� �'�� ������� ����� �� ���$��$�!
�����������
������#������
�����������
���!�������#������
Furnace with Optional Spark Pilot and Standard Single-Stage Gas Valve, W.D. 113236
Furnace with Standard Match-Lit Pilot and Optional Two-Stage Gas Valve, W.D. 115936

Form 422, Page 14
20. Gas ValveAll furnaces are equipped with a 24-volt combination valve whichincludes the automatic electric on-off valve controlled by the roomthermostat, the pressure regulator, the safety pilot valve, and the manualshutoff valve. The standard gas valve allows for single-stage controlfrom a single-stage, 24-volt thermostat.
WARNING: The operating valve is the primesafety shutoff. All gas supply lines must be free ofdirt or scale before connecting the unit to ensurepositive closure. See Hazard Levels, Page 1.
21. Optional Two-StageOperation for Heating Only
The standard combination control valve is replaced with a two-stagecombination gas control valve providing for low fire or high fire opera-tion controlled by a two-stage thermostat. First stage (low fire) isfactory set (not field adjustable). Both high and low stages are con-trolled by a Servo regulator, maintaining constant gas input under widevariations in gas supply pressure. See instructions packed with the unitfor specific gas valve specifications, wiring, and operating instructions.
�����
������������$!�,�
������-���������-��������-��� �����-� #������-�#���� ��-������-��������-�������"�-��"����� �����
�
�
�
��
��
��
��
��
��
�
�
����������������������
������������������
��������������������������
��������
��
# #
������������
��
��
��
��
��
��
�
��
��
�"
�" ����
� �� �
��
���!
��
���#��� �� -�
��
���"���
� ������
�������� ���!
����������
� �-�
�
�
�
�
�
�����
���
� �����
�����
������������
��
�"
��
��
�����������������
������ �
�����
����"���$���������
������������
#
�
��������
� �$�!��������
�"
��
��$
�����$���
��
�
�����������
#
�����
�� �
��
�
�
���
��
�
���$��$�
�
����������!�!�������� �
�
#��
��
���������������*�� ��������
������������������� !�����
�
�
��������
�� ����� �
���!��������������
� �
�
�"�" ���!�����������
#
�������� ���*������!���������������������������/���/���������!�!���������������(����������������������� ���$��$��!�!���������������������������/����/���������!�!��������� ������������������������������!
�� ���� ������!�����+������������������)��� ������������ �������������������������������#������������������
����� � �-�����"�����������(������������������������������������� ����!�%�����)!&���������"������������������������#����������� �������������������������!�%������ ����
%�&������ �'�� ������ ���������������������������� ���$��$�
�!������������ ����������$����������������������������������!%�&����-���� �'�� ������ �����!%�&������ �'�� ������������ �� ���$��$�!
!���������������������������/���/����������������������!%�&�������������"������������������������������������������!
�!���������������������������)���� ������������������� �'�� ����
!���� ����� ������������������������������!%�&������ �'�� ������� ����� �� ���$��$�!
�����$��$���������#������������"� ��!������������*������
������������!
�����������&
���$����$���� ���������#������$������������������#������$���� �!�!��������������������������������������������������������'�����
�!�������������� ������������������������#���'��������������������������+
�!�������������� ��������������������#�����������������+
�!�������������� �������������������������������������+
������������������������������������
����
��������������������������������
�!���������+�������#����������� ��������������������������������������������������������(������������������������������� ������������$�� ������������������� �������������� ���� ������!(��)�������������"��$����������������������������������������������� ��� ������!
!������,�� �!��������$����������������� ��������!!������,��� �!������������������������������ ��������!
�#�������+�������!�������������� ����������������� ������������������������������������
��������� $!��������������������������������������� ���$���� ��������#!
�!������ ��� $!������������������������������������������$���� ��������#!
���������� $!���������������"�����#�����������!
����� $!���������������"���������������%����#�����&!������ $!���������������"�����#������������%�������&!
������#������
�����������
���!�������#������
����������������������������������� �������������������'��� ���������������,�� �!�� ���������������,��� �!�� ���������������,��� �!
�������������������
Furnace with Optional Spark Pilot and Optional Two-Stage Gas Valve, W.D. 113237
TYPICAL WIRING DIAGRAMS (cont'd)
22. Optional Two-StageOperation for Makeup Air
Two-stage makeup air units are equipped with a two-stage gas valve,but instead of control from a two-stage room thermostat, the outlet airtemperature is monitored and controlled by a two-stage ductstat. Whenthe discharge air temperature drops to the setpoint, low fire is ener-gized. If low fire cannot satisfy the ductstat setting, high fire is ener-gized.
Makeup air applications are usually adjusted to discharge an outlet airtemperature between 65°F and 75°F. In all applications, the allowabletemperature rise of the furnace in the installation dictates the limits ofthe ductstat temperature setting.
Depending on the option selection, the factory-installed sensor is ei-ther field-connected by capillary tubing to the unit-mounted ductstat(Figure 16) or electrically connected to a remote electronic temperatureselector (Figure 17). The remote temperature selector is available withor without a display module.
See Figure 18 for a general location of the factory-installed sensor witheither the factory-mounted or the remote ductstat selector option.
Optional Ductstat with Capillary Tubing (Option AG3) - Either ofthe controls illustrated in Figure 16 is used with Option AG3. The

Form RZ 422, P/N 150491, Page 15
Dial has noactual tempera-ture markings."B" is approxi-mately 70°F.
Adjustable range 0-100°F;markings are on the dial.
.)��'�#�(���)�A7�/%��%��(
)""�';�&)���#���C.,G
8�4
�6�
��4
�� �
����
���
�����
����
��
��
Figure 16 - Ductstat Control in Option AG3Unit could be equipped with eithercontrol. Both are factory set at 70°F.
control is set to 70°F and has an adjustable range with a fixed differen-tial of 2-1/2°F. Due to different CFM settings and outside air tempera-ture, the average downstream outlet temperature may not match theductstat setting exactly. After the installation is complete, adjust thesetpoint of the ductstat to achieve the desired average outlet air tem-perature.
Optional Ductstat with Electronic Remote Setpoint Module (Op-tions AG15 and AG16) - The field-installed sensing probe is field-wired to a remote temperature selector with a temperature operatingrange to 130°F. The remote modules and sensing probe are shippedseparately for field installation. Follow the wiring diagram with the unitand the manufacturer's instructions for wiring and installation. Therewill be one module for selecting temperature and one-stage adder mod-ule. The digital display module is optional. See Figure 17.
Figure 17 - Remote Temperature Selector, Stage-AdderModule, and Optional Display Module for Ductstat in Two-Stage Makeup Air Control Options (Option AG15 orAG16)
23. Optional Mechanical Modulationfor Makeup Air Application
The mechanical modulation valve regulates the flow of gas to the mainburner, depending on the demands of the sensing bulb which is locatedin the airstream adjacent to the heat exchanger. Inputs are varied from50% through 100% of full rate in direct response to the modulatingcontrol sensing element and depending on the temperature of outside airbeing forced through the furnace. Outlet air or return air temperature canbe maintained within a range of 50°F to 100°F (Option AG6) and isadjustable at the mechanical modulating valve. Valve manufacturer'sspecifications and operating instructions for mechanical modulating valvemay be found in the heater instruction envelope accompanying thefurnace. (See Figure 18 for a general location of the factory-installedsensor.)
Figure 18 - Duct Temperature Sensor Location
%���&��)�4��)�+�+3���)��
�)(2��
�+('��*)"���)�#
�+('���)�2���9G$�H����������
���� �������������������������������>�
1. Remove access panel inductwork adjacent to controlcompartment access panel.
2. Element is retained by spring clips.3. Round gasket and metal retaining plate provide airtight seal
for capillary and must be removed to remove the element.
24. Optional ElectronicModulation
The type and capability of the electronic modulation system dependson the option selected. Electronic modulation options are identified bya suffix to the Serial No. printed on the heater rating plate. AG7 isidentified as MV-1; AG8 is identified as MV-3; AG9 is identified asMV-4; and AG21 is identified as MV-A.
Electronic Modulation between 50% and 100% Firing Rate (Op-tions AG7, AG8, AG9) - Depending on the heat requirements as estab-lished by the thermistor sensor, the burner modulates between 100%and 50% firing. The thermistor is a resistor that is temperature sensi-tive in that as the surrounding temperature changes, the Ohms resis-tance changes through the thermistor. This change is monitored by thesolid state control center (amplifier) which furnishes varying DC cur-rent to the modulating valve to adjust the gas input.
Each modulating valve is basically a regulator with electrical means ofraising and lowering the discharge pressure. When no DC current is fedto this device, it functions as a gas pressure regulator, supplying 3.5"w.c. pressure to the main operating valve.
Refer to the wiring diagram supplied with the furnace for proper wiringconnections. Electronic modulation for heating controlled by a spe-cially designed room thermostat (60°-85°F) is identified as OptionAG7. Electronic modulation control systems for makeup air applica-tions controlled by a duct sensor and temperature selector (55-90°F)are identified as either Option AG8 or Option AG9. The temperatureselector setting for Option AG8 is on the amplifier; Option AG9 has aremote temperature selector. Both systems are available with an over-ride thermostat.Computer Controlled Electronic Modulation between 50% and100% Firing Rate (Option AG21) - Withthis option the furnace is equipped with aMaxitrol A200 signal conditioner whichoperates much the same way as the am-plifier above to control the regulator valve.The conditioner accepts an input signalof either 4-20 milliamps or 0-10 volts froma customer-supplied control device suchas a computer. With the dip switches on the conditioner in the "on"positions, the conditioner accepts a 4-20 milliamp signal. In the "off"positions, the conditioner accepts a 0-10V signal. The conditioner con-verts the signal to the 0 to 20 volt DC current required to control themodulating valve.
Form 422, Page 16
.�)&�� �+(�+3���'5�
���'�G��-���
*�+�����+��'--��(��5!�+��
��3%�$�+(�'+,�)1
!�+��4)�2.�'+�
")�2�������'1� ")�2��)"
����7���>��&&
$'"�0��/'-�!�+��
$G��06�8
6��06�8�G.
�6,G$
���7������7��>��&&�����
�����7���>��&&�
����7������7���&&�����
Figure 20 - Optional Spark Pilot -- Maintain spark gapof 7/64"
If the above conditions are normal and no spark occurs, replace theignition controller.
If the main gas valve fails to open with a normal full size pilot flameestablished, check for the following:
a) Voltage between black and brown leads on the main gas valve is 20 to32 VAC and there is no main gas flow with the built-in manual valvein FULL OPEN position -- the main valve is defective.
b) No voltage between black and brown leads on the main gas valve --check for disconnected or shorted flame sensor lead or flame sensorprobe.
When the above conditions are normal and the main gas flow is still off,the ignition controller is probably defective.
26. Burners & Carryover SystemThese duct furnaces have individually formed steel burners with accu-rately die-formed ports to give controlled flame stability without liftingor flashback with either natural or propane gas. The burners are light-weight and factory mounted in an assembly which permits them to beremoved as a unit for inspection or service.
All natural gas burners are equipped with two flash carryover systemsthat receive a supply of gas simultaneously with the main burner. Allpropane gas burners are equipped with one flash carryover and a regu-lated gas lighter tube system. During regular service, check the mainburner ports, the carryover assemblies, and the orifices for cleanliness.
27. Burner Air AdjustmentBurner air shutters are not normally required on natural gas furnaces.Air shutters are required on propane gas units and may require adjust-ment.
Before making any adjustments to the air shutters, allow the heater tooperate for about fifteen minutes with the air shutters open. The slot-ted screw on the end manifold bracket moves the air shutters and ad-justs all burners simultaneously. Turning the screw clockwise opensthe shutters; counterclockwise closes the shutters. After the furnacehas been in operation for 15 minutes, close the air shutters observingthe flame for yellow-tipping. Open the shutters until the yellow disap-pears. A limited amount of yellow-tipping is permissible for liquefiedpetroleum gases. Natural gas should not display any yellow-tipping.
When making the adjustment, close the air shutters no more than isnecessary to eliminate the problem condition.
DANGER: Failure to install and/or adjust airshutters according to directions could causeproperty damage, personal injury, and or death.
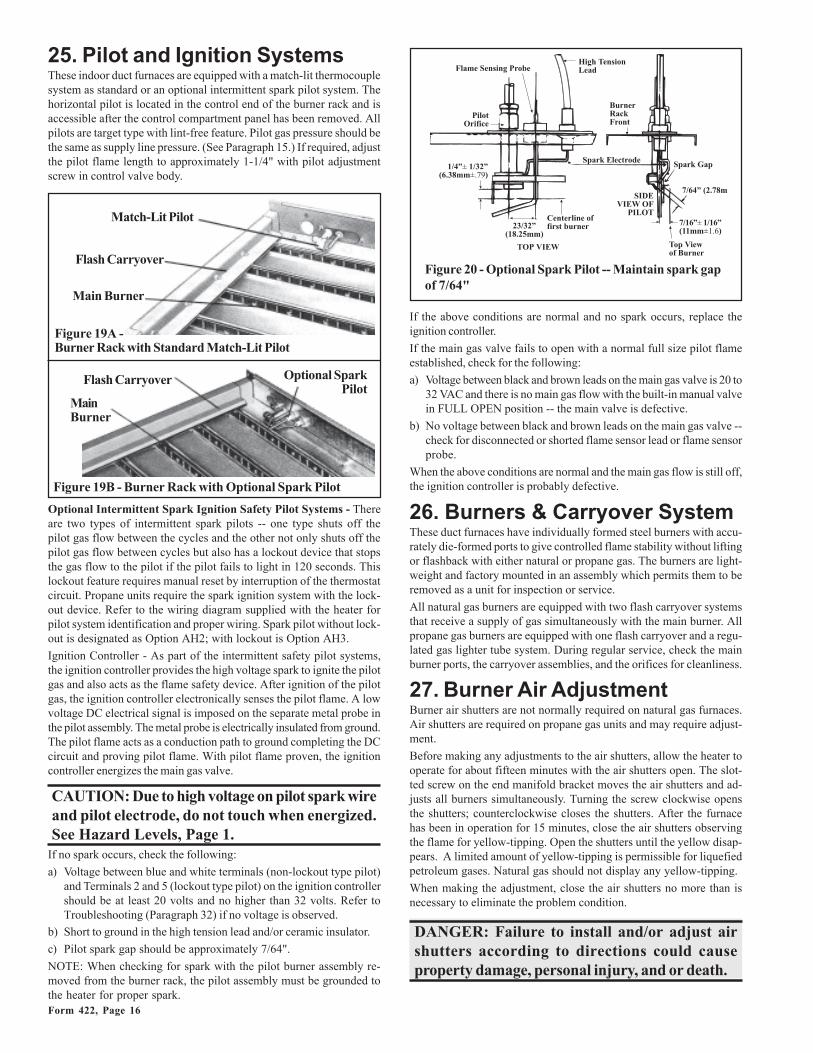
25. Pilot and Ignition SystemsThese indoor duct furnaces are equipped with a match-lit thermocouplesystem as standard or an optional intermittent spark pilot system. Thehorizontal pilot is located in the control end of the burner rack and isaccessible after the control compartment panel has been removed. Allpilots are target type with lint-free feature. Pilot gas pressure should bethe same as supply line pressure. (See Paragraph 15.) If required, adjustthe pilot flame length to approximately 1-1/4" with pilot adjustmentscrew in control valve body.
Optional Intermittent Spark Ignition Safety Pilot Systems - Thereare two types of intermittent spark pilots -- one type shuts off thepilot gas flow between the cycles and the other not only shuts off thepilot gas flow between cycles but also has a lockout device that stopsthe gas flow to the pilot if the pilot fails to light in 120 seconds. Thislockout feature requires manual reset by interruption of the thermostatcircuit. Propane units require the spark ignition system with the lock-out device. Refer to the wiring diagram supplied with the heater forpilot system identification and proper wiring. Spark pilot without lock-out is designated as Option AH2; with lockout is Option AH3.
Ignition Controller - As part of the intermittent safety pilot systems,the ignition controller provides the high voltage spark to ignite the pilotgas and also acts as the flame safety device. After ignition of the pilotgas, the ignition controller electronically senses the pilot flame. A lowvoltage DC electrical signal is imposed on the separate metal probe inthe pilot assembly. The metal probe is electrically insulated from ground.The pilot flame acts as a conduction path to ground completing the DCcircuit and proving pilot flame. With pilot flame proven, the ignitioncontroller energizes the main gas valve.
CAUTION: Due to high voltage on pilot spark wireand pilot electrode, do not touch when energized.See Hazard Levels, Page 1.
If no spark occurs, check the following:
a) Voltage between blue and white terminals (non-lockout type pilot)and Terminals 2 and 5 (lockout type pilot) on the ignition controllershould be at least 20 volts and no higher than 32 volts. Refer toTroubleshooting (Paragraph 32) if no voltage is observed.
b) Short to ground in the high tension lead and/or ceramic insulator.
c) Pilot spark gap should be approximately 7/64".
NOTE: When checking for spark with the pilot burner assembly re-moved from the burner rack, the pilot assembly must be grounded tothe heater for proper spark.
Figure 19A -Burner Rack with Standard Match-Lit Pilot
Flash Carryover
Main Burner
Match-Lit Pilot
Optional SparkPilot
Flash Carryover
Figure 19B - Burner Rack with Optional Spark Pilot
MainBurner

Form RZ 422, P/N 150491, Page 17
28. Check Installation & Start-UpCheck the installation prior to start-up:
Check suspension. Unit must be secure and level.
Be certain the electrical supply matches voltage rating of thefurnace. (Refer to the rating plate.)
Check clearances from combustibles. Requirements are shownin Paragraph 4.
Check vent system to be sure that it is installed according tothe instructions in Paragraph 9. Be sure that flue dischargeopenings are free from obstructions.
Check piping for leaks and proper gas line pressure. Bleedgas lines of trapped air. See Paragraph 15.
a) Turn manual shutoff valve to off position.b) Turn gas supply on.c) Observe gas meter for movement, ord) Attach pressure gauge readable to .1" w.c. and after turn-
ing gas on for ten seconds, turn gas supply off. No changein pressure should occur over a three-minute period.
e) If either c) or d) above indicate a leak, locate leak by brush-ing a soapy solution on all fittings. Bubbles will appear ata leak. Repair and repeat tests.
Start-UpTurn electric and gas supply on to the furnace. Adjust thethermostat or ductstat so that a call for heat exists. Observefor complete sequencing of safety pilot and ignition.
Operating Sequence with Standard Match-Lit Pilot:
1) Follow lighting instructions and establish pilot.
2) Thermostat calls for heat, energizing the single-stage gasvalve, firing unit at full rate.
3) Optional fan control senses heat exchanger temperature,energizing the motor on the attached blower.
Operating Sequence for Optional Intermittent Spark PilotSystem with or without 100% Lockout
1) Set the thermostat switch at its lowest setting.
2) Follow lighting instructions.
3) Set thermostat switch at desired setting.
4) Thermostat calls for heat, energizing the ignition control-ler and the pilot gas valve, lighting the pilot. NOTE: If theflame is extinguished during main burner operation, thesafety switch closes the main valve and recycles the sparkgap. On unit equipped with a G770NGC-4 controller whichincludes lockout control, if the pilot is not established within120 seconds (approximately), the unit locks out and mustbe reset by interrupting the power to the control circuit(See Lighting Instructions).
5) The sensing probe proves the presence of the pilot flame.
(a) De-energizing the ignitor.
(b) Energizing the gas valve.
6) Optional fan control senses heat exchanger temperature,energizing the motor on the attached blower.
7) Set the thermostat switch at lowest setting for shutdown.Optional fan control keeps the blower motor on while unitis hot.
Check installation after start-up:With the unit in operation, measure manifold gas pressure.Manifold pressure for natural gas should be 3.5" w.c. and 10"w.c. for propane gas. See Paragraph 15.
Turn the unit off and on, pausing two minutes between eachcycle. Observe for smooth ignition. On two-stage or modu-lating burner systems, manipulate temperature adjustmentslowly up and down to see if control is sequencing or modu-lating properly. Raising temperature setting drives burner onor to full fire.
Observe burner flame at full fire. Natural gas flame should beabout 1-1/2" in height with blue coloring. Propane gas flameshould be approximately the same length with blue coloring.Yellow tipping may appear on propane gas. If yellow extendsbeyond 1/2 to 3/4", adjust air shutters. See Paragraph 27.
Close all panels tightly. With the heater on, check limit controlby completely blocking off distribution air. The limit controlshould open within a few minutes, shutting off the gas sup-ply to the main burners.
Place "Owner's Envelope" containing Limited Warranty Card,this booklet, and any optional information in an accessiblelocation near the heater. Follow the instructions on the enve-lope.
DANGER: The gas burner in this gas-firedequipment is designed and equipped to provide safeand economically controlled complete combustion.However, if the installation does not permit theburner to receive the proper supply of combustionair, complete combustion may not occur. The resultis incomplete combustion which produces carbonmonoxide, a poisonous gas that can cause death.Safe operation of indirect-fired gas burningequipment requires a properly operating ventsystem which vents all flue products to the outsideatmosphere. FAILURE TO PROVIDE PROPERVENTING WILL RESULT IN A HEALTHHAZARD WHICH COULD CAUSE SERIOUSPERSONAL INJURY OR DEATH.
Always comply with the combustion airrequirements in the installation codes and inParagraph 7. Combustion air at the burner shouldbe regulated only by manufacturer-providedequipment. NEVER RESTRICT OROTHERWISE ALTER THE SUPPLY OFCOMBUSTION AIR TO ANY HEATER. Indoorunits installed in a confined space must be suppliedwith air for combustion as required by Code and inParagraph 7 of this heater installation manual.MAINTAIN THE VENT SYSTEM INSTRUCTURALLY SOUND AND PROPERLYOPERATING CONDITION.

Form 422, Page 18
$'"�)--�� !""'��
���/(�
'��'&)--��� !""'��
�)�2�
�(
�����(�%
)�3�
�������'+�'-���-�'/
���/�*4�3%�
,�-�
���/(�
���/�
*
Figure 21 - When cleaning outer heat exchanger surfaceremove directional air baffles. Remove Screws "A" and slidebaffles out. Clean and replace all baffles.NOTE: High CFM furnaces do not have directional airbaffles.
SERVICE AND MAINTENANCE
WARNING: If you turn off the power supply, turn off the gas. See Hazard Levels, Page 1.This unit will operate with a minimum of maintenance. To ensure long life and satisfactory performance, a furnace that is operating under normalconditions should be inspected every four months. If the furnace is operating in an area where an unusual amount of dust or soot or other impuritiesare present in the air, more frequent inspection is recommended.
The following procedures should be carried out at least annually (See Paragraphs 29-31 for specific instructions.):
Clean all dirt and grease from the primary and secondary combustion air openings.
Clean the heat exchanger both internally and externally.
Check the pilot burner and main burners for scale, dust, or lint accumulation. Clean as needed.
Check the vent system for soundness. Replace any parts that do not appear sound.
Check the wiring for any damaged wire. Replace damaged wiring. (See Paragraph 16 for replacement wiring requirements.)
CAUTION: When cleaning, wearing eye protection is recommended.
NOTE: Use only factory-authorized replacement parts.
nately blow through the burner ports and the venturi. Use a fine wire todislodge any stubborn particles. Do not use anything that might changethe port size.
Clean the burner rack carryover systems with air pressure.
31. Cleaning the Heat ExchangerTo clean the outer surfaces (circulating air side) of the heat exchanger,gain access by removing the inspection panels in the ductwork or re-move the ductwork. Depending on whether or not the furnace is de-signed for high CFM (Model prefix "H"), there may be directionalbaffles between the heat exchanger tubes. The standard furnace hasbaffles between the heat exchanger tubes as shown in Figure 21. (HighCFM furnaces have only the top baffle support which does not need tobe removed for cleaning.) To remove the baffles, remove the screwsmarked "A" in Figure 21, and slide each baffle forward. Use a brush and/or an air hose to remove accumulated dust and grease deposits from theheat exchanger tubes and the baffles. Re-install the baffles by slidingthem into the rear slot and replacing the screw.
29. Burner Rack RemovalInstructions
1. Turn off the gas supply.2. Turn off the electric supply.3. Remove control access side panel.4. Disconnect the pilot tubing and thermocouple or flame sensor lead.5. Mark and disconnect electric valve leads.6. Uncouple the union in the gas supply.7. Remove sheetmetal screws in the top corners of the burner rack
assembly.8. Pull "drawer-type" burner rack out of the furnace.
To disassemble the burner rack:1. Remove Carryover System --
Natural Gas - remove the flash carryover system from the "manifoldend" of the burner rack
Propane Gas - break the lighter tube connection at the regulator andremove the lighter tube orifice supply tubing; remove the retainingscrews in the drip shield and the shield; remove the retaining screwsand slide out the lighter tube.
2. Pull main burners horizontally away from injection opening and liftout.
3. Remove manifold bracket screws and remove manifold.4. Change main burner orifices, if necessary.5. Remove screws and lift out pilot burner.
Follow the instructions in Paragraph 30 to clean. To re-assemble andreplace, reverse the above procedures being careful not to create anyunsafe conditions.
30. Cleaning Pilot and MainBurners
In the event the pilot flame is short and/or yellow, check the pilot orificefor blockage caused by lint or dust accumulation. Remove the pilotorifice and clean with air pressure. DO NOT REAM THE ORIFICE.Check and clean the aeration slot in the pilot burner.
If the furnace is equipped with an optional spark pilot, clean the metalsensing probe and the pilot hood with an emery cloth and wipe off theceramic insulator. Check the spark gap; spark gap should be maintainedto 7/64". After the pilot is cleaned, blow any dirt away with com-pressed air.
Main burners may be cleaned using air pressure. Use an air nozzle toblow out scale and dust accumulation from the burner ports. Alter-

Form RZ 422, P/N 150491, Page 19
Figure 22 - Remove "V" Baffles to Clean Inner Surface of Heat ExchangerTubes
,''(�+ ���/(
4�&':� ���/(
$!5��)--���'�11'/+���)��
4�)�)--��
.�'+�)--��
$!5�)--��
The inner surfaces (combustion air side) of theheat exchanger can be reached for cleaning withthe burner rack removed. (See Paragraph 29.) Anair hose, an 18-24" long, 1/2" diameter furnacebrush (or heavy wire with steel wool securelyattached), a flashlight, and a mirror are needed.The required procedure depends on the date ofmanufacture and whether or not the furnace israted for high (80%) efficiency. Furnaces de-signed to provide high efficiency heating have"V" shaped baffles in the top of each heat ex-changer tube. Follow the instructions in Figure22 to remove the baffles when cleaning the innersurfaces of the heat exchanger.
NOTE: High efficiency furnaces manufacturedprior to 3/95 have a "C" prefix in their modeldesignation. All furnaces manufactured be-ginning 3/95 are designed for high efficiencyand include the heat exchanger "V" baffles.
Clean the inner surfaces of the heat exchangerfrom beneath using the brush to "scrub" the tubewalls to remove any accumulated dust, rust and/or soot. Clean the "V" tubes and re-assemble theheat exchanger and the furnace.
Check the furnace for proper operation.
32. TroubleshootingTRO UBLE PRO BABLE CAUSE REMEDYPilot wi ll not l ight 1. Manual valve not open. 1. Open manual valve.
(match-lit 2. Air in gas line. 2. Bleed gas line.system) 3. Dirt in pilot orifice. 3. Remove and clean with compressed air or solvent (do not ream).
4. Gas pressure too high or too low. 4. Adjust supply pressure. (See Paragraph 15).
5. Bent or kinked pilot tubing. 5. Replace tubing.6. Failed E.C.O. device 6. Replace E.C.O. device.
Pilot lights, main 1. Manual valve not open. 1. Open manual valve.
valve wi ll not open 2. Power not turned on or thermostat not calling for heat.
2. Turn on power; check fuses; turn on thermostat .
(Match-lit system) 3. Circuit to valve open. 3. Check wiring and connect ions at transformer and thermostat.4. Faulty transformer. 4. Replace the transformer.5. Faulty or dirty thermorouple or safety pilot
switch; or failed E.C.O. device
5. Clean and test with millivolt member or test. Replace defect ive part.
6. Faulty thermostat (see manufacturer's inst ructions)
6. Replace thermostat.
7. Faulty valve. 7. Replace valve or magnetic head.8. High gas pressure. 8. Maximum supply gas pressure 8 oz. or 14" w.c. 9. Activated blocked vent switch. 9. Correct venting problem. Reset switch.
Pilot wi ll not l ight 1. Manual valve not open. 1. Open manual valve.(spark ignition 2. Air in gas line. 2. Bleed gas line.system) 3. Dirt in pilot orifice. 3. Remove and clean with compressed air or solvent (do not ream).
4. Gas pressure too high or too low. 4. Adjust supply pressure. (See Paragraph 15). 5. Kinked pilot tubing. 5. Replace tubing.6. Pilot valve does not open. 6. If 24 volt available at valve, replace valve.
7. No spark: 7. a) Loose wire connections a) Be certain all wires connections are solid.
b) T ransformer failure. b) Be certain 24 volts is available. c) Incorrect spark gap. c) Maintain spark gap at 7/64".d) Spark cable shorted to ground. d) Replace worn or grounded spark cable.
e) Spark elect rode shorted to ground. e) Replace pilot if ceramic spark elect rode is cracked or grounded. f) Drafts affecting pilot . f) Make sure all panels are in place and tight ly secured to prevent drafts at
pilot.
g) Ignition control not grounded. g) Make certain ignition control is grounded to furnace chassis
Instructions to RemoveHeat Exchanger "V" Baffles:1) Remove the screws (the number varies depending on unit size) along the bottom of the
front baffle and the three on each end Slide the front baffle out of the furnace.
1) Remove the screws that attach the tube baffle hold-down plate to the rear flue baffle.
3) Pull the "V" baffles out of the heat exchanger.

Form 422, Page 20
FOR SERVICE OR REPAIR, FOLLOW THESE STEPS IN ORDER:
FIRST: Contact the installer.
Name _______________________________________________________________________________________
Address ________________________________________________________________________________________
________________________________________________________________________________________
________________________________________________________________________________________
Phone ________________________________________________________________________________________
SECOND: Contact the nearest distributor (See Yellow Pages). If no listing,contact Authorized Factory Representative, 1-800-695-1901 (Press 1).
THIRD: Contact: REZNOR®/ Thomas & Betts Corporation
150 McKinley Avenue
Mercer, PA 16137
Phone: (724) 662-4400
Model No. _________________________________________________
Unit Serial No. _____________________________________________
Date of Installation _________________________________________
©2001 Thomas & Betts Corporation, All rights reserved. Printed in the U.S.A.
MANUFACTURER OF GAS, OIL, ELECTRIC HEATING AND VENTILATING SYSTEMS
Trademark Note: Reznor® is registered in the United States and other countries.
(800) 695-1901; www.ReznorOnLine.com
04/01 YL Form 422 (Version .6)
32. Troubleshooting (cont'd)TRO UBLE (cont'd) PRO BABLE CAUSE (cont'd) REMEDY (cont'd)Spark Pilot wi ll not light (cont'd)
h) Faulty ignit ion controller. h) If 24 volt is available to ignition controller and all other causes have been
eliminated, replace ignition control. 8. Optional lockout device interrupting control 8. Reset lockout by interrupting control at thermostat .
9. Faulty combust ion air proving switch. 9. Replace combustion air proving switch. Pilot lights, main 1. Manual valve not open. 1. Open manual valve.
valve wi ll not open 2. Main valve not operating. 2.(Spark Ignition system)
a) Defect ive valve. a) If 24 volt is measured at valve connections and valve remains closed, replace valve.
b) Loose wire connections. b) Check and tighten all wiring connections.
3. Ignition control does not power main valve. 3.
a) Loose wire connections. a) Check and tighten all wiring connections.
b) Flame sensor grounded. (Pilot lights - spark continues)
b)Be certain flame sensor lead is not grounded or insulation or ceramic is not cracked. Replace as required.
c) Gas pressure incorrect. c) Set supply pressure at 5" w.c. to 8" w.c. for natural gas and 11" w.c. for
propane gas. d) Cracked ceramic at sensor. d) Replace sensor.
e) Faulty ignition controller. e) See Paragraph 25. If all checks indicate no other cause, replace ignition controller. DO NOT ATTEMPT TO REPAIR IGNITION CONTROLLER.
THIS DEVICE HAS NO FIELD REPLACEABLE PARTS.No heat (Heater 1. Dirty filters in blower system.. 1. Clean or replace filters.O perating) 2. Incorrect manifold pressure or orifices. 2. Check manifold pressure (See Paragraph 15).
3. Cycling on limit control. 3.Check air throughput (See Paragraph 12). 4. Improper thermostat locat ion or adjustment. 4. See thermostat manufacturer's instructions.
5. Belt slipping on blower 5. Adjust belt tensionCold air del ivered 1. Fan control improperly wired 1. Connect as per wiring diagram.
On Start-up 2. Defective fan control. 2. Replace fan control. During O peration 3. Incorrect manifold pressure. 3. Check manifold line pressure (See Paragraph 15).
4. Blower set for too low temperature rise. 4. Slow down blower or increase static pressure.
��������������������������������������������������������������������������������������������������������������������������������������������������������������������������������������������������������������������������������������������������������������������������������