Embed Size (px)
DESCRIPTION
Citation preview
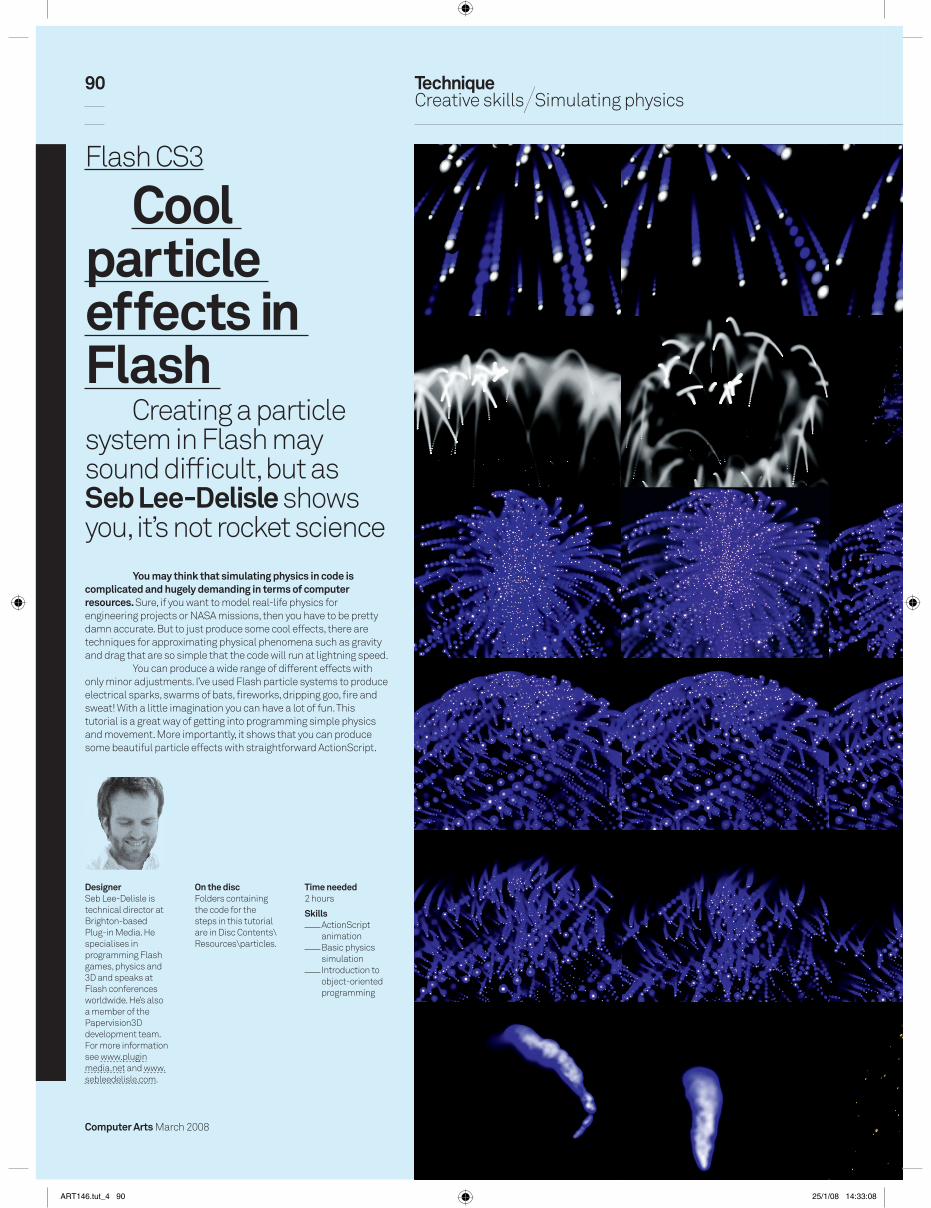
90 Technique Creative skills Simulating physics
Computer Arts March 2008
Flash CS3
Cool particle effects in Flash
Creating a particle system in Flash may sound diffi cult, but asSeb Lee-Delisle shows you, it’s not rocket science You may think that simulating physics in code is complicated and hugely demanding in terms of computer resources. Sure, if you want to model real-life physics for engineering projects or NASA missions, then you have to be pretty damn accurate. But to just produce some cool effects, there are techniques for approximating physical phenomena such as gravity and drag that are so simple that the code will run at lightning speed. You can produce a wide range of different effects with only minor adjustments. I’ve used Flash particle systems to produce electrical sparks, swarms of bats, fi reworks, dripping goo, fi re and sweat! With a little imagination you can have a lot of fun. This tutorial is a great way of getting into programming simple physics and movement. More importantly, it shows that you can produce some beautiful particle effects with straightforward ActionScript.
Designer Seb Lee-Delisle is technical director at Brighton-based Plug-in Media. He specialises in programming Flash games, physics and 3D and speaks at Flash conferences worldwide. He’s also a member of the Papervision3D development team. For more information see www.pluginmedia.net and www.sebleedelisle.com.
On the disc Folders containing the code for the steps in this tutorial are in Disc Contents\Resources\particles.
Time needed 2 hours
Skills ActionScript
animation Basic physics
simulation Introduction to
object-oriented programming
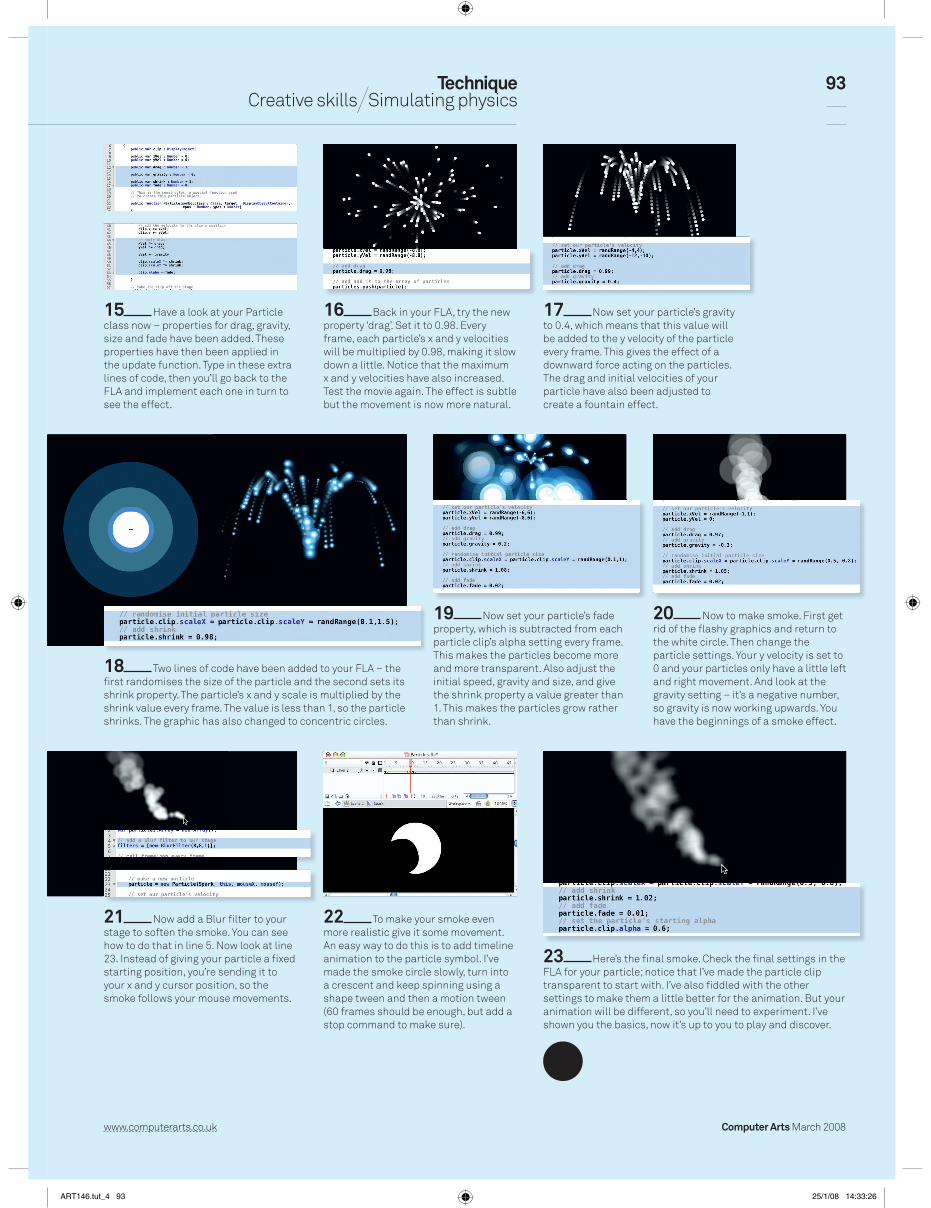
ART146.tut_4 90ART146.tut_4 90 25/1/08 14:33:0825/1/08 14:33:08
Computer Arts March 2008
91
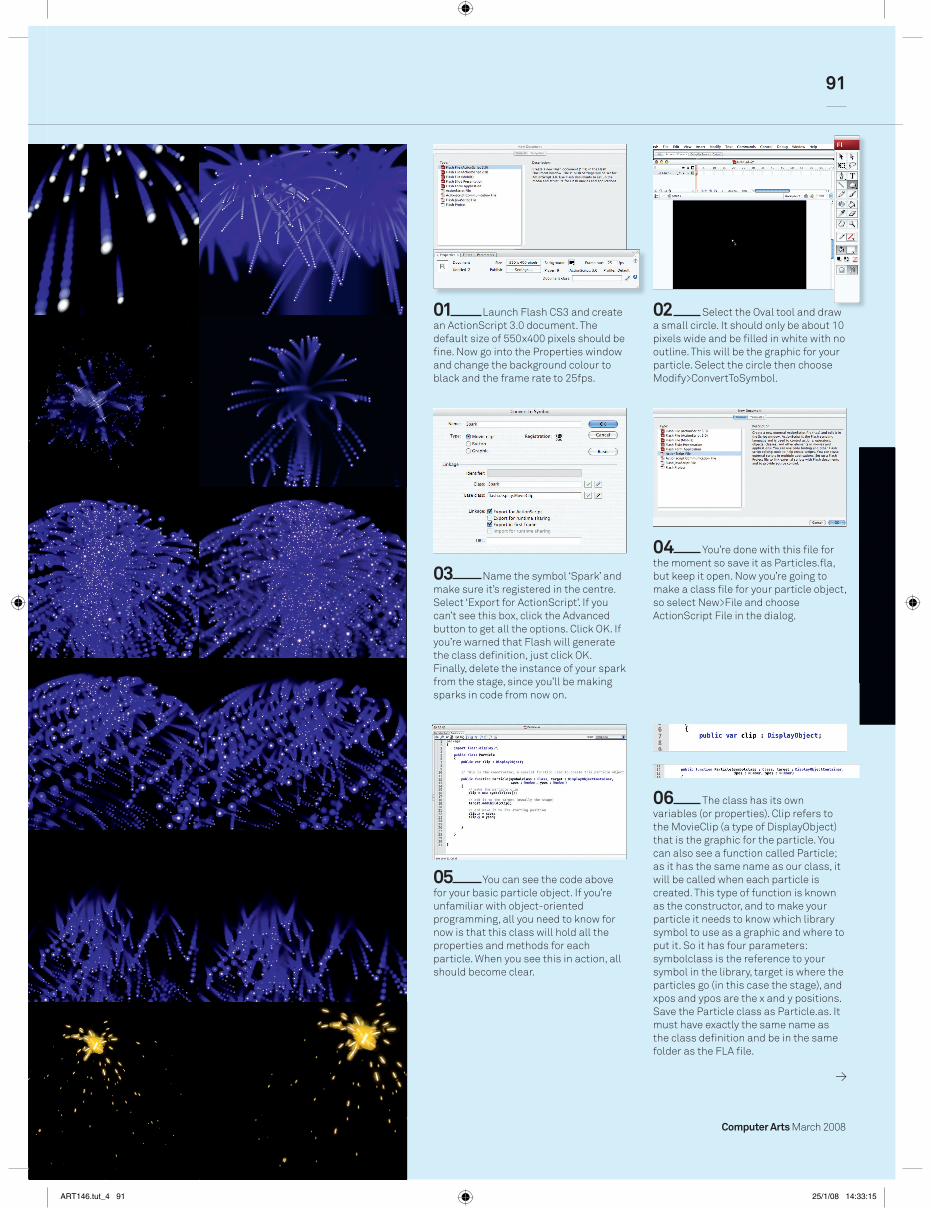
01 Launch Flash CS3 and create an ActionScript 3.0 document. The default size of 550x400 pixels should be fi ne. Now go into the Properties window and change the background colour to black and the frame rate to 25fps.
05 You can see the code above for your basic particle object. If you’re unfamiliar with object-oriented programming, all you need to know for now is that this class will hold all the properties and methods for each particle. When you see this in action, all should become clear.
04 You’re done with this fi le for the moment so save it as Particles.fl a, but keep it open. Now you’re going to make a class fi le for your particle object, so select New>File and choose ActionScript File in the dialog.
03 Name the symbol ‘Spark’ and make sure it’s registered in the centre. Select ‘Export for ActionScript’. If you can’t see this box, click the Advanced button to get all the options. Click OK. If you’re warned that Flash will generate the class defi nition, just click OK. Finally, delete the instance of your spark from the stage, since you’ll be making sparks in code from now on.
06 The class has its own variables (or properties). Clip refers to the MovieClip (a type of DisplayObject) that is the graphic for the particle. You can also see a function called Particle; as it has the same name as our class, it will be called when each particle is created. This type of function is known as the constructor, and to make your particle it needs to know which library symbol to use as a graphic and where to put it. So it has four parameters: symbolclass is the reference to your symbol in the library, target is where the particles go (in this case the stage), and xpos and ypos are the x and y positions. Save the Particle class as Particle.as. It must have exactly the same name as the class defi nition and be in the same folder as the FLA fi le.
02 Select the Oval tool and draw a small circle. It should only be about 10 pixels wide and be fi lled in white with no outline. This will be the graphic for your particle. Select the circle then choose Modify>ConvertToSymbol.
ART146.tut_4 91ART146.tut_4 91 25/1/08 14:33:1525/1/08 14:33:15

92
Computer Arts March 2008 www.computerarts.co.uk
12 Defi ne a new array called particles, as shown in the above code. Where there are fewer than 100 particles in a frame, a new one is made and added to the end of the array using the push method. Use a loop to iterate through and update every particle.
13 All good so far, but you can see that after you’ve made 100 particles, they stop. In fact, they don’t stop, they just keep animating off the screen. To get rid of them go back to your Particle.as fi le and add a method called destroy, which removes the clip from the stage.
14 Back in your FLA, you can see that the frameLoop has changed, so that while you have more than 100 particles, you’ll take away the fi rst particle from the array (using the pop method). Now when you test the movie, you get a constant stream of particles.
10 Return to Particles.fl a and add the code above so the particle moves 2 pixels to the right and 2 pixels down every frame. Update its position by calling its update method. You need to do this every frame, so set up an event listener using addEventListener(Event.ENTER_FRAME, frameLoop); This will call the frameLoop function every frame, which calls the update method on your particle. Test the movie.
11 To randomise the particles’ velocities use Math.random()*10-5; This multiplies the result from Math.random() – a value between 0 and 1 – by 10, then subtracts 5 to get a fi gure between -5 and +5. Wrap it in a function called randRange. You can now set xVel and yVel to randRange(-5, 5).
08 The particle just sits there not doing anything, so you need to tell it where to go and how fast. To do this add two more properties to the Particle class: xVel and yVel. Now, every frame, the particle will move along the x-axis by the amount stored in xVel and along the y-axis by yVel. Also give these properties a default value of 0.
07 Go back to Particles.fl a. Click on the fi rst frame in the timeline and open the ActionScript Editor, then type the above line of code. This creates a particle object from the symbol in the library called Spark and attaches it to the stage (this) at x=275 and y=200 (the middle of the stage). Preview your SWF fi le with Control>TestMovie.
09 Now make a function in your class called update, which you’ll put underneath the constructor. This will be called once per frame every time you want to update the position of your particle. You can see that it’s very simple – it merely adds the x velocity (xVel) to the x position (clip.x) and the y velocity (yVel) to the y position (clip.y) of the clip.
ART146.tut_4 92ART146.tut_4 92 25/1/08 14:33:2025/1/08 14:33:20
www.computerarts.co.uk Computer Arts March 2008
Technique 93 Creative skills Simulating physics
17 Now set your particle’s gravity to 0.4, which means that this value will be added to the y velocity of the particle every frame. This gives the effect of a downward force acting on the particles. The drag and initial velocities of your particle have also been adjusted to create a fountain effect.
18 Two lines of code have been added to your FLA – the fi rst randomises the size of the particle and the second sets its shrink property. The particle’s x and y scale is multiplied by the shrink value every frame. The value is less than 1, so the particle shrinks. The graphic has also changed to concentric circles.
19 Now set your particle’s fade property, which is subtracted from each particle clip’s alpha setting every frame. This makes the particles become more and more transparent. Also adjust the initial speed, gravity and size, and give the shrink property a value greater than 1. This makes the particles grow rather than shrink.
15 Have a look at your Particle class now – properties for drag, gravity, size and fade have been added. These properties have then been applied in the update function. Type in these extra lines of code, then you’ll go back to the FLA and implement each one in turn to see the effect.
16 Back in your FLA, try the new property ‘drag’. Set it to 0.98. Every frame, each particle’s x and y velocities will be multiplied by 0.98, making it slow down a little. Notice that the maximum x and y velocities have also increased. Test the movie again. The effect is subtle but the movement is now more natural.
20 Now to make smoke. First get rid of the fl ashy graphics and return to the white circle. Then change the particle settings. Your y velocity is set to 0 and your particles only have a little left and right movement. And look at the gravity setting – it’s a negative number, so gravity is now working upwards. You have the beginnings of a smoke effect.
21 Now add a Blur fi lter to your stage to soften the smoke. You can see how to do that in line 5. Now look at line 23. Instead of giving your particle a fi xed starting position, you’re sending it to your x and y cursor position, so the smoke follows your mouse movements.
22 To make your smoke even more realistic give it some movement. An easy way to do this is to add timeline animation to the particle symbol. I’ve made the smoke circle slowly, turn into a crescent and keep spinning using a shape tween and then a motion tween (60 frames should be enough, but add a stop command to make sure).
23 Here’s the fi nal smoke. Check the fi nal settings in the FLA for your particle; notice that I’ve made the particle clip transparent to start with. I’ve also fi ddled with the other settings to make them a little better for the animation. But your animation will be different, so you’ll need to experiment. I’ve shown you the basics, now it’s up to you to play and discover.
ART146.tut_4 93ART146.tut_4 93 25/1/08 14:33:2625/1/08 14:33:26


![ROI in the age of keyword not provided [Mozinar]](https://img.pdfslide.us/doc/110x75/53eabc7a8d7f7289708b51f7/roi-in-the-age-of-keyword-not-provided-mozinar.jpg)