Embed Size (px)
Citation preview
P r o f e s s i o n a l E x p e r t i s e D i s t i l l e d
Learn to design, build, and manage a virtualized data center using Microsoft Hyper-V
Mastering Hyper-V
Peter De Tender
Mastering H
yper-V
Mastering Hyper-V
Hyper-V is essentially a hypervisor technology, enabling a single physical machine to operate multiple operating systems simultaneously.
Mastering Hyper-V is a practical, hands-on guide that will provide you with a number of clear, step-by-step exercises that help you understand how the products work and how you should go about them in your own deployment. More signifi cantly, you will learn how to build your own high available Hyper-V cluster, while managing and troubleshooting your Hyper-V cluster environment.
By the end of the book, you will integrate System Center Virtual Machine Manager in your VMware environment, build blocks to create a true private cloud, operate your private cloud by using App Controller, and understand the features of Microsoft's public cloud offering, known as Microsoft Azure.
Who this book is written forThis book is mainly targeted at the common network and system administrator who has to deal with server virtualization in their day to day job, primarily using Microsoft Hyper-V and System Center. It assumes you have some practical experience with previous versions of Hyper-V, although this is not a requirement; you don't need to be a subject matter expert.
$ 49.99 US£ 30.99 UK
Prices do not include local sales tax or VAT where applicable
Peter De Tender
What you will learn from this book
Build and manage Hyper-V platforms using System Center Virtual Machine Manager
Adopt the cloud by upscaling Hyper-V with Microsoft Azure
Optimize your Microsoft Hyper-V and data center licensing
Extend VMM with other System Center components to allow private clouds
Migrate VMware ESX machines to Microsoft Hyper-V machines
Manage and operate your VMware platform from within VMM
Integrate non-Microsoft hypervisors into your System Center Virtual Machine Manager solution
P U B L I S H I N GP U B L I S H I N G
professional expert ise dist i l led
P U B L I S H I N GP U B L I S H I N G
professional expert ise dist i l led
Visit www.PacktPub.com for books, eBooks, code, downloads, and PacktLib.
Free Sample
In this package, you will find: The author biography
A preview chapter from the book, Chapter 1 'Introduction to Microsoft
Server 2012 R2 Hyper-V'
A synopsis of the book’s content
More information on Mastering Hyper-V
About the Author Peter De Tender has a strong focus on Microsoft Infrastructure technologies as an IT
professional with over 16 years of experience. Having a past expertise in Exchange
Server since version 4.0 back in 1995 all the way up to Exchange 2013, he has shifted to
the Microsoft private and public cloud solutions in the last 18 months.
He has worked on numerous design and implementation projects in Belgium and
internationally for companies ranging from between 250 and 50,000 users.
He has frequently worked on general Microsoft Core IO platform integration and
consultancy projects as an infrastructure architect, mainly working with Windows Server,
Hyper-V, and System Center Operations Manager.
In addition to being a consultant, Peter is also a recognized Microsoft Certified Trainer.
Because of his expertise, he is both a country lead for Belgium and the European
Chairman of IAMCT, the International Association of Microsoft Certified Trainers
( ). He is also a Microsoft Springboard Series member.
For the past few years, Peter has been regularly traveling around the world to speak at
international conferences on Microsoft technologies such as MCT Summits NA and EU,
TechFuse Minneapolis, Community Day, and so on or to work as a staff member at
Microsoft TechEds NA and EU, MMS, and so on.
Peter's passion for the IT communities is shown by his involvement in TheKrewe
( ), and he is the founder of TechEdYellowPantsTeam
( ). Mainly for his community
contributions, he was rewarded with the MVP title in October 2013 for the first time.
As a technical writer for TrainSignal ( ) and
Petri Knowledgebase ( ), Peter writes many technical
how-to articles on a multitude of Microsoft products, always with a twist from his
own experience.
Besides this book, Peter was the lead author of Exchange 2013 Cookbook, Packt
Publishing. He was also the co-author of Upgrading Skills to Exchange Server 2013, a
courseware training guide published by MVP-Press.
Acknowledgments
After finishing my Exchange 2013 Cookbook for Packt Publishing in October 2013, I
promised my wife and kids to never do it again—until Sonali contacted me asking if I
was interested in writing a practical overview of Microsoft virtualization solution, with a
main focus on Hyper-V Server 2012 R2, Virtual Machine Manager 2012 R2, and
Windows Azure IaaS. As this book wasn't going to be a in the Cookbook format, there
was a bit more flexibility on the writing style and chapter contents. As the topic was close
to my heart, it didn't take much to convince me.
I would like to specially thank the Packt Publishing team for their support and patience
along the line. Also, I thank the technical review team, as they gave marvelous feedback
and forced me to update the content to improve the quality of the book.
In general, I would also like to thank all the people who have ever attended one of my
trainings, workshop sessions, or public speaking gigs in all those different places in the
world. It is your feedback and stories that gave me enough inspiration for writing this
book, pulling real-life examples out of the discussions and conversations we had.
Last but not least, a more than special thanks goes once more to my wonderful family
for accepting I'm always busy on my PC, helping customers, being away to speak at
conferences, or writing another book. My dear wife, Els, I thank you so much for
supporting me in all that I do. Without your continuous help, all that I'm busy with
would just not be possible at all. You are an amazing woman and the best mom our
girls can have. Kaylee and Kitana, our wonderful teenage daughters, I see so much
energy and dedication in everything the two of you are doing, and it's just fun watching.
I would also like to thank my mom and sister who have supported me the last few
months. A lot happened in our lives and I could always count on you sharing my
frustrations about the things going on, and my book-writing experiences. Dad, although
you have been gone for about 2 years now, you are in my memories forever. It is with
pride and respect for you that I'm making the best of my life as you always taught me.
Mastering Hyper-V Hyper-V, Microsoft's virtualization technology, has matured into an enterprise-ready
platform. Unfortunately, if you are new to virtualization or have an extensive background
in VMware, for example, often you find yourself stranded in a pool of unfamiliar terms
and concepts or even get lost in the combination of Hyper-V with System Center, without
even talking about the questions that might arise around adopting cloud technology. The
good news is that these questions are common, both in Server Message Blocks (SMBs)
and in enterprise environments. By writing this book,
I hope you as a reader can gather together information on some of the most common
stumbling blocks to help you chart a clear path to a successful deployment, whether you
are using Hyper-V in a standalone or in a clustered setup, integrating with System Center
or not, or optimizing toward a private or a hybrid cloud architecture.
At the time of writing, Windows Server 2012 R2 has been released for about 6 months,
and the adoption in the market is huge. Besides all the other interesting features of this
latest version of Microsoft's server operating system, one of the key reasons to actually
migrate is the updated virtualization component, Hyper-V.
When I'm talking to customers myself about virtualization and more specifically the
Microsoft solutions that enable virtualization, I always tell them to forget everything
they know and have heard about Hyper-V before. Not that the previous version was bad,
actually not at all, but its feature set is so much different than the initial version in
Windows Server 2008 close to 6 years ago. At that time, the market adoption of Hyper-V
was rather low. Other virtualization platforms owned the market.
But not anymore…
And this is exactly the key reason why we have worked out this book, to take you on an
interesting journey, where you will learn everything there is to know about Server 2012
R2 Hyper-V.
The book starts from the planning phase, during which we highlight some interesting
tools that can help in assessing your current physical and/or virtual environment, whether
it is running Microsoft or Linux operating systems, regardless of what hypervisor you are
already using in your data center. This is followed by explaining what the new Hyper-V
features of Server 2012 R2 are. A very important aspect of adopting Hyper-V is its
management layer, made possible by System Center Virtual Machine Manager 2012 R2,
as well as by using other System Center components such as Server App Controller to
name just one.
The second part of this book will guide you in the realization of a "private cloud",
starting from describing what private cloud actually means, what tools you need for
running such a private cloud, how to perform full management of this on premises with a
mixed virtualized infrastructure, ending with a chapter dedicated to Microsoft Azure,
which allows you to not only run virtual machines "in-the-cloud", but also actually
provide migration mechanisms back and forth.
Okay, now you know what you will learn from reading this book. And we know your
expectations are high. You are a technical expert in operating and administering your
current environment, and you want to dive into the technology right away. But before
we do this, let's make sure everybody is on the right track here. That's why we would
like to start with explaining some of the basics around server virtualization and what it
takes to run a virtualized infrastructure. And if you are already familiar with these
terminologies, feel free to jump right away to Chapter 1, Introduction to Microsoft
Server 2012 R2 Hyper-V.
What is virtualization
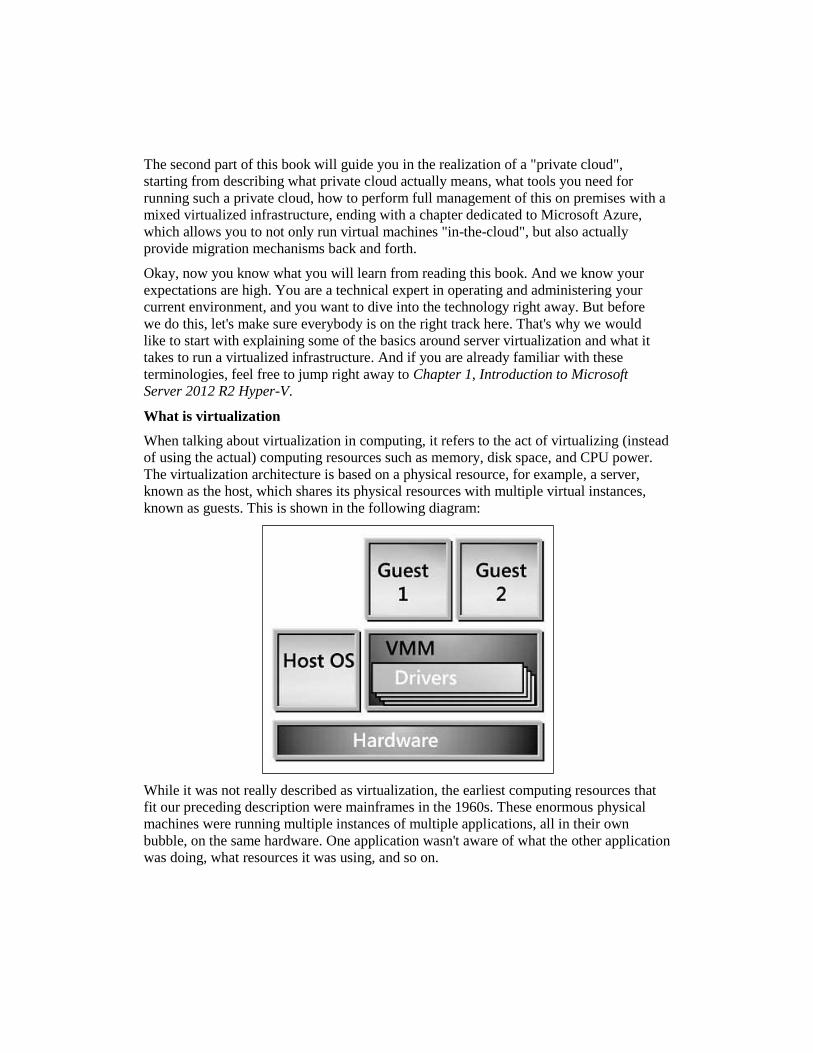
When talking about virtualization in computing, it refers to the act of virtualizing (instead
of using the actual) computing resources such as memory, disk space, and CPU power.
The virtualization architecture is based on a physical resource, for example, a server,
known as the host, which shares its physical resources with multiple virtual instances,
known as guests. This is shown in the following diagram:
While it was not really described as virtualization, the earliest computing resources that
fit our preceding description were mainframes in the 1960s. These enormous physical
machines were running multiple instances of multiple applications, all in their own
bubble, on the same hardware. One application wasn't aware of what the other application
was doing, what resources it was using, and so on.
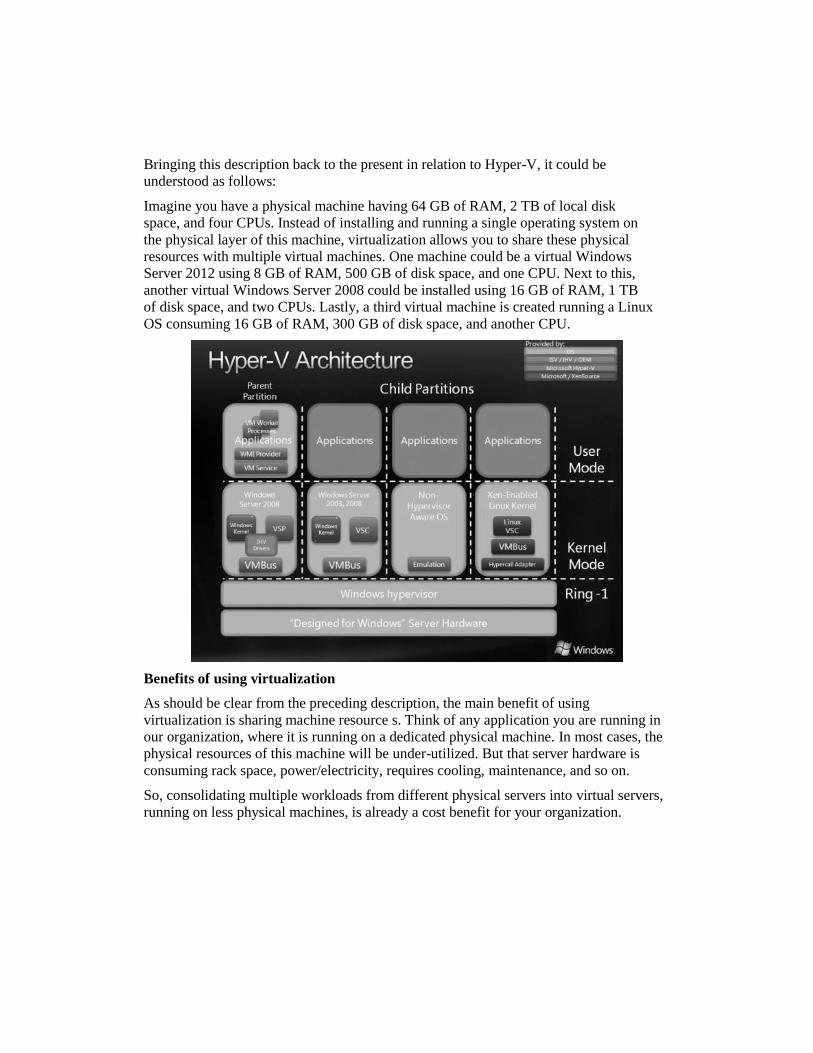
Bringing this description back to the present in relation to Hyper-V, it could be
understood as follows:
Imagine you have a physical machine having 64 GB of RAM, 2 TB of local disk
space, and four CPUs. Instead of installing and running a single operating system on
the physical layer of this machine, virtualization allows you to share these physical
resources with multiple virtual machines. One machine could be a virtual Windows
Server 2012 using 8 GB of RAM, 500 GB of disk space, and one CPU. Next to this,
another virtual Windows Server 2008 could be installed using 16 GB of RAM, 1 TB
of disk space, and two CPUs. Lastly, a third virtual machine is created running a Linux
OS consuming 16 GB of RAM, 300 GB of disk space, and another CPU.
Benefits of using virtualization
As should be clear from the preceding description, the main benefit of using
virtualization is sharing machine resource s. Think of any application you are running in
our organization, where it is running on a dedicated physical machine. In most cases, the
physical resources of this machine will be under-utilized. But that server hardware is
consuming rack space, power/electricity, requires cooling, maintenance, and so on.
So, consolidating multiple workloads from different physical servers into virtual servers,
running on less physical machines, is already a cost benefit for your organization.
Or, imagine you are running outdated physical machines, where the hardware
maintenance support cost is high. By the migration of this physical instance to a virtual
instance (known as P2V—physical-to-virtual), your organization can again save money.
Or maybe you are required to run legacy operating systems, which don't always run
anymore on the newest hardware. Maybe using virtualization is another benefit in this
specific scenario.
To continue describing some of the benefits, we can refer to our own examples being IT
consultants and trainers. How often do we need to "try out" new things, such as new
application versions, service pack upgrades, and just perform testing? How costly and
inefficient would it be to perform these on physical machines? Even on a recent laptop
having Windows 8 and enough resources available, it is possible to install the Hyper-V
client and run virtual machines. This is actually what I'm doing on a day-to-day basis.
Today, I will run a demo VM for a presentation on Exchange 2013; tomorrow, I will
show a System Center Virtual Machine Manager to another customer. Without using
virtualization, this would be a very hard nut to crack.
While we could easily extend this list of benefits with another five pages of real-life
examples, we are pretty sure you understand what we are trying to say. Just keep in
mind not all workloads can be virtualized (think of specific interfaces being required
to operate certain machines, which are not available in a virtual infrastructure).
Different kinds of virtualization
When talking about virtualization in the previous paragraphs, we mainly focused on
server virtualization. But that description is far from complete nowadays. At present, we
can determine the following "kinds of virtualization":
Server virtualization
Storage virtualization
Network virtualization
Desktop virtualization
Application virtualization
Let us briefly explain what each kind of virtualization refers to.
Server virtualization
Server virtualization is what we described previously, having a physical server that
runs on virtualization software (called the hypervisor), allowing you to deploy and run
multiple virtual machines on top of this. Each virtual machine is configured with virtual
machine resources such as memory, disk space, and CPU. These resources are allocated
to each individual virtual machine and cannot be shared with other virtual machines.
Other virtual machines rely on the shared physical resources, however.
Storage virtualization
Storage virtualization refers to the abstraction of the complexity and possibilities within a
storage solution. A storage system is also known as a storage array or a disk array, which
is actually a combination of physical hard drives that are split in different disk sets and
that can be allocated to servers and/or applications.
Within the hypervisor as such, storage virtualization could also refer to the virtual hard
disks that are linked to a virtual machine. Hyper-V supports the VHD and VHDX disk
format, whereas VMware uses the VMDK format for its virtual disks.
Network virtualization
Where server virtualization allows you to consolidate and share the physical resources
of server hardware between multiple virtual machines running on top of it, network
virtualization provides about the same capability. On the same physical network
infrastructure, you are running on multiple virtual network interfaces, where each virtual
network interface operates as if it is the only network running.
We will dive more into the concepts and possibilities of Hyper-V specific network
virtualization later on in Chapter 2, Unwrapping Hyper-V 2012 R2 Components.
Desktop virtualization
Desktop virtualization is very similar to server virtualization, except it is client
operating system oriented. Think of running virtual Windows 7/8/8.1 clients on top of
your hypervisor. Within desktop virtualization, you can detect three different flavors:
Session virtualization: This refers to the end user connecting to the virtual
desktop infrastructure (VDI) backend by using a session (remote desktop services
or Citrix, for example).
Personal VM or personal VDI: In this scenario, the end user is always
connected to the same virtual desktop client. From a hypervisor perspective, the
virtual machine is using its own virtual disk.
Pooled VM or pooled VDI: In this setup, the end user connects to an individual
virtual desktop, which is part of a pool of similarly and identically configured
VMs. When starting up the session, it connects to pooled VM 123, whereas the
next time it might occur that the user is connecting to pooled VM 345, for
example. From a hypervisor perspective, the virtual machine is actually created
out of a so-called base virtual disk and a differentiating disk, which owns the
specific characteristics for a given session.
Although the VDI can be configured on top of a Hyper-V-based platform, we decided to
not talk about this feature in this book, as it is a rather specific subject.
Application virtualization
This last virtualization possibility talks specifically about running an application in an
isolated virtualized way, irrelevant of the virtual operating system or the physical layer it
runs on. This mechanism is often described as "running the application in a bubble".
Instead of installing the application bits and bytes directly within the operating system
(could be a client or a server OS), it is isolated.
The advantages of using application virtualization are easier upgrades, solving
compatibility issues between operating system and/or similar application dependencies to
name just a few, and so on.
From Microsoft, there are two possible solutions available here: one is called App-V,
which is part of the MDOP add-on on a client level. The second one is called Server App-
V, which is managed through a System Center Virtual Machine Manager, a Server
Application Sequencer, and an App-V Server agent.
We hope with this little introduction and positioning of virtualization from one side, and
slightly lifting the blanket on Microsoft Server 2012 R2 Hyper-V, we've inspired you to
dive into the subject right away.
Happy reading!
What This Book Covers Chapter 1, Introduction to Microsoft Server 2012 R2 Hyper-V, helps the reader in finding
out if their existing environment is "ready" for Hyper-V; we will position a Microsoft
tool here that can help in doing the assessment (MAP Toolkit).
Chapter 2, Unwrapping Hyper-V 2012 R2 Components, handles the different components
of a Hyper-V virtual infrastructure, such as virtual machine, virtual disks, virtual network
configurations, and alike.
Chapter 3, Live Migration, Storage Migration, and Hyper-V Replica, talks about virtual
machine migration, including what mechanisms are available from within Hyper-V itself
and the difference between live migration and quick migration. The last topic will detail
the Hyper-V Replica feature.
Chapter 4, Building a High Available Hyper-V Cluster, describes how to implement a
high available cluster, the different components you need, and how to execute
failover testing.
Chapter 5, Hyper-V Management Using System Center Virtual Machine Manager, will
not only position a System Center VMM as a Hyper-V management and administration
solution, but also explain the benefits of using it compared to the standalone
Hyper-V manager.
Chapter 6, Integrating System Center VMM 2012 R2 with Your VMware Environment,
details how the integration works, how to configure the interaction between SCVMM
and VMware vCenter, and explains the possibilities of the interaction between both
platforms.
Chapter 7, Operating Your Private Cloud Using SCVMM and App Controller, tells you
that once your private cloud is operational from a technical perspective, it's time to start
looking at optimizing your service delivery; maybe providing self-service functionalities
to your users. By using System Center App Controller, we will show you how this can
become possible in your environment. We will cover how to install it, how to configure
it, and what could be a possible roadmap for integrating it in your environment.
Chapter 8, The Road to a Public Cloud Data Center Infrastructure Using Microsoft
Azure, starts with the features of Microsoft Azure, related to running a virtualized
infrastructure, and describes how this platform can be integrated in your existing
on-premise private cloud strategy.
Chapter 9, Hyper-V and System Center Licensing, talks about the different aspects of
Hyper-V licensing and System Center licensing, as well as guiding you in making a
decision, based on some real-life scenarios.
Introduction to Microsoft Server 2012 R2 Hyper-V
Microsoft offers different technologies that can help organizations in building a virtual infrastructure platform. We briefl y described some of those technologies in the Preface. In this chapter, we'll continue on the same path, but detailing a bit more what Server 2012 R2 features allow for virtualization, followed by the relationship between a virtual infrastructure and System Center Suite R2. Before we dive into the deep technical aspects of such Hyper-V and System Center platforms, we will guide you on how to do a technical assessment of an existing environment in the context of a Microsoft virtualized platform implementation or migration.
Once all that is clear, we will jump into the Hyper-V building blocks and the Hyper-V server role installation process and provide you with a quick overview of the Hyper-V management console.
Overview of Microsoft virtualization solutionsWhile we have only touched on the surface of different kinds of virtualization in the Preface, and mentioned already some of the Microsoft virtualization solutions there to make certain things more clear, we want to make sure you get a good understanding of what is possible with Hyper-V, running on Windows Server 2012 R2.
We will start off with Server Hyper-V 2012 R2, moving over to mentioning some System Center 2012 R2 components, and how they are of importance in a virtualized environment.
Introduction to Microsoft Server 2012 R2 Hyper-V
[ 14 ]
Windows Server Hyper-V 2012 R2The primary solution we will talk about during the remainder of this book is Hyper-V 2012 R2. This is Microsoft's server hypervisor, running as a server role of Windows Server 2012 R2. Just like some of the other well-known hypervisor solutions such as VMware ESX, Citrix XenServer and RedHat Enterprise Virtualization, Hyper-V is also a type 1 hypervisor.
A type 1 hypervisor refers to a hypervisor technology that runs directly on the bare metal components of the physical server. We are mentioning this here about Hyper-V because it is not always easy to understand. After all, you rely on Windows Server 2012 R2, where you install the Hyper-V Server Role "on top of the OS".
This is where most people get confused, and with a good reason.
During the installation of the Hyper-V server role, changes occur to the boot confi guration of the physical installation, which actually puts the Windows Boot Loader mode's hypervisorlaunchType setting to Auto. This means it automatically loads from the hypervisor. And thus, your physical Windows OS actually runs in a virtualized mode.
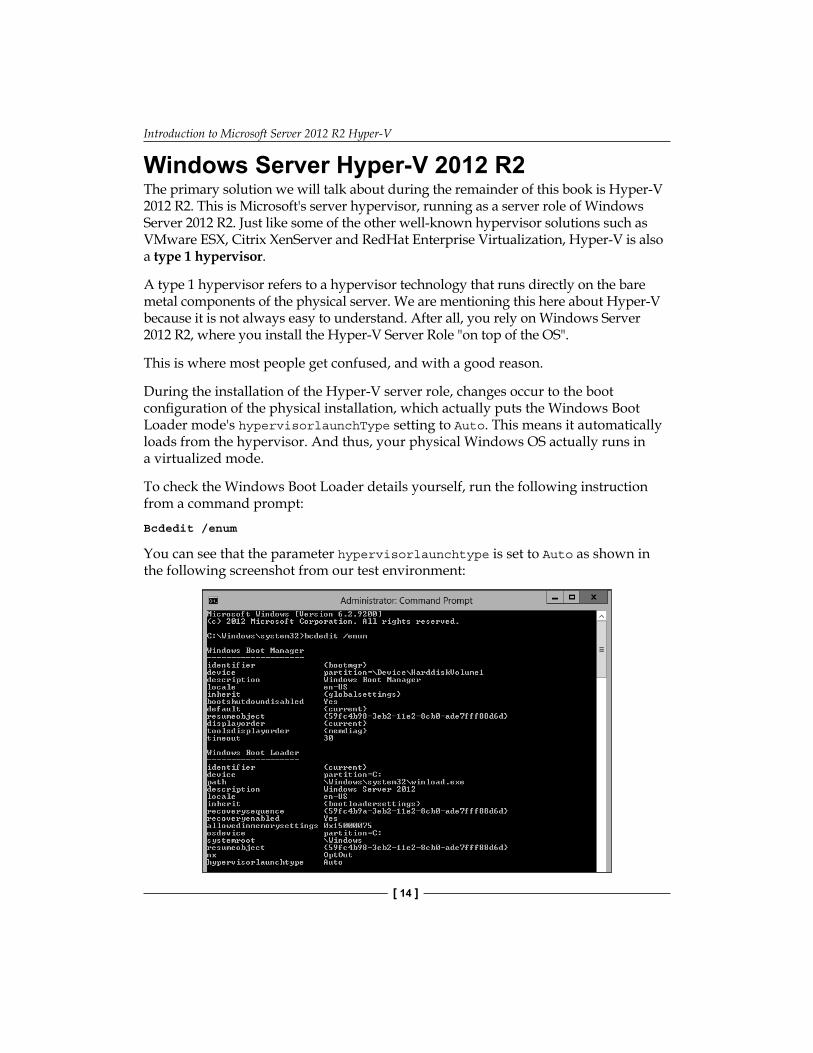
To check the Windows Boot Loader details yourself, run the following instruction from a command prompt:
Bcdedit /enum
You can see that the parameter hypervisorlaunchtype is set to Auto as shown in the following screenshot from our test environment:
Chapter 1
[ 15 ]
As already mentioned before, a lot has changed in the Hyper-V component in Server 2012 R2 compared to its predecessor in Windows Server 2008. While there are again specifi c updates and new features added in Server 2012 R2, most of them are actually new in Windows Server 2012:
• Multiple VM live migration: Live migration already existed in Hyper-V 2008, but was limited to migrating a single VM between hosts. As of Server 2012, it allows for multiple VM migrations at once.
• Virtual machine storage migration: In Hyper-V 2008 R2, moving a running instance of a VM using live migration is supported, but it is not possible to move the VM's storage while the machine is running. However, with Hyper-V on Server 2012 and R2, it is now possible to move the VM storage, while the virtual machine is running.
• Using SMB 3.0 fi le shares as virtual machine fi le locations: SMB 3.0 can be confi gured on Windows Server 2012 fi le servers, or on supported SAN or NAS solutions. By using SMB 3.0, your storage confi guration becomes a lot easier. If the VMs are stored within an SMB 3.0 fi le share, one can also make use of SMB live migration, which allows you to migrate VMs between different servers, even if they are not part of the same Hyper-V cluster.
• Shared Nothing Live Migration: This type of VM migration was also born in Server 2012 timeframe. It allows you to migrate a VM between any host in the data center, as well as to migrate the virtual storage between storage solutions in the data center. This is done without any downtime for the virtual machine itself.
• Hyper-V Replica: In this scenario, an exact copy/clone of a running VM is being replicated to another host; this host doesn't need to be part of a cluster. In the case of downtime of the production VM, a failover can be initiated to the replica server, which will have an up-to-date state of the original VM.
While this list is already impressive, the following are the specifi c new updates and features within Hyper-V on Server 2012 R2:
• Generation 2 VMs: A VM is built using virtualized emulated hardware such as CPU, NIC, BIOS, and so on. A Gen 2 VM is not using this emulated hardware anymore; several new features that are specifi c to Generation 2 virtual machines are PXE boot, boot from SCSI VHD, UEFI fi rmware support, and secure boot.
• Dynamically resize VHDX: In Hyper-V on Server 2012 R2, it is now possible to dynamically resize (extend and shrink) the disk space size of a running VM.
Introduction to Microsoft Server 2012 R2 Hyper-V
[ 16 ]
• Compressed live migration: While nothing has changed on the live migration feature itself, the data to be migrated is compressed. This results in faster migrations and less data packages going through the wire.
• Hyper-V Replica time interval: This interval time can now be set as low as 30 seconds, meaning that VM updates on a host will be synchronized to the replica host every 30 seconds.
• Better support for Linux VM: Server 2012 has already supported running certain Linux VMs; the list of these supported Linux versions and distributions has been extended.
• Automatic virtual machine activation: If the physical host is running Server 2012 R2 data center and has been activated, the same activation process will be applied to any running Windows Server 2012 R2 VM on that host. No need of KMS for these machines anymore.
For a full overview of all new features within Hyper-V on Server 2012 R2, have a look at the Microsoft Knowledgebase article at http://technet.microsoft.com/en-us/library/dn282278.aspx.
Of course, discussing all details about all the preceding mentioned features, including a lot more, is the main goal of this book.
Introduction to Microsoft System Center 2012 R2 in relation to Hyper-VWhenever you are planning to build a large virtualization environment on Hyper-V, you should also consider implementing (parts) of Microsoft System Center 2012 R2. While it is perfectly possible to manage and administer your Hyper-V platform from within the Hyper-V management console or by using PowerShell, at some point in time you might lack features that allow for thorough IT service management, automation, detailed monitoring and alike. And that's where System Center comes into play. System Center is actually a combination of different products, one can run totally independent from any other, but licensed as a bundle, as of version 2012. Before that, a customer had the choice to license one or more System Center components on an individual basis. If they were only using Operations Manager, they only needed to acquire the licenses for Operations Manager. As of System Center version 2012, the customer acquires a management license for the full suite, where one can decide which components to install.
Chapter 1
[ 17 ]
Let us give you a short description of the key usage scenarios and possibilities of each System Center component.
System Center Virtual Machine Manager – SCVMMThis component allows for full virtual platform management. Where most larger environments will use this solution for primarily managing Hyper-V hosts, storage, networks and VMs, you can also use it to administer and manage your VMware environment as well as Citrix XenServer environment. However, to manage your VMware environment out of System Center Virtual Machine Manager, you still need to have a running VMware vCenter available, as well as having the relevant license for it. Key functionality here is overall, centralized management of your full virtual infrastructure, whether it is virtual machines, virtual storage, virtual networks, or any other required confi guration.
Chapter 5, Hyper-V Management Using System Center Virtual Machine Manager, is dedicated to all details around Virtual Machine Manager 2012 R2, including the following:
• How to install it• How to use it to deploy or administer your virtual storage environment• How to confi gure the virtual network fabric• How to create, remove, and confi gure virtual machines and much more.
System Center App ControllerWhere Virtual Machine Manager is the management portal of your overall virtual infrastructure, App Controller allows for self-service to give an answer to both private cloud and public cloud scenarios. So basically it is the IT admin department managing the technical resources of the virtual platform using VMM, providing self-service features to the end users from within a web portal, which is App Controller. (Actually, VMM initially also had a self-service portal, but it got removed from the SP1 version of VMM 2012.)
Unlike other System Center components, which need to be installed on a separate server, App Controller can run on the same server as VMM, as well as on a single or multiple dedicated server(s).
Introduction to Microsoft Server 2012 R2 Hyper-V
[ 18 ]
Chapter 7, Operating Your Private Cloud by Using SCVMM and App Controller, will be your main resource throughout this book, which discusses the installation and integration of App Controller in your environment, as well as how to plan and prepare the confi guration that needs to be done on your virtual environment prior to implementing App Controller.
System Center Operations Manager – SCOMSCOM is the overall IT infrastructure management and monitoring solution. SCOM collects detailed information about any possible asset in your IT environment mainly by the power of management packs. This can be Microsoft servers, Microsoft server applications, Linux-based servers, network switches, fi rewalls, server hardware, server applications such as Oracle and SAP, Windows Server components, and so on.
Besides monitoring and alerting you about the health of your platform, SCOM helps keep track of solutions for given alerts, both company-specifi c and public information, by using its knowledgebase feature set. SCOM can be extended with dashboards and detailed reporting.
Head over to the Microsoft TechNet Library article at http://go.microsoft.com/fwlink/p/?LinkID=231676 for all details about SCOM.
System Center Confi guration Manager – SCCMSCCM or Confi g Manager is used for client and server management and deployment, has integrations with WSUS, and allows for deploying applications to these clients as well. It can also be extended with Microsoft Endpoint Protection, a very powerful antivirus/antimalware solution.
The intelligence of the product lies in the logic of collections one can create on a custom basis. A PC or any other client device that can be managed through SCCM gets applications and Windows updates installed, will report its inventory to a centralized CMDB, and much more.
Version 2007, which was mainly used for managing client environments, got extended intensively in version 2012 to also allow server OS deployment. Version 2012 R2 allows a strong integration (both technical and license-wise) with the Microsoft Intune cloud product, thus providing a full management platform solution for mobile device management.
Chapter 1
[ 19 ]
The Microsoft TechNet Library article providing information about SCCM is reachable at http://go.microsoft.com/fwlink/p/?LinkID=231675.
System Center Service Manager – SCSMService Manager is the part of System Center that allows an organization to streamline its service management best practices through automation. The built-in logic and processes are based on those found in the Microsoft Operations Framework (MOF) and ITIL, which are incident management, change management, problem management, and asset life cycle management.
The true power lies in the open framework, which allows you to customize forms, tasks, and processes up to a very high extent. The other true power comes from integration with the other System Center suite components, of course. Think of a possible situation as follows:
1. Your application server is generating several alerts (being reported in SCOM); out of these alerts, an automatic Service Manager incident problem ticket gets created.
2. This incident will be handled by an IT admin person. As the incident requires more investigation, the incident problem gets transferred into a change request ticket, which gets picked up by an external IT partner.
3. After investigating and solving the root cause of the issue, the problem ticket gets closed as resolved.
4. On its turn, the linked incident ticket gets closed as well; all alerts in SCOM will be marked as resolved too.
By using scripts, System Center Orchestrator, or any other mechanism (depending on the application), this imaginary workfl ow can be partly, almost, or completely automated.
All details about SCSM on Microsoft TechNet can be found at http://go.microsoft.com/fwlink/p/?LinkID=231678.
Introduction to Microsoft Server 2012 R2 Hyper-V
[ 20 ]
System Center Data Protection Manager – SCDPMData Protection Manager is the backup solution out of System Center. It allows for disk-based or tape-based backups of Windows Server, Exchange Server, SharePoint servers, SQL servers, virtual machines (both running Windows OS and supported Linux fl avors), as well as desktop or laptop clients.
By using snapshot technology in combination with the VSS engine of Windows Server, it allows for backups to be taken every few minutes. Restoration is similar to backups, a no-brainer. Detailed reporting is provided by default.
Read about SCDPM 2012 R2 at http://go.microsoft.com/fwlink/p/?LinkId=239439.
System Center OrchestratorOrchestrator is the workfl ow automation engine of System Center, allowing you to automate any task you can think of in your data center, both on-premises and in the cloud. It can not only interact with other System Center products, but also with any product you can think of. By default, Orchestrator has around 40 preconfi gured workfl ow activities, but if these are not enough for your environment, you can extend the functionality and feature set of Orchestrator by using the so-called integration packs. Besides Microsoft technologies integration packs for Active Directory, Exchange, or SharePoint, there are a lot of others that allow for integration with third-party components such as HP iLo, HP Operations Manager, and VMware vSphere integration packs to name just a few.
A full list of the currently available Orchestrator integration packs is available at http://technet.microsoft.com/en-us/library/hh295851.aspx.
The intelligence and possibilities of the automation engine is confi gured by using the so-called runbooks. It's the runbook (or set of runbooks) that contains the different tasks or processes that provide automation. As you can understand from the previous paragraph, these runbooks don't stop in the Microsoft environment, but allow for interaction with a lot of other IT components in your data center.
Chapter 1
[ 21 ]
The previous sections should have made clear how powerful System Center and its different components have become in the latest release of the product (suite). Though it is not required to use System Center in your environment, we can say from our experience that it offers a lot of benefi ts in an enterprise environment.
Besides highlighting System Center, we briefl y introduced you to the key features of Windows Server Hyper-V 2012 R2, which will be handled in a lot more detail in the next chapters.
Keeping both technologies in mind, it's about time we start helping you in thinking about your future virtualized environment. What about physical server and storage sizing, what about licensing, how to migrate your existing virtualized workloads—running already on Microsoft Hyper-V or other platforms—to Hyper-V 2012 R2. The keyword here is planning and assessing your existing platform. And that's exactly what we will discuss in the next topic.
Executing a technical assessment of your as-is environment by using the MAP ToolkitKnowing the technical details of a hypervisor solution such as Microsoft Hyper-V 2012 R2 is just one part of the complete story. In our own experience as consultants, we have seen a lot of customers that are using virtualization, and everything seems to run fi ne. But when looking a bit closer into the environment, we fi nd that there is a lot of room for optimization. This can be the case in the server and/or storage sizing, which can be both over- and undersized; with some other enterprise customers, we see still that a lot of manual interactions are needed to deploy virtual machines, or IT admins do not know at all what different workloads there are actually running in their environment.
A lot of this information can get answered by a simple, free but very useful tool, the MAP Toolkit or Microsoft Assessment and Planning Toolkit in full. This tool helps organizations in preparing a migration from existing servers and clients' infrastructure to new versions. Without talking about "how" to do the migration, this tool helps in making a preparation assessment. It mainly answers questions such as:
• Is my server hardware capable of hosting a virtualization platform?• Which of my client devices need to be upgraded with more RAM and
more CPU power in order to run Windows 7 / 8.1?
Introduction to Microsoft Server 2012 R2 Hyper-V
[ 22 ]
• Which PCs should be replaced?• Which server loads can be migrated to a virtualized platform?• What software am I running on my clients, and will it work with
Windows 7 / 8.1?
So after all these years, we are still surprised at times by the fact that it is a rather unknown tool. However, we are also happy to see how interesting the results are for our customers.
Customer satisfaction is the best reason why we have mentioned this tool here as part of this chapter. Without describing all the details of the tool, we will focus on the installation part and confi guration steps required to get a detailed assessment report, which will help you or your customer in planning the future virtualized environment.
Installing the toolIt all starts with downloading the installation bits from the Microsoft website. The latest version 9.0 dates from Feb 10 2014, so is rather new, and can be downloaded from http://www.microsoft.com/en-us/download/details.aspx?id=7826.
While I don't expect any diffi culties in the installation itself, here are some guidelines and prerequisites that can be of assistance:
• Don't install this tool on a Domain Controller, it's not supported and won't work.
• You don't need a powerful machine to run this tool on; I often install this on the management station of the IT team, or on a lightweight server such as File & Print or any other application server you have available.
• The tool can be installed on any OS version Windows 7 SP1 or higher, Windows 2008 R2 or higher and even Windows Server 2012 R2 if you have that already in your environment.
• Make sure you have the latest version of .Net Framework 4.5 installed (download can be found at http://go.microsoft.com/fwlink/?LinkId=389161). Mind you—this installation requires a reboot, so make sure you pick any non-business critical machine to install this tool on.
• By default, the MAP Toolkit will install a local version of SQL Server 2012 Express edition; this is mainly my default scenario. However, you could integrate this with an already present SQL Server installation having version 2008 or higher.
Chapter 1
[ 23 ]
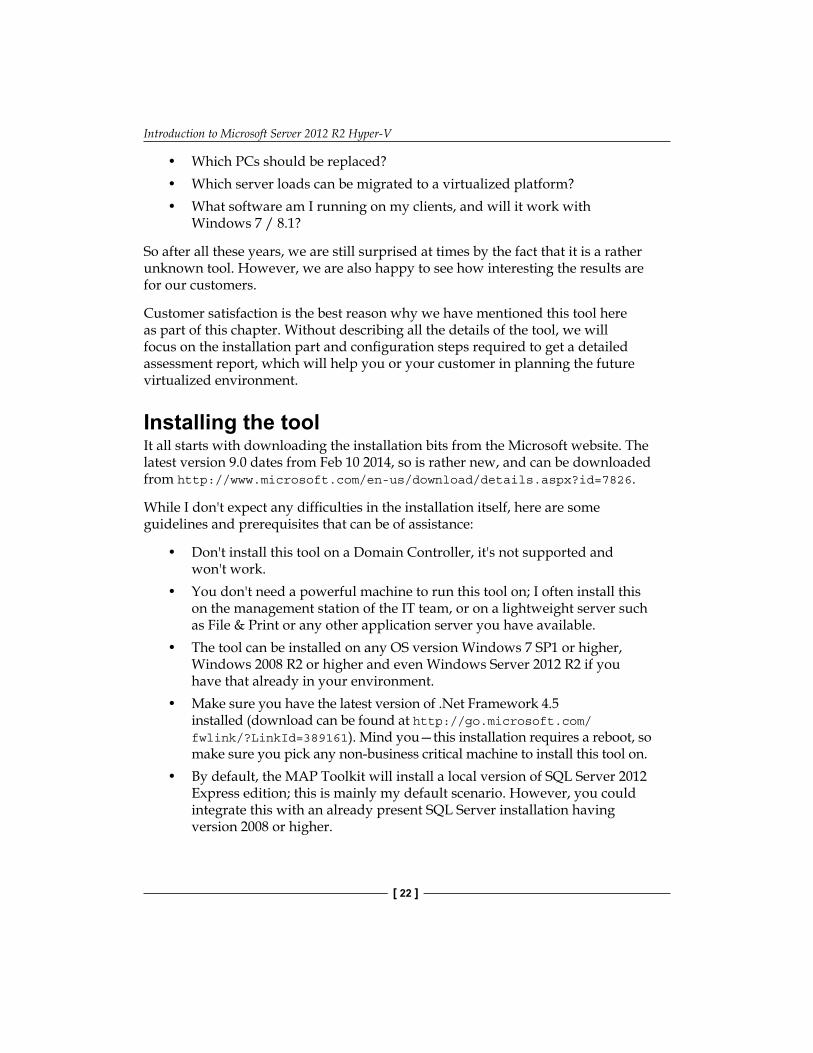
Running the tool – creating your inventoryOnce MAP Toolkit is installed, you can launch it from your Start screen or Start menu by going to Microsoft Assessment and Planning Toolkit. Your default screen should look like this, in which we will create the SQL data base:
Once your database has been created in the background, we can start the inventory; obviously, you need to click on Perform an inventory from the main page, which launches the Inventory and Assessment wizard:
Depending on what systems you want to integrate in your inventory, completing this step might be easy or a bit more diffi cult. It could be diffi cult in a sense that you have to know your administrative user accounts of the different systems (such as VMware, Linux, Oracle Database admin account, and so on). Some technologies also have certain plugin dependencies (for example, the Oracle database client).
Introduction to Microsoft Server 2012 R2 Hyper-V
[ 24 ]
Completing this wizard shouldn't be much of a problem. So, I allowed myself to skip writing down the different steps from this wizard.
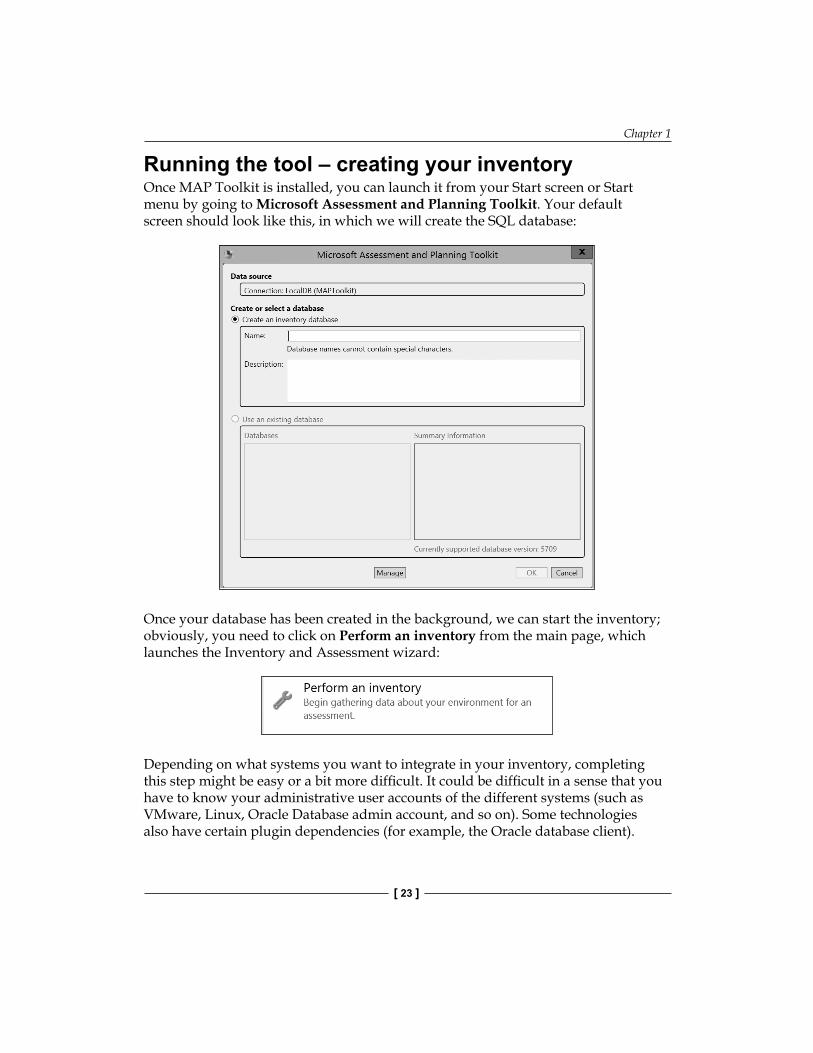
So I'll basically continue with the assumption that your inventory ran fi ne, and you should now see a console with data in it, looking similar to my screenshot:
Now, depending on your environment analysis and assessment scenario, you may want to go through the process of migration (for example, client migration, server migration, cloud migration, and so on). You have different options and results you can use from within the assessment tool. In our example, we will focus on the server migration and cloud migration scenarios.
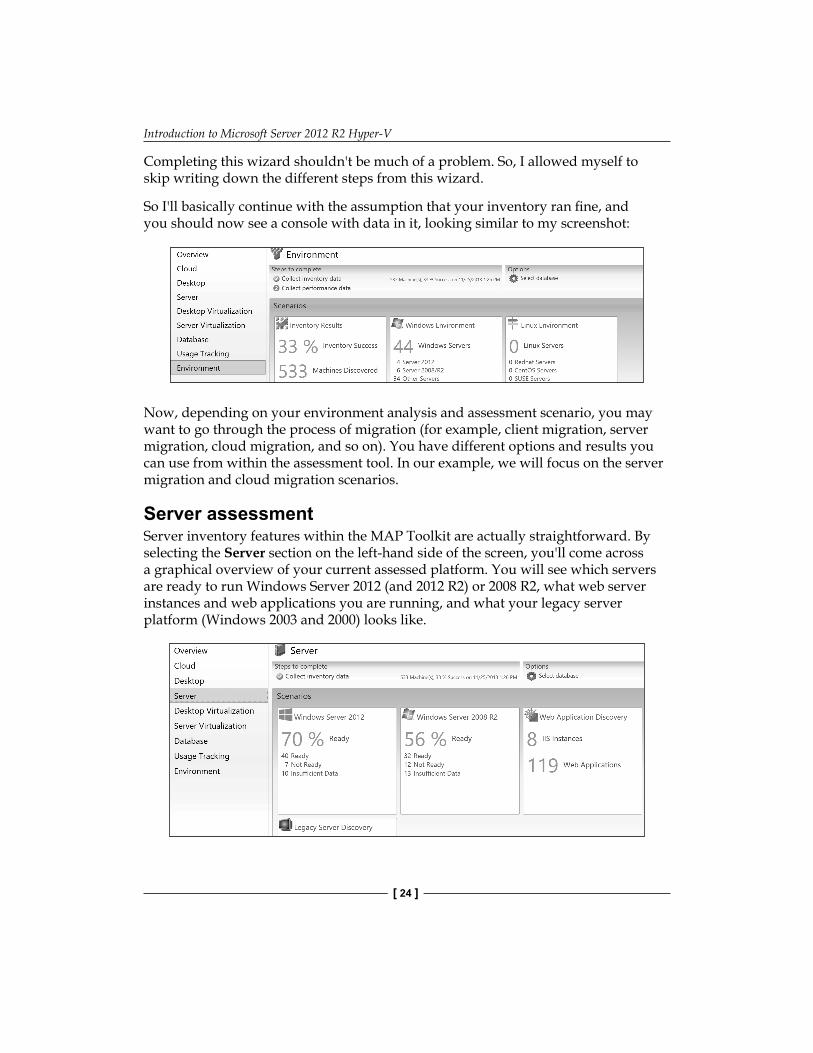
Server assessmentServer inventory features within the MAP Toolkit are actually straightforward. By selecting the Server section on the left-hand side of the screen, you'll come across a graphical overview of your current assessed platform. You will see which servers are ready to run Windows Server 2012 (and 2012 R2) or 2008 R2, what web server instances and web applications you are running, and what your legacy server platform (Windows 2003 and 2000) looks like.
Chapter 1
[ 25 ]
By selecting one of the scenarios, you are transferred to a more detailed view, which will have the options available to generate a Windows Server report and proposal and/or customize assessment properties.
Cloud assessmentWhen selecting the cloud assessment section, we are presented with the following scenarios:
• Azure VM readiness: This is an overview of machines that can be migrated to Azure.
• Azure VM capacity: It gathers performance data to guide you in Azure capacity requirements.
• Offi ce 365 readiness: Is your current environment ready for Offi ce365? (For example, you need to check if your Exchange 2010 on-premise instance can be migrated to Exchange Online.)
• Private Cloud Fast Track: This is explained more in detail in the next section.
And again, for each scenario, you can get more detailed dashboards and export the data into reports in both Word and Excel fi le format.
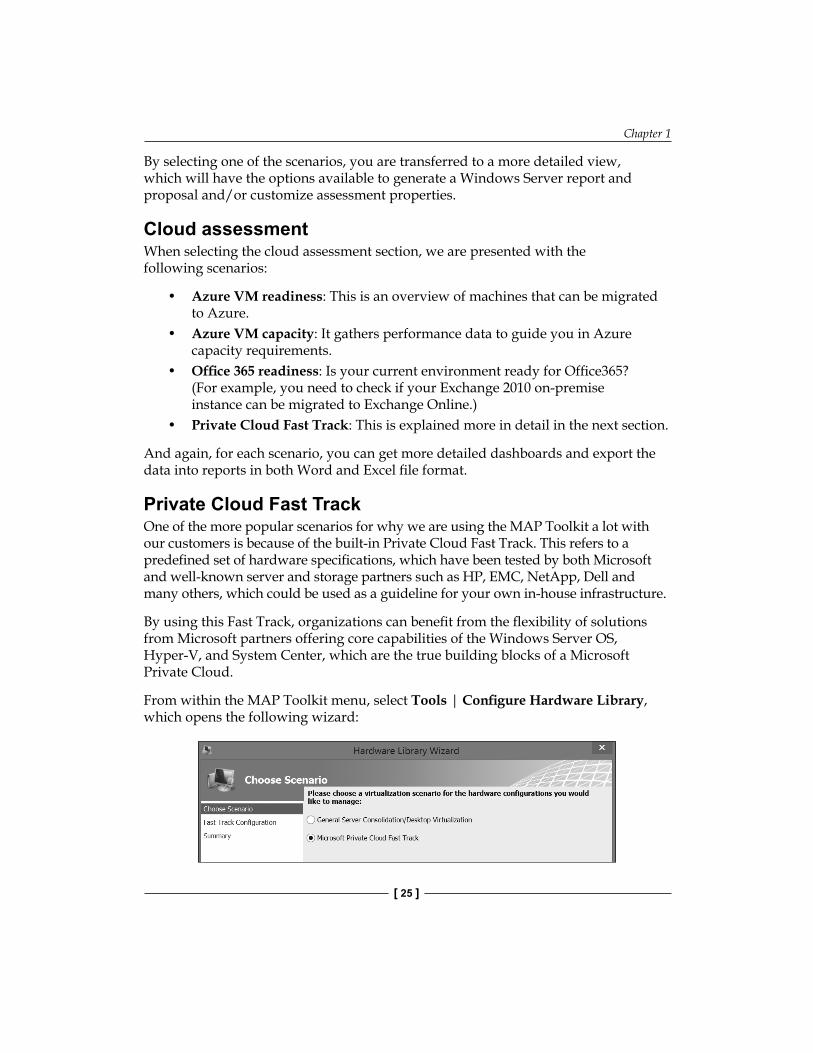
Private Cloud Fast TrackOne of the more popular scenarios for why we are using the MAP Toolkit a lot with our customers is because of the built-in Private Cloud Fast Track. This refers to a predefi ned set of hardware specifi cations, which have been tested by both Microsoft and well-known server and storage partners such as HP, EMC, NetApp, Dell and many others, which could be used as a guideline for your own in-house infrastructure.
By using this Fast Track, organizations can benefi t from the fl exibility of solutions from Microsoft partners offering core capabilities of the Windows Server OS, Hyper-V, and System Center, which are the true building blocks of a Microsoft Private Cloud.
From within the MAP Toolkit menu, select Tools | Confi gure Hardware Library, which opens the following wizard:
Introduction to Microsoft Server 2012 R2 Hyper-V
[ 26 ]
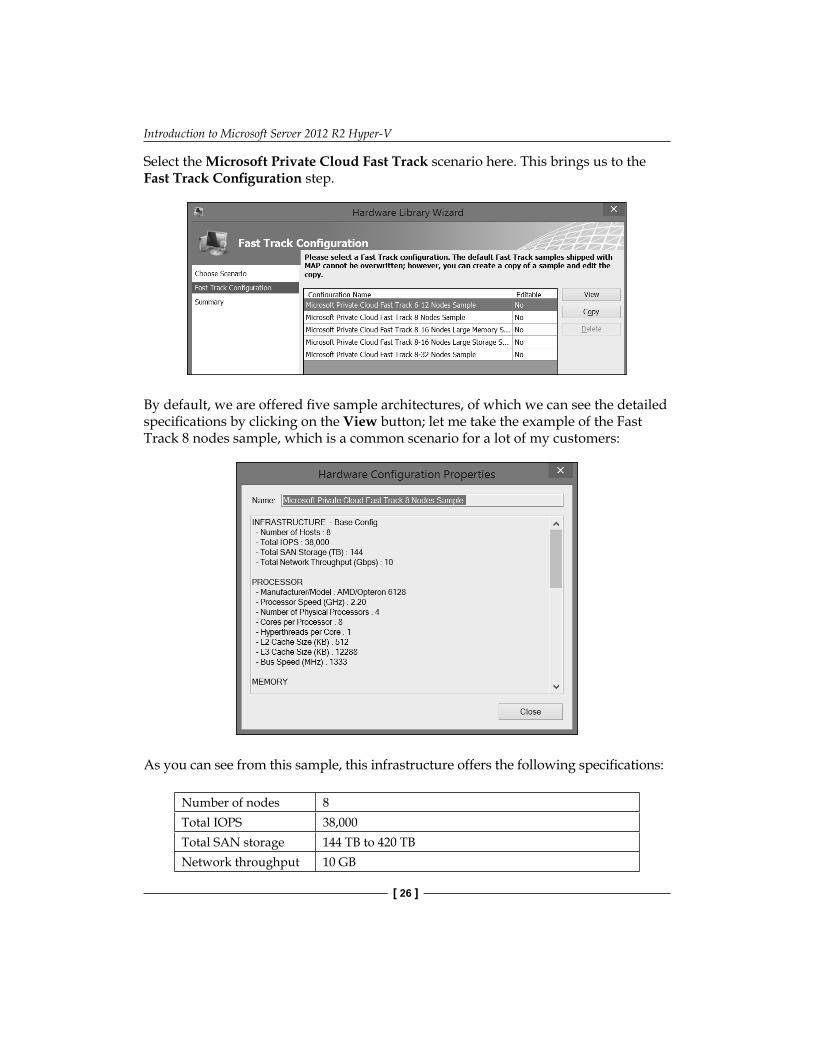
Select the Microsoft Private Cloud Fast Track scenario here. This brings us to the Fast Track Confi guration step.
By default, we are offered fi ve sample architectures, of which we can see the detailed specifi cations by clicking on the View button; let me take the example of the Fast Track 8 nodes sample, which is a common scenario for a lot of my customers:
As you can see from this sample, this infrastructure offers the following specifi cations:
Number of nodes 8Total IOPS 38,000Total SAN storage 144 TB to 420 TBNetwork throughput 10 GB
Chapter 1
[ 27 ]
CPU 2.2 GHz / 4 physical CPUs per node / 8 cores per CPUMemory 125GB to 500GB
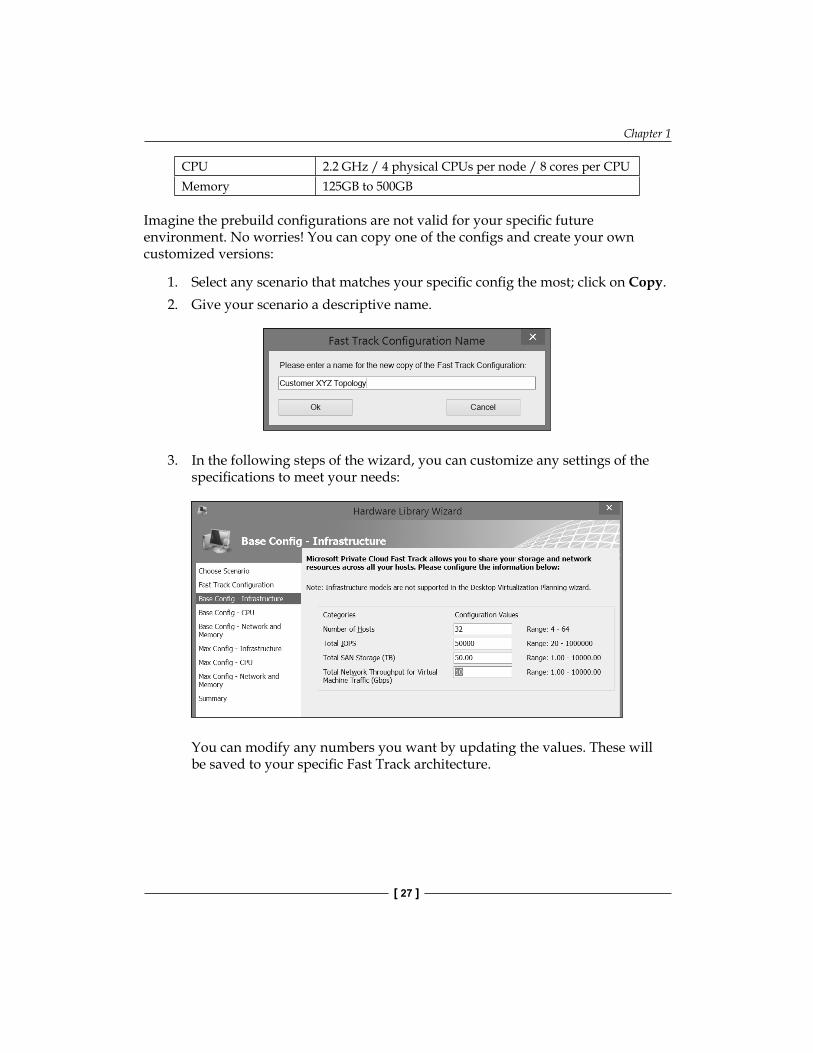
Imagine the prebuild confi gurations are not valid for your specifi c future environment. No worries! You can copy one of the confi gs and create your own customized versions:
1. Select any scenario that matches your specifi c confi g the most; click on Copy.2. Give your scenario a descriptive name.
3. In the following steps of the wizard, you can customize any settings of the specifi cations to meet your needs:
You can modify any numbers you want by updating the values. These will be saved to your specifi c Fast Track architecture.
Introduction to Microsoft Server 2012 R2 Hyper-V
[ 28 ]
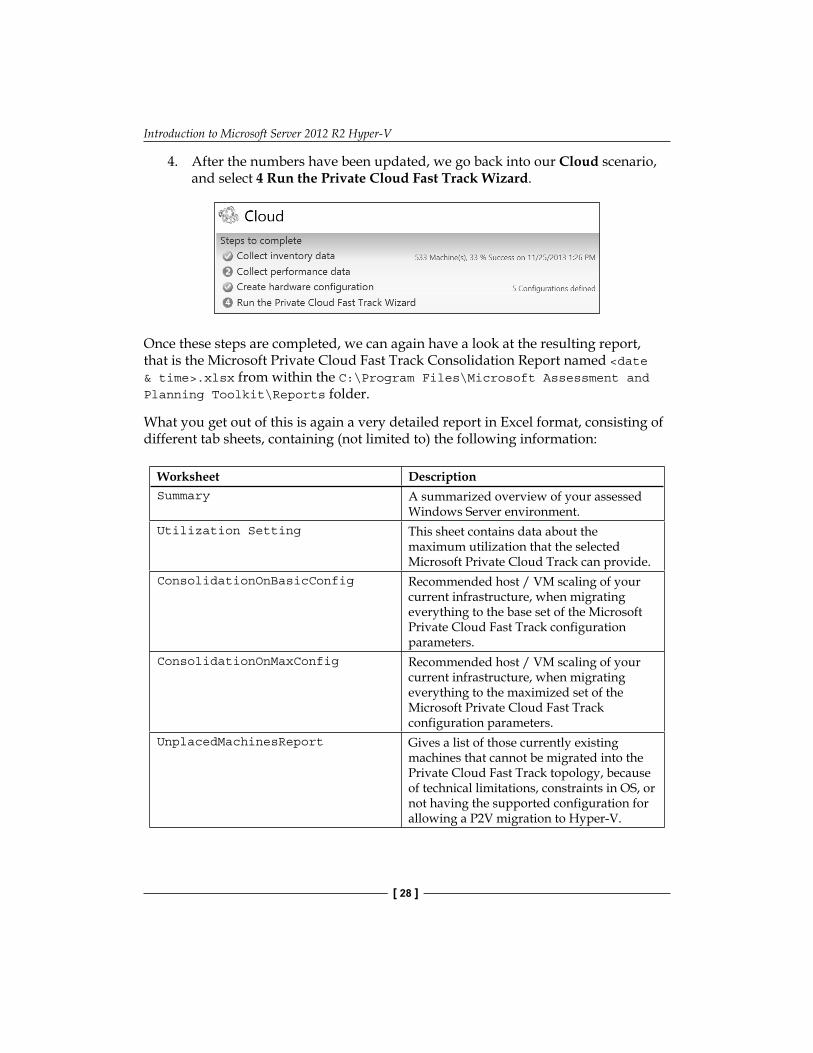
4. After the numbers have been updated, we go back into our Cloud scenario, and select 4 Run the Private Cloud Fast Track Wizard.
Once these steps are completed, we can again have a look at the resulting report, that is the Microsoft Private Cloud Fast Track Consolidation Report named <date & time>.xlsx from within the C:\Program Files\Microsoft Assessment and Planning Toolkit\Reports folder.
What you get out of this is again a very detailed report in Excel format, consisting of different tab sheets, containing (not limited to) the following information:
Worksheet DescriptionSummary A summarized overview of your assessed
Windows Server environment. Utilization Setting This sheet contains data about the
maximum utilization that the selected Microsoft Private Cloud Track can provide.
ConsolidationOnBasicConfig Recommended host / VM scaling of your current infrastructure, when migrating everything to the base set of the Microsoft Private Cloud Fast Track configuration parameters.
ConsolidationOnMaxConfig Recommended host / VM scaling of your current infrastructure, when migrating everything to the maximized set of the Microsoft Private Cloud Fast Track configuration parameters.
UnplacedMachinesReport Gives a list of those currently existing machines that cannot be migrated into the Private Cloud Fast Track topology, because of technical limitations, constraints in OS, or not having the supported configuration for allowing a P2V migration to Hyper-V.
Chapter 1
[ 29 ]
Worksheet DescriptionUtilizationBeforeConsolidation This report provides details of the current
utilization of machines in your network based on performance details collected earlier. The values indicate the utilization before each machine is virtualized for consolidation.
This concludes the usage of the Microsoft Assessment and Planning Toolkit.
Hyper-V building blocks for creating your Microsoft virtualization platformAfter having gone through the previously described MAP Toolkit, we now have a good overview and understanding of our current physical and/or virtual environment. The gathered information allows us to clearly defi ne a detailed list of required server hardware, storage hardware, physical and virtual machine operating systems, and anything else we need to be able to build our future virtualization platform.
These components are known as the Hyper-V building blocks, and we describe each one of them in the following sections.
Physical server hardwareOne of the fi rst important components when building a virtualization platform is the physical server hardware.
One of the key elements to check is the Microsoft certifi ed hardware and software supportability and compatibility list. This list gives a detailed overview of all tested and certifi ed server brands, server types, and their corresponding confi guration components. While it is not a requirement to use this kind of machine, we can only recommend it, based on our own experience. Imagine you have a performance issue with one of your applications running inside a VM, being hosted on non-supported hardware, using non-supported physical NICs, and you're not getting decent support from your IT partner or Microsoft on that specifi c platform, as the hardware is not supported.
The landing page for this compatibility list is http://www.windowsservercatalog.com.
Introduction to Microsoft Server 2012 R2 Hyper-V
[ 30 ]
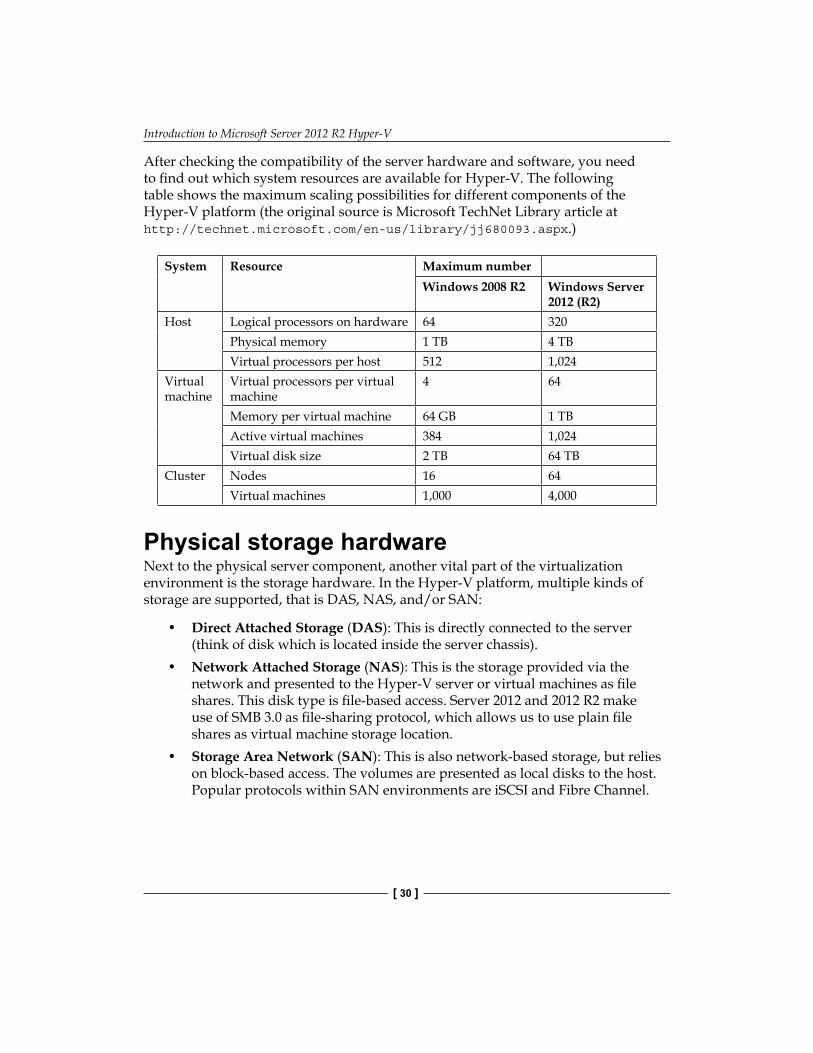
After checking the compatibility of the server hardware and software, you need to fi nd out which system resources are available for Hyper-V. The following table shows the maximum scaling possibilities for different components of the Hyper-V platform (the original source is Microsoft TechNet Library article at http://technet.microsoft.com/en-us/library/jj680093.aspx.)
System Resource Maximum numberWindows 2008 R2 Windows Server
2012 (R2)Host Logical processors on hardware 64 320
Physical memory 1 TB 4 TBVirtual processors per host 512 1,024
Virtual machine
Virtual processors per virtual machine
4 64
Memory per virtual machine 64 GB 1 TBActive virtual machines 384 1,024Virtual disk size 2 TB 64 TB
Cluster Nodes 16 64Virtual machines 1,000 4,000
Physical storage hardwareNext to the physical server component, another vital part of the virtualization environment is the storage hardware. In the Hyper-V platform, multiple kinds of storage are supported, that is DAS, NAS, and/or SAN:
• Direct Attached Storage (DAS): This is directly connected to the server (think of disk which is located inside the server chassis).
• Network Attached Storage (NAS): This is the storage provided via the network and presented to the Hyper-V server or virtual machines as fi le shares. This disk type is fi le-based access. Server 2012 and 2012 R2 make use of SMB 3.0 as fi le-sharing protocol, which allows us to use plain fi le shares as virtual machine storage location.
• Storage Area Network (SAN): This is also network-based storage, but relies on block-based access. The volumes are presented as local disks to the host. Popular protocols within SAN environments are iSCSI and Fibre Channel.
Chapter 1
[ 31 ]
The key point of consideration when sizing your disk infrastructure is providing enough storage, at the best performance available, and preferably high availability as well. Depending on the virtual machine's required resources, the disk subsystem can be based on high-performant / expensive SSD disks (solid-state drives), performant / medium-priced SAS disks (serial attached SCSI), or slower but cheaper SATA (serial ATA) disks. Or it could even be a combination of all these types.
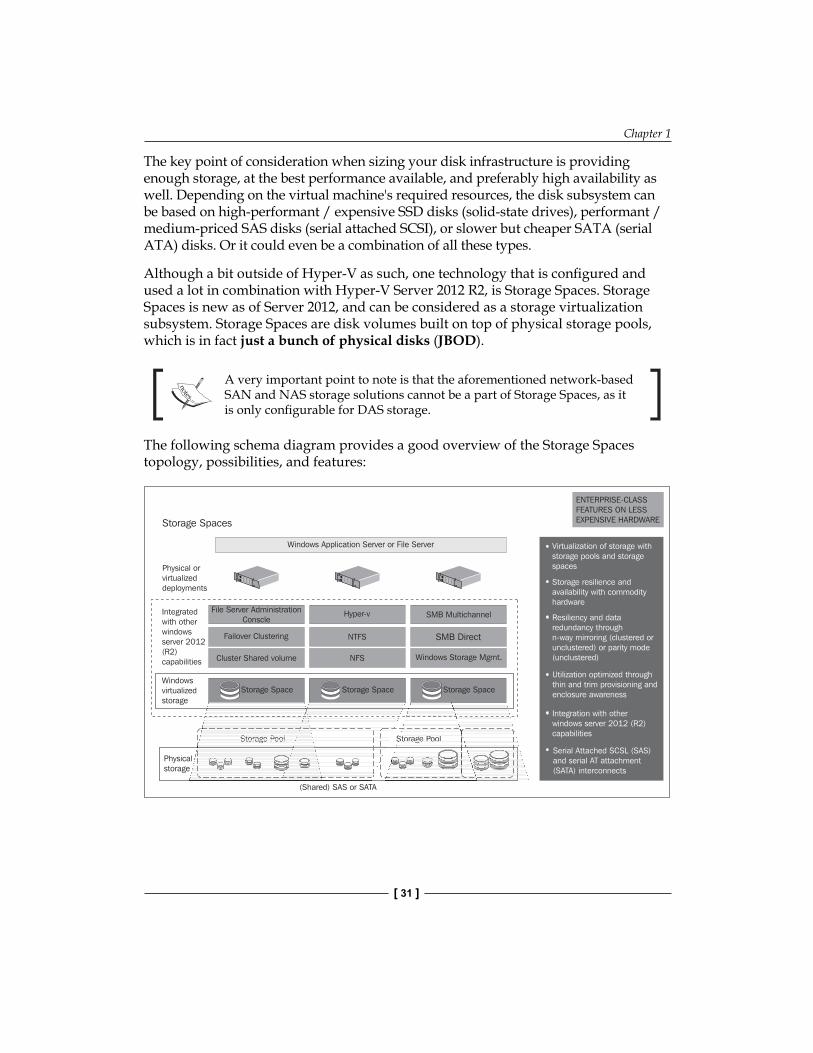
Although a bit outside of Hyper-V as such, one technology that is confi gured and used a lot in combination with Hyper-V Server 2012 R2, is Storage Spaces. Storage Spaces is new as of Server 2012, and can be considered as a storage virtualization subsystem. Storage Spaces are disk volumes built on top of physical storage pools, which is in fact just a bunch of physical disks (JBOD).
A very important point to note is that the aforementioned network-based SAN and NAS storage solutions cannot be a part of Storage Spaces, as it is only confi gurable for DAS storage.
The following schema diagram provides a good overview of the Storage Spaces topology, possibilities, and features:
Virtualization of storage withstorage pools and storagespaces
Storage resilience andavailability with commodityhardware
Resiliency and dataredundancy throughn-way mirroring (clustered orunclustered) or parity mode(unclustered)
Utilization optimized throughthin and trim provisioning andenclosure awareness
Integration with otherwindows server 2012 (R2)capabilities
Serial Attached SCSL (SAS)and serial AT attachment(SATA) interconnects
Storage Spaces
Windows Application Server or File Server
Physical orvirtualizeddeployments
Integratedwith otherwindowsserver 2012(R2)capabilities
Windowsvirtualizedstorage
Physicalstorage
Failover Clustering
Cluster Shared volume
Hyper-v
NTFS
NFS
SMB Multichannel
SMB Direct
Windows Storage Mgmt.
(Shared) SAS or SATA
Storage Pool Storage Pool
Storage Space Storage Space Storage Space
File Server AdministrationConscle
ENTERPRISE-CLASSFEATURES ON LESSEXPENSIVE HARDWARE
Introduction to Microsoft Server 2012 R2 Hyper-V
[ 32 ]
Physical network devicesIt's easy to understand that your virtual platform is dependent on your physical network devices such as physical (core) switches and physical NICs in the Hyper-V hosts. When confi guring Hyper-V, there are a few confi gurations to keep into consideration.
NIC TeamingNIC Teaming is the confi guration of multiple physical network interface cards into a single team, mainly used for high availability or higher bandwidth purposes. NIC Teaming as such is no technology of Hyper-V, but Hyper-V can make good use of this operating system feature. When confi guring a NIC team, the physical network cards are bundled and presented to the host OS as one or more virtual network adapter(s). Within Hyper-V, two basic sets of algorithms exist where you can choose from during the confi guration of Hyper-V networking:
• Switch-independent mode: In this confi guration, the teaming is confi gured regardless of the switches to which the host is connected. The main advantage in this confi guration is the fact the teaming can be confi gured to use multiple switches (for example, two NICs in the host are connected to switch 1 and 2 NICs are confi gured to use switch 2).
• Switch-dependent mode: In this confi guration, the underlying switch is part of the teaming confi guration; this automatically requires all NICs in the team to be connected to the same switch.
NIC Teaming is managed through the Server Manager / NIC Teaming interface or by using PowerShell cmdlets. Depending on your server hardware and brand, the vendor might provide you with specifi c confi guration software to achieve the same. For example, the HP Proliant series of servers allows for HP Team confi guration, which is managed by using a specifi c HP Team tool.
Chapter 1
[ 33 ]
Network virtualizationWhile we will talk more in detail about network virtualization in Chapter 2, Unwrapping Hyper-V 2012 R2 Components (confi guring networks in Hyper-V), and Chapter 5, Hyper-V Management Using System Center Virtual Machine Manager (confi guring the network fabric in Virtual Machine Manager), we want to mention it only briefl y here. Within Hyper-V 2012 R2, network virtualization not only refers to the virtual networking connections that are used by the virtual machines but also refers to the technology that allows for true network isolation to the different networks in which virtual machines operate. This feature set is very important for hosting providers, who run different virtual machines for their customers in an isolated network. You have to make sure that there is no connection possible between the virtual machines from customer A and the virtual machines from customer B. That's exactly the main purpose of network virtualization.
Another possible way of confi guring network segmentation is by using VLANs. However, this also requires VLAN confi guration to be done on the physical switches, where the described network virtualization completely runs inside the virtual network switch of Hyper-V.
Server editions and licensingThe last component that comprises the Hyper-V building blocks is the server editions and licensing of the physical and virtual machines operating system.
As we do have a chapter dedicated to this (Chapter 9, Hyper-V and System Center Licensing), we would like to refer you to this chapter for all details around this subject.
Walk-through of the Hyper-V Server role installation processThis section describes how to actually install the Hyper-V Server role on Windows Server 2012 R2, by using both GUI and PowerShell as a way to get the component installed.

Introduction to Microsoft Server 2012 R2 Hyper-V
[ 34 ]
We want to inform you about the fact that the installation process is identical on all versions of Windows Server 2012 R2, whether it is being installed on the Windows 2012 R2 Standard edition, on the Windows 2012 R2 Datacenter edition, or on the free Windows Hyper-V Server 2012 R2.
If you want to know more about functionality and licensing differences between the Windows Server 2012 R2 editions, we would like to refer you to Chapter 9, Hyper-V and System Center Licensing, which talks about this topic more in-depth.
Installing the Hyper-V Server role using the GUILog on to your Windows Server 2012 R2 machine using administrative credentials, and perform the following steps:
1. In Server Manager, from the Manage menu or by selecting Dashboard on the left-hand side, click on Add Roles and Features.
2. On the Before you begin page, go through the verifi cation steps. If your machine is compatible, click on Next.
3. On the Select installation type page, select Role-based or feature-based installation and then click on Next.
4. On the Select destination server page, select a server from the server pool (in most cases, this will be your local server; if you are connected using remote admin tools, you can select more than one server to install this server role on and then click on Next again).
5. On the Select server roles page, select Hyper-V.6. To add the tools that you use to create and manage virtual machines,
click on Add features. On the Features page, click on Next.7. On the Create Virtual Switches page, Virtual Machine Migration page, and
Default Stores page, select the appropriate options for your environment.
If you use this host from within a Virtual Machine Manager environment, we suggest you skip the virtual switches configuration at this stage, and configure the virtual network fabric from within VMM itself later on to avoid conflicts in the configuration.
Chapter 1
[ 35 ]
8. On the Confi rm installation selections page, verify the Reboot this server if required option is fl agged according to your organization's policies, and click on Finish.
9. Once the installation is fi nished, start the Hyper-V Manager console from the Start screen to verify it is up and running.
This completes the installation of the Hyper-V Server role on Windows Server 2012 R2, by using the GUI.
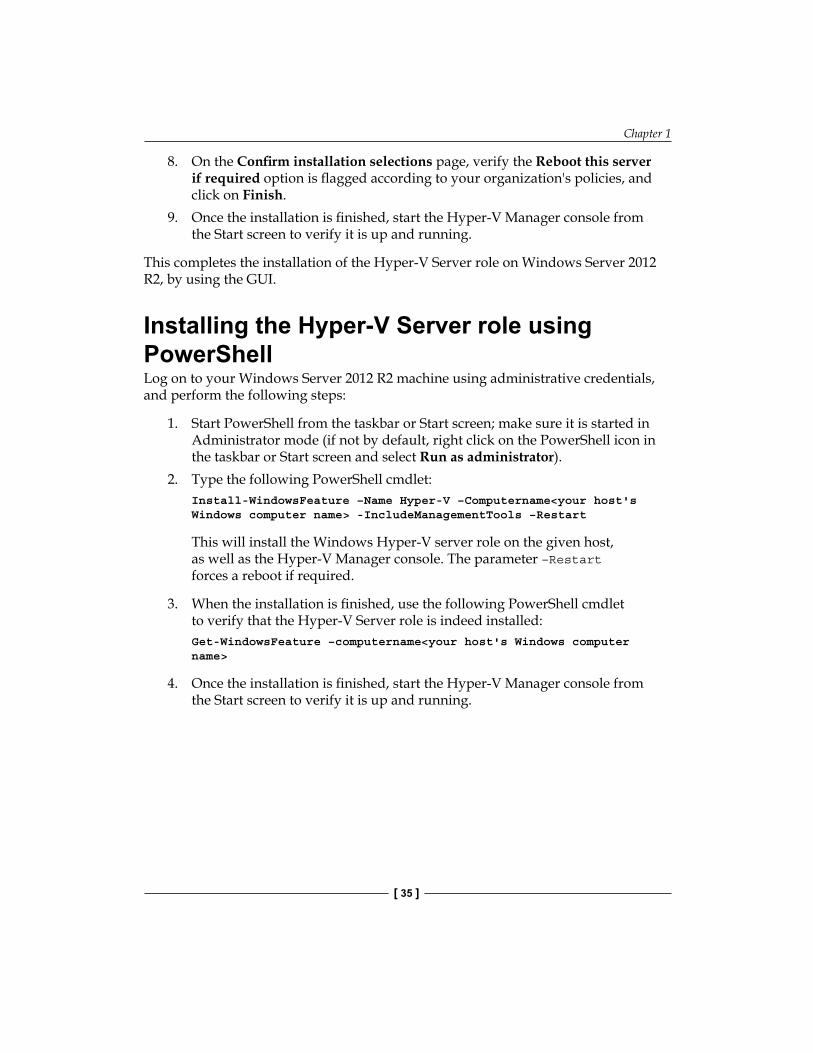
Installing the Hyper-V Server role using PowerShellLog on to your Windows Server 2012 R2 machine using administrative credentials, and perform the following steps:
1. Start PowerShell from the taskbar or Start screen; make sure it is started in Administrator mode (if not by default, right click on the PowerShell icon in the taskbar or Start screen and select Run as administrator).
2. Type the following PowerShell cmdlet:Install-WindowsFeature –Name Hyper-V –Computername<your host's Windows computer name> -IncludeManagementTools –Restart
This will install the Windows Hyper-V server role on the given host, as well as the Hyper-V Manager console. The parameter –Restart forces a reboot if required.
3. When the installation is fi nished, use the following PowerShell cmdlet to verify that the Hyper-V Server role is indeed installed:Get-WindowsFeature –computername<your host's Windows computer name>
4. Once the installation is fi nished, start the Hyper-V Manager console from the Start screen to verify it is up and running.
Introduction to Microsoft Server 2012 R2 Hyper-V
[ 36 ]
This completes the installation of the Hyper-V Server role on Windows Server 2012 R2, by using PowerShell.
Rapid-eye view of the Hyper-V management consoleAs the Hyper-V Manager console is installed, let us fi nish this fi rst chapter with a short walkthrough of this console.
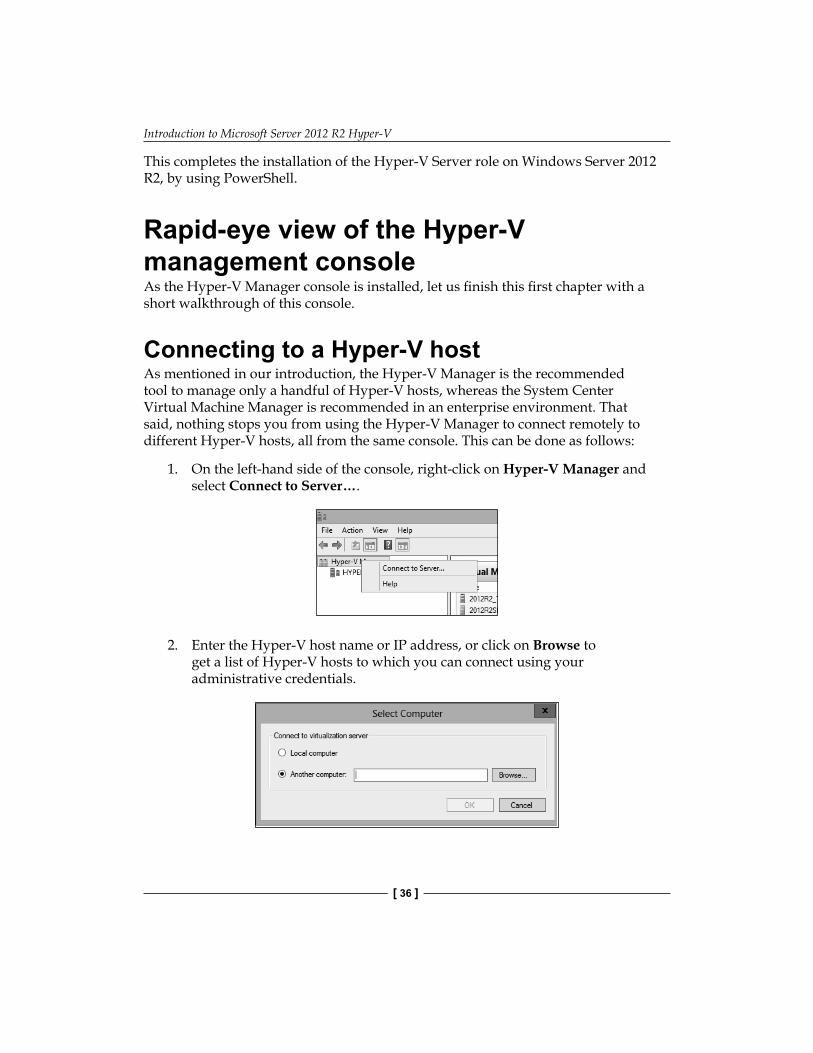
Connecting to a Hyper-V hostAs mentioned in our introduction, the Hyper-V Manager is the recommended tool to manage only a handful of Hyper-V hosts, whereas the System Center Virtual Machine Manager is recommended in an enterprise environment. That said, nothing stops you from using the Hyper-V Manager to connect remotely to different Hyper-V hosts, all from the same console. This can be done as follows:
1. On the left-hand side of the console, right-click on Hyper-V Manager and select Connect to Server….
2. Enter the Hyper-V host name or IP address, or click on Browse to get a list of Hyper-V hosts to which you can connect using your administrative credentials.
Chapter 1
[ 37 ]
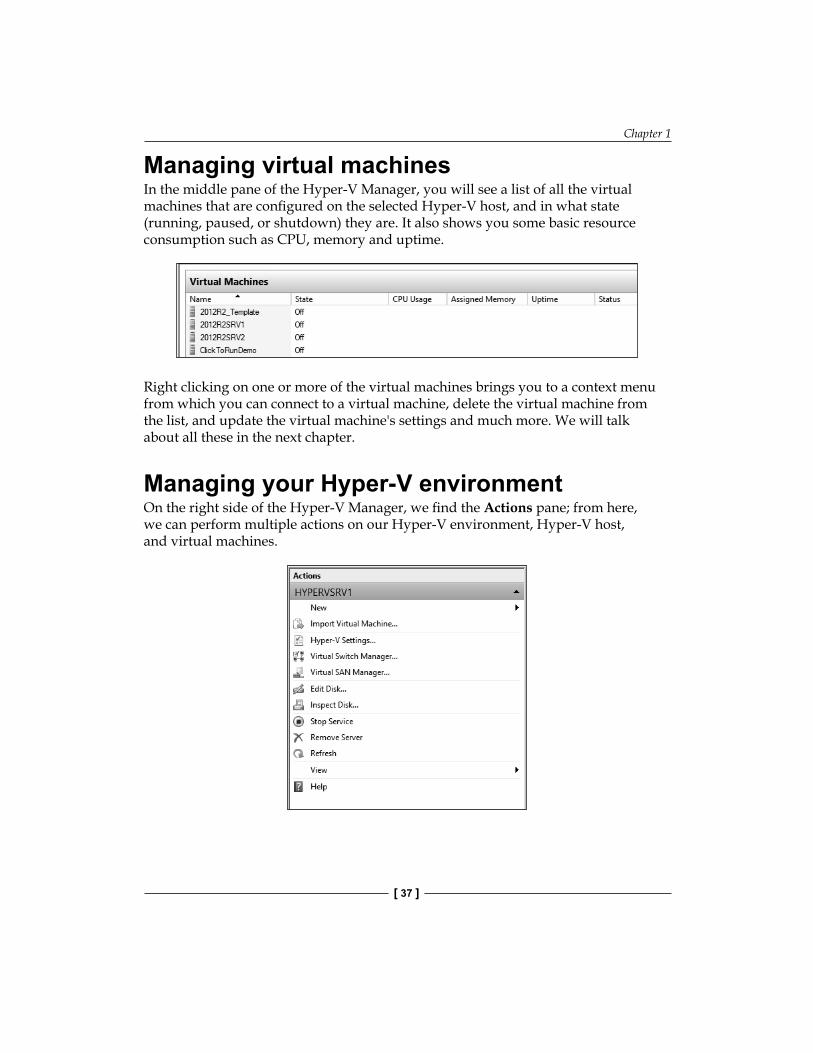
Managing virtual machinesIn the middle pane of the Hyper-V Manager, you will see a list of all the virtual machines that are confi gured on the selected Hyper-V host, and in what state (running, paused, or shutdown) they are. It also shows you some basic resource consumption such as CPU, memory and uptime.
Right clicking on one or more of the virtual machines brings you to a context menu from which you can connect to a virtual machine, delete the virtual machine from the list, and update the virtual machine's settings and much more. We will talk about all these in the next chapter.
Managing your Hyper-V environmentOn the right side of the Hyper-V Manager, we fi nd the Actions pane; from here, we can perform multiple actions on our Hyper-V environment, Hyper-V host, and virtual machines.
Introduction to Microsoft Server 2012 R2 Hyper-V
[ 38 ]
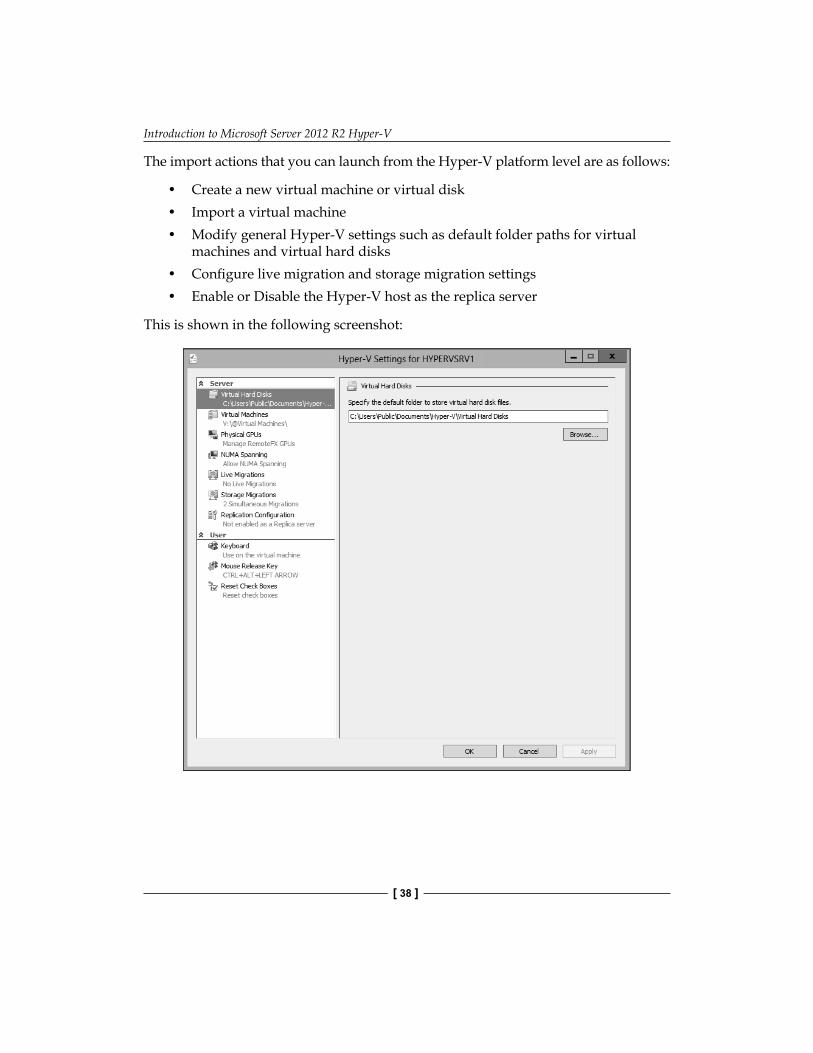
The import actions that you can launch from the Hyper-V platform level are as follows:
• Create a new virtual machine or virtual disk• Import a virtual machine• Modify general Hyper-V settings such as default folder paths for virtual
machines and virtual hard disks• Confi gure live migration and storage migration settings• Enable or Disable the Hyper-V host as the replica server
This is shown in the following screenshot:
Chapter 1
[ 39 ]
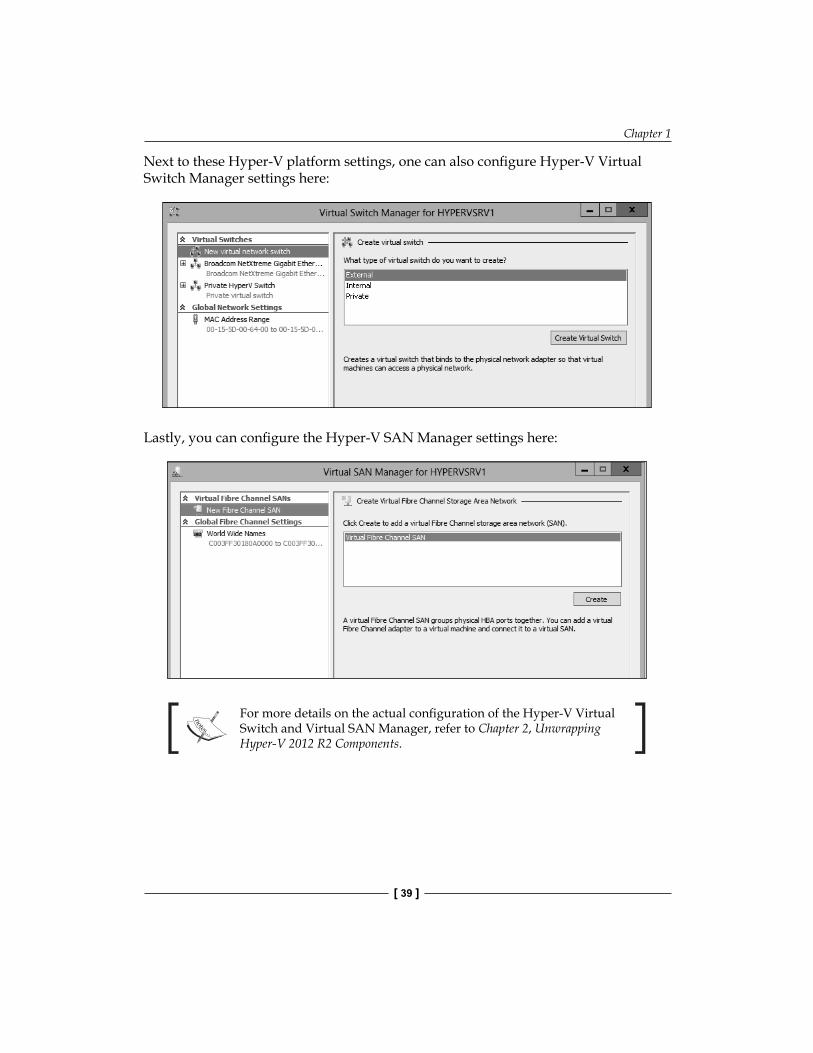
Next to these Hyper-V platform settings, one can also confi gure Hyper-V Virtual Switch Manager settings here:
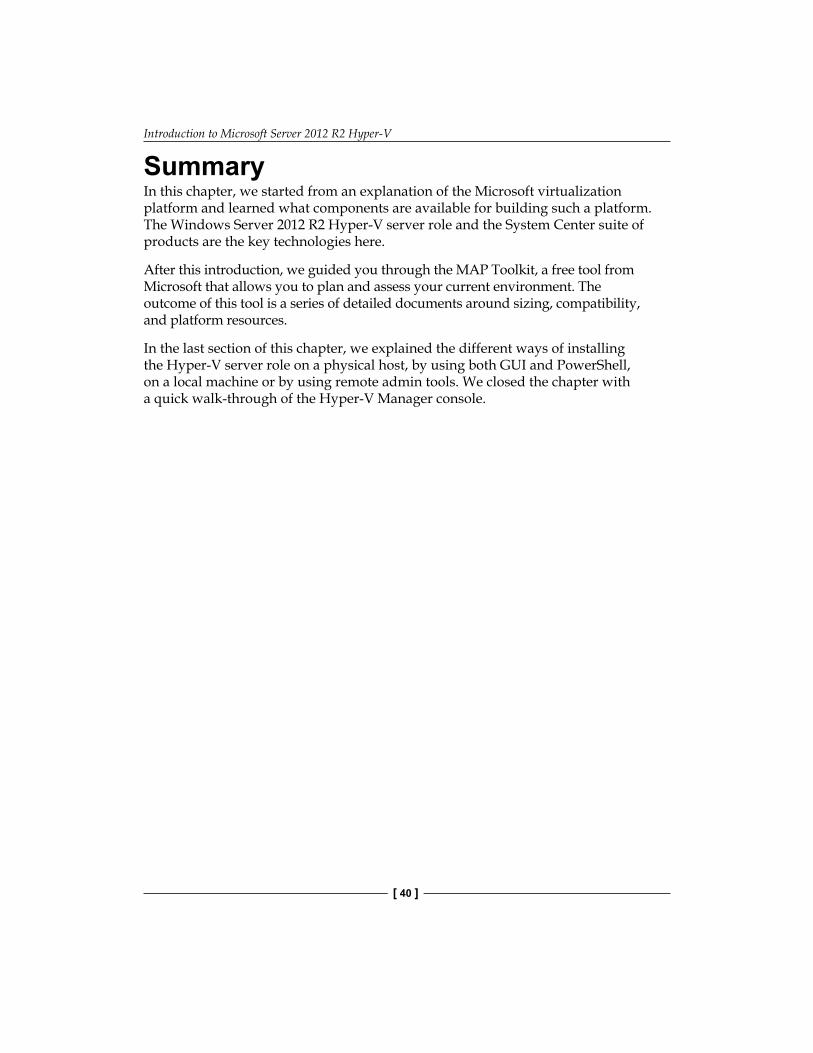
Lastly, you can confi gure the Hyper-V SAN Manager settings here:
For more details on the actual confi guration of the Hyper-V Virtual Switch and Virtual SAN Manager, refer to Chapter 2, Unwrapping Hyper-V 2012 R2 Components.
Introduction to Microsoft Server 2012 R2 Hyper-V
[ 40 ]
SummaryIn this chapter, we started from an explanation of the Microsoft virtualization platform and learned what components are available for building such a platform. The Windows Server 2012 R2 Hyper-V server role and the System Center suite of products are the key technologies here.
After this introduction, we guided you through the MAP Toolkit, a free tool from Microsoft that allows you to plan and assess your current environment. The outcome of this tool is a series of detailed documents around sizing, compatibility, and platform resources.
In the last section of this chapter, we explained the different ways of installing the Hyper-V server role on a physical host, by using both GUI and PowerShell, on a local machine or by using remote admin tools. We closed the chapter with a quick walk-through of the Hyper-V Manager console.
Where to buy this book You can buy Mastering Hyper-V from the Packt Publishing website.
Alternatively, you can buy the book from Amazon, BN.com, Computer Manuals and most internet
book retailers.
Click here for ordering and shipping details.
www.PacktPub.com
Stay Connected:
Get more information Mastering Hyper-V

![ROI in the age of keyword not provided [Mozinar]](https://img.pdfslide.us/doc/110x75/53eabc7a8d7f7289708b51f7/roi-in-the-age-of-keyword-not-provided-mozinar.jpg)