Embed Size (px)
Citation preview
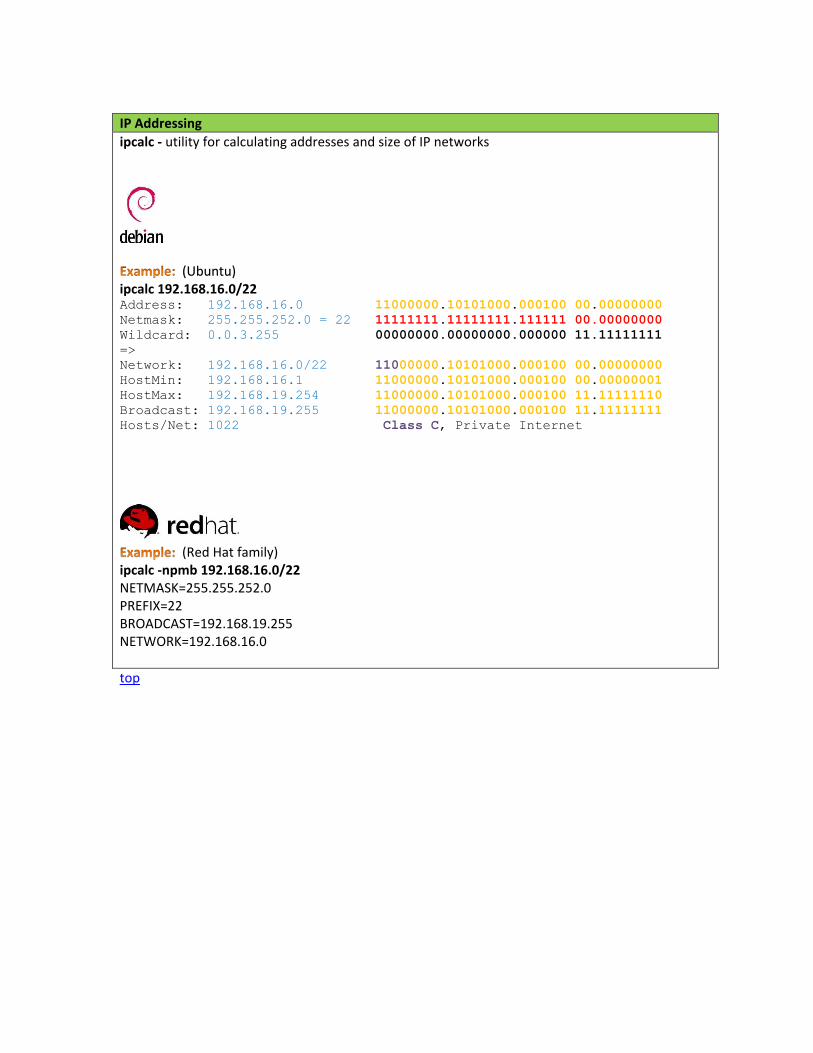
Virtual Cabling VMware Cabling
Joining a Network
Showing and Controlling Interfaces Show and Control Routes
NetworkManager
IPCalc - to calculate netmasks and more
Temporary Interface Configuration Using DHCP Temporary Interface Configuration Using Static IP addresses
Temporary Route configuration
Permanent Interface Configuration
Permanent Routing Table Configuration Permanent Hostname Configuration
Permanent Network Configuration
Permanent Hostname Configuration
Name Resolution
Connectivity Testing
Making Routers
Packet Forwarding
Firewalls and NAT
Firewalls Firewalls (Red Hat Family) Firewall - Lab 5 Firewall - SSH Brute Force Attack Blocker
NAT Favorites NAT Port Forwarding
Network Services Telnet FTP
10 Steps for Installation
Other
General Linux commands - root & shutdown General Linux commands - basic inventory Installing more commands
Packet Sniffing SSH Tunneling (Port Forwarding) SELinux
ARP commands
Linux hardware and driver commands
VMware

VMware commands and operations
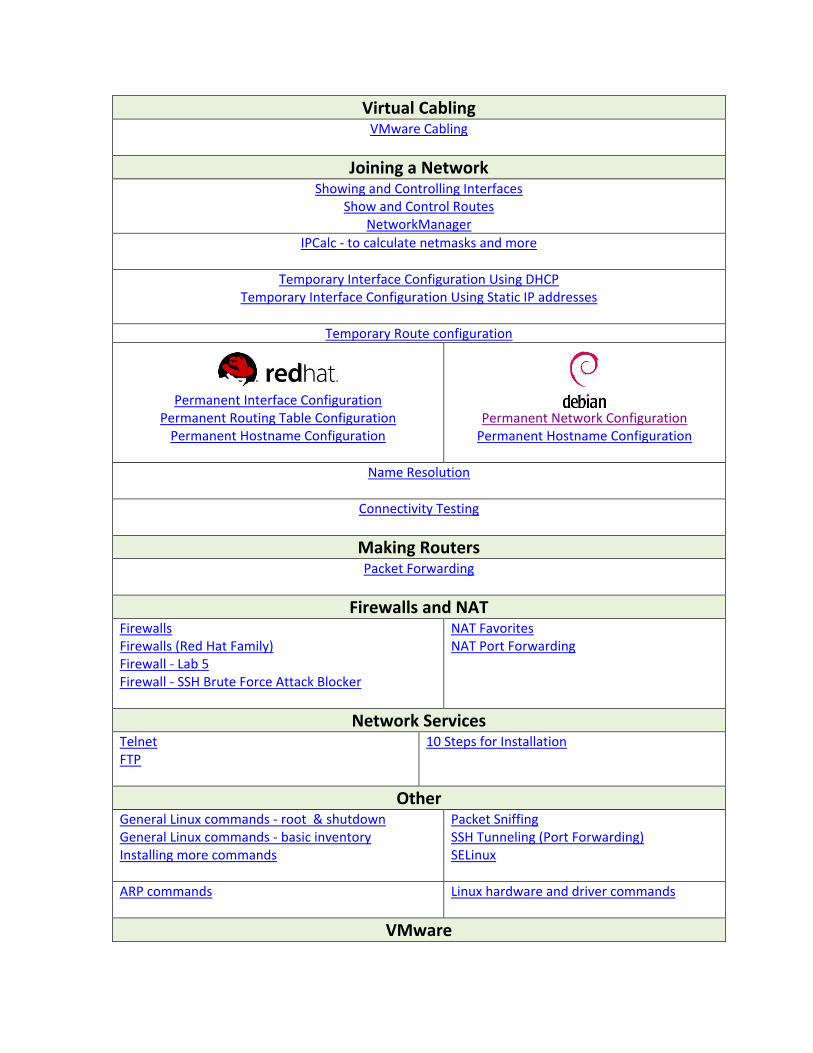
IP Addressing
ipcalc - utility for calculating addresses and size of IP networks
(Ubuntu)ipcalc 192.168.16.0/22 Address: 192.168.16.0 11000000.10101000.000100 00.00000000
Netmask: 255.255.252.0 = 22 11111111.11111111.111111 00.00000000
Wildcard: 0.0.3.255 00000000.00000000.000000 11.11111111
=>
Network: 192.168.16.0/22 11000000.10101000.000100 00.00000000
HostMin: 192.168.16.1 11000000.10101000.000100 00.00000001
HostMax: 192.168.19.254 11000000.10101000.000100 11.11111110
Broadcast: 192.168.19.255 11000000.10101000.000100 11.11111111
Hosts/Net: 1022 Class C, Private Internet
(Red Hat family) ipcalc -npmb 192.168.16.0/22 NETMASK=255.255.252.0 PREFIX=22 BROADCAST=192.168.19.255 NETWORK=192.168.16.0
top
Virtual Cabling VMware ESXi/vSphere VMware Workstation
In VM Settings ..., select the network adapter (NIC) to cable
Connect or disconnect the adapter
Select a network to connect to
top
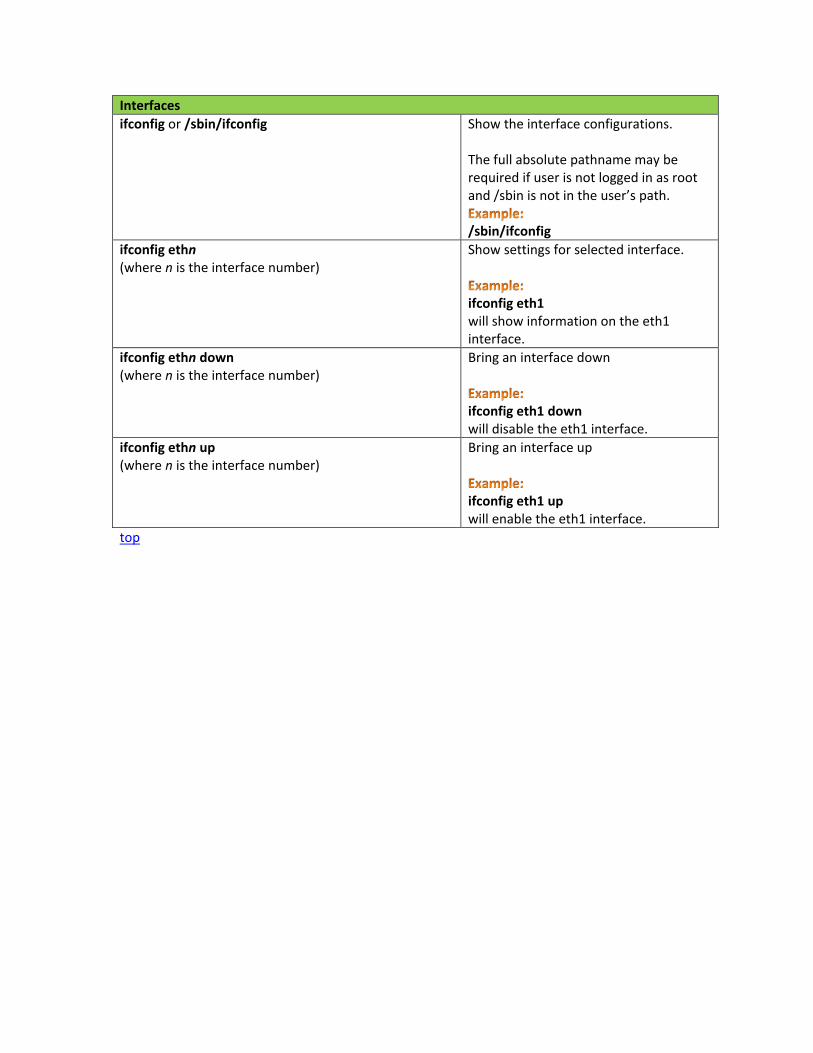
Interfaces
ifconfig or /sbin/ifconfig Show the interface configurations. The full absolute pathname may be required if user is not logged in as root and /sbin is not in the user’s path.
/sbin/ifconfig
ifconfig ethn (where n is the interface number)
Show settings for selected interface.
ifconfig eth1 will show information on the eth1 interface.
ifconfig ethn down (where n is the interface number)
Bring an interface down
ifconfig eth1 down will disable the eth1 interface.
ifconfig ethn up (where n is the interface number)
Bring an interface up
ifconfig eth1 up will enable the eth1 interface.
top
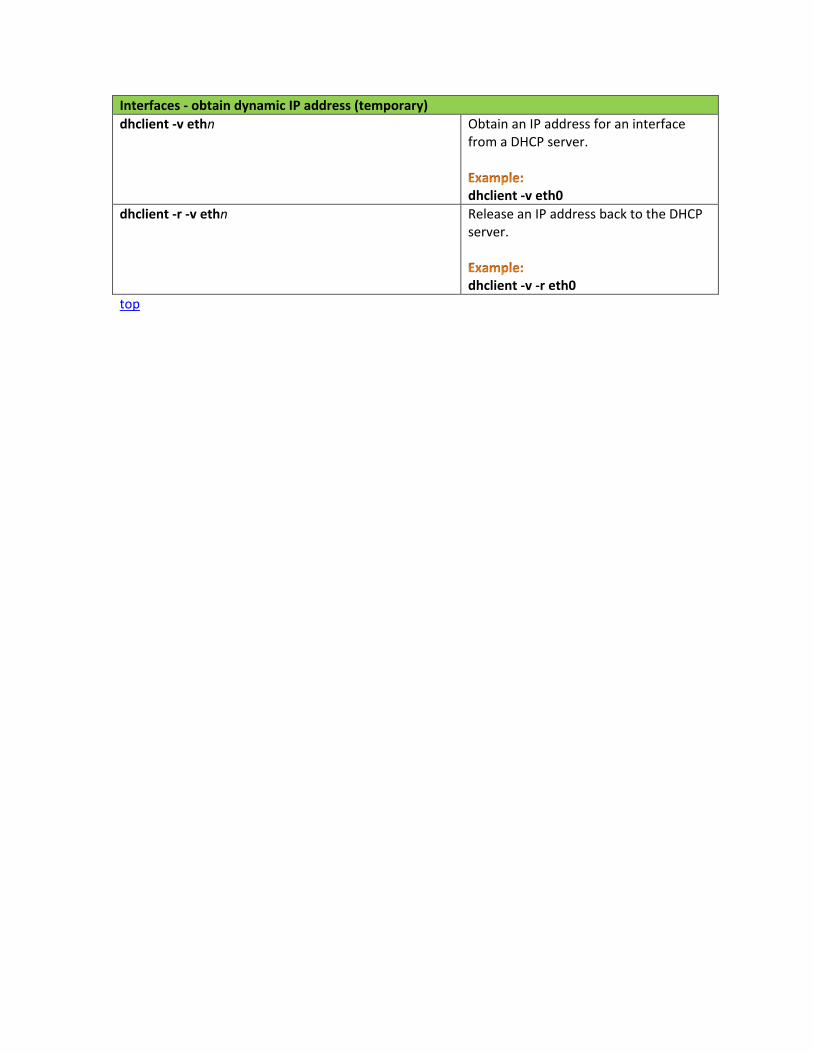
Interfaces - obtain dynamic IP address (temporary)
dhclient -v ethn Obtain an IP address for an interface from a DHCP server.
dhclient -v eth0
dhclient -r -v ethn Release an IP address back to the DHCP server.
dhclient -v -r eth0
top
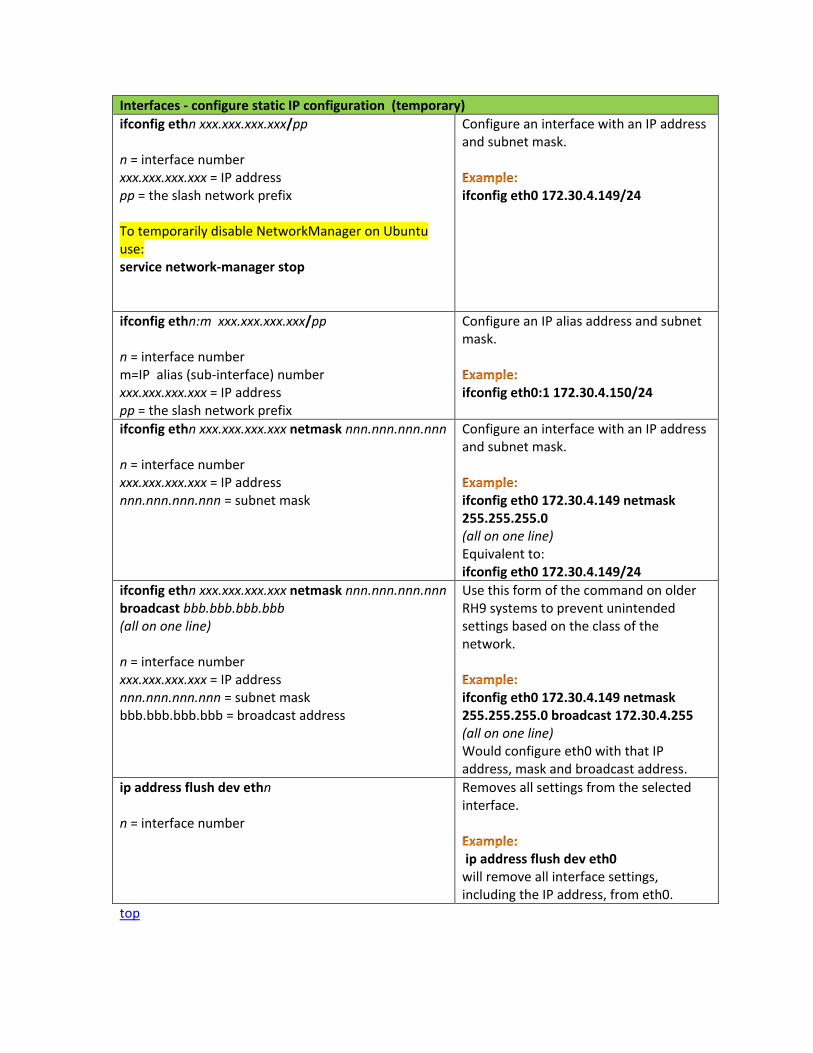
Interfaces - configure static IP configuration (temporary)
ifconfig ethn xxx.xxx.xxx.xxx/pp n = interface number xxx.xxx.xxx.xxx = IP address pp = the slash network prefix To temporarily disable NetworkManager on Ubuntu use: service network-manager stop
Configure an interface with an IP address and subnet mask.
ifconfig eth0 172.30.4.149/24
ifconfig ethn:m xxx.xxx.xxx.xxx/pp n = interface number m=IP alias (sub-interface) number xxx.xxx.xxx.xxx = IP address pp = the slash network prefix
Configure an IP alias address and subnet mask.
ifconfig eth0:1 172.30.4.150/24
ifconfig ethn xxx.xxx.xxx.xxx netmask nnn.nnn.nnn.nnn n = interface number xxx.xxx.xxx.xxx = IP address nnn.nnn.nnn.nnn = subnet mask
Configure an interface with an IP address and subnet mask.
ifconfig eth0 172.30.4.149 netmask 255.255.255.0 (all on one line) Equivalent to: ifconfig eth0 172.30.4.149/24
ifconfig ethn xxx.xxx.xxx.xxx netmask nnn.nnn.nnn.nnn broadcast bbb.bbb.bbb.bbb (all on one line) n = interface number xxx.xxx.xxx.xxx = IP address nnn.nnn.nnn.nnn = subnet mask bbb.bbb.bbb.bbb = broadcast address
Use this form of the command on older RH9 systems to prevent unintended settings based on the class of the network.
ifconfig eth0 172.30.4.149 netmask 255.255.255.0 broadcast 172.30.4.255 (all on one line) Would configure eth0 with that IP address, mask and broadcast address.
ip address flush dev ethn n = interface number
Removes all settings from the selected interface.
ip address flush dev eth0 will remove all interface settings, including the IP address, from eth0.
top
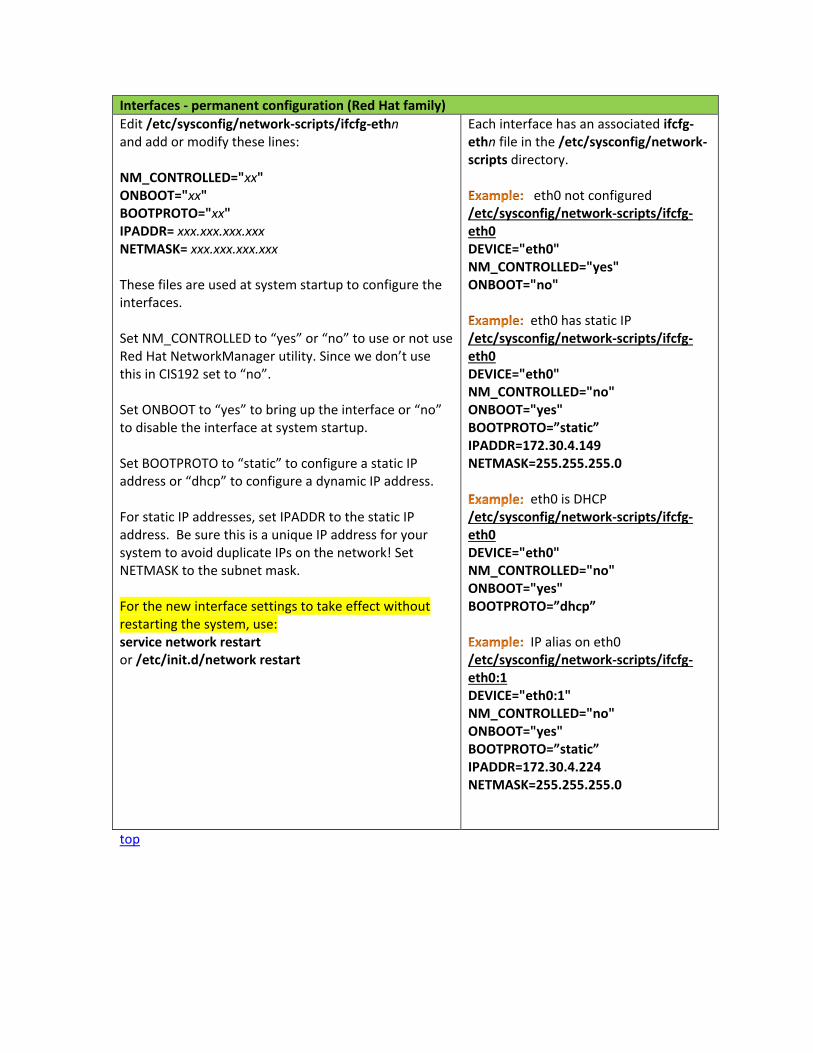
Interfaces - permanent configuration (Red Hat family)
Edit /etc/sysconfig/network-scripts/ifcfg-ethn and add or modify these lines: NM_CONTROLLED="xx" ONBOOT="xx" BOOTPROTO="xx" IPADDR= xxx.xxx.xxx.xxx NETMASK= xxx.xxx.xxx.xxx These files are used at system startup to configure the interfaces. Set NM_CONTROLLED to “yes” or “no” to use or not use Red Hat NetworkManager utility. Since we don’t use this in CIS192 set to “no”. Set ONBOOT to “yes” to bring up the interface or “no” to disable the interface at system startup. Set BOOTPROTO to “static” to configure a static IP address or “dhcp” to configure a dynamic IP address. For static IP addresses, set IPADDR to the static IP address. Be sure this is a unique IP address for your system to avoid duplicate IPs on the network! Set NETMASK to the subnet mask. For the new interface settings to take effect without restarting the system, use: service network restart or /etc/init.d/network restart
Each interface has an associated ifcfg-ethn file in the /etc/sysconfig/network-scripts directory.
eth0 not configured /etc/sysconfig/network-scripts/ifcfg-eth0 DEVICE="eth0" NM_CONTROLLED="yes" ONBOOT="no"
eth0 has static IP /etc/sysconfig/network-scripts/ifcfg-eth0 DEVICE="eth0" NM_CONTROLLED="no" ONBOOT="yes" BOOTPROTO=”static” IPADDR=172.30.4.149 NETMASK=255.255.255.0
eth0 is DHCP /etc/sysconfig/network-scripts/ifcfg-eth0 DEVICE="eth0" NM_CONTROLLED="no" ONBOOT="yes" BOOTPROTO=”dhcp”
IP alias on eth0 /etc/sysconfig/network-scripts/ifcfg-eth0:1 DEVICE="eth0:1" NM_CONTROLLED="no" ONBOOT="yes" BOOTPROTO=”static” IPADDR=172.30.4.224 NETMASK=255.255.255.0
top
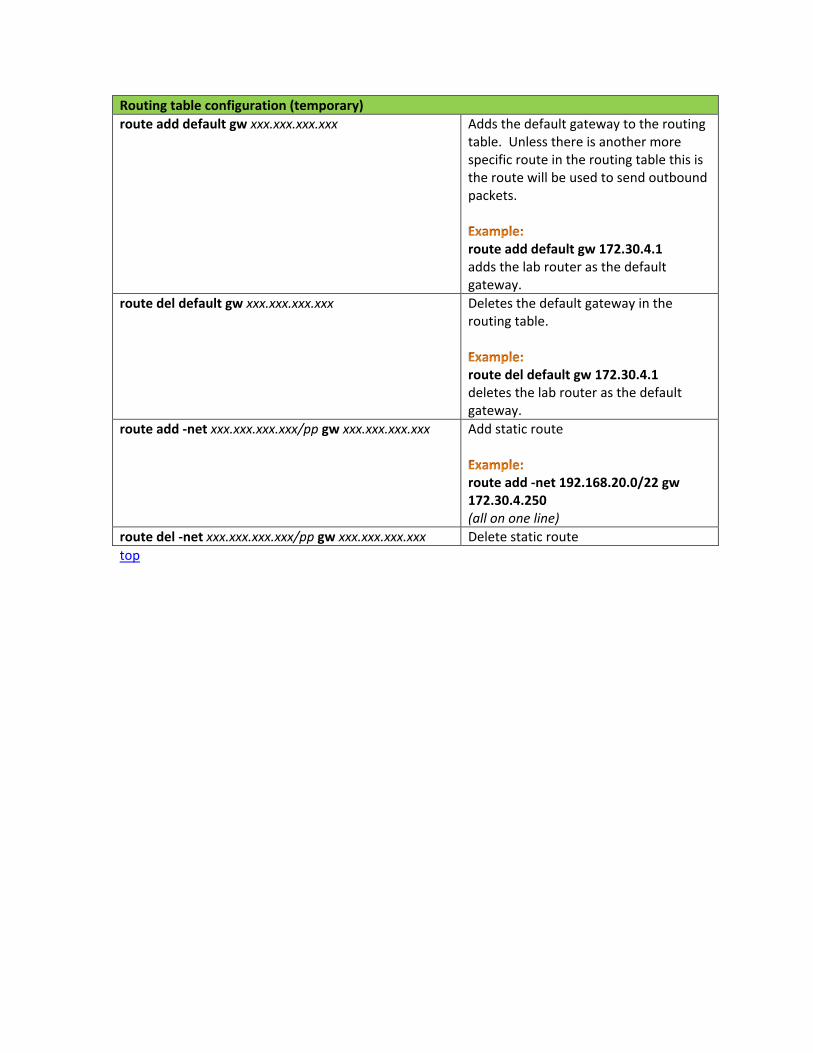
Routing table configuration (temporary)
route add default gw xxx.xxx.xxx.xxx
Adds the default gateway to the routing table. Unless there is another more specific route in the routing table this is the route will be used to send outbound packets.
route add default gw 172.30.4.1 adds the lab router as the default gateway.
route del default gw xxx.xxx.xxx.xxx
Deletes the default gateway in the routing table.
route del default gw 172.30.4.1 deletes the lab router as the default gateway.
route add -net xxx.xxx.xxx.xxx/pp gw xxx.xxx.xxx.xxx Add static route
route add -net 192.168.20.0/22 gw 172.30.4.250 (all on one line)
route del -net xxx.xxx.xxx.xxx/pp gw xxx.xxx.xxx.xxx Delete static route
top
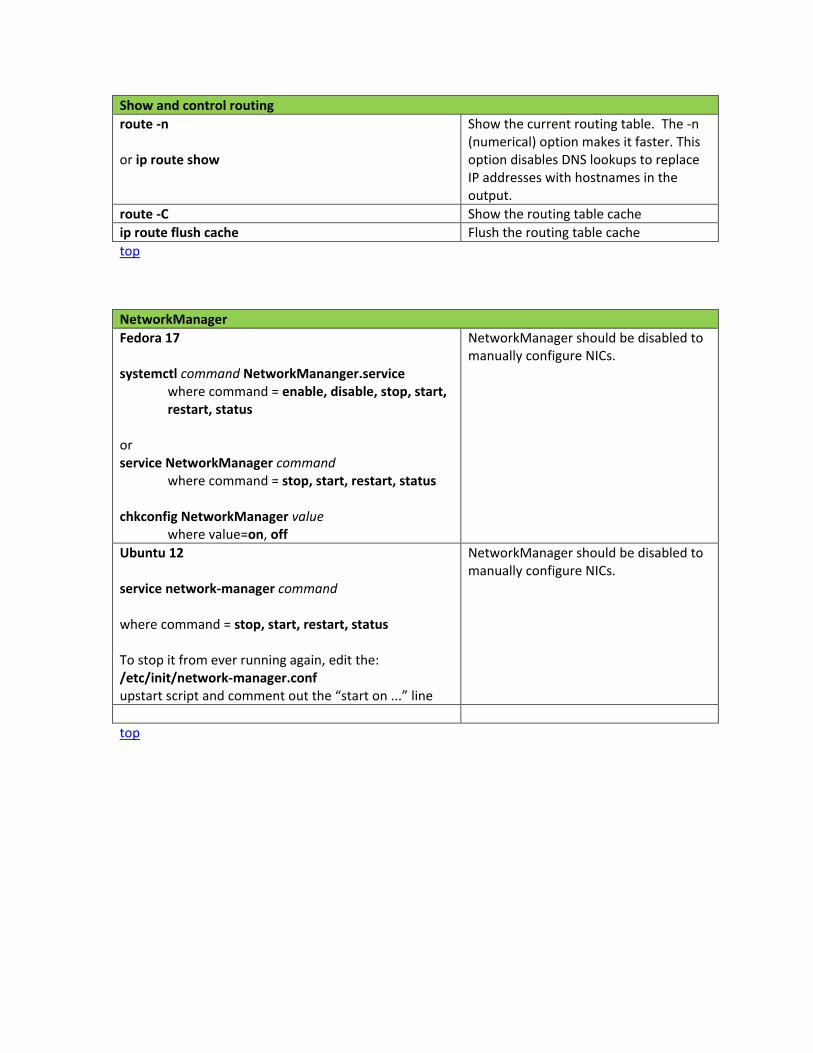
Show and control routing
route -n or ip route show
Show the current routing table. The -n (numerical) option makes it faster. This option disables DNS lookups to replace IP addresses with hostnames in the output.
route -C Show the routing table cache
ip route flush cache Flush the routing table cache
top
NetworkManager
Fedora 17 systemctl command NetworkMananger.service
where command = enable, disable, stop, start, restart, status
or service NetworkManager command
where command = stop, start, restart, status
chkconfig NetworkManager value where value=on, off
NetworkManager should be disabled to manually configure NICs.
Ubuntu 12 service network-manager command where command = stop, start, restart, status To stop it from ever running again, edit the: /etc/init/network-manager.conf upstart script and comment out the “start on ...” line
NetworkManager should be disabled to manually configure NICs.
top

Routing table permanent configuration (Red Hat family)
Edit /etc/sysconfig/network with: GATEWAY= xxx.xxx.xxx.xxx
Edit this file to add a permanent default gateway to the routing table. The new settings do not take effect until the system or network service is restarted.
/etc/sysconfig/network NETWORKING=yes HOSTNAME=elrond.localdomain GATEWAY=172.30.4.1 The default gateway on Elrond has been set to the CIS Lab router (172.30.4.1). For the new interface settings to take effect without restarting the system, use: service network restart or /etc/init.d/network restart
Edit /etc/sysconfig/network-scripts/route-ethn with: xxx.xxx.xxx.xxx/pp via xxx.xxx.xxx.xxx
Add static route permanently
/etc/sysconfig/network-scripts/route-eth0 192.168.20.0/22 via 172.30.4.250 to route traffic to the 192.168.20.0/22 network out the eth0 interface to the 172.30.4.250 “next hop” gateway router.
top
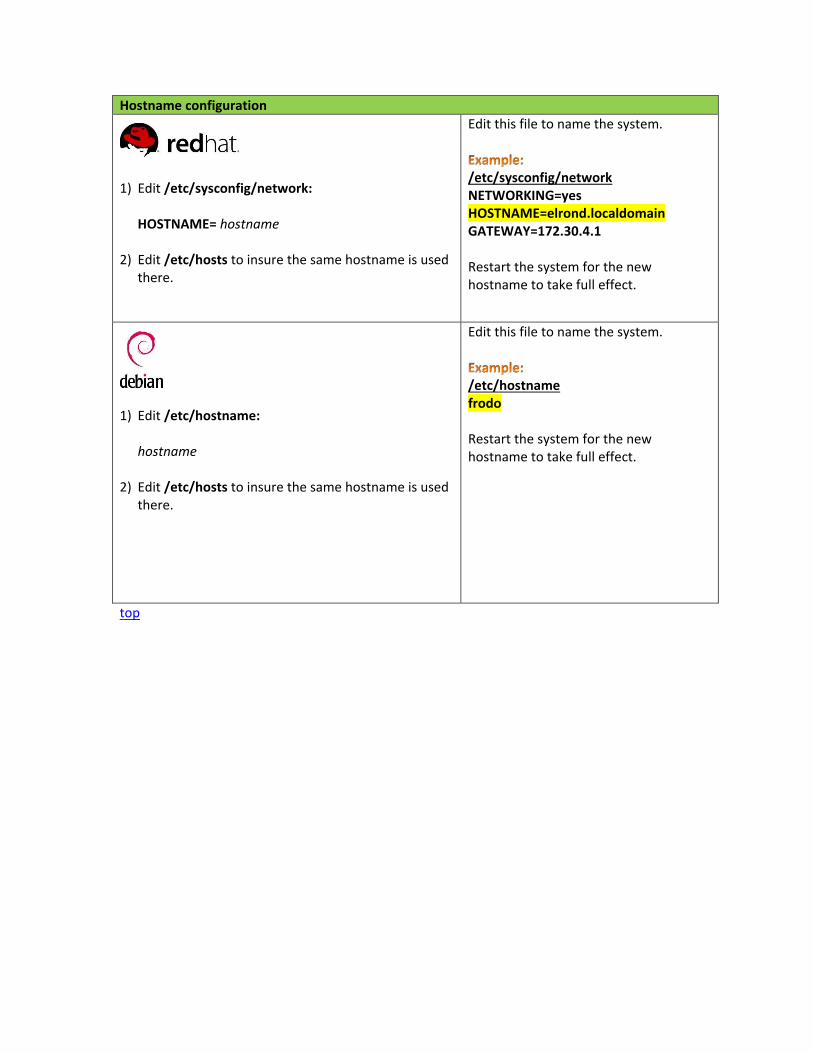
Hostname configuration
1) Edit /etc/sysconfig/network:
HOSTNAME= hostname 2) Edit /etc/hosts to insure the same hostname is used
there.
Edit this file to name the system.
/etc/sysconfig/network NETWORKING=yes HOSTNAME=elrond.localdomain GATEWAY=172.30.4.1 Restart the system for the new hostname to take full effect.
1) Edit /etc/hostname:
hostname 2) Edit /etc/hosts to insure the same hostname is used
there.
Edit this file to name the system.
/etc/hostname frodo Restart the system for the new hostname to take full effect.
top
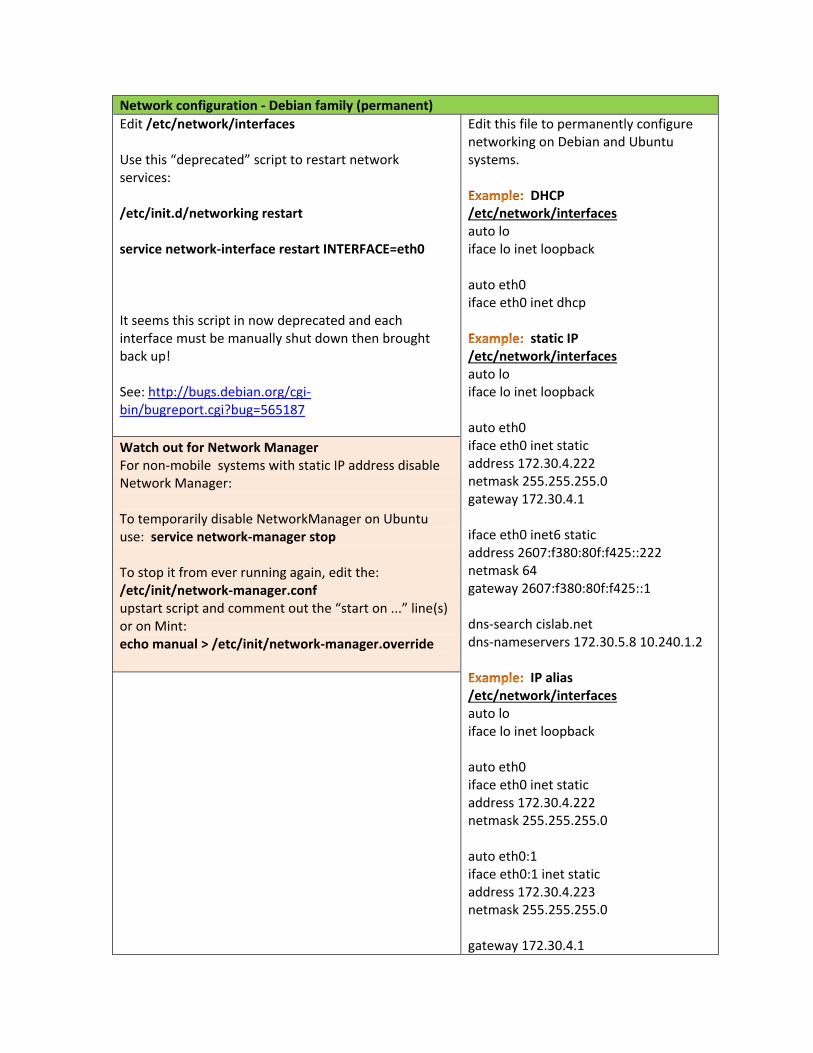
Network configuration - Debian family (permanent)
Edit /etc/network/interfaces Use this “deprecated” script to restart network services: /etc/init.d/networking restart service network-interface restart INTERFACE=eth0 It seems this script in now deprecated and each interface must be manually shut down then brought back up! See: http://bugs.debian.org/cgi-bin/bugreport.cgi?bug=565187
Watch out for Network Manager For non-mobile systems with static IP address disable Network Manager: To temporarily disable NetworkManager on Ubuntu use: service network-manager stop To stop it from ever running again, edit the: /etc/init/network-manager.conf upstart script and comment out the “start on ...” line(s) or on Mint: echo manual > /etc/init/network-manager.override
Edit this file to permanently configure networking on Debian and Ubuntu systems.
DHCP /etc/network/interfaces auto lo iface lo inet loopback auto eth0 iface eth0 inet dhcp
static IP /etc/network/interfaces auto lo iface lo inet loopback auto eth0 iface eth0 inet static address 172.30.4.222 netmask 255.255.255.0 gateway 172.30.4.1 iface eth0 inet6 static address 2607:f380:80f:f425::222 netmask 64 gateway 2607:f380:80f:f425::1 dns-search cislab.net dns-nameservers 172.30.5.8 10.240.1.2
IP alias /etc/network/interfaces auto lo iface lo inet loopback auto eth0 iface eth0 inet static address 172.30.4.222 netmask 255.255.255.0 auto eth0:1 iface eth0:1 inet static address 172.30.4.223 netmask 255.255.255.0 gateway 172.30.4.1
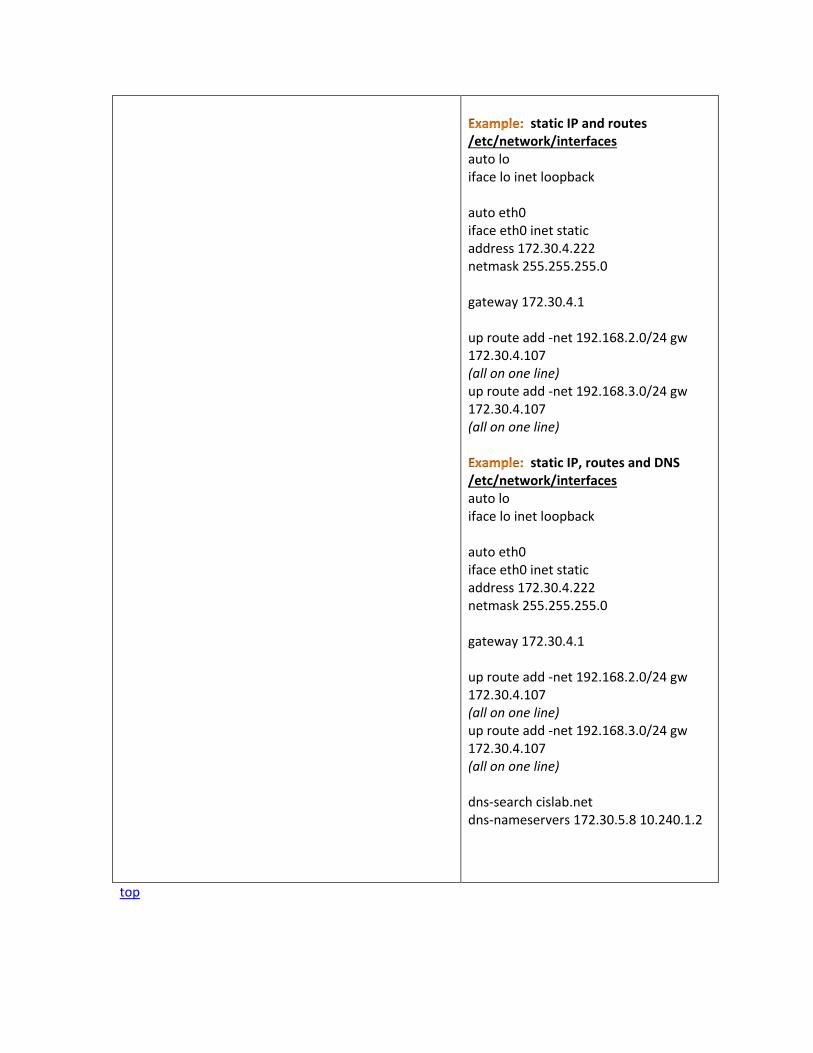
static IP and routes
/etc/network/interfaces auto lo iface lo inet loopback auto eth0 iface eth0 inet static address 172.30.4.222 netmask 255.255.255.0 gateway 172.30.4.1 up route add -net 192.168.2.0/24 gw 172.30.4.107 (all on one line) up route add -net 192.168.3.0/24 gw 172.30.4.107 (all on one line)
static IP, routes and DNS /etc/network/interfaces auto lo iface lo inet loopback auto eth0 iface eth0 inet static address 172.30.4.222 netmask 255.255.255.0 gateway 172.30.4.1 up route add -net 192.168.2.0/24 gw 172.30.4.107 (all on one line) up route add -net 192.168.3.0/24 gw 172.30.4.107 (all on one line) dns-search cislab.net dns-nameservers 172.30.5.8 10.240.1.2
top
Name resolution
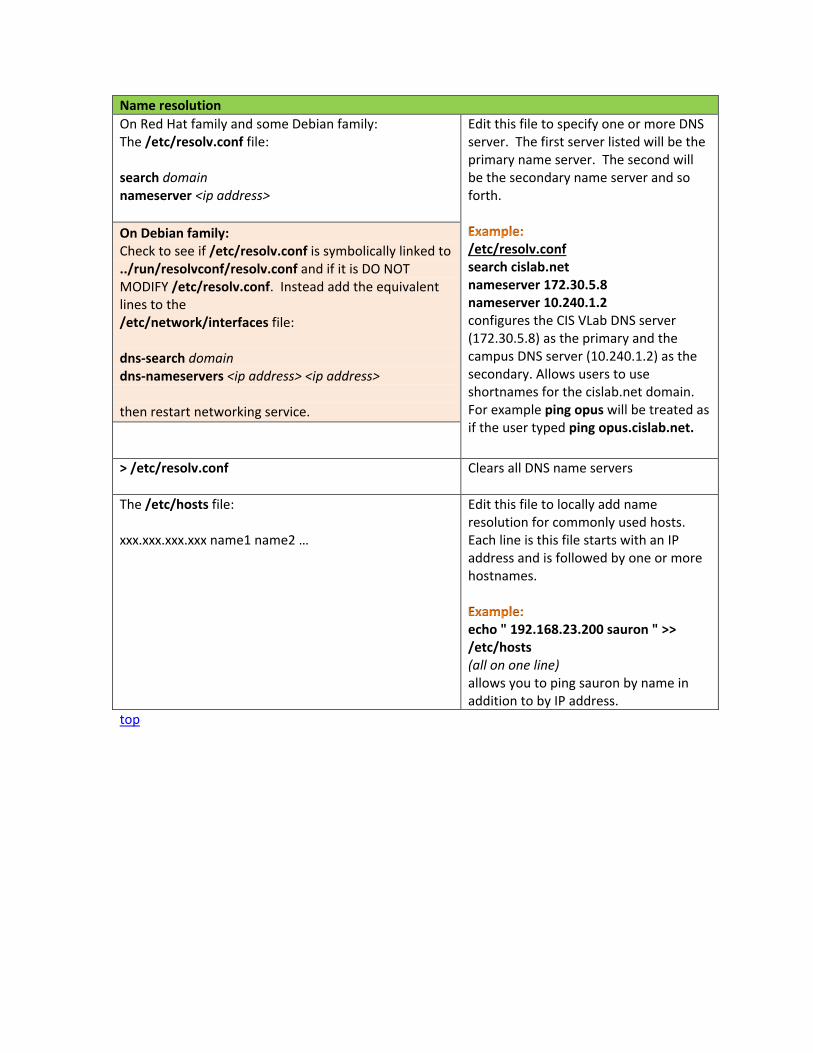
On Red Hat family and some Debian family: The /etc/resolv.conf file: search domain nameserver <ip address>
On Debian family: Check to see if /etc/resolv.conf is symbolically linked to ../run/resolvconf/resolv.conf and if it is DO NOT MODIFY /etc/resolv.conf. Instead add the equivalent lines to the /etc/network/interfaces file: dns-search domain dns-nameservers <ip address> <ip address> then restart networking service.
Edit this file to specify one or more DNS server. The first server listed will be the primary name server. The second will be the secondary name server and so forth.
/etc/resolv.conf search cislab.net nameserver 172.30.5.8 nameserver 10.240.1.2 configures the CIS VLab DNS server (172.30.5.8) as the primary and the campus DNS server (10.240.1.2) as the secondary. Allows users to use shortnames for the cislab.net domain. For example ping opus will be treated as if the user typed ping opus.cislab.net.
> /etc/resolv.conf Clears all DNS name servers
The /etc/hosts file: xxx.xxx.xxx.xxx name1 name2 …
Edit this file to locally add name resolution for commonly used hosts. Each line is this file starts with an IP address and is followed by one or more hostnames.
echo " 192.168.23.200 sauron " >> /etc/hosts (all on one line) allows you to ping sauron by name in addition to by IP address.
top
Packet forwarding
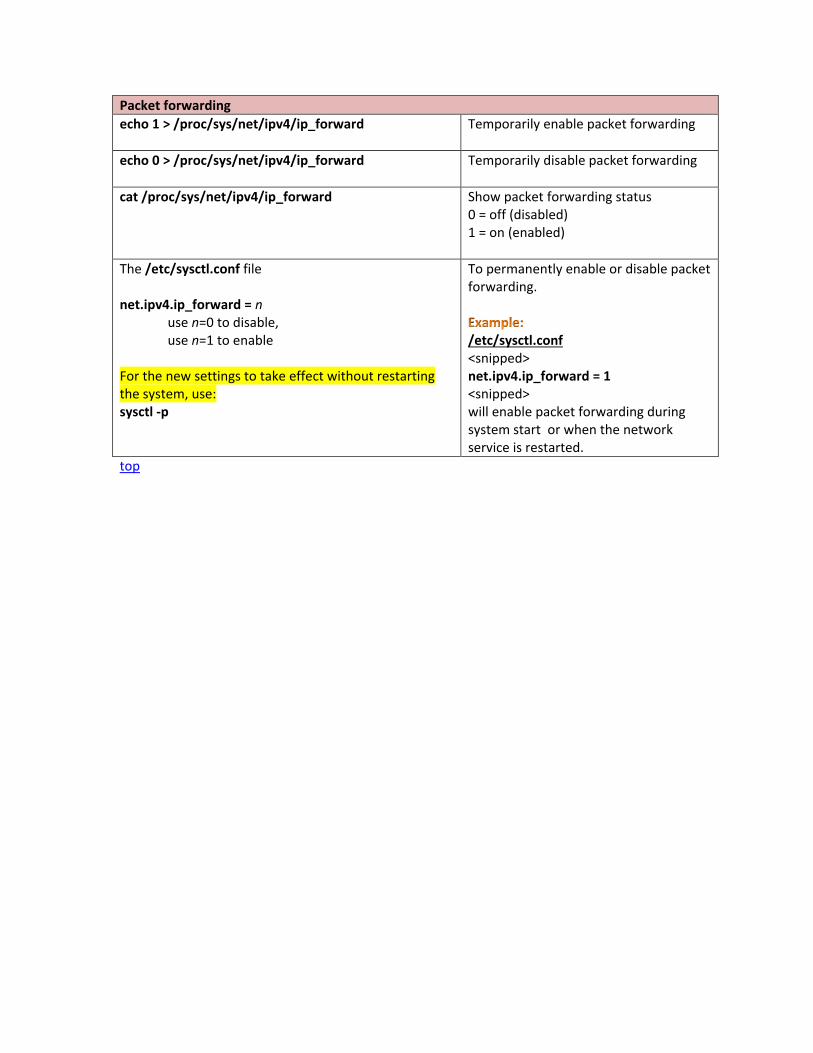
echo 1 > /proc/sys/net/ipv4/ip_forward Temporarily enable packet forwarding
echo 0 > /proc/sys/net/ipv4/ip_forward Temporarily disable packet forwarding
cat /proc/sys/net/ipv4/ip_forward Show packet forwarding status 0 = off (disabled) 1 = on (enabled)
The /etc/sysctl.conf file net.ipv4.ip_forward = n
use n=0 to disable, use n=1 to enable
For the new settings to take effect without restarting the system, use: sysctl -p
To permanently enable or disable packet forwarding.
/etc/sysctl.conf <snipped> net.ipv4.ip_forward = 1 <snipped> will enable packet forwarding during system start or when the network service is restarted.
top
Firewalls
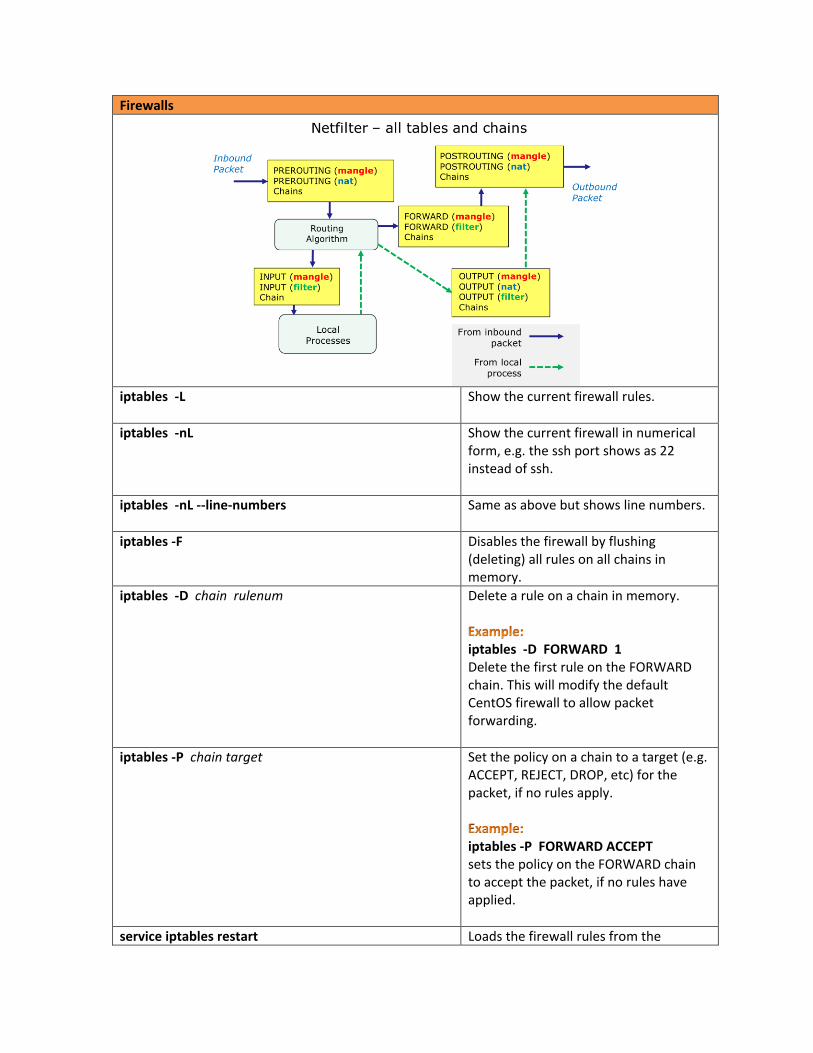
iptables -L Show the current firewall rules.
iptables -nL Show the current firewall in numerical form, e.g. the ssh port shows as 22 instead of ssh.
iptables -nL --line-numbers Same as above but shows line numbers.
iptables -F Disables the firewall by flushing (deleting) all rules on all chains in memory.
iptables -D chain rulenum Delete a rule on a chain in memory.
iptables -D FORWARD 1 Delete the first rule on the FORWARD chain. This will modify the default CentOS firewall to allow packet forwarding.
iptables -P chain target Set the policy on a chain to a target (e.g. ACCEPT, REJECT, DROP, etc) for the packet, if no rules apply.
iptables -P FORWARD ACCEPT sets the policy on the FORWARD chain to accept the packet, if no rules have applied.
service iptables restart Loads the firewall rules from the
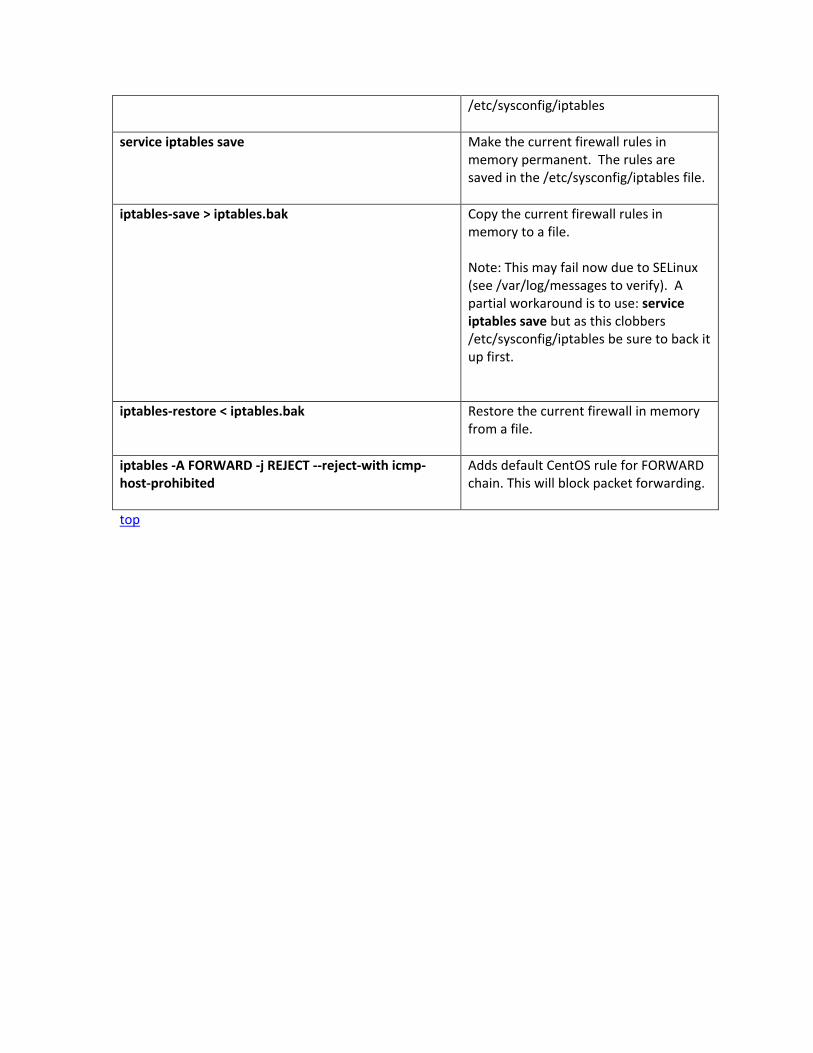
/etc/sysconfig/iptables
service iptables save Make the current firewall rules in memory permanent. The rules are saved in the /etc/sysconfig/iptables file.
iptables-save > iptables.bak
Copy the current firewall rules in memory to a file. Note: This may fail now due to SELinux (see /var/log/messages to verify). A partial workaround is to use: service iptables save but as this clobbers /etc/sysconfig/iptables be sure to back it up first.
iptables-restore < iptables.bak Restore the current firewall in memory from a file.
iptables -A FORWARD -j REJECT --reject-with icmp-host-prohibited
Adds default CentOS rule for FORWARD chain. This will block packet forwarding.
top
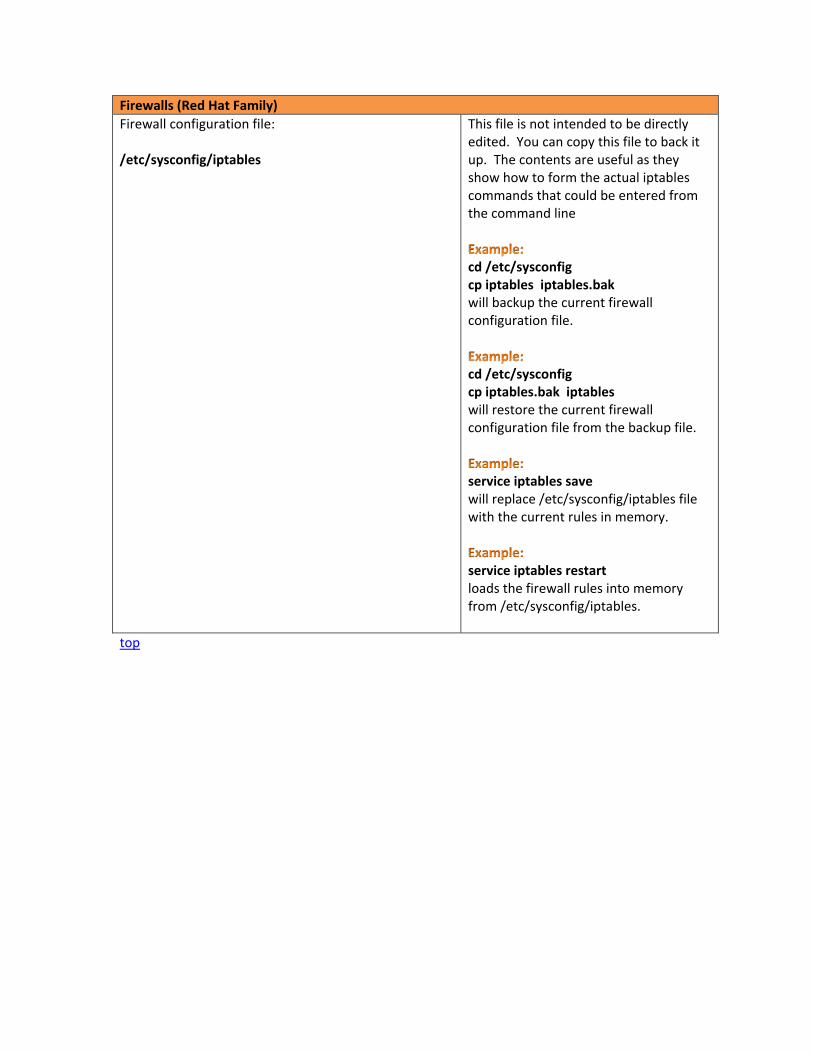
Firewalls (Red Hat Family)
Firewall configuration file: /etc/sysconfig/iptables
This file is not intended to be directly edited. You can copy this file to back it up. The contents are useful as they show how to form the actual iptables commands that could be entered from the command line
cd /etc/sysconfig cp iptables iptables.bak will backup the current firewall configuration file.
cd /etc/sysconfig cp iptables.bak iptables will restore the current firewall configuration file from the backup file.
service iptables save will replace /etc/sysconfig/iptables file with the current rules in memory.
service iptables restart loads the firewall rules into memory from /etc/sysconfig/iptables.
top
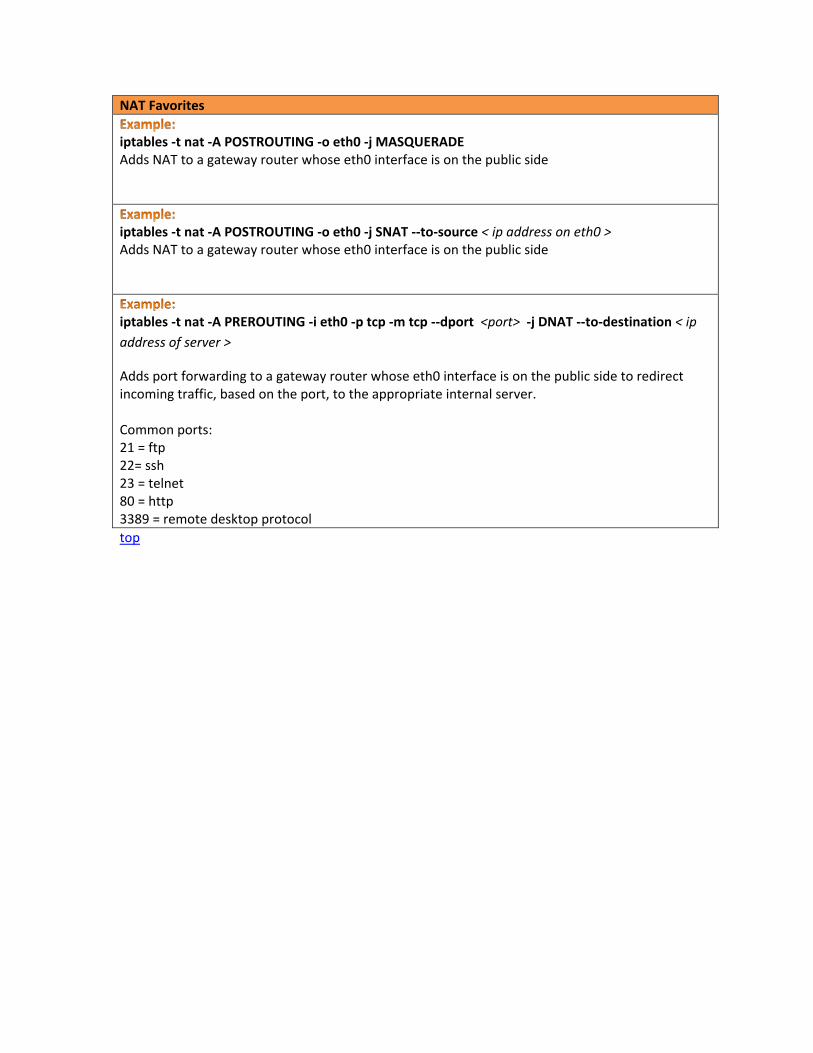
NAT Favorites
iptables -t nat -A POSTROUTING -o eth0 -j MASQUERADE Adds NAT to a gateway router whose eth0 interface is on the public side
iptables -t nat -A POSTROUTING -o eth0 -j SNAT --to-source < ip address on eth0 > Adds NAT to a gateway router whose eth0 interface is on the public side
iptables -t nat -A PREROUTING -i eth0 -p tcp -m tcp --dport <port> -j DNAT --to-destination < ip
address of server >
Adds port forwarding to a gateway router whose eth0 interface is on the public side to redirect incoming traffic, based on the port, to the appropriate internal server. Common ports: 21 = ftp 22= ssh 23 = telnet 80 = http 3389 = remote desktop protocol
top

Firewall Brute Force Blocker
[rsimms@opus ~]$ cat /etc/sysconfig/iptables < snipped > # Impede brute force SSH dictionary attacks using the recent module (Rule added by RJS) -A RH-Firewall-1-INPUT -p tcp --dport 22 -m state --state NEW -m recent --set –name SHBF -A RH-Firewall-1-INPUT -p tcp --dport 22 -m state --state NEW -m recent --update --seconds 60 --hitcount 4 --rttl --name SSHBF -j LOG --log-level info --log-prefix "iptables brute force block: " -A RH-Firewall-1-INPUT -p tcp --dport 22 -m state --state NEW -m recent --update --seconds 60 --hitcount 4 --rttl --name SSHBF -j DROP < snipped > Credit: http://kevin.vanzonneveld.net/techblog/article/block_brute_force_attacks_with_iptables/
top
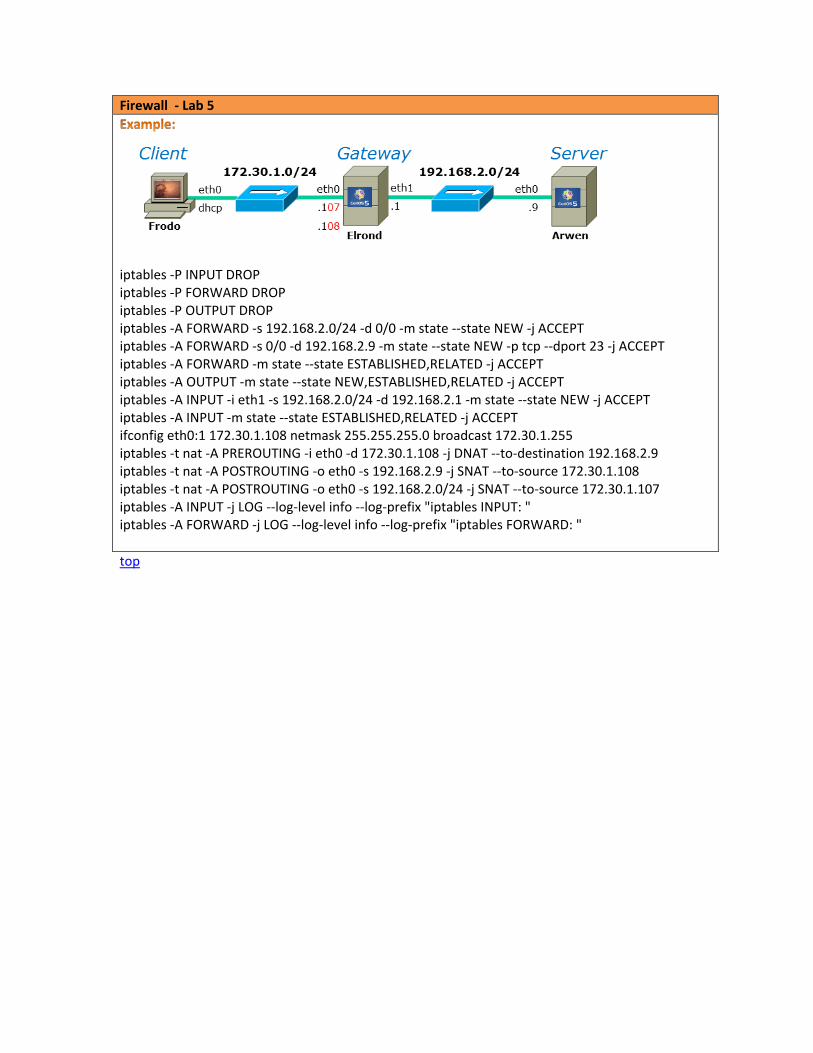
Firewall - Lab 5
iptables -P INPUT DROP iptables -P FORWARD DROP iptables -P OUTPUT DROP iptables -A FORWARD -s 192.168.2.0/24 -d 0/0 -m state --state NEW -j ACCEPT iptables -A FORWARD -s 0/0 -d 192.168.2.9 -m state --state NEW -p tcp --dport 23 -j ACCEPT iptables -A FORWARD -m state --state ESTABLISHED,RELATED -j ACCEPT iptables -A OUTPUT -m state --state NEW,ESTABLISHED,RELATED -j ACCEPT iptables -A INPUT -i eth1 -s 192.168.2.0/24 -d 192.168.2.1 -m state --state NEW -j ACCEPT iptables -A INPUT -m state --state ESTABLISHED,RELATED -j ACCEPT ifconfig eth0:1 172.30.1.108 netmask 255.255.255.0 broadcast 172.30.1.255 iptables -t nat -A PREROUTING -i eth0 -d 172.30.1.108 -j DNAT --to-destination 192.168.2.9 iptables -t nat -A POSTROUTING -o eth0 -s 192.168.2.9 -j SNAT --to-source 172.30.1.108 iptables -t nat -A POSTROUTING -o eth0 -s 192.168.2.0/24 -j SNAT --to-source 172.30.1.107 iptables -A INPUT -j LOG --log-level info --log-prefix "iptables INPUT: " iptables -A FORWARD -j LOG --log-level info --log-prefix "iptables FORWARD: "
top

NAT - Port forwarding
[root@elrond sysconfig]# cat iptables # Generated by iptables-save v1.4.7 on Sat Nov 19 08:25:01 2011 *nat :PREROUTING ACCEPT [1216:196031] :POSTROUTING ACCEPT [8:510] :OUTPUT ACCEPT [3:210] # Redirect incoming public IP traffic based on destination port -A PREROUTING -d 172.30.4.253/32 -p tcp -m tcp --dport 22 -j DNAT --to-destination 192.168.2.200 -A PREROUTING -d 172.30.4.253/32 -p tcp -m tcp --dport 23 -j DNAT --to-destination 192.168.2.9 -A PREROUTING -d 172.30.4.253/32 -p tcp -m tcp --dport 3389 -j DNAT --to-destination 192.168.2.100 # Internet for Rivendell hosts using NAT -A POSTROUTING -s 192.168.2.9/32 -o eth0 -j SNAT --to-source 172.30.4.253 -A POSTROUTING -s 192.168.2.0/24 -o eth0 -j SNAT --to-source 172.30.4.252 COMMIT # Completed on Sat Nov 19 08:25:01 2011 # Generated by iptables-save v1.4.7 on Sat Nov 19 08:25:01 2011 *filter :INPUT DROP [894:156935] :FORWARD DROP [7:668] :OUTPUT DROP [0:0] -A INPUT -m state --state RELATED,ESTABLISHED -j ACCEPT -A INPUT -s 192.168.2.0/24 -d 192.168.2.1/32 -i eth1 -m state --state NEW -j ACCEPT -A INPUT -j LOG --log-prefix "iptables INPUT:" --log-level 6 -A FORWARD -m state --state RELATED,ESTABLISHED -j ACCEPT -A FORWARD -s 192.168.2.0/24 -m state --state NEW -j ACCEPT -A FORWARD -d 192.168.2.200/32 -p tcp -m state --state NEW -m tcp --dport 22 -j ACCEPT -A FORWARD -d 192.168.2.9/32 -p tcp -m state --state NEW -m tcp --dport 23 -j ACCEPT -A FORWARD -d 192.168.2.100/32 -p tcp -m state --state NEW -m tcp --dport 3389 -j ACCEPT -A FORWARD -j LOG --log-prefix "iptables FORWARD:" --log-level 6 -A OUTPUT -m state --state NEW,RELATED,ESTABLISHED -j ACCEPT COMMIT # Completed on Sat Nov 19 08:25:01 2011 top
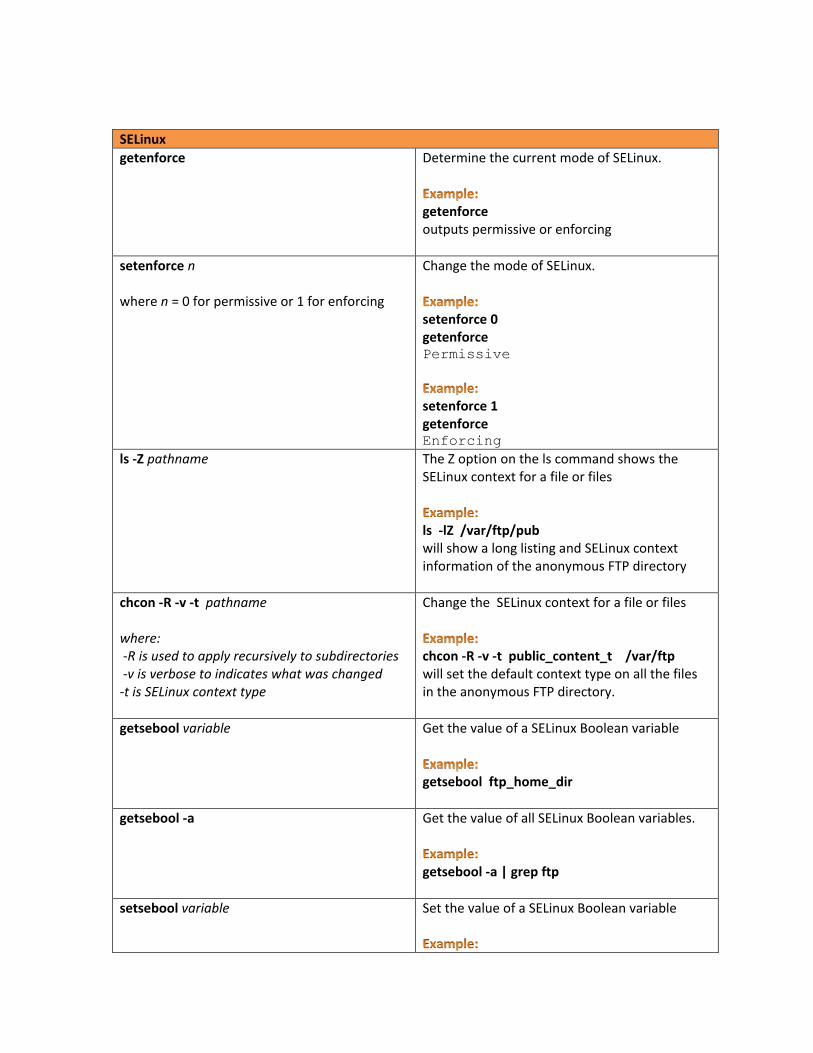
SELinux
getenforce
Determine the current mode of SELinux.
getenforce outputs permissive or enforcing
setenforce n where n = 0 for permissive or 1 for enforcing
Change the mode of SELinux.
setenforce 0 getenforce Permissive
setenforce 1 getenforce Enforcing
ls -Z pathname The Z option on the ls command shows the SELinux context for a file or files
ls -lZ /var/ftp/pub will show a long listing and SELinux context information of the anonymous FTP directory
chcon -R -v -t pathname where: -R is used to apply recursively to subdirectories -v is verbose to indicates what was changed -t is SELinux context type
Change the SELinux context for a file or files
chcon -R -v -t public_content_t /var/ftp will set the default context type on all the files in the anonymous FTP directory.
getsebool variable
Get the value of a SELinux Boolean variable
getsebool ftp_home_dir
getsebool -a Get the value of all SELinux Boolean variables.
getsebool -a | grep ftp
setsebool variable
Set the value of a SELinux Boolean variable

setsebool -P ftp_homedir=1
top
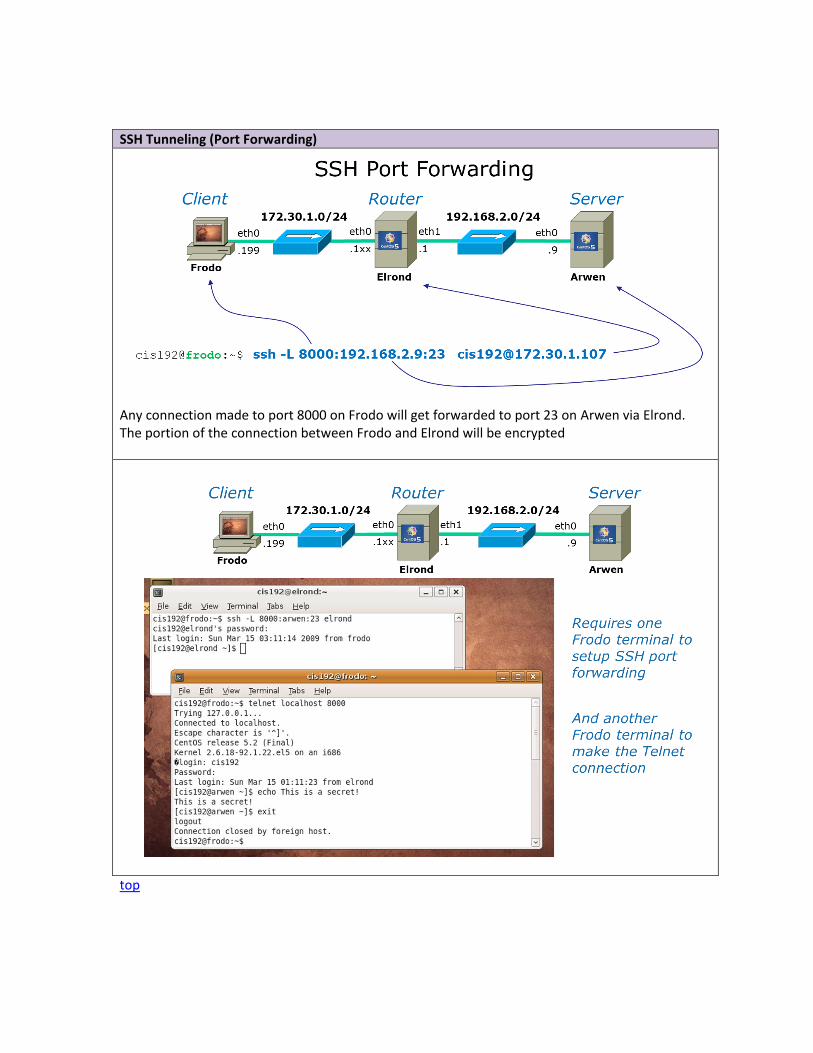
SSH Tunneling (Port Forwarding)
Any connection made to port 8000 on Frodo will get forwarded to port 23 on Arwen via Elrond. The portion of the connection between Frodo and Elrond will be encrypted
top
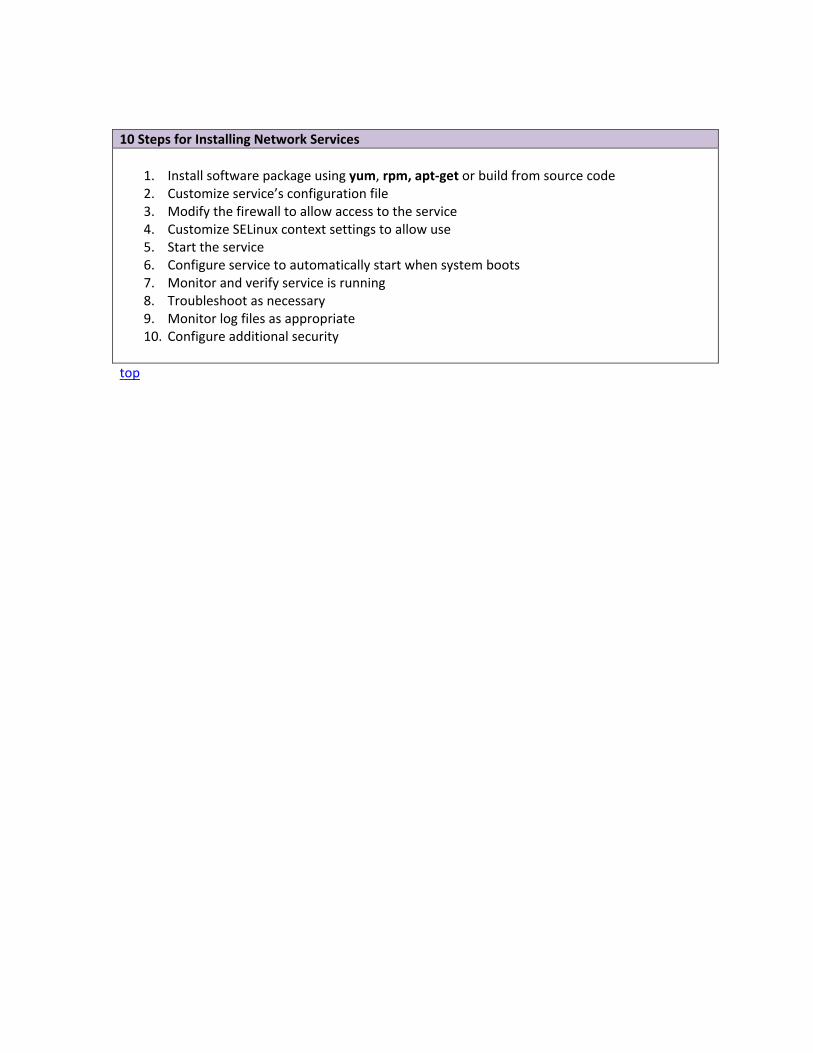
10 Steps for Installing Network Services
1. Install software package using yum, rpm, apt-get or build from source code 2. Customize service’s configuration file 3. Modify the firewall to allow access to the service 4. Customize SELinux context settings to allow use 5. Start the service 6. Configure service to automatically start when system boots 7. Monitor and verify service is running 8. Troubleshoot as necessary 9. Monitor log files as appropriate 10. Configure additional security
top
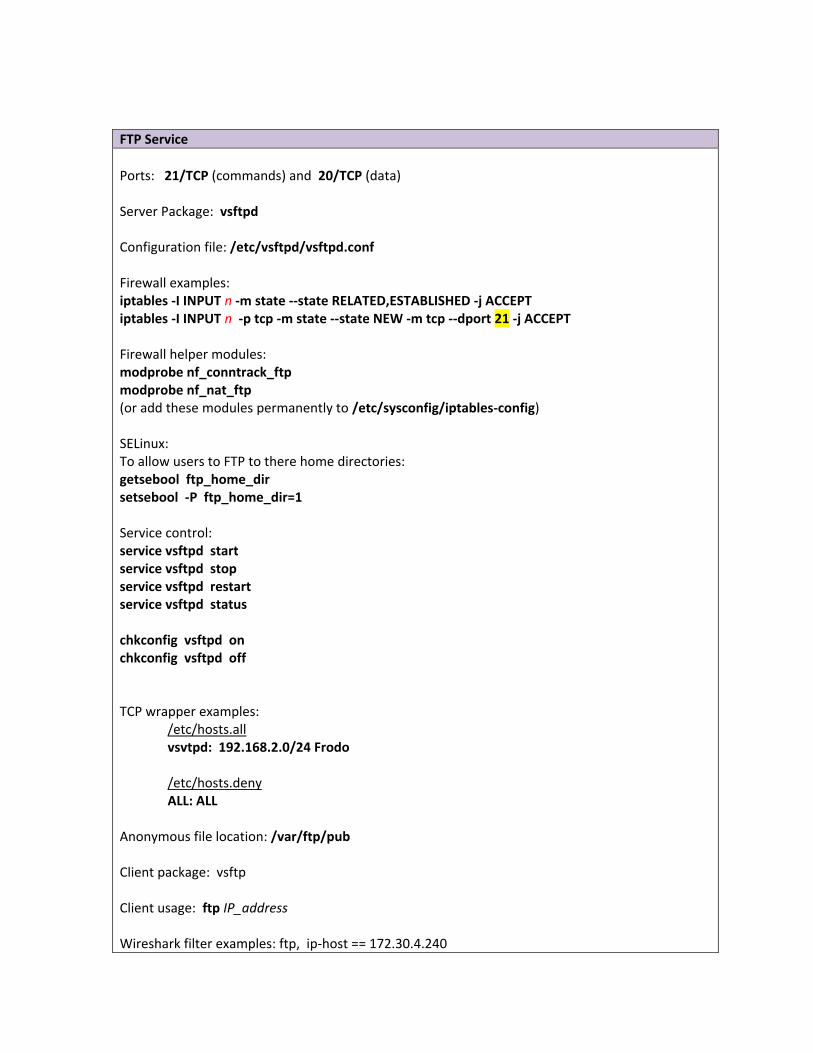
FTP Service
Ports: 21/TCP (commands) and 20/TCP (data) Server Package: vsftpd Configuration file: /etc/vsftpd/vsftpd.conf Firewall examples: iptables -I INPUT n -m state --state RELATED,ESTABLISHED -j ACCEPT iptables -I INPUT n -p tcp -m state --state NEW -m tcp --dport 21 -j ACCEPT Firewall helper modules: modprobe nf_conntrack_ftp modprobe nf_nat_ftp (or add these modules permanently to /etc/sysconfig/iptables-config) SELinux: To allow users to FTP to there home directories: getsebool ftp_home_dir setsebool -P ftp_home_dir=1 Service control: service vsftpd start service vsftpd stop service vsftpd restart service vsftpd status chkconfig vsftpd on chkconfig vsftpd off TCP wrapper examples:
/etc/hosts.all vsvtpd: 192.168.2.0/24 Frodo /etc/hosts.deny ALL: ALL
Anonymous file location: /var/ftp/pub Client package: vsftp Client usage: ftp IP_address Wireshark filter examples: ftp, ip-host == 172.30.4.240

top
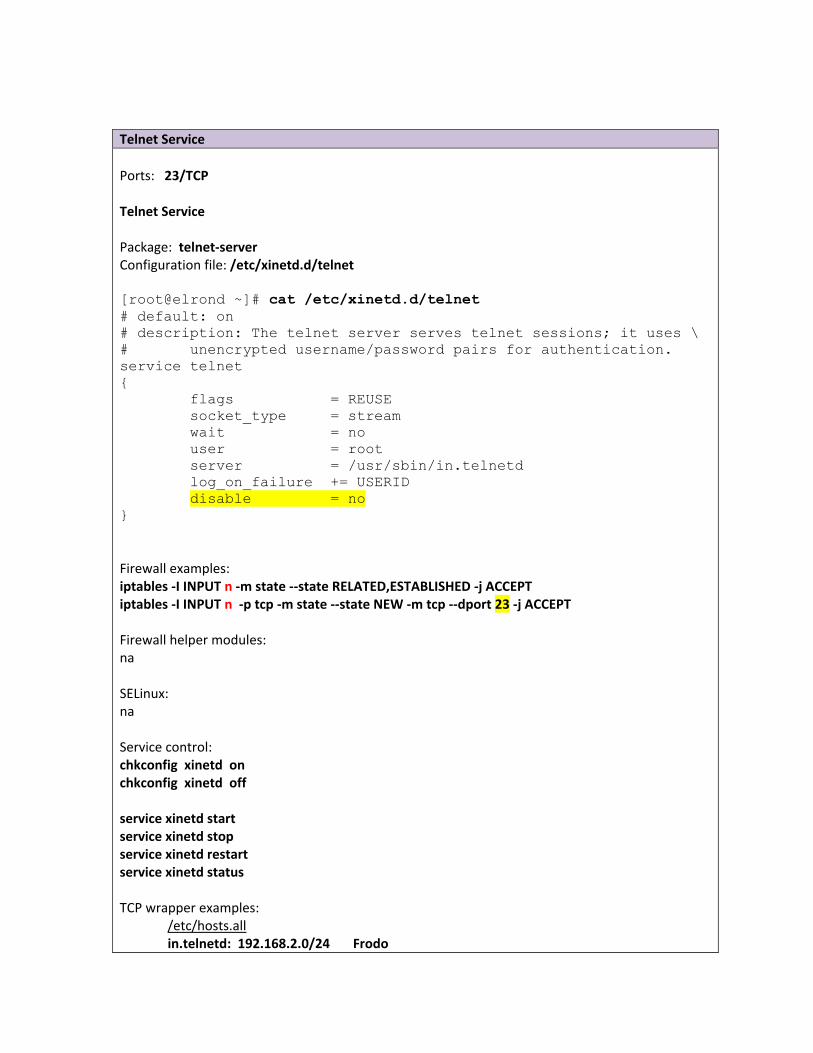
Telnet Service
Ports: 23/TCP Telnet Service Package: telnet-server Configuration file: /etc/xinetd.d/telnet [root@elrond ~]# cat /etc/xinetd.d/telnet
# default: on
# description: The telnet server serves telnet sessions; it uses \
# unencrypted username/password pairs for authentication.
service telnet
{
flags = REUSE
socket_type = stream
wait = no
user = root
server = /usr/sbin/in.telnetd
log_on_failure += USERID
disable = no
}
Firewall examples: iptables -I INPUT n -m state --state RELATED,ESTABLISHED -j ACCEPT iptables -I INPUT n -p tcp -m state --state NEW -m tcp --dport 23 -j ACCEPT Firewall helper modules: na SELinux: na Service control: chkconfig xinetd on chkconfig xinetd off service xinetd start service xinetd stop service xinetd restart service xinetd status TCP wrapper examples:
/etc/hosts.all in.telnetd: 192.168.2.0/24 Frodo

/etc/hosts.deny ALL: ALL
Telnet Client package: telnet Usage: telnet IP_address [port] Wireshark filter: tcp.port == 23 and ip.addr == xxx.xxx.xxx.xxx
top
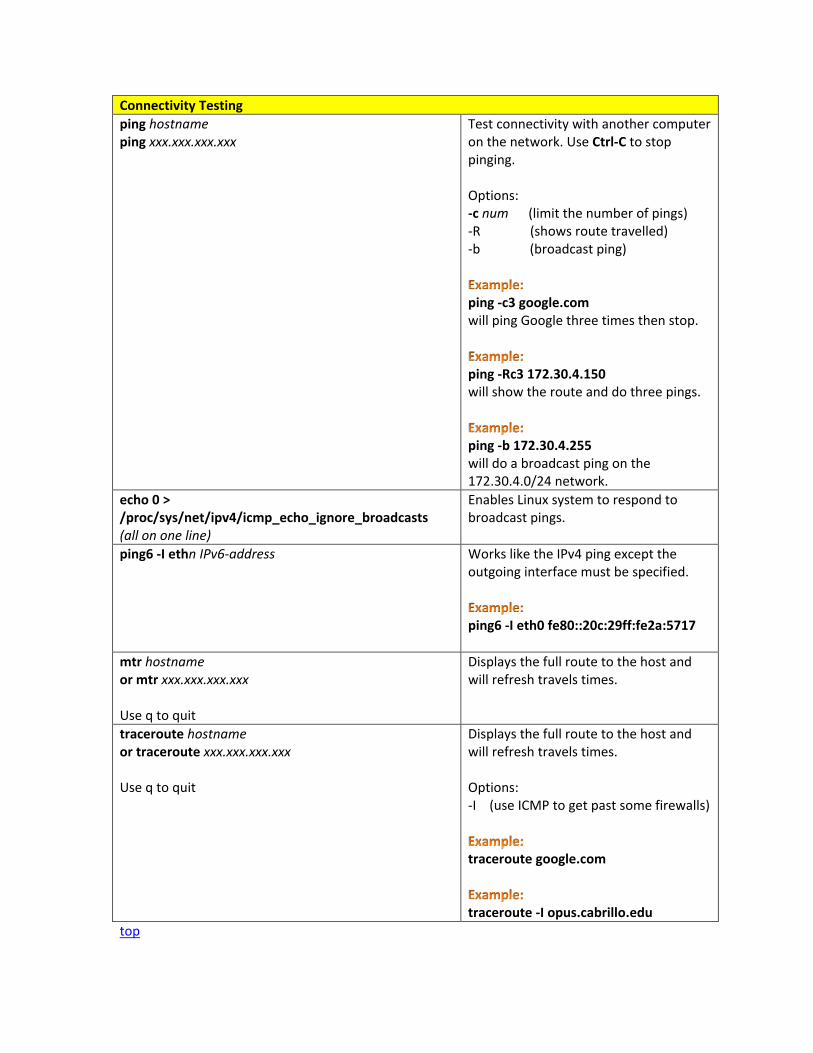
Connectivity Testing
ping hostname ping xxx.xxx.xxx.xxx
Test connectivity with another computer on the network. Use Ctrl-C to stop pinging. Options: -c num (limit the number of pings) -R (shows route travelled) -b (broadcast ping)
ping -c3 google.com will ping Google three times then stop.
ping -Rc3 172.30.4.150 will show the route and do three pings.
ping -b 172.30.4.255 will do a broadcast ping on the 172.30.4.0/24 network.
echo 0 > /proc/sys/net/ipv4/icmp_echo_ignore_broadcasts (all on one line)
Enables Linux system to respond to broadcast pings.
ping6 -I ethn IPv6-address Works like the IPv4 ping except the outgoing interface must be specified.
ping6 -I eth0 fe80::20c:29ff:fe2a:5717
mtr hostname or mtr xxx.xxx.xxx.xxx Use q to quit
Displays the full route to the host and will refresh travels times.
traceroute hostname or traceroute xxx.xxx.xxx.xxx Use q to quit
Displays the full route to the host and will refresh travels times. Options: -I (use ICMP to get past some firewalls)
traceroute google.com
traceroute -I opus.cabrillo.edu
top
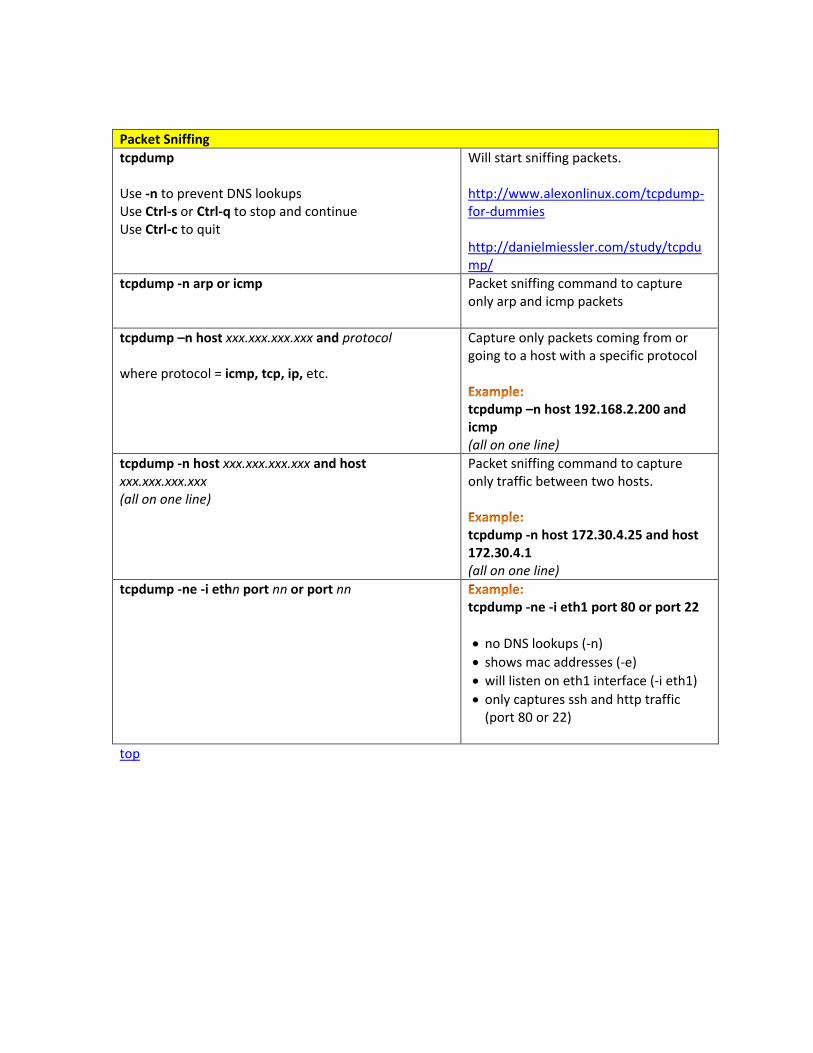
Packet Sniffing
tcpdump Use -n to prevent DNS lookups Use Ctrl-s or Ctrl-q to stop and continue Use Ctrl-c to quit
Will start sniffing packets. http://www.alexonlinux.com/tcpdump-for-dummies http://danielmiessler.com/study/tcpdump/
tcpdump -n arp or icmp
Packet sniffing command to capture only arp and icmp packets
tcpdump –n host xxx.xxx.xxx.xxx and protocol where protocol = icmp, tcp, ip, etc.
Capture only packets coming from or going to a host with a specific protocol
tcpdump –n host 192.168.2.200 and icmp (all on one line)
tcpdump -n host xxx.xxx.xxx.xxx and host xxx.xxx.xxx.xxx (all on one line)
Packet sniffing command to capture only traffic between two hosts.
tcpdump -n host 172.30.4.25 and host 172.30.4.1 (all on one line)
tcpdump -ne -i ethn port nn or port nn
tcpdump -ne -i eth1 port 80 or port 22
no DNS lookups (-n)
shows mac addresses (-e)
will listen on eth1 interface (-i eth1)
only captures ssh and http traffic (port 80 or 22)
top
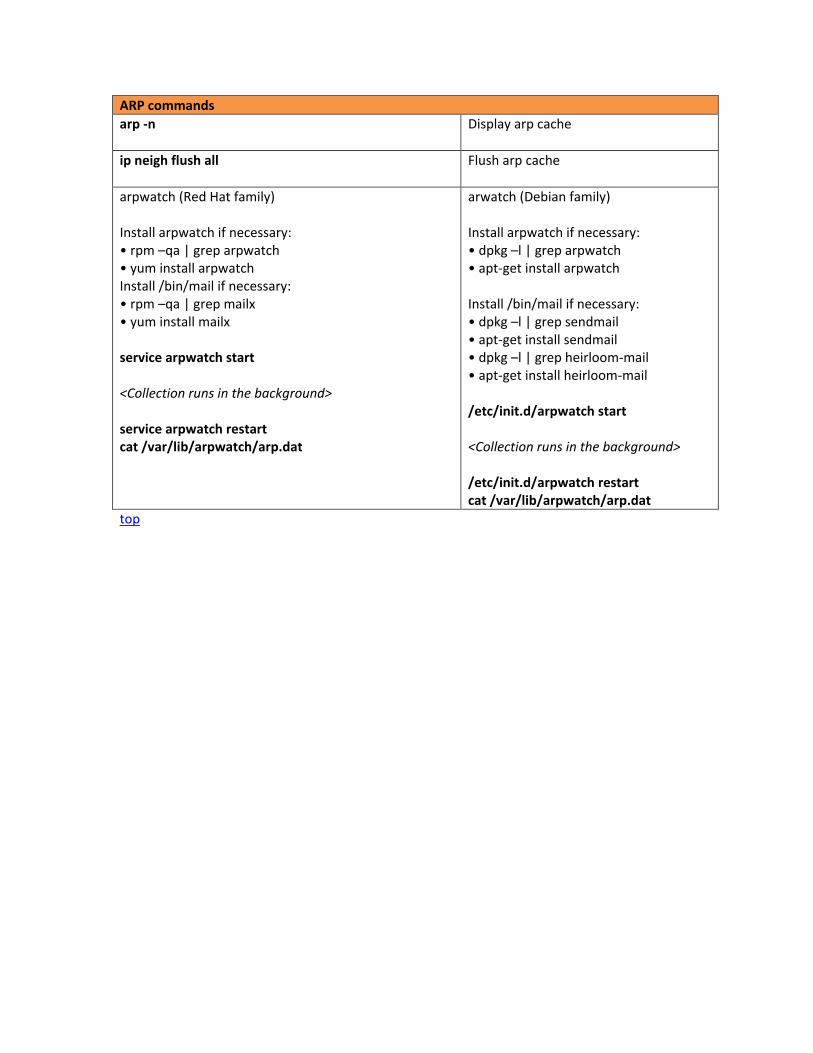
ARP commands
arp -n Display arp cache
ip neigh flush all Flush arp cache
arpwatch (Red Hat family) Install arpwatch if necessary: • rpm –qa | grep arpwatch • yum install arpwatch Install /bin/mail if necessary: • rpm –qa | grep mailx • yum install mailx service arpwatch start <Collection runs in the background> service arpwatch restart cat /var/lib/arpwatch/arp.dat
arwatch (Debian family) Install arpwatch if necessary: • dpkg –l | grep arpwatch • apt-get install arpwatch Install /bin/mail if necessary: • dpkg –l | grep sendmail • apt-get install sendmail • dpkg –l | grep heirloom-mail • apt-get install heirloom-mail /etc/init.d/arpwatch start <Collection runs in the background> /etc/init.d/arpwatch restart cat /var/lib/arpwatch/arp.dat
top
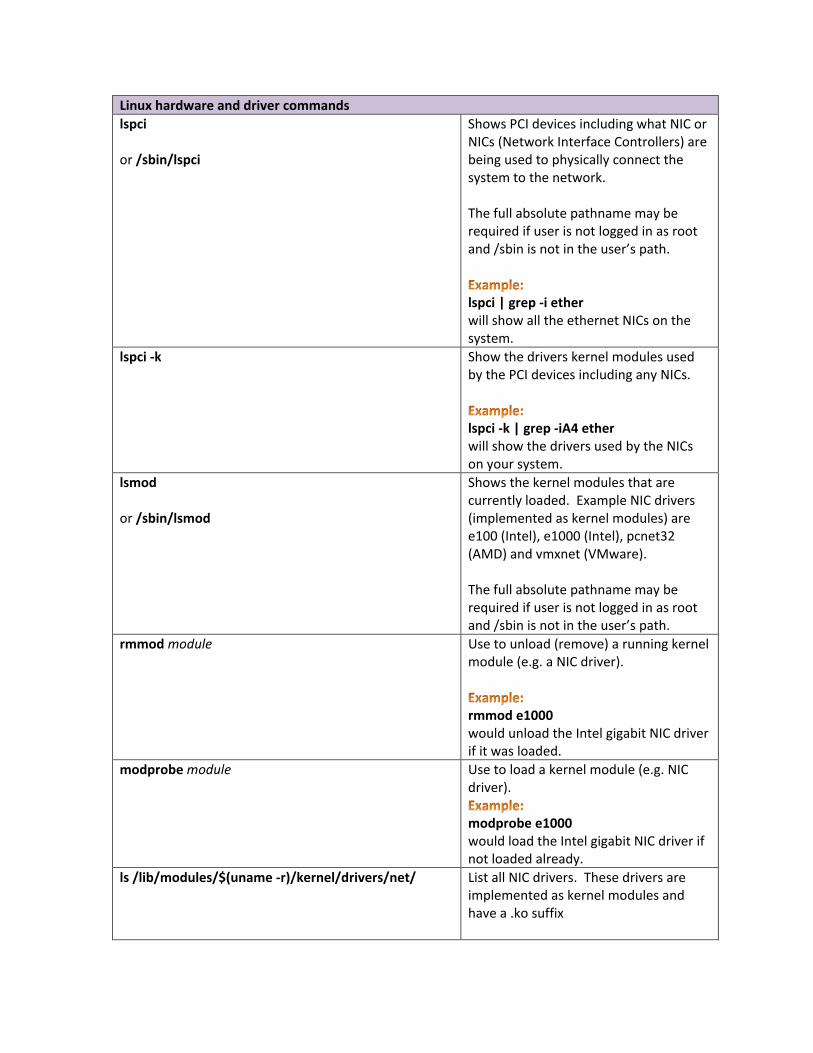
Linux hardware and driver commands
lspci or /sbin/lspci
Shows PCI devices including what NIC or NICs (Network Interface Controllers) are being used to physically connect the system to the network. The full absolute pathname may be required if user is not logged in as root and /sbin is not in the user’s path.
lspci | grep -i ether will show all the ethernet NICs on the system.
lspci -k Show the drivers kernel modules used by the PCI devices including any NICs.
lspci -k | grep -iA4 ether will show the drivers used by the NICs on your system.
lsmod or /sbin/lsmod
Shows the kernel modules that are currently loaded. Example NIC drivers (implemented as kernel modules) are e100 (Intel), e1000 (Intel), pcnet32 (AMD) and vmxnet (VMware). The full absolute pathname may be required if user is not logged in as root and /sbin is not in the user’s path.
rmmod module Use to unload (remove) a running kernel module (e.g. a NIC driver).
rmmod e1000 would unload the Intel gigabit NIC driver if it was loaded.
modprobe module Use to load a kernel module (e.g. NIC driver).
modprobe e1000 would load the Intel gigabit NIC driver if not loaded already.
ls /lib/modules/$(uname -r)/kernel/drivers/net/
List all NIC drivers. These drivers are implemented as kernel modules and have a .ko suffix

Information on older NIC drivers can be found here: http://www.tldp.org/HOWTO/text/Ethernet-HOWTO
ls /lib/modules/2.6.32-71.el6.i686/kernel/drivers/net/ (all on one line) will list all the network drivers on the CentOS VMs used in the Fall 2011 term.
top
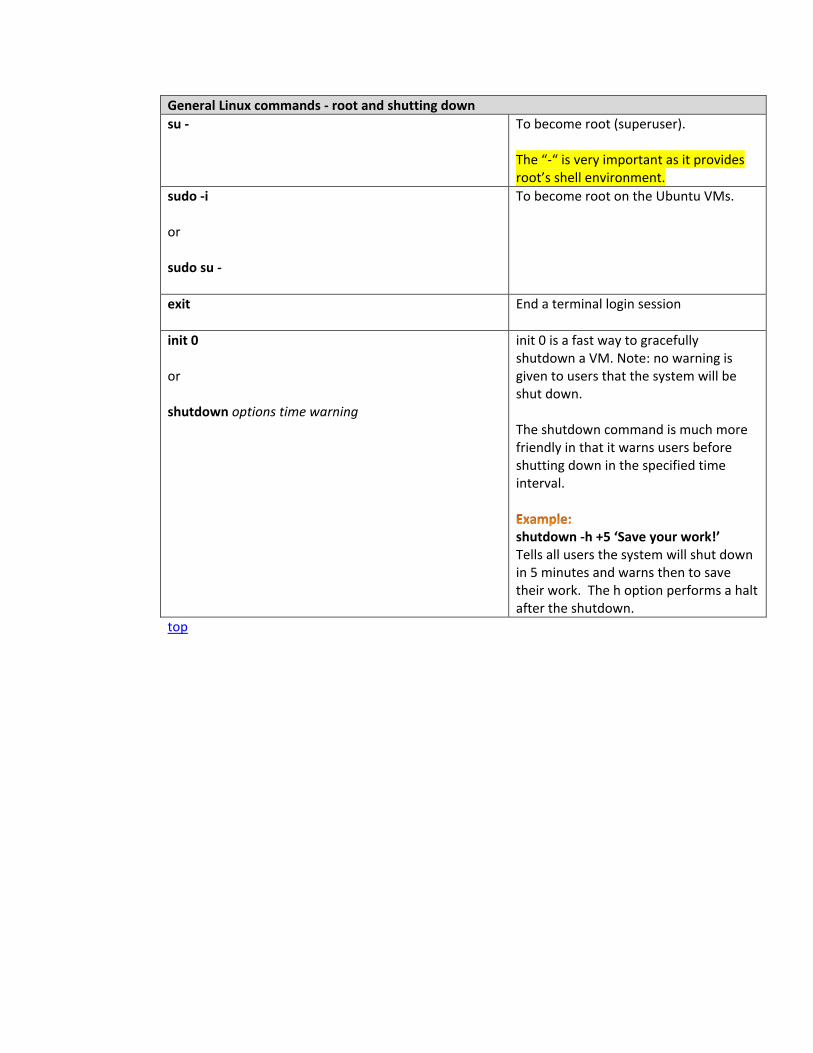
General Linux commands - root and shutting down
su - To become root (superuser). The “-“ is very important as it provides root’s shell environment.
sudo -i or sudo su -
To become root on the Ubuntu VMs.
exit End a terminal login session
init 0 or shutdown options time warning
init 0 is a fast way to gracefully shutdown a VM. Note: no warning is given to users that the system will be shut down. The shutdown command is much more friendly in that it warns users before shutting down in the specified time interval.
shutdown -h +5 ‘Save your work!’ Tells all users the system will shut down in 5 minutes and warns then to save their work. The h option performs a halt after the shutdown.
top
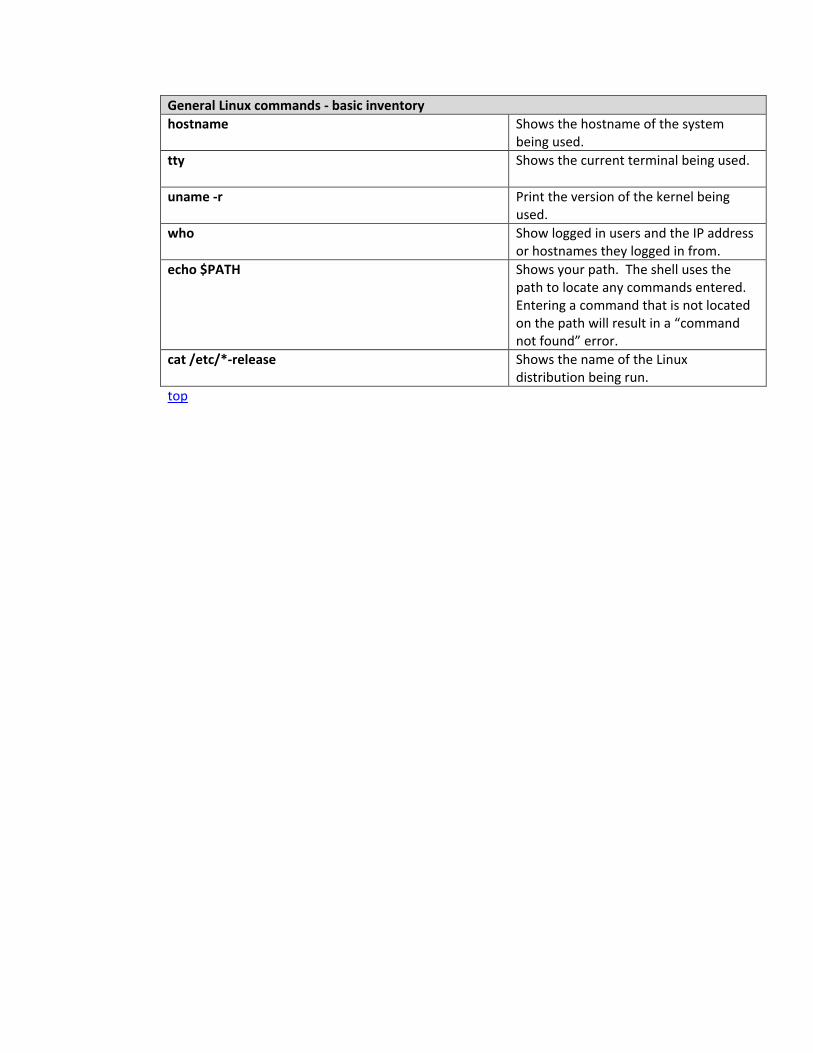
General Linux commands - basic inventory
hostname Shows the hostname of the system being used.
tty Shows the current terminal being used.
uname -r Print the version of the kernel being used.
who Show logged in users and the IP address or hostnames they logged in from.
echo $PATH Shows your path. The shell uses the path to locate any commands entered. Entering a command that is not located on the path will result in a “command not found” error.
cat /etc/*-release Shows the name of the Linux distribution being run.
top
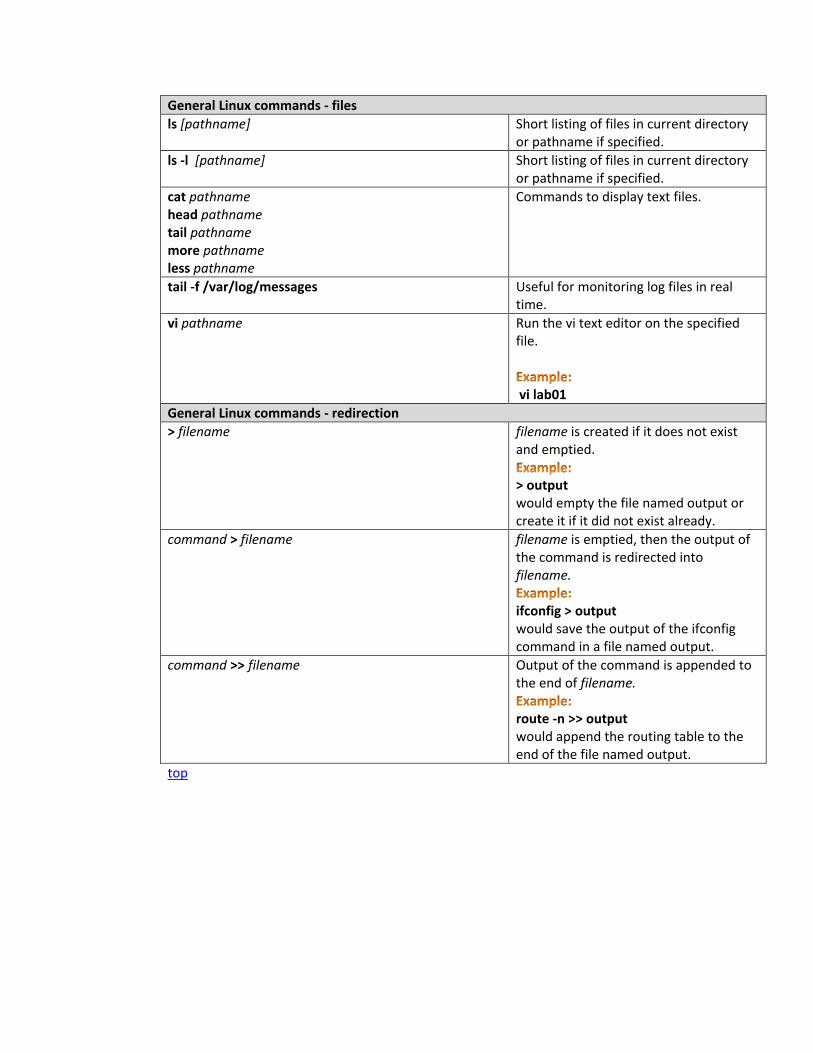
General Linux commands - files
ls [pathname] Short listing of files in current directory or pathname if specified.
ls -l [pathname] Short listing of files in current directory or pathname if specified.
cat pathname head pathname tail pathname more pathname less pathname
Commands to display text files.
tail -f /var/log/messages Useful for monitoring log files in real time.
vi pathname Run the vi text editor on the specified file.
vi lab01
General Linux commands - redirection
> filename filename is created if it does not exist and emptied.
> output would empty the file named output or create it if it did not exist already.
command > filename filename is emptied, then the output of the command is redirected into filename.
ifconfig > output would save the output of the ifconfig command in a file named output.
command >> filename Output of the command is appended to the end of filename.
route -n >> output would append the routing table to the end of the file named output.
top
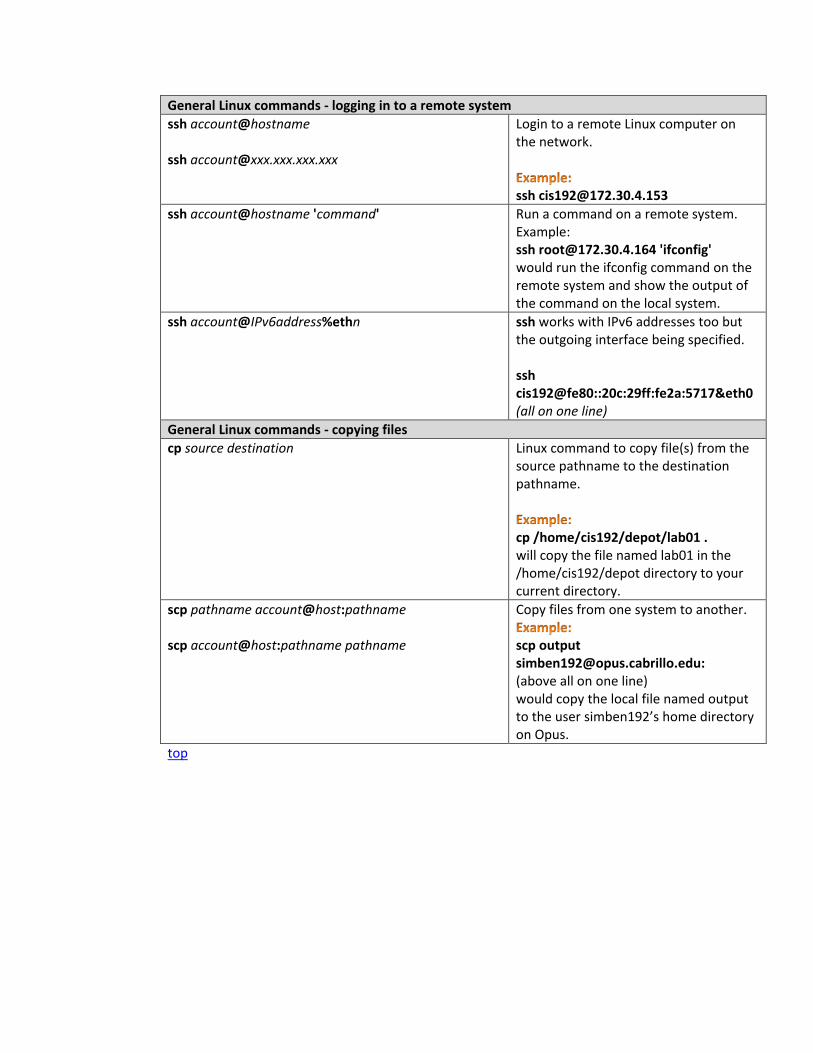
General Linux commands - logging in to a remote system
ssh account@hostname ssh [email protected]
Login to a remote Linux computer on the network.
ssh account@hostname 'command' Run a command on a remote system. Example: ssh [email protected] 'ifconfig' would run the ifconfig command on the remote system and show the output of the command on the local system.
ssh account@IPv6address%ethn ssh works with IPv6 addresses too but the outgoing interface being specified. ssh cis192@fe80::20c:29ff:fe2a:5717ð0 (all on one line)
General Linux commands - copying files
cp source destination Linux command to copy file(s) from the source pathname to the destination pathname.
cp /home/cis192/depot/lab01 . will copy the file named lab01 in the /home/cis192/depot directory to your current directory.
scp pathname account@host:pathname scp account@host:pathname pathname
Copy files from one system to another.
scp output [email protected]: (above all on one line) would copy the local file named output to the user simben192’s home directory on Opus.
top
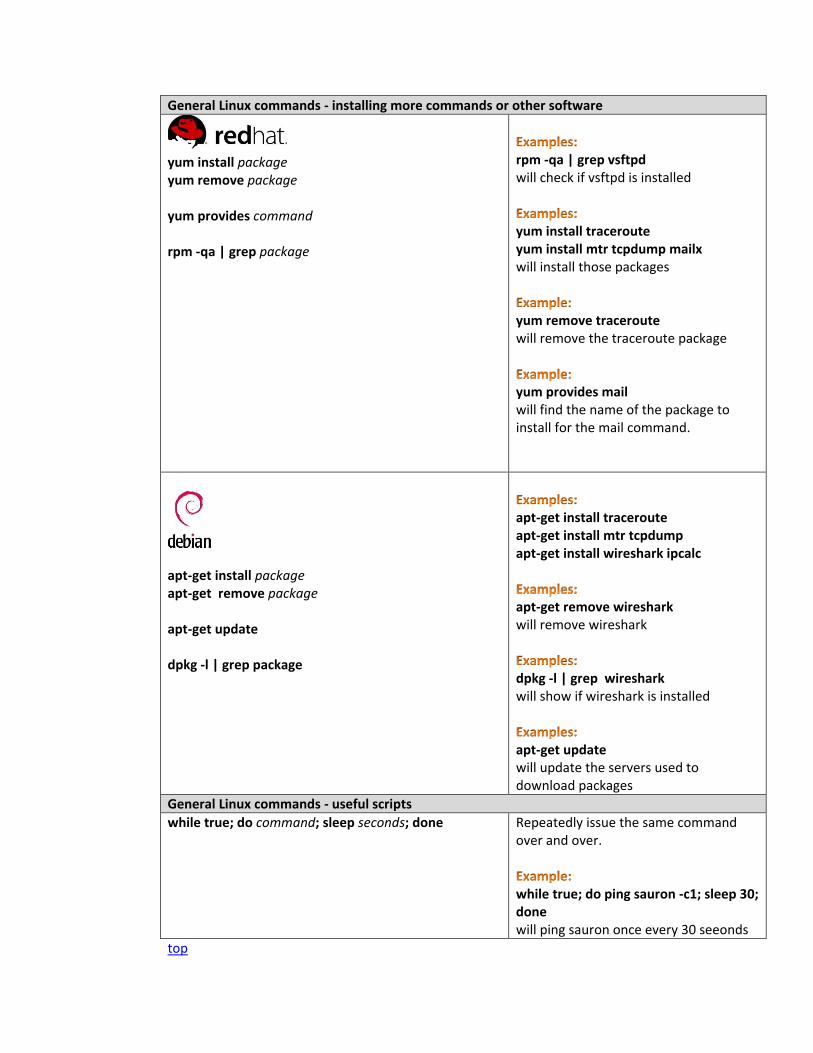
General Linux commands - installing more commands or other software
yum install package yum remove package yum provides command rpm -qa | grep package
rpm -qa | grep vsftpd will check if vsftpd is installed
yum install traceroute yum install mtr tcpdump mailx will install those packages
yum remove traceroute will remove the traceroute package
yum provides mail will find the name of the package to install for the mail command.
apt-get install package apt-get remove package apt-get update dpkg -l | grep package
apt-get install traceroute apt-get install mtr tcpdump apt-get install wireshark ipcalc
apt-get remove wireshark will remove wireshark
dpkg -l | grep wireshark will show if wireshark is installed
apt-get update will update the servers used to download packages
General Linux commands - useful scripts
while true; do command; sleep seconds; done Repeatedly issue the same command over and over.
while true; do ping sauron -c1; sleep 30; done will ping sauron once every 30 seeonds
top

VMware commands and operations
Change virtual terminals On PC Keyboard:
Method 1: While holding down the Ctrl-Alt keys, tap spacebar then tap f1, f2, ... or f7.
Method 2: While holding down Alt key, tap f1, f2, ... or f7. Does not always work but simpler than method 1.
On Mac keyboard:
Hold down Control and Option keys, tap the spacebar, hold down fn key (in addition to Control and Option keys) and tap f1, f2, ... or f7.
Change to a different virtual terminal on the VM. F7 is graphics mode for the Ubuntu VMs. The Centos VMs do not have graphics mode (init level 3 only) Note: the spacebar does not need to be tapped on a physical (non-VM) system. This is just required for changing virtual terminals on VMware VMs.
Copy/Paste (vSphere Client)
To enable this option for a specific virtual machine:
1. Log into a vCenter Server system using the vSphere Client and power off the virtual machine.
2. Select the virtual machine and click the Summary tab.
3. Click Edit Settings. 4. Navigate to Options > Advanced > General and
click Configuration Parameters. 5. Click Add Row. 6. Type these values in the Name and Value
columns:
o isolation.tools.copy.disable – false o isolation.tools.paste.disable – false
Note: These options override any settings made in the VMware Tools control panel of the guest operating system.
7. Click OK to close the Configuration Parameters dialog, and click OK again to close the Virtual Machine Properties dialog.
8. Power on the virtual machine.
Copy/Paste (ESXi server)
To enable this option for all the virtual machines in the ESX/ESXi host:
1. Log in to the ESX/ESXi host as a root user and open the /etc/vmware/config file using a text editor.
2. Add these entries to the file: isolation.tools.copy.disable="FALSE" isolation.tools.paste.disable="FALSE"
Save and close the file. The Copy and Paste options are only enabled when the virtual machines restart or resume the next time.
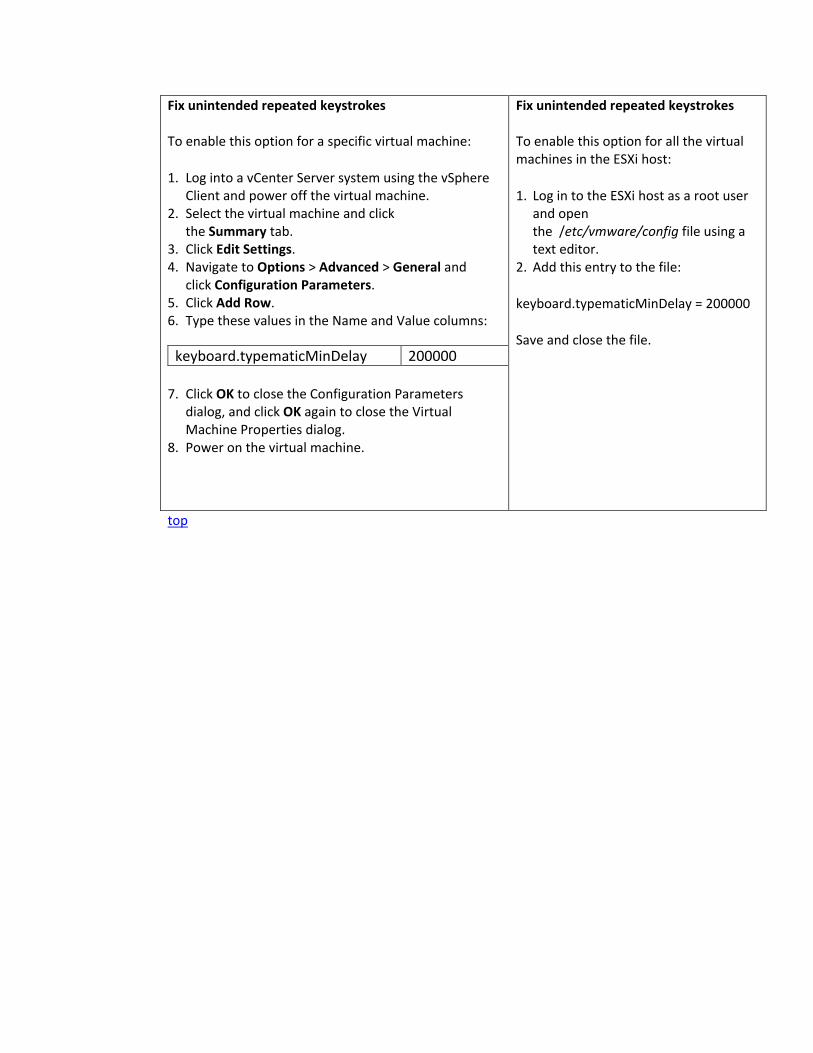
Fix unintended repeated keystrokes
To enable this option for a specific virtual machine:
1. Log into a vCenter Server system using the vSphere Client and power off the virtual machine.
2. Select the virtual machine and click the Summary tab.
3. Click Edit Settings. 4. Navigate to Options > Advanced > General and
click Configuration Parameters. 5. Click Add Row. 6. Type these values in the Name and Value columns:
keyboard.typematicMinDelay 200000
7. Click OK to close the Configuration Parameters dialog, and click OK again to close the Virtual Machine Properties dialog.
8. Power on the virtual machine.
Fix unintended repeated keystrokes
To enable this option for all the virtual machines in the ESXi host:
1. Log in to the ESXi host as a root user and open the /etc/vmware/config file using a text editor.
2. Add this entry to the file:
keyboard.typematicMinDelay = 200000
Save and close the file.
top


![Cisco TelePresence MCU 4500 Series Getting started · static A [] ... Creating conferences To create a conference:](https://img.pdfslide.us/doc/110x75/6032b7b62512c65c245d7c88/cisco-telepresence-mcu-4500-series-getting-started-static-a-creating-conferences.jpg)


![Bobcat GEV Linux Installer Manual - Imperx Website...[users@testbuilder ~]$ ifconfig enp5s0 inet 10.10.0.1 netmask 255.255.255.0 Verify interfaces are setup. [users@testbuilder ~]$](https://img.pdfslide.us/doc/110x75/5e4638e19c2c385f6f638691/bobcat-gev-linux-installer-manual-imperx-website-userstestbuilder-ifconfig.jpg)