Embed Size (px)
Citation preview
January 2013
1 Auditing Firewalls via Packet Crafting with HPing and Nemesis
Andy Wood
Introduction A firewall is usually the first security measure that a threat actor
will be faced with when attacking a network.
The firewall is responsible for ensuring separation of traffic from
one domain to another by a predefined policy. The firewall will
inspect each packet and compare against a set of rules, those
which match are permitted through, and those which don’t match
a rule are denied.
Depending on the network security architecture this can be true
not only for external threats but also from internal threats.
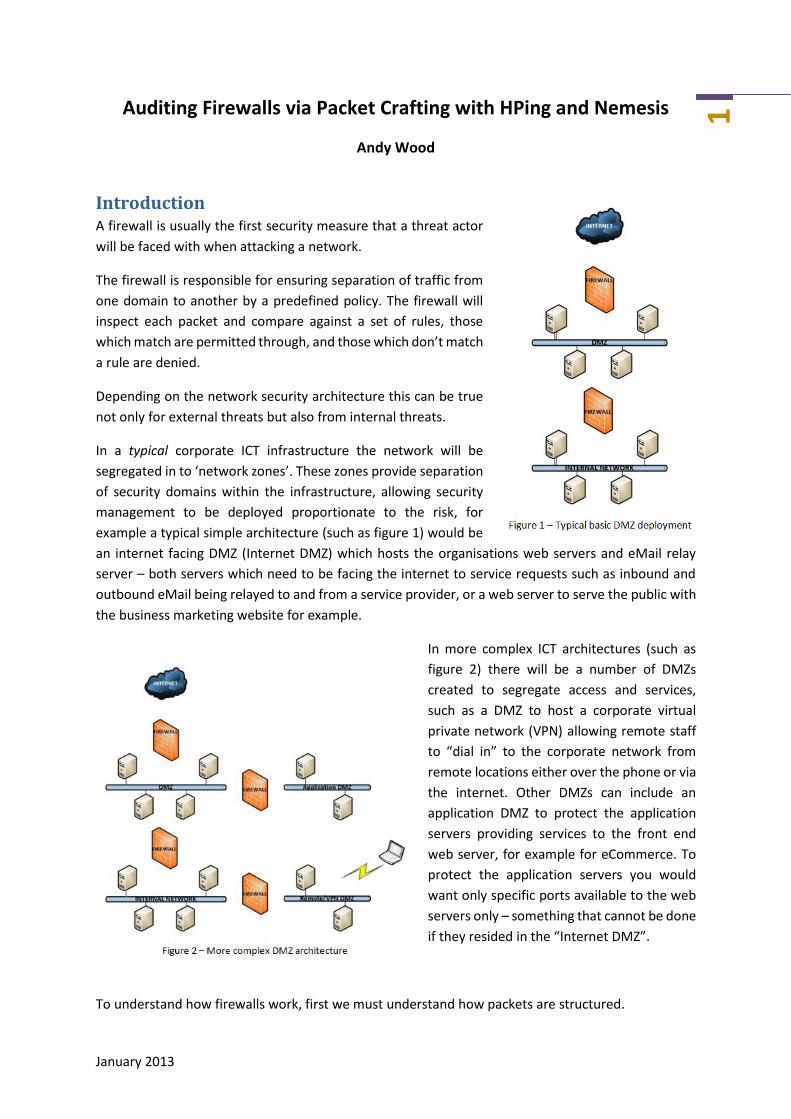
In a typical corporate ICT infrastructure the network will be
segregated in to ‘network zones’. These zones provide separation
of security domains within the infrastructure, allowing security
management to be deployed proportionate to the risk, for
example a typical simple architecture (such as figure 1) would be
an internet facing DMZ (Internet DMZ) which hosts the organisations web servers and eMail relay
server – both servers which need to be facing the internet to service requests such as inbound and
outbound eMail being relayed to and from a service provider, or a web server to serve the public with
the business marketing website for example.
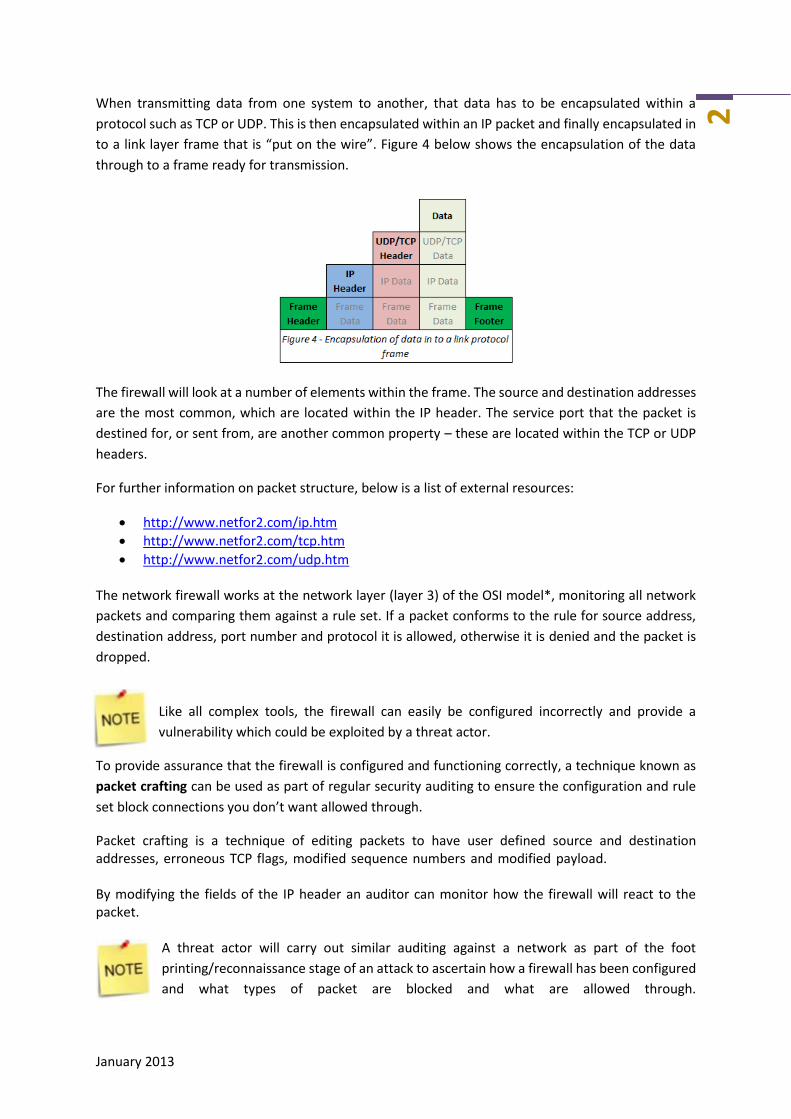
In more complex ICT architectures (such as
figure 2) there will be a number of DMZs
created to segregate access and services,
such as a DMZ to host a corporate virtual
private network (VPN) allowing remote staff
to “dial in” to the corporate network from
remote locations either over the phone or via
the internet. Other DMZs can include an
application DMZ to protect the application
servers providing services to the front end
web server, for example for eCommerce. To
protect the application servers you would
want only specific ports available to the web
servers only – something that cannot be done
if they resided in the “Internet DMZ”.
To understand how firewalls work, first we must understand how packets are structured.
January 2013
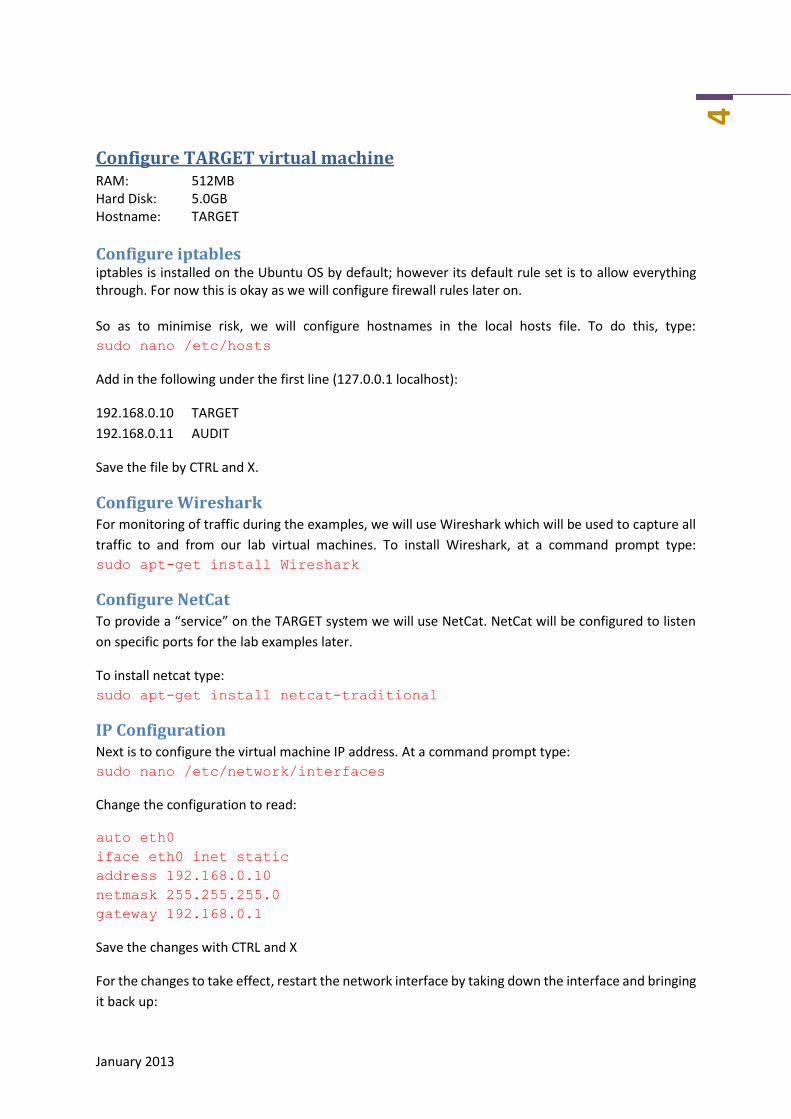
2 When transmitting data from one system to another, that data has to be encapsulated within a
protocol such as TCP or UDP. This is then encapsulated within an IP packet and finally encapsulated in
to a link layer frame that is “put on the wire”. Figure 4 below shows the encapsulation of the data
through to a frame ready for transmission.
The firewall will look at a number of elements within the frame. The source and destination addresses
are the most common, which are located within the IP header. The service port that the packet is
destined for, or sent from, are another common property – these are located within the TCP or UDP
headers.
For further information on packet structure, below is a list of external resources:
http://www.netfor2.com/ip.htm
http://www.netfor2.com/tcp.htm
http://www.netfor2.com/udp.htm
The network firewall works at the network layer (layer 3) of the OSI model*, monitoring all network
packets and comparing them against a rule set. If a packet conforms to the rule for source address,
destination address, port number and protocol it is allowed, otherwise it is denied and the packet is
dropped.
Like all complex tools, the firewall can easily be configured incorrectly and provide a
vulnerability which could be exploited by a threat actor.
To provide assurance that the firewall is configured and functioning correctly, a technique known as
packet crafting can be used as part of regular security auditing to ensure the configuration and rule
set block connections you don’t want allowed through.
Packet crafting is a technique of editing packets to have user defined source and destination addresses, erroneous TCP flags, modified sequence numbers and modified payload. inspect at OSI layer 7 – Application. By modifying the fields of the IP header an auditor can monitor how the firewall will react to the packet.
A threat actor will carry out similar auditing against a network as part of the foot
printing/reconnaissance stage of an attack to ascertain how a firewall has been configured
and what types of packet are blocked and what are allowed through.

January 2013
3 Typical tools which can be used for packet crafting include hping, Nemesis and Cat Karat Packet
Builder.
In this paper we will be using the tools hping3 (latest version of the tool) and Nemesis. Both tools
provide command line packet crafting. Hping is a small, easily installed tool for TCP, UDP, IP and IP-
RAW protocol crafting – especially good for the higher OSI layers. Although Nemesis also provides
these protocols, in addition it can cover some of the lower OSI layer protocols such as routing (RIP)
and ARP and IGMP packet crafting.
To facilitate testing of the packet crafting technique in a lab environment a software based firewall
called iptables will be used. The techniques work exactly the same on appliance based firewalls.
Test Environment Build
Before any experiments can be carried out, a test environment needs to be built to ensure the
activities are carried out safely without risk to any live infrastructure.
In the test environment you will need two Linux (Ubuntu v12) virtual machines. One will be the target
system that will run a host based firewall (iptables); Wireshark packet analyser and netcat to provide
a “service”. The other machine will be used to conduct the audit from, using hping3.
While the virtual machines are being built, they should be connected to the host network via NAT as
internet access will be required to download the software from the repositories. In VMware Player
this is done by configuring virtual machine settings > Network Adaptor and selecting “NAT: Used to
share the host’s IP address”.
Virtual Machine settings within VMware Player.
January 2013
4
Configure TARGET virtual machine RAM: 512MB Hard Disk: 5.0GB Hostname: TARGET
Configure iptables iptables is installed on the Ubuntu OS by default; however its default rule set is to allow everything through. For now this is okay as we will configure firewall rules later on. So as to minimise risk, we will configure hostnames in the local hosts file. To do this, type:
sudo nano /etc/hosts
Add in the following under the first line (127.0.0.1 localhost):
192.168.0.10 TARGET
192.168.0.11 AUDIT
Save the file by CTRL and X.
Configure Wireshark For monitoring of traffic during the examples, we will use Wireshark which will be used to capture all
traffic to and from our lab virtual machines. To install Wireshark, at a command prompt type:
sudo apt-get install Wireshark
Configure NetCat To provide a “service” on the TARGET system we will use NetCat. NetCat will be configured to listen
on specific ports for the lab examples later.
To install netcat type:
sudo apt-get install netcat-traditional
IP Configuration
Next is to configure the virtual machine IP address. At a command prompt type:
sudo nano /etc/network/interfaces
Change the configuration to read:
auto eth0
iface eth0 inet static
address 192.168.0.10
netmask 255.255.255.0
gateway 192.168.0.1
Save the changes with CTRL and X
For the changes to take effect, restart the network interface by taking down the interface and bringing
it back up:

January 2013
5 sudo ifdown eth0
sudo ifup eth0
Configure AUDIT virtual machine RAM: 512MB Hard Disk: 5.0GB Hostname: AUDIT
Install HPing First is to install hping3 which will be used to craft packets. At a command prompt:
sudo apt-get install hping3
Install Nemesis To install Nemesis (http://nemesis.sourceforge.net) there are some pre-requisite libraries which need
to be installed first.
Change to root:
sudo su
Step One: Install dependencies (accept all default answers):
apt-get install libdnet-dev
apt-get install libpcap-dev
Step Two: Install libnet (accept all default answers):
cd /usr
mkdir nembuild
cd nembuild
wget http://ips-builder.googlecode.com/files/libnet-1.0.2a.tar.gz
tar -xf libnet-1.0.2a.tar.gz
cd Libnet-1.0.2a
./configure
make && make install
Step Three: Install Nemesis (accept all default answers)::
cd /usr/nembuild
wget http://prdownloads.sourceforge.net/nemesis/nemesis-1.4.tar.gz
tar -xf nemesis-1.4.tar.gz
cd nemesis-1.4
./configure --with-libnet-includes=/usr/nembuild/Libnet-
1.0.2a/include --with-libnet-libraries=/usr/nembuild/Libnet-
1.0.2a/lib
make && make install

January 2013
6
Once complete, type:
nemesis
And you should get:
Type exit to leave root privileges.
Configure IP address Next is to configure the IP address. At a command prompt type:
sudo nano /etc/network/interfaces
Change the configuration file to read:
auto eth0
iface eth0 inet static
address 192.168.0.11
netmask 255.255.255.0
gateway 192.168.0.1
Save the changes with CTRL and X
For the changes to take effect, restart the network interface by taking down the interface and bringing
it up:
sudo ifdown eth0
sudo ifup eth0
Again, like the TARGET system, so as to minimise risk when we carry out our testing later, we will
configure hostnames in the local hosts file. To do this, from the command prompt:
sudo nano /etc/hosts
January 2013
7
Add in the following under the first line:
192.168.0.10 TARGET
192.168.0.11 AUDIT
Save the file by CTRL and X.
Isolate the VMs This concludes the installation; we now need to change the virtual networking to a private LAN
between the two virtual machines.
Power down both virtual machines.
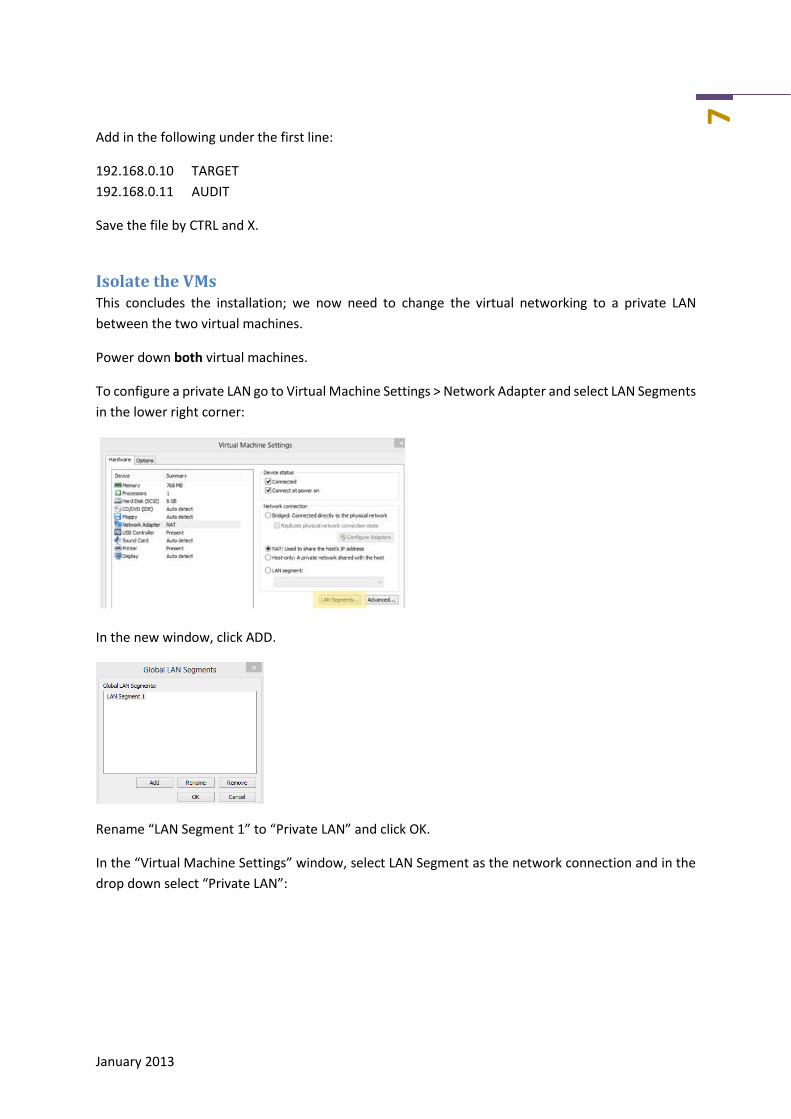
To configure a private LAN go to Virtual Machine Settings > Network Adapter and select LAN Segments
in the lower right corner:
In the new window, click ADD.
Rename “LAN Segment 1” to “Private LAN” and click OK.
In the “Virtual Machine Settings” window, select LAN Segment as the network connection and in the
drop down select “Private LAN”:
January 2013
8
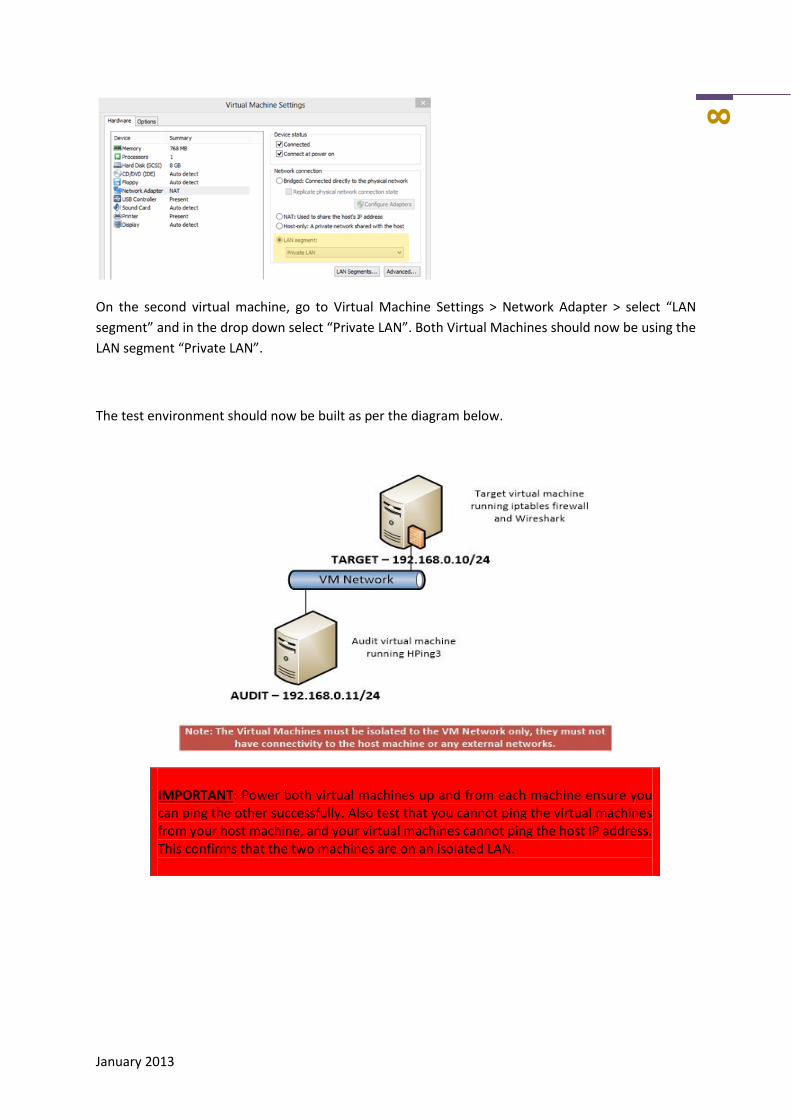
On the second virtual machine, go to Virtual Machine Settings > Network Adapter > select “LAN
segment” and in the drop down select “Private LAN”. Both Virtual Machines should now be using the
LAN segment “Private LAN”.
The test environment should now be built as per the diagram below.
IMPORTANT: Power both virtual machines up and from each machine ensure you can ping the other successfully. Also test that you cannot ping the virtual machines from your host machine, and your virtual machines cannot ping the host IP address. This confirms that the two machines are on an isolated LAN.
January 2013
9
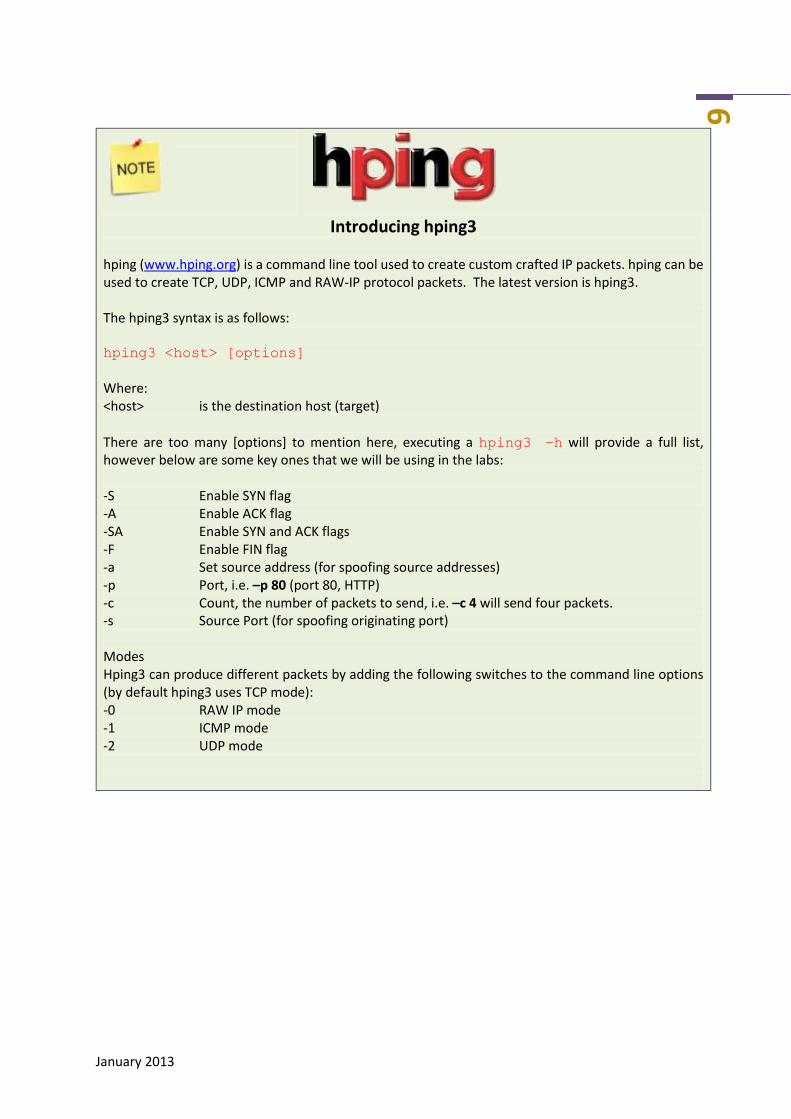
Introducing hping3 hping (www.hping.org) is a command line tool used to create custom crafted IP packets. hping can be used to create TCP, UDP, ICMP and RAW-IP protocol packets. The latest version is hping3. The hping3 syntax is as follows: hping3 <host> [options] Where: <host> is the destination host (target) There are too many [options] to mention here, executing a hping3 –h will provide a full list, however below are some key ones that we will be using in the labs: -S Enable SYN flag -A Enable ACK flag -SA Enable SYN and ACK flags -F Enable FIN flag -a Set source address (for spoofing source addresses) -p Port, i.e. –p 80 (port 80, HTTP) -c Count, the number of packets to send, i.e. –c 4 will send four packets. -s Source Port (for spoofing originating port) Modes Hping3 can produce different packets by adding the following switches to the command line options (by default hping3 uses TCP mode): -0 RAW IP mode -1 ICMP mode -2 UDP mode
January 2013
10
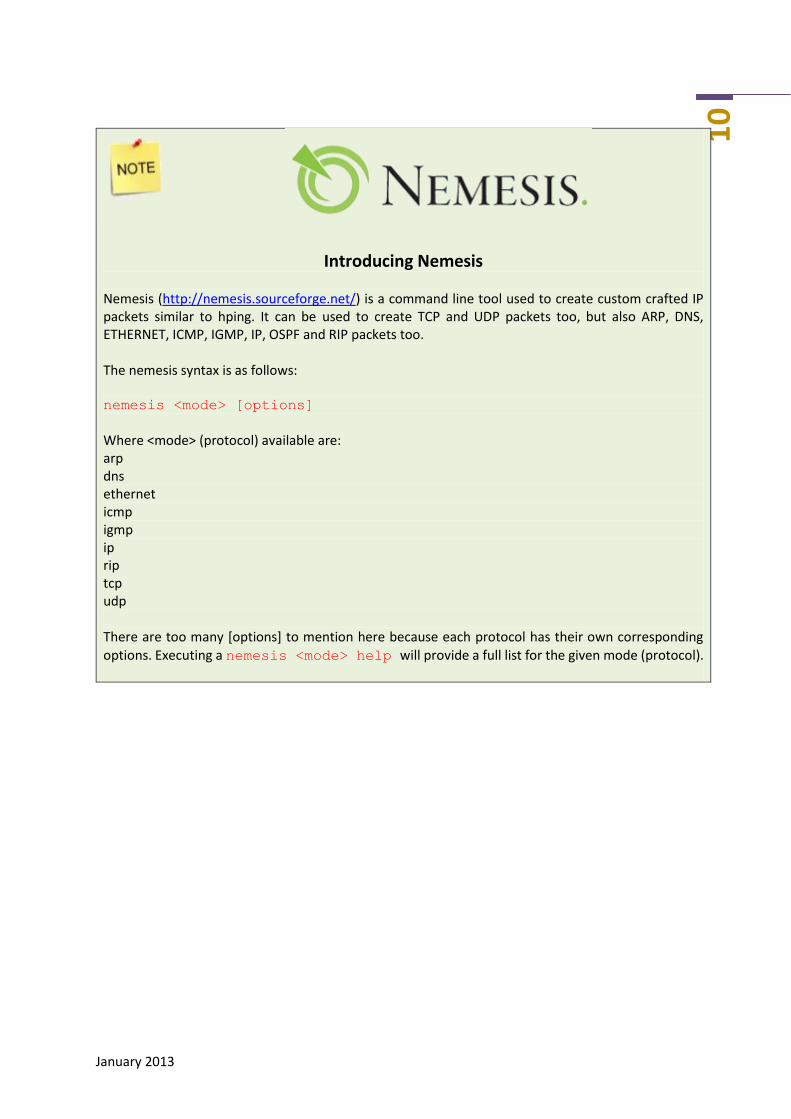
Introducing Nemesis Nemesis (http://nemesis.sourceforge.net/) is a command line tool used to create custom crafted IP packets similar to hping. It can be used to create TCP and UDP packets too, but also ARP, DNS, ETHERNET, ICMP, IGMP, IP, OSPF and RIP packets too. The nemesis syntax is as follows: nemesis <mode> [options] Where <mode> (protocol) available are: arp dns ethernet icmp igmp ip rip tcp udp There are too many [options] to mention here because each protocol has their own corresponding options. Executing a nemesis <mode> help will provide a full list for the given mode (protocol).
January 2013
11
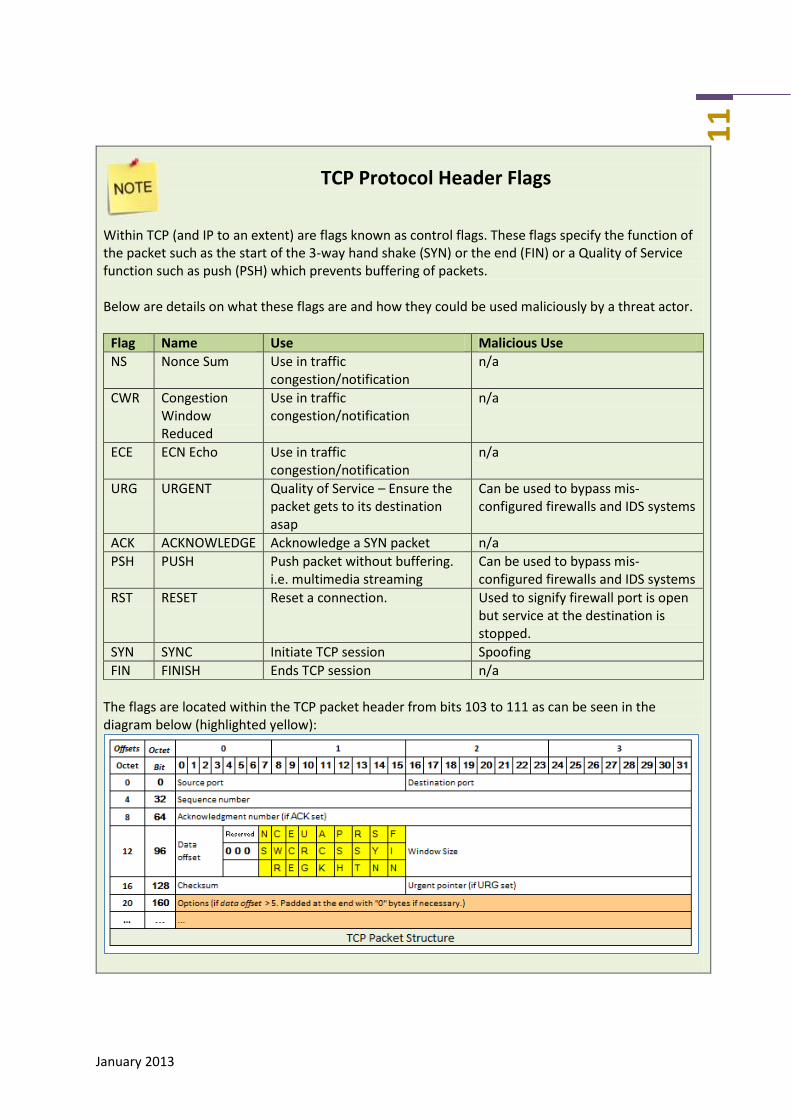
TCP Protocol Header Flags
Within TCP (and IP to an extent) are flags known as control flags. These flags specify the function of the packet such as the start of the 3-way hand shake (SYN) or the end (FIN) or a Quality of Service function such as push (PSH) which prevents buffering of packets. Below are details on what these flags are and how they could be used maliciously by a threat actor.
Flag Name Use Malicious Use
NS Nonce Sum Use in traffic congestion/notification
n/a
CWR Congestion Window Reduced
Use in traffic congestion/notification
n/a
ECE ECN Echo Use in traffic congestion/notification
n/a
URG URGENT Quality of Service – Ensure the packet gets to its destination asap
Can be used to bypass mis-configured firewalls and IDS systems
ACK ACKNOWLEDGE Acknowledge a SYN packet n/a
PSH PUSH Push packet without buffering. i.e. multimedia streaming
Can be used to bypass mis-configured firewalls and IDS systems
RST RESET Reset a connection. Used to signify firewall port is open but service at the destination is stopped.
SYN SYNC Initiate TCP session Spoofing
FIN FINISH Ends TCP session n/a
The flags are located within the TCP packet header from bits 103 to 111 as can be seen in the diagram below (highlighted yellow):
January 2013
12
Testing the Firewall
Before we start, we need to setup NetCat on the TARGET machine to provide us with a ‘service’. For our lab we will be using port TCP/80 (HTTP). To do this, open a terminal session on TARGET machine and load netcat to listen on port TCP 80 (HTTP): nc –l 80
By default iptables, like most firewalls, comes with no rules configured. In addition on the Ubuntu 12
installation, iptables is installed alongside the OS with no packet filtering configured – allowing all
communications in and out of the host.
Before we create any firewall rules we will first test the target system responses to a number of crafted
packets – they should all provide some form of response due to the firewall not being configured at
this stage.
What we are interested in here are the responses. We will then implement a simple set of 4 rules in
to the firewall and retest, comparing the results we get.
Because Nemesis and hping3 requires root level privileges to open sockets, the command needs to be
preceded by sudo. To save having to keep adding sudo to all our commands, escalate your privileges
to root by typing:
sudo su
Once you enter your password all commands from now on in will be executed with root privileges.
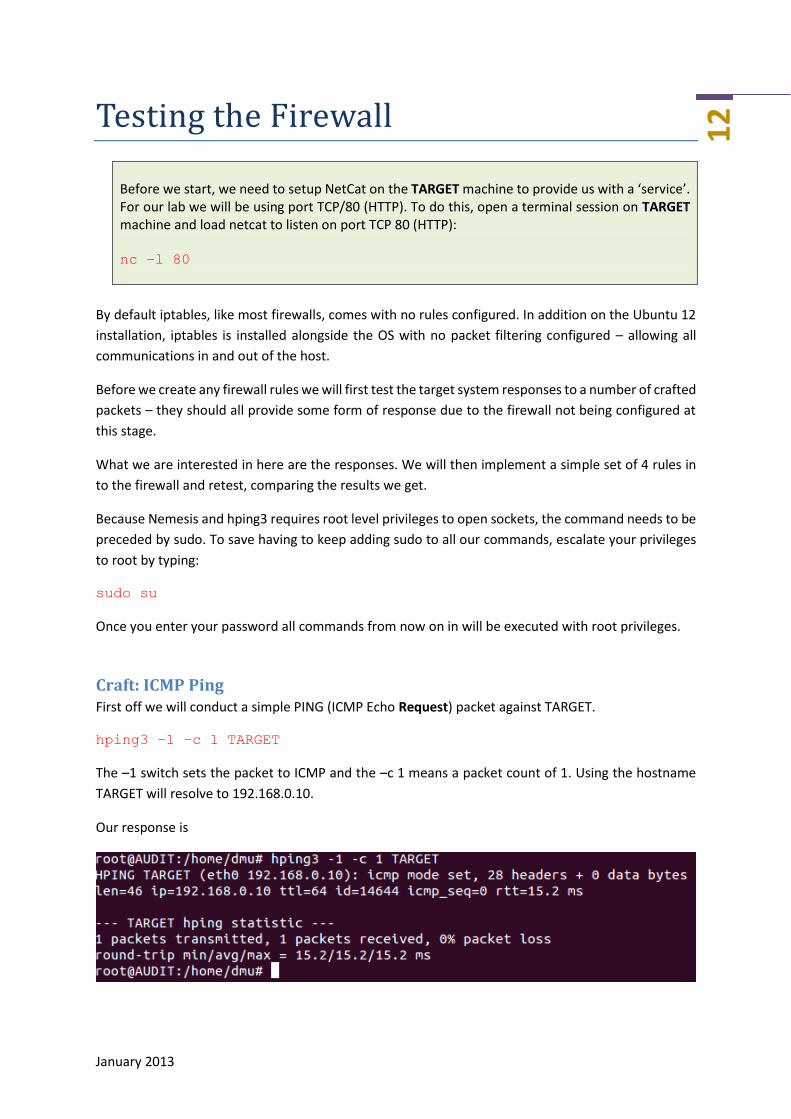
Craft: ICMP Ping First off we will conduct a simple PING (ICMP Echo Request) packet against TARGET.
hping3 –1 –c 1 TARGET
The –1 switch sets the packet to ICMP and the –c 1 means a packet count of 1. Using the hostname
TARGET will resolve to 192.168.0.10.
Our response is

January 2013
13
1 packet transmitted as ICMP and 1 packet received, indicating the target system is alive. We can see
this from the TARGET machine packet capture with an ICMP Echo Reply (line 2):
So first packet, the target machine is responding back to us indicating it is alive.
Craft: TCP SYN Let’s try again, this time a TCP packet with the SYN flag on:
hping3 –S –s 5555 –c 1 TARGET
The –S switch above sets the SYN flag, the –s flag sets the source port (otherwise it will be a random
port, this makes it easier to see on the packet capture).
Again, no surprise that we get a response back:
However this time you can see from the packet capture it has returned a RST (Reset) and ACK
(Acknowledge) flag.
Craft: TCP FIN The next packet we will send will have the FIN flag turned on.
hping3 –F –s 5555 –c 1 TARGET
Again as expected we get a response.
We can see in the packet capture the RST and ACK response which is as expected as this port is
closed.
January 2013
14
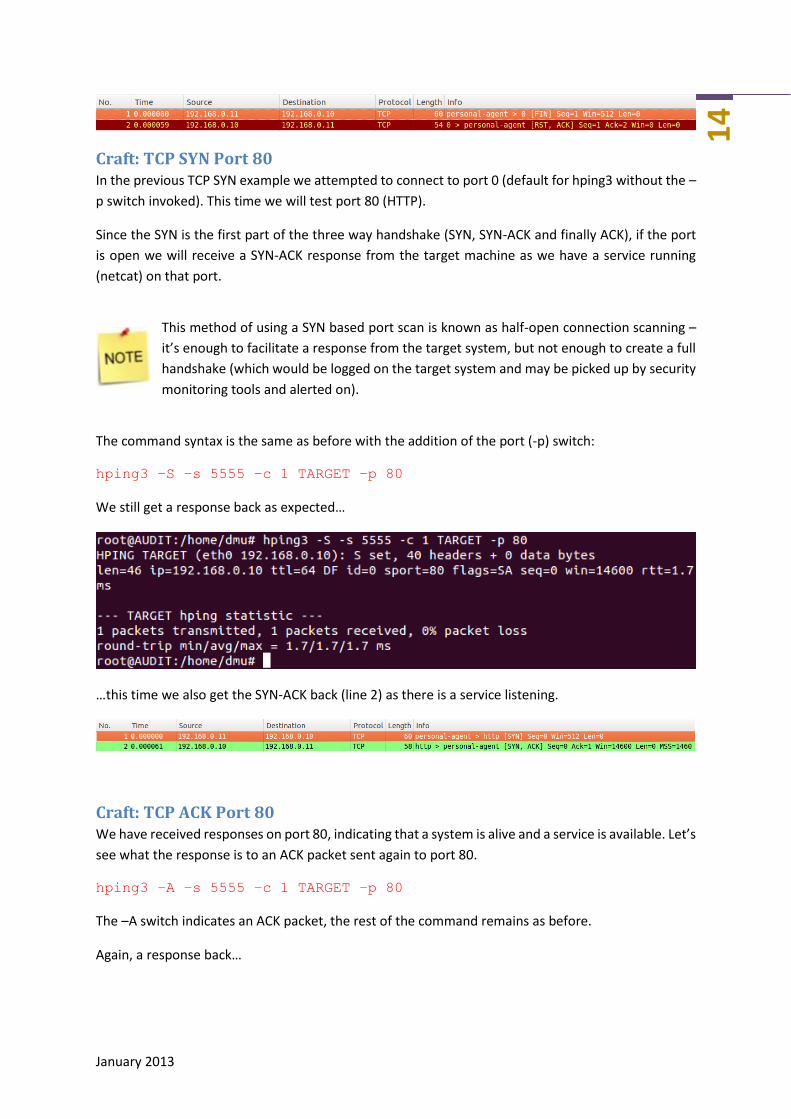
Craft: TCP SYN Port 80 In the previous TCP SYN example we attempted to connect to port 0 (default for hping3 without the –
p switch invoked). This time we will test port 80 (HTTP).
Since the SYN is the first part of the three way handshake (SYN, SYN-ACK and finally ACK), if the port
is open we will receive a SYN-ACK response from the target machine as we have a service running
(netcat) on that port.
This method of using a SYN based port scan is known as half-open connection scanning –
it’s enough to facilitate a response from the target system, but not enough to create a full
handshake (which would be logged on the target system and may be picked up by security
monitoring tools and alerted on).
The command syntax is the same as before with the addition of the port (-p) switch:
hping3 –S –s 5555 –c 1 TARGET –p 80
We still get a response back as expected…
…this time we also get the SYN-ACK back (line 2) as there is a service listening.
Craft: TCP ACK Port 80 We have received responses on port 80, indicating that a system is alive and a service is available. Let’s
see what the response is to an ACK packet sent again to port 80.
hping3 –A –s 5555 –c 1 TARGET –p 80
The –A switch indicates an ACK packet, the rest of the command remains as before.
Again, a response back…
January 2013
15
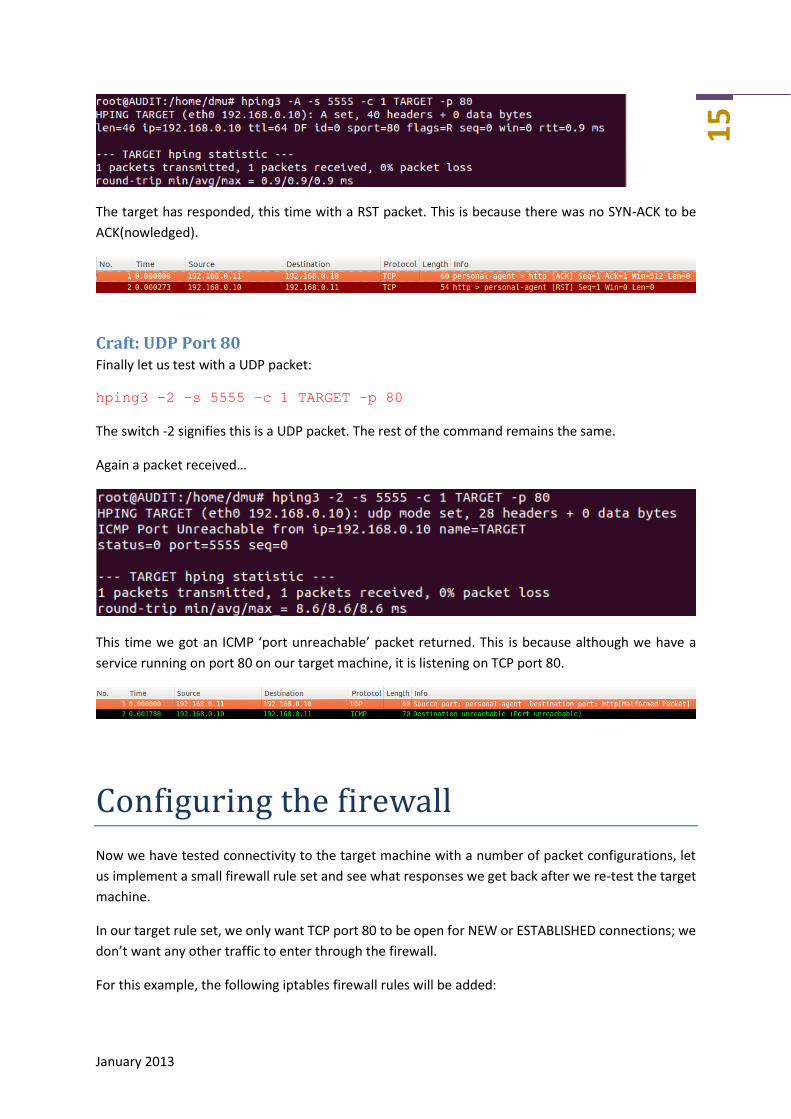
The target has responded, this time with a RST packet. This is because there was no SYN-ACK to be
ACK(nowledged).
Craft: UDP Port 80 Finally let us test with a UDP packet:
hping3 -2 –s 5555 –c 1 TARGET –p 80
The switch -2 signifies this is a UDP packet. The rest of the command remains the same.
Again a packet received…
This time we got an ICMP ‘port unreachable’ packet returned. This is because although we have a
service running on port 80 on our target machine, it is listening on TCP port 80.
Configuring the firewall
Now we have tested connectivity to the target machine with a number of packet configurations, let
us implement a small firewall rule set and see what responses we get back after we re-test the target
machine.
In our target rule set, we only want TCP port 80 to be open for NEW or ESTABLISHED connections; we
don’t want any other traffic to enter through the firewall.
For this example, the following iptables firewall rules will be added:
January 2013
16
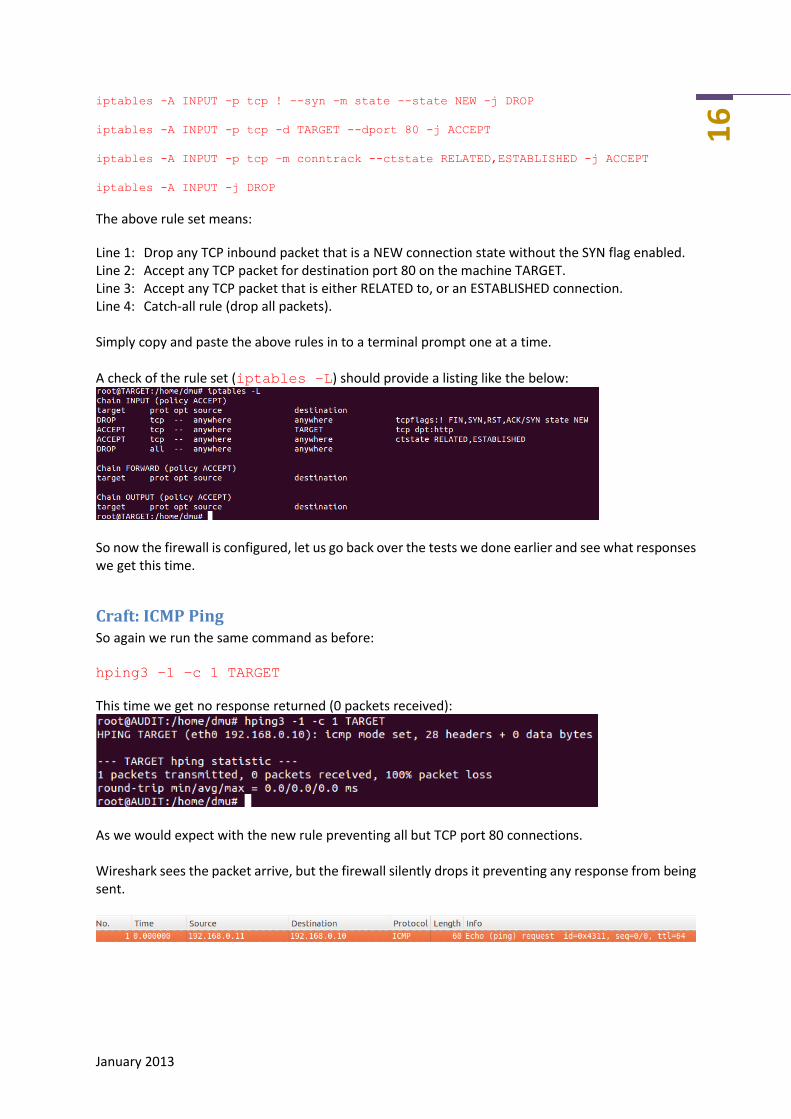
iptables -A INPUT -p tcp ! --syn -m state --state NEW -j DROP
iptables -A INPUT -p tcp -d TARGET --dport 80 -j ACCEPT
iptables -A INPUT -p tcp –m conntrack --ctstate RELATED,ESTABLISHED -j ACCEPT
iptables -A INPUT -j DROP
The above rule set means:
Line 1: Drop any TCP inbound packet that is a NEW connection state without the SYN flag enabled. Line 2: Accept any TCP packet for destination port 80 on the machine TARGET. Line 3: Accept any TCP packet that is either RELATED to, or an ESTABLISHED connection. Line 4: Catch-all rule (drop all packets). Simply copy and paste the above rules in to a terminal prompt one at a time. A check of the rule set (iptables –L) should provide a listing like the below:
So now the firewall is configured, let us go back over the tests we done earlier and see what responses we get this time.
Craft: ICMP Ping So again we run the same command as before: hping3 –1 –c 1 TARGET
This time we get no response returned (0 packets received):
As we would expect with the new rule preventing all but TCP port 80 connections. Wireshark sees the packet arrive, but the firewall silently drops it preventing any response from being sent.

January 2013
17
Craft: TCP SYN Port 80 Again we try to connect on port 80 with a TCP packet with SYN flag on. hping3 –S –s 5555 –c 1 TARGET –p 80
As we have a rule in place to allow NEW connection states on port TCP 80, this is expected. We receive the SYN-ACK from the target as part of the three way handshake.
Craft: FIN Port 80 If the packet had any other flag set, it would not be allowed through the firewall, let’s check this with the FIN flag on: hping3 –F –s 5555 –c 1 TARGET –p 80
We didn’t get a response back, and as can be seen in the packet capture below, the target received the TCP FIN packet, but the firewall dropped it so no response was provided.
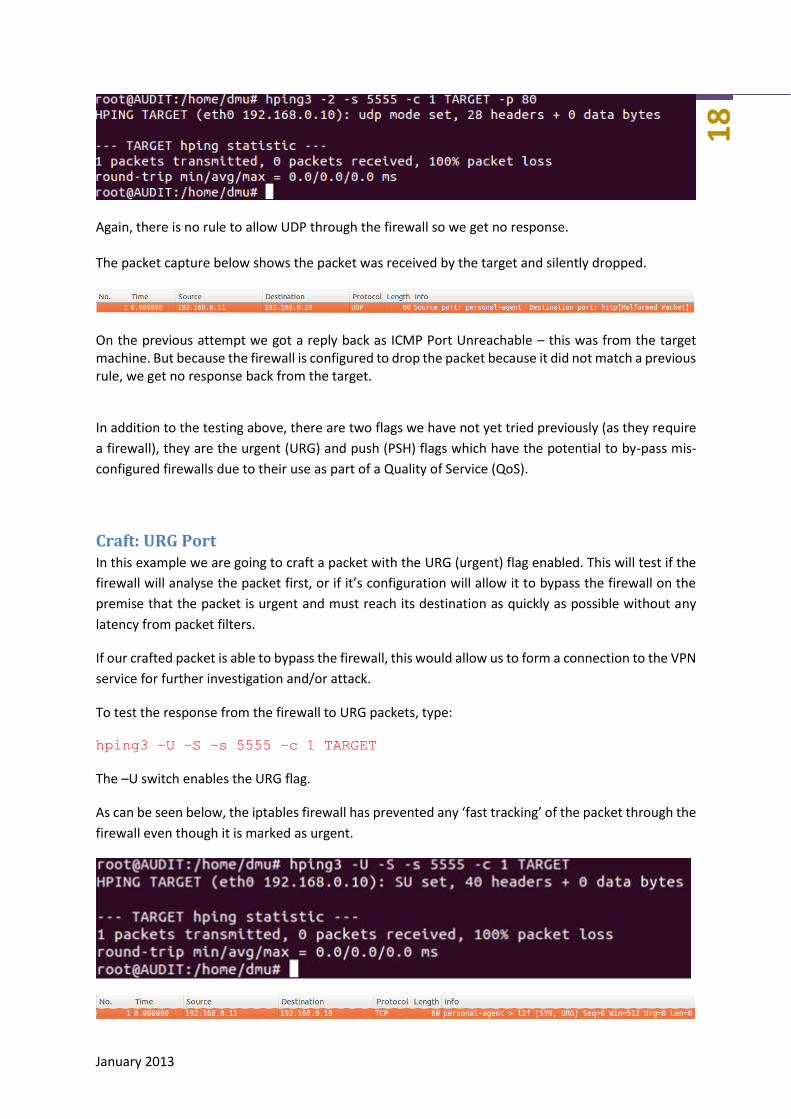
Craft: UDP Port 80 Lastly, we’ll try sending the UDP packet on port 80: hping3 -2 –s 5555 –c 1 TARGET –p 80
January 2013
18
Again, there is no rule to allow UDP through the firewall so we get no response. The packet capture below shows the packet was received by the target and silently dropped.
On the previous attempt we got a reply back as ICMP Port Unreachable – this was from the target machine. But because the firewall is configured to drop the packet because it did not match a previous rule, we get no response back from the target.
In addition to the testing above, there are two flags we have not yet tried previously (as they require
a firewall), they are the urgent (URG) and push (PSH) flags which have the potential to by-pass mis-
configured firewalls due to their use as part of a Quality of Service (QoS).
Craft: URG Port In this example we are going to craft a packet with the URG (urgent) flag enabled. This will test if the
firewall will analyse the packet first, or if it’s configuration will allow it to bypass the firewall on the
premise that the packet is urgent and must reach its destination as quickly as possible without any
latency from packet filters.
If our crafted packet is able to bypass the firewall, this would allow us to form a connection to the VPN
service for further investigation and/or attack.
To test the response from the firewall to URG packets, type:
hping3 –U –S –s 5555 –c 1 TARGET
The –U switch enables the URG flag.
As can be seen below, the iptables firewall has prevented any ‘fast tracking’ of the packet through the
firewall even though it is marked as urgent.

January 2013
19
Craft: PSH Port Much like the URG craft, the PSH flag has the potential for evading firewalls and IDS systems. PSH is
used on multimedia streams to prevent the packet from being buffered (and cause latency on the
stream).
To test the response from the firewall to PSH packets, type:
hping3 –P –S –s 5555 –c 1 TARGET
The –P switch enables the PSH flag.
As can be seen below, iptables has prevented the packet from being ‘fast tracked’ through and
because it failed to match a rule it was silently dropped.
Crafting Layer 2 and 3 Protocols
Testing of the higher layer protocols through the firewall is probably the most common form of
auditing as the firewall will be in place to generally protect from exploits leveraging these protocols
(i.e. HTTP, SMTP etc). However some firewalls will be filtering the layer 2 and 3 protocols such as
dynamic routing updates, usually internal to organisations.
To facilitate packet crafting and testing of protocols such as the following (in addition to TCP/UDP/IP):
ARP
DNS
Ethernet
ICMP
IGMP
OSPF
RIP We can use Nemesis – like hping it is another packet crafting tool.
January 2013
20
In the next example we will look at crafting a RIP UDP packet to port UDP/520 which would be used
for router updates as part of the convergence phase. RIP works at layer 3 (Network) of the OSI and is
a form of dynamic routing protocol.
Before we begin we need to configure a rule on the firewall to allow RIP (UDP/520) through from a
specific source address, in our example this will be 192.168.0.2. Like all infrastructure
communications, through firewalls they should be locked down to source and destination addresses
to reduce risk of attack.
Because router updates with RIP are UDP, there is no authentication process around
router update packets. To this end it is strongly recommended that RIP updates between
security domains are kept to a minimum and where possible not allowed due to the ease
of route poisoning.
On the TARGET machine, at the command prompt type:
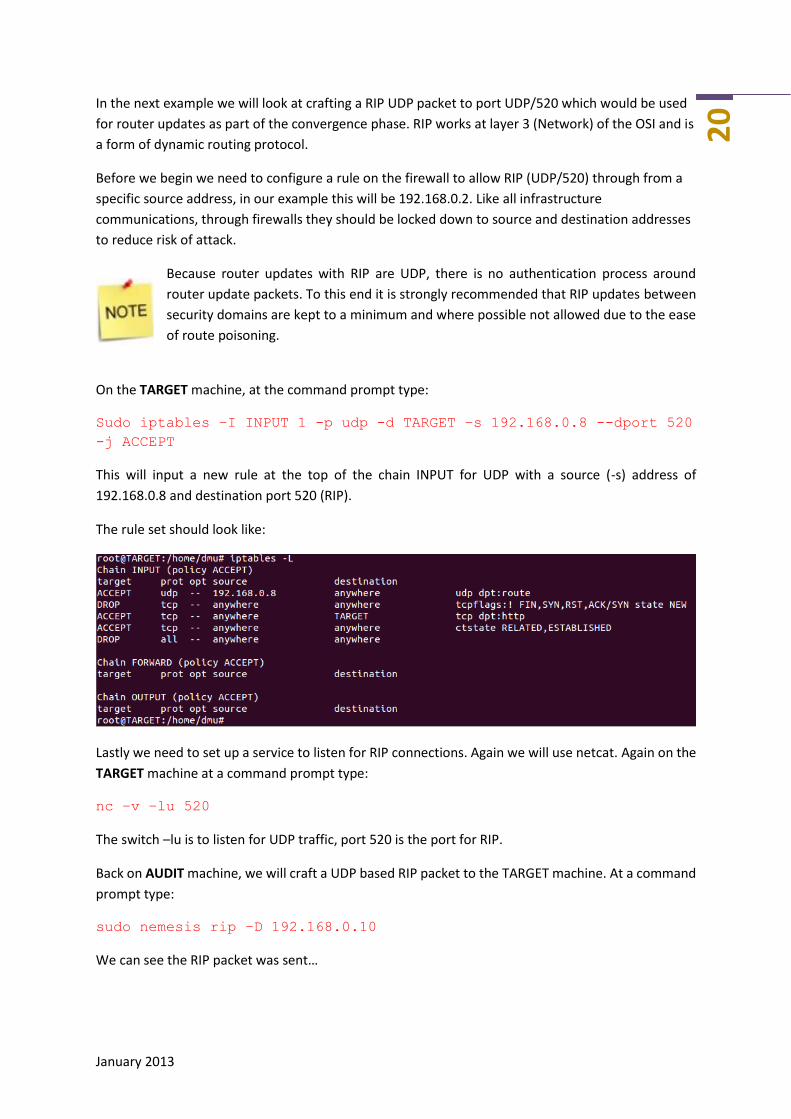
Sudo iptables –I INPUT 1 -p udp -d TARGET –s 192.168.0.8 --dport 520
-j ACCEPT
This will input a new rule at the top of the chain INPUT for UDP with a source (-s) address of
192.168.0.8 and destination port 520 (RIP).
The rule set should look like:
Lastly we need to set up a service to listen for RIP connections. Again we will use netcat. Again on the
TARGET machine at a command prompt type:
nc –v –lu 520
The switch –lu is to listen for UDP traffic, port 520 is the port for RIP.
Back on AUDIT machine, we will craft a UDP based RIP packet to the TARGET machine. At a command
prompt type:
sudo nemesis rip –D 192.168.0.10
We can see the RIP packet was sent…

January 2013
21
…and received on our TARGET machine. It was identified as a malformed packet as it was just a header
without any content.
Netcat shows no connection, so the firewall silently dropped the packet:
This time we will try another packet crafted with a forged known source address allowed by the
firewall:
sudo nemesis rip –D 192.168.0.10 –S 192.168.0.8
the packet was sent…
… and received by the target…
… and a connection was made as can be seen by NetCat and identified as UDP routing connection:
If this had been real, and the packet contained a malicious RIP payload, an attacker could have
poisoned the internal routing table of the router.
January 2013
22
Conclusion This paper has shown that by using packet crafting techniques you can understand exactly how a
firewall will respond to not only valid packets, but also malformed packets. Some times when a firewall
rule is added, the understanding on how it works is based on basic logic. In the real world some rules
can be by passed by malformed or spoofed packets, or by poor placement of firewall rules in the
policy.
This technique allows a firewall administrator to fine tune the firewall rules so as to minimise impact
in to the organisation from threat actors manipulating packets to bypass firewalls.
The downside of this technique is that for complex firewall configurations it can be a timely exercise,
and for firewall rule sets that change either regularly or even every few months, keeping on top of
these audits can be costly in terms of resource and money.
However, both tools can be used in scripts (something not touched on in this paper) to automate a
number of the functions.
To keep the organisation secure, the firewall rules should be carefully thought through and based on
the principle of DENY ALL. Where an exception is required it should be locked down as tightly as
possible based on source and destination address, protocol, connection state, acceptable flags and
payload content and not rely solely on source and destination address and destination port.
The techniques shown in this paper can also be extended to test intrusion detection and prevention
systems (IDS/IPS) too by manipulating the header and also the payload. By defining certain
characteristics such as out of range fields, incorrect flags or payload data, you can test your IDS/IPS
responds in the way it has been configured.

January 2013
23
References [1] hping homepage URL: http://www.hping.org [Accessed: Dec 20th 2012] [2] Nemesis homepage URL: http://nemesis.sourceforge.net [Accessed Jan 13th 2013] [3] Cisco Support Community Post – Packet Crafting to Test Firewall This document/post explains some common methods of packet manipulation with hping2 URL: https://supportforums.cisco.com/docs/DOC-17948 [Accessed: Jan 2nd 2013] [4] Ubuntu Community – iptables HowTo This page provides a how-to for configuring iptables. URL: https://help.ubuntu.com/community/IptablesHowTo [Accessed: Jan 8th 2013] [5] Symantec – Packet Crafting Firewall and IDS Audits Provides detailed description on packet crafting with hping for firewalls and IDS. URL: http://www.symantec.com/connect/articles/packet-crafting-firewall-amp-ids-audits-part-1-2 URL: http://www.symantec.com/connect/articles/packet-crafting-firewall-amp-ids-audits-part-2-2 [Accessed: Jan 5th 2013] [6] Packet Crafter - TCP Flags Provides details on TCP flag use, including malicious use. URL: http://packetcrafter.wordpress.com/2011/02/13/tcp-flags-hackers-playground/ [Accessed: Jan 12th 2013] [7] Installing Nemesis Provides information on installing Nemesis on Ubuntu. URL: http://insecurety.net/papers/nemesis.html [Accessed Jan 12th 2013]