Embed Size (px)
Citation preview
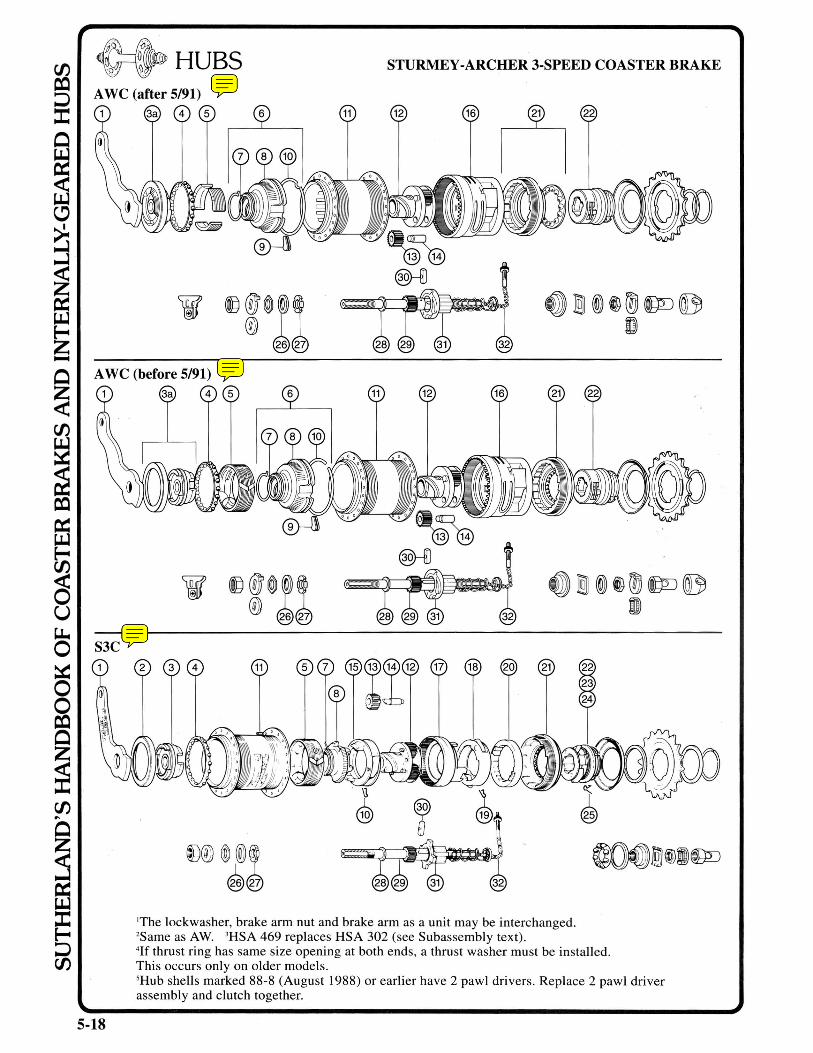
STURMEY·ARCHER 3·SPEED COASTER BRAKE
A WC (after 5/91)
S3C
5·18
~ ~j)~~ @@
~~@~~ @) @@
'The lockwasher, brake arm nut and brake arm as a unit may be interchanged. 2Same as AW. 3HSA 469 replaces HSA 302 (see Subassembly text) .
«
~ @OOlQj@l~
4If thrust ring has same size opening at both ends, a thrust washer must be installed. This occurs only on older models. 5Hub shells marked 88-8 (August 1988) or earlier have 2 pawl drivers. Replace 2 pawl driver assembly and clutch together.

5-20
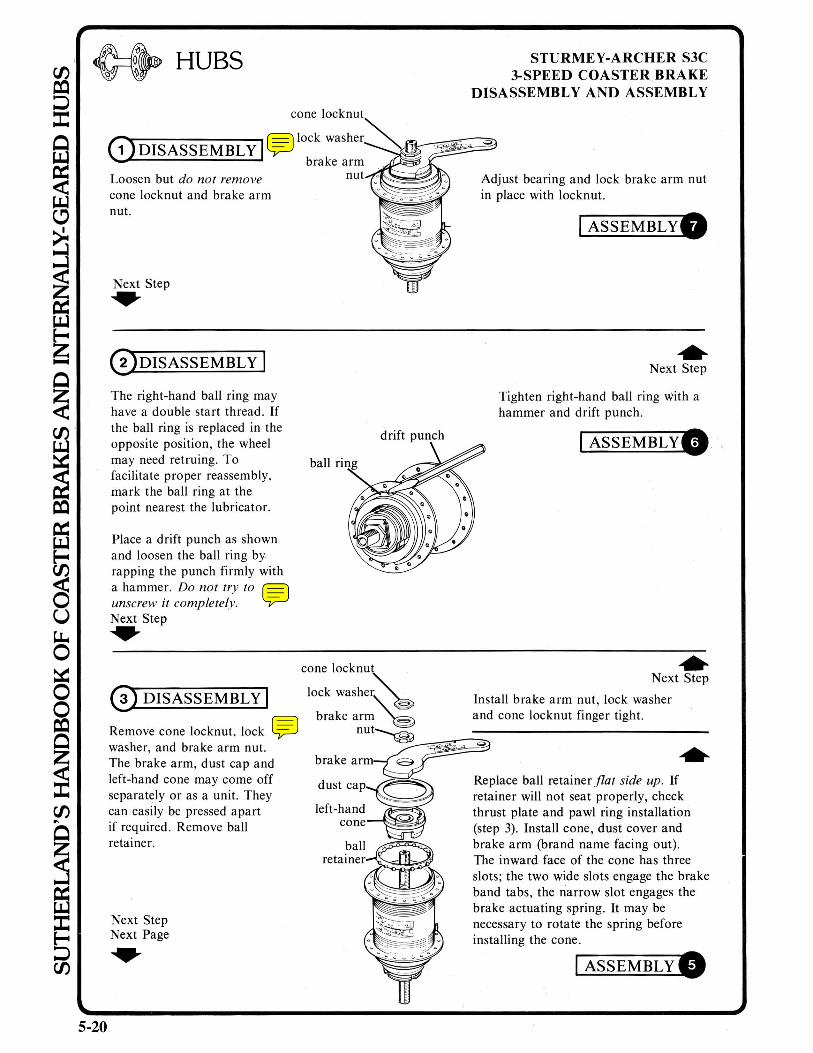
o DISASSEMBLY I Loosen but do not remove cone locknut and brake arm nut.
Next Step .. 0DISASSEMBLY I The right-hand ball ring may have a double start thread. If the ball ring is replaced in the opposite position, the wheel may need retruing. To facilitate proper reassembly, mark the ball ring at the point nearest the lubricator.
Place a drift punch as shown and loosen the ball ring by rapping the punch firmly with a hammer. Do not try to unscrew it completely. Next Step .. o DISASSEMBLY I Remove cone locknut, lock washer, and brake arm nut. The brake arm, dust cap and left-hand cone may come off separately or as a unit. They can easily be pressed apart if required . Remove ball retainer.
Next Step Next Page ..
brake arm nut
drift punch
cone locknut ,
STURMEY-ARCHER S3C 3-SPEED COASTER BRAKE
DISASSEMBL Y AND ASSEMBLY
Adjust bearing and lock brake arm nut in place with locknut.
I ASSEMBLY.
.. Next Step
Tighten right-hand ball ring with a hammer and drift punch.
I ASSEMBLY • .
... Next Step
Install brake arm nut, lock washer and cone locknut finger tight.
lock washe~ brake arr~ @
nut~
brake arm~ ~ ..
dmt ca~ Replace ball retainc< flat ,ide up. If retainer will not seat properly, check
left-hand a thrust plate and pawl ring installation cone (step 3). Install cone, dust cover and ball / " brake arm (brand name facing out).
retainer The inward face of the cone has three slots; the two wide slots engage the brake band tabs, the narrow slot engages the brake actuating spring. It may be necessary to rotate the spring before installing the cone .
I ASSEMBLY.

STURMEY-ARCHER S3C 3-SPEED COASTER BRAKE DISASSEMBL Y AND ASSEMBLY
o DISASSEMBLY I Unscrew right-hand ball ring from the bottom of hub shell and remove cartridge .
hub
Next Step right-hand ball . .. 0DISASSEMBLY I Remove brake band, thrust plate and planet cage pawl ring. If required brake actuating spring can be pried off thrust plate with a thin-bladed screwdriver.
brake
pinion pin end
G)DISASSEMBLY I Hold down ball ring while removing right-hand locknut , lock washer, cone clutch spring, spring cap and driver! (rotate driver to disengage driver pawls). If driver catches on ball ring, remove both parts together; be careful not to damage pawl springs when separating them. Lift off ball ring, ratchet ring and gear ring pawl ring.
ratchet rin
beveled edge--!~.~/r:J
gear ring tab keyway
HUBS * • Next Step
Preceding Page
Without inverting cartridge, slip it into the l;l.Ub shell and thread ball ring finger tight. If the mark made during disassembly is not beside the lubricator, remove and restart cartridge. Do not tip or invert hub until left-hand locknut has been installed in the next step.
I ASSEMBLY.
Next Step. Turn assembly over. Install brake actuating spring on thrust plate if it was removed: Viewed as shown hooked end of spring must be clockwise from gap. Incorrect installation will cause excessive drag and wear. Rotate pinion pins so the flats face outwards. Insert tabs of planet cage pawl ring into slots on thrust plate. Screw the pawl ring and thrust plate onto the planet cage until pawl ring seats on the planet cage. Install brake band, tabs up.
Next Step.
Install ball ring. Push pawls in and rotate ring until seated over pawls. Install driver.! Push pawls in and turn driver clockwise until it seats in ball ring. Install spring and spring cap.! Install cone, lock washer and locknut. Adjust bearing. If bearing runs rough, check spring cap.!
Replace gear ring pawl ring beveled edge down. Pawls must point clockwise when viewed from above. Top face of ring should be flush with top of gear ring tabs. Install ratchet ring. Ratchet ring keys must be engaged in keyways of the gear ring tabs. If the keys are positioned beside the gear ring tabs, low gear may not engage properly.
ASSEMBLY
!Old model spring caps are too l~rge to fitthrough the driver. On these hubs, the spring and cap are removed after and installed before the driver. Otherwise the spring cap will be compressed between the cone and the bearing with damage to both. Upon installation the driver must be held in place against the spring until the cone is installed.
5-21

* HUBS STURMEY-ARCHER S3C
3-SPEED COASTER BRAKE DISASSEMBLY AND ASSEMBLY (cont.)
5-22
0DISASSEMBLY I Remove gear ring, clutch and axle key. Push out pinion pins and remove pinions.
Pry off planet cage circlip and remove planet cage.
IDISASSEMBLY I
Ball Ring, Driver and Pawl Rings
ge.,'ingd clutch
circlip-O
SUBASSEMBLIES
dust cap
ball retainer
balls
.. Next Step
Preceding Page
Slide planet cage over left end of axle past circlip groove and replace circlip.
Replace pinions and pinion pins. Orient the pins as shown. Center axle key in the bottom of the axle slot with threaded hole parallel to axle. Slide clutch over axle key. Clutch should contact face of planet cage and engage pinion pins. Install gear ring.
Ball Ring, Driver and Pawl Rings
Bearings. Install balls or ball retainer. Orient retainer as shown. Start dust cover straight by hand and tap home with a soft hammer.
Bearings. Remove dust cover with a thin-bladed screwdriver. Work slowly around cover to avoid deforming it. Lift out balls or ball retainer.
ballring~ Pawls. If only pawl springs have been driver removed, springs may be fitted with pawl Va pawls in place. Use only new style pawl
Pawls. Pawl springs can be removed with the pawls in place, although some deformation usually results. Ease the hooked end of the spring over the side or long end of pawl to the other side. Spread the ends of spring <
_____________ springs. Early types tend to break .
Driver Pawl Springs current obsolete styles
style (breakage prone)
and slide out. bright finish HSA 469
dull finish
bright finish
Holding spring by hooked end, hook straight end around pawl pin beside pawl. Ease hooked end over the side or long end of pawl. Straight end must come to bear on piece body and hooked end on inside surface of pawl slightly behind driving edge.
If pawls were removed, install pawl, If pawls are to be removed, ------------- pawl spring and pin together. Make sure springs are best removed at I pawls are oriented as shown. Straight . h . R' d I ' P anet cage gear ring
t at tIme. IVete paw pms pawl ring pawl ring solid pins must be lightly riveted over. can be removed only by Q File end of pin flush . Hollow pins are drilling. Hollow pawl pins can ~ ~ driven in with a soft hammer. Grooved be driven out with the correct o~ ~_. /6' ~river pawl pins are installed groove first size drift punch. Some drivers . and retained by a circlip around the use removable pawl pins held driver. in place by a circlip. Do not mix up pawl sprin'Es.
I pawl I --=:::::::, __ s prlngs ___ ~ I ASSEMBLY I
HSA 253 HSA 120

STURMEY-ARCHER S3C 3-SPEED COASTER BRAKE DISASSEMBLY AND ASSEMBLY (cont.)
CLEANING
Clean all parts, including outside of hub shell and axle bore, in a suitable solvent. Be very careful not to introduce dirt or grit after cleaning.
POINTS TO CHECK
Part numbers followed by * refer to A W parts chart, others to S3C or TCW-III parts chart.
I. Clutch (26) and gear ring dogs (14) for rounded or chipped driving edges (rounqing to a radius of even \164" (0.4 mm) at the corners can cause hub to slip out of gear)
2. Pawls (12*, 19,21*), ball ring (18), lefthand ball cup (5) and ratchet ring (17) for rounded or chipped driving edges
3. Sun pinion (24), planet pinions (II) and gear ring (14) for worn or chipped teeth
4. Bearing surfaces of left-hand cone (3), left-hand ball cup (5), ball ring (18), driver (19) , right-hand cone (5*) and pinion pins (12) for wear and pitting
5. Axle key (25) and indicator for stripped threads
6. Clutch spring (32*) and brake actuating spring (7) for size and tension
7. Dustcaps and ball retainers for straightness
8. All threaded parts for worn or damaged threads
9. Axle (24) for straightness
10. Planet cage (13) and thrust plate (8) threads for wear or roughness
II. Thrust plate (8) and brake band (6) serrations for wear
12. Brake band (6) and hub shell (5) for wear or glazing
LUBRICATION
Lubricate ball retainers by filling the spaces between balls with grease. Lubricate hub shell and brake band liberally with a hightemperature grease. Be careful not to grease pawls. Lightly oil other internal parts with a good cycle oil. (WD-40 is too light for lasting lubrication, 3-in-1 Oil gums up with age .) Add about two teaspoons (8 ml) of oil when assembled.
5-23

~HUBS ~
C!:)DISASSEMBLY 1
locknut ~----t.!~ lockwasher -----{
brake arm nut -----+,.~.....l brake arm ---)
dustcap and cone assembly --~~~~~
brake shoes -~l~il~ ball retainer --(o~~£Iid~
Remove left-hand locknut, lockwasher, brake arm nut and brake arm. Remove cone and dustcap assembly and ball retainer. For hubs manufactured 5/91 and after, cone and dustcap assembly are one piece. Tum upside down so the brake shoes fall out.
Next Step .. <!) DISASSEMBLY I·
STURMEY-ARCHER AWC 3-SPEED COASTER BRAKE
DISASSEMBLY AND ASSEMBLY
Space the brake shoe segments evenly between brake actuator assembly and hub shell. Slotted edge of shoe segments should be facing up. Place ball cage assembly (ballside down) inside the hub. Note the slot in the brake cone and align it with the drag spring on the brake actuator.
Gently place dustcap and cone assembly onto the hub, turning gently so that shoe segments will line up into proper position, allowing a tight fit without forcing it. Attach brake arm (label face up) into slot on dustcap. Screw on brake arm nut, lock washer and locknut.
1 ASSEMBLY •
... Next Step
- drift punch The right-hand ball ring has a double start thread. If the ball ring is replaced in the opposite position, the wheel may need retruing. To facilitate proper reassembly, mark the ball ring and hub shell.
.:--...""'........,...----\-4\-- ball ring
5-24
Place a drift punch as shown and loosen the ball ring by rapping the punch firmly with a hammer.
Next Step Next Page ..
Tighten right-hand ball ring with a hammer arid drift punch.
1 ASSEMBLY •

STURMEY-ARCHER AWC 3-SPEED COASTER BRAKE DISASSEMBLY AND ASSEMBLY (cont.)
HUBS~ ~
<!)DISASSEMBLY I Unscrew right hand ball ring and remove the entire internal gear assembly. Remove the brake actuator assembly by turning it counterclockwise.
drag spring --'7~~~
planet cage -------;MI--.lor77&.
gear ring assembly ---t',~,,------,9--
Next Step ..
.. Next Step Preceding Page
Turn the cartridge over. Screw brake actuator assembly clockwise onto planet cage. Slide axle assembly into the hub shell, then screw ballring to hub shell.
I ASSEMBLY •
G) DISASSEMBLY I Turn cartridge over. Remove right hand locknut, spacers (if any), lockwasher, cone, clutch spring and cap from axle. Remove driver assembly, ball cage/dust cap assembly as one unit from axle. Depress the pawls in the driver. assembly to release the driver assembly from ball cage assembly and ball ring.
~IOCknut
spacer lockwasher
~ cone
.. Next Step
Next Step Next Page ..
ball ring
gear ring assembly ---V..
cap
\.....J'"---- clutch spring
"'-"l--- driver assembly
ball cage assembly
Place ball ring on gear ring assembly. Seat ball cage assembly (ball side down) into ball ring. Using a screwdriver, depress pawls of driver assembly so the driver assembly seats in the ball ring.
planet cage ---~vu:::~r-
Place tht< dutch spring and cap, over axle as shown. Screw on cone, lockwasher, spacer, if any, and locknut.
I ASSEMBLY.
5-25

5-26
G) DISASSEMBLY I
Remove the gear ring assembly. Remove the clutch and axle key from axle. Remove pinion pins to release planet pinions from the planet cage. Using snap ring-pliers, remove planet cage circlip and remove planet cage.
planet cage ---\
axle circlip ---~~
STURMEY-ARCHER AWC 3-SPEED COASTER BRAKE
DISASSEMBLY AND ASSEMBLY (cont.)
gear ring assembly
(1---- clutch
r-Q- pinion pin
~ planet pinion
.. Next Step Preceding Page
Slide planet cage assembly over left end of axle (side without axle key slot) over circlip groove and install new circlip. Clamp left end of axle in a vise (axle key slot up). Replace pinions and pinion pins. Orient the pins as shown. Center axle key into bottom of axle slot with threaded hole visible when looking down into slot. Install clutch over end of axle. Install gear ring assembly so that planet pinions mesh with the gear ring.
I ASSEMBLY.

STURMEY-ARCHER AWC 3-SPEED COASTER BRAKE DISASSEMBLY AND ASSEMBLY (cont.)
CLEANING
Clean all parts, including outside of hub shell and axle bore, in a suitable solvent. Be very careful not to introduce dirt or grit after cleaning.
POINTS TO CHECK
1. All threaded parts for worn or damaged threads. If hub shell is marked 88-8 or earlier, both clutch and driver assembly must be replaced at the same time.
2. Pinions (13), axle (29) and gear ring assembly (16) for worn gear teeth.
3. Axle (29) for straightness.
4. Gear ring assembly (16) and driver assembly (22) for wear and chipping. Drag spring on gear ring assembly assembly should move freely. Clutch (31) should slide easily into driver assembly. Manufacturer recommends replacing either assembly entirely with new factory-fitted assembly if any part of subassembly is not suitable.
5. Hub shell (11) for condition of LH ball track, ratchet and braking surface.
6. Ball cage assembly (4) should have 24 bearings if assembly is separate from dustcap, 14 bearings if ball cage and dustcap seal are integral.
7. Pawl (9) and pawl spring (10) in brake actuator assembly (6). Drag spring (7) should easily turn clockwise and have great resistance when rotated counterclockwIse.
8. Brake arm (1). Replace if damaged.
9. Brake band or shoe segments (5) for wearing and glazing.
HUBS~ ~
LUBRICATION
Lubricate ball retainers by filling the spaces between balls with grease. Lubricate hub shell and brake shoes liberally with a high-temperature grease. Be careful not to grease the pawls. Lightly oil other internal parts with a good cycle oil, (WD-40 is too light for lasting lubrication, 3-in-l Oil gums up with age.) Add about two teaspoons (8 ml) of oil when assembled.
5-27