Embed Size (px)
Citation preview
SAP® Exchange
Infrastructure 3.0: Demo Examples
Document Version 1.2 – July 20, 2004
SAP NetWeaver ’04
Configuration Guide
© Copyright 2004 SAP AG. All rights reserved. No part of this publication may be reproduced or transmitted in any form or for any purpose without the express permission of SAP AG. The information contained herein may be changed without prior notice. Some software products marketed by SAP AG and its distributors contain proprietary software components of other software vendors. Microsoft, Windows, Outlook, and PowerPoint are registered trademarks of Microsoft Corporation. IBM, DB2, DB2 Universal Database, OS/2, Parallel Sysplex, MVS/ESA, AIX, S/390, AS/400, OS/390, OS/400, iSeries, pSeries, xSeries, zSeries, z/OS, AFP, Intelligent Miner, WebSphere, Netfinity, Tivoli, and Informix are trademarks or registered trademarks of IBM Corporation in the United States and/or other countries. Oracle is a registered trademark of Oracle Corporation. UNIX, X/Open, OSF/1, and Motif are registered trademarks of the Open Group. Citrix, ICA, Program Neighborhood, MetaFrame, WinFrame, VideoFrame, and MultiWin are trademarks or registered trademarks of Citrix Systems, Inc. HTML, XML, XHTML and W3C are trademarks or registered trademarks of W3C®, World Wide Web Consortium, Massachusetts Institute of Technology. Java is a registered trademark of Sun Microsystems, Inc. JavaScript is a registered trademark of Sun Microsystems, Inc., used under license for technology invented and implemented by Netscape. MaxDB is a trademark of MySQL AB, Sweden. SAP, R/3, mySAP, mySAP.com, xApps, xApp, SAP NetWeaver, and other SAP products and services mentioned herein as well as their respective logos are trademarks or registered
trademarks of SAP AG in Germany and in several other countries all over the world. All other product and service names mentioned are the trademarks of their respective companies. Data contained in this document serves informational purposes only. National product specifications may vary. These materials are subject to change without notice. These materials are provided by SAP AG and its affiliated companies ("SAP Group") for informational purposes only, without representation or warranty of any kind, and SAP Group shall not be liable for errors or omissions with respect to the materials. The only warranties for SAP Group products and services are those that are set forth in the express warranty statements accompanying such products and services, if any. Nothing herein should be construed as constituting an additional warranty. Disclaimer Some components of this product are based on Java™. Any code change in these components may cause unpredictable and severe malfunctions and is therefore expressively prohibited, as is any decompilation of these components. Any Java™ Source Code delivered with this product is only to be used by SAP’s Support Services and may not be modified or altered in any way. Documentation in the SAP Service Marketplace You can find this documentation at the following address: http://service.sap.com/xi -> Media Library -> Guides
SAP AG Neurottstraße 16 69190 Walldorf Germany T +49/18 05/34 34 24 F +49/18 05/34 34 20 www.sap.com

Typographic Conventions
Type Style Represents
Example Text Words or characters that appear on the screen. These include field names, screen titles, pushbuttons as well as menu names, paths and options.
Cross-references to other documentation
Example text Emphasized words or phrases in body text, titles of graphics and tables
EXAMPLE TEXT Names of elements in the system. These include report names, program names, transaction codes, table names, and individual key words of a programming language, when surrounded by body text, for example, SELECT and INCLUDE.
Example text Screen output. This includes file and directory names and their paths, messages, names of variables and parameters, source code as well as names of installation, upgrade and database tools.
Example text Exact user entry. These are words or characters that you enter in the system exactly as they appear in the documentation.
<Example text> Variable user entry. Pointed brackets indicate that you replace these words and characters with appropriate entries.
EXAMPLE TEXT Keys on the keyboard, for example, function keys (such as F2) or the ENTER key.
Icons
Icon Meaning
Caution
Example
Note
Recommendation
Syntax
SAP XI 3.0 Demo Examples Configuration Guide
4 July 2004
1 Preface..........................................................................................7
2 Introduction..................................................................................9
3 Overview.......................................................................................9 3.1 Prerequisites .......................................................................................... 9 3.2 Overview of the Configuration Procedure............................................. 10
General Configuration Steps ........................................................................................ 10 Configuring the Business Scenario .............................................................................. 12
3.3 Estimating Configuration Duration........................................................ 12 3.4 Notes on Tools and Transactions......................................................... 13
4 General Configuration Steps ....................................................14 4.1 Providing the Necessary Users and Authorizations.............................. 14
4.1.1 Authorizations for Configuration Steps in the SAP System......................................14 4.1.2 Authorizations for Configuring the IDoc Variant .......................................................14 4.1.3 Authorizations for Configuring the RFC Variant .......................................................15
4.2 Setting Up the System Landscape ....................................................... 15 4.2.1 System Landscape ...................................................................................................15 4.2.2 Setting Up the Logical Systems................................................................................16 4.2.3 Assigning the Logical Systems to Clients.................................................................17 4.2.4 Client Copy ...............................................................................................................18
4.3 Describing the System Landscape in the System Landscape Directory ......................................................................................................... 18
4.3.1 Technical System Landscape...................................................................................19 4.3.2 Business System Description ...................................................................................20
4.4 Configuring the Business Systems as the Local Integration Engine..... 21 4.5 Defining Services and Communication Channels (Integration Directory)........................................................................................................ 21
4.5.1 Defining Business System Services and Creating Communication Channels Automatically ..........................................................................................................................22 4.5.2 Editing the Communication Channels ......................................................................23
Editing the Communication Channels with Adapter Type XI........................................ 23 Editing the Communication Channels with Adapter Type IDoc ................................... 24 Editing the Communication Channel with Adapter Type RFC ..................................... 25 Activating Services and Communication Channels...................................................... 26
4.6 Further Steps for Configuring the Demo Examples .............................. 27 4.6.1 Activating the BSP Application .................................................................................27 4.6.2 Generating the Flight Data .......................................................................................28
5 Configuration Settings for Using Special Adapters ...............29 5.1 Settings for IDoc Communication ......................................................... 29
5.1.1 Specifying RFC Destinations....................................................................................30
SAP XI 3.0 Demo Examples Configuration Guide
July 2004 5
R/3 Connection to the Integration Server ..................................................................... 30 R/3 Connection to the Application System of the Airline American Airlines................. 31
5.1.2 Specifying the IDoc Port ...........................................................................................32 5.1.3 Specifying IDocs.......................................................................................................32
Messages from the Travel Agency to the Airline American Airlines ............................ 32 Messages from the Airline American Airlines to the Integration Server....................... 33
5.1.4 Specifying the ALE Distribution Model (SALE).........................................................33 Specifying the Sender, Receiver, and Underlying BAPI .............................................. 33 Generating the Partner Profile...................................................................................... 34
5.1.5 Defining the Ports in the IDoc Adapter .....................................................................34 5.2 Settings for RFC Communication ......................................................... 35
6 Configuring the Business Scenario.........................................35 6.1 Checking Flight Seat Availability .......................................................... 36
6.1.1 Business Description (Brief) .....................................................................................36 6.1.2 Checking Flight Seat Availability (Proxy-to-Proxy Communication).........................36
Selecting the Business Scenario (Component View)................................................... 36 Assigning Services ....................................................................................................... 37 Configuring the Connection.......................................................................................... 37 Generating the Configuration Objects .......................................................................... 38 Manual Editing.............................................................................................................. 39 Final Steps.................................................................................................................... 39
6.1.3 Checking Flight Seat Availability (Proxy-to-RFC Communication)...........................40 Deleting Obsolete Configuration Objects ..................................................................... 40 Selecting the Business Scenario (Component View)................................................... 41 Assigning Services ....................................................................................................... 41 Configuring the Connection.......................................................................................... 42 Generating the Configuration Objects .......................................................................... 42 Manual Editing.............................................................................................................. 42 Final Steps.................................................................................................................... 42
6.1.4 Executing and Testing ..............................................................................................43 6.2 Booking a Single Flight......................................................................... 43
6.2.1 Business Description (Brief) .....................................................................................43 6.2.2 Booking a Single Flight (Proxy-to-Proxy Communication) .......................................44
Selecting the Business Scenario (Component View) and Creating the Scenario........ 44 Assigning Services ....................................................................................................... 45 Configuring the Connection.......................................................................................... 45 Generating the Configuration Objects .......................................................................... 46 Manual Editing.............................................................................................................. 46 Final Steps.................................................................................................................... 47
6.2.3 Booking a Single Flight (Proxy-to-IDoc Communication) .........................................48
SAP XI 3.0 Demo Examples Configuration Guide
6 July 2004
Selecting the Business Scenario (Component View)................................................... 49 Assigning Services ....................................................................................................... 49 Configuring the Connection.......................................................................................... 50 Generating the Configuration Objects .......................................................................... 50 Manual Editing.............................................................................................................. 51 Final Steps.................................................................................................................... 51
6.2.4 Executing and Testing ..............................................................................................51 6.3 Booking Connecting Flights.................................................................. 51
6.3.1 Business Description (Brief) .....................................................................................52 6.3.2 Booking a Connecting Flight (Proxy-to-Proxy Communication) ...............................54
Defining the Business Process Service........................................................................ 54 Selecting the Business Scenario (Component View) and Creating the Scenario........ 54 Assigning Services ....................................................................................................... 55 Configuring the Connection.......................................................................................... 55 Generating the Configuration Objects .......................................................................... 56 Manual Editing.............................................................................................................. 57
6.3.3 Executing and Testing ..............................................................................................58 6.4 Distributing Booking Order Data........................................................... 58
6.4.1 Business Description (Brief) .....................................................................................59 6.4.2 Preliminary Steps......................................................................................................59
Creating a File Directory............................................................................................... 60 System Landscape Directory: Definition eines technischen Systems für das Dateiverzeichnis ........................................................................................................... 60 System Landscape Directory: Define a second business system for the file directory 61 Integration Directory: Define the business system services for the file system ........... 61
6.4.3 Distributing Booking Order Data (Proxy-to-File System for XML File) .....................62 Selecting the Business Scenario (Component View)................................................... 62 Assigning Services ....................................................................................................... 62 Configuring the Connection.......................................................................................... 63 Generating the Configuration Objects .......................................................................... 63 Manual Editing.............................................................................................................. 64 Final Steps.................................................................................................................... 64
6.4.4 Distributing Booking Order Data (Proxy-to-File System for CSV File) .....................65 Final Steps.................................................................................................................... 65
6.4.5 Executing and Testing ..............................................................................................66
SAP XI 3.0 Demo Examples Configuration Guide
July 2004 7
1 Preface Constraints
The texts, references, and graphics contained in this manual have been compiled with utmost care; nevertheless, it is impossible to guarantee that they are fully without error. SAP cannot assume any responsibility for the correctness or completeness of the following documentation; the user alone is responsible for verifying the information contained therein.
SAP will only assume liability for damage arising from the use of this documentation – irrespective of the pertinent legal basis – in the case of intentional or active negligence, under no other circumstances will a warranty be made.
Definition
This configuration guide describes all the configuration steps that are necessary to execute the SAP Exchange Infrastructure (SAP XI) demo examples on the basis of SAP XI 3.0.
The information provided in this guide refers to the most up-to-date support package (patch) of SAP XI 3.0 at the time this document version was created.
Intended Audience
The Demo Examples Configuration Guide SAP Exchange Infrastructure 3.0 is intended to be used by both technology and application consultants.
Structure
The structure of this configuration guide follows the sequence of steps required to configure and run the SAP XI demo examples.
Additional Documentation
List of related documentation
Title Purpose Where to find
SAP NetWeaver Library documentation: Demo Examples
Introduction to SAP XI 3.0 Demo Examples and description of the business scenarios
SAP Help Portal at help.sap.com, under SAP NetWeaver Process Integration SAP Exchange Infrastructure Overview Demo Examples.
Master Guide – SAP NetWeaver ‘04
Starting point for implementing SAP NetWeaver™.
SAP Service Marketplace at service.sap.com, quick link /instguidesNW04.
Installation Guide – SAP Web AS ABAP and Java
Installing SAP Web Application Server (Web AS) 6.40
SAP Service Marketplace at service.sap.com, quick link /instguidesNW04.
Configuration Guide – SAP Exchange Infrastructure 3.0
Configuring SAP Exchange Infrastructure
SAP Service Marketplace at service.sap.com, quick link /instguidesNW04.
SAP System Landscape Directory User Manual for Web AS 6.40 /
Detailed user manual for the System Landscape Directory
SAP Service Marketplace at service.sap.com, quick link /netweaver; SAP NetWeaver in Detail → Solution Life-Cycle
SAP XI 3.0 Demo Examples Configuration Guide
8 July 2004
NetWeaver 04 Management → System Landscape Directory → Media Library SLD.
The SAP XI Demo Examples Configuration Guide is updated on a regular basis on the SAP Service Marketplace (http://service.sap.com/xi -> Media Library -> Guides).
Make sure you have the latest version of the SAP XI Demo Examples Configuration Guide by checking SAP Service Marketplace before you begin the configuration.
SAP XI 3.0 Demo Examples Configuration Guide
July 2004 9
2 Introduction The SAP XI demo examples (referred to simply as demo examples) are part of SAP Exchange Infrastructure. The demo examples demonstrate the basic communication scenarios of SAP Exchange Infrastructure and guide you step-by-step through the technical concepts and tools.
The demo examples comprise a set of simple business scenarios. These business scenarios are shipped as part of SAP XI 3.0.
You must configure the demo examples before you can execute them. This guide describes the configuration steps for all the available demo examples.
We recommend that you use the standard configuration described in this documentation. Since the demo examples are only intended to demonstrate SAP Exchange Infrastructure and are not scenarios for productive use, SAP only provides support for the standard configuration.
Note that you must configure the demo examples exactly as described in this guide and in the specified sequence.
3 Overview
3.1 Prerequisites List of required steps
Step Documentation
1. You have installed SAP Exchange Infrastructure. Master Guide – SAP NetWeaver
Installation Guide – SAP Web AS ABAP and Java
Installation Guide – SAP Exchange Infrastructure 3.0
2. You have installed the latest support package/patch of SAP Exchange Infrastructure 3.0.
SAP Note 670388 (only available in German)
This note specifies further notes that you must import to use Business Process Management (business scenario MultipleFlightBooking).
SAP XI 3.0 Demo Examples Configuration Guide
10 July 2004
3. You have imported the content for the Integration Repository corresponding to the latest support package/patch.
SAP Note 705541 (only available in German)
The demo examples are located in the Integration Repository in the software component SAP BASIS, software component version SAP BASIS 6.40, in the namespaces http://sap.com/xi/XI/Demo/Agency and http://sap.com/xi/XI/Demo/Airline.
4. You have configured SAP Exchange Infrastructure. Configuration Guide – SAP Exchange Infrastructure 3.0
5. You have configured the System Landscape Directory (SLD).
Installation Guide – SAP Exchange Infrastructure 3.0
6. You have activated the necessary ICF services (Internet Communication Framework) to enable you to execute the BSP application (see 4.6).
SAP Note 517484
Note that you set up the demo examples in your development or test system, but not in your productive system.
3.2 Overview of the Configuration Procedure This section contains an overview of the configuration of the demo examples. For a detailed description of the individual configuration steps for each demo example, see the respective chapter.
The configuration of the demo examples consists of the following:
• General configuration steps
The general configuration steps form the basis for the configuration of the individual business scenarios.
• Configuration of the individual business scenarios
General Configuration Steps
Providing the Necessary Users and Authorizations
To be able to call the transactions in the SAP system of the Integration Server that are required for configuration, you must have the relevant authorizations. Furthermore, to configure receiver communication channels you require particular system users so that you can call the relevant functions in the target application.
For more information, see 4.
SAP XI 3.0 Demo Examples Configuration Guide
July 2004 11
Setting Up the System Landscape
The demo examples (business scenarios) shipped with SAP XI 3.0 are defined in the Integration Repository independently of a specific system landscape. During configuration, you configure the business scenarios for a particular system landscape. The SAP standard configuration is based on a system landscape comprising a travel agency system and two airline systems. This system landscape is simple enough to be easily understood yet complex enough to illustrate the most important concepts of SAP Exchange Infrastructure. To set up this system landscape with a minimum of effort, we recommend that you simulate the different business systems by using different clients of one SAP system.
Note that all the configuration steps specified in this guide are based on the implementation of this system landscape.
To generate the clients for the different business systems, you use client copy.
For more information, see 0.
Describing the System Landscape in the System Landscape Directory
To be able to access the metadata for the business systems in the later configuration steps, you must describe the system landscape in the System Landscape Directory.
During configuration of the individual business scenarios in the Integration Directory, you define how messages are to be exchanged between the business systems involved (and executable business systems, if applicable).
For more information, see 0.
Configuring the Business Systems as the Local Integration Engine
You must configure the involved business systems (clients) of the system landscape as the local Integration Engine and define the connection to the central Integration Server.
For more information, see �.
Defining Services and Communication Channels
To be able to address business systems as the sender or receiver of messages, you must define them as services (business system services) in the Integration Directory.
If you want to use a business process as the sender or receiver of messages at runtime, you must also define the business process as a service (business process service). The demo examples include a business scenario that uses a business process (MultipleFlightBooking). The configuration instructions for this business scenario include instructions for defining a business process service.
To define the outbound processing of messages (from the Integration Server to a receiver business system), you must assign a communication channel to the corresponding service. The communication channel contains the technical information that is used for outbound processing of the message. The adapter type of the communication channel depends on the type of the receiver adapter. The SAP standard configuration uses communication channels with the adapter type XI (for communication using the proxy runtime) and IDoc (for communication using the IDoc adapter).
For more information, see 6.
SAP XI 3.0 Demo Examples Configuration Guide
12 July 2004
Activating the BSP Application and Generating the Flight Data
A BSP (Business Server Pages) application is available in the SAP system for executing the demo examples once configuration is complete. You must activate this BSP application.
To be able to access flight data during execution of the demo examples, you first have to generate it. You can use a data generation program to do this.
For more information, see 4.6 and 0.
Configuration Settings for Using Special Adapters
Settings for IDoc Communication
To demonstrate the integration of SAP Exchange Infrastructure with older SAP systems, you can configure a demo example (booking a single flight) so that one of the involved business systems communicates with the Integration Server using the IDoc adapter. The special settings that are necessary to configure this variant are described in 0.
Configuring the Business Scenario The business scenarios for the demo examples and all the corresponding objects (such as interface objects and mapping objects) are shipped with SAP XI 3.0. A business scenario contains the business logic for a particular cross-system process. This includes interfaces for message exchange, mappings for message transformation, and executable business processes.
The business scenarios are defined independently from the system landscape in which they are executed. During configuration of the demo examples, you map the relevant business scenarios to the specific system landscape that you set up and described in the general configuration steps.
During configuration of a business scenario, you define the following:
• The senders and receivers of messages
These can be executable business processes or business systems. To use the business systems of the underlying system landscape as senders and receivers of messages, you access the defined business system services.
• The receiver interfaces (and mappings, if used) of messages
• The details for inbound and outbound message processing for particular sender/receiver pairs
To specify the details for inbound and outbound message processing, you use the defined communication channels.
To define the relevant objects in the Integration Directory, use the business scenario configurator. This tool enables you to automate most of the configuration steps for a business scenario.
For more information, see 0.
3.3 Estimating Configuration Duration The time estimates below indicate approximately how long it will take you to configure the demo examples:
General Configuration Steps Configuration Step Duration Estimate
Setting Up Users/Authorizations 30 minutes
SAP XI 3.0 Demo Examples Configuration Guide
July 2004 13
Setting Up the System Landscape (Client Copy)
15 (+30) minutes for each client
The user activities for entering the necessary information take approximately 15 minutes for each client. Note that once these activities have been completed, the client copy itself then takes approximately 30 minutes (for each client).
Note also that you can only execute one client copy in a system at one time.
Take this into account and schedule the later configuration steps accordingly.
Configuring the Business Systems as the Local Integration Engine
15 minutes (total time for all three application clients)
Describing the System Landscape in the System Landscape Directory
1 hour
Defining the business system services and the communication channels
30 minutes
Generating the flight data and activating the BSP application
20 minutes (total)
Settings for IDoc Communication 2 hours
Configuring the Business Scenario Business Scenario (Variant) Estimate of Configuration Duration
Flight Availability Check (Proxy-to-Proxy) 30 minutes
Flight Availability Check (Proxy-to-RFC) 30 minutes
Booking a Single Flight (Proxy-to-Proxy) 30 minutes
Booking a Single Flight (Proxy-to-IDoc) 30 minutes
Booking Connecting Flights (Proxy-to-Proxy) 45 minutes
Distributing Booking Order Data (Proxy-to-File System)
1 hour
40 minutes (preparatory tasks) + 20 minutes (configuring the business scenario)
The times given above are approximate and are intended as a guide to help you with planning.
3.4 Notes on Tools and Transactions You use different tools to execute the individual configuration steps.
• Transactions in the SAP system of the Integration Server
To log on to the SAP system and call the required transactions, use the user XISUPER. This user is created during the installation of SAP Exchange Infrastructure.
Note that you can call the transactions in the SAP system in the user menu or in the SAP menu. To call the user menu, choose User menu ( ) in the
SAP XI 3.0 Demo Examples Configuration Guide
14 July 2004
pushbutton bar. To call the SAP menu, choose SAP menu ( ) in the pushbutton bar.
• System Landscape Directory
• Integration Builder (Integration Directory)
You only use the configuration part of the Integration Builder (Integration Directory) to configure the demo examples. You do not need the design part of the Integration Builder (Integration Repository). Wherever the term Integration Builder is used below, this refers to the Integration Builder (Integration Directory).
You call the System Landscape Directory and the Integration Builder (Integration Directory) on the initial screen of SAP Exchange Infrastructure. To call the initial screen of SAP Exchange Infrastructure, choose Exchange Infrastructure Start Integration Builder in the user menu.
For more information about calling the relevant tools and transactions, see the descriptions of the respective configuration steps.
4 General Configuration Steps
4.1 Providing the Necessary Users and Authorizations
4.1.1 Authorizations for Configuration Steps in the SAP System
To log on to the SAP system of the Integration Server to configure the demo examples, you can use the user XISUPER. This user is created during the installation of SAP Exchange Infrastructure.
For more information, see Installation Guide – SAP Exchange Infrastructure 3.0 under Post-Installation Activities Activities for SAP Exchange Infrastructure.
4.1.2 Authorizations for Configuring the IDoc Variant To configure the SingleFlightBooking (Proxy-to-IDoc-Communication) variant, you must make specific ALE settings in the SAP system (see 5). To call the transactions necessary to do this, you must create an additional user that is assigned the following roles:
• SAP_BC_MID_ALE_IDOC_ADMIN
• SAP_BC_MID_ALE_IDOC_DEVELOPER
Note that these roles are only available as of SAP Exchange Infrastructure 3.0 Support Package 02. If you want to configure the demo example SingleFlightBooking (with IDoc) before this release, use a user with the authorization SAP_ALL (for example, DDIC) for the configuration steps described in 5.

SAP XI 3.0 Demo Examples Configuration Guide
July 2004 15
4.1.3 Authorizations for Configuring the RFC Variant To configure the Flight Availability Check (Proxy-to-RFC-Communication) variant, you require a system user that is assigned the role SAP_BC_JSF_COMMUNICATION_RO (see 0 under Editing the Communication Channel with Adapter Type RFC).
4.2 Setting Up the System Landscape This section contains all the configuration steps for setting up the system landscape.
4.2.1 System Landscape The figure below shows the system landscape that is used for the configuration of the demo examples:
Integration Server
SAP Web AS 6.40
Fluggesellschaft AA
SAP Web AS 6.40
Reisebüro
SAP Web AS 6.40
Fluggesellschaft LH
SAP Web AS 6.40
Figure 1: System Landscape for the Demo Examples
The system landscape comprises the Integration Server and three other application systems (business systems). One business system implements the travel agency system and the other two business systems each implement an airline system (Lufthansa and American Airlines). In the SAP standard configuration, you set up an additional client for each of the three business systems on the SAP system of the Integration Server.
Note that you are not permitted to implement and run additional productive applications on the SAP system of the Integration Server. The main reason for this is that connecting a productive application to the Integration Server in this way makes it impossible to upgrade the application or the Integration Server separately.
This guideline does not apply to the demo examples. The reasoning behind this exception is as follows:
SAP XI 3.0 Demo Examples Configuration Guide
16 July 2004
- The demo examples are not a productive application and are only for use in development or test systems.
- The demo examples are part of SAP Exchange Infrastructure and, therefore, do not have their own release cycle.
Setting up separate business systems would significantly increase the technical requirements for the demo examples. To keep the examples simple and easy to use, you are therefore permitted to use additional clients on the SAP system of the Integration Server for the demo examples.
Use the following clients for the required business systems: System Client
Travel agency 105
Airline Lufthansa 106
Airline American Airlines 107
The client for the Integration Server is set up during installation of SAP Exchange Infrastructure. In this configuration guide, the client 100 is assigned to the Integration Server. You must set up additional clients for the business systems of the travel agency and the two airlines. These clients are referred to as application clients below.
You generate the application clients from the SAP reference client 000 by using client copy.
To do this, execute the following steps in the SAP system of the Integration Server:
• Set up the logical systems (for travel agency and airlines)
• Assign client and logical system
• Client Copy
The three-figure ID of the SAP system on which the Integration Server is installed is referred to below as <SID>.
4.2.2 Setting Up the Logical Systems To be able to configure a business system as a sender or receiver of IDocs, you must assign a logical system to it.
You must specify (ALE) logical systems for the configuration of the variant SingleFlightBooking (with IDoc). However, you also require the logical systems for the client copy (step 4.2.4). It is not possible to add or change the logical systems later. Therefore, you should execute steps 0 and 5 even if you are not currently planning to use the IDoc demo example.
Define a logical system for each business system.
1. Choose the transaction Display IMG (transaction code SALE).
2. Choose Basic Settings Logical Systems Define Logical System.
Ignore the message: Caution: The table is cross-client.
SAP XI 3.0 Demo Examples Configuration Guide
July 2004 17
3. In the Log.System column, specify the logical systems for all three clients. Adhere to the naming convention <SID>CLNT<Client>.
4. In the Name column, enter a name for each logical system. Use a meaningful name. Make the following entries in the Log.System and Name columns:
Log.System Name
<SID>CLNT100 Integration Server
<SID>CLNT105 Travel Agency
<SID>CLNT106 Airline Lufthansa
<SID>CLNT107 Airline American Airlines
5. Save your entries ( ).
4.2.3 Assigning the Logical Systems to Clients Since the business systems in the SAP standard configuration are implemented using different clients, you must assign a logical system to each client.
1. In the SAP menu, choose Tools Administration Administration Client Administration Client Maintenance (SCC4).
2. Choose Display -> Change ( ).
Ignore the message: Caution: The table is cross-client.
3. Choose New Entries.
4. In the New Entries: Details of Added Entries dialog box, enter the following information for client 105:
Field Entry
Client 105
Description (Field to the left of Client field)
Travel Agency
Logical System <SID>CLNT105
Select the entry in the dropdown list box.
5. Save your entries ( ).
6. Choose Back ( ).
7. Add an entry for each of the other clients. In the New Entries: Details of Added Entries dialog box, enter the following information:
Client Description (field to the right of the Client field)
Logical System
100 INTEGRATION_SERVER <SID>CLNT100
105 Travel Agency <SID>CLNT105
106 Airline Lufthansa <SID>CLNT106
107 Airline American Airlines <SID>CLNT107
SAP XI 3.0 Demo Examples Configuration Guide
18 July 2004
4.2.4 Client Copy You use the steps below to enter additional attributes for the specified clients and execute the client copy.
Execute the following steps separately for each of the clients 105, 106, and 107.
1. Log on in client 105. Use the user SAP* and the password PASS.
2. In the SAP menu, choose Tools Administration Administration Client Administration Client Copy Local Copy (SCCL).
3. In the Select Profile field, select SAP_UCSV.
4. In the Client and Source Client fields, select the client of the Integration Server as the source client (client 100 in this configuration guide).
5. In the menu bar, choose Client Copy Start.
6. Once the client copy is complete, execute the client copy for clients 106 and 107 one after the other.
Note that the user activities for entering the necessary information take approximately 15 minutes for each client. Once you have completed these activities, you must then allow approximately 30 minutes for the actual client copy (for each client). Take this into account and schedule the later configuration steps accordingly.
Note that other users cannot work in the system at the same time.
4.3 Describing the System Landscape in the System Landscape Directory
This section contains all the steps for describing the system landscape in the System Landscape Directory.
All the configuration steps that you must make in the System Landscape Directory to configure the Distributing Booking Order Data (Proxy-to-File System) variant (6.4.2), are described separately in Settings for Communicating with a File System (Fehler! Verweisquelle konnte nicht gefunden werden.). This is because these steps are only required when configuring special variants.
The description of the system landscape consists of:
• The technical system landscape
• The business system landscape
You access this data in the System Landscape Directory when executing the further configuration steps in the Integration Directory.
1. To call the System Landscape Directory, choose Exchange Infrastructure Start Integration Builder in the user menu.
SAP XI 3.0 Demo Examples Configuration Guide
July 2004 19
2. On the initial screen of SAP Exchange Infrastructure, choose the hyperlink System Landscape Directory.
3. Log on using your user and password.
4.3.1 Technical System Landscape Since the involved business systems are each simulated by a different client of the same SAP system, you only need one technical system (the system of the Integration Server).
The system of the Integration Server registers itself as a technical system in the System Landscape Directory automatically during installation of SAP Exchange Infrastructure (according to the Installation Guide – SAP Exchange Infrastructure 3.0).
You must assign the application clients to this technical system.
1. On the initial screen of the System Landscape Directory, choose Technical Landscape. The system displays all the technical systems in a table. The technical system of the Integration Server has the following name: <SID> on <Server Name>.
If you have called the system <SID>, the name of the server (<Server Name>) is displayed in the corresponding status field in the status bar of the SAP window (for the system <SID>) (for example, PWDF1234).
2. Open the technical system <SID> on <Server Name>. To do this, click the corresponding entry.
The system opens the technical system browser.
3. Assign the travel agency client to the technical system. To do this, in the Clients line, choose Add.
4. In the List, add, delete, and maintain technical systems dialog box, enter the following information:
5. Field Description Entry
Client Number Client 105
Logical System Name Logical system for IDoc communication <SID>CLNT105
Description Description Travel Agency
The specification of logical systems is relevant for the variant SingleFlightBooking (with IDoc). For more information about setting up the logical systems, see 0.
6. To save your entries, choose Save.
7. Repeat this step for the other application clients (106 for the airline Lufthansa and 107 for the airline American Airlines). Specify the following logical systems for the clients:
Client Number Logical System Name
106 <SID>CLNT106
107 <SID>CLNT107
8. Save your entries (choose Save).
SAP XI 3.0 Demo Examples Configuration Guide
20 July 2004
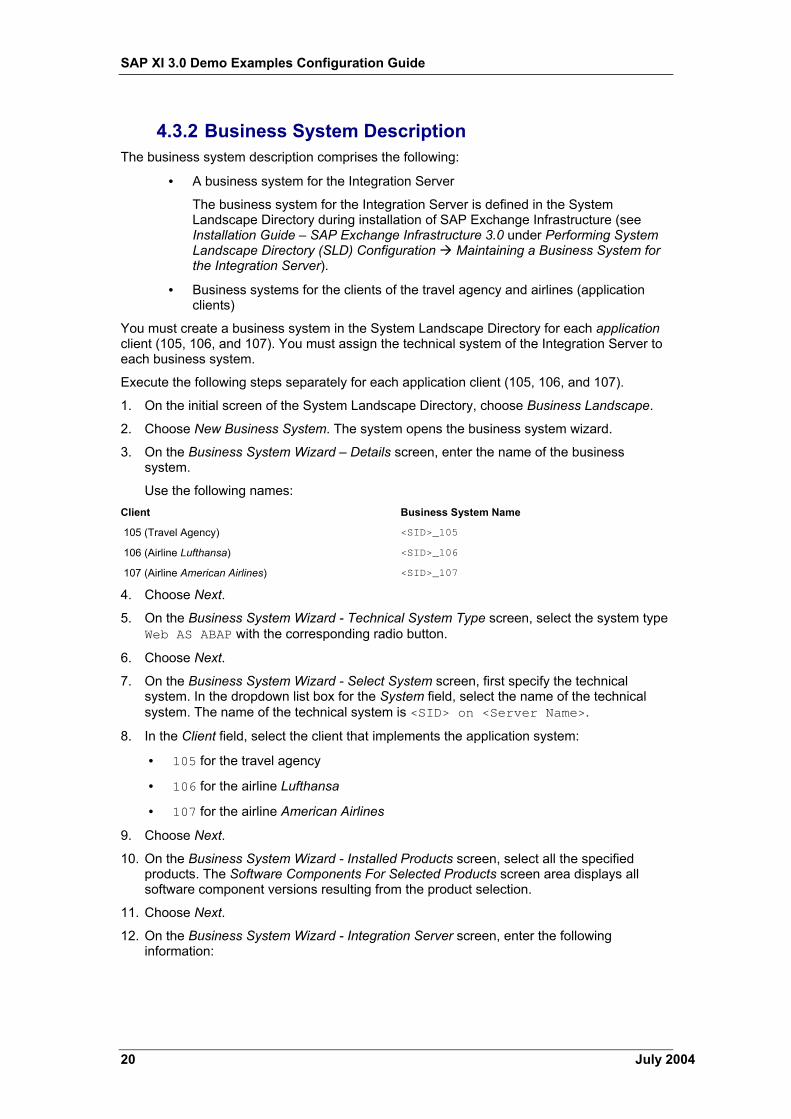
4.3.2 Business System Description The business system description comprises the following:
• A business system for the Integration Server
The business system for the Integration Server is defined in the System Landscape Directory during installation of SAP Exchange Infrastructure (see Installation Guide – SAP Exchange Infrastructure 3.0 under Performing System Landscape Directory (SLD) Configuration Maintaining a Business System for the Integration Server).
• Business systems for the clients of the travel agency and airlines (application clients)
You must create a business system in the System Landscape Directory for each application client (105, 106, and 107). You must assign the technical system of the Integration Server to each business system.
Execute the following steps separately for each application client (105, 106, and 107).
1. On the initial screen of the System Landscape Directory, choose Business Landscape.
2. Choose New Business System. The system opens the business system wizard.
3. On the Business System Wizard – Details screen, enter the name of the business system.
Use the following names: Client Business System Name
105 (Travel Agency) <SID>_105
106 (Airline Lufthansa) <SID>_106
107 (Airline American Airlines) <SID>_107
4. Choose Next.
5. On the Business System Wizard - Technical System Type screen, select the system type Web AS ABAP with the corresponding radio button.
6. Choose Next.
7. On the Business System Wizard - Select System screen, first specify the technical system. In the dropdown list box for the System field, select the name of the technical system. The name of the technical system is <SID> on <Server Name>.
8. In the Client field, select the client that implements the application system:
• 105 for the travel agency
• 106 for the airline Lufthansa
• 107 for the airline American Airlines
9. Choose Next.
10. On the Business System Wizard - Installed Products screen, select all the specified products. The Software Components For Selected Products screen area displays all software component versions resulting from the product selection.
11. Choose Next.
12. On the Business System Wizard - Integration Server screen, enter the following information:
SAP XI 3.0 Demo Examples Configuration Guide
July 2004 21
• In the Business System Role field, specify the role of the business system. Specify the role Application System for the clients of the application systems.
• In the Related Integration Server field, specify the technical system of the Integration Server (<SID> on <Server Name>).
• To save your entries, choose Finish.
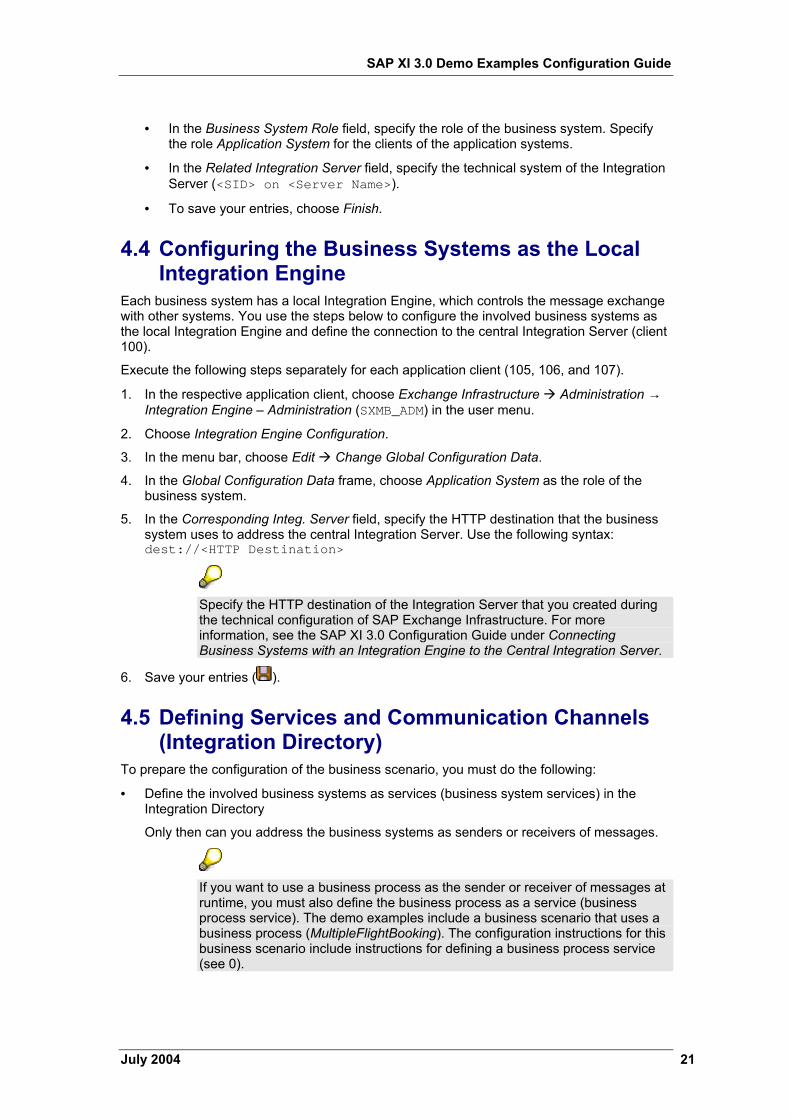
4.4 Configuring the Business Systems as the Local Integration Engine
Each business system has a local Integration Engine, which controls the message exchange with other systems. You use the steps below to configure the involved business systems as the local Integration Engine and define the connection to the central Integration Server (client 100).
Execute the following steps separately for each application client (105, 106, and 107).
1. In the respective application client, choose Exchange Infrastructure Administration → Integration Engine – Administration (SXMB_ADM) in the user menu.
2. Choose Integration Engine Configuration.
3. In the menu bar, choose Edit Change Global Configuration Data.
4. In the Global Configuration Data frame, choose Application System as the role of the business system.
5. In the Corresponding Integ. Server field, specify the HTTP destination that the business system uses to address the central Integration Server. Use the following syntax: dest://<HTTP Destination>
Specify the HTTP destination of the Integration Server that you created during the technical configuration of SAP Exchange Infrastructure. For more information, see the SAP XI 3.0 Configuration Guide under Connecting Business Systems with an Integration Engine to the Central Integration Server.
6. Save your entries ( ).
4.5 Defining Services and Communication Channels (Integration Directory)
To prepare the configuration of the business scenario, you must do the following:
• Define the involved business systems as services (business system services) in the Integration Directory
Only then can you address the business systems as senders or receivers of messages.
If you want to use a business process as the sender or receiver of messages at runtime, you must also define the business process as a service (business process service). The demo examples include a business scenario that uses a business process (MultipleFlightBooking). The configuration instructions for this business scenario include instructions for defining a business process service (see 0).
SAP XI 3.0 Demo Examples Configuration Guide
22 July 2004
• Define communication channels for outbound message processing (for all relevant receiver business systems)
You must define a communication channel for all communication types that you want to use (proxy-to-proxy and proxy-to-IDoc) and for all potential receiver systems.
You define services and communication channels in the Integration Directory.
Therefore, to execute the activities described below, call the Integration Builder (Integration Directory).
1. To call the Integration Builder (Integration Directory), choose Exchange Infrastructure Start Integration Builder in the user menu.
2. On the initial screen of SAP Exchange Infrastructure, choose the hyperlink Integration Directory.
3. Log on using your user and password. The system opens the Integration Builder (Integration Directory).
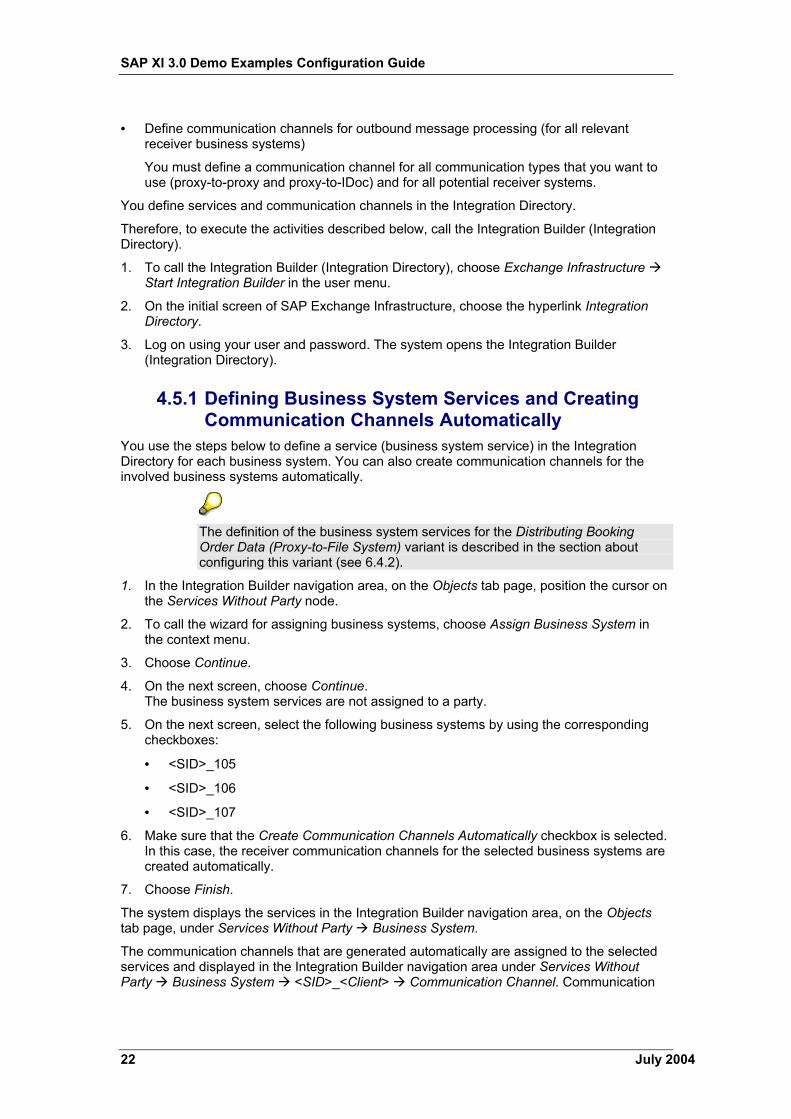
4.5.1 Defining Business System Services and Creating Communication Channels Automatically
You use the steps below to define a service (business system service) in the Integration Directory for each business system. You can also create communication channels for the involved business systems automatically.
The definition of the business system services for the Distributing Booking Order Data (Proxy-to-File System) variant is described in the section about configuring this variant (see 6.4.2).
1. In the Integration Builder navigation area, on the Objects tab page, position the cursor on the Services Without Party node.
2. To call the wizard for assigning business systems, choose Assign Business System in the context menu.
3. Choose Continue.
4. On the next screen, choose Continue. The business system services are not assigned to a party.
5. On the next screen, select the following business systems by using the corresponding checkboxes:
• <SID>_105
• <SID>_106
• <SID>_107
6. Make sure that the Create Communication Channels Automatically checkbox is selected. In this case, the receiver communication channels for the selected business systems are created automatically.
7. Choose Finish.
The system displays the services in the Integration Builder navigation area, on the Objects tab page, under Services Without Party Business System.
The communication channels that are generated automatically are assigned to the selected services and displayed in the Integration Builder navigation area under Services Without Party Business System <SID>_<Client> Communication Channel. Communication
SAP XI 3.0 Demo Examples Configuration Guide
July 2004 23
channels with adapter type XI have the name GeneratedReceiverChannel_XI and those with adapter type IDoc have the name GeneratedReceiverChannel_IDoc. Communication channels with adapter type RFC have the name GeneratedReceiverChannel_RFC.
You need receiver communication channels with adapter type XI, IDoc, and RFC for the standard configuration. To be able to use the communication channels, you have to edit them manually.
In the case of the Distributing Booking Order Data (Proxy-to-File System) variant, you need a receiver communication channel with the adapter type File. There is a communication channel template for this communication channel included in the shipment; you must assign it when configuring using the business scenario configurator. For more information, see 6.4.2.
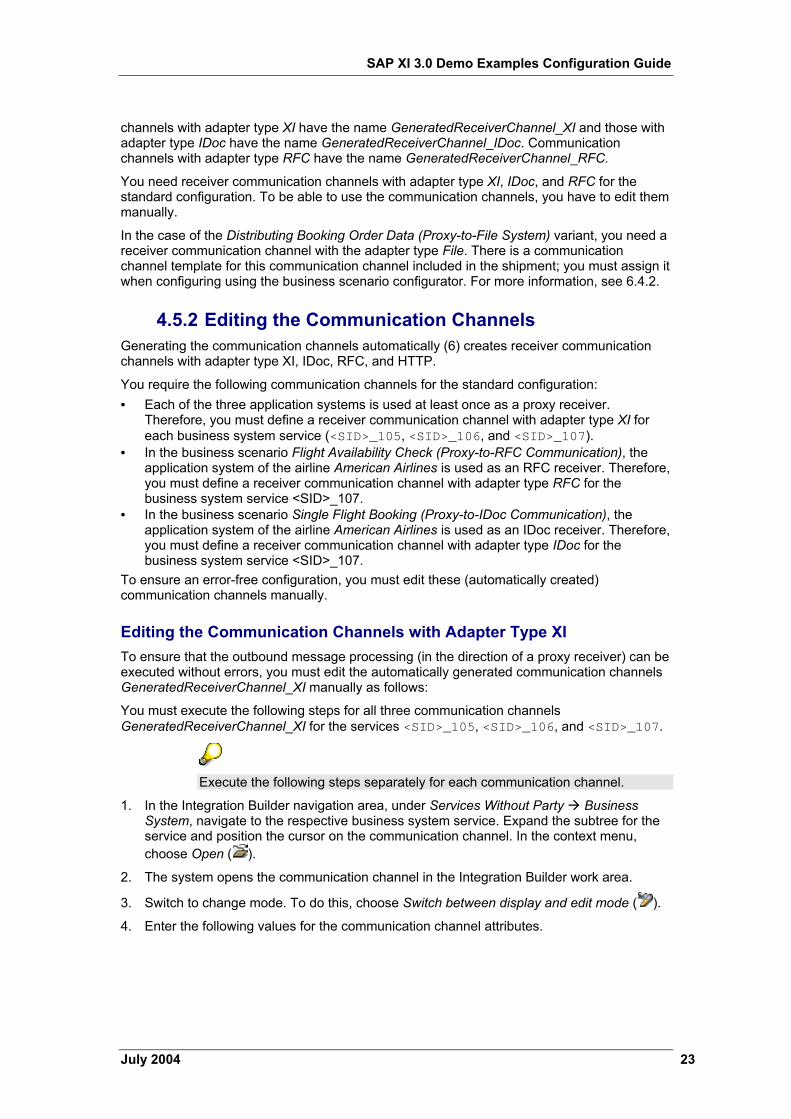
4.5.2 Editing the Communication Channels Generating the communication channels automatically (6) creates receiver communication channels with adapter type XI, IDoc, RFC, and HTTP.
You require the following communication channels for the standard configuration: • Each of the three application systems is used at least once as a proxy receiver.
Therefore, you must define a receiver communication channel with adapter type XI for each business system service (<SID>_105, <SID>_106, and <SID>_107).
• In the business scenario Flight Availability Check (Proxy-to-RFC Communication), the application system of the airline American Airlines is used as an RFC receiver. Therefore, you must define a receiver communication channel with adapter type RFC for the business system service <SID>_107.
• In the business scenario Single Flight Booking (Proxy-to-IDoc Communication), the application system of the airline American Airlines is used as an IDoc receiver. Therefore, you must define a receiver communication channel with adapter type IDoc for the business system service <SID>_107.
To ensure an error-free configuration, you must edit these (automatically created) communication channels manually.
Editing the Communication Channels with Adapter Type XI To ensure that the outbound message processing (in the direction of a proxy receiver) can be executed without errors, you must edit the automatically generated communication channels GeneratedReceiverChannel_XI manually as follows:
You must execute the following steps for all three communication channels GeneratedReceiverChannel_XI for the services <SID>_105, <SID>_106, and <SID>_107.
Execute the following steps separately for each communication channel.
1. In the Integration Builder navigation area, under Services Without Party Business System, navigate to the respective business system service. Expand the subtree for the service and position the cursor on the communication channel. In the context menu, choose Open ( ).
2. The system opens the communication channel in the Integration Builder work area.
3. Switch to change mode. To do this, choose Switch between display and edit mode ( ).
4. Enter the following values for the communication channel attributes.
SAP XI 3.0 Demo Examples Configuration Guide
24 July 2004
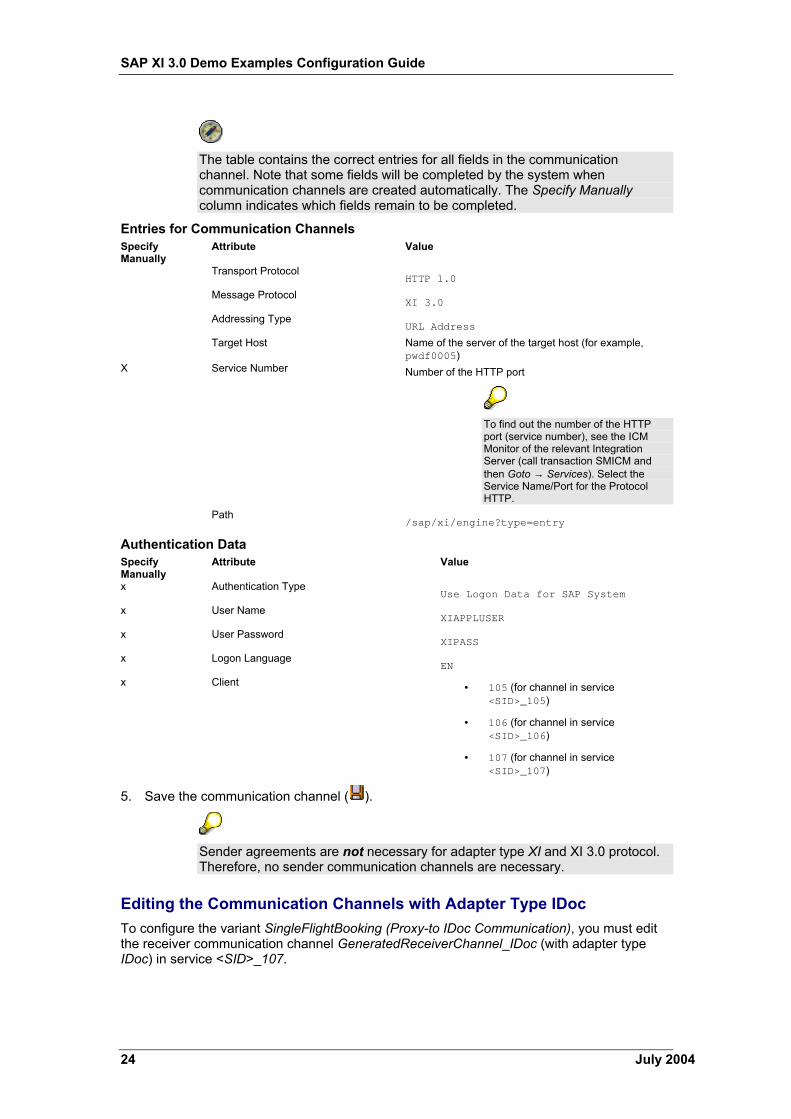
The table contains the correct entries for all fields in the communication channel. Note that some fields will be completed by the system when communication channels are created automatically. The Specify Manually column indicates which fields remain to be completed.
Entries for Communication Channels Specify Manually
Attribute Value
Transport Protocol HTTP 1.0
Message Protocol XI 3.0
Addressing Type URL Address
Target Host Name of the server of the target host (for example, pwdf0005)
X Service Number Number of the HTTP port
To find out the number of the HTTP port (service number), see the ICM Monitor of the relevant Integration Server (call transaction SMICM and then Goto → Services). Select the Service Name/Port for the Protocol HTTP.
Path /sap/xi/engine?type=entry
Authentication Data Specify Manually
Attribute Value
x Authentication Type Use Logon Data for SAP System
x User Name XIAPPLUSER
x User Password XIPASS
x Logon Language EN
x Client • 105 (for channel in service <SID>_105)
• 106 (for channel in service <SID>_106)
• 107 (for channel in service <SID>_107)
5. Save the communication channel ( ).
Sender agreements are not necessary for adapter type XI and XI 3.0 protocol. Therefore, no sender communication channels are necessary.
Editing the Communication Channels with Adapter Type IDoc To configure the variant SingleFlightBooking (Proxy-to IDoc Communication), you must edit the receiver communication channel GeneratedReceiverChannel_IDoc (with adapter type IDoc) in service <SID>_107.
SAP XI 3.0 Demo Examples Configuration Guide
July 2004 25
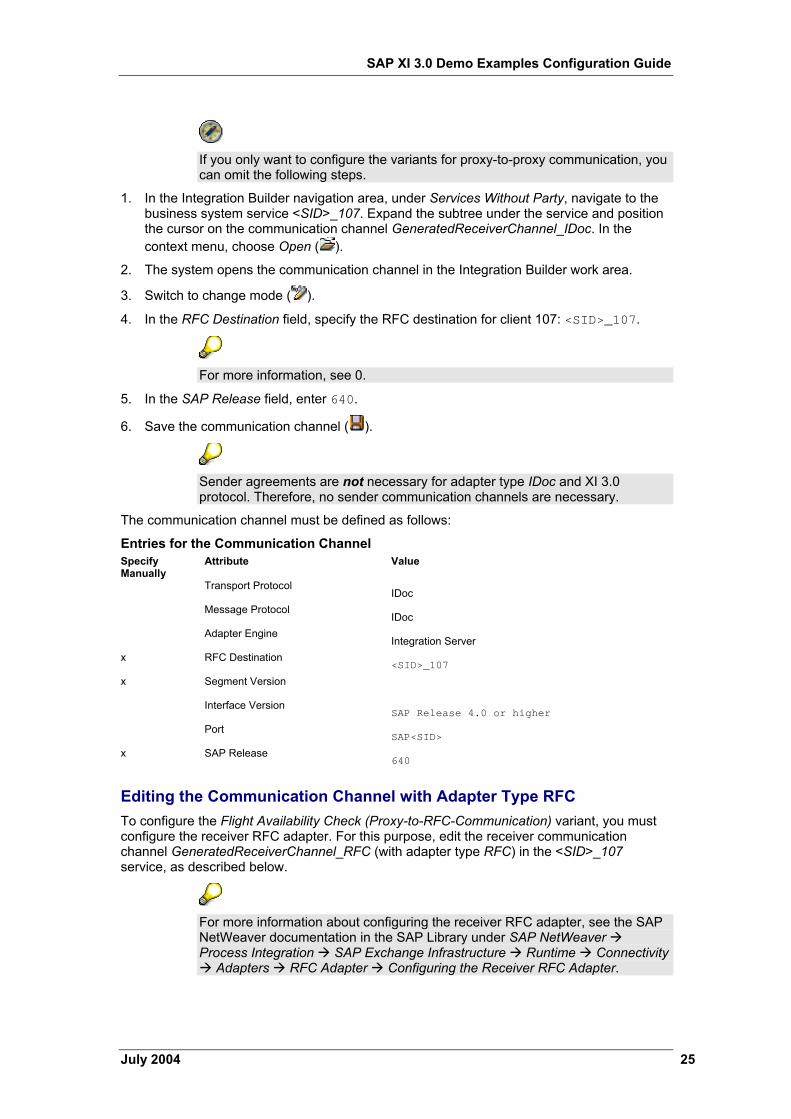
If you only want to configure the variants for proxy-to-proxy communication, you can omit the following steps.
1. In the Integration Builder navigation area, under Services Without Party, navigate to the business system service <SID>_107. Expand the subtree under the service and position the cursor on the communication channel GeneratedReceiverChannel_IDoc. In the context menu, choose Open ( ).
2. The system opens the communication channel in the Integration Builder work area.
3. Switch to change mode ( ).
4. In the RFC Destination field, specify the RFC destination for client 107: <SID>_107.
For more information, see 0.
5. In the SAP Release field, enter 640.
6. Save the communication channel ( ).
Sender agreements are not necessary for adapter type IDoc and XI 3.0 protocol. Therefore, no sender communication channels are necessary.
The communication channel must be defined as follows:
Entries for the Communication Channel Specify Manually
Attribute Value
Transport Protocol IDoc
Message Protocol IDoc
Adapter Engine Integration Server
x RFC Destination <SID>_107
x Segment Version
Interface Version SAP Release 4.0 or higher
Port SAP<SID>
x SAP Release 640
Editing the Communication Channel with Adapter Type RFC To configure the Flight Availability Check (Proxy-to-RFC-Communication) variant, you must configure the receiver RFC adapter. For this purpose, edit the receiver communication channel GeneratedReceiverChannel_RFC (with adapter type RFC) in the <SID>_107 service, as described below.
For more information about configuring the receiver RFC adapter, see the SAP NetWeaver documentation in the SAP Library under SAP NetWeaver Process Integration SAP Exchange Infrastructure Runtime Connectivity
Adapters RFC Adapter Configuring the Receiver RFC Adapter.
SAP XI 3.0 Demo Examples Configuration Guide
26 July 2004
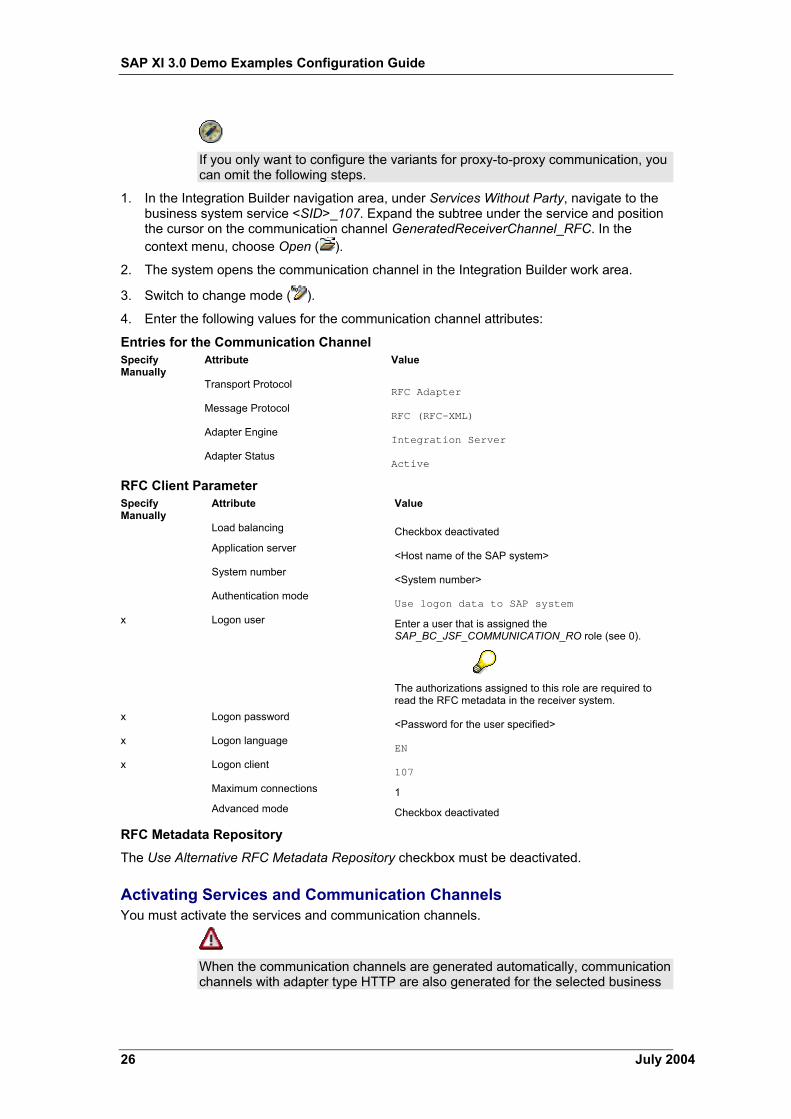
If you only want to configure the variants for proxy-to-proxy communication, you can omit the following steps.
1. In the Integration Builder navigation area, under Services Without Party, navigate to the business system service <SID>_107. Expand the subtree under the service and position the cursor on the communication channel GeneratedReceiverChannel_RFC. In the context menu, choose Open ( ).
2. The system opens the communication channel in the Integration Builder work area.
3. Switch to change mode ( ).
4. Enter the following values for the communication channel attributes:
Entries for the Communication Channel Specify Manually
Attribute Value
Transport Protocol RFC Adapter
Message Protocol RFC (RFC-XML)
Adapter Engine Integration Server
Adapter Status Active
RFC Client Parameter Specify Manually
Attribute Value
Load balancing Checkbox deactivated Application server
<Host name of the SAP system> System number
<System number> Authentication mode
Use logon data to SAP system
x Logon user Enter a user that is assigned the SAP_BC_JSF_COMMUNICATION_RO role (see 0).
The authorizations assigned to this role are required to read the RFC metadata in the receiver system.
x Logon password <Password for the user specified>
x Logon language EN
x Logon client 107
Maximum connections 1 Advanced mode Checkbox deactivated
RFC Metadata Repository
The Use Alternative RFC Metadata Repository checkbox must be deactivated.
Activating Services and Communication Channels You must activate the services and communication channels.
When the communication channels are generated automatically, communication channels with adapter type HTTP are also generated for the selected business

SAP XI 3.0 Demo Examples Configuration Guide
July 2004 27
systems. These communication channels are not required for the configuration of the demo examples, but they are saved in the user’s standard change list. Since these communication channels are not fully specified, you cannot activate them along with the other channels (adapter type XI, IDoc, and RFC).
The same applies to the communication channels GeneratedReceiverChannel_IDoc and GeneratedReceiverChannel_RFC for the services <SID>_105 and <SID>_106. These are also not required for the further configuration steps.
Therefore, you must delete the communication channels that are not required before activating.
1. In the Integration Builder navigation area, select the Change Lists tab page.
2. If you have created more than one change list, expand the change lists and check which one the communication channels are assigned to.
3. Delete the communication channels that are not required (adapter type HTTP) separately.
To delete an object in a change list, you must first open it (double-click). Then, choose Communication Channel Delete ( ) in the menu bar of the object editor.
4. Position the cursor in the change list with the communication channels and choose Activate in the context menu.
4.6 Further Steps for Configuring the Demo Examples
4.6.1 Activating the BSP Application A BSP (Business Server Pages) application is available to enable you to execute the demo examples. You use this application to make the necessary entries and display the results. To be able to execute the demo examples after configuration, you must activate the BSP application.
For more information about the necessary ICF (Internet Communication Framework) services, see SAP Note 517484.
1. Log on to the SAP system in client 100 (Integration Server).
2. Call the transaction Maintain Service. To do this, choose Tools Administration Administration Network HTTP Service Hierarchy Maintenance (SICF) in the SAP menu.
3. In the Virt.Hosts / Services column, expand the following nodes: default host sap bc bsp sap. Select the entry sxidemo_agcy_ui.
4. In the context menu, choose Activate Service.
Entry in gray font: Service is not activated. Entry in black font: Service is activated.
A service can only be activated if all nodes above it are activated.
SAP XI 3.0 Demo Examples Configuration Guide
28 July 2004
5. To open the service, double-click it.
6. Switch to change mode. To do this, choose Change ( ).
7. In the Anonymous Logon Data frame, make the following entries:
• In the Client field, specify the client of the travel agency: 105.
• In the User field, enter XISUPER.
• In the Password field, enter the password for this user.
The user XISUPER is created during the installation of SAP Exchange Infrastructure.
For more information about this user, see the Installation Guide – SAP Exchange Infrastructure 3.0 under Post-Installation Activities Activities for SAP Exchange Infrastructure.
The entries for user and password are optional. If you do not enter a user and password, you must log on separately with your user and password when you call the BSP application.
8. Choose Input ( ).
The system automatically creates a transport request for your change. A dialog box appears, in which you confirm this transport request.
4.6.2 Generating the Flight Data To be able to access flight data during execution of the demo examples, you first have to generate it. A data generation program is available to enable you to generate data for flights with different airlines on different days.
The data for a flight is made up of “static” data (for example, airline, flight date, flight number) and “dynamic” data (seat availability in the three flight classes). The “dynamic” data is dependent on the business system (client). Therefore, you must generate the data separately in all three clients.
The data generation process generates flight data for flights in a time interval from 40 weeks before until 40 weeks after the date of data generation. It also generates flights for the first day of every month for the year following the date of data generation for each airline and flight number. This simplifies the execution of the demo examples: When you select the first day of the month as the flight date, it is guaranteed that a flight is available for each airline and connection number.
Generate the data in all three clients on the same day. This guarantees that the (static) flight data (that is, the set of flights offered) is identical in all three clients.
The data generation does not generate any booking data.
To represent the distribution of the data management tasks between the travel agency and the two airlines as realistically as possible, the data generation program generates the following results:

SAP XI 3.0 Demo Examples Configuration Guide
July 2004 29
• If data generation takes place in the client of one airline, the maximum number of seats for the flights of the other airline is set to zero, depending on the client.
• If data generation takes place in the client of the travel agency, the maximum number of seats is set to zero for all flights.
This guarantees that you can only ever book the appropriate flights (for the respective client).
Execute the following steps separately in each application client (105, 106, and 107).
1. Log on to the SAP system in the respective client.
2. In the user menu, choose Exchange Infrastructure Demo Examples Settings: Generate Flight Data.
3. In the Specify the airlines for this system frame, specify the role of the respective application client.
• You are logged on in client 105: Select the No radio button.
• You are logged on in client 106 or 107: Select the Yes radio button and specify the respective airline ID in the Airline field (LH for Lufthansa in client 106 and AA for American Airlines in client 107).
You can leave the to field empty.
4. In the Select data range frame, specify the range of the generated data set. Select the Optimized Flight Data radio button.
We strongly recommend that you select the Optimized Flight Data radio button. In this case, a manageable number of flight connections is generated (for LH 0400, LH 0401, AA 0017, AA 0064).
Only select the Complete Flight Data option if you want to use the generated flight data for other demo examples that require access to a more extensive data set. In this case, flight data is generated for other airlines that do not belong to the system landscape of the demo examples. However, note that in this case you must adjust the configuration of the demo examples to the more extensive data set (for example, by adjusting the routing conditions). The configuration steps below are based on the data set generated using the Optimized Flight Data option.
5. Choose Execute ( ).
5 Configuration Settings for Using Special Adapters
This chapter describes the adapter-type-specific configuration steps that you must make in addition to the configuration of the relevant communication channel in the Integration Directory.
5.1 Settings for IDoc Communication You must make the following additional settings in the SAP system for the SingleFlightBooking (Proxy-to-IDoc Communication) variant.
SAP XI 3.0 Demo Examples Configuration Guide
30 July 2004
If you only want to configure the variants for proxy-to-proxy communication, you can skip this section.
For more information about IDoc communication and the integration technology Application Link Enabling (ALE), see the documentation for SAP NetWeaver under SAP NetWeaver Application Platform Connectivity Components of SAP Communication Technology Classical SAP Technologies (ABAP) IDoc Interface/ALE).
To call the transactions that are required for the configuration steps below, use a user that is assigned the following roles:
- SAP_CA_BFA_DATATRANSFER
- SAP_IDOC_ADMINISTRATION
5.1.1 Specifying RFC Destinations To enable the business system of the airline American Airlines (business system <SID>_107) to communicate with the Integration Server by using IDocs, you must do the following:
• Specify an R/3 connection to the Integration Server (client 100) in the client of the airline American Airlines (107)
• Specify an R/3 connection to the client of the airline American Airlines (107) in the system of the Integration Server (client 100)
Enter the required information as an RFC destination.
R/3 Connection to the Integration Server 1. In client 107, call the transaction Display and Maintain RFC Destinations. To do this,
choose Exchange Infrastructure Environment RFC Destinations (Display and Maintenance) (SM59) in the user menu.
2. Select the R/3 connections node.
3. In the pushbutton bar, choose Create.
4. In the RFC destination field, enter the following name for the RFC destination for the Integration Server: <SID>_100.
5. In the Connection type field, in the dropdown list box, select 3 - Connection to R/3 System.
6. In the Description frame, in the Description 1 field, enter the following: Connection to Integration Server.
7. Choose Return.
8. On the Technical settings tab page, enter the following information: In the Target host field, enter localhost. In the System Number field, specify the system number of the SAP system (for example, 73).
SAP XI 3.0 Demo Examples Configuration Guide
July 2004 31
To find the system number, choose Properties in the logon dialog box (SAP Logon). The system number is displayed in the System Number field.
9. On the Logon/Security tab page, enter the logon data for the target system. In the Logon frame, enter the following information:
• In the Client field, specify the client of the Integration Server: 100.
• In the User field, enter XIAPPLUSER.
• In the Password field, enter XIPASS.
10. Save the RFC destination (choose the Save pushbutton).
11. To test the RFC destination, choose Test connection in the pushbutton bar.
12. Choose Back ( ).
R/3 Connection to the Application System of the Airline American Airlines 1. In client 100, call the transaction Display and Maintain RFC Destinations. To do this,
choose Exchange Infrastructure Environment RFC Destinations (Display and Maintenance) (SM59) in the user menu.
2. Select the R/3 connections node.
3. In the pushbutton bar, choose Create.
4. In the RFC destination field, enter the following name for the RFC destination for the Integration Server: <SID>_107.
5. In the Connection type field, in the dropdown list box, select 3 - Connection to R/3 System.
6. In the Description frame, in the Description 1 field, enter the following: Connection to American Airlines.
7. Choose Return.
8. On the Technical settings tab page, enter the following information: In the Target host field, enter localhost. In the System Number field, specify the system number of the SAP system (for example, 73).
To find the system number, choose Properties in the logon dialog box (SAP Logon). The system number is displayed in the System Number field.
13. On the Logon/Security tab page, enter the logon data for the target system. In the Logon frame, enter the following information:
• In the Client field, specify the client of the application system for American Airlines: 107.
• In the User field, specify a user that is assigned the role SAP_XI_IS_SERV_USER and a role <Own Role> that you define yourself. Assign the following authorization objects to the <Own Role> role:
o S_RFC (Activity Execute, RFC object EDIN, object type Function Group)
SAP XI 3.0 Demo Examples Configuration Guide
32 July 2004
o B_ALE_RECV (Message type FLIGHTBOOKING_CREATEANDRESP)
Only then can the system (client) of the airline American Airlines receive and process IDocs.
• In the Password field, enter a password for this user.
14. Save the RFC destination (choose the Save pushbutton).
15. To test the RFC destination, choose Test connection in the pushbutton bar.
16. Choose Back ( ).
5.1.2 Specifying the IDoc Port To be able to send the IDocs from the application system of American Airlines to the system of the Integration Server, you must specify the port of the Integration Server.
1. In client 107, call the transaction Ports in IDoc Processing. To do this, choose Tools ALE ALE Administration Runtime Settings Port Maintenance (WE21) in the SAP menu.
2. Select the Ports Transactional RFC node and choose Create ( ).
3. In the Ports in IDoc processing dialog box, select the own port name radio button.
4. Enter the following port name: SAP<SID>.
5. Choose Continue ( ).
6. In the Description field, enter Integration Server.
7. In the RFC destination field, specify the RFC destination of the Integration Server: <SID>_100.
8. Save your entries ( ).
5.1.3 Specifying IDocs To define the involved IDocs, you must execute the following steps.
Messages from the Travel Agency to the Airline American Airlines First, define the IDocs for the messages from the travel agency to the airline American Airlines (client 105 client 107).
1. Call the transaction Partner Profiles in client 107. To do this, choose Tools ALE ALE Administration Runtime Settings Partner Profiles (WE20) in the SAP menu.
2. In the Partner no. field, specify the logical system of the travel agency: <SID>CLNT105.
3. In the Partn.Type field, in the dropdown list box, select LS (for logical system).
4. On the Post processing: permitted agent tab page, specify the user for the IDoc administrator. The IDoc administrator can then execute the IDoc monitoring. In the Type field, specify the user type (for example, organizational unit, normal user).
5. Save your entries ( ).
6. In the Inbound parmtrs. table, add a new line (Create inbound parameter ( )).
SAP XI 3.0 Demo Examples Configuration Guide
July 2004 33
7. In the Partner profiles: Inbound parameters dialog box, in the Message Type field, specify the inbound IDoc. In the dropdown list box, select FLIGHTBOOKING_CREATEANDRESP.
8. On the Inbound options tab page, in the Process code field, select the entry BAPI in the dropdown list box.
9. Save your entries ( ).
10. Choose Back ( ).
Messages from the Airline American Airlines to the Integration Server Define the IDocs for the messages from the airline American Airlines to the Integration Server (client 107 client 100).
Note that the receiver in this send direction is the Integration Server (that is, the IDoc adapter) and not the travel agency. The actual receiver system (the travel agency) is not defined by the Integration Server until routing (receiver determination).
1. In the Partner Profiles dialog box, choose Create ( ).
2. In the Partner no. field, specify the logical system of the Integration Server: <SID>CLNT100.
3. In the Partn.Type field, in the dropdown list box, select LS (for logical system).
4. On the Post processing: permitted agent tab page, specify the user for the IDoc administrator. The IDoc administrator can then execute the IDoc monitoring. In the Type field, specify the user type (for example, organizational unit, normal user).
5. Save your entries ( ).
6. In the Outbound parmtrs. table, add a new line (Create outbound parameter ( )).
7. In the Partner profiles: Outbound parameters dialog box, in the Message Type field, specify the outbound IDoc. In the dropdown list box, select FLIGHTBOOKING_SENDRESPONSE.
8. On the Outbound Options tab page, in the Receiver Port field, select the IDoc port of the Integration Server: <SID>100.
9. In the Output Mode frame, choose Transfer IDoc immed. (radio button).
10. In the IDoc Type frame, in the Basic Type field, select the basic type of the outbound IDoc: FLIGHTBOOKING_SENDRESPONSE01.
11. Save your entries ( ).
5.1.4 Specifying the ALE Distribution Model (SALE)
Specifying the Sender, Receiver, and Underlying BAPI Execute the following steps in client 107.
1. Call the transaction Display IMG (transaction code SALE).
2. Choose Modeling and Implementing Business Processes Maintain Distribution Model and Distribute Views.
3. Switch to change mode. To do this, choose Switch between display and edit mode ( ).
SAP XI 3.0 Demo Examples Configuration Guide
34 July 2004
4. Choose Create model view.
5. In the Short Text field, enter XI – IDoc.
6. In the Technical Name field, enter XIDEMO.
7. Choose Continue ( ).
8. The system displays the distribution model as another node under Model views. Select the node XI – IDoc.
9. Choose Add BAPI.
10. Call the input help in the Sender/client field.
11. Select the logical system <SID>CLNT107 and choose Copy ( ).
12. In the Receiver/server field, select the logical system <SID>CLNT100.
13. In the Obj. name/interface field, select the business object FlightBooking (by using the input help).
14. In the Method field, select the BAPI SendResponse (as a method of the business object FlightBooking).
15. Choose Continue ( ).
Generating the Partner Profile 1. Choose Change Distribution Model.
2. In the menu bar, choose Environment Generate partner profiles.
3. Choose Execute ( ).
5.1.5 Defining the Ports in the IDoc Adapter The IDoc adapter requires metadata to be able to convert the IDocs sent to it into IDoc XML.
For more information about the IDoc adapter, see the documentation for SAP NetWeaver in SAP Library under SAP NetWeaver Process Integration SAP Exchange Infrastructure → Runtime Connectivity Adapters IDoc Adapter.
To establish an RFC connection to the system that contains the metadata, you must execute the following steps.
1. In client 100, call the transaction Port Maintenance in IDoc Adapter (IDX1). To do this, choose Exchange Infrastructure Configuration Port Maintenance in IDoc Adapter in the user menu.
2. Choose Create ( ).
3. In the Port field, enter SAP<SID>.
4. In the Client field, enter 107.
5. In the Description field, enter Airline American Airlines.
6. In the RFC destination field, specify the RFC destination of the airline American Airlines: <SID>_107.
7. Save your entries ( ).

SAP XI 3.0 Demo Examples Configuration Guide
July 2004 35
The name of the port is generated automatically: SAP<SID>_107.
To define the direction from the IDoc adapter to the application system of the airline American Airlines, enter the following information.
1. In the user menu, choose Exchange Infrastructure Configuration Overview of All Loaded Metadata for IDoc Adapter.
2. Choose Create ( ).
3. In the Reload a type description dialog box, in the IDoc Type field, specify the basic type of the outbound IDoc: FLIGHTBOOKING_SENDRESPONSE01.
4. In the Source Port field, enter SAP<SID>_107
5. Choose Continue. ...
5.2 Settings for RFC Communication No further settings are required once the relevant communication channel has been configured (see 6).
6 Configuring the Business Scenario This section contains all the information you need to configure the available demo business scenarios.
The configuration instructions for each business scenario are preceded by a brief business description and a flowchart (component view).
For a detailed description of the individual business scenarios, see the SAP NetWeaver documentation in SAP Library under SAP NetWeaver Process Integration SAP Exchange Infrastructure Overview Demo Examples.
You configure the individual business scenarios in the Integration Directory. Therefore, to execute the activities described below, call the Integration Builder (Integration Directory).
1. In the user menu (in the SAP system of the Integration Server), choose Exchange Infrastructure Start Integration Builder.
2. On the initial screen of SAP Exchange Infrastructure, choose the hyperlink Integration Directory.
3. Log on using your user and password. The system opens the Integration Builder.
Below are detailed instructions for configuring the business scenarios. However, these instructions are only correct if
- No parts of the demo examples have been configured previously
- The business scenarios are configured in the specified order
It is possible to configure the business scenarios in a different order; if you decide to do so, the situation in your system will no longer correspond exactly with this configuration guide and it can no longer be guaranteed that the demo examples will run error-free.
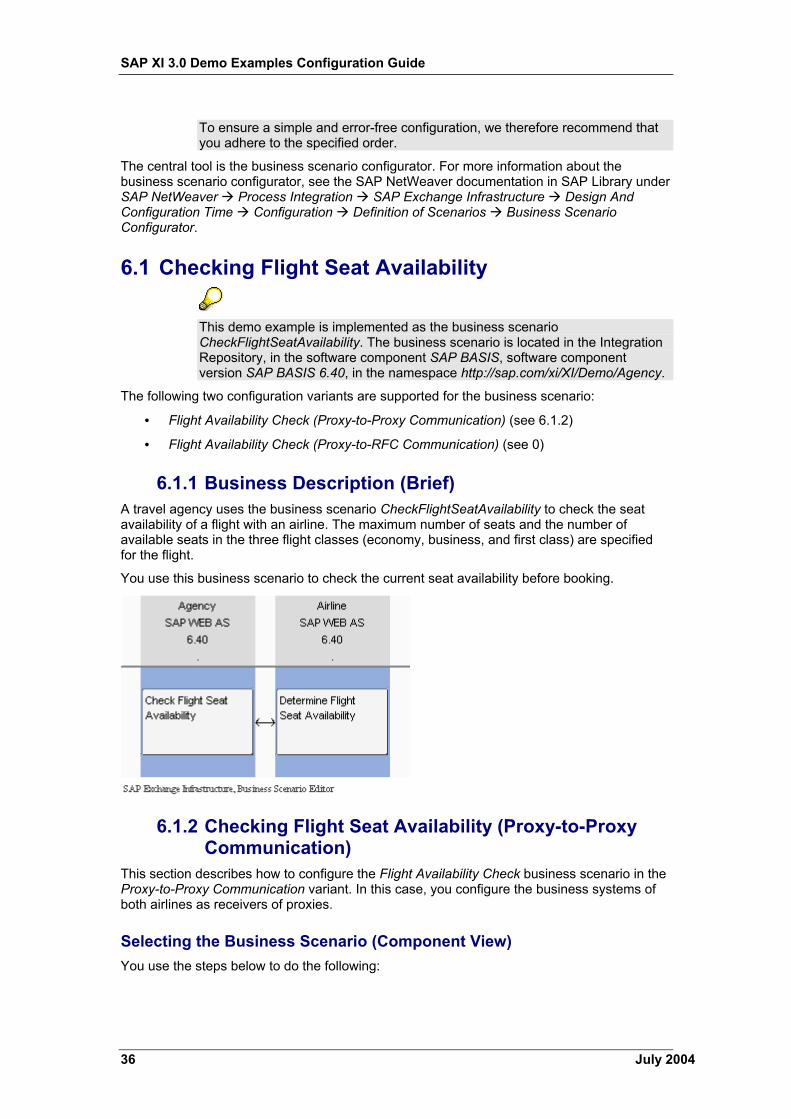
SAP XI 3.0 Demo Examples Configuration Guide
36 July 2004
To ensure a simple and error-free configuration, we therefore recommend that you adhere to the specified order.
The central tool is the business scenario configurator. For more information about the business scenario configurator, see the SAP NetWeaver documentation in SAP Library under SAP NetWeaver Process Integration SAP Exchange Infrastructure Design And Configuration Time Configuration Definition of Scenarios Business Scenario Configurator.
6.1 Checking Flight Seat Availability
This demo example is implemented as the business scenario CheckFlightSeatAvailability. The business scenario is located in the Integration Repository, in the software component SAP BASIS, software component version SAP BASIS 6.40, in the namespace http://sap.com/xi/XI/Demo/Agency.
The following two configuration variants are supported for the business scenario:
• Flight Availability Check (Proxy-to-Proxy Communication) (see 6.1.2)
• Flight Availability Check (Proxy-to-RFC Communication) (see 0)
6.1.1 Business Description (Brief) A travel agency uses the business scenario CheckFlightSeatAvailability to check the seat availability of a flight with an airline. The maximum number of seats and the number of available seats in the three flight classes (economy, business, and first class) are specified for the flight.
You use this business scenario to check the current seat availability before booking.
6.1.2 Checking Flight Seat Availability (Proxy-to-Proxy Communication)
This section describes how to configure the Flight Availability Check business scenario in the Proxy-to-Proxy Communication variant. In this case, you configure the business systems of both airlines as receivers of proxies.
Selecting the Business Scenario (Component View) You use the steps below to do the following:

SAP XI 3.0 Demo Examples Configuration Guide
July 2004 37
• Select the business scenario and the component view from the Integration Repository
• Create the scenario in the Integration Directory to group all the relevant configuration objects
1. To call the business scenario configurator, choose Tools Transfer Business Scenario from Integration Repository in the Integration Builder (Integration Directory) menu bar. This calls a wizard, which you use to select a business scenario and create a scenario in the Integration Directory.
2. In the Select Business Scenario from Integration Repository dialog box, choose the input help (for the Name field). This calls an input help, which displays all business scenarios from the Integration Repository in a list.
3. Select the business scenario CheckFlightSeatAvailability (software component version SAP Basis 6.40, namespace http://sap.com/xi/XI/Demo/Agency), and choose OK.
4. In the wizard, choose Continue.
5. On the next screen, you edit the predefined name of the scenario. Change the name to XIDemo_CheckFlightSeatAvailability.
6. Choose Finish. The system creates the scenario.
7. Choose Close. The system calls the business scenario configurator. The business scenario CheckFlightSeatAvailability is displayed in a graphical editor.
8. In the Configuration Steps bar, choose step 1 Select Component View.
9. In the Select Component View dialog box, in the preview area of the graphical editor, select the component view ABAP_Proxy_2_ABAP_Proxy and choose Apply.
Assigning Services You use the steps below to assign services to the application components of the business scenario.
1. In the Configuration Steps bar, choose step 2 Assign Services. This calls the Assign Services dialog box for the Agency application component.
2. In the Assign Services dialog box, on the Service Assignment tab page, insert a line ( ).
3. Click in the input field in the Service column and call the input help ( ). The system displays all services of type Business System.
4. Select the service <SID>_105 and choose Apply.
5. In the Assign Services dialog box, click the navigation arrow ( ) to switch to the application component Airline.
6. On the Service Assignment tab page, choose the input help ( ) in the pushbutton bar.
7. On the Select Business System Services screen, select the services <SID>_106 and <SID>_107.
8. Choose OK.
9. In the Assign Services dialog box, on the Service Assignment tab page, choose Assign.
Configuring the Connection You use the steps below to configure the connection of the business scenario.
SAP XI 3.0 Demo Examples Configuration Guide
38 July 2004
1. In the Configuration Steps bar, choose step 3 Configure Connections. This calls the Configure Connection dialog box for the connection between the actions Check Flight Seat Availability and Determine Flight Seat Availability.
2. In the Configure Connection dialog box, check that all sender/receiver relations are activated. All checkboxes must be selected.
3. To specify a receiver communication channel for the relation between sender service <SID>_105 and receiver service <SID>_106, click in the input field in the Communication Channel column (for receiver service <SID>_106).
4. Call the input help ( ).
If there are not yet any configuration objects in the system, the system displays all communication channels that are assigned to the service <SID>_106. If receiver agreements already exist for the inbound interface of the connection, the system only displays the communication channel assigned to this receiver agreement.
5. Select the communication channel GeneratedReceiverChannel_XI and choose OK.
6. In the same way, assign the receiver communication channel GeneratedReceiverChannel_XI (assigned to the service <SID>_107) to the relation between the sender service <SID>_105 and the receiver service <SID>_107.
7. In the Configure Connection dialog box, choose Apply.
Generating the Configuration Objects You use the steps below to generate the relevant configuration objects.
1. In the Configuration Steps bar, choose step 4 Generate. This calls the Create Configuration Objects dialog box.
2. Under General, select the Generation radio button.
3. Under Scope of Generation, select the checkboxes Receiver Determination, Interface Determination, and Receiver Agreement.
4. Under Change List for Generated Objects, select the Create New radio button. This means that the changes resulting from the generation are saved in a separate change list with the name of the scenario.
The scenario itself is saved in the standard change list.
5. Choose Start. The objects are generated. The generation log is called.
The generation log contains an overview of all information relating to the generation and indicates if any manual editing is necessary for the generated objects.
If the generation log displays error situations, this may be because parts of the demo examples had been configured previously in your system, or because you have not configured the business scenarios in the specified sequence. In this case, the log contains information on why the generation was not successful. You must correct the problems manually.
SAP XI 3.0 Demo Examples Configuration Guide
July 2004 39
Manual Editing You use the steps below to execute the necessary manual editing for the generated configuration objects.
To define exactly how a message is to be forwarded from the travel agency to the two airlines, you must add routing conditions to the receiver determination.
1. In the generation log, expand the Connections area.
2. Navigate to the receiver determination |<SID>_105| FlightSeatAvailabilityQuery_Out.
The yellow traffic light symbol signifies that manual editing may be necessary for this object.
3. To open the receiver determination, click the key |<SID>_105| FlightSeatAvailabilityQuery_Out. The system opens the receiver determination.
4. To switch to change mode, choose the function Switch Between Display and Edit Modes ( ) in the pushbutton bar of the Display Receiver Determination editor. In the Configured Receivers area, insert the conditions for forwarding messages to the two receiver services.
5. In the line containing the service <SID>_106, click in the input field in the Condition column and call the input help ( ). The system calls the condition editor.
6. In the condition editor, click in the input field in the Left Operand column and call the input help ( ). The system calls the expression editor.
7. In the expression editor, select the Context Object radio button.
8. In the dropdown list box, choose the context object AirlineID.
9. Choose OK.
10. In the condition editor, enter LH (for the airline Lufthansa) in the input field in the Right Operand column.
11. In the Op. column, choose the operator =.
12. Choose OK. You have specified the routing condition AirlineID=LH for the receiver <SID>_106.
13. In the same way, insert the condition AirlineID=AA for the receiver <SID>_107.
14. Save the receiver determination ( ).
Final Steps Execute the following steps:
1. Close the generation log.
You can save the generation log as a file.
2. Close the business scenario configurator. The system displays the message Do you want to keep the changes? Confirm with Apply.
3. Save the scenario XIDemo_CheckFlightSeatAvailability.
SAP XI 3.0 Demo Examples Configuration Guide
40 July 2004
4. Activate the scenario XIDemo_CheckFlightSeatAvailability and all objects that it uses.
Note that there are two change lists:
- Standard change list (containing the scenario XIDemo_CheckFlightSeatAvailability)
- Change list XIDemo_CheckFlightSeatAvailability (containing all objects of the scenario)
You must activate both change lists.
6.1.3 Checking Flight Seat Availability (Proxy-to-RFC Communication)
This section describes how to configure the Flight Availability Check business scenario in the Proxy-to-RFC-Communication variant.
The Flight Availability Check (Proxy-to-Proxy Communication) variant (6.1.2) is configured so that both airlines communicate with the Integration Server by using proxies. In this variant, the existing configuration is changed so that the airline American Airlines communicates with the Integration Server by using RFCs. Therefore, all configuration data defining the proxy communication for American Airlines is overwritten.
It is a prerequisite that you configure the Flight Availability Check (Proxy-to-Proxy Communication) variant (6.1.2) and activate the corresponding objects before configuring this variant. The following instructions only apply when you have done so.
Note that in the following configuration steps you will make changes to parts of the configuration of the Flight Availability Check (Proxy-to-Proxy Communication) variant. Once you have completed the configuration of the Flight Availability Check (Proxy-to-Proxy Communication) variant, in the business scenario Flight Availability Check, the system of the airline American Airlines only communicates with the Integration Server by using RFCs.
All the configuration objects for this variant are saved in the same scenario that was used for the Proxy-to-Proxy variant (XIDemo_CheckFlightSeatAvailability)
Deleting Obsolete Configuration Objects First, delete the following interface determination:
| <SID>_105 | FlightSeatAvailabilityQuery_Out | | <SID>_107 |
If you delete the interface determination, the business scenario configurator creates a new interface determination (with the correct RFC as the inbound interface). This saves you from having to change the existing interface determination manually.
1. In the Integration Builder (Integration Directory), select the Scenarios tab page.
SAP XI 3.0 Demo Examples Configuration Guide
July 2004 41
2. Expand the XIDemo_CheckFlightSeatAvailability scenario.
3. Expand the Interface Determination node.
4. Delete the interface determination | <SID>_105 | FlightSeatAvailabilityQuery_Out | | <SID>_107. To do this, position the cursor on the interface determination and choose Delete ( ) in the context menu.
5. Activate the change list containing the deleted interface determination (on the Change Lists tab page).
Selecting the Business Scenario (Component View) You use the steps below to select the business scenario and the component view from the Integration Repository.
Note that the following steps only configure the changes to the Flight Availability Check (Proxy-to-Proxy Communication) variant. Parts of the existing scenario XIDemo_CheckFlightSeatAvailability are overwritten in this process.
1. Open the scenario XIDemo_CheckFlightSeatAvailability.
2. Switch to change mode ( ).
3. In the pushbutton bar of the object editor, choose Business Scenario Configurator ( ).
4. In the Configuration Steps bar, choose step 1 Select Component View.
5. In the Select Component View dialog box, in the preview area of the graphical editor, select the component view ABAP_Proxy_2_RFC and choose Apply.
Assigning Services You use the steps below to assign services to the application components of the business scenario.
1. In the Configuration Steps bar, choose step 2 Assign Services. This calls the Assign Services dialog box for the Agency application component.
2. In the Assign Services dialog box, on the Service Assignment tab page, insert a line ( ).
3. Click in the input field in the Service column and call the input help ( ). The system displays all services of type Business System.
4. Select the service <SID>_105 and choose Apply.
5. In the Assign Services dialog box, click the navigation arrow ( ) to switch to the application component Airline.
6. On the Service Assignment tab page, insert a line ( ).
7. Click in the input field in the Service column and call the input help ( ).
8. Select the service <SID>_107 and choose OK.
In this variant, you are only configuring the communication between the travel agency (proxy) and American Airlines (RFC). The communication between the travel agency (proxy) and Lufthansa (proxy) uses the configuration objects created for Flight Availability Check (Proxy-to-Proxy Communication) (see 6.1.2).
SAP XI 3.0 Demo Examples Configuration Guide
42 July 2004
9. Choose Assign.
Configuring the Connection You use the steps below to configure the connection of the business scenario.
1. In the Configuration Steps bar, choose step 3 Configure Connections. This calls the Configure Connection dialog box for the connection between the actions Check Flight Seat Availability and Determine Flight Seat Availability.
2. In the Configure Connection dialog box, check that the sender/receiver relation is activated (checkbox).
3. To specify a receiver communication channel for the relation between sender service <SID>_105 (proxy) and receiver service <SID>_107 (RFC), click in the input field in the Communication Channel column (for receiver service <SID>_107).
4. Call the input help ( ).
5. Select the communication channel GeneratedReceiverChannel_RFC and choose OK.
No sender agreement with a sender channel is required for this variant since an RFC is only expected on the receiver side.
Generating the Configuration Objects You use the steps below to generate the relevant configuration objects.
1. In the Configuration Steps bar, choose step 4 Generate. This calls the Create Configuration Objects dialog box.
2. Under General, select the Generation radio button.
3. Under Scope of Generation, select the checkboxes Receiver Determination, Interface Determination, and Receiver Agreement.
4. Under Change List for Generated Objects, select the Create New radio button. This means that the changes resulting from the generation are saved in a separate change list with the name of the scenario.
5. Choose Start. The objects are generated. The generation log is called.
The generation log contains an overview of all information relating to the generation and indicates if any manual editing is necessary for the generated objects.
If the generation log displays error situations, this may be because parts of the demo examples had been configured previously in your system, or because you have not configured the business scenarios in the specified sequence. In this case, the log contains information on why the generation was not successful. You must correct the problems manually.
Manual Editing No manual editing is necessary.
Final Steps Execute the following steps:

SAP XI 3.0 Demo Examples Configuration Guide
July 2004 43
1. Close the generation log.
2. Close the business scenario configurator. The system displays the message Do you want to keep the changes? Confirm with Apply.
3. Save the scenario XIDemo_CheckFlightSeatAvailability.
4. Activate the scenario XIDemo_CheckFlightSeatAvailability and all objects that it uses.
Note that there are two change lists:
- Standard change list (containing the scenario XIDemo_CheckFlightSeatAvailability)
- Change list XIDemo_CheckFlightSeatAvailability (containing all objects of the scenario)
You must activate both change lists.
6.1.4 Executing and Testing There is a BSP application in the SAP system of the Integration Server (client 105) that you can use to test the business scenario (for both configurations).
For more information about executing the business scenario, see the SAP Help Portal (help.sap.com) under SAP NetWeaver Process Integration SAP Exchange Infrastructure Overview Demo Examples Checking Flight Seat Availability Checking Flight Seat Availability (Proxy-to-Proxy) Executing the Business Scenario.
6.2 Booking a Single Flight
This demo example is implemented as the business scenario SingleFlightBooking. The business scenario is located in the Integration Repository, in the software component SAP BASIS, software component version SAP BASIS 6.40, in the namespace http://sap.com/xi/XI/Demo/Agency.
The following configuration variants are supported for the business scenario:
• Single Flight Booking (Proxy-to-Proxy Communication) (see 6.2.2)
• Single Flight Booking (Proxy-to-IDoc Communication) (see 0)
6.2.1 Business Description (Brief) A travel agency uses the SingleFlightBooking business scenario to book a flight with an airline. The booking refers to exactly one flight for exactly one passenger. The airline sends a response stating whether the booking was successful or not.
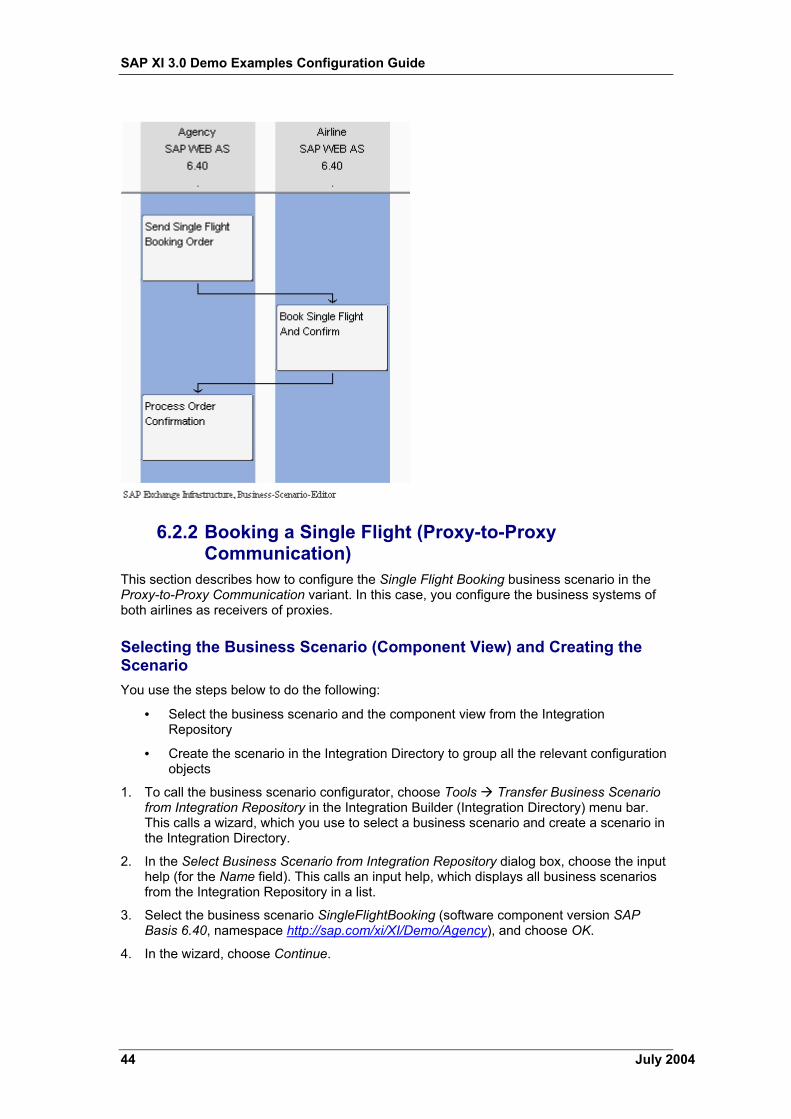
SAP XI 3.0 Demo Examples Configuration Guide
44 July 2004
6.2.2 Booking a Single Flight (Proxy-to-Proxy Communication)
This section describes how to configure the Single Flight Booking business scenario in the Proxy-to-Proxy Communication variant. In this case, you configure the business systems of both airlines as receivers of proxies.
Selecting the Business Scenario (Component View) and Creating the Scenario You use the steps below to do the following:
• Select the business scenario and the component view from the Integration Repository
• Create the scenario in the Integration Directory to group all the relevant configuration objects
1. To call the business scenario configurator, choose Tools Transfer Business Scenario from Integration Repository in the Integration Builder (Integration Directory) menu bar. This calls a wizard, which you use to select a business scenario and create a scenario in the Integration Directory.
2. In the Select Business Scenario from Integration Repository dialog box, choose the input help (for the Name field). This calls an input help, which displays all business scenarios from the Integration Repository in a list.
3. Select the business scenario SingleFlightBooking (software component version SAP Basis 6.40, namespace http://sap.com/xi/XI/Demo/Agency), and choose OK.
4. In the wizard, choose Continue.
SAP XI 3.0 Demo Examples Configuration Guide
July 2004 45
5. On the next screen, you edit the predefined name of the scenario. Change the name to XIDemo_SingleFlightBooking.
Choose Finish.
The system creates the scenario.
6. Choose Close. The system calls the business scenario configurator. The business scenario SingleFlightBooking is displayed in a graphical editor.
7. Check that the component view ABAP_Proxy_2_ABAP_Proxy is selected. If not, in the menu bar of the business scenario configurator, choose Scenario Settings Business Scenario from the Integration Repository Select Component View.
8. In the preview area of the graphical editor, select the component view ABAP_Proxy_2_ABAP_Proxy and choose Apply.
Assigning Services You use the steps below to assign services to the application components of the business scenario.
1. In the Configuration Steps bar, choose step 2 Assign Services. This calls the Assign Services dialog box for the Agency application component.
2. In the Assign Services dialog box, on the Service Assignment tab page, insert a line ( ).
3. Click in the input field in the Service column and call the input help ( ). The system displays all services of type Business System.
4. Select the service <SID>_105 and choose Apply.
5. In the Assign Services dialog box, click the navigation arrow ( ) to switch to the application component Airline.
6. On the Service Assignment tab page, choose the input help ( ) in the pushbutton bar.
7. On the Select Business System Services screen, select the services <SID>_106 and <SID>_107.
8. Choose OK.
9. In the Assign Services dialog box, on the Service Assignment tab page, choose Assign.
Configuring the Connection You use the steps below to configure the connections of the business scenario.
1. In the Configuration Steps bar, choose step 3 Configure Connections. This calls the Configure Connection dialog box for the connection between the actions Send Single Flight Booking Order and Book Single Flight And Confirm.
2. In the Configure Connection dialog box, check that the sender/receiver relations are activated (checkboxes).
3. To specify a receiver communication channel for the relation between sender service <SID>_105 and receiver service <SID>_106, click in the input field in the Communication Channel column (for receiver service <SID>_106).
4. Call the input help ( ).
5. Select the communication channel GeneratedReceiverChannel_XI and choose OK.
SAP XI 3.0 Demo Examples Configuration Guide
46 July 2004
6. In the same way, select the communication channel GeneratedReceiverChannel_XI (assigned to the receiver service <SID>_107) for the relation between the sender service <SID>_105 and the receiver service <SID>_107.
7. Click the navigation arrow ( ) to switch to the connection between the actions Book Single Flight And Confirm and Process Order Confirmation.
8. Check that the sender/receiver relations are activated (checkboxes).
9. To specify a receiver communication channel for the relation between sender service <SID>_106 and receiver service <SID>_105, click in the input field in the Communication Channel column (for receiver service <SID>_105).
10. Call the input help ( ).
11. Select the communication channel GeneratedReceiverChannel_XI and choose OK.
12. In the same way, select the communication channel GeneratedReceiverChannel_XI for the relation between sender service <SID>_107 and receiver service <SID>_105.
13. In the Configure Connection dialog box, choose Apply.
Generating the Configuration Objects You use the steps below to generate the relevant configuration objects.
1. In the Configuration Steps bar, choose step 4 Generate. This calls the Create Configuration Objects dialog box.
2. Under General, select the Generation radio button.
3. Under Scope of Generation, select the checkboxes Receiver Determination, Interface Determination, and Receiver Agreement.
4. Under Change List for Generated Objects, select the Create New radio button. This means that the changes resulting from the generation are saved in a separate change list with the name of the scenario.
The scenario itself is saved in the standard change list.
5. Choose Start. The objects are generated. The generation log is called.
The generation log contains an overview of all information relating to the generation and indicates if any manual editing is necessary for the generated objects.
If the generation log displays error situations, this may be because parts of the demo examples had been configured previously in your system, or because you have not configured the business scenarios in the specified sequence. In this case, the log contains information on why the generation was not successful. You must correct the problems manually.
Manual Editing You use the steps below to execute the necessary manual editing for the generated configuration objects.
To define exactly how a message is to be forwarded from the travel agency to the two airlines, you must add routing conditions to the receiver determination | <SID>_105 | BookingOrderRequest_Out.
SAP XI 3.0 Demo Examples Configuration Guide
July 2004 47
1. In the generation log, expand the Connections area.
2. Select the connection between the actions Send Single Flight Booking Order and Book Single Flight And Confirm.
3. Navigate to the receiver determination | <SID>_105 | BookingOrderRequest_Out.
4. To open the receiver determination, click the key | <SID>_105 | BookingOrderRequest_Out. The system opens the receiver determination.
5. To switch to change mode, choose the function Switch Between Display and Edit Modes ( ) in the pushbutton bar of the Display Receiver Determination editor. In the Configured Receivers area, insert the conditions for forwarding messages to the two receiver services.
6. In the line containing the service <SID>_106, click in the input field in the Condition column and call the input help ( ). The system calls the condition editor.
7. In the condition editor, click in the input field in the Left Operand column and call the input help ( ). The system calls the expression editor.
8. In the expression editor, select the Context Object radio button.
9. In the dropdown list box, choose the context object AirlineID.
10. Choose OK.
11. In the condition editor, enter LH in the input field in the Right Operand column.
12. In the Op. column, choose the operator =.
13. Choose OK. You have specified the routing condition AirlineID=LH for the receiver <SID>_106.
14. In the same way, insert the condition AirlineID=AA for the receiver <SID>_107.
15. Save the receiver determination ( ).
The log also displays a yellow traffic light (for the receiver determination) for the other connections of the business scenario. However, no further manual editing is necessary in this case.
Final Steps Execute the following steps:
1. Close the generation log.
You can save the generation log as a file.
2. Close the business scenario configurator. The system displays the message Do you want to keep the changes? Confirm with Apply.
3. Save the scenario XIDemo_SingleFlightBooking.
4. Activate the scenario XIDemo_SingleFlightBooking and all objects that it uses.
SAP XI 3.0 Demo Examples Configuration Guide
48 July 2004
Note that there are two change lists:
- Standard change list (containing the scenario XIDemo_SingleFlightBooking)
- Change list XIDemo_SingleFlightBooking (containing all objects of the scenario)
You must activate both change lists.
6.2.3 Booking a Single Flight (Proxy-to-IDoc Communication)
This section describes how to configure the Single Flight Booking business scenario in the Proxy-to-Proxy Communication variant. In this case, you configure the business systems of both airlines as receivers of proxies.
In the variant SingleFlightBooking (Proxy-to-IDoc Communication), you configure the business system of an airline as a receiver of IDocs.
This demo example is implemented as the business scenario SingleFlightBooking. The business scenario is located in the Integration Repository, in the software component SAP BASIS, software component version SAP BASIS 6.40, in the namespace http://sap.com/xi/XI/Demo/Agency.
For a brief business description, see �.
You must have performed the steps described in Settings for IDoc Communication (0) before you can configure this variant.
It is a prerequisite that you configure the Single Flight Booking (Proxy-to-Proxy Communication) variant (6.2.2) and activate the corresponding objects before configuring this variant. The following instructions only apply in their entirety if this is the case.
Note that in the following configuration steps you will make changes to parts of the configuration of the variant SingleFlightBooking (proxy communication). Once you have completed the configuration of the variant SingleFlightBooking (with IDoc), in the business scenario SingleFlightBooking the system of the airline American Airlines can only communicate with the Integration Server by using IDocs.
All configuration objects for this variant are saved in the same scenario as used for the proxy-to-proxy variants (XIDemo_SingleFlightBooking).
The Single Flight Booking (Proxy-to-Proxy Communication) variant (6.2.2) is configured so that both airlines communicate with the Integration Server by using proxies. In this variant, the existing configuration is changed so that the airline American Airlines communicates with the Integration Server by using IDocs. Therefore, all configuration data defining the proxy communication for American Airlines is overwritten.
First, delete the following interface determination:
SAP XI 3.0 Demo Examples Configuration Guide
July 2004 49
| <SID>_105 | BookingORderRequest_Out | | <SID>_107 |
If you delete the interface determination, the business scenario configurator creates a new interface determination (with the correct IDoc as the inbound interface). This saves you from having to change the existing interface determination manually.
6. In the Integration Builder (Integration Directory), select the Scenarios tab page.
7. Expand the scenario XIDemo_SingleFlightBooking.
8. Expand the Interface Determination node.
9. Delete the interface determination | <SID>_105 | BookingOrderRequest_Out | | <SID>_107. To do this, position the cursor on the interface determination and choose Delete ( ) in the context menu.
10. Activate the change list containing the deleted interface determination (on the Change Lists tab page).
Selecting the Business Scenario (Component View) You use the steps below to select the business scenario and the component view from the Integration Repository.
Note that the following steps only configure the change to the variant SingleFlightBooking. Parts of the existing scenario XIDemo_SingleFlightBooking are overwritten in this process.
6. Open the scenario XIDemo_SingleFlightBooking.
7. Switch to change mode ( ).
8. In the pushbutton bar of the object editor, choose Business Scenario Configurator ( ).
9. In the Configuration Steps bar, choose step 1 Select Component View.
10. In the Select Component View dialog box, in the preview area of the graphical editor, select the component view ABAP_Proxy_2_IDoc and choose Apply.
Assigning Services You use the steps below to assign services to the application components of the business scenario.
10. In the Configuration Steps bar, choose step 2 Assign Services. This calls the Assign Services dialog box for the Agency application component.
11. In the Assign Services dialog box, on the Service Assignment tab page, insert a line ( ).
12. Click in the input field in the Service column and call the input help ( ). The system displays all services of type Business System.
13. Select the service <SID>_105 and choose Apply.
14. In the Assign Services dialog box, click the navigation arrow ( ) to switch to the application component Airline.
15. On the Service Assignment tab page, insert a line ( ).
SAP XI 3.0 Demo Examples Configuration Guide
50 July 2004
16. Click in the input field in the Service column and call the input help ( ).
17. Select the service <SID>_107 and choose OK.
In this variant, you are only configuring the communication between the travel agency (proxy) and American Airlines (IDoc). The communication between the travel agency (proxy) and Lufthansa (proxy) uses the configuration objects created for SingleFlightBooking (see 0).
18. Choose Assign.
Configuring the Connection You use the steps below to configure the connections of the business scenario.
6. In the Configuration Steps bar, choose step 3 Configure Connections. This calls the Configure Connection dialog box for the connection between the actions Send Single Flight Booking Order and Book Single Flight And Confirm.
7. In the Configure Connection dialog box, check that the sender/receiver relation is activated (checkbox).
8. To specify a receiver communication channel for the relation between sender service <SID>_105 (proxy) and receiver service <SID>_107 (IDoc), click in the input field in the Communication Channel column (for receiver service <SID>_107).
9. Call the input help ( ).
10. Select the communication channel GeneratedReceiverChannel_IDoc and choose OK.
11. Click the navigation arrow ( ) to switch to the connection between the actions Book Single Flight And Confirm and Process Order Confirmation.
12. Check that the sender/receiver relation is activated (checkbox).
13. To specify a receiver communication channel for the relation between sender service <SID>_107 (IDoc) and receiver service <SID>_105 (proxy), click in the input field in the Communication Channel column (for receiver service <SID>_105).
14. Call the input help ( ). The system displays all communication channels that are assigned to the service <SID>_105.
15. Select the communication channel GeneratedReceiverChannel_XI and choose OK.
16. In the Configure Connection dialog box, choose Apply.
Generating the Configuration Objects You use the steps below to generate the relevant configuration objects.
6. In the Configuration Steps bar, choose step 4 Generate. This calls the Create Configuration Objects dialog box.
7. Under General, select the Generation radio button.
8. Under Scope of Generation, select the checkboxes Receiver Determination, Interface Determination, and Receiver Agreement.
9. Under Change List for Generated Objects, select the Create New radio button. This means that the changes resulting from the generation are saved in a separate change list with the name of the scenario.
SAP XI 3.0 Demo Examples Configuration Guide
July 2004 51
10. Choose Start. The objects are generated. The generation log is called.
The generation log contains an overview of all information relating to the generation and indicates if any manual editing is necessary for the generated objects.
If the generation log displays error situations, this may be because parts of the demo examples had been configured previously in your system, or because you have not configured the business scenarios in the specified sequence. In this case, the log contains information on why the generation was not successful. You must correct the problems manually.
Manual Editing No manual editing is necessary.
Final Steps Execute the following steps:
1. Close the generation log.
2. Close the business scenario configurator. The system displays the message Do you want to keep the changes? Confirm with Apply.
3. Save the scenario XIDemo_SingleFlightBooking.
4. Activate the scenario XIDemo_SingleFlightBooking and all objects that it uses.
Note that there are two change lists:
- Standard change list (containing the scenario XIDemo_SingleFlightBooking)
- Change list XIDemo_SingleFlightBooking (containing all objects of the scenario)
You must activate both change lists.
6.2.4 Executing and Testing There is a BSP application in the SAP system of the Integration Server (client 105) that you can use to test the business scenario (for both configurations).
For more information about executing the business scenario, see the SAP Help Portal (help.sap.com) under SAP NetWeaver Process Integration SAP Exchange Infrastructure Overview Demo Examples Booking a Single Flight Booking a Single Flight (Proxy-to-Proxy) Executing the Business Scenario.
6.3 Booking Connecting Flights
This demo example is implemented as the business scenario MultipleFlightBooking. The business scenario is located in the Integration
SAP XI 3.0 Demo Examples Configuration Guide
52 July 2004
Repository, in the software component SAP BASIS, software component version SAP BASIS 6.40, in the namespace http://sap.com/xi/XI/Demo/Agency.
It is a prerequisite that you configure both business scenarios CheckFlightSeatAvailability (0) and SingleFlightBooking (0) and activate the corresponding objects before configuring this variant. The following instructions only apply in their entirety if this is the case.
6.3.1 Business Description (Brief) A travel agency uses the business scenario MultipleFlightBooking to book a flight and a connecting flight (for a passenger).
The travel agency requests flight bookings for both legs of the trip (flight and connecting flight) with the respective airlines. The two legs of the trip can be with different airlines. The booking of a flight and a connecting flight is only successful if both individual flights are booked successfully.
Therefore, it is necessary to coordinate the results of both flight bookings. This is done by an application between the travel agency and airline applications. Technically speaking, this coordinating application is an executable business process.

SAP XI 3.0 Demo Examples Configuration Guide
July 2004 53
SAP XI 3.0 Demo Examples Configuration Guide
54 July 2004
6.3.2 Booking a Connecting Flight (Proxy-to-Proxy Communication)
Defining the Business Process Service The executable business process MultipleFlightBookingCoordination (with a separate application component) is integrated in the business scenario MultipleFlightBooking. To be able to address the business process as a sender or receiver of messages, you must create a service for the business process in the Integration Directory.
1. In the Integration Builder (Integration Directory), select the Objects tab page.
2. Expand the Service Without Party node.
3. Position the cursor on the Business Process node and choose New… ( ) in the context menu. The system calls the wizard for creating a business process service.
4. Choose Continue.
5. The next screen displays all business processes from the Integration Repository in a list. Select the business process MultipleFlightBookingCoordination (software component version SAP Basis 6.40, namespace http://sap.com/xi/XI/Demo/Agency).
6. Choose Continue.
7. On the next screen, enter the following in the Name field: MultipleFlightBookingCoordinator.
8. Choose Finish.
9. Activate the change list containing the service MultipleFlightBookingCoordinator.
Selecting the Business Scenario (Component View) and Creating the Scenario You use the steps below to do the following:
• Select the business scenario and the component view from the Integration Repository
• Create the scenario in the Integration Directory to group all the relevant configuration objects
1. To call the business scenario configurator, choose Tools Transfer Business Scenario from Integration Repository in the Integration Builder (Integration Directory) menu bar. This calls a wizard, which you use to select a business scenario and create a scenario in the Integration Directory.
2. In the Select Business Scenario from Integration Repository dialog box, choose the input help (for the Name field). This calls an input help, which displays all business scenarios from the Integration Repository in a list.
3. Select the business scenario MultipleFlightBooking (software component version SAP Basis 6.40, namespace http://sap.com/xi/XI/Demo/Agency), and choose OK.
4. Im Assistenten wählen Sie Continue.
5. On the next screen, you edit the predefined name of the scenario. Change the name to XIDemo_MultipleFlightBooking.
Choose Finish.
The system creates the scenario.
SAP XI 3.0 Demo Examples Configuration Guide
July 2004 55
6. Choose Close. The system calls the business scenario configurator. The business scenario MultipleFlightBooking is displayed in a graphical editor.
7. In the menu bar of the business scenario configurator, choose Scenario Settings Business Scenario from the Integration Repository Select Component View.
8. In the preview area of the graphical editor, select the component view ABAP_Proxy_2_ABAP_Proxy and choose Apply.
Assigning Services You use the steps below to assign services to the application components of the business scenario.
1. In the Configuration Steps bar, choose step 2 Assign Services. This calls the Assign Services dialog box for the Agency application component.
2. In the Assign Services dialog box, on the Service Assignment tab page, insert a line ( ).
3. Click in the input field in the Service column and call the input help ( ). The system displays all services of type Business System.
4. Select the service <SID>_105 and choose Apply.
5. In the Assign Services dialog box, click the navigation arrow ( ) to switch to the application component Coordinator.
6. On the Service Assignment tab page, choose the input help ( ).
The input help icon ( ) is to the right of the Party and Service input fields.
7. In the Select Business Process Service dialog box, select the service MultipleFlightBookingCoordinator and choose OK.
The service MultipleFlightBookingCoordinator is entered in the Service field.
8. In the Assign Services dialog box, click the navigation arrow ( ) to switch to the application component Airline.
9. Like in steps 2. – 4., assign the services <SID>_106 and <SID>_107 to the application component Airline.
10. Choose Assign.
Configuring the Connection You use the steps below to configure the connections of the business scenario.
1. In the Configuration Steps bar, choose step 3 Configure Connections. This calls the Configure Connection dialog box for the connection between the actions Send Multiple Flight Booking and Split Multiple Booking Order (BPM).
2. In the Configure Connection dialog box, check that the sender/receiver relation is activated (checkbox).
It is not necessary to assign a receiver communication channel when a business process is the receiver of messages.
SAP XI 3.0 Demo Examples Configuration Guide
56 July 2004
3. Click the navigation arrow ( ) to switch to the connection between the actions Split Multiple Booking Order (BPM) and Book Single Flight And Confirm.
4. Check that the sender/receiver relations are activated (checkboxes).
5. Assign the communication channel GeneratedReceiverChannel_XI (assigned to the receiver service <SID>_106) to the relation between the sender service MultipleFlightBookingCoordinator and the receiver service <SID>_106. To do this, call the input help ( ) in the Communication Channel field.
6. In the same way, select the communication channel GeneratedReceiverChannel_XI (assigned to the receiver service <SID>_107) for the relation between the sender service MultipleFlightBookingCoordinator and the receiver service <SID>_107.
7. Click the navigation arrow ( ) to switch to the connection between the actions Book Single Flight And Confirm and Merge Single Confirmations (BPM).
8. Check that the sender/receiver relations are activated (checkboxes). It is not necessary to assign a receiver communication channel for either relation (between sender service <SID>_106 or <SID>_107 and the receiver service MultipleFlightBookingCoordinator).
9. Click the navigation arrow ( ) to switch to the connection between the actions Merge Single Confirmations (BPM) and Process Order Confirmation.
10. Check that the sender/receiver relation is activated (checkbox).
11. Assign the receiver communication channel GeneratedReceiverChannel_XI (assigned to the receiver service <SID>_105) to the relation between the sender service MultipleFlightBookingCoordinator and the receiver service <SID>_105.
12. Click the navigation arrow ( ) to switch to the connection between the actions Send Single Cancellation (BPM) and Cancel Single Flight Booking.
13. Check that the sender/receiver relations are activated (checkboxes).
14. Assign the receiver communication channel GeneratedReceiverChannel_XI (assigned to the receiver service <SID>_106) to the relation between the sender service MultipleFlightBookingCoordinator and the receiver service <SID>_106.
15. Assign the receiver communication channel GeneratedReceiverChannel_XI (assigned to the receiver service <SID>_107) to the relation between the sender service MultipleFlightBookingCoordinator and the receiver service <SID>_107.
16. In the Configure Connection dialog box, choose Apply.
Generating the Configuration Objects You use the steps below to generate the relevant configuration objects.
1. In the Configuration Steps bar, choose step 4 Generate. This calls the Create Configuration Objects dialog box.
2. Under General, select the Generation radio button.
3. Under Scope of Generation, select the checkboxes Receiver Determination, Interface Determination, and Receiver Agreement.
4. Under Change List for Generated Objects, select the Create New radio button. This means that the changes resulting from the generation are saved in a separate change list with the name of the scenario.
The scenario itself is saved in the standard change list.
SAP XI 3.0 Demo Examples Configuration Guide
July 2004 57
5. Choose Start. The objects are generated. The generation log is called.
The generation log contains an overview of all information relating to the generation and indicates if any manual editing is necessary for the generated objects.
If the generation log displays error situations, this may be because parts of the demo examples had been configured previously in your system, or because you have not configured the business scenarios in the specified sequence. In this case, the log contains information on why the generation was not successful. You must correct the problems manually.
Manual Editing You use the steps below to execute the necessary manual editing for the generated configuration objects.
To define exactly how a message is to be forwarded from the executable business process to the two airlines, you must add routing conditions to the following two receiver determinations.
• | MultipleFlightBookingCoordinator | FlightBookingOrderCancelationRequest_Abstract
• | MultipleFlightBookingCoordinator | FlightBookingOrderRequest_Abstract
Insert the following routing conditions in the two receiver determinations respectively. Use the context object AirlineID:
• (AirlineID=LH) for receiver <SID>_106
• (AirlineID=AA) for receiver <SID>_107
For detailed information about the procedure for editing the receiver determinations, see 0 (in the business scenario CheckFlightSeatAvailability).
To define whether the message from the airline systems is forwarded to the executable business process (business scenario MultipleFlightBooking) or to the travel agency system (business scenario SingleFlightBooking), you must add conditions to the following two receiver determinations:
• | <SID>_106 | FlightBookingOrderConfirmation_Out
• | <SID>_107 | FlightBookingOrderConfirmation_Out
The airlines use the same receiver determination for both variants SingleFlightBooking and MultipleFlightBooking. This differentiation is necessary in routing to enable both scenarios to be used simultaneously.
The forwarding of the message depends on whether you are booking a single flight or a flight and a connecting flight. This is defined by the booking type (OrderType).
• If OrderType=Single, the booking is for a single flight.
• If OrderType=Multiple, the booking is for a flight and a connecting flight.
Add the following routing conditions to the two receiver determinations. Use the context object OrderType:
SAP XI 3.0 Demo Examples Configuration Guide
58 July 2004
• (OrderType=Multiple) for receiver MultipleFlightBookingCoordinator
• (OrderType=Single) for receiver <SID>_105
Save the receiver determinations.
Final Steps
1. Close the generation log.
You can save the generation log as a file.
2. Close the business scenario configurator. The system displays the message Do you want to keep the changes? Confirm with Apply.
3. Save the scenario XIDemo_MultipleFlightBooking.
4. Activate the scenario XIDemo_MultipleFlightBooking and all objects that it uses.
Note that there are two change lists:
- Standard change list (containing the scenario XIDemo_MultipleFlightBooking)
- Change list XIDemo_MultipleFlightBooking (containing all objects of the scenario)
You must activate both change lists.
6.3.3 Executing and Testing There is a BSP application in the SAP system of the Integration Server (client 105) that you can use to test the business scenario.
For more information about executing the business scenario, see the SAP Help Portal (help.sap.com) under SAP NetWeaver Process Integration SAP Exchange Infrastructure Overview Demo Examples Booking Connecting Flights Booking Connecting Flights (Proxy-to-Proxy) Executing the Business Scenario.
6.4 Distributing Booking Order Data
This demo example is implemented as the business scenario DistributeBookingOrderInformation. The business scenario is located in the Integration Repository, in the software component SAP BASIS, software component version SAP BASIS 6.40, in the namespace http://sap.com/xi/XI/Demo/Agency.
You must have performed the steps described in Settings for Communicating with a File System (0) before you can configure this variant.
This section describes how to configure the Distribute Booking Order Data business scenario in the Proxy-to-File System-Communication variant. You configure two file stores as the
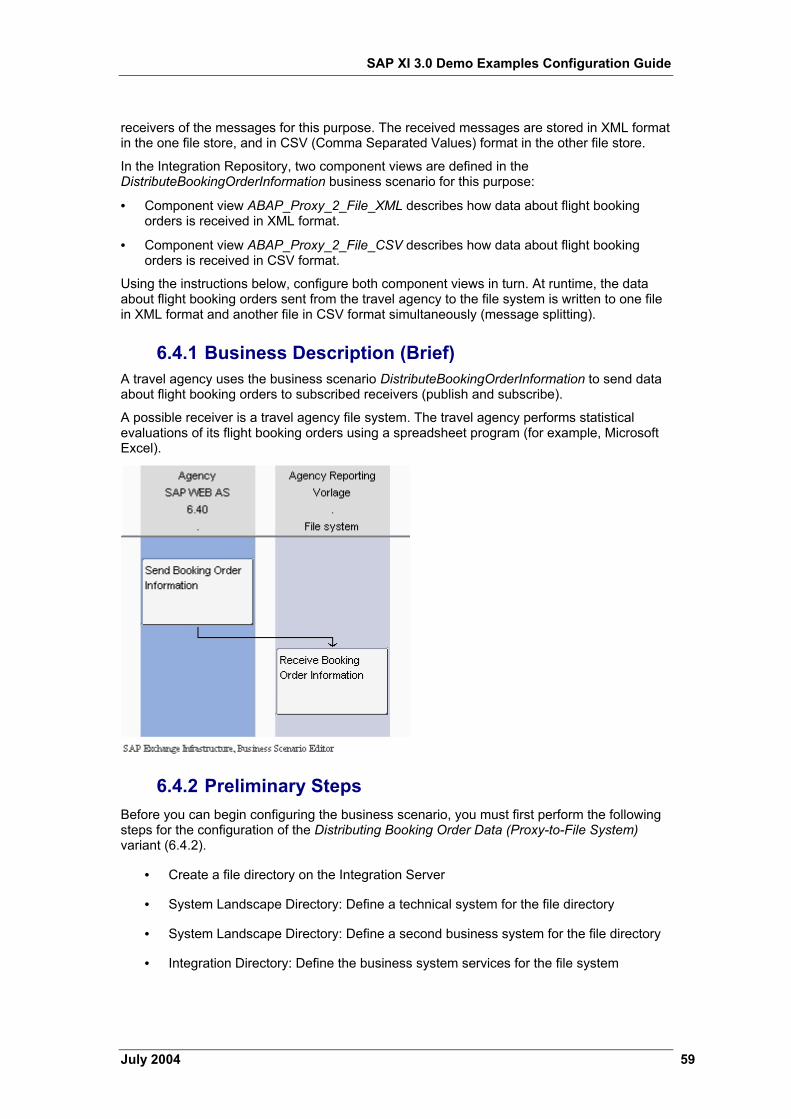
SAP XI 3.0 Demo Examples Configuration Guide
July 2004 59
receivers of the messages for this purpose. The received messages are stored in XML format in the one file store, and in CSV (Comma Separated Values) format in the other file store.
In the Integration Repository, two component views are defined in the DistributeBookingOrderInformation business scenario for this purpose:
• Component view ABAP_Proxy_2_File_XML describes how data about flight booking orders is received in XML format.
• Component view ABAP_Proxy_2_File_CSV describes how data about flight booking orders is received in CSV format.
Using the instructions below, configure both component views in turn. At runtime, the data about flight booking orders sent from the travel agency to the file system is written to one file in XML format and another file in CSV format simultaneously (message splitting).
6.4.1 Business Description (Brief) A travel agency uses the business scenario DistributeBookingOrderInformation to send data about flight booking orders to subscribed receivers (publish and subscribe).
A possible receiver is a travel agency file system. The travel agency performs statistical evaluations of its flight booking orders using a spreadsheet program (for example, Microsoft Excel).
6.4.2 Preliminary Steps Before you can begin configuring the business scenario, you must first perform the following steps for the configuration of the Distributing Booking Order Data (Proxy-to-File System) variant (6.4.2).
• Create a file directory on the Integration Server
• System Landscape Directory: Define a technical system for the file directory
• System Landscape Directory: Define a second business system for the file directory
• Integration Directory: Define the business system services for the file system
SAP XI 3.0 Demo Examples Configuration Guide
60 July 2004
Creating a File Directory You require a file directory on the Integration Server host where you can save the documents received.
In an actual customer installation, the two file stores are probably replaced by two directories. SAP recommends that you instead only use one physical directory so you can compare the XML and CSV files with each other easier.
For this purpose, create the XIDemo directory at the appropriate position in the file directory of the host.
A work directory already exists on many computers that can be used for this purpose and under which you can create the XIDemo directory.
You must have authorization to access this directory to be able to test the business scenario. Bear this in mind when you define the directory, and, if applicable, contact your system administrator.
System Landscape Directory: Definition eines technischen Systems für das Dateiverzeichnis To define a technical system for the target directory in the System Landscape Directory, proceed as follows:
1. Log on to the System Landscape Directory (see 0).
2. Choose Technical Landscape.
3. Choose New Technical System.
4. In the Technical System Wizard - Technical System Type dialog, select the Standalone Java radio button.
The file system is not an application system; therefore, select this option.
5. Choose Next.
6. In the Technical System Wizard - System Details dialog, enter the following: Field Technical System Identification: <SID>_FileSystem, Field System Host Name: <Host Name of Integration Server> (for example, pwdf00001).
You can determine the host name from the list of technical systems in the System Landscape Directory (Technical System Browser dialog). The naming convention for technical systems of type Web AS ABAP is: <SID> on <Host-Name>. To determine the host name of the Integration Server, search for the technical systems with the system ID (<SID>) of the Integration Server.
7. Choose Finish.
SAP XI 3.0 Demo Examples Configuration Guide
July 2004 61
System Landscape Directory: Define a second business system for the file directory In the Distributing Booking Order Data (Proxy-to-File System) variant (6.4.2), the data can be received in two ways on the database: in XML format and in Comma Separated Value (CSV) format.
In the following steps you define:
• A business system for the file system to receive the data in XML format
• A business system for the file system to receive the data in CSV format
1. On the initial screen of the System Landscape Directory, choose Business Landscape.
2. Choose New Business System.
3. On the Business System Wizard – Details screen, enter the following name for the business system: <SID>_FileSystem_XML.
4. Choose Next.
5. On the Business System Wizard - Technical System Type screen, select the system type Standalone Java with the corresponding radio button.
6. Choose Next.
7. On the Business System Wizard - Select System screen, enter the technical system that you defined previously (0). In the dropdown list box for the System field, select the name of the technical system. The name of the technical system is <SID>_FileSystem on <Host Name of Integration Server>. You do not need to specify the logical system.
8. Choose Next.
9. In the Business System Wizard - Integration Server dialog, specify the assigned Integration Server. Select the entry: <SID> on <Server Name>.
10. Choose Finish.
11. Following the same procedure, define a business system with the name <SID>_FileSystem_CSV.
Integration Directory: Define the business system services for the file system To define services in the Integration Directory for the business systems created in 7, proceed as follows:
1. In the Integration Builder (Integration Directory), select the Objects tab page.
2. Expand the Service Without Party node.
3. Position the cursor on the Business System node and choose New… ( ) in the context menu. The system calls the wizard for creating a business system service.
4. Choose Assign Business System.
5. In the business system wizard, choose Continue.
6. In the Assign Partner step, choose Continue.
7. In the Select Business Systems step, select the business systems <SID>_FileSystem_XML and <SID>_FileSystem_CSV by using the check boxes.
8. Deselect the Create Communication Channels Automatically check box.
SAP XI 3.0 Demo Examples Configuration Guide
62 July 2004
10. Choose Finish.
9. Activate the change list containing the services <SID>_FileSystem_XML and <SID>_FileSystem_CSV.
6.4.3 Distributing Booking Order Data (Proxy-to-File System for XML File)
This section describes how to configure the Distributing Booking Order Data business scenario to receive files in XML format.
Selecting the Business Scenario (Component View) You use the steps below to do the following:
• Select the business scenario from the Integration Repository
• Create the scenario in the Integration Directory to group all the relevant configuration objects
1. To call the business scenario configurator, choose Tools Transfer Business Scenario from Integration Repository ( ) in the Integration Builder (Integration Directory) menu bar. This calls a wizard, which you use to select a business scenario and create a scenario in the Integration Directory.
2. In the Select Business Scenario from Integration Repository dialog box, choose the input help (for the Name field). This calls an input help, which displays all business scenarios from the Integration Repository in a list.
3. Select the business scenario DistributeBookingOrderInformation (software component version SAP Basis 6.40, namespace http://sap.com/xi/XI/Demo/Agency), and choose OK.
4. In the wizard, choose Continue.
5. On the next screen, you edit the predefined name of the scenario. Change the name to XIDemo_DistributeBookingOrderInformation.
6. Choose Finish. The system creates the scenario.
7. Choose Close. The system calls the business scenario configurator. The business scenario DistributeBookingOrderInformation is displayed in a graphical editor.
8. In the Configuration Steps bar, choose step 1 Select Component View.
9. In the Select Component View dialog box, in the preview area of the graphical editor, select the component view ABAP_Proxy_2_XML and choose Apply.
Assigning Services You use the steps below to assign services to the application components of the business scenario.
1. In the Configuration Steps bar, choose step 2 Assign Services. This calls the Assign Services dialog box for the Agency application component.
2. In the Assign Services dialog box, on the Service Assignment tab page, insert a line ( ).
3. Click in the input field in the Service column and call the input help ( ). The system displays all services of type Business System.
SAP XI 3.0 Demo Examples Configuration Guide
July 2004 63
4. Select the service <SID>_105 and choose Apply.
5. In the Assign Services dialog box, click the navigation arrow ( ) to switch to the application component of the file system.
6. On the Service Assignment tab page, insert a line ( ).
7. Click in the input field in the Service column and call the input help ( ).
8. Select the <SID>_FileSystem_XML service and choose Apply.
9. Choose Assign.
Configuring the Connection You use the steps below to configure the connections of the business scenario.
1. In the Configuration Steps bar, choose step 3 Configure Connections. This calls the Configure Connection dialog box for the connection between the actions Send Booking Order Information and Receive Booking Order Information.
2. In the Configure Connection dialog box, check that the sender/receiver relation is activated (checkbox).
3. To specify a receiver communication channel for the relation between sender service <SID>_105 (proxy) and receiver service <SID>_FileSystem_XML, position the cursor on the input field in the Communication Channel column (for receiver service <SID>_FileSystem_XML).
4. Call the context menu and choose Create Communication Channel ( ) Create Communication Channel with Template. A wizard for creating a communication channel on the basis of a communication channel template is started.
5. Choose Continue.
6. In the Select Template step, select the XIDemoChannel_FileXML communication channel template (software component version SAP BASIS 6.40, namespace http://sap.com/xi/XI/Demo).
7. Choose Continue.
8. In the Create New Communication Channel step, confirm all entries by clicking Finish. The system creates a communication channel with the name XIDemoChannel_FileXML.
9. In the Configure Connection dialog box, choose Apply.
Generating the Configuration Objects You use the steps below to generate the relevant configuration objects.
1. In the Configuration Steps bar, choose step 4 Generate. This calls the Create Configuration Objects dialog box.
2. Under General, select the Generation radio button.
3. Under Scope of Generation, select the checkboxes Receiver Determination, Interface Determination, and Receiver Agreement.
4. Under Change List for Generated Objects, select the Create New radio button. This means that the changes resulting from the generation are saved in a separate change list with the name of the scenario.
SAP XI 3.0 Demo Examples Configuration Guide
64 July 2004
5. Choose Start. The objects are generated. The generation log is called.
The generation log contains an overview of all information relating to the generation and indicates if any manual editing is necessary for the generated objects.
If the generation log displays error situations, this may be because parts of the demo examples had been configured previously in your system, or because you have not configured the business scenarios in the specified sequence. In this case, the log contains information on why the generation was not successful. You must correct the problems manually.
Manual Editing You still have to define the XIDemoChannel_FileXML communication channel.
You use the steps below to execute the necessary manual editing for the generated configuration objects.
1. In the generation log, expand the Connections area.
2. Navigate to the receiver agreement |<SID>_105| |<SID>_FileSystem_XML | BookingOrderDataInformation_Ext.
The yellow traffic light symbol signifies that manual editing may be necessary for this object.
3. To open the receiver agreement, click the key | <SID>_105 | <SID>_FileSystem_XML | BookingOrderDataInformation_Ext. The receiver agreement is opened.
4. In the Receiver Communication Channel field, click the XIDemoChannel_FileXML entry. The XIDemoChannel_FileXML communication channel is opened.
5. To switch to change mode, choose the function Switch Between Display and Edit Modes ( ) in the pushbutton bar of the Display Communication Channel editor.
6. Make the following entries:
• Field Adapter Engine: Integration Server
• Field Target Directory: Enter the directory defined in 6.4.2 in this field.
In UNIX systems, it is possible that the default relative path in the communication channel already points to your directory. However, in Windows systems you must always specify an absolute path.
Final Steps Execute the following steps:
1. Close the generation log.
2. Close the business scenario configurator.
3. Save the XIDemo_DistributeBookingOrderInformation business scenario.
SAP XI 3.0 Demo Examples Configuration Guide
July 2004 65
6.4.4 Distributing Booking Order Data (Proxy-to-File System for CSV File)
This section describes how to configure the Distributing Booking Order Data business scenario to receive files in CSV format.
Note that you must also configure the second component View (ABAP_Proxy_2_File_CSV).
To configure this component view, perform the following steps:
1. In the object editor of the XIDemo_DistributeBookingOrderInformation business scenario, choose Business Scenario Configurator ( ) from the toolbar.
2. In the Configuration Steps bar, choose step 1 Select Component View.
3. In the Select Component View dialog box, in the preview area of the graphical editor, select the component view ABAP_Proxy_2_File_CSV and choose Apply.
4. Following the same procedure as for the first component view, now configure the second component view (starting with Assigning the Services).
For the following, proceed as described in 9.
Note the following differences:
• When assigning the services, assign the service <SID>_FileSystem_CSV to the application component of the file system.
• When configuring the connection, select the XIDemoChannel_FileCSV communication channel template (software component version SAP BASIS 6.40, namespace http://sap.com/xi/XI/Demo/Agency). Use this template to then create the XIDemoChannel_FileCSV communication channel.
• During manual editing, make the same additional entries in the XIDemoChannel_FileCSV communication channel as in the XIDemoChannel_FileXML communication channel.
Final Steps Execute the following steps:
1. Close the generation log.
2. Close the business scenario configurator.
3. Save the XIDemo_DistributeBookingOrderInformation business scenario.
4. Activate the scenario XIDemo_DistributeBookingOrderInformation and all objects that it uses.
Note that there are two change lists:
- Standard change list (containing the scenario XIDemo_DistributeBookingOrderInformation)
- Change list XIDemo_DistributeBookingOrderInformation (containing all objects of the scenario)
You must activate both change lists.
SAP XI 3.0 Demo Examples Configuration Guide
66 July 2004
Note that you save the configurations of both component views (ABAP_Proxy_2_File_XML and ABAP_Proxy_2_File_CSV) in scenario XIDemo_DistributeBookingOrderInformation.
6.4.5 Executing and Testing There is a BSP application in the SAP system of the Integration Server (client 105) that you can use to test the business scenario.
For more information about executing the business scenario, see the SAP Help Portal (help.sap.com) under SAP NetWeaver Process Integration SAP Exchange Infrastructure Overview Demo Examples Distributing Booking Order Data Distributing Booking Order Data (Proxy-to-File System)
Executing the Business Scenario.


![ConfigGuide Integration of SAP ERP and SAP EWM ADD-On Solmancont 2007 - Engl[1]. 070531](https://img.pdfslide.us/doc/110x75/577cc4031a28aba71197e568/configguide-integration-of-sap-erp-and-sap-ewm-add-on-solmancont-2007-engl1.jpg)