Embed Size (px)
Citation preview

OPNFV Configuration GuideRelease brahmaputra30 (605ebda)
OPNFV
April 27 2016
CONTENTS
1 Abstract 1
2 Configuration Options 321 OPNFV Scenarios 3
3 Installer Configuration 731 Lab Setup Guide 732 Apex configuration 933 Compass4nfv configuration 1234 Fuel configuration 1735 JOID Configuration 22
4 Feature Configuration 2941 Copper configuration 2942 Doctor Configuration 3043 IPv6 Configuration - Setting Up a Service VM as an IPv6 vRouter 3144 Installing OVSNFV Fuel Plugin 4345 Promise Feature Configuration Overview 4446 Configuring SDNVPN features 46
5 Post Configuration Activities 4751 Scenario validation activities 4752 Feature validation activities 4853 Additional testing and validation activities 50
i
ii
CHAPTER
ONE
ABSTRACT
This document provides guidance and instructions for the configuration of the Brahmaputra release of OPNFV
The release includes four installer tools leveraging different technologies Apex Compass4nfv Fuel and JOID whichdeploy components of the platform
This document provides a guide for the selection of tools and components including guidelines for how to deploy andconfigure the platform to an operational state
1
OPNFV Configuration Guide Release brahmaputra30 (605ebda)
2 Chapter 1 Abstract
CHAPTER
TWO
CONFIGURATION OPTIONS
OPNFV provides a variety of virtual infrastructure deployments called scenarios designed to host virtualised networkfunctions (VNFrsquos) Each scenario provide specific capabilities andor components aimed to solve specific problemsfor the deployment of VNFrsquos A scenario may include components such as OpenStack OpenDaylight OVS KVMetc where each scenario will include different source components or configurations
21 OPNFV Scenarios
Each OPNFV scenario provides unique features and capabilities it is important to understand your target platformcapabilities before installing and configuring your target scenario This configuration guide outlines how to install andconfigure components in order to enable the features you require
Scenarios are implemented as deployable compositions through integration with an installation tool OPNFV supportsmultiple installation tools and for any given release not all tools will support all scenarios While our target is toestablish parity across the installation tools to ensure they can provide all scenarios the practical challenge of achievingthat goal for any given feature and release results in some disparity
211 Brahmaputra scenario overeview
The following table provides an overview of the installation tools and available scenariorsquos in the Brahmaputra releaseof OPNFV
3
OPNFV Configuration Guide Release brahmaputra30 (605ebda)
Scenario status is indicated by a weather pattern icon All scenarios listed with a weather pattern are possible to deployand run in your environment or a Pharos lab however they may have known limitations or issues as indicated by theicon
Weather pattern icon legend
Weather Icon Scenario Status
Stable no known issues
Stable documented limitations
Deployable stability or feature limitations
Not deployed with this installer
Scenarios that are not yet in a state of ldquoStable no known issuesrdquo will continue to be stabilised and updates will bemade on the stablebrahmaputra branch While we intend that all Brahmaputra scenarios should be stable it is worth
4 Chapter 2 Configuration Options
OPNFV Configuration Guide Release brahmaputra30 (605ebda)
checking regularly to see the current status Due to our dependency on upstream communities and code some issuesmay not be resolved prior to the C release
212 Scenario Naming
In OPNFV scenarios are identified by short scenario names these names follow a scheme that identifies the keycomponents and behaviours of the scenario The rules for scenario naming are as follows
os-[controller]-[feature]-[mode]-[option]
Details of the fields are
bull os mandatory
ndash Refers to the platform type used
ndash possible value os (OpenStack)
bull [controller] mandatory
ndash Refers to the SDN controller integrated in the platform
ndash example values nosdn ocl odl onos
ndash [feature] mandatory
Refers to the feature projects supported by the scenario
example values nofeature kvm ovs sfc
ndash [mode] mandatory
Refers to the deployment type which may include for instance high availability
possible values ha noha
ndash [option] optional
Used for the scenarios those do not fit into naming scheme
The optional field in the short scenario name should not be included if there is no optional scenario
Some examples of supported scenario names are
bull os-nosdn-kvm-noha
ndash This is an OpenStack based deployment using neutron including the OPNFV enhanced KVM hypervisor
bull os-onos-nofeature-ha
ndash This is an OpenStack deployment in high availability mode including ONOS as the SDN controller
bull os-odl_l2-sfc
ndash This is an OpenStack deployment using OpenDaylight and OVS enabled with SFC features
213 Installing your scenario
There are two main methods of deploying your target scenario one method is to follow this guide which will walk youthrough the process of deploying to your hardware using scripts or ISO images the other method is to set up a Jenkinsslave and connect your infrastructure to the OPNFV Jenkins master
For the purposes of evaluation and development a number of Brahmaputra scenarios are able to be deployed virtuallyto mitigate the requirements on physical infrastructure Details and instructions on performing virtual deploymentscan be found in the installer specific installation instructions
21 OPNFV Scenarios 5
OPNFV Configuration Guide Release brahmaputra30 (605ebda)
To set up a Jenkins slave for automated deployment to your lab refer to the Jenkins slave connect guide
This document will describe how to install and configure your target OPNFV scenarios Remember to check theassociated validation procedures section following your installation for details of the use cases and tests that have beenrun
6 Chapter 2 Configuration Options
CHAPTER
THREE
INSTALLER CONFIGURATION
Installing the OPNFV platform requires either a physical environment as defined in the Pharos lab specificationor a virtual infrastructure When configuring a physical infrastructure it is strongly advised to follow the Pharosconfiguration material
31 Lab Setup Guide
Provides an overview for setting up a Pharos lab A full set of pharos_master documents are maintained in the pharosrepo
When setting up an OPNFV community lab
bull Provide the Pharos community with details of the intended setup including
ndash Overview of resources are being offered to the community intended purpose and known limitations
ndash Lab owner name with contacts
ndash Timelines for availablity for development test release production
bull Update the Pharos Wiki with lab details
ndash Lab map organization contacts status location resources role etc
ndash httpswikiopnfvorgpharoscommunity_labs
ndash pharos_wiki
bull Update the Pharos project information file ldquoCurrent Labsrdquo
ndash pharos_information
bull Create new Wiki pages for lab and POD specific information
ndash Access procedures
ndash Usage guidelines for developers
ndash Update infomtation as PODs are re-assigned or usageavailability changes
bull Fill Lab and POD templates pharos_lab pharos_pod
ndash Note that security sensitive lab information should be stored in the secure Pharos repo
bull Connect PODs to JenkinsCI
7
OPNFV Configuration Guide Release brahmaputra30 (605ebda)
311 Jump Server Configuration
Jump server install procedures are maintained by each installer project Addional Jump server configuraton BKMswill be maintained here The below install information was used for Fuel however may be outdated (please refer toFuel Installer documents)
Procedure
1 Obtain CentOS 7 Minimal ISO and install
wget httpmirrorskernelorgcentos7isosx86_64CentOS-7-x86_64-Minimal-1503-01iso
2 Set parameters appropriate for your environment during installation
3 Disable NetworkManager
systemctl disable NetworkManager
4 Configure your etcsysconfignetwork-scriptsifcfg- files for your network
5 Restart networking
service network restart
6 Edit etcresolvconf and add a nameserver
vi etcresolvconf
7 Install libvirt amp kvm
yum -y update yum -y install kvm qemu-kvm libvirt systemctl enablelibvirtd
8 Reboot
shutdown -r now
9 If you wish to avoid annoying delay when use ssh to log in disable DNS lookups
vi etcsshsshd_config
Uncomment ldquoUseDNS yesrdquo change lsquoyesrsquo to lsquonorsquo
Save
10 Restart sshd
systemctl restart sshd
11 Install virt-install
yum -y install virt-install
12 Visit artifactsopnfvorg and DL the OPNFV Fuel ISO
13 Create a bridge using the interface on the PXE network for example br0
14 Make a directory owned by qemu
mkdir homeqemu mkdir -p homeqemuVMsfuel-60disk
chown -R qemuqemu homeqemu
15 Copy the ISO to homeqemu
cd homeqemu
virt-install -n opnfv-2015-05-22_18-34-07-fuel -r 4096--vcpus=4 --cpuset=0-3 -c opnfv-2015-05-22_18-34-07iso
8 Chapter 3 Installer Configuration
OPNFV Configuration Guide Release brahmaputra30 (605ebda)
--os-type=linux --os-variant=rhel6 --boot hdcdrom --diskpath=homeqemuVMsmirantis-fuel-60diskfuel-vhd0qcow2bus=virtiosize=50format=qcow2-w bridge=br0model=virtio --graphics vnclisten=0000
16 Temporarily flush the firewall rules to make things easier
iptables -F
17 Connect to the console of the installing VM with your favorite VNC client
18 Change the IP settings to match the pod use an IP in the PXEAdmin network for the Fuel Master
The following sections describe the per installer configuration options Further details for each installer are capturedin the referred project documentation
32 Apex configuration
321 Introduction
This document describes the steps to install an OPNFV Bramaputra reference platform as defined by the GenesisProject using the Apex installer
The audience is assumed to have a good background in networking and Linux administration
322 Preface
Apex uses the RDO Manager Open Source project as a server provisioning tool RDO Manager is the RDO Projectimplementation of OpenStackrsquos Triple-O project The Triple-O image based life cycle installation tool provisions anOPNFV Target System (3 controllers n number of compute nodes) with OPNFV specific configuration provided bythe Apex deployment tool chain
The Apex deployment artifacts contain the necessary tools to deploy and configure an OPNFV target sys-tem using the Apex deployment toolchain These artifacts offer the choice of using the Apex bootable ISO(opnfv-apex-bramaputraiso) to both install CentOS 7 and the nessesary materials to deploy or the ApexRPM (opnfv-apexrpm) which expects installation to a CentOS 7 libvirt enabled host The RPM contains acollection of configuration file prebuilt disk images and the automatic deployment script (opnfv-deploy)
An OPNFV install requires a ldquoJumphostrdquo in order to operate The bootable ISO will allow you to install a cus-tomized CentOS 7 release to the Jumphost which includes the required packages needed to run opnfv-deployIf you already have a Jumphost with CentOS 7 installed you may choose to skip the ISO step and simply installthe (opnfv-apexrpm) RPM The RPM is the same RPM included in the ISO and includes all the necessary diskimages and configuration files to execute an OPNFV deployment Either method will prepare a host to the same readystate for OPNFV deployment
opnfv-deploy instantiates an RDO Manager Instack VM server using libvirt as its provider This VM is thenconfigured and used to provision the OPNFV target deployment (3 controllers n compute nodes) These nodes can beeither virtual or bare metal This guide contains instructions for installing either method
323 Installation High-Level Overview - Bare Metal Deployment
The setup presumes that you have 6 bare metal servers and have already setup network connectivity on at least 2interfaces for all servers via a TOR switch or other network implementation
32 Apex configuration 9
OPNFV Configuration Guide Release brahmaputra30 (605ebda)
The physical TOR switches are not automatically configured from the OPNFV reference platform All the networksinvolved in the OPNFV infrastructure as well as the provider networks and the private tenant VLANs needs to bemanually configured
The Jumphost can be installed using the bootable ISO or by other means including the (opnfv-apex) RPMs andvirtualization capabilities The Jumphost should then be configured with an IP gateway on its admin or public interfaceand configured with a working DNS server The Jumphost should also have routable access to the lights out network
opnfv-deploy is then executed in order to deploy the Instack VM opnfv-deploy uses three con-figuration files in order to know how to install and provision the OPNFV target system The in-formation gathered under section Execution Requirements (Bare Metal Only) is put into the YAML file(etcopnfv-apexinventoryyaml) configuration file Deployment options are put into the YAML file(etcopnfv-apexdeploy_settingsyaml) Networking definitions gathered under section Network Re-quirements are put into the YAML file (etcopnfv-apexnetwork_settingsyaml) opnfv-deploywill boot the Instack VM and load the target deployment configuration into the provisioning toolchain This includesMAC address IPMI Networking Environment and OPNFV deployment options
Once configuration is loaded and Instack is configured it will then reboot the nodes via IPMI The nodes should alreadybe set to PXE boot first off the admin interface The nodes will first PXE off of the Instack PXE server and go througha discoveryintrospection process
Introspection boots off of custom introspection PXE images These images are designed to look at the properties ofthe hardware that is booting off of them and report the properties of it back to the Instack node
After introspection Instack will execute a Heat Stack Deployment to being node provisioning and configuration Thenodes will reboot and PXE again off the Instack PXE server to provision each node using the Glance disk images pro-vided by Instack These disk images include all the necessary packages and configuration for an OPNFV deploymentto execute Once the nodersquos disk images have been written to disk the nodes will boot off the newly written disks andexecute cloud-init which will execute the final node configuration This configuration is largly completed by executinga puppet apply on each node
324 Installation High-Level Overview - VM Deployment
The VM nodes deployment operates almost the same way as the bare metal deployment with a few differencesopnfv-deploy still deploys an Instack VM In addition to the Instack VM a collection of VMs (3 control nodes +2 compute for an HA deployment or 1 control node and 1 compute node for a Non-HA Deployment) will be definedfor the target OPNFV deployment The part of the toolchain that executes IPMI power instructions calls into libvirtinstead of the IPMI interfaces on baremetal servers to operate the power managment These VMs are then provisionedwith the same disk images and configuration that baremetal would be
To RDO Manager these nodes look like they have just built and registered the same way as bare metal nodes the maindifference is the use of a libvirt driver for the power management
325 Installation Guide - Bare Metal Deployment
WARNING Baremetal documentation is not complete WARNING The main missing instructions are r elatedto bridging the networking for the undercloud to the physical underlay network for the overcloud to be deployedto
This section goes step-by-step on how to correctly install and provision the OPNFV target system to bare metal nodes
Install Bare Metal Jumphost
1a If your Jumphost does not have CentOS 7 already on it or you would like to do a fresh install then down-load the Apex bootable ISO from OPNFV artifacts lthttpartifactsopnfvorggt There have been isolated
10 Chapter 3 Installer Configuration
OPNFV Configuration Guide Release brahmaputra30 (605ebda)
reports of problems with the ISO having trouble completing installation successfully In the unexpectedevent the ISO does not work please workaround this by downloading the CentOS 7 DVD and perform-ing a ldquoVirtualization Hostrdquo install If you perform a ldquoMinimal Installrdquo or install type other than ldquoVirtu-alization Hostrdquo simply run sudo yum groupinstall Virtualization Host ampamp chkconfiglibvird on and reboot the host Once you have completed the base CentOS install proceed to step 1b
1b If your Jump host already has CentOS 7 with libvirt running on it then install the opnfv-apex RPMs fromOPNFV artifacts lthttpartifactsopnfvorggt The following RPMS are available for installation
bull opnfv-apex - OpenDaylight L2 L3 and ONOS support
bull opnfv-apex-opendaylight-sfc - OpenDaylight SFC support
bull opnfv-apex-undercloud (required)
bull opnfv-apex-common (required)
One or more of these RPMs is required If you only want the experimental SFC support then the opnfv-apexRPM is not required If you only want OpenDaylight or ONOS support then the opnfv-apex-opendaylight-sfcRPM is not required
To install these RPMs download them to the local disk on your CentOS 7 install and passthe file names directly to yum sudo yum install opnfv-apex-ltversiongtrpmopnfv-apex-undercloud-ltversiongtrpm opnfv-apex-common-ltversiongtrpm
2a Boot the ISO off of a USB or other installation media and walk through installing OPNFV CentOS 7 TheISO comes prepared to be written directly to a USB drive with dd as such
dd if=opnfv-apexiso of=devsdX bs=4M
Replace devsdX with the device assigned to your usb drive Then select the USB device as the boot media onyour Jumphost
2b Install the RDO Release RPM and the opnfv-apex RPM
sudo yum install -y httpswwwrdoprojectorgreposrdo-releaserpmopnfv-apex-versionrpm
The RDO Project release repository is needed to install OpenVSwitch which is a dependency of opnfv-apex If you do not have external connectivity to use this repository you need to download the Open-VSwitch RPM from the RDO Project repositories and install it with the opnfv-apex RPM
3 After the operating system and the opnfv-apex RPMs are installed login to your Jumphost as root
4 Configure IP addresses on the interfaces that you have selected as your networks
5 Configure the IP gateway to the Internet either preferably on the public interface
6 Configure your etcresolvconf to point to a DNS server (8888 is provided by Google)
Creating a Node Inventory File
IPMI configuration information gathered in section Execution Requirements (Bare Metal Only) needs to be added tothe inventoryyaml file
1 Copy usrsharedocopnfvinventoryyamlexample as your inventory file template toetcopnfv-apexinventoryyaml
2 The nodes dictionary contains a definition block for each baremetal host that will be deployed 1 or morecompute nodes and 3 controller nodes are required (The example file contains blocks for each of these already)It is optional at this point to add more compute nodes into the node list
3 Edit the following values for each node
32 Apex configuration 11
OPNFV Configuration Guide Release brahmaputra30 (605ebda)
bull mac_address MAC of the interface that will PXE boot from Instack
bull ipmi_ip IPMI IP Address
bull ipmi_user IPMI username
bull ipmi_password IPMI password
bull pm_type Power Management driver to use for the node
bull cpus (Introspected) CPU cores available
bull memory (Introspected) Memory available in Mib
bull disk (Introspected) Disk space available in Gb
bull arch (Introspected) System architecture
bull capabilities (Optional) Intended node role (profilecontrol or profilecompute)
bull Introspection looks up the overcloud nodersquos resources and overrides these value You can
leave default values and Apex will get the correct values when it runs introspection on the nodes
If capabilities profile is not specified then Apex will select nodersquos roles in the OPNFV cluster in a non-deterministicfashion
Creating the Settings Files
Edit the 2 settings files in etcopnfv-apex These files have comments to help you customize them
1 deploy_settingsyaml This file includes basic configuration options deployment
2 network_settingsyaml This file provides Apex with the networking information that satisfies the prerequisiteNetwork Requirements These are specific to your environment
Running opnfv-deploy
You are now ready to deploy OPNFV using Apex opnfv-deploy will use the inventory and settings files to deployOPNFV
Follow the steps below to execute
1 Execute opnfv-deploy sudo opnfv-deploy [ --flat | -n network_settingsyaml ] -iinventoryyaml -d deploy_settingsyaml If you need more information about the options thatcan be passed to opnfv-deploy use opnfv-deploy --help ndashflat will collapse all networks onto a singlenic -n network_settingsyaml allows you to customize your networking topology
2 Wait while deployment is executed If something goes wrong during this part of the process it is most likelya problem with the setup of your network or the information in your configuration files You will also noticedifferent outputs in your shell
3 The message ldquoOvercloud Deployedrdquo will display when When the deployment is complete Just above thismessage there will be a URL that ends in port httplthostgt5000 This url is also the endpoint for the OPNFVHorizon Dashboard if connected to on port 80
33 Compass4nfv configuration
This document describes providing guidelines on how to install and configure the Brahmaputra release of OPNFVwhen using Compass as a deployment tool including required software and hardware configurations
12 Chapter 3 Installer Configuration
OPNFV Configuration Guide Release brahmaputra30 (605ebda)
Installation and configuration of host OS OpenStack OpenDaylight ONOS Ceph etc can be supported by Compasson VMs or Bare Metal nodes
The audience of this document is assumed to have good knowledge in networking and UnixLinux administration
331 Preconditions
Before starting the installation of the Brahmaputra release of OPNFV some planning must be done
Retrieving the installation ISO image
First of all The installation ISO is needed for deploying your OPNFV environment it included packages of CompassOpenStack OpenDaylight ONOS and so on
The stable release ISO can be retrieved via OPNFV software download page
The daily build ISO can be retrieved via OPNFV artifacts repository
httpartifactsopnfvorg
NOTE Search the keyword ldquoCompass4nfvBrahmaputrardquo to locate the ISO image
Eg compass4nfvbrahmaputraopnfv-2016-01-16_15-03-18iso compass4nfvbrahmaputraopnfv-2016-01-16_15-03-18properties
The name of iso image includes the time of iso building you can get the daily ISO according the building time The giturl and sha1 of Compass4nfv are recorded in properties files According these the corresponding deployment scriptscan be retrieved
Getting the deployment scripts
To retrieve the repository of Compass4nfv on Jumphost use the following command
bull git clone httpsgerritopnfvorggerritcompass4nfv
To get stablebrahmaputra release you can use the following command
bull git checkout brahmaputra10
NOTE PLEASE DO NOT GIT CLONE COMPASS4NFV IN root DIRECTORY
If you donrsquot have a Linux foundation user id get it first by the url
httpswikiopnfvorgdevelopergetting_started
If you want to use a daily release ISO please checkout the corresponding sha1 to get the deployment scripts
Eg Git sha1 in file ldquoopnfv-2016-01-16_15-03-18propertiesrdquo is d5a13ce7cc2ce89946d34b0402ecf33c1d291851
bull git checkout d5a13ce7cc2ce89946d34b0402ecf33c1d291851
Preparing the installation environment
If you have only 1 Bare Metal server Virtual deployment is recommended if more than or equal 3 servers theBare Metal deployment is recommended The minimum number of servers for Bare metal deployment is 3 1 forJumpServer(Jumphost) 1 for controller 1 for compute
33 Compass4nfv configuration 13
OPNFV Configuration Guide Release brahmaputra30 (605ebda)
332 Setup Requirements
Jumphost Requirements
The Jumphost requirements are outlined below
1 Ubuntu 1404 (Pre-installed)
2 Root access
3 libvirt virtualization support
4 Minimum 2 NICs
bull PXE installation Network (Receiving PXE request from nodes and providing OS provisioning)
bull IPMI Network (Nodes power control and set boot PXE first via IPMI interface)
bull External Network (Optional Internet access)
5 16 GB of RAM for a Bare Metal deployment 64 GB of RAM for a VM deployment
6 Minimum 100G storage
Bare Metal Node Requirements
Bare Metal nodes require
1 IPMI enabled on OOB interface for power control
2 BIOS boot priority should be PXE first then local hard disk
3 Minimum 3 NICs
bull PXE installation Network (Broadcasting PXE request)
bull IPMI Network (Receiving IPMI command from Jumphost)
bull External Network (OpenStack mgmtexternalstoragetenant network)
Network Requirements
Network requirements include
1 No DHCP or TFTP server running on networks used by OPNFV
2 2-6 separate networks with connectivity between Jumphost and nodes
bull PXE installation Network
bull IPMI Network
bull Openstack mgmt Network
bull Openstack external Network
bull Openstack tenant Network
bull Openstack storage Network
3 Lights out OOB network access from Jumphost with IPMI node enabled (Bare Metal deployment only)
4 External network has Internet access meaning a gateway and DNS availability
14 Chapter 3 Installer Configuration
OPNFV Configuration Guide Release brahmaputra30 (605ebda)
The networks with() can be share one NIC(Default configuration) or use an exclusive NIC(Reconfigurated innetworkyml)
Execution Requirements (Bare Metal Only)
In order to execute a deployment one must gather the following information
1 IPMI IP addresses for the nodes
2 IPMI login information for the nodes (userpass)
3 MAC address of Control Plane Provisioning interfaces of the Bare Metal nodes
333 Installation Guide (BM Deployment)
Nodes Configuration (BM Deployment)
The bellow file is the inventory template of deployment nodes
ldquocompass4nfvdeployconfhardware_environmenthuawei_us_labpod1dhaymlrdquo
You can write your own IPMI IPUserPasswordMac addressroles reference to it
bull ipmiVer ndash IPMI interface version for deployment node support IPMI 10 or IPMI 20 is available
bull ipmiIP ndash IPMI IP address for deployment node Make sure it can access from Jumphost
bull ipmiUser ndash IPMI Username for deployment node
bull ipmiPass ndash IPMI Password for deployment node
bull mac ndash MAC Address of deployment node PXE NIC
bull name ndash Host name for deployment node after installation
bull roles ndash Components deployed
Assignment of different roles to servers
Eg Openstack only deployment roles setting
hosts- name host1roles
- controller- ha
- name host2roles
- compute
NOTE IF YOU SELECT MUTIPLE NODES AS CONTROLLER THE lsquoharsquo role MUST BE SELECT TOO
Eg Openstack and ceph deployment roles setting
hosts- name host1roles
- controller- ha- ceph-adm- ceph-mon
33 Compass4nfv configuration 15
OPNFV Configuration Guide Release brahmaputra30 (605ebda)
- name host2roles
- compute- ceph-osd
Eg Openstack and ODL deployment roles setting
hosts- name host1roles
- controller- ha- odl
- name host2roles
- compute
Eg Openstack and ONOS deployment roles setting
hosts- name host1roles
- controller- ha- onos
- name host2roles
- compute
Network Configuration (BM Deployment)
Before deployment there are some network configuration to be checked based on your network topology Com-pass4nfv network default configuration file is ldquocompass4nfvdeployconfnetwork_cfgyamlrdquo You can write yourown reference to it
The following figure shows the default network configuration
+--+ +--+ +--+| | | | | || | +------------+ | | | || +------+ Jumphost +------+ | | || | +------+-----+ | | | || | | | | | || | +------------+ +-----+ || | | | | || | +------------+ | | | || +------+ host1 +------+ | | || | +------+-----+ | | | || | | | | | || | +------------+ +-----+ || | | | | || | +------------+ | | | || +------+ host2 +------+ | | || | +------+-----+ | | | || | | | | | |
16 Chapter 3 Installer Configuration
OPNFV Configuration Guide Release brahmaputra30 (605ebda)
| | +------------+ +-----+ || | | | | || | +------------+ | | | || +------+ host3 +------+ | | || | +------+-----+ | | | || | | | | | || | +------------+ +-----+ || | | | | || | | | | |+-++ ++-+ +-++
^ ^ ^| | || | |
+-+-------------------------+ | || External Network | | |+---------------------------+ | |
+-----------------------+---+ || IPMI Network | |+---------------------------+ |
+-------------------------+-+| PXE(Installation) Network |+---------------------------+
Start Deployment (BM Deployment)
1 Set PXEInstallation NIC for Jumphost (set eth1 Eg)
export INSTALL_NIC=eth1
2 Set OS version for nodes provisioning (set Ubuntu1404 Eg)
export OS_VERSION=trusty
3 Set OpenStack version for deployment nodes (set liberty Eg)
export OPENSTACK_VERSION=liberty
4 Set ISO image that you want to deploy
export ISO_URL=file$YOUR_OWNcompassisoorexport ISO_URL=httpartifactsopnfvorgcompass4nfvbrahmaputraopnfv-releaseiso
5 Run deploysh with inventory and network configuration
deploysh --dha $YOUR_OWNdhayml --network $YOUR_OWNnetworkyml
34 Fuel configuration
This section provides guidelines on how to install and configure the Brahmaputra release of OPNFV when using Fuelas a deployment tool including required software and hardware configurations
For detailed instructions on how to install the Brahmaputra release using Fuel see Reference 13 in section ldquoFuelassociated referencesrdquo below
34 Fuel configuration 17
OPNFV Configuration Guide Release brahmaputra30 (605ebda)
341 Pre-configuration activities
Planning the deployment
Before starting the installation of the Brahmaputra release of OPNFV when using Fuel as a deployment tool someplanning must be done
Familiarize yourself with the Fuel by reading the following documents
bull Fuel planning guide please see Reference 8 in section ldquoFuel associated referencesrdquo below
bull Fuel quick start guide please see Reference 9 in section ldquoFuel associated referencesrdquo below
bull Fuel operations guide please see Reference 10 in section ldquoFuel associated referencesrdquo below
bull Fuel Plugin Developers Guide please see Reference 11 in section ldquoFuel associated referencesrdquo below
Before the installation can start a number of deployment specific parameters must be collected those are
1 Provider sub-net and gateway information
2 Provider VLAN information
3 Provider DNS addresses
4 Provider NTP addresses
5 Network overlay you plan to deploy (VLAN VXLAN FLAT)
6 Monitoring Options you want to deploy (Ceilometer Syslog etc)
7 How many nodes and what roles you want to deploy (Controllers Storage Computes)
8 Other options not covered in the document are available in the links above
Retrieving the ISO image
First of all the Fuel deployment ISO image needs to be retrieved the Fuel iso image of the Brahmaputra release canbe found at Reference 2
Alternatively you may build the iso from source by cloning the opnfvfuel git repository Detailed instructions onhow to build a Fuel OPNFV iso can be found in Reference 14 at section ldquoFuel associated referencesrdquo below
342 Hardware requirements
Following high level hardware requirements must be met
18 Chapter 3 Installer Configuration
OPNFV Configuration Guide Release brahmaputra30 (605ebda)
HW Aspect Requirement of nodes Minimum 5 (3 for non redundant deployment)
bull 1 Fuel deployment master (may be virtualized)bull 3(1) Controllers (1 colocated mongoceilometer
role 2 Ceph-OSD roles)bull 1 Compute (1 co-located Ceph-OSD role)
CPU Minimum 1 socket x86_AMD64 with Virtualizationsupport
RAM Minimum 16GBserver (Depending on VNF work load)Disk Minimum 256GB 10kRPM spinning disksNetworks 4 Tagged VLANs (PUBLIC MGMT STORAGE PRI-
VATE)1 Un-Tagged VLAN for PXE Boot - ADMIN Networknote These can be run on single NIC - or spread outover other nics as your hardware supports
For information on compatible hardware types available for use please see Reference 11 in section ldquoFuel associatedreferencesrdquo below
Top of the rack (TOR) Configuration requirements
The switching infrastructure provides connectivity for the OPNFV infrastructure operations tenant networks(EastWest) and provider connectivity (NorthSouth) it also provides needed connectivity for the Storage Area Net-work (SAN) To avoid traffic congestion it is strongly suggested that three physically separated networks are usedthat is 1 physical network for administration and control one physical network for tenant private and public networksand one physical network for SAN The switching connectivity can (but does not need to) be fully redundant in suchcase it and comprises a redundant 10GE switch pair for each of the three physically separated networks
The physical TOR switches are not automatically configured from the OPNFV reference platform All the networksinvolved in the OPNFV infrastructure as well as the provider networks and the private tenant VLANs needs to bemanually configured
343 Jumphost configuration
The Jumphost server also known as the ldquoFuel masterrdquo provides needed servicesfunctions to deploy an OP-NFVOpenStack cluster as well functions for cluster life-cycle management (extensions repair actions and upgrades)
The Jumphost server requires 2 (4 if redundancy is required) Ethernet interfaces - one for external management of theOPNFV installation and another for jump-host communication with the OPNFV cluster
Install the Fuel jump-host
Mount the Fuel Brahmaputra ISO file as a boot device to the jump host server reboot it and install the Fuel Jumphostin accordance with installation instructions see Reference 13 in section ldquoFuel associated referencesrdquo below
344 Platform components configuration
Fuel-Plugins
Fuel plugins enable you to install and configure additional capabilities for your Fuel OPNFV based cloud such asadditional storage types networking functionality or NFV features developed by OPNFV
34 Fuel configuration 19
OPNFV Configuration Guide Release brahmaputra30 (605ebda)
Fuel offers an open source framework for creating these plugins so therersquos a wide range of capabilities that you canenable Fuel to add to your OpenStack clouds
The OPNFV Brahmaputra version of Fuel provides a set of pre-packaged plugins developed by OPNFV
Pluginname
Short description
Open-Daylight
OpenDaylight provides an open-source SDN Controller providing networking features such as L2and L3 network control ldquoService Function Chainingrdquo routing networking policies etc Moreinformation on OpenDaylight in the OPNFV Brahmaputra release can be found in a separate sectionin this document
ONOS ONOS is another open-source SDN controller which in essense fill the same role as OpenDaylightMore information on ONOS in the OPNFV Brahmaputra release can be found in a separate section inthis document
BGP-VPN
BGP-VPN provides an BGPMPLS VPN service More information on BGP-VPN in the OPNFVBrahmaputra release can be found in a separate section in this document
OVS-NSH
OVS-NSH provides a variant of Open-vSwitch which supports ldquoNetwork Service Headersrdquo neededfor the ldquoService function chainingrdquo feature More information on ldquoService Function Chainingrdquo in theOPNFV Brahmaputra release can be found in a in a separate section in this document
OVS-NFV
OVS-NFV provides a variant of Open-vSwitch with carrier grade characteristics essential for NFVworkloads More information on OVS-NFV in the OPNFV Brahmaputra release can be found in a ina separate section in this document
KVM-NFV
KVM-NFV provides a variant of KVM with improved virtualization characteristics essential for NFVworkloads More information on KVM-NFV in the OPNFV Brahmaputra release can be found in a ina separate section in this document
VSPERF VSPERF provides a networking characteristics test bench that facilitates characteristicsperformanceevaluation of vSwithches More information on VSPERF in the OPNFV Brahmaputra release can befound in a in a separate section in this document
Additional third-party plugins can be found here httpswwwmirantiscomproductsopenstack-drivers-and-pluginsfuel-plugins Note Plugins are not necessarilly compatible with each other see section ldquoConfigurationoptions OPNFV scenariosrdquo for compatibility information
The plugins come prepackaged ready to install To do so follow the installation instructions provided in Reference 13provided in section ldquoFuel associated referencesrdquo below
Fuel environment
A Fuel environment is an OpenStack instance managed by Fuel one Fuel instance can manage several OpenStackinstancesenvironments with different configurations etc
To create a Fuel instance follow the instructions provided in the installation instructions see Reference 13 in sectionldquoFuel associated referencesrdquo below
Provisioning of aditional features and services
Although the plugins have already previously been installed they are not per default enabled for the environment wejust created The plugins of your choice need to be enabled and configured
To enable a plugin follow the installation instructions found in Reference 13 provided in section ldquoFuel associatedreferencesrdquo below
For configuration of the plugins please see section ldquoFeature Configurationrdquo
20 Chapter 3 Installer Configuration
OPNFV Configuration Guide Release brahmaputra30 (605ebda)
Networking
All the networking aspects need to be configured in terms of - InterfacesNICs - VLANs - Sub-nets - Gateways - Usernetwork segmentation (VLANVXLAN) - DNS - NTP - etc
For guidelines on how to configure networking please refer to the installation instructions found in Reference 13provided in section ldquoFuel associated referencesrdquo below
Node allocation
Now it is time to allocate the nodes in your OPNFV cluster to OpenStack- SDN- and other featureservice rolesSome roles may require redundancy while others donrsquot Some roles may be co-located with other roles while othersmay not The Fuel GUI will guide you in the allocation of roles and will not permit you to perform invalid allocations
For detailed guide-lines on node allocation please refer to the installation instructions found in Reference 13 providedin section ldquoFuel associated referencesrdquo below
Off-line deployment
The OPNFV Brahmaputra version of Fuel can be deployed using on-line upstream repositories (default) or off-lineusing built-in local repositories on the Fuel jump-start server
For instructions on how to configure Fuel for off-line deployment please refer to the installation instructions found inReference 13 provided in section ldquoFuel associated referencesrdquo below
Deployment
You should now be ready to deploy your OPNFV Brahmaputra environment - but before doing so you may want toverify your network settings
For further details on network verification and deployment please refer to the installation instructions found in Ref-erence 13 provided in section ldquoFuel associated referencesrdquo below
345 Fuel associated references
1 OPNFV Home Page
2 OPNFV documentation- and software downloads
3 OpenStack Liberty Release artifacts
4 OpenStack documentation
5 OpenDaylight artifacts
6 The Fuel OpenStack project
7 Fuel documentation overview
8 Fuel planning guide
9 Fuel quick start guide
10 Fuel operations guide
11 Fuel Plugin Developers Guide
12 Fuel OpenStack Hardware Compatibility List
34 Fuel configuration 21
OPNFV Configuration Guide Release brahmaputra30 (605ebda)
13 OPNFV Installation instruction for the Brahmaputra release of OPNFV when using Fuel as a deployment tool
14 OPNFV Build instruction for the Brahmaputra release of OPNFV when using Fuel as a deployment tool
15 OPNFV Release Note for the Brahmaputra release of OPNFV when using Fuel as a deployment tool
35 JOID Configuration
351 Bare Metal Installations
352 Requirements as per Pharos
353 Networking
Minimum 2 networks
1 First for Admin network with gateway to access external network
2 Second for public network to consume by tenants for floating ips
NOTE JOID support multiple isolated networks for data as well as storage Based on your network optionsfor Openstack
Minimum 6 physical servers
1 Jump host server
Minimum HW Spec needed
CPU cores 16
Memory 32 GB
Hard Disk 1(250 GB)
NIC eth0(Admin Management) eth1 (external network)
2 Control node servers (minimum 3)
Minimum HW Spec
CPU cores 16
Memory 32 GB
Hard Disk 1(500 GB)
NIC eth0(Admin Management) eth1 (external network)
3 Compute node servers (minimum 2)
Minimum HW Spec
CPU cores 16
Memory 32 GB
Hard Disk 1(1 TB) this includes the space for ceph as well
22 Chapter 3 Installer Configuration
OPNFV Configuration Guide Release brahmaputra30 (605ebda)
NIC eth0(Admin Management) eth1 (external network)
NOTE Above configuration is minimum and for better performance and usage of the Openstack please con-sider higher spec for each nodes
Make sure all servers are connected to top of rack switch and configured accord-ingly No DHCP server should be up and configured Only gateway at eth0 and eth1 network should be con-figure to access the network outside your lab
Jump node configuration
1 Install Ubuntu 1404 LTS server version of OS on the nodes 2 Install the git and bridge-utils pack-ages on the server and configure minimum two bridges on jump host
brAdm and brPublic cat etcnetworkinterfaces
The loopback network interface
auto lo
iface lo inet loopback
iface eth0 inet manual
auto brAdm
iface brAdm inet static
address 10411
netmask 2552552480
network 10400
broadcast 1047255
gateway 10401
dns- options are implemented by the resolvconf package if installed
dns-nameservers 10402
bridge_ports eth0
auto brPublic
iface brPublic inet static
address 102662
netmask 2552552550
bridge_ports eth2
NOTE If you choose to use the separate network for management data and storage then you need to createbridge for each interface In case of VLAN tags use the appropriate network on jump-host depend upon VLANID on the interface
354 Configure JOID for your lab
Get the joid code from gerritt
git clone httpsgerritopnfvorggerritpjoidgit
cd joidci
Enable MAAS
35 JOID Configuration 23
OPNFV Configuration Guide Release brahmaputra30 (605ebda)
bull Create a directory in maasltcompany namegtltpod numbergt for example
mkdir maasintelpod7
bull Copy files from pod5 to pod7
cp maasintelpod5 maasintelpod7
4 files will get copied deploymentyaml environmentsyaml interfaceshost lxc-add-more-interfaces
355 deploymentyaml file
Prerequisite
1 Make sure Jump host node has been configured with bridges on each interface so that appropriate MAAS and JUJUbootstrap VM can be created For example if you have three network admin data and public then I would suggestto give names like brAdm brData and brPublic 2 You have information about the node MAC address and powermanagement details (IPMI IP username password) of the nodes used for control and compute node
356 modify deploymentyaml
This file has been used to configure your maas and bootstrap node in a VM Comments in the file are self explanatoryand we expect fill up the information according to match lab infrastructure information Sample deploymentyaml canbe found at httpsgerritopnfvorggerritgitwebp=joidgita=blobf=cimaasintelpod5deploymentyaml
modify joidci01-deploybundlesh
under section case $3 add the intelpod7 section and make sure you have information provided correctly Beforeexample consider your network has 1921681024 your default network and eth1 is on public network which will beused to assign the floating ip
rsquointelpod7rsquo )
As per your lab vip address list be deafult uses 104111 - 104120
sed -i -- rsquos1041119216812grsquo bundlesyaml
Choose the external port to go out from gateway to use
sed -i -- rsquos ext-port eth1 ext-port eth1grsquo bundlesyaml
NOTE If you are using seprate data network then add this line below also along with other changes which representsnetwork 1049024 will be used for data network for openstack
sed -i -- rsquosos-data-network 1048021os-data-network 1049024grsquo bundlesyaml
modify joidci02-maasdeploysh
under section case $1 add the intelpod7 section and make sure you have information provided correctly
24 Chapter 3 Installer Configuration
OPNFV Configuration Guide Release brahmaputra30 (605ebda)
rsquointelpod7rsquo )
cp maasintelpod7deploymentyaml deploymentyaml
NOTE If you are using VLAN tags or more network for data and storage then make sure you modify the case $1section under Enable vlan interface with maas appropriately In the example below eth2 has been used as separate datanetwork for tenants in openstack with network 1049024 on compute and control nodes
rsquointelpod7rsquo )
maas refresh
enableautomodebyname eth2 AUTO 1049024 compute || true
enableautomodebyname eth2 AUTO 1049024 control || true
MAAS Install
After integrating the changes as mentioned above run the MAAS install Suppose you name the integration lab asintelpod7 then run the below commands to start the MAAS deployment
02-maasdeploysh intelpod7
This will take approximately 40 minutes to couple hours depending on your environment This script will do thefollowing
1 Create 2 VMs (KVM)
2 Install MAAS in one of the VMs
3 Configure the MAAS to enlist and commission a VM for Juju bootstrap node
4 Configure the MAAS to enlist and commission bare metal servers
When itrsquos done you should be able to view MAAS webpage (httpltMAAS IPgtMAAS) and see 1 bootstrap nodeand bare metal servers in the lsquoReadyrsquo state on the nodes page
Virtual deployment
By default just running the script 02-maasdeploysh will automatically create the KVM VMs on a single machineand configure everything for you
OPNFV Install
JOID allows you to deploy different combinations of OpenStack release and SDN solution in HA or non-HA mode
For OpenStack it supports Juno and Liberty For SDN it supports Openvswitch OpenContrail OpenDayLight andONOS
In addition to HA or non-HA mode it also supports to deploy the latest from the development tree (tip)
The deploysh in the joidci directoy will do all the work for you For example the following deploy OpenStack Liberywith OpenDayLight in a HA mode in the Intelpod7
35 JOID Configuration 25
OPNFV Configuration Guide Release brahmaputra30 (605ebda)
deploysh -o liberty -s odl -t ha -l intelpod7 -f none
By default the SDN is Openvswitch non-HA Liberty Intelpod5 OPNFV Brahmaputra release and ODL_L2 for theOPNFV feature
Possible options for each choice are as follows
[-s ]
nosdn openvswitch only and no other SDN
odl OpenDayLight Lithium version
opencontrail OpenContrail SDN
onos ONOS framework as SDN
[-t ]
nonha NO HA mode of Openstack
ha HA mode of openstack
tip the tip of the development
[-o ]
juno OpenStack Juno version
liberty OpenStack Liberty version
[-l ] etc
default For virtual deployment where installation will be done on KVM created using 02-maasdeploysh
intelpod5 Install on bare metal OPNFV pod5 of Intel lab
intelpod6
orangepod2
(other pods)
Note if you make changes as per your pod above then please use your pod
[-f ]
none no special feature will be enabled
ipv6 ipv6 will be enabled for tenant in openstack
By default debug is enabled in script and error messages will be printed on the SSH terminal where you are runningthe scripts It could take an hour to couple hours (max) to complete
Is the deployment done successfully
Once juju-deployer is complete use juju status to verify that all deployed unit are in the ready state
26 Chapter 3 Installer Configuration
OPNFV Configuration Guide Release brahmaputra30 (605ebda)
juju status --format tabular
Find the Openstack-dashboard IP address from the juju status output and see if you can log in via browser Theusername and password is adminopenstack
Optionall see if you can log in Juju GUI Juju GUI is on the Juju bootstrap node which is the second VM you definein the 02-maasdeploysh The username and password is adminadmin
If you deploy ODL OpenContrail or ONOS find the IP address of the web UI and login Please refer to each SDNbundleyaml for usernamepassword
Troubleshoot
To access to any deployed units juju ssh for example to login into nova-compute unit and look for varlogjujuunit-ltof interestgt for more info
juju ssh nova-compute0
Example
ubuntuR4N4B1~$ juju ssh nova-compute0
Warning Permanently added rsquo172165060rsquo (ECDSA) to the list of knownhosts
Warning Permanently added rsquo3-r4n3b1-computemaasrsquo (ECDSA) to the list ofknown hosts
Welcome to Ubuntu 14041 LTS (GNULinux 3130-77-generic x86_64)
Documentation httpshelpubuntucom
ltskippedgt
Last login Tue Feb 2 212356 2016 from bootstrapmaas
ubuntu3-R4N3B1-compute~$ sudo -i
root3-R4N3B1-compute~ cd varlogjuju
root3-R4N3B1-computevarlogjuju ls
machine-2log unit-ceilometer-agent-0log unit-ceph-osd-0logunit-neutron-contrail-0log unit-nodes-compute-0log unit-nova-compute-0logunit-ntp-0log
root3-R4N3B1-computevarlogjuju
By default juju will add the Ubuntu user keys for authentication into the deployed server and only ssh accesswill be available
Once you resolve the error go back to the jump host to rerun the charm hook with
juju resolved --retry ltunitgt
35 JOID Configuration 27
OPNFV Configuration Guide Release brahmaputra30 (605ebda)
28 Chapter 3 Installer Configuration
CHAPTER
FOUR
FEATURE CONFIGURATION
The following sections describe the configuration options for specific platform features provided in BrahmaputraFurther details for each feature are captured in the referred project documentation
41 Copper configuration
This release focused on use of the OpenStack Congress service for managing configuration policy The Congress installprocedure described here is largely manual This procedure as well as the longer-term goal of automated installersupport is a work in progress The procedure is further specific to one OPNFV installer (JOID ie MAASJuJu)based environment Support for other OPNFV installer deployed environments is also a work in progress
411 Pre-configuration activities
This procedure assumes OPNFV has been installed via the JOID installer
412 Hardware configuration
There is no specific hardware configuration required for the Copper project
413 Feature configuration
Following are instructions for installing Congress on an Ubuntu 1404 LXC container in the OPNFV Controller nodeas installed by the JOID installer This guide uses instructions from the Congress intro guide on readthedocs Specificvalues below will need to be modified if you intend to repeat this procedure in your JOID-based install environment
Install Procedure
The install currently occurs via four bash scripts provided in the copper repo See these files for the detailed steps
bull install_congress_1sh creates and starts the linux container for congress on the controller node copiesinstall_congress_2sh to the controller node and invokes it via ssh
bull install_congress_2sh installs congress on the congress server
29
OPNFV Configuration Guide Release brahmaputra30 (605ebda)
Cleanup Procedure
If there is an error during installation use the bash script clean_congresssh which stops the congress server if runningand removes the congress user and service from the controller database
Restarting after server power loss etc
Currently this install procedure is manual Automated install and restoral after host recovery is TBD For now thisprocedure will get the Congress service running again
On jumphost SSH to Congress serversource ~envshjuju ssh ubuntu$CONGRESS_HOST If that fails
On jumphost SSH to controller nodejuju ssh ubuntunode1-control Start the Congress containersudo lxc-start -n juju-trusty-congress -d Verify the Congress container statussudo lxc-ls -f juju-trusty-congressNAME STATE IPV4 IPV6 GROUPS AUTOSTART----------------------------------------------------------------------juju-trusty-congress RUNNING 19216810117 - - NO exit back to the Jumphost wait a minute and go back to the SSH to Congress server step above
On the Congress server that you have logged intosource ~admin-openrcshcd ~gitcongresssource binactivatebincongress-server ampdisown -h 1
42 Doctor Configuration
421 Doctor Inspector
Doctor Inspector is suggested to be placed in one of the controller nodes but it can be put on any host where DoctorMonitor can reach and accessible to the OpenStack Controller (Nova)
Make sure OpenStack env parameters are set properly so that Doctor Inspector can issue admin actions such ascompute host force-down and state update of VM
Then you can configure Doctor Inspector as follows
git clone httpsgerritopnfvorggerritdoctor -b stablebrahmaputracd doctortestsINSPECTOR_PORT=12345python inspectorpy $INSPECTOR_PORT gt inspectorlog 2gtamp1 amp
422 Doctor Monitor
Doctor Monitors are suggested to be placed in one of the controller nodes but those can be put on any host whichis reachable to target compute host and accessible to the Doctor Inspector You need to configure Monitors for allcompute hosts one by one
30 Chapter 4 Feature Configuration
OPNFV Configuration Guide Release brahmaputra30 (605ebda)
Make sure OpenStack env parameters are set properly so that Doctor Inspector can issue admin actions such ascompute host force-down and state update of VM
Then you can configure Doctor Monitor as follows
git clone httpsgerritopnfvorggerritdoctor -b stablebrahmaputracd doctortestsINSPECTOR_PORT=12345COMPUTE_HOST=overcloud-novacompute-0sudo python monitorpy $COMPUTE_HOST
http127001$INSPECTOR_PORTevents gt monitorlog 2gtamp1 amp
43 IPv6 Configuration - Setting Up a Service VM as an IPv6 vRouter
This section provides instructions to set up a service VM as an IPv6 vRouter using OPNFV Brahmaputra Releaseinstallers The environment may be pure OpenStack option or Open Daylight L2-only option The deployment modelmay be HA or non-HA The infrastructure may be bare metal or virtual environment
For complete instructions and documentations of setting up service VM as an IPv6 vRouter using ANY method pleaserefer to
1 IPv6 Configuration Guide (HTML) httpartifactsopnfvorgipv6docssetupservicevmindexhtml
2 IPv6 User Guide (HTML) httpartifactsopnfvorgipv6docsgapanalysisindexhtml
431 Pre-configuration Activities
The configuration will work in 2 environments
1 OpenStack-only environment
2 OpenStack with Open Daylight L2-only environment
Depending on which installer will be used to deploy OPNFV each environment may be deployed on bare metal orvirtualized infrastructure Each deployment may be HA or non-HA
Refer to the previous installer configuration chapters installations guide and release notes
432 Setup Manual in OpenStack-Only Environment
If you intend to set up a service VM as an IPv6 vRouter in OpenStack-only environment of OPNFV BrahmaputraRelease please NOTE that
bull Because the anti-spoofing rules of Security Group feature in OpenStack prevents a VM from forwarding packetswe need to disable Security Group feature in the OpenStack-only environment
bull The hostnames IP addresses and username are for exemplary purpose in instructions Please change as neededto fit your environment
bull The instructions apply to both deployment model of single controller node and HA (High Availability) deploy-ment model where multiple controller nodes are used
43 IPv6 Configuration - Setting Up a Service VM as an IPv6 vRouter 31
OPNFV Configuration Guide Release brahmaputra30 (605ebda)
Install OPNFV and Preparation
OPNFV-NATIVE-INSTALL-1 To install OpenStack-only environment of OPNFV Brahmaputra Release
Apex Installer
HA deployment in OpenStack-only environmentopnfv-deploy -d etcopnfv-apexos-nosdn-nofeature-hayaml
Non-HA deployment in OpenStack-only environment Non-HA deployment is currently not supported by Apex installer
Compass Installer
HA deployment in OpenStack-only environmentexport ISO_URL=file$BUILD_DIRECTORYcompassisoexport OS_VERSION=$COMPASS_OS_VERSIONexport OPENSTACK_VERSION=$COMPASS_OPENSTACK_VERSIONexport CONFDIR=$WORKSPACEdeployconfvm_environmentdeploysh --dha $CONFDIRos-nosdn-nofeature-hayml --network $CONFDIR$NODE_NAMEnetworkyml
Non-HA deployment in OpenStack-only environment Non-HA deployment is currently not supported by Compass installer
Fuel Installer
HA deployment in OpenStack-only environmentdeploysh -s os-nosdn-nofeature-ha
Non-HA deployment in OpenStack-only environmentdeploysh -s os-nosdn-nofeature-noha
Joid Installer
HA deployment in OpenStack-only environmentdeploysh -o liberty -s nosdn -t ha -l default -f ipv6
Non-HA deployment in OpenStack-only environmentdeploysh -o liberty -s nosdn -t nonha -l default -f ipv6
Please NOTE that
bull You need to refer to installerrsquos documentation for other necessary parameters applicable to your deployment
bull You need to refer to Release Notes and installerrsquos documentation if there is any issue in installation
OPNFV-NATIVE-INSTALL-2 Clone the following GitHub repository to get the configuration and metadata files
git clone httpsgithubcomsridhargaddamopnfv_os_ipv6_pocgit optstackopnfv_os_ipv6_poc
Disable Security Groups in OpenStack ML2 Setup
OPNFV-NATIVE-SEC-1 Change the settings in etcneutronpluginsml2ml2_confini as follows
etcneutronpluginsml2ml2_confini[securitygroup]extension_drivers = port_security
32 Chapter 4 Feature Configuration
OPNFV Configuration Guide Release brahmaputra30 (605ebda)
enable_security_group = Falsefirewall_driver = neutronagentfirewallNoopFirewallDriver
OPNFV-NATIVE-SEC-2 Change the settings in etcnovanovaconf as follows
etcnovanovaconf[DEFAULT]security_group_api = novafirewall_driver = novavirtfirewallNoopFirewallDriver
OPNFV-NATIVE-SEC-3 After updating the settings you will have to restart the Neutron and Nova services
Please note that the commands of restarting Neutron and Nova would vary depending on the installer Pleaserefer to relevant documentation of specific installers
Set Up Service VM as IPv6 vRouter
OPNFV-NATIVE-SETUP-1 Now we assume that OpenStack multi-node setup is up and running We have to sourcethe tenant credentials in this step Please NOTE that the method of sourcing tenant credentials may vary dependingon installers For example
Apex installer
source the tenant credentials using Apex installer of OPNFV you need to copy the file homestackovercloudrc from the installer VM called instack to a location in controller node for example in the directory optsource optovercloudrc
Compass installer
source the tenant credentials using Compass installer of OPNFVsource optadmin-openrcsh
Fuel installer
source the tenant credentials using Fuel installer of OPNFVsource rootopenrc
Joid installer
source the tenant credentials using Joid installer of OPNFVsource $HOMEjoid_configadmin-openrc
devstack
source the tenant credentials in devstacksource openrc admin demo
Please refer to relevant documentation of installers if you encounter any issue
OPNFV-NATIVE-SETUP-2 Download fedora22 image which would be used for vRouter
wget httpsdownloadfedoraprojectorgpubfedoralinuxreleases22Cloudx86_64ImagesFedora-Cloud-Base-22-20150521x86_64qcow2
OPNFV-NATIVE-SETUP-3 Import Fedora22 image to glance
glance image-create --name Fedora22 --disk-format qcow2 --container-format bare --file Fedora-Cloud-Base-22-20150521x86_64qcow2
43 IPv6 Configuration - Setting Up a Service VM as an IPv6 vRouter 33
OPNFV Configuration Guide Release brahmaputra30 (605ebda)
OPNFV-NATIVE-SETUP-4 This step is Informational OPNFV Installer has taken care of this step duringdeployment You may refer to this step only if there is any issue or if you are using other installers
We have to move the physical interface (ie the public network interface) to br-ex including moving the publicIP address and setting up default route Please refer to OS-NATIVE-SETUP-4 and OS-NATIVE-SETUP-5 in ourmore complete instruction
OPNFV-NATIVE-SETUP-5 Create Neutron routers ipv4-router and ipv6-router which need to provideexternal connectivity
neutron router-create ipv4-routerneutron router-create ipv6-router
OPNFV-NATIVE-SETUP-6 Create an external networksubnet ext-net using the appropriate values based on thedata-center physical network setup
Please NOTE that you may only need to create the subnet of ext-net because OPNFV installers should have createdan external network during installation You must use the same name of external network that installer creates whenyou create the subnet For example
bull Apex installer external
bull Compass installer ext-net
bull Fuel installer net04_ext
bull Joid installer ext-net
Please refer to the documentation of installers if there is any issue
This is needed only if installer does not create an external work Otherwise skip this command net-createneutron net-create --routerexternal ext-net
Note that the name ext-net may work for some installers such as Compass and Joid Change the name ext-net to match the name of external network that an installer createsneutron subnet-create --disable-dhcp --allocation-pool start=19859156251end=19859156254 --gateway 198591561 ext-net 19859156024
OPNFV-NATIVE-SETUP-7 Create Neutron networks ipv4-int-network1 and ipv6-int-network2 withport_security disabled
neutron net-create --port_security_enabled=False ipv4-int-network1neutron net-create --port_security_enabled=False ipv6-int-network2
OPNFV-NATIVE-SETUP-8 Create IPv4 subnet ipv4-int-subnet1 in the internal networkipv4-int-network1 and associate it to ipv4-router
neutron subnet-create --name ipv4-int-subnet1 --dns-nameserver 8888 ipv4-int-network1 2000024
neutron router-interface-add ipv4-router ipv4-int-subnet1
OPNFV-NATIVE-SETUP-9 Associate the ext-net to the Neutron routers ipv4-router and ipv6-router
Note that the name ext-net may work for some installers such as Compass and Joid Change the name ext-net to match the name of external network that an installer createsneutron router-gateway-set ipv4-router ext-netneutron router-gateway-set ipv6-router ext-net
OPNFV-NATIVE-SETUP-10 Create two subnets one IPv4 subnet ipv4-int-subnet2 and one IPv6 subnetipv6-int-subnet2 in ipv6-int-network2 and associate both subnets to ipv6-router
34 Chapter 4 Feature Configuration
OPNFV Configuration Guide Release brahmaputra30 (605ebda)
neutron subnet-create --name ipv4-int-subnet2 --dns-nameserver 8888 ipv6-int-network2 1000024
neutron subnet-create --name ipv6-int-subnet2 --ip-version 6 --ipv6-ra-mode slaac --ipv6-address-mode slaac ipv6-int-network2 2001db80164
neutron router-interface-add ipv6-router ipv4-int-subnet2neutron router-interface-add ipv6-router ipv6-int-subnet2
OPNFV-NATIVE-SETUP-11 Create a keypair
nova keypair-add vRouterKey gt ~vRouterKey
OPNFV-NATIVE-SETUP-12 Create ports for vRouter (with some specific MAC address - basically for automation- to know the IPv6 addresses that would be assigned to the port)
neutron port-create --name eth0-vRouter --mac-address fa163e111111 ipv6-int-network2neutron port-create --name eth1-vRouter --mac-address fa163e222222 ipv4-int-network1
OPNFV-NATIVE-SETUP-13 Create ports for VM1 and VM2
neutron port-create --name eth0-VM1 --mac-address fa163e333333 ipv4-int-network1neutron port-create --name eth0-VM2 --mac-address fa163e444444 ipv4-int-network1
OPNFV-NATIVE-SETUP-14 Update ipv6-router with routing information to subnet 2001db80264
neutron router-update ipv6-router --routes type=dict list=true destination=2001db80264nexthop=2001db801f8163efffe111111
OPNFV-NATIVE-SETUP-15 Boot Service VM (vRouter) VM1 and VM2
nova boot --image Fedora22 --flavor m1small --user-data optstackopnfv_os_ipv6_pocmetadatatxt --availability-zone novaopnfv-os-compute --nic port-id=$(neutron port-list | grep -w eth0-vRouter | awk print $2) --nic port-id=$(neutron port-list | grep -w eth1-vRouter | awk print $2) --key-name vRouterKey vRouter
nova list
Please wait for some 10 to 15 minutes so that necessary packages (like radvd) are installed and vRouter is upnova console-log vRouter
nova boot --image cirros-034-x86_64-uec --flavor m1tiny --user-data optstackopnfv_os_ipv6_pocset_mtush --availability-zone novaopnfv-os-controller --nic port-id=$(neutron port-list | grep -w eth0-VM1 | awk print $2) --key-name vRouterKey VM1
nova boot --image cirros-034-x86_64-uec --flavor m1tiny--user-data optstackopnfv_os_ipv6_pocset_mtush --availability-zone novaopnfv-os-compute --nic port-id=$(neutron port-list | grep -w eth0-VM2 | awk print $2) --key-name vRouterKey VM2
nova list Verify that all the VMs are in ACTIVE state
OPNFV-NATIVE-SETUP-16 If all goes well the IPv6 addresses assigned to the VMs would be as shown as follows
43 IPv6 Configuration - Setting Up a Service VM as an IPv6 vRouter 35
OPNFV Configuration Guide Release brahmaputra30 (605ebda)
vRouter eth0 interface would have the following IPv6 address 2001db801f8163efffe11111164 vRouter eth1 interface would have the following IPv6 address 2001db802164 VM1 would have the following IPv6 address 2001db802f8163efffe33333364 VM2 would have the following IPv6 address 2001db802f8163efffe44444464
OPNFV-NATIVE-SETUP-17 Now we can SSH to VMs You can execute the following command
1 Create a floatingip and associate it with VM1 VM2 and vRouter (to the port id that is passed) Note that the name ext-net may work for some installers such as Compass and Joid Change the name ext-net to match the name of external network that an installer createsneutron floatingip-create --port-id $(neutron port-list | grep -w eth0-VM1 | awk print $2) ext-netneutron floatingip-create --port-id $(neutron port-list | grep -w eth0-VM2 | awk print $2) ext-netneutron floatingip-create --port-id $(neutron port-list | grep -w eth1-vRouter | awk print $2) ext-net
2 To know display the floatingip associated with VM1 VM2 and vRouterneutron floatingip-list -F floating_ip_address -F port_id | grep $(neutron port-list | grep -w eth0-VM1 | awk print $2) | awk print $2neutron floatingip-list -F floating_ip_address -F port_id | grep $(neutron port-list | grep -w eth0-VM2 | awk print $2) | awk print $2neutron floatingip-list -F floating_ip_address -F port_id | grep $(neutron port-list | grep -w eth1-vRouter | awk print $2) | awk print $2
3 To ssh to the vRouter VM1 and VM2 user can execute the following commandssh -i ~vRouterKey fedoraltfloating-ip-of-vRoutergtssh -i ~vRouterKey cirrosltfloating-ip-of-VM1gtssh -i ~vRouterKey cirrosltfloating-ip-of-VM2gt
433 Setup Manual in OpenStack with Open Daylight L2-Only Environment
If you intend to set up a service VM as an IPv6 vRouter in an environment of OpenStack and Open Daylight L2-onlyof OPNFV Brahmaputra Release please NOTE that
bull The hostnames IP addresses and username are for exemplary purpose in instructions Please change as neededto fit your environment
bull The instructions apply to both deployment model of single controller node and HA (High Availability) deploy-ment model where multiple controller nodes are used
bull However in case of HA when ipv6-router is created in step SETUP-SVM-11 it could be created in anyof the controller node Thus you need to identify in which controller node ipv6-router is created in orderto manually spawn radvd daemon inside the ipv6-router namespace in steps SETUP-SVM-24 throughSETUP-SVM-30
Install OPNFV and Preparation
OPNFV-INSTALL-1 To install OpenStack with Open Daylight L2-only environment of OPNFV Brahmaputra Re-lease
Apex Installer
36 Chapter 4 Feature Configuration
OPNFV Configuration Guide Release brahmaputra30 (605ebda)
HA deployment in OpenStack with Open Daylight L2-only environmentopnfv-deploy -d etcopnfv-apexos-odl_l2-nofeature-hayaml
Non-HA deployment in OpenStack with Open Daylight L2-only environment Non-HA deployment is currently not supported by Apex installer
Compass Installer
HA deployment in OpenStack with Open Daylight L2-only environmentexport ISO_URL=file$BUILD_DIRECTORYcompassisoexport OS_VERSION=$COMPASS_OS_VERSIONexport OPENSTACK_VERSION=$COMPASS_OPENSTACK_VERSIONexport CONFDIR=$WORKSPACEdeployconfvm_environmentdeploysh --dha $CONFDIRos-odl_l2-nofeature-hayml --network $CONFDIR$NODE_NAMEnetworkyml
Non-HA deployment in OpenStack with Open Daylight L2-only environment Non-HA deployment is currently not supported by Compass installer
Fuel Installer
HA deployment in OpenStack with Open Daylight L2-only environmentdeploysh -s os-odl_l2-nofeature-ha
Non-HA deployment in OpenStack with Open Daylight L2-only environmentdeploysh -s os-odl_l2-nofeature-noha
Joid Installer
HA deployment in OpenStack with Open Daylight L2-only environmentdeploysh -o liberty -s odl -t ha -l default -f ipv6
Non-HA deployment in OpenStack with Open Daylight L2-only environmentdeploysh -o liberty -s odl -t nonha -l default -f ipv6
Please NOTE that
bull You need to refer to installerrsquos documentation for other necessary parameters applicable to your deployment
bull You need to refer to Release Notes and installerrsquos documentation if there is any issue in installation
OPNFV-INSTALL-2 Clone the following GitHub repository to get the configuration and metadata files
git clone httpsgithubcomsridhargaddamopnfv_os_ipv6_pocgit optstackopnfv_os_ipv6_poc
Disable Security Groups in OpenStack ML2 Setup
Please NOTE that although Security Groups feature has been disabled automatically through localconf configu-ration file by some installers such as devstack it is very likely that other installers such as Apex Compass Fuelor Joid will enable Security Groups feature after installation
Please make sure that Security Groups are disabled in the setup
OPNFV-SEC-1 Change the settings in etcneutronpluginsml2ml2_confini as follows
etcneutronpluginsml2ml2_confini[securitygroup]enable_security_group = Falsefirewall_driver = neutronagentfirewallNoopFirewallDriver
43 IPv6 Configuration - Setting Up a Service VM as an IPv6 vRouter 37
OPNFV Configuration Guide Release brahmaputra30 (605ebda)
OPNFV-SEC-2 Change the settings in etcnovanovaconf as follows
etcnovanovaconf[DEFAULT]security_group_api = novafirewall_driver = novavirtfirewallNoopFirewallDriver
OPNFV-SEC-3 After updating the settings you will have to restart the Neutron and Nova services
Please note that the commands of restarting Neutron and Nova would vary depending on the installer Pleaserefer to relevant documentation of specific installers
Source the Credentials in OpenStack Controller Node
SETUP-SVM-1 Login in OpenStack Controller Node Start a new terminal and change directory to where Open-Stack is installed
SETUP-SVM-2 We have to source the tenant credentials in this step Please NOTE that the method of sourcingtenant credentials may vary depending on installers For example
Apex installer
source the tenant credentials using Apex installer of OPNFV you need to copy the file homestackovercloudrc from the installer VM called instack to a location in controller node for example in the directory optsource optovercloudrc
Compass installer
source the tenant credentials using Compass installer of OPNFVsource optadmin-openrcsh
Fuel installer
source the tenant credentials using Fuel installer of OPNFVsource rootopenrc
Joid installer
source the tenant credentials using Joid installer of OPNFVsource $HOMEjoid_configadmin-openrc
devstack
source the tenant credentials in devstacksource openrc admin demo
Please refer to relevant documentation of installers if you encounter any issue
Informational Note Move Public Network from Physical Network Interface to br-ex
SETUP-SVM-3 Move the physical interface (ie the public network interface) to br-ex
SETUP-SVM-4 Verify setup of br-ex
Those 2 steps are Informational OPNFV Installer has taken care of those 2 steps during deployment You mayrefer to this step only if there is any issue or if you are using other installers
38 Chapter 4 Feature Configuration
OPNFV Configuration Guide Release brahmaputra30 (605ebda)
We have to move the physical interface (ie the public network interface) to br-ex including moving the publicIP address and setting up default route Please refer to SETUP-SVM-3 and SETUP-SVM-4 in our more completeinstruction
Create IPv4 Subnet and Router with External Connectivity
SETUP-SVM-5 Create a Neutron router ipv4-router which needs to provide external connectivity
neutron router-create ipv4-router
SETUP-SVM-6 Create an external networksubnet ext-net using the appropriate values based on the data-centerphysical network setup
Please NOTE that you may only need to create the subnet of ext-net because OPNFV installers should have createdan external network during installation You must use the same name of external network that installer creates whenyou create the subnet For example
bull Apex installer external
bull Compass installer ext-net
bull Fuel installer net04_ext
bull Joid installer ext-net
Please refer to the documentation of installers if there is any issue
This is needed only if installer does not create an external work Otherwise skip this command net-createneutron net-create --routerexternal ext-net
Note that the name ext-net may work for some installers such as Compass and Joid Change the name ext-net to match the name of external network that an installer createsneutron subnet-create --disable-dhcp --allocation-pool start=19859156251end=19859156254 --gateway 198591561 ext-net 19859156024
Please note that the IP addresses in the command above are for exemplary purpose Please replace the IP addressesof your actual network
SETUP-SVM-7 Associate the ext-net to the Neutron router ipv4-router
Note that the name ext-net may work for some installers such as Compass and Joid Change the name ext-net to match the name of external network that an installer createsneutron router-gateway-set ipv4-router ext-net
SETUP-SVM-8 Create an internaltenant IPv4 network ipv4-int-network1
neutron net-create ipv4-int-network1
SETUP-SVM-9 Create an IPv4 subnet ipv4-int-subnet1 in the internal network ipv4-int-network1
neutron subnet-create --name ipv4-int-subnet1 --dns-nameserver 8888 ipv4-int-network1 2000024
SETUP-SVM-10 Associate the IPv4 internal subnet ipv4-int-subnet1 to the Neutron router ipv4-router
neutron router-interface-add ipv4-router ipv4-int-subnet1
43 IPv6 Configuration - Setting Up a Service VM as an IPv6 vRouter 39
OPNFV Configuration Guide Release brahmaputra30 (605ebda)
Create IPv6 Subnet and Router with External Connectivity
Now let us create a second neutron router where we can ldquomanuallyrdquo spawn a radvd daemon to simulate an externalIPv6 router
SETUP-SVM-11 Create a second Neutron router ipv6-router which needs to provide external connectivity
neutron router-create ipv6-router
SETUP-SVM-12 Associate the ext-net to the Neutron router ipv6-router
Note that the name ext-net may work for some installers such as Compass and Joid Change the name ext-net to match the name of external network that an installer createsneutron router-gateway-set ipv6-router ext-net
SETUP-SVM-13 Create a second internaltenant IPv4 network ipv4-int-network2
neutron net-create ipv4-int-network2
SETUP-SVM-14 Create an IPv4 subnet ipv4-int-subnet2 for the ipv6-router internal networkipv4-int-network2
neutron subnet-create --name ipv4-int-subnet2 --dns-nameserver 8888 ipv4-int-network2 1000024
SETUP-SVM-15 Associate the IPv4 internal subnet ipv4-int-subnet2 to the Neutron router ipv6-router
neutron router-interface-add ipv6-router ipv4-int-subnet2
Prepare Image Metadata and Keypair for Service VM
SETUP-SVM-16 Download fedora22 image which would be used as vRouter
wget httpsdownloadfedoraprojectorgpubfedoralinuxreleases22Cloudx86_64ImagesFedora-Cloud-Base-22-20150521x86_64qcow2
glance image-create --name Fedora22 --disk-format qcow2 --container-format bare --file Fedora-Cloud-Base-22-20150521x86_64qcow2
SETUP-SVM-17 Create a keypair
nova keypair-add vRouterKey gt ~vRouterKey
SETUP-SVM-18 Create ports for vRouter and both the VMs with some specific MAC addresses
neutron port-create --name eth0-vRouter --mac-address fa163e111111 ipv4-int-network2neutron port-create --name eth1-vRouter --mac-address fa163e222222 ipv4-int-network1neutron port-create --name eth0-VM1 --mac-address fa163e333333 ipv4-int-network1neutron port-create --name eth0-VM2 --mac-address fa163e444444 ipv4-int-network1
Boot Service VM (vRouter) with eth0 on ipv4-int-network2 and eth1 on ipv4-int-network1
Let us boot the service VM (vRouter) with eth0 interface on ipv4-int-network2 connecting toipv6-router and eth1 interface on ipv4-int-network1 connecting to ipv4-router
SETUP-SVM-19 Boot the vRouter using Fedora22 image on the OpenStack Compute Node with hostnameopnfv-os-compute
40 Chapter 4 Feature Configuration
OPNFV Configuration Guide Release brahmaputra30 (605ebda)
nova boot --image Fedora22 --flavor m1small --user-data optstackopnfv_os_ipv6_pocmetadatatxt --availability-zone novaopnfv-os-compute --nic port-id=$(neutron port-list | grep -w eth0-vRouter | awk print $2) --nic port-id=$(neutron port-list | grep -w eth1-vRouter | awk print $2) --key-name vRouterKey vRouter
Please note that optstackopnfv_os_ipv6_pocmetadatatxt is used to enable the vRouter to au-tomatically spawn a radvd and
bull Act as an IPv6 vRouter which advertises the RA (Router Advertisements) with prefix 2001db80264on its internal interface (eth1)
bull Forward IPv6 traffic from internal interface (eth1)
SETUP-SVM-20 Verify that Fedora22 image boots up successfully and vRouter has ssh keys properly injected
nova listnova console-log vRouter
Please note that it may take a few minutes for the necessary packages to get installed and ssh keys to be injected
Sample Output[ 762884523] cloud-init[871] ec2 [ 762909634] cloud-init[871] ec2 -----BEGIN SSH HOST KEY FINGERPRINTS-----[ 762931626] cloud-init[871] ec2 2048 e3dc3d4abcb6b07775a170a3d02a47a9 (RSA)[ 762957380] cloud-init[871] ec2 -----END SSH HOST KEY FINGERPRINTS-----[ 762979554] cloud-init[871] ec2
Boot Two Other VMs in ipv4-int-network1
In order to verify that the setup is working let us create two cirros VMs with eth1 interface on theipv4-int-network1 ie connecting to vRouter eth1 interface for internal network
We will have to configure appropriate mtu on the VMsrsquo interface by taking into account the tunneling overhead andany physical switch requirements If so push the mtu to the VM either using dhcp options or via meta-data
SETUP-SVM-21 Create VM1 on OpenStack Controller Node with hostname opnfv-os-controller
nova boot --image cirros-034-x86_64-uec --flavor m1tiny --user-data optstackopnfv_os_ipv6_pocset_mtush --availability-zone novaopnfv-os-controller --nic port-id=$(neutron port-list | grep -w eth0-VM1 | awk print $2) --key-name vRouterKey VM1
SETUP-SVM-22 Create VM2 on OpenStack Compute Node with hostname opnfv-os-compute
nova boot --image cirros-034-x86_64-uec --flavor m1tiny --user-data optstackopnfv_os_ipv6_pocset_mtush --availability-zone novaopnfv-os-compute --nic port-id=$(neutron port-list | grep -w eth0-VM2 | awk print $2) --key-name vRouterKey VM2
SETUP-SVM-23 Confirm that both the VMs are successfully booted
nova listnova console-log VM1nova console-log VM2
43 IPv6 Configuration - Setting Up a Service VM as an IPv6 vRouter 41
OPNFV Configuration Guide Release brahmaputra30 (605ebda)
Spawn RADVD in ipv6-router
Let us manually spawn a radvd daemon inside ipv6-router namespace to simulate an external router First ofall we will have to identify the ipv6-router namespace and move to the namespace
Please NOTE that in case of HA (High Availability) deployment model where multiple controller nodes are usedipv6-router created in step SETUP-SVM-11 could be in any of the controller node Thus you need to iden-tify in which controller node ipv6-router is created in order to manually spawn radvd daemon inside theipv6-router namespace in steps SETUP-SVM-24 through SETUP-SVM-30 The following command in Neu-tron will display the controller on which the ipv6-router is spawned
neutron l3-agent-list-hosting-router ipv6-router
Then you login to that controller and execute steps SETUP-SVM-24 through SETUP-SVM-30
SETUP-SVM-24 identify the ipv6-router namespace and move to the namespace
sudo ip netns exec qrouter-$(neutron router-list | grep -w ipv6-router | awk print $2) bash
SETUP-SVM-25 Upon successful execution of the above command you will be in the router namespace Now letus configure the IPv6 address on the ltqr-xxxgt interface
export router_interface=$(ip a s | grep -w global qr- | awk print $7)ip -6 addr add 2001db8011 dev $router_interface
SETUP-SVM-26 Update the sample file optstackopnfv_os_ipv6_pocscenario2radvdconfwith $router_interface
cp optstackopnfv_os_ipv6_pocscenario2radvdconf tmpradvd$router_interfaceconfsed -i s$router_interface$router_interfaceg tmpradvd$router_interfaceconf
SETUP-SVM-27 Spawn a radvd daemon to simulate an external router This radvd daemon advertises an IPv6subnet prefix of 2001db80164 using RA (Router Advertisement) on its $router_interface so that eth0interface of vRouter automatically configures an IPv6 SLAAC address
$radvd -C tmpradvd$router_interfaceconf -p tmpbr-expidradvd -m syslog
SETUP-SVM-28 Add an IPv6 downstream route pointing to the eth0 interface of vRouter
ip -6 route add 2001db80264 via 2001db801f8163efffe111111
SETUP-SVM-29 The routing table should now look similar to something shown below
ip -6 route show2001db8011 dev qr-42968b9e-62 proto kernel metric 2562001db80164 dev qr-42968b9e-62 proto kernel metric 256 expires 86384sec2001db80264 via 2001db801f8163efffe111111 dev qr-42968b9e-62 proto ra metric 1024 expires 29secfe8064 dev qg-3736e0c7-7c proto kernel metric 256fe8064 dev qr-42968b9e-62 proto kernel metric 256
SETUP-SVM-30 If all goes well the IPv6 addresses assigned to the VMs would be as shown as follows
vRouter eth0 interface would have the following IPv6 address 2001db801f8163efffe11111164 vRouter eth1 interface would have the following IPv6 address 2001db802164 VM1 would have the following IPv6 address 2001db802f8163efffe33333364 VM2 would have the following IPv6 address 2001db802f8163efffe44444464
42 Chapter 4 Feature Configuration
OPNFV Configuration Guide Release brahmaputra30 (605ebda)
Testing to Verify Setup Complete
Now let us SSH to those VMs eg VM1 and or VM2 and or vRouter to confirm that it has successfully configuredthe IPv6 address using SLAAC with prefix 2001db80264 from vRouter
We use floatingip mechanism to achieve SSH
SETUP-SVM-31 Now we can SSH to VMs You can execute the following command
1 Create a floatingip and associate it with VM1 VM2 and vRouter (to the port id that is passed) Note that the name ext-net may work for some installers such as Compass and Joid Change the name ext-net to match the name of external network that an installer createsneutron floatingip-create --port-id $(neutron port-list | grep -w eth0-VM1 | awk print $2) ext-netneutron floatingip-create --port-id $(neutron port-list | grep -w eth0-VM2 | awk print $2) ext-netneutron floatingip-create --port-id $(neutron port-list | grep -w eth1-vRouter | awk print $2) ext-net
2 To know display the floatingip associated with VM1 VM2 and vRouterneutron floatingip-list -F floating_ip_address -F port_id | grep $(neutron port-list | grep -w eth0-VM1 | awk print $2) | awk print $2neutron floatingip-list -F floating_ip_address -F port_id | grep $(neutron port-list | grep -w eth0-VM2 | awk print $2) | awk print $2neutron floatingip-list -F floating_ip_address -F port_id | grep $(neutron port-list | grep -w eth1-vRouter | awk print $2) | awk print $2
3 To ssh to the vRouter VM1 and VM2 user can execute the following commandssh -i ~vRouterKey fedoraltfloating-ip-of-vRoutergtssh -i ~vRouterKey cirrosltfloating-ip-of-VM1gtssh -i ~vRouterKey cirrosltfloating-ip-of-VM2gt
If everything goes well ssh will be successful and you will be logged into those VMs Run some commands to verifythat IPv6 addresses are configured on eth0 interface
SETUP-SVM-32 Show an IPv6 address with a prefix of 2001db80264
ip address show
SETUP-SVM-33 ping some external IPv6 address eg ipv6-router
ping6 2001db8011
If the above ping6 command succeeds it implies that vRouter was able to successfully forward the IPv6 traffic toreach external ipv6-router
44 Installing OVSNFV Fuel Plugin
bull On the Fuel UI create a new environment
bull In Settings gt Userspace OVS support check ldquoUserspace OVS supportrdquo
bull Continue with environment configuration and deployment as normal
441 Upgrading the plugin
From time to time new versions of the plugin may become available
44 Installing OVSNFV Fuel Plugin 43
OPNFV Configuration Guide Release brahmaputra30 (605ebda)
The plugin cannot be upgraded if an active environment is using the plugin
In order to upgrade the plugin
bull Copy the updated plugin file to the fuel-master
bull On the Fuel UI reset the environment
bull On the Fuel CLI ldquofuel plugins ndashupdate ltfuel-plugin-filegtrdquo
bull On the Fuel UI re-deploy the environment
45 Promise Feature Configuration Overview
451 Promise installation
Install nodejs npm and promise
curl -sL httpsdebnodesourcecomsetup_4x | sudo -E bash -sudo apt-get install -y nodejssudo npm -g install npmlatestgit clone httpsgithubcomopnfvpromisegitcd promisenpm install
Please note that the last command lsquonpm installrsquo will install all needed dependencies for promise (including yangforgeand mocha)
452 Testing
Please perform the following preparation steps
1 Set OpenStack environment parameters properly (eg source openrc admin demo in DevStack)
2 Create OpenStack tenant (eg promise) and tenant user (eg promiser)
3 Create a flavor in Nova with 1 vCPU and 512 MB RAM
4 Create a private network subnet and router in Neutron
5 Create an image in Glance
Once done the promise test script can be invoked as follows (as a single line command)
NODE_ENV=mytest OS_TENANT_NAME=promise OS_USERNAME=promiser OS_PASSWORD=ltuser password from Step 2gt OS_TEST_FLAVOR=ltflavor ID from Step 3gt OS_TEST_NETWORK=ltnetwork ID from Step 4gt OS_TEST_IMAGE=ltimage ID from Step 5gt npm run -s test -- --reporter json gt promise-resultsjson
The results of the tests will be stored in the promise-resultsjson file
The results can also be seen in the console (ldquonpm run -s testrdquo)
All 33 tests passing Congratulations promise has been successfully installed and configured
44 Chapter 4 Feature Configuration
OPNFV Configuration Guide Release brahmaputra30 (605ebda)
45 Promise Feature Configuration Overview 45
OPNFV Configuration Guide Release brahmaputra30 (605ebda)
46 Configuring SDNVPN features
Fuel installer configuration
In order to install the BGPVPN feature the corresponding checkbox in Fuel has to be selected This will triggerinstallation of the OpenStack BGPVPN API extension for Neutron (set up for using the ODL driver)
In addition ODL has to be installed see the corresponding section in the respective installer documentation on how toinstall ODL If the BGPVPN feature is installed ODL will automatically be installed with VPN Service karaf featureactivated
No post-deploy configuration is necessary The Fuel BGPVPN plugin and the ODL plugin should set up the clusterready for BGPVPNs being created This includes the set-up of internal VxLAN transport tunnels between computenodes
No post-configuration activities are required
46 Chapter 4 Feature Configuration
CHAPTER
FIVE
POST CONFIGURATION ACTIVITIES
Once you have deployed and configured your scenario and features you should validate the state of the system usingthe following guides
51 Scenario validation activities
The following guides provide information on how to validate the installation of you scenario based on the tools andtest suites available for the installation tool you have selected
511 Fuel post installation procedures
Automated post installation activities
Fuel provides a fairly broad coverage of built in automated health checks These validate the installation in terms ofconfiguration services networking storage policies etc The execution of the full range of health checks takes lessthan 30 minutes
For instructions on how to run health-checks please read the Fuel installation instructions
Platform components validation
Consult the feature sections in this document for any post-install feature specific validationhealth-checks
512 JOID post installation procedures
Configure OpenStack
In each SDN directory for example joidciopencontrail there is a folder for Juju deployer where you can find thecharm bundle yaml files that the deploysh uses to deploy
In the same directory there is scripts folder where you can find shell scripts to help you configure the OpenStackcloud that you just deployed These scripts are created to help you configure a basic OpenStack Cloud to verify thecloud For more info on OpenStack Cloud configuration please refer to the OpenStack Cloud Administrator Guideon docsopenstackorg Similarly for complete SDN configuration please refer to the respective SDN adminstratorguide
Each SDN solution requires slightly different setup please refer to the README in each SDN folder Most likelyyou will need to modify the openstacksh and cloud-setupsh scripts for the floating IP range private IP network andSSH keys Please go through openstacksh glancesh and cloud-setupsh and make changes as you see fit
47
OPNFV Configuration Guide Release brahmaputra30 (605ebda)
52 Feature validation activities
The following sections provide information on how to validate the features you have installed in your scenario
521 Copper post installation procedures
This release focused on use of the OpenStack Congress service for managing configuration policy The Congressinstall verify procedure described here is largely manual This procedure as well as the longer-term goal of automatedverification support is a work in progress The procedure is further specific to one OPNFV installer (JOID ieMAASJuJu) based environment
Automated post installation activities
No automated procedures are provided at this time
Copper post configuration procedures
No configuration procedures are required beyond the basic install procedure
Platform components validation
Following are notes on creating a container as test driver for Congress This is based upon an Ubuntu host as installedby JOID
Create and Activate the Container
On the jumphost
sudo lxc-create -n trusty-copper -t usrsharelxctemplateslxc-ubuntu -- -b ubuntu ~opnfvsudo lxc-start -n trusty-copper -dsudo lxc-info --name trusty-copper(typical output)Name trusty-copperState RUNNINGPID 4563IP 100344CPU use 2877 secondsBlkIO use 52279 MiBMemory use 55975 MiBKMem use 0 bytesLink vethDMFOANTX bytes 262 MiBRX bytes 8848 MiBTotal bytes 9110 MiB
Login and configure the test server
48 Chapter 5 Post Configuration Activities
OPNFV Configuration Guide Release brahmaputra30 (605ebda)
ssh ubuntu100344sudo apt-get updatesudo apt-get upgrade -y
Install pipsudo apt-get install python-pip -y
Install javasudo apt-get install default-jre -y
Install other dependenciessudo apt-get install git gcc python-dev libxml2 libxslt1-dev libzip-dev php5-curl -y
Setup OpenStack environment variables per your OPNFV installexport CONGRESS_HOST=19216810117export KEYSTONE_HOST=19216810108export CEILOMETER_HOST=19216810105export CINDER_HOST=19216810101export GLANCE_HOST=19216810106export HEAT_HOST=19216810107export NEUTRON_HOST=19216810111export NOVA_HOST=19216810112source ~admin-openrcsh
Install and test OpenStack clientmkdir ~gitcd gitgit clone httpsgithubcomopenstackpython-openstackclientgitcd python-openstackclientgit checkout stablelibertysudo pip install -r requirementstxtsudo python setuppy installopenstack service list(typical output)+----------------------------------+------------+----------------+| ID | Name | Type |+----------------------------------+------------+----------------+| 2f8799ae50f24c928c021fabf8a50f5f | keystone | identity || 351b13f56d9a4e25849406ec1d5a2726 | cinder | volume || 5129510c3143454f9ba8ec7e6735e267 | cinderv2 | volumev2 || 5ee1e220460f41dea9be06921400ce9b | congress | policy || 78e73a7789a14f56a5d248a0cd141201 | quantum | network || 9d5a00fb475a45b2ae6767528299ed6b | ceilometer | metering || 9e4b1624ef0b434abc0b82f607c5045c | heat | orchestration || b6c01ceb5023442d9f394b83f2a18e01 | heat-cfn | cloudformation || ba6199e3505045ad87e2a7175bd0c57f | glance | image || d753f304a0d541dbb989780ae70328a8 | nova | compute |+----------------------------------+------------+----------------+
Install and test Congress clientcd ~gitgit clone httpsgithubcomopenstackpython-congressclientgitcd python-congressclientgit checkout stablelibertysudo pip install -r requirementstxtsudo python setuppy installopenstack congress driver list(typical output)+------------+--------------------------------------------------------------------------+| id | description |+------------+--------------------------------------------------------------------------+| ceilometer | Datasource driver that interfaces with ceilometer || neutronv2 | Datasource driver that interfaces with OpenStack Networking aka Neutron || nova | Datasource driver that interfaces with OpenStack Compute aka nova || keystone | Datasource driver that interfaces with keystone || cinder | Datasource driver that interfaces with OpenStack cinder || glancev2 | Datasource driver that interfaces with OpenStack Images aka Glance |+------------+--------------------------------------------------------------------------+
Install and test Glance clientcd ~gitgit clone httpsgithubcomopenstackpython-glanceclientgitcd python-glanceclientgit checkout stablelibertysudo pip install -r requirementstxtsudo python setuppy installglance image-list(typical output)+--------------------------------------+---------------------+| ID | Name |+--------------------------------------+---------------------+| 6ce4433e-65c0-4cd8-958d-b06e30c76241 | cirros-033-x86_64 |+--------------------------------------+---------------------+
Install and test Neutron clientcd ~gitgit clone httpsgithubcomopenstackpython-neutronclientgitcd python-neutronclientgit checkout stablelibertysudo pip install -r requirementstxtsudo python setuppy installneutron net-list(typical output)+--------------------------------------+----------+------------------------------------------------------+| id | name | subnets |+--------------------------------------+----------+------------------------------------------------------+| dc6227df-af41-439f-bd2c-c2c2f0fe7fc5 | public | 5745846c-dd79-4900-a7da-bf506348ceac 19216810024 || a3f9f13a-5de9-4d3b-98c8-d2e40a2ef8e9 | internal | 5e0be862-90da-44ab-af43-56d5c65aa049 1000024 |+--------------------------------------+----------+------------------------------------------------------+
Install and test Nova clientcd ~gitgit clone httpsgithubcomopenstackpython-novaclientgitcd python-novaclientgit checkout stablelibertysudo pip install -r requirementstxtsudo python setuppy installnova hypervisor-list(typical output)+----+---------------------+-------+---------+| ID | Hypervisor hostname | State | Status |+----+---------------------+-------+---------+| 1 | compute1maas | up | enabled |+----+---------------------+-------+---------+
Install and test Keystone clientcd ~gitgit clone httpsgithubcomopenstackpython-keystoneclientgitcd python-keystoneclientgit checkout stablelibertysudo pip install -r requirementstxtsudo python setuppy install
52 Feature validation activities 49
OPNFV Configuration Guide Release brahmaputra30 (605ebda)
Setup the Congress Test Webapp
Clone Copper (if not already cloned in user home)cd ~gitif [ -d ~gitcopper ] then git clone httpsgerritopnfvorggerritcopper fi
Copy the Apache configsudo cp ~gitcoppercomponentscongresstest-webappwwwubuntu-apache2conf etcapache2apache2conf
Point proxyphp to the Congress server per your installsed -i -- s19216810117$CONGRESS_HOSTg ~gitcoppercomponentscongresstest-webappwwwhtmlproxyindexphp
Copy the webapp to the Apache root directory and fix permissionssudo cp -R ~gitcoppercomponentscongresstest-webappwwwhtml varwwwsudo chmod 755 varwwwhtml -R
Make webapp log directory and set permissionsmkdir ~logschmod 777 ~logs
Restart Apachesudo service apache2 restart
Using the Test Webapp
Browse to the trusty-copper server IP address
Interactive options are meant to be self-explanatory given a basic familiarity with the Congress service and data modelBut the app will be developed with additional features and UI elements
522 IPv6 Post Installation Procedures
Congratulations you have completed the setup of using a service VM to act as an IPv6 vRouter You have validatedthe setup based on the instruction in previous sections If you want to further test your setup you can ping6 amongVM1 VM2 vRouter and ipv6-router
This setup allows further open innovation by any 3rd-party For more instructions and documentations please refer to
1 IPv6 Configuration Guide (HTML) httpartifactsopnfvorgipv6docssetupservicevmindexhtml
2 IPv6 User Guide (HTML) httpartifactsopnfvorgipv6docsgapanalysisindexhtml
Automated post installation activities
Refer to the relevant testing guides results and release notes of Yardstick Project
53 Additional testing and validation activities
Many of our testing tools can be manually installed to facilitate targeted testing of features and capabilities of yourscenario The following guides provide instruction on setting up these testing suites
50 Chapter 5 Post Configuration Activities
OPNFV Configuration Guide Release brahmaputra30 (605ebda)
531 Overview of the functest suites
Functest is the OPNFV project primarily targeting function testing In the Continuous Integration pipeline it islaunched after an OPNFV fresh installation to validate and verify the basic functions of the infrastructure
The current list of test suites can be distributed in 3 main domains VIM (Virtualised Infrastructure Manager) Con-trollers and Features
Do-main
Testsuite
Comments
VIM
vPing NFV ldquoHello Worldrdquo using SSH connection and floatting IPvPing_userdataPing using userdata and cloud-init mechanismTempest OpenStack reference test suite [2]Rallybench
OpenStack testing tool benchmarking OpenStack modules [3]
ControllersOpen-Day-light
Opendaylight Test suite
ONOS Test suite of ONOS L2 and L3 functions See ONOSFW User Guide for details
Features
vIMS Example of a real VNF deployment to show the NFV capabilities of the platform The IPMultimedia Subsytem is a typical Telco test case referenced by ETSI It provides a fullyfunctional VoIP System
Promise Resource reservation and management project to identify NFV related requirements andrealize resource reservation for future usage by capacity management of resource poolsregarding compute network and storage See Promise User Guide for details
Doctor Doctor platform as of Brahmaputra release provides the two features ImmediateNotification Consistent resource state awareness (compute) see Doctor User Guide fordetails
SD-NVPN
Implementation of the OpenStack bgpvpn API from the SDNVPN feature project Itallowing the cration of BGP VPNs see SDNVPN User Guide for
Functest includes different test suites with several test cases within Some of the tests are developed by Functest teammembers whereas others are integrated from upstream communities or other OPNFV projects For example Tempestis the OpenStack integration test suite and Functest is in charge of the selection integration and automation of the teststhat fit in OPNFV
The Tempest suite has been customized but no new test cases have been created
The results produced by the tests run from CI are pushed and collected in a NoSQL database The goal is to populatethe database with results from different sources and scenarios and to show them on a Dashboard
There is no real notion of Test domain or Test coverage Basic components (VIM controllers) are tested through theirown suites Feature projects also provide their own test suites with different ways of running their tests
vIMS test case was integrated to demonstrate the capability to deploy a relatively complex NFV scenario on top of theOPNFV infrastructure
Functest considers OPNFV as a black box OPNFV since the Brahmaputra release offers lots of potential combina-tions
bull 2 controllers (OpenDayligh ONOS)
bull 4 installers (Apex Compass Fuel Joid)
Most of the tests are runnable on any combination but some others might have restrictions imposed by the installersor the available deployed features
53 Additional testing and validation activities 51
OPNFV Configuration Guide Release brahmaputra30 (605ebda)
Preparing the Docker container
Pull the Functest Docker image from the Docker hub
docker pull opnfvfunctestbrahmaputra10
Check that the image is available
docker images
Run the docker container giving the environment variables
bull INSTALLER_TYPE possible values are apex compass fuel or joid
bull INSTALLER_IP IP of the installer nodeVM
Functest may need to know the IP of the installer to retrieve automatically the credentials from the installer nodeVMor even from the actual controllers
The minimum command to create the Functest Docker container can be described as follows
docker run -it -e INSTALLER_IP=102002 -e INSTALLER_TYPE=fuel opnfvfunctestbrahmaputra10 binbash
Optionally it is possible to precise the container name through the option ndashname
docker run --name CONTAINER_NAME -it -e INSTALLER_IP=102002 -e INSTALLER_TYPE=fuel opnfvfunctestbrahmaputra10 binbash
It is also possible to to indicate the path of the OpenStack credentials using -v
docker run -it -e INSTALLER_IP=102002 -e INSTALLER_TYPE=fuel -v ltpath_to_your_local_creds_filegthomeopnfvfunctestconfopenstackcreds opnfvfunctestbrahmaputra10 binbash
The local file will be mounted in the container under homeopnfvfunctestconfopenstackcreds
If the intention is to run Functest against any of the supported OPNFV scenarios it is recommended to include alsothe environment variable DEPLOY_SCENARIO for example
docker run -it -e INSTALLER_IP=102002 -e INSTALLER_TYPE=fuel -e DEPLOY_SCENARIO=os-odl_l2-nofeature-ha opnfvfunctestbrahmaputra10 binbash
Inside the container the following directory structure should be in place
`-- home`-- opnfv
|-- functest| |-- conf| |-- data| `-- results`-- repos
|-- bgpvpn|-- doctor|-- functest|-- odl_integration|-- onos|-- promise|-- rally|-- releng`-- vims-test
Basically the container includes
bull Functest directory to store the configuration (the OpenStack creds are stored inhomeopngbfunctestconfopenstackcreds) the data (cirros image needed for some tests) results (sometemporary result logs may be stored here)
52 Chapter 5 Post Configuration Activities
OPNFV Configuration Guide Release brahmaputra30 (605ebda)
bull Repositories the functest repository will be used to prepare the environment and run the tests Other repositoriesare used for the installation of the needed tooling (eg rally) andor the retrieval of feature projects scenarios(eg promise)
The structure under the Functest repository can be described as follows
|-- INFO|-- LICENSE|-- commons| |-- ims| |-- mobile| `-- traffic-profile-guidelinesrst|-- docker| |-- Dockerfile| |-- commonsh| |-- prepare_envsh| |-- requirementspip| `-- run_testssh|-- docs| |-- configguide| |-- devguide| |-- images| |-- results| `-- userguide`-- testcases
|-- Controllers|-- features|-- tests|-- VIM|-- vIMS|-- vPing|-- __init__py|-- config_functestpy|-- config_functestyaml`-- functest_utilspy
We may distinguish 4 different folders
bull commons it is a folder dedicated to store traffic profile or any test inputs that could be reused by any test project
bull docker this folder includes the scripts that will be used to setup the environment and run the tests
bull docs this folder includes the user and installationconfiguration guide
bull testcases this folder includes the scripts required by Functest internal test cases and other feature projects testcases
After the run command a new prompt appears which means that we are inside the container and ready to move to thenext step
Useful Docker commands
When typing exit in the container prompt this will cause exiting the container and probably stopping it Whenstopping a running Docker container all the changes will be lost there is a keyboard shortcut to quit the containerwithout stopping it CTRL+P+Q To reconnect to the running container DO NOT use the run command again (sinceit will create a new container) use exec instead
53 Additional testing and validation activities 53
OPNFV Configuration Guide Release brahmaputra30 (605ebda)
docker psltcopy the container IDgtdocker exec -ti ltCONTAINER_IDgt binbash
or simply
docker exec -ti $(docker ps|grep functest|awk print $1) binbash
There are other useful Docker commands that might be needed to manage possible issues with the containers
List the running containers
docker ps
List all the containers including the stopped ones
docker ps -a
It is useful sometimes to remove a container if there are some problems
docker rm ltCONTAINER_IDgt
Use the -f option if the container is still running it will force to destroy it
docker -f rm ltCONTAINER_IDgt
The Docker image is called opnfvfunctest and it is stored in the public Docker registry under the OPNFV accountdockerhub The are many different tags that have been created automatically by the CI mechanisms but the one thatthis document refers to is brahmaputra10 Pulling other tags might cause some problems while running the tests
Check the Docker documentation dockerdocs for more information
Preparing the Functest environment
Once the docker container is up and running execute the following command in the prompt
$repos_dirfunctestdockerprepare_envsh
NOTE $repos_dir is a default environment variable inside the docker container which points to homeopnfvrepos
This script will make sure that the requirements to run the tests are met and will install the needed libraries and toolsby all Functest test cases It must be run only once every time the docker is started from sratch
Focus on the OpenStack credentials
The OpenStack credentials are needed to run the tests against the VIM There are 3 ways to provide them to Functest
bull using the -v option when running the Docker container
bull create an empty file in homeopnfvfunctestconfopenstackcreds and paste the credentials in it
bull automatically retrieved using the following script $repos_dirrelengutilsfetch_os_credssh
Once the credentials are there they shall be sourced before running the tests
source homeopnfvfunctestconfopenstackcreds
or simply using the environment variable creds
54 Chapter 5 Post Configuration Activities
OPNFV Configuration Guide Release brahmaputra30 (605ebda)
$creds
After this try to run any OpenStack command to see if you get any output for instance
openstack user list
This will return a list of the actual users in the OpenStack deployment In any other case check that the credentialsare sourced
env|grep OS_
This command must show a set of environment variables starting with OS_ for example
OS_REGION_NAME=RegionOneOS_DEFAULT_DOMAIN=defaultOS_PROJECT_NAME=adminOS_PASSWORD=adminOS_AUTH_STRATEGY=keystoneOS_AUTH_URL=http172301035000v20OS_USERNAME=adminOS_TENANT_NAME=adminOS_ENDPOINT_TYPE=internalURLOS_NO_CACHE=true
If still the OpenStack command does not show anything or complains about connectivity issues it could be due to anincorrect url given to the OS_AUTH_URL environment variable Check the deployment settings
SSL Support
If you need to connect to a server that is TLS-enabled (the auth URL begins with lsquohttpsrsquo) and it uses a certificate froma private CA or a self-signed certificate you will need to specify the path to an appropriate CA certificate to use tovalidate the server certificate with the environment variable OS_CACERT
echo $OS_CACERTetcsslcertscacrt
However this certificate does not exist in the container by default It has to be copied manually from the OpenStackdeployment This can be done in 2 ways
1 Create manually that file and copy the contents from the OpenStack controller
2 (recommended) Add the file using a Docker volume when starting the container
-v ltpath_to_your_cert_filegtetcsslcertscacert
You might need to export OS_CACERT environment variable inside the container
export OS_CACERT=etcsslcertscacrt
Certificate verification can be turned off using OS_INSECURE=true For example Fuel uses self-signed cacerts bydefault so an pre step would be
export OS_INSECURE=true
Additional Options
In case you need to provide different configuration parameters to Functest (eg commit IDs or branches for therepositories ) copy the config_functestyaml from the repository to your current directory and run the container
53 Additional testing and validation activities 55
OPNFV Configuration Guide Release brahmaputra30 (605ebda)
with a volume
wget httpsgitopnfvorgcgitfunctestplaintestcasesconfig_functestyaml
ltmodify the file accordinglygt
docker run -ti -e INSTALLER_TYPE=fuel -e INSTALLER_IP=102002 opnfvfunctestbrahmaputra10 -v $(pwd)config_functestyamlhomeopnfvfunctestconfconfig_functestyaml binbash
However this is not recommended since most of the test cases rely on static parameters read from this file andchanging them might cause problems
Proxy support
Functest needs internet access to download some resources for some test cases For example to install the Rallyenvironment This might not work properly if the Jumphost is running through a Proxy
If that is the case make sure the resolvconf and the needed proxy environment variables are properly set
export http_proxy=ltyour http proxy settingsgtexport https_proxy=ltyour https proxy settingsgt
Or refer to the official Docker documentation for Proxy settings
Before running prepare_envsh make sure you can ping http and https sites inside the container For example
nc -v googlecom 80Connection to googlecom 80 port [tcphttp] succeeded
nc -v googlecom 443Connection to googlecom 443 port [tcphttps] succeeded
532 Installing vswitchperf
Supported Operating Systems
bull CentOS 7
bull Fedora 20
bull Fedora 21
bull Fedora 22
bull Ubuntu 1404
Supported vSwitches
The vSwitch must support Open Flow 13 or greater
bull OVS (built from source)
bull OVS with DPDK (built from source)
56 Chapter 5 Post Configuration Activities
OPNFV Configuration Guide Release brahmaputra30 (605ebda)
Supported Hypervisors
bull Qemu version 23
Available VNFs
A simple VNF that forwards traffic through a VM using
bull DPDK testpmd
bull Linux Brigde
bull custom l2fwd module
The VM image can be downloaded from httpartifactsopnfvorgvswitchperfvloop-vnf-ubuntu-1404_20151216qcow2
Other Requirements
The test suite requires Python 33 and relies on a number of other packages These need to be installed for the testsuite to function
Installation of required packages preparation of Python 3 virtual environment and compilation of OVS DPDK andQEMU is performed by script systemsbuild_base_machinesh It should be executed under user account which willbe used for vsperf execution
Please Note Password-less sudo access must be configured for given user account before script is executed
Execution of installation script
$ cd systems$ build_base_machinesh
Please Note you donrsquot need to go into any of the systems subdirectories simply run the top levelbuild_base_machinesh your OS will be detected automatically
Script build_base_machinesh will install all the vsperf dependencies in terms of system packages Python 3x andrequired Python modules In case of CentOS 7 it will install Python 33 from an additional repository provided bySoftware Collections (a link) Installation script will also use virtualenv to create a vsperf virtual environment whichis isolated from the default Python environment This environment will reside in a directory called vsperfenv in$HOME
You will need to activate the virtual environment every time you start a new shell session Its activation is specific toyour OS
CentOS 7
$ scl enable python33 bash$ cd $HOMEvsperfenv$ source binactivate
Fedora and Ubuntu
$ cd $HOMEvsperfenv$ source binactivate
53 Additional testing and validation activities 57
OPNFV Configuration Guide Release brahmaputra30 (605ebda)
Working Behind a Proxy
If yoursquore behind a proxy yoursquoll likely want to configure this before running any of the above For example
export http_proxy=proxymycompanycom123export https_proxy=proxymycompanycom123
533 Yardstick
The projectrsquos goal is to verify infrastructure compliance from the perspective of a Virtual Network Function (VNF)
The Projectrsquos scope is the development of a test framework Yardstick test cases and test stimuli to enable NetworkFunction Virtualization Infrastructure (NFVI) verification
In OPNFV Brahmaputra release generic test cases covering aspects of the metrics in the document ETSI GS NFV-TST001 ldquoPre-deployment Testing Report on Validation of NFV Environments and Servicesrdquo are available furtherOPNFV releases will provide extended testing of these metrics
The Project also includes a sample VNF the Virtual Traffic Classifier (VTC) and its experimental frameworkApexLake
Yardstick is used in OPNFV for verifying the OPNFV infrastructure and some of the OPNFV features The Yardstickframework is deployed in several OPNFV community labs It is installer infrastructure and application independent
See also
This Presentation for an overview of Yardstick and Yardsticktst for material on alignment ETSI TST001 and Yardstick
Yardstick Installation
Abstract
Yardstick currently supports installation on Ubuntu 1404 or by using a Docker image Detailed steps about installingYardstick using both of these options can be found below
To use Yardstick you should have access to an OpenStack environment with at least Nova Neutron Glance Keystoneand Heat installed
The steps needed to run Yardstick are
1 Install Yardstick and create the test configuration yaml file
2 Build a guest image and load the image into the OpenStack environment
3 Create a Neutron external network and load OpenStack environment variables
4 Run the test case
Installing Yardstick on Ubuntu 1404
Installing Yardstick framework Install dependencies
sudo apt-get install python-virtualenv python-devsudo apt-get install libffi-dev libssl-dev git
Create a python virtual environment source it and update setuptools
58 Chapter 5 Post Configuration Activities
OPNFV Configuration Guide Release brahmaputra30 (605ebda)
virtualenv ~yardstick_venvsource ~yardstick_venvbinactivateeasy_install -U setuptools
Download source code and install python dependencies
git clone httpsgerritopnfvorggerrityardstickcd yardstickpython setuppy install
There is also a YouTube video showing the above steps
Installing extra tools
yardstick-plot Yardstick has an internal plotting tool yardstick-plot which can be installed using the follow-ing command
python setuppy develop easy_install yardstick[plot]
Building a guest image Yardstick has a tool for building an Ubuntu Cloud Server image containing all the requiredtools to run test cases supported by Yardstick It is necessary to have sudo rights to use this tool
This image can be built using the following command while in the directory where Yardstick is installed(~yardstick if the framework is installed by following the commands above)
sudo toolsyardstick-img-modify toolsubuntu-server-cloudimg-modifysh
Warning the script will create files by default in tmpworkspaceyardstick and the files will be owned byroot
The created image can be added to OpenStack using the glance image-create or via the OpenStack Dashboard
Example command
glance --os-image-api-version 1 image-create --name yardstick-trusty-server --is-public true --disk-format qcow2 --container-format bare --file tmpworkspaceyardstickyardstick-trusty-serverimg
Installing Yardstick using Docker
Yardstick has two Docker images first one (Yardstick-framework) serves as a replacement for installing the Yardstickframework in a virtual environment (for example as done in Installing Yardstick framework) while the other image ismostly for CI purposes (Yardstick-CI)
Yardstick-framework image Download the source code
git clone httpsgerritopnfvorggerrityardstick
Build the Docker image and tag it as yardstick-framework
cd yardstickdocker build -t yardstick-framework
Run the Docker instance
53 Additional testing and validation activities 59
OPNFV Configuration Guide Release brahmaputra30 (605ebda)
docker run --name yardstick_instance -i -t yardstick-framework
To build a guest image for Yardstick see Building a guest image
Yardstick-CI image Pull the Yardstick-CI Docker image from Docker hub
docker pull opnfvyardstick-ci
Run the Docker image
docker run --privileged=true --rm -t -e INSTALLER_TYPE=$INSTALLER_TYPE -e INSTALLER_IP=$INSTALLER_IP opnfvyardstick-ci run_benchmarks
Where $INSTALLER_TYPE can be fuel foreman or compass and $INSTALLER_IP is the installer masternode IP address (ie 102002 is default for fuel)
Basic steps performed by the Yardstick-CI container
1 clone yardstick and releng repos
2 setup OS credentials (releng scripts)
3 install yardstick and dependencies
4 build yardstick cloud image and upload it to glance
5 upload cirros-033 cloud image to glance
6 run yardstick test scenarios
7 cleanup
OpenStack parameters and credentials
Yardstick-flavor Most of the sample test cases in Yardstick are using an OpenStack flavor called yardstick-flavorwhich deviates from the OpenStack standard m1tiny flavor by the disk size - instead of 1GB it has 3GB Otherparameters are the same as in m1tiny
Environment variables Before running Yardstick it is necessary to export OpenStack environment vari-ables from the OpenStack openrc file (using the source command) and export the external network nameexport EXTERNAL_NETWORK=external-network-name the default name for the external network isnet04_ext
Credential environment variables in the openrc file have to include at least
bull OS_AUTH_URL
bull OS_USERNAME
bull OS_PASSWORD
bull OS_TENANT_NAME
60 Chapter 5 Post Configuration Activities
OPNFV Configuration Guide Release brahmaputra30 (605ebda)
Yardstick default key pair Yardstick uses a SSH key pair to connect to the guest image This key pair can be foundin the resourcesfiles directory To run the ping-hotyaml test sample this key pair needs to be importedto the OpenStack environment
Examples and verifying the install
It is recommended to verify that Yardstick was installed successfully by executing some simple commands and testsamples Below is an example invocation of yardstick help command and pingpy test sample
yardstick -hyardstick task start samplespingyaml
Each testing tool supported by Yardstick has a sample configuration file These configuration files can be found in thesamples directory
Example invocation of yardstick-plot tool
yardstick-plot -i tmpyardstickout -o tmpplots
Default location for the output is tmpyardstickout
More info about the tool can be found by executing
yardstick-plot -h
53 Additional testing and validation activities 61

CHAPTER
ONE
ABSTRACT
This document provides guidance and instructions for the configuration of the Brahmaputra release of OPNFV
The release includes four installer tools leveraging different technologies Apex Compass4nfv Fuel and JOID whichdeploy components of the platform
This document provides a guide for the selection of tools and components including guidelines for how to deploy andconfigure the platform to an operational state
1
OPNFV Configuration Guide Release brahmaputra30 (605ebda)
2 Chapter 1 Abstract
CHAPTER
TWO
CONFIGURATION OPTIONS
OPNFV provides a variety of virtual infrastructure deployments called scenarios designed to host virtualised networkfunctions (VNFrsquos) Each scenario provide specific capabilities andor components aimed to solve specific problemsfor the deployment of VNFrsquos A scenario may include components such as OpenStack OpenDaylight OVS KVMetc where each scenario will include different source components or configurations
21 OPNFV Scenarios
Each OPNFV scenario provides unique features and capabilities it is important to understand your target platformcapabilities before installing and configuring your target scenario This configuration guide outlines how to install andconfigure components in order to enable the features you require
Scenarios are implemented as deployable compositions through integration with an installation tool OPNFV supportsmultiple installation tools and for any given release not all tools will support all scenarios While our target is toestablish parity across the installation tools to ensure they can provide all scenarios the practical challenge of achievingthat goal for any given feature and release results in some disparity
211 Brahmaputra scenario overeview
The following table provides an overview of the installation tools and available scenariorsquos in the Brahmaputra releaseof OPNFV
3
OPNFV Configuration Guide Release brahmaputra30 (605ebda)
Scenario status is indicated by a weather pattern icon All scenarios listed with a weather pattern are possible to deployand run in your environment or a Pharos lab however they may have known limitations or issues as indicated by theicon
Weather pattern icon legend
Weather Icon Scenario Status
Stable no known issues
Stable documented limitations
Deployable stability or feature limitations
Not deployed with this installer
Scenarios that are not yet in a state of ldquoStable no known issuesrdquo will continue to be stabilised and updates will bemade on the stablebrahmaputra branch While we intend that all Brahmaputra scenarios should be stable it is worth
4 Chapter 2 Configuration Options
OPNFV Configuration Guide Release brahmaputra30 (605ebda)
checking regularly to see the current status Due to our dependency on upstream communities and code some issuesmay not be resolved prior to the C release
212 Scenario Naming
In OPNFV scenarios are identified by short scenario names these names follow a scheme that identifies the keycomponents and behaviours of the scenario The rules for scenario naming are as follows
os-[controller]-[feature]-[mode]-[option]
Details of the fields are
bull os mandatory
ndash Refers to the platform type used
ndash possible value os (OpenStack)
bull [controller] mandatory
ndash Refers to the SDN controller integrated in the platform
ndash example values nosdn ocl odl onos
ndash [feature] mandatory
Refers to the feature projects supported by the scenario
example values nofeature kvm ovs sfc
ndash [mode] mandatory
Refers to the deployment type which may include for instance high availability
possible values ha noha
ndash [option] optional
Used for the scenarios those do not fit into naming scheme
The optional field in the short scenario name should not be included if there is no optional scenario
Some examples of supported scenario names are
bull os-nosdn-kvm-noha
ndash This is an OpenStack based deployment using neutron including the OPNFV enhanced KVM hypervisor
bull os-onos-nofeature-ha
ndash This is an OpenStack deployment in high availability mode including ONOS as the SDN controller
bull os-odl_l2-sfc
ndash This is an OpenStack deployment using OpenDaylight and OVS enabled with SFC features
213 Installing your scenario
There are two main methods of deploying your target scenario one method is to follow this guide which will walk youthrough the process of deploying to your hardware using scripts or ISO images the other method is to set up a Jenkinsslave and connect your infrastructure to the OPNFV Jenkins master
For the purposes of evaluation and development a number of Brahmaputra scenarios are able to be deployed virtuallyto mitigate the requirements on physical infrastructure Details and instructions on performing virtual deploymentscan be found in the installer specific installation instructions
21 OPNFV Scenarios 5
OPNFV Configuration Guide Release brahmaputra30 (605ebda)
To set up a Jenkins slave for automated deployment to your lab refer to the Jenkins slave connect guide
This document will describe how to install and configure your target OPNFV scenarios Remember to check theassociated validation procedures section following your installation for details of the use cases and tests that have beenrun
6 Chapter 2 Configuration Options
CHAPTER
THREE
INSTALLER CONFIGURATION
Installing the OPNFV platform requires either a physical environment as defined in the Pharos lab specificationor a virtual infrastructure When configuring a physical infrastructure it is strongly advised to follow the Pharosconfiguration material
31 Lab Setup Guide
Provides an overview for setting up a Pharos lab A full set of pharos_master documents are maintained in the pharosrepo
When setting up an OPNFV community lab
bull Provide the Pharos community with details of the intended setup including
ndash Overview of resources are being offered to the community intended purpose and known limitations
ndash Lab owner name with contacts
ndash Timelines for availablity for development test release production
bull Update the Pharos Wiki with lab details
ndash Lab map organization contacts status location resources role etc
ndash httpswikiopnfvorgpharoscommunity_labs
ndash pharos_wiki
bull Update the Pharos project information file ldquoCurrent Labsrdquo
ndash pharos_information
bull Create new Wiki pages for lab and POD specific information
ndash Access procedures
ndash Usage guidelines for developers
ndash Update infomtation as PODs are re-assigned or usageavailability changes
bull Fill Lab and POD templates pharos_lab pharos_pod
ndash Note that security sensitive lab information should be stored in the secure Pharos repo
bull Connect PODs to JenkinsCI
7
OPNFV Configuration Guide Release brahmaputra30 (605ebda)
311 Jump Server Configuration
Jump server install procedures are maintained by each installer project Addional Jump server configuraton BKMswill be maintained here The below install information was used for Fuel however may be outdated (please refer toFuel Installer documents)
Procedure
1 Obtain CentOS 7 Minimal ISO and install
wget httpmirrorskernelorgcentos7isosx86_64CentOS-7-x86_64-Minimal-1503-01iso
2 Set parameters appropriate for your environment during installation
3 Disable NetworkManager
systemctl disable NetworkManager
4 Configure your etcsysconfignetwork-scriptsifcfg- files for your network
5 Restart networking
service network restart
6 Edit etcresolvconf and add a nameserver
vi etcresolvconf
7 Install libvirt amp kvm
yum -y update yum -y install kvm qemu-kvm libvirt systemctl enablelibvirtd
8 Reboot
shutdown -r now
9 If you wish to avoid annoying delay when use ssh to log in disable DNS lookups
vi etcsshsshd_config
Uncomment ldquoUseDNS yesrdquo change lsquoyesrsquo to lsquonorsquo
Save
10 Restart sshd
systemctl restart sshd
11 Install virt-install
yum -y install virt-install
12 Visit artifactsopnfvorg and DL the OPNFV Fuel ISO
13 Create a bridge using the interface on the PXE network for example br0
14 Make a directory owned by qemu
mkdir homeqemu mkdir -p homeqemuVMsfuel-60disk
chown -R qemuqemu homeqemu
15 Copy the ISO to homeqemu
cd homeqemu
virt-install -n opnfv-2015-05-22_18-34-07-fuel -r 4096--vcpus=4 --cpuset=0-3 -c opnfv-2015-05-22_18-34-07iso
8 Chapter 3 Installer Configuration
OPNFV Configuration Guide Release brahmaputra30 (605ebda)
--os-type=linux --os-variant=rhel6 --boot hdcdrom --diskpath=homeqemuVMsmirantis-fuel-60diskfuel-vhd0qcow2bus=virtiosize=50format=qcow2-w bridge=br0model=virtio --graphics vnclisten=0000
16 Temporarily flush the firewall rules to make things easier
iptables -F
17 Connect to the console of the installing VM with your favorite VNC client
18 Change the IP settings to match the pod use an IP in the PXEAdmin network for the Fuel Master
The following sections describe the per installer configuration options Further details for each installer are capturedin the referred project documentation
32 Apex configuration
321 Introduction
This document describes the steps to install an OPNFV Bramaputra reference platform as defined by the GenesisProject using the Apex installer
The audience is assumed to have a good background in networking and Linux administration
322 Preface
Apex uses the RDO Manager Open Source project as a server provisioning tool RDO Manager is the RDO Projectimplementation of OpenStackrsquos Triple-O project The Triple-O image based life cycle installation tool provisions anOPNFV Target System (3 controllers n number of compute nodes) with OPNFV specific configuration provided bythe Apex deployment tool chain
The Apex deployment artifacts contain the necessary tools to deploy and configure an OPNFV target sys-tem using the Apex deployment toolchain These artifacts offer the choice of using the Apex bootable ISO(opnfv-apex-bramaputraiso) to both install CentOS 7 and the nessesary materials to deploy or the ApexRPM (opnfv-apexrpm) which expects installation to a CentOS 7 libvirt enabled host The RPM contains acollection of configuration file prebuilt disk images and the automatic deployment script (opnfv-deploy)
An OPNFV install requires a ldquoJumphostrdquo in order to operate The bootable ISO will allow you to install a cus-tomized CentOS 7 release to the Jumphost which includes the required packages needed to run opnfv-deployIf you already have a Jumphost with CentOS 7 installed you may choose to skip the ISO step and simply installthe (opnfv-apexrpm) RPM The RPM is the same RPM included in the ISO and includes all the necessary diskimages and configuration files to execute an OPNFV deployment Either method will prepare a host to the same readystate for OPNFV deployment
opnfv-deploy instantiates an RDO Manager Instack VM server using libvirt as its provider This VM is thenconfigured and used to provision the OPNFV target deployment (3 controllers n compute nodes) These nodes can beeither virtual or bare metal This guide contains instructions for installing either method
323 Installation High-Level Overview - Bare Metal Deployment
The setup presumes that you have 6 bare metal servers and have already setup network connectivity on at least 2interfaces for all servers via a TOR switch or other network implementation
32 Apex configuration 9
OPNFV Configuration Guide Release brahmaputra30 (605ebda)
The physical TOR switches are not automatically configured from the OPNFV reference platform All the networksinvolved in the OPNFV infrastructure as well as the provider networks and the private tenant VLANs needs to bemanually configured
The Jumphost can be installed using the bootable ISO or by other means including the (opnfv-apex) RPMs andvirtualization capabilities The Jumphost should then be configured with an IP gateway on its admin or public interfaceand configured with a working DNS server The Jumphost should also have routable access to the lights out network
opnfv-deploy is then executed in order to deploy the Instack VM opnfv-deploy uses three con-figuration files in order to know how to install and provision the OPNFV target system The in-formation gathered under section Execution Requirements (Bare Metal Only) is put into the YAML file(etcopnfv-apexinventoryyaml) configuration file Deployment options are put into the YAML file(etcopnfv-apexdeploy_settingsyaml) Networking definitions gathered under section Network Re-quirements are put into the YAML file (etcopnfv-apexnetwork_settingsyaml) opnfv-deploywill boot the Instack VM and load the target deployment configuration into the provisioning toolchain This includesMAC address IPMI Networking Environment and OPNFV deployment options
Once configuration is loaded and Instack is configured it will then reboot the nodes via IPMI The nodes should alreadybe set to PXE boot first off the admin interface The nodes will first PXE off of the Instack PXE server and go througha discoveryintrospection process
Introspection boots off of custom introspection PXE images These images are designed to look at the properties ofthe hardware that is booting off of them and report the properties of it back to the Instack node
After introspection Instack will execute a Heat Stack Deployment to being node provisioning and configuration Thenodes will reboot and PXE again off the Instack PXE server to provision each node using the Glance disk images pro-vided by Instack These disk images include all the necessary packages and configuration for an OPNFV deploymentto execute Once the nodersquos disk images have been written to disk the nodes will boot off the newly written disks andexecute cloud-init which will execute the final node configuration This configuration is largly completed by executinga puppet apply on each node
324 Installation High-Level Overview - VM Deployment
The VM nodes deployment operates almost the same way as the bare metal deployment with a few differencesopnfv-deploy still deploys an Instack VM In addition to the Instack VM a collection of VMs (3 control nodes +2 compute for an HA deployment or 1 control node and 1 compute node for a Non-HA Deployment) will be definedfor the target OPNFV deployment The part of the toolchain that executes IPMI power instructions calls into libvirtinstead of the IPMI interfaces on baremetal servers to operate the power managment These VMs are then provisionedwith the same disk images and configuration that baremetal would be
To RDO Manager these nodes look like they have just built and registered the same way as bare metal nodes the maindifference is the use of a libvirt driver for the power management
325 Installation Guide - Bare Metal Deployment
WARNING Baremetal documentation is not complete WARNING The main missing instructions are r elatedto bridging the networking for the undercloud to the physical underlay network for the overcloud to be deployedto
This section goes step-by-step on how to correctly install and provision the OPNFV target system to bare metal nodes
Install Bare Metal Jumphost
1a If your Jumphost does not have CentOS 7 already on it or you would like to do a fresh install then down-load the Apex bootable ISO from OPNFV artifacts lthttpartifactsopnfvorggt There have been isolated
10 Chapter 3 Installer Configuration
OPNFV Configuration Guide Release brahmaputra30 (605ebda)
reports of problems with the ISO having trouble completing installation successfully In the unexpectedevent the ISO does not work please workaround this by downloading the CentOS 7 DVD and perform-ing a ldquoVirtualization Hostrdquo install If you perform a ldquoMinimal Installrdquo or install type other than ldquoVirtu-alization Hostrdquo simply run sudo yum groupinstall Virtualization Host ampamp chkconfiglibvird on and reboot the host Once you have completed the base CentOS install proceed to step 1b
1b If your Jump host already has CentOS 7 with libvirt running on it then install the opnfv-apex RPMs fromOPNFV artifacts lthttpartifactsopnfvorggt The following RPMS are available for installation
bull opnfv-apex - OpenDaylight L2 L3 and ONOS support
bull opnfv-apex-opendaylight-sfc - OpenDaylight SFC support
bull opnfv-apex-undercloud (required)
bull opnfv-apex-common (required)
One or more of these RPMs is required If you only want the experimental SFC support then the opnfv-apexRPM is not required If you only want OpenDaylight or ONOS support then the opnfv-apex-opendaylight-sfcRPM is not required
To install these RPMs download them to the local disk on your CentOS 7 install and passthe file names directly to yum sudo yum install opnfv-apex-ltversiongtrpmopnfv-apex-undercloud-ltversiongtrpm opnfv-apex-common-ltversiongtrpm
2a Boot the ISO off of a USB or other installation media and walk through installing OPNFV CentOS 7 TheISO comes prepared to be written directly to a USB drive with dd as such
dd if=opnfv-apexiso of=devsdX bs=4M
Replace devsdX with the device assigned to your usb drive Then select the USB device as the boot media onyour Jumphost
2b Install the RDO Release RPM and the opnfv-apex RPM
sudo yum install -y httpswwwrdoprojectorgreposrdo-releaserpmopnfv-apex-versionrpm
The RDO Project release repository is needed to install OpenVSwitch which is a dependency of opnfv-apex If you do not have external connectivity to use this repository you need to download the Open-VSwitch RPM from the RDO Project repositories and install it with the opnfv-apex RPM
3 After the operating system and the opnfv-apex RPMs are installed login to your Jumphost as root
4 Configure IP addresses on the interfaces that you have selected as your networks
5 Configure the IP gateway to the Internet either preferably on the public interface
6 Configure your etcresolvconf to point to a DNS server (8888 is provided by Google)
Creating a Node Inventory File
IPMI configuration information gathered in section Execution Requirements (Bare Metal Only) needs to be added tothe inventoryyaml file
1 Copy usrsharedocopnfvinventoryyamlexample as your inventory file template toetcopnfv-apexinventoryyaml
2 The nodes dictionary contains a definition block for each baremetal host that will be deployed 1 or morecompute nodes and 3 controller nodes are required (The example file contains blocks for each of these already)It is optional at this point to add more compute nodes into the node list
3 Edit the following values for each node
32 Apex configuration 11
OPNFV Configuration Guide Release brahmaputra30 (605ebda)
bull mac_address MAC of the interface that will PXE boot from Instack
bull ipmi_ip IPMI IP Address
bull ipmi_user IPMI username
bull ipmi_password IPMI password
bull pm_type Power Management driver to use for the node
bull cpus (Introspected) CPU cores available
bull memory (Introspected) Memory available in Mib
bull disk (Introspected) Disk space available in Gb
bull arch (Introspected) System architecture
bull capabilities (Optional) Intended node role (profilecontrol or profilecompute)
bull Introspection looks up the overcloud nodersquos resources and overrides these value You can
leave default values and Apex will get the correct values when it runs introspection on the nodes
If capabilities profile is not specified then Apex will select nodersquos roles in the OPNFV cluster in a non-deterministicfashion
Creating the Settings Files
Edit the 2 settings files in etcopnfv-apex These files have comments to help you customize them
1 deploy_settingsyaml This file includes basic configuration options deployment
2 network_settingsyaml This file provides Apex with the networking information that satisfies the prerequisiteNetwork Requirements These are specific to your environment
Running opnfv-deploy
You are now ready to deploy OPNFV using Apex opnfv-deploy will use the inventory and settings files to deployOPNFV
Follow the steps below to execute
1 Execute opnfv-deploy sudo opnfv-deploy [ --flat | -n network_settingsyaml ] -iinventoryyaml -d deploy_settingsyaml If you need more information about the options thatcan be passed to opnfv-deploy use opnfv-deploy --help ndashflat will collapse all networks onto a singlenic -n network_settingsyaml allows you to customize your networking topology
2 Wait while deployment is executed If something goes wrong during this part of the process it is most likelya problem with the setup of your network or the information in your configuration files You will also noticedifferent outputs in your shell
3 The message ldquoOvercloud Deployedrdquo will display when When the deployment is complete Just above thismessage there will be a URL that ends in port httplthostgt5000 This url is also the endpoint for the OPNFVHorizon Dashboard if connected to on port 80
33 Compass4nfv configuration
This document describes providing guidelines on how to install and configure the Brahmaputra release of OPNFVwhen using Compass as a deployment tool including required software and hardware configurations
12 Chapter 3 Installer Configuration
OPNFV Configuration Guide Release brahmaputra30 (605ebda)
Installation and configuration of host OS OpenStack OpenDaylight ONOS Ceph etc can be supported by Compasson VMs or Bare Metal nodes
The audience of this document is assumed to have good knowledge in networking and UnixLinux administration
331 Preconditions
Before starting the installation of the Brahmaputra release of OPNFV some planning must be done
Retrieving the installation ISO image
First of all The installation ISO is needed for deploying your OPNFV environment it included packages of CompassOpenStack OpenDaylight ONOS and so on
The stable release ISO can be retrieved via OPNFV software download page
The daily build ISO can be retrieved via OPNFV artifacts repository
httpartifactsopnfvorg
NOTE Search the keyword ldquoCompass4nfvBrahmaputrardquo to locate the ISO image
Eg compass4nfvbrahmaputraopnfv-2016-01-16_15-03-18iso compass4nfvbrahmaputraopnfv-2016-01-16_15-03-18properties
The name of iso image includes the time of iso building you can get the daily ISO according the building time The giturl and sha1 of Compass4nfv are recorded in properties files According these the corresponding deployment scriptscan be retrieved
Getting the deployment scripts
To retrieve the repository of Compass4nfv on Jumphost use the following command
bull git clone httpsgerritopnfvorggerritcompass4nfv
To get stablebrahmaputra release you can use the following command
bull git checkout brahmaputra10
NOTE PLEASE DO NOT GIT CLONE COMPASS4NFV IN root DIRECTORY
If you donrsquot have a Linux foundation user id get it first by the url
httpswikiopnfvorgdevelopergetting_started
If you want to use a daily release ISO please checkout the corresponding sha1 to get the deployment scripts
Eg Git sha1 in file ldquoopnfv-2016-01-16_15-03-18propertiesrdquo is d5a13ce7cc2ce89946d34b0402ecf33c1d291851
bull git checkout d5a13ce7cc2ce89946d34b0402ecf33c1d291851
Preparing the installation environment
If you have only 1 Bare Metal server Virtual deployment is recommended if more than or equal 3 servers theBare Metal deployment is recommended The minimum number of servers for Bare metal deployment is 3 1 forJumpServer(Jumphost) 1 for controller 1 for compute
33 Compass4nfv configuration 13
OPNFV Configuration Guide Release brahmaputra30 (605ebda)
332 Setup Requirements
Jumphost Requirements
The Jumphost requirements are outlined below
1 Ubuntu 1404 (Pre-installed)
2 Root access
3 libvirt virtualization support
4 Minimum 2 NICs
bull PXE installation Network (Receiving PXE request from nodes and providing OS provisioning)
bull IPMI Network (Nodes power control and set boot PXE first via IPMI interface)
bull External Network (Optional Internet access)
5 16 GB of RAM for a Bare Metal deployment 64 GB of RAM for a VM deployment
6 Minimum 100G storage
Bare Metal Node Requirements
Bare Metal nodes require
1 IPMI enabled on OOB interface for power control
2 BIOS boot priority should be PXE first then local hard disk
3 Minimum 3 NICs
bull PXE installation Network (Broadcasting PXE request)
bull IPMI Network (Receiving IPMI command from Jumphost)
bull External Network (OpenStack mgmtexternalstoragetenant network)
Network Requirements
Network requirements include
1 No DHCP or TFTP server running on networks used by OPNFV
2 2-6 separate networks with connectivity between Jumphost and nodes
bull PXE installation Network
bull IPMI Network
bull Openstack mgmt Network
bull Openstack external Network
bull Openstack tenant Network
bull Openstack storage Network
3 Lights out OOB network access from Jumphost with IPMI node enabled (Bare Metal deployment only)
4 External network has Internet access meaning a gateway and DNS availability
14 Chapter 3 Installer Configuration
OPNFV Configuration Guide Release brahmaputra30 (605ebda)
The networks with() can be share one NIC(Default configuration) or use an exclusive NIC(Reconfigurated innetworkyml)
Execution Requirements (Bare Metal Only)
In order to execute a deployment one must gather the following information
1 IPMI IP addresses for the nodes
2 IPMI login information for the nodes (userpass)
3 MAC address of Control Plane Provisioning interfaces of the Bare Metal nodes
333 Installation Guide (BM Deployment)
Nodes Configuration (BM Deployment)
The bellow file is the inventory template of deployment nodes
ldquocompass4nfvdeployconfhardware_environmenthuawei_us_labpod1dhaymlrdquo
You can write your own IPMI IPUserPasswordMac addressroles reference to it
bull ipmiVer ndash IPMI interface version for deployment node support IPMI 10 or IPMI 20 is available
bull ipmiIP ndash IPMI IP address for deployment node Make sure it can access from Jumphost
bull ipmiUser ndash IPMI Username for deployment node
bull ipmiPass ndash IPMI Password for deployment node
bull mac ndash MAC Address of deployment node PXE NIC
bull name ndash Host name for deployment node after installation
bull roles ndash Components deployed
Assignment of different roles to servers
Eg Openstack only deployment roles setting
hosts- name host1roles
- controller- ha
- name host2roles
- compute
NOTE IF YOU SELECT MUTIPLE NODES AS CONTROLLER THE lsquoharsquo role MUST BE SELECT TOO
Eg Openstack and ceph deployment roles setting
hosts- name host1roles
- controller- ha- ceph-adm- ceph-mon
33 Compass4nfv configuration 15
OPNFV Configuration Guide Release brahmaputra30 (605ebda)
- name host2roles
- compute- ceph-osd
Eg Openstack and ODL deployment roles setting
hosts- name host1roles
- controller- ha- odl
- name host2roles
- compute
Eg Openstack and ONOS deployment roles setting
hosts- name host1roles
- controller- ha- onos
- name host2roles
- compute
Network Configuration (BM Deployment)
Before deployment there are some network configuration to be checked based on your network topology Com-pass4nfv network default configuration file is ldquocompass4nfvdeployconfnetwork_cfgyamlrdquo You can write yourown reference to it
The following figure shows the default network configuration
+--+ +--+ +--+| | | | | || | +------------+ | | | || +------+ Jumphost +------+ | | || | +------+-----+ | | | || | | | | | || | +------------+ +-----+ || | | | | || | +------------+ | | | || +------+ host1 +------+ | | || | +------+-----+ | | | || | | | | | || | +------------+ +-----+ || | | | | || | +------------+ | | | || +------+ host2 +------+ | | || | +------+-----+ | | | || | | | | | |
16 Chapter 3 Installer Configuration
OPNFV Configuration Guide Release brahmaputra30 (605ebda)
| | +------------+ +-----+ || | | | | || | +------------+ | | | || +------+ host3 +------+ | | || | +------+-----+ | | | || | | | | | || | +------------+ +-----+ || | | | | || | | | | |+-++ ++-+ +-++
^ ^ ^| | || | |
+-+-------------------------+ | || External Network | | |+---------------------------+ | |
+-----------------------+---+ || IPMI Network | |+---------------------------+ |
+-------------------------+-+| PXE(Installation) Network |+---------------------------+
Start Deployment (BM Deployment)
1 Set PXEInstallation NIC for Jumphost (set eth1 Eg)
export INSTALL_NIC=eth1
2 Set OS version for nodes provisioning (set Ubuntu1404 Eg)
export OS_VERSION=trusty
3 Set OpenStack version for deployment nodes (set liberty Eg)
export OPENSTACK_VERSION=liberty
4 Set ISO image that you want to deploy
export ISO_URL=file$YOUR_OWNcompassisoorexport ISO_URL=httpartifactsopnfvorgcompass4nfvbrahmaputraopnfv-releaseiso
5 Run deploysh with inventory and network configuration
deploysh --dha $YOUR_OWNdhayml --network $YOUR_OWNnetworkyml
34 Fuel configuration
This section provides guidelines on how to install and configure the Brahmaputra release of OPNFV when using Fuelas a deployment tool including required software and hardware configurations
For detailed instructions on how to install the Brahmaputra release using Fuel see Reference 13 in section ldquoFuelassociated referencesrdquo below
34 Fuel configuration 17
OPNFV Configuration Guide Release brahmaputra30 (605ebda)
341 Pre-configuration activities
Planning the deployment
Before starting the installation of the Brahmaputra release of OPNFV when using Fuel as a deployment tool someplanning must be done
Familiarize yourself with the Fuel by reading the following documents
bull Fuel planning guide please see Reference 8 in section ldquoFuel associated referencesrdquo below
bull Fuel quick start guide please see Reference 9 in section ldquoFuel associated referencesrdquo below
bull Fuel operations guide please see Reference 10 in section ldquoFuel associated referencesrdquo below
bull Fuel Plugin Developers Guide please see Reference 11 in section ldquoFuel associated referencesrdquo below
Before the installation can start a number of deployment specific parameters must be collected those are
1 Provider sub-net and gateway information
2 Provider VLAN information
3 Provider DNS addresses
4 Provider NTP addresses
5 Network overlay you plan to deploy (VLAN VXLAN FLAT)
6 Monitoring Options you want to deploy (Ceilometer Syslog etc)
7 How many nodes and what roles you want to deploy (Controllers Storage Computes)
8 Other options not covered in the document are available in the links above
Retrieving the ISO image
First of all the Fuel deployment ISO image needs to be retrieved the Fuel iso image of the Brahmaputra release canbe found at Reference 2
Alternatively you may build the iso from source by cloning the opnfvfuel git repository Detailed instructions onhow to build a Fuel OPNFV iso can be found in Reference 14 at section ldquoFuel associated referencesrdquo below
342 Hardware requirements
Following high level hardware requirements must be met
18 Chapter 3 Installer Configuration
OPNFV Configuration Guide Release brahmaputra30 (605ebda)
HW Aspect Requirement of nodes Minimum 5 (3 for non redundant deployment)
bull 1 Fuel deployment master (may be virtualized)bull 3(1) Controllers (1 colocated mongoceilometer
role 2 Ceph-OSD roles)bull 1 Compute (1 co-located Ceph-OSD role)
CPU Minimum 1 socket x86_AMD64 with Virtualizationsupport
RAM Minimum 16GBserver (Depending on VNF work load)Disk Minimum 256GB 10kRPM spinning disksNetworks 4 Tagged VLANs (PUBLIC MGMT STORAGE PRI-
VATE)1 Un-Tagged VLAN for PXE Boot - ADMIN Networknote These can be run on single NIC - or spread outover other nics as your hardware supports
For information on compatible hardware types available for use please see Reference 11 in section ldquoFuel associatedreferencesrdquo below
Top of the rack (TOR) Configuration requirements
The switching infrastructure provides connectivity for the OPNFV infrastructure operations tenant networks(EastWest) and provider connectivity (NorthSouth) it also provides needed connectivity for the Storage Area Net-work (SAN) To avoid traffic congestion it is strongly suggested that three physically separated networks are usedthat is 1 physical network for administration and control one physical network for tenant private and public networksand one physical network for SAN The switching connectivity can (but does not need to) be fully redundant in suchcase it and comprises a redundant 10GE switch pair for each of the three physically separated networks
The physical TOR switches are not automatically configured from the OPNFV reference platform All the networksinvolved in the OPNFV infrastructure as well as the provider networks and the private tenant VLANs needs to bemanually configured
343 Jumphost configuration
The Jumphost server also known as the ldquoFuel masterrdquo provides needed servicesfunctions to deploy an OP-NFVOpenStack cluster as well functions for cluster life-cycle management (extensions repair actions and upgrades)
The Jumphost server requires 2 (4 if redundancy is required) Ethernet interfaces - one for external management of theOPNFV installation and another for jump-host communication with the OPNFV cluster
Install the Fuel jump-host
Mount the Fuel Brahmaputra ISO file as a boot device to the jump host server reboot it and install the Fuel Jumphostin accordance with installation instructions see Reference 13 in section ldquoFuel associated referencesrdquo below
344 Platform components configuration
Fuel-Plugins
Fuel plugins enable you to install and configure additional capabilities for your Fuel OPNFV based cloud such asadditional storage types networking functionality or NFV features developed by OPNFV
34 Fuel configuration 19
OPNFV Configuration Guide Release brahmaputra30 (605ebda)
Fuel offers an open source framework for creating these plugins so therersquos a wide range of capabilities that you canenable Fuel to add to your OpenStack clouds
The OPNFV Brahmaputra version of Fuel provides a set of pre-packaged plugins developed by OPNFV
Pluginname
Short description
Open-Daylight
OpenDaylight provides an open-source SDN Controller providing networking features such as L2and L3 network control ldquoService Function Chainingrdquo routing networking policies etc Moreinformation on OpenDaylight in the OPNFV Brahmaputra release can be found in a separate sectionin this document
ONOS ONOS is another open-source SDN controller which in essense fill the same role as OpenDaylightMore information on ONOS in the OPNFV Brahmaputra release can be found in a separate section inthis document
BGP-VPN
BGP-VPN provides an BGPMPLS VPN service More information on BGP-VPN in the OPNFVBrahmaputra release can be found in a separate section in this document
OVS-NSH
OVS-NSH provides a variant of Open-vSwitch which supports ldquoNetwork Service Headersrdquo neededfor the ldquoService function chainingrdquo feature More information on ldquoService Function Chainingrdquo in theOPNFV Brahmaputra release can be found in a in a separate section in this document
OVS-NFV
OVS-NFV provides a variant of Open-vSwitch with carrier grade characteristics essential for NFVworkloads More information on OVS-NFV in the OPNFV Brahmaputra release can be found in a ina separate section in this document
KVM-NFV
KVM-NFV provides a variant of KVM with improved virtualization characteristics essential for NFVworkloads More information on KVM-NFV in the OPNFV Brahmaputra release can be found in a ina separate section in this document
VSPERF VSPERF provides a networking characteristics test bench that facilitates characteristicsperformanceevaluation of vSwithches More information on VSPERF in the OPNFV Brahmaputra release can befound in a in a separate section in this document
Additional third-party plugins can be found here httpswwwmirantiscomproductsopenstack-drivers-and-pluginsfuel-plugins Note Plugins are not necessarilly compatible with each other see section ldquoConfigurationoptions OPNFV scenariosrdquo for compatibility information
The plugins come prepackaged ready to install To do so follow the installation instructions provided in Reference 13provided in section ldquoFuel associated referencesrdquo below
Fuel environment
A Fuel environment is an OpenStack instance managed by Fuel one Fuel instance can manage several OpenStackinstancesenvironments with different configurations etc
To create a Fuel instance follow the instructions provided in the installation instructions see Reference 13 in sectionldquoFuel associated referencesrdquo below
Provisioning of aditional features and services
Although the plugins have already previously been installed they are not per default enabled for the environment wejust created The plugins of your choice need to be enabled and configured
To enable a plugin follow the installation instructions found in Reference 13 provided in section ldquoFuel associatedreferencesrdquo below
For configuration of the plugins please see section ldquoFeature Configurationrdquo
20 Chapter 3 Installer Configuration
OPNFV Configuration Guide Release brahmaputra30 (605ebda)
Networking
All the networking aspects need to be configured in terms of - InterfacesNICs - VLANs - Sub-nets - Gateways - Usernetwork segmentation (VLANVXLAN) - DNS - NTP - etc
For guidelines on how to configure networking please refer to the installation instructions found in Reference 13provided in section ldquoFuel associated referencesrdquo below
Node allocation
Now it is time to allocate the nodes in your OPNFV cluster to OpenStack- SDN- and other featureservice rolesSome roles may require redundancy while others donrsquot Some roles may be co-located with other roles while othersmay not The Fuel GUI will guide you in the allocation of roles and will not permit you to perform invalid allocations
For detailed guide-lines on node allocation please refer to the installation instructions found in Reference 13 providedin section ldquoFuel associated referencesrdquo below
Off-line deployment
The OPNFV Brahmaputra version of Fuel can be deployed using on-line upstream repositories (default) or off-lineusing built-in local repositories on the Fuel jump-start server
For instructions on how to configure Fuel for off-line deployment please refer to the installation instructions found inReference 13 provided in section ldquoFuel associated referencesrdquo below
Deployment
You should now be ready to deploy your OPNFV Brahmaputra environment - but before doing so you may want toverify your network settings
For further details on network verification and deployment please refer to the installation instructions found in Ref-erence 13 provided in section ldquoFuel associated referencesrdquo below
345 Fuel associated references
1 OPNFV Home Page
2 OPNFV documentation- and software downloads
3 OpenStack Liberty Release artifacts
4 OpenStack documentation
5 OpenDaylight artifacts
6 The Fuel OpenStack project
7 Fuel documentation overview
8 Fuel planning guide
9 Fuel quick start guide
10 Fuel operations guide
11 Fuel Plugin Developers Guide
12 Fuel OpenStack Hardware Compatibility List
34 Fuel configuration 21
OPNFV Configuration Guide Release brahmaputra30 (605ebda)
13 OPNFV Installation instruction for the Brahmaputra release of OPNFV when using Fuel as a deployment tool
14 OPNFV Build instruction for the Brahmaputra release of OPNFV when using Fuel as a deployment tool
15 OPNFV Release Note for the Brahmaputra release of OPNFV when using Fuel as a deployment tool
35 JOID Configuration
351 Bare Metal Installations
352 Requirements as per Pharos
353 Networking
Minimum 2 networks
1 First for Admin network with gateway to access external network
2 Second for public network to consume by tenants for floating ips
NOTE JOID support multiple isolated networks for data as well as storage Based on your network optionsfor Openstack
Minimum 6 physical servers
1 Jump host server
Minimum HW Spec needed
CPU cores 16
Memory 32 GB
Hard Disk 1(250 GB)
NIC eth0(Admin Management) eth1 (external network)
2 Control node servers (minimum 3)
Minimum HW Spec
CPU cores 16
Memory 32 GB
Hard Disk 1(500 GB)
NIC eth0(Admin Management) eth1 (external network)
3 Compute node servers (minimum 2)
Minimum HW Spec
CPU cores 16
Memory 32 GB
Hard Disk 1(1 TB) this includes the space for ceph as well
22 Chapter 3 Installer Configuration
OPNFV Configuration Guide Release brahmaputra30 (605ebda)
NIC eth0(Admin Management) eth1 (external network)
NOTE Above configuration is minimum and for better performance and usage of the Openstack please con-sider higher spec for each nodes
Make sure all servers are connected to top of rack switch and configured accord-ingly No DHCP server should be up and configured Only gateway at eth0 and eth1 network should be con-figure to access the network outside your lab
Jump node configuration
1 Install Ubuntu 1404 LTS server version of OS on the nodes 2 Install the git and bridge-utils pack-ages on the server and configure minimum two bridges on jump host
brAdm and brPublic cat etcnetworkinterfaces
The loopback network interface
auto lo
iface lo inet loopback
iface eth0 inet manual
auto brAdm
iface brAdm inet static
address 10411
netmask 2552552480
network 10400
broadcast 1047255
gateway 10401
dns- options are implemented by the resolvconf package if installed
dns-nameservers 10402
bridge_ports eth0
auto brPublic
iface brPublic inet static
address 102662
netmask 2552552550
bridge_ports eth2
NOTE If you choose to use the separate network for management data and storage then you need to createbridge for each interface In case of VLAN tags use the appropriate network on jump-host depend upon VLANID on the interface
354 Configure JOID for your lab
Get the joid code from gerritt
git clone httpsgerritopnfvorggerritpjoidgit
cd joidci
Enable MAAS
35 JOID Configuration 23
OPNFV Configuration Guide Release brahmaputra30 (605ebda)
bull Create a directory in maasltcompany namegtltpod numbergt for example
mkdir maasintelpod7
bull Copy files from pod5 to pod7
cp maasintelpod5 maasintelpod7
4 files will get copied deploymentyaml environmentsyaml interfaceshost lxc-add-more-interfaces
355 deploymentyaml file
Prerequisite
1 Make sure Jump host node has been configured with bridges on each interface so that appropriate MAAS and JUJUbootstrap VM can be created For example if you have three network admin data and public then I would suggestto give names like brAdm brData and brPublic 2 You have information about the node MAC address and powermanagement details (IPMI IP username password) of the nodes used for control and compute node
356 modify deploymentyaml
This file has been used to configure your maas and bootstrap node in a VM Comments in the file are self explanatoryand we expect fill up the information according to match lab infrastructure information Sample deploymentyaml canbe found at httpsgerritopnfvorggerritgitwebp=joidgita=blobf=cimaasintelpod5deploymentyaml
modify joidci01-deploybundlesh
under section case $3 add the intelpod7 section and make sure you have information provided correctly Beforeexample consider your network has 1921681024 your default network and eth1 is on public network which will beused to assign the floating ip
rsquointelpod7rsquo )
As per your lab vip address list be deafult uses 104111 - 104120
sed -i -- rsquos1041119216812grsquo bundlesyaml
Choose the external port to go out from gateway to use
sed -i -- rsquos ext-port eth1 ext-port eth1grsquo bundlesyaml
NOTE If you are using seprate data network then add this line below also along with other changes which representsnetwork 1049024 will be used for data network for openstack
sed -i -- rsquosos-data-network 1048021os-data-network 1049024grsquo bundlesyaml
modify joidci02-maasdeploysh
under section case $1 add the intelpod7 section and make sure you have information provided correctly
24 Chapter 3 Installer Configuration
OPNFV Configuration Guide Release brahmaputra30 (605ebda)
rsquointelpod7rsquo )
cp maasintelpod7deploymentyaml deploymentyaml
NOTE If you are using VLAN tags or more network for data and storage then make sure you modify the case $1section under Enable vlan interface with maas appropriately In the example below eth2 has been used as separate datanetwork for tenants in openstack with network 1049024 on compute and control nodes
rsquointelpod7rsquo )
maas refresh
enableautomodebyname eth2 AUTO 1049024 compute || true
enableautomodebyname eth2 AUTO 1049024 control || true
MAAS Install
After integrating the changes as mentioned above run the MAAS install Suppose you name the integration lab asintelpod7 then run the below commands to start the MAAS deployment
02-maasdeploysh intelpod7
This will take approximately 40 minutes to couple hours depending on your environment This script will do thefollowing
1 Create 2 VMs (KVM)
2 Install MAAS in one of the VMs
3 Configure the MAAS to enlist and commission a VM for Juju bootstrap node
4 Configure the MAAS to enlist and commission bare metal servers
When itrsquos done you should be able to view MAAS webpage (httpltMAAS IPgtMAAS) and see 1 bootstrap nodeand bare metal servers in the lsquoReadyrsquo state on the nodes page
Virtual deployment
By default just running the script 02-maasdeploysh will automatically create the KVM VMs on a single machineand configure everything for you
OPNFV Install
JOID allows you to deploy different combinations of OpenStack release and SDN solution in HA or non-HA mode
For OpenStack it supports Juno and Liberty For SDN it supports Openvswitch OpenContrail OpenDayLight andONOS
In addition to HA or non-HA mode it also supports to deploy the latest from the development tree (tip)
The deploysh in the joidci directoy will do all the work for you For example the following deploy OpenStack Liberywith OpenDayLight in a HA mode in the Intelpod7
35 JOID Configuration 25
OPNFV Configuration Guide Release brahmaputra30 (605ebda)
deploysh -o liberty -s odl -t ha -l intelpod7 -f none
By default the SDN is Openvswitch non-HA Liberty Intelpod5 OPNFV Brahmaputra release and ODL_L2 for theOPNFV feature
Possible options for each choice are as follows
[-s ]
nosdn openvswitch only and no other SDN
odl OpenDayLight Lithium version
opencontrail OpenContrail SDN
onos ONOS framework as SDN
[-t ]
nonha NO HA mode of Openstack
ha HA mode of openstack
tip the tip of the development
[-o ]
juno OpenStack Juno version
liberty OpenStack Liberty version
[-l ] etc
default For virtual deployment where installation will be done on KVM created using 02-maasdeploysh
intelpod5 Install on bare metal OPNFV pod5 of Intel lab
intelpod6
orangepod2
(other pods)
Note if you make changes as per your pod above then please use your pod
[-f ]
none no special feature will be enabled
ipv6 ipv6 will be enabled for tenant in openstack
By default debug is enabled in script and error messages will be printed on the SSH terminal where you are runningthe scripts It could take an hour to couple hours (max) to complete
Is the deployment done successfully
Once juju-deployer is complete use juju status to verify that all deployed unit are in the ready state
26 Chapter 3 Installer Configuration
OPNFV Configuration Guide Release brahmaputra30 (605ebda)
juju status --format tabular
Find the Openstack-dashboard IP address from the juju status output and see if you can log in via browser Theusername and password is adminopenstack
Optionall see if you can log in Juju GUI Juju GUI is on the Juju bootstrap node which is the second VM you definein the 02-maasdeploysh The username and password is adminadmin
If you deploy ODL OpenContrail or ONOS find the IP address of the web UI and login Please refer to each SDNbundleyaml for usernamepassword
Troubleshoot
To access to any deployed units juju ssh for example to login into nova-compute unit and look for varlogjujuunit-ltof interestgt for more info
juju ssh nova-compute0
Example
ubuntuR4N4B1~$ juju ssh nova-compute0
Warning Permanently added rsquo172165060rsquo (ECDSA) to the list of knownhosts
Warning Permanently added rsquo3-r4n3b1-computemaasrsquo (ECDSA) to the list ofknown hosts
Welcome to Ubuntu 14041 LTS (GNULinux 3130-77-generic x86_64)
Documentation httpshelpubuntucom
ltskippedgt
Last login Tue Feb 2 212356 2016 from bootstrapmaas
ubuntu3-R4N3B1-compute~$ sudo -i
root3-R4N3B1-compute~ cd varlogjuju
root3-R4N3B1-computevarlogjuju ls
machine-2log unit-ceilometer-agent-0log unit-ceph-osd-0logunit-neutron-contrail-0log unit-nodes-compute-0log unit-nova-compute-0logunit-ntp-0log
root3-R4N3B1-computevarlogjuju
By default juju will add the Ubuntu user keys for authentication into the deployed server and only ssh accesswill be available
Once you resolve the error go back to the jump host to rerun the charm hook with
juju resolved --retry ltunitgt
35 JOID Configuration 27
OPNFV Configuration Guide Release brahmaputra30 (605ebda)
28 Chapter 3 Installer Configuration
CHAPTER
FOUR
FEATURE CONFIGURATION
The following sections describe the configuration options for specific platform features provided in BrahmaputraFurther details for each feature are captured in the referred project documentation
41 Copper configuration
This release focused on use of the OpenStack Congress service for managing configuration policy The Congress installprocedure described here is largely manual This procedure as well as the longer-term goal of automated installersupport is a work in progress The procedure is further specific to one OPNFV installer (JOID ie MAASJuJu)based environment Support for other OPNFV installer deployed environments is also a work in progress
411 Pre-configuration activities
This procedure assumes OPNFV has been installed via the JOID installer
412 Hardware configuration
There is no specific hardware configuration required for the Copper project
413 Feature configuration
Following are instructions for installing Congress on an Ubuntu 1404 LXC container in the OPNFV Controller nodeas installed by the JOID installer This guide uses instructions from the Congress intro guide on readthedocs Specificvalues below will need to be modified if you intend to repeat this procedure in your JOID-based install environment
Install Procedure
The install currently occurs via four bash scripts provided in the copper repo See these files for the detailed steps
bull install_congress_1sh creates and starts the linux container for congress on the controller node copiesinstall_congress_2sh to the controller node and invokes it via ssh
bull install_congress_2sh installs congress on the congress server
29
OPNFV Configuration Guide Release brahmaputra30 (605ebda)
Cleanup Procedure
If there is an error during installation use the bash script clean_congresssh which stops the congress server if runningand removes the congress user and service from the controller database
Restarting after server power loss etc
Currently this install procedure is manual Automated install and restoral after host recovery is TBD For now thisprocedure will get the Congress service running again
On jumphost SSH to Congress serversource ~envshjuju ssh ubuntu$CONGRESS_HOST If that fails
On jumphost SSH to controller nodejuju ssh ubuntunode1-control Start the Congress containersudo lxc-start -n juju-trusty-congress -d Verify the Congress container statussudo lxc-ls -f juju-trusty-congressNAME STATE IPV4 IPV6 GROUPS AUTOSTART----------------------------------------------------------------------juju-trusty-congress RUNNING 19216810117 - - NO exit back to the Jumphost wait a minute and go back to the SSH to Congress server step above
On the Congress server that you have logged intosource ~admin-openrcshcd ~gitcongresssource binactivatebincongress-server ampdisown -h 1
42 Doctor Configuration
421 Doctor Inspector
Doctor Inspector is suggested to be placed in one of the controller nodes but it can be put on any host where DoctorMonitor can reach and accessible to the OpenStack Controller (Nova)
Make sure OpenStack env parameters are set properly so that Doctor Inspector can issue admin actions such ascompute host force-down and state update of VM
Then you can configure Doctor Inspector as follows
git clone httpsgerritopnfvorggerritdoctor -b stablebrahmaputracd doctortestsINSPECTOR_PORT=12345python inspectorpy $INSPECTOR_PORT gt inspectorlog 2gtamp1 amp
422 Doctor Monitor
Doctor Monitors are suggested to be placed in one of the controller nodes but those can be put on any host whichis reachable to target compute host and accessible to the Doctor Inspector You need to configure Monitors for allcompute hosts one by one
30 Chapter 4 Feature Configuration
OPNFV Configuration Guide Release brahmaputra30 (605ebda)
Make sure OpenStack env parameters are set properly so that Doctor Inspector can issue admin actions such ascompute host force-down and state update of VM
Then you can configure Doctor Monitor as follows
git clone httpsgerritopnfvorggerritdoctor -b stablebrahmaputracd doctortestsINSPECTOR_PORT=12345COMPUTE_HOST=overcloud-novacompute-0sudo python monitorpy $COMPUTE_HOST
http127001$INSPECTOR_PORTevents gt monitorlog 2gtamp1 amp
43 IPv6 Configuration - Setting Up a Service VM as an IPv6 vRouter
This section provides instructions to set up a service VM as an IPv6 vRouter using OPNFV Brahmaputra Releaseinstallers The environment may be pure OpenStack option or Open Daylight L2-only option The deployment modelmay be HA or non-HA The infrastructure may be bare metal or virtual environment
For complete instructions and documentations of setting up service VM as an IPv6 vRouter using ANY method pleaserefer to
1 IPv6 Configuration Guide (HTML) httpartifactsopnfvorgipv6docssetupservicevmindexhtml
2 IPv6 User Guide (HTML) httpartifactsopnfvorgipv6docsgapanalysisindexhtml
431 Pre-configuration Activities
The configuration will work in 2 environments
1 OpenStack-only environment
2 OpenStack with Open Daylight L2-only environment
Depending on which installer will be used to deploy OPNFV each environment may be deployed on bare metal orvirtualized infrastructure Each deployment may be HA or non-HA
Refer to the previous installer configuration chapters installations guide and release notes
432 Setup Manual in OpenStack-Only Environment
If you intend to set up a service VM as an IPv6 vRouter in OpenStack-only environment of OPNFV BrahmaputraRelease please NOTE that
bull Because the anti-spoofing rules of Security Group feature in OpenStack prevents a VM from forwarding packetswe need to disable Security Group feature in the OpenStack-only environment
bull The hostnames IP addresses and username are for exemplary purpose in instructions Please change as neededto fit your environment
bull The instructions apply to both deployment model of single controller node and HA (High Availability) deploy-ment model where multiple controller nodes are used
43 IPv6 Configuration - Setting Up a Service VM as an IPv6 vRouter 31
OPNFV Configuration Guide Release brahmaputra30 (605ebda)
Install OPNFV and Preparation
OPNFV-NATIVE-INSTALL-1 To install OpenStack-only environment of OPNFV Brahmaputra Release
Apex Installer
HA deployment in OpenStack-only environmentopnfv-deploy -d etcopnfv-apexos-nosdn-nofeature-hayaml
Non-HA deployment in OpenStack-only environment Non-HA deployment is currently not supported by Apex installer
Compass Installer
HA deployment in OpenStack-only environmentexport ISO_URL=file$BUILD_DIRECTORYcompassisoexport OS_VERSION=$COMPASS_OS_VERSIONexport OPENSTACK_VERSION=$COMPASS_OPENSTACK_VERSIONexport CONFDIR=$WORKSPACEdeployconfvm_environmentdeploysh --dha $CONFDIRos-nosdn-nofeature-hayml --network $CONFDIR$NODE_NAMEnetworkyml
Non-HA deployment in OpenStack-only environment Non-HA deployment is currently not supported by Compass installer
Fuel Installer
HA deployment in OpenStack-only environmentdeploysh -s os-nosdn-nofeature-ha
Non-HA deployment in OpenStack-only environmentdeploysh -s os-nosdn-nofeature-noha
Joid Installer
HA deployment in OpenStack-only environmentdeploysh -o liberty -s nosdn -t ha -l default -f ipv6
Non-HA deployment in OpenStack-only environmentdeploysh -o liberty -s nosdn -t nonha -l default -f ipv6
Please NOTE that
bull You need to refer to installerrsquos documentation for other necessary parameters applicable to your deployment
bull You need to refer to Release Notes and installerrsquos documentation if there is any issue in installation
OPNFV-NATIVE-INSTALL-2 Clone the following GitHub repository to get the configuration and metadata files
git clone httpsgithubcomsridhargaddamopnfv_os_ipv6_pocgit optstackopnfv_os_ipv6_poc
Disable Security Groups in OpenStack ML2 Setup
OPNFV-NATIVE-SEC-1 Change the settings in etcneutronpluginsml2ml2_confini as follows
etcneutronpluginsml2ml2_confini[securitygroup]extension_drivers = port_security
32 Chapter 4 Feature Configuration
OPNFV Configuration Guide Release brahmaputra30 (605ebda)
enable_security_group = Falsefirewall_driver = neutronagentfirewallNoopFirewallDriver
OPNFV-NATIVE-SEC-2 Change the settings in etcnovanovaconf as follows
etcnovanovaconf[DEFAULT]security_group_api = novafirewall_driver = novavirtfirewallNoopFirewallDriver
OPNFV-NATIVE-SEC-3 After updating the settings you will have to restart the Neutron and Nova services
Please note that the commands of restarting Neutron and Nova would vary depending on the installer Pleaserefer to relevant documentation of specific installers
Set Up Service VM as IPv6 vRouter
OPNFV-NATIVE-SETUP-1 Now we assume that OpenStack multi-node setup is up and running We have to sourcethe tenant credentials in this step Please NOTE that the method of sourcing tenant credentials may vary dependingon installers For example
Apex installer
source the tenant credentials using Apex installer of OPNFV you need to copy the file homestackovercloudrc from the installer VM called instack to a location in controller node for example in the directory optsource optovercloudrc
Compass installer
source the tenant credentials using Compass installer of OPNFVsource optadmin-openrcsh
Fuel installer
source the tenant credentials using Fuel installer of OPNFVsource rootopenrc
Joid installer
source the tenant credentials using Joid installer of OPNFVsource $HOMEjoid_configadmin-openrc
devstack
source the tenant credentials in devstacksource openrc admin demo
Please refer to relevant documentation of installers if you encounter any issue
OPNFV-NATIVE-SETUP-2 Download fedora22 image which would be used for vRouter
wget httpsdownloadfedoraprojectorgpubfedoralinuxreleases22Cloudx86_64ImagesFedora-Cloud-Base-22-20150521x86_64qcow2
OPNFV-NATIVE-SETUP-3 Import Fedora22 image to glance
glance image-create --name Fedora22 --disk-format qcow2 --container-format bare --file Fedora-Cloud-Base-22-20150521x86_64qcow2
43 IPv6 Configuration - Setting Up a Service VM as an IPv6 vRouter 33
OPNFV Configuration Guide Release brahmaputra30 (605ebda)
OPNFV-NATIVE-SETUP-4 This step is Informational OPNFV Installer has taken care of this step duringdeployment You may refer to this step only if there is any issue or if you are using other installers
We have to move the physical interface (ie the public network interface) to br-ex including moving the publicIP address and setting up default route Please refer to OS-NATIVE-SETUP-4 and OS-NATIVE-SETUP-5 in ourmore complete instruction
OPNFV-NATIVE-SETUP-5 Create Neutron routers ipv4-router and ipv6-router which need to provideexternal connectivity
neutron router-create ipv4-routerneutron router-create ipv6-router
OPNFV-NATIVE-SETUP-6 Create an external networksubnet ext-net using the appropriate values based on thedata-center physical network setup
Please NOTE that you may only need to create the subnet of ext-net because OPNFV installers should have createdan external network during installation You must use the same name of external network that installer creates whenyou create the subnet For example
bull Apex installer external
bull Compass installer ext-net
bull Fuel installer net04_ext
bull Joid installer ext-net
Please refer to the documentation of installers if there is any issue
This is needed only if installer does not create an external work Otherwise skip this command net-createneutron net-create --routerexternal ext-net
Note that the name ext-net may work for some installers such as Compass and Joid Change the name ext-net to match the name of external network that an installer createsneutron subnet-create --disable-dhcp --allocation-pool start=19859156251end=19859156254 --gateway 198591561 ext-net 19859156024
OPNFV-NATIVE-SETUP-7 Create Neutron networks ipv4-int-network1 and ipv6-int-network2 withport_security disabled
neutron net-create --port_security_enabled=False ipv4-int-network1neutron net-create --port_security_enabled=False ipv6-int-network2
OPNFV-NATIVE-SETUP-8 Create IPv4 subnet ipv4-int-subnet1 in the internal networkipv4-int-network1 and associate it to ipv4-router
neutron subnet-create --name ipv4-int-subnet1 --dns-nameserver 8888 ipv4-int-network1 2000024
neutron router-interface-add ipv4-router ipv4-int-subnet1
OPNFV-NATIVE-SETUP-9 Associate the ext-net to the Neutron routers ipv4-router and ipv6-router
Note that the name ext-net may work for some installers such as Compass and Joid Change the name ext-net to match the name of external network that an installer createsneutron router-gateway-set ipv4-router ext-netneutron router-gateway-set ipv6-router ext-net
OPNFV-NATIVE-SETUP-10 Create two subnets one IPv4 subnet ipv4-int-subnet2 and one IPv6 subnetipv6-int-subnet2 in ipv6-int-network2 and associate both subnets to ipv6-router
34 Chapter 4 Feature Configuration
OPNFV Configuration Guide Release brahmaputra30 (605ebda)
neutron subnet-create --name ipv4-int-subnet2 --dns-nameserver 8888 ipv6-int-network2 1000024
neutron subnet-create --name ipv6-int-subnet2 --ip-version 6 --ipv6-ra-mode slaac --ipv6-address-mode slaac ipv6-int-network2 2001db80164
neutron router-interface-add ipv6-router ipv4-int-subnet2neutron router-interface-add ipv6-router ipv6-int-subnet2
OPNFV-NATIVE-SETUP-11 Create a keypair
nova keypair-add vRouterKey gt ~vRouterKey
OPNFV-NATIVE-SETUP-12 Create ports for vRouter (with some specific MAC address - basically for automation- to know the IPv6 addresses that would be assigned to the port)
neutron port-create --name eth0-vRouter --mac-address fa163e111111 ipv6-int-network2neutron port-create --name eth1-vRouter --mac-address fa163e222222 ipv4-int-network1
OPNFV-NATIVE-SETUP-13 Create ports for VM1 and VM2
neutron port-create --name eth0-VM1 --mac-address fa163e333333 ipv4-int-network1neutron port-create --name eth0-VM2 --mac-address fa163e444444 ipv4-int-network1
OPNFV-NATIVE-SETUP-14 Update ipv6-router with routing information to subnet 2001db80264
neutron router-update ipv6-router --routes type=dict list=true destination=2001db80264nexthop=2001db801f8163efffe111111
OPNFV-NATIVE-SETUP-15 Boot Service VM (vRouter) VM1 and VM2
nova boot --image Fedora22 --flavor m1small --user-data optstackopnfv_os_ipv6_pocmetadatatxt --availability-zone novaopnfv-os-compute --nic port-id=$(neutron port-list | grep -w eth0-vRouter | awk print $2) --nic port-id=$(neutron port-list | grep -w eth1-vRouter | awk print $2) --key-name vRouterKey vRouter
nova list
Please wait for some 10 to 15 minutes so that necessary packages (like radvd) are installed and vRouter is upnova console-log vRouter
nova boot --image cirros-034-x86_64-uec --flavor m1tiny --user-data optstackopnfv_os_ipv6_pocset_mtush --availability-zone novaopnfv-os-controller --nic port-id=$(neutron port-list | grep -w eth0-VM1 | awk print $2) --key-name vRouterKey VM1
nova boot --image cirros-034-x86_64-uec --flavor m1tiny--user-data optstackopnfv_os_ipv6_pocset_mtush --availability-zone novaopnfv-os-compute --nic port-id=$(neutron port-list | grep -w eth0-VM2 | awk print $2) --key-name vRouterKey VM2
nova list Verify that all the VMs are in ACTIVE state
OPNFV-NATIVE-SETUP-16 If all goes well the IPv6 addresses assigned to the VMs would be as shown as follows
43 IPv6 Configuration - Setting Up a Service VM as an IPv6 vRouter 35
OPNFV Configuration Guide Release brahmaputra30 (605ebda)
vRouter eth0 interface would have the following IPv6 address 2001db801f8163efffe11111164 vRouter eth1 interface would have the following IPv6 address 2001db802164 VM1 would have the following IPv6 address 2001db802f8163efffe33333364 VM2 would have the following IPv6 address 2001db802f8163efffe44444464
OPNFV-NATIVE-SETUP-17 Now we can SSH to VMs You can execute the following command
1 Create a floatingip and associate it with VM1 VM2 and vRouter (to the port id that is passed) Note that the name ext-net may work for some installers such as Compass and Joid Change the name ext-net to match the name of external network that an installer createsneutron floatingip-create --port-id $(neutron port-list | grep -w eth0-VM1 | awk print $2) ext-netneutron floatingip-create --port-id $(neutron port-list | grep -w eth0-VM2 | awk print $2) ext-netneutron floatingip-create --port-id $(neutron port-list | grep -w eth1-vRouter | awk print $2) ext-net
2 To know display the floatingip associated with VM1 VM2 and vRouterneutron floatingip-list -F floating_ip_address -F port_id | grep $(neutron port-list | grep -w eth0-VM1 | awk print $2) | awk print $2neutron floatingip-list -F floating_ip_address -F port_id | grep $(neutron port-list | grep -w eth0-VM2 | awk print $2) | awk print $2neutron floatingip-list -F floating_ip_address -F port_id | grep $(neutron port-list | grep -w eth1-vRouter | awk print $2) | awk print $2
3 To ssh to the vRouter VM1 and VM2 user can execute the following commandssh -i ~vRouterKey fedoraltfloating-ip-of-vRoutergtssh -i ~vRouterKey cirrosltfloating-ip-of-VM1gtssh -i ~vRouterKey cirrosltfloating-ip-of-VM2gt
433 Setup Manual in OpenStack with Open Daylight L2-Only Environment
If you intend to set up a service VM as an IPv6 vRouter in an environment of OpenStack and Open Daylight L2-onlyof OPNFV Brahmaputra Release please NOTE that
bull The hostnames IP addresses and username are for exemplary purpose in instructions Please change as neededto fit your environment
bull The instructions apply to both deployment model of single controller node and HA (High Availability) deploy-ment model where multiple controller nodes are used
bull However in case of HA when ipv6-router is created in step SETUP-SVM-11 it could be created in anyof the controller node Thus you need to identify in which controller node ipv6-router is created in orderto manually spawn radvd daemon inside the ipv6-router namespace in steps SETUP-SVM-24 throughSETUP-SVM-30
Install OPNFV and Preparation
OPNFV-INSTALL-1 To install OpenStack with Open Daylight L2-only environment of OPNFV Brahmaputra Re-lease
Apex Installer
36 Chapter 4 Feature Configuration
OPNFV Configuration Guide Release brahmaputra30 (605ebda)
HA deployment in OpenStack with Open Daylight L2-only environmentopnfv-deploy -d etcopnfv-apexos-odl_l2-nofeature-hayaml
Non-HA deployment in OpenStack with Open Daylight L2-only environment Non-HA deployment is currently not supported by Apex installer
Compass Installer
HA deployment in OpenStack with Open Daylight L2-only environmentexport ISO_URL=file$BUILD_DIRECTORYcompassisoexport OS_VERSION=$COMPASS_OS_VERSIONexport OPENSTACK_VERSION=$COMPASS_OPENSTACK_VERSIONexport CONFDIR=$WORKSPACEdeployconfvm_environmentdeploysh --dha $CONFDIRos-odl_l2-nofeature-hayml --network $CONFDIR$NODE_NAMEnetworkyml
Non-HA deployment in OpenStack with Open Daylight L2-only environment Non-HA deployment is currently not supported by Compass installer
Fuel Installer
HA deployment in OpenStack with Open Daylight L2-only environmentdeploysh -s os-odl_l2-nofeature-ha
Non-HA deployment in OpenStack with Open Daylight L2-only environmentdeploysh -s os-odl_l2-nofeature-noha
Joid Installer
HA deployment in OpenStack with Open Daylight L2-only environmentdeploysh -o liberty -s odl -t ha -l default -f ipv6
Non-HA deployment in OpenStack with Open Daylight L2-only environmentdeploysh -o liberty -s odl -t nonha -l default -f ipv6
Please NOTE that
bull You need to refer to installerrsquos documentation for other necessary parameters applicable to your deployment
bull You need to refer to Release Notes and installerrsquos documentation if there is any issue in installation
OPNFV-INSTALL-2 Clone the following GitHub repository to get the configuration and metadata files
git clone httpsgithubcomsridhargaddamopnfv_os_ipv6_pocgit optstackopnfv_os_ipv6_poc
Disable Security Groups in OpenStack ML2 Setup
Please NOTE that although Security Groups feature has been disabled automatically through localconf configu-ration file by some installers such as devstack it is very likely that other installers such as Apex Compass Fuelor Joid will enable Security Groups feature after installation
Please make sure that Security Groups are disabled in the setup
OPNFV-SEC-1 Change the settings in etcneutronpluginsml2ml2_confini as follows
etcneutronpluginsml2ml2_confini[securitygroup]enable_security_group = Falsefirewall_driver = neutronagentfirewallNoopFirewallDriver
43 IPv6 Configuration - Setting Up a Service VM as an IPv6 vRouter 37
OPNFV Configuration Guide Release brahmaputra30 (605ebda)
OPNFV-SEC-2 Change the settings in etcnovanovaconf as follows
etcnovanovaconf[DEFAULT]security_group_api = novafirewall_driver = novavirtfirewallNoopFirewallDriver
OPNFV-SEC-3 After updating the settings you will have to restart the Neutron and Nova services
Please note that the commands of restarting Neutron and Nova would vary depending on the installer Pleaserefer to relevant documentation of specific installers
Source the Credentials in OpenStack Controller Node
SETUP-SVM-1 Login in OpenStack Controller Node Start a new terminal and change directory to where Open-Stack is installed
SETUP-SVM-2 We have to source the tenant credentials in this step Please NOTE that the method of sourcingtenant credentials may vary depending on installers For example
Apex installer
source the tenant credentials using Apex installer of OPNFV you need to copy the file homestackovercloudrc from the installer VM called instack to a location in controller node for example in the directory optsource optovercloudrc
Compass installer
source the tenant credentials using Compass installer of OPNFVsource optadmin-openrcsh
Fuel installer
source the tenant credentials using Fuel installer of OPNFVsource rootopenrc
Joid installer
source the tenant credentials using Joid installer of OPNFVsource $HOMEjoid_configadmin-openrc
devstack
source the tenant credentials in devstacksource openrc admin demo
Please refer to relevant documentation of installers if you encounter any issue
Informational Note Move Public Network from Physical Network Interface to br-ex
SETUP-SVM-3 Move the physical interface (ie the public network interface) to br-ex
SETUP-SVM-4 Verify setup of br-ex
Those 2 steps are Informational OPNFV Installer has taken care of those 2 steps during deployment You mayrefer to this step only if there is any issue or if you are using other installers
38 Chapter 4 Feature Configuration
OPNFV Configuration Guide Release brahmaputra30 (605ebda)
We have to move the physical interface (ie the public network interface) to br-ex including moving the publicIP address and setting up default route Please refer to SETUP-SVM-3 and SETUP-SVM-4 in our more completeinstruction
Create IPv4 Subnet and Router with External Connectivity
SETUP-SVM-5 Create a Neutron router ipv4-router which needs to provide external connectivity
neutron router-create ipv4-router
SETUP-SVM-6 Create an external networksubnet ext-net using the appropriate values based on the data-centerphysical network setup
Please NOTE that you may only need to create the subnet of ext-net because OPNFV installers should have createdan external network during installation You must use the same name of external network that installer creates whenyou create the subnet For example
bull Apex installer external
bull Compass installer ext-net
bull Fuel installer net04_ext
bull Joid installer ext-net
Please refer to the documentation of installers if there is any issue
This is needed only if installer does not create an external work Otherwise skip this command net-createneutron net-create --routerexternal ext-net
Note that the name ext-net may work for some installers such as Compass and Joid Change the name ext-net to match the name of external network that an installer createsneutron subnet-create --disable-dhcp --allocation-pool start=19859156251end=19859156254 --gateway 198591561 ext-net 19859156024
Please note that the IP addresses in the command above are for exemplary purpose Please replace the IP addressesof your actual network
SETUP-SVM-7 Associate the ext-net to the Neutron router ipv4-router
Note that the name ext-net may work for some installers such as Compass and Joid Change the name ext-net to match the name of external network that an installer createsneutron router-gateway-set ipv4-router ext-net
SETUP-SVM-8 Create an internaltenant IPv4 network ipv4-int-network1
neutron net-create ipv4-int-network1
SETUP-SVM-9 Create an IPv4 subnet ipv4-int-subnet1 in the internal network ipv4-int-network1
neutron subnet-create --name ipv4-int-subnet1 --dns-nameserver 8888 ipv4-int-network1 2000024
SETUP-SVM-10 Associate the IPv4 internal subnet ipv4-int-subnet1 to the Neutron router ipv4-router
neutron router-interface-add ipv4-router ipv4-int-subnet1
43 IPv6 Configuration - Setting Up a Service VM as an IPv6 vRouter 39
OPNFV Configuration Guide Release brahmaputra30 (605ebda)
Create IPv6 Subnet and Router with External Connectivity
Now let us create a second neutron router where we can ldquomanuallyrdquo spawn a radvd daemon to simulate an externalIPv6 router
SETUP-SVM-11 Create a second Neutron router ipv6-router which needs to provide external connectivity
neutron router-create ipv6-router
SETUP-SVM-12 Associate the ext-net to the Neutron router ipv6-router
Note that the name ext-net may work for some installers such as Compass and Joid Change the name ext-net to match the name of external network that an installer createsneutron router-gateway-set ipv6-router ext-net
SETUP-SVM-13 Create a second internaltenant IPv4 network ipv4-int-network2
neutron net-create ipv4-int-network2
SETUP-SVM-14 Create an IPv4 subnet ipv4-int-subnet2 for the ipv6-router internal networkipv4-int-network2
neutron subnet-create --name ipv4-int-subnet2 --dns-nameserver 8888 ipv4-int-network2 1000024
SETUP-SVM-15 Associate the IPv4 internal subnet ipv4-int-subnet2 to the Neutron router ipv6-router
neutron router-interface-add ipv6-router ipv4-int-subnet2
Prepare Image Metadata and Keypair for Service VM
SETUP-SVM-16 Download fedora22 image which would be used as vRouter
wget httpsdownloadfedoraprojectorgpubfedoralinuxreleases22Cloudx86_64ImagesFedora-Cloud-Base-22-20150521x86_64qcow2
glance image-create --name Fedora22 --disk-format qcow2 --container-format bare --file Fedora-Cloud-Base-22-20150521x86_64qcow2
SETUP-SVM-17 Create a keypair
nova keypair-add vRouterKey gt ~vRouterKey
SETUP-SVM-18 Create ports for vRouter and both the VMs with some specific MAC addresses
neutron port-create --name eth0-vRouter --mac-address fa163e111111 ipv4-int-network2neutron port-create --name eth1-vRouter --mac-address fa163e222222 ipv4-int-network1neutron port-create --name eth0-VM1 --mac-address fa163e333333 ipv4-int-network1neutron port-create --name eth0-VM2 --mac-address fa163e444444 ipv4-int-network1
Boot Service VM (vRouter) with eth0 on ipv4-int-network2 and eth1 on ipv4-int-network1
Let us boot the service VM (vRouter) with eth0 interface on ipv4-int-network2 connecting toipv6-router and eth1 interface on ipv4-int-network1 connecting to ipv4-router
SETUP-SVM-19 Boot the vRouter using Fedora22 image on the OpenStack Compute Node with hostnameopnfv-os-compute
40 Chapter 4 Feature Configuration
OPNFV Configuration Guide Release brahmaputra30 (605ebda)
nova boot --image Fedora22 --flavor m1small --user-data optstackopnfv_os_ipv6_pocmetadatatxt --availability-zone novaopnfv-os-compute --nic port-id=$(neutron port-list | grep -w eth0-vRouter | awk print $2) --nic port-id=$(neutron port-list | grep -w eth1-vRouter | awk print $2) --key-name vRouterKey vRouter
Please note that optstackopnfv_os_ipv6_pocmetadatatxt is used to enable the vRouter to au-tomatically spawn a radvd and
bull Act as an IPv6 vRouter which advertises the RA (Router Advertisements) with prefix 2001db80264on its internal interface (eth1)
bull Forward IPv6 traffic from internal interface (eth1)
SETUP-SVM-20 Verify that Fedora22 image boots up successfully and vRouter has ssh keys properly injected
nova listnova console-log vRouter
Please note that it may take a few minutes for the necessary packages to get installed and ssh keys to be injected
Sample Output[ 762884523] cloud-init[871] ec2 [ 762909634] cloud-init[871] ec2 -----BEGIN SSH HOST KEY FINGERPRINTS-----[ 762931626] cloud-init[871] ec2 2048 e3dc3d4abcb6b07775a170a3d02a47a9 (RSA)[ 762957380] cloud-init[871] ec2 -----END SSH HOST KEY FINGERPRINTS-----[ 762979554] cloud-init[871] ec2
Boot Two Other VMs in ipv4-int-network1
In order to verify that the setup is working let us create two cirros VMs with eth1 interface on theipv4-int-network1 ie connecting to vRouter eth1 interface for internal network
We will have to configure appropriate mtu on the VMsrsquo interface by taking into account the tunneling overhead andany physical switch requirements If so push the mtu to the VM either using dhcp options or via meta-data
SETUP-SVM-21 Create VM1 on OpenStack Controller Node with hostname opnfv-os-controller
nova boot --image cirros-034-x86_64-uec --flavor m1tiny --user-data optstackopnfv_os_ipv6_pocset_mtush --availability-zone novaopnfv-os-controller --nic port-id=$(neutron port-list | grep -w eth0-VM1 | awk print $2) --key-name vRouterKey VM1
SETUP-SVM-22 Create VM2 on OpenStack Compute Node with hostname opnfv-os-compute
nova boot --image cirros-034-x86_64-uec --flavor m1tiny --user-data optstackopnfv_os_ipv6_pocset_mtush --availability-zone novaopnfv-os-compute --nic port-id=$(neutron port-list | grep -w eth0-VM2 | awk print $2) --key-name vRouterKey VM2
SETUP-SVM-23 Confirm that both the VMs are successfully booted
nova listnova console-log VM1nova console-log VM2
43 IPv6 Configuration - Setting Up a Service VM as an IPv6 vRouter 41
OPNFV Configuration Guide Release brahmaputra30 (605ebda)
Spawn RADVD in ipv6-router
Let us manually spawn a radvd daemon inside ipv6-router namespace to simulate an external router First ofall we will have to identify the ipv6-router namespace and move to the namespace
Please NOTE that in case of HA (High Availability) deployment model where multiple controller nodes are usedipv6-router created in step SETUP-SVM-11 could be in any of the controller node Thus you need to iden-tify in which controller node ipv6-router is created in order to manually spawn radvd daemon inside theipv6-router namespace in steps SETUP-SVM-24 through SETUP-SVM-30 The following command in Neu-tron will display the controller on which the ipv6-router is spawned
neutron l3-agent-list-hosting-router ipv6-router
Then you login to that controller and execute steps SETUP-SVM-24 through SETUP-SVM-30
SETUP-SVM-24 identify the ipv6-router namespace and move to the namespace
sudo ip netns exec qrouter-$(neutron router-list | grep -w ipv6-router | awk print $2) bash
SETUP-SVM-25 Upon successful execution of the above command you will be in the router namespace Now letus configure the IPv6 address on the ltqr-xxxgt interface
export router_interface=$(ip a s | grep -w global qr- | awk print $7)ip -6 addr add 2001db8011 dev $router_interface
SETUP-SVM-26 Update the sample file optstackopnfv_os_ipv6_pocscenario2radvdconfwith $router_interface
cp optstackopnfv_os_ipv6_pocscenario2radvdconf tmpradvd$router_interfaceconfsed -i s$router_interface$router_interfaceg tmpradvd$router_interfaceconf
SETUP-SVM-27 Spawn a radvd daemon to simulate an external router This radvd daemon advertises an IPv6subnet prefix of 2001db80164 using RA (Router Advertisement) on its $router_interface so that eth0interface of vRouter automatically configures an IPv6 SLAAC address
$radvd -C tmpradvd$router_interfaceconf -p tmpbr-expidradvd -m syslog
SETUP-SVM-28 Add an IPv6 downstream route pointing to the eth0 interface of vRouter
ip -6 route add 2001db80264 via 2001db801f8163efffe111111
SETUP-SVM-29 The routing table should now look similar to something shown below
ip -6 route show2001db8011 dev qr-42968b9e-62 proto kernel metric 2562001db80164 dev qr-42968b9e-62 proto kernel metric 256 expires 86384sec2001db80264 via 2001db801f8163efffe111111 dev qr-42968b9e-62 proto ra metric 1024 expires 29secfe8064 dev qg-3736e0c7-7c proto kernel metric 256fe8064 dev qr-42968b9e-62 proto kernel metric 256
SETUP-SVM-30 If all goes well the IPv6 addresses assigned to the VMs would be as shown as follows
vRouter eth0 interface would have the following IPv6 address 2001db801f8163efffe11111164 vRouter eth1 interface would have the following IPv6 address 2001db802164 VM1 would have the following IPv6 address 2001db802f8163efffe33333364 VM2 would have the following IPv6 address 2001db802f8163efffe44444464
42 Chapter 4 Feature Configuration
OPNFV Configuration Guide Release brahmaputra30 (605ebda)
Testing to Verify Setup Complete
Now let us SSH to those VMs eg VM1 and or VM2 and or vRouter to confirm that it has successfully configuredthe IPv6 address using SLAAC with prefix 2001db80264 from vRouter
We use floatingip mechanism to achieve SSH
SETUP-SVM-31 Now we can SSH to VMs You can execute the following command
1 Create a floatingip and associate it with VM1 VM2 and vRouter (to the port id that is passed) Note that the name ext-net may work for some installers such as Compass and Joid Change the name ext-net to match the name of external network that an installer createsneutron floatingip-create --port-id $(neutron port-list | grep -w eth0-VM1 | awk print $2) ext-netneutron floatingip-create --port-id $(neutron port-list | grep -w eth0-VM2 | awk print $2) ext-netneutron floatingip-create --port-id $(neutron port-list | grep -w eth1-vRouter | awk print $2) ext-net
2 To know display the floatingip associated with VM1 VM2 and vRouterneutron floatingip-list -F floating_ip_address -F port_id | grep $(neutron port-list | grep -w eth0-VM1 | awk print $2) | awk print $2neutron floatingip-list -F floating_ip_address -F port_id | grep $(neutron port-list | grep -w eth0-VM2 | awk print $2) | awk print $2neutron floatingip-list -F floating_ip_address -F port_id | grep $(neutron port-list | grep -w eth1-vRouter | awk print $2) | awk print $2
3 To ssh to the vRouter VM1 and VM2 user can execute the following commandssh -i ~vRouterKey fedoraltfloating-ip-of-vRoutergtssh -i ~vRouterKey cirrosltfloating-ip-of-VM1gtssh -i ~vRouterKey cirrosltfloating-ip-of-VM2gt
If everything goes well ssh will be successful and you will be logged into those VMs Run some commands to verifythat IPv6 addresses are configured on eth0 interface
SETUP-SVM-32 Show an IPv6 address with a prefix of 2001db80264
ip address show
SETUP-SVM-33 ping some external IPv6 address eg ipv6-router
ping6 2001db8011
If the above ping6 command succeeds it implies that vRouter was able to successfully forward the IPv6 traffic toreach external ipv6-router
44 Installing OVSNFV Fuel Plugin
bull On the Fuel UI create a new environment
bull In Settings gt Userspace OVS support check ldquoUserspace OVS supportrdquo
bull Continue with environment configuration and deployment as normal
441 Upgrading the plugin
From time to time new versions of the plugin may become available
44 Installing OVSNFV Fuel Plugin 43
OPNFV Configuration Guide Release brahmaputra30 (605ebda)
The plugin cannot be upgraded if an active environment is using the plugin
In order to upgrade the plugin
bull Copy the updated plugin file to the fuel-master
bull On the Fuel UI reset the environment
bull On the Fuel CLI ldquofuel plugins ndashupdate ltfuel-plugin-filegtrdquo
bull On the Fuel UI re-deploy the environment
45 Promise Feature Configuration Overview
451 Promise installation
Install nodejs npm and promise
curl -sL httpsdebnodesourcecomsetup_4x | sudo -E bash -sudo apt-get install -y nodejssudo npm -g install npmlatestgit clone httpsgithubcomopnfvpromisegitcd promisenpm install
Please note that the last command lsquonpm installrsquo will install all needed dependencies for promise (including yangforgeand mocha)
452 Testing
Please perform the following preparation steps
1 Set OpenStack environment parameters properly (eg source openrc admin demo in DevStack)
2 Create OpenStack tenant (eg promise) and tenant user (eg promiser)
3 Create a flavor in Nova with 1 vCPU and 512 MB RAM
4 Create a private network subnet and router in Neutron
5 Create an image in Glance
Once done the promise test script can be invoked as follows (as a single line command)
NODE_ENV=mytest OS_TENANT_NAME=promise OS_USERNAME=promiser OS_PASSWORD=ltuser password from Step 2gt OS_TEST_FLAVOR=ltflavor ID from Step 3gt OS_TEST_NETWORK=ltnetwork ID from Step 4gt OS_TEST_IMAGE=ltimage ID from Step 5gt npm run -s test -- --reporter json gt promise-resultsjson
The results of the tests will be stored in the promise-resultsjson file
The results can also be seen in the console (ldquonpm run -s testrdquo)
All 33 tests passing Congratulations promise has been successfully installed and configured
44 Chapter 4 Feature Configuration
OPNFV Configuration Guide Release brahmaputra30 (605ebda)
45 Promise Feature Configuration Overview 45
OPNFV Configuration Guide Release brahmaputra30 (605ebda)
46 Configuring SDNVPN features
Fuel installer configuration
In order to install the BGPVPN feature the corresponding checkbox in Fuel has to be selected This will triggerinstallation of the OpenStack BGPVPN API extension for Neutron (set up for using the ODL driver)
In addition ODL has to be installed see the corresponding section in the respective installer documentation on how toinstall ODL If the BGPVPN feature is installed ODL will automatically be installed with VPN Service karaf featureactivated
No post-deploy configuration is necessary The Fuel BGPVPN plugin and the ODL plugin should set up the clusterready for BGPVPNs being created This includes the set-up of internal VxLAN transport tunnels between computenodes
No post-configuration activities are required
46 Chapter 4 Feature Configuration
CHAPTER
FIVE
POST CONFIGURATION ACTIVITIES
Once you have deployed and configured your scenario and features you should validate the state of the system usingthe following guides
51 Scenario validation activities
The following guides provide information on how to validate the installation of you scenario based on the tools andtest suites available for the installation tool you have selected
511 Fuel post installation procedures
Automated post installation activities
Fuel provides a fairly broad coverage of built in automated health checks These validate the installation in terms ofconfiguration services networking storage policies etc The execution of the full range of health checks takes lessthan 30 minutes
For instructions on how to run health-checks please read the Fuel installation instructions
Platform components validation
Consult the feature sections in this document for any post-install feature specific validationhealth-checks
512 JOID post installation procedures
Configure OpenStack
In each SDN directory for example joidciopencontrail there is a folder for Juju deployer where you can find thecharm bundle yaml files that the deploysh uses to deploy
In the same directory there is scripts folder where you can find shell scripts to help you configure the OpenStackcloud that you just deployed These scripts are created to help you configure a basic OpenStack Cloud to verify thecloud For more info on OpenStack Cloud configuration please refer to the OpenStack Cloud Administrator Guideon docsopenstackorg Similarly for complete SDN configuration please refer to the respective SDN adminstratorguide
Each SDN solution requires slightly different setup please refer to the README in each SDN folder Most likelyyou will need to modify the openstacksh and cloud-setupsh scripts for the floating IP range private IP network andSSH keys Please go through openstacksh glancesh and cloud-setupsh and make changes as you see fit
47
OPNFV Configuration Guide Release brahmaputra30 (605ebda)
52 Feature validation activities
The following sections provide information on how to validate the features you have installed in your scenario
521 Copper post installation procedures
This release focused on use of the OpenStack Congress service for managing configuration policy The Congressinstall verify procedure described here is largely manual This procedure as well as the longer-term goal of automatedverification support is a work in progress The procedure is further specific to one OPNFV installer (JOID ieMAASJuJu) based environment
Automated post installation activities
No automated procedures are provided at this time
Copper post configuration procedures
No configuration procedures are required beyond the basic install procedure
Platform components validation
Following are notes on creating a container as test driver for Congress This is based upon an Ubuntu host as installedby JOID
Create and Activate the Container
On the jumphost
sudo lxc-create -n trusty-copper -t usrsharelxctemplateslxc-ubuntu -- -b ubuntu ~opnfvsudo lxc-start -n trusty-copper -dsudo lxc-info --name trusty-copper(typical output)Name trusty-copperState RUNNINGPID 4563IP 100344CPU use 2877 secondsBlkIO use 52279 MiBMemory use 55975 MiBKMem use 0 bytesLink vethDMFOANTX bytes 262 MiBRX bytes 8848 MiBTotal bytes 9110 MiB
Login and configure the test server
48 Chapter 5 Post Configuration Activities
OPNFV Configuration Guide Release brahmaputra30 (605ebda)
ssh ubuntu100344sudo apt-get updatesudo apt-get upgrade -y
Install pipsudo apt-get install python-pip -y
Install javasudo apt-get install default-jre -y
Install other dependenciessudo apt-get install git gcc python-dev libxml2 libxslt1-dev libzip-dev php5-curl -y
Setup OpenStack environment variables per your OPNFV installexport CONGRESS_HOST=19216810117export KEYSTONE_HOST=19216810108export CEILOMETER_HOST=19216810105export CINDER_HOST=19216810101export GLANCE_HOST=19216810106export HEAT_HOST=19216810107export NEUTRON_HOST=19216810111export NOVA_HOST=19216810112source ~admin-openrcsh
Install and test OpenStack clientmkdir ~gitcd gitgit clone httpsgithubcomopenstackpython-openstackclientgitcd python-openstackclientgit checkout stablelibertysudo pip install -r requirementstxtsudo python setuppy installopenstack service list(typical output)+----------------------------------+------------+----------------+| ID | Name | Type |+----------------------------------+------------+----------------+| 2f8799ae50f24c928c021fabf8a50f5f | keystone | identity || 351b13f56d9a4e25849406ec1d5a2726 | cinder | volume || 5129510c3143454f9ba8ec7e6735e267 | cinderv2 | volumev2 || 5ee1e220460f41dea9be06921400ce9b | congress | policy || 78e73a7789a14f56a5d248a0cd141201 | quantum | network || 9d5a00fb475a45b2ae6767528299ed6b | ceilometer | metering || 9e4b1624ef0b434abc0b82f607c5045c | heat | orchestration || b6c01ceb5023442d9f394b83f2a18e01 | heat-cfn | cloudformation || ba6199e3505045ad87e2a7175bd0c57f | glance | image || d753f304a0d541dbb989780ae70328a8 | nova | compute |+----------------------------------+------------+----------------+
Install and test Congress clientcd ~gitgit clone httpsgithubcomopenstackpython-congressclientgitcd python-congressclientgit checkout stablelibertysudo pip install -r requirementstxtsudo python setuppy installopenstack congress driver list(typical output)+------------+--------------------------------------------------------------------------+| id | description |+------------+--------------------------------------------------------------------------+| ceilometer | Datasource driver that interfaces with ceilometer || neutronv2 | Datasource driver that interfaces with OpenStack Networking aka Neutron || nova | Datasource driver that interfaces with OpenStack Compute aka nova || keystone | Datasource driver that interfaces with keystone || cinder | Datasource driver that interfaces with OpenStack cinder || glancev2 | Datasource driver that interfaces with OpenStack Images aka Glance |+------------+--------------------------------------------------------------------------+
Install and test Glance clientcd ~gitgit clone httpsgithubcomopenstackpython-glanceclientgitcd python-glanceclientgit checkout stablelibertysudo pip install -r requirementstxtsudo python setuppy installglance image-list(typical output)+--------------------------------------+---------------------+| ID | Name |+--------------------------------------+---------------------+| 6ce4433e-65c0-4cd8-958d-b06e30c76241 | cirros-033-x86_64 |+--------------------------------------+---------------------+
Install and test Neutron clientcd ~gitgit clone httpsgithubcomopenstackpython-neutronclientgitcd python-neutronclientgit checkout stablelibertysudo pip install -r requirementstxtsudo python setuppy installneutron net-list(typical output)+--------------------------------------+----------+------------------------------------------------------+| id | name | subnets |+--------------------------------------+----------+------------------------------------------------------+| dc6227df-af41-439f-bd2c-c2c2f0fe7fc5 | public | 5745846c-dd79-4900-a7da-bf506348ceac 19216810024 || a3f9f13a-5de9-4d3b-98c8-d2e40a2ef8e9 | internal | 5e0be862-90da-44ab-af43-56d5c65aa049 1000024 |+--------------------------------------+----------+------------------------------------------------------+
Install and test Nova clientcd ~gitgit clone httpsgithubcomopenstackpython-novaclientgitcd python-novaclientgit checkout stablelibertysudo pip install -r requirementstxtsudo python setuppy installnova hypervisor-list(typical output)+----+---------------------+-------+---------+| ID | Hypervisor hostname | State | Status |+----+---------------------+-------+---------+| 1 | compute1maas | up | enabled |+----+---------------------+-------+---------+
Install and test Keystone clientcd ~gitgit clone httpsgithubcomopenstackpython-keystoneclientgitcd python-keystoneclientgit checkout stablelibertysudo pip install -r requirementstxtsudo python setuppy install
52 Feature validation activities 49
OPNFV Configuration Guide Release brahmaputra30 (605ebda)
Setup the Congress Test Webapp
Clone Copper (if not already cloned in user home)cd ~gitif [ -d ~gitcopper ] then git clone httpsgerritopnfvorggerritcopper fi
Copy the Apache configsudo cp ~gitcoppercomponentscongresstest-webappwwwubuntu-apache2conf etcapache2apache2conf
Point proxyphp to the Congress server per your installsed -i -- s19216810117$CONGRESS_HOSTg ~gitcoppercomponentscongresstest-webappwwwhtmlproxyindexphp
Copy the webapp to the Apache root directory and fix permissionssudo cp -R ~gitcoppercomponentscongresstest-webappwwwhtml varwwwsudo chmod 755 varwwwhtml -R
Make webapp log directory and set permissionsmkdir ~logschmod 777 ~logs
Restart Apachesudo service apache2 restart
Using the Test Webapp
Browse to the trusty-copper server IP address
Interactive options are meant to be self-explanatory given a basic familiarity with the Congress service and data modelBut the app will be developed with additional features and UI elements
522 IPv6 Post Installation Procedures
Congratulations you have completed the setup of using a service VM to act as an IPv6 vRouter You have validatedthe setup based on the instruction in previous sections If you want to further test your setup you can ping6 amongVM1 VM2 vRouter and ipv6-router
This setup allows further open innovation by any 3rd-party For more instructions and documentations please refer to
1 IPv6 Configuration Guide (HTML) httpartifactsopnfvorgipv6docssetupservicevmindexhtml
2 IPv6 User Guide (HTML) httpartifactsopnfvorgipv6docsgapanalysisindexhtml
Automated post installation activities
Refer to the relevant testing guides results and release notes of Yardstick Project
53 Additional testing and validation activities
Many of our testing tools can be manually installed to facilitate targeted testing of features and capabilities of yourscenario The following guides provide instruction on setting up these testing suites
50 Chapter 5 Post Configuration Activities
OPNFV Configuration Guide Release brahmaputra30 (605ebda)
531 Overview of the functest suites
Functest is the OPNFV project primarily targeting function testing In the Continuous Integration pipeline it islaunched after an OPNFV fresh installation to validate and verify the basic functions of the infrastructure
The current list of test suites can be distributed in 3 main domains VIM (Virtualised Infrastructure Manager) Con-trollers and Features
Do-main
Testsuite
Comments
VIM
vPing NFV ldquoHello Worldrdquo using SSH connection and floatting IPvPing_userdataPing using userdata and cloud-init mechanismTempest OpenStack reference test suite [2]Rallybench
OpenStack testing tool benchmarking OpenStack modules [3]
ControllersOpen-Day-light
Opendaylight Test suite
ONOS Test suite of ONOS L2 and L3 functions See ONOSFW User Guide for details
Features
vIMS Example of a real VNF deployment to show the NFV capabilities of the platform The IPMultimedia Subsytem is a typical Telco test case referenced by ETSI It provides a fullyfunctional VoIP System
Promise Resource reservation and management project to identify NFV related requirements andrealize resource reservation for future usage by capacity management of resource poolsregarding compute network and storage See Promise User Guide for details
Doctor Doctor platform as of Brahmaputra release provides the two features ImmediateNotification Consistent resource state awareness (compute) see Doctor User Guide fordetails
SD-NVPN
Implementation of the OpenStack bgpvpn API from the SDNVPN feature project Itallowing the cration of BGP VPNs see SDNVPN User Guide for
Functest includes different test suites with several test cases within Some of the tests are developed by Functest teammembers whereas others are integrated from upstream communities or other OPNFV projects For example Tempestis the OpenStack integration test suite and Functest is in charge of the selection integration and automation of the teststhat fit in OPNFV
The Tempest suite has been customized but no new test cases have been created
The results produced by the tests run from CI are pushed and collected in a NoSQL database The goal is to populatethe database with results from different sources and scenarios and to show them on a Dashboard
There is no real notion of Test domain or Test coverage Basic components (VIM controllers) are tested through theirown suites Feature projects also provide their own test suites with different ways of running their tests
vIMS test case was integrated to demonstrate the capability to deploy a relatively complex NFV scenario on top of theOPNFV infrastructure
Functest considers OPNFV as a black box OPNFV since the Brahmaputra release offers lots of potential combina-tions
bull 2 controllers (OpenDayligh ONOS)
bull 4 installers (Apex Compass Fuel Joid)
Most of the tests are runnable on any combination but some others might have restrictions imposed by the installersor the available deployed features
53 Additional testing and validation activities 51
OPNFV Configuration Guide Release brahmaputra30 (605ebda)
Preparing the Docker container
Pull the Functest Docker image from the Docker hub
docker pull opnfvfunctestbrahmaputra10
Check that the image is available
docker images
Run the docker container giving the environment variables
bull INSTALLER_TYPE possible values are apex compass fuel or joid
bull INSTALLER_IP IP of the installer nodeVM
Functest may need to know the IP of the installer to retrieve automatically the credentials from the installer nodeVMor even from the actual controllers
The minimum command to create the Functest Docker container can be described as follows
docker run -it -e INSTALLER_IP=102002 -e INSTALLER_TYPE=fuel opnfvfunctestbrahmaputra10 binbash
Optionally it is possible to precise the container name through the option ndashname
docker run --name CONTAINER_NAME -it -e INSTALLER_IP=102002 -e INSTALLER_TYPE=fuel opnfvfunctestbrahmaputra10 binbash
It is also possible to to indicate the path of the OpenStack credentials using -v
docker run -it -e INSTALLER_IP=102002 -e INSTALLER_TYPE=fuel -v ltpath_to_your_local_creds_filegthomeopnfvfunctestconfopenstackcreds opnfvfunctestbrahmaputra10 binbash
The local file will be mounted in the container under homeopnfvfunctestconfopenstackcreds
If the intention is to run Functest against any of the supported OPNFV scenarios it is recommended to include alsothe environment variable DEPLOY_SCENARIO for example
docker run -it -e INSTALLER_IP=102002 -e INSTALLER_TYPE=fuel -e DEPLOY_SCENARIO=os-odl_l2-nofeature-ha opnfvfunctestbrahmaputra10 binbash
Inside the container the following directory structure should be in place
`-- home`-- opnfv
|-- functest| |-- conf| |-- data| `-- results`-- repos
|-- bgpvpn|-- doctor|-- functest|-- odl_integration|-- onos|-- promise|-- rally|-- releng`-- vims-test
Basically the container includes
bull Functest directory to store the configuration (the OpenStack creds are stored inhomeopngbfunctestconfopenstackcreds) the data (cirros image needed for some tests) results (sometemporary result logs may be stored here)
52 Chapter 5 Post Configuration Activities
OPNFV Configuration Guide Release brahmaputra30 (605ebda)
bull Repositories the functest repository will be used to prepare the environment and run the tests Other repositoriesare used for the installation of the needed tooling (eg rally) andor the retrieval of feature projects scenarios(eg promise)
The structure under the Functest repository can be described as follows
|-- INFO|-- LICENSE|-- commons| |-- ims| |-- mobile| `-- traffic-profile-guidelinesrst|-- docker| |-- Dockerfile| |-- commonsh| |-- prepare_envsh| |-- requirementspip| `-- run_testssh|-- docs| |-- configguide| |-- devguide| |-- images| |-- results| `-- userguide`-- testcases
|-- Controllers|-- features|-- tests|-- VIM|-- vIMS|-- vPing|-- __init__py|-- config_functestpy|-- config_functestyaml`-- functest_utilspy
We may distinguish 4 different folders
bull commons it is a folder dedicated to store traffic profile or any test inputs that could be reused by any test project
bull docker this folder includes the scripts that will be used to setup the environment and run the tests
bull docs this folder includes the user and installationconfiguration guide
bull testcases this folder includes the scripts required by Functest internal test cases and other feature projects testcases
After the run command a new prompt appears which means that we are inside the container and ready to move to thenext step
Useful Docker commands
When typing exit in the container prompt this will cause exiting the container and probably stopping it Whenstopping a running Docker container all the changes will be lost there is a keyboard shortcut to quit the containerwithout stopping it CTRL+P+Q To reconnect to the running container DO NOT use the run command again (sinceit will create a new container) use exec instead
53 Additional testing and validation activities 53
OPNFV Configuration Guide Release brahmaputra30 (605ebda)
docker psltcopy the container IDgtdocker exec -ti ltCONTAINER_IDgt binbash
or simply
docker exec -ti $(docker ps|grep functest|awk print $1) binbash
There are other useful Docker commands that might be needed to manage possible issues with the containers
List the running containers
docker ps
List all the containers including the stopped ones
docker ps -a
It is useful sometimes to remove a container if there are some problems
docker rm ltCONTAINER_IDgt
Use the -f option if the container is still running it will force to destroy it
docker -f rm ltCONTAINER_IDgt
The Docker image is called opnfvfunctest and it is stored in the public Docker registry under the OPNFV accountdockerhub The are many different tags that have been created automatically by the CI mechanisms but the one thatthis document refers to is brahmaputra10 Pulling other tags might cause some problems while running the tests
Check the Docker documentation dockerdocs for more information
Preparing the Functest environment
Once the docker container is up and running execute the following command in the prompt
$repos_dirfunctestdockerprepare_envsh
NOTE $repos_dir is a default environment variable inside the docker container which points to homeopnfvrepos
This script will make sure that the requirements to run the tests are met and will install the needed libraries and toolsby all Functest test cases It must be run only once every time the docker is started from sratch
Focus on the OpenStack credentials
The OpenStack credentials are needed to run the tests against the VIM There are 3 ways to provide them to Functest
bull using the -v option when running the Docker container
bull create an empty file in homeopnfvfunctestconfopenstackcreds and paste the credentials in it
bull automatically retrieved using the following script $repos_dirrelengutilsfetch_os_credssh
Once the credentials are there they shall be sourced before running the tests
source homeopnfvfunctestconfopenstackcreds
or simply using the environment variable creds
54 Chapter 5 Post Configuration Activities
OPNFV Configuration Guide Release brahmaputra30 (605ebda)
$creds
After this try to run any OpenStack command to see if you get any output for instance
openstack user list
This will return a list of the actual users in the OpenStack deployment In any other case check that the credentialsare sourced
env|grep OS_
This command must show a set of environment variables starting with OS_ for example
OS_REGION_NAME=RegionOneOS_DEFAULT_DOMAIN=defaultOS_PROJECT_NAME=adminOS_PASSWORD=adminOS_AUTH_STRATEGY=keystoneOS_AUTH_URL=http172301035000v20OS_USERNAME=adminOS_TENANT_NAME=adminOS_ENDPOINT_TYPE=internalURLOS_NO_CACHE=true
If still the OpenStack command does not show anything or complains about connectivity issues it could be due to anincorrect url given to the OS_AUTH_URL environment variable Check the deployment settings
SSL Support
If you need to connect to a server that is TLS-enabled (the auth URL begins with lsquohttpsrsquo) and it uses a certificate froma private CA or a self-signed certificate you will need to specify the path to an appropriate CA certificate to use tovalidate the server certificate with the environment variable OS_CACERT
echo $OS_CACERTetcsslcertscacrt
However this certificate does not exist in the container by default It has to be copied manually from the OpenStackdeployment This can be done in 2 ways
1 Create manually that file and copy the contents from the OpenStack controller
2 (recommended) Add the file using a Docker volume when starting the container
-v ltpath_to_your_cert_filegtetcsslcertscacert
You might need to export OS_CACERT environment variable inside the container
export OS_CACERT=etcsslcertscacrt
Certificate verification can be turned off using OS_INSECURE=true For example Fuel uses self-signed cacerts bydefault so an pre step would be
export OS_INSECURE=true
Additional Options
In case you need to provide different configuration parameters to Functest (eg commit IDs or branches for therepositories ) copy the config_functestyaml from the repository to your current directory and run the container
53 Additional testing and validation activities 55
OPNFV Configuration Guide Release brahmaputra30 (605ebda)
with a volume
wget httpsgitopnfvorgcgitfunctestplaintestcasesconfig_functestyaml
ltmodify the file accordinglygt
docker run -ti -e INSTALLER_TYPE=fuel -e INSTALLER_IP=102002 opnfvfunctestbrahmaputra10 -v $(pwd)config_functestyamlhomeopnfvfunctestconfconfig_functestyaml binbash
However this is not recommended since most of the test cases rely on static parameters read from this file andchanging them might cause problems
Proxy support
Functest needs internet access to download some resources for some test cases For example to install the Rallyenvironment This might not work properly if the Jumphost is running through a Proxy
If that is the case make sure the resolvconf and the needed proxy environment variables are properly set
export http_proxy=ltyour http proxy settingsgtexport https_proxy=ltyour https proxy settingsgt
Or refer to the official Docker documentation for Proxy settings
Before running prepare_envsh make sure you can ping http and https sites inside the container For example
nc -v googlecom 80Connection to googlecom 80 port [tcphttp] succeeded
nc -v googlecom 443Connection to googlecom 443 port [tcphttps] succeeded
532 Installing vswitchperf
Supported Operating Systems
bull CentOS 7
bull Fedora 20
bull Fedora 21
bull Fedora 22
bull Ubuntu 1404
Supported vSwitches
The vSwitch must support Open Flow 13 or greater
bull OVS (built from source)
bull OVS with DPDK (built from source)
56 Chapter 5 Post Configuration Activities
OPNFV Configuration Guide Release brahmaputra30 (605ebda)
Supported Hypervisors
bull Qemu version 23
Available VNFs
A simple VNF that forwards traffic through a VM using
bull DPDK testpmd
bull Linux Brigde
bull custom l2fwd module
The VM image can be downloaded from httpartifactsopnfvorgvswitchperfvloop-vnf-ubuntu-1404_20151216qcow2
Other Requirements
The test suite requires Python 33 and relies on a number of other packages These need to be installed for the testsuite to function
Installation of required packages preparation of Python 3 virtual environment and compilation of OVS DPDK andQEMU is performed by script systemsbuild_base_machinesh It should be executed under user account which willbe used for vsperf execution
Please Note Password-less sudo access must be configured for given user account before script is executed
Execution of installation script
$ cd systems$ build_base_machinesh
Please Note you donrsquot need to go into any of the systems subdirectories simply run the top levelbuild_base_machinesh your OS will be detected automatically
Script build_base_machinesh will install all the vsperf dependencies in terms of system packages Python 3x andrequired Python modules In case of CentOS 7 it will install Python 33 from an additional repository provided bySoftware Collections (a link) Installation script will also use virtualenv to create a vsperf virtual environment whichis isolated from the default Python environment This environment will reside in a directory called vsperfenv in$HOME
You will need to activate the virtual environment every time you start a new shell session Its activation is specific toyour OS
CentOS 7
$ scl enable python33 bash$ cd $HOMEvsperfenv$ source binactivate
Fedora and Ubuntu
$ cd $HOMEvsperfenv$ source binactivate
53 Additional testing and validation activities 57
OPNFV Configuration Guide Release brahmaputra30 (605ebda)
Working Behind a Proxy
If yoursquore behind a proxy yoursquoll likely want to configure this before running any of the above For example
export http_proxy=proxymycompanycom123export https_proxy=proxymycompanycom123
533 Yardstick
The projectrsquos goal is to verify infrastructure compliance from the perspective of a Virtual Network Function (VNF)
The Projectrsquos scope is the development of a test framework Yardstick test cases and test stimuli to enable NetworkFunction Virtualization Infrastructure (NFVI) verification
In OPNFV Brahmaputra release generic test cases covering aspects of the metrics in the document ETSI GS NFV-TST001 ldquoPre-deployment Testing Report on Validation of NFV Environments and Servicesrdquo are available furtherOPNFV releases will provide extended testing of these metrics
The Project also includes a sample VNF the Virtual Traffic Classifier (VTC) and its experimental frameworkApexLake
Yardstick is used in OPNFV for verifying the OPNFV infrastructure and some of the OPNFV features The Yardstickframework is deployed in several OPNFV community labs It is installer infrastructure and application independent
See also
This Presentation for an overview of Yardstick and Yardsticktst for material on alignment ETSI TST001 and Yardstick
Yardstick Installation
Abstract
Yardstick currently supports installation on Ubuntu 1404 or by using a Docker image Detailed steps about installingYardstick using both of these options can be found below
To use Yardstick you should have access to an OpenStack environment with at least Nova Neutron Glance Keystoneand Heat installed
The steps needed to run Yardstick are
1 Install Yardstick and create the test configuration yaml file
2 Build a guest image and load the image into the OpenStack environment
3 Create a Neutron external network and load OpenStack environment variables
4 Run the test case
Installing Yardstick on Ubuntu 1404
Installing Yardstick framework Install dependencies
sudo apt-get install python-virtualenv python-devsudo apt-get install libffi-dev libssl-dev git
Create a python virtual environment source it and update setuptools
58 Chapter 5 Post Configuration Activities
OPNFV Configuration Guide Release brahmaputra30 (605ebda)
virtualenv ~yardstick_venvsource ~yardstick_venvbinactivateeasy_install -U setuptools
Download source code and install python dependencies
git clone httpsgerritopnfvorggerrityardstickcd yardstickpython setuppy install
There is also a YouTube video showing the above steps
Installing extra tools
yardstick-plot Yardstick has an internal plotting tool yardstick-plot which can be installed using the follow-ing command
python setuppy develop easy_install yardstick[plot]
Building a guest image Yardstick has a tool for building an Ubuntu Cloud Server image containing all the requiredtools to run test cases supported by Yardstick It is necessary to have sudo rights to use this tool
This image can be built using the following command while in the directory where Yardstick is installed(~yardstick if the framework is installed by following the commands above)
sudo toolsyardstick-img-modify toolsubuntu-server-cloudimg-modifysh
Warning the script will create files by default in tmpworkspaceyardstick and the files will be owned byroot
The created image can be added to OpenStack using the glance image-create or via the OpenStack Dashboard
Example command
glance --os-image-api-version 1 image-create --name yardstick-trusty-server --is-public true --disk-format qcow2 --container-format bare --file tmpworkspaceyardstickyardstick-trusty-serverimg
Installing Yardstick using Docker
Yardstick has two Docker images first one (Yardstick-framework) serves as a replacement for installing the Yardstickframework in a virtual environment (for example as done in Installing Yardstick framework) while the other image ismostly for CI purposes (Yardstick-CI)
Yardstick-framework image Download the source code
git clone httpsgerritopnfvorggerrityardstick
Build the Docker image and tag it as yardstick-framework
cd yardstickdocker build -t yardstick-framework
Run the Docker instance
53 Additional testing and validation activities 59
OPNFV Configuration Guide Release brahmaputra30 (605ebda)
docker run --name yardstick_instance -i -t yardstick-framework
To build a guest image for Yardstick see Building a guest image
Yardstick-CI image Pull the Yardstick-CI Docker image from Docker hub
docker pull opnfvyardstick-ci
Run the Docker image
docker run --privileged=true --rm -t -e INSTALLER_TYPE=$INSTALLER_TYPE -e INSTALLER_IP=$INSTALLER_IP opnfvyardstick-ci run_benchmarks
Where $INSTALLER_TYPE can be fuel foreman or compass and $INSTALLER_IP is the installer masternode IP address (ie 102002 is default for fuel)
Basic steps performed by the Yardstick-CI container
1 clone yardstick and releng repos
2 setup OS credentials (releng scripts)
3 install yardstick and dependencies
4 build yardstick cloud image and upload it to glance
5 upload cirros-033 cloud image to glance
6 run yardstick test scenarios
7 cleanup
OpenStack parameters and credentials
Yardstick-flavor Most of the sample test cases in Yardstick are using an OpenStack flavor called yardstick-flavorwhich deviates from the OpenStack standard m1tiny flavor by the disk size - instead of 1GB it has 3GB Otherparameters are the same as in m1tiny
Environment variables Before running Yardstick it is necessary to export OpenStack environment vari-ables from the OpenStack openrc file (using the source command) and export the external network nameexport EXTERNAL_NETWORK=external-network-name the default name for the external network isnet04_ext
Credential environment variables in the openrc file have to include at least
bull OS_AUTH_URL
bull OS_USERNAME
bull OS_PASSWORD
bull OS_TENANT_NAME
60 Chapter 5 Post Configuration Activities
OPNFV Configuration Guide Release brahmaputra30 (605ebda)
Yardstick default key pair Yardstick uses a SSH key pair to connect to the guest image This key pair can be foundin the resourcesfiles directory To run the ping-hotyaml test sample this key pair needs to be importedto the OpenStack environment
Examples and verifying the install
It is recommended to verify that Yardstick was installed successfully by executing some simple commands and testsamples Below is an example invocation of yardstick help command and pingpy test sample
yardstick -hyardstick task start samplespingyaml
Each testing tool supported by Yardstick has a sample configuration file These configuration files can be found in thesamples directory
Example invocation of yardstick-plot tool
yardstick-plot -i tmpyardstickout -o tmpplots
Default location for the output is tmpyardstickout
More info about the tool can be found by executing
yardstick-plot -h
53 Additional testing and validation activities 61

OPNFV Configuration Guide Release brahmaputra30 (605ebda)
2 Chapter 1 Abstract
CHAPTER
TWO
CONFIGURATION OPTIONS
OPNFV provides a variety of virtual infrastructure deployments called scenarios designed to host virtualised networkfunctions (VNFrsquos) Each scenario provide specific capabilities andor components aimed to solve specific problemsfor the deployment of VNFrsquos A scenario may include components such as OpenStack OpenDaylight OVS KVMetc where each scenario will include different source components or configurations
21 OPNFV Scenarios
Each OPNFV scenario provides unique features and capabilities it is important to understand your target platformcapabilities before installing and configuring your target scenario This configuration guide outlines how to install andconfigure components in order to enable the features you require
Scenarios are implemented as deployable compositions through integration with an installation tool OPNFV supportsmultiple installation tools and for any given release not all tools will support all scenarios While our target is toestablish parity across the installation tools to ensure they can provide all scenarios the practical challenge of achievingthat goal for any given feature and release results in some disparity
211 Brahmaputra scenario overeview
The following table provides an overview of the installation tools and available scenariorsquos in the Brahmaputra releaseof OPNFV
3
OPNFV Configuration Guide Release brahmaputra30 (605ebda)
Scenario status is indicated by a weather pattern icon All scenarios listed with a weather pattern are possible to deployand run in your environment or a Pharos lab however they may have known limitations or issues as indicated by theicon
Weather pattern icon legend
Weather Icon Scenario Status
Stable no known issues
Stable documented limitations
Deployable stability or feature limitations
Not deployed with this installer
Scenarios that are not yet in a state of ldquoStable no known issuesrdquo will continue to be stabilised and updates will bemade on the stablebrahmaputra branch While we intend that all Brahmaputra scenarios should be stable it is worth
4 Chapter 2 Configuration Options
OPNFV Configuration Guide Release brahmaputra30 (605ebda)
checking regularly to see the current status Due to our dependency on upstream communities and code some issuesmay not be resolved prior to the C release
212 Scenario Naming
In OPNFV scenarios are identified by short scenario names these names follow a scheme that identifies the keycomponents and behaviours of the scenario The rules for scenario naming are as follows
os-[controller]-[feature]-[mode]-[option]
Details of the fields are
bull os mandatory
ndash Refers to the platform type used
ndash possible value os (OpenStack)
bull [controller] mandatory
ndash Refers to the SDN controller integrated in the platform
ndash example values nosdn ocl odl onos
ndash [feature] mandatory
Refers to the feature projects supported by the scenario
example values nofeature kvm ovs sfc
ndash [mode] mandatory
Refers to the deployment type which may include for instance high availability
possible values ha noha
ndash [option] optional
Used for the scenarios those do not fit into naming scheme
The optional field in the short scenario name should not be included if there is no optional scenario
Some examples of supported scenario names are
bull os-nosdn-kvm-noha
ndash This is an OpenStack based deployment using neutron including the OPNFV enhanced KVM hypervisor
bull os-onos-nofeature-ha
ndash This is an OpenStack deployment in high availability mode including ONOS as the SDN controller
bull os-odl_l2-sfc
ndash This is an OpenStack deployment using OpenDaylight and OVS enabled with SFC features
213 Installing your scenario
There are two main methods of deploying your target scenario one method is to follow this guide which will walk youthrough the process of deploying to your hardware using scripts or ISO images the other method is to set up a Jenkinsslave and connect your infrastructure to the OPNFV Jenkins master
For the purposes of evaluation and development a number of Brahmaputra scenarios are able to be deployed virtuallyto mitigate the requirements on physical infrastructure Details and instructions on performing virtual deploymentscan be found in the installer specific installation instructions
21 OPNFV Scenarios 5
OPNFV Configuration Guide Release brahmaputra30 (605ebda)
To set up a Jenkins slave for automated deployment to your lab refer to the Jenkins slave connect guide
This document will describe how to install and configure your target OPNFV scenarios Remember to check theassociated validation procedures section following your installation for details of the use cases and tests that have beenrun
6 Chapter 2 Configuration Options
CHAPTER
THREE
INSTALLER CONFIGURATION
Installing the OPNFV platform requires either a physical environment as defined in the Pharos lab specificationor a virtual infrastructure When configuring a physical infrastructure it is strongly advised to follow the Pharosconfiguration material
31 Lab Setup Guide
Provides an overview for setting up a Pharos lab A full set of pharos_master documents are maintained in the pharosrepo
When setting up an OPNFV community lab
bull Provide the Pharos community with details of the intended setup including
ndash Overview of resources are being offered to the community intended purpose and known limitations
ndash Lab owner name with contacts
ndash Timelines for availablity for development test release production
bull Update the Pharos Wiki with lab details
ndash Lab map organization contacts status location resources role etc
ndash httpswikiopnfvorgpharoscommunity_labs
ndash pharos_wiki
bull Update the Pharos project information file ldquoCurrent Labsrdquo
ndash pharos_information
bull Create new Wiki pages for lab and POD specific information
ndash Access procedures
ndash Usage guidelines for developers
ndash Update infomtation as PODs are re-assigned or usageavailability changes
bull Fill Lab and POD templates pharos_lab pharos_pod
ndash Note that security sensitive lab information should be stored in the secure Pharos repo
bull Connect PODs to JenkinsCI
7
OPNFV Configuration Guide Release brahmaputra30 (605ebda)
311 Jump Server Configuration
Jump server install procedures are maintained by each installer project Addional Jump server configuraton BKMswill be maintained here The below install information was used for Fuel however may be outdated (please refer toFuel Installer documents)
Procedure
1 Obtain CentOS 7 Minimal ISO and install
wget httpmirrorskernelorgcentos7isosx86_64CentOS-7-x86_64-Minimal-1503-01iso
2 Set parameters appropriate for your environment during installation
3 Disable NetworkManager
systemctl disable NetworkManager
4 Configure your etcsysconfignetwork-scriptsifcfg- files for your network
5 Restart networking
service network restart
6 Edit etcresolvconf and add a nameserver
vi etcresolvconf
7 Install libvirt amp kvm
yum -y update yum -y install kvm qemu-kvm libvirt systemctl enablelibvirtd
8 Reboot
shutdown -r now
9 If you wish to avoid annoying delay when use ssh to log in disable DNS lookups
vi etcsshsshd_config
Uncomment ldquoUseDNS yesrdquo change lsquoyesrsquo to lsquonorsquo
Save
10 Restart sshd
systemctl restart sshd
11 Install virt-install
yum -y install virt-install
12 Visit artifactsopnfvorg and DL the OPNFV Fuel ISO
13 Create a bridge using the interface on the PXE network for example br0
14 Make a directory owned by qemu
mkdir homeqemu mkdir -p homeqemuVMsfuel-60disk
chown -R qemuqemu homeqemu
15 Copy the ISO to homeqemu
cd homeqemu
virt-install -n opnfv-2015-05-22_18-34-07-fuel -r 4096--vcpus=4 --cpuset=0-3 -c opnfv-2015-05-22_18-34-07iso
8 Chapter 3 Installer Configuration
OPNFV Configuration Guide Release brahmaputra30 (605ebda)
--os-type=linux --os-variant=rhel6 --boot hdcdrom --diskpath=homeqemuVMsmirantis-fuel-60diskfuel-vhd0qcow2bus=virtiosize=50format=qcow2-w bridge=br0model=virtio --graphics vnclisten=0000
16 Temporarily flush the firewall rules to make things easier
iptables -F
17 Connect to the console of the installing VM with your favorite VNC client
18 Change the IP settings to match the pod use an IP in the PXEAdmin network for the Fuel Master
The following sections describe the per installer configuration options Further details for each installer are capturedin the referred project documentation
32 Apex configuration
321 Introduction
This document describes the steps to install an OPNFV Bramaputra reference platform as defined by the GenesisProject using the Apex installer
The audience is assumed to have a good background in networking and Linux administration
322 Preface
Apex uses the RDO Manager Open Source project as a server provisioning tool RDO Manager is the RDO Projectimplementation of OpenStackrsquos Triple-O project The Triple-O image based life cycle installation tool provisions anOPNFV Target System (3 controllers n number of compute nodes) with OPNFV specific configuration provided bythe Apex deployment tool chain
The Apex deployment artifacts contain the necessary tools to deploy and configure an OPNFV target sys-tem using the Apex deployment toolchain These artifacts offer the choice of using the Apex bootable ISO(opnfv-apex-bramaputraiso) to both install CentOS 7 and the nessesary materials to deploy or the ApexRPM (opnfv-apexrpm) which expects installation to a CentOS 7 libvirt enabled host The RPM contains acollection of configuration file prebuilt disk images and the automatic deployment script (opnfv-deploy)
An OPNFV install requires a ldquoJumphostrdquo in order to operate The bootable ISO will allow you to install a cus-tomized CentOS 7 release to the Jumphost which includes the required packages needed to run opnfv-deployIf you already have a Jumphost with CentOS 7 installed you may choose to skip the ISO step and simply installthe (opnfv-apexrpm) RPM The RPM is the same RPM included in the ISO and includes all the necessary diskimages and configuration files to execute an OPNFV deployment Either method will prepare a host to the same readystate for OPNFV deployment
opnfv-deploy instantiates an RDO Manager Instack VM server using libvirt as its provider This VM is thenconfigured and used to provision the OPNFV target deployment (3 controllers n compute nodes) These nodes can beeither virtual or bare metal This guide contains instructions for installing either method
323 Installation High-Level Overview - Bare Metal Deployment
The setup presumes that you have 6 bare metal servers and have already setup network connectivity on at least 2interfaces for all servers via a TOR switch or other network implementation
32 Apex configuration 9
OPNFV Configuration Guide Release brahmaputra30 (605ebda)
The physical TOR switches are not automatically configured from the OPNFV reference platform All the networksinvolved in the OPNFV infrastructure as well as the provider networks and the private tenant VLANs needs to bemanually configured
The Jumphost can be installed using the bootable ISO or by other means including the (opnfv-apex) RPMs andvirtualization capabilities The Jumphost should then be configured with an IP gateway on its admin or public interfaceand configured with a working DNS server The Jumphost should also have routable access to the lights out network
opnfv-deploy is then executed in order to deploy the Instack VM opnfv-deploy uses three con-figuration files in order to know how to install and provision the OPNFV target system The in-formation gathered under section Execution Requirements (Bare Metal Only) is put into the YAML file(etcopnfv-apexinventoryyaml) configuration file Deployment options are put into the YAML file(etcopnfv-apexdeploy_settingsyaml) Networking definitions gathered under section Network Re-quirements are put into the YAML file (etcopnfv-apexnetwork_settingsyaml) opnfv-deploywill boot the Instack VM and load the target deployment configuration into the provisioning toolchain This includesMAC address IPMI Networking Environment and OPNFV deployment options
Once configuration is loaded and Instack is configured it will then reboot the nodes via IPMI The nodes should alreadybe set to PXE boot first off the admin interface The nodes will first PXE off of the Instack PXE server and go througha discoveryintrospection process
Introspection boots off of custom introspection PXE images These images are designed to look at the properties ofthe hardware that is booting off of them and report the properties of it back to the Instack node
After introspection Instack will execute a Heat Stack Deployment to being node provisioning and configuration Thenodes will reboot and PXE again off the Instack PXE server to provision each node using the Glance disk images pro-vided by Instack These disk images include all the necessary packages and configuration for an OPNFV deploymentto execute Once the nodersquos disk images have been written to disk the nodes will boot off the newly written disks andexecute cloud-init which will execute the final node configuration This configuration is largly completed by executinga puppet apply on each node
324 Installation High-Level Overview - VM Deployment
The VM nodes deployment operates almost the same way as the bare metal deployment with a few differencesopnfv-deploy still deploys an Instack VM In addition to the Instack VM a collection of VMs (3 control nodes +2 compute for an HA deployment or 1 control node and 1 compute node for a Non-HA Deployment) will be definedfor the target OPNFV deployment The part of the toolchain that executes IPMI power instructions calls into libvirtinstead of the IPMI interfaces on baremetal servers to operate the power managment These VMs are then provisionedwith the same disk images and configuration that baremetal would be
To RDO Manager these nodes look like they have just built and registered the same way as bare metal nodes the maindifference is the use of a libvirt driver for the power management
325 Installation Guide - Bare Metal Deployment
WARNING Baremetal documentation is not complete WARNING The main missing instructions are r elatedto bridging the networking for the undercloud to the physical underlay network for the overcloud to be deployedto
This section goes step-by-step on how to correctly install and provision the OPNFV target system to bare metal nodes
Install Bare Metal Jumphost
1a If your Jumphost does not have CentOS 7 already on it or you would like to do a fresh install then down-load the Apex bootable ISO from OPNFV artifacts lthttpartifactsopnfvorggt There have been isolated
10 Chapter 3 Installer Configuration
OPNFV Configuration Guide Release brahmaputra30 (605ebda)
reports of problems with the ISO having trouble completing installation successfully In the unexpectedevent the ISO does not work please workaround this by downloading the CentOS 7 DVD and perform-ing a ldquoVirtualization Hostrdquo install If you perform a ldquoMinimal Installrdquo or install type other than ldquoVirtu-alization Hostrdquo simply run sudo yum groupinstall Virtualization Host ampamp chkconfiglibvird on and reboot the host Once you have completed the base CentOS install proceed to step 1b
1b If your Jump host already has CentOS 7 with libvirt running on it then install the opnfv-apex RPMs fromOPNFV artifacts lthttpartifactsopnfvorggt The following RPMS are available for installation
bull opnfv-apex - OpenDaylight L2 L3 and ONOS support
bull opnfv-apex-opendaylight-sfc - OpenDaylight SFC support
bull opnfv-apex-undercloud (required)
bull opnfv-apex-common (required)
One or more of these RPMs is required If you only want the experimental SFC support then the opnfv-apexRPM is not required If you only want OpenDaylight or ONOS support then the opnfv-apex-opendaylight-sfcRPM is not required
To install these RPMs download them to the local disk on your CentOS 7 install and passthe file names directly to yum sudo yum install opnfv-apex-ltversiongtrpmopnfv-apex-undercloud-ltversiongtrpm opnfv-apex-common-ltversiongtrpm
2a Boot the ISO off of a USB or other installation media and walk through installing OPNFV CentOS 7 TheISO comes prepared to be written directly to a USB drive with dd as such
dd if=opnfv-apexiso of=devsdX bs=4M
Replace devsdX with the device assigned to your usb drive Then select the USB device as the boot media onyour Jumphost
2b Install the RDO Release RPM and the opnfv-apex RPM
sudo yum install -y httpswwwrdoprojectorgreposrdo-releaserpmopnfv-apex-versionrpm
The RDO Project release repository is needed to install OpenVSwitch which is a dependency of opnfv-apex If you do not have external connectivity to use this repository you need to download the Open-VSwitch RPM from the RDO Project repositories and install it with the opnfv-apex RPM
3 After the operating system and the opnfv-apex RPMs are installed login to your Jumphost as root
4 Configure IP addresses on the interfaces that you have selected as your networks
5 Configure the IP gateway to the Internet either preferably on the public interface
6 Configure your etcresolvconf to point to a DNS server (8888 is provided by Google)
Creating a Node Inventory File
IPMI configuration information gathered in section Execution Requirements (Bare Metal Only) needs to be added tothe inventoryyaml file
1 Copy usrsharedocopnfvinventoryyamlexample as your inventory file template toetcopnfv-apexinventoryyaml
2 The nodes dictionary contains a definition block for each baremetal host that will be deployed 1 or morecompute nodes and 3 controller nodes are required (The example file contains blocks for each of these already)It is optional at this point to add more compute nodes into the node list
3 Edit the following values for each node
32 Apex configuration 11
OPNFV Configuration Guide Release brahmaputra30 (605ebda)
bull mac_address MAC of the interface that will PXE boot from Instack
bull ipmi_ip IPMI IP Address
bull ipmi_user IPMI username
bull ipmi_password IPMI password
bull pm_type Power Management driver to use for the node
bull cpus (Introspected) CPU cores available
bull memory (Introspected) Memory available in Mib
bull disk (Introspected) Disk space available in Gb
bull arch (Introspected) System architecture
bull capabilities (Optional) Intended node role (profilecontrol or profilecompute)
bull Introspection looks up the overcloud nodersquos resources and overrides these value You can
leave default values and Apex will get the correct values when it runs introspection on the nodes
If capabilities profile is not specified then Apex will select nodersquos roles in the OPNFV cluster in a non-deterministicfashion
Creating the Settings Files
Edit the 2 settings files in etcopnfv-apex These files have comments to help you customize them
1 deploy_settingsyaml This file includes basic configuration options deployment
2 network_settingsyaml This file provides Apex with the networking information that satisfies the prerequisiteNetwork Requirements These are specific to your environment
Running opnfv-deploy
You are now ready to deploy OPNFV using Apex opnfv-deploy will use the inventory and settings files to deployOPNFV
Follow the steps below to execute
1 Execute opnfv-deploy sudo opnfv-deploy [ --flat | -n network_settingsyaml ] -iinventoryyaml -d deploy_settingsyaml If you need more information about the options thatcan be passed to opnfv-deploy use opnfv-deploy --help ndashflat will collapse all networks onto a singlenic -n network_settingsyaml allows you to customize your networking topology
2 Wait while deployment is executed If something goes wrong during this part of the process it is most likelya problem with the setup of your network or the information in your configuration files You will also noticedifferent outputs in your shell
3 The message ldquoOvercloud Deployedrdquo will display when When the deployment is complete Just above thismessage there will be a URL that ends in port httplthostgt5000 This url is also the endpoint for the OPNFVHorizon Dashboard if connected to on port 80
33 Compass4nfv configuration
This document describes providing guidelines on how to install and configure the Brahmaputra release of OPNFVwhen using Compass as a deployment tool including required software and hardware configurations
12 Chapter 3 Installer Configuration
OPNFV Configuration Guide Release brahmaputra30 (605ebda)
Installation and configuration of host OS OpenStack OpenDaylight ONOS Ceph etc can be supported by Compasson VMs or Bare Metal nodes
The audience of this document is assumed to have good knowledge in networking and UnixLinux administration
331 Preconditions
Before starting the installation of the Brahmaputra release of OPNFV some planning must be done
Retrieving the installation ISO image
First of all The installation ISO is needed for deploying your OPNFV environment it included packages of CompassOpenStack OpenDaylight ONOS and so on
The stable release ISO can be retrieved via OPNFV software download page
The daily build ISO can be retrieved via OPNFV artifacts repository
httpartifactsopnfvorg
NOTE Search the keyword ldquoCompass4nfvBrahmaputrardquo to locate the ISO image
Eg compass4nfvbrahmaputraopnfv-2016-01-16_15-03-18iso compass4nfvbrahmaputraopnfv-2016-01-16_15-03-18properties
The name of iso image includes the time of iso building you can get the daily ISO according the building time The giturl and sha1 of Compass4nfv are recorded in properties files According these the corresponding deployment scriptscan be retrieved
Getting the deployment scripts
To retrieve the repository of Compass4nfv on Jumphost use the following command
bull git clone httpsgerritopnfvorggerritcompass4nfv
To get stablebrahmaputra release you can use the following command
bull git checkout brahmaputra10
NOTE PLEASE DO NOT GIT CLONE COMPASS4NFV IN root DIRECTORY
If you donrsquot have a Linux foundation user id get it first by the url
httpswikiopnfvorgdevelopergetting_started
If you want to use a daily release ISO please checkout the corresponding sha1 to get the deployment scripts
Eg Git sha1 in file ldquoopnfv-2016-01-16_15-03-18propertiesrdquo is d5a13ce7cc2ce89946d34b0402ecf33c1d291851
bull git checkout d5a13ce7cc2ce89946d34b0402ecf33c1d291851
Preparing the installation environment
If you have only 1 Bare Metal server Virtual deployment is recommended if more than or equal 3 servers theBare Metal deployment is recommended The minimum number of servers for Bare metal deployment is 3 1 forJumpServer(Jumphost) 1 for controller 1 for compute
33 Compass4nfv configuration 13
OPNFV Configuration Guide Release brahmaputra30 (605ebda)
332 Setup Requirements
Jumphost Requirements
The Jumphost requirements are outlined below
1 Ubuntu 1404 (Pre-installed)
2 Root access
3 libvirt virtualization support
4 Minimum 2 NICs
bull PXE installation Network (Receiving PXE request from nodes and providing OS provisioning)
bull IPMI Network (Nodes power control and set boot PXE first via IPMI interface)
bull External Network (Optional Internet access)
5 16 GB of RAM for a Bare Metal deployment 64 GB of RAM for a VM deployment
6 Minimum 100G storage
Bare Metal Node Requirements
Bare Metal nodes require
1 IPMI enabled on OOB interface for power control
2 BIOS boot priority should be PXE first then local hard disk
3 Minimum 3 NICs
bull PXE installation Network (Broadcasting PXE request)
bull IPMI Network (Receiving IPMI command from Jumphost)
bull External Network (OpenStack mgmtexternalstoragetenant network)
Network Requirements
Network requirements include
1 No DHCP or TFTP server running on networks used by OPNFV
2 2-6 separate networks with connectivity between Jumphost and nodes
bull PXE installation Network
bull IPMI Network
bull Openstack mgmt Network
bull Openstack external Network
bull Openstack tenant Network
bull Openstack storage Network
3 Lights out OOB network access from Jumphost with IPMI node enabled (Bare Metal deployment only)
4 External network has Internet access meaning a gateway and DNS availability
14 Chapter 3 Installer Configuration
OPNFV Configuration Guide Release brahmaputra30 (605ebda)
The networks with() can be share one NIC(Default configuration) or use an exclusive NIC(Reconfigurated innetworkyml)
Execution Requirements (Bare Metal Only)
In order to execute a deployment one must gather the following information
1 IPMI IP addresses for the nodes
2 IPMI login information for the nodes (userpass)
3 MAC address of Control Plane Provisioning interfaces of the Bare Metal nodes
333 Installation Guide (BM Deployment)
Nodes Configuration (BM Deployment)
The bellow file is the inventory template of deployment nodes
ldquocompass4nfvdeployconfhardware_environmenthuawei_us_labpod1dhaymlrdquo
You can write your own IPMI IPUserPasswordMac addressroles reference to it
bull ipmiVer ndash IPMI interface version for deployment node support IPMI 10 or IPMI 20 is available
bull ipmiIP ndash IPMI IP address for deployment node Make sure it can access from Jumphost
bull ipmiUser ndash IPMI Username for deployment node
bull ipmiPass ndash IPMI Password for deployment node
bull mac ndash MAC Address of deployment node PXE NIC
bull name ndash Host name for deployment node after installation
bull roles ndash Components deployed
Assignment of different roles to servers
Eg Openstack only deployment roles setting
hosts- name host1roles
- controller- ha
- name host2roles
- compute
NOTE IF YOU SELECT MUTIPLE NODES AS CONTROLLER THE lsquoharsquo role MUST BE SELECT TOO
Eg Openstack and ceph deployment roles setting
hosts- name host1roles
- controller- ha- ceph-adm- ceph-mon
33 Compass4nfv configuration 15
OPNFV Configuration Guide Release brahmaputra30 (605ebda)
- name host2roles
- compute- ceph-osd
Eg Openstack and ODL deployment roles setting
hosts- name host1roles
- controller- ha- odl
- name host2roles
- compute
Eg Openstack and ONOS deployment roles setting
hosts- name host1roles
- controller- ha- onos
- name host2roles
- compute
Network Configuration (BM Deployment)
Before deployment there are some network configuration to be checked based on your network topology Com-pass4nfv network default configuration file is ldquocompass4nfvdeployconfnetwork_cfgyamlrdquo You can write yourown reference to it
The following figure shows the default network configuration
+--+ +--+ +--+| | | | | || | +------------+ | | | || +------+ Jumphost +------+ | | || | +------+-----+ | | | || | | | | | || | +------------+ +-----+ || | | | | || | +------------+ | | | || +------+ host1 +------+ | | || | +------+-----+ | | | || | | | | | || | +------------+ +-----+ || | | | | || | +------------+ | | | || +------+ host2 +------+ | | || | +------+-----+ | | | || | | | | | |
16 Chapter 3 Installer Configuration
OPNFV Configuration Guide Release brahmaputra30 (605ebda)
| | +------------+ +-----+ || | | | | || | +------------+ | | | || +------+ host3 +------+ | | || | +------+-----+ | | | || | | | | | || | +------------+ +-----+ || | | | | || | | | | |+-++ ++-+ +-++
^ ^ ^| | || | |
+-+-------------------------+ | || External Network | | |+---------------------------+ | |
+-----------------------+---+ || IPMI Network | |+---------------------------+ |
+-------------------------+-+| PXE(Installation) Network |+---------------------------+
Start Deployment (BM Deployment)
1 Set PXEInstallation NIC for Jumphost (set eth1 Eg)
export INSTALL_NIC=eth1
2 Set OS version for nodes provisioning (set Ubuntu1404 Eg)
export OS_VERSION=trusty
3 Set OpenStack version for deployment nodes (set liberty Eg)
export OPENSTACK_VERSION=liberty
4 Set ISO image that you want to deploy
export ISO_URL=file$YOUR_OWNcompassisoorexport ISO_URL=httpartifactsopnfvorgcompass4nfvbrahmaputraopnfv-releaseiso
5 Run deploysh with inventory and network configuration
deploysh --dha $YOUR_OWNdhayml --network $YOUR_OWNnetworkyml
34 Fuel configuration
This section provides guidelines on how to install and configure the Brahmaputra release of OPNFV when using Fuelas a deployment tool including required software and hardware configurations
For detailed instructions on how to install the Brahmaputra release using Fuel see Reference 13 in section ldquoFuelassociated referencesrdquo below
34 Fuel configuration 17
OPNFV Configuration Guide Release brahmaputra30 (605ebda)
341 Pre-configuration activities
Planning the deployment
Before starting the installation of the Brahmaputra release of OPNFV when using Fuel as a deployment tool someplanning must be done
Familiarize yourself with the Fuel by reading the following documents
bull Fuel planning guide please see Reference 8 in section ldquoFuel associated referencesrdquo below
bull Fuel quick start guide please see Reference 9 in section ldquoFuel associated referencesrdquo below
bull Fuel operations guide please see Reference 10 in section ldquoFuel associated referencesrdquo below
bull Fuel Plugin Developers Guide please see Reference 11 in section ldquoFuel associated referencesrdquo below
Before the installation can start a number of deployment specific parameters must be collected those are
1 Provider sub-net and gateway information
2 Provider VLAN information
3 Provider DNS addresses
4 Provider NTP addresses
5 Network overlay you plan to deploy (VLAN VXLAN FLAT)
6 Monitoring Options you want to deploy (Ceilometer Syslog etc)
7 How many nodes and what roles you want to deploy (Controllers Storage Computes)
8 Other options not covered in the document are available in the links above
Retrieving the ISO image
First of all the Fuel deployment ISO image needs to be retrieved the Fuel iso image of the Brahmaputra release canbe found at Reference 2
Alternatively you may build the iso from source by cloning the opnfvfuel git repository Detailed instructions onhow to build a Fuel OPNFV iso can be found in Reference 14 at section ldquoFuel associated referencesrdquo below
342 Hardware requirements
Following high level hardware requirements must be met
18 Chapter 3 Installer Configuration
OPNFV Configuration Guide Release brahmaputra30 (605ebda)
HW Aspect Requirement of nodes Minimum 5 (3 for non redundant deployment)
bull 1 Fuel deployment master (may be virtualized)bull 3(1) Controllers (1 colocated mongoceilometer
role 2 Ceph-OSD roles)bull 1 Compute (1 co-located Ceph-OSD role)
CPU Minimum 1 socket x86_AMD64 with Virtualizationsupport
RAM Minimum 16GBserver (Depending on VNF work load)Disk Minimum 256GB 10kRPM spinning disksNetworks 4 Tagged VLANs (PUBLIC MGMT STORAGE PRI-
VATE)1 Un-Tagged VLAN for PXE Boot - ADMIN Networknote These can be run on single NIC - or spread outover other nics as your hardware supports
For information on compatible hardware types available for use please see Reference 11 in section ldquoFuel associatedreferencesrdquo below
Top of the rack (TOR) Configuration requirements
The switching infrastructure provides connectivity for the OPNFV infrastructure operations tenant networks(EastWest) and provider connectivity (NorthSouth) it also provides needed connectivity for the Storage Area Net-work (SAN) To avoid traffic congestion it is strongly suggested that three physically separated networks are usedthat is 1 physical network for administration and control one physical network for tenant private and public networksand one physical network for SAN The switching connectivity can (but does not need to) be fully redundant in suchcase it and comprises a redundant 10GE switch pair for each of the three physically separated networks
The physical TOR switches are not automatically configured from the OPNFV reference platform All the networksinvolved in the OPNFV infrastructure as well as the provider networks and the private tenant VLANs needs to bemanually configured
343 Jumphost configuration
The Jumphost server also known as the ldquoFuel masterrdquo provides needed servicesfunctions to deploy an OP-NFVOpenStack cluster as well functions for cluster life-cycle management (extensions repair actions and upgrades)
The Jumphost server requires 2 (4 if redundancy is required) Ethernet interfaces - one for external management of theOPNFV installation and another for jump-host communication with the OPNFV cluster
Install the Fuel jump-host
Mount the Fuel Brahmaputra ISO file as a boot device to the jump host server reboot it and install the Fuel Jumphostin accordance with installation instructions see Reference 13 in section ldquoFuel associated referencesrdquo below
344 Platform components configuration
Fuel-Plugins
Fuel plugins enable you to install and configure additional capabilities for your Fuel OPNFV based cloud such asadditional storage types networking functionality or NFV features developed by OPNFV
34 Fuel configuration 19
OPNFV Configuration Guide Release brahmaputra30 (605ebda)
Fuel offers an open source framework for creating these plugins so therersquos a wide range of capabilities that you canenable Fuel to add to your OpenStack clouds
The OPNFV Brahmaputra version of Fuel provides a set of pre-packaged plugins developed by OPNFV
Pluginname
Short description
Open-Daylight
OpenDaylight provides an open-source SDN Controller providing networking features such as L2and L3 network control ldquoService Function Chainingrdquo routing networking policies etc Moreinformation on OpenDaylight in the OPNFV Brahmaputra release can be found in a separate sectionin this document
ONOS ONOS is another open-source SDN controller which in essense fill the same role as OpenDaylightMore information on ONOS in the OPNFV Brahmaputra release can be found in a separate section inthis document
BGP-VPN
BGP-VPN provides an BGPMPLS VPN service More information on BGP-VPN in the OPNFVBrahmaputra release can be found in a separate section in this document
OVS-NSH
OVS-NSH provides a variant of Open-vSwitch which supports ldquoNetwork Service Headersrdquo neededfor the ldquoService function chainingrdquo feature More information on ldquoService Function Chainingrdquo in theOPNFV Brahmaputra release can be found in a in a separate section in this document
OVS-NFV
OVS-NFV provides a variant of Open-vSwitch with carrier grade characteristics essential for NFVworkloads More information on OVS-NFV in the OPNFV Brahmaputra release can be found in a ina separate section in this document
KVM-NFV
KVM-NFV provides a variant of KVM with improved virtualization characteristics essential for NFVworkloads More information on KVM-NFV in the OPNFV Brahmaputra release can be found in a ina separate section in this document
VSPERF VSPERF provides a networking characteristics test bench that facilitates characteristicsperformanceevaluation of vSwithches More information on VSPERF in the OPNFV Brahmaputra release can befound in a in a separate section in this document
Additional third-party plugins can be found here httpswwwmirantiscomproductsopenstack-drivers-and-pluginsfuel-plugins Note Plugins are not necessarilly compatible with each other see section ldquoConfigurationoptions OPNFV scenariosrdquo for compatibility information
The plugins come prepackaged ready to install To do so follow the installation instructions provided in Reference 13provided in section ldquoFuel associated referencesrdquo below
Fuel environment
A Fuel environment is an OpenStack instance managed by Fuel one Fuel instance can manage several OpenStackinstancesenvironments with different configurations etc
To create a Fuel instance follow the instructions provided in the installation instructions see Reference 13 in sectionldquoFuel associated referencesrdquo below
Provisioning of aditional features and services
Although the plugins have already previously been installed they are not per default enabled for the environment wejust created The plugins of your choice need to be enabled and configured
To enable a plugin follow the installation instructions found in Reference 13 provided in section ldquoFuel associatedreferencesrdquo below
For configuration of the plugins please see section ldquoFeature Configurationrdquo
20 Chapter 3 Installer Configuration
OPNFV Configuration Guide Release brahmaputra30 (605ebda)
Networking
All the networking aspects need to be configured in terms of - InterfacesNICs - VLANs - Sub-nets - Gateways - Usernetwork segmentation (VLANVXLAN) - DNS - NTP - etc
For guidelines on how to configure networking please refer to the installation instructions found in Reference 13provided in section ldquoFuel associated referencesrdquo below
Node allocation
Now it is time to allocate the nodes in your OPNFV cluster to OpenStack- SDN- and other featureservice rolesSome roles may require redundancy while others donrsquot Some roles may be co-located with other roles while othersmay not The Fuel GUI will guide you in the allocation of roles and will not permit you to perform invalid allocations
For detailed guide-lines on node allocation please refer to the installation instructions found in Reference 13 providedin section ldquoFuel associated referencesrdquo below
Off-line deployment
The OPNFV Brahmaputra version of Fuel can be deployed using on-line upstream repositories (default) or off-lineusing built-in local repositories on the Fuel jump-start server
For instructions on how to configure Fuel for off-line deployment please refer to the installation instructions found inReference 13 provided in section ldquoFuel associated referencesrdquo below
Deployment
You should now be ready to deploy your OPNFV Brahmaputra environment - but before doing so you may want toverify your network settings
For further details on network verification and deployment please refer to the installation instructions found in Ref-erence 13 provided in section ldquoFuel associated referencesrdquo below
345 Fuel associated references
1 OPNFV Home Page
2 OPNFV documentation- and software downloads
3 OpenStack Liberty Release artifacts
4 OpenStack documentation
5 OpenDaylight artifacts
6 The Fuel OpenStack project
7 Fuel documentation overview
8 Fuel planning guide
9 Fuel quick start guide
10 Fuel operations guide
11 Fuel Plugin Developers Guide
12 Fuel OpenStack Hardware Compatibility List
34 Fuel configuration 21
OPNFV Configuration Guide Release brahmaputra30 (605ebda)
13 OPNFV Installation instruction for the Brahmaputra release of OPNFV when using Fuel as a deployment tool
14 OPNFV Build instruction for the Brahmaputra release of OPNFV when using Fuel as a deployment tool
15 OPNFV Release Note for the Brahmaputra release of OPNFV when using Fuel as a deployment tool
35 JOID Configuration
351 Bare Metal Installations
352 Requirements as per Pharos
353 Networking
Minimum 2 networks
1 First for Admin network with gateway to access external network
2 Second for public network to consume by tenants for floating ips
NOTE JOID support multiple isolated networks for data as well as storage Based on your network optionsfor Openstack
Minimum 6 physical servers
1 Jump host server
Minimum HW Spec needed
CPU cores 16
Memory 32 GB
Hard Disk 1(250 GB)
NIC eth0(Admin Management) eth1 (external network)
2 Control node servers (minimum 3)
Minimum HW Spec
CPU cores 16
Memory 32 GB
Hard Disk 1(500 GB)
NIC eth0(Admin Management) eth1 (external network)
3 Compute node servers (minimum 2)
Minimum HW Spec
CPU cores 16
Memory 32 GB
Hard Disk 1(1 TB) this includes the space for ceph as well
22 Chapter 3 Installer Configuration
OPNFV Configuration Guide Release brahmaputra30 (605ebda)
NIC eth0(Admin Management) eth1 (external network)
NOTE Above configuration is minimum and for better performance and usage of the Openstack please con-sider higher spec for each nodes
Make sure all servers are connected to top of rack switch and configured accord-ingly No DHCP server should be up and configured Only gateway at eth0 and eth1 network should be con-figure to access the network outside your lab
Jump node configuration
1 Install Ubuntu 1404 LTS server version of OS on the nodes 2 Install the git and bridge-utils pack-ages on the server and configure minimum two bridges on jump host
brAdm and brPublic cat etcnetworkinterfaces
The loopback network interface
auto lo
iface lo inet loopback
iface eth0 inet manual
auto brAdm
iface brAdm inet static
address 10411
netmask 2552552480
network 10400
broadcast 1047255
gateway 10401
dns- options are implemented by the resolvconf package if installed
dns-nameservers 10402
bridge_ports eth0
auto brPublic
iface brPublic inet static
address 102662
netmask 2552552550
bridge_ports eth2
NOTE If you choose to use the separate network for management data and storage then you need to createbridge for each interface In case of VLAN tags use the appropriate network on jump-host depend upon VLANID on the interface
354 Configure JOID for your lab
Get the joid code from gerritt
git clone httpsgerritopnfvorggerritpjoidgit
cd joidci
Enable MAAS
35 JOID Configuration 23
OPNFV Configuration Guide Release brahmaputra30 (605ebda)
bull Create a directory in maasltcompany namegtltpod numbergt for example
mkdir maasintelpod7
bull Copy files from pod5 to pod7
cp maasintelpod5 maasintelpod7
4 files will get copied deploymentyaml environmentsyaml interfaceshost lxc-add-more-interfaces
355 deploymentyaml file
Prerequisite
1 Make sure Jump host node has been configured with bridges on each interface so that appropriate MAAS and JUJUbootstrap VM can be created For example if you have three network admin data and public then I would suggestto give names like brAdm brData and brPublic 2 You have information about the node MAC address and powermanagement details (IPMI IP username password) of the nodes used for control and compute node
356 modify deploymentyaml
This file has been used to configure your maas and bootstrap node in a VM Comments in the file are self explanatoryand we expect fill up the information according to match lab infrastructure information Sample deploymentyaml canbe found at httpsgerritopnfvorggerritgitwebp=joidgita=blobf=cimaasintelpod5deploymentyaml
modify joidci01-deploybundlesh
under section case $3 add the intelpod7 section and make sure you have information provided correctly Beforeexample consider your network has 1921681024 your default network and eth1 is on public network which will beused to assign the floating ip
rsquointelpod7rsquo )
As per your lab vip address list be deafult uses 104111 - 104120
sed -i -- rsquos1041119216812grsquo bundlesyaml
Choose the external port to go out from gateway to use
sed -i -- rsquos ext-port eth1 ext-port eth1grsquo bundlesyaml
NOTE If you are using seprate data network then add this line below also along with other changes which representsnetwork 1049024 will be used for data network for openstack
sed -i -- rsquosos-data-network 1048021os-data-network 1049024grsquo bundlesyaml
modify joidci02-maasdeploysh
under section case $1 add the intelpod7 section and make sure you have information provided correctly
24 Chapter 3 Installer Configuration
OPNFV Configuration Guide Release brahmaputra30 (605ebda)
rsquointelpod7rsquo )
cp maasintelpod7deploymentyaml deploymentyaml
NOTE If you are using VLAN tags or more network for data and storage then make sure you modify the case $1section under Enable vlan interface with maas appropriately In the example below eth2 has been used as separate datanetwork for tenants in openstack with network 1049024 on compute and control nodes
rsquointelpod7rsquo )
maas refresh
enableautomodebyname eth2 AUTO 1049024 compute || true
enableautomodebyname eth2 AUTO 1049024 control || true
MAAS Install
After integrating the changes as mentioned above run the MAAS install Suppose you name the integration lab asintelpod7 then run the below commands to start the MAAS deployment
02-maasdeploysh intelpod7
This will take approximately 40 minutes to couple hours depending on your environment This script will do thefollowing
1 Create 2 VMs (KVM)
2 Install MAAS in one of the VMs
3 Configure the MAAS to enlist and commission a VM for Juju bootstrap node
4 Configure the MAAS to enlist and commission bare metal servers
When itrsquos done you should be able to view MAAS webpage (httpltMAAS IPgtMAAS) and see 1 bootstrap nodeand bare metal servers in the lsquoReadyrsquo state on the nodes page
Virtual deployment
By default just running the script 02-maasdeploysh will automatically create the KVM VMs on a single machineand configure everything for you
OPNFV Install
JOID allows you to deploy different combinations of OpenStack release and SDN solution in HA or non-HA mode
For OpenStack it supports Juno and Liberty For SDN it supports Openvswitch OpenContrail OpenDayLight andONOS
In addition to HA or non-HA mode it also supports to deploy the latest from the development tree (tip)
The deploysh in the joidci directoy will do all the work for you For example the following deploy OpenStack Liberywith OpenDayLight in a HA mode in the Intelpod7
35 JOID Configuration 25
OPNFV Configuration Guide Release brahmaputra30 (605ebda)
deploysh -o liberty -s odl -t ha -l intelpod7 -f none
By default the SDN is Openvswitch non-HA Liberty Intelpod5 OPNFV Brahmaputra release and ODL_L2 for theOPNFV feature
Possible options for each choice are as follows
[-s ]
nosdn openvswitch only and no other SDN
odl OpenDayLight Lithium version
opencontrail OpenContrail SDN
onos ONOS framework as SDN
[-t ]
nonha NO HA mode of Openstack
ha HA mode of openstack
tip the tip of the development
[-o ]
juno OpenStack Juno version
liberty OpenStack Liberty version
[-l ] etc
default For virtual deployment where installation will be done on KVM created using 02-maasdeploysh
intelpod5 Install on bare metal OPNFV pod5 of Intel lab
intelpod6
orangepod2
(other pods)
Note if you make changes as per your pod above then please use your pod
[-f ]
none no special feature will be enabled
ipv6 ipv6 will be enabled for tenant in openstack
By default debug is enabled in script and error messages will be printed on the SSH terminal where you are runningthe scripts It could take an hour to couple hours (max) to complete
Is the deployment done successfully
Once juju-deployer is complete use juju status to verify that all deployed unit are in the ready state
26 Chapter 3 Installer Configuration
OPNFV Configuration Guide Release brahmaputra30 (605ebda)
juju status --format tabular
Find the Openstack-dashboard IP address from the juju status output and see if you can log in via browser Theusername and password is adminopenstack
Optionall see if you can log in Juju GUI Juju GUI is on the Juju bootstrap node which is the second VM you definein the 02-maasdeploysh The username and password is adminadmin
If you deploy ODL OpenContrail or ONOS find the IP address of the web UI and login Please refer to each SDNbundleyaml for usernamepassword
Troubleshoot
To access to any deployed units juju ssh for example to login into nova-compute unit and look for varlogjujuunit-ltof interestgt for more info
juju ssh nova-compute0
Example
ubuntuR4N4B1~$ juju ssh nova-compute0
Warning Permanently added rsquo172165060rsquo (ECDSA) to the list of knownhosts
Warning Permanently added rsquo3-r4n3b1-computemaasrsquo (ECDSA) to the list ofknown hosts
Welcome to Ubuntu 14041 LTS (GNULinux 3130-77-generic x86_64)
Documentation httpshelpubuntucom
ltskippedgt
Last login Tue Feb 2 212356 2016 from bootstrapmaas
ubuntu3-R4N3B1-compute~$ sudo -i
root3-R4N3B1-compute~ cd varlogjuju
root3-R4N3B1-computevarlogjuju ls
machine-2log unit-ceilometer-agent-0log unit-ceph-osd-0logunit-neutron-contrail-0log unit-nodes-compute-0log unit-nova-compute-0logunit-ntp-0log
root3-R4N3B1-computevarlogjuju
By default juju will add the Ubuntu user keys for authentication into the deployed server and only ssh accesswill be available
Once you resolve the error go back to the jump host to rerun the charm hook with
juju resolved --retry ltunitgt
35 JOID Configuration 27
OPNFV Configuration Guide Release brahmaputra30 (605ebda)
28 Chapter 3 Installer Configuration
CHAPTER
FOUR
FEATURE CONFIGURATION
The following sections describe the configuration options for specific platform features provided in BrahmaputraFurther details for each feature are captured in the referred project documentation
41 Copper configuration
This release focused on use of the OpenStack Congress service for managing configuration policy The Congress installprocedure described here is largely manual This procedure as well as the longer-term goal of automated installersupport is a work in progress The procedure is further specific to one OPNFV installer (JOID ie MAASJuJu)based environment Support for other OPNFV installer deployed environments is also a work in progress
411 Pre-configuration activities
This procedure assumes OPNFV has been installed via the JOID installer
412 Hardware configuration
There is no specific hardware configuration required for the Copper project
413 Feature configuration
Following are instructions for installing Congress on an Ubuntu 1404 LXC container in the OPNFV Controller nodeas installed by the JOID installer This guide uses instructions from the Congress intro guide on readthedocs Specificvalues below will need to be modified if you intend to repeat this procedure in your JOID-based install environment
Install Procedure
The install currently occurs via four bash scripts provided in the copper repo See these files for the detailed steps
bull install_congress_1sh creates and starts the linux container for congress on the controller node copiesinstall_congress_2sh to the controller node and invokes it via ssh
bull install_congress_2sh installs congress on the congress server
29
OPNFV Configuration Guide Release brahmaputra30 (605ebda)
Cleanup Procedure
If there is an error during installation use the bash script clean_congresssh which stops the congress server if runningand removes the congress user and service from the controller database
Restarting after server power loss etc
Currently this install procedure is manual Automated install and restoral after host recovery is TBD For now thisprocedure will get the Congress service running again
On jumphost SSH to Congress serversource ~envshjuju ssh ubuntu$CONGRESS_HOST If that fails
On jumphost SSH to controller nodejuju ssh ubuntunode1-control Start the Congress containersudo lxc-start -n juju-trusty-congress -d Verify the Congress container statussudo lxc-ls -f juju-trusty-congressNAME STATE IPV4 IPV6 GROUPS AUTOSTART----------------------------------------------------------------------juju-trusty-congress RUNNING 19216810117 - - NO exit back to the Jumphost wait a minute and go back to the SSH to Congress server step above
On the Congress server that you have logged intosource ~admin-openrcshcd ~gitcongresssource binactivatebincongress-server ampdisown -h 1
42 Doctor Configuration
421 Doctor Inspector
Doctor Inspector is suggested to be placed in one of the controller nodes but it can be put on any host where DoctorMonitor can reach and accessible to the OpenStack Controller (Nova)
Make sure OpenStack env parameters are set properly so that Doctor Inspector can issue admin actions such ascompute host force-down and state update of VM
Then you can configure Doctor Inspector as follows
git clone httpsgerritopnfvorggerritdoctor -b stablebrahmaputracd doctortestsINSPECTOR_PORT=12345python inspectorpy $INSPECTOR_PORT gt inspectorlog 2gtamp1 amp
422 Doctor Monitor
Doctor Monitors are suggested to be placed in one of the controller nodes but those can be put on any host whichis reachable to target compute host and accessible to the Doctor Inspector You need to configure Monitors for allcompute hosts one by one
30 Chapter 4 Feature Configuration
OPNFV Configuration Guide Release brahmaputra30 (605ebda)
Make sure OpenStack env parameters are set properly so that Doctor Inspector can issue admin actions such ascompute host force-down and state update of VM
Then you can configure Doctor Monitor as follows
git clone httpsgerritopnfvorggerritdoctor -b stablebrahmaputracd doctortestsINSPECTOR_PORT=12345COMPUTE_HOST=overcloud-novacompute-0sudo python monitorpy $COMPUTE_HOST
http127001$INSPECTOR_PORTevents gt monitorlog 2gtamp1 amp
43 IPv6 Configuration - Setting Up a Service VM as an IPv6 vRouter
This section provides instructions to set up a service VM as an IPv6 vRouter using OPNFV Brahmaputra Releaseinstallers The environment may be pure OpenStack option or Open Daylight L2-only option The deployment modelmay be HA or non-HA The infrastructure may be bare metal or virtual environment
For complete instructions and documentations of setting up service VM as an IPv6 vRouter using ANY method pleaserefer to
1 IPv6 Configuration Guide (HTML) httpartifactsopnfvorgipv6docssetupservicevmindexhtml
2 IPv6 User Guide (HTML) httpartifactsopnfvorgipv6docsgapanalysisindexhtml
431 Pre-configuration Activities
The configuration will work in 2 environments
1 OpenStack-only environment
2 OpenStack with Open Daylight L2-only environment
Depending on which installer will be used to deploy OPNFV each environment may be deployed on bare metal orvirtualized infrastructure Each deployment may be HA or non-HA
Refer to the previous installer configuration chapters installations guide and release notes
432 Setup Manual in OpenStack-Only Environment
If you intend to set up a service VM as an IPv6 vRouter in OpenStack-only environment of OPNFV BrahmaputraRelease please NOTE that
bull Because the anti-spoofing rules of Security Group feature in OpenStack prevents a VM from forwarding packetswe need to disable Security Group feature in the OpenStack-only environment
bull The hostnames IP addresses and username are for exemplary purpose in instructions Please change as neededto fit your environment
bull The instructions apply to both deployment model of single controller node and HA (High Availability) deploy-ment model where multiple controller nodes are used
43 IPv6 Configuration - Setting Up a Service VM as an IPv6 vRouter 31
OPNFV Configuration Guide Release brahmaputra30 (605ebda)
Install OPNFV and Preparation
OPNFV-NATIVE-INSTALL-1 To install OpenStack-only environment of OPNFV Brahmaputra Release
Apex Installer
HA deployment in OpenStack-only environmentopnfv-deploy -d etcopnfv-apexos-nosdn-nofeature-hayaml
Non-HA deployment in OpenStack-only environment Non-HA deployment is currently not supported by Apex installer
Compass Installer
HA deployment in OpenStack-only environmentexport ISO_URL=file$BUILD_DIRECTORYcompassisoexport OS_VERSION=$COMPASS_OS_VERSIONexport OPENSTACK_VERSION=$COMPASS_OPENSTACK_VERSIONexport CONFDIR=$WORKSPACEdeployconfvm_environmentdeploysh --dha $CONFDIRos-nosdn-nofeature-hayml --network $CONFDIR$NODE_NAMEnetworkyml
Non-HA deployment in OpenStack-only environment Non-HA deployment is currently not supported by Compass installer
Fuel Installer
HA deployment in OpenStack-only environmentdeploysh -s os-nosdn-nofeature-ha
Non-HA deployment in OpenStack-only environmentdeploysh -s os-nosdn-nofeature-noha
Joid Installer
HA deployment in OpenStack-only environmentdeploysh -o liberty -s nosdn -t ha -l default -f ipv6
Non-HA deployment in OpenStack-only environmentdeploysh -o liberty -s nosdn -t nonha -l default -f ipv6
Please NOTE that
bull You need to refer to installerrsquos documentation for other necessary parameters applicable to your deployment
bull You need to refer to Release Notes and installerrsquos documentation if there is any issue in installation
OPNFV-NATIVE-INSTALL-2 Clone the following GitHub repository to get the configuration and metadata files
git clone httpsgithubcomsridhargaddamopnfv_os_ipv6_pocgit optstackopnfv_os_ipv6_poc
Disable Security Groups in OpenStack ML2 Setup
OPNFV-NATIVE-SEC-1 Change the settings in etcneutronpluginsml2ml2_confini as follows
etcneutronpluginsml2ml2_confini[securitygroup]extension_drivers = port_security
32 Chapter 4 Feature Configuration
OPNFV Configuration Guide Release brahmaputra30 (605ebda)
enable_security_group = Falsefirewall_driver = neutronagentfirewallNoopFirewallDriver
OPNFV-NATIVE-SEC-2 Change the settings in etcnovanovaconf as follows
etcnovanovaconf[DEFAULT]security_group_api = novafirewall_driver = novavirtfirewallNoopFirewallDriver
OPNFV-NATIVE-SEC-3 After updating the settings you will have to restart the Neutron and Nova services
Please note that the commands of restarting Neutron and Nova would vary depending on the installer Pleaserefer to relevant documentation of specific installers
Set Up Service VM as IPv6 vRouter
OPNFV-NATIVE-SETUP-1 Now we assume that OpenStack multi-node setup is up and running We have to sourcethe tenant credentials in this step Please NOTE that the method of sourcing tenant credentials may vary dependingon installers For example
Apex installer
source the tenant credentials using Apex installer of OPNFV you need to copy the file homestackovercloudrc from the installer VM called instack to a location in controller node for example in the directory optsource optovercloudrc
Compass installer
source the tenant credentials using Compass installer of OPNFVsource optadmin-openrcsh
Fuel installer
source the tenant credentials using Fuel installer of OPNFVsource rootopenrc
Joid installer
source the tenant credentials using Joid installer of OPNFVsource $HOMEjoid_configadmin-openrc
devstack
source the tenant credentials in devstacksource openrc admin demo
Please refer to relevant documentation of installers if you encounter any issue
OPNFV-NATIVE-SETUP-2 Download fedora22 image which would be used for vRouter
wget httpsdownloadfedoraprojectorgpubfedoralinuxreleases22Cloudx86_64ImagesFedora-Cloud-Base-22-20150521x86_64qcow2
OPNFV-NATIVE-SETUP-3 Import Fedora22 image to glance
glance image-create --name Fedora22 --disk-format qcow2 --container-format bare --file Fedora-Cloud-Base-22-20150521x86_64qcow2
43 IPv6 Configuration - Setting Up a Service VM as an IPv6 vRouter 33
OPNFV Configuration Guide Release brahmaputra30 (605ebda)
OPNFV-NATIVE-SETUP-4 This step is Informational OPNFV Installer has taken care of this step duringdeployment You may refer to this step only if there is any issue or if you are using other installers
We have to move the physical interface (ie the public network interface) to br-ex including moving the publicIP address and setting up default route Please refer to OS-NATIVE-SETUP-4 and OS-NATIVE-SETUP-5 in ourmore complete instruction
OPNFV-NATIVE-SETUP-5 Create Neutron routers ipv4-router and ipv6-router which need to provideexternal connectivity
neutron router-create ipv4-routerneutron router-create ipv6-router
OPNFV-NATIVE-SETUP-6 Create an external networksubnet ext-net using the appropriate values based on thedata-center physical network setup
Please NOTE that you may only need to create the subnet of ext-net because OPNFV installers should have createdan external network during installation You must use the same name of external network that installer creates whenyou create the subnet For example
bull Apex installer external
bull Compass installer ext-net
bull Fuel installer net04_ext
bull Joid installer ext-net
Please refer to the documentation of installers if there is any issue
This is needed only if installer does not create an external work Otherwise skip this command net-createneutron net-create --routerexternal ext-net
Note that the name ext-net may work for some installers such as Compass and Joid Change the name ext-net to match the name of external network that an installer createsneutron subnet-create --disable-dhcp --allocation-pool start=19859156251end=19859156254 --gateway 198591561 ext-net 19859156024
OPNFV-NATIVE-SETUP-7 Create Neutron networks ipv4-int-network1 and ipv6-int-network2 withport_security disabled
neutron net-create --port_security_enabled=False ipv4-int-network1neutron net-create --port_security_enabled=False ipv6-int-network2
OPNFV-NATIVE-SETUP-8 Create IPv4 subnet ipv4-int-subnet1 in the internal networkipv4-int-network1 and associate it to ipv4-router
neutron subnet-create --name ipv4-int-subnet1 --dns-nameserver 8888 ipv4-int-network1 2000024
neutron router-interface-add ipv4-router ipv4-int-subnet1
OPNFV-NATIVE-SETUP-9 Associate the ext-net to the Neutron routers ipv4-router and ipv6-router
Note that the name ext-net may work for some installers such as Compass and Joid Change the name ext-net to match the name of external network that an installer createsneutron router-gateway-set ipv4-router ext-netneutron router-gateway-set ipv6-router ext-net
OPNFV-NATIVE-SETUP-10 Create two subnets one IPv4 subnet ipv4-int-subnet2 and one IPv6 subnetipv6-int-subnet2 in ipv6-int-network2 and associate both subnets to ipv6-router
34 Chapter 4 Feature Configuration
OPNFV Configuration Guide Release brahmaputra30 (605ebda)
neutron subnet-create --name ipv4-int-subnet2 --dns-nameserver 8888 ipv6-int-network2 1000024
neutron subnet-create --name ipv6-int-subnet2 --ip-version 6 --ipv6-ra-mode slaac --ipv6-address-mode slaac ipv6-int-network2 2001db80164
neutron router-interface-add ipv6-router ipv4-int-subnet2neutron router-interface-add ipv6-router ipv6-int-subnet2
OPNFV-NATIVE-SETUP-11 Create a keypair
nova keypair-add vRouterKey gt ~vRouterKey
OPNFV-NATIVE-SETUP-12 Create ports for vRouter (with some specific MAC address - basically for automation- to know the IPv6 addresses that would be assigned to the port)
neutron port-create --name eth0-vRouter --mac-address fa163e111111 ipv6-int-network2neutron port-create --name eth1-vRouter --mac-address fa163e222222 ipv4-int-network1
OPNFV-NATIVE-SETUP-13 Create ports for VM1 and VM2
neutron port-create --name eth0-VM1 --mac-address fa163e333333 ipv4-int-network1neutron port-create --name eth0-VM2 --mac-address fa163e444444 ipv4-int-network1
OPNFV-NATIVE-SETUP-14 Update ipv6-router with routing information to subnet 2001db80264
neutron router-update ipv6-router --routes type=dict list=true destination=2001db80264nexthop=2001db801f8163efffe111111
OPNFV-NATIVE-SETUP-15 Boot Service VM (vRouter) VM1 and VM2
nova boot --image Fedora22 --flavor m1small --user-data optstackopnfv_os_ipv6_pocmetadatatxt --availability-zone novaopnfv-os-compute --nic port-id=$(neutron port-list | grep -w eth0-vRouter | awk print $2) --nic port-id=$(neutron port-list | grep -w eth1-vRouter | awk print $2) --key-name vRouterKey vRouter
nova list
Please wait for some 10 to 15 minutes so that necessary packages (like radvd) are installed and vRouter is upnova console-log vRouter
nova boot --image cirros-034-x86_64-uec --flavor m1tiny --user-data optstackopnfv_os_ipv6_pocset_mtush --availability-zone novaopnfv-os-controller --nic port-id=$(neutron port-list | grep -w eth0-VM1 | awk print $2) --key-name vRouterKey VM1
nova boot --image cirros-034-x86_64-uec --flavor m1tiny--user-data optstackopnfv_os_ipv6_pocset_mtush --availability-zone novaopnfv-os-compute --nic port-id=$(neutron port-list | grep -w eth0-VM2 | awk print $2) --key-name vRouterKey VM2
nova list Verify that all the VMs are in ACTIVE state
OPNFV-NATIVE-SETUP-16 If all goes well the IPv6 addresses assigned to the VMs would be as shown as follows
43 IPv6 Configuration - Setting Up a Service VM as an IPv6 vRouter 35
OPNFV Configuration Guide Release brahmaputra30 (605ebda)
vRouter eth0 interface would have the following IPv6 address 2001db801f8163efffe11111164 vRouter eth1 interface would have the following IPv6 address 2001db802164 VM1 would have the following IPv6 address 2001db802f8163efffe33333364 VM2 would have the following IPv6 address 2001db802f8163efffe44444464
OPNFV-NATIVE-SETUP-17 Now we can SSH to VMs You can execute the following command
1 Create a floatingip and associate it with VM1 VM2 and vRouter (to the port id that is passed) Note that the name ext-net may work for some installers such as Compass and Joid Change the name ext-net to match the name of external network that an installer createsneutron floatingip-create --port-id $(neutron port-list | grep -w eth0-VM1 | awk print $2) ext-netneutron floatingip-create --port-id $(neutron port-list | grep -w eth0-VM2 | awk print $2) ext-netneutron floatingip-create --port-id $(neutron port-list | grep -w eth1-vRouter | awk print $2) ext-net
2 To know display the floatingip associated with VM1 VM2 and vRouterneutron floatingip-list -F floating_ip_address -F port_id | grep $(neutron port-list | grep -w eth0-VM1 | awk print $2) | awk print $2neutron floatingip-list -F floating_ip_address -F port_id | grep $(neutron port-list | grep -w eth0-VM2 | awk print $2) | awk print $2neutron floatingip-list -F floating_ip_address -F port_id | grep $(neutron port-list | grep -w eth1-vRouter | awk print $2) | awk print $2
3 To ssh to the vRouter VM1 and VM2 user can execute the following commandssh -i ~vRouterKey fedoraltfloating-ip-of-vRoutergtssh -i ~vRouterKey cirrosltfloating-ip-of-VM1gtssh -i ~vRouterKey cirrosltfloating-ip-of-VM2gt
433 Setup Manual in OpenStack with Open Daylight L2-Only Environment
If you intend to set up a service VM as an IPv6 vRouter in an environment of OpenStack and Open Daylight L2-onlyof OPNFV Brahmaputra Release please NOTE that
bull The hostnames IP addresses and username are for exemplary purpose in instructions Please change as neededto fit your environment
bull The instructions apply to both deployment model of single controller node and HA (High Availability) deploy-ment model where multiple controller nodes are used
bull However in case of HA when ipv6-router is created in step SETUP-SVM-11 it could be created in anyof the controller node Thus you need to identify in which controller node ipv6-router is created in orderto manually spawn radvd daemon inside the ipv6-router namespace in steps SETUP-SVM-24 throughSETUP-SVM-30
Install OPNFV and Preparation
OPNFV-INSTALL-1 To install OpenStack with Open Daylight L2-only environment of OPNFV Brahmaputra Re-lease
Apex Installer
36 Chapter 4 Feature Configuration
OPNFV Configuration Guide Release brahmaputra30 (605ebda)
HA deployment in OpenStack with Open Daylight L2-only environmentopnfv-deploy -d etcopnfv-apexos-odl_l2-nofeature-hayaml
Non-HA deployment in OpenStack with Open Daylight L2-only environment Non-HA deployment is currently not supported by Apex installer
Compass Installer
HA deployment in OpenStack with Open Daylight L2-only environmentexport ISO_URL=file$BUILD_DIRECTORYcompassisoexport OS_VERSION=$COMPASS_OS_VERSIONexport OPENSTACK_VERSION=$COMPASS_OPENSTACK_VERSIONexport CONFDIR=$WORKSPACEdeployconfvm_environmentdeploysh --dha $CONFDIRos-odl_l2-nofeature-hayml --network $CONFDIR$NODE_NAMEnetworkyml
Non-HA deployment in OpenStack with Open Daylight L2-only environment Non-HA deployment is currently not supported by Compass installer
Fuel Installer
HA deployment in OpenStack with Open Daylight L2-only environmentdeploysh -s os-odl_l2-nofeature-ha
Non-HA deployment in OpenStack with Open Daylight L2-only environmentdeploysh -s os-odl_l2-nofeature-noha
Joid Installer
HA deployment in OpenStack with Open Daylight L2-only environmentdeploysh -o liberty -s odl -t ha -l default -f ipv6
Non-HA deployment in OpenStack with Open Daylight L2-only environmentdeploysh -o liberty -s odl -t nonha -l default -f ipv6
Please NOTE that
bull You need to refer to installerrsquos documentation for other necessary parameters applicable to your deployment
bull You need to refer to Release Notes and installerrsquos documentation if there is any issue in installation
OPNFV-INSTALL-2 Clone the following GitHub repository to get the configuration and metadata files
git clone httpsgithubcomsridhargaddamopnfv_os_ipv6_pocgit optstackopnfv_os_ipv6_poc
Disable Security Groups in OpenStack ML2 Setup
Please NOTE that although Security Groups feature has been disabled automatically through localconf configu-ration file by some installers such as devstack it is very likely that other installers such as Apex Compass Fuelor Joid will enable Security Groups feature after installation
Please make sure that Security Groups are disabled in the setup
OPNFV-SEC-1 Change the settings in etcneutronpluginsml2ml2_confini as follows
etcneutronpluginsml2ml2_confini[securitygroup]enable_security_group = Falsefirewall_driver = neutronagentfirewallNoopFirewallDriver
43 IPv6 Configuration - Setting Up a Service VM as an IPv6 vRouter 37
OPNFV Configuration Guide Release brahmaputra30 (605ebda)
OPNFV-SEC-2 Change the settings in etcnovanovaconf as follows
etcnovanovaconf[DEFAULT]security_group_api = novafirewall_driver = novavirtfirewallNoopFirewallDriver
OPNFV-SEC-3 After updating the settings you will have to restart the Neutron and Nova services
Please note that the commands of restarting Neutron and Nova would vary depending on the installer Pleaserefer to relevant documentation of specific installers
Source the Credentials in OpenStack Controller Node
SETUP-SVM-1 Login in OpenStack Controller Node Start a new terminal and change directory to where Open-Stack is installed
SETUP-SVM-2 We have to source the tenant credentials in this step Please NOTE that the method of sourcingtenant credentials may vary depending on installers For example
Apex installer
source the tenant credentials using Apex installer of OPNFV you need to copy the file homestackovercloudrc from the installer VM called instack to a location in controller node for example in the directory optsource optovercloudrc
Compass installer
source the tenant credentials using Compass installer of OPNFVsource optadmin-openrcsh
Fuel installer
source the tenant credentials using Fuel installer of OPNFVsource rootopenrc
Joid installer
source the tenant credentials using Joid installer of OPNFVsource $HOMEjoid_configadmin-openrc
devstack
source the tenant credentials in devstacksource openrc admin demo
Please refer to relevant documentation of installers if you encounter any issue
Informational Note Move Public Network from Physical Network Interface to br-ex
SETUP-SVM-3 Move the physical interface (ie the public network interface) to br-ex
SETUP-SVM-4 Verify setup of br-ex
Those 2 steps are Informational OPNFV Installer has taken care of those 2 steps during deployment You mayrefer to this step only if there is any issue or if you are using other installers
38 Chapter 4 Feature Configuration
OPNFV Configuration Guide Release brahmaputra30 (605ebda)
We have to move the physical interface (ie the public network interface) to br-ex including moving the publicIP address and setting up default route Please refer to SETUP-SVM-3 and SETUP-SVM-4 in our more completeinstruction
Create IPv4 Subnet and Router with External Connectivity
SETUP-SVM-5 Create a Neutron router ipv4-router which needs to provide external connectivity
neutron router-create ipv4-router
SETUP-SVM-6 Create an external networksubnet ext-net using the appropriate values based on the data-centerphysical network setup
Please NOTE that you may only need to create the subnet of ext-net because OPNFV installers should have createdan external network during installation You must use the same name of external network that installer creates whenyou create the subnet For example
bull Apex installer external
bull Compass installer ext-net
bull Fuel installer net04_ext
bull Joid installer ext-net
Please refer to the documentation of installers if there is any issue
This is needed only if installer does not create an external work Otherwise skip this command net-createneutron net-create --routerexternal ext-net
Note that the name ext-net may work for some installers such as Compass and Joid Change the name ext-net to match the name of external network that an installer createsneutron subnet-create --disable-dhcp --allocation-pool start=19859156251end=19859156254 --gateway 198591561 ext-net 19859156024
Please note that the IP addresses in the command above are for exemplary purpose Please replace the IP addressesof your actual network
SETUP-SVM-7 Associate the ext-net to the Neutron router ipv4-router
Note that the name ext-net may work for some installers such as Compass and Joid Change the name ext-net to match the name of external network that an installer createsneutron router-gateway-set ipv4-router ext-net
SETUP-SVM-8 Create an internaltenant IPv4 network ipv4-int-network1
neutron net-create ipv4-int-network1
SETUP-SVM-9 Create an IPv4 subnet ipv4-int-subnet1 in the internal network ipv4-int-network1
neutron subnet-create --name ipv4-int-subnet1 --dns-nameserver 8888 ipv4-int-network1 2000024
SETUP-SVM-10 Associate the IPv4 internal subnet ipv4-int-subnet1 to the Neutron router ipv4-router
neutron router-interface-add ipv4-router ipv4-int-subnet1
43 IPv6 Configuration - Setting Up a Service VM as an IPv6 vRouter 39
OPNFV Configuration Guide Release brahmaputra30 (605ebda)
Create IPv6 Subnet and Router with External Connectivity
Now let us create a second neutron router where we can ldquomanuallyrdquo spawn a radvd daemon to simulate an externalIPv6 router
SETUP-SVM-11 Create a second Neutron router ipv6-router which needs to provide external connectivity
neutron router-create ipv6-router
SETUP-SVM-12 Associate the ext-net to the Neutron router ipv6-router
Note that the name ext-net may work for some installers such as Compass and Joid Change the name ext-net to match the name of external network that an installer createsneutron router-gateway-set ipv6-router ext-net
SETUP-SVM-13 Create a second internaltenant IPv4 network ipv4-int-network2
neutron net-create ipv4-int-network2
SETUP-SVM-14 Create an IPv4 subnet ipv4-int-subnet2 for the ipv6-router internal networkipv4-int-network2
neutron subnet-create --name ipv4-int-subnet2 --dns-nameserver 8888 ipv4-int-network2 1000024
SETUP-SVM-15 Associate the IPv4 internal subnet ipv4-int-subnet2 to the Neutron router ipv6-router
neutron router-interface-add ipv6-router ipv4-int-subnet2
Prepare Image Metadata and Keypair for Service VM
SETUP-SVM-16 Download fedora22 image which would be used as vRouter
wget httpsdownloadfedoraprojectorgpubfedoralinuxreleases22Cloudx86_64ImagesFedora-Cloud-Base-22-20150521x86_64qcow2
glance image-create --name Fedora22 --disk-format qcow2 --container-format bare --file Fedora-Cloud-Base-22-20150521x86_64qcow2
SETUP-SVM-17 Create a keypair
nova keypair-add vRouterKey gt ~vRouterKey
SETUP-SVM-18 Create ports for vRouter and both the VMs with some specific MAC addresses
neutron port-create --name eth0-vRouter --mac-address fa163e111111 ipv4-int-network2neutron port-create --name eth1-vRouter --mac-address fa163e222222 ipv4-int-network1neutron port-create --name eth0-VM1 --mac-address fa163e333333 ipv4-int-network1neutron port-create --name eth0-VM2 --mac-address fa163e444444 ipv4-int-network1
Boot Service VM (vRouter) with eth0 on ipv4-int-network2 and eth1 on ipv4-int-network1
Let us boot the service VM (vRouter) with eth0 interface on ipv4-int-network2 connecting toipv6-router and eth1 interface on ipv4-int-network1 connecting to ipv4-router
SETUP-SVM-19 Boot the vRouter using Fedora22 image on the OpenStack Compute Node with hostnameopnfv-os-compute
40 Chapter 4 Feature Configuration
OPNFV Configuration Guide Release brahmaputra30 (605ebda)
nova boot --image Fedora22 --flavor m1small --user-data optstackopnfv_os_ipv6_pocmetadatatxt --availability-zone novaopnfv-os-compute --nic port-id=$(neutron port-list | grep -w eth0-vRouter | awk print $2) --nic port-id=$(neutron port-list | grep -w eth1-vRouter | awk print $2) --key-name vRouterKey vRouter
Please note that optstackopnfv_os_ipv6_pocmetadatatxt is used to enable the vRouter to au-tomatically spawn a radvd and
bull Act as an IPv6 vRouter which advertises the RA (Router Advertisements) with prefix 2001db80264on its internal interface (eth1)
bull Forward IPv6 traffic from internal interface (eth1)
SETUP-SVM-20 Verify that Fedora22 image boots up successfully and vRouter has ssh keys properly injected
nova listnova console-log vRouter
Please note that it may take a few minutes for the necessary packages to get installed and ssh keys to be injected
Sample Output[ 762884523] cloud-init[871] ec2 [ 762909634] cloud-init[871] ec2 -----BEGIN SSH HOST KEY FINGERPRINTS-----[ 762931626] cloud-init[871] ec2 2048 e3dc3d4abcb6b07775a170a3d02a47a9 (RSA)[ 762957380] cloud-init[871] ec2 -----END SSH HOST KEY FINGERPRINTS-----[ 762979554] cloud-init[871] ec2
Boot Two Other VMs in ipv4-int-network1
In order to verify that the setup is working let us create two cirros VMs with eth1 interface on theipv4-int-network1 ie connecting to vRouter eth1 interface for internal network
We will have to configure appropriate mtu on the VMsrsquo interface by taking into account the tunneling overhead andany physical switch requirements If so push the mtu to the VM either using dhcp options or via meta-data
SETUP-SVM-21 Create VM1 on OpenStack Controller Node with hostname opnfv-os-controller
nova boot --image cirros-034-x86_64-uec --flavor m1tiny --user-data optstackopnfv_os_ipv6_pocset_mtush --availability-zone novaopnfv-os-controller --nic port-id=$(neutron port-list | grep -w eth0-VM1 | awk print $2) --key-name vRouterKey VM1
SETUP-SVM-22 Create VM2 on OpenStack Compute Node with hostname opnfv-os-compute
nova boot --image cirros-034-x86_64-uec --flavor m1tiny --user-data optstackopnfv_os_ipv6_pocset_mtush --availability-zone novaopnfv-os-compute --nic port-id=$(neutron port-list | grep -w eth0-VM2 | awk print $2) --key-name vRouterKey VM2
SETUP-SVM-23 Confirm that both the VMs are successfully booted
nova listnova console-log VM1nova console-log VM2
43 IPv6 Configuration - Setting Up a Service VM as an IPv6 vRouter 41
OPNFV Configuration Guide Release brahmaputra30 (605ebda)
Spawn RADVD in ipv6-router
Let us manually spawn a radvd daemon inside ipv6-router namespace to simulate an external router First ofall we will have to identify the ipv6-router namespace and move to the namespace
Please NOTE that in case of HA (High Availability) deployment model where multiple controller nodes are usedipv6-router created in step SETUP-SVM-11 could be in any of the controller node Thus you need to iden-tify in which controller node ipv6-router is created in order to manually spawn radvd daemon inside theipv6-router namespace in steps SETUP-SVM-24 through SETUP-SVM-30 The following command in Neu-tron will display the controller on which the ipv6-router is spawned
neutron l3-agent-list-hosting-router ipv6-router
Then you login to that controller and execute steps SETUP-SVM-24 through SETUP-SVM-30
SETUP-SVM-24 identify the ipv6-router namespace and move to the namespace
sudo ip netns exec qrouter-$(neutron router-list | grep -w ipv6-router | awk print $2) bash
SETUP-SVM-25 Upon successful execution of the above command you will be in the router namespace Now letus configure the IPv6 address on the ltqr-xxxgt interface
export router_interface=$(ip a s | grep -w global qr- | awk print $7)ip -6 addr add 2001db8011 dev $router_interface
SETUP-SVM-26 Update the sample file optstackopnfv_os_ipv6_pocscenario2radvdconfwith $router_interface
cp optstackopnfv_os_ipv6_pocscenario2radvdconf tmpradvd$router_interfaceconfsed -i s$router_interface$router_interfaceg tmpradvd$router_interfaceconf
SETUP-SVM-27 Spawn a radvd daemon to simulate an external router This radvd daemon advertises an IPv6subnet prefix of 2001db80164 using RA (Router Advertisement) on its $router_interface so that eth0interface of vRouter automatically configures an IPv6 SLAAC address
$radvd -C tmpradvd$router_interfaceconf -p tmpbr-expidradvd -m syslog
SETUP-SVM-28 Add an IPv6 downstream route pointing to the eth0 interface of vRouter
ip -6 route add 2001db80264 via 2001db801f8163efffe111111
SETUP-SVM-29 The routing table should now look similar to something shown below
ip -6 route show2001db8011 dev qr-42968b9e-62 proto kernel metric 2562001db80164 dev qr-42968b9e-62 proto kernel metric 256 expires 86384sec2001db80264 via 2001db801f8163efffe111111 dev qr-42968b9e-62 proto ra metric 1024 expires 29secfe8064 dev qg-3736e0c7-7c proto kernel metric 256fe8064 dev qr-42968b9e-62 proto kernel metric 256
SETUP-SVM-30 If all goes well the IPv6 addresses assigned to the VMs would be as shown as follows
vRouter eth0 interface would have the following IPv6 address 2001db801f8163efffe11111164 vRouter eth1 interface would have the following IPv6 address 2001db802164 VM1 would have the following IPv6 address 2001db802f8163efffe33333364 VM2 would have the following IPv6 address 2001db802f8163efffe44444464
42 Chapter 4 Feature Configuration
OPNFV Configuration Guide Release brahmaputra30 (605ebda)
Testing to Verify Setup Complete
Now let us SSH to those VMs eg VM1 and or VM2 and or vRouter to confirm that it has successfully configuredthe IPv6 address using SLAAC with prefix 2001db80264 from vRouter
We use floatingip mechanism to achieve SSH
SETUP-SVM-31 Now we can SSH to VMs You can execute the following command
1 Create a floatingip and associate it with VM1 VM2 and vRouter (to the port id that is passed) Note that the name ext-net may work for some installers such as Compass and Joid Change the name ext-net to match the name of external network that an installer createsneutron floatingip-create --port-id $(neutron port-list | grep -w eth0-VM1 | awk print $2) ext-netneutron floatingip-create --port-id $(neutron port-list | grep -w eth0-VM2 | awk print $2) ext-netneutron floatingip-create --port-id $(neutron port-list | grep -w eth1-vRouter | awk print $2) ext-net
2 To know display the floatingip associated with VM1 VM2 and vRouterneutron floatingip-list -F floating_ip_address -F port_id | grep $(neutron port-list | grep -w eth0-VM1 | awk print $2) | awk print $2neutron floatingip-list -F floating_ip_address -F port_id | grep $(neutron port-list | grep -w eth0-VM2 | awk print $2) | awk print $2neutron floatingip-list -F floating_ip_address -F port_id | grep $(neutron port-list | grep -w eth1-vRouter | awk print $2) | awk print $2
3 To ssh to the vRouter VM1 and VM2 user can execute the following commandssh -i ~vRouterKey fedoraltfloating-ip-of-vRoutergtssh -i ~vRouterKey cirrosltfloating-ip-of-VM1gtssh -i ~vRouterKey cirrosltfloating-ip-of-VM2gt
If everything goes well ssh will be successful and you will be logged into those VMs Run some commands to verifythat IPv6 addresses are configured on eth0 interface
SETUP-SVM-32 Show an IPv6 address with a prefix of 2001db80264
ip address show
SETUP-SVM-33 ping some external IPv6 address eg ipv6-router
ping6 2001db8011
If the above ping6 command succeeds it implies that vRouter was able to successfully forward the IPv6 traffic toreach external ipv6-router
44 Installing OVSNFV Fuel Plugin
bull On the Fuel UI create a new environment
bull In Settings gt Userspace OVS support check ldquoUserspace OVS supportrdquo
bull Continue with environment configuration and deployment as normal
441 Upgrading the plugin
From time to time new versions of the plugin may become available
44 Installing OVSNFV Fuel Plugin 43
OPNFV Configuration Guide Release brahmaputra30 (605ebda)
The plugin cannot be upgraded if an active environment is using the plugin
In order to upgrade the plugin
bull Copy the updated plugin file to the fuel-master
bull On the Fuel UI reset the environment
bull On the Fuel CLI ldquofuel plugins ndashupdate ltfuel-plugin-filegtrdquo
bull On the Fuel UI re-deploy the environment
45 Promise Feature Configuration Overview
451 Promise installation
Install nodejs npm and promise
curl -sL httpsdebnodesourcecomsetup_4x | sudo -E bash -sudo apt-get install -y nodejssudo npm -g install npmlatestgit clone httpsgithubcomopnfvpromisegitcd promisenpm install
Please note that the last command lsquonpm installrsquo will install all needed dependencies for promise (including yangforgeand mocha)
452 Testing
Please perform the following preparation steps
1 Set OpenStack environment parameters properly (eg source openrc admin demo in DevStack)
2 Create OpenStack tenant (eg promise) and tenant user (eg promiser)
3 Create a flavor in Nova with 1 vCPU and 512 MB RAM
4 Create a private network subnet and router in Neutron
5 Create an image in Glance
Once done the promise test script can be invoked as follows (as a single line command)
NODE_ENV=mytest OS_TENANT_NAME=promise OS_USERNAME=promiser OS_PASSWORD=ltuser password from Step 2gt OS_TEST_FLAVOR=ltflavor ID from Step 3gt OS_TEST_NETWORK=ltnetwork ID from Step 4gt OS_TEST_IMAGE=ltimage ID from Step 5gt npm run -s test -- --reporter json gt promise-resultsjson
The results of the tests will be stored in the promise-resultsjson file
The results can also be seen in the console (ldquonpm run -s testrdquo)
All 33 tests passing Congratulations promise has been successfully installed and configured
44 Chapter 4 Feature Configuration
OPNFV Configuration Guide Release brahmaputra30 (605ebda)
45 Promise Feature Configuration Overview 45
OPNFV Configuration Guide Release brahmaputra30 (605ebda)
46 Configuring SDNVPN features
Fuel installer configuration
In order to install the BGPVPN feature the corresponding checkbox in Fuel has to be selected This will triggerinstallation of the OpenStack BGPVPN API extension for Neutron (set up for using the ODL driver)
In addition ODL has to be installed see the corresponding section in the respective installer documentation on how toinstall ODL If the BGPVPN feature is installed ODL will automatically be installed with VPN Service karaf featureactivated
No post-deploy configuration is necessary The Fuel BGPVPN plugin and the ODL plugin should set up the clusterready for BGPVPNs being created This includes the set-up of internal VxLAN transport tunnels between computenodes
No post-configuration activities are required
46 Chapter 4 Feature Configuration
CHAPTER
FIVE
POST CONFIGURATION ACTIVITIES
Once you have deployed and configured your scenario and features you should validate the state of the system usingthe following guides
51 Scenario validation activities
The following guides provide information on how to validate the installation of you scenario based on the tools andtest suites available for the installation tool you have selected
511 Fuel post installation procedures
Automated post installation activities
Fuel provides a fairly broad coverage of built in automated health checks These validate the installation in terms ofconfiguration services networking storage policies etc The execution of the full range of health checks takes lessthan 30 minutes
For instructions on how to run health-checks please read the Fuel installation instructions
Platform components validation
Consult the feature sections in this document for any post-install feature specific validationhealth-checks
512 JOID post installation procedures
Configure OpenStack
In each SDN directory for example joidciopencontrail there is a folder for Juju deployer where you can find thecharm bundle yaml files that the deploysh uses to deploy
In the same directory there is scripts folder where you can find shell scripts to help you configure the OpenStackcloud that you just deployed These scripts are created to help you configure a basic OpenStack Cloud to verify thecloud For more info on OpenStack Cloud configuration please refer to the OpenStack Cloud Administrator Guideon docsopenstackorg Similarly for complete SDN configuration please refer to the respective SDN adminstratorguide
Each SDN solution requires slightly different setup please refer to the README in each SDN folder Most likelyyou will need to modify the openstacksh and cloud-setupsh scripts for the floating IP range private IP network andSSH keys Please go through openstacksh glancesh and cloud-setupsh and make changes as you see fit
47
OPNFV Configuration Guide Release brahmaputra30 (605ebda)
52 Feature validation activities
The following sections provide information on how to validate the features you have installed in your scenario
521 Copper post installation procedures
This release focused on use of the OpenStack Congress service for managing configuration policy The Congressinstall verify procedure described here is largely manual This procedure as well as the longer-term goal of automatedverification support is a work in progress The procedure is further specific to one OPNFV installer (JOID ieMAASJuJu) based environment
Automated post installation activities
No automated procedures are provided at this time
Copper post configuration procedures
No configuration procedures are required beyond the basic install procedure
Platform components validation
Following are notes on creating a container as test driver for Congress This is based upon an Ubuntu host as installedby JOID
Create and Activate the Container
On the jumphost
sudo lxc-create -n trusty-copper -t usrsharelxctemplateslxc-ubuntu -- -b ubuntu ~opnfvsudo lxc-start -n trusty-copper -dsudo lxc-info --name trusty-copper(typical output)Name trusty-copperState RUNNINGPID 4563IP 100344CPU use 2877 secondsBlkIO use 52279 MiBMemory use 55975 MiBKMem use 0 bytesLink vethDMFOANTX bytes 262 MiBRX bytes 8848 MiBTotal bytes 9110 MiB
Login and configure the test server
48 Chapter 5 Post Configuration Activities
OPNFV Configuration Guide Release brahmaputra30 (605ebda)
ssh ubuntu100344sudo apt-get updatesudo apt-get upgrade -y
Install pipsudo apt-get install python-pip -y
Install javasudo apt-get install default-jre -y
Install other dependenciessudo apt-get install git gcc python-dev libxml2 libxslt1-dev libzip-dev php5-curl -y
Setup OpenStack environment variables per your OPNFV installexport CONGRESS_HOST=19216810117export KEYSTONE_HOST=19216810108export CEILOMETER_HOST=19216810105export CINDER_HOST=19216810101export GLANCE_HOST=19216810106export HEAT_HOST=19216810107export NEUTRON_HOST=19216810111export NOVA_HOST=19216810112source ~admin-openrcsh
Install and test OpenStack clientmkdir ~gitcd gitgit clone httpsgithubcomopenstackpython-openstackclientgitcd python-openstackclientgit checkout stablelibertysudo pip install -r requirementstxtsudo python setuppy installopenstack service list(typical output)+----------------------------------+------------+----------------+| ID | Name | Type |+----------------------------------+------------+----------------+| 2f8799ae50f24c928c021fabf8a50f5f | keystone | identity || 351b13f56d9a4e25849406ec1d5a2726 | cinder | volume || 5129510c3143454f9ba8ec7e6735e267 | cinderv2 | volumev2 || 5ee1e220460f41dea9be06921400ce9b | congress | policy || 78e73a7789a14f56a5d248a0cd141201 | quantum | network || 9d5a00fb475a45b2ae6767528299ed6b | ceilometer | metering || 9e4b1624ef0b434abc0b82f607c5045c | heat | orchestration || b6c01ceb5023442d9f394b83f2a18e01 | heat-cfn | cloudformation || ba6199e3505045ad87e2a7175bd0c57f | glance | image || d753f304a0d541dbb989780ae70328a8 | nova | compute |+----------------------------------+------------+----------------+
Install and test Congress clientcd ~gitgit clone httpsgithubcomopenstackpython-congressclientgitcd python-congressclientgit checkout stablelibertysudo pip install -r requirementstxtsudo python setuppy installopenstack congress driver list(typical output)+------------+--------------------------------------------------------------------------+| id | description |+------------+--------------------------------------------------------------------------+| ceilometer | Datasource driver that interfaces with ceilometer || neutronv2 | Datasource driver that interfaces with OpenStack Networking aka Neutron || nova | Datasource driver that interfaces with OpenStack Compute aka nova || keystone | Datasource driver that interfaces with keystone || cinder | Datasource driver that interfaces with OpenStack cinder || glancev2 | Datasource driver that interfaces with OpenStack Images aka Glance |+------------+--------------------------------------------------------------------------+
Install and test Glance clientcd ~gitgit clone httpsgithubcomopenstackpython-glanceclientgitcd python-glanceclientgit checkout stablelibertysudo pip install -r requirementstxtsudo python setuppy installglance image-list(typical output)+--------------------------------------+---------------------+| ID | Name |+--------------------------------------+---------------------+| 6ce4433e-65c0-4cd8-958d-b06e30c76241 | cirros-033-x86_64 |+--------------------------------------+---------------------+
Install and test Neutron clientcd ~gitgit clone httpsgithubcomopenstackpython-neutronclientgitcd python-neutronclientgit checkout stablelibertysudo pip install -r requirementstxtsudo python setuppy installneutron net-list(typical output)+--------------------------------------+----------+------------------------------------------------------+| id | name | subnets |+--------------------------------------+----------+------------------------------------------------------+| dc6227df-af41-439f-bd2c-c2c2f0fe7fc5 | public | 5745846c-dd79-4900-a7da-bf506348ceac 19216810024 || a3f9f13a-5de9-4d3b-98c8-d2e40a2ef8e9 | internal | 5e0be862-90da-44ab-af43-56d5c65aa049 1000024 |+--------------------------------------+----------+------------------------------------------------------+
Install and test Nova clientcd ~gitgit clone httpsgithubcomopenstackpython-novaclientgitcd python-novaclientgit checkout stablelibertysudo pip install -r requirementstxtsudo python setuppy installnova hypervisor-list(typical output)+----+---------------------+-------+---------+| ID | Hypervisor hostname | State | Status |+----+---------------------+-------+---------+| 1 | compute1maas | up | enabled |+----+---------------------+-------+---------+
Install and test Keystone clientcd ~gitgit clone httpsgithubcomopenstackpython-keystoneclientgitcd python-keystoneclientgit checkout stablelibertysudo pip install -r requirementstxtsudo python setuppy install
52 Feature validation activities 49
OPNFV Configuration Guide Release brahmaputra30 (605ebda)
Setup the Congress Test Webapp
Clone Copper (if not already cloned in user home)cd ~gitif [ -d ~gitcopper ] then git clone httpsgerritopnfvorggerritcopper fi
Copy the Apache configsudo cp ~gitcoppercomponentscongresstest-webappwwwubuntu-apache2conf etcapache2apache2conf
Point proxyphp to the Congress server per your installsed -i -- s19216810117$CONGRESS_HOSTg ~gitcoppercomponentscongresstest-webappwwwhtmlproxyindexphp
Copy the webapp to the Apache root directory and fix permissionssudo cp -R ~gitcoppercomponentscongresstest-webappwwwhtml varwwwsudo chmod 755 varwwwhtml -R
Make webapp log directory and set permissionsmkdir ~logschmod 777 ~logs
Restart Apachesudo service apache2 restart
Using the Test Webapp
Browse to the trusty-copper server IP address
Interactive options are meant to be self-explanatory given a basic familiarity with the Congress service and data modelBut the app will be developed with additional features and UI elements
522 IPv6 Post Installation Procedures
Congratulations you have completed the setup of using a service VM to act as an IPv6 vRouter You have validatedthe setup based on the instruction in previous sections If you want to further test your setup you can ping6 amongVM1 VM2 vRouter and ipv6-router
This setup allows further open innovation by any 3rd-party For more instructions and documentations please refer to
1 IPv6 Configuration Guide (HTML) httpartifactsopnfvorgipv6docssetupservicevmindexhtml
2 IPv6 User Guide (HTML) httpartifactsopnfvorgipv6docsgapanalysisindexhtml
Automated post installation activities
Refer to the relevant testing guides results and release notes of Yardstick Project
53 Additional testing and validation activities
Many of our testing tools can be manually installed to facilitate targeted testing of features and capabilities of yourscenario The following guides provide instruction on setting up these testing suites
50 Chapter 5 Post Configuration Activities
OPNFV Configuration Guide Release brahmaputra30 (605ebda)
531 Overview of the functest suites
Functest is the OPNFV project primarily targeting function testing In the Continuous Integration pipeline it islaunched after an OPNFV fresh installation to validate and verify the basic functions of the infrastructure
The current list of test suites can be distributed in 3 main domains VIM (Virtualised Infrastructure Manager) Con-trollers and Features
Do-main
Testsuite
Comments
VIM
vPing NFV ldquoHello Worldrdquo using SSH connection and floatting IPvPing_userdataPing using userdata and cloud-init mechanismTempest OpenStack reference test suite [2]Rallybench
OpenStack testing tool benchmarking OpenStack modules [3]
ControllersOpen-Day-light
Opendaylight Test suite
ONOS Test suite of ONOS L2 and L3 functions See ONOSFW User Guide for details
Features
vIMS Example of a real VNF deployment to show the NFV capabilities of the platform The IPMultimedia Subsytem is a typical Telco test case referenced by ETSI It provides a fullyfunctional VoIP System
Promise Resource reservation and management project to identify NFV related requirements andrealize resource reservation for future usage by capacity management of resource poolsregarding compute network and storage See Promise User Guide for details
Doctor Doctor platform as of Brahmaputra release provides the two features ImmediateNotification Consistent resource state awareness (compute) see Doctor User Guide fordetails
SD-NVPN
Implementation of the OpenStack bgpvpn API from the SDNVPN feature project Itallowing the cration of BGP VPNs see SDNVPN User Guide for
Functest includes different test suites with several test cases within Some of the tests are developed by Functest teammembers whereas others are integrated from upstream communities or other OPNFV projects For example Tempestis the OpenStack integration test suite and Functest is in charge of the selection integration and automation of the teststhat fit in OPNFV
The Tempest suite has been customized but no new test cases have been created
The results produced by the tests run from CI are pushed and collected in a NoSQL database The goal is to populatethe database with results from different sources and scenarios and to show them on a Dashboard
There is no real notion of Test domain or Test coverage Basic components (VIM controllers) are tested through theirown suites Feature projects also provide their own test suites with different ways of running their tests
vIMS test case was integrated to demonstrate the capability to deploy a relatively complex NFV scenario on top of theOPNFV infrastructure
Functest considers OPNFV as a black box OPNFV since the Brahmaputra release offers lots of potential combina-tions
bull 2 controllers (OpenDayligh ONOS)
bull 4 installers (Apex Compass Fuel Joid)
Most of the tests are runnable on any combination but some others might have restrictions imposed by the installersor the available deployed features
53 Additional testing and validation activities 51
OPNFV Configuration Guide Release brahmaputra30 (605ebda)
Preparing the Docker container
Pull the Functest Docker image from the Docker hub
docker pull opnfvfunctestbrahmaputra10
Check that the image is available
docker images
Run the docker container giving the environment variables
bull INSTALLER_TYPE possible values are apex compass fuel or joid
bull INSTALLER_IP IP of the installer nodeVM
Functest may need to know the IP of the installer to retrieve automatically the credentials from the installer nodeVMor even from the actual controllers
The minimum command to create the Functest Docker container can be described as follows
docker run -it -e INSTALLER_IP=102002 -e INSTALLER_TYPE=fuel opnfvfunctestbrahmaputra10 binbash
Optionally it is possible to precise the container name through the option ndashname
docker run --name CONTAINER_NAME -it -e INSTALLER_IP=102002 -e INSTALLER_TYPE=fuel opnfvfunctestbrahmaputra10 binbash
It is also possible to to indicate the path of the OpenStack credentials using -v
docker run -it -e INSTALLER_IP=102002 -e INSTALLER_TYPE=fuel -v ltpath_to_your_local_creds_filegthomeopnfvfunctestconfopenstackcreds opnfvfunctestbrahmaputra10 binbash
The local file will be mounted in the container under homeopnfvfunctestconfopenstackcreds
If the intention is to run Functest against any of the supported OPNFV scenarios it is recommended to include alsothe environment variable DEPLOY_SCENARIO for example
docker run -it -e INSTALLER_IP=102002 -e INSTALLER_TYPE=fuel -e DEPLOY_SCENARIO=os-odl_l2-nofeature-ha opnfvfunctestbrahmaputra10 binbash
Inside the container the following directory structure should be in place
`-- home`-- opnfv
|-- functest| |-- conf| |-- data| `-- results`-- repos
|-- bgpvpn|-- doctor|-- functest|-- odl_integration|-- onos|-- promise|-- rally|-- releng`-- vims-test
Basically the container includes
bull Functest directory to store the configuration (the OpenStack creds are stored inhomeopngbfunctestconfopenstackcreds) the data (cirros image needed for some tests) results (sometemporary result logs may be stored here)
52 Chapter 5 Post Configuration Activities
OPNFV Configuration Guide Release brahmaputra30 (605ebda)
bull Repositories the functest repository will be used to prepare the environment and run the tests Other repositoriesare used for the installation of the needed tooling (eg rally) andor the retrieval of feature projects scenarios(eg promise)
The structure under the Functest repository can be described as follows
|-- INFO|-- LICENSE|-- commons| |-- ims| |-- mobile| `-- traffic-profile-guidelinesrst|-- docker| |-- Dockerfile| |-- commonsh| |-- prepare_envsh| |-- requirementspip| `-- run_testssh|-- docs| |-- configguide| |-- devguide| |-- images| |-- results| `-- userguide`-- testcases
|-- Controllers|-- features|-- tests|-- VIM|-- vIMS|-- vPing|-- __init__py|-- config_functestpy|-- config_functestyaml`-- functest_utilspy
We may distinguish 4 different folders
bull commons it is a folder dedicated to store traffic profile or any test inputs that could be reused by any test project
bull docker this folder includes the scripts that will be used to setup the environment and run the tests
bull docs this folder includes the user and installationconfiguration guide
bull testcases this folder includes the scripts required by Functest internal test cases and other feature projects testcases
After the run command a new prompt appears which means that we are inside the container and ready to move to thenext step
Useful Docker commands
When typing exit in the container prompt this will cause exiting the container and probably stopping it Whenstopping a running Docker container all the changes will be lost there is a keyboard shortcut to quit the containerwithout stopping it CTRL+P+Q To reconnect to the running container DO NOT use the run command again (sinceit will create a new container) use exec instead
53 Additional testing and validation activities 53
OPNFV Configuration Guide Release brahmaputra30 (605ebda)
docker psltcopy the container IDgtdocker exec -ti ltCONTAINER_IDgt binbash
or simply
docker exec -ti $(docker ps|grep functest|awk print $1) binbash
There are other useful Docker commands that might be needed to manage possible issues with the containers
List the running containers
docker ps
List all the containers including the stopped ones
docker ps -a
It is useful sometimes to remove a container if there are some problems
docker rm ltCONTAINER_IDgt
Use the -f option if the container is still running it will force to destroy it
docker -f rm ltCONTAINER_IDgt
The Docker image is called opnfvfunctest and it is stored in the public Docker registry under the OPNFV accountdockerhub The are many different tags that have been created automatically by the CI mechanisms but the one thatthis document refers to is brahmaputra10 Pulling other tags might cause some problems while running the tests
Check the Docker documentation dockerdocs for more information
Preparing the Functest environment
Once the docker container is up and running execute the following command in the prompt
$repos_dirfunctestdockerprepare_envsh
NOTE $repos_dir is a default environment variable inside the docker container which points to homeopnfvrepos
This script will make sure that the requirements to run the tests are met and will install the needed libraries and toolsby all Functest test cases It must be run only once every time the docker is started from sratch
Focus on the OpenStack credentials
The OpenStack credentials are needed to run the tests against the VIM There are 3 ways to provide them to Functest
bull using the -v option when running the Docker container
bull create an empty file in homeopnfvfunctestconfopenstackcreds and paste the credentials in it
bull automatically retrieved using the following script $repos_dirrelengutilsfetch_os_credssh
Once the credentials are there they shall be sourced before running the tests
source homeopnfvfunctestconfopenstackcreds
or simply using the environment variable creds
54 Chapter 5 Post Configuration Activities
OPNFV Configuration Guide Release brahmaputra30 (605ebda)
$creds
After this try to run any OpenStack command to see if you get any output for instance
openstack user list
This will return a list of the actual users in the OpenStack deployment In any other case check that the credentialsare sourced
env|grep OS_
This command must show a set of environment variables starting with OS_ for example
OS_REGION_NAME=RegionOneOS_DEFAULT_DOMAIN=defaultOS_PROJECT_NAME=adminOS_PASSWORD=adminOS_AUTH_STRATEGY=keystoneOS_AUTH_URL=http172301035000v20OS_USERNAME=adminOS_TENANT_NAME=adminOS_ENDPOINT_TYPE=internalURLOS_NO_CACHE=true
If still the OpenStack command does not show anything or complains about connectivity issues it could be due to anincorrect url given to the OS_AUTH_URL environment variable Check the deployment settings
SSL Support
If you need to connect to a server that is TLS-enabled (the auth URL begins with lsquohttpsrsquo) and it uses a certificate froma private CA or a self-signed certificate you will need to specify the path to an appropriate CA certificate to use tovalidate the server certificate with the environment variable OS_CACERT
echo $OS_CACERTetcsslcertscacrt
However this certificate does not exist in the container by default It has to be copied manually from the OpenStackdeployment This can be done in 2 ways
1 Create manually that file and copy the contents from the OpenStack controller
2 (recommended) Add the file using a Docker volume when starting the container
-v ltpath_to_your_cert_filegtetcsslcertscacert
You might need to export OS_CACERT environment variable inside the container
export OS_CACERT=etcsslcertscacrt
Certificate verification can be turned off using OS_INSECURE=true For example Fuel uses self-signed cacerts bydefault so an pre step would be
export OS_INSECURE=true
Additional Options
In case you need to provide different configuration parameters to Functest (eg commit IDs or branches for therepositories ) copy the config_functestyaml from the repository to your current directory and run the container
53 Additional testing and validation activities 55
OPNFV Configuration Guide Release brahmaputra30 (605ebda)
with a volume
wget httpsgitopnfvorgcgitfunctestplaintestcasesconfig_functestyaml
ltmodify the file accordinglygt
docker run -ti -e INSTALLER_TYPE=fuel -e INSTALLER_IP=102002 opnfvfunctestbrahmaputra10 -v $(pwd)config_functestyamlhomeopnfvfunctestconfconfig_functestyaml binbash
However this is not recommended since most of the test cases rely on static parameters read from this file andchanging them might cause problems
Proxy support
Functest needs internet access to download some resources for some test cases For example to install the Rallyenvironment This might not work properly if the Jumphost is running through a Proxy
If that is the case make sure the resolvconf and the needed proxy environment variables are properly set
export http_proxy=ltyour http proxy settingsgtexport https_proxy=ltyour https proxy settingsgt
Or refer to the official Docker documentation for Proxy settings
Before running prepare_envsh make sure you can ping http and https sites inside the container For example
nc -v googlecom 80Connection to googlecom 80 port [tcphttp] succeeded
nc -v googlecom 443Connection to googlecom 443 port [tcphttps] succeeded
532 Installing vswitchperf
Supported Operating Systems
bull CentOS 7
bull Fedora 20
bull Fedora 21
bull Fedora 22
bull Ubuntu 1404
Supported vSwitches
The vSwitch must support Open Flow 13 or greater
bull OVS (built from source)
bull OVS with DPDK (built from source)
56 Chapter 5 Post Configuration Activities
OPNFV Configuration Guide Release brahmaputra30 (605ebda)
Supported Hypervisors
bull Qemu version 23
Available VNFs
A simple VNF that forwards traffic through a VM using
bull DPDK testpmd
bull Linux Brigde
bull custom l2fwd module
The VM image can be downloaded from httpartifactsopnfvorgvswitchperfvloop-vnf-ubuntu-1404_20151216qcow2
Other Requirements
The test suite requires Python 33 and relies on a number of other packages These need to be installed for the testsuite to function
Installation of required packages preparation of Python 3 virtual environment and compilation of OVS DPDK andQEMU is performed by script systemsbuild_base_machinesh It should be executed under user account which willbe used for vsperf execution
Please Note Password-less sudo access must be configured for given user account before script is executed
Execution of installation script
$ cd systems$ build_base_machinesh
Please Note you donrsquot need to go into any of the systems subdirectories simply run the top levelbuild_base_machinesh your OS will be detected automatically
Script build_base_machinesh will install all the vsperf dependencies in terms of system packages Python 3x andrequired Python modules In case of CentOS 7 it will install Python 33 from an additional repository provided bySoftware Collections (a link) Installation script will also use virtualenv to create a vsperf virtual environment whichis isolated from the default Python environment This environment will reside in a directory called vsperfenv in$HOME
You will need to activate the virtual environment every time you start a new shell session Its activation is specific toyour OS
CentOS 7
$ scl enable python33 bash$ cd $HOMEvsperfenv$ source binactivate
Fedora and Ubuntu
$ cd $HOMEvsperfenv$ source binactivate
53 Additional testing and validation activities 57
OPNFV Configuration Guide Release brahmaputra30 (605ebda)
Working Behind a Proxy
If yoursquore behind a proxy yoursquoll likely want to configure this before running any of the above For example
export http_proxy=proxymycompanycom123export https_proxy=proxymycompanycom123
533 Yardstick
The projectrsquos goal is to verify infrastructure compliance from the perspective of a Virtual Network Function (VNF)
The Projectrsquos scope is the development of a test framework Yardstick test cases and test stimuli to enable NetworkFunction Virtualization Infrastructure (NFVI) verification
In OPNFV Brahmaputra release generic test cases covering aspects of the metrics in the document ETSI GS NFV-TST001 ldquoPre-deployment Testing Report on Validation of NFV Environments and Servicesrdquo are available furtherOPNFV releases will provide extended testing of these metrics
The Project also includes a sample VNF the Virtual Traffic Classifier (VTC) and its experimental frameworkApexLake
Yardstick is used in OPNFV for verifying the OPNFV infrastructure and some of the OPNFV features The Yardstickframework is deployed in several OPNFV community labs It is installer infrastructure and application independent
See also
This Presentation for an overview of Yardstick and Yardsticktst for material on alignment ETSI TST001 and Yardstick
Yardstick Installation
Abstract
Yardstick currently supports installation on Ubuntu 1404 or by using a Docker image Detailed steps about installingYardstick using both of these options can be found below
To use Yardstick you should have access to an OpenStack environment with at least Nova Neutron Glance Keystoneand Heat installed
The steps needed to run Yardstick are
1 Install Yardstick and create the test configuration yaml file
2 Build a guest image and load the image into the OpenStack environment
3 Create a Neutron external network and load OpenStack environment variables
4 Run the test case
Installing Yardstick on Ubuntu 1404
Installing Yardstick framework Install dependencies
sudo apt-get install python-virtualenv python-devsudo apt-get install libffi-dev libssl-dev git
Create a python virtual environment source it and update setuptools
58 Chapter 5 Post Configuration Activities
OPNFV Configuration Guide Release brahmaputra30 (605ebda)
virtualenv ~yardstick_venvsource ~yardstick_venvbinactivateeasy_install -U setuptools
Download source code and install python dependencies
git clone httpsgerritopnfvorggerrityardstickcd yardstickpython setuppy install
There is also a YouTube video showing the above steps
Installing extra tools
yardstick-plot Yardstick has an internal plotting tool yardstick-plot which can be installed using the follow-ing command
python setuppy develop easy_install yardstick[plot]
Building a guest image Yardstick has a tool for building an Ubuntu Cloud Server image containing all the requiredtools to run test cases supported by Yardstick It is necessary to have sudo rights to use this tool
This image can be built using the following command while in the directory where Yardstick is installed(~yardstick if the framework is installed by following the commands above)
sudo toolsyardstick-img-modify toolsubuntu-server-cloudimg-modifysh
Warning the script will create files by default in tmpworkspaceyardstick and the files will be owned byroot
The created image can be added to OpenStack using the glance image-create or via the OpenStack Dashboard
Example command
glance --os-image-api-version 1 image-create --name yardstick-trusty-server --is-public true --disk-format qcow2 --container-format bare --file tmpworkspaceyardstickyardstick-trusty-serverimg
Installing Yardstick using Docker
Yardstick has two Docker images first one (Yardstick-framework) serves as a replacement for installing the Yardstickframework in a virtual environment (for example as done in Installing Yardstick framework) while the other image ismostly for CI purposes (Yardstick-CI)
Yardstick-framework image Download the source code
git clone httpsgerritopnfvorggerrityardstick
Build the Docker image and tag it as yardstick-framework
cd yardstickdocker build -t yardstick-framework
Run the Docker instance
53 Additional testing and validation activities 59
OPNFV Configuration Guide Release brahmaputra30 (605ebda)
docker run --name yardstick_instance -i -t yardstick-framework
To build a guest image for Yardstick see Building a guest image
Yardstick-CI image Pull the Yardstick-CI Docker image from Docker hub
docker pull opnfvyardstick-ci
Run the Docker image
docker run --privileged=true --rm -t -e INSTALLER_TYPE=$INSTALLER_TYPE -e INSTALLER_IP=$INSTALLER_IP opnfvyardstick-ci run_benchmarks
Where $INSTALLER_TYPE can be fuel foreman or compass and $INSTALLER_IP is the installer masternode IP address (ie 102002 is default for fuel)
Basic steps performed by the Yardstick-CI container
1 clone yardstick and releng repos
2 setup OS credentials (releng scripts)
3 install yardstick and dependencies
4 build yardstick cloud image and upload it to glance
5 upload cirros-033 cloud image to glance
6 run yardstick test scenarios
7 cleanup
OpenStack parameters and credentials
Yardstick-flavor Most of the sample test cases in Yardstick are using an OpenStack flavor called yardstick-flavorwhich deviates from the OpenStack standard m1tiny flavor by the disk size - instead of 1GB it has 3GB Otherparameters are the same as in m1tiny
Environment variables Before running Yardstick it is necessary to export OpenStack environment vari-ables from the OpenStack openrc file (using the source command) and export the external network nameexport EXTERNAL_NETWORK=external-network-name the default name for the external network isnet04_ext
Credential environment variables in the openrc file have to include at least
bull OS_AUTH_URL
bull OS_USERNAME
bull OS_PASSWORD
bull OS_TENANT_NAME
60 Chapter 5 Post Configuration Activities
OPNFV Configuration Guide Release brahmaputra30 (605ebda)
Yardstick default key pair Yardstick uses a SSH key pair to connect to the guest image This key pair can be foundin the resourcesfiles directory To run the ping-hotyaml test sample this key pair needs to be importedto the OpenStack environment
Examples and verifying the install
It is recommended to verify that Yardstick was installed successfully by executing some simple commands and testsamples Below is an example invocation of yardstick help command and pingpy test sample
yardstick -hyardstick task start samplespingyaml
Each testing tool supported by Yardstick has a sample configuration file These configuration files can be found in thesamples directory
Example invocation of yardstick-plot tool
yardstick-plot -i tmpyardstickout -o tmpplots
Default location for the output is tmpyardstickout
More info about the tool can be found by executing
yardstick-plot -h
53 Additional testing and validation activities 61

CHAPTER
TWO
CONFIGURATION OPTIONS
OPNFV provides a variety of virtual infrastructure deployments called scenarios designed to host virtualised networkfunctions (VNFrsquos) Each scenario provide specific capabilities andor components aimed to solve specific problemsfor the deployment of VNFrsquos A scenario may include components such as OpenStack OpenDaylight OVS KVMetc where each scenario will include different source components or configurations
21 OPNFV Scenarios
Each OPNFV scenario provides unique features and capabilities it is important to understand your target platformcapabilities before installing and configuring your target scenario This configuration guide outlines how to install andconfigure components in order to enable the features you require
Scenarios are implemented as deployable compositions through integration with an installation tool OPNFV supportsmultiple installation tools and for any given release not all tools will support all scenarios While our target is toestablish parity across the installation tools to ensure they can provide all scenarios the practical challenge of achievingthat goal for any given feature and release results in some disparity
211 Brahmaputra scenario overeview
The following table provides an overview of the installation tools and available scenariorsquos in the Brahmaputra releaseof OPNFV
3
OPNFV Configuration Guide Release brahmaputra30 (605ebda)
Scenario status is indicated by a weather pattern icon All scenarios listed with a weather pattern are possible to deployand run in your environment or a Pharos lab however they may have known limitations or issues as indicated by theicon
Weather pattern icon legend
Weather Icon Scenario Status
Stable no known issues
Stable documented limitations
Deployable stability or feature limitations
Not deployed with this installer
Scenarios that are not yet in a state of ldquoStable no known issuesrdquo will continue to be stabilised and updates will bemade on the stablebrahmaputra branch While we intend that all Brahmaputra scenarios should be stable it is worth
4 Chapter 2 Configuration Options
OPNFV Configuration Guide Release brahmaputra30 (605ebda)
checking regularly to see the current status Due to our dependency on upstream communities and code some issuesmay not be resolved prior to the C release
212 Scenario Naming
In OPNFV scenarios are identified by short scenario names these names follow a scheme that identifies the keycomponents and behaviours of the scenario The rules for scenario naming are as follows
os-[controller]-[feature]-[mode]-[option]
Details of the fields are
bull os mandatory
ndash Refers to the platform type used
ndash possible value os (OpenStack)
bull [controller] mandatory
ndash Refers to the SDN controller integrated in the platform
ndash example values nosdn ocl odl onos
ndash [feature] mandatory
Refers to the feature projects supported by the scenario
example values nofeature kvm ovs sfc
ndash [mode] mandatory
Refers to the deployment type which may include for instance high availability
possible values ha noha
ndash [option] optional
Used for the scenarios those do not fit into naming scheme
The optional field in the short scenario name should not be included if there is no optional scenario
Some examples of supported scenario names are
bull os-nosdn-kvm-noha
ndash This is an OpenStack based deployment using neutron including the OPNFV enhanced KVM hypervisor
bull os-onos-nofeature-ha
ndash This is an OpenStack deployment in high availability mode including ONOS as the SDN controller
bull os-odl_l2-sfc
ndash This is an OpenStack deployment using OpenDaylight and OVS enabled with SFC features
213 Installing your scenario
There are two main methods of deploying your target scenario one method is to follow this guide which will walk youthrough the process of deploying to your hardware using scripts or ISO images the other method is to set up a Jenkinsslave and connect your infrastructure to the OPNFV Jenkins master
For the purposes of evaluation and development a number of Brahmaputra scenarios are able to be deployed virtuallyto mitigate the requirements on physical infrastructure Details and instructions on performing virtual deploymentscan be found in the installer specific installation instructions
21 OPNFV Scenarios 5
OPNFV Configuration Guide Release brahmaputra30 (605ebda)
To set up a Jenkins slave for automated deployment to your lab refer to the Jenkins slave connect guide
This document will describe how to install and configure your target OPNFV scenarios Remember to check theassociated validation procedures section following your installation for details of the use cases and tests that have beenrun
6 Chapter 2 Configuration Options
CHAPTER
THREE
INSTALLER CONFIGURATION
Installing the OPNFV platform requires either a physical environment as defined in the Pharos lab specificationor a virtual infrastructure When configuring a physical infrastructure it is strongly advised to follow the Pharosconfiguration material
31 Lab Setup Guide
Provides an overview for setting up a Pharos lab A full set of pharos_master documents are maintained in the pharosrepo
When setting up an OPNFV community lab
bull Provide the Pharos community with details of the intended setup including
ndash Overview of resources are being offered to the community intended purpose and known limitations
ndash Lab owner name with contacts
ndash Timelines for availablity for development test release production
bull Update the Pharos Wiki with lab details
ndash Lab map organization contacts status location resources role etc
ndash httpswikiopnfvorgpharoscommunity_labs
ndash pharos_wiki
bull Update the Pharos project information file ldquoCurrent Labsrdquo
ndash pharos_information
bull Create new Wiki pages for lab and POD specific information
ndash Access procedures
ndash Usage guidelines for developers
ndash Update infomtation as PODs are re-assigned or usageavailability changes
bull Fill Lab and POD templates pharos_lab pharos_pod
ndash Note that security sensitive lab information should be stored in the secure Pharos repo
bull Connect PODs to JenkinsCI
7
OPNFV Configuration Guide Release brahmaputra30 (605ebda)
311 Jump Server Configuration
Jump server install procedures are maintained by each installer project Addional Jump server configuraton BKMswill be maintained here The below install information was used for Fuel however may be outdated (please refer toFuel Installer documents)
Procedure
1 Obtain CentOS 7 Minimal ISO and install
wget httpmirrorskernelorgcentos7isosx86_64CentOS-7-x86_64-Minimal-1503-01iso
2 Set parameters appropriate for your environment during installation
3 Disable NetworkManager
systemctl disable NetworkManager
4 Configure your etcsysconfignetwork-scriptsifcfg- files for your network
5 Restart networking
service network restart
6 Edit etcresolvconf and add a nameserver
vi etcresolvconf
7 Install libvirt amp kvm
yum -y update yum -y install kvm qemu-kvm libvirt systemctl enablelibvirtd
8 Reboot
shutdown -r now
9 If you wish to avoid annoying delay when use ssh to log in disable DNS lookups
vi etcsshsshd_config
Uncomment ldquoUseDNS yesrdquo change lsquoyesrsquo to lsquonorsquo
Save
10 Restart sshd
systemctl restart sshd
11 Install virt-install
yum -y install virt-install
12 Visit artifactsopnfvorg and DL the OPNFV Fuel ISO
13 Create a bridge using the interface on the PXE network for example br0
14 Make a directory owned by qemu
mkdir homeqemu mkdir -p homeqemuVMsfuel-60disk
chown -R qemuqemu homeqemu
15 Copy the ISO to homeqemu
cd homeqemu
virt-install -n opnfv-2015-05-22_18-34-07-fuel -r 4096--vcpus=4 --cpuset=0-3 -c opnfv-2015-05-22_18-34-07iso
8 Chapter 3 Installer Configuration
OPNFV Configuration Guide Release brahmaputra30 (605ebda)
--os-type=linux --os-variant=rhel6 --boot hdcdrom --diskpath=homeqemuVMsmirantis-fuel-60diskfuel-vhd0qcow2bus=virtiosize=50format=qcow2-w bridge=br0model=virtio --graphics vnclisten=0000
16 Temporarily flush the firewall rules to make things easier
iptables -F
17 Connect to the console of the installing VM with your favorite VNC client
18 Change the IP settings to match the pod use an IP in the PXEAdmin network for the Fuel Master
The following sections describe the per installer configuration options Further details for each installer are capturedin the referred project documentation
32 Apex configuration
321 Introduction
This document describes the steps to install an OPNFV Bramaputra reference platform as defined by the GenesisProject using the Apex installer
The audience is assumed to have a good background in networking and Linux administration
322 Preface
Apex uses the RDO Manager Open Source project as a server provisioning tool RDO Manager is the RDO Projectimplementation of OpenStackrsquos Triple-O project The Triple-O image based life cycle installation tool provisions anOPNFV Target System (3 controllers n number of compute nodes) with OPNFV specific configuration provided bythe Apex deployment tool chain
The Apex deployment artifacts contain the necessary tools to deploy and configure an OPNFV target sys-tem using the Apex deployment toolchain These artifacts offer the choice of using the Apex bootable ISO(opnfv-apex-bramaputraiso) to both install CentOS 7 and the nessesary materials to deploy or the ApexRPM (opnfv-apexrpm) which expects installation to a CentOS 7 libvirt enabled host The RPM contains acollection of configuration file prebuilt disk images and the automatic deployment script (opnfv-deploy)
An OPNFV install requires a ldquoJumphostrdquo in order to operate The bootable ISO will allow you to install a cus-tomized CentOS 7 release to the Jumphost which includes the required packages needed to run opnfv-deployIf you already have a Jumphost with CentOS 7 installed you may choose to skip the ISO step and simply installthe (opnfv-apexrpm) RPM The RPM is the same RPM included in the ISO and includes all the necessary diskimages and configuration files to execute an OPNFV deployment Either method will prepare a host to the same readystate for OPNFV deployment
opnfv-deploy instantiates an RDO Manager Instack VM server using libvirt as its provider This VM is thenconfigured and used to provision the OPNFV target deployment (3 controllers n compute nodes) These nodes can beeither virtual or bare metal This guide contains instructions for installing either method
323 Installation High-Level Overview - Bare Metal Deployment
The setup presumes that you have 6 bare metal servers and have already setup network connectivity on at least 2interfaces for all servers via a TOR switch or other network implementation
32 Apex configuration 9
OPNFV Configuration Guide Release brahmaputra30 (605ebda)
The physical TOR switches are not automatically configured from the OPNFV reference platform All the networksinvolved in the OPNFV infrastructure as well as the provider networks and the private tenant VLANs needs to bemanually configured
The Jumphost can be installed using the bootable ISO or by other means including the (opnfv-apex) RPMs andvirtualization capabilities The Jumphost should then be configured with an IP gateway on its admin or public interfaceand configured with a working DNS server The Jumphost should also have routable access to the lights out network
opnfv-deploy is then executed in order to deploy the Instack VM opnfv-deploy uses three con-figuration files in order to know how to install and provision the OPNFV target system The in-formation gathered under section Execution Requirements (Bare Metal Only) is put into the YAML file(etcopnfv-apexinventoryyaml) configuration file Deployment options are put into the YAML file(etcopnfv-apexdeploy_settingsyaml) Networking definitions gathered under section Network Re-quirements are put into the YAML file (etcopnfv-apexnetwork_settingsyaml) opnfv-deploywill boot the Instack VM and load the target deployment configuration into the provisioning toolchain This includesMAC address IPMI Networking Environment and OPNFV deployment options
Once configuration is loaded and Instack is configured it will then reboot the nodes via IPMI The nodes should alreadybe set to PXE boot first off the admin interface The nodes will first PXE off of the Instack PXE server and go througha discoveryintrospection process
Introspection boots off of custom introspection PXE images These images are designed to look at the properties ofthe hardware that is booting off of them and report the properties of it back to the Instack node
After introspection Instack will execute a Heat Stack Deployment to being node provisioning and configuration Thenodes will reboot and PXE again off the Instack PXE server to provision each node using the Glance disk images pro-vided by Instack These disk images include all the necessary packages and configuration for an OPNFV deploymentto execute Once the nodersquos disk images have been written to disk the nodes will boot off the newly written disks andexecute cloud-init which will execute the final node configuration This configuration is largly completed by executinga puppet apply on each node
324 Installation High-Level Overview - VM Deployment
The VM nodes deployment operates almost the same way as the bare metal deployment with a few differencesopnfv-deploy still deploys an Instack VM In addition to the Instack VM a collection of VMs (3 control nodes +2 compute for an HA deployment or 1 control node and 1 compute node for a Non-HA Deployment) will be definedfor the target OPNFV deployment The part of the toolchain that executes IPMI power instructions calls into libvirtinstead of the IPMI interfaces on baremetal servers to operate the power managment These VMs are then provisionedwith the same disk images and configuration that baremetal would be
To RDO Manager these nodes look like they have just built and registered the same way as bare metal nodes the maindifference is the use of a libvirt driver for the power management
325 Installation Guide - Bare Metal Deployment
WARNING Baremetal documentation is not complete WARNING The main missing instructions are r elatedto bridging the networking for the undercloud to the physical underlay network for the overcloud to be deployedto
This section goes step-by-step on how to correctly install and provision the OPNFV target system to bare metal nodes
Install Bare Metal Jumphost
1a If your Jumphost does not have CentOS 7 already on it or you would like to do a fresh install then down-load the Apex bootable ISO from OPNFV artifacts lthttpartifactsopnfvorggt There have been isolated
10 Chapter 3 Installer Configuration
OPNFV Configuration Guide Release brahmaputra30 (605ebda)
reports of problems with the ISO having trouble completing installation successfully In the unexpectedevent the ISO does not work please workaround this by downloading the CentOS 7 DVD and perform-ing a ldquoVirtualization Hostrdquo install If you perform a ldquoMinimal Installrdquo or install type other than ldquoVirtu-alization Hostrdquo simply run sudo yum groupinstall Virtualization Host ampamp chkconfiglibvird on and reboot the host Once you have completed the base CentOS install proceed to step 1b
1b If your Jump host already has CentOS 7 with libvirt running on it then install the opnfv-apex RPMs fromOPNFV artifacts lthttpartifactsopnfvorggt The following RPMS are available for installation
bull opnfv-apex - OpenDaylight L2 L3 and ONOS support
bull opnfv-apex-opendaylight-sfc - OpenDaylight SFC support
bull opnfv-apex-undercloud (required)
bull opnfv-apex-common (required)
One or more of these RPMs is required If you only want the experimental SFC support then the opnfv-apexRPM is not required If you only want OpenDaylight or ONOS support then the opnfv-apex-opendaylight-sfcRPM is not required
To install these RPMs download them to the local disk on your CentOS 7 install and passthe file names directly to yum sudo yum install opnfv-apex-ltversiongtrpmopnfv-apex-undercloud-ltversiongtrpm opnfv-apex-common-ltversiongtrpm
2a Boot the ISO off of a USB or other installation media and walk through installing OPNFV CentOS 7 TheISO comes prepared to be written directly to a USB drive with dd as such
dd if=opnfv-apexiso of=devsdX bs=4M
Replace devsdX with the device assigned to your usb drive Then select the USB device as the boot media onyour Jumphost
2b Install the RDO Release RPM and the opnfv-apex RPM
sudo yum install -y httpswwwrdoprojectorgreposrdo-releaserpmopnfv-apex-versionrpm
The RDO Project release repository is needed to install OpenVSwitch which is a dependency of opnfv-apex If you do not have external connectivity to use this repository you need to download the Open-VSwitch RPM from the RDO Project repositories and install it with the opnfv-apex RPM
3 After the operating system and the opnfv-apex RPMs are installed login to your Jumphost as root
4 Configure IP addresses on the interfaces that you have selected as your networks
5 Configure the IP gateway to the Internet either preferably on the public interface
6 Configure your etcresolvconf to point to a DNS server (8888 is provided by Google)
Creating a Node Inventory File
IPMI configuration information gathered in section Execution Requirements (Bare Metal Only) needs to be added tothe inventoryyaml file
1 Copy usrsharedocopnfvinventoryyamlexample as your inventory file template toetcopnfv-apexinventoryyaml
2 The nodes dictionary contains a definition block for each baremetal host that will be deployed 1 or morecompute nodes and 3 controller nodes are required (The example file contains blocks for each of these already)It is optional at this point to add more compute nodes into the node list
3 Edit the following values for each node
32 Apex configuration 11
OPNFV Configuration Guide Release brahmaputra30 (605ebda)
bull mac_address MAC of the interface that will PXE boot from Instack
bull ipmi_ip IPMI IP Address
bull ipmi_user IPMI username
bull ipmi_password IPMI password
bull pm_type Power Management driver to use for the node
bull cpus (Introspected) CPU cores available
bull memory (Introspected) Memory available in Mib
bull disk (Introspected) Disk space available in Gb
bull arch (Introspected) System architecture
bull capabilities (Optional) Intended node role (profilecontrol or profilecompute)
bull Introspection looks up the overcloud nodersquos resources and overrides these value You can
leave default values and Apex will get the correct values when it runs introspection on the nodes
If capabilities profile is not specified then Apex will select nodersquos roles in the OPNFV cluster in a non-deterministicfashion
Creating the Settings Files
Edit the 2 settings files in etcopnfv-apex These files have comments to help you customize them
1 deploy_settingsyaml This file includes basic configuration options deployment
2 network_settingsyaml This file provides Apex with the networking information that satisfies the prerequisiteNetwork Requirements These are specific to your environment
Running opnfv-deploy
You are now ready to deploy OPNFV using Apex opnfv-deploy will use the inventory and settings files to deployOPNFV
Follow the steps below to execute
1 Execute opnfv-deploy sudo opnfv-deploy [ --flat | -n network_settingsyaml ] -iinventoryyaml -d deploy_settingsyaml If you need more information about the options thatcan be passed to opnfv-deploy use opnfv-deploy --help ndashflat will collapse all networks onto a singlenic -n network_settingsyaml allows you to customize your networking topology
2 Wait while deployment is executed If something goes wrong during this part of the process it is most likelya problem with the setup of your network or the information in your configuration files You will also noticedifferent outputs in your shell
3 The message ldquoOvercloud Deployedrdquo will display when When the deployment is complete Just above thismessage there will be a URL that ends in port httplthostgt5000 This url is also the endpoint for the OPNFVHorizon Dashboard if connected to on port 80
33 Compass4nfv configuration
This document describes providing guidelines on how to install and configure the Brahmaputra release of OPNFVwhen using Compass as a deployment tool including required software and hardware configurations
12 Chapter 3 Installer Configuration
OPNFV Configuration Guide Release brahmaputra30 (605ebda)
Installation and configuration of host OS OpenStack OpenDaylight ONOS Ceph etc can be supported by Compasson VMs or Bare Metal nodes
The audience of this document is assumed to have good knowledge in networking and UnixLinux administration
331 Preconditions
Before starting the installation of the Brahmaputra release of OPNFV some planning must be done
Retrieving the installation ISO image
First of all The installation ISO is needed for deploying your OPNFV environment it included packages of CompassOpenStack OpenDaylight ONOS and so on
The stable release ISO can be retrieved via OPNFV software download page
The daily build ISO can be retrieved via OPNFV artifacts repository
httpartifactsopnfvorg
NOTE Search the keyword ldquoCompass4nfvBrahmaputrardquo to locate the ISO image
Eg compass4nfvbrahmaputraopnfv-2016-01-16_15-03-18iso compass4nfvbrahmaputraopnfv-2016-01-16_15-03-18properties
The name of iso image includes the time of iso building you can get the daily ISO according the building time The giturl and sha1 of Compass4nfv are recorded in properties files According these the corresponding deployment scriptscan be retrieved
Getting the deployment scripts
To retrieve the repository of Compass4nfv on Jumphost use the following command
bull git clone httpsgerritopnfvorggerritcompass4nfv
To get stablebrahmaputra release you can use the following command
bull git checkout brahmaputra10
NOTE PLEASE DO NOT GIT CLONE COMPASS4NFV IN root DIRECTORY
If you donrsquot have a Linux foundation user id get it first by the url
httpswikiopnfvorgdevelopergetting_started
If you want to use a daily release ISO please checkout the corresponding sha1 to get the deployment scripts
Eg Git sha1 in file ldquoopnfv-2016-01-16_15-03-18propertiesrdquo is d5a13ce7cc2ce89946d34b0402ecf33c1d291851
bull git checkout d5a13ce7cc2ce89946d34b0402ecf33c1d291851
Preparing the installation environment
If you have only 1 Bare Metal server Virtual deployment is recommended if more than or equal 3 servers theBare Metal deployment is recommended The minimum number of servers for Bare metal deployment is 3 1 forJumpServer(Jumphost) 1 for controller 1 for compute
33 Compass4nfv configuration 13
OPNFV Configuration Guide Release brahmaputra30 (605ebda)
332 Setup Requirements
Jumphost Requirements
The Jumphost requirements are outlined below
1 Ubuntu 1404 (Pre-installed)
2 Root access
3 libvirt virtualization support
4 Minimum 2 NICs
bull PXE installation Network (Receiving PXE request from nodes and providing OS provisioning)
bull IPMI Network (Nodes power control and set boot PXE first via IPMI interface)
bull External Network (Optional Internet access)
5 16 GB of RAM for a Bare Metal deployment 64 GB of RAM for a VM deployment
6 Minimum 100G storage
Bare Metal Node Requirements
Bare Metal nodes require
1 IPMI enabled on OOB interface for power control
2 BIOS boot priority should be PXE first then local hard disk
3 Minimum 3 NICs
bull PXE installation Network (Broadcasting PXE request)
bull IPMI Network (Receiving IPMI command from Jumphost)
bull External Network (OpenStack mgmtexternalstoragetenant network)
Network Requirements
Network requirements include
1 No DHCP or TFTP server running on networks used by OPNFV
2 2-6 separate networks with connectivity between Jumphost and nodes
bull PXE installation Network
bull IPMI Network
bull Openstack mgmt Network
bull Openstack external Network
bull Openstack tenant Network
bull Openstack storage Network
3 Lights out OOB network access from Jumphost with IPMI node enabled (Bare Metal deployment only)
4 External network has Internet access meaning a gateway and DNS availability
14 Chapter 3 Installer Configuration
OPNFV Configuration Guide Release brahmaputra30 (605ebda)
The networks with() can be share one NIC(Default configuration) or use an exclusive NIC(Reconfigurated innetworkyml)
Execution Requirements (Bare Metal Only)
In order to execute a deployment one must gather the following information
1 IPMI IP addresses for the nodes
2 IPMI login information for the nodes (userpass)
3 MAC address of Control Plane Provisioning interfaces of the Bare Metal nodes
333 Installation Guide (BM Deployment)
Nodes Configuration (BM Deployment)
The bellow file is the inventory template of deployment nodes
ldquocompass4nfvdeployconfhardware_environmenthuawei_us_labpod1dhaymlrdquo
You can write your own IPMI IPUserPasswordMac addressroles reference to it
bull ipmiVer ndash IPMI interface version for deployment node support IPMI 10 or IPMI 20 is available
bull ipmiIP ndash IPMI IP address for deployment node Make sure it can access from Jumphost
bull ipmiUser ndash IPMI Username for deployment node
bull ipmiPass ndash IPMI Password for deployment node
bull mac ndash MAC Address of deployment node PXE NIC
bull name ndash Host name for deployment node after installation
bull roles ndash Components deployed
Assignment of different roles to servers
Eg Openstack only deployment roles setting
hosts- name host1roles
- controller- ha
- name host2roles
- compute
NOTE IF YOU SELECT MUTIPLE NODES AS CONTROLLER THE lsquoharsquo role MUST BE SELECT TOO
Eg Openstack and ceph deployment roles setting
hosts- name host1roles
- controller- ha- ceph-adm- ceph-mon
33 Compass4nfv configuration 15
OPNFV Configuration Guide Release brahmaputra30 (605ebda)
- name host2roles
- compute- ceph-osd
Eg Openstack and ODL deployment roles setting
hosts- name host1roles
- controller- ha- odl
- name host2roles
- compute
Eg Openstack and ONOS deployment roles setting
hosts- name host1roles
- controller- ha- onos
- name host2roles
- compute
Network Configuration (BM Deployment)
Before deployment there are some network configuration to be checked based on your network topology Com-pass4nfv network default configuration file is ldquocompass4nfvdeployconfnetwork_cfgyamlrdquo You can write yourown reference to it
The following figure shows the default network configuration
+--+ +--+ +--+| | | | | || | +------------+ | | | || +------+ Jumphost +------+ | | || | +------+-----+ | | | || | | | | | || | +------------+ +-----+ || | | | | || | +------------+ | | | || +------+ host1 +------+ | | || | +------+-----+ | | | || | | | | | || | +------------+ +-----+ || | | | | || | +------------+ | | | || +------+ host2 +------+ | | || | +------+-----+ | | | || | | | | | |
16 Chapter 3 Installer Configuration
OPNFV Configuration Guide Release brahmaputra30 (605ebda)
| | +------------+ +-----+ || | | | | || | +------------+ | | | || +------+ host3 +------+ | | || | +------+-----+ | | | || | | | | | || | +------------+ +-----+ || | | | | || | | | | |+-++ ++-+ +-++
^ ^ ^| | || | |
+-+-------------------------+ | || External Network | | |+---------------------------+ | |
+-----------------------+---+ || IPMI Network | |+---------------------------+ |
+-------------------------+-+| PXE(Installation) Network |+---------------------------+
Start Deployment (BM Deployment)
1 Set PXEInstallation NIC for Jumphost (set eth1 Eg)
export INSTALL_NIC=eth1
2 Set OS version for nodes provisioning (set Ubuntu1404 Eg)
export OS_VERSION=trusty
3 Set OpenStack version for deployment nodes (set liberty Eg)
export OPENSTACK_VERSION=liberty
4 Set ISO image that you want to deploy
export ISO_URL=file$YOUR_OWNcompassisoorexport ISO_URL=httpartifactsopnfvorgcompass4nfvbrahmaputraopnfv-releaseiso
5 Run deploysh with inventory and network configuration
deploysh --dha $YOUR_OWNdhayml --network $YOUR_OWNnetworkyml
34 Fuel configuration
This section provides guidelines on how to install and configure the Brahmaputra release of OPNFV when using Fuelas a deployment tool including required software and hardware configurations
For detailed instructions on how to install the Brahmaputra release using Fuel see Reference 13 in section ldquoFuelassociated referencesrdquo below
34 Fuel configuration 17
OPNFV Configuration Guide Release brahmaputra30 (605ebda)
341 Pre-configuration activities
Planning the deployment
Before starting the installation of the Brahmaputra release of OPNFV when using Fuel as a deployment tool someplanning must be done
Familiarize yourself with the Fuel by reading the following documents
bull Fuel planning guide please see Reference 8 in section ldquoFuel associated referencesrdquo below
bull Fuel quick start guide please see Reference 9 in section ldquoFuel associated referencesrdquo below
bull Fuel operations guide please see Reference 10 in section ldquoFuel associated referencesrdquo below
bull Fuel Plugin Developers Guide please see Reference 11 in section ldquoFuel associated referencesrdquo below
Before the installation can start a number of deployment specific parameters must be collected those are
1 Provider sub-net and gateway information
2 Provider VLAN information
3 Provider DNS addresses
4 Provider NTP addresses
5 Network overlay you plan to deploy (VLAN VXLAN FLAT)
6 Monitoring Options you want to deploy (Ceilometer Syslog etc)
7 How many nodes and what roles you want to deploy (Controllers Storage Computes)
8 Other options not covered in the document are available in the links above
Retrieving the ISO image
First of all the Fuel deployment ISO image needs to be retrieved the Fuel iso image of the Brahmaputra release canbe found at Reference 2
Alternatively you may build the iso from source by cloning the opnfvfuel git repository Detailed instructions onhow to build a Fuel OPNFV iso can be found in Reference 14 at section ldquoFuel associated referencesrdquo below
342 Hardware requirements
Following high level hardware requirements must be met
18 Chapter 3 Installer Configuration
OPNFV Configuration Guide Release brahmaputra30 (605ebda)
HW Aspect Requirement of nodes Minimum 5 (3 for non redundant deployment)
bull 1 Fuel deployment master (may be virtualized)bull 3(1) Controllers (1 colocated mongoceilometer
role 2 Ceph-OSD roles)bull 1 Compute (1 co-located Ceph-OSD role)
CPU Minimum 1 socket x86_AMD64 with Virtualizationsupport
RAM Minimum 16GBserver (Depending on VNF work load)Disk Minimum 256GB 10kRPM spinning disksNetworks 4 Tagged VLANs (PUBLIC MGMT STORAGE PRI-
VATE)1 Un-Tagged VLAN for PXE Boot - ADMIN Networknote These can be run on single NIC - or spread outover other nics as your hardware supports
For information on compatible hardware types available for use please see Reference 11 in section ldquoFuel associatedreferencesrdquo below
Top of the rack (TOR) Configuration requirements
The switching infrastructure provides connectivity for the OPNFV infrastructure operations tenant networks(EastWest) and provider connectivity (NorthSouth) it also provides needed connectivity for the Storage Area Net-work (SAN) To avoid traffic congestion it is strongly suggested that three physically separated networks are usedthat is 1 physical network for administration and control one physical network for tenant private and public networksand one physical network for SAN The switching connectivity can (but does not need to) be fully redundant in suchcase it and comprises a redundant 10GE switch pair for each of the three physically separated networks
The physical TOR switches are not automatically configured from the OPNFV reference platform All the networksinvolved in the OPNFV infrastructure as well as the provider networks and the private tenant VLANs needs to bemanually configured
343 Jumphost configuration
The Jumphost server also known as the ldquoFuel masterrdquo provides needed servicesfunctions to deploy an OP-NFVOpenStack cluster as well functions for cluster life-cycle management (extensions repair actions and upgrades)
The Jumphost server requires 2 (4 if redundancy is required) Ethernet interfaces - one for external management of theOPNFV installation and another for jump-host communication with the OPNFV cluster
Install the Fuel jump-host
Mount the Fuel Brahmaputra ISO file as a boot device to the jump host server reboot it and install the Fuel Jumphostin accordance with installation instructions see Reference 13 in section ldquoFuel associated referencesrdquo below
344 Platform components configuration
Fuel-Plugins
Fuel plugins enable you to install and configure additional capabilities for your Fuel OPNFV based cloud such asadditional storage types networking functionality or NFV features developed by OPNFV
34 Fuel configuration 19
OPNFV Configuration Guide Release brahmaputra30 (605ebda)
Fuel offers an open source framework for creating these plugins so therersquos a wide range of capabilities that you canenable Fuel to add to your OpenStack clouds
The OPNFV Brahmaputra version of Fuel provides a set of pre-packaged plugins developed by OPNFV
Pluginname
Short description
Open-Daylight
OpenDaylight provides an open-source SDN Controller providing networking features such as L2and L3 network control ldquoService Function Chainingrdquo routing networking policies etc Moreinformation on OpenDaylight in the OPNFV Brahmaputra release can be found in a separate sectionin this document
ONOS ONOS is another open-source SDN controller which in essense fill the same role as OpenDaylightMore information on ONOS in the OPNFV Brahmaputra release can be found in a separate section inthis document
BGP-VPN
BGP-VPN provides an BGPMPLS VPN service More information on BGP-VPN in the OPNFVBrahmaputra release can be found in a separate section in this document
OVS-NSH
OVS-NSH provides a variant of Open-vSwitch which supports ldquoNetwork Service Headersrdquo neededfor the ldquoService function chainingrdquo feature More information on ldquoService Function Chainingrdquo in theOPNFV Brahmaputra release can be found in a in a separate section in this document
OVS-NFV
OVS-NFV provides a variant of Open-vSwitch with carrier grade characteristics essential for NFVworkloads More information on OVS-NFV in the OPNFV Brahmaputra release can be found in a ina separate section in this document
KVM-NFV
KVM-NFV provides a variant of KVM with improved virtualization characteristics essential for NFVworkloads More information on KVM-NFV in the OPNFV Brahmaputra release can be found in a ina separate section in this document
VSPERF VSPERF provides a networking characteristics test bench that facilitates characteristicsperformanceevaluation of vSwithches More information on VSPERF in the OPNFV Brahmaputra release can befound in a in a separate section in this document
Additional third-party plugins can be found here httpswwwmirantiscomproductsopenstack-drivers-and-pluginsfuel-plugins Note Plugins are not necessarilly compatible with each other see section ldquoConfigurationoptions OPNFV scenariosrdquo for compatibility information
The plugins come prepackaged ready to install To do so follow the installation instructions provided in Reference 13provided in section ldquoFuel associated referencesrdquo below
Fuel environment
A Fuel environment is an OpenStack instance managed by Fuel one Fuel instance can manage several OpenStackinstancesenvironments with different configurations etc
To create a Fuel instance follow the instructions provided in the installation instructions see Reference 13 in sectionldquoFuel associated referencesrdquo below
Provisioning of aditional features and services
Although the plugins have already previously been installed they are not per default enabled for the environment wejust created The plugins of your choice need to be enabled and configured
To enable a plugin follow the installation instructions found in Reference 13 provided in section ldquoFuel associatedreferencesrdquo below
For configuration of the plugins please see section ldquoFeature Configurationrdquo
20 Chapter 3 Installer Configuration
OPNFV Configuration Guide Release brahmaputra30 (605ebda)
Networking
All the networking aspects need to be configured in terms of - InterfacesNICs - VLANs - Sub-nets - Gateways - Usernetwork segmentation (VLANVXLAN) - DNS - NTP - etc
For guidelines on how to configure networking please refer to the installation instructions found in Reference 13provided in section ldquoFuel associated referencesrdquo below
Node allocation
Now it is time to allocate the nodes in your OPNFV cluster to OpenStack- SDN- and other featureservice rolesSome roles may require redundancy while others donrsquot Some roles may be co-located with other roles while othersmay not The Fuel GUI will guide you in the allocation of roles and will not permit you to perform invalid allocations
For detailed guide-lines on node allocation please refer to the installation instructions found in Reference 13 providedin section ldquoFuel associated referencesrdquo below
Off-line deployment
The OPNFV Brahmaputra version of Fuel can be deployed using on-line upstream repositories (default) or off-lineusing built-in local repositories on the Fuel jump-start server
For instructions on how to configure Fuel for off-line deployment please refer to the installation instructions found inReference 13 provided in section ldquoFuel associated referencesrdquo below
Deployment
You should now be ready to deploy your OPNFV Brahmaputra environment - but before doing so you may want toverify your network settings
For further details on network verification and deployment please refer to the installation instructions found in Ref-erence 13 provided in section ldquoFuel associated referencesrdquo below
345 Fuel associated references
1 OPNFV Home Page
2 OPNFV documentation- and software downloads
3 OpenStack Liberty Release artifacts
4 OpenStack documentation
5 OpenDaylight artifacts
6 The Fuel OpenStack project
7 Fuel documentation overview
8 Fuel planning guide
9 Fuel quick start guide
10 Fuel operations guide
11 Fuel Plugin Developers Guide
12 Fuel OpenStack Hardware Compatibility List
34 Fuel configuration 21
OPNFV Configuration Guide Release brahmaputra30 (605ebda)
13 OPNFV Installation instruction for the Brahmaputra release of OPNFV when using Fuel as a deployment tool
14 OPNFV Build instruction for the Brahmaputra release of OPNFV when using Fuel as a deployment tool
15 OPNFV Release Note for the Brahmaputra release of OPNFV when using Fuel as a deployment tool
35 JOID Configuration
351 Bare Metal Installations
352 Requirements as per Pharos
353 Networking
Minimum 2 networks
1 First for Admin network with gateway to access external network
2 Second for public network to consume by tenants for floating ips
NOTE JOID support multiple isolated networks for data as well as storage Based on your network optionsfor Openstack
Minimum 6 physical servers
1 Jump host server
Minimum HW Spec needed
CPU cores 16
Memory 32 GB
Hard Disk 1(250 GB)
NIC eth0(Admin Management) eth1 (external network)
2 Control node servers (minimum 3)
Minimum HW Spec
CPU cores 16
Memory 32 GB
Hard Disk 1(500 GB)
NIC eth0(Admin Management) eth1 (external network)
3 Compute node servers (minimum 2)
Minimum HW Spec
CPU cores 16
Memory 32 GB
Hard Disk 1(1 TB) this includes the space for ceph as well
22 Chapter 3 Installer Configuration
OPNFV Configuration Guide Release brahmaputra30 (605ebda)
NIC eth0(Admin Management) eth1 (external network)
NOTE Above configuration is minimum and for better performance and usage of the Openstack please con-sider higher spec for each nodes
Make sure all servers are connected to top of rack switch and configured accord-ingly No DHCP server should be up and configured Only gateway at eth0 and eth1 network should be con-figure to access the network outside your lab
Jump node configuration
1 Install Ubuntu 1404 LTS server version of OS on the nodes 2 Install the git and bridge-utils pack-ages on the server and configure minimum two bridges on jump host
brAdm and brPublic cat etcnetworkinterfaces
The loopback network interface
auto lo
iface lo inet loopback
iface eth0 inet manual
auto brAdm
iface brAdm inet static
address 10411
netmask 2552552480
network 10400
broadcast 1047255
gateway 10401
dns- options are implemented by the resolvconf package if installed
dns-nameservers 10402
bridge_ports eth0
auto brPublic
iface brPublic inet static
address 102662
netmask 2552552550
bridge_ports eth2
NOTE If you choose to use the separate network for management data and storage then you need to createbridge for each interface In case of VLAN tags use the appropriate network on jump-host depend upon VLANID on the interface
354 Configure JOID for your lab
Get the joid code from gerritt
git clone httpsgerritopnfvorggerritpjoidgit
cd joidci
Enable MAAS
35 JOID Configuration 23
OPNFV Configuration Guide Release brahmaputra30 (605ebda)
bull Create a directory in maasltcompany namegtltpod numbergt for example
mkdir maasintelpod7
bull Copy files from pod5 to pod7
cp maasintelpod5 maasintelpod7
4 files will get copied deploymentyaml environmentsyaml interfaceshost lxc-add-more-interfaces
355 deploymentyaml file
Prerequisite
1 Make sure Jump host node has been configured with bridges on each interface so that appropriate MAAS and JUJUbootstrap VM can be created For example if you have three network admin data and public then I would suggestto give names like brAdm brData and brPublic 2 You have information about the node MAC address and powermanagement details (IPMI IP username password) of the nodes used for control and compute node
356 modify deploymentyaml
This file has been used to configure your maas and bootstrap node in a VM Comments in the file are self explanatoryand we expect fill up the information according to match lab infrastructure information Sample deploymentyaml canbe found at httpsgerritopnfvorggerritgitwebp=joidgita=blobf=cimaasintelpod5deploymentyaml
modify joidci01-deploybundlesh
under section case $3 add the intelpod7 section and make sure you have information provided correctly Beforeexample consider your network has 1921681024 your default network and eth1 is on public network which will beused to assign the floating ip
rsquointelpod7rsquo )
As per your lab vip address list be deafult uses 104111 - 104120
sed -i -- rsquos1041119216812grsquo bundlesyaml
Choose the external port to go out from gateway to use
sed -i -- rsquos ext-port eth1 ext-port eth1grsquo bundlesyaml
NOTE If you are using seprate data network then add this line below also along with other changes which representsnetwork 1049024 will be used for data network for openstack
sed -i -- rsquosos-data-network 1048021os-data-network 1049024grsquo bundlesyaml
modify joidci02-maasdeploysh
under section case $1 add the intelpod7 section and make sure you have information provided correctly
24 Chapter 3 Installer Configuration
OPNFV Configuration Guide Release brahmaputra30 (605ebda)
rsquointelpod7rsquo )
cp maasintelpod7deploymentyaml deploymentyaml
NOTE If you are using VLAN tags or more network for data and storage then make sure you modify the case $1section under Enable vlan interface with maas appropriately In the example below eth2 has been used as separate datanetwork for tenants in openstack with network 1049024 on compute and control nodes
rsquointelpod7rsquo )
maas refresh
enableautomodebyname eth2 AUTO 1049024 compute || true
enableautomodebyname eth2 AUTO 1049024 control || true
MAAS Install
After integrating the changes as mentioned above run the MAAS install Suppose you name the integration lab asintelpod7 then run the below commands to start the MAAS deployment
02-maasdeploysh intelpod7
This will take approximately 40 minutes to couple hours depending on your environment This script will do thefollowing
1 Create 2 VMs (KVM)
2 Install MAAS in one of the VMs
3 Configure the MAAS to enlist and commission a VM for Juju bootstrap node
4 Configure the MAAS to enlist and commission bare metal servers
When itrsquos done you should be able to view MAAS webpage (httpltMAAS IPgtMAAS) and see 1 bootstrap nodeand bare metal servers in the lsquoReadyrsquo state on the nodes page
Virtual deployment
By default just running the script 02-maasdeploysh will automatically create the KVM VMs on a single machineand configure everything for you
OPNFV Install
JOID allows you to deploy different combinations of OpenStack release and SDN solution in HA or non-HA mode
For OpenStack it supports Juno and Liberty For SDN it supports Openvswitch OpenContrail OpenDayLight andONOS
In addition to HA or non-HA mode it also supports to deploy the latest from the development tree (tip)
The deploysh in the joidci directoy will do all the work for you For example the following deploy OpenStack Liberywith OpenDayLight in a HA mode in the Intelpod7
35 JOID Configuration 25
OPNFV Configuration Guide Release brahmaputra30 (605ebda)
deploysh -o liberty -s odl -t ha -l intelpod7 -f none
By default the SDN is Openvswitch non-HA Liberty Intelpod5 OPNFV Brahmaputra release and ODL_L2 for theOPNFV feature
Possible options for each choice are as follows
[-s ]
nosdn openvswitch only and no other SDN
odl OpenDayLight Lithium version
opencontrail OpenContrail SDN
onos ONOS framework as SDN
[-t ]
nonha NO HA mode of Openstack
ha HA mode of openstack
tip the tip of the development
[-o ]
juno OpenStack Juno version
liberty OpenStack Liberty version
[-l ] etc
default For virtual deployment where installation will be done on KVM created using 02-maasdeploysh
intelpod5 Install on bare metal OPNFV pod5 of Intel lab
intelpod6
orangepod2
(other pods)
Note if you make changes as per your pod above then please use your pod
[-f ]
none no special feature will be enabled
ipv6 ipv6 will be enabled for tenant in openstack
By default debug is enabled in script and error messages will be printed on the SSH terminal where you are runningthe scripts It could take an hour to couple hours (max) to complete
Is the deployment done successfully
Once juju-deployer is complete use juju status to verify that all deployed unit are in the ready state
26 Chapter 3 Installer Configuration
OPNFV Configuration Guide Release brahmaputra30 (605ebda)
juju status --format tabular
Find the Openstack-dashboard IP address from the juju status output and see if you can log in via browser Theusername and password is adminopenstack
Optionall see if you can log in Juju GUI Juju GUI is on the Juju bootstrap node which is the second VM you definein the 02-maasdeploysh The username and password is adminadmin
If you deploy ODL OpenContrail or ONOS find the IP address of the web UI and login Please refer to each SDNbundleyaml for usernamepassword
Troubleshoot
To access to any deployed units juju ssh for example to login into nova-compute unit and look for varlogjujuunit-ltof interestgt for more info
juju ssh nova-compute0
Example
ubuntuR4N4B1~$ juju ssh nova-compute0
Warning Permanently added rsquo172165060rsquo (ECDSA) to the list of knownhosts
Warning Permanently added rsquo3-r4n3b1-computemaasrsquo (ECDSA) to the list ofknown hosts
Welcome to Ubuntu 14041 LTS (GNULinux 3130-77-generic x86_64)
Documentation httpshelpubuntucom
ltskippedgt
Last login Tue Feb 2 212356 2016 from bootstrapmaas
ubuntu3-R4N3B1-compute~$ sudo -i
root3-R4N3B1-compute~ cd varlogjuju
root3-R4N3B1-computevarlogjuju ls
machine-2log unit-ceilometer-agent-0log unit-ceph-osd-0logunit-neutron-contrail-0log unit-nodes-compute-0log unit-nova-compute-0logunit-ntp-0log
root3-R4N3B1-computevarlogjuju
By default juju will add the Ubuntu user keys for authentication into the deployed server and only ssh accesswill be available
Once you resolve the error go back to the jump host to rerun the charm hook with
juju resolved --retry ltunitgt
35 JOID Configuration 27
OPNFV Configuration Guide Release brahmaputra30 (605ebda)
28 Chapter 3 Installer Configuration
CHAPTER
FOUR
FEATURE CONFIGURATION
The following sections describe the configuration options for specific platform features provided in BrahmaputraFurther details for each feature are captured in the referred project documentation
41 Copper configuration
This release focused on use of the OpenStack Congress service for managing configuration policy The Congress installprocedure described here is largely manual This procedure as well as the longer-term goal of automated installersupport is a work in progress The procedure is further specific to one OPNFV installer (JOID ie MAASJuJu)based environment Support for other OPNFV installer deployed environments is also a work in progress
411 Pre-configuration activities
This procedure assumes OPNFV has been installed via the JOID installer
412 Hardware configuration
There is no specific hardware configuration required for the Copper project
413 Feature configuration
Following are instructions for installing Congress on an Ubuntu 1404 LXC container in the OPNFV Controller nodeas installed by the JOID installer This guide uses instructions from the Congress intro guide on readthedocs Specificvalues below will need to be modified if you intend to repeat this procedure in your JOID-based install environment
Install Procedure
The install currently occurs via four bash scripts provided in the copper repo See these files for the detailed steps
bull install_congress_1sh creates and starts the linux container for congress on the controller node copiesinstall_congress_2sh to the controller node and invokes it via ssh
bull install_congress_2sh installs congress on the congress server
29
OPNFV Configuration Guide Release brahmaputra30 (605ebda)
Cleanup Procedure
If there is an error during installation use the bash script clean_congresssh which stops the congress server if runningand removes the congress user and service from the controller database
Restarting after server power loss etc
Currently this install procedure is manual Automated install and restoral after host recovery is TBD For now thisprocedure will get the Congress service running again
On jumphost SSH to Congress serversource ~envshjuju ssh ubuntu$CONGRESS_HOST If that fails
On jumphost SSH to controller nodejuju ssh ubuntunode1-control Start the Congress containersudo lxc-start -n juju-trusty-congress -d Verify the Congress container statussudo lxc-ls -f juju-trusty-congressNAME STATE IPV4 IPV6 GROUPS AUTOSTART----------------------------------------------------------------------juju-trusty-congress RUNNING 19216810117 - - NO exit back to the Jumphost wait a minute and go back to the SSH to Congress server step above
On the Congress server that you have logged intosource ~admin-openrcshcd ~gitcongresssource binactivatebincongress-server ampdisown -h 1
42 Doctor Configuration
421 Doctor Inspector
Doctor Inspector is suggested to be placed in one of the controller nodes but it can be put on any host where DoctorMonitor can reach and accessible to the OpenStack Controller (Nova)
Make sure OpenStack env parameters are set properly so that Doctor Inspector can issue admin actions such ascompute host force-down and state update of VM
Then you can configure Doctor Inspector as follows
git clone httpsgerritopnfvorggerritdoctor -b stablebrahmaputracd doctortestsINSPECTOR_PORT=12345python inspectorpy $INSPECTOR_PORT gt inspectorlog 2gtamp1 amp
422 Doctor Monitor
Doctor Monitors are suggested to be placed in one of the controller nodes but those can be put on any host whichis reachable to target compute host and accessible to the Doctor Inspector You need to configure Monitors for allcompute hosts one by one
30 Chapter 4 Feature Configuration
OPNFV Configuration Guide Release brahmaputra30 (605ebda)
Make sure OpenStack env parameters are set properly so that Doctor Inspector can issue admin actions such ascompute host force-down and state update of VM
Then you can configure Doctor Monitor as follows
git clone httpsgerritopnfvorggerritdoctor -b stablebrahmaputracd doctortestsINSPECTOR_PORT=12345COMPUTE_HOST=overcloud-novacompute-0sudo python monitorpy $COMPUTE_HOST
http127001$INSPECTOR_PORTevents gt monitorlog 2gtamp1 amp
43 IPv6 Configuration - Setting Up a Service VM as an IPv6 vRouter
This section provides instructions to set up a service VM as an IPv6 vRouter using OPNFV Brahmaputra Releaseinstallers The environment may be pure OpenStack option or Open Daylight L2-only option The deployment modelmay be HA or non-HA The infrastructure may be bare metal or virtual environment
For complete instructions and documentations of setting up service VM as an IPv6 vRouter using ANY method pleaserefer to
1 IPv6 Configuration Guide (HTML) httpartifactsopnfvorgipv6docssetupservicevmindexhtml
2 IPv6 User Guide (HTML) httpartifactsopnfvorgipv6docsgapanalysisindexhtml
431 Pre-configuration Activities
The configuration will work in 2 environments
1 OpenStack-only environment
2 OpenStack with Open Daylight L2-only environment
Depending on which installer will be used to deploy OPNFV each environment may be deployed on bare metal orvirtualized infrastructure Each deployment may be HA or non-HA
Refer to the previous installer configuration chapters installations guide and release notes
432 Setup Manual in OpenStack-Only Environment
If you intend to set up a service VM as an IPv6 vRouter in OpenStack-only environment of OPNFV BrahmaputraRelease please NOTE that
bull Because the anti-spoofing rules of Security Group feature in OpenStack prevents a VM from forwarding packetswe need to disable Security Group feature in the OpenStack-only environment
bull The hostnames IP addresses and username are for exemplary purpose in instructions Please change as neededto fit your environment
bull The instructions apply to both deployment model of single controller node and HA (High Availability) deploy-ment model where multiple controller nodes are used
43 IPv6 Configuration - Setting Up a Service VM as an IPv6 vRouter 31
OPNFV Configuration Guide Release brahmaputra30 (605ebda)
Install OPNFV and Preparation
OPNFV-NATIVE-INSTALL-1 To install OpenStack-only environment of OPNFV Brahmaputra Release
Apex Installer
HA deployment in OpenStack-only environmentopnfv-deploy -d etcopnfv-apexos-nosdn-nofeature-hayaml
Non-HA deployment in OpenStack-only environment Non-HA deployment is currently not supported by Apex installer
Compass Installer
HA deployment in OpenStack-only environmentexport ISO_URL=file$BUILD_DIRECTORYcompassisoexport OS_VERSION=$COMPASS_OS_VERSIONexport OPENSTACK_VERSION=$COMPASS_OPENSTACK_VERSIONexport CONFDIR=$WORKSPACEdeployconfvm_environmentdeploysh --dha $CONFDIRos-nosdn-nofeature-hayml --network $CONFDIR$NODE_NAMEnetworkyml
Non-HA deployment in OpenStack-only environment Non-HA deployment is currently not supported by Compass installer
Fuel Installer
HA deployment in OpenStack-only environmentdeploysh -s os-nosdn-nofeature-ha
Non-HA deployment in OpenStack-only environmentdeploysh -s os-nosdn-nofeature-noha
Joid Installer
HA deployment in OpenStack-only environmentdeploysh -o liberty -s nosdn -t ha -l default -f ipv6
Non-HA deployment in OpenStack-only environmentdeploysh -o liberty -s nosdn -t nonha -l default -f ipv6
Please NOTE that
bull You need to refer to installerrsquos documentation for other necessary parameters applicable to your deployment
bull You need to refer to Release Notes and installerrsquos documentation if there is any issue in installation
OPNFV-NATIVE-INSTALL-2 Clone the following GitHub repository to get the configuration and metadata files
git clone httpsgithubcomsridhargaddamopnfv_os_ipv6_pocgit optstackopnfv_os_ipv6_poc
Disable Security Groups in OpenStack ML2 Setup
OPNFV-NATIVE-SEC-1 Change the settings in etcneutronpluginsml2ml2_confini as follows
etcneutronpluginsml2ml2_confini[securitygroup]extension_drivers = port_security
32 Chapter 4 Feature Configuration
OPNFV Configuration Guide Release brahmaputra30 (605ebda)
enable_security_group = Falsefirewall_driver = neutronagentfirewallNoopFirewallDriver
OPNFV-NATIVE-SEC-2 Change the settings in etcnovanovaconf as follows
etcnovanovaconf[DEFAULT]security_group_api = novafirewall_driver = novavirtfirewallNoopFirewallDriver
OPNFV-NATIVE-SEC-3 After updating the settings you will have to restart the Neutron and Nova services
Please note that the commands of restarting Neutron and Nova would vary depending on the installer Pleaserefer to relevant documentation of specific installers
Set Up Service VM as IPv6 vRouter
OPNFV-NATIVE-SETUP-1 Now we assume that OpenStack multi-node setup is up and running We have to sourcethe tenant credentials in this step Please NOTE that the method of sourcing tenant credentials may vary dependingon installers For example
Apex installer
source the tenant credentials using Apex installer of OPNFV you need to copy the file homestackovercloudrc from the installer VM called instack to a location in controller node for example in the directory optsource optovercloudrc
Compass installer
source the tenant credentials using Compass installer of OPNFVsource optadmin-openrcsh
Fuel installer
source the tenant credentials using Fuel installer of OPNFVsource rootopenrc
Joid installer
source the tenant credentials using Joid installer of OPNFVsource $HOMEjoid_configadmin-openrc
devstack
source the tenant credentials in devstacksource openrc admin demo
Please refer to relevant documentation of installers if you encounter any issue
OPNFV-NATIVE-SETUP-2 Download fedora22 image which would be used for vRouter
wget httpsdownloadfedoraprojectorgpubfedoralinuxreleases22Cloudx86_64ImagesFedora-Cloud-Base-22-20150521x86_64qcow2
OPNFV-NATIVE-SETUP-3 Import Fedora22 image to glance
glance image-create --name Fedora22 --disk-format qcow2 --container-format bare --file Fedora-Cloud-Base-22-20150521x86_64qcow2
43 IPv6 Configuration - Setting Up a Service VM as an IPv6 vRouter 33
OPNFV Configuration Guide Release brahmaputra30 (605ebda)
OPNFV-NATIVE-SETUP-4 This step is Informational OPNFV Installer has taken care of this step duringdeployment You may refer to this step only if there is any issue or if you are using other installers
We have to move the physical interface (ie the public network interface) to br-ex including moving the publicIP address and setting up default route Please refer to OS-NATIVE-SETUP-4 and OS-NATIVE-SETUP-5 in ourmore complete instruction
OPNFV-NATIVE-SETUP-5 Create Neutron routers ipv4-router and ipv6-router which need to provideexternal connectivity
neutron router-create ipv4-routerneutron router-create ipv6-router
OPNFV-NATIVE-SETUP-6 Create an external networksubnet ext-net using the appropriate values based on thedata-center physical network setup
Please NOTE that you may only need to create the subnet of ext-net because OPNFV installers should have createdan external network during installation You must use the same name of external network that installer creates whenyou create the subnet For example
bull Apex installer external
bull Compass installer ext-net
bull Fuel installer net04_ext
bull Joid installer ext-net
Please refer to the documentation of installers if there is any issue
This is needed only if installer does not create an external work Otherwise skip this command net-createneutron net-create --routerexternal ext-net
Note that the name ext-net may work for some installers such as Compass and Joid Change the name ext-net to match the name of external network that an installer createsneutron subnet-create --disable-dhcp --allocation-pool start=19859156251end=19859156254 --gateway 198591561 ext-net 19859156024
OPNFV-NATIVE-SETUP-7 Create Neutron networks ipv4-int-network1 and ipv6-int-network2 withport_security disabled
neutron net-create --port_security_enabled=False ipv4-int-network1neutron net-create --port_security_enabled=False ipv6-int-network2
OPNFV-NATIVE-SETUP-8 Create IPv4 subnet ipv4-int-subnet1 in the internal networkipv4-int-network1 and associate it to ipv4-router
neutron subnet-create --name ipv4-int-subnet1 --dns-nameserver 8888 ipv4-int-network1 2000024
neutron router-interface-add ipv4-router ipv4-int-subnet1
OPNFV-NATIVE-SETUP-9 Associate the ext-net to the Neutron routers ipv4-router and ipv6-router
Note that the name ext-net may work for some installers such as Compass and Joid Change the name ext-net to match the name of external network that an installer createsneutron router-gateway-set ipv4-router ext-netneutron router-gateway-set ipv6-router ext-net
OPNFV-NATIVE-SETUP-10 Create two subnets one IPv4 subnet ipv4-int-subnet2 and one IPv6 subnetipv6-int-subnet2 in ipv6-int-network2 and associate both subnets to ipv6-router
34 Chapter 4 Feature Configuration
OPNFV Configuration Guide Release brahmaputra30 (605ebda)
neutron subnet-create --name ipv4-int-subnet2 --dns-nameserver 8888 ipv6-int-network2 1000024
neutron subnet-create --name ipv6-int-subnet2 --ip-version 6 --ipv6-ra-mode slaac --ipv6-address-mode slaac ipv6-int-network2 2001db80164
neutron router-interface-add ipv6-router ipv4-int-subnet2neutron router-interface-add ipv6-router ipv6-int-subnet2
OPNFV-NATIVE-SETUP-11 Create a keypair
nova keypair-add vRouterKey gt ~vRouterKey
OPNFV-NATIVE-SETUP-12 Create ports for vRouter (with some specific MAC address - basically for automation- to know the IPv6 addresses that would be assigned to the port)
neutron port-create --name eth0-vRouter --mac-address fa163e111111 ipv6-int-network2neutron port-create --name eth1-vRouter --mac-address fa163e222222 ipv4-int-network1
OPNFV-NATIVE-SETUP-13 Create ports for VM1 and VM2
neutron port-create --name eth0-VM1 --mac-address fa163e333333 ipv4-int-network1neutron port-create --name eth0-VM2 --mac-address fa163e444444 ipv4-int-network1
OPNFV-NATIVE-SETUP-14 Update ipv6-router with routing information to subnet 2001db80264
neutron router-update ipv6-router --routes type=dict list=true destination=2001db80264nexthop=2001db801f8163efffe111111
OPNFV-NATIVE-SETUP-15 Boot Service VM (vRouter) VM1 and VM2
nova boot --image Fedora22 --flavor m1small --user-data optstackopnfv_os_ipv6_pocmetadatatxt --availability-zone novaopnfv-os-compute --nic port-id=$(neutron port-list | grep -w eth0-vRouter | awk print $2) --nic port-id=$(neutron port-list | grep -w eth1-vRouter | awk print $2) --key-name vRouterKey vRouter
nova list
Please wait for some 10 to 15 minutes so that necessary packages (like radvd) are installed and vRouter is upnova console-log vRouter
nova boot --image cirros-034-x86_64-uec --flavor m1tiny --user-data optstackopnfv_os_ipv6_pocset_mtush --availability-zone novaopnfv-os-controller --nic port-id=$(neutron port-list | grep -w eth0-VM1 | awk print $2) --key-name vRouterKey VM1
nova boot --image cirros-034-x86_64-uec --flavor m1tiny--user-data optstackopnfv_os_ipv6_pocset_mtush --availability-zone novaopnfv-os-compute --nic port-id=$(neutron port-list | grep -w eth0-VM2 | awk print $2) --key-name vRouterKey VM2
nova list Verify that all the VMs are in ACTIVE state
OPNFV-NATIVE-SETUP-16 If all goes well the IPv6 addresses assigned to the VMs would be as shown as follows
43 IPv6 Configuration - Setting Up a Service VM as an IPv6 vRouter 35
OPNFV Configuration Guide Release brahmaputra30 (605ebda)
vRouter eth0 interface would have the following IPv6 address 2001db801f8163efffe11111164 vRouter eth1 interface would have the following IPv6 address 2001db802164 VM1 would have the following IPv6 address 2001db802f8163efffe33333364 VM2 would have the following IPv6 address 2001db802f8163efffe44444464
OPNFV-NATIVE-SETUP-17 Now we can SSH to VMs You can execute the following command
1 Create a floatingip and associate it with VM1 VM2 and vRouter (to the port id that is passed) Note that the name ext-net may work for some installers such as Compass and Joid Change the name ext-net to match the name of external network that an installer createsneutron floatingip-create --port-id $(neutron port-list | grep -w eth0-VM1 | awk print $2) ext-netneutron floatingip-create --port-id $(neutron port-list | grep -w eth0-VM2 | awk print $2) ext-netneutron floatingip-create --port-id $(neutron port-list | grep -w eth1-vRouter | awk print $2) ext-net
2 To know display the floatingip associated with VM1 VM2 and vRouterneutron floatingip-list -F floating_ip_address -F port_id | grep $(neutron port-list | grep -w eth0-VM1 | awk print $2) | awk print $2neutron floatingip-list -F floating_ip_address -F port_id | grep $(neutron port-list | grep -w eth0-VM2 | awk print $2) | awk print $2neutron floatingip-list -F floating_ip_address -F port_id | grep $(neutron port-list | grep -w eth1-vRouter | awk print $2) | awk print $2
3 To ssh to the vRouter VM1 and VM2 user can execute the following commandssh -i ~vRouterKey fedoraltfloating-ip-of-vRoutergtssh -i ~vRouterKey cirrosltfloating-ip-of-VM1gtssh -i ~vRouterKey cirrosltfloating-ip-of-VM2gt
433 Setup Manual in OpenStack with Open Daylight L2-Only Environment
If you intend to set up a service VM as an IPv6 vRouter in an environment of OpenStack and Open Daylight L2-onlyof OPNFV Brahmaputra Release please NOTE that
bull The hostnames IP addresses and username are for exemplary purpose in instructions Please change as neededto fit your environment
bull The instructions apply to both deployment model of single controller node and HA (High Availability) deploy-ment model where multiple controller nodes are used
bull However in case of HA when ipv6-router is created in step SETUP-SVM-11 it could be created in anyof the controller node Thus you need to identify in which controller node ipv6-router is created in orderto manually spawn radvd daemon inside the ipv6-router namespace in steps SETUP-SVM-24 throughSETUP-SVM-30
Install OPNFV and Preparation
OPNFV-INSTALL-1 To install OpenStack with Open Daylight L2-only environment of OPNFV Brahmaputra Re-lease
Apex Installer
36 Chapter 4 Feature Configuration
OPNFV Configuration Guide Release brahmaputra30 (605ebda)
HA deployment in OpenStack with Open Daylight L2-only environmentopnfv-deploy -d etcopnfv-apexos-odl_l2-nofeature-hayaml
Non-HA deployment in OpenStack with Open Daylight L2-only environment Non-HA deployment is currently not supported by Apex installer
Compass Installer
HA deployment in OpenStack with Open Daylight L2-only environmentexport ISO_URL=file$BUILD_DIRECTORYcompassisoexport OS_VERSION=$COMPASS_OS_VERSIONexport OPENSTACK_VERSION=$COMPASS_OPENSTACK_VERSIONexport CONFDIR=$WORKSPACEdeployconfvm_environmentdeploysh --dha $CONFDIRos-odl_l2-nofeature-hayml --network $CONFDIR$NODE_NAMEnetworkyml
Non-HA deployment in OpenStack with Open Daylight L2-only environment Non-HA deployment is currently not supported by Compass installer
Fuel Installer
HA deployment in OpenStack with Open Daylight L2-only environmentdeploysh -s os-odl_l2-nofeature-ha
Non-HA deployment in OpenStack with Open Daylight L2-only environmentdeploysh -s os-odl_l2-nofeature-noha
Joid Installer
HA deployment in OpenStack with Open Daylight L2-only environmentdeploysh -o liberty -s odl -t ha -l default -f ipv6
Non-HA deployment in OpenStack with Open Daylight L2-only environmentdeploysh -o liberty -s odl -t nonha -l default -f ipv6
Please NOTE that
bull You need to refer to installerrsquos documentation for other necessary parameters applicable to your deployment
bull You need to refer to Release Notes and installerrsquos documentation if there is any issue in installation
OPNFV-INSTALL-2 Clone the following GitHub repository to get the configuration and metadata files
git clone httpsgithubcomsridhargaddamopnfv_os_ipv6_pocgit optstackopnfv_os_ipv6_poc
Disable Security Groups in OpenStack ML2 Setup
Please NOTE that although Security Groups feature has been disabled automatically through localconf configu-ration file by some installers such as devstack it is very likely that other installers such as Apex Compass Fuelor Joid will enable Security Groups feature after installation
Please make sure that Security Groups are disabled in the setup
OPNFV-SEC-1 Change the settings in etcneutronpluginsml2ml2_confini as follows
etcneutronpluginsml2ml2_confini[securitygroup]enable_security_group = Falsefirewall_driver = neutronagentfirewallNoopFirewallDriver
43 IPv6 Configuration - Setting Up a Service VM as an IPv6 vRouter 37
OPNFV Configuration Guide Release brahmaputra30 (605ebda)
OPNFV-SEC-2 Change the settings in etcnovanovaconf as follows
etcnovanovaconf[DEFAULT]security_group_api = novafirewall_driver = novavirtfirewallNoopFirewallDriver
OPNFV-SEC-3 After updating the settings you will have to restart the Neutron and Nova services
Please note that the commands of restarting Neutron and Nova would vary depending on the installer Pleaserefer to relevant documentation of specific installers
Source the Credentials in OpenStack Controller Node
SETUP-SVM-1 Login in OpenStack Controller Node Start a new terminal and change directory to where Open-Stack is installed
SETUP-SVM-2 We have to source the tenant credentials in this step Please NOTE that the method of sourcingtenant credentials may vary depending on installers For example
Apex installer
source the tenant credentials using Apex installer of OPNFV you need to copy the file homestackovercloudrc from the installer VM called instack to a location in controller node for example in the directory optsource optovercloudrc
Compass installer
source the tenant credentials using Compass installer of OPNFVsource optadmin-openrcsh
Fuel installer
source the tenant credentials using Fuel installer of OPNFVsource rootopenrc
Joid installer
source the tenant credentials using Joid installer of OPNFVsource $HOMEjoid_configadmin-openrc
devstack
source the tenant credentials in devstacksource openrc admin demo
Please refer to relevant documentation of installers if you encounter any issue
Informational Note Move Public Network from Physical Network Interface to br-ex
SETUP-SVM-3 Move the physical interface (ie the public network interface) to br-ex
SETUP-SVM-4 Verify setup of br-ex
Those 2 steps are Informational OPNFV Installer has taken care of those 2 steps during deployment You mayrefer to this step only if there is any issue or if you are using other installers
38 Chapter 4 Feature Configuration
OPNFV Configuration Guide Release brahmaputra30 (605ebda)
We have to move the physical interface (ie the public network interface) to br-ex including moving the publicIP address and setting up default route Please refer to SETUP-SVM-3 and SETUP-SVM-4 in our more completeinstruction
Create IPv4 Subnet and Router with External Connectivity
SETUP-SVM-5 Create a Neutron router ipv4-router which needs to provide external connectivity
neutron router-create ipv4-router
SETUP-SVM-6 Create an external networksubnet ext-net using the appropriate values based on the data-centerphysical network setup
Please NOTE that you may only need to create the subnet of ext-net because OPNFV installers should have createdan external network during installation You must use the same name of external network that installer creates whenyou create the subnet For example
bull Apex installer external
bull Compass installer ext-net
bull Fuel installer net04_ext
bull Joid installer ext-net
Please refer to the documentation of installers if there is any issue
This is needed only if installer does not create an external work Otherwise skip this command net-createneutron net-create --routerexternal ext-net
Note that the name ext-net may work for some installers such as Compass and Joid Change the name ext-net to match the name of external network that an installer createsneutron subnet-create --disable-dhcp --allocation-pool start=19859156251end=19859156254 --gateway 198591561 ext-net 19859156024
Please note that the IP addresses in the command above are for exemplary purpose Please replace the IP addressesof your actual network
SETUP-SVM-7 Associate the ext-net to the Neutron router ipv4-router
Note that the name ext-net may work for some installers such as Compass and Joid Change the name ext-net to match the name of external network that an installer createsneutron router-gateway-set ipv4-router ext-net
SETUP-SVM-8 Create an internaltenant IPv4 network ipv4-int-network1
neutron net-create ipv4-int-network1
SETUP-SVM-9 Create an IPv4 subnet ipv4-int-subnet1 in the internal network ipv4-int-network1
neutron subnet-create --name ipv4-int-subnet1 --dns-nameserver 8888 ipv4-int-network1 2000024
SETUP-SVM-10 Associate the IPv4 internal subnet ipv4-int-subnet1 to the Neutron router ipv4-router
neutron router-interface-add ipv4-router ipv4-int-subnet1
43 IPv6 Configuration - Setting Up a Service VM as an IPv6 vRouter 39
OPNFV Configuration Guide Release brahmaputra30 (605ebda)
Create IPv6 Subnet and Router with External Connectivity
Now let us create a second neutron router where we can ldquomanuallyrdquo spawn a radvd daemon to simulate an externalIPv6 router
SETUP-SVM-11 Create a second Neutron router ipv6-router which needs to provide external connectivity
neutron router-create ipv6-router
SETUP-SVM-12 Associate the ext-net to the Neutron router ipv6-router
Note that the name ext-net may work for some installers such as Compass and Joid Change the name ext-net to match the name of external network that an installer createsneutron router-gateway-set ipv6-router ext-net
SETUP-SVM-13 Create a second internaltenant IPv4 network ipv4-int-network2
neutron net-create ipv4-int-network2
SETUP-SVM-14 Create an IPv4 subnet ipv4-int-subnet2 for the ipv6-router internal networkipv4-int-network2
neutron subnet-create --name ipv4-int-subnet2 --dns-nameserver 8888 ipv4-int-network2 1000024
SETUP-SVM-15 Associate the IPv4 internal subnet ipv4-int-subnet2 to the Neutron router ipv6-router
neutron router-interface-add ipv6-router ipv4-int-subnet2
Prepare Image Metadata and Keypair for Service VM
SETUP-SVM-16 Download fedora22 image which would be used as vRouter
wget httpsdownloadfedoraprojectorgpubfedoralinuxreleases22Cloudx86_64ImagesFedora-Cloud-Base-22-20150521x86_64qcow2
glance image-create --name Fedora22 --disk-format qcow2 --container-format bare --file Fedora-Cloud-Base-22-20150521x86_64qcow2
SETUP-SVM-17 Create a keypair
nova keypair-add vRouterKey gt ~vRouterKey
SETUP-SVM-18 Create ports for vRouter and both the VMs with some specific MAC addresses
neutron port-create --name eth0-vRouter --mac-address fa163e111111 ipv4-int-network2neutron port-create --name eth1-vRouter --mac-address fa163e222222 ipv4-int-network1neutron port-create --name eth0-VM1 --mac-address fa163e333333 ipv4-int-network1neutron port-create --name eth0-VM2 --mac-address fa163e444444 ipv4-int-network1
Boot Service VM (vRouter) with eth0 on ipv4-int-network2 and eth1 on ipv4-int-network1
Let us boot the service VM (vRouter) with eth0 interface on ipv4-int-network2 connecting toipv6-router and eth1 interface on ipv4-int-network1 connecting to ipv4-router
SETUP-SVM-19 Boot the vRouter using Fedora22 image on the OpenStack Compute Node with hostnameopnfv-os-compute
40 Chapter 4 Feature Configuration
OPNFV Configuration Guide Release brahmaputra30 (605ebda)
nova boot --image Fedora22 --flavor m1small --user-data optstackopnfv_os_ipv6_pocmetadatatxt --availability-zone novaopnfv-os-compute --nic port-id=$(neutron port-list | grep -w eth0-vRouter | awk print $2) --nic port-id=$(neutron port-list | grep -w eth1-vRouter | awk print $2) --key-name vRouterKey vRouter
Please note that optstackopnfv_os_ipv6_pocmetadatatxt is used to enable the vRouter to au-tomatically spawn a radvd and
bull Act as an IPv6 vRouter which advertises the RA (Router Advertisements) with prefix 2001db80264on its internal interface (eth1)
bull Forward IPv6 traffic from internal interface (eth1)
SETUP-SVM-20 Verify that Fedora22 image boots up successfully and vRouter has ssh keys properly injected
nova listnova console-log vRouter
Please note that it may take a few minutes for the necessary packages to get installed and ssh keys to be injected
Sample Output[ 762884523] cloud-init[871] ec2 [ 762909634] cloud-init[871] ec2 -----BEGIN SSH HOST KEY FINGERPRINTS-----[ 762931626] cloud-init[871] ec2 2048 e3dc3d4abcb6b07775a170a3d02a47a9 (RSA)[ 762957380] cloud-init[871] ec2 -----END SSH HOST KEY FINGERPRINTS-----[ 762979554] cloud-init[871] ec2
Boot Two Other VMs in ipv4-int-network1
In order to verify that the setup is working let us create two cirros VMs with eth1 interface on theipv4-int-network1 ie connecting to vRouter eth1 interface for internal network
We will have to configure appropriate mtu on the VMsrsquo interface by taking into account the tunneling overhead andany physical switch requirements If so push the mtu to the VM either using dhcp options or via meta-data
SETUP-SVM-21 Create VM1 on OpenStack Controller Node with hostname opnfv-os-controller
nova boot --image cirros-034-x86_64-uec --flavor m1tiny --user-data optstackopnfv_os_ipv6_pocset_mtush --availability-zone novaopnfv-os-controller --nic port-id=$(neutron port-list | grep -w eth0-VM1 | awk print $2) --key-name vRouterKey VM1
SETUP-SVM-22 Create VM2 on OpenStack Compute Node with hostname opnfv-os-compute
nova boot --image cirros-034-x86_64-uec --flavor m1tiny --user-data optstackopnfv_os_ipv6_pocset_mtush --availability-zone novaopnfv-os-compute --nic port-id=$(neutron port-list | grep -w eth0-VM2 | awk print $2) --key-name vRouterKey VM2
SETUP-SVM-23 Confirm that both the VMs are successfully booted
nova listnova console-log VM1nova console-log VM2
43 IPv6 Configuration - Setting Up a Service VM as an IPv6 vRouter 41
OPNFV Configuration Guide Release brahmaputra30 (605ebda)
Spawn RADVD in ipv6-router
Let us manually spawn a radvd daemon inside ipv6-router namespace to simulate an external router First ofall we will have to identify the ipv6-router namespace and move to the namespace
Please NOTE that in case of HA (High Availability) deployment model where multiple controller nodes are usedipv6-router created in step SETUP-SVM-11 could be in any of the controller node Thus you need to iden-tify in which controller node ipv6-router is created in order to manually spawn radvd daemon inside theipv6-router namespace in steps SETUP-SVM-24 through SETUP-SVM-30 The following command in Neu-tron will display the controller on which the ipv6-router is spawned
neutron l3-agent-list-hosting-router ipv6-router
Then you login to that controller and execute steps SETUP-SVM-24 through SETUP-SVM-30
SETUP-SVM-24 identify the ipv6-router namespace and move to the namespace
sudo ip netns exec qrouter-$(neutron router-list | grep -w ipv6-router | awk print $2) bash
SETUP-SVM-25 Upon successful execution of the above command you will be in the router namespace Now letus configure the IPv6 address on the ltqr-xxxgt interface
export router_interface=$(ip a s | grep -w global qr- | awk print $7)ip -6 addr add 2001db8011 dev $router_interface
SETUP-SVM-26 Update the sample file optstackopnfv_os_ipv6_pocscenario2radvdconfwith $router_interface
cp optstackopnfv_os_ipv6_pocscenario2radvdconf tmpradvd$router_interfaceconfsed -i s$router_interface$router_interfaceg tmpradvd$router_interfaceconf
SETUP-SVM-27 Spawn a radvd daemon to simulate an external router This radvd daemon advertises an IPv6subnet prefix of 2001db80164 using RA (Router Advertisement) on its $router_interface so that eth0interface of vRouter automatically configures an IPv6 SLAAC address
$radvd -C tmpradvd$router_interfaceconf -p tmpbr-expidradvd -m syslog
SETUP-SVM-28 Add an IPv6 downstream route pointing to the eth0 interface of vRouter
ip -6 route add 2001db80264 via 2001db801f8163efffe111111
SETUP-SVM-29 The routing table should now look similar to something shown below
ip -6 route show2001db8011 dev qr-42968b9e-62 proto kernel metric 2562001db80164 dev qr-42968b9e-62 proto kernel metric 256 expires 86384sec2001db80264 via 2001db801f8163efffe111111 dev qr-42968b9e-62 proto ra metric 1024 expires 29secfe8064 dev qg-3736e0c7-7c proto kernel metric 256fe8064 dev qr-42968b9e-62 proto kernel metric 256
SETUP-SVM-30 If all goes well the IPv6 addresses assigned to the VMs would be as shown as follows
vRouter eth0 interface would have the following IPv6 address 2001db801f8163efffe11111164 vRouter eth1 interface would have the following IPv6 address 2001db802164 VM1 would have the following IPv6 address 2001db802f8163efffe33333364 VM2 would have the following IPv6 address 2001db802f8163efffe44444464
42 Chapter 4 Feature Configuration
OPNFV Configuration Guide Release brahmaputra30 (605ebda)
Testing to Verify Setup Complete
Now let us SSH to those VMs eg VM1 and or VM2 and or vRouter to confirm that it has successfully configuredthe IPv6 address using SLAAC with prefix 2001db80264 from vRouter
We use floatingip mechanism to achieve SSH
SETUP-SVM-31 Now we can SSH to VMs You can execute the following command
1 Create a floatingip and associate it with VM1 VM2 and vRouter (to the port id that is passed) Note that the name ext-net may work for some installers such as Compass and Joid Change the name ext-net to match the name of external network that an installer createsneutron floatingip-create --port-id $(neutron port-list | grep -w eth0-VM1 | awk print $2) ext-netneutron floatingip-create --port-id $(neutron port-list | grep -w eth0-VM2 | awk print $2) ext-netneutron floatingip-create --port-id $(neutron port-list | grep -w eth1-vRouter | awk print $2) ext-net
2 To know display the floatingip associated with VM1 VM2 and vRouterneutron floatingip-list -F floating_ip_address -F port_id | grep $(neutron port-list | grep -w eth0-VM1 | awk print $2) | awk print $2neutron floatingip-list -F floating_ip_address -F port_id | grep $(neutron port-list | grep -w eth0-VM2 | awk print $2) | awk print $2neutron floatingip-list -F floating_ip_address -F port_id | grep $(neutron port-list | grep -w eth1-vRouter | awk print $2) | awk print $2
3 To ssh to the vRouter VM1 and VM2 user can execute the following commandssh -i ~vRouterKey fedoraltfloating-ip-of-vRoutergtssh -i ~vRouterKey cirrosltfloating-ip-of-VM1gtssh -i ~vRouterKey cirrosltfloating-ip-of-VM2gt
If everything goes well ssh will be successful and you will be logged into those VMs Run some commands to verifythat IPv6 addresses are configured on eth0 interface
SETUP-SVM-32 Show an IPv6 address with a prefix of 2001db80264
ip address show
SETUP-SVM-33 ping some external IPv6 address eg ipv6-router
ping6 2001db8011
If the above ping6 command succeeds it implies that vRouter was able to successfully forward the IPv6 traffic toreach external ipv6-router
44 Installing OVSNFV Fuel Plugin
bull On the Fuel UI create a new environment
bull In Settings gt Userspace OVS support check ldquoUserspace OVS supportrdquo
bull Continue with environment configuration and deployment as normal
441 Upgrading the plugin
From time to time new versions of the plugin may become available
44 Installing OVSNFV Fuel Plugin 43
OPNFV Configuration Guide Release brahmaputra30 (605ebda)
The plugin cannot be upgraded if an active environment is using the plugin
In order to upgrade the plugin
bull Copy the updated plugin file to the fuel-master
bull On the Fuel UI reset the environment
bull On the Fuel CLI ldquofuel plugins ndashupdate ltfuel-plugin-filegtrdquo
bull On the Fuel UI re-deploy the environment
45 Promise Feature Configuration Overview
451 Promise installation
Install nodejs npm and promise
curl -sL httpsdebnodesourcecomsetup_4x | sudo -E bash -sudo apt-get install -y nodejssudo npm -g install npmlatestgit clone httpsgithubcomopnfvpromisegitcd promisenpm install
Please note that the last command lsquonpm installrsquo will install all needed dependencies for promise (including yangforgeand mocha)
452 Testing
Please perform the following preparation steps
1 Set OpenStack environment parameters properly (eg source openrc admin demo in DevStack)
2 Create OpenStack tenant (eg promise) and tenant user (eg promiser)
3 Create a flavor in Nova with 1 vCPU and 512 MB RAM
4 Create a private network subnet and router in Neutron
5 Create an image in Glance
Once done the promise test script can be invoked as follows (as a single line command)
NODE_ENV=mytest OS_TENANT_NAME=promise OS_USERNAME=promiser OS_PASSWORD=ltuser password from Step 2gt OS_TEST_FLAVOR=ltflavor ID from Step 3gt OS_TEST_NETWORK=ltnetwork ID from Step 4gt OS_TEST_IMAGE=ltimage ID from Step 5gt npm run -s test -- --reporter json gt promise-resultsjson
The results of the tests will be stored in the promise-resultsjson file
The results can also be seen in the console (ldquonpm run -s testrdquo)
All 33 tests passing Congratulations promise has been successfully installed and configured
44 Chapter 4 Feature Configuration
OPNFV Configuration Guide Release brahmaputra30 (605ebda)
45 Promise Feature Configuration Overview 45
OPNFV Configuration Guide Release brahmaputra30 (605ebda)
46 Configuring SDNVPN features
Fuel installer configuration
In order to install the BGPVPN feature the corresponding checkbox in Fuel has to be selected This will triggerinstallation of the OpenStack BGPVPN API extension for Neutron (set up for using the ODL driver)
In addition ODL has to be installed see the corresponding section in the respective installer documentation on how toinstall ODL If the BGPVPN feature is installed ODL will automatically be installed with VPN Service karaf featureactivated
No post-deploy configuration is necessary The Fuel BGPVPN plugin and the ODL plugin should set up the clusterready for BGPVPNs being created This includes the set-up of internal VxLAN transport tunnels between computenodes
No post-configuration activities are required
46 Chapter 4 Feature Configuration
CHAPTER
FIVE
POST CONFIGURATION ACTIVITIES
Once you have deployed and configured your scenario and features you should validate the state of the system usingthe following guides
51 Scenario validation activities
The following guides provide information on how to validate the installation of you scenario based on the tools andtest suites available for the installation tool you have selected
511 Fuel post installation procedures
Automated post installation activities
Fuel provides a fairly broad coverage of built in automated health checks These validate the installation in terms ofconfiguration services networking storage policies etc The execution of the full range of health checks takes lessthan 30 minutes
For instructions on how to run health-checks please read the Fuel installation instructions
Platform components validation
Consult the feature sections in this document for any post-install feature specific validationhealth-checks
512 JOID post installation procedures
Configure OpenStack
In each SDN directory for example joidciopencontrail there is a folder for Juju deployer where you can find thecharm bundle yaml files that the deploysh uses to deploy
In the same directory there is scripts folder where you can find shell scripts to help you configure the OpenStackcloud that you just deployed These scripts are created to help you configure a basic OpenStack Cloud to verify thecloud For more info on OpenStack Cloud configuration please refer to the OpenStack Cloud Administrator Guideon docsopenstackorg Similarly for complete SDN configuration please refer to the respective SDN adminstratorguide
Each SDN solution requires slightly different setup please refer to the README in each SDN folder Most likelyyou will need to modify the openstacksh and cloud-setupsh scripts for the floating IP range private IP network andSSH keys Please go through openstacksh glancesh and cloud-setupsh and make changes as you see fit
47
OPNFV Configuration Guide Release brahmaputra30 (605ebda)
52 Feature validation activities
The following sections provide information on how to validate the features you have installed in your scenario
521 Copper post installation procedures
This release focused on use of the OpenStack Congress service for managing configuration policy The Congressinstall verify procedure described here is largely manual This procedure as well as the longer-term goal of automatedverification support is a work in progress The procedure is further specific to one OPNFV installer (JOID ieMAASJuJu) based environment
Automated post installation activities
No automated procedures are provided at this time
Copper post configuration procedures
No configuration procedures are required beyond the basic install procedure
Platform components validation
Following are notes on creating a container as test driver for Congress This is based upon an Ubuntu host as installedby JOID
Create and Activate the Container
On the jumphost
sudo lxc-create -n trusty-copper -t usrsharelxctemplateslxc-ubuntu -- -b ubuntu ~opnfvsudo lxc-start -n trusty-copper -dsudo lxc-info --name trusty-copper(typical output)Name trusty-copperState RUNNINGPID 4563IP 100344CPU use 2877 secondsBlkIO use 52279 MiBMemory use 55975 MiBKMem use 0 bytesLink vethDMFOANTX bytes 262 MiBRX bytes 8848 MiBTotal bytes 9110 MiB
Login and configure the test server
48 Chapter 5 Post Configuration Activities
OPNFV Configuration Guide Release brahmaputra30 (605ebda)
ssh ubuntu100344sudo apt-get updatesudo apt-get upgrade -y
Install pipsudo apt-get install python-pip -y
Install javasudo apt-get install default-jre -y
Install other dependenciessudo apt-get install git gcc python-dev libxml2 libxslt1-dev libzip-dev php5-curl -y
Setup OpenStack environment variables per your OPNFV installexport CONGRESS_HOST=19216810117export KEYSTONE_HOST=19216810108export CEILOMETER_HOST=19216810105export CINDER_HOST=19216810101export GLANCE_HOST=19216810106export HEAT_HOST=19216810107export NEUTRON_HOST=19216810111export NOVA_HOST=19216810112source ~admin-openrcsh
Install and test OpenStack clientmkdir ~gitcd gitgit clone httpsgithubcomopenstackpython-openstackclientgitcd python-openstackclientgit checkout stablelibertysudo pip install -r requirementstxtsudo python setuppy installopenstack service list(typical output)+----------------------------------+------------+----------------+| ID | Name | Type |+----------------------------------+------------+----------------+| 2f8799ae50f24c928c021fabf8a50f5f | keystone | identity || 351b13f56d9a4e25849406ec1d5a2726 | cinder | volume || 5129510c3143454f9ba8ec7e6735e267 | cinderv2 | volumev2 || 5ee1e220460f41dea9be06921400ce9b | congress | policy || 78e73a7789a14f56a5d248a0cd141201 | quantum | network || 9d5a00fb475a45b2ae6767528299ed6b | ceilometer | metering || 9e4b1624ef0b434abc0b82f607c5045c | heat | orchestration || b6c01ceb5023442d9f394b83f2a18e01 | heat-cfn | cloudformation || ba6199e3505045ad87e2a7175bd0c57f | glance | image || d753f304a0d541dbb989780ae70328a8 | nova | compute |+----------------------------------+------------+----------------+
Install and test Congress clientcd ~gitgit clone httpsgithubcomopenstackpython-congressclientgitcd python-congressclientgit checkout stablelibertysudo pip install -r requirementstxtsudo python setuppy installopenstack congress driver list(typical output)+------------+--------------------------------------------------------------------------+| id | description |+------------+--------------------------------------------------------------------------+| ceilometer | Datasource driver that interfaces with ceilometer || neutronv2 | Datasource driver that interfaces with OpenStack Networking aka Neutron || nova | Datasource driver that interfaces with OpenStack Compute aka nova || keystone | Datasource driver that interfaces with keystone || cinder | Datasource driver that interfaces with OpenStack cinder || glancev2 | Datasource driver that interfaces with OpenStack Images aka Glance |+------------+--------------------------------------------------------------------------+
Install and test Glance clientcd ~gitgit clone httpsgithubcomopenstackpython-glanceclientgitcd python-glanceclientgit checkout stablelibertysudo pip install -r requirementstxtsudo python setuppy installglance image-list(typical output)+--------------------------------------+---------------------+| ID | Name |+--------------------------------------+---------------------+| 6ce4433e-65c0-4cd8-958d-b06e30c76241 | cirros-033-x86_64 |+--------------------------------------+---------------------+
Install and test Neutron clientcd ~gitgit clone httpsgithubcomopenstackpython-neutronclientgitcd python-neutronclientgit checkout stablelibertysudo pip install -r requirementstxtsudo python setuppy installneutron net-list(typical output)+--------------------------------------+----------+------------------------------------------------------+| id | name | subnets |+--------------------------------------+----------+------------------------------------------------------+| dc6227df-af41-439f-bd2c-c2c2f0fe7fc5 | public | 5745846c-dd79-4900-a7da-bf506348ceac 19216810024 || a3f9f13a-5de9-4d3b-98c8-d2e40a2ef8e9 | internal | 5e0be862-90da-44ab-af43-56d5c65aa049 1000024 |+--------------------------------------+----------+------------------------------------------------------+
Install and test Nova clientcd ~gitgit clone httpsgithubcomopenstackpython-novaclientgitcd python-novaclientgit checkout stablelibertysudo pip install -r requirementstxtsudo python setuppy installnova hypervisor-list(typical output)+----+---------------------+-------+---------+| ID | Hypervisor hostname | State | Status |+----+---------------------+-------+---------+| 1 | compute1maas | up | enabled |+----+---------------------+-------+---------+
Install and test Keystone clientcd ~gitgit clone httpsgithubcomopenstackpython-keystoneclientgitcd python-keystoneclientgit checkout stablelibertysudo pip install -r requirementstxtsudo python setuppy install
52 Feature validation activities 49
OPNFV Configuration Guide Release brahmaputra30 (605ebda)
Setup the Congress Test Webapp
Clone Copper (if not already cloned in user home)cd ~gitif [ -d ~gitcopper ] then git clone httpsgerritopnfvorggerritcopper fi
Copy the Apache configsudo cp ~gitcoppercomponentscongresstest-webappwwwubuntu-apache2conf etcapache2apache2conf
Point proxyphp to the Congress server per your installsed -i -- s19216810117$CONGRESS_HOSTg ~gitcoppercomponentscongresstest-webappwwwhtmlproxyindexphp
Copy the webapp to the Apache root directory and fix permissionssudo cp -R ~gitcoppercomponentscongresstest-webappwwwhtml varwwwsudo chmod 755 varwwwhtml -R
Make webapp log directory and set permissionsmkdir ~logschmod 777 ~logs
Restart Apachesudo service apache2 restart
Using the Test Webapp
Browse to the trusty-copper server IP address
Interactive options are meant to be self-explanatory given a basic familiarity with the Congress service and data modelBut the app will be developed with additional features and UI elements
522 IPv6 Post Installation Procedures
Congratulations you have completed the setup of using a service VM to act as an IPv6 vRouter You have validatedthe setup based on the instruction in previous sections If you want to further test your setup you can ping6 amongVM1 VM2 vRouter and ipv6-router
This setup allows further open innovation by any 3rd-party For more instructions and documentations please refer to
1 IPv6 Configuration Guide (HTML) httpartifactsopnfvorgipv6docssetupservicevmindexhtml
2 IPv6 User Guide (HTML) httpartifactsopnfvorgipv6docsgapanalysisindexhtml
Automated post installation activities
Refer to the relevant testing guides results and release notes of Yardstick Project
53 Additional testing and validation activities
Many of our testing tools can be manually installed to facilitate targeted testing of features and capabilities of yourscenario The following guides provide instruction on setting up these testing suites
50 Chapter 5 Post Configuration Activities
OPNFV Configuration Guide Release brahmaputra30 (605ebda)
531 Overview of the functest suites
Functest is the OPNFV project primarily targeting function testing In the Continuous Integration pipeline it islaunched after an OPNFV fresh installation to validate and verify the basic functions of the infrastructure
The current list of test suites can be distributed in 3 main domains VIM (Virtualised Infrastructure Manager) Con-trollers and Features
Do-main
Testsuite
Comments
VIM
vPing NFV ldquoHello Worldrdquo using SSH connection and floatting IPvPing_userdataPing using userdata and cloud-init mechanismTempest OpenStack reference test suite [2]Rallybench
OpenStack testing tool benchmarking OpenStack modules [3]
ControllersOpen-Day-light
Opendaylight Test suite
ONOS Test suite of ONOS L2 and L3 functions See ONOSFW User Guide for details
Features
vIMS Example of a real VNF deployment to show the NFV capabilities of the platform The IPMultimedia Subsytem is a typical Telco test case referenced by ETSI It provides a fullyfunctional VoIP System
Promise Resource reservation and management project to identify NFV related requirements andrealize resource reservation for future usage by capacity management of resource poolsregarding compute network and storage See Promise User Guide for details
Doctor Doctor platform as of Brahmaputra release provides the two features ImmediateNotification Consistent resource state awareness (compute) see Doctor User Guide fordetails
SD-NVPN
Implementation of the OpenStack bgpvpn API from the SDNVPN feature project Itallowing the cration of BGP VPNs see SDNVPN User Guide for
Functest includes different test suites with several test cases within Some of the tests are developed by Functest teammembers whereas others are integrated from upstream communities or other OPNFV projects For example Tempestis the OpenStack integration test suite and Functest is in charge of the selection integration and automation of the teststhat fit in OPNFV
The Tempest suite has been customized but no new test cases have been created
The results produced by the tests run from CI are pushed and collected in a NoSQL database The goal is to populatethe database with results from different sources and scenarios and to show them on a Dashboard
There is no real notion of Test domain or Test coverage Basic components (VIM controllers) are tested through theirown suites Feature projects also provide their own test suites with different ways of running their tests
vIMS test case was integrated to demonstrate the capability to deploy a relatively complex NFV scenario on top of theOPNFV infrastructure
Functest considers OPNFV as a black box OPNFV since the Brahmaputra release offers lots of potential combina-tions
bull 2 controllers (OpenDayligh ONOS)
bull 4 installers (Apex Compass Fuel Joid)
Most of the tests are runnable on any combination but some others might have restrictions imposed by the installersor the available deployed features
53 Additional testing and validation activities 51
OPNFV Configuration Guide Release brahmaputra30 (605ebda)
Preparing the Docker container
Pull the Functest Docker image from the Docker hub
docker pull opnfvfunctestbrahmaputra10
Check that the image is available
docker images
Run the docker container giving the environment variables
bull INSTALLER_TYPE possible values are apex compass fuel or joid
bull INSTALLER_IP IP of the installer nodeVM
Functest may need to know the IP of the installer to retrieve automatically the credentials from the installer nodeVMor even from the actual controllers
The minimum command to create the Functest Docker container can be described as follows
docker run -it -e INSTALLER_IP=102002 -e INSTALLER_TYPE=fuel opnfvfunctestbrahmaputra10 binbash
Optionally it is possible to precise the container name through the option ndashname
docker run --name CONTAINER_NAME -it -e INSTALLER_IP=102002 -e INSTALLER_TYPE=fuel opnfvfunctestbrahmaputra10 binbash
It is also possible to to indicate the path of the OpenStack credentials using -v
docker run -it -e INSTALLER_IP=102002 -e INSTALLER_TYPE=fuel -v ltpath_to_your_local_creds_filegthomeopnfvfunctestconfopenstackcreds opnfvfunctestbrahmaputra10 binbash
The local file will be mounted in the container under homeopnfvfunctestconfopenstackcreds
If the intention is to run Functest against any of the supported OPNFV scenarios it is recommended to include alsothe environment variable DEPLOY_SCENARIO for example
docker run -it -e INSTALLER_IP=102002 -e INSTALLER_TYPE=fuel -e DEPLOY_SCENARIO=os-odl_l2-nofeature-ha opnfvfunctestbrahmaputra10 binbash
Inside the container the following directory structure should be in place
`-- home`-- opnfv
|-- functest| |-- conf| |-- data| `-- results`-- repos
|-- bgpvpn|-- doctor|-- functest|-- odl_integration|-- onos|-- promise|-- rally|-- releng`-- vims-test
Basically the container includes
bull Functest directory to store the configuration (the OpenStack creds are stored inhomeopngbfunctestconfopenstackcreds) the data (cirros image needed for some tests) results (sometemporary result logs may be stored here)
52 Chapter 5 Post Configuration Activities
OPNFV Configuration Guide Release brahmaputra30 (605ebda)
bull Repositories the functest repository will be used to prepare the environment and run the tests Other repositoriesare used for the installation of the needed tooling (eg rally) andor the retrieval of feature projects scenarios(eg promise)
The structure under the Functest repository can be described as follows
|-- INFO|-- LICENSE|-- commons| |-- ims| |-- mobile| `-- traffic-profile-guidelinesrst|-- docker| |-- Dockerfile| |-- commonsh| |-- prepare_envsh| |-- requirementspip| `-- run_testssh|-- docs| |-- configguide| |-- devguide| |-- images| |-- results| `-- userguide`-- testcases
|-- Controllers|-- features|-- tests|-- VIM|-- vIMS|-- vPing|-- __init__py|-- config_functestpy|-- config_functestyaml`-- functest_utilspy
We may distinguish 4 different folders
bull commons it is a folder dedicated to store traffic profile or any test inputs that could be reused by any test project
bull docker this folder includes the scripts that will be used to setup the environment and run the tests
bull docs this folder includes the user and installationconfiguration guide
bull testcases this folder includes the scripts required by Functest internal test cases and other feature projects testcases
After the run command a new prompt appears which means that we are inside the container and ready to move to thenext step
Useful Docker commands
When typing exit in the container prompt this will cause exiting the container and probably stopping it Whenstopping a running Docker container all the changes will be lost there is a keyboard shortcut to quit the containerwithout stopping it CTRL+P+Q To reconnect to the running container DO NOT use the run command again (sinceit will create a new container) use exec instead
53 Additional testing and validation activities 53
OPNFV Configuration Guide Release brahmaputra30 (605ebda)
docker psltcopy the container IDgtdocker exec -ti ltCONTAINER_IDgt binbash
or simply
docker exec -ti $(docker ps|grep functest|awk print $1) binbash
There are other useful Docker commands that might be needed to manage possible issues with the containers
List the running containers
docker ps
List all the containers including the stopped ones
docker ps -a
It is useful sometimes to remove a container if there are some problems
docker rm ltCONTAINER_IDgt
Use the -f option if the container is still running it will force to destroy it
docker -f rm ltCONTAINER_IDgt
The Docker image is called opnfvfunctest and it is stored in the public Docker registry under the OPNFV accountdockerhub The are many different tags that have been created automatically by the CI mechanisms but the one thatthis document refers to is brahmaputra10 Pulling other tags might cause some problems while running the tests
Check the Docker documentation dockerdocs for more information
Preparing the Functest environment
Once the docker container is up and running execute the following command in the prompt
$repos_dirfunctestdockerprepare_envsh
NOTE $repos_dir is a default environment variable inside the docker container which points to homeopnfvrepos
This script will make sure that the requirements to run the tests are met and will install the needed libraries and toolsby all Functest test cases It must be run only once every time the docker is started from sratch
Focus on the OpenStack credentials
The OpenStack credentials are needed to run the tests against the VIM There are 3 ways to provide them to Functest
bull using the -v option when running the Docker container
bull create an empty file in homeopnfvfunctestconfopenstackcreds and paste the credentials in it
bull automatically retrieved using the following script $repos_dirrelengutilsfetch_os_credssh
Once the credentials are there they shall be sourced before running the tests
source homeopnfvfunctestconfopenstackcreds
or simply using the environment variable creds
54 Chapter 5 Post Configuration Activities
OPNFV Configuration Guide Release brahmaputra30 (605ebda)
$creds
After this try to run any OpenStack command to see if you get any output for instance
openstack user list
This will return a list of the actual users in the OpenStack deployment In any other case check that the credentialsare sourced
env|grep OS_
This command must show a set of environment variables starting with OS_ for example
OS_REGION_NAME=RegionOneOS_DEFAULT_DOMAIN=defaultOS_PROJECT_NAME=adminOS_PASSWORD=adminOS_AUTH_STRATEGY=keystoneOS_AUTH_URL=http172301035000v20OS_USERNAME=adminOS_TENANT_NAME=adminOS_ENDPOINT_TYPE=internalURLOS_NO_CACHE=true
If still the OpenStack command does not show anything or complains about connectivity issues it could be due to anincorrect url given to the OS_AUTH_URL environment variable Check the deployment settings
SSL Support
If you need to connect to a server that is TLS-enabled (the auth URL begins with lsquohttpsrsquo) and it uses a certificate froma private CA or a self-signed certificate you will need to specify the path to an appropriate CA certificate to use tovalidate the server certificate with the environment variable OS_CACERT
echo $OS_CACERTetcsslcertscacrt
However this certificate does not exist in the container by default It has to be copied manually from the OpenStackdeployment This can be done in 2 ways
1 Create manually that file and copy the contents from the OpenStack controller
2 (recommended) Add the file using a Docker volume when starting the container
-v ltpath_to_your_cert_filegtetcsslcertscacert
You might need to export OS_CACERT environment variable inside the container
export OS_CACERT=etcsslcertscacrt
Certificate verification can be turned off using OS_INSECURE=true For example Fuel uses self-signed cacerts bydefault so an pre step would be
export OS_INSECURE=true
Additional Options
In case you need to provide different configuration parameters to Functest (eg commit IDs or branches for therepositories ) copy the config_functestyaml from the repository to your current directory and run the container
53 Additional testing and validation activities 55
OPNFV Configuration Guide Release brahmaputra30 (605ebda)
with a volume
wget httpsgitopnfvorgcgitfunctestplaintestcasesconfig_functestyaml
ltmodify the file accordinglygt
docker run -ti -e INSTALLER_TYPE=fuel -e INSTALLER_IP=102002 opnfvfunctestbrahmaputra10 -v $(pwd)config_functestyamlhomeopnfvfunctestconfconfig_functestyaml binbash
However this is not recommended since most of the test cases rely on static parameters read from this file andchanging them might cause problems
Proxy support
Functest needs internet access to download some resources for some test cases For example to install the Rallyenvironment This might not work properly if the Jumphost is running through a Proxy
If that is the case make sure the resolvconf and the needed proxy environment variables are properly set
export http_proxy=ltyour http proxy settingsgtexport https_proxy=ltyour https proxy settingsgt
Or refer to the official Docker documentation for Proxy settings
Before running prepare_envsh make sure you can ping http and https sites inside the container For example
nc -v googlecom 80Connection to googlecom 80 port [tcphttp] succeeded
nc -v googlecom 443Connection to googlecom 443 port [tcphttps] succeeded
532 Installing vswitchperf
Supported Operating Systems
bull CentOS 7
bull Fedora 20
bull Fedora 21
bull Fedora 22
bull Ubuntu 1404
Supported vSwitches
The vSwitch must support Open Flow 13 or greater
bull OVS (built from source)
bull OVS with DPDK (built from source)
56 Chapter 5 Post Configuration Activities
OPNFV Configuration Guide Release brahmaputra30 (605ebda)
Supported Hypervisors
bull Qemu version 23
Available VNFs
A simple VNF that forwards traffic through a VM using
bull DPDK testpmd
bull Linux Brigde
bull custom l2fwd module
The VM image can be downloaded from httpartifactsopnfvorgvswitchperfvloop-vnf-ubuntu-1404_20151216qcow2
Other Requirements
The test suite requires Python 33 and relies on a number of other packages These need to be installed for the testsuite to function
Installation of required packages preparation of Python 3 virtual environment and compilation of OVS DPDK andQEMU is performed by script systemsbuild_base_machinesh It should be executed under user account which willbe used for vsperf execution
Please Note Password-less sudo access must be configured for given user account before script is executed
Execution of installation script
$ cd systems$ build_base_machinesh
Please Note you donrsquot need to go into any of the systems subdirectories simply run the top levelbuild_base_machinesh your OS will be detected automatically
Script build_base_machinesh will install all the vsperf dependencies in terms of system packages Python 3x andrequired Python modules In case of CentOS 7 it will install Python 33 from an additional repository provided bySoftware Collections (a link) Installation script will also use virtualenv to create a vsperf virtual environment whichis isolated from the default Python environment This environment will reside in a directory called vsperfenv in$HOME
You will need to activate the virtual environment every time you start a new shell session Its activation is specific toyour OS
CentOS 7
$ scl enable python33 bash$ cd $HOMEvsperfenv$ source binactivate
Fedora and Ubuntu
$ cd $HOMEvsperfenv$ source binactivate
53 Additional testing and validation activities 57
OPNFV Configuration Guide Release brahmaputra30 (605ebda)
Working Behind a Proxy
If yoursquore behind a proxy yoursquoll likely want to configure this before running any of the above For example
export http_proxy=proxymycompanycom123export https_proxy=proxymycompanycom123
533 Yardstick
The projectrsquos goal is to verify infrastructure compliance from the perspective of a Virtual Network Function (VNF)
The Projectrsquos scope is the development of a test framework Yardstick test cases and test stimuli to enable NetworkFunction Virtualization Infrastructure (NFVI) verification
In OPNFV Brahmaputra release generic test cases covering aspects of the metrics in the document ETSI GS NFV-TST001 ldquoPre-deployment Testing Report on Validation of NFV Environments and Servicesrdquo are available furtherOPNFV releases will provide extended testing of these metrics
The Project also includes a sample VNF the Virtual Traffic Classifier (VTC) and its experimental frameworkApexLake
Yardstick is used in OPNFV for verifying the OPNFV infrastructure and some of the OPNFV features The Yardstickframework is deployed in several OPNFV community labs It is installer infrastructure and application independent
See also
This Presentation for an overview of Yardstick and Yardsticktst for material on alignment ETSI TST001 and Yardstick
Yardstick Installation
Abstract
Yardstick currently supports installation on Ubuntu 1404 or by using a Docker image Detailed steps about installingYardstick using both of these options can be found below
To use Yardstick you should have access to an OpenStack environment with at least Nova Neutron Glance Keystoneand Heat installed
The steps needed to run Yardstick are
1 Install Yardstick and create the test configuration yaml file
2 Build a guest image and load the image into the OpenStack environment
3 Create a Neutron external network and load OpenStack environment variables
4 Run the test case
Installing Yardstick on Ubuntu 1404
Installing Yardstick framework Install dependencies
sudo apt-get install python-virtualenv python-devsudo apt-get install libffi-dev libssl-dev git
Create a python virtual environment source it and update setuptools
58 Chapter 5 Post Configuration Activities
OPNFV Configuration Guide Release brahmaputra30 (605ebda)
virtualenv ~yardstick_venvsource ~yardstick_venvbinactivateeasy_install -U setuptools
Download source code and install python dependencies
git clone httpsgerritopnfvorggerrityardstickcd yardstickpython setuppy install
There is also a YouTube video showing the above steps
Installing extra tools
yardstick-plot Yardstick has an internal plotting tool yardstick-plot which can be installed using the follow-ing command
python setuppy develop easy_install yardstick[plot]
Building a guest image Yardstick has a tool for building an Ubuntu Cloud Server image containing all the requiredtools to run test cases supported by Yardstick It is necessary to have sudo rights to use this tool
This image can be built using the following command while in the directory where Yardstick is installed(~yardstick if the framework is installed by following the commands above)
sudo toolsyardstick-img-modify toolsubuntu-server-cloudimg-modifysh
Warning the script will create files by default in tmpworkspaceyardstick and the files will be owned byroot
The created image can be added to OpenStack using the glance image-create or via the OpenStack Dashboard
Example command
glance --os-image-api-version 1 image-create --name yardstick-trusty-server --is-public true --disk-format qcow2 --container-format bare --file tmpworkspaceyardstickyardstick-trusty-serverimg
Installing Yardstick using Docker
Yardstick has two Docker images first one (Yardstick-framework) serves as a replacement for installing the Yardstickframework in a virtual environment (for example as done in Installing Yardstick framework) while the other image ismostly for CI purposes (Yardstick-CI)
Yardstick-framework image Download the source code
git clone httpsgerritopnfvorggerrityardstick
Build the Docker image and tag it as yardstick-framework
cd yardstickdocker build -t yardstick-framework
Run the Docker instance
53 Additional testing and validation activities 59
OPNFV Configuration Guide Release brahmaputra30 (605ebda)
docker run --name yardstick_instance -i -t yardstick-framework
To build a guest image for Yardstick see Building a guest image
Yardstick-CI image Pull the Yardstick-CI Docker image from Docker hub
docker pull opnfvyardstick-ci
Run the Docker image
docker run --privileged=true --rm -t -e INSTALLER_TYPE=$INSTALLER_TYPE -e INSTALLER_IP=$INSTALLER_IP opnfvyardstick-ci run_benchmarks
Where $INSTALLER_TYPE can be fuel foreman or compass and $INSTALLER_IP is the installer masternode IP address (ie 102002 is default for fuel)
Basic steps performed by the Yardstick-CI container
1 clone yardstick and releng repos
2 setup OS credentials (releng scripts)
3 install yardstick and dependencies
4 build yardstick cloud image and upload it to glance
5 upload cirros-033 cloud image to glance
6 run yardstick test scenarios
7 cleanup
OpenStack parameters and credentials
Yardstick-flavor Most of the sample test cases in Yardstick are using an OpenStack flavor called yardstick-flavorwhich deviates from the OpenStack standard m1tiny flavor by the disk size - instead of 1GB it has 3GB Otherparameters are the same as in m1tiny
Environment variables Before running Yardstick it is necessary to export OpenStack environment vari-ables from the OpenStack openrc file (using the source command) and export the external network nameexport EXTERNAL_NETWORK=external-network-name the default name for the external network isnet04_ext
Credential environment variables in the openrc file have to include at least
bull OS_AUTH_URL
bull OS_USERNAME
bull OS_PASSWORD
bull OS_TENANT_NAME
60 Chapter 5 Post Configuration Activities
OPNFV Configuration Guide Release brahmaputra30 (605ebda)
Yardstick default key pair Yardstick uses a SSH key pair to connect to the guest image This key pair can be foundin the resourcesfiles directory To run the ping-hotyaml test sample this key pair needs to be importedto the OpenStack environment
Examples and verifying the install
It is recommended to verify that Yardstick was installed successfully by executing some simple commands and testsamples Below is an example invocation of yardstick help command and pingpy test sample
yardstick -hyardstick task start samplespingyaml
Each testing tool supported by Yardstick has a sample configuration file These configuration files can be found in thesamples directory
Example invocation of yardstick-plot tool
yardstick-plot -i tmpyardstickout -o tmpplots
Default location for the output is tmpyardstickout
More info about the tool can be found by executing
yardstick-plot -h
53 Additional testing and validation activities 61

OPNFV Configuration Guide Release brahmaputra30 (605ebda)
To set up a Jenkins slave for automated deployment to your lab refer to the Jenkins slave connect guide
This document will describe how to install and configure your target OPNFV scenarios Remember to check theassociated validation procedures section following your installation for details of the use cases and tests that have beenrun
6 Chapter 2 Configuration Options
CHAPTER
THREE
INSTALLER CONFIGURATION
Installing the OPNFV platform requires either a physical environment as defined in the Pharos lab specificationor a virtual infrastructure When configuring a physical infrastructure it is strongly advised to follow the Pharosconfiguration material
31 Lab Setup Guide
Provides an overview for setting up a Pharos lab A full set of pharos_master documents are maintained in the pharosrepo
When setting up an OPNFV community lab
bull Provide the Pharos community with details of the intended setup including
ndash Overview of resources are being offered to the community intended purpose and known limitations
ndash Lab owner name with contacts
ndash Timelines for availablity for development test release production
bull Update the Pharos Wiki with lab details
ndash Lab map organization contacts status location resources role etc
ndash httpswikiopnfvorgpharoscommunity_labs
ndash pharos_wiki
bull Update the Pharos project information file ldquoCurrent Labsrdquo
ndash pharos_information
bull Create new Wiki pages for lab and POD specific information
ndash Access procedures
ndash Usage guidelines for developers
ndash Update infomtation as PODs are re-assigned or usageavailability changes
bull Fill Lab and POD templates pharos_lab pharos_pod
ndash Note that security sensitive lab information should be stored in the secure Pharos repo
bull Connect PODs to JenkinsCI
7
OPNFV Configuration Guide Release brahmaputra30 (605ebda)
311 Jump Server Configuration
Jump server install procedures are maintained by each installer project Addional Jump server configuraton BKMswill be maintained here The below install information was used for Fuel however may be outdated (please refer toFuel Installer documents)
Procedure
1 Obtain CentOS 7 Minimal ISO and install
wget httpmirrorskernelorgcentos7isosx86_64CentOS-7-x86_64-Minimal-1503-01iso
2 Set parameters appropriate for your environment during installation
3 Disable NetworkManager
systemctl disable NetworkManager
4 Configure your etcsysconfignetwork-scriptsifcfg- files for your network
5 Restart networking
service network restart
6 Edit etcresolvconf and add a nameserver
vi etcresolvconf
7 Install libvirt amp kvm
yum -y update yum -y install kvm qemu-kvm libvirt systemctl enablelibvirtd
8 Reboot
shutdown -r now
9 If you wish to avoid annoying delay when use ssh to log in disable DNS lookups
vi etcsshsshd_config
Uncomment ldquoUseDNS yesrdquo change lsquoyesrsquo to lsquonorsquo
Save
10 Restart sshd
systemctl restart sshd
11 Install virt-install
yum -y install virt-install
12 Visit artifactsopnfvorg and DL the OPNFV Fuel ISO
13 Create a bridge using the interface on the PXE network for example br0
14 Make a directory owned by qemu
mkdir homeqemu mkdir -p homeqemuVMsfuel-60disk
chown -R qemuqemu homeqemu
15 Copy the ISO to homeqemu
cd homeqemu
virt-install -n opnfv-2015-05-22_18-34-07-fuel -r 4096--vcpus=4 --cpuset=0-3 -c opnfv-2015-05-22_18-34-07iso
8 Chapter 3 Installer Configuration
OPNFV Configuration Guide Release brahmaputra30 (605ebda)
--os-type=linux --os-variant=rhel6 --boot hdcdrom --diskpath=homeqemuVMsmirantis-fuel-60diskfuel-vhd0qcow2bus=virtiosize=50format=qcow2-w bridge=br0model=virtio --graphics vnclisten=0000
16 Temporarily flush the firewall rules to make things easier
iptables -F
17 Connect to the console of the installing VM with your favorite VNC client
18 Change the IP settings to match the pod use an IP in the PXEAdmin network for the Fuel Master
The following sections describe the per installer configuration options Further details for each installer are capturedin the referred project documentation
32 Apex configuration
321 Introduction
This document describes the steps to install an OPNFV Bramaputra reference platform as defined by the GenesisProject using the Apex installer
The audience is assumed to have a good background in networking and Linux administration
322 Preface
Apex uses the RDO Manager Open Source project as a server provisioning tool RDO Manager is the RDO Projectimplementation of OpenStackrsquos Triple-O project The Triple-O image based life cycle installation tool provisions anOPNFV Target System (3 controllers n number of compute nodes) with OPNFV specific configuration provided bythe Apex deployment tool chain
The Apex deployment artifacts contain the necessary tools to deploy and configure an OPNFV target sys-tem using the Apex deployment toolchain These artifacts offer the choice of using the Apex bootable ISO(opnfv-apex-bramaputraiso) to both install CentOS 7 and the nessesary materials to deploy or the ApexRPM (opnfv-apexrpm) which expects installation to a CentOS 7 libvirt enabled host The RPM contains acollection of configuration file prebuilt disk images and the automatic deployment script (opnfv-deploy)
An OPNFV install requires a ldquoJumphostrdquo in order to operate The bootable ISO will allow you to install a cus-tomized CentOS 7 release to the Jumphost which includes the required packages needed to run opnfv-deployIf you already have a Jumphost with CentOS 7 installed you may choose to skip the ISO step and simply installthe (opnfv-apexrpm) RPM The RPM is the same RPM included in the ISO and includes all the necessary diskimages and configuration files to execute an OPNFV deployment Either method will prepare a host to the same readystate for OPNFV deployment
opnfv-deploy instantiates an RDO Manager Instack VM server using libvirt as its provider This VM is thenconfigured and used to provision the OPNFV target deployment (3 controllers n compute nodes) These nodes can beeither virtual or bare metal This guide contains instructions for installing either method
323 Installation High-Level Overview - Bare Metal Deployment
The setup presumes that you have 6 bare metal servers and have already setup network connectivity on at least 2interfaces for all servers via a TOR switch or other network implementation
32 Apex configuration 9
OPNFV Configuration Guide Release brahmaputra30 (605ebda)
The physical TOR switches are not automatically configured from the OPNFV reference platform All the networksinvolved in the OPNFV infrastructure as well as the provider networks and the private tenant VLANs needs to bemanually configured
The Jumphost can be installed using the bootable ISO or by other means including the (opnfv-apex) RPMs andvirtualization capabilities The Jumphost should then be configured with an IP gateway on its admin or public interfaceand configured with a working DNS server The Jumphost should also have routable access to the lights out network
opnfv-deploy is then executed in order to deploy the Instack VM opnfv-deploy uses three con-figuration files in order to know how to install and provision the OPNFV target system The in-formation gathered under section Execution Requirements (Bare Metal Only) is put into the YAML file(etcopnfv-apexinventoryyaml) configuration file Deployment options are put into the YAML file(etcopnfv-apexdeploy_settingsyaml) Networking definitions gathered under section Network Re-quirements are put into the YAML file (etcopnfv-apexnetwork_settingsyaml) opnfv-deploywill boot the Instack VM and load the target deployment configuration into the provisioning toolchain This includesMAC address IPMI Networking Environment and OPNFV deployment options
Once configuration is loaded and Instack is configured it will then reboot the nodes via IPMI The nodes should alreadybe set to PXE boot first off the admin interface The nodes will first PXE off of the Instack PXE server and go througha discoveryintrospection process
Introspection boots off of custom introspection PXE images These images are designed to look at the properties ofthe hardware that is booting off of them and report the properties of it back to the Instack node
After introspection Instack will execute a Heat Stack Deployment to being node provisioning and configuration Thenodes will reboot and PXE again off the Instack PXE server to provision each node using the Glance disk images pro-vided by Instack These disk images include all the necessary packages and configuration for an OPNFV deploymentto execute Once the nodersquos disk images have been written to disk the nodes will boot off the newly written disks andexecute cloud-init which will execute the final node configuration This configuration is largly completed by executinga puppet apply on each node
324 Installation High-Level Overview - VM Deployment
The VM nodes deployment operates almost the same way as the bare metal deployment with a few differencesopnfv-deploy still deploys an Instack VM In addition to the Instack VM a collection of VMs (3 control nodes +2 compute for an HA deployment or 1 control node and 1 compute node for a Non-HA Deployment) will be definedfor the target OPNFV deployment The part of the toolchain that executes IPMI power instructions calls into libvirtinstead of the IPMI interfaces on baremetal servers to operate the power managment These VMs are then provisionedwith the same disk images and configuration that baremetal would be
To RDO Manager these nodes look like they have just built and registered the same way as bare metal nodes the maindifference is the use of a libvirt driver for the power management
325 Installation Guide - Bare Metal Deployment
WARNING Baremetal documentation is not complete WARNING The main missing instructions are r elatedto bridging the networking for the undercloud to the physical underlay network for the overcloud to be deployedto
This section goes step-by-step on how to correctly install and provision the OPNFV target system to bare metal nodes
Install Bare Metal Jumphost
1a If your Jumphost does not have CentOS 7 already on it or you would like to do a fresh install then down-load the Apex bootable ISO from OPNFV artifacts lthttpartifactsopnfvorggt There have been isolated
10 Chapter 3 Installer Configuration
OPNFV Configuration Guide Release brahmaputra30 (605ebda)
reports of problems with the ISO having trouble completing installation successfully In the unexpectedevent the ISO does not work please workaround this by downloading the CentOS 7 DVD and perform-ing a ldquoVirtualization Hostrdquo install If you perform a ldquoMinimal Installrdquo or install type other than ldquoVirtu-alization Hostrdquo simply run sudo yum groupinstall Virtualization Host ampamp chkconfiglibvird on and reboot the host Once you have completed the base CentOS install proceed to step 1b
1b If your Jump host already has CentOS 7 with libvirt running on it then install the opnfv-apex RPMs fromOPNFV artifacts lthttpartifactsopnfvorggt The following RPMS are available for installation
bull opnfv-apex - OpenDaylight L2 L3 and ONOS support
bull opnfv-apex-opendaylight-sfc - OpenDaylight SFC support
bull opnfv-apex-undercloud (required)
bull opnfv-apex-common (required)
One or more of these RPMs is required If you only want the experimental SFC support then the opnfv-apexRPM is not required If you only want OpenDaylight or ONOS support then the opnfv-apex-opendaylight-sfcRPM is not required
To install these RPMs download them to the local disk on your CentOS 7 install and passthe file names directly to yum sudo yum install opnfv-apex-ltversiongtrpmopnfv-apex-undercloud-ltversiongtrpm opnfv-apex-common-ltversiongtrpm
2a Boot the ISO off of a USB or other installation media and walk through installing OPNFV CentOS 7 TheISO comes prepared to be written directly to a USB drive with dd as such
dd if=opnfv-apexiso of=devsdX bs=4M
Replace devsdX with the device assigned to your usb drive Then select the USB device as the boot media onyour Jumphost
2b Install the RDO Release RPM and the opnfv-apex RPM
sudo yum install -y httpswwwrdoprojectorgreposrdo-releaserpmopnfv-apex-versionrpm
The RDO Project release repository is needed to install OpenVSwitch which is a dependency of opnfv-apex If you do not have external connectivity to use this repository you need to download the Open-VSwitch RPM from the RDO Project repositories and install it with the opnfv-apex RPM
3 After the operating system and the opnfv-apex RPMs are installed login to your Jumphost as root
4 Configure IP addresses on the interfaces that you have selected as your networks
5 Configure the IP gateway to the Internet either preferably on the public interface
6 Configure your etcresolvconf to point to a DNS server (8888 is provided by Google)
Creating a Node Inventory File
IPMI configuration information gathered in section Execution Requirements (Bare Metal Only) needs to be added tothe inventoryyaml file
1 Copy usrsharedocopnfvinventoryyamlexample as your inventory file template toetcopnfv-apexinventoryyaml
2 The nodes dictionary contains a definition block for each baremetal host that will be deployed 1 or morecompute nodes and 3 controller nodes are required (The example file contains blocks for each of these already)It is optional at this point to add more compute nodes into the node list
3 Edit the following values for each node
32 Apex configuration 11
OPNFV Configuration Guide Release brahmaputra30 (605ebda)
bull mac_address MAC of the interface that will PXE boot from Instack
bull ipmi_ip IPMI IP Address
bull ipmi_user IPMI username
bull ipmi_password IPMI password
bull pm_type Power Management driver to use for the node
bull cpus (Introspected) CPU cores available
bull memory (Introspected) Memory available in Mib
bull disk (Introspected) Disk space available in Gb
bull arch (Introspected) System architecture
bull capabilities (Optional) Intended node role (profilecontrol or profilecompute)
bull Introspection looks up the overcloud nodersquos resources and overrides these value You can
leave default values and Apex will get the correct values when it runs introspection on the nodes
If capabilities profile is not specified then Apex will select nodersquos roles in the OPNFV cluster in a non-deterministicfashion
Creating the Settings Files
Edit the 2 settings files in etcopnfv-apex These files have comments to help you customize them
1 deploy_settingsyaml This file includes basic configuration options deployment
2 network_settingsyaml This file provides Apex with the networking information that satisfies the prerequisiteNetwork Requirements These are specific to your environment
Running opnfv-deploy
You are now ready to deploy OPNFV using Apex opnfv-deploy will use the inventory and settings files to deployOPNFV
Follow the steps below to execute
1 Execute opnfv-deploy sudo opnfv-deploy [ --flat | -n network_settingsyaml ] -iinventoryyaml -d deploy_settingsyaml If you need more information about the options thatcan be passed to opnfv-deploy use opnfv-deploy --help ndashflat will collapse all networks onto a singlenic -n network_settingsyaml allows you to customize your networking topology
2 Wait while deployment is executed If something goes wrong during this part of the process it is most likelya problem with the setup of your network or the information in your configuration files You will also noticedifferent outputs in your shell
3 The message ldquoOvercloud Deployedrdquo will display when When the deployment is complete Just above thismessage there will be a URL that ends in port httplthostgt5000 This url is also the endpoint for the OPNFVHorizon Dashboard if connected to on port 80
33 Compass4nfv configuration
This document describes providing guidelines on how to install and configure the Brahmaputra release of OPNFVwhen using Compass as a deployment tool including required software and hardware configurations
12 Chapter 3 Installer Configuration
OPNFV Configuration Guide Release brahmaputra30 (605ebda)
Installation and configuration of host OS OpenStack OpenDaylight ONOS Ceph etc can be supported by Compasson VMs or Bare Metal nodes
The audience of this document is assumed to have good knowledge in networking and UnixLinux administration
331 Preconditions
Before starting the installation of the Brahmaputra release of OPNFV some planning must be done
Retrieving the installation ISO image
First of all The installation ISO is needed for deploying your OPNFV environment it included packages of CompassOpenStack OpenDaylight ONOS and so on
The stable release ISO can be retrieved via OPNFV software download page
The daily build ISO can be retrieved via OPNFV artifacts repository
httpartifactsopnfvorg
NOTE Search the keyword ldquoCompass4nfvBrahmaputrardquo to locate the ISO image
Eg compass4nfvbrahmaputraopnfv-2016-01-16_15-03-18iso compass4nfvbrahmaputraopnfv-2016-01-16_15-03-18properties
The name of iso image includes the time of iso building you can get the daily ISO according the building time The giturl and sha1 of Compass4nfv are recorded in properties files According these the corresponding deployment scriptscan be retrieved
Getting the deployment scripts
To retrieve the repository of Compass4nfv on Jumphost use the following command
bull git clone httpsgerritopnfvorggerritcompass4nfv
To get stablebrahmaputra release you can use the following command
bull git checkout brahmaputra10
NOTE PLEASE DO NOT GIT CLONE COMPASS4NFV IN root DIRECTORY
If you donrsquot have a Linux foundation user id get it first by the url
httpswikiopnfvorgdevelopergetting_started
If you want to use a daily release ISO please checkout the corresponding sha1 to get the deployment scripts
Eg Git sha1 in file ldquoopnfv-2016-01-16_15-03-18propertiesrdquo is d5a13ce7cc2ce89946d34b0402ecf33c1d291851
bull git checkout d5a13ce7cc2ce89946d34b0402ecf33c1d291851
Preparing the installation environment
If you have only 1 Bare Metal server Virtual deployment is recommended if more than or equal 3 servers theBare Metal deployment is recommended The minimum number of servers for Bare metal deployment is 3 1 forJumpServer(Jumphost) 1 for controller 1 for compute
33 Compass4nfv configuration 13
OPNFV Configuration Guide Release brahmaputra30 (605ebda)
332 Setup Requirements
Jumphost Requirements
The Jumphost requirements are outlined below
1 Ubuntu 1404 (Pre-installed)
2 Root access
3 libvirt virtualization support
4 Minimum 2 NICs
bull PXE installation Network (Receiving PXE request from nodes and providing OS provisioning)
bull IPMI Network (Nodes power control and set boot PXE first via IPMI interface)
bull External Network (Optional Internet access)
5 16 GB of RAM for a Bare Metal deployment 64 GB of RAM for a VM deployment
6 Minimum 100G storage
Bare Metal Node Requirements
Bare Metal nodes require
1 IPMI enabled on OOB interface for power control
2 BIOS boot priority should be PXE first then local hard disk
3 Minimum 3 NICs
bull PXE installation Network (Broadcasting PXE request)
bull IPMI Network (Receiving IPMI command from Jumphost)
bull External Network (OpenStack mgmtexternalstoragetenant network)
Network Requirements
Network requirements include
1 No DHCP or TFTP server running on networks used by OPNFV
2 2-6 separate networks with connectivity between Jumphost and nodes
bull PXE installation Network
bull IPMI Network
bull Openstack mgmt Network
bull Openstack external Network
bull Openstack tenant Network
bull Openstack storage Network
3 Lights out OOB network access from Jumphost with IPMI node enabled (Bare Metal deployment only)
4 External network has Internet access meaning a gateway and DNS availability
14 Chapter 3 Installer Configuration
OPNFV Configuration Guide Release brahmaputra30 (605ebda)
The networks with() can be share one NIC(Default configuration) or use an exclusive NIC(Reconfigurated innetworkyml)
Execution Requirements (Bare Metal Only)
In order to execute a deployment one must gather the following information
1 IPMI IP addresses for the nodes
2 IPMI login information for the nodes (userpass)
3 MAC address of Control Plane Provisioning interfaces of the Bare Metal nodes
333 Installation Guide (BM Deployment)
Nodes Configuration (BM Deployment)
The bellow file is the inventory template of deployment nodes
ldquocompass4nfvdeployconfhardware_environmenthuawei_us_labpod1dhaymlrdquo
You can write your own IPMI IPUserPasswordMac addressroles reference to it
bull ipmiVer ndash IPMI interface version for deployment node support IPMI 10 or IPMI 20 is available
bull ipmiIP ndash IPMI IP address for deployment node Make sure it can access from Jumphost
bull ipmiUser ndash IPMI Username for deployment node
bull ipmiPass ndash IPMI Password for deployment node
bull mac ndash MAC Address of deployment node PXE NIC
bull name ndash Host name for deployment node after installation
bull roles ndash Components deployed
Assignment of different roles to servers
Eg Openstack only deployment roles setting
hosts- name host1roles
- controller- ha
- name host2roles
- compute
NOTE IF YOU SELECT MUTIPLE NODES AS CONTROLLER THE lsquoharsquo role MUST BE SELECT TOO
Eg Openstack and ceph deployment roles setting
hosts- name host1roles
- controller- ha- ceph-adm- ceph-mon
33 Compass4nfv configuration 15
OPNFV Configuration Guide Release brahmaputra30 (605ebda)
- name host2roles
- compute- ceph-osd
Eg Openstack and ODL deployment roles setting
hosts- name host1roles
- controller- ha- odl
- name host2roles
- compute
Eg Openstack and ONOS deployment roles setting
hosts- name host1roles
- controller- ha- onos
- name host2roles
- compute
Network Configuration (BM Deployment)
Before deployment there are some network configuration to be checked based on your network topology Com-pass4nfv network default configuration file is ldquocompass4nfvdeployconfnetwork_cfgyamlrdquo You can write yourown reference to it
The following figure shows the default network configuration
+--+ +--+ +--+| | | | | || | +------------+ | | | || +------+ Jumphost +------+ | | || | +------+-----+ | | | || | | | | | || | +------------+ +-----+ || | | | | || | +------------+ | | | || +------+ host1 +------+ | | || | +------+-----+ | | | || | | | | | || | +------------+ +-----+ || | | | | || | +------------+ | | | || +------+ host2 +------+ | | || | +------+-----+ | | | || | | | | | |
16 Chapter 3 Installer Configuration
OPNFV Configuration Guide Release brahmaputra30 (605ebda)
| | +------------+ +-----+ || | | | | || | +------------+ | | | || +------+ host3 +------+ | | || | +------+-----+ | | | || | | | | | || | +------------+ +-----+ || | | | | || | | | | |+-++ ++-+ +-++
^ ^ ^| | || | |
+-+-------------------------+ | || External Network | | |+---------------------------+ | |
+-----------------------+---+ || IPMI Network | |+---------------------------+ |
+-------------------------+-+| PXE(Installation) Network |+---------------------------+
Start Deployment (BM Deployment)
1 Set PXEInstallation NIC for Jumphost (set eth1 Eg)
export INSTALL_NIC=eth1
2 Set OS version for nodes provisioning (set Ubuntu1404 Eg)
export OS_VERSION=trusty
3 Set OpenStack version for deployment nodes (set liberty Eg)
export OPENSTACK_VERSION=liberty
4 Set ISO image that you want to deploy
export ISO_URL=file$YOUR_OWNcompassisoorexport ISO_URL=httpartifactsopnfvorgcompass4nfvbrahmaputraopnfv-releaseiso
5 Run deploysh with inventory and network configuration
deploysh --dha $YOUR_OWNdhayml --network $YOUR_OWNnetworkyml
34 Fuel configuration
This section provides guidelines on how to install and configure the Brahmaputra release of OPNFV when using Fuelas a deployment tool including required software and hardware configurations
For detailed instructions on how to install the Brahmaputra release using Fuel see Reference 13 in section ldquoFuelassociated referencesrdquo below
34 Fuel configuration 17
OPNFV Configuration Guide Release brahmaputra30 (605ebda)
341 Pre-configuration activities
Planning the deployment
Before starting the installation of the Brahmaputra release of OPNFV when using Fuel as a deployment tool someplanning must be done
Familiarize yourself with the Fuel by reading the following documents
bull Fuel planning guide please see Reference 8 in section ldquoFuel associated referencesrdquo below
bull Fuel quick start guide please see Reference 9 in section ldquoFuel associated referencesrdquo below
bull Fuel operations guide please see Reference 10 in section ldquoFuel associated referencesrdquo below
bull Fuel Plugin Developers Guide please see Reference 11 in section ldquoFuel associated referencesrdquo below
Before the installation can start a number of deployment specific parameters must be collected those are
1 Provider sub-net and gateway information
2 Provider VLAN information
3 Provider DNS addresses
4 Provider NTP addresses
5 Network overlay you plan to deploy (VLAN VXLAN FLAT)
6 Monitoring Options you want to deploy (Ceilometer Syslog etc)
7 How many nodes and what roles you want to deploy (Controllers Storage Computes)
8 Other options not covered in the document are available in the links above
Retrieving the ISO image
First of all the Fuel deployment ISO image needs to be retrieved the Fuel iso image of the Brahmaputra release canbe found at Reference 2
Alternatively you may build the iso from source by cloning the opnfvfuel git repository Detailed instructions onhow to build a Fuel OPNFV iso can be found in Reference 14 at section ldquoFuel associated referencesrdquo below
342 Hardware requirements
Following high level hardware requirements must be met
18 Chapter 3 Installer Configuration
OPNFV Configuration Guide Release brahmaputra30 (605ebda)
HW Aspect Requirement of nodes Minimum 5 (3 for non redundant deployment)
bull 1 Fuel deployment master (may be virtualized)bull 3(1) Controllers (1 colocated mongoceilometer
role 2 Ceph-OSD roles)bull 1 Compute (1 co-located Ceph-OSD role)
CPU Minimum 1 socket x86_AMD64 with Virtualizationsupport
RAM Minimum 16GBserver (Depending on VNF work load)Disk Minimum 256GB 10kRPM spinning disksNetworks 4 Tagged VLANs (PUBLIC MGMT STORAGE PRI-
VATE)1 Un-Tagged VLAN for PXE Boot - ADMIN Networknote These can be run on single NIC - or spread outover other nics as your hardware supports
For information on compatible hardware types available for use please see Reference 11 in section ldquoFuel associatedreferencesrdquo below
Top of the rack (TOR) Configuration requirements
The switching infrastructure provides connectivity for the OPNFV infrastructure operations tenant networks(EastWest) and provider connectivity (NorthSouth) it also provides needed connectivity for the Storage Area Net-work (SAN) To avoid traffic congestion it is strongly suggested that three physically separated networks are usedthat is 1 physical network for administration and control one physical network for tenant private and public networksand one physical network for SAN The switching connectivity can (but does not need to) be fully redundant in suchcase it and comprises a redundant 10GE switch pair for each of the three physically separated networks
The physical TOR switches are not automatically configured from the OPNFV reference platform All the networksinvolved in the OPNFV infrastructure as well as the provider networks and the private tenant VLANs needs to bemanually configured
343 Jumphost configuration
The Jumphost server also known as the ldquoFuel masterrdquo provides needed servicesfunctions to deploy an OP-NFVOpenStack cluster as well functions for cluster life-cycle management (extensions repair actions and upgrades)
The Jumphost server requires 2 (4 if redundancy is required) Ethernet interfaces - one for external management of theOPNFV installation and another for jump-host communication with the OPNFV cluster
Install the Fuel jump-host
Mount the Fuel Brahmaputra ISO file as a boot device to the jump host server reboot it and install the Fuel Jumphostin accordance with installation instructions see Reference 13 in section ldquoFuel associated referencesrdquo below
344 Platform components configuration
Fuel-Plugins
Fuel plugins enable you to install and configure additional capabilities for your Fuel OPNFV based cloud such asadditional storage types networking functionality or NFV features developed by OPNFV
34 Fuel configuration 19
OPNFV Configuration Guide Release brahmaputra30 (605ebda)
Fuel offers an open source framework for creating these plugins so therersquos a wide range of capabilities that you canenable Fuel to add to your OpenStack clouds
The OPNFV Brahmaputra version of Fuel provides a set of pre-packaged plugins developed by OPNFV
Pluginname
Short description
Open-Daylight
OpenDaylight provides an open-source SDN Controller providing networking features such as L2and L3 network control ldquoService Function Chainingrdquo routing networking policies etc Moreinformation on OpenDaylight in the OPNFV Brahmaputra release can be found in a separate sectionin this document
ONOS ONOS is another open-source SDN controller which in essense fill the same role as OpenDaylightMore information on ONOS in the OPNFV Brahmaputra release can be found in a separate section inthis document
BGP-VPN
BGP-VPN provides an BGPMPLS VPN service More information on BGP-VPN in the OPNFVBrahmaputra release can be found in a separate section in this document
OVS-NSH
OVS-NSH provides a variant of Open-vSwitch which supports ldquoNetwork Service Headersrdquo neededfor the ldquoService function chainingrdquo feature More information on ldquoService Function Chainingrdquo in theOPNFV Brahmaputra release can be found in a in a separate section in this document
OVS-NFV
OVS-NFV provides a variant of Open-vSwitch with carrier grade characteristics essential for NFVworkloads More information on OVS-NFV in the OPNFV Brahmaputra release can be found in a ina separate section in this document
KVM-NFV
KVM-NFV provides a variant of KVM with improved virtualization characteristics essential for NFVworkloads More information on KVM-NFV in the OPNFV Brahmaputra release can be found in a ina separate section in this document
VSPERF VSPERF provides a networking characteristics test bench that facilitates characteristicsperformanceevaluation of vSwithches More information on VSPERF in the OPNFV Brahmaputra release can befound in a in a separate section in this document
Additional third-party plugins can be found here httpswwwmirantiscomproductsopenstack-drivers-and-pluginsfuel-plugins Note Plugins are not necessarilly compatible with each other see section ldquoConfigurationoptions OPNFV scenariosrdquo for compatibility information
The plugins come prepackaged ready to install To do so follow the installation instructions provided in Reference 13provided in section ldquoFuel associated referencesrdquo below
Fuel environment
A Fuel environment is an OpenStack instance managed by Fuel one Fuel instance can manage several OpenStackinstancesenvironments with different configurations etc
To create a Fuel instance follow the instructions provided in the installation instructions see Reference 13 in sectionldquoFuel associated referencesrdquo below
Provisioning of aditional features and services
Although the plugins have already previously been installed they are not per default enabled for the environment wejust created The plugins of your choice need to be enabled and configured
To enable a plugin follow the installation instructions found in Reference 13 provided in section ldquoFuel associatedreferencesrdquo below
For configuration of the plugins please see section ldquoFeature Configurationrdquo
20 Chapter 3 Installer Configuration
OPNFV Configuration Guide Release brahmaputra30 (605ebda)
Networking
All the networking aspects need to be configured in terms of - InterfacesNICs - VLANs - Sub-nets - Gateways - Usernetwork segmentation (VLANVXLAN) - DNS - NTP - etc
For guidelines on how to configure networking please refer to the installation instructions found in Reference 13provided in section ldquoFuel associated referencesrdquo below
Node allocation
Now it is time to allocate the nodes in your OPNFV cluster to OpenStack- SDN- and other featureservice rolesSome roles may require redundancy while others donrsquot Some roles may be co-located with other roles while othersmay not The Fuel GUI will guide you in the allocation of roles and will not permit you to perform invalid allocations
For detailed guide-lines on node allocation please refer to the installation instructions found in Reference 13 providedin section ldquoFuel associated referencesrdquo below
Off-line deployment
The OPNFV Brahmaputra version of Fuel can be deployed using on-line upstream repositories (default) or off-lineusing built-in local repositories on the Fuel jump-start server
For instructions on how to configure Fuel for off-line deployment please refer to the installation instructions found inReference 13 provided in section ldquoFuel associated referencesrdquo below
Deployment
You should now be ready to deploy your OPNFV Brahmaputra environment - but before doing so you may want toverify your network settings
For further details on network verification and deployment please refer to the installation instructions found in Ref-erence 13 provided in section ldquoFuel associated referencesrdquo below
345 Fuel associated references
1 OPNFV Home Page
2 OPNFV documentation- and software downloads
3 OpenStack Liberty Release artifacts
4 OpenStack documentation
5 OpenDaylight artifacts
6 The Fuel OpenStack project
7 Fuel documentation overview
8 Fuel planning guide
9 Fuel quick start guide
10 Fuel operations guide
11 Fuel Plugin Developers Guide
12 Fuel OpenStack Hardware Compatibility List
34 Fuel configuration 21
OPNFV Configuration Guide Release brahmaputra30 (605ebda)
13 OPNFV Installation instruction for the Brahmaputra release of OPNFV when using Fuel as a deployment tool
14 OPNFV Build instruction for the Brahmaputra release of OPNFV when using Fuel as a deployment tool
15 OPNFV Release Note for the Brahmaputra release of OPNFV when using Fuel as a deployment tool
35 JOID Configuration
351 Bare Metal Installations
352 Requirements as per Pharos
353 Networking
Minimum 2 networks
1 First for Admin network with gateway to access external network
2 Second for public network to consume by tenants for floating ips
NOTE JOID support multiple isolated networks for data as well as storage Based on your network optionsfor Openstack
Minimum 6 physical servers
1 Jump host server
Minimum HW Spec needed
CPU cores 16
Memory 32 GB
Hard Disk 1(250 GB)
NIC eth0(Admin Management) eth1 (external network)
2 Control node servers (minimum 3)
Minimum HW Spec
CPU cores 16
Memory 32 GB
Hard Disk 1(500 GB)
NIC eth0(Admin Management) eth1 (external network)
3 Compute node servers (minimum 2)
Minimum HW Spec
CPU cores 16
Memory 32 GB
Hard Disk 1(1 TB) this includes the space for ceph as well
22 Chapter 3 Installer Configuration
OPNFV Configuration Guide Release brahmaputra30 (605ebda)
NIC eth0(Admin Management) eth1 (external network)
NOTE Above configuration is minimum and for better performance and usage of the Openstack please con-sider higher spec for each nodes
Make sure all servers are connected to top of rack switch and configured accord-ingly No DHCP server should be up and configured Only gateway at eth0 and eth1 network should be con-figure to access the network outside your lab
Jump node configuration
1 Install Ubuntu 1404 LTS server version of OS on the nodes 2 Install the git and bridge-utils pack-ages on the server and configure minimum two bridges on jump host
brAdm and brPublic cat etcnetworkinterfaces
The loopback network interface
auto lo
iface lo inet loopback
iface eth0 inet manual
auto brAdm
iface brAdm inet static
address 10411
netmask 2552552480
network 10400
broadcast 1047255
gateway 10401
dns- options are implemented by the resolvconf package if installed
dns-nameservers 10402
bridge_ports eth0
auto brPublic
iface brPublic inet static
address 102662
netmask 2552552550
bridge_ports eth2
NOTE If you choose to use the separate network for management data and storage then you need to createbridge for each interface In case of VLAN tags use the appropriate network on jump-host depend upon VLANID on the interface
354 Configure JOID for your lab
Get the joid code from gerritt
git clone httpsgerritopnfvorggerritpjoidgit
cd joidci
Enable MAAS
35 JOID Configuration 23
OPNFV Configuration Guide Release brahmaputra30 (605ebda)
bull Create a directory in maasltcompany namegtltpod numbergt for example
mkdir maasintelpod7
bull Copy files from pod5 to pod7
cp maasintelpod5 maasintelpod7
4 files will get copied deploymentyaml environmentsyaml interfaceshost lxc-add-more-interfaces
355 deploymentyaml file
Prerequisite
1 Make sure Jump host node has been configured with bridges on each interface so that appropriate MAAS and JUJUbootstrap VM can be created For example if you have three network admin data and public then I would suggestto give names like brAdm brData and brPublic 2 You have information about the node MAC address and powermanagement details (IPMI IP username password) of the nodes used for control and compute node
356 modify deploymentyaml
This file has been used to configure your maas and bootstrap node in a VM Comments in the file are self explanatoryand we expect fill up the information according to match lab infrastructure information Sample deploymentyaml canbe found at httpsgerritopnfvorggerritgitwebp=joidgita=blobf=cimaasintelpod5deploymentyaml
modify joidci01-deploybundlesh
under section case $3 add the intelpod7 section and make sure you have information provided correctly Beforeexample consider your network has 1921681024 your default network and eth1 is on public network which will beused to assign the floating ip
rsquointelpod7rsquo )
As per your lab vip address list be deafult uses 104111 - 104120
sed -i -- rsquos1041119216812grsquo bundlesyaml
Choose the external port to go out from gateway to use
sed -i -- rsquos ext-port eth1 ext-port eth1grsquo bundlesyaml
NOTE If you are using seprate data network then add this line below also along with other changes which representsnetwork 1049024 will be used for data network for openstack
sed -i -- rsquosos-data-network 1048021os-data-network 1049024grsquo bundlesyaml
modify joidci02-maasdeploysh
under section case $1 add the intelpod7 section and make sure you have information provided correctly
24 Chapter 3 Installer Configuration
OPNFV Configuration Guide Release brahmaputra30 (605ebda)
rsquointelpod7rsquo )
cp maasintelpod7deploymentyaml deploymentyaml
NOTE If you are using VLAN tags or more network for data and storage then make sure you modify the case $1section under Enable vlan interface with maas appropriately In the example below eth2 has been used as separate datanetwork for tenants in openstack with network 1049024 on compute and control nodes
rsquointelpod7rsquo )
maas refresh
enableautomodebyname eth2 AUTO 1049024 compute || true
enableautomodebyname eth2 AUTO 1049024 control || true
MAAS Install
After integrating the changes as mentioned above run the MAAS install Suppose you name the integration lab asintelpod7 then run the below commands to start the MAAS deployment
02-maasdeploysh intelpod7
This will take approximately 40 minutes to couple hours depending on your environment This script will do thefollowing
1 Create 2 VMs (KVM)
2 Install MAAS in one of the VMs
3 Configure the MAAS to enlist and commission a VM for Juju bootstrap node
4 Configure the MAAS to enlist and commission bare metal servers
When itrsquos done you should be able to view MAAS webpage (httpltMAAS IPgtMAAS) and see 1 bootstrap nodeand bare metal servers in the lsquoReadyrsquo state on the nodes page
Virtual deployment
By default just running the script 02-maasdeploysh will automatically create the KVM VMs on a single machineand configure everything for you
OPNFV Install
JOID allows you to deploy different combinations of OpenStack release and SDN solution in HA or non-HA mode
For OpenStack it supports Juno and Liberty For SDN it supports Openvswitch OpenContrail OpenDayLight andONOS
In addition to HA or non-HA mode it also supports to deploy the latest from the development tree (tip)
The deploysh in the joidci directoy will do all the work for you For example the following deploy OpenStack Liberywith OpenDayLight in a HA mode in the Intelpod7
35 JOID Configuration 25
OPNFV Configuration Guide Release brahmaputra30 (605ebda)
deploysh -o liberty -s odl -t ha -l intelpod7 -f none
By default the SDN is Openvswitch non-HA Liberty Intelpod5 OPNFV Brahmaputra release and ODL_L2 for theOPNFV feature
Possible options for each choice are as follows
[-s ]
nosdn openvswitch only and no other SDN
odl OpenDayLight Lithium version
opencontrail OpenContrail SDN
onos ONOS framework as SDN
[-t ]
nonha NO HA mode of Openstack
ha HA mode of openstack
tip the tip of the development
[-o ]
juno OpenStack Juno version
liberty OpenStack Liberty version
[-l ] etc
default For virtual deployment where installation will be done on KVM created using 02-maasdeploysh
intelpod5 Install on bare metal OPNFV pod5 of Intel lab
intelpod6
orangepod2
(other pods)
Note if you make changes as per your pod above then please use your pod
[-f ]
none no special feature will be enabled
ipv6 ipv6 will be enabled for tenant in openstack
By default debug is enabled in script and error messages will be printed on the SSH terminal where you are runningthe scripts It could take an hour to couple hours (max) to complete
Is the deployment done successfully
Once juju-deployer is complete use juju status to verify that all deployed unit are in the ready state
26 Chapter 3 Installer Configuration
OPNFV Configuration Guide Release brahmaputra30 (605ebda)
juju status --format tabular
Find the Openstack-dashboard IP address from the juju status output and see if you can log in via browser Theusername and password is adminopenstack
Optionall see if you can log in Juju GUI Juju GUI is on the Juju bootstrap node which is the second VM you definein the 02-maasdeploysh The username and password is adminadmin
If you deploy ODL OpenContrail or ONOS find the IP address of the web UI and login Please refer to each SDNbundleyaml for usernamepassword
Troubleshoot
To access to any deployed units juju ssh for example to login into nova-compute unit and look for varlogjujuunit-ltof interestgt for more info
juju ssh nova-compute0
Example
ubuntuR4N4B1~$ juju ssh nova-compute0
Warning Permanently added rsquo172165060rsquo (ECDSA) to the list of knownhosts
Warning Permanently added rsquo3-r4n3b1-computemaasrsquo (ECDSA) to the list ofknown hosts
Welcome to Ubuntu 14041 LTS (GNULinux 3130-77-generic x86_64)
Documentation httpshelpubuntucom
ltskippedgt
Last login Tue Feb 2 212356 2016 from bootstrapmaas
ubuntu3-R4N3B1-compute~$ sudo -i
root3-R4N3B1-compute~ cd varlogjuju
root3-R4N3B1-computevarlogjuju ls
machine-2log unit-ceilometer-agent-0log unit-ceph-osd-0logunit-neutron-contrail-0log unit-nodes-compute-0log unit-nova-compute-0logunit-ntp-0log
root3-R4N3B1-computevarlogjuju
By default juju will add the Ubuntu user keys for authentication into the deployed server and only ssh accesswill be available
Once you resolve the error go back to the jump host to rerun the charm hook with
juju resolved --retry ltunitgt
35 JOID Configuration 27
OPNFV Configuration Guide Release brahmaputra30 (605ebda)
28 Chapter 3 Installer Configuration
CHAPTER
FOUR
FEATURE CONFIGURATION
The following sections describe the configuration options for specific platform features provided in BrahmaputraFurther details for each feature are captured in the referred project documentation
41 Copper configuration
This release focused on use of the OpenStack Congress service for managing configuration policy The Congress installprocedure described here is largely manual This procedure as well as the longer-term goal of automated installersupport is a work in progress The procedure is further specific to one OPNFV installer (JOID ie MAASJuJu)based environment Support for other OPNFV installer deployed environments is also a work in progress
411 Pre-configuration activities
This procedure assumes OPNFV has been installed via the JOID installer
412 Hardware configuration
There is no specific hardware configuration required for the Copper project
413 Feature configuration
Following are instructions for installing Congress on an Ubuntu 1404 LXC container in the OPNFV Controller nodeas installed by the JOID installer This guide uses instructions from the Congress intro guide on readthedocs Specificvalues below will need to be modified if you intend to repeat this procedure in your JOID-based install environment
Install Procedure
The install currently occurs via four bash scripts provided in the copper repo See these files for the detailed steps
bull install_congress_1sh creates and starts the linux container for congress on the controller node copiesinstall_congress_2sh to the controller node and invokes it via ssh
bull install_congress_2sh installs congress on the congress server
29
OPNFV Configuration Guide Release brahmaputra30 (605ebda)
Cleanup Procedure
If there is an error during installation use the bash script clean_congresssh which stops the congress server if runningand removes the congress user and service from the controller database
Restarting after server power loss etc
Currently this install procedure is manual Automated install and restoral after host recovery is TBD For now thisprocedure will get the Congress service running again
On jumphost SSH to Congress serversource ~envshjuju ssh ubuntu$CONGRESS_HOST If that fails
On jumphost SSH to controller nodejuju ssh ubuntunode1-control Start the Congress containersudo lxc-start -n juju-trusty-congress -d Verify the Congress container statussudo lxc-ls -f juju-trusty-congressNAME STATE IPV4 IPV6 GROUPS AUTOSTART----------------------------------------------------------------------juju-trusty-congress RUNNING 19216810117 - - NO exit back to the Jumphost wait a minute and go back to the SSH to Congress server step above
On the Congress server that you have logged intosource ~admin-openrcshcd ~gitcongresssource binactivatebincongress-server ampdisown -h 1
42 Doctor Configuration
421 Doctor Inspector
Doctor Inspector is suggested to be placed in one of the controller nodes but it can be put on any host where DoctorMonitor can reach and accessible to the OpenStack Controller (Nova)
Make sure OpenStack env parameters are set properly so that Doctor Inspector can issue admin actions such ascompute host force-down and state update of VM
Then you can configure Doctor Inspector as follows
git clone httpsgerritopnfvorggerritdoctor -b stablebrahmaputracd doctortestsINSPECTOR_PORT=12345python inspectorpy $INSPECTOR_PORT gt inspectorlog 2gtamp1 amp
422 Doctor Monitor
Doctor Monitors are suggested to be placed in one of the controller nodes but those can be put on any host whichis reachable to target compute host and accessible to the Doctor Inspector You need to configure Monitors for allcompute hosts one by one
30 Chapter 4 Feature Configuration
OPNFV Configuration Guide Release brahmaputra30 (605ebda)
Make sure OpenStack env parameters are set properly so that Doctor Inspector can issue admin actions such ascompute host force-down and state update of VM
Then you can configure Doctor Monitor as follows
git clone httpsgerritopnfvorggerritdoctor -b stablebrahmaputracd doctortestsINSPECTOR_PORT=12345COMPUTE_HOST=overcloud-novacompute-0sudo python monitorpy $COMPUTE_HOST
http127001$INSPECTOR_PORTevents gt monitorlog 2gtamp1 amp
43 IPv6 Configuration - Setting Up a Service VM as an IPv6 vRouter
This section provides instructions to set up a service VM as an IPv6 vRouter using OPNFV Brahmaputra Releaseinstallers The environment may be pure OpenStack option or Open Daylight L2-only option The deployment modelmay be HA or non-HA The infrastructure may be bare metal or virtual environment
For complete instructions and documentations of setting up service VM as an IPv6 vRouter using ANY method pleaserefer to
1 IPv6 Configuration Guide (HTML) httpartifactsopnfvorgipv6docssetupservicevmindexhtml
2 IPv6 User Guide (HTML) httpartifactsopnfvorgipv6docsgapanalysisindexhtml
431 Pre-configuration Activities
The configuration will work in 2 environments
1 OpenStack-only environment
2 OpenStack with Open Daylight L2-only environment
Depending on which installer will be used to deploy OPNFV each environment may be deployed on bare metal orvirtualized infrastructure Each deployment may be HA or non-HA
Refer to the previous installer configuration chapters installations guide and release notes
432 Setup Manual in OpenStack-Only Environment
If you intend to set up a service VM as an IPv6 vRouter in OpenStack-only environment of OPNFV BrahmaputraRelease please NOTE that
bull Because the anti-spoofing rules of Security Group feature in OpenStack prevents a VM from forwarding packetswe need to disable Security Group feature in the OpenStack-only environment
bull The hostnames IP addresses and username are for exemplary purpose in instructions Please change as neededto fit your environment
bull The instructions apply to both deployment model of single controller node and HA (High Availability) deploy-ment model where multiple controller nodes are used
43 IPv6 Configuration - Setting Up a Service VM as an IPv6 vRouter 31
OPNFV Configuration Guide Release brahmaputra30 (605ebda)
Install OPNFV and Preparation
OPNFV-NATIVE-INSTALL-1 To install OpenStack-only environment of OPNFV Brahmaputra Release
Apex Installer
HA deployment in OpenStack-only environmentopnfv-deploy -d etcopnfv-apexos-nosdn-nofeature-hayaml
Non-HA deployment in OpenStack-only environment Non-HA deployment is currently not supported by Apex installer
Compass Installer
HA deployment in OpenStack-only environmentexport ISO_URL=file$BUILD_DIRECTORYcompassisoexport OS_VERSION=$COMPASS_OS_VERSIONexport OPENSTACK_VERSION=$COMPASS_OPENSTACK_VERSIONexport CONFDIR=$WORKSPACEdeployconfvm_environmentdeploysh --dha $CONFDIRos-nosdn-nofeature-hayml --network $CONFDIR$NODE_NAMEnetworkyml
Non-HA deployment in OpenStack-only environment Non-HA deployment is currently not supported by Compass installer
Fuel Installer
HA deployment in OpenStack-only environmentdeploysh -s os-nosdn-nofeature-ha
Non-HA deployment in OpenStack-only environmentdeploysh -s os-nosdn-nofeature-noha
Joid Installer
HA deployment in OpenStack-only environmentdeploysh -o liberty -s nosdn -t ha -l default -f ipv6
Non-HA deployment in OpenStack-only environmentdeploysh -o liberty -s nosdn -t nonha -l default -f ipv6
Please NOTE that
bull You need to refer to installerrsquos documentation for other necessary parameters applicable to your deployment
bull You need to refer to Release Notes and installerrsquos documentation if there is any issue in installation
OPNFV-NATIVE-INSTALL-2 Clone the following GitHub repository to get the configuration and metadata files
git clone httpsgithubcomsridhargaddamopnfv_os_ipv6_pocgit optstackopnfv_os_ipv6_poc
Disable Security Groups in OpenStack ML2 Setup
OPNFV-NATIVE-SEC-1 Change the settings in etcneutronpluginsml2ml2_confini as follows
etcneutronpluginsml2ml2_confini[securitygroup]extension_drivers = port_security
32 Chapter 4 Feature Configuration
OPNFV Configuration Guide Release brahmaputra30 (605ebda)
enable_security_group = Falsefirewall_driver = neutronagentfirewallNoopFirewallDriver
OPNFV-NATIVE-SEC-2 Change the settings in etcnovanovaconf as follows
etcnovanovaconf[DEFAULT]security_group_api = novafirewall_driver = novavirtfirewallNoopFirewallDriver
OPNFV-NATIVE-SEC-3 After updating the settings you will have to restart the Neutron and Nova services
Please note that the commands of restarting Neutron and Nova would vary depending on the installer Pleaserefer to relevant documentation of specific installers
Set Up Service VM as IPv6 vRouter
OPNFV-NATIVE-SETUP-1 Now we assume that OpenStack multi-node setup is up and running We have to sourcethe tenant credentials in this step Please NOTE that the method of sourcing tenant credentials may vary dependingon installers For example
Apex installer
source the tenant credentials using Apex installer of OPNFV you need to copy the file homestackovercloudrc from the installer VM called instack to a location in controller node for example in the directory optsource optovercloudrc
Compass installer
source the tenant credentials using Compass installer of OPNFVsource optadmin-openrcsh
Fuel installer
source the tenant credentials using Fuel installer of OPNFVsource rootopenrc
Joid installer
source the tenant credentials using Joid installer of OPNFVsource $HOMEjoid_configadmin-openrc
devstack
source the tenant credentials in devstacksource openrc admin demo
Please refer to relevant documentation of installers if you encounter any issue
OPNFV-NATIVE-SETUP-2 Download fedora22 image which would be used for vRouter
wget httpsdownloadfedoraprojectorgpubfedoralinuxreleases22Cloudx86_64ImagesFedora-Cloud-Base-22-20150521x86_64qcow2
OPNFV-NATIVE-SETUP-3 Import Fedora22 image to glance
glance image-create --name Fedora22 --disk-format qcow2 --container-format bare --file Fedora-Cloud-Base-22-20150521x86_64qcow2
43 IPv6 Configuration - Setting Up a Service VM as an IPv6 vRouter 33
OPNFV Configuration Guide Release brahmaputra30 (605ebda)
OPNFV-NATIVE-SETUP-4 This step is Informational OPNFV Installer has taken care of this step duringdeployment You may refer to this step only if there is any issue or if you are using other installers
We have to move the physical interface (ie the public network interface) to br-ex including moving the publicIP address and setting up default route Please refer to OS-NATIVE-SETUP-4 and OS-NATIVE-SETUP-5 in ourmore complete instruction
OPNFV-NATIVE-SETUP-5 Create Neutron routers ipv4-router and ipv6-router which need to provideexternal connectivity
neutron router-create ipv4-routerneutron router-create ipv6-router
OPNFV-NATIVE-SETUP-6 Create an external networksubnet ext-net using the appropriate values based on thedata-center physical network setup
Please NOTE that you may only need to create the subnet of ext-net because OPNFV installers should have createdan external network during installation You must use the same name of external network that installer creates whenyou create the subnet For example
bull Apex installer external
bull Compass installer ext-net
bull Fuel installer net04_ext
bull Joid installer ext-net
Please refer to the documentation of installers if there is any issue
This is needed only if installer does not create an external work Otherwise skip this command net-createneutron net-create --routerexternal ext-net
Note that the name ext-net may work for some installers such as Compass and Joid Change the name ext-net to match the name of external network that an installer createsneutron subnet-create --disable-dhcp --allocation-pool start=19859156251end=19859156254 --gateway 198591561 ext-net 19859156024
OPNFV-NATIVE-SETUP-7 Create Neutron networks ipv4-int-network1 and ipv6-int-network2 withport_security disabled
neutron net-create --port_security_enabled=False ipv4-int-network1neutron net-create --port_security_enabled=False ipv6-int-network2
OPNFV-NATIVE-SETUP-8 Create IPv4 subnet ipv4-int-subnet1 in the internal networkipv4-int-network1 and associate it to ipv4-router
neutron subnet-create --name ipv4-int-subnet1 --dns-nameserver 8888 ipv4-int-network1 2000024
neutron router-interface-add ipv4-router ipv4-int-subnet1
OPNFV-NATIVE-SETUP-9 Associate the ext-net to the Neutron routers ipv4-router and ipv6-router
Note that the name ext-net may work for some installers such as Compass and Joid Change the name ext-net to match the name of external network that an installer createsneutron router-gateway-set ipv4-router ext-netneutron router-gateway-set ipv6-router ext-net
OPNFV-NATIVE-SETUP-10 Create two subnets one IPv4 subnet ipv4-int-subnet2 and one IPv6 subnetipv6-int-subnet2 in ipv6-int-network2 and associate both subnets to ipv6-router
34 Chapter 4 Feature Configuration
OPNFV Configuration Guide Release brahmaputra30 (605ebda)
neutron subnet-create --name ipv4-int-subnet2 --dns-nameserver 8888 ipv6-int-network2 1000024
neutron subnet-create --name ipv6-int-subnet2 --ip-version 6 --ipv6-ra-mode slaac --ipv6-address-mode slaac ipv6-int-network2 2001db80164
neutron router-interface-add ipv6-router ipv4-int-subnet2neutron router-interface-add ipv6-router ipv6-int-subnet2
OPNFV-NATIVE-SETUP-11 Create a keypair
nova keypair-add vRouterKey gt ~vRouterKey
OPNFV-NATIVE-SETUP-12 Create ports for vRouter (with some specific MAC address - basically for automation- to know the IPv6 addresses that would be assigned to the port)
neutron port-create --name eth0-vRouter --mac-address fa163e111111 ipv6-int-network2neutron port-create --name eth1-vRouter --mac-address fa163e222222 ipv4-int-network1
OPNFV-NATIVE-SETUP-13 Create ports for VM1 and VM2
neutron port-create --name eth0-VM1 --mac-address fa163e333333 ipv4-int-network1neutron port-create --name eth0-VM2 --mac-address fa163e444444 ipv4-int-network1
OPNFV-NATIVE-SETUP-14 Update ipv6-router with routing information to subnet 2001db80264
neutron router-update ipv6-router --routes type=dict list=true destination=2001db80264nexthop=2001db801f8163efffe111111
OPNFV-NATIVE-SETUP-15 Boot Service VM (vRouter) VM1 and VM2
nova boot --image Fedora22 --flavor m1small --user-data optstackopnfv_os_ipv6_pocmetadatatxt --availability-zone novaopnfv-os-compute --nic port-id=$(neutron port-list | grep -w eth0-vRouter | awk print $2) --nic port-id=$(neutron port-list | grep -w eth1-vRouter | awk print $2) --key-name vRouterKey vRouter
nova list
Please wait for some 10 to 15 minutes so that necessary packages (like radvd) are installed and vRouter is upnova console-log vRouter
nova boot --image cirros-034-x86_64-uec --flavor m1tiny --user-data optstackopnfv_os_ipv6_pocset_mtush --availability-zone novaopnfv-os-controller --nic port-id=$(neutron port-list | grep -w eth0-VM1 | awk print $2) --key-name vRouterKey VM1
nova boot --image cirros-034-x86_64-uec --flavor m1tiny--user-data optstackopnfv_os_ipv6_pocset_mtush --availability-zone novaopnfv-os-compute --nic port-id=$(neutron port-list | grep -w eth0-VM2 | awk print $2) --key-name vRouterKey VM2
nova list Verify that all the VMs are in ACTIVE state
OPNFV-NATIVE-SETUP-16 If all goes well the IPv6 addresses assigned to the VMs would be as shown as follows
43 IPv6 Configuration - Setting Up a Service VM as an IPv6 vRouter 35
OPNFV Configuration Guide Release brahmaputra30 (605ebda)
vRouter eth0 interface would have the following IPv6 address 2001db801f8163efffe11111164 vRouter eth1 interface would have the following IPv6 address 2001db802164 VM1 would have the following IPv6 address 2001db802f8163efffe33333364 VM2 would have the following IPv6 address 2001db802f8163efffe44444464
OPNFV-NATIVE-SETUP-17 Now we can SSH to VMs You can execute the following command
1 Create a floatingip and associate it with VM1 VM2 and vRouter (to the port id that is passed) Note that the name ext-net may work for some installers such as Compass and Joid Change the name ext-net to match the name of external network that an installer createsneutron floatingip-create --port-id $(neutron port-list | grep -w eth0-VM1 | awk print $2) ext-netneutron floatingip-create --port-id $(neutron port-list | grep -w eth0-VM2 | awk print $2) ext-netneutron floatingip-create --port-id $(neutron port-list | grep -w eth1-vRouter | awk print $2) ext-net
2 To know display the floatingip associated with VM1 VM2 and vRouterneutron floatingip-list -F floating_ip_address -F port_id | grep $(neutron port-list | grep -w eth0-VM1 | awk print $2) | awk print $2neutron floatingip-list -F floating_ip_address -F port_id | grep $(neutron port-list | grep -w eth0-VM2 | awk print $2) | awk print $2neutron floatingip-list -F floating_ip_address -F port_id | grep $(neutron port-list | grep -w eth1-vRouter | awk print $2) | awk print $2
3 To ssh to the vRouter VM1 and VM2 user can execute the following commandssh -i ~vRouterKey fedoraltfloating-ip-of-vRoutergtssh -i ~vRouterKey cirrosltfloating-ip-of-VM1gtssh -i ~vRouterKey cirrosltfloating-ip-of-VM2gt
433 Setup Manual in OpenStack with Open Daylight L2-Only Environment
If you intend to set up a service VM as an IPv6 vRouter in an environment of OpenStack and Open Daylight L2-onlyof OPNFV Brahmaputra Release please NOTE that
bull The hostnames IP addresses and username are for exemplary purpose in instructions Please change as neededto fit your environment
bull The instructions apply to both deployment model of single controller node and HA (High Availability) deploy-ment model where multiple controller nodes are used
bull However in case of HA when ipv6-router is created in step SETUP-SVM-11 it could be created in anyof the controller node Thus you need to identify in which controller node ipv6-router is created in orderto manually spawn radvd daemon inside the ipv6-router namespace in steps SETUP-SVM-24 throughSETUP-SVM-30
Install OPNFV and Preparation
OPNFV-INSTALL-1 To install OpenStack with Open Daylight L2-only environment of OPNFV Brahmaputra Re-lease
Apex Installer
36 Chapter 4 Feature Configuration
OPNFV Configuration Guide Release brahmaputra30 (605ebda)
HA deployment in OpenStack with Open Daylight L2-only environmentopnfv-deploy -d etcopnfv-apexos-odl_l2-nofeature-hayaml
Non-HA deployment in OpenStack with Open Daylight L2-only environment Non-HA deployment is currently not supported by Apex installer
Compass Installer
HA deployment in OpenStack with Open Daylight L2-only environmentexport ISO_URL=file$BUILD_DIRECTORYcompassisoexport OS_VERSION=$COMPASS_OS_VERSIONexport OPENSTACK_VERSION=$COMPASS_OPENSTACK_VERSIONexport CONFDIR=$WORKSPACEdeployconfvm_environmentdeploysh --dha $CONFDIRos-odl_l2-nofeature-hayml --network $CONFDIR$NODE_NAMEnetworkyml
Non-HA deployment in OpenStack with Open Daylight L2-only environment Non-HA deployment is currently not supported by Compass installer
Fuel Installer
HA deployment in OpenStack with Open Daylight L2-only environmentdeploysh -s os-odl_l2-nofeature-ha
Non-HA deployment in OpenStack with Open Daylight L2-only environmentdeploysh -s os-odl_l2-nofeature-noha
Joid Installer
HA deployment in OpenStack with Open Daylight L2-only environmentdeploysh -o liberty -s odl -t ha -l default -f ipv6
Non-HA deployment in OpenStack with Open Daylight L2-only environmentdeploysh -o liberty -s odl -t nonha -l default -f ipv6
Please NOTE that
bull You need to refer to installerrsquos documentation for other necessary parameters applicable to your deployment
bull You need to refer to Release Notes and installerrsquos documentation if there is any issue in installation
OPNFV-INSTALL-2 Clone the following GitHub repository to get the configuration and metadata files
git clone httpsgithubcomsridhargaddamopnfv_os_ipv6_pocgit optstackopnfv_os_ipv6_poc
Disable Security Groups in OpenStack ML2 Setup
Please NOTE that although Security Groups feature has been disabled automatically through localconf configu-ration file by some installers such as devstack it is very likely that other installers such as Apex Compass Fuelor Joid will enable Security Groups feature after installation
Please make sure that Security Groups are disabled in the setup
OPNFV-SEC-1 Change the settings in etcneutronpluginsml2ml2_confini as follows
etcneutronpluginsml2ml2_confini[securitygroup]enable_security_group = Falsefirewall_driver = neutronagentfirewallNoopFirewallDriver
43 IPv6 Configuration - Setting Up a Service VM as an IPv6 vRouter 37
OPNFV Configuration Guide Release brahmaputra30 (605ebda)
OPNFV-SEC-2 Change the settings in etcnovanovaconf as follows
etcnovanovaconf[DEFAULT]security_group_api = novafirewall_driver = novavirtfirewallNoopFirewallDriver
OPNFV-SEC-3 After updating the settings you will have to restart the Neutron and Nova services
Please note that the commands of restarting Neutron and Nova would vary depending on the installer Pleaserefer to relevant documentation of specific installers
Source the Credentials in OpenStack Controller Node
SETUP-SVM-1 Login in OpenStack Controller Node Start a new terminal and change directory to where Open-Stack is installed
SETUP-SVM-2 We have to source the tenant credentials in this step Please NOTE that the method of sourcingtenant credentials may vary depending on installers For example
Apex installer
source the tenant credentials using Apex installer of OPNFV you need to copy the file homestackovercloudrc from the installer VM called instack to a location in controller node for example in the directory optsource optovercloudrc
Compass installer
source the tenant credentials using Compass installer of OPNFVsource optadmin-openrcsh
Fuel installer
source the tenant credentials using Fuel installer of OPNFVsource rootopenrc
Joid installer
source the tenant credentials using Joid installer of OPNFVsource $HOMEjoid_configadmin-openrc
devstack
source the tenant credentials in devstacksource openrc admin demo
Please refer to relevant documentation of installers if you encounter any issue
Informational Note Move Public Network from Physical Network Interface to br-ex
SETUP-SVM-3 Move the physical interface (ie the public network interface) to br-ex
SETUP-SVM-4 Verify setup of br-ex
Those 2 steps are Informational OPNFV Installer has taken care of those 2 steps during deployment You mayrefer to this step only if there is any issue or if you are using other installers
38 Chapter 4 Feature Configuration
OPNFV Configuration Guide Release brahmaputra30 (605ebda)
We have to move the physical interface (ie the public network interface) to br-ex including moving the publicIP address and setting up default route Please refer to SETUP-SVM-3 and SETUP-SVM-4 in our more completeinstruction
Create IPv4 Subnet and Router with External Connectivity
SETUP-SVM-5 Create a Neutron router ipv4-router which needs to provide external connectivity
neutron router-create ipv4-router
SETUP-SVM-6 Create an external networksubnet ext-net using the appropriate values based on the data-centerphysical network setup
Please NOTE that you may only need to create the subnet of ext-net because OPNFV installers should have createdan external network during installation You must use the same name of external network that installer creates whenyou create the subnet For example
bull Apex installer external
bull Compass installer ext-net
bull Fuel installer net04_ext
bull Joid installer ext-net
Please refer to the documentation of installers if there is any issue
This is needed only if installer does not create an external work Otherwise skip this command net-createneutron net-create --routerexternal ext-net
Note that the name ext-net may work for some installers such as Compass and Joid Change the name ext-net to match the name of external network that an installer createsneutron subnet-create --disable-dhcp --allocation-pool start=19859156251end=19859156254 --gateway 198591561 ext-net 19859156024
Please note that the IP addresses in the command above are for exemplary purpose Please replace the IP addressesof your actual network
SETUP-SVM-7 Associate the ext-net to the Neutron router ipv4-router
Note that the name ext-net may work for some installers such as Compass and Joid Change the name ext-net to match the name of external network that an installer createsneutron router-gateway-set ipv4-router ext-net
SETUP-SVM-8 Create an internaltenant IPv4 network ipv4-int-network1
neutron net-create ipv4-int-network1
SETUP-SVM-9 Create an IPv4 subnet ipv4-int-subnet1 in the internal network ipv4-int-network1
neutron subnet-create --name ipv4-int-subnet1 --dns-nameserver 8888 ipv4-int-network1 2000024
SETUP-SVM-10 Associate the IPv4 internal subnet ipv4-int-subnet1 to the Neutron router ipv4-router
neutron router-interface-add ipv4-router ipv4-int-subnet1
43 IPv6 Configuration - Setting Up a Service VM as an IPv6 vRouter 39
OPNFV Configuration Guide Release brahmaputra30 (605ebda)
Create IPv6 Subnet and Router with External Connectivity
Now let us create a second neutron router where we can ldquomanuallyrdquo spawn a radvd daemon to simulate an externalIPv6 router
SETUP-SVM-11 Create a second Neutron router ipv6-router which needs to provide external connectivity
neutron router-create ipv6-router
SETUP-SVM-12 Associate the ext-net to the Neutron router ipv6-router
Note that the name ext-net may work for some installers such as Compass and Joid Change the name ext-net to match the name of external network that an installer createsneutron router-gateway-set ipv6-router ext-net
SETUP-SVM-13 Create a second internaltenant IPv4 network ipv4-int-network2
neutron net-create ipv4-int-network2
SETUP-SVM-14 Create an IPv4 subnet ipv4-int-subnet2 for the ipv6-router internal networkipv4-int-network2
neutron subnet-create --name ipv4-int-subnet2 --dns-nameserver 8888 ipv4-int-network2 1000024
SETUP-SVM-15 Associate the IPv4 internal subnet ipv4-int-subnet2 to the Neutron router ipv6-router
neutron router-interface-add ipv6-router ipv4-int-subnet2
Prepare Image Metadata and Keypair for Service VM
SETUP-SVM-16 Download fedora22 image which would be used as vRouter
wget httpsdownloadfedoraprojectorgpubfedoralinuxreleases22Cloudx86_64ImagesFedora-Cloud-Base-22-20150521x86_64qcow2
glance image-create --name Fedora22 --disk-format qcow2 --container-format bare --file Fedora-Cloud-Base-22-20150521x86_64qcow2
SETUP-SVM-17 Create a keypair
nova keypair-add vRouterKey gt ~vRouterKey
SETUP-SVM-18 Create ports for vRouter and both the VMs with some specific MAC addresses
neutron port-create --name eth0-vRouter --mac-address fa163e111111 ipv4-int-network2neutron port-create --name eth1-vRouter --mac-address fa163e222222 ipv4-int-network1neutron port-create --name eth0-VM1 --mac-address fa163e333333 ipv4-int-network1neutron port-create --name eth0-VM2 --mac-address fa163e444444 ipv4-int-network1
Boot Service VM (vRouter) with eth0 on ipv4-int-network2 and eth1 on ipv4-int-network1
Let us boot the service VM (vRouter) with eth0 interface on ipv4-int-network2 connecting toipv6-router and eth1 interface on ipv4-int-network1 connecting to ipv4-router
SETUP-SVM-19 Boot the vRouter using Fedora22 image on the OpenStack Compute Node with hostnameopnfv-os-compute
40 Chapter 4 Feature Configuration
OPNFV Configuration Guide Release brahmaputra30 (605ebda)
nova boot --image Fedora22 --flavor m1small --user-data optstackopnfv_os_ipv6_pocmetadatatxt --availability-zone novaopnfv-os-compute --nic port-id=$(neutron port-list | grep -w eth0-vRouter | awk print $2) --nic port-id=$(neutron port-list | grep -w eth1-vRouter | awk print $2) --key-name vRouterKey vRouter
Please note that optstackopnfv_os_ipv6_pocmetadatatxt is used to enable the vRouter to au-tomatically spawn a radvd and
bull Act as an IPv6 vRouter which advertises the RA (Router Advertisements) with prefix 2001db80264on its internal interface (eth1)
bull Forward IPv6 traffic from internal interface (eth1)
SETUP-SVM-20 Verify that Fedora22 image boots up successfully and vRouter has ssh keys properly injected
nova listnova console-log vRouter
Please note that it may take a few minutes for the necessary packages to get installed and ssh keys to be injected
Sample Output[ 762884523] cloud-init[871] ec2 [ 762909634] cloud-init[871] ec2 -----BEGIN SSH HOST KEY FINGERPRINTS-----[ 762931626] cloud-init[871] ec2 2048 e3dc3d4abcb6b07775a170a3d02a47a9 (RSA)[ 762957380] cloud-init[871] ec2 -----END SSH HOST KEY FINGERPRINTS-----[ 762979554] cloud-init[871] ec2
Boot Two Other VMs in ipv4-int-network1
In order to verify that the setup is working let us create two cirros VMs with eth1 interface on theipv4-int-network1 ie connecting to vRouter eth1 interface for internal network
We will have to configure appropriate mtu on the VMsrsquo interface by taking into account the tunneling overhead andany physical switch requirements If so push the mtu to the VM either using dhcp options or via meta-data
SETUP-SVM-21 Create VM1 on OpenStack Controller Node with hostname opnfv-os-controller
nova boot --image cirros-034-x86_64-uec --flavor m1tiny --user-data optstackopnfv_os_ipv6_pocset_mtush --availability-zone novaopnfv-os-controller --nic port-id=$(neutron port-list | grep -w eth0-VM1 | awk print $2) --key-name vRouterKey VM1
SETUP-SVM-22 Create VM2 on OpenStack Compute Node with hostname opnfv-os-compute
nova boot --image cirros-034-x86_64-uec --flavor m1tiny --user-data optstackopnfv_os_ipv6_pocset_mtush --availability-zone novaopnfv-os-compute --nic port-id=$(neutron port-list | grep -w eth0-VM2 | awk print $2) --key-name vRouterKey VM2
SETUP-SVM-23 Confirm that both the VMs are successfully booted
nova listnova console-log VM1nova console-log VM2
43 IPv6 Configuration - Setting Up a Service VM as an IPv6 vRouter 41
OPNFV Configuration Guide Release brahmaputra30 (605ebda)
Spawn RADVD in ipv6-router
Let us manually spawn a radvd daemon inside ipv6-router namespace to simulate an external router First ofall we will have to identify the ipv6-router namespace and move to the namespace
Please NOTE that in case of HA (High Availability) deployment model where multiple controller nodes are usedipv6-router created in step SETUP-SVM-11 could be in any of the controller node Thus you need to iden-tify in which controller node ipv6-router is created in order to manually spawn radvd daemon inside theipv6-router namespace in steps SETUP-SVM-24 through SETUP-SVM-30 The following command in Neu-tron will display the controller on which the ipv6-router is spawned
neutron l3-agent-list-hosting-router ipv6-router
Then you login to that controller and execute steps SETUP-SVM-24 through SETUP-SVM-30
SETUP-SVM-24 identify the ipv6-router namespace and move to the namespace
sudo ip netns exec qrouter-$(neutron router-list | grep -w ipv6-router | awk print $2) bash
SETUP-SVM-25 Upon successful execution of the above command you will be in the router namespace Now letus configure the IPv6 address on the ltqr-xxxgt interface
export router_interface=$(ip a s | grep -w global qr- | awk print $7)ip -6 addr add 2001db8011 dev $router_interface
SETUP-SVM-26 Update the sample file optstackopnfv_os_ipv6_pocscenario2radvdconfwith $router_interface
cp optstackopnfv_os_ipv6_pocscenario2radvdconf tmpradvd$router_interfaceconfsed -i s$router_interface$router_interfaceg tmpradvd$router_interfaceconf
SETUP-SVM-27 Spawn a radvd daemon to simulate an external router This radvd daemon advertises an IPv6subnet prefix of 2001db80164 using RA (Router Advertisement) on its $router_interface so that eth0interface of vRouter automatically configures an IPv6 SLAAC address
$radvd -C tmpradvd$router_interfaceconf -p tmpbr-expidradvd -m syslog
SETUP-SVM-28 Add an IPv6 downstream route pointing to the eth0 interface of vRouter
ip -6 route add 2001db80264 via 2001db801f8163efffe111111
SETUP-SVM-29 The routing table should now look similar to something shown below
ip -6 route show2001db8011 dev qr-42968b9e-62 proto kernel metric 2562001db80164 dev qr-42968b9e-62 proto kernel metric 256 expires 86384sec2001db80264 via 2001db801f8163efffe111111 dev qr-42968b9e-62 proto ra metric 1024 expires 29secfe8064 dev qg-3736e0c7-7c proto kernel metric 256fe8064 dev qr-42968b9e-62 proto kernel metric 256
SETUP-SVM-30 If all goes well the IPv6 addresses assigned to the VMs would be as shown as follows
vRouter eth0 interface would have the following IPv6 address 2001db801f8163efffe11111164 vRouter eth1 interface would have the following IPv6 address 2001db802164 VM1 would have the following IPv6 address 2001db802f8163efffe33333364 VM2 would have the following IPv6 address 2001db802f8163efffe44444464
42 Chapter 4 Feature Configuration
OPNFV Configuration Guide Release brahmaputra30 (605ebda)
Testing to Verify Setup Complete
Now let us SSH to those VMs eg VM1 and or VM2 and or vRouter to confirm that it has successfully configuredthe IPv6 address using SLAAC with prefix 2001db80264 from vRouter
We use floatingip mechanism to achieve SSH
SETUP-SVM-31 Now we can SSH to VMs You can execute the following command
1 Create a floatingip and associate it with VM1 VM2 and vRouter (to the port id that is passed) Note that the name ext-net may work for some installers such as Compass and Joid Change the name ext-net to match the name of external network that an installer createsneutron floatingip-create --port-id $(neutron port-list | grep -w eth0-VM1 | awk print $2) ext-netneutron floatingip-create --port-id $(neutron port-list | grep -w eth0-VM2 | awk print $2) ext-netneutron floatingip-create --port-id $(neutron port-list | grep -w eth1-vRouter | awk print $2) ext-net
2 To know display the floatingip associated with VM1 VM2 and vRouterneutron floatingip-list -F floating_ip_address -F port_id | grep $(neutron port-list | grep -w eth0-VM1 | awk print $2) | awk print $2neutron floatingip-list -F floating_ip_address -F port_id | grep $(neutron port-list | grep -w eth0-VM2 | awk print $2) | awk print $2neutron floatingip-list -F floating_ip_address -F port_id | grep $(neutron port-list | grep -w eth1-vRouter | awk print $2) | awk print $2
3 To ssh to the vRouter VM1 and VM2 user can execute the following commandssh -i ~vRouterKey fedoraltfloating-ip-of-vRoutergtssh -i ~vRouterKey cirrosltfloating-ip-of-VM1gtssh -i ~vRouterKey cirrosltfloating-ip-of-VM2gt
If everything goes well ssh will be successful and you will be logged into those VMs Run some commands to verifythat IPv6 addresses are configured on eth0 interface
SETUP-SVM-32 Show an IPv6 address with a prefix of 2001db80264
ip address show
SETUP-SVM-33 ping some external IPv6 address eg ipv6-router
ping6 2001db8011
If the above ping6 command succeeds it implies that vRouter was able to successfully forward the IPv6 traffic toreach external ipv6-router
44 Installing OVSNFV Fuel Plugin
bull On the Fuel UI create a new environment
bull In Settings gt Userspace OVS support check ldquoUserspace OVS supportrdquo
bull Continue with environment configuration and deployment as normal
441 Upgrading the plugin
From time to time new versions of the plugin may become available
44 Installing OVSNFV Fuel Plugin 43
OPNFV Configuration Guide Release brahmaputra30 (605ebda)
The plugin cannot be upgraded if an active environment is using the plugin
In order to upgrade the plugin
bull Copy the updated plugin file to the fuel-master
bull On the Fuel UI reset the environment
bull On the Fuel CLI ldquofuel plugins ndashupdate ltfuel-plugin-filegtrdquo
bull On the Fuel UI re-deploy the environment
45 Promise Feature Configuration Overview
451 Promise installation
Install nodejs npm and promise
curl -sL httpsdebnodesourcecomsetup_4x | sudo -E bash -sudo apt-get install -y nodejssudo npm -g install npmlatestgit clone httpsgithubcomopnfvpromisegitcd promisenpm install
Please note that the last command lsquonpm installrsquo will install all needed dependencies for promise (including yangforgeand mocha)
452 Testing
Please perform the following preparation steps
1 Set OpenStack environment parameters properly (eg source openrc admin demo in DevStack)
2 Create OpenStack tenant (eg promise) and tenant user (eg promiser)
3 Create a flavor in Nova with 1 vCPU and 512 MB RAM
4 Create a private network subnet and router in Neutron
5 Create an image in Glance
Once done the promise test script can be invoked as follows (as a single line command)
NODE_ENV=mytest OS_TENANT_NAME=promise OS_USERNAME=promiser OS_PASSWORD=ltuser password from Step 2gt OS_TEST_FLAVOR=ltflavor ID from Step 3gt OS_TEST_NETWORK=ltnetwork ID from Step 4gt OS_TEST_IMAGE=ltimage ID from Step 5gt npm run -s test -- --reporter json gt promise-resultsjson
The results of the tests will be stored in the promise-resultsjson file
The results can also be seen in the console (ldquonpm run -s testrdquo)
All 33 tests passing Congratulations promise has been successfully installed and configured
44 Chapter 4 Feature Configuration
OPNFV Configuration Guide Release brahmaputra30 (605ebda)
45 Promise Feature Configuration Overview 45
OPNFV Configuration Guide Release brahmaputra30 (605ebda)
46 Configuring SDNVPN features
Fuel installer configuration
In order to install the BGPVPN feature the corresponding checkbox in Fuel has to be selected This will triggerinstallation of the OpenStack BGPVPN API extension for Neutron (set up for using the ODL driver)
In addition ODL has to be installed see the corresponding section in the respective installer documentation on how toinstall ODL If the BGPVPN feature is installed ODL will automatically be installed with VPN Service karaf featureactivated
No post-deploy configuration is necessary The Fuel BGPVPN plugin and the ODL plugin should set up the clusterready for BGPVPNs being created This includes the set-up of internal VxLAN transport tunnels between computenodes
No post-configuration activities are required
46 Chapter 4 Feature Configuration
CHAPTER
FIVE
POST CONFIGURATION ACTIVITIES
Once you have deployed and configured your scenario and features you should validate the state of the system usingthe following guides
51 Scenario validation activities
The following guides provide information on how to validate the installation of you scenario based on the tools andtest suites available for the installation tool you have selected
511 Fuel post installation procedures
Automated post installation activities
Fuel provides a fairly broad coverage of built in automated health checks These validate the installation in terms ofconfiguration services networking storage policies etc The execution of the full range of health checks takes lessthan 30 minutes
For instructions on how to run health-checks please read the Fuel installation instructions
Platform components validation
Consult the feature sections in this document for any post-install feature specific validationhealth-checks
512 JOID post installation procedures
Configure OpenStack
In each SDN directory for example joidciopencontrail there is a folder for Juju deployer where you can find thecharm bundle yaml files that the deploysh uses to deploy
In the same directory there is scripts folder where you can find shell scripts to help you configure the OpenStackcloud that you just deployed These scripts are created to help you configure a basic OpenStack Cloud to verify thecloud For more info on OpenStack Cloud configuration please refer to the OpenStack Cloud Administrator Guideon docsopenstackorg Similarly for complete SDN configuration please refer to the respective SDN adminstratorguide
Each SDN solution requires slightly different setup please refer to the README in each SDN folder Most likelyyou will need to modify the openstacksh and cloud-setupsh scripts for the floating IP range private IP network andSSH keys Please go through openstacksh glancesh and cloud-setupsh and make changes as you see fit
47
OPNFV Configuration Guide Release brahmaputra30 (605ebda)
52 Feature validation activities
The following sections provide information on how to validate the features you have installed in your scenario
521 Copper post installation procedures
This release focused on use of the OpenStack Congress service for managing configuration policy The Congressinstall verify procedure described here is largely manual This procedure as well as the longer-term goal of automatedverification support is a work in progress The procedure is further specific to one OPNFV installer (JOID ieMAASJuJu) based environment
Automated post installation activities
No automated procedures are provided at this time
Copper post configuration procedures
No configuration procedures are required beyond the basic install procedure
Platform components validation
Following are notes on creating a container as test driver for Congress This is based upon an Ubuntu host as installedby JOID
Create and Activate the Container
On the jumphost
sudo lxc-create -n trusty-copper -t usrsharelxctemplateslxc-ubuntu -- -b ubuntu ~opnfvsudo lxc-start -n trusty-copper -dsudo lxc-info --name trusty-copper(typical output)Name trusty-copperState RUNNINGPID 4563IP 100344CPU use 2877 secondsBlkIO use 52279 MiBMemory use 55975 MiBKMem use 0 bytesLink vethDMFOANTX bytes 262 MiBRX bytes 8848 MiBTotal bytes 9110 MiB
Login and configure the test server
48 Chapter 5 Post Configuration Activities
OPNFV Configuration Guide Release brahmaputra30 (605ebda)
ssh ubuntu100344sudo apt-get updatesudo apt-get upgrade -y
Install pipsudo apt-get install python-pip -y
Install javasudo apt-get install default-jre -y
Install other dependenciessudo apt-get install git gcc python-dev libxml2 libxslt1-dev libzip-dev php5-curl -y
Setup OpenStack environment variables per your OPNFV installexport CONGRESS_HOST=19216810117export KEYSTONE_HOST=19216810108export CEILOMETER_HOST=19216810105export CINDER_HOST=19216810101export GLANCE_HOST=19216810106export HEAT_HOST=19216810107export NEUTRON_HOST=19216810111export NOVA_HOST=19216810112source ~admin-openrcsh
Install and test OpenStack clientmkdir ~gitcd gitgit clone httpsgithubcomopenstackpython-openstackclientgitcd python-openstackclientgit checkout stablelibertysudo pip install -r requirementstxtsudo python setuppy installopenstack service list(typical output)+----------------------------------+------------+----------------+| ID | Name | Type |+----------------------------------+------------+----------------+| 2f8799ae50f24c928c021fabf8a50f5f | keystone | identity || 351b13f56d9a4e25849406ec1d5a2726 | cinder | volume || 5129510c3143454f9ba8ec7e6735e267 | cinderv2 | volumev2 || 5ee1e220460f41dea9be06921400ce9b | congress | policy || 78e73a7789a14f56a5d248a0cd141201 | quantum | network || 9d5a00fb475a45b2ae6767528299ed6b | ceilometer | metering || 9e4b1624ef0b434abc0b82f607c5045c | heat | orchestration || b6c01ceb5023442d9f394b83f2a18e01 | heat-cfn | cloudformation || ba6199e3505045ad87e2a7175bd0c57f | glance | image || d753f304a0d541dbb989780ae70328a8 | nova | compute |+----------------------------------+------------+----------------+
Install and test Congress clientcd ~gitgit clone httpsgithubcomopenstackpython-congressclientgitcd python-congressclientgit checkout stablelibertysudo pip install -r requirementstxtsudo python setuppy installopenstack congress driver list(typical output)+------------+--------------------------------------------------------------------------+| id | description |+------------+--------------------------------------------------------------------------+| ceilometer | Datasource driver that interfaces with ceilometer || neutronv2 | Datasource driver that interfaces with OpenStack Networking aka Neutron || nova | Datasource driver that interfaces with OpenStack Compute aka nova || keystone | Datasource driver that interfaces with keystone || cinder | Datasource driver that interfaces with OpenStack cinder || glancev2 | Datasource driver that interfaces with OpenStack Images aka Glance |+------------+--------------------------------------------------------------------------+
Install and test Glance clientcd ~gitgit clone httpsgithubcomopenstackpython-glanceclientgitcd python-glanceclientgit checkout stablelibertysudo pip install -r requirementstxtsudo python setuppy installglance image-list(typical output)+--------------------------------------+---------------------+| ID | Name |+--------------------------------------+---------------------+| 6ce4433e-65c0-4cd8-958d-b06e30c76241 | cirros-033-x86_64 |+--------------------------------------+---------------------+
Install and test Neutron clientcd ~gitgit clone httpsgithubcomopenstackpython-neutronclientgitcd python-neutronclientgit checkout stablelibertysudo pip install -r requirementstxtsudo python setuppy installneutron net-list(typical output)+--------------------------------------+----------+------------------------------------------------------+| id | name | subnets |+--------------------------------------+----------+------------------------------------------------------+| dc6227df-af41-439f-bd2c-c2c2f0fe7fc5 | public | 5745846c-dd79-4900-a7da-bf506348ceac 19216810024 || a3f9f13a-5de9-4d3b-98c8-d2e40a2ef8e9 | internal | 5e0be862-90da-44ab-af43-56d5c65aa049 1000024 |+--------------------------------------+----------+------------------------------------------------------+
Install and test Nova clientcd ~gitgit clone httpsgithubcomopenstackpython-novaclientgitcd python-novaclientgit checkout stablelibertysudo pip install -r requirementstxtsudo python setuppy installnova hypervisor-list(typical output)+----+---------------------+-------+---------+| ID | Hypervisor hostname | State | Status |+----+---------------------+-------+---------+| 1 | compute1maas | up | enabled |+----+---------------------+-------+---------+
Install and test Keystone clientcd ~gitgit clone httpsgithubcomopenstackpython-keystoneclientgitcd python-keystoneclientgit checkout stablelibertysudo pip install -r requirementstxtsudo python setuppy install
52 Feature validation activities 49
OPNFV Configuration Guide Release brahmaputra30 (605ebda)
Setup the Congress Test Webapp
Clone Copper (if not already cloned in user home)cd ~gitif [ -d ~gitcopper ] then git clone httpsgerritopnfvorggerritcopper fi
Copy the Apache configsudo cp ~gitcoppercomponentscongresstest-webappwwwubuntu-apache2conf etcapache2apache2conf
Point proxyphp to the Congress server per your installsed -i -- s19216810117$CONGRESS_HOSTg ~gitcoppercomponentscongresstest-webappwwwhtmlproxyindexphp
Copy the webapp to the Apache root directory and fix permissionssudo cp -R ~gitcoppercomponentscongresstest-webappwwwhtml varwwwsudo chmod 755 varwwwhtml -R
Make webapp log directory and set permissionsmkdir ~logschmod 777 ~logs
Restart Apachesudo service apache2 restart
Using the Test Webapp
Browse to the trusty-copper server IP address
Interactive options are meant to be self-explanatory given a basic familiarity with the Congress service and data modelBut the app will be developed with additional features and UI elements
522 IPv6 Post Installation Procedures
Congratulations you have completed the setup of using a service VM to act as an IPv6 vRouter You have validatedthe setup based on the instruction in previous sections If you want to further test your setup you can ping6 amongVM1 VM2 vRouter and ipv6-router
This setup allows further open innovation by any 3rd-party For more instructions and documentations please refer to
1 IPv6 Configuration Guide (HTML) httpartifactsopnfvorgipv6docssetupservicevmindexhtml
2 IPv6 User Guide (HTML) httpartifactsopnfvorgipv6docsgapanalysisindexhtml
Automated post installation activities
Refer to the relevant testing guides results and release notes of Yardstick Project
53 Additional testing and validation activities
Many of our testing tools can be manually installed to facilitate targeted testing of features and capabilities of yourscenario The following guides provide instruction on setting up these testing suites
50 Chapter 5 Post Configuration Activities
OPNFV Configuration Guide Release brahmaputra30 (605ebda)
531 Overview of the functest suites
Functest is the OPNFV project primarily targeting function testing In the Continuous Integration pipeline it islaunched after an OPNFV fresh installation to validate and verify the basic functions of the infrastructure
The current list of test suites can be distributed in 3 main domains VIM (Virtualised Infrastructure Manager) Con-trollers and Features
Do-main
Testsuite
Comments
VIM
vPing NFV ldquoHello Worldrdquo using SSH connection and floatting IPvPing_userdataPing using userdata and cloud-init mechanismTempest OpenStack reference test suite [2]Rallybench
OpenStack testing tool benchmarking OpenStack modules [3]
ControllersOpen-Day-light
Opendaylight Test suite
ONOS Test suite of ONOS L2 and L3 functions See ONOSFW User Guide for details
Features
vIMS Example of a real VNF deployment to show the NFV capabilities of the platform The IPMultimedia Subsytem is a typical Telco test case referenced by ETSI It provides a fullyfunctional VoIP System
Promise Resource reservation and management project to identify NFV related requirements andrealize resource reservation for future usage by capacity management of resource poolsregarding compute network and storage See Promise User Guide for details
Doctor Doctor platform as of Brahmaputra release provides the two features ImmediateNotification Consistent resource state awareness (compute) see Doctor User Guide fordetails
SD-NVPN
Implementation of the OpenStack bgpvpn API from the SDNVPN feature project Itallowing the cration of BGP VPNs see SDNVPN User Guide for
Functest includes different test suites with several test cases within Some of the tests are developed by Functest teammembers whereas others are integrated from upstream communities or other OPNFV projects For example Tempestis the OpenStack integration test suite and Functest is in charge of the selection integration and automation of the teststhat fit in OPNFV
The Tempest suite has been customized but no new test cases have been created
The results produced by the tests run from CI are pushed and collected in a NoSQL database The goal is to populatethe database with results from different sources and scenarios and to show them on a Dashboard
There is no real notion of Test domain or Test coverage Basic components (VIM controllers) are tested through theirown suites Feature projects also provide their own test suites with different ways of running their tests
vIMS test case was integrated to demonstrate the capability to deploy a relatively complex NFV scenario on top of theOPNFV infrastructure
Functest considers OPNFV as a black box OPNFV since the Brahmaputra release offers lots of potential combina-tions
bull 2 controllers (OpenDayligh ONOS)
bull 4 installers (Apex Compass Fuel Joid)
Most of the tests are runnable on any combination but some others might have restrictions imposed by the installersor the available deployed features
53 Additional testing and validation activities 51
OPNFV Configuration Guide Release brahmaputra30 (605ebda)
Preparing the Docker container
Pull the Functest Docker image from the Docker hub
docker pull opnfvfunctestbrahmaputra10
Check that the image is available
docker images
Run the docker container giving the environment variables
bull INSTALLER_TYPE possible values are apex compass fuel or joid
bull INSTALLER_IP IP of the installer nodeVM
Functest may need to know the IP of the installer to retrieve automatically the credentials from the installer nodeVMor even from the actual controllers
The minimum command to create the Functest Docker container can be described as follows
docker run -it -e INSTALLER_IP=102002 -e INSTALLER_TYPE=fuel opnfvfunctestbrahmaputra10 binbash
Optionally it is possible to precise the container name through the option ndashname
docker run --name CONTAINER_NAME -it -e INSTALLER_IP=102002 -e INSTALLER_TYPE=fuel opnfvfunctestbrahmaputra10 binbash
It is also possible to to indicate the path of the OpenStack credentials using -v
docker run -it -e INSTALLER_IP=102002 -e INSTALLER_TYPE=fuel -v ltpath_to_your_local_creds_filegthomeopnfvfunctestconfopenstackcreds opnfvfunctestbrahmaputra10 binbash
The local file will be mounted in the container under homeopnfvfunctestconfopenstackcreds
If the intention is to run Functest against any of the supported OPNFV scenarios it is recommended to include alsothe environment variable DEPLOY_SCENARIO for example
docker run -it -e INSTALLER_IP=102002 -e INSTALLER_TYPE=fuel -e DEPLOY_SCENARIO=os-odl_l2-nofeature-ha opnfvfunctestbrahmaputra10 binbash
Inside the container the following directory structure should be in place
`-- home`-- opnfv
|-- functest| |-- conf| |-- data| `-- results`-- repos
|-- bgpvpn|-- doctor|-- functest|-- odl_integration|-- onos|-- promise|-- rally|-- releng`-- vims-test
Basically the container includes
bull Functest directory to store the configuration (the OpenStack creds are stored inhomeopngbfunctestconfopenstackcreds) the data (cirros image needed for some tests) results (sometemporary result logs may be stored here)
52 Chapter 5 Post Configuration Activities
OPNFV Configuration Guide Release brahmaputra30 (605ebda)
bull Repositories the functest repository will be used to prepare the environment and run the tests Other repositoriesare used for the installation of the needed tooling (eg rally) andor the retrieval of feature projects scenarios(eg promise)
The structure under the Functest repository can be described as follows
|-- INFO|-- LICENSE|-- commons| |-- ims| |-- mobile| `-- traffic-profile-guidelinesrst|-- docker| |-- Dockerfile| |-- commonsh| |-- prepare_envsh| |-- requirementspip| `-- run_testssh|-- docs| |-- configguide| |-- devguide| |-- images| |-- results| `-- userguide`-- testcases
|-- Controllers|-- features|-- tests|-- VIM|-- vIMS|-- vPing|-- __init__py|-- config_functestpy|-- config_functestyaml`-- functest_utilspy
We may distinguish 4 different folders
bull commons it is a folder dedicated to store traffic profile or any test inputs that could be reused by any test project
bull docker this folder includes the scripts that will be used to setup the environment and run the tests
bull docs this folder includes the user and installationconfiguration guide
bull testcases this folder includes the scripts required by Functest internal test cases and other feature projects testcases
After the run command a new prompt appears which means that we are inside the container and ready to move to thenext step
Useful Docker commands
When typing exit in the container prompt this will cause exiting the container and probably stopping it Whenstopping a running Docker container all the changes will be lost there is a keyboard shortcut to quit the containerwithout stopping it CTRL+P+Q To reconnect to the running container DO NOT use the run command again (sinceit will create a new container) use exec instead
53 Additional testing and validation activities 53
OPNFV Configuration Guide Release brahmaputra30 (605ebda)
docker psltcopy the container IDgtdocker exec -ti ltCONTAINER_IDgt binbash
or simply
docker exec -ti $(docker ps|grep functest|awk print $1) binbash
There are other useful Docker commands that might be needed to manage possible issues with the containers
List the running containers
docker ps
List all the containers including the stopped ones
docker ps -a
It is useful sometimes to remove a container if there are some problems
docker rm ltCONTAINER_IDgt
Use the -f option if the container is still running it will force to destroy it
docker -f rm ltCONTAINER_IDgt
The Docker image is called opnfvfunctest and it is stored in the public Docker registry under the OPNFV accountdockerhub The are many different tags that have been created automatically by the CI mechanisms but the one thatthis document refers to is brahmaputra10 Pulling other tags might cause some problems while running the tests
Check the Docker documentation dockerdocs for more information
Preparing the Functest environment
Once the docker container is up and running execute the following command in the prompt
$repos_dirfunctestdockerprepare_envsh
NOTE $repos_dir is a default environment variable inside the docker container which points to homeopnfvrepos
This script will make sure that the requirements to run the tests are met and will install the needed libraries and toolsby all Functest test cases It must be run only once every time the docker is started from sratch
Focus on the OpenStack credentials
The OpenStack credentials are needed to run the tests against the VIM There are 3 ways to provide them to Functest
bull using the -v option when running the Docker container
bull create an empty file in homeopnfvfunctestconfopenstackcreds and paste the credentials in it
bull automatically retrieved using the following script $repos_dirrelengutilsfetch_os_credssh
Once the credentials are there they shall be sourced before running the tests
source homeopnfvfunctestconfopenstackcreds
or simply using the environment variable creds
54 Chapter 5 Post Configuration Activities
OPNFV Configuration Guide Release brahmaputra30 (605ebda)
$creds
After this try to run any OpenStack command to see if you get any output for instance
openstack user list
This will return a list of the actual users in the OpenStack deployment In any other case check that the credentialsare sourced
env|grep OS_
This command must show a set of environment variables starting with OS_ for example
OS_REGION_NAME=RegionOneOS_DEFAULT_DOMAIN=defaultOS_PROJECT_NAME=adminOS_PASSWORD=adminOS_AUTH_STRATEGY=keystoneOS_AUTH_URL=http172301035000v20OS_USERNAME=adminOS_TENANT_NAME=adminOS_ENDPOINT_TYPE=internalURLOS_NO_CACHE=true
If still the OpenStack command does not show anything or complains about connectivity issues it could be due to anincorrect url given to the OS_AUTH_URL environment variable Check the deployment settings
SSL Support
If you need to connect to a server that is TLS-enabled (the auth URL begins with lsquohttpsrsquo) and it uses a certificate froma private CA or a self-signed certificate you will need to specify the path to an appropriate CA certificate to use tovalidate the server certificate with the environment variable OS_CACERT
echo $OS_CACERTetcsslcertscacrt
However this certificate does not exist in the container by default It has to be copied manually from the OpenStackdeployment This can be done in 2 ways
1 Create manually that file and copy the contents from the OpenStack controller
2 (recommended) Add the file using a Docker volume when starting the container
-v ltpath_to_your_cert_filegtetcsslcertscacert
You might need to export OS_CACERT environment variable inside the container
export OS_CACERT=etcsslcertscacrt
Certificate verification can be turned off using OS_INSECURE=true For example Fuel uses self-signed cacerts bydefault so an pre step would be
export OS_INSECURE=true
Additional Options
In case you need to provide different configuration parameters to Functest (eg commit IDs or branches for therepositories ) copy the config_functestyaml from the repository to your current directory and run the container
53 Additional testing and validation activities 55
OPNFV Configuration Guide Release brahmaputra30 (605ebda)
with a volume
wget httpsgitopnfvorgcgitfunctestplaintestcasesconfig_functestyaml
ltmodify the file accordinglygt
docker run -ti -e INSTALLER_TYPE=fuel -e INSTALLER_IP=102002 opnfvfunctestbrahmaputra10 -v $(pwd)config_functestyamlhomeopnfvfunctestconfconfig_functestyaml binbash
However this is not recommended since most of the test cases rely on static parameters read from this file andchanging them might cause problems
Proxy support
Functest needs internet access to download some resources for some test cases For example to install the Rallyenvironment This might not work properly if the Jumphost is running through a Proxy
If that is the case make sure the resolvconf and the needed proxy environment variables are properly set
export http_proxy=ltyour http proxy settingsgtexport https_proxy=ltyour https proxy settingsgt
Or refer to the official Docker documentation for Proxy settings
Before running prepare_envsh make sure you can ping http and https sites inside the container For example
nc -v googlecom 80Connection to googlecom 80 port [tcphttp] succeeded
nc -v googlecom 443Connection to googlecom 443 port [tcphttps] succeeded
532 Installing vswitchperf
Supported Operating Systems
bull CentOS 7
bull Fedora 20
bull Fedora 21
bull Fedora 22
bull Ubuntu 1404
Supported vSwitches
The vSwitch must support Open Flow 13 or greater
bull OVS (built from source)
bull OVS with DPDK (built from source)
56 Chapter 5 Post Configuration Activities
OPNFV Configuration Guide Release brahmaputra30 (605ebda)
Supported Hypervisors
bull Qemu version 23
Available VNFs
A simple VNF that forwards traffic through a VM using
bull DPDK testpmd
bull Linux Brigde
bull custom l2fwd module
The VM image can be downloaded from httpartifactsopnfvorgvswitchperfvloop-vnf-ubuntu-1404_20151216qcow2
Other Requirements
The test suite requires Python 33 and relies on a number of other packages These need to be installed for the testsuite to function
Installation of required packages preparation of Python 3 virtual environment and compilation of OVS DPDK andQEMU is performed by script systemsbuild_base_machinesh It should be executed under user account which willbe used for vsperf execution
Please Note Password-less sudo access must be configured for given user account before script is executed
Execution of installation script
$ cd systems$ build_base_machinesh
Please Note you donrsquot need to go into any of the systems subdirectories simply run the top levelbuild_base_machinesh your OS will be detected automatically
Script build_base_machinesh will install all the vsperf dependencies in terms of system packages Python 3x andrequired Python modules In case of CentOS 7 it will install Python 33 from an additional repository provided bySoftware Collections (a link) Installation script will also use virtualenv to create a vsperf virtual environment whichis isolated from the default Python environment This environment will reside in a directory called vsperfenv in$HOME
You will need to activate the virtual environment every time you start a new shell session Its activation is specific toyour OS
CentOS 7
$ scl enable python33 bash$ cd $HOMEvsperfenv$ source binactivate
Fedora and Ubuntu
$ cd $HOMEvsperfenv$ source binactivate
53 Additional testing and validation activities 57
OPNFV Configuration Guide Release brahmaputra30 (605ebda)
Working Behind a Proxy
If yoursquore behind a proxy yoursquoll likely want to configure this before running any of the above For example
export http_proxy=proxymycompanycom123export https_proxy=proxymycompanycom123
533 Yardstick
The projectrsquos goal is to verify infrastructure compliance from the perspective of a Virtual Network Function (VNF)
The Projectrsquos scope is the development of a test framework Yardstick test cases and test stimuli to enable NetworkFunction Virtualization Infrastructure (NFVI) verification
In OPNFV Brahmaputra release generic test cases covering aspects of the metrics in the document ETSI GS NFV-TST001 ldquoPre-deployment Testing Report on Validation of NFV Environments and Servicesrdquo are available furtherOPNFV releases will provide extended testing of these metrics
The Project also includes a sample VNF the Virtual Traffic Classifier (VTC) and its experimental frameworkApexLake
Yardstick is used in OPNFV for verifying the OPNFV infrastructure and some of the OPNFV features The Yardstickframework is deployed in several OPNFV community labs It is installer infrastructure and application independent
See also
This Presentation for an overview of Yardstick and Yardsticktst for material on alignment ETSI TST001 and Yardstick
Yardstick Installation
Abstract
Yardstick currently supports installation on Ubuntu 1404 or by using a Docker image Detailed steps about installingYardstick using both of these options can be found below
To use Yardstick you should have access to an OpenStack environment with at least Nova Neutron Glance Keystoneand Heat installed
The steps needed to run Yardstick are
1 Install Yardstick and create the test configuration yaml file
2 Build a guest image and load the image into the OpenStack environment
3 Create a Neutron external network and load OpenStack environment variables
4 Run the test case
Installing Yardstick on Ubuntu 1404
Installing Yardstick framework Install dependencies
sudo apt-get install python-virtualenv python-devsudo apt-get install libffi-dev libssl-dev git
Create a python virtual environment source it and update setuptools
58 Chapter 5 Post Configuration Activities
OPNFV Configuration Guide Release brahmaputra30 (605ebda)
virtualenv ~yardstick_venvsource ~yardstick_venvbinactivateeasy_install -U setuptools
Download source code and install python dependencies
git clone httpsgerritopnfvorggerrityardstickcd yardstickpython setuppy install
There is also a YouTube video showing the above steps
Installing extra tools
yardstick-plot Yardstick has an internal plotting tool yardstick-plot which can be installed using the follow-ing command
python setuppy develop easy_install yardstick[plot]
Building a guest image Yardstick has a tool for building an Ubuntu Cloud Server image containing all the requiredtools to run test cases supported by Yardstick It is necessary to have sudo rights to use this tool
This image can be built using the following command while in the directory where Yardstick is installed(~yardstick if the framework is installed by following the commands above)
sudo toolsyardstick-img-modify toolsubuntu-server-cloudimg-modifysh
Warning the script will create files by default in tmpworkspaceyardstick and the files will be owned byroot
The created image can be added to OpenStack using the glance image-create or via the OpenStack Dashboard
Example command
glance --os-image-api-version 1 image-create --name yardstick-trusty-server --is-public true --disk-format qcow2 --container-format bare --file tmpworkspaceyardstickyardstick-trusty-serverimg
Installing Yardstick using Docker
Yardstick has two Docker images first one (Yardstick-framework) serves as a replacement for installing the Yardstickframework in a virtual environment (for example as done in Installing Yardstick framework) while the other image ismostly for CI purposes (Yardstick-CI)
Yardstick-framework image Download the source code
git clone httpsgerritopnfvorggerrityardstick
Build the Docker image and tag it as yardstick-framework
cd yardstickdocker build -t yardstick-framework
Run the Docker instance
53 Additional testing and validation activities 59
OPNFV Configuration Guide Release brahmaputra30 (605ebda)
docker run --name yardstick_instance -i -t yardstick-framework
To build a guest image for Yardstick see Building a guest image
Yardstick-CI image Pull the Yardstick-CI Docker image from Docker hub
docker pull opnfvyardstick-ci
Run the Docker image
docker run --privileged=true --rm -t -e INSTALLER_TYPE=$INSTALLER_TYPE -e INSTALLER_IP=$INSTALLER_IP opnfvyardstick-ci run_benchmarks
Where $INSTALLER_TYPE can be fuel foreman or compass and $INSTALLER_IP is the installer masternode IP address (ie 102002 is default for fuel)
Basic steps performed by the Yardstick-CI container
1 clone yardstick and releng repos
2 setup OS credentials (releng scripts)
3 install yardstick and dependencies
4 build yardstick cloud image and upload it to glance
5 upload cirros-033 cloud image to glance
6 run yardstick test scenarios
7 cleanup
OpenStack parameters and credentials
Yardstick-flavor Most of the sample test cases in Yardstick are using an OpenStack flavor called yardstick-flavorwhich deviates from the OpenStack standard m1tiny flavor by the disk size - instead of 1GB it has 3GB Otherparameters are the same as in m1tiny
Environment variables Before running Yardstick it is necessary to export OpenStack environment vari-ables from the OpenStack openrc file (using the source command) and export the external network nameexport EXTERNAL_NETWORK=external-network-name the default name for the external network isnet04_ext
Credential environment variables in the openrc file have to include at least
bull OS_AUTH_URL
bull OS_USERNAME
bull OS_PASSWORD
bull OS_TENANT_NAME
60 Chapter 5 Post Configuration Activities
OPNFV Configuration Guide Release brahmaputra30 (605ebda)
Yardstick default key pair Yardstick uses a SSH key pair to connect to the guest image This key pair can be foundin the resourcesfiles directory To run the ping-hotyaml test sample this key pair needs to be importedto the OpenStack environment
Examples and verifying the install
It is recommended to verify that Yardstick was installed successfully by executing some simple commands and testsamples Below is an example invocation of yardstick help command and pingpy test sample
yardstick -hyardstick task start samplespingyaml
Each testing tool supported by Yardstick has a sample configuration file These configuration files can be found in thesamples directory
Example invocation of yardstick-plot tool
yardstick-plot -i tmpyardstickout -o tmpplots
Default location for the output is tmpyardstickout
More info about the tool can be found by executing
yardstick-plot -h
53 Additional testing and validation activities 61

CHAPTER
THREE
INSTALLER CONFIGURATION
Installing the OPNFV platform requires either a physical environment as defined in the Pharos lab specificationor a virtual infrastructure When configuring a physical infrastructure it is strongly advised to follow the Pharosconfiguration material
31 Lab Setup Guide
Provides an overview for setting up a Pharos lab A full set of pharos_master documents are maintained in the pharosrepo
When setting up an OPNFV community lab
bull Provide the Pharos community with details of the intended setup including
ndash Overview of resources are being offered to the community intended purpose and known limitations
ndash Lab owner name with contacts
ndash Timelines for availablity for development test release production
bull Update the Pharos Wiki with lab details
ndash Lab map organization contacts status location resources role etc
ndash httpswikiopnfvorgpharoscommunity_labs
ndash pharos_wiki
bull Update the Pharos project information file ldquoCurrent Labsrdquo
ndash pharos_information
bull Create new Wiki pages for lab and POD specific information
ndash Access procedures
ndash Usage guidelines for developers
ndash Update infomtation as PODs are re-assigned or usageavailability changes
bull Fill Lab and POD templates pharos_lab pharos_pod
ndash Note that security sensitive lab information should be stored in the secure Pharos repo
bull Connect PODs to JenkinsCI
7
OPNFV Configuration Guide Release brahmaputra30 (605ebda)
311 Jump Server Configuration
Jump server install procedures are maintained by each installer project Addional Jump server configuraton BKMswill be maintained here The below install information was used for Fuel however may be outdated (please refer toFuel Installer documents)
Procedure
1 Obtain CentOS 7 Minimal ISO and install
wget httpmirrorskernelorgcentos7isosx86_64CentOS-7-x86_64-Minimal-1503-01iso
2 Set parameters appropriate for your environment during installation
3 Disable NetworkManager
systemctl disable NetworkManager
4 Configure your etcsysconfignetwork-scriptsifcfg- files for your network
5 Restart networking
service network restart
6 Edit etcresolvconf and add a nameserver
vi etcresolvconf
7 Install libvirt amp kvm
yum -y update yum -y install kvm qemu-kvm libvirt systemctl enablelibvirtd
8 Reboot
shutdown -r now
9 If you wish to avoid annoying delay when use ssh to log in disable DNS lookups
vi etcsshsshd_config
Uncomment ldquoUseDNS yesrdquo change lsquoyesrsquo to lsquonorsquo
Save
10 Restart sshd
systemctl restart sshd
11 Install virt-install
yum -y install virt-install
12 Visit artifactsopnfvorg and DL the OPNFV Fuel ISO
13 Create a bridge using the interface on the PXE network for example br0
14 Make a directory owned by qemu
mkdir homeqemu mkdir -p homeqemuVMsfuel-60disk
chown -R qemuqemu homeqemu
15 Copy the ISO to homeqemu
cd homeqemu
virt-install -n opnfv-2015-05-22_18-34-07-fuel -r 4096--vcpus=4 --cpuset=0-3 -c opnfv-2015-05-22_18-34-07iso
8 Chapter 3 Installer Configuration
OPNFV Configuration Guide Release brahmaputra30 (605ebda)
--os-type=linux --os-variant=rhel6 --boot hdcdrom --diskpath=homeqemuVMsmirantis-fuel-60diskfuel-vhd0qcow2bus=virtiosize=50format=qcow2-w bridge=br0model=virtio --graphics vnclisten=0000
16 Temporarily flush the firewall rules to make things easier
iptables -F
17 Connect to the console of the installing VM with your favorite VNC client
18 Change the IP settings to match the pod use an IP in the PXEAdmin network for the Fuel Master
The following sections describe the per installer configuration options Further details for each installer are capturedin the referred project documentation
32 Apex configuration
321 Introduction
This document describes the steps to install an OPNFV Bramaputra reference platform as defined by the GenesisProject using the Apex installer
The audience is assumed to have a good background in networking and Linux administration
322 Preface
Apex uses the RDO Manager Open Source project as a server provisioning tool RDO Manager is the RDO Projectimplementation of OpenStackrsquos Triple-O project The Triple-O image based life cycle installation tool provisions anOPNFV Target System (3 controllers n number of compute nodes) with OPNFV specific configuration provided bythe Apex deployment tool chain
The Apex deployment artifacts contain the necessary tools to deploy and configure an OPNFV target sys-tem using the Apex deployment toolchain These artifacts offer the choice of using the Apex bootable ISO(opnfv-apex-bramaputraiso) to both install CentOS 7 and the nessesary materials to deploy or the ApexRPM (opnfv-apexrpm) which expects installation to a CentOS 7 libvirt enabled host The RPM contains acollection of configuration file prebuilt disk images and the automatic deployment script (opnfv-deploy)
An OPNFV install requires a ldquoJumphostrdquo in order to operate The bootable ISO will allow you to install a cus-tomized CentOS 7 release to the Jumphost which includes the required packages needed to run opnfv-deployIf you already have a Jumphost with CentOS 7 installed you may choose to skip the ISO step and simply installthe (opnfv-apexrpm) RPM The RPM is the same RPM included in the ISO and includes all the necessary diskimages and configuration files to execute an OPNFV deployment Either method will prepare a host to the same readystate for OPNFV deployment
opnfv-deploy instantiates an RDO Manager Instack VM server using libvirt as its provider This VM is thenconfigured and used to provision the OPNFV target deployment (3 controllers n compute nodes) These nodes can beeither virtual or bare metal This guide contains instructions for installing either method
323 Installation High-Level Overview - Bare Metal Deployment
The setup presumes that you have 6 bare metal servers and have already setup network connectivity on at least 2interfaces for all servers via a TOR switch or other network implementation
32 Apex configuration 9
OPNFV Configuration Guide Release brahmaputra30 (605ebda)
The physical TOR switches are not automatically configured from the OPNFV reference platform All the networksinvolved in the OPNFV infrastructure as well as the provider networks and the private tenant VLANs needs to bemanually configured
The Jumphost can be installed using the bootable ISO or by other means including the (opnfv-apex) RPMs andvirtualization capabilities The Jumphost should then be configured with an IP gateway on its admin or public interfaceand configured with a working DNS server The Jumphost should also have routable access to the lights out network
opnfv-deploy is then executed in order to deploy the Instack VM opnfv-deploy uses three con-figuration files in order to know how to install and provision the OPNFV target system The in-formation gathered under section Execution Requirements (Bare Metal Only) is put into the YAML file(etcopnfv-apexinventoryyaml) configuration file Deployment options are put into the YAML file(etcopnfv-apexdeploy_settingsyaml) Networking definitions gathered under section Network Re-quirements are put into the YAML file (etcopnfv-apexnetwork_settingsyaml) opnfv-deploywill boot the Instack VM and load the target deployment configuration into the provisioning toolchain This includesMAC address IPMI Networking Environment and OPNFV deployment options
Once configuration is loaded and Instack is configured it will then reboot the nodes via IPMI The nodes should alreadybe set to PXE boot first off the admin interface The nodes will first PXE off of the Instack PXE server and go througha discoveryintrospection process
Introspection boots off of custom introspection PXE images These images are designed to look at the properties ofthe hardware that is booting off of them and report the properties of it back to the Instack node
After introspection Instack will execute a Heat Stack Deployment to being node provisioning and configuration Thenodes will reboot and PXE again off the Instack PXE server to provision each node using the Glance disk images pro-vided by Instack These disk images include all the necessary packages and configuration for an OPNFV deploymentto execute Once the nodersquos disk images have been written to disk the nodes will boot off the newly written disks andexecute cloud-init which will execute the final node configuration This configuration is largly completed by executinga puppet apply on each node
324 Installation High-Level Overview - VM Deployment
The VM nodes deployment operates almost the same way as the bare metal deployment with a few differencesopnfv-deploy still deploys an Instack VM In addition to the Instack VM a collection of VMs (3 control nodes +2 compute for an HA deployment or 1 control node and 1 compute node for a Non-HA Deployment) will be definedfor the target OPNFV deployment The part of the toolchain that executes IPMI power instructions calls into libvirtinstead of the IPMI interfaces on baremetal servers to operate the power managment These VMs are then provisionedwith the same disk images and configuration that baremetal would be
To RDO Manager these nodes look like they have just built and registered the same way as bare metal nodes the maindifference is the use of a libvirt driver for the power management
325 Installation Guide - Bare Metal Deployment
WARNING Baremetal documentation is not complete WARNING The main missing instructions are r elatedto bridging the networking for the undercloud to the physical underlay network for the overcloud to be deployedto
This section goes step-by-step on how to correctly install and provision the OPNFV target system to bare metal nodes
Install Bare Metal Jumphost
1a If your Jumphost does not have CentOS 7 already on it or you would like to do a fresh install then down-load the Apex bootable ISO from OPNFV artifacts lthttpartifactsopnfvorggt There have been isolated
10 Chapter 3 Installer Configuration
OPNFV Configuration Guide Release brahmaputra30 (605ebda)
reports of problems with the ISO having trouble completing installation successfully In the unexpectedevent the ISO does not work please workaround this by downloading the CentOS 7 DVD and perform-ing a ldquoVirtualization Hostrdquo install If you perform a ldquoMinimal Installrdquo or install type other than ldquoVirtu-alization Hostrdquo simply run sudo yum groupinstall Virtualization Host ampamp chkconfiglibvird on and reboot the host Once you have completed the base CentOS install proceed to step 1b
1b If your Jump host already has CentOS 7 with libvirt running on it then install the opnfv-apex RPMs fromOPNFV artifacts lthttpartifactsopnfvorggt The following RPMS are available for installation
bull opnfv-apex - OpenDaylight L2 L3 and ONOS support
bull opnfv-apex-opendaylight-sfc - OpenDaylight SFC support
bull opnfv-apex-undercloud (required)
bull opnfv-apex-common (required)
One or more of these RPMs is required If you only want the experimental SFC support then the opnfv-apexRPM is not required If you only want OpenDaylight or ONOS support then the opnfv-apex-opendaylight-sfcRPM is not required
To install these RPMs download them to the local disk on your CentOS 7 install and passthe file names directly to yum sudo yum install opnfv-apex-ltversiongtrpmopnfv-apex-undercloud-ltversiongtrpm opnfv-apex-common-ltversiongtrpm
2a Boot the ISO off of a USB or other installation media and walk through installing OPNFV CentOS 7 TheISO comes prepared to be written directly to a USB drive with dd as such
dd if=opnfv-apexiso of=devsdX bs=4M
Replace devsdX with the device assigned to your usb drive Then select the USB device as the boot media onyour Jumphost
2b Install the RDO Release RPM and the opnfv-apex RPM
sudo yum install -y httpswwwrdoprojectorgreposrdo-releaserpmopnfv-apex-versionrpm
The RDO Project release repository is needed to install OpenVSwitch which is a dependency of opnfv-apex If you do not have external connectivity to use this repository you need to download the Open-VSwitch RPM from the RDO Project repositories and install it with the opnfv-apex RPM
3 After the operating system and the opnfv-apex RPMs are installed login to your Jumphost as root
4 Configure IP addresses on the interfaces that you have selected as your networks
5 Configure the IP gateway to the Internet either preferably on the public interface
6 Configure your etcresolvconf to point to a DNS server (8888 is provided by Google)
Creating a Node Inventory File
IPMI configuration information gathered in section Execution Requirements (Bare Metal Only) needs to be added tothe inventoryyaml file
1 Copy usrsharedocopnfvinventoryyamlexample as your inventory file template toetcopnfv-apexinventoryyaml
2 The nodes dictionary contains a definition block for each baremetal host that will be deployed 1 or morecompute nodes and 3 controller nodes are required (The example file contains blocks for each of these already)It is optional at this point to add more compute nodes into the node list
3 Edit the following values for each node
32 Apex configuration 11
OPNFV Configuration Guide Release brahmaputra30 (605ebda)
bull mac_address MAC of the interface that will PXE boot from Instack
bull ipmi_ip IPMI IP Address
bull ipmi_user IPMI username
bull ipmi_password IPMI password
bull pm_type Power Management driver to use for the node
bull cpus (Introspected) CPU cores available
bull memory (Introspected) Memory available in Mib
bull disk (Introspected) Disk space available in Gb
bull arch (Introspected) System architecture
bull capabilities (Optional) Intended node role (profilecontrol or profilecompute)
bull Introspection looks up the overcloud nodersquos resources and overrides these value You can
leave default values and Apex will get the correct values when it runs introspection on the nodes
If capabilities profile is not specified then Apex will select nodersquos roles in the OPNFV cluster in a non-deterministicfashion
Creating the Settings Files
Edit the 2 settings files in etcopnfv-apex These files have comments to help you customize them
1 deploy_settingsyaml This file includes basic configuration options deployment
2 network_settingsyaml This file provides Apex with the networking information that satisfies the prerequisiteNetwork Requirements These are specific to your environment
Running opnfv-deploy
You are now ready to deploy OPNFV using Apex opnfv-deploy will use the inventory and settings files to deployOPNFV
Follow the steps below to execute
1 Execute opnfv-deploy sudo opnfv-deploy [ --flat | -n network_settingsyaml ] -iinventoryyaml -d deploy_settingsyaml If you need more information about the options thatcan be passed to opnfv-deploy use opnfv-deploy --help ndashflat will collapse all networks onto a singlenic -n network_settingsyaml allows you to customize your networking topology
2 Wait while deployment is executed If something goes wrong during this part of the process it is most likelya problem with the setup of your network or the information in your configuration files You will also noticedifferent outputs in your shell
3 The message ldquoOvercloud Deployedrdquo will display when When the deployment is complete Just above thismessage there will be a URL that ends in port httplthostgt5000 This url is also the endpoint for the OPNFVHorizon Dashboard if connected to on port 80
33 Compass4nfv configuration
This document describes providing guidelines on how to install and configure the Brahmaputra release of OPNFVwhen using Compass as a deployment tool including required software and hardware configurations
12 Chapter 3 Installer Configuration
OPNFV Configuration Guide Release brahmaputra30 (605ebda)
Installation and configuration of host OS OpenStack OpenDaylight ONOS Ceph etc can be supported by Compasson VMs or Bare Metal nodes
The audience of this document is assumed to have good knowledge in networking and UnixLinux administration
331 Preconditions
Before starting the installation of the Brahmaputra release of OPNFV some planning must be done
Retrieving the installation ISO image
First of all The installation ISO is needed for deploying your OPNFV environment it included packages of CompassOpenStack OpenDaylight ONOS and so on
The stable release ISO can be retrieved via OPNFV software download page
The daily build ISO can be retrieved via OPNFV artifacts repository
httpartifactsopnfvorg
NOTE Search the keyword ldquoCompass4nfvBrahmaputrardquo to locate the ISO image
Eg compass4nfvbrahmaputraopnfv-2016-01-16_15-03-18iso compass4nfvbrahmaputraopnfv-2016-01-16_15-03-18properties
The name of iso image includes the time of iso building you can get the daily ISO according the building time The giturl and sha1 of Compass4nfv are recorded in properties files According these the corresponding deployment scriptscan be retrieved
Getting the deployment scripts
To retrieve the repository of Compass4nfv on Jumphost use the following command
bull git clone httpsgerritopnfvorggerritcompass4nfv
To get stablebrahmaputra release you can use the following command
bull git checkout brahmaputra10
NOTE PLEASE DO NOT GIT CLONE COMPASS4NFV IN root DIRECTORY
If you donrsquot have a Linux foundation user id get it first by the url
httpswikiopnfvorgdevelopergetting_started
If you want to use a daily release ISO please checkout the corresponding sha1 to get the deployment scripts
Eg Git sha1 in file ldquoopnfv-2016-01-16_15-03-18propertiesrdquo is d5a13ce7cc2ce89946d34b0402ecf33c1d291851
bull git checkout d5a13ce7cc2ce89946d34b0402ecf33c1d291851
Preparing the installation environment
If you have only 1 Bare Metal server Virtual deployment is recommended if more than or equal 3 servers theBare Metal deployment is recommended The minimum number of servers for Bare metal deployment is 3 1 forJumpServer(Jumphost) 1 for controller 1 for compute
33 Compass4nfv configuration 13
OPNFV Configuration Guide Release brahmaputra30 (605ebda)
332 Setup Requirements
Jumphost Requirements
The Jumphost requirements are outlined below
1 Ubuntu 1404 (Pre-installed)
2 Root access
3 libvirt virtualization support
4 Minimum 2 NICs
bull PXE installation Network (Receiving PXE request from nodes and providing OS provisioning)
bull IPMI Network (Nodes power control and set boot PXE first via IPMI interface)
bull External Network (Optional Internet access)
5 16 GB of RAM for a Bare Metal deployment 64 GB of RAM for a VM deployment
6 Minimum 100G storage
Bare Metal Node Requirements
Bare Metal nodes require
1 IPMI enabled on OOB interface for power control
2 BIOS boot priority should be PXE first then local hard disk
3 Minimum 3 NICs
bull PXE installation Network (Broadcasting PXE request)
bull IPMI Network (Receiving IPMI command from Jumphost)
bull External Network (OpenStack mgmtexternalstoragetenant network)
Network Requirements
Network requirements include
1 No DHCP or TFTP server running on networks used by OPNFV
2 2-6 separate networks with connectivity between Jumphost and nodes
bull PXE installation Network
bull IPMI Network
bull Openstack mgmt Network
bull Openstack external Network
bull Openstack tenant Network
bull Openstack storage Network
3 Lights out OOB network access from Jumphost with IPMI node enabled (Bare Metal deployment only)
4 External network has Internet access meaning a gateway and DNS availability
14 Chapter 3 Installer Configuration
OPNFV Configuration Guide Release brahmaputra30 (605ebda)
The networks with() can be share one NIC(Default configuration) or use an exclusive NIC(Reconfigurated innetworkyml)
Execution Requirements (Bare Metal Only)
In order to execute a deployment one must gather the following information
1 IPMI IP addresses for the nodes
2 IPMI login information for the nodes (userpass)
3 MAC address of Control Plane Provisioning interfaces of the Bare Metal nodes
333 Installation Guide (BM Deployment)
Nodes Configuration (BM Deployment)
The bellow file is the inventory template of deployment nodes
ldquocompass4nfvdeployconfhardware_environmenthuawei_us_labpod1dhaymlrdquo
You can write your own IPMI IPUserPasswordMac addressroles reference to it
bull ipmiVer ndash IPMI interface version for deployment node support IPMI 10 or IPMI 20 is available
bull ipmiIP ndash IPMI IP address for deployment node Make sure it can access from Jumphost
bull ipmiUser ndash IPMI Username for deployment node
bull ipmiPass ndash IPMI Password for deployment node
bull mac ndash MAC Address of deployment node PXE NIC
bull name ndash Host name for deployment node after installation
bull roles ndash Components deployed
Assignment of different roles to servers
Eg Openstack only deployment roles setting
hosts- name host1roles
- controller- ha
- name host2roles
- compute
NOTE IF YOU SELECT MUTIPLE NODES AS CONTROLLER THE lsquoharsquo role MUST BE SELECT TOO
Eg Openstack and ceph deployment roles setting
hosts- name host1roles
- controller- ha- ceph-adm- ceph-mon
33 Compass4nfv configuration 15
OPNFV Configuration Guide Release brahmaputra30 (605ebda)
- name host2roles
- compute- ceph-osd
Eg Openstack and ODL deployment roles setting
hosts- name host1roles
- controller- ha- odl
- name host2roles
- compute
Eg Openstack and ONOS deployment roles setting
hosts- name host1roles
- controller- ha- onos
- name host2roles
- compute
Network Configuration (BM Deployment)
Before deployment there are some network configuration to be checked based on your network topology Com-pass4nfv network default configuration file is ldquocompass4nfvdeployconfnetwork_cfgyamlrdquo You can write yourown reference to it
The following figure shows the default network configuration
+--+ +--+ +--+| | | | | || | +------------+ | | | || +------+ Jumphost +------+ | | || | +------+-----+ | | | || | | | | | || | +------------+ +-----+ || | | | | || | +------------+ | | | || +------+ host1 +------+ | | || | +------+-----+ | | | || | | | | | || | +------------+ +-----+ || | | | | || | +------------+ | | | || +------+ host2 +------+ | | || | +------+-----+ | | | || | | | | | |
16 Chapter 3 Installer Configuration
OPNFV Configuration Guide Release brahmaputra30 (605ebda)
| | +------------+ +-----+ || | | | | || | +------------+ | | | || +------+ host3 +------+ | | || | +------+-----+ | | | || | | | | | || | +------------+ +-----+ || | | | | || | | | | |+-++ ++-+ +-++
^ ^ ^| | || | |
+-+-------------------------+ | || External Network | | |+---------------------------+ | |
+-----------------------+---+ || IPMI Network | |+---------------------------+ |
+-------------------------+-+| PXE(Installation) Network |+---------------------------+
Start Deployment (BM Deployment)
1 Set PXEInstallation NIC for Jumphost (set eth1 Eg)
export INSTALL_NIC=eth1
2 Set OS version for nodes provisioning (set Ubuntu1404 Eg)
export OS_VERSION=trusty
3 Set OpenStack version for deployment nodes (set liberty Eg)
export OPENSTACK_VERSION=liberty
4 Set ISO image that you want to deploy
export ISO_URL=file$YOUR_OWNcompassisoorexport ISO_URL=httpartifactsopnfvorgcompass4nfvbrahmaputraopnfv-releaseiso
5 Run deploysh with inventory and network configuration
deploysh --dha $YOUR_OWNdhayml --network $YOUR_OWNnetworkyml
34 Fuel configuration
This section provides guidelines on how to install and configure the Brahmaputra release of OPNFV when using Fuelas a deployment tool including required software and hardware configurations
For detailed instructions on how to install the Brahmaputra release using Fuel see Reference 13 in section ldquoFuelassociated referencesrdquo below
34 Fuel configuration 17
OPNFV Configuration Guide Release brahmaputra30 (605ebda)
341 Pre-configuration activities
Planning the deployment
Before starting the installation of the Brahmaputra release of OPNFV when using Fuel as a deployment tool someplanning must be done
Familiarize yourself with the Fuel by reading the following documents
bull Fuel planning guide please see Reference 8 in section ldquoFuel associated referencesrdquo below
bull Fuel quick start guide please see Reference 9 in section ldquoFuel associated referencesrdquo below
bull Fuel operations guide please see Reference 10 in section ldquoFuel associated referencesrdquo below
bull Fuel Plugin Developers Guide please see Reference 11 in section ldquoFuel associated referencesrdquo below
Before the installation can start a number of deployment specific parameters must be collected those are
1 Provider sub-net and gateway information
2 Provider VLAN information
3 Provider DNS addresses
4 Provider NTP addresses
5 Network overlay you plan to deploy (VLAN VXLAN FLAT)
6 Monitoring Options you want to deploy (Ceilometer Syslog etc)
7 How many nodes and what roles you want to deploy (Controllers Storage Computes)
8 Other options not covered in the document are available in the links above
Retrieving the ISO image
First of all the Fuel deployment ISO image needs to be retrieved the Fuel iso image of the Brahmaputra release canbe found at Reference 2
Alternatively you may build the iso from source by cloning the opnfvfuel git repository Detailed instructions onhow to build a Fuel OPNFV iso can be found in Reference 14 at section ldquoFuel associated referencesrdquo below
342 Hardware requirements
Following high level hardware requirements must be met
18 Chapter 3 Installer Configuration
OPNFV Configuration Guide Release brahmaputra30 (605ebda)
HW Aspect Requirement of nodes Minimum 5 (3 for non redundant deployment)
bull 1 Fuel deployment master (may be virtualized)bull 3(1) Controllers (1 colocated mongoceilometer
role 2 Ceph-OSD roles)bull 1 Compute (1 co-located Ceph-OSD role)
CPU Minimum 1 socket x86_AMD64 with Virtualizationsupport
RAM Minimum 16GBserver (Depending on VNF work load)Disk Minimum 256GB 10kRPM spinning disksNetworks 4 Tagged VLANs (PUBLIC MGMT STORAGE PRI-
VATE)1 Un-Tagged VLAN for PXE Boot - ADMIN Networknote These can be run on single NIC - or spread outover other nics as your hardware supports
For information on compatible hardware types available for use please see Reference 11 in section ldquoFuel associatedreferencesrdquo below
Top of the rack (TOR) Configuration requirements
The switching infrastructure provides connectivity for the OPNFV infrastructure operations tenant networks(EastWest) and provider connectivity (NorthSouth) it also provides needed connectivity for the Storage Area Net-work (SAN) To avoid traffic congestion it is strongly suggested that three physically separated networks are usedthat is 1 physical network for administration and control one physical network for tenant private and public networksand one physical network for SAN The switching connectivity can (but does not need to) be fully redundant in suchcase it and comprises a redundant 10GE switch pair for each of the three physically separated networks
The physical TOR switches are not automatically configured from the OPNFV reference platform All the networksinvolved in the OPNFV infrastructure as well as the provider networks and the private tenant VLANs needs to bemanually configured
343 Jumphost configuration
The Jumphost server also known as the ldquoFuel masterrdquo provides needed servicesfunctions to deploy an OP-NFVOpenStack cluster as well functions for cluster life-cycle management (extensions repair actions and upgrades)
The Jumphost server requires 2 (4 if redundancy is required) Ethernet interfaces - one for external management of theOPNFV installation and another for jump-host communication with the OPNFV cluster
Install the Fuel jump-host
Mount the Fuel Brahmaputra ISO file as a boot device to the jump host server reboot it and install the Fuel Jumphostin accordance with installation instructions see Reference 13 in section ldquoFuel associated referencesrdquo below
344 Platform components configuration
Fuel-Plugins
Fuel plugins enable you to install and configure additional capabilities for your Fuel OPNFV based cloud such asadditional storage types networking functionality or NFV features developed by OPNFV
34 Fuel configuration 19
OPNFV Configuration Guide Release brahmaputra30 (605ebda)
Fuel offers an open source framework for creating these plugins so therersquos a wide range of capabilities that you canenable Fuel to add to your OpenStack clouds
The OPNFV Brahmaputra version of Fuel provides a set of pre-packaged plugins developed by OPNFV
Pluginname
Short description
Open-Daylight
OpenDaylight provides an open-source SDN Controller providing networking features such as L2and L3 network control ldquoService Function Chainingrdquo routing networking policies etc Moreinformation on OpenDaylight in the OPNFV Brahmaputra release can be found in a separate sectionin this document
ONOS ONOS is another open-source SDN controller which in essense fill the same role as OpenDaylightMore information on ONOS in the OPNFV Brahmaputra release can be found in a separate section inthis document
BGP-VPN
BGP-VPN provides an BGPMPLS VPN service More information on BGP-VPN in the OPNFVBrahmaputra release can be found in a separate section in this document
OVS-NSH
OVS-NSH provides a variant of Open-vSwitch which supports ldquoNetwork Service Headersrdquo neededfor the ldquoService function chainingrdquo feature More information on ldquoService Function Chainingrdquo in theOPNFV Brahmaputra release can be found in a in a separate section in this document
OVS-NFV
OVS-NFV provides a variant of Open-vSwitch with carrier grade characteristics essential for NFVworkloads More information on OVS-NFV in the OPNFV Brahmaputra release can be found in a ina separate section in this document
KVM-NFV
KVM-NFV provides a variant of KVM with improved virtualization characteristics essential for NFVworkloads More information on KVM-NFV in the OPNFV Brahmaputra release can be found in a ina separate section in this document
VSPERF VSPERF provides a networking characteristics test bench that facilitates characteristicsperformanceevaluation of vSwithches More information on VSPERF in the OPNFV Brahmaputra release can befound in a in a separate section in this document
Additional third-party plugins can be found here httpswwwmirantiscomproductsopenstack-drivers-and-pluginsfuel-plugins Note Plugins are not necessarilly compatible with each other see section ldquoConfigurationoptions OPNFV scenariosrdquo for compatibility information
The plugins come prepackaged ready to install To do so follow the installation instructions provided in Reference 13provided in section ldquoFuel associated referencesrdquo below
Fuel environment
A Fuel environment is an OpenStack instance managed by Fuel one Fuel instance can manage several OpenStackinstancesenvironments with different configurations etc
To create a Fuel instance follow the instructions provided in the installation instructions see Reference 13 in sectionldquoFuel associated referencesrdquo below
Provisioning of aditional features and services
Although the plugins have already previously been installed they are not per default enabled for the environment wejust created The plugins of your choice need to be enabled and configured
To enable a plugin follow the installation instructions found in Reference 13 provided in section ldquoFuel associatedreferencesrdquo below
For configuration of the plugins please see section ldquoFeature Configurationrdquo
20 Chapter 3 Installer Configuration
OPNFV Configuration Guide Release brahmaputra30 (605ebda)
Networking
All the networking aspects need to be configured in terms of - InterfacesNICs - VLANs - Sub-nets - Gateways - Usernetwork segmentation (VLANVXLAN) - DNS - NTP - etc
For guidelines on how to configure networking please refer to the installation instructions found in Reference 13provided in section ldquoFuel associated referencesrdquo below
Node allocation
Now it is time to allocate the nodes in your OPNFV cluster to OpenStack- SDN- and other featureservice rolesSome roles may require redundancy while others donrsquot Some roles may be co-located with other roles while othersmay not The Fuel GUI will guide you in the allocation of roles and will not permit you to perform invalid allocations
For detailed guide-lines on node allocation please refer to the installation instructions found in Reference 13 providedin section ldquoFuel associated referencesrdquo below
Off-line deployment
The OPNFV Brahmaputra version of Fuel can be deployed using on-line upstream repositories (default) or off-lineusing built-in local repositories on the Fuel jump-start server
For instructions on how to configure Fuel for off-line deployment please refer to the installation instructions found inReference 13 provided in section ldquoFuel associated referencesrdquo below
Deployment
You should now be ready to deploy your OPNFV Brahmaputra environment - but before doing so you may want toverify your network settings
For further details on network verification and deployment please refer to the installation instructions found in Ref-erence 13 provided in section ldquoFuel associated referencesrdquo below
345 Fuel associated references
1 OPNFV Home Page
2 OPNFV documentation- and software downloads
3 OpenStack Liberty Release artifacts
4 OpenStack documentation
5 OpenDaylight artifacts
6 The Fuel OpenStack project
7 Fuel documentation overview
8 Fuel planning guide
9 Fuel quick start guide
10 Fuel operations guide
11 Fuel Plugin Developers Guide
12 Fuel OpenStack Hardware Compatibility List
34 Fuel configuration 21
OPNFV Configuration Guide Release brahmaputra30 (605ebda)
13 OPNFV Installation instruction for the Brahmaputra release of OPNFV when using Fuel as a deployment tool
14 OPNFV Build instruction for the Brahmaputra release of OPNFV when using Fuel as a deployment tool
15 OPNFV Release Note for the Brahmaputra release of OPNFV when using Fuel as a deployment tool
35 JOID Configuration
351 Bare Metal Installations
352 Requirements as per Pharos
353 Networking
Minimum 2 networks
1 First for Admin network with gateway to access external network
2 Second for public network to consume by tenants for floating ips
NOTE JOID support multiple isolated networks for data as well as storage Based on your network optionsfor Openstack
Minimum 6 physical servers
1 Jump host server
Minimum HW Spec needed
CPU cores 16
Memory 32 GB
Hard Disk 1(250 GB)
NIC eth0(Admin Management) eth1 (external network)
2 Control node servers (minimum 3)
Minimum HW Spec
CPU cores 16
Memory 32 GB
Hard Disk 1(500 GB)
NIC eth0(Admin Management) eth1 (external network)
3 Compute node servers (minimum 2)
Minimum HW Spec
CPU cores 16
Memory 32 GB
Hard Disk 1(1 TB) this includes the space for ceph as well
22 Chapter 3 Installer Configuration
OPNFV Configuration Guide Release brahmaputra30 (605ebda)
NIC eth0(Admin Management) eth1 (external network)
NOTE Above configuration is minimum and for better performance and usage of the Openstack please con-sider higher spec for each nodes
Make sure all servers are connected to top of rack switch and configured accord-ingly No DHCP server should be up and configured Only gateway at eth0 and eth1 network should be con-figure to access the network outside your lab
Jump node configuration
1 Install Ubuntu 1404 LTS server version of OS on the nodes 2 Install the git and bridge-utils pack-ages on the server and configure minimum two bridges on jump host
brAdm and brPublic cat etcnetworkinterfaces
The loopback network interface
auto lo
iface lo inet loopback
iface eth0 inet manual
auto brAdm
iface brAdm inet static
address 10411
netmask 2552552480
network 10400
broadcast 1047255
gateway 10401
dns- options are implemented by the resolvconf package if installed
dns-nameservers 10402
bridge_ports eth0
auto brPublic
iface brPublic inet static
address 102662
netmask 2552552550
bridge_ports eth2
NOTE If you choose to use the separate network for management data and storage then you need to createbridge for each interface In case of VLAN tags use the appropriate network on jump-host depend upon VLANID on the interface
354 Configure JOID for your lab
Get the joid code from gerritt
git clone httpsgerritopnfvorggerritpjoidgit
cd joidci
Enable MAAS
35 JOID Configuration 23
OPNFV Configuration Guide Release brahmaputra30 (605ebda)
bull Create a directory in maasltcompany namegtltpod numbergt for example
mkdir maasintelpod7
bull Copy files from pod5 to pod7
cp maasintelpod5 maasintelpod7
4 files will get copied deploymentyaml environmentsyaml interfaceshost lxc-add-more-interfaces
355 deploymentyaml file
Prerequisite
1 Make sure Jump host node has been configured with bridges on each interface so that appropriate MAAS and JUJUbootstrap VM can be created For example if you have three network admin data and public then I would suggestto give names like brAdm brData and brPublic 2 You have information about the node MAC address and powermanagement details (IPMI IP username password) of the nodes used for control and compute node
356 modify deploymentyaml
This file has been used to configure your maas and bootstrap node in a VM Comments in the file are self explanatoryand we expect fill up the information according to match lab infrastructure information Sample deploymentyaml canbe found at httpsgerritopnfvorggerritgitwebp=joidgita=blobf=cimaasintelpod5deploymentyaml
modify joidci01-deploybundlesh
under section case $3 add the intelpod7 section and make sure you have information provided correctly Beforeexample consider your network has 1921681024 your default network and eth1 is on public network which will beused to assign the floating ip
rsquointelpod7rsquo )
As per your lab vip address list be deafult uses 104111 - 104120
sed -i -- rsquos1041119216812grsquo bundlesyaml
Choose the external port to go out from gateway to use
sed -i -- rsquos ext-port eth1 ext-port eth1grsquo bundlesyaml
NOTE If you are using seprate data network then add this line below also along with other changes which representsnetwork 1049024 will be used for data network for openstack
sed -i -- rsquosos-data-network 1048021os-data-network 1049024grsquo bundlesyaml
modify joidci02-maasdeploysh
under section case $1 add the intelpod7 section and make sure you have information provided correctly
24 Chapter 3 Installer Configuration
OPNFV Configuration Guide Release brahmaputra30 (605ebda)
rsquointelpod7rsquo )
cp maasintelpod7deploymentyaml deploymentyaml
NOTE If you are using VLAN tags or more network for data and storage then make sure you modify the case $1section under Enable vlan interface with maas appropriately In the example below eth2 has been used as separate datanetwork for tenants in openstack with network 1049024 on compute and control nodes
rsquointelpod7rsquo )
maas refresh
enableautomodebyname eth2 AUTO 1049024 compute || true
enableautomodebyname eth2 AUTO 1049024 control || true
MAAS Install
After integrating the changes as mentioned above run the MAAS install Suppose you name the integration lab asintelpod7 then run the below commands to start the MAAS deployment
02-maasdeploysh intelpod7
This will take approximately 40 minutes to couple hours depending on your environment This script will do thefollowing
1 Create 2 VMs (KVM)
2 Install MAAS in one of the VMs
3 Configure the MAAS to enlist and commission a VM for Juju bootstrap node
4 Configure the MAAS to enlist and commission bare metal servers
When itrsquos done you should be able to view MAAS webpage (httpltMAAS IPgtMAAS) and see 1 bootstrap nodeand bare metal servers in the lsquoReadyrsquo state on the nodes page
Virtual deployment
By default just running the script 02-maasdeploysh will automatically create the KVM VMs on a single machineand configure everything for you
OPNFV Install
JOID allows you to deploy different combinations of OpenStack release and SDN solution in HA or non-HA mode
For OpenStack it supports Juno and Liberty For SDN it supports Openvswitch OpenContrail OpenDayLight andONOS
In addition to HA or non-HA mode it also supports to deploy the latest from the development tree (tip)
The deploysh in the joidci directoy will do all the work for you For example the following deploy OpenStack Liberywith OpenDayLight in a HA mode in the Intelpod7
35 JOID Configuration 25
OPNFV Configuration Guide Release brahmaputra30 (605ebda)
deploysh -o liberty -s odl -t ha -l intelpod7 -f none
By default the SDN is Openvswitch non-HA Liberty Intelpod5 OPNFV Brahmaputra release and ODL_L2 for theOPNFV feature
Possible options for each choice are as follows
[-s ]
nosdn openvswitch only and no other SDN
odl OpenDayLight Lithium version
opencontrail OpenContrail SDN
onos ONOS framework as SDN
[-t ]
nonha NO HA mode of Openstack
ha HA mode of openstack
tip the tip of the development
[-o ]
juno OpenStack Juno version
liberty OpenStack Liberty version
[-l ] etc
default For virtual deployment where installation will be done on KVM created using 02-maasdeploysh
intelpod5 Install on bare metal OPNFV pod5 of Intel lab
intelpod6
orangepod2
(other pods)
Note if you make changes as per your pod above then please use your pod
[-f ]
none no special feature will be enabled
ipv6 ipv6 will be enabled for tenant in openstack
By default debug is enabled in script and error messages will be printed on the SSH terminal where you are runningthe scripts It could take an hour to couple hours (max) to complete
Is the deployment done successfully
Once juju-deployer is complete use juju status to verify that all deployed unit are in the ready state
26 Chapter 3 Installer Configuration
OPNFV Configuration Guide Release brahmaputra30 (605ebda)
juju status --format tabular
Find the Openstack-dashboard IP address from the juju status output and see if you can log in via browser Theusername and password is adminopenstack
Optionall see if you can log in Juju GUI Juju GUI is on the Juju bootstrap node which is the second VM you definein the 02-maasdeploysh The username and password is adminadmin
If you deploy ODL OpenContrail or ONOS find the IP address of the web UI and login Please refer to each SDNbundleyaml for usernamepassword
Troubleshoot
To access to any deployed units juju ssh for example to login into nova-compute unit and look for varlogjujuunit-ltof interestgt for more info
juju ssh nova-compute0
Example
ubuntuR4N4B1~$ juju ssh nova-compute0
Warning Permanently added rsquo172165060rsquo (ECDSA) to the list of knownhosts
Warning Permanently added rsquo3-r4n3b1-computemaasrsquo (ECDSA) to the list ofknown hosts
Welcome to Ubuntu 14041 LTS (GNULinux 3130-77-generic x86_64)
Documentation httpshelpubuntucom
ltskippedgt
Last login Tue Feb 2 212356 2016 from bootstrapmaas
ubuntu3-R4N3B1-compute~$ sudo -i
root3-R4N3B1-compute~ cd varlogjuju
root3-R4N3B1-computevarlogjuju ls
machine-2log unit-ceilometer-agent-0log unit-ceph-osd-0logunit-neutron-contrail-0log unit-nodes-compute-0log unit-nova-compute-0logunit-ntp-0log
root3-R4N3B1-computevarlogjuju
By default juju will add the Ubuntu user keys for authentication into the deployed server and only ssh accesswill be available
Once you resolve the error go back to the jump host to rerun the charm hook with
juju resolved --retry ltunitgt
35 JOID Configuration 27
OPNFV Configuration Guide Release brahmaputra30 (605ebda)
28 Chapter 3 Installer Configuration
CHAPTER
FOUR
FEATURE CONFIGURATION
The following sections describe the configuration options for specific platform features provided in BrahmaputraFurther details for each feature are captured in the referred project documentation
41 Copper configuration
This release focused on use of the OpenStack Congress service for managing configuration policy The Congress installprocedure described here is largely manual This procedure as well as the longer-term goal of automated installersupport is a work in progress The procedure is further specific to one OPNFV installer (JOID ie MAASJuJu)based environment Support for other OPNFV installer deployed environments is also a work in progress
411 Pre-configuration activities
This procedure assumes OPNFV has been installed via the JOID installer
412 Hardware configuration
There is no specific hardware configuration required for the Copper project
413 Feature configuration
Following are instructions for installing Congress on an Ubuntu 1404 LXC container in the OPNFV Controller nodeas installed by the JOID installer This guide uses instructions from the Congress intro guide on readthedocs Specificvalues below will need to be modified if you intend to repeat this procedure in your JOID-based install environment
Install Procedure
The install currently occurs via four bash scripts provided in the copper repo See these files for the detailed steps
bull install_congress_1sh creates and starts the linux container for congress on the controller node copiesinstall_congress_2sh to the controller node and invokes it via ssh
bull install_congress_2sh installs congress on the congress server
29
OPNFV Configuration Guide Release brahmaputra30 (605ebda)
Cleanup Procedure
If there is an error during installation use the bash script clean_congresssh which stops the congress server if runningand removes the congress user and service from the controller database
Restarting after server power loss etc
Currently this install procedure is manual Automated install and restoral after host recovery is TBD For now thisprocedure will get the Congress service running again
On jumphost SSH to Congress serversource ~envshjuju ssh ubuntu$CONGRESS_HOST If that fails
On jumphost SSH to controller nodejuju ssh ubuntunode1-control Start the Congress containersudo lxc-start -n juju-trusty-congress -d Verify the Congress container statussudo lxc-ls -f juju-trusty-congressNAME STATE IPV4 IPV6 GROUPS AUTOSTART----------------------------------------------------------------------juju-trusty-congress RUNNING 19216810117 - - NO exit back to the Jumphost wait a minute and go back to the SSH to Congress server step above
On the Congress server that you have logged intosource ~admin-openrcshcd ~gitcongresssource binactivatebincongress-server ampdisown -h 1
42 Doctor Configuration
421 Doctor Inspector
Doctor Inspector is suggested to be placed in one of the controller nodes but it can be put on any host where DoctorMonitor can reach and accessible to the OpenStack Controller (Nova)
Make sure OpenStack env parameters are set properly so that Doctor Inspector can issue admin actions such ascompute host force-down and state update of VM
Then you can configure Doctor Inspector as follows
git clone httpsgerritopnfvorggerritdoctor -b stablebrahmaputracd doctortestsINSPECTOR_PORT=12345python inspectorpy $INSPECTOR_PORT gt inspectorlog 2gtamp1 amp
422 Doctor Monitor
Doctor Monitors are suggested to be placed in one of the controller nodes but those can be put on any host whichis reachable to target compute host and accessible to the Doctor Inspector You need to configure Monitors for allcompute hosts one by one
30 Chapter 4 Feature Configuration
OPNFV Configuration Guide Release brahmaputra30 (605ebda)
Make sure OpenStack env parameters are set properly so that Doctor Inspector can issue admin actions such ascompute host force-down and state update of VM
Then you can configure Doctor Monitor as follows
git clone httpsgerritopnfvorggerritdoctor -b stablebrahmaputracd doctortestsINSPECTOR_PORT=12345COMPUTE_HOST=overcloud-novacompute-0sudo python monitorpy $COMPUTE_HOST
http127001$INSPECTOR_PORTevents gt monitorlog 2gtamp1 amp
43 IPv6 Configuration - Setting Up a Service VM as an IPv6 vRouter
This section provides instructions to set up a service VM as an IPv6 vRouter using OPNFV Brahmaputra Releaseinstallers The environment may be pure OpenStack option or Open Daylight L2-only option The deployment modelmay be HA or non-HA The infrastructure may be bare metal or virtual environment
For complete instructions and documentations of setting up service VM as an IPv6 vRouter using ANY method pleaserefer to
1 IPv6 Configuration Guide (HTML) httpartifactsopnfvorgipv6docssetupservicevmindexhtml
2 IPv6 User Guide (HTML) httpartifactsopnfvorgipv6docsgapanalysisindexhtml
431 Pre-configuration Activities
The configuration will work in 2 environments
1 OpenStack-only environment
2 OpenStack with Open Daylight L2-only environment
Depending on which installer will be used to deploy OPNFV each environment may be deployed on bare metal orvirtualized infrastructure Each deployment may be HA or non-HA
Refer to the previous installer configuration chapters installations guide and release notes
432 Setup Manual in OpenStack-Only Environment
If you intend to set up a service VM as an IPv6 vRouter in OpenStack-only environment of OPNFV BrahmaputraRelease please NOTE that
bull Because the anti-spoofing rules of Security Group feature in OpenStack prevents a VM from forwarding packetswe need to disable Security Group feature in the OpenStack-only environment
bull The hostnames IP addresses and username are for exemplary purpose in instructions Please change as neededto fit your environment
bull The instructions apply to both deployment model of single controller node and HA (High Availability) deploy-ment model where multiple controller nodes are used
43 IPv6 Configuration - Setting Up a Service VM as an IPv6 vRouter 31
OPNFV Configuration Guide Release brahmaputra30 (605ebda)
Install OPNFV and Preparation
OPNFV-NATIVE-INSTALL-1 To install OpenStack-only environment of OPNFV Brahmaputra Release
Apex Installer
HA deployment in OpenStack-only environmentopnfv-deploy -d etcopnfv-apexos-nosdn-nofeature-hayaml
Non-HA deployment in OpenStack-only environment Non-HA deployment is currently not supported by Apex installer
Compass Installer
HA deployment in OpenStack-only environmentexport ISO_URL=file$BUILD_DIRECTORYcompassisoexport OS_VERSION=$COMPASS_OS_VERSIONexport OPENSTACK_VERSION=$COMPASS_OPENSTACK_VERSIONexport CONFDIR=$WORKSPACEdeployconfvm_environmentdeploysh --dha $CONFDIRos-nosdn-nofeature-hayml --network $CONFDIR$NODE_NAMEnetworkyml
Non-HA deployment in OpenStack-only environment Non-HA deployment is currently not supported by Compass installer
Fuel Installer
HA deployment in OpenStack-only environmentdeploysh -s os-nosdn-nofeature-ha
Non-HA deployment in OpenStack-only environmentdeploysh -s os-nosdn-nofeature-noha
Joid Installer
HA deployment in OpenStack-only environmentdeploysh -o liberty -s nosdn -t ha -l default -f ipv6
Non-HA deployment in OpenStack-only environmentdeploysh -o liberty -s nosdn -t nonha -l default -f ipv6
Please NOTE that
bull You need to refer to installerrsquos documentation for other necessary parameters applicable to your deployment
bull You need to refer to Release Notes and installerrsquos documentation if there is any issue in installation
OPNFV-NATIVE-INSTALL-2 Clone the following GitHub repository to get the configuration and metadata files
git clone httpsgithubcomsridhargaddamopnfv_os_ipv6_pocgit optstackopnfv_os_ipv6_poc
Disable Security Groups in OpenStack ML2 Setup
OPNFV-NATIVE-SEC-1 Change the settings in etcneutronpluginsml2ml2_confini as follows
etcneutronpluginsml2ml2_confini[securitygroup]extension_drivers = port_security
32 Chapter 4 Feature Configuration
OPNFV Configuration Guide Release brahmaputra30 (605ebda)
enable_security_group = Falsefirewall_driver = neutronagentfirewallNoopFirewallDriver
OPNFV-NATIVE-SEC-2 Change the settings in etcnovanovaconf as follows
etcnovanovaconf[DEFAULT]security_group_api = novafirewall_driver = novavirtfirewallNoopFirewallDriver
OPNFV-NATIVE-SEC-3 After updating the settings you will have to restart the Neutron and Nova services
Please note that the commands of restarting Neutron and Nova would vary depending on the installer Pleaserefer to relevant documentation of specific installers
Set Up Service VM as IPv6 vRouter
OPNFV-NATIVE-SETUP-1 Now we assume that OpenStack multi-node setup is up and running We have to sourcethe tenant credentials in this step Please NOTE that the method of sourcing tenant credentials may vary dependingon installers For example
Apex installer
source the tenant credentials using Apex installer of OPNFV you need to copy the file homestackovercloudrc from the installer VM called instack to a location in controller node for example in the directory optsource optovercloudrc
Compass installer
source the tenant credentials using Compass installer of OPNFVsource optadmin-openrcsh
Fuel installer
source the tenant credentials using Fuel installer of OPNFVsource rootopenrc
Joid installer
source the tenant credentials using Joid installer of OPNFVsource $HOMEjoid_configadmin-openrc
devstack
source the tenant credentials in devstacksource openrc admin demo
Please refer to relevant documentation of installers if you encounter any issue
OPNFV-NATIVE-SETUP-2 Download fedora22 image which would be used for vRouter
wget httpsdownloadfedoraprojectorgpubfedoralinuxreleases22Cloudx86_64ImagesFedora-Cloud-Base-22-20150521x86_64qcow2
OPNFV-NATIVE-SETUP-3 Import Fedora22 image to glance
glance image-create --name Fedora22 --disk-format qcow2 --container-format bare --file Fedora-Cloud-Base-22-20150521x86_64qcow2
43 IPv6 Configuration - Setting Up a Service VM as an IPv6 vRouter 33
OPNFV Configuration Guide Release brahmaputra30 (605ebda)
OPNFV-NATIVE-SETUP-4 This step is Informational OPNFV Installer has taken care of this step duringdeployment You may refer to this step only if there is any issue or if you are using other installers
We have to move the physical interface (ie the public network interface) to br-ex including moving the publicIP address and setting up default route Please refer to OS-NATIVE-SETUP-4 and OS-NATIVE-SETUP-5 in ourmore complete instruction
OPNFV-NATIVE-SETUP-5 Create Neutron routers ipv4-router and ipv6-router which need to provideexternal connectivity
neutron router-create ipv4-routerneutron router-create ipv6-router
OPNFV-NATIVE-SETUP-6 Create an external networksubnet ext-net using the appropriate values based on thedata-center physical network setup
Please NOTE that you may only need to create the subnet of ext-net because OPNFV installers should have createdan external network during installation You must use the same name of external network that installer creates whenyou create the subnet For example
bull Apex installer external
bull Compass installer ext-net
bull Fuel installer net04_ext
bull Joid installer ext-net
Please refer to the documentation of installers if there is any issue
This is needed only if installer does not create an external work Otherwise skip this command net-createneutron net-create --routerexternal ext-net
Note that the name ext-net may work for some installers such as Compass and Joid Change the name ext-net to match the name of external network that an installer createsneutron subnet-create --disable-dhcp --allocation-pool start=19859156251end=19859156254 --gateway 198591561 ext-net 19859156024
OPNFV-NATIVE-SETUP-7 Create Neutron networks ipv4-int-network1 and ipv6-int-network2 withport_security disabled
neutron net-create --port_security_enabled=False ipv4-int-network1neutron net-create --port_security_enabled=False ipv6-int-network2
OPNFV-NATIVE-SETUP-8 Create IPv4 subnet ipv4-int-subnet1 in the internal networkipv4-int-network1 and associate it to ipv4-router
neutron subnet-create --name ipv4-int-subnet1 --dns-nameserver 8888 ipv4-int-network1 2000024
neutron router-interface-add ipv4-router ipv4-int-subnet1
OPNFV-NATIVE-SETUP-9 Associate the ext-net to the Neutron routers ipv4-router and ipv6-router
Note that the name ext-net may work for some installers such as Compass and Joid Change the name ext-net to match the name of external network that an installer createsneutron router-gateway-set ipv4-router ext-netneutron router-gateway-set ipv6-router ext-net
OPNFV-NATIVE-SETUP-10 Create two subnets one IPv4 subnet ipv4-int-subnet2 and one IPv6 subnetipv6-int-subnet2 in ipv6-int-network2 and associate both subnets to ipv6-router
34 Chapter 4 Feature Configuration
OPNFV Configuration Guide Release brahmaputra30 (605ebda)
neutron subnet-create --name ipv4-int-subnet2 --dns-nameserver 8888 ipv6-int-network2 1000024
neutron subnet-create --name ipv6-int-subnet2 --ip-version 6 --ipv6-ra-mode slaac --ipv6-address-mode slaac ipv6-int-network2 2001db80164
neutron router-interface-add ipv6-router ipv4-int-subnet2neutron router-interface-add ipv6-router ipv6-int-subnet2
OPNFV-NATIVE-SETUP-11 Create a keypair
nova keypair-add vRouterKey gt ~vRouterKey
OPNFV-NATIVE-SETUP-12 Create ports for vRouter (with some specific MAC address - basically for automation- to know the IPv6 addresses that would be assigned to the port)
neutron port-create --name eth0-vRouter --mac-address fa163e111111 ipv6-int-network2neutron port-create --name eth1-vRouter --mac-address fa163e222222 ipv4-int-network1
OPNFV-NATIVE-SETUP-13 Create ports for VM1 and VM2
neutron port-create --name eth0-VM1 --mac-address fa163e333333 ipv4-int-network1neutron port-create --name eth0-VM2 --mac-address fa163e444444 ipv4-int-network1
OPNFV-NATIVE-SETUP-14 Update ipv6-router with routing information to subnet 2001db80264
neutron router-update ipv6-router --routes type=dict list=true destination=2001db80264nexthop=2001db801f8163efffe111111
OPNFV-NATIVE-SETUP-15 Boot Service VM (vRouter) VM1 and VM2
nova boot --image Fedora22 --flavor m1small --user-data optstackopnfv_os_ipv6_pocmetadatatxt --availability-zone novaopnfv-os-compute --nic port-id=$(neutron port-list | grep -w eth0-vRouter | awk print $2) --nic port-id=$(neutron port-list | grep -w eth1-vRouter | awk print $2) --key-name vRouterKey vRouter
nova list
Please wait for some 10 to 15 minutes so that necessary packages (like radvd) are installed and vRouter is upnova console-log vRouter
nova boot --image cirros-034-x86_64-uec --flavor m1tiny --user-data optstackopnfv_os_ipv6_pocset_mtush --availability-zone novaopnfv-os-controller --nic port-id=$(neutron port-list | grep -w eth0-VM1 | awk print $2) --key-name vRouterKey VM1
nova boot --image cirros-034-x86_64-uec --flavor m1tiny--user-data optstackopnfv_os_ipv6_pocset_mtush --availability-zone novaopnfv-os-compute --nic port-id=$(neutron port-list | grep -w eth0-VM2 | awk print $2) --key-name vRouterKey VM2
nova list Verify that all the VMs are in ACTIVE state
OPNFV-NATIVE-SETUP-16 If all goes well the IPv6 addresses assigned to the VMs would be as shown as follows
43 IPv6 Configuration - Setting Up a Service VM as an IPv6 vRouter 35
OPNFV Configuration Guide Release brahmaputra30 (605ebda)
vRouter eth0 interface would have the following IPv6 address 2001db801f8163efffe11111164 vRouter eth1 interface would have the following IPv6 address 2001db802164 VM1 would have the following IPv6 address 2001db802f8163efffe33333364 VM2 would have the following IPv6 address 2001db802f8163efffe44444464
OPNFV-NATIVE-SETUP-17 Now we can SSH to VMs You can execute the following command
1 Create a floatingip and associate it with VM1 VM2 and vRouter (to the port id that is passed) Note that the name ext-net may work for some installers such as Compass and Joid Change the name ext-net to match the name of external network that an installer createsneutron floatingip-create --port-id $(neutron port-list | grep -w eth0-VM1 | awk print $2) ext-netneutron floatingip-create --port-id $(neutron port-list | grep -w eth0-VM2 | awk print $2) ext-netneutron floatingip-create --port-id $(neutron port-list | grep -w eth1-vRouter | awk print $2) ext-net
2 To know display the floatingip associated with VM1 VM2 and vRouterneutron floatingip-list -F floating_ip_address -F port_id | grep $(neutron port-list | grep -w eth0-VM1 | awk print $2) | awk print $2neutron floatingip-list -F floating_ip_address -F port_id | grep $(neutron port-list | grep -w eth0-VM2 | awk print $2) | awk print $2neutron floatingip-list -F floating_ip_address -F port_id | grep $(neutron port-list | grep -w eth1-vRouter | awk print $2) | awk print $2
3 To ssh to the vRouter VM1 and VM2 user can execute the following commandssh -i ~vRouterKey fedoraltfloating-ip-of-vRoutergtssh -i ~vRouterKey cirrosltfloating-ip-of-VM1gtssh -i ~vRouterKey cirrosltfloating-ip-of-VM2gt
433 Setup Manual in OpenStack with Open Daylight L2-Only Environment
If you intend to set up a service VM as an IPv6 vRouter in an environment of OpenStack and Open Daylight L2-onlyof OPNFV Brahmaputra Release please NOTE that
bull The hostnames IP addresses and username are for exemplary purpose in instructions Please change as neededto fit your environment
bull The instructions apply to both deployment model of single controller node and HA (High Availability) deploy-ment model where multiple controller nodes are used
bull However in case of HA when ipv6-router is created in step SETUP-SVM-11 it could be created in anyof the controller node Thus you need to identify in which controller node ipv6-router is created in orderto manually spawn radvd daemon inside the ipv6-router namespace in steps SETUP-SVM-24 throughSETUP-SVM-30
Install OPNFV and Preparation
OPNFV-INSTALL-1 To install OpenStack with Open Daylight L2-only environment of OPNFV Brahmaputra Re-lease
Apex Installer
36 Chapter 4 Feature Configuration
OPNFV Configuration Guide Release brahmaputra30 (605ebda)
HA deployment in OpenStack with Open Daylight L2-only environmentopnfv-deploy -d etcopnfv-apexos-odl_l2-nofeature-hayaml
Non-HA deployment in OpenStack with Open Daylight L2-only environment Non-HA deployment is currently not supported by Apex installer
Compass Installer
HA deployment in OpenStack with Open Daylight L2-only environmentexport ISO_URL=file$BUILD_DIRECTORYcompassisoexport OS_VERSION=$COMPASS_OS_VERSIONexport OPENSTACK_VERSION=$COMPASS_OPENSTACK_VERSIONexport CONFDIR=$WORKSPACEdeployconfvm_environmentdeploysh --dha $CONFDIRos-odl_l2-nofeature-hayml --network $CONFDIR$NODE_NAMEnetworkyml
Non-HA deployment in OpenStack with Open Daylight L2-only environment Non-HA deployment is currently not supported by Compass installer
Fuel Installer
HA deployment in OpenStack with Open Daylight L2-only environmentdeploysh -s os-odl_l2-nofeature-ha
Non-HA deployment in OpenStack with Open Daylight L2-only environmentdeploysh -s os-odl_l2-nofeature-noha
Joid Installer
HA deployment in OpenStack with Open Daylight L2-only environmentdeploysh -o liberty -s odl -t ha -l default -f ipv6
Non-HA deployment in OpenStack with Open Daylight L2-only environmentdeploysh -o liberty -s odl -t nonha -l default -f ipv6
Please NOTE that
bull You need to refer to installerrsquos documentation for other necessary parameters applicable to your deployment
bull You need to refer to Release Notes and installerrsquos documentation if there is any issue in installation
OPNFV-INSTALL-2 Clone the following GitHub repository to get the configuration and metadata files
git clone httpsgithubcomsridhargaddamopnfv_os_ipv6_pocgit optstackopnfv_os_ipv6_poc
Disable Security Groups in OpenStack ML2 Setup
Please NOTE that although Security Groups feature has been disabled automatically through localconf configu-ration file by some installers such as devstack it is very likely that other installers such as Apex Compass Fuelor Joid will enable Security Groups feature after installation
Please make sure that Security Groups are disabled in the setup
OPNFV-SEC-1 Change the settings in etcneutronpluginsml2ml2_confini as follows
etcneutronpluginsml2ml2_confini[securitygroup]enable_security_group = Falsefirewall_driver = neutronagentfirewallNoopFirewallDriver
43 IPv6 Configuration - Setting Up a Service VM as an IPv6 vRouter 37
OPNFV Configuration Guide Release brahmaputra30 (605ebda)
OPNFV-SEC-2 Change the settings in etcnovanovaconf as follows
etcnovanovaconf[DEFAULT]security_group_api = novafirewall_driver = novavirtfirewallNoopFirewallDriver
OPNFV-SEC-3 After updating the settings you will have to restart the Neutron and Nova services
Please note that the commands of restarting Neutron and Nova would vary depending on the installer Pleaserefer to relevant documentation of specific installers
Source the Credentials in OpenStack Controller Node
SETUP-SVM-1 Login in OpenStack Controller Node Start a new terminal and change directory to where Open-Stack is installed
SETUP-SVM-2 We have to source the tenant credentials in this step Please NOTE that the method of sourcingtenant credentials may vary depending on installers For example
Apex installer
source the tenant credentials using Apex installer of OPNFV you need to copy the file homestackovercloudrc from the installer VM called instack to a location in controller node for example in the directory optsource optovercloudrc
Compass installer
source the tenant credentials using Compass installer of OPNFVsource optadmin-openrcsh
Fuel installer
source the tenant credentials using Fuel installer of OPNFVsource rootopenrc
Joid installer
source the tenant credentials using Joid installer of OPNFVsource $HOMEjoid_configadmin-openrc
devstack
source the tenant credentials in devstacksource openrc admin demo
Please refer to relevant documentation of installers if you encounter any issue
Informational Note Move Public Network from Physical Network Interface to br-ex
SETUP-SVM-3 Move the physical interface (ie the public network interface) to br-ex
SETUP-SVM-4 Verify setup of br-ex
Those 2 steps are Informational OPNFV Installer has taken care of those 2 steps during deployment You mayrefer to this step only if there is any issue or if you are using other installers
38 Chapter 4 Feature Configuration
OPNFV Configuration Guide Release brahmaputra30 (605ebda)
We have to move the physical interface (ie the public network interface) to br-ex including moving the publicIP address and setting up default route Please refer to SETUP-SVM-3 and SETUP-SVM-4 in our more completeinstruction
Create IPv4 Subnet and Router with External Connectivity
SETUP-SVM-5 Create a Neutron router ipv4-router which needs to provide external connectivity
neutron router-create ipv4-router
SETUP-SVM-6 Create an external networksubnet ext-net using the appropriate values based on the data-centerphysical network setup
Please NOTE that you may only need to create the subnet of ext-net because OPNFV installers should have createdan external network during installation You must use the same name of external network that installer creates whenyou create the subnet For example
bull Apex installer external
bull Compass installer ext-net
bull Fuel installer net04_ext
bull Joid installer ext-net
Please refer to the documentation of installers if there is any issue
This is needed only if installer does not create an external work Otherwise skip this command net-createneutron net-create --routerexternal ext-net
Note that the name ext-net may work for some installers such as Compass and Joid Change the name ext-net to match the name of external network that an installer createsneutron subnet-create --disable-dhcp --allocation-pool start=19859156251end=19859156254 --gateway 198591561 ext-net 19859156024
Please note that the IP addresses in the command above are for exemplary purpose Please replace the IP addressesof your actual network
SETUP-SVM-7 Associate the ext-net to the Neutron router ipv4-router
Note that the name ext-net may work for some installers such as Compass and Joid Change the name ext-net to match the name of external network that an installer createsneutron router-gateway-set ipv4-router ext-net
SETUP-SVM-8 Create an internaltenant IPv4 network ipv4-int-network1
neutron net-create ipv4-int-network1
SETUP-SVM-9 Create an IPv4 subnet ipv4-int-subnet1 in the internal network ipv4-int-network1
neutron subnet-create --name ipv4-int-subnet1 --dns-nameserver 8888 ipv4-int-network1 2000024
SETUP-SVM-10 Associate the IPv4 internal subnet ipv4-int-subnet1 to the Neutron router ipv4-router
neutron router-interface-add ipv4-router ipv4-int-subnet1
43 IPv6 Configuration - Setting Up a Service VM as an IPv6 vRouter 39
OPNFV Configuration Guide Release brahmaputra30 (605ebda)
Create IPv6 Subnet and Router with External Connectivity
Now let us create a second neutron router where we can ldquomanuallyrdquo spawn a radvd daemon to simulate an externalIPv6 router
SETUP-SVM-11 Create a second Neutron router ipv6-router which needs to provide external connectivity
neutron router-create ipv6-router
SETUP-SVM-12 Associate the ext-net to the Neutron router ipv6-router
Note that the name ext-net may work for some installers such as Compass and Joid Change the name ext-net to match the name of external network that an installer createsneutron router-gateway-set ipv6-router ext-net
SETUP-SVM-13 Create a second internaltenant IPv4 network ipv4-int-network2
neutron net-create ipv4-int-network2
SETUP-SVM-14 Create an IPv4 subnet ipv4-int-subnet2 for the ipv6-router internal networkipv4-int-network2
neutron subnet-create --name ipv4-int-subnet2 --dns-nameserver 8888 ipv4-int-network2 1000024
SETUP-SVM-15 Associate the IPv4 internal subnet ipv4-int-subnet2 to the Neutron router ipv6-router
neutron router-interface-add ipv6-router ipv4-int-subnet2
Prepare Image Metadata and Keypair for Service VM
SETUP-SVM-16 Download fedora22 image which would be used as vRouter
wget httpsdownloadfedoraprojectorgpubfedoralinuxreleases22Cloudx86_64ImagesFedora-Cloud-Base-22-20150521x86_64qcow2
glance image-create --name Fedora22 --disk-format qcow2 --container-format bare --file Fedora-Cloud-Base-22-20150521x86_64qcow2
SETUP-SVM-17 Create a keypair
nova keypair-add vRouterKey gt ~vRouterKey
SETUP-SVM-18 Create ports for vRouter and both the VMs with some specific MAC addresses
neutron port-create --name eth0-vRouter --mac-address fa163e111111 ipv4-int-network2neutron port-create --name eth1-vRouter --mac-address fa163e222222 ipv4-int-network1neutron port-create --name eth0-VM1 --mac-address fa163e333333 ipv4-int-network1neutron port-create --name eth0-VM2 --mac-address fa163e444444 ipv4-int-network1
Boot Service VM (vRouter) with eth0 on ipv4-int-network2 and eth1 on ipv4-int-network1
Let us boot the service VM (vRouter) with eth0 interface on ipv4-int-network2 connecting toipv6-router and eth1 interface on ipv4-int-network1 connecting to ipv4-router
SETUP-SVM-19 Boot the vRouter using Fedora22 image on the OpenStack Compute Node with hostnameopnfv-os-compute
40 Chapter 4 Feature Configuration
OPNFV Configuration Guide Release brahmaputra30 (605ebda)
nova boot --image Fedora22 --flavor m1small --user-data optstackopnfv_os_ipv6_pocmetadatatxt --availability-zone novaopnfv-os-compute --nic port-id=$(neutron port-list | grep -w eth0-vRouter | awk print $2) --nic port-id=$(neutron port-list | grep -w eth1-vRouter | awk print $2) --key-name vRouterKey vRouter
Please note that optstackopnfv_os_ipv6_pocmetadatatxt is used to enable the vRouter to au-tomatically spawn a radvd and
bull Act as an IPv6 vRouter which advertises the RA (Router Advertisements) with prefix 2001db80264on its internal interface (eth1)
bull Forward IPv6 traffic from internal interface (eth1)
SETUP-SVM-20 Verify that Fedora22 image boots up successfully and vRouter has ssh keys properly injected
nova listnova console-log vRouter
Please note that it may take a few minutes for the necessary packages to get installed and ssh keys to be injected
Sample Output[ 762884523] cloud-init[871] ec2 [ 762909634] cloud-init[871] ec2 -----BEGIN SSH HOST KEY FINGERPRINTS-----[ 762931626] cloud-init[871] ec2 2048 e3dc3d4abcb6b07775a170a3d02a47a9 (RSA)[ 762957380] cloud-init[871] ec2 -----END SSH HOST KEY FINGERPRINTS-----[ 762979554] cloud-init[871] ec2
Boot Two Other VMs in ipv4-int-network1
In order to verify that the setup is working let us create two cirros VMs with eth1 interface on theipv4-int-network1 ie connecting to vRouter eth1 interface for internal network
We will have to configure appropriate mtu on the VMsrsquo interface by taking into account the tunneling overhead andany physical switch requirements If so push the mtu to the VM either using dhcp options or via meta-data
SETUP-SVM-21 Create VM1 on OpenStack Controller Node with hostname opnfv-os-controller
nova boot --image cirros-034-x86_64-uec --flavor m1tiny --user-data optstackopnfv_os_ipv6_pocset_mtush --availability-zone novaopnfv-os-controller --nic port-id=$(neutron port-list | grep -w eth0-VM1 | awk print $2) --key-name vRouterKey VM1
SETUP-SVM-22 Create VM2 on OpenStack Compute Node with hostname opnfv-os-compute
nova boot --image cirros-034-x86_64-uec --flavor m1tiny --user-data optstackopnfv_os_ipv6_pocset_mtush --availability-zone novaopnfv-os-compute --nic port-id=$(neutron port-list | grep -w eth0-VM2 | awk print $2) --key-name vRouterKey VM2
SETUP-SVM-23 Confirm that both the VMs are successfully booted
nova listnova console-log VM1nova console-log VM2
43 IPv6 Configuration - Setting Up a Service VM as an IPv6 vRouter 41
OPNFV Configuration Guide Release brahmaputra30 (605ebda)
Spawn RADVD in ipv6-router
Let us manually spawn a radvd daemon inside ipv6-router namespace to simulate an external router First ofall we will have to identify the ipv6-router namespace and move to the namespace
Please NOTE that in case of HA (High Availability) deployment model where multiple controller nodes are usedipv6-router created in step SETUP-SVM-11 could be in any of the controller node Thus you need to iden-tify in which controller node ipv6-router is created in order to manually spawn radvd daemon inside theipv6-router namespace in steps SETUP-SVM-24 through SETUP-SVM-30 The following command in Neu-tron will display the controller on which the ipv6-router is spawned
neutron l3-agent-list-hosting-router ipv6-router
Then you login to that controller and execute steps SETUP-SVM-24 through SETUP-SVM-30
SETUP-SVM-24 identify the ipv6-router namespace and move to the namespace
sudo ip netns exec qrouter-$(neutron router-list | grep -w ipv6-router | awk print $2) bash
SETUP-SVM-25 Upon successful execution of the above command you will be in the router namespace Now letus configure the IPv6 address on the ltqr-xxxgt interface
export router_interface=$(ip a s | grep -w global qr- | awk print $7)ip -6 addr add 2001db8011 dev $router_interface
SETUP-SVM-26 Update the sample file optstackopnfv_os_ipv6_pocscenario2radvdconfwith $router_interface
cp optstackopnfv_os_ipv6_pocscenario2radvdconf tmpradvd$router_interfaceconfsed -i s$router_interface$router_interfaceg tmpradvd$router_interfaceconf
SETUP-SVM-27 Spawn a radvd daemon to simulate an external router This radvd daemon advertises an IPv6subnet prefix of 2001db80164 using RA (Router Advertisement) on its $router_interface so that eth0interface of vRouter automatically configures an IPv6 SLAAC address
$radvd -C tmpradvd$router_interfaceconf -p tmpbr-expidradvd -m syslog
SETUP-SVM-28 Add an IPv6 downstream route pointing to the eth0 interface of vRouter
ip -6 route add 2001db80264 via 2001db801f8163efffe111111
SETUP-SVM-29 The routing table should now look similar to something shown below
ip -6 route show2001db8011 dev qr-42968b9e-62 proto kernel metric 2562001db80164 dev qr-42968b9e-62 proto kernel metric 256 expires 86384sec2001db80264 via 2001db801f8163efffe111111 dev qr-42968b9e-62 proto ra metric 1024 expires 29secfe8064 dev qg-3736e0c7-7c proto kernel metric 256fe8064 dev qr-42968b9e-62 proto kernel metric 256
SETUP-SVM-30 If all goes well the IPv6 addresses assigned to the VMs would be as shown as follows
vRouter eth0 interface would have the following IPv6 address 2001db801f8163efffe11111164 vRouter eth1 interface would have the following IPv6 address 2001db802164 VM1 would have the following IPv6 address 2001db802f8163efffe33333364 VM2 would have the following IPv6 address 2001db802f8163efffe44444464
42 Chapter 4 Feature Configuration
OPNFV Configuration Guide Release brahmaputra30 (605ebda)
Testing to Verify Setup Complete
Now let us SSH to those VMs eg VM1 and or VM2 and or vRouter to confirm that it has successfully configuredthe IPv6 address using SLAAC with prefix 2001db80264 from vRouter
We use floatingip mechanism to achieve SSH
SETUP-SVM-31 Now we can SSH to VMs You can execute the following command
1 Create a floatingip and associate it with VM1 VM2 and vRouter (to the port id that is passed) Note that the name ext-net may work for some installers such as Compass and Joid Change the name ext-net to match the name of external network that an installer createsneutron floatingip-create --port-id $(neutron port-list | grep -w eth0-VM1 | awk print $2) ext-netneutron floatingip-create --port-id $(neutron port-list | grep -w eth0-VM2 | awk print $2) ext-netneutron floatingip-create --port-id $(neutron port-list | grep -w eth1-vRouter | awk print $2) ext-net
2 To know display the floatingip associated with VM1 VM2 and vRouterneutron floatingip-list -F floating_ip_address -F port_id | grep $(neutron port-list | grep -w eth0-VM1 | awk print $2) | awk print $2neutron floatingip-list -F floating_ip_address -F port_id | grep $(neutron port-list | grep -w eth0-VM2 | awk print $2) | awk print $2neutron floatingip-list -F floating_ip_address -F port_id | grep $(neutron port-list | grep -w eth1-vRouter | awk print $2) | awk print $2
3 To ssh to the vRouter VM1 and VM2 user can execute the following commandssh -i ~vRouterKey fedoraltfloating-ip-of-vRoutergtssh -i ~vRouterKey cirrosltfloating-ip-of-VM1gtssh -i ~vRouterKey cirrosltfloating-ip-of-VM2gt
If everything goes well ssh will be successful and you will be logged into those VMs Run some commands to verifythat IPv6 addresses are configured on eth0 interface
SETUP-SVM-32 Show an IPv6 address with a prefix of 2001db80264
ip address show
SETUP-SVM-33 ping some external IPv6 address eg ipv6-router
ping6 2001db8011
If the above ping6 command succeeds it implies that vRouter was able to successfully forward the IPv6 traffic toreach external ipv6-router
44 Installing OVSNFV Fuel Plugin
bull On the Fuel UI create a new environment
bull In Settings gt Userspace OVS support check ldquoUserspace OVS supportrdquo
bull Continue with environment configuration and deployment as normal
441 Upgrading the plugin
From time to time new versions of the plugin may become available
44 Installing OVSNFV Fuel Plugin 43
OPNFV Configuration Guide Release brahmaputra30 (605ebda)
The plugin cannot be upgraded if an active environment is using the plugin
In order to upgrade the plugin
bull Copy the updated plugin file to the fuel-master
bull On the Fuel UI reset the environment
bull On the Fuel CLI ldquofuel plugins ndashupdate ltfuel-plugin-filegtrdquo
bull On the Fuel UI re-deploy the environment
45 Promise Feature Configuration Overview
451 Promise installation
Install nodejs npm and promise
curl -sL httpsdebnodesourcecomsetup_4x | sudo -E bash -sudo apt-get install -y nodejssudo npm -g install npmlatestgit clone httpsgithubcomopnfvpromisegitcd promisenpm install
Please note that the last command lsquonpm installrsquo will install all needed dependencies for promise (including yangforgeand mocha)
452 Testing
Please perform the following preparation steps
1 Set OpenStack environment parameters properly (eg source openrc admin demo in DevStack)
2 Create OpenStack tenant (eg promise) and tenant user (eg promiser)
3 Create a flavor in Nova with 1 vCPU and 512 MB RAM
4 Create a private network subnet and router in Neutron
5 Create an image in Glance
Once done the promise test script can be invoked as follows (as a single line command)
NODE_ENV=mytest OS_TENANT_NAME=promise OS_USERNAME=promiser OS_PASSWORD=ltuser password from Step 2gt OS_TEST_FLAVOR=ltflavor ID from Step 3gt OS_TEST_NETWORK=ltnetwork ID from Step 4gt OS_TEST_IMAGE=ltimage ID from Step 5gt npm run -s test -- --reporter json gt promise-resultsjson
The results of the tests will be stored in the promise-resultsjson file
The results can also be seen in the console (ldquonpm run -s testrdquo)
All 33 tests passing Congratulations promise has been successfully installed and configured
44 Chapter 4 Feature Configuration
OPNFV Configuration Guide Release brahmaputra30 (605ebda)
45 Promise Feature Configuration Overview 45
OPNFV Configuration Guide Release brahmaputra30 (605ebda)
46 Configuring SDNVPN features
Fuel installer configuration
In order to install the BGPVPN feature the corresponding checkbox in Fuel has to be selected This will triggerinstallation of the OpenStack BGPVPN API extension for Neutron (set up for using the ODL driver)
In addition ODL has to be installed see the corresponding section in the respective installer documentation on how toinstall ODL If the BGPVPN feature is installed ODL will automatically be installed with VPN Service karaf featureactivated
No post-deploy configuration is necessary The Fuel BGPVPN plugin and the ODL plugin should set up the clusterready for BGPVPNs being created This includes the set-up of internal VxLAN transport tunnels between computenodes
No post-configuration activities are required
46 Chapter 4 Feature Configuration
CHAPTER
FIVE
POST CONFIGURATION ACTIVITIES
Once you have deployed and configured your scenario and features you should validate the state of the system usingthe following guides
51 Scenario validation activities
The following guides provide information on how to validate the installation of you scenario based on the tools andtest suites available for the installation tool you have selected
511 Fuel post installation procedures
Automated post installation activities
Fuel provides a fairly broad coverage of built in automated health checks These validate the installation in terms ofconfiguration services networking storage policies etc The execution of the full range of health checks takes lessthan 30 minutes
For instructions on how to run health-checks please read the Fuel installation instructions
Platform components validation
Consult the feature sections in this document for any post-install feature specific validationhealth-checks
512 JOID post installation procedures
Configure OpenStack
In each SDN directory for example joidciopencontrail there is a folder for Juju deployer where you can find thecharm bundle yaml files that the deploysh uses to deploy
In the same directory there is scripts folder where you can find shell scripts to help you configure the OpenStackcloud that you just deployed These scripts are created to help you configure a basic OpenStack Cloud to verify thecloud For more info on OpenStack Cloud configuration please refer to the OpenStack Cloud Administrator Guideon docsopenstackorg Similarly for complete SDN configuration please refer to the respective SDN adminstratorguide
Each SDN solution requires slightly different setup please refer to the README in each SDN folder Most likelyyou will need to modify the openstacksh and cloud-setupsh scripts for the floating IP range private IP network andSSH keys Please go through openstacksh glancesh and cloud-setupsh and make changes as you see fit
47
OPNFV Configuration Guide Release brahmaputra30 (605ebda)
52 Feature validation activities
The following sections provide information on how to validate the features you have installed in your scenario
521 Copper post installation procedures
This release focused on use of the OpenStack Congress service for managing configuration policy The Congressinstall verify procedure described here is largely manual This procedure as well as the longer-term goal of automatedverification support is a work in progress The procedure is further specific to one OPNFV installer (JOID ieMAASJuJu) based environment
Automated post installation activities
No automated procedures are provided at this time
Copper post configuration procedures
No configuration procedures are required beyond the basic install procedure
Platform components validation
Following are notes on creating a container as test driver for Congress This is based upon an Ubuntu host as installedby JOID
Create and Activate the Container
On the jumphost
sudo lxc-create -n trusty-copper -t usrsharelxctemplateslxc-ubuntu -- -b ubuntu ~opnfvsudo lxc-start -n trusty-copper -dsudo lxc-info --name trusty-copper(typical output)Name trusty-copperState RUNNINGPID 4563IP 100344CPU use 2877 secondsBlkIO use 52279 MiBMemory use 55975 MiBKMem use 0 bytesLink vethDMFOANTX bytes 262 MiBRX bytes 8848 MiBTotal bytes 9110 MiB
Login and configure the test server
48 Chapter 5 Post Configuration Activities
OPNFV Configuration Guide Release brahmaputra30 (605ebda)
ssh ubuntu100344sudo apt-get updatesudo apt-get upgrade -y
Install pipsudo apt-get install python-pip -y
Install javasudo apt-get install default-jre -y
Install other dependenciessudo apt-get install git gcc python-dev libxml2 libxslt1-dev libzip-dev php5-curl -y
Setup OpenStack environment variables per your OPNFV installexport CONGRESS_HOST=19216810117export KEYSTONE_HOST=19216810108export CEILOMETER_HOST=19216810105export CINDER_HOST=19216810101export GLANCE_HOST=19216810106export HEAT_HOST=19216810107export NEUTRON_HOST=19216810111export NOVA_HOST=19216810112source ~admin-openrcsh
Install and test OpenStack clientmkdir ~gitcd gitgit clone httpsgithubcomopenstackpython-openstackclientgitcd python-openstackclientgit checkout stablelibertysudo pip install -r requirementstxtsudo python setuppy installopenstack service list(typical output)+----------------------------------+------------+----------------+| ID | Name | Type |+----------------------------------+------------+----------------+| 2f8799ae50f24c928c021fabf8a50f5f | keystone | identity || 351b13f56d9a4e25849406ec1d5a2726 | cinder | volume || 5129510c3143454f9ba8ec7e6735e267 | cinderv2 | volumev2 || 5ee1e220460f41dea9be06921400ce9b | congress | policy || 78e73a7789a14f56a5d248a0cd141201 | quantum | network || 9d5a00fb475a45b2ae6767528299ed6b | ceilometer | metering || 9e4b1624ef0b434abc0b82f607c5045c | heat | orchestration || b6c01ceb5023442d9f394b83f2a18e01 | heat-cfn | cloudformation || ba6199e3505045ad87e2a7175bd0c57f | glance | image || d753f304a0d541dbb989780ae70328a8 | nova | compute |+----------------------------------+------------+----------------+
Install and test Congress clientcd ~gitgit clone httpsgithubcomopenstackpython-congressclientgitcd python-congressclientgit checkout stablelibertysudo pip install -r requirementstxtsudo python setuppy installopenstack congress driver list(typical output)+------------+--------------------------------------------------------------------------+| id | description |+------------+--------------------------------------------------------------------------+| ceilometer | Datasource driver that interfaces with ceilometer || neutronv2 | Datasource driver that interfaces with OpenStack Networking aka Neutron || nova | Datasource driver that interfaces with OpenStack Compute aka nova || keystone | Datasource driver that interfaces with keystone || cinder | Datasource driver that interfaces with OpenStack cinder || glancev2 | Datasource driver that interfaces with OpenStack Images aka Glance |+------------+--------------------------------------------------------------------------+
Install and test Glance clientcd ~gitgit clone httpsgithubcomopenstackpython-glanceclientgitcd python-glanceclientgit checkout stablelibertysudo pip install -r requirementstxtsudo python setuppy installglance image-list(typical output)+--------------------------------------+---------------------+| ID | Name |+--------------------------------------+---------------------+| 6ce4433e-65c0-4cd8-958d-b06e30c76241 | cirros-033-x86_64 |+--------------------------------------+---------------------+
Install and test Neutron clientcd ~gitgit clone httpsgithubcomopenstackpython-neutronclientgitcd python-neutronclientgit checkout stablelibertysudo pip install -r requirementstxtsudo python setuppy installneutron net-list(typical output)+--------------------------------------+----------+------------------------------------------------------+| id | name | subnets |+--------------------------------------+----------+------------------------------------------------------+| dc6227df-af41-439f-bd2c-c2c2f0fe7fc5 | public | 5745846c-dd79-4900-a7da-bf506348ceac 19216810024 || a3f9f13a-5de9-4d3b-98c8-d2e40a2ef8e9 | internal | 5e0be862-90da-44ab-af43-56d5c65aa049 1000024 |+--------------------------------------+----------+------------------------------------------------------+
Install and test Nova clientcd ~gitgit clone httpsgithubcomopenstackpython-novaclientgitcd python-novaclientgit checkout stablelibertysudo pip install -r requirementstxtsudo python setuppy installnova hypervisor-list(typical output)+----+---------------------+-------+---------+| ID | Hypervisor hostname | State | Status |+----+---------------------+-------+---------+| 1 | compute1maas | up | enabled |+----+---------------------+-------+---------+
Install and test Keystone clientcd ~gitgit clone httpsgithubcomopenstackpython-keystoneclientgitcd python-keystoneclientgit checkout stablelibertysudo pip install -r requirementstxtsudo python setuppy install
52 Feature validation activities 49
OPNFV Configuration Guide Release brahmaputra30 (605ebda)
Setup the Congress Test Webapp
Clone Copper (if not already cloned in user home)cd ~gitif [ -d ~gitcopper ] then git clone httpsgerritopnfvorggerritcopper fi
Copy the Apache configsudo cp ~gitcoppercomponentscongresstest-webappwwwubuntu-apache2conf etcapache2apache2conf
Point proxyphp to the Congress server per your installsed -i -- s19216810117$CONGRESS_HOSTg ~gitcoppercomponentscongresstest-webappwwwhtmlproxyindexphp
Copy the webapp to the Apache root directory and fix permissionssudo cp -R ~gitcoppercomponentscongresstest-webappwwwhtml varwwwsudo chmod 755 varwwwhtml -R
Make webapp log directory and set permissionsmkdir ~logschmod 777 ~logs
Restart Apachesudo service apache2 restart
Using the Test Webapp
Browse to the trusty-copper server IP address
Interactive options are meant to be self-explanatory given a basic familiarity with the Congress service and data modelBut the app will be developed with additional features and UI elements
522 IPv6 Post Installation Procedures
Congratulations you have completed the setup of using a service VM to act as an IPv6 vRouter You have validatedthe setup based on the instruction in previous sections If you want to further test your setup you can ping6 amongVM1 VM2 vRouter and ipv6-router
This setup allows further open innovation by any 3rd-party For more instructions and documentations please refer to
1 IPv6 Configuration Guide (HTML) httpartifactsopnfvorgipv6docssetupservicevmindexhtml
2 IPv6 User Guide (HTML) httpartifactsopnfvorgipv6docsgapanalysisindexhtml
Automated post installation activities
Refer to the relevant testing guides results and release notes of Yardstick Project
53 Additional testing and validation activities
Many of our testing tools can be manually installed to facilitate targeted testing of features and capabilities of yourscenario The following guides provide instruction on setting up these testing suites
50 Chapter 5 Post Configuration Activities
OPNFV Configuration Guide Release brahmaputra30 (605ebda)
531 Overview of the functest suites
Functest is the OPNFV project primarily targeting function testing In the Continuous Integration pipeline it islaunched after an OPNFV fresh installation to validate and verify the basic functions of the infrastructure
The current list of test suites can be distributed in 3 main domains VIM (Virtualised Infrastructure Manager) Con-trollers and Features
Do-main
Testsuite
Comments
VIM
vPing NFV ldquoHello Worldrdquo using SSH connection and floatting IPvPing_userdataPing using userdata and cloud-init mechanismTempest OpenStack reference test suite [2]Rallybench
OpenStack testing tool benchmarking OpenStack modules [3]
ControllersOpen-Day-light
Opendaylight Test suite
ONOS Test suite of ONOS L2 and L3 functions See ONOSFW User Guide for details
Features
vIMS Example of a real VNF deployment to show the NFV capabilities of the platform The IPMultimedia Subsytem is a typical Telco test case referenced by ETSI It provides a fullyfunctional VoIP System
Promise Resource reservation and management project to identify NFV related requirements andrealize resource reservation for future usage by capacity management of resource poolsregarding compute network and storage See Promise User Guide for details
Doctor Doctor platform as of Brahmaputra release provides the two features ImmediateNotification Consistent resource state awareness (compute) see Doctor User Guide fordetails
SD-NVPN
Implementation of the OpenStack bgpvpn API from the SDNVPN feature project Itallowing the cration of BGP VPNs see SDNVPN User Guide for
Functest includes different test suites with several test cases within Some of the tests are developed by Functest teammembers whereas others are integrated from upstream communities or other OPNFV projects For example Tempestis the OpenStack integration test suite and Functest is in charge of the selection integration and automation of the teststhat fit in OPNFV
The Tempest suite has been customized but no new test cases have been created
The results produced by the tests run from CI are pushed and collected in a NoSQL database The goal is to populatethe database with results from different sources and scenarios and to show them on a Dashboard
There is no real notion of Test domain or Test coverage Basic components (VIM controllers) are tested through theirown suites Feature projects also provide their own test suites with different ways of running their tests
vIMS test case was integrated to demonstrate the capability to deploy a relatively complex NFV scenario on top of theOPNFV infrastructure
Functest considers OPNFV as a black box OPNFV since the Brahmaputra release offers lots of potential combina-tions
bull 2 controllers (OpenDayligh ONOS)
bull 4 installers (Apex Compass Fuel Joid)
Most of the tests are runnable on any combination but some others might have restrictions imposed by the installersor the available deployed features
53 Additional testing and validation activities 51
OPNFV Configuration Guide Release brahmaputra30 (605ebda)
Preparing the Docker container
Pull the Functest Docker image from the Docker hub
docker pull opnfvfunctestbrahmaputra10
Check that the image is available
docker images
Run the docker container giving the environment variables
bull INSTALLER_TYPE possible values are apex compass fuel or joid
bull INSTALLER_IP IP of the installer nodeVM
Functest may need to know the IP of the installer to retrieve automatically the credentials from the installer nodeVMor even from the actual controllers
The minimum command to create the Functest Docker container can be described as follows
docker run -it -e INSTALLER_IP=102002 -e INSTALLER_TYPE=fuel opnfvfunctestbrahmaputra10 binbash
Optionally it is possible to precise the container name through the option ndashname
docker run --name CONTAINER_NAME -it -e INSTALLER_IP=102002 -e INSTALLER_TYPE=fuel opnfvfunctestbrahmaputra10 binbash
It is also possible to to indicate the path of the OpenStack credentials using -v
docker run -it -e INSTALLER_IP=102002 -e INSTALLER_TYPE=fuel -v ltpath_to_your_local_creds_filegthomeopnfvfunctestconfopenstackcreds opnfvfunctestbrahmaputra10 binbash
The local file will be mounted in the container under homeopnfvfunctestconfopenstackcreds
If the intention is to run Functest against any of the supported OPNFV scenarios it is recommended to include alsothe environment variable DEPLOY_SCENARIO for example
docker run -it -e INSTALLER_IP=102002 -e INSTALLER_TYPE=fuel -e DEPLOY_SCENARIO=os-odl_l2-nofeature-ha opnfvfunctestbrahmaputra10 binbash
Inside the container the following directory structure should be in place
`-- home`-- opnfv
|-- functest| |-- conf| |-- data| `-- results`-- repos
|-- bgpvpn|-- doctor|-- functest|-- odl_integration|-- onos|-- promise|-- rally|-- releng`-- vims-test
Basically the container includes
bull Functest directory to store the configuration (the OpenStack creds are stored inhomeopngbfunctestconfopenstackcreds) the data (cirros image needed for some tests) results (sometemporary result logs may be stored here)
52 Chapter 5 Post Configuration Activities
OPNFV Configuration Guide Release brahmaputra30 (605ebda)
bull Repositories the functest repository will be used to prepare the environment and run the tests Other repositoriesare used for the installation of the needed tooling (eg rally) andor the retrieval of feature projects scenarios(eg promise)
The structure under the Functest repository can be described as follows
|-- INFO|-- LICENSE|-- commons| |-- ims| |-- mobile| `-- traffic-profile-guidelinesrst|-- docker| |-- Dockerfile| |-- commonsh| |-- prepare_envsh| |-- requirementspip| `-- run_testssh|-- docs| |-- configguide| |-- devguide| |-- images| |-- results| `-- userguide`-- testcases
|-- Controllers|-- features|-- tests|-- VIM|-- vIMS|-- vPing|-- __init__py|-- config_functestpy|-- config_functestyaml`-- functest_utilspy
We may distinguish 4 different folders
bull commons it is a folder dedicated to store traffic profile or any test inputs that could be reused by any test project
bull docker this folder includes the scripts that will be used to setup the environment and run the tests
bull docs this folder includes the user and installationconfiguration guide
bull testcases this folder includes the scripts required by Functest internal test cases and other feature projects testcases
After the run command a new prompt appears which means that we are inside the container and ready to move to thenext step
Useful Docker commands
When typing exit in the container prompt this will cause exiting the container and probably stopping it Whenstopping a running Docker container all the changes will be lost there is a keyboard shortcut to quit the containerwithout stopping it CTRL+P+Q To reconnect to the running container DO NOT use the run command again (sinceit will create a new container) use exec instead
53 Additional testing and validation activities 53
OPNFV Configuration Guide Release brahmaputra30 (605ebda)
docker psltcopy the container IDgtdocker exec -ti ltCONTAINER_IDgt binbash
or simply
docker exec -ti $(docker ps|grep functest|awk print $1) binbash
There are other useful Docker commands that might be needed to manage possible issues with the containers
List the running containers
docker ps
List all the containers including the stopped ones
docker ps -a
It is useful sometimes to remove a container if there are some problems
docker rm ltCONTAINER_IDgt
Use the -f option if the container is still running it will force to destroy it
docker -f rm ltCONTAINER_IDgt
The Docker image is called opnfvfunctest and it is stored in the public Docker registry under the OPNFV accountdockerhub The are many different tags that have been created automatically by the CI mechanisms but the one thatthis document refers to is brahmaputra10 Pulling other tags might cause some problems while running the tests
Check the Docker documentation dockerdocs for more information
Preparing the Functest environment
Once the docker container is up and running execute the following command in the prompt
$repos_dirfunctestdockerprepare_envsh
NOTE $repos_dir is a default environment variable inside the docker container which points to homeopnfvrepos
This script will make sure that the requirements to run the tests are met and will install the needed libraries and toolsby all Functest test cases It must be run only once every time the docker is started from sratch
Focus on the OpenStack credentials
The OpenStack credentials are needed to run the tests against the VIM There are 3 ways to provide them to Functest
bull using the -v option when running the Docker container
bull create an empty file in homeopnfvfunctestconfopenstackcreds and paste the credentials in it
bull automatically retrieved using the following script $repos_dirrelengutilsfetch_os_credssh
Once the credentials are there they shall be sourced before running the tests
source homeopnfvfunctestconfopenstackcreds
or simply using the environment variable creds
54 Chapter 5 Post Configuration Activities
OPNFV Configuration Guide Release brahmaputra30 (605ebda)
$creds
After this try to run any OpenStack command to see if you get any output for instance
openstack user list
This will return a list of the actual users in the OpenStack deployment In any other case check that the credentialsare sourced
env|grep OS_
This command must show a set of environment variables starting with OS_ for example
OS_REGION_NAME=RegionOneOS_DEFAULT_DOMAIN=defaultOS_PROJECT_NAME=adminOS_PASSWORD=adminOS_AUTH_STRATEGY=keystoneOS_AUTH_URL=http172301035000v20OS_USERNAME=adminOS_TENANT_NAME=adminOS_ENDPOINT_TYPE=internalURLOS_NO_CACHE=true
If still the OpenStack command does not show anything or complains about connectivity issues it could be due to anincorrect url given to the OS_AUTH_URL environment variable Check the deployment settings
SSL Support
If you need to connect to a server that is TLS-enabled (the auth URL begins with lsquohttpsrsquo) and it uses a certificate froma private CA or a self-signed certificate you will need to specify the path to an appropriate CA certificate to use tovalidate the server certificate with the environment variable OS_CACERT
echo $OS_CACERTetcsslcertscacrt
However this certificate does not exist in the container by default It has to be copied manually from the OpenStackdeployment This can be done in 2 ways
1 Create manually that file and copy the contents from the OpenStack controller
2 (recommended) Add the file using a Docker volume when starting the container
-v ltpath_to_your_cert_filegtetcsslcertscacert
You might need to export OS_CACERT environment variable inside the container
export OS_CACERT=etcsslcertscacrt
Certificate verification can be turned off using OS_INSECURE=true For example Fuel uses self-signed cacerts bydefault so an pre step would be
export OS_INSECURE=true
Additional Options
In case you need to provide different configuration parameters to Functest (eg commit IDs or branches for therepositories ) copy the config_functestyaml from the repository to your current directory and run the container
53 Additional testing and validation activities 55
OPNFV Configuration Guide Release brahmaputra30 (605ebda)
with a volume
wget httpsgitopnfvorgcgitfunctestplaintestcasesconfig_functestyaml
ltmodify the file accordinglygt
docker run -ti -e INSTALLER_TYPE=fuel -e INSTALLER_IP=102002 opnfvfunctestbrahmaputra10 -v $(pwd)config_functestyamlhomeopnfvfunctestconfconfig_functestyaml binbash
However this is not recommended since most of the test cases rely on static parameters read from this file andchanging them might cause problems
Proxy support
Functest needs internet access to download some resources for some test cases For example to install the Rallyenvironment This might not work properly if the Jumphost is running through a Proxy
If that is the case make sure the resolvconf and the needed proxy environment variables are properly set
export http_proxy=ltyour http proxy settingsgtexport https_proxy=ltyour https proxy settingsgt
Or refer to the official Docker documentation for Proxy settings
Before running prepare_envsh make sure you can ping http and https sites inside the container For example
nc -v googlecom 80Connection to googlecom 80 port [tcphttp] succeeded
nc -v googlecom 443Connection to googlecom 443 port [tcphttps] succeeded
532 Installing vswitchperf
Supported Operating Systems
bull CentOS 7
bull Fedora 20
bull Fedora 21
bull Fedora 22
bull Ubuntu 1404
Supported vSwitches
The vSwitch must support Open Flow 13 or greater
bull OVS (built from source)
bull OVS with DPDK (built from source)
56 Chapter 5 Post Configuration Activities
OPNFV Configuration Guide Release brahmaputra30 (605ebda)
Supported Hypervisors
bull Qemu version 23
Available VNFs
A simple VNF that forwards traffic through a VM using
bull DPDK testpmd
bull Linux Brigde
bull custom l2fwd module
The VM image can be downloaded from httpartifactsopnfvorgvswitchperfvloop-vnf-ubuntu-1404_20151216qcow2
Other Requirements
The test suite requires Python 33 and relies on a number of other packages These need to be installed for the testsuite to function
Installation of required packages preparation of Python 3 virtual environment and compilation of OVS DPDK andQEMU is performed by script systemsbuild_base_machinesh It should be executed under user account which willbe used for vsperf execution
Please Note Password-less sudo access must be configured for given user account before script is executed
Execution of installation script
$ cd systems$ build_base_machinesh
Please Note you donrsquot need to go into any of the systems subdirectories simply run the top levelbuild_base_machinesh your OS will be detected automatically
Script build_base_machinesh will install all the vsperf dependencies in terms of system packages Python 3x andrequired Python modules In case of CentOS 7 it will install Python 33 from an additional repository provided bySoftware Collections (a link) Installation script will also use virtualenv to create a vsperf virtual environment whichis isolated from the default Python environment This environment will reside in a directory called vsperfenv in$HOME
You will need to activate the virtual environment every time you start a new shell session Its activation is specific toyour OS
CentOS 7
$ scl enable python33 bash$ cd $HOMEvsperfenv$ source binactivate
Fedora and Ubuntu
$ cd $HOMEvsperfenv$ source binactivate
53 Additional testing and validation activities 57
OPNFV Configuration Guide Release brahmaputra30 (605ebda)
Working Behind a Proxy
If yoursquore behind a proxy yoursquoll likely want to configure this before running any of the above For example
export http_proxy=proxymycompanycom123export https_proxy=proxymycompanycom123
533 Yardstick
The projectrsquos goal is to verify infrastructure compliance from the perspective of a Virtual Network Function (VNF)
The Projectrsquos scope is the development of a test framework Yardstick test cases and test stimuli to enable NetworkFunction Virtualization Infrastructure (NFVI) verification
In OPNFV Brahmaputra release generic test cases covering aspects of the metrics in the document ETSI GS NFV-TST001 ldquoPre-deployment Testing Report on Validation of NFV Environments and Servicesrdquo are available furtherOPNFV releases will provide extended testing of these metrics
The Project also includes a sample VNF the Virtual Traffic Classifier (VTC) and its experimental frameworkApexLake
Yardstick is used in OPNFV for verifying the OPNFV infrastructure and some of the OPNFV features The Yardstickframework is deployed in several OPNFV community labs It is installer infrastructure and application independent
See also
This Presentation for an overview of Yardstick and Yardsticktst for material on alignment ETSI TST001 and Yardstick
Yardstick Installation
Abstract
Yardstick currently supports installation on Ubuntu 1404 or by using a Docker image Detailed steps about installingYardstick using both of these options can be found below
To use Yardstick you should have access to an OpenStack environment with at least Nova Neutron Glance Keystoneand Heat installed
The steps needed to run Yardstick are
1 Install Yardstick and create the test configuration yaml file
2 Build a guest image and load the image into the OpenStack environment
3 Create a Neutron external network and load OpenStack environment variables
4 Run the test case
Installing Yardstick on Ubuntu 1404
Installing Yardstick framework Install dependencies
sudo apt-get install python-virtualenv python-devsudo apt-get install libffi-dev libssl-dev git
Create a python virtual environment source it and update setuptools
58 Chapter 5 Post Configuration Activities
OPNFV Configuration Guide Release brahmaputra30 (605ebda)
virtualenv ~yardstick_venvsource ~yardstick_venvbinactivateeasy_install -U setuptools
Download source code and install python dependencies
git clone httpsgerritopnfvorggerrityardstickcd yardstickpython setuppy install
There is also a YouTube video showing the above steps
Installing extra tools
yardstick-plot Yardstick has an internal plotting tool yardstick-plot which can be installed using the follow-ing command
python setuppy develop easy_install yardstick[plot]
Building a guest image Yardstick has a tool for building an Ubuntu Cloud Server image containing all the requiredtools to run test cases supported by Yardstick It is necessary to have sudo rights to use this tool
This image can be built using the following command while in the directory where Yardstick is installed(~yardstick if the framework is installed by following the commands above)
sudo toolsyardstick-img-modify toolsubuntu-server-cloudimg-modifysh
Warning the script will create files by default in tmpworkspaceyardstick and the files will be owned byroot
The created image can be added to OpenStack using the glance image-create or via the OpenStack Dashboard
Example command
glance --os-image-api-version 1 image-create --name yardstick-trusty-server --is-public true --disk-format qcow2 --container-format bare --file tmpworkspaceyardstickyardstick-trusty-serverimg
Installing Yardstick using Docker
Yardstick has two Docker images first one (Yardstick-framework) serves as a replacement for installing the Yardstickframework in a virtual environment (for example as done in Installing Yardstick framework) while the other image ismostly for CI purposes (Yardstick-CI)
Yardstick-framework image Download the source code
git clone httpsgerritopnfvorggerrityardstick
Build the Docker image and tag it as yardstick-framework
cd yardstickdocker build -t yardstick-framework
Run the Docker instance
53 Additional testing and validation activities 59
OPNFV Configuration Guide Release brahmaputra30 (605ebda)
docker run --name yardstick_instance -i -t yardstick-framework
To build a guest image for Yardstick see Building a guest image
Yardstick-CI image Pull the Yardstick-CI Docker image from Docker hub
docker pull opnfvyardstick-ci
Run the Docker image
docker run --privileged=true --rm -t -e INSTALLER_TYPE=$INSTALLER_TYPE -e INSTALLER_IP=$INSTALLER_IP opnfvyardstick-ci run_benchmarks
Where $INSTALLER_TYPE can be fuel foreman or compass and $INSTALLER_IP is the installer masternode IP address (ie 102002 is default for fuel)
Basic steps performed by the Yardstick-CI container
1 clone yardstick and releng repos
2 setup OS credentials (releng scripts)
3 install yardstick and dependencies
4 build yardstick cloud image and upload it to glance
5 upload cirros-033 cloud image to glance
6 run yardstick test scenarios
7 cleanup
OpenStack parameters and credentials
Yardstick-flavor Most of the sample test cases in Yardstick are using an OpenStack flavor called yardstick-flavorwhich deviates from the OpenStack standard m1tiny flavor by the disk size - instead of 1GB it has 3GB Otherparameters are the same as in m1tiny
Environment variables Before running Yardstick it is necessary to export OpenStack environment vari-ables from the OpenStack openrc file (using the source command) and export the external network nameexport EXTERNAL_NETWORK=external-network-name the default name for the external network isnet04_ext
Credential environment variables in the openrc file have to include at least
bull OS_AUTH_URL
bull OS_USERNAME
bull OS_PASSWORD
bull OS_TENANT_NAME
60 Chapter 5 Post Configuration Activities
OPNFV Configuration Guide Release brahmaputra30 (605ebda)
Yardstick default key pair Yardstick uses a SSH key pair to connect to the guest image This key pair can be foundin the resourcesfiles directory To run the ping-hotyaml test sample this key pair needs to be importedto the OpenStack environment
Examples and verifying the install
It is recommended to verify that Yardstick was installed successfully by executing some simple commands and testsamples Below is an example invocation of yardstick help command and pingpy test sample
yardstick -hyardstick task start samplespingyaml
Each testing tool supported by Yardstick has a sample configuration file These configuration files can be found in thesamples directory
Example invocation of yardstick-plot tool
yardstick-plot -i tmpyardstickout -o tmpplots
Default location for the output is tmpyardstickout
More info about the tool can be found by executing
yardstick-plot -h
53 Additional testing and validation activities 61

OPNFV Configuration Guide Release brahmaputra30 (605ebda)
The physical TOR switches are not automatically configured from the OPNFV reference platform All the networksinvolved in the OPNFV infrastructure as well as the provider networks and the private tenant VLANs needs to bemanually configured
The Jumphost can be installed using the bootable ISO or by other means including the (opnfv-apex) RPMs andvirtualization capabilities The Jumphost should then be configured with an IP gateway on its admin or public interfaceand configured with a working DNS server The Jumphost should also have routable access to the lights out network
opnfv-deploy is then executed in order to deploy the Instack VM opnfv-deploy uses three con-figuration files in order to know how to install and provision the OPNFV target system The in-formation gathered under section Execution Requirements (Bare Metal Only) is put into the YAML file(etcopnfv-apexinventoryyaml) configuration file Deployment options are put into the YAML file(etcopnfv-apexdeploy_settingsyaml) Networking definitions gathered under section Network Re-quirements are put into the YAML file (etcopnfv-apexnetwork_settingsyaml) opnfv-deploywill boot the Instack VM and load the target deployment configuration into the provisioning toolchain This includesMAC address IPMI Networking Environment and OPNFV deployment options
Once configuration is loaded and Instack is configured it will then reboot the nodes via IPMI The nodes should alreadybe set to PXE boot first off the admin interface The nodes will first PXE off of the Instack PXE server and go througha discoveryintrospection process
Introspection boots off of custom introspection PXE images These images are designed to look at the properties ofthe hardware that is booting off of them and report the properties of it back to the Instack node
After introspection Instack will execute a Heat Stack Deployment to being node provisioning and configuration Thenodes will reboot and PXE again off the Instack PXE server to provision each node using the Glance disk images pro-vided by Instack These disk images include all the necessary packages and configuration for an OPNFV deploymentto execute Once the nodersquos disk images have been written to disk the nodes will boot off the newly written disks andexecute cloud-init which will execute the final node configuration This configuration is largly completed by executinga puppet apply on each node
324 Installation High-Level Overview - VM Deployment
The VM nodes deployment operates almost the same way as the bare metal deployment with a few differencesopnfv-deploy still deploys an Instack VM In addition to the Instack VM a collection of VMs (3 control nodes +2 compute for an HA deployment or 1 control node and 1 compute node for a Non-HA Deployment) will be definedfor the target OPNFV deployment The part of the toolchain that executes IPMI power instructions calls into libvirtinstead of the IPMI interfaces on baremetal servers to operate the power managment These VMs are then provisionedwith the same disk images and configuration that baremetal would be
To RDO Manager these nodes look like they have just built and registered the same way as bare metal nodes the maindifference is the use of a libvirt driver for the power management
325 Installation Guide - Bare Metal Deployment
WARNING Baremetal documentation is not complete WARNING The main missing instructions are r elatedto bridging the networking for the undercloud to the physical underlay network for the overcloud to be deployedto
This section goes step-by-step on how to correctly install and provision the OPNFV target system to bare metal nodes
Install Bare Metal Jumphost
1a If your Jumphost does not have CentOS 7 already on it or you would like to do a fresh install then down-load the Apex bootable ISO from OPNFV artifacts lthttpartifactsopnfvorggt There have been isolated
10 Chapter 3 Installer Configuration
OPNFV Configuration Guide Release brahmaputra30 (605ebda)
reports of problems with the ISO having trouble completing installation successfully In the unexpectedevent the ISO does not work please workaround this by downloading the CentOS 7 DVD and perform-ing a ldquoVirtualization Hostrdquo install If you perform a ldquoMinimal Installrdquo or install type other than ldquoVirtu-alization Hostrdquo simply run sudo yum groupinstall Virtualization Host ampamp chkconfiglibvird on and reboot the host Once you have completed the base CentOS install proceed to step 1b
1b If your Jump host already has CentOS 7 with libvirt running on it then install the opnfv-apex RPMs fromOPNFV artifacts lthttpartifactsopnfvorggt The following RPMS are available for installation
bull opnfv-apex - OpenDaylight L2 L3 and ONOS support
bull opnfv-apex-opendaylight-sfc - OpenDaylight SFC support
bull opnfv-apex-undercloud (required)
bull opnfv-apex-common (required)
One or more of these RPMs is required If you only want the experimental SFC support then the opnfv-apexRPM is not required If you only want OpenDaylight or ONOS support then the opnfv-apex-opendaylight-sfcRPM is not required
To install these RPMs download them to the local disk on your CentOS 7 install and passthe file names directly to yum sudo yum install opnfv-apex-ltversiongtrpmopnfv-apex-undercloud-ltversiongtrpm opnfv-apex-common-ltversiongtrpm
2a Boot the ISO off of a USB or other installation media and walk through installing OPNFV CentOS 7 TheISO comes prepared to be written directly to a USB drive with dd as such
dd if=opnfv-apexiso of=devsdX bs=4M
Replace devsdX with the device assigned to your usb drive Then select the USB device as the boot media onyour Jumphost
2b Install the RDO Release RPM and the opnfv-apex RPM
sudo yum install -y httpswwwrdoprojectorgreposrdo-releaserpmopnfv-apex-versionrpm
The RDO Project release repository is needed to install OpenVSwitch which is a dependency of opnfv-apex If you do not have external connectivity to use this repository you need to download the Open-VSwitch RPM from the RDO Project repositories and install it with the opnfv-apex RPM
3 After the operating system and the opnfv-apex RPMs are installed login to your Jumphost as root
4 Configure IP addresses on the interfaces that you have selected as your networks
5 Configure the IP gateway to the Internet either preferably on the public interface
6 Configure your etcresolvconf to point to a DNS server (8888 is provided by Google)
Creating a Node Inventory File
IPMI configuration information gathered in section Execution Requirements (Bare Metal Only) needs to be added tothe inventoryyaml file
1 Copy usrsharedocopnfvinventoryyamlexample as your inventory file template toetcopnfv-apexinventoryyaml
2 The nodes dictionary contains a definition block for each baremetal host that will be deployed 1 or morecompute nodes and 3 controller nodes are required (The example file contains blocks for each of these already)It is optional at this point to add more compute nodes into the node list
3 Edit the following values for each node
32 Apex configuration 11
OPNFV Configuration Guide Release brahmaputra30 (605ebda)
bull mac_address MAC of the interface that will PXE boot from Instack
bull ipmi_ip IPMI IP Address
bull ipmi_user IPMI username
bull ipmi_password IPMI password
bull pm_type Power Management driver to use for the node
bull cpus (Introspected) CPU cores available
bull memory (Introspected) Memory available in Mib
bull disk (Introspected) Disk space available in Gb
bull arch (Introspected) System architecture
bull capabilities (Optional) Intended node role (profilecontrol or profilecompute)
bull Introspection looks up the overcloud nodersquos resources and overrides these value You can
leave default values and Apex will get the correct values when it runs introspection on the nodes
If capabilities profile is not specified then Apex will select nodersquos roles in the OPNFV cluster in a non-deterministicfashion
Creating the Settings Files
Edit the 2 settings files in etcopnfv-apex These files have comments to help you customize them
1 deploy_settingsyaml This file includes basic configuration options deployment
2 network_settingsyaml This file provides Apex with the networking information that satisfies the prerequisiteNetwork Requirements These are specific to your environment
Running opnfv-deploy
You are now ready to deploy OPNFV using Apex opnfv-deploy will use the inventory and settings files to deployOPNFV
Follow the steps below to execute
1 Execute opnfv-deploy sudo opnfv-deploy [ --flat | -n network_settingsyaml ] -iinventoryyaml -d deploy_settingsyaml If you need more information about the options thatcan be passed to opnfv-deploy use opnfv-deploy --help ndashflat will collapse all networks onto a singlenic -n network_settingsyaml allows you to customize your networking topology
2 Wait while deployment is executed If something goes wrong during this part of the process it is most likelya problem with the setup of your network or the information in your configuration files You will also noticedifferent outputs in your shell
3 The message ldquoOvercloud Deployedrdquo will display when When the deployment is complete Just above thismessage there will be a URL that ends in port httplthostgt5000 This url is also the endpoint for the OPNFVHorizon Dashboard if connected to on port 80
33 Compass4nfv configuration
This document describes providing guidelines on how to install and configure the Brahmaputra release of OPNFVwhen using Compass as a deployment tool including required software and hardware configurations
12 Chapter 3 Installer Configuration
OPNFV Configuration Guide Release brahmaputra30 (605ebda)
Installation and configuration of host OS OpenStack OpenDaylight ONOS Ceph etc can be supported by Compasson VMs or Bare Metal nodes
The audience of this document is assumed to have good knowledge in networking and UnixLinux administration
331 Preconditions
Before starting the installation of the Brahmaputra release of OPNFV some planning must be done
Retrieving the installation ISO image
First of all The installation ISO is needed for deploying your OPNFV environment it included packages of CompassOpenStack OpenDaylight ONOS and so on
The stable release ISO can be retrieved via OPNFV software download page
The daily build ISO can be retrieved via OPNFV artifacts repository
httpartifactsopnfvorg
NOTE Search the keyword ldquoCompass4nfvBrahmaputrardquo to locate the ISO image
Eg compass4nfvbrahmaputraopnfv-2016-01-16_15-03-18iso compass4nfvbrahmaputraopnfv-2016-01-16_15-03-18properties
The name of iso image includes the time of iso building you can get the daily ISO according the building time The giturl and sha1 of Compass4nfv are recorded in properties files According these the corresponding deployment scriptscan be retrieved
Getting the deployment scripts
To retrieve the repository of Compass4nfv on Jumphost use the following command
bull git clone httpsgerritopnfvorggerritcompass4nfv
To get stablebrahmaputra release you can use the following command
bull git checkout brahmaputra10
NOTE PLEASE DO NOT GIT CLONE COMPASS4NFV IN root DIRECTORY
If you donrsquot have a Linux foundation user id get it first by the url
httpswikiopnfvorgdevelopergetting_started
If you want to use a daily release ISO please checkout the corresponding sha1 to get the deployment scripts
Eg Git sha1 in file ldquoopnfv-2016-01-16_15-03-18propertiesrdquo is d5a13ce7cc2ce89946d34b0402ecf33c1d291851
bull git checkout d5a13ce7cc2ce89946d34b0402ecf33c1d291851
Preparing the installation environment
If you have only 1 Bare Metal server Virtual deployment is recommended if more than or equal 3 servers theBare Metal deployment is recommended The minimum number of servers for Bare metal deployment is 3 1 forJumpServer(Jumphost) 1 for controller 1 for compute
33 Compass4nfv configuration 13
OPNFV Configuration Guide Release brahmaputra30 (605ebda)
332 Setup Requirements
Jumphost Requirements
The Jumphost requirements are outlined below
1 Ubuntu 1404 (Pre-installed)
2 Root access
3 libvirt virtualization support
4 Minimum 2 NICs
bull PXE installation Network (Receiving PXE request from nodes and providing OS provisioning)
bull IPMI Network (Nodes power control and set boot PXE first via IPMI interface)
bull External Network (Optional Internet access)
5 16 GB of RAM for a Bare Metal deployment 64 GB of RAM for a VM deployment
6 Minimum 100G storage
Bare Metal Node Requirements
Bare Metal nodes require
1 IPMI enabled on OOB interface for power control
2 BIOS boot priority should be PXE first then local hard disk
3 Minimum 3 NICs
bull PXE installation Network (Broadcasting PXE request)
bull IPMI Network (Receiving IPMI command from Jumphost)
bull External Network (OpenStack mgmtexternalstoragetenant network)
Network Requirements
Network requirements include
1 No DHCP or TFTP server running on networks used by OPNFV
2 2-6 separate networks with connectivity between Jumphost and nodes
bull PXE installation Network
bull IPMI Network
bull Openstack mgmt Network
bull Openstack external Network
bull Openstack tenant Network
bull Openstack storage Network
3 Lights out OOB network access from Jumphost with IPMI node enabled (Bare Metal deployment only)
4 External network has Internet access meaning a gateway and DNS availability
14 Chapter 3 Installer Configuration
OPNFV Configuration Guide Release brahmaputra30 (605ebda)
The networks with() can be share one NIC(Default configuration) or use an exclusive NIC(Reconfigurated innetworkyml)
Execution Requirements (Bare Metal Only)
In order to execute a deployment one must gather the following information
1 IPMI IP addresses for the nodes
2 IPMI login information for the nodes (userpass)
3 MAC address of Control Plane Provisioning interfaces of the Bare Metal nodes
333 Installation Guide (BM Deployment)
Nodes Configuration (BM Deployment)
The bellow file is the inventory template of deployment nodes
ldquocompass4nfvdeployconfhardware_environmenthuawei_us_labpod1dhaymlrdquo
You can write your own IPMI IPUserPasswordMac addressroles reference to it
bull ipmiVer ndash IPMI interface version for deployment node support IPMI 10 or IPMI 20 is available
bull ipmiIP ndash IPMI IP address for deployment node Make sure it can access from Jumphost
bull ipmiUser ndash IPMI Username for deployment node
bull ipmiPass ndash IPMI Password for deployment node
bull mac ndash MAC Address of deployment node PXE NIC
bull name ndash Host name for deployment node after installation
bull roles ndash Components deployed
Assignment of different roles to servers
Eg Openstack only deployment roles setting
hosts- name host1roles
- controller- ha
- name host2roles
- compute
NOTE IF YOU SELECT MUTIPLE NODES AS CONTROLLER THE lsquoharsquo role MUST BE SELECT TOO
Eg Openstack and ceph deployment roles setting
hosts- name host1roles
- controller- ha- ceph-adm- ceph-mon
33 Compass4nfv configuration 15
OPNFV Configuration Guide Release brahmaputra30 (605ebda)
- name host2roles
- compute- ceph-osd
Eg Openstack and ODL deployment roles setting
hosts- name host1roles
- controller- ha- odl
- name host2roles
- compute
Eg Openstack and ONOS deployment roles setting
hosts- name host1roles
- controller- ha- onos
- name host2roles
- compute
Network Configuration (BM Deployment)
Before deployment there are some network configuration to be checked based on your network topology Com-pass4nfv network default configuration file is ldquocompass4nfvdeployconfnetwork_cfgyamlrdquo You can write yourown reference to it
The following figure shows the default network configuration
+--+ +--+ +--+| | | | | || | +------------+ | | | || +------+ Jumphost +------+ | | || | +------+-----+ | | | || | | | | | || | +------------+ +-----+ || | | | | || | +------------+ | | | || +------+ host1 +------+ | | || | +------+-----+ | | | || | | | | | || | +------------+ +-----+ || | | | | || | +------------+ | | | || +------+ host2 +------+ | | || | +------+-----+ | | | || | | | | | |
16 Chapter 3 Installer Configuration
OPNFV Configuration Guide Release brahmaputra30 (605ebda)
| | +------------+ +-----+ || | | | | || | +------------+ | | | || +------+ host3 +------+ | | || | +------+-----+ | | | || | | | | | || | +------------+ +-----+ || | | | | || | | | | |+-++ ++-+ +-++
^ ^ ^| | || | |
+-+-------------------------+ | || External Network | | |+---------------------------+ | |
+-----------------------+---+ || IPMI Network | |+---------------------------+ |
+-------------------------+-+| PXE(Installation) Network |+---------------------------+
Start Deployment (BM Deployment)
1 Set PXEInstallation NIC for Jumphost (set eth1 Eg)
export INSTALL_NIC=eth1
2 Set OS version for nodes provisioning (set Ubuntu1404 Eg)
export OS_VERSION=trusty
3 Set OpenStack version for deployment nodes (set liberty Eg)
export OPENSTACK_VERSION=liberty
4 Set ISO image that you want to deploy
export ISO_URL=file$YOUR_OWNcompassisoorexport ISO_URL=httpartifactsopnfvorgcompass4nfvbrahmaputraopnfv-releaseiso
5 Run deploysh with inventory and network configuration
deploysh --dha $YOUR_OWNdhayml --network $YOUR_OWNnetworkyml
34 Fuel configuration
This section provides guidelines on how to install and configure the Brahmaputra release of OPNFV when using Fuelas a deployment tool including required software and hardware configurations
For detailed instructions on how to install the Brahmaputra release using Fuel see Reference 13 in section ldquoFuelassociated referencesrdquo below
34 Fuel configuration 17
OPNFV Configuration Guide Release brahmaputra30 (605ebda)
341 Pre-configuration activities
Planning the deployment
Before starting the installation of the Brahmaputra release of OPNFV when using Fuel as a deployment tool someplanning must be done
Familiarize yourself with the Fuel by reading the following documents
bull Fuel planning guide please see Reference 8 in section ldquoFuel associated referencesrdquo below
bull Fuel quick start guide please see Reference 9 in section ldquoFuel associated referencesrdquo below
bull Fuel operations guide please see Reference 10 in section ldquoFuel associated referencesrdquo below
bull Fuel Plugin Developers Guide please see Reference 11 in section ldquoFuel associated referencesrdquo below
Before the installation can start a number of deployment specific parameters must be collected those are
1 Provider sub-net and gateway information
2 Provider VLAN information
3 Provider DNS addresses
4 Provider NTP addresses
5 Network overlay you plan to deploy (VLAN VXLAN FLAT)
6 Monitoring Options you want to deploy (Ceilometer Syslog etc)
7 How many nodes and what roles you want to deploy (Controllers Storage Computes)
8 Other options not covered in the document are available in the links above
Retrieving the ISO image
First of all the Fuel deployment ISO image needs to be retrieved the Fuel iso image of the Brahmaputra release canbe found at Reference 2
Alternatively you may build the iso from source by cloning the opnfvfuel git repository Detailed instructions onhow to build a Fuel OPNFV iso can be found in Reference 14 at section ldquoFuel associated referencesrdquo below
342 Hardware requirements
Following high level hardware requirements must be met
18 Chapter 3 Installer Configuration
OPNFV Configuration Guide Release brahmaputra30 (605ebda)
HW Aspect Requirement of nodes Minimum 5 (3 for non redundant deployment)
bull 1 Fuel deployment master (may be virtualized)bull 3(1) Controllers (1 colocated mongoceilometer
role 2 Ceph-OSD roles)bull 1 Compute (1 co-located Ceph-OSD role)
CPU Minimum 1 socket x86_AMD64 with Virtualizationsupport
RAM Minimum 16GBserver (Depending on VNF work load)Disk Minimum 256GB 10kRPM spinning disksNetworks 4 Tagged VLANs (PUBLIC MGMT STORAGE PRI-
VATE)1 Un-Tagged VLAN for PXE Boot - ADMIN Networknote These can be run on single NIC - or spread outover other nics as your hardware supports
For information on compatible hardware types available for use please see Reference 11 in section ldquoFuel associatedreferencesrdquo below
Top of the rack (TOR) Configuration requirements
The switching infrastructure provides connectivity for the OPNFV infrastructure operations tenant networks(EastWest) and provider connectivity (NorthSouth) it also provides needed connectivity for the Storage Area Net-work (SAN) To avoid traffic congestion it is strongly suggested that three physically separated networks are usedthat is 1 physical network for administration and control one physical network for tenant private and public networksand one physical network for SAN The switching connectivity can (but does not need to) be fully redundant in suchcase it and comprises a redundant 10GE switch pair for each of the three physically separated networks
The physical TOR switches are not automatically configured from the OPNFV reference platform All the networksinvolved in the OPNFV infrastructure as well as the provider networks and the private tenant VLANs needs to bemanually configured
343 Jumphost configuration
The Jumphost server also known as the ldquoFuel masterrdquo provides needed servicesfunctions to deploy an OP-NFVOpenStack cluster as well functions for cluster life-cycle management (extensions repair actions and upgrades)
The Jumphost server requires 2 (4 if redundancy is required) Ethernet interfaces - one for external management of theOPNFV installation and another for jump-host communication with the OPNFV cluster
Install the Fuel jump-host
Mount the Fuel Brahmaputra ISO file as a boot device to the jump host server reboot it and install the Fuel Jumphostin accordance with installation instructions see Reference 13 in section ldquoFuel associated referencesrdquo below
344 Platform components configuration
Fuel-Plugins
Fuel plugins enable you to install and configure additional capabilities for your Fuel OPNFV based cloud such asadditional storage types networking functionality or NFV features developed by OPNFV
34 Fuel configuration 19
OPNFV Configuration Guide Release brahmaputra30 (605ebda)
Fuel offers an open source framework for creating these plugins so therersquos a wide range of capabilities that you canenable Fuel to add to your OpenStack clouds
The OPNFV Brahmaputra version of Fuel provides a set of pre-packaged plugins developed by OPNFV
Pluginname
Short description
Open-Daylight
OpenDaylight provides an open-source SDN Controller providing networking features such as L2and L3 network control ldquoService Function Chainingrdquo routing networking policies etc Moreinformation on OpenDaylight in the OPNFV Brahmaputra release can be found in a separate sectionin this document
ONOS ONOS is another open-source SDN controller which in essense fill the same role as OpenDaylightMore information on ONOS in the OPNFV Brahmaputra release can be found in a separate section inthis document
BGP-VPN
BGP-VPN provides an BGPMPLS VPN service More information on BGP-VPN in the OPNFVBrahmaputra release can be found in a separate section in this document
OVS-NSH
OVS-NSH provides a variant of Open-vSwitch which supports ldquoNetwork Service Headersrdquo neededfor the ldquoService function chainingrdquo feature More information on ldquoService Function Chainingrdquo in theOPNFV Brahmaputra release can be found in a in a separate section in this document
OVS-NFV
OVS-NFV provides a variant of Open-vSwitch with carrier grade characteristics essential for NFVworkloads More information on OVS-NFV in the OPNFV Brahmaputra release can be found in a ina separate section in this document
KVM-NFV
KVM-NFV provides a variant of KVM with improved virtualization characteristics essential for NFVworkloads More information on KVM-NFV in the OPNFV Brahmaputra release can be found in a ina separate section in this document
VSPERF VSPERF provides a networking characteristics test bench that facilitates characteristicsperformanceevaluation of vSwithches More information on VSPERF in the OPNFV Brahmaputra release can befound in a in a separate section in this document
Additional third-party plugins can be found here httpswwwmirantiscomproductsopenstack-drivers-and-pluginsfuel-plugins Note Plugins are not necessarilly compatible with each other see section ldquoConfigurationoptions OPNFV scenariosrdquo for compatibility information
The plugins come prepackaged ready to install To do so follow the installation instructions provided in Reference 13provided in section ldquoFuel associated referencesrdquo below
Fuel environment
A Fuel environment is an OpenStack instance managed by Fuel one Fuel instance can manage several OpenStackinstancesenvironments with different configurations etc
To create a Fuel instance follow the instructions provided in the installation instructions see Reference 13 in sectionldquoFuel associated referencesrdquo below
Provisioning of aditional features and services
Although the plugins have already previously been installed they are not per default enabled for the environment wejust created The plugins of your choice need to be enabled and configured
To enable a plugin follow the installation instructions found in Reference 13 provided in section ldquoFuel associatedreferencesrdquo below
For configuration of the plugins please see section ldquoFeature Configurationrdquo
20 Chapter 3 Installer Configuration
OPNFV Configuration Guide Release brahmaputra30 (605ebda)
Networking
All the networking aspects need to be configured in terms of - InterfacesNICs - VLANs - Sub-nets - Gateways - Usernetwork segmentation (VLANVXLAN) - DNS - NTP - etc
For guidelines on how to configure networking please refer to the installation instructions found in Reference 13provided in section ldquoFuel associated referencesrdquo below
Node allocation
Now it is time to allocate the nodes in your OPNFV cluster to OpenStack- SDN- and other featureservice rolesSome roles may require redundancy while others donrsquot Some roles may be co-located with other roles while othersmay not The Fuel GUI will guide you in the allocation of roles and will not permit you to perform invalid allocations
For detailed guide-lines on node allocation please refer to the installation instructions found in Reference 13 providedin section ldquoFuel associated referencesrdquo below
Off-line deployment
The OPNFV Brahmaputra version of Fuel can be deployed using on-line upstream repositories (default) or off-lineusing built-in local repositories on the Fuel jump-start server
For instructions on how to configure Fuel for off-line deployment please refer to the installation instructions found inReference 13 provided in section ldquoFuel associated referencesrdquo below
Deployment
You should now be ready to deploy your OPNFV Brahmaputra environment - but before doing so you may want toverify your network settings
For further details on network verification and deployment please refer to the installation instructions found in Ref-erence 13 provided in section ldquoFuel associated referencesrdquo below
345 Fuel associated references
1 OPNFV Home Page
2 OPNFV documentation- and software downloads
3 OpenStack Liberty Release artifacts
4 OpenStack documentation
5 OpenDaylight artifacts
6 The Fuel OpenStack project
7 Fuel documentation overview
8 Fuel planning guide
9 Fuel quick start guide
10 Fuel operations guide
11 Fuel Plugin Developers Guide
12 Fuel OpenStack Hardware Compatibility List
34 Fuel configuration 21
OPNFV Configuration Guide Release brahmaputra30 (605ebda)
13 OPNFV Installation instruction for the Brahmaputra release of OPNFV when using Fuel as a deployment tool
14 OPNFV Build instruction for the Brahmaputra release of OPNFV when using Fuel as a deployment tool
15 OPNFV Release Note for the Brahmaputra release of OPNFV when using Fuel as a deployment tool
35 JOID Configuration
351 Bare Metal Installations
352 Requirements as per Pharos
353 Networking
Minimum 2 networks
1 First for Admin network with gateway to access external network
2 Second for public network to consume by tenants for floating ips
NOTE JOID support multiple isolated networks for data as well as storage Based on your network optionsfor Openstack
Minimum 6 physical servers
1 Jump host server
Minimum HW Spec needed
CPU cores 16
Memory 32 GB
Hard Disk 1(250 GB)
NIC eth0(Admin Management) eth1 (external network)
2 Control node servers (minimum 3)
Minimum HW Spec
CPU cores 16
Memory 32 GB
Hard Disk 1(500 GB)
NIC eth0(Admin Management) eth1 (external network)
3 Compute node servers (minimum 2)
Minimum HW Spec
CPU cores 16
Memory 32 GB
Hard Disk 1(1 TB) this includes the space for ceph as well
22 Chapter 3 Installer Configuration
OPNFV Configuration Guide Release brahmaputra30 (605ebda)
NIC eth0(Admin Management) eth1 (external network)
NOTE Above configuration is minimum and for better performance and usage of the Openstack please con-sider higher spec for each nodes
Make sure all servers are connected to top of rack switch and configured accord-ingly No DHCP server should be up and configured Only gateway at eth0 and eth1 network should be con-figure to access the network outside your lab
Jump node configuration
1 Install Ubuntu 1404 LTS server version of OS on the nodes 2 Install the git and bridge-utils pack-ages on the server and configure minimum two bridges on jump host
brAdm and brPublic cat etcnetworkinterfaces
The loopback network interface
auto lo
iface lo inet loopback
iface eth0 inet manual
auto brAdm
iface brAdm inet static
address 10411
netmask 2552552480
network 10400
broadcast 1047255
gateway 10401
dns- options are implemented by the resolvconf package if installed
dns-nameservers 10402
bridge_ports eth0
auto brPublic
iface brPublic inet static
address 102662
netmask 2552552550
bridge_ports eth2
NOTE If you choose to use the separate network for management data and storage then you need to createbridge for each interface In case of VLAN tags use the appropriate network on jump-host depend upon VLANID on the interface
354 Configure JOID for your lab
Get the joid code from gerritt
git clone httpsgerritopnfvorggerritpjoidgit
cd joidci
Enable MAAS
35 JOID Configuration 23
OPNFV Configuration Guide Release brahmaputra30 (605ebda)
bull Create a directory in maasltcompany namegtltpod numbergt for example
mkdir maasintelpod7
bull Copy files from pod5 to pod7
cp maasintelpod5 maasintelpod7
4 files will get copied deploymentyaml environmentsyaml interfaceshost lxc-add-more-interfaces
355 deploymentyaml file
Prerequisite
1 Make sure Jump host node has been configured with bridges on each interface so that appropriate MAAS and JUJUbootstrap VM can be created For example if you have three network admin data and public then I would suggestto give names like brAdm brData and brPublic 2 You have information about the node MAC address and powermanagement details (IPMI IP username password) of the nodes used for control and compute node
356 modify deploymentyaml
This file has been used to configure your maas and bootstrap node in a VM Comments in the file are self explanatoryand we expect fill up the information according to match lab infrastructure information Sample deploymentyaml canbe found at httpsgerritopnfvorggerritgitwebp=joidgita=blobf=cimaasintelpod5deploymentyaml
modify joidci01-deploybundlesh
under section case $3 add the intelpod7 section and make sure you have information provided correctly Beforeexample consider your network has 1921681024 your default network and eth1 is on public network which will beused to assign the floating ip
rsquointelpod7rsquo )
As per your lab vip address list be deafult uses 104111 - 104120
sed -i -- rsquos1041119216812grsquo bundlesyaml
Choose the external port to go out from gateway to use
sed -i -- rsquos ext-port eth1 ext-port eth1grsquo bundlesyaml
NOTE If you are using seprate data network then add this line below also along with other changes which representsnetwork 1049024 will be used for data network for openstack
sed -i -- rsquosos-data-network 1048021os-data-network 1049024grsquo bundlesyaml
modify joidci02-maasdeploysh
under section case $1 add the intelpod7 section and make sure you have information provided correctly
24 Chapter 3 Installer Configuration
OPNFV Configuration Guide Release brahmaputra30 (605ebda)
rsquointelpod7rsquo )
cp maasintelpod7deploymentyaml deploymentyaml
NOTE If you are using VLAN tags or more network for data and storage then make sure you modify the case $1section under Enable vlan interface with maas appropriately In the example below eth2 has been used as separate datanetwork for tenants in openstack with network 1049024 on compute and control nodes
rsquointelpod7rsquo )
maas refresh
enableautomodebyname eth2 AUTO 1049024 compute || true
enableautomodebyname eth2 AUTO 1049024 control || true
MAAS Install
After integrating the changes as mentioned above run the MAAS install Suppose you name the integration lab asintelpod7 then run the below commands to start the MAAS deployment
02-maasdeploysh intelpod7
This will take approximately 40 minutes to couple hours depending on your environment This script will do thefollowing
1 Create 2 VMs (KVM)
2 Install MAAS in one of the VMs
3 Configure the MAAS to enlist and commission a VM for Juju bootstrap node
4 Configure the MAAS to enlist and commission bare metal servers
When itrsquos done you should be able to view MAAS webpage (httpltMAAS IPgtMAAS) and see 1 bootstrap nodeand bare metal servers in the lsquoReadyrsquo state on the nodes page
Virtual deployment
By default just running the script 02-maasdeploysh will automatically create the KVM VMs on a single machineand configure everything for you
OPNFV Install
JOID allows you to deploy different combinations of OpenStack release and SDN solution in HA or non-HA mode
For OpenStack it supports Juno and Liberty For SDN it supports Openvswitch OpenContrail OpenDayLight andONOS
In addition to HA or non-HA mode it also supports to deploy the latest from the development tree (tip)
The deploysh in the joidci directoy will do all the work for you For example the following deploy OpenStack Liberywith OpenDayLight in a HA mode in the Intelpod7
35 JOID Configuration 25
OPNFV Configuration Guide Release brahmaputra30 (605ebda)
deploysh -o liberty -s odl -t ha -l intelpod7 -f none
By default the SDN is Openvswitch non-HA Liberty Intelpod5 OPNFV Brahmaputra release and ODL_L2 for theOPNFV feature
Possible options for each choice are as follows
[-s ]
nosdn openvswitch only and no other SDN
odl OpenDayLight Lithium version
opencontrail OpenContrail SDN
onos ONOS framework as SDN
[-t ]
nonha NO HA mode of Openstack
ha HA mode of openstack
tip the tip of the development
[-o ]
juno OpenStack Juno version
liberty OpenStack Liberty version
[-l ] etc
default For virtual deployment where installation will be done on KVM created using 02-maasdeploysh
intelpod5 Install on bare metal OPNFV pod5 of Intel lab
intelpod6
orangepod2
(other pods)
Note if you make changes as per your pod above then please use your pod
[-f ]
none no special feature will be enabled
ipv6 ipv6 will be enabled for tenant in openstack
By default debug is enabled in script and error messages will be printed on the SSH terminal where you are runningthe scripts It could take an hour to couple hours (max) to complete
Is the deployment done successfully
Once juju-deployer is complete use juju status to verify that all deployed unit are in the ready state
26 Chapter 3 Installer Configuration
OPNFV Configuration Guide Release brahmaputra30 (605ebda)
juju status --format tabular
Find the Openstack-dashboard IP address from the juju status output and see if you can log in via browser Theusername and password is adminopenstack
Optionall see if you can log in Juju GUI Juju GUI is on the Juju bootstrap node which is the second VM you definein the 02-maasdeploysh The username and password is adminadmin
If you deploy ODL OpenContrail or ONOS find the IP address of the web UI and login Please refer to each SDNbundleyaml for usernamepassword
Troubleshoot
To access to any deployed units juju ssh for example to login into nova-compute unit and look for varlogjujuunit-ltof interestgt for more info
juju ssh nova-compute0
Example
ubuntuR4N4B1~$ juju ssh nova-compute0
Warning Permanently added rsquo172165060rsquo (ECDSA) to the list of knownhosts
Warning Permanently added rsquo3-r4n3b1-computemaasrsquo (ECDSA) to the list ofknown hosts
Welcome to Ubuntu 14041 LTS (GNULinux 3130-77-generic x86_64)
Documentation httpshelpubuntucom
ltskippedgt
Last login Tue Feb 2 212356 2016 from bootstrapmaas
ubuntu3-R4N3B1-compute~$ sudo -i
root3-R4N3B1-compute~ cd varlogjuju
root3-R4N3B1-computevarlogjuju ls
machine-2log unit-ceilometer-agent-0log unit-ceph-osd-0logunit-neutron-contrail-0log unit-nodes-compute-0log unit-nova-compute-0logunit-ntp-0log
root3-R4N3B1-computevarlogjuju
By default juju will add the Ubuntu user keys for authentication into the deployed server and only ssh accesswill be available
Once you resolve the error go back to the jump host to rerun the charm hook with
juju resolved --retry ltunitgt
35 JOID Configuration 27
OPNFV Configuration Guide Release brahmaputra30 (605ebda)
28 Chapter 3 Installer Configuration
CHAPTER
FOUR
FEATURE CONFIGURATION
The following sections describe the configuration options for specific platform features provided in BrahmaputraFurther details for each feature are captured in the referred project documentation
41 Copper configuration
This release focused on use of the OpenStack Congress service for managing configuration policy The Congress installprocedure described here is largely manual This procedure as well as the longer-term goal of automated installersupport is a work in progress The procedure is further specific to one OPNFV installer (JOID ie MAASJuJu)based environment Support for other OPNFV installer deployed environments is also a work in progress
411 Pre-configuration activities
This procedure assumes OPNFV has been installed via the JOID installer
412 Hardware configuration
There is no specific hardware configuration required for the Copper project
413 Feature configuration
Following are instructions for installing Congress on an Ubuntu 1404 LXC container in the OPNFV Controller nodeas installed by the JOID installer This guide uses instructions from the Congress intro guide on readthedocs Specificvalues below will need to be modified if you intend to repeat this procedure in your JOID-based install environment
Install Procedure
The install currently occurs via four bash scripts provided in the copper repo See these files for the detailed steps
bull install_congress_1sh creates and starts the linux container for congress on the controller node copiesinstall_congress_2sh to the controller node and invokes it via ssh
bull install_congress_2sh installs congress on the congress server
29
OPNFV Configuration Guide Release brahmaputra30 (605ebda)
Cleanup Procedure
If there is an error during installation use the bash script clean_congresssh which stops the congress server if runningand removes the congress user and service from the controller database
Restarting after server power loss etc
Currently this install procedure is manual Automated install and restoral after host recovery is TBD For now thisprocedure will get the Congress service running again
On jumphost SSH to Congress serversource ~envshjuju ssh ubuntu$CONGRESS_HOST If that fails
On jumphost SSH to controller nodejuju ssh ubuntunode1-control Start the Congress containersudo lxc-start -n juju-trusty-congress -d Verify the Congress container statussudo lxc-ls -f juju-trusty-congressNAME STATE IPV4 IPV6 GROUPS AUTOSTART----------------------------------------------------------------------juju-trusty-congress RUNNING 19216810117 - - NO exit back to the Jumphost wait a minute and go back to the SSH to Congress server step above
On the Congress server that you have logged intosource ~admin-openrcshcd ~gitcongresssource binactivatebincongress-server ampdisown -h 1
42 Doctor Configuration
421 Doctor Inspector
Doctor Inspector is suggested to be placed in one of the controller nodes but it can be put on any host where DoctorMonitor can reach and accessible to the OpenStack Controller (Nova)
Make sure OpenStack env parameters are set properly so that Doctor Inspector can issue admin actions such ascompute host force-down and state update of VM
Then you can configure Doctor Inspector as follows
git clone httpsgerritopnfvorggerritdoctor -b stablebrahmaputracd doctortestsINSPECTOR_PORT=12345python inspectorpy $INSPECTOR_PORT gt inspectorlog 2gtamp1 amp
422 Doctor Monitor
Doctor Monitors are suggested to be placed in one of the controller nodes but those can be put on any host whichis reachable to target compute host and accessible to the Doctor Inspector You need to configure Monitors for allcompute hosts one by one
30 Chapter 4 Feature Configuration
OPNFV Configuration Guide Release brahmaputra30 (605ebda)
Make sure OpenStack env parameters are set properly so that Doctor Inspector can issue admin actions such ascompute host force-down and state update of VM
Then you can configure Doctor Monitor as follows
git clone httpsgerritopnfvorggerritdoctor -b stablebrahmaputracd doctortestsINSPECTOR_PORT=12345COMPUTE_HOST=overcloud-novacompute-0sudo python monitorpy $COMPUTE_HOST
http127001$INSPECTOR_PORTevents gt monitorlog 2gtamp1 amp
43 IPv6 Configuration - Setting Up a Service VM as an IPv6 vRouter
This section provides instructions to set up a service VM as an IPv6 vRouter using OPNFV Brahmaputra Releaseinstallers The environment may be pure OpenStack option or Open Daylight L2-only option The deployment modelmay be HA or non-HA The infrastructure may be bare metal or virtual environment
For complete instructions and documentations of setting up service VM as an IPv6 vRouter using ANY method pleaserefer to
1 IPv6 Configuration Guide (HTML) httpartifactsopnfvorgipv6docssetupservicevmindexhtml
2 IPv6 User Guide (HTML) httpartifactsopnfvorgipv6docsgapanalysisindexhtml
431 Pre-configuration Activities
The configuration will work in 2 environments
1 OpenStack-only environment
2 OpenStack with Open Daylight L2-only environment
Depending on which installer will be used to deploy OPNFV each environment may be deployed on bare metal orvirtualized infrastructure Each deployment may be HA or non-HA
Refer to the previous installer configuration chapters installations guide and release notes
432 Setup Manual in OpenStack-Only Environment
If you intend to set up a service VM as an IPv6 vRouter in OpenStack-only environment of OPNFV BrahmaputraRelease please NOTE that
bull Because the anti-spoofing rules of Security Group feature in OpenStack prevents a VM from forwarding packetswe need to disable Security Group feature in the OpenStack-only environment
bull The hostnames IP addresses and username are for exemplary purpose in instructions Please change as neededto fit your environment
bull The instructions apply to both deployment model of single controller node and HA (High Availability) deploy-ment model where multiple controller nodes are used
43 IPv6 Configuration - Setting Up a Service VM as an IPv6 vRouter 31
OPNFV Configuration Guide Release brahmaputra30 (605ebda)
Install OPNFV and Preparation
OPNFV-NATIVE-INSTALL-1 To install OpenStack-only environment of OPNFV Brahmaputra Release
Apex Installer
HA deployment in OpenStack-only environmentopnfv-deploy -d etcopnfv-apexos-nosdn-nofeature-hayaml
Non-HA deployment in OpenStack-only environment Non-HA deployment is currently not supported by Apex installer
Compass Installer
HA deployment in OpenStack-only environmentexport ISO_URL=file$BUILD_DIRECTORYcompassisoexport OS_VERSION=$COMPASS_OS_VERSIONexport OPENSTACK_VERSION=$COMPASS_OPENSTACK_VERSIONexport CONFDIR=$WORKSPACEdeployconfvm_environmentdeploysh --dha $CONFDIRos-nosdn-nofeature-hayml --network $CONFDIR$NODE_NAMEnetworkyml
Non-HA deployment in OpenStack-only environment Non-HA deployment is currently not supported by Compass installer
Fuel Installer
HA deployment in OpenStack-only environmentdeploysh -s os-nosdn-nofeature-ha
Non-HA deployment in OpenStack-only environmentdeploysh -s os-nosdn-nofeature-noha
Joid Installer
HA deployment in OpenStack-only environmentdeploysh -o liberty -s nosdn -t ha -l default -f ipv6
Non-HA deployment in OpenStack-only environmentdeploysh -o liberty -s nosdn -t nonha -l default -f ipv6
Please NOTE that
bull You need to refer to installerrsquos documentation for other necessary parameters applicable to your deployment
bull You need to refer to Release Notes and installerrsquos documentation if there is any issue in installation
OPNFV-NATIVE-INSTALL-2 Clone the following GitHub repository to get the configuration and metadata files
git clone httpsgithubcomsridhargaddamopnfv_os_ipv6_pocgit optstackopnfv_os_ipv6_poc
Disable Security Groups in OpenStack ML2 Setup
OPNFV-NATIVE-SEC-1 Change the settings in etcneutronpluginsml2ml2_confini as follows
etcneutronpluginsml2ml2_confini[securitygroup]extension_drivers = port_security
32 Chapter 4 Feature Configuration
OPNFV Configuration Guide Release brahmaputra30 (605ebda)
enable_security_group = Falsefirewall_driver = neutronagentfirewallNoopFirewallDriver
OPNFV-NATIVE-SEC-2 Change the settings in etcnovanovaconf as follows
etcnovanovaconf[DEFAULT]security_group_api = novafirewall_driver = novavirtfirewallNoopFirewallDriver
OPNFV-NATIVE-SEC-3 After updating the settings you will have to restart the Neutron and Nova services
Please note that the commands of restarting Neutron and Nova would vary depending on the installer Pleaserefer to relevant documentation of specific installers
Set Up Service VM as IPv6 vRouter
OPNFV-NATIVE-SETUP-1 Now we assume that OpenStack multi-node setup is up and running We have to sourcethe tenant credentials in this step Please NOTE that the method of sourcing tenant credentials may vary dependingon installers For example
Apex installer
source the tenant credentials using Apex installer of OPNFV you need to copy the file homestackovercloudrc from the installer VM called instack to a location in controller node for example in the directory optsource optovercloudrc
Compass installer
source the tenant credentials using Compass installer of OPNFVsource optadmin-openrcsh
Fuel installer
source the tenant credentials using Fuel installer of OPNFVsource rootopenrc
Joid installer
source the tenant credentials using Joid installer of OPNFVsource $HOMEjoid_configadmin-openrc
devstack
source the tenant credentials in devstacksource openrc admin demo
Please refer to relevant documentation of installers if you encounter any issue
OPNFV-NATIVE-SETUP-2 Download fedora22 image which would be used for vRouter
wget httpsdownloadfedoraprojectorgpubfedoralinuxreleases22Cloudx86_64ImagesFedora-Cloud-Base-22-20150521x86_64qcow2
OPNFV-NATIVE-SETUP-3 Import Fedora22 image to glance
glance image-create --name Fedora22 --disk-format qcow2 --container-format bare --file Fedora-Cloud-Base-22-20150521x86_64qcow2
43 IPv6 Configuration - Setting Up a Service VM as an IPv6 vRouter 33
OPNFV Configuration Guide Release brahmaputra30 (605ebda)
OPNFV-NATIVE-SETUP-4 This step is Informational OPNFV Installer has taken care of this step duringdeployment You may refer to this step only if there is any issue or if you are using other installers
We have to move the physical interface (ie the public network interface) to br-ex including moving the publicIP address and setting up default route Please refer to OS-NATIVE-SETUP-4 and OS-NATIVE-SETUP-5 in ourmore complete instruction
OPNFV-NATIVE-SETUP-5 Create Neutron routers ipv4-router and ipv6-router which need to provideexternal connectivity
neutron router-create ipv4-routerneutron router-create ipv6-router
OPNFV-NATIVE-SETUP-6 Create an external networksubnet ext-net using the appropriate values based on thedata-center physical network setup
Please NOTE that you may only need to create the subnet of ext-net because OPNFV installers should have createdan external network during installation You must use the same name of external network that installer creates whenyou create the subnet For example
bull Apex installer external
bull Compass installer ext-net
bull Fuel installer net04_ext
bull Joid installer ext-net
Please refer to the documentation of installers if there is any issue
This is needed only if installer does not create an external work Otherwise skip this command net-createneutron net-create --routerexternal ext-net
Note that the name ext-net may work for some installers such as Compass and Joid Change the name ext-net to match the name of external network that an installer createsneutron subnet-create --disable-dhcp --allocation-pool start=19859156251end=19859156254 --gateway 198591561 ext-net 19859156024
OPNFV-NATIVE-SETUP-7 Create Neutron networks ipv4-int-network1 and ipv6-int-network2 withport_security disabled
neutron net-create --port_security_enabled=False ipv4-int-network1neutron net-create --port_security_enabled=False ipv6-int-network2
OPNFV-NATIVE-SETUP-8 Create IPv4 subnet ipv4-int-subnet1 in the internal networkipv4-int-network1 and associate it to ipv4-router
neutron subnet-create --name ipv4-int-subnet1 --dns-nameserver 8888 ipv4-int-network1 2000024
neutron router-interface-add ipv4-router ipv4-int-subnet1
OPNFV-NATIVE-SETUP-9 Associate the ext-net to the Neutron routers ipv4-router and ipv6-router
Note that the name ext-net may work for some installers such as Compass and Joid Change the name ext-net to match the name of external network that an installer createsneutron router-gateway-set ipv4-router ext-netneutron router-gateway-set ipv6-router ext-net
OPNFV-NATIVE-SETUP-10 Create two subnets one IPv4 subnet ipv4-int-subnet2 and one IPv6 subnetipv6-int-subnet2 in ipv6-int-network2 and associate both subnets to ipv6-router
34 Chapter 4 Feature Configuration
OPNFV Configuration Guide Release brahmaputra30 (605ebda)
neutron subnet-create --name ipv4-int-subnet2 --dns-nameserver 8888 ipv6-int-network2 1000024
neutron subnet-create --name ipv6-int-subnet2 --ip-version 6 --ipv6-ra-mode slaac --ipv6-address-mode slaac ipv6-int-network2 2001db80164
neutron router-interface-add ipv6-router ipv4-int-subnet2neutron router-interface-add ipv6-router ipv6-int-subnet2
OPNFV-NATIVE-SETUP-11 Create a keypair
nova keypair-add vRouterKey gt ~vRouterKey
OPNFV-NATIVE-SETUP-12 Create ports for vRouter (with some specific MAC address - basically for automation- to know the IPv6 addresses that would be assigned to the port)
neutron port-create --name eth0-vRouter --mac-address fa163e111111 ipv6-int-network2neutron port-create --name eth1-vRouter --mac-address fa163e222222 ipv4-int-network1
OPNFV-NATIVE-SETUP-13 Create ports for VM1 and VM2
neutron port-create --name eth0-VM1 --mac-address fa163e333333 ipv4-int-network1neutron port-create --name eth0-VM2 --mac-address fa163e444444 ipv4-int-network1
OPNFV-NATIVE-SETUP-14 Update ipv6-router with routing information to subnet 2001db80264
neutron router-update ipv6-router --routes type=dict list=true destination=2001db80264nexthop=2001db801f8163efffe111111
OPNFV-NATIVE-SETUP-15 Boot Service VM (vRouter) VM1 and VM2
nova boot --image Fedora22 --flavor m1small --user-data optstackopnfv_os_ipv6_pocmetadatatxt --availability-zone novaopnfv-os-compute --nic port-id=$(neutron port-list | grep -w eth0-vRouter | awk print $2) --nic port-id=$(neutron port-list | grep -w eth1-vRouter | awk print $2) --key-name vRouterKey vRouter
nova list
Please wait for some 10 to 15 minutes so that necessary packages (like radvd) are installed and vRouter is upnova console-log vRouter
nova boot --image cirros-034-x86_64-uec --flavor m1tiny --user-data optstackopnfv_os_ipv6_pocset_mtush --availability-zone novaopnfv-os-controller --nic port-id=$(neutron port-list | grep -w eth0-VM1 | awk print $2) --key-name vRouterKey VM1
nova boot --image cirros-034-x86_64-uec --flavor m1tiny--user-data optstackopnfv_os_ipv6_pocset_mtush --availability-zone novaopnfv-os-compute --nic port-id=$(neutron port-list | grep -w eth0-VM2 | awk print $2) --key-name vRouterKey VM2
nova list Verify that all the VMs are in ACTIVE state
OPNFV-NATIVE-SETUP-16 If all goes well the IPv6 addresses assigned to the VMs would be as shown as follows
43 IPv6 Configuration - Setting Up a Service VM as an IPv6 vRouter 35
OPNFV Configuration Guide Release brahmaputra30 (605ebda)
vRouter eth0 interface would have the following IPv6 address 2001db801f8163efffe11111164 vRouter eth1 interface would have the following IPv6 address 2001db802164 VM1 would have the following IPv6 address 2001db802f8163efffe33333364 VM2 would have the following IPv6 address 2001db802f8163efffe44444464
OPNFV-NATIVE-SETUP-17 Now we can SSH to VMs You can execute the following command
1 Create a floatingip and associate it with VM1 VM2 and vRouter (to the port id that is passed) Note that the name ext-net may work for some installers such as Compass and Joid Change the name ext-net to match the name of external network that an installer createsneutron floatingip-create --port-id $(neutron port-list | grep -w eth0-VM1 | awk print $2) ext-netneutron floatingip-create --port-id $(neutron port-list | grep -w eth0-VM2 | awk print $2) ext-netneutron floatingip-create --port-id $(neutron port-list | grep -w eth1-vRouter | awk print $2) ext-net
2 To know display the floatingip associated with VM1 VM2 and vRouterneutron floatingip-list -F floating_ip_address -F port_id | grep $(neutron port-list | grep -w eth0-VM1 | awk print $2) | awk print $2neutron floatingip-list -F floating_ip_address -F port_id | grep $(neutron port-list | grep -w eth0-VM2 | awk print $2) | awk print $2neutron floatingip-list -F floating_ip_address -F port_id | grep $(neutron port-list | grep -w eth1-vRouter | awk print $2) | awk print $2
3 To ssh to the vRouter VM1 and VM2 user can execute the following commandssh -i ~vRouterKey fedoraltfloating-ip-of-vRoutergtssh -i ~vRouterKey cirrosltfloating-ip-of-VM1gtssh -i ~vRouterKey cirrosltfloating-ip-of-VM2gt
433 Setup Manual in OpenStack with Open Daylight L2-Only Environment
If you intend to set up a service VM as an IPv6 vRouter in an environment of OpenStack and Open Daylight L2-onlyof OPNFV Brahmaputra Release please NOTE that
bull The hostnames IP addresses and username are for exemplary purpose in instructions Please change as neededto fit your environment
bull The instructions apply to both deployment model of single controller node and HA (High Availability) deploy-ment model where multiple controller nodes are used
bull However in case of HA when ipv6-router is created in step SETUP-SVM-11 it could be created in anyof the controller node Thus you need to identify in which controller node ipv6-router is created in orderto manually spawn radvd daemon inside the ipv6-router namespace in steps SETUP-SVM-24 throughSETUP-SVM-30
Install OPNFV and Preparation
OPNFV-INSTALL-1 To install OpenStack with Open Daylight L2-only environment of OPNFV Brahmaputra Re-lease
Apex Installer
36 Chapter 4 Feature Configuration
OPNFV Configuration Guide Release brahmaputra30 (605ebda)
HA deployment in OpenStack with Open Daylight L2-only environmentopnfv-deploy -d etcopnfv-apexos-odl_l2-nofeature-hayaml
Non-HA deployment in OpenStack with Open Daylight L2-only environment Non-HA deployment is currently not supported by Apex installer
Compass Installer
HA deployment in OpenStack with Open Daylight L2-only environmentexport ISO_URL=file$BUILD_DIRECTORYcompassisoexport OS_VERSION=$COMPASS_OS_VERSIONexport OPENSTACK_VERSION=$COMPASS_OPENSTACK_VERSIONexport CONFDIR=$WORKSPACEdeployconfvm_environmentdeploysh --dha $CONFDIRos-odl_l2-nofeature-hayml --network $CONFDIR$NODE_NAMEnetworkyml
Non-HA deployment in OpenStack with Open Daylight L2-only environment Non-HA deployment is currently not supported by Compass installer
Fuel Installer
HA deployment in OpenStack with Open Daylight L2-only environmentdeploysh -s os-odl_l2-nofeature-ha
Non-HA deployment in OpenStack with Open Daylight L2-only environmentdeploysh -s os-odl_l2-nofeature-noha
Joid Installer
HA deployment in OpenStack with Open Daylight L2-only environmentdeploysh -o liberty -s odl -t ha -l default -f ipv6
Non-HA deployment in OpenStack with Open Daylight L2-only environmentdeploysh -o liberty -s odl -t nonha -l default -f ipv6
Please NOTE that
bull You need to refer to installerrsquos documentation for other necessary parameters applicable to your deployment
bull You need to refer to Release Notes and installerrsquos documentation if there is any issue in installation
OPNFV-INSTALL-2 Clone the following GitHub repository to get the configuration and metadata files
git clone httpsgithubcomsridhargaddamopnfv_os_ipv6_pocgit optstackopnfv_os_ipv6_poc
Disable Security Groups in OpenStack ML2 Setup
Please NOTE that although Security Groups feature has been disabled automatically through localconf configu-ration file by some installers such as devstack it is very likely that other installers such as Apex Compass Fuelor Joid will enable Security Groups feature after installation
Please make sure that Security Groups are disabled in the setup
OPNFV-SEC-1 Change the settings in etcneutronpluginsml2ml2_confini as follows
etcneutronpluginsml2ml2_confini[securitygroup]enable_security_group = Falsefirewall_driver = neutronagentfirewallNoopFirewallDriver
43 IPv6 Configuration - Setting Up a Service VM as an IPv6 vRouter 37
OPNFV Configuration Guide Release brahmaputra30 (605ebda)
OPNFV-SEC-2 Change the settings in etcnovanovaconf as follows
etcnovanovaconf[DEFAULT]security_group_api = novafirewall_driver = novavirtfirewallNoopFirewallDriver
OPNFV-SEC-3 After updating the settings you will have to restart the Neutron and Nova services
Please note that the commands of restarting Neutron and Nova would vary depending on the installer Pleaserefer to relevant documentation of specific installers
Source the Credentials in OpenStack Controller Node
SETUP-SVM-1 Login in OpenStack Controller Node Start a new terminal and change directory to where Open-Stack is installed
SETUP-SVM-2 We have to source the tenant credentials in this step Please NOTE that the method of sourcingtenant credentials may vary depending on installers For example
Apex installer
source the tenant credentials using Apex installer of OPNFV you need to copy the file homestackovercloudrc from the installer VM called instack to a location in controller node for example in the directory optsource optovercloudrc
Compass installer
source the tenant credentials using Compass installer of OPNFVsource optadmin-openrcsh
Fuel installer
source the tenant credentials using Fuel installer of OPNFVsource rootopenrc
Joid installer
source the tenant credentials using Joid installer of OPNFVsource $HOMEjoid_configadmin-openrc
devstack
source the tenant credentials in devstacksource openrc admin demo
Please refer to relevant documentation of installers if you encounter any issue
Informational Note Move Public Network from Physical Network Interface to br-ex
SETUP-SVM-3 Move the physical interface (ie the public network interface) to br-ex
SETUP-SVM-4 Verify setup of br-ex
Those 2 steps are Informational OPNFV Installer has taken care of those 2 steps during deployment You mayrefer to this step only if there is any issue or if you are using other installers
38 Chapter 4 Feature Configuration
OPNFV Configuration Guide Release brahmaputra30 (605ebda)
We have to move the physical interface (ie the public network interface) to br-ex including moving the publicIP address and setting up default route Please refer to SETUP-SVM-3 and SETUP-SVM-4 in our more completeinstruction
Create IPv4 Subnet and Router with External Connectivity
SETUP-SVM-5 Create a Neutron router ipv4-router which needs to provide external connectivity
neutron router-create ipv4-router
SETUP-SVM-6 Create an external networksubnet ext-net using the appropriate values based on the data-centerphysical network setup
Please NOTE that you may only need to create the subnet of ext-net because OPNFV installers should have createdan external network during installation You must use the same name of external network that installer creates whenyou create the subnet For example
bull Apex installer external
bull Compass installer ext-net
bull Fuel installer net04_ext
bull Joid installer ext-net
Please refer to the documentation of installers if there is any issue
This is needed only if installer does not create an external work Otherwise skip this command net-createneutron net-create --routerexternal ext-net
Note that the name ext-net may work for some installers such as Compass and Joid Change the name ext-net to match the name of external network that an installer createsneutron subnet-create --disable-dhcp --allocation-pool start=19859156251end=19859156254 --gateway 198591561 ext-net 19859156024
Please note that the IP addresses in the command above are for exemplary purpose Please replace the IP addressesof your actual network
SETUP-SVM-7 Associate the ext-net to the Neutron router ipv4-router
Note that the name ext-net may work for some installers such as Compass and Joid Change the name ext-net to match the name of external network that an installer createsneutron router-gateway-set ipv4-router ext-net
SETUP-SVM-8 Create an internaltenant IPv4 network ipv4-int-network1
neutron net-create ipv4-int-network1
SETUP-SVM-9 Create an IPv4 subnet ipv4-int-subnet1 in the internal network ipv4-int-network1
neutron subnet-create --name ipv4-int-subnet1 --dns-nameserver 8888 ipv4-int-network1 2000024
SETUP-SVM-10 Associate the IPv4 internal subnet ipv4-int-subnet1 to the Neutron router ipv4-router
neutron router-interface-add ipv4-router ipv4-int-subnet1
43 IPv6 Configuration - Setting Up a Service VM as an IPv6 vRouter 39
OPNFV Configuration Guide Release brahmaputra30 (605ebda)
Create IPv6 Subnet and Router with External Connectivity
Now let us create a second neutron router where we can ldquomanuallyrdquo spawn a radvd daemon to simulate an externalIPv6 router
SETUP-SVM-11 Create a second Neutron router ipv6-router which needs to provide external connectivity
neutron router-create ipv6-router
SETUP-SVM-12 Associate the ext-net to the Neutron router ipv6-router
Note that the name ext-net may work for some installers such as Compass and Joid Change the name ext-net to match the name of external network that an installer createsneutron router-gateway-set ipv6-router ext-net
SETUP-SVM-13 Create a second internaltenant IPv4 network ipv4-int-network2
neutron net-create ipv4-int-network2
SETUP-SVM-14 Create an IPv4 subnet ipv4-int-subnet2 for the ipv6-router internal networkipv4-int-network2
neutron subnet-create --name ipv4-int-subnet2 --dns-nameserver 8888 ipv4-int-network2 1000024
SETUP-SVM-15 Associate the IPv4 internal subnet ipv4-int-subnet2 to the Neutron router ipv6-router
neutron router-interface-add ipv6-router ipv4-int-subnet2
Prepare Image Metadata and Keypair for Service VM
SETUP-SVM-16 Download fedora22 image which would be used as vRouter
wget httpsdownloadfedoraprojectorgpubfedoralinuxreleases22Cloudx86_64ImagesFedora-Cloud-Base-22-20150521x86_64qcow2
glance image-create --name Fedora22 --disk-format qcow2 --container-format bare --file Fedora-Cloud-Base-22-20150521x86_64qcow2
SETUP-SVM-17 Create a keypair
nova keypair-add vRouterKey gt ~vRouterKey
SETUP-SVM-18 Create ports for vRouter and both the VMs with some specific MAC addresses
neutron port-create --name eth0-vRouter --mac-address fa163e111111 ipv4-int-network2neutron port-create --name eth1-vRouter --mac-address fa163e222222 ipv4-int-network1neutron port-create --name eth0-VM1 --mac-address fa163e333333 ipv4-int-network1neutron port-create --name eth0-VM2 --mac-address fa163e444444 ipv4-int-network1
Boot Service VM (vRouter) with eth0 on ipv4-int-network2 and eth1 on ipv4-int-network1
Let us boot the service VM (vRouter) with eth0 interface on ipv4-int-network2 connecting toipv6-router and eth1 interface on ipv4-int-network1 connecting to ipv4-router
SETUP-SVM-19 Boot the vRouter using Fedora22 image on the OpenStack Compute Node with hostnameopnfv-os-compute
40 Chapter 4 Feature Configuration
OPNFV Configuration Guide Release brahmaputra30 (605ebda)
nova boot --image Fedora22 --flavor m1small --user-data optstackopnfv_os_ipv6_pocmetadatatxt --availability-zone novaopnfv-os-compute --nic port-id=$(neutron port-list | grep -w eth0-vRouter | awk print $2) --nic port-id=$(neutron port-list | grep -w eth1-vRouter | awk print $2) --key-name vRouterKey vRouter
Please note that optstackopnfv_os_ipv6_pocmetadatatxt is used to enable the vRouter to au-tomatically spawn a radvd and
bull Act as an IPv6 vRouter which advertises the RA (Router Advertisements) with prefix 2001db80264on its internal interface (eth1)
bull Forward IPv6 traffic from internal interface (eth1)
SETUP-SVM-20 Verify that Fedora22 image boots up successfully and vRouter has ssh keys properly injected
nova listnova console-log vRouter
Please note that it may take a few minutes for the necessary packages to get installed and ssh keys to be injected
Sample Output[ 762884523] cloud-init[871] ec2 [ 762909634] cloud-init[871] ec2 -----BEGIN SSH HOST KEY FINGERPRINTS-----[ 762931626] cloud-init[871] ec2 2048 e3dc3d4abcb6b07775a170a3d02a47a9 (RSA)[ 762957380] cloud-init[871] ec2 -----END SSH HOST KEY FINGERPRINTS-----[ 762979554] cloud-init[871] ec2
Boot Two Other VMs in ipv4-int-network1
In order to verify that the setup is working let us create two cirros VMs with eth1 interface on theipv4-int-network1 ie connecting to vRouter eth1 interface for internal network
We will have to configure appropriate mtu on the VMsrsquo interface by taking into account the tunneling overhead andany physical switch requirements If so push the mtu to the VM either using dhcp options or via meta-data
SETUP-SVM-21 Create VM1 on OpenStack Controller Node with hostname opnfv-os-controller
nova boot --image cirros-034-x86_64-uec --flavor m1tiny --user-data optstackopnfv_os_ipv6_pocset_mtush --availability-zone novaopnfv-os-controller --nic port-id=$(neutron port-list | grep -w eth0-VM1 | awk print $2) --key-name vRouterKey VM1
SETUP-SVM-22 Create VM2 on OpenStack Compute Node with hostname opnfv-os-compute
nova boot --image cirros-034-x86_64-uec --flavor m1tiny --user-data optstackopnfv_os_ipv6_pocset_mtush --availability-zone novaopnfv-os-compute --nic port-id=$(neutron port-list | grep -w eth0-VM2 | awk print $2) --key-name vRouterKey VM2
SETUP-SVM-23 Confirm that both the VMs are successfully booted
nova listnova console-log VM1nova console-log VM2
43 IPv6 Configuration - Setting Up a Service VM as an IPv6 vRouter 41
OPNFV Configuration Guide Release brahmaputra30 (605ebda)
Spawn RADVD in ipv6-router
Let us manually spawn a radvd daemon inside ipv6-router namespace to simulate an external router First ofall we will have to identify the ipv6-router namespace and move to the namespace
Please NOTE that in case of HA (High Availability) deployment model where multiple controller nodes are usedipv6-router created in step SETUP-SVM-11 could be in any of the controller node Thus you need to iden-tify in which controller node ipv6-router is created in order to manually spawn radvd daemon inside theipv6-router namespace in steps SETUP-SVM-24 through SETUP-SVM-30 The following command in Neu-tron will display the controller on which the ipv6-router is spawned
neutron l3-agent-list-hosting-router ipv6-router
Then you login to that controller and execute steps SETUP-SVM-24 through SETUP-SVM-30
SETUP-SVM-24 identify the ipv6-router namespace and move to the namespace
sudo ip netns exec qrouter-$(neutron router-list | grep -w ipv6-router | awk print $2) bash
SETUP-SVM-25 Upon successful execution of the above command you will be in the router namespace Now letus configure the IPv6 address on the ltqr-xxxgt interface
export router_interface=$(ip a s | grep -w global qr- | awk print $7)ip -6 addr add 2001db8011 dev $router_interface
SETUP-SVM-26 Update the sample file optstackopnfv_os_ipv6_pocscenario2radvdconfwith $router_interface
cp optstackopnfv_os_ipv6_pocscenario2radvdconf tmpradvd$router_interfaceconfsed -i s$router_interface$router_interfaceg tmpradvd$router_interfaceconf
SETUP-SVM-27 Spawn a radvd daemon to simulate an external router This radvd daemon advertises an IPv6subnet prefix of 2001db80164 using RA (Router Advertisement) on its $router_interface so that eth0interface of vRouter automatically configures an IPv6 SLAAC address
$radvd -C tmpradvd$router_interfaceconf -p tmpbr-expidradvd -m syslog
SETUP-SVM-28 Add an IPv6 downstream route pointing to the eth0 interface of vRouter
ip -6 route add 2001db80264 via 2001db801f8163efffe111111
SETUP-SVM-29 The routing table should now look similar to something shown below
ip -6 route show2001db8011 dev qr-42968b9e-62 proto kernel metric 2562001db80164 dev qr-42968b9e-62 proto kernel metric 256 expires 86384sec2001db80264 via 2001db801f8163efffe111111 dev qr-42968b9e-62 proto ra metric 1024 expires 29secfe8064 dev qg-3736e0c7-7c proto kernel metric 256fe8064 dev qr-42968b9e-62 proto kernel metric 256
SETUP-SVM-30 If all goes well the IPv6 addresses assigned to the VMs would be as shown as follows
vRouter eth0 interface would have the following IPv6 address 2001db801f8163efffe11111164 vRouter eth1 interface would have the following IPv6 address 2001db802164 VM1 would have the following IPv6 address 2001db802f8163efffe33333364 VM2 would have the following IPv6 address 2001db802f8163efffe44444464
42 Chapter 4 Feature Configuration
OPNFV Configuration Guide Release brahmaputra30 (605ebda)
Testing to Verify Setup Complete
Now let us SSH to those VMs eg VM1 and or VM2 and or vRouter to confirm that it has successfully configuredthe IPv6 address using SLAAC with prefix 2001db80264 from vRouter
We use floatingip mechanism to achieve SSH
SETUP-SVM-31 Now we can SSH to VMs You can execute the following command
1 Create a floatingip and associate it with VM1 VM2 and vRouter (to the port id that is passed) Note that the name ext-net may work for some installers such as Compass and Joid Change the name ext-net to match the name of external network that an installer createsneutron floatingip-create --port-id $(neutron port-list | grep -w eth0-VM1 | awk print $2) ext-netneutron floatingip-create --port-id $(neutron port-list | grep -w eth0-VM2 | awk print $2) ext-netneutron floatingip-create --port-id $(neutron port-list | grep -w eth1-vRouter | awk print $2) ext-net
2 To know display the floatingip associated with VM1 VM2 and vRouterneutron floatingip-list -F floating_ip_address -F port_id | grep $(neutron port-list | grep -w eth0-VM1 | awk print $2) | awk print $2neutron floatingip-list -F floating_ip_address -F port_id | grep $(neutron port-list | grep -w eth0-VM2 | awk print $2) | awk print $2neutron floatingip-list -F floating_ip_address -F port_id | grep $(neutron port-list | grep -w eth1-vRouter | awk print $2) | awk print $2
3 To ssh to the vRouter VM1 and VM2 user can execute the following commandssh -i ~vRouterKey fedoraltfloating-ip-of-vRoutergtssh -i ~vRouterKey cirrosltfloating-ip-of-VM1gtssh -i ~vRouterKey cirrosltfloating-ip-of-VM2gt
If everything goes well ssh will be successful and you will be logged into those VMs Run some commands to verifythat IPv6 addresses are configured on eth0 interface
SETUP-SVM-32 Show an IPv6 address with a prefix of 2001db80264
ip address show
SETUP-SVM-33 ping some external IPv6 address eg ipv6-router
ping6 2001db8011
If the above ping6 command succeeds it implies that vRouter was able to successfully forward the IPv6 traffic toreach external ipv6-router
44 Installing OVSNFV Fuel Plugin
bull On the Fuel UI create a new environment
bull In Settings gt Userspace OVS support check ldquoUserspace OVS supportrdquo
bull Continue with environment configuration and deployment as normal
441 Upgrading the plugin
From time to time new versions of the plugin may become available
44 Installing OVSNFV Fuel Plugin 43
OPNFV Configuration Guide Release brahmaputra30 (605ebda)
The plugin cannot be upgraded if an active environment is using the plugin
In order to upgrade the plugin
bull Copy the updated plugin file to the fuel-master
bull On the Fuel UI reset the environment
bull On the Fuel CLI ldquofuel plugins ndashupdate ltfuel-plugin-filegtrdquo
bull On the Fuel UI re-deploy the environment
45 Promise Feature Configuration Overview
451 Promise installation
Install nodejs npm and promise
curl -sL httpsdebnodesourcecomsetup_4x | sudo -E bash -sudo apt-get install -y nodejssudo npm -g install npmlatestgit clone httpsgithubcomopnfvpromisegitcd promisenpm install
Please note that the last command lsquonpm installrsquo will install all needed dependencies for promise (including yangforgeand mocha)
452 Testing
Please perform the following preparation steps
1 Set OpenStack environment parameters properly (eg source openrc admin demo in DevStack)
2 Create OpenStack tenant (eg promise) and tenant user (eg promiser)
3 Create a flavor in Nova with 1 vCPU and 512 MB RAM
4 Create a private network subnet and router in Neutron
5 Create an image in Glance
Once done the promise test script can be invoked as follows (as a single line command)
NODE_ENV=mytest OS_TENANT_NAME=promise OS_USERNAME=promiser OS_PASSWORD=ltuser password from Step 2gt OS_TEST_FLAVOR=ltflavor ID from Step 3gt OS_TEST_NETWORK=ltnetwork ID from Step 4gt OS_TEST_IMAGE=ltimage ID from Step 5gt npm run -s test -- --reporter json gt promise-resultsjson
The results of the tests will be stored in the promise-resultsjson file
The results can also be seen in the console (ldquonpm run -s testrdquo)
All 33 tests passing Congratulations promise has been successfully installed and configured
44 Chapter 4 Feature Configuration
OPNFV Configuration Guide Release brahmaputra30 (605ebda)
45 Promise Feature Configuration Overview 45
OPNFV Configuration Guide Release brahmaputra30 (605ebda)
46 Configuring SDNVPN features
Fuel installer configuration
In order to install the BGPVPN feature the corresponding checkbox in Fuel has to be selected This will triggerinstallation of the OpenStack BGPVPN API extension for Neutron (set up for using the ODL driver)
In addition ODL has to be installed see the corresponding section in the respective installer documentation on how toinstall ODL If the BGPVPN feature is installed ODL will automatically be installed with VPN Service karaf featureactivated
No post-deploy configuration is necessary The Fuel BGPVPN plugin and the ODL plugin should set up the clusterready for BGPVPNs being created This includes the set-up of internal VxLAN transport tunnels between computenodes
No post-configuration activities are required
46 Chapter 4 Feature Configuration
CHAPTER
FIVE
POST CONFIGURATION ACTIVITIES
Once you have deployed and configured your scenario and features you should validate the state of the system usingthe following guides
51 Scenario validation activities
The following guides provide information on how to validate the installation of you scenario based on the tools andtest suites available for the installation tool you have selected
511 Fuel post installation procedures
Automated post installation activities
Fuel provides a fairly broad coverage of built in automated health checks These validate the installation in terms ofconfiguration services networking storage policies etc The execution of the full range of health checks takes lessthan 30 minutes
For instructions on how to run health-checks please read the Fuel installation instructions
Platform components validation
Consult the feature sections in this document for any post-install feature specific validationhealth-checks
512 JOID post installation procedures
Configure OpenStack
In each SDN directory for example joidciopencontrail there is a folder for Juju deployer where you can find thecharm bundle yaml files that the deploysh uses to deploy
In the same directory there is scripts folder where you can find shell scripts to help you configure the OpenStackcloud that you just deployed These scripts are created to help you configure a basic OpenStack Cloud to verify thecloud For more info on OpenStack Cloud configuration please refer to the OpenStack Cloud Administrator Guideon docsopenstackorg Similarly for complete SDN configuration please refer to the respective SDN adminstratorguide
Each SDN solution requires slightly different setup please refer to the README in each SDN folder Most likelyyou will need to modify the openstacksh and cloud-setupsh scripts for the floating IP range private IP network andSSH keys Please go through openstacksh glancesh and cloud-setupsh and make changes as you see fit
47
OPNFV Configuration Guide Release brahmaputra30 (605ebda)
52 Feature validation activities
The following sections provide information on how to validate the features you have installed in your scenario
521 Copper post installation procedures
This release focused on use of the OpenStack Congress service for managing configuration policy The Congressinstall verify procedure described here is largely manual This procedure as well as the longer-term goal of automatedverification support is a work in progress The procedure is further specific to one OPNFV installer (JOID ieMAASJuJu) based environment
Automated post installation activities
No automated procedures are provided at this time
Copper post configuration procedures
No configuration procedures are required beyond the basic install procedure
Platform components validation
Following are notes on creating a container as test driver for Congress This is based upon an Ubuntu host as installedby JOID
Create and Activate the Container
On the jumphost
sudo lxc-create -n trusty-copper -t usrsharelxctemplateslxc-ubuntu -- -b ubuntu ~opnfvsudo lxc-start -n trusty-copper -dsudo lxc-info --name trusty-copper(typical output)Name trusty-copperState RUNNINGPID 4563IP 100344CPU use 2877 secondsBlkIO use 52279 MiBMemory use 55975 MiBKMem use 0 bytesLink vethDMFOANTX bytes 262 MiBRX bytes 8848 MiBTotal bytes 9110 MiB
Login and configure the test server
48 Chapter 5 Post Configuration Activities
OPNFV Configuration Guide Release brahmaputra30 (605ebda)
ssh ubuntu100344sudo apt-get updatesudo apt-get upgrade -y
Install pipsudo apt-get install python-pip -y
Install javasudo apt-get install default-jre -y
Install other dependenciessudo apt-get install git gcc python-dev libxml2 libxslt1-dev libzip-dev php5-curl -y
Setup OpenStack environment variables per your OPNFV installexport CONGRESS_HOST=19216810117export KEYSTONE_HOST=19216810108export CEILOMETER_HOST=19216810105export CINDER_HOST=19216810101export GLANCE_HOST=19216810106export HEAT_HOST=19216810107export NEUTRON_HOST=19216810111export NOVA_HOST=19216810112source ~admin-openrcsh
Install and test OpenStack clientmkdir ~gitcd gitgit clone httpsgithubcomopenstackpython-openstackclientgitcd python-openstackclientgit checkout stablelibertysudo pip install -r requirementstxtsudo python setuppy installopenstack service list(typical output)+----------------------------------+------------+----------------+| ID | Name | Type |+----------------------------------+------------+----------------+| 2f8799ae50f24c928c021fabf8a50f5f | keystone | identity || 351b13f56d9a4e25849406ec1d5a2726 | cinder | volume || 5129510c3143454f9ba8ec7e6735e267 | cinderv2 | volumev2 || 5ee1e220460f41dea9be06921400ce9b | congress | policy || 78e73a7789a14f56a5d248a0cd141201 | quantum | network || 9d5a00fb475a45b2ae6767528299ed6b | ceilometer | metering || 9e4b1624ef0b434abc0b82f607c5045c | heat | orchestration || b6c01ceb5023442d9f394b83f2a18e01 | heat-cfn | cloudformation || ba6199e3505045ad87e2a7175bd0c57f | glance | image || d753f304a0d541dbb989780ae70328a8 | nova | compute |+----------------------------------+------------+----------------+
Install and test Congress clientcd ~gitgit clone httpsgithubcomopenstackpython-congressclientgitcd python-congressclientgit checkout stablelibertysudo pip install -r requirementstxtsudo python setuppy installopenstack congress driver list(typical output)+------------+--------------------------------------------------------------------------+| id | description |+------------+--------------------------------------------------------------------------+| ceilometer | Datasource driver that interfaces with ceilometer || neutronv2 | Datasource driver that interfaces with OpenStack Networking aka Neutron || nova | Datasource driver that interfaces with OpenStack Compute aka nova || keystone | Datasource driver that interfaces with keystone || cinder | Datasource driver that interfaces with OpenStack cinder || glancev2 | Datasource driver that interfaces with OpenStack Images aka Glance |+------------+--------------------------------------------------------------------------+
Install and test Glance clientcd ~gitgit clone httpsgithubcomopenstackpython-glanceclientgitcd python-glanceclientgit checkout stablelibertysudo pip install -r requirementstxtsudo python setuppy installglance image-list(typical output)+--------------------------------------+---------------------+| ID | Name |+--------------------------------------+---------------------+| 6ce4433e-65c0-4cd8-958d-b06e30c76241 | cirros-033-x86_64 |+--------------------------------------+---------------------+
Install and test Neutron clientcd ~gitgit clone httpsgithubcomopenstackpython-neutronclientgitcd python-neutronclientgit checkout stablelibertysudo pip install -r requirementstxtsudo python setuppy installneutron net-list(typical output)+--------------------------------------+----------+------------------------------------------------------+| id | name | subnets |+--------------------------------------+----------+------------------------------------------------------+| dc6227df-af41-439f-bd2c-c2c2f0fe7fc5 | public | 5745846c-dd79-4900-a7da-bf506348ceac 19216810024 || a3f9f13a-5de9-4d3b-98c8-d2e40a2ef8e9 | internal | 5e0be862-90da-44ab-af43-56d5c65aa049 1000024 |+--------------------------------------+----------+------------------------------------------------------+
Install and test Nova clientcd ~gitgit clone httpsgithubcomopenstackpython-novaclientgitcd python-novaclientgit checkout stablelibertysudo pip install -r requirementstxtsudo python setuppy installnova hypervisor-list(typical output)+----+---------------------+-------+---------+| ID | Hypervisor hostname | State | Status |+----+---------------------+-------+---------+| 1 | compute1maas | up | enabled |+----+---------------------+-------+---------+
Install and test Keystone clientcd ~gitgit clone httpsgithubcomopenstackpython-keystoneclientgitcd python-keystoneclientgit checkout stablelibertysudo pip install -r requirementstxtsudo python setuppy install
52 Feature validation activities 49
OPNFV Configuration Guide Release brahmaputra30 (605ebda)
Setup the Congress Test Webapp
Clone Copper (if not already cloned in user home)cd ~gitif [ -d ~gitcopper ] then git clone httpsgerritopnfvorggerritcopper fi
Copy the Apache configsudo cp ~gitcoppercomponentscongresstest-webappwwwubuntu-apache2conf etcapache2apache2conf
Point proxyphp to the Congress server per your installsed -i -- s19216810117$CONGRESS_HOSTg ~gitcoppercomponentscongresstest-webappwwwhtmlproxyindexphp
Copy the webapp to the Apache root directory and fix permissionssudo cp -R ~gitcoppercomponentscongresstest-webappwwwhtml varwwwsudo chmod 755 varwwwhtml -R
Make webapp log directory and set permissionsmkdir ~logschmod 777 ~logs
Restart Apachesudo service apache2 restart
Using the Test Webapp
Browse to the trusty-copper server IP address
Interactive options are meant to be self-explanatory given a basic familiarity with the Congress service and data modelBut the app will be developed with additional features and UI elements
522 IPv6 Post Installation Procedures
Congratulations you have completed the setup of using a service VM to act as an IPv6 vRouter You have validatedthe setup based on the instruction in previous sections If you want to further test your setup you can ping6 amongVM1 VM2 vRouter and ipv6-router
This setup allows further open innovation by any 3rd-party For more instructions and documentations please refer to
1 IPv6 Configuration Guide (HTML) httpartifactsopnfvorgipv6docssetupservicevmindexhtml
2 IPv6 User Guide (HTML) httpartifactsopnfvorgipv6docsgapanalysisindexhtml
Automated post installation activities
Refer to the relevant testing guides results and release notes of Yardstick Project
53 Additional testing and validation activities
Many of our testing tools can be manually installed to facilitate targeted testing of features and capabilities of yourscenario The following guides provide instruction on setting up these testing suites
50 Chapter 5 Post Configuration Activities
OPNFV Configuration Guide Release brahmaputra30 (605ebda)
531 Overview of the functest suites
Functest is the OPNFV project primarily targeting function testing In the Continuous Integration pipeline it islaunched after an OPNFV fresh installation to validate and verify the basic functions of the infrastructure
The current list of test suites can be distributed in 3 main domains VIM (Virtualised Infrastructure Manager) Con-trollers and Features
Do-main
Testsuite
Comments
VIM
vPing NFV ldquoHello Worldrdquo using SSH connection and floatting IPvPing_userdataPing using userdata and cloud-init mechanismTempest OpenStack reference test suite [2]Rallybench
OpenStack testing tool benchmarking OpenStack modules [3]
ControllersOpen-Day-light
Opendaylight Test suite
ONOS Test suite of ONOS L2 and L3 functions See ONOSFW User Guide for details
Features
vIMS Example of a real VNF deployment to show the NFV capabilities of the platform The IPMultimedia Subsytem is a typical Telco test case referenced by ETSI It provides a fullyfunctional VoIP System
Promise Resource reservation and management project to identify NFV related requirements andrealize resource reservation for future usage by capacity management of resource poolsregarding compute network and storage See Promise User Guide for details
Doctor Doctor platform as of Brahmaputra release provides the two features ImmediateNotification Consistent resource state awareness (compute) see Doctor User Guide fordetails
SD-NVPN
Implementation of the OpenStack bgpvpn API from the SDNVPN feature project Itallowing the cration of BGP VPNs see SDNVPN User Guide for
Functest includes different test suites with several test cases within Some of the tests are developed by Functest teammembers whereas others are integrated from upstream communities or other OPNFV projects For example Tempestis the OpenStack integration test suite and Functest is in charge of the selection integration and automation of the teststhat fit in OPNFV
The Tempest suite has been customized but no new test cases have been created
The results produced by the tests run from CI are pushed and collected in a NoSQL database The goal is to populatethe database with results from different sources and scenarios and to show them on a Dashboard
There is no real notion of Test domain or Test coverage Basic components (VIM controllers) are tested through theirown suites Feature projects also provide their own test suites with different ways of running their tests
vIMS test case was integrated to demonstrate the capability to deploy a relatively complex NFV scenario on top of theOPNFV infrastructure
Functest considers OPNFV as a black box OPNFV since the Brahmaputra release offers lots of potential combina-tions
bull 2 controllers (OpenDayligh ONOS)
bull 4 installers (Apex Compass Fuel Joid)
Most of the tests are runnable on any combination but some others might have restrictions imposed by the installersor the available deployed features
53 Additional testing and validation activities 51
OPNFV Configuration Guide Release brahmaputra30 (605ebda)
Preparing the Docker container
Pull the Functest Docker image from the Docker hub
docker pull opnfvfunctestbrahmaputra10
Check that the image is available
docker images
Run the docker container giving the environment variables
bull INSTALLER_TYPE possible values are apex compass fuel or joid
bull INSTALLER_IP IP of the installer nodeVM
Functest may need to know the IP of the installer to retrieve automatically the credentials from the installer nodeVMor even from the actual controllers
The minimum command to create the Functest Docker container can be described as follows
docker run -it -e INSTALLER_IP=102002 -e INSTALLER_TYPE=fuel opnfvfunctestbrahmaputra10 binbash
Optionally it is possible to precise the container name through the option ndashname
docker run --name CONTAINER_NAME -it -e INSTALLER_IP=102002 -e INSTALLER_TYPE=fuel opnfvfunctestbrahmaputra10 binbash
It is also possible to to indicate the path of the OpenStack credentials using -v
docker run -it -e INSTALLER_IP=102002 -e INSTALLER_TYPE=fuel -v ltpath_to_your_local_creds_filegthomeopnfvfunctestconfopenstackcreds opnfvfunctestbrahmaputra10 binbash
The local file will be mounted in the container under homeopnfvfunctestconfopenstackcreds
If the intention is to run Functest against any of the supported OPNFV scenarios it is recommended to include alsothe environment variable DEPLOY_SCENARIO for example
docker run -it -e INSTALLER_IP=102002 -e INSTALLER_TYPE=fuel -e DEPLOY_SCENARIO=os-odl_l2-nofeature-ha opnfvfunctestbrahmaputra10 binbash
Inside the container the following directory structure should be in place
`-- home`-- opnfv
|-- functest| |-- conf| |-- data| `-- results`-- repos
|-- bgpvpn|-- doctor|-- functest|-- odl_integration|-- onos|-- promise|-- rally|-- releng`-- vims-test
Basically the container includes
bull Functest directory to store the configuration (the OpenStack creds are stored inhomeopngbfunctestconfopenstackcreds) the data (cirros image needed for some tests) results (sometemporary result logs may be stored here)
52 Chapter 5 Post Configuration Activities
OPNFV Configuration Guide Release brahmaputra30 (605ebda)
bull Repositories the functest repository will be used to prepare the environment and run the tests Other repositoriesare used for the installation of the needed tooling (eg rally) andor the retrieval of feature projects scenarios(eg promise)
The structure under the Functest repository can be described as follows
|-- INFO|-- LICENSE|-- commons| |-- ims| |-- mobile| `-- traffic-profile-guidelinesrst|-- docker| |-- Dockerfile| |-- commonsh| |-- prepare_envsh| |-- requirementspip| `-- run_testssh|-- docs| |-- configguide| |-- devguide| |-- images| |-- results| `-- userguide`-- testcases
|-- Controllers|-- features|-- tests|-- VIM|-- vIMS|-- vPing|-- __init__py|-- config_functestpy|-- config_functestyaml`-- functest_utilspy
We may distinguish 4 different folders
bull commons it is a folder dedicated to store traffic profile or any test inputs that could be reused by any test project
bull docker this folder includes the scripts that will be used to setup the environment and run the tests
bull docs this folder includes the user and installationconfiguration guide
bull testcases this folder includes the scripts required by Functest internal test cases and other feature projects testcases
After the run command a new prompt appears which means that we are inside the container and ready to move to thenext step
Useful Docker commands
When typing exit in the container prompt this will cause exiting the container and probably stopping it Whenstopping a running Docker container all the changes will be lost there is a keyboard shortcut to quit the containerwithout stopping it CTRL+P+Q To reconnect to the running container DO NOT use the run command again (sinceit will create a new container) use exec instead
53 Additional testing and validation activities 53
OPNFV Configuration Guide Release brahmaputra30 (605ebda)
docker psltcopy the container IDgtdocker exec -ti ltCONTAINER_IDgt binbash
or simply
docker exec -ti $(docker ps|grep functest|awk print $1) binbash
There are other useful Docker commands that might be needed to manage possible issues with the containers
List the running containers
docker ps
List all the containers including the stopped ones
docker ps -a
It is useful sometimes to remove a container if there are some problems
docker rm ltCONTAINER_IDgt
Use the -f option if the container is still running it will force to destroy it
docker -f rm ltCONTAINER_IDgt
The Docker image is called opnfvfunctest and it is stored in the public Docker registry under the OPNFV accountdockerhub The are many different tags that have been created automatically by the CI mechanisms but the one thatthis document refers to is brahmaputra10 Pulling other tags might cause some problems while running the tests
Check the Docker documentation dockerdocs for more information
Preparing the Functest environment
Once the docker container is up and running execute the following command in the prompt
$repos_dirfunctestdockerprepare_envsh
NOTE $repos_dir is a default environment variable inside the docker container which points to homeopnfvrepos
This script will make sure that the requirements to run the tests are met and will install the needed libraries and toolsby all Functest test cases It must be run only once every time the docker is started from sratch
Focus on the OpenStack credentials
The OpenStack credentials are needed to run the tests against the VIM There are 3 ways to provide them to Functest
bull using the -v option when running the Docker container
bull create an empty file in homeopnfvfunctestconfopenstackcreds and paste the credentials in it
bull automatically retrieved using the following script $repos_dirrelengutilsfetch_os_credssh
Once the credentials are there they shall be sourced before running the tests
source homeopnfvfunctestconfopenstackcreds
or simply using the environment variable creds
54 Chapter 5 Post Configuration Activities
OPNFV Configuration Guide Release brahmaputra30 (605ebda)
$creds
After this try to run any OpenStack command to see if you get any output for instance
openstack user list
This will return a list of the actual users in the OpenStack deployment In any other case check that the credentialsare sourced
env|grep OS_
This command must show a set of environment variables starting with OS_ for example
OS_REGION_NAME=RegionOneOS_DEFAULT_DOMAIN=defaultOS_PROJECT_NAME=adminOS_PASSWORD=adminOS_AUTH_STRATEGY=keystoneOS_AUTH_URL=http172301035000v20OS_USERNAME=adminOS_TENANT_NAME=adminOS_ENDPOINT_TYPE=internalURLOS_NO_CACHE=true
If still the OpenStack command does not show anything or complains about connectivity issues it could be due to anincorrect url given to the OS_AUTH_URL environment variable Check the deployment settings
SSL Support
If you need to connect to a server that is TLS-enabled (the auth URL begins with lsquohttpsrsquo) and it uses a certificate froma private CA or a self-signed certificate you will need to specify the path to an appropriate CA certificate to use tovalidate the server certificate with the environment variable OS_CACERT
echo $OS_CACERTetcsslcertscacrt
However this certificate does not exist in the container by default It has to be copied manually from the OpenStackdeployment This can be done in 2 ways
1 Create manually that file and copy the contents from the OpenStack controller
2 (recommended) Add the file using a Docker volume when starting the container
-v ltpath_to_your_cert_filegtetcsslcertscacert
You might need to export OS_CACERT environment variable inside the container
export OS_CACERT=etcsslcertscacrt
Certificate verification can be turned off using OS_INSECURE=true For example Fuel uses self-signed cacerts bydefault so an pre step would be
export OS_INSECURE=true
Additional Options
In case you need to provide different configuration parameters to Functest (eg commit IDs or branches for therepositories ) copy the config_functestyaml from the repository to your current directory and run the container
53 Additional testing and validation activities 55
OPNFV Configuration Guide Release brahmaputra30 (605ebda)
with a volume
wget httpsgitopnfvorgcgitfunctestplaintestcasesconfig_functestyaml
ltmodify the file accordinglygt
docker run -ti -e INSTALLER_TYPE=fuel -e INSTALLER_IP=102002 opnfvfunctestbrahmaputra10 -v $(pwd)config_functestyamlhomeopnfvfunctestconfconfig_functestyaml binbash
However this is not recommended since most of the test cases rely on static parameters read from this file andchanging them might cause problems
Proxy support
Functest needs internet access to download some resources for some test cases For example to install the Rallyenvironment This might not work properly if the Jumphost is running through a Proxy
If that is the case make sure the resolvconf and the needed proxy environment variables are properly set
export http_proxy=ltyour http proxy settingsgtexport https_proxy=ltyour https proxy settingsgt
Or refer to the official Docker documentation for Proxy settings
Before running prepare_envsh make sure you can ping http and https sites inside the container For example
nc -v googlecom 80Connection to googlecom 80 port [tcphttp] succeeded
nc -v googlecom 443Connection to googlecom 443 port [tcphttps] succeeded
532 Installing vswitchperf
Supported Operating Systems
bull CentOS 7
bull Fedora 20
bull Fedora 21
bull Fedora 22
bull Ubuntu 1404
Supported vSwitches
The vSwitch must support Open Flow 13 or greater
bull OVS (built from source)
bull OVS with DPDK (built from source)
56 Chapter 5 Post Configuration Activities
OPNFV Configuration Guide Release brahmaputra30 (605ebda)
Supported Hypervisors
bull Qemu version 23
Available VNFs
A simple VNF that forwards traffic through a VM using
bull DPDK testpmd
bull Linux Brigde
bull custom l2fwd module
The VM image can be downloaded from httpartifactsopnfvorgvswitchperfvloop-vnf-ubuntu-1404_20151216qcow2
Other Requirements
The test suite requires Python 33 and relies on a number of other packages These need to be installed for the testsuite to function
Installation of required packages preparation of Python 3 virtual environment and compilation of OVS DPDK andQEMU is performed by script systemsbuild_base_machinesh It should be executed under user account which willbe used for vsperf execution
Please Note Password-less sudo access must be configured for given user account before script is executed
Execution of installation script
$ cd systems$ build_base_machinesh
Please Note you donrsquot need to go into any of the systems subdirectories simply run the top levelbuild_base_machinesh your OS will be detected automatically
Script build_base_machinesh will install all the vsperf dependencies in terms of system packages Python 3x andrequired Python modules In case of CentOS 7 it will install Python 33 from an additional repository provided bySoftware Collections (a link) Installation script will also use virtualenv to create a vsperf virtual environment whichis isolated from the default Python environment This environment will reside in a directory called vsperfenv in$HOME
You will need to activate the virtual environment every time you start a new shell session Its activation is specific toyour OS
CentOS 7
$ scl enable python33 bash$ cd $HOMEvsperfenv$ source binactivate
Fedora and Ubuntu
$ cd $HOMEvsperfenv$ source binactivate
53 Additional testing and validation activities 57
OPNFV Configuration Guide Release brahmaputra30 (605ebda)
Working Behind a Proxy
If yoursquore behind a proxy yoursquoll likely want to configure this before running any of the above For example
export http_proxy=proxymycompanycom123export https_proxy=proxymycompanycom123
533 Yardstick
The projectrsquos goal is to verify infrastructure compliance from the perspective of a Virtual Network Function (VNF)
The Projectrsquos scope is the development of a test framework Yardstick test cases and test stimuli to enable NetworkFunction Virtualization Infrastructure (NFVI) verification
In OPNFV Brahmaputra release generic test cases covering aspects of the metrics in the document ETSI GS NFV-TST001 ldquoPre-deployment Testing Report on Validation of NFV Environments and Servicesrdquo are available furtherOPNFV releases will provide extended testing of these metrics
The Project also includes a sample VNF the Virtual Traffic Classifier (VTC) and its experimental frameworkApexLake
Yardstick is used in OPNFV for verifying the OPNFV infrastructure and some of the OPNFV features The Yardstickframework is deployed in several OPNFV community labs It is installer infrastructure and application independent
See also
This Presentation for an overview of Yardstick and Yardsticktst for material on alignment ETSI TST001 and Yardstick
Yardstick Installation
Abstract
Yardstick currently supports installation on Ubuntu 1404 or by using a Docker image Detailed steps about installingYardstick using both of these options can be found below
To use Yardstick you should have access to an OpenStack environment with at least Nova Neutron Glance Keystoneand Heat installed
The steps needed to run Yardstick are
1 Install Yardstick and create the test configuration yaml file
2 Build a guest image and load the image into the OpenStack environment
3 Create a Neutron external network and load OpenStack environment variables
4 Run the test case
Installing Yardstick on Ubuntu 1404
Installing Yardstick framework Install dependencies
sudo apt-get install python-virtualenv python-devsudo apt-get install libffi-dev libssl-dev git
Create a python virtual environment source it and update setuptools
58 Chapter 5 Post Configuration Activities
OPNFV Configuration Guide Release brahmaputra30 (605ebda)
virtualenv ~yardstick_venvsource ~yardstick_venvbinactivateeasy_install -U setuptools
Download source code and install python dependencies
git clone httpsgerritopnfvorggerrityardstickcd yardstickpython setuppy install
There is also a YouTube video showing the above steps
Installing extra tools
yardstick-plot Yardstick has an internal plotting tool yardstick-plot which can be installed using the follow-ing command
python setuppy develop easy_install yardstick[plot]
Building a guest image Yardstick has a tool for building an Ubuntu Cloud Server image containing all the requiredtools to run test cases supported by Yardstick It is necessary to have sudo rights to use this tool
This image can be built using the following command while in the directory where Yardstick is installed(~yardstick if the framework is installed by following the commands above)
sudo toolsyardstick-img-modify toolsubuntu-server-cloudimg-modifysh
Warning the script will create files by default in tmpworkspaceyardstick and the files will be owned byroot
The created image can be added to OpenStack using the glance image-create or via the OpenStack Dashboard
Example command
glance --os-image-api-version 1 image-create --name yardstick-trusty-server --is-public true --disk-format qcow2 --container-format bare --file tmpworkspaceyardstickyardstick-trusty-serverimg
Installing Yardstick using Docker
Yardstick has two Docker images first one (Yardstick-framework) serves as a replacement for installing the Yardstickframework in a virtual environment (for example as done in Installing Yardstick framework) while the other image ismostly for CI purposes (Yardstick-CI)
Yardstick-framework image Download the source code
git clone httpsgerritopnfvorggerrityardstick
Build the Docker image and tag it as yardstick-framework
cd yardstickdocker build -t yardstick-framework
Run the Docker instance
53 Additional testing and validation activities 59
OPNFV Configuration Guide Release brahmaputra30 (605ebda)
docker run --name yardstick_instance -i -t yardstick-framework
To build a guest image for Yardstick see Building a guest image
Yardstick-CI image Pull the Yardstick-CI Docker image from Docker hub
docker pull opnfvyardstick-ci
Run the Docker image
docker run --privileged=true --rm -t -e INSTALLER_TYPE=$INSTALLER_TYPE -e INSTALLER_IP=$INSTALLER_IP opnfvyardstick-ci run_benchmarks
Where $INSTALLER_TYPE can be fuel foreman or compass and $INSTALLER_IP is the installer masternode IP address (ie 102002 is default for fuel)
Basic steps performed by the Yardstick-CI container
1 clone yardstick and releng repos
2 setup OS credentials (releng scripts)
3 install yardstick and dependencies
4 build yardstick cloud image and upload it to glance
5 upload cirros-033 cloud image to glance
6 run yardstick test scenarios
7 cleanup
OpenStack parameters and credentials
Yardstick-flavor Most of the sample test cases in Yardstick are using an OpenStack flavor called yardstick-flavorwhich deviates from the OpenStack standard m1tiny flavor by the disk size - instead of 1GB it has 3GB Otherparameters are the same as in m1tiny
Environment variables Before running Yardstick it is necessary to export OpenStack environment vari-ables from the OpenStack openrc file (using the source command) and export the external network nameexport EXTERNAL_NETWORK=external-network-name the default name for the external network isnet04_ext
Credential environment variables in the openrc file have to include at least
bull OS_AUTH_URL
bull OS_USERNAME
bull OS_PASSWORD
bull OS_TENANT_NAME
60 Chapter 5 Post Configuration Activities
OPNFV Configuration Guide Release brahmaputra30 (605ebda)
Yardstick default key pair Yardstick uses a SSH key pair to connect to the guest image This key pair can be foundin the resourcesfiles directory To run the ping-hotyaml test sample this key pair needs to be importedto the OpenStack environment
Examples and verifying the install
It is recommended to verify that Yardstick was installed successfully by executing some simple commands and testsamples Below is an example invocation of yardstick help command and pingpy test sample
yardstick -hyardstick task start samplespingyaml
Each testing tool supported by Yardstick has a sample configuration file These configuration files can be found in thesamples directory
Example invocation of yardstick-plot tool
yardstick-plot -i tmpyardstickout -o tmpplots
Default location for the output is tmpyardstickout
More info about the tool can be found by executing
yardstick-plot -h
53 Additional testing and validation activities 61

OPNFV Configuration Guide Release brahmaputra30 (605ebda)
- name host2roles
- compute- ceph-osd
Eg Openstack and ODL deployment roles setting
hosts- name host1roles
- controller- ha- odl
- name host2roles
- compute
Eg Openstack and ONOS deployment roles setting
hosts- name host1roles
- controller- ha- onos
- name host2roles
- compute
Network Configuration (BM Deployment)
Before deployment there are some network configuration to be checked based on your network topology Com-pass4nfv network default configuration file is ldquocompass4nfvdeployconfnetwork_cfgyamlrdquo You can write yourown reference to it
The following figure shows the default network configuration
+--+ +--+ +--+| | | | | || | +------------+ | | | || +------+ Jumphost +------+ | | || | +------+-----+ | | | || | | | | | || | +------------+ +-----+ || | | | | || | +------------+ | | | || +------+ host1 +------+ | | || | +------+-----+ | | | || | | | | | || | +------------+ +-----+ || | | | | || | +------------+ | | | || +------+ host2 +------+ | | || | +------+-----+ | | | || | | | | | |
16 Chapter 3 Installer Configuration
OPNFV Configuration Guide Release brahmaputra30 (605ebda)
| | +------------+ +-----+ || | | | | || | +------------+ | | | || +------+ host3 +------+ | | || | +------+-----+ | | | || | | | | | || | +------------+ +-----+ || | | | | || | | | | |+-++ ++-+ +-++
^ ^ ^| | || | |
+-+-------------------------+ | || External Network | | |+---------------------------+ | |
+-----------------------+---+ || IPMI Network | |+---------------------------+ |
+-------------------------+-+| PXE(Installation) Network |+---------------------------+
Start Deployment (BM Deployment)
1 Set PXEInstallation NIC for Jumphost (set eth1 Eg)
export INSTALL_NIC=eth1
2 Set OS version for nodes provisioning (set Ubuntu1404 Eg)
export OS_VERSION=trusty
3 Set OpenStack version for deployment nodes (set liberty Eg)
export OPENSTACK_VERSION=liberty
4 Set ISO image that you want to deploy
export ISO_URL=file$YOUR_OWNcompassisoorexport ISO_URL=httpartifactsopnfvorgcompass4nfvbrahmaputraopnfv-releaseiso
5 Run deploysh with inventory and network configuration
deploysh --dha $YOUR_OWNdhayml --network $YOUR_OWNnetworkyml
34 Fuel configuration
This section provides guidelines on how to install and configure the Brahmaputra release of OPNFV when using Fuelas a deployment tool including required software and hardware configurations
For detailed instructions on how to install the Brahmaputra release using Fuel see Reference 13 in section ldquoFuelassociated referencesrdquo below
34 Fuel configuration 17
OPNFV Configuration Guide Release brahmaputra30 (605ebda)
341 Pre-configuration activities
Planning the deployment
Before starting the installation of the Brahmaputra release of OPNFV when using Fuel as a deployment tool someplanning must be done
Familiarize yourself with the Fuel by reading the following documents
bull Fuel planning guide please see Reference 8 in section ldquoFuel associated referencesrdquo below
bull Fuel quick start guide please see Reference 9 in section ldquoFuel associated referencesrdquo below
bull Fuel operations guide please see Reference 10 in section ldquoFuel associated referencesrdquo below
bull Fuel Plugin Developers Guide please see Reference 11 in section ldquoFuel associated referencesrdquo below
Before the installation can start a number of deployment specific parameters must be collected those are
1 Provider sub-net and gateway information
2 Provider VLAN information
3 Provider DNS addresses
4 Provider NTP addresses
5 Network overlay you plan to deploy (VLAN VXLAN FLAT)
6 Monitoring Options you want to deploy (Ceilometer Syslog etc)
7 How many nodes and what roles you want to deploy (Controllers Storage Computes)
8 Other options not covered in the document are available in the links above
Retrieving the ISO image
First of all the Fuel deployment ISO image needs to be retrieved the Fuel iso image of the Brahmaputra release canbe found at Reference 2
Alternatively you may build the iso from source by cloning the opnfvfuel git repository Detailed instructions onhow to build a Fuel OPNFV iso can be found in Reference 14 at section ldquoFuel associated referencesrdquo below
342 Hardware requirements
Following high level hardware requirements must be met
18 Chapter 3 Installer Configuration
OPNFV Configuration Guide Release brahmaputra30 (605ebda)
HW Aspect Requirement of nodes Minimum 5 (3 for non redundant deployment)
bull 1 Fuel deployment master (may be virtualized)bull 3(1) Controllers (1 colocated mongoceilometer
role 2 Ceph-OSD roles)bull 1 Compute (1 co-located Ceph-OSD role)
CPU Minimum 1 socket x86_AMD64 with Virtualizationsupport
RAM Minimum 16GBserver (Depending on VNF work load)Disk Minimum 256GB 10kRPM spinning disksNetworks 4 Tagged VLANs (PUBLIC MGMT STORAGE PRI-
VATE)1 Un-Tagged VLAN for PXE Boot - ADMIN Networknote These can be run on single NIC - or spread outover other nics as your hardware supports
For information on compatible hardware types available for use please see Reference 11 in section ldquoFuel associatedreferencesrdquo below
Top of the rack (TOR) Configuration requirements
The switching infrastructure provides connectivity for the OPNFV infrastructure operations tenant networks(EastWest) and provider connectivity (NorthSouth) it also provides needed connectivity for the Storage Area Net-work (SAN) To avoid traffic congestion it is strongly suggested that three physically separated networks are usedthat is 1 physical network for administration and control one physical network for tenant private and public networksand one physical network for SAN The switching connectivity can (but does not need to) be fully redundant in suchcase it and comprises a redundant 10GE switch pair for each of the three physically separated networks
The physical TOR switches are not automatically configured from the OPNFV reference platform All the networksinvolved in the OPNFV infrastructure as well as the provider networks and the private tenant VLANs needs to bemanually configured
343 Jumphost configuration
The Jumphost server also known as the ldquoFuel masterrdquo provides needed servicesfunctions to deploy an OP-NFVOpenStack cluster as well functions for cluster life-cycle management (extensions repair actions and upgrades)
The Jumphost server requires 2 (4 if redundancy is required) Ethernet interfaces - one for external management of theOPNFV installation and another for jump-host communication with the OPNFV cluster
Install the Fuel jump-host
Mount the Fuel Brahmaputra ISO file as a boot device to the jump host server reboot it and install the Fuel Jumphostin accordance with installation instructions see Reference 13 in section ldquoFuel associated referencesrdquo below
344 Platform components configuration
Fuel-Plugins
Fuel plugins enable you to install and configure additional capabilities for your Fuel OPNFV based cloud such asadditional storage types networking functionality or NFV features developed by OPNFV
34 Fuel configuration 19
OPNFV Configuration Guide Release brahmaputra30 (605ebda)
Fuel offers an open source framework for creating these plugins so therersquos a wide range of capabilities that you canenable Fuel to add to your OpenStack clouds
The OPNFV Brahmaputra version of Fuel provides a set of pre-packaged plugins developed by OPNFV
Pluginname
Short description
Open-Daylight
OpenDaylight provides an open-source SDN Controller providing networking features such as L2and L3 network control ldquoService Function Chainingrdquo routing networking policies etc Moreinformation on OpenDaylight in the OPNFV Brahmaputra release can be found in a separate sectionin this document
ONOS ONOS is another open-source SDN controller which in essense fill the same role as OpenDaylightMore information on ONOS in the OPNFV Brahmaputra release can be found in a separate section inthis document
BGP-VPN
BGP-VPN provides an BGPMPLS VPN service More information on BGP-VPN in the OPNFVBrahmaputra release can be found in a separate section in this document
OVS-NSH
OVS-NSH provides a variant of Open-vSwitch which supports ldquoNetwork Service Headersrdquo neededfor the ldquoService function chainingrdquo feature More information on ldquoService Function Chainingrdquo in theOPNFV Brahmaputra release can be found in a in a separate section in this document
OVS-NFV
OVS-NFV provides a variant of Open-vSwitch with carrier grade characteristics essential for NFVworkloads More information on OVS-NFV in the OPNFV Brahmaputra release can be found in a ina separate section in this document
KVM-NFV
KVM-NFV provides a variant of KVM with improved virtualization characteristics essential for NFVworkloads More information on KVM-NFV in the OPNFV Brahmaputra release can be found in a ina separate section in this document
VSPERF VSPERF provides a networking characteristics test bench that facilitates characteristicsperformanceevaluation of vSwithches More information on VSPERF in the OPNFV Brahmaputra release can befound in a in a separate section in this document
Additional third-party plugins can be found here httpswwwmirantiscomproductsopenstack-drivers-and-pluginsfuel-plugins Note Plugins are not necessarilly compatible with each other see section ldquoConfigurationoptions OPNFV scenariosrdquo for compatibility information
The plugins come prepackaged ready to install To do so follow the installation instructions provided in Reference 13provided in section ldquoFuel associated referencesrdquo below
Fuel environment
A Fuel environment is an OpenStack instance managed by Fuel one Fuel instance can manage several OpenStackinstancesenvironments with different configurations etc
To create a Fuel instance follow the instructions provided in the installation instructions see Reference 13 in sectionldquoFuel associated referencesrdquo below
Provisioning of aditional features and services
Although the plugins have already previously been installed they are not per default enabled for the environment wejust created The plugins of your choice need to be enabled and configured
To enable a plugin follow the installation instructions found in Reference 13 provided in section ldquoFuel associatedreferencesrdquo below
For configuration of the plugins please see section ldquoFeature Configurationrdquo
20 Chapter 3 Installer Configuration
OPNFV Configuration Guide Release brahmaputra30 (605ebda)
Networking
All the networking aspects need to be configured in terms of - InterfacesNICs - VLANs - Sub-nets - Gateways - Usernetwork segmentation (VLANVXLAN) - DNS - NTP - etc
For guidelines on how to configure networking please refer to the installation instructions found in Reference 13provided in section ldquoFuel associated referencesrdquo below
Node allocation
Now it is time to allocate the nodes in your OPNFV cluster to OpenStack- SDN- and other featureservice rolesSome roles may require redundancy while others donrsquot Some roles may be co-located with other roles while othersmay not The Fuel GUI will guide you in the allocation of roles and will not permit you to perform invalid allocations
For detailed guide-lines on node allocation please refer to the installation instructions found in Reference 13 providedin section ldquoFuel associated referencesrdquo below
Off-line deployment
The OPNFV Brahmaputra version of Fuel can be deployed using on-line upstream repositories (default) or off-lineusing built-in local repositories on the Fuel jump-start server
For instructions on how to configure Fuel for off-line deployment please refer to the installation instructions found inReference 13 provided in section ldquoFuel associated referencesrdquo below
Deployment
You should now be ready to deploy your OPNFV Brahmaputra environment - but before doing so you may want toverify your network settings
For further details on network verification and deployment please refer to the installation instructions found in Ref-erence 13 provided in section ldquoFuel associated referencesrdquo below
345 Fuel associated references
1 OPNFV Home Page
2 OPNFV documentation- and software downloads
3 OpenStack Liberty Release artifacts
4 OpenStack documentation
5 OpenDaylight artifacts
6 The Fuel OpenStack project
7 Fuel documentation overview
8 Fuel planning guide
9 Fuel quick start guide
10 Fuel operations guide
11 Fuel Plugin Developers Guide
12 Fuel OpenStack Hardware Compatibility List
34 Fuel configuration 21
OPNFV Configuration Guide Release brahmaputra30 (605ebda)
13 OPNFV Installation instruction for the Brahmaputra release of OPNFV when using Fuel as a deployment tool
14 OPNFV Build instruction for the Brahmaputra release of OPNFV when using Fuel as a deployment tool
15 OPNFV Release Note for the Brahmaputra release of OPNFV when using Fuel as a deployment tool
35 JOID Configuration
351 Bare Metal Installations
352 Requirements as per Pharos
353 Networking
Minimum 2 networks
1 First for Admin network with gateway to access external network
2 Second for public network to consume by tenants for floating ips
NOTE JOID support multiple isolated networks for data as well as storage Based on your network optionsfor Openstack
Minimum 6 physical servers
1 Jump host server
Minimum HW Spec needed
CPU cores 16
Memory 32 GB
Hard Disk 1(250 GB)
NIC eth0(Admin Management) eth1 (external network)
2 Control node servers (minimum 3)
Minimum HW Spec
CPU cores 16
Memory 32 GB
Hard Disk 1(500 GB)
NIC eth0(Admin Management) eth1 (external network)
3 Compute node servers (minimum 2)
Minimum HW Spec
CPU cores 16
Memory 32 GB
Hard Disk 1(1 TB) this includes the space for ceph as well
22 Chapter 3 Installer Configuration
OPNFV Configuration Guide Release brahmaputra30 (605ebda)
NIC eth0(Admin Management) eth1 (external network)
NOTE Above configuration is minimum and for better performance and usage of the Openstack please con-sider higher spec for each nodes
Make sure all servers are connected to top of rack switch and configured accord-ingly No DHCP server should be up and configured Only gateway at eth0 and eth1 network should be con-figure to access the network outside your lab
Jump node configuration
1 Install Ubuntu 1404 LTS server version of OS on the nodes 2 Install the git and bridge-utils pack-ages on the server and configure minimum two bridges on jump host
brAdm and brPublic cat etcnetworkinterfaces
The loopback network interface
auto lo
iface lo inet loopback
iface eth0 inet manual
auto brAdm
iface brAdm inet static
address 10411
netmask 2552552480
network 10400
broadcast 1047255
gateway 10401
dns- options are implemented by the resolvconf package if installed
dns-nameservers 10402
bridge_ports eth0
auto brPublic
iface brPublic inet static
address 102662
netmask 2552552550
bridge_ports eth2
NOTE If you choose to use the separate network for management data and storage then you need to createbridge for each interface In case of VLAN tags use the appropriate network on jump-host depend upon VLANID on the interface
354 Configure JOID for your lab
Get the joid code from gerritt
git clone httpsgerritopnfvorggerritpjoidgit
cd joidci
Enable MAAS
35 JOID Configuration 23
OPNFV Configuration Guide Release brahmaputra30 (605ebda)
bull Create a directory in maasltcompany namegtltpod numbergt for example
mkdir maasintelpod7
bull Copy files from pod5 to pod7
cp maasintelpod5 maasintelpod7
4 files will get copied deploymentyaml environmentsyaml interfaceshost lxc-add-more-interfaces
355 deploymentyaml file
Prerequisite
1 Make sure Jump host node has been configured with bridges on each interface so that appropriate MAAS and JUJUbootstrap VM can be created For example if you have three network admin data and public then I would suggestto give names like brAdm brData and brPublic 2 You have information about the node MAC address and powermanagement details (IPMI IP username password) of the nodes used for control and compute node
356 modify deploymentyaml
This file has been used to configure your maas and bootstrap node in a VM Comments in the file are self explanatoryand we expect fill up the information according to match lab infrastructure information Sample deploymentyaml canbe found at httpsgerritopnfvorggerritgitwebp=joidgita=blobf=cimaasintelpod5deploymentyaml
modify joidci01-deploybundlesh
under section case $3 add the intelpod7 section and make sure you have information provided correctly Beforeexample consider your network has 1921681024 your default network and eth1 is on public network which will beused to assign the floating ip
rsquointelpod7rsquo )
As per your lab vip address list be deafult uses 104111 - 104120
sed -i -- rsquos1041119216812grsquo bundlesyaml
Choose the external port to go out from gateway to use
sed -i -- rsquos ext-port eth1 ext-port eth1grsquo bundlesyaml
NOTE If you are using seprate data network then add this line below also along with other changes which representsnetwork 1049024 will be used for data network for openstack
sed -i -- rsquosos-data-network 1048021os-data-network 1049024grsquo bundlesyaml
modify joidci02-maasdeploysh
under section case $1 add the intelpod7 section and make sure you have information provided correctly
24 Chapter 3 Installer Configuration
OPNFV Configuration Guide Release brahmaputra30 (605ebda)
rsquointelpod7rsquo )
cp maasintelpod7deploymentyaml deploymentyaml
NOTE If you are using VLAN tags or more network for data and storage then make sure you modify the case $1section under Enable vlan interface with maas appropriately In the example below eth2 has been used as separate datanetwork for tenants in openstack with network 1049024 on compute and control nodes
rsquointelpod7rsquo )
maas refresh
enableautomodebyname eth2 AUTO 1049024 compute || true
enableautomodebyname eth2 AUTO 1049024 control || true
MAAS Install
After integrating the changes as mentioned above run the MAAS install Suppose you name the integration lab asintelpod7 then run the below commands to start the MAAS deployment
02-maasdeploysh intelpod7
This will take approximately 40 minutes to couple hours depending on your environment This script will do thefollowing
1 Create 2 VMs (KVM)
2 Install MAAS in one of the VMs
3 Configure the MAAS to enlist and commission a VM for Juju bootstrap node
4 Configure the MAAS to enlist and commission bare metal servers
When itrsquos done you should be able to view MAAS webpage (httpltMAAS IPgtMAAS) and see 1 bootstrap nodeand bare metal servers in the lsquoReadyrsquo state on the nodes page
Virtual deployment
By default just running the script 02-maasdeploysh will automatically create the KVM VMs on a single machineand configure everything for you
OPNFV Install
JOID allows you to deploy different combinations of OpenStack release and SDN solution in HA or non-HA mode
For OpenStack it supports Juno and Liberty For SDN it supports Openvswitch OpenContrail OpenDayLight andONOS
In addition to HA or non-HA mode it also supports to deploy the latest from the development tree (tip)
The deploysh in the joidci directoy will do all the work for you For example the following deploy OpenStack Liberywith OpenDayLight in a HA mode in the Intelpod7
35 JOID Configuration 25
OPNFV Configuration Guide Release brahmaputra30 (605ebda)
deploysh -o liberty -s odl -t ha -l intelpod7 -f none
By default the SDN is Openvswitch non-HA Liberty Intelpod5 OPNFV Brahmaputra release and ODL_L2 for theOPNFV feature
Possible options for each choice are as follows
[-s ]
nosdn openvswitch only and no other SDN
odl OpenDayLight Lithium version
opencontrail OpenContrail SDN
onos ONOS framework as SDN
[-t ]
nonha NO HA mode of Openstack
ha HA mode of openstack
tip the tip of the development
[-o ]
juno OpenStack Juno version
liberty OpenStack Liberty version
[-l ] etc
default For virtual deployment where installation will be done on KVM created using 02-maasdeploysh
intelpod5 Install on bare metal OPNFV pod5 of Intel lab
intelpod6
orangepod2
(other pods)
Note if you make changes as per your pod above then please use your pod
[-f ]
none no special feature will be enabled
ipv6 ipv6 will be enabled for tenant in openstack
By default debug is enabled in script and error messages will be printed on the SSH terminal where you are runningthe scripts It could take an hour to couple hours (max) to complete
Is the deployment done successfully
Once juju-deployer is complete use juju status to verify that all deployed unit are in the ready state
26 Chapter 3 Installer Configuration
OPNFV Configuration Guide Release brahmaputra30 (605ebda)
juju status --format tabular
Find the Openstack-dashboard IP address from the juju status output and see if you can log in via browser Theusername and password is adminopenstack
Optionall see if you can log in Juju GUI Juju GUI is on the Juju bootstrap node which is the second VM you definein the 02-maasdeploysh The username and password is adminadmin
If you deploy ODL OpenContrail or ONOS find the IP address of the web UI and login Please refer to each SDNbundleyaml for usernamepassword
Troubleshoot
To access to any deployed units juju ssh for example to login into nova-compute unit and look for varlogjujuunit-ltof interestgt for more info
juju ssh nova-compute0
Example
ubuntuR4N4B1~$ juju ssh nova-compute0
Warning Permanently added rsquo172165060rsquo (ECDSA) to the list of knownhosts
Warning Permanently added rsquo3-r4n3b1-computemaasrsquo (ECDSA) to the list ofknown hosts
Welcome to Ubuntu 14041 LTS (GNULinux 3130-77-generic x86_64)
Documentation httpshelpubuntucom
ltskippedgt
Last login Tue Feb 2 212356 2016 from bootstrapmaas
ubuntu3-R4N3B1-compute~$ sudo -i
root3-R4N3B1-compute~ cd varlogjuju
root3-R4N3B1-computevarlogjuju ls
machine-2log unit-ceilometer-agent-0log unit-ceph-osd-0logunit-neutron-contrail-0log unit-nodes-compute-0log unit-nova-compute-0logunit-ntp-0log
root3-R4N3B1-computevarlogjuju
By default juju will add the Ubuntu user keys for authentication into the deployed server and only ssh accesswill be available
Once you resolve the error go back to the jump host to rerun the charm hook with
juju resolved --retry ltunitgt
35 JOID Configuration 27
OPNFV Configuration Guide Release brahmaputra30 (605ebda)
28 Chapter 3 Installer Configuration
CHAPTER
FOUR
FEATURE CONFIGURATION
The following sections describe the configuration options for specific platform features provided in BrahmaputraFurther details for each feature are captured in the referred project documentation
41 Copper configuration
This release focused on use of the OpenStack Congress service for managing configuration policy The Congress installprocedure described here is largely manual This procedure as well as the longer-term goal of automated installersupport is a work in progress The procedure is further specific to one OPNFV installer (JOID ie MAASJuJu)based environment Support for other OPNFV installer deployed environments is also a work in progress
411 Pre-configuration activities
This procedure assumes OPNFV has been installed via the JOID installer
412 Hardware configuration
There is no specific hardware configuration required for the Copper project
413 Feature configuration
Following are instructions for installing Congress on an Ubuntu 1404 LXC container in the OPNFV Controller nodeas installed by the JOID installer This guide uses instructions from the Congress intro guide on readthedocs Specificvalues below will need to be modified if you intend to repeat this procedure in your JOID-based install environment
Install Procedure
The install currently occurs via four bash scripts provided in the copper repo See these files for the detailed steps
bull install_congress_1sh creates and starts the linux container for congress on the controller node copiesinstall_congress_2sh to the controller node and invokes it via ssh
bull install_congress_2sh installs congress on the congress server
29
OPNFV Configuration Guide Release brahmaputra30 (605ebda)
Cleanup Procedure
If there is an error during installation use the bash script clean_congresssh which stops the congress server if runningand removes the congress user and service from the controller database
Restarting after server power loss etc
Currently this install procedure is manual Automated install and restoral after host recovery is TBD For now thisprocedure will get the Congress service running again
On jumphost SSH to Congress serversource ~envshjuju ssh ubuntu$CONGRESS_HOST If that fails
On jumphost SSH to controller nodejuju ssh ubuntunode1-control Start the Congress containersudo lxc-start -n juju-trusty-congress -d Verify the Congress container statussudo lxc-ls -f juju-trusty-congressNAME STATE IPV4 IPV6 GROUPS AUTOSTART----------------------------------------------------------------------juju-trusty-congress RUNNING 19216810117 - - NO exit back to the Jumphost wait a minute and go back to the SSH to Congress server step above
On the Congress server that you have logged intosource ~admin-openrcshcd ~gitcongresssource binactivatebincongress-server ampdisown -h 1
42 Doctor Configuration
421 Doctor Inspector
Doctor Inspector is suggested to be placed in one of the controller nodes but it can be put on any host where DoctorMonitor can reach and accessible to the OpenStack Controller (Nova)
Make sure OpenStack env parameters are set properly so that Doctor Inspector can issue admin actions such ascompute host force-down and state update of VM
Then you can configure Doctor Inspector as follows
git clone httpsgerritopnfvorggerritdoctor -b stablebrahmaputracd doctortestsINSPECTOR_PORT=12345python inspectorpy $INSPECTOR_PORT gt inspectorlog 2gtamp1 amp
422 Doctor Monitor
Doctor Monitors are suggested to be placed in one of the controller nodes but those can be put on any host whichis reachable to target compute host and accessible to the Doctor Inspector You need to configure Monitors for allcompute hosts one by one
30 Chapter 4 Feature Configuration
OPNFV Configuration Guide Release brahmaputra30 (605ebda)
Make sure OpenStack env parameters are set properly so that Doctor Inspector can issue admin actions such ascompute host force-down and state update of VM
Then you can configure Doctor Monitor as follows
git clone httpsgerritopnfvorggerritdoctor -b stablebrahmaputracd doctortestsINSPECTOR_PORT=12345COMPUTE_HOST=overcloud-novacompute-0sudo python monitorpy $COMPUTE_HOST
http127001$INSPECTOR_PORTevents gt monitorlog 2gtamp1 amp
43 IPv6 Configuration - Setting Up a Service VM as an IPv6 vRouter
This section provides instructions to set up a service VM as an IPv6 vRouter using OPNFV Brahmaputra Releaseinstallers The environment may be pure OpenStack option or Open Daylight L2-only option The deployment modelmay be HA or non-HA The infrastructure may be bare metal or virtual environment
For complete instructions and documentations of setting up service VM as an IPv6 vRouter using ANY method pleaserefer to
1 IPv6 Configuration Guide (HTML) httpartifactsopnfvorgipv6docssetupservicevmindexhtml
2 IPv6 User Guide (HTML) httpartifactsopnfvorgipv6docsgapanalysisindexhtml
431 Pre-configuration Activities
The configuration will work in 2 environments
1 OpenStack-only environment
2 OpenStack with Open Daylight L2-only environment
Depending on which installer will be used to deploy OPNFV each environment may be deployed on bare metal orvirtualized infrastructure Each deployment may be HA or non-HA
Refer to the previous installer configuration chapters installations guide and release notes
432 Setup Manual in OpenStack-Only Environment
If you intend to set up a service VM as an IPv6 vRouter in OpenStack-only environment of OPNFV BrahmaputraRelease please NOTE that
bull Because the anti-spoofing rules of Security Group feature in OpenStack prevents a VM from forwarding packetswe need to disable Security Group feature in the OpenStack-only environment
bull The hostnames IP addresses and username are for exemplary purpose in instructions Please change as neededto fit your environment
bull The instructions apply to both deployment model of single controller node and HA (High Availability) deploy-ment model where multiple controller nodes are used
43 IPv6 Configuration - Setting Up a Service VM as an IPv6 vRouter 31
OPNFV Configuration Guide Release brahmaputra30 (605ebda)
Install OPNFV and Preparation
OPNFV-NATIVE-INSTALL-1 To install OpenStack-only environment of OPNFV Brahmaputra Release
Apex Installer
HA deployment in OpenStack-only environmentopnfv-deploy -d etcopnfv-apexos-nosdn-nofeature-hayaml
Non-HA deployment in OpenStack-only environment Non-HA deployment is currently not supported by Apex installer
Compass Installer
HA deployment in OpenStack-only environmentexport ISO_URL=file$BUILD_DIRECTORYcompassisoexport OS_VERSION=$COMPASS_OS_VERSIONexport OPENSTACK_VERSION=$COMPASS_OPENSTACK_VERSIONexport CONFDIR=$WORKSPACEdeployconfvm_environmentdeploysh --dha $CONFDIRos-nosdn-nofeature-hayml --network $CONFDIR$NODE_NAMEnetworkyml
Non-HA deployment in OpenStack-only environment Non-HA deployment is currently not supported by Compass installer
Fuel Installer
HA deployment in OpenStack-only environmentdeploysh -s os-nosdn-nofeature-ha
Non-HA deployment in OpenStack-only environmentdeploysh -s os-nosdn-nofeature-noha
Joid Installer
HA deployment in OpenStack-only environmentdeploysh -o liberty -s nosdn -t ha -l default -f ipv6
Non-HA deployment in OpenStack-only environmentdeploysh -o liberty -s nosdn -t nonha -l default -f ipv6
Please NOTE that
bull You need to refer to installerrsquos documentation for other necessary parameters applicable to your deployment
bull You need to refer to Release Notes and installerrsquos documentation if there is any issue in installation
OPNFV-NATIVE-INSTALL-2 Clone the following GitHub repository to get the configuration and metadata files
git clone httpsgithubcomsridhargaddamopnfv_os_ipv6_pocgit optstackopnfv_os_ipv6_poc
Disable Security Groups in OpenStack ML2 Setup
OPNFV-NATIVE-SEC-1 Change the settings in etcneutronpluginsml2ml2_confini as follows
etcneutronpluginsml2ml2_confini[securitygroup]extension_drivers = port_security
32 Chapter 4 Feature Configuration
OPNFV Configuration Guide Release brahmaputra30 (605ebda)
enable_security_group = Falsefirewall_driver = neutronagentfirewallNoopFirewallDriver
OPNFV-NATIVE-SEC-2 Change the settings in etcnovanovaconf as follows
etcnovanovaconf[DEFAULT]security_group_api = novafirewall_driver = novavirtfirewallNoopFirewallDriver
OPNFV-NATIVE-SEC-3 After updating the settings you will have to restart the Neutron and Nova services
Please note that the commands of restarting Neutron and Nova would vary depending on the installer Pleaserefer to relevant documentation of specific installers
Set Up Service VM as IPv6 vRouter
OPNFV-NATIVE-SETUP-1 Now we assume that OpenStack multi-node setup is up and running We have to sourcethe tenant credentials in this step Please NOTE that the method of sourcing tenant credentials may vary dependingon installers For example
Apex installer
source the tenant credentials using Apex installer of OPNFV you need to copy the file homestackovercloudrc from the installer VM called instack to a location in controller node for example in the directory optsource optovercloudrc
Compass installer
source the tenant credentials using Compass installer of OPNFVsource optadmin-openrcsh
Fuel installer
source the tenant credentials using Fuel installer of OPNFVsource rootopenrc
Joid installer
source the tenant credentials using Joid installer of OPNFVsource $HOMEjoid_configadmin-openrc
devstack
source the tenant credentials in devstacksource openrc admin demo
Please refer to relevant documentation of installers if you encounter any issue
OPNFV-NATIVE-SETUP-2 Download fedora22 image which would be used for vRouter
wget httpsdownloadfedoraprojectorgpubfedoralinuxreleases22Cloudx86_64ImagesFedora-Cloud-Base-22-20150521x86_64qcow2
OPNFV-NATIVE-SETUP-3 Import Fedora22 image to glance
glance image-create --name Fedora22 --disk-format qcow2 --container-format bare --file Fedora-Cloud-Base-22-20150521x86_64qcow2
43 IPv6 Configuration - Setting Up a Service VM as an IPv6 vRouter 33
OPNFV Configuration Guide Release brahmaputra30 (605ebda)
OPNFV-NATIVE-SETUP-4 This step is Informational OPNFV Installer has taken care of this step duringdeployment You may refer to this step only if there is any issue or if you are using other installers
We have to move the physical interface (ie the public network interface) to br-ex including moving the publicIP address and setting up default route Please refer to OS-NATIVE-SETUP-4 and OS-NATIVE-SETUP-5 in ourmore complete instruction
OPNFV-NATIVE-SETUP-5 Create Neutron routers ipv4-router and ipv6-router which need to provideexternal connectivity
neutron router-create ipv4-routerneutron router-create ipv6-router
OPNFV-NATIVE-SETUP-6 Create an external networksubnet ext-net using the appropriate values based on thedata-center physical network setup
Please NOTE that you may only need to create the subnet of ext-net because OPNFV installers should have createdan external network during installation You must use the same name of external network that installer creates whenyou create the subnet For example
bull Apex installer external
bull Compass installer ext-net
bull Fuel installer net04_ext
bull Joid installer ext-net
Please refer to the documentation of installers if there is any issue
This is needed only if installer does not create an external work Otherwise skip this command net-createneutron net-create --routerexternal ext-net
Note that the name ext-net may work for some installers such as Compass and Joid Change the name ext-net to match the name of external network that an installer createsneutron subnet-create --disable-dhcp --allocation-pool start=19859156251end=19859156254 --gateway 198591561 ext-net 19859156024
OPNFV-NATIVE-SETUP-7 Create Neutron networks ipv4-int-network1 and ipv6-int-network2 withport_security disabled
neutron net-create --port_security_enabled=False ipv4-int-network1neutron net-create --port_security_enabled=False ipv6-int-network2
OPNFV-NATIVE-SETUP-8 Create IPv4 subnet ipv4-int-subnet1 in the internal networkipv4-int-network1 and associate it to ipv4-router
neutron subnet-create --name ipv4-int-subnet1 --dns-nameserver 8888 ipv4-int-network1 2000024
neutron router-interface-add ipv4-router ipv4-int-subnet1
OPNFV-NATIVE-SETUP-9 Associate the ext-net to the Neutron routers ipv4-router and ipv6-router
Note that the name ext-net may work for some installers such as Compass and Joid Change the name ext-net to match the name of external network that an installer createsneutron router-gateway-set ipv4-router ext-netneutron router-gateway-set ipv6-router ext-net
OPNFV-NATIVE-SETUP-10 Create two subnets one IPv4 subnet ipv4-int-subnet2 and one IPv6 subnetipv6-int-subnet2 in ipv6-int-network2 and associate both subnets to ipv6-router
34 Chapter 4 Feature Configuration
OPNFV Configuration Guide Release brahmaputra30 (605ebda)
neutron subnet-create --name ipv4-int-subnet2 --dns-nameserver 8888 ipv6-int-network2 1000024
neutron subnet-create --name ipv6-int-subnet2 --ip-version 6 --ipv6-ra-mode slaac --ipv6-address-mode slaac ipv6-int-network2 2001db80164
neutron router-interface-add ipv6-router ipv4-int-subnet2neutron router-interface-add ipv6-router ipv6-int-subnet2
OPNFV-NATIVE-SETUP-11 Create a keypair
nova keypair-add vRouterKey gt ~vRouterKey
OPNFV-NATIVE-SETUP-12 Create ports for vRouter (with some specific MAC address - basically for automation- to know the IPv6 addresses that would be assigned to the port)
neutron port-create --name eth0-vRouter --mac-address fa163e111111 ipv6-int-network2neutron port-create --name eth1-vRouter --mac-address fa163e222222 ipv4-int-network1
OPNFV-NATIVE-SETUP-13 Create ports for VM1 and VM2
neutron port-create --name eth0-VM1 --mac-address fa163e333333 ipv4-int-network1neutron port-create --name eth0-VM2 --mac-address fa163e444444 ipv4-int-network1
OPNFV-NATIVE-SETUP-14 Update ipv6-router with routing information to subnet 2001db80264
neutron router-update ipv6-router --routes type=dict list=true destination=2001db80264nexthop=2001db801f8163efffe111111
OPNFV-NATIVE-SETUP-15 Boot Service VM (vRouter) VM1 and VM2
nova boot --image Fedora22 --flavor m1small --user-data optstackopnfv_os_ipv6_pocmetadatatxt --availability-zone novaopnfv-os-compute --nic port-id=$(neutron port-list | grep -w eth0-vRouter | awk print $2) --nic port-id=$(neutron port-list | grep -w eth1-vRouter | awk print $2) --key-name vRouterKey vRouter
nova list
Please wait for some 10 to 15 minutes so that necessary packages (like radvd) are installed and vRouter is upnova console-log vRouter
nova boot --image cirros-034-x86_64-uec --flavor m1tiny --user-data optstackopnfv_os_ipv6_pocset_mtush --availability-zone novaopnfv-os-controller --nic port-id=$(neutron port-list | grep -w eth0-VM1 | awk print $2) --key-name vRouterKey VM1
nova boot --image cirros-034-x86_64-uec --flavor m1tiny--user-data optstackopnfv_os_ipv6_pocset_mtush --availability-zone novaopnfv-os-compute --nic port-id=$(neutron port-list | grep -w eth0-VM2 | awk print $2) --key-name vRouterKey VM2
nova list Verify that all the VMs are in ACTIVE state
OPNFV-NATIVE-SETUP-16 If all goes well the IPv6 addresses assigned to the VMs would be as shown as follows
43 IPv6 Configuration - Setting Up a Service VM as an IPv6 vRouter 35
OPNFV Configuration Guide Release brahmaputra30 (605ebda)
vRouter eth0 interface would have the following IPv6 address 2001db801f8163efffe11111164 vRouter eth1 interface would have the following IPv6 address 2001db802164 VM1 would have the following IPv6 address 2001db802f8163efffe33333364 VM2 would have the following IPv6 address 2001db802f8163efffe44444464
OPNFV-NATIVE-SETUP-17 Now we can SSH to VMs You can execute the following command
1 Create a floatingip and associate it with VM1 VM2 and vRouter (to the port id that is passed) Note that the name ext-net may work for some installers such as Compass and Joid Change the name ext-net to match the name of external network that an installer createsneutron floatingip-create --port-id $(neutron port-list | grep -w eth0-VM1 | awk print $2) ext-netneutron floatingip-create --port-id $(neutron port-list | grep -w eth0-VM2 | awk print $2) ext-netneutron floatingip-create --port-id $(neutron port-list | grep -w eth1-vRouter | awk print $2) ext-net
2 To know display the floatingip associated with VM1 VM2 and vRouterneutron floatingip-list -F floating_ip_address -F port_id | grep $(neutron port-list | grep -w eth0-VM1 | awk print $2) | awk print $2neutron floatingip-list -F floating_ip_address -F port_id | grep $(neutron port-list | grep -w eth0-VM2 | awk print $2) | awk print $2neutron floatingip-list -F floating_ip_address -F port_id | grep $(neutron port-list | grep -w eth1-vRouter | awk print $2) | awk print $2
3 To ssh to the vRouter VM1 and VM2 user can execute the following commandssh -i ~vRouterKey fedoraltfloating-ip-of-vRoutergtssh -i ~vRouterKey cirrosltfloating-ip-of-VM1gtssh -i ~vRouterKey cirrosltfloating-ip-of-VM2gt
433 Setup Manual in OpenStack with Open Daylight L2-Only Environment
If you intend to set up a service VM as an IPv6 vRouter in an environment of OpenStack and Open Daylight L2-onlyof OPNFV Brahmaputra Release please NOTE that
bull The hostnames IP addresses and username are for exemplary purpose in instructions Please change as neededto fit your environment
bull The instructions apply to both deployment model of single controller node and HA (High Availability) deploy-ment model where multiple controller nodes are used
bull However in case of HA when ipv6-router is created in step SETUP-SVM-11 it could be created in anyof the controller node Thus you need to identify in which controller node ipv6-router is created in orderto manually spawn radvd daemon inside the ipv6-router namespace in steps SETUP-SVM-24 throughSETUP-SVM-30
Install OPNFV and Preparation
OPNFV-INSTALL-1 To install OpenStack with Open Daylight L2-only environment of OPNFV Brahmaputra Re-lease
Apex Installer
36 Chapter 4 Feature Configuration
OPNFV Configuration Guide Release brahmaputra30 (605ebda)
HA deployment in OpenStack with Open Daylight L2-only environmentopnfv-deploy -d etcopnfv-apexos-odl_l2-nofeature-hayaml
Non-HA deployment in OpenStack with Open Daylight L2-only environment Non-HA deployment is currently not supported by Apex installer
Compass Installer
HA deployment in OpenStack with Open Daylight L2-only environmentexport ISO_URL=file$BUILD_DIRECTORYcompassisoexport OS_VERSION=$COMPASS_OS_VERSIONexport OPENSTACK_VERSION=$COMPASS_OPENSTACK_VERSIONexport CONFDIR=$WORKSPACEdeployconfvm_environmentdeploysh --dha $CONFDIRos-odl_l2-nofeature-hayml --network $CONFDIR$NODE_NAMEnetworkyml
Non-HA deployment in OpenStack with Open Daylight L2-only environment Non-HA deployment is currently not supported by Compass installer
Fuel Installer
HA deployment in OpenStack with Open Daylight L2-only environmentdeploysh -s os-odl_l2-nofeature-ha
Non-HA deployment in OpenStack with Open Daylight L2-only environmentdeploysh -s os-odl_l2-nofeature-noha
Joid Installer
HA deployment in OpenStack with Open Daylight L2-only environmentdeploysh -o liberty -s odl -t ha -l default -f ipv6
Non-HA deployment in OpenStack with Open Daylight L2-only environmentdeploysh -o liberty -s odl -t nonha -l default -f ipv6
Please NOTE that
bull You need to refer to installerrsquos documentation for other necessary parameters applicable to your deployment
bull You need to refer to Release Notes and installerrsquos documentation if there is any issue in installation
OPNFV-INSTALL-2 Clone the following GitHub repository to get the configuration and metadata files
git clone httpsgithubcomsridhargaddamopnfv_os_ipv6_pocgit optstackopnfv_os_ipv6_poc
Disable Security Groups in OpenStack ML2 Setup
Please NOTE that although Security Groups feature has been disabled automatically through localconf configu-ration file by some installers such as devstack it is very likely that other installers such as Apex Compass Fuelor Joid will enable Security Groups feature after installation
Please make sure that Security Groups are disabled in the setup
OPNFV-SEC-1 Change the settings in etcneutronpluginsml2ml2_confini as follows
etcneutronpluginsml2ml2_confini[securitygroup]enable_security_group = Falsefirewall_driver = neutronagentfirewallNoopFirewallDriver
43 IPv6 Configuration - Setting Up a Service VM as an IPv6 vRouter 37
OPNFV Configuration Guide Release brahmaputra30 (605ebda)
OPNFV-SEC-2 Change the settings in etcnovanovaconf as follows
etcnovanovaconf[DEFAULT]security_group_api = novafirewall_driver = novavirtfirewallNoopFirewallDriver
OPNFV-SEC-3 After updating the settings you will have to restart the Neutron and Nova services
Please note that the commands of restarting Neutron and Nova would vary depending on the installer Pleaserefer to relevant documentation of specific installers
Source the Credentials in OpenStack Controller Node
SETUP-SVM-1 Login in OpenStack Controller Node Start a new terminal and change directory to where Open-Stack is installed
SETUP-SVM-2 We have to source the tenant credentials in this step Please NOTE that the method of sourcingtenant credentials may vary depending on installers For example
Apex installer
source the tenant credentials using Apex installer of OPNFV you need to copy the file homestackovercloudrc from the installer VM called instack to a location in controller node for example in the directory optsource optovercloudrc
Compass installer
source the tenant credentials using Compass installer of OPNFVsource optadmin-openrcsh
Fuel installer
source the tenant credentials using Fuel installer of OPNFVsource rootopenrc
Joid installer
source the tenant credentials using Joid installer of OPNFVsource $HOMEjoid_configadmin-openrc
devstack
source the tenant credentials in devstacksource openrc admin demo
Please refer to relevant documentation of installers if you encounter any issue
Informational Note Move Public Network from Physical Network Interface to br-ex
SETUP-SVM-3 Move the physical interface (ie the public network interface) to br-ex
SETUP-SVM-4 Verify setup of br-ex
Those 2 steps are Informational OPNFV Installer has taken care of those 2 steps during deployment You mayrefer to this step only if there is any issue or if you are using other installers
38 Chapter 4 Feature Configuration
OPNFV Configuration Guide Release brahmaputra30 (605ebda)
We have to move the physical interface (ie the public network interface) to br-ex including moving the publicIP address and setting up default route Please refer to SETUP-SVM-3 and SETUP-SVM-4 in our more completeinstruction
Create IPv4 Subnet and Router with External Connectivity
SETUP-SVM-5 Create a Neutron router ipv4-router which needs to provide external connectivity
neutron router-create ipv4-router
SETUP-SVM-6 Create an external networksubnet ext-net using the appropriate values based on the data-centerphysical network setup
Please NOTE that you may only need to create the subnet of ext-net because OPNFV installers should have createdan external network during installation You must use the same name of external network that installer creates whenyou create the subnet For example
bull Apex installer external
bull Compass installer ext-net
bull Fuel installer net04_ext
bull Joid installer ext-net
Please refer to the documentation of installers if there is any issue
This is needed only if installer does not create an external work Otherwise skip this command net-createneutron net-create --routerexternal ext-net
Note that the name ext-net may work for some installers such as Compass and Joid Change the name ext-net to match the name of external network that an installer createsneutron subnet-create --disable-dhcp --allocation-pool start=19859156251end=19859156254 --gateway 198591561 ext-net 19859156024
Please note that the IP addresses in the command above are for exemplary purpose Please replace the IP addressesof your actual network
SETUP-SVM-7 Associate the ext-net to the Neutron router ipv4-router
Note that the name ext-net may work for some installers such as Compass and Joid Change the name ext-net to match the name of external network that an installer createsneutron router-gateway-set ipv4-router ext-net
SETUP-SVM-8 Create an internaltenant IPv4 network ipv4-int-network1
neutron net-create ipv4-int-network1
SETUP-SVM-9 Create an IPv4 subnet ipv4-int-subnet1 in the internal network ipv4-int-network1
neutron subnet-create --name ipv4-int-subnet1 --dns-nameserver 8888 ipv4-int-network1 2000024
SETUP-SVM-10 Associate the IPv4 internal subnet ipv4-int-subnet1 to the Neutron router ipv4-router
neutron router-interface-add ipv4-router ipv4-int-subnet1
43 IPv6 Configuration - Setting Up a Service VM as an IPv6 vRouter 39
OPNFV Configuration Guide Release brahmaputra30 (605ebda)
Create IPv6 Subnet and Router with External Connectivity
Now let us create a second neutron router where we can ldquomanuallyrdquo spawn a radvd daemon to simulate an externalIPv6 router
SETUP-SVM-11 Create a second Neutron router ipv6-router which needs to provide external connectivity
neutron router-create ipv6-router
SETUP-SVM-12 Associate the ext-net to the Neutron router ipv6-router
Note that the name ext-net may work for some installers such as Compass and Joid Change the name ext-net to match the name of external network that an installer createsneutron router-gateway-set ipv6-router ext-net
SETUP-SVM-13 Create a second internaltenant IPv4 network ipv4-int-network2
neutron net-create ipv4-int-network2
SETUP-SVM-14 Create an IPv4 subnet ipv4-int-subnet2 for the ipv6-router internal networkipv4-int-network2
neutron subnet-create --name ipv4-int-subnet2 --dns-nameserver 8888 ipv4-int-network2 1000024
SETUP-SVM-15 Associate the IPv4 internal subnet ipv4-int-subnet2 to the Neutron router ipv6-router
neutron router-interface-add ipv6-router ipv4-int-subnet2
Prepare Image Metadata and Keypair for Service VM
SETUP-SVM-16 Download fedora22 image which would be used as vRouter
wget httpsdownloadfedoraprojectorgpubfedoralinuxreleases22Cloudx86_64ImagesFedora-Cloud-Base-22-20150521x86_64qcow2
glance image-create --name Fedora22 --disk-format qcow2 --container-format bare --file Fedora-Cloud-Base-22-20150521x86_64qcow2
SETUP-SVM-17 Create a keypair
nova keypair-add vRouterKey gt ~vRouterKey
SETUP-SVM-18 Create ports for vRouter and both the VMs with some specific MAC addresses
neutron port-create --name eth0-vRouter --mac-address fa163e111111 ipv4-int-network2neutron port-create --name eth1-vRouter --mac-address fa163e222222 ipv4-int-network1neutron port-create --name eth0-VM1 --mac-address fa163e333333 ipv4-int-network1neutron port-create --name eth0-VM2 --mac-address fa163e444444 ipv4-int-network1
Boot Service VM (vRouter) with eth0 on ipv4-int-network2 and eth1 on ipv4-int-network1
Let us boot the service VM (vRouter) with eth0 interface on ipv4-int-network2 connecting toipv6-router and eth1 interface on ipv4-int-network1 connecting to ipv4-router
SETUP-SVM-19 Boot the vRouter using Fedora22 image on the OpenStack Compute Node with hostnameopnfv-os-compute
40 Chapter 4 Feature Configuration
OPNFV Configuration Guide Release brahmaputra30 (605ebda)
nova boot --image Fedora22 --flavor m1small --user-data optstackopnfv_os_ipv6_pocmetadatatxt --availability-zone novaopnfv-os-compute --nic port-id=$(neutron port-list | grep -w eth0-vRouter | awk print $2) --nic port-id=$(neutron port-list | grep -w eth1-vRouter | awk print $2) --key-name vRouterKey vRouter
Please note that optstackopnfv_os_ipv6_pocmetadatatxt is used to enable the vRouter to au-tomatically spawn a radvd and
bull Act as an IPv6 vRouter which advertises the RA (Router Advertisements) with prefix 2001db80264on its internal interface (eth1)
bull Forward IPv6 traffic from internal interface (eth1)
SETUP-SVM-20 Verify that Fedora22 image boots up successfully and vRouter has ssh keys properly injected
nova listnova console-log vRouter
Please note that it may take a few minutes for the necessary packages to get installed and ssh keys to be injected
Sample Output[ 762884523] cloud-init[871] ec2 [ 762909634] cloud-init[871] ec2 -----BEGIN SSH HOST KEY FINGERPRINTS-----[ 762931626] cloud-init[871] ec2 2048 e3dc3d4abcb6b07775a170a3d02a47a9 (RSA)[ 762957380] cloud-init[871] ec2 -----END SSH HOST KEY FINGERPRINTS-----[ 762979554] cloud-init[871] ec2
Boot Two Other VMs in ipv4-int-network1
In order to verify that the setup is working let us create two cirros VMs with eth1 interface on theipv4-int-network1 ie connecting to vRouter eth1 interface for internal network
We will have to configure appropriate mtu on the VMsrsquo interface by taking into account the tunneling overhead andany physical switch requirements If so push the mtu to the VM either using dhcp options or via meta-data
SETUP-SVM-21 Create VM1 on OpenStack Controller Node with hostname opnfv-os-controller
nova boot --image cirros-034-x86_64-uec --flavor m1tiny --user-data optstackopnfv_os_ipv6_pocset_mtush --availability-zone novaopnfv-os-controller --nic port-id=$(neutron port-list | grep -w eth0-VM1 | awk print $2) --key-name vRouterKey VM1
SETUP-SVM-22 Create VM2 on OpenStack Compute Node with hostname opnfv-os-compute
nova boot --image cirros-034-x86_64-uec --flavor m1tiny --user-data optstackopnfv_os_ipv6_pocset_mtush --availability-zone novaopnfv-os-compute --nic port-id=$(neutron port-list | grep -w eth0-VM2 | awk print $2) --key-name vRouterKey VM2
SETUP-SVM-23 Confirm that both the VMs are successfully booted
nova listnova console-log VM1nova console-log VM2
43 IPv6 Configuration - Setting Up a Service VM as an IPv6 vRouter 41
OPNFV Configuration Guide Release brahmaputra30 (605ebda)
Spawn RADVD in ipv6-router
Let us manually spawn a radvd daemon inside ipv6-router namespace to simulate an external router First ofall we will have to identify the ipv6-router namespace and move to the namespace
Please NOTE that in case of HA (High Availability) deployment model where multiple controller nodes are usedipv6-router created in step SETUP-SVM-11 could be in any of the controller node Thus you need to iden-tify in which controller node ipv6-router is created in order to manually spawn radvd daemon inside theipv6-router namespace in steps SETUP-SVM-24 through SETUP-SVM-30 The following command in Neu-tron will display the controller on which the ipv6-router is spawned
neutron l3-agent-list-hosting-router ipv6-router
Then you login to that controller and execute steps SETUP-SVM-24 through SETUP-SVM-30
SETUP-SVM-24 identify the ipv6-router namespace and move to the namespace
sudo ip netns exec qrouter-$(neutron router-list | grep -w ipv6-router | awk print $2) bash
SETUP-SVM-25 Upon successful execution of the above command you will be in the router namespace Now letus configure the IPv6 address on the ltqr-xxxgt interface
export router_interface=$(ip a s | grep -w global qr- | awk print $7)ip -6 addr add 2001db8011 dev $router_interface
SETUP-SVM-26 Update the sample file optstackopnfv_os_ipv6_pocscenario2radvdconfwith $router_interface
cp optstackopnfv_os_ipv6_pocscenario2radvdconf tmpradvd$router_interfaceconfsed -i s$router_interface$router_interfaceg tmpradvd$router_interfaceconf
SETUP-SVM-27 Spawn a radvd daemon to simulate an external router This radvd daemon advertises an IPv6subnet prefix of 2001db80164 using RA (Router Advertisement) on its $router_interface so that eth0interface of vRouter automatically configures an IPv6 SLAAC address
$radvd -C tmpradvd$router_interfaceconf -p tmpbr-expidradvd -m syslog
SETUP-SVM-28 Add an IPv6 downstream route pointing to the eth0 interface of vRouter
ip -6 route add 2001db80264 via 2001db801f8163efffe111111
SETUP-SVM-29 The routing table should now look similar to something shown below
ip -6 route show2001db8011 dev qr-42968b9e-62 proto kernel metric 2562001db80164 dev qr-42968b9e-62 proto kernel metric 256 expires 86384sec2001db80264 via 2001db801f8163efffe111111 dev qr-42968b9e-62 proto ra metric 1024 expires 29secfe8064 dev qg-3736e0c7-7c proto kernel metric 256fe8064 dev qr-42968b9e-62 proto kernel metric 256
SETUP-SVM-30 If all goes well the IPv6 addresses assigned to the VMs would be as shown as follows
vRouter eth0 interface would have the following IPv6 address 2001db801f8163efffe11111164 vRouter eth1 interface would have the following IPv6 address 2001db802164 VM1 would have the following IPv6 address 2001db802f8163efffe33333364 VM2 would have the following IPv6 address 2001db802f8163efffe44444464
42 Chapter 4 Feature Configuration
OPNFV Configuration Guide Release brahmaputra30 (605ebda)
Testing to Verify Setup Complete
Now let us SSH to those VMs eg VM1 and or VM2 and or vRouter to confirm that it has successfully configuredthe IPv6 address using SLAAC with prefix 2001db80264 from vRouter
We use floatingip mechanism to achieve SSH
SETUP-SVM-31 Now we can SSH to VMs You can execute the following command
1 Create a floatingip and associate it with VM1 VM2 and vRouter (to the port id that is passed) Note that the name ext-net may work for some installers such as Compass and Joid Change the name ext-net to match the name of external network that an installer createsneutron floatingip-create --port-id $(neutron port-list | grep -w eth0-VM1 | awk print $2) ext-netneutron floatingip-create --port-id $(neutron port-list | grep -w eth0-VM2 | awk print $2) ext-netneutron floatingip-create --port-id $(neutron port-list | grep -w eth1-vRouter | awk print $2) ext-net
2 To know display the floatingip associated with VM1 VM2 and vRouterneutron floatingip-list -F floating_ip_address -F port_id | grep $(neutron port-list | grep -w eth0-VM1 | awk print $2) | awk print $2neutron floatingip-list -F floating_ip_address -F port_id | grep $(neutron port-list | grep -w eth0-VM2 | awk print $2) | awk print $2neutron floatingip-list -F floating_ip_address -F port_id | grep $(neutron port-list | grep -w eth1-vRouter | awk print $2) | awk print $2
3 To ssh to the vRouter VM1 and VM2 user can execute the following commandssh -i ~vRouterKey fedoraltfloating-ip-of-vRoutergtssh -i ~vRouterKey cirrosltfloating-ip-of-VM1gtssh -i ~vRouterKey cirrosltfloating-ip-of-VM2gt
If everything goes well ssh will be successful and you will be logged into those VMs Run some commands to verifythat IPv6 addresses are configured on eth0 interface
SETUP-SVM-32 Show an IPv6 address with a prefix of 2001db80264
ip address show
SETUP-SVM-33 ping some external IPv6 address eg ipv6-router
ping6 2001db8011
If the above ping6 command succeeds it implies that vRouter was able to successfully forward the IPv6 traffic toreach external ipv6-router
44 Installing OVSNFV Fuel Plugin
bull On the Fuel UI create a new environment
bull In Settings gt Userspace OVS support check ldquoUserspace OVS supportrdquo
bull Continue with environment configuration and deployment as normal
441 Upgrading the plugin
From time to time new versions of the plugin may become available
44 Installing OVSNFV Fuel Plugin 43
OPNFV Configuration Guide Release brahmaputra30 (605ebda)
The plugin cannot be upgraded if an active environment is using the plugin
In order to upgrade the plugin
bull Copy the updated plugin file to the fuel-master
bull On the Fuel UI reset the environment
bull On the Fuel CLI ldquofuel plugins ndashupdate ltfuel-plugin-filegtrdquo
bull On the Fuel UI re-deploy the environment
45 Promise Feature Configuration Overview
451 Promise installation
Install nodejs npm and promise
curl -sL httpsdebnodesourcecomsetup_4x | sudo -E bash -sudo apt-get install -y nodejssudo npm -g install npmlatestgit clone httpsgithubcomopnfvpromisegitcd promisenpm install
Please note that the last command lsquonpm installrsquo will install all needed dependencies for promise (including yangforgeand mocha)
452 Testing
Please perform the following preparation steps
1 Set OpenStack environment parameters properly (eg source openrc admin demo in DevStack)
2 Create OpenStack tenant (eg promise) and tenant user (eg promiser)
3 Create a flavor in Nova with 1 vCPU and 512 MB RAM
4 Create a private network subnet and router in Neutron
5 Create an image in Glance
Once done the promise test script can be invoked as follows (as a single line command)
NODE_ENV=mytest OS_TENANT_NAME=promise OS_USERNAME=promiser OS_PASSWORD=ltuser password from Step 2gt OS_TEST_FLAVOR=ltflavor ID from Step 3gt OS_TEST_NETWORK=ltnetwork ID from Step 4gt OS_TEST_IMAGE=ltimage ID from Step 5gt npm run -s test -- --reporter json gt promise-resultsjson
The results of the tests will be stored in the promise-resultsjson file
The results can also be seen in the console (ldquonpm run -s testrdquo)
All 33 tests passing Congratulations promise has been successfully installed and configured
44 Chapter 4 Feature Configuration
OPNFV Configuration Guide Release brahmaputra30 (605ebda)
45 Promise Feature Configuration Overview 45
OPNFV Configuration Guide Release brahmaputra30 (605ebda)
46 Configuring SDNVPN features
Fuel installer configuration
In order to install the BGPVPN feature the corresponding checkbox in Fuel has to be selected This will triggerinstallation of the OpenStack BGPVPN API extension for Neutron (set up for using the ODL driver)
In addition ODL has to be installed see the corresponding section in the respective installer documentation on how toinstall ODL If the BGPVPN feature is installed ODL will automatically be installed with VPN Service karaf featureactivated
No post-deploy configuration is necessary The Fuel BGPVPN plugin and the ODL plugin should set up the clusterready for BGPVPNs being created This includes the set-up of internal VxLAN transport tunnels between computenodes
No post-configuration activities are required
46 Chapter 4 Feature Configuration
CHAPTER
FIVE
POST CONFIGURATION ACTIVITIES
Once you have deployed and configured your scenario and features you should validate the state of the system usingthe following guides
51 Scenario validation activities
The following guides provide information on how to validate the installation of you scenario based on the tools andtest suites available for the installation tool you have selected
511 Fuel post installation procedures
Automated post installation activities
Fuel provides a fairly broad coverage of built in automated health checks These validate the installation in terms ofconfiguration services networking storage policies etc The execution of the full range of health checks takes lessthan 30 minutes
For instructions on how to run health-checks please read the Fuel installation instructions
Platform components validation
Consult the feature sections in this document for any post-install feature specific validationhealth-checks
512 JOID post installation procedures
Configure OpenStack
In each SDN directory for example joidciopencontrail there is a folder for Juju deployer where you can find thecharm bundle yaml files that the deploysh uses to deploy
In the same directory there is scripts folder where you can find shell scripts to help you configure the OpenStackcloud that you just deployed These scripts are created to help you configure a basic OpenStack Cloud to verify thecloud For more info on OpenStack Cloud configuration please refer to the OpenStack Cloud Administrator Guideon docsopenstackorg Similarly for complete SDN configuration please refer to the respective SDN adminstratorguide
Each SDN solution requires slightly different setup please refer to the README in each SDN folder Most likelyyou will need to modify the openstacksh and cloud-setupsh scripts for the floating IP range private IP network andSSH keys Please go through openstacksh glancesh and cloud-setupsh and make changes as you see fit
47
OPNFV Configuration Guide Release brahmaputra30 (605ebda)
52 Feature validation activities
The following sections provide information on how to validate the features you have installed in your scenario
521 Copper post installation procedures
This release focused on use of the OpenStack Congress service for managing configuration policy The Congressinstall verify procedure described here is largely manual This procedure as well as the longer-term goal of automatedverification support is a work in progress The procedure is further specific to one OPNFV installer (JOID ieMAASJuJu) based environment
Automated post installation activities
No automated procedures are provided at this time
Copper post configuration procedures
No configuration procedures are required beyond the basic install procedure
Platform components validation
Following are notes on creating a container as test driver for Congress This is based upon an Ubuntu host as installedby JOID
Create and Activate the Container
On the jumphost
sudo lxc-create -n trusty-copper -t usrsharelxctemplateslxc-ubuntu -- -b ubuntu ~opnfvsudo lxc-start -n trusty-copper -dsudo lxc-info --name trusty-copper(typical output)Name trusty-copperState RUNNINGPID 4563IP 100344CPU use 2877 secondsBlkIO use 52279 MiBMemory use 55975 MiBKMem use 0 bytesLink vethDMFOANTX bytes 262 MiBRX bytes 8848 MiBTotal bytes 9110 MiB
Login and configure the test server
48 Chapter 5 Post Configuration Activities
OPNFV Configuration Guide Release brahmaputra30 (605ebda)
ssh ubuntu100344sudo apt-get updatesudo apt-get upgrade -y
Install pipsudo apt-get install python-pip -y
Install javasudo apt-get install default-jre -y
Install other dependenciessudo apt-get install git gcc python-dev libxml2 libxslt1-dev libzip-dev php5-curl -y
Setup OpenStack environment variables per your OPNFV installexport CONGRESS_HOST=19216810117export KEYSTONE_HOST=19216810108export CEILOMETER_HOST=19216810105export CINDER_HOST=19216810101export GLANCE_HOST=19216810106export HEAT_HOST=19216810107export NEUTRON_HOST=19216810111export NOVA_HOST=19216810112source ~admin-openrcsh
Install and test OpenStack clientmkdir ~gitcd gitgit clone httpsgithubcomopenstackpython-openstackclientgitcd python-openstackclientgit checkout stablelibertysudo pip install -r requirementstxtsudo python setuppy installopenstack service list(typical output)+----------------------------------+------------+----------------+| ID | Name | Type |+----------------------------------+------------+----------------+| 2f8799ae50f24c928c021fabf8a50f5f | keystone | identity || 351b13f56d9a4e25849406ec1d5a2726 | cinder | volume || 5129510c3143454f9ba8ec7e6735e267 | cinderv2 | volumev2 || 5ee1e220460f41dea9be06921400ce9b | congress | policy || 78e73a7789a14f56a5d248a0cd141201 | quantum | network || 9d5a00fb475a45b2ae6767528299ed6b | ceilometer | metering || 9e4b1624ef0b434abc0b82f607c5045c | heat | orchestration || b6c01ceb5023442d9f394b83f2a18e01 | heat-cfn | cloudformation || ba6199e3505045ad87e2a7175bd0c57f | glance | image || d753f304a0d541dbb989780ae70328a8 | nova | compute |+----------------------------------+------------+----------------+
Install and test Congress clientcd ~gitgit clone httpsgithubcomopenstackpython-congressclientgitcd python-congressclientgit checkout stablelibertysudo pip install -r requirementstxtsudo python setuppy installopenstack congress driver list(typical output)+------------+--------------------------------------------------------------------------+| id | description |+------------+--------------------------------------------------------------------------+| ceilometer | Datasource driver that interfaces with ceilometer || neutronv2 | Datasource driver that interfaces with OpenStack Networking aka Neutron || nova | Datasource driver that interfaces with OpenStack Compute aka nova || keystone | Datasource driver that interfaces with keystone || cinder | Datasource driver that interfaces with OpenStack cinder || glancev2 | Datasource driver that interfaces with OpenStack Images aka Glance |+------------+--------------------------------------------------------------------------+
Install and test Glance clientcd ~gitgit clone httpsgithubcomopenstackpython-glanceclientgitcd python-glanceclientgit checkout stablelibertysudo pip install -r requirementstxtsudo python setuppy installglance image-list(typical output)+--------------------------------------+---------------------+| ID | Name |+--------------------------------------+---------------------+| 6ce4433e-65c0-4cd8-958d-b06e30c76241 | cirros-033-x86_64 |+--------------------------------------+---------------------+
Install and test Neutron clientcd ~gitgit clone httpsgithubcomopenstackpython-neutronclientgitcd python-neutronclientgit checkout stablelibertysudo pip install -r requirementstxtsudo python setuppy installneutron net-list(typical output)+--------------------------------------+----------+------------------------------------------------------+| id | name | subnets |+--------------------------------------+----------+------------------------------------------------------+| dc6227df-af41-439f-bd2c-c2c2f0fe7fc5 | public | 5745846c-dd79-4900-a7da-bf506348ceac 19216810024 || a3f9f13a-5de9-4d3b-98c8-d2e40a2ef8e9 | internal | 5e0be862-90da-44ab-af43-56d5c65aa049 1000024 |+--------------------------------------+----------+------------------------------------------------------+
Install and test Nova clientcd ~gitgit clone httpsgithubcomopenstackpython-novaclientgitcd python-novaclientgit checkout stablelibertysudo pip install -r requirementstxtsudo python setuppy installnova hypervisor-list(typical output)+----+---------------------+-------+---------+| ID | Hypervisor hostname | State | Status |+----+---------------------+-------+---------+| 1 | compute1maas | up | enabled |+----+---------------------+-------+---------+
Install and test Keystone clientcd ~gitgit clone httpsgithubcomopenstackpython-keystoneclientgitcd python-keystoneclientgit checkout stablelibertysudo pip install -r requirementstxtsudo python setuppy install
52 Feature validation activities 49
OPNFV Configuration Guide Release brahmaputra30 (605ebda)
Setup the Congress Test Webapp
Clone Copper (if not already cloned in user home)cd ~gitif [ -d ~gitcopper ] then git clone httpsgerritopnfvorggerritcopper fi
Copy the Apache configsudo cp ~gitcoppercomponentscongresstest-webappwwwubuntu-apache2conf etcapache2apache2conf
Point proxyphp to the Congress server per your installsed -i -- s19216810117$CONGRESS_HOSTg ~gitcoppercomponentscongresstest-webappwwwhtmlproxyindexphp
Copy the webapp to the Apache root directory and fix permissionssudo cp -R ~gitcoppercomponentscongresstest-webappwwwhtml varwwwsudo chmod 755 varwwwhtml -R
Make webapp log directory and set permissionsmkdir ~logschmod 777 ~logs
Restart Apachesudo service apache2 restart
Using the Test Webapp
Browse to the trusty-copper server IP address
Interactive options are meant to be self-explanatory given a basic familiarity with the Congress service and data modelBut the app will be developed with additional features and UI elements
522 IPv6 Post Installation Procedures
Congratulations you have completed the setup of using a service VM to act as an IPv6 vRouter You have validatedthe setup based on the instruction in previous sections If you want to further test your setup you can ping6 amongVM1 VM2 vRouter and ipv6-router
This setup allows further open innovation by any 3rd-party For more instructions and documentations please refer to
1 IPv6 Configuration Guide (HTML) httpartifactsopnfvorgipv6docssetupservicevmindexhtml
2 IPv6 User Guide (HTML) httpartifactsopnfvorgipv6docsgapanalysisindexhtml
Automated post installation activities
Refer to the relevant testing guides results and release notes of Yardstick Project
53 Additional testing and validation activities
Many of our testing tools can be manually installed to facilitate targeted testing of features and capabilities of yourscenario The following guides provide instruction on setting up these testing suites
50 Chapter 5 Post Configuration Activities
OPNFV Configuration Guide Release brahmaputra30 (605ebda)
531 Overview of the functest suites
Functest is the OPNFV project primarily targeting function testing In the Continuous Integration pipeline it islaunched after an OPNFV fresh installation to validate and verify the basic functions of the infrastructure
The current list of test suites can be distributed in 3 main domains VIM (Virtualised Infrastructure Manager) Con-trollers and Features
Do-main
Testsuite
Comments
VIM
vPing NFV ldquoHello Worldrdquo using SSH connection and floatting IPvPing_userdataPing using userdata and cloud-init mechanismTempest OpenStack reference test suite [2]Rallybench
OpenStack testing tool benchmarking OpenStack modules [3]
ControllersOpen-Day-light
Opendaylight Test suite
ONOS Test suite of ONOS L2 and L3 functions See ONOSFW User Guide for details
Features
vIMS Example of a real VNF deployment to show the NFV capabilities of the platform The IPMultimedia Subsytem is a typical Telco test case referenced by ETSI It provides a fullyfunctional VoIP System
Promise Resource reservation and management project to identify NFV related requirements andrealize resource reservation for future usage by capacity management of resource poolsregarding compute network and storage See Promise User Guide for details
Doctor Doctor platform as of Brahmaputra release provides the two features ImmediateNotification Consistent resource state awareness (compute) see Doctor User Guide fordetails
SD-NVPN
Implementation of the OpenStack bgpvpn API from the SDNVPN feature project Itallowing the cration of BGP VPNs see SDNVPN User Guide for
Functest includes different test suites with several test cases within Some of the tests are developed by Functest teammembers whereas others are integrated from upstream communities or other OPNFV projects For example Tempestis the OpenStack integration test suite and Functest is in charge of the selection integration and automation of the teststhat fit in OPNFV
The Tempest suite has been customized but no new test cases have been created
The results produced by the tests run from CI are pushed and collected in a NoSQL database The goal is to populatethe database with results from different sources and scenarios and to show them on a Dashboard
There is no real notion of Test domain or Test coverage Basic components (VIM controllers) are tested through theirown suites Feature projects also provide their own test suites with different ways of running their tests
vIMS test case was integrated to demonstrate the capability to deploy a relatively complex NFV scenario on top of theOPNFV infrastructure
Functest considers OPNFV as a black box OPNFV since the Brahmaputra release offers lots of potential combina-tions
bull 2 controllers (OpenDayligh ONOS)
bull 4 installers (Apex Compass Fuel Joid)
Most of the tests are runnable on any combination but some others might have restrictions imposed by the installersor the available deployed features
53 Additional testing and validation activities 51
OPNFV Configuration Guide Release brahmaputra30 (605ebda)
Preparing the Docker container
Pull the Functest Docker image from the Docker hub
docker pull opnfvfunctestbrahmaputra10
Check that the image is available
docker images
Run the docker container giving the environment variables
bull INSTALLER_TYPE possible values are apex compass fuel or joid
bull INSTALLER_IP IP of the installer nodeVM
Functest may need to know the IP of the installer to retrieve automatically the credentials from the installer nodeVMor even from the actual controllers
The minimum command to create the Functest Docker container can be described as follows
docker run -it -e INSTALLER_IP=102002 -e INSTALLER_TYPE=fuel opnfvfunctestbrahmaputra10 binbash
Optionally it is possible to precise the container name through the option ndashname
docker run --name CONTAINER_NAME -it -e INSTALLER_IP=102002 -e INSTALLER_TYPE=fuel opnfvfunctestbrahmaputra10 binbash
It is also possible to to indicate the path of the OpenStack credentials using -v
docker run -it -e INSTALLER_IP=102002 -e INSTALLER_TYPE=fuel -v ltpath_to_your_local_creds_filegthomeopnfvfunctestconfopenstackcreds opnfvfunctestbrahmaputra10 binbash
The local file will be mounted in the container under homeopnfvfunctestconfopenstackcreds
If the intention is to run Functest against any of the supported OPNFV scenarios it is recommended to include alsothe environment variable DEPLOY_SCENARIO for example
docker run -it -e INSTALLER_IP=102002 -e INSTALLER_TYPE=fuel -e DEPLOY_SCENARIO=os-odl_l2-nofeature-ha opnfvfunctestbrahmaputra10 binbash
Inside the container the following directory structure should be in place
`-- home`-- opnfv
|-- functest| |-- conf| |-- data| `-- results`-- repos
|-- bgpvpn|-- doctor|-- functest|-- odl_integration|-- onos|-- promise|-- rally|-- releng`-- vims-test
Basically the container includes
bull Functest directory to store the configuration (the OpenStack creds are stored inhomeopngbfunctestconfopenstackcreds) the data (cirros image needed for some tests) results (sometemporary result logs may be stored here)
52 Chapter 5 Post Configuration Activities
OPNFV Configuration Guide Release brahmaputra30 (605ebda)
bull Repositories the functest repository will be used to prepare the environment and run the tests Other repositoriesare used for the installation of the needed tooling (eg rally) andor the retrieval of feature projects scenarios(eg promise)
The structure under the Functest repository can be described as follows
|-- INFO|-- LICENSE|-- commons| |-- ims| |-- mobile| `-- traffic-profile-guidelinesrst|-- docker| |-- Dockerfile| |-- commonsh| |-- prepare_envsh| |-- requirementspip| `-- run_testssh|-- docs| |-- configguide| |-- devguide| |-- images| |-- results| `-- userguide`-- testcases
|-- Controllers|-- features|-- tests|-- VIM|-- vIMS|-- vPing|-- __init__py|-- config_functestpy|-- config_functestyaml`-- functest_utilspy
We may distinguish 4 different folders
bull commons it is a folder dedicated to store traffic profile or any test inputs that could be reused by any test project
bull docker this folder includes the scripts that will be used to setup the environment and run the tests
bull docs this folder includes the user and installationconfiguration guide
bull testcases this folder includes the scripts required by Functest internal test cases and other feature projects testcases
After the run command a new prompt appears which means that we are inside the container and ready to move to thenext step
Useful Docker commands
When typing exit in the container prompt this will cause exiting the container and probably stopping it Whenstopping a running Docker container all the changes will be lost there is a keyboard shortcut to quit the containerwithout stopping it CTRL+P+Q To reconnect to the running container DO NOT use the run command again (sinceit will create a new container) use exec instead
53 Additional testing and validation activities 53
OPNFV Configuration Guide Release brahmaputra30 (605ebda)
docker psltcopy the container IDgtdocker exec -ti ltCONTAINER_IDgt binbash
or simply
docker exec -ti $(docker ps|grep functest|awk print $1) binbash
There are other useful Docker commands that might be needed to manage possible issues with the containers
List the running containers
docker ps
List all the containers including the stopped ones
docker ps -a
It is useful sometimes to remove a container if there are some problems
docker rm ltCONTAINER_IDgt
Use the -f option if the container is still running it will force to destroy it
docker -f rm ltCONTAINER_IDgt
The Docker image is called opnfvfunctest and it is stored in the public Docker registry under the OPNFV accountdockerhub The are many different tags that have been created automatically by the CI mechanisms but the one thatthis document refers to is brahmaputra10 Pulling other tags might cause some problems while running the tests
Check the Docker documentation dockerdocs for more information
Preparing the Functest environment
Once the docker container is up and running execute the following command in the prompt
$repos_dirfunctestdockerprepare_envsh
NOTE $repos_dir is a default environment variable inside the docker container which points to homeopnfvrepos
This script will make sure that the requirements to run the tests are met and will install the needed libraries and toolsby all Functest test cases It must be run only once every time the docker is started from sratch
Focus on the OpenStack credentials
The OpenStack credentials are needed to run the tests against the VIM There are 3 ways to provide them to Functest
bull using the -v option when running the Docker container
bull create an empty file in homeopnfvfunctestconfopenstackcreds and paste the credentials in it
bull automatically retrieved using the following script $repos_dirrelengutilsfetch_os_credssh
Once the credentials are there they shall be sourced before running the tests
source homeopnfvfunctestconfopenstackcreds
or simply using the environment variable creds
54 Chapter 5 Post Configuration Activities
OPNFV Configuration Guide Release brahmaputra30 (605ebda)
$creds
After this try to run any OpenStack command to see if you get any output for instance
openstack user list
This will return a list of the actual users in the OpenStack deployment In any other case check that the credentialsare sourced
env|grep OS_
This command must show a set of environment variables starting with OS_ for example
OS_REGION_NAME=RegionOneOS_DEFAULT_DOMAIN=defaultOS_PROJECT_NAME=adminOS_PASSWORD=adminOS_AUTH_STRATEGY=keystoneOS_AUTH_URL=http172301035000v20OS_USERNAME=adminOS_TENANT_NAME=adminOS_ENDPOINT_TYPE=internalURLOS_NO_CACHE=true
If still the OpenStack command does not show anything or complains about connectivity issues it could be due to anincorrect url given to the OS_AUTH_URL environment variable Check the deployment settings
SSL Support
If you need to connect to a server that is TLS-enabled (the auth URL begins with lsquohttpsrsquo) and it uses a certificate froma private CA or a self-signed certificate you will need to specify the path to an appropriate CA certificate to use tovalidate the server certificate with the environment variable OS_CACERT
echo $OS_CACERTetcsslcertscacrt
However this certificate does not exist in the container by default It has to be copied manually from the OpenStackdeployment This can be done in 2 ways
1 Create manually that file and copy the contents from the OpenStack controller
2 (recommended) Add the file using a Docker volume when starting the container
-v ltpath_to_your_cert_filegtetcsslcertscacert
You might need to export OS_CACERT environment variable inside the container
export OS_CACERT=etcsslcertscacrt
Certificate verification can be turned off using OS_INSECURE=true For example Fuel uses self-signed cacerts bydefault so an pre step would be
export OS_INSECURE=true
Additional Options
In case you need to provide different configuration parameters to Functest (eg commit IDs or branches for therepositories ) copy the config_functestyaml from the repository to your current directory and run the container
53 Additional testing and validation activities 55
OPNFV Configuration Guide Release brahmaputra30 (605ebda)
with a volume
wget httpsgitopnfvorgcgitfunctestplaintestcasesconfig_functestyaml
ltmodify the file accordinglygt
docker run -ti -e INSTALLER_TYPE=fuel -e INSTALLER_IP=102002 opnfvfunctestbrahmaputra10 -v $(pwd)config_functestyamlhomeopnfvfunctestconfconfig_functestyaml binbash
However this is not recommended since most of the test cases rely on static parameters read from this file andchanging them might cause problems
Proxy support
Functest needs internet access to download some resources for some test cases For example to install the Rallyenvironment This might not work properly if the Jumphost is running through a Proxy
If that is the case make sure the resolvconf and the needed proxy environment variables are properly set
export http_proxy=ltyour http proxy settingsgtexport https_proxy=ltyour https proxy settingsgt
Or refer to the official Docker documentation for Proxy settings
Before running prepare_envsh make sure you can ping http and https sites inside the container For example
nc -v googlecom 80Connection to googlecom 80 port [tcphttp] succeeded
nc -v googlecom 443Connection to googlecom 443 port [tcphttps] succeeded
532 Installing vswitchperf
Supported Operating Systems
bull CentOS 7
bull Fedora 20
bull Fedora 21
bull Fedora 22
bull Ubuntu 1404
Supported vSwitches
The vSwitch must support Open Flow 13 or greater
bull OVS (built from source)
bull OVS with DPDK (built from source)
56 Chapter 5 Post Configuration Activities
OPNFV Configuration Guide Release brahmaputra30 (605ebda)
Supported Hypervisors
bull Qemu version 23
Available VNFs
A simple VNF that forwards traffic through a VM using
bull DPDK testpmd
bull Linux Brigde
bull custom l2fwd module
The VM image can be downloaded from httpartifactsopnfvorgvswitchperfvloop-vnf-ubuntu-1404_20151216qcow2
Other Requirements
The test suite requires Python 33 and relies on a number of other packages These need to be installed for the testsuite to function
Installation of required packages preparation of Python 3 virtual environment and compilation of OVS DPDK andQEMU is performed by script systemsbuild_base_machinesh It should be executed under user account which willbe used for vsperf execution
Please Note Password-less sudo access must be configured for given user account before script is executed
Execution of installation script
$ cd systems$ build_base_machinesh
Please Note you donrsquot need to go into any of the systems subdirectories simply run the top levelbuild_base_machinesh your OS will be detected automatically
Script build_base_machinesh will install all the vsperf dependencies in terms of system packages Python 3x andrequired Python modules In case of CentOS 7 it will install Python 33 from an additional repository provided bySoftware Collections (a link) Installation script will also use virtualenv to create a vsperf virtual environment whichis isolated from the default Python environment This environment will reside in a directory called vsperfenv in$HOME
You will need to activate the virtual environment every time you start a new shell session Its activation is specific toyour OS
CentOS 7
$ scl enable python33 bash$ cd $HOMEvsperfenv$ source binactivate
Fedora and Ubuntu
$ cd $HOMEvsperfenv$ source binactivate
53 Additional testing and validation activities 57
OPNFV Configuration Guide Release brahmaputra30 (605ebda)
Working Behind a Proxy
If yoursquore behind a proxy yoursquoll likely want to configure this before running any of the above For example
export http_proxy=proxymycompanycom123export https_proxy=proxymycompanycom123
533 Yardstick
The projectrsquos goal is to verify infrastructure compliance from the perspective of a Virtual Network Function (VNF)
The Projectrsquos scope is the development of a test framework Yardstick test cases and test stimuli to enable NetworkFunction Virtualization Infrastructure (NFVI) verification
In OPNFV Brahmaputra release generic test cases covering aspects of the metrics in the document ETSI GS NFV-TST001 ldquoPre-deployment Testing Report on Validation of NFV Environments and Servicesrdquo are available furtherOPNFV releases will provide extended testing of these metrics
The Project also includes a sample VNF the Virtual Traffic Classifier (VTC) and its experimental frameworkApexLake
Yardstick is used in OPNFV for verifying the OPNFV infrastructure and some of the OPNFV features The Yardstickframework is deployed in several OPNFV community labs It is installer infrastructure and application independent
See also
This Presentation for an overview of Yardstick and Yardsticktst for material on alignment ETSI TST001 and Yardstick
Yardstick Installation
Abstract
Yardstick currently supports installation on Ubuntu 1404 or by using a Docker image Detailed steps about installingYardstick using both of these options can be found below
To use Yardstick you should have access to an OpenStack environment with at least Nova Neutron Glance Keystoneand Heat installed
The steps needed to run Yardstick are
1 Install Yardstick and create the test configuration yaml file
2 Build a guest image and load the image into the OpenStack environment
3 Create a Neutron external network and load OpenStack environment variables
4 Run the test case
Installing Yardstick on Ubuntu 1404
Installing Yardstick framework Install dependencies
sudo apt-get install python-virtualenv python-devsudo apt-get install libffi-dev libssl-dev git
Create a python virtual environment source it and update setuptools
58 Chapter 5 Post Configuration Activities
OPNFV Configuration Guide Release brahmaputra30 (605ebda)
virtualenv ~yardstick_venvsource ~yardstick_venvbinactivateeasy_install -U setuptools
Download source code and install python dependencies
git clone httpsgerritopnfvorggerrityardstickcd yardstickpython setuppy install
There is also a YouTube video showing the above steps
Installing extra tools
yardstick-plot Yardstick has an internal plotting tool yardstick-plot which can be installed using the follow-ing command
python setuppy develop easy_install yardstick[plot]
Building a guest image Yardstick has a tool for building an Ubuntu Cloud Server image containing all the requiredtools to run test cases supported by Yardstick It is necessary to have sudo rights to use this tool
This image can be built using the following command while in the directory where Yardstick is installed(~yardstick if the framework is installed by following the commands above)
sudo toolsyardstick-img-modify toolsubuntu-server-cloudimg-modifysh
Warning the script will create files by default in tmpworkspaceyardstick and the files will be owned byroot
The created image can be added to OpenStack using the glance image-create or via the OpenStack Dashboard
Example command
glance --os-image-api-version 1 image-create --name yardstick-trusty-server --is-public true --disk-format qcow2 --container-format bare --file tmpworkspaceyardstickyardstick-trusty-serverimg
Installing Yardstick using Docker
Yardstick has two Docker images first one (Yardstick-framework) serves as a replacement for installing the Yardstickframework in a virtual environment (for example as done in Installing Yardstick framework) while the other image ismostly for CI purposes (Yardstick-CI)
Yardstick-framework image Download the source code
git clone httpsgerritopnfvorggerrityardstick
Build the Docker image and tag it as yardstick-framework
cd yardstickdocker build -t yardstick-framework
Run the Docker instance
53 Additional testing and validation activities 59
OPNFV Configuration Guide Release brahmaputra30 (605ebda)
docker run --name yardstick_instance -i -t yardstick-framework
To build a guest image for Yardstick see Building a guest image
Yardstick-CI image Pull the Yardstick-CI Docker image from Docker hub
docker pull opnfvyardstick-ci
Run the Docker image
docker run --privileged=true --rm -t -e INSTALLER_TYPE=$INSTALLER_TYPE -e INSTALLER_IP=$INSTALLER_IP opnfvyardstick-ci run_benchmarks
Where $INSTALLER_TYPE can be fuel foreman or compass and $INSTALLER_IP is the installer masternode IP address (ie 102002 is default for fuel)
Basic steps performed by the Yardstick-CI container
1 clone yardstick and releng repos
2 setup OS credentials (releng scripts)
3 install yardstick and dependencies
4 build yardstick cloud image and upload it to glance
5 upload cirros-033 cloud image to glance
6 run yardstick test scenarios
7 cleanup
OpenStack parameters and credentials
Yardstick-flavor Most of the sample test cases in Yardstick are using an OpenStack flavor called yardstick-flavorwhich deviates from the OpenStack standard m1tiny flavor by the disk size - instead of 1GB it has 3GB Otherparameters are the same as in m1tiny
Environment variables Before running Yardstick it is necessary to export OpenStack environment vari-ables from the OpenStack openrc file (using the source command) and export the external network nameexport EXTERNAL_NETWORK=external-network-name the default name for the external network isnet04_ext
Credential environment variables in the openrc file have to include at least
bull OS_AUTH_URL
bull OS_USERNAME
bull OS_PASSWORD
bull OS_TENANT_NAME
60 Chapter 5 Post Configuration Activities
OPNFV Configuration Guide Release brahmaputra30 (605ebda)
Yardstick default key pair Yardstick uses a SSH key pair to connect to the guest image This key pair can be foundin the resourcesfiles directory To run the ping-hotyaml test sample this key pair needs to be importedto the OpenStack environment
Examples and verifying the install
It is recommended to verify that Yardstick was installed successfully by executing some simple commands and testsamples Below is an example invocation of yardstick help command and pingpy test sample
yardstick -hyardstick task start samplespingyaml
Each testing tool supported by Yardstick has a sample configuration file These configuration files can be found in thesamples directory
Example invocation of yardstick-plot tool
yardstick-plot -i tmpyardstickout -o tmpplots
Default location for the output is tmpyardstickout
More info about the tool can be found by executing
yardstick-plot -h
53 Additional testing and validation activities 61

OPNFV Configuration Guide Release brahmaputra30 (605ebda)
HW Aspect Requirement of nodes Minimum 5 (3 for non redundant deployment)
bull 1 Fuel deployment master (may be virtualized)bull 3(1) Controllers (1 colocated mongoceilometer
role 2 Ceph-OSD roles)bull 1 Compute (1 co-located Ceph-OSD role)
CPU Minimum 1 socket x86_AMD64 with Virtualizationsupport
RAM Minimum 16GBserver (Depending on VNF work load)Disk Minimum 256GB 10kRPM spinning disksNetworks 4 Tagged VLANs (PUBLIC MGMT STORAGE PRI-
VATE)1 Un-Tagged VLAN for PXE Boot - ADMIN Networknote These can be run on single NIC - or spread outover other nics as your hardware supports
For information on compatible hardware types available for use please see Reference 11 in section ldquoFuel associatedreferencesrdquo below
Top of the rack (TOR) Configuration requirements
The switching infrastructure provides connectivity for the OPNFV infrastructure operations tenant networks(EastWest) and provider connectivity (NorthSouth) it also provides needed connectivity for the Storage Area Net-work (SAN) To avoid traffic congestion it is strongly suggested that three physically separated networks are usedthat is 1 physical network for administration and control one physical network for tenant private and public networksand one physical network for SAN The switching connectivity can (but does not need to) be fully redundant in suchcase it and comprises a redundant 10GE switch pair for each of the three physically separated networks
The physical TOR switches are not automatically configured from the OPNFV reference platform All the networksinvolved in the OPNFV infrastructure as well as the provider networks and the private tenant VLANs needs to bemanually configured
343 Jumphost configuration
The Jumphost server also known as the ldquoFuel masterrdquo provides needed servicesfunctions to deploy an OP-NFVOpenStack cluster as well functions for cluster life-cycle management (extensions repair actions and upgrades)
The Jumphost server requires 2 (4 if redundancy is required) Ethernet interfaces - one for external management of theOPNFV installation and another for jump-host communication with the OPNFV cluster
Install the Fuel jump-host
Mount the Fuel Brahmaputra ISO file as a boot device to the jump host server reboot it and install the Fuel Jumphostin accordance with installation instructions see Reference 13 in section ldquoFuel associated referencesrdquo below
344 Platform components configuration
Fuel-Plugins
Fuel plugins enable you to install and configure additional capabilities for your Fuel OPNFV based cloud such asadditional storage types networking functionality or NFV features developed by OPNFV
34 Fuel configuration 19
OPNFV Configuration Guide Release brahmaputra30 (605ebda)
Fuel offers an open source framework for creating these plugins so therersquos a wide range of capabilities that you canenable Fuel to add to your OpenStack clouds
The OPNFV Brahmaputra version of Fuel provides a set of pre-packaged plugins developed by OPNFV
Pluginname
Short description
Open-Daylight
OpenDaylight provides an open-source SDN Controller providing networking features such as L2and L3 network control ldquoService Function Chainingrdquo routing networking policies etc Moreinformation on OpenDaylight in the OPNFV Brahmaputra release can be found in a separate sectionin this document
ONOS ONOS is another open-source SDN controller which in essense fill the same role as OpenDaylightMore information on ONOS in the OPNFV Brahmaputra release can be found in a separate section inthis document
BGP-VPN
BGP-VPN provides an BGPMPLS VPN service More information on BGP-VPN in the OPNFVBrahmaputra release can be found in a separate section in this document
OVS-NSH
OVS-NSH provides a variant of Open-vSwitch which supports ldquoNetwork Service Headersrdquo neededfor the ldquoService function chainingrdquo feature More information on ldquoService Function Chainingrdquo in theOPNFV Brahmaputra release can be found in a in a separate section in this document
OVS-NFV
OVS-NFV provides a variant of Open-vSwitch with carrier grade characteristics essential for NFVworkloads More information on OVS-NFV in the OPNFV Brahmaputra release can be found in a ina separate section in this document
KVM-NFV
KVM-NFV provides a variant of KVM with improved virtualization characteristics essential for NFVworkloads More information on KVM-NFV in the OPNFV Brahmaputra release can be found in a ina separate section in this document
VSPERF VSPERF provides a networking characteristics test bench that facilitates characteristicsperformanceevaluation of vSwithches More information on VSPERF in the OPNFV Brahmaputra release can befound in a in a separate section in this document
Additional third-party plugins can be found here httpswwwmirantiscomproductsopenstack-drivers-and-pluginsfuel-plugins Note Plugins are not necessarilly compatible with each other see section ldquoConfigurationoptions OPNFV scenariosrdquo for compatibility information
The plugins come prepackaged ready to install To do so follow the installation instructions provided in Reference 13provided in section ldquoFuel associated referencesrdquo below
Fuel environment
A Fuel environment is an OpenStack instance managed by Fuel one Fuel instance can manage several OpenStackinstancesenvironments with different configurations etc
To create a Fuel instance follow the instructions provided in the installation instructions see Reference 13 in sectionldquoFuel associated referencesrdquo below
Provisioning of aditional features and services
Although the plugins have already previously been installed they are not per default enabled for the environment wejust created The plugins of your choice need to be enabled and configured
To enable a plugin follow the installation instructions found in Reference 13 provided in section ldquoFuel associatedreferencesrdquo below
For configuration of the plugins please see section ldquoFeature Configurationrdquo
20 Chapter 3 Installer Configuration
OPNFV Configuration Guide Release brahmaputra30 (605ebda)
Networking
All the networking aspects need to be configured in terms of - InterfacesNICs - VLANs - Sub-nets - Gateways - Usernetwork segmentation (VLANVXLAN) - DNS - NTP - etc
For guidelines on how to configure networking please refer to the installation instructions found in Reference 13provided in section ldquoFuel associated referencesrdquo below
Node allocation
Now it is time to allocate the nodes in your OPNFV cluster to OpenStack- SDN- and other featureservice rolesSome roles may require redundancy while others donrsquot Some roles may be co-located with other roles while othersmay not The Fuel GUI will guide you in the allocation of roles and will not permit you to perform invalid allocations
For detailed guide-lines on node allocation please refer to the installation instructions found in Reference 13 providedin section ldquoFuel associated referencesrdquo below
Off-line deployment
The OPNFV Brahmaputra version of Fuel can be deployed using on-line upstream repositories (default) or off-lineusing built-in local repositories on the Fuel jump-start server
For instructions on how to configure Fuel for off-line deployment please refer to the installation instructions found inReference 13 provided in section ldquoFuel associated referencesrdquo below
Deployment
You should now be ready to deploy your OPNFV Brahmaputra environment - but before doing so you may want toverify your network settings
For further details on network verification and deployment please refer to the installation instructions found in Ref-erence 13 provided in section ldquoFuel associated referencesrdquo below
345 Fuel associated references
1 OPNFV Home Page
2 OPNFV documentation- and software downloads
3 OpenStack Liberty Release artifacts
4 OpenStack documentation
5 OpenDaylight artifacts
6 The Fuel OpenStack project
7 Fuel documentation overview
8 Fuel planning guide
9 Fuel quick start guide
10 Fuel operations guide
11 Fuel Plugin Developers Guide
12 Fuel OpenStack Hardware Compatibility List
34 Fuel configuration 21
OPNFV Configuration Guide Release brahmaputra30 (605ebda)
13 OPNFV Installation instruction for the Brahmaputra release of OPNFV when using Fuel as a deployment tool
14 OPNFV Build instruction for the Brahmaputra release of OPNFV when using Fuel as a deployment tool
15 OPNFV Release Note for the Brahmaputra release of OPNFV when using Fuel as a deployment tool
35 JOID Configuration
351 Bare Metal Installations
352 Requirements as per Pharos
353 Networking
Minimum 2 networks
1 First for Admin network with gateway to access external network
2 Second for public network to consume by tenants for floating ips
NOTE JOID support multiple isolated networks for data as well as storage Based on your network optionsfor Openstack
Minimum 6 physical servers
1 Jump host server
Minimum HW Spec needed
CPU cores 16
Memory 32 GB
Hard Disk 1(250 GB)
NIC eth0(Admin Management) eth1 (external network)
2 Control node servers (minimum 3)
Minimum HW Spec
CPU cores 16
Memory 32 GB
Hard Disk 1(500 GB)
NIC eth0(Admin Management) eth1 (external network)
3 Compute node servers (minimum 2)
Minimum HW Spec
CPU cores 16
Memory 32 GB
Hard Disk 1(1 TB) this includes the space for ceph as well
22 Chapter 3 Installer Configuration
OPNFV Configuration Guide Release brahmaputra30 (605ebda)
NIC eth0(Admin Management) eth1 (external network)
NOTE Above configuration is minimum and for better performance and usage of the Openstack please con-sider higher spec for each nodes
Make sure all servers are connected to top of rack switch and configured accord-ingly No DHCP server should be up and configured Only gateway at eth0 and eth1 network should be con-figure to access the network outside your lab
Jump node configuration
1 Install Ubuntu 1404 LTS server version of OS on the nodes 2 Install the git and bridge-utils pack-ages on the server and configure minimum two bridges on jump host
brAdm and brPublic cat etcnetworkinterfaces
The loopback network interface
auto lo
iface lo inet loopback
iface eth0 inet manual
auto brAdm
iface brAdm inet static
address 10411
netmask 2552552480
network 10400
broadcast 1047255
gateway 10401
dns- options are implemented by the resolvconf package if installed
dns-nameservers 10402
bridge_ports eth0
auto brPublic
iface brPublic inet static
address 102662
netmask 2552552550
bridge_ports eth2
NOTE If you choose to use the separate network for management data and storage then you need to createbridge for each interface In case of VLAN tags use the appropriate network on jump-host depend upon VLANID on the interface
354 Configure JOID for your lab
Get the joid code from gerritt
git clone httpsgerritopnfvorggerritpjoidgit
cd joidci
Enable MAAS
35 JOID Configuration 23
OPNFV Configuration Guide Release brahmaputra30 (605ebda)
bull Create a directory in maasltcompany namegtltpod numbergt for example
mkdir maasintelpod7
bull Copy files from pod5 to pod7
cp maasintelpod5 maasintelpod7
4 files will get copied deploymentyaml environmentsyaml interfaceshost lxc-add-more-interfaces
355 deploymentyaml file
Prerequisite
1 Make sure Jump host node has been configured with bridges on each interface so that appropriate MAAS and JUJUbootstrap VM can be created For example if you have three network admin data and public then I would suggestto give names like brAdm brData and brPublic 2 You have information about the node MAC address and powermanagement details (IPMI IP username password) of the nodes used for control and compute node
356 modify deploymentyaml
This file has been used to configure your maas and bootstrap node in a VM Comments in the file are self explanatoryand we expect fill up the information according to match lab infrastructure information Sample deploymentyaml canbe found at httpsgerritopnfvorggerritgitwebp=joidgita=blobf=cimaasintelpod5deploymentyaml
modify joidci01-deploybundlesh
under section case $3 add the intelpod7 section and make sure you have information provided correctly Beforeexample consider your network has 1921681024 your default network and eth1 is on public network which will beused to assign the floating ip
rsquointelpod7rsquo )
As per your lab vip address list be deafult uses 104111 - 104120
sed -i -- rsquos1041119216812grsquo bundlesyaml
Choose the external port to go out from gateway to use
sed -i -- rsquos ext-port eth1 ext-port eth1grsquo bundlesyaml
NOTE If you are using seprate data network then add this line below also along with other changes which representsnetwork 1049024 will be used for data network for openstack
sed -i -- rsquosos-data-network 1048021os-data-network 1049024grsquo bundlesyaml
modify joidci02-maasdeploysh
under section case $1 add the intelpod7 section and make sure you have information provided correctly
24 Chapter 3 Installer Configuration
OPNFV Configuration Guide Release brahmaputra30 (605ebda)
rsquointelpod7rsquo )
cp maasintelpod7deploymentyaml deploymentyaml
NOTE If you are using VLAN tags or more network for data and storage then make sure you modify the case $1section under Enable vlan interface with maas appropriately In the example below eth2 has been used as separate datanetwork for tenants in openstack with network 1049024 on compute and control nodes
rsquointelpod7rsquo )
maas refresh
enableautomodebyname eth2 AUTO 1049024 compute || true
enableautomodebyname eth2 AUTO 1049024 control || true
MAAS Install
After integrating the changes as mentioned above run the MAAS install Suppose you name the integration lab asintelpod7 then run the below commands to start the MAAS deployment
02-maasdeploysh intelpod7
This will take approximately 40 minutes to couple hours depending on your environment This script will do thefollowing
1 Create 2 VMs (KVM)
2 Install MAAS in one of the VMs
3 Configure the MAAS to enlist and commission a VM for Juju bootstrap node
4 Configure the MAAS to enlist and commission bare metal servers
When itrsquos done you should be able to view MAAS webpage (httpltMAAS IPgtMAAS) and see 1 bootstrap nodeand bare metal servers in the lsquoReadyrsquo state on the nodes page
Virtual deployment
By default just running the script 02-maasdeploysh will automatically create the KVM VMs on a single machineand configure everything for you
OPNFV Install
JOID allows you to deploy different combinations of OpenStack release and SDN solution in HA or non-HA mode
For OpenStack it supports Juno and Liberty For SDN it supports Openvswitch OpenContrail OpenDayLight andONOS
In addition to HA or non-HA mode it also supports to deploy the latest from the development tree (tip)
The deploysh in the joidci directoy will do all the work for you For example the following deploy OpenStack Liberywith OpenDayLight in a HA mode in the Intelpod7
35 JOID Configuration 25
OPNFV Configuration Guide Release brahmaputra30 (605ebda)
deploysh -o liberty -s odl -t ha -l intelpod7 -f none
By default the SDN is Openvswitch non-HA Liberty Intelpod5 OPNFV Brahmaputra release and ODL_L2 for theOPNFV feature
Possible options for each choice are as follows
[-s ]
nosdn openvswitch only and no other SDN
odl OpenDayLight Lithium version
opencontrail OpenContrail SDN
onos ONOS framework as SDN
[-t ]
nonha NO HA mode of Openstack
ha HA mode of openstack
tip the tip of the development
[-o ]
juno OpenStack Juno version
liberty OpenStack Liberty version
[-l ] etc
default For virtual deployment where installation will be done on KVM created using 02-maasdeploysh
intelpod5 Install on bare metal OPNFV pod5 of Intel lab
intelpod6
orangepod2
(other pods)
Note if you make changes as per your pod above then please use your pod
[-f ]
none no special feature will be enabled
ipv6 ipv6 will be enabled for tenant in openstack
By default debug is enabled in script and error messages will be printed on the SSH terminal where you are runningthe scripts It could take an hour to couple hours (max) to complete
Is the deployment done successfully
Once juju-deployer is complete use juju status to verify that all deployed unit are in the ready state
26 Chapter 3 Installer Configuration
OPNFV Configuration Guide Release brahmaputra30 (605ebda)
juju status --format tabular
Find the Openstack-dashboard IP address from the juju status output and see if you can log in via browser Theusername and password is adminopenstack
Optionall see if you can log in Juju GUI Juju GUI is on the Juju bootstrap node which is the second VM you definein the 02-maasdeploysh The username and password is adminadmin
If you deploy ODL OpenContrail or ONOS find the IP address of the web UI and login Please refer to each SDNbundleyaml for usernamepassword
Troubleshoot
To access to any deployed units juju ssh for example to login into nova-compute unit and look for varlogjujuunit-ltof interestgt for more info
juju ssh nova-compute0
Example
ubuntuR4N4B1~$ juju ssh nova-compute0
Warning Permanently added rsquo172165060rsquo (ECDSA) to the list of knownhosts
Warning Permanently added rsquo3-r4n3b1-computemaasrsquo (ECDSA) to the list ofknown hosts
Welcome to Ubuntu 14041 LTS (GNULinux 3130-77-generic x86_64)
Documentation httpshelpubuntucom
ltskippedgt
Last login Tue Feb 2 212356 2016 from bootstrapmaas
ubuntu3-R4N3B1-compute~$ sudo -i
root3-R4N3B1-compute~ cd varlogjuju
root3-R4N3B1-computevarlogjuju ls
machine-2log unit-ceilometer-agent-0log unit-ceph-osd-0logunit-neutron-contrail-0log unit-nodes-compute-0log unit-nova-compute-0logunit-ntp-0log
root3-R4N3B1-computevarlogjuju
By default juju will add the Ubuntu user keys for authentication into the deployed server and only ssh accesswill be available
Once you resolve the error go back to the jump host to rerun the charm hook with
juju resolved --retry ltunitgt
35 JOID Configuration 27
OPNFV Configuration Guide Release brahmaputra30 (605ebda)
28 Chapter 3 Installer Configuration
CHAPTER
FOUR
FEATURE CONFIGURATION
The following sections describe the configuration options for specific platform features provided in BrahmaputraFurther details for each feature are captured in the referred project documentation
41 Copper configuration
This release focused on use of the OpenStack Congress service for managing configuration policy The Congress installprocedure described here is largely manual This procedure as well as the longer-term goal of automated installersupport is a work in progress The procedure is further specific to one OPNFV installer (JOID ie MAASJuJu)based environment Support for other OPNFV installer deployed environments is also a work in progress
411 Pre-configuration activities
This procedure assumes OPNFV has been installed via the JOID installer
412 Hardware configuration
There is no specific hardware configuration required for the Copper project
413 Feature configuration
Following are instructions for installing Congress on an Ubuntu 1404 LXC container in the OPNFV Controller nodeas installed by the JOID installer This guide uses instructions from the Congress intro guide on readthedocs Specificvalues below will need to be modified if you intend to repeat this procedure in your JOID-based install environment
Install Procedure
The install currently occurs via four bash scripts provided in the copper repo See these files for the detailed steps
bull install_congress_1sh creates and starts the linux container for congress on the controller node copiesinstall_congress_2sh to the controller node and invokes it via ssh
bull install_congress_2sh installs congress on the congress server
29
OPNFV Configuration Guide Release brahmaputra30 (605ebda)
Cleanup Procedure
If there is an error during installation use the bash script clean_congresssh which stops the congress server if runningand removes the congress user and service from the controller database
Restarting after server power loss etc
Currently this install procedure is manual Automated install and restoral after host recovery is TBD For now thisprocedure will get the Congress service running again
On jumphost SSH to Congress serversource ~envshjuju ssh ubuntu$CONGRESS_HOST If that fails
On jumphost SSH to controller nodejuju ssh ubuntunode1-control Start the Congress containersudo lxc-start -n juju-trusty-congress -d Verify the Congress container statussudo lxc-ls -f juju-trusty-congressNAME STATE IPV4 IPV6 GROUPS AUTOSTART----------------------------------------------------------------------juju-trusty-congress RUNNING 19216810117 - - NO exit back to the Jumphost wait a minute and go back to the SSH to Congress server step above
On the Congress server that you have logged intosource ~admin-openrcshcd ~gitcongresssource binactivatebincongress-server ampdisown -h 1
42 Doctor Configuration
421 Doctor Inspector
Doctor Inspector is suggested to be placed in one of the controller nodes but it can be put on any host where DoctorMonitor can reach and accessible to the OpenStack Controller (Nova)
Make sure OpenStack env parameters are set properly so that Doctor Inspector can issue admin actions such ascompute host force-down and state update of VM
Then you can configure Doctor Inspector as follows
git clone httpsgerritopnfvorggerritdoctor -b stablebrahmaputracd doctortestsINSPECTOR_PORT=12345python inspectorpy $INSPECTOR_PORT gt inspectorlog 2gtamp1 amp
422 Doctor Monitor
Doctor Monitors are suggested to be placed in one of the controller nodes but those can be put on any host whichis reachable to target compute host and accessible to the Doctor Inspector You need to configure Monitors for allcompute hosts one by one
30 Chapter 4 Feature Configuration
OPNFV Configuration Guide Release brahmaputra30 (605ebda)
Make sure OpenStack env parameters are set properly so that Doctor Inspector can issue admin actions such ascompute host force-down and state update of VM
Then you can configure Doctor Monitor as follows
git clone httpsgerritopnfvorggerritdoctor -b stablebrahmaputracd doctortestsINSPECTOR_PORT=12345COMPUTE_HOST=overcloud-novacompute-0sudo python monitorpy $COMPUTE_HOST
http127001$INSPECTOR_PORTevents gt monitorlog 2gtamp1 amp
43 IPv6 Configuration - Setting Up a Service VM as an IPv6 vRouter
This section provides instructions to set up a service VM as an IPv6 vRouter using OPNFV Brahmaputra Releaseinstallers The environment may be pure OpenStack option or Open Daylight L2-only option The deployment modelmay be HA or non-HA The infrastructure may be bare metal or virtual environment
For complete instructions and documentations of setting up service VM as an IPv6 vRouter using ANY method pleaserefer to
1 IPv6 Configuration Guide (HTML) httpartifactsopnfvorgipv6docssetupservicevmindexhtml
2 IPv6 User Guide (HTML) httpartifactsopnfvorgipv6docsgapanalysisindexhtml
431 Pre-configuration Activities
The configuration will work in 2 environments
1 OpenStack-only environment
2 OpenStack with Open Daylight L2-only environment
Depending on which installer will be used to deploy OPNFV each environment may be deployed on bare metal orvirtualized infrastructure Each deployment may be HA or non-HA
Refer to the previous installer configuration chapters installations guide and release notes
432 Setup Manual in OpenStack-Only Environment
If you intend to set up a service VM as an IPv6 vRouter in OpenStack-only environment of OPNFV BrahmaputraRelease please NOTE that
bull Because the anti-spoofing rules of Security Group feature in OpenStack prevents a VM from forwarding packetswe need to disable Security Group feature in the OpenStack-only environment
bull The hostnames IP addresses and username are for exemplary purpose in instructions Please change as neededto fit your environment
bull The instructions apply to both deployment model of single controller node and HA (High Availability) deploy-ment model where multiple controller nodes are used
43 IPv6 Configuration - Setting Up a Service VM as an IPv6 vRouter 31
OPNFV Configuration Guide Release brahmaputra30 (605ebda)
Install OPNFV and Preparation
OPNFV-NATIVE-INSTALL-1 To install OpenStack-only environment of OPNFV Brahmaputra Release
Apex Installer
HA deployment in OpenStack-only environmentopnfv-deploy -d etcopnfv-apexos-nosdn-nofeature-hayaml
Non-HA deployment in OpenStack-only environment Non-HA deployment is currently not supported by Apex installer
Compass Installer
HA deployment in OpenStack-only environmentexport ISO_URL=file$BUILD_DIRECTORYcompassisoexport OS_VERSION=$COMPASS_OS_VERSIONexport OPENSTACK_VERSION=$COMPASS_OPENSTACK_VERSIONexport CONFDIR=$WORKSPACEdeployconfvm_environmentdeploysh --dha $CONFDIRos-nosdn-nofeature-hayml --network $CONFDIR$NODE_NAMEnetworkyml
Non-HA deployment in OpenStack-only environment Non-HA deployment is currently not supported by Compass installer
Fuel Installer
HA deployment in OpenStack-only environmentdeploysh -s os-nosdn-nofeature-ha
Non-HA deployment in OpenStack-only environmentdeploysh -s os-nosdn-nofeature-noha
Joid Installer
HA deployment in OpenStack-only environmentdeploysh -o liberty -s nosdn -t ha -l default -f ipv6
Non-HA deployment in OpenStack-only environmentdeploysh -o liberty -s nosdn -t nonha -l default -f ipv6
Please NOTE that
bull You need to refer to installerrsquos documentation for other necessary parameters applicable to your deployment
bull You need to refer to Release Notes and installerrsquos documentation if there is any issue in installation
OPNFV-NATIVE-INSTALL-2 Clone the following GitHub repository to get the configuration and metadata files
git clone httpsgithubcomsridhargaddamopnfv_os_ipv6_pocgit optstackopnfv_os_ipv6_poc
Disable Security Groups in OpenStack ML2 Setup
OPNFV-NATIVE-SEC-1 Change the settings in etcneutronpluginsml2ml2_confini as follows
etcneutronpluginsml2ml2_confini[securitygroup]extension_drivers = port_security
32 Chapter 4 Feature Configuration
OPNFV Configuration Guide Release brahmaputra30 (605ebda)
enable_security_group = Falsefirewall_driver = neutronagentfirewallNoopFirewallDriver
OPNFV-NATIVE-SEC-2 Change the settings in etcnovanovaconf as follows
etcnovanovaconf[DEFAULT]security_group_api = novafirewall_driver = novavirtfirewallNoopFirewallDriver
OPNFV-NATIVE-SEC-3 After updating the settings you will have to restart the Neutron and Nova services
Please note that the commands of restarting Neutron and Nova would vary depending on the installer Pleaserefer to relevant documentation of specific installers
Set Up Service VM as IPv6 vRouter
OPNFV-NATIVE-SETUP-1 Now we assume that OpenStack multi-node setup is up and running We have to sourcethe tenant credentials in this step Please NOTE that the method of sourcing tenant credentials may vary dependingon installers For example
Apex installer
source the tenant credentials using Apex installer of OPNFV you need to copy the file homestackovercloudrc from the installer VM called instack to a location in controller node for example in the directory optsource optovercloudrc
Compass installer
source the tenant credentials using Compass installer of OPNFVsource optadmin-openrcsh
Fuel installer
source the tenant credentials using Fuel installer of OPNFVsource rootopenrc
Joid installer
source the tenant credentials using Joid installer of OPNFVsource $HOMEjoid_configadmin-openrc
devstack
source the tenant credentials in devstacksource openrc admin demo
Please refer to relevant documentation of installers if you encounter any issue
OPNFV-NATIVE-SETUP-2 Download fedora22 image which would be used for vRouter
wget httpsdownloadfedoraprojectorgpubfedoralinuxreleases22Cloudx86_64ImagesFedora-Cloud-Base-22-20150521x86_64qcow2
OPNFV-NATIVE-SETUP-3 Import Fedora22 image to glance
glance image-create --name Fedora22 --disk-format qcow2 --container-format bare --file Fedora-Cloud-Base-22-20150521x86_64qcow2
43 IPv6 Configuration - Setting Up a Service VM as an IPv6 vRouter 33
OPNFV Configuration Guide Release brahmaputra30 (605ebda)
OPNFV-NATIVE-SETUP-4 This step is Informational OPNFV Installer has taken care of this step duringdeployment You may refer to this step only if there is any issue or if you are using other installers
We have to move the physical interface (ie the public network interface) to br-ex including moving the publicIP address and setting up default route Please refer to OS-NATIVE-SETUP-4 and OS-NATIVE-SETUP-5 in ourmore complete instruction
OPNFV-NATIVE-SETUP-5 Create Neutron routers ipv4-router and ipv6-router which need to provideexternal connectivity
neutron router-create ipv4-routerneutron router-create ipv6-router
OPNFV-NATIVE-SETUP-6 Create an external networksubnet ext-net using the appropriate values based on thedata-center physical network setup
Please NOTE that you may only need to create the subnet of ext-net because OPNFV installers should have createdan external network during installation You must use the same name of external network that installer creates whenyou create the subnet For example
bull Apex installer external
bull Compass installer ext-net
bull Fuel installer net04_ext
bull Joid installer ext-net
Please refer to the documentation of installers if there is any issue
This is needed only if installer does not create an external work Otherwise skip this command net-createneutron net-create --routerexternal ext-net
Note that the name ext-net may work for some installers such as Compass and Joid Change the name ext-net to match the name of external network that an installer createsneutron subnet-create --disable-dhcp --allocation-pool start=19859156251end=19859156254 --gateway 198591561 ext-net 19859156024
OPNFV-NATIVE-SETUP-7 Create Neutron networks ipv4-int-network1 and ipv6-int-network2 withport_security disabled
neutron net-create --port_security_enabled=False ipv4-int-network1neutron net-create --port_security_enabled=False ipv6-int-network2
OPNFV-NATIVE-SETUP-8 Create IPv4 subnet ipv4-int-subnet1 in the internal networkipv4-int-network1 and associate it to ipv4-router
neutron subnet-create --name ipv4-int-subnet1 --dns-nameserver 8888 ipv4-int-network1 2000024
neutron router-interface-add ipv4-router ipv4-int-subnet1
OPNFV-NATIVE-SETUP-9 Associate the ext-net to the Neutron routers ipv4-router and ipv6-router
Note that the name ext-net may work for some installers such as Compass and Joid Change the name ext-net to match the name of external network that an installer createsneutron router-gateway-set ipv4-router ext-netneutron router-gateway-set ipv6-router ext-net
OPNFV-NATIVE-SETUP-10 Create two subnets one IPv4 subnet ipv4-int-subnet2 and one IPv6 subnetipv6-int-subnet2 in ipv6-int-network2 and associate both subnets to ipv6-router
34 Chapter 4 Feature Configuration
OPNFV Configuration Guide Release brahmaputra30 (605ebda)
neutron subnet-create --name ipv4-int-subnet2 --dns-nameserver 8888 ipv6-int-network2 1000024
neutron subnet-create --name ipv6-int-subnet2 --ip-version 6 --ipv6-ra-mode slaac --ipv6-address-mode slaac ipv6-int-network2 2001db80164
neutron router-interface-add ipv6-router ipv4-int-subnet2neutron router-interface-add ipv6-router ipv6-int-subnet2
OPNFV-NATIVE-SETUP-11 Create a keypair
nova keypair-add vRouterKey gt ~vRouterKey
OPNFV-NATIVE-SETUP-12 Create ports for vRouter (with some specific MAC address - basically for automation- to know the IPv6 addresses that would be assigned to the port)
neutron port-create --name eth0-vRouter --mac-address fa163e111111 ipv6-int-network2neutron port-create --name eth1-vRouter --mac-address fa163e222222 ipv4-int-network1
OPNFV-NATIVE-SETUP-13 Create ports for VM1 and VM2
neutron port-create --name eth0-VM1 --mac-address fa163e333333 ipv4-int-network1neutron port-create --name eth0-VM2 --mac-address fa163e444444 ipv4-int-network1
OPNFV-NATIVE-SETUP-14 Update ipv6-router with routing information to subnet 2001db80264
neutron router-update ipv6-router --routes type=dict list=true destination=2001db80264nexthop=2001db801f8163efffe111111
OPNFV-NATIVE-SETUP-15 Boot Service VM (vRouter) VM1 and VM2
nova boot --image Fedora22 --flavor m1small --user-data optstackopnfv_os_ipv6_pocmetadatatxt --availability-zone novaopnfv-os-compute --nic port-id=$(neutron port-list | grep -w eth0-vRouter | awk print $2) --nic port-id=$(neutron port-list | grep -w eth1-vRouter | awk print $2) --key-name vRouterKey vRouter
nova list
Please wait for some 10 to 15 minutes so that necessary packages (like radvd) are installed and vRouter is upnova console-log vRouter
nova boot --image cirros-034-x86_64-uec --flavor m1tiny --user-data optstackopnfv_os_ipv6_pocset_mtush --availability-zone novaopnfv-os-controller --nic port-id=$(neutron port-list | grep -w eth0-VM1 | awk print $2) --key-name vRouterKey VM1
nova boot --image cirros-034-x86_64-uec --flavor m1tiny--user-data optstackopnfv_os_ipv6_pocset_mtush --availability-zone novaopnfv-os-compute --nic port-id=$(neutron port-list | grep -w eth0-VM2 | awk print $2) --key-name vRouterKey VM2
nova list Verify that all the VMs are in ACTIVE state
OPNFV-NATIVE-SETUP-16 If all goes well the IPv6 addresses assigned to the VMs would be as shown as follows
43 IPv6 Configuration - Setting Up a Service VM as an IPv6 vRouter 35
OPNFV Configuration Guide Release brahmaputra30 (605ebda)
vRouter eth0 interface would have the following IPv6 address 2001db801f8163efffe11111164 vRouter eth1 interface would have the following IPv6 address 2001db802164 VM1 would have the following IPv6 address 2001db802f8163efffe33333364 VM2 would have the following IPv6 address 2001db802f8163efffe44444464
OPNFV-NATIVE-SETUP-17 Now we can SSH to VMs You can execute the following command
1 Create a floatingip and associate it with VM1 VM2 and vRouter (to the port id that is passed) Note that the name ext-net may work for some installers such as Compass and Joid Change the name ext-net to match the name of external network that an installer createsneutron floatingip-create --port-id $(neutron port-list | grep -w eth0-VM1 | awk print $2) ext-netneutron floatingip-create --port-id $(neutron port-list | grep -w eth0-VM2 | awk print $2) ext-netneutron floatingip-create --port-id $(neutron port-list | grep -w eth1-vRouter | awk print $2) ext-net
2 To know display the floatingip associated with VM1 VM2 and vRouterneutron floatingip-list -F floating_ip_address -F port_id | grep $(neutron port-list | grep -w eth0-VM1 | awk print $2) | awk print $2neutron floatingip-list -F floating_ip_address -F port_id | grep $(neutron port-list | grep -w eth0-VM2 | awk print $2) | awk print $2neutron floatingip-list -F floating_ip_address -F port_id | grep $(neutron port-list | grep -w eth1-vRouter | awk print $2) | awk print $2
3 To ssh to the vRouter VM1 and VM2 user can execute the following commandssh -i ~vRouterKey fedoraltfloating-ip-of-vRoutergtssh -i ~vRouterKey cirrosltfloating-ip-of-VM1gtssh -i ~vRouterKey cirrosltfloating-ip-of-VM2gt
433 Setup Manual in OpenStack with Open Daylight L2-Only Environment
If you intend to set up a service VM as an IPv6 vRouter in an environment of OpenStack and Open Daylight L2-onlyof OPNFV Brahmaputra Release please NOTE that
bull The hostnames IP addresses and username are for exemplary purpose in instructions Please change as neededto fit your environment
bull The instructions apply to both deployment model of single controller node and HA (High Availability) deploy-ment model where multiple controller nodes are used
bull However in case of HA when ipv6-router is created in step SETUP-SVM-11 it could be created in anyof the controller node Thus you need to identify in which controller node ipv6-router is created in orderto manually spawn radvd daemon inside the ipv6-router namespace in steps SETUP-SVM-24 throughSETUP-SVM-30
Install OPNFV and Preparation
OPNFV-INSTALL-1 To install OpenStack with Open Daylight L2-only environment of OPNFV Brahmaputra Re-lease
Apex Installer
36 Chapter 4 Feature Configuration
OPNFV Configuration Guide Release brahmaputra30 (605ebda)
HA deployment in OpenStack with Open Daylight L2-only environmentopnfv-deploy -d etcopnfv-apexos-odl_l2-nofeature-hayaml
Non-HA deployment in OpenStack with Open Daylight L2-only environment Non-HA deployment is currently not supported by Apex installer
Compass Installer
HA deployment in OpenStack with Open Daylight L2-only environmentexport ISO_URL=file$BUILD_DIRECTORYcompassisoexport OS_VERSION=$COMPASS_OS_VERSIONexport OPENSTACK_VERSION=$COMPASS_OPENSTACK_VERSIONexport CONFDIR=$WORKSPACEdeployconfvm_environmentdeploysh --dha $CONFDIRos-odl_l2-nofeature-hayml --network $CONFDIR$NODE_NAMEnetworkyml
Non-HA deployment in OpenStack with Open Daylight L2-only environment Non-HA deployment is currently not supported by Compass installer
Fuel Installer
HA deployment in OpenStack with Open Daylight L2-only environmentdeploysh -s os-odl_l2-nofeature-ha
Non-HA deployment in OpenStack with Open Daylight L2-only environmentdeploysh -s os-odl_l2-nofeature-noha
Joid Installer
HA deployment in OpenStack with Open Daylight L2-only environmentdeploysh -o liberty -s odl -t ha -l default -f ipv6
Non-HA deployment in OpenStack with Open Daylight L2-only environmentdeploysh -o liberty -s odl -t nonha -l default -f ipv6
Please NOTE that
bull You need to refer to installerrsquos documentation for other necessary parameters applicable to your deployment
bull You need to refer to Release Notes and installerrsquos documentation if there is any issue in installation
OPNFV-INSTALL-2 Clone the following GitHub repository to get the configuration and metadata files
git clone httpsgithubcomsridhargaddamopnfv_os_ipv6_pocgit optstackopnfv_os_ipv6_poc
Disable Security Groups in OpenStack ML2 Setup
Please NOTE that although Security Groups feature has been disabled automatically through localconf configu-ration file by some installers such as devstack it is very likely that other installers such as Apex Compass Fuelor Joid will enable Security Groups feature after installation
Please make sure that Security Groups are disabled in the setup
OPNFV-SEC-1 Change the settings in etcneutronpluginsml2ml2_confini as follows
etcneutronpluginsml2ml2_confini[securitygroup]enable_security_group = Falsefirewall_driver = neutronagentfirewallNoopFirewallDriver
43 IPv6 Configuration - Setting Up a Service VM as an IPv6 vRouter 37
OPNFV Configuration Guide Release brahmaputra30 (605ebda)
OPNFV-SEC-2 Change the settings in etcnovanovaconf as follows
etcnovanovaconf[DEFAULT]security_group_api = novafirewall_driver = novavirtfirewallNoopFirewallDriver
OPNFV-SEC-3 After updating the settings you will have to restart the Neutron and Nova services
Please note that the commands of restarting Neutron and Nova would vary depending on the installer Pleaserefer to relevant documentation of specific installers
Source the Credentials in OpenStack Controller Node
SETUP-SVM-1 Login in OpenStack Controller Node Start a new terminal and change directory to where Open-Stack is installed
SETUP-SVM-2 We have to source the tenant credentials in this step Please NOTE that the method of sourcingtenant credentials may vary depending on installers For example
Apex installer
source the tenant credentials using Apex installer of OPNFV you need to copy the file homestackovercloudrc from the installer VM called instack to a location in controller node for example in the directory optsource optovercloudrc
Compass installer
source the tenant credentials using Compass installer of OPNFVsource optadmin-openrcsh
Fuel installer
source the tenant credentials using Fuel installer of OPNFVsource rootopenrc
Joid installer
source the tenant credentials using Joid installer of OPNFVsource $HOMEjoid_configadmin-openrc
devstack
source the tenant credentials in devstacksource openrc admin demo
Please refer to relevant documentation of installers if you encounter any issue
Informational Note Move Public Network from Physical Network Interface to br-ex
SETUP-SVM-3 Move the physical interface (ie the public network interface) to br-ex
SETUP-SVM-4 Verify setup of br-ex
Those 2 steps are Informational OPNFV Installer has taken care of those 2 steps during deployment You mayrefer to this step only if there is any issue or if you are using other installers
38 Chapter 4 Feature Configuration
OPNFV Configuration Guide Release brahmaputra30 (605ebda)
We have to move the physical interface (ie the public network interface) to br-ex including moving the publicIP address and setting up default route Please refer to SETUP-SVM-3 and SETUP-SVM-4 in our more completeinstruction
Create IPv4 Subnet and Router with External Connectivity
SETUP-SVM-5 Create a Neutron router ipv4-router which needs to provide external connectivity
neutron router-create ipv4-router
SETUP-SVM-6 Create an external networksubnet ext-net using the appropriate values based on the data-centerphysical network setup
Please NOTE that you may only need to create the subnet of ext-net because OPNFV installers should have createdan external network during installation You must use the same name of external network that installer creates whenyou create the subnet For example
bull Apex installer external
bull Compass installer ext-net
bull Fuel installer net04_ext
bull Joid installer ext-net
Please refer to the documentation of installers if there is any issue
This is needed only if installer does not create an external work Otherwise skip this command net-createneutron net-create --routerexternal ext-net
Note that the name ext-net may work for some installers such as Compass and Joid Change the name ext-net to match the name of external network that an installer createsneutron subnet-create --disable-dhcp --allocation-pool start=19859156251end=19859156254 --gateway 198591561 ext-net 19859156024
Please note that the IP addresses in the command above are for exemplary purpose Please replace the IP addressesof your actual network
SETUP-SVM-7 Associate the ext-net to the Neutron router ipv4-router
Note that the name ext-net may work for some installers such as Compass and Joid Change the name ext-net to match the name of external network that an installer createsneutron router-gateway-set ipv4-router ext-net
SETUP-SVM-8 Create an internaltenant IPv4 network ipv4-int-network1
neutron net-create ipv4-int-network1
SETUP-SVM-9 Create an IPv4 subnet ipv4-int-subnet1 in the internal network ipv4-int-network1
neutron subnet-create --name ipv4-int-subnet1 --dns-nameserver 8888 ipv4-int-network1 2000024
SETUP-SVM-10 Associate the IPv4 internal subnet ipv4-int-subnet1 to the Neutron router ipv4-router
neutron router-interface-add ipv4-router ipv4-int-subnet1
43 IPv6 Configuration - Setting Up a Service VM as an IPv6 vRouter 39
OPNFV Configuration Guide Release brahmaputra30 (605ebda)
Create IPv6 Subnet and Router with External Connectivity
Now let us create a second neutron router where we can ldquomanuallyrdquo spawn a radvd daemon to simulate an externalIPv6 router
SETUP-SVM-11 Create a second Neutron router ipv6-router which needs to provide external connectivity
neutron router-create ipv6-router
SETUP-SVM-12 Associate the ext-net to the Neutron router ipv6-router
Note that the name ext-net may work for some installers such as Compass and Joid Change the name ext-net to match the name of external network that an installer createsneutron router-gateway-set ipv6-router ext-net
SETUP-SVM-13 Create a second internaltenant IPv4 network ipv4-int-network2
neutron net-create ipv4-int-network2
SETUP-SVM-14 Create an IPv4 subnet ipv4-int-subnet2 for the ipv6-router internal networkipv4-int-network2
neutron subnet-create --name ipv4-int-subnet2 --dns-nameserver 8888 ipv4-int-network2 1000024
SETUP-SVM-15 Associate the IPv4 internal subnet ipv4-int-subnet2 to the Neutron router ipv6-router
neutron router-interface-add ipv6-router ipv4-int-subnet2
Prepare Image Metadata and Keypair for Service VM
SETUP-SVM-16 Download fedora22 image which would be used as vRouter
wget httpsdownloadfedoraprojectorgpubfedoralinuxreleases22Cloudx86_64ImagesFedora-Cloud-Base-22-20150521x86_64qcow2
glance image-create --name Fedora22 --disk-format qcow2 --container-format bare --file Fedora-Cloud-Base-22-20150521x86_64qcow2
SETUP-SVM-17 Create a keypair
nova keypair-add vRouterKey gt ~vRouterKey
SETUP-SVM-18 Create ports for vRouter and both the VMs with some specific MAC addresses
neutron port-create --name eth0-vRouter --mac-address fa163e111111 ipv4-int-network2neutron port-create --name eth1-vRouter --mac-address fa163e222222 ipv4-int-network1neutron port-create --name eth0-VM1 --mac-address fa163e333333 ipv4-int-network1neutron port-create --name eth0-VM2 --mac-address fa163e444444 ipv4-int-network1
Boot Service VM (vRouter) with eth0 on ipv4-int-network2 and eth1 on ipv4-int-network1
Let us boot the service VM (vRouter) with eth0 interface on ipv4-int-network2 connecting toipv6-router and eth1 interface on ipv4-int-network1 connecting to ipv4-router
SETUP-SVM-19 Boot the vRouter using Fedora22 image on the OpenStack Compute Node with hostnameopnfv-os-compute
40 Chapter 4 Feature Configuration
OPNFV Configuration Guide Release brahmaputra30 (605ebda)
nova boot --image Fedora22 --flavor m1small --user-data optstackopnfv_os_ipv6_pocmetadatatxt --availability-zone novaopnfv-os-compute --nic port-id=$(neutron port-list | grep -w eth0-vRouter | awk print $2) --nic port-id=$(neutron port-list | grep -w eth1-vRouter | awk print $2) --key-name vRouterKey vRouter
Please note that optstackopnfv_os_ipv6_pocmetadatatxt is used to enable the vRouter to au-tomatically spawn a radvd and
bull Act as an IPv6 vRouter which advertises the RA (Router Advertisements) with prefix 2001db80264on its internal interface (eth1)
bull Forward IPv6 traffic from internal interface (eth1)
SETUP-SVM-20 Verify that Fedora22 image boots up successfully and vRouter has ssh keys properly injected
nova listnova console-log vRouter
Please note that it may take a few minutes for the necessary packages to get installed and ssh keys to be injected
Sample Output[ 762884523] cloud-init[871] ec2 [ 762909634] cloud-init[871] ec2 -----BEGIN SSH HOST KEY FINGERPRINTS-----[ 762931626] cloud-init[871] ec2 2048 e3dc3d4abcb6b07775a170a3d02a47a9 (RSA)[ 762957380] cloud-init[871] ec2 -----END SSH HOST KEY FINGERPRINTS-----[ 762979554] cloud-init[871] ec2
Boot Two Other VMs in ipv4-int-network1
In order to verify that the setup is working let us create two cirros VMs with eth1 interface on theipv4-int-network1 ie connecting to vRouter eth1 interface for internal network
We will have to configure appropriate mtu on the VMsrsquo interface by taking into account the tunneling overhead andany physical switch requirements If so push the mtu to the VM either using dhcp options or via meta-data
SETUP-SVM-21 Create VM1 on OpenStack Controller Node with hostname opnfv-os-controller
nova boot --image cirros-034-x86_64-uec --flavor m1tiny --user-data optstackopnfv_os_ipv6_pocset_mtush --availability-zone novaopnfv-os-controller --nic port-id=$(neutron port-list | grep -w eth0-VM1 | awk print $2) --key-name vRouterKey VM1
SETUP-SVM-22 Create VM2 on OpenStack Compute Node with hostname opnfv-os-compute
nova boot --image cirros-034-x86_64-uec --flavor m1tiny --user-data optstackopnfv_os_ipv6_pocset_mtush --availability-zone novaopnfv-os-compute --nic port-id=$(neutron port-list | grep -w eth0-VM2 | awk print $2) --key-name vRouterKey VM2
SETUP-SVM-23 Confirm that both the VMs are successfully booted
nova listnova console-log VM1nova console-log VM2
43 IPv6 Configuration - Setting Up a Service VM as an IPv6 vRouter 41
OPNFV Configuration Guide Release brahmaputra30 (605ebda)
Spawn RADVD in ipv6-router
Let us manually spawn a radvd daemon inside ipv6-router namespace to simulate an external router First ofall we will have to identify the ipv6-router namespace and move to the namespace
Please NOTE that in case of HA (High Availability) deployment model where multiple controller nodes are usedipv6-router created in step SETUP-SVM-11 could be in any of the controller node Thus you need to iden-tify in which controller node ipv6-router is created in order to manually spawn radvd daemon inside theipv6-router namespace in steps SETUP-SVM-24 through SETUP-SVM-30 The following command in Neu-tron will display the controller on which the ipv6-router is spawned
neutron l3-agent-list-hosting-router ipv6-router
Then you login to that controller and execute steps SETUP-SVM-24 through SETUP-SVM-30
SETUP-SVM-24 identify the ipv6-router namespace and move to the namespace
sudo ip netns exec qrouter-$(neutron router-list | grep -w ipv6-router | awk print $2) bash
SETUP-SVM-25 Upon successful execution of the above command you will be in the router namespace Now letus configure the IPv6 address on the ltqr-xxxgt interface
export router_interface=$(ip a s | grep -w global qr- | awk print $7)ip -6 addr add 2001db8011 dev $router_interface
SETUP-SVM-26 Update the sample file optstackopnfv_os_ipv6_pocscenario2radvdconfwith $router_interface
cp optstackopnfv_os_ipv6_pocscenario2radvdconf tmpradvd$router_interfaceconfsed -i s$router_interface$router_interfaceg tmpradvd$router_interfaceconf
SETUP-SVM-27 Spawn a radvd daemon to simulate an external router This radvd daemon advertises an IPv6subnet prefix of 2001db80164 using RA (Router Advertisement) on its $router_interface so that eth0interface of vRouter automatically configures an IPv6 SLAAC address
$radvd -C tmpradvd$router_interfaceconf -p tmpbr-expidradvd -m syslog
SETUP-SVM-28 Add an IPv6 downstream route pointing to the eth0 interface of vRouter
ip -6 route add 2001db80264 via 2001db801f8163efffe111111
SETUP-SVM-29 The routing table should now look similar to something shown below
ip -6 route show2001db8011 dev qr-42968b9e-62 proto kernel metric 2562001db80164 dev qr-42968b9e-62 proto kernel metric 256 expires 86384sec2001db80264 via 2001db801f8163efffe111111 dev qr-42968b9e-62 proto ra metric 1024 expires 29secfe8064 dev qg-3736e0c7-7c proto kernel metric 256fe8064 dev qr-42968b9e-62 proto kernel metric 256
SETUP-SVM-30 If all goes well the IPv6 addresses assigned to the VMs would be as shown as follows
vRouter eth0 interface would have the following IPv6 address 2001db801f8163efffe11111164 vRouter eth1 interface would have the following IPv6 address 2001db802164 VM1 would have the following IPv6 address 2001db802f8163efffe33333364 VM2 would have the following IPv6 address 2001db802f8163efffe44444464
42 Chapter 4 Feature Configuration
OPNFV Configuration Guide Release brahmaputra30 (605ebda)
Testing to Verify Setup Complete
Now let us SSH to those VMs eg VM1 and or VM2 and or vRouter to confirm that it has successfully configuredthe IPv6 address using SLAAC with prefix 2001db80264 from vRouter
We use floatingip mechanism to achieve SSH
SETUP-SVM-31 Now we can SSH to VMs You can execute the following command
1 Create a floatingip and associate it with VM1 VM2 and vRouter (to the port id that is passed) Note that the name ext-net may work for some installers such as Compass and Joid Change the name ext-net to match the name of external network that an installer createsneutron floatingip-create --port-id $(neutron port-list | grep -w eth0-VM1 | awk print $2) ext-netneutron floatingip-create --port-id $(neutron port-list | grep -w eth0-VM2 | awk print $2) ext-netneutron floatingip-create --port-id $(neutron port-list | grep -w eth1-vRouter | awk print $2) ext-net
2 To know display the floatingip associated with VM1 VM2 and vRouterneutron floatingip-list -F floating_ip_address -F port_id | grep $(neutron port-list | grep -w eth0-VM1 | awk print $2) | awk print $2neutron floatingip-list -F floating_ip_address -F port_id | grep $(neutron port-list | grep -w eth0-VM2 | awk print $2) | awk print $2neutron floatingip-list -F floating_ip_address -F port_id | grep $(neutron port-list | grep -w eth1-vRouter | awk print $2) | awk print $2
3 To ssh to the vRouter VM1 and VM2 user can execute the following commandssh -i ~vRouterKey fedoraltfloating-ip-of-vRoutergtssh -i ~vRouterKey cirrosltfloating-ip-of-VM1gtssh -i ~vRouterKey cirrosltfloating-ip-of-VM2gt
If everything goes well ssh will be successful and you will be logged into those VMs Run some commands to verifythat IPv6 addresses are configured on eth0 interface
SETUP-SVM-32 Show an IPv6 address with a prefix of 2001db80264
ip address show
SETUP-SVM-33 ping some external IPv6 address eg ipv6-router
ping6 2001db8011
If the above ping6 command succeeds it implies that vRouter was able to successfully forward the IPv6 traffic toreach external ipv6-router
44 Installing OVSNFV Fuel Plugin
bull On the Fuel UI create a new environment
bull In Settings gt Userspace OVS support check ldquoUserspace OVS supportrdquo
bull Continue with environment configuration and deployment as normal
441 Upgrading the plugin
From time to time new versions of the plugin may become available
44 Installing OVSNFV Fuel Plugin 43
OPNFV Configuration Guide Release brahmaputra30 (605ebda)
The plugin cannot be upgraded if an active environment is using the plugin
In order to upgrade the plugin
bull Copy the updated plugin file to the fuel-master
bull On the Fuel UI reset the environment
bull On the Fuel CLI ldquofuel plugins ndashupdate ltfuel-plugin-filegtrdquo
bull On the Fuel UI re-deploy the environment
45 Promise Feature Configuration Overview
451 Promise installation
Install nodejs npm and promise
curl -sL httpsdebnodesourcecomsetup_4x | sudo -E bash -sudo apt-get install -y nodejssudo npm -g install npmlatestgit clone httpsgithubcomopnfvpromisegitcd promisenpm install
Please note that the last command lsquonpm installrsquo will install all needed dependencies for promise (including yangforgeand mocha)
452 Testing
Please perform the following preparation steps
1 Set OpenStack environment parameters properly (eg source openrc admin demo in DevStack)
2 Create OpenStack tenant (eg promise) and tenant user (eg promiser)
3 Create a flavor in Nova with 1 vCPU and 512 MB RAM
4 Create a private network subnet and router in Neutron
5 Create an image in Glance
Once done the promise test script can be invoked as follows (as a single line command)
NODE_ENV=mytest OS_TENANT_NAME=promise OS_USERNAME=promiser OS_PASSWORD=ltuser password from Step 2gt OS_TEST_FLAVOR=ltflavor ID from Step 3gt OS_TEST_NETWORK=ltnetwork ID from Step 4gt OS_TEST_IMAGE=ltimage ID from Step 5gt npm run -s test -- --reporter json gt promise-resultsjson
The results of the tests will be stored in the promise-resultsjson file
The results can also be seen in the console (ldquonpm run -s testrdquo)
All 33 tests passing Congratulations promise has been successfully installed and configured
44 Chapter 4 Feature Configuration
OPNFV Configuration Guide Release brahmaputra30 (605ebda)
45 Promise Feature Configuration Overview 45
OPNFV Configuration Guide Release brahmaputra30 (605ebda)
46 Configuring SDNVPN features
Fuel installer configuration
In order to install the BGPVPN feature the corresponding checkbox in Fuel has to be selected This will triggerinstallation of the OpenStack BGPVPN API extension for Neutron (set up for using the ODL driver)
In addition ODL has to be installed see the corresponding section in the respective installer documentation on how toinstall ODL If the BGPVPN feature is installed ODL will automatically be installed with VPN Service karaf featureactivated
No post-deploy configuration is necessary The Fuel BGPVPN plugin and the ODL plugin should set up the clusterready for BGPVPNs being created This includes the set-up of internal VxLAN transport tunnels between computenodes
No post-configuration activities are required
46 Chapter 4 Feature Configuration
CHAPTER
FIVE
POST CONFIGURATION ACTIVITIES
Once you have deployed and configured your scenario and features you should validate the state of the system usingthe following guides
51 Scenario validation activities
The following guides provide information on how to validate the installation of you scenario based on the tools andtest suites available for the installation tool you have selected
511 Fuel post installation procedures
Automated post installation activities
Fuel provides a fairly broad coverage of built in automated health checks These validate the installation in terms ofconfiguration services networking storage policies etc The execution of the full range of health checks takes lessthan 30 minutes
For instructions on how to run health-checks please read the Fuel installation instructions
Platform components validation
Consult the feature sections in this document for any post-install feature specific validationhealth-checks
512 JOID post installation procedures
Configure OpenStack
In each SDN directory for example joidciopencontrail there is a folder for Juju deployer where you can find thecharm bundle yaml files that the deploysh uses to deploy
In the same directory there is scripts folder where you can find shell scripts to help you configure the OpenStackcloud that you just deployed These scripts are created to help you configure a basic OpenStack Cloud to verify thecloud For more info on OpenStack Cloud configuration please refer to the OpenStack Cloud Administrator Guideon docsopenstackorg Similarly for complete SDN configuration please refer to the respective SDN adminstratorguide
Each SDN solution requires slightly different setup please refer to the README in each SDN folder Most likelyyou will need to modify the openstacksh and cloud-setupsh scripts for the floating IP range private IP network andSSH keys Please go through openstacksh glancesh and cloud-setupsh and make changes as you see fit
47
OPNFV Configuration Guide Release brahmaputra30 (605ebda)
52 Feature validation activities
The following sections provide information on how to validate the features you have installed in your scenario
521 Copper post installation procedures
This release focused on use of the OpenStack Congress service for managing configuration policy The Congressinstall verify procedure described here is largely manual This procedure as well as the longer-term goal of automatedverification support is a work in progress The procedure is further specific to one OPNFV installer (JOID ieMAASJuJu) based environment
Automated post installation activities
No automated procedures are provided at this time
Copper post configuration procedures
No configuration procedures are required beyond the basic install procedure
Platform components validation
Following are notes on creating a container as test driver for Congress This is based upon an Ubuntu host as installedby JOID
Create and Activate the Container
On the jumphost
sudo lxc-create -n trusty-copper -t usrsharelxctemplateslxc-ubuntu -- -b ubuntu ~opnfvsudo lxc-start -n trusty-copper -dsudo lxc-info --name trusty-copper(typical output)Name trusty-copperState RUNNINGPID 4563IP 100344CPU use 2877 secondsBlkIO use 52279 MiBMemory use 55975 MiBKMem use 0 bytesLink vethDMFOANTX bytes 262 MiBRX bytes 8848 MiBTotal bytes 9110 MiB
Login and configure the test server
48 Chapter 5 Post Configuration Activities
OPNFV Configuration Guide Release brahmaputra30 (605ebda)
ssh ubuntu100344sudo apt-get updatesudo apt-get upgrade -y
Install pipsudo apt-get install python-pip -y
Install javasudo apt-get install default-jre -y
Install other dependenciessudo apt-get install git gcc python-dev libxml2 libxslt1-dev libzip-dev php5-curl -y
Setup OpenStack environment variables per your OPNFV installexport CONGRESS_HOST=19216810117export KEYSTONE_HOST=19216810108export CEILOMETER_HOST=19216810105export CINDER_HOST=19216810101export GLANCE_HOST=19216810106export HEAT_HOST=19216810107export NEUTRON_HOST=19216810111export NOVA_HOST=19216810112source ~admin-openrcsh
Install and test OpenStack clientmkdir ~gitcd gitgit clone httpsgithubcomopenstackpython-openstackclientgitcd python-openstackclientgit checkout stablelibertysudo pip install -r requirementstxtsudo python setuppy installopenstack service list(typical output)+----------------------------------+------------+----------------+| ID | Name | Type |+----------------------------------+------------+----------------+| 2f8799ae50f24c928c021fabf8a50f5f | keystone | identity || 351b13f56d9a4e25849406ec1d5a2726 | cinder | volume || 5129510c3143454f9ba8ec7e6735e267 | cinderv2 | volumev2 || 5ee1e220460f41dea9be06921400ce9b | congress | policy || 78e73a7789a14f56a5d248a0cd141201 | quantum | network || 9d5a00fb475a45b2ae6767528299ed6b | ceilometer | metering || 9e4b1624ef0b434abc0b82f607c5045c | heat | orchestration || b6c01ceb5023442d9f394b83f2a18e01 | heat-cfn | cloudformation || ba6199e3505045ad87e2a7175bd0c57f | glance | image || d753f304a0d541dbb989780ae70328a8 | nova | compute |+----------------------------------+------------+----------------+
Install and test Congress clientcd ~gitgit clone httpsgithubcomopenstackpython-congressclientgitcd python-congressclientgit checkout stablelibertysudo pip install -r requirementstxtsudo python setuppy installopenstack congress driver list(typical output)+------------+--------------------------------------------------------------------------+| id | description |+------------+--------------------------------------------------------------------------+| ceilometer | Datasource driver that interfaces with ceilometer || neutronv2 | Datasource driver that interfaces with OpenStack Networking aka Neutron || nova | Datasource driver that interfaces with OpenStack Compute aka nova || keystone | Datasource driver that interfaces with keystone || cinder | Datasource driver that interfaces with OpenStack cinder || glancev2 | Datasource driver that interfaces with OpenStack Images aka Glance |+------------+--------------------------------------------------------------------------+
Install and test Glance clientcd ~gitgit clone httpsgithubcomopenstackpython-glanceclientgitcd python-glanceclientgit checkout stablelibertysudo pip install -r requirementstxtsudo python setuppy installglance image-list(typical output)+--------------------------------------+---------------------+| ID | Name |+--------------------------------------+---------------------+| 6ce4433e-65c0-4cd8-958d-b06e30c76241 | cirros-033-x86_64 |+--------------------------------------+---------------------+
Install and test Neutron clientcd ~gitgit clone httpsgithubcomopenstackpython-neutronclientgitcd python-neutronclientgit checkout stablelibertysudo pip install -r requirementstxtsudo python setuppy installneutron net-list(typical output)+--------------------------------------+----------+------------------------------------------------------+| id | name | subnets |+--------------------------------------+----------+------------------------------------------------------+| dc6227df-af41-439f-bd2c-c2c2f0fe7fc5 | public | 5745846c-dd79-4900-a7da-bf506348ceac 19216810024 || a3f9f13a-5de9-4d3b-98c8-d2e40a2ef8e9 | internal | 5e0be862-90da-44ab-af43-56d5c65aa049 1000024 |+--------------------------------------+----------+------------------------------------------------------+
Install and test Nova clientcd ~gitgit clone httpsgithubcomopenstackpython-novaclientgitcd python-novaclientgit checkout stablelibertysudo pip install -r requirementstxtsudo python setuppy installnova hypervisor-list(typical output)+----+---------------------+-------+---------+| ID | Hypervisor hostname | State | Status |+----+---------------------+-------+---------+| 1 | compute1maas | up | enabled |+----+---------------------+-------+---------+
Install and test Keystone clientcd ~gitgit clone httpsgithubcomopenstackpython-keystoneclientgitcd python-keystoneclientgit checkout stablelibertysudo pip install -r requirementstxtsudo python setuppy install
52 Feature validation activities 49
OPNFV Configuration Guide Release brahmaputra30 (605ebda)
Setup the Congress Test Webapp
Clone Copper (if not already cloned in user home)cd ~gitif [ -d ~gitcopper ] then git clone httpsgerritopnfvorggerritcopper fi
Copy the Apache configsudo cp ~gitcoppercomponentscongresstest-webappwwwubuntu-apache2conf etcapache2apache2conf
Point proxyphp to the Congress server per your installsed -i -- s19216810117$CONGRESS_HOSTg ~gitcoppercomponentscongresstest-webappwwwhtmlproxyindexphp
Copy the webapp to the Apache root directory and fix permissionssudo cp -R ~gitcoppercomponentscongresstest-webappwwwhtml varwwwsudo chmod 755 varwwwhtml -R
Make webapp log directory and set permissionsmkdir ~logschmod 777 ~logs
Restart Apachesudo service apache2 restart
Using the Test Webapp
Browse to the trusty-copper server IP address
Interactive options are meant to be self-explanatory given a basic familiarity with the Congress service and data modelBut the app will be developed with additional features and UI elements
522 IPv6 Post Installation Procedures
Congratulations you have completed the setup of using a service VM to act as an IPv6 vRouter You have validatedthe setup based on the instruction in previous sections If you want to further test your setup you can ping6 amongVM1 VM2 vRouter and ipv6-router
This setup allows further open innovation by any 3rd-party For more instructions and documentations please refer to
1 IPv6 Configuration Guide (HTML) httpartifactsopnfvorgipv6docssetupservicevmindexhtml
2 IPv6 User Guide (HTML) httpartifactsopnfvorgipv6docsgapanalysisindexhtml
Automated post installation activities
Refer to the relevant testing guides results and release notes of Yardstick Project
53 Additional testing and validation activities
Many of our testing tools can be manually installed to facilitate targeted testing of features and capabilities of yourscenario The following guides provide instruction on setting up these testing suites
50 Chapter 5 Post Configuration Activities
OPNFV Configuration Guide Release brahmaputra30 (605ebda)
531 Overview of the functest suites
Functest is the OPNFV project primarily targeting function testing In the Continuous Integration pipeline it islaunched after an OPNFV fresh installation to validate and verify the basic functions of the infrastructure
The current list of test suites can be distributed in 3 main domains VIM (Virtualised Infrastructure Manager) Con-trollers and Features
Do-main
Testsuite
Comments
VIM
vPing NFV ldquoHello Worldrdquo using SSH connection and floatting IPvPing_userdataPing using userdata and cloud-init mechanismTempest OpenStack reference test suite [2]Rallybench
OpenStack testing tool benchmarking OpenStack modules [3]
ControllersOpen-Day-light
Opendaylight Test suite
ONOS Test suite of ONOS L2 and L3 functions See ONOSFW User Guide for details
Features
vIMS Example of a real VNF deployment to show the NFV capabilities of the platform The IPMultimedia Subsytem is a typical Telco test case referenced by ETSI It provides a fullyfunctional VoIP System
Promise Resource reservation and management project to identify NFV related requirements andrealize resource reservation for future usage by capacity management of resource poolsregarding compute network and storage See Promise User Guide for details
Doctor Doctor platform as of Brahmaputra release provides the two features ImmediateNotification Consistent resource state awareness (compute) see Doctor User Guide fordetails
SD-NVPN
Implementation of the OpenStack bgpvpn API from the SDNVPN feature project Itallowing the cration of BGP VPNs see SDNVPN User Guide for
Functest includes different test suites with several test cases within Some of the tests are developed by Functest teammembers whereas others are integrated from upstream communities or other OPNFV projects For example Tempestis the OpenStack integration test suite and Functest is in charge of the selection integration and automation of the teststhat fit in OPNFV
The Tempest suite has been customized but no new test cases have been created
The results produced by the tests run from CI are pushed and collected in a NoSQL database The goal is to populatethe database with results from different sources and scenarios and to show them on a Dashboard
There is no real notion of Test domain or Test coverage Basic components (VIM controllers) are tested through theirown suites Feature projects also provide their own test suites with different ways of running their tests
vIMS test case was integrated to demonstrate the capability to deploy a relatively complex NFV scenario on top of theOPNFV infrastructure
Functest considers OPNFV as a black box OPNFV since the Brahmaputra release offers lots of potential combina-tions
bull 2 controllers (OpenDayligh ONOS)
bull 4 installers (Apex Compass Fuel Joid)
Most of the tests are runnable on any combination but some others might have restrictions imposed by the installersor the available deployed features
53 Additional testing and validation activities 51
OPNFV Configuration Guide Release brahmaputra30 (605ebda)
Preparing the Docker container
Pull the Functest Docker image from the Docker hub
docker pull opnfvfunctestbrahmaputra10
Check that the image is available
docker images
Run the docker container giving the environment variables
bull INSTALLER_TYPE possible values are apex compass fuel or joid
bull INSTALLER_IP IP of the installer nodeVM
Functest may need to know the IP of the installer to retrieve automatically the credentials from the installer nodeVMor even from the actual controllers
The minimum command to create the Functest Docker container can be described as follows
docker run -it -e INSTALLER_IP=102002 -e INSTALLER_TYPE=fuel opnfvfunctestbrahmaputra10 binbash
Optionally it is possible to precise the container name through the option ndashname
docker run --name CONTAINER_NAME -it -e INSTALLER_IP=102002 -e INSTALLER_TYPE=fuel opnfvfunctestbrahmaputra10 binbash
It is also possible to to indicate the path of the OpenStack credentials using -v
docker run -it -e INSTALLER_IP=102002 -e INSTALLER_TYPE=fuel -v ltpath_to_your_local_creds_filegthomeopnfvfunctestconfopenstackcreds opnfvfunctestbrahmaputra10 binbash
The local file will be mounted in the container under homeopnfvfunctestconfopenstackcreds
If the intention is to run Functest against any of the supported OPNFV scenarios it is recommended to include alsothe environment variable DEPLOY_SCENARIO for example
docker run -it -e INSTALLER_IP=102002 -e INSTALLER_TYPE=fuel -e DEPLOY_SCENARIO=os-odl_l2-nofeature-ha opnfvfunctestbrahmaputra10 binbash
Inside the container the following directory structure should be in place
`-- home`-- opnfv
|-- functest| |-- conf| |-- data| `-- results`-- repos
|-- bgpvpn|-- doctor|-- functest|-- odl_integration|-- onos|-- promise|-- rally|-- releng`-- vims-test
Basically the container includes
bull Functest directory to store the configuration (the OpenStack creds are stored inhomeopngbfunctestconfopenstackcreds) the data (cirros image needed for some tests) results (sometemporary result logs may be stored here)
52 Chapter 5 Post Configuration Activities
OPNFV Configuration Guide Release brahmaputra30 (605ebda)
bull Repositories the functest repository will be used to prepare the environment and run the tests Other repositoriesare used for the installation of the needed tooling (eg rally) andor the retrieval of feature projects scenarios(eg promise)
The structure under the Functest repository can be described as follows
|-- INFO|-- LICENSE|-- commons| |-- ims| |-- mobile| `-- traffic-profile-guidelinesrst|-- docker| |-- Dockerfile| |-- commonsh| |-- prepare_envsh| |-- requirementspip| `-- run_testssh|-- docs| |-- configguide| |-- devguide| |-- images| |-- results| `-- userguide`-- testcases
|-- Controllers|-- features|-- tests|-- VIM|-- vIMS|-- vPing|-- __init__py|-- config_functestpy|-- config_functestyaml`-- functest_utilspy
We may distinguish 4 different folders
bull commons it is a folder dedicated to store traffic profile or any test inputs that could be reused by any test project
bull docker this folder includes the scripts that will be used to setup the environment and run the tests
bull docs this folder includes the user and installationconfiguration guide
bull testcases this folder includes the scripts required by Functest internal test cases and other feature projects testcases
After the run command a new prompt appears which means that we are inside the container and ready to move to thenext step
Useful Docker commands
When typing exit in the container prompt this will cause exiting the container and probably stopping it Whenstopping a running Docker container all the changes will be lost there is a keyboard shortcut to quit the containerwithout stopping it CTRL+P+Q To reconnect to the running container DO NOT use the run command again (sinceit will create a new container) use exec instead
53 Additional testing and validation activities 53
OPNFV Configuration Guide Release brahmaputra30 (605ebda)
docker psltcopy the container IDgtdocker exec -ti ltCONTAINER_IDgt binbash
or simply
docker exec -ti $(docker ps|grep functest|awk print $1) binbash
There are other useful Docker commands that might be needed to manage possible issues with the containers
List the running containers
docker ps
List all the containers including the stopped ones
docker ps -a
It is useful sometimes to remove a container if there are some problems
docker rm ltCONTAINER_IDgt
Use the -f option if the container is still running it will force to destroy it
docker -f rm ltCONTAINER_IDgt
The Docker image is called opnfvfunctest and it is stored in the public Docker registry under the OPNFV accountdockerhub The are many different tags that have been created automatically by the CI mechanisms but the one thatthis document refers to is brahmaputra10 Pulling other tags might cause some problems while running the tests
Check the Docker documentation dockerdocs for more information
Preparing the Functest environment
Once the docker container is up and running execute the following command in the prompt
$repos_dirfunctestdockerprepare_envsh
NOTE $repos_dir is a default environment variable inside the docker container which points to homeopnfvrepos
This script will make sure that the requirements to run the tests are met and will install the needed libraries and toolsby all Functest test cases It must be run only once every time the docker is started from sratch
Focus on the OpenStack credentials
The OpenStack credentials are needed to run the tests against the VIM There are 3 ways to provide them to Functest
bull using the -v option when running the Docker container
bull create an empty file in homeopnfvfunctestconfopenstackcreds and paste the credentials in it
bull automatically retrieved using the following script $repos_dirrelengutilsfetch_os_credssh
Once the credentials are there they shall be sourced before running the tests
source homeopnfvfunctestconfopenstackcreds
or simply using the environment variable creds
54 Chapter 5 Post Configuration Activities
OPNFV Configuration Guide Release brahmaputra30 (605ebda)
$creds
After this try to run any OpenStack command to see if you get any output for instance
openstack user list
This will return a list of the actual users in the OpenStack deployment In any other case check that the credentialsare sourced
env|grep OS_
This command must show a set of environment variables starting with OS_ for example
OS_REGION_NAME=RegionOneOS_DEFAULT_DOMAIN=defaultOS_PROJECT_NAME=adminOS_PASSWORD=adminOS_AUTH_STRATEGY=keystoneOS_AUTH_URL=http172301035000v20OS_USERNAME=adminOS_TENANT_NAME=adminOS_ENDPOINT_TYPE=internalURLOS_NO_CACHE=true
If still the OpenStack command does not show anything or complains about connectivity issues it could be due to anincorrect url given to the OS_AUTH_URL environment variable Check the deployment settings
SSL Support
If you need to connect to a server that is TLS-enabled (the auth URL begins with lsquohttpsrsquo) and it uses a certificate froma private CA or a self-signed certificate you will need to specify the path to an appropriate CA certificate to use tovalidate the server certificate with the environment variable OS_CACERT
echo $OS_CACERTetcsslcertscacrt
However this certificate does not exist in the container by default It has to be copied manually from the OpenStackdeployment This can be done in 2 ways
1 Create manually that file and copy the contents from the OpenStack controller
2 (recommended) Add the file using a Docker volume when starting the container
-v ltpath_to_your_cert_filegtetcsslcertscacert
You might need to export OS_CACERT environment variable inside the container
export OS_CACERT=etcsslcertscacrt
Certificate verification can be turned off using OS_INSECURE=true For example Fuel uses self-signed cacerts bydefault so an pre step would be
export OS_INSECURE=true
Additional Options
In case you need to provide different configuration parameters to Functest (eg commit IDs or branches for therepositories ) copy the config_functestyaml from the repository to your current directory and run the container
53 Additional testing and validation activities 55
OPNFV Configuration Guide Release brahmaputra30 (605ebda)
with a volume
wget httpsgitopnfvorgcgitfunctestplaintestcasesconfig_functestyaml
ltmodify the file accordinglygt
docker run -ti -e INSTALLER_TYPE=fuel -e INSTALLER_IP=102002 opnfvfunctestbrahmaputra10 -v $(pwd)config_functestyamlhomeopnfvfunctestconfconfig_functestyaml binbash
However this is not recommended since most of the test cases rely on static parameters read from this file andchanging them might cause problems
Proxy support
Functest needs internet access to download some resources for some test cases For example to install the Rallyenvironment This might not work properly if the Jumphost is running through a Proxy
If that is the case make sure the resolvconf and the needed proxy environment variables are properly set
export http_proxy=ltyour http proxy settingsgtexport https_proxy=ltyour https proxy settingsgt
Or refer to the official Docker documentation for Proxy settings
Before running prepare_envsh make sure you can ping http and https sites inside the container For example
nc -v googlecom 80Connection to googlecom 80 port [tcphttp] succeeded
nc -v googlecom 443Connection to googlecom 443 port [tcphttps] succeeded
532 Installing vswitchperf
Supported Operating Systems
bull CentOS 7
bull Fedora 20
bull Fedora 21
bull Fedora 22
bull Ubuntu 1404
Supported vSwitches
The vSwitch must support Open Flow 13 or greater
bull OVS (built from source)
bull OVS with DPDK (built from source)
56 Chapter 5 Post Configuration Activities
OPNFV Configuration Guide Release brahmaputra30 (605ebda)
Supported Hypervisors
bull Qemu version 23
Available VNFs
A simple VNF that forwards traffic through a VM using
bull DPDK testpmd
bull Linux Brigde
bull custom l2fwd module
The VM image can be downloaded from httpartifactsopnfvorgvswitchperfvloop-vnf-ubuntu-1404_20151216qcow2
Other Requirements
The test suite requires Python 33 and relies on a number of other packages These need to be installed for the testsuite to function
Installation of required packages preparation of Python 3 virtual environment and compilation of OVS DPDK andQEMU is performed by script systemsbuild_base_machinesh It should be executed under user account which willbe used for vsperf execution
Please Note Password-less sudo access must be configured for given user account before script is executed
Execution of installation script
$ cd systems$ build_base_machinesh
Please Note you donrsquot need to go into any of the systems subdirectories simply run the top levelbuild_base_machinesh your OS will be detected automatically
Script build_base_machinesh will install all the vsperf dependencies in terms of system packages Python 3x andrequired Python modules In case of CentOS 7 it will install Python 33 from an additional repository provided bySoftware Collections (a link) Installation script will also use virtualenv to create a vsperf virtual environment whichis isolated from the default Python environment This environment will reside in a directory called vsperfenv in$HOME
You will need to activate the virtual environment every time you start a new shell session Its activation is specific toyour OS
CentOS 7
$ scl enable python33 bash$ cd $HOMEvsperfenv$ source binactivate
Fedora and Ubuntu
$ cd $HOMEvsperfenv$ source binactivate
53 Additional testing and validation activities 57
OPNFV Configuration Guide Release brahmaputra30 (605ebda)
Working Behind a Proxy
If yoursquore behind a proxy yoursquoll likely want to configure this before running any of the above For example
export http_proxy=proxymycompanycom123export https_proxy=proxymycompanycom123
533 Yardstick
The projectrsquos goal is to verify infrastructure compliance from the perspective of a Virtual Network Function (VNF)
The Projectrsquos scope is the development of a test framework Yardstick test cases and test stimuli to enable NetworkFunction Virtualization Infrastructure (NFVI) verification
In OPNFV Brahmaputra release generic test cases covering aspects of the metrics in the document ETSI GS NFV-TST001 ldquoPre-deployment Testing Report on Validation of NFV Environments and Servicesrdquo are available furtherOPNFV releases will provide extended testing of these metrics
The Project also includes a sample VNF the Virtual Traffic Classifier (VTC) and its experimental frameworkApexLake
Yardstick is used in OPNFV for verifying the OPNFV infrastructure and some of the OPNFV features The Yardstickframework is deployed in several OPNFV community labs It is installer infrastructure and application independent
See also
This Presentation for an overview of Yardstick and Yardsticktst for material on alignment ETSI TST001 and Yardstick
Yardstick Installation
Abstract
Yardstick currently supports installation on Ubuntu 1404 or by using a Docker image Detailed steps about installingYardstick using both of these options can be found below
To use Yardstick you should have access to an OpenStack environment with at least Nova Neutron Glance Keystoneand Heat installed
The steps needed to run Yardstick are
1 Install Yardstick and create the test configuration yaml file
2 Build a guest image and load the image into the OpenStack environment
3 Create a Neutron external network and load OpenStack environment variables
4 Run the test case
Installing Yardstick on Ubuntu 1404
Installing Yardstick framework Install dependencies
sudo apt-get install python-virtualenv python-devsudo apt-get install libffi-dev libssl-dev git
Create a python virtual environment source it and update setuptools
58 Chapter 5 Post Configuration Activities
OPNFV Configuration Guide Release brahmaputra30 (605ebda)
virtualenv ~yardstick_venvsource ~yardstick_venvbinactivateeasy_install -U setuptools
Download source code and install python dependencies
git clone httpsgerritopnfvorggerrityardstickcd yardstickpython setuppy install
There is also a YouTube video showing the above steps
Installing extra tools
yardstick-plot Yardstick has an internal plotting tool yardstick-plot which can be installed using the follow-ing command
python setuppy develop easy_install yardstick[plot]
Building a guest image Yardstick has a tool for building an Ubuntu Cloud Server image containing all the requiredtools to run test cases supported by Yardstick It is necessary to have sudo rights to use this tool
This image can be built using the following command while in the directory where Yardstick is installed(~yardstick if the framework is installed by following the commands above)
sudo toolsyardstick-img-modify toolsubuntu-server-cloudimg-modifysh
Warning the script will create files by default in tmpworkspaceyardstick and the files will be owned byroot
The created image can be added to OpenStack using the glance image-create or via the OpenStack Dashboard
Example command
glance --os-image-api-version 1 image-create --name yardstick-trusty-server --is-public true --disk-format qcow2 --container-format bare --file tmpworkspaceyardstickyardstick-trusty-serverimg
Installing Yardstick using Docker
Yardstick has two Docker images first one (Yardstick-framework) serves as a replacement for installing the Yardstickframework in a virtual environment (for example as done in Installing Yardstick framework) while the other image ismostly for CI purposes (Yardstick-CI)
Yardstick-framework image Download the source code
git clone httpsgerritopnfvorggerrityardstick
Build the Docker image and tag it as yardstick-framework
cd yardstickdocker build -t yardstick-framework
Run the Docker instance
53 Additional testing and validation activities 59
OPNFV Configuration Guide Release brahmaputra30 (605ebda)
docker run --name yardstick_instance -i -t yardstick-framework
To build a guest image for Yardstick see Building a guest image
Yardstick-CI image Pull the Yardstick-CI Docker image from Docker hub
docker pull opnfvyardstick-ci
Run the Docker image
docker run --privileged=true --rm -t -e INSTALLER_TYPE=$INSTALLER_TYPE -e INSTALLER_IP=$INSTALLER_IP opnfvyardstick-ci run_benchmarks
Where $INSTALLER_TYPE can be fuel foreman or compass and $INSTALLER_IP is the installer masternode IP address (ie 102002 is default for fuel)
Basic steps performed by the Yardstick-CI container
1 clone yardstick and releng repos
2 setup OS credentials (releng scripts)
3 install yardstick and dependencies
4 build yardstick cloud image and upload it to glance
5 upload cirros-033 cloud image to glance
6 run yardstick test scenarios
7 cleanup
OpenStack parameters and credentials
Yardstick-flavor Most of the sample test cases in Yardstick are using an OpenStack flavor called yardstick-flavorwhich deviates from the OpenStack standard m1tiny flavor by the disk size - instead of 1GB it has 3GB Otherparameters are the same as in m1tiny
Environment variables Before running Yardstick it is necessary to export OpenStack environment vari-ables from the OpenStack openrc file (using the source command) and export the external network nameexport EXTERNAL_NETWORK=external-network-name the default name for the external network isnet04_ext
Credential environment variables in the openrc file have to include at least
bull OS_AUTH_URL
bull OS_USERNAME
bull OS_PASSWORD
bull OS_TENANT_NAME
60 Chapter 5 Post Configuration Activities
OPNFV Configuration Guide Release brahmaputra30 (605ebda)
Yardstick default key pair Yardstick uses a SSH key pair to connect to the guest image This key pair can be foundin the resourcesfiles directory To run the ping-hotyaml test sample this key pair needs to be importedto the OpenStack environment
Examples and verifying the install
It is recommended to verify that Yardstick was installed successfully by executing some simple commands and testsamples Below is an example invocation of yardstick help command and pingpy test sample
yardstick -hyardstick task start samplespingyaml
Each testing tool supported by Yardstick has a sample configuration file These configuration files can be found in thesamples directory
Example invocation of yardstick-plot tool
yardstick-plot -i tmpyardstickout -o tmpplots
Default location for the output is tmpyardstickout
More info about the tool can be found by executing
yardstick-plot -h
53 Additional testing and validation activities 61
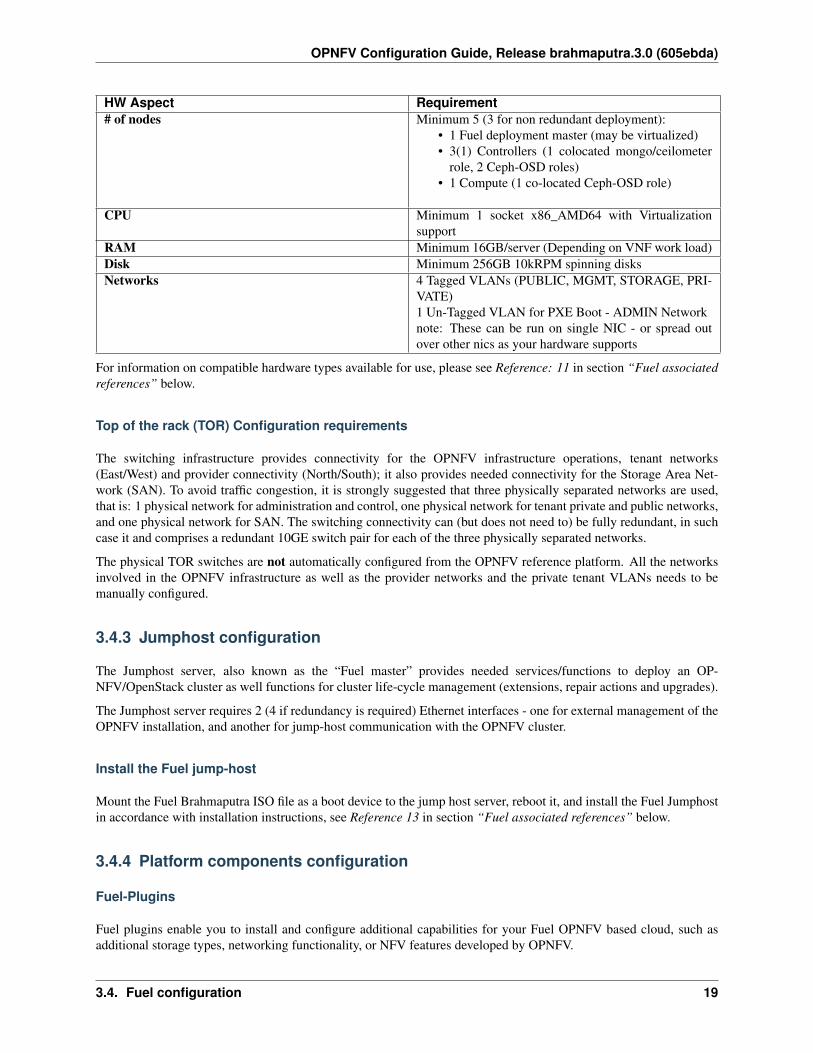
OPNFV Configuration Guide Release brahmaputra30 (605ebda)
Fuel offers an open source framework for creating these plugins so therersquos a wide range of capabilities that you canenable Fuel to add to your OpenStack clouds
The OPNFV Brahmaputra version of Fuel provides a set of pre-packaged plugins developed by OPNFV
Pluginname
Short description
Open-Daylight
OpenDaylight provides an open-source SDN Controller providing networking features such as L2and L3 network control ldquoService Function Chainingrdquo routing networking policies etc Moreinformation on OpenDaylight in the OPNFV Brahmaputra release can be found in a separate sectionin this document
ONOS ONOS is another open-source SDN controller which in essense fill the same role as OpenDaylightMore information on ONOS in the OPNFV Brahmaputra release can be found in a separate section inthis document
BGP-VPN
BGP-VPN provides an BGPMPLS VPN service More information on BGP-VPN in the OPNFVBrahmaputra release can be found in a separate section in this document
OVS-NSH
OVS-NSH provides a variant of Open-vSwitch which supports ldquoNetwork Service Headersrdquo neededfor the ldquoService function chainingrdquo feature More information on ldquoService Function Chainingrdquo in theOPNFV Brahmaputra release can be found in a in a separate section in this document
OVS-NFV
OVS-NFV provides a variant of Open-vSwitch with carrier grade characteristics essential for NFVworkloads More information on OVS-NFV in the OPNFV Brahmaputra release can be found in a ina separate section in this document
KVM-NFV
KVM-NFV provides a variant of KVM with improved virtualization characteristics essential for NFVworkloads More information on KVM-NFV in the OPNFV Brahmaputra release can be found in a ina separate section in this document
VSPERF VSPERF provides a networking characteristics test bench that facilitates characteristicsperformanceevaluation of vSwithches More information on VSPERF in the OPNFV Brahmaputra release can befound in a in a separate section in this document
Additional third-party plugins can be found here httpswwwmirantiscomproductsopenstack-drivers-and-pluginsfuel-plugins Note Plugins are not necessarilly compatible with each other see section ldquoConfigurationoptions OPNFV scenariosrdquo for compatibility information
The plugins come prepackaged ready to install To do so follow the installation instructions provided in Reference 13provided in section ldquoFuel associated referencesrdquo below
Fuel environment
A Fuel environment is an OpenStack instance managed by Fuel one Fuel instance can manage several OpenStackinstancesenvironments with different configurations etc
To create a Fuel instance follow the instructions provided in the installation instructions see Reference 13 in sectionldquoFuel associated referencesrdquo below
Provisioning of aditional features and services
Although the plugins have already previously been installed they are not per default enabled for the environment wejust created The plugins of your choice need to be enabled and configured
To enable a plugin follow the installation instructions found in Reference 13 provided in section ldquoFuel associatedreferencesrdquo below
For configuration of the plugins please see section ldquoFeature Configurationrdquo
20 Chapter 3 Installer Configuration
OPNFV Configuration Guide Release brahmaputra30 (605ebda)
Networking
All the networking aspects need to be configured in terms of - InterfacesNICs - VLANs - Sub-nets - Gateways - Usernetwork segmentation (VLANVXLAN) - DNS - NTP - etc
For guidelines on how to configure networking please refer to the installation instructions found in Reference 13provided in section ldquoFuel associated referencesrdquo below
Node allocation
Now it is time to allocate the nodes in your OPNFV cluster to OpenStack- SDN- and other featureservice rolesSome roles may require redundancy while others donrsquot Some roles may be co-located with other roles while othersmay not The Fuel GUI will guide you in the allocation of roles and will not permit you to perform invalid allocations
For detailed guide-lines on node allocation please refer to the installation instructions found in Reference 13 providedin section ldquoFuel associated referencesrdquo below
Off-line deployment
The OPNFV Brahmaputra version of Fuel can be deployed using on-line upstream repositories (default) or off-lineusing built-in local repositories on the Fuel jump-start server
For instructions on how to configure Fuel for off-line deployment please refer to the installation instructions found inReference 13 provided in section ldquoFuel associated referencesrdquo below
Deployment
You should now be ready to deploy your OPNFV Brahmaputra environment - but before doing so you may want toverify your network settings
For further details on network verification and deployment please refer to the installation instructions found in Ref-erence 13 provided in section ldquoFuel associated referencesrdquo below
345 Fuel associated references
1 OPNFV Home Page
2 OPNFV documentation- and software downloads
3 OpenStack Liberty Release artifacts
4 OpenStack documentation
5 OpenDaylight artifacts
6 The Fuel OpenStack project
7 Fuel documentation overview
8 Fuel planning guide
9 Fuel quick start guide
10 Fuel operations guide
11 Fuel Plugin Developers Guide
12 Fuel OpenStack Hardware Compatibility List
34 Fuel configuration 21
OPNFV Configuration Guide Release brahmaputra30 (605ebda)
13 OPNFV Installation instruction for the Brahmaputra release of OPNFV when using Fuel as a deployment tool
14 OPNFV Build instruction for the Brahmaputra release of OPNFV when using Fuel as a deployment tool
15 OPNFV Release Note for the Brahmaputra release of OPNFV when using Fuel as a deployment tool
35 JOID Configuration
351 Bare Metal Installations
352 Requirements as per Pharos
353 Networking
Minimum 2 networks
1 First for Admin network with gateway to access external network
2 Second for public network to consume by tenants for floating ips
NOTE JOID support multiple isolated networks for data as well as storage Based on your network optionsfor Openstack
Minimum 6 physical servers
1 Jump host server
Minimum HW Spec needed
CPU cores 16
Memory 32 GB
Hard Disk 1(250 GB)
NIC eth0(Admin Management) eth1 (external network)
2 Control node servers (minimum 3)
Minimum HW Spec
CPU cores 16
Memory 32 GB
Hard Disk 1(500 GB)
NIC eth0(Admin Management) eth1 (external network)
3 Compute node servers (minimum 2)
Minimum HW Spec
CPU cores 16
Memory 32 GB
Hard Disk 1(1 TB) this includes the space for ceph as well
22 Chapter 3 Installer Configuration
OPNFV Configuration Guide Release brahmaputra30 (605ebda)
NIC eth0(Admin Management) eth1 (external network)
NOTE Above configuration is minimum and for better performance and usage of the Openstack please con-sider higher spec for each nodes
Make sure all servers are connected to top of rack switch and configured accord-ingly No DHCP server should be up and configured Only gateway at eth0 and eth1 network should be con-figure to access the network outside your lab
Jump node configuration
1 Install Ubuntu 1404 LTS server version of OS on the nodes 2 Install the git and bridge-utils pack-ages on the server and configure minimum two bridges on jump host
brAdm and brPublic cat etcnetworkinterfaces
The loopback network interface
auto lo
iface lo inet loopback
iface eth0 inet manual
auto brAdm
iface brAdm inet static
address 10411
netmask 2552552480
network 10400
broadcast 1047255
gateway 10401
dns- options are implemented by the resolvconf package if installed
dns-nameservers 10402
bridge_ports eth0
auto brPublic
iface brPublic inet static
address 102662
netmask 2552552550
bridge_ports eth2
NOTE If you choose to use the separate network for management data and storage then you need to createbridge for each interface In case of VLAN tags use the appropriate network on jump-host depend upon VLANID on the interface
354 Configure JOID for your lab
Get the joid code from gerritt
git clone httpsgerritopnfvorggerritpjoidgit
cd joidci
Enable MAAS
35 JOID Configuration 23
OPNFV Configuration Guide Release brahmaputra30 (605ebda)
bull Create a directory in maasltcompany namegtltpod numbergt for example
mkdir maasintelpod7
bull Copy files from pod5 to pod7
cp maasintelpod5 maasintelpod7
4 files will get copied deploymentyaml environmentsyaml interfaceshost lxc-add-more-interfaces
355 deploymentyaml file
Prerequisite
1 Make sure Jump host node has been configured with bridges on each interface so that appropriate MAAS and JUJUbootstrap VM can be created For example if you have three network admin data and public then I would suggestto give names like brAdm brData and brPublic 2 You have information about the node MAC address and powermanagement details (IPMI IP username password) of the nodes used for control and compute node
356 modify deploymentyaml
This file has been used to configure your maas and bootstrap node in a VM Comments in the file are self explanatoryand we expect fill up the information according to match lab infrastructure information Sample deploymentyaml canbe found at httpsgerritopnfvorggerritgitwebp=joidgita=blobf=cimaasintelpod5deploymentyaml
modify joidci01-deploybundlesh
under section case $3 add the intelpod7 section and make sure you have information provided correctly Beforeexample consider your network has 1921681024 your default network and eth1 is on public network which will beused to assign the floating ip
rsquointelpod7rsquo )
As per your lab vip address list be deafult uses 104111 - 104120
sed -i -- rsquos1041119216812grsquo bundlesyaml
Choose the external port to go out from gateway to use
sed -i -- rsquos ext-port eth1 ext-port eth1grsquo bundlesyaml
NOTE If you are using seprate data network then add this line below also along with other changes which representsnetwork 1049024 will be used for data network for openstack
sed -i -- rsquosos-data-network 1048021os-data-network 1049024grsquo bundlesyaml
modify joidci02-maasdeploysh
under section case $1 add the intelpod7 section and make sure you have information provided correctly
24 Chapter 3 Installer Configuration
OPNFV Configuration Guide Release brahmaputra30 (605ebda)
rsquointelpod7rsquo )
cp maasintelpod7deploymentyaml deploymentyaml
NOTE If you are using VLAN tags or more network for data and storage then make sure you modify the case $1section under Enable vlan interface with maas appropriately In the example below eth2 has been used as separate datanetwork for tenants in openstack with network 1049024 on compute and control nodes
rsquointelpod7rsquo )
maas refresh
enableautomodebyname eth2 AUTO 1049024 compute || true
enableautomodebyname eth2 AUTO 1049024 control || true
MAAS Install
After integrating the changes as mentioned above run the MAAS install Suppose you name the integration lab asintelpod7 then run the below commands to start the MAAS deployment
02-maasdeploysh intelpod7
This will take approximately 40 minutes to couple hours depending on your environment This script will do thefollowing
1 Create 2 VMs (KVM)
2 Install MAAS in one of the VMs
3 Configure the MAAS to enlist and commission a VM for Juju bootstrap node
4 Configure the MAAS to enlist and commission bare metal servers
When itrsquos done you should be able to view MAAS webpage (httpltMAAS IPgtMAAS) and see 1 bootstrap nodeand bare metal servers in the lsquoReadyrsquo state on the nodes page
Virtual deployment
By default just running the script 02-maasdeploysh will automatically create the KVM VMs on a single machineand configure everything for you
OPNFV Install
JOID allows you to deploy different combinations of OpenStack release and SDN solution in HA or non-HA mode
For OpenStack it supports Juno and Liberty For SDN it supports Openvswitch OpenContrail OpenDayLight andONOS
In addition to HA or non-HA mode it also supports to deploy the latest from the development tree (tip)
The deploysh in the joidci directoy will do all the work for you For example the following deploy OpenStack Liberywith OpenDayLight in a HA mode in the Intelpod7
35 JOID Configuration 25
OPNFV Configuration Guide Release brahmaputra30 (605ebda)
deploysh -o liberty -s odl -t ha -l intelpod7 -f none
By default the SDN is Openvswitch non-HA Liberty Intelpod5 OPNFV Brahmaputra release and ODL_L2 for theOPNFV feature
Possible options for each choice are as follows
[-s ]
nosdn openvswitch only and no other SDN
odl OpenDayLight Lithium version
opencontrail OpenContrail SDN
onos ONOS framework as SDN
[-t ]
nonha NO HA mode of Openstack
ha HA mode of openstack
tip the tip of the development
[-o ]
juno OpenStack Juno version
liberty OpenStack Liberty version
[-l ] etc
default For virtual deployment where installation will be done on KVM created using 02-maasdeploysh
intelpod5 Install on bare metal OPNFV pod5 of Intel lab
intelpod6
orangepod2
(other pods)
Note if you make changes as per your pod above then please use your pod
[-f ]
none no special feature will be enabled
ipv6 ipv6 will be enabled for tenant in openstack
By default debug is enabled in script and error messages will be printed on the SSH terminal where you are runningthe scripts It could take an hour to couple hours (max) to complete
Is the deployment done successfully
Once juju-deployer is complete use juju status to verify that all deployed unit are in the ready state
26 Chapter 3 Installer Configuration
OPNFV Configuration Guide Release brahmaputra30 (605ebda)
juju status --format tabular
Find the Openstack-dashboard IP address from the juju status output and see if you can log in via browser Theusername and password is adminopenstack
Optionall see if you can log in Juju GUI Juju GUI is on the Juju bootstrap node which is the second VM you definein the 02-maasdeploysh The username and password is adminadmin
If you deploy ODL OpenContrail or ONOS find the IP address of the web UI and login Please refer to each SDNbundleyaml for usernamepassword
Troubleshoot
To access to any deployed units juju ssh for example to login into nova-compute unit and look for varlogjujuunit-ltof interestgt for more info
juju ssh nova-compute0
Example
ubuntuR4N4B1~$ juju ssh nova-compute0
Warning Permanently added rsquo172165060rsquo (ECDSA) to the list of knownhosts
Warning Permanently added rsquo3-r4n3b1-computemaasrsquo (ECDSA) to the list ofknown hosts
Welcome to Ubuntu 14041 LTS (GNULinux 3130-77-generic x86_64)
Documentation httpshelpubuntucom
ltskippedgt
Last login Tue Feb 2 212356 2016 from bootstrapmaas
ubuntu3-R4N3B1-compute~$ sudo -i
root3-R4N3B1-compute~ cd varlogjuju
root3-R4N3B1-computevarlogjuju ls
machine-2log unit-ceilometer-agent-0log unit-ceph-osd-0logunit-neutron-contrail-0log unit-nodes-compute-0log unit-nova-compute-0logunit-ntp-0log
root3-R4N3B1-computevarlogjuju
By default juju will add the Ubuntu user keys for authentication into the deployed server and only ssh accesswill be available
Once you resolve the error go back to the jump host to rerun the charm hook with
juju resolved --retry ltunitgt
35 JOID Configuration 27
OPNFV Configuration Guide Release brahmaputra30 (605ebda)
28 Chapter 3 Installer Configuration
CHAPTER
FOUR
FEATURE CONFIGURATION
The following sections describe the configuration options for specific platform features provided in BrahmaputraFurther details for each feature are captured in the referred project documentation
41 Copper configuration
This release focused on use of the OpenStack Congress service for managing configuration policy The Congress installprocedure described here is largely manual This procedure as well as the longer-term goal of automated installersupport is a work in progress The procedure is further specific to one OPNFV installer (JOID ie MAASJuJu)based environment Support for other OPNFV installer deployed environments is also a work in progress
411 Pre-configuration activities
This procedure assumes OPNFV has been installed via the JOID installer
412 Hardware configuration
There is no specific hardware configuration required for the Copper project
413 Feature configuration
Following are instructions for installing Congress on an Ubuntu 1404 LXC container in the OPNFV Controller nodeas installed by the JOID installer This guide uses instructions from the Congress intro guide on readthedocs Specificvalues below will need to be modified if you intend to repeat this procedure in your JOID-based install environment
Install Procedure
The install currently occurs via four bash scripts provided in the copper repo See these files for the detailed steps
bull install_congress_1sh creates and starts the linux container for congress on the controller node copiesinstall_congress_2sh to the controller node and invokes it via ssh
bull install_congress_2sh installs congress on the congress server
29
OPNFV Configuration Guide Release brahmaputra30 (605ebda)
Cleanup Procedure
If there is an error during installation use the bash script clean_congresssh which stops the congress server if runningand removes the congress user and service from the controller database
Restarting after server power loss etc
Currently this install procedure is manual Automated install and restoral after host recovery is TBD For now thisprocedure will get the Congress service running again
On jumphost SSH to Congress serversource ~envshjuju ssh ubuntu$CONGRESS_HOST If that fails
On jumphost SSH to controller nodejuju ssh ubuntunode1-control Start the Congress containersudo lxc-start -n juju-trusty-congress -d Verify the Congress container statussudo lxc-ls -f juju-trusty-congressNAME STATE IPV4 IPV6 GROUPS AUTOSTART----------------------------------------------------------------------juju-trusty-congress RUNNING 19216810117 - - NO exit back to the Jumphost wait a minute and go back to the SSH to Congress server step above
On the Congress server that you have logged intosource ~admin-openrcshcd ~gitcongresssource binactivatebincongress-server ampdisown -h 1
42 Doctor Configuration
421 Doctor Inspector
Doctor Inspector is suggested to be placed in one of the controller nodes but it can be put on any host where DoctorMonitor can reach and accessible to the OpenStack Controller (Nova)
Make sure OpenStack env parameters are set properly so that Doctor Inspector can issue admin actions such ascompute host force-down and state update of VM
Then you can configure Doctor Inspector as follows
git clone httpsgerritopnfvorggerritdoctor -b stablebrahmaputracd doctortestsINSPECTOR_PORT=12345python inspectorpy $INSPECTOR_PORT gt inspectorlog 2gtamp1 amp
422 Doctor Monitor
Doctor Monitors are suggested to be placed in one of the controller nodes but those can be put on any host whichis reachable to target compute host and accessible to the Doctor Inspector You need to configure Monitors for allcompute hosts one by one
30 Chapter 4 Feature Configuration
OPNFV Configuration Guide Release brahmaputra30 (605ebda)
Make sure OpenStack env parameters are set properly so that Doctor Inspector can issue admin actions such ascompute host force-down and state update of VM
Then you can configure Doctor Monitor as follows
git clone httpsgerritopnfvorggerritdoctor -b stablebrahmaputracd doctortestsINSPECTOR_PORT=12345COMPUTE_HOST=overcloud-novacompute-0sudo python monitorpy $COMPUTE_HOST
http127001$INSPECTOR_PORTevents gt monitorlog 2gtamp1 amp
43 IPv6 Configuration - Setting Up a Service VM as an IPv6 vRouter
This section provides instructions to set up a service VM as an IPv6 vRouter using OPNFV Brahmaputra Releaseinstallers The environment may be pure OpenStack option or Open Daylight L2-only option The deployment modelmay be HA or non-HA The infrastructure may be bare metal or virtual environment
For complete instructions and documentations of setting up service VM as an IPv6 vRouter using ANY method pleaserefer to
1 IPv6 Configuration Guide (HTML) httpartifactsopnfvorgipv6docssetupservicevmindexhtml
2 IPv6 User Guide (HTML) httpartifactsopnfvorgipv6docsgapanalysisindexhtml
431 Pre-configuration Activities
The configuration will work in 2 environments
1 OpenStack-only environment
2 OpenStack with Open Daylight L2-only environment
Depending on which installer will be used to deploy OPNFV each environment may be deployed on bare metal orvirtualized infrastructure Each deployment may be HA or non-HA
Refer to the previous installer configuration chapters installations guide and release notes
432 Setup Manual in OpenStack-Only Environment
If you intend to set up a service VM as an IPv6 vRouter in OpenStack-only environment of OPNFV BrahmaputraRelease please NOTE that
bull Because the anti-spoofing rules of Security Group feature in OpenStack prevents a VM from forwarding packetswe need to disable Security Group feature in the OpenStack-only environment
bull The hostnames IP addresses and username are for exemplary purpose in instructions Please change as neededto fit your environment
bull The instructions apply to both deployment model of single controller node and HA (High Availability) deploy-ment model where multiple controller nodes are used
43 IPv6 Configuration - Setting Up a Service VM as an IPv6 vRouter 31
OPNFV Configuration Guide Release brahmaputra30 (605ebda)
Install OPNFV and Preparation
OPNFV-NATIVE-INSTALL-1 To install OpenStack-only environment of OPNFV Brahmaputra Release
Apex Installer
HA deployment in OpenStack-only environmentopnfv-deploy -d etcopnfv-apexos-nosdn-nofeature-hayaml
Non-HA deployment in OpenStack-only environment Non-HA deployment is currently not supported by Apex installer
Compass Installer
HA deployment in OpenStack-only environmentexport ISO_URL=file$BUILD_DIRECTORYcompassisoexport OS_VERSION=$COMPASS_OS_VERSIONexport OPENSTACK_VERSION=$COMPASS_OPENSTACK_VERSIONexport CONFDIR=$WORKSPACEdeployconfvm_environmentdeploysh --dha $CONFDIRos-nosdn-nofeature-hayml --network $CONFDIR$NODE_NAMEnetworkyml
Non-HA deployment in OpenStack-only environment Non-HA deployment is currently not supported by Compass installer
Fuel Installer
HA deployment in OpenStack-only environmentdeploysh -s os-nosdn-nofeature-ha
Non-HA deployment in OpenStack-only environmentdeploysh -s os-nosdn-nofeature-noha
Joid Installer
HA deployment in OpenStack-only environmentdeploysh -o liberty -s nosdn -t ha -l default -f ipv6
Non-HA deployment in OpenStack-only environmentdeploysh -o liberty -s nosdn -t nonha -l default -f ipv6
Please NOTE that
bull You need to refer to installerrsquos documentation for other necessary parameters applicable to your deployment
bull You need to refer to Release Notes and installerrsquos documentation if there is any issue in installation
OPNFV-NATIVE-INSTALL-2 Clone the following GitHub repository to get the configuration and metadata files
git clone httpsgithubcomsridhargaddamopnfv_os_ipv6_pocgit optstackopnfv_os_ipv6_poc
Disable Security Groups in OpenStack ML2 Setup
OPNFV-NATIVE-SEC-1 Change the settings in etcneutronpluginsml2ml2_confini as follows
etcneutronpluginsml2ml2_confini[securitygroup]extension_drivers = port_security
32 Chapter 4 Feature Configuration
OPNFV Configuration Guide Release brahmaputra30 (605ebda)
enable_security_group = Falsefirewall_driver = neutronagentfirewallNoopFirewallDriver
OPNFV-NATIVE-SEC-2 Change the settings in etcnovanovaconf as follows
etcnovanovaconf[DEFAULT]security_group_api = novafirewall_driver = novavirtfirewallNoopFirewallDriver
OPNFV-NATIVE-SEC-3 After updating the settings you will have to restart the Neutron and Nova services
Please note that the commands of restarting Neutron and Nova would vary depending on the installer Pleaserefer to relevant documentation of specific installers
Set Up Service VM as IPv6 vRouter
OPNFV-NATIVE-SETUP-1 Now we assume that OpenStack multi-node setup is up and running We have to sourcethe tenant credentials in this step Please NOTE that the method of sourcing tenant credentials may vary dependingon installers For example
Apex installer
source the tenant credentials using Apex installer of OPNFV you need to copy the file homestackovercloudrc from the installer VM called instack to a location in controller node for example in the directory optsource optovercloudrc
Compass installer
source the tenant credentials using Compass installer of OPNFVsource optadmin-openrcsh
Fuel installer
source the tenant credentials using Fuel installer of OPNFVsource rootopenrc
Joid installer
source the tenant credentials using Joid installer of OPNFVsource $HOMEjoid_configadmin-openrc
devstack
source the tenant credentials in devstacksource openrc admin demo
Please refer to relevant documentation of installers if you encounter any issue
OPNFV-NATIVE-SETUP-2 Download fedora22 image which would be used for vRouter
wget httpsdownloadfedoraprojectorgpubfedoralinuxreleases22Cloudx86_64ImagesFedora-Cloud-Base-22-20150521x86_64qcow2
OPNFV-NATIVE-SETUP-3 Import Fedora22 image to glance
glance image-create --name Fedora22 --disk-format qcow2 --container-format bare --file Fedora-Cloud-Base-22-20150521x86_64qcow2
43 IPv6 Configuration - Setting Up a Service VM as an IPv6 vRouter 33
OPNFV Configuration Guide Release brahmaputra30 (605ebda)
OPNFV-NATIVE-SETUP-4 This step is Informational OPNFV Installer has taken care of this step duringdeployment You may refer to this step only if there is any issue or if you are using other installers
We have to move the physical interface (ie the public network interface) to br-ex including moving the publicIP address and setting up default route Please refer to OS-NATIVE-SETUP-4 and OS-NATIVE-SETUP-5 in ourmore complete instruction
OPNFV-NATIVE-SETUP-5 Create Neutron routers ipv4-router and ipv6-router which need to provideexternal connectivity
neutron router-create ipv4-routerneutron router-create ipv6-router
OPNFV-NATIVE-SETUP-6 Create an external networksubnet ext-net using the appropriate values based on thedata-center physical network setup
Please NOTE that you may only need to create the subnet of ext-net because OPNFV installers should have createdan external network during installation You must use the same name of external network that installer creates whenyou create the subnet For example
bull Apex installer external
bull Compass installer ext-net
bull Fuel installer net04_ext
bull Joid installer ext-net
Please refer to the documentation of installers if there is any issue
This is needed only if installer does not create an external work Otherwise skip this command net-createneutron net-create --routerexternal ext-net
Note that the name ext-net may work for some installers such as Compass and Joid Change the name ext-net to match the name of external network that an installer createsneutron subnet-create --disable-dhcp --allocation-pool start=19859156251end=19859156254 --gateway 198591561 ext-net 19859156024
OPNFV-NATIVE-SETUP-7 Create Neutron networks ipv4-int-network1 and ipv6-int-network2 withport_security disabled
neutron net-create --port_security_enabled=False ipv4-int-network1neutron net-create --port_security_enabled=False ipv6-int-network2
OPNFV-NATIVE-SETUP-8 Create IPv4 subnet ipv4-int-subnet1 in the internal networkipv4-int-network1 and associate it to ipv4-router
neutron subnet-create --name ipv4-int-subnet1 --dns-nameserver 8888 ipv4-int-network1 2000024
neutron router-interface-add ipv4-router ipv4-int-subnet1
OPNFV-NATIVE-SETUP-9 Associate the ext-net to the Neutron routers ipv4-router and ipv6-router
Note that the name ext-net may work for some installers such as Compass and Joid Change the name ext-net to match the name of external network that an installer createsneutron router-gateway-set ipv4-router ext-netneutron router-gateway-set ipv6-router ext-net
OPNFV-NATIVE-SETUP-10 Create two subnets one IPv4 subnet ipv4-int-subnet2 and one IPv6 subnetipv6-int-subnet2 in ipv6-int-network2 and associate both subnets to ipv6-router
34 Chapter 4 Feature Configuration
OPNFV Configuration Guide Release brahmaputra30 (605ebda)
neutron subnet-create --name ipv4-int-subnet2 --dns-nameserver 8888 ipv6-int-network2 1000024
neutron subnet-create --name ipv6-int-subnet2 --ip-version 6 --ipv6-ra-mode slaac --ipv6-address-mode slaac ipv6-int-network2 2001db80164
neutron router-interface-add ipv6-router ipv4-int-subnet2neutron router-interface-add ipv6-router ipv6-int-subnet2
OPNFV-NATIVE-SETUP-11 Create a keypair
nova keypair-add vRouterKey gt ~vRouterKey
OPNFV-NATIVE-SETUP-12 Create ports for vRouter (with some specific MAC address - basically for automation- to know the IPv6 addresses that would be assigned to the port)
neutron port-create --name eth0-vRouter --mac-address fa163e111111 ipv6-int-network2neutron port-create --name eth1-vRouter --mac-address fa163e222222 ipv4-int-network1
OPNFV-NATIVE-SETUP-13 Create ports for VM1 and VM2
neutron port-create --name eth0-VM1 --mac-address fa163e333333 ipv4-int-network1neutron port-create --name eth0-VM2 --mac-address fa163e444444 ipv4-int-network1
OPNFV-NATIVE-SETUP-14 Update ipv6-router with routing information to subnet 2001db80264
neutron router-update ipv6-router --routes type=dict list=true destination=2001db80264nexthop=2001db801f8163efffe111111
OPNFV-NATIVE-SETUP-15 Boot Service VM (vRouter) VM1 and VM2
nova boot --image Fedora22 --flavor m1small --user-data optstackopnfv_os_ipv6_pocmetadatatxt --availability-zone novaopnfv-os-compute --nic port-id=$(neutron port-list | grep -w eth0-vRouter | awk print $2) --nic port-id=$(neutron port-list | grep -w eth1-vRouter | awk print $2) --key-name vRouterKey vRouter
nova list
Please wait for some 10 to 15 minutes so that necessary packages (like radvd) are installed and vRouter is upnova console-log vRouter
nova boot --image cirros-034-x86_64-uec --flavor m1tiny --user-data optstackopnfv_os_ipv6_pocset_mtush --availability-zone novaopnfv-os-controller --nic port-id=$(neutron port-list | grep -w eth0-VM1 | awk print $2) --key-name vRouterKey VM1
nova boot --image cirros-034-x86_64-uec --flavor m1tiny--user-data optstackopnfv_os_ipv6_pocset_mtush --availability-zone novaopnfv-os-compute --nic port-id=$(neutron port-list | grep -w eth0-VM2 | awk print $2) --key-name vRouterKey VM2
nova list Verify that all the VMs are in ACTIVE state
OPNFV-NATIVE-SETUP-16 If all goes well the IPv6 addresses assigned to the VMs would be as shown as follows
43 IPv6 Configuration - Setting Up a Service VM as an IPv6 vRouter 35
OPNFV Configuration Guide Release brahmaputra30 (605ebda)
vRouter eth0 interface would have the following IPv6 address 2001db801f8163efffe11111164 vRouter eth1 interface would have the following IPv6 address 2001db802164 VM1 would have the following IPv6 address 2001db802f8163efffe33333364 VM2 would have the following IPv6 address 2001db802f8163efffe44444464
OPNFV-NATIVE-SETUP-17 Now we can SSH to VMs You can execute the following command
1 Create a floatingip and associate it with VM1 VM2 and vRouter (to the port id that is passed) Note that the name ext-net may work for some installers such as Compass and Joid Change the name ext-net to match the name of external network that an installer createsneutron floatingip-create --port-id $(neutron port-list | grep -w eth0-VM1 | awk print $2) ext-netneutron floatingip-create --port-id $(neutron port-list | grep -w eth0-VM2 | awk print $2) ext-netneutron floatingip-create --port-id $(neutron port-list | grep -w eth1-vRouter | awk print $2) ext-net
2 To know display the floatingip associated with VM1 VM2 and vRouterneutron floatingip-list -F floating_ip_address -F port_id | grep $(neutron port-list | grep -w eth0-VM1 | awk print $2) | awk print $2neutron floatingip-list -F floating_ip_address -F port_id | grep $(neutron port-list | grep -w eth0-VM2 | awk print $2) | awk print $2neutron floatingip-list -F floating_ip_address -F port_id | grep $(neutron port-list | grep -w eth1-vRouter | awk print $2) | awk print $2
3 To ssh to the vRouter VM1 and VM2 user can execute the following commandssh -i ~vRouterKey fedoraltfloating-ip-of-vRoutergtssh -i ~vRouterKey cirrosltfloating-ip-of-VM1gtssh -i ~vRouterKey cirrosltfloating-ip-of-VM2gt
433 Setup Manual in OpenStack with Open Daylight L2-Only Environment
If you intend to set up a service VM as an IPv6 vRouter in an environment of OpenStack and Open Daylight L2-onlyof OPNFV Brahmaputra Release please NOTE that
bull The hostnames IP addresses and username are for exemplary purpose in instructions Please change as neededto fit your environment
bull The instructions apply to both deployment model of single controller node and HA (High Availability) deploy-ment model where multiple controller nodes are used
bull However in case of HA when ipv6-router is created in step SETUP-SVM-11 it could be created in anyof the controller node Thus you need to identify in which controller node ipv6-router is created in orderto manually spawn radvd daemon inside the ipv6-router namespace in steps SETUP-SVM-24 throughSETUP-SVM-30
Install OPNFV and Preparation
OPNFV-INSTALL-1 To install OpenStack with Open Daylight L2-only environment of OPNFV Brahmaputra Re-lease
Apex Installer
36 Chapter 4 Feature Configuration
OPNFV Configuration Guide Release brahmaputra30 (605ebda)
HA deployment in OpenStack with Open Daylight L2-only environmentopnfv-deploy -d etcopnfv-apexos-odl_l2-nofeature-hayaml
Non-HA deployment in OpenStack with Open Daylight L2-only environment Non-HA deployment is currently not supported by Apex installer
Compass Installer
HA deployment in OpenStack with Open Daylight L2-only environmentexport ISO_URL=file$BUILD_DIRECTORYcompassisoexport OS_VERSION=$COMPASS_OS_VERSIONexport OPENSTACK_VERSION=$COMPASS_OPENSTACK_VERSIONexport CONFDIR=$WORKSPACEdeployconfvm_environmentdeploysh --dha $CONFDIRos-odl_l2-nofeature-hayml --network $CONFDIR$NODE_NAMEnetworkyml
Non-HA deployment in OpenStack with Open Daylight L2-only environment Non-HA deployment is currently not supported by Compass installer
Fuel Installer
HA deployment in OpenStack with Open Daylight L2-only environmentdeploysh -s os-odl_l2-nofeature-ha
Non-HA deployment in OpenStack with Open Daylight L2-only environmentdeploysh -s os-odl_l2-nofeature-noha
Joid Installer
HA deployment in OpenStack with Open Daylight L2-only environmentdeploysh -o liberty -s odl -t ha -l default -f ipv6
Non-HA deployment in OpenStack with Open Daylight L2-only environmentdeploysh -o liberty -s odl -t nonha -l default -f ipv6
Please NOTE that
bull You need to refer to installerrsquos documentation for other necessary parameters applicable to your deployment
bull You need to refer to Release Notes and installerrsquos documentation if there is any issue in installation
OPNFV-INSTALL-2 Clone the following GitHub repository to get the configuration and metadata files
git clone httpsgithubcomsridhargaddamopnfv_os_ipv6_pocgit optstackopnfv_os_ipv6_poc
Disable Security Groups in OpenStack ML2 Setup
Please NOTE that although Security Groups feature has been disabled automatically through localconf configu-ration file by some installers such as devstack it is very likely that other installers such as Apex Compass Fuelor Joid will enable Security Groups feature after installation
Please make sure that Security Groups are disabled in the setup
OPNFV-SEC-1 Change the settings in etcneutronpluginsml2ml2_confini as follows
etcneutronpluginsml2ml2_confini[securitygroup]enable_security_group = Falsefirewall_driver = neutronagentfirewallNoopFirewallDriver
43 IPv6 Configuration - Setting Up a Service VM as an IPv6 vRouter 37
OPNFV Configuration Guide Release brahmaputra30 (605ebda)
OPNFV-SEC-2 Change the settings in etcnovanovaconf as follows
etcnovanovaconf[DEFAULT]security_group_api = novafirewall_driver = novavirtfirewallNoopFirewallDriver
OPNFV-SEC-3 After updating the settings you will have to restart the Neutron and Nova services
Please note that the commands of restarting Neutron and Nova would vary depending on the installer Pleaserefer to relevant documentation of specific installers
Source the Credentials in OpenStack Controller Node
SETUP-SVM-1 Login in OpenStack Controller Node Start a new terminal and change directory to where Open-Stack is installed
SETUP-SVM-2 We have to source the tenant credentials in this step Please NOTE that the method of sourcingtenant credentials may vary depending on installers For example
Apex installer
source the tenant credentials using Apex installer of OPNFV you need to copy the file homestackovercloudrc from the installer VM called instack to a location in controller node for example in the directory optsource optovercloudrc
Compass installer
source the tenant credentials using Compass installer of OPNFVsource optadmin-openrcsh
Fuel installer
source the tenant credentials using Fuel installer of OPNFVsource rootopenrc
Joid installer
source the tenant credentials using Joid installer of OPNFVsource $HOMEjoid_configadmin-openrc
devstack
source the tenant credentials in devstacksource openrc admin demo
Please refer to relevant documentation of installers if you encounter any issue
Informational Note Move Public Network from Physical Network Interface to br-ex
SETUP-SVM-3 Move the physical interface (ie the public network interface) to br-ex
SETUP-SVM-4 Verify setup of br-ex
Those 2 steps are Informational OPNFV Installer has taken care of those 2 steps during deployment You mayrefer to this step only if there is any issue or if you are using other installers
38 Chapter 4 Feature Configuration
OPNFV Configuration Guide Release brahmaputra30 (605ebda)
We have to move the physical interface (ie the public network interface) to br-ex including moving the publicIP address and setting up default route Please refer to SETUP-SVM-3 and SETUP-SVM-4 in our more completeinstruction
Create IPv4 Subnet and Router with External Connectivity
SETUP-SVM-5 Create a Neutron router ipv4-router which needs to provide external connectivity
neutron router-create ipv4-router
SETUP-SVM-6 Create an external networksubnet ext-net using the appropriate values based on the data-centerphysical network setup
Please NOTE that you may only need to create the subnet of ext-net because OPNFV installers should have createdan external network during installation You must use the same name of external network that installer creates whenyou create the subnet For example
bull Apex installer external
bull Compass installer ext-net
bull Fuel installer net04_ext
bull Joid installer ext-net
Please refer to the documentation of installers if there is any issue
This is needed only if installer does not create an external work Otherwise skip this command net-createneutron net-create --routerexternal ext-net
Note that the name ext-net may work for some installers such as Compass and Joid Change the name ext-net to match the name of external network that an installer createsneutron subnet-create --disable-dhcp --allocation-pool start=19859156251end=19859156254 --gateway 198591561 ext-net 19859156024
Please note that the IP addresses in the command above are for exemplary purpose Please replace the IP addressesof your actual network
SETUP-SVM-7 Associate the ext-net to the Neutron router ipv4-router
Note that the name ext-net may work for some installers such as Compass and Joid Change the name ext-net to match the name of external network that an installer createsneutron router-gateway-set ipv4-router ext-net
SETUP-SVM-8 Create an internaltenant IPv4 network ipv4-int-network1
neutron net-create ipv4-int-network1
SETUP-SVM-9 Create an IPv4 subnet ipv4-int-subnet1 in the internal network ipv4-int-network1
neutron subnet-create --name ipv4-int-subnet1 --dns-nameserver 8888 ipv4-int-network1 2000024
SETUP-SVM-10 Associate the IPv4 internal subnet ipv4-int-subnet1 to the Neutron router ipv4-router
neutron router-interface-add ipv4-router ipv4-int-subnet1
43 IPv6 Configuration - Setting Up a Service VM as an IPv6 vRouter 39
OPNFV Configuration Guide Release brahmaputra30 (605ebda)
Create IPv6 Subnet and Router with External Connectivity
Now let us create a second neutron router where we can ldquomanuallyrdquo spawn a radvd daemon to simulate an externalIPv6 router
SETUP-SVM-11 Create a second Neutron router ipv6-router which needs to provide external connectivity
neutron router-create ipv6-router
SETUP-SVM-12 Associate the ext-net to the Neutron router ipv6-router
Note that the name ext-net may work for some installers such as Compass and Joid Change the name ext-net to match the name of external network that an installer createsneutron router-gateway-set ipv6-router ext-net
SETUP-SVM-13 Create a second internaltenant IPv4 network ipv4-int-network2
neutron net-create ipv4-int-network2
SETUP-SVM-14 Create an IPv4 subnet ipv4-int-subnet2 for the ipv6-router internal networkipv4-int-network2
neutron subnet-create --name ipv4-int-subnet2 --dns-nameserver 8888 ipv4-int-network2 1000024
SETUP-SVM-15 Associate the IPv4 internal subnet ipv4-int-subnet2 to the Neutron router ipv6-router
neutron router-interface-add ipv6-router ipv4-int-subnet2
Prepare Image Metadata and Keypair for Service VM
SETUP-SVM-16 Download fedora22 image which would be used as vRouter
wget httpsdownloadfedoraprojectorgpubfedoralinuxreleases22Cloudx86_64ImagesFedora-Cloud-Base-22-20150521x86_64qcow2
glance image-create --name Fedora22 --disk-format qcow2 --container-format bare --file Fedora-Cloud-Base-22-20150521x86_64qcow2
SETUP-SVM-17 Create a keypair
nova keypair-add vRouterKey gt ~vRouterKey
SETUP-SVM-18 Create ports for vRouter and both the VMs with some specific MAC addresses
neutron port-create --name eth0-vRouter --mac-address fa163e111111 ipv4-int-network2neutron port-create --name eth1-vRouter --mac-address fa163e222222 ipv4-int-network1neutron port-create --name eth0-VM1 --mac-address fa163e333333 ipv4-int-network1neutron port-create --name eth0-VM2 --mac-address fa163e444444 ipv4-int-network1
Boot Service VM (vRouter) with eth0 on ipv4-int-network2 and eth1 on ipv4-int-network1
Let us boot the service VM (vRouter) with eth0 interface on ipv4-int-network2 connecting toipv6-router and eth1 interface on ipv4-int-network1 connecting to ipv4-router
SETUP-SVM-19 Boot the vRouter using Fedora22 image on the OpenStack Compute Node with hostnameopnfv-os-compute
40 Chapter 4 Feature Configuration
OPNFV Configuration Guide Release brahmaputra30 (605ebda)
nova boot --image Fedora22 --flavor m1small --user-data optstackopnfv_os_ipv6_pocmetadatatxt --availability-zone novaopnfv-os-compute --nic port-id=$(neutron port-list | grep -w eth0-vRouter | awk print $2) --nic port-id=$(neutron port-list | grep -w eth1-vRouter | awk print $2) --key-name vRouterKey vRouter
Please note that optstackopnfv_os_ipv6_pocmetadatatxt is used to enable the vRouter to au-tomatically spawn a radvd and
bull Act as an IPv6 vRouter which advertises the RA (Router Advertisements) with prefix 2001db80264on its internal interface (eth1)
bull Forward IPv6 traffic from internal interface (eth1)
SETUP-SVM-20 Verify that Fedora22 image boots up successfully and vRouter has ssh keys properly injected
nova listnova console-log vRouter
Please note that it may take a few minutes for the necessary packages to get installed and ssh keys to be injected
Sample Output[ 762884523] cloud-init[871] ec2 [ 762909634] cloud-init[871] ec2 -----BEGIN SSH HOST KEY FINGERPRINTS-----[ 762931626] cloud-init[871] ec2 2048 e3dc3d4abcb6b07775a170a3d02a47a9 (RSA)[ 762957380] cloud-init[871] ec2 -----END SSH HOST KEY FINGERPRINTS-----[ 762979554] cloud-init[871] ec2
Boot Two Other VMs in ipv4-int-network1
In order to verify that the setup is working let us create two cirros VMs with eth1 interface on theipv4-int-network1 ie connecting to vRouter eth1 interface for internal network
We will have to configure appropriate mtu on the VMsrsquo interface by taking into account the tunneling overhead andany physical switch requirements If so push the mtu to the VM either using dhcp options or via meta-data
SETUP-SVM-21 Create VM1 on OpenStack Controller Node with hostname opnfv-os-controller
nova boot --image cirros-034-x86_64-uec --flavor m1tiny --user-data optstackopnfv_os_ipv6_pocset_mtush --availability-zone novaopnfv-os-controller --nic port-id=$(neutron port-list | grep -w eth0-VM1 | awk print $2) --key-name vRouterKey VM1
SETUP-SVM-22 Create VM2 on OpenStack Compute Node with hostname opnfv-os-compute
nova boot --image cirros-034-x86_64-uec --flavor m1tiny --user-data optstackopnfv_os_ipv6_pocset_mtush --availability-zone novaopnfv-os-compute --nic port-id=$(neutron port-list | grep -w eth0-VM2 | awk print $2) --key-name vRouterKey VM2
SETUP-SVM-23 Confirm that both the VMs are successfully booted
nova listnova console-log VM1nova console-log VM2
43 IPv6 Configuration - Setting Up a Service VM as an IPv6 vRouter 41
OPNFV Configuration Guide Release brahmaputra30 (605ebda)
Spawn RADVD in ipv6-router
Let us manually spawn a radvd daemon inside ipv6-router namespace to simulate an external router First ofall we will have to identify the ipv6-router namespace and move to the namespace
Please NOTE that in case of HA (High Availability) deployment model where multiple controller nodes are usedipv6-router created in step SETUP-SVM-11 could be in any of the controller node Thus you need to iden-tify in which controller node ipv6-router is created in order to manually spawn radvd daemon inside theipv6-router namespace in steps SETUP-SVM-24 through SETUP-SVM-30 The following command in Neu-tron will display the controller on which the ipv6-router is spawned
neutron l3-agent-list-hosting-router ipv6-router
Then you login to that controller and execute steps SETUP-SVM-24 through SETUP-SVM-30
SETUP-SVM-24 identify the ipv6-router namespace and move to the namespace
sudo ip netns exec qrouter-$(neutron router-list | grep -w ipv6-router | awk print $2) bash
SETUP-SVM-25 Upon successful execution of the above command you will be in the router namespace Now letus configure the IPv6 address on the ltqr-xxxgt interface
export router_interface=$(ip a s | grep -w global qr- | awk print $7)ip -6 addr add 2001db8011 dev $router_interface
SETUP-SVM-26 Update the sample file optstackopnfv_os_ipv6_pocscenario2radvdconfwith $router_interface
cp optstackopnfv_os_ipv6_pocscenario2radvdconf tmpradvd$router_interfaceconfsed -i s$router_interface$router_interfaceg tmpradvd$router_interfaceconf
SETUP-SVM-27 Spawn a radvd daemon to simulate an external router This radvd daemon advertises an IPv6subnet prefix of 2001db80164 using RA (Router Advertisement) on its $router_interface so that eth0interface of vRouter automatically configures an IPv6 SLAAC address
$radvd -C tmpradvd$router_interfaceconf -p tmpbr-expidradvd -m syslog
SETUP-SVM-28 Add an IPv6 downstream route pointing to the eth0 interface of vRouter
ip -6 route add 2001db80264 via 2001db801f8163efffe111111
SETUP-SVM-29 The routing table should now look similar to something shown below
ip -6 route show2001db8011 dev qr-42968b9e-62 proto kernel metric 2562001db80164 dev qr-42968b9e-62 proto kernel metric 256 expires 86384sec2001db80264 via 2001db801f8163efffe111111 dev qr-42968b9e-62 proto ra metric 1024 expires 29secfe8064 dev qg-3736e0c7-7c proto kernel metric 256fe8064 dev qr-42968b9e-62 proto kernel metric 256
SETUP-SVM-30 If all goes well the IPv6 addresses assigned to the VMs would be as shown as follows
vRouter eth0 interface would have the following IPv6 address 2001db801f8163efffe11111164 vRouter eth1 interface would have the following IPv6 address 2001db802164 VM1 would have the following IPv6 address 2001db802f8163efffe33333364 VM2 would have the following IPv6 address 2001db802f8163efffe44444464
42 Chapter 4 Feature Configuration
OPNFV Configuration Guide Release brahmaputra30 (605ebda)
Testing to Verify Setup Complete
Now let us SSH to those VMs eg VM1 and or VM2 and or vRouter to confirm that it has successfully configuredthe IPv6 address using SLAAC with prefix 2001db80264 from vRouter
We use floatingip mechanism to achieve SSH
SETUP-SVM-31 Now we can SSH to VMs You can execute the following command
1 Create a floatingip and associate it with VM1 VM2 and vRouter (to the port id that is passed) Note that the name ext-net may work for some installers such as Compass and Joid Change the name ext-net to match the name of external network that an installer createsneutron floatingip-create --port-id $(neutron port-list | grep -w eth0-VM1 | awk print $2) ext-netneutron floatingip-create --port-id $(neutron port-list | grep -w eth0-VM2 | awk print $2) ext-netneutron floatingip-create --port-id $(neutron port-list | grep -w eth1-vRouter | awk print $2) ext-net
2 To know display the floatingip associated with VM1 VM2 and vRouterneutron floatingip-list -F floating_ip_address -F port_id | grep $(neutron port-list | grep -w eth0-VM1 | awk print $2) | awk print $2neutron floatingip-list -F floating_ip_address -F port_id | grep $(neutron port-list | grep -w eth0-VM2 | awk print $2) | awk print $2neutron floatingip-list -F floating_ip_address -F port_id | grep $(neutron port-list | grep -w eth1-vRouter | awk print $2) | awk print $2
3 To ssh to the vRouter VM1 and VM2 user can execute the following commandssh -i ~vRouterKey fedoraltfloating-ip-of-vRoutergtssh -i ~vRouterKey cirrosltfloating-ip-of-VM1gtssh -i ~vRouterKey cirrosltfloating-ip-of-VM2gt
If everything goes well ssh will be successful and you will be logged into those VMs Run some commands to verifythat IPv6 addresses are configured on eth0 interface
SETUP-SVM-32 Show an IPv6 address with a prefix of 2001db80264
ip address show
SETUP-SVM-33 ping some external IPv6 address eg ipv6-router
ping6 2001db8011
If the above ping6 command succeeds it implies that vRouter was able to successfully forward the IPv6 traffic toreach external ipv6-router
44 Installing OVSNFV Fuel Plugin
bull On the Fuel UI create a new environment
bull In Settings gt Userspace OVS support check ldquoUserspace OVS supportrdquo
bull Continue with environment configuration and deployment as normal
441 Upgrading the plugin
From time to time new versions of the plugin may become available
44 Installing OVSNFV Fuel Plugin 43
OPNFV Configuration Guide Release brahmaputra30 (605ebda)
The plugin cannot be upgraded if an active environment is using the plugin
In order to upgrade the plugin
bull Copy the updated plugin file to the fuel-master
bull On the Fuel UI reset the environment
bull On the Fuel CLI ldquofuel plugins ndashupdate ltfuel-plugin-filegtrdquo
bull On the Fuel UI re-deploy the environment
45 Promise Feature Configuration Overview
451 Promise installation
Install nodejs npm and promise
curl -sL httpsdebnodesourcecomsetup_4x | sudo -E bash -sudo apt-get install -y nodejssudo npm -g install npmlatestgit clone httpsgithubcomopnfvpromisegitcd promisenpm install
Please note that the last command lsquonpm installrsquo will install all needed dependencies for promise (including yangforgeand mocha)
452 Testing
Please perform the following preparation steps
1 Set OpenStack environment parameters properly (eg source openrc admin demo in DevStack)
2 Create OpenStack tenant (eg promise) and tenant user (eg promiser)
3 Create a flavor in Nova with 1 vCPU and 512 MB RAM
4 Create a private network subnet and router in Neutron
5 Create an image in Glance
Once done the promise test script can be invoked as follows (as a single line command)
NODE_ENV=mytest OS_TENANT_NAME=promise OS_USERNAME=promiser OS_PASSWORD=ltuser password from Step 2gt OS_TEST_FLAVOR=ltflavor ID from Step 3gt OS_TEST_NETWORK=ltnetwork ID from Step 4gt OS_TEST_IMAGE=ltimage ID from Step 5gt npm run -s test -- --reporter json gt promise-resultsjson
The results of the tests will be stored in the promise-resultsjson file
The results can also be seen in the console (ldquonpm run -s testrdquo)
All 33 tests passing Congratulations promise has been successfully installed and configured
44 Chapter 4 Feature Configuration
OPNFV Configuration Guide Release brahmaputra30 (605ebda)
45 Promise Feature Configuration Overview 45
OPNFV Configuration Guide Release brahmaputra30 (605ebda)
46 Configuring SDNVPN features
Fuel installer configuration
In order to install the BGPVPN feature the corresponding checkbox in Fuel has to be selected This will triggerinstallation of the OpenStack BGPVPN API extension for Neutron (set up for using the ODL driver)
In addition ODL has to be installed see the corresponding section in the respective installer documentation on how toinstall ODL If the BGPVPN feature is installed ODL will automatically be installed with VPN Service karaf featureactivated
No post-deploy configuration is necessary The Fuel BGPVPN plugin and the ODL plugin should set up the clusterready for BGPVPNs being created This includes the set-up of internal VxLAN transport tunnels between computenodes
No post-configuration activities are required
46 Chapter 4 Feature Configuration
CHAPTER
FIVE
POST CONFIGURATION ACTIVITIES
Once you have deployed and configured your scenario and features you should validate the state of the system usingthe following guides
51 Scenario validation activities
The following guides provide information on how to validate the installation of you scenario based on the tools andtest suites available for the installation tool you have selected
511 Fuel post installation procedures
Automated post installation activities
Fuel provides a fairly broad coverage of built in automated health checks These validate the installation in terms ofconfiguration services networking storage policies etc The execution of the full range of health checks takes lessthan 30 minutes
For instructions on how to run health-checks please read the Fuel installation instructions
Platform components validation
Consult the feature sections in this document for any post-install feature specific validationhealth-checks
512 JOID post installation procedures
Configure OpenStack
In each SDN directory for example joidciopencontrail there is a folder for Juju deployer where you can find thecharm bundle yaml files that the deploysh uses to deploy
In the same directory there is scripts folder where you can find shell scripts to help you configure the OpenStackcloud that you just deployed These scripts are created to help you configure a basic OpenStack Cloud to verify thecloud For more info on OpenStack Cloud configuration please refer to the OpenStack Cloud Administrator Guideon docsopenstackorg Similarly for complete SDN configuration please refer to the respective SDN adminstratorguide
Each SDN solution requires slightly different setup please refer to the README in each SDN folder Most likelyyou will need to modify the openstacksh and cloud-setupsh scripts for the floating IP range private IP network andSSH keys Please go through openstacksh glancesh and cloud-setupsh and make changes as you see fit
47
OPNFV Configuration Guide Release brahmaputra30 (605ebda)
52 Feature validation activities
The following sections provide information on how to validate the features you have installed in your scenario
521 Copper post installation procedures
This release focused on use of the OpenStack Congress service for managing configuration policy The Congressinstall verify procedure described here is largely manual This procedure as well as the longer-term goal of automatedverification support is a work in progress The procedure is further specific to one OPNFV installer (JOID ieMAASJuJu) based environment
Automated post installation activities
No automated procedures are provided at this time
Copper post configuration procedures
No configuration procedures are required beyond the basic install procedure
Platform components validation
Following are notes on creating a container as test driver for Congress This is based upon an Ubuntu host as installedby JOID
Create and Activate the Container
On the jumphost
sudo lxc-create -n trusty-copper -t usrsharelxctemplateslxc-ubuntu -- -b ubuntu ~opnfvsudo lxc-start -n trusty-copper -dsudo lxc-info --name trusty-copper(typical output)Name trusty-copperState RUNNINGPID 4563IP 100344CPU use 2877 secondsBlkIO use 52279 MiBMemory use 55975 MiBKMem use 0 bytesLink vethDMFOANTX bytes 262 MiBRX bytes 8848 MiBTotal bytes 9110 MiB
Login and configure the test server
48 Chapter 5 Post Configuration Activities
OPNFV Configuration Guide Release brahmaputra30 (605ebda)
ssh ubuntu100344sudo apt-get updatesudo apt-get upgrade -y
Install pipsudo apt-get install python-pip -y
Install javasudo apt-get install default-jre -y
Install other dependenciessudo apt-get install git gcc python-dev libxml2 libxslt1-dev libzip-dev php5-curl -y
Setup OpenStack environment variables per your OPNFV installexport CONGRESS_HOST=19216810117export KEYSTONE_HOST=19216810108export CEILOMETER_HOST=19216810105export CINDER_HOST=19216810101export GLANCE_HOST=19216810106export HEAT_HOST=19216810107export NEUTRON_HOST=19216810111export NOVA_HOST=19216810112source ~admin-openrcsh
Install and test OpenStack clientmkdir ~gitcd gitgit clone httpsgithubcomopenstackpython-openstackclientgitcd python-openstackclientgit checkout stablelibertysudo pip install -r requirementstxtsudo python setuppy installopenstack service list(typical output)+----------------------------------+------------+----------------+| ID | Name | Type |+----------------------------------+------------+----------------+| 2f8799ae50f24c928c021fabf8a50f5f | keystone | identity || 351b13f56d9a4e25849406ec1d5a2726 | cinder | volume || 5129510c3143454f9ba8ec7e6735e267 | cinderv2 | volumev2 || 5ee1e220460f41dea9be06921400ce9b | congress | policy || 78e73a7789a14f56a5d248a0cd141201 | quantum | network || 9d5a00fb475a45b2ae6767528299ed6b | ceilometer | metering || 9e4b1624ef0b434abc0b82f607c5045c | heat | orchestration || b6c01ceb5023442d9f394b83f2a18e01 | heat-cfn | cloudformation || ba6199e3505045ad87e2a7175bd0c57f | glance | image || d753f304a0d541dbb989780ae70328a8 | nova | compute |+----------------------------------+------------+----------------+
Install and test Congress clientcd ~gitgit clone httpsgithubcomopenstackpython-congressclientgitcd python-congressclientgit checkout stablelibertysudo pip install -r requirementstxtsudo python setuppy installopenstack congress driver list(typical output)+------------+--------------------------------------------------------------------------+| id | description |+------------+--------------------------------------------------------------------------+| ceilometer | Datasource driver that interfaces with ceilometer || neutronv2 | Datasource driver that interfaces with OpenStack Networking aka Neutron || nova | Datasource driver that interfaces with OpenStack Compute aka nova || keystone | Datasource driver that interfaces with keystone || cinder | Datasource driver that interfaces with OpenStack cinder || glancev2 | Datasource driver that interfaces with OpenStack Images aka Glance |+------------+--------------------------------------------------------------------------+
Install and test Glance clientcd ~gitgit clone httpsgithubcomopenstackpython-glanceclientgitcd python-glanceclientgit checkout stablelibertysudo pip install -r requirementstxtsudo python setuppy installglance image-list(typical output)+--------------------------------------+---------------------+| ID | Name |+--------------------------------------+---------------------+| 6ce4433e-65c0-4cd8-958d-b06e30c76241 | cirros-033-x86_64 |+--------------------------------------+---------------------+
Install and test Neutron clientcd ~gitgit clone httpsgithubcomopenstackpython-neutronclientgitcd python-neutronclientgit checkout stablelibertysudo pip install -r requirementstxtsudo python setuppy installneutron net-list(typical output)+--------------------------------------+----------+------------------------------------------------------+| id | name | subnets |+--------------------------------------+----------+------------------------------------------------------+| dc6227df-af41-439f-bd2c-c2c2f0fe7fc5 | public | 5745846c-dd79-4900-a7da-bf506348ceac 19216810024 || a3f9f13a-5de9-4d3b-98c8-d2e40a2ef8e9 | internal | 5e0be862-90da-44ab-af43-56d5c65aa049 1000024 |+--------------------------------------+----------+------------------------------------------------------+
Install and test Nova clientcd ~gitgit clone httpsgithubcomopenstackpython-novaclientgitcd python-novaclientgit checkout stablelibertysudo pip install -r requirementstxtsudo python setuppy installnova hypervisor-list(typical output)+----+---------------------+-------+---------+| ID | Hypervisor hostname | State | Status |+----+---------------------+-------+---------+| 1 | compute1maas | up | enabled |+----+---------------------+-------+---------+
Install and test Keystone clientcd ~gitgit clone httpsgithubcomopenstackpython-keystoneclientgitcd python-keystoneclientgit checkout stablelibertysudo pip install -r requirementstxtsudo python setuppy install
52 Feature validation activities 49
OPNFV Configuration Guide Release brahmaputra30 (605ebda)
Setup the Congress Test Webapp
Clone Copper (if not already cloned in user home)cd ~gitif [ -d ~gitcopper ] then git clone httpsgerritopnfvorggerritcopper fi
Copy the Apache configsudo cp ~gitcoppercomponentscongresstest-webappwwwubuntu-apache2conf etcapache2apache2conf
Point proxyphp to the Congress server per your installsed -i -- s19216810117$CONGRESS_HOSTg ~gitcoppercomponentscongresstest-webappwwwhtmlproxyindexphp
Copy the webapp to the Apache root directory and fix permissionssudo cp -R ~gitcoppercomponentscongresstest-webappwwwhtml varwwwsudo chmod 755 varwwwhtml -R
Make webapp log directory and set permissionsmkdir ~logschmod 777 ~logs
Restart Apachesudo service apache2 restart
Using the Test Webapp
Browse to the trusty-copper server IP address
Interactive options are meant to be self-explanatory given a basic familiarity with the Congress service and data modelBut the app will be developed with additional features and UI elements
522 IPv6 Post Installation Procedures
Congratulations you have completed the setup of using a service VM to act as an IPv6 vRouter You have validatedthe setup based on the instruction in previous sections If you want to further test your setup you can ping6 amongVM1 VM2 vRouter and ipv6-router
This setup allows further open innovation by any 3rd-party For more instructions and documentations please refer to
1 IPv6 Configuration Guide (HTML) httpartifactsopnfvorgipv6docssetupservicevmindexhtml
2 IPv6 User Guide (HTML) httpartifactsopnfvorgipv6docsgapanalysisindexhtml
Automated post installation activities
Refer to the relevant testing guides results and release notes of Yardstick Project
53 Additional testing and validation activities
Many of our testing tools can be manually installed to facilitate targeted testing of features and capabilities of yourscenario The following guides provide instruction on setting up these testing suites
50 Chapter 5 Post Configuration Activities
OPNFV Configuration Guide Release brahmaputra30 (605ebda)
531 Overview of the functest suites
Functest is the OPNFV project primarily targeting function testing In the Continuous Integration pipeline it islaunched after an OPNFV fresh installation to validate and verify the basic functions of the infrastructure
The current list of test suites can be distributed in 3 main domains VIM (Virtualised Infrastructure Manager) Con-trollers and Features
Do-main
Testsuite
Comments
VIM
vPing NFV ldquoHello Worldrdquo using SSH connection and floatting IPvPing_userdataPing using userdata and cloud-init mechanismTempest OpenStack reference test suite [2]Rallybench
OpenStack testing tool benchmarking OpenStack modules [3]
ControllersOpen-Day-light
Opendaylight Test suite
ONOS Test suite of ONOS L2 and L3 functions See ONOSFW User Guide for details
Features
vIMS Example of a real VNF deployment to show the NFV capabilities of the platform The IPMultimedia Subsytem is a typical Telco test case referenced by ETSI It provides a fullyfunctional VoIP System
Promise Resource reservation and management project to identify NFV related requirements andrealize resource reservation for future usage by capacity management of resource poolsregarding compute network and storage See Promise User Guide for details
Doctor Doctor platform as of Brahmaputra release provides the two features ImmediateNotification Consistent resource state awareness (compute) see Doctor User Guide fordetails
SD-NVPN
Implementation of the OpenStack bgpvpn API from the SDNVPN feature project Itallowing the cration of BGP VPNs see SDNVPN User Guide for
Functest includes different test suites with several test cases within Some of the tests are developed by Functest teammembers whereas others are integrated from upstream communities or other OPNFV projects For example Tempestis the OpenStack integration test suite and Functest is in charge of the selection integration and automation of the teststhat fit in OPNFV
The Tempest suite has been customized but no new test cases have been created
The results produced by the tests run from CI are pushed and collected in a NoSQL database The goal is to populatethe database with results from different sources and scenarios and to show them on a Dashboard
There is no real notion of Test domain or Test coverage Basic components (VIM controllers) are tested through theirown suites Feature projects also provide their own test suites with different ways of running their tests
vIMS test case was integrated to demonstrate the capability to deploy a relatively complex NFV scenario on top of theOPNFV infrastructure
Functest considers OPNFV as a black box OPNFV since the Brahmaputra release offers lots of potential combina-tions
bull 2 controllers (OpenDayligh ONOS)
bull 4 installers (Apex Compass Fuel Joid)
Most of the tests are runnable on any combination but some others might have restrictions imposed by the installersor the available deployed features
53 Additional testing and validation activities 51
OPNFV Configuration Guide Release brahmaputra30 (605ebda)
Preparing the Docker container
Pull the Functest Docker image from the Docker hub
docker pull opnfvfunctestbrahmaputra10
Check that the image is available
docker images
Run the docker container giving the environment variables
bull INSTALLER_TYPE possible values are apex compass fuel or joid
bull INSTALLER_IP IP of the installer nodeVM
Functest may need to know the IP of the installer to retrieve automatically the credentials from the installer nodeVMor even from the actual controllers
The minimum command to create the Functest Docker container can be described as follows
docker run -it -e INSTALLER_IP=102002 -e INSTALLER_TYPE=fuel opnfvfunctestbrahmaputra10 binbash
Optionally it is possible to precise the container name through the option ndashname
docker run --name CONTAINER_NAME -it -e INSTALLER_IP=102002 -e INSTALLER_TYPE=fuel opnfvfunctestbrahmaputra10 binbash
It is also possible to to indicate the path of the OpenStack credentials using -v
docker run -it -e INSTALLER_IP=102002 -e INSTALLER_TYPE=fuel -v ltpath_to_your_local_creds_filegthomeopnfvfunctestconfopenstackcreds opnfvfunctestbrahmaputra10 binbash
The local file will be mounted in the container under homeopnfvfunctestconfopenstackcreds
If the intention is to run Functest against any of the supported OPNFV scenarios it is recommended to include alsothe environment variable DEPLOY_SCENARIO for example
docker run -it -e INSTALLER_IP=102002 -e INSTALLER_TYPE=fuel -e DEPLOY_SCENARIO=os-odl_l2-nofeature-ha opnfvfunctestbrahmaputra10 binbash
Inside the container the following directory structure should be in place
`-- home`-- opnfv
|-- functest| |-- conf| |-- data| `-- results`-- repos
|-- bgpvpn|-- doctor|-- functest|-- odl_integration|-- onos|-- promise|-- rally|-- releng`-- vims-test
Basically the container includes
bull Functest directory to store the configuration (the OpenStack creds are stored inhomeopngbfunctestconfopenstackcreds) the data (cirros image needed for some tests) results (sometemporary result logs may be stored here)
52 Chapter 5 Post Configuration Activities
OPNFV Configuration Guide Release brahmaputra30 (605ebda)
bull Repositories the functest repository will be used to prepare the environment and run the tests Other repositoriesare used for the installation of the needed tooling (eg rally) andor the retrieval of feature projects scenarios(eg promise)
The structure under the Functest repository can be described as follows
|-- INFO|-- LICENSE|-- commons| |-- ims| |-- mobile| `-- traffic-profile-guidelinesrst|-- docker| |-- Dockerfile| |-- commonsh| |-- prepare_envsh| |-- requirementspip| `-- run_testssh|-- docs| |-- configguide| |-- devguide| |-- images| |-- results| `-- userguide`-- testcases
|-- Controllers|-- features|-- tests|-- VIM|-- vIMS|-- vPing|-- __init__py|-- config_functestpy|-- config_functestyaml`-- functest_utilspy
We may distinguish 4 different folders
bull commons it is a folder dedicated to store traffic profile or any test inputs that could be reused by any test project
bull docker this folder includes the scripts that will be used to setup the environment and run the tests
bull docs this folder includes the user and installationconfiguration guide
bull testcases this folder includes the scripts required by Functest internal test cases and other feature projects testcases
After the run command a new prompt appears which means that we are inside the container and ready to move to thenext step
Useful Docker commands
When typing exit in the container prompt this will cause exiting the container and probably stopping it Whenstopping a running Docker container all the changes will be lost there is a keyboard shortcut to quit the containerwithout stopping it CTRL+P+Q To reconnect to the running container DO NOT use the run command again (sinceit will create a new container) use exec instead
53 Additional testing and validation activities 53
OPNFV Configuration Guide Release brahmaputra30 (605ebda)
docker psltcopy the container IDgtdocker exec -ti ltCONTAINER_IDgt binbash
or simply
docker exec -ti $(docker ps|grep functest|awk print $1) binbash
There are other useful Docker commands that might be needed to manage possible issues with the containers
List the running containers
docker ps
List all the containers including the stopped ones
docker ps -a
It is useful sometimes to remove a container if there are some problems
docker rm ltCONTAINER_IDgt
Use the -f option if the container is still running it will force to destroy it
docker -f rm ltCONTAINER_IDgt
The Docker image is called opnfvfunctest and it is stored in the public Docker registry under the OPNFV accountdockerhub The are many different tags that have been created automatically by the CI mechanisms but the one thatthis document refers to is brahmaputra10 Pulling other tags might cause some problems while running the tests
Check the Docker documentation dockerdocs for more information
Preparing the Functest environment
Once the docker container is up and running execute the following command in the prompt
$repos_dirfunctestdockerprepare_envsh
NOTE $repos_dir is a default environment variable inside the docker container which points to homeopnfvrepos
This script will make sure that the requirements to run the tests are met and will install the needed libraries and toolsby all Functest test cases It must be run only once every time the docker is started from sratch
Focus on the OpenStack credentials
The OpenStack credentials are needed to run the tests against the VIM There are 3 ways to provide them to Functest
bull using the -v option when running the Docker container
bull create an empty file in homeopnfvfunctestconfopenstackcreds and paste the credentials in it
bull automatically retrieved using the following script $repos_dirrelengutilsfetch_os_credssh
Once the credentials are there they shall be sourced before running the tests
source homeopnfvfunctestconfopenstackcreds
or simply using the environment variable creds
54 Chapter 5 Post Configuration Activities
OPNFV Configuration Guide Release brahmaputra30 (605ebda)
$creds
After this try to run any OpenStack command to see if you get any output for instance
openstack user list
This will return a list of the actual users in the OpenStack deployment In any other case check that the credentialsare sourced
env|grep OS_
This command must show a set of environment variables starting with OS_ for example
OS_REGION_NAME=RegionOneOS_DEFAULT_DOMAIN=defaultOS_PROJECT_NAME=adminOS_PASSWORD=adminOS_AUTH_STRATEGY=keystoneOS_AUTH_URL=http172301035000v20OS_USERNAME=adminOS_TENANT_NAME=adminOS_ENDPOINT_TYPE=internalURLOS_NO_CACHE=true
If still the OpenStack command does not show anything or complains about connectivity issues it could be due to anincorrect url given to the OS_AUTH_URL environment variable Check the deployment settings
SSL Support
If you need to connect to a server that is TLS-enabled (the auth URL begins with lsquohttpsrsquo) and it uses a certificate froma private CA or a self-signed certificate you will need to specify the path to an appropriate CA certificate to use tovalidate the server certificate with the environment variable OS_CACERT
echo $OS_CACERTetcsslcertscacrt
However this certificate does not exist in the container by default It has to be copied manually from the OpenStackdeployment This can be done in 2 ways
1 Create manually that file and copy the contents from the OpenStack controller
2 (recommended) Add the file using a Docker volume when starting the container
-v ltpath_to_your_cert_filegtetcsslcertscacert
You might need to export OS_CACERT environment variable inside the container
export OS_CACERT=etcsslcertscacrt
Certificate verification can be turned off using OS_INSECURE=true For example Fuel uses self-signed cacerts bydefault so an pre step would be
export OS_INSECURE=true
Additional Options
In case you need to provide different configuration parameters to Functest (eg commit IDs or branches for therepositories ) copy the config_functestyaml from the repository to your current directory and run the container
53 Additional testing and validation activities 55
OPNFV Configuration Guide Release brahmaputra30 (605ebda)
with a volume
wget httpsgitopnfvorgcgitfunctestplaintestcasesconfig_functestyaml
ltmodify the file accordinglygt
docker run -ti -e INSTALLER_TYPE=fuel -e INSTALLER_IP=102002 opnfvfunctestbrahmaputra10 -v $(pwd)config_functestyamlhomeopnfvfunctestconfconfig_functestyaml binbash
However this is not recommended since most of the test cases rely on static parameters read from this file andchanging them might cause problems
Proxy support
Functest needs internet access to download some resources for some test cases For example to install the Rallyenvironment This might not work properly if the Jumphost is running through a Proxy
If that is the case make sure the resolvconf and the needed proxy environment variables are properly set
export http_proxy=ltyour http proxy settingsgtexport https_proxy=ltyour https proxy settingsgt
Or refer to the official Docker documentation for Proxy settings
Before running prepare_envsh make sure you can ping http and https sites inside the container For example
nc -v googlecom 80Connection to googlecom 80 port [tcphttp] succeeded
nc -v googlecom 443Connection to googlecom 443 port [tcphttps] succeeded
532 Installing vswitchperf
Supported Operating Systems
bull CentOS 7
bull Fedora 20
bull Fedora 21
bull Fedora 22
bull Ubuntu 1404
Supported vSwitches
The vSwitch must support Open Flow 13 or greater
bull OVS (built from source)
bull OVS with DPDK (built from source)
56 Chapter 5 Post Configuration Activities
OPNFV Configuration Guide Release brahmaputra30 (605ebda)
Supported Hypervisors
bull Qemu version 23
Available VNFs
A simple VNF that forwards traffic through a VM using
bull DPDK testpmd
bull Linux Brigde
bull custom l2fwd module
The VM image can be downloaded from httpartifactsopnfvorgvswitchperfvloop-vnf-ubuntu-1404_20151216qcow2
Other Requirements
The test suite requires Python 33 and relies on a number of other packages These need to be installed for the testsuite to function
Installation of required packages preparation of Python 3 virtual environment and compilation of OVS DPDK andQEMU is performed by script systemsbuild_base_machinesh It should be executed under user account which willbe used for vsperf execution
Please Note Password-less sudo access must be configured for given user account before script is executed
Execution of installation script
$ cd systems$ build_base_machinesh
Please Note you donrsquot need to go into any of the systems subdirectories simply run the top levelbuild_base_machinesh your OS will be detected automatically
Script build_base_machinesh will install all the vsperf dependencies in terms of system packages Python 3x andrequired Python modules In case of CentOS 7 it will install Python 33 from an additional repository provided bySoftware Collections (a link) Installation script will also use virtualenv to create a vsperf virtual environment whichis isolated from the default Python environment This environment will reside in a directory called vsperfenv in$HOME
You will need to activate the virtual environment every time you start a new shell session Its activation is specific toyour OS
CentOS 7
$ scl enable python33 bash$ cd $HOMEvsperfenv$ source binactivate
Fedora and Ubuntu
$ cd $HOMEvsperfenv$ source binactivate
53 Additional testing and validation activities 57
OPNFV Configuration Guide Release brahmaputra30 (605ebda)
Working Behind a Proxy
If yoursquore behind a proxy yoursquoll likely want to configure this before running any of the above For example
export http_proxy=proxymycompanycom123export https_proxy=proxymycompanycom123
533 Yardstick
The projectrsquos goal is to verify infrastructure compliance from the perspective of a Virtual Network Function (VNF)
The Projectrsquos scope is the development of a test framework Yardstick test cases and test stimuli to enable NetworkFunction Virtualization Infrastructure (NFVI) verification
In OPNFV Brahmaputra release generic test cases covering aspects of the metrics in the document ETSI GS NFV-TST001 ldquoPre-deployment Testing Report on Validation of NFV Environments and Servicesrdquo are available furtherOPNFV releases will provide extended testing of these metrics
The Project also includes a sample VNF the Virtual Traffic Classifier (VTC) and its experimental frameworkApexLake
Yardstick is used in OPNFV for verifying the OPNFV infrastructure and some of the OPNFV features The Yardstickframework is deployed in several OPNFV community labs It is installer infrastructure and application independent
See also
This Presentation for an overview of Yardstick and Yardsticktst for material on alignment ETSI TST001 and Yardstick
Yardstick Installation
Abstract
Yardstick currently supports installation on Ubuntu 1404 or by using a Docker image Detailed steps about installingYardstick using both of these options can be found below
To use Yardstick you should have access to an OpenStack environment with at least Nova Neutron Glance Keystoneand Heat installed
The steps needed to run Yardstick are
1 Install Yardstick and create the test configuration yaml file
2 Build a guest image and load the image into the OpenStack environment
3 Create a Neutron external network and load OpenStack environment variables
4 Run the test case
Installing Yardstick on Ubuntu 1404
Installing Yardstick framework Install dependencies
sudo apt-get install python-virtualenv python-devsudo apt-get install libffi-dev libssl-dev git
Create a python virtual environment source it and update setuptools
58 Chapter 5 Post Configuration Activities
OPNFV Configuration Guide Release brahmaputra30 (605ebda)
virtualenv ~yardstick_venvsource ~yardstick_venvbinactivateeasy_install -U setuptools
Download source code and install python dependencies
git clone httpsgerritopnfvorggerrityardstickcd yardstickpython setuppy install
There is also a YouTube video showing the above steps
Installing extra tools
yardstick-plot Yardstick has an internal plotting tool yardstick-plot which can be installed using the follow-ing command
python setuppy develop easy_install yardstick[plot]
Building a guest image Yardstick has a tool for building an Ubuntu Cloud Server image containing all the requiredtools to run test cases supported by Yardstick It is necessary to have sudo rights to use this tool
This image can be built using the following command while in the directory where Yardstick is installed(~yardstick if the framework is installed by following the commands above)
sudo toolsyardstick-img-modify toolsubuntu-server-cloudimg-modifysh
Warning the script will create files by default in tmpworkspaceyardstick and the files will be owned byroot
The created image can be added to OpenStack using the glance image-create or via the OpenStack Dashboard
Example command
glance --os-image-api-version 1 image-create --name yardstick-trusty-server --is-public true --disk-format qcow2 --container-format bare --file tmpworkspaceyardstickyardstick-trusty-serverimg
Installing Yardstick using Docker
Yardstick has two Docker images first one (Yardstick-framework) serves as a replacement for installing the Yardstickframework in a virtual environment (for example as done in Installing Yardstick framework) while the other image ismostly for CI purposes (Yardstick-CI)
Yardstick-framework image Download the source code
git clone httpsgerritopnfvorggerrityardstick
Build the Docker image and tag it as yardstick-framework
cd yardstickdocker build -t yardstick-framework
Run the Docker instance
53 Additional testing and validation activities 59
OPNFV Configuration Guide Release brahmaputra30 (605ebda)
docker run --name yardstick_instance -i -t yardstick-framework
To build a guest image for Yardstick see Building a guest image
Yardstick-CI image Pull the Yardstick-CI Docker image from Docker hub
docker pull opnfvyardstick-ci
Run the Docker image
docker run --privileged=true --rm -t -e INSTALLER_TYPE=$INSTALLER_TYPE -e INSTALLER_IP=$INSTALLER_IP opnfvyardstick-ci run_benchmarks
Where $INSTALLER_TYPE can be fuel foreman or compass and $INSTALLER_IP is the installer masternode IP address (ie 102002 is default for fuel)
Basic steps performed by the Yardstick-CI container
1 clone yardstick and releng repos
2 setup OS credentials (releng scripts)
3 install yardstick and dependencies
4 build yardstick cloud image and upload it to glance
5 upload cirros-033 cloud image to glance
6 run yardstick test scenarios
7 cleanup
OpenStack parameters and credentials
Yardstick-flavor Most of the sample test cases in Yardstick are using an OpenStack flavor called yardstick-flavorwhich deviates from the OpenStack standard m1tiny flavor by the disk size - instead of 1GB it has 3GB Otherparameters are the same as in m1tiny
Environment variables Before running Yardstick it is necessary to export OpenStack environment vari-ables from the OpenStack openrc file (using the source command) and export the external network nameexport EXTERNAL_NETWORK=external-network-name the default name for the external network isnet04_ext
Credential environment variables in the openrc file have to include at least
bull OS_AUTH_URL
bull OS_USERNAME
bull OS_PASSWORD
bull OS_TENANT_NAME
60 Chapter 5 Post Configuration Activities
OPNFV Configuration Guide Release brahmaputra30 (605ebda)
Yardstick default key pair Yardstick uses a SSH key pair to connect to the guest image This key pair can be foundin the resourcesfiles directory To run the ping-hotyaml test sample this key pair needs to be importedto the OpenStack environment
Examples and verifying the install
It is recommended to verify that Yardstick was installed successfully by executing some simple commands and testsamples Below is an example invocation of yardstick help command and pingpy test sample
yardstick -hyardstick task start samplespingyaml
Each testing tool supported by Yardstick has a sample configuration file These configuration files can be found in thesamples directory
Example invocation of yardstick-plot tool
yardstick-plot -i tmpyardstickout -o tmpplots
Default location for the output is tmpyardstickout
More info about the tool can be found by executing
yardstick-plot -h
53 Additional testing and validation activities 61
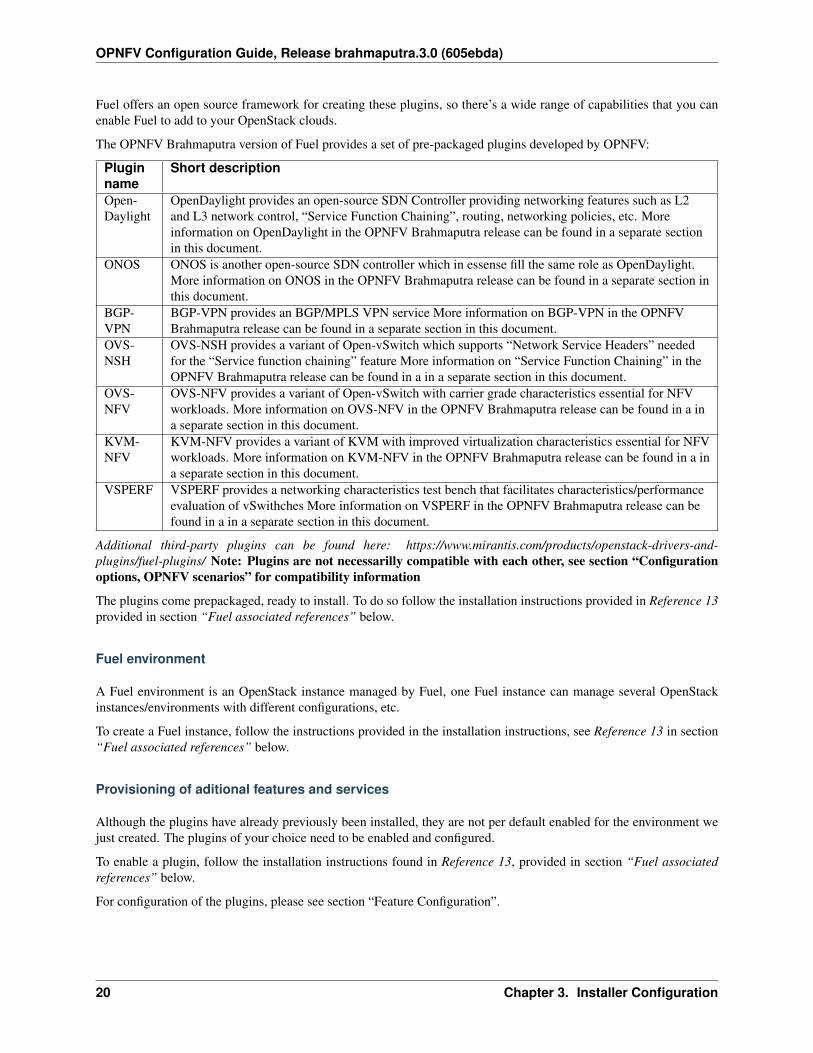
OPNFV Configuration Guide Release brahmaputra30 (605ebda)
rsquointelpod7rsquo )
cp maasintelpod7deploymentyaml deploymentyaml
NOTE If you are using VLAN tags or more network for data and storage then make sure you modify the case $1section under Enable vlan interface with maas appropriately In the example below eth2 has been used as separate datanetwork for tenants in openstack with network 1049024 on compute and control nodes
rsquointelpod7rsquo )
maas refresh
enableautomodebyname eth2 AUTO 1049024 compute || true
enableautomodebyname eth2 AUTO 1049024 control || true
MAAS Install
After integrating the changes as mentioned above run the MAAS install Suppose you name the integration lab asintelpod7 then run the below commands to start the MAAS deployment
02-maasdeploysh intelpod7
This will take approximately 40 minutes to couple hours depending on your environment This script will do thefollowing
1 Create 2 VMs (KVM)
2 Install MAAS in one of the VMs
3 Configure the MAAS to enlist and commission a VM for Juju bootstrap node
4 Configure the MAAS to enlist and commission bare metal servers
When itrsquos done you should be able to view MAAS webpage (httpltMAAS IPgtMAAS) and see 1 bootstrap nodeand bare metal servers in the lsquoReadyrsquo state on the nodes page
Virtual deployment
By default just running the script 02-maasdeploysh will automatically create the KVM VMs on a single machineand configure everything for you
OPNFV Install
JOID allows you to deploy different combinations of OpenStack release and SDN solution in HA or non-HA mode
For OpenStack it supports Juno and Liberty For SDN it supports Openvswitch OpenContrail OpenDayLight andONOS
In addition to HA or non-HA mode it also supports to deploy the latest from the development tree (tip)
The deploysh in the joidci directoy will do all the work for you For example the following deploy OpenStack Liberywith OpenDayLight in a HA mode in the Intelpod7
35 JOID Configuration 25
OPNFV Configuration Guide Release brahmaputra30 (605ebda)
deploysh -o liberty -s odl -t ha -l intelpod7 -f none
By default the SDN is Openvswitch non-HA Liberty Intelpod5 OPNFV Brahmaputra release and ODL_L2 for theOPNFV feature
Possible options for each choice are as follows
[-s ]
nosdn openvswitch only and no other SDN
odl OpenDayLight Lithium version
opencontrail OpenContrail SDN
onos ONOS framework as SDN
[-t ]
nonha NO HA mode of Openstack
ha HA mode of openstack
tip the tip of the development
[-o ]
juno OpenStack Juno version
liberty OpenStack Liberty version
[-l ] etc
default For virtual deployment where installation will be done on KVM created using 02-maasdeploysh
intelpod5 Install on bare metal OPNFV pod5 of Intel lab
intelpod6
orangepod2
(other pods)
Note if you make changes as per your pod above then please use your pod
[-f ]
none no special feature will be enabled
ipv6 ipv6 will be enabled for tenant in openstack
By default debug is enabled in script and error messages will be printed on the SSH terminal where you are runningthe scripts It could take an hour to couple hours (max) to complete
Is the deployment done successfully
Once juju-deployer is complete use juju status to verify that all deployed unit are in the ready state
26 Chapter 3 Installer Configuration
OPNFV Configuration Guide Release brahmaputra30 (605ebda)
juju status --format tabular
Find the Openstack-dashboard IP address from the juju status output and see if you can log in via browser Theusername and password is adminopenstack
Optionall see if you can log in Juju GUI Juju GUI is on the Juju bootstrap node which is the second VM you definein the 02-maasdeploysh The username and password is adminadmin
If you deploy ODL OpenContrail or ONOS find the IP address of the web UI and login Please refer to each SDNbundleyaml for usernamepassword
Troubleshoot
To access to any deployed units juju ssh for example to login into nova-compute unit and look for varlogjujuunit-ltof interestgt for more info
juju ssh nova-compute0
Example
ubuntuR4N4B1~$ juju ssh nova-compute0
Warning Permanently added rsquo172165060rsquo (ECDSA) to the list of knownhosts
Warning Permanently added rsquo3-r4n3b1-computemaasrsquo (ECDSA) to the list ofknown hosts
Welcome to Ubuntu 14041 LTS (GNULinux 3130-77-generic x86_64)
Documentation httpshelpubuntucom
ltskippedgt
Last login Tue Feb 2 212356 2016 from bootstrapmaas
ubuntu3-R4N3B1-compute~$ sudo -i
root3-R4N3B1-compute~ cd varlogjuju
root3-R4N3B1-computevarlogjuju ls
machine-2log unit-ceilometer-agent-0log unit-ceph-osd-0logunit-neutron-contrail-0log unit-nodes-compute-0log unit-nova-compute-0logunit-ntp-0log
root3-R4N3B1-computevarlogjuju
By default juju will add the Ubuntu user keys for authentication into the deployed server and only ssh accesswill be available
Once you resolve the error go back to the jump host to rerun the charm hook with
juju resolved --retry ltunitgt
35 JOID Configuration 27
OPNFV Configuration Guide Release brahmaputra30 (605ebda)
28 Chapter 3 Installer Configuration
CHAPTER
FOUR
FEATURE CONFIGURATION
The following sections describe the configuration options for specific platform features provided in BrahmaputraFurther details for each feature are captured in the referred project documentation
41 Copper configuration
This release focused on use of the OpenStack Congress service for managing configuration policy The Congress installprocedure described here is largely manual This procedure as well as the longer-term goal of automated installersupport is a work in progress The procedure is further specific to one OPNFV installer (JOID ie MAASJuJu)based environment Support for other OPNFV installer deployed environments is also a work in progress
411 Pre-configuration activities
This procedure assumes OPNFV has been installed via the JOID installer
412 Hardware configuration
There is no specific hardware configuration required for the Copper project
413 Feature configuration
Following are instructions for installing Congress on an Ubuntu 1404 LXC container in the OPNFV Controller nodeas installed by the JOID installer This guide uses instructions from the Congress intro guide on readthedocs Specificvalues below will need to be modified if you intend to repeat this procedure in your JOID-based install environment
Install Procedure
The install currently occurs via four bash scripts provided in the copper repo See these files for the detailed steps
bull install_congress_1sh creates and starts the linux container for congress on the controller node copiesinstall_congress_2sh to the controller node and invokes it via ssh
bull install_congress_2sh installs congress on the congress server
29
OPNFV Configuration Guide Release brahmaputra30 (605ebda)
Cleanup Procedure
If there is an error during installation use the bash script clean_congresssh which stops the congress server if runningand removes the congress user and service from the controller database
Restarting after server power loss etc
Currently this install procedure is manual Automated install and restoral after host recovery is TBD For now thisprocedure will get the Congress service running again
On jumphost SSH to Congress serversource ~envshjuju ssh ubuntu$CONGRESS_HOST If that fails
On jumphost SSH to controller nodejuju ssh ubuntunode1-control Start the Congress containersudo lxc-start -n juju-trusty-congress -d Verify the Congress container statussudo lxc-ls -f juju-trusty-congressNAME STATE IPV4 IPV6 GROUPS AUTOSTART----------------------------------------------------------------------juju-trusty-congress RUNNING 19216810117 - - NO exit back to the Jumphost wait a minute and go back to the SSH to Congress server step above
On the Congress server that you have logged intosource ~admin-openrcshcd ~gitcongresssource binactivatebincongress-server ampdisown -h 1
42 Doctor Configuration
421 Doctor Inspector
Doctor Inspector is suggested to be placed in one of the controller nodes but it can be put on any host where DoctorMonitor can reach and accessible to the OpenStack Controller (Nova)
Make sure OpenStack env parameters are set properly so that Doctor Inspector can issue admin actions such ascompute host force-down and state update of VM
Then you can configure Doctor Inspector as follows
git clone httpsgerritopnfvorggerritdoctor -b stablebrahmaputracd doctortestsINSPECTOR_PORT=12345python inspectorpy $INSPECTOR_PORT gt inspectorlog 2gtamp1 amp
422 Doctor Monitor
Doctor Monitors are suggested to be placed in one of the controller nodes but those can be put on any host whichis reachable to target compute host and accessible to the Doctor Inspector You need to configure Monitors for allcompute hosts one by one
30 Chapter 4 Feature Configuration
OPNFV Configuration Guide Release brahmaputra30 (605ebda)
Make sure OpenStack env parameters are set properly so that Doctor Inspector can issue admin actions such ascompute host force-down and state update of VM
Then you can configure Doctor Monitor as follows
git clone httpsgerritopnfvorggerritdoctor -b stablebrahmaputracd doctortestsINSPECTOR_PORT=12345COMPUTE_HOST=overcloud-novacompute-0sudo python monitorpy $COMPUTE_HOST
http127001$INSPECTOR_PORTevents gt monitorlog 2gtamp1 amp
43 IPv6 Configuration - Setting Up a Service VM as an IPv6 vRouter
This section provides instructions to set up a service VM as an IPv6 vRouter using OPNFV Brahmaputra Releaseinstallers The environment may be pure OpenStack option or Open Daylight L2-only option The deployment modelmay be HA or non-HA The infrastructure may be bare metal or virtual environment
For complete instructions and documentations of setting up service VM as an IPv6 vRouter using ANY method pleaserefer to
1 IPv6 Configuration Guide (HTML) httpartifactsopnfvorgipv6docssetupservicevmindexhtml
2 IPv6 User Guide (HTML) httpartifactsopnfvorgipv6docsgapanalysisindexhtml
431 Pre-configuration Activities
The configuration will work in 2 environments
1 OpenStack-only environment
2 OpenStack with Open Daylight L2-only environment
Depending on which installer will be used to deploy OPNFV each environment may be deployed on bare metal orvirtualized infrastructure Each deployment may be HA or non-HA
Refer to the previous installer configuration chapters installations guide and release notes
432 Setup Manual in OpenStack-Only Environment
If you intend to set up a service VM as an IPv6 vRouter in OpenStack-only environment of OPNFV BrahmaputraRelease please NOTE that
bull Because the anti-spoofing rules of Security Group feature in OpenStack prevents a VM from forwarding packetswe need to disable Security Group feature in the OpenStack-only environment
bull The hostnames IP addresses and username are for exemplary purpose in instructions Please change as neededto fit your environment
bull The instructions apply to both deployment model of single controller node and HA (High Availability) deploy-ment model where multiple controller nodes are used
43 IPv6 Configuration - Setting Up a Service VM as an IPv6 vRouter 31
OPNFV Configuration Guide Release brahmaputra30 (605ebda)
Install OPNFV and Preparation
OPNFV-NATIVE-INSTALL-1 To install OpenStack-only environment of OPNFV Brahmaputra Release
Apex Installer
HA deployment in OpenStack-only environmentopnfv-deploy -d etcopnfv-apexos-nosdn-nofeature-hayaml
Non-HA deployment in OpenStack-only environment Non-HA deployment is currently not supported by Apex installer
Compass Installer
HA deployment in OpenStack-only environmentexport ISO_URL=file$BUILD_DIRECTORYcompassisoexport OS_VERSION=$COMPASS_OS_VERSIONexport OPENSTACK_VERSION=$COMPASS_OPENSTACK_VERSIONexport CONFDIR=$WORKSPACEdeployconfvm_environmentdeploysh --dha $CONFDIRos-nosdn-nofeature-hayml --network $CONFDIR$NODE_NAMEnetworkyml
Non-HA deployment in OpenStack-only environment Non-HA deployment is currently not supported by Compass installer
Fuel Installer
HA deployment in OpenStack-only environmentdeploysh -s os-nosdn-nofeature-ha
Non-HA deployment in OpenStack-only environmentdeploysh -s os-nosdn-nofeature-noha
Joid Installer
HA deployment in OpenStack-only environmentdeploysh -o liberty -s nosdn -t ha -l default -f ipv6
Non-HA deployment in OpenStack-only environmentdeploysh -o liberty -s nosdn -t nonha -l default -f ipv6
Please NOTE that
bull You need to refer to installerrsquos documentation for other necessary parameters applicable to your deployment
bull You need to refer to Release Notes and installerrsquos documentation if there is any issue in installation
OPNFV-NATIVE-INSTALL-2 Clone the following GitHub repository to get the configuration and metadata files
git clone httpsgithubcomsridhargaddamopnfv_os_ipv6_pocgit optstackopnfv_os_ipv6_poc
Disable Security Groups in OpenStack ML2 Setup
OPNFV-NATIVE-SEC-1 Change the settings in etcneutronpluginsml2ml2_confini as follows
etcneutronpluginsml2ml2_confini[securitygroup]extension_drivers = port_security
32 Chapter 4 Feature Configuration
OPNFV Configuration Guide Release brahmaputra30 (605ebda)
enable_security_group = Falsefirewall_driver = neutronagentfirewallNoopFirewallDriver
OPNFV-NATIVE-SEC-2 Change the settings in etcnovanovaconf as follows
etcnovanovaconf[DEFAULT]security_group_api = novafirewall_driver = novavirtfirewallNoopFirewallDriver
OPNFV-NATIVE-SEC-3 After updating the settings you will have to restart the Neutron and Nova services
Please note that the commands of restarting Neutron and Nova would vary depending on the installer Pleaserefer to relevant documentation of specific installers
Set Up Service VM as IPv6 vRouter
OPNFV-NATIVE-SETUP-1 Now we assume that OpenStack multi-node setup is up and running We have to sourcethe tenant credentials in this step Please NOTE that the method of sourcing tenant credentials may vary dependingon installers For example
Apex installer
source the tenant credentials using Apex installer of OPNFV you need to copy the file homestackovercloudrc from the installer VM called instack to a location in controller node for example in the directory optsource optovercloudrc
Compass installer
source the tenant credentials using Compass installer of OPNFVsource optadmin-openrcsh
Fuel installer
source the tenant credentials using Fuel installer of OPNFVsource rootopenrc
Joid installer
source the tenant credentials using Joid installer of OPNFVsource $HOMEjoid_configadmin-openrc
devstack
source the tenant credentials in devstacksource openrc admin demo
Please refer to relevant documentation of installers if you encounter any issue
OPNFV-NATIVE-SETUP-2 Download fedora22 image which would be used for vRouter
wget httpsdownloadfedoraprojectorgpubfedoralinuxreleases22Cloudx86_64ImagesFedora-Cloud-Base-22-20150521x86_64qcow2
OPNFV-NATIVE-SETUP-3 Import Fedora22 image to glance
glance image-create --name Fedora22 --disk-format qcow2 --container-format bare --file Fedora-Cloud-Base-22-20150521x86_64qcow2
43 IPv6 Configuration - Setting Up a Service VM as an IPv6 vRouter 33
OPNFV Configuration Guide Release brahmaputra30 (605ebda)
OPNFV-NATIVE-SETUP-4 This step is Informational OPNFV Installer has taken care of this step duringdeployment You may refer to this step only if there is any issue or if you are using other installers
We have to move the physical interface (ie the public network interface) to br-ex including moving the publicIP address and setting up default route Please refer to OS-NATIVE-SETUP-4 and OS-NATIVE-SETUP-5 in ourmore complete instruction
OPNFV-NATIVE-SETUP-5 Create Neutron routers ipv4-router and ipv6-router which need to provideexternal connectivity
neutron router-create ipv4-routerneutron router-create ipv6-router
OPNFV-NATIVE-SETUP-6 Create an external networksubnet ext-net using the appropriate values based on thedata-center physical network setup
Please NOTE that you may only need to create the subnet of ext-net because OPNFV installers should have createdan external network during installation You must use the same name of external network that installer creates whenyou create the subnet For example
bull Apex installer external
bull Compass installer ext-net
bull Fuel installer net04_ext
bull Joid installer ext-net
Please refer to the documentation of installers if there is any issue
This is needed only if installer does not create an external work Otherwise skip this command net-createneutron net-create --routerexternal ext-net
Note that the name ext-net may work for some installers such as Compass and Joid Change the name ext-net to match the name of external network that an installer createsneutron subnet-create --disable-dhcp --allocation-pool start=19859156251end=19859156254 --gateway 198591561 ext-net 19859156024
OPNFV-NATIVE-SETUP-7 Create Neutron networks ipv4-int-network1 and ipv6-int-network2 withport_security disabled
neutron net-create --port_security_enabled=False ipv4-int-network1neutron net-create --port_security_enabled=False ipv6-int-network2
OPNFV-NATIVE-SETUP-8 Create IPv4 subnet ipv4-int-subnet1 in the internal networkipv4-int-network1 and associate it to ipv4-router
neutron subnet-create --name ipv4-int-subnet1 --dns-nameserver 8888 ipv4-int-network1 2000024
neutron router-interface-add ipv4-router ipv4-int-subnet1
OPNFV-NATIVE-SETUP-9 Associate the ext-net to the Neutron routers ipv4-router and ipv6-router
Note that the name ext-net may work for some installers such as Compass and Joid Change the name ext-net to match the name of external network that an installer createsneutron router-gateway-set ipv4-router ext-netneutron router-gateway-set ipv6-router ext-net
OPNFV-NATIVE-SETUP-10 Create two subnets one IPv4 subnet ipv4-int-subnet2 and one IPv6 subnetipv6-int-subnet2 in ipv6-int-network2 and associate both subnets to ipv6-router
34 Chapter 4 Feature Configuration
OPNFV Configuration Guide Release brahmaputra30 (605ebda)
neutron subnet-create --name ipv4-int-subnet2 --dns-nameserver 8888 ipv6-int-network2 1000024
neutron subnet-create --name ipv6-int-subnet2 --ip-version 6 --ipv6-ra-mode slaac --ipv6-address-mode slaac ipv6-int-network2 2001db80164
neutron router-interface-add ipv6-router ipv4-int-subnet2neutron router-interface-add ipv6-router ipv6-int-subnet2
OPNFV-NATIVE-SETUP-11 Create a keypair
nova keypair-add vRouterKey gt ~vRouterKey
OPNFV-NATIVE-SETUP-12 Create ports for vRouter (with some specific MAC address - basically for automation- to know the IPv6 addresses that would be assigned to the port)
neutron port-create --name eth0-vRouter --mac-address fa163e111111 ipv6-int-network2neutron port-create --name eth1-vRouter --mac-address fa163e222222 ipv4-int-network1
OPNFV-NATIVE-SETUP-13 Create ports for VM1 and VM2
neutron port-create --name eth0-VM1 --mac-address fa163e333333 ipv4-int-network1neutron port-create --name eth0-VM2 --mac-address fa163e444444 ipv4-int-network1
OPNFV-NATIVE-SETUP-14 Update ipv6-router with routing information to subnet 2001db80264
neutron router-update ipv6-router --routes type=dict list=true destination=2001db80264nexthop=2001db801f8163efffe111111
OPNFV-NATIVE-SETUP-15 Boot Service VM (vRouter) VM1 and VM2
nova boot --image Fedora22 --flavor m1small --user-data optstackopnfv_os_ipv6_pocmetadatatxt --availability-zone novaopnfv-os-compute --nic port-id=$(neutron port-list | grep -w eth0-vRouter | awk print $2) --nic port-id=$(neutron port-list | grep -w eth1-vRouter | awk print $2) --key-name vRouterKey vRouter
nova list
Please wait for some 10 to 15 minutes so that necessary packages (like radvd) are installed and vRouter is upnova console-log vRouter
nova boot --image cirros-034-x86_64-uec --flavor m1tiny --user-data optstackopnfv_os_ipv6_pocset_mtush --availability-zone novaopnfv-os-controller --nic port-id=$(neutron port-list | grep -w eth0-VM1 | awk print $2) --key-name vRouterKey VM1
nova boot --image cirros-034-x86_64-uec --flavor m1tiny--user-data optstackopnfv_os_ipv6_pocset_mtush --availability-zone novaopnfv-os-compute --nic port-id=$(neutron port-list | grep -w eth0-VM2 | awk print $2) --key-name vRouterKey VM2
nova list Verify that all the VMs are in ACTIVE state
OPNFV-NATIVE-SETUP-16 If all goes well the IPv6 addresses assigned to the VMs would be as shown as follows
43 IPv6 Configuration - Setting Up a Service VM as an IPv6 vRouter 35
OPNFV Configuration Guide Release brahmaputra30 (605ebda)
vRouter eth0 interface would have the following IPv6 address 2001db801f8163efffe11111164 vRouter eth1 interface would have the following IPv6 address 2001db802164 VM1 would have the following IPv6 address 2001db802f8163efffe33333364 VM2 would have the following IPv6 address 2001db802f8163efffe44444464
OPNFV-NATIVE-SETUP-17 Now we can SSH to VMs You can execute the following command
1 Create a floatingip and associate it with VM1 VM2 and vRouter (to the port id that is passed) Note that the name ext-net may work for some installers such as Compass and Joid Change the name ext-net to match the name of external network that an installer createsneutron floatingip-create --port-id $(neutron port-list | grep -w eth0-VM1 | awk print $2) ext-netneutron floatingip-create --port-id $(neutron port-list | grep -w eth0-VM2 | awk print $2) ext-netneutron floatingip-create --port-id $(neutron port-list | grep -w eth1-vRouter | awk print $2) ext-net
2 To know display the floatingip associated with VM1 VM2 and vRouterneutron floatingip-list -F floating_ip_address -F port_id | grep $(neutron port-list | grep -w eth0-VM1 | awk print $2) | awk print $2neutron floatingip-list -F floating_ip_address -F port_id | grep $(neutron port-list | grep -w eth0-VM2 | awk print $2) | awk print $2neutron floatingip-list -F floating_ip_address -F port_id | grep $(neutron port-list | grep -w eth1-vRouter | awk print $2) | awk print $2
3 To ssh to the vRouter VM1 and VM2 user can execute the following commandssh -i ~vRouterKey fedoraltfloating-ip-of-vRoutergtssh -i ~vRouterKey cirrosltfloating-ip-of-VM1gtssh -i ~vRouterKey cirrosltfloating-ip-of-VM2gt
433 Setup Manual in OpenStack with Open Daylight L2-Only Environment
If you intend to set up a service VM as an IPv6 vRouter in an environment of OpenStack and Open Daylight L2-onlyof OPNFV Brahmaputra Release please NOTE that
bull The hostnames IP addresses and username are for exemplary purpose in instructions Please change as neededto fit your environment
bull The instructions apply to both deployment model of single controller node and HA (High Availability) deploy-ment model where multiple controller nodes are used
bull However in case of HA when ipv6-router is created in step SETUP-SVM-11 it could be created in anyof the controller node Thus you need to identify in which controller node ipv6-router is created in orderto manually spawn radvd daemon inside the ipv6-router namespace in steps SETUP-SVM-24 throughSETUP-SVM-30
Install OPNFV and Preparation
OPNFV-INSTALL-1 To install OpenStack with Open Daylight L2-only environment of OPNFV Brahmaputra Re-lease
Apex Installer
36 Chapter 4 Feature Configuration
OPNFV Configuration Guide Release brahmaputra30 (605ebda)
HA deployment in OpenStack with Open Daylight L2-only environmentopnfv-deploy -d etcopnfv-apexos-odl_l2-nofeature-hayaml
Non-HA deployment in OpenStack with Open Daylight L2-only environment Non-HA deployment is currently not supported by Apex installer
Compass Installer
HA deployment in OpenStack with Open Daylight L2-only environmentexport ISO_URL=file$BUILD_DIRECTORYcompassisoexport OS_VERSION=$COMPASS_OS_VERSIONexport OPENSTACK_VERSION=$COMPASS_OPENSTACK_VERSIONexport CONFDIR=$WORKSPACEdeployconfvm_environmentdeploysh --dha $CONFDIRos-odl_l2-nofeature-hayml --network $CONFDIR$NODE_NAMEnetworkyml
Non-HA deployment in OpenStack with Open Daylight L2-only environment Non-HA deployment is currently not supported by Compass installer
Fuel Installer
HA deployment in OpenStack with Open Daylight L2-only environmentdeploysh -s os-odl_l2-nofeature-ha
Non-HA deployment in OpenStack with Open Daylight L2-only environmentdeploysh -s os-odl_l2-nofeature-noha
Joid Installer
HA deployment in OpenStack with Open Daylight L2-only environmentdeploysh -o liberty -s odl -t ha -l default -f ipv6
Non-HA deployment in OpenStack with Open Daylight L2-only environmentdeploysh -o liberty -s odl -t nonha -l default -f ipv6
Please NOTE that
bull You need to refer to installerrsquos documentation for other necessary parameters applicable to your deployment
bull You need to refer to Release Notes and installerrsquos documentation if there is any issue in installation
OPNFV-INSTALL-2 Clone the following GitHub repository to get the configuration and metadata files
git clone httpsgithubcomsridhargaddamopnfv_os_ipv6_pocgit optstackopnfv_os_ipv6_poc
Disable Security Groups in OpenStack ML2 Setup
Please NOTE that although Security Groups feature has been disabled automatically through localconf configu-ration file by some installers such as devstack it is very likely that other installers such as Apex Compass Fuelor Joid will enable Security Groups feature after installation
Please make sure that Security Groups are disabled in the setup
OPNFV-SEC-1 Change the settings in etcneutronpluginsml2ml2_confini as follows
etcneutronpluginsml2ml2_confini[securitygroup]enable_security_group = Falsefirewall_driver = neutronagentfirewallNoopFirewallDriver
43 IPv6 Configuration - Setting Up a Service VM as an IPv6 vRouter 37
OPNFV Configuration Guide Release brahmaputra30 (605ebda)
OPNFV-SEC-2 Change the settings in etcnovanovaconf as follows
etcnovanovaconf[DEFAULT]security_group_api = novafirewall_driver = novavirtfirewallNoopFirewallDriver
OPNFV-SEC-3 After updating the settings you will have to restart the Neutron and Nova services
Please note that the commands of restarting Neutron and Nova would vary depending on the installer Pleaserefer to relevant documentation of specific installers
Source the Credentials in OpenStack Controller Node
SETUP-SVM-1 Login in OpenStack Controller Node Start a new terminal and change directory to where Open-Stack is installed
SETUP-SVM-2 We have to source the tenant credentials in this step Please NOTE that the method of sourcingtenant credentials may vary depending on installers For example
Apex installer
source the tenant credentials using Apex installer of OPNFV you need to copy the file homestackovercloudrc from the installer VM called instack to a location in controller node for example in the directory optsource optovercloudrc
Compass installer
source the tenant credentials using Compass installer of OPNFVsource optadmin-openrcsh
Fuel installer
source the tenant credentials using Fuel installer of OPNFVsource rootopenrc
Joid installer
source the tenant credentials using Joid installer of OPNFVsource $HOMEjoid_configadmin-openrc
devstack
source the tenant credentials in devstacksource openrc admin demo
Please refer to relevant documentation of installers if you encounter any issue
Informational Note Move Public Network from Physical Network Interface to br-ex
SETUP-SVM-3 Move the physical interface (ie the public network interface) to br-ex
SETUP-SVM-4 Verify setup of br-ex
Those 2 steps are Informational OPNFV Installer has taken care of those 2 steps during deployment You mayrefer to this step only if there is any issue or if you are using other installers
38 Chapter 4 Feature Configuration
OPNFV Configuration Guide Release brahmaputra30 (605ebda)
We have to move the physical interface (ie the public network interface) to br-ex including moving the publicIP address and setting up default route Please refer to SETUP-SVM-3 and SETUP-SVM-4 in our more completeinstruction
Create IPv4 Subnet and Router with External Connectivity
SETUP-SVM-5 Create a Neutron router ipv4-router which needs to provide external connectivity
neutron router-create ipv4-router
SETUP-SVM-6 Create an external networksubnet ext-net using the appropriate values based on the data-centerphysical network setup
Please NOTE that you may only need to create the subnet of ext-net because OPNFV installers should have createdan external network during installation You must use the same name of external network that installer creates whenyou create the subnet For example
bull Apex installer external
bull Compass installer ext-net
bull Fuel installer net04_ext
bull Joid installer ext-net
Please refer to the documentation of installers if there is any issue
This is needed only if installer does not create an external work Otherwise skip this command net-createneutron net-create --routerexternal ext-net
Note that the name ext-net may work for some installers such as Compass and Joid Change the name ext-net to match the name of external network that an installer createsneutron subnet-create --disable-dhcp --allocation-pool start=19859156251end=19859156254 --gateway 198591561 ext-net 19859156024
Please note that the IP addresses in the command above are for exemplary purpose Please replace the IP addressesof your actual network
SETUP-SVM-7 Associate the ext-net to the Neutron router ipv4-router
Note that the name ext-net may work for some installers such as Compass and Joid Change the name ext-net to match the name of external network that an installer createsneutron router-gateway-set ipv4-router ext-net
SETUP-SVM-8 Create an internaltenant IPv4 network ipv4-int-network1
neutron net-create ipv4-int-network1
SETUP-SVM-9 Create an IPv4 subnet ipv4-int-subnet1 in the internal network ipv4-int-network1
neutron subnet-create --name ipv4-int-subnet1 --dns-nameserver 8888 ipv4-int-network1 2000024
SETUP-SVM-10 Associate the IPv4 internal subnet ipv4-int-subnet1 to the Neutron router ipv4-router
neutron router-interface-add ipv4-router ipv4-int-subnet1
43 IPv6 Configuration - Setting Up a Service VM as an IPv6 vRouter 39
OPNFV Configuration Guide Release brahmaputra30 (605ebda)
Create IPv6 Subnet and Router with External Connectivity
Now let us create a second neutron router where we can ldquomanuallyrdquo spawn a radvd daemon to simulate an externalIPv6 router
SETUP-SVM-11 Create a second Neutron router ipv6-router which needs to provide external connectivity
neutron router-create ipv6-router
SETUP-SVM-12 Associate the ext-net to the Neutron router ipv6-router
Note that the name ext-net may work for some installers such as Compass and Joid Change the name ext-net to match the name of external network that an installer createsneutron router-gateway-set ipv6-router ext-net
SETUP-SVM-13 Create a second internaltenant IPv4 network ipv4-int-network2
neutron net-create ipv4-int-network2
SETUP-SVM-14 Create an IPv4 subnet ipv4-int-subnet2 for the ipv6-router internal networkipv4-int-network2
neutron subnet-create --name ipv4-int-subnet2 --dns-nameserver 8888 ipv4-int-network2 1000024
SETUP-SVM-15 Associate the IPv4 internal subnet ipv4-int-subnet2 to the Neutron router ipv6-router
neutron router-interface-add ipv6-router ipv4-int-subnet2
Prepare Image Metadata and Keypair for Service VM
SETUP-SVM-16 Download fedora22 image which would be used as vRouter
wget httpsdownloadfedoraprojectorgpubfedoralinuxreleases22Cloudx86_64ImagesFedora-Cloud-Base-22-20150521x86_64qcow2
glance image-create --name Fedora22 --disk-format qcow2 --container-format bare --file Fedora-Cloud-Base-22-20150521x86_64qcow2
SETUP-SVM-17 Create a keypair
nova keypair-add vRouterKey gt ~vRouterKey
SETUP-SVM-18 Create ports for vRouter and both the VMs with some specific MAC addresses
neutron port-create --name eth0-vRouter --mac-address fa163e111111 ipv4-int-network2neutron port-create --name eth1-vRouter --mac-address fa163e222222 ipv4-int-network1neutron port-create --name eth0-VM1 --mac-address fa163e333333 ipv4-int-network1neutron port-create --name eth0-VM2 --mac-address fa163e444444 ipv4-int-network1
Boot Service VM (vRouter) with eth0 on ipv4-int-network2 and eth1 on ipv4-int-network1
Let us boot the service VM (vRouter) with eth0 interface on ipv4-int-network2 connecting toipv6-router and eth1 interface on ipv4-int-network1 connecting to ipv4-router
SETUP-SVM-19 Boot the vRouter using Fedora22 image on the OpenStack Compute Node with hostnameopnfv-os-compute
40 Chapter 4 Feature Configuration
OPNFV Configuration Guide Release brahmaputra30 (605ebda)
nova boot --image Fedora22 --flavor m1small --user-data optstackopnfv_os_ipv6_pocmetadatatxt --availability-zone novaopnfv-os-compute --nic port-id=$(neutron port-list | grep -w eth0-vRouter | awk print $2) --nic port-id=$(neutron port-list | grep -w eth1-vRouter | awk print $2) --key-name vRouterKey vRouter
Please note that optstackopnfv_os_ipv6_pocmetadatatxt is used to enable the vRouter to au-tomatically spawn a radvd and
bull Act as an IPv6 vRouter which advertises the RA (Router Advertisements) with prefix 2001db80264on its internal interface (eth1)
bull Forward IPv6 traffic from internal interface (eth1)
SETUP-SVM-20 Verify that Fedora22 image boots up successfully and vRouter has ssh keys properly injected
nova listnova console-log vRouter
Please note that it may take a few minutes for the necessary packages to get installed and ssh keys to be injected
Sample Output[ 762884523] cloud-init[871] ec2 [ 762909634] cloud-init[871] ec2 -----BEGIN SSH HOST KEY FINGERPRINTS-----[ 762931626] cloud-init[871] ec2 2048 e3dc3d4abcb6b07775a170a3d02a47a9 (RSA)[ 762957380] cloud-init[871] ec2 -----END SSH HOST KEY FINGERPRINTS-----[ 762979554] cloud-init[871] ec2
Boot Two Other VMs in ipv4-int-network1
In order to verify that the setup is working let us create two cirros VMs with eth1 interface on theipv4-int-network1 ie connecting to vRouter eth1 interface for internal network
We will have to configure appropriate mtu on the VMsrsquo interface by taking into account the tunneling overhead andany physical switch requirements If so push the mtu to the VM either using dhcp options or via meta-data
SETUP-SVM-21 Create VM1 on OpenStack Controller Node with hostname opnfv-os-controller
nova boot --image cirros-034-x86_64-uec --flavor m1tiny --user-data optstackopnfv_os_ipv6_pocset_mtush --availability-zone novaopnfv-os-controller --nic port-id=$(neutron port-list | grep -w eth0-VM1 | awk print $2) --key-name vRouterKey VM1
SETUP-SVM-22 Create VM2 on OpenStack Compute Node with hostname opnfv-os-compute
nova boot --image cirros-034-x86_64-uec --flavor m1tiny --user-data optstackopnfv_os_ipv6_pocset_mtush --availability-zone novaopnfv-os-compute --nic port-id=$(neutron port-list | grep -w eth0-VM2 | awk print $2) --key-name vRouterKey VM2
SETUP-SVM-23 Confirm that both the VMs are successfully booted
nova listnova console-log VM1nova console-log VM2
43 IPv6 Configuration - Setting Up a Service VM as an IPv6 vRouter 41
OPNFV Configuration Guide Release brahmaputra30 (605ebda)
Spawn RADVD in ipv6-router
Let us manually spawn a radvd daemon inside ipv6-router namespace to simulate an external router First ofall we will have to identify the ipv6-router namespace and move to the namespace
Please NOTE that in case of HA (High Availability) deployment model where multiple controller nodes are usedipv6-router created in step SETUP-SVM-11 could be in any of the controller node Thus you need to iden-tify in which controller node ipv6-router is created in order to manually spawn radvd daemon inside theipv6-router namespace in steps SETUP-SVM-24 through SETUP-SVM-30 The following command in Neu-tron will display the controller on which the ipv6-router is spawned
neutron l3-agent-list-hosting-router ipv6-router
Then you login to that controller and execute steps SETUP-SVM-24 through SETUP-SVM-30
SETUP-SVM-24 identify the ipv6-router namespace and move to the namespace
sudo ip netns exec qrouter-$(neutron router-list | grep -w ipv6-router | awk print $2) bash
SETUP-SVM-25 Upon successful execution of the above command you will be in the router namespace Now letus configure the IPv6 address on the ltqr-xxxgt interface
export router_interface=$(ip a s | grep -w global qr- | awk print $7)ip -6 addr add 2001db8011 dev $router_interface
SETUP-SVM-26 Update the sample file optstackopnfv_os_ipv6_pocscenario2radvdconfwith $router_interface
cp optstackopnfv_os_ipv6_pocscenario2radvdconf tmpradvd$router_interfaceconfsed -i s$router_interface$router_interfaceg tmpradvd$router_interfaceconf
SETUP-SVM-27 Spawn a radvd daemon to simulate an external router This radvd daemon advertises an IPv6subnet prefix of 2001db80164 using RA (Router Advertisement) on its $router_interface so that eth0interface of vRouter automatically configures an IPv6 SLAAC address
$radvd -C tmpradvd$router_interfaceconf -p tmpbr-expidradvd -m syslog
SETUP-SVM-28 Add an IPv6 downstream route pointing to the eth0 interface of vRouter
ip -6 route add 2001db80264 via 2001db801f8163efffe111111
SETUP-SVM-29 The routing table should now look similar to something shown below
ip -6 route show2001db8011 dev qr-42968b9e-62 proto kernel metric 2562001db80164 dev qr-42968b9e-62 proto kernel metric 256 expires 86384sec2001db80264 via 2001db801f8163efffe111111 dev qr-42968b9e-62 proto ra metric 1024 expires 29secfe8064 dev qg-3736e0c7-7c proto kernel metric 256fe8064 dev qr-42968b9e-62 proto kernel metric 256
SETUP-SVM-30 If all goes well the IPv6 addresses assigned to the VMs would be as shown as follows
vRouter eth0 interface would have the following IPv6 address 2001db801f8163efffe11111164 vRouter eth1 interface would have the following IPv6 address 2001db802164 VM1 would have the following IPv6 address 2001db802f8163efffe33333364 VM2 would have the following IPv6 address 2001db802f8163efffe44444464
42 Chapter 4 Feature Configuration
OPNFV Configuration Guide Release brahmaputra30 (605ebda)
Testing to Verify Setup Complete
Now let us SSH to those VMs eg VM1 and or VM2 and or vRouter to confirm that it has successfully configuredthe IPv6 address using SLAAC with prefix 2001db80264 from vRouter
We use floatingip mechanism to achieve SSH
SETUP-SVM-31 Now we can SSH to VMs You can execute the following command
1 Create a floatingip and associate it with VM1 VM2 and vRouter (to the port id that is passed) Note that the name ext-net may work for some installers such as Compass and Joid Change the name ext-net to match the name of external network that an installer createsneutron floatingip-create --port-id $(neutron port-list | grep -w eth0-VM1 | awk print $2) ext-netneutron floatingip-create --port-id $(neutron port-list | grep -w eth0-VM2 | awk print $2) ext-netneutron floatingip-create --port-id $(neutron port-list | grep -w eth1-vRouter | awk print $2) ext-net
2 To know display the floatingip associated with VM1 VM2 and vRouterneutron floatingip-list -F floating_ip_address -F port_id | grep $(neutron port-list | grep -w eth0-VM1 | awk print $2) | awk print $2neutron floatingip-list -F floating_ip_address -F port_id | grep $(neutron port-list | grep -w eth0-VM2 | awk print $2) | awk print $2neutron floatingip-list -F floating_ip_address -F port_id | grep $(neutron port-list | grep -w eth1-vRouter | awk print $2) | awk print $2
3 To ssh to the vRouter VM1 and VM2 user can execute the following commandssh -i ~vRouterKey fedoraltfloating-ip-of-vRoutergtssh -i ~vRouterKey cirrosltfloating-ip-of-VM1gtssh -i ~vRouterKey cirrosltfloating-ip-of-VM2gt
If everything goes well ssh will be successful and you will be logged into those VMs Run some commands to verifythat IPv6 addresses are configured on eth0 interface
SETUP-SVM-32 Show an IPv6 address with a prefix of 2001db80264
ip address show
SETUP-SVM-33 ping some external IPv6 address eg ipv6-router
ping6 2001db8011
If the above ping6 command succeeds it implies that vRouter was able to successfully forward the IPv6 traffic toreach external ipv6-router
44 Installing OVSNFV Fuel Plugin
bull On the Fuel UI create a new environment
bull In Settings gt Userspace OVS support check ldquoUserspace OVS supportrdquo
bull Continue with environment configuration and deployment as normal
441 Upgrading the plugin
From time to time new versions of the plugin may become available
44 Installing OVSNFV Fuel Plugin 43
OPNFV Configuration Guide Release brahmaputra30 (605ebda)
The plugin cannot be upgraded if an active environment is using the plugin
In order to upgrade the plugin
bull Copy the updated plugin file to the fuel-master
bull On the Fuel UI reset the environment
bull On the Fuel CLI ldquofuel plugins ndashupdate ltfuel-plugin-filegtrdquo
bull On the Fuel UI re-deploy the environment
45 Promise Feature Configuration Overview
451 Promise installation
Install nodejs npm and promise
curl -sL httpsdebnodesourcecomsetup_4x | sudo -E bash -sudo apt-get install -y nodejssudo npm -g install npmlatestgit clone httpsgithubcomopnfvpromisegitcd promisenpm install
Please note that the last command lsquonpm installrsquo will install all needed dependencies for promise (including yangforgeand mocha)
452 Testing
Please perform the following preparation steps
1 Set OpenStack environment parameters properly (eg source openrc admin demo in DevStack)
2 Create OpenStack tenant (eg promise) and tenant user (eg promiser)
3 Create a flavor in Nova with 1 vCPU and 512 MB RAM
4 Create a private network subnet and router in Neutron
5 Create an image in Glance
Once done the promise test script can be invoked as follows (as a single line command)
NODE_ENV=mytest OS_TENANT_NAME=promise OS_USERNAME=promiser OS_PASSWORD=ltuser password from Step 2gt OS_TEST_FLAVOR=ltflavor ID from Step 3gt OS_TEST_NETWORK=ltnetwork ID from Step 4gt OS_TEST_IMAGE=ltimage ID from Step 5gt npm run -s test -- --reporter json gt promise-resultsjson
The results of the tests will be stored in the promise-resultsjson file
The results can also be seen in the console (ldquonpm run -s testrdquo)
All 33 tests passing Congratulations promise has been successfully installed and configured
44 Chapter 4 Feature Configuration
OPNFV Configuration Guide Release brahmaputra30 (605ebda)
45 Promise Feature Configuration Overview 45
OPNFV Configuration Guide Release brahmaputra30 (605ebda)
46 Configuring SDNVPN features
Fuel installer configuration
In order to install the BGPVPN feature the corresponding checkbox in Fuel has to be selected This will triggerinstallation of the OpenStack BGPVPN API extension for Neutron (set up for using the ODL driver)
In addition ODL has to be installed see the corresponding section in the respective installer documentation on how toinstall ODL If the BGPVPN feature is installed ODL will automatically be installed with VPN Service karaf featureactivated
No post-deploy configuration is necessary The Fuel BGPVPN plugin and the ODL plugin should set up the clusterready for BGPVPNs being created This includes the set-up of internal VxLAN transport tunnels between computenodes
No post-configuration activities are required
46 Chapter 4 Feature Configuration
CHAPTER
FIVE
POST CONFIGURATION ACTIVITIES
Once you have deployed and configured your scenario and features you should validate the state of the system usingthe following guides
51 Scenario validation activities
The following guides provide information on how to validate the installation of you scenario based on the tools andtest suites available for the installation tool you have selected
511 Fuel post installation procedures
Automated post installation activities
Fuel provides a fairly broad coverage of built in automated health checks These validate the installation in terms ofconfiguration services networking storage policies etc The execution of the full range of health checks takes lessthan 30 minutes
For instructions on how to run health-checks please read the Fuel installation instructions
Platform components validation
Consult the feature sections in this document for any post-install feature specific validationhealth-checks
512 JOID post installation procedures
Configure OpenStack
In each SDN directory for example joidciopencontrail there is a folder for Juju deployer where you can find thecharm bundle yaml files that the deploysh uses to deploy
In the same directory there is scripts folder where you can find shell scripts to help you configure the OpenStackcloud that you just deployed These scripts are created to help you configure a basic OpenStack Cloud to verify thecloud For more info on OpenStack Cloud configuration please refer to the OpenStack Cloud Administrator Guideon docsopenstackorg Similarly for complete SDN configuration please refer to the respective SDN adminstratorguide
Each SDN solution requires slightly different setup please refer to the README in each SDN folder Most likelyyou will need to modify the openstacksh and cloud-setupsh scripts for the floating IP range private IP network andSSH keys Please go through openstacksh glancesh and cloud-setupsh and make changes as you see fit
47
OPNFV Configuration Guide Release brahmaputra30 (605ebda)
52 Feature validation activities
The following sections provide information on how to validate the features you have installed in your scenario
521 Copper post installation procedures
This release focused on use of the OpenStack Congress service for managing configuration policy The Congressinstall verify procedure described here is largely manual This procedure as well as the longer-term goal of automatedverification support is a work in progress The procedure is further specific to one OPNFV installer (JOID ieMAASJuJu) based environment
Automated post installation activities
No automated procedures are provided at this time
Copper post configuration procedures
No configuration procedures are required beyond the basic install procedure
Platform components validation
Following are notes on creating a container as test driver for Congress This is based upon an Ubuntu host as installedby JOID
Create and Activate the Container
On the jumphost
sudo lxc-create -n trusty-copper -t usrsharelxctemplateslxc-ubuntu -- -b ubuntu ~opnfvsudo lxc-start -n trusty-copper -dsudo lxc-info --name trusty-copper(typical output)Name trusty-copperState RUNNINGPID 4563IP 100344CPU use 2877 secondsBlkIO use 52279 MiBMemory use 55975 MiBKMem use 0 bytesLink vethDMFOANTX bytes 262 MiBRX bytes 8848 MiBTotal bytes 9110 MiB
Login and configure the test server
48 Chapter 5 Post Configuration Activities
OPNFV Configuration Guide Release brahmaputra30 (605ebda)
ssh ubuntu100344sudo apt-get updatesudo apt-get upgrade -y
Install pipsudo apt-get install python-pip -y
Install javasudo apt-get install default-jre -y
Install other dependenciessudo apt-get install git gcc python-dev libxml2 libxslt1-dev libzip-dev php5-curl -y
Setup OpenStack environment variables per your OPNFV installexport CONGRESS_HOST=19216810117export KEYSTONE_HOST=19216810108export CEILOMETER_HOST=19216810105export CINDER_HOST=19216810101export GLANCE_HOST=19216810106export HEAT_HOST=19216810107export NEUTRON_HOST=19216810111export NOVA_HOST=19216810112source ~admin-openrcsh
Install and test OpenStack clientmkdir ~gitcd gitgit clone httpsgithubcomopenstackpython-openstackclientgitcd python-openstackclientgit checkout stablelibertysudo pip install -r requirementstxtsudo python setuppy installopenstack service list(typical output)+----------------------------------+------------+----------------+| ID | Name | Type |+----------------------------------+------------+----------------+| 2f8799ae50f24c928c021fabf8a50f5f | keystone | identity || 351b13f56d9a4e25849406ec1d5a2726 | cinder | volume || 5129510c3143454f9ba8ec7e6735e267 | cinderv2 | volumev2 || 5ee1e220460f41dea9be06921400ce9b | congress | policy || 78e73a7789a14f56a5d248a0cd141201 | quantum | network || 9d5a00fb475a45b2ae6767528299ed6b | ceilometer | metering || 9e4b1624ef0b434abc0b82f607c5045c | heat | orchestration || b6c01ceb5023442d9f394b83f2a18e01 | heat-cfn | cloudformation || ba6199e3505045ad87e2a7175bd0c57f | glance | image || d753f304a0d541dbb989780ae70328a8 | nova | compute |+----------------------------------+------------+----------------+
Install and test Congress clientcd ~gitgit clone httpsgithubcomopenstackpython-congressclientgitcd python-congressclientgit checkout stablelibertysudo pip install -r requirementstxtsudo python setuppy installopenstack congress driver list(typical output)+------------+--------------------------------------------------------------------------+| id | description |+------------+--------------------------------------------------------------------------+| ceilometer | Datasource driver that interfaces with ceilometer || neutronv2 | Datasource driver that interfaces with OpenStack Networking aka Neutron || nova | Datasource driver that interfaces with OpenStack Compute aka nova || keystone | Datasource driver that interfaces with keystone || cinder | Datasource driver that interfaces with OpenStack cinder || glancev2 | Datasource driver that interfaces with OpenStack Images aka Glance |+------------+--------------------------------------------------------------------------+
Install and test Glance clientcd ~gitgit clone httpsgithubcomopenstackpython-glanceclientgitcd python-glanceclientgit checkout stablelibertysudo pip install -r requirementstxtsudo python setuppy installglance image-list(typical output)+--------------------------------------+---------------------+| ID | Name |+--------------------------------------+---------------------+| 6ce4433e-65c0-4cd8-958d-b06e30c76241 | cirros-033-x86_64 |+--------------------------------------+---------------------+
Install and test Neutron clientcd ~gitgit clone httpsgithubcomopenstackpython-neutronclientgitcd python-neutronclientgit checkout stablelibertysudo pip install -r requirementstxtsudo python setuppy installneutron net-list(typical output)+--------------------------------------+----------+------------------------------------------------------+| id | name | subnets |+--------------------------------------+----------+------------------------------------------------------+| dc6227df-af41-439f-bd2c-c2c2f0fe7fc5 | public | 5745846c-dd79-4900-a7da-bf506348ceac 19216810024 || a3f9f13a-5de9-4d3b-98c8-d2e40a2ef8e9 | internal | 5e0be862-90da-44ab-af43-56d5c65aa049 1000024 |+--------------------------------------+----------+------------------------------------------------------+
Install and test Nova clientcd ~gitgit clone httpsgithubcomopenstackpython-novaclientgitcd python-novaclientgit checkout stablelibertysudo pip install -r requirementstxtsudo python setuppy installnova hypervisor-list(typical output)+----+---------------------+-------+---------+| ID | Hypervisor hostname | State | Status |+----+---------------------+-------+---------+| 1 | compute1maas | up | enabled |+----+---------------------+-------+---------+
Install and test Keystone clientcd ~gitgit clone httpsgithubcomopenstackpython-keystoneclientgitcd python-keystoneclientgit checkout stablelibertysudo pip install -r requirementstxtsudo python setuppy install
52 Feature validation activities 49
OPNFV Configuration Guide Release brahmaputra30 (605ebda)
Setup the Congress Test Webapp
Clone Copper (if not already cloned in user home)cd ~gitif [ -d ~gitcopper ] then git clone httpsgerritopnfvorggerritcopper fi
Copy the Apache configsudo cp ~gitcoppercomponentscongresstest-webappwwwubuntu-apache2conf etcapache2apache2conf
Point proxyphp to the Congress server per your installsed -i -- s19216810117$CONGRESS_HOSTg ~gitcoppercomponentscongresstest-webappwwwhtmlproxyindexphp
Copy the webapp to the Apache root directory and fix permissionssudo cp -R ~gitcoppercomponentscongresstest-webappwwwhtml varwwwsudo chmod 755 varwwwhtml -R
Make webapp log directory and set permissionsmkdir ~logschmod 777 ~logs
Restart Apachesudo service apache2 restart
Using the Test Webapp
Browse to the trusty-copper server IP address
Interactive options are meant to be self-explanatory given a basic familiarity with the Congress service and data modelBut the app will be developed with additional features and UI elements
522 IPv6 Post Installation Procedures
Congratulations you have completed the setup of using a service VM to act as an IPv6 vRouter You have validatedthe setup based on the instruction in previous sections If you want to further test your setup you can ping6 amongVM1 VM2 vRouter and ipv6-router
This setup allows further open innovation by any 3rd-party For more instructions and documentations please refer to
1 IPv6 Configuration Guide (HTML) httpartifactsopnfvorgipv6docssetupservicevmindexhtml
2 IPv6 User Guide (HTML) httpartifactsopnfvorgipv6docsgapanalysisindexhtml
Automated post installation activities
Refer to the relevant testing guides results and release notes of Yardstick Project
53 Additional testing and validation activities
Many of our testing tools can be manually installed to facilitate targeted testing of features and capabilities of yourscenario The following guides provide instruction on setting up these testing suites
50 Chapter 5 Post Configuration Activities
OPNFV Configuration Guide Release brahmaputra30 (605ebda)
531 Overview of the functest suites
Functest is the OPNFV project primarily targeting function testing In the Continuous Integration pipeline it islaunched after an OPNFV fresh installation to validate and verify the basic functions of the infrastructure
The current list of test suites can be distributed in 3 main domains VIM (Virtualised Infrastructure Manager) Con-trollers and Features
Do-main
Testsuite
Comments
VIM
vPing NFV ldquoHello Worldrdquo using SSH connection and floatting IPvPing_userdataPing using userdata and cloud-init mechanismTempest OpenStack reference test suite [2]Rallybench
OpenStack testing tool benchmarking OpenStack modules [3]
ControllersOpen-Day-light
Opendaylight Test suite
ONOS Test suite of ONOS L2 and L3 functions See ONOSFW User Guide for details
Features
vIMS Example of a real VNF deployment to show the NFV capabilities of the platform The IPMultimedia Subsytem is a typical Telco test case referenced by ETSI It provides a fullyfunctional VoIP System
Promise Resource reservation and management project to identify NFV related requirements andrealize resource reservation for future usage by capacity management of resource poolsregarding compute network and storage See Promise User Guide for details
Doctor Doctor platform as of Brahmaputra release provides the two features ImmediateNotification Consistent resource state awareness (compute) see Doctor User Guide fordetails
SD-NVPN
Implementation of the OpenStack bgpvpn API from the SDNVPN feature project Itallowing the cration of BGP VPNs see SDNVPN User Guide for
Functest includes different test suites with several test cases within Some of the tests are developed by Functest teammembers whereas others are integrated from upstream communities or other OPNFV projects For example Tempestis the OpenStack integration test suite and Functest is in charge of the selection integration and automation of the teststhat fit in OPNFV
The Tempest suite has been customized but no new test cases have been created
The results produced by the tests run from CI are pushed and collected in a NoSQL database The goal is to populatethe database with results from different sources and scenarios and to show them on a Dashboard
There is no real notion of Test domain or Test coverage Basic components (VIM controllers) are tested through theirown suites Feature projects also provide their own test suites with different ways of running their tests
vIMS test case was integrated to demonstrate the capability to deploy a relatively complex NFV scenario on top of theOPNFV infrastructure
Functest considers OPNFV as a black box OPNFV since the Brahmaputra release offers lots of potential combina-tions
bull 2 controllers (OpenDayligh ONOS)
bull 4 installers (Apex Compass Fuel Joid)
Most of the tests are runnable on any combination but some others might have restrictions imposed by the installersor the available deployed features
53 Additional testing and validation activities 51
OPNFV Configuration Guide Release brahmaputra30 (605ebda)
Preparing the Docker container
Pull the Functest Docker image from the Docker hub
docker pull opnfvfunctestbrahmaputra10
Check that the image is available
docker images
Run the docker container giving the environment variables
bull INSTALLER_TYPE possible values are apex compass fuel or joid
bull INSTALLER_IP IP of the installer nodeVM
Functest may need to know the IP of the installer to retrieve automatically the credentials from the installer nodeVMor even from the actual controllers
The minimum command to create the Functest Docker container can be described as follows
docker run -it -e INSTALLER_IP=102002 -e INSTALLER_TYPE=fuel opnfvfunctestbrahmaputra10 binbash
Optionally it is possible to precise the container name through the option ndashname
docker run --name CONTAINER_NAME -it -e INSTALLER_IP=102002 -e INSTALLER_TYPE=fuel opnfvfunctestbrahmaputra10 binbash
It is also possible to to indicate the path of the OpenStack credentials using -v
docker run -it -e INSTALLER_IP=102002 -e INSTALLER_TYPE=fuel -v ltpath_to_your_local_creds_filegthomeopnfvfunctestconfopenstackcreds opnfvfunctestbrahmaputra10 binbash
The local file will be mounted in the container under homeopnfvfunctestconfopenstackcreds
If the intention is to run Functest against any of the supported OPNFV scenarios it is recommended to include alsothe environment variable DEPLOY_SCENARIO for example
docker run -it -e INSTALLER_IP=102002 -e INSTALLER_TYPE=fuel -e DEPLOY_SCENARIO=os-odl_l2-nofeature-ha opnfvfunctestbrahmaputra10 binbash
Inside the container the following directory structure should be in place
`-- home`-- opnfv
|-- functest| |-- conf| |-- data| `-- results`-- repos
|-- bgpvpn|-- doctor|-- functest|-- odl_integration|-- onos|-- promise|-- rally|-- releng`-- vims-test
Basically the container includes
bull Functest directory to store the configuration (the OpenStack creds are stored inhomeopngbfunctestconfopenstackcreds) the data (cirros image needed for some tests) results (sometemporary result logs may be stored here)
52 Chapter 5 Post Configuration Activities
OPNFV Configuration Guide Release brahmaputra30 (605ebda)
bull Repositories the functest repository will be used to prepare the environment and run the tests Other repositoriesare used for the installation of the needed tooling (eg rally) andor the retrieval of feature projects scenarios(eg promise)
The structure under the Functest repository can be described as follows
|-- INFO|-- LICENSE|-- commons| |-- ims| |-- mobile| `-- traffic-profile-guidelinesrst|-- docker| |-- Dockerfile| |-- commonsh| |-- prepare_envsh| |-- requirementspip| `-- run_testssh|-- docs| |-- configguide| |-- devguide| |-- images| |-- results| `-- userguide`-- testcases
|-- Controllers|-- features|-- tests|-- VIM|-- vIMS|-- vPing|-- __init__py|-- config_functestpy|-- config_functestyaml`-- functest_utilspy
We may distinguish 4 different folders
bull commons it is a folder dedicated to store traffic profile or any test inputs that could be reused by any test project
bull docker this folder includes the scripts that will be used to setup the environment and run the tests
bull docs this folder includes the user and installationconfiguration guide
bull testcases this folder includes the scripts required by Functest internal test cases and other feature projects testcases
After the run command a new prompt appears which means that we are inside the container and ready to move to thenext step
Useful Docker commands
When typing exit in the container prompt this will cause exiting the container and probably stopping it Whenstopping a running Docker container all the changes will be lost there is a keyboard shortcut to quit the containerwithout stopping it CTRL+P+Q To reconnect to the running container DO NOT use the run command again (sinceit will create a new container) use exec instead
53 Additional testing and validation activities 53
OPNFV Configuration Guide Release brahmaputra30 (605ebda)
docker psltcopy the container IDgtdocker exec -ti ltCONTAINER_IDgt binbash
or simply
docker exec -ti $(docker ps|grep functest|awk print $1) binbash
There are other useful Docker commands that might be needed to manage possible issues with the containers
List the running containers
docker ps
List all the containers including the stopped ones
docker ps -a
It is useful sometimes to remove a container if there are some problems
docker rm ltCONTAINER_IDgt
Use the -f option if the container is still running it will force to destroy it
docker -f rm ltCONTAINER_IDgt
The Docker image is called opnfvfunctest and it is stored in the public Docker registry under the OPNFV accountdockerhub The are many different tags that have been created automatically by the CI mechanisms but the one thatthis document refers to is brahmaputra10 Pulling other tags might cause some problems while running the tests
Check the Docker documentation dockerdocs for more information
Preparing the Functest environment
Once the docker container is up and running execute the following command in the prompt
$repos_dirfunctestdockerprepare_envsh
NOTE $repos_dir is a default environment variable inside the docker container which points to homeopnfvrepos
This script will make sure that the requirements to run the tests are met and will install the needed libraries and toolsby all Functest test cases It must be run only once every time the docker is started from sratch
Focus on the OpenStack credentials
The OpenStack credentials are needed to run the tests against the VIM There are 3 ways to provide them to Functest
bull using the -v option when running the Docker container
bull create an empty file in homeopnfvfunctestconfopenstackcreds and paste the credentials in it
bull automatically retrieved using the following script $repos_dirrelengutilsfetch_os_credssh
Once the credentials are there they shall be sourced before running the tests
source homeopnfvfunctestconfopenstackcreds
or simply using the environment variable creds
54 Chapter 5 Post Configuration Activities
OPNFV Configuration Guide Release brahmaputra30 (605ebda)
$creds
After this try to run any OpenStack command to see if you get any output for instance
openstack user list
This will return a list of the actual users in the OpenStack deployment In any other case check that the credentialsare sourced
env|grep OS_
This command must show a set of environment variables starting with OS_ for example
OS_REGION_NAME=RegionOneOS_DEFAULT_DOMAIN=defaultOS_PROJECT_NAME=adminOS_PASSWORD=adminOS_AUTH_STRATEGY=keystoneOS_AUTH_URL=http172301035000v20OS_USERNAME=adminOS_TENANT_NAME=adminOS_ENDPOINT_TYPE=internalURLOS_NO_CACHE=true
If still the OpenStack command does not show anything or complains about connectivity issues it could be due to anincorrect url given to the OS_AUTH_URL environment variable Check the deployment settings
SSL Support
If you need to connect to a server that is TLS-enabled (the auth URL begins with lsquohttpsrsquo) and it uses a certificate froma private CA or a self-signed certificate you will need to specify the path to an appropriate CA certificate to use tovalidate the server certificate with the environment variable OS_CACERT
echo $OS_CACERTetcsslcertscacrt
However this certificate does not exist in the container by default It has to be copied manually from the OpenStackdeployment This can be done in 2 ways
1 Create manually that file and copy the contents from the OpenStack controller
2 (recommended) Add the file using a Docker volume when starting the container
-v ltpath_to_your_cert_filegtetcsslcertscacert
You might need to export OS_CACERT environment variable inside the container
export OS_CACERT=etcsslcertscacrt
Certificate verification can be turned off using OS_INSECURE=true For example Fuel uses self-signed cacerts bydefault so an pre step would be
export OS_INSECURE=true
Additional Options
In case you need to provide different configuration parameters to Functest (eg commit IDs or branches for therepositories ) copy the config_functestyaml from the repository to your current directory and run the container
53 Additional testing and validation activities 55
OPNFV Configuration Guide Release brahmaputra30 (605ebda)
with a volume
wget httpsgitopnfvorgcgitfunctestplaintestcasesconfig_functestyaml
ltmodify the file accordinglygt
docker run -ti -e INSTALLER_TYPE=fuel -e INSTALLER_IP=102002 opnfvfunctestbrahmaputra10 -v $(pwd)config_functestyamlhomeopnfvfunctestconfconfig_functestyaml binbash
However this is not recommended since most of the test cases rely on static parameters read from this file andchanging them might cause problems
Proxy support
Functest needs internet access to download some resources for some test cases For example to install the Rallyenvironment This might not work properly if the Jumphost is running through a Proxy
If that is the case make sure the resolvconf and the needed proxy environment variables are properly set
export http_proxy=ltyour http proxy settingsgtexport https_proxy=ltyour https proxy settingsgt
Or refer to the official Docker documentation for Proxy settings
Before running prepare_envsh make sure you can ping http and https sites inside the container For example
nc -v googlecom 80Connection to googlecom 80 port [tcphttp] succeeded
nc -v googlecom 443Connection to googlecom 443 port [tcphttps] succeeded
532 Installing vswitchperf
Supported Operating Systems
bull CentOS 7
bull Fedora 20
bull Fedora 21
bull Fedora 22
bull Ubuntu 1404
Supported vSwitches
The vSwitch must support Open Flow 13 or greater
bull OVS (built from source)
bull OVS with DPDK (built from source)
56 Chapter 5 Post Configuration Activities
OPNFV Configuration Guide Release brahmaputra30 (605ebda)
Supported Hypervisors
bull Qemu version 23
Available VNFs
A simple VNF that forwards traffic through a VM using
bull DPDK testpmd
bull Linux Brigde
bull custom l2fwd module
The VM image can be downloaded from httpartifactsopnfvorgvswitchperfvloop-vnf-ubuntu-1404_20151216qcow2
Other Requirements
The test suite requires Python 33 and relies on a number of other packages These need to be installed for the testsuite to function
Installation of required packages preparation of Python 3 virtual environment and compilation of OVS DPDK andQEMU is performed by script systemsbuild_base_machinesh It should be executed under user account which willbe used for vsperf execution
Please Note Password-less sudo access must be configured for given user account before script is executed
Execution of installation script
$ cd systems$ build_base_machinesh
Please Note you donrsquot need to go into any of the systems subdirectories simply run the top levelbuild_base_machinesh your OS will be detected automatically
Script build_base_machinesh will install all the vsperf dependencies in terms of system packages Python 3x andrequired Python modules In case of CentOS 7 it will install Python 33 from an additional repository provided bySoftware Collections (a link) Installation script will also use virtualenv to create a vsperf virtual environment whichis isolated from the default Python environment This environment will reside in a directory called vsperfenv in$HOME
You will need to activate the virtual environment every time you start a new shell session Its activation is specific toyour OS
CentOS 7
$ scl enable python33 bash$ cd $HOMEvsperfenv$ source binactivate
Fedora and Ubuntu
$ cd $HOMEvsperfenv$ source binactivate
53 Additional testing and validation activities 57
OPNFV Configuration Guide Release brahmaputra30 (605ebda)
Working Behind a Proxy
If yoursquore behind a proxy yoursquoll likely want to configure this before running any of the above For example
export http_proxy=proxymycompanycom123export https_proxy=proxymycompanycom123
533 Yardstick
The projectrsquos goal is to verify infrastructure compliance from the perspective of a Virtual Network Function (VNF)
The Projectrsquos scope is the development of a test framework Yardstick test cases and test stimuli to enable NetworkFunction Virtualization Infrastructure (NFVI) verification
In OPNFV Brahmaputra release generic test cases covering aspects of the metrics in the document ETSI GS NFV-TST001 ldquoPre-deployment Testing Report on Validation of NFV Environments and Servicesrdquo are available furtherOPNFV releases will provide extended testing of these metrics
The Project also includes a sample VNF the Virtual Traffic Classifier (VTC) and its experimental frameworkApexLake
Yardstick is used in OPNFV for verifying the OPNFV infrastructure and some of the OPNFV features The Yardstickframework is deployed in several OPNFV community labs It is installer infrastructure and application independent
See also
This Presentation for an overview of Yardstick and Yardsticktst for material on alignment ETSI TST001 and Yardstick
Yardstick Installation
Abstract
Yardstick currently supports installation on Ubuntu 1404 or by using a Docker image Detailed steps about installingYardstick using both of these options can be found below
To use Yardstick you should have access to an OpenStack environment with at least Nova Neutron Glance Keystoneand Heat installed
The steps needed to run Yardstick are
1 Install Yardstick and create the test configuration yaml file
2 Build a guest image and load the image into the OpenStack environment
3 Create a Neutron external network and load OpenStack environment variables
4 Run the test case
Installing Yardstick on Ubuntu 1404
Installing Yardstick framework Install dependencies
sudo apt-get install python-virtualenv python-devsudo apt-get install libffi-dev libssl-dev git
Create a python virtual environment source it and update setuptools
58 Chapter 5 Post Configuration Activities
OPNFV Configuration Guide Release brahmaputra30 (605ebda)
virtualenv ~yardstick_venvsource ~yardstick_venvbinactivateeasy_install -U setuptools
Download source code and install python dependencies
git clone httpsgerritopnfvorggerrityardstickcd yardstickpython setuppy install
There is also a YouTube video showing the above steps
Installing extra tools
yardstick-plot Yardstick has an internal plotting tool yardstick-plot which can be installed using the follow-ing command
python setuppy develop easy_install yardstick[plot]
Building a guest image Yardstick has a tool for building an Ubuntu Cloud Server image containing all the requiredtools to run test cases supported by Yardstick It is necessary to have sudo rights to use this tool
This image can be built using the following command while in the directory where Yardstick is installed(~yardstick if the framework is installed by following the commands above)
sudo toolsyardstick-img-modify toolsubuntu-server-cloudimg-modifysh
Warning the script will create files by default in tmpworkspaceyardstick and the files will be owned byroot
The created image can be added to OpenStack using the glance image-create or via the OpenStack Dashboard
Example command
glance --os-image-api-version 1 image-create --name yardstick-trusty-server --is-public true --disk-format qcow2 --container-format bare --file tmpworkspaceyardstickyardstick-trusty-serverimg
Installing Yardstick using Docker
Yardstick has two Docker images first one (Yardstick-framework) serves as a replacement for installing the Yardstickframework in a virtual environment (for example as done in Installing Yardstick framework) while the other image ismostly for CI purposes (Yardstick-CI)
Yardstick-framework image Download the source code
git clone httpsgerritopnfvorggerrityardstick
Build the Docker image and tag it as yardstick-framework
cd yardstickdocker build -t yardstick-framework
Run the Docker instance
53 Additional testing and validation activities 59
OPNFV Configuration Guide Release brahmaputra30 (605ebda)
docker run --name yardstick_instance -i -t yardstick-framework
To build a guest image for Yardstick see Building a guest image
Yardstick-CI image Pull the Yardstick-CI Docker image from Docker hub
docker pull opnfvyardstick-ci
Run the Docker image
docker run --privileged=true --rm -t -e INSTALLER_TYPE=$INSTALLER_TYPE -e INSTALLER_IP=$INSTALLER_IP opnfvyardstick-ci run_benchmarks
Where $INSTALLER_TYPE can be fuel foreman or compass and $INSTALLER_IP is the installer masternode IP address (ie 102002 is default for fuel)
Basic steps performed by the Yardstick-CI container
1 clone yardstick and releng repos
2 setup OS credentials (releng scripts)
3 install yardstick and dependencies
4 build yardstick cloud image and upload it to glance
5 upload cirros-033 cloud image to glance
6 run yardstick test scenarios
7 cleanup
OpenStack parameters and credentials
Yardstick-flavor Most of the sample test cases in Yardstick are using an OpenStack flavor called yardstick-flavorwhich deviates from the OpenStack standard m1tiny flavor by the disk size - instead of 1GB it has 3GB Otherparameters are the same as in m1tiny
Environment variables Before running Yardstick it is necessary to export OpenStack environment vari-ables from the OpenStack openrc file (using the source command) and export the external network nameexport EXTERNAL_NETWORK=external-network-name the default name for the external network isnet04_ext
Credential environment variables in the openrc file have to include at least
bull OS_AUTH_URL
bull OS_USERNAME
bull OS_PASSWORD
bull OS_TENANT_NAME
60 Chapter 5 Post Configuration Activities
OPNFV Configuration Guide Release brahmaputra30 (605ebda)
Yardstick default key pair Yardstick uses a SSH key pair to connect to the guest image This key pair can be foundin the resourcesfiles directory To run the ping-hotyaml test sample this key pair needs to be importedto the OpenStack environment
Examples and verifying the install
It is recommended to verify that Yardstick was installed successfully by executing some simple commands and testsamples Below is an example invocation of yardstick help command and pingpy test sample
yardstick -hyardstick task start samplespingyaml
Each testing tool supported by Yardstick has a sample configuration file These configuration files can be found in thesamples directory
Example invocation of yardstick-plot tool
yardstick-plot -i tmpyardstickout -o tmpplots
Default location for the output is tmpyardstickout
More info about the tool can be found by executing
yardstick-plot -h
53 Additional testing and validation activities 61

OPNFV Configuration Guide Release brahmaputra30 (605ebda)
28 Chapter 3 Installer Configuration
CHAPTER
FOUR
FEATURE CONFIGURATION
The following sections describe the configuration options for specific platform features provided in BrahmaputraFurther details for each feature are captured in the referred project documentation
41 Copper configuration
This release focused on use of the OpenStack Congress service for managing configuration policy The Congress installprocedure described here is largely manual This procedure as well as the longer-term goal of automated installersupport is a work in progress The procedure is further specific to one OPNFV installer (JOID ie MAASJuJu)based environment Support for other OPNFV installer deployed environments is also a work in progress
411 Pre-configuration activities
This procedure assumes OPNFV has been installed via the JOID installer
412 Hardware configuration
There is no specific hardware configuration required for the Copper project
413 Feature configuration
Following are instructions for installing Congress on an Ubuntu 1404 LXC container in the OPNFV Controller nodeas installed by the JOID installer This guide uses instructions from the Congress intro guide on readthedocs Specificvalues below will need to be modified if you intend to repeat this procedure in your JOID-based install environment
Install Procedure
The install currently occurs via four bash scripts provided in the copper repo See these files for the detailed steps
bull install_congress_1sh creates and starts the linux container for congress on the controller node copiesinstall_congress_2sh to the controller node and invokes it via ssh
bull install_congress_2sh installs congress on the congress server
29
OPNFV Configuration Guide Release brahmaputra30 (605ebda)
Cleanup Procedure
If there is an error during installation use the bash script clean_congresssh which stops the congress server if runningand removes the congress user and service from the controller database
Restarting after server power loss etc
Currently this install procedure is manual Automated install and restoral after host recovery is TBD For now thisprocedure will get the Congress service running again
On jumphost SSH to Congress serversource ~envshjuju ssh ubuntu$CONGRESS_HOST If that fails
On jumphost SSH to controller nodejuju ssh ubuntunode1-control Start the Congress containersudo lxc-start -n juju-trusty-congress -d Verify the Congress container statussudo lxc-ls -f juju-trusty-congressNAME STATE IPV4 IPV6 GROUPS AUTOSTART----------------------------------------------------------------------juju-trusty-congress RUNNING 19216810117 - - NO exit back to the Jumphost wait a minute and go back to the SSH to Congress server step above
On the Congress server that you have logged intosource ~admin-openrcshcd ~gitcongresssource binactivatebincongress-server ampdisown -h 1
42 Doctor Configuration
421 Doctor Inspector
Doctor Inspector is suggested to be placed in one of the controller nodes but it can be put on any host where DoctorMonitor can reach and accessible to the OpenStack Controller (Nova)
Make sure OpenStack env parameters are set properly so that Doctor Inspector can issue admin actions such ascompute host force-down and state update of VM
Then you can configure Doctor Inspector as follows
git clone httpsgerritopnfvorggerritdoctor -b stablebrahmaputracd doctortestsINSPECTOR_PORT=12345python inspectorpy $INSPECTOR_PORT gt inspectorlog 2gtamp1 amp
422 Doctor Monitor
Doctor Monitors are suggested to be placed in one of the controller nodes but those can be put on any host whichis reachable to target compute host and accessible to the Doctor Inspector You need to configure Monitors for allcompute hosts one by one
30 Chapter 4 Feature Configuration
OPNFV Configuration Guide Release brahmaputra30 (605ebda)
Make sure OpenStack env parameters are set properly so that Doctor Inspector can issue admin actions such ascompute host force-down and state update of VM
Then you can configure Doctor Monitor as follows
git clone httpsgerritopnfvorggerritdoctor -b stablebrahmaputracd doctortestsINSPECTOR_PORT=12345COMPUTE_HOST=overcloud-novacompute-0sudo python monitorpy $COMPUTE_HOST
http127001$INSPECTOR_PORTevents gt monitorlog 2gtamp1 amp
43 IPv6 Configuration - Setting Up a Service VM as an IPv6 vRouter
This section provides instructions to set up a service VM as an IPv6 vRouter using OPNFV Brahmaputra Releaseinstallers The environment may be pure OpenStack option or Open Daylight L2-only option The deployment modelmay be HA or non-HA The infrastructure may be bare metal or virtual environment
For complete instructions and documentations of setting up service VM as an IPv6 vRouter using ANY method pleaserefer to
1 IPv6 Configuration Guide (HTML) httpartifactsopnfvorgipv6docssetupservicevmindexhtml
2 IPv6 User Guide (HTML) httpartifactsopnfvorgipv6docsgapanalysisindexhtml
431 Pre-configuration Activities
The configuration will work in 2 environments
1 OpenStack-only environment
2 OpenStack with Open Daylight L2-only environment
Depending on which installer will be used to deploy OPNFV each environment may be deployed on bare metal orvirtualized infrastructure Each deployment may be HA or non-HA
Refer to the previous installer configuration chapters installations guide and release notes
432 Setup Manual in OpenStack-Only Environment
If you intend to set up a service VM as an IPv6 vRouter in OpenStack-only environment of OPNFV BrahmaputraRelease please NOTE that
bull Because the anti-spoofing rules of Security Group feature in OpenStack prevents a VM from forwarding packetswe need to disable Security Group feature in the OpenStack-only environment
bull The hostnames IP addresses and username are for exemplary purpose in instructions Please change as neededto fit your environment
bull The instructions apply to both deployment model of single controller node and HA (High Availability) deploy-ment model where multiple controller nodes are used
43 IPv6 Configuration - Setting Up a Service VM as an IPv6 vRouter 31
OPNFV Configuration Guide Release brahmaputra30 (605ebda)
Install OPNFV and Preparation
OPNFV-NATIVE-INSTALL-1 To install OpenStack-only environment of OPNFV Brahmaputra Release
Apex Installer
HA deployment in OpenStack-only environmentopnfv-deploy -d etcopnfv-apexos-nosdn-nofeature-hayaml
Non-HA deployment in OpenStack-only environment Non-HA deployment is currently not supported by Apex installer
Compass Installer
HA deployment in OpenStack-only environmentexport ISO_URL=file$BUILD_DIRECTORYcompassisoexport OS_VERSION=$COMPASS_OS_VERSIONexport OPENSTACK_VERSION=$COMPASS_OPENSTACK_VERSIONexport CONFDIR=$WORKSPACEdeployconfvm_environmentdeploysh --dha $CONFDIRos-nosdn-nofeature-hayml --network $CONFDIR$NODE_NAMEnetworkyml
Non-HA deployment in OpenStack-only environment Non-HA deployment is currently not supported by Compass installer
Fuel Installer
HA deployment in OpenStack-only environmentdeploysh -s os-nosdn-nofeature-ha
Non-HA deployment in OpenStack-only environmentdeploysh -s os-nosdn-nofeature-noha
Joid Installer
HA deployment in OpenStack-only environmentdeploysh -o liberty -s nosdn -t ha -l default -f ipv6
Non-HA deployment in OpenStack-only environmentdeploysh -o liberty -s nosdn -t nonha -l default -f ipv6
Please NOTE that
bull You need to refer to installerrsquos documentation for other necessary parameters applicable to your deployment
bull You need to refer to Release Notes and installerrsquos documentation if there is any issue in installation
OPNFV-NATIVE-INSTALL-2 Clone the following GitHub repository to get the configuration and metadata files
git clone httpsgithubcomsridhargaddamopnfv_os_ipv6_pocgit optstackopnfv_os_ipv6_poc
Disable Security Groups in OpenStack ML2 Setup
OPNFV-NATIVE-SEC-1 Change the settings in etcneutronpluginsml2ml2_confini as follows
etcneutronpluginsml2ml2_confini[securitygroup]extension_drivers = port_security
32 Chapter 4 Feature Configuration
OPNFV Configuration Guide Release brahmaputra30 (605ebda)
enable_security_group = Falsefirewall_driver = neutronagentfirewallNoopFirewallDriver
OPNFV-NATIVE-SEC-2 Change the settings in etcnovanovaconf as follows
etcnovanovaconf[DEFAULT]security_group_api = novafirewall_driver = novavirtfirewallNoopFirewallDriver
OPNFV-NATIVE-SEC-3 After updating the settings you will have to restart the Neutron and Nova services
Please note that the commands of restarting Neutron and Nova would vary depending on the installer Pleaserefer to relevant documentation of specific installers
Set Up Service VM as IPv6 vRouter
OPNFV-NATIVE-SETUP-1 Now we assume that OpenStack multi-node setup is up and running We have to sourcethe tenant credentials in this step Please NOTE that the method of sourcing tenant credentials may vary dependingon installers For example
Apex installer
source the tenant credentials using Apex installer of OPNFV you need to copy the file homestackovercloudrc from the installer VM called instack to a location in controller node for example in the directory optsource optovercloudrc
Compass installer
source the tenant credentials using Compass installer of OPNFVsource optadmin-openrcsh
Fuel installer
source the tenant credentials using Fuel installer of OPNFVsource rootopenrc
Joid installer
source the tenant credentials using Joid installer of OPNFVsource $HOMEjoid_configadmin-openrc
devstack
source the tenant credentials in devstacksource openrc admin demo
Please refer to relevant documentation of installers if you encounter any issue
OPNFV-NATIVE-SETUP-2 Download fedora22 image which would be used for vRouter
wget httpsdownloadfedoraprojectorgpubfedoralinuxreleases22Cloudx86_64ImagesFedora-Cloud-Base-22-20150521x86_64qcow2
OPNFV-NATIVE-SETUP-3 Import Fedora22 image to glance
glance image-create --name Fedora22 --disk-format qcow2 --container-format bare --file Fedora-Cloud-Base-22-20150521x86_64qcow2
43 IPv6 Configuration - Setting Up a Service VM as an IPv6 vRouter 33
OPNFV Configuration Guide Release brahmaputra30 (605ebda)
OPNFV-NATIVE-SETUP-4 This step is Informational OPNFV Installer has taken care of this step duringdeployment You may refer to this step only if there is any issue or if you are using other installers
We have to move the physical interface (ie the public network interface) to br-ex including moving the publicIP address and setting up default route Please refer to OS-NATIVE-SETUP-4 and OS-NATIVE-SETUP-5 in ourmore complete instruction
OPNFV-NATIVE-SETUP-5 Create Neutron routers ipv4-router and ipv6-router which need to provideexternal connectivity
neutron router-create ipv4-routerneutron router-create ipv6-router
OPNFV-NATIVE-SETUP-6 Create an external networksubnet ext-net using the appropriate values based on thedata-center physical network setup
Please NOTE that you may only need to create the subnet of ext-net because OPNFV installers should have createdan external network during installation You must use the same name of external network that installer creates whenyou create the subnet For example
bull Apex installer external
bull Compass installer ext-net
bull Fuel installer net04_ext
bull Joid installer ext-net
Please refer to the documentation of installers if there is any issue
This is needed only if installer does not create an external work Otherwise skip this command net-createneutron net-create --routerexternal ext-net
Note that the name ext-net may work for some installers such as Compass and Joid Change the name ext-net to match the name of external network that an installer createsneutron subnet-create --disable-dhcp --allocation-pool start=19859156251end=19859156254 --gateway 198591561 ext-net 19859156024
OPNFV-NATIVE-SETUP-7 Create Neutron networks ipv4-int-network1 and ipv6-int-network2 withport_security disabled
neutron net-create --port_security_enabled=False ipv4-int-network1neutron net-create --port_security_enabled=False ipv6-int-network2
OPNFV-NATIVE-SETUP-8 Create IPv4 subnet ipv4-int-subnet1 in the internal networkipv4-int-network1 and associate it to ipv4-router
neutron subnet-create --name ipv4-int-subnet1 --dns-nameserver 8888 ipv4-int-network1 2000024
neutron router-interface-add ipv4-router ipv4-int-subnet1
OPNFV-NATIVE-SETUP-9 Associate the ext-net to the Neutron routers ipv4-router and ipv6-router
Note that the name ext-net may work for some installers such as Compass and Joid Change the name ext-net to match the name of external network that an installer createsneutron router-gateway-set ipv4-router ext-netneutron router-gateway-set ipv6-router ext-net
OPNFV-NATIVE-SETUP-10 Create two subnets one IPv4 subnet ipv4-int-subnet2 and one IPv6 subnetipv6-int-subnet2 in ipv6-int-network2 and associate both subnets to ipv6-router
34 Chapter 4 Feature Configuration
OPNFV Configuration Guide Release brahmaputra30 (605ebda)
neutron subnet-create --name ipv4-int-subnet2 --dns-nameserver 8888 ipv6-int-network2 1000024
neutron subnet-create --name ipv6-int-subnet2 --ip-version 6 --ipv6-ra-mode slaac --ipv6-address-mode slaac ipv6-int-network2 2001db80164
neutron router-interface-add ipv6-router ipv4-int-subnet2neutron router-interface-add ipv6-router ipv6-int-subnet2
OPNFV-NATIVE-SETUP-11 Create a keypair
nova keypair-add vRouterKey gt ~vRouterKey
OPNFV-NATIVE-SETUP-12 Create ports for vRouter (with some specific MAC address - basically for automation- to know the IPv6 addresses that would be assigned to the port)
neutron port-create --name eth0-vRouter --mac-address fa163e111111 ipv6-int-network2neutron port-create --name eth1-vRouter --mac-address fa163e222222 ipv4-int-network1
OPNFV-NATIVE-SETUP-13 Create ports for VM1 and VM2
neutron port-create --name eth0-VM1 --mac-address fa163e333333 ipv4-int-network1neutron port-create --name eth0-VM2 --mac-address fa163e444444 ipv4-int-network1
OPNFV-NATIVE-SETUP-14 Update ipv6-router with routing information to subnet 2001db80264
neutron router-update ipv6-router --routes type=dict list=true destination=2001db80264nexthop=2001db801f8163efffe111111
OPNFV-NATIVE-SETUP-15 Boot Service VM (vRouter) VM1 and VM2
nova boot --image Fedora22 --flavor m1small --user-data optstackopnfv_os_ipv6_pocmetadatatxt --availability-zone novaopnfv-os-compute --nic port-id=$(neutron port-list | grep -w eth0-vRouter | awk print $2) --nic port-id=$(neutron port-list | grep -w eth1-vRouter | awk print $2) --key-name vRouterKey vRouter
nova list
Please wait for some 10 to 15 minutes so that necessary packages (like radvd) are installed and vRouter is upnova console-log vRouter
nova boot --image cirros-034-x86_64-uec --flavor m1tiny --user-data optstackopnfv_os_ipv6_pocset_mtush --availability-zone novaopnfv-os-controller --nic port-id=$(neutron port-list | grep -w eth0-VM1 | awk print $2) --key-name vRouterKey VM1
nova boot --image cirros-034-x86_64-uec --flavor m1tiny--user-data optstackopnfv_os_ipv6_pocset_mtush --availability-zone novaopnfv-os-compute --nic port-id=$(neutron port-list | grep -w eth0-VM2 | awk print $2) --key-name vRouterKey VM2
nova list Verify that all the VMs are in ACTIVE state
OPNFV-NATIVE-SETUP-16 If all goes well the IPv6 addresses assigned to the VMs would be as shown as follows
43 IPv6 Configuration - Setting Up a Service VM as an IPv6 vRouter 35
OPNFV Configuration Guide Release brahmaputra30 (605ebda)
vRouter eth0 interface would have the following IPv6 address 2001db801f8163efffe11111164 vRouter eth1 interface would have the following IPv6 address 2001db802164 VM1 would have the following IPv6 address 2001db802f8163efffe33333364 VM2 would have the following IPv6 address 2001db802f8163efffe44444464
OPNFV-NATIVE-SETUP-17 Now we can SSH to VMs You can execute the following command
1 Create a floatingip and associate it with VM1 VM2 and vRouter (to the port id that is passed) Note that the name ext-net may work for some installers such as Compass and Joid Change the name ext-net to match the name of external network that an installer createsneutron floatingip-create --port-id $(neutron port-list | grep -w eth0-VM1 | awk print $2) ext-netneutron floatingip-create --port-id $(neutron port-list | grep -w eth0-VM2 | awk print $2) ext-netneutron floatingip-create --port-id $(neutron port-list | grep -w eth1-vRouter | awk print $2) ext-net
2 To know display the floatingip associated with VM1 VM2 and vRouterneutron floatingip-list -F floating_ip_address -F port_id | grep $(neutron port-list | grep -w eth0-VM1 | awk print $2) | awk print $2neutron floatingip-list -F floating_ip_address -F port_id | grep $(neutron port-list | grep -w eth0-VM2 | awk print $2) | awk print $2neutron floatingip-list -F floating_ip_address -F port_id | grep $(neutron port-list | grep -w eth1-vRouter | awk print $2) | awk print $2
3 To ssh to the vRouter VM1 and VM2 user can execute the following commandssh -i ~vRouterKey fedoraltfloating-ip-of-vRoutergtssh -i ~vRouterKey cirrosltfloating-ip-of-VM1gtssh -i ~vRouterKey cirrosltfloating-ip-of-VM2gt
433 Setup Manual in OpenStack with Open Daylight L2-Only Environment
If you intend to set up a service VM as an IPv6 vRouter in an environment of OpenStack and Open Daylight L2-onlyof OPNFV Brahmaputra Release please NOTE that
bull The hostnames IP addresses and username are for exemplary purpose in instructions Please change as neededto fit your environment
bull The instructions apply to both deployment model of single controller node and HA (High Availability) deploy-ment model where multiple controller nodes are used
bull However in case of HA when ipv6-router is created in step SETUP-SVM-11 it could be created in anyof the controller node Thus you need to identify in which controller node ipv6-router is created in orderto manually spawn radvd daemon inside the ipv6-router namespace in steps SETUP-SVM-24 throughSETUP-SVM-30
Install OPNFV and Preparation
OPNFV-INSTALL-1 To install OpenStack with Open Daylight L2-only environment of OPNFV Brahmaputra Re-lease
Apex Installer
36 Chapter 4 Feature Configuration
OPNFV Configuration Guide Release brahmaputra30 (605ebda)
HA deployment in OpenStack with Open Daylight L2-only environmentopnfv-deploy -d etcopnfv-apexos-odl_l2-nofeature-hayaml
Non-HA deployment in OpenStack with Open Daylight L2-only environment Non-HA deployment is currently not supported by Apex installer
Compass Installer
HA deployment in OpenStack with Open Daylight L2-only environmentexport ISO_URL=file$BUILD_DIRECTORYcompassisoexport OS_VERSION=$COMPASS_OS_VERSIONexport OPENSTACK_VERSION=$COMPASS_OPENSTACK_VERSIONexport CONFDIR=$WORKSPACEdeployconfvm_environmentdeploysh --dha $CONFDIRos-odl_l2-nofeature-hayml --network $CONFDIR$NODE_NAMEnetworkyml
Non-HA deployment in OpenStack with Open Daylight L2-only environment Non-HA deployment is currently not supported by Compass installer
Fuel Installer
HA deployment in OpenStack with Open Daylight L2-only environmentdeploysh -s os-odl_l2-nofeature-ha
Non-HA deployment in OpenStack with Open Daylight L2-only environmentdeploysh -s os-odl_l2-nofeature-noha
Joid Installer
HA deployment in OpenStack with Open Daylight L2-only environmentdeploysh -o liberty -s odl -t ha -l default -f ipv6
Non-HA deployment in OpenStack with Open Daylight L2-only environmentdeploysh -o liberty -s odl -t nonha -l default -f ipv6
Please NOTE that
bull You need to refer to installerrsquos documentation for other necessary parameters applicable to your deployment
bull You need to refer to Release Notes and installerrsquos documentation if there is any issue in installation
OPNFV-INSTALL-2 Clone the following GitHub repository to get the configuration and metadata files
git clone httpsgithubcomsridhargaddamopnfv_os_ipv6_pocgit optstackopnfv_os_ipv6_poc
Disable Security Groups in OpenStack ML2 Setup
Please NOTE that although Security Groups feature has been disabled automatically through localconf configu-ration file by some installers such as devstack it is very likely that other installers such as Apex Compass Fuelor Joid will enable Security Groups feature after installation
Please make sure that Security Groups are disabled in the setup
OPNFV-SEC-1 Change the settings in etcneutronpluginsml2ml2_confini as follows
etcneutronpluginsml2ml2_confini[securitygroup]enable_security_group = Falsefirewall_driver = neutronagentfirewallNoopFirewallDriver
43 IPv6 Configuration - Setting Up a Service VM as an IPv6 vRouter 37
OPNFV Configuration Guide Release brahmaputra30 (605ebda)
OPNFV-SEC-2 Change the settings in etcnovanovaconf as follows
etcnovanovaconf[DEFAULT]security_group_api = novafirewall_driver = novavirtfirewallNoopFirewallDriver
OPNFV-SEC-3 After updating the settings you will have to restart the Neutron and Nova services
Please note that the commands of restarting Neutron and Nova would vary depending on the installer Pleaserefer to relevant documentation of specific installers
Source the Credentials in OpenStack Controller Node
SETUP-SVM-1 Login in OpenStack Controller Node Start a new terminal and change directory to where Open-Stack is installed
SETUP-SVM-2 We have to source the tenant credentials in this step Please NOTE that the method of sourcingtenant credentials may vary depending on installers For example
Apex installer
source the tenant credentials using Apex installer of OPNFV you need to copy the file homestackovercloudrc from the installer VM called instack to a location in controller node for example in the directory optsource optovercloudrc
Compass installer
source the tenant credentials using Compass installer of OPNFVsource optadmin-openrcsh
Fuel installer
source the tenant credentials using Fuel installer of OPNFVsource rootopenrc
Joid installer
source the tenant credentials using Joid installer of OPNFVsource $HOMEjoid_configadmin-openrc
devstack
source the tenant credentials in devstacksource openrc admin demo
Please refer to relevant documentation of installers if you encounter any issue
Informational Note Move Public Network from Physical Network Interface to br-ex
SETUP-SVM-3 Move the physical interface (ie the public network interface) to br-ex
SETUP-SVM-4 Verify setup of br-ex
Those 2 steps are Informational OPNFV Installer has taken care of those 2 steps during deployment You mayrefer to this step only if there is any issue or if you are using other installers
38 Chapter 4 Feature Configuration
OPNFV Configuration Guide Release brahmaputra30 (605ebda)
We have to move the physical interface (ie the public network interface) to br-ex including moving the publicIP address and setting up default route Please refer to SETUP-SVM-3 and SETUP-SVM-4 in our more completeinstruction
Create IPv4 Subnet and Router with External Connectivity
SETUP-SVM-5 Create a Neutron router ipv4-router which needs to provide external connectivity
neutron router-create ipv4-router
SETUP-SVM-6 Create an external networksubnet ext-net using the appropriate values based on the data-centerphysical network setup
Please NOTE that you may only need to create the subnet of ext-net because OPNFV installers should have createdan external network during installation You must use the same name of external network that installer creates whenyou create the subnet For example
bull Apex installer external
bull Compass installer ext-net
bull Fuel installer net04_ext
bull Joid installer ext-net
Please refer to the documentation of installers if there is any issue
This is needed only if installer does not create an external work Otherwise skip this command net-createneutron net-create --routerexternal ext-net
Note that the name ext-net may work for some installers such as Compass and Joid Change the name ext-net to match the name of external network that an installer createsneutron subnet-create --disable-dhcp --allocation-pool start=19859156251end=19859156254 --gateway 198591561 ext-net 19859156024
Please note that the IP addresses in the command above are for exemplary purpose Please replace the IP addressesof your actual network
SETUP-SVM-7 Associate the ext-net to the Neutron router ipv4-router
Note that the name ext-net may work for some installers such as Compass and Joid Change the name ext-net to match the name of external network that an installer createsneutron router-gateway-set ipv4-router ext-net
SETUP-SVM-8 Create an internaltenant IPv4 network ipv4-int-network1
neutron net-create ipv4-int-network1
SETUP-SVM-9 Create an IPv4 subnet ipv4-int-subnet1 in the internal network ipv4-int-network1
neutron subnet-create --name ipv4-int-subnet1 --dns-nameserver 8888 ipv4-int-network1 2000024
SETUP-SVM-10 Associate the IPv4 internal subnet ipv4-int-subnet1 to the Neutron router ipv4-router
neutron router-interface-add ipv4-router ipv4-int-subnet1
43 IPv6 Configuration - Setting Up a Service VM as an IPv6 vRouter 39
OPNFV Configuration Guide Release brahmaputra30 (605ebda)
Create IPv6 Subnet and Router with External Connectivity
Now let us create a second neutron router where we can ldquomanuallyrdquo spawn a radvd daemon to simulate an externalIPv6 router
SETUP-SVM-11 Create a second Neutron router ipv6-router which needs to provide external connectivity
neutron router-create ipv6-router
SETUP-SVM-12 Associate the ext-net to the Neutron router ipv6-router
Note that the name ext-net may work for some installers such as Compass and Joid Change the name ext-net to match the name of external network that an installer createsneutron router-gateway-set ipv6-router ext-net
SETUP-SVM-13 Create a second internaltenant IPv4 network ipv4-int-network2
neutron net-create ipv4-int-network2
SETUP-SVM-14 Create an IPv4 subnet ipv4-int-subnet2 for the ipv6-router internal networkipv4-int-network2
neutron subnet-create --name ipv4-int-subnet2 --dns-nameserver 8888 ipv4-int-network2 1000024
SETUP-SVM-15 Associate the IPv4 internal subnet ipv4-int-subnet2 to the Neutron router ipv6-router
neutron router-interface-add ipv6-router ipv4-int-subnet2
Prepare Image Metadata and Keypair for Service VM
SETUP-SVM-16 Download fedora22 image which would be used as vRouter
wget httpsdownloadfedoraprojectorgpubfedoralinuxreleases22Cloudx86_64ImagesFedora-Cloud-Base-22-20150521x86_64qcow2
glance image-create --name Fedora22 --disk-format qcow2 --container-format bare --file Fedora-Cloud-Base-22-20150521x86_64qcow2
SETUP-SVM-17 Create a keypair
nova keypair-add vRouterKey gt ~vRouterKey
SETUP-SVM-18 Create ports for vRouter and both the VMs with some specific MAC addresses
neutron port-create --name eth0-vRouter --mac-address fa163e111111 ipv4-int-network2neutron port-create --name eth1-vRouter --mac-address fa163e222222 ipv4-int-network1neutron port-create --name eth0-VM1 --mac-address fa163e333333 ipv4-int-network1neutron port-create --name eth0-VM2 --mac-address fa163e444444 ipv4-int-network1
Boot Service VM (vRouter) with eth0 on ipv4-int-network2 and eth1 on ipv4-int-network1
Let us boot the service VM (vRouter) with eth0 interface on ipv4-int-network2 connecting toipv6-router and eth1 interface on ipv4-int-network1 connecting to ipv4-router
SETUP-SVM-19 Boot the vRouter using Fedora22 image on the OpenStack Compute Node with hostnameopnfv-os-compute
40 Chapter 4 Feature Configuration
OPNFV Configuration Guide Release brahmaputra30 (605ebda)
nova boot --image Fedora22 --flavor m1small --user-data optstackopnfv_os_ipv6_pocmetadatatxt --availability-zone novaopnfv-os-compute --nic port-id=$(neutron port-list | grep -w eth0-vRouter | awk print $2) --nic port-id=$(neutron port-list | grep -w eth1-vRouter | awk print $2) --key-name vRouterKey vRouter
Please note that optstackopnfv_os_ipv6_pocmetadatatxt is used to enable the vRouter to au-tomatically spawn a radvd and
bull Act as an IPv6 vRouter which advertises the RA (Router Advertisements) with prefix 2001db80264on its internal interface (eth1)
bull Forward IPv6 traffic from internal interface (eth1)
SETUP-SVM-20 Verify that Fedora22 image boots up successfully and vRouter has ssh keys properly injected
nova listnova console-log vRouter
Please note that it may take a few minutes for the necessary packages to get installed and ssh keys to be injected
Sample Output[ 762884523] cloud-init[871] ec2 [ 762909634] cloud-init[871] ec2 -----BEGIN SSH HOST KEY FINGERPRINTS-----[ 762931626] cloud-init[871] ec2 2048 e3dc3d4abcb6b07775a170a3d02a47a9 (RSA)[ 762957380] cloud-init[871] ec2 -----END SSH HOST KEY FINGERPRINTS-----[ 762979554] cloud-init[871] ec2
Boot Two Other VMs in ipv4-int-network1
In order to verify that the setup is working let us create two cirros VMs with eth1 interface on theipv4-int-network1 ie connecting to vRouter eth1 interface for internal network
We will have to configure appropriate mtu on the VMsrsquo interface by taking into account the tunneling overhead andany physical switch requirements If so push the mtu to the VM either using dhcp options or via meta-data
SETUP-SVM-21 Create VM1 on OpenStack Controller Node with hostname opnfv-os-controller
nova boot --image cirros-034-x86_64-uec --flavor m1tiny --user-data optstackopnfv_os_ipv6_pocset_mtush --availability-zone novaopnfv-os-controller --nic port-id=$(neutron port-list | grep -w eth0-VM1 | awk print $2) --key-name vRouterKey VM1
SETUP-SVM-22 Create VM2 on OpenStack Compute Node with hostname opnfv-os-compute
nova boot --image cirros-034-x86_64-uec --flavor m1tiny --user-data optstackopnfv_os_ipv6_pocset_mtush --availability-zone novaopnfv-os-compute --nic port-id=$(neutron port-list | grep -w eth0-VM2 | awk print $2) --key-name vRouterKey VM2
SETUP-SVM-23 Confirm that both the VMs are successfully booted
nova listnova console-log VM1nova console-log VM2
43 IPv6 Configuration - Setting Up a Service VM as an IPv6 vRouter 41
OPNFV Configuration Guide Release brahmaputra30 (605ebda)
Spawn RADVD in ipv6-router
Let us manually spawn a radvd daemon inside ipv6-router namespace to simulate an external router First ofall we will have to identify the ipv6-router namespace and move to the namespace
Please NOTE that in case of HA (High Availability) deployment model where multiple controller nodes are usedipv6-router created in step SETUP-SVM-11 could be in any of the controller node Thus you need to iden-tify in which controller node ipv6-router is created in order to manually spawn radvd daemon inside theipv6-router namespace in steps SETUP-SVM-24 through SETUP-SVM-30 The following command in Neu-tron will display the controller on which the ipv6-router is spawned
neutron l3-agent-list-hosting-router ipv6-router
Then you login to that controller and execute steps SETUP-SVM-24 through SETUP-SVM-30
SETUP-SVM-24 identify the ipv6-router namespace and move to the namespace
sudo ip netns exec qrouter-$(neutron router-list | grep -w ipv6-router | awk print $2) bash
SETUP-SVM-25 Upon successful execution of the above command you will be in the router namespace Now letus configure the IPv6 address on the ltqr-xxxgt interface
export router_interface=$(ip a s | grep -w global qr- | awk print $7)ip -6 addr add 2001db8011 dev $router_interface
SETUP-SVM-26 Update the sample file optstackopnfv_os_ipv6_pocscenario2radvdconfwith $router_interface
cp optstackopnfv_os_ipv6_pocscenario2radvdconf tmpradvd$router_interfaceconfsed -i s$router_interface$router_interfaceg tmpradvd$router_interfaceconf
SETUP-SVM-27 Spawn a radvd daemon to simulate an external router This radvd daemon advertises an IPv6subnet prefix of 2001db80164 using RA (Router Advertisement) on its $router_interface so that eth0interface of vRouter automatically configures an IPv6 SLAAC address
$radvd -C tmpradvd$router_interfaceconf -p tmpbr-expidradvd -m syslog
SETUP-SVM-28 Add an IPv6 downstream route pointing to the eth0 interface of vRouter
ip -6 route add 2001db80264 via 2001db801f8163efffe111111
SETUP-SVM-29 The routing table should now look similar to something shown below
ip -6 route show2001db8011 dev qr-42968b9e-62 proto kernel metric 2562001db80164 dev qr-42968b9e-62 proto kernel metric 256 expires 86384sec2001db80264 via 2001db801f8163efffe111111 dev qr-42968b9e-62 proto ra metric 1024 expires 29secfe8064 dev qg-3736e0c7-7c proto kernel metric 256fe8064 dev qr-42968b9e-62 proto kernel metric 256
SETUP-SVM-30 If all goes well the IPv6 addresses assigned to the VMs would be as shown as follows
vRouter eth0 interface would have the following IPv6 address 2001db801f8163efffe11111164 vRouter eth1 interface would have the following IPv6 address 2001db802164 VM1 would have the following IPv6 address 2001db802f8163efffe33333364 VM2 would have the following IPv6 address 2001db802f8163efffe44444464
42 Chapter 4 Feature Configuration
OPNFV Configuration Guide Release brahmaputra30 (605ebda)
Testing to Verify Setup Complete
Now let us SSH to those VMs eg VM1 and or VM2 and or vRouter to confirm that it has successfully configuredthe IPv6 address using SLAAC with prefix 2001db80264 from vRouter
We use floatingip mechanism to achieve SSH
SETUP-SVM-31 Now we can SSH to VMs You can execute the following command
1 Create a floatingip and associate it with VM1 VM2 and vRouter (to the port id that is passed) Note that the name ext-net may work for some installers such as Compass and Joid Change the name ext-net to match the name of external network that an installer createsneutron floatingip-create --port-id $(neutron port-list | grep -w eth0-VM1 | awk print $2) ext-netneutron floatingip-create --port-id $(neutron port-list | grep -w eth0-VM2 | awk print $2) ext-netneutron floatingip-create --port-id $(neutron port-list | grep -w eth1-vRouter | awk print $2) ext-net
2 To know display the floatingip associated with VM1 VM2 and vRouterneutron floatingip-list -F floating_ip_address -F port_id | grep $(neutron port-list | grep -w eth0-VM1 | awk print $2) | awk print $2neutron floatingip-list -F floating_ip_address -F port_id | grep $(neutron port-list | grep -w eth0-VM2 | awk print $2) | awk print $2neutron floatingip-list -F floating_ip_address -F port_id | grep $(neutron port-list | grep -w eth1-vRouter | awk print $2) | awk print $2
3 To ssh to the vRouter VM1 and VM2 user can execute the following commandssh -i ~vRouterKey fedoraltfloating-ip-of-vRoutergtssh -i ~vRouterKey cirrosltfloating-ip-of-VM1gtssh -i ~vRouterKey cirrosltfloating-ip-of-VM2gt
If everything goes well ssh will be successful and you will be logged into those VMs Run some commands to verifythat IPv6 addresses are configured on eth0 interface
SETUP-SVM-32 Show an IPv6 address with a prefix of 2001db80264
ip address show
SETUP-SVM-33 ping some external IPv6 address eg ipv6-router
ping6 2001db8011
If the above ping6 command succeeds it implies that vRouter was able to successfully forward the IPv6 traffic toreach external ipv6-router
44 Installing OVSNFV Fuel Plugin
bull On the Fuel UI create a new environment
bull In Settings gt Userspace OVS support check ldquoUserspace OVS supportrdquo
bull Continue with environment configuration and deployment as normal
441 Upgrading the plugin
From time to time new versions of the plugin may become available
44 Installing OVSNFV Fuel Plugin 43
OPNFV Configuration Guide Release brahmaputra30 (605ebda)
The plugin cannot be upgraded if an active environment is using the plugin
In order to upgrade the plugin
bull Copy the updated plugin file to the fuel-master
bull On the Fuel UI reset the environment
bull On the Fuel CLI ldquofuel plugins ndashupdate ltfuel-plugin-filegtrdquo
bull On the Fuel UI re-deploy the environment
45 Promise Feature Configuration Overview
451 Promise installation
Install nodejs npm and promise
curl -sL httpsdebnodesourcecomsetup_4x | sudo -E bash -sudo apt-get install -y nodejssudo npm -g install npmlatestgit clone httpsgithubcomopnfvpromisegitcd promisenpm install
Please note that the last command lsquonpm installrsquo will install all needed dependencies for promise (including yangforgeand mocha)
452 Testing
Please perform the following preparation steps
1 Set OpenStack environment parameters properly (eg source openrc admin demo in DevStack)
2 Create OpenStack tenant (eg promise) and tenant user (eg promiser)
3 Create a flavor in Nova with 1 vCPU and 512 MB RAM
4 Create a private network subnet and router in Neutron
5 Create an image in Glance
Once done the promise test script can be invoked as follows (as a single line command)
NODE_ENV=mytest OS_TENANT_NAME=promise OS_USERNAME=promiser OS_PASSWORD=ltuser password from Step 2gt OS_TEST_FLAVOR=ltflavor ID from Step 3gt OS_TEST_NETWORK=ltnetwork ID from Step 4gt OS_TEST_IMAGE=ltimage ID from Step 5gt npm run -s test -- --reporter json gt promise-resultsjson
The results of the tests will be stored in the promise-resultsjson file
The results can also be seen in the console (ldquonpm run -s testrdquo)
All 33 tests passing Congratulations promise has been successfully installed and configured
44 Chapter 4 Feature Configuration
OPNFV Configuration Guide Release brahmaputra30 (605ebda)
45 Promise Feature Configuration Overview 45
OPNFV Configuration Guide Release brahmaputra30 (605ebda)
46 Configuring SDNVPN features
Fuel installer configuration
In order to install the BGPVPN feature the corresponding checkbox in Fuel has to be selected This will triggerinstallation of the OpenStack BGPVPN API extension for Neutron (set up for using the ODL driver)
In addition ODL has to be installed see the corresponding section in the respective installer documentation on how toinstall ODL If the BGPVPN feature is installed ODL will automatically be installed with VPN Service karaf featureactivated
No post-deploy configuration is necessary The Fuel BGPVPN plugin and the ODL plugin should set up the clusterready for BGPVPNs being created This includes the set-up of internal VxLAN transport tunnels between computenodes
No post-configuration activities are required
46 Chapter 4 Feature Configuration
CHAPTER
FIVE
POST CONFIGURATION ACTIVITIES
Once you have deployed and configured your scenario and features you should validate the state of the system usingthe following guides
51 Scenario validation activities
The following guides provide information on how to validate the installation of you scenario based on the tools andtest suites available for the installation tool you have selected
511 Fuel post installation procedures
Automated post installation activities
Fuel provides a fairly broad coverage of built in automated health checks These validate the installation in terms ofconfiguration services networking storage policies etc The execution of the full range of health checks takes lessthan 30 minutes
For instructions on how to run health-checks please read the Fuel installation instructions
Platform components validation
Consult the feature sections in this document for any post-install feature specific validationhealth-checks
512 JOID post installation procedures
Configure OpenStack
In each SDN directory for example joidciopencontrail there is a folder for Juju deployer where you can find thecharm bundle yaml files that the deploysh uses to deploy
In the same directory there is scripts folder where you can find shell scripts to help you configure the OpenStackcloud that you just deployed These scripts are created to help you configure a basic OpenStack Cloud to verify thecloud For more info on OpenStack Cloud configuration please refer to the OpenStack Cloud Administrator Guideon docsopenstackorg Similarly for complete SDN configuration please refer to the respective SDN adminstratorguide
Each SDN solution requires slightly different setup please refer to the README in each SDN folder Most likelyyou will need to modify the openstacksh and cloud-setupsh scripts for the floating IP range private IP network andSSH keys Please go through openstacksh glancesh and cloud-setupsh and make changes as you see fit
47
OPNFV Configuration Guide Release brahmaputra30 (605ebda)
52 Feature validation activities
The following sections provide information on how to validate the features you have installed in your scenario
521 Copper post installation procedures
This release focused on use of the OpenStack Congress service for managing configuration policy The Congressinstall verify procedure described here is largely manual This procedure as well as the longer-term goal of automatedverification support is a work in progress The procedure is further specific to one OPNFV installer (JOID ieMAASJuJu) based environment
Automated post installation activities
No automated procedures are provided at this time
Copper post configuration procedures
No configuration procedures are required beyond the basic install procedure
Platform components validation
Following are notes on creating a container as test driver for Congress This is based upon an Ubuntu host as installedby JOID
Create and Activate the Container
On the jumphost
sudo lxc-create -n trusty-copper -t usrsharelxctemplateslxc-ubuntu -- -b ubuntu ~opnfvsudo lxc-start -n trusty-copper -dsudo lxc-info --name trusty-copper(typical output)Name trusty-copperState RUNNINGPID 4563IP 100344CPU use 2877 secondsBlkIO use 52279 MiBMemory use 55975 MiBKMem use 0 bytesLink vethDMFOANTX bytes 262 MiBRX bytes 8848 MiBTotal bytes 9110 MiB
Login and configure the test server
48 Chapter 5 Post Configuration Activities
OPNFV Configuration Guide Release brahmaputra30 (605ebda)
ssh ubuntu100344sudo apt-get updatesudo apt-get upgrade -y
Install pipsudo apt-get install python-pip -y
Install javasudo apt-get install default-jre -y
Install other dependenciessudo apt-get install git gcc python-dev libxml2 libxslt1-dev libzip-dev php5-curl -y
Setup OpenStack environment variables per your OPNFV installexport CONGRESS_HOST=19216810117export KEYSTONE_HOST=19216810108export CEILOMETER_HOST=19216810105export CINDER_HOST=19216810101export GLANCE_HOST=19216810106export HEAT_HOST=19216810107export NEUTRON_HOST=19216810111export NOVA_HOST=19216810112source ~admin-openrcsh
Install and test OpenStack clientmkdir ~gitcd gitgit clone httpsgithubcomopenstackpython-openstackclientgitcd python-openstackclientgit checkout stablelibertysudo pip install -r requirementstxtsudo python setuppy installopenstack service list(typical output)+----------------------------------+------------+----------------+| ID | Name | Type |+----------------------------------+------------+----------------+| 2f8799ae50f24c928c021fabf8a50f5f | keystone | identity || 351b13f56d9a4e25849406ec1d5a2726 | cinder | volume || 5129510c3143454f9ba8ec7e6735e267 | cinderv2 | volumev2 || 5ee1e220460f41dea9be06921400ce9b | congress | policy || 78e73a7789a14f56a5d248a0cd141201 | quantum | network || 9d5a00fb475a45b2ae6767528299ed6b | ceilometer | metering || 9e4b1624ef0b434abc0b82f607c5045c | heat | orchestration || b6c01ceb5023442d9f394b83f2a18e01 | heat-cfn | cloudformation || ba6199e3505045ad87e2a7175bd0c57f | glance | image || d753f304a0d541dbb989780ae70328a8 | nova | compute |+----------------------------------+------------+----------------+
Install and test Congress clientcd ~gitgit clone httpsgithubcomopenstackpython-congressclientgitcd python-congressclientgit checkout stablelibertysudo pip install -r requirementstxtsudo python setuppy installopenstack congress driver list(typical output)+------------+--------------------------------------------------------------------------+| id | description |+------------+--------------------------------------------------------------------------+| ceilometer | Datasource driver that interfaces with ceilometer || neutronv2 | Datasource driver that interfaces with OpenStack Networking aka Neutron || nova | Datasource driver that interfaces with OpenStack Compute aka nova || keystone | Datasource driver that interfaces with keystone || cinder | Datasource driver that interfaces with OpenStack cinder || glancev2 | Datasource driver that interfaces with OpenStack Images aka Glance |+------------+--------------------------------------------------------------------------+
Install and test Glance clientcd ~gitgit clone httpsgithubcomopenstackpython-glanceclientgitcd python-glanceclientgit checkout stablelibertysudo pip install -r requirementstxtsudo python setuppy installglance image-list(typical output)+--------------------------------------+---------------------+| ID | Name |+--------------------------------------+---------------------+| 6ce4433e-65c0-4cd8-958d-b06e30c76241 | cirros-033-x86_64 |+--------------------------------------+---------------------+
Install and test Neutron clientcd ~gitgit clone httpsgithubcomopenstackpython-neutronclientgitcd python-neutronclientgit checkout stablelibertysudo pip install -r requirementstxtsudo python setuppy installneutron net-list(typical output)+--------------------------------------+----------+------------------------------------------------------+| id | name | subnets |+--------------------------------------+----------+------------------------------------------------------+| dc6227df-af41-439f-bd2c-c2c2f0fe7fc5 | public | 5745846c-dd79-4900-a7da-bf506348ceac 19216810024 || a3f9f13a-5de9-4d3b-98c8-d2e40a2ef8e9 | internal | 5e0be862-90da-44ab-af43-56d5c65aa049 1000024 |+--------------------------------------+----------+------------------------------------------------------+
Install and test Nova clientcd ~gitgit clone httpsgithubcomopenstackpython-novaclientgitcd python-novaclientgit checkout stablelibertysudo pip install -r requirementstxtsudo python setuppy installnova hypervisor-list(typical output)+----+---------------------+-------+---------+| ID | Hypervisor hostname | State | Status |+----+---------------------+-------+---------+| 1 | compute1maas | up | enabled |+----+---------------------+-------+---------+
Install and test Keystone clientcd ~gitgit clone httpsgithubcomopenstackpython-keystoneclientgitcd python-keystoneclientgit checkout stablelibertysudo pip install -r requirementstxtsudo python setuppy install
52 Feature validation activities 49
OPNFV Configuration Guide Release brahmaputra30 (605ebda)
Setup the Congress Test Webapp
Clone Copper (if not already cloned in user home)cd ~gitif [ -d ~gitcopper ] then git clone httpsgerritopnfvorggerritcopper fi
Copy the Apache configsudo cp ~gitcoppercomponentscongresstest-webappwwwubuntu-apache2conf etcapache2apache2conf
Point proxyphp to the Congress server per your installsed -i -- s19216810117$CONGRESS_HOSTg ~gitcoppercomponentscongresstest-webappwwwhtmlproxyindexphp
Copy the webapp to the Apache root directory and fix permissionssudo cp -R ~gitcoppercomponentscongresstest-webappwwwhtml varwwwsudo chmod 755 varwwwhtml -R
Make webapp log directory and set permissionsmkdir ~logschmod 777 ~logs
Restart Apachesudo service apache2 restart
Using the Test Webapp
Browse to the trusty-copper server IP address
Interactive options are meant to be self-explanatory given a basic familiarity with the Congress service and data modelBut the app will be developed with additional features and UI elements
522 IPv6 Post Installation Procedures
Congratulations you have completed the setup of using a service VM to act as an IPv6 vRouter You have validatedthe setup based on the instruction in previous sections If you want to further test your setup you can ping6 amongVM1 VM2 vRouter and ipv6-router
This setup allows further open innovation by any 3rd-party For more instructions and documentations please refer to
1 IPv6 Configuration Guide (HTML) httpartifactsopnfvorgipv6docssetupservicevmindexhtml
2 IPv6 User Guide (HTML) httpartifactsopnfvorgipv6docsgapanalysisindexhtml
Automated post installation activities
Refer to the relevant testing guides results and release notes of Yardstick Project
53 Additional testing and validation activities
Many of our testing tools can be manually installed to facilitate targeted testing of features and capabilities of yourscenario The following guides provide instruction on setting up these testing suites
50 Chapter 5 Post Configuration Activities
OPNFV Configuration Guide Release brahmaputra30 (605ebda)
531 Overview of the functest suites
Functest is the OPNFV project primarily targeting function testing In the Continuous Integration pipeline it islaunched after an OPNFV fresh installation to validate and verify the basic functions of the infrastructure
The current list of test suites can be distributed in 3 main domains VIM (Virtualised Infrastructure Manager) Con-trollers and Features
Do-main
Testsuite
Comments
VIM
vPing NFV ldquoHello Worldrdquo using SSH connection and floatting IPvPing_userdataPing using userdata and cloud-init mechanismTempest OpenStack reference test suite [2]Rallybench
OpenStack testing tool benchmarking OpenStack modules [3]
ControllersOpen-Day-light
Opendaylight Test suite
ONOS Test suite of ONOS L2 and L3 functions See ONOSFW User Guide for details
Features
vIMS Example of a real VNF deployment to show the NFV capabilities of the platform The IPMultimedia Subsytem is a typical Telco test case referenced by ETSI It provides a fullyfunctional VoIP System
Promise Resource reservation and management project to identify NFV related requirements andrealize resource reservation for future usage by capacity management of resource poolsregarding compute network and storage See Promise User Guide for details
Doctor Doctor platform as of Brahmaputra release provides the two features ImmediateNotification Consistent resource state awareness (compute) see Doctor User Guide fordetails
SD-NVPN
Implementation of the OpenStack bgpvpn API from the SDNVPN feature project Itallowing the cration of BGP VPNs see SDNVPN User Guide for
Functest includes different test suites with several test cases within Some of the tests are developed by Functest teammembers whereas others are integrated from upstream communities or other OPNFV projects For example Tempestis the OpenStack integration test suite and Functest is in charge of the selection integration and automation of the teststhat fit in OPNFV
The Tempest suite has been customized but no new test cases have been created
The results produced by the tests run from CI are pushed and collected in a NoSQL database The goal is to populatethe database with results from different sources and scenarios and to show them on a Dashboard
There is no real notion of Test domain or Test coverage Basic components (VIM controllers) are tested through theirown suites Feature projects also provide their own test suites with different ways of running their tests
vIMS test case was integrated to demonstrate the capability to deploy a relatively complex NFV scenario on top of theOPNFV infrastructure
Functest considers OPNFV as a black box OPNFV since the Brahmaputra release offers lots of potential combina-tions
bull 2 controllers (OpenDayligh ONOS)
bull 4 installers (Apex Compass Fuel Joid)
Most of the tests are runnable on any combination but some others might have restrictions imposed by the installersor the available deployed features
53 Additional testing and validation activities 51
OPNFV Configuration Guide Release brahmaputra30 (605ebda)
Preparing the Docker container
Pull the Functest Docker image from the Docker hub
docker pull opnfvfunctestbrahmaputra10
Check that the image is available
docker images
Run the docker container giving the environment variables
bull INSTALLER_TYPE possible values are apex compass fuel or joid
bull INSTALLER_IP IP of the installer nodeVM
Functest may need to know the IP of the installer to retrieve automatically the credentials from the installer nodeVMor even from the actual controllers
The minimum command to create the Functest Docker container can be described as follows
docker run -it -e INSTALLER_IP=102002 -e INSTALLER_TYPE=fuel opnfvfunctestbrahmaputra10 binbash
Optionally it is possible to precise the container name through the option ndashname
docker run --name CONTAINER_NAME -it -e INSTALLER_IP=102002 -e INSTALLER_TYPE=fuel opnfvfunctestbrahmaputra10 binbash
It is also possible to to indicate the path of the OpenStack credentials using -v
docker run -it -e INSTALLER_IP=102002 -e INSTALLER_TYPE=fuel -v ltpath_to_your_local_creds_filegthomeopnfvfunctestconfopenstackcreds opnfvfunctestbrahmaputra10 binbash
The local file will be mounted in the container under homeopnfvfunctestconfopenstackcreds
If the intention is to run Functest against any of the supported OPNFV scenarios it is recommended to include alsothe environment variable DEPLOY_SCENARIO for example
docker run -it -e INSTALLER_IP=102002 -e INSTALLER_TYPE=fuel -e DEPLOY_SCENARIO=os-odl_l2-nofeature-ha opnfvfunctestbrahmaputra10 binbash
Inside the container the following directory structure should be in place
`-- home`-- opnfv
|-- functest| |-- conf| |-- data| `-- results`-- repos
|-- bgpvpn|-- doctor|-- functest|-- odl_integration|-- onos|-- promise|-- rally|-- releng`-- vims-test
Basically the container includes
bull Functest directory to store the configuration (the OpenStack creds are stored inhomeopngbfunctestconfopenstackcreds) the data (cirros image needed for some tests) results (sometemporary result logs may be stored here)
52 Chapter 5 Post Configuration Activities
OPNFV Configuration Guide Release brahmaputra30 (605ebda)
bull Repositories the functest repository will be used to prepare the environment and run the tests Other repositoriesare used for the installation of the needed tooling (eg rally) andor the retrieval of feature projects scenarios(eg promise)
The structure under the Functest repository can be described as follows
|-- INFO|-- LICENSE|-- commons| |-- ims| |-- mobile| `-- traffic-profile-guidelinesrst|-- docker| |-- Dockerfile| |-- commonsh| |-- prepare_envsh| |-- requirementspip| `-- run_testssh|-- docs| |-- configguide| |-- devguide| |-- images| |-- results| `-- userguide`-- testcases
|-- Controllers|-- features|-- tests|-- VIM|-- vIMS|-- vPing|-- __init__py|-- config_functestpy|-- config_functestyaml`-- functest_utilspy
We may distinguish 4 different folders
bull commons it is a folder dedicated to store traffic profile or any test inputs that could be reused by any test project
bull docker this folder includes the scripts that will be used to setup the environment and run the tests
bull docs this folder includes the user and installationconfiguration guide
bull testcases this folder includes the scripts required by Functest internal test cases and other feature projects testcases
After the run command a new prompt appears which means that we are inside the container and ready to move to thenext step
Useful Docker commands
When typing exit in the container prompt this will cause exiting the container and probably stopping it Whenstopping a running Docker container all the changes will be lost there is a keyboard shortcut to quit the containerwithout stopping it CTRL+P+Q To reconnect to the running container DO NOT use the run command again (sinceit will create a new container) use exec instead
53 Additional testing and validation activities 53
OPNFV Configuration Guide Release brahmaputra30 (605ebda)
docker psltcopy the container IDgtdocker exec -ti ltCONTAINER_IDgt binbash
or simply
docker exec -ti $(docker ps|grep functest|awk print $1) binbash
There are other useful Docker commands that might be needed to manage possible issues with the containers
List the running containers
docker ps
List all the containers including the stopped ones
docker ps -a
It is useful sometimes to remove a container if there are some problems
docker rm ltCONTAINER_IDgt
Use the -f option if the container is still running it will force to destroy it
docker -f rm ltCONTAINER_IDgt
The Docker image is called opnfvfunctest and it is stored in the public Docker registry under the OPNFV accountdockerhub The are many different tags that have been created automatically by the CI mechanisms but the one thatthis document refers to is brahmaputra10 Pulling other tags might cause some problems while running the tests
Check the Docker documentation dockerdocs for more information
Preparing the Functest environment
Once the docker container is up and running execute the following command in the prompt
$repos_dirfunctestdockerprepare_envsh
NOTE $repos_dir is a default environment variable inside the docker container which points to homeopnfvrepos
This script will make sure that the requirements to run the tests are met and will install the needed libraries and toolsby all Functest test cases It must be run only once every time the docker is started from sratch
Focus on the OpenStack credentials
The OpenStack credentials are needed to run the tests against the VIM There are 3 ways to provide them to Functest
bull using the -v option when running the Docker container
bull create an empty file in homeopnfvfunctestconfopenstackcreds and paste the credentials in it
bull automatically retrieved using the following script $repos_dirrelengutilsfetch_os_credssh
Once the credentials are there they shall be sourced before running the tests
source homeopnfvfunctestconfopenstackcreds
or simply using the environment variable creds
54 Chapter 5 Post Configuration Activities
OPNFV Configuration Guide Release brahmaputra30 (605ebda)
$creds
After this try to run any OpenStack command to see if you get any output for instance
openstack user list
This will return a list of the actual users in the OpenStack deployment In any other case check that the credentialsare sourced
env|grep OS_
This command must show a set of environment variables starting with OS_ for example
OS_REGION_NAME=RegionOneOS_DEFAULT_DOMAIN=defaultOS_PROJECT_NAME=adminOS_PASSWORD=adminOS_AUTH_STRATEGY=keystoneOS_AUTH_URL=http172301035000v20OS_USERNAME=adminOS_TENANT_NAME=adminOS_ENDPOINT_TYPE=internalURLOS_NO_CACHE=true
If still the OpenStack command does not show anything or complains about connectivity issues it could be due to anincorrect url given to the OS_AUTH_URL environment variable Check the deployment settings
SSL Support
If you need to connect to a server that is TLS-enabled (the auth URL begins with lsquohttpsrsquo) and it uses a certificate froma private CA or a self-signed certificate you will need to specify the path to an appropriate CA certificate to use tovalidate the server certificate with the environment variable OS_CACERT
echo $OS_CACERTetcsslcertscacrt
However this certificate does not exist in the container by default It has to be copied manually from the OpenStackdeployment This can be done in 2 ways
1 Create manually that file and copy the contents from the OpenStack controller
2 (recommended) Add the file using a Docker volume when starting the container
-v ltpath_to_your_cert_filegtetcsslcertscacert
You might need to export OS_CACERT environment variable inside the container
export OS_CACERT=etcsslcertscacrt
Certificate verification can be turned off using OS_INSECURE=true For example Fuel uses self-signed cacerts bydefault so an pre step would be
export OS_INSECURE=true
Additional Options
In case you need to provide different configuration parameters to Functest (eg commit IDs or branches for therepositories ) copy the config_functestyaml from the repository to your current directory and run the container
53 Additional testing and validation activities 55
OPNFV Configuration Guide Release brahmaputra30 (605ebda)
with a volume
wget httpsgitopnfvorgcgitfunctestplaintestcasesconfig_functestyaml
ltmodify the file accordinglygt
docker run -ti -e INSTALLER_TYPE=fuel -e INSTALLER_IP=102002 opnfvfunctestbrahmaputra10 -v $(pwd)config_functestyamlhomeopnfvfunctestconfconfig_functestyaml binbash
However this is not recommended since most of the test cases rely on static parameters read from this file andchanging them might cause problems
Proxy support
Functest needs internet access to download some resources for some test cases For example to install the Rallyenvironment This might not work properly if the Jumphost is running through a Proxy
If that is the case make sure the resolvconf and the needed proxy environment variables are properly set
export http_proxy=ltyour http proxy settingsgtexport https_proxy=ltyour https proxy settingsgt
Or refer to the official Docker documentation for Proxy settings
Before running prepare_envsh make sure you can ping http and https sites inside the container For example
nc -v googlecom 80Connection to googlecom 80 port [tcphttp] succeeded
nc -v googlecom 443Connection to googlecom 443 port [tcphttps] succeeded
532 Installing vswitchperf
Supported Operating Systems
bull CentOS 7
bull Fedora 20
bull Fedora 21
bull Fedora 22
bull Ubuntu 1404
Supported vSwitches
The vSwitch must support Open Flow 13 or greater
bull OVS (built from source)
bull OVS with DPDK (built from source)
56 Chapter 5 Post Configuration Activities
OPNFV Configuration Guide Release brahmaputra30 (605ebda)
Supported Hypervisors
bull Qemu version 23
Available VNFs
A simple VNF that forwards traffic through a VM using
bull DPDK testpmd
bull Linux Brigde
bull custom l2fwd module
The VM image can be downloaded from httpartifactsopnfvorgvswitchperfvloop-vnf-ubuntu-1404_20151216qcow2
Other Requirements
The test suite requires Python 33 and relies on a number of other packages These need to be installed for the testsuite to function
Installation of required packages preparation of Python 3 virtual environment and compilation of OVS DPDK andQEMU is performed by script systemsbuild_base_machinesh It should be executed under user account which willbe used for vsperf execution
Please Note Password-less sudo access must be configured for given user account before script is executed
Execution of installation script
$ cd systems$ build_base_machinesh
Please Note you donrsquot need to go into any of the systems subdirectories simply run the top levelbuild_base_machinesh your OS will be detected automatically
Script build_base_machinesh will install all the vsperf dependencies in terms of system packages Python 3x andrequired Python modules In case of CentOS 7 it will install Python 33 from an additional repository provided bySoftware Collections (a link) Installation script will also use virtualenv to create a vsperf virtual environment whichis isolated from the default Python environment This environment will reside in a directory called vsperfenv in$HOME
You will need to activate the virtual environment every time you start a new shell session Its activation is specific toyour OS
CentOS 7
$ scl enable python33 bash$ cd $HOMEvsperfenv$ source binactivate
Fedora and Ubuntu
$ cd $HOMEvsperfenv$ source binactivate
53 Additional testing and validation activities 57
OPNFV Configuration Guide Release brahmaputra30 (605ebda)
Working Behind a Proxy
If yoursquore behind a proxy yoursquoll likely want to configure this before running any of the above For example
export http_proxy=proxymycompanycom123export https_proxy=proxymycompanycom123
533 Yardstick
The projectrsquos goal is to verify infrastructure compliance from the perspective of a Virtual Network Function (VNF)
The Projectrsquos scope is the development of a test framework Yardstick test cases and test stimuli to enable NetworkFunction Virtualization Infrastructure (NFVI) verification
In OPNFV Brahmaputra release generic test cases covering aspects of the metrics in the document ETSI GS NFV-TST001 ldquoPre-deployment Testing Report on Validation of NFV Environments and Servicesrdquo are available furtherOPNFV releases will provide extended testing of these metrics
The Project also includes a sample VNF the Virtual Traffic Classifier (VTC) and its experimental frameworkApexLake
Yardstick is used in OPNFV for verifying the OPNFV infrastructure and some of the OPNFV features The Yardstickframework is deployed in several OPNFV community labs It is installer infrastructure and application independent
See also
This Presentation for an overview of Yardstick and Yardsticktst for material on alignment ETSI TST001 and Yardstick
Yardstick Installation
Abstract
Yardstick currently supports installation on Ubuntu 1404 or by using a Docker image Detailed steps about installingYardstick using both of these options can be found below
To use Yardstick you should have access to an OpenStack environment with at least Nova Neutron Glance Keystoneand Heat installed
The steps needed to run Yardstick are
1 Install Yardstick and create the test configuration yaml file
2 Build a guest image and load the image into the OpenStack environment
3 Create a Neutron external network and load OpenStack environment variables
4 Run the test case
Installing Yardstick on Ubuntu 1404
Installing Yardstick framework Install dependencies
sudo apt-get install python-virtualenv python-devsudo apt-get install libffi-dev libssl-dev git
Create a python virtual environment source it and update setuptools
58 Chapter 5 Post Configuration Activities
OPNFV Configuration Guide Release brahmaputra30 (605ebda)
virtualenv ~yardstick_venvsource ~yardstick_venvbinactivateeasy_install -U setuptools
Download source code and install python dependencies
git clone httpsgerritopnfvorggerrityardstickcd yardstickpython setuppy install
There is also a YouTube video showing the above steps
Installing extra tools
yardstick-plot Yardstick has an internal plotting tool yardstick-plot which can be installed using the follow-ing command
python setuppy develop easy_install yardstick[plot]
Building a guest image Yardstick has a tool for building an Ubuntu Cloud Server image containing all the requiredtools to run test cases supported by Yardstick It is necessary to have sudo rights to use this tool
This image can be built using the following command while in the directory where Yardstick is installed(~yardstick if the framework is installed by following the commands above)
sudo toolsyardstick-img-modify toolsubuntu-server-cloudimg-modifysh
Warning the script will create files by default in tmpworkspaceyardstick and the files will be owned byroot
The created image can be added to OpenStack using the glance image-create or via the OpenStack Dashboard
Example command
glance --os-image-api-version 1 image-create --name yardstick-trusty-server --is-public true --disk-format qcow2 --container-format bare --file tmpworkspaceyardstickyardstick-trusty-serverimg
Installing Yardstick using Docker
Yardstick has two Docker images first one (Yardstick-framework) serves as a replacement for installing the Yardstickframework in a virtual environment (for example as done in Installing Yardstick framework) while the other image ismostly for CI purposes (Yardstick-CI)
Yardstick-framework image Download the source code
git clone httpsgerritopnfvorggerrityardstick
Build the Docker image and tag it as yardstick-framework
cd yardstickdocker build -t yardstick-framework
Run the Docker instance
53 Additional testing and validation activities 59
OPNFV Configuration Guide Release brahmaputra30 (605ebda)
docker run --name yardstick_instance -i -t yardstick-framework
To build a guest image for Yardstick see Building a guest image
Yardstick-CI image Pull the Yardstick-CI Docker image from Docker hub
docker pull opnfvyardstick-ci
Run the Docker image
docker run --privileged=true --rm -t -e INSTALLER_TYPE=$INSTALLER_TYPE -e INSTALLER_IP=$INSTALLER_IP opnfvyardstick-ci run_benchmarks
Where $INSTALLER_TYPE can be fuel foreman or compass and $INSTALLER_IP is the installer masternode IP address (ie 102002 is default for fuel)
Basic steps performed by the Yardstick-CI container
1 clone yardstick and releng repos
2 setup OS credentials (releng scripts)
3 install yardstick and dependencies
4 build yardstick cloud image and upload it to glance
5 upload cirros-033 cloud image to glance
6 run yardstick test scenarios
7 cleanup
OpenStack parameters and credentials
Yardstick-flavor Most of the sample test cases in Yardstick are using an OpenStack flavor called yardstick-flavorwhich deviates from the OpenStack standard m1tiny flavor by the disk size - instead of 1GB it has 3GB Otherparameters are the same as in m1tiny
Environment variables Before running Yardstick it is necessary to export OpenStack environment vari-ables from the OpenStack openrc file (using the source command) and export the external network nameexport EXTERNAL_NETWORK=external-network-name the default name for the external network isnet04_ext
Credential environment variables in the openrc file have to include at least
bull OS_AUTH_URL
bull OS_USERNAME
bull OS_PASSWORD
bull OS_TENANT_NAME
60 Chapter 5 Post Configuration Activities
OPNFV Configuration Guide Release brahmaputra30 (605ebda)
Yardstick default key pair Yardstick uses a SSH key pair to connect to the guest image This key pair can be foundin the resourcesfiles directory To run the ping-hotyaml test sample this key pair needs to be importedto the OpenStack environment
Examples and verifying the install
It is recommended to verify that Yardstick was installed successfully by executing some simple commands and testsamples Below is an example invocation of yardstick help command and pingpy test sample
yardstick -hyardstick task start samplespingyaml
Each testing tool supported by Yardstick has a sample configuration file These configuration files can be found in thesamples directory
Example invocation of yardstick-plot tool
yardstick-plot -i tmpyardstickout -o tmpplots
Default location for the output is tmpyardstickout
More info about the tool can be found by executing
yardstick-plot -h
53 Additional testing and validation activities 61

CHAPTER
FOUR
FEATURE CONFIGURATION
The following sections describe the configuration options for specific platform features provided in BrahmaputraFurther details for each feature are captured in the referred project documentation
41 Copper configuration
This release focused on use of the OpenStack Congress service for managing configuration policy The Congress installprocedure described here is largely manual This procedure as well as the longer-term goal of automated installersupport is a work in progress The procedure is further specific to one OPNFV installer (JOID ie MAASJuJu)based environment Support for other OPNFV installer deployed environments is also a work in progress
411 Pre-configuration activities
This procedure assumes OPNFV has been installed via the JOID installer
412 Hardware configuration
There is no specific hardware configuration required for the Copper project
413 Feature configuration
Following are instructions for installing Congress on an Ubuntu 1404 LXC container in the OPNFV Controller nodeas installed by the JOID installer This guide uses instructions from the Congress intro guide on readthedocs Specificvalues below will need to be modified if you intend to repeat this procedure in your JOID-based install environment
Install Procedure
The install currently occurs via four bash scripts provided in the copper repo See these files for the detailed steps
bull install_congress_1sh creates and starts the linux container for congress on the controller node copiesinstall_congress_2sh to the controller node and invokes it via ssh
bull install_congress_2sh installs congress on the congress server
29
OPNFV Configuration Guide Release brahmaputra30 (605ebda)
Cleanup Procedure
If there is an error during installation use the bash script clean_congresssh which stops the congress server if runningand removes the congress user and service from the controller database
Restarting after server power loss etc
Currently this install procedure is manual Automated install and restoral after host recovery is TBD For now thisprocedure will get the Congress service running again
On jumphost SSH to Congress serversource ~envshjuju ssh ubuntu$CONGRESS_HOST If that fails
On jumphost SSH to controller nodejuju ssh ubuntunode1-control Start the Congress containersudo lxc-start -n juju-trusty-congress -d Verify the Congress container statussudo lxc-ls -f juju-trusty-congressNAME STATE IPV4 IPV6 GROUPS AUTOSTART----------------------------------------------------------------------juju-trusty-congress RUNNING 19216810117 - - NO exit back to the Jumphost wait a minute and go back to the SSH to Congress server step above
On the Congress server that you have logged intosource ~admin-openrcshcd ~gitcongresssource binactivatebincongress-server ampdisown -h 1
42 Doctor Configuration
421 Doctor Inspector
Doctor Inspector is suggested to be placed in one of the controller nodes but it can be put on any host where DoctorMonitor can reach and accessible to the OpenStack Controller (Nova)
Make sure OpenStack env parameters are set properly so that Doctor Inspector can issue admin actions such ascompute host force-down and state update of VM
Then you can configure Doctor Inspector as follows
git clone httpsgerritopnfvorggerritdoctor -b stablebrahmaputracd doctortestsINSPECTOR_PORT=12345python inspectorpy $INSPECTOR_PORT gt inspectorlog 2gtamp1 amp
422 Doctor Monitor
Doctor Monitors are suggested to be placed in one of the controller nodes but those can be put on any host whichis reachable to target compute host and accessible to the Doctor Inspector You need to configure Monitors for allcompute hosts one by one
30 Chapter 4 Feature Configuration
OPNFV Configuration Guide Release brahmaputra30 (605ebda)
Make sure OpenStack env parameters are set properly so that Doctor Inspector can issue admin actions such ascompute host force-down and state update of VM
Then you can configure Doctor Monitor as follows
git clone httpsgerritopnfvorggerritdoctor -b stablebrahmaputracd doctortestsINSPECTOR_PORT=12345COMPUTE_HOST=overcloud-novacompute-0sudo python monitorpy $COMPUTE_HOST
http127001$INSPECTOR_PORTevents gt monitorlog 2gtamp1 amp
43 IPv6 Configuration - Setting Up a Service VM as an IPv6 vRouter
This section provides instructions to set up a service VM as an IPv6 vRouter using OPNFV Brahmaputra Releaseinstallers The environment may be pure OpenStack option or Open Daylight L2-only option The deployment modelmay be HA or non-HA The infrastructure may be bare metal or virtual environment
For complete instructions and documentations of setting up service VM as an IPv6 vRouter using ANY method pleaserefer to
1 IPv6 Configuration Guide (HTML) httpartifactsopnfvorgipv6docssetupservicevmindexhtml
2 IPv6 User Guide (HTML) httpartifactsopnfvorgipv6docsgapanalysisindexhtml
431 Pre-configuration Activities
The configuration will work in 2 environments
1 OpenStack-only environment
2 OpenStack with Open Daylight L2-only environment
Depending on which installer will be used to deploy OPNFV each environment may be deployed on bare metal orvirtualized infrastructure Each deployment may be HA or non-HA
Refer to the previous installer configuration chapters installations guide and release notes
432 Setup Manual in OpenStack-Only Environment
If you intend to set up a service VM as an IPv6 vRouter in OpenStack-only environment of OPNFV BrahmaputraRelease please NOTE that
bull Because the anti-spoofing rules of Security Group feature in OpenStack prevents a VM from forwarding packetswe need to disable Security Group feature in the OpenStack-only environment
bull The hostnames IP addresses and username are for exemplary purpose in instructions Please change as neededto fit your environment
bull The instructions apply to both deployment model of single controller node and HA (High Availability) deploy-ment model where multiple controller nodes are used
43 IPv6 Configuration - Setting Up a Service VM as an IPv6 vRouter 31
OPNFV Configuration Guide Release brahmaputra30 (605ebda)
Install OPNFV and Preparation
OPNFV-NATIVE-INSTALL-1 To install OpenStack-only environment of OPNFV Brahmaputra Release
Apex Installer
HA deployment in OpenStack-only environmentopnfv-deploy -d etcopnfv-apexos-nosdn-nofeature-hayaml
Non-HA deployment in OpenStack-only environment Non-HA deployment is currently not supported by Apex installer
Compass Installer
HA deployment in OpenStack-only environmentexport ISO_URL=file$BUILD_DIRECTORYcompassisoexport OS_VERSION=$COMPASS_OS_VERSIONexport OPENSTACK_VERSION=$COMPASS_OPENSTACK_VERSIONexport CONFDIR=$WORKSPACEdeployconfvm_environmentdeploysh --dha $CONFDIRos-nosdn-nofeature-hayml --network $CONFDIR$NODE_NAMEnetworkyml
Non-HA deployment in OpenStack-only environment Non-HA deployment is currently not supported by Compass installer
Fuel Installer
HA deployment in OpenStack-only environmentdeploysh -s os-nosdn-nofeature-ha
Non-HA deployment in OpenStack-only environmentdeploysh -s os-nosdn-nofeature-noha
Joid Installer
HA deployment in OpenStack-only environmentdeploysh -o liberty -s nosdn -t ha -l default -f ipv6
Non-HA deployment in OpenStack-only environmentdeploysh -o liberty -s nosdn -t nonha -l default -f ipv6
Please NOTE that
bull You need to refer to installerrsquos documentation for other necessary parameters applicable to your deployment
bull You need to refer to Release Notes and installerrsquos documentation if there is any issue in installation
OPNFV-NATIVE-INSTALL-2 Clone the following GitHub repository to get the configuration and metadata files
git clone httpsgithubcomsridhargaddamopnfv_os_ipv6_pocgit optstackopnfv_os_ipv6_poc
Disable Security Groups in OpenStack ML2 Setup
OPNFV-NATIVE-SEC-1 Change the settings in etcneutronpluginsml2ml2_confini as follows
etcneutronpluginsml2ml2_confini[securitygroup]extension_drivers = port_security
32 Chapter 4 Feature Configuration
OPNFV Configuration Guide Release brahmaputra30 (605ebda)
enable_security_group = Falsefirewall_driver = neutronagentfirewallNoopFirewallDriver
OPNFV-NATIVE-SEC-2 Change the settings in etcnovanovaconf as follows
etcnovanovaconf[DEFAULT]security_group_api = novafirewall_driver = novavirtfirewallNoopFirewallDriver
OPNFV-NATIVE-SEC-3 After updating the settings you will have to restart the Neutron and Nova services
Please note that the commands of restarting Neutron and Nova would vary depending on the installer Pleaserefer to relevant documentation of specific installers
Set Up Service VM as IPv6 vRouter
OPNFV-NATIVE-SETUP-1 Now we assume that OpenStack multi-node setup is up and running We have to sourcethe tenant credentials in this step Please NOTE that the method of sourcing tenant credentials may vary dependingon installers For example
Apex installer
source the tenant credentials using Apex installer of OPNFV you need to copy the file homestackovercloudrc from the installer VM called instack to a location in controller node for example in the directory optsource optovercloudrc
Compass installer
source the tenant credentials using Compass installer of OPNFVsource optadmin-openrcsh
Fuel installer
source the tenant credentials using Fuel installer of OPNFVsource rootopenrc
Joid installer
source the tenant credentials using Joid installer of OPNFVsource $HOMEjoid_configadmin-openrc
devstack
source the tenant credentials in devstacksource openrc admin demo
Please refer to relevant documentation of installers if you encounter any issue
OPNFV-NATIVE-SETUP-2 Download fedora22 image which would be used for vRouter
wget httpsdownloadfedoraprojectorgpubfedoralinuxreleases22Cloudx86_64ImagesFedora-Cloud-Base-22-20150521x86_64qcow2
OPNFV-NATIVE-SETUP-3 Import Fedora22 image to glance
glance image-create --name Fedora22 --disk-format qcow2 --container-format bare --file Fedora-Cloud-Base-22-20150521x86_64qcow2
43 IPv6 Configuration - Setting Up a Service VM as an IPv6 vRouter 33
OPNFV Configuration Guide Release brahmaputra30 (605ebda)
OPNFV-NATIVE-SETUP-4 This step is Informational OPNFV Installer has taken care of this step duringdeployment You may refer to this step only if there is any issue or if you are using other installers
We have to move the physical interface (ie the public network interface) to br-ex including moving the publicIP address and setting up default route Please refer to OS-NATIVE-SETUP-4 and OS-NATIVE-SETUP-5 in ourmore complete instruction
OPNFV-NATIVE-SETUP-5 Create Neutron routers ipv4-router and ipv6-router which need to provideexternal connectivity
neutron router-create ipv4-routerneutron router-create ipv6-router
OPNFV-NATIVE-SETUP-6 Create an external networksubnet ext-net using the appropriate values based on thedata-center physical network setup
Please NOTE that you may only need to create the subnet of ext-net because OPNFV installers should have createdan external network during installation You must use the same name of external network that installer creates whenyou create the subnet For example
bull Apex installer external
bull Compass installer ext-net
bull Fuel installer net04_ext
bull Joid installer ext-net
Please refer to the documentation of installers if there is any issue
This is needed only if installer does not create an external work Otherwise skip this command net-createneutron net-create --routerexternal ext-net
Note that the name ext-net may work for some installers such as Compass and Joid Change the name ext-net to match the name of external network that an installer createsneutron subnet-create --disable-dhcp --allocation-pool start=19859156251end=19859156254 --gateway 198591561 ext-net 19859156024
OPNFV-NATIVE-SETUP-7 Create Neutron networks ipv4-int-network1 and ipv6-int-network2 withport_security disabled
neutron net-create --port_security_enabled=False ipv4-int-network1neutron net-create --port_security_enabled=False ipv6-int-network2
OPNFV-NATIVE-SETUP-8 Create IPv4 subnet ipv4-int-subnet1 in the internal networkipv4-int-network1 and associate it to ipv4-router
neutron subnet-create --name ipv4-int-subnet1 --dns-nameserver 8888 ipv4-int-network1 2000024
neutron router-interface-add ipv4-router ipv4-int-subnet1
OPNFV-NATIVE-SETUP-9 Associate the ext-net to the Neutron routers ipv4-router and ipv6-router
Note that the name ext-net may work for some installers such as Compass and Joid Change the name ext-net to match the name of external network that an installer createsneutron router-gateway-set ipv4-router ext-netneutron router-gateway-set ipv6-router ext-net
OPNFV-NATIVE-SETUP-10 Create two subnets one IPv4 subnet ipv4-int-subnet2 and one IPv6 subnetipv6-int-subnet2 in ipv6-int-network2 and associate both subnets to ipv6-router
34 Chapter 4 Feature Configuration
OPNFV Configuration Guide Release brahmaputra30 (605ebda)
neutron subnet-create --name ipv4-int-subnet2 --dns-nameserver 8888 ipv6-int-network2 1000024
neutron subnet-create --name ipv6-int-subnet2 --ip-version 6 --ipv6-ra-mode slaac --ipv6-address-mode slaac ipv6-int-network2 2001db80164
neutron router-interface-add ipv6-router ipv4-int-subnet2neutron router-interface-add ipv6-router ipv6-int-subnet2
OPNFV-NATIVE-SETUP-11 Create a keypair
nova keypair-add vRouterKey gt ~vRouterKey
OPNFV-NATIVE-SETUP-12 Create ports for vRouter (with some specific MAC address - basically for automation- to know the IPv6 addresses that would be assigned to the port)
neutron port-create --name eth0-vRouter --mac-address fa163e111111 ipv6-int-network2neutron port-create --name eth1-vRouter --mac-address fa163e222222 ipv4-int-network1
OPNFV-NATIVE-SETUP-13 Create ports for VM1 and VM2
neutron port-create --name eth0-VM1 --mac-address fa163e333333 ipv4-int-network1neutron port-create --name eth0-VM2 --mac-address fa163e444444 ipv4-int-network1
OPNFV-NATIVE-SETUP-14 Update ipv6-router with routing information to subnet 2001db80264
neutron router-update ipv6-router --routes type=dict list=true destination=2001db80264nexthop=2001db801f8163efffe111111
OPNFV-NATIVE-SETUP-15 Boot Service VM (vRouter) VM1 and VM2
nova boot --image Fedora22 --flavor m1small --user-data optstackopnfv_os_ipv6_pocmetadatatxt --availability-zone novaopnfv-os-compute --nic port-id=$(neutron port-list | grep -w eth0-vRouter | awk print $2) --nic port-id=$(neutron port-list | grep -w eth1-vRouter | awk print $2) --key-name vRouterKey vRouter
nova list
Please wait for some 10 to 15 minutes so that necessary packages (like radvd) are installed and vRouter is upnova console-log vRouter
nova boot --image cirros-034-x86_64-uec --flavor m1tiny --user-data optstackopnfv_os_ipv6_pocset_mtush --availability-zone novaopnfv-os-controller --nic port-id=$(neutron port-list | grep -w eth0-VM1 | awk print $2) --key-name vRouterKey VM1
nova boot --image cirros-034-x86_64-uec --flavor m1tiny--user-data optstackopnfv_os_ipv6_pocset_mtush --availability-zone novaopnfv-os-compute --nic port-id=$(neutron port-list | grep -w eth0-VM2 | awk print $2) --key-name vRouterKey VM2
nova list Verify that all the VMs are in ACTIVE state
OPNFV-NATIVE-SETUP-16 If all goes well the IPv6 addresses assigned to the VMs would be as shown as follows
43 IPv6 Configuration - Setting Up a Service VM as an IPv6 vRouter 35
OPNFV Configuration Guide Release brahmaputra30 (605ebda)
vRouter eth0 interface would have the following IPv6 address 2001db801f8163efffe11111164 vRouter eth1 interface would have the following IPv6 address 2001db802164 VM1 would have the following IPv6 address 2001db802f8163efffe33333364 VM2 would have the following IPv6 address 2001db802f8163efffe44444464
OPNFV-NATIVE-SETUP-17 Now we can SSH to VMs You can execute the following command
1 Create a floatingip and associate it with VM1 VM2 and vRouter (to the port id that is passed) Note that the name ext-net may work for some installers such as Compass and Joid Change the name ext-net to match the name of external network that an installer createsneutron floatingip-create --port-id $(neutron port-list | grep -w eth0-VM1 | awk print $2) ext-netneutron floatingip-create --port-id $(neutron port-list | grep -w eth0-VM2 | awk print $2) ext-netneutron floatingip-create --port-id $(neutron port-list | grep -w eth1-vRouter | awk print $2) ext-net
2 To know display the floatingip associated with VM1 VM2 and vRouterneutron floatingip-list -F floating_ip_address -F port_id | grep $(neutron port-list | grep -w eth0-VM1 | awk print $2) | awk print $2neutron floatingip-list -F floating_ip_address -F port_id | grep $(neutron port-list | grep -w eth0-VM2 | awk print $2) | awk print $2neutron floatingip-list -F floating_ip_address -F port_id | grep $(neutron port-list | grep -w eth1-vRouter | awk print $2) | awk print $2
3 To ssh to the vRouter VM1 and VM2 user can execute the following commandssh -i ~vRouterKey fedoraltfloating-ip-of-vRoutergtssh -i ~vRouterKey cirrosltfloating-ip-of-VM1gtssh -i ~vRouterKey cirrosltfloating-ip-of-VM2gt
433 Setup Manual in OpenStack with Open Daylight L2-Only Environment
If you intend to set up a service VM as an IPv6 vRouter in an environment of OpenStack and Open Daylight L2-onlyof OPNFV Brahmaputra Release please NOTE that
bull The hostnames IP addresses and username are for exemplary purpose in instructions Please change as neededto fit your environment
bull The instructions apply to both deployment model of single controller node and HA (High Availability) deploy-ment model where multiple controller nodes are used
bull However in case of HA when ipv6-router is created in step SETUP-SVM-11 it could be created in anyof the controller node Thus you need to identify in which controller node ipv6-router is created in orderto manually spawn radvd daemon inside the ipv6-router namespace in steps SETUP-SVM-24 throughSETUP-SVM-30
Install OPNFV and Preparation
OPNFV-INSTALL-1 To install OpenStack with Open Daylight L2-only environment of OPNFV Brahmaputra Re-lease
Apex Installer
36 Chapter 4 Feature Configuration
OPNFV Configuration Guide Release brahmaputra30 (605ebda)
HA deployment in OpenStack with Open Daylight L2-only environmentopnfv-deploy -d etcopnfv-apexos-odl_l2-nofeature-hayaml
Non-HA deployment in OpenStack with Open Daylight L2-only environment Non-HA deployment is currently not supported by Apex installer
Compass Installer
HA deployment in OpenStack with Open Daylight L2-only environmentexport ISO_URL=file$BUILD_DIRECTORYcompassisoexport OS_VERSION=$COMPASS_OS_VERSIONexport OPENSTACK_VERSION=$COMPASS_OPENSTACK_VERSIONexport CONFDIR=$WORKSPACEdeployconfvm_environmentdeploysh --dha $CONFDIRos-odl_l2-nofeature-hayml --network $CONFDIR$NODE_NAMEnetworkyml
Non-HA deployment in OpenStack with Open Daylight L2-only environment Non-HA deployment is currently not supported by Compass installer
Fuel Installer
HA deployment in OpenStack with Open Daylight L2-only environmentdeploysh -s os-odl_l2-nofeature-ha
Non-HA deployment in OpenStack with Open Daylight L2-only environmentdeploysh -s os-odl_l2-nofeature-noha
Joid Installer
HA deployment in OpenStack with Open Daylight L2-only environmentdeploysh -o liberty -s odl -t ha -l default -f ipv6
Non-HA deployment in OpenStack with Open Daylight L2-only environmentdeploysh -o liberty -s odl -t nonha -l default -f ipv6
Please NOTE that
bull You need to refer to installerrsquos documentation for other necessary parameters applicable to your deployment
bull You need to refer to Release Notes and installerrsquos documentation if there is any issue in installation
OPNFV-INSTALL-2 Clone the following GitHub repository to get the configuration and metadata files
git clone httpsgithubcomsridhargaddamopnfv_os_ipv6_pocgit optstackopnfv_os_ipv6_poc
Disable Security Groups in OpenStack ML2 Setup
Please NOTE that although Security Groups feature has been disabled automatically through localconf configu-ration file by some installers such as devstack it is very likely that other installers such as Apex Compass Fuelor Joid will enable Security Groups feature after installation
Please make sure that Security Groups are disabled in the setup
OPNFV-SEC-1 Change the settings in etcneutronpluginsml2ml2_confini as follows
etcneutronpluginsml2ml2_confini[securitygroup]enable_security_group = Falsefirewall_driver = neutronagentfirewallNoopFirewallDriver
43 IPv6 Configuration - Setting Up a Service VM as an IPv6 vRouter 37
OPNFV Configuration Guide Release brahmaputra30 (605ebda)
OPNFV-SEC-2 Change the settings in etcnovanovaconf as follows
etcnovanovaconf[DEFAULT]security_group_api = novafirewall_driver = novavirtfirewallNoopFirewallDriver
OPNFV-SEC-3 After updating the settings you will have to restart the Neutron and Nova services
Please note that the commands of restarting Neutron and Nova would vary depending on the installer Pleaserefer to relevant documentation of specific installers
Source the Credentials in OpenStack Controller Node
SETUP-SVM-1 Login in OpenStack Controller Node Start a new terminal and change directory to where Open-Stack is installed
SETUP-SVM-2 We have to source the tenant credentials in this step Please NOTE that the method of sourcingtenant credentials may vary depending on installers For example
Apex installer
source the tenant credentials using Apex installer of OPNFV you need to copy the file homestackovercloudrc from the installer VM called instack to a location in controller node for example in the directory optsource optovercloudrc
Compass installer
source the tenant credentials using Compass installer of OPNFVsource optadmin-openrcsh
Fuel installer
source the tenant credentials using Fuel installer of OPNFVsource rootopenrc
Joid installer
source the tenant credentials using Joid installer of OPNFVsource $HOMEjoid_configadmin-openrc
devstack
source the tenant credentials in devstacksource openrc admin demo
Please refer to relevant documentation of installers if you encounter any issue
Informational Note Move Public Network from Physical Network Interface to br-ex
SETUP-SVM-3 Move the physical interface (ie the public network interface) to br-ex
SETUP-SVM-4 Verify setup of br-ex
Those 2 steps are Informational OPNFV Installer has taken care of those 2 steps during deployment You mayrefer to this step only if there is any issue or if you are using other installers
38 Chapter 4 Feature Configuration
OPNFV Configuration Guide Release brahmaputra30 (605ebda)
We have to move the physical interface (ie the public network interface) to br-ex including moving the publicIP address and setting up default route Please refer to SETUP-SVM-3 and SETUP-SVM-4 in our more completeinstruction
Create IPv4 Subnet and Router with External Connectivity
SETUP-SVM-5 Create a Neutron router ipv4-router which needs to provide external connectivity
neutron router-create ipv4-router
SETUP-SVM-6 Create an external networksubnet ext-net using the appropriate values based on the data-centerphysical network setup
Please NOTE that you may only need to create the subnet of ext-net because OPNFV installers should have createdan external network during installation You must use the same name of external network that installer creates whenyou create the subnet For example
bull Apex installer external
bull Compass installer ext-net
bull Fuel installer net04_ext
bull Joid installer ext-net
Please refer to the documentation of installers if there is any issue
This is needed only if installer does not create an external work Otherwise skip this command net-createneutron net-create --routerexternal ext-net
Note that the name ext-net may work for some installers such as Compass and Joid Change the name ext-net to match the name of external network that an installer createsneutron subnet-create --disable-dhcp --allocation-pool start=19859156251end=19859156254 --gateway 198591561 ext-net 19859156024
Please note that the IP addresses in the command above are for exemplary purpose Please replace the IP addressesof your actual network
SETUP-SVM-7 Associate the ext-net to the Neutron router ipv4-router
Note that the name ext-net may work for some installers such as Compass and Joid Change the name ext-net to match the name of external network that an installer createsneutron router-gateway-set ipv4-router ext-net
SETUP-SVM-8 Create an internaltenant IPv4 network ipv4-int-network1
neutron net-create ipv4-int-network1
SETUP-SVM-9 Create an IPv4 subnet ipv4-int-subnet1 in the internal network ipv4-int-network1
neutron subnet-create --name ipv4-int-subnet1 --dns-nameserver 8888 ipv4-int-network1 2000024
SETUP-SVM-10 Associate the IPv4 internal subnet ipv4-int-subnet1 to the Neutron router ipv4-router
neutron router-interface-add ipv4-router ipv4-int-subnet1
43 IPv6 Configuration - Setting Up a Service VM as an IPv6 vRouter 39
OPNFV Configuration Guide Release brahmaputra30 (605ebda)
Create IPv6 Subnet and Router with External Connectivity
Now let us create a second neutron router where we can ldquomanuallyrdquo spawn a radvd daemon to simulate an externalIPv6 router
SETUP-SVM-11 Create a second Neutron router ipv6-router which needs to provide external connectivity
neutron router-create ipv6-router
SETUP-SVM-12 Associate the ext-net to the Neutron router ipv6-router
Note that the name ext-net may work for some installers such as Compass and Joid Change the name ext-net to match the name of external network that an installer createsneutron router-gateway-set ipv6-router ext-net
SETUP-SVM-13 Create a second internaltenant IPv4 network ipv4-int-network2
neutron net-create ipv4-int-network2
SETUP-SVM-14 Create an IPv4 subnet ipv4-int-subnet2 for the ipv6-router internal networkipv4-int-network2
neutron subnet-create --name ipv4-int-subnet2 --dns-nameserver 8888 ipv4-int-network2 1000024
SETUP-SVM-15 Associate the IPv4 internal subnet ipv4-int-subnet2 to the Neutron router ipv6-router
neutron router-interface-add ipv6-router ipv4-int-subnet2
Prepare Image Metadata and Keypair for Service VM
SETUP-SVM-16 Download fedora22 image which would be used as vRouter
wget httpsdownloadfedoraprojectorgpubfedoralinuxreleases22Cloudx86_64ImagesFedora-Cloud-Base-22-20150521x86_64qcow2
glance image-create --name Fedora22 --disk-format qcow2 --container-format bare --file Fedora-Cloud-Base-22-20150521x86_64qcow2
SETUP-SVM-17 Create a keypair
nova keypair-add vRouterKey gt ~vRouterKey
SETUP-SVM-18 Create ports for vRouter and both the VMs with some specific MAC addresses
neutron port-create --name eth0-vRouter --mac-address fa163e111111 ipv4-int-network2neutron port-create --name eth1-vRouter --mac-address fa163e222222 ipv4-int-network1neutron port-create --name eth0-VM1 --mac-address fa163e333333 ipv4-int-network1neutron port-create --name eth0-VM2 --mac-address fa163e444444 ipv4-int-network1
Boot Service VM (vRouter) with eth0 on ipv4-int-network2 and eth1 on ipv4-int-network1
Let us boot the service VM (vRouter) with eth0 interface on ipv4-int-network2 connecting toipv6-router and eth1 interface on ipv4-int-network1 connecting to ipv4-router
SETUP-SVM-19 Boot the vRouter using Fedora22 image on the OpenStack Compute Node with hostnameopnfv-os-compute
40 Chapter 4 Feature Configuration
OPNFV Configuration Guide Release brahmaputra30 (605ebda)
nova boot --image Fedora22 --flavor m1small --user-data optstackopnfv_os_ipv6_pocmetadatatxt --availability-zone novaopnfv-os-compute --nic port-id=$(neutron port-list | grep -w eth0-vRouter | awk print $2) --nic port-id=$(neutron port-list | grep -w eth1-vRouter | awk print $2) --key-name vRouterKey vRouter
Please note that optstackopnfv_os_ipv6_pocmetadatatxt is used to enable the vRouter to au-tomatically spawn a radvd and
bull Act as an IPv6 vRouter which advertises the RA (Router Advertisements) with prefix 2001db80264on its internal interface (eth1)
bull Forward IPv6 traffic from internal interface (eth1)
SETUP-SVM-20 Verify that Fedora22 image boots up successfully and vRouter has ssh keys properly injected
nova listnova console-log vRouter
Please note that it may take a few minutes for the necessary packages to get installed and ssh keys to be injected
Sample Output[ 762884523] cloud-init[871] ec2 [ 762909634] cloud-init[871] ec2 -----BEGIN SSH HOST KEY FINGERPRINTS-----[ 762931626] cloud-init[871] ec2 2048 e3dc3d4abcb6b07775a170a3d02a47a9 (RSA)[ 762957380] cloud-init[871] ec2 -----END SSH HOST KEY FINGERPRINTS-----[ 762979554] cloud-init[871] ec2
Boot Two Other VMs in ipv4-int-network1
In order to verify that the setup is working let us create two cirros VMs with eth1 interface on theipv4-int-network1 ie connecting to vRouter eth1 interface for internal network
We will have to configure appropriate mtu on the VMsrsquo interface by taking into account the tunneling overhead andany physical switch requirements If so push the mtu to the VM either using dhcp options or via meta-data
SETUP-SVM-21 Create VM1 on OpenStack Controller Node with hostname opnfv-os-controller
nova boot --image cirros-034-x86_64-uec --flavor m1tiny --user-data optstackopnfv_os_ipv6_pocset_mtush --availability-zone novaopnfv-os-controller --nic port-id=$(neutron port-list | grep -w eth0-VM1 | awk print $2) --key-name vRouterKey VM1
SETUP-SVM-22 Create VM2 on OpenStack Compute Node with hostname opnfv-os-compute
nova boot --image cirros-034-x86_64-uec --flavor m1tiny --user-data optstackopnfv_os_ipv6_pocset_mtush --availability-zone novaopnfv-os-compute --nic port-id=$(neutron port-list | grep -w eth0-VM2 | awk print $2) --key-name vRouterKey VM2
SETUP-SVM-23 Confirm that both the VMs are successfully booted
nova listnova console-log VM1nova console-log VM2
43 IPv6 Configuration - Setting Up a Service VM as an IPv6 vRouter 41
OPNFV Configuration Guide Release brahmaputra30 (605ebda)
Spawn RADVD in ipv6-router
Let us manually spawn a radvd daemon inside ipv6-router namespace to simulate an external router First ofall we will have to identify the ipv6-router namespace and move to the namespace
Please NOTE that in case of HA (High Availability) deployment model where multiple controller nodes are usedipv6-router created in step SETUP-SVM-11 could be in any of the controller node Thus you need to iden-tify in which controller node ipv6-router is created in order to manually spawn radvd daemon inside theipv6-router namespace in steps SETUP-SVM-24 through SETUP-SVM-30 The following command in Neu-tron will display the controller on which the ipv6-router is spawned
neutron l3-agent-list-hosting-router ipv6-router
Then you login to that controller and execute steps SETUP-SVM-24 through SETUP-SVM-30
SETUP-SVM-24 identify the ipv6-router namespace and move to the namespace
sudo ip netns exec qrouter-$(neutron router-list | grep -w ipv6-router | awk print $2) bash
SETUP-SVM-25 Upon successful execution of the above command you will be in the router namespace Now letus configure the IPv6 address on the ltqr-xxxgt interface
export router_interface=$(ip a s | grep -w global qr- | awk print $7)ip -6 addr add 2001db8011 dev $router_interface
SETUP-SVM-26 Update the sample file optstackopnfv_os_ipv6_pocscenario2radvdconfwith $router_interface
cp optstackopnfv_os_ipv6_pocscenario2radvdconf tmpradvd$router_interfaceconfsed -i s$router_interface$router_interfaceg tmpradvd$router_interfaceconf
SETUP-SVM-27 Spawn a radvd daemon to simulate an external router This radvd daemon advertises an IPv6subnet prefix of 2001db80164 using RA (Router Advertisement) on its $router_interface so that eth0interface of vRouter automatically configures an IPv6 SLAAC address
$radvd -C tmpradvd$router_interfaceconf -p tmpbr-expidradvd -m syslog
SETUP-SVM-28 Add an IPv6 downstream route pointing to the eth0 interface of vRouter
ip -6 route add 2001db80264 via 2001db801f8163efffe111111
SETUP-SVM-29 The routing table should now look similar to something shown below
ip -6 route show2001db8011 dev qr-42968b9e-62 proto kernel metric 2562001db80164 dev qr-42968b9e-62 proto kernel metric 256 expires 86384sec2001db80264 via 2001db801f8163efffe111111 dev qr-42968b9e-62 proto ra metric 1024 expires 29secfe8064 dev qg-3736e0c7-7c proto kernel metric 256fe8064 dev qr-42968b9e-62 proto kernel metric 256
SETUP-SVM-30 If all goes well the IPv6 addresses assigned to the VMs would be as shown as follows
vRouter eth0 interface would have the following IPv6 address 2001db801f8163efffe11111164 vRouter eth1 interface would have the following IPv6 address 2001db802164 VM1 would have the following IPv6 address 2001db802f8163efffe33333364 VM2 would have the following IPv6 address 2001db802f8163efffe44444464
42 Chapter 4 Feature Configuration
OPNFV Configuration Guide Release brahmaputra30 (605ebda)
Testing to Verify Setup Complete
Now let us SSH to those VMs eg VM1 and or VM2 and or vRouter to confirm that it has successfully configuredthe IPv6 address using SLAAC with prefix 2001db80264 from vRouter
We use floatingip mechanism to achieve SSH
SETUP-SVM-31 Now we can SSH to VMs You can execute the following command
1 Create a floatingip and associate it with VM1 VM2 and vRouter (to the port id that is passed) Note that the name ext-net may work for some installers such as Compass and Joid Change the name ext-net to match the name of external network that an installer createsneutron floatingip-create --port-id $(neutron port-list | grep -w eth0-VM1 | awk print $2) ext-netneutron floatingip-create --port-id $(neutron port-list | grep -w eth0-VM2 | awk print $2) ext-netneutron floatingip-create --port-id $(neutron port-list | grep -w eth1-vRouter | awk print $2) ext-net
2 To know display the floatingip associated with VM1 VM2 and vRouterneutron floatingip-list -F floating_ip_address -F port_id | grep $(neutron port-list | grep -w eth0-VM1 | awk print $2) | awk print $2neutron floatingip-list -F floating_ip_address -F port_id | grep $(neutron port-list | grep -w eth0-VM2 | awk print $2) | awk print $2neutron floatingip-list -F floating_ip_address -F port_id | grep $(neutron port-list | grep -w eth1-vRouter | awk print $2) | awk print $2
3 To ssh to the vRouter VM1 and VM2 user can execute the following commandssh -i ~vRouterKey fedoraltfloating-ip-of-vRoutergtssh -i ~vRouterKey cirrosltfloating-ip-of-VM1gtssh -i ~vRouterKey cirrosltfloating-ip-of-VM2gt
If everything goes well ssh will be successful and you will be logged into those VMs Run some commands to verifythat IPv6 addresses are configured on eth0 interface
SETUP-SVM-32 Show an IPv6 address with a prefix of 2001db80264
ip address show
SETUP-SVM-33 ping some external IPv6 address eg ipv6-router
ping6 2001db8011
If the above ping6 command succeeds it implies that vRouter was able to successfully forward the IPv6 traffic toreach external ipv6-router
44 Installing OVSNFV Fuel Plugin
bull On the Fuel UI create a new environment
bull In Settings gt Userspace OVS support check ldquoUserspace OVS supportrdquo
bull Continue with environment configuration and deployment as normal
441 Upgrading the plugin
From time to time new versions of the plugin may become available
44 Installing OVSNFV Fuel Plugin 43
OPNFV Configuration Guide Release brahmaputra30 (605ebda)
The plugin cannot be upgraded if an active environment is using the plugin
In order to upgrade the plugin
bull Copy the updated plugin file to the fuel-master
bull On the Fuel UI reset the environment
bull On the Fuel CLI ldquofuel plugins ndashupdate ltfuel-plugin-filegtrdquo
bull On the Fuel UI re-deploy the environment
45 Promise Feature Configuration Overview
451 Promise installation
Install nodejs npm and promise
curl -sL httpsdebnodesourcecomsetup_4x | sudo -E bash -sudo apt-get install -y nodejssudo npm -g install npmlatestgit clone httpsgithubcomopnfvpromisegitcd promisenpm install
Please note that the last command lsquonpm installrsquo will install all needed dependencies for promise (including yangforgeand mocha)
452 Testing
Please perform the following preparation steps
1 Set OpenStack environment parameters properly (eg source openrc admin demo in DevStack)
2 Create OpenStack tenant (eg promise) and tenant user (eg promiser)
3 Create a flavor in Nova with 1 vCPU and 512 MB RAM
4 Create a private network subnet and router in Neutron
5 Create an image in Glance
Once done the promise test script can be invoked as follows (as a single line command)
NODE_ENV=mytest OS_TENANT_NAME=promise OS_USERNAME=promiser OS_PASSWORD=ltuser password from Step 2gt OS_TEST_FLAVOR=ltflavor ID from Step 3gt OS_TEST_NETWORK=ltnetwork ID from Step 4gt OS_TEST_IMAGE=ltimage ID from Step 5gt npm run -s test -- --reporter json gt promise-resultsjson
The results of the tests will be stored in the promise-resultsjson file
The results can also be seen in the console (ldquonpm run -s testrdquo)
All 33 tests passing Congratulations promise has been successfully installed and configured
44 Chapter 4 Feature Configuration
OPNFV Configuration Guide Release brahmaputra30 (605ebda)
45 Promise Feature Configuration Overview 45
OPNFV Configuration Guide Release brahmaputra30 (605ebda)
46 Configuring SDNVPN features
Fuel installer configuration
In order to install the BGPVPN feature the corresponding checkbox in Fuel has to be selected This will triggerinstallation of the OpenStack BGPVPN API extension for Neutron (set up for using the ODL driver)
In addition ODL has to be installed see the corresponding section in the respective installer documentation on how toinstall ODL If the BGPVPN feature is installed ODL will automatically be installed with VPN Service karaf featureactivated
No post-deploy configuration is necessary The Fuel BGPVPN plugin and the ODL plugin should set up the clusterready for BGPVPNs being created This includes the set-up of internal VxLAN transport tunnels between computenodes
No post-configuration activities are required
46 Chapter 4 Feature Configuration
CHAPTER
FIVE
POST CONFIGURATION ACTIVITIES
Once you have deployed and configured your scenario and features you should validate the state of the system usingthe following guides
51 Scenario validation activities
The following guides provide information on how to validate the installation of you scenario based on the tools andtest suites available for the installation tool you have selected
511 Fuel post installation procedures
Automated post installation activities
Fuel provides a fairly broad coverage of built in automated health checks These validate the installation in terms ofconfiguration services networking storage policies etc The execution of the full range of health checks takes lessthan 30 minutes
For instructions on how to run health-checks please read the Fuel installation instructions
Platform components validation
Consult the feature sections in this document for any post-install feature specific validationhealth-checks
512 JOID post installation procedures
Configure OpenStack
In each SDN directory for example joidciopencontrail there is a folder for Juju deployer where you can find thecharm bundle yaml files that the deploysh uses to deploy
In the same directory there is scripts folder where you can find shell scripts to help you configure the OpenStackcloud that you just deployed These scripts are created to help you configure a basic OpenStack Cloud to verify thecloud For more info on OpenStack Cloud configuration please refer to the OpenStack Cloud Administrator Guideon docsopenstackorg Similarly for complete SDN configuration please refer to the respective SDN adminstratorguide
Each SDN solution requires slightly different setup please refer to the README in each SDN folder Most likelyyou will need to modify the openstacksh and cloud-setupsh scripts for the floating IP range private IP network andSSH keys Please go through openstacksh glancesh and cloud-setupsh and make changes as you see fit
47
OPNFV Configuration Guide Release brahmaputra30 (605ebda)
52 Feature validation activities
The following sections provide information on how to validate the features you have installed in your scenario
521 Copper post installation procedures
This release focused on use of the OpenStack Congress service for managing configuration policy The Congressinstall verify procedure described here is largely manual This procedure as well as the longer-term goal of automatedverification support is a work in progress The procedure is further specific to one OPNFV installer (JOID ieMAASJuJu) based environment
Automated post installation activities
No automated procedures are provided at this time
Copper post configuration procedures
No configuration procedures are required beyond the basic install procedure
Platform components validation
Following are notes on creating a container as test driver for Congress This is based upon an Ubuntu host as installedby JOID
Create and Activate the Container
On the jumphost
sudo lxc-create -n trusty-copper -t usrsharelxctemplateslxc-ubuntu -- -b ubuntu ~opnfvsudo lxc-start -n trusty-copper -dsudo lxc-info --name trusty-copper(typical output)Name trusty-copperState RUNNINGPID 4563IP 100344CPU use 2877 secondsBlkIO use 52279 MiBMemory use 55975 MiBKMem use 0 bytesLink vethDMFOANTX bytes 262 MiBRX bytes 8848 MiBTotal bytes 9110 MiB
Login and configure the test server
48 Chapter 5 Post Configuration Activities
OPNFV Configuration Guide Release brahmaputra30 (605ebda)
ssh ubuntu100344sudo apt-get updatesudo apt-get upgrade -y
Install pipsudo apt-get install python-pip -y
Install javasudo apt-get install default-jre -y
Install other dependenciessudo apt-get install git gcc python-dev libxml2 libxslt1-dev libzip-dev php5-curl -y
Setup OpenStack environment variables per your OPNFV installexport CONGRESS_HOST=19216810117export KEYSTONE_HOST=19216810108export CEILOMETER_HOST=19216810105export CINDER_HOST=19216810101export GLANCE_HOST=19216810106export HEAT_HOST=19216810107export NEUTRON_HOST=19216810111export NOVA_HOST=19216810112source ~admin-openrcsh
Install and test OpenStack clientmkdir ~gitcd gitgit clone httpsgithubcomopenstackpython-openstackclientgitcd python-openstackclientgit checkout stablelibertysudo pip install -r requirementstxtsudo python setuppy installopenstack service list(typical output)+----------------------------------+------------+----------------+| ID | Name | Type |+----------------------------------+------------+----------------+| 2f8799ae50f24c928c021fabf8a50f5f | keystone | identity || 351b13f56d9a4e25849406ec1d5a2726 | cinder | volume || 5129510c3143454f9ba8ec7e6735e267 | cinderv2 | volumev2 || 5ee1e220460f41dea9be06921400ce9b | congress | policy || 78e73a7789a14f56a5d248a0cd141201 | quantum | network || 9d5a00fb475a45b2ae6767528299ed6b | ceilometer | metering || 9e4b1624ef0b434abc0b82f607c5045c | heat | orchestration || b6c01ceb5023442d9f394b83f2a18e01 | heat-cfn | cloudformation || ba6199e3505045ad87e2a7175bd0c57f | glance | image || d753f304a0d541dbb989780ae70328a8 | nova | compute |+----------------------------------+------------+----------------+
Install and test Congress clientcd ~gitgit clone httpsgithubcomopenstackpython-congressclientgitcd python-congressclientgit checkout stablelibertysudo pip install -r requirementstxtsudo python setuppy installopenstack congress driver list(typical output)+------------+--------------------------------------------------------------------------+| id | description |+------------+--------------------------------------------------------------------------+| ceilometer | Datasource driver that interfaces with ceilometer || neutronv2 | Datasource driver that interfaces with OpenStack Networking aka Neutron || nova | Datasource driver that interfaces with OpenStack Compute aka nova || keystone | Datasource driver that interfaces with keystone || cinder | Datasource driver that interfaces with OpenStack cinder || glancev2 | Datasource driver that interfaces with OpenStack Images aka Glance |+------------+--------------------------------------------------------------------------+
Install and test Glance clientcd ~gitgit clone httpsgithubcomopenstackpython-glanceclientgitcd python-glanceclientgit checkout stablelibertysudo pip install -r requirementstxtsudo python setuppy installglance image-list(typical output)+--------------------------------------+---------------------+| ID | Name |+--------------------------------------+---------------------+| 6ce4433e-65c0-4cd8-958d-b06e30c76241 | cirros-033-x86_64 |+--------------------------------------+---------------------+
Install and test Neutron clientcd ~gitgit clone httpsgithubcomopenstackpython-neutronclientgitcd python-neutronclientgit checkout stablelibertysudo pip install -r requirementstxtsudo python setuppy installneutron net-list(typical output)+--------------------------------------+----------+------------------------------------------------------+| id | name | subnets |+--------------------------------------+----------+------------------------------------------------------+| dc6227df-af41-439f-bd2c-c2c2f0fe7fc5 | public | 5745846c-dd79-4900-a7da-bf506348ceac 19216810024 || a3f9f13a-5de9-4d3b-98c8-d2e40a2ef8e9 | internal | 5e0be862-90da-44ab-af43-56d5c65aa049 1000024 |+--------------------------------------+----------+------------------------------------------------------+
Install and test Nova clientcd ~gitgit clone httpsgithubcomopenstackpython-novaclientgitcd python-novaclientgit checkout stablelibertysudo pip install -r requirementstxtsudo python setuppy installnova hypervisor-list(typical output)+----+---------------------+-------+---------+| ID | Hypervisor hostname | State | Status |+----+---------------------+-------+---------+| 1 | compute1maas | up | enabled |+----+---------------------+-------+---------+
Install and test Keystone clientcd ~gitgit clone httpsgithubcomopenstackpython-keystoneclientgitcd python-keystoneclientgit checkout stablelibertysudo pip install -r requirementstxtsudo python setuppy install
52 Feature validation activities 49
OPNFV Configuration Guide Release brahmaputra30 (605ebda)
Setup the Congress Test Webapp
Clone Copper (if not already cloned in user home)cd ~gitif [ -d ~gitcopper ] then git clone httpsgerritopnfvorggerritcopper fi
Copy the Apache configsudo cp ~gitcoppercomponentscongresstest-webappwwwubuntu-apache2conf etcapache2apache2conf
Point proxyphp to the Congress server per your installsed -i -- s19216810117$CONGRESS_HOSTg ~gitcoppercomponentscongresstest-webappwwwhtmlproxyindexphp
Copy the webapp to the Apache root directory and fix permissionssudo cp -R ~gitcoppercomponentscongresstest-webappwwwhtml varwwwsudo chmod 755 varwwwhtml -R
Make webapp log directory and set permissionsmkdir ~logschmod 777 ~logs
Restart Apachesudo service apache2 restart
Using the Test Webapp
Browse to the trusty-copper server IP address
Interactive options are meant to be self-explanatory given a basic familiarity with the Congress service and data modelBut the app will be developed with additional features and UI elements
522 IPv6 Post Installation Procedures
Congratulations you have completed the setup of using a service VM to act as an IPv6 vRouter You have validatedthe setup based on the instruction in previous sections If you want to further test your setup you can ping6 amongVM1 VM2 vRouter and ipv6-router
This setup allows further open innovation by any 3rd-party For more instructions and documentations please refer to
1 IPv6 Configuration Guide (HTML) httpartifactsopnfvorgipv6docssetupservicevmindexhtml
2 IPv6 User Guide (HTML) httpartifactsopnfvorgipv6docsgapanalysisindexhtml
Automated post installation activities
Refer to the relevant testing guides results and release notes of Yardstick Project
53 Additional testing and validation activities
Many of our testing tools can be manually installed to facilitate targeted testing of features and capabilities of yourscenario The following guides provide instruction on setting up these testing suites
50 Chapter 5 Post Configuration Activities
OPNFV Configuration Guide Release brahmaputra30 (605ebda)
531 Overview of the functest suites
Functest is the OPNFV project primarily targeting function testing In the Continuous Integration pipeline it islaunched after an OPNFV fresh installation to validate and verify the basic functions of the infrastructure
The current list of test suites can be distributed in 3 main domains VIM (Virtualised Infrastructure Manager) Con-trollers and Features
Do-main
Testsuite
Comments
VIM
vPing NFV ldquoHello Worldrdquo using SSH connection and floatting IPvPing_userdataPing using userdata and cloud-init mechanismTempest OpenStack reference test suite [2]Rallybench
OpenStack testing tool benchmarking OpenStack modules [3]
ControllersOpen-Day-light
Opendaylight Test suite
ONOS Test suite of ONOS L2 and L3 functions See ONOSFW User Guide for details
Features
vIMS Example of a real VNF deployment to show the NFV capabilities of the platform The IPMultimedia Subsytem is a typical Telco test case referenced by ETSI It provides a fullyfunctional VoIP System
Promise Resource reservation and management project to identify NFV related requirements andrealize resource reservation for future usage by capacity management of resource poolsregarding compute network and storage See Promise User Guide for details
Doctor Doctor platform as of Brahmaputra release provides the two features ImmediateNotification Consistent resource state awareness (compute) see Doctor User Guide fordetails
SD-NVPN
Implementation of the OpenStack bgpvpn API from the SDNVPN feature project Itallowing the cration of BGP VPNs see SDNVPN User Guide for
Functest includes different test suites with several test cases within Some of the tests are developed by Functest teammembers whereas others are integrated from upstream communities or other OPNFV projects For example Tempestis the OpenStack integration test suite and Functest is in charge of the selection integration and automation of the teststhat fit in OPNFV
The Tempest suite has been customized but no new test cases have been created
The results produced by the tests run from CI are pushed and collected in a NoSQL database The goal is to populatethe database with results from different sources and scenarios and to show them on a Dashboard
There is no real notion of Test domain or Test coverage Basic components (VIM controllers) are tested through theirown suites Feature projects also provide their own test suites with different ways of running their tests
vIMS test case was integrated to demonstrate the capability to deploy a relatively complex NFV scenario on top of theOPNFV infrastructure
Functest considers OPNFV as a black box OPNFV since the Brahmaputra release offers lots of potential combina-tions
bull 2 controllers (OpenDayligh ONOS)
bull 4 installers (Apex Compass Fuel Joid)
Most of the tests are runnable on any combination but some others might have restrictions imposed by the installersor the available deployed features
53 Additional testing and validation activities 51
OPNFV Configuration Guide Release brahmaputra30 (605ebda)
Preparing the Docker container
Pull the Functest Docker image from the Docker hub
docker pull opnfvfunctestbrahmaputra10
Check that the image is available
docker images
Run the docker container giving the environment variables
bull INSTALLER_TYPE possible values are apex compass fuel or joid
bull INSTALLER_IP IP of the installer nodeVM
Functest may need to know the IP of the installer to retrieve automatically the credentials from the installer nodeVMor even from the actual controllers
The minimum command to create the Functest Docker container can be described as follows
docker run -it -e INSTALLER_IP=102002 -e INSTALLER_TYPE=fuel opnfvfunctestbrahmaputra10 binbash
Optionally it is possible to precise the container name through the option ndashname
docker run --name CONTAINER_NAME -it -e INSTALLER_IP=102002 -e INSTALLER_TYPE=fuel opnfvfunctestbrahmaputra10 binbash
It is also possible to to indicate the path of the OpenStack credentials using -v
docker run -it -e INSTALLER_IP=102002 -e INSTALLER_TYPE=fuel -v ltpath_to_your_local_creds_filegthomeopnfvfunctestconfopenstackcreds opnfvfunctestbrahmaputra10 binbash
The local file will be mounted in the container under homeopnfvfunctestconfopenstackcreds
If the intention is to run Functest against any of the supported OPNFV scenarios it is recommended to include alsothe environment variable DEPLOY_SCENARIO for example
docker run -it -e INSTALLER_IP=102002 -e INSTALLER_TYPE=fuel -e DEPLOY_SCENARIO=os-odl_l2-nofeature-ha opnfvfunctestbrahmaputra10 binbash
Inside the container the following directory structure should be in place
`-- home`-- opnfv
|-- functest| |-- conf| |-- data| `-- results`-- repos
|-- bgpvpn|-- doctor|-- functest|-- odl_integration|-- onos|-- promise|-- rally|-- releng`-- vims-test
Basically the container includes
bull Functest directory to store the configuration (the OpenStack creds are stored inhomeopngbfunctestconfopenstackcreds) the data (cirros image needed for some tests) results (sometemporary result logs may be stored here)
52 Chapter 5 Post Configuration Activities
OPNFV Configuration Guide Release brahmaputra30 (605ebda)
bull Repositories the functest repository will be used to prepare the environment and run the tests Other repositoriesare used for the installation of the needed tooling (eg rally) andor the retrieval of feature projects scenarios(eg promise)
The structure under the Functest repository can be described as follows
|-- INFO|-- LICENSE|-- commons| |-- ims| |-- mobile| `-- traffic-profile-guidelinesrst|-- docker| |-- Dockerfile| |-- commonsh| |-- prepare_envsh| |-- requirementspip| `-- run_testssh|-- docs| |-- configguide| |-- devguide| |-- images| |-- results| `-- userguide`-- testcases
|-- Controllers|-- features|-- tests|-- VIM|-- vIMS|-- vPing|-- __init__py|-- config_functestpy|-- config_functestyaml`-- functest_utilspy
We may distinguish 4 different folders
bull commons it is a folder dedicated to store traffic profile or any test inputs that could be reused by any test project
bull docker this folder includes the scripts that will be used to setup the environment and run the tests
bull docs this folder includes the user and installationconfiguration guide
bull testcases this folder includes the scripts required by Functest internal test cases and other feature projects testcases
After the run command a new prompt appears which means that we are inside the container and ready to move to thenext step
Useful Docker commands
When typing exit in the container prompt this will cause exiting the container and probably stopping it Whenstopping a running Docker container all the changes will be lost there is a keyboard shortcut to quit the containerwithout stopping it CTRL+P+Q To reconnect to the running container DO NOT use the run command again (sinceit will create a new container) use exec instead
53 Additional testing and validation activities 53
OPNFV Configuration Guide Release brahmaputra30 (605ebda)
docker psltcopy the container IDgtdocker exec -ti ltCONTAINER_IDgt binbash
or simply
docker exec -ti $(docker ps|grep functest|awk print $1) binbash
There are other useful Docker commands that might be needed to manage possible issues with the containers
List the running containers
docker ps
List all the containers including the stopped ones
docker ps -a
It is useful sometimes to remove a container if there are some problems
docker rm ltCONTAINER_IDgt
Use the -f option if the container is still running it will force to destroy it
docker -f rm ltCONTAINER_IDgt
The Docker image is called opnfvfunctest and it is stored in the public Docker registry under the OPNFV accountdockerhub The are many different tags that have been created automatically by the CI mechanisms but the one thatthis document refers to is brahmaputra10 Pulling other tags might cause some problems while running the tests
Check the Docker documentation dockerdocs for more information
Preparing the Functest environment
Once the docker container is up and running execute the following command in the prompt
$repos_dirfunctestdockerprepare_envsh
NOTE $repos_dir is a default environment variable inside the docker container which points to homeopnfvrepos
This script will make sure that the requirements to run the tests are met and will install the needed libraries and toolsby all Functest test cases It must be run only once every time the docker is started from sratch
Focus on the OpenStack credentials
The OpenStack credentials are needed to run the tests against the VIM There are 3 ways to provide them to Functest
bull using the -v option when running the Docker container
bull create an empty file in homeopnfvfunctestconfopenstackcreds and paste the credentials in it
bull automatically retrieved using the following script $repos_dirrelengutilsfetch_os_credssh
Once the credentials are there they shall be sourced before running the tests
source homeopnfvfunctestconfopenstackcreds
or simply using the environment variable creds
54 Chapter 5 Post Configuration Activities
OPNFV Configuration Guide Release brahmaputra30 (605ebda)
$creds
After this try to run any OpenStack command to see if you get any output for instance
openstack user list
This will return a list of the actual users in the OpenStack deployment In any other case check that the credentialsare sourced
env|grep OS_
This command must show a set of environment variables starting with OS_ for example
OS_REGION_NAME=RegionOneOS_DEFAULT_DOMAIN=defaultOS_PROJECT_NAME=adminOS_PASSWORD=adminOS_AUTH_STRATEGY=keystoneOS_AUTH_URL=http172301035000v20OS_USERNAME=adminOS_TENANT_NAME=adminOS_ENDPOINT_TYPE=internalURLOS_NO_CACHE=true
If still the OpenStack command does not show anything or complains about connectivity issues it could be due to anincorrect url given to the OS_AUTH_URL environment variable Check the deployment settings
SSL Support
If you need to connect to a server that is TLS-enabled (the auth URL begins with lsquohttpsrsquo) and it uses a certificate froma private CA or a self-signed certificate you will need to specify the path to an appropriate CA certificate to use tovalidate the server certificate with the environment variable OS_CACERT
echo $OS_CACERTetcsslcertscacrt
However this certificate does not exist in the container by default It has to be copied manually from the OpenStackdeployment This can be done in 2 ways
1 Create manually that file and copy the contents from the OpenStack controller
2 (recommended) Add the file using a Docker volume when starting the container
-v ltpath_to_your_cert_filegtetcsslcertscacert
You might need to export OS_CACERT environment variable inside the container
export OS_CACERT=etcsslcertscacrt
Certificate verification can be turned off using OS_INSECURE=true For example Fuel uses self-signed cacerts bydefault so an pre step would be
export OS_INSECURE=true
Additional Options
In case you need to provide different configuration parameters to Functest (eg commit IDs or branches for therepositories ) copy the config_functestyaml from the repository to your current directory and run the container
53 Additional testing and validation activities 55
OPNFV Configuration Guide Release brahmaputra30 (605ebda)
with a volume
wget httpsgitopnfvorgcgitfunctestplaintestcasesconfig_functestyaml
ltmodify the file accordinglygt
docker run -ti -e INSTALLER_TYPE=fuel -e INSTALLER_IP=102002 opnfvfunctestbrahmaputra10 -v $(pwd)config_functestyamlhomeopnfvfunctestconfconfig_functestyaml binbash
However this is not recommended since most of the test cases rely on static parameters read from this file andchanging them might cause problems
Proxy support
Functest needs internet access to download some resources for some test cases For example to install the Rallyenvironment This might not work properly if the Jumphost is running through a Proxy
If that is the case make sure the resolvconf and the needed proxy environment variables are properly set
export http_proxy=ltyour http proxy settingsgtexport https_proxy=ltyour https proxy settingsgt
Or refer to the official Docker documentation for Proxy settings
Before running prepare_envsh make sure you can ping http and https sites inside the container For example
nc -v googlecom 80Connection to googlecom 80 port [tcphttp] succeeded
nc -v googlecom 443Connection to googlecom 443 port [tcphttps] succeeded
532 Installing vswitchperf
Supported Operating Systems
bull CentOS 7
bull Fedora 20
bull Fedora 21
bull Fedora 22
bull Ubuntu 1404
Supported vSwitches
The vSwitch must support Open Flow 13 or greater
bull OVS (built from source)
bull OVS with DPDK (built from source)
56 Chapter 5 Post Configuration Activities
OPNFV Configuration Guide Release brahmaputra30 (605ebda)
Supported Hypervisors
bull Qemu version 23
Available VNFs
A simple VNF that forwards traffic through a VM using
bull DPDK testpmd
bull Linux Brigde
bull custom l2fwd module
The VM image can be downloaded from httpartifactsopnfvorgvswitchperfvloop-vnf-ubuntu-1404_20151216qcow2
Other Requirements
The test suite requires Python 33 and relies on a number of other packages These need to be installed for the testsuite to function
Installation of required packages preparation of Python 3 virtual environment and compilation of OVS DPDK andQEMU is performed by script systemsbuild_base_machinesh It should be executed under user account which willbe used for vsperf execution
Please Note Password-less sudo access must be configured for given user account before script is executed
Execution of installation script
$ cd systems$ build_base_machinesh
Please Note you donrsquot need to go into any of the systems subdirectories simply run the top levelbuild_base_machinesh your OS will be detected automatically
Script build_base_machinesh will install all the vsperf dependencies in terms of system packages Python 3x andrequired Python modules In case of CentOS 7 it will install Python 33 from an additional repository provided bySoftware Collections (a link) Installation script will also use virtualenv to create a vsperf virtual environment whichis isolated from the default Python environment This environment will reside in a directory called vsperfenv in$HOME
You will need to activate the virtual environment every time you start a new shell session Its activation is specific toyour OS
CentOS 7
$ scl enable python33 bash$ cd $HOMEvsperfenv$ source binactivate
Fedora and Ubuntu
$ cd $HOMEvsperfenv$ source binactivate
53 Additional testing and validation activities 57
OPNFV Configuration Guide Release brahmaputra30 (605ebda)
Working Behind a Proxy
If yoursquore behind a proxy yoursquoll likely want to configure this before running any of the above For example
export http_proxy=proxymycompanycom123export https_proxy=proxymycompanycom123
533 Yardstick
The projectrsquos goal is to verify infrastructure compliance from the perspective of a Virtual Network Function (VNF)
The Projectrsquos scope is the development of a test framework Yardstick test cases and test stimuli to enable NetworkFunction Virtualization Infrastructure (NFVI) verification
In OPNFV Brahmaputra release generic test cases covering aspects of the metrics in the document ETSI GS NFV-TST001 ldquoPre-deployment Testing Report on Validation of NFV Environments and Servicesrdquo are available furtherOPNFV releases will provide extended testing of these metrics
The Project also includes a sample VNF the Virtual Traffic Classifier (VTC) and its experimental frameworkApexLake
Yardstick is used in OPNFV for verifying the OPNFV infrastructure and some of the OPNFV features The Yardstickframework is deployed in several OPNFV community labs It is installer infrastructure and application independent
See also
This Presentation for an overview of Yardstick and Yardsticktst for material on alignment ETSI TST001 and Yardstick
Yardstick Installation
Abstract
Yardstick currently supports installation on Ubuntu 1404 or by using a Docker image Detailed steps about installingYardstick using both of these options can be found below
To use Yardstick you should have access to an OpenStack environment with at least Nova Neutron Glance Keystoneand Heat installed
The steps needed to run Yardstick are
1 Install Yardstick and create the test configuration yaml file
2 Build a guest image and load the image into the OpenStack environment
3 Create a Neutron external network and load OpenStack environment variables
4 Run the test case
Installing Yardstick on Ubuntu 1404
Installing Yardstick framework Install dependencies
sudo apt-get install python-virtualenv python-devsudo apt-get install libffi-dev libssl-dev git
Create a python virtual environment source it and update setuptools
58 Chapter 5 Post Configuration Activities
OPNFV Configuration Guide Release brahmaputra30 (605ebda)
virtualenv ~yardstick_venvsource ~yardstick_venvbinactivateeasy_install -U setuptools
Download source code and install python dependencies
git clone httpsgerritopnfvorggerrityardstickcd yardstickpython setuppy install
There is also a YouTube video showing the above steps
Installing extra tools
yardstick-plot Yardstick has an internal plotting tool yardstick-plot which can be installed using the follow-ing command
python setuppy develop easy_install yardstick[plot]
Building a guest image Yardstick has a tool for building an Ubuntu Cloud Server image containing all the requiredtools to run test cases supported by Yardstick It is necessary to have sudo rights to use this tool
This image can be built using the following command while in the directory where Yardstick is installed(~yardstick if the framework is installed by following the commands above)
sudo toolsyardstick-img-modify toolsubuntu-server-cloudimg-modifysh
Warning the script will create files by default in tmpworkspaceyardstick and the files will be owned byroot
The created image can be added to OpenStack using the glance image-create or via the OpenStack Dashboard
Example command
glance --os-image-api-version 1 image-create --name yardstick-trusty-server --is-public true --disk-format qcow2 --container-format bare --file tmpworkspaceyardstickyardstick-trusty-serverimg
Installing Yardstick using Docker
Yardstick has two Docker images first one (Yardstick-framework) serves as a replacement for installing the Yardstickframework in a virtual environment (for example as done in Installing Yardstick framework) while the other image ismostly for CI purposes (Yardstick-CI)
Yardstick-framework image Download the source code
git clone httpsgerritopnfvorggerrityardstick
Build the Docker image and tag it as yardstick-framework
cd yardstickdocker build -t yardstick-framework
Run the Docker instance
53 Additional testing and validation activities 59
OPNFV Configuration Guide Release brahmaputra30 (605ebda)
docker run --name yardstick_instance -i -t yardstick-framework
To build a guest image for Yardstick see Building a guest image
Yardstick-CI image Pull the Yardstick-CI Docker image from Docker hub
docker pull opnfvyardstick-ci
Run the Docker image
docker run --privileged=true --rm -t -e INSTALLER_TYPE=$INSTALLER_TYPE -e INSTALLER_IP=$INSTALLER_IP opnfvyardstick-ci run_benchmarks
Where $INSTALLER_TYPE can be fuel foreman or compass and $INSTALLER_IP is the installer masternode IP address (ie 102002 is default for fuel)
Basic steps performed by the Yardstick-CI container
1 clone yardstick and releng repos
2 setup OS credentials (releng scripts)
3 install yardstick and dependencies
4 build yardstick cloud image and upload it to glance
5 upload cirros-033 cloud image to glance
6 run yardstick test scenarios
7 cleanup
OpenStack parameters and credentials
Yardstick-flavor Most of the sample test cases in Yardstick are using an OpenStack flavor called yardstick-flavorwhich deviates from the OpenStack standard m1tiny flavor by the disk size - instead of 1GB it has 3GB Otherparameters are the same as in m1tiny
Environment variables Before running Yardstick it is necessary to export OpenStack environment vari-ables from the OpenStack openrc file (using the source command) and export the external network nameexport EXTERNAL_NETWORK=external-network-name the default name for the external network isnet04_ext
Credential environment variables in the openrc file have to include at least
bull OS_AUTH_URL
bull OS_USERNAME
bull OS_PASSWORD
bull OS_TENANT_NAME
60 Chapter 5 Post Configuration Activities
OPNFV Configuration Guide Release brahmaputra30 (605ebda)
Yardstick default key pair Yardstick uses a SSH key pair to connect to the guest image This key pair can be foundin the resourcesfiles directory To run the ping-hotyaml test sample this key pair needs to be importedto the OpenStack environment
Examples and verifying the install
It is recommended to verify that Yardstick was installed successfully by executing some simple commands and testsamples Below is an example invocation of yardstick help command and pingpy test sample
yardstick -hyardstick task start samplespingyaml
Each testing tool supported by Yardstick has a sample configuration file These configuration files can be found in thesamples directory
Example invocation of yardstick-plot tool
yardstick-plot -i tmpyardstickout -o tmpplots
Default location for the output is tmpyardstickout
More info about the tool can be found by executing
yardstick-plot -h
53 Additional testing and validation activities 61

OPNFV Configuration Guide Release brahmaputra30 (605ebda)
Install OPNFV and Preparation
OPNFV-NATIVE-INSTALL-1 To install OpenStack-only environment of OPNFV Brahmaputra Release
Apex Installer
HA deployment in OpenStack-only environmentopnfv-deploy -d etcopnfv-apexos-nosdn-nofeature-hayaml
Non-HA deployment in OpenStack-only environment Non-HA deployment is currently not supported by Apex installer
Compass Installer
HA deployment in OpenStack-only environmentexport ISO_URL=file$BUILD_DIRECTORYcompassisoexport OS_VERSION=$COMPASS_OS_VERSIONexport OPENSTACK_VERSION=$COMPASS_OPENSTACK_VERSIONexport CONFDIR=$WORKSPACEdeployconfvm_environmentdeploysh --dha $CONFDIRos-nosdn-nofeature-hayml --network $CONFDIR$NODE_NAMEnetworkyml
Non-HA deployment in OpenStack-only environment Non-HA deployment is currently not supported by Compass installer
Fuel Installer
HA deployment in OpenStack-only environmentdeploysh -s os-nosdn-nofeature-ha
Non-HA deployment in OpenStack-only environmentdeploysh -s os-nosdn-nofeature-noha
Joid Installer
HA deployment in OpenStack-only environmentdeploysh -o liberty -s nosdn -t ha -l default -f ipv6
Non-HA deployment in OpenStack-only environmentdeploysh -o liberty -s nosdn -t nonha -l default -f ipv6
Please NOTE that
bull You need to refer to installerrsquos documentation for other necessary parameters applicable to your deployment
bull You need to refer to Release Notes and installerrsquos documentation if there is any issue in installation
OPNFV-NATIVE-INSTALL-2 Clone the following GitHub repository to get the configuration and metadata files
git clone httpsgithubcomsridhargaddamopnfv_os_ipv6_pocgit optstackopnfv_os_ipv6_poc
Disable Security Groups in OpenStack ML2 Setup
OPNFV-NATIVE-SEC-1 Change the settings in etcneutronpluginsml2ml2_confini as follows
etcneutronpluginsml2ml2_confini[securitygroup]extension_drivers = port_security
32 Chapter 4 Feature Configuration
OPNFV Configuration Guide Release brahmaputra30 (605ebda)
enable_security_group = Falsefirewall_driver = neutronagentfirewallNoopFirewallDriver
OPNFV-NATIVE-SEC-2 Change the settings in etcnovanovaconf as follows
etcnovanovaconf[DEFAULT]security_group_api = novafirewall_driver = novavirtfirewallNoopFirewallDriver
OPNFV-NATIVE-SEC-3 After updating the settings you will have to restart the Neutron and Nova services
Please note that the commands of restarting Neutron and Nova would vary depending on the installer Pleaserefer to relevant documentation of specific installers
Set Up Service VM as IPv6 vRouter
OPNFV-NATIVE-SETUP-1 Now we assume that OpenStack multi-node setup is up and running We have to sourcethe tenant credentials in this step Please NOTE that the method of sourcing tenant credentials may vary dependingon installers For example
Apex installer
source the tenant credentials using Apex installer of OPNFV you need to copy the file homestackovercloudrc from the installer VM called instack to a location in controller node for example in the directory optsource optovercloudrc
Compass installer
source the tenant credentials using Compass installer of OPNFVsource optadmin-openrcsh
Fuel installer
source the tenant credentials using Fuel installer of OPNFVsource rootopenrc
Joid installer
source the tenant credentials using Joid installer of OPNFVsource $HOMEjoid_configadmin-openrc
devstack
source the tenant credentials in devstacksource openrc admin demo
Please refer to relevant documentation of installers if you encounter any issue
OPNFV-NATIVE-SETUP-2 Download fedora22 image which would be used for vRouter
wget httpsdownloadfedoraprojectorgpubfedoralinuxreleases22Cloudx86_64ImagesFedora-Cloud-Base-22-20150521x86_64qcow2
OPNFV-NATIVE-SETUP-3 Import Fedora22 image to glance
glance image-create --name Fedora22 --disk-format qcow2 --container-format bare --file Fedora-Cloud-Base-22-20150521x86_64qcow2
43 IPv6 Configuration - Setting Up a Service VM as an IPv6 vRouter 33
OPNFV Configuration Guide Release brahmaputra30 (605ebda)
OPNFV-NATIVE-SETUP-4 This step is Informational OPNFV Installer has taken care of this step duringdeployment You may refer to this step only if there is any issue or if you are using other installers
We have to move the physical interface (ie the public network interface) to br-ex including moving the publicIP address and setting up default route Please refer to OS-NATIVE-SETUP-4 and OS-NATIVE-SETUP-5 in ourmore complete instruction
OPNFV-NATIVE-SETUP-5 Create Neutron routers ipv4-router and ipv6-router which need to provideexternal connectivity
neutron router-create ipv4-routerneutron router-create ipv6-router
OPNFV-NATIVE-SETUP-6 Create an external networksubnet ext-net using the appropriate values based on thedata-center physical network setup
Please NOTE that you may only need to create the subnet of ext-net because OPNFV installers should have createdan external network during installation You must use the same name of external network that installer creates whenyou create the subnet For example
bull Apex installer external
bull Compass installer ext-net
bull Fuel installer net04_ext
bull Joid installer ext-net
Please refer to the documentation of installers if there is any issue
This is needed only if installer does not create an external work Otherwise skip this command net-createneutron net-create --routerexternal ext-net
Note that the name ext-net may work for some installers such as Compass and Joid Change the name ext-net to match the name of external network that an installer createsneutron subnet-create --disable-dhcp --allocation-pool start=19859156251end=19859156254 --gateway 198591561 ext-net 19859156024
OPNFV-NATIVE-SETUP-7 Create Neutron networks ipv4-int-network1 and ipv6-int-network2 withport_security disabled
neutron net-create --port_security_enabled=False ipv4-int-network1neutron net-create --port_security_enabled=False ipv6-int-network2
OPNFV-NATIVE-SETUP-8 Create IPv4 subnet ipv4-int-subnet1 in the internal networkipv4-int-network1 and associate it to ipv4-router
neutron subnet-create --name ipv4-int-subnet1 --dns-nameserver 8888 ipv4-int-network1 2000024
neutron router-interface-add ipv4-router ipv4-int-subnet1
OPNFV-NATIVE-SETUP-9 Associate the ext-net to the Neutron routers ipv4-router and ipv6-router
Note that the name ext-net may work for some installers such as Compass and Joid Change the name ext-net to match the name of external network that an installer createsneutron router-gateway-set ipv4-router ext-netneutron router-gateway-set ipv6-router ext-net
OPNFV-NATIVE-SETUP-10 Create two subnets one IPv4 subnet ipv4-int-subnet2 and one IPv6 subnetipv6-int-subnet2 in ipv6-int-network2 and associate both subnets to ipv6-router
34 Chapter 4 Feature Configuration
OPNFV Configuration Guide Release brahmaputra30 (605ebda)
neutron subnet-create --name ipv4-int-subnet2 --dns-nameserver 8888 ipv6-int-network2 1000024
neutron subnet-create --name ipv6-int-subnet2 --ip-version 6 --ipv6-ra-mode slaac --ipv6-address-mode slaac ipv6-int-network2 2001db80164
neutron router-interface-add ipv6-router ipv4-int-subnet2neutron router-interface-add ipv6-router ipv6-int-subnet2
OPNFV-NATIVE-SETUP-11 Create a keypair
nova keypair-add vRouterKey gt ~vRouterKey
OPNFV-NATIVE-SETUP-12 Create ports for vRouter (with some specific MAC address - basically for automation- to know the IPv6 addresses that would be assigned to the port)
neutron port-create --name eth0-vRouter --mac-address fa163e111111 ipv6-int-network2neutron port-create --name eth1-vRouter --mac-address fa163e222222 ipv4-int-network1
OPNFV-NATIVE-SETUP-13 Create ports for VM1 and VM2
neutron port-create --name eth0-VM1 --mac-address fa163e333333 ipv4-int-network1neutron port-create --name eth0-VM2 --mac-address fa163e444444 ipv4-int-network1
OPNFV-NATIVE-SETUP-14 Update ipv6-router with routing information to subnet 2001db80264
neutron router-update ipv6-router --routes type=dict list=true destination=2001db80264nexthop=2001db801f8163efffe111111
OPNFV-NATIVE-SETUP-15 Boot Service VM (vRouter) VM1 and VM2
nova boot --image Fedora22 --flavor m1small --user-data optstackopnfv_os_ipv6_pocmetadatatxt --availability-zone novaopnfv-os-compute --nic port-id=$(neutron port-list | grep -w eth0-vRouter | awk print $2) --nic port-id=$(neutron port-list | grep -w eth1-vRouter | awk print $2) --key-name vRouterKey vRouter
nova list
Please wait for some 10 to 15 minutes so that necessary packages (like radvd) are installed and vRouter is upnova console-log vRouter
nova boot --image cirros-034-x86_64-uec --flavor m1tiny --user-data optstackopnfv_os_ipv6_pocset_mtush --availability-zone novaopnfv-os-controller --nic port-id=$(neutron port-list | grep -w eth0-VM1 | awk print $2) --key-name vRouterKey VM1
nova boot --image cirros-034-x86_64-uec --flavor m1tiny--user-data optstackopnfv_os_ipv6_pocset_mtush --availability-zone novaopnfv-os-compute --nic port-id=$(neutron port-list | grep -w eth0-VM2 | awk print $2) --key-name vRouterKey VM2
nova list Verify that all the VMs are in ACTIVE state
OPNFV-NATIVE-SETUP-16 If all goes well the IPv6 addresses assigned to the VMs would be as shown as follows
43 IPv6 Configuration - Setting Up a Service VM as an IPv6 vRouter 35
OPNFV Configuration Guide Release brahmaputra30 (605ebda)
vRouter eth0 interface would have the following IPv6 address 2001db801f8163efffe11111164 vRouter eth1 interface would have the following IPv6 address 2001db802164 VM1 would have the following IPv6 address 2001db802f8163efffe33333364 VM2 would have the following IPv6 address 2001db802f8163efffe44444464
OPNFV-NATIVE-SETUP-17 Now we can SSH to VMs You can execute the following command
1 Create a floatingip and associate it with VM1 VM2 and vRouter (to the port id that is passed) Note that the name ext-net may work for some installers such as Compass and Joid Change the name ext-net to match the name of external network that an installer createsneutron floatingip-create --port-id $(neutron port-list | grep -w eth0-VM1 | awk print $2) ext-netneutron floatingip-create --port-id $(neutron port-list | grep -w eth0-VM2 | awk print $2) ext-netneutron floatingip-create --port-id $(neutron port-list | grep -w eth1-vRouter | awk print $2) ext-net
2 To know display the floatingip associated with VM1 VM2 and vRouterneutron floatingip-list -F floating_ip_address -F port_id | grep $(neutron port-list | grep -w eth0-VM1 | awk print $2) | awk print $2neutron floatingip-list -F floating_ip_address -F port_id | grep $(neutron port-list | grep -w eth0-VM2 | awk print $2) | awk print $2neutron floatingip-list -F floating_ip_address -F port_id | grep $(neutron port-list | grep -w eth1-vRouter | awk print $2) | awk print $2
3 To ssh to the vRouter VM1 and VM2 user can execute the following commandssh -i ~vRouterKey fedoraltfloating-ip-of-vRoutergtssh -i ~vRouterKey cirrosltfloating-ip-of-VM1gtssh -i ~vRouterKey cirrosltfloating-ip-of-VM2gt
433 Setup Manual in OpenStack with Open Daylight L2-Only Environment
If you intend to set up a service VM as an IPv6 vRouter in an environment of OpenStack and Open Daylight L2-onlyof OPNFV Brahmaputra Release please NOTE that
bull The hostnames IP addresses and username are for exemplary purpose in instructions Please change as neededto fit your environment
bull The instructions apply to both deployment model of single controller node and HA (High Availability) deploy-ment model where multiple controller nodes are used
bull However in case of HA when ipv6-router is created in step SETUP-SVM-11 it could be created in anyof the controller node Thus you need to identify in which controller node ipv6-router is created in orderto manually spawn radvd daemon inside the ipv6-router namespace in steps SETUP-SVM-24 throughSETUP-SVM-30
Install OPNFV and Preparation
OPNFV-INSTALL-1 To install OpenStack with Open Daylight L2-only environment of OPNFV Brahmaputra Re-lease
Apex Installer
36 Chapter 4 Feature Configuration
OPNFV Configuration Guide Release brahmaputra30 (605ebda)
HA deployment in OpenStack with Open Daylight L2-only environmentopnfv-deploy -d etcopnfv-apexos-odl_l2-nofeature-hayaml
Non-HA deployment in OpenStack with Open Daylight L2-only environment Non-HA deployment is currently not supported by Apex installer
Compass Installer
HA deployment in OpenStack with Open Daylight L2-only environmentexport ISO_URL=file$BUILD_DIRECTORYcompassisoexport OS_VERSION=$COMPASS_OS_VERSIONexport OPENSTACK_VERSION=$COMPASS_OPENSTACK_VERSIONexport CONFDIR=$WORKSPACEdeployconfvm_environmentdeploysh --dha $CONFDIRos-odl_l2-nofeature-hayml --network $CONFDIR$NODE_NAMEnetworkyml
Non-HA deployment in OpenStack with Open Daylight L2-only environment Non-HA deployment is currently not supported by Compass installer
Fuel Installer
HA deployment in OpenStack with Open Daylight L2-only environmentdeploysh -s os-odl_l2-nofeature-ha
Non-HA deployment in OpenStack with Open Daylight L2-only environmentdeploysh -s os-odl_l2-nofeature-noha
Joid Installer
HA deployment in OpenStack with Open Daylight L2-only environmentdeploysh -o liberty -s odl -t ha -l default -f ipv6
Non-HA deployment in OpenStack with Open Daylight L2-only environmentdeploysh -o liberty -s odl -t nonha -l default -f ipv6
Please NOTE that
bull You need to refer to installerrsquos documentation for other necessary parameters applicable to your deployment
bull You need to refer to Release Notes and installerrsquos documentation if there is any issue in installation
OPNFV-INSTALL-2 Clone the following GitHub repository to get the configuration and metadata files
git clone httpsgithubcomsridhargaddamopnfv_os_ipv6_pocgit optstackopnfv_os_ipv6_poc
Disable Security Groups in OpenStack ML2 Setup
Please NOTE that although Security Groups feature has been disabled automatically through localconf configu-ration file by some installers such as devstack it is very likely that other installers such as Apex Compass Fuelor Joid will enable Security Groups feature after installation
Please make sure that Security Groups are disabled in the setup
OPNFV-SEC-1 Change the settings in etcneutronpluginsml2ml2_confini as follows
etcneutronpluginsml2ml2_confini[securitygroup]enable_security_group = Falsefirewall_driver = neutronagentfirewallNoopFirewallDriver
43 IPv6 Configuration - Setting Up a Service VM as an IPv6 vRouter 37
OPNFV Configuration Guide Release brahmaputra30 (605ebda)
OPNFV-SEC-2 Change the settings in etcnovanovaconf as follows
etcnovanovaconf[DEFAULT]security_group_api = novafirewall_driver = novavirtfirewallNoopFirewallDriver
OPNFV-SEC-3 After updating the settings you will have to restart the Neutron and Nova services
Please note that the commands of restarting Neutron and Nova would vary depending on the installer Pleaserefer to relevant documentation of specific installers
Source the Credentials in OpenStack Controller Node
SETUP-SVM-1 Login in OpenStack Controller Node Start a new terminal and change directory to where Open-Stack is installed
SETUP-SVM-2 We have to source the tenant credentials in this step Please NOTE that the method of sourcingtenant credentials may vary depending on installers For example
Apex installer
source the tenant credentials using Apex installer of OPNFV you need to copy the file homestackovercloudrc from the installer VM called instack to a location in controller node for example in the directory optsource optovercloudrc
Compass installer
source the tenant credentials using Compass installer of OPNFVsource optadmin-openrcsh
Fuel installer
source the tenant credentials using Fuel installer of OPNFVsource rootopenrc
Joid installer
source the tenant credentials using Joid installer of OPNFVsource $HOMEjoid_configadmin-openrc
devstack
source the tenant credentials in devstacksource openrc admin demo
Please refer to relevant documentation of installers if you encounter any issue
Informational Note Move Public Network from Physical Network Interface to br-ex
SETUP-SVM-3 Move the physical interface (ie the public network interface) to br-ex
SETUP-SVM-4 Verify setup of br-ex
Those 2 steps are Informational OPNFV Installer has taken care of those 2 steps during deployment You mayrefer to this step only if there is any issue or if you are using other installers
38 Chapter 4 Feature Configuration
OPNFV Configuration Guide Release brahmaputra30 (605ebda)
We have to move the physical interface (ie the public network interface) to br-ex including moving the publicIP address and setting up default route Please refer to SETUP-SVM-3 and SETUP-SVM-4 in our more completeinstruction
Create IPv4 Subnet and Router with External Connectivity
SETUP-SVM-5 Create a Neutron router ipv4-router which needs to provide external connectivity
neutron router-create ipv4-router
SETUP-SVM-6 Create an external networksubnet ext-net using the appropriate values based on the data-centerphysical network setup
Please NOTE that you may only need to create the subnet of ext-net because OPNFV installers should have createdan external network during installation You must use the same name of external network that installer creates whenyou create the subnet For example
bull Apex installer external
bull Compass installer ext-net
bull Fuel installer net04_ext
bull Joid installer ext-net
Please refer to the documentation of installers if there is any issue
This is needed only if installer does not create an external work Otherwise skip this command net-createneutron net-create --routerexternal ext-net
Note that the name ext-net may work for some installers such as Compass and Joid Change the name ext-net to match the name of external network that an installer createsneutron subnet-create --disable-dhcp --allocation-pool start=19859156251end=19859156254 --gateway 198591561 ext-net 19859156024
Please note that the IP addresses in the command above are for exemplary purpose Please replace the IP addressesof your actual network
SETUP-SVM-7 Associate the ext-net to the Neutron router ipv4-router
Note that the name ext-net may work for some installers such as Compass and Joid Change the name ext-net to match the name of external network that an installer createsneutron router-gateway-set ipv4-router ext-net
SETUP-SVM-8 Create an internaltenant IPv4 network ipv4-int-network1
neutron net-create ipv4-int-network1
SETUP-SVM-9 Create an IPv4 subnet ipv4-int-subnet1 in the internal network ipv4-int-network1
neutron subnet-create --name ipv4-int-subnet1 --dns-nameserver 8888 ipv4-int-network1 2000024
SETUP-SVM-10 Associate the IPv4 internal subnet ipv4-int-subnet1 to the Neutron router ipv4-router
neutron router-interface-add ipv4-router ipv4-int-subnet1
43 IPv6 Configuration - Setting Up a Service VM as an IPv6 vRouter 39
OPNFV Configuration Guide Release brahmaputra30 (605ebda)
Create IPv6 Subnet and Router with External Connectivity
Now let us create a second neutron router where we can ldquomanuallyrdquo spawn a radvd daemon to simulate an externalIPv6 router
SETUP-SVM-11 Create a second Neutron router ipv6-router which needs to provide external connectivity
neutron router-create ipv6-router
SETUP-SVM-12 Associate the ext-net to the Neutron router ipv6-router
Note that the name ext-net may work for some installers such as Compass and Joid Change the name ext-net to match the name of external network that an installer createsneutron router-gateway-set ipv6-router ext-net
SETUP-SVM-13 Create a second internaltenant IPv4 network ipv4-int-network2
neutron net-create ipv4-int-network2
SETUP-SVM-14 Create an IPv4 subnet ipv4-int-subnet2 for the ipv6-router internal networkipv4-int-network2
neutron subnet-create --name ipv4-int-subnet2 --dns-nameserver 8888 ipv4-int-network2 1000024
SETUP-SVM-15 Associate the IPv4 internal subnet ipv4-int-subnet2 to the Neutron router ipv6-router
neutron router-interface-add ipv6-router ipv4-int-subnet2
Prepare Image Metadata and Keypair for Service VM
SETUP-SVM-16 Download fedora22 image which would be used as vRouter
wget httpsdownloadfedoraprojectorgpubfedoralinuxreleases22Cloudx86_64ImagesFedora-Cloud-Base-22-20150521x86_64qcow2
glance image-create --name Fedora22 --disk-format qcow2 --container-format bare --file Fedora-Cloud-Base-22-20150521x86_64qcow2
SETUP-SVM-17 Create a keypair
nova keypair-add vRouterKey gt ~vRouterKey
SETUP-SVM-18 Create ports for vRouter and both the VMs with some specific MAC addresses
neutron port-create --name eth0-vRouter --mac-address fa163e111111 ipv4-int-network2neutron port-create --name eth1-vRouter --mac-address fa163e222222 ipv4-int-network1neutron port-create --name eth0-VM1 --mac-address fa163e333333 ipv4-int-network1neutron port-create --name eth0-VM2 --mac-address fa163e444444 ipv4-int-network1
Boot Service VM (vRouter) with eth0 on ipv4-int-network2 and eth1 on ipv4-int-network1
Let us boot the service VM (vRouter) with eth0 interface on ipv4-int-network2 connecting toipv6-router and eth1 interface on ipv4-int-network1 connecting to ipv4-router
SETUP-SVM-19 Boot the vRouter using Fedora22 image on the OpenStack Compute Node with hostnameopnfv-os-compute
40 Chapter 4 Feature Configuration
OPNFV Configuration Guide Release brahmaputra30 (605ebda)
nova boot --image Fedora22 --flavor m1small --user-data optstackopnfv_os_ipv6_pocmetadatatxt --availability-zone novaopnfv-os-compute --nic port-id=$(neutron port-list | grep -w eth0-vRouter | awk print $2) --nic port-id=$(neutron port-list | grep -w eth1-vRouter | awk print $2) --key-name vRouterKey vRouter
Please note that optstackopnfv_os_ipv6_pocmetadatatxt is used to enable the vRouter to au-tomatically spawn a radvd and
bull Act as an IPv6 vRouter which advertises the RA (Router Advertisements) with prefix 2001db80264on its internal interface (eth1)
bull Forward IPv6 traffic from internal interface (eth1)
SETUP-SVM-20 Verify that Fedora22 image boots up successfully and vRouter has ssh keys properly injected
nova listnova console-log vRouter
Please note that it may take a few minutes for the necessary packages to get installed and ssh keys to be injected
Sample Output[ 762884523] cloud-init[871] ec2 [ 762909634] cloud-init[871] ec2 -----BEGIN SSH HOST KEY FINGERPRINTS-----[ 762931626] cloud-init[871] ec2 2048 e3dc3d4abcb6b07775a170a3d02a47a9 (RSA)[ 762957380] cloud-init[871] ec2 -----END SSH HOST KEY FINGERPRINTS-----[ 762979554] cloud-init[871] ec2
Boot Two Other VMs in ipv4-int-network1
In order to verify that the setup is working let us create two cirros VMs with eth1 interface on theipv4-int-network1 ie connecting to vRouter eth1 interface for internal network
We will have to configure appropriate mtu on the VMsrsquo interface by taking into account the tunneling overhead andany physical switch requirements If so push the mtu to the VM either using dhcp options or via meta-data
SETUP-SVM-21 Create VM1 on OpenStack Controller Node with hostname opnfv-os-controller
nova boot --image cirros-034-x86_64-uec --flavor m1tiny --user-data optstackopnfv_os_ipv6_pocset_mtush --availability-zone novaopnfv-os-controller --nic port-id=$(neutron port-list | grep -w eth0-VM1 | awk print $2) --key-name vRouterKey VM1
SETUP-SVM-22 Create VM2 on OpenStack Compute Node with hostname opnfv-os-compute
nova boot --image cirros-034-x86_64-uec --flavor m1tiny --user-data optstackopnfv_os_ipv6_pocset_mtush --availability-zone novaopnfv-os-compute --nic port-id=$(neutron port-list | grep -w eth0-VM2 | awk print $2) --key-name vRouterKey VM2
SETUP-SVM-23 Confirm that both the VMs are successfully booted
nova listnova console-log VM1nova console-log VM2
43 IPv6 Configuration - Setting Up a Service VM as an IPv6 vRouter 41
OPNFV Configuration Guide Release brahmaputra30 (605ebda)
Spawn RADVD in ipv6-router
Let us manually spawn a radvd daemon inside ipv6-router namespace to simulate an external router First ofall we will have to identify the ipv6-router namespace and move to the namespace
Please NOTE that in case of HA (High Availability) deployment model where multiple controller nodes are usedipv6-router created in step SETUP-SVM-11 could be in any of the controller node Thus you need to iden-tify in which controller node ipv6-router is created in order to manually spawn radvd daemon inside theipv6-router namespace in steps SETUP-SVM-24 through SETUP-SVM-30 The following command in Neu-tron will display the controller on which the ipv6-router is spawned
neutron l3-agent-list-hosting-router ipv6-router
Then you login to that controller and execute steps SETUP-SVM-24 through SETUP-SVM-30
SETUP-SVM-24 identify the ipv6-router namespace and move to the namespace
sudo ip netns exec qrouter-$(neutron router-list | grep -w ipv6-router | awk print $2) bash
SETUP-SVM-25 Upon successful execution of the above command you will be in the router namespace Now letus configure the IPv6 address on the ltqr-xxxgt interface
export router_interface=$(ip a s | grep -w global qr- | awk print $7)ip -6 addr add 2001db8011 dev $router_interface
SETUP-SVM-26 Update the sample file optstackopnfv_os_ipv6_pocscenario2radvdconfwith $router_interface
cp optstackopnfv_os_ipv6_pocscenario2radvdconf tmpradvd$router_interfaceconfsed -i s$router_interface$router_interfaceg tmpradvd$router_interfaceconf
SETUP-SVM-27 Spawn a radvd daemon to simulate an external router This radvd daemon advertises an IPv6subnet prefix of 2001db80164 using RA (Router Advertisement) on its $router_interface so that eth0interface of vRouter automatically configures an IPv6 SLAAC address
$radvd -C tmpradvd$router_interfaceconf -p tmpbr-expidradvd -m syslog
SETUP-SVM-28 Add an IPv6 downstream route pointing to the eth0 interface of vRouter
ip -6 route add 2001db80264 via 2001db801f8163efffe111111
SETUP-SVM-29 The routing table should now look similar to something shown below
ip -6 route show2001db8011 dev qr-42968b9e-62 proto kernel metric 2562001db80164 dev qr-42968b9e-62 proto kernel metric 256 expires 86384sec2001db80264 via 2001db801f8163efffe111111 dev qr-42968b9e-62 proto ra metric 1024 expires 29secfe8064 dev qg-3736e0c7-7c proto kernel metric 256fe8064 dev qr-42968b9e-62 proto kernel metric 256
SETUP-SVM-30 If all goes well the IPv6 addresses assigned to the VMs would be as shown as follows
vRouter eth0 interface would have the following IPv6 address 2001db801f8163efffe11111164 vRouter eth1 interface would have the following IPv6 address 2001db802164 VM1 would have the following IPv6 address 2001db802f8163efffe33333364 VM2 would have the following IPv6 address 2001db802f8163efffe44444464
42 Chapter 4 Feature Configuration
OPNFV Configuration Guide Release brahmaputra30 (605ebda)
Testing to Verify Setup Complete
Now let us SSH to those VMs eg VM1 and or VM2 and or vRouter to confirm that it has successfully configuredthe IPv6 address using SLAAC with prefix 2001db80264 from vRouter
We use floatingip mechanism to achieve SSH
SETUP-SVM-31 Now we can SSH to VMs You can execute the following command
1 Create a floatingip and associate it with VM1 VM2 and vRouter (to the port id that is passed) Note that the name ext-net may work for some installers such as Compass and Joid Change the name ext-net to match the name of external network that an installer createsneutron floatingip-create --port-id $(neutron port-list | grep -w eth0-VM1 | awk print $2) ext-netneutron floatingip-create --port-id $(neutron port-list | grep -w eth0-VM2 | awk print $2) ext-netneutron floatingip-create --port-id $(neutron port-list | grep -w eth1-vRouter | awk print $2) ext-net
2 To know display the floatingip associated with VM1 VM2 and vRouterneutron floatingip-list -F floating_ip_address -F port_id | grep $(neutron port-list | grep -w eth0-VM1 | awk print $2) | awk print $2neutron floatingip-list -F floating_ip_address -F port_id | grep $(neutron port-list | grep -w eth0-VM2 | awk print $2) | awk print $2neutron floatingip-list -F floating_ip_address -F port_id | grep $(neutron port-list | grep -w eth1-vRouter | awk print $2) | awk print $2
3 To ssh to the vRouter VM1 and VM2 user can execute the following commandssh -i ~vRouterKey fedoraltfloating-ip-of-vRoutergtssh -i ~vRouterKey cirrosltfloating-ip-of-VM1gtssh -i ~vRouterKey cirrosltfloating-ip-of-VM2gt
If everything goes well ssh will be successful and you will be logged into those VMs Run some commands to verifythat IPv6 addresses are configured on eth0 interface
SETUP-SVM-32 Show an IPv6 address with a prefix of 2001db80264
ip address show
SETUP-SVM-33 ping some external IPv6 address eg ipv6-router
ping6 2001db8011
If the above ping6 command succeeds it implies that vRouter was able to successfully forward the IPv6 traffic toreach external ipv6-router
44 Installing OVSNFV Fuel Plugin
bull On the Fuel UI create a new environment
bull In Settings gt Userspace OVS support check ldquoUserspace OVS supportrdquo
bull Continue with environment configuration and deployment as normal
441 Upgrading the plugin
From time to time new versions of the plugin may become available
44 Installing OVSNFV Fuel Plugin 43
OPNFV Configuration Guide Release brahmaputra30 (605ebda)
The plugin cannot be upgraded if an active environment is using the plugin
In order to upgrade the plugin
bull Copy the updated plugin file to the fuel-master
bull On the Fuel UI reset the environment
bull On the Fuel CLI ldquofuel plugins ndashupdate ltfuel-plugin-filegtrdquo
bull On the Fuel UI re-deploy the environment
45 Promise Feature Configuration Overview
451 Promise installation
Install nodejs npm and promise
curl -sL httpsdebnodesourcecomsetup_4x | sudo -E bash -sudo apt-get install -y nodejssudo npm -g install npmlatestgit clone httpsgithubcomopnfvpromisegitcd promisenpm install
Please note that the last command lsquonpm installrsquo will install all needed dependencies for promise (including yangforgeand mocha)
452 Testing
Please perform the following preparation steps
1 Set OpenStack environment parameters properly (eg source openrc admin demo in DevStack)
2 Create OpenStack tenant (eg promise) and tenant user (eg promiser)
3 Create a flavor in Nova with 1 vCPU and 512 MB RAM
4 Create a private network subnet and router in Neutron
5 Create an image in Glance
Once done the promise test script can be invoked as follows (as a single line command)
NODE_ENV=mytest OS_TENANT_NAME=promise OS_USERNAME=promiser OS_PASSWORD=ltuser password from Step 2gt OS_TEST_FLAVOR=ltflavor ID from Step 3gt OS_TEST_NETWORK=ltnetwork ID from Step 4gt OS_TEST_IMAGE=ltimage ID from Step 5gt npm run -s test -- --reporter json gt promise-resultsjson
The results of the tests will be stored in the promise-resultsjson file
The results can also be seen in the console (ldquonpm run -s testrdquo)
All 33 tests passing Congratulations promise has been successfully installed and configured
44 Chapter 4 Feature Configuration
OPNFV Configuration Guide Release brahmaputra30 (605ebda)
45 Promise Feature Configuration Overview 45
OPNFV Configuration Guide Release brahmaputra30 (605ebda)
46 Configuring SDNVPN features
Fuel installer configuration
In order to install the BGPVPN feature the corresponding checkbox in Fuel has to be selected This will triggerinstallation of the OpenStack BGPVPN API extension for Neutron (set up for using the ODL driver)
In addition ODL has to be installed see the corresponding section in the respective installer documentation on how toinstall ODL If the BGPVPN feature is installed ODL will automatically be installed with VPN Service karaf featureactivated
No post-deploy configuration is necessary The Fuel BGPVPN plugin and the ODL plugin should set up the clusterready for BGPVPNs being created This includes the set-up of internal VxLAN transport tunnels between computenodes
No post-configuration activities are required
46 Chapter 4 Feature Configuration
CHAPTER
FIVE
POST CONFIGURATION ACTIVITIES
Once you have deployed and configured your scenario and features you should validate the state of the system usingthe following guides
51 Scenario validation activities
The following guides provide information on how to validate the installation of you scenario based on the tools andtest suites available for the installation tool you have selected
511 Fuel post installation procedures
Automated post installation activities
Fuel provides a fairly broad coverage of built in automated health checks These validate the installation in terms ofconfiguration services networking storage policies etc The execution of the full range of health checks takes lessthan 30 minutes
For instructions on how to run health-checks please read the Fuel installation instructions
Platform components validation
Consult the feature sections in this document for any post-install feature specific validationhealth-checks
512 JOID post installation procedures
Configure OpenStack
In each SDN directory for example joidciopencontrail there is a folder for Juju deployer where you can find thecharm bundle yaml files that the deploysh uses to deploy
In the same directory there is scripts folder where you can find shell scripts to help you configure the OpenStackcloud that you just deployed These scripts are created to help you configure a basic OpenStack Cloud to verify thecloud For more info on OpenStack Cloud configuration please refer to the OpenStack Cloud Administrator Guideon docsopenstackorg Similarly for complete SDN configuration please refer to the respective SDN adminstratorguide
Each SDN solution requires slightly different setup please refer to the README in each SDN folder Most likelyyou will need to modify the openstacksh and cloud-setupsh scripts for the floating IP range private IP network andSSH keys Please go through openstacksh glancesh and cloud-setupsh and make changes as you see fit
47
OPNFV Configuration Guide Release brahmaputra30 (605ebda)
52 Feature validation activities
The following sections provide information on how to validate the features you have installed in your scenario
521 Copper post installation procedures
This release focused on use of the OpenStack Congress service for managing configuration policy The Congressinstall verify procedure described here is largely manual This procedure as well as the longer-term goal of automatedverification support is a work in progress The procedure is further specific to one OPNFV installer (JOID ieMAASJuJu) based environment
Automated post installation activities
No automated procedures are provided at this time
Copper post configuration procedures
No configuration procedures are required beyond the basic install procedure
Platform components validation
Following are notes on creating a container as test driver for Congress This is based upon an Ubuntu host as installedby JOID
Create and Activate the Container
On the jumphost
sudo lxc-create -n trusty-copper -t usrsharelxctemplateslxc-ubuntu -- -b ubuntu ~opnfvsudo lxc-start -n trusty-copper -dsudo lxc-info --name trusty-copper(typical output)Name trusty-copperState RUNNINGPID 4563IP 100344CPU use 2877 secondsBlkIO use 52279 MiBMemory use 55975 MiBKMem use 0 bytesLink vethDMFOANTX bytes 262 MiBRX bytes 8848 MiBTotal bytes 9110 MiB
Login and configure the test server
48 Chapter 5 Post Configuration Activities
OPNFV Configuration Guide Release brahmaputra30 (605ebda)
ssh ubuntu100344sudo apt-get updatesudo apt-get upgrade -y
Install pipsudo apt-get install python-pip -y
Install javasudo apt-get install default-jre -y
Install other dependenciessudo apt-get install git gcc python-dev libxml2 libxslt1-dev libzip-dev php5-curl -y
Setup OpenStack environment variables per your OPNFV installexport CONGRESS_HOST=19216810117export KEYSTONE_HOST=19216810108export CEILOMETER_HOST=19216810105export CINDER_HOST=19216810101export GLANCE_HOST=19216810106export HEAT_HOST=19216810107export NEUTRON_HOST=19216810111export NOVA_HOST=19216810112source ~admin-openrcsh
Install and test OpenStack clientmkdir ~gitcd gitgit clone httpsgithubcomopenstackpython-openstackclientgitcd python-openstackclientgit checkout stablelibertysudo pip install -r requirementstxtsudo python setuppy installopenstack service list(typical output)+----------------------------------+------------+----------------+| ID | Name | Type |+----------------------------------+------------+----------------+| 2f8799ae50f24c928c021fabf8a50f5f | keystone | identity || 351b13f56d9a4e25849406ec1d5a2726 | cinder | volume || 5129510c3143454f9ba8ec7e6735e267 | cinderv2 | volumev2 || 5ee1e220460f41dea9be06921400ce9b | congress | policy || 78e73a7789a14f56a5d248a0cd141201 | quantum | network || 9d5a00fb475a45b2ae6767528299ed6b | ceilometer | metering || 9e4b1624ef0b434abc0b82f607c5045c | heat | orchestration || b6c01ceb5023442d9f394b83f2a18e01 | heat-cfn | cloudformation || ba6199e3505045ad87e2a7175bd0c57f | glance | image || d753f304a0d541dbb989780ae70328a8 | nova | compute |+----------------------------------+------------+----------------+
Install and test Congress clientcd ~gitgit clone httpsgithubcomopenstackpython-congressclientgitcd python-congressclientgit checkout stablelibertysudo pip install -r requirementstxtsudo python setuppy installopenstack congress driver list(typical output)+------------+--------------------------------------------------------------------------+| id | description |+------------+--------------------------------------------------------------------------+| ceilometer | Datasource driver that interfaces with ceilometer || neutronv2 | Datasource driver that interfaces with OpenStack Networking aka Neutron || nova | Datasource driver that interfaces with OpenStack Compute aka nova || keystone | Datasource driver that interfaces with keystone || cinder | Datasource driver that interfaces with OpenStack cinder || glancev2 | Datasource driver that interfaces with OpenStack Images aka Glance |+------------+--------------------------------------------------------------------------+
Install and test Glance clientcd ~gitgit clone httpsgithubcomopenstackpython-glanceclientgitcd python-glanceclientgit checkout stablelibertysudo pip install -r requirementstxtsudo python setuppy installglance image-list(typical output)+--------------------------------------+---------------------+| ID | Name |+--------------------------------------+---------------------+| 6ce4433e-65c0-4cd8-958d-b06e30c76241 | cirros-033-x86_64 |+--------------------------------------+---------------------+
Install and test Neutron clientcd ~gitgit clone httpsgithubcomopenstackpython-neutronclientgitcd python-neutronclientgit checkout stablelibertysudo pip install -r requirementstxtsudo python setuppy installneutron net-list(typical output)+--------------------------------------+----------+------------------------------------------------------+| id | name | subnets |+--------------------------------------+----------+------------------------------------------------------+| dc6227df-af41-439f-bd2c-c2c2f0fe7fc5 | public | 5745846c-dd79-4900-a7da-bf506348ceac 19216810024 || a3f9f13a-5de9-4d3b-98c8-d2e40a2ef8e9 | internal | 5e0be862-90da-44ab-af43-56d5c65aa049 1000024 |+--------------------------------------+----------+------------------------------------------------------+
Install and test Nova clientcd ~gitgit clone httpsgithubcomopenstackpython-novaclientgitcd python-novaclientgit checkout stablelibertysudo pip install -r requirementstxtsudo python setuppy installnova hypervisor-list(typical output)+----+---------------------+-------+---------+| ID | Hypervisor hostname | State | Status |+----+---------------------+-------+---------+| 1 | compute1maas | up | enabled |+----+---------------------+-------+---------+
Install and test Keystone clientcd ~gitgit clone httpsgithubcomopenstackpython-keystoneclientgitcd python-keystoneclientgit checkout stablelibertysudo pip install -r requirementstxtsudo python setuppy install
52 Feature validation activities 49
OPNFV Configuration Guide Release brahmaputra30 (605ebda)
Setup the Congress Test Webapp
Clone Copper (if not already cloned in user home)cd ~gitif [ -d ~gitcopper ] then git clone httpsgerritopnfvorggerritcopper fi
Copy the Apache configsudo cp ~gitcoppercomponentscongresstest-webappwwwubuntu-apache2conf etcapache2apache2conf
Point proxyphp to the Congress server per your installsed -i -- s19216810117$CONGRESS_HOSTg ~gitcoppercomponentscongresstest-webappwwwhtmlproxyindexphp
Copy the webapp to the Apache root directory and fix permissionssudo cp -R ~gitcoppercomponentscongresstest-webappwwwhtml varwwwsudo chmod 755 varwwwhtml -R
Make webapp log directory and set permissionsmkdir ~logschmod 777 ~logs
Restart Apachesudo service apache2 restart
Using the Test Webapp
Browse to the trusty-copper server IP address
Interactive options are meant to be self-explanatory given a basic familiarity with the Congress service and data modelBut the app will be developed with additional features and UI elements
522 IPv6 Post Installation Procedures
Congratulations you have completed the setup of using a service VM to act as an IPv6 vRouter You have validatedthe setup based on the instruction in previous sections If you want to further test your setup you can ping6 amongVM1 VM2 vRouter and ipv6-router
This setup allows further open innovation by any 3rd-party For more instructions and documentations please refer to
1 IPv6 Configuration Guide (HTML) httpartifactsopnfvorgipv6docssetupservicevmindexhtml
2 IPv6 User Guide (HTML) httpartifactsopnfvorgipv6docsgapanalysisindexhtml
Automated post installation activities
Refer to the relevant testing guides results and release notes of Yardstick Project
53 Additional testing and validation activities
Many of our testing tools can be manually installed to facilitate targeted testing of features and capabilities of yourscenario The following guides provide instruction on setting up these testing suites
50 Chapter 5 Post Configuration Activities
OPNFV Configuration Guide Release brahmaputra30 (605ebda)
531 Overview of the functest suites
Functest is the OPNFV project primarily targeting function testing In the Continuous Integration pipeline it islaunched after an OPNFV fresh installation to validate and verify the basic functions of the infrastructure
The current list of test suites can be distributed in 3 main domains VIM (Virtualised Infrastructure Manager) Con-trollers and Features
Do-main
Testsuite
Comments
VIM
vPing NFV ldquoHello Worldrdquo using SSH connection and floatting IPvPing_userdataPing using userdata and cloud-init mechanismTempest OpenStack reference test suite [2]Rallybench
OpenStack testing tool benchmarking OpenStack modules [3]
ControllersOpen-Day-light
Opendaylight Test suite
ONOS Test suite of ONOS L2 and L3 functions See ONOSFW User Guide for details
Features
vIMS Example of a real VNF deployment to show the NFV capabilities of the platform The IPMultimedia Subsytem is a typical Telco test case referenced by ETSI It provides a fullyfunctional VoIP System
Promise Resource reservation and management project to identify NFV related requirements andrealize resource reservation for future usage by capacity management of resource poolsregarding compute network and storage See Promise User Guide for details
Doctor Doctor platform as of Brahmaputra release provides the two features ImmediateNotification Consistent resource state awareness (compute) see Doctor User Guide fordetails
SD-NVPN
Implementation of the OpenStack bgpvpn API from the SDNVPN feature project Itallowing the cration of BGP VPNs see SDNVPN User Guide for
Functest includes different test suites with several test cases within Some of the tests are developed by Functest teammembers whereas others are integrated from upstream communities or other OPNFV projects For example Tempestis the OpenStack integration test suite and Functest is in charge of the selection integration and automation of the teststhat fit in OPNFV
The Tempest suite has been customized but no new test cases have been created
The results produced by the tests run from CI are pushed and collected in a NoSQL database The goal is to populatethe database with results from different sources and scenarios and to show them on a Dashboard
There is no real notion of Test domain or Test coverage Basic components (VIM controllers) are tested through theirown suites Feature projects also provide their own test suites with different ways of running their tests
vIMS test case was integrated to demonstrate the capability to deploy a relatively complex NFV scenario on top of theOPNFV infrastructure
Functest considers OPNFV as a black box OPNFV since the Brahmaputra release offers lots of potential combina-tions
bull 2 controllers (OpenDayligh ONOS)
bull 4 installers (Apex Compass Fuel Joid)
Most of the tests are runnable on any combination but some others might have restrictions imposed by the installersor the available deployed features
53 Additional testing and validation activities 51
OPNFV Configuration Guide Release brahmaputra30 (605ebda)
Preparing the Docker container
Pull the Functest Docker image from the Docker hub
docker pull opnfvfunctestbrahmaputra10
Check that the image is available
docker images
Run the docker container giving the environment variables
bull INSTALLER_TYPE possible values are apex compass fuel or joid
bull INSTALLER_IP IP of the installer nodeVM
Functest may need to know the IP of the installer to retrieve automatically the credentials from the installer nodeVMor even from the actual controllers
The minimum command to create the Functest Docker container can be described as follows
docker run -it -e INSTALLER_IP=102002 -e INSTALLER_TYPE=fuel opnfvfunctestbrahmaputra10 binbash
Optionally it is possible to precise the container name through the option ndashname
docker run --name CONTAINER_NAME -it -e INSTALLER_IP=102002 -e INSTALLER_TYPE=fuel opnfvfunctestbrahmaputra10 binbash
It is also possible to to indicate the path of the OpenStack credentials using -v
docker run -it -e INSTALLER_IP=102002 -e INSTALLER_TYPE=fuel -v ltpath_to_your_local_creds_filegthomeopnfvfunctestconfopenstackcreds opnfvfunctestbrahmaputra10 binbash
The local file will be mounted in the container under homeopnfvfunctestconfopenstackcreds
If the intention is to run Functest against any of the supported OPNFV scenarios it is recommended to include alsothe environment variable DEPLOY_SCENARIO for example
docker run -it -e INSTALLER_IP=102002 -e INSTALLER_TYPE=fuel -e DEPLOY_SCENARIO=os-odl_l2-nofeature-ha opnfvfunctestbrahmaputra10 binbash
Inside the container the following directory structure should be in place
`-- home`-- opnfv
|-- functest| |-- conf| |-- data| `-- results`-- repos
|-- bgpvpn|-- doctor|-- functest|-- odl_integration|-- onos|-- promise|-- rally|-- releng`-- vims-test
Basically the container includes
bull Functest directory to store the configuration (the OpenStack creds are stored inhomeopngbfunctestconfopenstackcreds) the data (cirros image needed for some tests) results (sometemporary result logs may be stored here)
52 Chapter 5 Post Configuration Activities
OPNFV Configuration Guide Release brahmaputra30 (605ebda)
bull Repositories the functest repository will be used to prepare the environment and run the tests Other repositoriesare used for the installation of the needed tooling (eg rally) andor the retrieval of feature projects scenarios(eg promise)
The structure under the Functest repository can be described as follows
|-- INFO|-- LICENSE|-- commons| |-- ims| |-- mobile| `-- traffic-profile-guidelinesrst|-- docker| |-- Dockerfile| |-- commonsh| |-- prepare_envsh| |-- requirementspip| `-- run_testssh|-- docs| |-- configguide| |-- devguide| |-- images| |-- results| `-- userguide`-- testcases
|-- Controllers|-- features|-- tests|-- VIM|-- vIMS|-- vPing|-- __init__py|-- config_functestpy|-- config_functestyaml`-- functest_utilspy
We may distinguish 4 different folders
bull commons it is a folder dedicated to store traffic profile or any test inputs that could be reused by any test project
bull docker this folder includes the scripts that will be used to setup the environment and run the tests
bull docs this folder includes the user and installationconfiguration guide
bull testcases this folder includes the scripts required by Functest internal test cases and other feature projects testcases
After the run command a new prompt appears which means that we are inside the container and ready to move to thenext step
Useful Docker commands
When typing exit in the container prompt this will cause exiting the container and probably stopping it Whenstopping a running Docker container all the changes will be lost there is a keyboard shortcut to quit the containerwithout stopping it CTRL+P+Q To reconnect to the running container DO NOT use the run command again (sinceit will create a new container) use exec instead
53 Additional testing and validation activities 53
OPNFV Configuration Guide Release brahmaputra30 (605ebda)
docker psltcopy the container IDgtdocker exec -ti ltCONTAINER_IDgt binbash
or simply
docker exec -ti $(docker ps|grep functest|awk print $1) binbash
There are other useful Docker commands that might be needed to manage possible issues with the containers
List the running containers
docker ps
List all the containers including the stopped ones
docker ps -a
It is useful sometimes to remove a container if there are some problems
docker rm ltCONTAINER_IDgt
Use the -f option if the container is still running it will force to destroy it
docker -f rm ltCONTAINER_IDgt
The Docker image is called opnfvfunctest and it is stored in the public Docker registry under the OPNFV accountdockerhub The are many different tags that have been created automatically by the CI mechanisms but the one thatthis document refers to is brahmaputra10 Pulling other tags might cause some problems while running the tests
Check the Docker documentation dockerdocs for more information
Preparing the Functest environment
Once the docker container is up and running execute the following command in the prompt
$repos_dirfunctestdockerprepare_envsh
NOTE $repos_dir is a default environment variable inside the docker container which points to homeopnfvrepos
This script will make sure that the requirements to run the tests are met and will install the needed libraries and toolsby all Functest test cases It must be run only once every time the docker is started from sratch
Focus on the OpenStack credentials
The OpenStack credentials are needed to run the tests against the VIM There are 3 ways to provide them to Functest
bull using the -v option when running the Docker container
bull create an empty file in homeopnfvfunctestconfopenstackcreds and paste the credentials in it
bull automatically retrieved using the following script $repos_dirrelengutilsfetch_os_credssh
Once the credentials are there they shall be sourced before running the tests
source homeopnfvfunctestconfopenstackcreds
or simply using the environment variable creds
54 Chapter 5 Post Configuration Activities
OPNFV Configuration Guide Release brahmaputra30 (605ebda)
$creds
After this try to run any OpenStack command to see if you get any output for instance
openstack user list
This will return a list of the actual users in the OpenStack deployment In any other case check that the credentialsare sourced
env|grep OS_
This command must show a set of environment variables starting with OS_ for example
OS_REGION_NAME=RegionOneOS_DEFAULT_DOMAIN=defaultOS_PROJECT_NAME=adminOS_PASSWORD=adminOS_AUTH_STRATEGY=keystoneOS_AUTH_URL=http172301035000v20OS_USERNAME=adminOS_TENANT_NAME=adminOS_ENDPOINT_TYPE=internalURLOS_NO_CACHE=true
If still the OpenStack command does not show anything or complains about connectivity issues it could be due to anincorrect url given to the OS_AUTH_URL environment variable Check the deployment settings
SSL Support
If you need to connect to a server that is TLS-enabled (the auth URL begins with lsquohttpsrsquo) and it uses a certificate froma private CA or a self-signed certificate you will need to specify the path to an appropriate CA certificate to use tovalidate the server certificate with the environment variable OS_CACERT
echo $OS_CACERTetcsslcertscacrt
However this certificate does not exist in the container by default It has to be copied manually from the OpenStackdeployment This can be done in 2 ways
1 Create manually that file and copy the contents from the OpenStack controller
2 (recommended) Add the file using a Docker volume when starting the container
-v ltpath_to_your_cert_filegtetcsslcertscacert
You might need to export OS_CACERT environment variable inside the container
export OS_CACERT=etcsslcertscacrt
Certificate verification can be turned off using OS_INSECURE=true For example Fuel uses self-signed cacerts bydefault so an pre step would be
export OS_INSECURE=true
Additional Options
In case you need to provide different configuration parameters to Functest (eg commit IDs or branches for therepositories ) copy the config_functestyaml from the repository to your current directory and run the container
53 Additional testing and validation activities 55
OPNFV Configuration Guide Release brahmaputra30 (605ebda)
with a volume
wget httpsgitopnfvorgcgitfunctestplaintestcasesconfig_functestyaml
ltmodify the file accordinglygt
docker run -ti -e INSTALLER_TYPE=fuel -e INSTALLER_IP=102002 opnfvfunctestbrahmaputra10 -v $(pwd)config_functestyamlhomeopnfvfunctestconfconfig_functestyaml binbash
However this is not recommended since most of the test cases rely on static parameters read from this file andchanging them might cause problems
Proxy support
Functest needs internet access to download some resources for some test cases For example to install the Rallyenvironment This might not work properly if the Jumphost is running through a Proxy
If that is the case make sure the resolvconf and the needed proxy environment variables are properly set
export http_proxy=ltyour http proxy settingsgtexport https_proxy=ltyour https proxy settingsgt
Or refer to the official Docker documentation for Proxy settings
Before running prepare_envsh make sure you can ping http and https sites inside the container For example
nc -v googlecom 80Connection to googlecom 80 port [tcphttp] succeeded
nc -v googlecom 443Connection to googlecom 443 port [tcphttps] succeeded
532 Installing vswitchperf
Supported Operating Systems
bull CentOS 7
bull Fedora 20
bull Fedora 21
bull Fedora 22
bull Ubuntu 1404
Supported vSwitches
The vSwitch must support Open Flow 13 or greater
bull OVS (built from source)
bull OVS with DPDK (built from source)
56 Chapter 5 Post Configuration Activities
OPNFV Configuration Guide Release brahmaputra30 (605ebda)
Supported Hypervisors
bull Qemu version 23
Available VNFs
A simple VNF that forwards traffic through a VM using
bull DPDK testpmd
bull Linux Brigde
bull custom l2fwd module
The VM image can be downloaded from httpartifactsopnfvorgvswitchperfvloop-vnf-ubuntu-1404_20151216qcow2
Other Requirements
The test suite requires Python 33 and relies on a number of other packages These need to be installed for the testsuite to function
Installation of required packages preparation of Python 3 virtual environment and compilation of OVS DPDK andQEMU is performed by script systemsbuild_base_machinesh It should be executed under user account which willbe used for vsperf execution
Please Note Password-less sudo access must be configured for given user account before script is executed
Execution of installation script
$ cd systems$ build_base_machinesh
Please Note you donrsquot need to go into any of the systems subdirectories simply run the top levelbuild_base_machinesh your OS will be detected automatically
Script build_base_machinesh will install all the vsperf dependencies in terms of system packages Python 3x andrequired Python modules In case of CentOS 7 it will install Python 33 from an additional repository provided bySoftware Collections (a link) Installation script will also use virtualenv to create a vsperf virtual environment whichis isolated from the default Python environment This environment will reside in a directory called vsperfenv in$HOME
You will need to activate the virtual environment every time you start a new shell session Its activation is specific toyour OS
CentOS 7
$ scl enable python33 bash$ cd $HOMEvsperfenv$ source binactivate
Fedora and Ubuntu
$ cd $HOMEvsperfenv$ source binactivate
53 Additional testing and validation activities 57
OPNFV Configuration Guide Release brahmaputra30 (605ebda)
Working Behind a Proxy
If yoursquore behind a proxy yoursquoll likely want to configure this before running any of the above For example
export http_proxy=proxymycompanycom123export https_proxy=proxymycompanycom123
533 Yardstick
The projectrsquos goal is to verify infrastructure compliance from the perspective of a Virtual Network Function (VNF)
The Projectrsquos scope is the development of a test framework Yardstick test cases and test stimuli to enable NetworkFunction Virtualization Infrastructure (NFVI) verification
In OPNFV Brahmaputra release generic test cases covering aspects of the metrics in the document ETSI GS NFV-TST001 ldquoPre-deployment Testing Report on Validation of NFV Environments and Servicesrdquo are available furtherOPNFV releases will provide extended testing of these metrics
The Project also includes a sample VNF the Virtual Traffic Classifier (VTC) and its experimental frameworkApexLake
Yardstick is used in OPNFV for verifying the OPNFV infrastructure and some of the OPNFV features The Yardstickframework is deployed in several OPNFV community labs It is installer infrastructure and application independent
See also
This Presentation for an overview of Yardstick and Yardsticktst for material on alignment ETSI TST001 and Yardstick
Yardstick Installation
Abstract
Yardstick currently supports installation on Ubuntu 1404 or by using a Docker image Detailed steps about installingYardstick using both of these options can be found below
To use Yardstick you should have access to an OpenStack environment with at least Nova Neutron Glance Keystoneand Heat installed
The steps needed to run Yardstick are
1 Install Yardstick and create the test configuration yaml file
2 Build a guest image and load the image into the OpenStack environment
3 Create a Neutron external network and load OpenStack environment variables
4 Run the test case
Installing Yardstick on Ubuntu 1404
Installing Yardstick framework Install dependencies
sudo apt-get install python-virtualenv python-devsudo apt-get install libffi-dev libssl-dev git
Create a python virtual environment source it and update setuptools
58 Chapter 5 Post Configuration Activities
OPNFV Configuration Guide Release brahmaputra30 (605ebda)
virtualenv ~yardstick_venvsource ~yardstick_venvbinactivateeasy_install -U setuptools
Download source code and install python dependencies
git clone httpsgerritopnfvorggerrityardstickcd yardstickpython setuppy install
There is also a YouTube video showing the above steps
Installing extra tools
yardstick-plot Yardstick has an internal plotting tool yardstick-plot which can be installed using the follow-ing command
python setuppy develop easy_install yardstick[plot]
Building a guest image Yardstick has a tool for building an Ubuntu Cloud Server image containing all the requiredtools to run test cases supported by Yardstick It is necessary to have sudo rights to use this tool
This image can be built using the following command while in the directory where Yardstick is installed(~yardstick if the framework is installed by following the commands above)
sudo toolsyardstick-img-modify toolsubuntu-server-cloudimg-modifysh
Warning the script will create files by default in tmpworkspaceyardstick and the files will be owned byroot
The created image can be added to OpenStack using the glance image-create or via the OpenStack Dashboard
Example command
glance --os-image-api-version 1 image-create --name yardstick-trusty-server --is-public true --disk-format qcow2 --container-format bare --file tmpworkspaceyardstickyardstick-trusty-serverimg
Installing Yardstick using Docker
Yardstick has two Docker images first one (Yardstick-framework) serves as a replacement for installing the Yardstickframework in a virtual environment (for example as done in Installing Yardstick framework) while the other image ismostly for CI purposes (Yardstick-CI)
Yardstick-framework image Download the source code
git clone httpsgerritopnfvorggerrityardstick
Build the Docker image and tag it as yardstick-framework
cd yardstickdocker build -t yardstick-framework
Run the Docker instance
53 Additional testing and validation activities 59
OPNFV Configuration Guide Release brahmaputra30 (605ebda)
docker run --name yardstick_instance -i -t yardstick-framework
To build a guest image for Yardstick see Building a guest image
Yardstick-CI image Pull the Yardstick-CI Docker image from Docker hub
docker pull opnfvyardstick-ci
Run the Docker image
docker run --privileged=true --rm -t -e INSTALLER_TYPE=$INSTALLER_TYPE -e INSTALLER_IP=$INSTALLER_IP opnfvyardstick-ci run_benchmarks
Where $INSTALLER_TYPE can be fuel foreman or compass and $INSTALLER_IP is the installer masternode IP address (ie 102002 is default for fuel)
Basic steps performed by the Yardstick-CI container
1 clone yardstick and releng repos
2 setup OS credentials (releng scripts)
3 install yardstick and dependencies
4 build yardstick cloud image and upload it to glance
5 upload cirros-033 cloud image to glance
6 run yardstick test scenarios
7 cleanup
OpenStack parameters and credentials
Yardstick-flavor Most of the sample test cases in Yardstick are using an OpenStack flavor called yardstick-flavorwhich deviates from the OpenStack standard m1tiny flavor by the disk size - instead of 1GB it has 3GB Otherparameters are the same as in m1tiny
Environment variables Before running Yardstick it is necessary to export OpenStack environment vari-ables from the OpenStack openrc file (using the source command) and export the external network nameexport EXTERNAL_NETWORK=external-network-name the default name for the external network isnet04_ext
Credential environment variables in the openrc file have to include at least
bull OS_AUTH_URL
bull OS_USERNAME
bull OS_PASSWORD
bull OS_TENANT_NAME
60 Chapter 5 Post Configuration Activities
OPNFV Configuration Guide Release brahmaputra30 (605ebda)
Yardstick default key pair Yardstick uses a SSH key pair to connect to the guest image This key pair can be foundin the resourcesfiles directory To run the ping-hotyaml test sample this key pair needs to be importedto the OpenStack environment
Examples and verifying the install
It is recommended to verify that Yardstick was installed successfully by executing some simple commands and testsamples Below is an example invocation of yardstick help command and pingpy test sample
yardstick -hyardstick task start samplespingyaml
Each testing tool supported by Yardstick has a sample configuration file These configuration files can be found in thesamples directory
Example invocation of yardstick-plot tool
yardstick-plot -i tmpyardstickout -o tmpplots
Default location for the output is tmpyardstickout
More info about the tool can be found by executing
yardstick-plot -h
53 Additional testing and validation activities 61

OPNFV Configuration Guide Release brahmaputra30 (605ebda)
vRouter eth0 interface would have the following IPv6 address 2001db801f8163efffe11111164 vRouter eth1 interface would have the following IPv6 address 2001db802164 VM1 would have the following IPv6 address 2001db802f8163efffe33333364 VM2 would have the following IPv6 address 2001db802f8163efffe44444464
OPNFV-NATIVE-SETUP-17 Now we can SSH to VMs You can execute the following command
1 Create a floatingip and associate it with VM1 VM2 and vRouter (to the port id that is passed) Note that the name ext-net may work for some installers such as Compass and Joid Change the name ext-net to match the name of external network that an installer createsneutron floatingip-create --port-id $(neutron port-list | grep -w eth0-VM1 | awk print $2) ext-netneutron floatingip-create --port-id $(neutron port-list | grep -w eth0-VM2 | awk print $2) ext-netneutron floatingip-create --port-id $(neutron port-list | grep -w eth1-vRouter | awk print $2) ext-net
2 To know display the floatingip associated with VM1 VM2 and vRouterneutron floatingip-list -F floating_ip_address -F port_id | grep $(neutron port-list | grep -w eth0-VM1 | awk print $2) | awk print $2neutron floatingip-list -F floating_ip_address -F port_id | grep $(neutron port-list | grep -w eth0-VM2 | awk print $2) | awk print $2neutron floatingip-list -F floating_ip_address -F port_id | grep $(neutron port-list | grep -w eth1-vRouter | awk print $2) | awk print $2
3 To ssh to the vRouter VM1 and VM2 user can execute the following commandssh -i ~vRouterKey fedoraltfloating-ip-of-vRoutergtssh -i ~vRouterKey cirrosltfloating-ip-of-VM1gtssh -i ~vRouterKey cirrosltfloating-ip-of-VM2gt
433 Setup Manual in OpenStack with Open Daylight L2-Only Environment
If you intend to set up a service VM as an IPv6 vRouter in an environment of OpenStack and Open Daylight L2-onlyof OPNFV Brahmaputra Release please NOTE that
bull The hostnames IP addresses and username are for exemplary purpose in instructions Please change as neededto fit your environment
bull The instructions apply to both deployment model of single controller node and HA (High Availability) deploy-ment model where multiple controller nodes are used
bull However in case of HA when ipv6-router is created in step SETUP-SVM-11 it could be created in anyof the controller node Thus you need to identify in which controller node ipv6-router is created in orderto manually spawn radvd daemon inside the ipv6-router namespace in steps SETUP-SVM-24 throughSETUP-SVM-30
Install OPNFV and Preparation
OPNFV-INSTALL-1 To install OpenStack with Open Daylight L2-only environment of OPNFV Brahmaputra Re-lease
Apex Installer
36 Chapter 4 Feature Configuration
OPNFV Configuration Guide Release brahmaputra30 (605ebda)
HA deployment in OpenStack with Open Daylight L2-only environmentopnfv-deploy -d etcopnfv-apexos-odl_l2-nofeature-hayaml
Non-HA deployment in OpenStack with Open Daylight L2-only environment Non-HA deployment is currently not supported by Apex installer
Compass Installer
HA deployment in OpenStack with Open Daylight L2-only environmentexport ISO_URL=file$BUILD_DIRECTORYcompassisoexport OS_VERSION=$COMPASS_OS_VERSIONexport OPENSTACK_VERSION=$COMPASS_OPENSTACK_VERSIONexport CONFDIR=$WORKSPACEdeployconfvm_environmentdeploysh --dha $CONFDIRos-odl_l2-nofeature-hayml --network $CONFDIR$NODE_NAMEnetworkyml
Non-HA deployment in OpenStack with Open Daylight L2-only environment Non-HA deployment is currently not supported by Compass installer
Fuel Installer
HA deployment in OpenStack with Open Daylight L2-only environmentdeploysh -s os-odl_l2-nofeature-ha
Non-HA deployment in OpenStack with Open Daylight L2-only environmentdeploysh -s os-odl_l2-nofeature-noha
Joid Installer
HA deployment in OpenStack with Open Daylight L2-only environmentdeploysh -o liberty -s odl -t ha -l default -f ipv6
Non-HA deployment in OpenStack with Open Daylight L2-only environmentdeploysh -o liberty -s odl -t nonha -l default -f ipv6
Please NOTE that
bull You need to refer to installerrsquos documentation for other necessary parameters applicable to your deployment
bull You need to refer to Release Notes and installerrsquos documentation if there is any issue in installation
OPNFV-INSTALL-2 Clone the following GitHub repository to get the configuration and metadata files
git clone httpsgithubcomsridhargaddamopnfv_os_ipv6_pocgit optstackopnfv_os_ipv6_poc
Disable Security Groups in OpenStack ML2 Setup
Please NOTE that although Security Groups feature has been disabled automatically through localconf configu-ration file by some installers such as devstack it is very likely that other installers such as Apex Compass Fuelor Joid will enable Security Groups feature after installation
Please make sure that Security Groups are disabled in the setup
OPNFV-SEC-1 Change the settings in etcneutronpluginsml2ml2_confini as follows
etcneutronpluginsml2ml2_confini[securitygroup]enable_security_group = Falsefirewall_driver = neutronagentfirewallNoopFirewallDriver
43 IPv6 Configuration - Setting Up a Service VM as an IPv6 vRouter 37
OPNFV Configuration Guide Release brahmaputra30 (605ebda)
OPNFV-SEC-2 Change the settings in etcnovanovaconf as follows
etcnovanovaconf[DEFAULT]security_group_api = novafirewall_driver = novavirtfirewallNoopFirewallDriver
OPNFV-SEC-3 After updating the settings you will have to restart the Neutron and Nova services
Please note that the commands of restarting Neutron and Nova would vary depending on the installer Pleaserefer to relevant documentation of specific installers
Source the Credentials in OpenStack Controller Node
SETUP-SVM-1 Login in OpenStack Controller Node Start a new terminal and change directory to where Open-Stack is installed
SETUP-SVM-2 We have to source the tenant credentials in this step Please NOTE that the method of sourcingtenant credentials may vary depending on installers For example
Apex installer
source the tenant credentials using Apex installer of OPNFV you need to copy the file homestackovercloudrc from the installer VM called instack to a location in controller node for example in the directory optsource optovercloudrc
Compass installer
source the tenant credentials using Compass installer of OPNFVsource optadmin-openrcsh
Fuel installer
source the tenant credentials using Fuel installer of OPNFVsource rootopenrc
Joid installer
source the tenant credentials using Joid installer of OPNFVsource $HOMEjoid_configadmin-openrc
devstack
source the tenant credentials in devstacksource openrc admin demo
Please refer to relevant documentation of installers if you encounter any issue
Informational Note Move Public Network from Physical Network Interface to br-ex
SETUP-SVM-3 Move the physical interface (ie the public network interface) to br-ex
SETUP-SVM-4 Verify setup of br-ex
Those 2 steps are Informational OPNFV Installer has taken care of those 2 steps during deployment You mayrefer to this step only if there is any issue or if you are using other installers
38 Chapter 4 Feature Configuration
OPNFV Configuration Guide Release brahmaputra30 (605ebda)
We have to move the physical interface (ie the public network interface) to br-ex including moving the publicIP address and setting up default route Please refer to SETUP-SVM-3 and SETUP-SVM-4 in our more completeinstruction
Create IPv4 Subnet and Router with External Connectivity
SETUP-SVM-5 Create a Neutron router ipv4-router which needs to provide external connectivity
neutron router-create ipv4-router
SETUP-SVM-6 Create an external networksubnet ext-net using the appropriate values based on the data-centerphysical network setup
Please NOTE that you may only need to create the subnet of ext-net because OPNFV installers should have createdan external network during installation You must use the same name of external network that installer creates whenyou create the subnet For example
bull Apex installer external
bull Compass installer ext-net
bull Fuel installer net04_ext
bull Joid installer ext-net
Please refer to the documentation of installers if there is any issue
This is needed only if installer does not create an external work Otherwise skip this command net-createneutron net-create --routerexternal ext-net
Note that the name ext-net may work for some installers such as Compass and Joid Change the name ext-net to match the name of external network that an installer createsneutron subnet-create --disable-dhcp --allocation-pool start=19859156251end=19859156254 --gateway 198591561 ext-net 19859156024
Please note that the IP addresses in the command above are for exemplary purpose Please replace the IP addressesof your actual network
SETUP-SVM-7 Associate the ext-net to the Neutron router ipv4-router
Note that the name ext-net may work for some installers such as Compass and Joid Change the name ext-net to match the name of external network that an installer createsneutron router-gateway-set ipv4-router ext-net
SETUP-SVM-8 Create an internaltenant IPv4 network ipv4-int-network1
neutron net-create ipv4-int-network1
SETUP-SVM-9 Create an IPv4 subnet ipv4-int-subnet1 in the internal network ipv4-int-network1
neutron subnet-create --name ipv4-int-subnet1 --dns-nameserver 8888 ipv4-int-network1 2000024
SETUP-SVM-10 Associate the IPv4 internal subnet ipv4-int-subnet1 to the Neutron router ipv4-router
neutron router-interface-add ipv4-router ipv4-int-subnet1
43 IPv6 Configuration - Setting Up a Service VM as an IPv6 vRouter 39
OPNFV Configuration Guide Release brahmaputra30 (605ebda)
Create IPv6 Subnet and Router with External Connectivity
Now let us create a second neutron router where we can ldquomanuallyrdquo spawn a radvd daemon to simulate an externalIPv6 router
SETUP-SVM-11 Create a second Neutron router ipv6-router which needs to provide external connectivity
neutron router-create ipv6-router
SETUP-SVM-12 Associate the ext-net to the Neutron router ipv6-router
Note that the name ext-net may work for some installers such as Compass and Joid Change the name ext-net to match the name of external network that an installer createsneutron router-gateway-set ipv6-router ext-net
SETUP-SVM-13 Create a second internaltenant IPv4 network ipv4-int-network2
neutron net-create ipv4-int-network2
SETUP-SVM-14 Create an IPv4 subnet ipv4-int-subnet2 for the ipv6-router internal networkipv4-int-network2
neutron subnet-create --name ipv4-int-subnet2 --dns-nameserver 8888 ipv4-int-network2 1000024
SETUP-SVM-15 Associate the IPv4 internal subnet ipv4-int-subnet2 to the Neutron router ipv6-router
neutron router-interface-add ipv6-router ipv4-int-subnet2
Prepare Image Metadata and Keypair for Service VM
SETUP-SVM-16 Download fedora22 image which would be used as vRouter
wget httpsdownloadfedoraprojectorgpubfedoralinuxreleases22Cloudx86_64ImagesFedora-Cloud-Base-22-20150521x86_64qcow2
glance image-create --name Fedora22 --disk-format qcow2 --container-format bare --file Fedora-Cloud-Base-22-20150521x86_64qcow2
SETUP-SVM-17 Create a keypair
nova keypair-add vRouterKey gt ~vRouterKey
SETUP-SVM-18 Create ports for vRouter and both the VMs with some specific MAC addresses
neutron port-create --name eth0-vRouter --mac-address fa163e111111 ipv4-int-network2neutron port-create --name eth1-vRouter --mac-address fa163e222222 ipv4-int-network1neutron port-create --name eth0-VM1 --mac-address fa163e333333 ipv4-int-network1neutron port-create --name eth0-VM2 --mac-address fa163e444444 ipv4-int-network1
Boot Service VM (vRouter) with eth0 on ipv4-int-network2 and eth1 on ipv4-int-network1
Let us boot the service VM (vRouter) with eth0 interface on ipv4-int-network2 connecting toipv6-router and eth1 interface on ipv4-int-network1 connecting to ipv4-router
SETUP-SVM-19 Boot the vRouter using Fedora22 image on the OpenStack Compute Node with hostnameopnfv-os-compute
40 Chapter 4 Feature Configuration
OPNFV Configuration Guide Release brahmaputra30 (605ebda)
nova boot --image Fedora22 --flavor m1small --user-data optstackopnfv_os_ipv6_pocmetadatatxt --availability-zone novaopnfv-os-compute --nic port-id=$(neutron port-list | grep -w eth0-vRouter | awk print $2) --nic port-id=$(neutron port-list | grep -w eth1-vRouter | awk print $2) --key-name vRouterKey vRouter
Please note that optstackopnfv_os_ipv6_pocmetadatatxt is used to enable the vRouter to au-tomatically spawn a radvd and
bull Act as an IPv6 vRouter which advertises the RA (Router Advertisements) with prefix 2001db80264on its internal interface (eth1)
bull Forward IPv6 traffic from internal interface (eth1)
SETUP-SVM-20 Verify that Fedora22 image boots up successfully and vRouter has ssh keys properly injected
nova listnova console-log vRouter
Please note that it may take a few minutes for the necessary packages to get installed and ssh keys to be injected
Sample Output[ 762884523] cloud-init[871] ec2 [ 762909634] cloud-init[871] ec2 -----BEGIN SSH HOST KEY FINGERPRINTS-----[ 762931626] cloud-init[871] ec2 2048 e3dc3d4abcb6b07775a170a3d02a47a9 (RSA)[ 762957380] cloud-init[871] ec2 -----END SSH HOST KEY FINGERPRINTS-----[ 762979554] cloud-init[871] ec2
Boot Two Other VMs in ipv4-int-network1
In order to verify that the setup is working let us create two cirros VMs with eth1 interface on theipv4-int-network1 ie connecting to vRouter eth1 interface for internal network
We will have to configure appropriate mtu on the VMsrsquo interface by taking into account the tunneling overhead andany physical switch requirements If so push the mtu to the VM either using dhcp options or via meta-data
SETUP-SVM-21 Create VM1 on OpenStack Controller Node with hostname opnfv-os-controller
nova boot --image cirros-034-x86_64-uec --flavor m1tiny --user-data optstackopnfv_os_ipv6_pocset_mtush --availability-zone novaopnfv-os-controller --nic port-id=$(neutron port-list | grep -w eth0-VM1 | awk print $2) --key-name vRouterKey VM1
SETUP-SVM-22 Create VM2 on OpenStack Compute Node with hostname opnfv-os-compute
nova boot --image cirros-034-x86_64-uec --flavor m1tiny --user-data optstackopnfv_os_ipv6_pocset_mtush --availability-zone novaopnfv-os-compute --nic port-id=$(neutron port-list | grep -w eth0-VM2 | awk print $2) --key-name vRouterKey VM2
SETUP-SVM-23 Confirm that both the VMs are successfully booted
nova listnova console-log VM1nova console-log VM2
43 IPv6 Configuration - Setting Up a Service VM as an IPv6 vRouter 41
OPNFV Configuration Guide Release brahmaputra30 (605ebda)
Spawn RADVD in ipv6-router
Let us manually spawn a radvd daemon inside ipv6-router namespace to simulate an external router First ofall we will have to identify the ipv6-router namespace and move to the namespace
Please NOTE that in case of HA (High Availability) deployment model where multiple controller nodes are usedipv6-router created in step SETUP-SVM-11 could be in any of the controller node Thus you need to iden-tify in which controller node ipv6-router is created in order to manually spawn radvd daemon inside theipv6-router namespace in steps SETUP-SVM-24 through SETUP-SVM-30 The following command in Neu-tron will display the controller on which the ipv6-router is spawned
neutron l3-agent-list-hosting-router ipv6-router
Then you login to that controller and execute steps SETUP-SVM-24 through SETUP-SVM-30
SETUP-SVM-24 identify the ipv6-router namespace and move to the namespace
sudo ip netns exec qrouter-$(neutron router-list | grep -w ipv6-router | awk print $2) bash
SETUP-SVM-25 Upon successful execution of the above command you will be in the router namespace Now letus configure the IPv6 address on the ltqr-xxxgt interface
export router_interface=$(ip a s | grep -w global qr- | awk print $7)ip -6 addr add 2001db8011 dev $router_interface
SETUP-SVM-26 Update the sample file optstackopnfv_os_ipv6_pocscenario2radvdconfwith $router_interface
cp optstackopnfv_os_ipv6_pocscenario2radvdconf tmpradvd$router_interfaceconfsed -i s$router_interface$router_interfaceg tmpradvd$router_interfaceconf
SETUP-SVM-27 Spawn a radvd daemon to simulate an external router This radvd daemon advertises an IPv6subnet prefix of 2001db80164 using RA (Router Advertisement) on its $router_interface so that eth0interface of vRouter automatically configures an IPv6 SLAAC address
$radvd -C tmpradvd$router_interfaceconf -p tmpbr-expidradvd -m syslog
SETUP-SVM-28 Add an IPv6 downstream route pointing to the eth0 interface of vRouter
ip -6 route add 2001db80264 via 2001db801f8163efffe111111
SETUP-SVM-29 The routing table should now look similar to something shown below
ip -6 route show2001db8011 dev qr-42968b9e-62 proto kernel metric 2562001db80164 dev qr-42968b9e-62 proto kernel metric 256 expires 86384sec2001db80264 via 2001db801f8163efffe111111 dev qr-42968b9e-62 proto ra metric 1024 expires 29secfe8064 dev qg-3736e0c7-7c proto kernel metric 256fe8064 dev qr-42968b9e-62 proto kernel metric 256
SETUP-SVM-30 If all goes well the IPv6 addresses assigned to the VMs would be as shown as follows
vRouter eth0 interface would have the following IPv6 address 2001db801f8163efffe11111164 vRouter eth1 interface would have the following IPv6 address 2001db802164 VM1 would have the following IPv6 address 2001db802f8163efffe33333364 VM2 would have the following IPv6 address 2001db802f8163efffe44444464
42 Chapter 4 Feature Configuration
OPNFV Configuration Guide Release brahmaputra30 (605ebda)
Testing to Verify Setup Complete
Now let us SSH to those VMs eg VM1 and or VM2 and or vRouter to confirm that it has successfully configuredthe IPv6 address using SLAAC with prefix 2001db80264 from vRouter
We use floatingip mechanism to achieve SSH
SETUP-SVM-31 Now we can SSH to VMs You can execute the following command
1 Create a floatingip and associate it with VM1 VM2 and vRouter (to the port id that is passed) Note that the name ext-net may work for some installers such as Compass and Joid Change the name ext-net to match the name of external network that an installer createsneutron floatingip-create --port-id $(neutron port-list | grep -w eth0-VM1 | awk print $2) ext-netneutron floatingip-create --port-id $(neutron port-list | grep -w eth0-VM2 | awk print $2) ext-netneutron floatingip-create --port-id $(neutron port-list | grep -w eth1-vRouter | awk print $2) ext-net
2 To know display the floatingip associated with VM1 VM2 and vRouterneutron floatingip-list -F floating_ip_address -F port_id | grep $(neutron port-list | grep -w eth0-VM1 | awk print $2) | awk print $2neutron floatingip-list -F floating_ip_address -F port_id | grep $(neutron port-list | grep -w eth0-VM2 | awk print $2) | awk print $2neutron floatingip-list -F floating_ip_address -F port_id | grep $(neutron port-list | grep -w eth1-vRouter | awk print $2) | awk print $2
3 To ssh to the vRouter VM1 and VM2 user can execute the following commandssh -i ~vRouterKey fedoraltfloating-ip-of-vRoutergtssh -i ~vRouterKey cirrosltfloating-ip-of-VM1gtssh -i ~vRouterKey cirrosltfloating-ip-of-VM2gt
If everything goes well ssh will be successful and you will be logged into those VMs Run some commands to verifythat IPv6 addresses are configured on eth0 interface
SETUP-SVM-32 Show an IPv6 address with a prefix of 2001db80264
ip address show
SETUP-SVM-33 ping some external IPv6 address eg ipv6-router
ping6 2001db8011
If the above ping6 command succeeds it implies that vRouter was able to successfully forward the IPv6 traffic toreach external ipv6-router
44 Installing OVSNFV Fuel Plugin
bull On the Fuel UI create a new environment
bull In Settings gt Userspace OVS support check ldquoUserspace OVS supportrdquo
bull Continue with environment configuration and deployment as normal
441 Upgrading the plugin
From time to time new versions of the plugin may become available
44 Installing OVSNFV Fuel Plugin 43
OPNFV Configuration Guide Release brahmaputra30 (605ebda)
The plugin cannot be upgraded if an active environment is using the plugin
In order to upgrade the plugin
bull Copy the updated plugin file to the fuel-master
bull On the Fuel UI reset the environment
bull On the Fuel CLI ldquofuel plugins ndashupdate ltfuel-plugin-filegtrdquo
bull On the Fuel UI re-deploy the environment
45 Promise Feature Configuration Overview
451 Promise installation
Install nodejs npm and promise
curl -sL httpsdebnodesourcecomsetup_4x | sudo -E bash -sudo apt-get install -y nodejssudo npm -g install npmlatestgit clone httpsgithubcomopnfvpromisegitcd promisenpm install
Please note that the last command lsquonpm installrsquo will install all needed dependencies for promise (including yangforgeand mocha)
452 Testing
Please perform the following preparation steps
1 Set OpenStack environment parameters properly (eg source openrc admin demo in DevStack)
2 Create OpenStack tenant (eg promise) and tenant user (eg promiser)
3 Create a flavor in Nova with 1 vCPU and 512 MB RAM
4 Create a private network subnet and router in Neutron
5 Create an image in Glance
Once done the promise test script can be invoked as follows (as a single line command)
NODE_ENV=mytest OS_TENANT_NAME=promise OS_USERNAME=promiser OS_PASSWORD=ltuser password from Step 2gt OS_TEST_FLAVOR=ltflavor ID from Step 3gt OS_TEST_NETWORK=ltnetwork ID from Step 4gt OS_TEST_IMAGE=ltimage ID from Step 5gt npm run -s test -- --reporter json gt promise-resultsjson
The results of the tests will be stored in the promise-resultsjson file
The results can also be seen in the console (ldquonpm run -s testrdquo)
All 33 tests passing Congratulations promise has been successfully installed and configured
44 Chapter 4 Feature Configuration
OPNFV Configuration Guide Release brahmaputra30 (605ebda)
45 Promise Feature Configuration Overview 45
OPNFV Configuration Guide Release brahmaputra30 (605ebda)
46 Configuring SDNVPN features
Fuel installer configuration
In order to install the BGPVPN feature the corresponding checkbox in Fuel has to be selected This will triggerinstallation of the OpenStack BGPVPN API extension for Neutron (set up for using the ODL driver)
In addition ODL has to be installed see the corresponding section in the respective installer documentation on how toinstall ODL If the BGPVPN feature is installed ODL will automatically be installed with VPN Service karaf featureactivated
No post-deploy configuration is necessary The Fuel BGPVPN plugin and the ODL plugin should set up the clusterready for BGPVPNs being created This includes the set-up of internal VxLAN transport tunnels between computenodes
No post-configuration activities are required
46 Chapter 4 Feature Configuration
CHAPTER
FIVE
POST CONFIGURATION ACTIVITIES
Once you have deployed and configured your scenario and features you should validate the state of the system usingthe following guides
51 Scenario validation activities
The following guides provide information on how to validate the installation of you scenario based on the tools andtest suites available for the installation tool you have selected
511 Fuel post installation procedures
Automated post installation activities
Fuel provides a fairly broad coverage of built in automated health checks These validate the installation in terms ofconfiguration services networking storage policies etc The execution of the full range of health checks takes lessthan 30 minutes
For instructions on how to run health-checks please read the Fuel installation instructions
Platform components validation
Consult the feature sections in this document for any post-install feature specific validationhealth-checks
512 JOID post installation procedures
Configure OpenStack
In each SDN directory for example joidciopencontrail there is a folder for Juju deployer where you can find thecharm bundle yaml files that the deploysh uses to deploy
In the same directory there is scripts folder where you can find shell scripts to help you configure the OpenStackcloud that you just deployed These scripts are created to help you configure a basic OpenStack Cloud to verify thecloud For more info on OpenStack Cloud configuration please refer to the OpenStack Cloud Administrator Guideon docsopenstackorg Similarly for complete SDN configuration please refer to the respective SDN adminstratorguide
Each SDN solution requires slightly different setup please refer to the README in each SDN folder Most likelyyou will need to modify the openstacksh and cloud-setupsh scripts for the floating IP range private IP network andSSH keys Please go through openstacksh glancesh and cloud-setupsh and make changes as you see fit
47
OPNFV Configuration Guide Release brahmaputra30 (605ebda)
52 Feature validation activities
The following sections provide information on how to validate the features you have installed in your scenario
521 Copper post installation procedures
This release focused on use of the OpenStack Congress service for managing configuration policy The Congressinstall verify procedure described here is largely manual This procedure as well as the longer-term goal of automatedverification support is a work in progress The procedure is further specific to one OPNFV installer (JOID ieMAASJuJu) based environment
Automated post installation activities
No automated procedures are provided at this time
Copper post configuration procedures
No configuration procedures are required beyond the basic install procedure
Platform components validation
Following are notes on creating a container as test driver for Congress This is based upon an Ubuntu host as installedby JOID
Create and Activate the Container
On the jumphost
sudo lxc-create -n trusty-copper -t usrsharelxctemplateslxc-ubuntu -- -b ubuntu ~opnfvsudo lxc-start -n trusty-copper -dsudo lxc-info --name trusty-copper(typical output)Name trusty-copperState RUNNINGPID 4563IP 100344CPU use 2877 secondsBlkIO use 52279 MiBMemory use 55975 MiBKMem use 0 bytesLink vethDMFOANTX bytes 262 MiBRX bytes 8848 MiBTotal bytes 9110 MiB
Login and configure the test server
48 Chapter 5 Post Configuration Activities
OPNFV Configuration Guide Release brahmaputra30 (605ebda)
ssh ubuntu100344sudo apt-get updatesudo apt-get upgrade -y
Install pipsudo apt-get install python-pip -y
Install javasudo apt-get install default-jre -y
Install other dependenciessudo apt-get install git gcc python-dev libxml2 libxslt1-dev libzip-dev php5-curl -y
Setup OpenStack environment variables per your OPNFV installexport CONGRESS_HOST=19216810117export KEYSTONE_HOST=19216810108export CEILOMETER_HOST=19216810105export CINDER_HOST=19216810101export GLANCE_HOST=19216810106export HEAT_HOST=19216810107export NEUTRON_HOST=19216810111export NOVA_HOST=19216810112source ~admin-openrcsh
Install and test OpenStack clientmkdir ~gitcd gitgit clone httpsgithubcomopenstackpython-openstackclientgitcd python-openstackclientgit checkout stablelibertysudo pip install -r requirementstxtsudo python setuppy installopenstack service list(typical output)+----------------------------------+------------+----------------+| ID | Name | Type |+----------------------------------+------------+----------------+| 2f8799ae50f24c928c021fabf8a50f5f | keystone | identity || 351b13f56d9a4e25849406ec1d5a2726 | cinder | volume || 5129510c3143454f9ba8ec7e6735e267 | cinderv2 | volumev2 || 5ee1e220460f41dea9be06921400ce9b | congress | policy || 78e73a7789a14f56a5d248a0cd141201 | quantum | network || 9d5a00fb475a45b2ae6767528299ed6b | ceilometer | metering || 9e4b1624ef0b434abc0b82f607c5045c | heat | orchestration || b6c01ceb5023442d9f394b83f2a18e01 | heat-cfn | cloudformation || ba6199e3505045ad87e2a7175bd0c57f | glance | image || d753f304a0d541dbb989780ae70328a8 | nova | compute |+----------------------------------+------------+----------------+
Install and test Congress clientcd ~gitgit clone httpsgithubcomopenstackpython-congressclientgitcd python-congressclientgit checkout stablelibertysudo pip install -r requirementstxtsudo python setuppy installopenstack congress driver list(typical output)+------------+--------------------------------------------------------------------------+| id | description |+------------+--------------------------------------------------------------------------+| ceilometer | Datasource driver that interfaces with ceilometer || neutronv2 | Datasource driver that interfaces with OpenStack Networking aka Neutron || nova | Datasource driver that interfaces with OpenStack Compute aka nova || keystone | Datasource driver that interfaces with keystone || cinder | Datasource driver that interfaces with OpenStack cinder || glancev2 | Datasource driver that interfaces with OpenStack Images aka Glance |+------------+--------------------------------------------------------------------------+
Install and test Glance clientcd ~gitgit clone httpsgithubcomopenstackpython-glanceclientgitcd python-glanceclientgit checkout stablelibertysudo pip install -r requirementstxtsudo python setuppy installglance image-list(typical output)+--------------------------------------+---------------------+| ID | Name |+--------------------------------------+---------------------+| 6ce4433e-65c0-4cd8-958d-b06e30c76241 | cirros-033-x86_64 |+--------------------------------------+---------------------+
Install and test Neutron clientcd ~gitgit clone httpsgithubcomopenstackpython-neutronclientgitcd python-neutronclientgit checkout stablelibertysudo pip install -r requirementstxtsudo python setuppy installneutron net-list(typical output)+--------------------------------------+----------+------------------------------------------------------+| id | name | subnets |+--------------------------------------+----------+------------------------------------------------------+| dc6227df-af41-439f-bd2c-c2c2f0fe7fc5 | public | 5745846c-dd79-4900-a7da-bf506348ceac 19216810024 || a3f9f13a-5de9-4d3b-98c8-d2e40a2ef8e9 | internal | 5e0be862-90da-44ab-af43-56d5c65aa049 1000024 |+--------------------------------------+----------+------------------------------------------------------+
Install and test Nova clientcd ~gitgit clone httpsgithubcomopenstackpython-novaclientgitcd python-novaclientgit checkout stablelibertysudo pip install -r requirementstxtsudo python setuppy installnova hypervisor-list(typical output)+----+---------------------+-------+---------+| ID | Hypervisor hostname | State | Status |+----+---------------------+-------+---------+| 1 | compute1maas | up | enabled |+----+---------------------+-------+---------+
Install and test Keystone clientcd ~gitgit clone httpsgithubcomopenstackpython-keystoneclientgitcd python-keystoneclientgit checkout stablelibertysudo pip install -r requirementstxtsudo python setuppy install
52 Feature validation activities 49
OPNFV Configuration Guide Release brahmaputra30 (605ebda)
Setup the Congress Test Webapp
Clone Copper (if not already cloned in user home)cd ~gitif [ -d ~gitcopper ] then git clone httpsgerritopnfvorggerritcopper fi
Copy the Apache configsudo cp ~gitcoppercomponentscongresstest-webappwwwubuntu-apache2conf etcapache2apache2conf
Point proxyphp to the Congress server per your installsed -i -- s19216810117$CONGRESS_HOSTg ~gitcoppercomponentscongresstest-webappwwwhtmlproxyindexphp
Copy the webapp to the Apache root directory and fix permissionssudo cp -R ~gitcoppercomponentscongresstest-webappwwwhtml varwwwsudo chmod 755 varwwwhtml -R
Make webapp log directory and set permissionsmkdir ~logschmod 777 ~logs
Restart Apachesudo service apache2 restart
Using the Test Webapp
Browse to the trusty-copper server IP address
Interactive options are meant to be self-explanatory given a basic familiarity with the Congress service and data modelBut the app will be developed with additional features and UI elements
522 IPv6 Post Installation Procedures
Congratulations you have completed the setup of using a service VM to act as an IPv6 vRouter You have validatedthe setup based on the instruction in previous sections If you want to further test your setup you can ping6 amongVM1 VM2 vRouter and ipv6-router
This setup allows further open innovation by any 3rd-party For more instructions and documentations please refer to
1 IPv6 Configuration Guide (HTML) httpartifactsopnfvorgipv6docssetupservicevmindexhtml
2 IPv6 User Guide (HTML) httpartifactsopnfvorgipv6docsgapanalysisindexhtml
Automated post installation activities
Refer to the relevant testing guides results and release notes of Yardstick Project
53 Additional testing and validation activities
Many of our testing tools can be manually installed to facilitate targeted testing of features and capabilities of yourscenario The following guides provide instruction on setting up these testing suites
50 Chapter 5 Post Configuration Activities
OPNFV Configuration Guide Release brahmaputra30 (605ebda)
531 Overview of the functest suites
Functest is the OPNFV project primarily targeting function testing In the Continuous Integration pipeline it islaunched after an OPNFV fresh installation to validate and verify the basic functions of the infrastructure
The current list of test suites can be distributed in 3 main domains VIM (Virtualised Infrastructure Manager) Con-trollers and Features
Do-main
Testsuite
Comments
VIM
vPing NFV ldquoHello Worldrdquo using SSH connection and floatting IPvPing_userdataPing using userdata and cloud-init mechanismTempest OpenStack reference test suite [2]Rallybench
OpenStack testing tool benchmarking OpenStack modules [3]
ControllersOpen-Day-light
Opendaylight Test suite
ONOS Test suite of ONOS L2 and L3 functions See ONOSFW User Guide for details
Features
vIMS Example of a real VNF deployment to show the NFV capabilities of the platform The IPMultimedia Subsytem is a typical Telco test case referenced by ETSI It provides a fullyfunctional VoIP System
Promise Resource reservation and management project to identify NFV related requirements andrealize resource reservation for future usage by capacity management of resource poolsregarding compute network and storage See Promise User Guide for details
Doctor Doctor platform as of Brahmaputra release provides the two features ImmediateNotification Consistent resource state awareness (compute) see Doctor User Guide fordetails
SD-NVPN
Implementation of the OpenStack bgpvpn API from the SDNVPN feature project Itallowing the cration of BGP VPNs see SDNVPN User Guide for
Functest includes different test suites with several test cases within Some of the tests are developed by Functest teammembers whereas others are integrated from upstream communities or other OPNFV projects For example Tempestis the OpenStack integration test suite and Functest is in charge of the selection integration and automation of the teststhat fit in OPNFV
The Tempest suite has been customized but no new test cases have been created
The results produced by the tests run from CI are pushed and collected in a NoSQL database The goal is to populatethe database with results from different sources and scenarios and to show them on a Dashboard
There is no real notion of Test domain or Test coverage Basic components (VIM controllers) are tested through theirown suites Feature projects also provide their own test suites with different ways of running their tests
vIMS test case was integrated to demonstrate the capability to deploy a relatively complex NFV scenario on top of theOPNFV infrastructure
Functest considers OPNFV as a black box OPNFV since the Brahmaputra release offers lots of potential combina-tions
bull 2 controllers (OpenDayligh ONOS)
bull 4 installers (Apex Compass Fuel Joid)
Most of the tests are runnable on any combination but some others might have restrictions imposed by the installersor the available deployed features
53 Additional testing and validation activities 51
OPNFV Configuration Guide Release brahmaputra30 (605ebda)
Preparing the Docker container
Pull the Functest Docker image from the Docker hub
docker pull opnfvfunctestbrahmaputra10
Check that the image is available
docker images
Run the docker container giving the environment variables
bull INSTALLER_TYPE possible values are apex compass fuel or joid
bull INSTALLER_IP IP of the installer nodeVM
Functest may need to know the IP of the installer to retrieve automatically the credentials from the installer nodeVMor even from the actual controllers
The minimum command to create the Functest Docker container can be described as follows
docker run -it -e INSTALLER_IP=102002 -e INSTALLER_TYPE=fuel opnfvfunctestbrahmaputra10 binbash
Optionally it is possible to precise the container name through the option ndashname
docker run --name CONTAINER_NAME -it -e INSTALLER_IP=102002 -e INSTALLER_TYPE=fuel opnfvfunctestbrahmaputra10 binbash
It is also possible to to indicate the path of the OpenStack credentials using -v
docker run -it -e INSTALLER_IP=102002 -e INSTALLER_TYPE=fuel -v ltpath_to_your_local_creds_filegthomeopnfvfunctestconfopenstackcreds opnfvfunctestbrahmaputra10 binbash
The local file will be mounted in the container under homeopnfvfunctestconfopenstackcreds
If the intention is to run Functest against any of the supported OPNFV scenarios it is recommended to include alsothe environment variable DEPLOY_SCENARIO for example
docker run -it -e INSTALLER_IP=102002 -e INSTALLER_TYPE=fuel -e DEPLOY_SCENARIO=os-odl_l2-nofeature-ha opnfvfunctestbrahmaputra10 binbash
Inside the container the following directory structure should be in place
`-- home`-- opnfv
|-- functest| |-- conf| |-- data| `-- results`-- repos
|-- bgpvpn|-- doctor|-- functest|-- odl_integration|-- onos|-- promise|-- rally|-- releng`-- vims-test
Basically the container includes
bull Functest directory to store the configuration (the OpenStack creds are stored inhomeopngbfunctestconfopenstackcreds) the data (cirros image needed for some tests) results (sometemporary result logs may be stored here)
52 Chapter 5 Post Configuration Activities
OPNFV Configuration Guide Release brahmaputra30 (605ebda)
bull Repositories the functest repository will be used to prepare the environment and run the tests Other repositoriesare used for the installation of the needed tooling (eg rally) andor the retrieval of feature projects scenarios(eg promise)
The structure under the Functest repository can be described as follows
|-- INFO|-- LICENSE|-- commons| |-- ims| |-- mobile| `-- traffic-profile-guidelinesrst|-- docker| |-- Dockerfile| |-- commonsh| |-- prepare_envsh| |-- requirementspip| `-- run_testssh|-- docs| |-- configguide| |-- devguide| |-- images| |-- results| `-- userguide`-- testcases
|-- Controllers|-- features|-- tests|-- VIM|-- vIMS|-- vPing|-- __init__py|-- config_functestpy|-- config_functestyaml`-- functest_utilspy
We may distinguish 4 different folders
bull commons it is a folder dedicated to store traffic profile or any test inputs that could be reused by any test project
bull docker this folder includes the scripts that will be used to setup the environment and run the tests
bull docs this folder includes the user and installationconfiguration guide
bull testcases this folder includes the scripts required by Functest internal test cases and other feature projects testcases
After the run command a new prompt appears which means that we are inside the container and ready to move to thenext step
Useful Docker commands
When typing exit in the container prompt this will cause exiting the container and probably stopping it Whenstopping a running Docker container all the changes will be lost there is a keyboard shortcut to quit the containerwithout stopping it CTRL+P+Q To reconnect to the running container DO NOT use the run command again (sinceit will create a new container) use exec instead
53 Additional testing and validation activities 53
OPNFV Configuration Guide Release brahmaputra30 (605ebda)
docker psltcopy the container IDgtdocker exec -ti ltCONTAINER_IDgt binbash
or simply
docker exec -ti $(docker ps|grep functest|awk print $1) binbash
There are other useful Docker commands that might be needed to manage possible issues with the containers
List the running containers
docker ps
List all the containers including the stopped ones
docker ps -a
It is useful sometimes to remove a container if there are some problems
docker rm ltCONTAINER_IDgt
Use the -f option if the container is still running it will force to destroy it
docker -f rm ltCONTAINER_IDgt
The Docker image is called opnfvfunctest and it is stored in the public Docker registry under the OPNFV accountdockerhub The are many different tags that have been created automatically by the CI mechanisms but the one thatthis document refers to is brahmaputra10 Pulling other tags might cause some problems while running the tests
Check the Docker documentation dockerdocs for more information
Preparing the Functest environment
Once the docker container is up and running execute the following command in the prompt
$repos_dirfunctestdockerprepare_envsh
NOTE $repos_dir is a default environment variable inside the docker container which points to homeopnfvrepos
This script will make sure that the requirements to run the tests are met and will install the needed libraries and toolsby all Functest test cases It must be run only once every time the docker is started from sratch
Focus on the OpenStack credentials
The OpenStack credentials are needed to run the tests against the VIM There are 3 ways to provide them to Functest
bull using the -v option when running the Docker container
bull create an empty file in homeopnfvfunctestconfopenstackcreds and paste the credentials in it
bull automatically retrieved using the following script $repos_dirrelengutilsfetch_os_credssh
Once the credentials are there they shall be sourced before running the tests
source homeopnfvfunctestconfopenstackcreds
or simply using the environment variable creds
54 Chapter 5 Post Configuration Activities
OPNFV Configuration Guide Release brahmaputra30 (605ebda)
$creds
After this try to run any OpenStack command to see if you get any output for instance
openstack user list
This will return a list of the actual users in the OpenStack deployment In any other case check that the credentialsare sourced
env|grep OS_
This command must show a set of environment variables starting with OS_ for example
OS_REGION_NAME=RegionOneOS_DEFAULT_DOMAIN=defaultOS_PROJECT_NAME=adminOS_PASSWORD=adminOS_AUTH_STRATEGY=keystoneOS_AUTH_URL=http172301035000v20OS_USERNAME=adminOS_TENANT_NAME=adminOS_ENDPOINT_TYPE=internalURLOS_NO_CACHE=true
If still the OpenStack command does not show anything or complains about connectivity issues it could be due to anincorrect url given to the OS_AUTH_URL environment variable Check the deployment settings
SSL Support
If you need to connect to a server that is TLS-enabled (the auth URL begins with lsquohttpsrsquo) and it uses a certificate froma private CA or a self-signed certificate you will need to specify the path to an appropriate CA certificate to use tovalidate the server certificate with the environment variable OS_CACERT
echo $OS_CACERTetcsslcertscacrt
However this certificate does not exist in the container by default It has to be copied manually from the OpenStackdeployment This can be done in 2 ways
1 Create manually that file and copy the contents from the OpenStack controller
2 (recommended) Add the file using a Docker volume when starting the container
-v ltpath_to_your_cert_filegtetcsslcertscacert
You might need to export OS_CACERT environment variable inside the container
export OS_CACERT=etcsslcertscacrt
Certificate verification can be turned off using OS_INSECURE=true For example Fuel uses self-signed cacerts bydefault so an pre step would be
export OS_INSECURE=true
Additional Options
In case you need to provide different configuration parameters to Functest (eg commit IDs or branches for therepositories ) copy the config_functestyaml from the repository to your current directory and run the container
53 Additional testing and validation activities 55
OPNFV Configuration Guide Release brahmaputra30 (605ebda)
with a volume
wget httpsgitopnfvorgcgitfunctestplaintestcasesconfig_functestyaml
ltmodify the file accordinglygt
docker run -ti -e INSTALLER_TYPE=fuel -e INSTALLER_IP=102002 opnfvfunctestbrahmaputra10 -v $(pwd)config_functestyamlhomeopnfvfunctestconfconfig_functestyaml binbash
However this is not recommended since most of the test cases rely on static parameters read from this file andchanging them might cause problems
Proxy support
Functest needs internet access to download some resources for some test cases For example to install the Rallyenvironment This might not work properly if the Jumphost is running through a Proxy
If that is the case make sure the resolvconf and the needed proxy environment variables are properly set
export http_proxy=ltyour http proxy settingsgtexport https_proxy=ltyour https proxy settingsgt
Or refer to the official Docker documentation for Proxy settings
Before running prepare_envsh make sure you can ping http and https sites inside the container For example
nc -v googlecom 80Connection to googlecom 80 port [tcphttp] succeeded
nc -v googlecom 443Connection to googlecom 443 port [tcphttps] succeeded
532 Installing vswitchperf
Supported Operating Systems
bull CentOS 7
bull Fedora 20
bull Fedora 21
bull Fedora 22
bull Ubuntu 1404
Supported vSwitches
The vSwitch must support Open Flow 13 or greater
bull OVS (built from source)
bull OVS with DPDK (built from source)
56 Chapter 5 Post Configuration Activities
OPNFV Configuration Guide Release brahmaputra30 (605ebda)
Supported Hypervisors
bull Qemu version 23
Available VNFs
A simple VNF that forwards traffic through a VM using
bull DPDK testpmd
bull Linux Brigde
bull custom l2fwd module
The VM image can be downloaded from httpartifactsopnfvorgvswitchperfvloop-vnf-ubuntu-1404_20151216qcow2
Other Requirements
The test suite requires Python 33 and relies on a number of other packages These need to be installed for the testsuite to function
Installation of required packages preparation of Python 3 virtual environment and compilation of OVS DPDK andQEMU is performed by script systemsbuild_base_machinesh It should be executed under user account which willbe used for vsperf execution
Please Note Password-less sudo access must be configured for given user account before script is executed
Execution of installation script
$ cd systems$ build_base_machinesh
Please Note you donrsquot need to go into any of the systems subdirectories simply run the top levelbuild_base_machinesh your OS will be detected automatically
Script build_base_machinesh will install all the vsperf dependencies in terms of system packages Python 3x andrequired Python modules In case of CentOS 7 it will install Python 33 from an additional repository provided bySoftware Collections (a link) Installation script will also use virtualenv to create a vsperf virtual environment whichis isolated from the default Python environment This environment will reside in a directory called vsperfenv in$HOME
You will need to activate the virtual environment every time you start a new shell session Its activation is specific toyour OS
CentOS 7
$ scl enable python33 bash$ cd $HOMEvsperfenv$ source binactivate
Fedora and Ubuntu
$ cd $HOMEvsperfenv$ source binactivate
53 Additional testing and validation activities 57
OPNFV Configuration Guide Release brahmaputra30 (605ebda)
Working Behind a Proxy
If yoursquore behind a proxy yoursquoll likely want to configure this before running any of the above For example
export http_proxy=proxymycompanycom123export https_proxy=proxymycompanycom123
533 Yardstick
The projectrsquos goal is to verify infrastructure compliance from the perspective of a Virtual Network Function (VNF)
The Projectrsquos scope is the development of a test framework Yardstick test cases and test stimuli to enable NetworkFunction Virtualization Infrastructure (NFVI) verification
In OPNFV Brahmaputra release generic test cases covering aspects of the metrics in the document ETSI GS NFV-TST001 ldquoPre-deployment Testing Report on Validation of NFV Environments and Servicesrdquo are available furtherOPNFV releases will provide extended testing of these metrics
The Project also includes a sample VNF the Virtual Traffic Classifier (VTC) and its experimental frameworkApexLake
Yardstick is used in OPNFV for verifying the OPNFV infrastructure and some of the OPNFV features The Yardstickframework is deployed in several OPNFV community labs It is installer infrastructure and application independent
See also
This Presentation for an overview of Yardstick and Yardsticktst for material on alignment ETSI TST001 and Yardstick
Yardstick Installation
Abstract
Yardstick currently supports installation on Ubuntu 1404 or by using a Docker image Detailed steps about installingYardstick using both of these options can be found below
To use Yardstick you should have access to an OpenStack environment with at least Nova Neutron Glance Keystoneand Heat installed
The steps needed to run Yardstick are
1 Install Yardstick and create the test configuration yaml file
2 Build a guest image and load the image into the OpenStack environment
3 Create a Neutron external network and load OpenStack environment variables
4 Run the test case
Installing Yardstick on Ubuntu 1404
Installing Yardstick framework Install dependencies
sudo apt-get install python-virtualenv python-devsudo apt-get install libffi-dev libssl-dev git
Create a python virtual environment source it and update setuptools
58 Chapter 5 Post Configuration Activities
OPNFV Configuration Guide Release brahmaputra30 (605ebda)
virtualenv ~yardstick_venvsource ~yardstick_venvbinactivateeasy_install -U setuptools
Download source code and install python dependencies
git clone httpsgerritopnfvorggerrityardstickcd yardstickpython setuppy install
There is also a YouTube video showing the above steps
Installing extra tools
yardstick-plot Yardstick has an internal plotting tool yardstick-plot which can be installed using the follow-ing command
python setuppy develop easy_install yardstick[plot]
Building a guest image Yardstick has a tool for building an Ubuntu Cloud Server image containing all the requiredtools to run test cases supported by Yardstick It is necessary to have sudo rights to use this tool
This image can be built using the following command while in the directory where Yardstick is installed(~yardstick if the framework is installed by following the commands above)
sudo toolsyardstick-img-modify toolsubuntu-server-cloudimg-modifysh
Warning the script will create files by default in tmpworkspaceyardstick and the files will be owned byroot
The created image can be added to OpenStack using the glance image-create or via the OpenStack Dashboard
Example command
glance --os-image-api-version 1 image-create --name yardstick-trusty-server --is-public true --disk-format qcow2 --container-format bare --file tmpworkspaceyardstickyardstick-trusty-serverimg
Installing Yardstick using Docker
Yardstick has two Docker images first one (Yardstick-framework) serves as a replacement for installing the Yardstickframework in a virtual environment (for example as done in Installing Yardstick framework) while the other image ismostly for CI purposes (Yardstick-CI)
Yardstick-framework image Download the source code
git clone httpsgerritopnfvorggerrityardstick
Build the Docker image and tag it as yardstick-framework
cd yardstickdocker build -t yardstick-framework
Run the Docker instance
53 Additional testing and validation activities 59
OPNFV Configuration Guide Release brahmaputra30 (605ebda)
docker run --name yardstick_instance -i -t yardstick-framework
To build a guest image for Yardstick see Building a guest image
Yardstick-CI image Pull the Yardstick-CI Docker image from Docker hub
docker pull opnfvyardstick-ci
Run the Docker image
docker run --privileged=true --rm -t -e INSTALLER_TYPE=$INSTALLER_TYPE -e INSTALLER_IP=$INSTALLER_IP opnfvyardstick-ci run_benchmarks
Where $INSTALLER_TYPE can be fuel foreman or compass and $INSTALLER_IP is the installer masternode IP address (ie 102002 is default for fuel)
Basic steps performed by the Yardstick-CI container
1 clone yardstick and releng repos
2 setup OS credentials (releng scripts)
3 install yardstick and dependencies
4 build yardstick cloud image and upload it to glance
5 upload cirros-033 cloud image to glance
6 run yardstick test scenarios
7 cleanup
OpenStack parameters and credentials
Yardstick-flavor Most of the sample test cases in Yardstick are using an OpenStack flavor called yardstick-flavorwhich deviates from the OpenStack standard m1tiny flavor by the disk size - instead of 1GB it has 3GB Otherparameters are the same as in m1tiny
Environment variables Before running Yardstick it is necessary to export OpenStack environment vari-ables from the OpenStack openrc file (using the source command) and export the external network nameexport EXTERNAL_NETWORK=external-network-name the default name for the external network isnet04_ext
Credential environment variables in the openrc file have to include at least
bull OS_AUTH_URL
bull OS_USERNAME
bull OS_PASSWORD
bull OS_TENANT_NAME
60 Chapter 5 Post Configuration Activities
OPNFV Configuration Guide Release brahmaputra30 (605ebda)
Yardstick default key pair Yardstick uses a SSH key pair to connect to the guest image This key pair can be foundin the resourcesfiles directory To run the ping-hotyaml test sample this key pair needs to be importedto the OpenStack environment
Examples and verifying the install
It is recommended to verify that Yardstick was installed successfully by executing some simple commands and testsamples Below is an example invocation of yardstick help command and pingpy test sample
yardstick -hyardstick task start samplespingyaml
Each testing tool supported by Yardstick has a sample configuration file These configuration files can be found in thesamples directory
Example invocation of yardstick-plot tool
yardstick-plot -i tmpyardstickout -o tmpplots
Default location for the output is tmpyardstickout
More info about the tool can be found by executing
yardstick-plot -h
53 Additional testing and validation activities 61

OPNFV Configuration Guide Release brahmaputra30 (605ebda)
46 Configuring SDNVPN features
Fuel installer configuration
In order to install the BGPVPN feature the corresponding checkbox in Fuel has to be selected This will triggerinstallation of the OpenStack BGPVPN API extension for Neutron (set up for using the ODL driver)
In addition ODL has to be installed see the corresponding section in the respective installer documentation on how toinstall ODL If the BGPVPN feature is installed ODL will automatically be installed with VPN Service karaf featureactivated
No post-deploy configuration is necessary The Fuel BGPVPN plugin and the ODL plugin should set up the clusterready for BGPVPNs being created This includes the set-up of internal VxLAN transport tunnels between computenodes
No post-configuration activities are required
46 Chapter 4 Feature Configuration
CHAPTER
FIVE
POST CONFIGURATION ACTIVITIES
Once you have deployed and configured your scenario and features you should validate the state of the system usingthe following guides
51 Scenario validation activities
The following guides provide information on how to validate the installation of you scenario based on the tools andtest suites available for the installation tool you have selected
511 Fuel post installation procedures
Automated post installation activities
Fuel provides a fairly broad coverage of built in automated health checks These validate the installation in terms ofconfiguration services networking storage policies etc The execution of the full range of health checks takes lessthan 30 minutes
For instructions on how to run health-checks please read the Fuel installation instructions
Platform components validation
Consult the feature sections in this document for any post-install feature specific validationhealth-checks
512 JOID post installation procedures
Configure OpenStack
In each SDN directory for example joidciopencontrail there is a folder for Juju deployer where you can find thecharm bundle yaml files that the deploysh uses to deploy
In the same directory there is scripts folder where you can find shell scripts to help you configure the OpenStackcloud that you just deployed These scripts are created to help you configure a basic OpenStack Cloud to verify thecloud For more info on OpenStack Cloud configuration please refer to the OpenStack Cloud Administrator Guideon docsopenstackorg Similarly for complete SDN configuration please refer to the respective SDN adminstratorguide
Each SDN solution requires slightly different setup please refer to the README in each SDN folder Most likelyyou will need to modify the openstacksh and cloud-setupsh scripts for the floating IP range private IP network andSSH keys Please go through openstacksh glancesh and cloud-setupsh and make changes as you see fit
47
OPNFV Configuration Guide Release brahmaputra30 (605ebda)
52 Feature validation activities
The following sections provide information on how to validate the features you have installed in your scenario
521 Copper post installation procedures
This release focused on use of the OpenStack Congress service for managing configuration policy The Congressinstall verify procedure described here is largely manual This procedure as well as the longer-term goal of automatedverification support is a work in progress The procedure is further specific to one OPNFV installer (JOID ieMAASJuJu) based environment
Automated post installation activities
No automated procedures are provided at this time
Copper post configuration procedures
No configuration procedures are required beyond the basic install procedure
Platform components validation
Following are notes on creating a container as test driver for Congress This is based upon an Ubuntu host as installedby JOID
Create and Activate the Container
On the jumphost
sudo lxc-create -n trusty-copper -t usrsharelxctemplateslxc-ubuntu -- -b ubuntu ~opnfvsudo lxc-start -n trusty-copper -dsudo lxc-info --name trusty-copper(typical output)Name trusty-copperState RUNNINGPID 4563IP 100344CPU use 2877 secondsBlkIO use 52279 MiBMemory use 55975 MiBKMem use 0 bytesLink vethDMFOANTX bytes 262 MiBRX bytes 8848 MiBTotal bytes 9110 MiB
Login and configure the test server
48 Chapter 5 Post Configuration Activities
OPNFV Configuration Guide Release brahmaputra30 (605ebda)
ssh ubuntu100344sudo apt-get updatesudo apt-get upgrade -y
Install pipsudo apt-get install python-pip -y
Install javasudo apt-get install default-jre -y
Install other dependenciessudo apt-get install git gcc python-dev libxml2 libxslt1-dev libzip-dev php5-curl -y
Setup OpenStack environment variables per your OPNFV installexport CONGRESS_HOST=19216810117export KEYSTONE_HOST=19216810108export CEILOMETER_HOST=19216810105export CINDER_HOST=19216810101export GLANCE_HOST=19216810106export HEAT_HOST=19216810107export NEUTRON_HOST=19216810111export NOVA_HOST=19216810112source ~admin-openrcsh
Install and test OpenStack clientmkdir ~gitcd gitgit clone httpsgithubcomopenstackpython-openstackclientgitcd python-openstackclientgit checkout stablelibertysudo pip install -r requirementstxtsudo python setuppy installopenstack service list(typical output)+----------------------------------+------------+----------------+| ID | Name | Type |+----------------------------------+------------+----------------+| 2f8799ae50f24c928c021fabf8a50f5f | keystone | identity || 351b13f56d9a4e25849406ec1d5a2726 | cinder | volume || 5129510c3143454f9ba8ec7e6735e267 | cinderv2 | volumev2 || 5ee1e220460f41dea9be06921400ce9b | congress | policy || 78e73a7789a14f56a5d248a0cd141201 | quantum | network || 9d5a00fb475a45b2ae6767528299ed6b | ceilometer | metering || 9e4b1624ef0b434abc0b82f607c5045c | heat | orchestration || b6c01ceb5023442d9f394b83f2a18e01 | heat-cfn | cloudformation || ba6199e3505045ad87e2a7175bd0c57f | glance | image || d753f304a0d541dbb989780ae70328a8 | nova | compute |+----------------------------------+------------+----------------+
Install and test Congress clientcd ~gitgit clone httpsgithubcomopenstackpython-congressclientgitcd python-congressclientgit checkout stablelibertysudo pip install -r requirementstxtsudo python setuppy installopenstack congress driver list(typical output)+------------+--------------------------------------------------------------------------+| id | description |+------------+--------------------------------------------------------------------------+| ceilometer | Datasource driver that interfaces with ceilometer || neutronv2 | Datasource driver that interfaces with OpenStack Networking aka Neutron || nova | Datasource driver that interfaces with OpenStack Compute aka nova || keystone | Datasource driver that interfaces with keystone || cinder | Datasource driver that interfaces with OpenStack cinder || glancev2 | Datasource driver that interfaces with OpenStack Images aka Glance |+------------+--------------------------------------------------------------------------+
Install and test Glance clientcd ~gitgit clone httpsgithubcomopenstackpython-glanceclientgitcd python-glanceclientgit checkout stablelibertysudo pip install -r requirementstxtsudo python setuppy installglance image-list(typical output)+--------------------------------------+---------------------+| ID | Name |+--------------------------------------+---------------------+| 6ce4433e-65c0-4cd8-958d-b06e30c76241 | cirros-033-x86_64 |+--------------------------------------+---------------------+
Install and test Neutron clientcd ~gitgit clone httpsgithubcomopenstackpython-neutronclientgitcd python-neutronclientgit checkout stablelibertysudo pip install -r requirementstxtsudo python setuppy installneutron net-list(typical output)+--------------------------------------+----------+------------------------------------------------------+| id | name | subnets |+--------------------------------------+----------+------------------------------------------------------+| dc6227df-af41-439f-bd2c-c2c2f0fe7fc5 | public | 5745846c-dd79-4900-a7da-bf506348ceac 19216810024 || a3f9f13a-5de9-4d3b-98c8-d2e40a2ef8e9 | internal | 5e0be862-90da-44ab-af43-56d5c65aa049 1000024 |+--------------------------------------+----------+------------------------------------------------------+
Install and test Nova clientcd ~gitgit clone httpsgithubcomopenstackpython-novaclientgitcd python-novaclientgit checkout stablelibertysudo pip install -r requirementstxtsudo python setuppy installnova hypervisor-list(typical output)+----+---------------------+-------+---------+| ID | Hypervisor hostname | State | Status |+----+---------------------+-------+---------+| 1 | compute1maas | up | enabled |+----+---------------------+-------+---------+
Install and test Keystone clientcd ~gitgit clone httpsgithubcomopenstackpython-keystoneclientgitcd python-keystoneclientgit checkout stablelibertysudo pip install -r requirementstxtsudo python setuppy install
52 Feature validation activities 49
OPNFV Configuration Guide Release brahmaputra30 (605ebda)
Setup the Congress Test Webapp
Clone Copper (if not already cloned in user home)cd ~gitif [ -d ~gitcopper ] then git clone httpsgerritopnfvorggerritcopper fi
Copy the Apache configsudo cp ~gitcoppercomponentscongresstest-webappwwwubuntu-apache2conf etcapache2apache2conf
Point proxyphp to the Congress server per your installsed -i -- s19216810117$CONGRESS_HOSTg ~gitcoppercomponentscongresstest-webappwwwhtmlproxyindexphp
Copy the webapp to the Apache root directory and fix permissionssudo cp -R ~gitcoppercomponentscongresstest-webappwwwhtml varwwwsudo chmod 755 varwwwhtml -R
Make webapp log directory and set permissionsmkdir ~logschmod 777 ~logs
Restart Apachesudo service apache2 restart
Using the Test Webapp
Browse to the trusty-copper server IP address
Interactive options are meant to be self-explanatory given a basic familiarity with the Congress service and data modelBut the app will be developed with additional features and UI elements
522 IPv6 Post Installation Procedures
Congratulations you have completed the setup of using a service VM to act as an IPv6 vRouter You have validatedthe setup based on the instruction in previous sections If you want to further test your setup you can ping6 amongVM1 VM2 vRouter and ipv6-router
This setup allows further open innovation by any 3rd-party For more instructions and documentations please refer to
1 IPv6 Configuration Guide (HTML) httpartifactsopnfvorgipv6docssetupservicevmindexhtml
2 IPv6 User Guide (HTML) httpartifactsopnfvorgipv6docsgapanalysisindexhtml
Automated post installation activities
Refer to the relevant testing guides results and release notes of Yardstick Project
53 Additional testing and validation activities
Many of our testing tools can be manually installed to facilitate targeted testing of features and capabilities of yourscenario The following guides provide instruction on setting up these testing suites
50 Chapter 5 Post Configuration Activities
OPNFV Configuration Guide Release brahmaputra30 (605ebda)
531 Overview of the functest suites
Functest is the OPNFV project primarily targeting function testing In the Continuous Integration pipeline it islaunched after an OPNFV fresh installation to validate and verify the basic functions of the infrastructure
The current list of test suites can be distributed in 3 main domains VIM (Virtualised Infrastructure Manager) Con-trollers and Features
Do-main
Testsuite
Comments
VIM
vPing NFV ldquoHello Worldrdquo using SSH connection and floatting IPvPing_userdataPing using userdata and cloud-init mechanismTempest OpenStack reference test suite [2]Rallybench
OpenStack testing tool benchmarking OpenStack modules [3]
ControllersOpen-Day-light
Opendaylight Test suite
ONOS Test suite of ONOS L2 and L3 functions See ONOSFW User Guide for details
Features
vIMS Example of a real VNF deployment to show the NFV capabilities of the platform The IPMultimedia Subsytem is a typical Telco test case referenced by ETSI It provides a fullyfunctional VoIP System
Promise Resource reservation and management project to identify NFV related requirements andrealize resource reservation for future usage by capacity management of resource poolsregarding compute network and storage See Promise User Guide for details
Doctor Doctor platform as of Brahmaputra release provides the two features ImmediateNotification Consistent resource state awareness (compute) see Doctor User Guide fordetails
SD-NVPN
Implementation of the OpenStack bgpvpn API from the SDNVPN feature project Itallowing the cration of BGP VPNs see SDNVPN User Guide for
Functest includes different test suites with several test cases within Some of the tests are developed by Functest teammembers whereas others are integrated from upstream communities or other OPNFV projects For example Tempestis the OpenStack integration test suite and Functest is in charge of the selection integration and automation of the teststhat fit in OPNFV
The Tempest suite has been customized but no new test cases have been created
The results produced by the tests run from CI are pushed and collected in a NoSQL database The goal is to populatethe database with results from different sources and scenarios and to show them on a Dashboard
There is no real notion of Test domain or Test coverage Basic components (VIM controllers) are tested through theirown suites Feature projects also provide their own test suites with different ways of running their tests
vIMS test case was integrated to demonstrate the capability to deploy a relatively complex NFV scenario on top of theOPNFV infrastructure
Functest considers OPNFV as a black box OPNFV since the Brahmaputra release offers lots of potential combina-tions
bull 2 controllers (OpenDayligh ONOS)
bull 4 installers (Apex Compass Fuel Joid)
Most of the tests are runnable on any combination but some others might have restrictions imposed by the installersor the available deployed features
53 Additional testing and validation activities 51
OPNFV Configuration Guide Release brahmaputra30 (605ebda)
Preparing the Docker container
Pull the Functest Docker image from the Docker hub
docker pull opnfvfunctestbrahmaputra10
Check that the image is available
docker images
Run the docker container giving the environment variables
bull INSTALLER_TYPE possible values are apex compass fuel or joid
bull INSTALLER_IP IP of the installer nodeVM
Functest may need to know the IP of the installer to retrieve automatically the credentials from the installer nodeVMor even from the actual controllers
The minimum command to create the Functest Docker container can be described as follows
docker run -it -e INSTALLER_IP=102002 -e INSTALLER_TYPE=fuel opnfvfunctestbrahmaputra10 binbash
Optionally it is possible to precise the container name through the option ndashname
docker run --name CONTAINER_NAME -it -e INSTALLER_IP=102002 -e INSTALLER_TYPE=fuel opnfvfunctestbrahmaputra10 binbash
It is also possible to to indicate the path of the OpenStack credentials using -v
docker run -it -e INSTALLER_IP=102002 -e INSTALLER_TYPE=fuel -v ltpath_to_your_local_creds_filegthomeopnfvfunctestconfopenstackcreds opnfvfunctestbrahmaputra10 binbash
The local file will be mounted in the container under homeopnfvfunctestconfopenstackcreds
If the intention is to run Functest against any of the supported OPNFV scenarios it is recommended to include alsothe environment variable DEPLOY_SCENARIO for example
docker run -it -e INSTALLER_IP=102002 -e INSTALLER_TYPE=fuel -e DEPLOY_SCENARIO=os-odl_l2-nofeature-ha opnfvfunctestbrahmaputra10 binbash
Inside the container the following directory structure should be in place
`-- home`-- opnfv
|-- functest| |-- conf| |-- data| `-- results`-- repos
|-- bgpvpn|-- doctor|-- functest|-- odl_integration|-- onos|-- promise|-- rally|-- releng`-- vims-test
Basically the container includes
bull Functest directory to store the configuration (the OpenStack creds are stored inhomeopngbfunctestconfopenstackcreds) the data (cirros image needed for some tests) results (sometemporary result logs may be stored here)
52 Chapter 5 Post Configuration Activities
OPNFV Configuration Guide Release brahmaputra30 (605ebda)
bull Repositories the functest repository will be used to prepare the environment and run the tests Other repositoriesare used for the installation of the needed tooling (eg rally) andor the retrieval of feature projects scenarios(eg promise)
The structure under the Functest repository can be described as follows
|-- INFO|-- LICENSE|-- commons| |-- ims| |-- mobile| `-- traffic-profile-guidelinesrst|-- docker| |-- Dockerfile| |-- commonsh| |-- prepare_envsh| |-- requirementspip| `-- run_testssh|-- docs| |-- configguide| |-- devguide| |-- images| |-- results| `-- userguide`-- testcases
|-- Controllers|-- features|-- tests|-- VIM|-- vIMS|-- vPing|-- __init__py|-- config_functestpy|-- config_functestyaml`-- functest_utilspy
We may distinguish 4 different folders
bull commons it is a folder dedicated to store traffic profile or any test inputs that could be reused by any test project
bull docker this folder includes the scripts that will be used to setup the environment and run the tests
bull docs this folder includes the user and installationconfiguration guide
bull testcases this folder includes the scripts required by Functest internal test cases and other feature projects testcases
After the run command a new prompt appears which means that we are inside the container and ready to move to thenext step
Useful Docker commands
When typing exit in the container prompt this will cause exiting the container and probably stopping it Whenstopping a running Docker container all the changes will be lost there is a keyboard shortcut to quit the containerwithout stopping it CTRL+P+Q To reconnect to the running container DO NOT use the run command again (sinceit will create a new container) use exec instead
53 Additional testing and validation activities 53
OPNFV Configuration Guide Release brahmaputra30 (605ebda)
docker psltcopy the container IDgtdocker exec -ti ltCONTAINER_IDgt binbash
or simply
docker exec -ti $(docker ps|grep functest|awk print $1) binbash
There are other useful Docker commands that might be needed to manage possible issues with the containers
List the running containers
docker ps
List all the containers including the stopped ones
docker ps -a
It is useful sometimes to remove a container if there are some problems
docker rm ltCONTAINER_IDgt
Use the -f option if the container is still running it will force to destroy it
docker -f rm ltCONTAINER_IDgt
The Docker image is called opnfvfunctest and it is stored in the public Docker registry under the OPNFV accountdockerhub The are many different tags that have been created automatically by the CI mechanisms but the one thatthis document refers to is brahmaputra10 Pulling other tags might cause some problems while running the tests
Check the Docker documentation dockerdocs for more information
Preparing the Functest environment
Once the docker container is up and running execute the following command in the prompt
$repos_dirfunctestdockerprepare_envsh
NOTE $repos_dir is a default environment variable inside the docker container which points to homeopnfvrepos
This script will make sure that the requirements to run the tests are met and will install the needed libraries and toolsby all Functest test cases It must be run only once every time the docker is started from sratch
Focus on the OpenStack credentials
The OpenStack credentials are needed to run the tests against the VIM There are 3 ways to provide them to Functest
bull using the -v option when running the Docker container
bull create an empty file in homeopnfvfunctestconfopenstackcreds and paste the credentials in it
bull automatically retrieved using the following script $repos_dirrelengutilsfetch_os_credssh
Once the credentials are there they shall be sourced before running the tests
source homeopnfvfunctestconfopenstackcreds
or simply using the environment variable creds
54 Chapter 5 Post Configuration Activities
OPNFV Configuration Guide Release brahmaputra30 (605ebda)
$creds
After this try to run any OpenStack command to see if you get any output for instance
openstack user list
This will return a list of the actual users in the OpenStack deployment In any other case check that the credentialsare sourced
env|grep OS_
This command must show a set of environment variables starting with OS_ for example
OS_REGION_NAME=RegionOneOS_DEFAULT_DOMAIN=defaultOS_PROJECT_NAME=adminOS_PASSWORD=adminOS_AUTH_STRATEGY=keystoneOS_AUTH_URL=http172301035000v20OS_USERNAME=adminOS_TENANT_NAME=adminOS_ENDPOINT_TYPE=internalURLOS_NO_CACHE=true
If still the OpenStack command does not show anything or complains about connectivity issues it could be due to anincorrect url given to the OS_AUTH_URL environment variable Check the deployment settings
SSL Support
If you need to connect to a server that is TLS-enabled (the auth URL begins with lsquohttpsrsquo) and it uses a certificate froma private CA or a self-signed certificate you will need to specify the path to an appropriate CA certificate to use tovalidate the server certificate with the environment variable OS_CACERT
echo $OS_CACERTetcsslcertscacrt
However this certificate does not exist in the container by default It has to be copied manually from the OpenStackdeployment This can be done in 2 ways
1 Create manually that file and copy the contents from the OpenStack controller
2 (recommended) Add the file using a Docker volume when starting the container
-v ltpath_to_your_cert_filegtetcsslcertscacert
You might need to export OS_CACERT environment variable inside the container
export OS_CACERT=etcsslcertscacrt
Certificate verification can be turned off using OS_INSECURE=true For example Fuel uses self-signed cacerts bydefault so an pre step would be
export OS_INSECURE=true
Additional Options
In case you need to provide different configuration parameters to Functest (eg commit IDs or branches for therepositories ) copy the config_functestyaml from the repository to your current directory and run the container
53 Additional testing and validation activities 55
OPNFV Configuration Guide Release brahmaputra30 (605ebda)
with a volume
wget httpsgitopnfvorgcgitfunctestplaintestcasesconfig_functestyaml
ltmodify the file accordinglygt
docker run -ti -e INSTALLER_TYPE=fuel -e INSTALLER_IP=102002 opnfvfunctestbrahmaputra10 -v $(pwd)config_functestyamlhomeopnfvfunctestconfconfig_functestyaml binbash
However this is not recommended since most of the test cases rely on static parameters read from this file andchanging them might cause problems
Proxy support
Functest needs internet access to download some resources for some test cases For example to install the Rallyenvironment This might not work properly if the Jumphost is running through a Proxy
If that is the case make sure the resolvconf and the needed proxy environment variables are properly set
export http_proxy=ltyour http proxy settingsgtexport https_proxy=ltyour https proxy settingsgt
Or refer to the official Docker documentation for Proxy settings
Before running prepare_envsh make sure you can ping http and https sites inside the container For example
nc -v googlecom 80Connection to googlecom 80 port [tcphttp] succeeded
nc -v googlecom 443Connection to googlecom 443 port [tcphttps] succeeded
532 Installing vswitchperf
Supported Operating Systems
bull CentOS 7
bull Fedora 20
bull Fedora 21
bull Fedora 22
bull Ubuntu 1404
Supported vSwitches
The vSwitch must support Open Flow 13 or greater
bull OVS (built from source)
bull OVS with DPDK (built from source)
56 Chapter 5 Post Configuration Activities
OPNFV Configuration Guide Release brahmaputra30 (605ebda)
Supported Hypervisors
bull Qemu version 23
Available VNFs
A simple VNF that forwards traffic through a VM using
bull DPDK testpmd
bull Linux Brigde
bull custom l2fwd module
The VM image can be downloaded from httpartifactsopnfvorgvswitchperfvloop-vnf-ubuntu-1404_20151216qcow2
Other Requirements
The test suite requires Python 33 and relies on a number of other packages These need to be installed for the testsuite to function
Installation of required packages preparation of Python 3 virtual environment and compilation of OVS DPDK andQEMU is performed by script systemsbuild_base_machinesh It should be executed under user account which willbe used for vsperf execution
Please Note Password-less sudo access must be configured for given user account before script is executed
Execution of installation script
$ cd systems$ build_base_machinesh
Please Note you donrsquot need to go into any of the systems subdirectories simply run the top levelbuild_base_machinesh your OS will be detected automatically
Script build_base_machinesh will install all the vsperf dependencies in terms of system packages Python 3x andrequired Python modules In case of CentOS 7 it will install Python 33 from an additional repository provided bySoftware Collections (a link) Installation script will also use virtualenv to create a vsperf virtual environment whichis isolated from the default Python environment This environment will reside in a directory called vsperfenv in$HOME
You will need to activate the virtual environment every time you start a new shell session Its activation is specific toyour OS
CentOS 7
$ scl enable python33 bash$ cd $HOMEvsperfenv$ source binactivate
Fedora and Ubuntu
$ cd $HOMEvsperfenv$ source binactivate
53 Additional testing and validation activities 57
OPNFV Configuration Guide Release brahmaputra30 (605ebda)
Working Behind a Proxy
If yoursquore behind a proxy yoursquoll likely want to configure this before running any of the above For example
export http_proxy=proxymycompanycom123export https_proxy=proxymycompanycom123
533 Yardstick
The projectrsquos goal is to verify infrastructure compliance from the perspective of a Virtual Network Function (VNF)
The Projectrsquos scope is the development of a test framework Yardstick test cases and test stimuli to enable NetworkFunction Virtualization Infrastructure (NFVI) verification
In OPNFV Brahmaputra release generic test cases covering aspects of the metrics in the document ETSI GS NFV-TST001 ldquoPre-deployment Testing Report on Validation of NFV Environments and Servicesrdquo are available furtherOPNFV releases will provide extended testing of these metrics
The Project also includes a sample VNF the Virtual Traffic Classifier (VTC) and its experimental frameworkApexLake
Yardstick is used in OPNFV for verifying the OPNFV infrastructure and some of the OPNFV features The Yardstickframework is deployed in several OPNFV community labs It is installer infrastructure and application independent
See also
This Presentation for an overview of Yardstick and Yardsticktst for material on alignment ETSI TST001 and Yardstick
Yardstick Installation
Abstract
Yardstick currently supports installation on Ubuntu 1404 or by using a Docker image Detailed steps about installingYardstick using both of these options can be found below
To use Yardstick you should have access to an OpenStack environment with at least Nova Neutron Glance Keystoneand Heat installed
The steps needed to run Yardstick are
1 Install Yardstick and create the test configuration yaml file
2 Build a guest image and load the image into the OpenStack environment
3 Create a Neutron external network and load OpenStack environment variables
4 Run the test case
Installing Yardstick on Ubuntu 1404
Installing Yardstick framework Install dependencies
sudo apt-get install python-virtualenv python-devsudo apt-get install libffi-dev libssl-dev git
Create a python virtual environment source it and update setuptools
58 Chapter 5 Post Configuration Activities
OPNFV Configuration Guide Release brahmaputra30 (605ebda)
virtualenv ~yardstick_venvsource ~yardstick_venvbinactivateeasy_install -U setuptools
Download source code and install python dependencies
git clone httpsgerritopnfvorggerrityardstickcd yardstickpython setuppy install
There is also a YouTube video showing the above steps
Installing extra tools
yardstick-plot Yardstick has an internal plotting tool yardstick-plot which can be installed using the follow-ing command
python setuppy develop easy_install yardstick[plot]
Building a guest image Yardstick has a tool for building an Ubuntu Cloud Server image containing all the requiredtools to run test cases supported by Yardstick It is necessary to have sudo rights to use this tool
This image can be built using the following command while in the directory where Yardstick is installed(~yardstick if the framework is installed by following the commands above)
sudo toolsyardstick-img-modify toolsubuntu-server-cloudimg-modifysh
Warning the script will create files by default in tmpworkspaceyardstick and the files will be owned byroot
The created image can be added to OpenStack using the glance image-create or via the OpenStack Dashboard
Example command
glance --os-image-api-version 1 image-create --name yardstick-trusty-server --is-public true --disk-format qcow2 --container-format bare --file tmpworkspaceyardstickyardstick-trusty-serverimg
Installing Yardstick using Docker
Yardstick has two Docker images first one (Yardstick-framework) serves as a replacement for installing the Yardstickframework in a virtual environment (for example as done in Installing Yardstick framework) while the other image ismostly for CI purposes (Yardstick-CI)
Yardstick-framework image Download the source code
git clone httpsgerritopnfvorggerrityardstick
Build the Docker image and tag it as yardstick-framework
cd yardstickdocker build -t yardstick-framework
Run the Docker instance
53 Additional testing and validation activities 59
OPNFV Configuration Guide Release brahmaputra30 (605ebda)
docker run --name yardstick_instance -i -t yardstick-framework
To build a guest image for Yardstick see Building a guest image
Yardstick-CI image Pull the Yardstick-CI Docker image from Docker hub
docker pull opnfvyardstick-ci
Run the Docker image
docker run --privileged=true --rm -t -e INSTALLER_TYPE=$INSTALLER_TYPE -e INSTALLER_IP=$INSTALLER_IP opnfvyardstick-ci run_benchmarks
Where $INSTALLER_TYPE can be fuel foreman or compass and $INSTALLER_IP is the installer masternode IP address (ie 102002 is default for fuel)
Basic steps performed by the Yardstick-CI container
1 clone yardstick and releng repos
2 setup OS credentials (releng scripts)
3 install yardstick and dependencies
4 build yardstick cloud image and upload it to glance
5 upload cirros-033 cloud image to glance
6 run yardstick test scenarios
7 cleanup
OpenStack parameters and credentials
Yardstick-flavor Most of the sample test cases in Yardstick are using an OpenStack flavor called yardstick-flavorwhich deviates from the OpenStack standard m1tiny flavor by the disk size - instead of 1GB it has 3GB Otherparameters are the same as in m1tiny
Environment variables Before running Yardstick it is necessary to export OpenStack environment vari-ables from the OpenStack openrc file (using the source command) and export the external network nameexport EXTERNAL_NETWORK=external-network-name the default name for the external network isnet04_ext
Credential environment variables in the openrc file have to include at least
bull OS_AUTH_URL
bull OS_USERNAME
bull OS_PASSWORD
bull OS_TENANT_NAME
60 Chapter 5 Post Configuration Activities
OPNFV Configuration Guide Release brahmaputra30 (605ebda)
Yardstick default key pair Yardstick uses a SSH key pair to connect to the guest image This key pair can be foundin the resourcesfiles directory To run the ping-hotyaml test sample this key pair needs to be importedto the OpenStack environment
Examples and verifying the install
It is recommended to verify that Yardstick was installed successfully by executing some simple commands and testsamples Below is an example invocation of yardstick help command and pingpy test sample
yardstick -hyardstick task start samplespingyaml
Each testing tool supported by Yardstick has a sample configuration file These configuration files can be found in thesamples directory
Example invocation of yardstick-plot tool
yardstick-plot -i tmpyardstickout -o tmpplots
Default location for the output is tmpyardstickout
More info about the tool can be found by executing
yardstick-plot -h
53 Additional testing and validation activities 61

OPNFV Configuration Guide Release brahmaputra30 (605ebda)
Yardstick default key pair Yardstick uses a SSH key pair to connect to the guest image This key pair can be foundin the resourcesfiles directory To run the ping-hotyaml test sample this key pair needs to be importedto the OpenStack environment
Examples and verifying the install
It is recommended to verify that Yardstick was installed successfully by executing some simple commands and testsamples Below is an example invocation of yardstick help command and pingpy test sample
yardstick -hyardstick task start samplespingyaml
Each testing tool supported by Yardstick has a sample configuration file These configuration files can be found in thesamples directory
Example invocation of yardstick-plot tool
yardstick-plot -i tmpyardstickout -o tmpplots
Default location for the output is tmpyardstickout
More info about the tool can be found by executing
yardstick-plot -h
53 Additional testing and validation activities 61


![OPNFV FUNCTEST user guideartifacts.opnfv.org/functest/brahmaputra/docs/userguide/userguide.pdfTempest[2]is the reference OpenStack Integration test suite. It is a set of integration](https://img.pdfslide.us/doc/110x75/5ed436efee2f292b645b3754/opnfv-functest-user-tempest2is-the-reference-openstack-integration-test-suite.jpg)