Embed Size (px)
Citation preview
September 2017
B y J o s e p h K i m , D D S , J D
Guidelines for Optimal Adhesion
Resin-Based Cements:
Resin-Based Cements: Guidelines for Optimal Adhesion
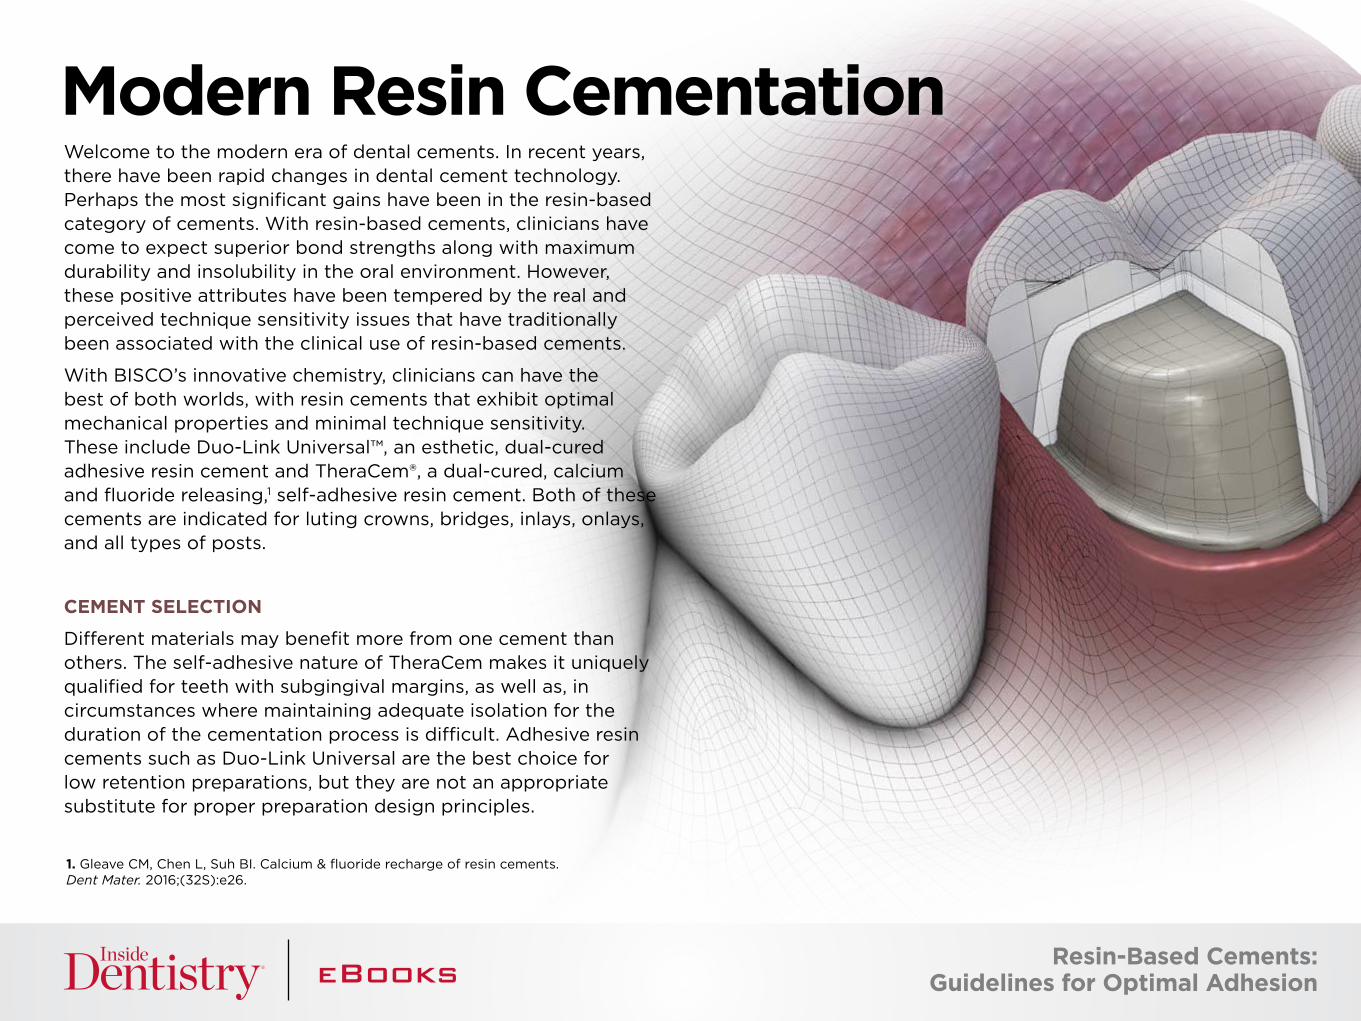
Welcome to the modern era of dental cements. In recent years, there have been rapid changes in dental cement technology. Perhaps the most significant gains have been in the resin-based category of cements. With resin-based cements, clinicians have come to expect superior bond strengths along with maximum durability and insolubility in the oral environment. However, these positive attributes have been tempered by the real and perceived technique sensitivity issues that have traditionally been associated with the clinical use of resin-based cements.
With BISCO’s innovative chemistry, clinicians can have the best of both worlds, with resin cements that exhibit optimal mechanical properties and minimal technique sensitivity. These include Duo-Link Universal™, an esthetic, dual-cured adhesive resin cement and TheraCem®, a dual-cured, calcium and fluoride releasing,1 self-adhesive resin cement. Both of these cements are indicated for luting crowns, bridges, inlays, onlays, and all types of posts.
CEMENT SELECTION
Different materials may benefit more from one cement than others. The self-adhesive nature of TheraCem makes it uniquely qualified for teeth with subgingival margins, as well as, in circumstances where maintaining adequate isolation for the duration of the cementation process is difficult. Adhesive resin cements such as Duo-Link Universal are the best choice for low retention preparations, but they are not an appropriate substitute for proper preparation design principles.
Modern Resin Cementation
Resin-Based Cements:
1. Gleave CM, Chen L, Suh BI. Calcium & fluoride recharge of resin cements. Dent Mater. 2016;(32S):e26.
Resin-Based Cements: Guidelines for Optimal Adhesion
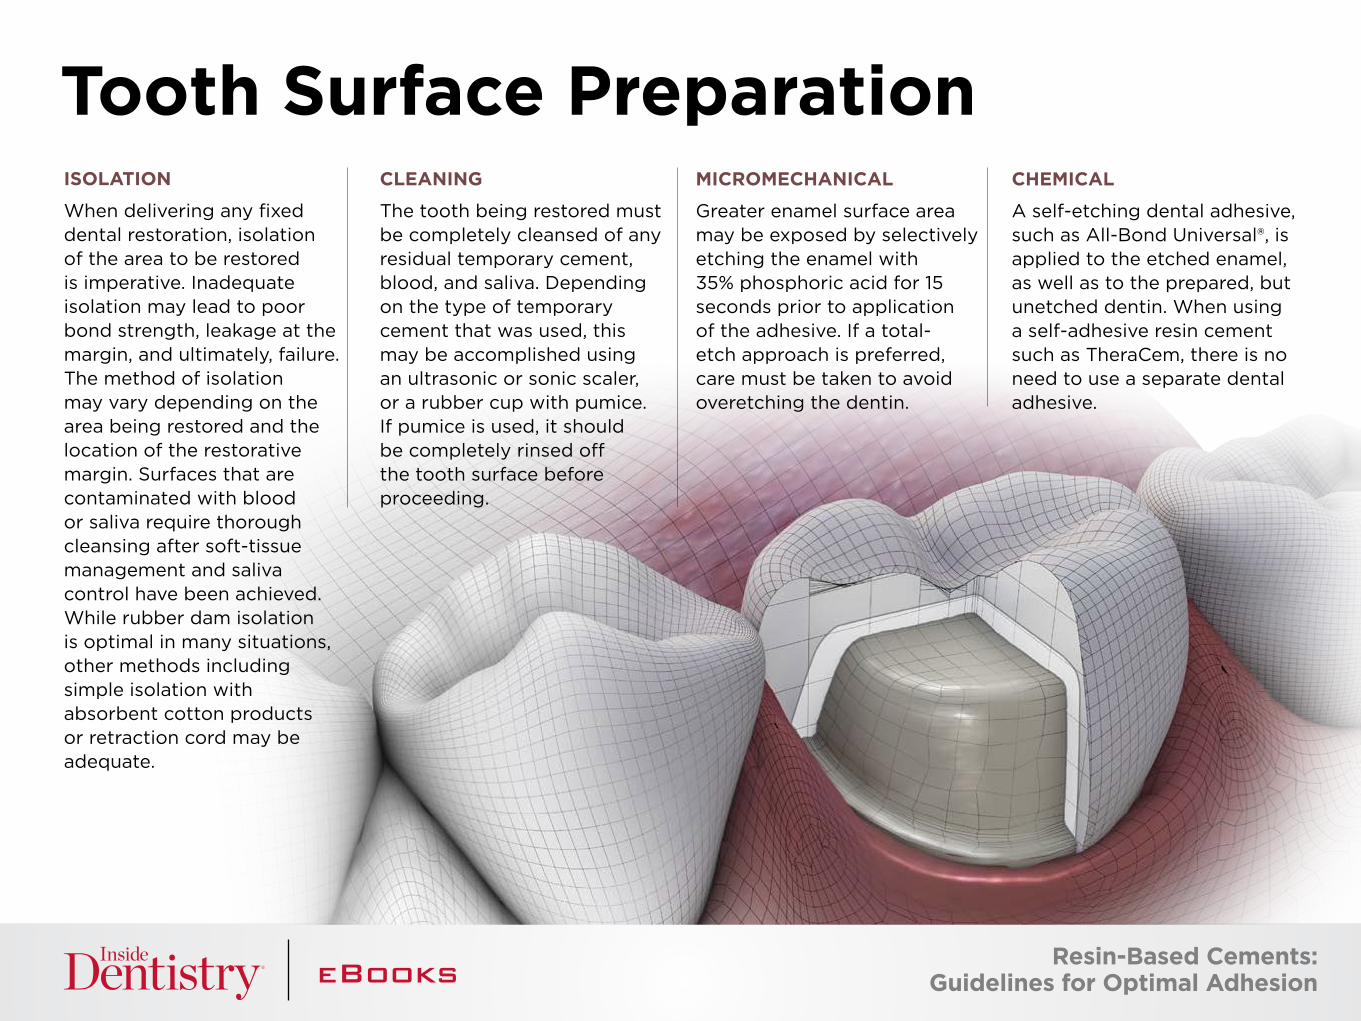
ISOLATION
When delivering any fixed dental restoration, isolation of the area to be restored is imperative. Inadequate isolation may lead to poor bond strength, leakage at the margin, and ultimately, failure. The method of isolation may vary depending on the area being restored and the location of the restorative margin. Surfaces that are contaminated with blood or saliva require thorough cleansing after soft-tissue management and saliva control have been achieved. While rubber dam isolation is optimal in many situations, other methods including simple isolation with absorbent cotton products or retraction cord may be adequate.
CLEANING
The tooth being restored must be completely cleansed of any residual temporary cement, blood, and saliva. Depending on the type of temporary cement that was used, this may be accomplished using an ultrasonic or sonic scaler, or a rubber cup with pumice. If pumice is used, it should be completely rinsed off the tooth surface before proceeding.
MICROMECHANICAL
Greater enamel surface area may be exposed by selectively etching the enamel with 35% phosphoric acid for 15 seconds prior to application of the adhesive. If a total-etch approach is preferred, care must be taken to avoid overetching the dentin.
CHEMICAL
A self-etching dental adhesive, such as All-Bond Universal®, is applied to the etched enamel, as well as to the prepared, but unetched dentin. When using a self-adhesive resin cement such as TheraCem, there is no need to use a separate dental adhesive.
Tooth Surface Preparation
Resin-Based Cements: Guidelines for Optimal Adhesion
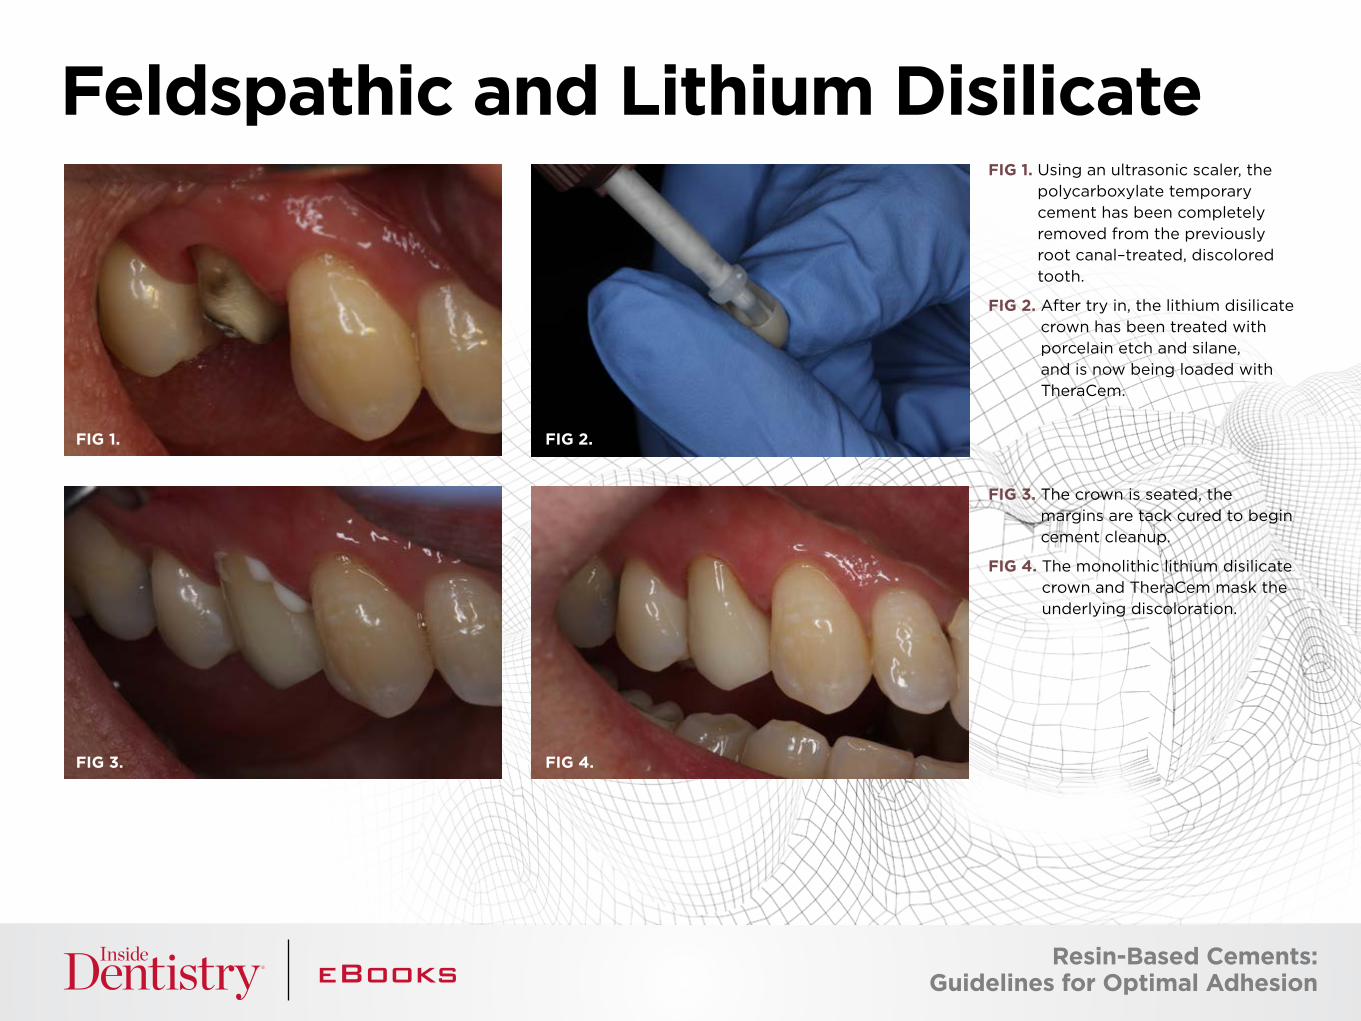
FIG 1. Using an ultrasonic scaler, the polycarboxylate temporary cement has been completely removed from the previously root canal–treated, discolored tooth.
FIG 2. After try in, the lithium disilicate crown has been treated with porcelain etch and silane, and is now being loaded with TheraCem.
FIG 3. The crown is seated, the margins are tack cured to begin cement cleanup.
FIG 4. The monolithic lithium disilicate crown and TheraCem mask the underlying discoloration.
Feldspathic and Lithium Disilicate
FIG 1. FIG 2.
FIG 3. FIG 4.
Resin-Based Cements: Guidelines for Optimal Adhesion
SUBSTRATE PREPARATION: MICROMECHANICAL
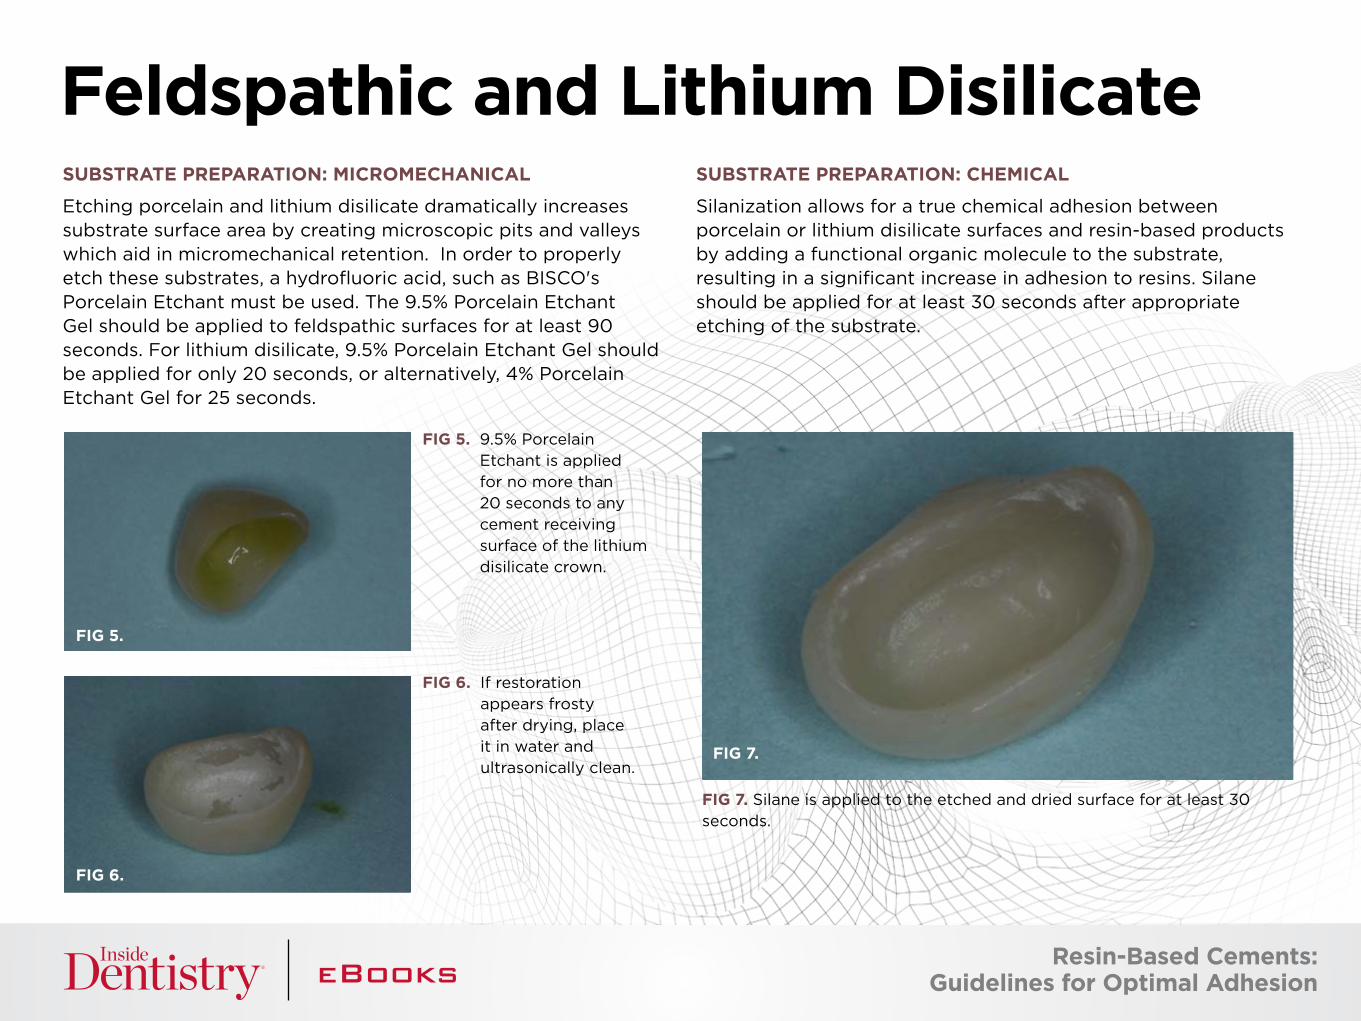
Etching porcelain and lithium disilicate dramatically increases substrate surface area by creating microscopic pits and valleys which aid in micromechanical retention. In order to properly etch these substrates, a hydrofluoric acid, such as BISCO's Porcelain Etchant must be used. The 9.5% Porcelain Etchant Gel should be applied to feldspathic surfaces for at least 90 seconds. For lithium disilicate, 9.5% Porcelain Etchant Gel should be applied for only 20 seconds, or alternatively, 4% Porcelain Etchant Gel for 25 seconds.
SUBSTRATE PREPARATION: CHEMICAL
Silanization allows for a true chemical adhesion between porcelain or lithium disilicate surfaces and resin-based products by adding a functional organic molecule to the substrate, resulting in a significant increase in adhesion to resins. Silane should be applied for at least 30 seconds after appropriate etching of the substrate.
Feldspathic and Lithium Disilicate
FIG 5.
FIG 6.
FIG 5. 9.5% Porcelain Etchant is applied for no more than 20 seconds to any cement receiving surface of the lithium disilicate crown.
FIG 6. If restoration appears frosty after drying, place it in water and ultrasonically clean.
FIG 7. Silane is applied to the etched and dried surface for at least 30 seconds.
FIG 7.
Resin-Based Cements: Guidelines for Optimal Adhesion
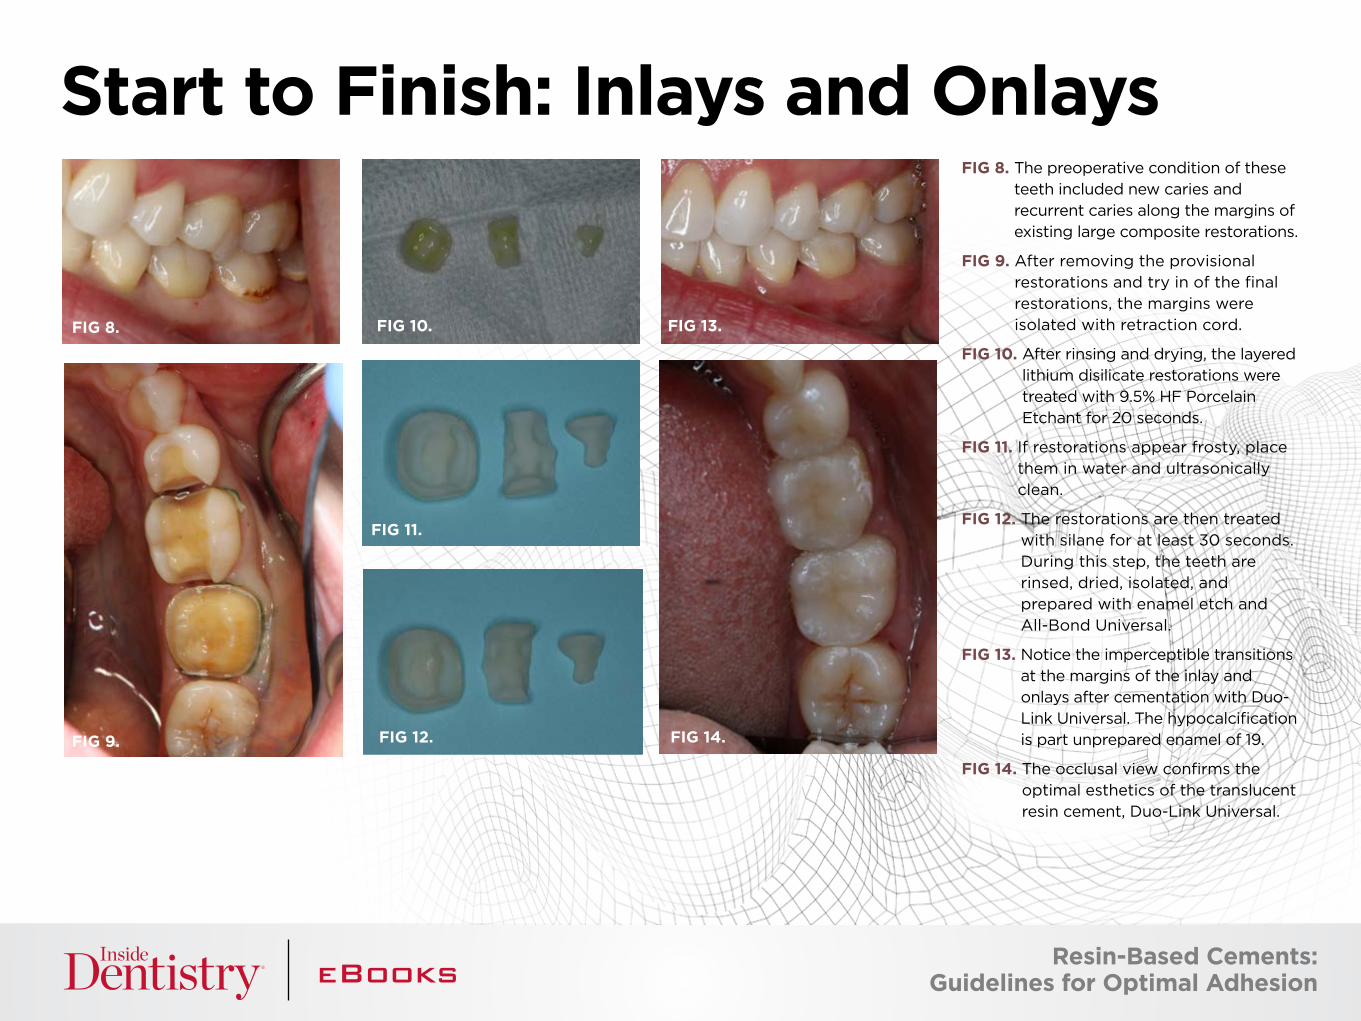
FIG 8. The preoperative condition of these teeth included new caries and recurrent caries along the margins of existing large composite restorations.
FIG 9. After removing the provisional restorations and try in of the final restorations, the margins were isolated with retraction cord.
FIG 10. After rinsing and drying, the layered lithium disilicate restorations were treated with 9.5% HF Porcelain Etchant for 20 seconds.
FIG 11. If restorations appear frosty, place them in water and ultrasonically clean.
FIG 12. The restorations are then treated with silane for at least 30 seconds. During this step, the teeth are rinsed, dried, isolated, and prepared with enamel etch and All-Bond Universal.
FIG 13. Notice the imperceptible transitions at the margins of the inlay and onlays after cementation with Duo-Link Universal. The hypocalcification is part unprepared enamel of 19.
FIG 14. The occlusal view confirms the optimal esthetics of the translucent resin cement, Duo-Link Universal.
Start to Finish: Inlays and Onlays
FIG 8.
FIG 11.
FIG 9. FIG 12.
FIG 10.
FIG 14.
FIG 13.
Resin-Based Cements: Guidelines for Optimal Adhesion
SUBSTRATE PREPARATION: MICROMECHANICAL
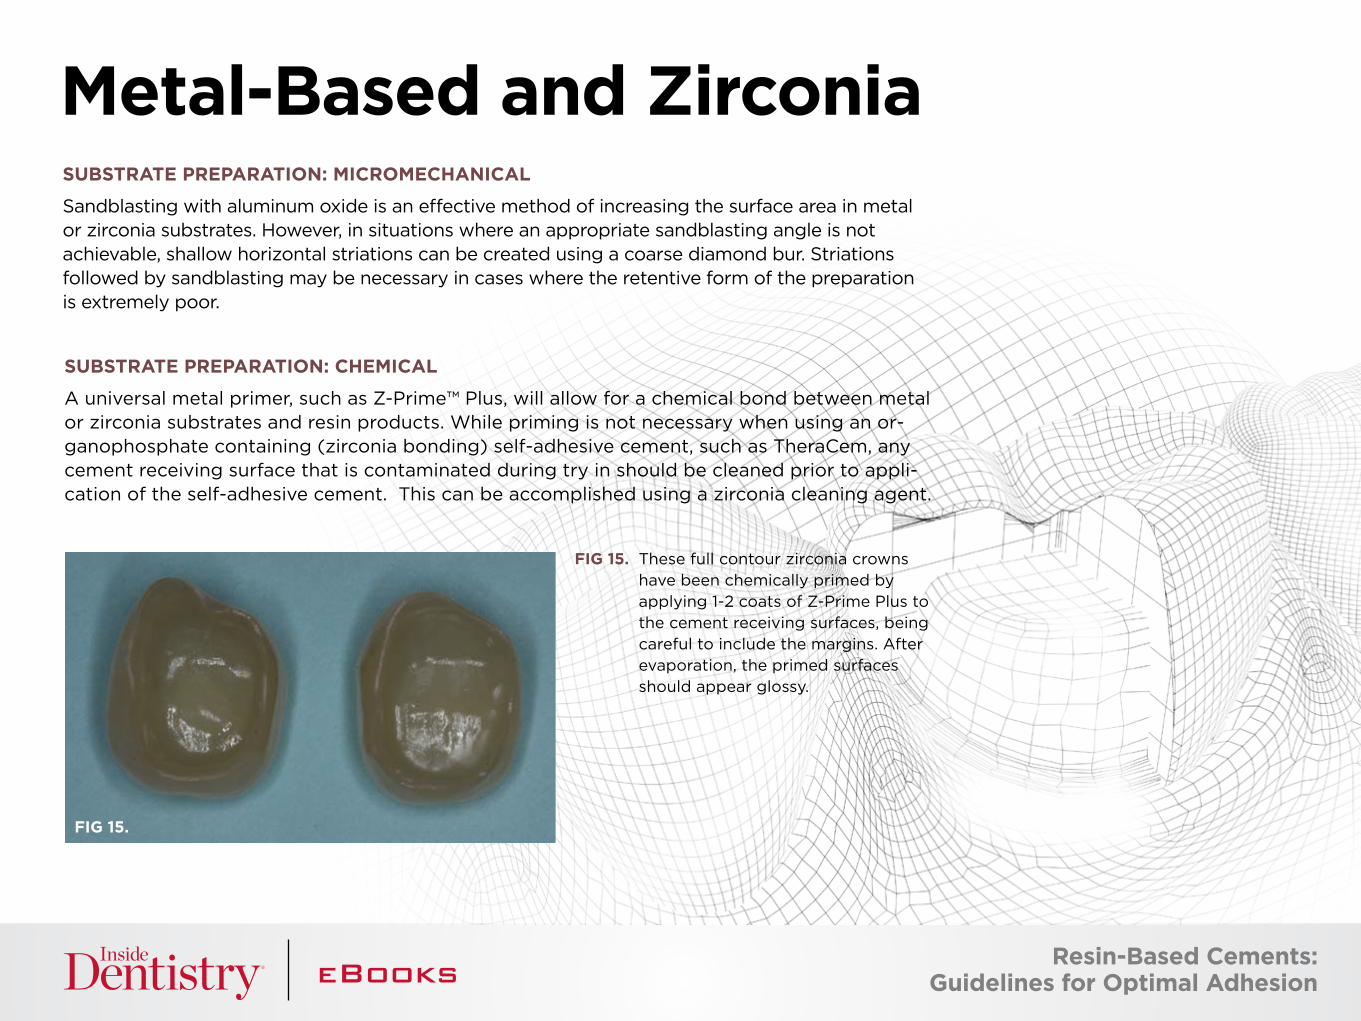
Sandblasting with aluminum oxide is an effective method of increasing the surface area in metal or zirconia substrates. However, in situations where an appropriate sandblasting angle is not achievable, shallow horizontal striations can be created using a coarse diamond bur. Striations followed by sandblasting may be necessary in cases where the retentive form of the preparation is extremely poor.
Metal-Based and Zirconia
FIG 15.
SUBSTRATE PREPARATION: CHEMICAL
A universal metal primer, such as Z-Prime™ Plus, will allow for a chemical bond between metal or zirconia substrates and resin products. While priming is not necessary when using an or-ganophosphate containing (zirconia bonding) self-adhesive cement, such as TheraCem, any cement receiving surface that is contaminated during try in should be cleaned prior to appli-cation of the self-adhesive cement. This can be accomplished using a zirconia cleaning agent.
FIG 15. These full contour zirconia crowns have been chemically primed by applying 1-2 coats of Z-Prime Plus to the cement receiving surfaces, being careful to include the margins. After evaporation, the primed surfaces should appear glossy.
Resin-Based Cements: Guidelines for Optimal Adhesion
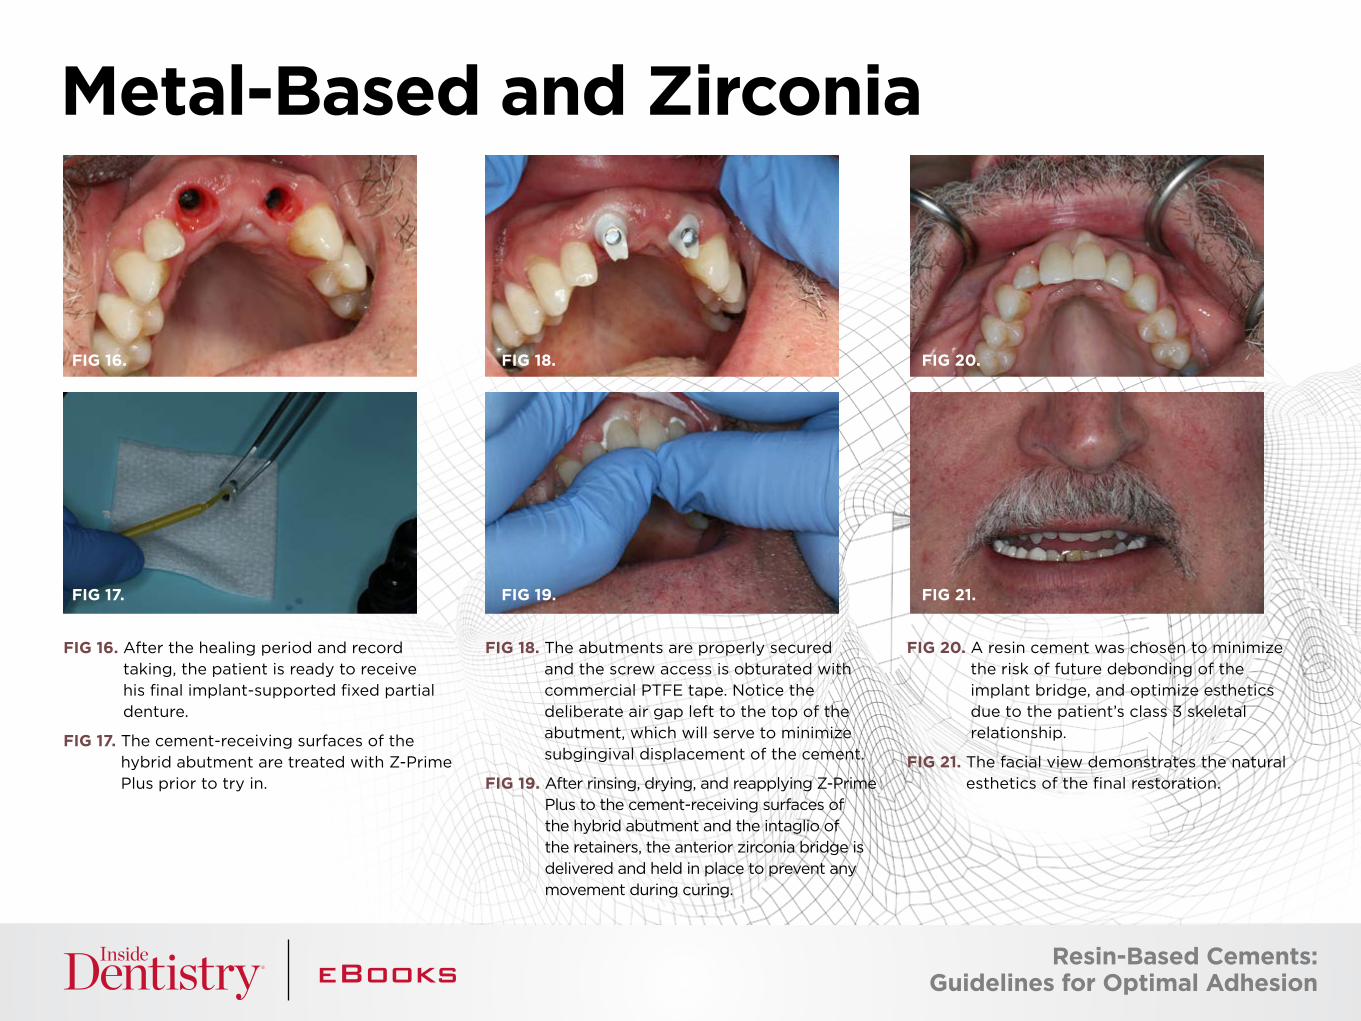
FIG 16. After the healing period and record taking, the patient is ready to receive his final implant-supported fixed partial denture.
FIG 17. The cement-receiving surfaces of the hybrid abutment are treated with Z-Prime Plus prior to try in.
FIG 18. The abutments are properly secured and the screw access is obturated with commercial PTFE tape. Notice the deliberate air gap left to the top of the abutment, which will serve to minimize subgingival displacement of the cement.
FIG 19. After rinsing, drying, and reapplying Z-Prime Plus to the cement-receiving surfaces of the hybrid abutment and the intaglio of the retainers, the anterior zirconia bridge is delivered and held in place to prevent any movement during curing.
FIG 20. A resin cement was chosen to minimize the risk of future debonding of the implant bridge, and optimize esthetics due to the patient’s class 3 skeletal relationship.
FIG 21. The facial view demonstrates the natural esthetics of the final restoration.
Metal-Based and Zirconia
FIG 16.
FIG 17.
FIG 18.
FIG 19.
FIG 20.
FIG 21.
Resin-Based Cements: Guidelines for Optimal Adhesion
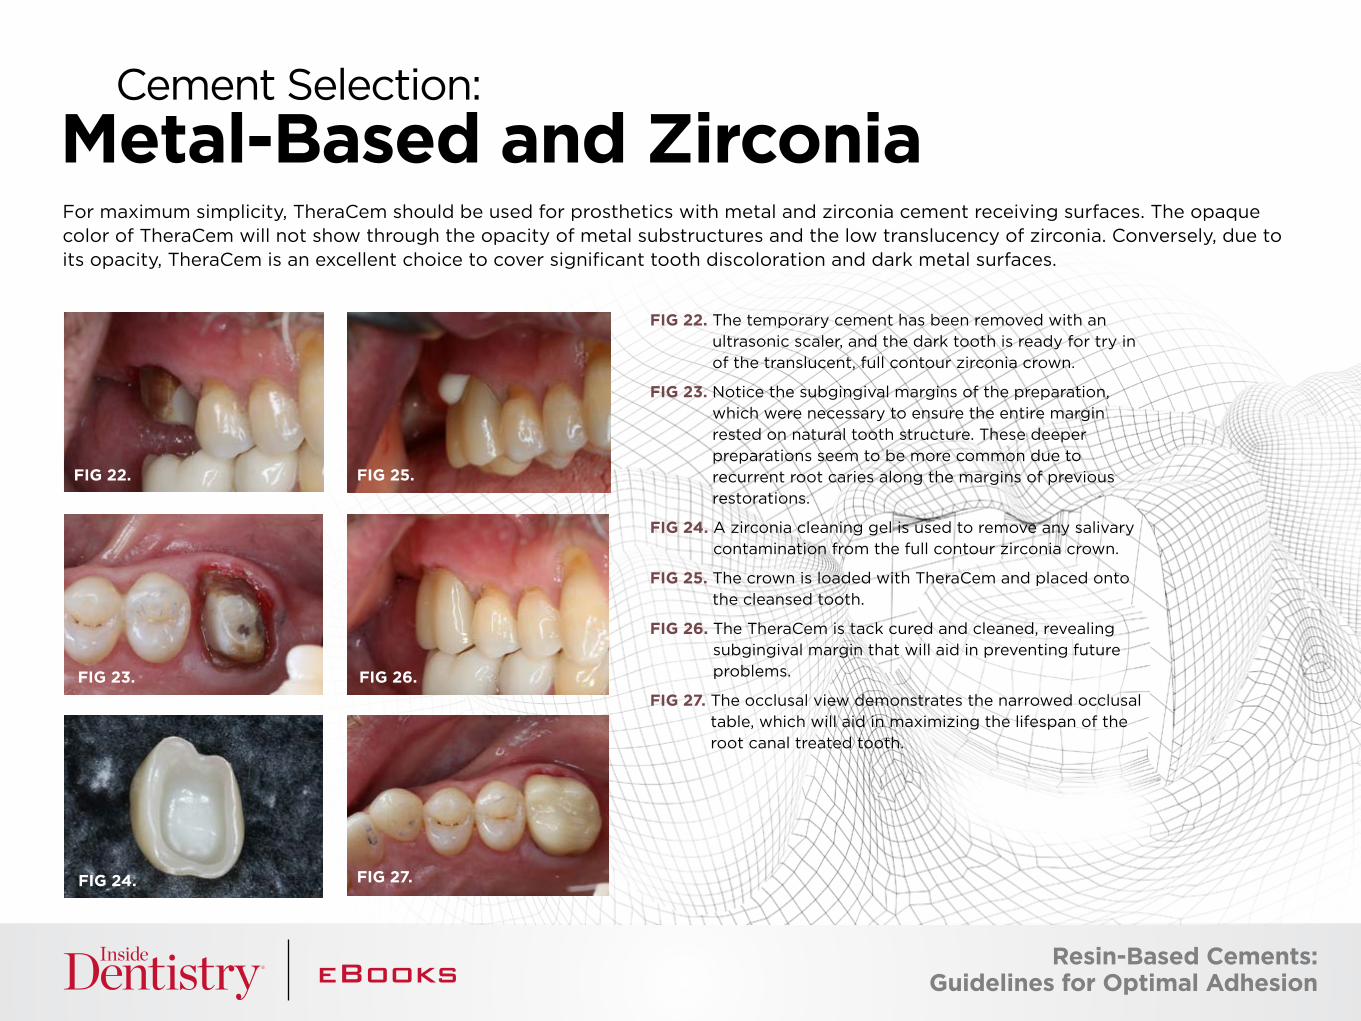
FIG 22. The temporary cement has been removed with an ultrasonic scaler, and the dark tooth is ready for try in of the translucent, full contour zirconia crown.
FIG 23. Notice the subgingival margins of the preparation, which were necessary to ensure the entire margin rested on natural tooth structure. These deeper preparations seem to be more common due to recurrent root caries along the margins of previous restorations.
FIG 24. A zirconia cleaning gel is used to remove any salivary contamination from the full contour zirconia crown.
FIG 25. The crown is loaded with TheraCem and placed onto the cleansed tooth.
FIG 26. The TheraCem is tack cured and cleaned, revealing subgingival margin that will aid in preventing future problems.
FIG 27. The occlusal view demonstrates the narrowed occlusal table, which will aid in maximizing the lifespan of the root canal treated tooth.
For maximum simplicity, TheraCem should be used for prosthetics with metal and zirconia cement receiving surfaces. The opaque color of TheraCem will not show through the opacity of metal substructures and the low translucency of zirconia. Conversely, due to its opacity, TheraCem is an excellent choice to cover significant tooth discoloration and dark metal surfaces.
Metal-Based and Zirconia
Cement Selection:
FIG 22. FIG 25.
FIG 27.
FIG 23. FIG 26.
FIG 24.
Resin-Based Cements: Guidelines for Optimal Adhesion
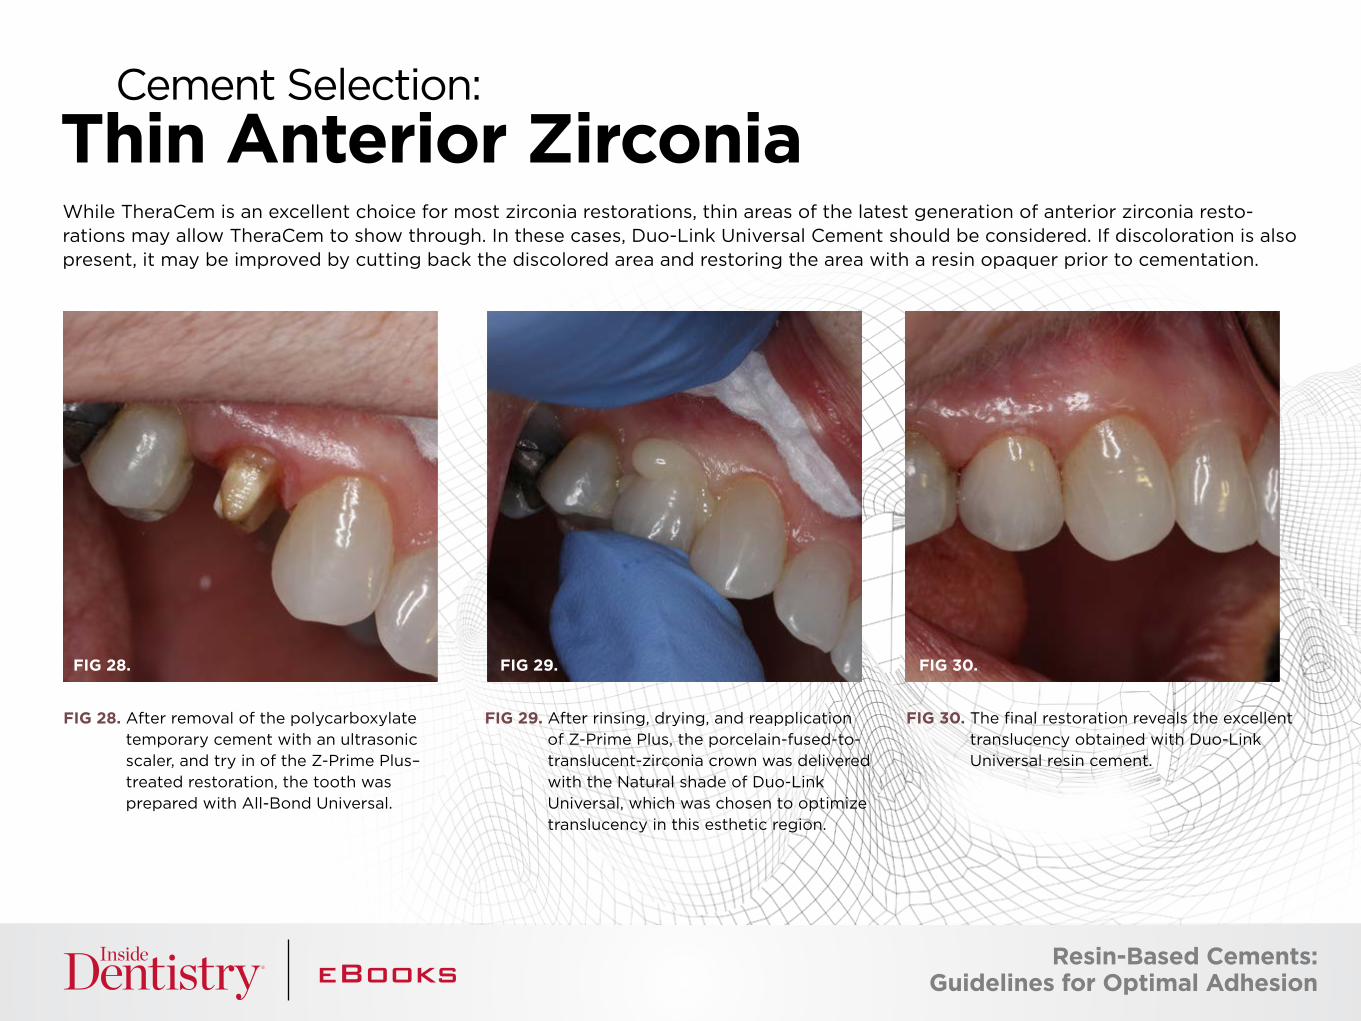
While TheraCem is an excellent choice for most zirconia restorations, thin areas of the latest generation of anterior zirconia resto-rations may allow TheraCem to show through. In these cases, Duo-Link Universal Cement should be considered. If discoloration is also present, it may be improved by cutting back the discolored area and restoring the area with a resin opaquer prior to cementation.
Thin Anterior ZirconiaCement Selection:
FIG 28. After removal of the polycarboxylate temporary cement with an ultrasonic scaler, and try in of the Z-Prime Plus–treated restoration, the tooth was prepared with All-Bond Universal.
FIG 29. After rinsing, drying, and reapplication of Z-Prime Plus, the porcelain-fused-to-translucent-zirconia crown was delivered with the Natural shade of Duo-Link Universal, which was chosen to optimize translucency in this esthetic region.
FIG 30. The final restoration reveals the excellent translucency obtained with Duo-Link Universal resin cement.
FIG 28. FIG 29. FIG 30.
Resin-Based Cements: Guidelines for Optimal Adhesion
WHY ARE THE MARGINS OF MY ALL CERAMIC RESTORATIONS TURNING DARK OR BLACK SOMETIME AFTER CEMENTATION? You are probably using an iron-based chemical astringent for soft tissue management. Switch to an aluminum-based astringent and make sure there is no contamination of the site with blood prior to cementation.
THE BOND OF MY SELF-ADHESIVE RESIN-BASED CEMENT IS FAILING AFTER A FEW YEARS, WHAT CAN I DO? Assuming the preparation possesses adequate retention and resistance forms, consider using a self-etching adhesive on the entire preparation surface prior to recementing the restoration, as this will enhance the adhesion of any resin cement. If you are using a eugenol containing temporary cement, consider switching to a non-eugenol cement, or waiting at least 1 week after exposing the tooth to eugenol prior to cementation of the final restoration.
WHAT IF A SUBGINGIVAL AREA OF THE PREPARATION CONTINUES TO BLEED AFTER APPLYING AN ASTRINGENT? Consider packing retraction cord in the area, placing a wedge to compress the bleeding tissues, or cauterizing the area prior to proceeding with cementation.
WHAT SHOULD I DO IF I AM HAVING A DIFFICULT TIME REMOVING THE RESIDUAL CEMENT FROM THE RESTORATION MARGINS AND BETWEEN THE TEETH? If the restoration possesses open margins, you may have to use a finishing bur to remove residual cement at the margin without creating a defect or void. Please keep in mind that cements are not intended to be used to fill significant marginal gaps. If the margins are closed, then try gently pushing the cement towards the gingiva with a scaler to break it away from the restoration. Interproximal cement can be removed with a similar technique, pushing the cement towards the gingiva, away from the margin. Remember to dislodge any loosened fragments.
I THINK I MAY HAVE BONDED THE CONTACT BETWEEN THE RESTORATION AND THE ADJACENT TOOTH TOGETHER. HOW CAN I PASS FLOSS THROUGH THIS NOW? If you cannot get a thin, PTFE-based floss through the contact, use an end-cutting saw to carefully break through the very thin cement that is filling the contact. Avoid using diamond strips, which may end up opening the contact. In the future, be careful not to etch or splash self-etching adhesive onto adjacent tooth surfaces or resin-based restorations. If this is unavoidable, consider using commercially available PTFE-based tape to protect the adjacent surface during the tooth preparation phase of cementation.
Complications and Tips
T H A N K YO U TO O U R S P O N S O R : B I S CO
The preceding material was provided by the manufacturer. Statements and opinions are solely those of the manufacturer and not of the editors, publisher, or the Editorial Board of Inside Dentistry.
JOSEPH KIM, DDS, JD, maintains a general practice focused on sedation and implant therapy in the Chicago suburbs. Dr. Kim is excited to serve as a consultant to BISCO, working with the Research and Development Department in the development of new and innovative products.
About the Author
+
Calcium & Fluoride Release1Easy Clean-Up RadiopaqueStrong Bond to Zirconia
* U.S. customers only. Discount cannot be combined with any other offer.
Expires: 12/31/2017 Promo code: 17THERA
Buy 1, Get 1 FREE*INTRODUCTORY OFFER!
Rx Only
Call to order: 1-800-247-33681. Gleave CM, Chen L, Suh BI. Calcium & uoride recharge of resin cements. Dent Mater. 2016 (32S):e26.
with the “NEXT GENERATION CEMENT”THE FUTURE IS HERE

A D D I T I O N A L R E S O U R C E S
Learn More about TheraCem Features
i
Visit our BisDent Globe
i
CLICK HERE CLICK HERE
View Our Whiteboard Video
i
CLICK HERE