Embed Size (px)
Citation preview
VERSION 1.1.2
QUICK-START GUIDE VESTAX VCI-400
VERSION 1.1.2
Installation and SetupThe Vestax VCI-400 is a class compliant USB plug and play device for Mac, however requires drivers for Windows. You will find these on the installation cd provided within your Vestax VCI-400 box.
1 Connect your Vestax VCI-400 to an available USB Port.2 Open Serato DJ.
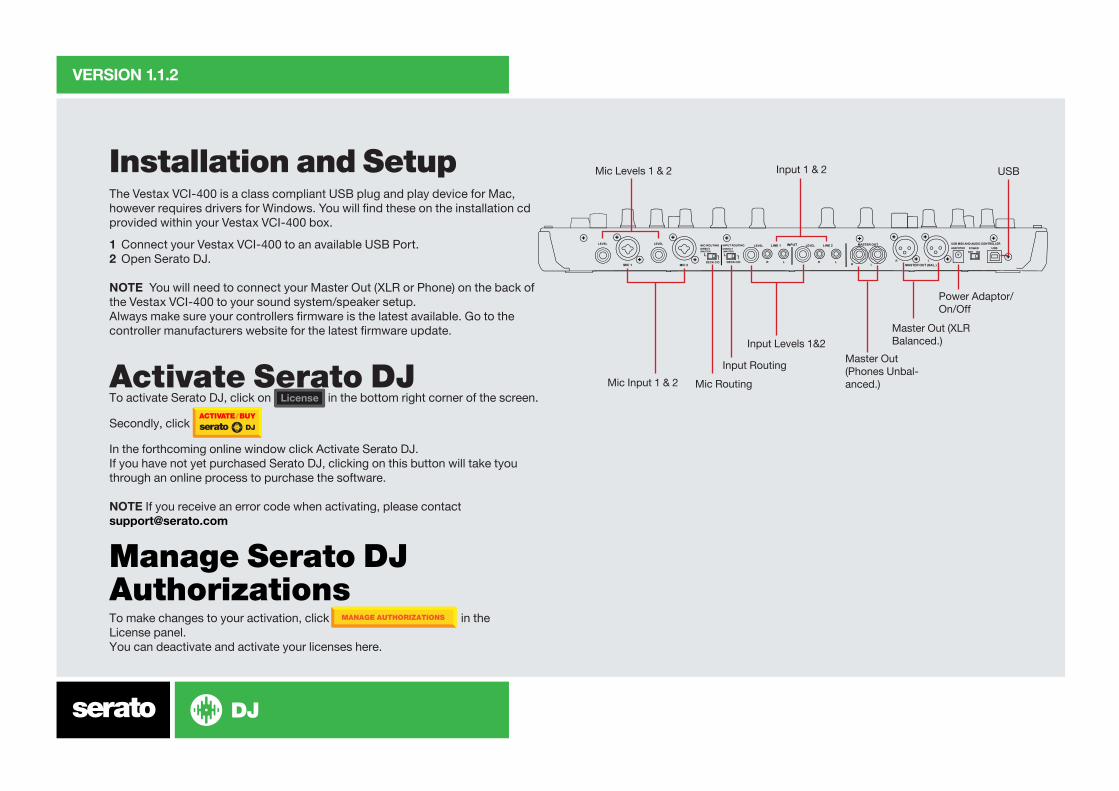
NOTE You will need to connect your Master Out (XLR or Phone) on the back of the Vestax VCI-400 to your sound system/speaker setup.Always make sure your controllers firmware is the latest available. Go to the controller manufacturers website for the latest firmware update.
Activate Serato DJTo activate Serato DJ, click on in the bottom right corner of the screen.
Secondly, click
In the forthcoming online window click Activate Serato DJ.If you have not yet purchased Serato DJ, clicking on this button will take tyou through an online process to purchase the software.
NOTE If you receive an error code when activating, please contact [email protected]
Manage Serato DJ AuthorizationsTo make changes to your activation, click in the License panel. You can deactivate and activate your licenses here.
MANAGE AUTHORIZATIONS
License
USB MIDI AND AUDIO CONTROLLER
ADAPOTOR POWEROFF ON
USB
MASTER OUT (BAL.)R L
R LR L
MASTER OUTLINE 2LEVELINPUTLINE 1LEVEL
R L
INPUT ROUTINGDIRECT(MASTER)
DECK C/DDECK C/D
LEVELLEVEL
MIC 1 MIC 2
MIC ROUTINGDIRECT(MASTER)
Mic Input 1 & 2
Mic Levels 1 & 2
Mic Routing
Input Routing
Input Levels 1&2
Input 1 & 2
Master Out (Phones Unbal-anced.)
Master Out (XLR Balanced.)
Power Adaptor/On/Off
USB
VERSION 1.1.2
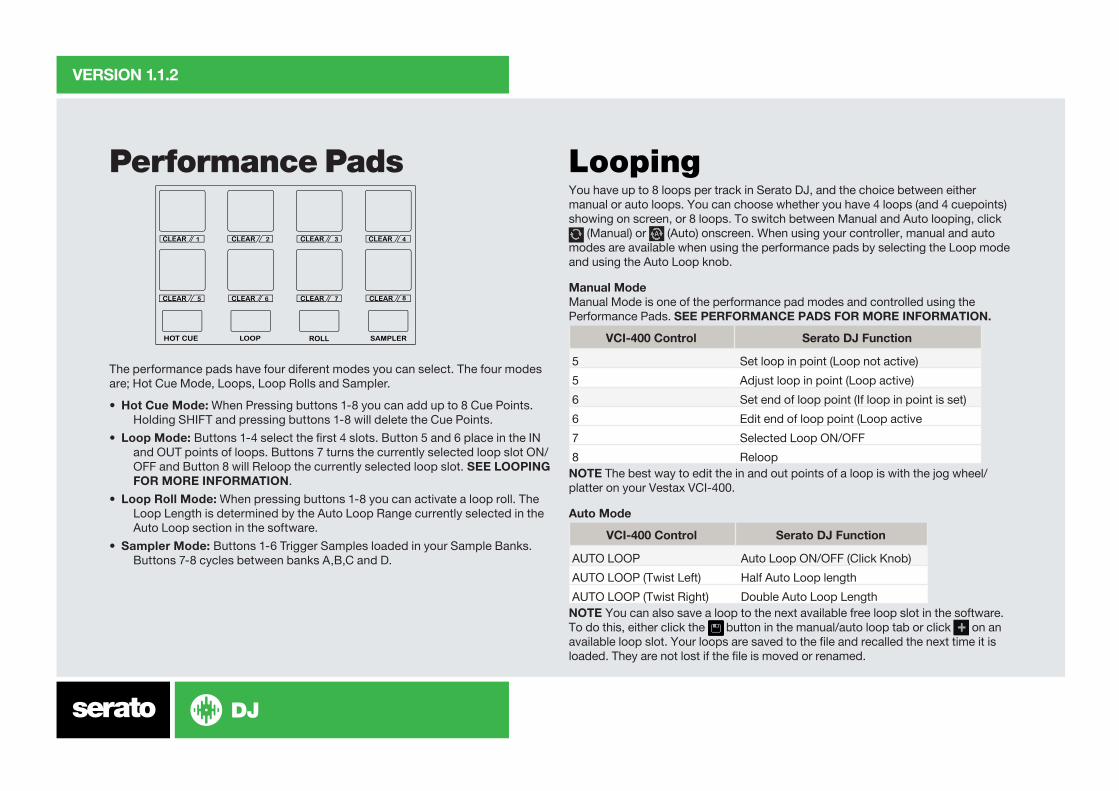
Performance Pads
The performance pads have four diferent modes you can select. The four modes are; Hot Cue Mode, Loops, Loop Rolls and Sampler.
• Hot Cue Mode: When Pressing buttons 1-8 you can add up to 8 Cue Points. Holding SHIFT and pressing buttons 1-8 will delete the Cue Points.
• Loop Mode: Buttons 1-4 select the first 4 slots. Button 5 and 6 place in the IN and OUT points of loops. Buttons 7 turns the currently selected loop slot ON/OFF and Button 8 will Reloop the currently selected loop slot. SEE LOOPING FOR MORE INFORMATION.
• Loop Roll Mode: When pressing buttons 1-8 you can activate a loop roll. The Loop Length is determined by the Auto Loop Range currently selected in the Auto Loop section in the software.
• Sampler Mode: Buttons 1-6 Trigger Samples loaded in your Sample Banks. Buttons 7-8 cycles between banks A,B,C and D.
LoopingYou have up to 8 loops per track in Serato DJ, and the choice between either manual or auto loops. You can choose whether you have 4 loops (and 4 cuepoints) showing on screen, or 8 loops. To switch between Manual and Auto looping, click
(Manual) or (Auto) onscreen. When using your controller, manual and auto modes are available when using the performance pads by selecting the Loop mode and using the Auto Loop knob.
Manual ModeManual Mode is one of the performance pad modes and controlled using the Performance Pads. SEE PERFORMANCE PADS FOR MORE INFORMATION.
VCI-400 Control Serato DJ Function
5 Set loop in point (Loop not active)
5 Adjust loop in point (Loop active)
6 Set end of loop point (If loop in point is set)
6 Edit end of loop point (Loop active
7 Selected Loop ON/OFF
8 ReloopNOTE The best way to edit the in and out points of a loop is with the jog wheel/platter on your Vestax VCI-400.
Auto Mode
VCI-400 Control Serato DJ Function
AUTO LOOP Auto Loop ON/OFF (Click Knob)
AUTO LOOP (Twist Left) Half Auto Loop length
AUTO LOOP (Twist Right) Double Auto Loop LengthNOTE You can also save a loop to the next available free loop slot in the software. To do this, either click the button in the manual/auto loop tab or click on an available loop slot. Your loops are saved to the file and recalled the next time it is loaded. They are not lost if the file is moved or renamed.
LOOP ROLL SAMPLERHOT CUE
CLEAR CLEAR
CLEAR CLEAR
CLEAR
CLEAR
CLEAR
CLEAR
1 2 3 4
5 6 7 8
VERSION 1.1.2
DJ-FXThe DJ-FX in Serato DJ are powered by iZotope™. Click the FX tab to open the FX panel. Select either 1, 2 or M in the Deck Assign area to assign the selected effect bank to a deck or Master Output. To activate an effect, click the ON button on your FX UNIT in the software, or the FX1 or FX2 areas of your controller. You can adjust effect parameters by using either software controls, or the knobs/buttons in the FX1 and FX2 section on your controller.
VCI-400 Control Serato DJ Function
FX ON 1 (button) Effect On/Off
FX MODE (button) Choose Effect
FX 1 (knob) FX Dial 1
FX 2 (knob) FX Dial 2
FX 3 (knob) FX Dial 3
FX ON 2 (button) FX Button 1
FX ON 3 (button) FX Button 2
The effect time is set using the tracks BPM value, but by applying the Beats Multiplier you can increase or decrease the effect timing. Modify this by using the BEATS knob on the controller. Automatic tempo requires that the track on the deck assigned to the FX Unit has BPM information. Manual tempo mode allows you to tap in the tempo yourself.NOTE To change to MANUAL mode, simply tap the BEATS knob until a desired rate is established. To return to AUTO mode, click and hold BEATS for 1 second.
VCI-400 Control Serato DJ Function
TAP (Press for 1 second) Auto
TAP Tap down the BEATS to the desired rate
BEATS Beats Dial
Serato VideoSerato Video is a software plugin for Serato Software which adds the ability to playback and mix video files, use effects and fader transitions with your Serato DJ Controller, an additional MIDI controller or your mouse/keyboard. For more information on Serato Video click here.
MIDIThe MIDI control feature in Serato DJ provides the ability to map Serato DJ software functions to MIDI controller functions such as keyboards, triggers, sliders, and knobs. Integrating MIDI controllers into your Serato DJ setup can improve live performance usability, such as hitting pads on a MIDI controller to trigger Loops and Cue Points. For more information download the Serato DJ manual here.
NOTE You can not MIDI Map your Mixtrack Pro, you will need to connect an additional MIDI controller to use these MIDI functions.
VERSION 1.1.2
1 2
3 45 6 7 8 9 10 11 12 13 14 15 16 17 18 20 21
22
23
24252627
28
293031323340 39 38 37 36 35 34
41
42
43
4445
46
47
19
VERSION 1.1.2
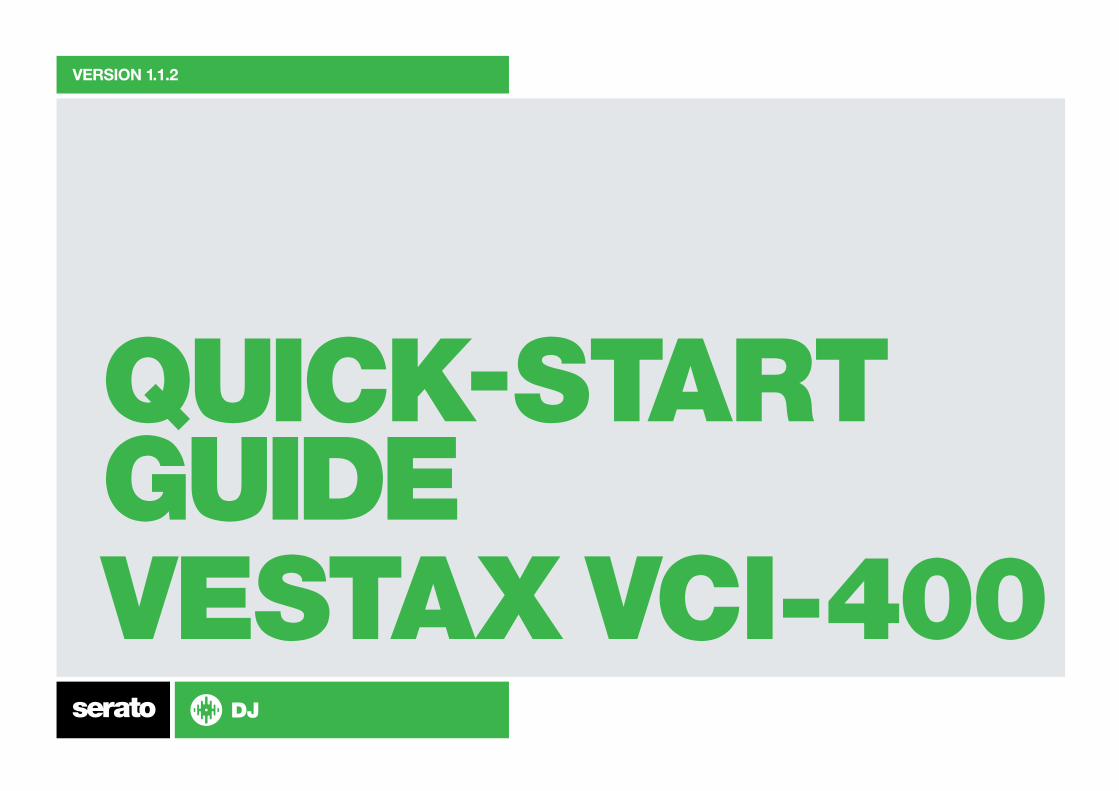
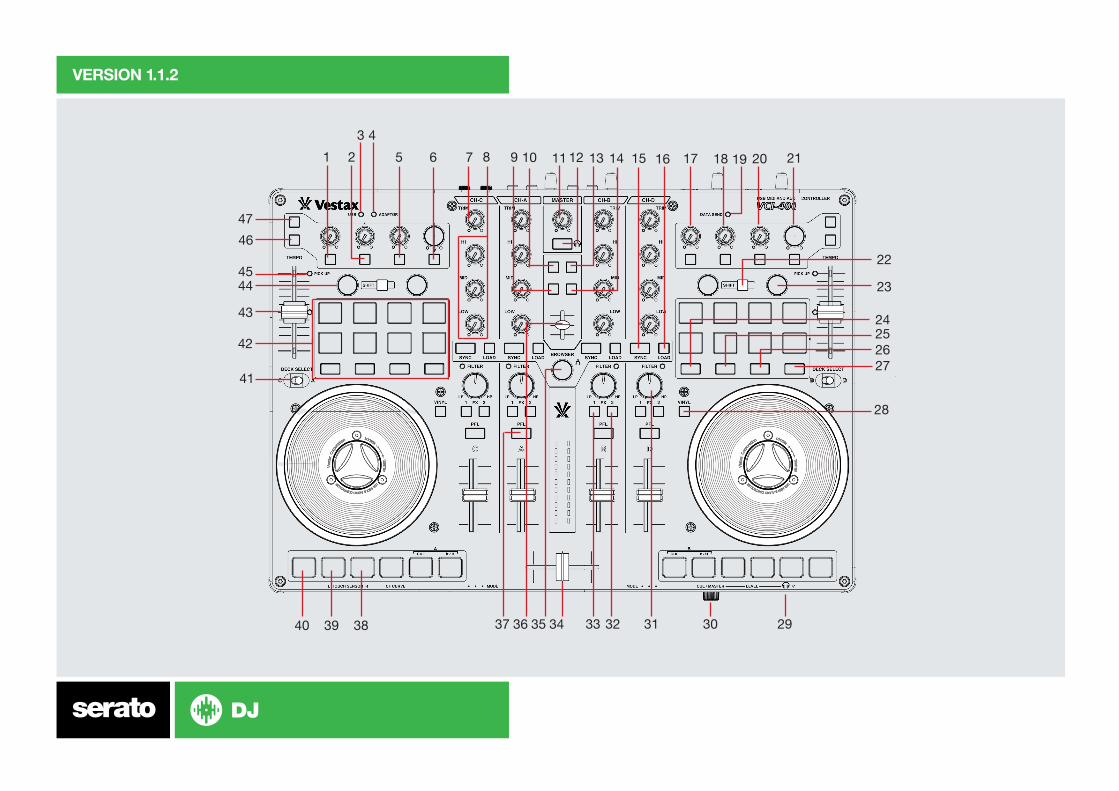
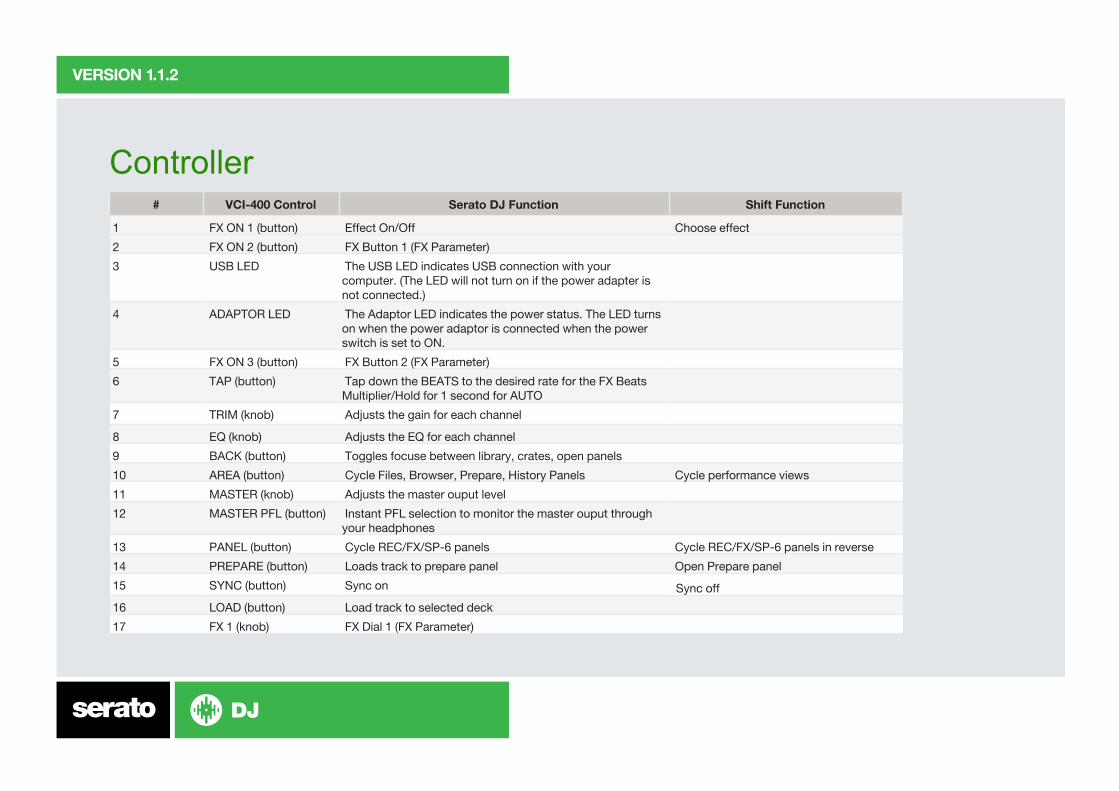
Controller# VCI-400 Control Serato DJ Function Shift Function
1 FX ON 1 (button) Effect On/Off Choose effect
2 FX ON 2 (button) FX Button 1 (FX Parameter)
3 USB LED The USB LED indicates USB connection with your computer. (The LED will not turn on if the power adapter is not connected.)
4 ADAPTOR LED The Adaptor LED indicates the power status. The LED turns on when the power adaptor is connected when the power switch is set to ON.
5 FX ON 3 (button) FX Button 2 (FX Parameter)
6 TAP (button) Tap down the BEATS to the desired rate for the FX Beats Multiplier/Hold for 1 second for AUTO
7 TRIM (knob) Adjusts the gain for each channel
8 EQ (knob) Adjusts the EQ for each channel
9 BACK (button) Toggles focuse between library, crates, open panels
10 AREA (button) Cycle Files, Browser, Prepare, History Panels Cycle performance views
11 MASTER (knob) Adjusts the master ouput level
12 MASTER PFL (button) Instant PFL selection to monitor the master ouput through your headphones
13 PANEL (button) Cycle REC/FX/SP-6 panels Cycle REC/FX/SP-6 panels in reverse
14 PREPARE (button) Loads track to prepare panel Open Prepare panel
15 SYNC (button) Sync on Sync off
16 LOAD (button) Load track to selected deck
17 FX 1 (knob) FX Dial 1 (FX Parameter)
VERSION 1.1.2
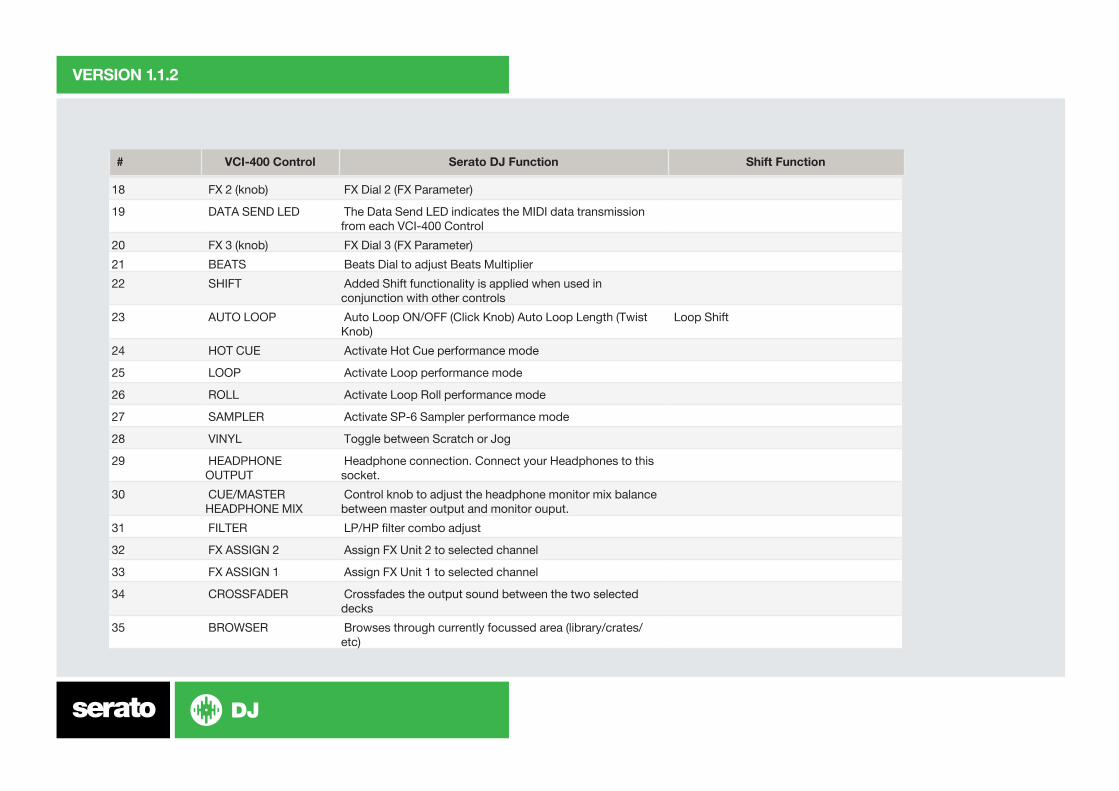
18 FX 2 (knob) FX Dial 2 (FX Parameter)
19 DATA SEND LED The Data Send LED indicates the MIDI data transmission from each VCI-400 Control
20 FX 3 (knob) FX Dial 3 (FX Parameter)
21 BEATS Beats Dial to adjust Beats Multiplier
22 SHIFT Added Shift functionality is applied when used in conjunction with other controls
23 AUTO LOOP Auto Loop ON/OFF (Click Knob) Auto Loop Length (Twist Knob)
Loop Shift
24 HOT CUE Activate Hot Cue performance mode
25 LOOP Activate Loop performance mode
26 ROLL Activate Loop Roll performance mode
27 SAMPLER Activate SP-6 Sampler performance mode
28 VINYL Toggle between Scratch or Jog
29 HEADPHONE OUTPUT
Headphone connection. Connect your Headphones to this socket.
30 CUE/MASTER HEADPHONE MIX
Control knob to adjust the headphone monitor mix balance between master output and monitor ouput.
31 FILTER LP/HP filter combo adjust
32 FX ASSIGN 2 Assign FX Unit 2 to selected channel
33 FX ASSIGN 1 Assign FX Unit 1 to selected channel
34 CROSSFADER Crossfades the output sound between the two selected decks
35 BROWSER Browses through currently focussed area (library/crates/etc)
# VCI-400 Control Serato DJ Function Shift Function
VERSION 1.1.2
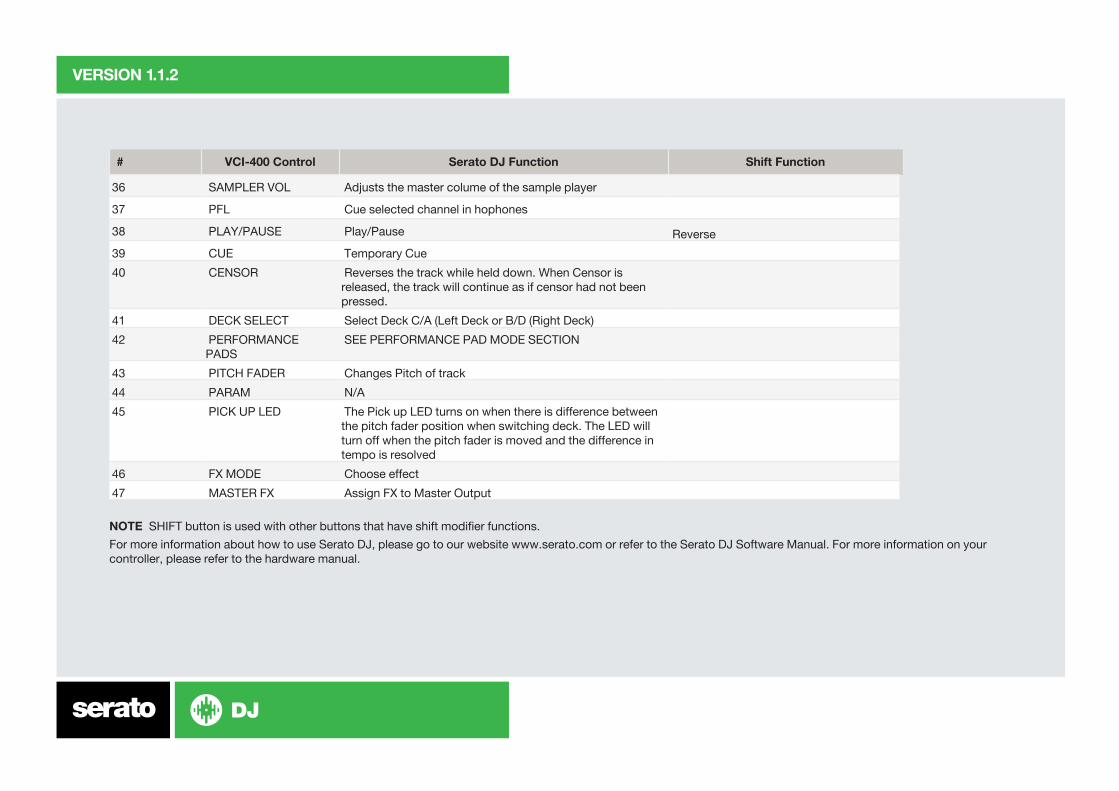
# VCI-400 Control Serato DJ Function Shift Function
36 SAMPLER VOL Adjusts the master colume of the sample player
37 PFL Cue selected channel in hophones
38 PLAY/PAUSE Play/Pause Reverse
39 CUE Temporary Cue
40 CENSOR Reverses the track while held down. When Censor is released, the track will continue as if censor had not been pressed.
41 DECK SELECT Select Deck C/A (Left Deck or B/D (Right Deck)
42 PERFORMANCE PADS
SEE PERFORMANCE PAD MODE SECTION
43 PITCH FADER Changes Pitch of track
44 PARAM N/A
45 PICK UP LED The Pick up LED turns on when there is difference between the pitch fader position when switching deck. The LED will turn off when the pitch fader is moved and the difference in tempo is resolved
46 FX MODE Choose effect
47 MASTER FX Assign FX to Master Output
NOTE SHIFT button is used with other buttons that have shift modifier functions.
For more information about how to use Serato DJ, please go to our website www.serato.com or refer to the Serato DJ Software Manual. For more information on your controller, please refer to the hardware manual.