Embed Size (px)
Citation preview

Novell
m
w w w . n o v e l l . c oIntegration Manager™
6 . 0
J u n e 2 7 , 2 0 0 6
S A P C O N N E C T U S E R ’ S G U I D E
Legal Notices
Novell, Inc. makes no representations or warranties with respect to the contents or use of this documentation, and specifically disclaims any express or implied warranties of merchantability or fitness for any particular purpose. Further, Novell, Inc. reserves the right to revise this publication and to make changes to its content, at any time, without obligation to notify any person or entity of such revisions or changes.
Further, Novell, Inc. makes no representations or warranties with respect to any software, and specifically disclaims any express or implied warranties of merchantability or fitness for any particular purpose. Further, Novell, Inc. reserves the right to make changes to any and all parts of Novell software, at any time, without any obligation to notify any person or entity of such changes.
Any products or technical information provided under this Agreement may be subject to U.S. export controls and the trade laws of other countries. You agree to comply with all export control regulations and to obtain any required licenses or classification to export, re-export or import deliverables. You agree not to export or re-export to entities on the current U.S. export exclusion lists or to any embargoed or terrorist countries as specified in the U.S. export laws. You agree to not use deliverables for prohibited nuclear, missile, or chemical biological weaponry end uses. Please refer to www.novell.com/info/exports/ for more information on exporting Novell software. Novell assumes no responsibility for your failure to obtain any necessary export approvals.
Copyright © 2006 Novell, Inc. All rights reserved. No part of this publication may be reproduced, photocopied, stored on a retrieval system, or transmitted without the express written consent of the publisher.
Novell, Inc. has intellectual property rights relating to technology embodied in the product that is described in this document. In particular, and without limitation, these intellectual property rights may include one or more of the U.S. patents listed at http://www.novell.com/company/legal/patents/ and one or more additional patents or pending patent applications in the U.S. and in other countries.
Novell, Inc.404 Wyman Street, Suite 500Waltham, MA 02451U.S.A.www.novell.com
Online Documentation: To access the online documentation for this and other Novell products, and to get updates, see www.novell.com/documentation.
2 SAP Connect User’s Guide

Novell TrademarksFor Novell trademarks, see the Novell Trademark and Service Mark list.
Third-Party TrademarksAll third-party trademarks are the property of their respective owners.
3

4 SAP Connect User’s Guide
Contents
About This Book. . . . . . . . . . . . . . . . . . . . . . . . . . . . . . . . . . . . . . . . . . . . . . . . . . . . . . . . . . . . . . . . . . . . . . . . . . . . . . . . . . . . . 7
1 Welcome to Integration Manager and SAP Connect . . . . . . . . . . . . . . . . . . . . . . . . . . . . . . . . . . . . . . . . . . . . . . . . . . . 9Before You Begin. . . . . . . . . . . . . . . . . . . . . . . . . . . . . . . . . . . . . . . . . . . . . . . . . . . . . . . . . . . . . . . . . . . . . . . . . . . . . . . . . 9About Integration Manager Connectors. . . . . . . . . . . . . . . . . . . . . . . . . . . . . . . . . . . . . . . . . . . . . . . . . . . . . . . . . . . . . . . 10What is SAP Connect? . . . . . . . . . . . . . . . . . . . . . . . . . . . . . . . . . . . . . . . . . . . . . . . . . . . . . . . . . . . . . . . . . . . . . . . . . . . 10About the SAP Component . . . . . . . . . . . . . . . . . . . . . . . . . . . . . . . . . . . . . . . . . . . . . . . . . . . . . . . . . . . . . . . . . . . . . . . . 13What Applications Can You Build Using the SAP Component Editor? . . . . . . . . . . . . . . . . . . . . . . . . . . . . . . . . . . . . . . . 13
2 Getting Started with the SAP Component Editor . . . . . . . . . . . . . . . . . . . . . . . . . . . . . . . . . . . . . . . . . . . . . . . . . . . . . 15Installing SAP Java Connector Libraries (JCo) . . . . . . . . . . . . . . . . . . . . . . . . . . . . . . . . . . . . . . . . . . . . . . . . . . . . . . . . . 15Creating an SAP Connection Resource . . . . . . . . . . . . . . . . . . . . . . . . . . . . . . . . . . . . . . . . . . . . . . . . . . . . . . . . . . . . . . 17SAP Connections. . . . . . . . . . . . . . . . . . . . . . . . . . . . . . . . . . . . . . . . . . . . . . . . . . . . . . . . . . . . . . . . . . . . . . . . . . . . . . . . 19About SAP and Connection Pools . . . . . . . . . . . . . . . . . . . . . . . . . . . . . . . . . . . . . . . . . . . . . . . . . . . . . . . . . . . . . . . . . . . 22Managing Pools . . . . . . . . . . . . . . . . . . . . . . . . . . . . . . . . . . . . . . . . . . . . . . . . . . . . . . . . . . . . . . . . . . . . . . . . . . . . . . . . . 24Creating XML Templates for Your Component . . . . . . . . . . . . . . . . . . . . . . . . . . . . . . . . . . . . . . . . . . . . . . . . . . . . . . . . . 27
3 Creating an SAP Component . . . . . . . . . . . . . . . . . . . . . . . . . . . . . . . . . . . . . . . . . . . . . . . . . . . . . . . . . . . . . . . . . . . . . 29Before Creating an SAP Component. . . . . . . . . . . . . . . . . . . . . . . . . . . . . . . . . . . . . . . . . . . . . . . . . . . . . . . . . . . . . . . . . 29About the SAP Component Editor Window . . . . . . . . . . . . . . . . . . . . . . . . . . . . . . . . . . . . . . . . . . . . . . . . . . . . . . . . . . . . 32About the Native Environment Pane . . . . . . . . . . . . . . . . . . . . . . . . . . . . . . . . . . . . . . . . . . . . . . . . . . . . . . . . . . . . . . . . . 32
4 Performing SAP Actions . . . . . . . . . . . . . . . . . . . . . . . . . . . . . . . . . . . . . . . . . . . . . . . . . . . . . . . . . . . . . . . . . . . . . . . . . 35About Actions. . . . . . . . . . . . . . . . . . . . . . . . . . . . . . . . . . . . . . . . . . . . . . . . . . . . . . . . . . . . . . . . . . . . . . . . . . . . . . . . . . . 35The SAP Function Action. . . . . . . . . . . . . . . . . . . . . . . . . . . . . . . . . . . . . . . . . . . . . . . . . . . . . . . . . . . . . . . . . . . . . . . . . . 35SAP Action Model . . . . . . . . . . . . . . . . . . . . . . . . . . . . . . . . . . . . . . . . . . . . . . . . . . . . . . . . . . . . . . . . . . . . . . . . . . . . . . . 40Component with Connection Action. . . . . . . . . . . . . . . . . . . . . . . . . . . . . . . . . . . . . . . . . . . . . . . . . . . . . . . . . . . . . . . . . . 46Using Other Actions in the SAP Component Editor. . . . . . . . . . . . . . . . . . . . . . . . . . . . . . . . . . . . . . . . . . . . . . . . . . . . . . 51Handling Errors and Messages . . . . . . . . . . . . . . . . . . . . . . . . . . . . . . . . . . . . . . . . . . . . . . . . . . . . . . . . . . . . . . . . . . . . . 52
5 SAP Service . . . . . . . . . . . . . . . . . . . . . . . . . . . . . . . . . . . . . . . . . . . . . . . . . . . . . . . . . . . . . . . . . . . . . . . . . . . . . . . . . . . 53About Services. . . . . . . . . . . . . . . . . . . . . . . . . . . . . . . . . . . . . . . . . . . . . . . . . . . . . . . . . . . . . . . . . . . . . . . . . . . . . . . . . . 53Creating an SAP Service . . . . . . . . . . . . . . . . . . . . . . . . . . . . . . . . . . . . . . . . . . . . . . . . . . . . . . . . . . . . . . . . . . . . . . . . . . 54Using the SAP Service Switch Action . . . . . . . . . . . . . . . . . . . . . . . . . . . . . . . . . . . . . . . . . . . . . . . . . . . . . . . . . . . . . . . . 56Deploying the SAP Service Component . . . . . . . . . . . . . . . . . . . . . . . . . . . . . . . . . . . . . . . . . . . . . . . . . . . . . . . . . . . . . . 58Testing an SAP Service. . . . . . . . . . . . . . . . . . . . . . . . . . . . . . . . . . . . . . . . . . . . . . . . . . . . . . . . . . . . . . . . . . . . . . . . . . . 59
A Document Management . . . . . . . . . . . . . . . . . . . . . . . . . . . . . . . . . . . . . . . . . . . . . . . . . . . . . . . . . . . . . . . . . . . . . . . . . . 61About Document Management . . . . . . . . . . . . . . . . . . . . . . . . . . . . . . . . . . . . . . . . . . . . . . . . . . . . . . . . . . . . . . . . . . . . . 61
B SAP Glossary . . . . . . . . . . . . . . . . . . . . . . . . . . . . . . . . . . . . . . . . . . . . . . . . . . . . . . . . . . . . . . . . . . . . . . . . . . . . . . . . . . 63
5

6 SAP Connect User’s Guide

About This Book
Purpose
The guide describes how to use Integration Manager SAP Connect, referred to as the SAP Component Editor. The SAP Component Editor is a separately-installed component editor in Integration Manager.
Audience
The audience for the guide is developers and system integrators using Integration Manager to create services and components which integrate SAP applications.
Prerequisites
The guide assumes the reader is familiar with and has used Integration Manager’s development environment and deployment options. You must also have a good understanding of SAP concepts and the SAP environment.
Additional documentation
For the complete set of Novell Integration Manager documentation, see the Novell Documentation Web Site (http://www.novell.com/documentation-index/index.jsp).
Organization
The guide is organized as follows:
Chapter 1, Welcome to Integration Manager and SAP, gives a definition and overview of the SAP Component Editor.
Chapter 2, Getting Started with the SAP Component Editor, describes the necessary preparations for creating a SAP component.
Chapter 3, Creating an SAP Component, describes how to create an SAP Component using the SAP Component Editor.
Chapter 4, Performing SAP Actions, describes how to use the SAP Function Action.
Chapter 5, Connection Pools, describes how to create and use connection pools.
Appendix A, Testing, describes environmental differences between animation testing and deployment testing.
Appendix B, Document Management, describes document management within the SAP Component Editor.
Appendix C, is a glossary.
7
Conventions Used in the GuideThe guide uses the following typographical conventions.
Bold typeface within instructions indicate action items, including:
Menu selectionsForm selectionsDialog box items
Sans-serif bold typeface is used for:
Uniform Resource IdentifiersFile namesDirectories and partial pathnames
Italic typeface indicates:
Variable information that you supplyTechnical terms used for the first timeTitle of other Novell publications
Monospaced typeface indicates:
Method namesCode examplesSystem inputOperating system objects
About the Product Name ChangeIn version 6.0. we've changed the name of exteNd Composer to Novell Integration Manager. In some places in the user interface, and in Integration Manager file and directory names, you will still see the name "exteNd Composer" or "Composer".
8 SAP Connect User’s Guide
1 Welcome to Integration Manager and SAP Connect
Before You BeginWelcome to the Novell Integration Manager SAP Connect Guide. This Guide is a companion to the Novell Integration Manager User’s Guide, which details how to use all the features of Integration Manager, except the Connect Component Editors. So, if you haven’t looked at the Novell Integration Manager User’s Guide yet, please familiarize yourself with it before using this Guide.
Integration Manager provides separate Component Editors for each Connector, such as SAP Connect. The special features of each component editor are described in separate Guides like this one.
If you have been using Integration Manager, and are familiar with the core component editor, the XML Map Component Editor, then this Guide should get you started with the SAP Component Editor.
Before you can begin working with SAP Connect, you must have installed it into your existing Integration Manager. Likewise, before you can run any Services built with this Connector in the Integration Manager Enterprise Server environment, you must have already installed the Server side software for this Connector into Integration Manager Enterprise Server.
NOTE: To be successful with this Component Editor, you must be familiar with the SAP environment and the applications that you want to XML-enable.
Welcome to Integration Manager and SAP Connect 9
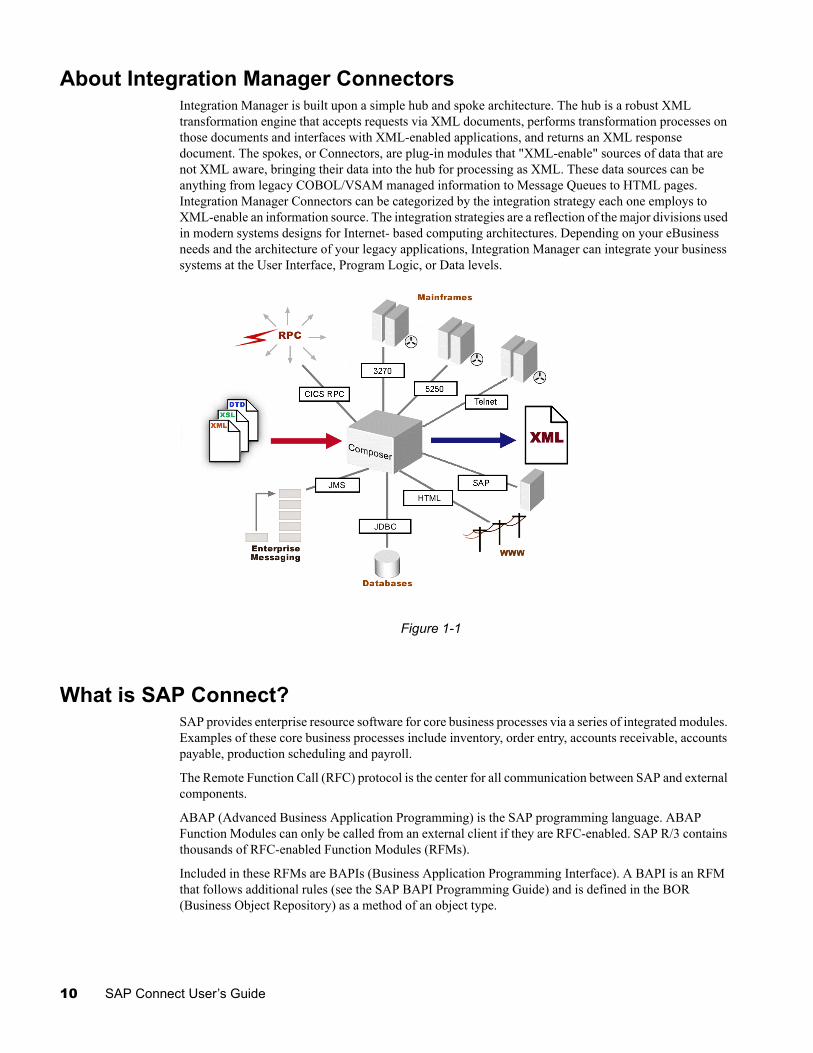
About Integration Manager ConnectorsIntegration Manager is built upon a simple hub and spoke architecture. The hub is a robust XML transformation engine that accepts requests via XML documents, performs transformation processes on those documents and interfaces with XML-enabled applications, and returns an XML response document. The spokes, or Connectors, are plug-in modules that "XML-enable" sources of data that are not XML aware, bringing their data into the hub for processing as XML. These data sources can be anything from legacy COBOL/VSAM managed information to Message Queues to HTML pages. Integration Manager Connectors can be categorized by the integration strategy each one employs to XML-enable an information source. The integration strategies are a reflection of the major divisions used in modern systems designs for Internet- based computing architectures. Depending on your eBusiness needs and the architecture of your legacy applications, Integration Manager can integrate your business systems at the User Interface, Program Logic, or Data levels.
Figure 1-1
What is SAP Connect?SAP provides enterprise resource software for core business processes via a series of integrated modules. Examples of these core business processes include inventory, order entry, accounts receivable, accounts payable, production scheduling and payroll.
The Remote Function Call (RFC) protocol is the center for all communication between SAP and external components.
ABAP (Advanced Business Application Programming) is the SAP programming language. ABAP Function Modules can only be called from an external client if they are RFC-enabled. SAP R/3 contains thousands of RFC-enabled Function Modules (RFMs).
Included in these RFMs are BAPIs (Business Application Programming Interface). A BAPI is an RFM that follows additional rules (see the SAP BAPI Programming Guide) and is defined in the BOR (Business Object Repository) as a method of an object type.
10 SAP Connect User’s Guide
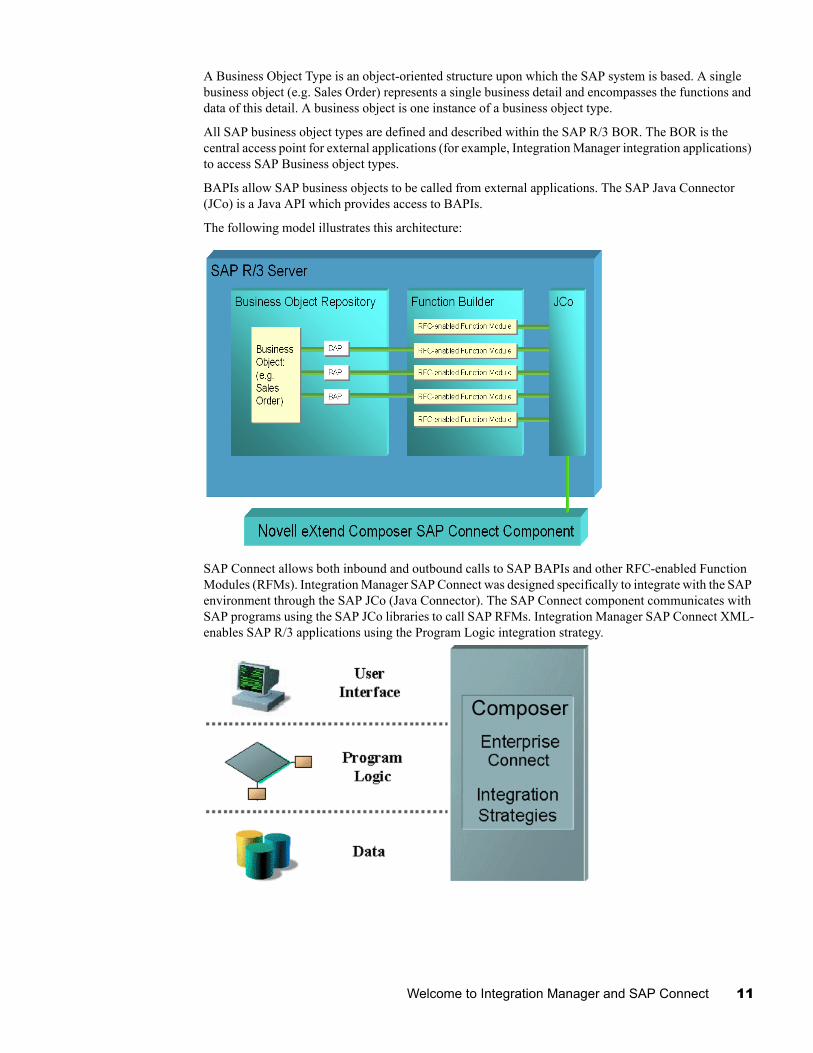
A Business Object Type is an object-oriented structure upon which the SAP system is based. A single business object (e.g. Sales Order) represents a single business detail and encompasses the functions and data of this detail. A business object is one instance of a business object type.
All SAP business object types are defined and described within the SAP R/3 BOR. The BOR is the central access point for external applications (for example, Integration Manager integration applications) to access SAP Business object types.
BAPIs allow SAP business objects to be called from external applications. The SAP Java Connector (JCo) is a Java API which provides access to BAPIs.
The following model illustrates this architecture:
SAP Connect allows both inbound and outbound calls to SAP BAPIs and other RFC-enabled Function Modules (RFMs). Integration Manager SAP Connect was designed specifically to integrate with the SAP environment through the SAP JCo (Java Connector). The SAP Connect component communicates with SAP programs using the SAP JCo libraries to call SAP RFMs. Integration Manager SAP Connect XML-enables SAP R/3 applications using the Program Logic integration strategy.
Welcome to Integration Manager and SAP Connect 11
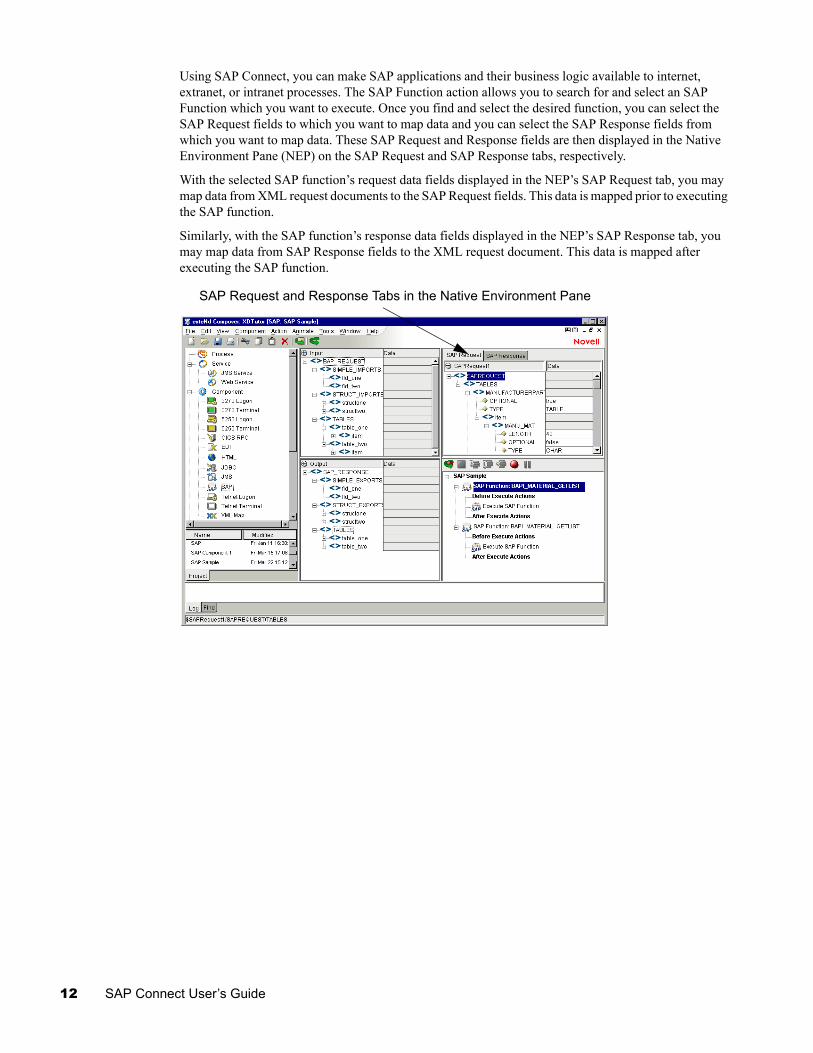
Using SAP Connect, you can make SAP applications and their business logic available to internet, extranet, or intranet processes. The SAP Function action allows you to search for and select an SAP Function which you want to execute. Once you find and select the desired function, you can select the SAP Request fields to which you want to map data and you can select the SAP Response fields from which you want to map data. These SAP Request and Response fields are then displayed in the Native Environment Pane (NEP) on the SAP Request and SAP Response tabs, respectively.
With the selected SAP function’s request data fields displayed in the NEP’s SAP Request tab, you may map data from XML request documents to the SAP Request fields. This data is mapped prior to executing the SAP function.
Similarly, with the SAP function’s response data fields displayed in the NEP’s SAP Response tab, you may map data from SAP Response fields to the XML request document. This data is mapped after executing the SAP function.
SAP Request and Response Tabs in the Native Environment Pane
12 SAP Connect User’s Guide
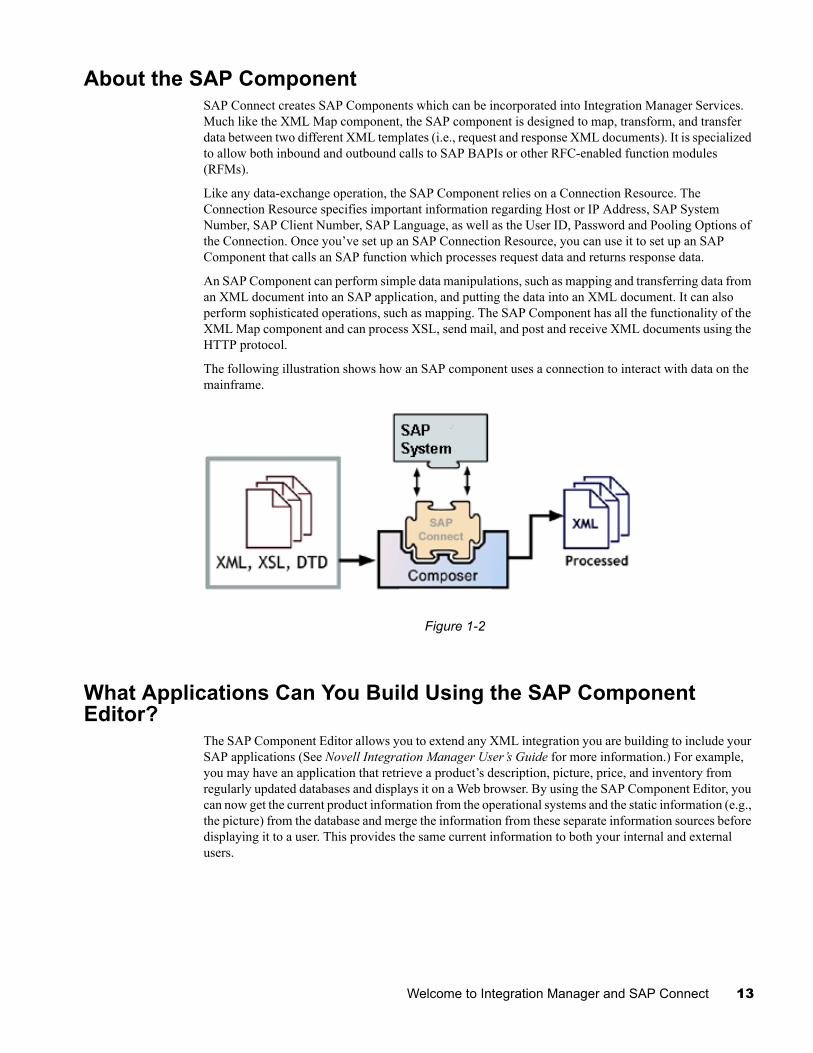
About the SAP ComponentSAP Connect creates SAP Components which can be incorporated into Integration Manager Services. Much like the XML Map component, the SAP component is designed to map, transform, and transfer data between two different XML templates (i.e., request and response XML documents). It is specialized to allow both inbound and outbound calls to SAP BAPIs or other RFC-enabled function modules (RFMs).
Like any data-exchange operation, the SAP Component relies on a Connection Resource. The Connection Resource specifies important information regarding Host or IP Address, SAP System Number, SAP Client Number, SAP Language, as well as the User ID, Password and Pooling Options of the Connection. Once you’ve set up an SAP Connection Resource, you can use it to set up an SAP Component that calls an SAP function which processes request data and returns response data.
An SAP Component can perform simple data manipulations, such as mapping and transferring data from an XML document into an SAP application, and putting the data into an XML document. It can also perform sophisticated operations, such as mapping. The SAP Component has all the functionality of the XML Map component and can process XSL, send mail, and post and receive XML documents using the HTTP protocol.
The following illustration shows how an SAP component uses a connection to interact with data on the mainframe.
Figure 1-2
What Applications Can You Build Using the SAP Component Editor?
The SAP Component Editor allows you to extend any XML integration you are building to include your SAP applications (See Novell Integration Manager User’s Guide for more information.) For example, you may have an application that retrieve a product’s description, picture, price, and inventory from regularly updated databases and displays it on a Web browser. By using the SAP Component Editor, you can now get the current product information from the operational systems and the static information (e.g., the picture) from the database and merge the information from these separate information sources before displaying it to a user. This provides the same current information to both your internal and external users.
Welcome to Integration Manager and SAP Connect 13

14 SAP Connect User’s Guide
2 Getting Started with the SAP Component Editor
Installing SAP Java Connector Libraries (JCo)Novell Integration Manager SAP Connect is designed specifically to integrate with the SAP environment through the SAP JCo (Java Connector) libraries. Please see the Integration Manager SAP Connect Release Notes for specific software version support info. You should obtain the appropriate (currently supported) version of the
Registered SAP users may download SAP JCo libraries from the following SAP site: http://service.sap.com. A valid SAP Service Marketplace user ID and password is required to access this SAP site.
Error MessagesNOTE: To install Integration Manager SAP Connect, you must have SAP’s JCo libraries installed. See discussion below.
If you do not have SAP Java Connector installed (as described below) prior to installing Integration Manager SAP Connect, the following dialog will be displayed.
Also, the log will have at least some of the following messages:
java.lang.NoClassDefFoundError: com/sap/mw/jco/JCO$PoolChangedListener
java.lang.NoClassDefFoundError: com/sap/mw/jco/JCO$ServerStateChangedListener
Enabler: SAP; Error: Cannot get build for: com.sssw.b2b.ee.sap.rt.GNVSAPXObjectFactory
Enabler: SAPService; Error: Cannot get build for: com.sssw.b2b.ee.sap.rt.GNVSAPServiceXObjectFactory
Getting Started with the SAP Component Editor 15

License StatusSAP Connect will not load if the ENABLER_LICENSE element in xconfig.xml is not set to “true.” On the design-time machine, look for xconfig.xml under the \Composer\Designer\bin directory. On the server-side, look in App Server\Composer\lib.
Open xconfig.xml in a teswt editor. Look for the <COMPONENT_FACTORY> entries for SAP and SAPService. Set the ENABLER_LICENSE element within each of these to “true”:
<ENABLER_LICENSE enabled="true">
Then Save the modified file and restart Integration Manager or the server, as applicable.
NOTE: Do not edit xconfig.xml while Integration Manager is running. Integration Manager overwrites its config file at shutdown. If you have made edits while Integration Manager is running, they will be lost as soon as you exit Integration Manager. Always stop Integration Manager, then edit xconfig.xml, then restart Integration Manager.
Integration Manager SAP Connect (Design Time)For Integration Manager SAP Connect design-time installation, follow SAP’s instructions for installing JCo libraries on Windows 2000/XP or Linux as appropriate. Here is what you need to do to get started:
1 From the SAP website, download the JCo zip file that is appropriate for your operating system.2 Unzip the file into an arbitrary directory {jco-install-path}.3 Add the library files (for example, DLLs) to the NIM6\Composer\Designer\bin directory
(Windows) or nim/Composer/Designer/bin directory (Linux).4 Add sapjco.jar to the NIM6\Composer\Designer\lib directory (Windows) or
nim/Composer/Designer/lib directory (Linux).5 Add a <JAR> entry for sapjco.jar to the SAP section of xconfig.xml (this entry may already exist)
which is in the \Composer\Designer\bin directory. For example:<JAR>..\lib\jCO.jar</JAR>
Integration Manager SAP Connect Server on WindowsFor Integration Manager SAP Connect on Integration Manager Enterprise Server, follow SAP's instructions for installing JCO on Windows 2000:
1 From the SAP site, download jco-ntintel-1.1.04.zip into an arbitrary directory {jco-install-path}.2 Unzip the file jco-ntintel-1.1.04.zip into an arbitrary directory {jco-install-path}.3 Add the DLLs to a location within the application server directory tree that is in the path so that
they can be found at runtime. For example, the application server bin directory. 4 Add jCO.jar to the Server's exteNd5\Composer\Designer\lib directory.5 Add [PATH]\exteNd5\Composer\Designer\lib\jCO.jar to the application server’s CLASSPATH
Integration Manager SAP Connect Server on SolarisFor Integration Manager SAP Connect Server, follow SAP's instructions for installing JCO on Solaris.
1 From the SAP site, download jco-sun-1.1.04.tgz or jco-sun-1.1.04.tar.z (or appropriate version; see SAP Connect Release Notes) into an arbitrary directory {jco-install-path}.
2 Expand the jco-sun-1.1.04.tgz or jco-sun-1.1.04.tar.z into an arbitrary directory {jco-install-path}.3 Add the SOs to a location with the application server directory tree that is in the
LD_LIBRARY_PATH so that they can be found at runtime.4 Add jCO.jar to the Server’s exteNd5\Composer\Designer\lib directory.
16 SAP Connect User’s Guide
5 Add [PATH]\exteNd5\Composer\Designer\lib\jCO.jar to your CLASSPATH environment variable.
Integration Manager SAP Connect Server on AIXFor Integration Manager SAP Connect Server, follow SAP's instructions for installing JCO on AIX.
1 From the SAP site, download jco-rs6000-1.1.04.tgz or jco-rs6000-1.1.04.tar.z into an arbitrary directory {jco-install-path}.
2 Expand the jco-rs6000-1.1.04.tgz or jco-rs6000-1.1.04.tar.z into an arbitrary directory {jco-install-path}.
3 Add The SOs to a location with the application server directory tree that is in the LIBPATH sot that they can be found at runtime.
4 Add jCO.jar to the Server's exteNdComposer\lib directory.5 Add [PATH]\exteNd5\Composer\lib\jCO.jar to your CLASSPATH environment variable.
Integration Manager SAP Connect Server on HP-UXFor Integration Manager SAP Connect Server, follow SAP's instructions for installing JCO on HP-UX.
1 From the SAP site, download jco-hp_32-1.1.04.tgz or jco-hp_32-1.1.04.tar.z into an arbitrary directory {jco-install-path}.
2 Expand the jco-hp_32-1.1.04.tgz or jco-hp_32-1.1.04.tar.z into an arbitrary directory {jco-install-path}.
3 Add The SLs to a location with the application server directory tree that is in the SHLIB_PATH sot that they can be found at runtime.
4 Add jCO.jar to the Server's exteNdComposer\lib directory.5 Add [PATH]\exteNd5\Composer\lib\jCO.jar to your CLASSPATH environment variable.
Creating an SAP Connection ResourceBefore you create an SAP Component, you will find it necessary to create a Connection Resource to access the SAP system.
Each Connector, including SAP Connect, uses its own Connection Resource type. The Connection Resources (for JDBC, 3270, 5250, CICS RPC, JMS, HTML, Telnet, EDI, etc.) require various types of parameters, appropriate to the external data source being connected. The appearance of the setup wizard changes dynamically to reflect the type of Connection Resource that is selected.
Once you create a Connection Resource, you can reuse it for multiple SAP components that you create, rather than creating a new connection each time. Also, a Connection Resource, once created, can to some degree be self-configuring in that its data fields can be linked to ECMAScript expressions that control the parameter values associated with the connection (see below).
There are two types of SAP Connectors: the standard SAP Connection and the SAP Service Connection. Steps for creating both types will be described below.
Getting Started with the SAP Component Editor 17
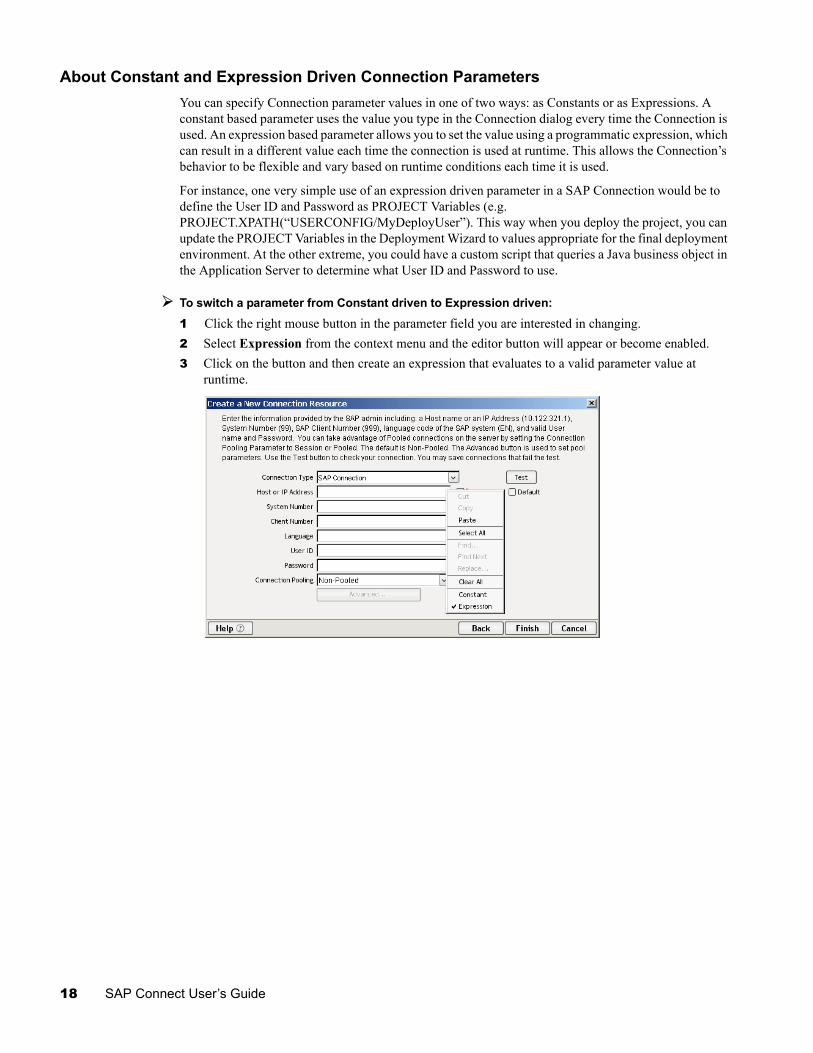
About Constant and Expression Driven Connection ParametersYou can specify Connection parameter values in one of two ways: as Constants or as Expressions. A constant based parameter uses the value you type in the Connection dialog every time the Connection is used. An expression based parameter allows you to set the value using a programmatic expression, which can result in a different value each time the connection is used at runtime. This allows the Connection’s behavior to be flexible and vary based on runtime conditions each time it is used.
For instance, one very simple use of an expression driven parameter in a SAP Connection would be to define the User ID and Password as PROJECT Variables (e.g. PROJECT.XPATH(“USERCONFIG/MyDeployUser”). This way when you deploy the project, you can update the PROJECT Variables in the Deployment Wizard to values appropriate for the final deployment environment. At the other extreme, you could have a custom script that queries a Java business object in the Application Server to determine what User ID and Password to use.
To switch a parameter from Constant driven to Expression driven:
1 Click the right mouse button in the parameter field you are interested in changing.2 Select Expression from the context menu and the editor button will appear or become enabled.3 Click on the button and then create an expression that evaluates to a valid parameter value at
runtime.
18 SAP Connect User’s Guide
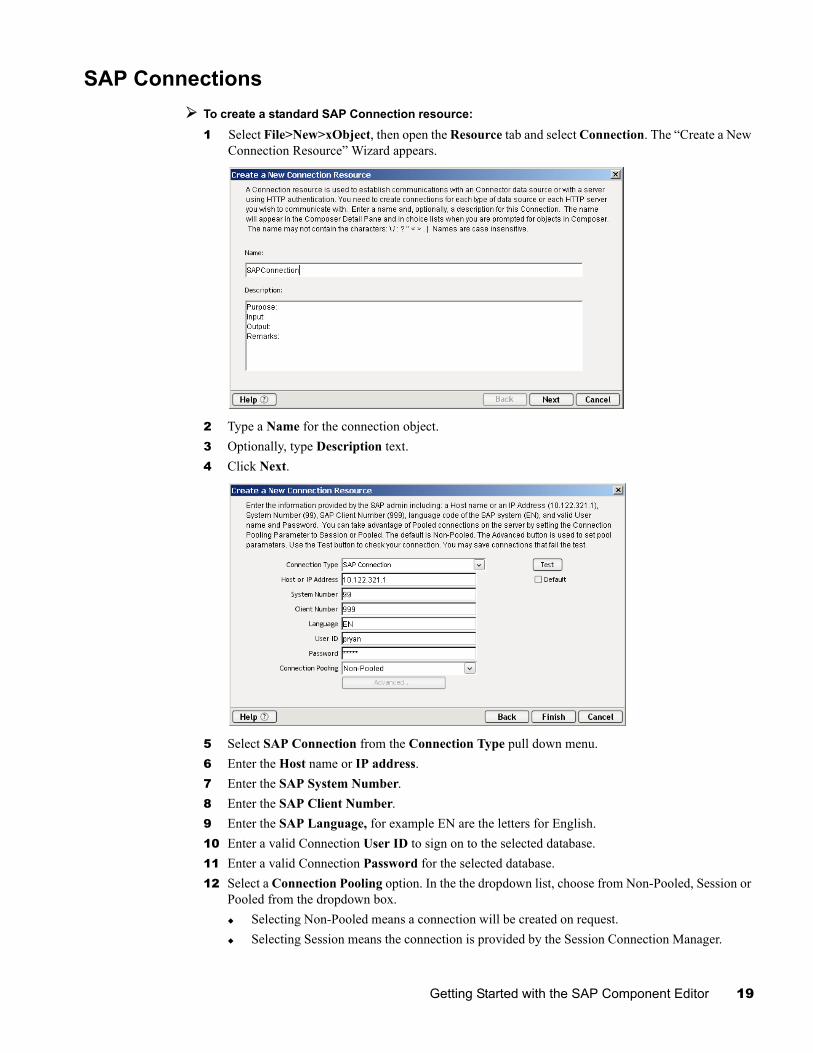
SAP ConnectionsTo create a standard SAP Connection resource:
1 Select File>New>xObject, then open the Resource tab and select Connection. The “Create a New Connection Resource” Wizard appears.
2 Type a Name for the connection object.3 Optionally, type Description text.4 Click Next.
5 Select SAP Connection from the Connection Type pull down menu.6 Enter the Host name or IP address.7 Enter the SAP System Number.8 Enter the SAP Client Number.9 Enter the SAP Language, for example EN are the letters for English.10 Enter a valid Connection User ID to sign on to the selected database.11 Enter a valid Connection Password for the selected database.12 Select a Connection Pooling option. In the the dropdown list, choose from Non-Pooled, Session or
Pooled from the dropdown box.Selecting Non-Pooled means a connection will be created on request.Selecting Session means the connection is provided by the Session Connection Manager.
Getting Started with the SAP Component Editor 19
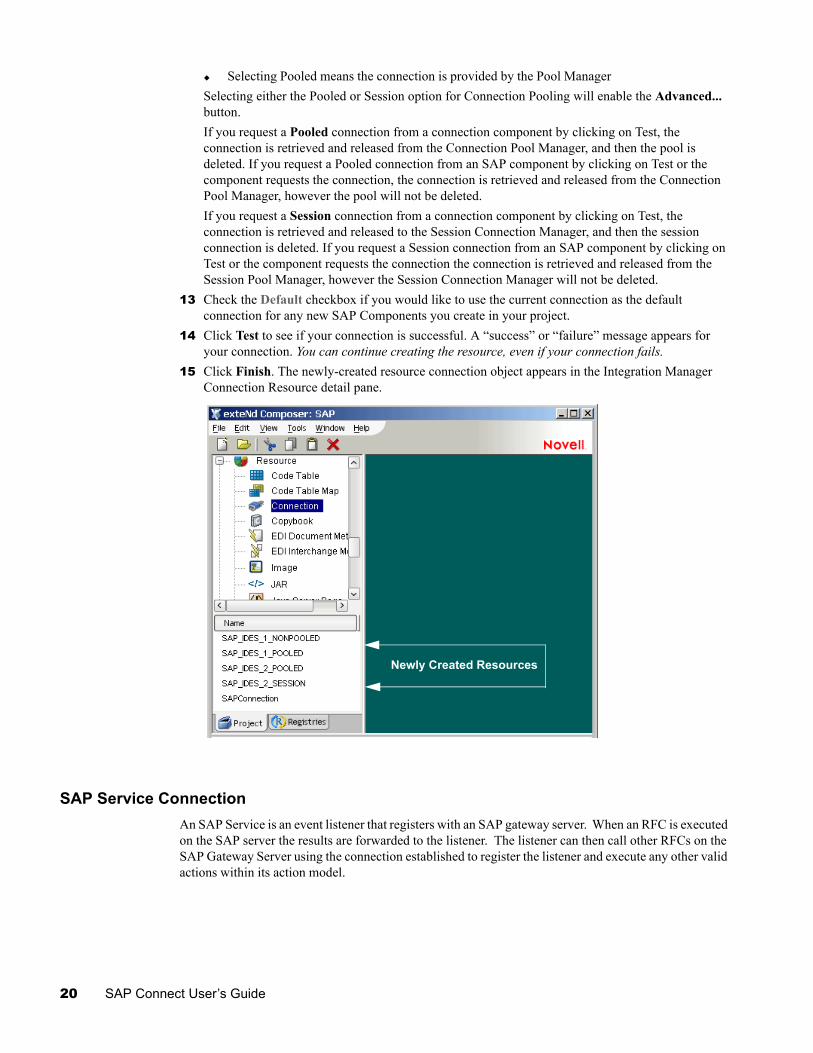
Selecting Pooled means the connection is provided by the Pool ManagerSelecting either the Pooled or Session option for Connection Pooling will enable the Advanced... button.If you request a Pooled connection from a connection component by clicking on Test, the connection is retrieved and released from the Connection Pool Manager, and then the pool is deleted. If you request a Pooled connection from an SAP component by clicking on Test or the component requests the connection, the connection is retrieved and released from the Connection Pool Manager, however the pool will not be deleted.If you request a Session connection from a connection component by clicking on Test, the connection is retrieved and released to the Session Connection Manager, and then the session connection is deleted. If you request a Session connection from an SAP component by clicking on Test or the component requests the connection the connection is retrieved and released from the Session Pool Manager, however the Session Connection Manager will not be deleted.
13 Check the Default checkbox if you would like to use the current connection as the default connection for any new SAP Components you create in your project.
14 Click Test to see if your connection is successful. A “success” or “failure” message appears for your connection. You can continue creating the resource, even if your connection fails.
15 Click Finish. The newly-created resource connection object appears in the Integration Manager Connection Resource detail pane.
SAP Service ConnectionAn SAP Service is an event listener that registers with an SAP gateway server. When an RFC is executed on the SAP server the results are forwarded to the listener. The listener can then call other RFCs on the SAP Gateway Server using the connection established to register the listener and execute any other valid actions within its action model.
Newly Created Resources
20 SAP Connect User’s Guide
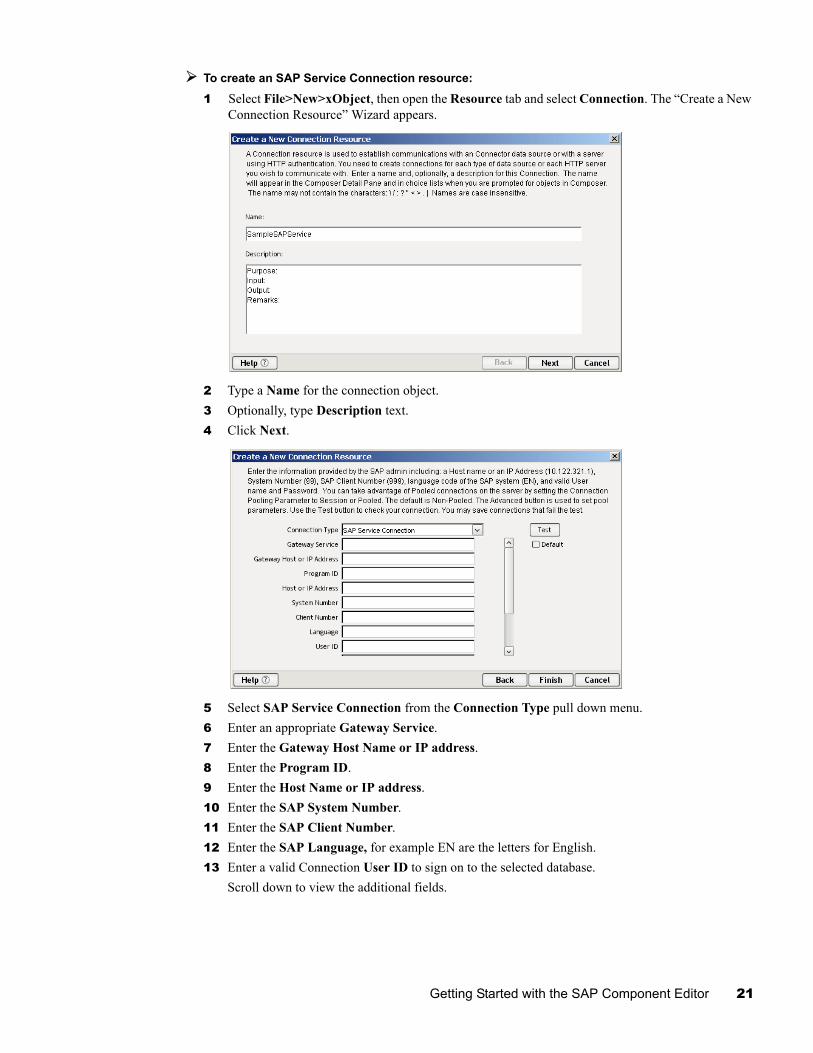
To create an SAP Service Connection resource:
1 Select File>New>xObject, then open the Resource tab and select Connection. The “Create a New Connection Resource” Wizard appears.
2 Type a Name for the connection object.3 Optionally, type Description text.4 Click Next.
5 Select SAP Service Connection from the Connection Type pull down menu.6 Enter an appropriate Gateway Service.7 Enter the Gateway Host Name or IP address.8 Enter the Program ID.9 Enter the Host Name or IP address.10 Enter the SAP System Number.11 Enter the SAP Client Number.12 Enter the SAP Language, for example EN are the letters for English.13 Enter a valid Connection User ID to sign on to the selected database.
Scroll down to view the additional fields.
Getting Started with the SAP Component Editor 21
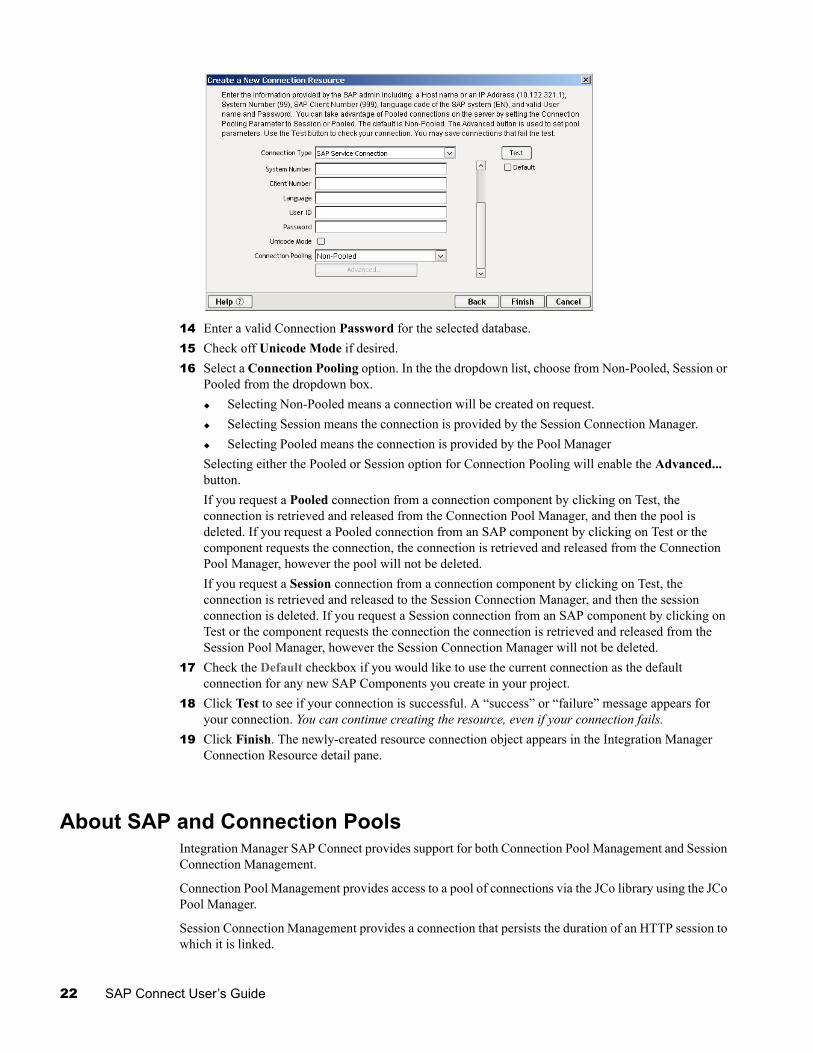
14 Enter a valid Connection Password for the selected database.15 Check off Unicode Mode if desired.16 Select a Connection Pooling option. In the the dropdown list, choose from Non-Pooled, Session or
Pooled from the dropdown box.Selecting Non-Pooled means a connection will be created on request.Selecting Session means the connection is provided by the Session Connection Manager. Selecting Pooled means the connection is provided by the Pool Manager
Selecting either the Pooled or Session option for Connection Pooling will enable the Advanced... button.If you request a Pooled connection from a connection component by clicking on Test, the connection is retrieved and released from the Connection Pool Manager, and then the pool is deleted. If you request a Pooled connection from an SAP component by clicking on Test or the component requests the connection, the connection is retrieved and released from the Connection Pool Manager, however the pool will not be deleted.If you request a Session connection from a connection component by clicking on Test, the connection is retrieved and released to the Session Connection Manager, and then the session connection is deleted. If you request a Session connection from an SAP component by clicking on Test or the component requests the connection the connection is retrieved and released from the Session Pool Manager, however the Session Connection Manager will not be deleted.
17 Check the Default checkbox if you would like to use the current connection as the default connection for any new SAP Components you create in your project.
18 Click Test to see if your connection is successful. A “success” or “failure” message appears for your connection. You can continue creating the resource, even if your connection fails.
19 Click Finish. The newly-created resource connection object appears in the Integration Manager Connection Resource detail pane.
About SAP and Connection PoolsIntegration Manager SAP Connect provides support for both Connection Pool Management and Session Connection Management.
Connection Pool Management provides access to a pool of connections via the JCo library using the JCo Pool Manager.
Session Connection Management provides a connection that persists the duration of an HTTP session to which it is linked.
22 SAP Connect User’s Guide

Both Session Connection Management and Connection Pool Management are active in both Integration Manager SAP Connect Designer and Integration Manager SAP Connect Server.
Session Connection ManagementSession Connection Management helps performance when you want to make multiple server requests with a server specified time frame (server request timeout). The connection is maintained based on the server http request. The connection is available from the sesssion connection manager as long as the session remains alive. When the session times out, the session connection manager is removed.
For an SAP Connection with Session Connection Pooling, a session connection manager and a session connection will be created the first time a component using the connection executes.
When Session Connection Pooling is selected for an SAP Connection Resource, the Advanced button will display the Session Info dialog. The Session Info dialog allows you to set Keep Alive and Inactivity Lifetime options for a managed session connection.
Keep Alive: (default 5) - is the delay period between checks to see if the connection is still alive. After this period Integration Manager will ping the SAP system to keep the connection open - or alive.
Inactivity Lifetime: (default 60) - is the timeout period in minutes that overrides the HTTP session timeout. This is the time limit for an idle connection.
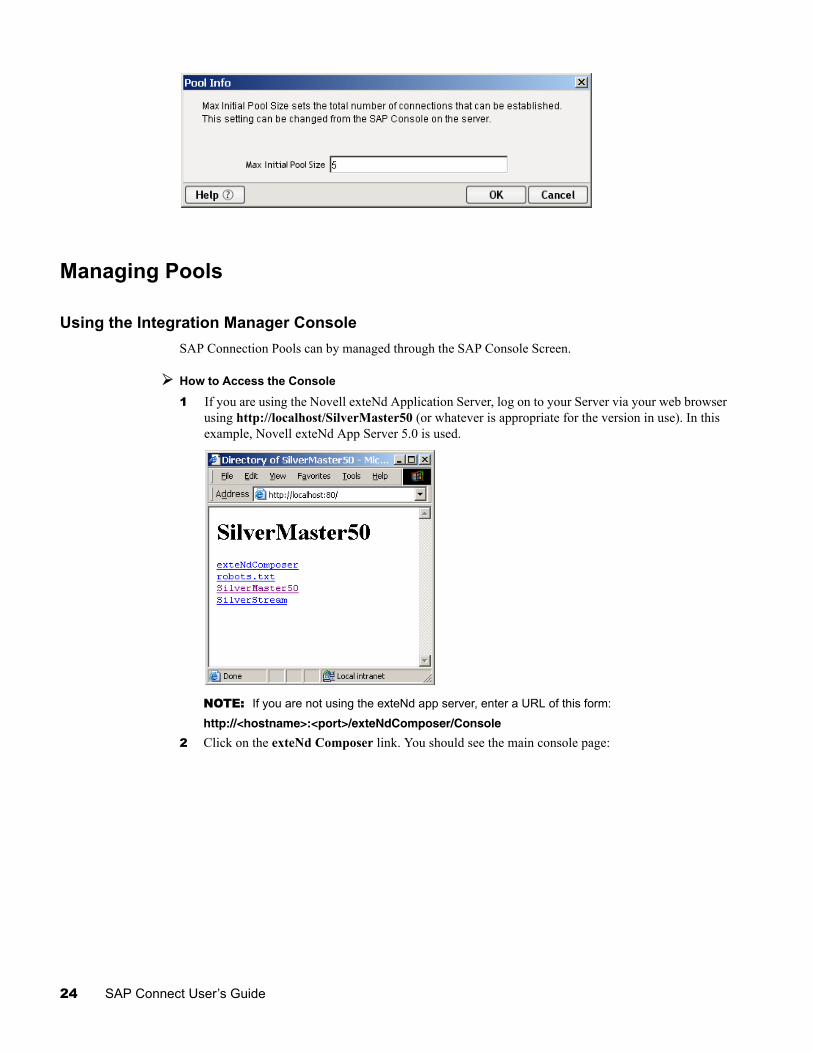
Connection Pool ManagementIn the SAP Connection dialog, when you specify Pooled as the Server Connection Source for the SAP Connection, a pool using the JCo Pool Manager will be created via the connection pool manager the first time a component using the connection executes or when a user pre-initializes the pool from the SAP Console.
When Pooling is selected as the Connection Pooling option for an SAP Connection Resource, the Advanced button will display the Pool Info dialog. The Pool Info dialog allows you to set the maximum initial pool size of the connection pool.
Interaction every 5 minutesActive Connection for 60 minutes
Getting Started with the SAP Component Editor 23
Managing Pools
Using the Integration Manager ConsoleSAP Connection Pools can by managed through the SAP Console Screen.
How to Access the Console
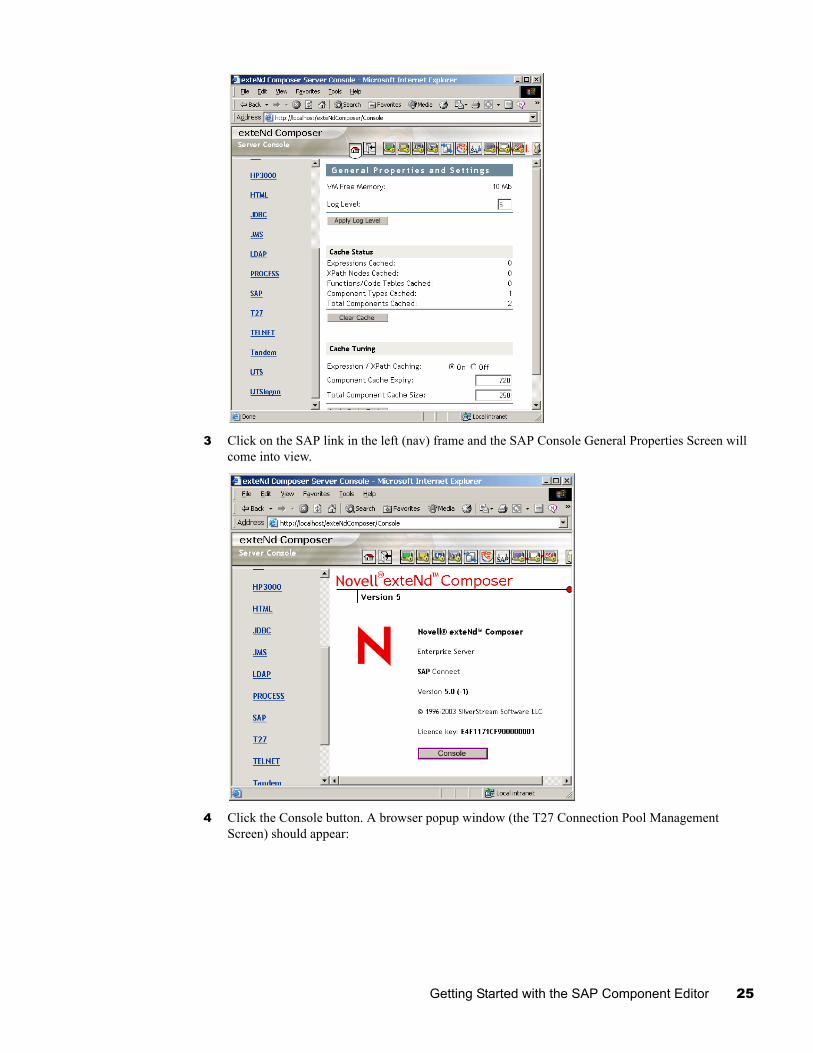
1 If you are using the Novell exteNd Application Server, log on to your Server via your web browser using http://localhost/SilverMaster50 (or whatever is appropriate for the version in use). In this example, Novell exteNd App Server 5.0 is used.
NOTE: If you are not using the exteNd app server, enter a URL of this form:
http://<hostname>:<port>/exteNdComposer/Console
2 Click on the exteNd Composer link. You should see the main console page:
24 SAP Connect User’s Guide
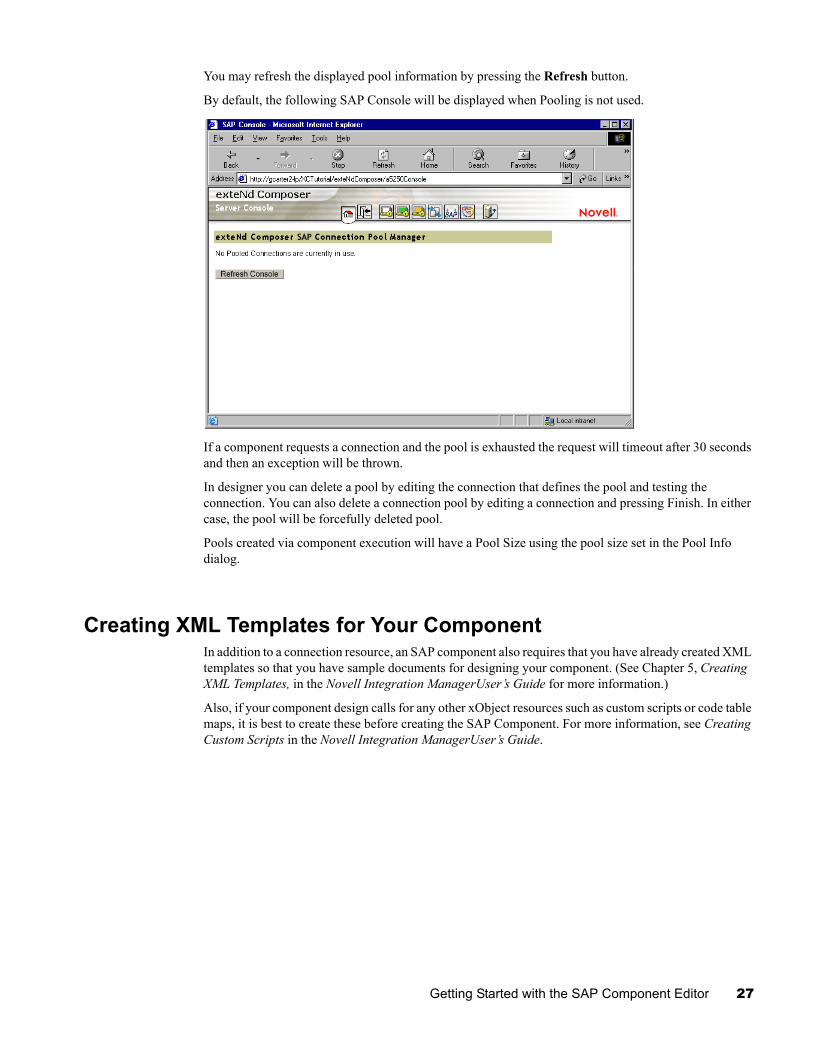
3 Click on the SAP link in the left (nav) frame and the SAP Console General Properties Screen will come into view.
4 Click the Console button. A browser popup window (the T27 Connection Pool Management Screen) should appear:
Getting Started with the SAP Component Editor 25

The SAP Console provides the following information and interaction for managing connection pools.
Pool Name - the full SAP connection pool nameIn Use - is the number of connections in the pool that are currently allocated to applicationsMax Used - is the peak number of connections that have been usedAvailable - is the number of connections in the pool that are currently freePool Size - is the maximum size of the pool. This field can be edited when resetting the Pool. To do so, enter the new pool size and press apply.
NOTE: Pool connections In Use will always be one more than required by the application because one pool connection is required for connection to the repository.
You may refresh the displayed pool information by pressing the Refresh Console button.
If you attempt to resize the pool and the connections are in use, the following SAP Console page will be displayed. You may press the Retry button to attempt to resize the pool again. You may also press the Kill button to forcibly resize the pool. This will close any open connections, delete the pool, and recreate it with the specified size. You may navigate back to the main SAP Console by pressing the Return button.
26 SAP Connect User’s Guide
You may refresh the displayed pool information by pressing the Refresh button.
By default, the following SAP Console will be displayed when Pooling is not used.
If a component requests a connection and the pool is exhausted the request will timeout after 30 seconds and then an exception will be thrown.
In designer you can delete a pool by editing the connection that defines the pool and testing the connection. You can also delete a connection pool by editing a connection and pressing Finish. In either case, the pool will be forcefully deleted pool.
Pools created via component execution will have a Pool Size using the pool size set in the Pool Info dialog.
Creating XML Templates for Your ComponentIn addition to a connection resource, an SAP component also requires that you have already created XML templates so that you have sample documents for designing your component. (See Chapter 5, Creating XML Templates, in the Novell Integration ManagerUser’s Guide for more information.)
Also, if your component design calls for any other xObject resources such as custom scripts or code table maps, it is best to create these before creating the SAP Component. For more information, see Creating Custom Scripts in the Novell Integration ManagerUser’s Guide.
Getting Started with the SAP Component Editor 27

28 SAP Connect User’s Guide

3 Creating an SAP Component
Before Creating an SAP ComponentAs with all Integration Manager components, the first step in creating an SAP component is to specify the XML templates needed. (For more information, see Creating a New XML Template in the Novell Integration Manager User’s Guide.) Once you’ve specified the XML templates you can create a component using the template’s sample documents to represent the inputs and outputs processed by your component.
Also, as part of the process of creating an SAP component, you must select an SAP connection or you can create a new one. If you created a connection beforehand, then it is available to all new SAP components as a selection.
To create a new SAP component:
1 Select File>New>xObject, then open the Component tab and select SAP.NOTE: Alternatively, under Component in the Integration Manager window category pane you can highlight SAP, click the right mouse button, then select New.
2 The “Create a New SAP Component” Wizard appears.
3 Enter a Name for the new SAP Component.4 Optionally, type Description text.5 Click Next. The XML Input/Output Property Info panel of the New SAP Component Wizard
appears.
Creating an SAP Component 29
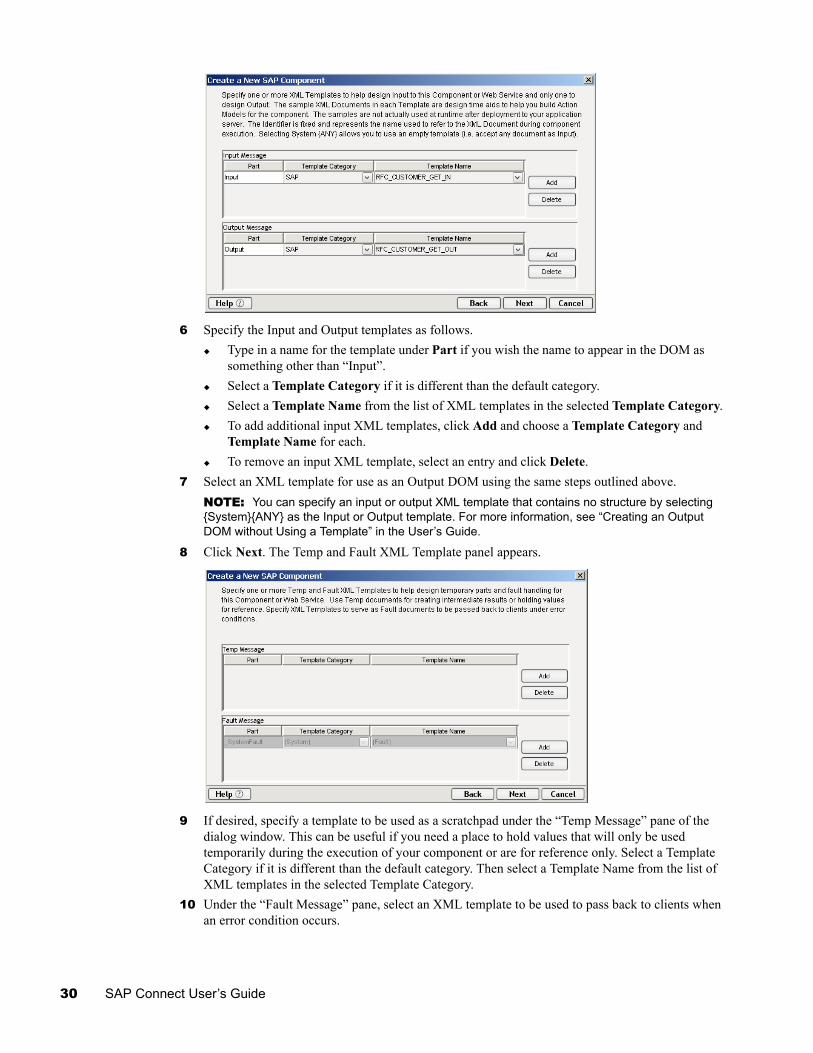
6 Specify the Input and Output templates as follows.Type in a name for the template under Part if you wish the name to appear in the DOM as something other than “Input”.Select a Template Category if it is different than the default category.Select a Template Name from the list of XML templates in the selected Template Category.To add additional input XML templates, click Add and choose a Template Category and Template Name for each.To remove an input XML template, select an entry and click Delete.
7 Select an XML template for use as an Output DOM using the same steps outlined above. NOTE: You can specify an input or output XML template that contains no structure by selecting {System}{ANY} as the Input or Output template. For more information, see “Creating an Output DOM without Using a Template” in the User’s Guide.
8 Click Next. The Temp and Fault XML Template panel appears.
9 If desired, specify a template to be used as a scratchpad under the “Temp Message” pane of the dialog window. This can be useful if you need a place to hold values that will only be used temporarily during the execution of your component or are for reference only. Select a Template Category if it is different than the default category. Then select a Template Name from the list of XML templates in the selected Template Category.
10 Under the “Fault Message” pane, select an XML template to be used to pass back to clients when an error condition occurs.
30 SAP Connect User’s Guide
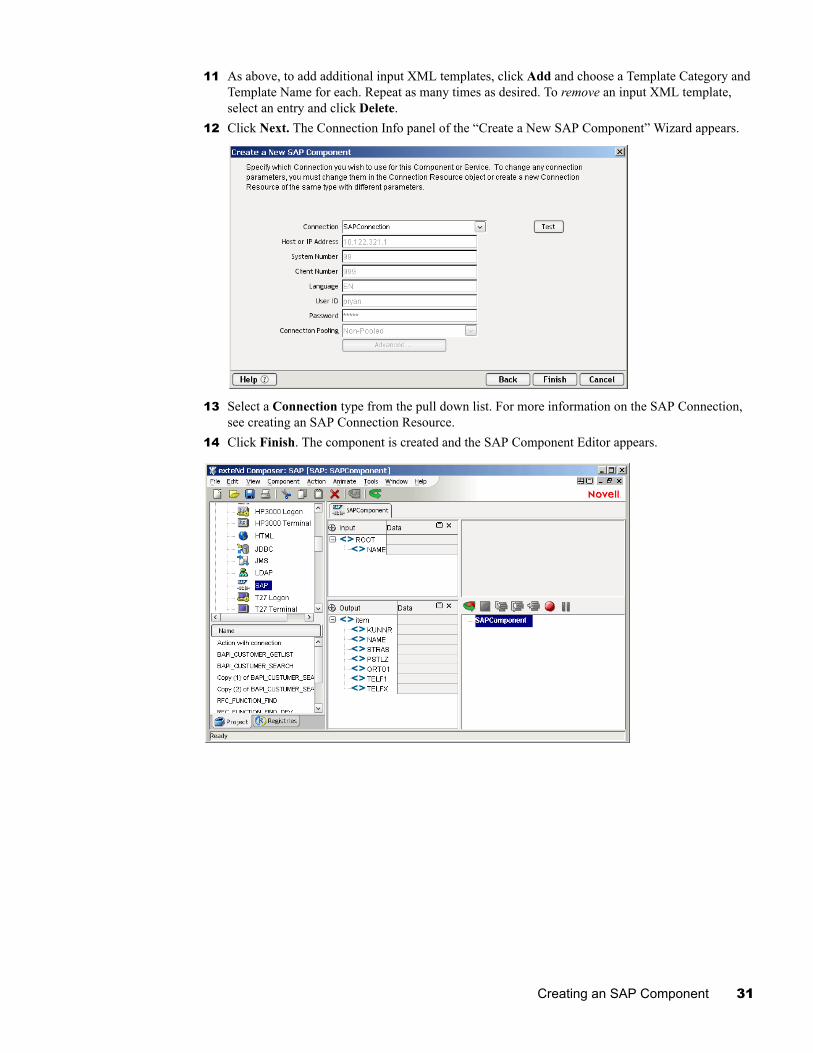
11 As above, to add additional input XML templates, click Add and choose a Template Category and Template Name for each. Repeat as many times as desired. To remove an input XML template, select an entry and click Delete.
12 Click Next. The Connection Info panel of the “Create a New SAP Component” Wizard appears.
13 Select a Connection type from the pull down list. For more information on the SAP Connection, see creating an SAP Connection Resource.
14 Click Finish. The component is created and the SAP Component Editor appears.
Creating an SAP Component 31
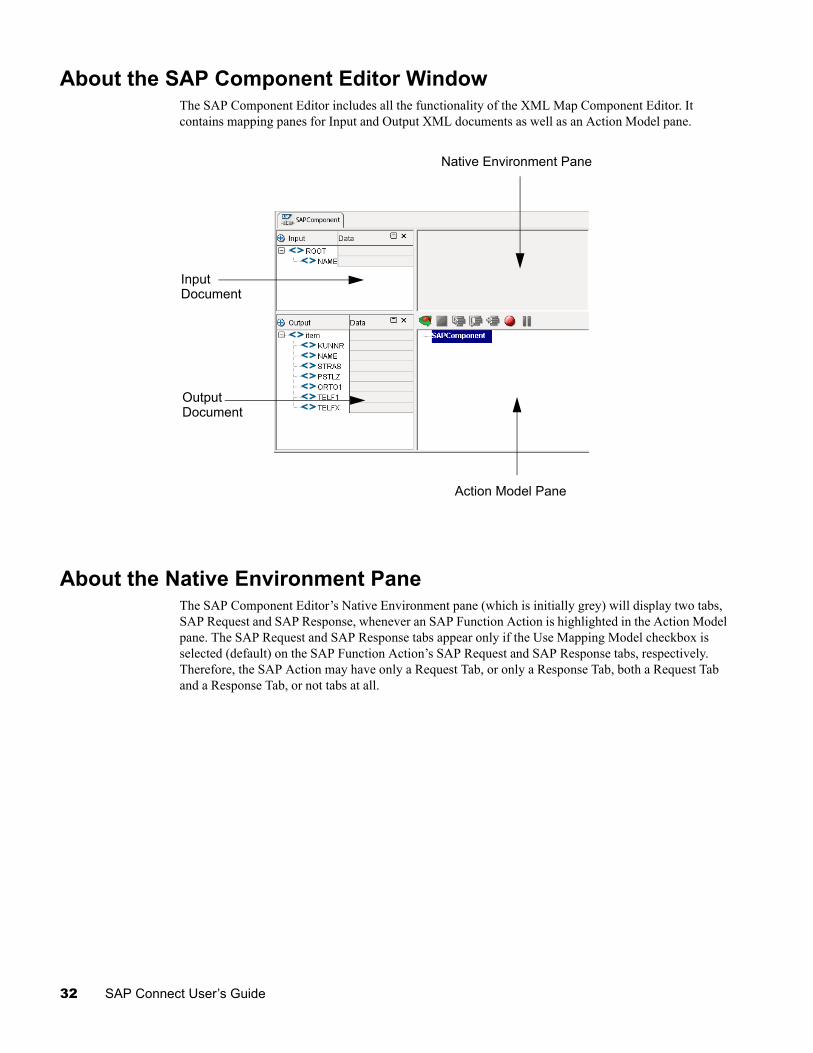
About the SAP Component Editor WindowThe SAP Component Editor includes all the functionality of the XML Map Component Editor. It contains mapping panes for Input and Output XML documents as well as an Action Model pane.
About the Native Environment PaneThe SAP Component Editor’s Native Environment pane (which is initially grey) will display two tabs, SAP Request and SAP Response, whenever an SAP Function Action is highlighted in the Action Model pane. The SAP Request and SAP Response tabs appear only if the Use Mapping Model checkbox is selected (default) on the SAP Function Action’s SAP Request and SAP Response tabs, respectively. Therefore, the SAP Action may have only a Request Tab, or only a Response Tab, both a Request Tab and a Response Tab, or not tabs at all.
Input Document
Output Document
Native Environment Pane
Action Model Pane
32 SAP Connect User’s Guide
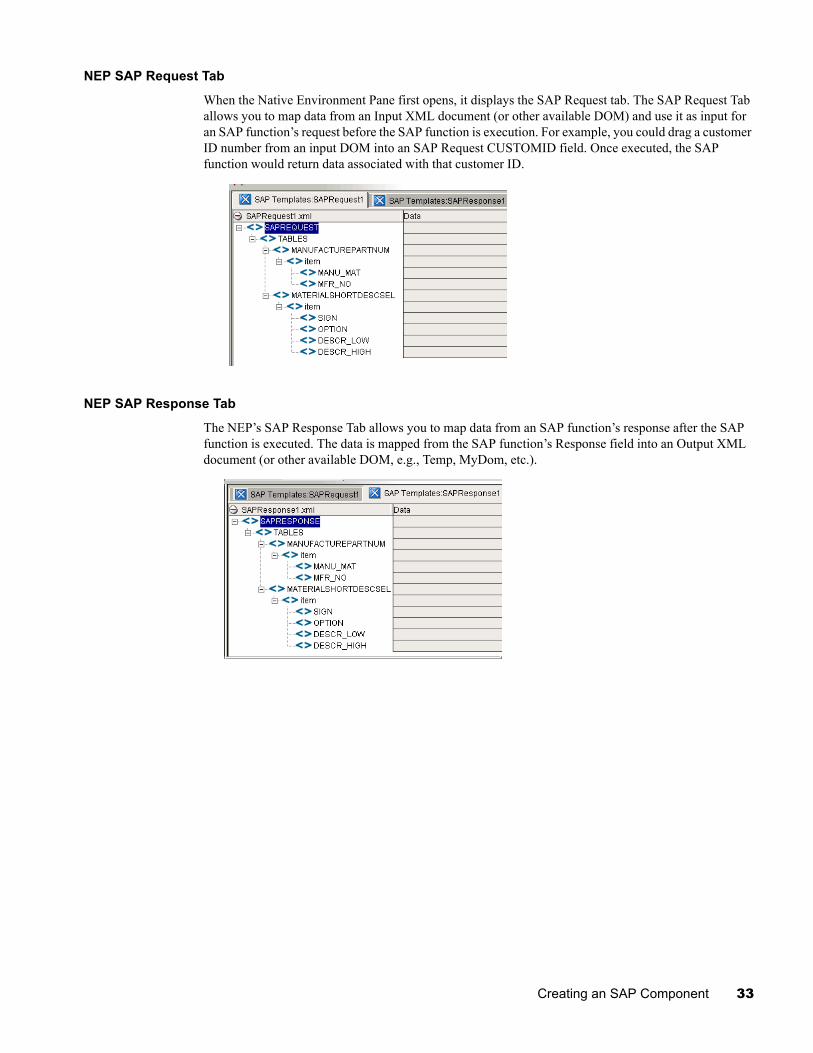
NEP SAP Request Tab
When the Native Environment Pane first opens, it displays the SAP Request tab. The SAP Request Tab allows you to map data from an Input XML document (or other available DOM) and use it as input for an SAP function’s request before the SAP function is execution. For example, you could drag a customer ID number from an input DOM into an SAP Request CUSTOMID field. Once executed, the SAP function would return data associated with that customer ID.
NEP SAP Response Tab
The NEP’s SAP Response Tab allows you to map data from an SAP function’s response after the SAP function is executed. The data is mapped from the SAP function’s Response field into an Output XML document (or other available DOM, e.g., Temp, MyDom, etc.).
Creating an SAP Component 33

34 SAP Connect User’s Guide
4 Performing SAP Actions
About ActionsAn action is similar to a programming statement in that it takes input in the form of parameters and performs specific tasks. (For general information on actions, please see the chapters in the Novell Integration Manager User’s Guide devoted to Actions. This discussion assumes you are familiar, already, with Integration Manager’s basic actions.) Within the SAP Component Editor, as with other Integration Manager component editors, a set of instructions for processing XML documents or communicating with non-XML data sources can be created at design time and stored (for later deployment) in an Action Model. The Action Model contains the business logic needed to perform all data mapping, data transformation, data transfer between databases and XML documents, and data transfer within components and services.
An Action Model is made up of a list of actions. All actions within an Action Model work together. As an example, one Action Model might contain individual actions that read invoice data from a disk, retrieve data from an inventory database, map the result to a temporary XML document, make a conversion, and map the converted data to an output XML document.
The Action Model mentioned above would be composed of several discrete actions. These actions would:
Open a document and perform an SAP Function action to retrieve data from an SAP databaseMap the result to a temporary XML documentConvert a numeric code using a Code Table and map the result to an Output XML document.
Integration Manager SAP Connect allows both inbound and outbound calls to SAP’s BAPIs or other RFC-enabled Function Modules (RFMs) from Integration Manager and the runtime environments. Integration Manager SAP Connect uses the Java Connector libraries to call SAP’s BAPI and RFMs.
The SAP Function ActionThe SAP Component editor contains all the core functionality of Integration Manager’s XML Map Component editor. It has two additional actions relevant only to the SAP Component editor:
SAP Function (discussed in this section)Component with Connection (discussed further below)
The SAP Function action’s dialog is composed of three tabs: SAP Function, SAP Request and SAP Response.
SAP Function TabThe SAP Function Tab validates the function name to ensure that this function exists in the SAP system to which it is currently connected. If the function name is valid, it is displayed in the Search for Function text field and can be selected in the Functions list.
Performing SAP Actions 35
If the entered function name is invalid, the entry, “No function found”, is displayed in the Function list. If another type of error occurs during validation, such as a communications error, the entry “Error searching for function” displays in the Functions list. The SAP Request and SAP Response tabs are enabled when you double click on a valid function name in the Function list.
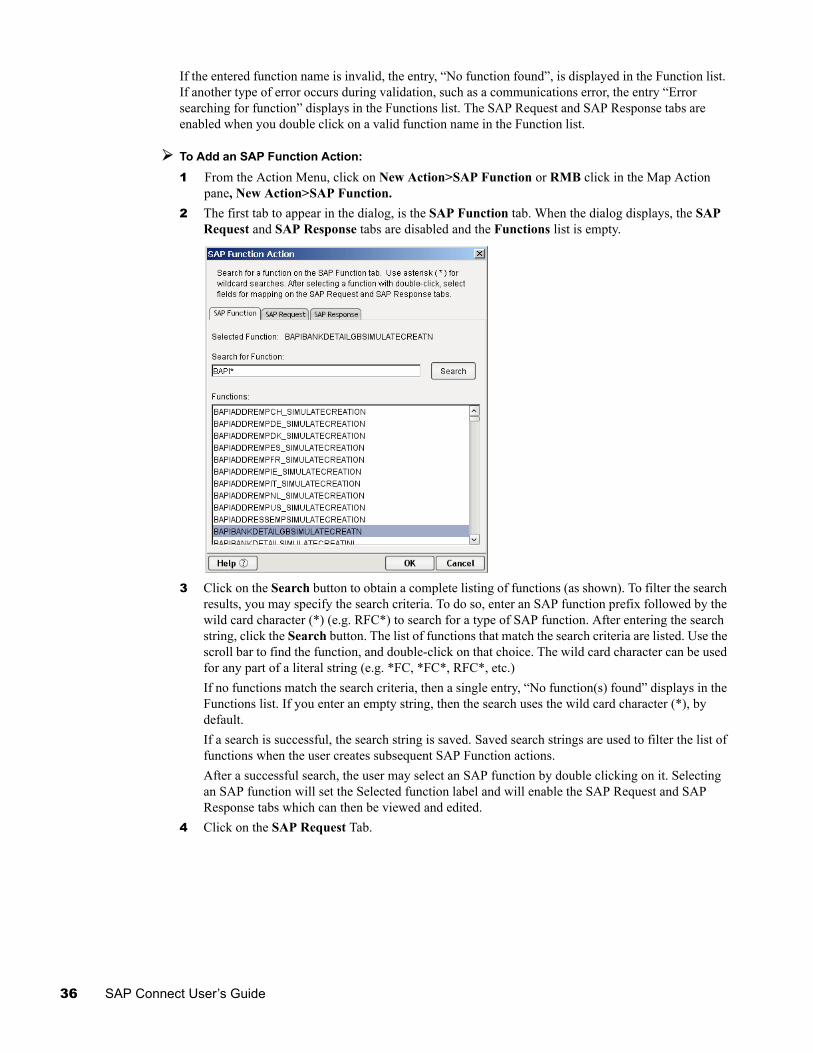
To Add an SAP Function Action:
1 From the Action Menu, click on New Action>SAP Function or RMB click in the Map Action pane, New Action>SAP Function.
2 The first tab to appear in the dialog, is the SAP Function tab. When the dialog displays, the SAP Request and SAP Response tabs are disabled and the Functions list is empty.
3 Click on the Search button to obtain a complete listing of functions (as shown). To filter the search results, you may specify the search criteria. To do so, enter an SAP function prefix followed by the wild card character (*) (e.g. RFC*) to search for a type of SAP function. After entering the search string, click the Search button. The list of functions that match the search criteria are listed. Use the scroll bar to find the function, and double-click on that choice. The wild card character can be used for any part of a literal string (e.g. *FC, *FC*, RFC*, etc.)If no functions match the search criteria, then a single entry, “No function(s) found” displays in the Functions list. If you enter an empty string, then the search uses the wild card character (*), by default.If a search is successful, the search string is saved. Saved search strings are used to filter the list of functions when the user creates subsequent SAP Function actions. After a successful search, the user may select an SAP function by double clicking on it. Selecting an SAP function will set the Selected function label and will enable the SAP Request and SAP Response tabs which can then be viewed and edited.
4 Click on the SAP Request Tab.
36 SAP Connect User’s Guide
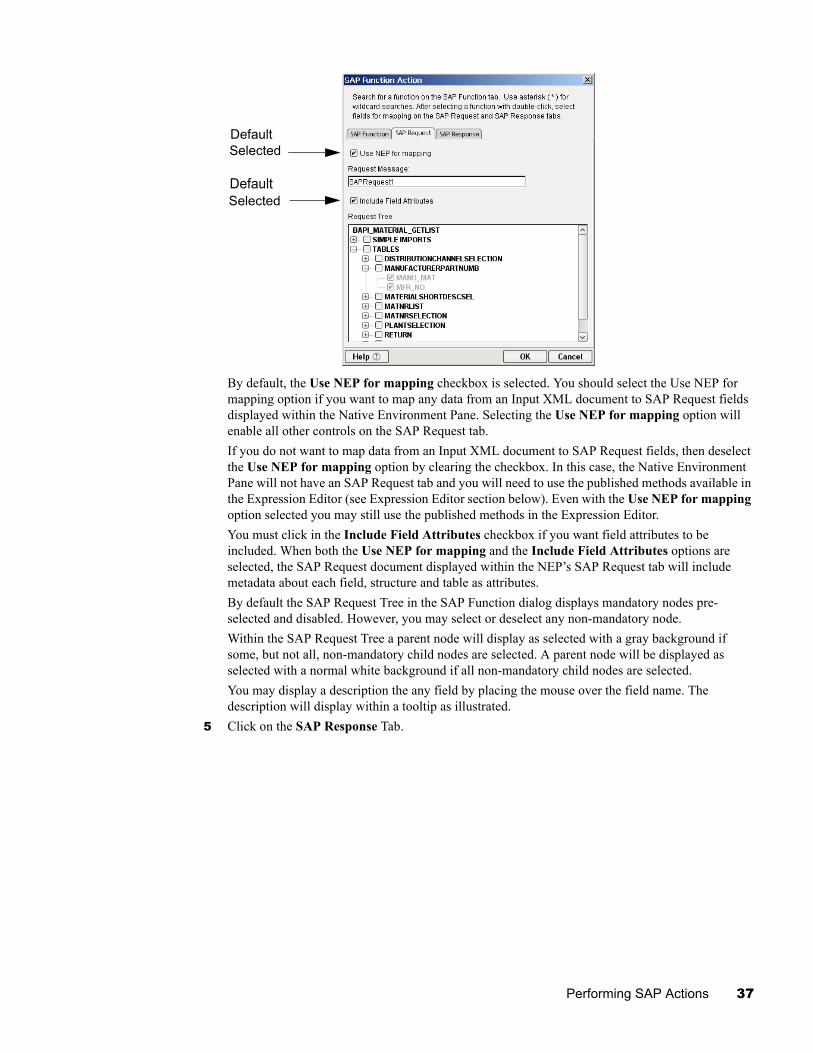
By default, the Use NEP for mapping checkbox is selected. You should select the Use NEP for mapping option if you want to map any data from an Input XML document to SAP Request fields displayed within the Native Environment Pane. Selecting the Use NEP for mapping option will enable all other controls on the SAP Request tab.If you do not want to map data from an Input XML document to SAP Request fields, then deselect the Use NEP for mapping option by clearing the checkbox. In this case, the Native Environment Pane will not have an SAP Request tab and you will need to use the published methods available in the Expression Editor (see Expression Editor section below). Even with the Use NEP for mapping option selected you may still use the published methods in the Expression Editor. You must click in the Include Field Attributes checkbox if you want field attributes to be included. When both the Use NEP for mapping and the Include Field Attributes options are selected, the SAP Request document displayed within the NEP’s SAP Request tab will include metadata about each field, structure and table as attributes. By default the SAP Request Tree in the SAP Function dialog displays mandatory nodes pre-selected and disabled. However, you may select or deselect any non-mandatory node.Within the SAP Request Tree a parent node will display as selected with a gray background if some, but not all, non-mandatory child nodes are selected. A parent node will be displayed as selected with a normal white background if all non-mandatory child nodes are selected.You may display a description the any field by placing the mouse over the field name. The description will display within a tooltip as illustrated.
5 Click on the SAP Response Tab.
DefaultSelected
DefaultSelected
Performing SAP Actions 37
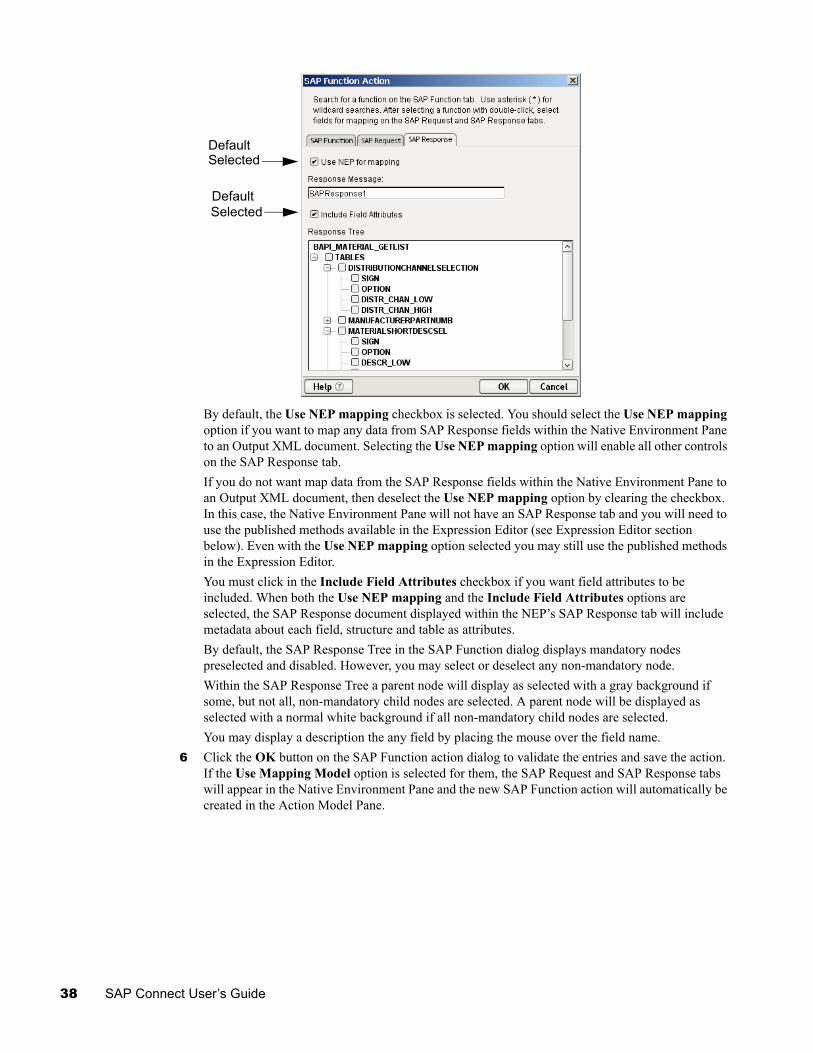
By default, the Use NEP mapping checkbox is selected. You should select the Use NEP mapping option if you want to map any data from SAP Response fields within the Native Environment Pane to an Output XML document. Selecting the Use NEP mapping option will enable all other controls on the SAP Response tab.If you do not want map data from the SAP Response fields within the Native Environment Pane to an Output XML document, then deselect the Use NEP mapping option by clearing the checkbox. In this case, the Native Environment Pane will not have an SAP Response tab and you will need to use the published methods available in the Expression Editor (see Expression Editor section below). Even with the Use NEP mapping option selected you may still use the published methods in the Expression Editor. You must click in the Include Field Attributes checkbox if you want field attributes to be included. When both the Use NEP mapping and the Include Field Attributes options are selected, the SAP Response document displayed within the NEP’s SAP Response tab will include metadata about each field, structure and table as attributes. By default, the SAP Response Tree in the SAP Function dialog displays mandatory nodes preselected and disabled. However, you may select or deselect any non-mandatory node.Within the SAP Response Tree a parent node will display as selected with a gray background if some, but not all, non-mandatory child nodes are selected. A parent node will be displayed as selected with a normal white background if all non-mandatory child nodes are selected.You may display a description the any field by placing the mouse over the field name.
6 Click the OK button on the SAP Function action dialog to validate the entries and save the action. If the Use Mapping Model option is selected for them, the SAP Request and SAP Response tabs will appear in the Native Environment Pane and the new SAP Function action will automatically be created in the Action Model Pane.
SelectedDefault
DefaultSelected
38 SAP Connect User’s Guide
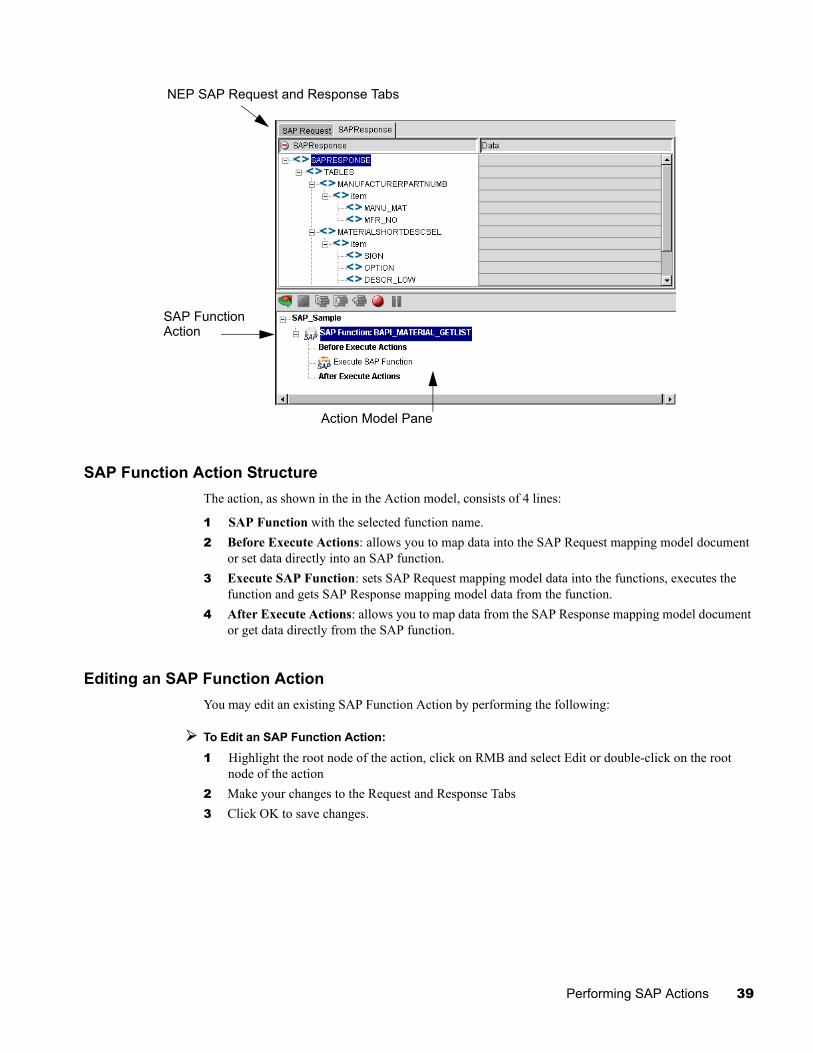
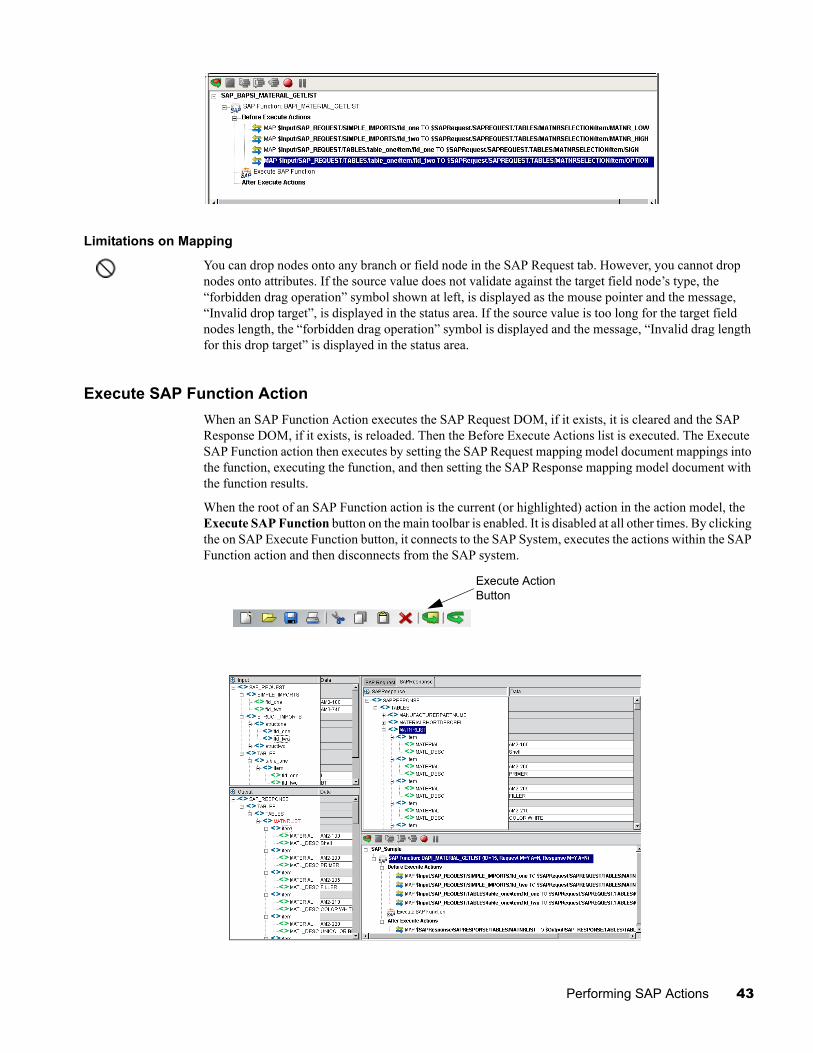
SAP Function Action Structure The action, as shown in the in the Action model, consists of 4 lines:
1 SAP Function with the selected function name.2 Before Execute Actions: allows you to map data into the SAP Request mapping model document
or set data directly into an SAP function. 3 Execute SAP Function: sets SAP Request mapping model data into the functions, executes the
function and gets SAP Response mapping model data from the function.4 After Execute Actions: allows you to map data from the SAP Response mapping model document
or get data directly from the SAP function.
Editing an SAP Function ActionYou may edit an existing SAP Function Action by performing the following:
To Edit an SAP Function Action:
1 Highlight the root node of the action, click on RMB and select Edit or double-click on the root node of the action
2 Make your changes to the Request and Response Tabs3 Click OK to save changes.
NEP SAP Request and Response Tabs
SAP Function Action
Action Model Pane
Performing SAP Actions 39
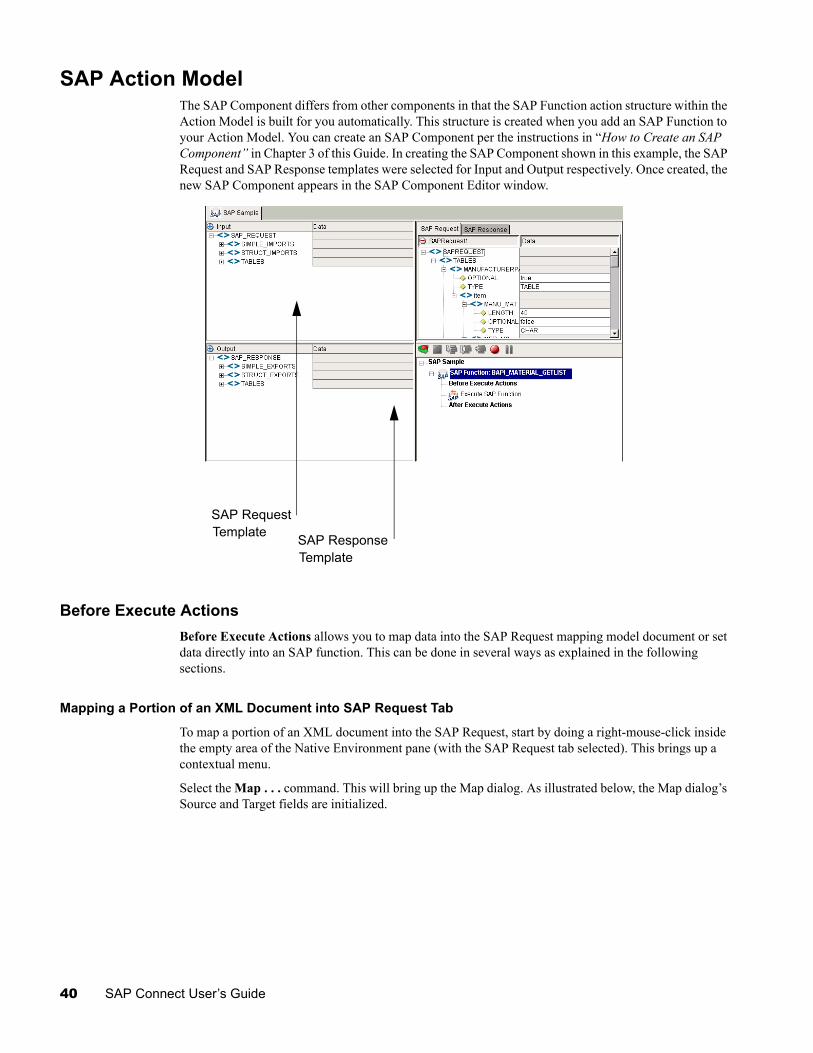
SAP Action ModelThe SAP Component differs from other components in that the SAP Function action structure within the Action Model is built for you automatically. This structure is created when you add an SAP Function to your Action Model. You can create an SAP Component per the instructions in “How to Create an SAP Component” in Chapter 3 of this Guide. In creating the SAP Component shown in this example, the SAP Request and SAP Response templates were selected for Input and Output respectively. Once created, the new SAP Component appears in the SAP Component Editor window.
Before Execute ActionsBefore Execute Actions allows you to map data into the SAP Request mapping model document or set data directly into an SAP function. This can be done in several ways as explained in the following sections.
Mapping a Portion of an XML Document into SAP Request Tab
To map a portion of an XML document into the SAP Request, start by doing a right-mouse-click inside the empty area of the Native Environment pane (with the SAP Request tab selected). This brings up a contextual menu.
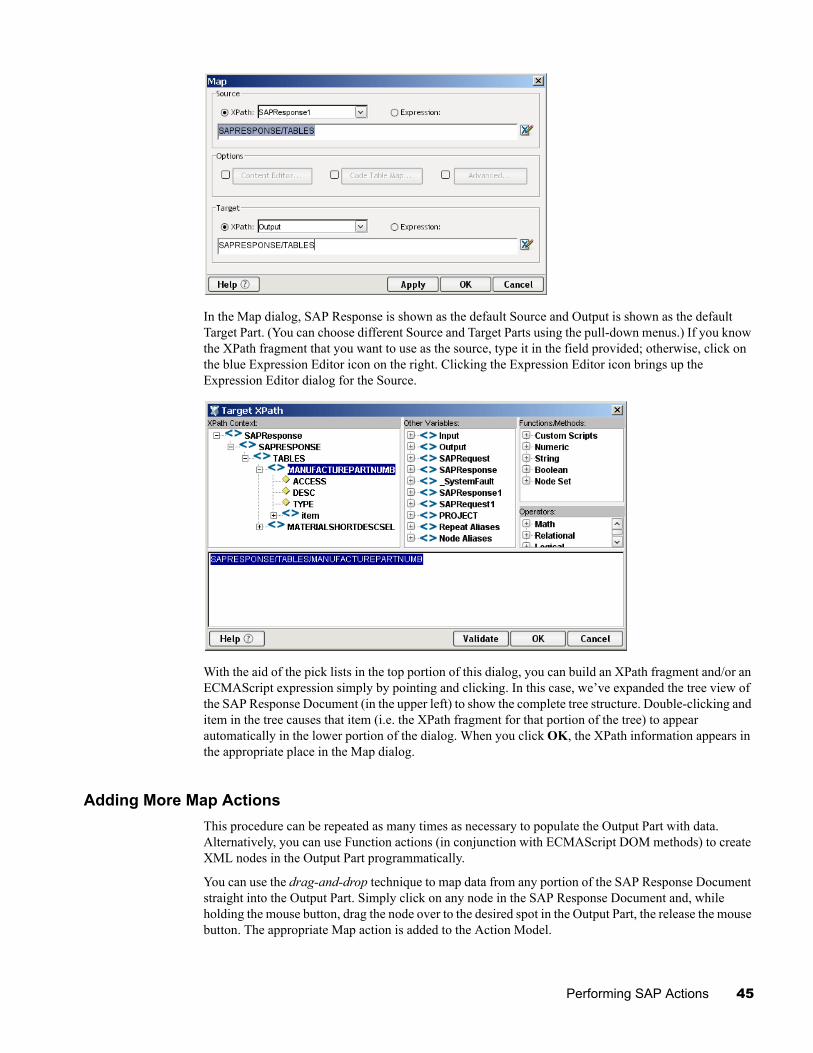
Select the Map . . . command. This will bring up the Map dialog. As illustrated below, the Map dialog’s Source and Target fields are initialized.
SAP RequestTemplate SAP Response
Template
40 SAP Connect User’s Guide
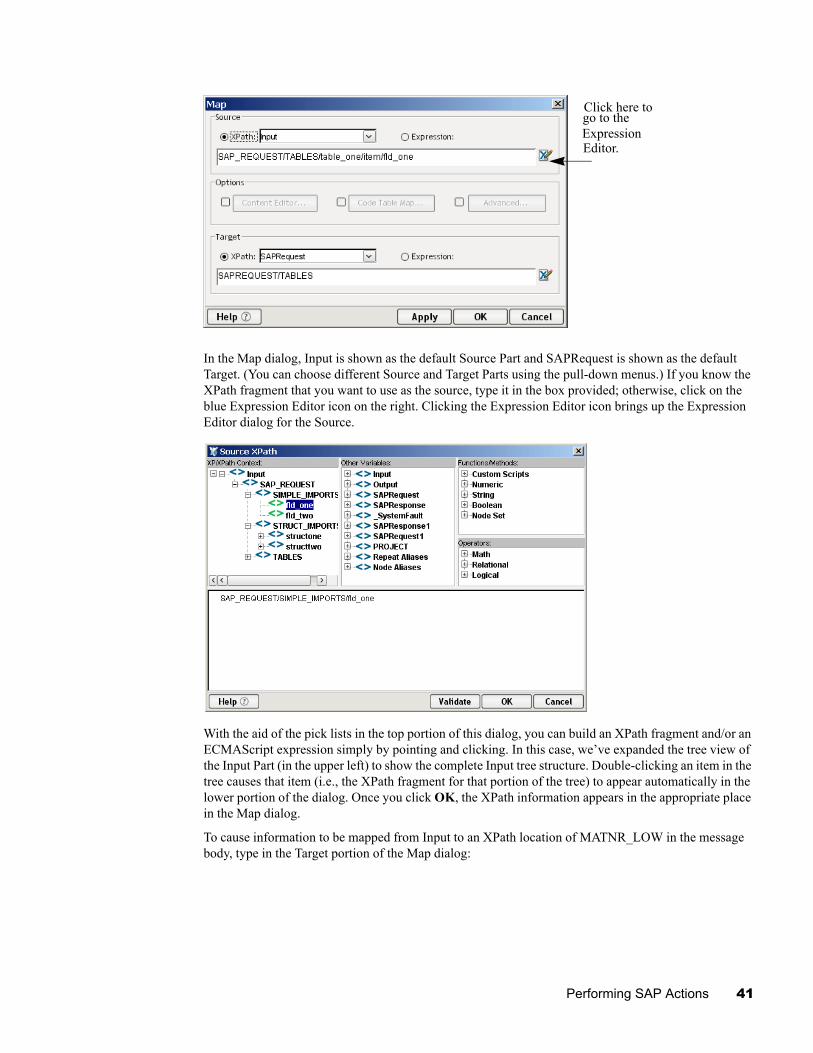
In the Map dialog, Input is shown as the default Source Part and SAPRequest is shown as the default Target. (You can choose different Source and Target Parts using the pull-down menus.) If you know the XPath fragment that you want to use as the source, type it in the box provided; otherwise, click on the blue Expression Editor icon on the right. Clicking the Expression Editor icon brings up the Expression Editor dialog for the Source.
With the aid of the pick lists in the top portion of this dialog, you can build an XPath fragment and/or an ECMAScript expression simply by pointing and clicking. In this case, we’ve expanded the tree view of the Input Part (in the upper left) to show the complete Input tree structure. Double-clicking an item in the tree causes that item (i.e., the XPath fragment for that portion of the tree) to appear automatically in the lower portion of the dialog. Once you click OK, the XPath information appears in the appropriate place in the Map dialog.
To cause information to be mapped from Input to an XPath location of MATNR_LOW in the message body, type in the Target portion of the Map dialog:
Click here togo to theExpressionEditor.
Performing SAP Actions 41
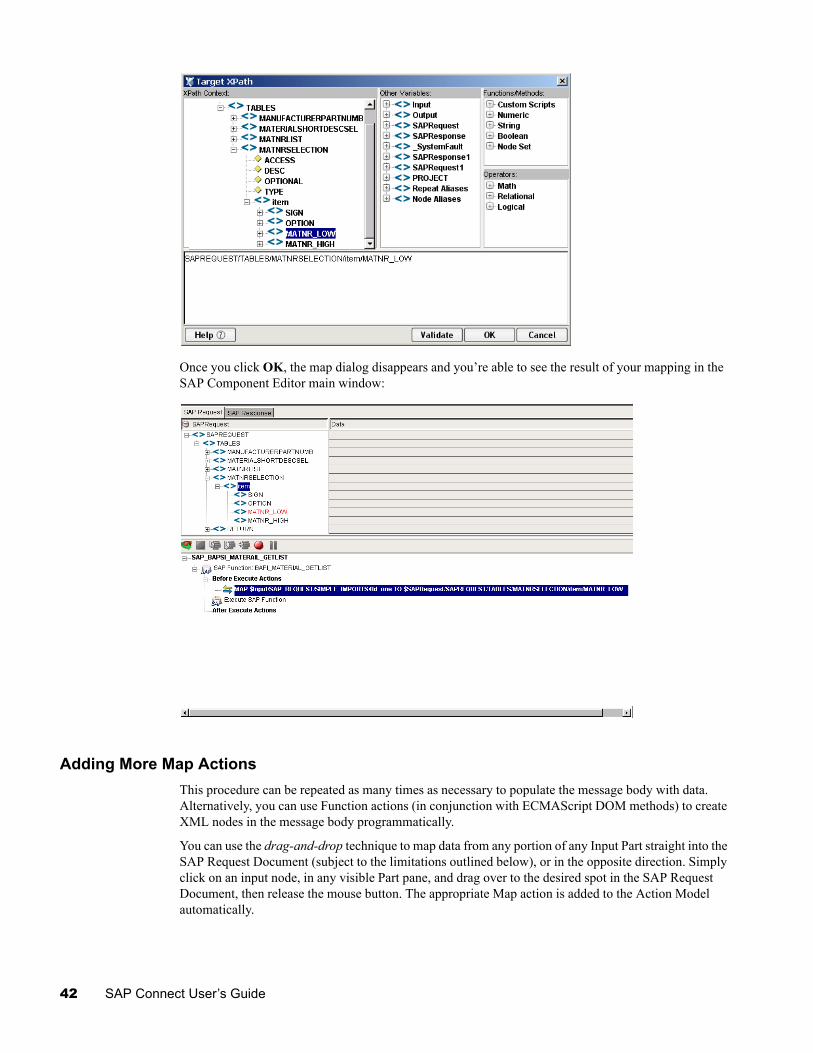
Once you click OK, the map dialog disappears and you’re able to see the result of your mapping in the SAP Component Editor main window:
Adding More Map ActionsThis procedure can be repeated as many times as necessary to populate the message body with data. Alternatively, you can use Function actions (in conjunction with ECMAScript DOM methods) to create XML nodes in the message body programmatically.
You can use the drag-and-drop technique to map data from any portion of any Input Part straight into the SAP Request Document (subject to the limitations outlined below), or in the opposite direction. Simply click on an input node, in any visible Part pane, and drag over to the desired spot in the SAP Request Document, then release the mouse button. The appropriate Map action is added to the Action Model automatically.
42 SAP Connect User’s Guide
Limitations on Mapping
You can drop nodes onto any branch or field node in the SAP Request tab. However, you cannot drop nodes onto attributes. If the source value does not validate against the target field node’s type, the “forbidden drag operation” symbol shown at left, is displayed as the mouse pointer and the message, “Invalid drop target”, is displayed in the status area. If the source value is too long for the target field nodes length, the “forbidden drag operation” symbol is displayed and the message, “Invalid drag length for this drop target” is displayed in the status area.
Execute SAP Function ActionWhen an SAP Function Action executes the SAP Request DOM, if it exists, it is cleared and the SAP Response DOM, if it exists, is reloaded. Then the Before Execute Actions list is executed. The Execute SAP Function action then executes by setting the SAP Request mapping model document mappings into the function, executing the function, and then setting the SAP Response mapping model document with the function results.
When the root of an SAP Function action is the current (or highlighted) action in the action model, the Execute SAP Function button on the main toolbar is enabled. It is disabled at all other times. By clicking the on SAP Execute Function button, it connects to the SAP System, executes the actions within the SAP Function action and then disconnects from the SAP system.
Execute Action Button
Performing SAP Actions 43
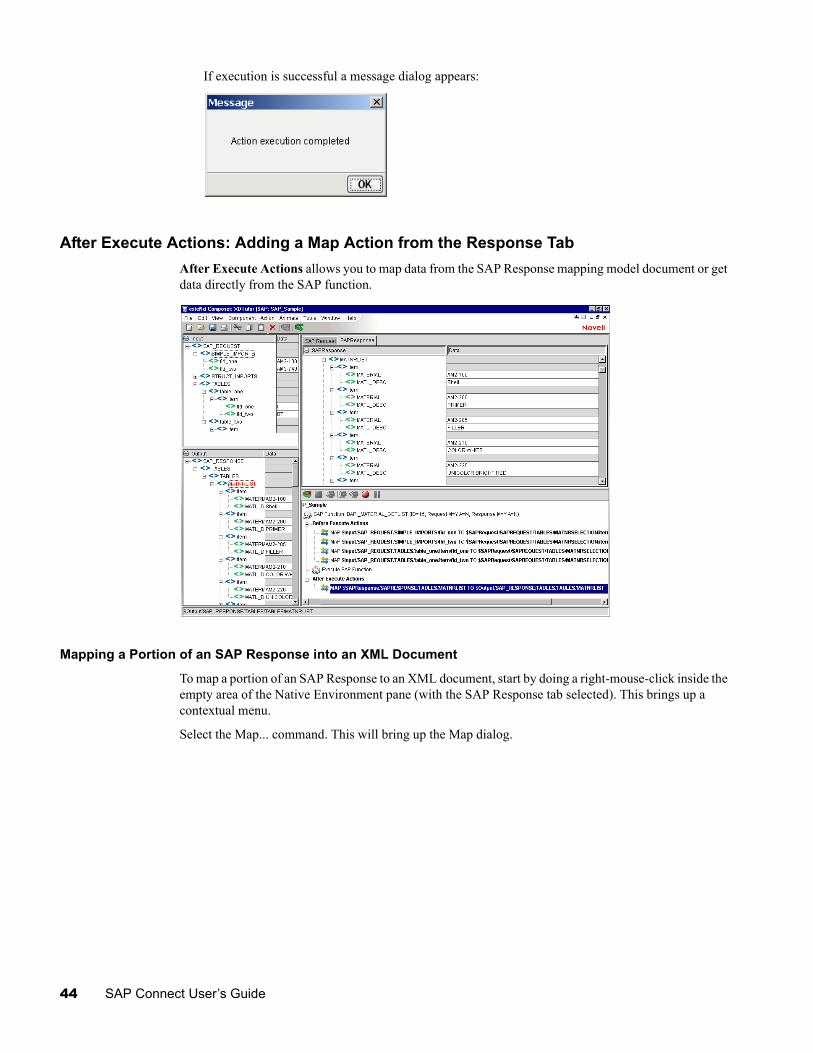
If execution is successful a message dialog appears:
After Execute Actions: Adding a Map Action from the Response TabAfter Execute Actions allows you to map data from the SAP Response mapping model document or get data directly from the SAP function.
Mapping a Portion of an SAP Response into an XML Document
To map a portion of an SAP Response to an XML document, start by doing a right-mouse-click inside the empty area of the Native Environment pane (with the SAP Response tab selected). This brings up a contextual menu.
Select the Map... command. This will bring up the Map dialog.
44 SAP Connect User’s Guide
In the Map dialog, SAP Response is shown as the default Source and Output is shown as the default Target Part. (You can choose different Source and Target Parts using the pull-down menus.) If you know the XPath fragment that you want to use as the source, type it in the field provided; otherwise, click on the blue Expression Editor icon on the right. Clicking the Expression Editor icon brings up the Expression Editor dialog for the Source.
With the aid of the pick lists in the top portion of this dialog, you can build an XPath fragment and/or an ECMAScript expression simply by pointing and clicking. In this case, we’ve expanded the tree view of the SAP Response Document (in the upper left) to show the complete tree structure. Double-clicking and item in the tree causes that item (i.e. the XPath fragment for that portion of the tree) to appear automatically in the lower portion of the dialog. When you click OK, the XPath information appears in the appropriate place in the Map dialog.
Adding More Map ActionsThis procedure can be repeated as many times as necessary to populate the Output Part with data. Alternatively, you can use Function actions (in conjunction with ECMAScript DOM methods) to create XML nodes in the Output Part programmatically.
You can use the drag-and-drop technique to map data from any portion of the SAP Response Document straight into the Output Part. Simply click on any node in the SAP Response Document and, while holding the mouse button, drag the node over to the desired spot in the Output Part, the release the mouse button. The appropriate Map action is added to the Action Model.
Performing SAP Actions 45
Component with Connection ActionThe Component with Connection Action is unique because it allows an SAP component to call another component allowing that component to share the same connection. The action allows you to break up a large component into a main SAP component and subcomponents so it is easier to maintain the Action Model. The ability to have the main component share the connection with the subcomponent greatly reduces the amount of connection overhead which enhances runtime performance. This is extremely useful when you want to specify a session connection.
To use the Component with Connection Action
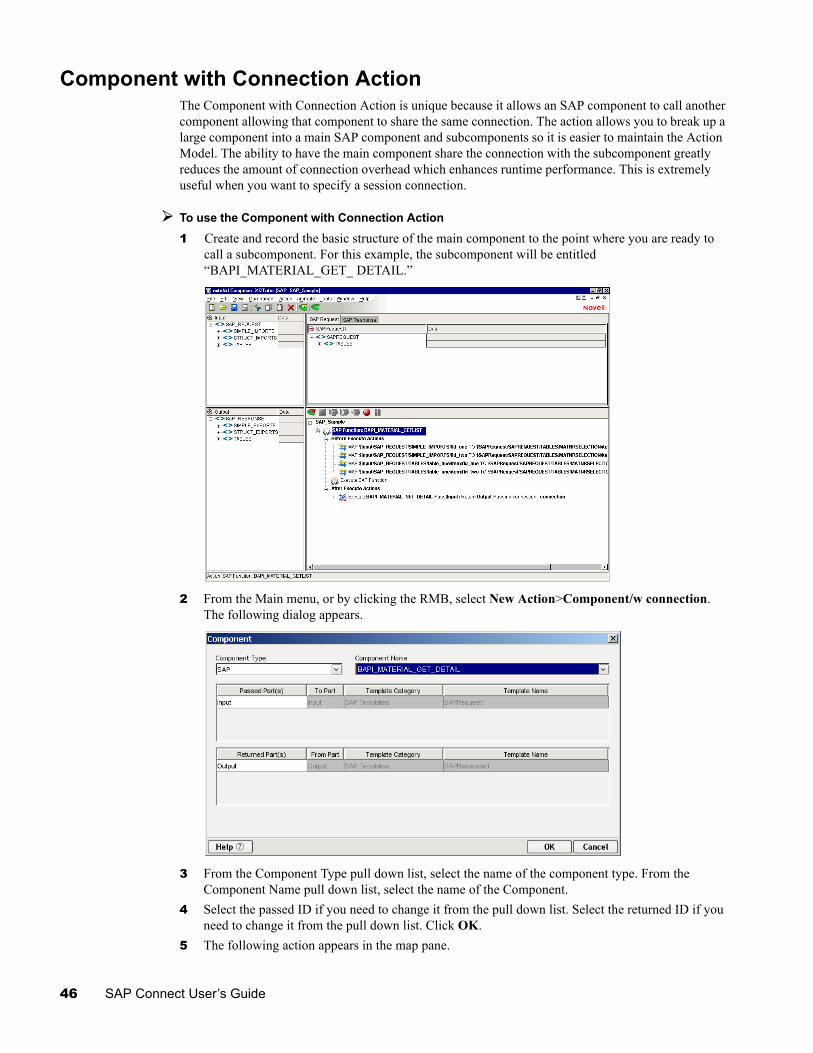
1 Create and record the basic structure of the main component to the point where you are ready to call a subcomponent. For this example, the subcomponent will be entitled “BAPI_MATERIAL_GET_ DETAIL.”
2 From the Main menu, or by clicking the RMB, select New Action>Component/w connection. The following dialog appears.
3 From the Component Type pull down list, select the name of the component type. From the Component Name pull down list, select the name of the Component.
4 Select the passed ID if you need to change it from the pull down list. Select the returned ID if you need to change it from the pull down list. Click OK.
5 The following action appears in the map pane.
46 SAP Connect User’s Guide
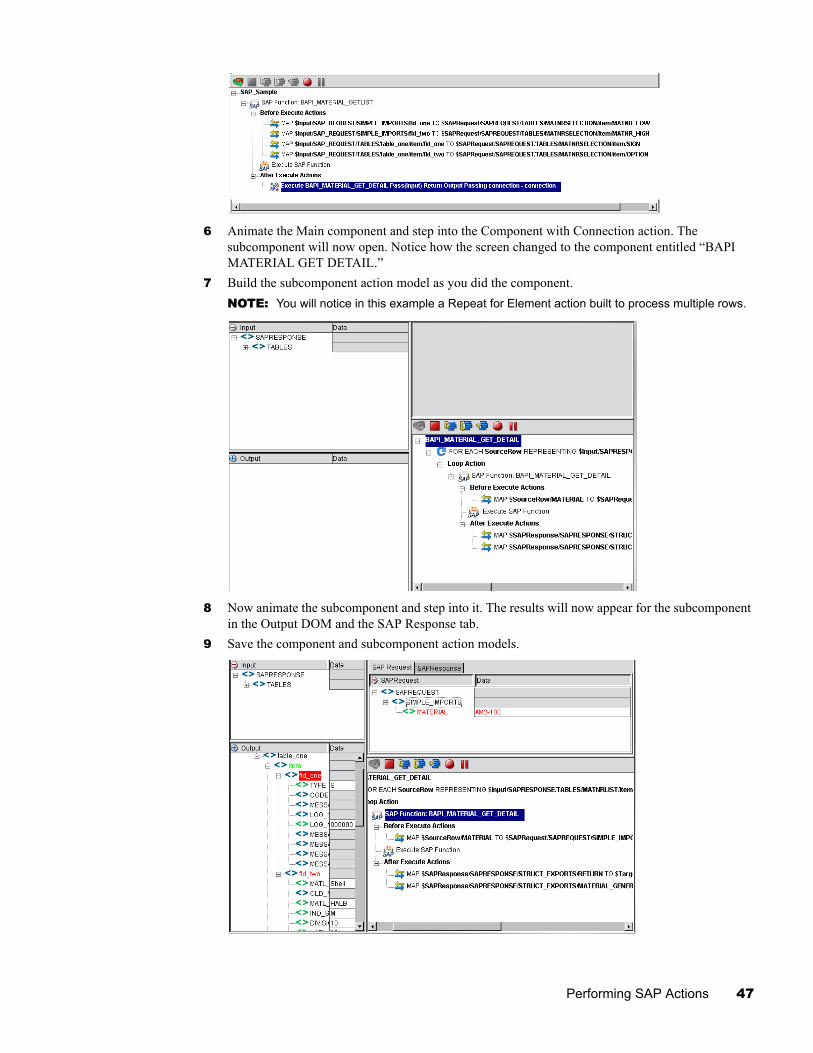
6 Animate the Main component and step into the Component with Connection action. The subcomponent will now open. Notice how the screen changed to the component entitled “BAPI MATERIAL GET DETAIL.”
7 Build the subcomponent action model as you did the component.NOTE: You will notice in this example a Repeat for Element action built to process multiple rows.
8 Now animate the subcomponent and step into it. The results will now appear for the subcomponent in the Output DOM and the SAP Response tab.
9 Save the component and subcomponent action models.
Performing SAP Actions 47
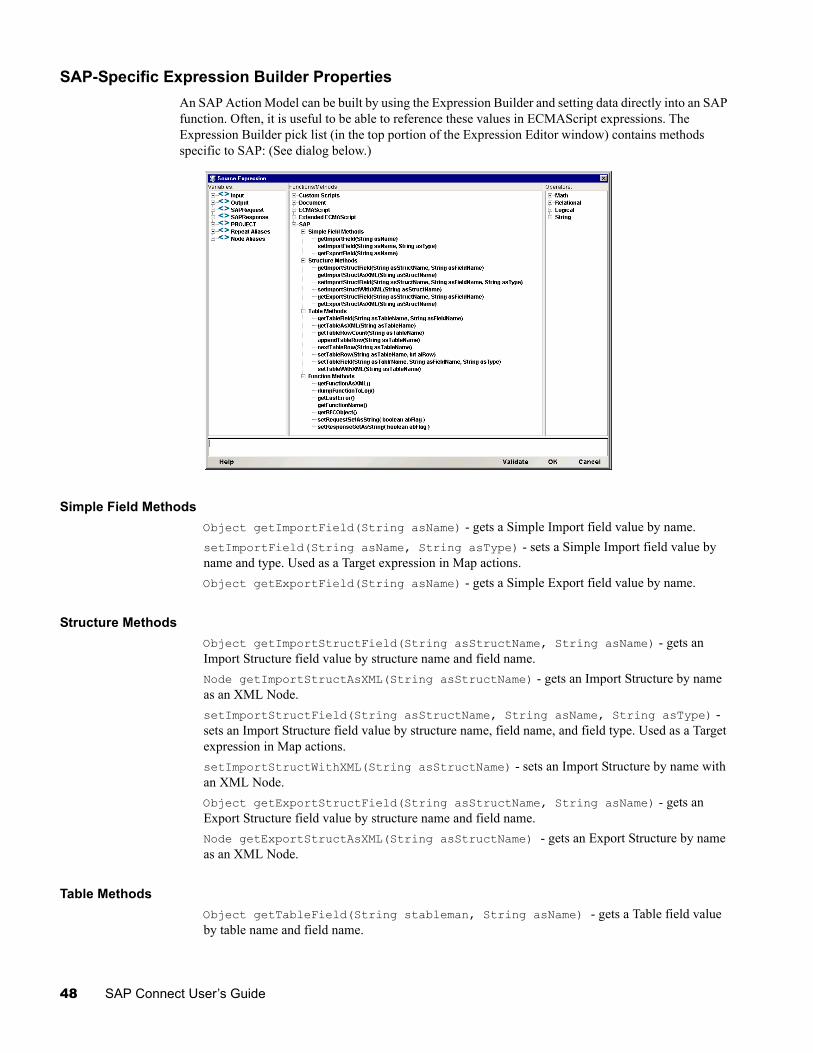
SAP-Specific Expression Builder PropertiesAn SAP Action Model can be built by using the Expression Builder and setting data directly into an SAP function. Often, it is useful to be able to reference these values in ECMAScript expressions. The Expression Builder pick list (in the top portion of the Expression Editor window) contains methods specific to SAP: (See dialog below.)
Simple Field MethodsObject getImportField(String asName) - gets a Simple Import field value by name.setImportField(String asName, String asType) - sets a Simple Import field value by name and type. Used as a Target expression in Map actions.Object getExportField(String asName) - gets a Simple Export field value by name.
Structure MethodsObject getImportStructField(String asStructName, String asName) - gets an Import Structure field value by structure name and field name.Node getImportStructAsXML(String asStructName) - gets an Import Structure by name as an XML Node.setImportStructField(String asStructName, String asName, String asType) - sets an Import Structure field value by structure name, field name, and field type. Used as a Target expression in Map actions.setImportStructWithXML(String asStructName) - sets an Import Structure by name with an XML Node.Object getExportStructField(String asStructName, String asName) - gets an Export Structure field value by structure name and field name.Node getExportStructAsXML(String asStructName) - gets an Export Structure by name as an XML Node.
Table MethodsObject getTableField(String stableman, String asName) - gets a Table field value by table name and field name.
48 SAP Connect User’s Guide
Node getTableAsXML(String asTableName) - gets a Table by name as an XML Node.int getTableRowCount(String asTableName) - gets the number of rows in a named Table as an integer.appendTableRow(String asTableName) - appends a row to the end of named Table.nextTableRow(String asTableName) - moves the cursor to the next row in the named Table.setTableRow(String asTableName, int aiRow) - moves the cursor to specified row in the named Table.setTableField(String asTableName, String asName, String asType) - sets a Table field value by table name, field name, and field type. Used as a Target expression in Map actions.setTableWithXML(String asTableName) - sets a Table by name with an XML Node
Function MethodsNode getFunctionAsXML() - returns a Node representing the SAP function. Can be used before or after execution.dumpFunctionToLog() - calls getFunctionAsXML(), adds a DATE attribute to the function name element, and prints with format to the log via the Framework Factory log() method.String getLastError() - returns the most recent execution error.String getFunctionName() - returns the function name.Object getRFCObject() - returns the RFC object. For JCo this is a JCO.Function Object.setRequestSetAsString(boolean abFlag) - sets whether input to a function prior to execution should be set as a String or converted to an Object appropriate for the field type and then set. By default this flag is true in the ECMA wrapper. For example, if true and the field type is DATE then input via the model document or published setter methods is expected to be in the form "YYYYMMDD". If false and the field type is DATE and the input is via the model document the String will be used as input to a java Date() object. If false and the field type is DATE and the input is via a published setter the user can directly pass in a java Date() Object or the user can pass in a String which will be used as input to a java Date() object.
Field Type Conversions when flag is falseBCD - java BigDecimalBYTES - byte[] array (currently) no way to pass an array inCHAR - java StringDATE - java Date (conversion tries YYYYMMDD pattern and java Date() default string patterns)FLOAT - java DoubleINT - java IntegerINT1 - java IntegerINT2 - java IntegerNUM - java String XSTRING - byte[] array (currently) no way to pass an array inTIME - java Date
Performing SAP Actions 49
setResponseGetAsString(boolean abFlag) - sets whether output from a function after execution should be retrieved as a String or as an Object appropriate for the field type. By default this flag is true in the ECMA wrapper. For example, if true and the field type is DATE then the field will be retrieved using the JCO.Field.getString() method for the model document and for published getters. If false and the field type is DATE and the field is being retrieved via the model document then the field will be retrieved using the JCO.Field.getObject() method and then converted to a String using the Objects toString() method. If false and the field type is DATE and the field is being retrieved via a published getter method then the field will be retrieved using the JCO.Field.getObject() method.
Field Type Conversions when flag is falseBCD - java StringBYTES - byte[] array (if getting for response model document getString() is used)CHAR - java StringDATE - java DateFLOAT - java DoubleINT - java IntegerINT1 - java IntegerINT2 - java IntegerNUM - java StringXSTRING - byte[] array (if getting for response model document getString() is used)TIME - java Date
Processing Table RowsGetting and setting SAP tables requires different logic because Tables may have multiple rows.
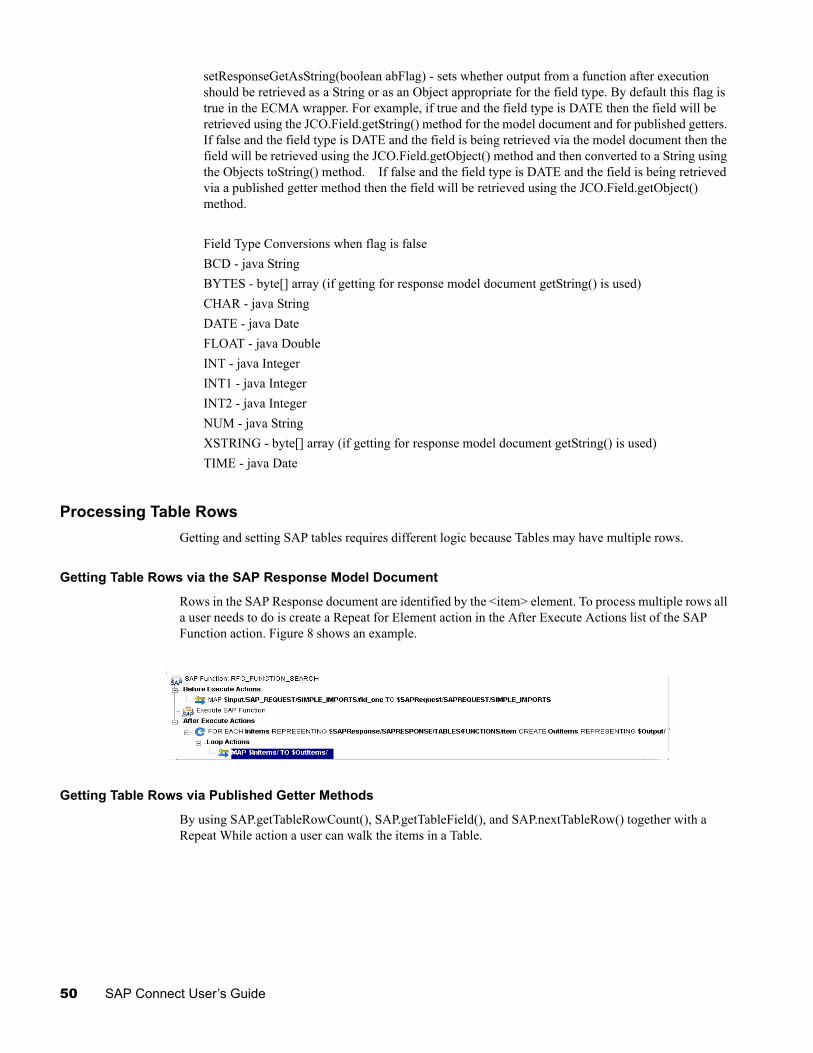
Getting Table Rows via the SAP Response Model Document
Rows in the SAP Response document are identified by the <item> element. To process multiple rows all a user needs to do is create a Repeat for Element action in the After Execute Actions list of the SAP Function action. Figure 8 shows an example.
Getting Table Rows via Published Getter Methods
By using SAP.getTableRowCount(), SAP.getTableField(), and SAP.nextTableRow() together with a Repeat While action a user can walk the items in a Table.
50 SAP Connect User’s Guide
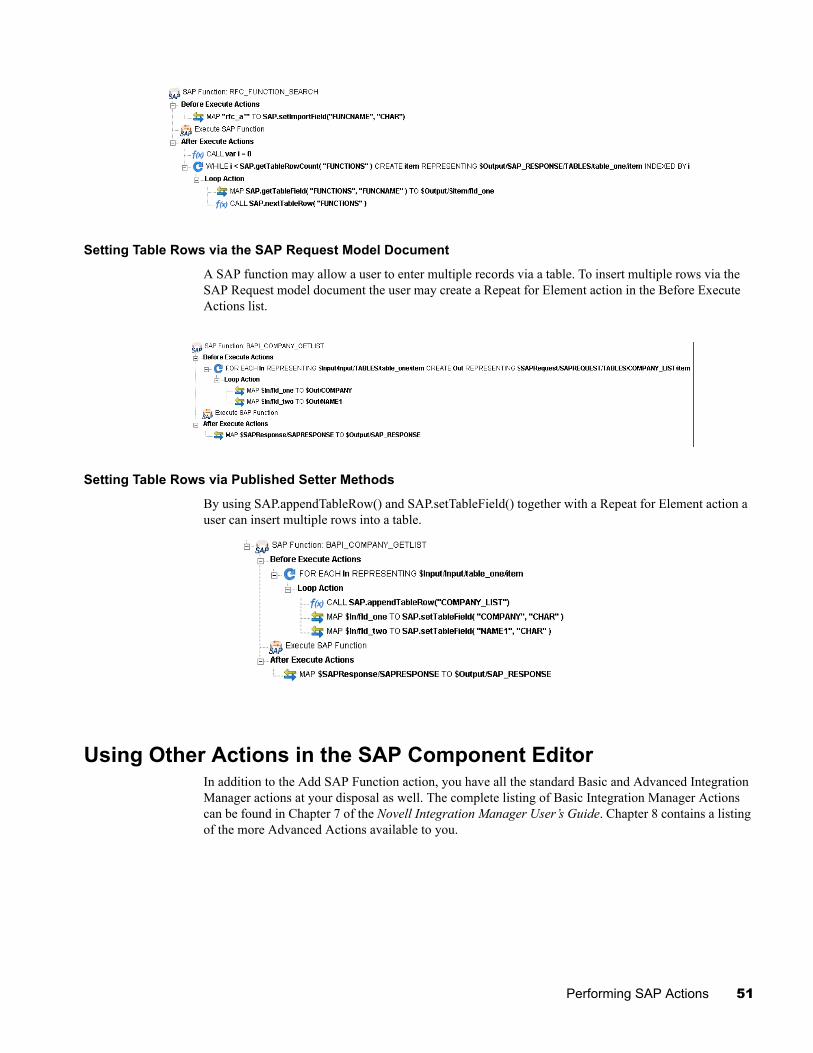
Setting Table Rows via the SAP Request Model Document
A SAP function may allow a user to enter multiple records via a table. To insert multiple rows via the SAP Request model document the user may create a Repeat for Element action in the Before Execute Actions list.
Setting Table Rows via Published Setter Methods
By using SAP.appendTableRow() and SAP.setTableField() together with a Repeat for Element action a user can insert multiple rows into a table.
Using Other Actions in the SAP Component EditorIn addition to the Add SAP Function action, you have all the standard Basic and Advanced Integration Manager actions at your disposal as well. The complete listing of Basic Integration Manager Actions can be found in Chapter 7 of the Novell Integration Manager User’s Guide. Chapter 8 contains a listing of the more Advanced Actions available to you.
Performing SAP Actions 51

Handling Errors and MessagesError handling has been enhanced. If a connection error occurs at any time during design time Integration Manager releases the connection to allow you to fix the problem and recover without exiting the component.
The SAP Function dialog will now display one of three error messages in the Functions list:
No function(s) found - RFC_FUNCTION_SEARCH failed to find RFCs matching the criteria. Can occur when pressing Search.
Error searching for functions - Communications error or other system error. Can occur when pressing Search.
Error getting metadata for function - Communications error or other system error. Can occur when selecting a function.
52 SAP Connect User’s Guide
5 SAP Service
The SAP Service is a type of Integration Manager service that can be activated by an incoming RFC call to an SAP server. In essence, the SAP Service becomes a BAPI destination, and the action logic in the service becomes the BAPI logic of that destination. The Integration Manager SAP Service may call other BAPIs (via SAP Components) or it may not. The service might, in the course of executing, call JDBC or 3270 components, execute LDAP queries, participate in a CICS transaction, or use other kinds of connectivity involving other Integration Manager Connect products. Then again, it might simply take data in, transform it in some way, and send XML out.
In this chapter, you’ll learn what the capabilities of the SAP Service are, how to create such a service, and how to use it. Before proceeding, you should already have familiarized yourself with the sections of this guide that deal with creating SAP connections (see “Getting Started with the SAP Component Editor” on page 15) and using SAP actions (see “Performing SAP Actions” on page 35). You should also be familiar with Integration Manager action-model programming concepts (see the separate Novell Integration Manager User’s Guide).
About ServicesIn Integration Manager’s navigation tree (or explorer tree), there is a category called Service. Under this category, if you have Integration Manager Enterprise Edition, you will see three types of service listed: JMS Service, Web Service, and SAP Service. (The latter is visible only if you have the SAP Connect and all relevant JCO libraries installed as described in “Getting Started with the SAP Component Editor” on page 15.) You can create service xObjects (instances of deployable services, created in Integration Manager) falling under any one of these service types.
The services you create in Integration Manager usually execute components. Any of the types of services listed above can make calls to any number of components of any type. For example, an SAP Service can wrapper calls to XML Map, JDBC, and SAP Components. What distinguishes a service from a component is that the service xObject is triggerable. When your project is deployed on the server (in EAR form, usually), the components in it can be invoked only by Integration Manager services, whereas the services within a project can be invoked by various kinds of trigger objects (the most common being HTTP servlets). Integration Manager’s three main kinds of service differ in how they are invoked. The JMS Service is triggered by arrival of messages on a JMS message queue or topic. The Web Service can be triggered by any number of mechanisms: arrival of an HTTP request, arrival of e-mail at a mail server, direct invocation by a Java object, etc.
The SAP Service is an event listener that registers with an SAP gateway server. When an RFC (remote function call) is executed on an SAP gateway server, the results are forwarded to the listener (in this case, a Integration Manager SAP Service). The listener can then call other remote functions on the gateway server using the same connection that was established to register the listener.
When to Use an SAP ServiceThe choice of whether to wrapper your SAP Components with an SAP Service as opposed to, say, a Web Service should be based on the kind of message-exchange pattern in which your service will participate. Will your service respond to RFCs? Or will it initiate function calls on its own? Consider the four canonical Web Service message-exchange types:
One-way. The endpoint receives a message. Request-response. The endpoint receives a message, and sends a correlated message. Solicit-response. The endpoint sends a message, and receives a correlated message.
SAP Service 53
Notification. The endpoint sends a message.
If messages are being sent via RFC, the first two types of exchange patterns (one-way and request-response) can be implemented with an SAP Service. The second two kinds of exchanges, in which the endpoint (your application) initiates the sending of a message (by calling an RFC), can be handled with an SAP Component packaged inside any kind of service.
The rule of thumb is: If your application will be consumed by other SAP applications or functions, using RFCs transmitted via SAP gateway server, your app is going to be deployed as an SAP Service. If your application will be invoked by non-SAP-gateway processes (i.e., you don’t need to register with an SAP gateway server), then you’ll deploy your SAP-enabled application as a Web Service or JMS Service.
SAP Service Action ModelThe SAP Service is like any other kind of executable xObject (XML Map Component, JDBC Component, etc.) in that it has an action model that can utilize any of Integration Manager’s core action types: Log, Map, Decision, etc. In theory, you could perform all of your business logic inside the SAP Service’s action model (assuming no other kinds of connectivity are needed, such as JDBC or LDAP). As a best-practices issue, however, you should put all of your business logic in individual components, and use the service to call the components. The kinds of logic you should employ at the service level are things like fault-trapping and logging.
When you first create an SAP Service, you will notice that an action (called an SAP Service Switch) is present in the action model. This action is present once and only once in any given SAP Service and never occurs in an SAP Component. Therefore, it is not available on any menu commands. Integration Manager always creates the action for you when you create an SAP Service. The purpose of this action is to allow you to associate RFC Function Names with action logic on a case basis. This action is discussed again in a later section of this chapter.
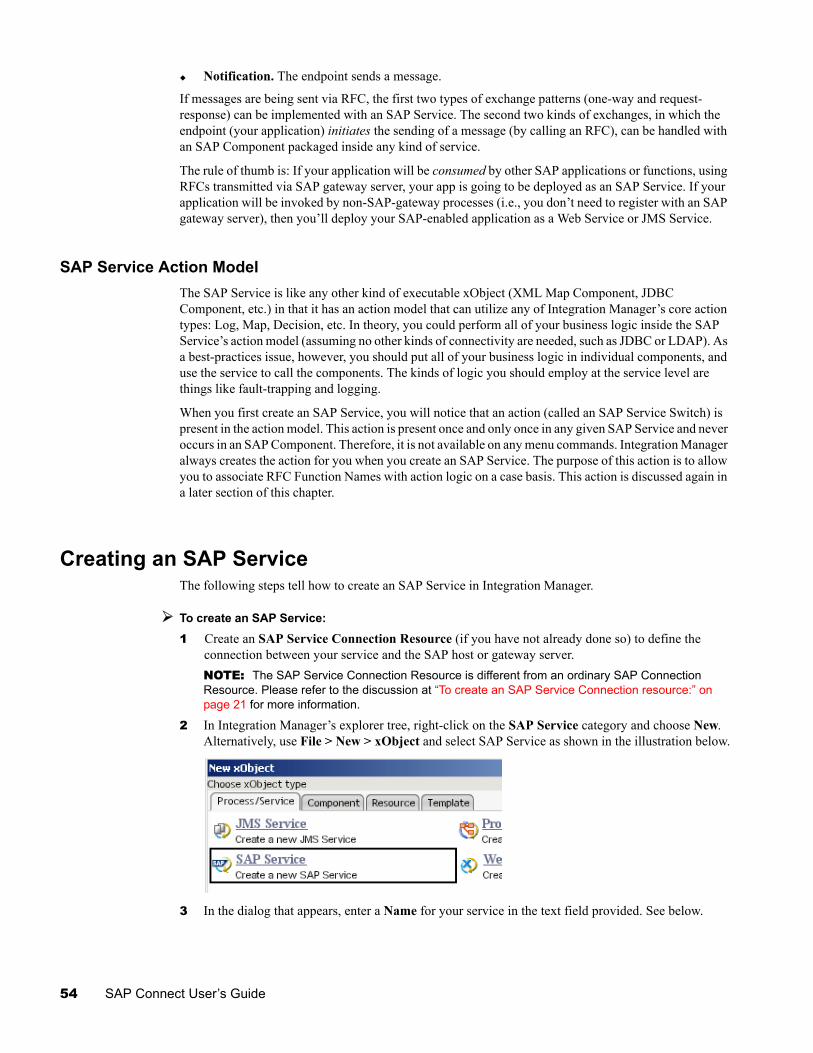
Creating an SAP ServiceThe following steps tell how to create an SAP Service in Integration Manager.
To create an SAP Service:
1 Create an SAP Service Connection Resource (if you have not already done so) to define the connection between your service and the SAP host or gateway server. NOTE: The SAP Service Connection Resource is different from an ordinary SAP Connection Resource. Please refer to the discussion at “To create an SAP Service Connection resource:” on page 21 for more information.
2 In Integration Manager’s explorer tree, right-click on the SAP Service category and choose New. Alternatively, use File > New > xObject and select SAP Service as shown in the illustration below.
3 In the dialog that appears, enter a Name for your service in the text field provided. See below.
54 SAP Connect User’s Guide

4 Click Next. A new wizard panel opens.
5 In this dialog, specify the XML Template sample documents you wish to use in the design of your service’s inputs and outputs.
6 Click Next. A new wizard panel appears.
SAP Service 55
7 In this dialog, specify any Temp documents you would like to use in your service. (You can add these later, if need be. If you’re not sure what to do, click Next for now.)
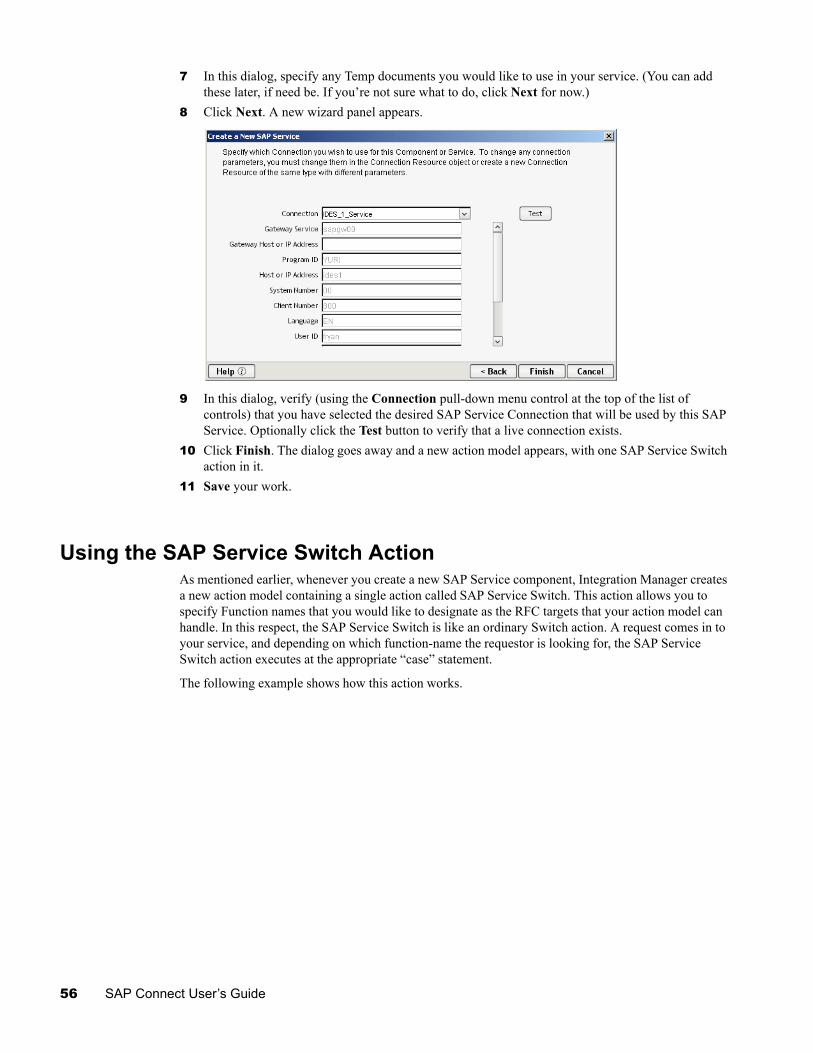
8 Click Next. A new wizard panel appears.
9 In this dialog, verify (using the Connection pull-down menu control at the top of the list of controls) that you have selected the desired SAP Service Connection that will be used by this SAP Service. Optionally click the Test button to verify that a live connection exists.
10 Click Finish. The dialog goes away and a new action model appears, with one SAP Service Switch action in it.
11 Save your work.
Using the SAP Service Switch ActionAs mentioned earlier, whenever you create a new SAP Service component, Integration Manager creates a new action model containing a single action called SAP Service Switch. This action allows you to specify Function names that you would like to designate as the RFC targets that your action model can handle. In this respect, the SAP Service Switch is like an ordinary Switch action. A request comes in to your service, and depending on which function-name the requestor is looking for, the SAP Service Switch action executes at the appropriate “case” statement.
The following example shows how this action works.
56 SAP Connect User’s Guide
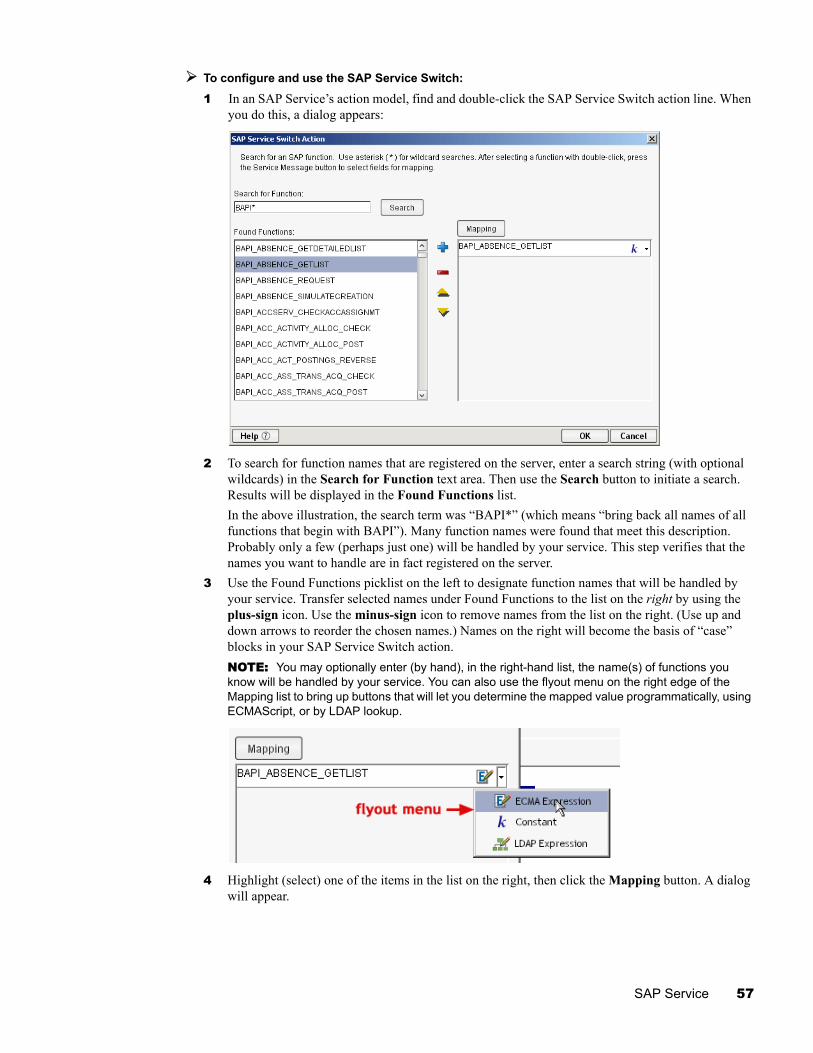
To configure and use the SAP Service Switch:
1 In an SAP Service’s action model, find and double-click the SAP Service Switch action line. When you do this, a dialog appears:
2 To search for function names that are registered on the server, enter a search string (with optional wildcards) in the Search for Function text area. Then use the Search button to initiate a search. Results will be displayed in the Found Functions list. In the above illustration, the search term was “BAPI*” (which means “bring back all names of all functions that begin with BAPI”). Many function names were found that meet this description. Probably only a few (perhaps just one) will be handled by your service. This step verifies that the names you want to handle are in fact registered on the server.
3 Use the Found Functions picklist on the left to designate function names that will be handled by your service. Transfer selected names under Found Functions to the list on the right by using the plus-sign icon. Use the minus-sign icon to remove names from the list on the right. (Use up and down arrows to reorder the chosen names.) Names on the right will become the basis of “case” blocks in your SAP Service Switch action.NOTE: You may optionally enter (by hand), in the right-hand list, the name(s) of functions you know will be handled by your service. You can also use the flyout menu on the right edge of the Mapping list to bring up buttons that will let you determine the mapped value programmatically, using ECMAScript, or by LDAP lookup.
4 Highlight (select) one of the items in the list on the right, then click the Mapping button. A dialog will appear.
SAP Service 57
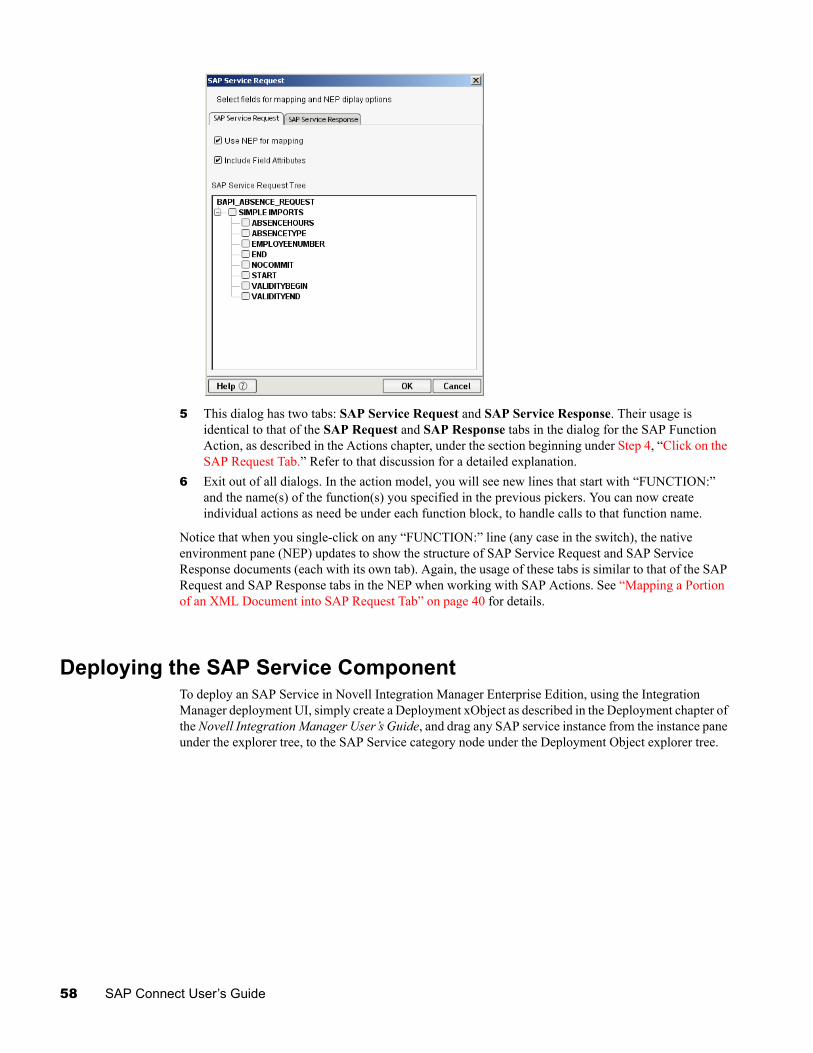
5 This dialog has two tabs: SAP Service Request and SAP Service Response. Their usage is identical to that of the SAP Request and SAP Response tabs in the dialog for the SAP Function Action, as described in the Actions chapter, under the section beginning under Step 4, “Click on the SAP Request Tab.” Refer to that discussion for a detailed explanation.
6 Exit out of all dialogs. In the action model, you will see new lines that start with “FUNCTION:” and the name(s) of the function(s) you specified in the previous pickers. You can now create individual actions as need be under each function block, to handle calls to that function name.
Notice that when you single-click on any “FUNCTION:” line (any case in the switch), the native environment pane (NEP) updates to show the structure of SAP Service Request and SAP Service Response documents (each with its own tab). Again, the usage of these tabs is similar to that of the SAP Request and SAP Response tabs in the NEP when working with SAP Actions. See “Mapping a Portion of an XML Document into SAP Request Tab” on page 40 for details.
Deploying the SAP Service ComponentTo deploy an SAP Service in Novell Integration Manager Enterprise Edition, using the Integration Manager deployment UI, simply create a Deployment xObject as described in the Deployment chapter of the Novell Integration Manager User’s Guide, and drag any SAP service instance from the instance pane under the explorer tree, to the SAP Service category node under the Deployment Object explorer tree.
58 SAP Connect User’s Guide
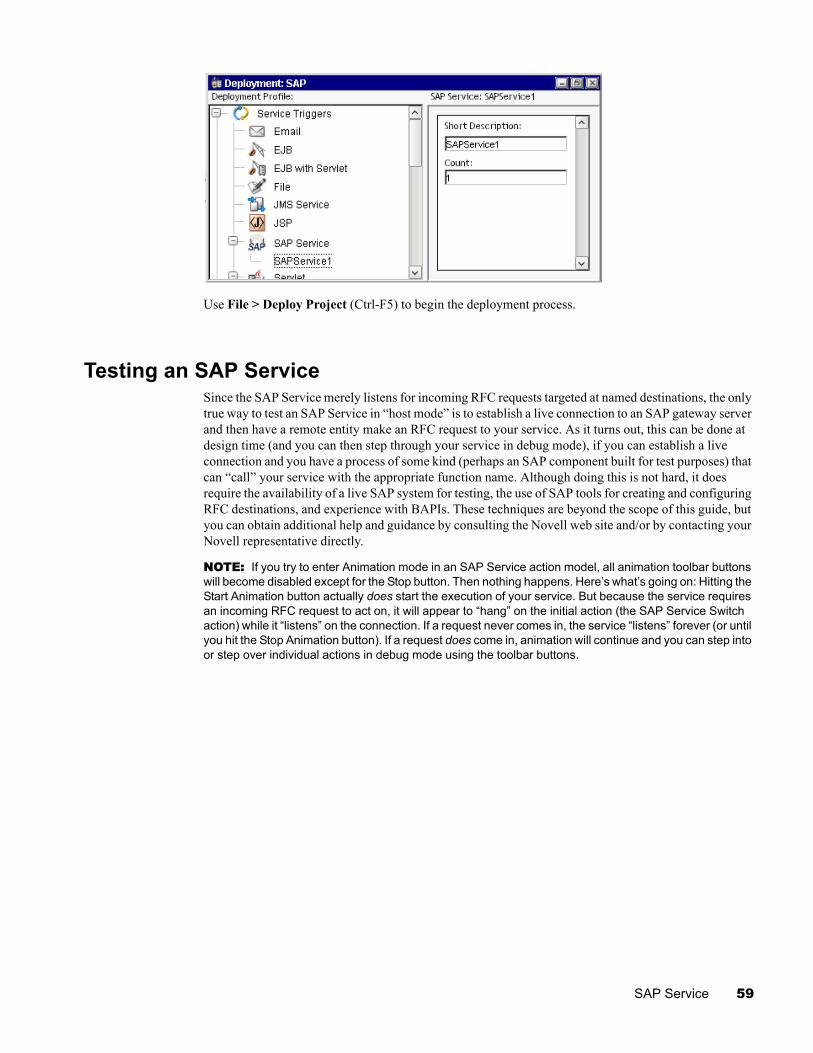
Use File > Deploy Project (Ctrl-F5) to begin the deployment process.
Testing an SAP ServiceSince the SAP Service merely listens for incoming RFC requests targeted at named destinations, the only true way to test an SAP Service in “host mode” is to establish a live connection to an SAP gateway server and then have a remote entity make an RFC request to your service. As it turns out, this can be done at design time (and you can then step through your service in debug mode), if you can establish a live connection and you have a process of some kind (perhaps an SAP component built for test purposes) that can “call” your service with the appropriate function name. Although doing this is not hard, it does require the availability of a live SAP system for testing, the use of SAP tools for creating and configuring RFC destinations, and experience with BAPIs. These techniques are beyond the scope of this guide, but you can obtain additional help and guidance by consulting the Novell web site and/or by contacting your Novell representative directly.
NOTE: If you try to enter Animation mode in an SAP Service action model, all animation toolbar buttons will become disabled except for the Stop button. Then nothing happens. Here’s what’s going on: Hitting the Start Animation button actually does start the execution of your service. But because the service requires an incoming RFC request to act on, it will appear to “hang” on the initial action (the SAP Service Switch action) while it “listens” on the connection. If a request never comes in, the service “listens” forever (or until you hit the Stop Animation button). If a request does come in, animation will continue and you can step into or step over individual actions in debug mode using the toolbar buttons.
SAP Service 59

60 SAP Connect User’s Guide
A Document Management
About Document ManagementEach SAP Function action has two document names and aliases associated with it: the SAP Request Document and the SAP Response Document. Regardless of whether Use Mapping Model is selected, these aliases are saved with the action. The SAP Component keeps a table of these names so that new unique names can be generated and prevent you from accidentally using a name already in use.
If you delete an SAP Function action, the alias name associated with that action is not removed from the table. To reuse these names, you must either close and reopen the component (thus purging the names from the cache), or execute the Reload XML Documents command from the Component menu.
Documents are loaded on an as-needed basis. When you click on or in an SAP Function action, the Native Environment Pane will load the needed documents by creating the XML documents with the alias names based on the model definitions stored within the action as well as storing them in the document manager.
When a user executes the Reload XML Documents, the following tasks are performed:
Clear the Alias TableClear the Undo/Redo stackWalk through the action tree and for each SAP Function action, add a Request and Response entry in the Alias table Issue a request to the document manager to remove documents from those names.
You can share Alias names among multiple SAP Function actions by copying and pasting the SAP Function actions. This can create problems keeping the Native Environment Pane in synch with the current SAP Function action. To handle this problem, each SAP Function action has a unique identifier that is stored along with the alias names in the Alias table. When you click on an SAP Function action, the Native Environment Pane checks for the entry for each alias to see if it is associated with the current action. If it is, a request is made to the document manager. If it is not, a request is made to the document manager with the reload flag set to true and then update the entry in the Alias table with the SAP Function action’s identifier.
Document Management 61

62 SAP Connect User’s Guide
B SAP Glossary
ALE
Application Link Enabling
Supports the creation and operation of distributed applications and application integration achieved via synchronous and asynchronous communication. Provides business-controlled message exchange with consistent data on loosely linked SAP applications.
BAPI
Business Application Programming Interface
BOR
Business Object Repository
Control Record
Contains information about the content, structure, sender, receiver, and status of the IDoc.
Data Record
Consists of administrative part (control field) and a data part (segments).
IDoc
Intermediate Document. IDocs are structured data containers in which data can be stored hierarchically. This data format is generated by SAP’s R/3 and mySAP.com products.
Interface Repository
The place where all the SAP interfaces relevant to inter-enterprise communication are published.
JCo
Java Connector
Native Environment Pane (NEP)
A pane in the SAP Component Editor that displays the SAP Request fields and SAP Response fields to which and from which XML document data may be mapped.
RPC
Remote Function Call
SAP Glossary 63
SAP Function Action
A special action for the SAP Component Editor that enables you to search for and select SAP functions and then select SAP Request and SAP Response fields that will be displayed in the Native Environment Pane (NEP).
Scalar Data
The data is represented directly as content of the parameter element. It is represented in text form
Status Records
Describes the previous processing steps of the IDoc.
Structured Data (BA or records)
This data is represented by an XML element that is entered in every field of the structure as a sub element of the parameter element.
Table Data (internal SAP tables or arrays)
The data is represented by an XML element entered in every row of the table s a sub element of the parameter element.
XML Business Documents
XML documents which are instanced from the XML schemas defined in the Repository
XML Schemas
Defines how the XML document represents the call of the interface or the result of the call, are stored for each interface in the Interface Repository.
64 SAP Connect User’s Guide
Index
Numerics3270 175250 17
Aaction 35Action Model 35Actions 35actions 51After Execute Actions - Add a Map Action from the Response Tab
44AIX 17ALE 63Alias names 61
BBAPI 10, 53, 63Before Execute Actions 40BOR 11building applications 13business object type 11
CCICS RPC 17code table map 27component editor 32Component with Connection Action 46connection pool 22Connection Pool Management 23connection pool management 23connection pooling 19, 22Connection Resource 17connection resource 13, 17Constant and Expression Driven Connections 18Constant Driven Connection 18Create
SAP Connection Resource 18Creating an SAP Component 29Creating an SAP Connection Resource 17custom script 27
Ddata manipulation 13default 20, 22Document 61Document Management 61
EECMAScript 17, 41EDI 17Editing a SAP Function Action 39Execute SAP Action 43Expression Driven Connection 18Expression Editor 41exteNd Connectors 10
Ffieldyype conversions 49forbidden drag operation 43Found Functions 57function methods 49
Ggateway 53
HHandling Errors and Messages 52HP-UX 17HTML 17hub and spoke 10
Iimport 48In 51inactivity lifetime 23include field attributes 37Integration Manager Services 13
JJava Connector 11
65
JCo 11, 15, 49JDBC 17JMS 17
Kkeep alive 23
LLimitations on Mapping 43
MMap Actions 42Map command 40Mapping a Portion of an XML Document into SAP Request Tab 40
NNative Environment Pane 32, 61new xObject 29
Ppool info 23pool name 26processing table rows 50
Qqueries 18Queues 10
RReload XML Documents 61Repeat for Element 47request 12response 12RFC 53RFC-enabled Function Modules 11RFM 11
SSAP Action Model 40SAP component 29
about 13SAP component editor
building applications 13SAP Connect 10SAP Function Action 35SAP Function Action Structure 39SAP Function Tab 35SAP gateway server 53SAP R/3 11SAP Request 35SAP Request Tab 33SAP Response 35SAP Response Tab 33SAP Service 53SAP Service Request 58SAP Service Response 58SAP Service Switch Action 56SAP-Specific Expression Builder Properties 48Service Switch 56services, Integration Manager 13session 20, 22session connection management 23setting table rows 51simple field methods 48Solaris 16structure methods 48switch action 56
Ttable methods 48table rows 50Telnet 17Temp XML Document 30template 29Templates 27test 20, 22timeout 27To use the Component with Connect Action 46
Uuse mapping model 37user ID 13
WWindows NT 16
XXML template 27XPath 41
66