Embed Size (px)
Citation preview
MyHumber Step by Step
A Guide for Applicants and Students

Table of ContentsLog in to MyHumber and Main Menu……………………………………………………...3Tracking Admissions Applications Status……………………………………………….5Checking Missing Requirements…………………………………………………………….7Registering for an Admissions Assessment (Event)………………………………10Viewing Your Offer of Admission…………………………………………………………..13Viewing Conditions of Your Offer…………………………………………………………..14Confirming Your Offer…………………………………………………………………………..15Checking the Status of Your Transfer Credits………………………………………..16Registration ~ Plan Ahead……………………………………………………………………25How to Drop or Withdraw from a Course……………………………………………….41View / Email your Timetable…………………………………………………………………43Records/Registration Inquiries…………………………………………………………….48Paying Your Tuition Deposit………………………………………………………………....49T2202A Tax Forms………………………………………………………………………………50Account Detail ~ Summary ………………………………………………………………....51Viewing your T4A Slips…………………………………………………………………………53
2
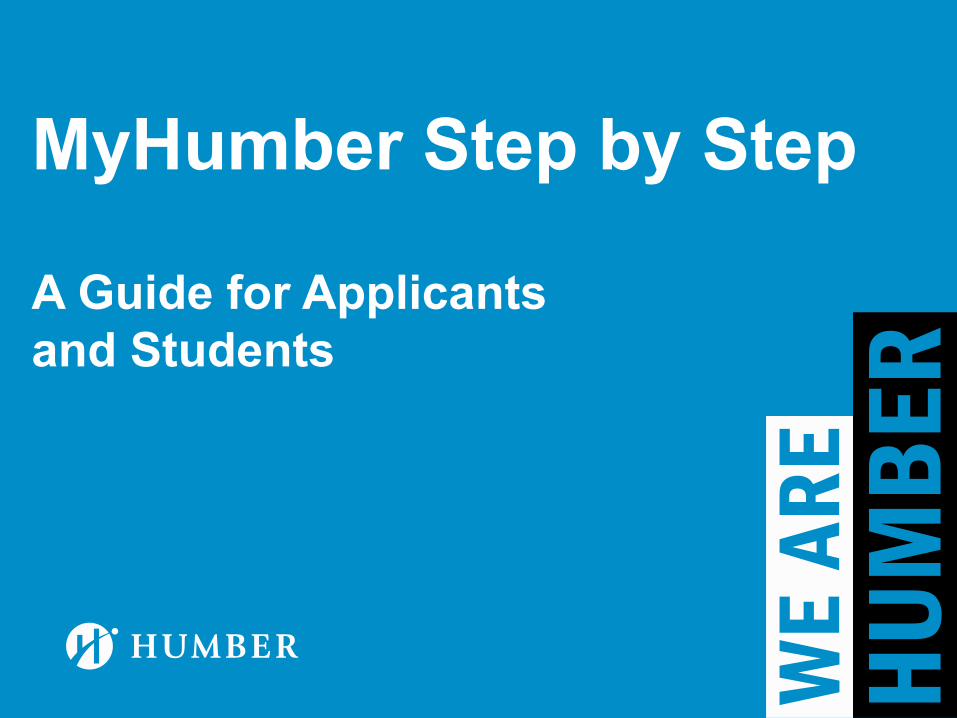
Log in to MyHumber• Go to humber.ca/MyHumber• Click the Login Button• Type your username and password• Click “Sign In”
3
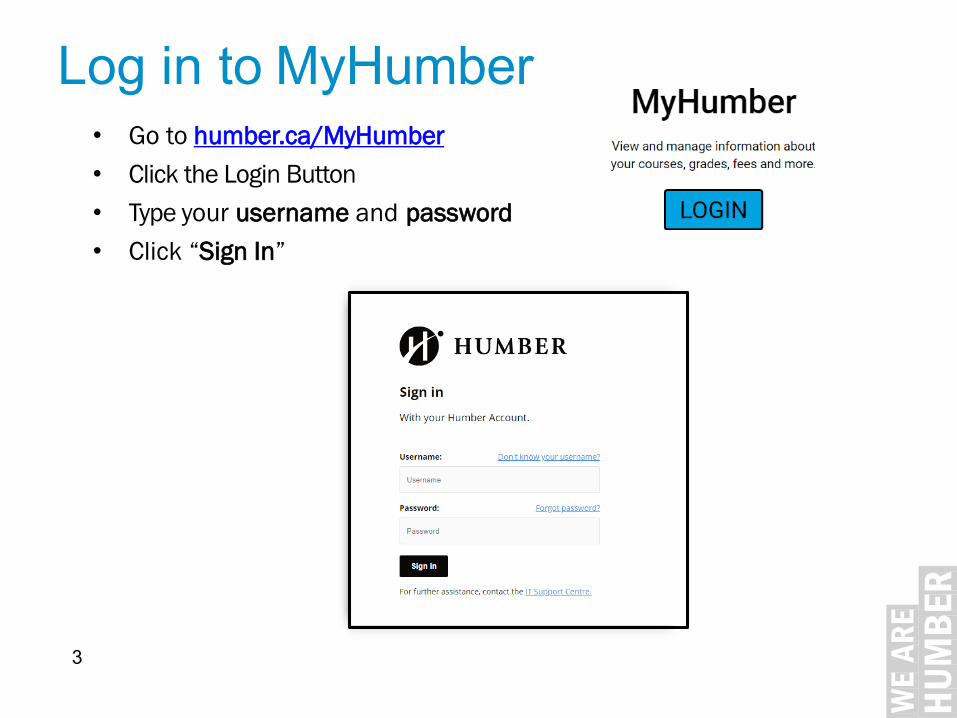
MyHumber Main MenuYou will be able to view thefollowing:
• Personal Information• Registration• Student Records
• Student Account• Academic Progress• Student Awards and Financial Aid
4

Tracking AdmissionsApplications Status1. Select Applicant tab2. Select Applied Programs tabIf you had previously applied to Humber, there will be a prompt asking to select a Year and Applicant Number3. Select the Year and Applicant Number4. Click on Submit
5
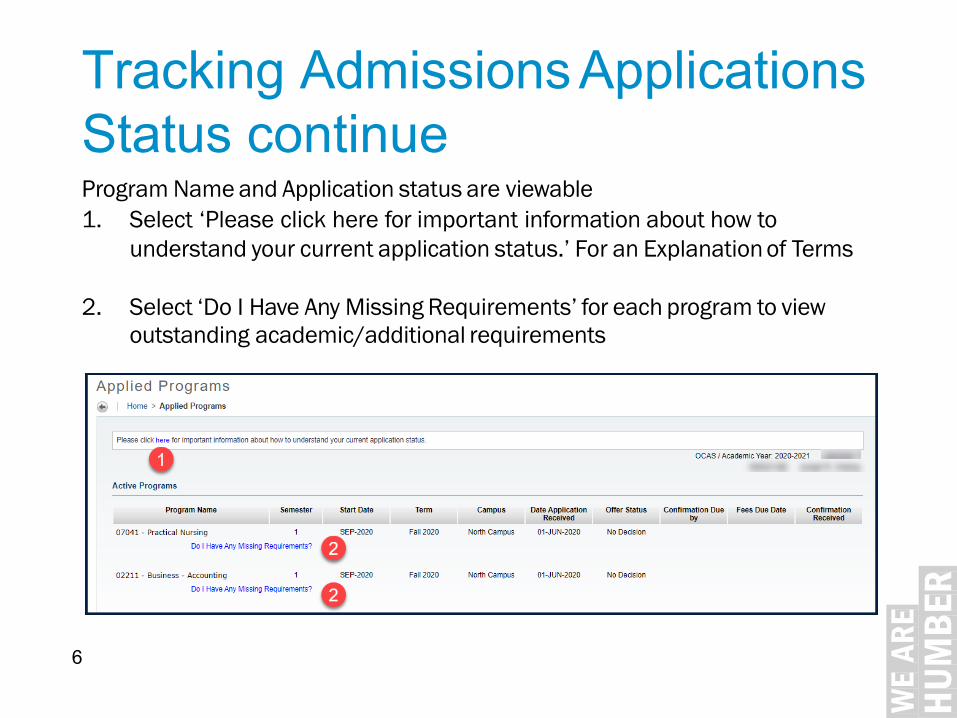
Tracking AdmissionsApplications Status continueProgram Name and Application status are viewable1. Select ‘Please click here for important information about how to
understand your current application status.’ For an Explanation of Terms
2. Select ‘Do I Have Any Missing Requirements’ for each program to view outstanding academic/additional requirements
6
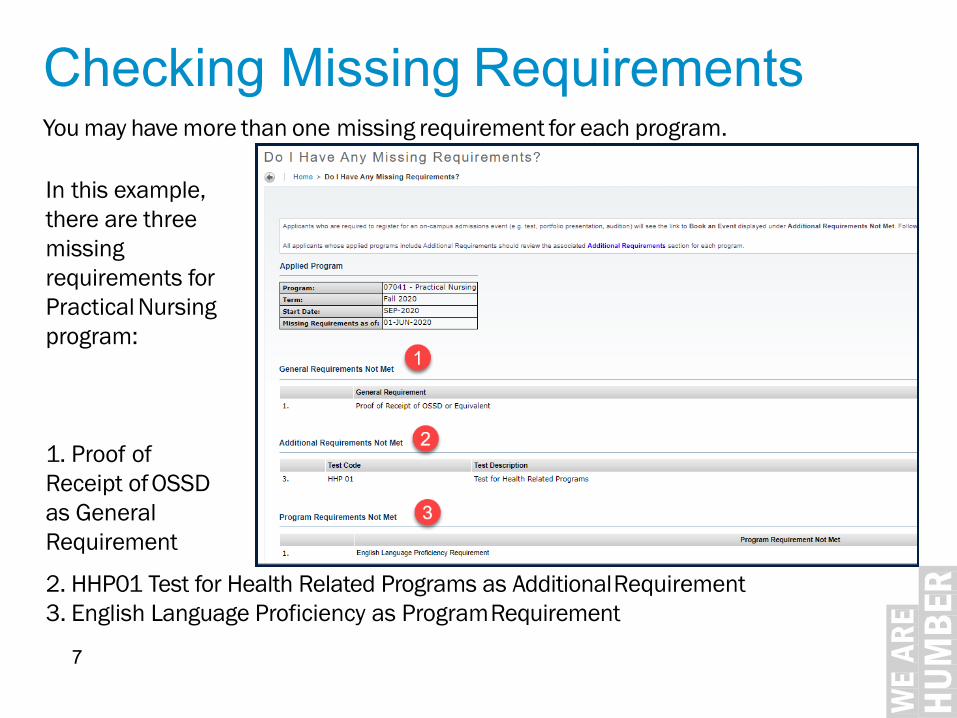
Checking Missing RequirementsYou may have more than one missing requirement for each program.
In this example, there are three missing requirements for Practical Nursing program:
1. Proof of Receipt ofOSSD as General Requirement
2. HHP01 Test for Health Related Programs as AdditionalRequirement3. English Language Proficiency as ProgramRequirement
7
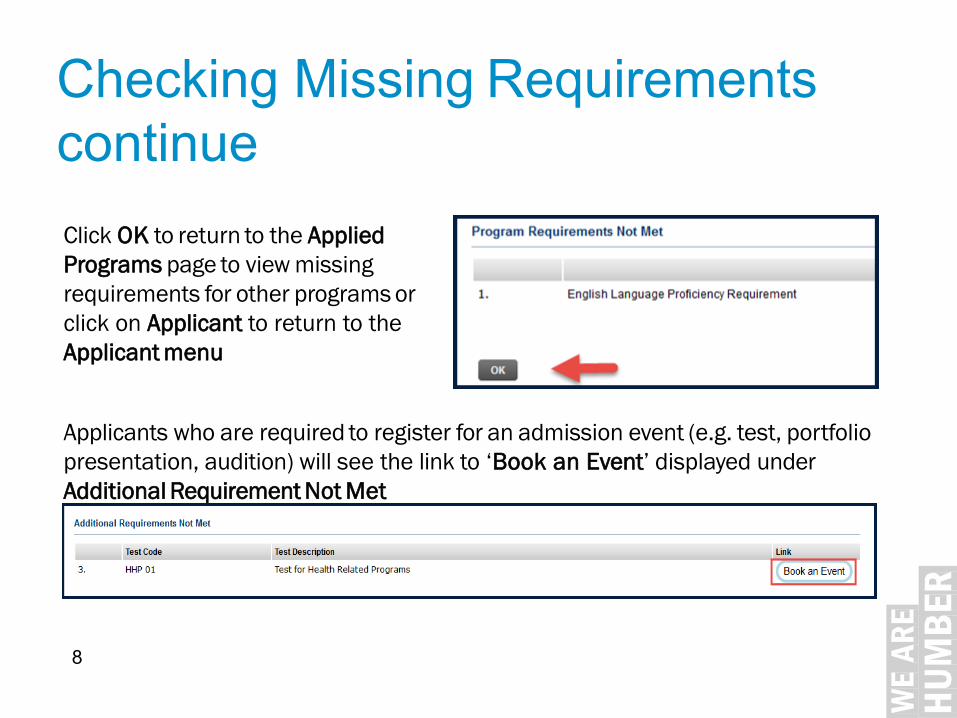
Checking Missing Requirements continueClick OK to return to the Applied Programs page to view missingrequirements for other programs or click on Applicant to return to the Applicant menu
Applicants who are required to register for an admission event (e.g. test, portfolio presentation, audition) will see the link to ‘Book an Event’ displayed under Additional Requirement Not Met
8
Checking Missing Requirements continue
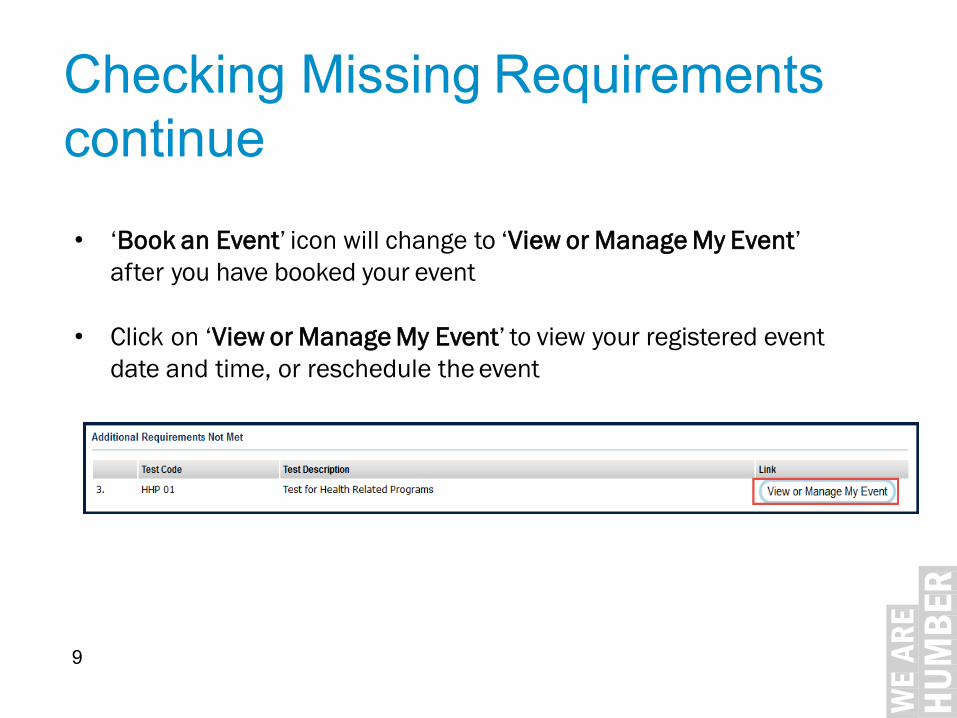
• ‘Book an Event’ icon will change to ‘View or Manage My Event’ after you have booked your event
• Click on ‘View or Manage My Event’ to view your registered event date and time, or reschedule the event
9
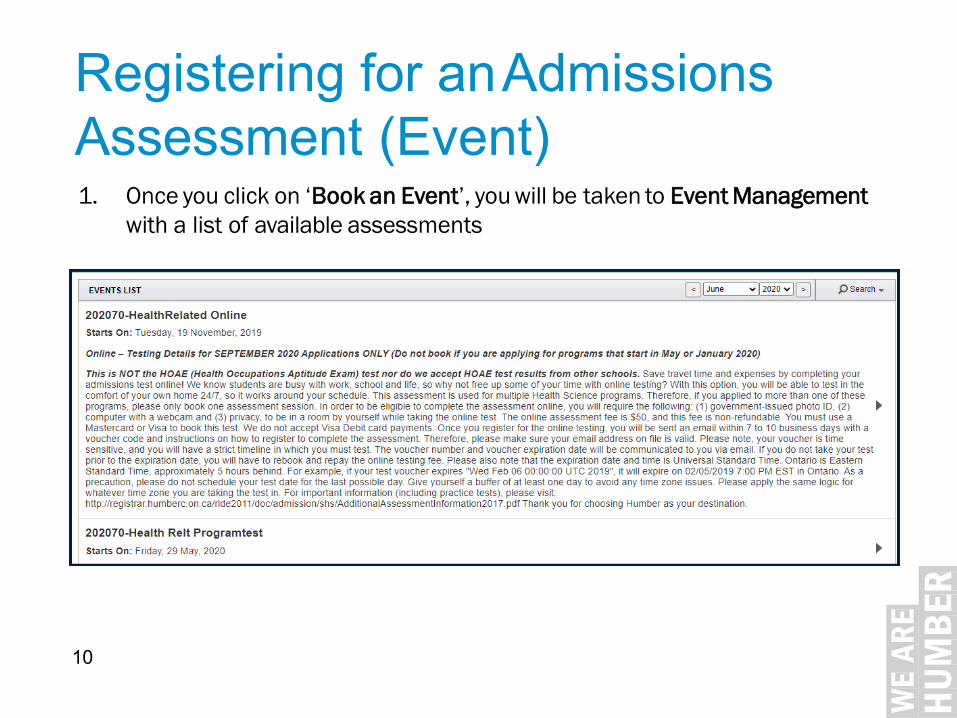
Registering for anAdmissions Assessment (Event)1. Once you click on ‘Book an Event’, you will be taken to Event Management
with a list of available assessments
10

Registering for an Admissions Assessment (Event) continueSelect the distance or on-campus assessment. A list of available assessment dates will display
11
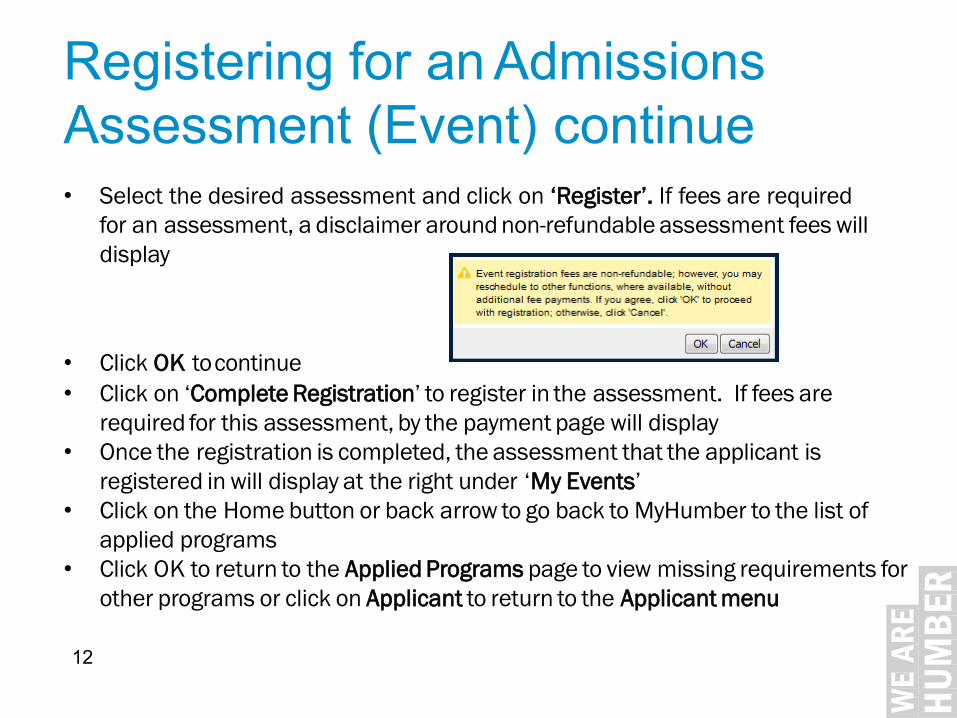
Registering for an Admissions Assessment (Event) continue• Select the desired assessment and click on ‘Register’. If fees are required
for an assessment, a disclaimer around non-refundable assessment fees will display
• Click OK tocontinue• Click on ‘Complete Registration’ to register in the assessment. If fees are
required for this assessment, by the payment page will display• Once the registration is completed, the assessment that the applicant is
registered in will display at the right under ‘My Events’• Click on the Home button or back arrow to go back to MyHumber to the list of
applied programs• Click OK to return to the Applied Programs page to view missing requirements for
other programs or click on Applicant to return to the Applicant menu
12
Viewing Your Offer of Admission
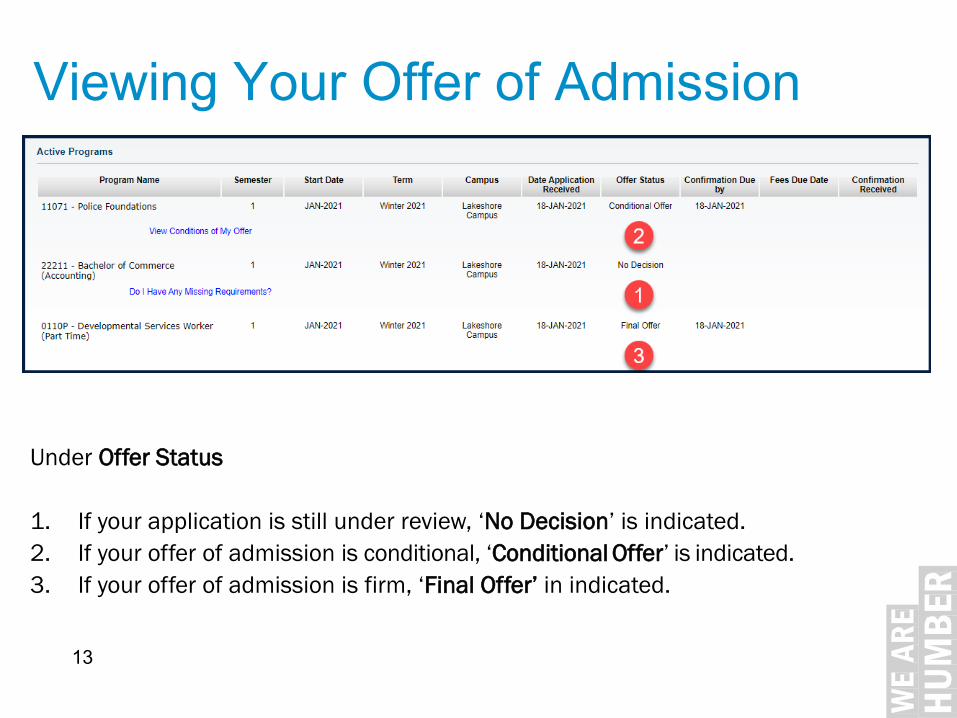
Under Offer Status
1. If your application is still under review, ‘No Decision’ is indicated.2. If your offer of admission is conditional, ‘Conditional Offer’ is indicated.3. If your offer of admission is firm, ‘Final Offer’ in indicated.
13
Viewing Conditions of Your Offer
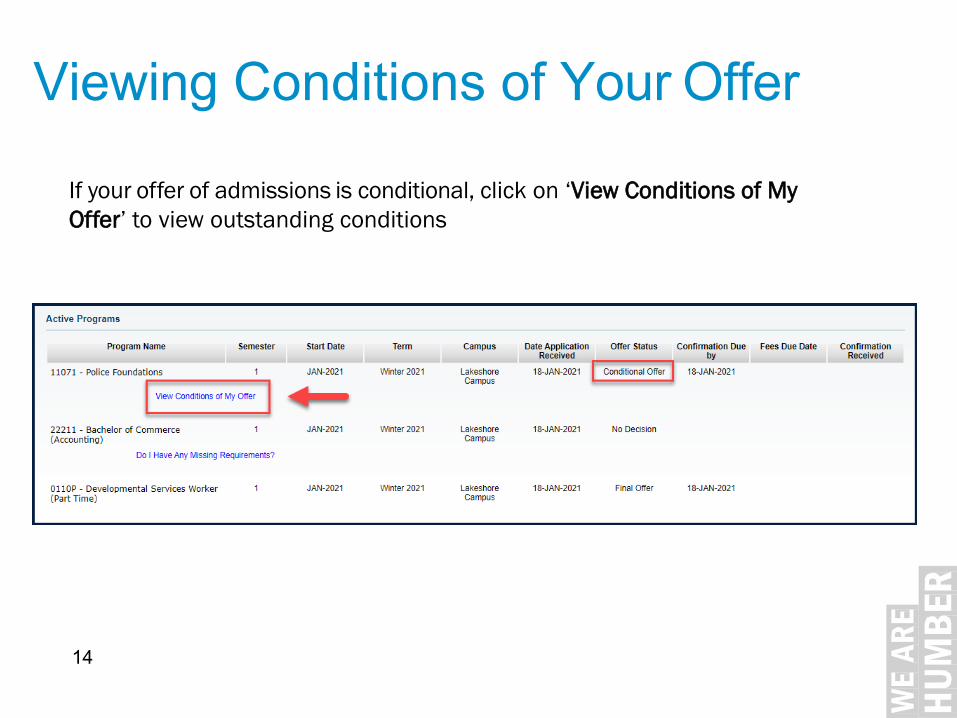
If your offer of admissions is conditional, click on ‘View Conditions of My Offer’ to view outstanding conditions
14
Domestic Applicants: Confirm your offers at ontariocolleges.ca. Click here for more information on how to view and confirm Offers of Admission.
International Applicants: Confirm your offer at MyHumber.View the How to Confirm video to guide you through this process.
Confirming Your Offer
15
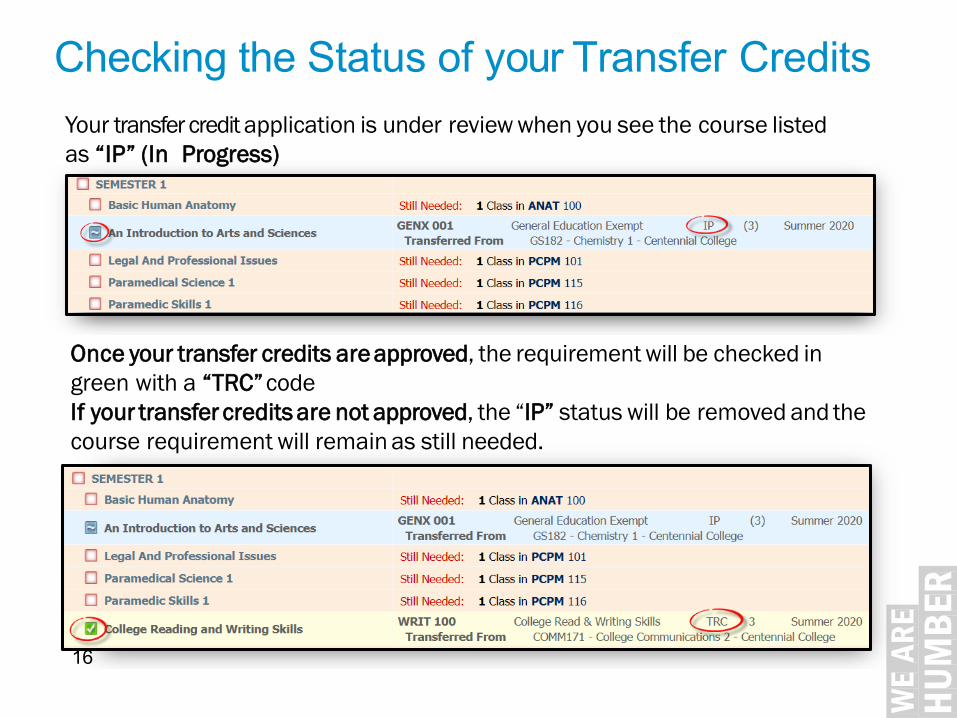
Checking the Status of your Transfer CreditsYour transfer credit application is under review when you see the course listedas “IP” (In Progress)
Once your transfer credits are approved, the requirement will be checked in green with a “TRC”codeIf your transfer credits are not approved, the “IP” status will be removed and the course requirement will remain as still needed.
16

Pre – Registration Information1. Check your email for Registration updates2. Check when you register athttp://humber.ca/registration/
a) Enter your program to review:i. Day and Time ofRegistrationii. Type ofRegistration
17
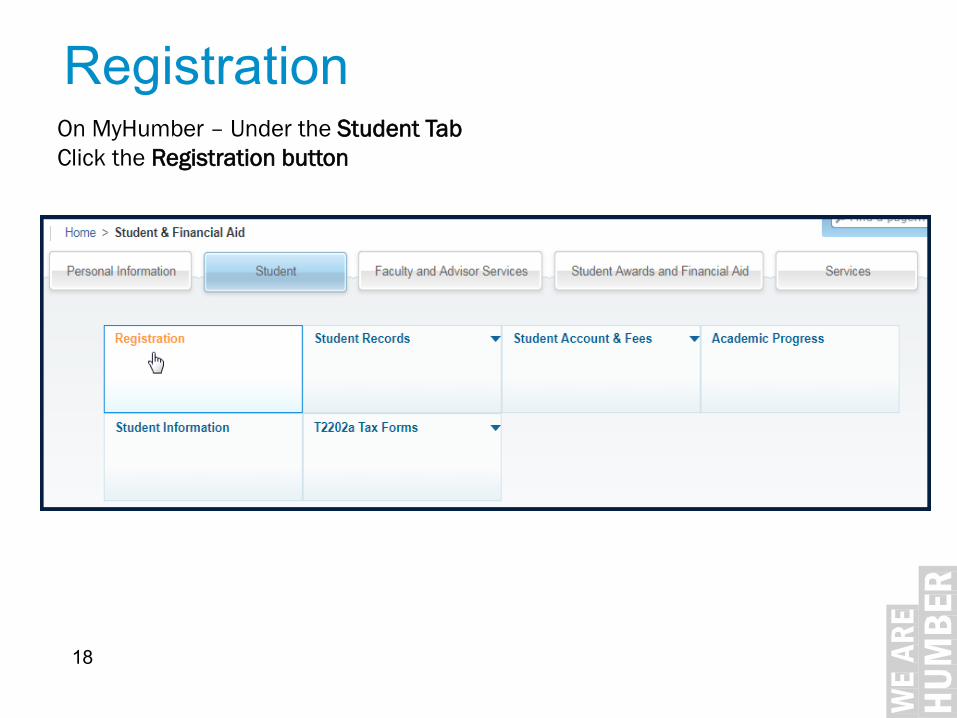
RegistrationOn MyHumber – Under the Student TabClick the Registration button
18
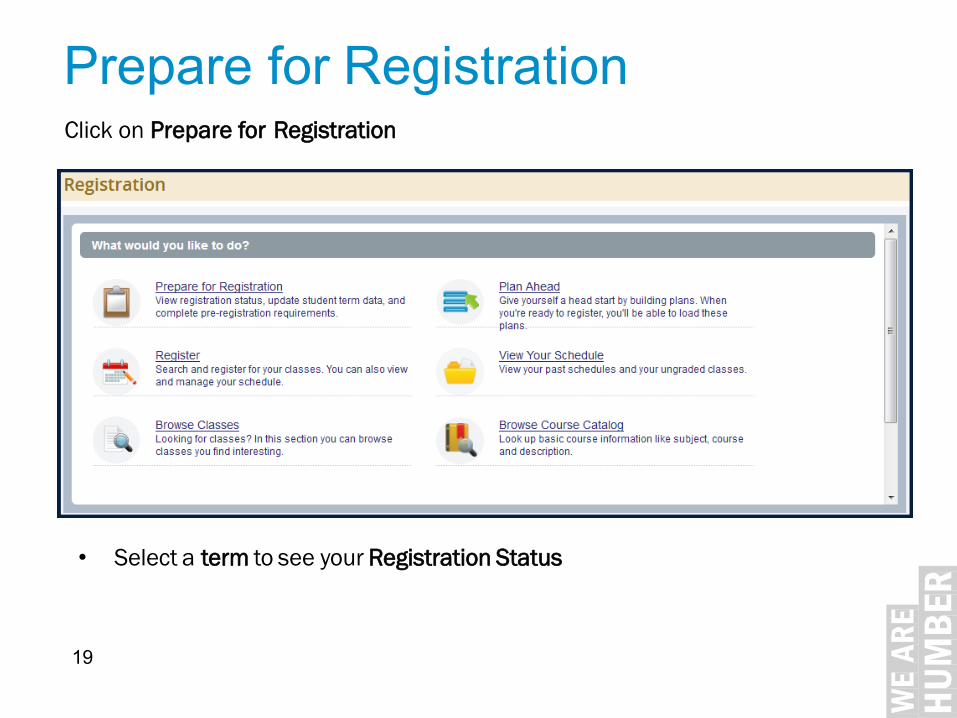
• Select a term to see your Registration Status
Prepare for RegistrationClick on Prepare for Registration
19

Registration StatusConfirm your Registration Status:
1. Student Status2. Academic Status3. Holds4. Validate your
Primary Program Listing
Note: Contact your program coordinator if any information is incorrect
Originator – The Academic School or Department that will be able to assist in the resolution of thehold.
Process Affected – The process affected by the hold being placed on the record. Some holds will limit the ability to register for the given term.
Please check your program at www.humber.ca/registration for timing andprogram registration information20

Block Based RegistrationBlocks available for registration will be viewable when registration for your program opens as per the registration calendar at http://www.humber.ca/registration/• Go to MyHumber, click on Registration and click Register for Classes
• Select a Term
Important: The Plan Ahead tool is ONLY for Course Based Students21
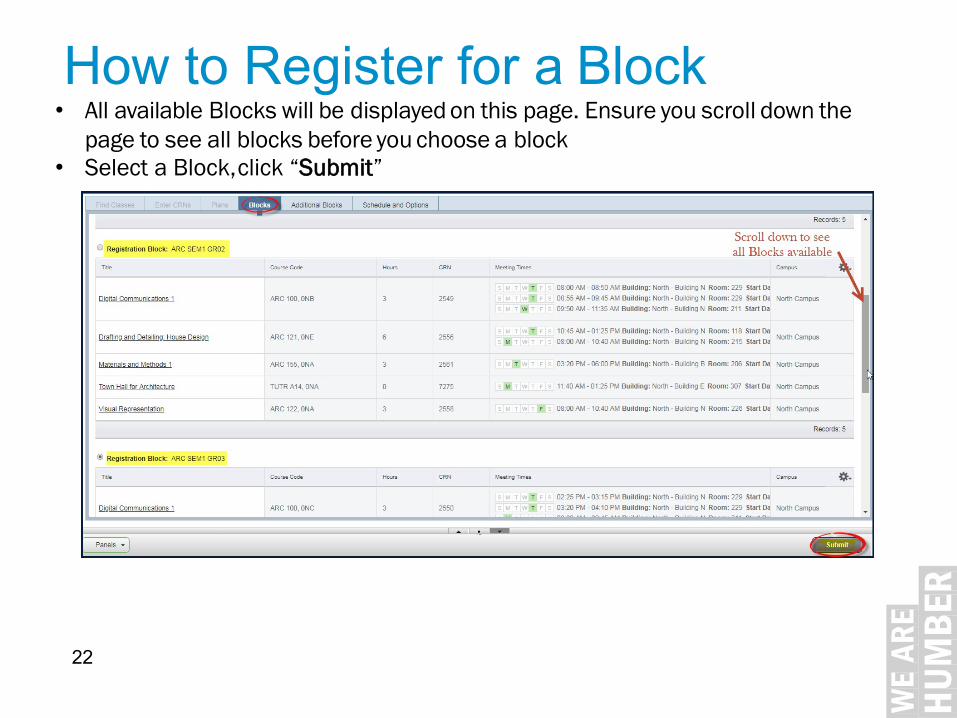
How to Register for a Block• All available Blocks will be displayed on this page. Ensure you scroll down the
page to see all blocks before you choose a block• Select a Block,click “Submit”
22
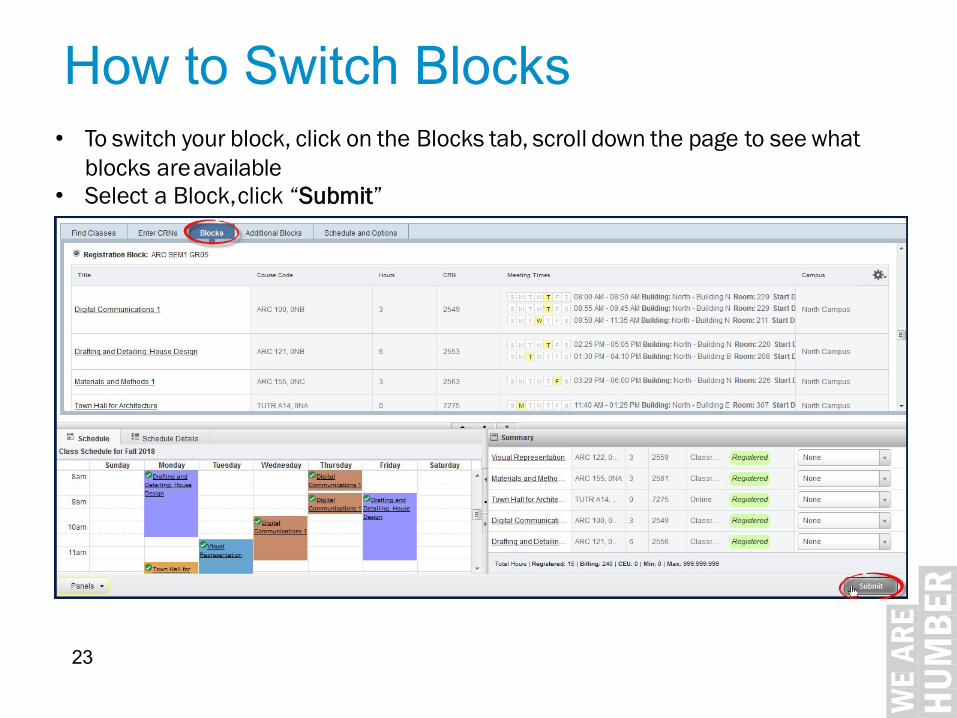
How to Switch Blocks• To switch your block, click on the Blocks tab, scroll down the page to see what
blocks areavailable• Select a Block,click “Submit”
23
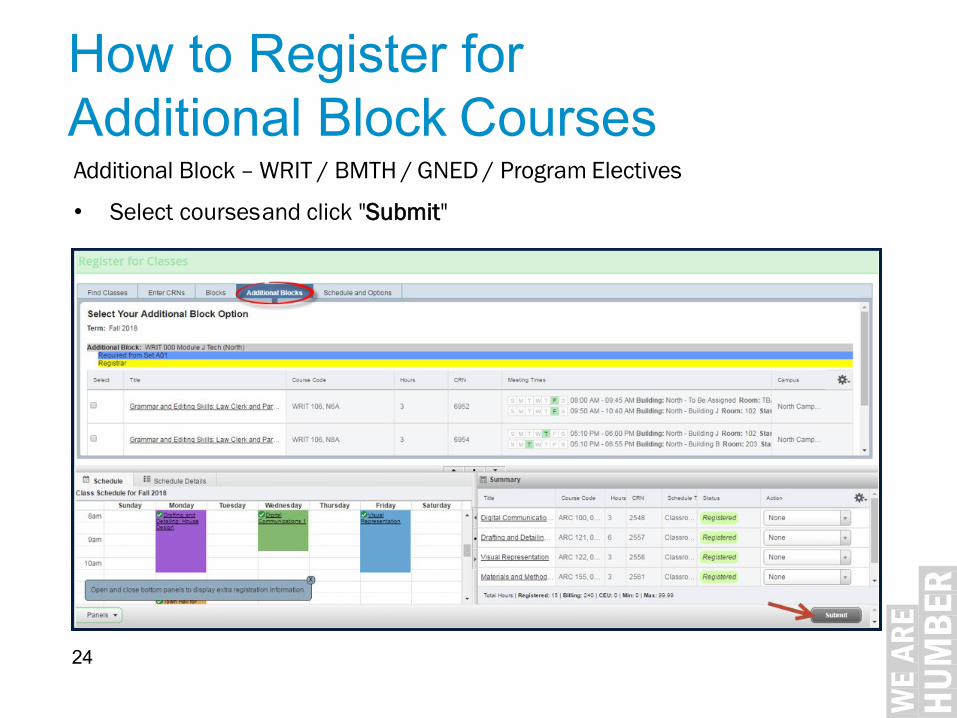
How to Register for Additional Block CoursesAdditional Block – WRIT / BMTH / GNED / Program Electives
• Select coursesand click "Submit"
24
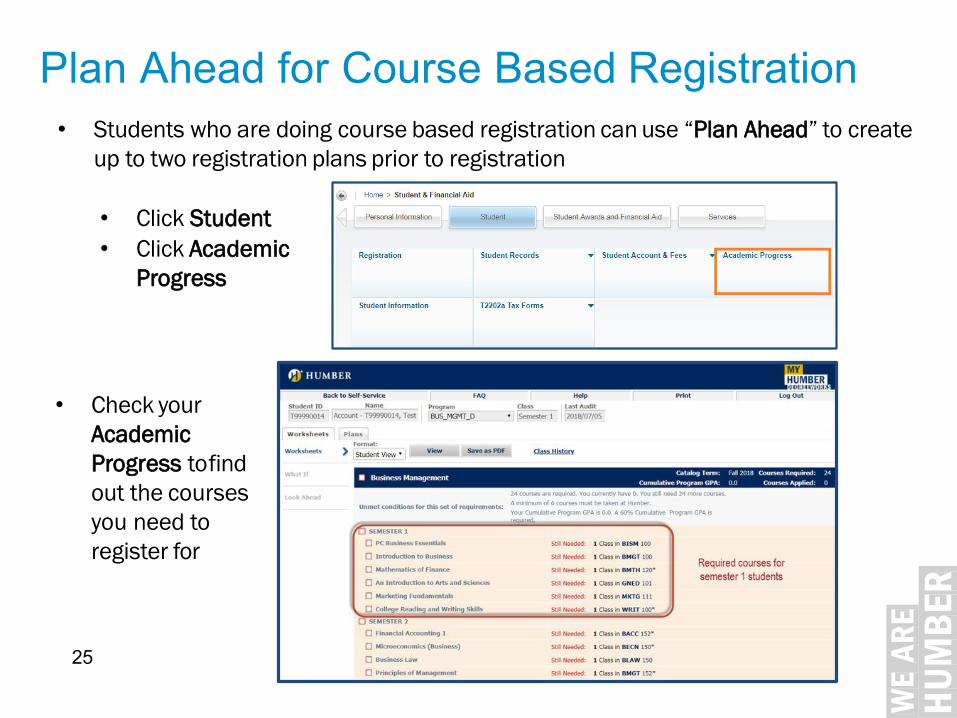
Plan Ahead for Course Based Registration
• Check your AcademicProgress tofind out the courses you need to register for
• Students who are doing course based registration can use “Plan Ahead” to create up to two registration plans prior to registration
• Click Student• Click Academic
Progress
25
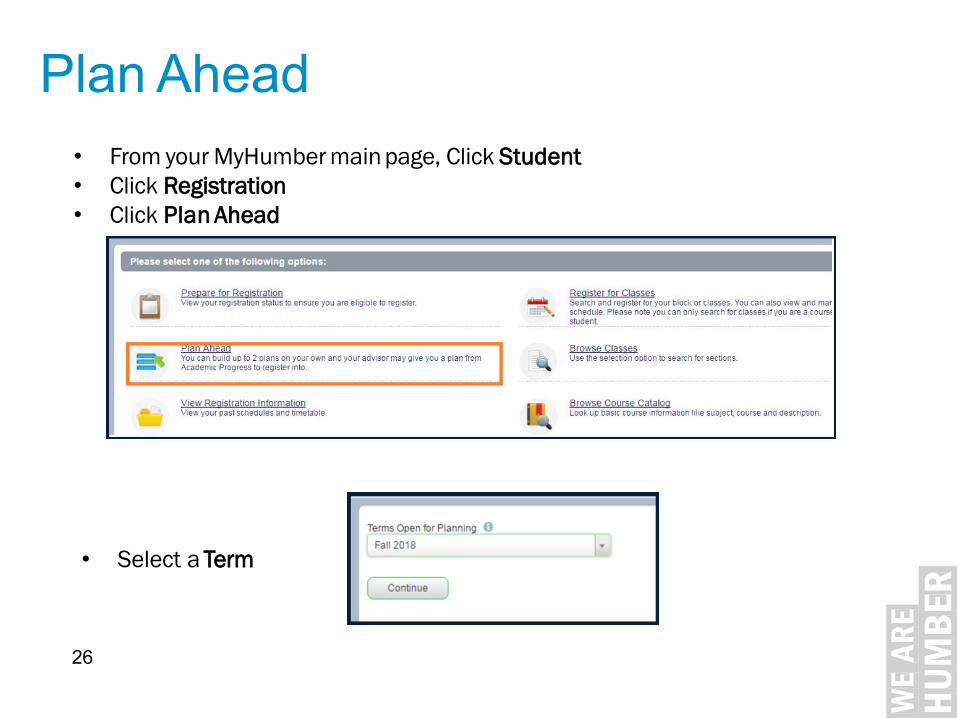
Plan Ahead
• Select a Term
• From your MyHumber main page, Click Student• Click Registration• Click Plan Ahead
26
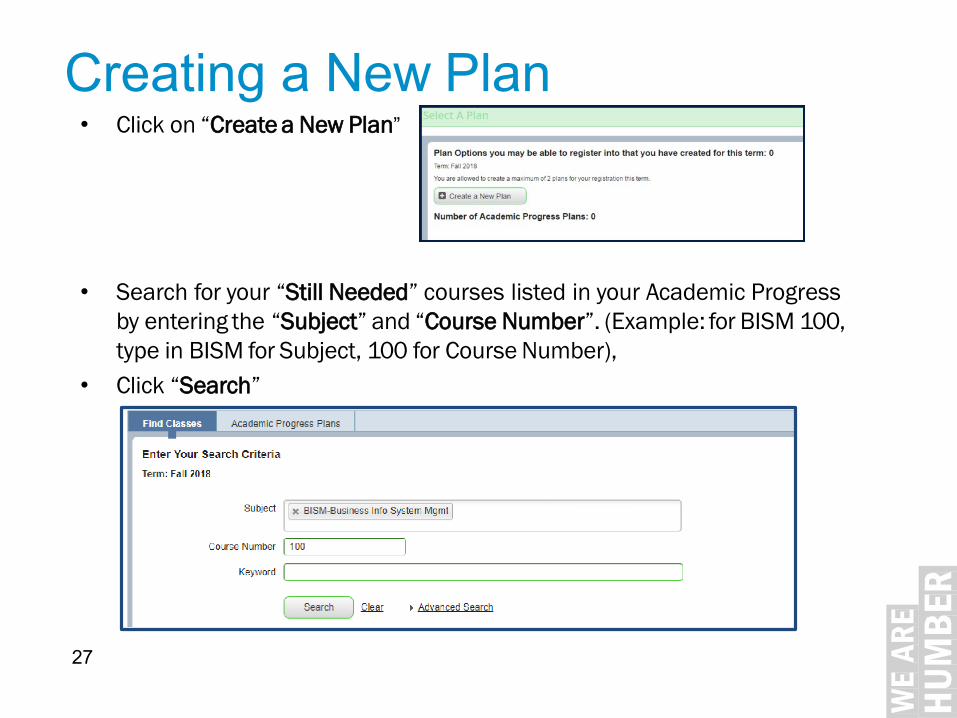
Creating a New Plan• Click on “Create a New Plan”
• Search for your “Still Needed” courses listed in your Academic Progress by entering the “Subject” and “Course Number”. (Example: for BISM 100, type in BISM for Subject, 100 for Course Number),
• Click “Search”
27
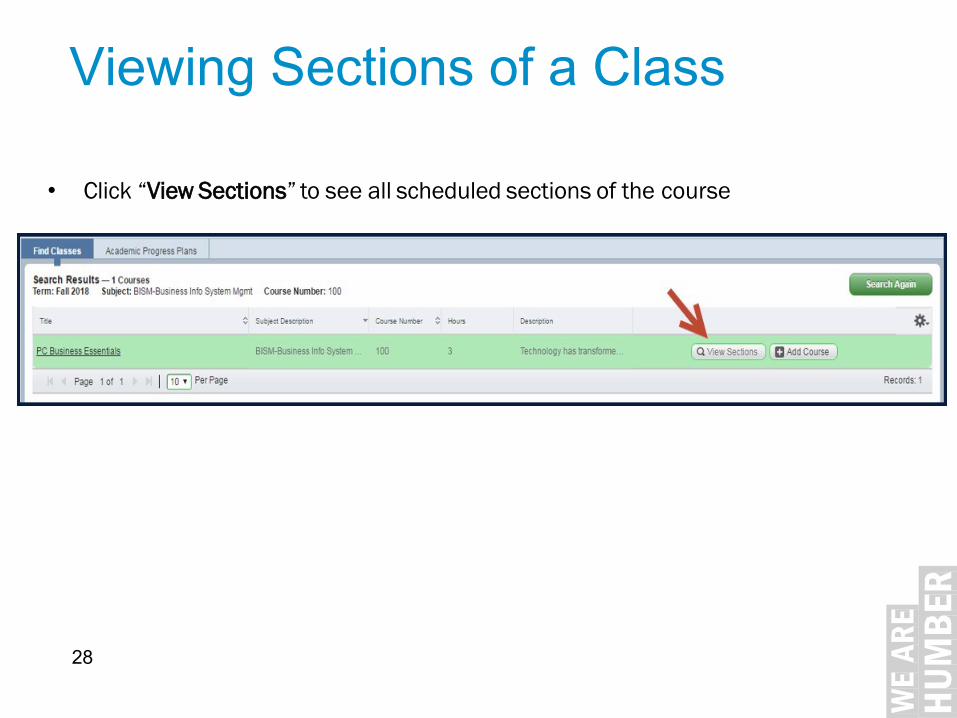
• Click “View Sections” to see all scheduled sections of the course
Viewing Sections of a Class
28
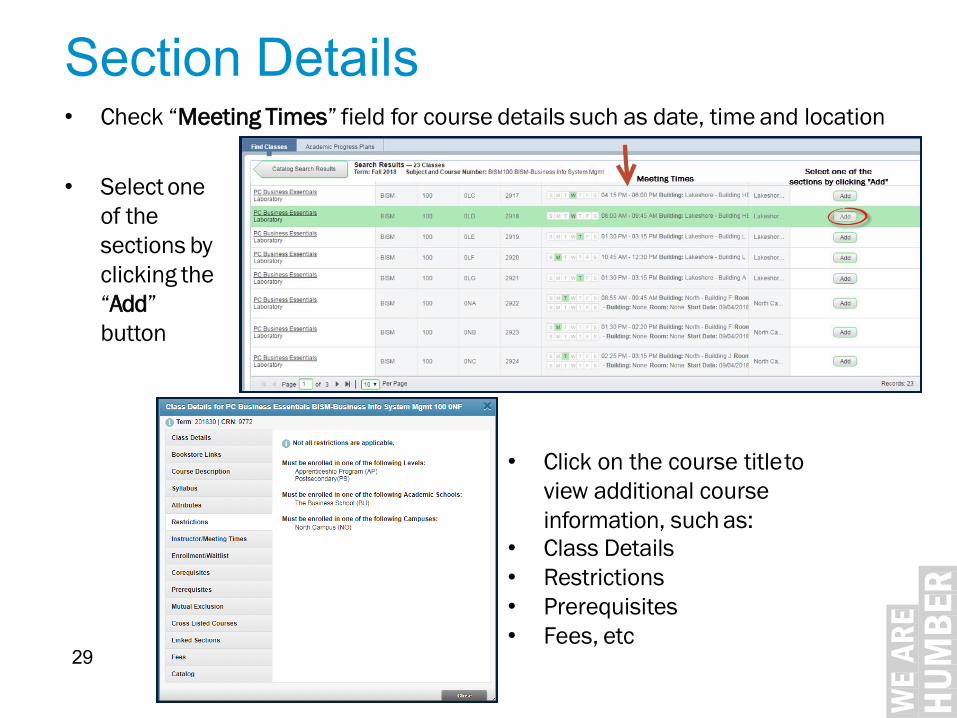
Section Details• Check “Meeting Times” field for course details such as date, time and location
• Select one of thesections by clicking the “Add” button
• Click on the course titleto view additional course information, such as:
• Class Details• Restrictions• Prerequisites• Fees, etc
29
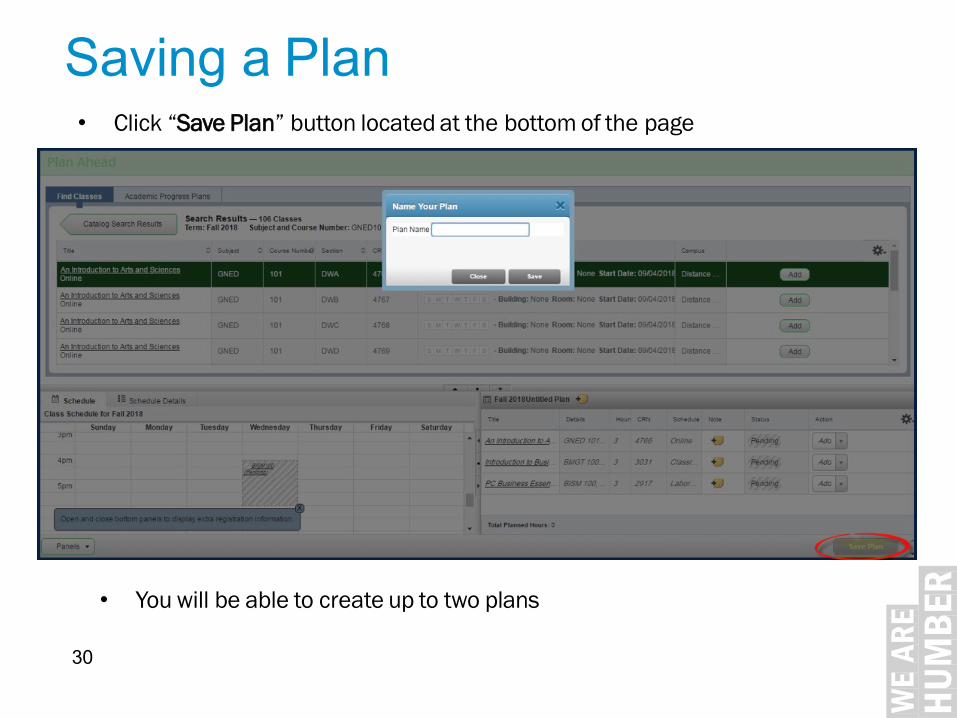
• Click “Save Plan” button located at the bottom of the page
Saving a Plan
• You will be able to create up to two plans
30
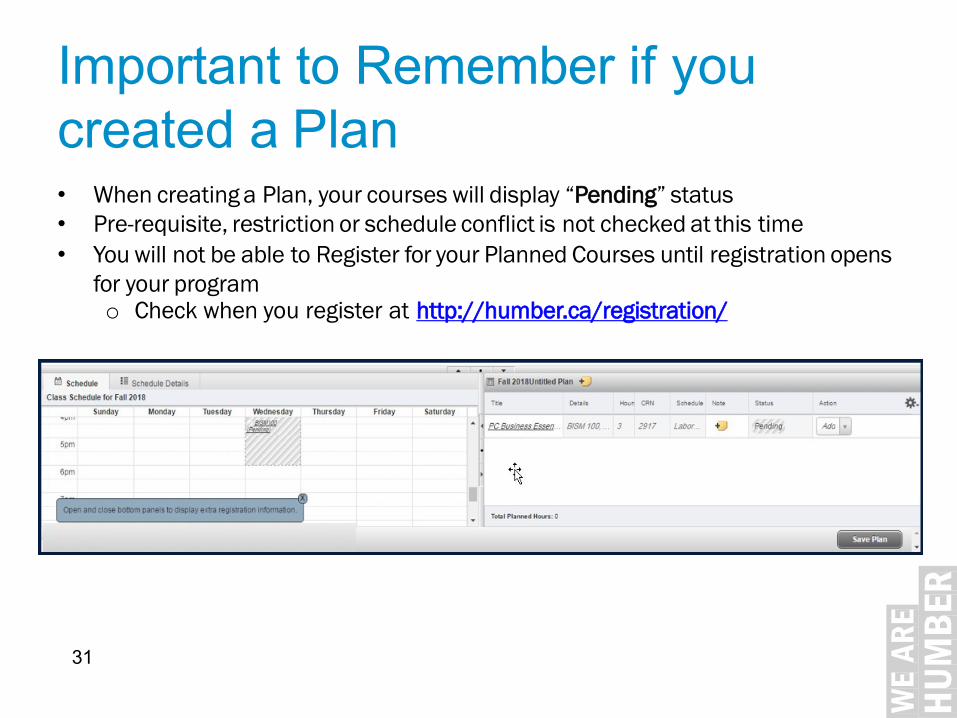
Important to Remember if you created a Plan• When creating a Plan, your courses will display “Pending” status• Pre-requisite, restriction or schedule conflict is not checked at this time• You will not be able to Register for your Planned Courses until registration opens
for your programo Check when you register at http://humber.ca/registration/
31
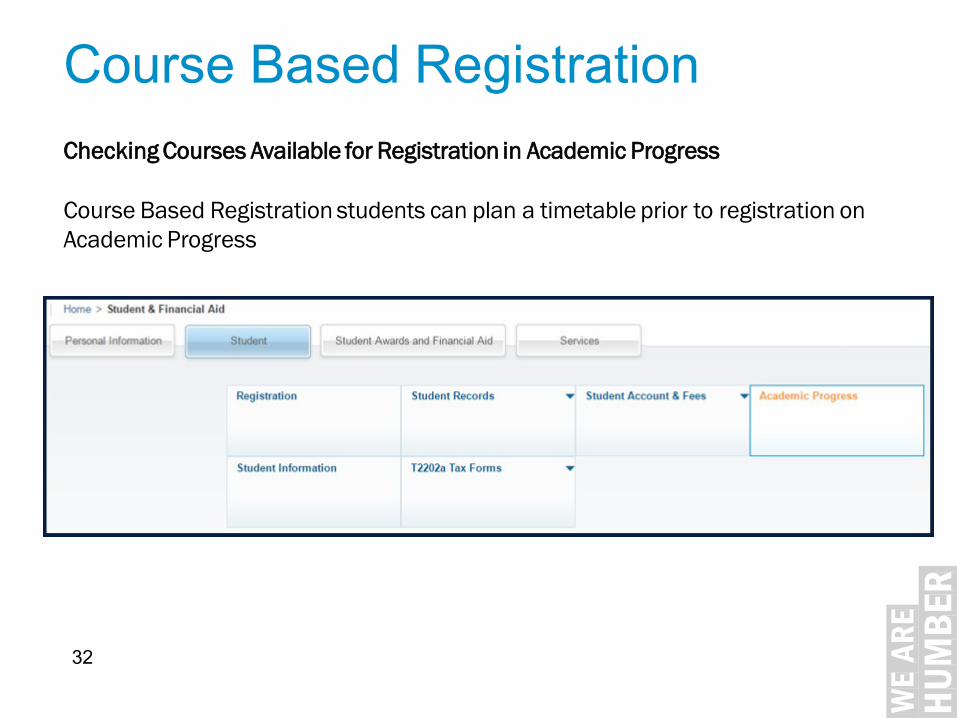
Course Based RegistrationChecking Courses Available for Registration in Academic Progress
Course Based Registration students can plan a timetable prior to registration on Academic Progress
32
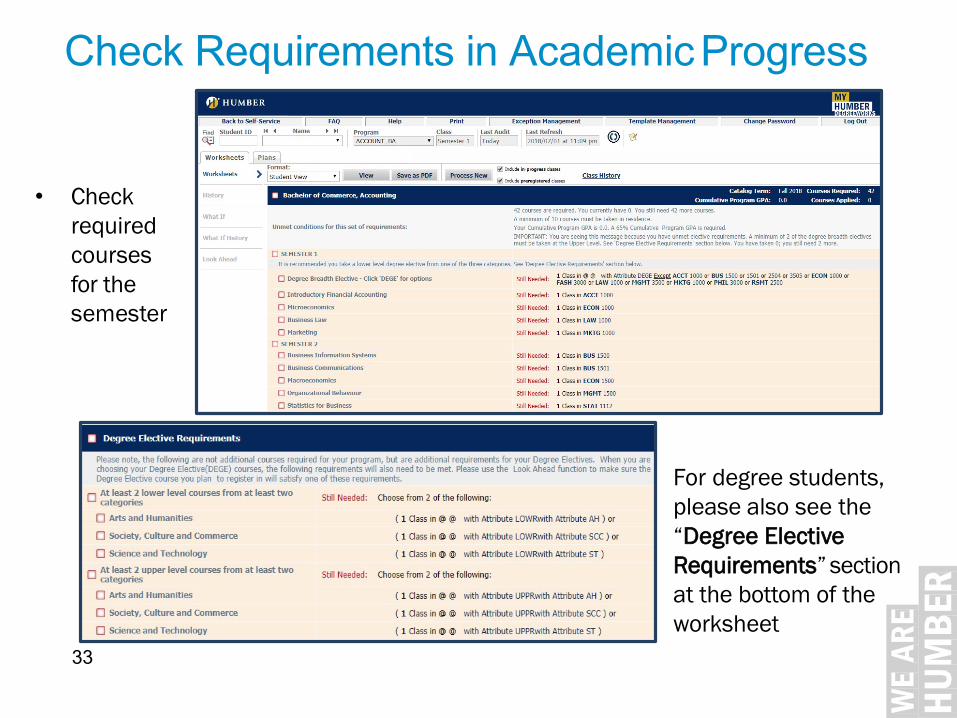
• Check required courses for the semester
Check Requirements in AcademicProgress
• For degree students, please also see the “Degree Elective Requirements” section at the bottom of the worksheet
33
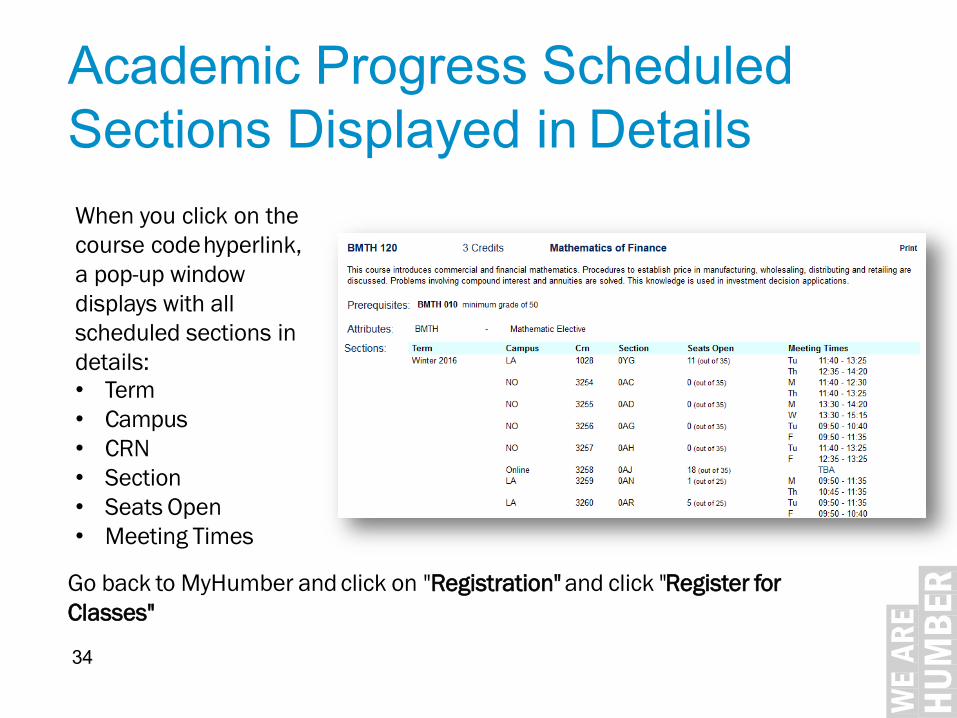
Academic Progress Scheduled Sections Displayed in DetailsWhen you click on the course codehyperlink, a pop-up window displays with all scheduled sections in details:• Term• Campus• CRN• Section• Seats Open• Meeting Times
Go back to MyHumber and click on "Registration" and click "Register forClasses"
34
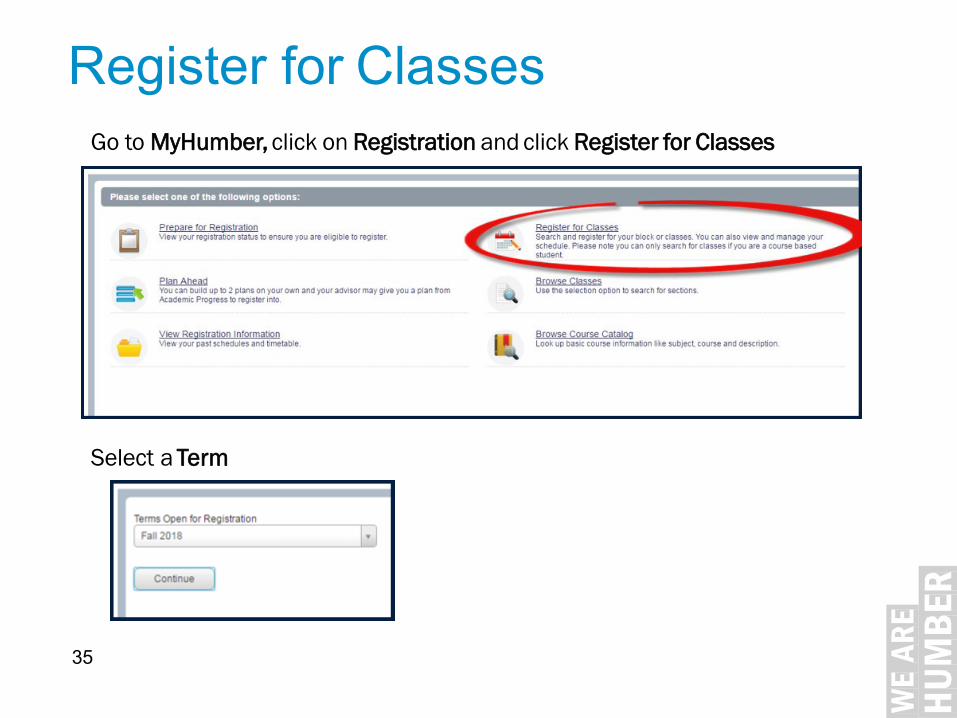
Register for ClassesGo to MyHumber, click on Registration and click Register for Classes
Select a Term
35
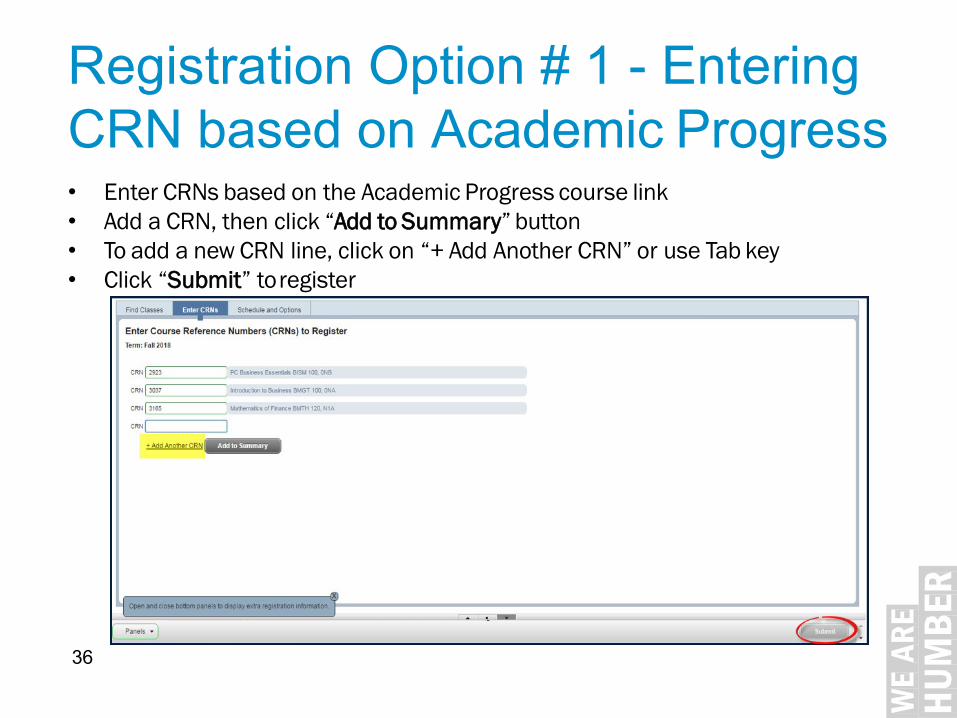
Registration Option # 1 - Entering CRN based on Academic Progress• Enter CRNs based on the Academic Progress course link• Add a CRN, then click “Add to Summary” button• To add a new CRN line, click on “+ Add Another CRN” or use Tab key• Click “Submit” toregister
36
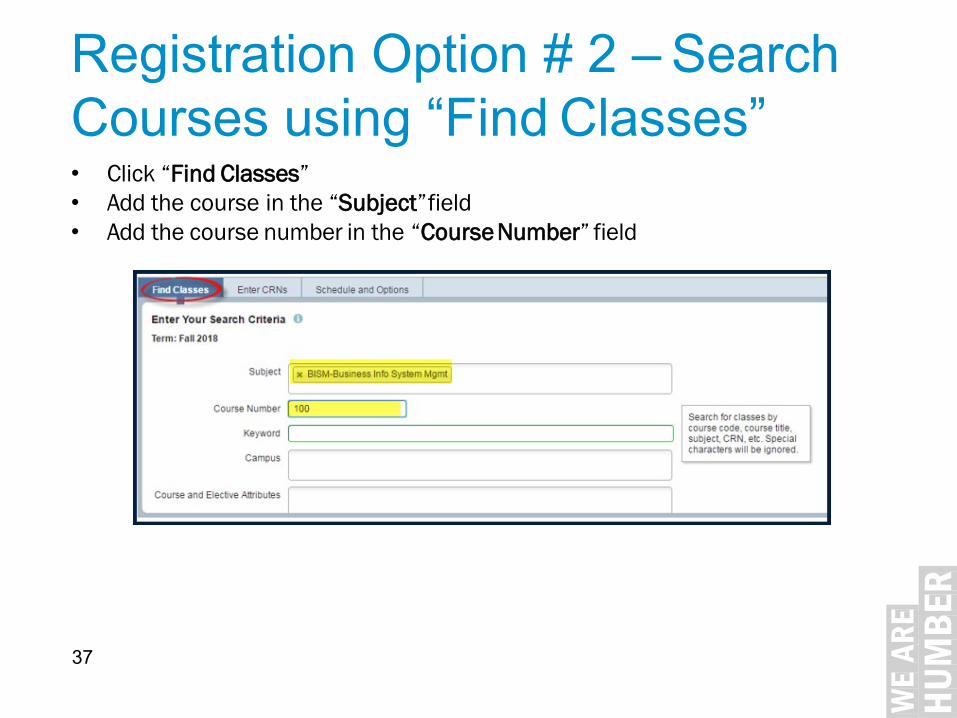
Registration Option # 2 – Search Courses using “Find Classes”• Click “Find Classes”• Add the course in the “Subject”field• Add the course number in the “CourseNumber” field
37
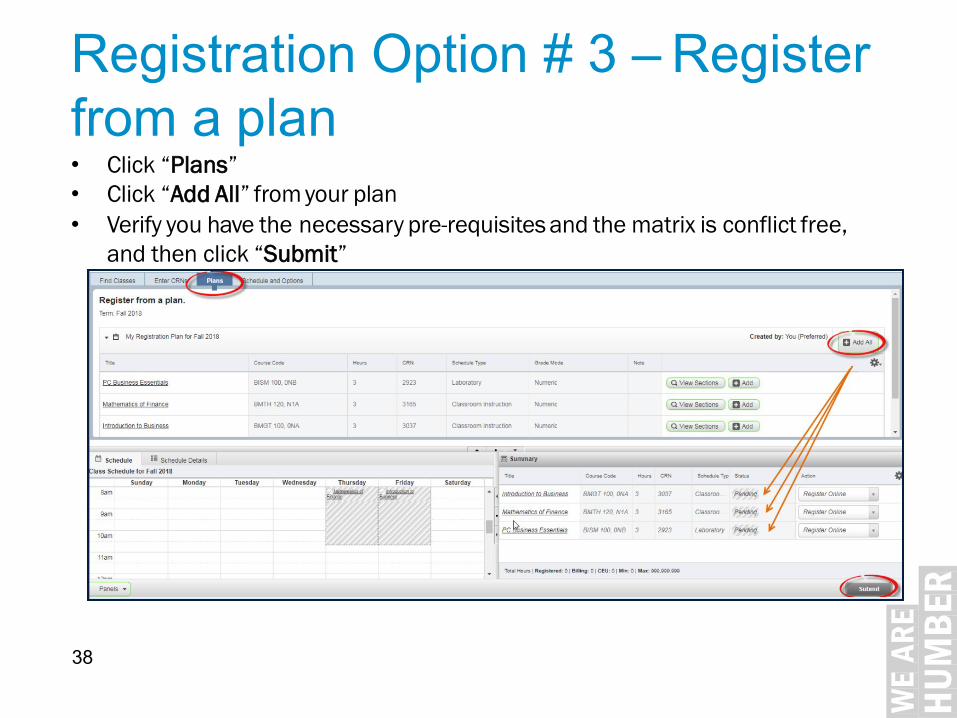
Registration Option # 3 – Register from a plan• Click “Plans”• Click “Add All” from your plan• Verify you have the necessary pre-requisites and the matrix is conflict free,
and then click “Submit”
38
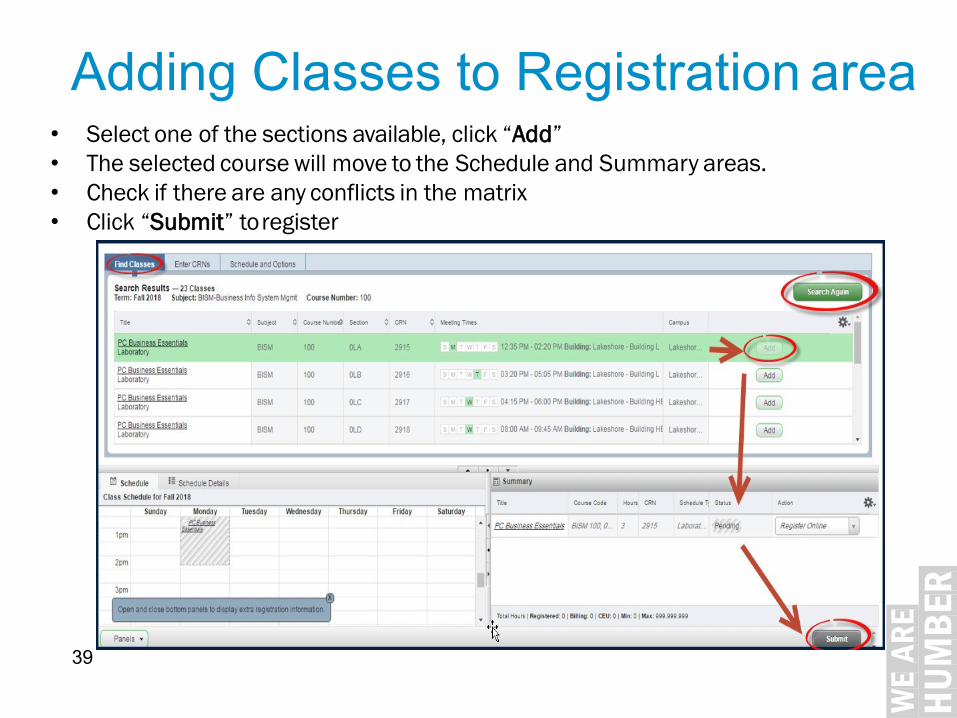
Adding Classes to Registration area• Select one of the sections available, click “Add”• The selected course will move to the Schedule and Summary areas.• Check if there are any conflicts in the matrix• Click “Submit” toregister
39
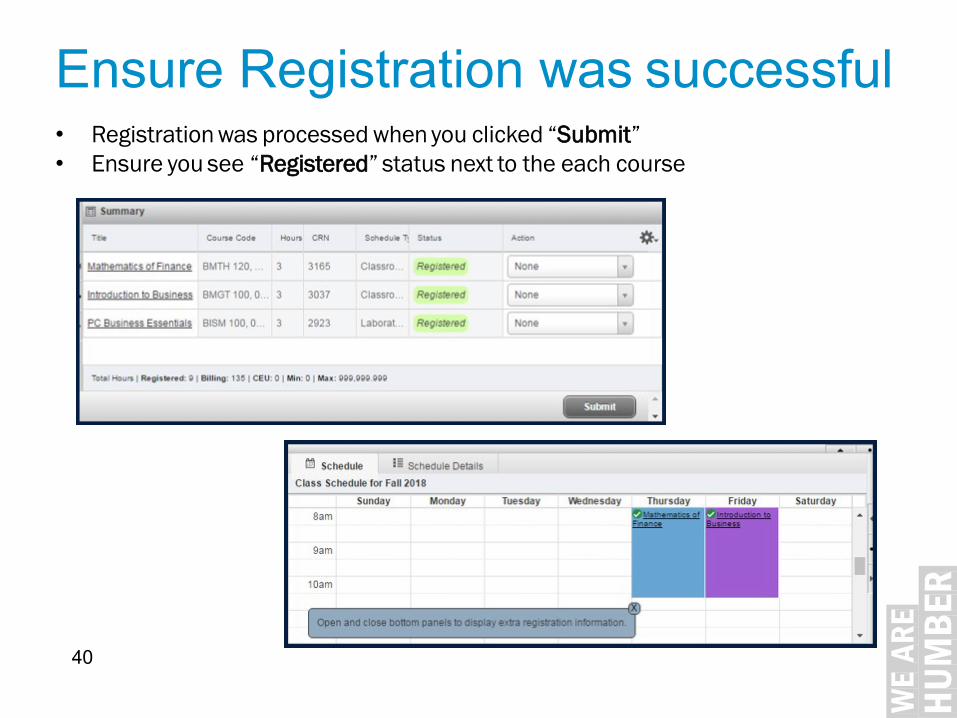
• Registration was processed when you clicked “Submit”• Ensure you see “Registered” status next to the each course
Ensure Registration was successful
40
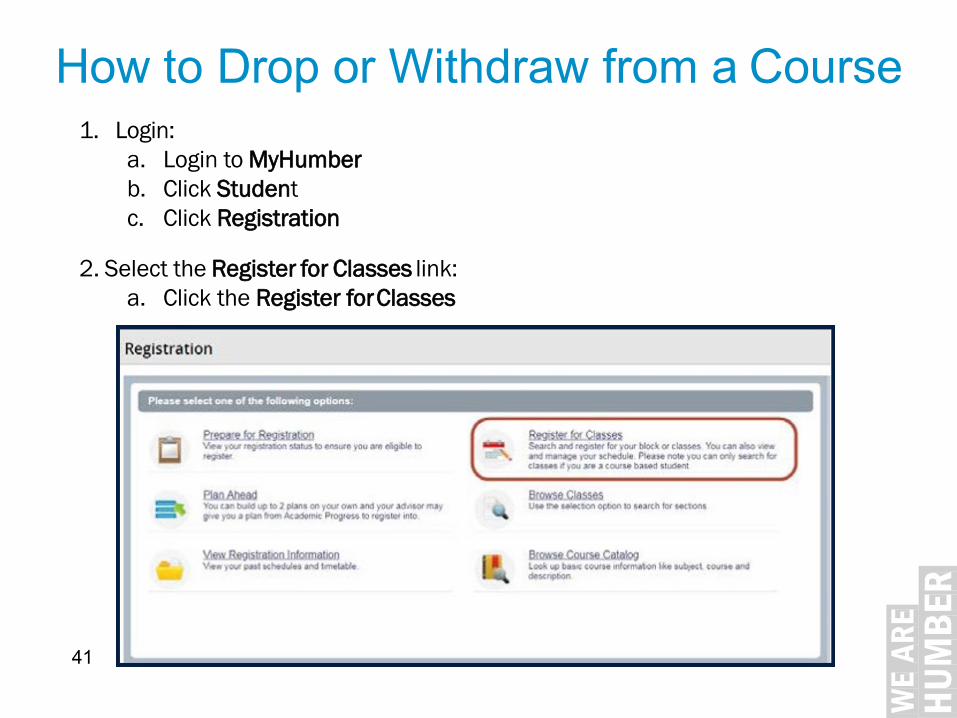
How to Drop or Withdraw from a Course1. Login:
a. Login to MyHumberb. Click Studentc. Click Registration
2. Select the Register for Classes link:a. Click the Register forClasses
41
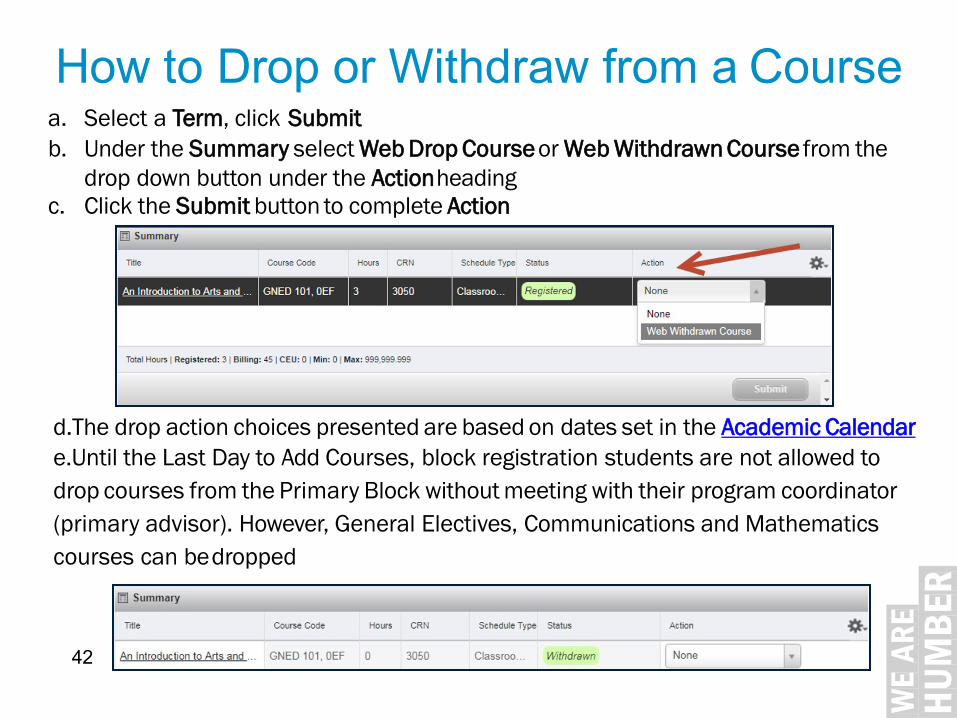
a. Select a Term, click Submitb. Under the Summary select Web Drop Courseor Web Withdrawn Course from the
drop down button under the Actionheadingc. Click the Submit button to complete Action
How to Drop or Withdraw from a Course
d.The drop action choices presented are based on dates set in the Academic Calendare.Until the Last Day to Add Courses, block registration students are not allowed to drop courses from the Primary Block without meeting with their program coordinator (primary advisor). However, General Electives, Communications and Mathematics courses can bedropped
42
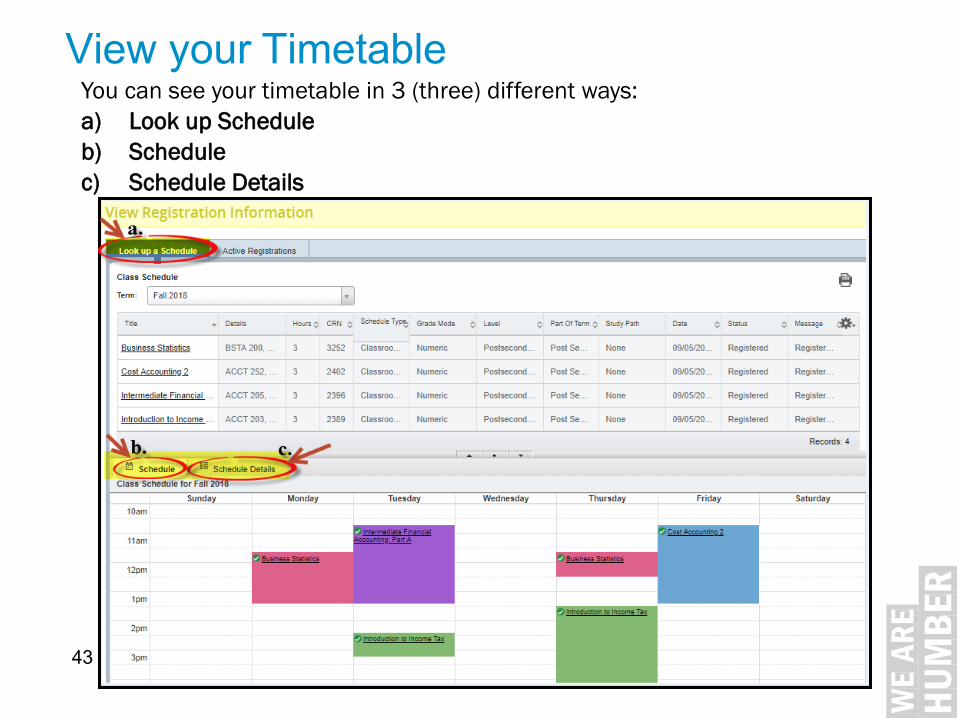
View your TimetableYou can see your timetable in 3 (three) different ways:a) Look up Scheduleb) Schedulec) Schedule Details
43
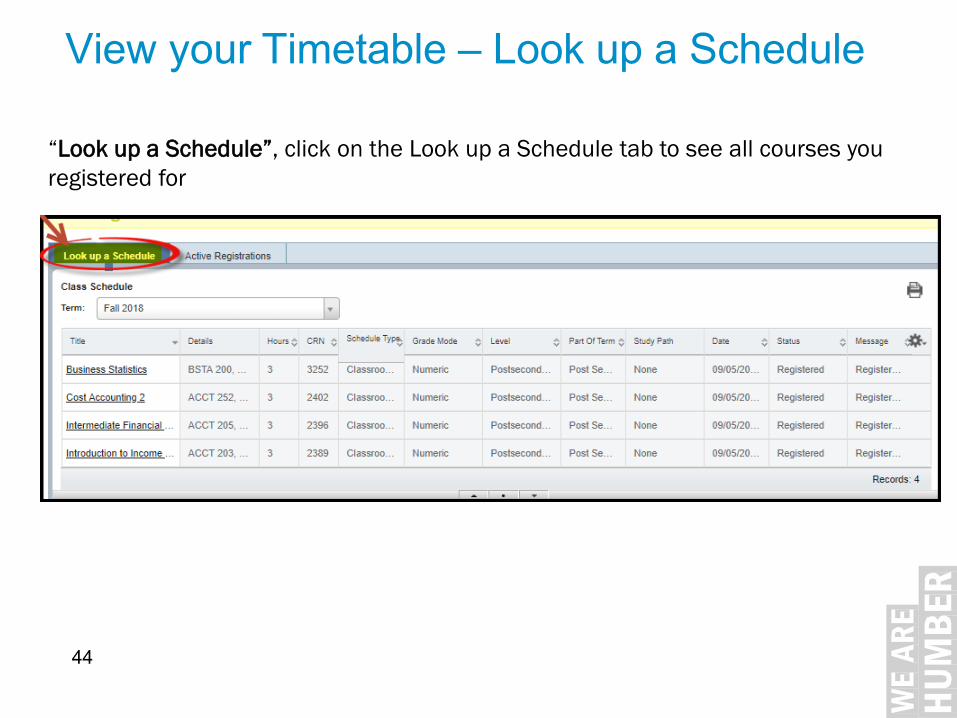
View your Timetable – Look up a Schedule
“Look up a Schedule”, click on the Look up a Schedule tab to see all courses you registered for
44
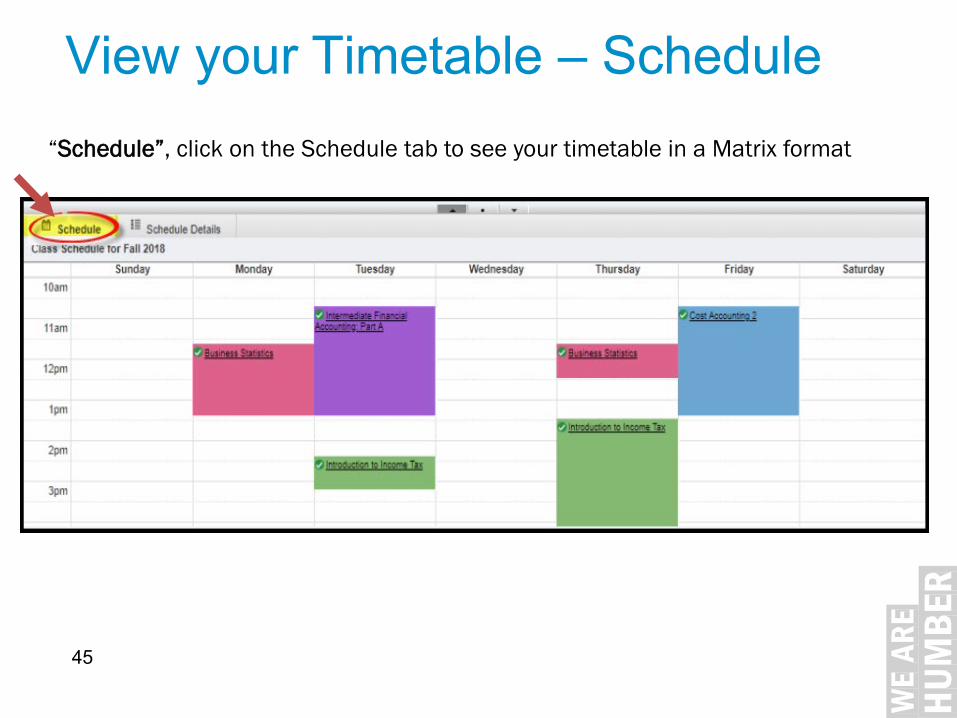
View your Timetable – Schedule “Schedule”, click on the Schedule tab to see your timetable in a Matrix format
45
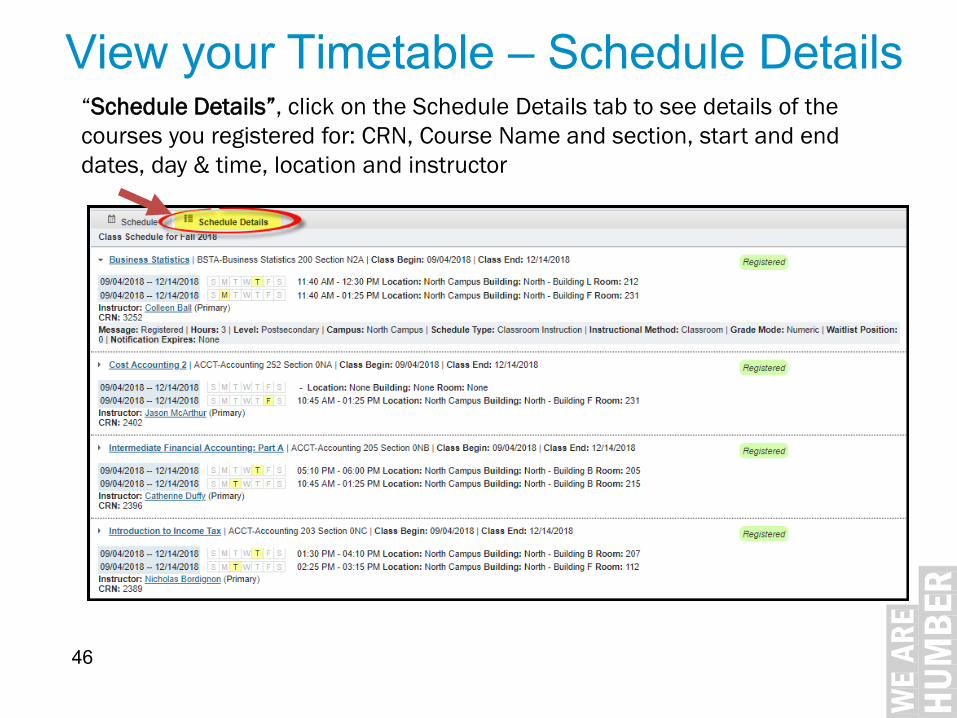
View your Timetable – Schedule Details“Schedule Details”, click on the Schedule Details tab to see details of the courses you registered for: CRN, Course Name and section, start and end dates, day & time, location and instructor
46

Email your Timetable – Schedule .ICS
47
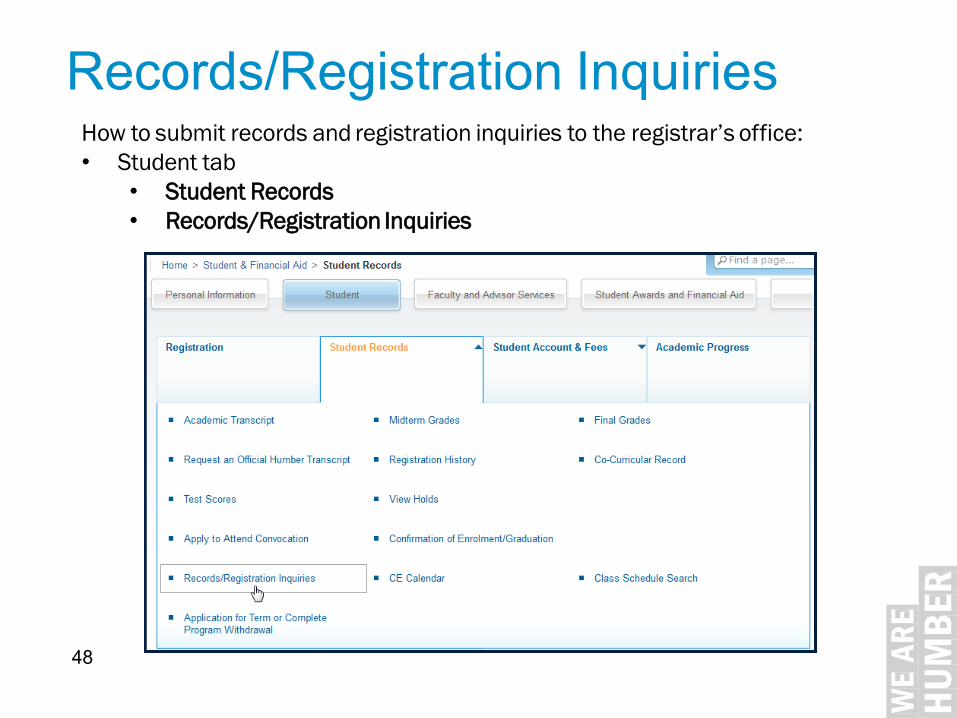
Records/Registration InquiriesHow to submit records and registration inquiries to the registrar’s office:• Student tab
• Student Records• Records/Registration Inquiries
48
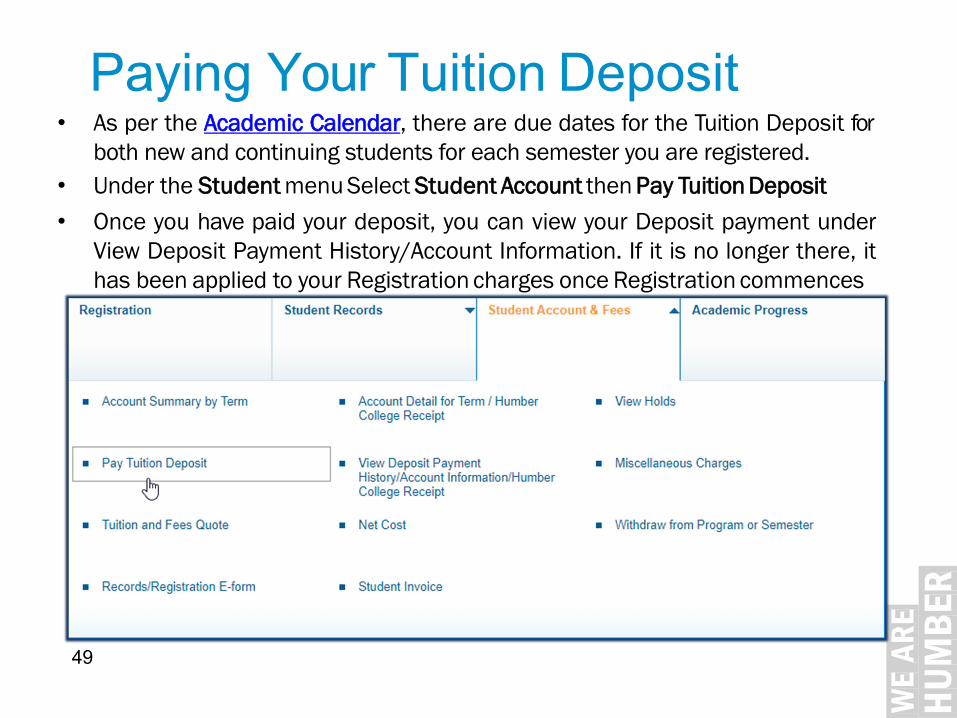
Paying Your Tuition Deposit• As per the Academic Calendar, there are due dates for the Tuition Deposit for
both new and continuing students for each semester you are registered.• Under the Student menu Select Student Account then Pay Tuition Deposit• Once you have paid your deposit, you can view your Deposit payment under
View Deposit Payment History/Account Information. If it is no longer there, ithas been applied to your Registration charges once Registration commences
49
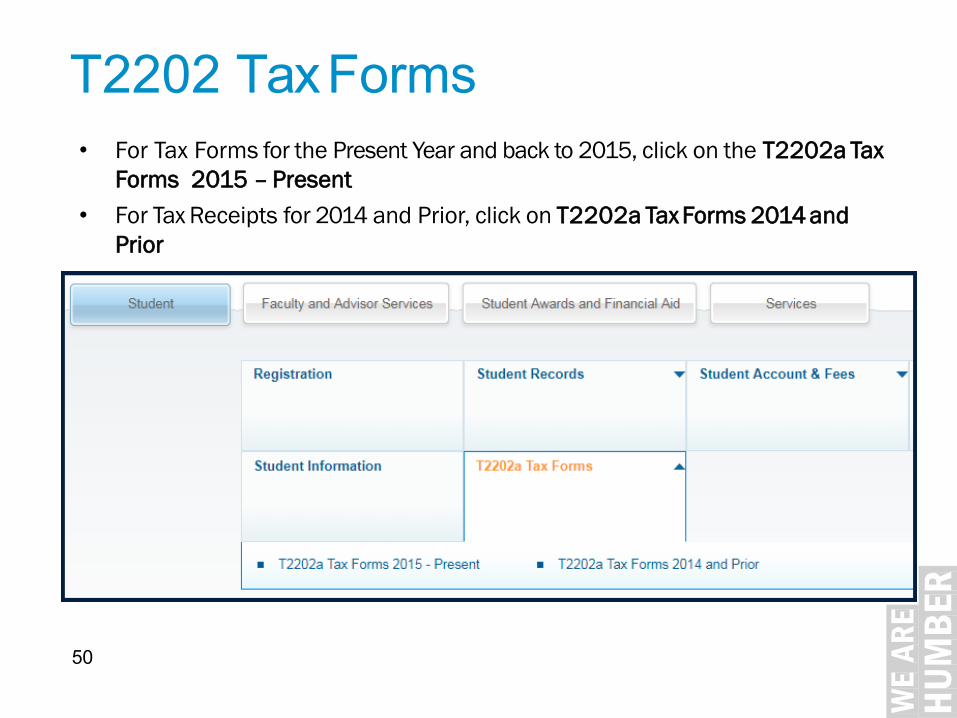
T2202 TaxForms• For Tax Forms for the Present Year and back to 2015, click on the T2202a Tax
Forms 2015 – Present• For Tax Receipts for 2014 and Prior, click on T2202a TaxForms 2014 and
Prior
50

Account Detail for Term/Humber College Receipt
• Select Account Detail for Term to see details of a specific term
• Select the term that you would like to view
• View Account Balance and Click Pay Now to pay outstanding fees by Visa or MasterCard, which will be subject to a 1.75% Service Fee.
• To view another term go back to Select Term under Registration and choose the term51
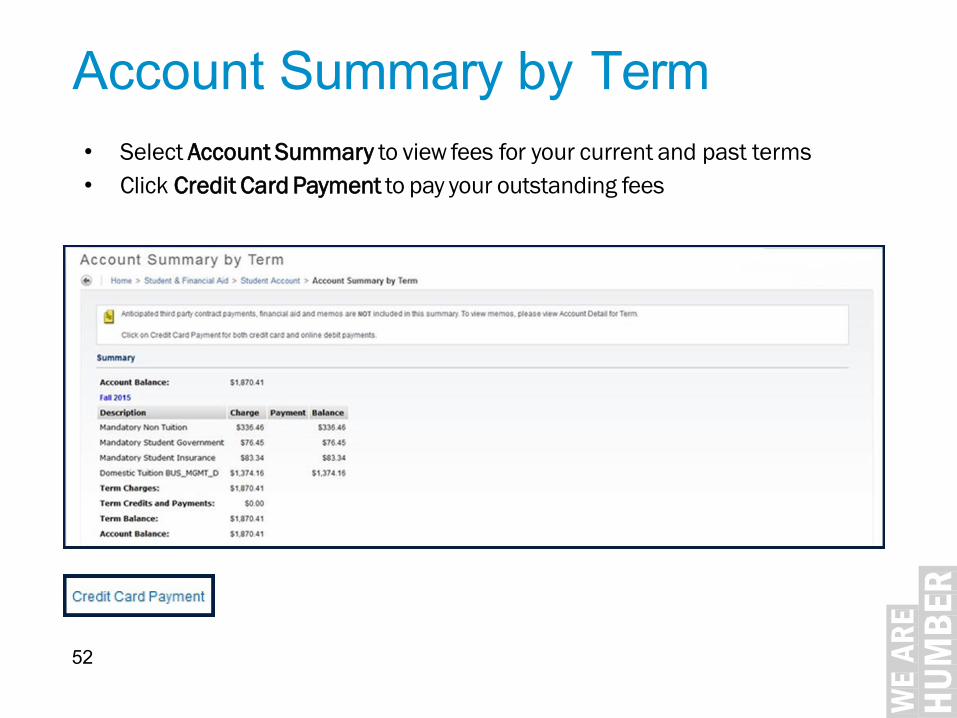
Account Summary by Term• Select Account Summary to view fees for your current and past terms• Click Credit Card Payment to pay your outstanding fees
52
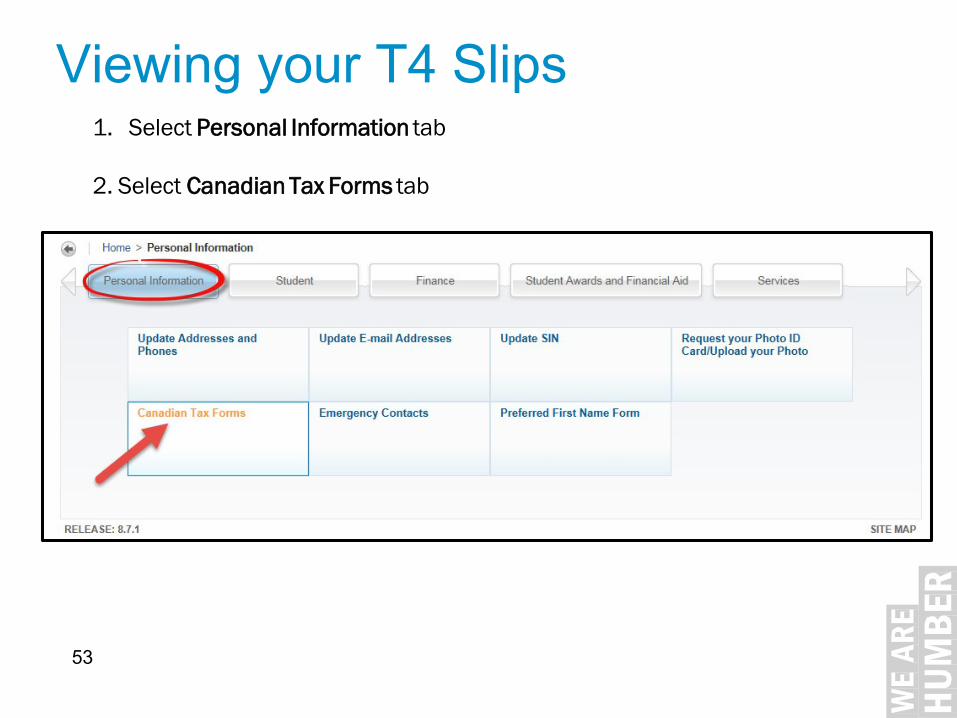
Viewing your T4 Slips 1. Select Personal Information tab
2. Select Canadian Tax Forms tab
53
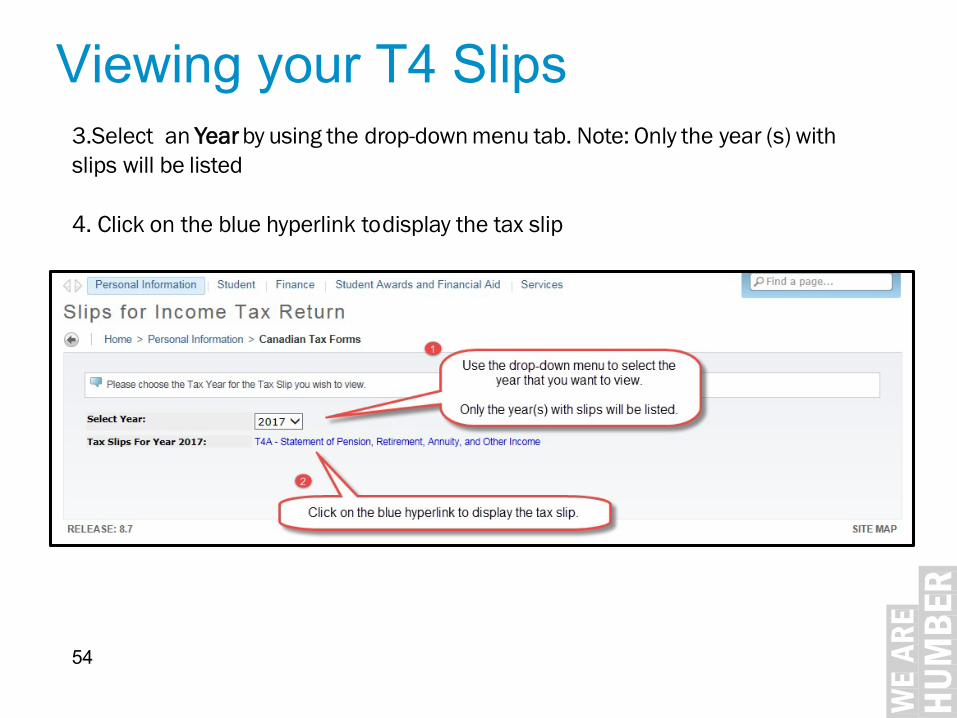
Viewing your T4 Slips3.Select an Year by using the drop-down menu tab. Note: Only the year (s) with slips will be listed
4. Click on the blue hyperlink todisplay the tax slip
54
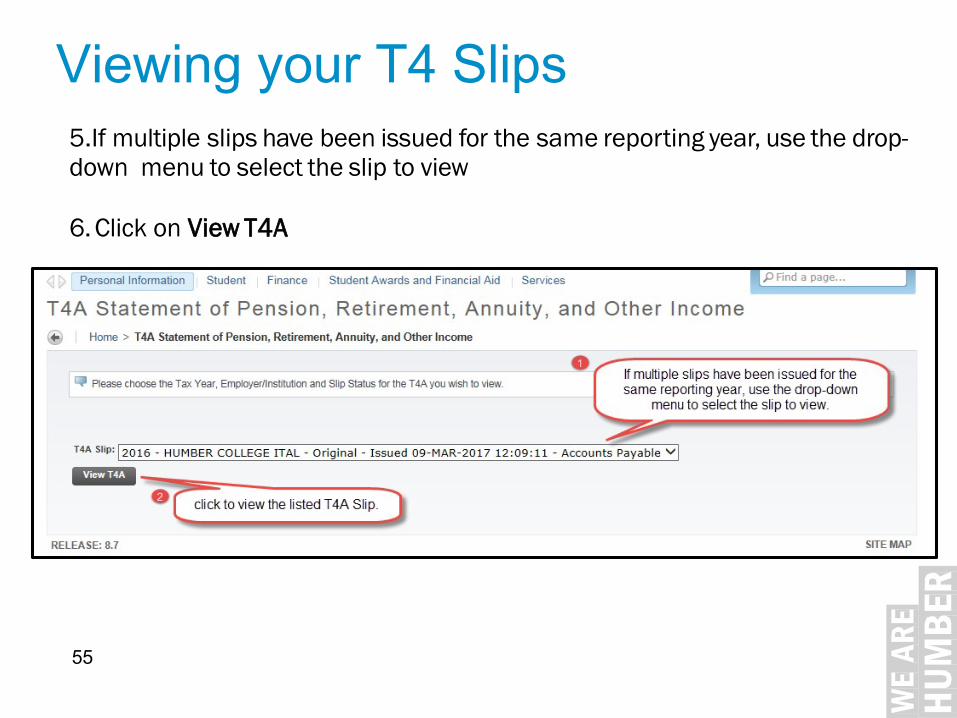
Viewing your T4 Slips5.If multiple slips have been issued for the same reporting year, use the drop-down menu to select the slip to view
6. Click on View T4A
55