Embed Size (px)
Citation preview
iTrail GPS Logger• Getting Started with iTrail GPS Logger
• GPS Logger LED Indicators
• Important Information
− Essentials for Beginners
− GPS Education
iTrail PC Software• iTrail Actiatioin
• Download Data
• Current Configuration
• Report
• Setup
• Vehicle Info
• Map Options
• Contact and Support
iTrail GPS Logger
Package Contents & Specifications
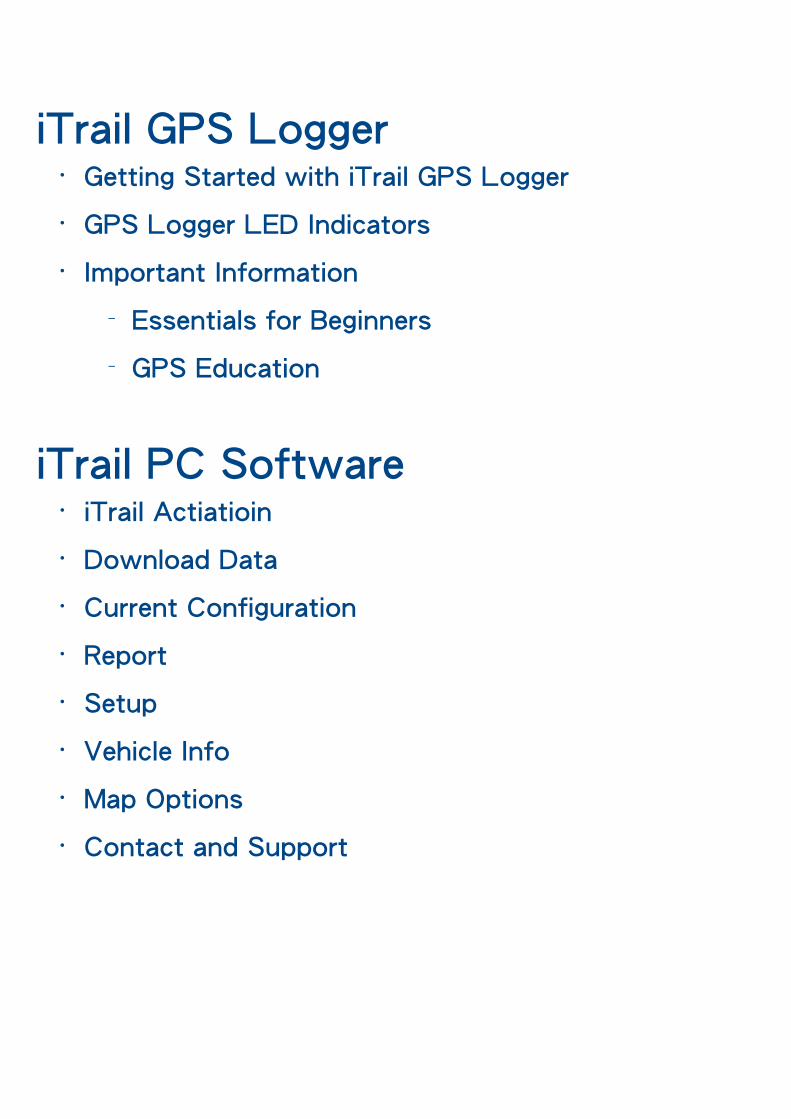
The iTrail GPS Logger package includes one iTrail PC CD-ROM, one GPS data logger, one iTrail GPS Logger / USB Cable, and
one jelly case.
SleuthGear iTRAIL GPS LOGGER package contents
iTrail GPS Logger USB Cable GPS Logger Cable works both as SleuthGear iTRAIL GPS LOGGER built-in battery charger and data transfer medium for SleuthGear iTRAIL GPS LOGGER.
iTrail PC CD-ROM iTrail PC is an easy to use software tool to install iTrail in your PC.
iTrail GPS Logger jelly case The iTrail GPS logger comes with a jelly case which provides for additional protection and mounting capabilities, and can be used in conjunction with the fastening strap.
iTrail GPS Logger Fastening Strap iTrail GPS Logger Fastening Strap allows you to tie and fasten the iTrail GPS Logger anywhere for easier travel.
Note: To allow for expanded applications, the iTrail GPS logger is designed as a water-resistant device. This means that it will
still functional normally if splashed by rain or water. Although it is water resistant, it should NOT be submersed under water
for activities like swimming, diving, etc. Submersion of iTrail GPS logger may cause unexpected damages.
SleuthGear iTRAIL GPS LOGGER Dimension 1.5" x 1.5" x 0.5"Weight 1.3ozChipset Built-in SiRF StarIII low-power chipsetAntenna Built-in GPS patch antennaBattery Built-in 750 mAh Lithium-ion batteryLED indicators Blue & RedCold start < 35 secondsWarm start < 35 secondsConnection interface USB 1.1 for PC connectionOperation temperature
-10 °C to + 50 °C
Water-resistant YesMotion detection Yes
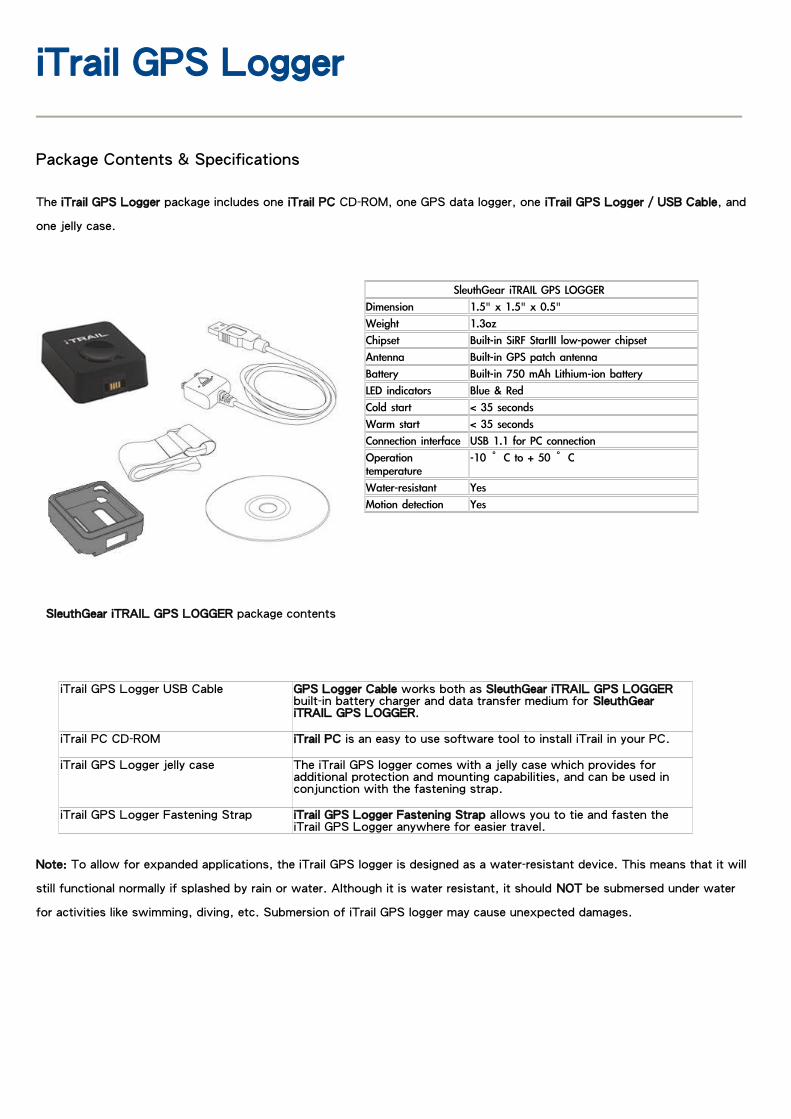
iTrail GPS Logger Product View
SleuthGear iTRAIL GPS LOGGER
Getting Started with iTrail GPS Logger
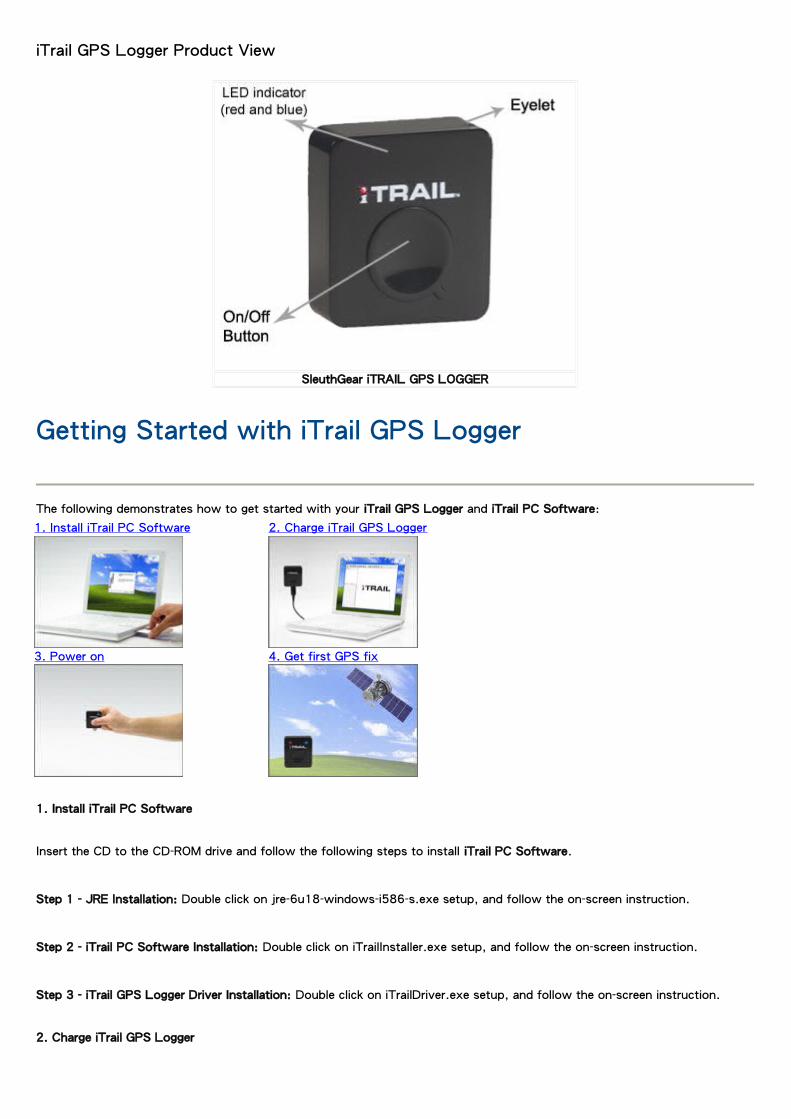
The following demonstrates how to get started with your iTrail GPS Logger and iTrail PC Software:
1. Install iTrail PC Software 2. Charge iTrail GPS Logger
3. Power on 4. Get first GPS fix
1. Install iTrail PC Software
Insert the CD to the CD-ROM drive and follow the following steps to install iTrail PC Software.
Step 1 - JRE Installation: Double click on jre-6u18-windows-i586-s.exe setup, and follow the on-screen instruction.
Step 2 - iTrail PC Software Installation: Double click on iTrailInstaller.exe setup, and follow the on-screen instruction.
Step 3 - iTrail GPS Logger Driver Installation: Double click on iTrailDriver.exe setup, and follow the on-screen instruction.
2. Charge iTrail GPS Logger

iTrail GPS Logger / USB Cable functions both as a charger as well as the connection to your PC for data transfer. Please
follow the instructions shown in the illustrations below to connect your iTrail GPS Logger to PC and have it fully charged.
It takes about 4 hours to fully charge your iTrail GPS Logger for the first time. After it's initial 4 hours charge, the unit will
only need approximately 2 hours to fully charge. The red LED indicator stays on during charging, and goes off when charging
is complete. Remove your iTrail GPS Logger when charging is complete.
Note: One side of the USB connector marked with an arrow should face up when you intend to connect it to the device, in order to avoid unexpected damage caused by incorrect plugging.
Connect & Remove iTrail GPS Logger USB Cable
Connect & Remove iTrail GPS Logger USB Cable
3. Power on/off your iTrail GPS Logger
Press and hold the button for a few seconds to power on/off your iTrail GPS Logger. The blue LED indicator blinks once upon
power-on, and the red LED indicator blinks upon power-off.
Tip: Go to iTrail GPS Logger indicators to familiarize yourself with the LED indicators.
4. Initiate your iTrail GPS Logger for the first GPS fix
The iTrail GPS Logger needs a direct line of sight to the clear sky to receive GPS signals and acquire a GPS signal. The first
time you use your iTrail GPS Logger, please place the unit on a balcony, top of your car, or someplace where there is an
unobstructed view of the sky in order to get the quickest GPS signal acquisition for your iTrail GPS Logger.
Once the first GPS fix is successfully acquired, both the blue and red LED indicator of iTrail GPS Logger will blink
simultaneously twice, indicating that GPS logging has begun. iTrail GPS Logger will then start logging based on the tracking
interval configured in hardware settings.
Note:
1. Find the LED indicator demos in iTrail GPS Logger LED indicators.
2. For more detailed information on the GPS fix, correct wear and use of your iTrail GPS Logger, please refer to Essentials for
Beginners.
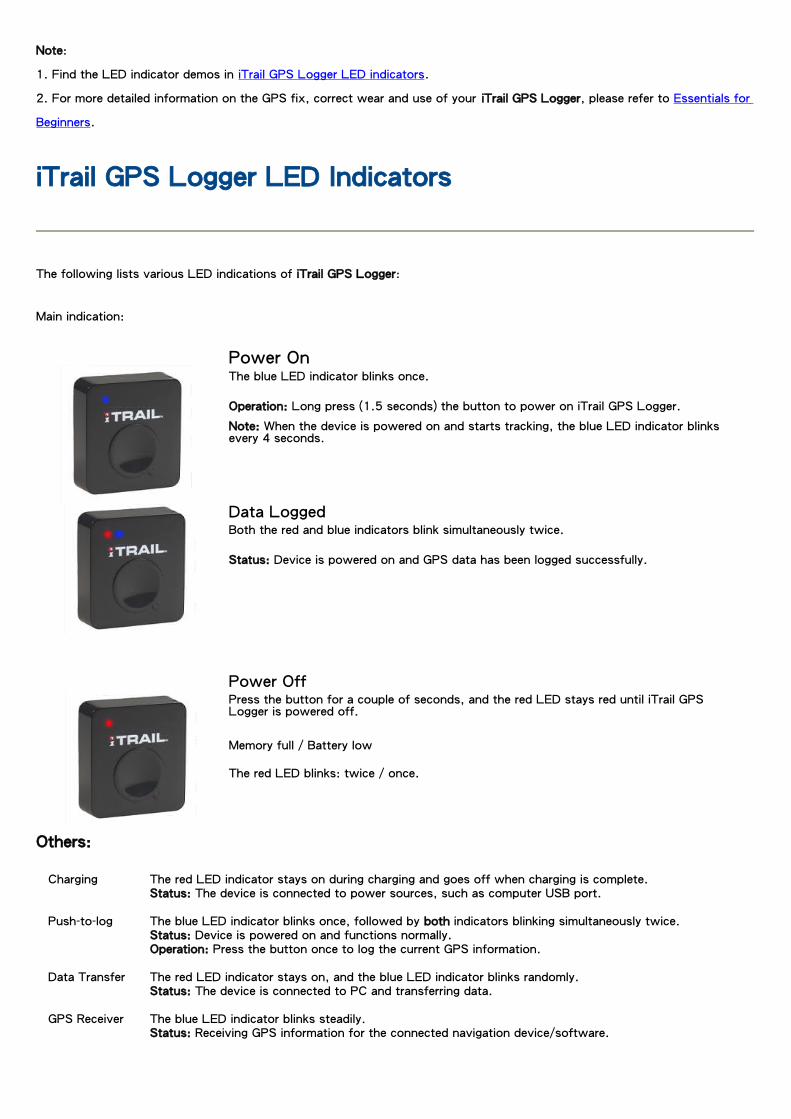
iTrail GPS Logger LED Indicators
The following lists various LED indications of iTrail GPS Logger:
Main indication:
Power OnThe blue LED indicator blinks once.
Operation: Long press (1.5 seconds) the button to power on iTrail GPS Logger.
Note: When the device is powered on and starts tracking, the blue LED indicator blinks every 4 seconds.
Data LoggedBoth the red and blue indicators blink simultaneously twice.
Status: Device is powered on and GPS data has been logged successfully.
Power Off Press the button for a couple of seconds, and the red LED stays red until iTrail GPS Logger is powered off.
Memory full / Battery low
The red LED blinks: twice / once.
Others:
Charging The red LED indicator stays on during charging and goes off when charging is complete. Status: The device is connected to power sources, such as computer USB port.
Push-to-log The blue LED indicator blinks once, followed by both indicators blinking simultaneously twice. Status: Device is powered on and functions normally. Operation: Press the button once to log the current GPS information.
Data Transfer The red LED indicator stays on, and the blue LED indicator blinks randomly. Status: The device is connected to PC and transferring data.
GPS Receiver The blue LED indicator blinks steadily. Status: Receiving GPS information for the connected navigation device/software.
Essentials For Beginners
Before hitting on the road with your iTrail GPS Logger, please read the following information thoroughly to ensure the iTrail
GPS Logger will function properly.
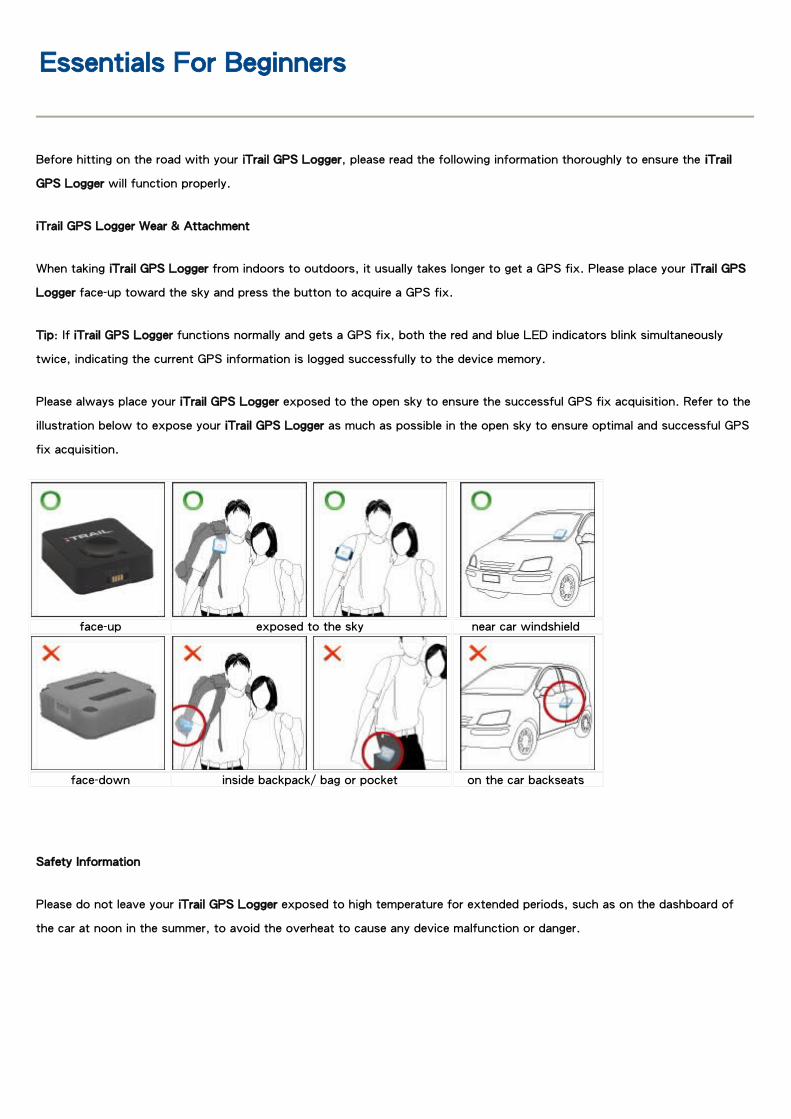
iTrail GPS Logger Wear & Attachment
When taking iTrail GPS Logger from indoors to outdoors, it usually takes longer to get a GPS fix. Please place your iTrail GPS
Logger face-up toward the sky and press the button to acquire a GPS fix.
Tip: If iTrail GPS Logger functions normally and gets a GPS fix, both the red and blue LED indicators blink simultaneously
twice, indicating the current GPS information is logged successfully to the device memory.
Please always place your iTrail GPS Logger exposed to the open sky to ensure the successful GPS fix acquisition. Refer to the
illustration below to expose your iTrail GPS Logger as much as possible in the open sky to ensure optimal and successful GPS
fix acquisition.
face-up exposed to the sky near car windshield
face-down inside backpack/ bag or pocket on the car backseats
Safety Information
Please do not leave your iTrail GPS Logger exposed to high temperature for extended periods, such as on the dashboard of
the car at noon in the summer, to avoid the overheat to cause any device malfunction or danger.
GPS Education
What is GPS: Global Position System (GPS) is developed and operated by the Department of Defense (DOD) of the United
States, on which the accuracy and maintenance of this system fully depends. Any change made by the authorities might
influence the accuracy and performance of the GPS equipments.
How GPS works: GPS provides satellite signals which are specially coded for the computation in a GPS receiver to produce the
position, velocity and time. Usually it requires four GPS satellite signals to computer correctly the position in three dimensions
and the offset time of the GPS receiver’s clock.
Limitations on GPS reception: Initial or any use after a longer interval over four hours takes a few minutes for a successful
location. Any obstruction above or around the receiver, such as high buildings in the neighborhood, or bad reception location,
such as in a tunnel or in the building, will influence the time needed for a successful GPS location.
Cold Start: Cold start of the GPS device refers to the state of the tracker when time and position are known to within some
limits, the almanac known, and the ephemeris unknown.
Example: If the GPS device has been off for a few hours, and the ephemeris data is known for at least three satellites, the
start up will be a warm start and fix the positional in 10 - 20 seconds. Therefore, if ephemeris data for only 2 or less satellites
is known it's a cold start and acquisition will take as much as a few minutes.
Warm Start: Warm start of the GPS device refers to the state of the device when time and position are known to within some
limits, the almanac known, and at least 3 satellite ephemeris are known from previous operation.
Example: If the GPS device has been off for only a few minutes, the ephemeris data for all the satellites will be known and
therefore the GPS device will fix the positional in a matter of seconds.
Note: The almanac data is an estimated (computed) data and can be valid for months while the ephemeris is only valid for 3 -
6 hours.
Note: Actual acquisition time depends on the terrain and satellite coverage.
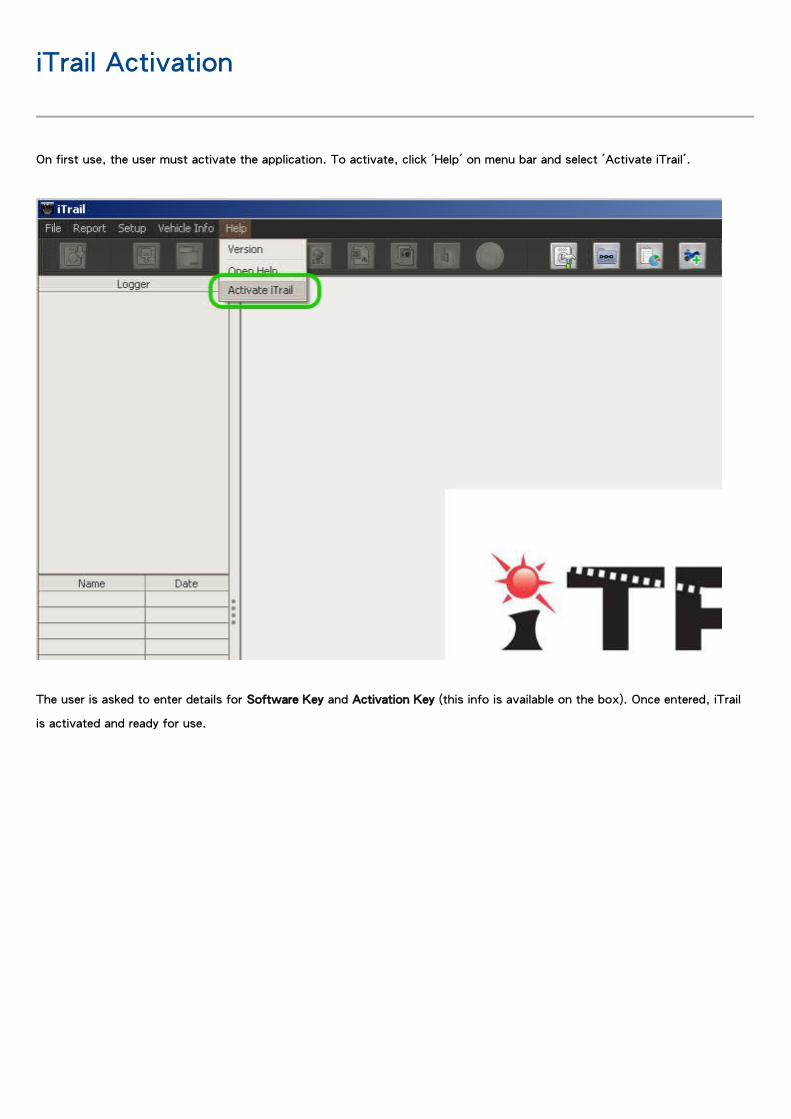
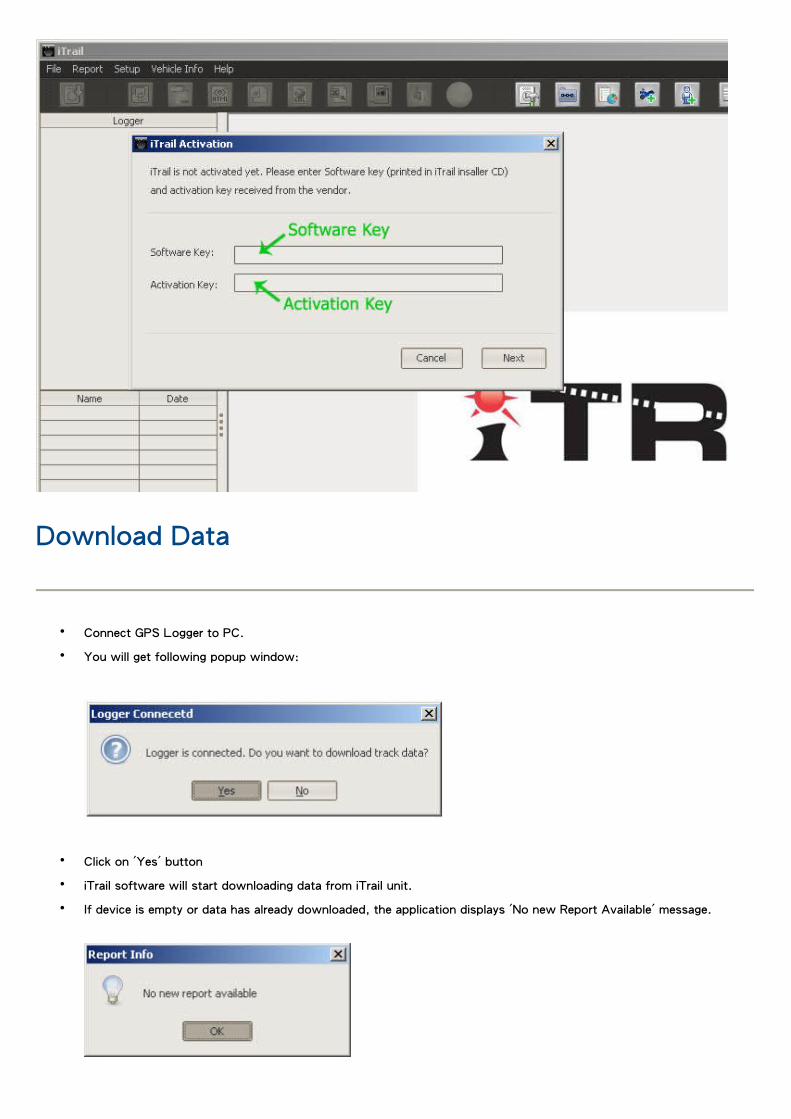
iTrail Activation
On first use, the user must activate the application. To activate, click 'Help' on menu bar and select 'Activate iTrail'.
The user is asked to enter details for Software Key and Activation Key (this info is available on the box). Once entered, iTrail
is activated and ready for use.
Download Data
• Connect GPS Logger to PC.
• You will get following popup window:
• Click on 'Yes' button
• iTrail software will start downloading data from iTrail unit.
• If device is empty or data has already downloaded, the application displays 'No new Report Available' message.

• After successfully reading data from the logger, iTrail opens Memory Info window, following which the report will be
generated. After report generation, it opens Trip Info window to specify trip name, vehicle info and driver info.
• After submitting Current Configuration, it opens Map in right hand side. (Please note that for Map to be displayed,
internet connection is required)
• If logger is not registered yet with iTrail, iTrail creates entry for the logger in ‘Logger’ table at Left hand side.
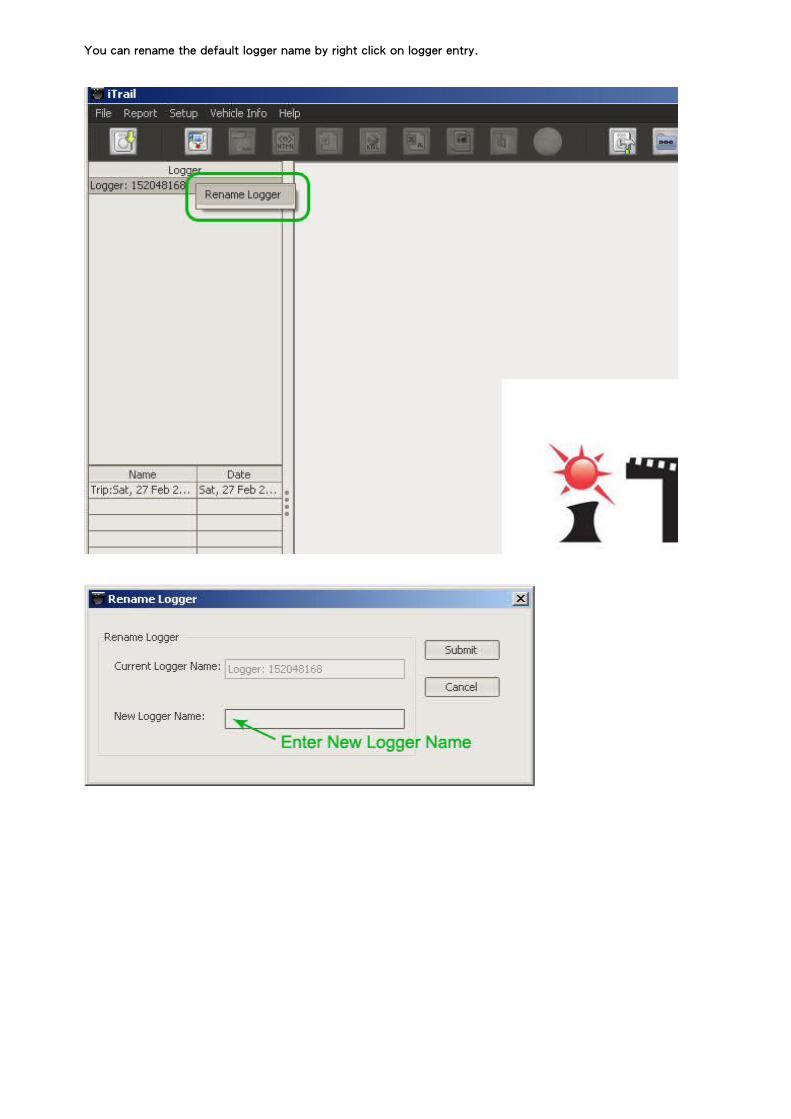
You can rename the default logger name by right click on logger entry.
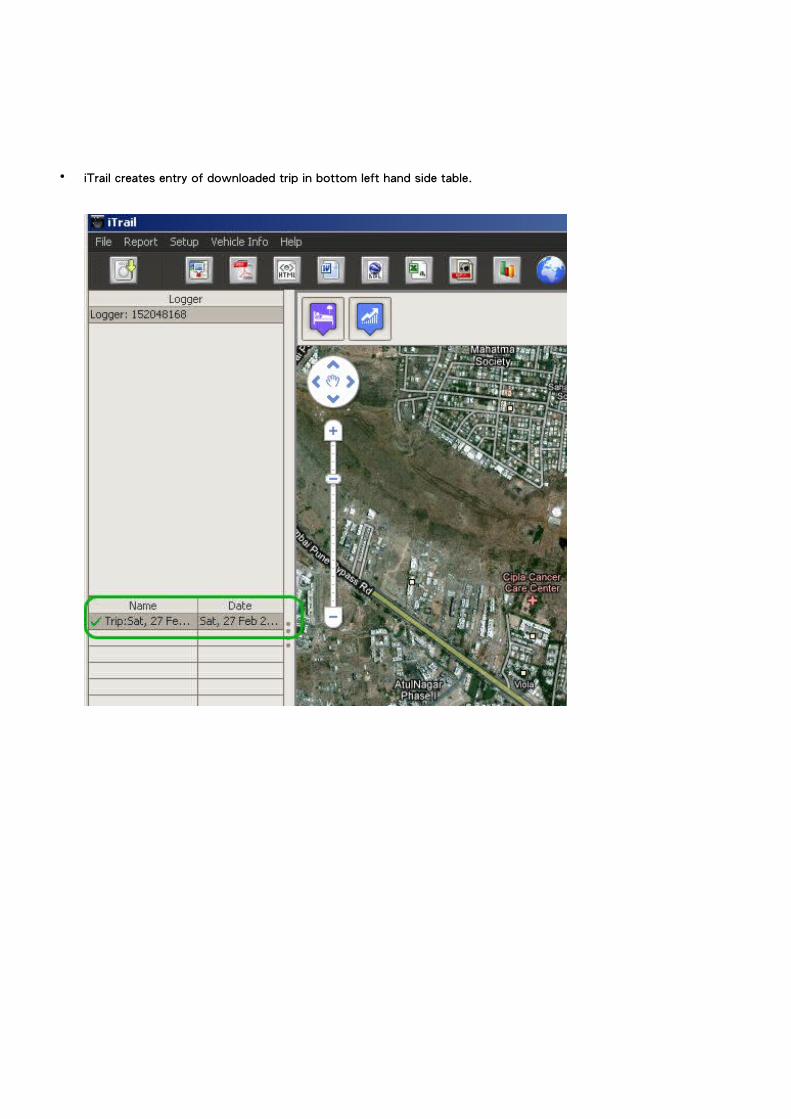
• iTrail creates entry of downloaded trip in bottom left hand side table.
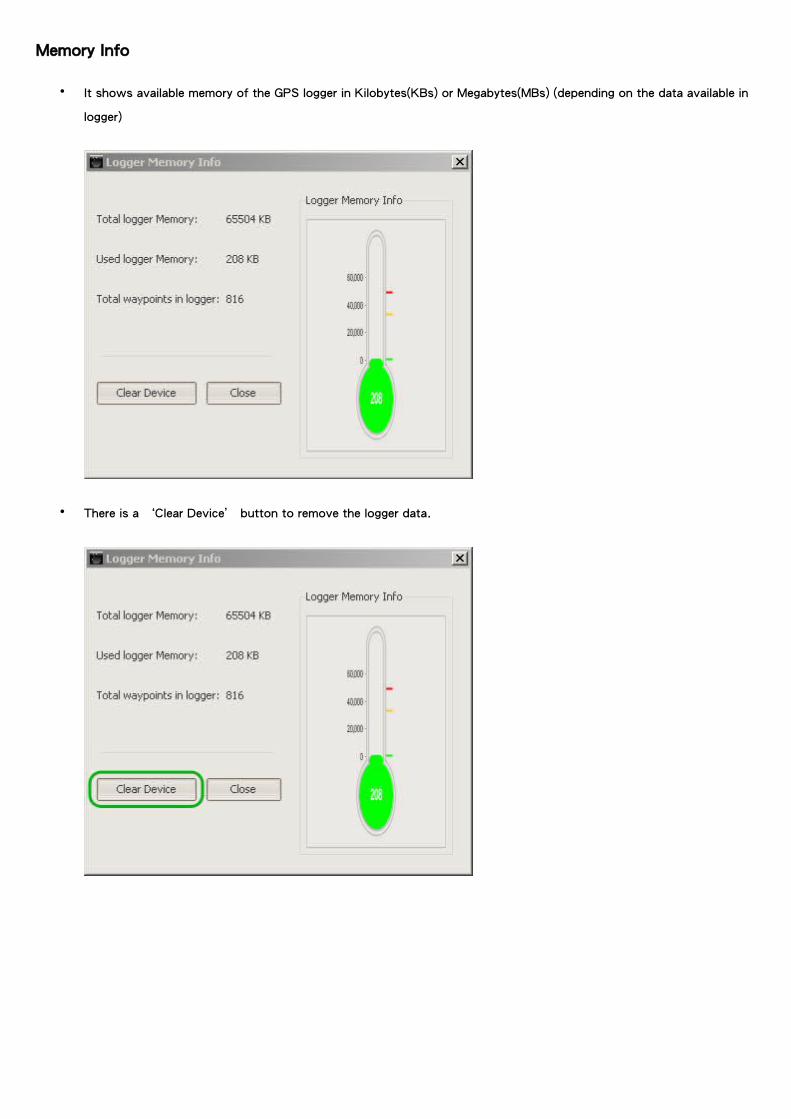
Memory Info
• It shows available memory of the GPS logger in Kilobytes(KBs) or Megabytes(MBs) (depending on the data available in
logger)
• There is a ‘Clear Device’ button to remove the logger data.
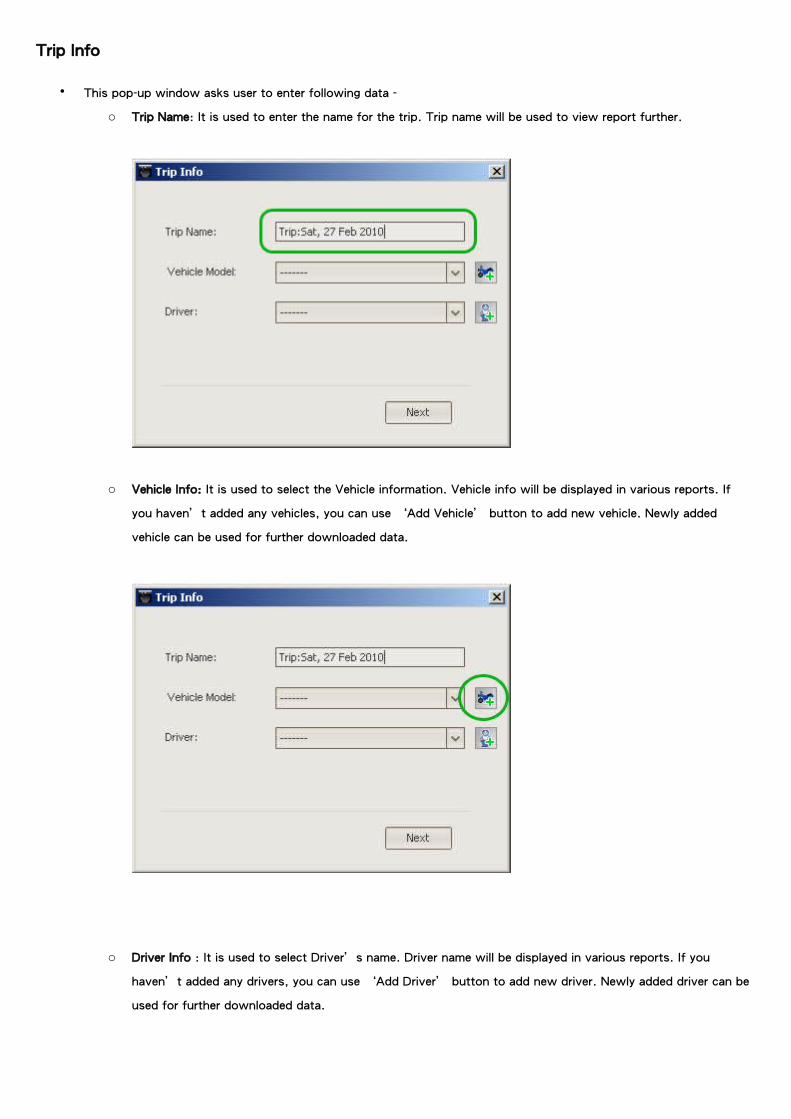
Trip Info
• This pop-up window asks user to enter following data -
o Trip Name: It is used to enter the name for the trip. Trip name will be used to view report further.
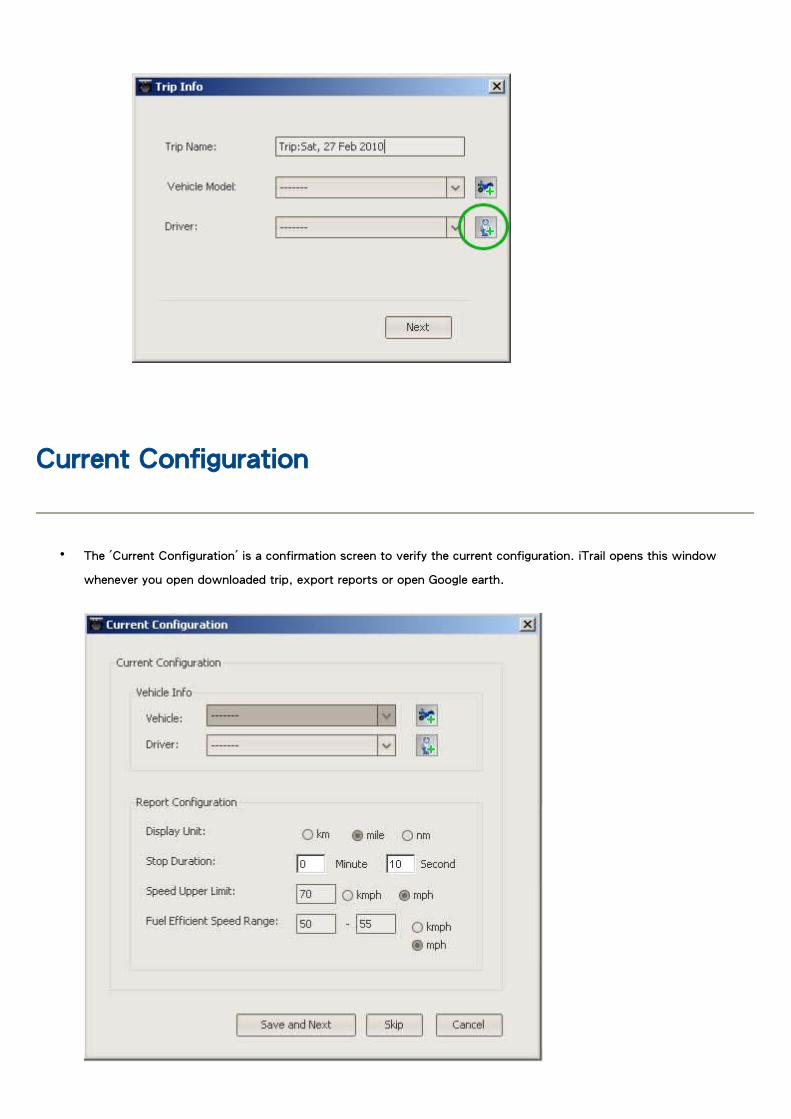
o Vehicle Info: It is used to select the Vehicle information. Vehicle info will be displayed in various reports. If
you haven’t added any vehicles, you can use ‘Add Vehicle’ button to add new vehicle. Newly added
vehicle can be used for further downloaded data.
o Driver Info : It is used to select Driver’s name. Driver name will be displayed in various reports. If you
haven’t added any drivers, you can use ‘Add Driver’ button to add new driver. Newly added driver can be
used for further downloaded data.
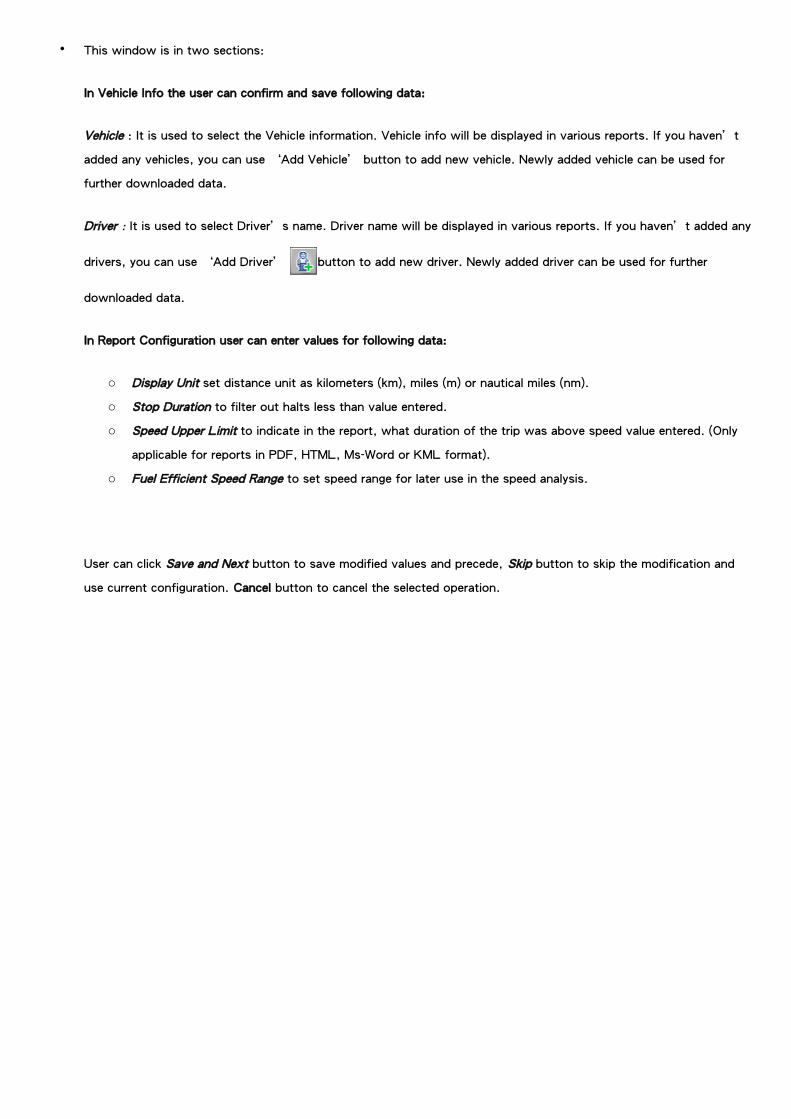
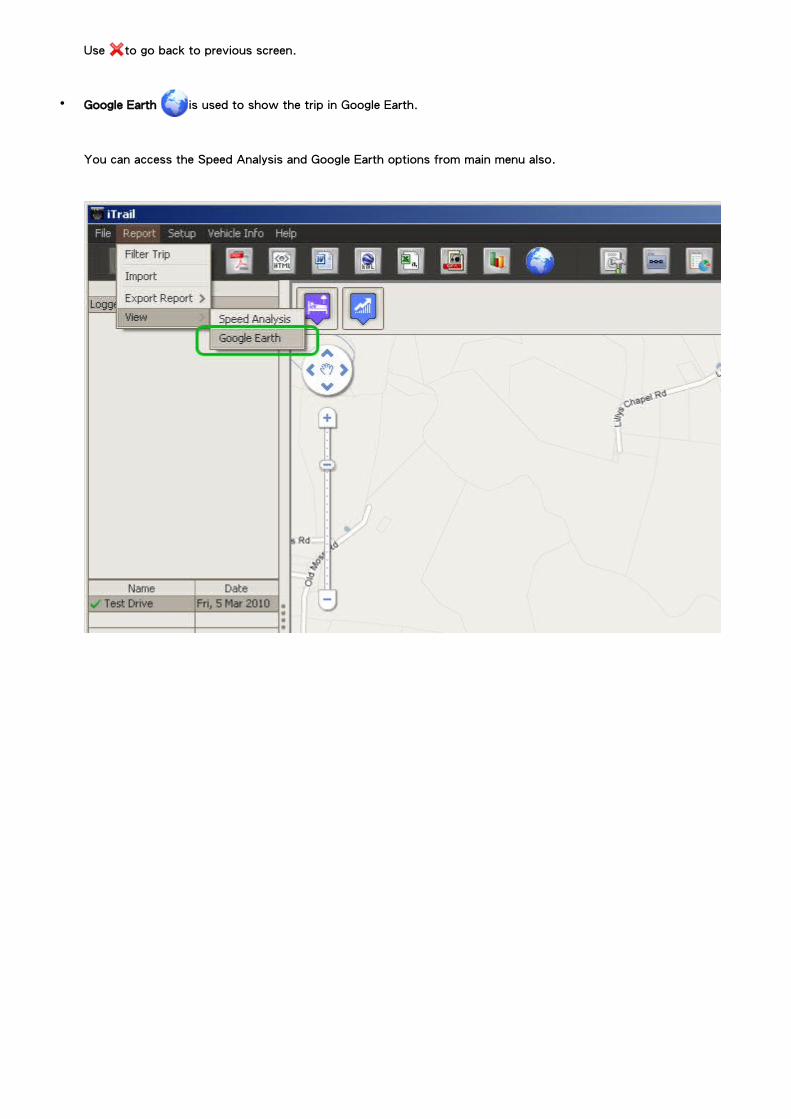
Current Configuration
• The 'Current Configuration' is a confirmation screen to verify the current configuration. iTrail opens this window
whenever you open downloaded trip, export reports or open Google earth.
• This window is in two sections:
In Vehicle Info the user can confirm and save following data:
Vehicle : It is used to select the Vehicle information. Vehicle info will be displayed in various reports. If you haven’t
added any vehicles, you can use ‘Add Vehicle’ button to add new vehicle. Newly added vehicle can be used for
further downloaded data.
Driver : It is used to select Driver’s name. Driver name will be displayed in various reports. If you haven’t added any
drivers, you can use ‘Add Driver’ button to add new driver. Newly added driver can be used for further
downloaded data.
In Report Configuration user can enter values for following data:
o Display Unit set distance unit as kilometers (km), miles (m) or nautical miles (nm).
o Stop Duration to filter out halts less than value entered.
o Speed Upper Limit to indicate in the report, what duration of the trip was above speed value entered. (Only
applicable for reports in PDF, HTML, Ms-Word or KML format).
o Fuel Efficient Speed Range to set speed range for later use in the speed analysis.
User can click Save and Next button to save modified values and precede, Skip button to skip the modification and
use current configuration. Cancel button to cancel the selected operation.

Report
• Filter Trip to filter out from multiple trips by the date on which the data was downloaded by user; from-date to–
date.
You can access Filter Trip from main menu also.

• Import to import SKX files. Import is available in main menu.
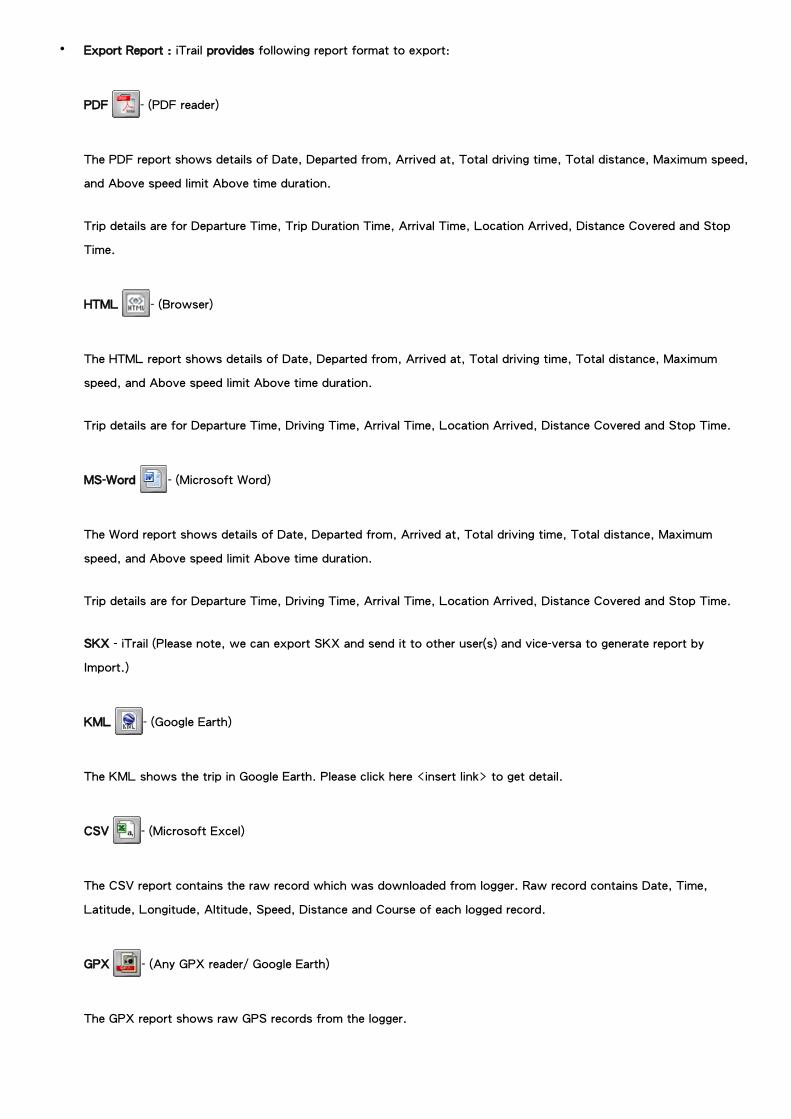
• Export Report : iTrail provides following report format to export:
PDF - (PDF reader)
The PDF report shows details of Date, Departed from, Arrived at, Total driving time, Total distance, Maximum speed,
and Above speed limit Above time duration.
Trip details are for Departure Time, Trip Duration Time, Arrival Time, Location Arrived, Distance Covered and Stop
Time.
HTML - (Browser)
The HTML report shows details of Date, Departed from, Arrived at, Total driving time, Total distance, Maximum
speed, and Above speed limit Above time duration.
Trip details are for Departure Time, Driving Time, Arrival Time, Location Arrived, Distance Covered and Stop Time.
MS-Word - (Microsoft Word)
The Word report shows details of Date, Departed from, Arrived at, Total driving time, Total distance, Maximum
speed, and Above speed limit Above time duration.
Trip details are for Departure Time, Driving Time, Arrival Time, Location Arrived, Distance Covered and Stop Time.
SKX - iTrail (Please note, we can export SKX and send it to other user(s) and vice-versa to generate report by
Import.)
KML - (Google Earth)
The KML shows the trip in Google Earth. Please click here <insert link> to get detail.
CSV - (Microsoft Excel)
The CSV report contains the raw record which was downloaded from logger. Raw record contains Date, Time,
Latitude, Longitude, Altitude, Speed, Distance and Course of each logged record.
GPX - (Any GPX reader/ Google Earth)
The GPX report shows raw GPS records from the logger.
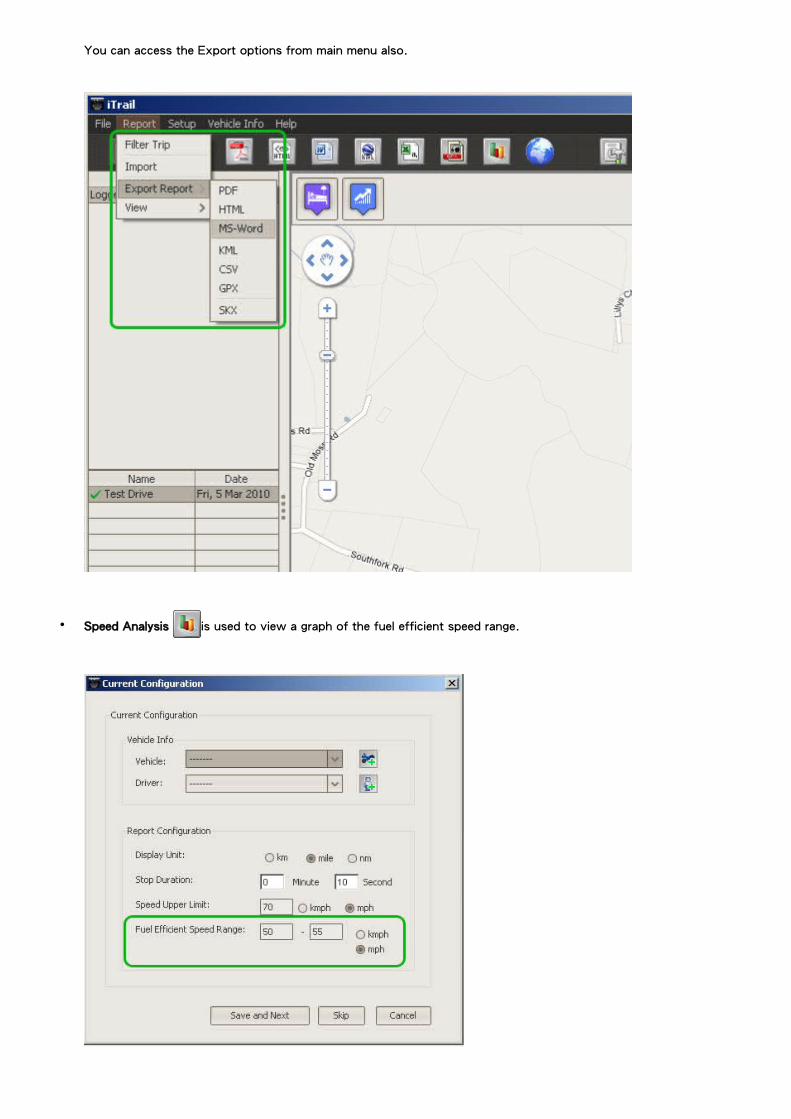
You can access the Export options from main menu also.
• Speed Analysis is used to view a graph of the fuel efficient speed range.
Use to go back to previous screen.
• Google Earth is used to show the trip in Google Earth.
You can access the Speed Analysis and Google Earth options from main menu also.

Setup
• Setup Device
If logger is already connected, Device Setup shows green indication otherwise it shows red indication. Connect logger
if is not connected, please wait a while until Device Setup does not show green indication.
Following facilities are available here:-
o Interval in second: Pulse rate for logging location data.
o Enable Button: Enable button control or not. If selected, button control is enabled.
Enter the pulse rate (second) in Interval field and click on Save Setup button.
o Reset Device
Reset is used to reset the device configuration. Reset clears the device data, and set the default pulse rate i.e. 5
seconds.
o Clear Device
Clear Device is used to remove the device data; it does not change the pulse rate.
o Close to close the window.
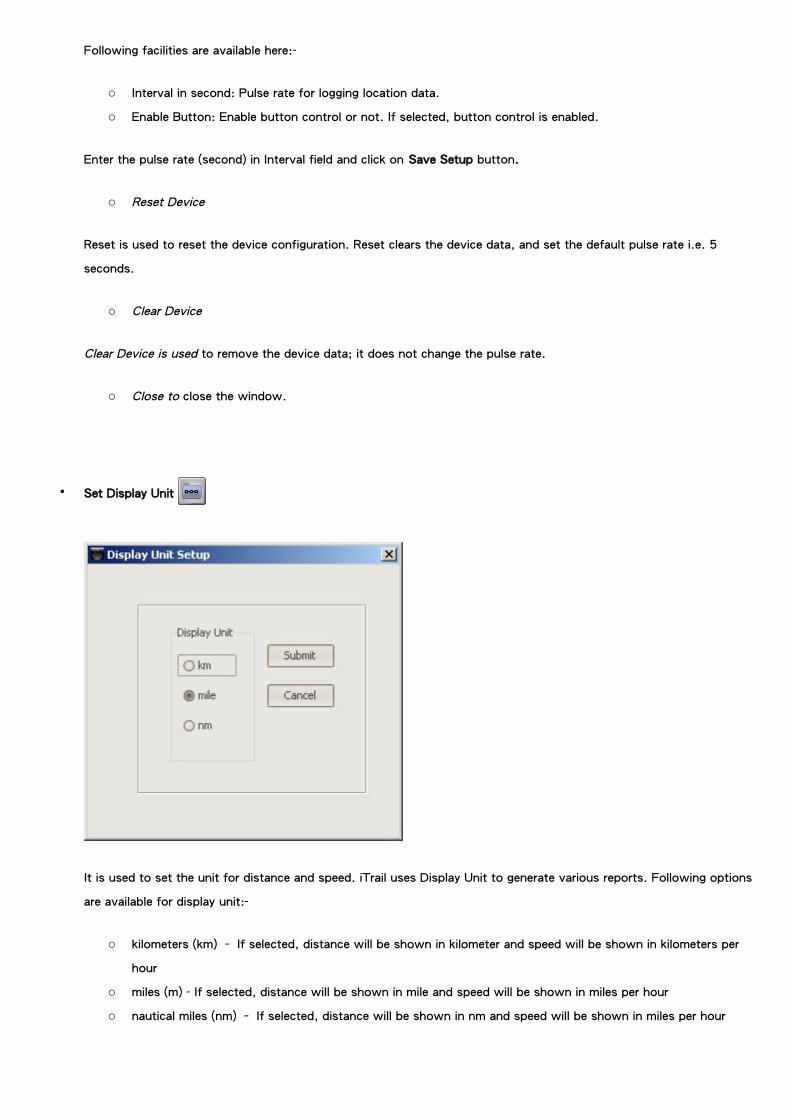
• Set Display Unit
It is used to set the unit for distance and speed. iTrail uses Display Unit to generate various reports. Following options
are available for display unit:-
o kilometers (km) – If selected, distance will be shown in kilometer and speed will be shown in kilometers per
hour
o miles (m) - If selected, distance will be shown in mile and speed will be shown in miles per hour
o nautical miles (nm) – If selected, distance will be shown in nm and speed will be shown in miles per hour
To select the display unit, click on one of the option and click on ‘Submit’ button.
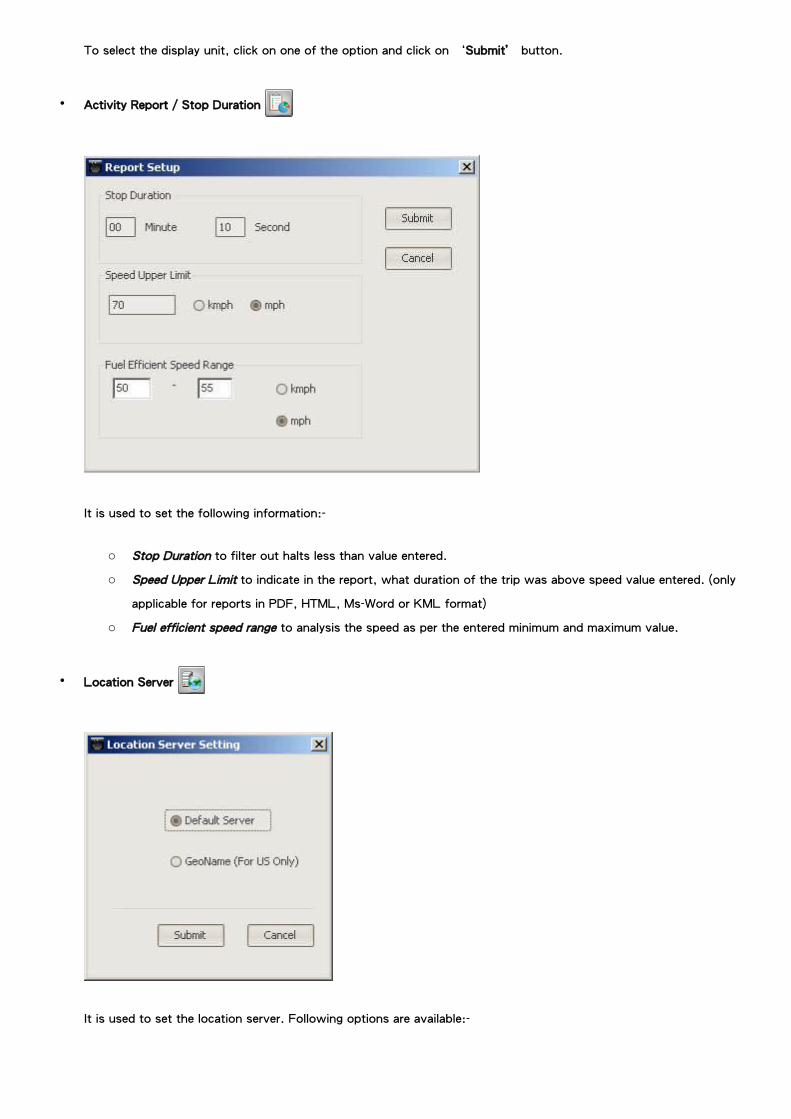
• Activity Report / Stop Duration
It is used to set the following information:-
o Stop Duration to filter out halts less than value entered.
o Speed Upper Limit to indicate in the report, what duration of the trip was above speed value entered. (only
applicable for reports in PDF, HTML, Ms-Word or KML format)
o Fuel efficient speed range to analysis the speed as per the entered minimum and maximum value.
• Location Server
It is used to set the location server. Following options are available:-

o Default Server
o Geoname (for USA only)
• Application Configuration
Go to Setup -> Application Configuration to open Application Configuration window.
Following configuration facilities are available:
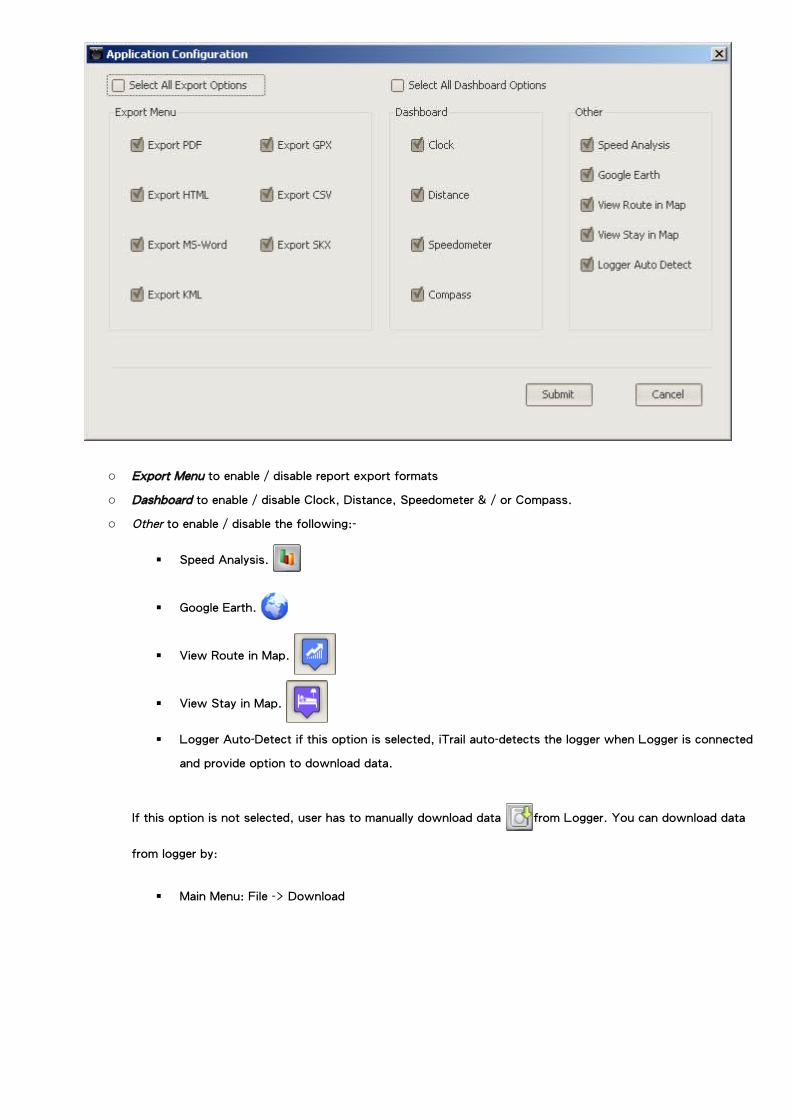
o Export Menu to enable / disable report export formats
o Dashboard to enable / disable Clock, Distance, Speedometer & / or Compass.
o Other to enable / disable the following:-
Speed Analysis.
Google Earth.
View Route in Map.
View Stay in Map.
Logger Auto-Detect if this option is selected, iTrail auto-detects the logger when Logger is connected
and provide option to download data.
If this option is not selected, user has to manually download data from Logger. You can download data
from logger by:
Main Menu: File -> Download
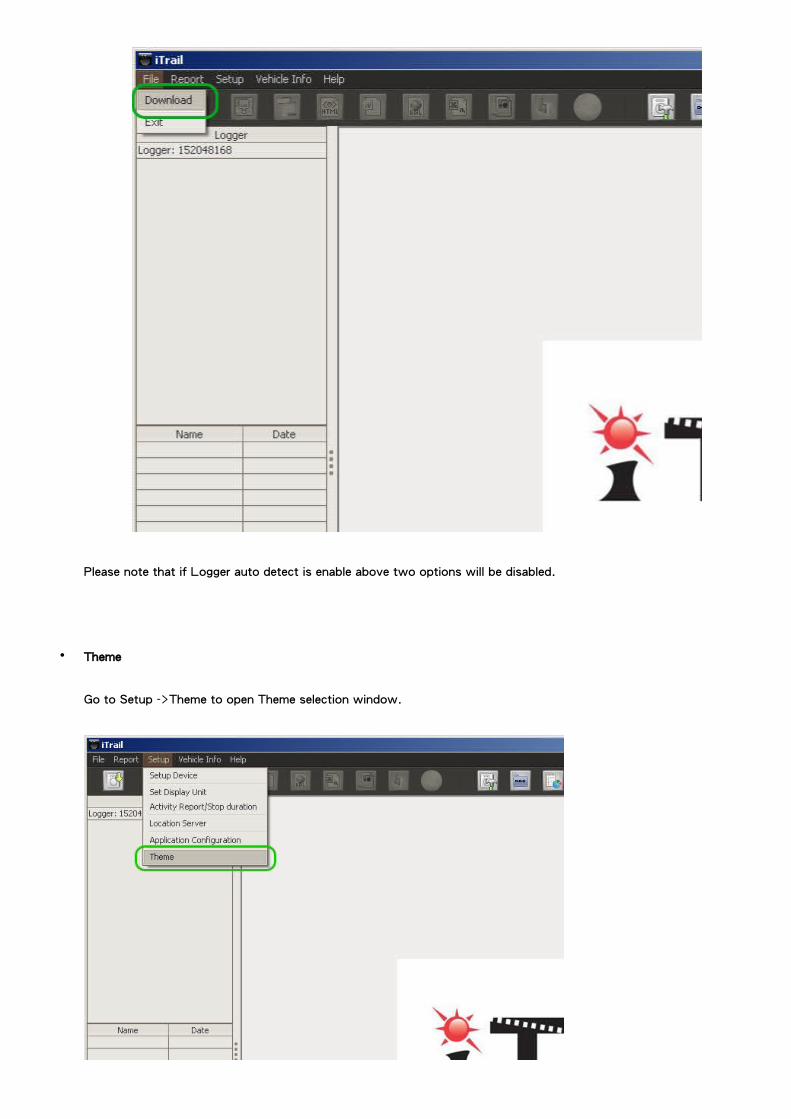
Please note that if Logger auto detect is enable above two options will be disabled.
• Theme
Go to Setup ->Theme to open Theme selection window.
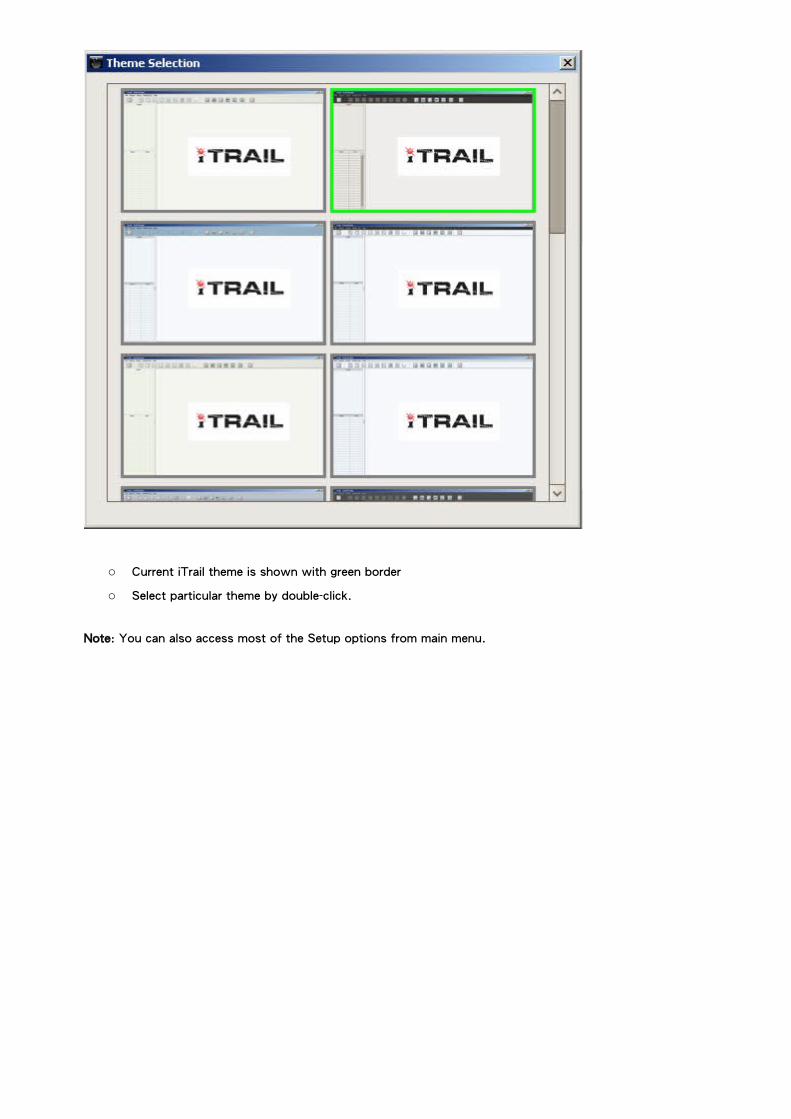
o Current iTrail theme is shown with green border
o Select particular theme by double-click.
Note: You can also access most of the Setup options from main menu.

Vehicle Info
• It provides the facility to add Vehicle and Driver in advance. Added Vehicle and Driver can be used to configure further
downloaded trip.
• You can access it by main menu option ‘Vehicle Info’.
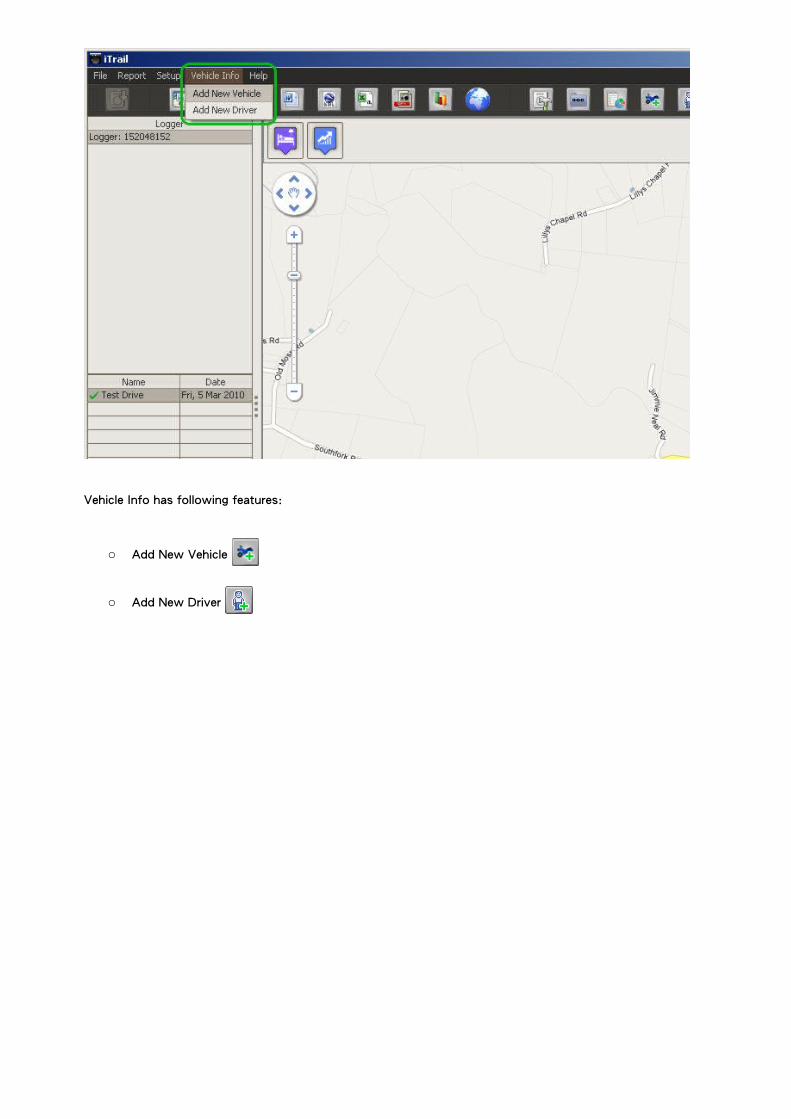
Vehicle Info has following features:
o Add New Vehicle
o Add New Driver

Map Options
• View Stay to display all halts exceeding the value set in stop duration.
Select particular stay by single-click, it will be indicated on the map with info window
• View Route to display route in sections made by stops, with start and end points.
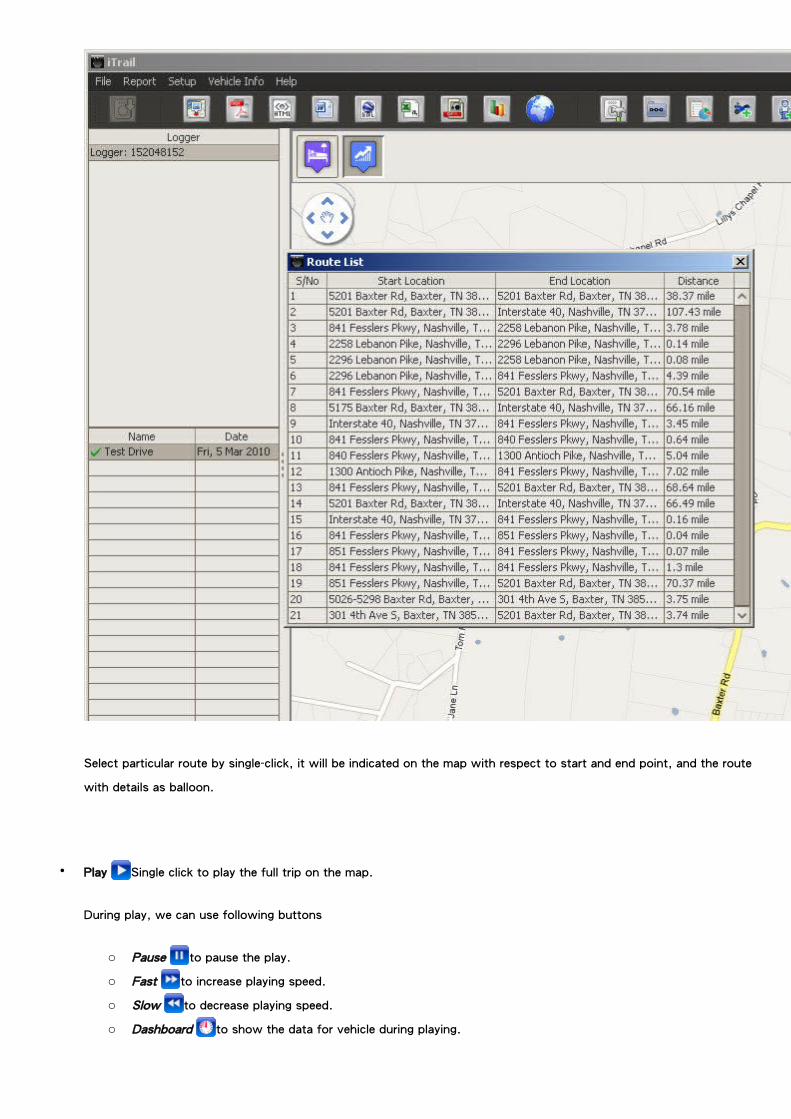
Select particular route by single-click, it will be indicated on the map with respect to start and end point, and the route
with details as balloon.
• Play Single click to play the full trip on the map.
During play, we can use following buttons
o Pause to pause the play.
o Fast to increase playing speed.
o Slow to decrease playing speed.
o Dashboard to show the data for vehicle during playing.
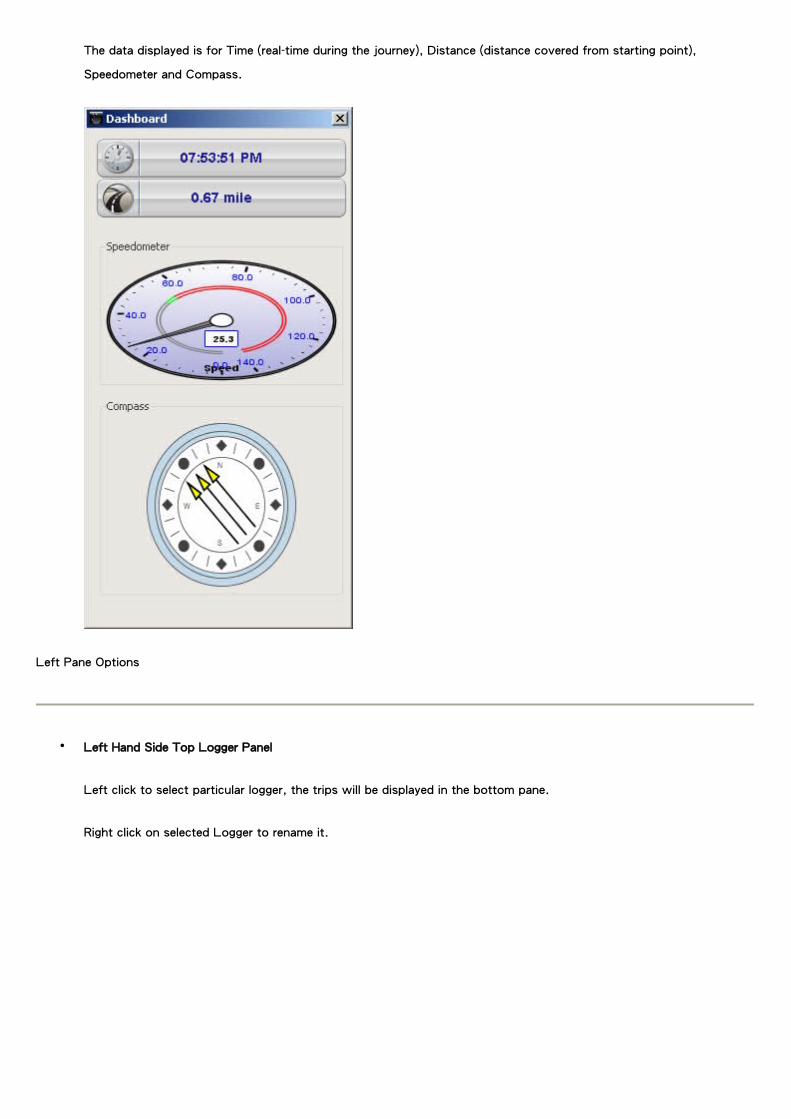
The data displayed is for Time (real-time during the journey), Distance (distance covered from starting point),
Speedometer and Compass.
Left Pane Options
• Left Hand Side Top Logger Panel
Left click to select particular logger, the trips will be displayed in the bottom pane.
Right click on selected Logger to rename it.
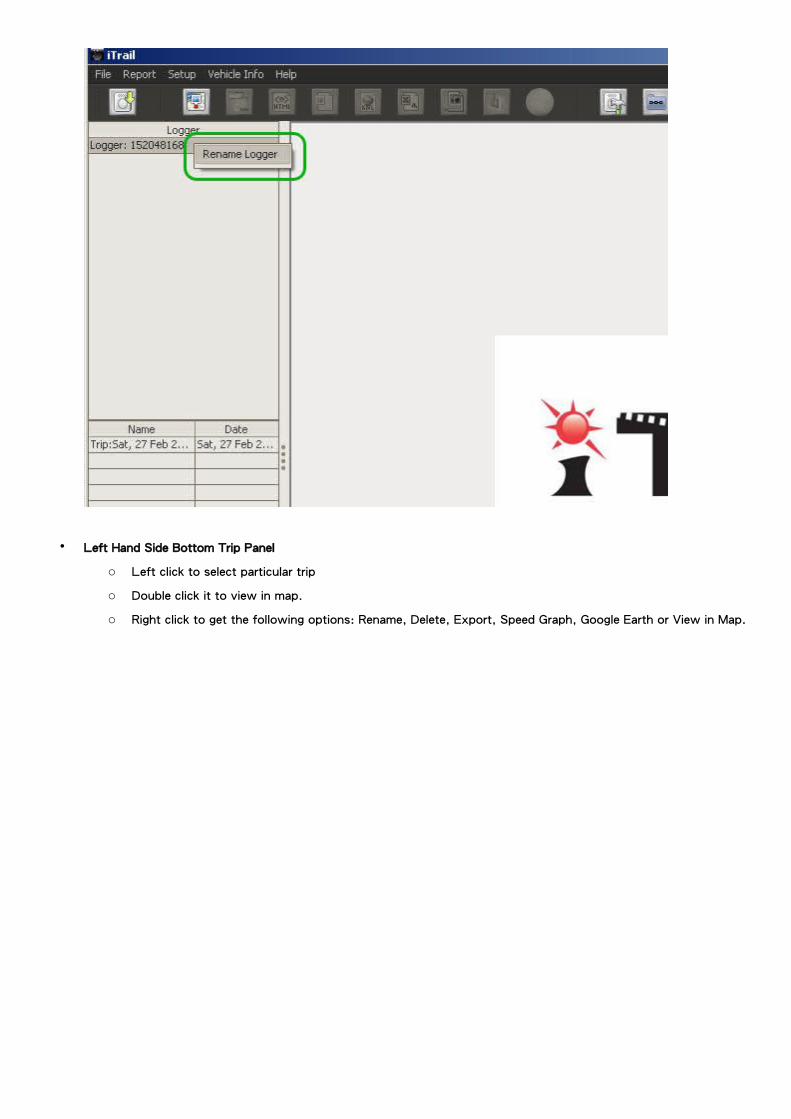
• Left Hand Side Bottom Trip Panel
o Left click to select particular trip
o Double click it to view in map.
o Right click to get the following options: Rename, Delete, Export, Speed Graph, Google Earth or View in Map.

Contact and Support
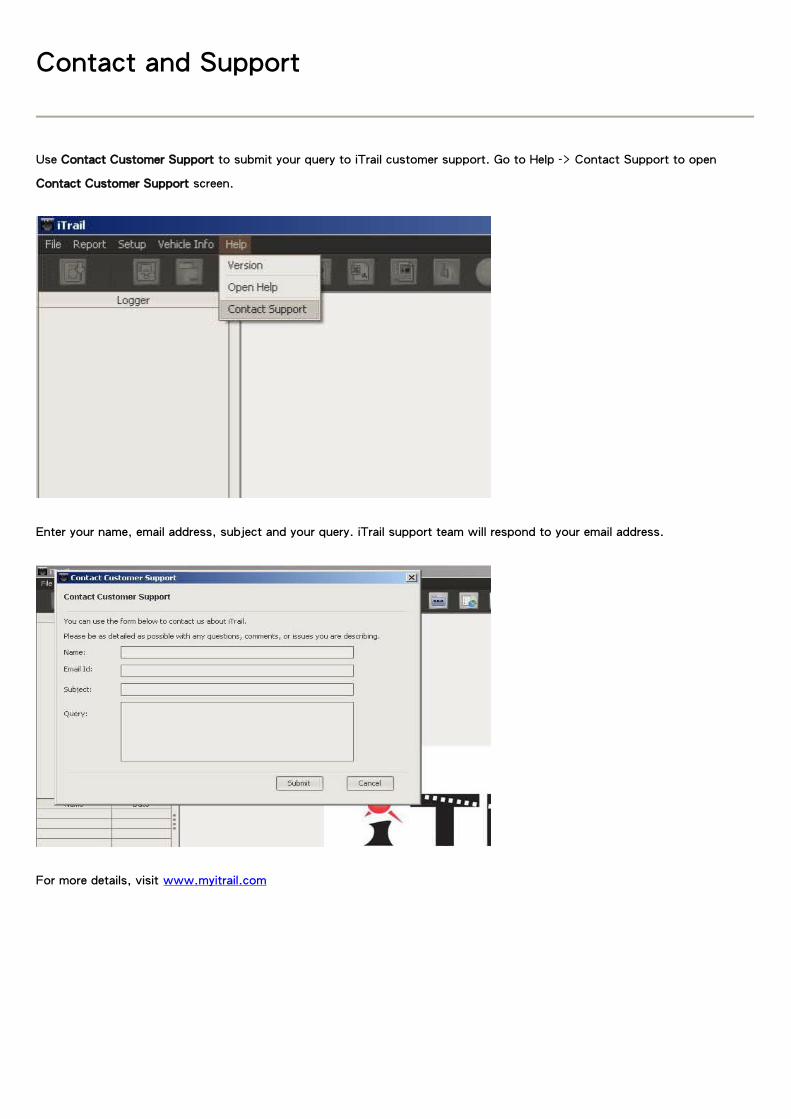
Use Contact Customer Support to submit your query to iTrail customer support. Go to Help -> Contact Support to open
Contact Customer Support screen.
Enter your name, email address, subject and your query. iTrail support team will respond to your email address.
For more details, visit www.myitrail.com


![Holux Wireless GPS Logger - [ ]](https://img.pdfslide.us/doc/110x75/61fb84c32e268c58cd5f1fcb/holux-wireless-gps-logger-.jpg)