Embed Size (px)
Citation preview

eRecruit User Guide
File ID: eR User Guide
Version # 1.0
Version Date: 11/15/2013
- Proprietary -
Proprietary Table of Contents i
Table of Contents
eRecruit Homepage _______________________________________________________ 1 1
1.1 Switch to Accessibility Mode ____________________________________________________ 1
1.2 Navigation ___________________________________________________________________ 1
1.2.1 Tabs ____________________________________________________________________________ 1
1.2.2 Breadcrumb Trail __________________________________________________________________ 2
1.2.3 Multi-System Navigation ____________________________________________________________ 2
1.3 Time Zone ___________________________________________________________________ 2
1.4 Show Help ___________________________________________________________________ 3
1.5 Candidate Search _____________________________________________________________ 3
1.5.1 Applicant Card ____________________________________________________________________ 4
1.6 Recent Items _________________________________________________________________ 4
1.7 Give Feedback ________________________________________________________________ 4
1.8 Show Search _________________________________________________________________ 5
1.8.1 Keyword _________________________________________________________________________ 5
1.8.2 Status ___________________________________________________________________________ 6
1.8.3 Opening Date and Closing Date _______________________________________________________ 7
1.8.4 Type ____________________________________________________________________________ 7
1.8.5 Reset/Filter _______________________________________________________________________ 7
1.9 Create Recruitment Request ____________________________________________________ 8
1.10 List of Records ________________________________________________________________ 8
1.10.1 Select Columns__________________________________________________________________ 9
1.10.2 Pagination Process _______________________________________________________________ 9
1.11 Logout ______________________________________________________________________ 9
Position Description Library ________________________________________________ 10 2
2.1 Search Position Descriptions ___________________________________________________ 10
2.1.1 Search Approved PDs ______________________________________________________________ 10
2.1.2 Search In Progress PDs _____________________________________________________________ 10
2.1.3 Search Criteria _________________________________________________________________ 11
2.2 Approved Position Descriptions ________________________________________________ 14
2.2.1 PD Table Navigation _______________________________________________________________ 14
2.2.2 PD List Fields_____________________________________________________________________ 14
2.2.3 PD List Action(s) __________________________________________________________________ 15
2.3 In Progress Position Description Library __________________________________________ 16
2.3.1 PD Table Navigation _______________________________________________________________ 16
2.3.2 PD List Fields_____________________________________________________________________ 17
2.3.3 PD Table Status __________________________________________________________________ 17

Proprietary Table of Contents ii
2.3.4 PD List Action(s) __________________________________________________________________ 17
2.4 Add New Position Description __________________________________________________ 18
2.4.1 Step 1: PD Template ______________________________________________________________ 19
2.4.2 Step 2: Duties ____________________________________________________________________ 21
2.4.3 Step 3: Position Description _________________________________________________________ 23
2.4.4 Step 4: Assign Approver ____________________________________________________________ 25
2.4.5 Step 5: Approval __________________________________________________________________ 26
2.5 Create a Printable PD Summary ________________________________________________ 27
Create and Post a Vacancy Announcement ____________________________________ 29 3
3.1 Create a Recruitment Request __________________________________________________ 29
3.1.1 Create a Recruitment Request _______________________________________________________ 29
3.2 Create a Recruitment Request *with* an EmpowHR position ________________________ 30
3.3 Create a Recruitment Request *without* an EmpowHR position _____________________ 34
3.4 Recruitment Request Workflow ________________________________________________ 35
3.5 Recruitment Request _________________________________________________________ 36
3.6 Vacancy Locations ____________________________________________________________ 41
3.7 Assign Hiring Manager and Approving Authority Screen ____________________________ 45
3.8 Position Description Selection (PD) ______________________________________________ 45
3.9 Vacancy Announcement Template ______________________________________________ 47
3.10 Edit Vacancy Ad Content ______________________________________________________ 48
3.10.1 Overview _____________________________________________________________________ 48
3.10.2 Duties ________________________________________________________________________ 55
3.10.3 Qualifications and Evaluations ____________________________________________________ 56
3.10.4 Benefits and Other Information ___________________________________________________ 57
3.10.5 How to Apply __________________________________________________________________ 58
3.10.6 Vacancy Contact Information _____________________________________________________ 60
3.10.7 Vacancy Announcement Summary _________________________________________________ 62
3.11 Questionnaire Builder ________________________________________________________ 63
3.11.1 Navigating Questionnaire Builder __________________________________________________ 63
3.11.2 Adding Minimum Qualifications Questions ___________________________________________ 65
3.11.3 Screenouts ____________________________________________________________________ 66
3.11.4 Create, Edit and Delete questions __________________________________________________ 66
3.11.5 Question Library-Searching and Adding Assessment Questions ___________________________ 70
3.11.6 Preview Questionnaire Content ___________________________________________________ 72
3.12 Eligibility Categories __________________________________________________________ 75
3.13 Post to USAJOBS _____________________________________________________________ 76
The Vacancy Dashboard ___________________________________________________ 78 4
4.1 Navigating the Vacancy Dashboard ______________________________________________ 78
Proprietary Table of Contents iii
4.1.1 Overview _______________________________________________________________________ 79
4.1.2 Position Information ______________________________________________________________ 80
4.1.3 Preview _________________________________________________________________________ 85
4.1.4 Announcement Information ________________________________________________________ 86
4.1.5 Associated Vacancy Costs __________________________________________________________ 86
4.1.6 Actions _________________________________________________________________________ 86
4.1.7 Certificate List ___________________________________________________________________ 89
4.1.8 Vacancy Announcement Comments __________________________________________________ 90
4.1.9 Questionnaire Builder Comments ____________________________________________________ 90
The Applicant Experience __________________________________________________ 91 5
5.1 USAJOBS ___________________________________________________________________ 91
5.1.1 Login to USAJOBS _________________________________________________________________ 91
5.1.2 Search, Select and Apply ___________________________________________________________ 91
5.1.3 Applying ________________________________________________________________________ 94
Paper Applicant __________________________________________________________ 96 6
6.1 Register Paper Applicant ______________________________________________________ 96
6.1.1 Create a New Candidate ___________________________________________________________ 97
6.1.2 Selecting Existing Candidate ________________________________________________________ 97
6.2 Application Form ____________________________________________________________ 98
Applicant Card __________________________________________________________ 100 7
7.1 Application Details Tab_______________________________________________________ 100
7.1.1 Headings _______________________________________________________________________ 100
7.1.2 Source _________________________________________________________________________ 100
7.1.3 View Application Snapshot ________________________________________________________ 101
7.1.4 Resume ________________________________________________________________________ 101
7.1.5 Status _________________________________________________________________________ 101
7.1.6 Time Zone ______________________________________________________________________ 101
7.1.7 Actions ________________________________________________________________________ 101
7.2 Scoring Detail ______________________________________________________________ 102
7.3 Screenout _________________________________________________________________ 103
7.4 Application Preferences ______________________________________________________ 104
7.5 EOD Documents ____________________________________________________________ 104
7.6 Applicant Status Log _________________________________________________________ 104
7.7 Application History __________________________________________________________ 104
7.8 Notes Log __________________________________________________________________ 104
7.9 Communication Log _________________________________________________________ 105
Candidate Assessment ___________________________________________________ 106 8
8.1 Candidate Assessment Matrix Details ___________________________________________ 107
Proprietary Table of Contents iv
8.1.1 Applications ____________________________________________________________________ 107
8.1.2 Assessments ____________________________________________________________________ 108
8.1.3 Certificate ______________________________________________________________________ 108
Ineligible Applicant Pool __________________________________________________ 110 9
9.1 Search – Application Status ___________________________________________________ 111
9.2 Change Status ______________________________________________________________ 111
9.2.1 Flag details _____________________________________________________________________ 113
9.3 Bulk Actions ________________________________________________________________ 113
Applicant Pool __________________________________________________________ 114 10
10.1 Navigating to the Applicant Pool _______________________________________________ 114
10.2 The Applicant Pool __________________________________________________________ 115
10.2.1 Show Search __________________________________________________________________ 116
Certificates ____________________________________________________________ 131 11
11.1 Generate a Certificate _______________________________________________________ 131
11.1.1 Search ______________________________________________________________________ 131
11.1.2 Preview Certificate_____________________________________________________________ 132
11.1.3 Create Certificate ______________________________________________________________ 133
11.2 Issue Certificate_____________________________________________________________ 137
11.3 Amend Certificate ___________________________________________________________ 138
11.3.1 Add Applicants to Certificate _____________________________________________________ 138
11.3.2 Remove Applicant from Certificate ________________________________________________ 138
11.4 Annotate Certificate _________________________________________________________ 139
11.4.1 Return Certificate _____________________________________________________________ 140
11.4.2 Extend Certificate _____________________________________________________________ 141
11.4.3 Close Certificate _______________________________________________________________ 142
11.4.4 Audit Certificate _______________________________________________________________ 143
11.4.5 Package Applications ___________________________________________________________ 143
11.4.6 Create Certificate PDF __________________________________________________________ 144
11.4.7 Cancel Certificate ______________________________________________________________ 144
Tentative Selection and Manual Onboarding _________________________________ 146 12
12.1 Select New Hire _____________________________________________________________ 146
12.2 Enter EmpowHR Selectee Information __________________________________________ 147
12.3 Associate Position ___________________________________________________________ 150
12.3.1 Option 1 _____________________________________________________________________ 150
12.3.2 Option 2 _____________________________________________________________________ 151
Vacancy Closeout _______________________________________________________ 153 13
13.1 Change Vacancy Status: Vacancy Close Out ______________________________________ 153

Proprietary Table of Contents v
13.2 Certificate Closeout/Certificate Member Status __________________________________ 154
13.3 Ineligible Application Status __________________________________________________ 154
13.4 Eligible Application Status ____________________________________________________ 156
13.5 Vacancy Closeout Closed/Cancelled ____________________________________________ 157
13.6 Close Vacancy ______________________________________________________________ 158
Reporting ______________________________________________________________ 160 14
Proprietary Figure List vi
Figure List Figure 1-1 Homepage.................................................................................................................................. 1
Figure 1-2 Accessibility Mode ..................................................................................................................... 1
Figure 1-3 Tab Navigation ........................................................................................................................... 2
Figure 1-4 Breadcrumb Trail ....................................................................................................................... 2
Figure 1-5 Multi-System Navigation ............................................................................................................ 2
Figure 1-6 Time Zone Indication ................................................................................................................. 2
Figure 1-7 Show/Hide Help ......................................................................................................................... 3
Figure 1-8 Candidate Search Location......................................................................................................... 3
Figure 1-9 Candidate Search Filter .............................................................................................................. 3
Figure 1-10 Candidate Search Results ......................................................................................................... 4
Figure 1-11 Applicant Card View ................................................................................................................. 4
Figure 1-12 Recent Item History ................................................................................................................. 4
Figure 1-13 Give Feedback .......................................................................................................................... 5
Figure 1-14 Show Search............................................................................................................................. 5
Figure 1-15 Homepage Filter ...................................................................................................................... 5
Figure 1-16 Keyword Search ....................................................................................................................... 6
Figure 1-17 Vacancy Status Filter ................................................................................................................ 6
Figure 1-18 Vacancy Open/Close Date Filter............................................................................................... 7
Figure 1-19 Calendar View .......................................................................................................................... 7
Figure 1-20 Vacancy Filter Type .................................................................................................................. 7
Figure 1-21 Reset/Filter View Results ......................................................................................................... 7
Figure 1-22 Create New Recruitment Request ........................................................................................... 8
Figure 1-23 Homepage Results View .......................................................................................................... 8
Figure 1-24 Page Navigation Example ......................................................................................................... 9
Figure 1-25 Logout Function ....................................................................................................................... 9
Figure 2-1 Position Description Library ..................................................................................................... 10
Figure 2-2 View In Progress PDs ................................................................................................................ 10
Figure 2-3 PD Library Show Search ........................................................................................................... 11
Figure 2-4 PD Search Criteria .................................................................................................................... 12
Figure 2-5 PD Keyword Search .................................................................................................................. 12
Figure 2-6 PD Occupational Group ............................................................................................................ 13
Figure 2-7 PD Occupational Series ............................................................................................................ 13
Figure 2-8 PD Pay Grade ........................................................................................................................... 13
Figure 2-9 PD Filtering............................................................................................................................... 13
Figure 2-10 PD Table Navigation ............................................................................................................... 14
Figure 2-11 Page Navigation Icons ............................................................................................................ 14
Figure 2-12 Show Active/Inactive PDs ...................................................................................................... 15
Figure 2-13 In Progress PDs ...................................................................................................................... 16
Figure 2-14 View Approved PD ................................................................................................................. 16
Figure 2-15 Page Navigation ..................................................................................................................... 16
Figure 2-16 PD Tab .................................................................................................................................... 18
Proprietary Figure List vii
Figure 2-17 Add New PD ........................................................................................................................... 18
Figure 2-18 PD Workflow .......................................................................................................................... 19
Figure 2-19 PD Template .......................................................................................................................... 19
Figure 2-20 Save and Continue ................................................................................................................. 19
Figure 2-21 Save PD Template .................................................................................................................. 20
Figure 2-22 Validation of Missing Fields ................................................................................................... 20
Figure 2-23 View PD Summary .................................................................................................................. 20
Figure 2-24 PD Preview ............................................................................................................................. 21
Figure 2-25 Save and Continue ................................................................................................................. 21
Figure 2-26 PD Workflow Step 2 ............................................................................................................... 21
Figure 2-27 PD Duties ............................................................................................................................... 22
Figure 2-28 Save........................................................................................................................................ 22
Figure 2-29 Confirm Update ..................................................................................................................... 22
Figure 2-30 Missing Required Data ........................................................................................................... 23
Figure 2-31 Save Progress ......................................................................................................................... 23
Figure 2-32 PD Workflow Step 3 ............................................................................................................... 23
Figure 2-33 Evaluation .............................................................................................................................. 24
Figure 2-34 PD Point Total Label ............................................................................................................... 24
Figure 2-35 Save Progress ......................................................................................................................... 25
Figure 2-36 - Missing Required Data ......................................................................................................... 25
Figure 2-37 PD Workflow Step 4 ............................................................................................................... 25
Figure 2-38 PD Assign Approver ................................................................................................................ 25
Figure 2-39 Add Users ............................................................................................................................... 26
Figure 2-40 Delete Approver ..................................................................................................................... 26
Figure 2-41 PD Approval Comments ......................................................................................................... 27
Figure 2-42 Summary Details .................................................................................................................... 27
Figure 2-43 PD Save as or Print ................................................................................................................. 28
Figure 3-1 Create Recruitment Request .................................................................................................... 29
Figure 3-2 Select Agency System .............................................................................................................. 29
Figure 3-3 Create RR with EmpowHR position .......................................................................................... 30
Figure 3-4 Select Positions ........................................................................................................................ 31
Figure 3-5 View Position Details ............................................................................................................... 31
Figure 3-6 Preview Window ...................................................................................................................... 32
Figure 3-7 Additional Occupational Series ................................................................................................ 33
Figure 3-8 Select Positions ........................................................................................................................ 33
Figure 3-9 Positions to Associate with a RR .............................................................................................. 34
Figure 3-10 Remove Position .................................................................................................................... 34
Figure 3-11 Select More Positions ............................................................................................................ 34
Figure 3-12 Continue Without Position .................................................................................................... 35
Figure 3-13 Recruitment Request ............................................................................................................. 35
Figure 3-14 Save Progress ......................................................................................................................... 36
Figure 3-15 Add Locations ........................................................................................................................ 42
Figure 3-16 Show Search........................................................................................................................... 42
Proprietary Figure List viii
Figure 3-17 Location Search ...................................................................................................................... 43
Figure 3-18 Expansion Codes .................................................................................................................... 43
Figure 3-19 Filter results ........................................................................................................................... 44
Figure 3-20 Total Openings ....................................................................................................................... 44
Figure 3-21 Assign HM and Approving Authority ...................................................................................... 45
Figure 3-22 Select Approvers .................................................................................................................... 45
Figure 3-23 Add Position Description ........................................................................................................ 46
Figure 3-24 Preview/Select PD .................................................................................................................. 46
Figure 3-25 PD Selection ........................................................................................................................... 47
Figure 3-26 Vacancy Templates ................................................................................................................ 48
Figure 3-27 Edit Vacancy Ad Overview ..................................................................................................... 48
Figure 3-28 Job Ad editor .......................................................................................................................... 49
Figure 3-29 Overview ................................................................................................................................ 49
Figure 3-30 Overview ................................................................................................................................ 51
Figure 3-31 Hiring Manager Review .......................................................................................................... 54
Figure 3-32 Edit Vacancy Ad - Duties ........................................................................................................ 55
Figure 3-33 Edit Vacancy Ad – Qualifications and Evaluations .................................................................. 55
Figure 3-34 Edit Vacancy Ad – Benefits and Other Information ................................................................ 57
Figure 3-35 Edit Vacancy Ad – How to Apply ............................................................................................ 58
Figure 3-36 Edit Vacancy Ad – Vacancy Contact Information ................................................................... 60
Figure 3-37 Vacancy Contact Information................................................................................................. 60
Figure 3-38 HM Approval Received........................................................................................................... 63
Figure 3-39 Questionnaire Builder Navigation .......................................................................................... 63
Figure 3-40 Scores Overview .................................................................................................................... 64
Figure 3-41 Core Eligibility Questions ....................................................................................................... 64
Figure 3-42 Minimum Qualification Questions ......................................................................................... 65
Figure 3-43 Question Library Search ......................................................................................................... 66
Figure 3-44 Minimum Qualification Question Actions .............................................................................. 66
Figure 3-45 Create Question ..................................................................................................................... 67
Figure 3-46 Question Details ..................................................................................................................... 67
Figure 3-47 Add New Answers .................................................................................................................. 67
Figure 3-48 Question Actions .................................................................................................................... 68
Figure 3-49 Question Details ..................................................................................................................... 68
Figure 3-50 Answer Options ..................................................................................................................... 69
Figure 3-51 Delete Question Confirmation ............................................................................................... 69
Figure 3-52 Create Child Question Association ......................................................................................... 69
Figure 3-53 Select Child Question ............................................................................................................. 70
Figure 3-54 Question Search ..................................................................................................................... 70
Figure 3-55 Multiple Choice Question ...................................................................................................... 71
Figure 3-56 Multi Select Question ............................................................................................................ 71
Figure 3-57 Multiple Choice ...................................................................................................................... 71
Figure 3-58 Add Questions to Questionnaire ............................................................................................ 72
Figure 3-59 Preview Questionnaire Content ............................................................................................. 72

Proprietary Figure List ix
Figure 3-60 Select Child Questions ........................................................................................................... 73
Figure 3-61 Assessment Questions ........................................................................................................... 74
Figure 3-62 Question Details ..................................................................................................................... 74
Figure 3-63 Answer Options ..................................................................................................................... 74
Figure 3-64 Delete Question Confirmation ............................................................................................... 75
Figure 3-65 Select Child Questions ........................................................................................................... 75
Figure 3-66 Manage Eligibility Categories ................................................................................................. 76
Figure 3-67 Post to USAJOBS .................................................................................................................... 76
Figure 3-68 Job Open Confirmation .......................................................................................................... 76
Figure 3-69 Dashboard Confirmation ........................................................................................................ 77
Figure 3-70 Control Number Location....................................................................................................... 77
Figure 4-1 Navigating the Dashboard ....................................................................................................... 78
Figure 4-2 Vacancy Dashboard Options .................................................................................................... 79
Figure 4-3 Overview .................................................................................................................................. 79
Figure 4-4 Position Information ................................................................................................................ 80
Figure 4-5 Edit USAJOBS Job Ad Content .................................................................................................. 81
Figure 4-6 Edit Vacancy Ad - Overview ..................................................................................................... 81
Figure-4-7 Cancel Vacancy Announcement .............................................................................................. 82
Figure 4-8 Confirmation of Cancellation ................................................................................................... 82
Figure 4-9 Position Information ................................................................................................................ 83
Figure 4-10 Preview Announcement......................................................................................................... 83
Figure 4-11 Control Number ..................................................................................................................... 83
Figure4-12 - Modify Open/Close Date ...................................................................................................... 84
Figure 4-13 Add Locations ........................................................................................................................ 85
Figure 4-14 - Eligible Applications ............................................................................................................. 85
Figure 4-15 Preview .................................................................................................................................. 85
Figure 4-16 Announcement Information .................................................................................................. 86
Figure 4-17 - Associated Vacancy Costs .................................................................................................... 86
Figure 4-18 - Actions ................................................................................................................................. 87
Figure 4-19 View Vacancy Case Files ......................................................................................................... 87
Figure 4-20 Close Vacancy ........................................................................................................................ 88
Figure 4-21 Select Closing Job Status ........................................................................................................ 89
Figure 4-22 - Close Vacancy ...................................................................................................................... 89
Figure 4-23 - Certificate List ...................................................................................................................... 90
Figure 4-24 Vacancy Announcement Comments ...................................................................................... 90
Figure 4-25 Questionnaire Builder Comments .......................................................................................... 90
Figure 5-1 Login to USAJOBS ..................................................................................................................... 91
Figure 5-2 Edit USAJOBS Account ............................................................................................................. 92
Figure 5-3 Select Vacancy Announcement ................................................................................................ 93
Figure 5-4 Apply Online ............................................................................................................................ 93
Figure 5-5 Application Navigation ............................................................................................................. 94
Figure 5-6 Submit Application ................................................................................................................... 95
Figure 6-1 Enter Paper Application ........................................................................................................... 96

Proprietary Figure List x
Figure 6-2 Select Existing Candidate ID ..................................................................................................... 97
Figure 6-3 Select Paper Applicant ............................................................................................................. 97
Figure 6-4 Confirmation of Details ............................................................................................................ 98
Figure 6-5 Application Summary ............................................................................................................... 99
Figure 7-1 - Applicant Card ..................................................................................................................... 100
Figure 8-1 Candidate Assessment ........................................................................................................... 106
Figure 8-2 - Candidate Assessment Matrix ............................................................................................. 107
Figure 9-1 - Ineligible Applicant Pool ...................................................................................................... 110
Figure 9-2 - Search .................................................................................................................................. 111
Figure 9-3 - Search Application Status .................................................................................................... 111
Figure 9-4 - Change Status ...................................................................................................................... 112
Figure 9-5 - Ineligible Applicant Indicator Flags ...................................................................................... 112
Figure 10-1 Navigating to the Applicant Pool ......................................................................................... 114
Figure 10-2 Applicant Pool Navigation – Vacancy Applications .............................................................. 115
Figure 10-3 Category of Eligibility Column .............................................................................................. 116
Figure 10-4 Show Search......................................................................................................................... 116
Figure 10-5 Filtering Options .................................................................................................................. 117
Figure 10-6 Add Criteria .......................................................................................................................... 118
Figure 10-7 Select Questions .................................................................................................................. 118
Figure 10-8 Clear and Reset Search Form ............................................................................................... 118
Figure 10-9 Filter Options ....................................................................................................................... 119
Figure 10-10 Priority filtering .................................................................................................................. 119
Figure 10-11 Merge Categories ............................................................................................................... 120
Figure 10-12 Series/Grade Filter ............................................................................................................. 120
Figure 10-13 Filter Options ..................................................................................................................... 121
Figure 10-14 Optional Criteria to Filter ................................................................................................... 122
Figure 10-15 View Eligible Applicants ..................................................................................................... 122
Figure 10-16 Flag for Referral ................................................................................................................. 122
Figure 10-17 Priority Checkbox ............................................................................................................... 122
Figure 10-18 Applicant Card.................................................................................................................... 123
Figure 10-19 Preview Certificate ............................................................................................................. 123
Figure 10-20 Reset Applicants ................................................................................................................ 123
Figure 10-21 Reset Confirmation ............................................................................................................ 124
Figure 10-22 Bulk Actions ....................................................................................................................... 124
Figure 10-23 Preference Verification ...................................................................................................... 125
Figure 10-24 Email Subject ..................................................................................................................... 126
Figure 10-25 Select Merge Fields ............................................................................................................ 126
Figure 10-26 Create and Preview Email .................................................................................................. 127
Figure 10-27 Add Note ............................................................................................................................ 128
Figure 10-28 Change Candidate Status ................................................................................................... 128
Figure 10-29 Change Referral Flag .......................................................................................................... 129
Figure 10-30 Flag for Referral ................................................................................................................. 129
Figure 10-31 Select Items to Package ..................................................................................................... 129
Proprietary Figure List xi
Figure 10-32 Package Complete.............................................................................................................. 130
Figure 10-33 Active Messages................................................................................................................. 130
Figure 10-34 Package Ready Confirmation ............................................................................................. 130
Figure 10-35 Packaging Options .............................................................................................................. 130
Figure 11-1 - Filter Options ..................................................................................................................... 132
Figure 11-2 Clear/Reset Search Form ..................................................................................................... 132
Figure 11-3 - Preview Certificate ............................................................................................................. 133
Figure 11-4 Create Certificate ................................................................................................................. 133
Figure 11-5 Certificate Details ................................................................................................................. 135
Figure 11-6 Add User Permissions to Certificate ..................................................................................... 135
Figure 11-7 Confirmation of Assigned User ............................................................................................ 136
Figure 11-8 Certificate Audit Log ............................................................................................................ 136
Figure 11-9 Certificate Comments .......................................................................................................... 137
Figure 11-10 Certificate Overview .......................................................................................................... 137
Figure 11-11 Issue Certificate ................................................................................................................. 137
Figure 11-12 Amend Certificate .............................................................................................................. 138
Figure 11-13 Remove Applicant from Certificate .................................................................................... 138
Figure 11-14 Amend Certificate Reason ................................................................................................. 139
Figure 11-15 - Annotate Certificate ........................................................................................................ 139
Figure 11-16 Return Certificate ............................................................................................................... 140
Figure 11-17 Extend Certificate .............................................................................................................. 141
Figure 11-18 Close Certificate ................................................................................................................. 142
Figure 11-19 Audit Certificate ................................................................................................................. 143
Figure 11-20 Package from Certificate .................................................................................................... 143
Figure 11-21 Request Package ................................................................................................................ 144
Figure 11-22 Create Certificate PDF ........................................................................................................ 144
Figure 11-23 Cancel Certificate ............................................................................................................... 145
Figure 12-1 Select New Hire .................................................................................................................... 146
Figure 12-2 Update Certificate Status ..................................................................................................... 147
Figure 12-3 Enter EmpowHR Selectee Information ................................................................................ 147
Figure 12-4 Associate Position ................................................................................................................ 150
Figure 12-5 Position List .......................................................................................................................... 150
Figure 12-6 Confirmation of New Hire Transmission .............................................................................. 151
Figure 12-7 Add New Position................................................................................................................. 151
Figure 12-8 Search Position List .............................................................................................................. 151
Figure 12-9 Confirmation of Selectee Transmission ............................................................................... 152
Figure 13-1 Vacancy Close Out ............................................................................................................... 153
Figure 13-2 Vacancy Closeout checklist .................................................................................................. 153
Figure 13-3 Certificate Closeout ............................................................................................................. 154
Figure 13-4 Final Status Validation Message........................................................................................... 154
Figure 13-5 Ineligible Application Status ................................................................................................. 155
Figure 13-6 Change Status Navigation .................................................................................................... 155
Figure 13-7 Ineligible Final Status Options .............................................................................................. 155
Proprietary Figure List xii
Figure 13-8 Application Status Update ................................................................................................... 156
Figure 13-9 Change Status Navigation .................................................................................................... 156
Figure 13-10 Final Status Options ........................................................................................................... 157
Figure 13-11 Close Vacancy .................................................................................................................... 157
Figure 13-12 Cancel Vacancy .................................................................................................................. 158
Figure 13-13 Close Vacancy Navigation .................................................................................................. 158
Figure 13-14 Vacancy Status Change Verification ................................................................................... 159
Figure 14-1 Reports ................................................................................................................................ 160
Figure 14-2 Reports Navigation .............................................................................................................. 160
Figure 14-3 Reports Folder Navigation ................................................................................................... 161
Figure 14-4 Standard Reports Folder View ............................................................................................. 161
Figure 14-5 Filtering Navigation .............................................................................................................. 161
Figure 14-6 Running a Report ................................................................................................................. 162
Figure 14-7 Report View ......................................................................................................................... 162
Proprietary
Homepage 1
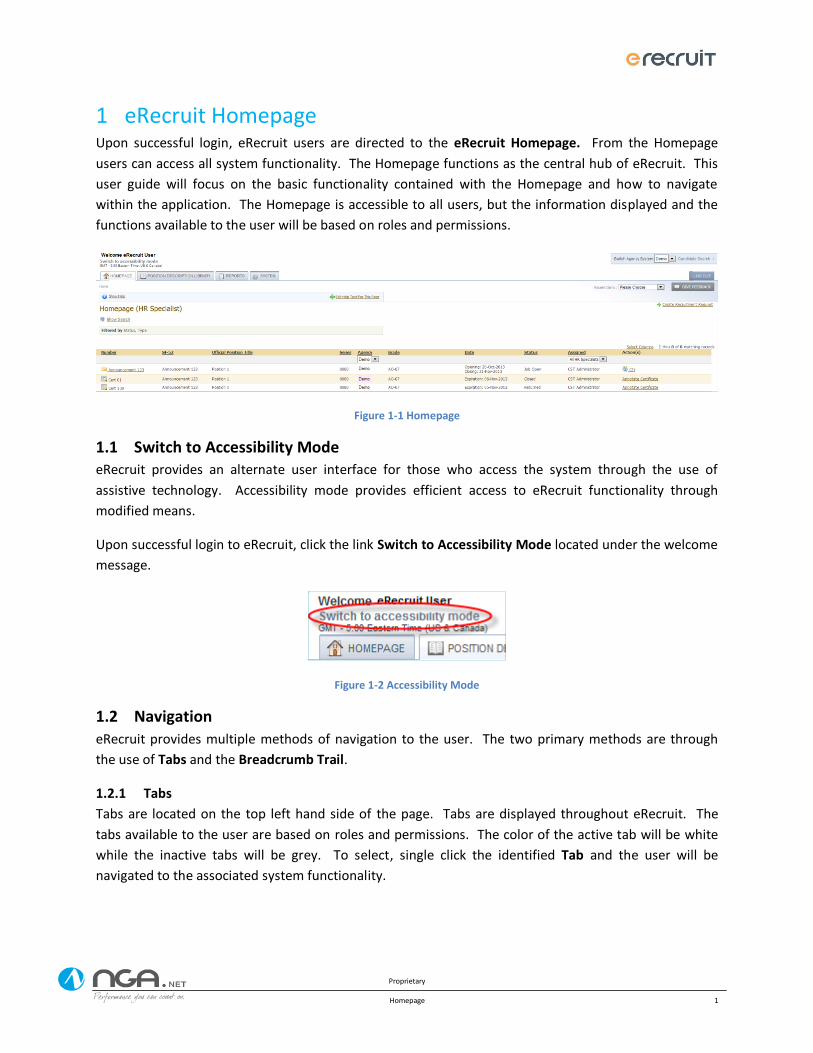
eRecruit Homepage 1Upon successful login, eRecruit users are directed to the eRecruit Homepage. From the Homepage
users can access all system functionality. The Homepage functions as the central hub of eRecruit. This
user guide will focus on the basic functionality contained with the Homepage and how to navigate
within the application. The Homepage is accessible to all users, but the information displayed and the
functions available to the user will be based on roles and permissions.
Figure 1-1 Homepage
1.1 Switch to Accessibility Mode eRecruit provides an alternate user interface for those who access the system through the use of
assistive technology. Accessibility mode provides efficient access to eRecruit functionality through
modified means.
Upon successful login to eRecruit, click the link Switch to Accessibility Mode located under the welcome
message.
Figure 1-2 Accessibility Mode
1.2 Navigation
eRecruit provides multiple methods of navigation to the user. The two primary methods are through
the use of Tabs and the Breadcrumb Trail.
1.2.1 Tabs
Tabs are located on the top left hand side of the page. Tabs are displayed throughout eRecruit. The
tabs available to the user are based on roles and permissions. The color of the active tab will be white
while the inactive tabs will be grey. To select, single click the identified Tab and the user will be
navigated to the associated system functionality.
Proprietary
Homepage 2
Figure 1-3 Tab Navigation
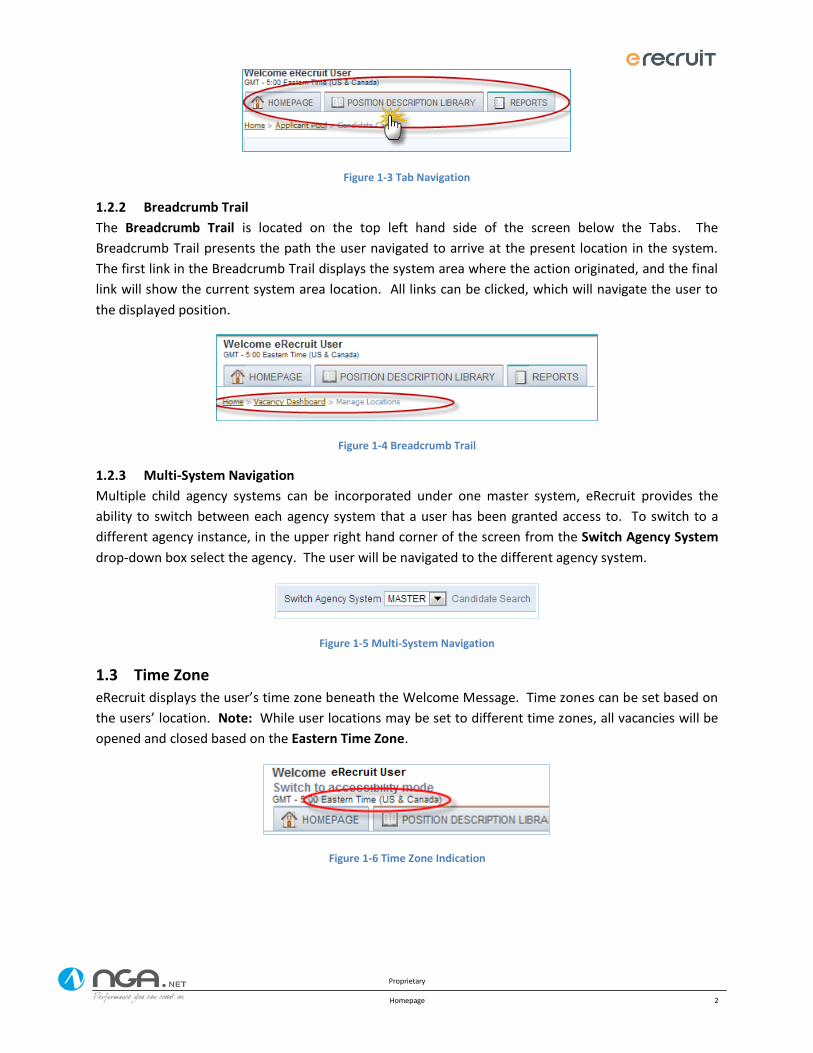
1.2.2 Breadcrumb Trail
The Breadcrumb Trail is located on the top left hand side of the screen below the Tabs. The
Breadcrumb Trail presents the path the user navigated to arrive at the present location in the system.
The first link in the Breadcrumb Trail displays the system area where the action originated, and the final
link will show the current system area location. All links can be clicked, which will navigate the user to
the displayed position.
Figure 1-4 Breadcrumb Trail
1.2.3 Multi-System Navigation
Multiple child agency systems can be incorporated under one master system, eRecruit provides the
ability to switch between each agency system that a user has been granted access to. To switch to a
different agency instance, in the upper right hand corner of the screen from the Switch Agency System
drop-down box select the agency. The user will be navigated to the different agency system.
Figure 1-5 Multi-System Navigation
1.3 Time Zone
eRecruit displays the user’s time zone beneath the Welcome Message. Time zones can be set based on
the users’ location. Note: While user locations may be set to different time zones, all vacancies will be
opened and closed based on the Eastern Time Zone.
Figure 1-6 Time Zone Indication
Proprietary
Homepage 3
1.4 Show Help For additional information on the Homepage, click Show Help. Help text will be displayed. To collapse
the Help text, click Hide Help. Help text content may be added/modified/deleted based on roles and
permissions. Refer to the eRecruit System Administrator User Guide for additional information.
Figure 1-7 Show/Hide Help
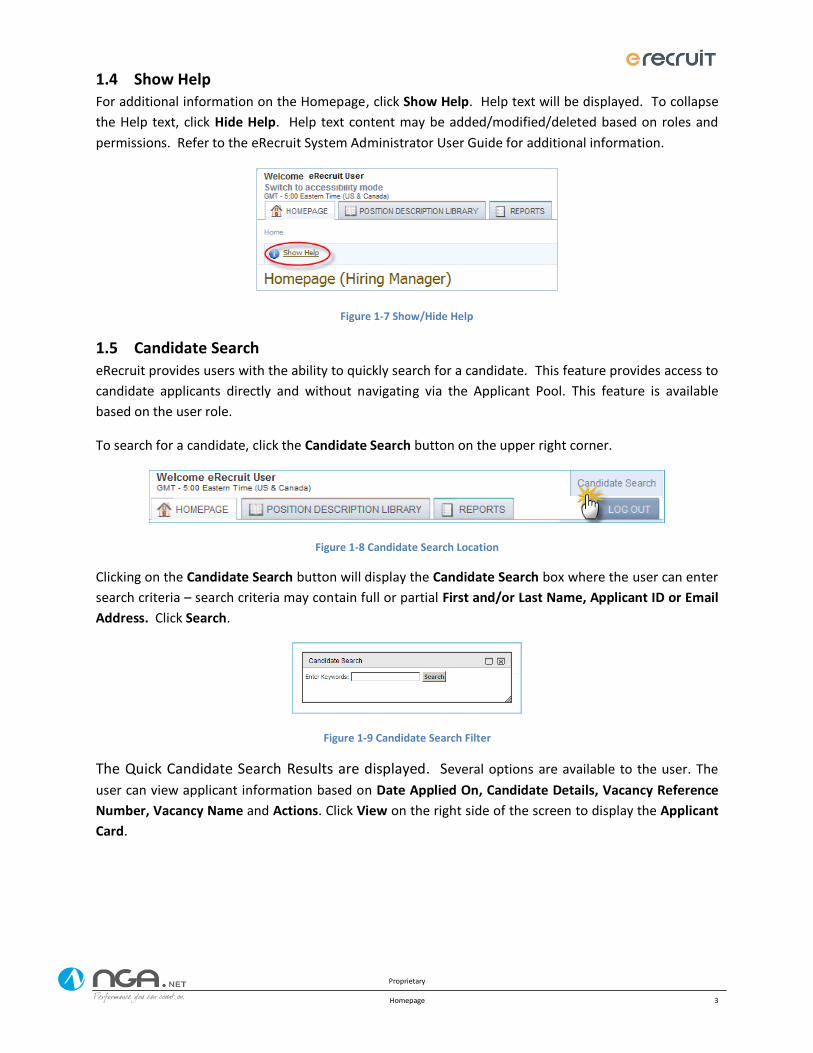
1.5 Candidate Search
eRecruit provides users with the ability to quickly search for a candidate. This feature provides access to
candidate applicants directly and without navigating via the Applicant Pool. This feature is available
based on the user role.
To search for a candidate, click the Candidate Search button on the upper right corner.
Figure 1-8 Candidate Search Location
Clicking on the Candidate Search button will display the Candidate Search box where the user can enter
search criteria – search criteria may contain full or partial First and/or Last Name, Applicant ID or Email
Address. Click Search.
Figure 1-9 Candidate Search Filter
The Quick Candidate Search Results are displayed. Several options are available to the user. The
user can view applicant information based on Date Applied On, Candidate Details, Vacancy Reference
Number, Vacancy Name and Actions. Click View on the right side of the screen to display the Applicant
Card.
Proprietary
Homepage 4
Figure 1-10 Candidate Search Results
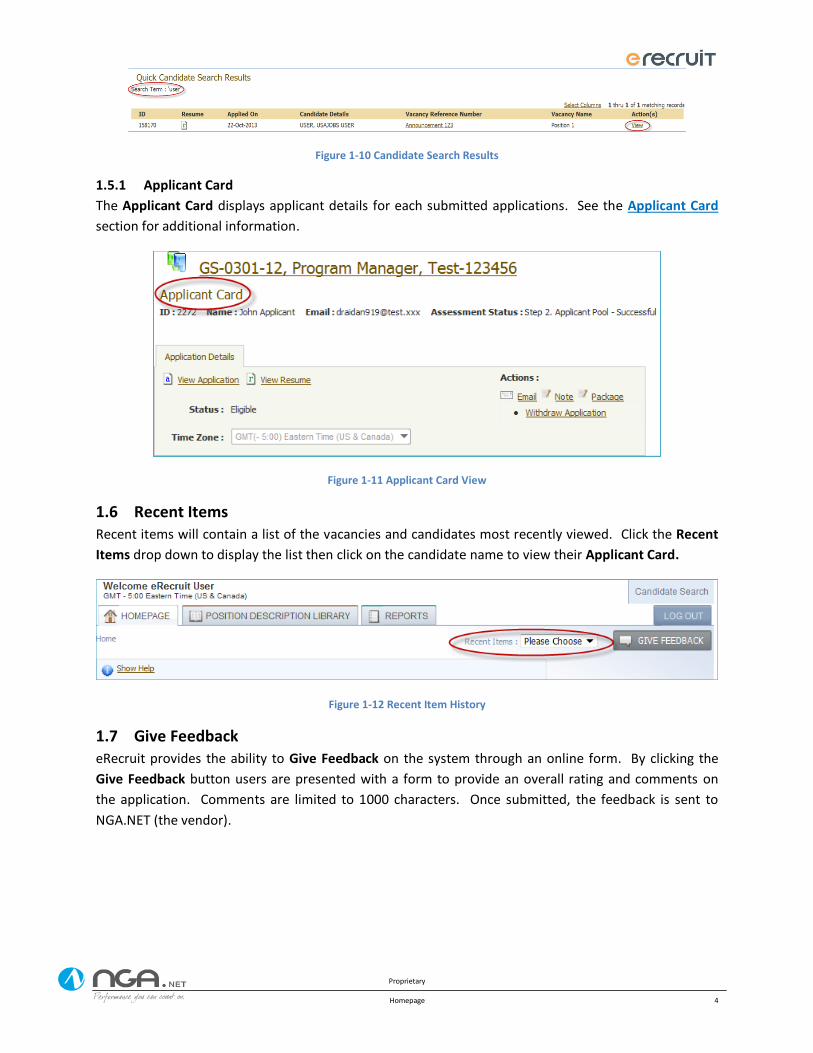
1.5.1 Applicant Card
The Applicant Card displays applicant details for each submitted applications. See the Applicant Card
section for additional information.
Figure 1-11 Applicant Card View
1.6 Recent Items Recent items will contain a list of the vacancies and candidates most recently viewed. Click the Recent
Items drop down to display the list then click on the candidate name to view their Applicant Card.
Figure 1-12 Recent Item History
1.7 Give Feedback eRecruit provides the ability to Give Feedback on the system through an online form. By clicking the
Give Feedback button users are presented with a form to provide an overall rating and comments on
the application. Comments are limited to 1000 characters. Once submitted, the feedback is sent to
NGA.NET (the vendor).
Proprietary
Homepage 5
Figure 1-13 Give Feedback
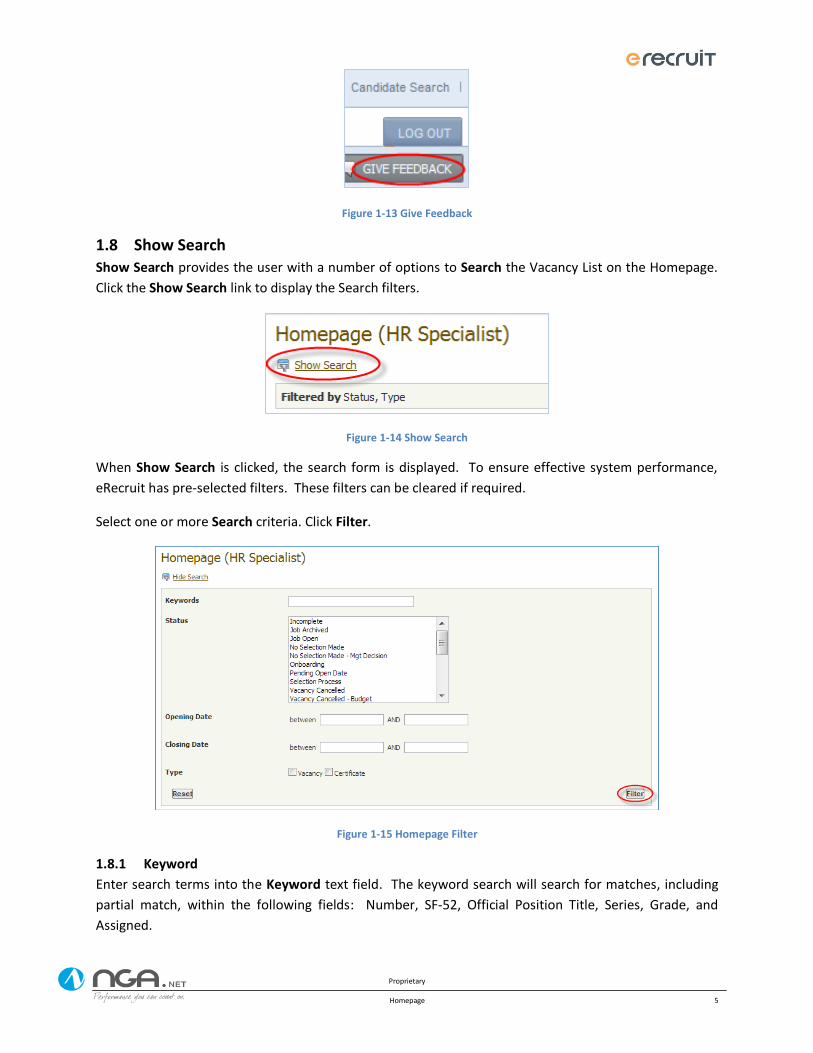
1.8 Show Search Show Search provides the user with a number of options to Search the Vacancy List on the Homepage.
Click the Show Search link to display the Search filters.
Figure 1-14 Show Search
When Show Search is clicked, the search form is displayed. To ensure effective system performance,
eRecruit has pre-selected filters. These filters can be cleared if required.
Select one or more Search criteria. Click Filter.
Figure 1-15 Homepage Filter
1.8.1 Keyword
Enter search terms into the Keyword text field. The keyword search will search for matches, including
partial match, within the following fields: Number, SF-52, Official Position Title, Series, Grade, and
Assigned.
Proprietary
Homepage 6
Figure 1-16 Keyword Search
1.8.2 Status
Select one or more vacancy statuses, by holding down the Ctrl button on the keyboard.
Figure 1-17 Vacancy Status Filter
Incomplete
Job Archived
Job Open
No Selection Made
No Selection Made – Mgt Decision
Onboarding
Pending Open Date
Selection Process
Vacancy Cancelled
Vacancy Cancelled – Budget
Vacancy Cancelled - Error
Vacancy Cancelled – Hiring Freeze
Vacancy Filled – Through Another
Announcement
Vacancy Filled – Through Another
Method
Vacancy Filled – Through This
Announcement
Vacancy Not Filled – No Qualified
Applicants
Vacancy Not Filled – Offer Declined
Waiting on Someone
Approved
In Progress
Not Approved
Requires More Information
Requisition Closed
Proprietary
Homepage 7
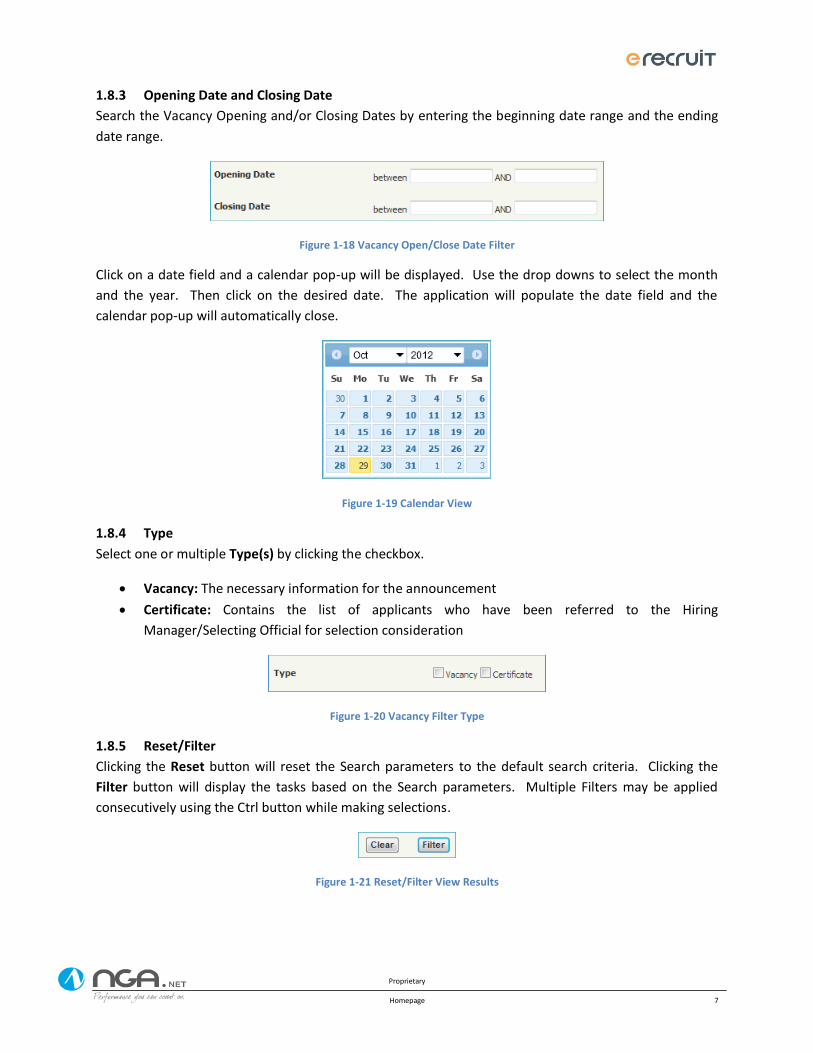
1.8.3 Opening Date and Closing Date
Search the Vacancy Opening and/or Closing Dates by entering the beginning date range and the ending
date range.
Figure 1-18 Vacancy Open/Close Date Filter
Click on a date field and a calendar pop-up will be displayed. Use the drop downs to select the month
and the year. Then click on the desired date. The application will populate the date field and the
calendar pop-up will automatically close.
Figure 1-19 Calendar View
1.8.4 Type
Select one or multiple Type(s) by clicking the checkbox.
Vacancy: The necessary information for the announcement
Certificate: Contains the list of applicants who have been referred to the Hiring
Manager/Selecting Official for selection consideration
Figure 1-20 Vacancy Filter Type
1.8.5 Reset/Filter
Clicking the Reset button will reset the Search parameters to the default search criteria. Clicking the
Filter button will display the tasks based on the Search parameters. Multiple Filters may be applied
consecutively using the Ctrl button while making selections.
Figure 1-21 Reset/Filter View Results
Proprietary
Homepage 8
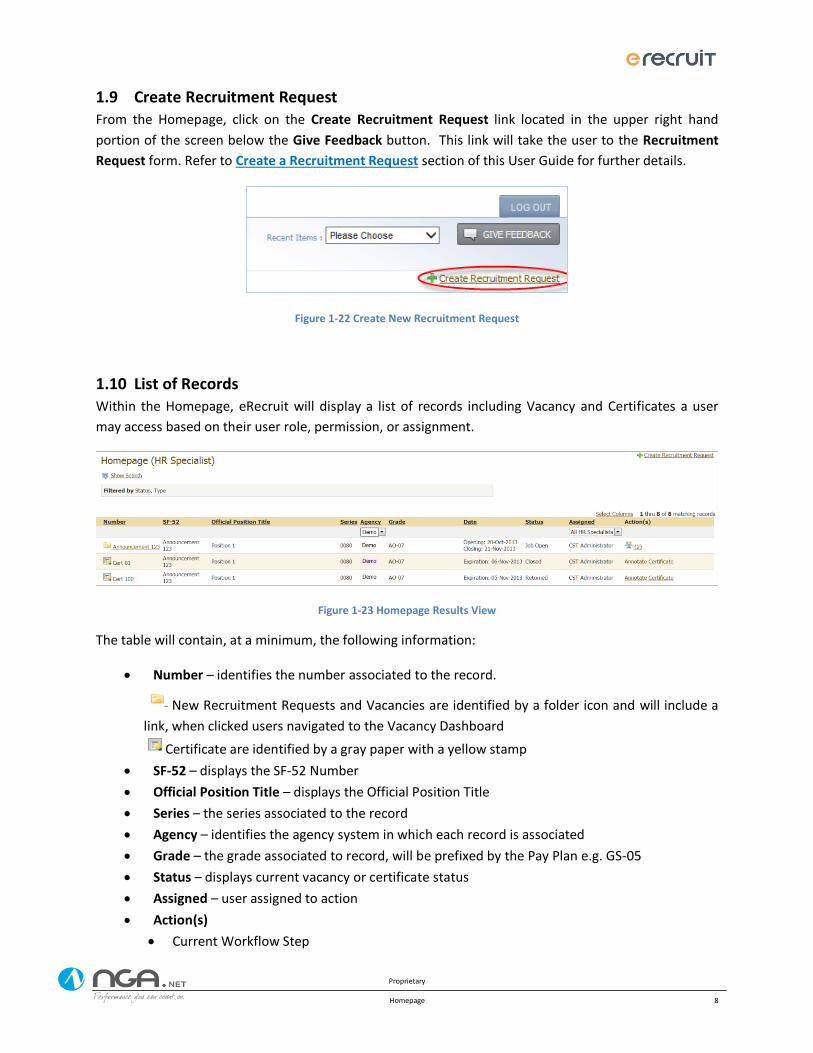
1.9 Create Recruitment Request From the Homepage, click on the Create Recruitment Request link located in the upper right hand
portion of the screen below the Give Feedback button. This link will take the user to the Recruitment
Request form. Refer to Create a Recruitment Request section of this User Guide for further details.
Figure 1-22 Create New Recruitment Request
1.10 List of Records Within the Homepage, eRecruit will display a list of records including Vacancy and Certificates a user
may access based on their user role, permission, or assignment.
Figure 1-23 Homepage Results View
The table will contain, at a minimum, the following information:
Number – identifies the number associated to the record.
New Recruitment Requests and Vacancies are identified by a folder icon and will include a
link, when clicked users navigated to the Vacancy Dashboard
Certificate are identified by a gray paper with a yellow stamp
SF-52 – displays the SF-52 Number
Official Position Title – displays the Official Position Title
Series – the series associated to the record
Agency – identifies the agency system in which each record is associated
Grade – the grade associated to record, will be prefixed by the Pay Plan e.g. GS-05
Status – displays current vacancy or certificate status
Assigned – user assigned to action
Action(s)
Current Workflow Step
Proprietary
Homepage 9
Applicant Pool
Certificate List
With the exception of the Action(s) column, all of the above column headers will be sortable ascending
on first click of title name and descending by clicking a second time.
1.10.1 Select Columns
The user has the ability to modify the Vacancy List display. Click on the Select Columns link to add or
remove columns from the Homepage Vacancy List.
1.10.2 Pagination Process
The Vacancy List will display 20 records at a time. The display will notify the user of the total number of
matching records and which records are currently being viewed. The user can move between pages by
clicking on the number or move to the next page via the arrow. Click on the double arrow to move to
the end of the matching records.
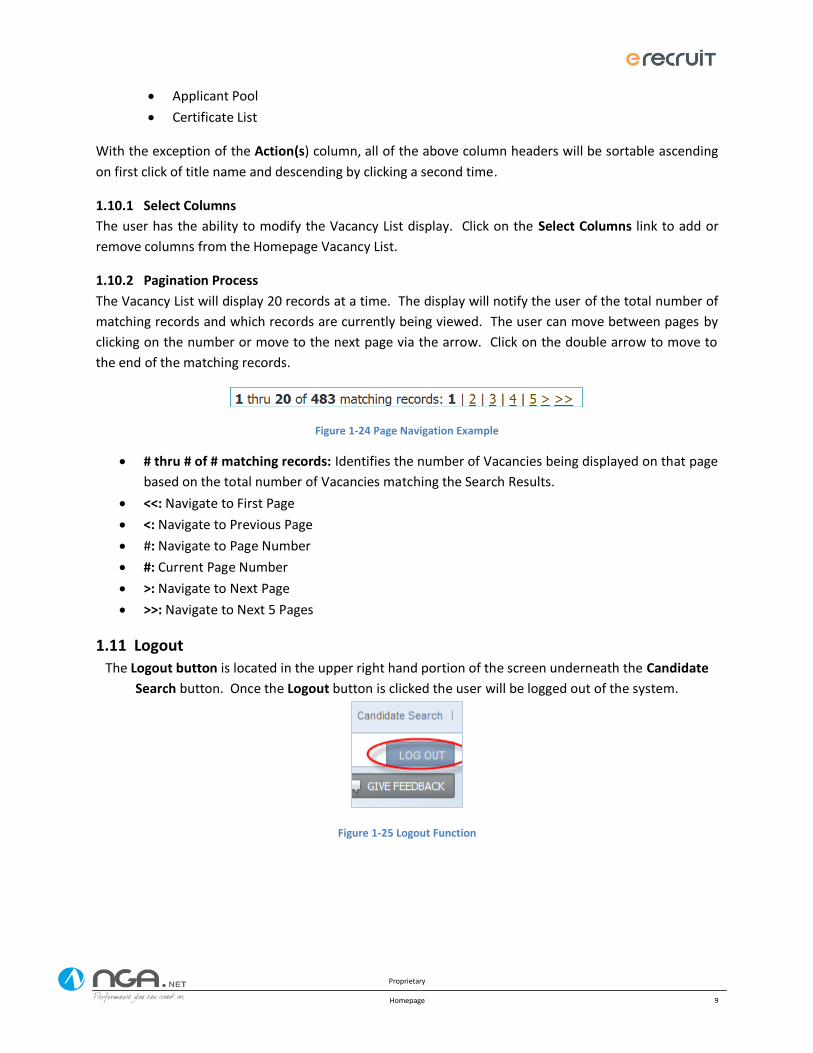
Figure 1-24 Page Navigation Example
# thru # of # matching records: Identifies the number of Vacancies being displayed on that page
based on the total number of Vacancies matching the Search Results.
<<: Navigate to First Page
<: Navigate to Previous Page
#: Navigate to Page Number
#: Current Page Number
>: Navigate to Next Page
>>: Navigate to Next 5 Pages
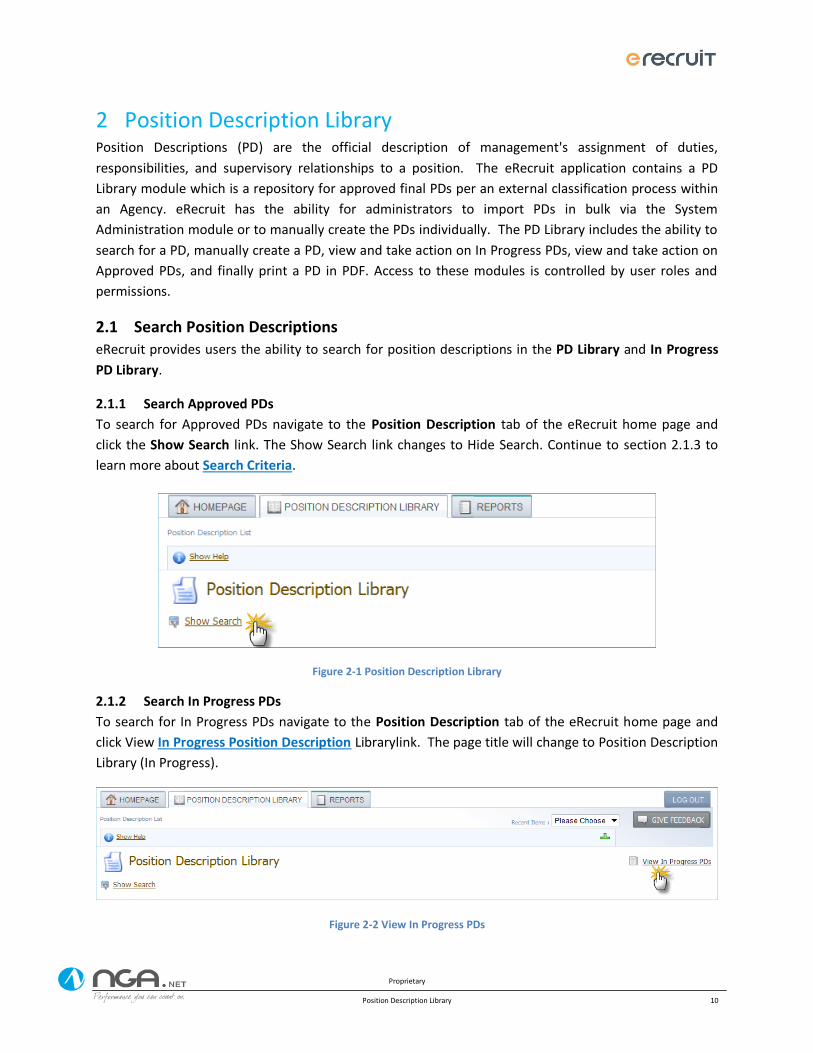
1.11 Logout
The Logout button is located in the upper right hand portion of the screen underneath the Candidate
Search button. Once the Logout button is clicked the user will be logged out of the system.
Figure 1-25 Logout Function
Proprietary
Position Description Library 10
Position Description Library 2Position Descriptions (PD) are the official description of management's assignment of duties,
responsibilities, and supervisory relationships to a position. The eRecruit application contains a PD
Library module which is a repository for approved final PDs per an external classification process within
an Agency. eRecruit has the ability for administrators to import PDs in bulk via the System
Administration module or to manually create the PDs individually. The PD Library includes the ability to
search for a PD, manually create a PD, view and take action on In Progress PDs, view and take action on
Approved PDs, and finally print a PD in PDF. Access to these modules is controlled by user roles and
permissions.
2.1 Search Position Descriptions eRecruit provides users the ability to search for position descriptions in the PD Library and In Progress
PD Library.
2.1.1 Search Approved PDs
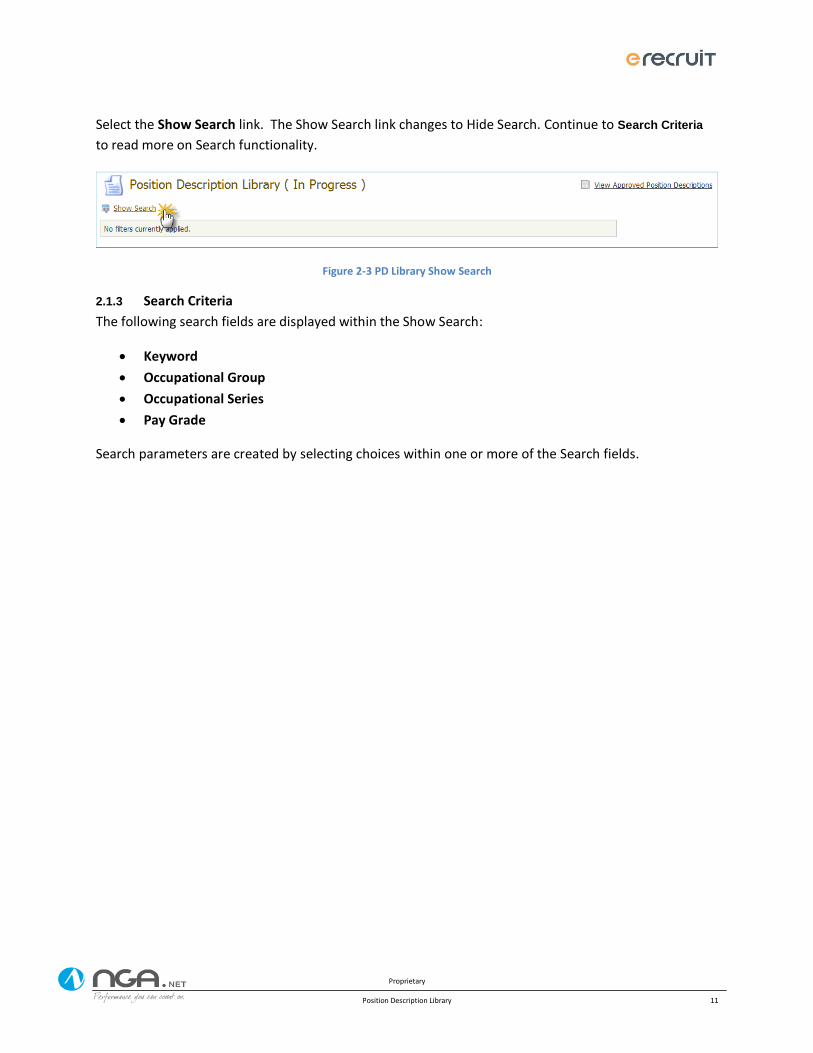
To search for Approved PDs navigate to the Position Description tab of the eRecruit home page and
click the Show Search link. The Show Search link changes to Hide Search. Continue to section 2.1.3 to
learn more about Search Criteria.
Figure 2-1 Position Description Library
2.1.2 Search In Progress PDs
To search for In Progress PDs navigate to the Position Description tab of the eRecruit home page and
click View In Progress Position Description Librarylink. The page title will change to Position Description
Library (In Progress).
Figure 2-2 View In Progress PDs
Proprietary
Position Description Library 11
Select the Show Search link. The Show Search link changes to Hide Search. Continue to Search Criteria
to read more on Search functionality.
Figure 2-3 PD Library Show Search
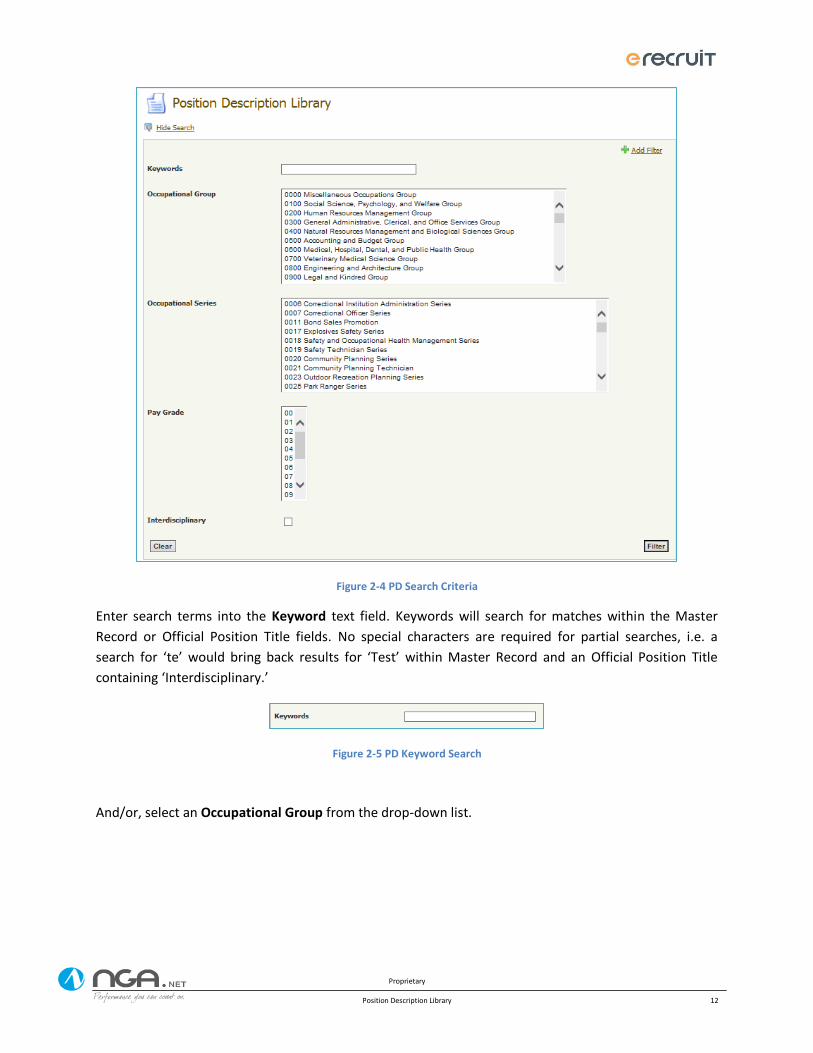
2.1.3 Search Criteria
The following search fields are displayed within the Show Search:
Keyword
Occupational Group
Occupational Series
Pay Grade
Search parameters are created by selecting choices within one or more of the Search fields.
Proprietary
Position Description Library 12
Figure 2-4 PD Search Criteria
Enter search terms into the Keyword text field. Keywords will search for matches within the Master
Record or Official Position Title fields. No special characters are required for partial searches, i.e. a
search for ‘te’ would bring back results for ‘Test’ within Master Record and an Official Position Title
containing ‘Interdisciplinary.’
Figure 2-5 PD Keyword Search
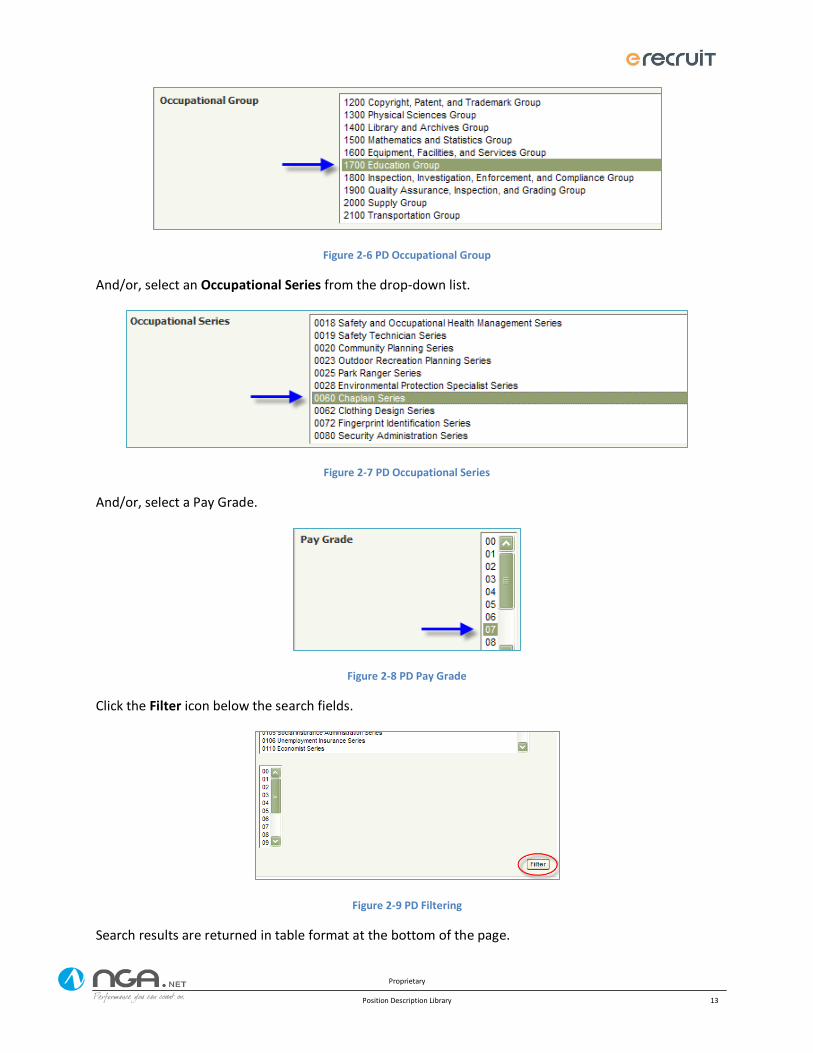
And/or, select an Occupational Group from the drop-down list.
Proprietary
Position Description Library 13
Figure 2-6 PD Occupational Group
And/or, select an Occupational Series from the drop-down list.
Figure 2-7 PD Occupational Series
And/or, select a Pay Grade.
Figure 2-8 PD Pay Grade
Click the Filter icon below the search fields.
Figure 2-9 PD Filtering
Search results are returned in table format at the bottom of the page.
Proprietary
Position Description Library 14
Hint: Use the Ctrl key to make multiple selections within a field.
If the intended search results are not returned, click the Clear button below the search fields to remove
the selected search criteria. Next, reduce the search criteria and click the Filter icon again.
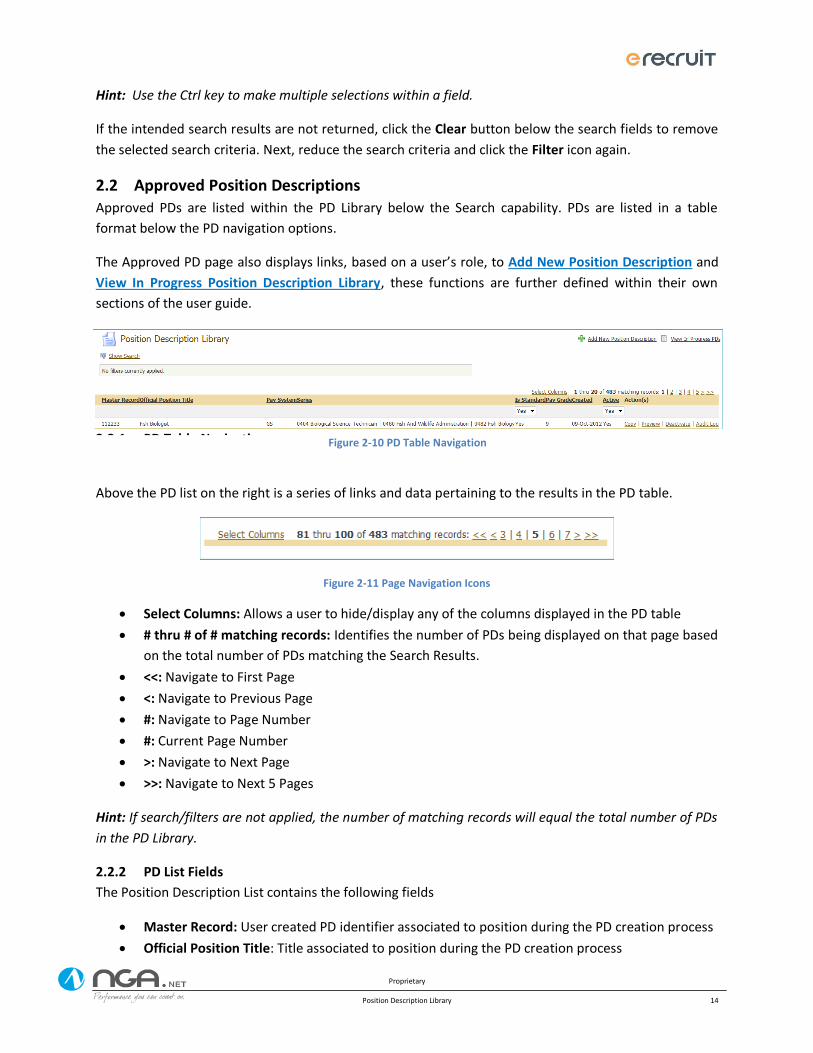
2.2 Approved Position Descriptions Approved PDs are listed within the PD Library below the Search capability. PDs are listed in a table
format below the PD navigation options.
The Approved PD page also displays links, based on a user’s role, to Add New Position Description and
View In Progress Position Description Library, these functions are further defined within their own
sections of the user guide.
2.2.1 PD Table Navigation
Above the PD list on the right is a series of links and data pertaining to the results in the PD table.
Figure 2-11 Page Navigation Icons
Select Columns: Allows a user to hide/display any of the columns displayed in the PD table
# thru # of # matching records: Identifies the number of PDs being displayed on that page based
on the total number of PDs matching the Search Results.
<<: Navigate to First Page
<: Navigate to Previous Page
#: Navigate to Page Number
#: Current Page Number
>: Navigate to Next Page
>>: Navigate to Next 5 Pages
Hint: If search/filters are not applied, the number of matching records will equal the total number of PDs
in the PD Library.
2.2.2 PD List Fields
The Position Description List contains the following fields
Master Record: User created PD identifier associated to position during the PD creation process
Official Position Title: Title associated to position during the PD creation process
Figure 2-10 PD Table Navigation
Proprietary
Position Description Library 15
Pay System: Pay System associated to position during the PD creation process
Series: Series associated to position during the PD creation process
Is Standard: Yes/No identifier associated to position. List can be filtered on by this field.
Pay Grade: Pay Grade associated to position during the PD creation process
Created: Date PD was created in Approved PD Library
Active: Yes/No identifier based on Action. List can be filtered on by this field.
Action(s): Controlled by Permission. Possible options – Copy, Preview, Deactivate, Activate,
Audit Log
Hint: Clicking on the field title will sort the results in ascending order or descending order if clicked again.
Multiple sorts may not be applied; a search should be conducted to further narrow results.
2.2.3 PD List Action(s)
The PD List Actions column identifies the actions that are available per PD within the Approved PD
Library. Actions are based on user roles and permissions and only available to designated users based
on internal Agency policy.
Hint: An approved PD cannot be edited. Rather it would need to be copied. Once the new one is
approved the previous version may be deactivated.
Copy: The PD Copy feature takes a copy of the approved PD and takes the user through the Add a New
Position Description Workflow; however the data will be prepopulated. The user may modify the
content and create a new PD.
Preview: To view a PD summary, click the Preview link in the Action column. A new window opens,
containing the Position Description Information Summary.
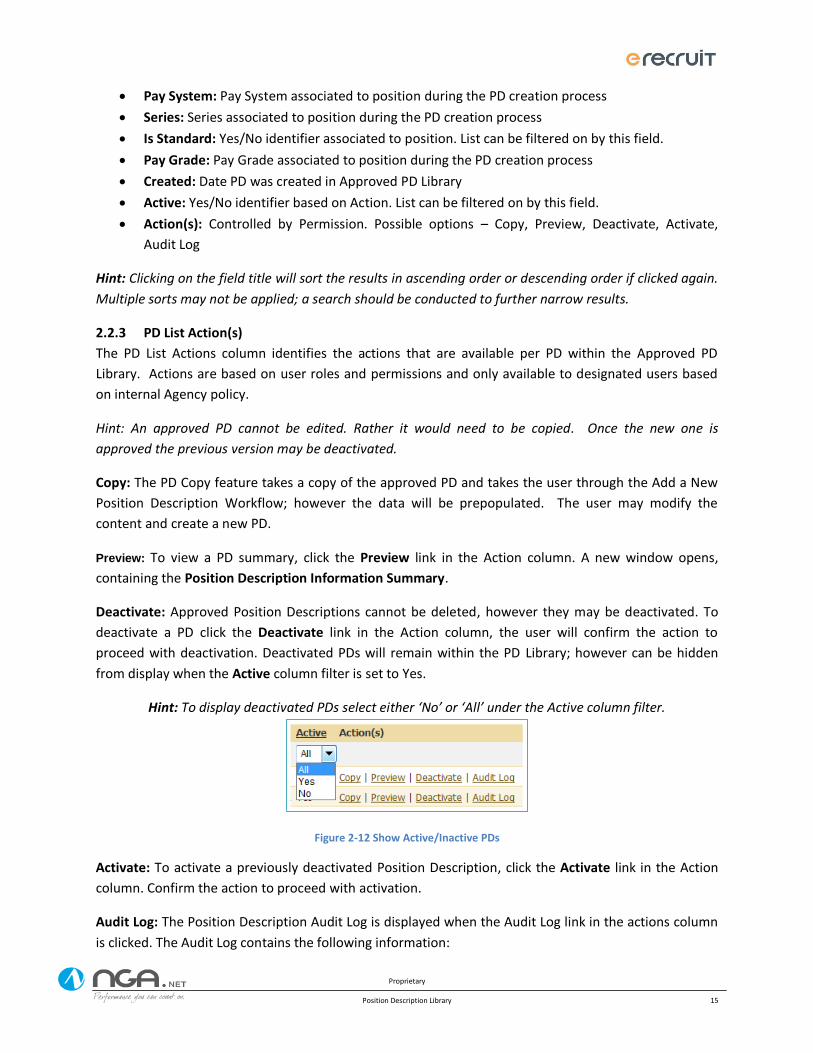
Deactivate: Approved Position Descriptions cannot be deleted, however they may be deactivated. To
deactivate a PD click the Deactivate link in the Action column, the user will confirm the action to
proceed with deactivation. Deactivated PDs will remain within the PD Library; however can be hidden
from display when the Active column filter is set to Yes.
Hint: To display deactivated PDs select either ‘No’ or ‘All’ under the Active column filter.
Figure 2-12 Show Active/Inactive PDs
Activate: To activate a previously deactivated Position Description, click the Activate link in the Action
column. Confirm the action to proceed with activation.
Audit Log: The Position Description Audit Log is displayed when the Audit Log link in the actions column
is clicked. The Audit Log contains the following information:
Proprietary
Position Description Library 16
Created – This is a date and time stamp to indicate when changes have been made to the
Position Description.
Name – This will list the user who has made changes to the PD.
Change Type Desc – This will indicate what specific changes have been made to the PD.
Origin - Indicates where positions are derived from.
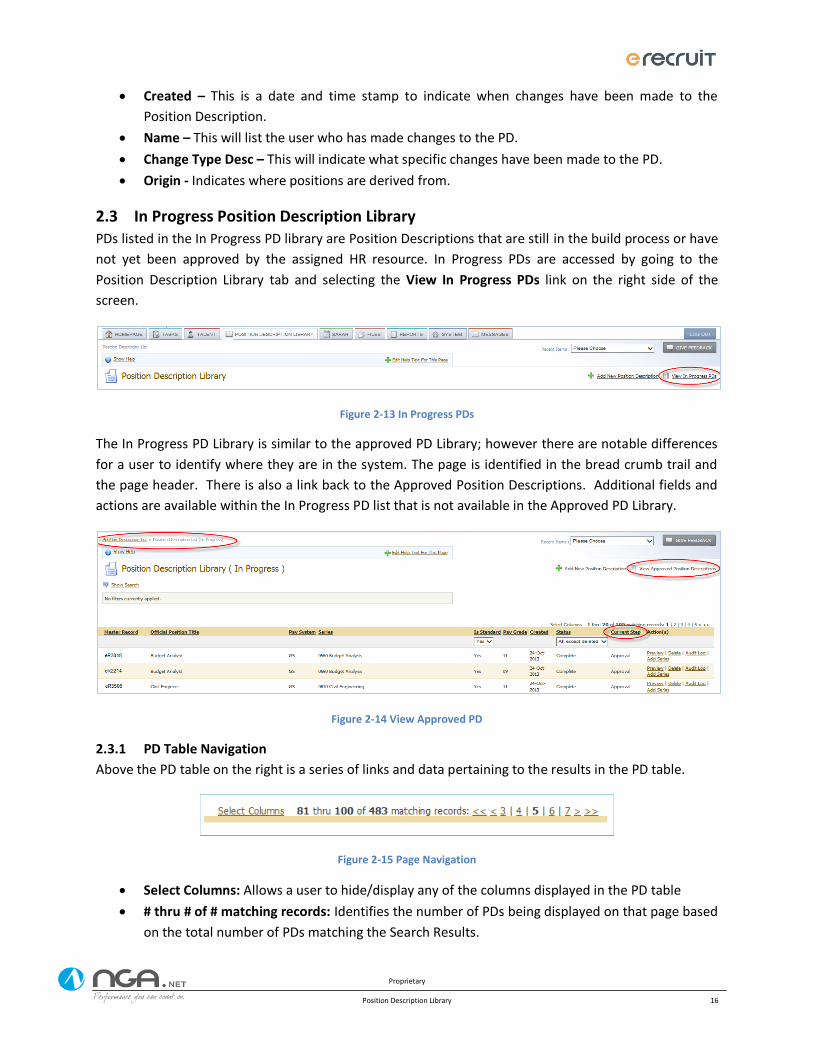
2.3 In Progress Position Description Library PDs listed in the In Progress PD library are Position Descriptions that are still in the build process or have
not yet been approved by the assigned HR resource. In Progress PDs are accessed by going to the
Position Description Library tab and selecting the View In Progress PDs link on the right side of the
screen.
Figure 2-13 In Progress PDs
The In Progress PD Library is similar to the approved PD Library; however there are notable differences
for a user to identify where they are in the system. The page is identified in the bread crumb trail and
the page header. There is also a link back to the Approved Position Descriptions. Additional fields and
actions are available within the In Progress PD list that is not available in the Approved PD Library.
Figure 2-14 View Approved PD
2.3.1 PD Table Navigation
Above the PD table on the right is a series of links and data pertaining to the results in the PD table.
Figure 2-15 Page Navigation
Select Columns: Allows a user to hide/display any of the columns displayed in the PD table
# thru # of # matching records: Identifies the number of PDs being displayed on that page based
on the total number of PDs matching the Search Results.

Proprietary
Position Description Library 17
<<: Navigate to First Page
<: Navigate to Previous Page
#: Navigate to Page Number
#: Current Page Number
>: Navigate to Next Page
>>: Navigate to Next 5 Pages
2.3.2 PD List Fields
The following are the fields and their description available within the PD List
Master Record: User created PD identifier associated to position during the PD creation process
Official Position Title: Title associated to position during the PD creation process
Pay System: Pay System associated to position during the PD creation process
Series: Series associated to position during the PD creation process
Is Standard: Yes/No identifier associated to position. List can be filtered on by this field.
Pay Grade: Pay Grade associated to position during the PD creation process
Created: Date PD was started
Status: Incomplete, Complete, Classified, Rejected, Deleted. Status is further defined in section
2.3.3
Current Step: Current step of Add New Position Description workflow
Action(s): Controlled by Permission. Possible options – Begin, Continue, Preview, Delete, Audit
Log. Actions are further defined in section2.3.4.
Hint: Clicking on the field title will sort the results ascending order or descending order if clicked again.
Multiple sorts may not be applied; instead a search should be leveraged to further narrow results.
2.3.3 PD Table Status
Status is available per PD to indicate where in progress the PD currently stands.
Incomplete: PD is still in PD Workflow prior to Approval. The Current Step column will provide
additional information of where in the process the PD stands.
Complete: The PD has completed the workflow process and is at Current Step of Assign Approver or
Approval
Classified: Once the PD is classified it’s moved from In Progress to Approved PD library
Rejected: A rejected PD returns to Incomplete Status.
Deleted: Deleted PDs are no longer visible within the system
2.3.4 PD List Action(s)
The follow section identifies the actions that are available per PD within the Approved PD Library.
Actions are based on roles and permissions and are only available to designated users based on internal
Agency policy.
Proprietary
Position Description Library 18
Begin: The PD is assigned to the user and has not been begun. The action is role/permission based.
Clicking on the Begin link will open the PD workflow to the current step.
Continue: The PD is assigned to the user and has creation has begun however there is an action pending
to complete based on Status and Current Step. Clicking on the Continue link will open the PD workflow
to the current step.
Preview: To view a PD summary, click the Preview link in the Action column. A new window opens,
containing the Position Description Information Summary. Within the Preview is a link that allows the
user to Create a Printable PD Summary. Section 2.5 provides additional details around this process.
Delete: To permanently delete the PD from the In Progress Library, click Delete and confirm the action
on the following page. Once an In Progress PD has been deleted it cannot be retrieved.
Audit Log: If user clicks 'Audit Log' link in the 'Action(s)' column, the Position Description Audit Log is
displayed The Audit window contains following information:
Created – This is a date and time stamp to indicate when changes have been made to the
Position Description.
Name – This will list the user who has made changes to the PD.
Change Type Desc – This will indicate what specific changes have been made to the PD.
Origin – Indicates where positions are derived from.
2.4 Add New Position Description
Users with the proper permissions have the ability to Add a New Position Description. Click the Position
Description Library tab to begin the process.
Figure 2-16 PD Tab
The Add New Position Description link is located below the Log Out button, of your eRecruit Position
Description Library page. Click the link to begin the process of manually creating a PD to be stored in the
PD Library.
Figure 2-17 Add New PD
There are five steps in the standard eRecruit workflow navigation. The left hand side of the screen will
show the workflow steps, where within the workflow the user currently is i.e., Step 2/5, and the green
checkmark indicates the previous step was successfully completed.
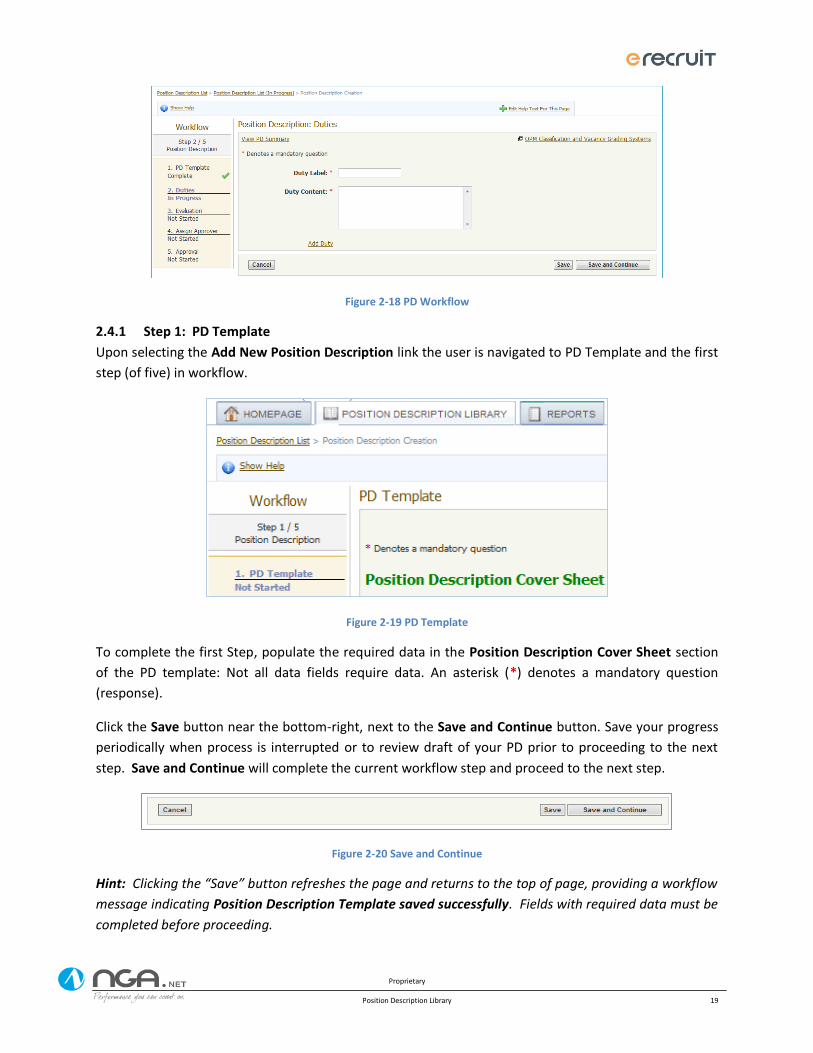
Proprietary
Position Description Library 19
Figure 2-18 PD Workflow
2.4.1 Step 1: PD Template
Upon selecting the Add New Position Description link the user is navigated to PD Template and the first
step (of five) in workflow.
Figure 2-19 PD Template
To complete the first Step, populate the required data in the Position Description Cover Sheet section
of the PD template: Not all data fields require data. An asterisk (*) denotes a mandatory question
(response).
Click the Save button near the bottom-right, next to the Save and Continue button. Save your progress
periodically when process is interrupted or to review draft of your PD prior to proceeding to the next
step. Save and Continue will complete the current workflow step and proceed to the next step.
Figure 2-20 Save and Continue
Hint: Clicking the “Save” button refreshes the page and returns to the top of page, providing a workflow
message indicating Position Description Template saved successfully. Fields with required data must be
completed before proceeding.
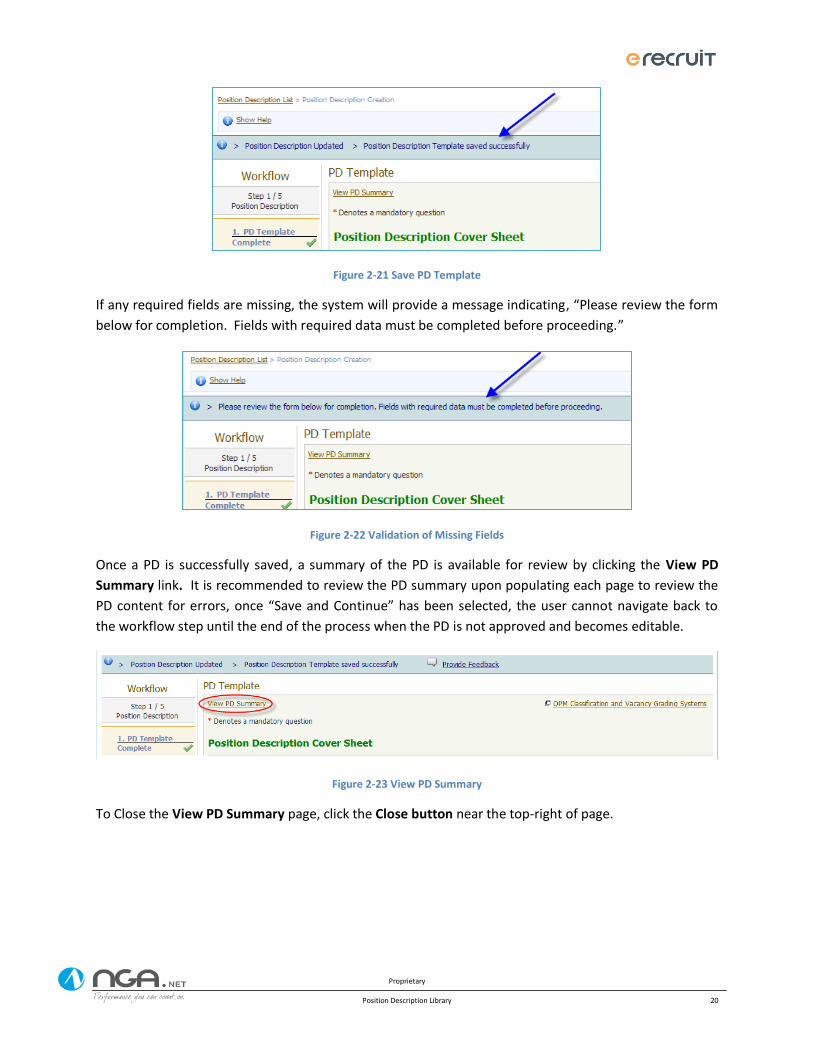
Proprietary
Position Description Library 20
Figure 2-21 Save PD Template
If any required fields are missing, the system will provide a message indicating, “Please review the form
below for completion. Fields with required data must be completed before proceeding.”
Figure 2-22 Validation of Missing Fields
Once a PD is successfully saved, a summary of the PD is available for review by clicking the View PD
Summary link. It is recommended to review the PD summary upon populating each page to review the
PD content for errors, once “Save and Continue” has been selected, the user cannot navigate back to
the workflow step until the end of the process when the PD is not approved and becomes editable.
Figure 2-23 View PD Summary
To Close the View PD Summary page, click the Close button near the top-right of page.
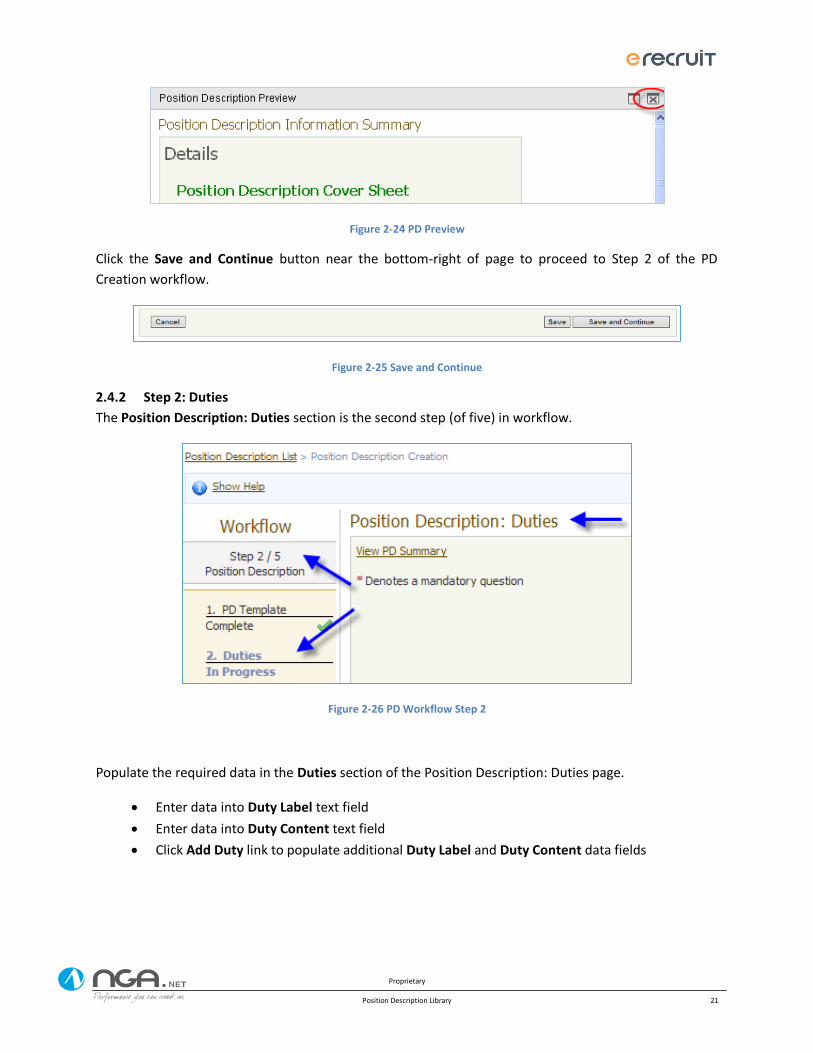
Proprietary
Position Description Library 21
Figure 2-24 PD Preview
Click the Save and Continue button near the bottom-right of page to proceed to Step 2 of the PD
Creation workflow.
Figure 2-25 Save and Continue
2.4.2 Step 2: Duties
The Position Description: Duties section is the second step (of five) in workflow.
Figure 2-26 PD Workflow Step 2
Populate the required data in the Duties section of the Position Description: Duties page.
Enter data into Duty Label text field
Enter data into Duty Content text field
Click Add Duty link to populate additional Duty Label and Duty Content data fields
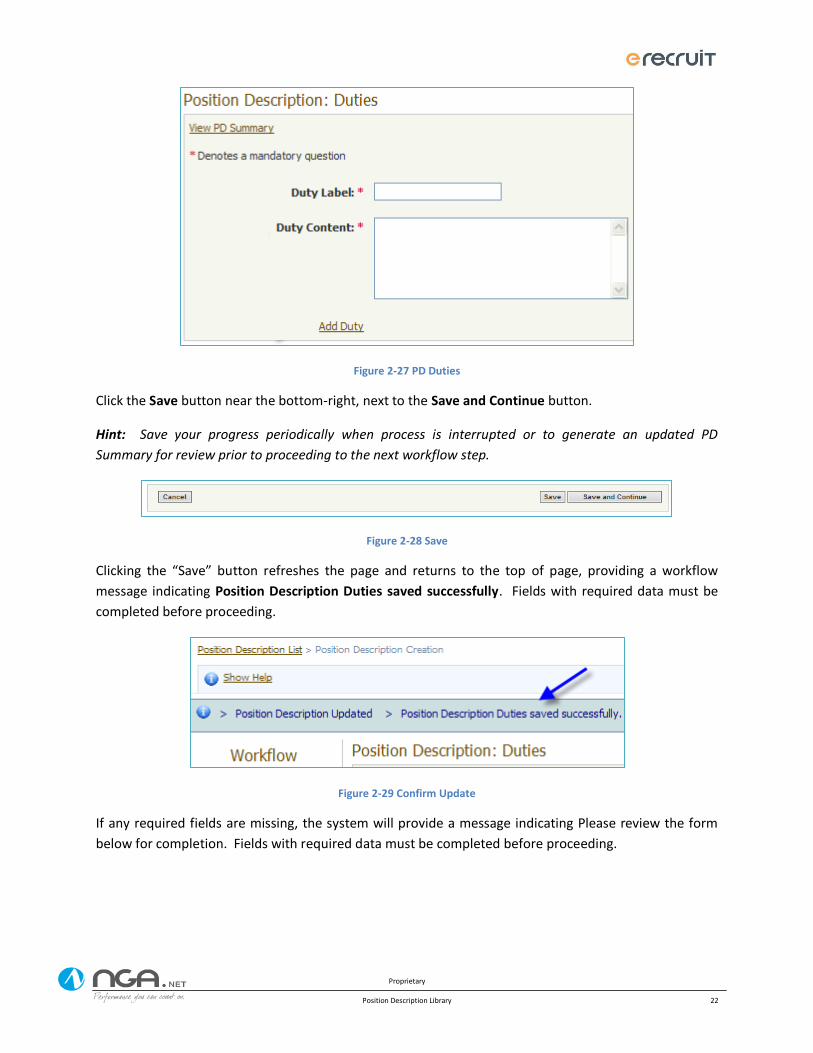
Proprietary
Position Description Library 22
Figure 2-27 PD Duties
Click the Save button near the bottom-right, next to the Save and Continue button.
Hint: Save your progress periodically when process is interrupted or to generate an updated PD
Summary for review prior to proceeding to the next workflow step.
Figure 2-28 Save
Clicking the “Save” button refreshes the page and returns to the top of page, providing a workflow
message indicating Position Description Duties saved successfully. Fields with required data must be
completed before proceeding.
Figure 2-29 Confirm Update
If any required fields are missing, the system will provide a message indicating Please review the form
below for completion. Fields with required data must be completed before proceeding.
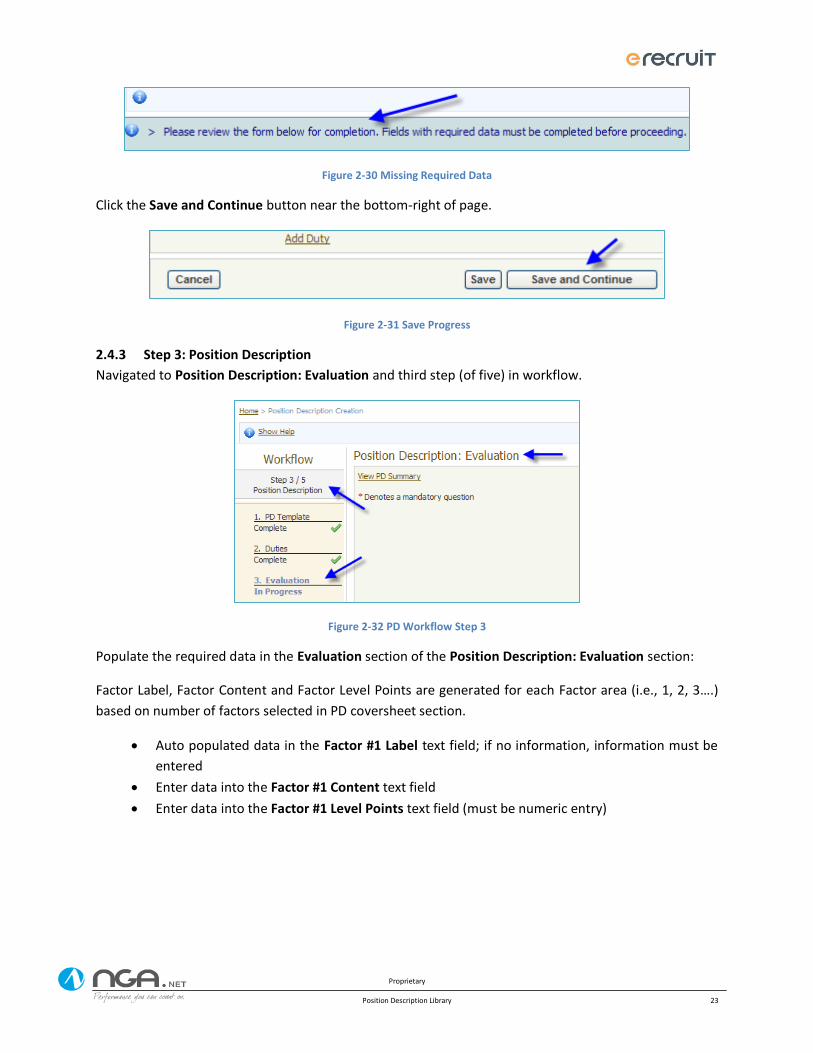
Proprietary
Position Description Library 23
Figure 2-30 Missing Required Data
Click the Save and Continue button near the bottom-right of page.
Figure 2-31 Save Progress
2.4.3 Step 3: Position Description
Navigated to Position Description: Evaluation and third step (of five) in workflow.
Figure 2-32 PD Workflow Step 3
Populate the required data in the Evaluation section of the Position Description: Evaluation section:
Factor Label, Factor Content and Factor Level Points are generated for each Factor area (i.e., 1, 2, 3….)
based on number of factors selected in PD coversheet section.
Auto populated data in the Factor #1 Label text field; if no information, information must be
entered
Enter data into the Factor #1 Content text field
Enter data into the Factor #1 Level Points text field (must be numeric entry)
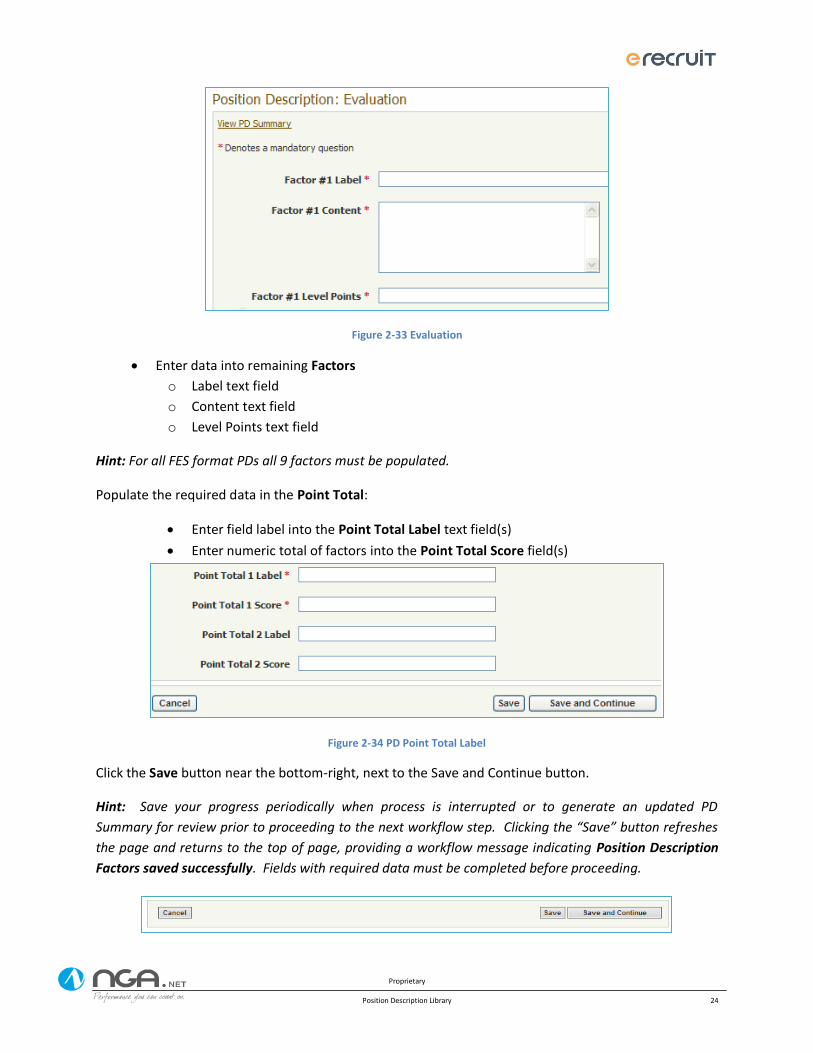
Proprietary
Position Description Library 24
Figure 2-33 Evaluation
Enter data into remaining Factors
o Label text field
o Content text field
o Level Points text field
Hint: For all FES format PDs all 9 factors must be populated.
Populate the required data in the Point Total:
Enter field label into the Point Total Label text field(s)
Enter numeric total of factors into the Point Total Score field(s)
Figure 2-34 PD Point Total Label
Click the Save button near the bottom-right, next to the Save and Continue button.
Hint: Save your progress periodically when process is interrupted or to generate an updated PD
Summary for review prior to proceeding to the next workflow step. Clicking the “Save” button refreshes
the page and returns to the top of page, providing a workflow message indicating Position Description
Factors saved successfully. Fields with required data must be completed before proceeding.
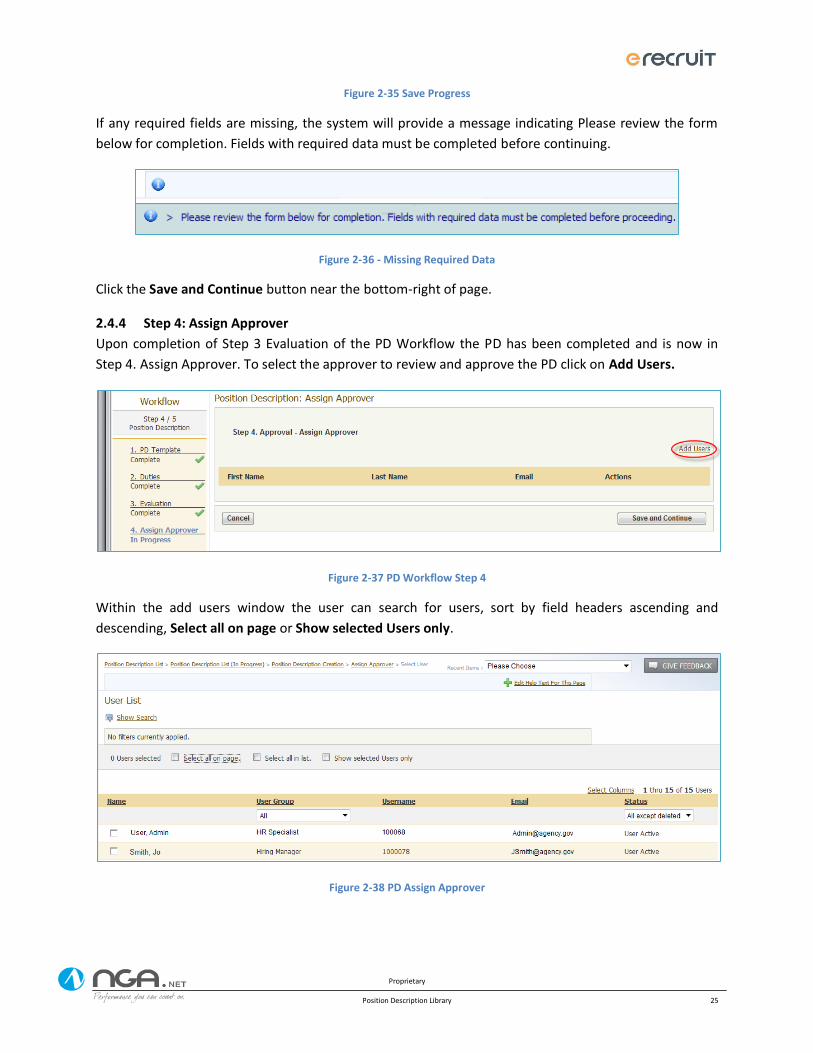
Proprietary
Position Description Library 25
Figure 2-35 Save Progress
If any required fields are missing, the system will provide a message indicating Please review the form
below for completion. Fields with required data must be completed before continuing.
Figure 2-36 - Missing Required Data
Click the Save and Continue button near the bottom-right of page.
2.4.4 Step 4: Assign Approver
Upon completion of Step 3 Evaluation of the PD Workflow the PD has been completed and is now in
Step 4. Assign Approver. To select the approver to review and approve the PD click on Add Users.
Figure 2-37 PD Workflow Step 4
Within the add users window the user can search for users, sort by field headers ascending and
descending, Select all on page or Show selected Users only.
Figure 2-38 PD Assign Approver
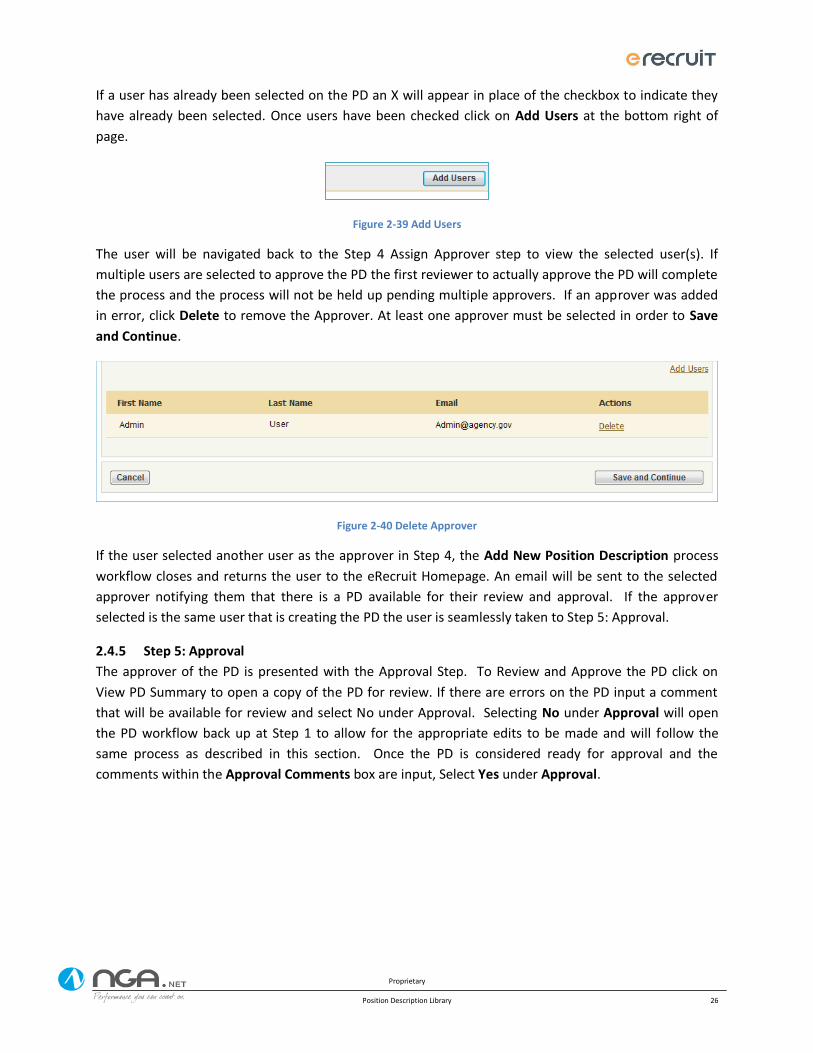
Proprietary
Position Description Library 26
If a user has already been selected on the PD an X will appear in place of the checkbox to indicate they
have already been selected. Once users have been checked click on Add Users at the bottom right of
page.
Figure 2-39 Add Users
The user will be navigated back to the Step 4 Assign Approver step to view the selected user(s). If
multiple users are selected to approve the PD the first reviewer to actually approve the PD will complete
the process and the process will not be held up pending multiple approvers. If an approver was added
in error, click Delete to remove the Approver. At least one approver must be selected in order to Save
and Continue.
Figure 2-40 Delete Approver
If the user selected another user as the approver in Step 4, the Add New Position Description process
workflow closes and returns the user to the eRecruit Homepage. An email will be sent to the selected
approver notifying them that there is a PD available for their review and approval. If the approver
selected is the same user that is creating the PD the user is seamlessly taken to Step 5: Approval.
2.4.5 Step 5: Approval
The approver of the PD is presented with the Approval Step. To Review and Approve the PD click on
View PD Summary to open a copy of the PD for review. If there are errors on the PD input a comment
that will be available for review and select No under Approval. Selecting No under Approval will open
the PD workflow back up at Step 1 to allow for the appropriate edits to be made and will follow the
same process as described in this section. Once the PD is considered ready for approval and the
comments within the Approval Comments box are input, Select Yes under Approval.
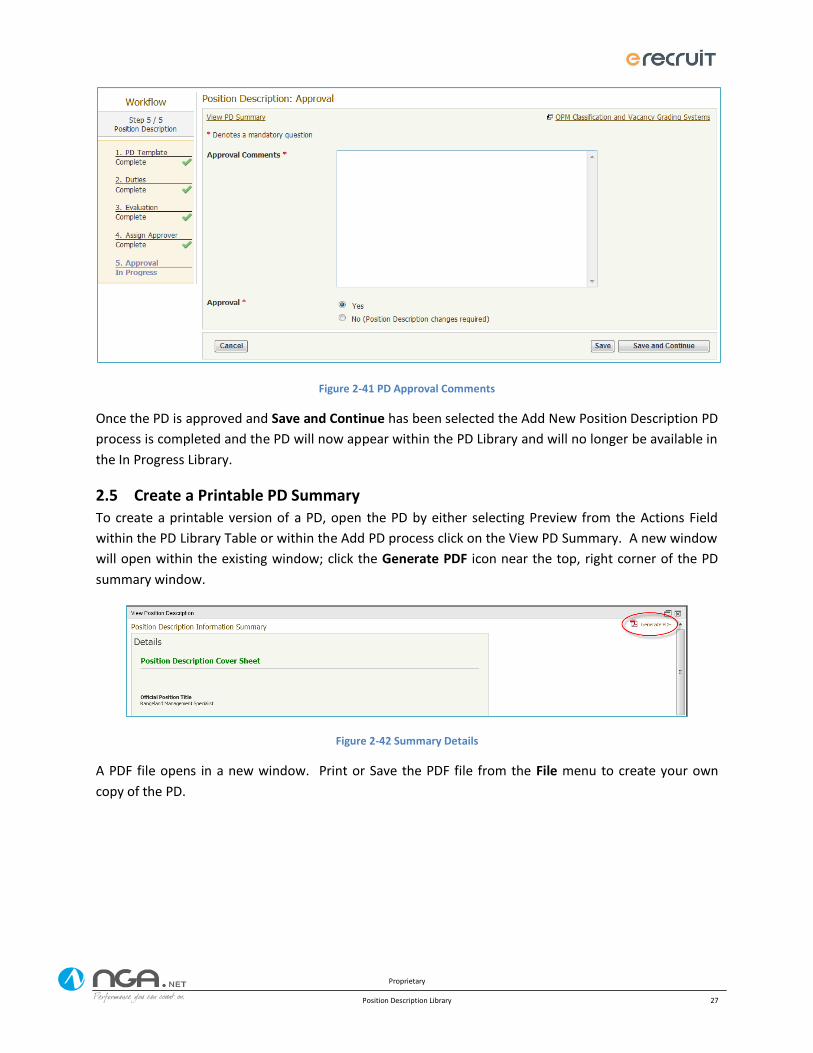
Proprietary
Position Description Library 27
Figure 2-41 PD Approval Comments
Once the PD is approved and Save and Continue has been selected the Add New Position Description PD
process is completed and the PD will now appear within the PD Library and will no longer be available in
the In Progress Library.
2.5 Create a Printable PD Summary To create a printable version of a PD, open the PD by either selecting Preview from the Actions Field
within the PD Library Table or within the Add PD process click on the View PD Summary. A new window
will open within the existing window; click the Generate PDF icon near the top, right corner of the PD
summary window.
Figure 2-42 Summary Details
A PDF file opens in a new window. Print or Save the PDF file from the File menu to create your own
copy of the PD.
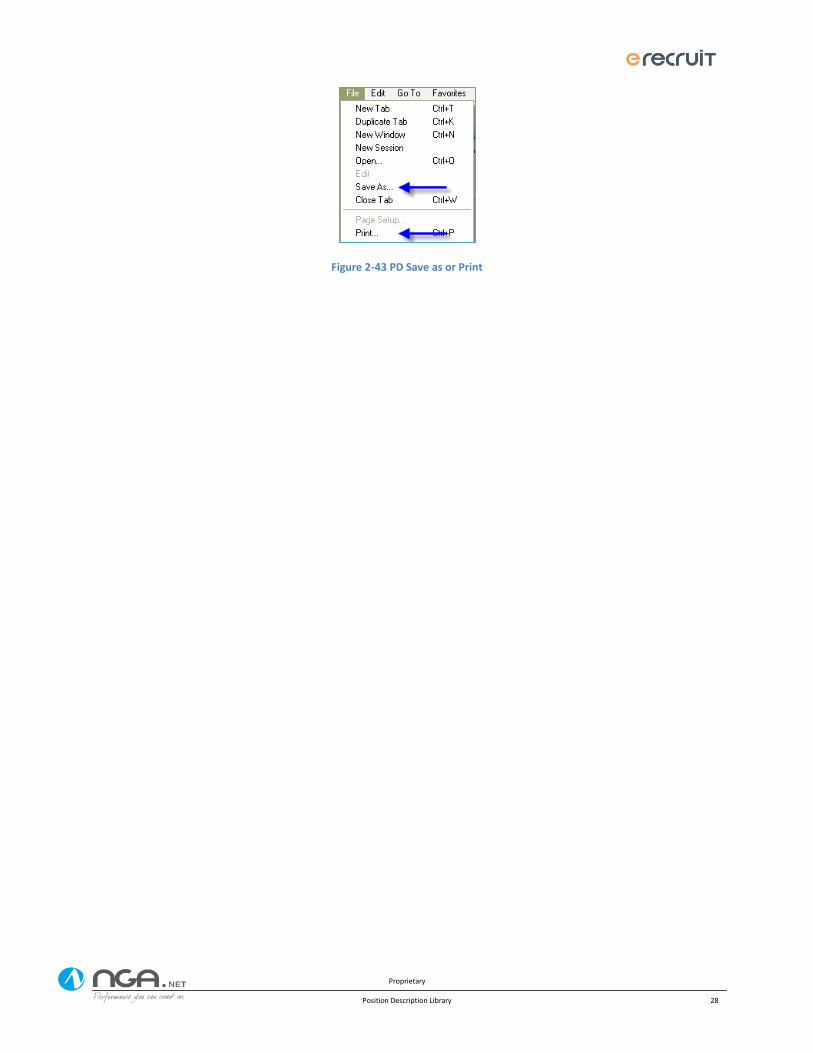
Proprietary
Position Description Library 28
Figure 2-43 PD Save as or Print
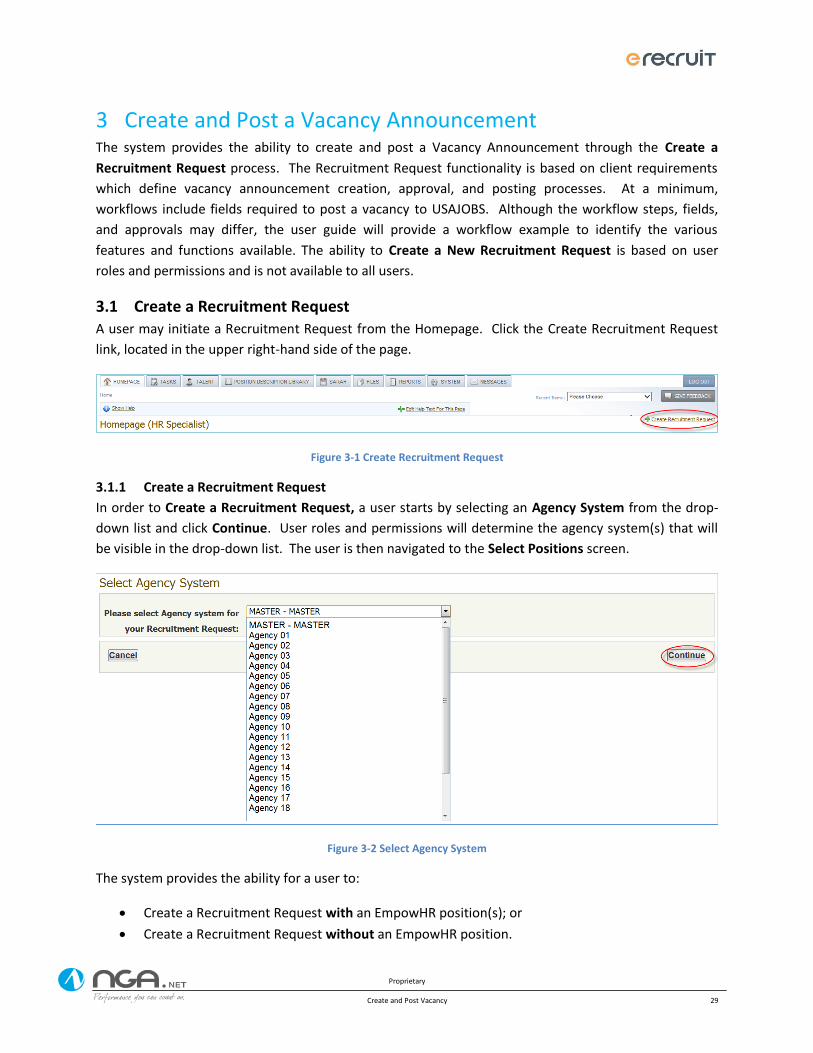
Proprietary
Create and Post Vacancy 29
Create and Post a Vacancy Announcement 3The system provides the ability to create and post a Vacancy Announcement through the Create a
Recruitment Request process. The Recruitment Request functionality is based on client requirements
which define vacancy announcement creation, approval, and posting processes. At a minimum,
workflows include fields required to post a vacancy to USAJOBS. Although the workflow steps, fields,
and approvals may differ, the user guide will provide a workflow example to identify the various
features and functions available. The ability to Create a New Recruitment Request is based on user
roles and permissions and is not available to all users.
3.1 Create a Recruitment Request A user may initiate a Recruitment Request from the Homepage. Click the Create Recruitment Request
link, located in the upper right-hand side of the page.
Figure 3-1 Create Recruitment Request
3.1.1 Create a Recruitment Request
In order to Create a Recruitment Request, a user starts by selecting an Agency System from the drop-
down list and click Continue. User roles and permissions will determine the agency system(s) that will
be visible in the drop-down list. The user is then navigated to the Select Positions screen.
Figure 3-2 Select Agency System
The system provides the ability for a user to:
Create a Recruitment Request with an EmpowHR position(s); or
Create a Recruitment Request without an EmpowHR position.
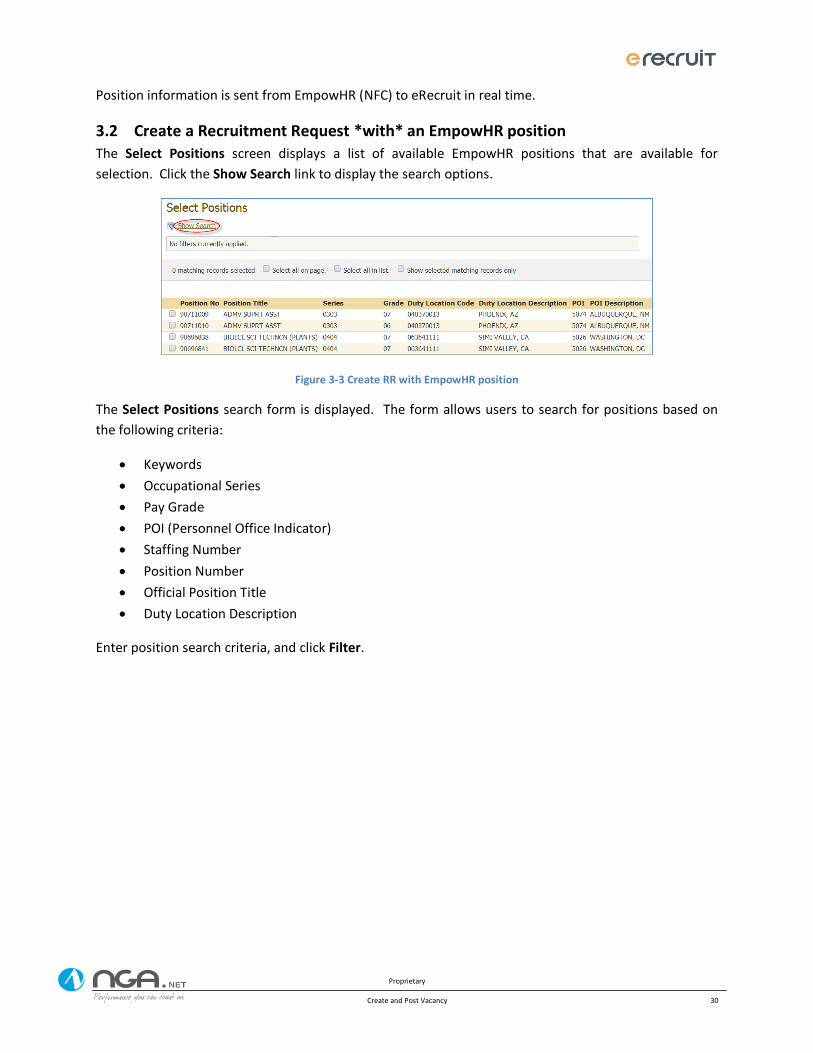
Proprietary
Create and Post Vacancy 30
Position information is sent from EmpowHR (NFC) to eRecruit in real time.
3.2 Create a Recruitment Request *with* an EmpowHR position
The Select Positions screen displays a list of available EmpowHR positions that are available for
selection. Click the Show Search link to display the search options.
Figure 3-3 Create RR with EmpowHR position
The Select Positions search form is displayed. The form allows users to search for positions based on
the following criteria:
Keywords
Occupational Series
Pay Grade
POI (Personnel Office Indicator)
Staffing Number
Position Number
Official Position Title
Duty Location Description
Enter position search criteria, and click Filter.
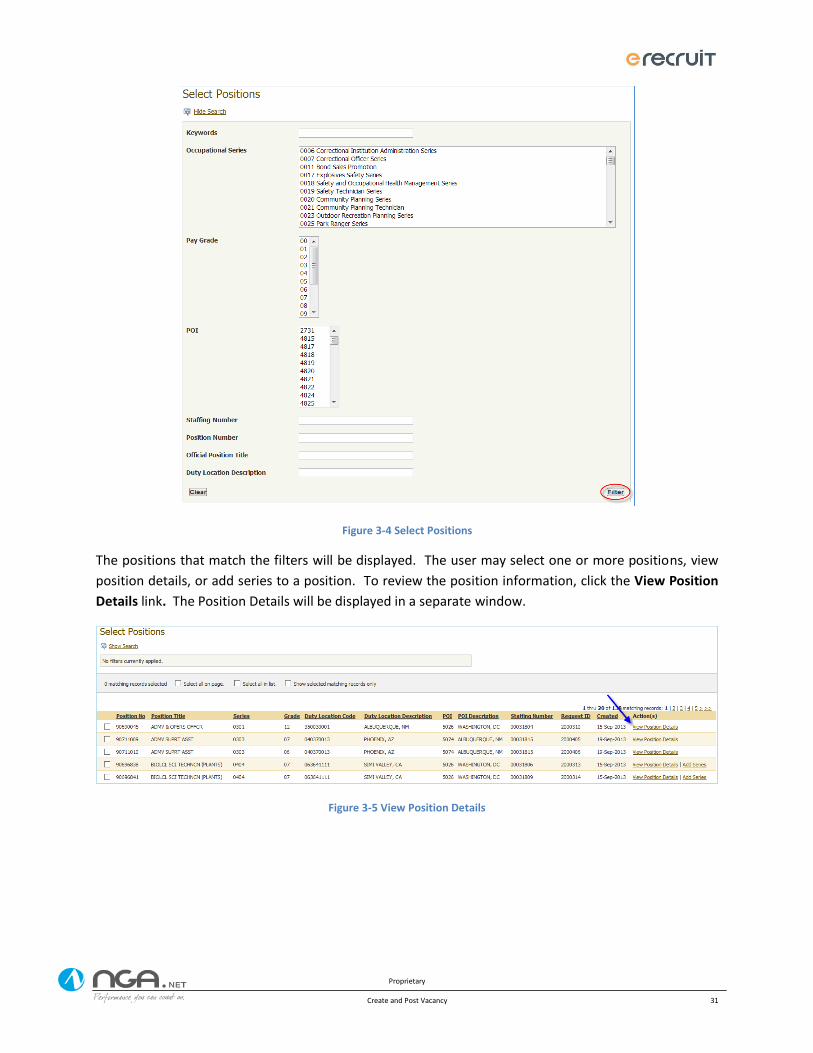
Proprietary
Create and Post Vacancy 31
Figure 3-4 Select Positions
The positions that match the filters will be displayed. The user may select one or more positions, view
position details, or add series to a position. To review the position information, click the View Position
Details link. The Position Details will be displayed in a separate window.
Figure 3-5 View Position Details

Proprietary
Create and Post Vacancy 32
Figure 3-6 Preview Window
Close the preview window with the X icon in the top right to return to the Select Position list.
If one or more series needs to be added to a position to support an interdisciplinary vacancy, click the
Add Series link associated to the position.
Hint: EmpowHR currently supports one series per position. To support the posting of an interdisciplinary
vacancy, the system provides the ability to add additional series to the position. If the position has been
previously associated to an announcement the option to Add Series will no longer be available. The user
is navigated to the Manage Occupational Series for <Position Name> form.
Add Additional Occupational Series by selecting from the available options, and click Save.
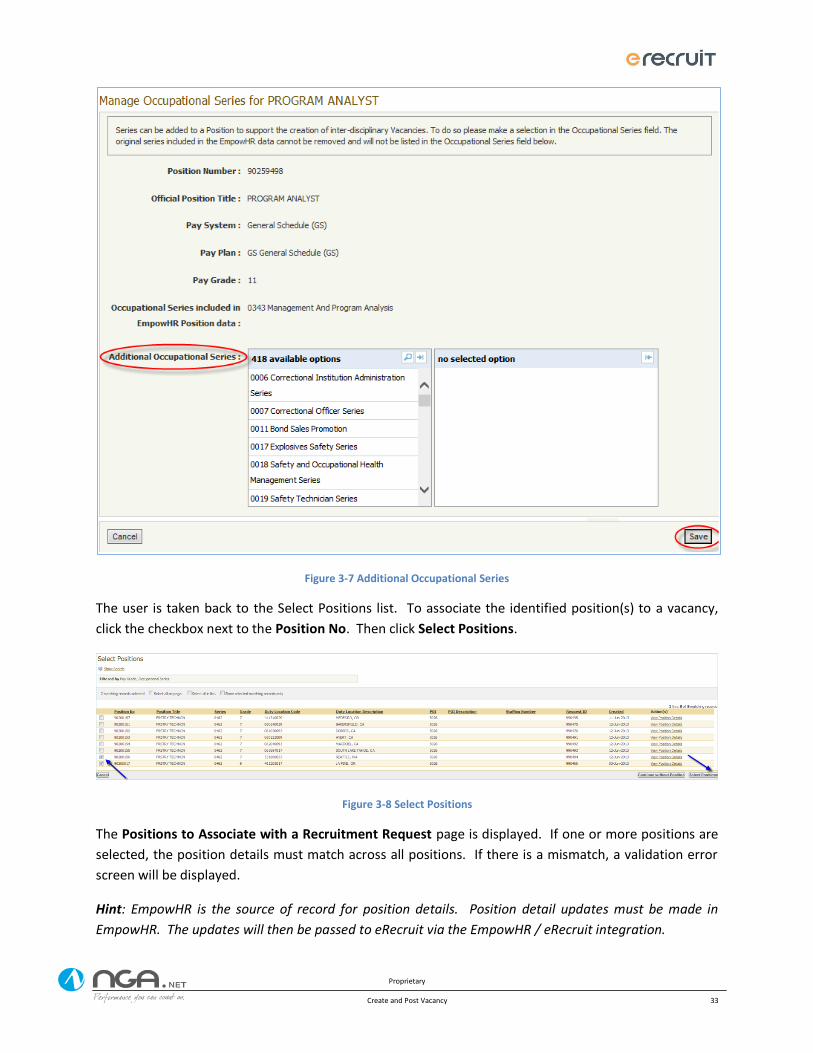
Proprietary
Create and Post Vacancy 33
Figure 3-7 Additional Occupational Series
The user is taken back to the Select Positions list. To associate the identified position(s) to a vacancy,
click the checkbox next to the Position No. Then click Select Positions.
Figure 3-8 Select Positions
The Positions to Associate with a Recruitment Request page is displayed. If one or more positions are
selected, the position details must match across all positions. If there is a mismatch, a validation error
screen will be displayed.
Hint: EmpowHR is the source of record for position details. Position detail updates must be made in
EmpowHR. The updates will then be passed to eRecruit via the EmpowHR / eRecruit integration.
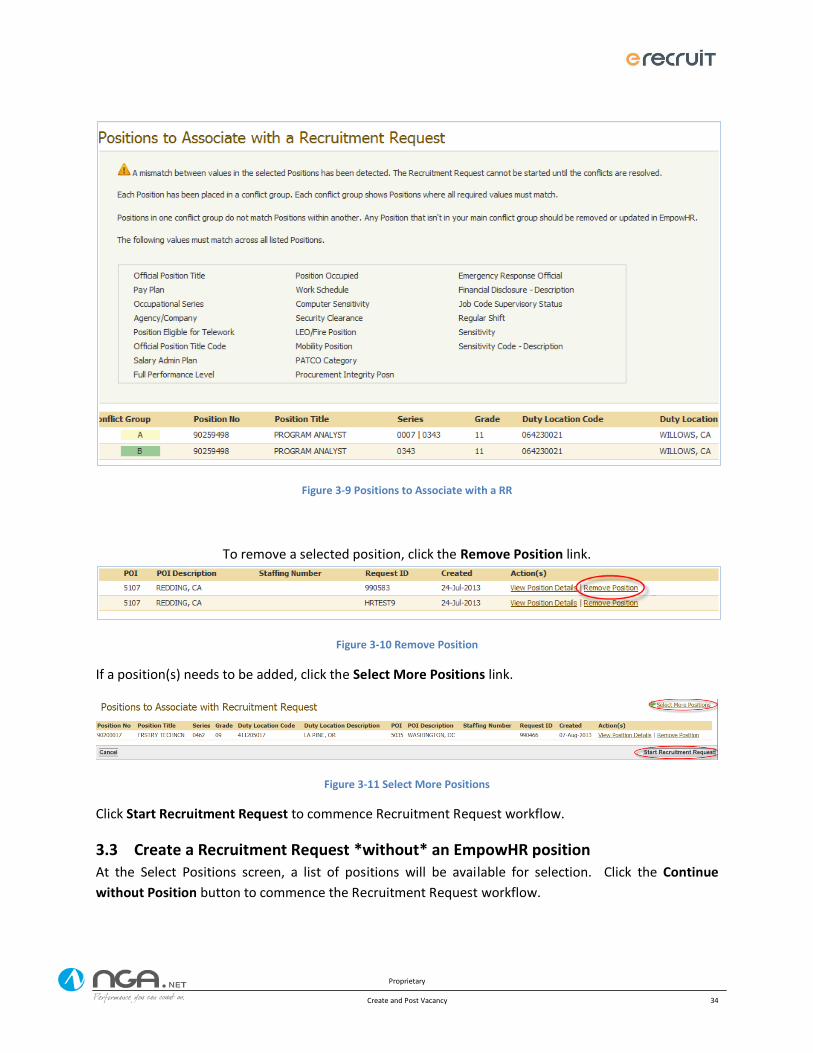
Proprietary
Create and Post Vacancy 34
Figure 3-9 Positions to Associate with a RR
To remove a selected position, click the Remove Position link.
Figure 3-10 Remove Position
If a position(s) needs to be added, click the Select More Positions link.
Figure 3-11 Select More Positions
Click Start Recruitment Request to commence Recruitment Request workflow.
3.3 Create a Recruitment Request *without* an EmpowHR position At the Select Positions screen, a list of positions will be available for selection. Click the Continue
without Position button to commence the Recruitment Request workflow.
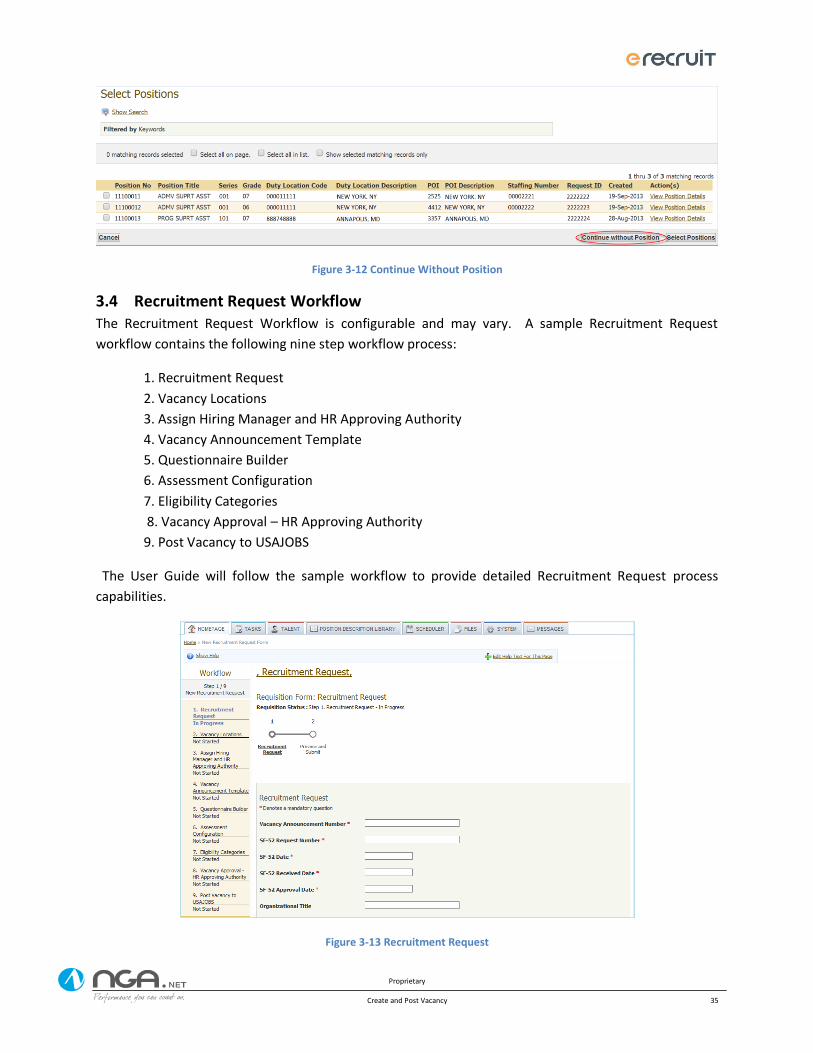
Proprietary
Create and Post Vacancy 35
Figure 3-12 Continue Without Position
3.4 Recruitment Request Workflow The Recruitment Request Workflow is configurable and may vary. A sample Recruitment Request
workflow contains the following nine step workflow process:
1. Recruitment Request
2. Vacancy Locations
3. Assign Hiring Manager and HR Approving Authority
4. Vacancy Announcement Template
5. Questionnaire Builder
6. Assessment Configuration
7. Eligibility Categories
8. Vacancy Approval – HR Approving Authority
9. Post Vacancy to USAJOBS
The User Guide will follow the sample workflow to provide detailed Recruitment Request process
capabilities.
Figure 3-13 Recruitment Request
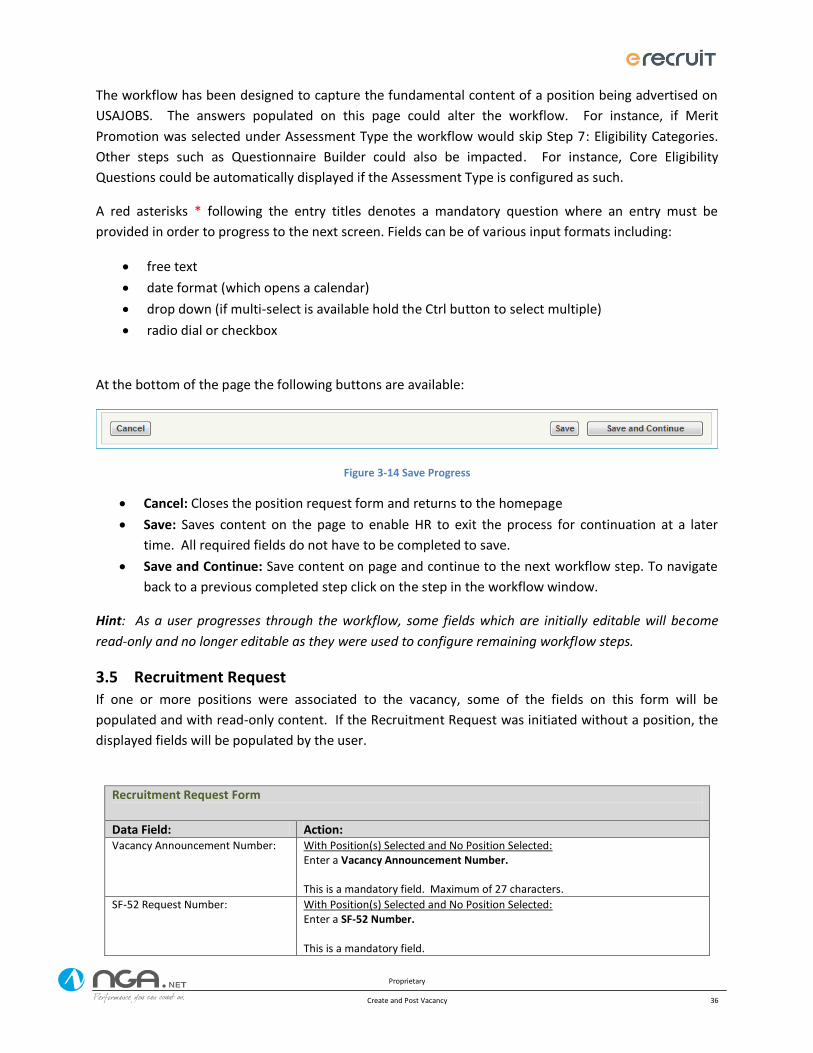
Proprietary
Create and Post Vacancy 36
The workflow has been designed to capture the fundamental content of a position being advertised on
USAJOBS. The answers populated on this page could alter the workflow. For instance, if Merit
Promotion was selected under Assessment Type the workflow would skip Step 7: Eligibility Categories.
Other steps such as Questionnaire Builder could also be impacted. For instance, Core Eligibility
Questions could be automatically displayed if the Assessment Type is configured as such.
A red asterisks * following the entry titles denotes a mandatory question where an entry must be
provided in order to progress to the next screen. Fields can be of various input formats including:
free text
date format (which opens a calendar)
drop down (if multi-select is available hold the Ctrl button to select multiple)
radio dial or checkbox
At the bottom of the page the following buttons are available:
Figure 3-14 Save Progress
Cancel: Closes the position request form and returns to the homepage
Save: Saves content on the page to enable HR to exit the process for continuation at a later
time. All required fields do not have to be completed to save.
Save and Continue: Save content on page and continue to the next workflow step. To navigate
back to a previous completed step click on the step in the workflow window.
Hint: As a user progresses through the workflow, some fields which are initially editable will become
read-only and no longer editable as they were used to configure remaining workflow steps.
3.5 Recruitment Request If one or more positions were associated to the vacancy, some of the fields on this form will be
populated and with read-only content. If the Recruitment Request was initiated without a position, the
displayed fields will be populated by the user.
Recruitment Request Form
Data Field: Action: Vacancy Announcement Number: With Position(s) Selected and No Position Selected:
Enter a Vacancy Announcement Number. This is a mandatory field. Maximum of 27 characters.
SF-52 Request Number: With Position(s) Selected and No Position Selected: Enter a SF-52 Number. This is a mandatory field.
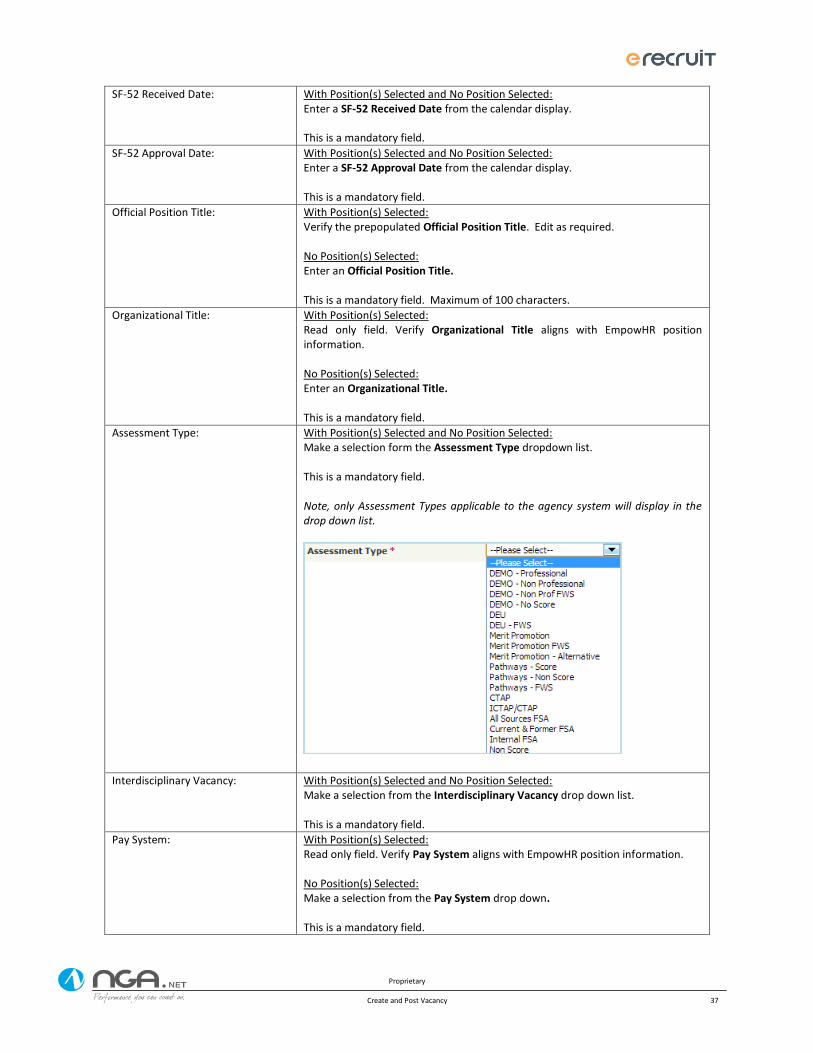
Proprietary
Create and Post Vacancy 37
SF-52 Received Date: With Position(s) Selected and No Position Selected: Enter a SF-52 Received Date from the calendar display. This is a mandatory field.
SF-52 Approval Date: With Position(s) Selected and No Position Selected: Enter a SF-52 Approval Date from the calendar display. This is a mandatory field.
Official Position Title: With Position(s) Selected: Verify the prepopulated Official Position Title. Edit as required. No Position(s) Selected: Enter an Official Position Title. This is a mandatory field. Maximum of 100 characters.
Organizational Title: With Position(s) Selected: Read only field. Verify Organizational Title aligns with EmpowHR position information. No Position(s) Selected: Enter an Organizational Title. This is a mandatory field.
Assessment Type: With Position(s) Selected and No Position Selected: Make a selection form the Assessment Type dropdown list. This is a mandatory field. Note, only Assessment Types applicable to the agency system will display in the drop down list.
Interdisciplinary Vacancy: With Position(s) Selected and No Position Selected: Make a selection from the Interdisciplinary Vacancy drop down list. This is a mandatory field.
Pay System: With Position(s) Selected: Read only field. Verify Pay System aligns with EmpowHR position information. No Position(s) Selected: Make a selection from the Pay System drop down. This is a mandatory field.
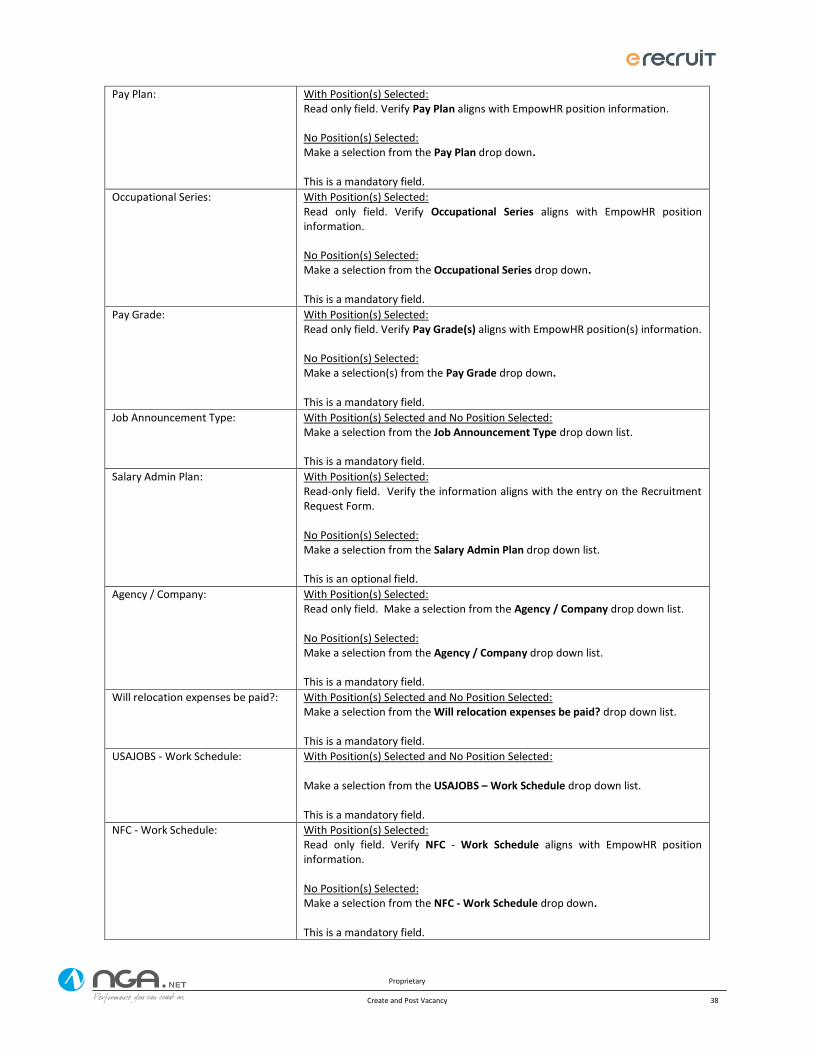
Proprietary
Create and Post Vacancy 38
Pay Plan: With Position(s) Selected: Read only field. Verify Pay Plan aligns with EmpowHR position information. No Position(s) Selected: Make a selection from the Pay Plan drop down. This is a mandatory field.
Occupational Series: With Position(s) Selected: Read only field. Verify Occupational Series aligns with EmpowHR position information. No Position(s) Selected: Make a selection from the Occupational Series drop down. This is a mandatory field.
Pay Grade: With Position(s) Selected: Read only field. Verify Pay Grade(s) aligns with EmpowHR position(s) information. No Position(s) Selected: Make a selection(s) from the Pay Grade drop down. This is a mandatory field.
Job Announcement Type: With Position(s) Selected and No Position Selected: Make a selection from the Job Announcement Type drop down list. This is a mandatory field.
Salary Admin Plan: With Position(s) Selected: Read-only field. Verify the information aligns with the entry on the Recruitment Request Form. No Position(s) Selected: Make a selection from the Salary Admin Plan drop down list. This is an optional field.
Agency / Company: With Position(s) Selected: Read only field. Make a selection from the Agency / Company drop down list. No Position(s) Selected: Make a selection from the Agency / Company drop down list. This is a mandatory field.
Will relocation expenses be paid?: With Position(s) Selected and No Position Selected: Make a selection from the Will relocation expenses be paid? drop down list. This is a mandatory field.
USAJOBS - Work Schedule: With Position(s) Selected and No Position Selected: Make a selection from the USAJOBS – Work Schedule drop down list. This is a mandatory field.
NFC - Work Schedule: With Position(s) Selected: Read only field. Verify NFC - Work Schedule aligns with EmpowHR position information. No Position(s) Selected: Make a selection from the NFC - Work Schedule drop down. This is a mandatory field.
Proprietary
Create and Post Vacancy 39
Position Occupied: With Position(s) Selected: Read only field. Verify Position Occupied aligns with EmpowHR position information. No Position(s) Selected: Make a selection from the Position Occupied drop down. This is an optional field.
Bargaining Unit: With Position(s) Selected: Read only field. Verify Bargaining Unit aligns with EmpowHR position information. No Position(s) Selected: Make a selection from the Bargaining Unit drop down. This is a mandatory field.
Position Eligible for Telework: With Position(s) Selected and No Position Selected: Make a selection from the Position Eligible for Telework? drop down list. This is a mandatory field.
Computer Sensitivity: With Position(s) Selected: Read only field. Verify Computer Sensitivity aligns with EmpowHR position information. No Position(s) Selected: Make a selection from the Computer Sensitivity drop down. This is a mandatory field.
Security Clearance: With Position(s) Selected: Read only field. Verify Security Clearance aligns with EmpowHR position information. No Position(s) Selected: Make a selection from the Security Clearance drop down. This is a mandatory field.
LEO/Fire Position: With Position(s) Selected: Read only field. Verify LEO/Fire Position aligns with EmpowHR position information. No Position(s) Selected: Make a selection from the LEO/Fire Position drop down. This is a mandatory field.
Mobility Position: With Position(s) Selected: Read only field. Verify Mobility Position aligns with EmpowHR position information. No Position(s) Selected: Make a selection from the Mobility Position drop down. This is an optional field.
Official Position Title Code: With Position(s) Selected: Read only field. Verify Official Position Title Code aligns with EmpowHR position information. No Position(s) Selected: Enter an Official Position Title Code.
Proprietary
Create and Post Vacancy 40
This is a mandatory field.
Procurement Integrity Position: With Position(s) Selected: Read only field. Verify Procurement Integrity Position aligns with EmpowHR position information, if provided. No Position(s) Selected: Make a selection from the Procurement Integrity Position drop down. This is an optional field.
Emergency Response Official: With Position(s) Selected: Read only field. Verify Emergency Response Official aligns with EmpowHR position information, if provided. No Position(s) Selected: Make a selection from the Emergency Response Official drop down. This is an optional field.
Financial Disclosure – Description: With Position(s) Selected: Read only field. Verify Financial Disclosure - Description aligns with EmpowHR position information. No Position(s) Selected: Make a selection from the Financial Disclosure – Description drop down. This is a mandatory field.
Job Code Supervisory Status: With Position(s) Selected: Read only field. Verify Job Code Supervisory Status aligns with EmpowHR position information. No Position(s) Selected: Make a selection from the Job Code Supervisory Status drop down. This is an optional field.
Parenthetical Title: With Position(s) Selected: Read only field. Verify Parenthetical Title aligns with EmpowHR position information. No Position(s) Selected: Enter a Parenthetical Title. This is an optional field.
Regular Shift: With Position(s) Selected: Read only field. Verify Regular Shift aligns with EmpowHR position information. No Position(s) Selected: Make a selection from the Regular Shift drop down. This is an optional field.
Full Performance Level: With Position(s) Selected: Read only field. Verify Full Performance Level aligns with EmpowHR position information, if provided. No Position(s) Selected: Make a selection from the Full Performance Level drop down. This is an optional field.
POI: With Position(s) Selected:
Proprietary
Create and Post Vacancy 41
Read only field. Verify POI aligns with EmpowHR position information. No Position(s) Selected: Make selection(s) from the POI list. This is a mandatory field.
Sensitivity Code: With Position(s) Selected: Read only field. Verify Sensitivity Code aligns with EmpowHR position information. No Position(s) Selected: Make a selection from the Sensitivity Code drop down. This is a mandatory field.
PATCO Category: With Position(s) Selected: Read only field. Verify PATCO aligns with EmpowHR position information, if provided. No Position(s) Selected: Make a selection from the PATCO drop down. This is an optional field.
Agency Use: With Position(s) Selected: Read only field. Verify Agency Use aligns with EmpowHR position information, if provided. No Position(s) Selected: Enter an Agency Use. This is an optional field.
FLSA Status: With Position(s) Selected and No Position Selected: Make a selection from the FLSA Status drop down. This is a mandatory field.
Submit Recruitment Request: With Position(s) Selected and No Position Selected: Make a selection from the Submit Recruitment Request drop down. This is a mandatory field.
3.6 Vacancy Locations USAJOBS requires the vacancy location(s) to be identified prior to posting. The next step in the sample
workflow is to select the location(s). The user may select multiple locations. During the apply process
the applicant is able to indicate the location(s) of interest. Based on USAJOBS requirements, a number
can be entered in the Total Openings text field or it can be left blank if the number of vacancies has
been defined for each location.
To display the Vacancy Locations screen, click the Add locations link.
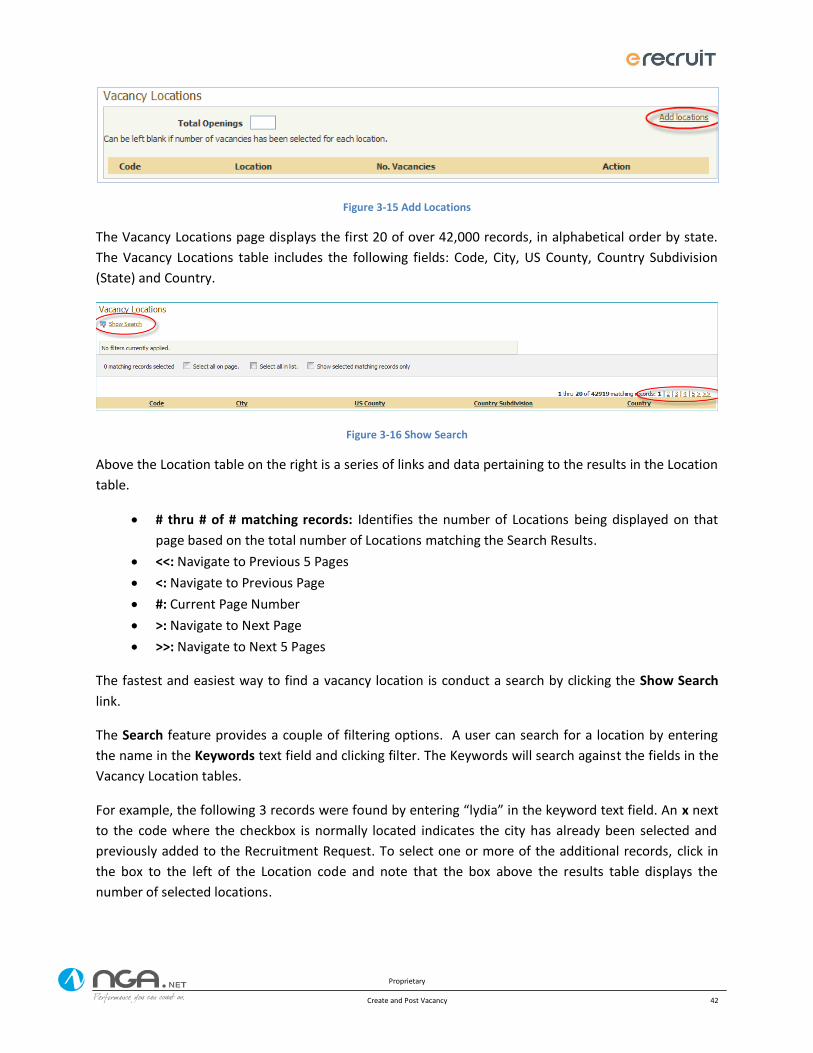
Proprietary
Create and Post Vacancy 42
Figure 3-15 Add Locations
The Vacancy Locations page displays the first 20 of over 42,000 records, in alphabetical order by state.
The Vacancy Locations table includes the following fields: Code, City, US County, Country Subdivision
(State) and Country.
Figure 3-16 Show Search
Above the Location table on the right is a series of links and data pertaining to the results in the Location
table.
# thru # of # matching records: Identifies the number of Locations being displayed on that
page based on the total number of Locations matching the Search Results.
<<: Navigate to Previous 5 Pages
<: Navigate to Previous Page
#: Current Page Number
>: Navigate to Next Page
>>: Navigate to Next 5 Pages
The fastest and easiest way to find a vacancy location is conduct a search by clicking the Show Search
link.
The Search feature provides a couple of filtering options. A user can search for a location by entering
the name in the Keywords text field and clicking filter. The Keywords will search against the fields in the
Vacancy Location tables.
For example, the following 3 records were found by entering “lydia” in the keyword text field. An x next
to the code where the checkbox is normally located indicates the city has already been selected and
previously added to the Recruitment Request. To select one or more of the additional records, click in
the box to the left of the Location code and note that the box above the results table displays the
number of selected locations.
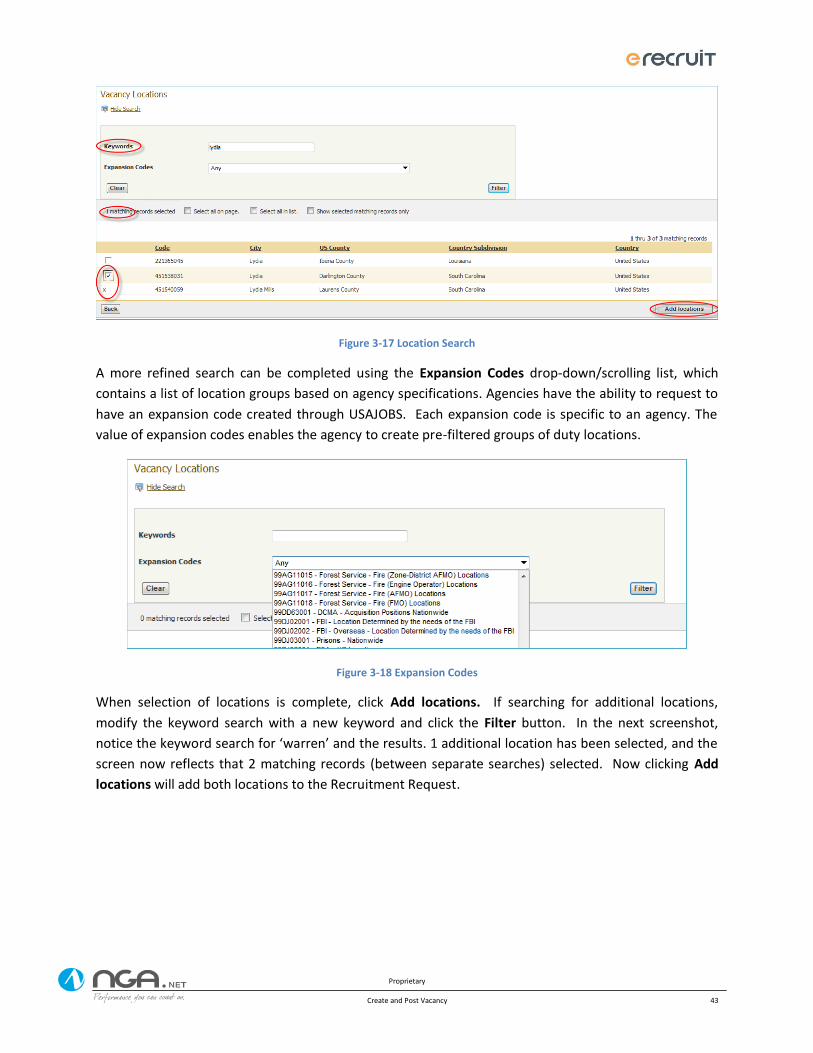
Proprietary
Create and Post Vacancy 43
Figure 3-17 Location Search
A more refined search can be completed using the Expansion Codes drop-down/scrolling list, which
contains a list of location groups based on agency specifications. Agencies have the ability to request to
have an expansion code created through USAJOBS. Each expansion code is specific to an agency. The
value of expansion codes enables the agency to create pre-filtered groups of duty locations.
Figure 3-18 Expansion Codes
When selection of locations is complete, click Add locations. If searching for additional locations,
modify the keyword search with a new keyword and click the Filter button. In the next screenshot,
notice the keyword search for ‘warren’ and the results. 1 additional location has been selected, and the
screen now reflects that 2 matching records (between separate searches) selected. Now clicking Add
locations will add both locations to the Recruitment Request.
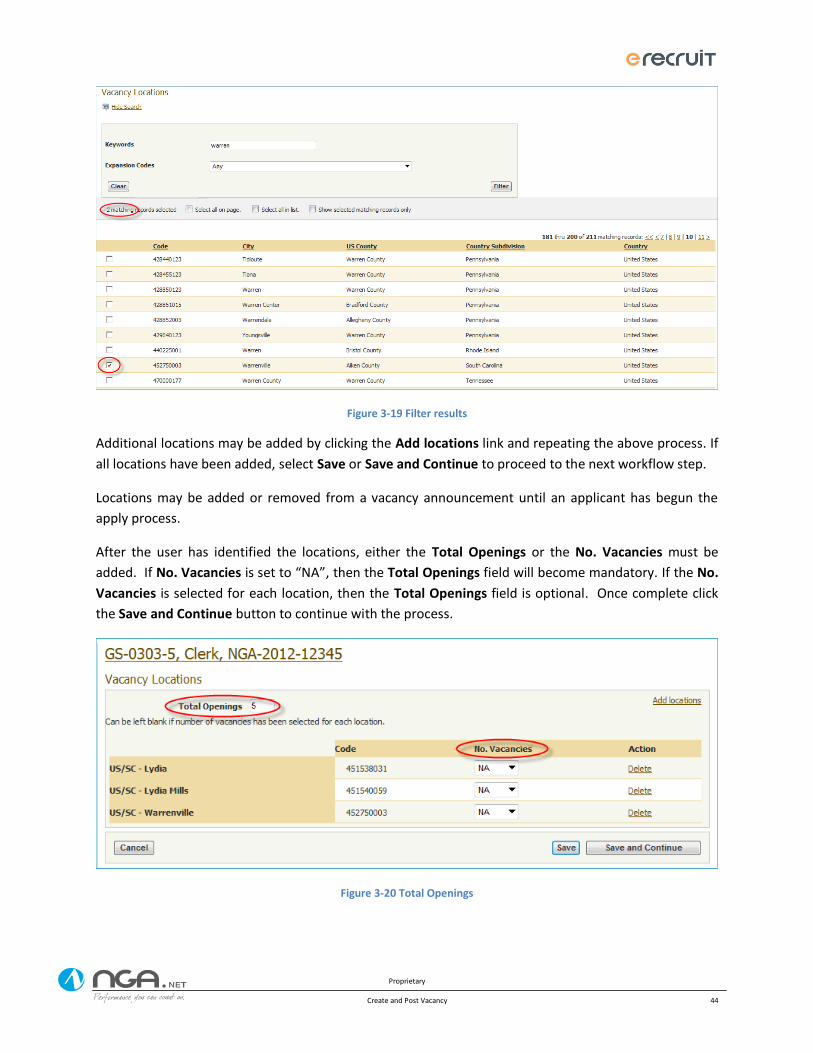
Proprietary
Create and Post Vacancy 44
Figure 3-19 Filter results
Additional locations may be added by clicking the Add locations link and repeating the above process. If
all locations have been added, select Save or Save and Continue to proceed to the next workflow step.
Locations may be added or removed from a vacancy announcement until an applicant has begun the
apply process.
After the user has identified the locations, either the Total Openings or the No. Vacancies must be
added. If No. Vacancies is set to “NA”, then the Total Openings field will become mandatory. If the No.
Vacancies is selected for each location, then the Total Openings field is optional. Once complete click
the Save and Continue button to continue with the process.
Figure 3-20 Total Openings
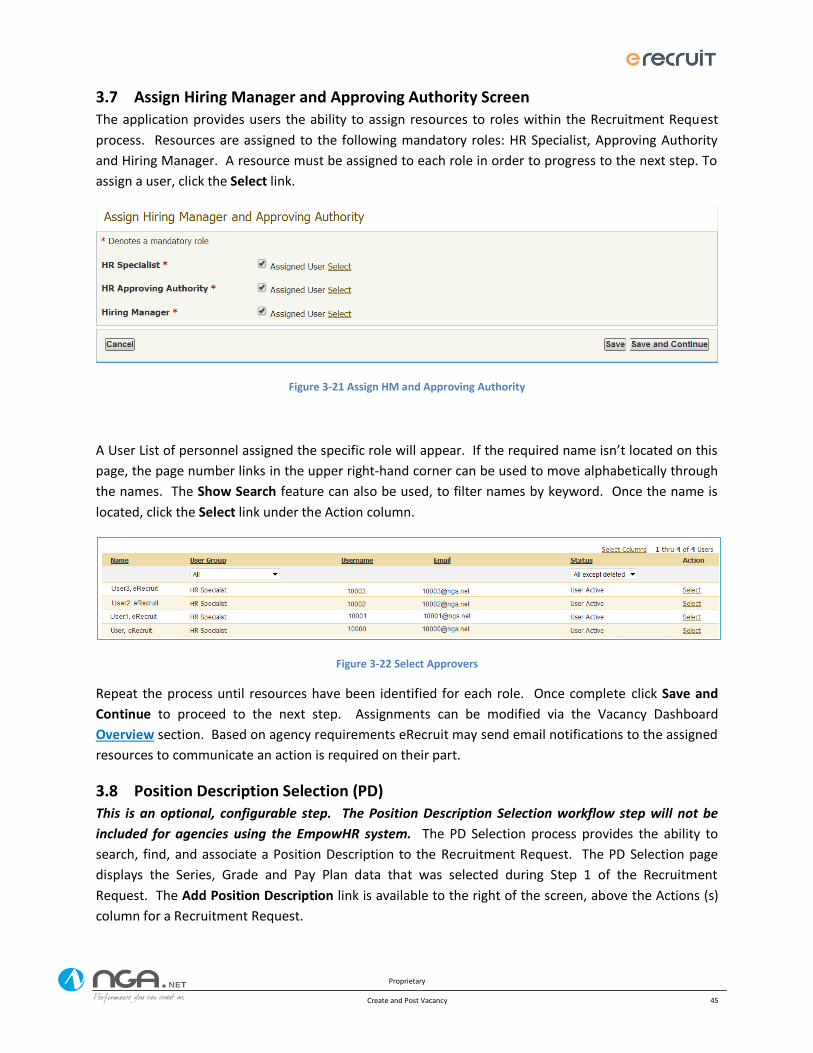
Proprietary
Create and Post Vacancy 45
3.7 Assign Hiring Manager and Approving Authority Screen The application provides users the ability to assign resources to roles within the Recruitment Request
process. Resources are assigned to the following mandatory roles: HR Specialist, Approving Authority
and Hiring Manager. A resource must be assigned to each role in order to progress to the next step. To
assign a user, click the Select link.
Figure 3-21 Assign HM and Approving Authority
A User List of personnel assigned the specific role will appear. If the required name isn’t located on this
page, the page number links in the upper right-hand corner can be used to move alphabetically through
the names. The Show Search feature can also be used, to filter names by keyword. Once the name is
located, click the Select link under the Action column.
Figure 3-22 Select Approvers
Repeat the process until resources have been identified for each role. Once complete click Save and
Continue to proceed to the next step. Assignments can be modified via the Vacancy Dashboard
Overview section. Based on agency requirements eRecruit may send email notifications to the assigned
resources to communicate an action is required on their part.
3.8 Position Description Selection (PD) This is an optional, configurable step. The Position Description Selection workflow step will not be
included for agencies using the EmpowHR system. The PD Selection process provides the ability to
search, find, and associate a Position Description to the Recruitment Request. The PD Selection page
displays the Series, Grade and Pay Plan data that was selected during Step 1 of the Recruitment
Request. The Add Position Description link is available to the right of the screen, above the Actions (s)
column for a Recruitment Request.
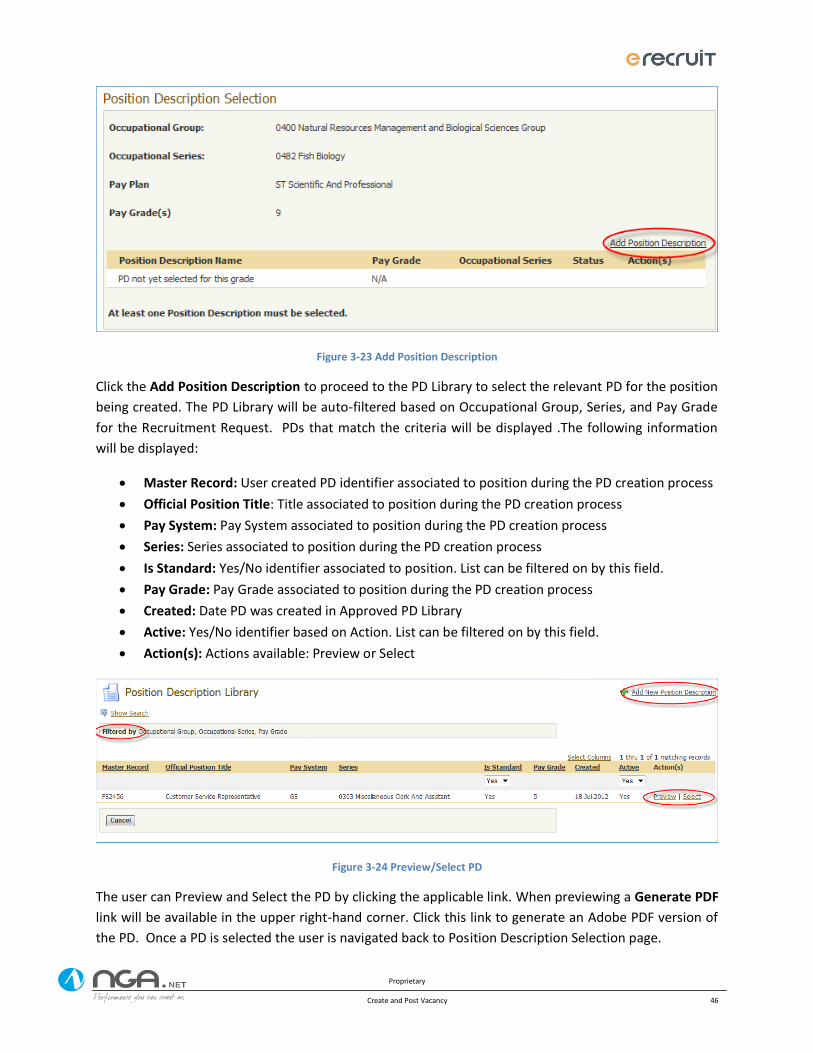
Proprietary
Create and Post Vacancy 46
Figure 3-23 Add Position Description
Click the Add Position Description to proceed to the PD Library to select the relevant PD for the position
being created. The PD Library will be auto-filtered based on Occupational Group, Series, and Pay Grade
for the Recruitment Request. PDs that match the criteria will be displayed .The following information
will be displayed:
Master Record: User created PD identifier associated to position during the PD creation process
Official Position Title: Title associated to position during the PD creation process
Pay System: Pay System associated to position during the PD creation process
Series: Series associated to position during the PD creation process
Is Standard: Yes/No identifier associated to position. List can be filtered on by this field.
Pay Grade: Pay Grade associated to position during the PD creation process
Created: Date PD was created in Approved PD Library
Active: Yes/No identifier based on Action. List can be filtered on by this field.
Action(s): Actions available: Preview or Select
Figure 3-24 Preview/Select PD
The user can Preview and Select the PD by clicking the applicable link. When previewing a Generate PDF
link will be available in the upper right-hand corner. Click this link to generate an Adobe PDF version of
the PD. Once a PD is selected the user is navigated back to Position Description Selection page.
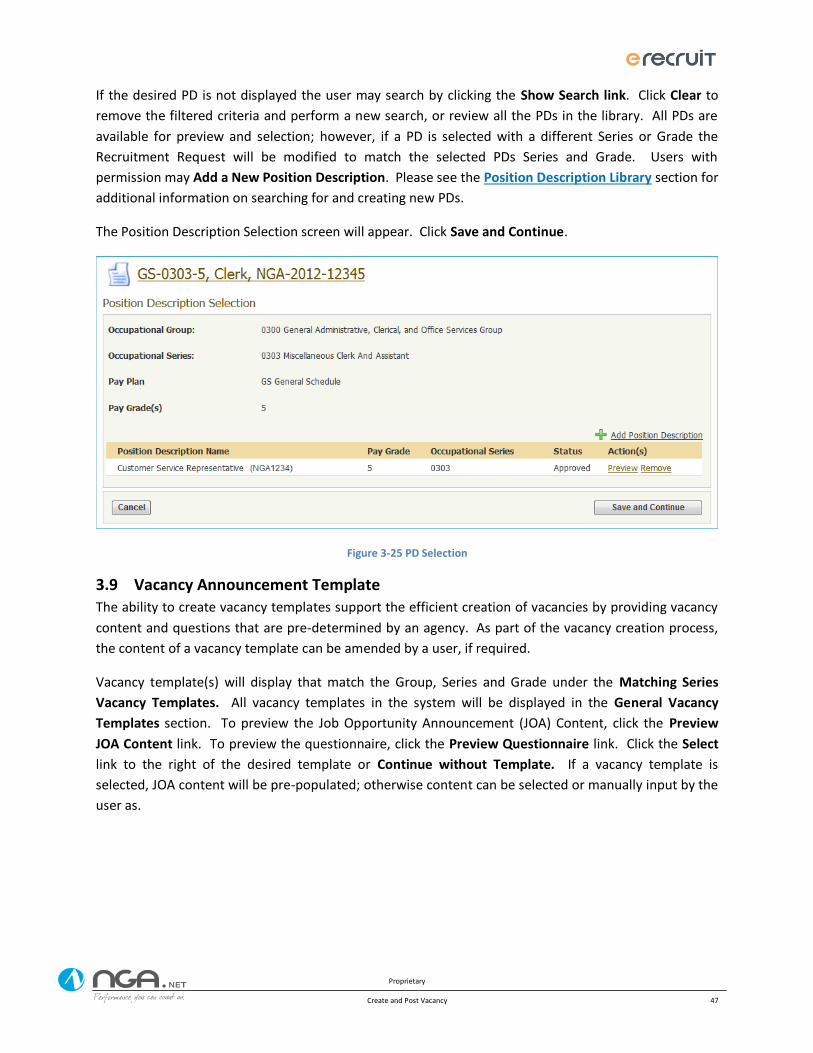
Proprietary
Create and Post Vacancy 47
If the desired PD is not displayed the user may search by clicking the Show Search link. Click Clear to
remove the filtered criteria and perform a new search, or review all the PDs in the library. All PDs are
available for preview and selection; however, if a PD is selected with a different Series or Grade the
Recruitment Request will be modified to match the selected PDs Series and Grade. Users with
permission may Add a New Position Description. Please see the Position Description Library section for
additional information on searching for and creating new PDs.
The Position Description Selection screen will appear. Click Save and Continue.
Figure 3-25 PD Selection
3.9 Vacancy Announcement Template The ability to create vacancy templates support the efficient creation of vacancies by providing vacancy
content and questions that are pre-determined by an agency. As part of the vacancy creation process,
the content of a vacancy template can be amended by a user, if required.
Vacancy template(s) will display that match the Group, Series and Grade under the Matching Series
Vacancy Templates. All vacancy templates in the system will be displayed in the General Vacancy
Templates section. To preview the Job Opportunity Announcement (JOA) Content, click the Preview
JOA Content link. To preview the questionnaire, click the Preview Questionnaire link. Click the Select
link to the right of the desired template or Continue without Template. If a vacancy template is
selected, JOA content will be pre-populated; otherwise content can be selected or manually input by the
user as.
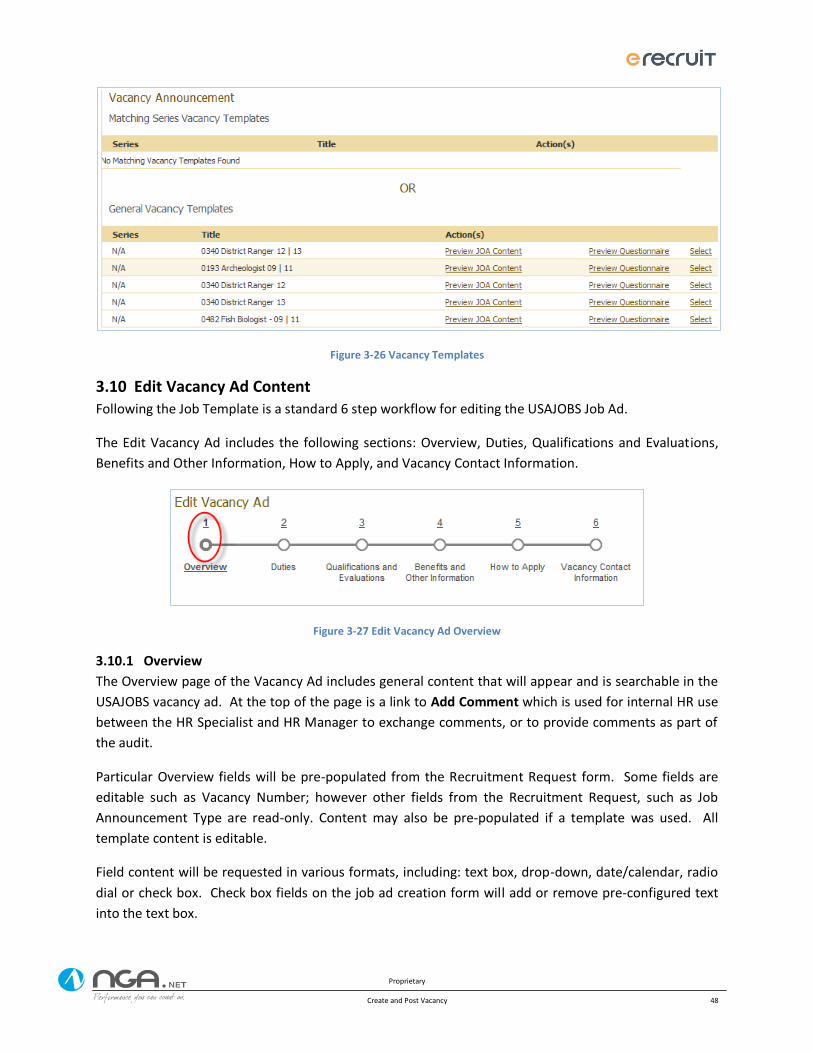
Proprietary
Create and Post Vacancy 48
Figure 3-26 Vacancy Templates
3.10 Edit Vacancy Ad Content Following the Job Template is a standard 6 step workflow for editing the USAJOBS Job Ad.
The Edit Vacancy Ad includes the following sections: Overview, Duties, Qualifications and Evaluations,
Benefits and Other Information, How to Apply, and Vacancy Contact Information.
Figure 3-27 Edit Vacancy Ad Overview
3.10.1 Overview
The Overview page of the Vacancy Ad includes general content that will appear and is searchable in the
USAJOBS vacancy ad. At the top of the page is a link to Add Comment which is used for internal HR use
between the HR Specialist and HR Manager to exchange comments, or to provide comments as part of
the audit.
Particular Overview fields will be pre-populated from the Recruitment Request form. Some fields are
editable such as Vacancy Number; however other fields from the Recruitment Request, such as Job
Announcement Type are read-only. Content may also be pre-populated if a template was used. All
template content is editable.
Field content will be requested in various formats, including: text box, drop-down, date/calendar, radio
dial or check box. Check box fields on the job ad creation form will add or remove pre-configured text
into the text box.
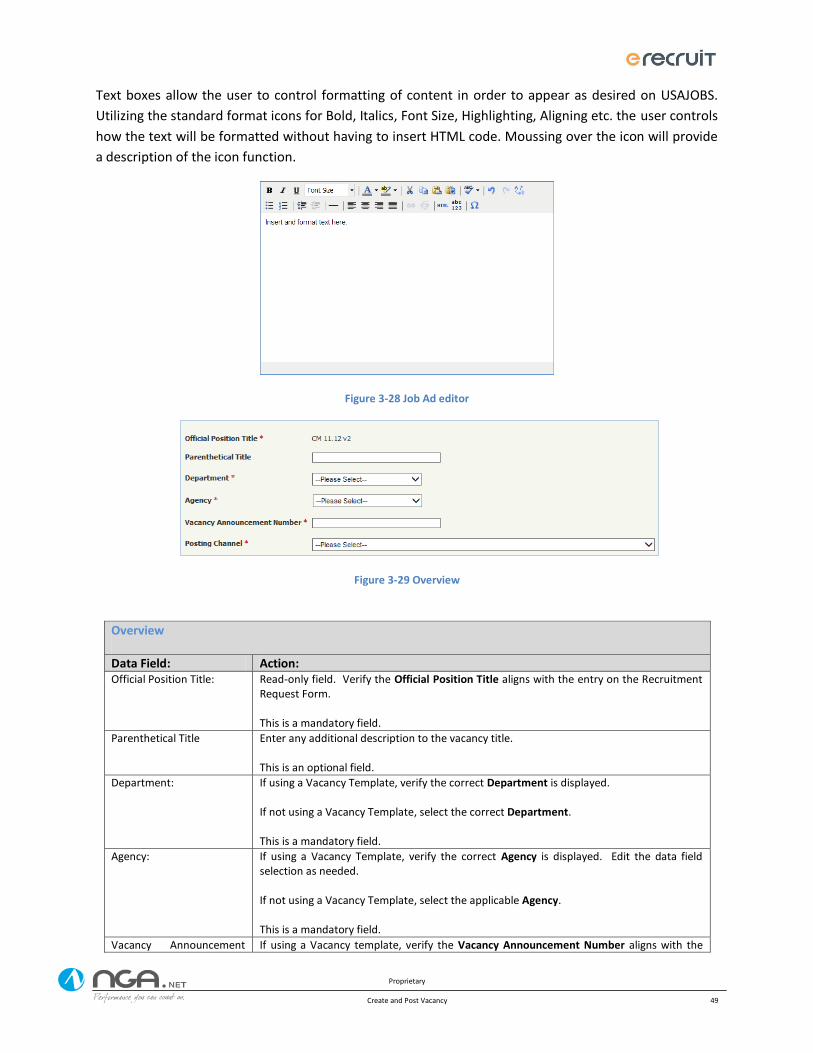
Proprietary
Create and Post Vacancy 49
Text boxes allow the user to control formatting of content in order to appear as desired on USAJOBS.
Utilizing the standard format icons for Bold, Italics, Font Size, Highlighting, Aligning etc. the user controls
how the text will be formatted without having to insert HTML code. Moussing over the icon will provide
a description of the icon function.
Figure 3-28 Job Ad editor
Figure 3-29 Overview
Overview
Data Field: Action: Official Position Title: Read-only field. Verify the Official Position Title aligns with the entry on the Recruitment
Request Form. This is a mandatory field.
Parenthetical Title Enter any additional description to the vacancy title. This is an optional field.
Department: If using a Vacancy Template, verify the correct Department is displayed. If not using a Vacancy Template, select the correct Department. This is a mandatory field.
Agency: If using a Vacancy Template, verify the correct Agency is displayed. Edit the data field selection as needed. If not using a Vacancy Template, select the applicable Agency. This is a mandatory field.
Vacancy Announcement If using a Vacancy template, verify the Vacancy Announcement Number aligns with the
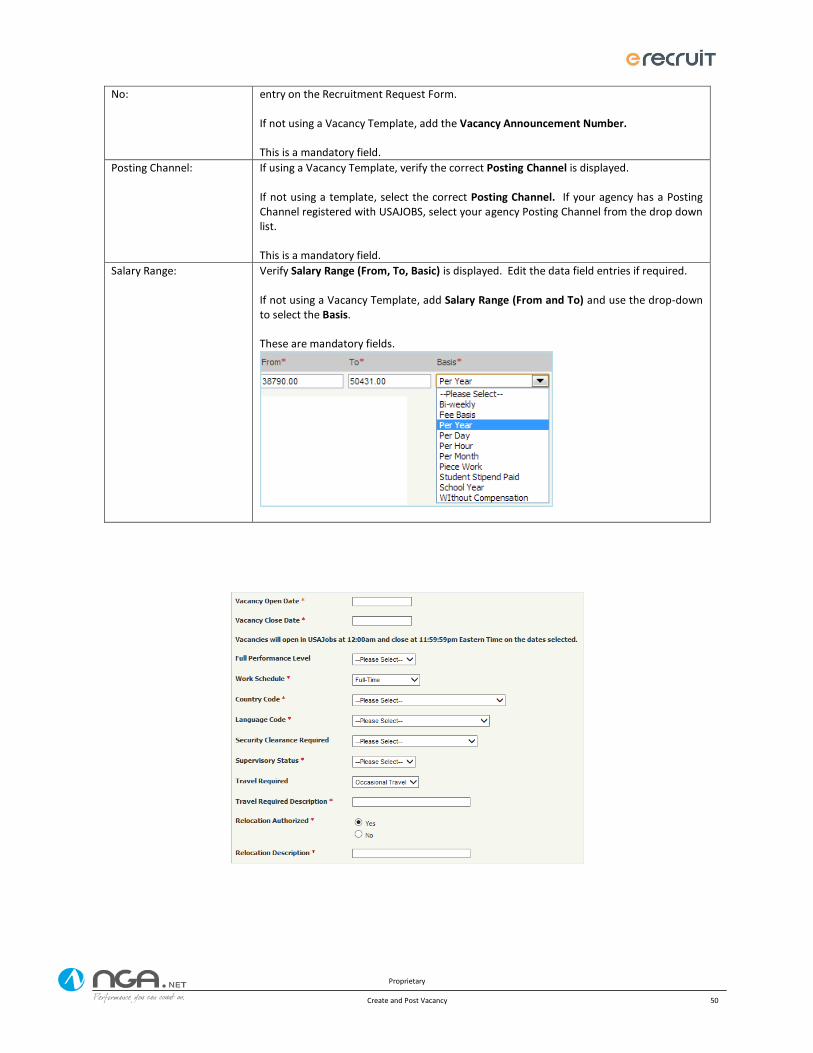
Proprietary
Create and Post Vacancy 50
No: entry on the Recruitment Request Form. If not using a Vacancy Template, add the Vacancy Announcement Number. This is a mandatory field.
Posting Channel: If using a Vacancy Template, verify the correct Posting Channel is displayed. If not using a template, select the correct Posting Channel. If your agency has a Posting Channel registered with USAJOBS, select your agency Posting Channel from the drop down list. This is a mandatory field.
Salary Range: Verify Salary Range (From, To, Basic) is displayed. Edit the data field entries if required. If not using a Vacancy Template, add Salary Range (From and To) and use the drop-down to select the Basis. These are mandatory fields.
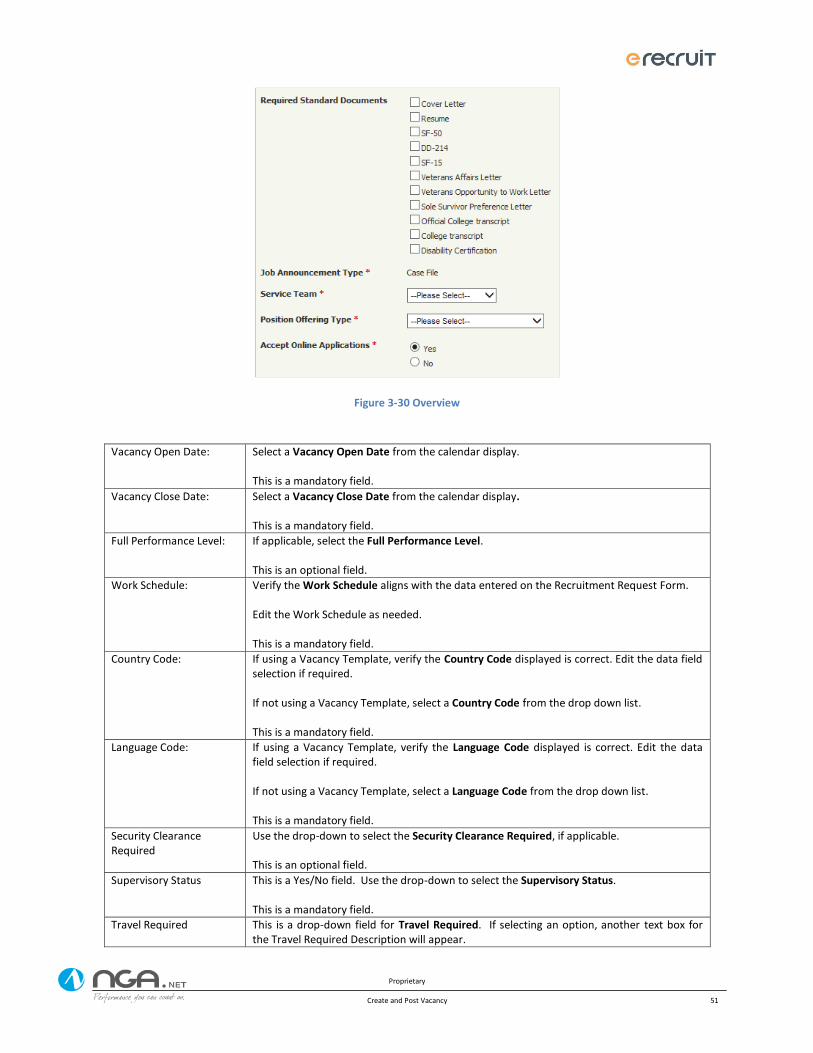
Proprietary
Create and Post Vacancy 51
Figure 3-30 Overview
Vacancy Open Date:
Select a Vacancy Open Date from the calendar display. This is a mandatory field.
Vacancy Close Date:
Select a Vacancy Close Date from the calendar display. This is a mandatory field.
Full Performance Level: If applicable, select the Full Performance Level. This is an optional field.
Work Schedule: Verify the Work Schedule aligns with the data entered on the Recruitment Request Form. Edit the Work Schedule as needed. This is a mandatory field.
Country Code: If using a Vacancy Template, verify the Country Code displayed is correct. Edit the data field selection if required. If not using a Vacancy Template, select a Country Code from the drop down list. This is a mandatory field.
Language Code: If using a Vacancy Template, verify the Language Code displayed is correct. Edit the data field selection if required. If not using a Vacancy Template, select a Language Code from the drop down list. This is a mandatory field.
Security Clearance Required
Use the drop-down to select the Security Clearance Required, if applicable. This is an optional field.
Supervisory Status This is a Yes/No field. Use the drop-down to select the Supervisory Status. This is a mandatory field.
Travel Required This is a drop-down field for Travel Required. If selecting an option, another text box for the Travel Required Description will appear.
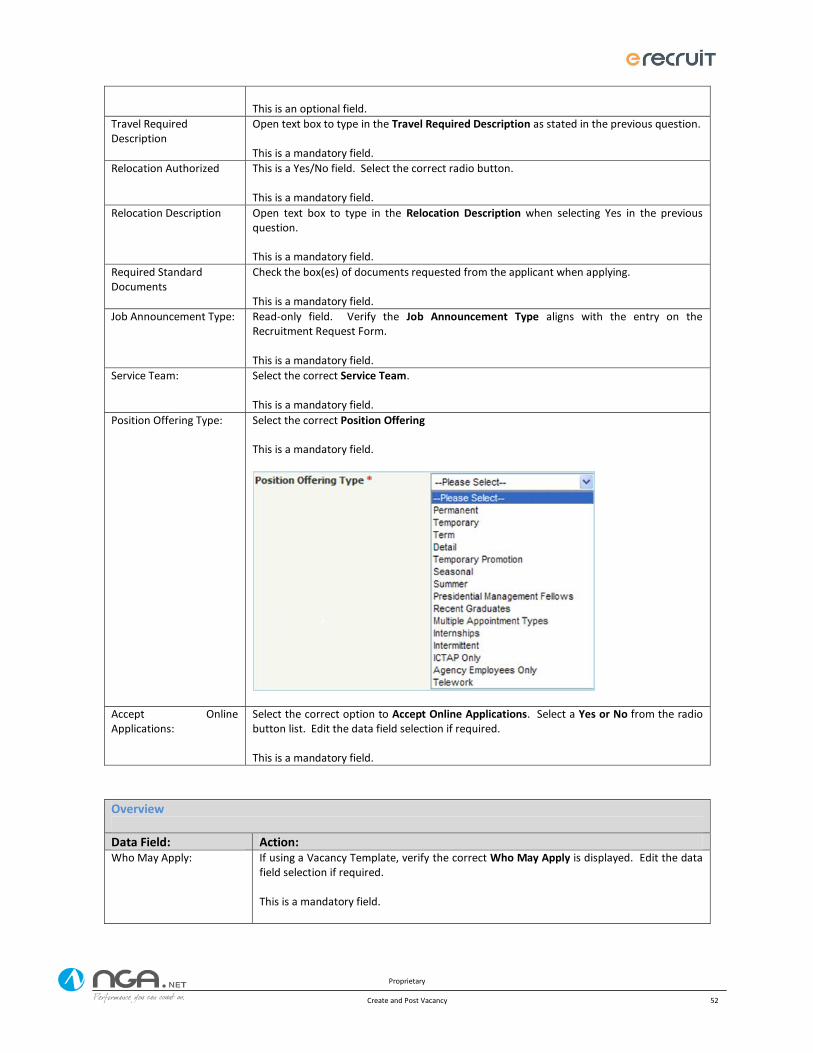
Proprietary
Create and Post Vacancy 52
This is an optional field.
Travel Required Description
Open text box to type in the Travel Required Description as stated in the previous question. This is a mandatory field.
Relocation Authorized This is a Yes/No field. Select the correct radio button. This is a mandatory field.
Relocation Description Open text box to type in the Relocation Description when selecting Yes in the previous question. This is a mandatory field.
Required Standard Documents
Check the box(es) of documents requested from the applicant when applying. This is a mandatory field.
Job Announcement Type: Read-only field. Verify the Job Announcement Type aligns with the entry on the Recruitment Request Form. This is a mandatory field.
Service Team: Select the correct Service Team. This is a mandatory field.
Position Offering Type: Select the correct Position Offering This is a mandatory field.
Accept Online Applications:
Select the correct option to Accept Online Applications. Select a Yes or No from the radio button list. Edit the data field selection if required. This is a mandatory field.
Overview
Data Field: Action: Who May Apply: If using a Vacancy Template, verify the correct Who May Apply is displayed. Edit the data
field selection if required. This is a mandatory field.
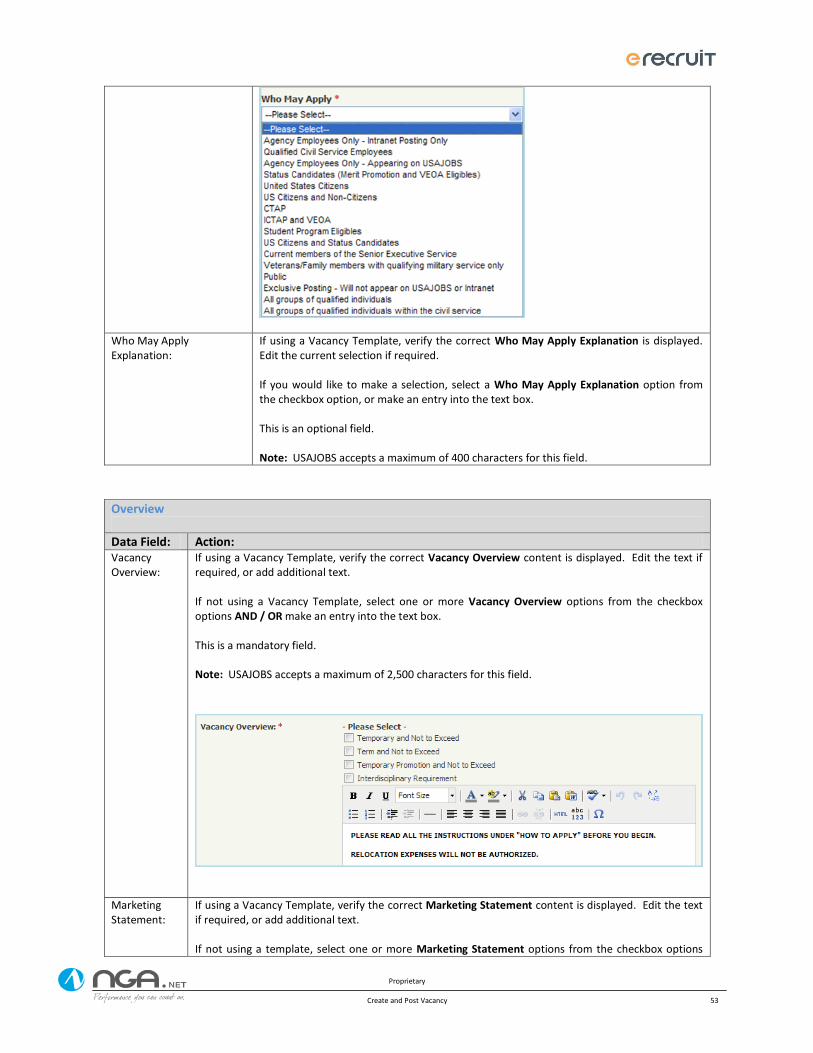
Proprietary
Create and Post Vacancy 53
Who May Apply Explanation:
If using a Vacancy Template, verify the correct Who May Apply Explanation is displayed. Edit the current selection if required. If you would like to make a selection, select a Who May Apply Explanation option from the checkbox option, or make an entry into the text box. This is an optional field. Note: USAJOBS accepts a maximum of 400 characters for this field.
Overview
Data Field: Action: Vacancy Overview:
If using a Vacancy Template, verify the correct Vacancy Overview content is displayed. Edit the text if required, or add additional text. If not using a Vacancy Template, select one or more Vacancy Overview options from the checkbox options AND / OR make an entry into the text box. This is a mandatory field. Note: USAJOBS accepts a maximum of 2,500 characters for this field.
Marketing Statement:
If using a Vacancy Template, verify the correct Marketing Statement content is displayed. Edit the text if required, or add additional text. If not using a template, select one or more Marketing Statement options from the checkbox options
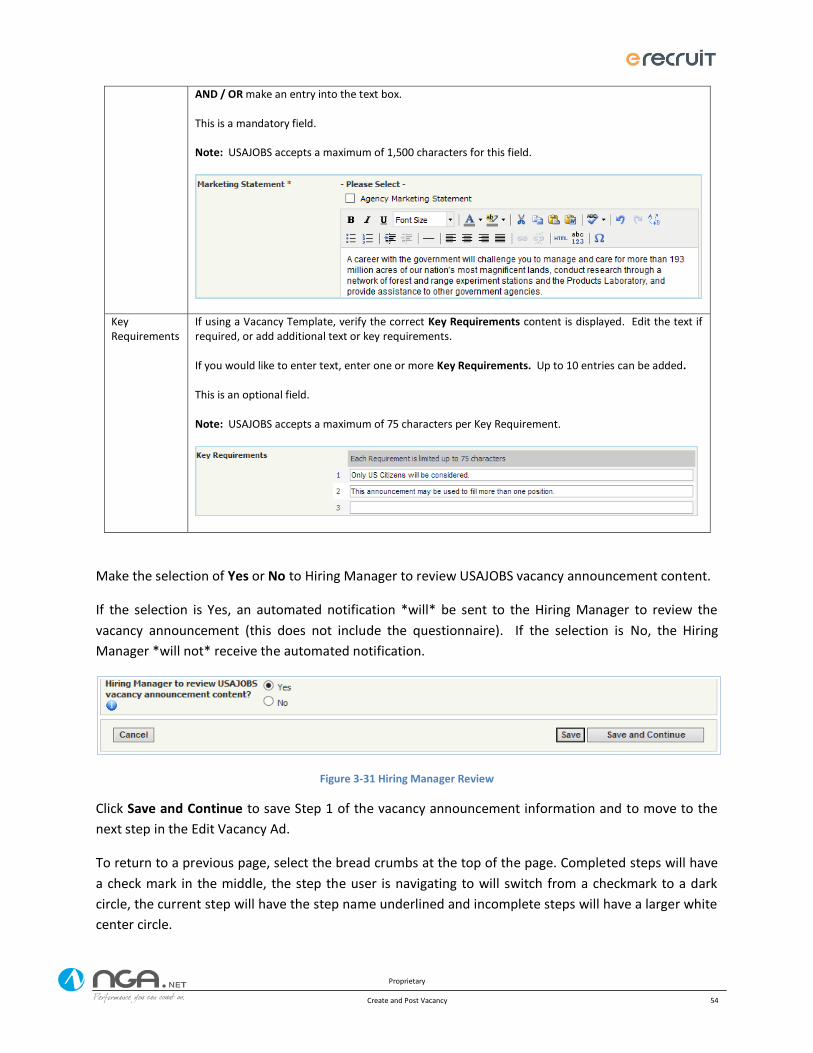
Proprietary
Create and Post Vacancy 54
AND / OR make an entry into the text box. This is a mandatory field. Note: USAJOBS accepts a maximum of 1,500 characters for this field.
Key Requirements
If using a Vacancy Template, verify the correct Key Requirements content is displayed. Edit the text if required, or add additional text or key requirements. If you would like to enter text, enter one or more Key Requirements. Up to 10 entries can be added. This is an optional field. Note: USAJOBS accepts a maximum of 75 characters per Key Requirement.
Make the selection of Yes or No to Hiring Manager to review USAJOBS vacancy announcement content.
If the selection is Yes, an automated notification *will* be sent to the Hiring Manager to review the
vacancy announcement (this does not include the questionnaire). If the selection is No, the Hiring
Manager *will not* receive the automated notification.
Figure 3-31 Hiring Manager Review
Click Save and Continue to save Step 1 of the vacancy announcement information and to move to the
next step in the Edit Vacancy Ad.
To return to a previous page, select the bread crumbs at the top of the page. Completed steps will have
a check mark in the middle, the step the user is navigating to will switch from a checkmark to a dark
circle, the current step will have the step name underlined and incomplete steps will have a larger white
center circle.
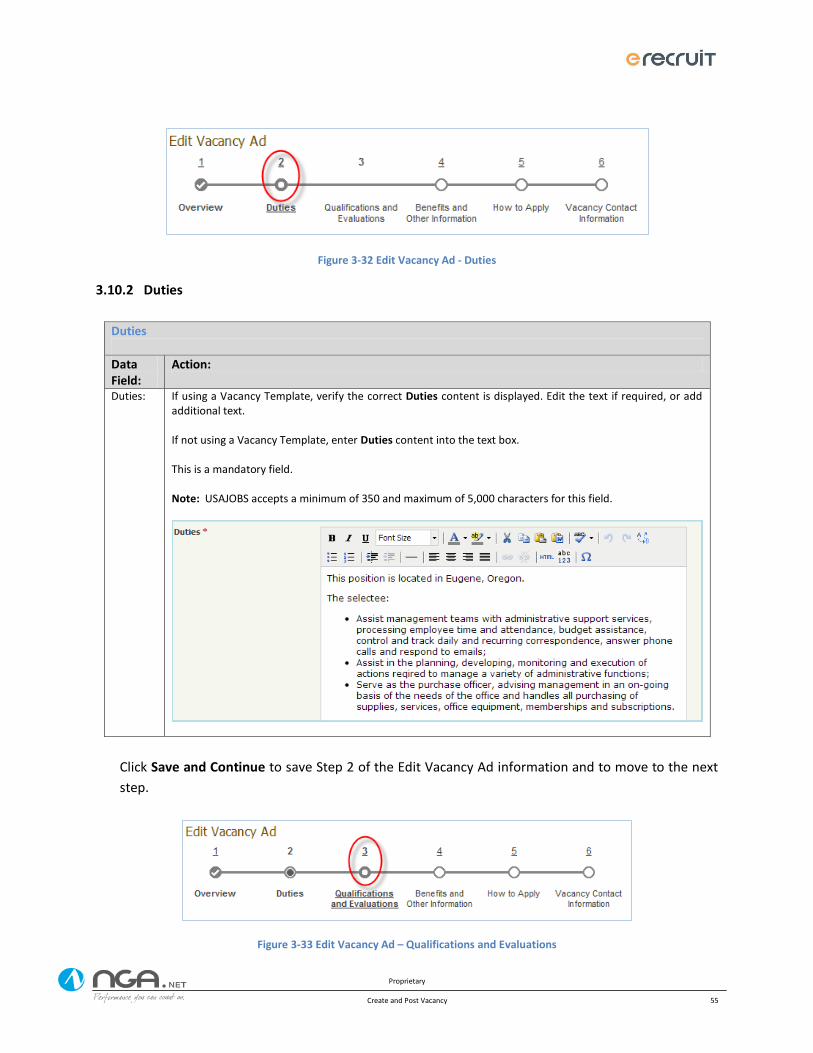
Proprietary
Create and Post Vacancy 55
Figure 3-32 Edit Vacancy Ad - Duties
3.10.2 Duties
Duties
Data Field:
Action:
Duties: If using a Vacancy Template, verify the correct Duties content is displayed. Edit the text if required, or add additional text. If not using a Vacancy Template, enter Duties content into the text box. This is a mandatory field. Note: USAJOBS accepts a minimum of 350 and maximum of 5,000 characters for this field.
Click Save and Continue to save Step 2 of the Edit Vacancy Ad information and to move to the next
step.
Figure 3-33 Edit Vacancy Ad – Qualifications and Evaluations
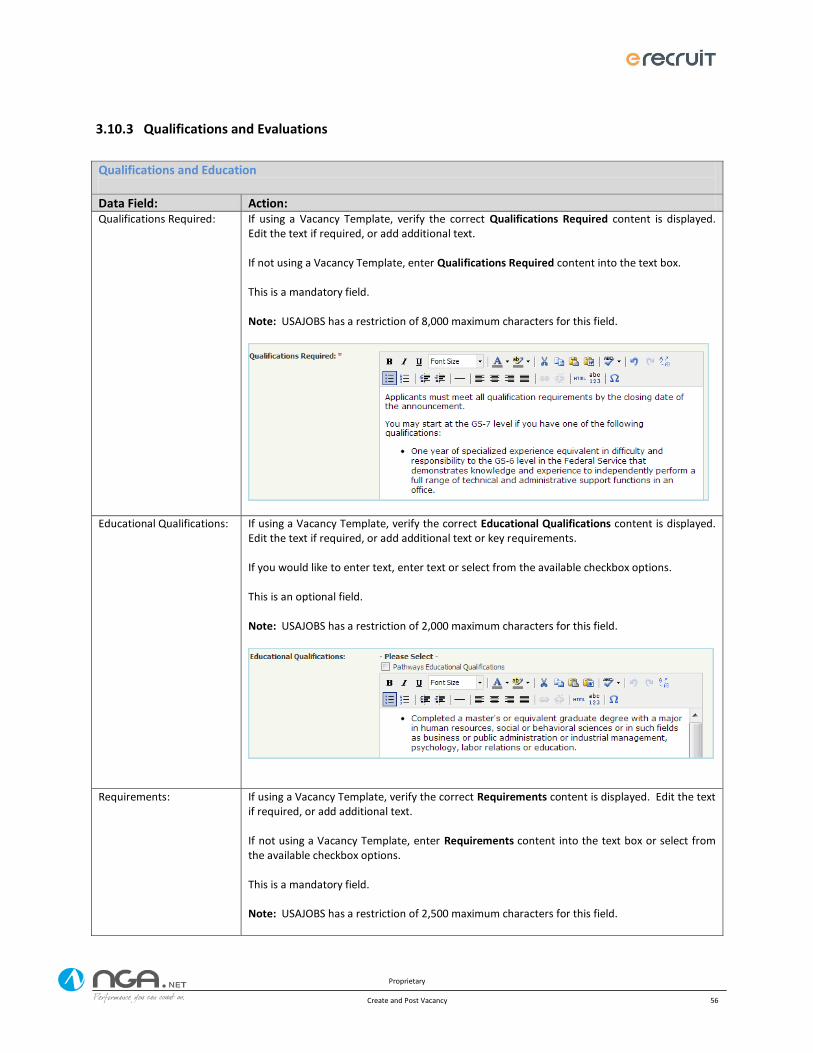
Proprietary
Create and Post Vacancy 56
3.10.3 Qualifications and Evaluations
Qualifications and Education
Data Field: Action: Qualifications Required: If using a Vacancy Template, verify the correct Qualifications Required content is displayed.
Edit the text if required, or add additional text. If not using a Vacancy Template, enter Qualifications Required content into the text box. This is a mandatory field. Note: USAJOBS has a restriction of 8,000 maximum characters for this field.
Educational Qualifications: If using a Vacancy Template, verify the correct Educational Qualifications content is displayed. Edit the text if required, or add additional text or key requirements. If you would like to enter text, enter text or select from the available checkbox options. This is an optional field. Note: USAJOBS has a restriction of 2,000 maximum characters for this field.
Requirements: If using a Vacancy Template, verify the correct Requirements content is displayed. Edit the text if required, or add additional text. If not using a Vacancy Template, enter Requirements content into the text box or select from the available checkbox options. This is a mandatory field. Note: USAJOBS has a restriction of 2,500 maximum characters for this field.
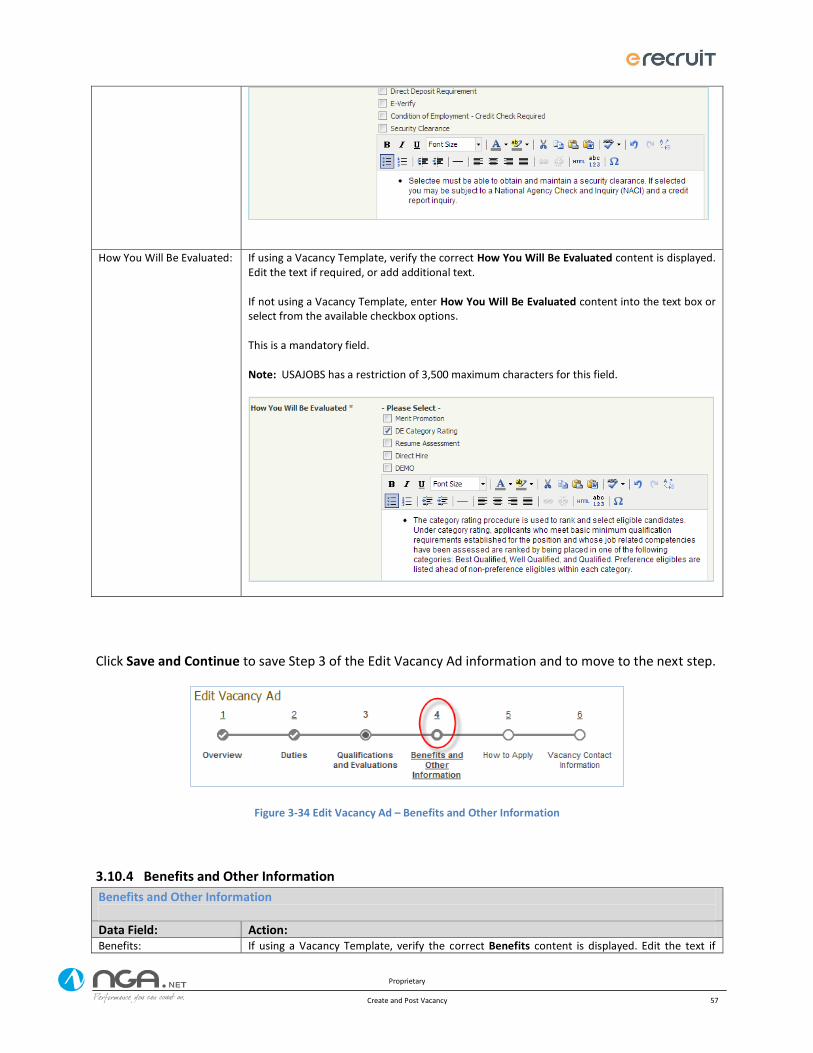
Proprietary
Create and Post Vacancy 57
How You Will Be Evaluated: If using a Vacancy Template, verify the correct How You Will Be Evaluated content is displayed. Edit the text if required, or add additional text. If not using a Vacancy Template, enter How You Will Be Evaluated content into the text box or select from the available checkbox options. This is a mandatory field. Note: USAJOBS has a restriction of 3,500 maximum characters for this field.
Click Save and Continue to save Step 3 of the Edit Vacancy Ad information and to move to the next step.
Figure 3-34 Edit Vacancy Ad – Benefits and Other Information
3.10.4 Benefits and Other Information
Benefits and Other Information
Data Field: Action: Benefits: If using a Vacancy Template, verify the correct Benefits content is displayed. Edit the text if
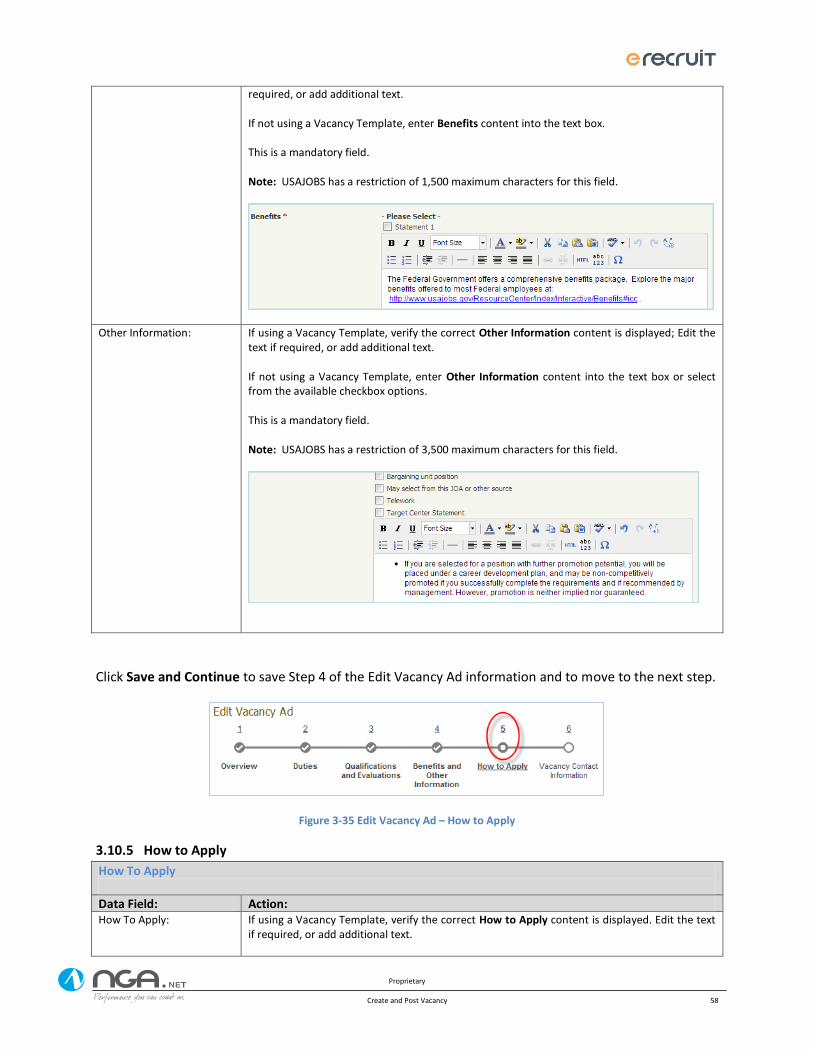
Proprietary
Create and Post Vacancy 58
required, or add additional text. If not using a Vacancy Template, enter Benefits content into the text box. This is a mandatory field. Note: USAJOBS has a restriction of 1,500 maximum characters for this field.
Other Information: If using a Vacancy Template, verify the correct Other Information content is displayed; Edit the text if required, or add additional text. If not using a Vacancy Template, enter Other Information content into the text box or select from the available checkbox options. This is a mandatory field. Note: USAJOBS has a restriction of 3,500 maximum characters for this field.
Click Save and Continue to save Step 4 of the Edit Vacancy Ad information and to move to the next step.
Figure 3-35 Edit Vacancy Ad – How to Apply
3.10.5 How to Apply
How To Apply
Data Field: Action: How To Apply: If using a Vacancy Template, verify the correct How to Apply content is displayed. Edit the text
if required, or add additional text.
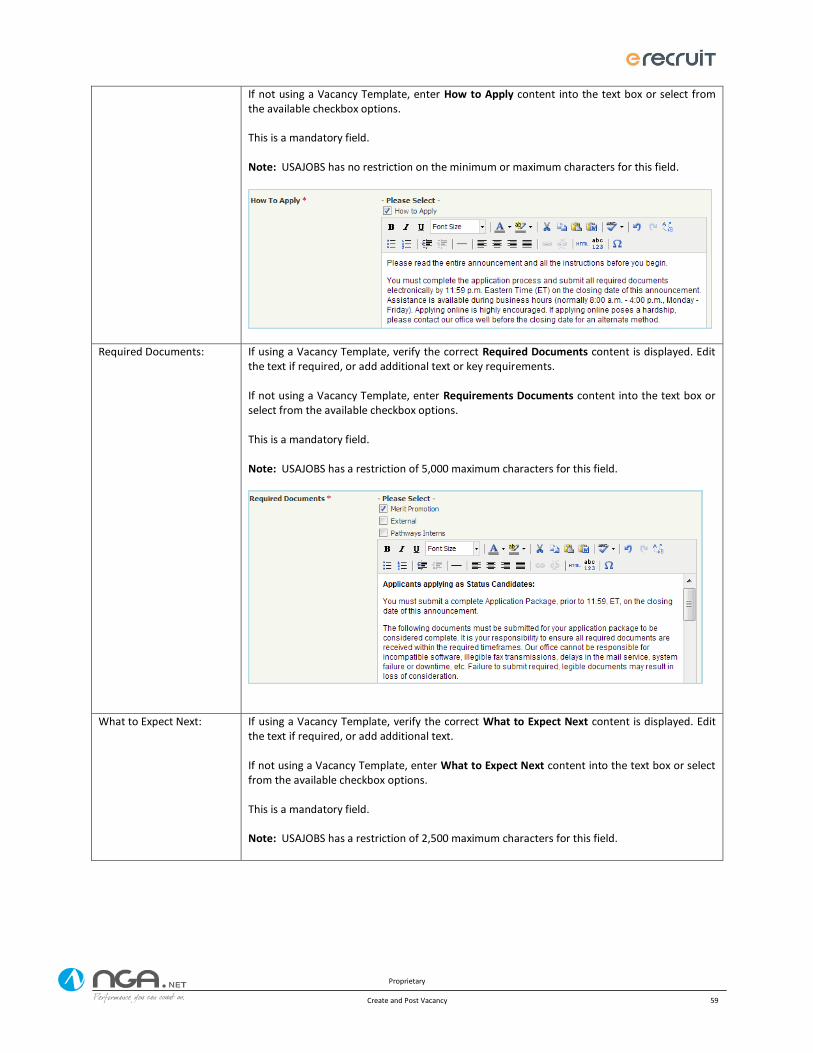
Proprietary
Create and Post Vacancy 59
If not using a Vacancy Template, enter How to Apply content into the text box or select from the available checkbox options. This is a mandatory field. Note: USAJOBS has no restriction on the minimum or maximum characters for this field.
Required Documents: If using a Vacancy Template, verify the correct Required Documents content is displayed. Edit the text if required, or add additional text or key requirements. If not using a Vacancy Template, enter Requirements Documents content into the text box or select from the available checkbox options. This is a mandatory field. Note: USAJOBS has a restriction of 5,000 maximum characters for this field.
What to Expect Next: If using a Vacancy Template, verify the correct What to Expect Next content is displayed. Edit the text if required, or add additional text. If not using a Vacancy Template, enter What to Expect Next content into the text box or select from the available checkbox options. This is a mandatory field. Note: USAJOBS has a restriction of 2,500 maximum characters for this field.
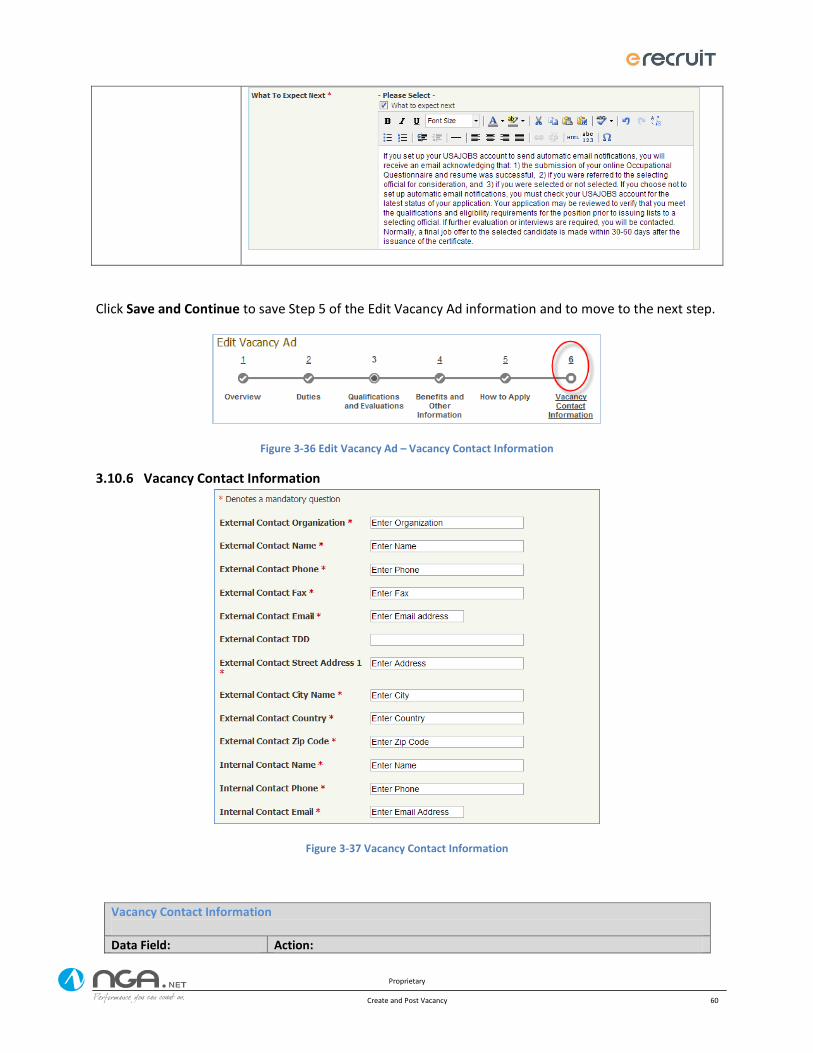
Proprietary
Create and Post Vacancy 60
Click Save and Continue to save Step 5 of the Edit Vacancy Ad information and to move to the next step.
Figure 3-36 Edit Vacancy Ad – Vacancy Contact Information
3.10.6 Vacancy Contact Information
Figure 3-37 Vacancy Contact Information
Vacancy Contact Information
Data Field: Action:

Proprietary
Create and Post Vacancy 61
External Contact Organization:
If using a Vacancy Template, verify External Contact Organization content is correctly displayed. If not using a Vacancy Template, enter External Contact Organization content. This is a mandatory field.
External Contact Name: If using a Vacancy Template, verify External Contact Name content is correctly displayed. If not using a Vacancy Template, enter External Contact Name content. This is a mandatory field.
External Contact Phone: If using a Vacancy Template, verify External Contact Phone content is correctly displayed. If not using a Vacancy Template, enter External Contact Phone content. This is a mandatory field.
External Contact Fax: If using a Vacancy Template, verify External Contact Fax content is correctly displayed. If not using a Vacancy Template, enter External Contact Fax content. This is a mandatory field.
External Contact Email: If using a Vacancy Template, verify External Contact Email content is correctly displayed. If not using a Vacancy Template, enter External Contact Email content. This is a mandatory field.
External Contact TDD: If using a Vacancy Template, verify External Contact TDD content is correctly displayed. If you would like to enter text, enter text into the field. This is an optional field.
External Contact Street Address 1:
If using a Vacancy Template, verify External Contact Street Address 1 content is correctly displayed. If not using a Vacancy Template, enter External Contact Street Address 1 content. This is a mandatory field.
External Contact City Name: If using a Vacancy Template, verify External Contact City Name content is correctly displayed. If not using a Vacancy Template, enter External Contact City Name content. This is a mandatory field.
External Contact Country: If using a Vacancy Template, verify External Contact Country content is correctly displayed. If not using a Vacancy Template, enter External Contact Country content. This is a mandatory field.
External Contact Zip Code: If using a Vacancy Template, verify External Contact Zip Code content is correctly displayed. If not using a Vacancy Template, enter External Contact Zip Code content. This is a mandatory field.
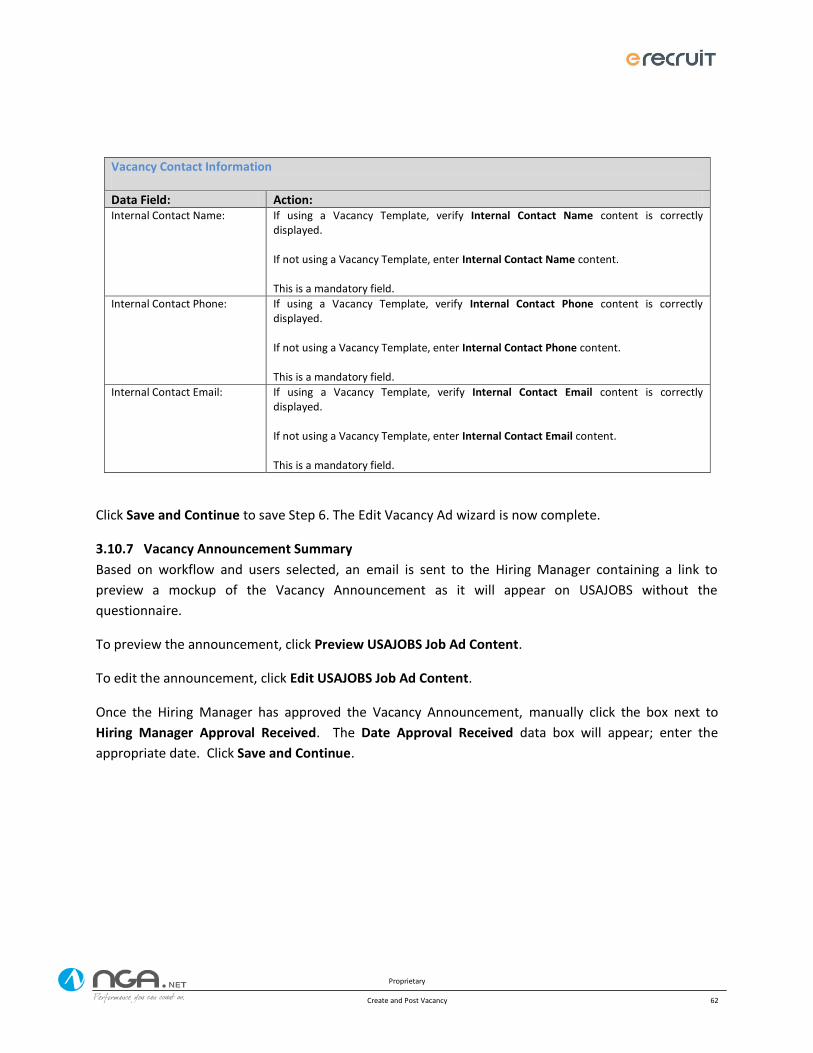
Proprietary
Create and Post Vacancy 62
Vacancy Contact Information
Data Field: Action: Internal Contact Name: If using a Vacancy Template, verify Internal Contact Name content is correctly
displayed. If not using a Vacancy Template, enter Internal Contact Name content. This is a mandatory field.
Internal Contact Phone: If using a Vacancy Template, verify Internal Contact Phone content is correctly displayed. If not using a Vacancy Template, enter Internal Contact Phone content. This is a mandatory field.
Internal Contact Email: If using a Vacancy Template, verify Internal Contact Email content is correctly displayed. If not using a Vacancy Template, enter Internal Contact Email content. This is a mandatory field.
Click Save and Continue to save Step 6. The Edit Vacancy Ad wizard is now complete.
3.10.7 Vacancy Announcement Summary
Based on workflow and users selected, an email is sent to the Hiring Manager containing a link to
preview a mockup of the Vacancy Announcement as it will appear on USAJOBS without the
questionnaire.
To preview the announcement, click Preview USAJOBS Job Ad Content.
To edit the announcement, click Edit USAJOBS Job Ad Content.
Once the Hiring Manager has approved the Vacancy Announcement, manually click the box next to
Hiring Manager Approval Received. The Date Approval Received data box will appear; enter the
appropriate date. Click Save and Continue.
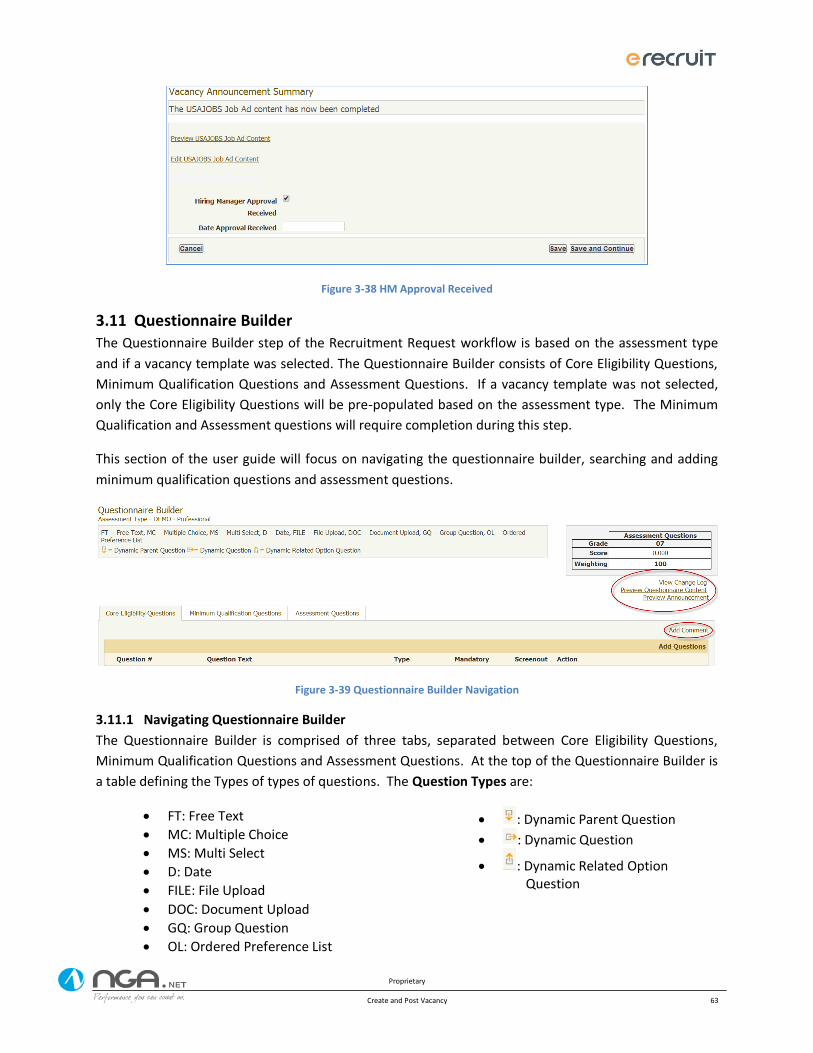
Proprietary
Create and Post Vacancy 63
Figure 3-38 HM Approval Received
3.11 Questionnaire Builder The Questionnaire Builder step of the Recruitment Request workflow is based on the assessment type
and if a vacancy template was selected. The Questionnaire Builder consists of Core Eligibility Questions,
Minimum Qualification Questions and Assessment Questions. If a vacancy template was not selected,
only the Core Eligibility Questions will be pre-populated based on the assessment type. The Minimum
Qualification and Assessment questions will require completion during this step.
This section of the user guide will focus on navigating the questionnaire builder, searching and adding
minimum qualification questions and assessment questions.
Figure 3-39 Questionnaire Builder Navigation
3.11.1 Navigating Questionnaire Builder
The Questionnaire Builder is comprised of three tabs, separated between Core Eligibility Questions,
Minimum Qualification Questions and Assessment Questions. At the top of the Questionnaire Builder is
a table defining the Types of types of questions. The Question Types are:
FT: Free Text
MC: Multiple Choice
MS: Multi Select
D: Date
FILE: File Upload
DOC: Document Upload
GQ: Group Question
OL: Ordered Preference List
: Dynamic Parent Question
: Dynamic Question
: Dynamic Related Option Question
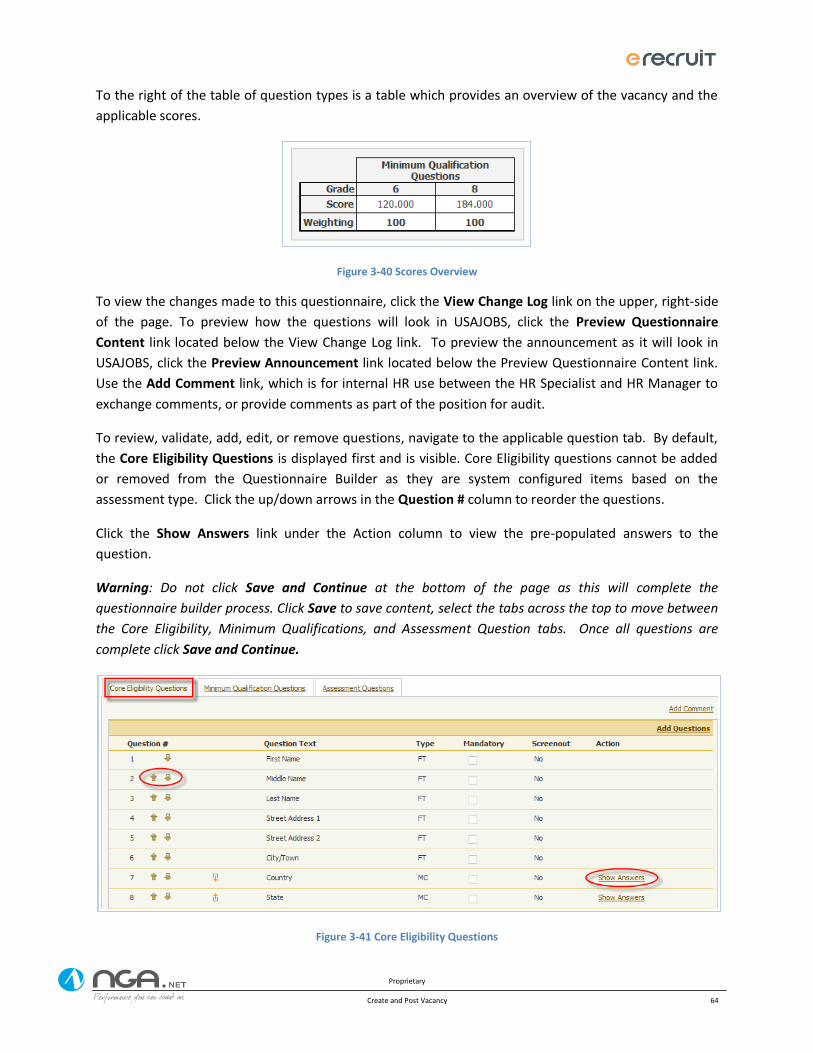
Proprietary
Create and Post Vacancy 64
To the right of the table of question types is a table which provides an overview of the vacancy and the
applicable scores.
Figure 3-40 Scores Overview
To view the changes made to this questionnaire, click the View Change Log link on the upper, right-side
of the page. To preview how the questions will look in USAJOBS, click the Preview Questionnaire
Content link located below the View Change Log link. To preview the announcement as it will look in
USAJOBS, click the Preview Announcement link located below the Preview Questionnaire Content link.
Use the Add Comment link, which is for internal HR use between the HR Specialist and HR Manager to
exchange comments, or provide comments as part of the position for audit.
To review, validate, add, edit, or remove questions, navigate to the applicable question tab. By default,
the Core Eligibility Questions is displayed first and is visible. Core Eligibility questions cannot be added
or removed from the Questionnaire Builder as they are system configured items based on the
assessment type. Click the up/down arrows in the Question # column to reorder the questions.
Click the Show Answers link under the Action column to view the pre-populated answers to the
question.
Warning: Do not click Save and Continue at the bottom of the page as this will complete the
questionnaire builder process. Click Save to save content, select the tabs across the top to move between
the Core Eligibility, Minimum Qualifications, and Assessment Question tabs. Once all questions are
complete click Save and Continue.
Figure 3-41 Core Eligibility Questions
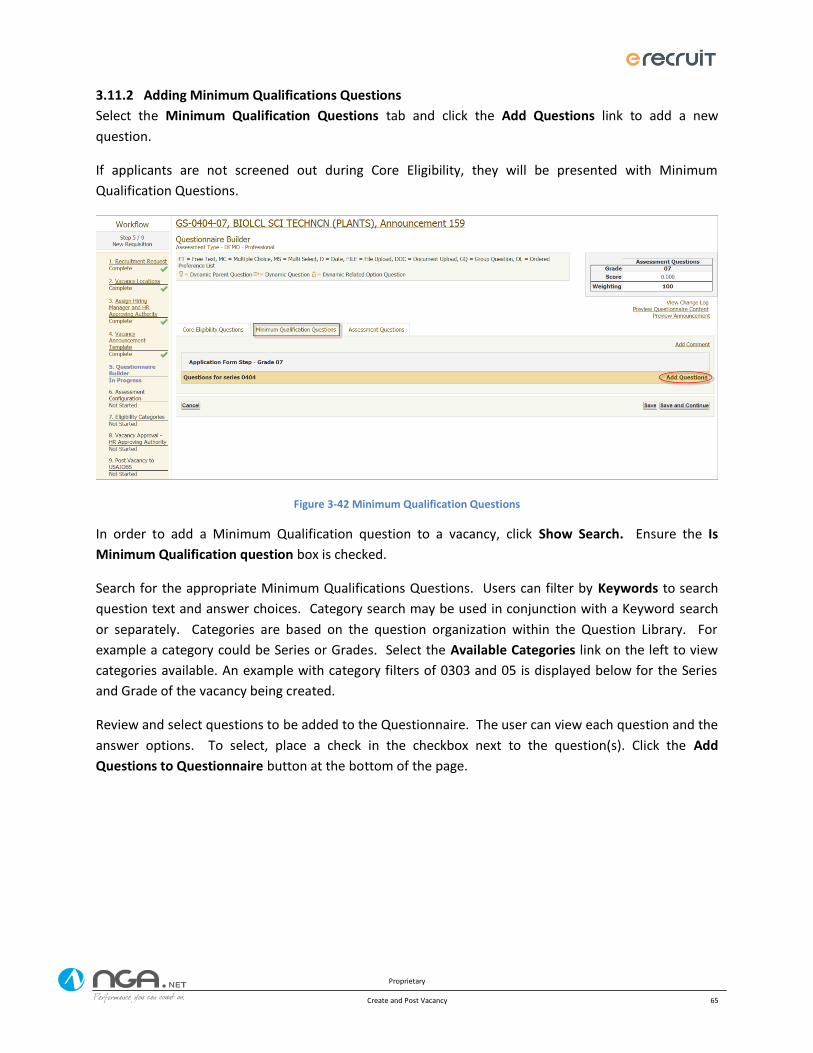
Proprietary
Create and Post Vacancy 65
3.11.2 Adding Minimum Qualifications Questions
Select the Minimum Qualification Questions tab and click the Add Questions link to add a new
question.
If applicants are not screened out during Core Eligibility, they will be presented with Minimum
Qualification Questions.
Figure 3-42 Minimum Qualification Questions
In order to add a Minimum Qualification question to a vacancy, click Show Search. Ensure the Is
Minimum Qualification question box is checked.
Search for the appropriate Minimum Qualifications Questions. Users can filter by Keywords to search
question text and answer choices. Category search may be used in conjunction with a Keyword search
or separately. Categories are based on the question organization within the Question Library. For
example a category could be Series or Grades. Select the Available Categories link on the left to view
categories available. An example with category filters of 0303 and 05 is displayed below for the Series
and Grade of the vacancy being created.
Review and select questions to be added to the Questionnaire. The user can view each question and the
answer options. To select, place a check in the checkbox next to the question(s). Click the Add
Questions to Questionnaire button at the bottom of the page.
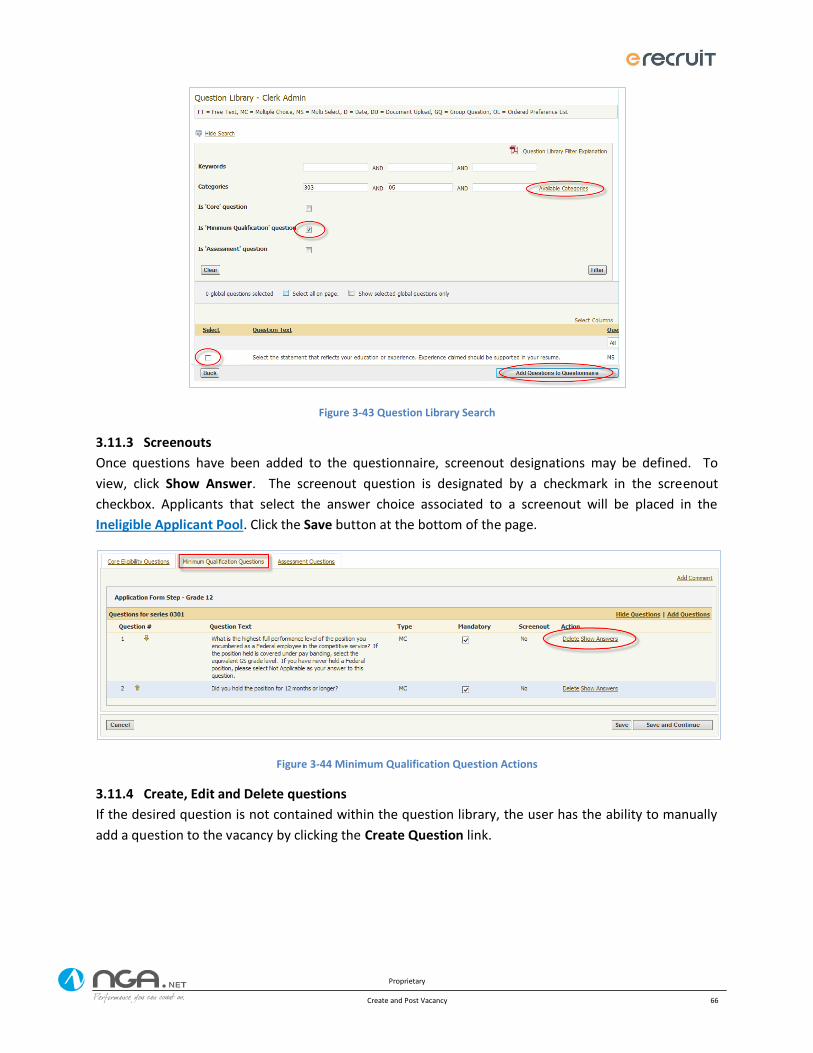
Proprietary
Create and Post Vacancy 66
Figure 3-43 Question Library Search
3.11.3 Screenouts
Once questions have been added to the questionnaire, screenout designations may be defined. To
view, click Show Answer. The screenout question is designated by a checkmark in the screenout
checkbox. Applicants that select the answer choice associated to a screenout will be placed in the
Ineligible Applicant Pool. Click the Save button at the bottom of the page.
Figure 3-44 Minimum Qualification Question Actions
3.11.4 Create, Edit and Delete questions
If the desired question is not contained within the question library, the user has the ability to manually
add a question to the vacancy by clicking the Create Question link.
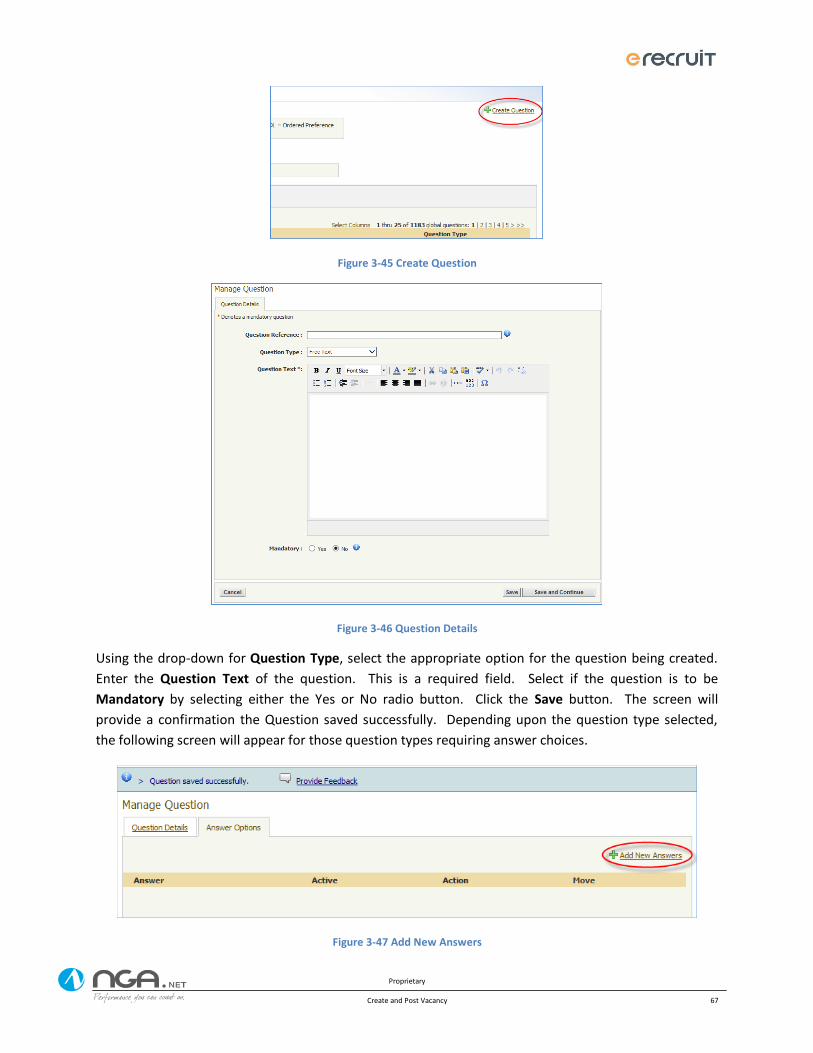
Proprietary
Create and Post Vacancy 67
Figure 3-45 Create Question
Figure 3-46 Question Details
Using the drop-down for Question Type, select the appropriate option for the question being created.
Enter the Question Text of the question. This is a required field. Select if the question is to be
Mandatory by selecting either the Yes or No radio button. Click the Save button. The screen will
provide a confirmation the Question saved successfully. Depending upon the question type selected,
the following screen will appear for those question types requiring answer choices.
Figure 3-47 Add New Answers
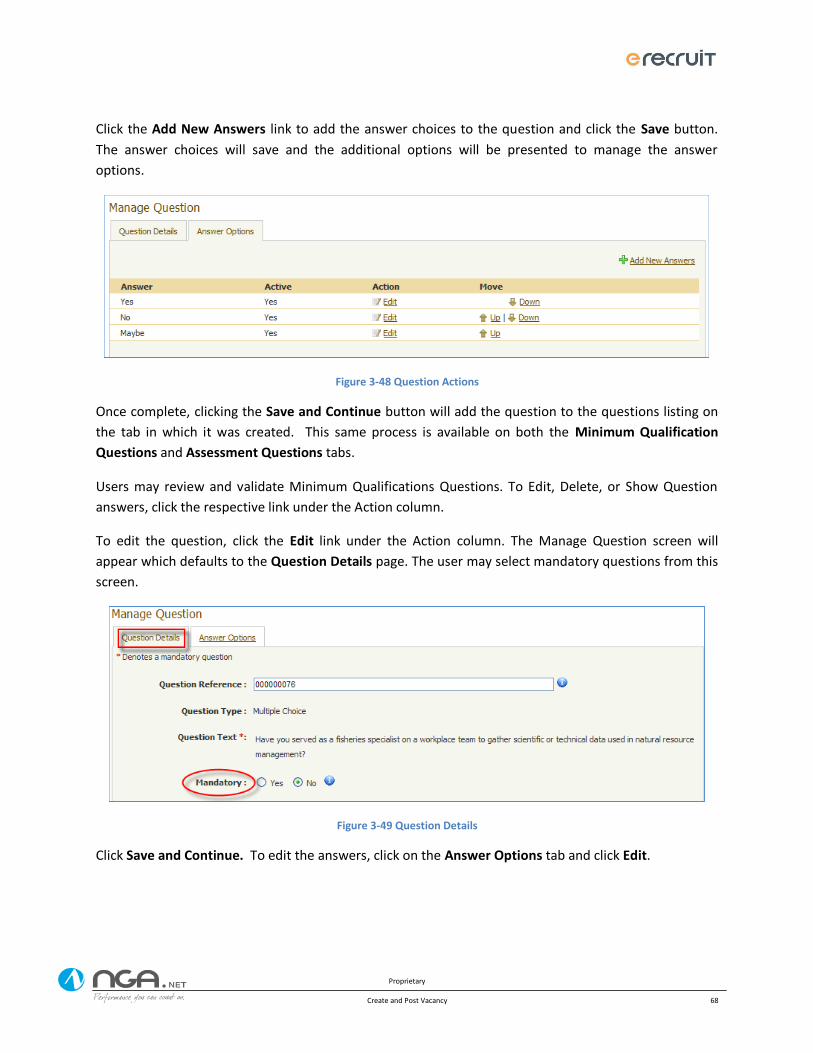
Proprietary
Create and Post Vacancy 68
Click the Add New Answers link to add the answer choices to the question and click the Save button.
The answer choices will save and the additional options will be presented to manage the answer
options.
Figure 3-48 Question Actions
Once complete, clicking the Save and Continue button will add the question to the questions listing on
the tab in which it was created. This same process is available on both the Minimum Qualification
Questions and Assessment Questions tabs.
Users may review and validate Minimum Qualifications Questions. To Edit, Delete, or Show Question
answers, click the respective link under the Action column.
To edit the question, click the Edit link under the Action column. The Manage Question screen will
appear which defaults to the Question Details page. The user may select mandatory questions from this
screen.
Figure 3-49 Question Details
Click Save and Continue. To edit the answers, click on the Answer Options tab and click Edit.
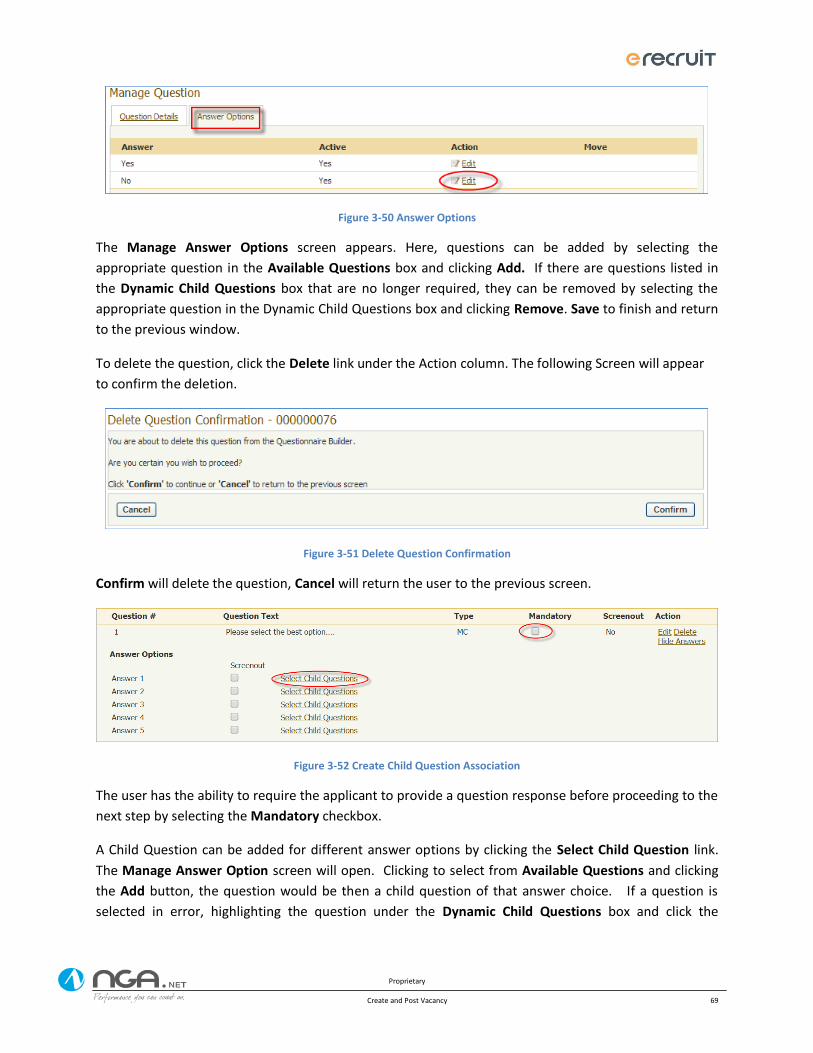
Proprietary
Create and Post Vacancy 69
Figure 3-50 Answer Options
The Manage Answer Options screen appears. Here, questions can be added by selecting the
appropriate question in the Available Questions box and clicking Add. If there are questions listed in
the Dynamic Child Questions box that are no longer required, they can be removed by selecting the
appropriate question in the Dynamic Child Questions box and clicking Remove. Save to finish and return
to the previous window.
To delete the question, click the Delete link under the Action column. The following Screen will appear
to confirm the deletion.
Figure 3-51 Delete Question Confirmation
Confirm will delete the question, Cancel will return the user to the previous screen.
Figure 3-52 Create Child Question Association
The user has the ability to require the applicant to provide a question response before proceeding to the
next step by selecting the Mandatory checkbox.
A Child Question can be added for different answer options by clicking the Select Child Question link.
The Manage Answer Option screen will open. Clicking to select from Available Questions and clicking
the Add button, the question would be then a child question of that answer choice. If a question is
selected in error, highlighting the question under the Dynamic Child Questions box and click the
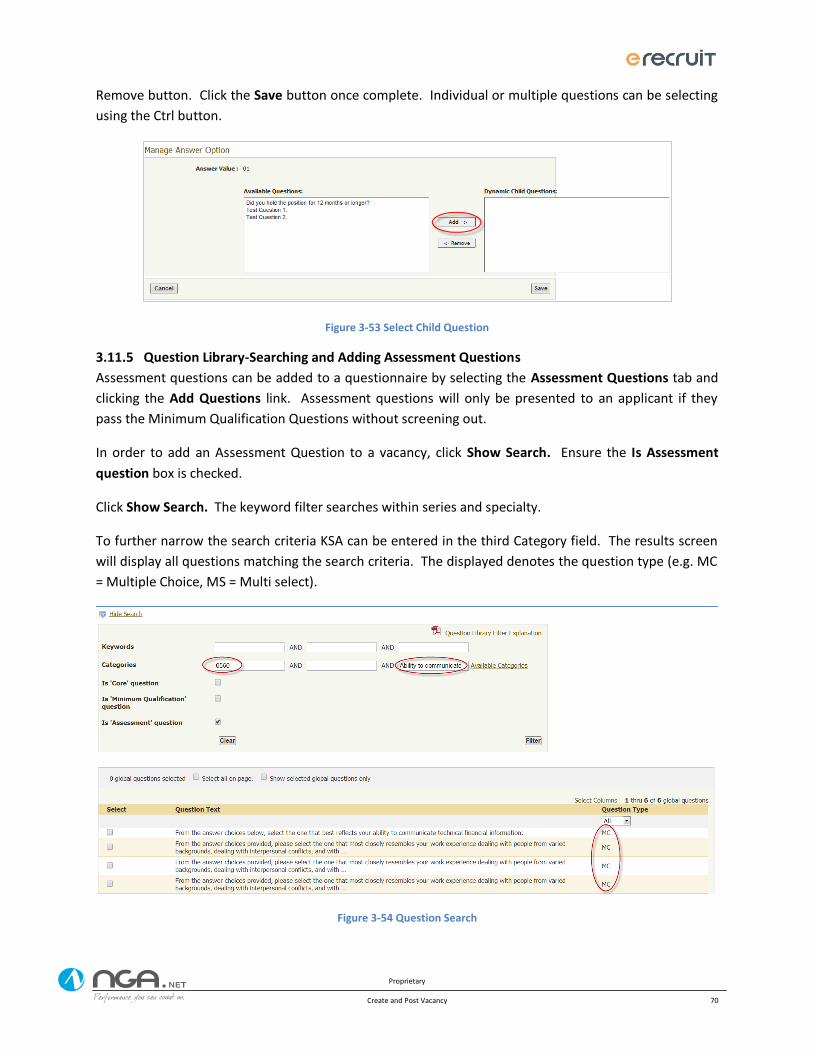
Proprietary
Create and Post Vacancy 70
Remove button. Click the Save button once complete. Individual or multiple questions can be selecting
using the Ctrl button.
Figure 3-53 Select Child Question
3.11.5 Question Library-Searching and Adding Assessment Questions
Assessment questions can be added to a questionnaire by selecting the Assessment Questions tab and
clicking the Add Questions link. Assessment questions will only be presented to an applicant if they
pass the Minimum Qualification Questions without screening out.
In order to add an Assessment Question to a vacancy, click Show Search. Ensure the Is Assessment
question box is checked.
Click Show Search. The keyword filter searches within series and specialty.
To further narrow the search criteria KSA can be entered in the third Category field. The results screen
will display all questions matching the search criteria. The displayed denotes the question type (e.g. MC
= Multiple Choice, MS = Multi select).
Figure 3-54 Question Search
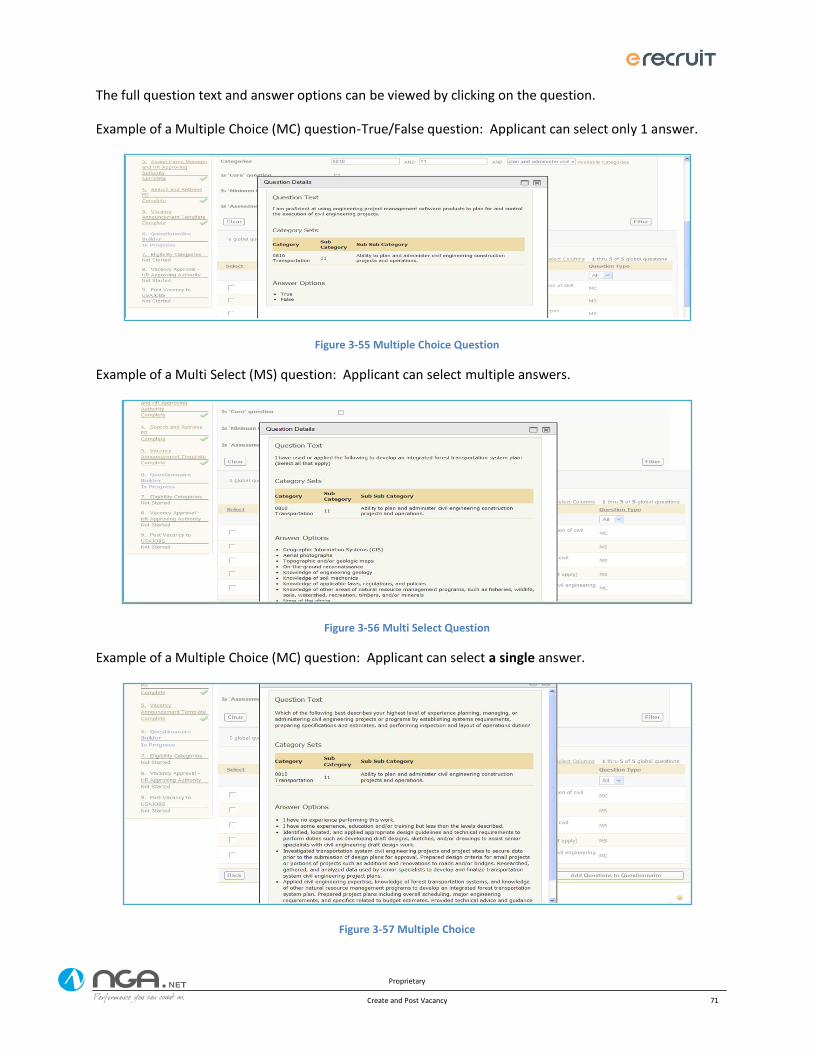
Proprietary
Create and Post Vacancy 71
The full question text and answer options can be viewed by clicking on the question.
Example of a Multiple Choice (MC) question-True/False question: Applicant can select only 1 answer.
Figure 3-55 Multiple Choice Question
Example of a Multi Select (MS) question: Applicant can select multiple answers.
Figure 3-56 Multi Select Question
Example of a Multiple Choice (MC) question: Applicant can select a single answer.
Figure 3-57 Multiple Choice
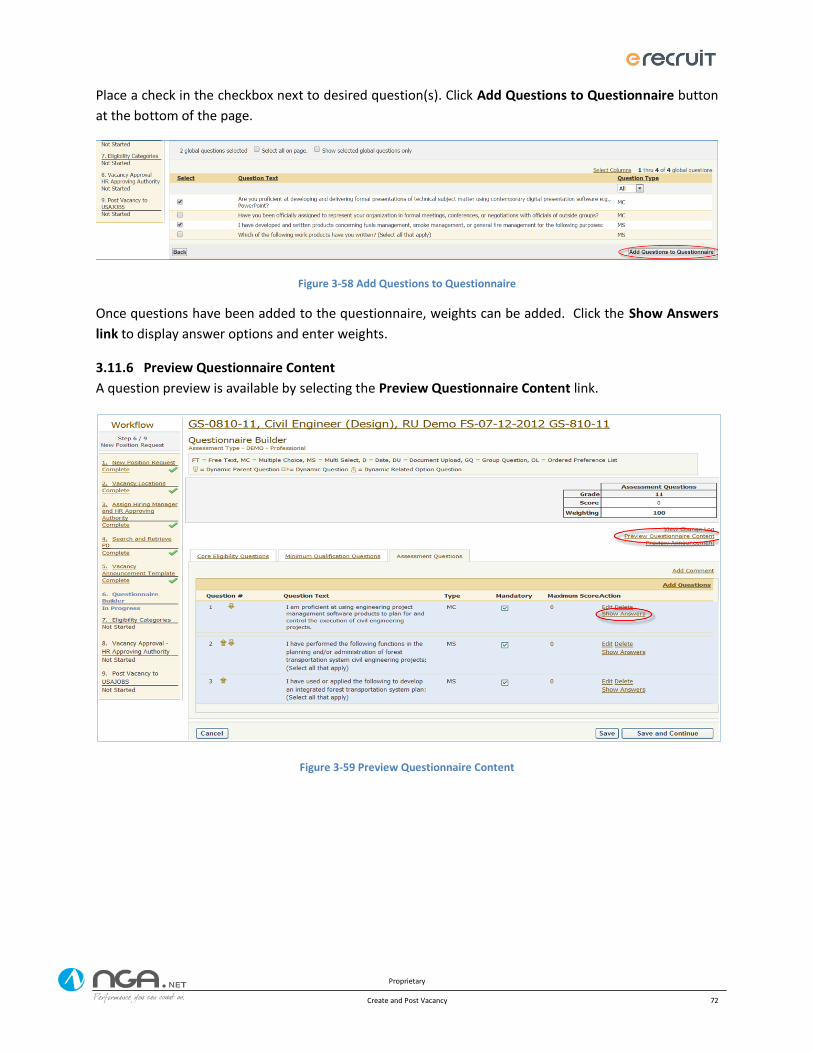
Proprietary
Create and Post Vacancy 72
Place a check in the checkbox next to desired question(s). Click Add Questions to Questionnaire button
at the bottom of the page.
Figure 3-58 Add Questions to Questionnaire
Once questions have been added to the questionnaire, weights can be added. Click the Show Answers
link to display answer options and enter weights.
3.11.6 Preview Questionnaire Content
A question preview is available by selecting the Preview Questionnaire Content link.
Figure 3-59 Preview Questionnaire Content
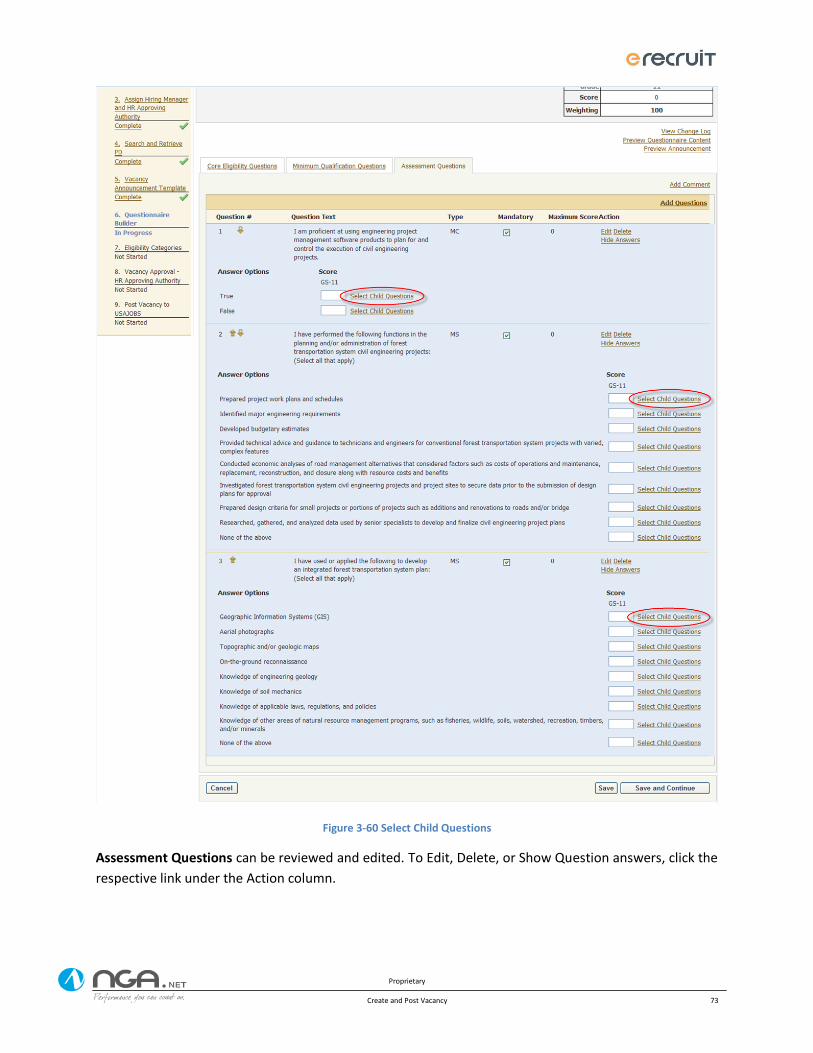
Proprietary
Create and Post Vacancy 73
Figure 3-60 Select Child Questions
Assessment Questions can be reviewed and edited. To Edit, Delete, or Show Question answers, click the
respective link under the Action column.
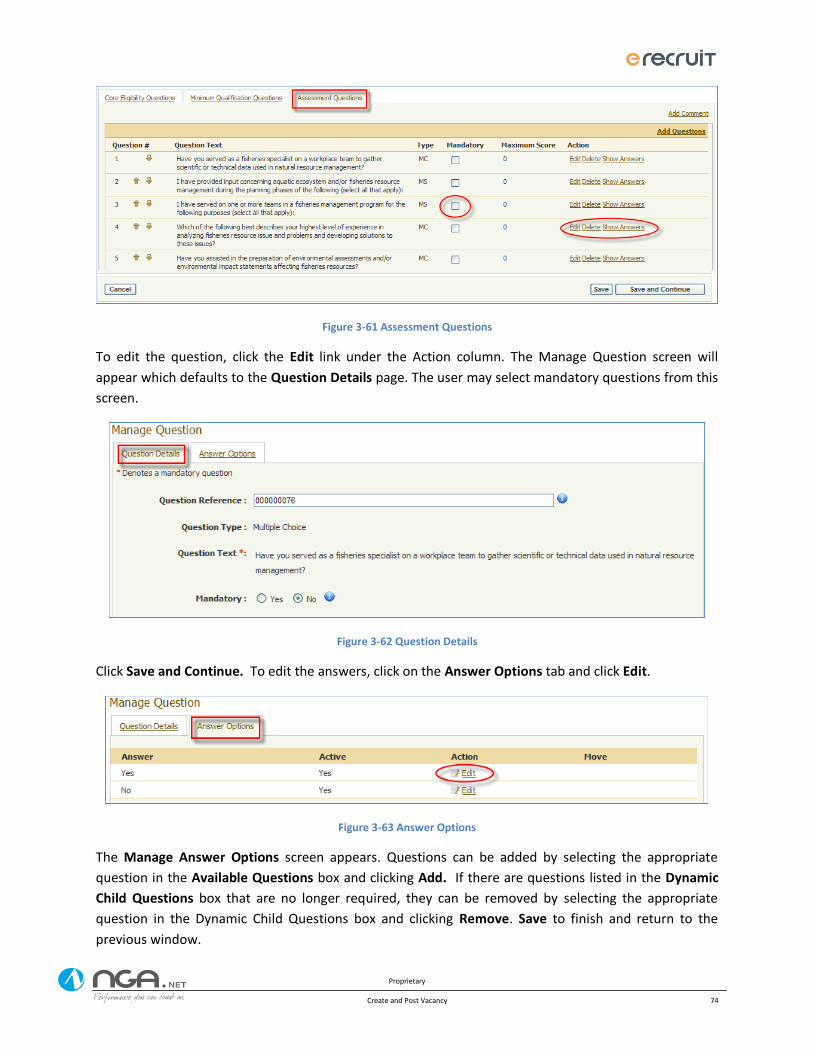
Proprietary
Create and Post Vacancy 74
Figure 3-61 Assessment Questions
To edit the question, click the Edit link under the Action column. The Manage Question screen will
appear which defaults to the Question Details page. The user may select mandatory questions from this
screen.
Figure 3-62 Question Details
Click Save and Continue. To edit the answers, click on the Answer Options tab and click Edit.
Figure 3-63 Answer Options
The Manage Answer Options screen appears. Questions can be added by selecting the appropriate
question in the Available Questions box and clicking Add. If there are questions listed in the Dynamic
Child Questions box that are no longer required, they can be removed by selecting the appropriate
question in the Dynamic Child Questions box and clicking Remove. Save to finish and return to the
previous window.
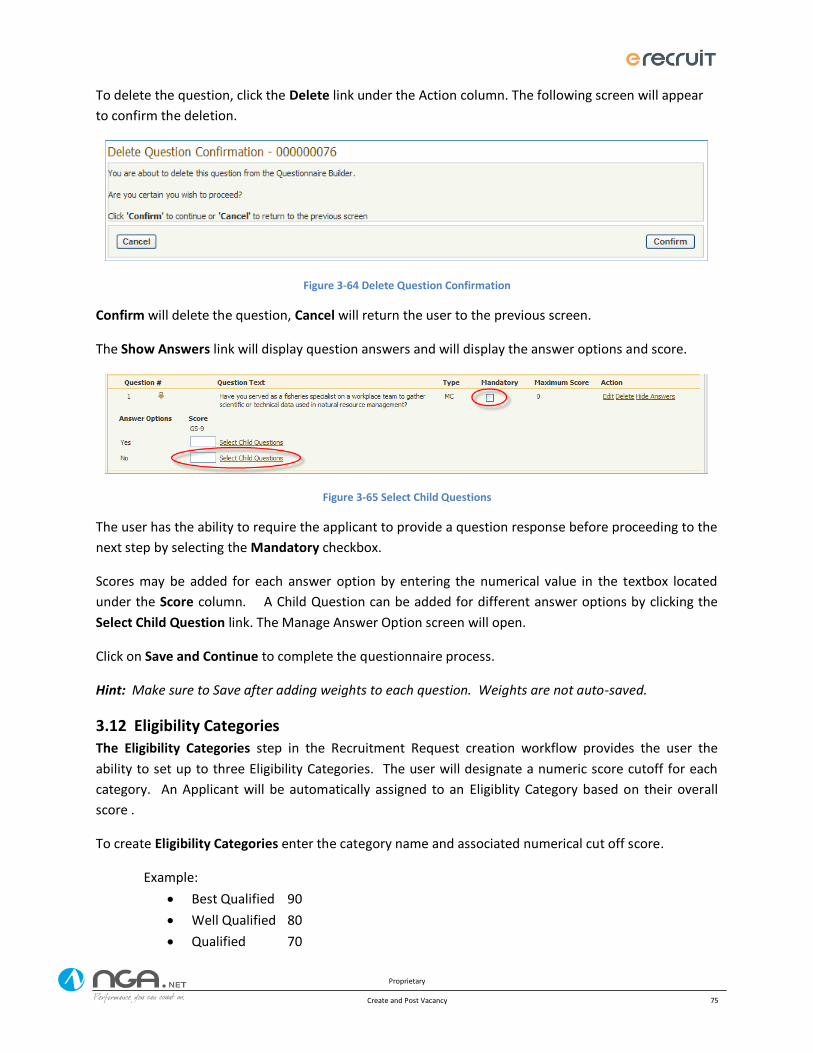
Proprietary
Create and Post Vacancy 75
To delete the question, click the Delete link under the Action column. The following screen will appear
to confirm the deletion.
Figure 3-64 Delete Question Confirmation
Confirm will delete the question, Cancel will return the user to the previous screen.
The Show Answers link will display question answers and will display the answer options and score.
Figure 3-65 Select Child Questions
The user has the ability to require the applicant to provide a question response before proceeding to the
next step by selecting the Mandatory checkbox.
Scores may be added for each answer option by entering the numerical value in the textbox located
under the Score column. A Child Question can be added for different answer options by clicking the
Select Child Question link. The Manage Answer Option screen will open.
Click on Save and Continue to complete the questionnaire process.
Hint: Make sure to Save after adding weights to each question. Weights are not auto-saved.
3.12 Eligibility Categories The Eligibility Categories step in the Recruitment Request creation workflow provides the user the
ability to set up to three Eligibility Categories. The user will designate a numeric score cutoff for each
category. An Applicant will be automatically assigned to an Eligiblity Category based on their overall
score .
To create Eligibility Categories enter the category name and associated numerical cut off score.
Example:
Best Qualified 90
Well Qualified 80
Qualified 70
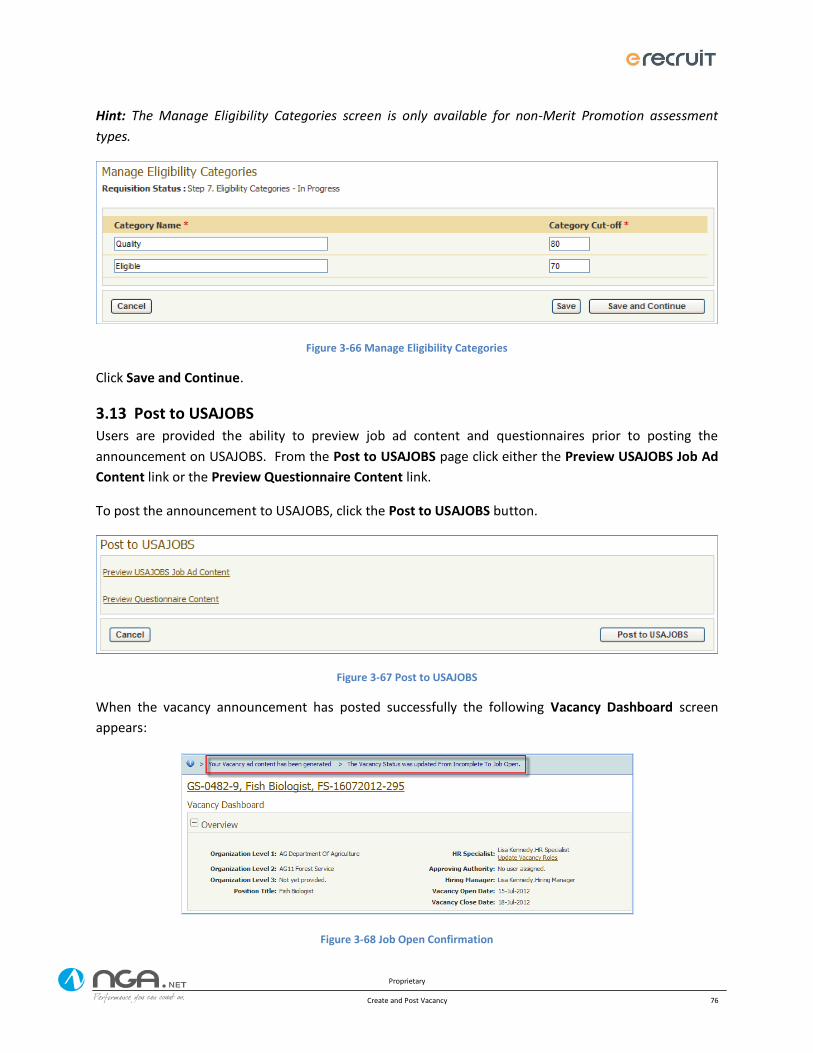
Proprietary
Create and Post Vacancy 76
Hint: The Manage Eligibility Categories screen is only available for non-Merit Promotion assessment
types.
Figure 3-66 Manage Eligibility Categories
Click Save and Continue.
3.13 Post to USAJOBS Users are provided the ability to preview job ad content and questionnaires prior to posting the
announcement on USAJOBS. From the Post to USAJOBS page click either the Preview USAJOBS Job Ad
Content link or the Preview Questionnaire Content link.
To post the announcement to USAJOBS, click the Post to USAJOBS button.
Figure 3-67 Post to USAJOBS
When the vacancy announcement has posted successfully the following Vacancy Dashboard screen
appears:
Figure 3-68 Job Open Confirmation
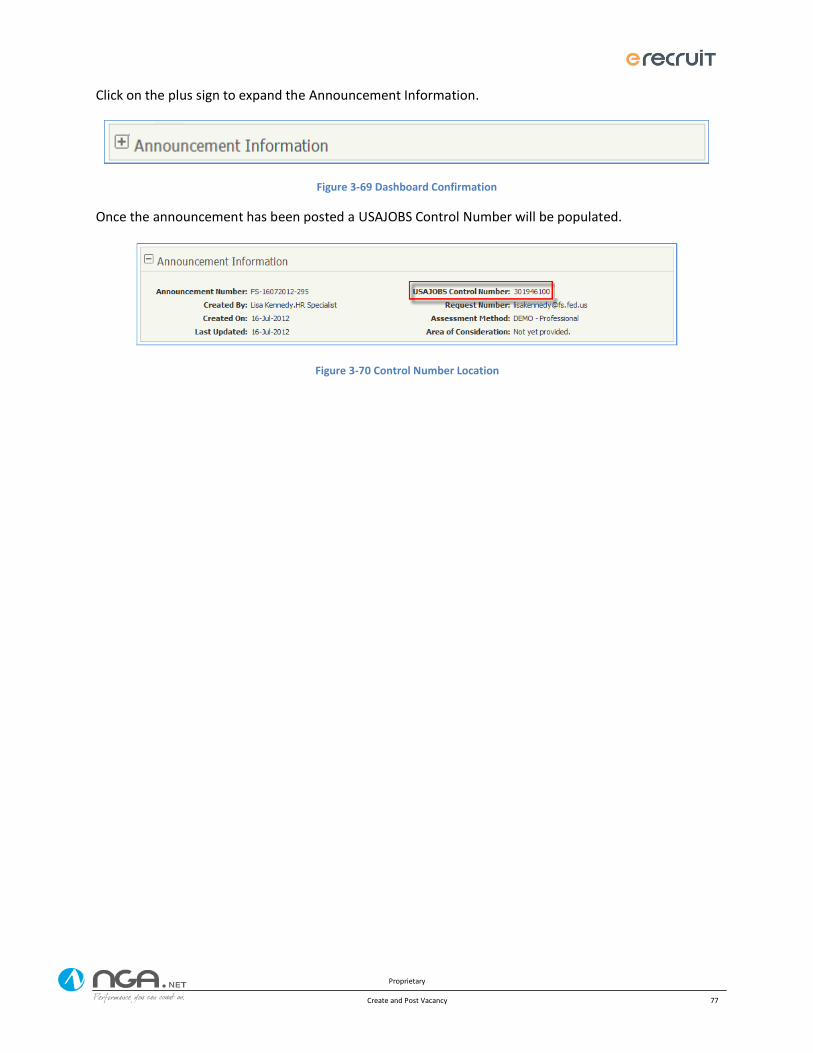
Proprietary
Create and Post Vacancy 77
Click on the plus sign to expand the Announcement Information.
Figure 3-69 Dashboard Confirmation
Once the announcement has been posted a USAJOBS Control Number will be populated.
Figure 3-70 Control Number Location
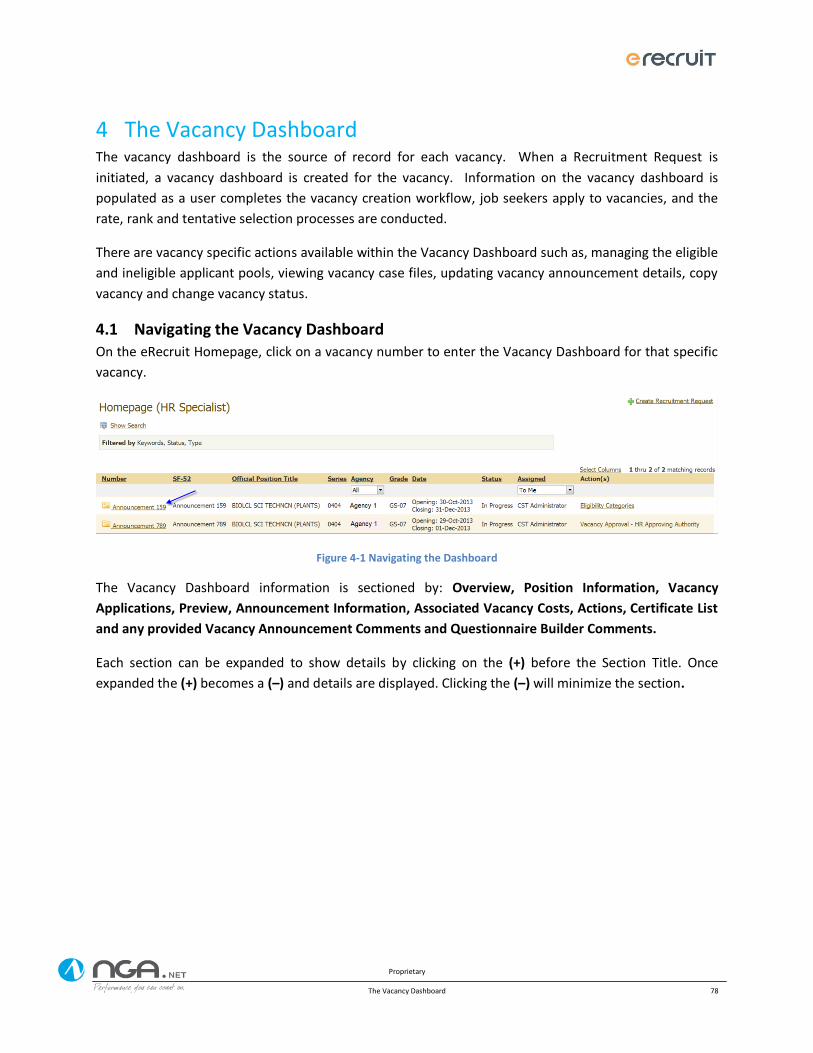
Proprietary
The Vacancy Dashboard 78
The Vacancy Dashboard 4The vacancy dashboard is the source of record for each vacancy. When a Recruitment Request is
initiated, a vacancy dashboard is created for the vacancy. Information on the vacancy dashboard is
populated as a user completes the vacancy creation workflow, job seekers apply to vacancies, and the
rate, rank and tentative selection processes are conducted.
There are vacancy specific actions available within the Vacancy Dashboard such as, managing the eligible
and ineligible applicant pools, viewing vacancy case files, updating vacancy announcement details, copy
vacancy and change vacancy status.
4.1 Navigating the Vacancy Dashboard On the eRecruit Homepage, click on a vacancy number to enter the Vacancy Dashboard for that specific
vacancy.
Figure 4-1 Navigating the Dashboard
The Vacancy Dashboard information is sectioned by: Overview, Position Information, Vacancy
Applications, Preview, Announcement Information, Associated Vacancy Costs, Actions, Certificate List
and any provided Vacancy Announcement Comments and Questionnaire Builder Comments.
Each section can be expanded to show details by clicking on the (+) before the Section Title. Once
expanded the (+) becomes a (–) and details are displayed. Clicking the (–) will minimize the section.
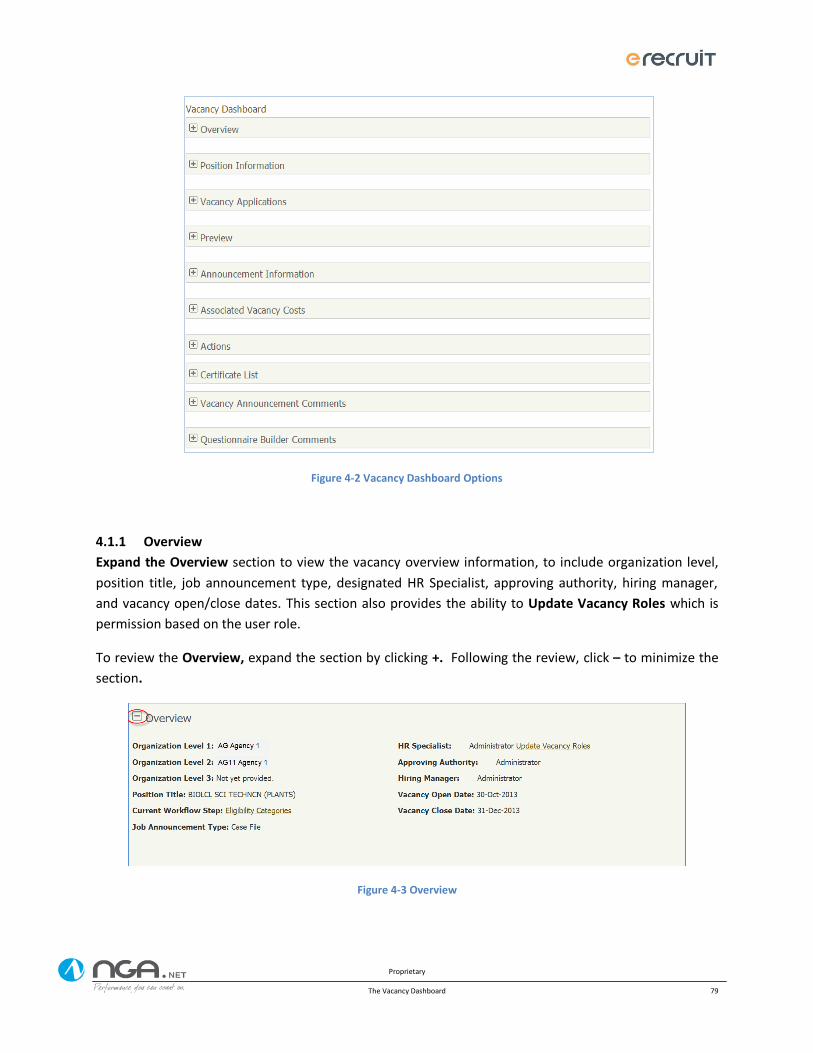
Proprietary
The Vacancy Dashboard 79
Figure 4-2 Vacancy Dashboard Options
4.1.1 Overview
Expand the Overview section to view the vacancy overview information, to include organization level,
position title, job announcement type, designated HR Specialist, approving authority, hiring manager,
and vacancy open/close dates. This section also provides the ability to Update Vacancy Roles which is
permission based on the user role.
To review the Overview, expand the section by clicking +. Following the review, click – to minimize the
section.
Figure 4-3 Overview
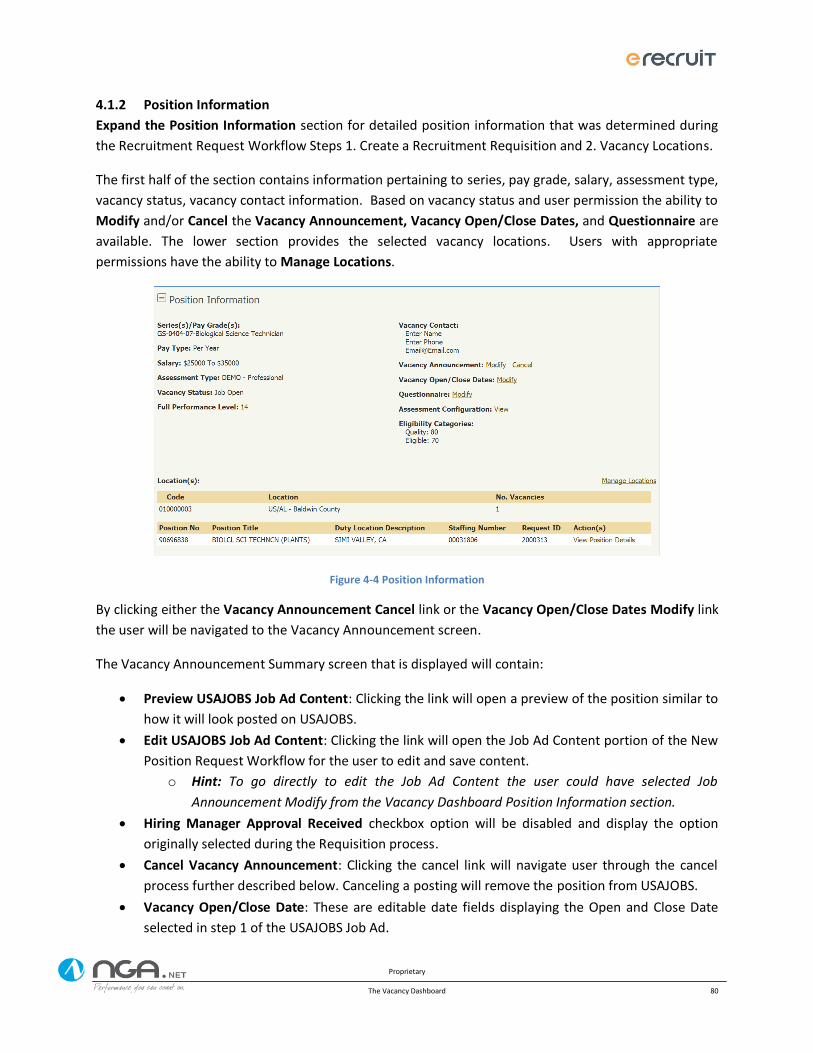
Proprietary
The Vacancy Dashboard 80
4.1.2 Position Information
Expand the Position Information section for detailed position information that was determined during
the Recruitment Request Workflow Steps 1. Create a Recruitment Requisition and 2. Vacancy Locations.
The first half of the section contains information pertaining to series, pay grade, salary, assessment type,
vacancy status, vacancy contact information. Based on vacancy status and user permission the ability to
Modify and/or Cancel the Vacancy Announcement, Vacancy Open/Close Dates, and Questionnaire are
available. The lower section provides the selected vacancy locations. Users with appropriate
permissions have the ability to Manage Locations.
Figure 4-4 Position Information
By clicking either the Vacancy Announcement Cancel link or the Vacancy Open/Close Dates Modify link
the user will be navigated to the Vacancy Announcement screen.
The Vacancy Announcement Summary screen that is displayed will contain:
Preview USAJOBS Job Ad Content: Clicking the link will open a preview of the position similar to
how it will look posted on USAJOBS.
Edit USAJOBS Job Ad Content: Clicking the link will open the Job Ad Content portion of the New
Position Request Workflow for the user to edit and save content.
o Hint: To go directly to edit the Job Ad Content the user could have selected Job
Announcement Modify from the Vacancy Dashboard Position Information section.
Hiring Manager Approval Received checkbox option will be disabled and display the option
originally selected during the Requisition process.
Cancel Vacancy Announcement: Clicking the cancel link will navigate user through the cancel
process further described below. Canceling a posting will remove the position from USAJOBS.
Vacancy Open/Close Date: These are editable date fields displaying the Open and Close Date
selected in step 1 of the USAJOBS Job Ad.
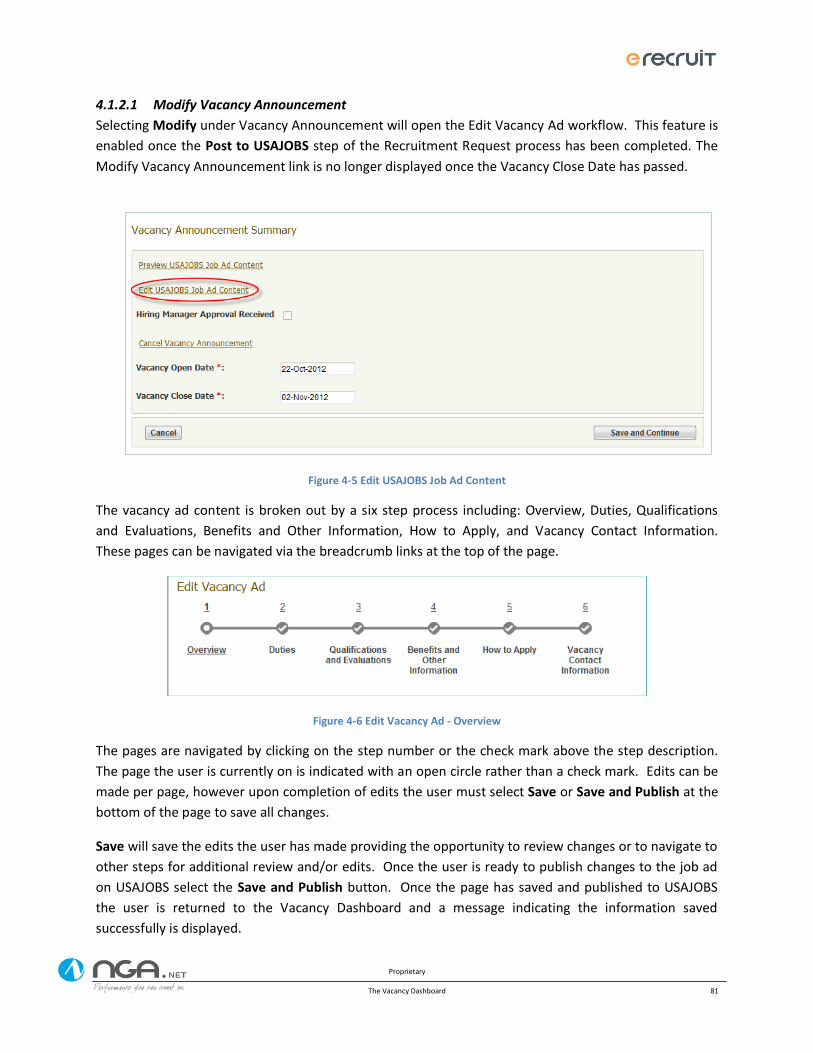
Proprietary
The Vacancy Dashboard 81
4.1.2.1 Modify Vacancy Announcement
Selecting Modify under Vacancy Announcement will open the Edit Vacancy Ad workflow. This feature is
enabled once the Post to USAJOBS step of the Recruitment Request process has been completed. The
Modify Vacancy Announcement link is no longer displayed once the Vacancy Close Date has passed.
Figure 4-5 Edit USAJOBS Job Ad Content
The vacancy ad content is broken out by a six step process including: Overview, Duties, Qualifications
and Evaluations, Benefits and Other Information, How to Apply, and Vacancy Contact Information.
These pages can be navigated via the breadcrumb links at the top of the page.
Figure 4-6 Edit Vacancy Ad - Overview
The pages are navigated by clicking on the step number or the check mark above the step description.
The page the user is currently on is indicated with an open circle rather than a check mark. Edits can be
made per page, however upon completion of edits the user must select Save or Save and Publish at the
bottom of the page to save all changes.
Save will save the edits the user has made providing the opportunity to review changes or to navigate to
other steps for additional review and/or edits. Once the user is ready to publish changes to the job ad
on USAJOBS select the Save and Publish button. Once the page has saved and published to USAJOBS
the user is returned to the Vacancy Dashboard and a message indicating the information saved
successfully is displayed.
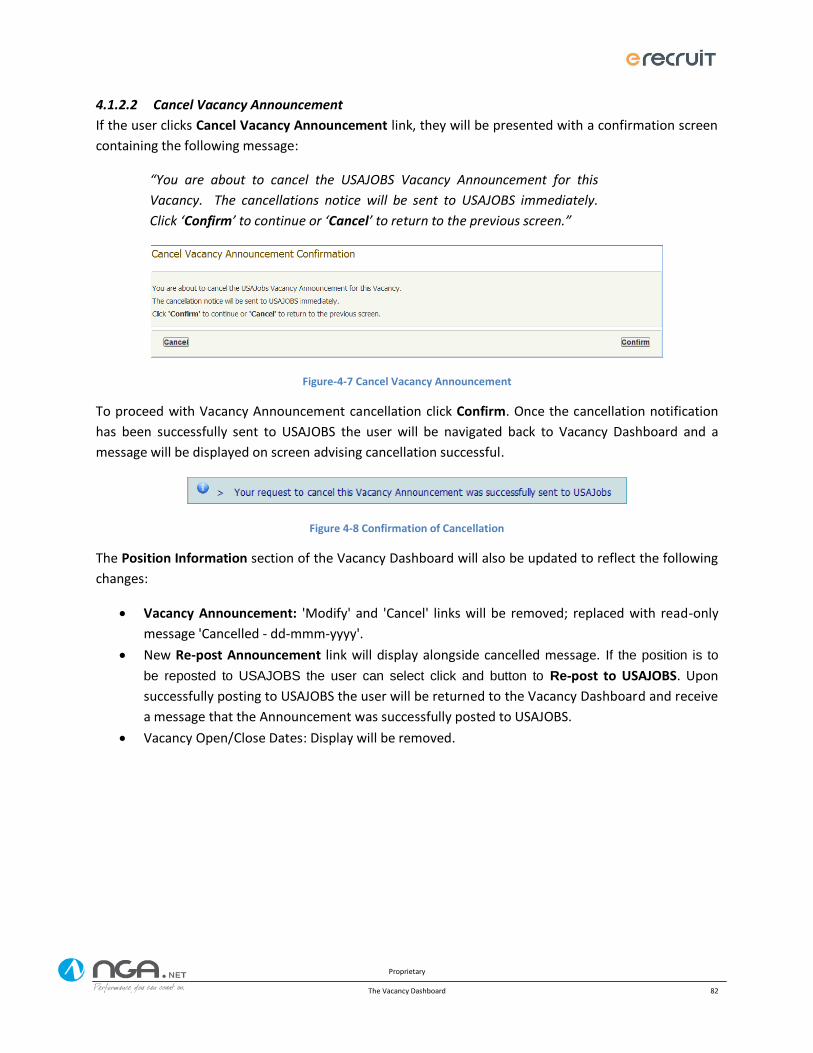
Proprietary
The Vacancy Dashboard 82
4.1.2.2 Cancel Vacancy Announcement
If the user clicks Cancel Vacancy Announcement link, they will be presented with a confirmation screen
containing the following message:
“You are about to cancel the USAJOBS Vacancy Announcement for this
Vacancy. The cancellations notice will be sent to USAJOBS immediately.
Click ‘Confirm’ to continue or ‘Cancel’ to return to the previous screen.”
Figure-4-7 Cancel Vacancy Announcement
To proceed with Vacancy Announcement cancellation click Confirm. Once the cancellation notification
has been successfully sent to USAJOBS the user will be navigated back to Vacancy Dashboard and a
message will be displayed on screen advising cancellation successful.
Figure 4-8 Confirmation of Cancellation
The Position Information section of the Vacancy Dashboard will also be updated to reflect the following
changes:
Vacancy Announcement: 'Modify' and 'Cancel' links will be removed; replaced with read-only
message 'Cancelled - dd-mmm-yyyy'.
New Re-post Announcement link will display alongside cancelled message. If the position is to
be reposted to USAJOBS the user can select click and button to Re-post to USAJOBS. Upon
successfully posting to USAJOBS the user will be returned to the Vacancy Dashboard and receive
a message that the Announcement was successfully posted to USAJOBS.
Vacancy Open/Close Dates: Display will be removed.
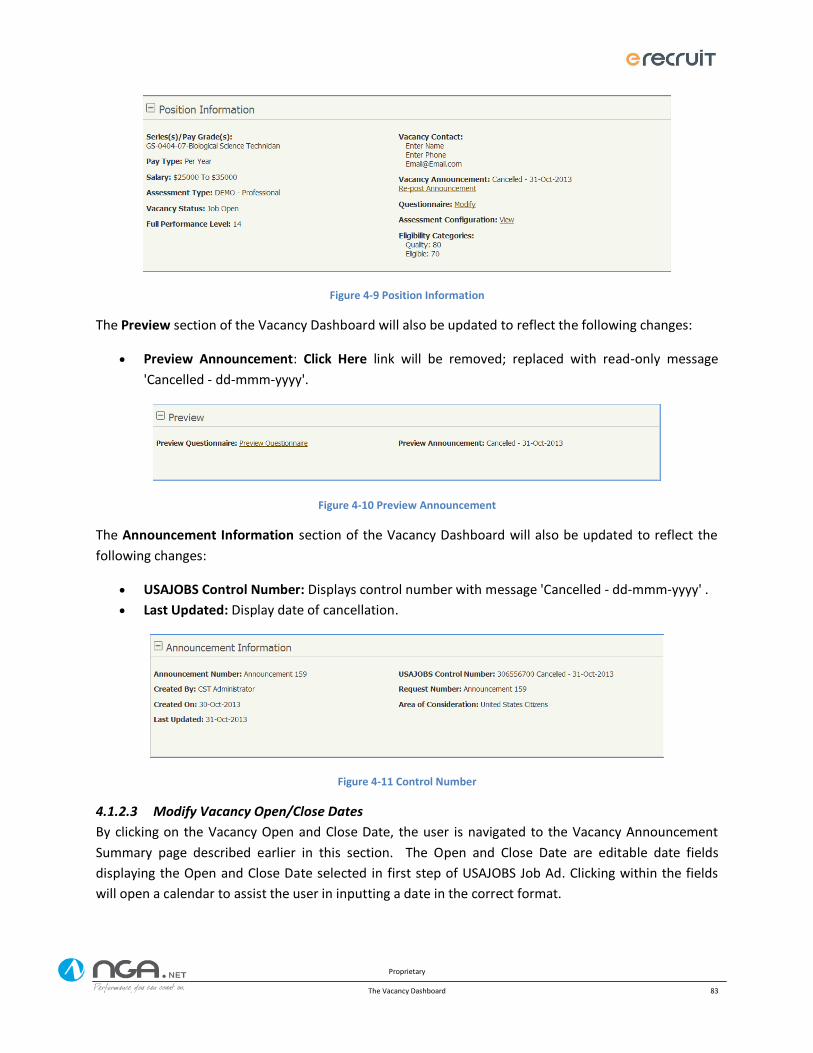
Proprietary
The Vacancy Dashboard 83
Figure 4-9 Position Information
The Preview section of the Vacancy Dashboard will also be updated to reflect the following changes:
Preview Announcement: Click Here link will be removed; replaced with read-only message
'Cancelled - dd-mmm-yyyy'.
Figure 4-10 Preview Announcement
The Announcement Information section of the Vacancy Dashboard will also be updated to reflect the
following changes:
USAJOBS Control Number: Displays control number with message 'Cancelled - dd-mmm-yyyy' .
Last Updated: Display date of cancellation.
Figure 4-11 Control Number
4.1.2.3 Modify Vacancy Open/Close Dates
By clicking on the Vacancy Open and Close Date, the user is navigated to the Vacancy Announcement
Summary page described earlier in this section. The Open and Close Date are editable date fields
displaying the Open and Close Date selected in first step of USAJOBS Job Ad. Clicking within the fields
will open a calendar to assist the user in inputting a date in the correct format.
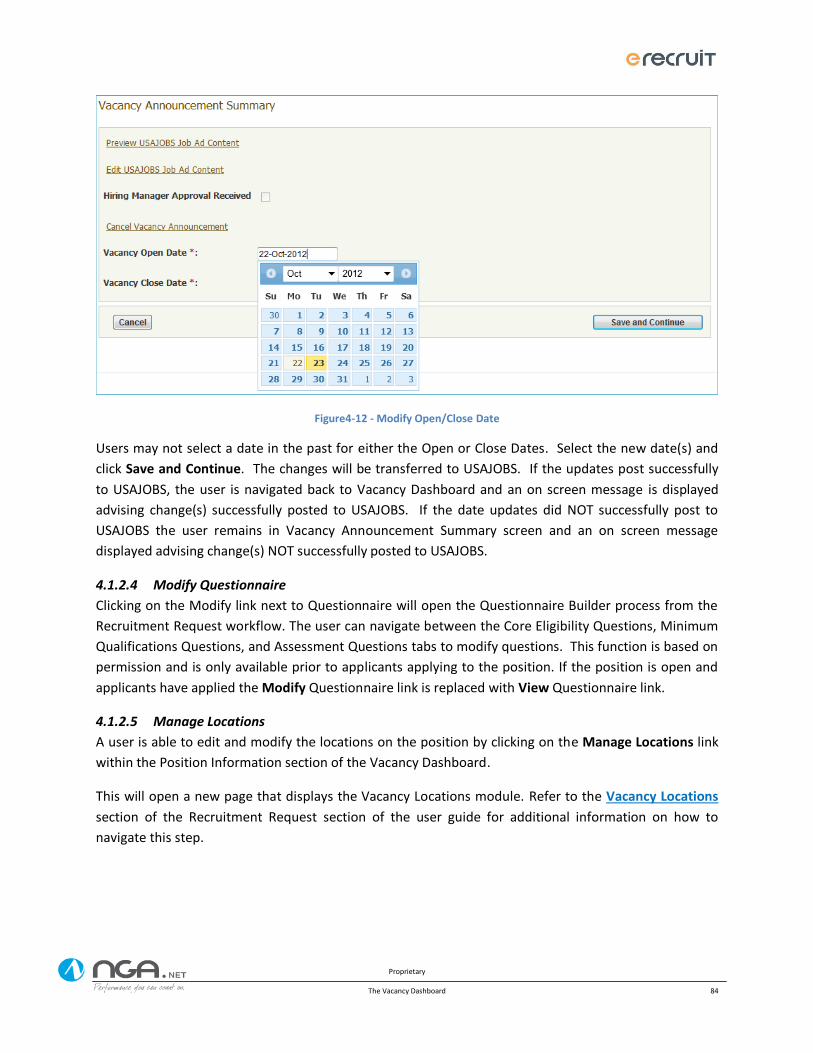
Proprietary
The Vacancy Dashboard 84
Figure4-12 - Modify Open/Close Date
Users may not select a date in the past for either the Open or Close Dates. Select the new date(s) and
click Save and Continue. The changes will be transferred to USAJOBS. If the updates post successfully
to USAJOBS, the user is navigated back to Vacancy Dashboard and an on screen message is displayed
advising change(s) successfully posted to USAJOBS. If the date updates did NOT successfully post to
USAJOBS the user remains in Vacancy Announcement Summary screen and an on screen message
displayed advising change(s) NOT successfully posted to USAJOBS.
4.1.2.4 Modify Questionnaire
Clicking on the Modify link next to Questionnaire will open the Questionnaire Builder process from the
Recruitment Request workflow. The user can navigate between the Core Eligibility Questions, Minimum
Qualifications Questions, and Assessment Questions tabs to modify questions. This function is based on
permission and is only available prior to applicants applying to the position. If the position is open and
applicants have applied the Modify Questionnaire link is replaced with View Questionnaire link.
4.1.2.5 Manage Locations
A user is able to edit and modify the locations on the position by clicking on the Manage Locations link
within the Position Information section of the Vacancy Dashboard.
This will open a new page that displays the Vacancy Locations module. Refer to the Vacancy Locations
section of the Recruitment Request section of the user guide for additional information on how to
navigate this step.
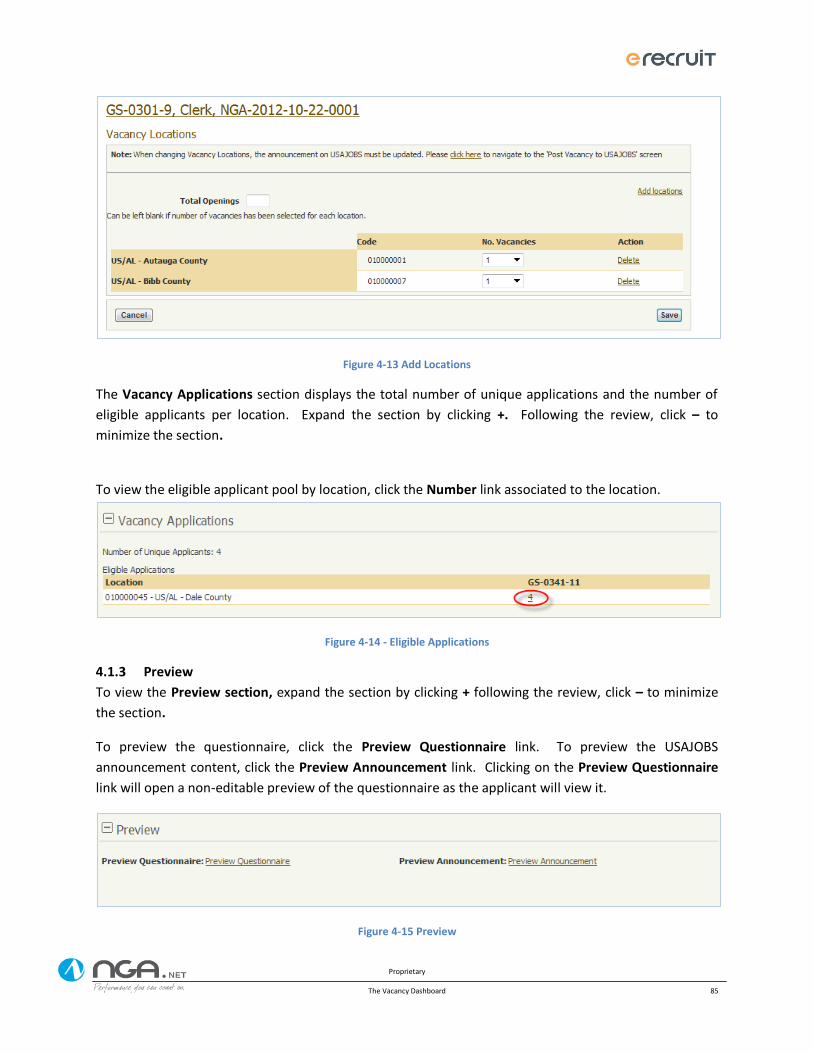
Proprietary
The Vacancy Dashboard 85
Figure 4-13 Add Locations
The Vacancy Applications section displays the total number of unique applications and the number of
eligible applicants per location. Expand the section by clicking +. Following the review, click – to
minimize the section.
To view the eligible applicant pool by location, click the Number link associated to the location.
Figure 4-14 - Eligible Applications
4.1.3 Preview
To view the Preview section, expand the section by clicking + following the review, click – to minimize
the section.
To preview the questionnaire, click the Preview Questionnaire link. To preview the USAJOBS
announcement content, click the Preview Announcement link. Clicking on the Preview Questionnaire
link will open a non-editable preview of the questionnaire as the applicant will view it.
Figure 4-15 Preview
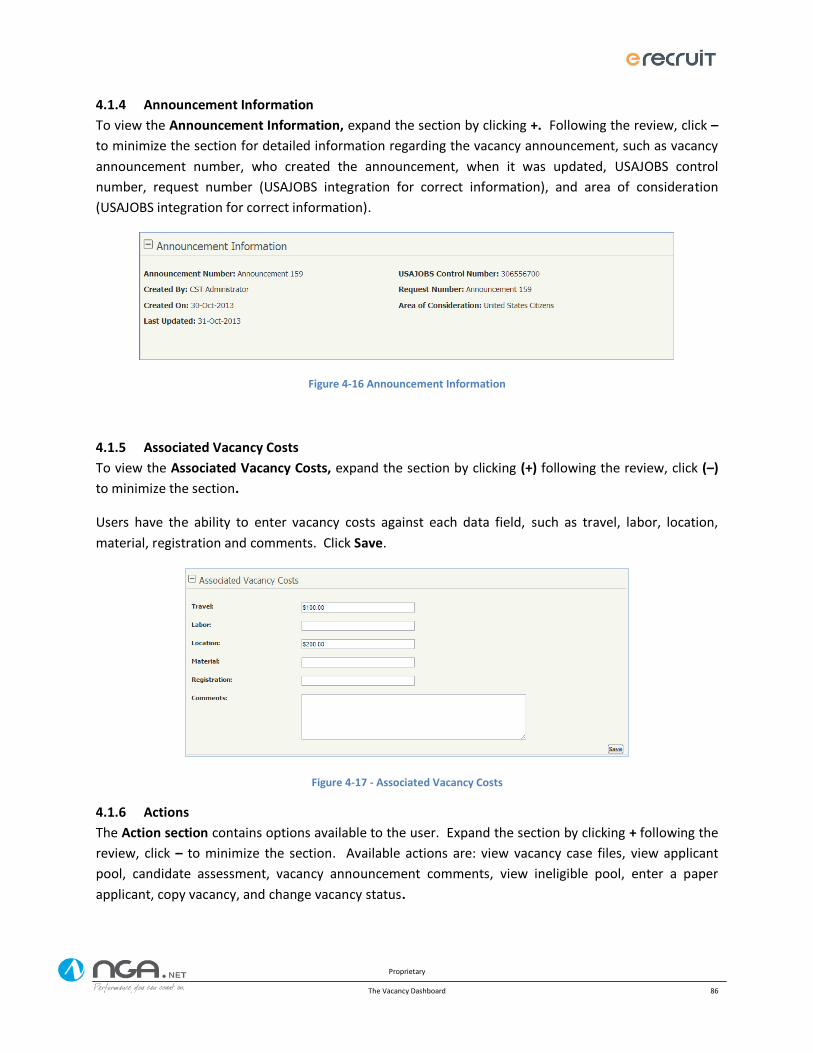
Proprietary
The Vacancy Dashboard 86
4.1.4 Announcement Information
To view the Announcement Information, expand the section by clicking +. Following the review, click –
to minimize the section for detailed information regarding the vacancy announcement, such as vacancy
announcement number, who created the announcement, when it was updated, USAJOBS control
number, request number (USAJOBS integration for correct information), and area of consideration
(USAJOBS integration for correct information).
Figure 4-16 Announcement Information
4.1.5 Associated Vacancy Costs
To view the Associated Vacancy Costs, expand the section by clicking (+) following the review, click (–)
to minimize the section.
Users have the ability to enter vacancy costs against each data field, such as travel, labor, location,
material, registration and comments. Click Save.
Figure 4-17 - Associated Vacancy Costs
4.1.6 Actions
The Action section contains options available to the user. Expand the section by clicking + following the
review, click – to minimize the section. Available actions are: view vacancy case files, view applicant
pool, candidate assessment, vacancy announcement comments, view ineligible pool, enter a paper
applicant, copy vacancy, and change vacancy status.
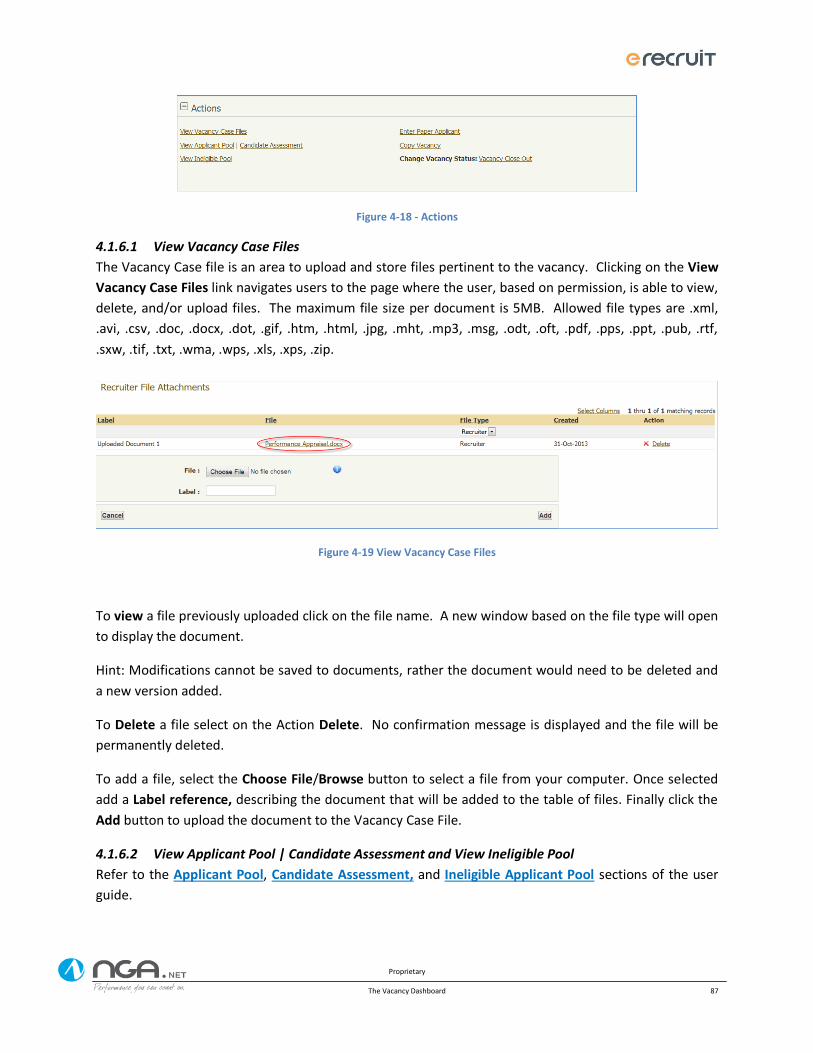
Proprietary
The Vacancy Dashboard 87
Figure 4-18 - Actions
4.1.6.1 View Vacancy Case Files
The Vacancy Case file is an area to upload and store files pertinent to the vacancy. Clicking on the View
Vacancy Case Files link navigates users to the page where the user, based on permission, is able to view,
delete, and/or upload files. The maximum file size per document is 5MB. Allowed file types are .xml,
.avi, .csv, .doc, .docx, .dot, .gif, .htm, .html, .jpg, .mht, .mp3, .msg, .odt, .oft, .pdf, .pps, .ppt, .pub, .rtf,
.sxw, .tif, .txt, .wma, .wps, .xls, .xps, .zip.
Figure 4-19 View Vacancy Case Files
To view a file previously uploaded click on the file name. A new window based on the file type will open
to display the document.
Hint: Modifications cannot be saved to documents, rather the document would need to be deleted and
a new version added.
To Delete a file select on the Action Delete. No confirmation message is displayed and the file will be
permanently deleted.
To add a file, select the Choose File/Browse button to select a file from your computer. Once selected
add a Label reference, describing the document that will be added to the table of files. Finally click the
Add button to upload the document to the Vacancy Case File.
4.1.6.2 View Applicant Pool | Candidate Assessment and View Ineligible Pool
Refer to the Applicant Pool, Candidate Assessment, and Ineligible Applicant Pool sections of the user
guide.
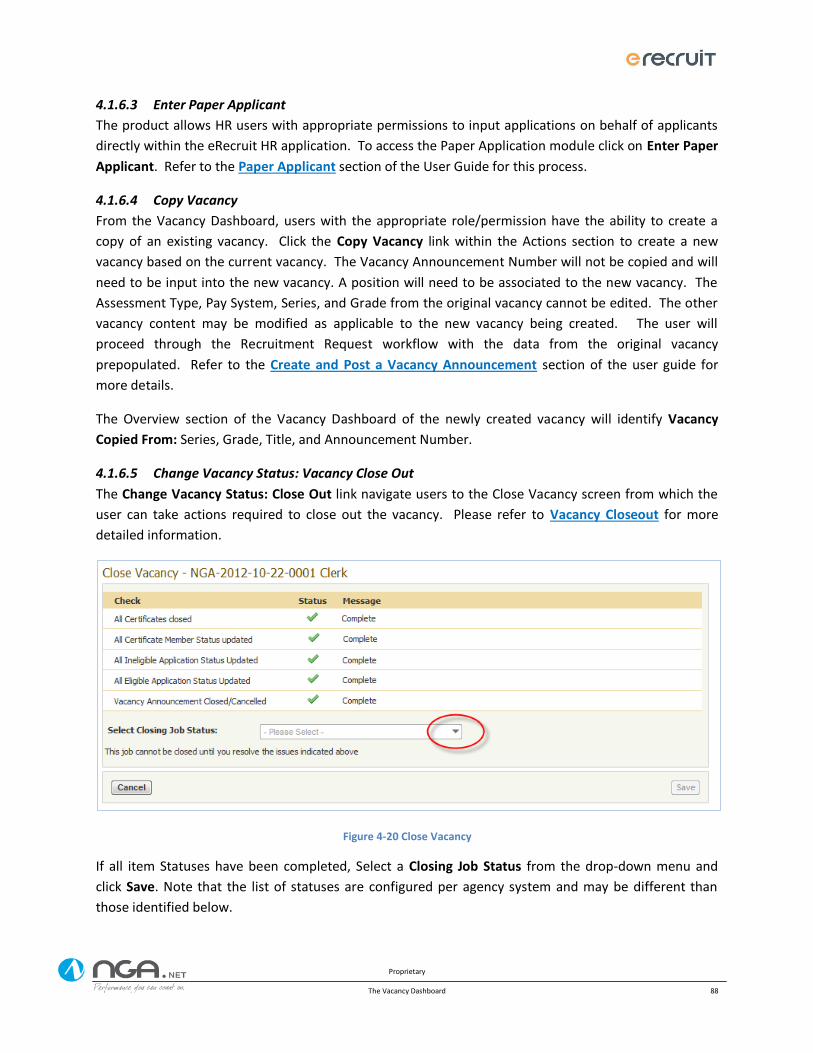
Proprietary
The Vacancy Dashboard 88
4.1.6.3 Enter Paper Applicant
The product allows HR users with appropriate permissions to input applications on behalf of applicants
directly within the eRecruit HR application. To access the Paper Application module click on Enter Paper
Applicant. Refer to the Paper Applicant section of the User Guide for this process.
4.1.6.4 Copy Vacancy
From the Vacancy Dashboard, users with the appropriate role/permission have the ability to create a
copy of an existing vacancy. Click the Copy Vacancy link within the Actions section to create a new
vacancy based on the current vacancy. The Vacancy Announcement Number will not be copied and will
need to be input into the new vacancy. A position will need to be associated to the new vacancy. The
Assessment Type, Pay System, Series, and Grade from the original vacancy cannot be edited. The other
vacancy content may be modified as applicable to the new vacancy being created. The user will
proceed through the Recruitment Request workflow with the data from the original vacancy
prepopulated. Refer to the Create and Post a Vacancy Announcement section of the user guide for
more details.
The Overview section of the Vacancy Dashboard of the newly created vacancy will identify Vacancy
Copied From: Series, Grade, Title, and Announcement Number.
4.1.6.5 Change Vacancy Status: Vacancy Close Out
The Change Vacancy Status: Close Out link navigate users to the Close Vacancy screen from which the
user can take actions required to close out the vacancy. Please refer to Vacancy Closeout for more
detailed information.
Figure 4-20 Close Vacancy
If all item Statuses have been completed, Select a Closing Job Status from the drop-down menu and
click Save. Note that the list of statuses are configured per agency system and may be different than
those identified below.
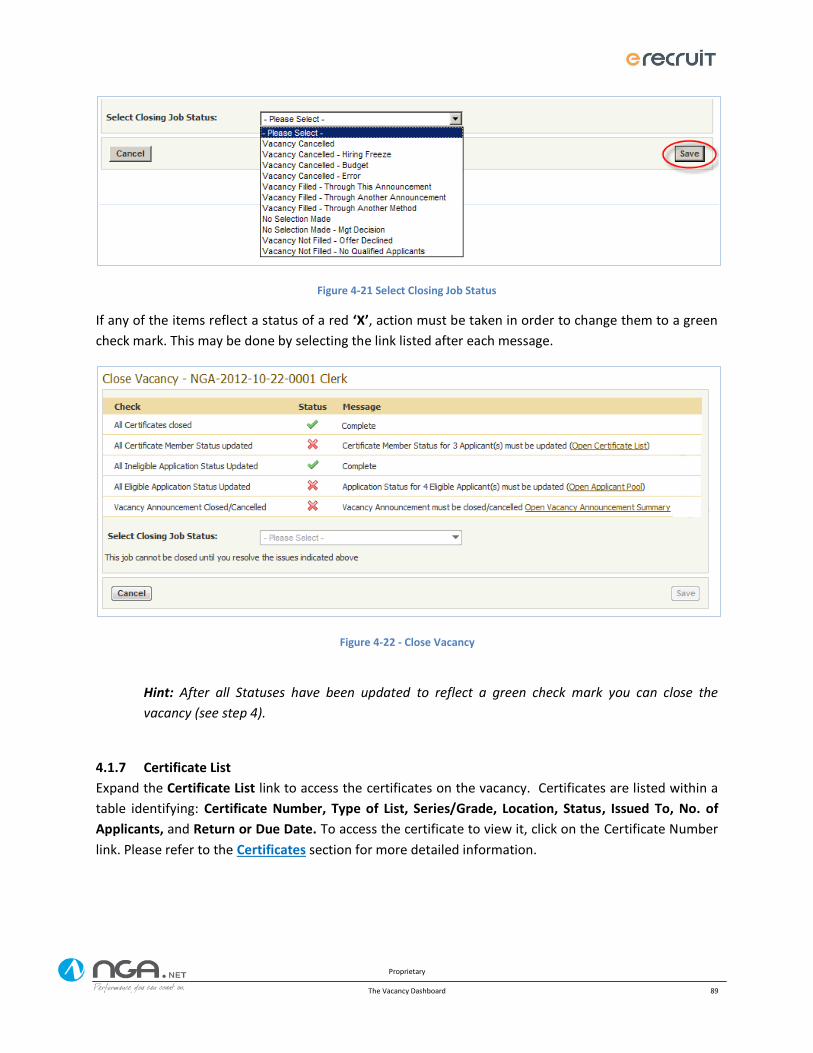
Proprietary
The Vacancy Dashboard 89
Figure 4-21 Select Closing Job Status
If any of the items reflect a status of a red ‘X’, action must be taken in order to change them to a green
check mark. This may be done by selecting the link listed after each message.
Figure 4-22 - Close Vacancy
Hint: After all Statuses have been updated to reflect a green check mark you can close the
vacancy (see step 4).
4.1.7 Certificate List
Expand the Certificate List link to access the certificates on the vacancy. Certificates are listed within a
table identifying: Certificate Number, Type of List, Series/Grade, Location, Status, Issued To, No. of
Applicants, and Return or Due Date. To access the certificate to view it, click on the Certificate Number
link. Please refer to the Certificates section for more detailed information.
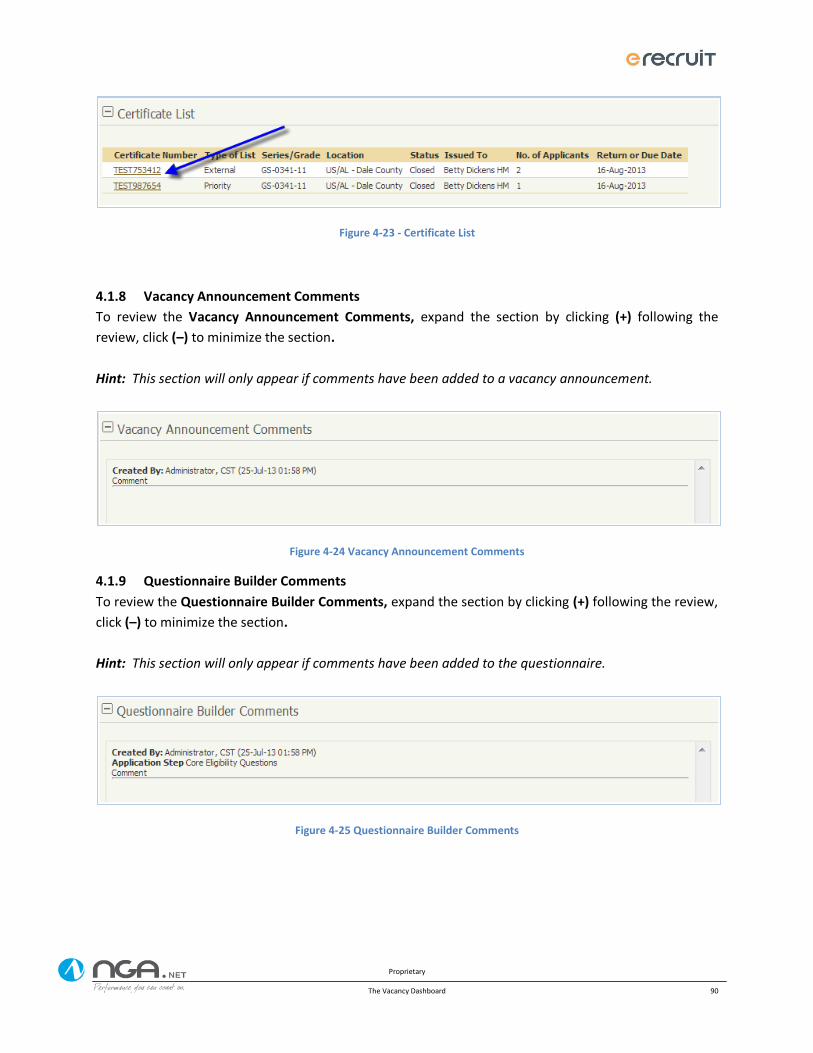
Proprietary
The Vacancy Dashboard 90
Figure 4-23 - Certificate List
4.1.8 Vacancy Announcement Comments
To review the Vacancy Announcement Comments, expand the section by clicking (+) following the
review, click (–) to minimize the section.
Hint: This section will only appear if comments have been added to a vacancy announcement.
Figure 4-24 Vacancy Announcement Comments
4.1.9 Questionnaire Builder Comments
To review the Questionnaire Builder Comments, expand the section by clicking (+) following the review,
click (–) to minimize the section.
Hint: This section will only appear if comments have been added to the questionnaire.
Figure 4-25 Questionnaire Builder Comments
Proprietary
The Applicant Experience 91
The Applicant Experience 5The applicant experience will utilize USAJOBS to apply for vacancies that have been created and posted
through the eRecruit system. A user must create a profile within USAJOBS and search for a vacancy in
which they would like to apply.
5.1 USAJOBS All Jobs that have been created will be posted to USAJOBS.gov. Candidates create an account and
search and apply to open job vacancies. This documents the applicant experience as they are taken
through the USAJOBS apply process.
5.1.1 Login to USAJOBS
An applicant will navigate to the USAJOBS website and login into the system. The first time a user has
accessed USAJOBS, they will need to create a free account with USAJOBS in order to apply to any job
postings.
Figure 5-1 Login to USAJOBS
5.1.2 Search, Select and Apply
Applicants will be taken to their homepage once logged in. Here they can edit their profile, create or
upload resumes, check the status of current applications, search for new available positions and apply.
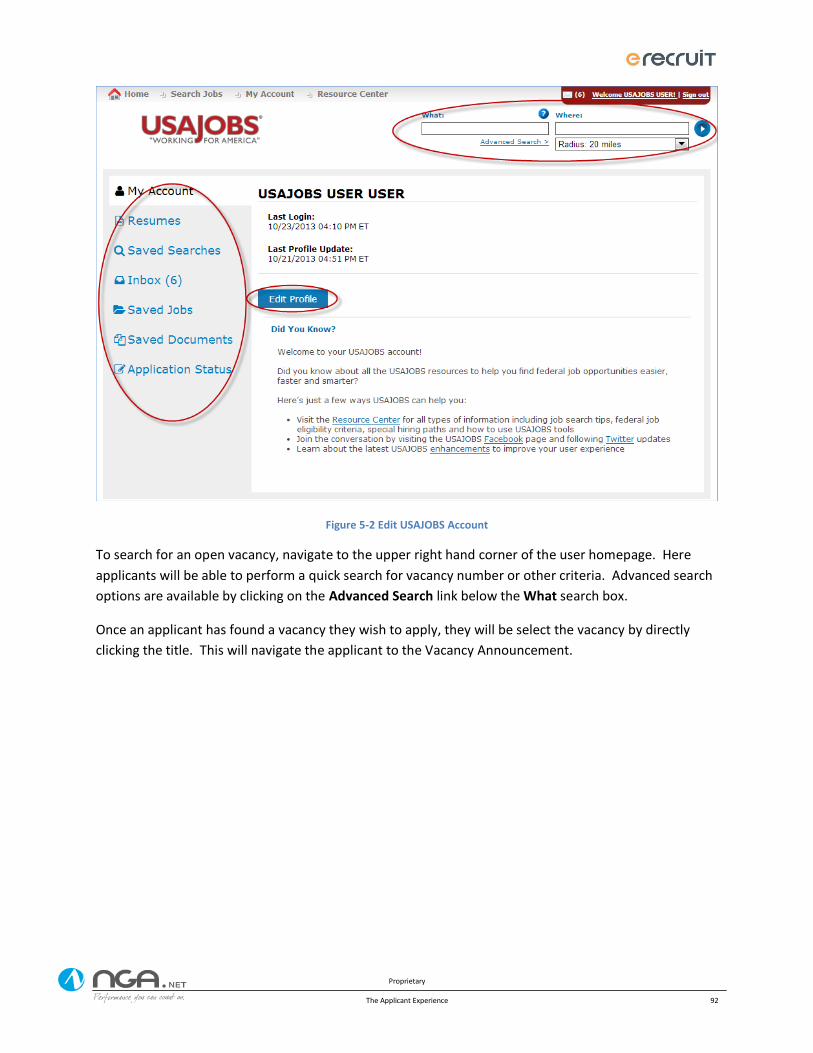
Proprietary
The Applicant Experience 92
Figure 5-2 Edit USAJOBS Account
To search for an open vacancy, navigate to the upper right hand corner of the user homepage. Here
applicants will be able to perform a quick search for vacancy number or other criteria. Advanced search
options are available by clicking on the Advanced Search link below the What search box.
Once an applicant has found a vacancy they wish to apply, they will be select the vacancy by directly
clicking the title. This will navigate the applicant to the Vacancy Announcement.
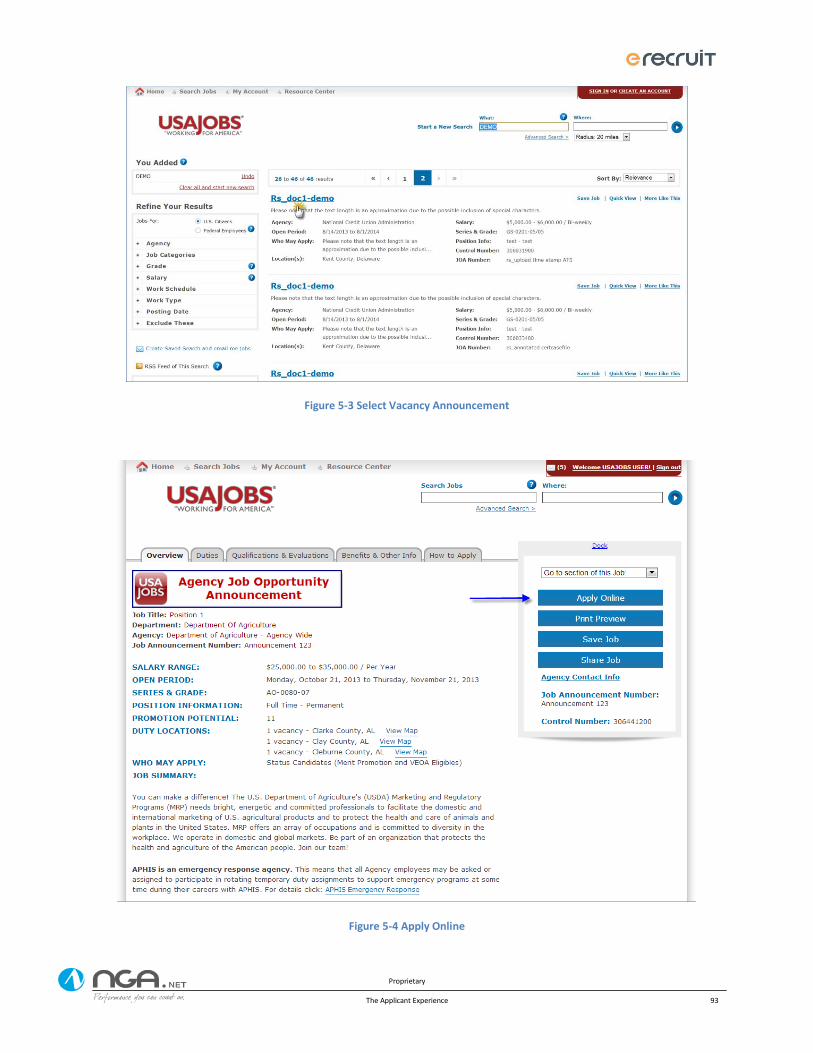
Proprietary
The Applicant Experience 93
Figure 5-3 Select Vacancy Announcement
Figure 5-4 Apply Online
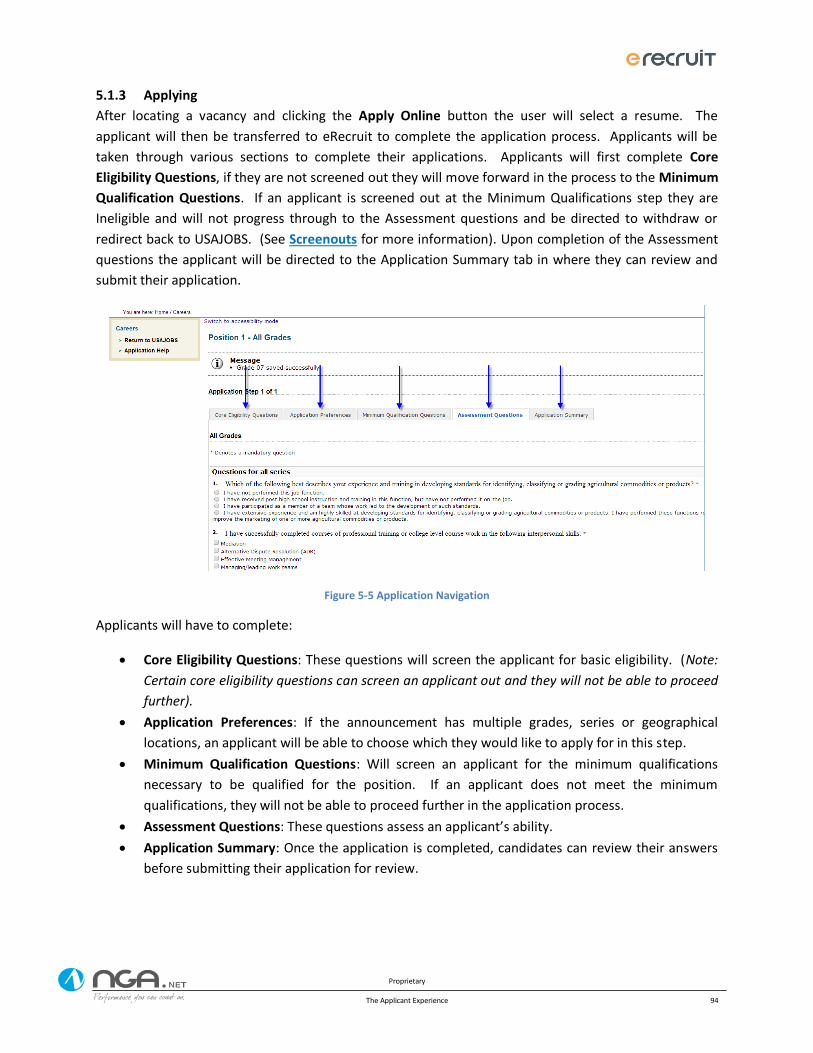
Proprietary
The Applicant Experience 94
5.1.3 Applying
After locating a vacancy and clicking the Apply Online button the user will select a resume. The
applicant will then be transferred to eRecruit to complete the application process. Applicants will be
taken through various sections to complete their applications. Applicants will first complete Core
Eligibility Questions, if they are not screened out they will move forward in the process to the Minimum
Qualification Questions. If an applicant is screened out at the Minimum Qualifications step they are
Ineligible and will not progress through to the Assessment questions and be directed to withdraw or
redirect back to USAJOBS. (See Screenouts for more information). Upon completion of the Assessment
questions the applicant will be directed to the Application Summary tab in where they can review and
submit their application.
Figure 5-5 Application Navigation
Applicants will have to complete:
Core Eligibility Questions: These questions will screen the applicant for basic eligibility. (Note:
Certain core eligibility questions can screen an applicant out and they will not be able to proceed
further).
Application Preferences: If the announcement has multiple grades, series or geographical
locations, an applicant will be able to choose which they would like to apply for in this step.
Minimum Qualification Questions: Will screen an applicant for the minimum qualifications
necessary to be qualified for the position. If an applicant does not meet the minimum
qualifications, they will not be able to proceed further in the application process.
Assessment Questions: These questions assess an applicant’s ability.
Application Summary: Once the application is completed, candidates can review their answers
before submitting their application for review.

Proprietary
The Applicant Experience 95
Figure 5-6 Submit Application
The applicant will be redirected back to USAJOBS where additional actions can be performed.
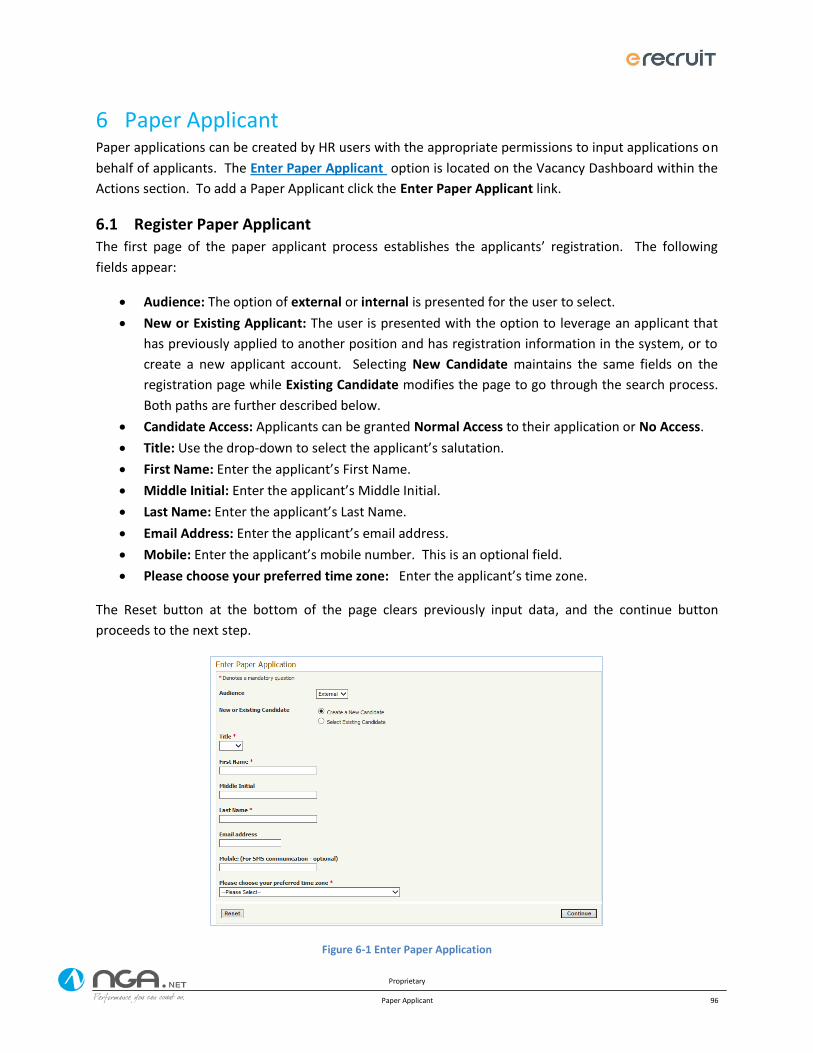
Proprietary
Paper Applicant 96
Paper Applicant 6Paper applications can be created by HR users with the appropriate permissions to input applications on
behalf of applicants. The Enter Paper Applicant option is located on the Vacancy Dashboard within the
Actions section. To add a Paper Applicant click the Enter Paper Applicant link.
6.1 Register Paper Applicant The first page of the paper applicant process establishes the applicants’ registration. The following
fields appear:
Audience: The option of external or internal is presented for the user to select.
New or Existing Applicant: The user is presented with the option to leverage an applicant that
has previously applied to another position and has registration information in the system, or to
create a new applicant account. Selecting New Candidate maintains the same fields on the
registration page while Existing Candidate modifies the page to go through the search process.
Both paths are further described below.
Candidate Access: Applicants can be granted Normal Access to their application or No Access.
Title: Use the drop-down to select the applicant’s salutation.
First Name: Enter the applicant’s First Name.
Middle Initial: Enter the applicant’s Middle Initial.
Last Name: Enter the applicant’s Last Name.
Email Address: Enter the applicant’s email address.
Mobile: Enter the applicant’s mobile number. This is an optional field.
Please choose your preferred time zone: Enter the applicant’s time zone.
The Reset button at the bottom of the page clears previously input data, and the continue button
proceeds to the next step.
Figure 6-1 Enter Paper Application
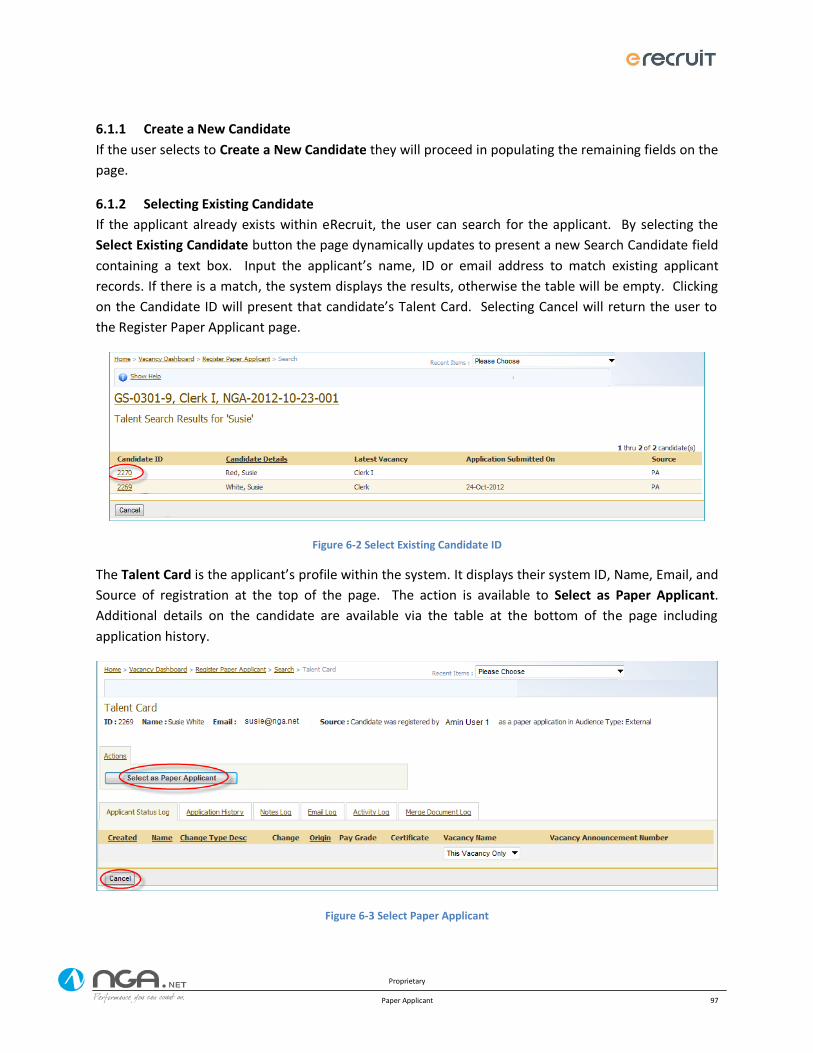
Proprietary
Paper Applicant 97
6.1.1 Create a New Candidate
If the user selects to Create a New Candidate they will proceed in populating the remaining fields on the
page.
6.1.2 Selecting Existing Candidate
If the applicant already exists within eRecruit, the user can search for the applicant. By selecting the
Select Existing Candidate button the page dynamically updates to present a new Search Candidate field
containing a text box. Input the applicant’s name, ID or email address to match existing applicant
records. If there is a match, the system displays the results, otherwise the table will be empty. Clicking
on the Candidate ID will present that candidate’s Talent Card. Selecting Cancel will return the user to
the Register Paper Applicant page.
Figure 6-2 Select Existing Candidate ID
The Talent Card is the applicant’s profile within the system. It displays their system ID, Name, Email, and
Source of registration at the top of the page. The action is available to Select as Paper Applicant.
Additional details on the candidate are available via the table at the bottom of the page including
application history.
Figure 6-3 Select Paper Applicant
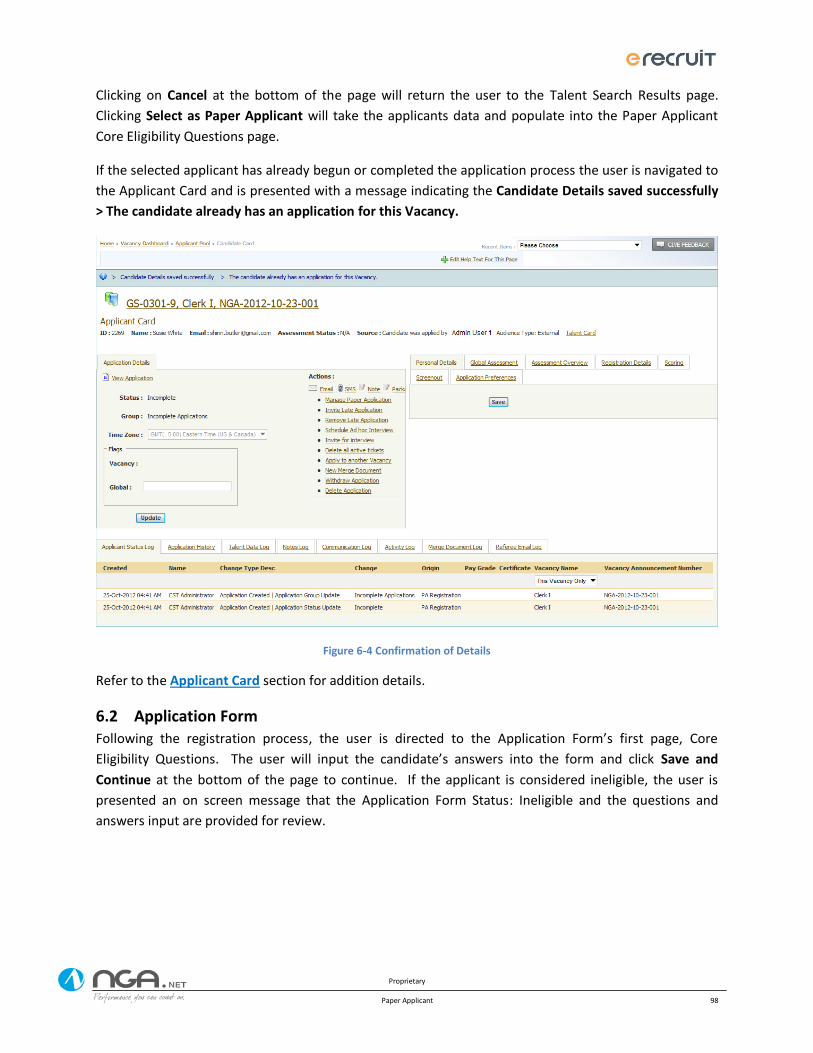
Proprietary
Paper Applicant 98
Clicking on Cancel at the bottom of the page will return the user to the Talent Search Results page.
Clicking Select as Paper Applicant will take the applicants data and populate into the Paper Applicant
Core Eligibility Questions page.
If the selected applicant has already begun or completed the application process the user is navigated to
the Applicant Card and is presented with a message indicating the Candidate Details saved successfully
> The candidate already has an application for this Vacancy.
Figure 6-4 Confirmation of Details
Refer to the Applicant Card section for addition details.
6.2 Application Form Following the registration process, the user is directed to the Application Form’s first page, Core
Eligibility Questions. The user will input the candidate’s answers into the form and click Save and
Continue at the bottom of the page to continue. If the applicant is considered ineligible, the user is
presented an on screen message that the Application Form Status: Ineligible and the questions and
answers input are provided for review.
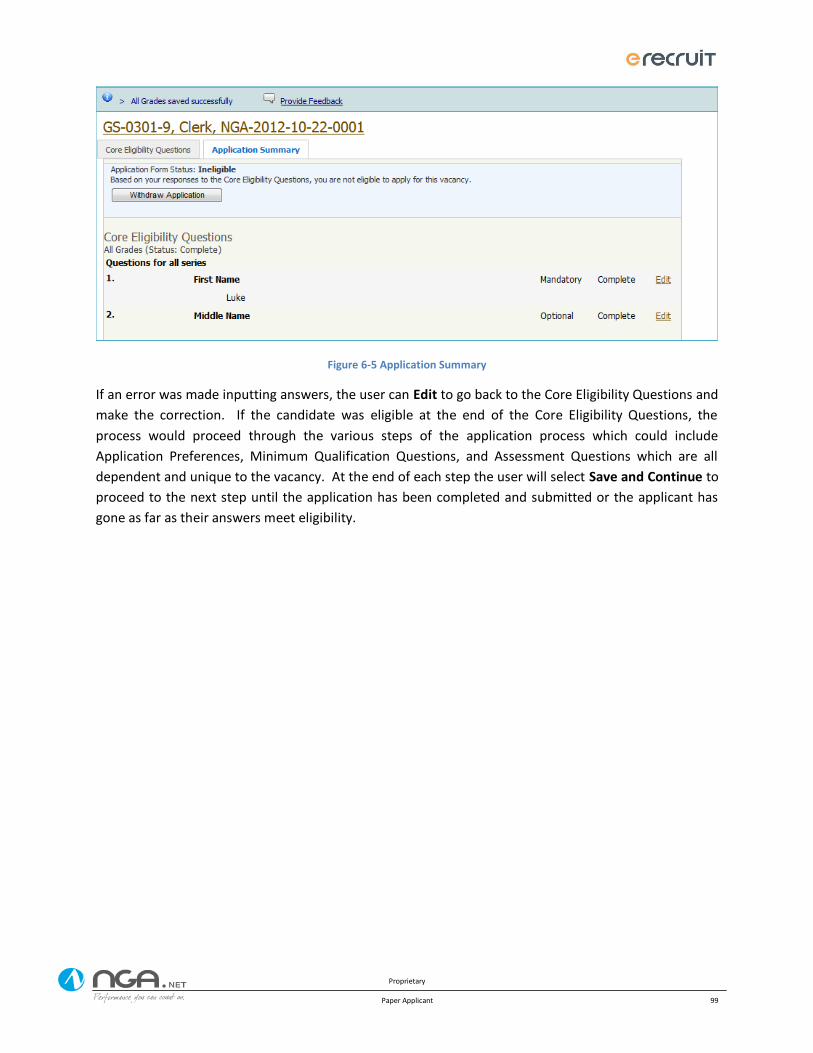
Proprietary
Paper Applicant 99
Figure 6-5 Application Summary
If an error was made inputting answers, the user can Edit to go back to the Core Eligibility Questions and
make the correction. If the candidate was eligible at the end of the Core Eligibility Questions, the
process would proceed through the various steps of the application process which could include
Application Preferences, Minimum Qualification Questions, and Assessment Questions which are all
dependent and unique to the vacancy. At the end of each step the user will select Save and Continue to
proceed to the next step until the application has been completed and submitted or the applicant has
gone as far as their answers meet eligibility.
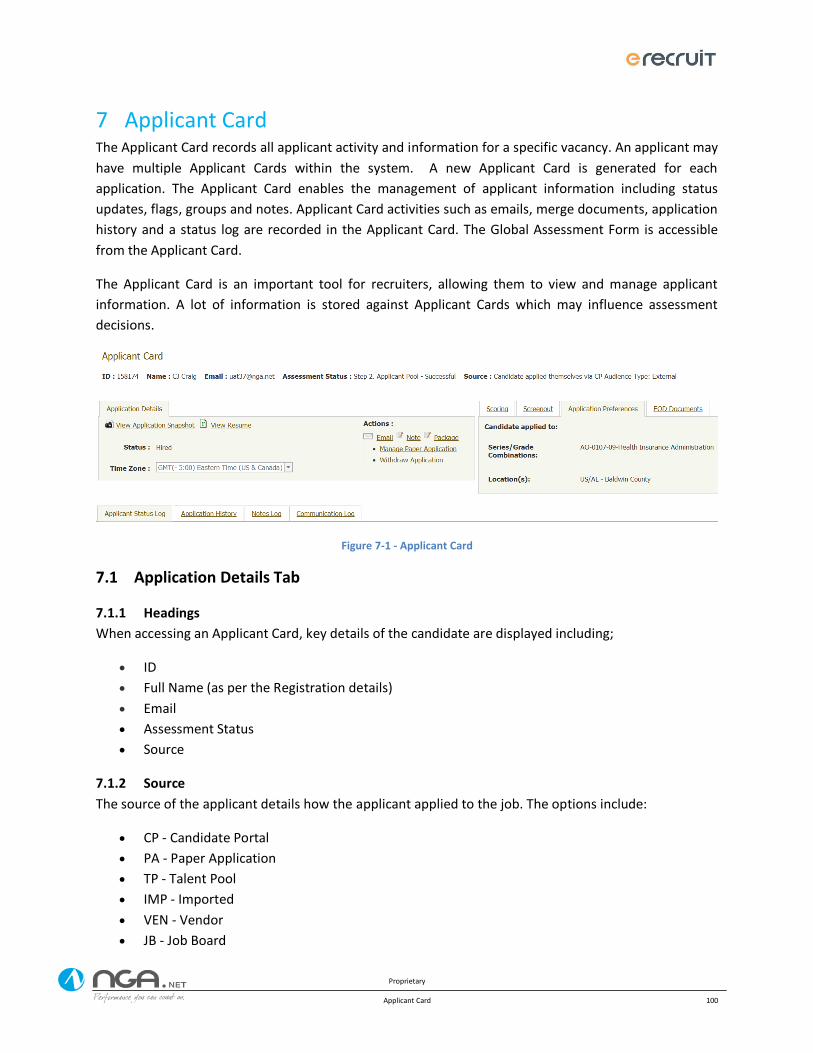
Proprietary
Applicant Card 100
Applicant Card 7The Applicant Card records all applicant activity and information for a specific vacancy. An applicant may
have multiple Applicant Cards within the system. A new Applicant Card is generated for each
application. The Applicant Card enables the management of applicant information including status
updates, flags, groups and notes. Applicant Card activities such as emails, merge documents, application
history and a status log are recorded in the Applicant Card. The Global Assessment Form is accessible
from the Applicant Card.
The Applicant Card is an important tool for recruiters, allowing them to view and manage applicant
information. A lot of information is stored against Applicant Cards which may influence assessment
decisions.
Figure 7-1 - Applicant Card
7.1 Application Details Tab
7.1.1 Headings
When accessing an Applicant Card, key details of the candidate are displayed including;
ID
Full Name (as per the Registration details)
Assessment Status
Source
7.1.2 Source
The source of the applicant details how the applicant applied to the job. The options include:
CP - Candidate Portal
PA - Paper Application
TP - Talent Pool
IMP - Imported
VEN - Vendor
JB - Job Board
Proprietary
Applicant Card 101
7.1.3 View Application Snapshot
The complete application can be viewed by selecting the icon at the top of the Applicant Card. The
application snapshot will be opened in HTML format and display the information submitted by the
applicant for that vacancy.
7.1.4 Resume
The resume can be viewed separately by selecting the icon at the top of the Applicant Card. The icon
will only display when an applicant has attached a file to the standard resume global question for that
application form.
7.1.5 Status
Application statuses are used to manage applicants throughout the selection process. They are the
means of tracking an applicant. They can also be used in conjunction with an Assessment Process
Manager (APM) for additional tracking of activity such as 'unsuccessful and notified'.
There are standard system Application Statuses, however custom statuses can be added. These are
managed on a vacancy template or individual vacancy level and not system wide.
From the Applicant Card, users can view and/or manually update the applicant status.
Applicant statuses cannot be manually changed to Withdrawn or Incomplete as these are triggered
automatically based on the applicant’s activity.
7.1.6 Time Zone
When an applicant registers, they select the appropriate time zone for their location. This allows the
applicant to view opening and closing dates/times based on their location.
From the Applicant Card Application Details tab, the Time Zone is displayed in read only format. This can
be updated via the Registration Details tab if required.
7.1.7 Actions
The Actions menu allows for a variety of actions to be taken on behalf of the applicant.
7.1.7.1 Email
From the Applicant Card the Email link provides the ability to send the individual applicant an ad hoc
email. An email template can be selected or a new email drafted. File attachments can be included
as part of the selected template or attached prior to sending.
A record of the email and the User who completed the action is recorded in the communication log
on the Applicant Card.
7.1.7.2 Note
Notes can be recorded against the applicant as a way of tracking conversations or details about the
applicant/selection activity that are not recorded in the assessment forms.
Proprietary
Applicant Card 102
A new note is added by accessing the note link. A subject, comments and attachments can be
recorded. The note can be saved as job specific or global.
Global notes are viewable on all other Applicant Cards for the applicant (i.e. all other vacancies they
have applied for.
Notes are also used to record when a candidate has been included in a package (see package).
7.1.7.3 Package
The package link provides the ability to group the applicant(s) application form, resume,
application form attachments and assessment forms as a zip file. The users can then download, or
email the zip file.
Once the icon is selected, Users have to select the data that needs to be packaged, and then the
package will be processed. Unlike bulk packaging from the Applicant Pool, packaging from the
Applicant Card is processed immediately and available instantly for emailing or downloading.
Emails can be sent to any valid email address and the email text can be selected from a template or
ad hoc. All packages are recorded against the Applicant Card under the Notes Log.
7.1.7.4 Manage Paper Application
The user can modify the paper application for an applicant. The menu will appear with the tabs for
Core Eligibility Questions, Application Preferences, Minimum Qualification questions and
Assessment Questions.
To edit the application, the user will select Edit Application from the Application Summary tab.
Once an application has been selected for edit, it will not be considered complete until the
application is re-submitted.
7.1.7.5 Withdraw Application
The Withdraw Applicant link allows a user to manually remove the applicant from further
assessment from the vacancy.
Withdrawing an applicant will automatically change their status to Withdrawn, move them to the
Withdrawn Applicant Group and move them to the Withdrawn column of the Assessment Process
Manager for the step they have progressed to at the time of withdrawal.
Applicants that are withdrawn will no longer appear in tasks for assessment forms to be completed
nor will they display in the Applicant Pool (unless filters are changed). Candidates can also choose
to withdraw via the Application Summary on the Candidate Portal.
7.2 Scoring Detail The Scoring Detail tab is located in the right pane of the Applicant Card. The Applicant Card will contain
the detailed scoring information. Only eligible applicants will have information populated in the Scoring
Tab.
Proprietary
Applicant Card 103
Question – The question that was answered as part of the application.
Selected Answer(s) – The answer(s) that was selected by the applicant for a particular question.
Score – The score that was given to the applicant based on the selected answer(s).
Max Score – The total maximum score based on the assigned score to each individual answer(s).
Weighting – The weight distribution for each individual question.
Raw Score – Total accumulated score based on all question answers.
Maximum Possible Score – Maximum possible score based on all answers with score
assignments.
The scoring summary will list specific information regarding how the applicants score is calculated into
its final score.
Step – Which step of the application process the questions were answered in.
Scoring Type – How the score will be calculated.
Step Weight – The percentage weight of the step score.
Grade – The grade of the position in which the applicant is applying for.
Step Score – This is the breakdown of scores, broken down by the steps within the
announcement.
Weighted Step Score – The total weight the applicant received for the step.
Base Score - The base score to be deemed eligible for the position.
Applicant Pool Score – This is the total score the applicant received, reflected within the
Applicant Pool.
7.3 Screenout The Screenout Details tab is located in the right pane of the Applicant Card. It is divided into two
sections. Only ineligible applicants will have information populated in the Screenout Tab.
Screenout Questions display the details for all answered screenout questions within the Minimum
Qualification hurdles. Details will be shown per grade.
Step Name - Which step of the application process the questions were answered in.
Question - The question that was answered as part of the application.
Series - Shows the series the questions belongs to. May also be ‘All Series’.
Selected answer(s) – The answer(s) selected by the applicant.
Screened Out - Indicate if the applicant was screened out based on the selected answer option.
Wage Grade Screenout will only display for wage grade jobs (Pay System = Federal Wage System). Each
grade displays the following information.
Raw Score - Score the applicant received for Minimum Qualification questions (for the grade).
Total number of scoring questions - Display the number of Minimum Qualification questions
configured for scoring
Average - Raw Score/Total number of scoring questions
Proprietary
Applicant Card 104
7.4 Application Preferences The Application Preferences displays the Series and Grade combinations as well as the different
locations the applicant applied to.
7.5 EOD Documents Documents that are uploaded as part of the Entrance on Duty for an applicant will be displayed in this
tab.
7.6 Applicant Status Log
The Applicant Status Log provides a history of all status and rule changes that have been made against
the applicant. For each entry the following is recorded:
Created – Date and Time of Change
Name – User who initiated/completed the change.
Change Type Desc – A description of the change type.
Change – The specific change outcome that occurred as a result of the action.
Origin – The origin of the change (form step, registration etc.)
Pay Grade – The associated pay grade.
Certificate – Filter on a specific certificate if the applicant appears on more than one certificate.
Vacancy Name – The selected name of the Vacancy.
Vacancy Announcement Number – The selected Vacancy Announcement Number.
The Applicant Status Log can be viewed for the specific job or the filter can be updated to show all jobs.
7.7 Application History The Application History Tab provides a list of all vacancy(s) the applicant has an applied for including;
Candidate Applied On – Date and time application initiated.
Application Submitted On – Date and time submitted.
Vacancy Name – The selected name of the Vacancy.
Vacancy Group – Displays the vacancy group in which the applicant appears in.
Status – Current Status of the current application.
Action – Displays the where the last action for the applicant was taken
7.8 Notes Log The Notes Log is a record of all notes recorded against the applicant. New notes can be added via the
Notes link on the Application Details tab of the Applicant Card. The Notes Log displays:
Created – Date & Time created.
Author – User who created the note.
Subject – The subject of the note.
Certificate – The certificate that the note applies to.
Vacancy Name – The selected name of the Vacancy.
Action – Displays the where the last action for the applicant was taken
Proprietary
Applicant Card 105
Notes cannot be deleted or edited once saved. Users can use filters to show all vacancy notes or job
specific notes.
7.9 Communication Log The Communication Log is a record of all email has has been sent to the applicant from the system. The
Communication Log displays:
Sent – Date & Time sent
Type – Type of communication
Author – User who sent the email
Subject – The subject of the note.
Certificate – The certificate that the note applies to.
Vacancy Name – The selected name of the Vacancy.
Action – Displays the where the last action for the applicant was taken
Users can use filters to show all job emails, or job specific emails using the drop-down box under the
Vacancy Name heading.
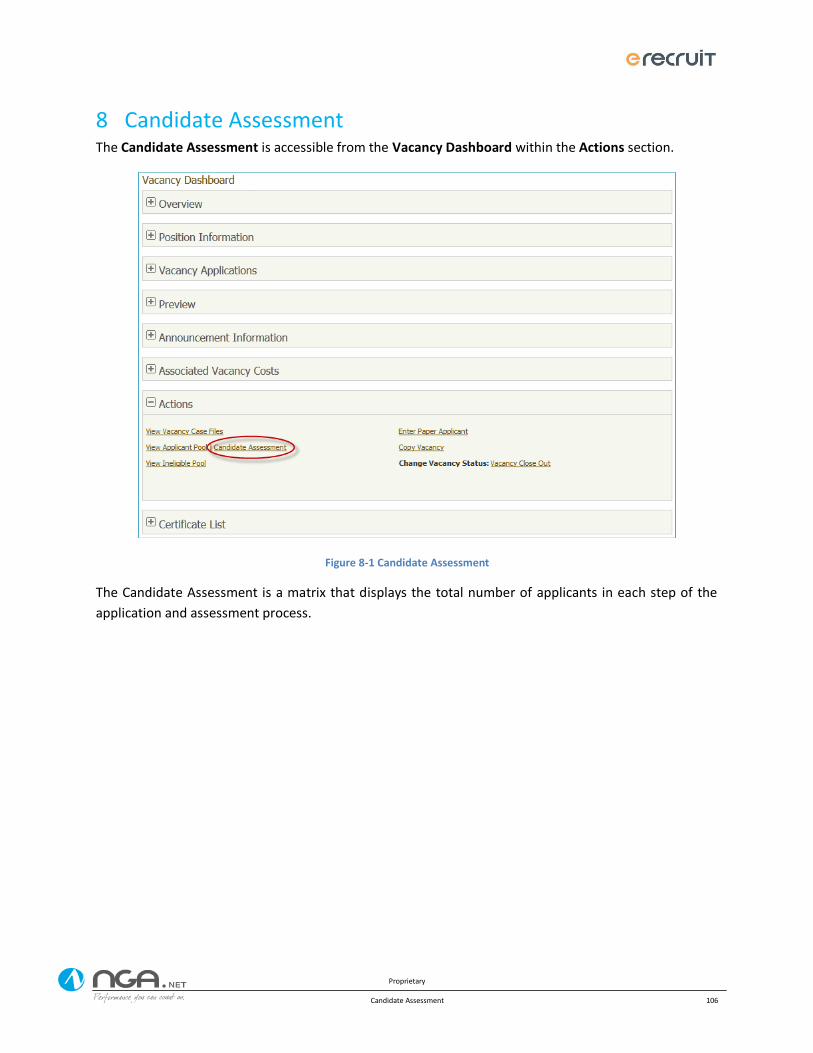
Proprietary
Candidate Assessment 106
Candidate Assessment 8The Candidate Assessment is accessible from the Vacancy Dashboard within the Actions section.
Figure 8-1 Candidate Assessment
The Candidate Assessment is a matrix that displays the total number of applicants in each step of the
application and assessment process.
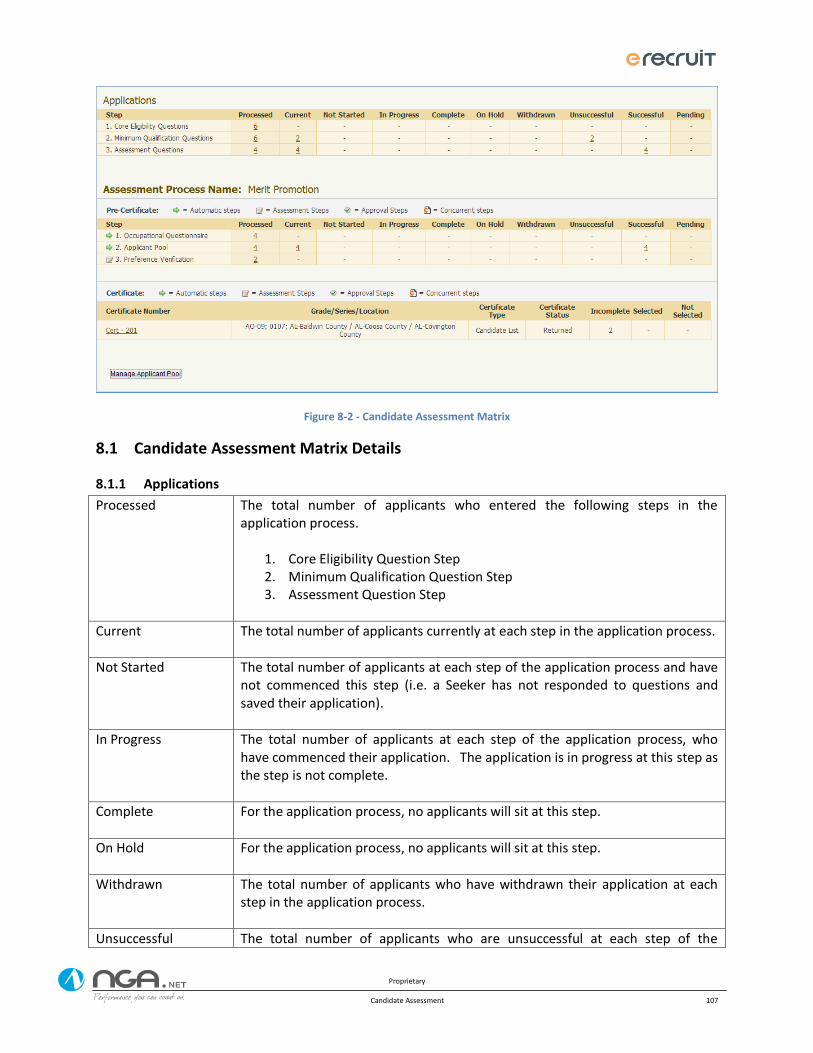
Proprietary
Candidate Assessment 107
Figure 8-2 - Candidate Assessment Matrix
8.1 Candidate Assessment Matrix Details
8.1.1 Applications
Processed The total number of applicants who entered the following steps in the application process.
1. Core Eligibility Question Step 2. Minimum Qualification Question Step 3. Assessment Question Step
Current The total number of applicants currently at each step in the application process.
Not Started The total number of applicants at each step of the application process and have not commenced this step (i.e. a Seeker has not responded to questions and saved their application).
In Progress The total number of applicants at each step of the application process, who have commenced their application. The application is in progress at this step as the step is not complete.
Complete For the application process, no applicants will sit at this step.
On Hold For the application process, no applicants will sit at this step.
Withdrawn The total number of applicants who have withdrawn their application at each step in the application process.
Unsuccessful The total number of applicants who are unsuccessful at each step of the
Proprietary
Candidate Assessment 108
application process.
Successful The total number of applicants who were successful in the application process and have passed to the applicant pool.
Pending For the application process, no applicants will sit at this step.
8.1.2 Assessments
Processed The total number of applicants who entered each step in the assessment process.
Current The total number of applicants currently at each step in the assessment process.
Not Started The total number of applicants at each step of the assessment process and have not commenced this step.
In Progress The total number of applicants at each step of the assessment process, who have commenced the assessment step. The assessment is in progress at this step as the step is not complete.
Complete The total number of applicants who have completed this step in the assessment process and will not move forward in the assessment process.
On Hold The total number of applicants at each step of the assessment process, who have been placed on hold at this step in the assessment process.
Withdrawn The total number of applicants who have withdrawn their application at each step in the assessment process.
Unsuccessful The total number of applicants who are unsuccessful at each step of the assessment process.
Successful The total number of applicants who were successful in the step in the assessment process.
8.1.3 Certificate
Certificate Number The certificate number of all current certificates in the system for the particular vacancy.
Grade/Series/Location Displays the Grade(s), Series(s) and Location(s) that are associated with the particular certificate.
Certificate Type Displays the certificate type. For more information refer to Section 11.1.3 for an explanation of Certificate Type.
Proprietary
Candidate Assessment 109
Certificate Status Displays the current status of the Certificate.
Incomplete Displays the number of incomplete candidates that are on the certificate that have not been assigned a Certificate Member Status.
Selected Displays the number of selected candidates for the particular certificate.
Not Selected Displays the number of candidates that have not been selected.
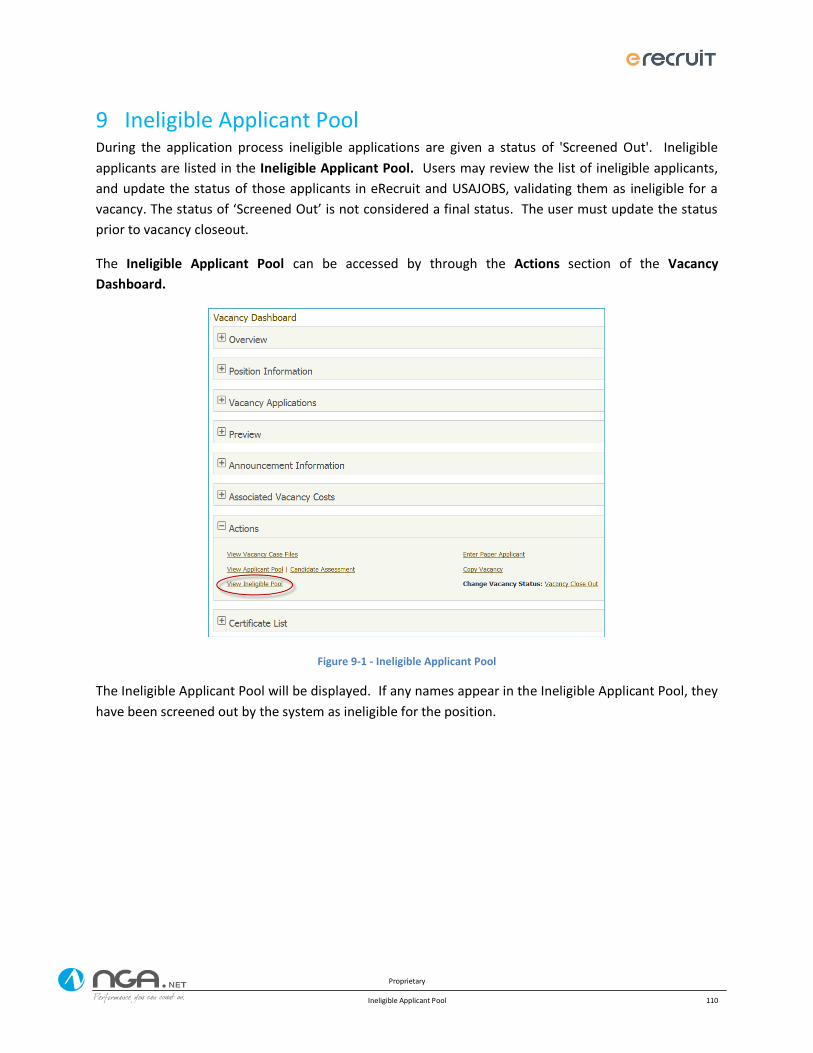
Proprietary
Ineligible Applicant Pool 110
Ineligible Applicant Pool 9During the application process ineligible applications are given a status of 'Screened Out'. Ineligible
applicants are listed in the Ineligible Applicant Pool. Users may review the list of ineligible applicants,
and update the status of those applicants in eRecruit and USAJOBS, validating them as ineligible for a
vacancy. The status of ‘Screened Out’ is not considered a final status. The user must update the status
prior to vacancy closeout.
The Ineligible Applicant Pool can be accessed by through the Actions section of the Vacancy
Dashboard.
Figure 9-1 - Ineligible Applicant Pool
The Ineligible Applicant Pool will be displayed. If any names appear in the Ineligible Applicant Pool, they
have been screened out by the system as ineligible for the position.
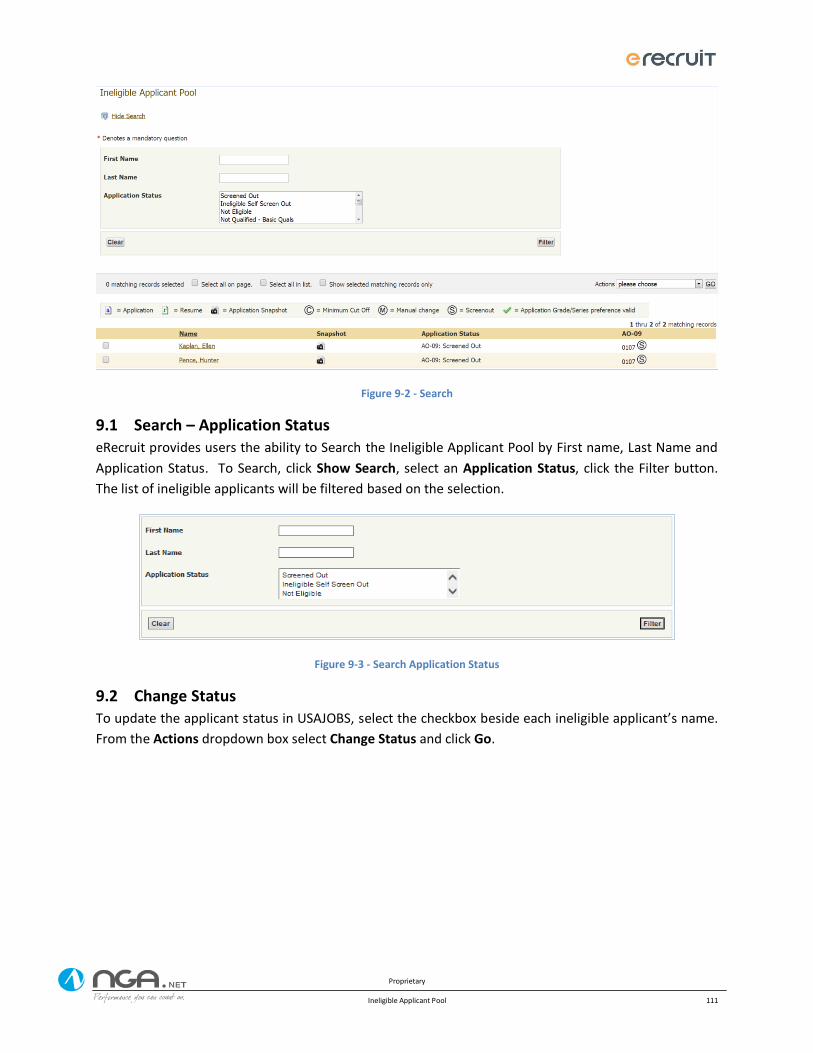
Proprietary
Ineligible Applicant Pool 111
Figure 9-2 - Search
9.1 Search – Application Status eRecruit provides users the ability to Search the Ineligible Applicant Pool by First name, Last Name and
Application Status. To Search, click Show Search, select an Application Status, click the Filter button.
The list of ineligible applicants will be filtered based on the selection.
Figure 9-3 - Search Application Status
9.2 Change Status To update the applicant status in USAJOBS, select the checkbox beside each ineligible applicant’s name.
From the Actions dropdown box select Change Status and click Go.
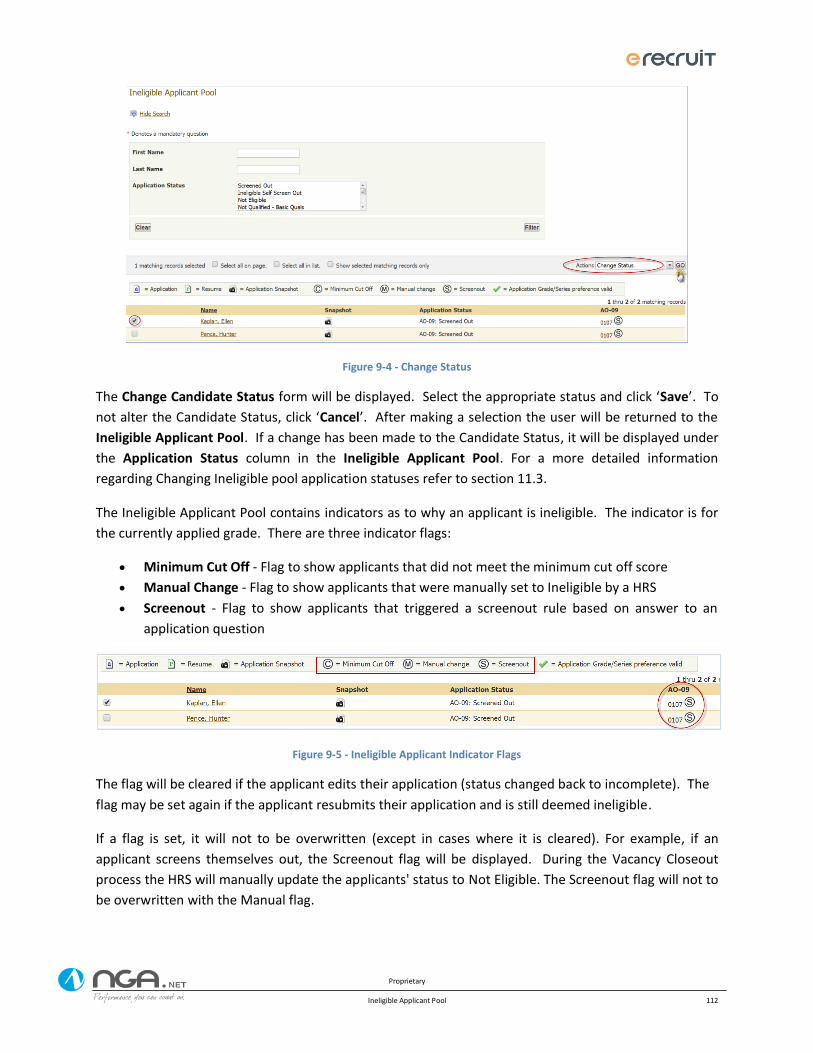
Proprietary
Ineligible Applicant Pool 112
Figure 9-4 - Change Status
The Change Candidate Status form will be displayed. Select the appropriate status and click ‘Save’. To
not alter the Candidate Status, click ‘Cancel’. After making a selection the user will be returned to the
Ineligible Applicant Pool. If a change has been made to the Candidate Status, it will be displayed under
the Application Status column in the Ineligible Applicant Pool. For a more detailed information
regarding Changing Ineligible pool application statuses refer to section 11.3.
The Ineligible Applicant Pool contains indicators as to why an applicant is ineligible. The indicator is for
the currently applied grade. There are three indicator flags:
Minimum Cut Off - Flag to show applicants that did not meet the minimum cut off score
Manual Change - Flag to show applicants that were manually set to Ineligible by a HRS
Screenout - Flag to show applicants that triggered a screenout rule based on answer to an
application question
Figure 9-5 - Ineligible Applicant Indicator Flags
The flag will be cleared if the applicant edits their application (status changed back to incomplete). The
flag may be set again if the applicant resubmits their application and is still deemed ineligible.
If a flag is set, it will not to be overwritten (except in cases where it is cleared). For example, if an
applicant screens themselves out, the Screenout flag will be displayed. During the Vacancy Closeout
process the HRS will manually update the applicants' status to Not Eligible. The Screenout flag will not to
be overwritten with the Manual flag.
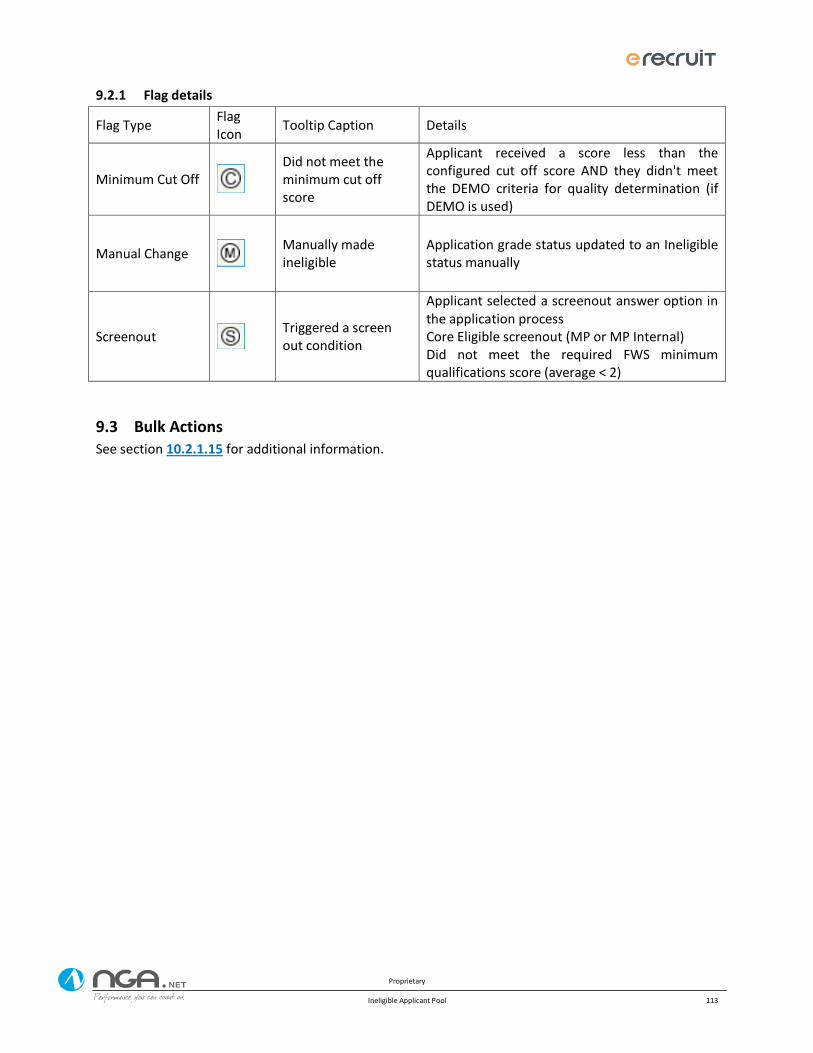
Proprietary
Ineligible Applicant Pool 113
9.2.1 Flag details
Flag Type Flag Icon
Tooltip Caption Details
Minimum Cut Off
Did not meet the minimum cut off score
Applicant received a score less than the configured cut off score AND they didn't meet the DEMO criteria for quality determination (if DEMO is used)
Manual Change
Manually made ineligible
Application grade status updated to an Ineligible status manually
Screenout
Triggered a screen out condition
Applicant selected a screenout answer option in the application process Core Eligible screenout (MP or MP Internal) Did not meet the required FWS minimum qualifications score (average < 2)
9.3 Bulk Actions See section 10.2.1.15 for additional information.
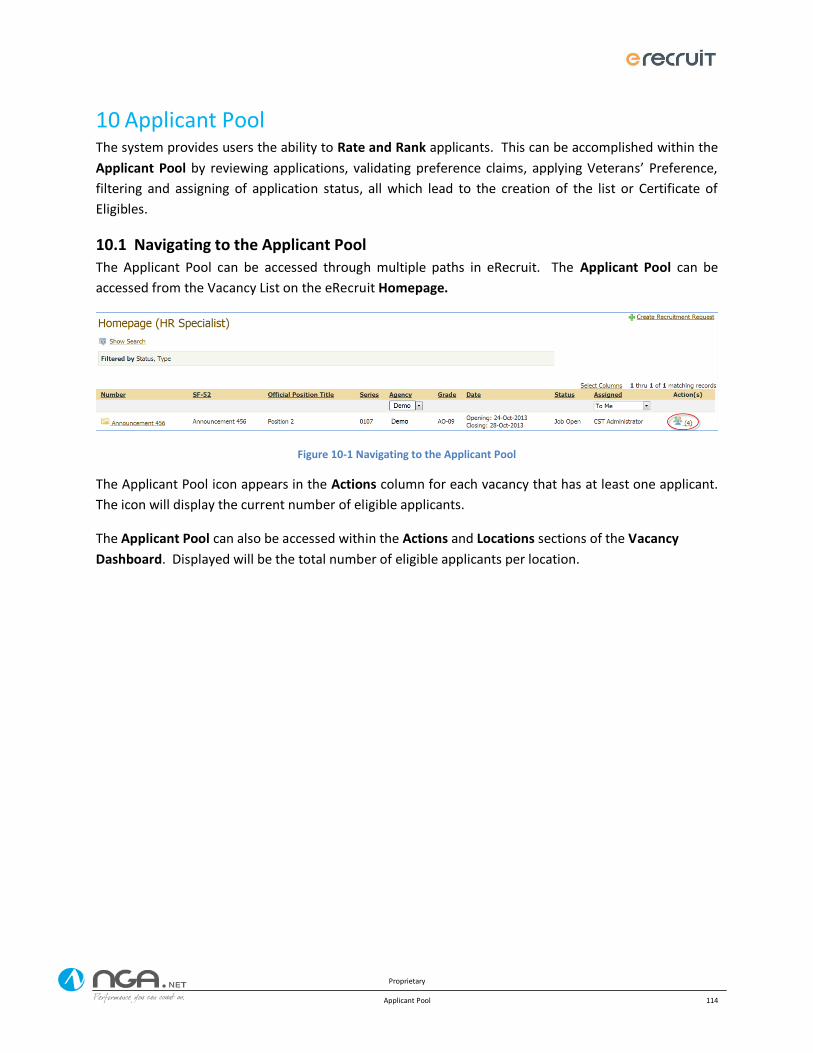
Proprietary
Applicant Pool 114
Applicant Pool 10The system provides users the ability to Rate and Rank applicants. This can be accomplished within the
Applicant Pool by reviewing applications, validating preference claims, applying Veterans’ Preference,
filtering and assigning of application status, all which lead to the creation of the list or Certificate of
Eligibles.
10.1 Navigating to the Applicant Pool
The Applicant Pool can be accessed through multiple paths in eRecruit. The Applicant Pool can be
accessed from the Vacancy List on the eRecruit Homepage.
Figure 10-1 Navigating to the Applicant Pool
The Applicant Pool icon appears in the Actions column for each vacancy that has at least one applicant.
The icon will display the current number of eligible applicants.
The Applicant Pool can also be accessed within the Actions and Locations sections of the Vacancy
Dashboard. Displayed will be the total number of eligible applicants per location.
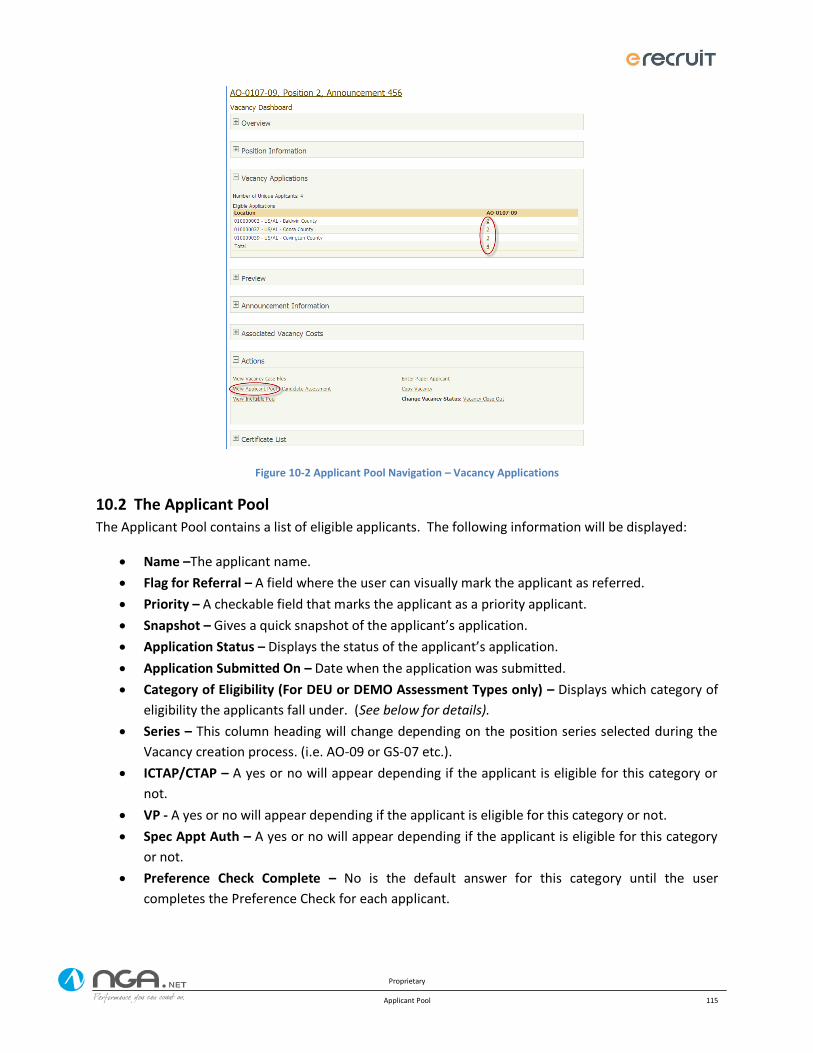
Proprietary
Applicant Pool 115
Figure 10-2 Applicant Pool Navigation – Vacancy Applications
10.2 The Applicant Pool
The Applicant Pool contains a list of eligible applicants. The following information will be displayed:
Name –The applicant name.
Flag for Referral – A field where the user can visually mark the applicant as referred.
Priority – A checkable field that marks the applicant as a priority applicant.
Snapshot – Gives a quick snapshot of the applicant’s application.
Application Status – Displays the status of the applicant’s application.
Application Submitted On – Date when the application was submitted.
Category of Eligibility (For DEU or DEMO Assessment Types only) – Displays which category of
eligibility the applicants fall under. (See below for details).
Series – This column heading will change depending on the position series selected during the
Vacancy creation process. (i.e. AO-09 or GS-07 etc.).
ICTAP/CTAP – A yes or no will appear depending if the applicant is eligible for this category or
not.
VP - A yes or no will appear depending if the applicant is eligible for this category or not.
Spec Appt Auth – A yes or no will appear depending if the applicant is eligible for this category
or not.
Preference Check Complete – No is the default answer for this category until the user
completes the Preference Check for each applicant.
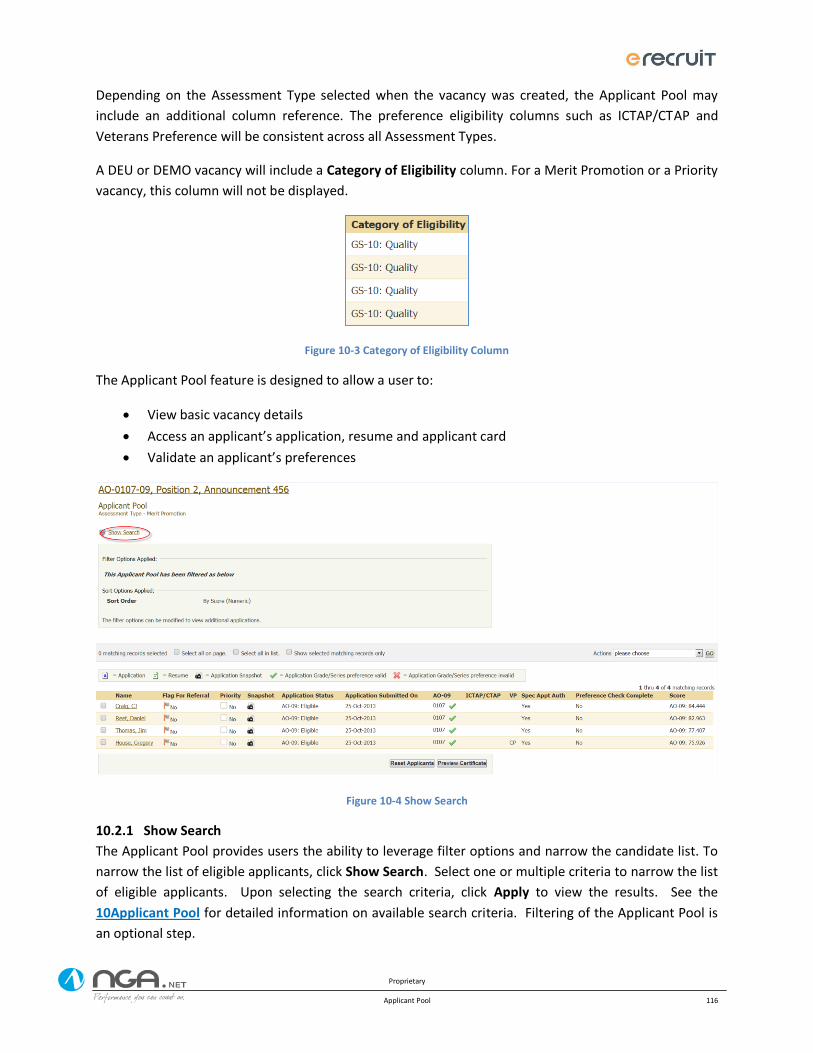
Proprietary
Applicant Pool 116
Depending on the Assessment Type selected when the vacancy was created, the Applicant Pool may
include an additional column reference. The preference eligibility columns such as ICTAP/CTAP and
Veterans Preference will be consistent across all Assessment Types.
A DEU or DEMO vacancy will include a Category of Eligibility column. For a Merit Promotion or a Priority
vacancy, this column will not be displayed.
Figure 10-3 Category of Eligibility Column
The Applicant Pool feature is designed to allow a user to:
View basic vacancy details
Access an applicant’s application, resume and applicant card
Validate an applicant’s preferences
Figure 10-4 Show Search
10.2.1 Show Search
The Applicant Pool provides users the ability to leverage filter options and narrow the candidate list. To
narrow the list of eligible applicants, click Show Search. Select one or multiple criteria to narrow the list
of eligible applicants. Upon selecting the search criteria, click Apply to view the results. See the
10Applicant Pool for detailed information on available search criteria. Filtering of the Applicant Pool is
an optional step.
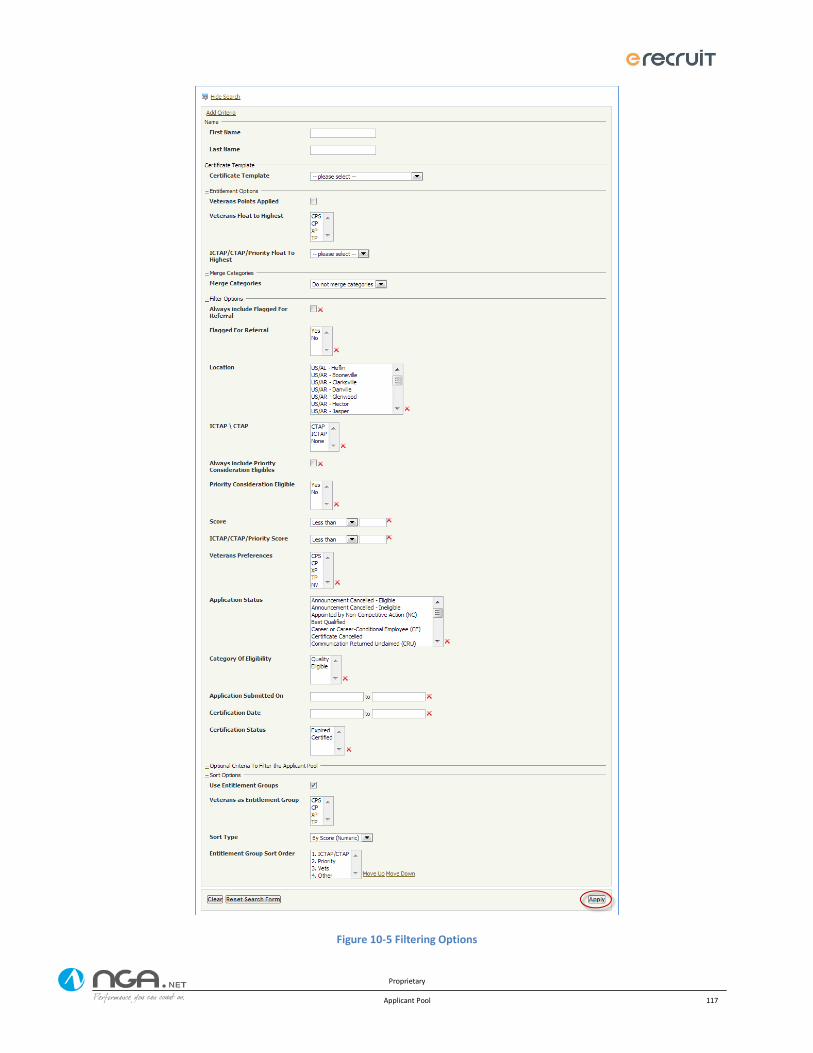
Proprietary
Applicant Pool 117
Figure 10-5 Filtering Options

Proprietary
Applicant Pool 118
10.2.1.1 Add Criteria
The user is provided with the ability to add additional search criteria to the Applicant Pool. Click Add
Criteria on the top left of the Show Search section.
Figure 10-6 Add Criteria
The user will be directed to the Criteria List. Additional criteria can be selected to be added to the
Applicant Pool Search. A checkbox signifies that the criterion is available for selection. An ‘X’ signifies
that the criterion is already in use. Make selection(s) and click the Add Questions button.
Figure 10-7 Select Questions
10.2.1.2 Clear and Reset Search Form
The Clear button will remove the Search criteria and will display the entire Applicant Pool. The Reset
Search Form will remove the criteria changes and reset the selections to the default options on the
search form.
Figure 10-8 Clear and Reset Search Form
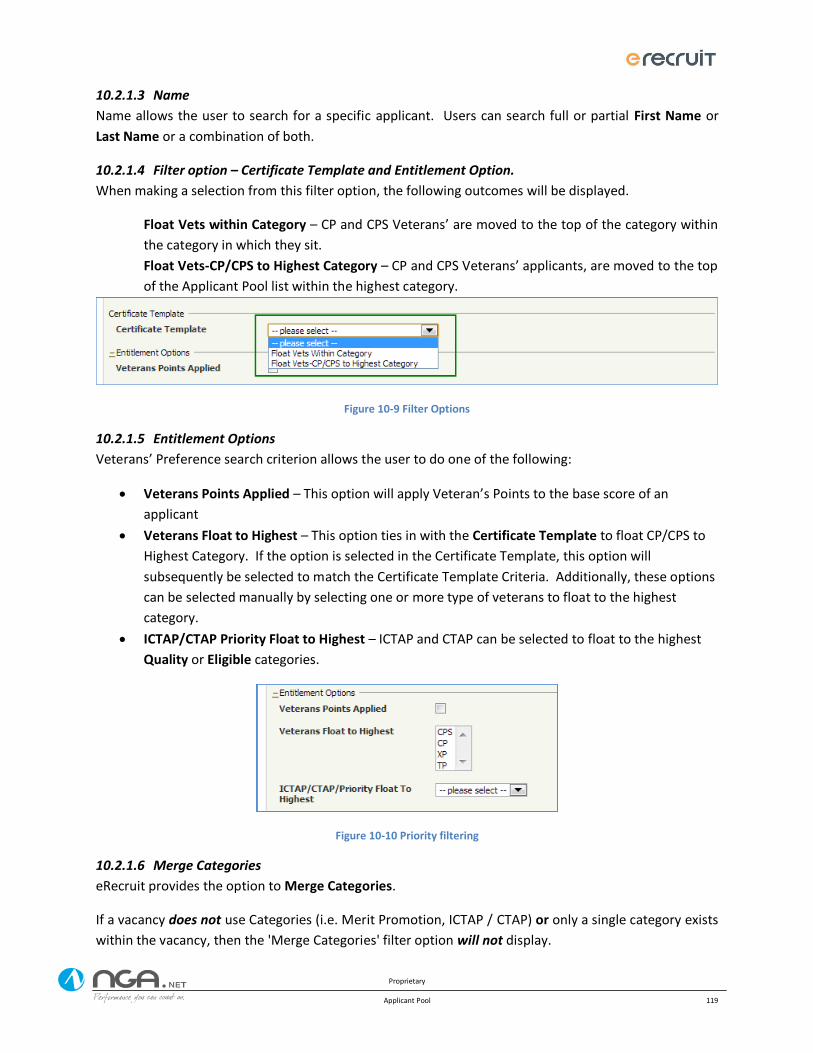
Proprietary
Applicant Pool 119
10.2.1.3 Name
Name allows the user to search for a specific applicant. Users can search full or partial First Name or
Last Name or a combination of both.
10.2.1.4 Filter option – Certificate Template and Entitlement Option.
When making a selection from this filter option, the following outcomes will be displayed.
Float Vets within Category – CP and CPS Veterans’ are moved to the top of the category within
the category in which they sit.
Float Vets-CP/CPS to Highest Category – CP and CPS Veterans’ applicants, are moved to the top
of the Applicant Pool list within the highest category.
Figure 10-9 Filter Options
10.2.1.5 Entitlement Options
Veterans’ Preference search criterion allows the user to do one of the following:
Veterans Points Applied – This option will apply Veteran’s Points to the base score of an
applicant
Veterans Float to Highest – This option ties in with the Certificate Template to float CP/CPS to
Highest Category. If the option is selected in the Certificate Template, this option will
subsequently be selected to match the Certificate Template Criteria. Additionally, these options
can be selected manually by selecting one or more type of veterans to float to the highest
category.
ICTAP/CTAP Priority Float to Highest – ICTAP and CTAP can be selected to float to the highest
Quality or Eligible categories.
Figure 10-10 Priority filtering
10.2.1.6 Merge Categories
eRecruit provides the option to Merge Categories.
If a vacancy does not use Categories (i.e. Merit Promotion, ICTAP / CTAP) or only a single category exists
within the vacancy, then the 'Merge Categories' filter option will not display.
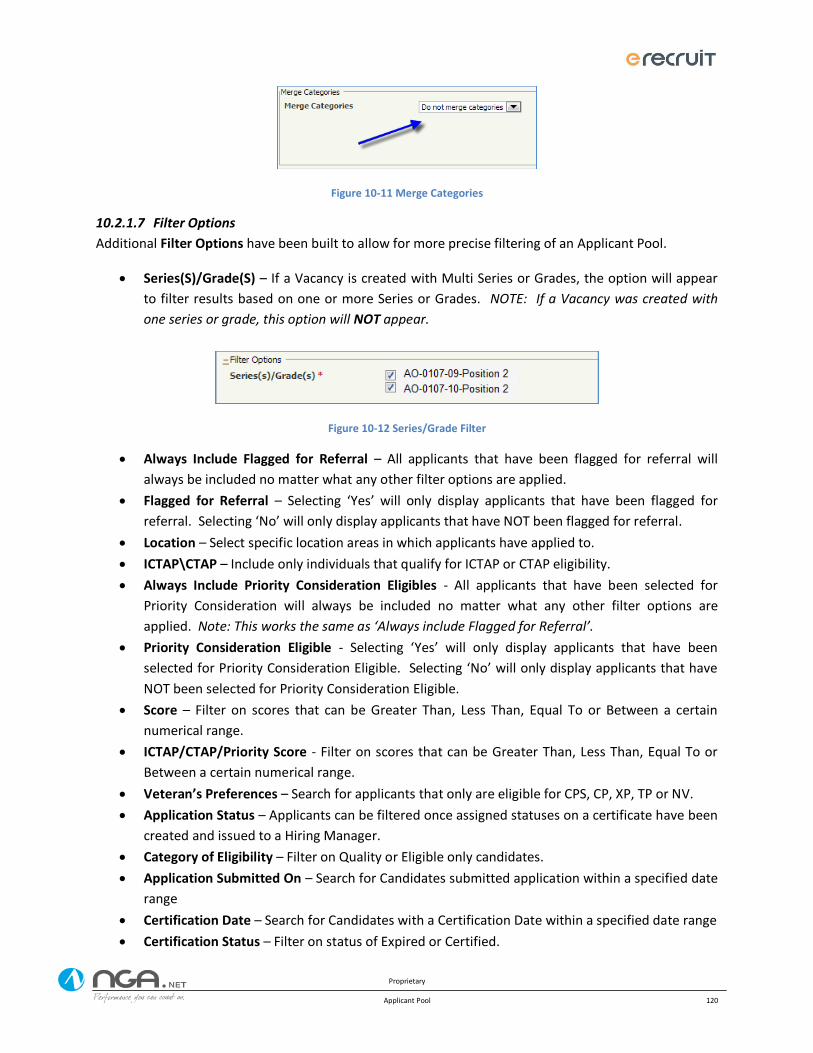
Proprietary
Applicant Pool 120
Figure 10-11 Merge Categories
10.2.1.7 Filter Options
Additional Filter Options have been built to allow for more precise filtering of an Applicant Pool.
Series(S)/Grade(S) – If a Vacancy is created with Multi Series or Grades, the option will appear
to filter results based on one or more Series or Grades. NOTE: If a Vacancy was created with
one series or grade, this option will NOT appear.
Figure 10-12 Series/Grade Filter
Always Include Flagged for Referral – All applicants that have been flagged for referral will
always be included no matter what any other filter options are applied.
Flagged for Referral – Selecting ‘Yes’ will only display applicants that have been flagged for
referral. Selecting ‘No’ will only display applicants that have NOT been flagged for referral.
Location – Select specific location areas in which applicants have applied to.
ICTAP\CTAP – Include only individuals that qualify for ICTAP or CTAP eligibility.
Always Include Priority Consideration Eligibles - All applicants that have been selected for
Priority Consideration will always be included no matter what any other filter options are
applied. Note: This works the same as ‘Always include Flagged for Referral’.
Priority Consideration Eligible - Selecting ‘Yes’ will only display applicants that have been
selected for Priority Consideration Eligible. Selecting ‘No’ will only display applicants that have
NOT been selected for Priority Consideration Eligible.
Score – Filter on scores that can be Greater Than, Less Than, Equal To or Between a certain
numerical range.
ICTAP/CTAP/Priority Score - Filter on scores that can be Greater Than, Less Than, Equal To or
Between a certain numerical range.
Veteran’s Preferences – Search for applicants that only are eligible for CPS, CP, XP, TP or NV.
Application Status – Applicants can be filtered once assigned statuses on a certificate have been
created and issued to a Hiring Manager.
Category of Eligibility – Filter on Quality or Eligible only candidates.
Application Submitted On – Search for Candidates submitted application within a specified date
range
Certification Date – Search for Candidates with a Certification Date within a specified date range
Certification Status – Filter on status of Expired or Certified.
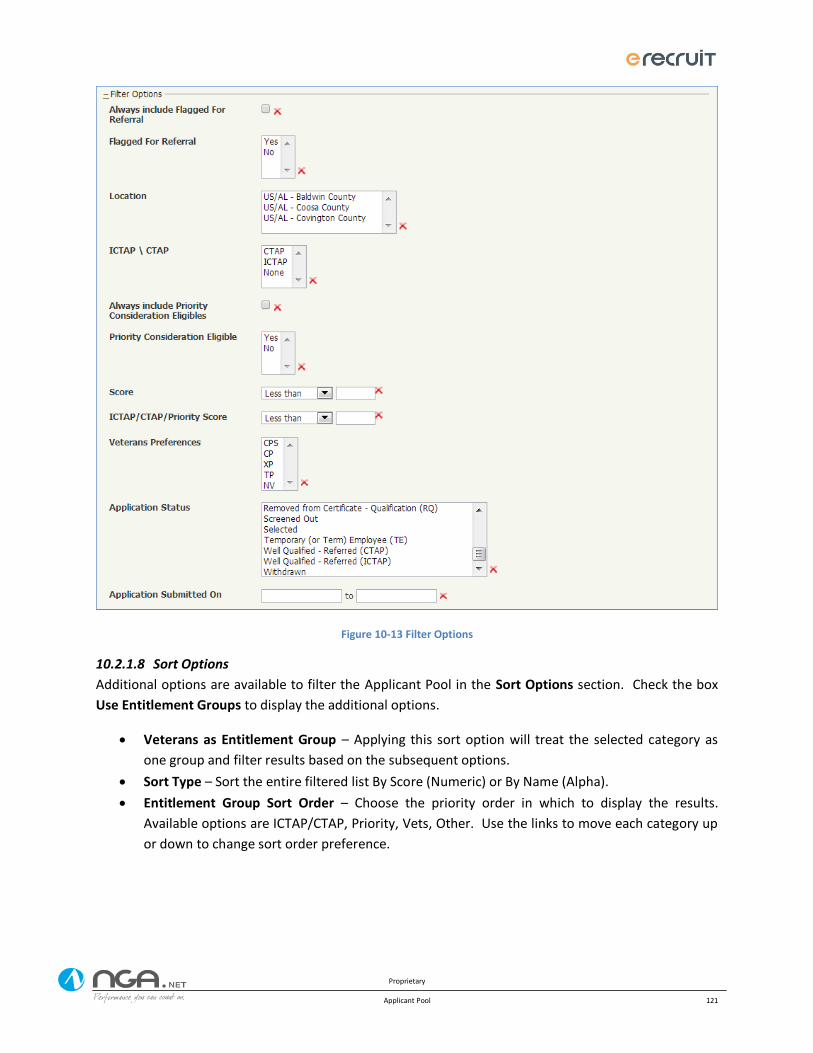
Proprietary
Applicant Pool 121
Figure 10-13 Filter Options
10.2.1.8 Sort Options
Additional options are available to filter the Applicant Pool in the Sort Options section. Check the box
Use Entitlement Groups to display the additional options.
Veterans as Entitlement Group – Applying this sort option will treat the selected category as
one group and filter results based on the subsequent options.
Sort Type – Sort the entire filtered list By Score (Numeric) or By Name (Alpha).
Entitlement Group Sort Order – Choose the priority order in which to display the results.
Available options are ICTAP/CTAP, Priority, Vets, Other. Use the links to move each category up
or down to change sort order preference.
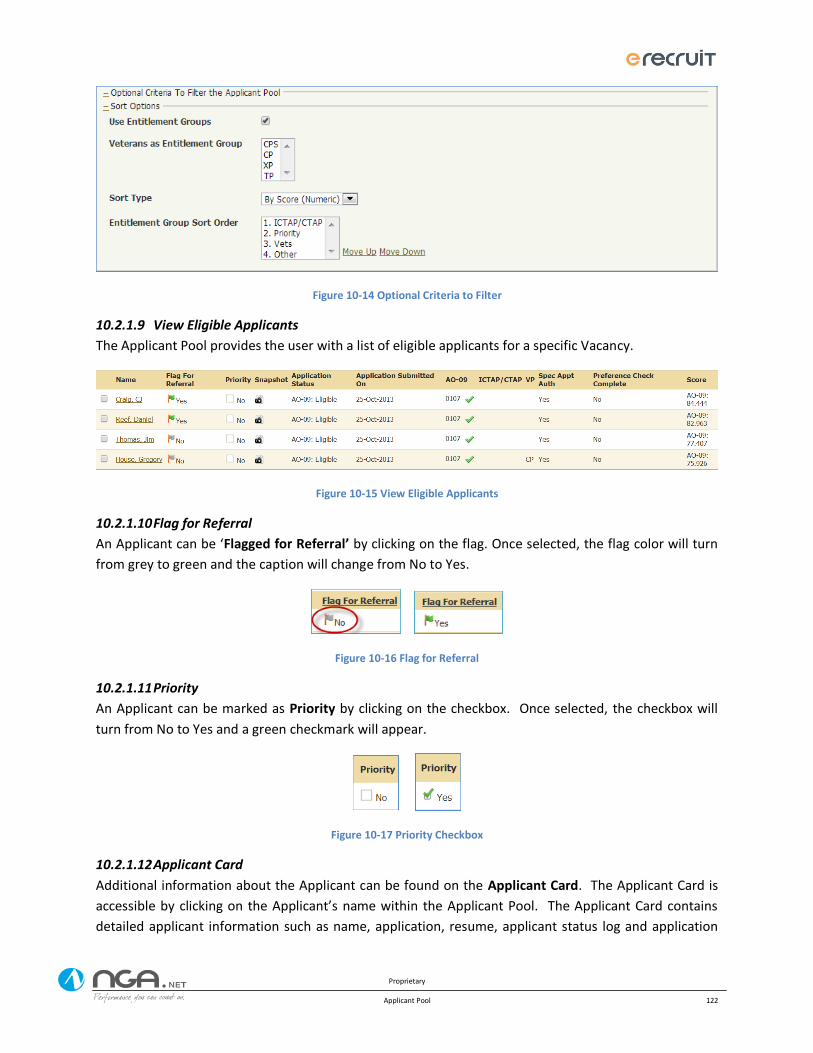
Proprietary
Applicant Pool 122
Figure 10-14 Optional Criteria to Filter
10.2.1.9 View Eligible Applicants
The Applicant Pool provides the user with a list of eligible applicants for a specific Vacancy.
Figure 10-15 View Eligible Applicants
10.2.1.10 Flag for Referral
An Applicant can be ‘Flagged for Referral’ by clicking on the flag. Once selected, the flag color will turn
from grey to green and the caption will change from No to Yes.
Figure 10-16 Flag for Referral
10.2.1.11 Priority
An Applicant can be marked as Priority by clicking on the checkbox. Once selected, the checkbox will
turn from No to Yes and a green checkmark will appear.
Figure 10-17 Priority Checkbox
10.2.1.12 Applicant Card
Additional information about the Applicant can be found on the Applicant Card. The Applicant Card is
accessible by clicking on the Applicant’s name within the Applicant Pool. The Applicant Card contains
detailed applicant information such as name, application, resume, applicant status log and application
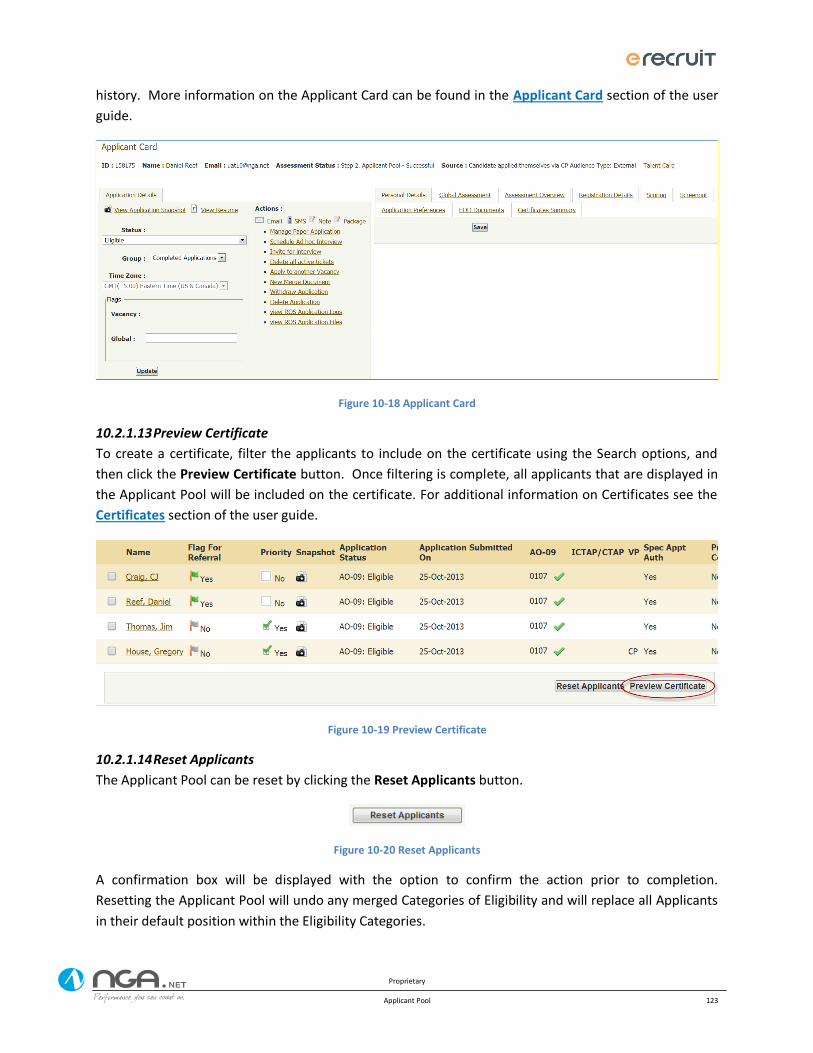
Proprietary
Applicant Pool 123
history. More information on the Applicant Card can be found in the Applicant Card section of the user
guide.
Figure 10-18 Applicant Card
10.2.1.13 Preview Certificate
To create a certificate, filter the applicants to include on the certificate using the Search options, and
then click the Preview Certificate button. Once filtering is complete, all applicants that are displayed in
the Applicant Pool will be included on the certificate. For additional information on Certificates see the
Certificates section of the user guide.
Figure 10-19 Preview Certificate
10.2.1.14 Reset Applicants
The Applicant Pool can be reset by clicking the Reset Applicants button.
Figure 10-20 Reset Applicants
A confirmation box will be displayed with the option to confirm the action prior to completion.
Resetting the Applicant Pool will undo any merged Categories of Eligibility and will replace all Applicants
in their default position within the Eligibility Categories.
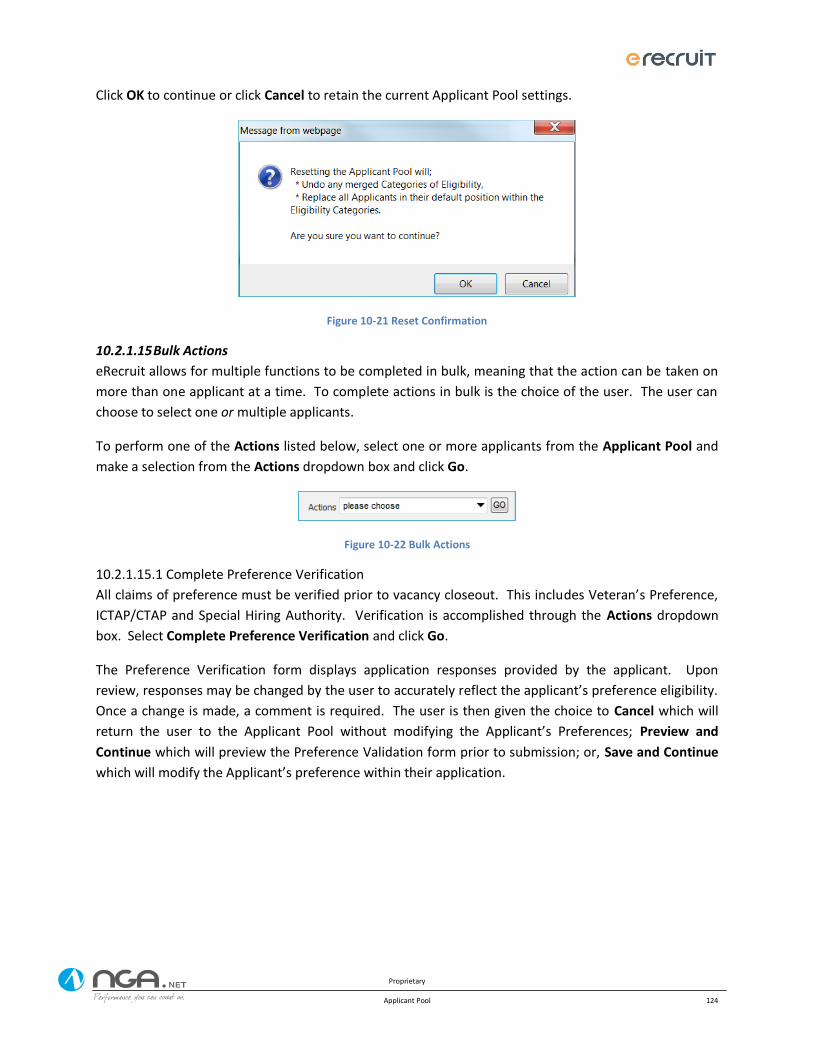
Proprietary
Applicant Pool 124
Click OK to continue or click Cancel to retain the current Applicant Pool settings.
Figure 10-21 Reset Confirmation
10.2.1.15 Bulk Actions
eRecruit allows for multiple functions to be completed in bulk, meaning that the action can be taken on
more than one applicant at a time. To complete actions in bulk is the choice of the user. The user can
choose to select one or multiple applicants.
To perform one of the Actions listed below, select one or more applicants from the Applicant Pool and
make a selection from the Actions dropdown box and click Go.
Figure 10-22 Bulk Actions
10.2.1.15.1 Complete Preference Verification
All claims of preference must be verified prior to vacancy closeout. This includes Veteran’s Preference,
ICTAP/CTAP and Special Hiring Authority. Verification is accomplished through the Actions dropdown
box. Select Complete Preference Verification and click Go.
The Preference Verification form displays application responses provided by the applicant. Upon
review, responses may be changed by the user to accurately reflect the applicant’s preference eligibility.
Once a change is made, a comment is required. The user is then given the choice to Cancel which will
return the user to the Applicant Pool without modifying the Applicant’s Preferences; Preview and
Continue which will preview the Preference Validation form prior to submission; or, Save and Continue
which will modify the Applicant’s preference within their application.
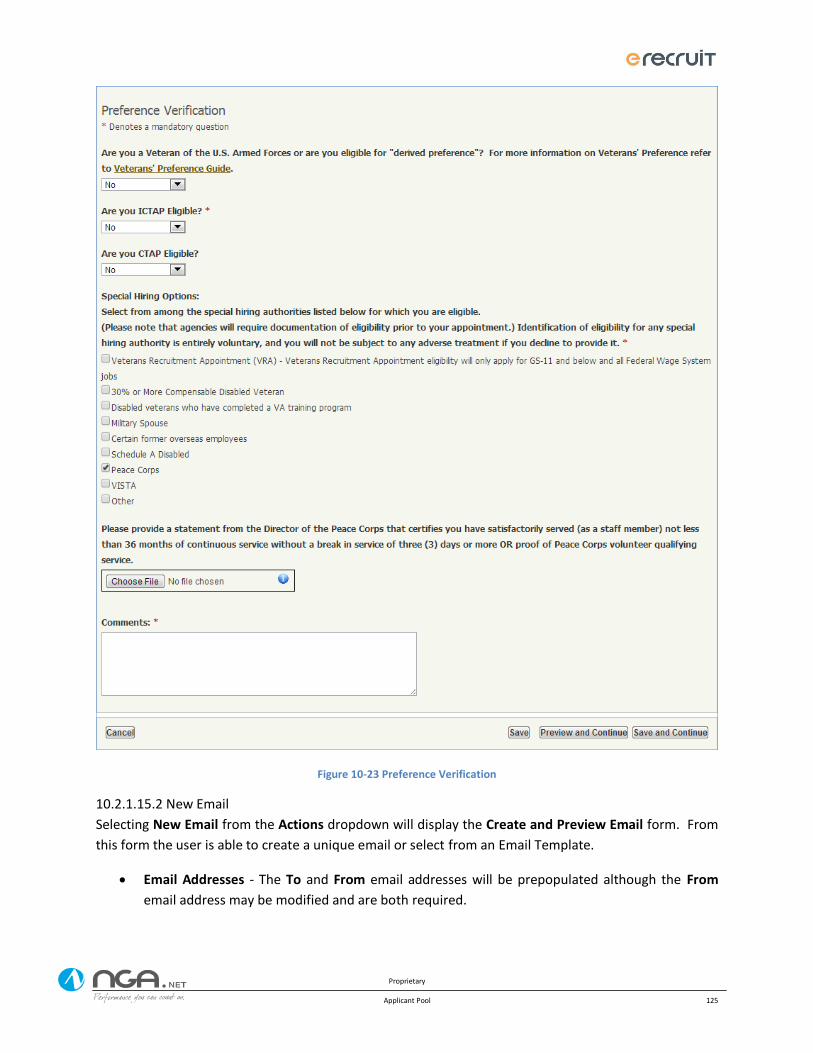
Proprietary
Applicant Pool 125
Figure 10-23 Preference Verification
10.2.1.15.2 New Email
Selecting New Email from the Actions dropdown will display the Create and Preview Email form. From
this form the user is able to create a unique email or select from an Email Template.
Email Addresses - The To and From email addresses will be prepopulated although the From
email address may be modified and are both required.
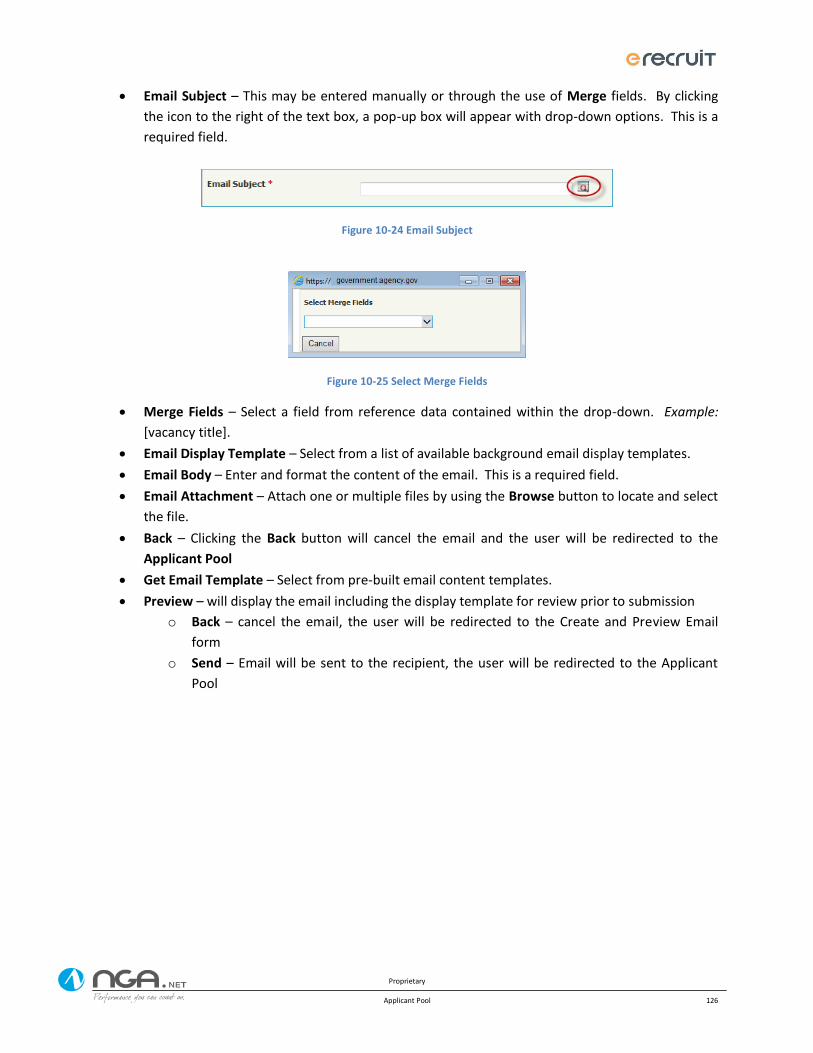
Proprietary
Applicant Pool 126
Email Subject – This may be entered manually or through the use of Merge fields. By clicking
the icon to the right of the text box, a pop-up box will appear with drop-down options. This is a
required field.
Figure 10-24 Email Subject
Figure 10-25 Select Merge Fields
Merge Fields – Select a field from reference data contained within the drop-down. Example:
[vacancy title].
Email Display Template – Select from a list of available background email display templates.
Email Body – Enter and format the content of the email. This is a required field.
Email Attachment – Attach one or multiple files by using the Browse button to locate and select
the file.
Back – Clicking the Back button will cancel the email and the user will be redirected to the
Applicant Pool
Get Email Template – Select from pre-built email content templates.
Preview – will display the email including the display template for review prior to submission
o Back – cancel the email, the user will be redirected to the Create and Preview Email
form
o Send – Email will be sent to the recipient, the user will be redirected to the Applicant
Pool
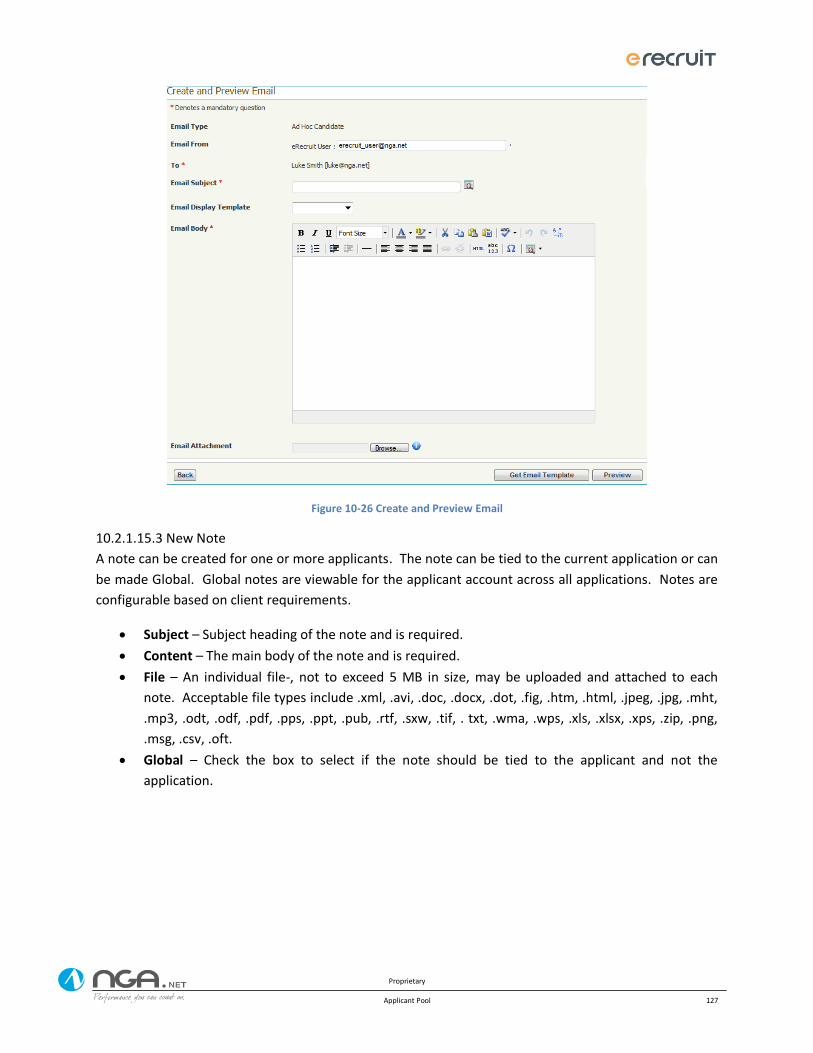
Proprietary
Applicant Pool 127
Figure 10-26 Create and Preview Email
10.2.1.15.3 New Note
A note can be created for one or more applicants. The note can be tied to the current application or can
be made Global. Global notes are viewable for the applicant account across all applications. Notes are
configurable based on client requirements.
Subject – Subject heading of the note and is required.
Content – The main body of the note and is required.
File – An individual file-, not to exceed 5 MB in size, may be uploaded and attached to each
note. Acceptable file types include .xml, .avi, .doc, .docx, .dot, .fig, .htm, .html, .jpeg, .jpg, .mht,
.mp3, .odt, .odf, .pdf, .pps, .ppt, .pub, .rtf, .sxw, .tif, . txt, .wma, .wps, .xls, .xlsx, .xps, .zip, .png,
.msg, .csv, .oft.
Global – Check the box to select if the note should be tied to the applicant and not the
application.
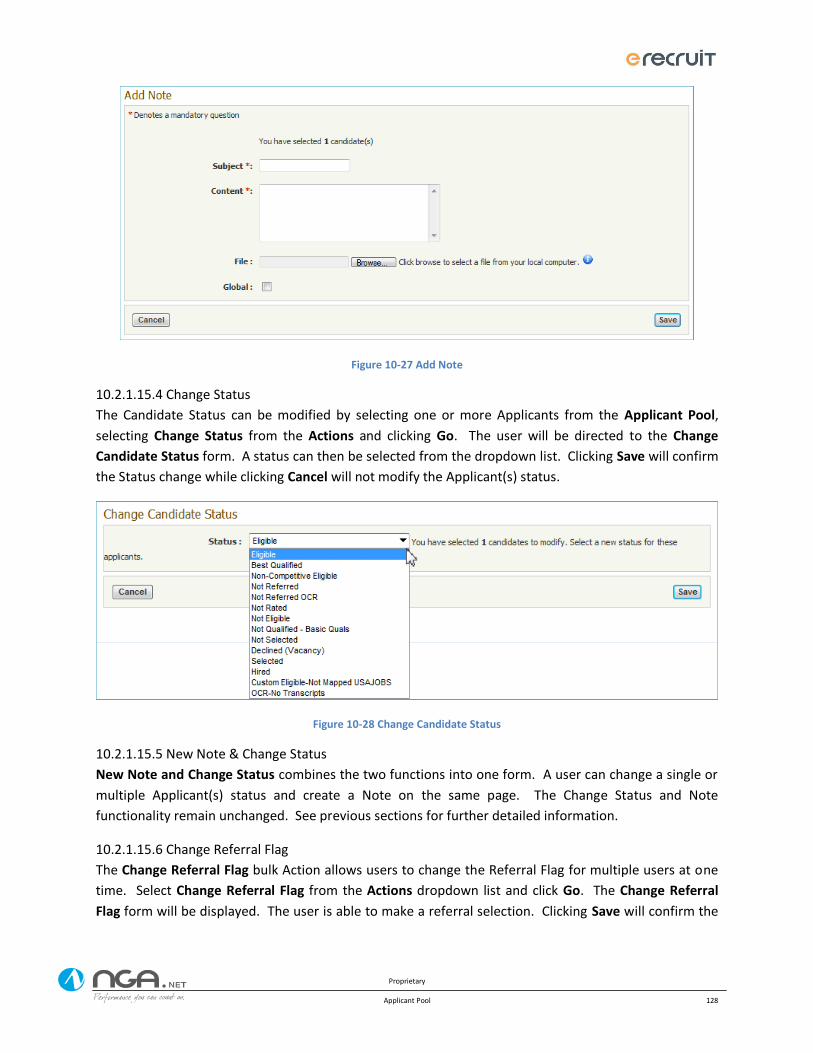
Proprietary
Applicant Pool 128
Figure 10-27 Add Note
10.2.1.15.4 Change Status
The Candidate Status can be modified by selecting one or more Applicants from the Applicant Pool,
selecting Change Status from the Actions and clicking Go. The user will be directed to the Change
Candidate Status form. A status can then be selected from the dropdown list. Clicking Save will confirm
the Status change while clicking Cancel will not modify the Applicant(s) status.
Figure 10-28 Change Candidate Status
10.2.1.15.5 New Note & Change Status
New Note and Change Status combines the two functions into one form. A user can change a single or
multiple Applicant(s) status and create a Note on the same page. The Change Status and Note
functionality remain unchanged. See previous sections for further detailed information.
10.2.1.15.6 Change Referral Flag
The Change Referral Flag bulk Action allows users to change the Referral Flag for multiple users at one
time. Select Change Referral Flag from the Actions dropdown list and click Go. The Change Referral
Flag form will be displayed. The user is able to make a referral selection. Clicking Save will confirm the
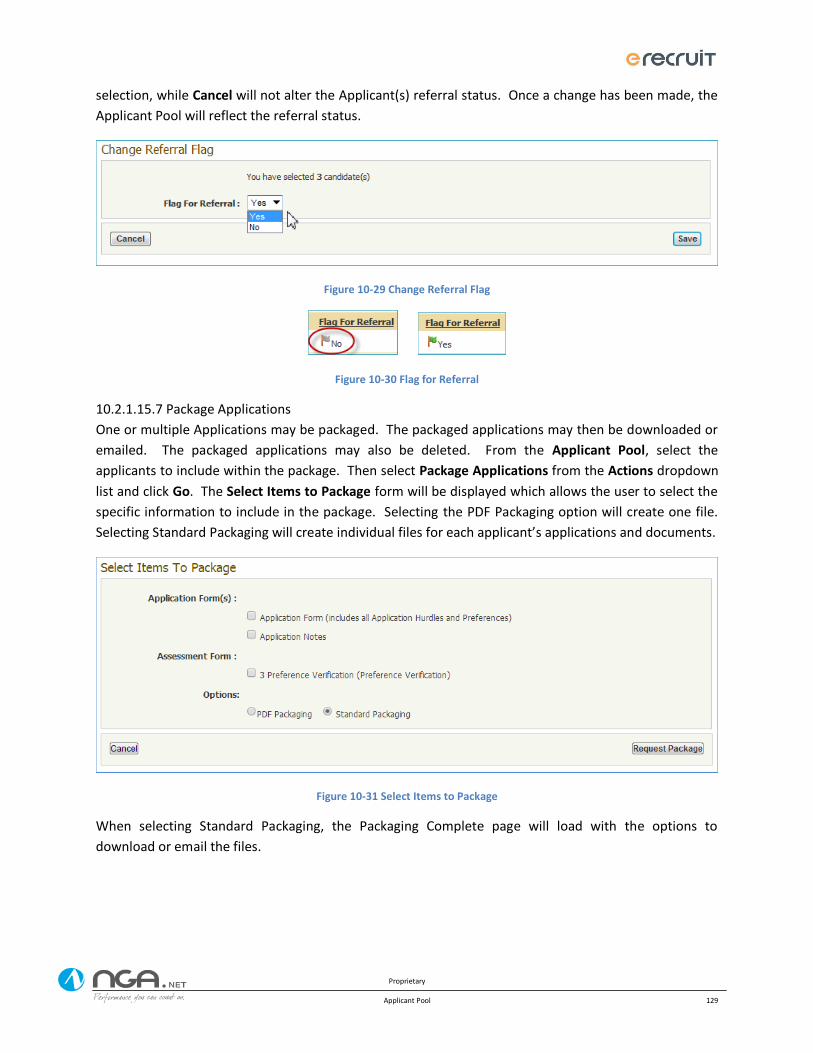
Proprietary
Applicant Pool 129
selection, while Cancel will not alter the Applicant(s) referral status. Once a change has been made, the
Applicant Pool will reflect the referral status.
Figure 10-29 Change Referral Flag
Figure 10-30 Flag for Referral
10.2.1.15.7 Package Applications
One or multiple Applications may be packaged. The packaged applications may then be downloaded or
emailed. The packaged applications may also be deleted. From the Applicant Pool, select the
applicants to include within the package. Then select Package Applications from the Actions dropdown
list and click Go. The Select Items to Package form will be displayed which allows the user to select the
specific information to include in the package. Selecting the PDF Packaging option will create one file.
Selecting Standard Packaging will create individual files for each applicant’s applications and documents.
Figure 10-31 Select Items to Package
When selecting Standard Packaging, the Packaging Complete page will load with the options to
download or email the files.
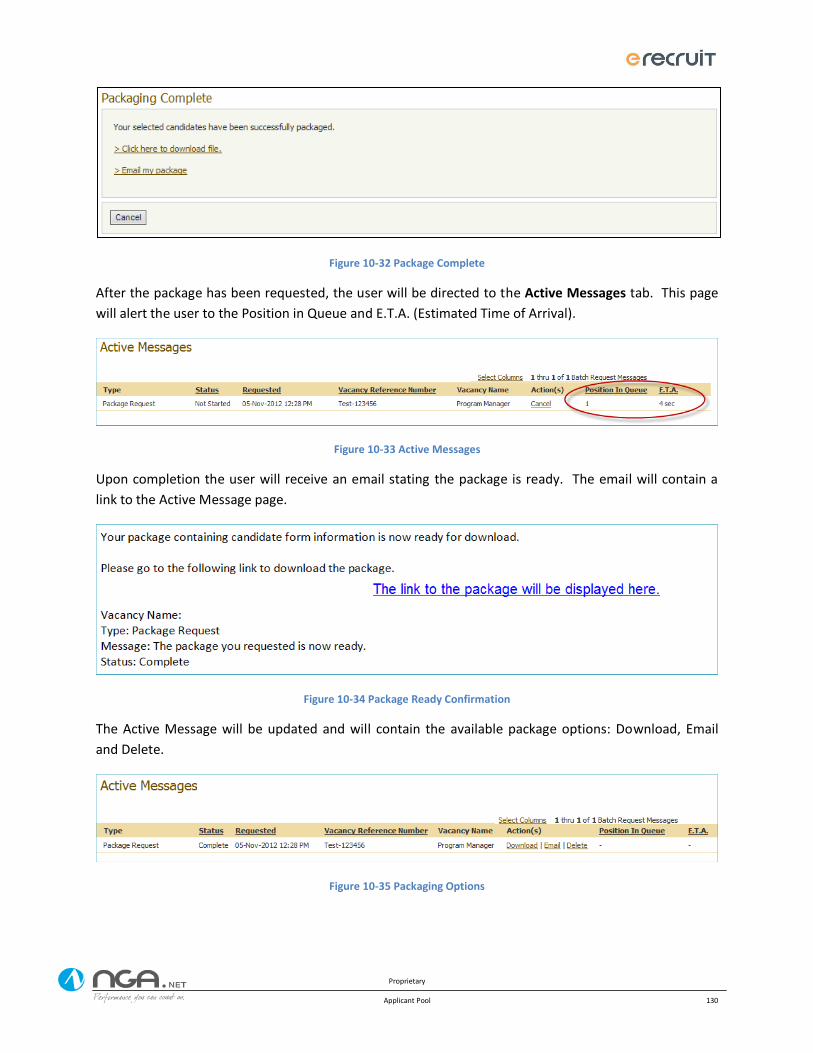
Proprietary
Applicant Pool 130
Figure 10-32 Package Complete
After the package has been requested, the user will be directed to the Active Messages tab. This page
will alert the user to the Position in Queue and E.T.A. (Estimated Time of Arrival).
Figure 10-33 Active Messages
Upon completion the user will receive an email stating the package is ready. The email will contain a
link to the Active Message page.
Figure 10-34 Package Ready Confirmation
The Active Message will be updated and will contain the available package options: Download, Email
and Delete.
Figure 10-35 Packaging Options
Proprietary
Certificates 131
Certificates 11
11.1 Generate a Certificate
This system provides the ability to select eligible applicants from a vacancy’s Applicant Pool and
generate one or more certificates for a new hire selection. The Certificate module provides guidance on
filtering the applicant pool leading to the previewing of the certificate, creating the certificate and
issuing the certificate to the Hiring Manager.
Prior to generating a certificate, a user will have typically worked the Applicant Pool using the different
Applicant Pool filters and search options, to provide a *refined* list of applicants who are eligible for
referral.
Hint: There are no system restrictions for when a certificate can be created. A certificate can be created
before a vacancy announcement is closed on USAJOBS.
There are no restrictions on the number of certificates that can be created for each vacancy. A validation
message will display when a certificate with the same grade and duty location has already been created,
however this will not prevent a new certificate with the same grade and location (s) from being created.
11.1.1 Search
The search function within the Applicant Pool allows a user to narrow the list of eligible applicants. To
do this, click Show Search and select the preferred criteria. Once selections have been made, Apply the
changes. For a detailed explanation of the Search Functionality, please refer to section 10.2.1.
To remove Search selections click Reset Search Form or Clear. The filter will be cleared and the original
list of eligible applicants will be displayed.
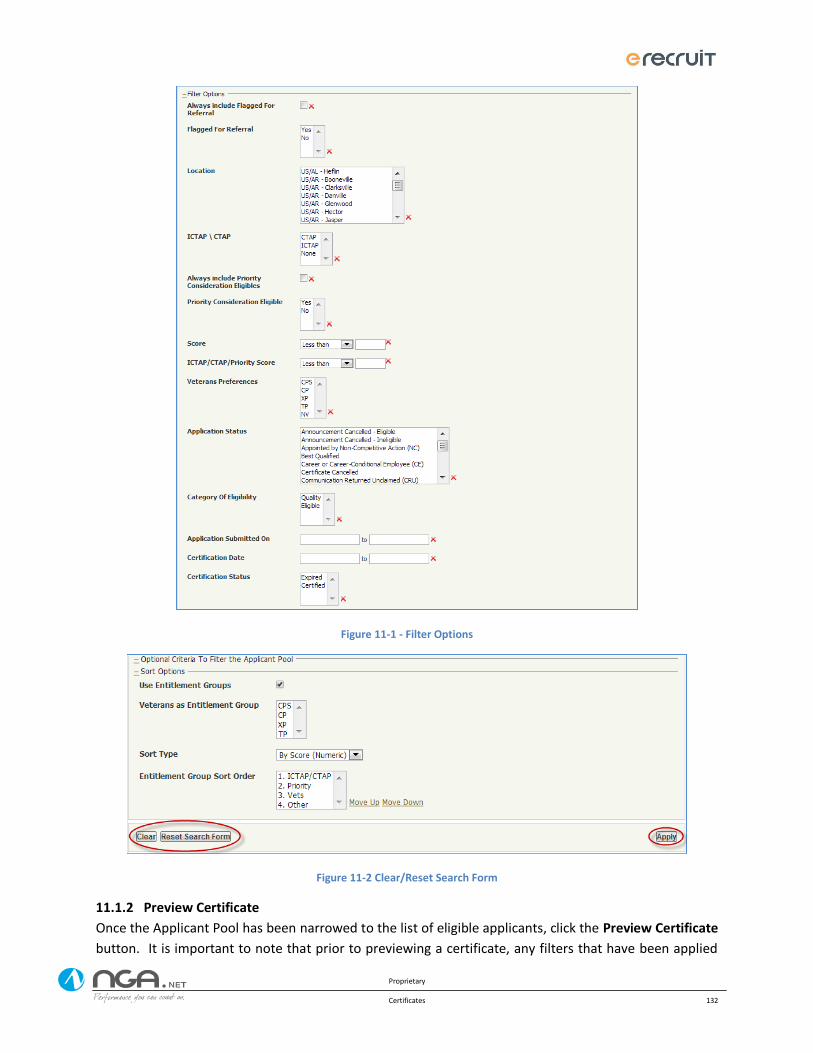
Proprietary
Certificates 132
Figure 11-1 - Filter Options
Figure 11-2 Clear/Reset Search Form
11.1.2 Preview Certificate
Once the Applicant Pool has been narrowed to the list of eligible applicants, click the Preview Certificate
button. It is important to note that prior to previewing a certificate, any filters that have been applied
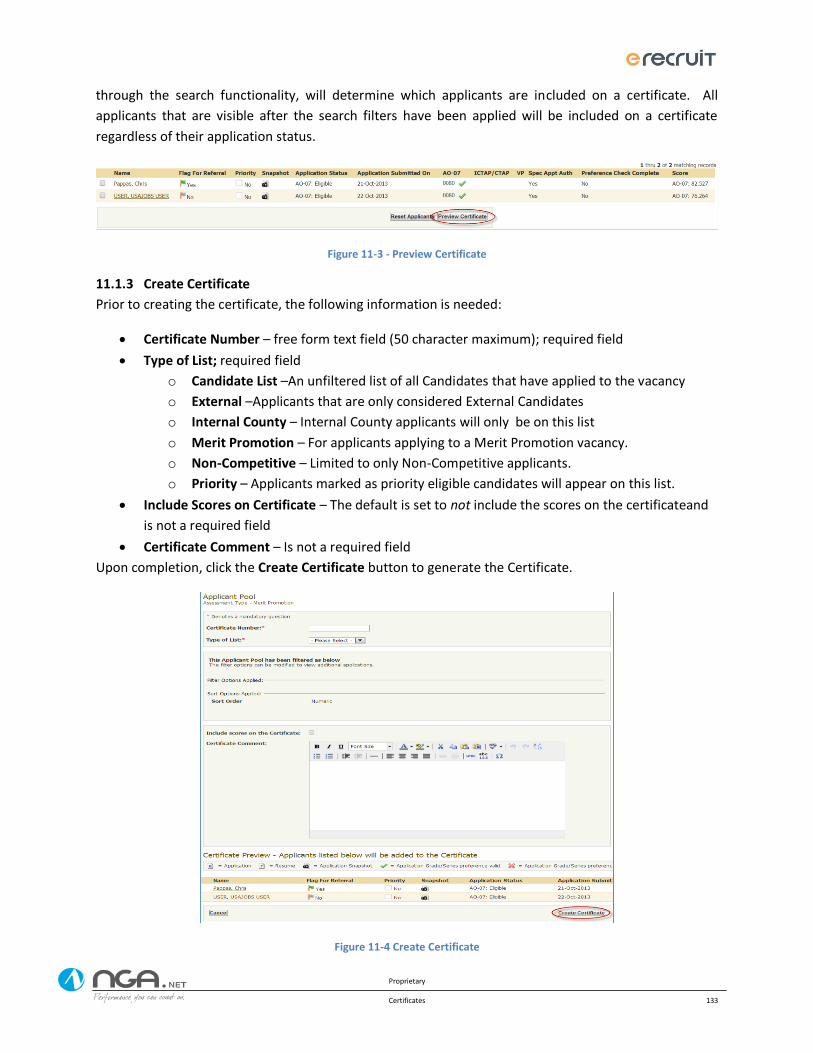
Proprietary
Certificates 133
through the search functionality, will determine which applicants are included on a certificate. All
applicants that are visible after the search filters have been applied will be included on a certificate
regardless of their application status.
Figure 11-3 - Preview Certificate
11.1.3 Create Certificate
Prior to creating the certificate, the following information is needed:
Certificate Number – free form text field (50 character maximum); required field
Type of List; required field
o Candidate List –An unfiltered list of all Candidates that have applied to the vacancy
o External –Applicants that are only considered External Candidates
o Internal County – Internal County applicants will only be on this list
o Merit Promotion – For applicants applying to a Merit Promotion vacancy.
o Non-Competitive – Limited to only Non-Competitive applicants.
o Priority – Applicants marked as priority eligible candidates will appear on this list.
Include Scores on Certificate – The default is set to not include the scores on the certificateand
is not a required field
Certificate Comment – Is not a required field
Upon completion, click the Create Certificate button to generate the Certificate.
Figure 11-4 Create Certificate
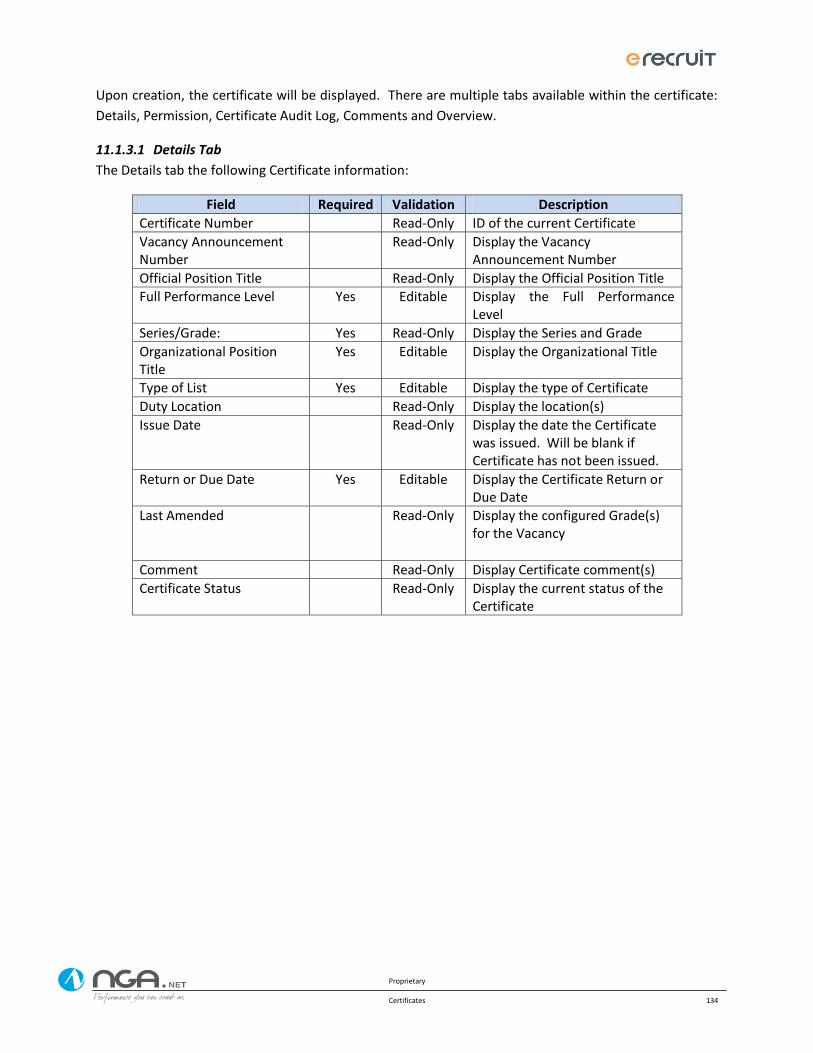
Proprietary
Certificates 134
Upon creation, the certificate will be displayed. There are multiple tabs available within the certificate:
Details, Permission, Certificate Audit Log, Comments and Overview.
11.1.3.1 Details Tab
The Details tab the following Certificate information:
Field Required Validation Description
Certificate Number Read-Only ID of the current Certificate
Vacancy Announcement Number
Read-Only Display the Vacancy Announcement Number
Official Position Title Read-Only Display the Official Position Title
Full Performance Level Yes Editable Display the Full Performance Level
Series/Grade: Yes Read-Only Display the Series and Grade
Organizational Position Title
Yes Editable Display the Organizational Title
Type of List Yes Editable Display the type of Certificate
Duty Location Read-Only Display the location(s)
Issue Date Read-Only Display the date the Certificate was issued. Will be blank if Certificate has not been issued.
Return or Due Date Yes Editable Display the Certificate Return or Due Date
Last Amended Read-Only Display the configured Grade(s) for the Vacancy
Comment Read-Only Display Certificate comment(s)
Certificate Status Read-Only Display the current status of the Certificate
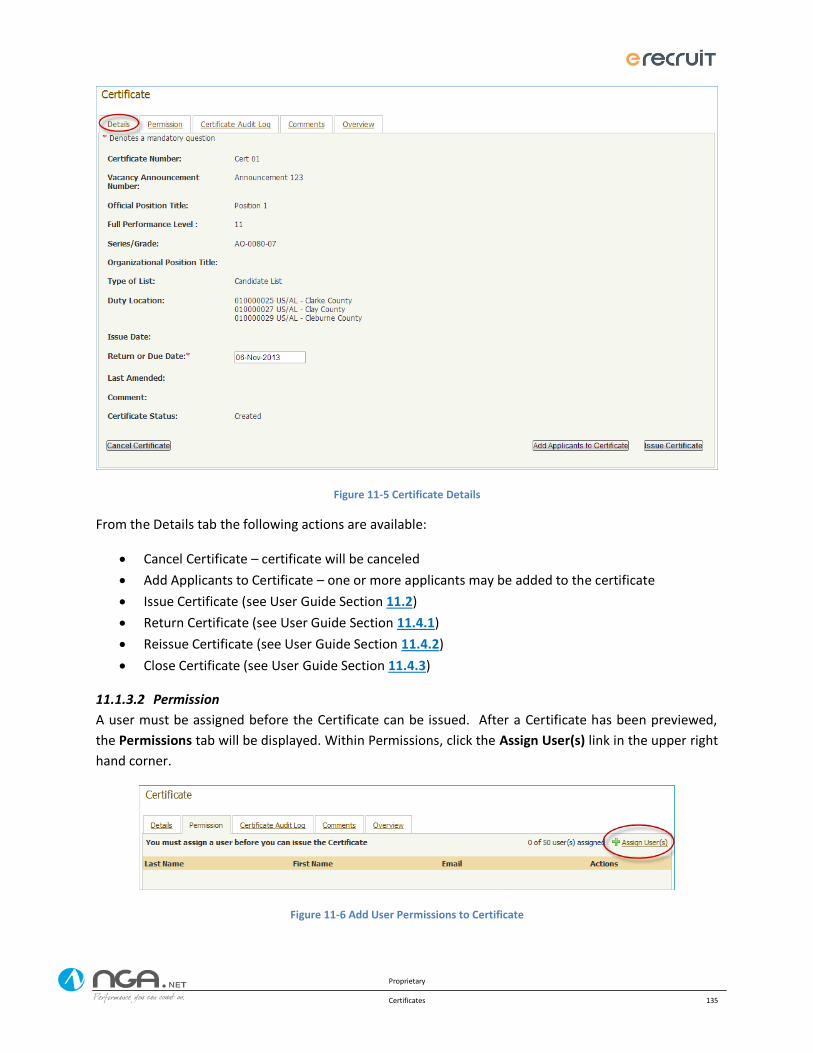
Proprietary
Certificates 135
Figure 11-5 Certificate Details
From the Details tab the following actions are available:
Cancel Certificate – certificate will be canceled
Add Applicants to Certificate – one or more applicants may be added to the certificate
Issue Certificate (see User Guide Section 11.2)
Return Certificate (see User Guide Section 11.4.1)
Reissue Certificate (see User Guide Section 11.4.2)
Close Certificate (see User Guide Section 11.4.3)
11.1.3.2 Permission
A user must be assigned before the Certificate can be issued. After a Certificate has been previewed,
the Permissions tab will be displayed. Within Permissions, click the Assign User(s) link in the upper right
hand corner.
Figure 11-6 Add User Permissions to Certificate
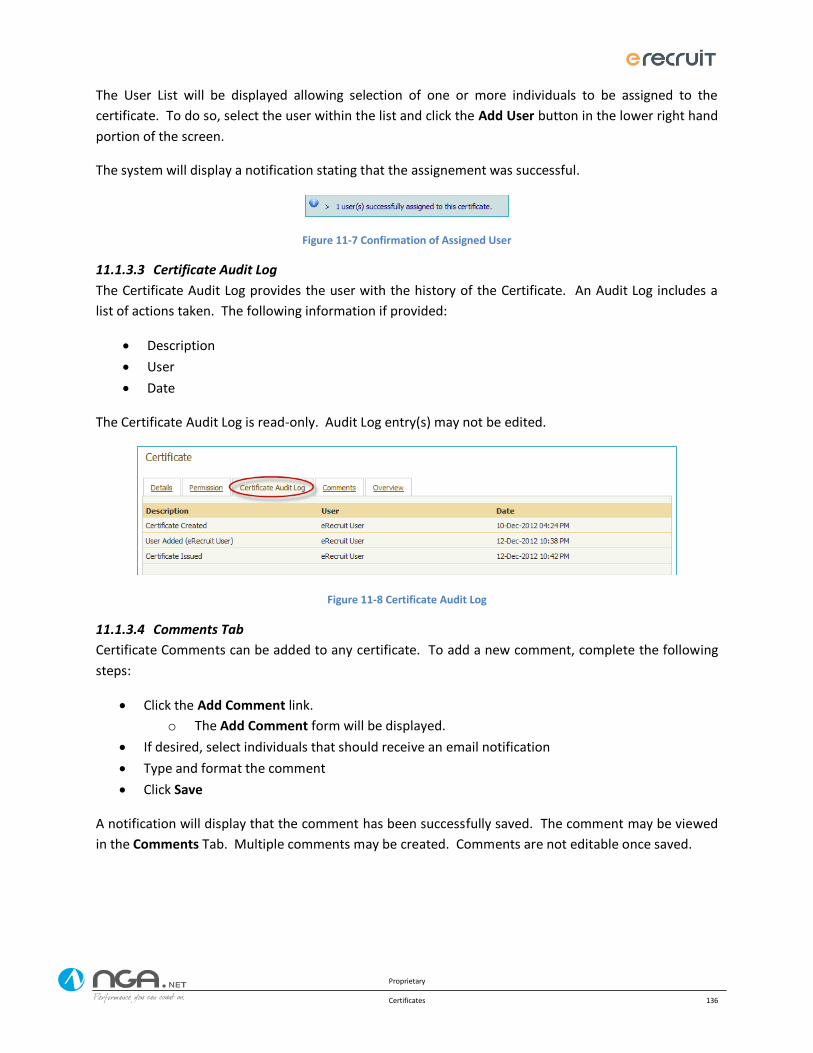
Proprietary
Certificates 136
The User List will be displayed allowing selection of one or more individuals to be assigned to the
certificate. To do so, select the user within the list and click the Add User button in the lower right hand
portion of the screen.
The system will display a notification stating that the assignement was successful.
Figure 11-7 Confirmation of Assigned User
11.1.3.3 Certificate Audit Log
The Certificate Audit Log provides the user with the history of the Certificate. An Audit Log includes a
list of actions taken. The following information if provided:
Description
User
Date
The Certificate Audit Log is read-only. Audit Log entry(s) may not be edited.
Figure 11-8 Certificate Audit Log
11.1.3.4 Comments Tab
Certificate Comments can be added to any certificate. To add a new comment, complete the following
steps:
Click the Add Comment link.
o The Add Comment form will be displayed.
If desired, select individuals that should receive an email notification
Type and format the comment
Click Save
A notification will display that the comment has been successfully saved. The comment may be viewed
in the Comments Tab. Multiple comments may be created. Comments are not editable once saved.
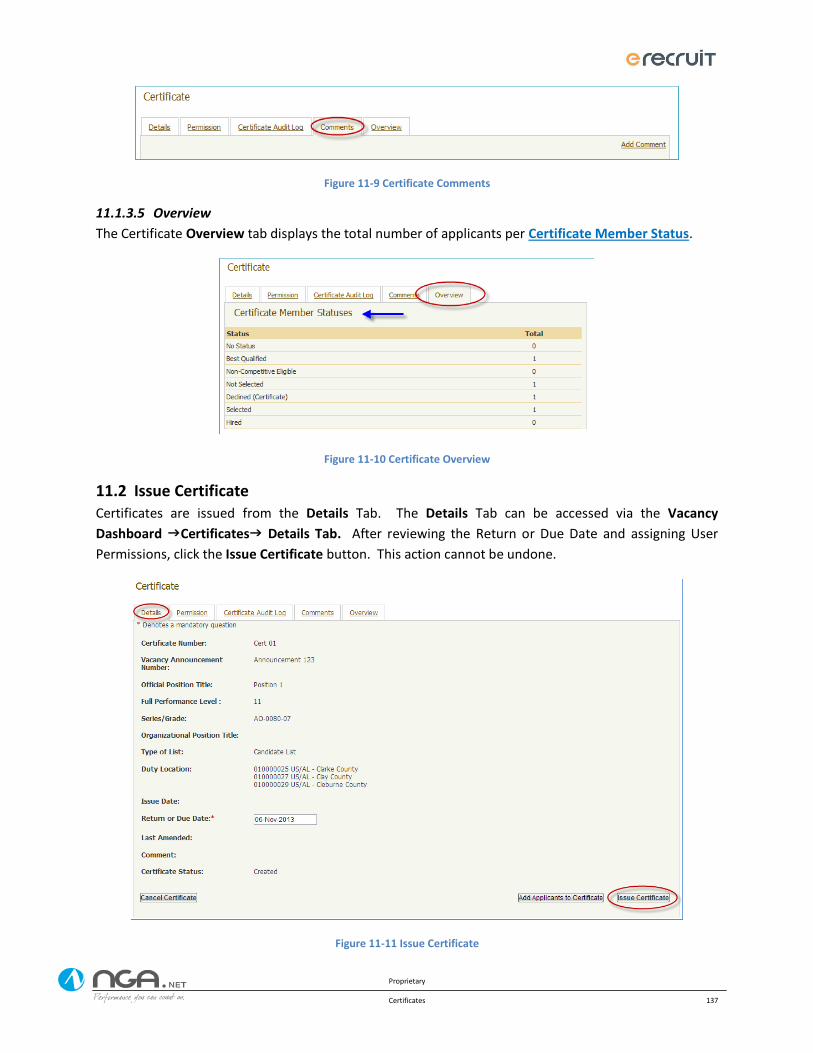
Proprietary
Certificates 137
Figure 11-9 Certificate Comments
11.1.3.5 Overview
The Certificate Overview tab displays the total number of applicants per Certificate Member Status.
Figure 11-10 Certificate Overview
11.2 Issue Certificate Certificates are issued from the Details Tab. The Details Tab can be accessed via the Vacancy
Dashboard Certificates Details Tab. After reviewing the Return or Due Date and assigning User
Permissions, click the Issue Certificate button. This action cannot be undone.
Figure 11-11 Issue Certificate

Proprietary
Certificates 138
11.3 Amend Certificate A Certificate may be amended to include additional eligible applicants or remove applicants.
11.3.1 Add Applicants to Certificate
Eligible applicants in the Applicant Pool who were not included on the Certificate may be added through
the Add Applicants to Certificate button. This button is accessed on the Certificate Details Tab.
Figure 11-12 Amend Certificate
11.3.2 Remove Applicant from Certificate
Applicants may be removed from a Certificate while the Certificate is open. From the certificate select
the applicants to be removed. Then select Remove from Certificate from the Actions dropdown list.
Figure 11-13 Remove Applicant from Certificate
The system will prompt the user to provide a Reason for Amendment. The Reason for Amendment is a
mandatory field. Upon completion, the select applicants will be removed from the Certificate.
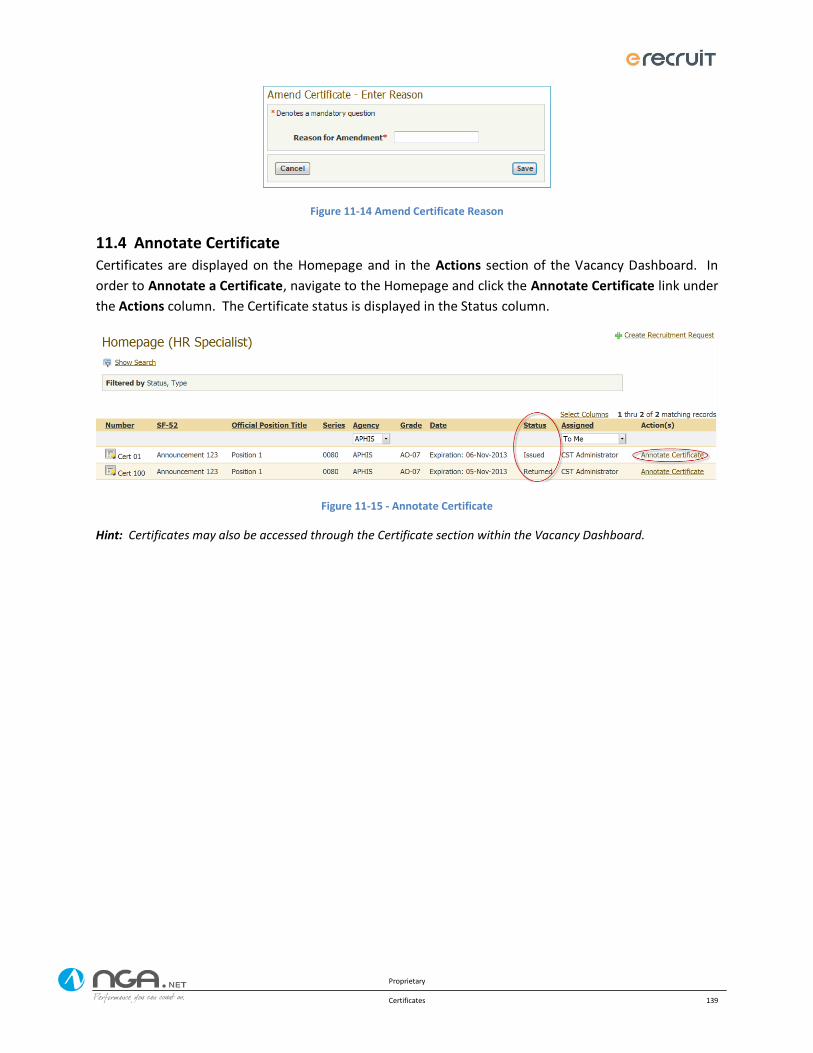
Proprietary
Certificates 139
Figure 11-14 Amend Certificate Reason
11.4 Annotate Certificate Certificates are displayed on the Homepage and in the Actions section of the Vacancy Dashboard. In
order to Annotate a Certificate, navigate to the Homepage and click the Annotate Certificate link under
the Actions column. The Certificate status is displayed in the Status column.
Figure 11-15 - Annotate Certificate
Hint: Certificates may also be accessed through the Certificate section within the Vacancy Dashboard.
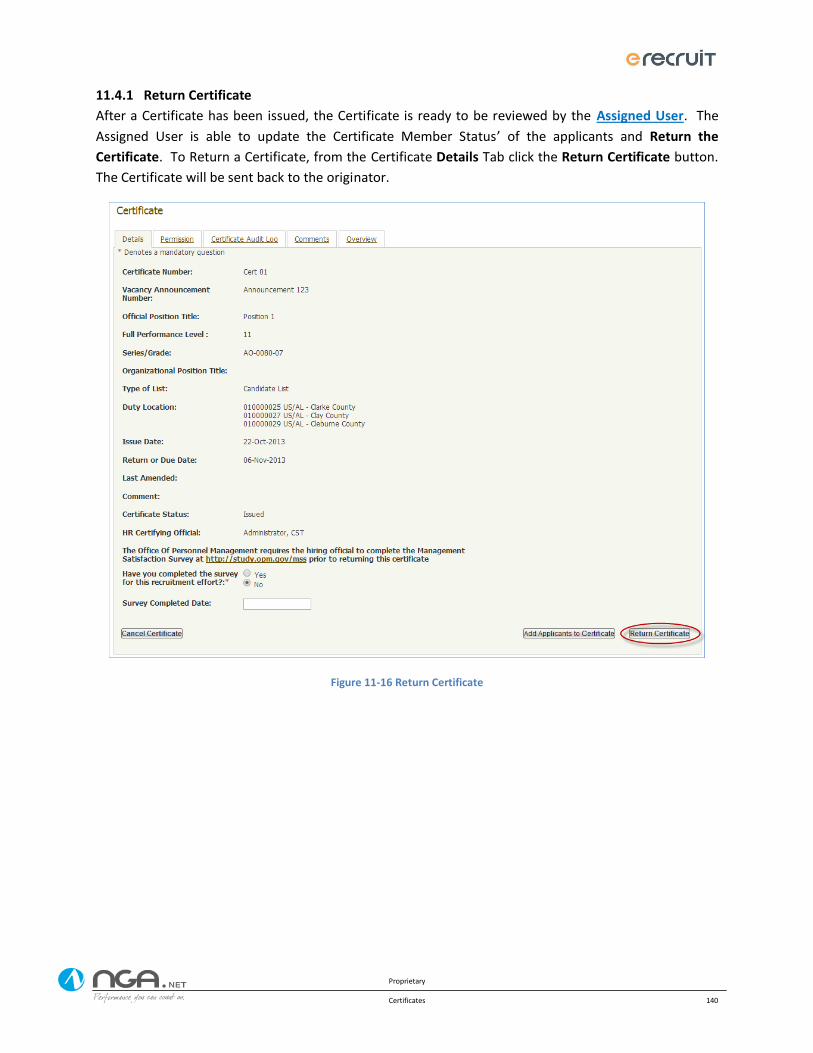
Proprietary
Certificates 140
11.4.1 Return Certificate
After a Certificate has been issued, the Certificate is ready to be reviewed by the Assigned User. The
Assigned User is able to update the Certificate Member Status’ of the applicants and Return the
Certificate. To Return a Certificate, from the Certificate Details Tab click the Return Certificate button.
The Certificate will be sent back to the originator.
Figure 11-16 Return Certificate

Proprietary
Certificates 141
11.4.2 Extend Certificate
After the Certificate has been returned, the user has the ability to Extend the Certificate. The Extended
Certificate would be available for additional annotation by the Assigned User. From the Certificate
Details Tab modify the Certificate as desired and click the Extend Certificate button.
Figure 11-17 Extend Certificate
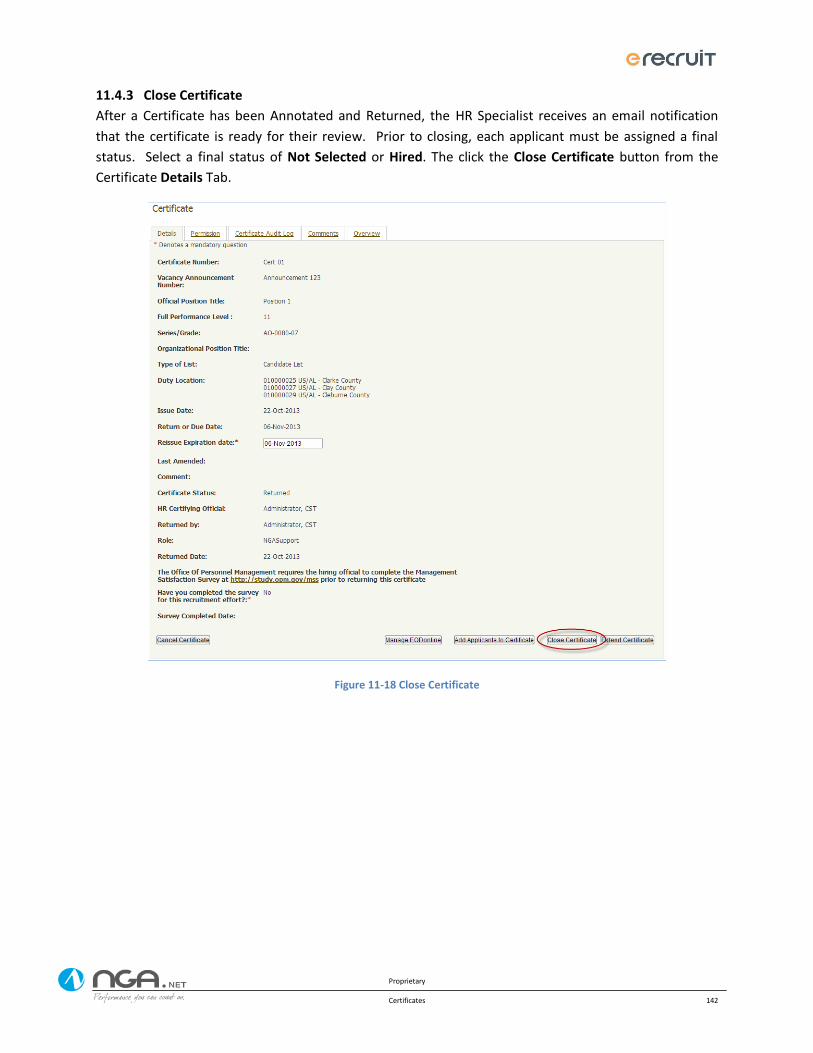
Proprietary
Certificates 142
11.4.3 Close Certificate
After a Certificate has been Annotated and Returned, the HR Specialist receives an email notification
that the certificate is ready for their review. Prior to closing, each applicant must be assigned a final
status. Select a final status of Not Selected or Hired. The click the Close Certificate button from the
Certificate Details Tab.
Figure 11-18 Close Certificate
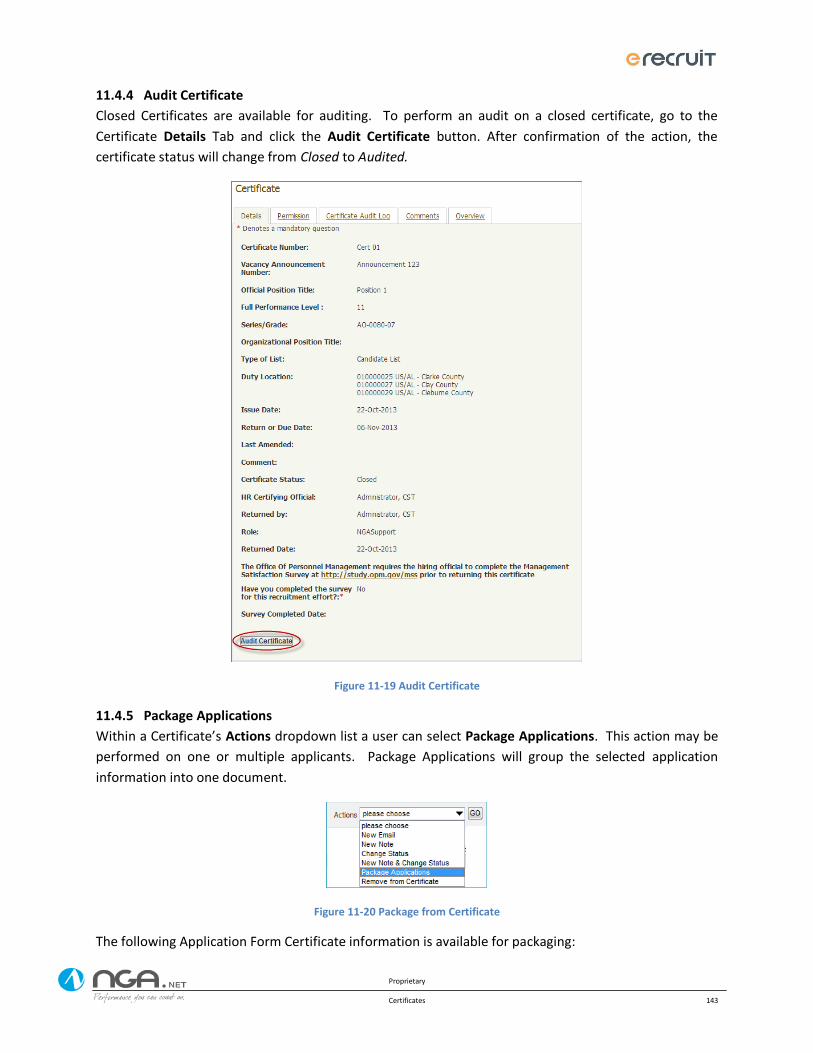
Proprietary
Certificates 143
11.4.4 Audit Certificate
Closed Certificates are available for auditing. To perform an audit on a closed certificate, go to the
Certificate Details Tab and click the Audit Certificate button. After confirmation of the action, the
certificate status will change from Closed to Audited.
Figure 11-19 Audit Certificate
11.4.5 Package Applications
Within a Certificate’s Actions dropdown list a user can select Package Applications. This action may be
performed on one or multiple applicants. Package Applications will group the selected application
information into one document.
Figure 11-20 Package from Certificate
The following Application Form Certificate information is available for packaging:
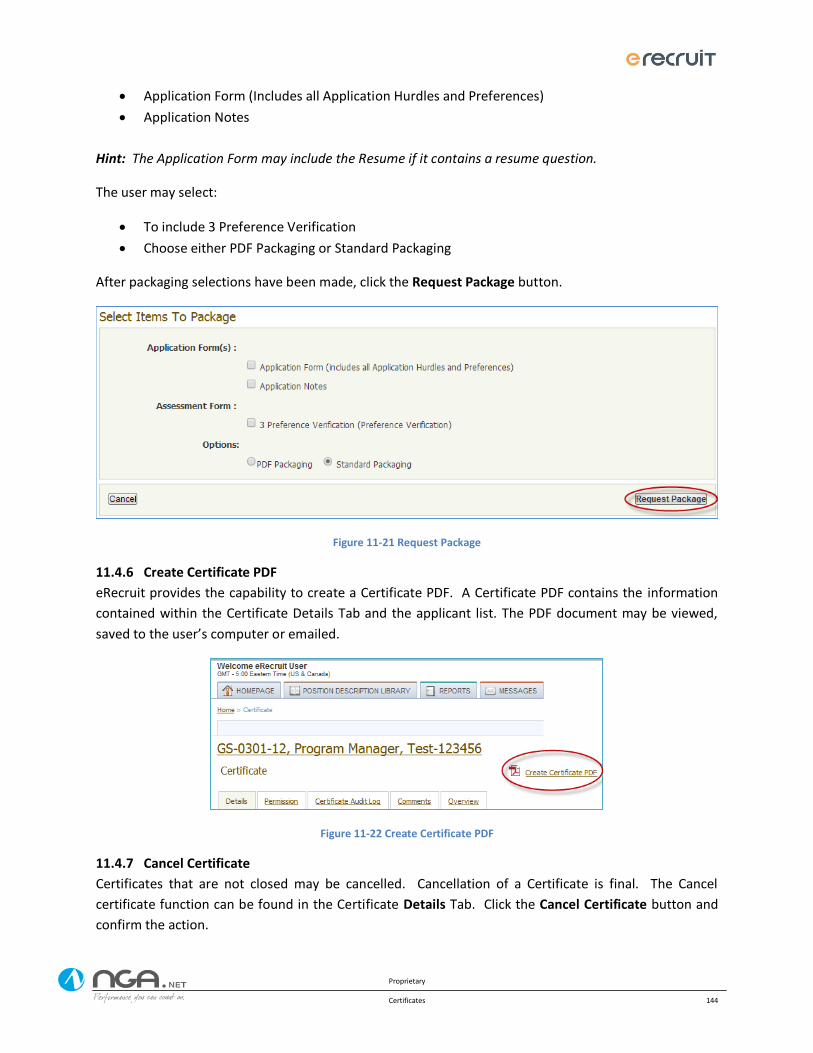
Proprietary
Certificates 144
Application Form (Includes all Application Hurdles and Preferences)
Application Notes
Hint: The Application Form may include the Resume if it contains a resume question.
The user may select:
To include 3 Preference Verification
Choose either PDF Packaging or Standard Packaging
After packaging selections have been made, click the Request Package button.
Figure 11-21 Request Package
11.4.6 Create Certificate PDF
eRecruit provides the capability to create a Certificate PDF. A Certificate PDF contains the information
contained within the Certificate Details Tab and the applicant list. The PDF document may be viewed,
saved to the user’s computer or emailed.
Figure 11-22 Create Certificate PDF
11.4.7 Cancel Certificate
Certificates that are not closed may be cancelled. Cancellation of a Certificate is final. The Cancel
certificate function can be found in the Certificate Details Tab. Click the Cancel Certificate button and
confirm the action.
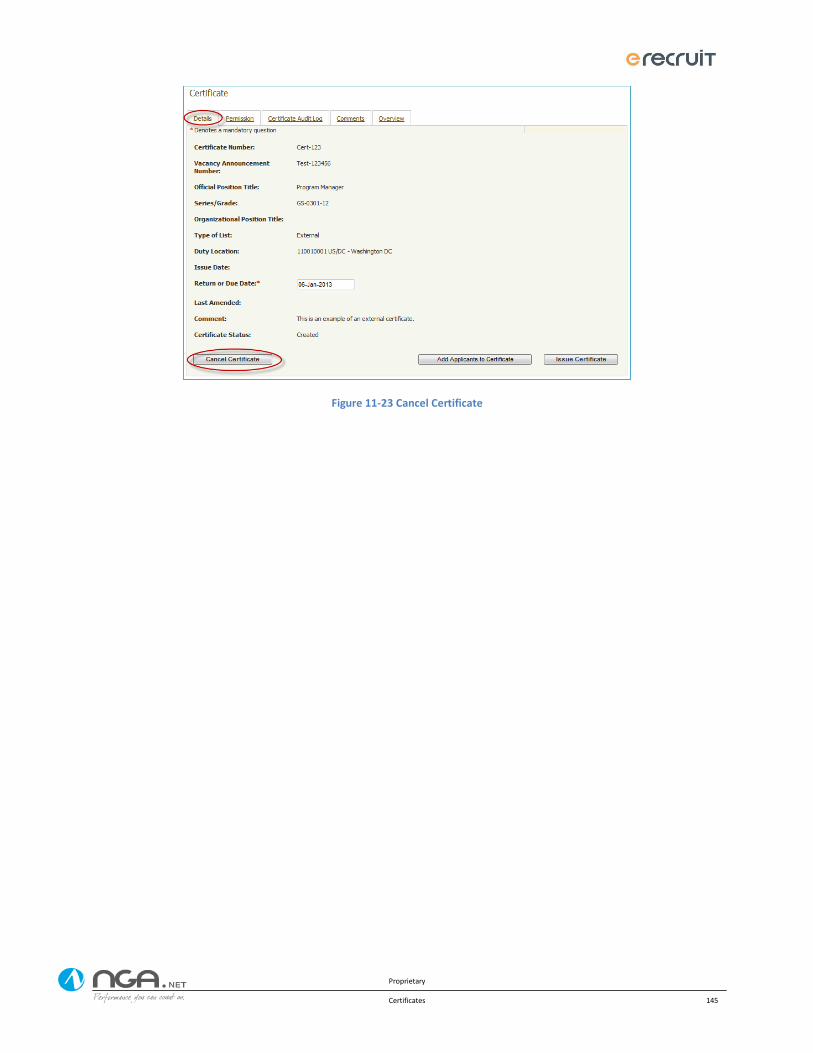
Proprietary
Certificates 145
Figure 11-23 Cancel Certificate
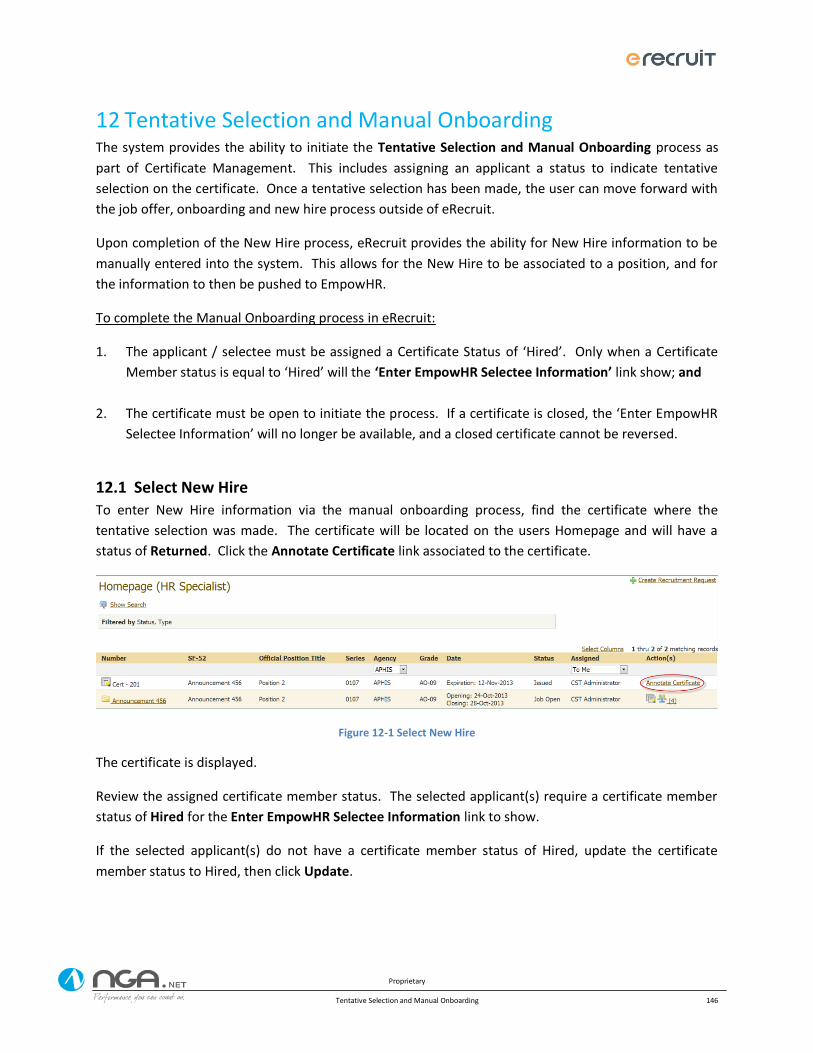
Proprietary
Tentative Selection and Manual Onboarding 146
Tentative Selection and Manual Onboarding 12The system provides the ability to initiate the Tentative Selection and Manual Onboarding process as
part of Certificate Management. This includes assigning an applicant a status to indicate tentative
selection on the certificate. Once a tentative selection has been made, the user can move forward with
the job offer, onboarding and new hire process outside of eRecruit.
Upon completion of the New Hire process, eRecruit provides the ability for New Hire information to be
manually entered into the system. This allows for the New Hire to be associated to a position, and for
the information to then be pushed to EmpowHR.
To complete the Manual Onboarding process in eRecruit:
1. The applicant / selectee must be assigned a Certificate Status of ‘Hired’. Only when a Certificate
Member status is equal to ‘Hired’ will the ‘Enter EmpowHR Selectee Information’ link show; and
2. The certificate must be open to initiate the process. If a certificate is closed, the ‘Enter EmpowHR
Selectee Information’ will no longer be available, and a closed certificate cannot be reversed.
12.1 Select New Hire
To enter New Hire information via the manual onboarding process, find the certificate where the
tentative selection was made. The certificate will be located on the users Homepage and will have a
status of Returned. Click the Annotate Certificate link associated to the certificate.
Figure 12-1 Select New Hire
The certificate is displayed.
Review the assigned certificate member status. The selected applicant(s) require a certificate member
status of Hired for the Enter EmpowHR Selectee Information link to show.
If the selected applicant(s) do not have a certificate member status of Hired, update the certificate
member status to Hired, then click Update.
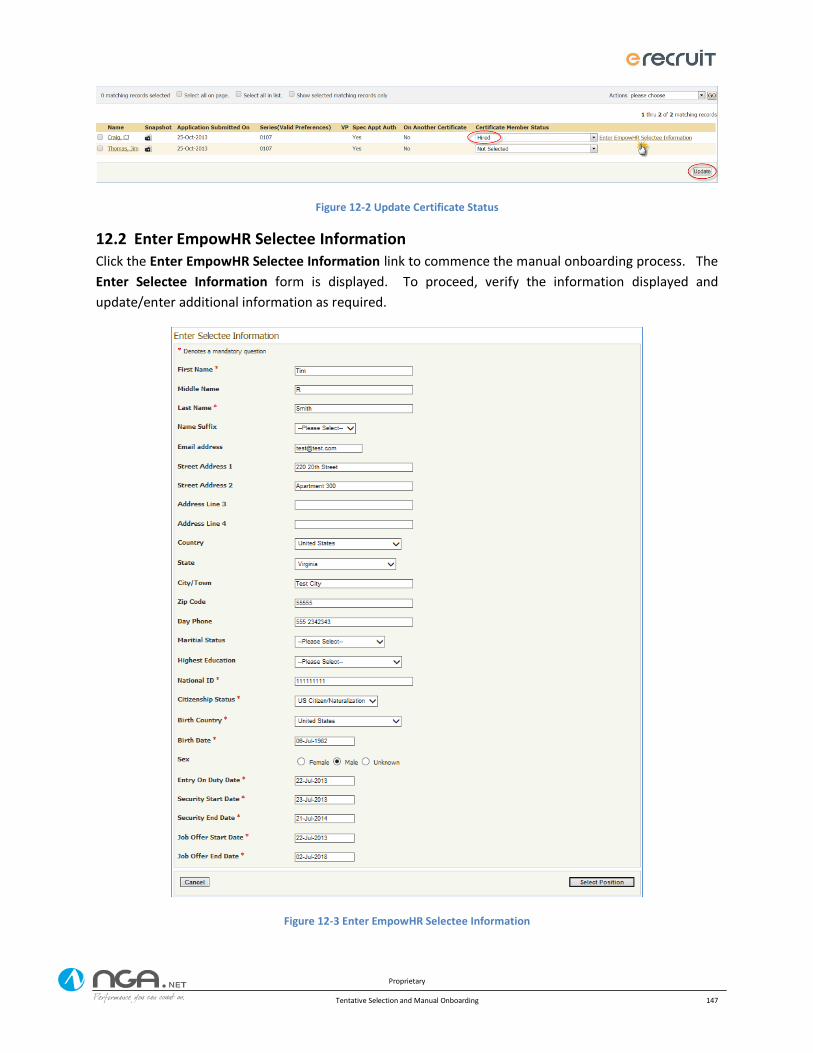
Proprietary
Tentative Selection and Manual Onboarding 147
Figure 12-2 Update Certificate Status
12.2 Enter EmpowHR Selectee Information Click the Enter EmpowHR Selectee Information link to commence the manual onboarding process. The
Enter Selectee Information form is displayed. To proceed, verify the information displayed and
update/enter additional information as required.
Figure 12-3 Enter EmpowHR Selectee Information
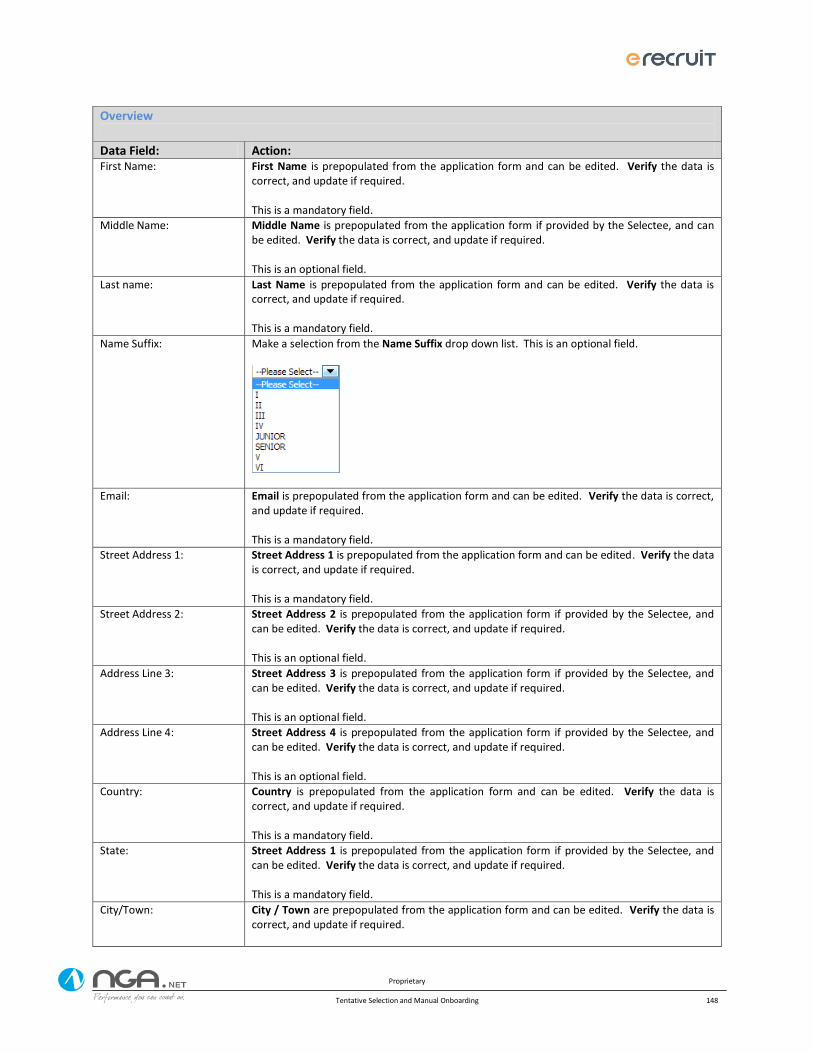
Proprietary
Tentative Selection and Manual Onboarding 148
Overview
Data Field: Action: First Name: First Name is prepopulated from the application form and can be edited. Verify the data is
correct, and update if required. This is a mandatory field.
Middle Name: Middle Name is prepopulated from the application form if provided by the Selectee, and can be edited. Verify the data is correct, and update if required. This is an optional field.
Last name: Last Name is prepopulated from the application form and can be edited. Verify the data is correct, and update if required. This is a mandatory field.
Name Suffix: Make a selection from the Name Suffix drop down list. This is an optional field.
Email: Email is prepopulated from the application form and can be edited. Verify the data is correct, and update if required. This is a mandatory field.
Street Address 1: Street Address 1 is prepopulated from the application form and can be edited. Verify the data is correct, and update if required. This is a mandatory field.
Street Address 2: Street Address 2 is prepopulated from the application form if provided by the Selectee, and can be edited. Verify the data is correct, and update if required. This is an optional field.
Address Line 3: Street Address 3 is prepopulated from the application form if provided by the Selectee, and can be edited. Verify the data is correct, and update if required. This is an optional field.
Address Line 4: Street Address 4 is prepopulated from the application form if provided by the Selectee, and can be edited. Verify the data is correct, and update if required. This is an optional field.
Country: Country is prepopulated from the application form and can be edited. Verify the data is correct, and update if required. This is a mandatory field.
State: Street Address 1 is prepopulated from the application form if provided by the Selectee, and can be edited. Verify the data is correct, and update if required. This is a mandatory field.
City/Town: City / Town are prepopulated from the application form and can be edited. Verify the data is correct, and update if required.
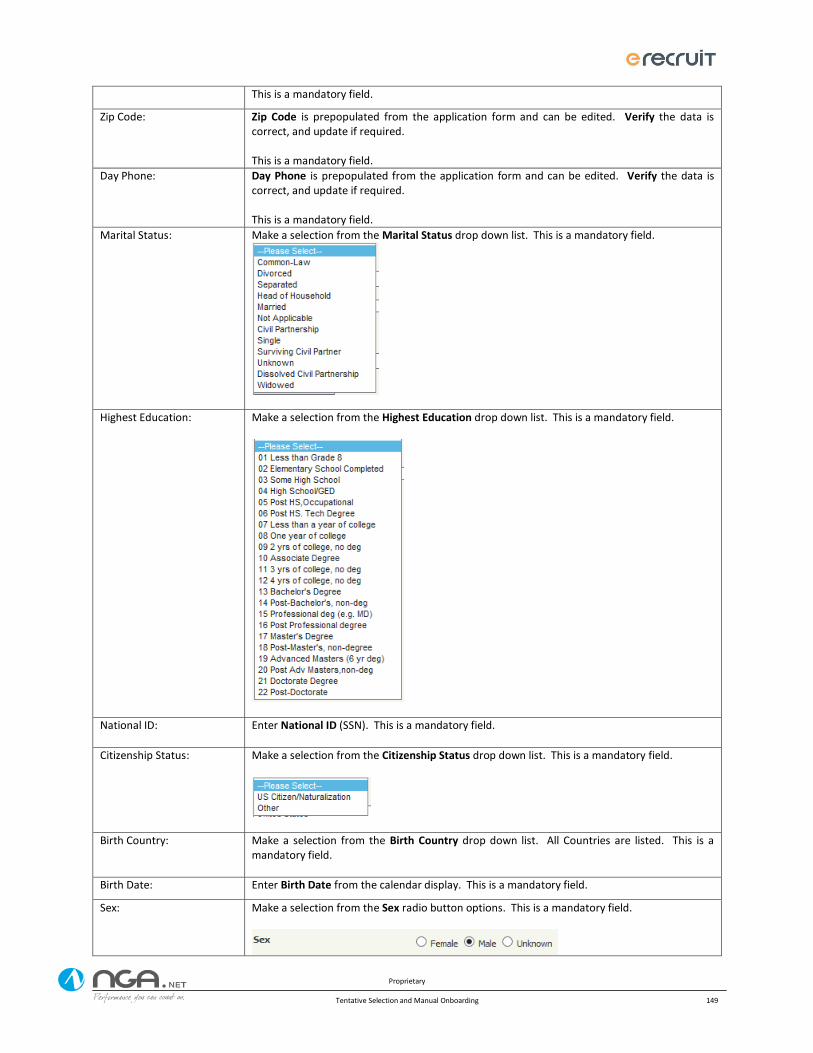
Proprietary
Tentative Selection and Manual Onboarding 149
This is a mandatory field.
Zip Code: Zip Code is prepopulated from the application form and can be edited. Verify the data is correct, and update if required. This is a mandatory field.
Day Phone: Day Phone is prepopulated from the application form and can be edited. Verify the data is correct, and update if required. This is a mandatory field.
Marital Status: Make a selection from the Marital Status drop down list. This is a mandatory field.
Highest Education: Make a selection from the Highest Education drop down list. This is a mandatory field.
National ID: Enter National ID (SSN). This is a mandatory field.
Citizenship Status: Make a selection from the Citizenship Status drop down list. This is a mandatory field.
Birth Country: Make a selection from the Birth Country drop down list. All Countries are listed. This is a mandatory field.
Birth Date: Enter Birth Date from the calendar display. This is a mandatory field.
Sex: Make a selection from the Sex radio button options. This is a mandatory field.
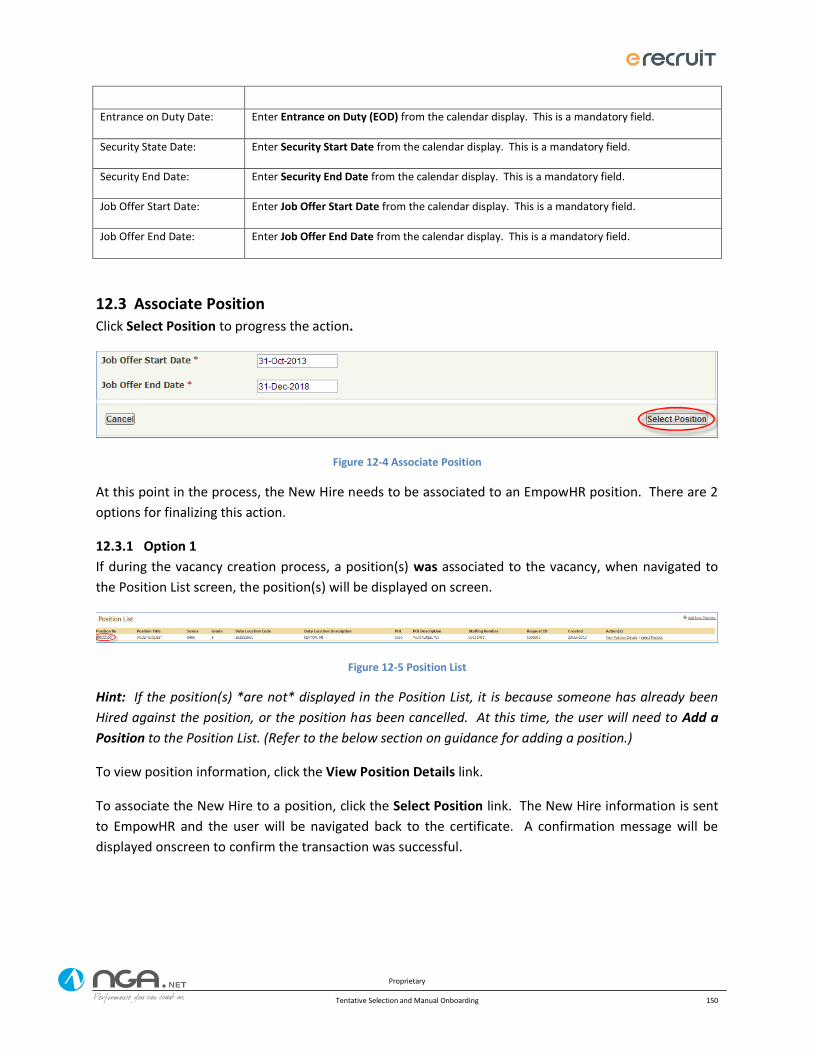
Proprietary
Tentative Selection and Manual Onboarding 150
Entrance on Duty Date: Enter Entrance on Duty (EOD) from the calendar display. This is a mandatory field.
Security State Date: Enter Security Start Date from the calendar display. This is a mandatory field.
Security End Date: Enter Security End Date from the calendar display. This is a mandatory field.
Job Offer Start Date: Enter Job Offer Start Date from the calendar display. This is a mandatory field.
Job Offer End Date: Enter Job Offer End Date from the calendar display. This is a mandatory field.
12.3 Associate Position Click Select Position to progress the action.
Figure 12-4 Associate Position
At this point in the process, the New Hire needs to be associated to an EmpowHR position. There are 2
options for finalizing this action.
12.3.1 Option 1
If during the vacancy creation process, a position(s) was associated to the vacancy, when navigated to
the Position List screen, the position(s) will be displayed on screen.
Figure 12-5 Position List
Hint: If the position(s) *are not* displayed in the Position List, it is because someone has already been
Hired against the position, or the position has been cancelled. At this time, the user will need to Add a
Position to the Position List. (Refer to the below section on guidance for adding a position.)
To view position information, click the View Position Details link.
To associate the New Hire to a position, click the Select Position link. The New Hire information is sent
to EmpowHR and the user will be navigated back to the certificate. A confirmation message will be
displayed onscreen to confirm the transaction was successful.
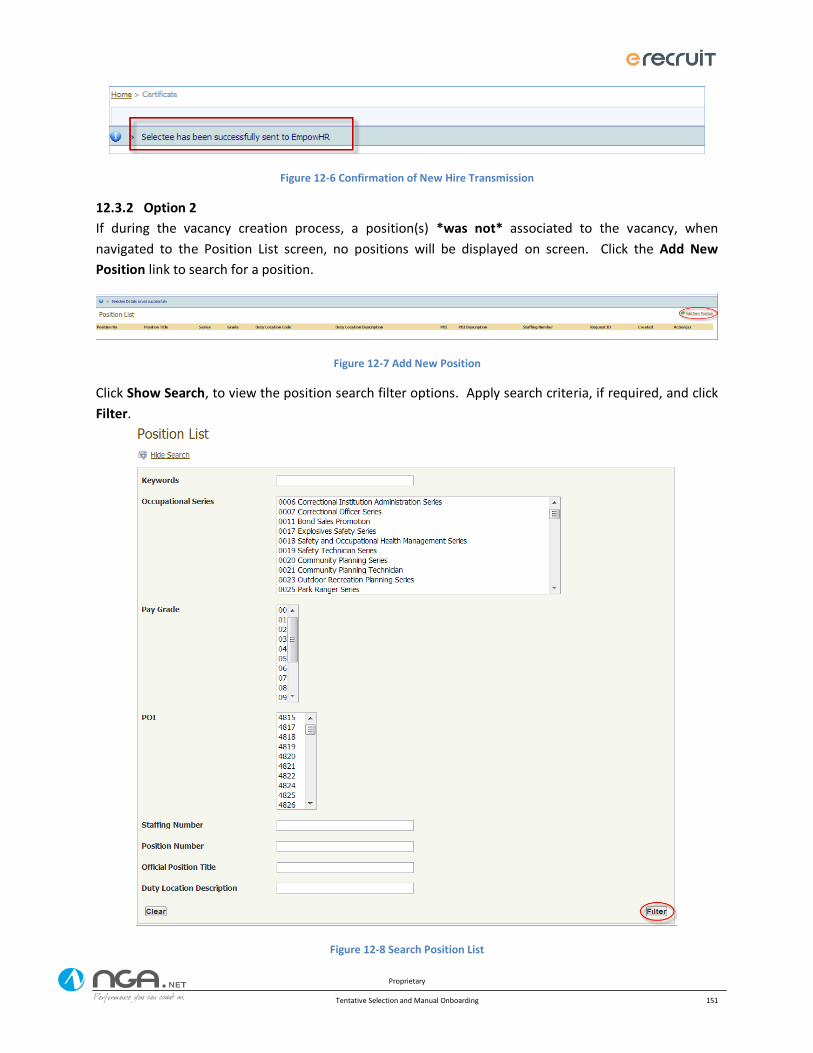
Proprietary
Tentative Selection and Manual Onboarding 151
Figure 12-6 Confirmation of New Hire Transmission
12.3.2 Option 2
If during the vacancy creation process, a position(s) *was not* associated to the vacancy, when
navigated to the Position List screen, no positions will be displayed on screen. Click the Add New
Position link to search for a position.
Figure 12-7 Add New Position
Click Show Search, to view the position search filter options. Apply search criteria, if required, and click
Filter.
Figure 12-8 Search Position List
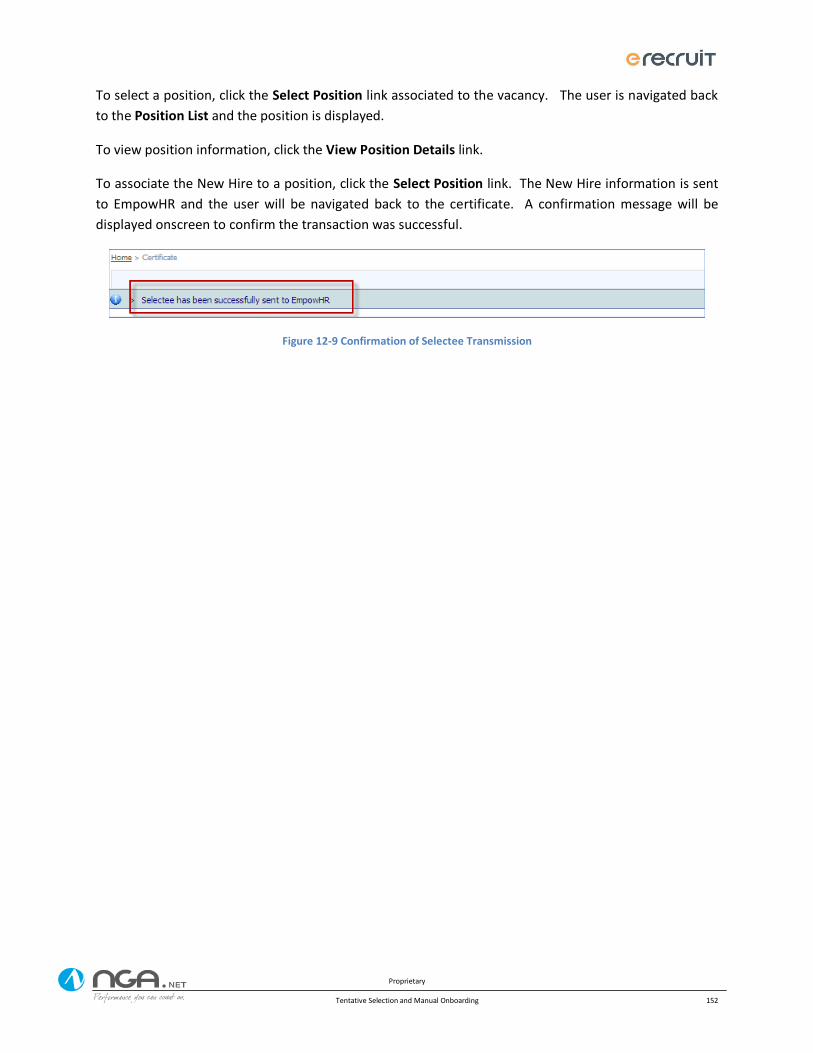
Proprietary
Tentative Selection and Manual Onboarding 152
To select a position, click the Select Position link associated to the vacancy. The user is navigated back
to the Position List and the position is displayed.
To view position information, click the View Position Details link.
To associate the New Hire to a position, click the Select Position link. The New Hire information is sent
to EmpowHR and the user will be navigated back to the certificate. A confirmation message will be
displayed onscreen to confirm the transaction was successful.
Figure 12-9 Confirmation of Selectee Transmission
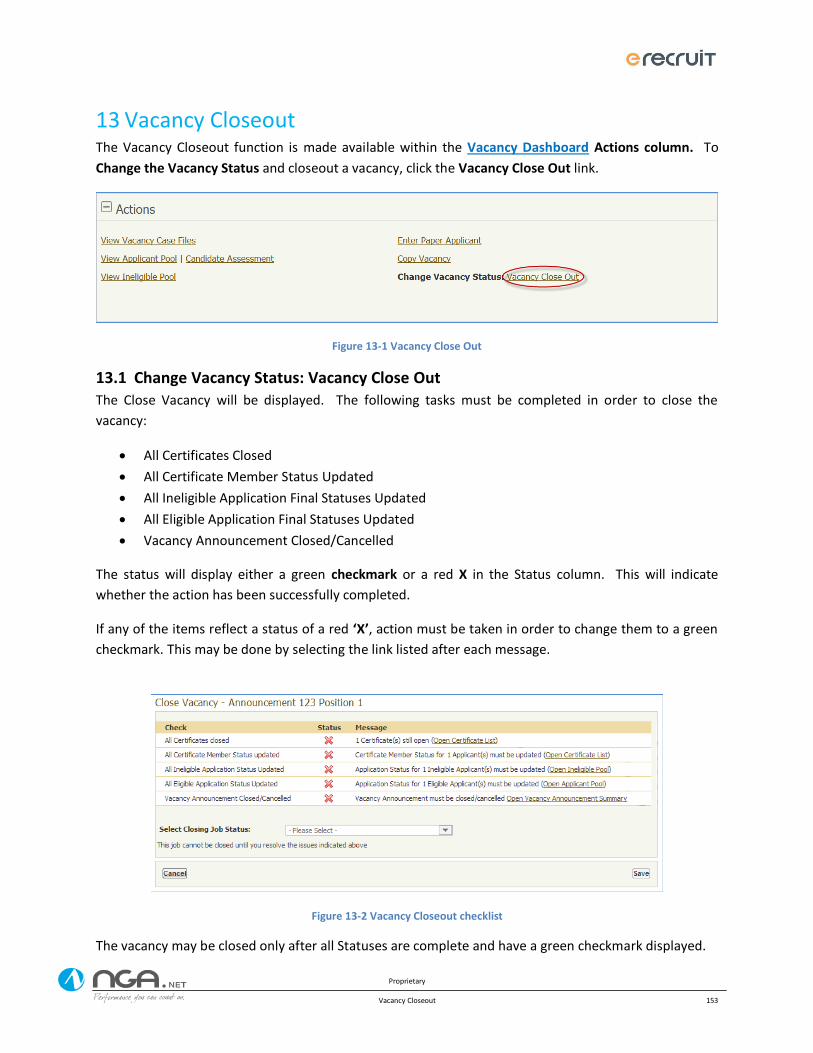
Proprietary
Vacancy Closeout 153
Vacancy Closeout 13The Vacancy Closeout function is made available within the Vacancy Dashboard Actions column. To
Change the Vacancy Status and closeout a vacancy, click the Vacancy Close Out link.
Figure 13-1 Vacancy Close Out
13.1 Change Vacancy Status: Vacancy Close Out The Close Vacancy will be displayed. The following tasks must be completed in order to close the
vacancy:
All Certificates Closed
All Certificate Member Status Updated
All Ineligible Application Final Statuses Updated
All Eligible Application Final Statuses Updated
Vacancy Announcement Closed/Cancelled
The status will display either a green checkmark or a red X in the Status column. This will indicate
whether the action has been successfully completed.
If any of the items reflect a status of a red ‘X’, action must be taken in order to change them to a green
checkmark. This may be done by selecting the link listed after each message.
Figure 13-2 Vacancy Closeout checklist
The vacancy may be closed only after all Statuses are complete and have a green checkmark displayed.
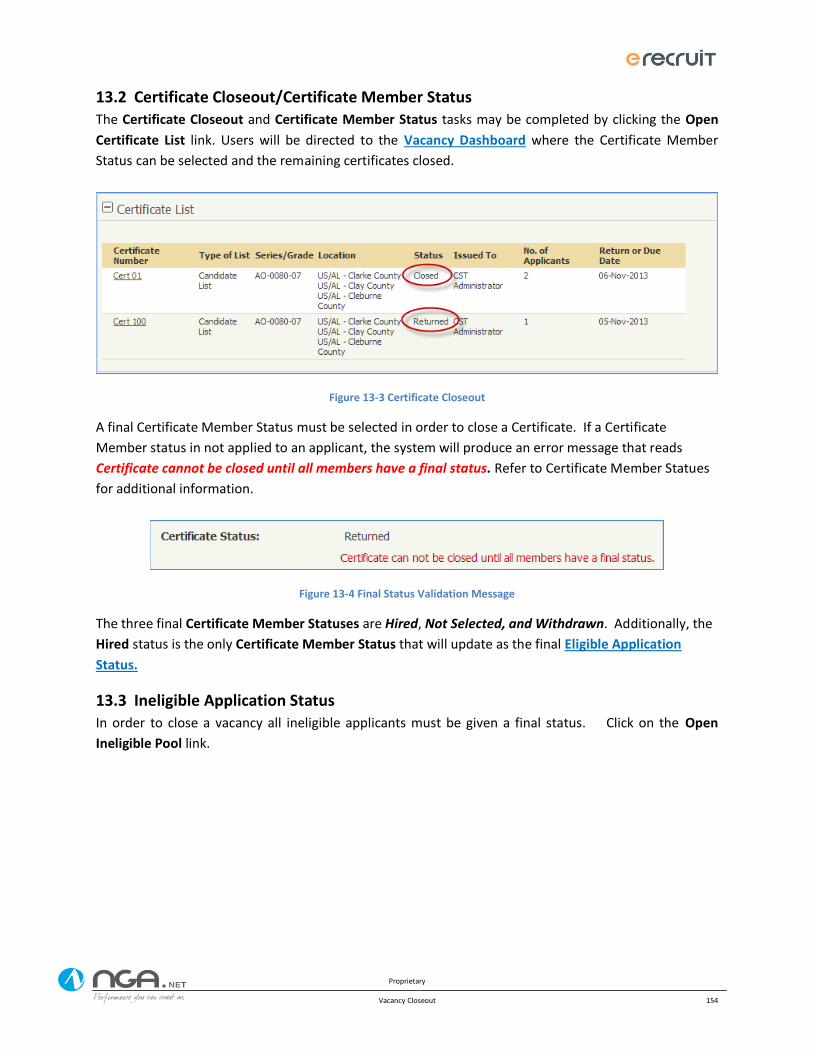
Proprietary
Vacancy Closeout 154
13.2 Certificate Closeout/Certificate Member Status The Certificate Closeout and Certificate Member Status tasks may be completed by clicking the Open
Certificate List link. Users will be directed to the Vacancy Dashboard where the Certificate Member
Status can be selected and the remaining certificates closed.
Figure 13-3 Certificate Closeout
A final Certificate Member Status must be selected in order to close a Certificate. If a Certificate
Member status in not applied to an applicant, the system will produce an error message that reads
Certificate cannot be closed until all members have a final status. Refer to Certificate Member Statues
for additional information.
Figure 13-4 Final Status Validation Message
The three final Certificate Member Statuses are Hired, Not Selected, and Withdrawn. Additionally, the
Hired status is the only Certificate Member Status that will update as the final Eligible Application
Status.
13.3 Ineligible Application Status In order to close a vacancy all ineligible applicants must be given a final status. Click on the Open
Ineligible Pool link.
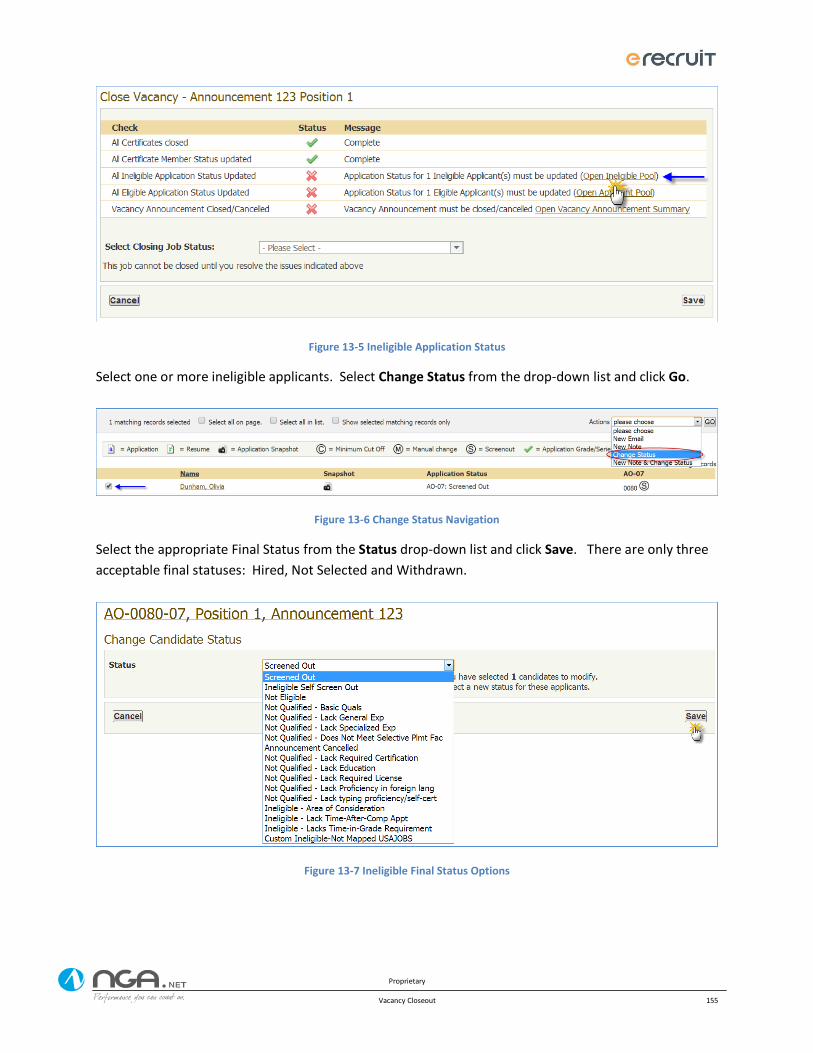
Proprietary
Vacancy Closeout 155
Figure 13-5 Ineligible Application Status
Select one or more ineligible applicants. Select Change Status from the drop-down list and click Go.
Figure 13-6 Change Status Navigation
Select the appropriate Final Status from the Status drop-down list and click Save. There are only three
acceptable final statuses: Hired, Not Selected and Withdrawn.
Figure 13-7 Ineligible Final Status Options
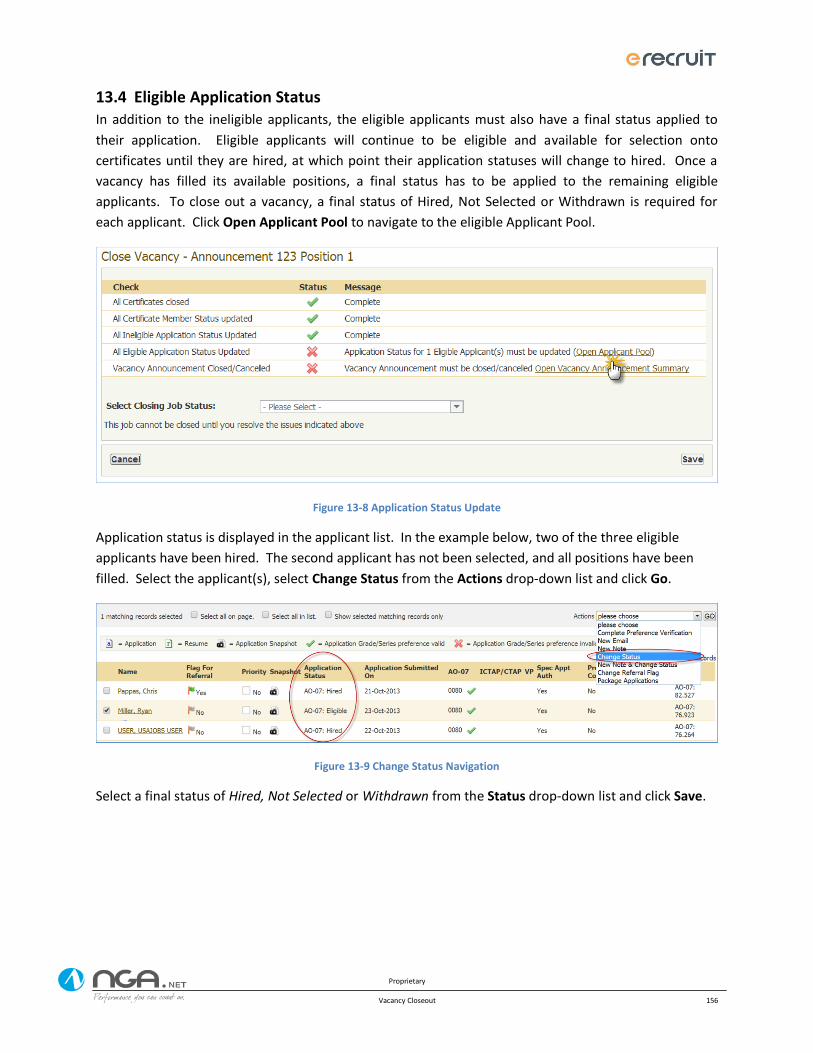
Proprietary
Vacancy Closeout 156
13.4 Eligible Application Status In addition to the ineligible applicants, the eligible applicants must also have a final status applied to
their application. Eligible applicants will continue to be eligible and available for selection onto
certificates until they are hired, at which point their application statuses will change to hired. Once a
vacancy has filled its available positions, a final status has to be applied to the remaining eligible
applicants. To close out a vacancy, a final status of Hired, Not Selected or Withdrawn is required for
each applicant. Click Open Applicant Pool to navigate to the eligible Applicant Pool.
Figure 13-8 Application Status Update
Application status is displayed in the applicant list. In the example below, two of the three eligible
applicants have been hired. The second applicant has not been selected, and all positions have been
filled. Select the applicant(s), select Change Status from the Actions drop-down list and click Go.
Figure 13-9 Change Status Navigation
Select a final status of Hired, Not Selected or Withdrawn from the Status drop-down list and click Save.

Proprietary
Vacancy Closeout 157
Figure 13-10 Final Status Options
13.5 Vacancy Closeout Closed/Cancelled Vacancy closeout will be the final step in the closeout process. Select Open Vacancy Announcement
Summary to navigate to the vacancy summary page.
Figure 13-11 Close Vacancy
A vacancy can only be closed out if the vacancy close date has passed, or if a user cancels the Vacancy
Announcement. If the vacancy close date has not yet passed, the user can update the date to the
present date, but must wait until 11:59:59 pm Eastern Time for the vacancy to officially close.
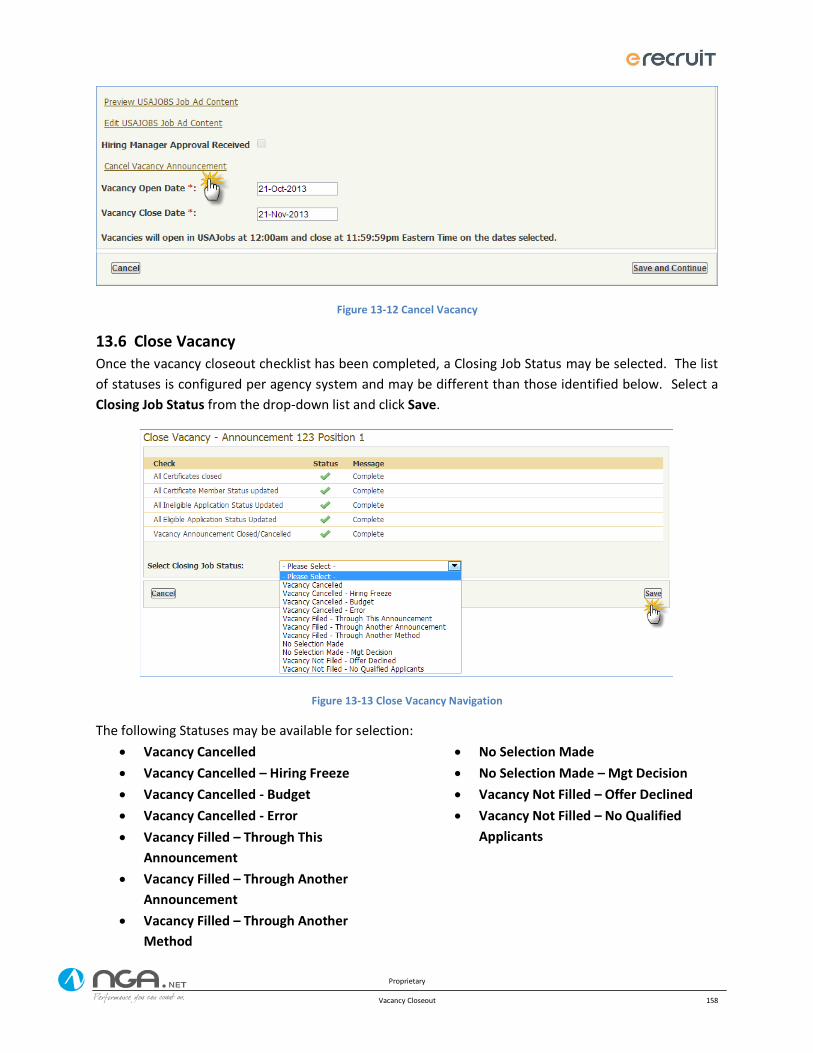
Proprietary
Vacancy Closeout 158
Figure 13-12 Cancel Vacancy
13.6 Close Vacancy Once the vacancy closeout checklist has been completed, a Closing Job Status may be selected. The list
of statuses is configured per agency system and may be different than those identified below. Select a
Closing Job Status from the drop-down list and click Save.
Figure 13-13 Close Vacancy Navigation
The following Statuses may be available for selection:
Vacancy Cancelled
Vacancy Cancelled – Hiring Freeze
Vacancy Cancelled - Budget
Vacancy Cancelled - Error
Vacancy Filled – Through This
Announcement
Vacancy Filled – Through Another
Announcement
Vacancy Filled – Through Another
Method
No Selection Made
No Selection Made – Mgt Decision
Vacancy Not Filled – Offer Declined
Vacancy Not Filled – No Qualified
Applicants
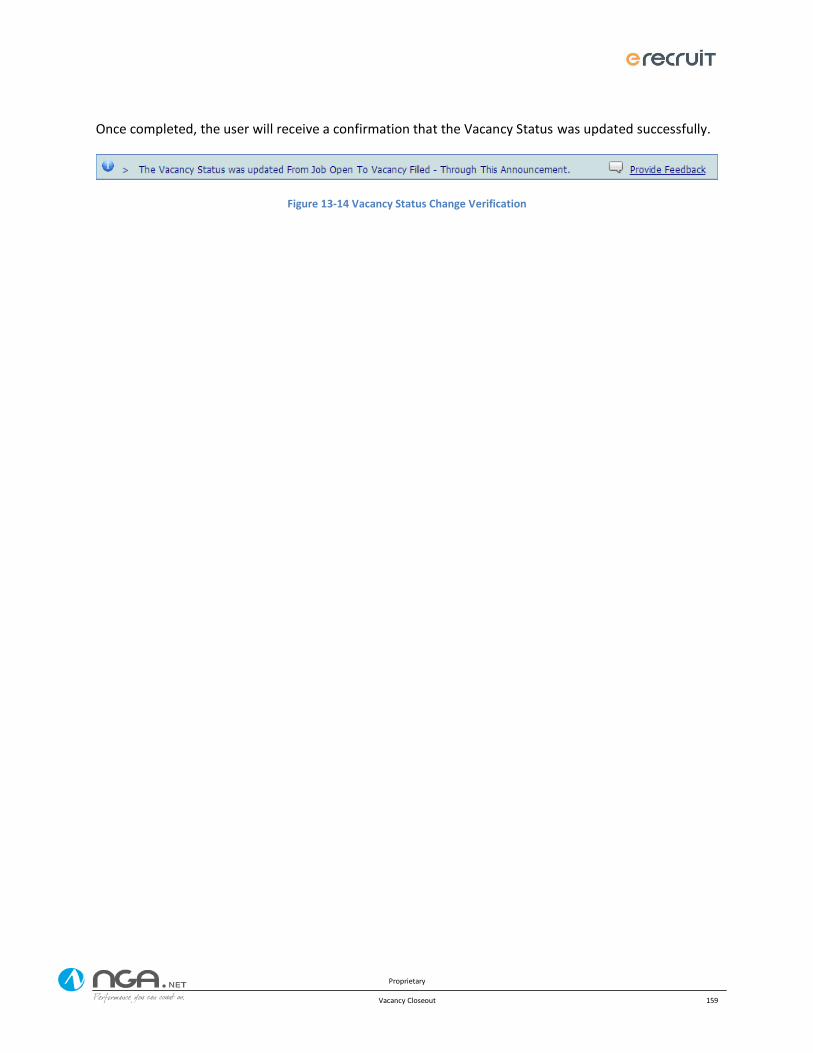
Proprietary
Vacancy Closeout 159
Once completed, the user will receive a confirmation that the Vacancy Status was updated successfully.
Figure 13-14 Vacancy Status Change Verification
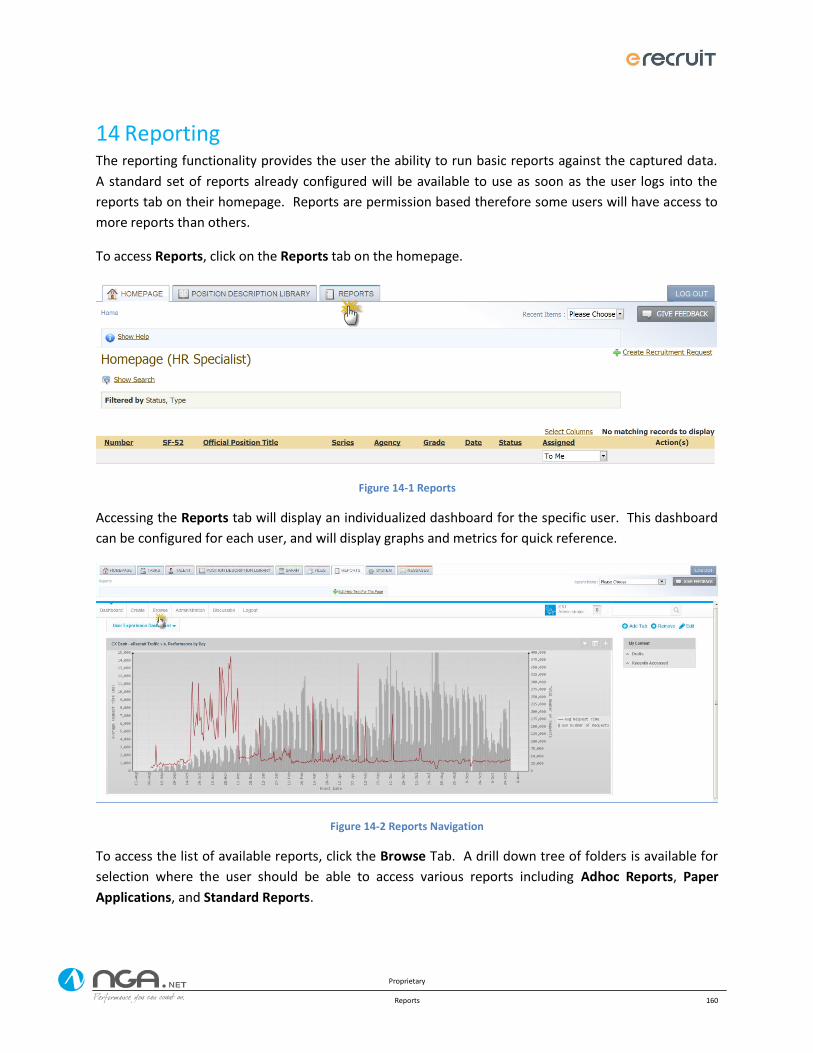
Proprietary
Reports 160
Reporting 14The reporting functionality provides the user the ability to run basic reports against the captured data.
A standard set of reports already configured will be available to use as soon as the user logs into the
reports tab on their homepage. Reports are permission based therefore some users will have access to
more reports than others.
To access Reports, click on the Reports tab on the homepage.
Figure 14-1 Reports
Accessing the Reports tab will display an individualized dashboard for the specific user. This dashboard
can be configured for each user, and will display graphs and metrics for quick reference.
Figure 14-2 Reports Navigation
To access the list of available reports, click the Browse Tab. A drill down tree of folders is available for
selection where the user should be able to access various reports including Adhoc Reports, Paper
Applications, and Standard Reports.
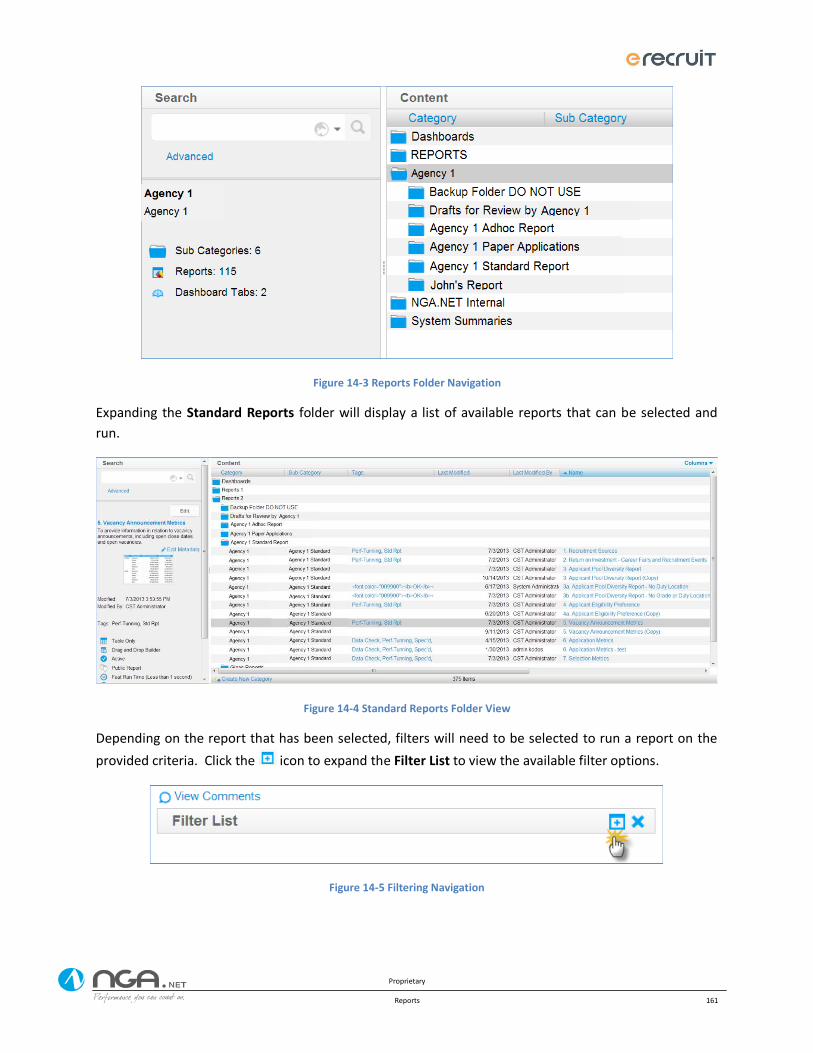
Proprietary
Reports 161
Figure 14-3 Reports Folder Navigation
Expanding the Standard Reports folder will display a list of available reports that can be selected and
run.
Figure 14-4 Standard Reports Folder View
Depending on the report that has been selected, filters will need to be selected to run a report on the
provided criteria. Click the icon to expand the Filter List to view the available filter options.
Figure 14-5 Filtering Navigation
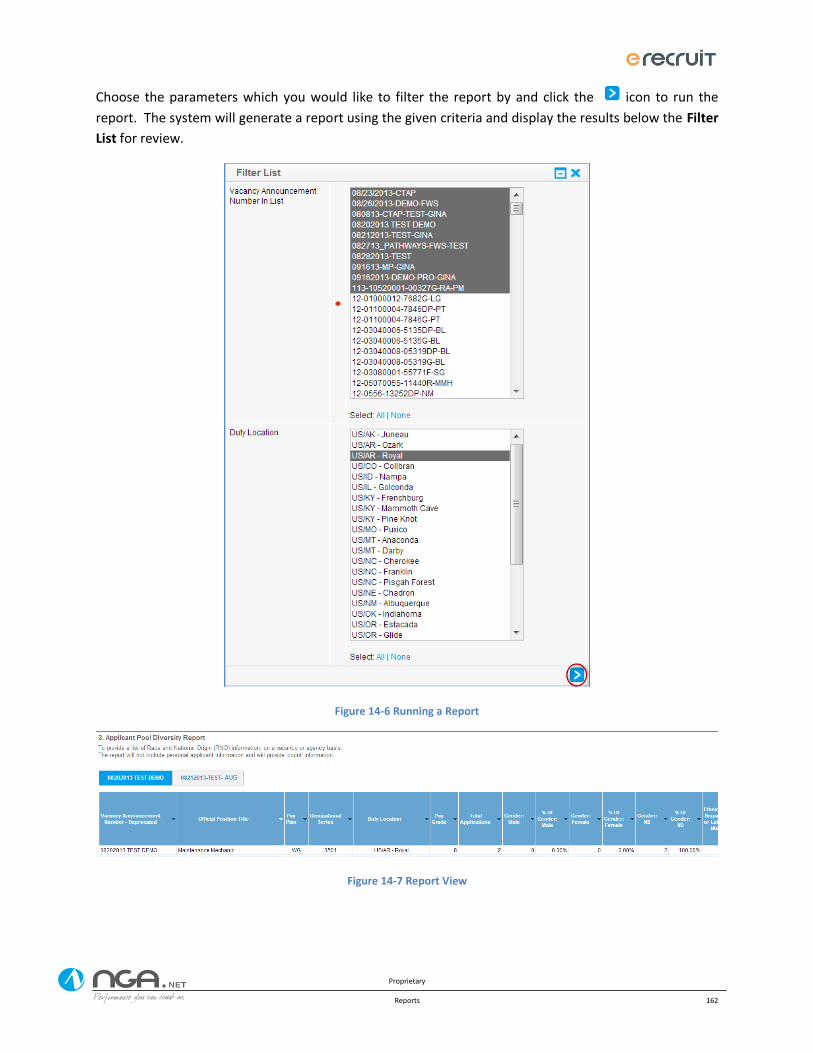
Proprietary
Reports 162
Choose the parameters which you would like to filter the report by and click the icon to run the
report. The system will generate a report using the given criteria and display the results below the Filter
List for review.
Figure 14-6 Running a Report
Figure 14-7 Report View
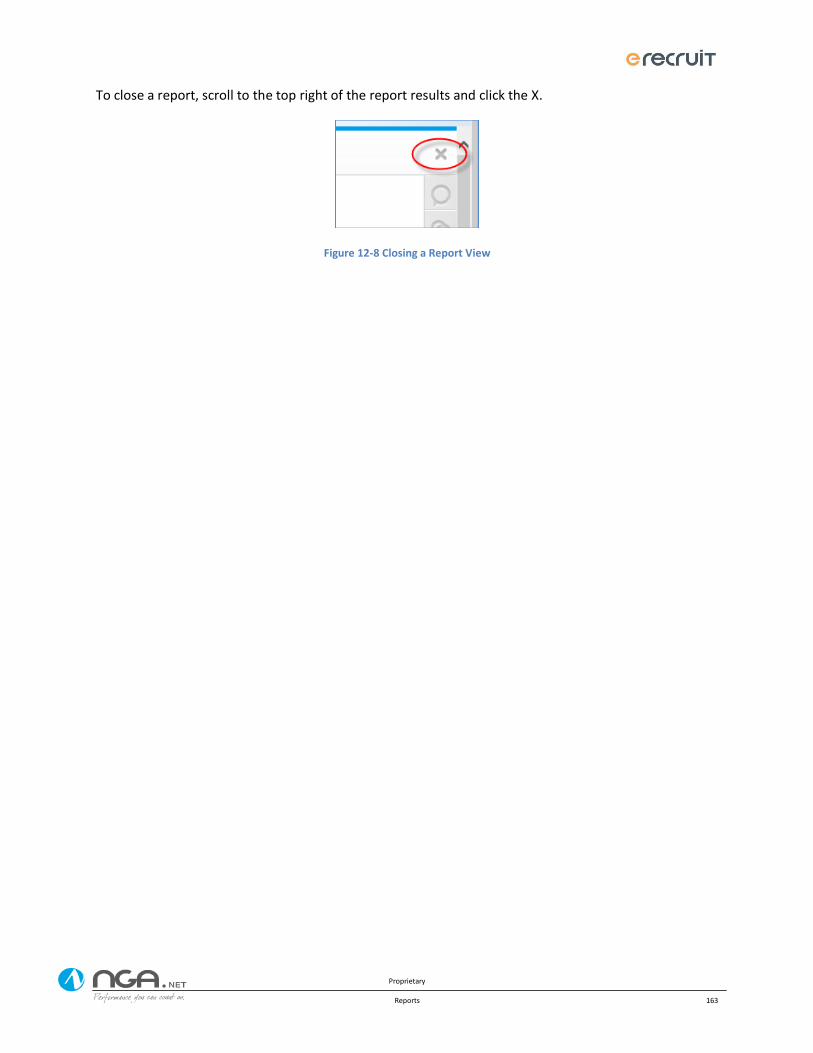
Proprietary
Reports 163
To close a report, scroll to the top right of the report results and click the X.
Figure 12-8 Closing a Report View