Embed Size (px)
Citation preview
School of Mathematics and Systems Engineering Reports from MSI - Rapporter från MSI
Employee Management System
Kancho Dimitrov Kanchev
Dec 2006
MSI Report 06170 Växjö University ISSN 1650-2647 SE-351 95 VÄXJÖ ISRN VXU/MSI/DA/E/--06170/--SE
- 2 -
Abstract This report includes a development presentation of an information system for managing the staff data within a small company or organization. The system as such as it has been developed is called Employee Management System. It consists of functionally related GUI (application program) and database. The choice of the programming tools is individual and particular.
Keywords Information system, Database system, DBMS, parent table, child table, table fields, primary key, foreign key, relationship, sql queries, objects, classes, controls.
- 3 -
Contents 1. Introduction…………………………………………………………4
1.1 Background……………………………………………………....................4 1.2 Problem statement ...…………………………………………………….....5 1.3 Problem discussion………………………………………………………....5 1.4 Report Overview…………………………………………………………...5
2. Problem’s solution……………………………………………….....6 2.1 Method...…………………………………………………………………...6 2.2 Programming environments………………………………………………..7 2.3 Database analyzing, design and implementation…………………………10 2.4 Program’s structure analyzing and GUI constructing…………………….12 2.5 Database connections and code implementation………………………….14
2.5.1 Retrieving data from the database………………………………....19 2.5.2 Saving data into the database……………………………………...22 2.5.3 Updating records into the database………………………………..24 2.5.4 Deleting data from the database…………………………………...26
3. Conclusion………………………………………………………....27 4. References………………………………………………………...28
Appendix A: Programming environments and database content….29 Appendix B: Program’s structure and code Implementation……...35 Appendix C: Test Performance…………………………………....56
- 4 -
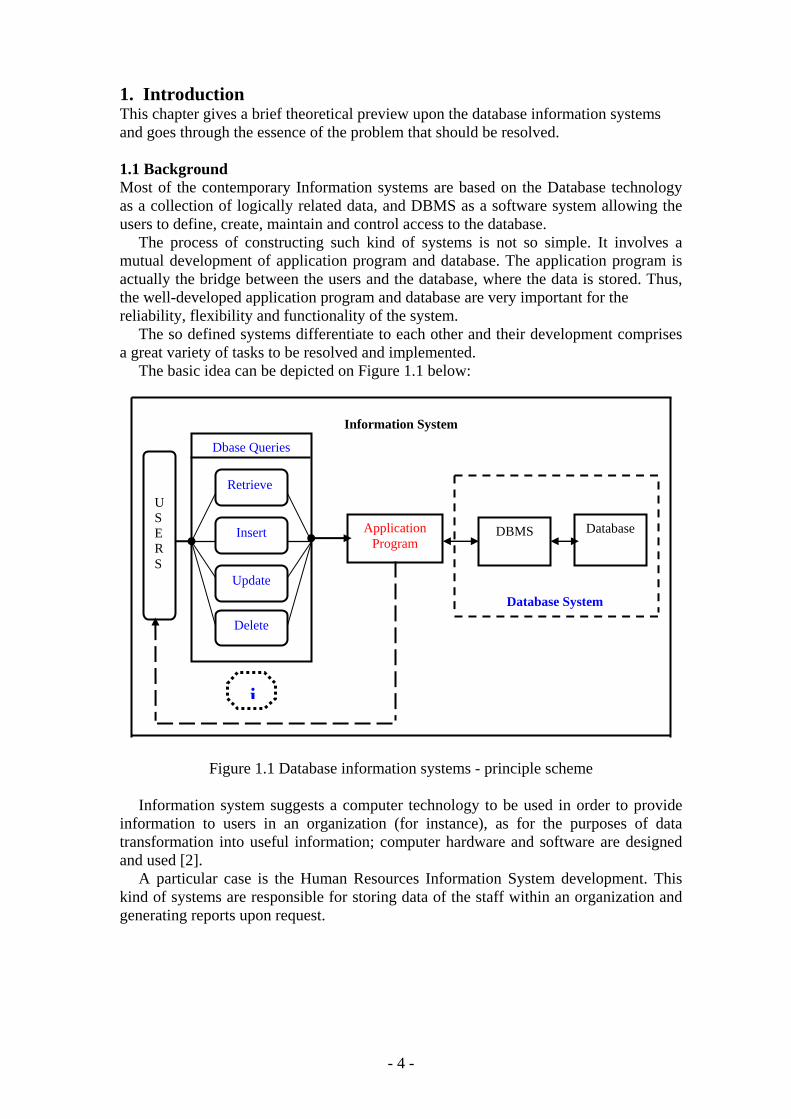
1. Introduction This chapter gives a brief theoretical preview upon the database information systems and goes through the essence of the problem that should be resolved. 1.1 Background Most of the contemporary Information systems are based on the Database technology as a collection of logically related data, and DBMS as a software system allowing the users to define, create, maintain and control access to the database.
The process of constructing such kind of systems is not so simple. It involves a mutual development of application program and database. The application program is actually the bridge between the users and the database, where the data is stored. Thus, the well-developed application program and database are very important for the reliability, flexibility and functionality of the system.
The so defined systems differentiate to each other and their development comprises a great variety of tasks to be resolved and implemented.
The basic idea can be depicted on Figure 1.1 below:
Information System Database System
Figure 1.1 Database information systems - principle scheme
Information system suggests a computer technology to be used in order to provide
information to users in an organization (for instance), as for the purposes of data transformation into useful information; computer hardware and software are designed and used [2].
A particular case is the Human Resources Information System development. This kind of systems are responsible for storing data of the staff within an organization and generating reports upon request.
Dbase Queries
Application Program
Database DBMS
Retrieve
Insert
Update
Delete
U S E R S
i
- 5 -
Such kind of system could be integrated with other Information systems or modules: Accounting Information System (AIS) – designed to transform financial data into information, or Management Information System (MIS) that provides decision-oriented information to managers, and so on…
“Organizations depend on Information Systems in order to stay competitive. Productivity, which is crucial to staying competitive, can be increased through better Information Systems.” [2]. 1.2 Problem Statement This report’s documentation goes through the whole process of both application program and database development. It also comprises the development tools have been utilized for these purposes. 1.3 Problem Discussion This system should consist of an application program, on one hand, and a database (repository of data) on the other. The program should perform the basic operations upon the database as retrieving, inserting, updating and deleting data. Any additional functionality is a goal of a further module development.
It is a kind of strategy to start the development from designing and constructing the database, as this structure will determine the further structure of the application program.
The logical database model (tables, their content and the relationships between them) should respond to the given task and cover the basic requirements.
The Interface of the program should be user-friendly, and the program should be as easy for use as it is possible.
Both controls and forms should logically and functionally be related within the program and fully respond to the structure of the database.
Another problem is establishing the connections with the database, every time, when a query is needed to be performed upon it. Exception-handling should also be taken into an account during the system’s development due to eventual exceptions that may occur. 1.4 Report Overview The next chapter and its subsections will turn the attention to the method for resolving the problem, the programming environments used for developing the system and the implementation of the operations performed upon the database.
- 6 -
2. Problem’s Solution This chapter involves some subsections that concern the basic scheme of resolving the given task and comprise both the methods and tools of its development as well. 2.1 Method At the very commencement, I proceeded to a decision to carry out the development of my task into the following steps:
1. Exploring the available development environments and techniques. 2. Database Analyzing. 3. Database design and Implementation. 4. Program’s Structure Analyzing. 5. GUI (Graphical User Interface) constructing. 6. Bringing all the stuff together (controls data binding and functions implementation). 7. Tests.
Each one of these steps could be explained in some brief details as follows: 1. Exploring the available development environments and techniques There is a lot of programming environments available to be used for such kind of
elaborations. The point is to choose such an environment that we will be able to operate with in a convenient and easy way. This is more or less optional and individual process, that depends on the developer’s experience as well.
2. Database Analyzing It concerns all of the demands, put upon the database content and its functionality.
The database should be designed and implemented in a way that the user would expect it to be.
3. Database design and Implementation This step is tightly related with the previous one as it is completely determined by
the requirements, analyzed and discussed in step2. 4. Program’s Structure Analyzing The application program as an interface between the users and the database should
be an accurate “reflection” of the database on the screen; hence a well analyzed and defined structure is needed.
5. GUI Constructing After analyzing the program’s structure and defining what it should consist of, a
graphical representation of this stuff is needed in order to enable the user to interact with the data.
6. Bringing all the stuff together The next step that should be taken is connecting the program with the database and
performing the necessary functionality upon all of the controls. 7. Tests To ensure that everything works properly and as it has been expected, test
performance has to be done upon the system’s functionality.
- 7 -
2.2 Programming Environments The given task concerns a small company (organization). For instance, for the needs of a small company, we could use one set of tools, but for the needs of a larger one, it would be much better if we apply our approach by using some different, that could be more appropriate and would fit much better the requirements we have to satisfy.
I decided to use the Access Database Environment as a Database Management System and C# as a programming language for developing my project.
Before proceeding to the explanatory notes of how I have developed the software, I would like to take a preview upon the programming tools (environments) that have been used during this project’s development course.
• Database Environment: Access is a typical environment for constructing relational databases.
The database is the skeleton and the underlying framework of most of the contemporary Information Systems. The evolution of the Database systems could be divided into three phases: the Manual-filing System, the File-based systems, and the Database and the Database Management systems (DBMS).
o The manual-filing system contains files of information, related to a project, product, task, client, or employee and they are usually labeled and stored in one or more cabinets. The cabinets may be located in the secure area of the building, for safety. To facilitate the process of searching and to find out what we want, more quickly, the different types of item can be put in separate folders and they remain logically related.
Actually, the needs of the contemporary industrial world could not be covered or satisfied by using such kind of systems, and especially what concerns their reliability and efficiency.
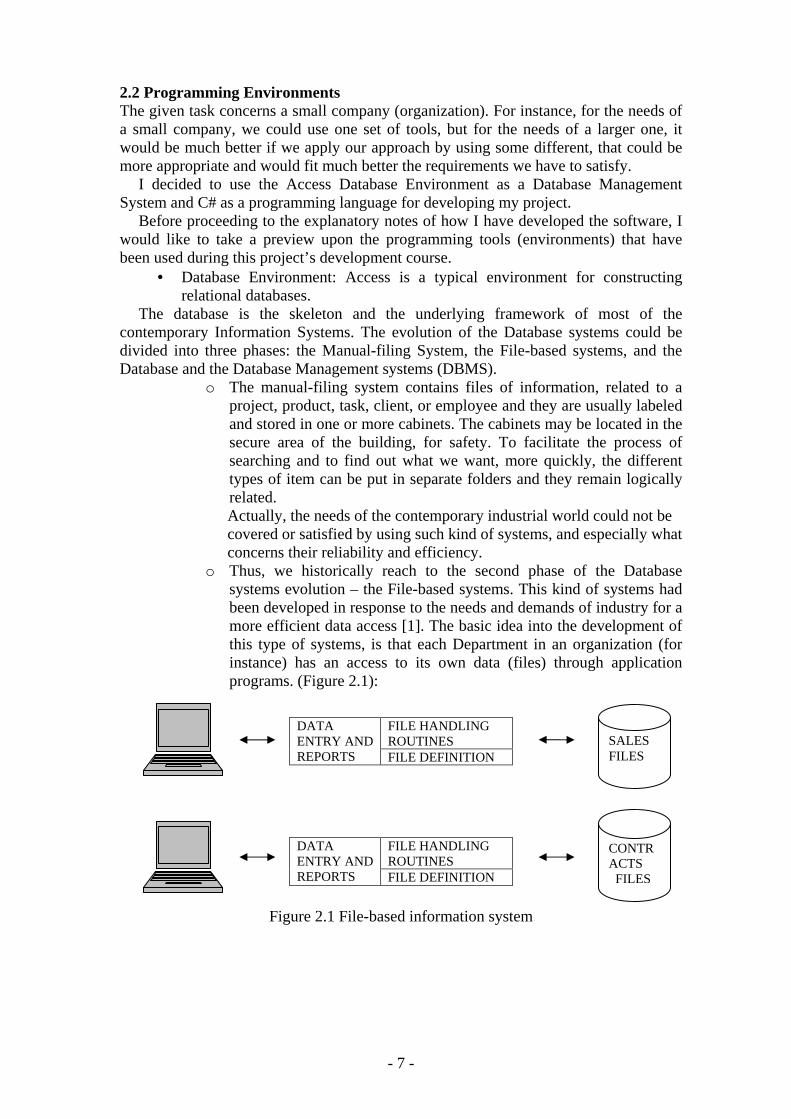
o Thus, we historically reach to the second phase of the Database systems evolution – the File-based systems. This kind of systems had been developed in response to the needs and demands of industry for a more efficient data access [1]. The basic idea into the development of this type of systems, is that each Department in an organization (for instance) has an access to its own data (files) through application programs. (Figure 2.1):
Figure 2.1 File-based information system
FILE HANDLING ROUTINES
DATA ENTRY AND REPORTS FILE DEFINITION
FILE HANDLING ROUTINES
DATA ENTRY AND REPORTS FILE DEFINITION
SALES FILES
CONTRACTS FILES
- 8 -
There are some limitations of the File-based systems: - Data Duplication: It is undesirable as it costs time and money, and takes additional storage space. - Dependency of Data: That’s a kind of inconvenience as the physical structure and storage of the data files and records are defined in the application code. - Data Isolation: It is some difficult to access data, isolated
in separate files. - Incompatibility of the file formats: It concerns the file
structure as a dependent on the programming language, in which one the application program has been developed and implemented, as the file’s structure is embedded in the application program.
o After taking a new and more effective approach, the Database and the Database Management System (DBMS) have been created. Most of the contemporary systems are based on the Database technology as a collection of logically related data and the DBMS as a software system allowing the users to define, create, maintain and control access to the Database.
The DBMS is a really powerful set of tools, enabling users to operate easily with data into a database as: Inserting, Updating, Deleting and Retrieving data. It prevents unauthorized access to the database and maintains the consistency of the stored data. The DBMS also restores the data in case of hardware or software failure and reduces the loss of data in this way.
MS-Access 2000 (Microsoft Access 2000) is a contemporary development environment for dealing with databases:
Access is a computerized management system with relational database. The whole information is stored in separate tables in one file. Such an information arrangement is more or less convenient as we can view, add and delete information using online forms, and search or retrieve by using queries.
The term “Database” comprises collection of objects (tables, forms, pages, queries, macros) for manipulating, retrieving and storing data.
It is a very good advantage that the information (data) can be populated in different tables (related to each other) and it is not necessary to store all data into one table. That leads to a less redundancy of data and reduces the required disk storage space, and speeds up processing as well. There are three relationships between the tables in a database: (one-to-many), (one-to-one) and (many-to-many).
One of the mostly used relationships is the (one-to-many) type. If we have a main table (so called Parent table) and some other obedient tables (so called Child tables), then let us assume that the relationship between the parent table and the child tables is of type (one-to-many). It means that every single record from the parent table could have several records into each one of its related child tables. The tables are related by their key-values. The key into the parent table is called primary key, and the keys into its child tables are called foreign keys. The primary and the foreign key have the same unique value.
These conclusions are based on a theory in [3]. The main window-frame of MS-Access can be seen on Figure 1 (Appendix A).
- 9 -
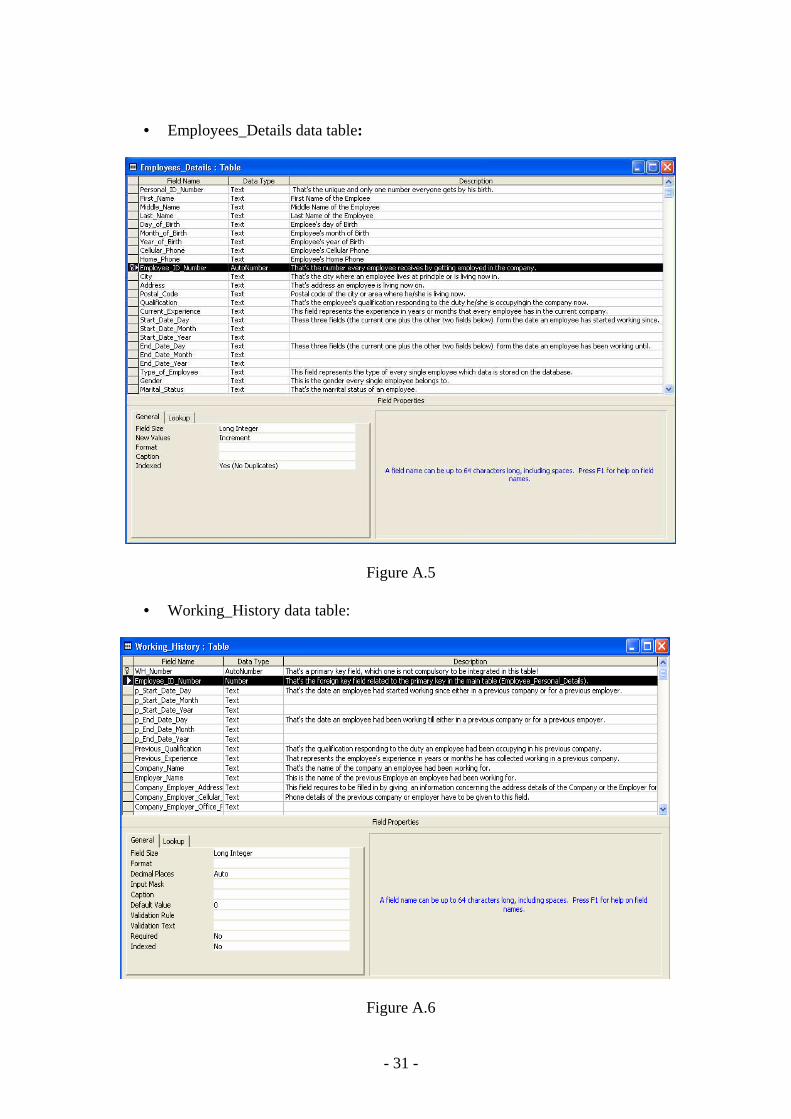
C# and the .Net Framework: For the purposes of my project I chose to work with Visual Studio of Microsoft, in particular with the C# as a programming language. My choice is based on the reliable programming environment offered by C# and the highly cleared syntax of this programming language as well. C# is a good proof for a highly developed modern technology based on the contemporary object-oriented theory in programming and lying on a very powerful, reliable and flexible platform as such as it is the .Net Framework.
The main window of the Visual Studio and the .Net Framework basic architecture could be seen on Figure 2: Visual Studio main window and Figure 3: Basic architecture of .Net Framework – Appendix A, [4]:
Based on [4] we can say that the .Net Framework is a development of Microsoft Corporation. In fact, a lot of efforts, time and investments have been spent on this research and development.
As a class library, .Net Framework allows “cross-language” development and can be used by any .Net language to perform different kind of tasks. There are approximately 40 languages with compilers for the .Net Framework, but only some of them are supported by Microsoft Corporation: C#, Visual Basic .Net, C++/CLI, J#, Jscript .Net, Eiffel, and some more.
“. Net has several designed intentions: - Interoperability for existing code in COM libraries. - Common Runtime Engine: languages compiled to an intermediate
language, Common Intermediate Language. - Language Independence: using a Common Type System that defines all
possible data-type and programming concepts supported by the CLR (Common Language Runtime).
- Base Class Library: also known, as the Foundation Class Library is a l library of types available to all languages using .Net.
- Simplified Installation: for the Windows Platform, due to eliminating registry setting and dll-problems.
- Security: by letting code execute in different trust levels.” [4]. The language of choice – C# as an object-oriented programming language, has a
procedural, object-oriented syntax based on C++. It includes some aspects and features of other programming languages as: Java, Visual Basic and Delphi.
The developers of C# have emphasized on the language simplification as: fewer symbolic and decorative requirements.

- 10 -
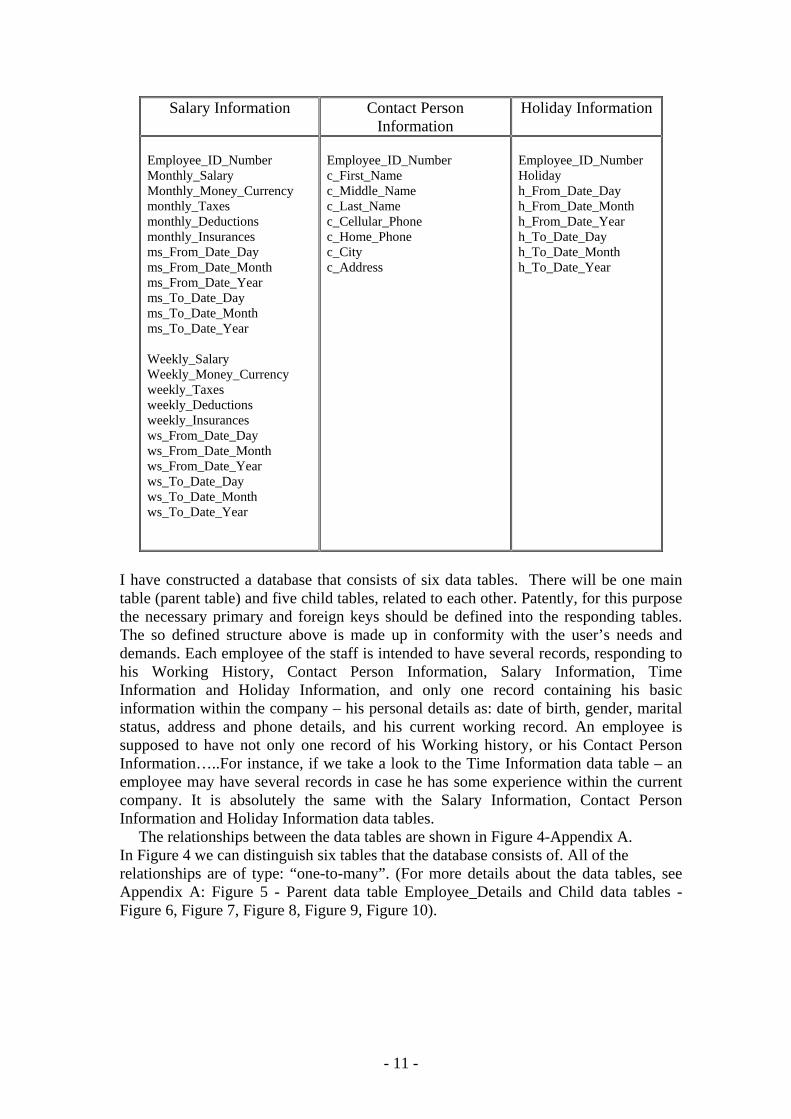
2.3 Database Analyzing, design and implementation The database for the system should include information of company’s staff, respectively of its employees. The data is subdivided into the following groups:
Employees’ Basic Details
Working History Time_Information
Employee_ID_Number Personal_ID_Number First_Name Middle_Name Last_Name Day_of_Birth Month_of_Birth Year_of_Birth Cellular_Phone Home_Phone City Address Postal_Code Qualification Current_Experience Start_Date_Day Start_Date_Month Start_Date_Year End_Date_Day End_Date_Month End_Date_Year Type_of_Employee Gender Marital_Status
Employee_ID_Number Company_Name Employer_Name Company_Employer_Address Company_Employer_Cellular_Phone Company_Employer_Office_Phone Previous_Qualification Previous_Experience p_Start_Date_Day p_Start_Date_Month p_Start_Date_Year p_End_Date_Day p_End_Date_Month p_End_Date_Year
Employee_ID_Number Wroked_Hours Off_Hours Days_off Over_Time Extra_Days w_From_Date_Day w_From_Date_Month w_From_Date_Year w_To_Date_Day w_To_Date_Month w_To_Date_Year
- 11 -
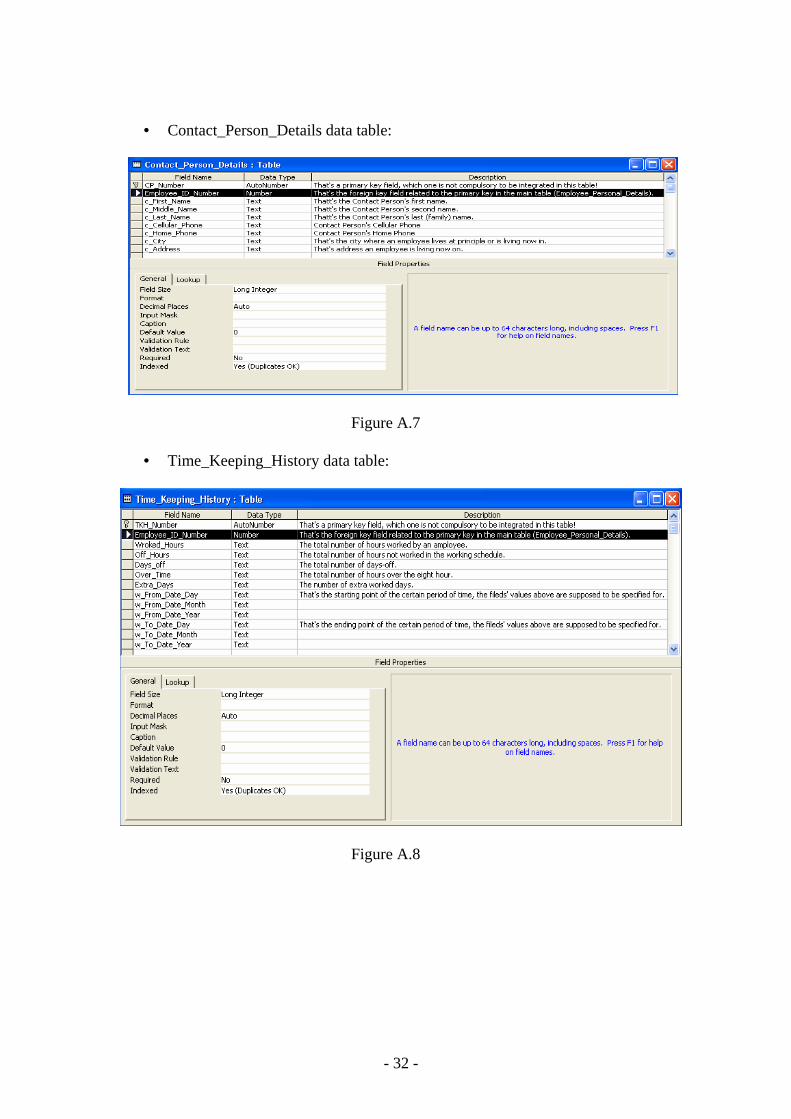
I have constructed a database that consists of six data tables. There will be one main table (parent table) and five child tables, related to each other. Patently, for this purpose the necessary primary and foreign keys should be defined into the responding tables. The so defined structure above is made up in conformity with the user’s needs and demands. Each employee of the staff is intended to have several records, responding to his Working History, Contact Person Information, Salary Information, Time Information and Holiday Information, and only one record containing his basic information within the company – his personal details as: date of birth, gender, marital status, address and phone details, and his current working record. An employee is supposed to have not only one record of his Working history, or his Contact Person Information…..For instance, if we take a look to the Time Information data table – an employee may have several records in case he has some experience within the current company. It is absolutely the same with the Salary Information, Contact Person Information and Holiday Information data tables.
The relationships between the data tables are shown in Figure 4-Appendix A. In Figure 4 we can distinguish six tables that the database consists of. All of the relationships are of type: “one-to-many”. (For more details about the data tables, see Appendix A: Figure 5 - Parent data table Employee_Details and Child data tables - Figure 6, Figure 7, Figure 8, Figure 9, Figure 10).
Salary Information Contact Person Information
Holiday Information
Employee_ID_Number Monthly_Salary Monthly_Money_Currency monthly_Taxes monthly_Deductions monthly_Insurances ms_From_Date_Day ms_From_Date_Month ms_From_Date_Year ms_To_Date_Day ms_To_Date_Month ms_To_Date_Year Weekly_Salary Weekly_Money_Currency weekly_Taxes weekly_Deductions weekly_Insurances ws_From_Date_Day ws_From_Date_Month ws_From_Date_Year ws_To_Date_Day ws_To_Date_Month ws_To_Date_Year
Employee_ID_Number c_First_Name c_Middle_Name c_Last_Name c_Cellular_Phone c_Home_Phone c_City c_Address
Employee_ID_Number Holiday h_From_Date_Day h_From_Date_Month h_From_Date_Year h_To_Date_Day h_To_Date_Month h_To_Date_Year

- 12 -
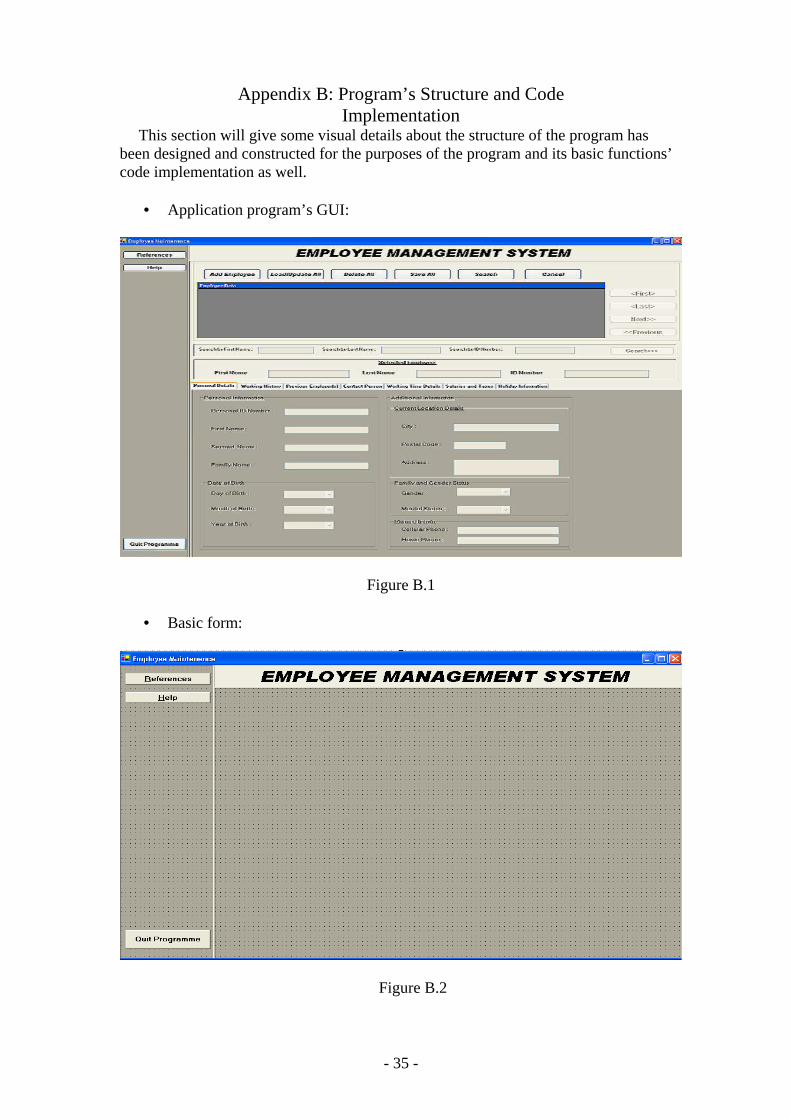
The primary key fields could be set to Auto-number data type as Access creates these values in an ascending order to ensure that they are unique within a table. Some of the fields should be “adjusted” to accept null-values. It is quite important to be done as it is tightly related to the input fields of the application program. I decided to perform it in the following way: those fields that are compulsory to be filled by the user I have set not to accept any null-values of data and on the other hand, those ones, that can be left blank, are set to accept null-values. It is easy to be performed by changing the Allow Zero Length setting (Appendix A: Figure 11 – Setting a data-field to accept null-values).
It is just needed to go to the desired field that has to be set, and switch between the two options, offered into the “Allow Zero Length” field. In the example, shown above, the Personal_ID_Number field is set not to allow any null-values thus its field’s length can not be zero as its value is quite essential for identifying an employee as an individual and distinctive person.
That has been considered and done for a kind of convenience as the user would wish not to enter all of the data at the moment, and come back later.
2.4 Program’s Structure Analyzing and GUI Constructing After getting the database prepared, application program should be constructed and implemented in some programming environment to enable the users to communicate with the database.
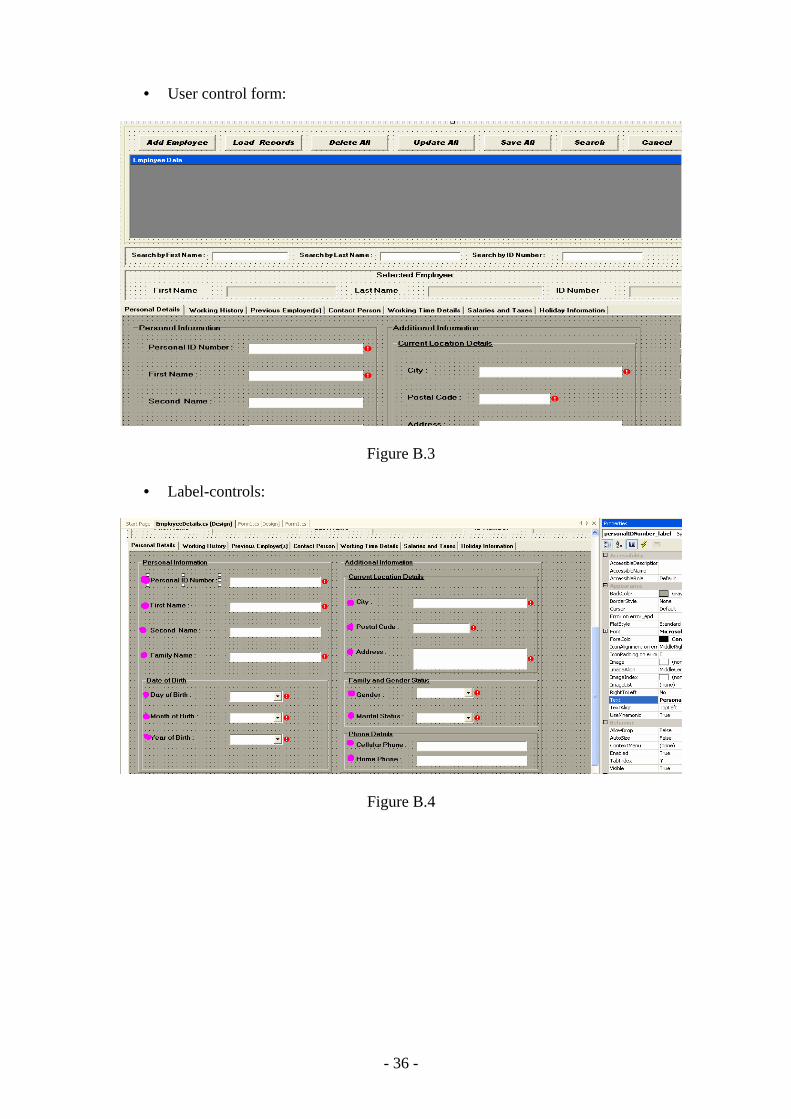
Graphical User Interface (GUI) is intended to be built up as a basic structure of the program. The first general advice when constructing GUIs is to “know thy users” as there is a large number of rules and requirements, concerning the whole process of GUI development. Every GUI consists of certain number of controls (text-boxes, combo-boxes, buttons…etc.). The list of all properties and methods for all controls is called Application Programming Interface (API). The Program’s GUI is shown in (Appendix B: Figure 1):
A set of controls is used in order to reach the desired purpose, what concerns the functionality of the application, including Labels, Text boxes, Combo Boxes, Data Grid, Buttons, Group Boxes, Panels, Tab controls etc. All of these controls, available in the program, are fitted to the corresponding forms that are used in the application.
The Program contains two basic forms: � General - used as a platform (Appendix B: Figure 2 Basic form): � And a second one (Appendix B: Figure 3) that is loaded onto the first
(General) form. One control that is heavily used is the Label control. It is used to display text on the
form. A Label-control is declared as: • Private Label label_name;
And afterwards - instantiated by the initComponent method: • Label_name = new Label();
- 13 -
For all controls, the default constructor is used as their properties are set after that. A set of Label controls is depicted on Figure 4 – Appendix B. The role of the Label
is to point at the responding text field, showing what it is intended to be used for. Other set of controls, used in the program, is the set of text boxes and combo boxes, shown in Figure 5 – Appendix B. All of the text boxes and combo boxes are marked with green-coloured circle points.
“Windows Forms text boxes are used to get input from the user or to display text. The TextBox control is generally used for editable text, although it can also be made read-only. Text boxes can display multiple lines, wrap text to the size of the control, and add basic formatting. The Windows Forms ComboBox control is used to display data in a drop-down combo box. By default, the ComboBox control appears in two parts: the top part is a text box that allows the user to type a list item.” [5].
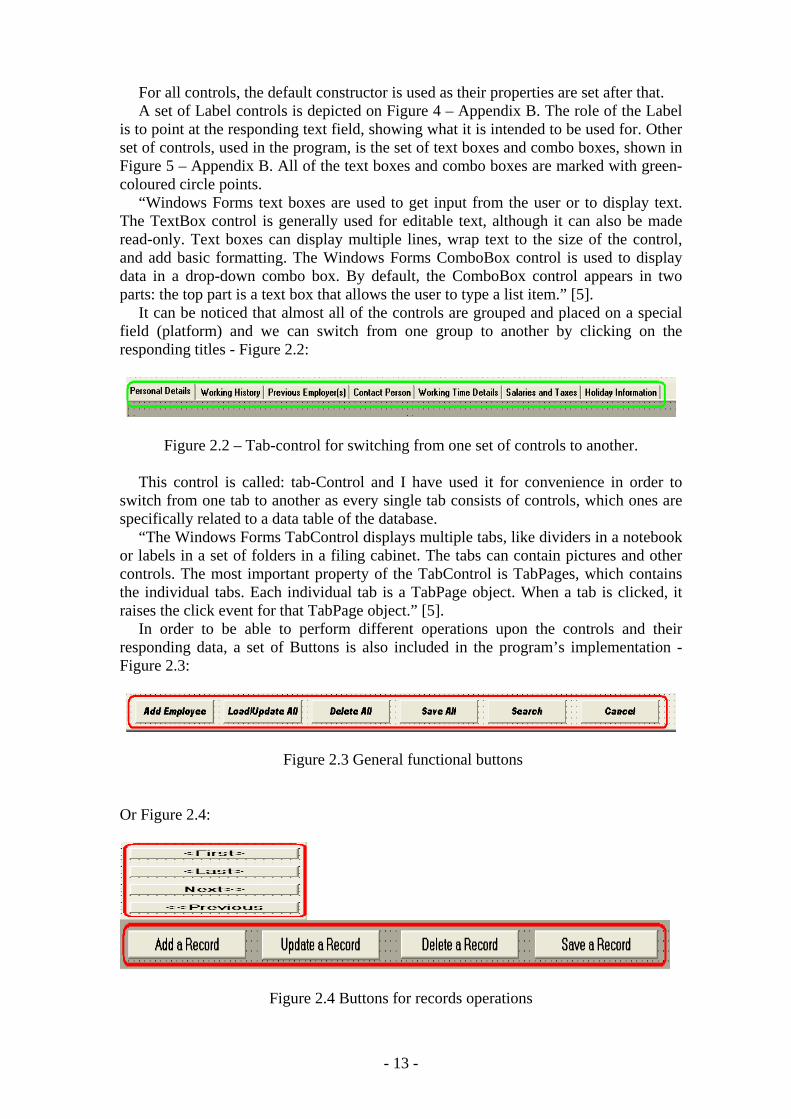
It can be noticed that almost all of the controls are grouped and placed on a special field (platform) and we can switch from one group to another by clicking on the responding titles - Figure 2.2:
Figure 2.2 – Tab-control for switching from one set of controls to another.
This control is called: tab-Control and I have used it for convenience in order to switch from one tab to another as every single tab consists of controls, which ones are specifically related to a data table of the database.
“The Windows Forms TabControl displays multiple tabs, like dividers in a notebook or labels in a set of folders in a filing cabinet. The tabs can contain pictures and other controls. The most important property of the TabControl is TabPages, which contains the individual tabs. Each individual tab is a TabPage object. When a tab is clicked, it raises the click event for that TabPage object.” [5].
In order to be able to perform different operations upon the controls and their responding data, a set of Buttons is also included in the program’s implementation -Figure 2.3:
Figure 2.3 General functional buttons Or Figure 2.4:
Figure 2.4 Buttons for records operations
- 14 -
Some of the buttons are deliberately omitted to be shown here. The following snippet of code represents a normal button in the graphical interface: this .add_button.FlatStyle = System.Windows.Forms.FlatSt yle.System; this .add_button.Font = new System.Drawing.Font("Arial Black", 10F, System.Drawing.FontStyle.Italic, System.Drawing.Gra phicsUnit.Point, ((System.Byte)(0))); this .add_button.Location = new System.Drawing.Point(24, 24); this .add_button.Name = "add_button"; this .add_button.Size = new System.Drawing.Size(128, 32); this .add_button.TabIndex = 0; this .add_button.Text = "&Add Employee";
The buttons are connected to their respective Event Handlers through their click
methods: this .add_button.Click += new System.EventHandler( this .add_button_Click);
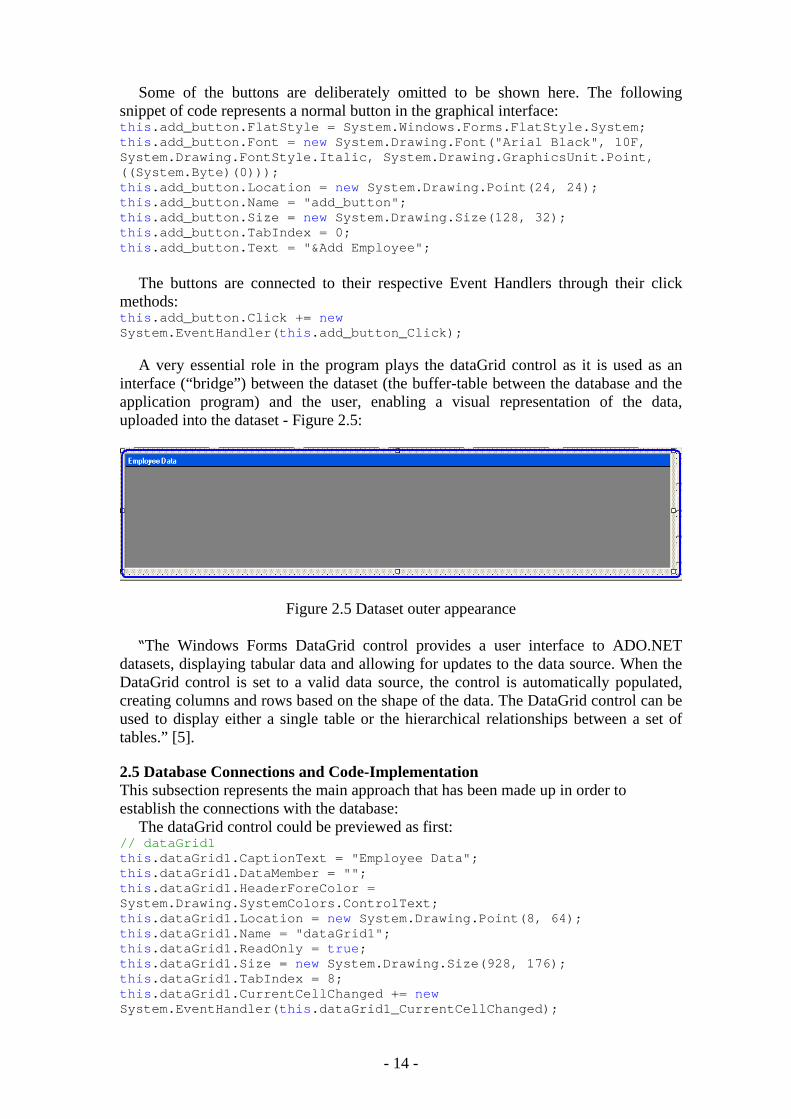
A very essential role in the program plays the dataGrid control as it is used as an interface (“bridge”) between the dataset (the buffer-table between the database and the application program) and the user, enabling a visual representation of the data, uploaded into the dataset - Figure 2.5:
Figure 2.5 Dataset outer appearance “The Windows Forms DataGrid control provides a user interface to ADO.NET
datasets, displaying tabular data and allowing for updates to the data source. When the DataGrid control is set to a valid data source, the control is automatically populated, creating columns and rows based on the shape of the data. The DataGrid control can be used to display either a single table or the hierarchical relationships between a set of tables.” [5].
2.5 Database Connections and Code-Implementation This subsection represents the main approach that has been made up in order to establish the connections with the database:
The dataGrid control could be previewed as first: // dataGrid1 this .dataGrid1.CaptionText = "Employee Data"; this .dataGrid1.DataMember = ""; this .dataGrid1.HeaderForeColor = System.Drawing.SystemColors.ControlText; this .dataGrid1.Location = new System.Drawing.Point(8, 64); this .dataGrid1.Name = "dataGrid1"; this .dataGrid1.ReadOnly = true ; this .dataGrid1.Size = new System.Drawing.Size(928, 176); this .dataGrid1.TabIndex = 8; this .dataGrid1.CurrentCellChanged += new System.EventHandler( this .dataGrid1_CurrentCellChanged);
- 15 -
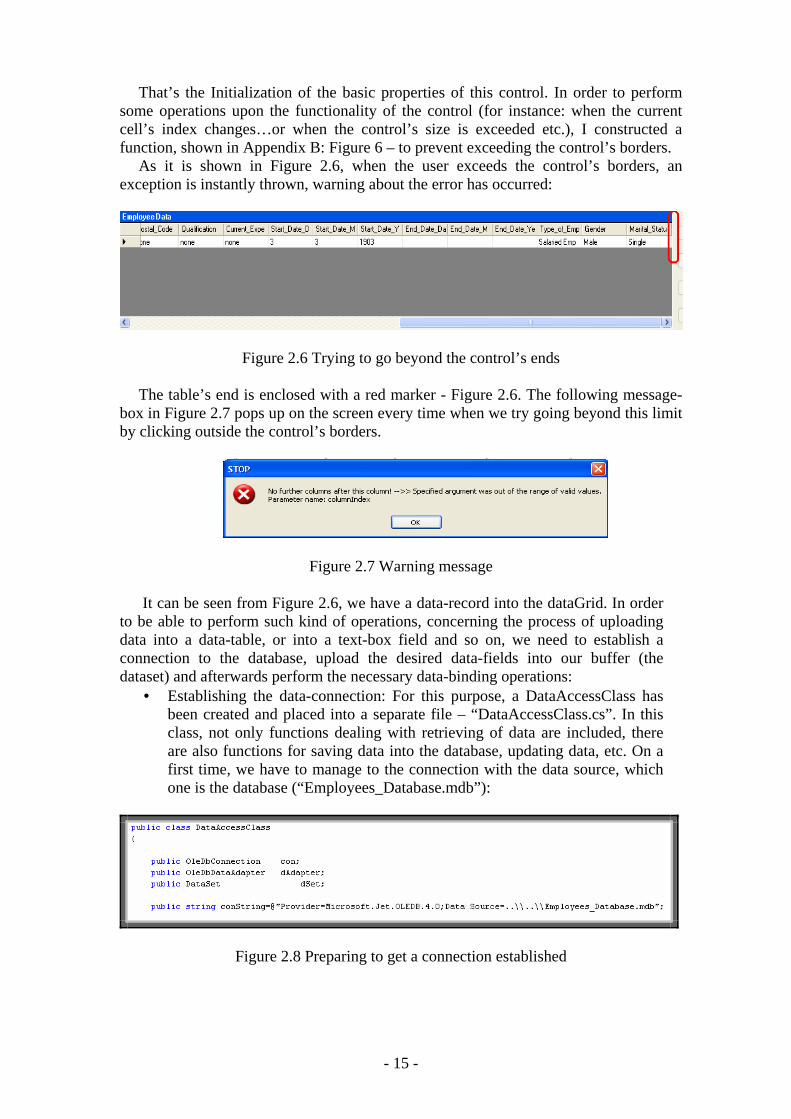
That’s the Initialization of the basic properties of this control. In order to perform some operations upon the functionality of the control (for instance: when the current cell’s index changes…or when the control’s size is exceeded etc.), I constructed a function, shown in Appendix B: Figure 6 – to prevent exceeding the control’s borders.
As it is shown in Figure 2.6, when the user exceeds the control’s borders, an exception is instantly thrown, warning about the error has occurred:
Figure 2.6 Trying to go beyond the control’s ends
The table’s end is enclosed with a red marker - Figure 2.6. The following message-
box in Figure 2.7 pops up on the screen every time when we try going beyond this limit by clicking outside the control’s borders.
Figure 2.7 Warning message
It can be seen from Figure 2.6, we have a data-record into the dataGrid. In order to be able to perform such kind of operations, concerning the process of uploading data into a data-table, or into a text-box field and so on, we need to establish a connection to the database, upload the desired data-fields into our buffer (the dataset) and afterwards perform the necessary data-binding operations:
• Establishing the data-connection: For this purpose, a DataAccessClass has been created and placed into a separate file – “DataAccessClass.cs”. In this class, not only functions dealing with retrieving of data are included, there are also functions for saving data into the database, updating data, etc. On a first time, we have to manage to the connection with the data source, which one is the database (“Employees_Database.mdb”):
Figure 2.8 Preparing to get a connection established
- 16 -
There are few steps until the data source get connected to the application program’s components:
o Specifying the connection string: public string conString=@"Provider=Microsoft.Jet.OLEDB.4.0;Data Source=..\\..\\Employees_Database.mdb";
o Making up a query-string to be performed upon the database: this .select_query1=" select* from Employees_Details ord er by Last_Name,First_Name";
o Creating a data adapter to communicate between the dataset and the
database using the already specified connection- and query-strings: public OleDbDataAdapter dAdapter; … dAdapter= new OleDbDataAdapter( this .select_query1, con);
A bit more about the data adapter: “The ADO.NET DataSet is a memory-resident representation of data that provides a consistent relational programming model independent of the data source. The DataSet represents a complete set of data including tables, constraints, and relationships among the tables. Because the DataSet is independent of the data source, a DataSet can include data local to the application, as well as data from multiple data sources. Interaction with existing data sources is controlled through the DataAdapter…The Fill method of the DataAdapter is used to populate a DataSet with the results of the SelectCommand of the DataAdapter...” [5].
o Creating the Dataset to be populated with data: public DataSet dSet; … dSet= new DataSet(); o Populating the Dataset with data using the so constructed Data-adapter:
dAdapter.Fill(dSet,"Employees_Details");
After getting the connection established and populating the desired data-fields into
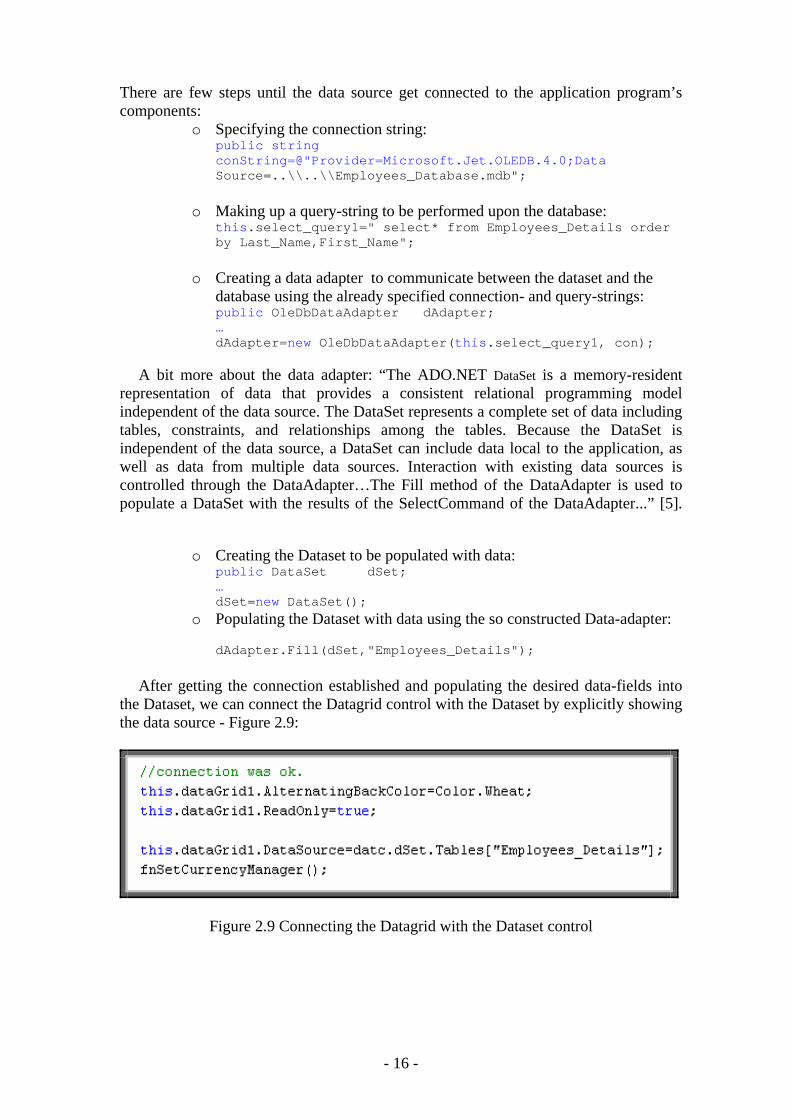
the Dataset, we can connect the Datagrid control with the Dataset by explicitly showing the data source - Figure 2.9:
Figure 2.9 Connecting the Datagrid with the Dataset control
- 17 -
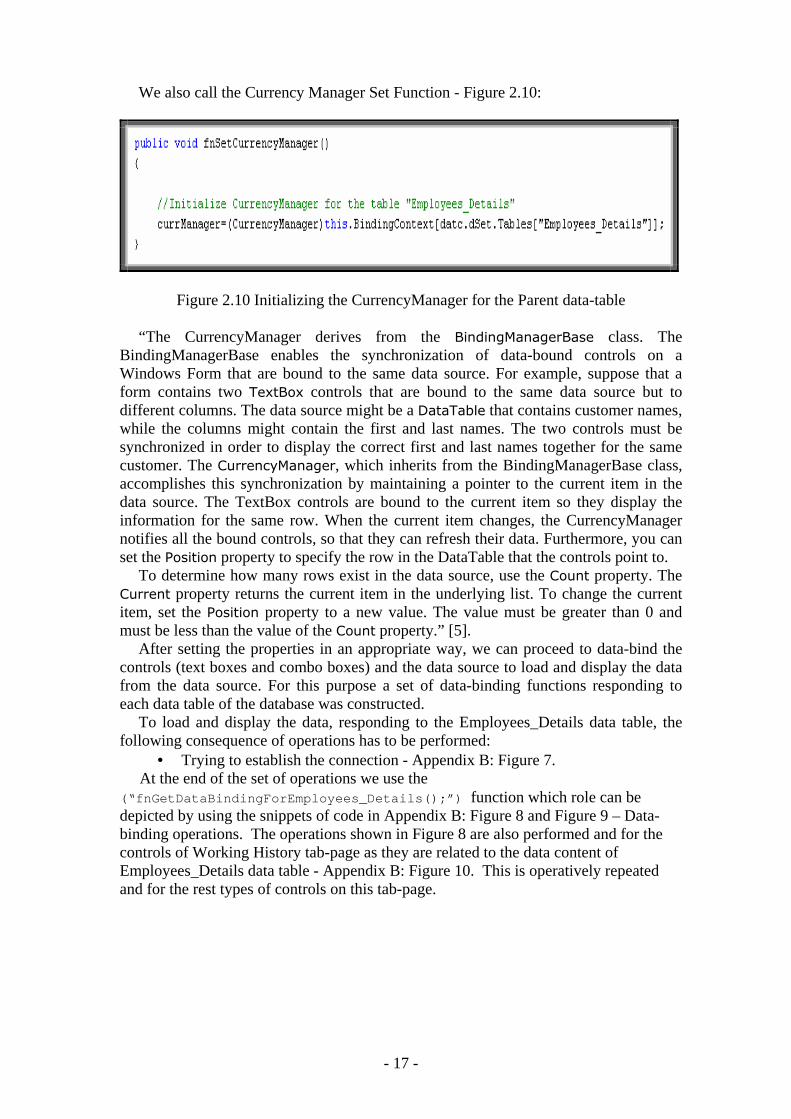
We also call the Currency Manager Set Function - Figure 2.10:
Figure 2.10 Initializing the CurrencyManager for the Parent data-table
“The CurrencyManager derives from the BindingManagerBase class. The BindingManagerBase enables the synchronization of data-bound controls on a Windows Form that are bound to the same data source. For example, suppose that a form contains two TextBox controls that are bound to the same data source but to different columns. The data source might be a DataTable that contains customer names, while the columns might contain the first and last names. The two controls must be synchronized in order to display the correct first and last names together for the same customer. The CurrencyManager, which inherits from the BindingManagerBase class, accomplishes this synchronization by maintaining a pointer to the current item in the data source. The TextBox controls are bound to the current item so they display the information for the same row. When the current item changes, the CurrencyManager notifies all the bound controls, so that they can refresh their data. Furthermore, you can set the Position property to specify the row in the DataTable that the controls point to.
To determine how many rows exist in the data source, use the Count property. The Current property returns the current item in the underlying list. To change the current item, set the Position property to a new value. The value must be greater than 0 and must be less than the value of the Count property.” [5].
After setting the properties in an appropriate way, we can proceed to data-bind the controls (text boxes and combo boxes) and the data source to load and display the data from the data source. For this purpose a set of data-binding functions responding to each data table of the database was constructed.
To load and display the data, responding to the Employees_Details data table, the following consequence of operations has to be performed:
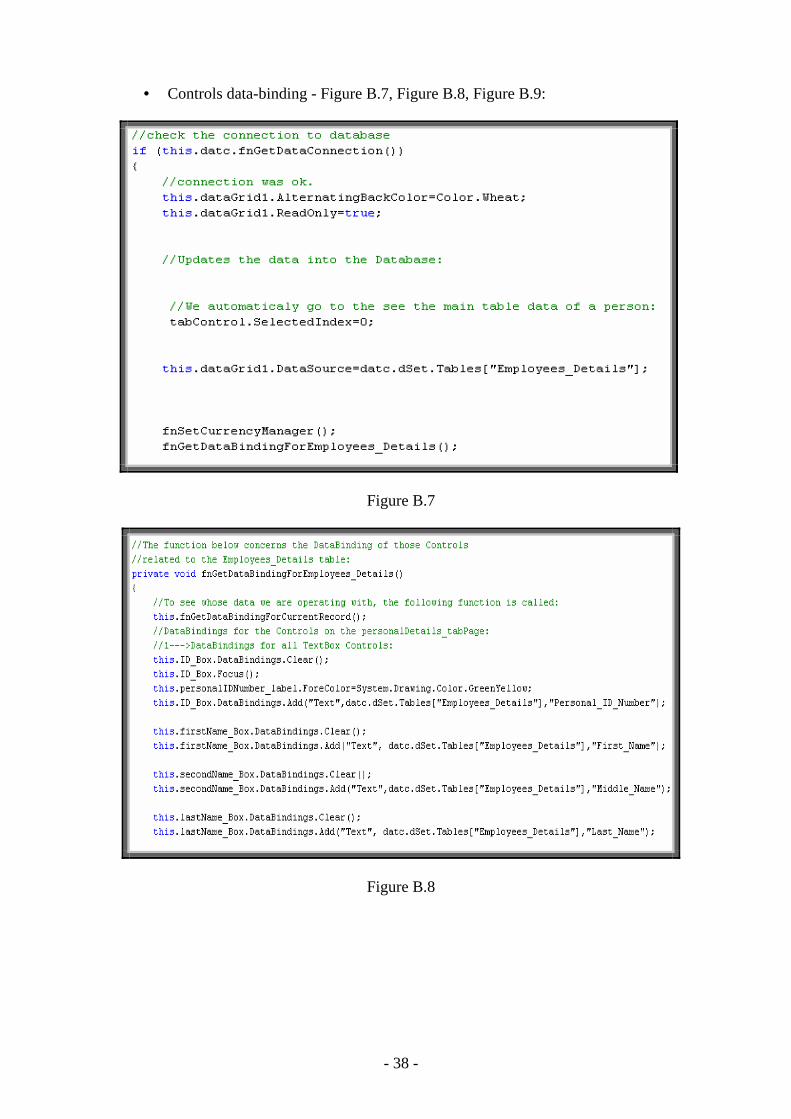
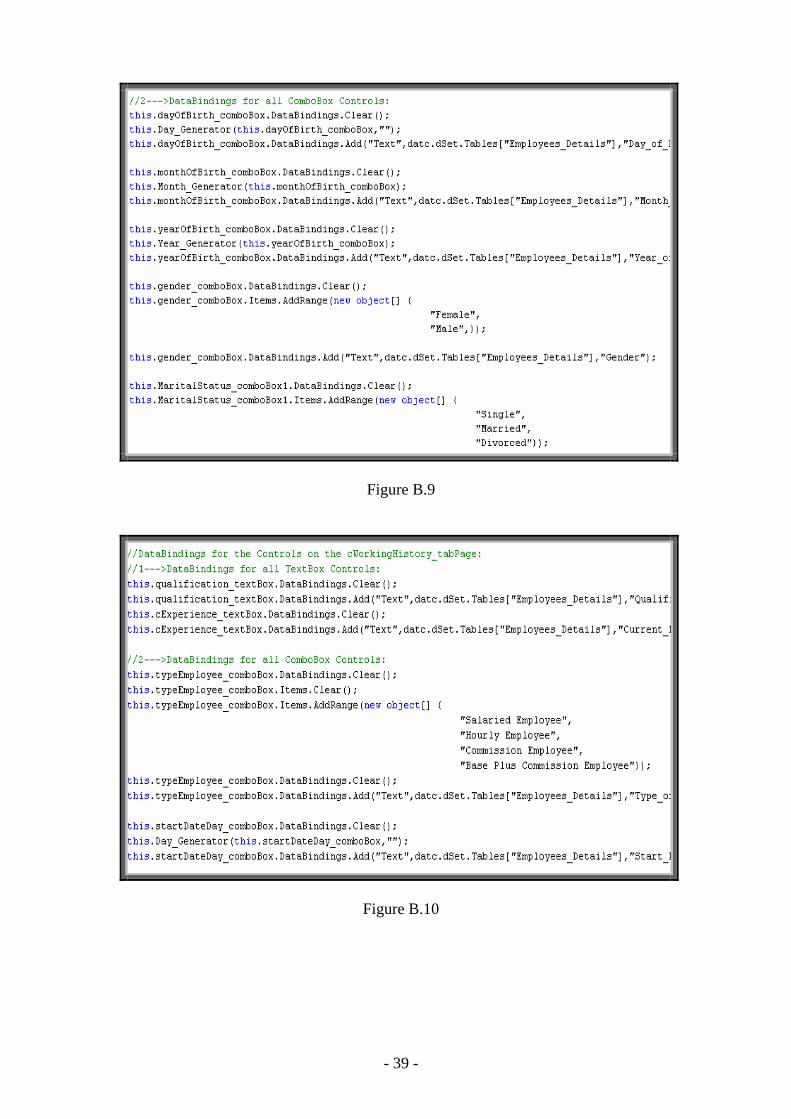
• Trying to establish the connection - Appendix B: Figure 7. At the end of the set of operations we use the (“fnGetDataBindingForEmployees_Details();”) function which role can be depicted by using the snippets of code in Appendix B: Figure 8 and Figure 9 – Data-binding operations. The operations shown in Figure 8 are also performed and for the controls of Working History tab-page as they are related to the data content of Employees_Details data table - Appendix B: Figure 10. This is operatively repeated and for the rest types of controls on this tab-page.
- 18 -
One thing should always be taken into an account when we perform such operations: We are not allowed to perform a data binding operation more than once at a time, thus a function should be made up for clearing the control’s collection of any data bindings. A (“control.DataBindings.Clear();”) function is called every time when we commit to a data binding operation upon a control. Otherwise, an exception would be thrown and we have just to quit the program. Such kind of exceptions are not only undesirable, they are not allowable in the practice as well.
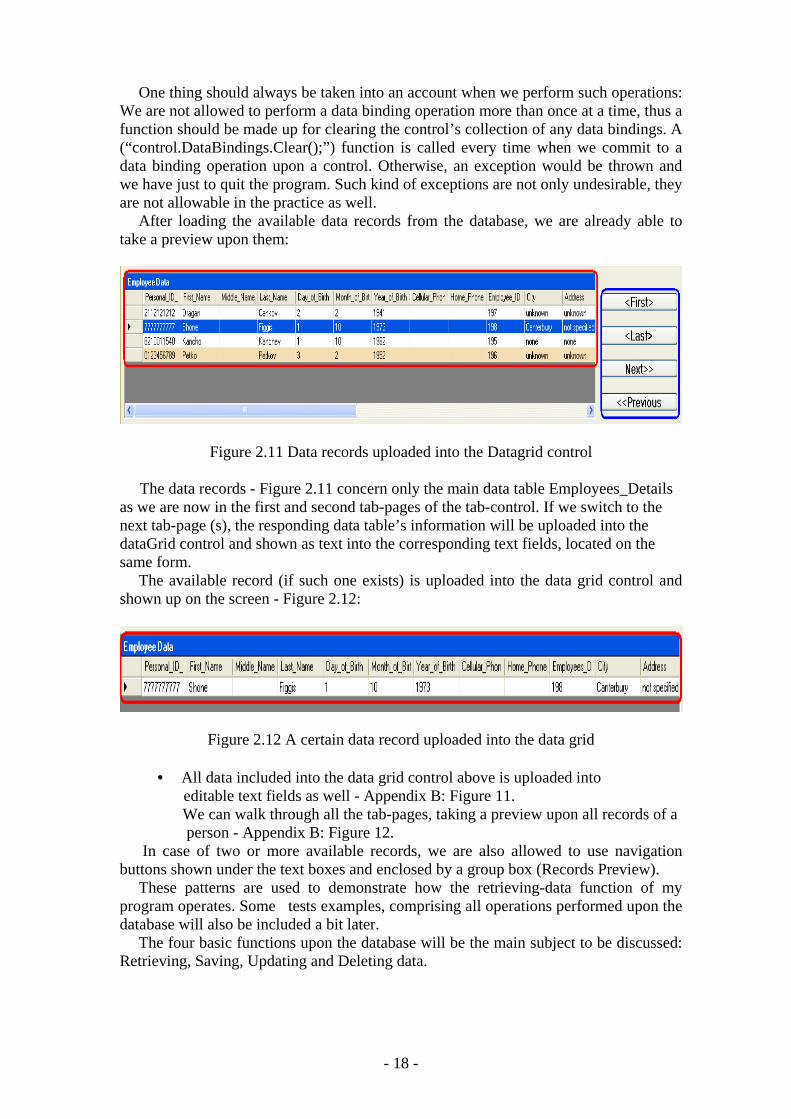
After loading the available data records from the database, we are already able to take a preview upon them:
Figure 2.11 Data records uploaded into the Datagrid control The data records - Figure 2.11 concern only the main data table Employees_Details as we are now in the first and second tab-pages of the tab-control. If we switch to the next tab-page (s), the responding data table’s information will be uploaded into the dataGrid control and shown as text into the corresponding text fields, located on the same form.
The available record (if such one exists) is uploaded into the data grid control and shown up on the screen - Figure 2.12:
Figure 2.12 A certain data record uploaded into the data grid
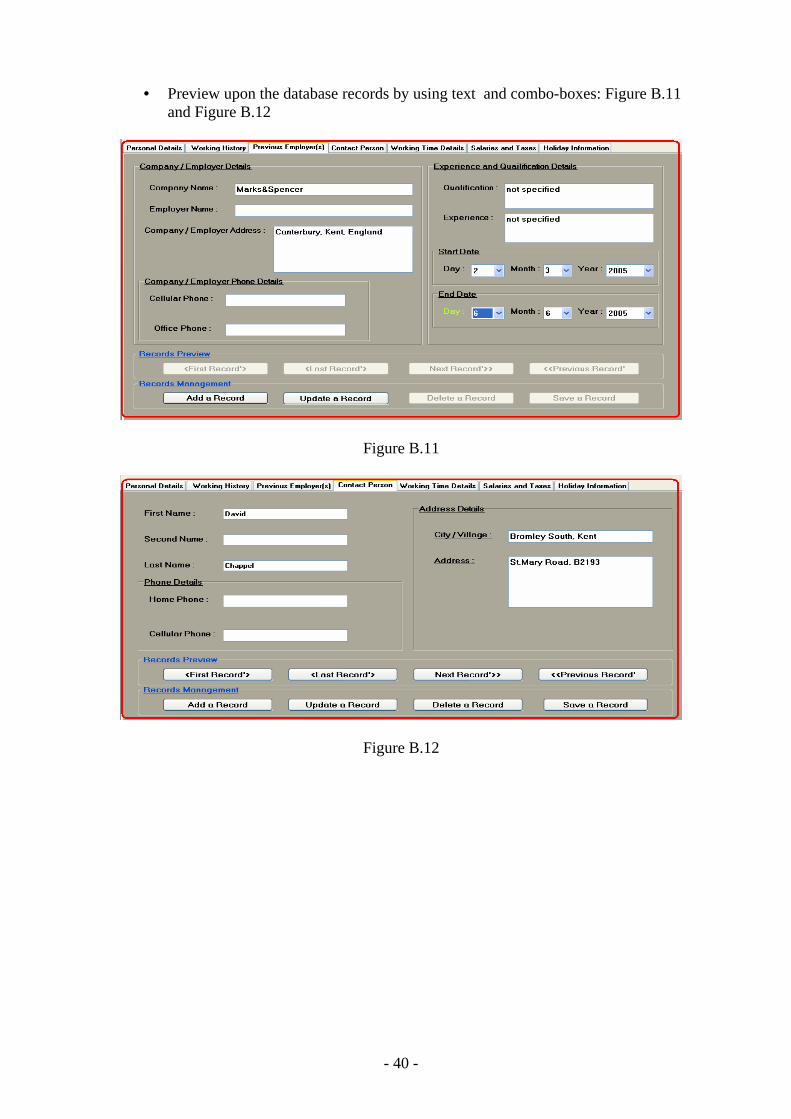
• All data included into the data grid control above is uploaded into
editable text fields as well - Appendix B: Figure 11. We can walk through all the tab-pages, taking a preview upon all records of a person - Appendix B: Figure 12.
In case of two or more available records, we are also allowed to use navigation buttons shown under the text boxes and enclosed by a group box (Records Preview).
These patterns are used to demonstrate how the retrieving-data function of my program operates. Some tests examples, comprising all operations performed upon the database will also be included a bit later.
The four basic functions upon the database will be the main subject to be discussed: Retrieving, Saving, Updating and Deleting data.
- 19 -
2.5.1 Retrieving data from the database Retrieving data from a database is less or more tightly related to dealing with the SELECT query that should be applied to the database in order to extract the desirable result, which one should satisfy certain conditions. This SQL query has the following structure: SLECT <column_name> FROM <table_name> WHERE [(condition_1), (condition_2), …..(condition_n)].
Into the WHERE-statement, the following logical and arithmetical operators are included as well: [AND, OR, <, <=, >, >=, =]. The data from the database is retrieved in three different ways:
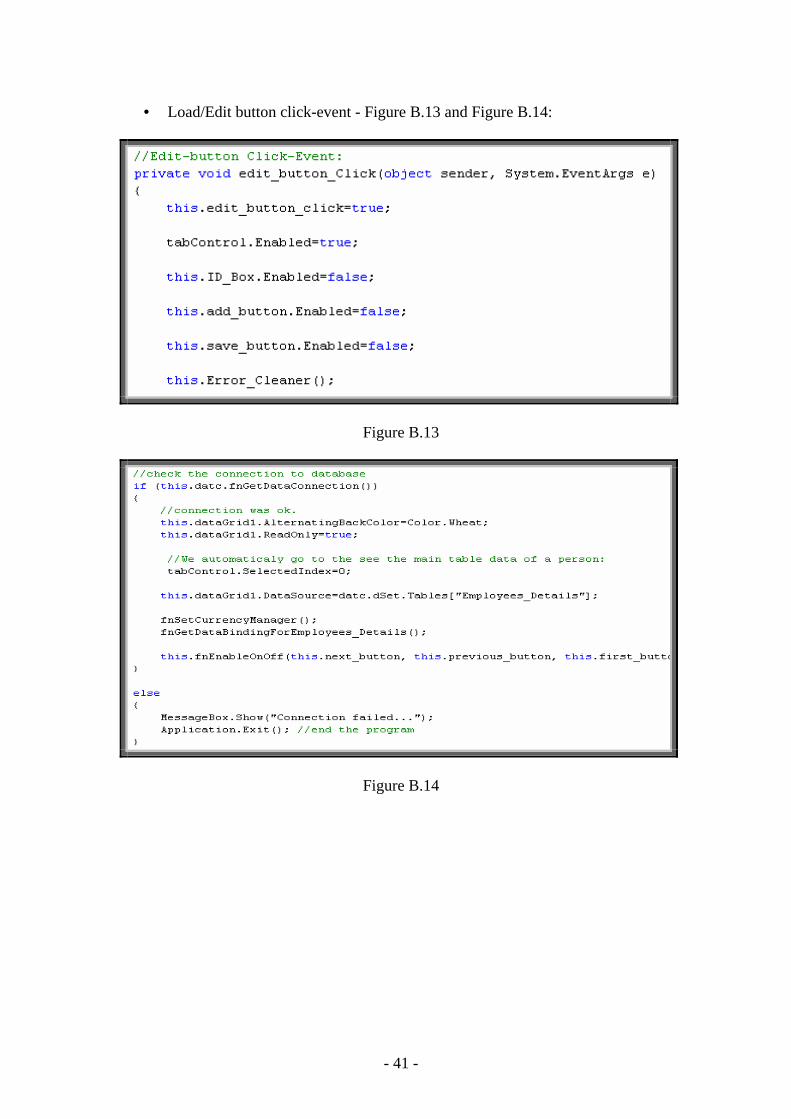
By clicking on the (Load Records) button: It calls the event handler, associated with this event, and operates as follows – Appendix B: Figure 13 – Load/Edit button click event and Figure 14 – Trying to establish a connection to the database, evoked by the Load/Edit button click event. It sets some of the functionality properties of some of the other buttons, logically related to the eventual operations that may be performed upon the retrieved data and calls a function that establishes a connection to the database and performs the desirable SQL query upon it. Its implementation is shown in Appendix B: Figure 15.
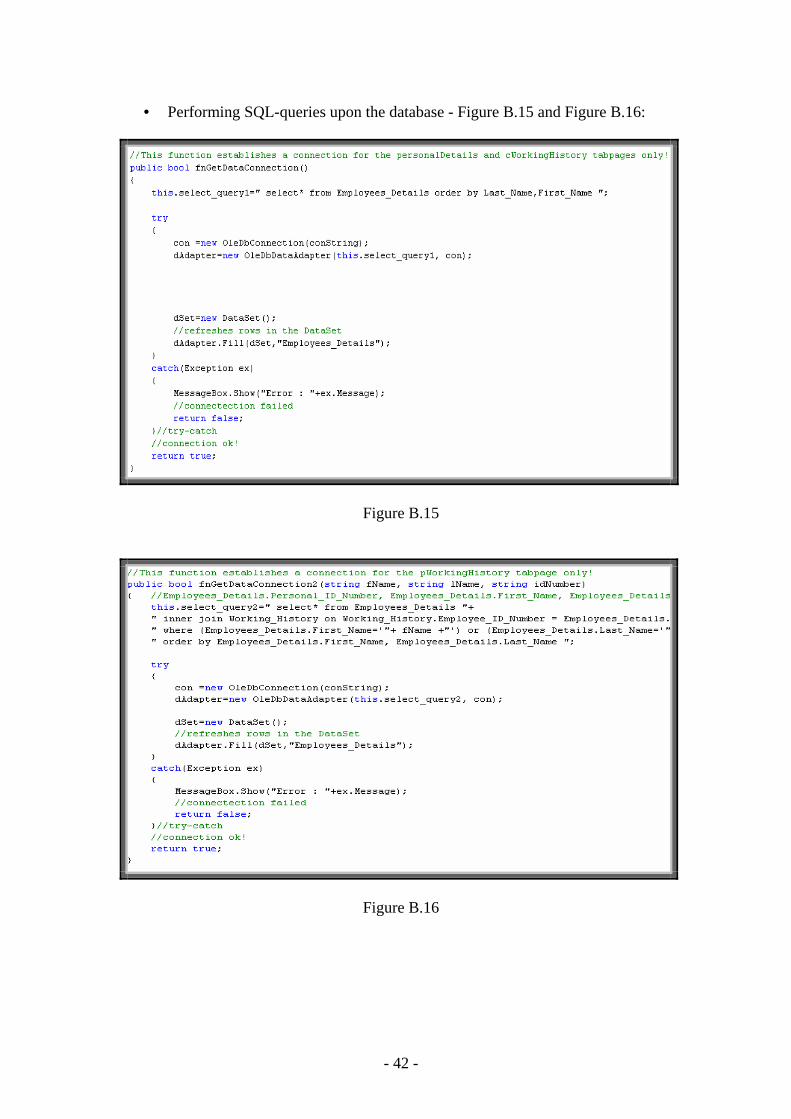
Function ( fnGetDataConnection() ) is implemented in a separate class, located in a different file. Actually, all of the functions dealing with the data operations in the program have been put there.
The SELECT query here retrieves all data from Employees_Details data table. This data is uploaded into the data grid and all text fields of personalDetails and cWorkingHistory pages, which ones are related to the content of Employees_Details data table.
• After loading the available records existing into the main table, we can proceed to upload and other existing records from another table by switching from one tab-page to another. That performs a SQL query for retrieving data from the main table plus data from its related (child) table. It is shown in Appendix B: Figure 16 – Function performing the select query expression.
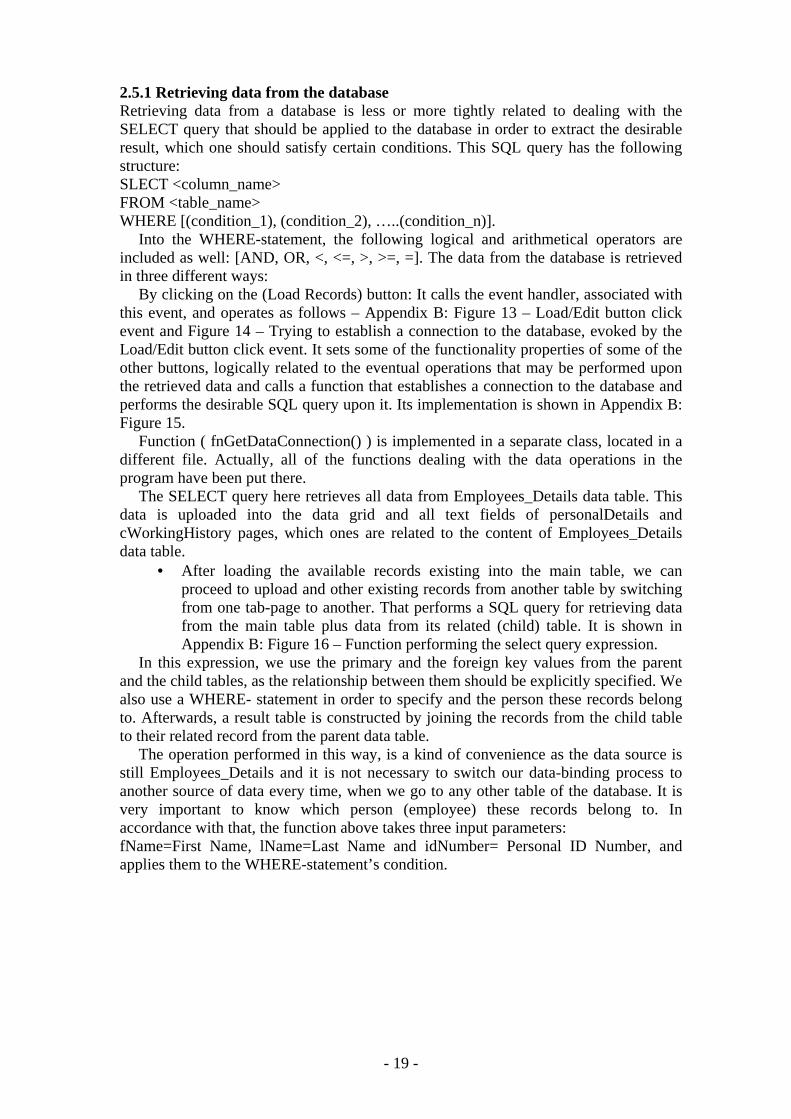
In this expression, we use the primary and the foreign key values from the parent and the child tables, as the relationship between them should be explicitly specified. We also use a WHERE- statement in order to specify and the person these records belong to. Afterwards, a result table is constructed by joining the records from the child table to their related record from the parent data table.
The operation performed in this way, is a kind of convenience as the data source is still Employees_Details and it is not necessary to switch our data-binding process to another source of data every time, when we go to any other table of the database. It is very important to know which person (employee) these records belong to. In accordance with that, the function above takes three input parameters: fName=First Name, lName=Last Name and idNumber= Personal ID Number, and applies them to the WHERE-statement’s condition.
- 20 -
These explanatory notes are graphically presented on Figure 2.13:
Parent Table Child Table (i)
Figure 2.13 Retrieving records scheme
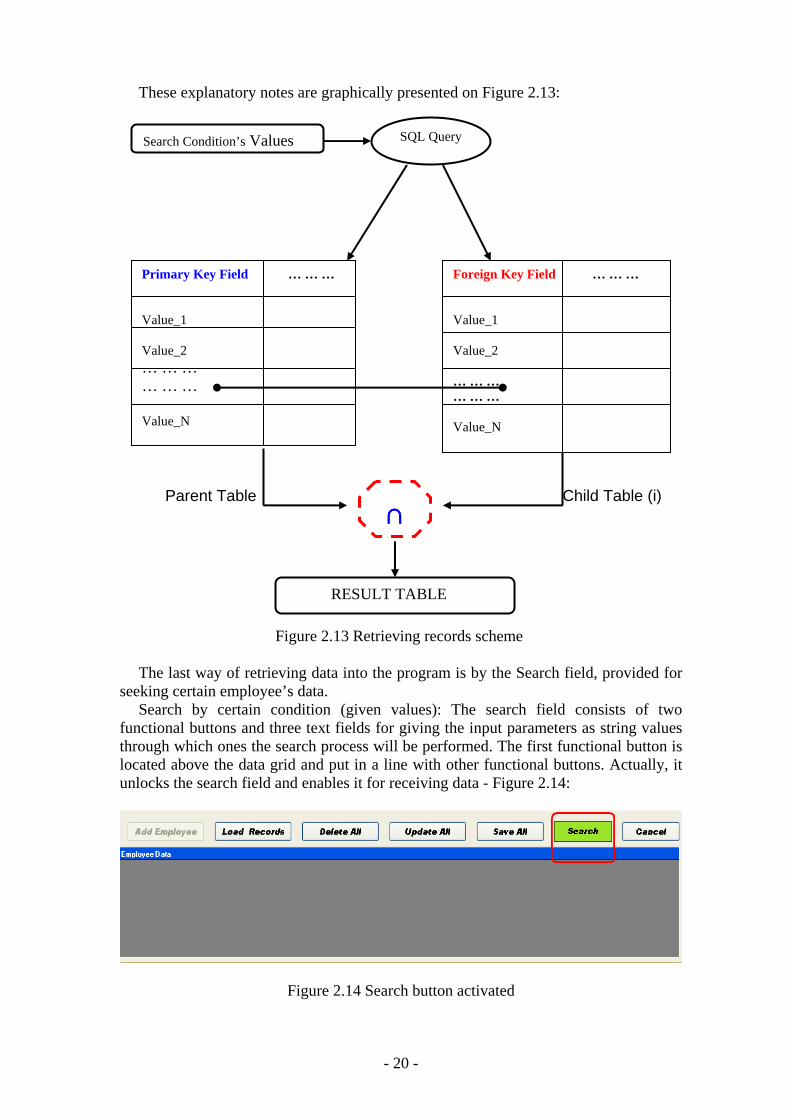
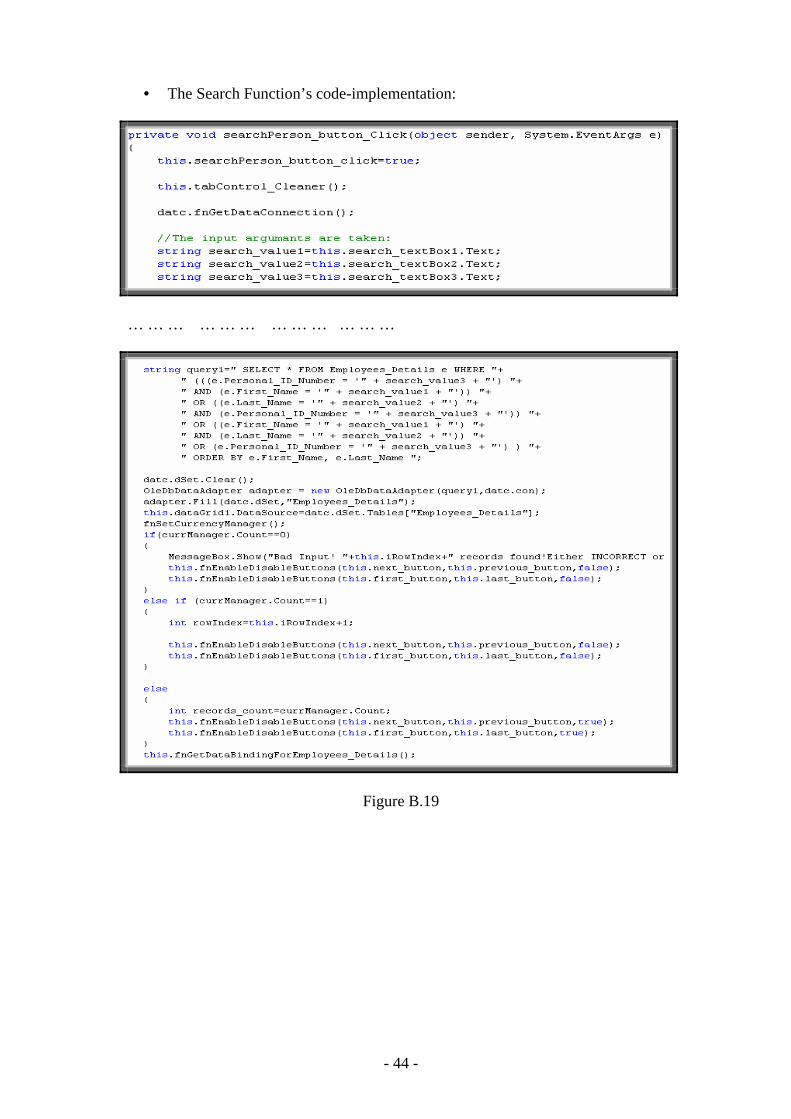
The last way of retrieving data into the program is by the Search field, provided for seeking certain employee’s data.
Search by certain condition (given values): The search field consists of two functional buttons and three text fields for giving the input parameters as string values through which ones the search process will be performed. The first functional button is located above the data grid and put in a line with other functional buttons. Actually, it unlocks the search field and enables it for receiving data - Figure 2.14:
Figure 2.14 Search button activated
Primary Key Field … … … Value_1 Value_2 … … … … … … Value_N
Foreign Key Field … … … Value_1 Value_2 … … … … … … Value_N
SQL Query Search Condition’s Values
∩∩∩∩
RESULT TABLE

- 21 -
Every time, when it’s clicked, its current style and colour properties are changed in order to show that is in active mode. After clicking upon it, we can proceed to the Search field, located a bit further below - Figure 2.15:
Figure 2.15 Search engine fields
The search engine operates with the exact values of the First Name, Last Name and
Personal ID Number attributes. Sufficient and correct information has to be input unless we want zero records to be
found. Four available cases have been considered: a. First Name and Personal ID Number. b. Last Name and Personal ID Number. c. First Name and Last Name. d. Personal ID Number.
This search conditions are embedded in a SELECT-query as follows - Figure 2.16:
Figure 2.16 Select query expression
It could be rewritten in the following way, just to get the clue: SELECT * FROM PARENT TABLE [(e)-indicator] WHERE ( ( (Condition_1) AND (Condition_2) )
OR ( (Condition_3) AND (Condition_1) ) … OR ( (Condition_3) AND (Condition_2) ) OR (Condition_3) )
ORDER BY e. ColumnName_x, e. ColumnName_y
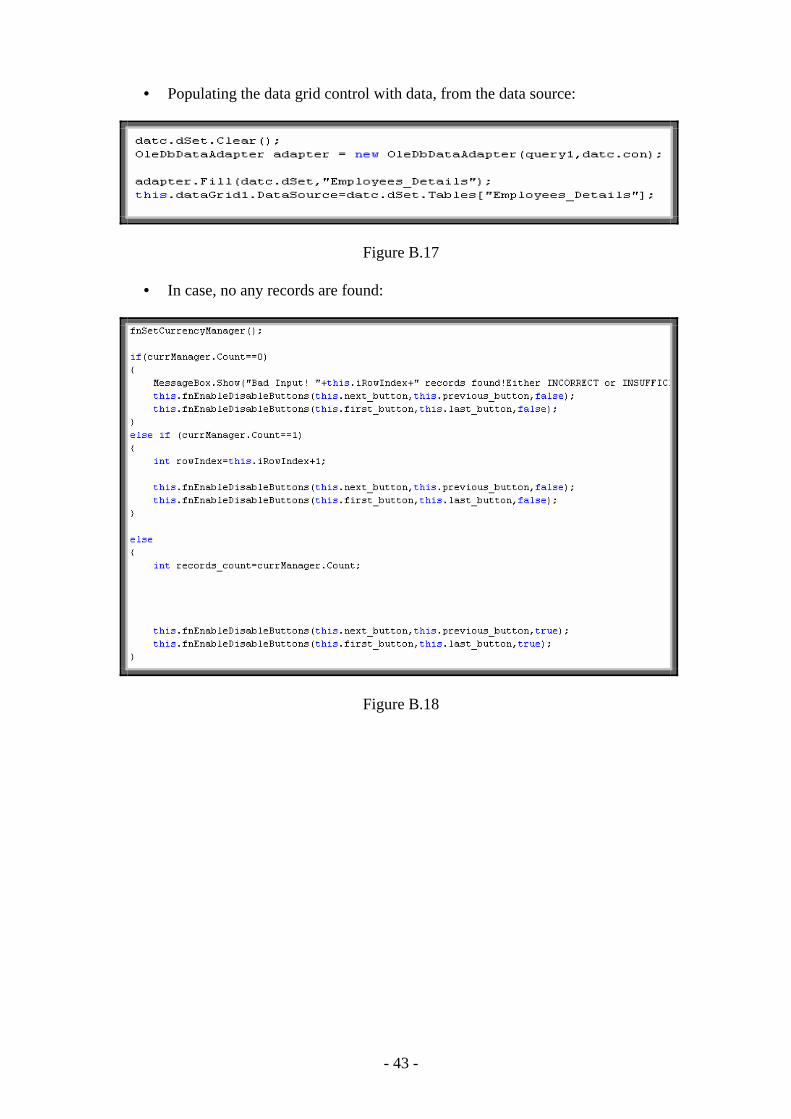
After the search query execution upon the database, we need to populate the data grid and the relevant text fields with this data – Appendix B: Figure 17 - Uploading data into the Datagrid, in order to be on disposal of the program’s users.
If no any data record is found, a message box pops up on the screen, telling the user that such a person doesn’t exists into the database – Appendix B: Figure 18.
- 22 -
To upload the data into the text fields of the form, a data-binding function is called:
The entire function’s body is shown in Appendix B: Figure 19 Search function – code implementation.
For test samples, see Appendix C: Figure 2.1- successful Search operation and Figure 2.2-Search failure.
2.5.2 Saving data into the database This kind of operation upon the database is subdivided into two groups: Saving a new employee’s records (Populating all of the tables with data) and Add a record to an employee’s data records. Saving new employee’s records: The whole process comprises a few actions, but not all of them are compulsory to be accomplished at once! First of all, to unlock the fields in order to get them prepared for accepting new data, the (“Add Employee”) button has to be clicked. Afterwards, we can go to the desired form and fill the required data in. It’s not necessary to fill in all of the forms with an exception of the two first, which ones hold the data for the parent table into the database, and to be able to perform a successful save into the database, we need to fill in all of the fields required there! Of course, if not all of the rest forms are populated with data, a message appears on screen asking the user whether he would like to proceed anyway saving only the data, filled till the moment, or go back and fill them in.
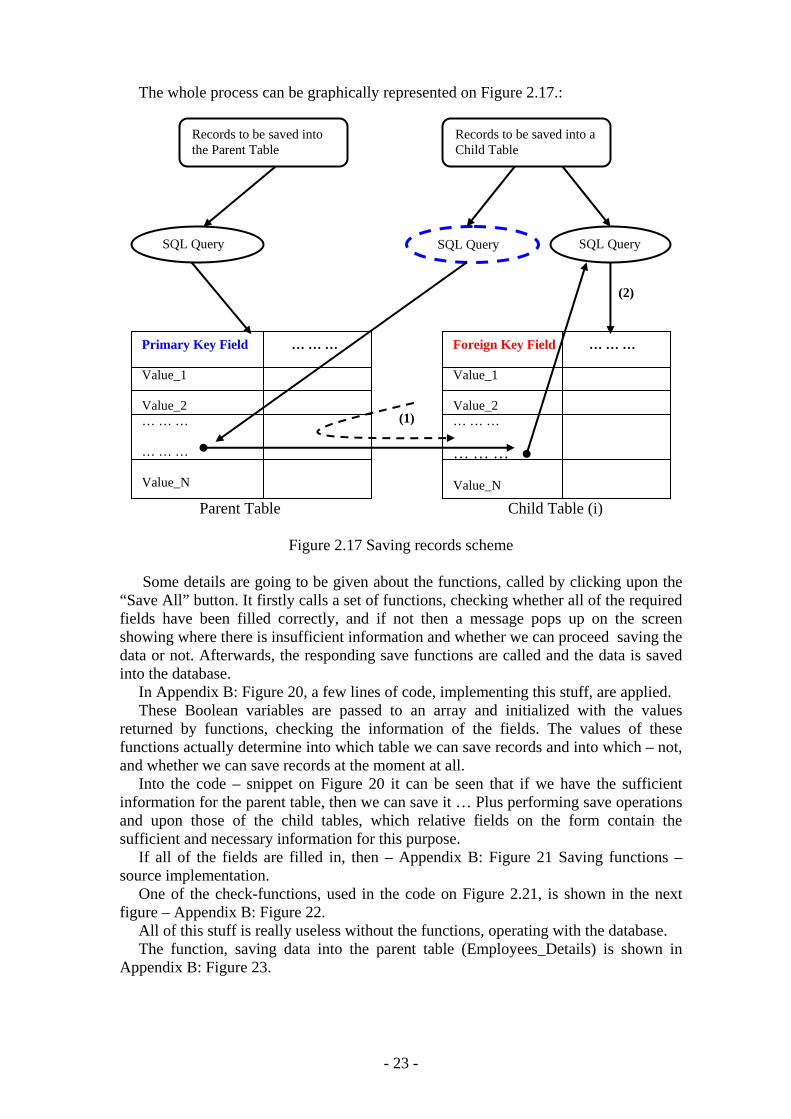
The next approach has been made up to resolve the saving problem: Firstly, it is known that the primary key values in all tables are automatically generated by saving a record as they have been set to an AutoNumber type. When data is saved into the parent table, we have the primary key, which one is the Employee_ID_Number, but this value is also needed for proceeding to another (child) table and populate it with data as the DBMS needs to know the responding record into the parent table! Apparently, we need to specify to which employee (person) from the parent table, the current record we are trying to save, belongs to.
As it concerns all child tables into the database, it could be done in the following way: When a record is populated into the parent table and we try to save another one into a child table, the primary key’s value is taken and put into the child table where we want to save the current record. Afterwards, we go to the child table and save the record there. To implement this in code, a few functions have been constructed (one for each child table and one for establishing the connection between the parent and the child tables).
- 23 -
The whole process can be graphically represented on Figure 2.17.: (2) (1) Parent Table Child Table (i)
Figure 2.17 Saving records scheme
Some details are going to be given about the functions, called by clicking upon the
“Save All” button. It firstly calls a set of functions, checking whether all of the required fields have been filled correctly, and if not then a message pops up on the screen showing where there is insufficient information and whether we can proceed saving the data or not. Afterwards, the responding save functions are called and the data is saved into the database.
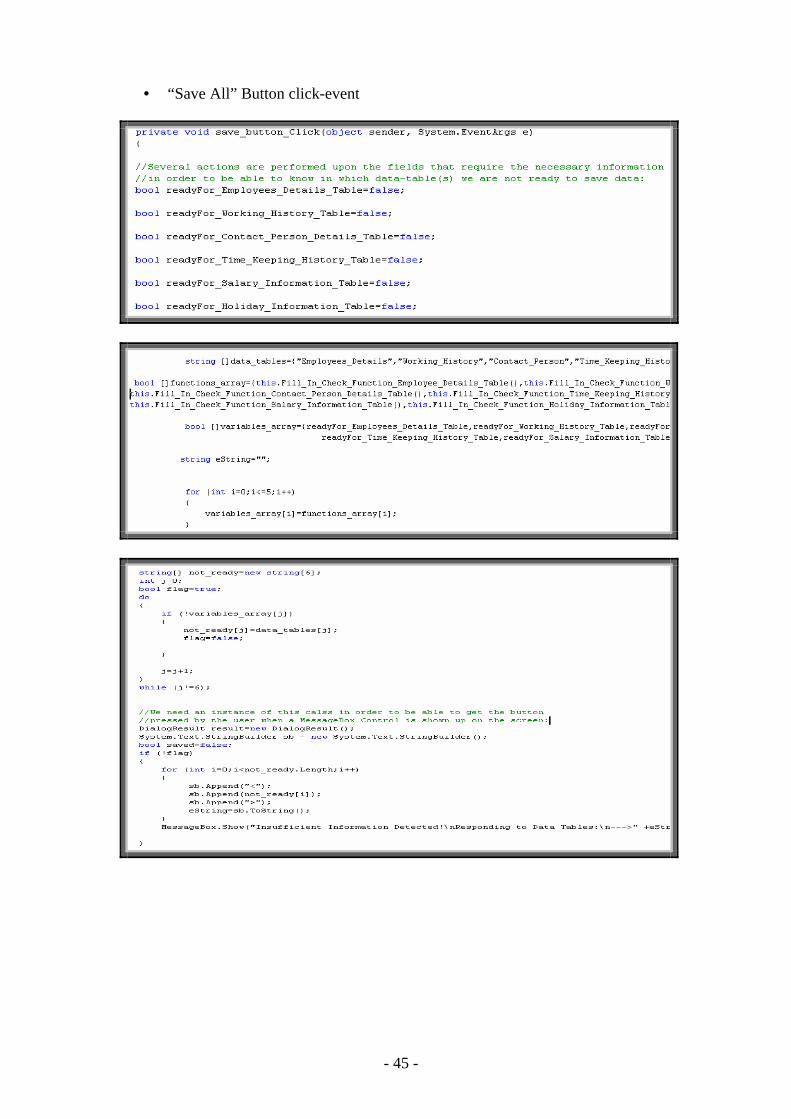
In Appendix B: Figure 20, a few lines of code, implementing this stuff, are applied. These Boolean variables are passed to an array and initialized with the values
returned by functions, checking the information of the fields. The values of these functions actually determine into which table we can save records and into which – not, and whether we can save records at the moment at all.
Into the code – snippet on Figure 20 it can be seen that if we have the sufficient information for the parent table, then we can save it … Plus performing save operations and upon those of the child tables, which relative fields on the form contain the sufficient and necessary information for this purpose.
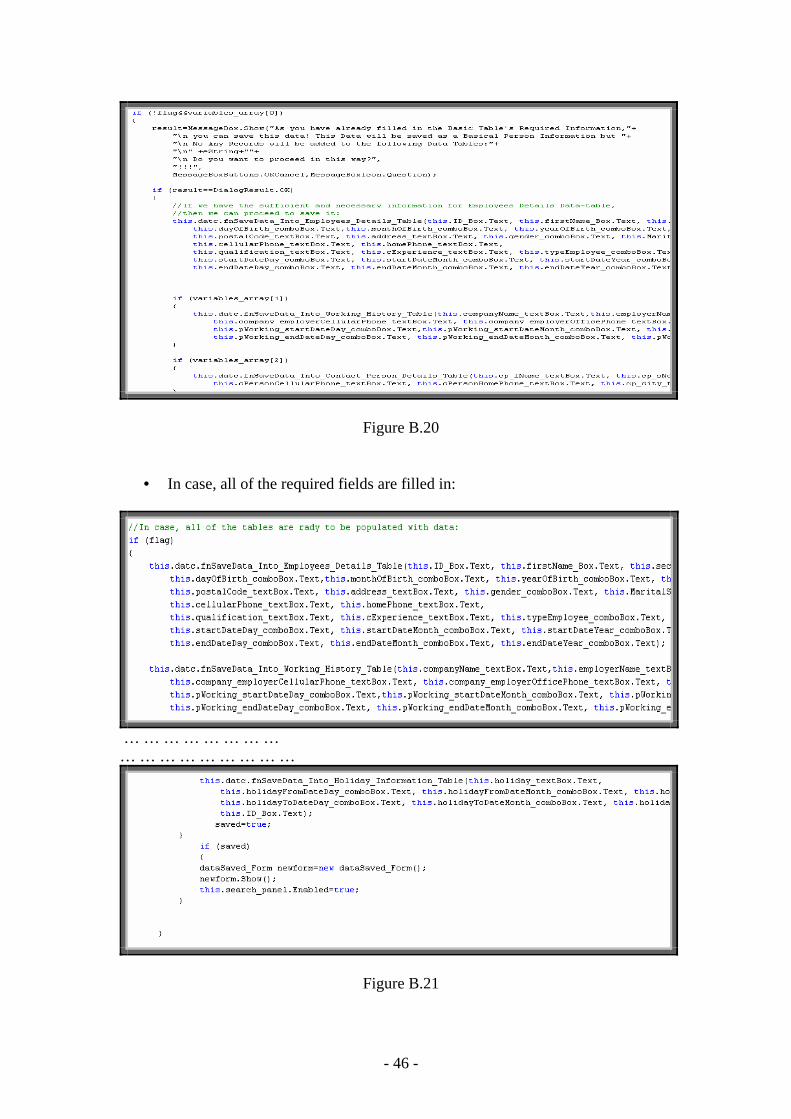
If all of the fields are filled in, then – Appendix B: Figure 21 Saving functions – source implementation.
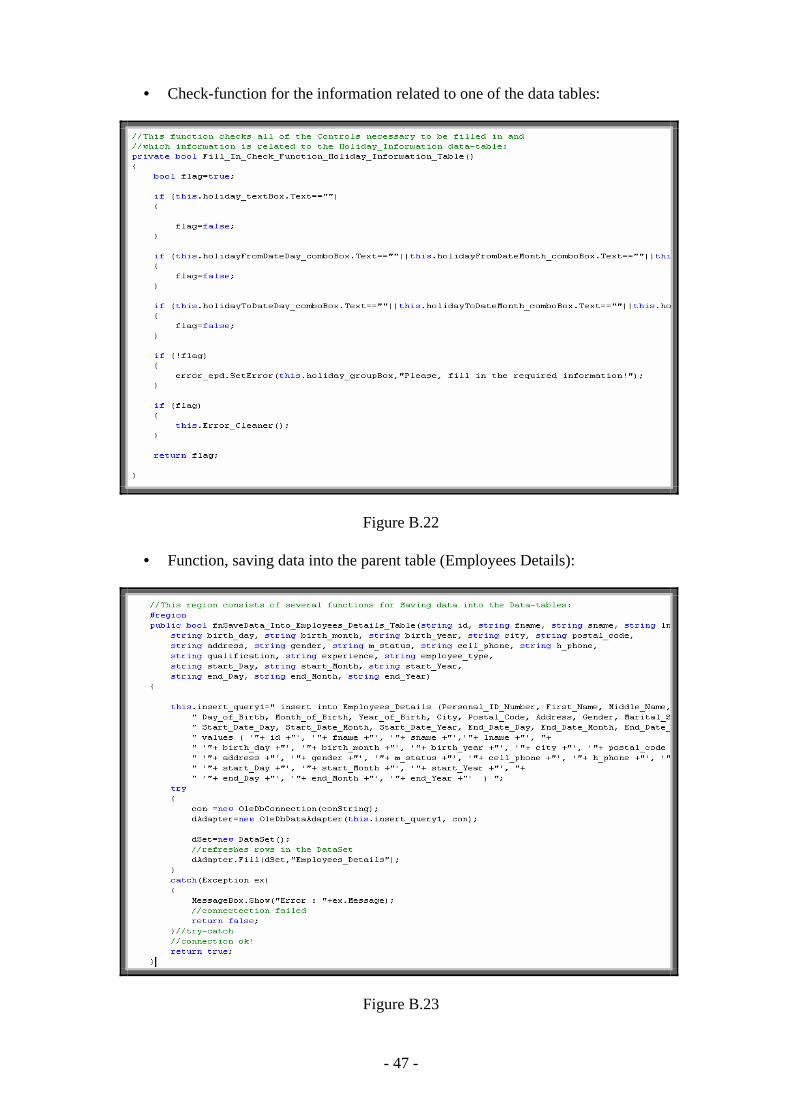
One of the check-functions, used in the code on Figure 2.21, is shown in the next figure – Appendix B: Figure 22.
All of this stuff is really useless without the functions, operating with the database. The function, saving data into the parent table (Employees_Details) is shown in
Appendix B: Figure 23.
Primary Key Field … … … Value_1 Value_2 … … … … … … Value_N
Foreign Key Field … … … Value_1 Value_2 … … … … … … Value_N
Records to be saved into the Parent Table
Records to be saved into a Child Table
SQL Query SQL Query SQL Query
- 24 -
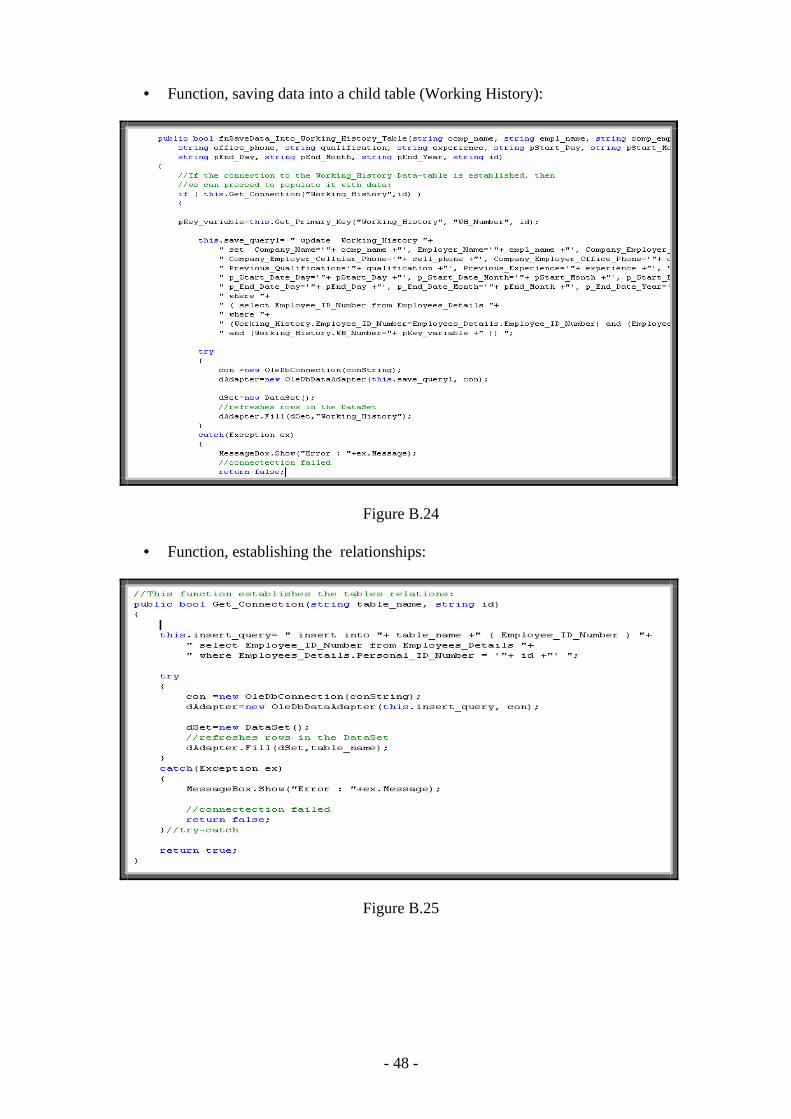
We can see how and the other functions operate. For simplicity, only one of them is going to be shown - Appendix B: Figure 24 Function, saving data into the child data-table Working_History, as they are constructed to act almost in the same way. All of these functions use the Get_Connection(Table_Name, ID) and Get_Primary_Key(Table_Name, Primary_Key_Value, ID) methods, which ones are very essential for the purposes, they have been constructed. Get_Connection() Method is shown in Appendix B: Figure 25. When the method (function) shown in Figure 24 is called, then the primary key’s value is taken from the parent table and after that the obtained value is inserted into the relative child table.
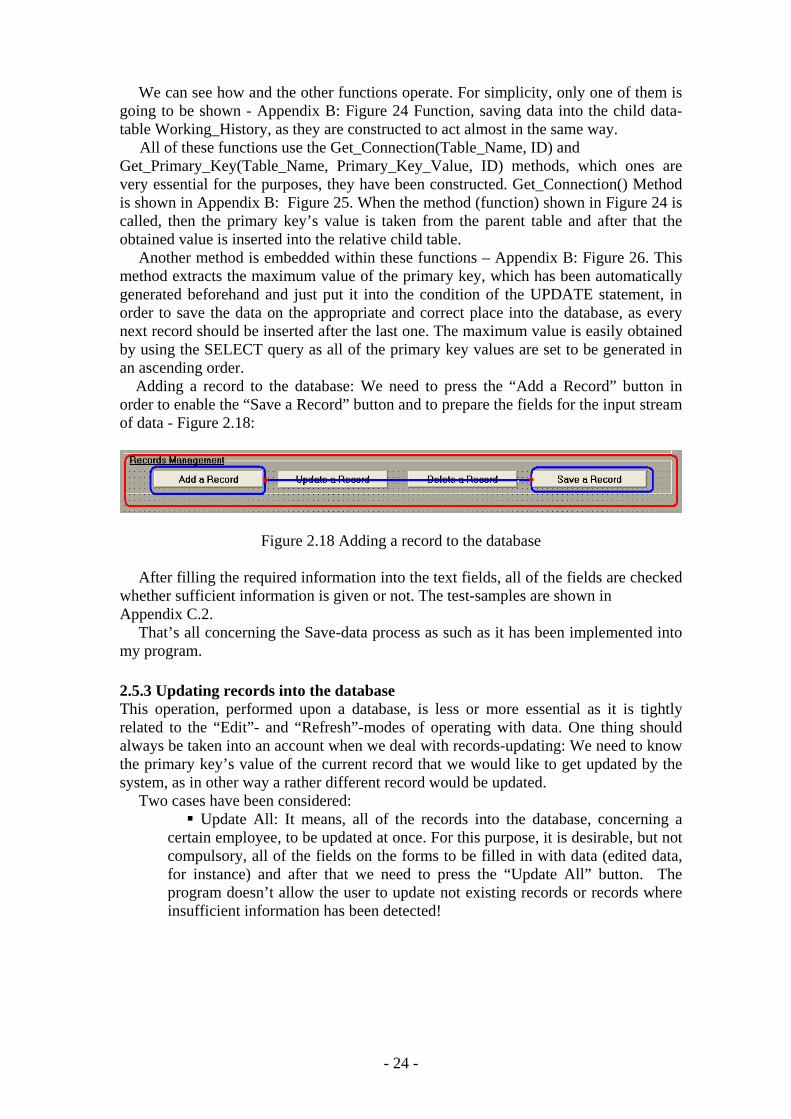
Another method is embedded within these functions – Appendix B: Figure 26. This method extracts the maximum value of the primary key, which has been automatically generated beforehand and just put it into the condition of the UPDATE statement, in order to save the data on the appropriate and correct place into the database, as every next record should be inserted after the last one. The maximum value is easily obtained by using the SELECT query as all of the primary key values are set to be generated in an ascending order. Adding a record to the database: We need to press the “Add a Record” button in order to enable the “Save a Record” button and to prepare the fields for the input stream of data - Figure 2.18:
Figure 2.18 Adding a record to the database
After filling the required information into the text fields, all of the fields are checked
whether sufficient information is given or not. The test-samples are shown in Appendix C.2.
That’s all concerning the Save-data process as such as it has been implemented into my program. 2.5.3 Updating records into the database This operation, performed upon a database, is less or more essential as it is tightly related to the “Edit”- and “Refresh”-modes of operating with data. One thing should always be taken into an account when we deal with records-updating: We need to know the primary key’s value of the current record that we would like to get updated by the system, as in other way a rather different record would be updated.
Two cases have been considered: � Update All: It means, all of the records into the database, concerning a
certain employee, to be updated at once. For this purpose, it is desirable, but not compulsory, all of the fields on the forms to be filled in with data (edited data, for instance) and after that we need to press the “Update All” button. The program doesn’t allow the user to update not existing records or records where insufficient information has been detected!
- 25 -
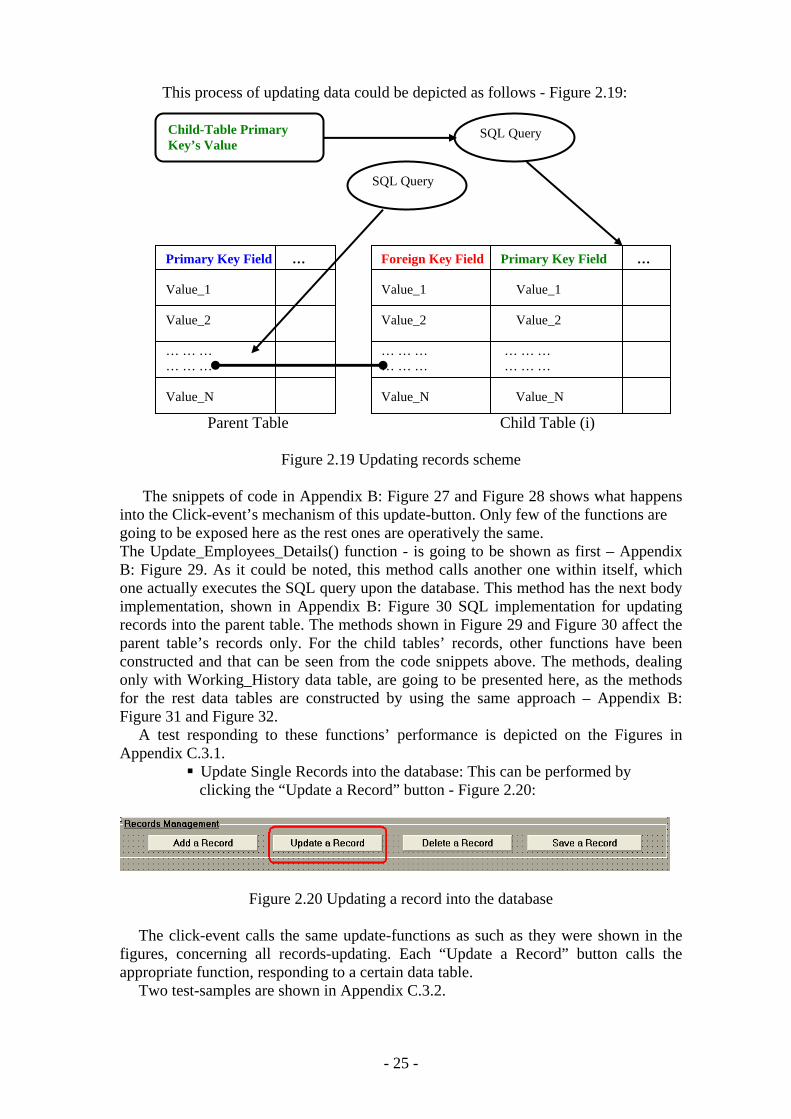
This process of updating data could be depicted as follows - Figure 2.19:
Parent Table Child Table (i)
Figure 2.19 Updating records scheme
The snippets of code in Appendix B: Figure 27 and Figure 28 shows what happens
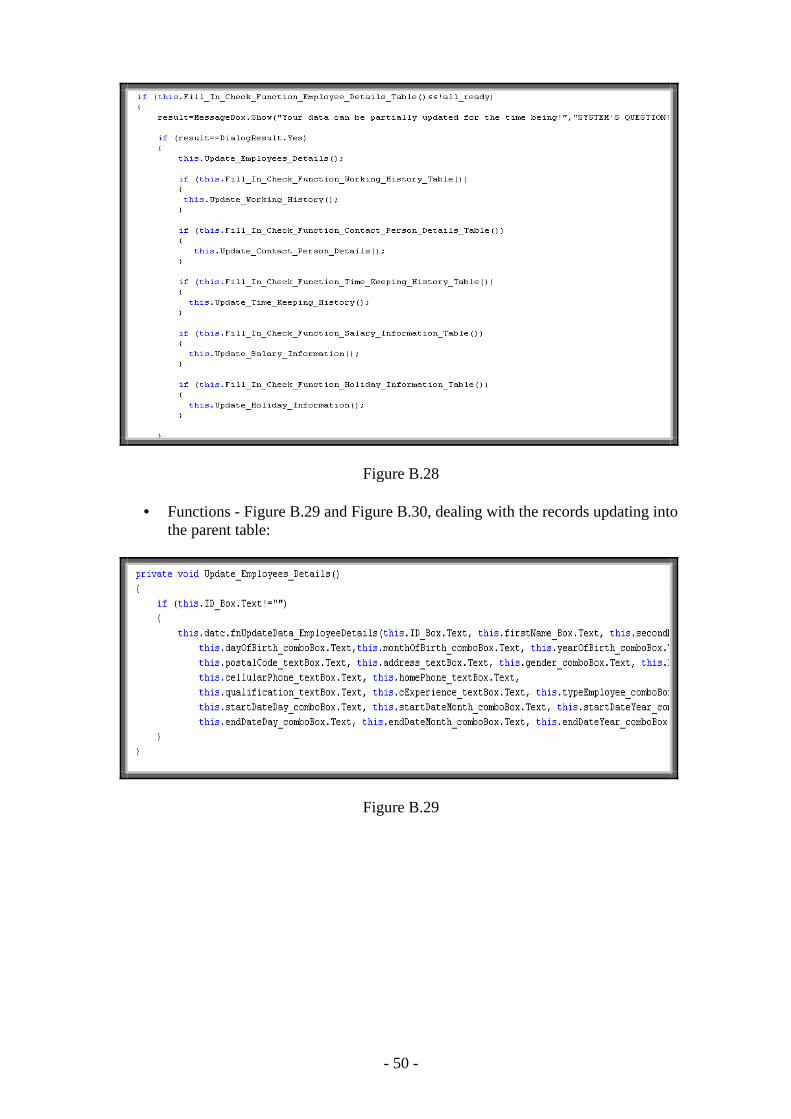
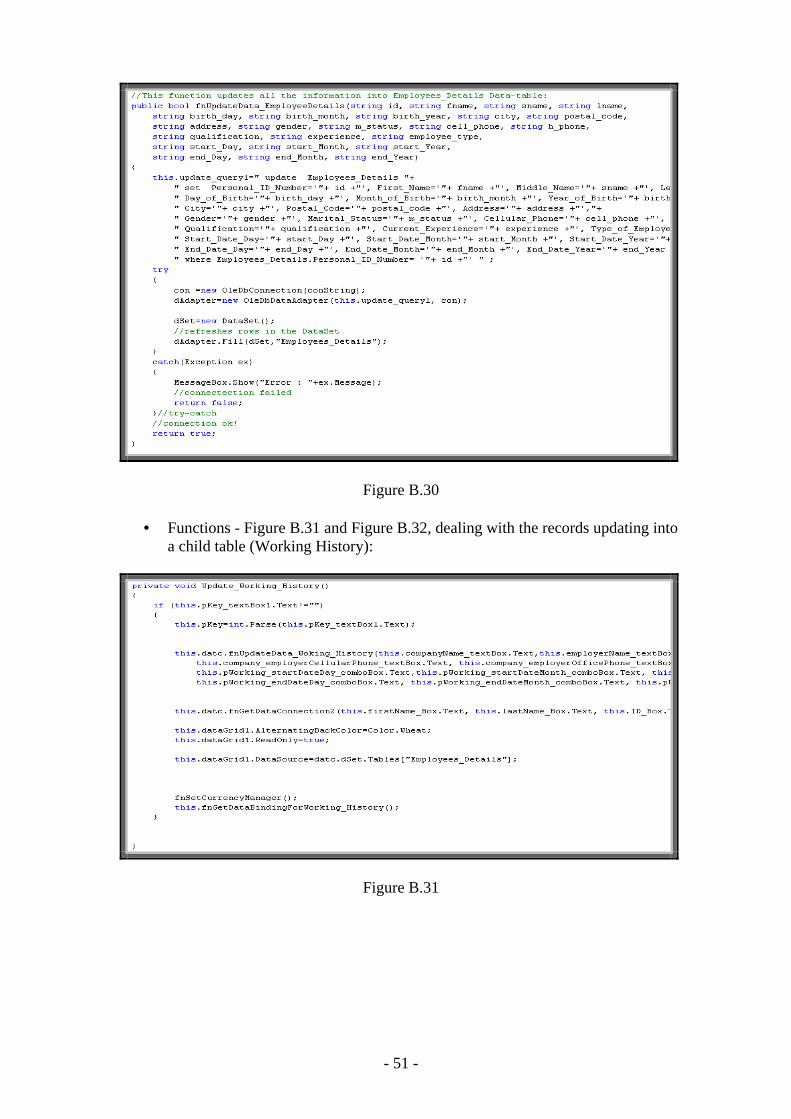
into the Click-event’s mechanism of this update-button. Only few of the functions are going to be exposed here as the rest ones are operatively the same. The Update_Employees_Details() function - is going to be shown as first – Appendix B: Figure 29. As it could be noted, this method calls another one within itself, which one actually executes the SQL query upon the database. This method has the next body implementation, shown in Appendix B: Figure 30 SQL implementation for updating records into the parent table. The methods shown in Figure 29 and Figure 30 affect the parent table’s records only. For the child tables’ records, other functions have been constructed and that can be seen from the code snippets above. The methods, dealing only with Working_History data table, are going to be presented here, as the methods for the rest data tables are constructed by using the same approach – Appendix B: Figure 31 and Figure 32.
A test responding to these functions’ performance is depicted on the Figures in Appendix C.3.1.
� Update Single Records into the database: This can be performed by clicking the “Update a Record” button - Figure 2.20:
Figure 2.20 Updating a record into the database
The click-event calls the same update-functions as such as they were shown in the figures, concerning all records-updating. Each “Update a Record” button calls the appropriate function, responding to a certain data table.
Two test-samples are shown in Appendix C.3.2.
Primary Key Field … Value_1 Value_2 … … … … … … Value_N
Foreign Key Field Primary Key Field … Value_1 Value_1 Value_2 Value_2 … … … … … … … … … … … … Value_N Value_N
SQL Query
SQL Query Child-Table Primary Key’s Value
- 26 -
2.5.4 Deleting data from the database This kind of operation, performed upon the database, is subdivided into two parts: Single Records Deletion and All Records Deletion. Both parts concern only single employee’s data into the database. Deleting a single record from the database means moving to a certain child table, selecting the record we want to be deleted and press the “Delete a Record” button. The result is instantly reflected into the database and back into the program as well. There is a bit difference between performing single record deletion into the child tables and performing a delete operation upon the whole amount of records of an employee. In the second case we need to delete the employee’s record into the parent table as well, but before proceeding to this final action we have to ensure that all of his records into the child tables are fully erased. Otherwise, the DBMS will not allow any data into the parent table to be deleted! I made up as simple approach as it was possible: I have constructed a delete function for every single child table, erasing all of the records of the selected employee. These functions go through the child tables and when all data gets deleted, a function, erasing the record into the parent table, is called as last.
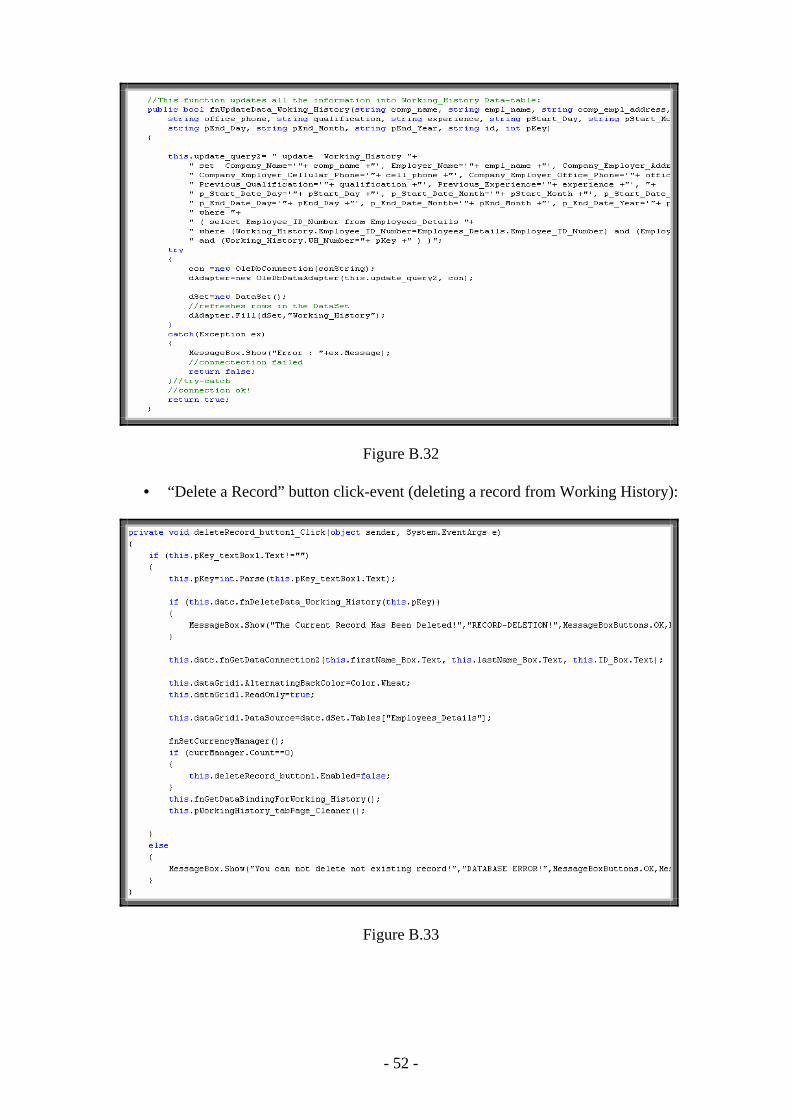
• Single Record Deletion: means that only the current record we want to delete, shall be removed from the database. For this purpose, we can use the functional buttons, related to a record in each data table. The click-event of such a button is shown in Appendix B: Figure 33 Click-event function and Figure 34 Delete function, evoked within the click-event’s body.
The test-samples are shown in Appendix C.4.1. • All Records Deletion: To perform successfully this kind of operation upon the
whole data of an employee, existing into the database, we firstly need to delete consequently all of his records into the child tables and then proceed to the parent table. By clicking the “Delete All” button, a click-event is involved as it is shown in Appendix B: Figure 35. Into the code in Figure 35, we get, or at least try to obtain the primary key values from every single child table in order to ensure that there is (are) available record(s) there, because in other way exception is thrown and the operation crashes down.
To cope with these special cases, a “try-catch” statement has been considered and put to deal with the emergencies of this kind. In case there is no any record, then the primary key is automatically initialized to zero (0), unambiguously showing that there is no any available record into the current child table – Appendix B: Figure 36 Function obtaining the primary key’s value. If the primary key is not zero, then the delete function is called to be performed upon the found record(s) – Appendix B: Figure 37 Function, deleting all records of an employee. Afterwards, we go back to the basic function, in which body all of this stuff is involved, and keep on operating in the same way with the rest of the child tables until we reach to the parent table’s operative function, shown in Appendix B: Figure 38 and Figure 39 – Delete function, operating upon the records into the parent data table.
A test-sample showing this function’s performance is illustrated in Appendix C.4.2.
- 27 -
3. Conclusion In this report, an information system’s development has been presented. It was emphasized on the basic steps, consequently taken during the project’s development course as a particular attention was turned to the basic operative functions performed upon the data into the database. The report’s content comprises the whole task solution, starting from the programming environments have been selected, going through the database, the application’s analyze and construction, and finishing with the code-implementation and test-samples, shown separately in Appendix chapters.
As a future work, some additional stuff could be implemented and integrated into the application code making it much more reliable and flexible; especially what concerns a pay-roll module, for instance.
Apparently, the role of such systems is basic and essential within each company that wants to keep a really good control and record concerning its personnel data, functionality and performance on all levels in its structure. Every organization, in nowadays, has the necessity of managing its staff on a really good level as the staff has definitely the greatest merit of building up a company as such as it is. The well-managed staff means giving the appropriate financial award-ness and all kind of benefits as such as they have been deserved. That’s why the development of such systems is not just a programming business – a lot of people are ordinarily involved in such projects and one of the basic requirements is the reliability of the system, especially what concerns the storage of data and all of the operations that will be performed upon it.

- 28 -
4. References [1] – Begg Carolyn, Connolly Thomas, Database systems (a Practical approach to Design, Implementation, and Management), Addison-Wesley, an imprint of Pearson Education, University of Paisley (U.K.), Fourth edition 2005 [2] – Bodnar George /Duquesne University/, Hopwood William /Florida Atlantic University/, Accounting Information systems, Eighth Edition, Prentice Hall, Upper Saddle River, New Jersey . [3] – Andersen Virginia, Access 2000: The Complete Reference, Blacklick, OH, USA: McGraw-Hill Professional Book Group, 2001, http://site.ebrary.com/lib/vaxjo/Doc?id=5002842 (2006-05-25). [4] – Andersson Tobias, [DAB744] C# Course Lectures, School of Mathematics and System Engineering, Växjö University. [5] - http://msdn.microsoft.com/library/default.asp?url=/library/en- us/vbcon/html/vboritextboxctltasks.asp (2006-05-25).
- 29 -
Appendix A: Programming Environments and
Database Content This section will give some visual details about the content and the structure of the
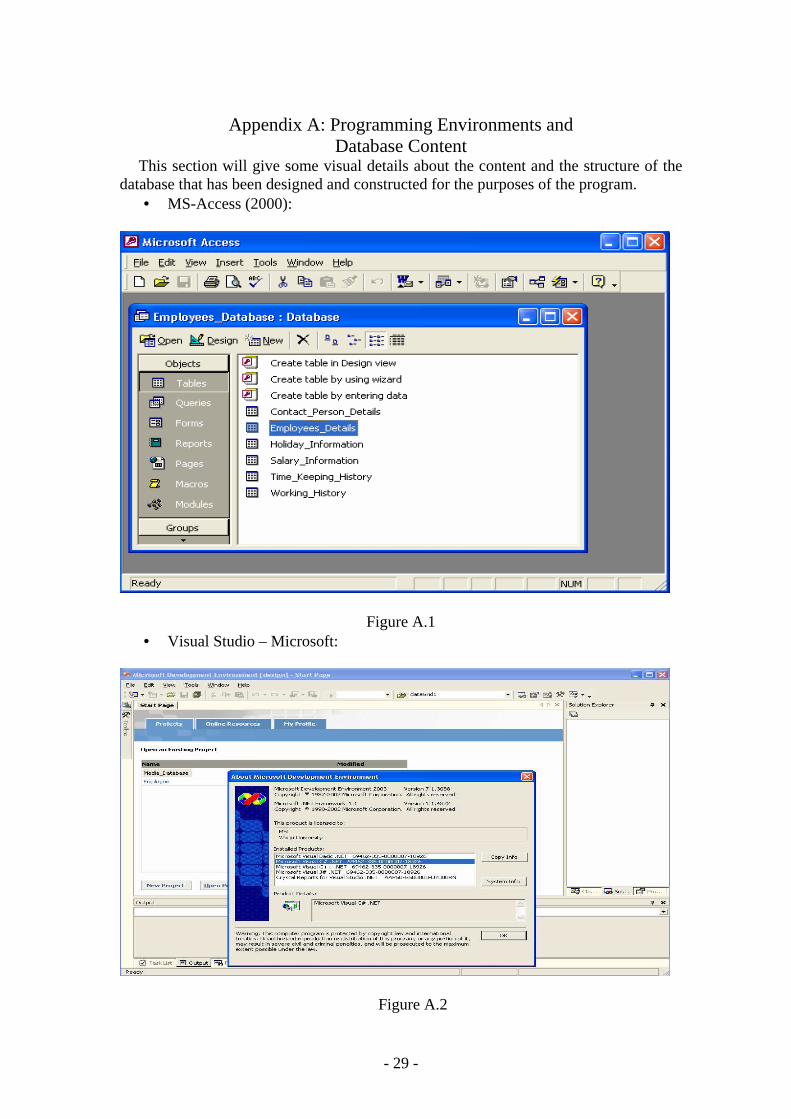
database that has been designed and constructed for the purposes of the program. • MS-Access (2000):
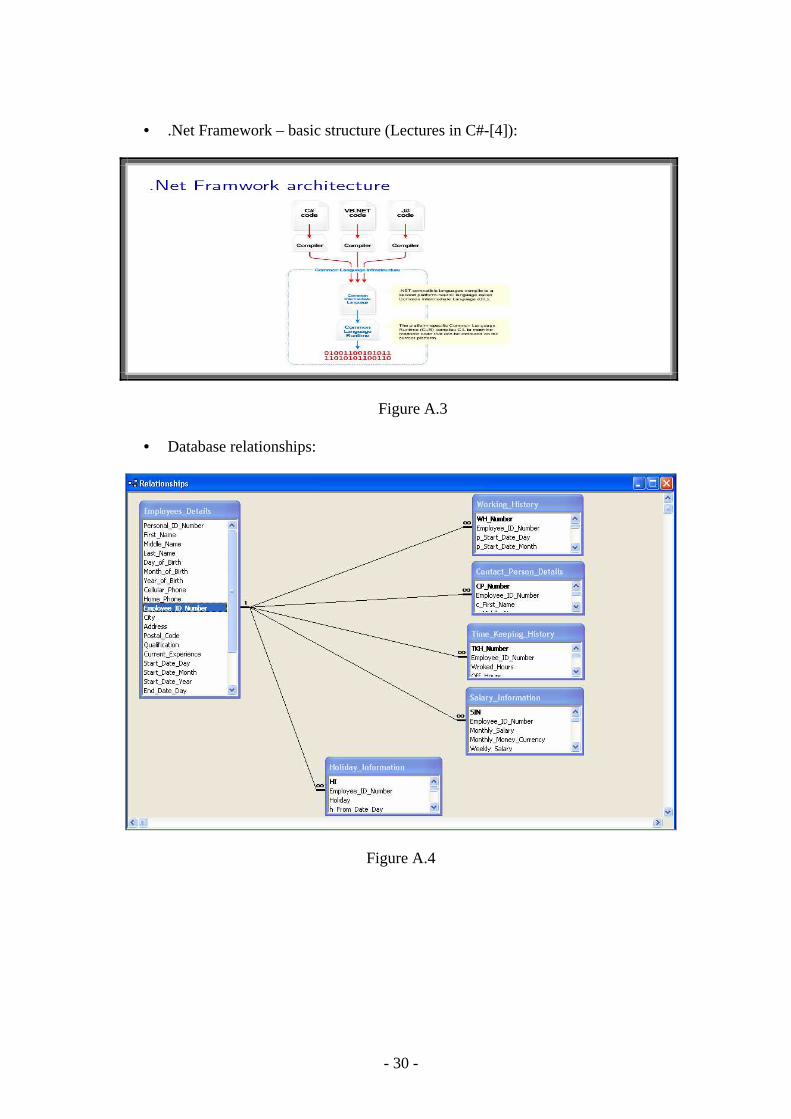
Figure A.1 • Visual Studio – Microsoft:
Figure A.2
- 30 -
• .Net Framework – basic structure (Lectures in C#-[4]):
Figure A.3
• Database relationships:
Figure A.4
- 31 -
• Employees_Details data table:
Figure A.5
• Working_History data table:
Figure A.6
- 32 -
• Contact_Person_Details data table:
Figure A.7
• Time_Keeping_History data table:
Figure A.8
- 33 -
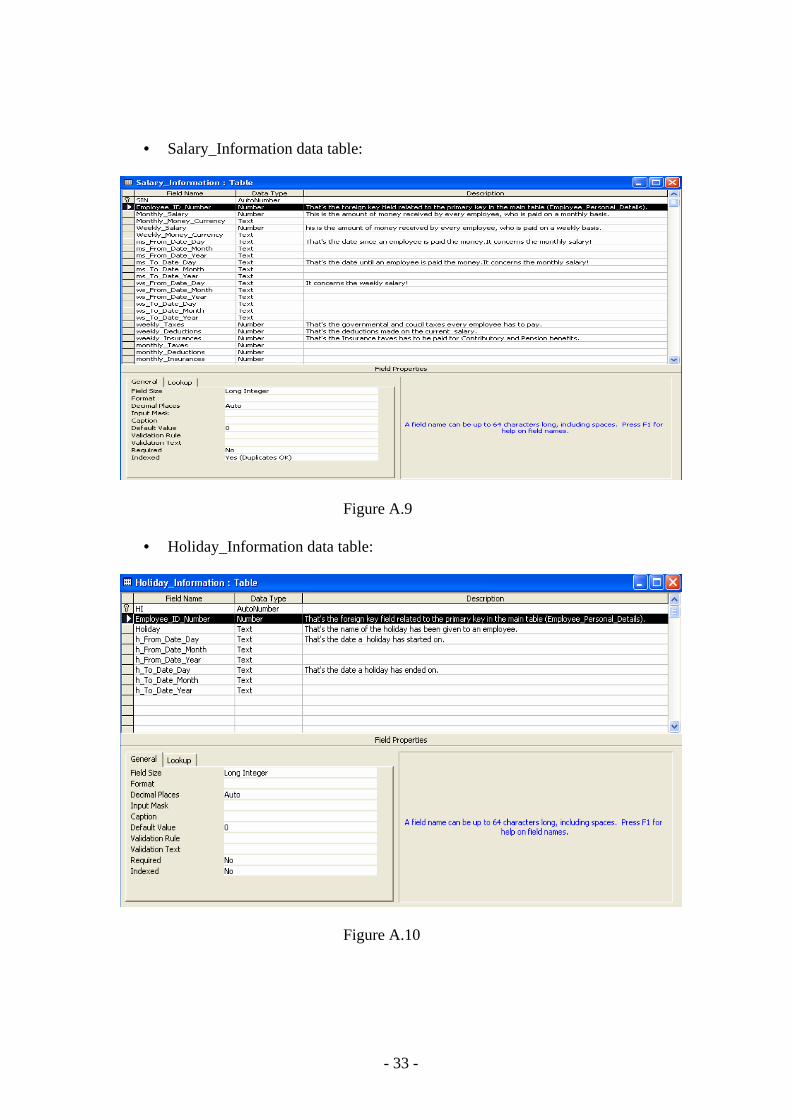
• Salary_Information data table:
Figure A.9
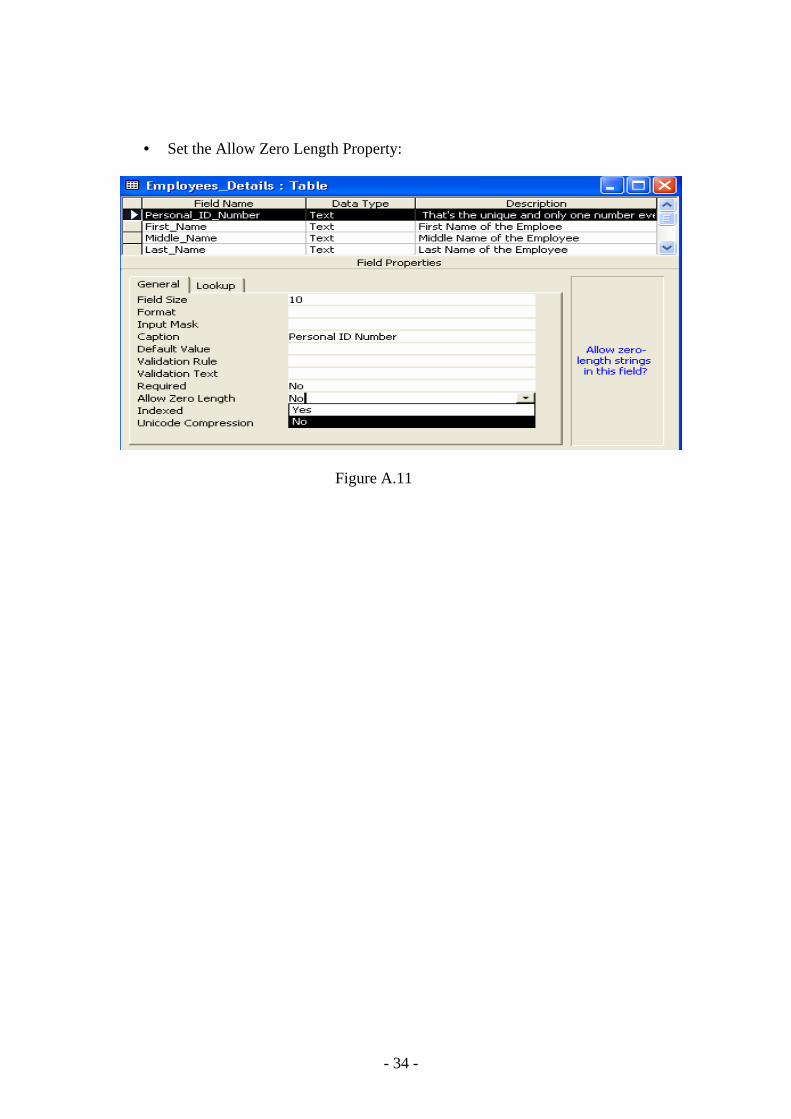
• Holiday_Information data table:
Figure A.10
- 34 -
• Set the Allow Zero Length Property:
Figure A.11
- 35 -
Appendix B: Program’s Structure and Code Implementation
This section will give some visual details about the structure of the program has been designed and constructed for the purposes of the program and its basic functions’ code implementation as well.
• Application program’s GUI:
Figure B.1
• Basic form:
Figure B.2
- 36 -
• User control form:
Figure B.3
• Label-controls:
Figure B.4
- 37 -
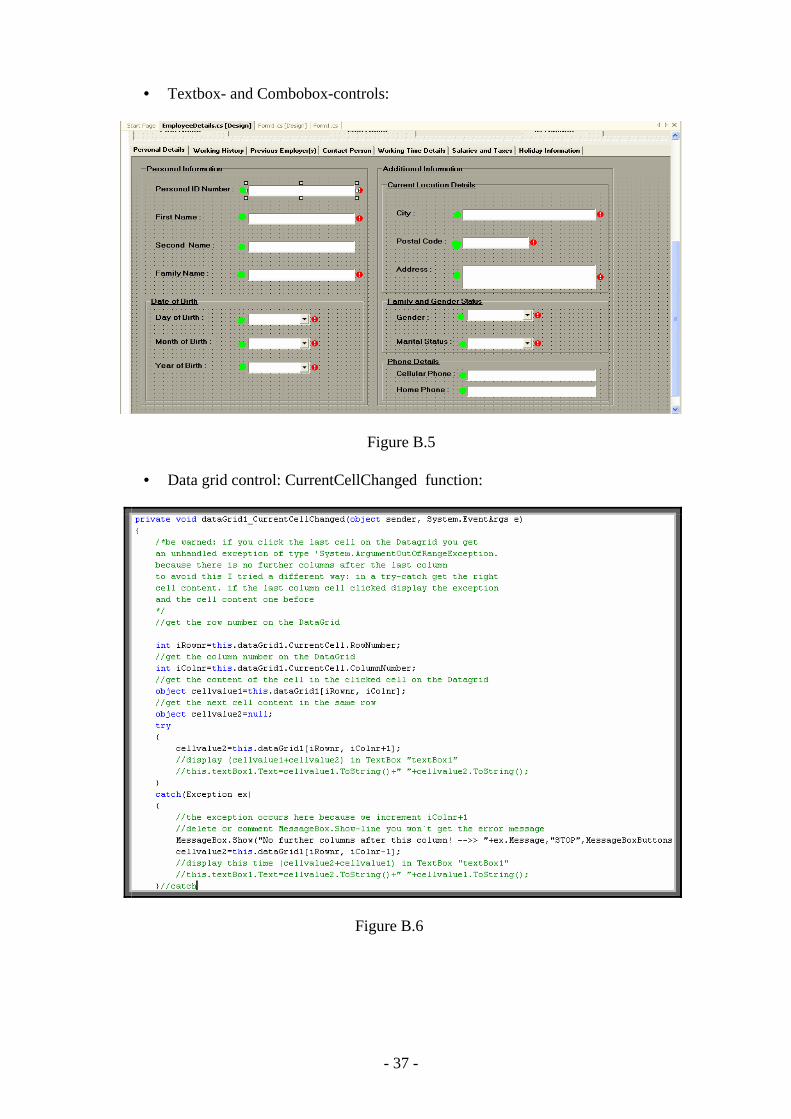
• Textbox- and Combobox-controls:
Figure B.5
• Data grid control: CurrentCellChanged function:
Figure B.6
- 38 -
• Controls data-binding - Figure B.7, Figure B.8, Figure B.9:
Figure B.7
Figure B.8
- 39 -
Figure B.9
Figure B.10
- 40 -
• Preview upon the database records by using text and combo-boxes: Figure B.11 and Figure B.12
Figure B.11
Figure B.12
- 41 -
• Load/Edit button click-event - Figure B.13 and Figure B.14:
Figure B.13
Figure B.14
- 42 -
• Performing SQL-queries upon the database - Figure B.15 and Figure B.16:
Figure B.15
Figure B.16
- 43 -
• Populating the data grid control with data, from the data source:
Figure B.17
• In case, no any records are found:
Figure B.18
- 44 -
• The Search Function’s code-implementation:
… … … … … … … … … … … …
Figure B.19
- 45 -
• “Save All” Button click-event
- 46 -
Figure B.20
• In case, all of the required fields are filled in:
… … … … … … … … … … … … … … … … …
Figure B.21
- 47 -
• Check-function for the information related to one of the data tables:
Figure B.22
• Function, saving data into the parent table (Employees Details):
Figure B.23
- 48 -
• Function, saving data into a child table (Working History):
Figure B.24
• Function, establishing the relationships:
Figure B.25
- 49 -
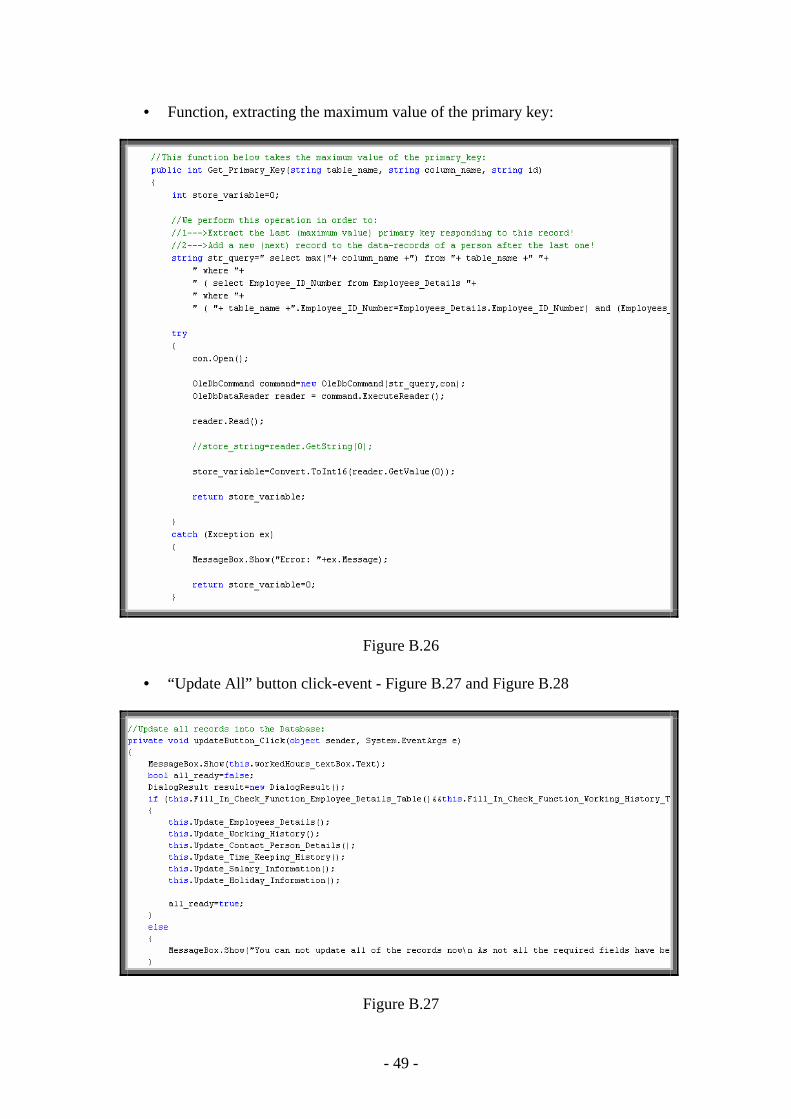
• Function, extracting the maximum value of the primary key:
Figure B.26
• “Update All” button click-event - Figure B.27 and Figure B.28
Figure B.27
- 50 -
Figure B.28
• Functions - Figure B.29 and Figure B.30, dealing with the records updating into the parent table:
Figure B.29
- 51 -
Figure B.30
• Functions - Figure B.31 and Figure B.32, dealing with the records updating into a child table (Working History):
Figure B.31
- 52 -
Figure B.32
• “Delete a Record” button click-event (deleting a record from Working History):
Figure B.33
- 53 -
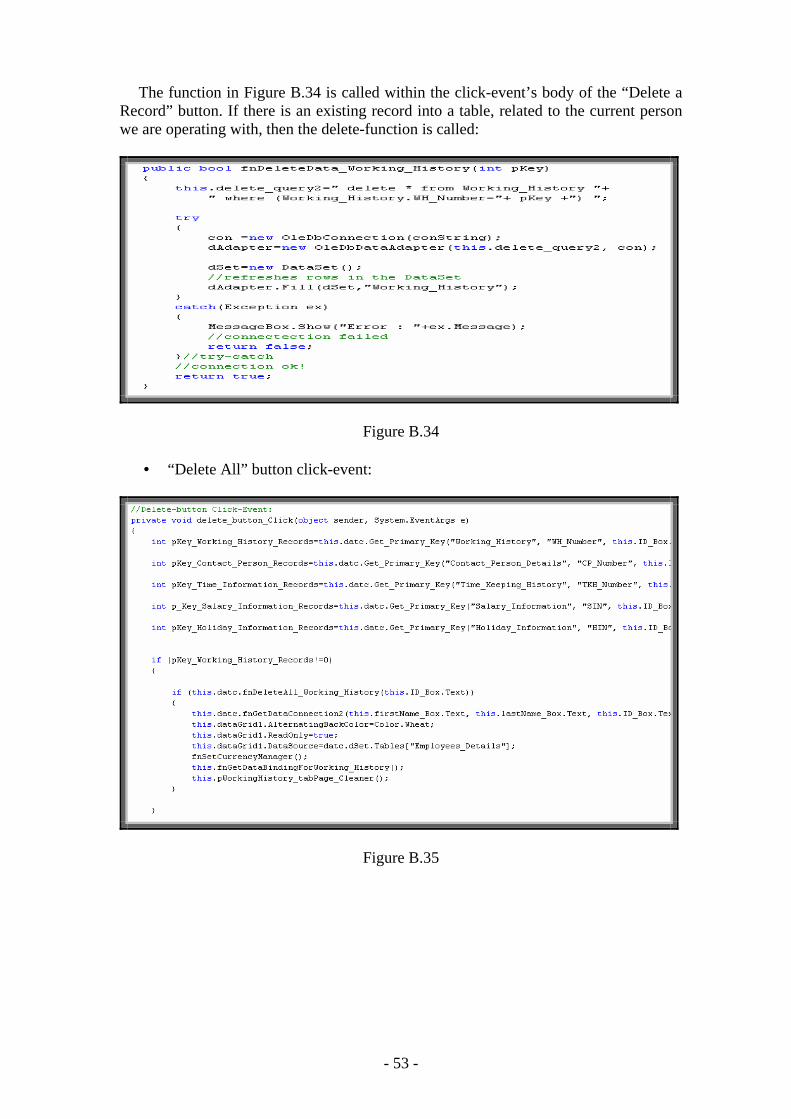
The function in Figure B.34 is called within the click-event’s body of the “Delete a Record” button. If there is an existing record into a table, related to the current person we are operating with, then the delete-function is called:
Figure B.34
• “Delete All” button click-event:
Figure B.35
- 54 -
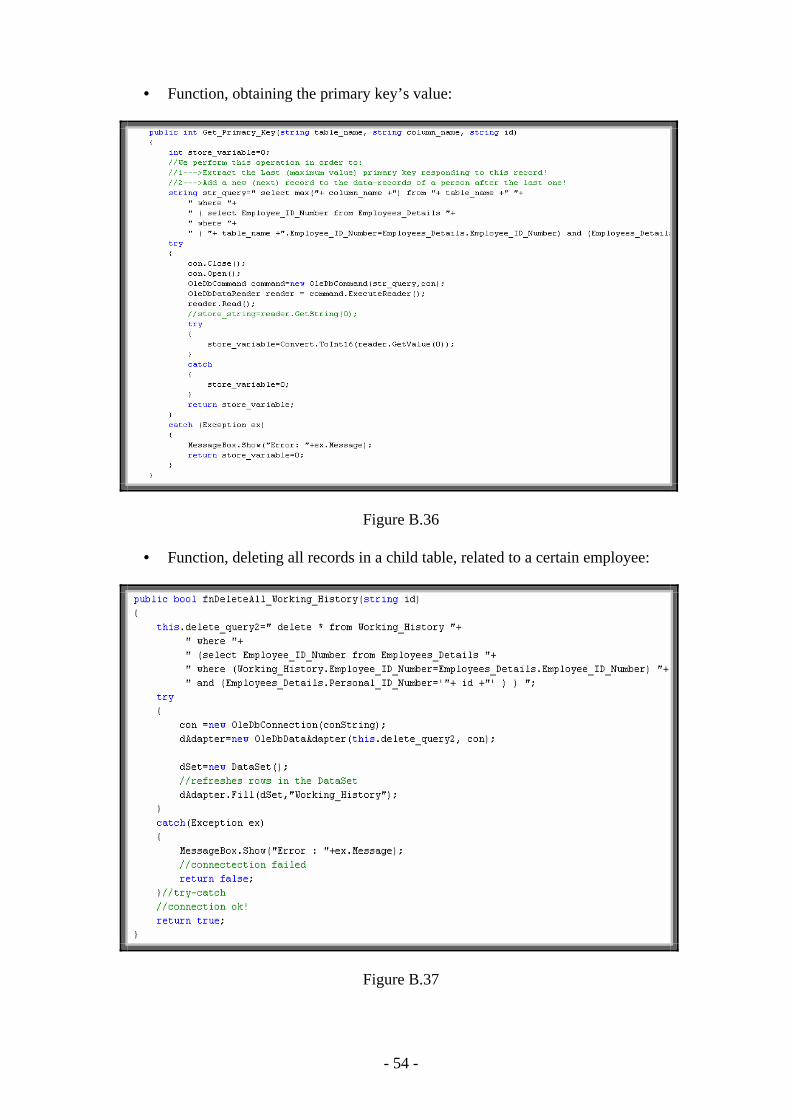
• Function, obtaining the primary key’s value:
Figure B.36
• Function, deleting all records in a child table, related to a certain employee:
Figure B.37
- 55 -
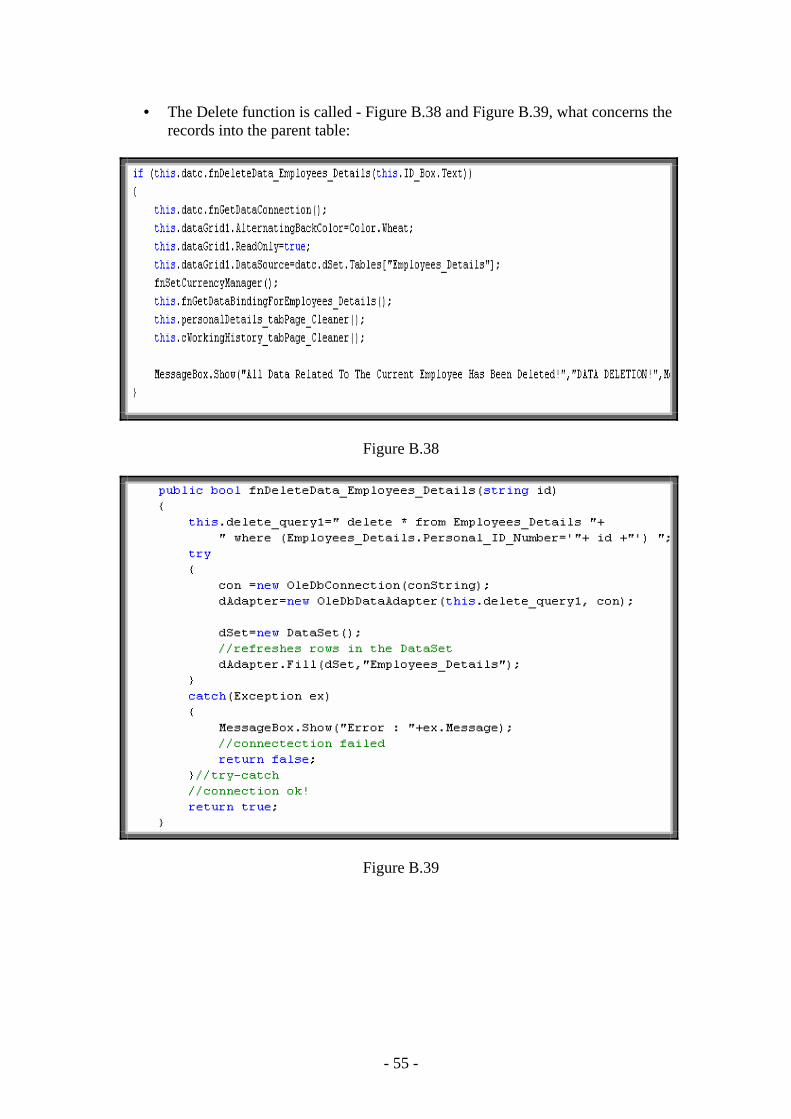
• The Delete function is called - Figure B.38 and Figure B.39, what concerns the
records into the parent table:
Figure B.38
Figure B.39
- 56 -
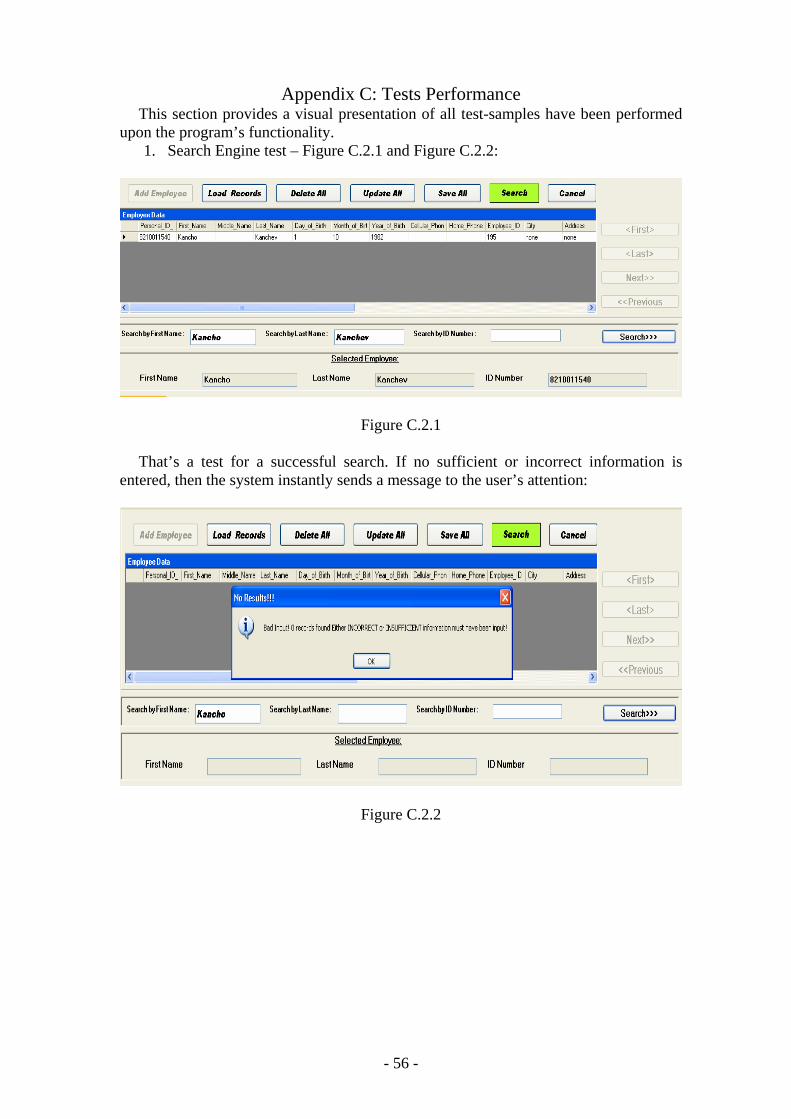
Appendix C: Tests Performance This section provides a visual presentation of all test-samples have been performed
upon the program’s functionality. 1. Search Engine test – Figure C.2.1 and Figure C.2.2:
Figure C.2.1
That’s a test for a successful search. If no sufficient or incorrect information is
entered, then the system instantly sends a message to the user’s attention:
Figure C.2.2
- 57 -
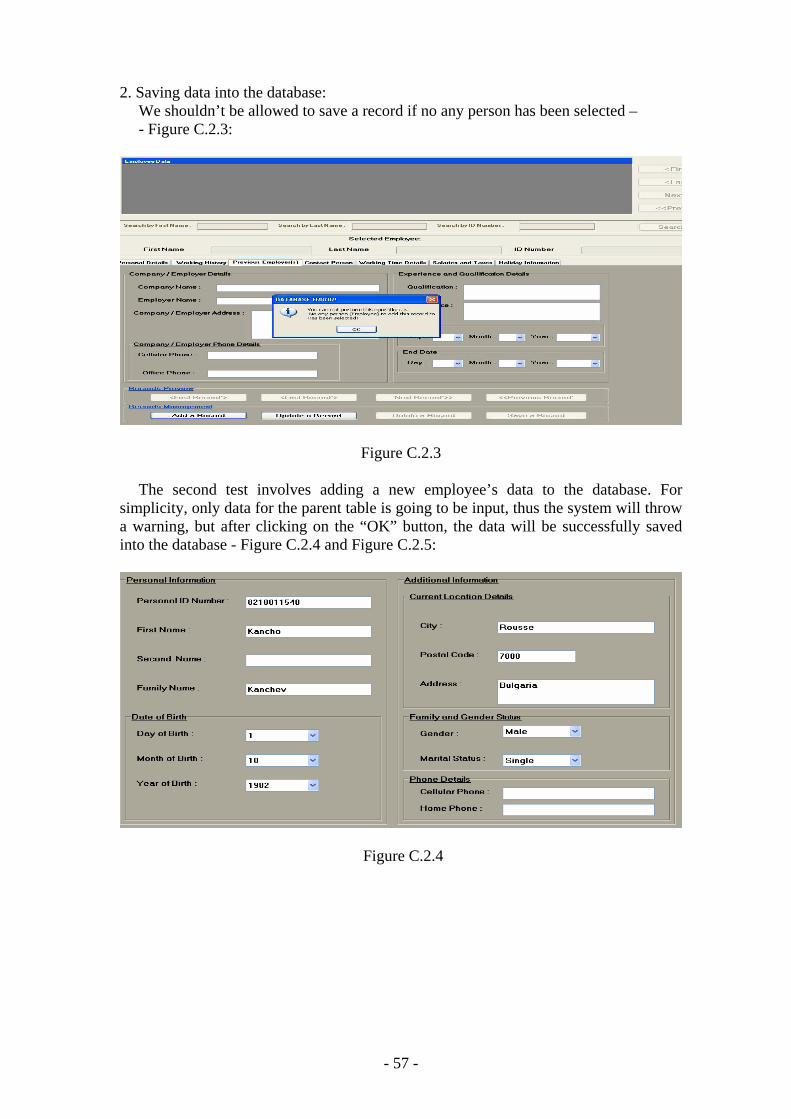
2. Saving data into the database: We shouldn’t be allowed to save a record if no any person has been selected – - Figure C.2.3:
Figure C.2.3
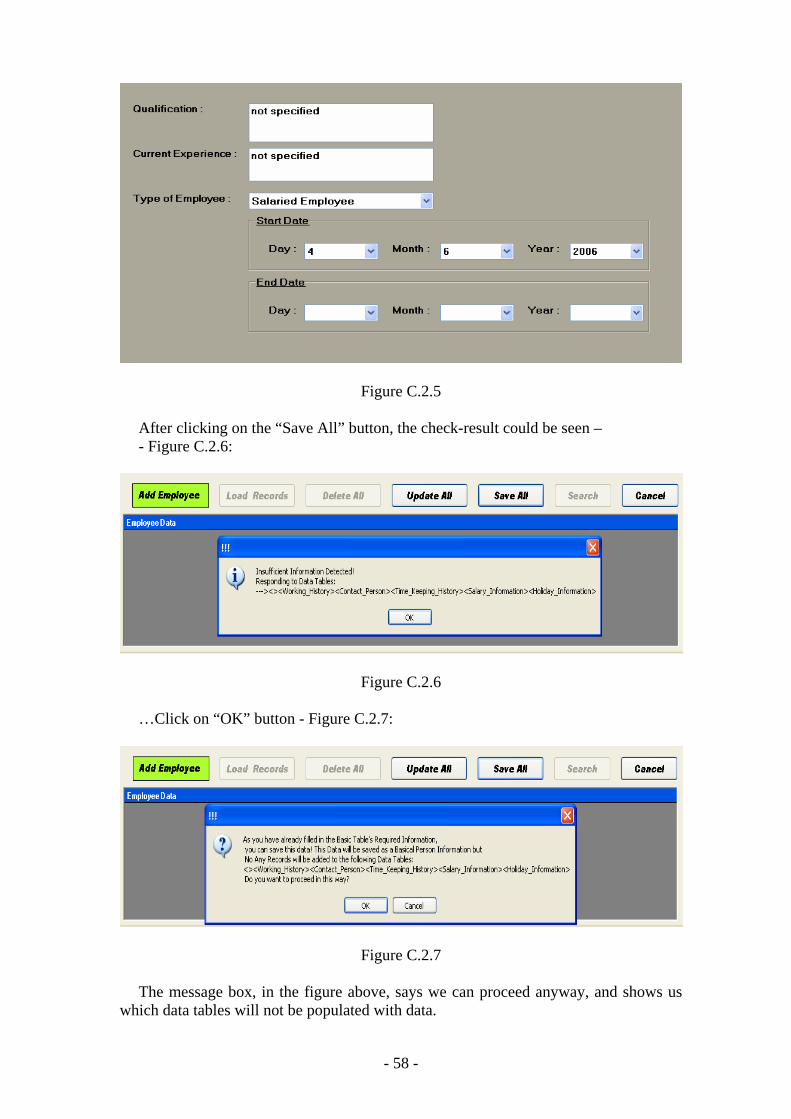
The second test involves adding a new employee’s data to the database. For
simplicity, only data for the parent table is going to be input, thus the system will throw a warning, but after clicking on the “OK” button, the data will be successfully saved into the database - Figure C.2.4 and Figure C.2.5:
Figure C.2.4
- 58 -
Figure C.2.5
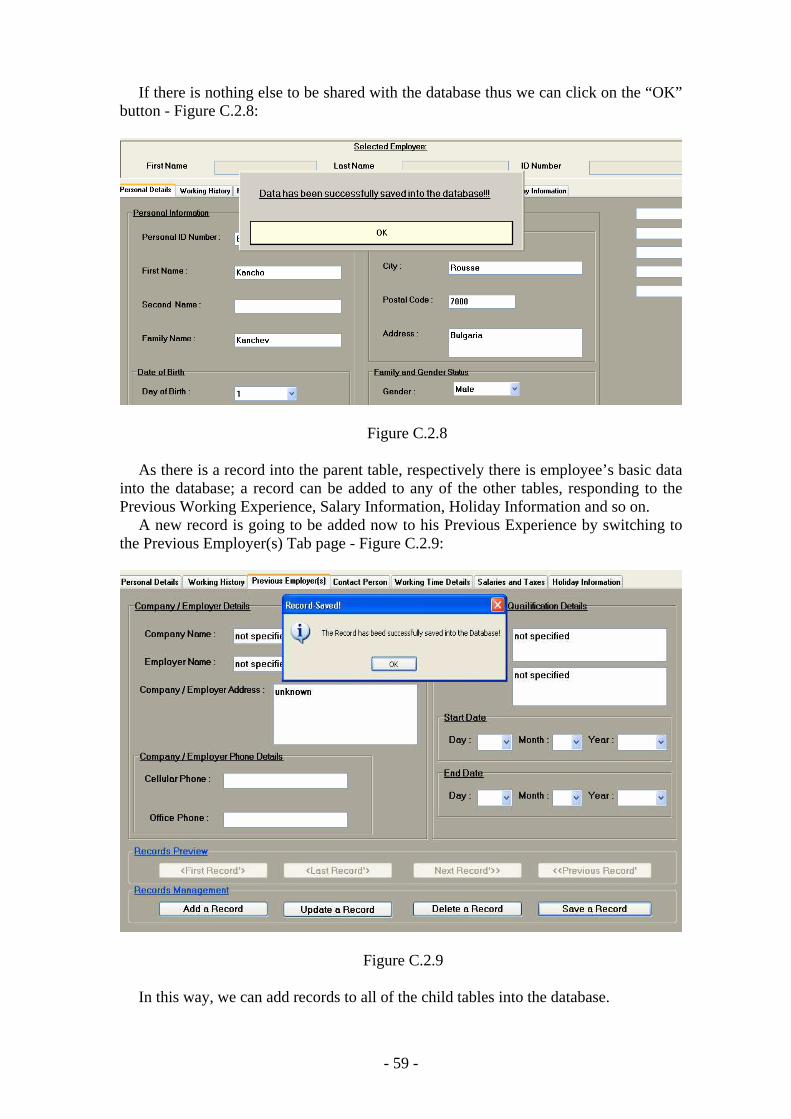
After clicking on the “Save All” button, the check-result could be seen – - Figure C.2.6:
Figure C.2.6
…Click on “OK” button - Figure C.2.7:
Figure C.2.7
The message box, in the figure above, says we can proceed anyway, and shows us
which data tables will not be populated with data.
- 59 -
If there is nothing else to be shared with the database thus we can click on the “OK” button - Figure C.2.8:
Figure C.2.8
As there is a record into the parent table, respectively there is employee’s basic data into the database; a record can be added to any of the other tables, responding to the Previous Working Experience, Salary Information, Holiday Information and so on.
A new record is going to be added now to his Previous Experience by switching to the Previous Employer(s) Tab page - Figure C.2.9:
Figure C.2.9
In this way, we can add records to all of the child tables into the database.
- 60 -
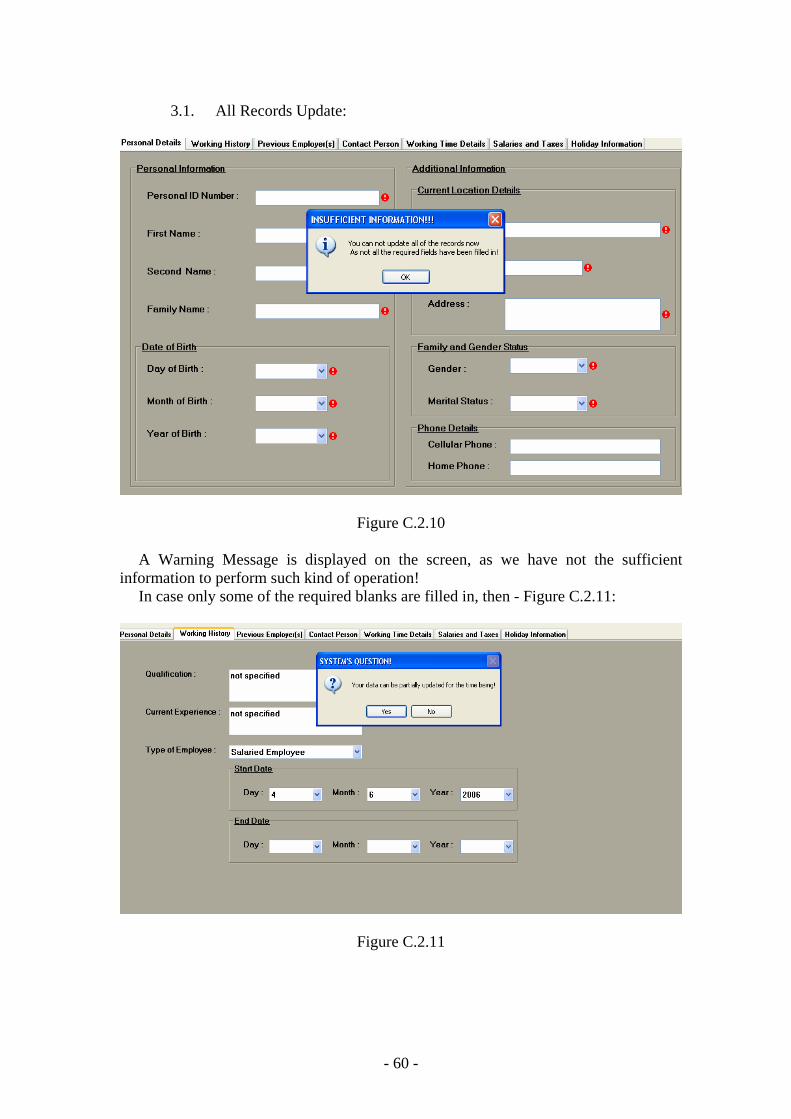
3.1. All Records Update:
Figure C.2.10
A Warning Message is displayed on the screen, as we have not the sufficient information to perform such kind of operation!
In case only some of the required blanks are filled in, then - Figure C.2.11:
Figure C.2.11
- 61 -
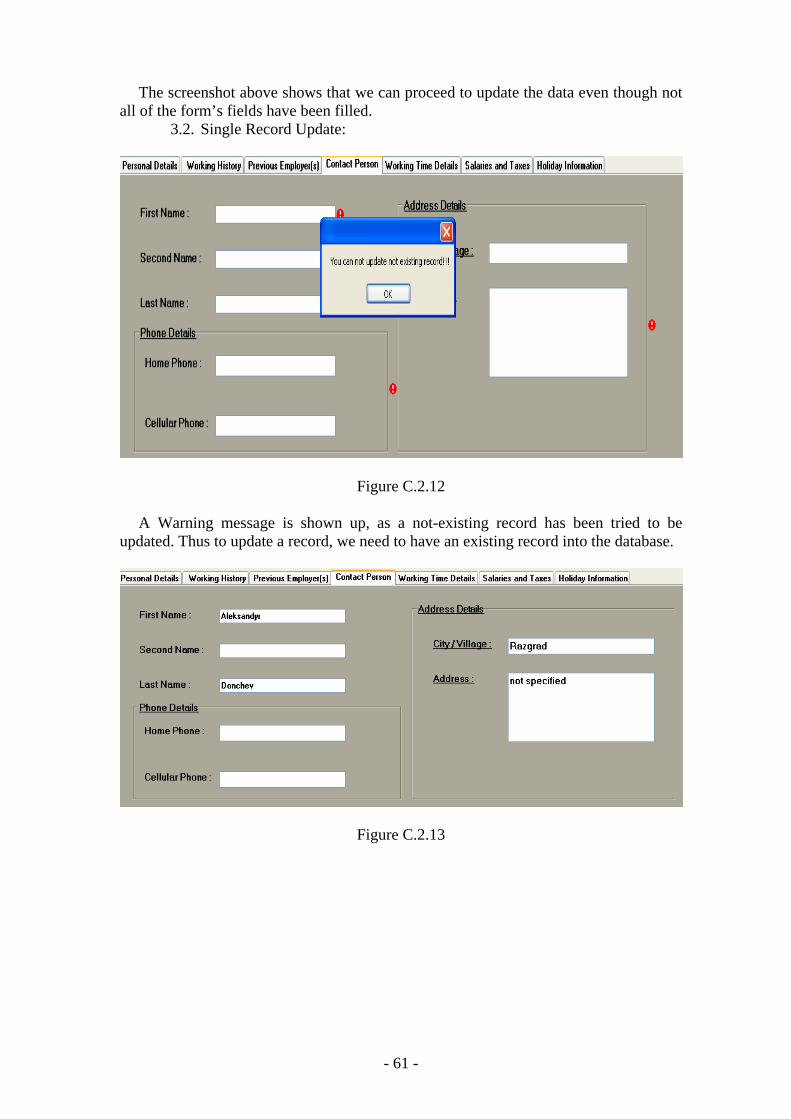
The screenshot above shows that we can proceed to update the data even though not all of the form’s fields have been filled.
3.2. Single Record Update:
Figure C.2.12
A Warning message is shown up, as a not-existing record has been tried to be
updated. Thus to update a record, we need to have an existing record into the database.
Figure C.2.13
- 62 -
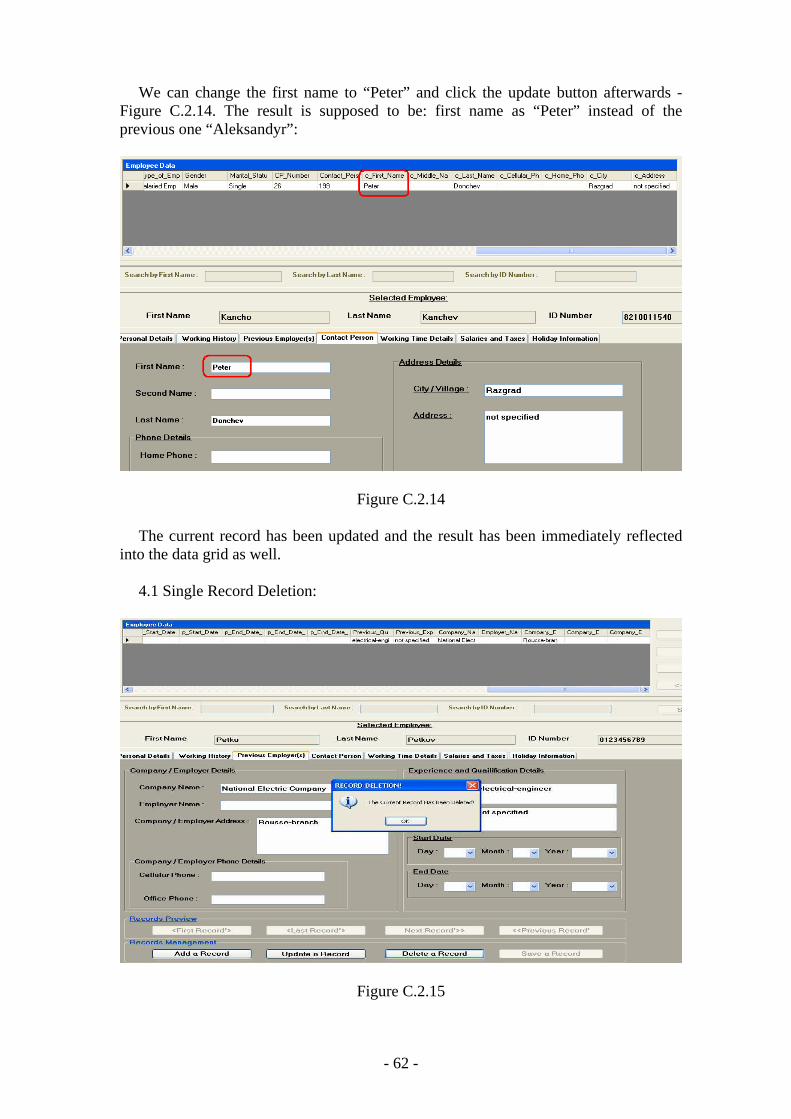
We can change the first name to “Peter” and click the update button afterwards - Figure C.2.14. The result is supposed to be: first name as “Peter” instead of the previous one “Aleksandyr”:
Figure C.2.14
The current record has been updated and the result has been immediately reflected into the data grid as well.
4.1 Single Record Deletion:
Figure C.2.15
- 63 -
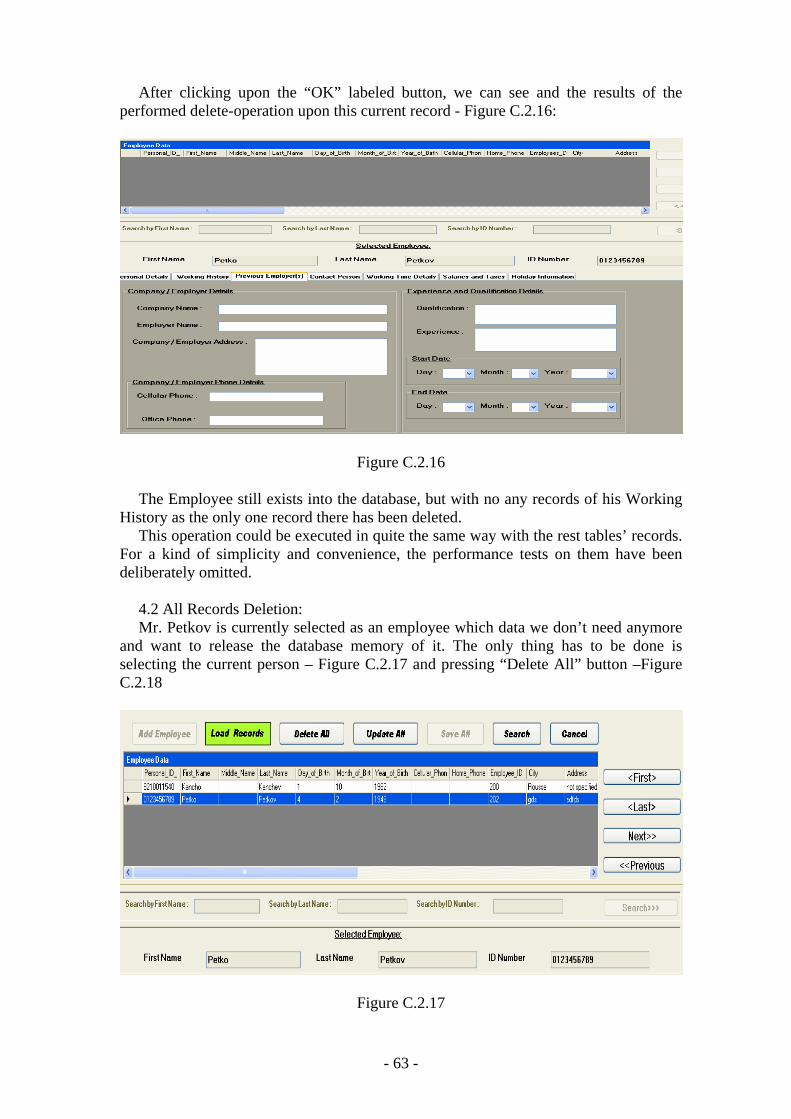
After clicking upon the “OK” labeled button, we can see and the results of the performed delete-operation upon this current record - Figure C.2.16:
Figure C.2.16
The Employee still exists into the database, but with no any records of his Working
History as the only one record there has been deleted. This operation could be executed in quite the same way with the rest tables’ records.
For a kind of simplicity and convenience, the performance tests on them have been deliberately omitted.
4.2 All Records Deletion: Mr. Petkov is currently selected as an employee which data we don’t need anymore
and want to release the database memory of it. The only thing has to be done is selecting the current person – Figure C.2.17 and pressing “Delete All” button –Figure C.2.18
Figure C.2.17
- 64 -
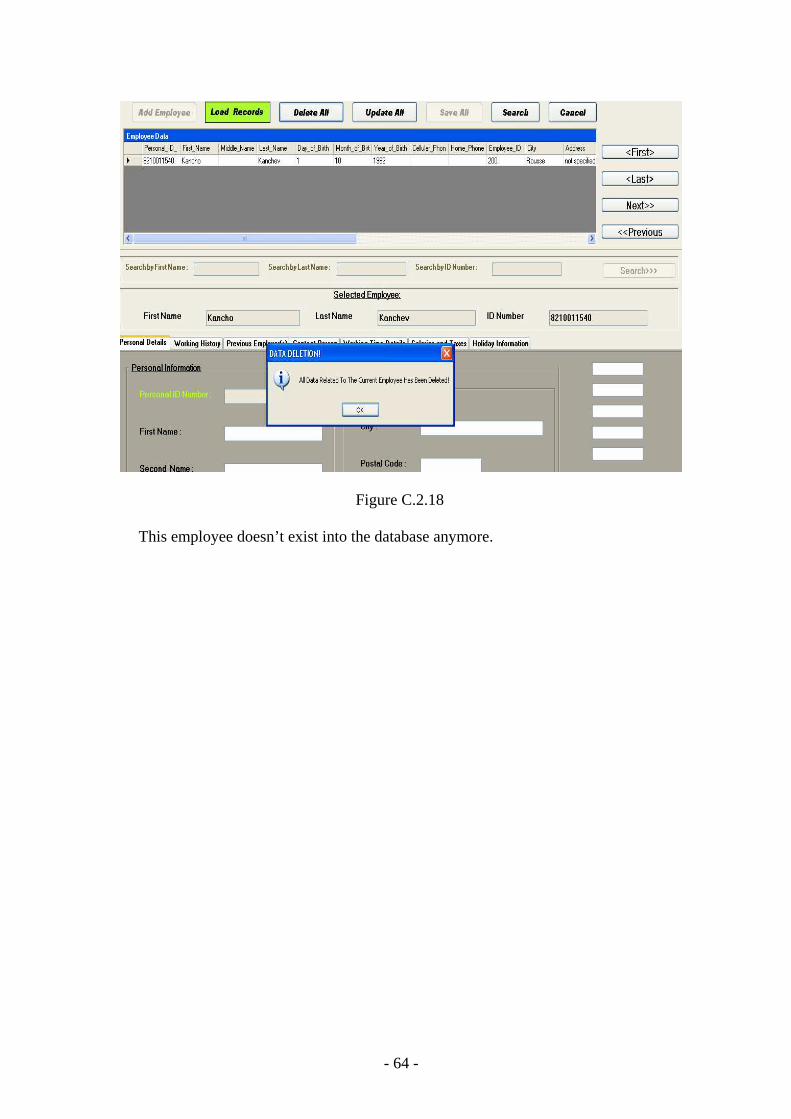
Figure C.2.18
This employee doesn’t exist into the database anymore.

- 65 -
Växjöuniversitet
Matematiska och systemtekniska institutionenSE-351 95 Växjö
tel 0470-70 80 00, fax 0470-840 04www.msi.vxu.se