Embed Size (px)
Citation preview
Digital Recording Studio D16 Guide
Mode / Function Overview Audio Monitoring Connections 3 How to Select and Listen to the Demo Songs 3 Demo Song Track Listings 4 Quick Tour of a D16 Demo Song 4 Scene Memory Mode 4 Meter / Track View Mode 5 Pan / Balance Controls and Channel Pairing Feature 5 EQ Mode 6 Insert Effect Mode 6 Master Effect Mode 7 Solo / Monitor Modes 7 Monitor Function 8 Scrub Function 8 Tuner / Microphone Function 9 Metronome Function 9 Analog Inputs 10 Virtual Tracks / Bounce Functions 10 Punch-IN / OUT Function 11
Working with the D16: Demo Basics 13 Muting / Un-muting Specific Tracks 14 Working with the EQ Function 14 Applying Insert Effects to Tracks 14 The "Big Effects Picture" 18 Working with the Scrub Function 19 Working with the Solo Function 19 Working with the Metronome and Rhythm Patterns 20
KORG D16 Guide
2
Recording and Editing Basics: Create and Rename a New Song 21 Basic Recording 22 Recording with EQ On-Input 24 Working with the Undo / Redo Function 25 Working with the Manual Punch-In / Out Function 26 Storing Locate Points 27 Auto Punch In / Out Recording 29 Storing Mark Points 30 Working with Scene Memory 31
Loop Recording and Playback Working with the Loop Functions 35 Copying and Un-protecting a Demo Song 36 Setting IN / OUT Points 38
Virtual Tracks Working with Virtual Tracks 39 Track Bouncing 41 Perform a Virtual 16-2 Mixdown 43
Insert, Master and Final Effects Working with the Effects 46 Working with the Insert Effects – Assigning and Routing 49 Working with the Master Effects 52 Working with the Final Effect 53
Metronome and Rhythm Pattern Applications: Create a New Song and Connect Your Source Device 55 Work with the Tempo / Rhythm Function 56 Record a Rhythm Pattern to Stereo Tracks 57 Work with the Tempo Map Function 58
Song and Track Editing: Overviews and Quick Steps 60
Additional Owner’s Manual References: Additional References 63
KORG D16 Guide
3
Digital Recording Studio D16 Guide
Mode / Function Overview
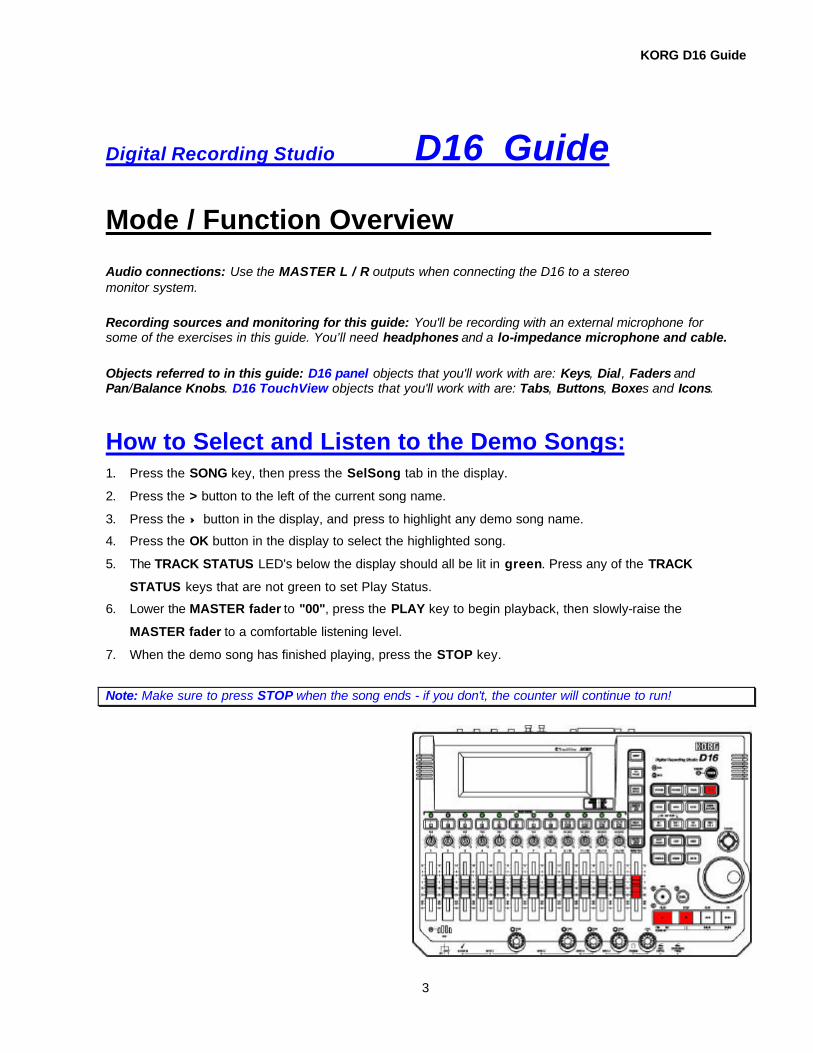
Audio connections: Use the MASTER L / R outputs when connecting the D16 to a stereo monitor system.
Recording sources and monitoring for this guide: You'll be recording with an external microphone for some of the exercises in this guide. You’ll need headphones and a lo-impedance microphone and cable.
Objects referred to in this guide: D16 panel objects that you'll work with are: Keys, Dial, Faders and Pan/Balance Knobs. D16 TouchView objects that you'll work with are: Tabs, Buttons, Boxes and Icons.
How to Select and Listen to the Demo Songs: 1. Press the SONG key, then press the SelSong tab in the display.
2. Press the > button to the left of the current song name.
3. Press the ↑↑ button in the display, and press to highlight any demo song name.
4. Press the OK button in the display to select the highlighted song.
5. The TRACK STATUS LED's below the display should all be lit in green. Press any of the TRACK
STATUS keys that are not green to set Play Status.
6. Lower the MASTER fader to "00", press the PLAY key to begin playback, then slowly-raise the
MASTER fader to a comfortable listening level.
7. When the demo song has finished playing, press the STOP key.
Note: Make sure to press STOP when the song ends - if you don't, the counter will continue to run!
KORG D16 Guide
4
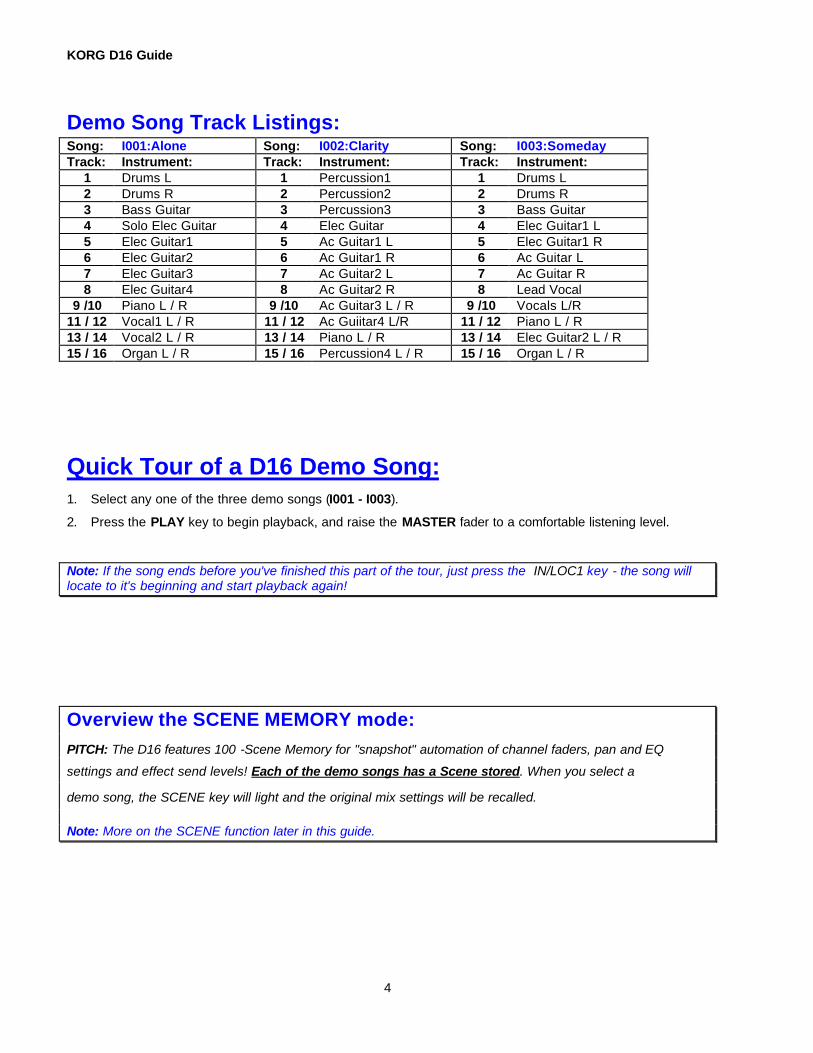
Demo Song Track Listings: Song: I001:Alone Song: I002:Clarity Song: I003:Someday Track: Instrument: Track: Instrument: Track: Instrument:
1 Drums L 1 Percussion1 1 Drums L 2 Drums R 2 Percussion2 2 Drums R 3 Bass Guitar 3 Percussion3 3 Bass Guitar 4 Solo Elec Guitar 4 Elec Guitar 4 Elec Guitar1 L 5 Elec Guitar1 5 Ac Guitar1 L 5 Elec Guitar1 R 6 Elec Guitar2 6 Ac Guitar1 R 6 Ac Guitar L 7 Elec Guitar3 7 Ac Guitar2 L 7 Ac Guitar R 8 Elec Guitar4 8 Ac Guitar2 R 8 Lead Vocal
9 /10 Piano L / R 9 /10 Ac Guitar3 L / R 9 /10 Vocals L/R 11 / 12 Vocal1 L / R 11 / 12 Ac Guiitar4 L/R 11 / 12 Piano L / R 13 / 14 Vocal2 L / R 13 / 14 Piano L / R 13 / 14 Elec Guitar2 L / R 15 / 16 Organ L / R 15 / 16 Percussion4 L / R 15 / 16 Organ L / R
Quick Tour of a D16 Demo Song: 1. Select any one of the three demo songs (I001 - I003).
2. Press the PLAY key to begin playback, and raise the MASTER fader to a comfortable listening level. Note: If the song ends before you've finished this part of the tour, just press the IN/LOC1 key - the song will locate to it's beginning and start playback again!
Overview the SCENE MEMORY mode: PITCH: The D16 features 100 -Scene Memory for "snapshot" automation of channel faders, pan and EQ
settings and effect send levels! Each of the demo songs has a Scene stored. When you select a
demo song, the SCENE key will light and the original mix settings will be recalled. Note: More on the SCENE function later in this guide.

KORG D16 Guide
5
Overview the METER / TRACK VIEW mode: 1. As the song plays, press the METER/TRACK VIEW key, and work with the Channel Faders - the
display will indicate your changes, and you can view the Send, Monitor and Master levels.
Note: Make sure that the display mode is set to PostFdr in the upper-left of the display - if not, press the
Popup Button in the upper-left, and select PostFaderLevel from the dialog box, then press the OK
button.
PITCH: The METER/TRACK VIEW mode features five ways to see overall mix and track data (PreFader,
PostFader, TrackView1-8, TrackView9-16, TrackView1-16) for accurate metering of all signal levels!
Overview the PAN controls and CHANNEL PAIRING feature: 1. As the song continues to play, adjust the PAN controls for tracks 1-8 to set new pan settings for each
track.
PITCH: The D16 features a Channel Pairing function to simultaneously - control adjacent channels for
controlling Track Status, Pan, EQ, Aux and Effect send settings as well as Channel fader position!
KORG D16 Guide
6
Overview the EQ mode: 1. Press the EQ/PHASE key, then press the Eq1-4 tab in the display. Here you'll see EQ settings for tracks
1-4 - by pressing an EQ parameter "knob" in the display and rotating the DIAL, you can make changes
to the track EQ.
PITCH: The D16 features 3- band EQ for every track! Lo, Mid and Hi EQ plus Mid frequency
control to give you the utmost in EQ control! You can apply EQ as you record, as well as in track playback!
Note: If the song ends before you've finished this part of the tour, just press the IN/LOC1 key - the song will locate to it's beginning and start playback again!
Overview the INSERT EFFECT mode: PITCH: 44 Bit Effects: 8 insert, 2 master and 1 final mastering effect - that's 11 simultaneous
for each song!
1. Press the INSERT EFFECT key - this page let's you set Insert Effect assignments for each track and
assign the effect type. By pressing one of the insert effect tabs (InsEff1, etc.) you can apply an insert
effect. Once a desired effect is selected, you can press the effect name button to access the icons and
editing parameters for the insert effect program you've selected.
PITCH: There are 128 preset insert effect programs to choose from, including 98 chains of up
to 5 effects at once! The D16 features Korg's new REMS modeling effects - accurate amp, cabinet and
microphone simulations! You can edit any of the preset effect programs, then store your edits to 128 user
effect programs! Plus, many of the effects like wah and delay can be controlled in realtime using the D16's
exclusive Expression Pedal input!
KORG D16 Guide
7
Overview the MASTER EFFECT mode: PITCH: Send your mix through Master and Final Effects - for ultimate processing!
1. Press the MASTER EFFECT / AUX key, then press the MstEff1 tab in the display - for both Master
Effect 1 and Master Effect 2, you can select from any of 32 Master effects, set return levels and balance,
and easily-edit the effect parameters! The Eff1 and Eff2 tabs let you set individual send levels for every
track!
PITCH: The highest-quality effect algorithms available are all onboard, and if you need more external
processing, there's an AUX send and level for every track! The Master and Final Effect programs let you
polish-off your mix for CD-ready mastering - here you can choose from 32 preset effects, and store
any edits to one of 32 user locations!
Note: The D16 demo songs already include applied Master and Final Effects. You can view them by pressing the MASTER EFFECT / AUX key, followed by the MASTER and FINAL effect tabs.
Overview the SOLO / MONITOR modes: PITCH: The SOLO function lets you solo channels, sends and returns instantly!
1. Press the SOLO / MONITOR key. You can listen to one or more selected tracks by pressing the
desired track button(s) in the display. The solo audio can be routed to the Monitor L/R outputs or Master L/R
outputs and headphone out. You can solo effect send 1 and 2 levels, aux level, as well as return levels for
master effects. Note: You can also press the TRACK STATUS keys during playback, to mute desired tracks (unlit). Note: More "hands-on" work with the SOLO function later in this guide.
KORG D16 Guide
8
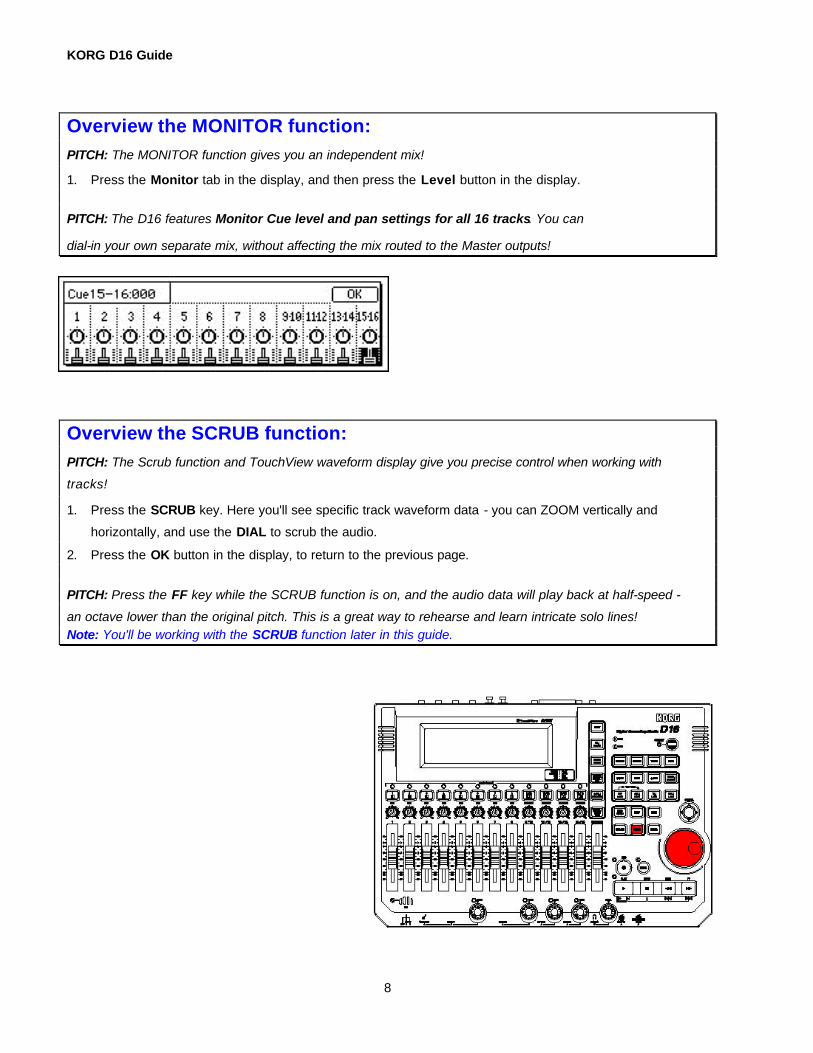
Overview the MONITOR function: PITCH: The MONITOR function gives you an independent mix!
1. Press the Monitor tab in the display, and then press the Level button in the display.
PITCH: The D16 features Monitor Cue level and pan settings for all 16 tracks. You can
dial-in your own separate mix, without affecting the mix routed to the Master outputs!
Overview the SCRUB function: PITCH: The Scrub function and TouchView waveform display give you precise control when working with
tracks!
1. Press the SCRUB key. Here you'll see specific track waveform data - you can ZOOM vertically and
horizontally, and use the DIAL to scrub the audio.
2. Press the OK button in the display, to return to the previous page.
PITCH: Press the FF key while the SCRUB function is on, and the audio data will play back at half-speed -
an octave lower than the original pitch. This is a great way to rehearse and learn intricate solo lines! Note: You'll be working with the SCRUB function later in this guide.
KORG D16 Guide
9
Overview the TUNER / MICROPHONE functions: PITCH: The D16 features a built-in TUNER and MICROPHONE!
1. Press the INPUT key, then press the Tuner tab in the display.
PITCH: With the tuner, you can precisely - tune electric instruments, or use the built-in microphone to tune
external sources like acoustic guitars. In addition, the tuner lets you check the tuning of a previously
recorded track, and the microphone can be used to record scratch vocal tracks or narration!
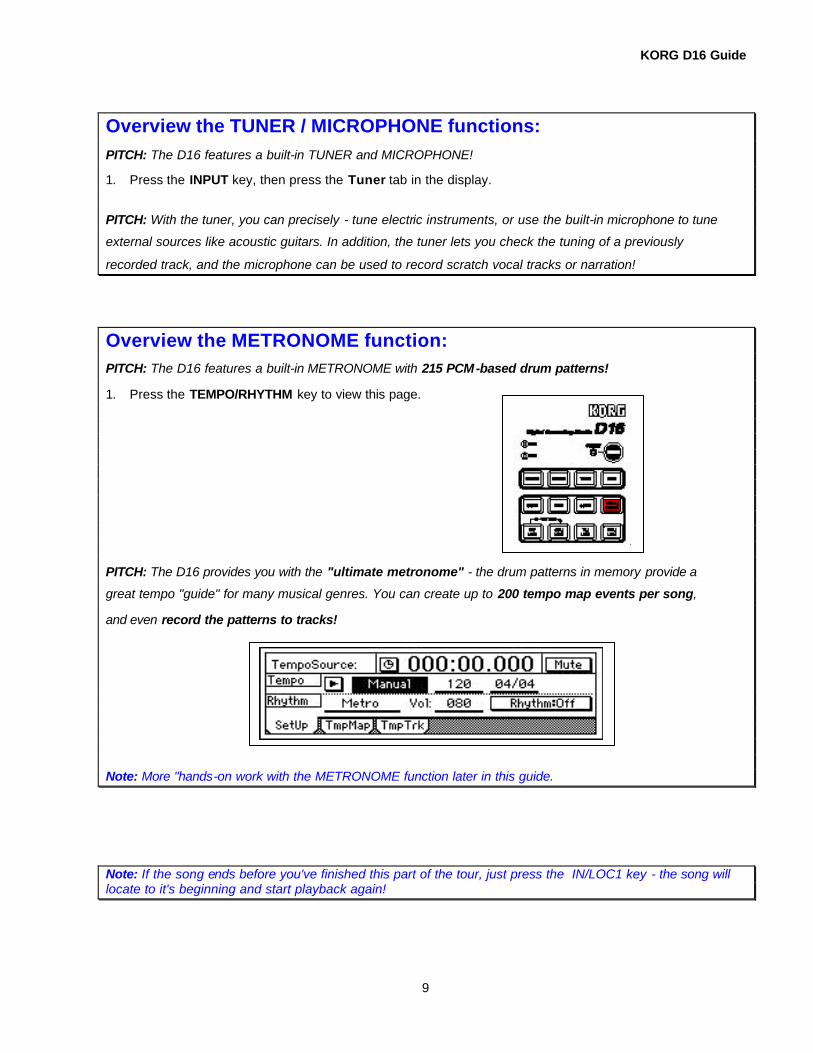
Overview the METRONOME function: PITCH: The D16 features a built-in METRONOME with 215 PCM-based drum patterns!
1. Press the TEMPO/RHYTHM key to view this page.
PITCH: The D16 provides you with the "ultimate metronome" - the drum patterns in memory provide a
great tempo "guide" for many musical genres. You can create up to 200 tempo map events per song,
and even record the patterns to tracks!
Note: More "hands-on work with the METRONOME function later in this guide. Note: If the song ends before you've finished this part of the tour, just press the IN/LOC1 key - the song will locate to it's beginning and start playback again!
KORG D16 Guide
10
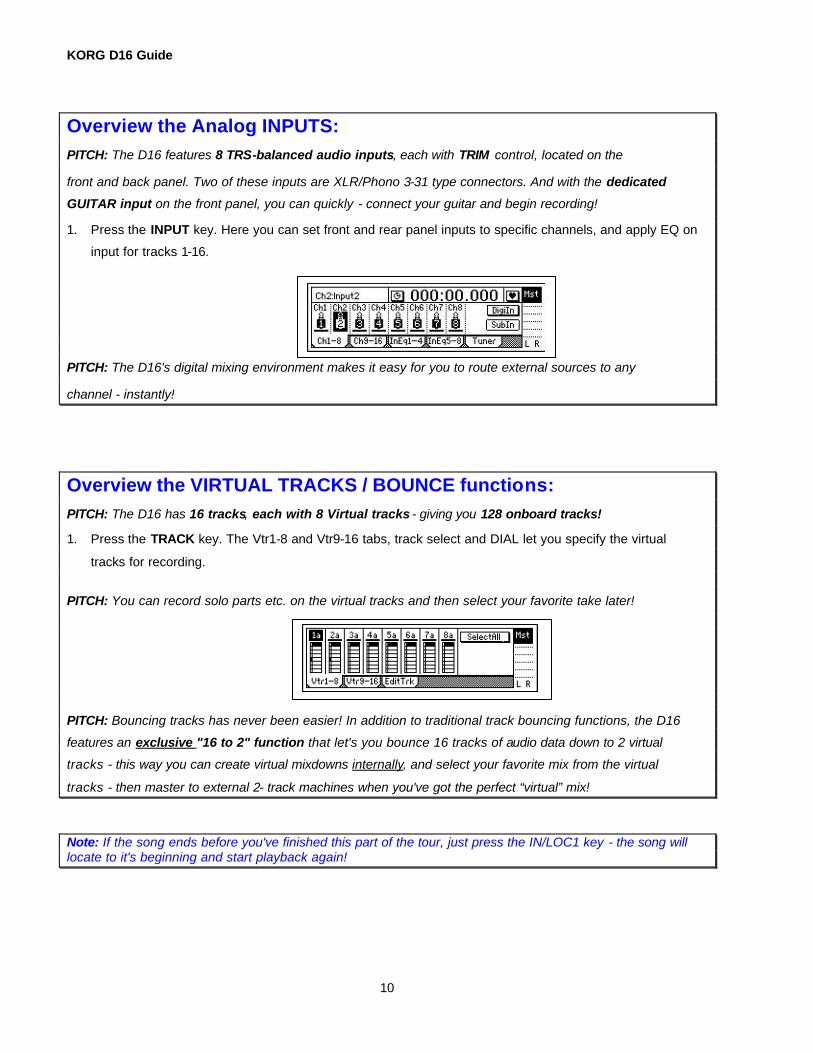
Overview the Analog INPUTS: PITCH: The D16 features 8 TRS-balanced audio inputs, each with TRIM control, located on the
front and back panel. Two of these inputs are XLR/Phono 3-31 type connectors. And with the dedicated
GUITAR input on the front panel, you can quickly - connect your guitar and begin recording!
1. Press the INPUT key. Here you can set front and rear panel inputs to specific channels, and apply EQ on
input for tracks 1-16.
PITCH: The D16's digital mixing environment makes it easy for you to route external sources to any
channel - instantly!
Overview the VIRTUAL TRACKS / BOUNCE functions: PITCH: The D16 has 16 tracks, each with 8 Virtual tracks - giving you 128 onboard tracks!
1. Press the TRACK key. The Vtr1-8 and Vtr9-16 tabs, track select and DIAL let you specify the virtual
tracks for recording.
PITCH: You can record solo parts etc. on the virtual tracks and then select your favorite take later!
PITCH: Bouncing tracks has never been easier! In addition to traditional track bouncing functions, the D16
features an exclusive "16 to 2" function that let's you bounce 16 tracks of audio data down to 2 virtual
tracks - this way you can create virtual mixdowns internally, and select your favorite mix from the virtual
tracks - then master to external 2- track machines when you've got the perfect “virtual” mix!
Note: If the song ends before you've finished this part of the tour, just press the IN/LOC1 key - the song will locate to it's beginning and start playback again!
KORG D16 Guide
11
Overview the PUNCH IN / OUT functions: PITCH: The Manual and Auto Punch In/Out functions let you re-record specific sections seamlessly!
Manual - Punch In/Out on a selected track is easily accomplished by pressing the REC key or a footswitch
during playback - to instantly enter record mode.
1. Press the AUTO PUNCH key - in the display you'll see "In" and "Out" locations that you can set ahead
of time, using the STORE and IN/OUT keys.
PITCH: You can also set In / Out times by pressing the "Wave" button in the Auto Punch page - a great
feature that let's you set punch in / out times while viewing a waveform display! And you can easily - set Pre
and Post-roll times to specify playback time before and after recording!
Additional Features:
100 Scenes, 100 Mark points, 4 Locate points per song!
Store "snapshot" Scene automation of fader, pan, EQ and effect send levels, and name your scenes for easy
recall ! Create specific Mark points in the song structure, name them for convenient access to "Verse",
"Chorus", "G-Solo" etc., and immediately jump to these registered locations! Store four Locate points for
instant access to specific areas with front panel keys!
99 levels of UNDO:
Use the UNDO / REDO function to step back through the previous recording or editing operations, so that
you have plenty of opportunity to fix any mistakes that happen!
Time Stretching:
Match tempo between recordings of different tempo, or fit recording into a specific time length!
Reverse playback:
Reverse specific regions of audio data using single or multiple tracks, then copy the results to new audio
regions or tracks!
KORG D16 Guide
12
Optimizing Track Data:
After editing your tracks, this feature let's you create one piece of audio data from several "fragmented"
regions - resulting in perfect playback and better conservation of hard disk space!
Auto-Save Feature:
It's good to know that your valuable song data will be saved automatically, when selecting new songs and on
power-down!
Loop recording and playback:
Set specific in / out points in your song and loop the audio - then rehearse intricate parts to be recorded, or
use the punch-in function while looping, and add new data as the loop plays! Use the loop playback feature
to audition specific regions of recorded audio!
Trigger Recording:
Set recording to begin automatically in response to an audio input!
Record Tap Tempo:
This function lets you record the tempo after you've recorded a song that has no tempo settings - a great
feature! This way you can then edit your tracks in units of measures or synchronize the D16 to external MIDI
devices!
Use MIDI to automate D16 functions:
Besides using MIDI to synchronize the D16 to other devices, it can be used to control the effects in real time,
and change scenes via MIDI program change messages!
Program Play function:
Playback your songs in any order - from internal and external drives!
Produce an Audio CD, or backup your audio data to CD-R / CD-RW- directly from the D16:
Burn an audio CD via the D16's built-in software and SCSI interface! Easily backup your valuable audio data
to CD -R or CD-RW, or to external drives!
KORG D16 Guide
13
Use the SUB INPUTS to send external audio directly to the Master bus:
Assign any analog inputs as Sub Inputs, and run the audio from your sequencer - in sync - direct to the D16's
Master bus, or record a guitar final pass, along with the internal tracks -direct to your mastering deck! Use
the Sub Inputs to return audio from an external processor connected to the AUX OUT!
TIP: Alternate access of songs
Besides using TouchView to select songs, you can use the DIAL, or press and hold the STOP key and press
the REW or FF keys to move to new songs!
D16 Feature Overview
Basics Features:
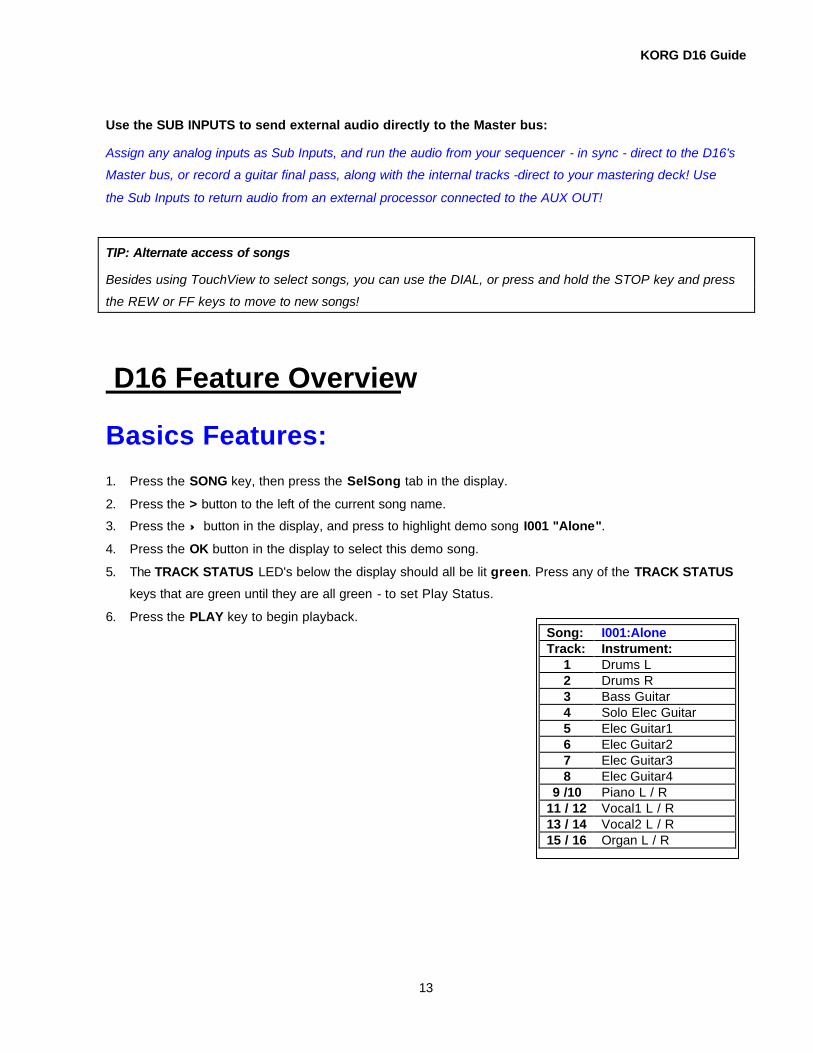
1. Press the SONG key, then press the SelSong tab in the display.
2. Press the > button to the left of the current song name.
3. Press the ↑↑ button in the display, and press to highlight demo song I001 "Alone".
4. Press the OK button in the display to select this demo song.
5. The TRACK STATUS LED's below the display should all be lit green. Press any of the TRACK STATUS
keys that are green until they are all green - to set Play Status.
6. Press the PLAY key to begin playback.
Song: I001:Alone Track: Instrument:
1 Drums L 2 Drums R 3 Bass Guitar 4 Solo Elec Guitar 5 Elec Guitar1 6 Elec Guitar2 7 Elec Guitar3 8 Elec Guitar4
9 /10 Piano L / R 11 / 12 Vocal1 L / R 13 / 14 Vocal2 L / R 15 / 16 Organ L / R
KORG D16 Guide
14
Mute / Un-mute specific tracks with the TRACK STATUS keys: 1. While the song plays, try muting and un-muting tracks, by pressing the TRACK STATUS keys (unlit -
mute / green - play).
2. Mute all tracks except tracks 1,2 and 3. (Drums L/R and bass). Note: If the song ends before you've finished this part of the tour, just press the IN/LOC1 key - the song will locate to it's beginning and start playback again!
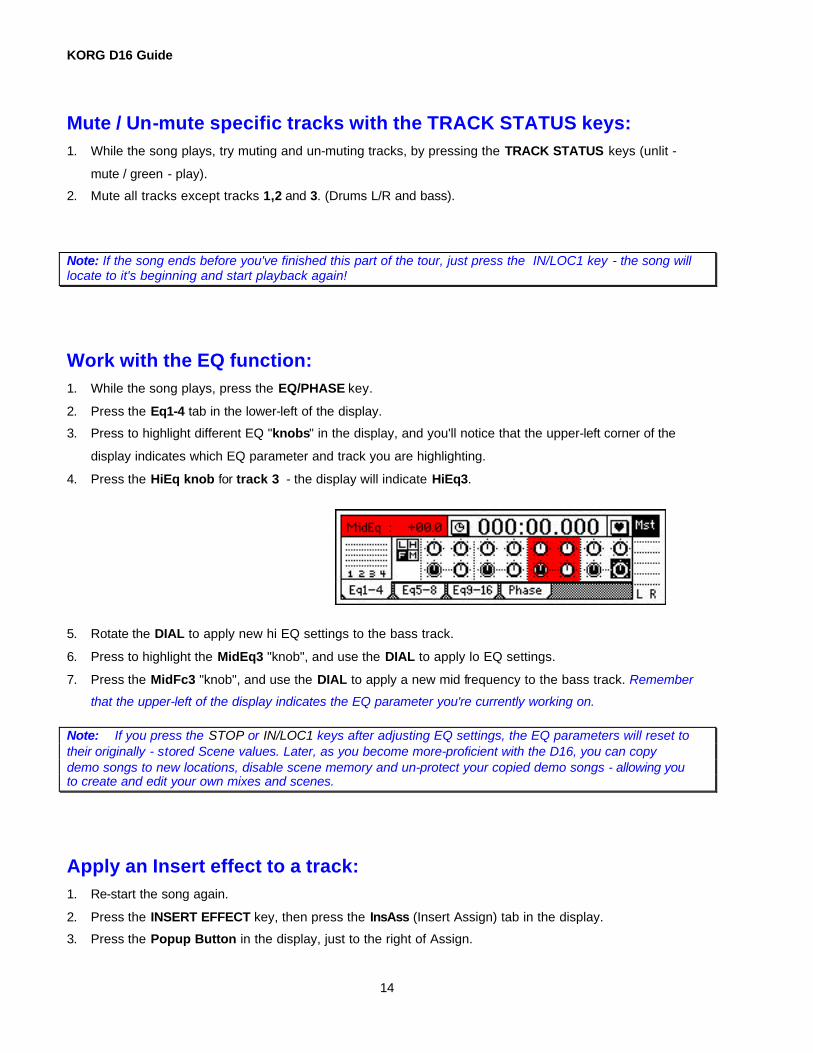
Work with the EQ function: 1. While the song plays, press the EQ/PHASE key.
2. Press the Eq1-4 tab in the lower-left of the display.
3. Press to highlight different EQ "knobs" in the display, and you'll notice that the upper-left corner of the
display indicates which EQ parameter and track you are highlighting.
4. Press the HiEq knob for track 3 - the display will indicate HiEq3.
5. Rotate the DIAL to apply new hi EQ settings to the bass track.
6. Press to highlight the MidEq3 "knob", and use the DIAL to apply lo EQ settings.
7. Press the MidFc3 "knob", and use the DIAL to apply a new mid frequency to the bass track. Remember
that the upper-left of the display indicates the EQ parameter you're currently working on. Note: If you press the STOP or IN/LOC1 keys after adjusting EQ settings, the EQ parameters will reset to their originally - stored Scene values. Later, as you become more-proficient with the D16, you can copy demo songs to new locations, disable scene memory and un-protect your copied demo songs - allowing you to create and edit your own mixes and scenes.
Apply an Insert effect to a track: 1. Re-start the song again.
2. Press the INSERT EFFECT key, then press the InsAss (Insert Assign) tab in the display.
3. Press the Popup Button in the display, just to the right of Assign.
KORG D16 Guide
15
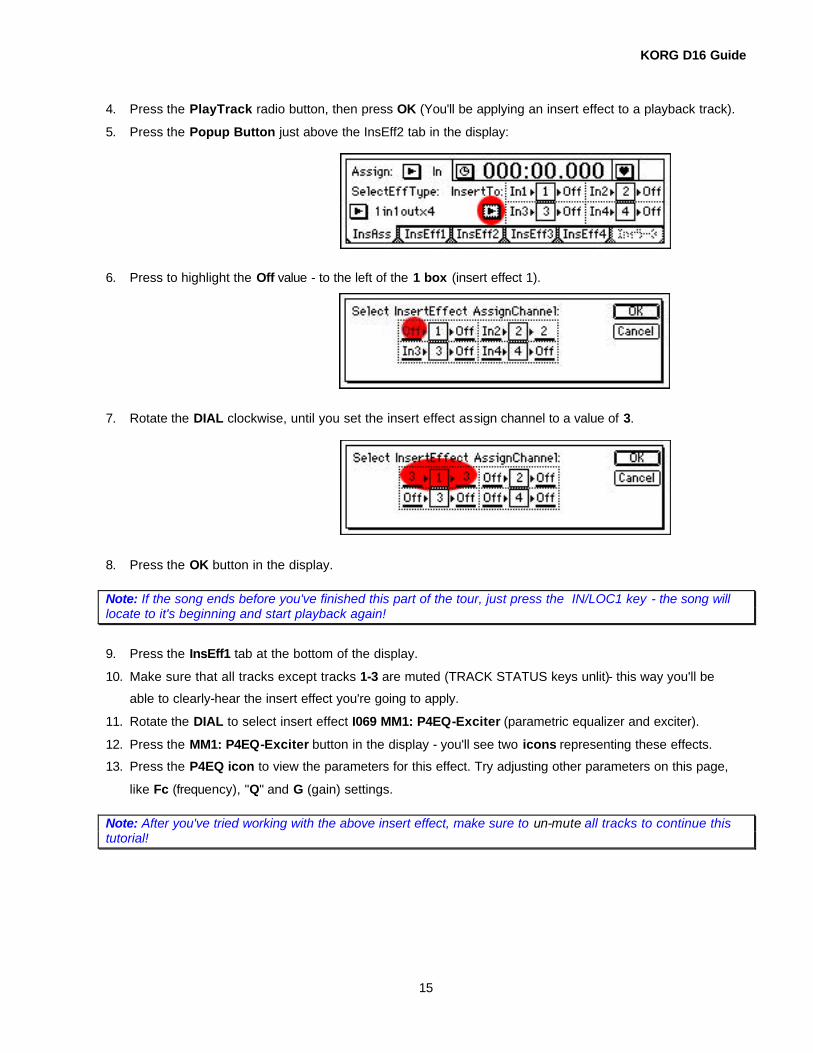
4. Press the PlayTrack radio button, then press OK (You'll be applying an insert effect to a playback track).
5. Press the Popup Button just above the InsEff2 tab in the display:
6. Press to highlight the Off value - to the left of the 1 box (insert effect 1).
7. Rotate the DIAL clockwise, until you set the insert effect assign channel to a value of 3.
8. Press the OK button in the display. Note: If the song ends before you've finished this part of the tour, just press the IN/LOC1 key - the song will locate to it's beginning and start playback again!
9. Press the InsEff1 tab at the bottom of the display.
10. Make sure that all tracks except tracks 1-3 are muted (TRACK STATUS keys unlit)- this way you'll be
able to clearly-hear the insert effect you're going to apply.
11. Rotate the DIAL to select insert effect I069 MM1: P4EQ-Exciter (parametric equalizer and exciter).
12. Press the MM1: P4EQ-Exciter button in the display - you'll see two icons representing these effects.
13. Press the P4EQ icon to view the parameters for this effect. Try adjusting other parameters on this page,
like Fc (frequency), "Q" and G (gain) settings. Note: After you've tried working with the above insert effect, make sure to un-mute all tracks to continue this tutorial!
KORG D16 Guide
16
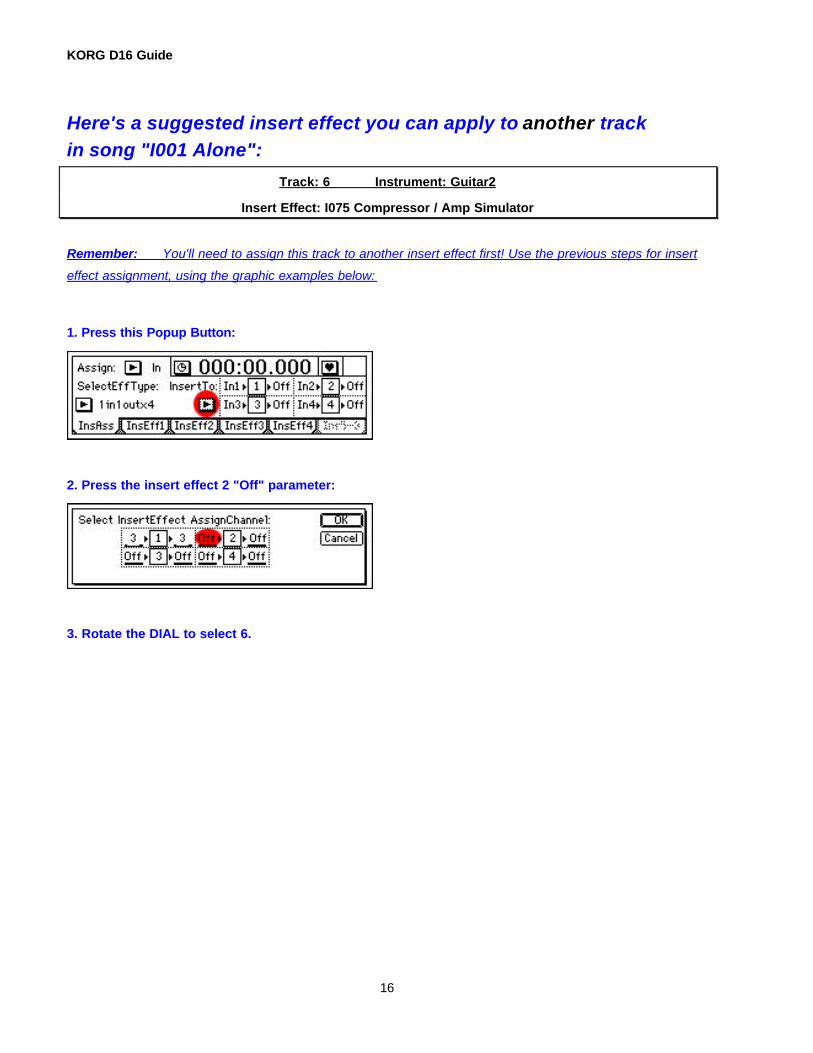
Here's a suggested insert effect you can apply to another track in song "I001 Alone":
Track: 6 Instrument: Guitar2
Insert Effect: I075 Compressor / Amp Simulator
Remember: You'll need to assign this track to another insert effect first! Use the previous steps for insert
effect assignment, using the graphic examples below:
1. Press this Popup Button:
2. Press the insert effect 2 "Off" parameter:
3. Rotate the DIAL to select 6.
KORG D16 Guide
17
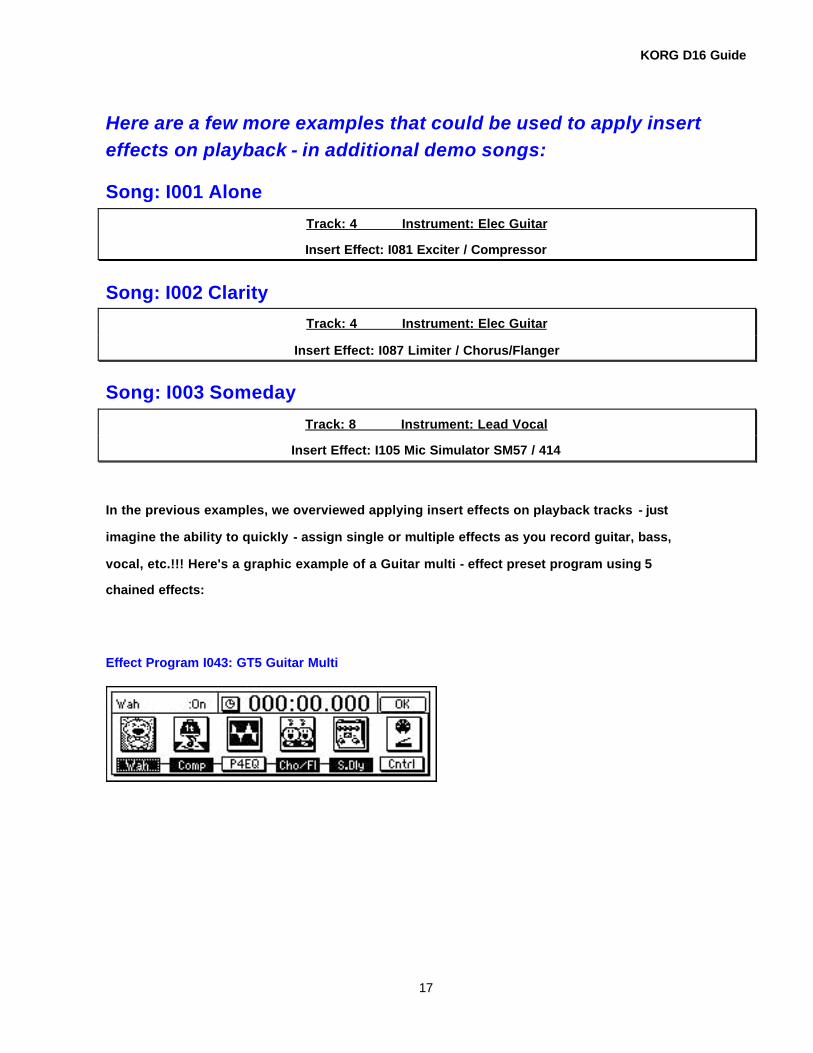
Here are a few more examples that could be used to apply insert effects on playback - in additional demo songs:
Song: I001 Alone
Track: 4 Instrument: Elec Guitar
Insert Effect: I081 Exciter / Compressor
Song: I002 Clarity Track: 4 Instrument: Elec Guitar
Insert Effect: I087 Limiter / Chorus/Flanger
Song: I003 Someday
Track: 8 Instrument: Lead Vocal
Insert Effect: I105 Mic Simulator SM57 / 414
In the previous examples, we overviewed applying insert effects on playback tracks - just
imagine the ability to quickly - assign single or multiple effects as you record guitar, bass,
vocal, etc.!!! Here's a graphic example of a Guitar multi - effect preset program using 5
chained effects:
Effect Program I043: GT5 Guitar Multi
KORG D16 Guide
18
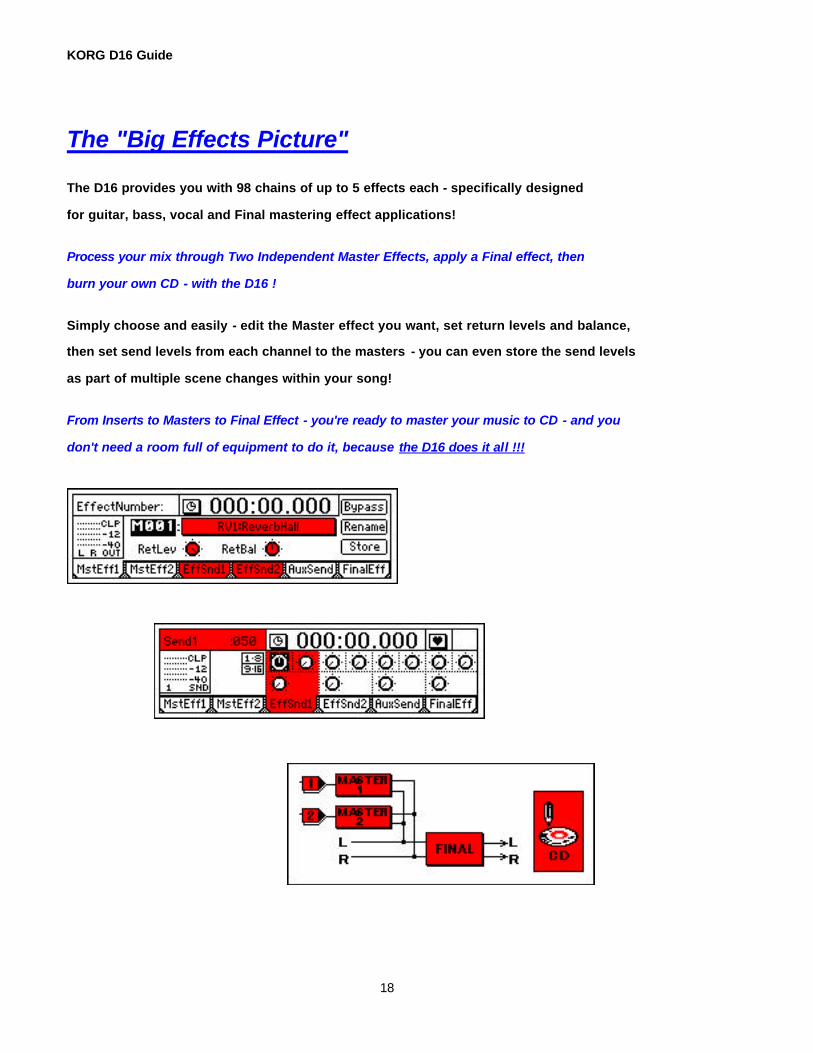
The "Big Effects Picture"
The D16 provides you with 98 chains of up to 5 effects each - specifically designed
for guitar, bass, vocal and Final mastering effect applications!
Process your mix through Two Independent Master Effects, apply a Final effect, then
burn your own CD - with the D16 !
Simply choose and easily - edit the Master effect you want, set return levels and balance,
then set send levels from each channel to the masters - you can even store the send levels
as part of multiple scene changes within your song!
From Inserts to Masters to Final Effect - you're ready to master your music to CD - and you
don't need a room full of equipment to do it, because the D16 does it all !!!
KORG D16 Guide
19
Work with the SCRUB function: 1. If you've been editing effects previous to this point in the tour, make sure to exit the effect parameter
pages by pressing OK in the display, then press the SONG key to return to the main page - Song I001:
Alone.
2. Make sure that the TRACK STATUS LED's are all lit green!
3. Press the SCRUB key.
4. Press the > button to the left of Trk1 in the display, and press to select the Trk6 (Guitar) radio button
from the dialog box, then press OK.
5. Rotate the DIAL - you'll see the track waveform data as you scroll through measures with the DIAL,
and you'll hear the audio data for this track - at a pitch governed by how fast you scrub with the DIAL.
6. Press the ⋅⋅ button in the lower - left of the display to zoom - in on the waveform data, then continue to
scrub the audio.
Playback the audio data at half-speed:
1. Press the FF key while the SCRUB function is on.
The audio data will play back at half-speed of the original pitch - a great way to rehearse
and learn intricate solo lines, etc.!
2. Press the STOP key to stop song playback, then press OK in the display.
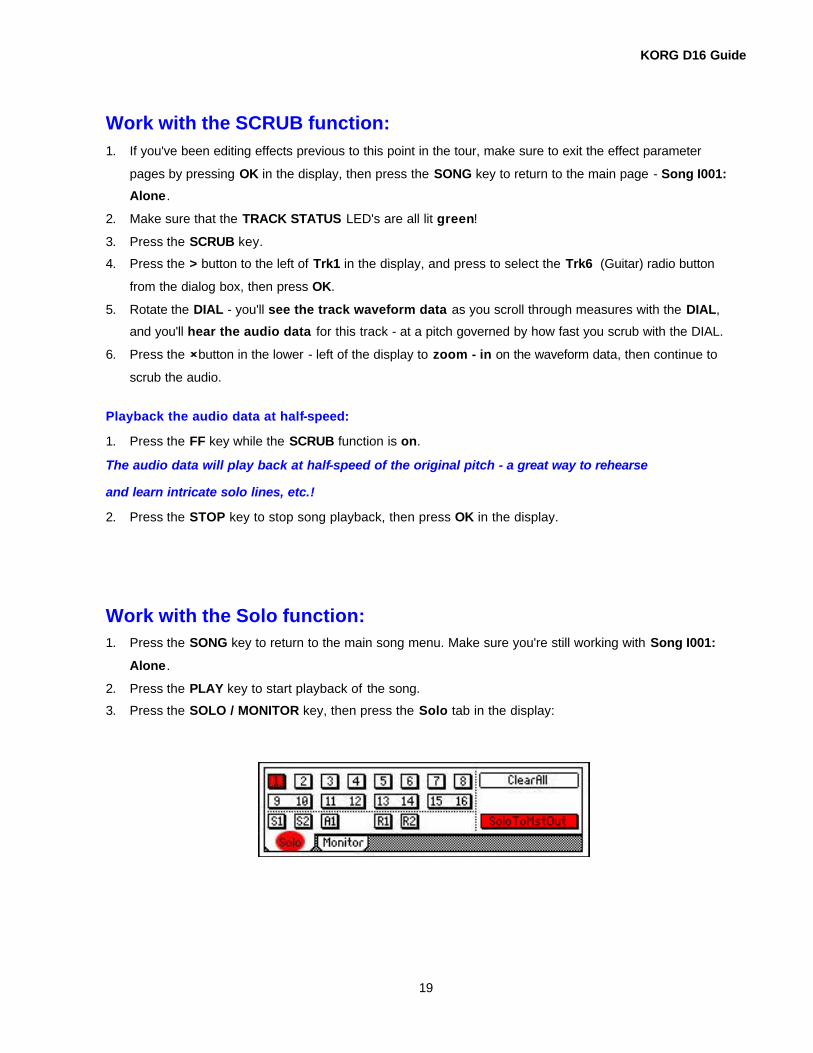
Work with the Solo function: 1. Press the SONG key to return to the main song menu. Make sure you're still working with Song I001:
Alone.
2. Press the PLAY key to start playback of the song.
3. Press the SOLO / MONITOR key, then press the Solo tab in the display:
KORG D16 Guide
20
4. As the song plays, press the track button 1, then press the SoloToMstOut button to solo the Drum L.
5. Try pressing other track buttons to create solo "groups", or press highlighted track buttons to turn solo
off for the desired tracks. Note: If the D16 you're working with is connected to audio monitors via the MASTER outputs, the solo function will not work until you press the Solo To Master Out button in the lower-right of the display, after selecting a track to solo.
6. When you're finished trying the Solo function, press the Clear All button in the upper-right of the display,
then press the STOP key.
Work with the Metronome and Rhythm Patterns: For the following section, we'll have you select a NEW SONG:
1. Press the SONG key, then press the SelSong tab in the display.
2. Press the New button in the lower right of the display. From the MakeNewSong dialog box, press OK.
The next - available empty song location will be selected.
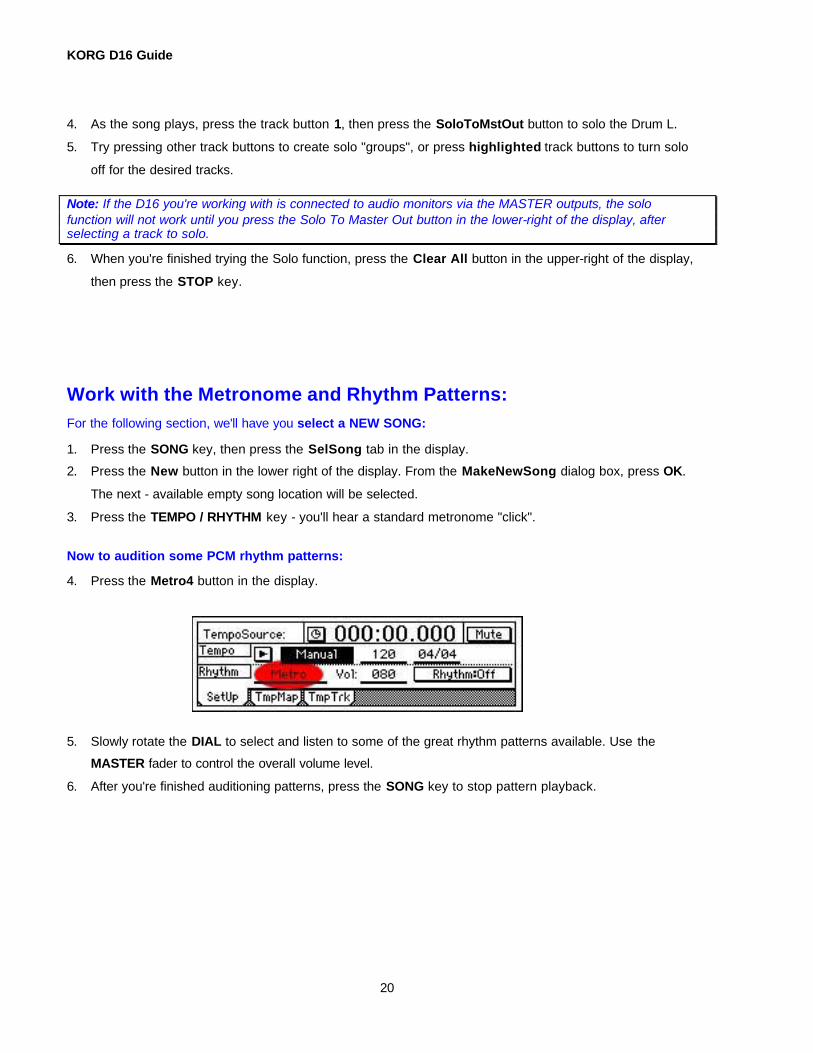
3. Press the TEMPO / RHYTHM key - you'll hear a standard metronome "click".
Now to audition some PCM rhythm patterns:
4. Press the Metro4 button in the display.
5. Slowly rotate the DIAL to select and listen to some of the great rhythm patterns available. Use the
MASTER fader to control the overall volume level.
6. After you're finished auditioning patterns, press the SONG key to stop pattern playback.
KORG D16 Guide
21
Recording and Editing Basics
Create a new song: 1. Press the SONG key, followed by the SongSel tab in the display.
2. Press the New button in the display, followed by the OK button. The D16 will automatically select the
next-available empty song location (IXXX : NEW SONG). Note: This page lets you select the type of recording you are going to perform, and lets you copy the MixerSet settings from the previous song, if desired. For now, leave the radio buttons set as they are: 16Bit / 16Track and New MixerSet.
Rename the new song: 1. Press the Rename button in the display.
2. Press the ClearAll button, then press the A…/ a… button to insert letters in the name field (press the
A…/ a… button repeatedly to select between upper and lower case characters).
3. Rotate the DIAL to change characters, and use the < > buttons to move the cursor left or right in the
song name field. Use the 0..9 and Mark buttons to change character types, and press the Space button
to insert spaces in the name field.
4. When you've finished inputting characters, press the OK button to name the new song (We suggest
something like " HELP ME!!! ").
KORG D16 Guide
22
Basic Recording
To get started, you'll use the new song you just created, and record basic tracks. For the following
exercises, you'll need a lo - impedance microphone and headphones. You can use an electric guitar or
another mono output instrument if you like; however the steps in each exercise refer to the use of an external
microphone…
Connect your microphone and set the input level: 1. Lower the MASTER Fader and all the Channel Faders to "oo".
2. Connect your mic to INPUT 1 (XLR) on the front panel.
3. Press the TRACK STATUS key for track 1 repeatedly, until it's LED lights RED.
4. Move the Channel Fader for TRACK 1 up to the "0" position, and set the BALANCE knob to center.
5. Rotate the PHONE LEVEL knob to it's lowest position (0), and raise the Master Fader to the "0"
position.
6. Speak into the mic, and raise the PHONE LEVEL knob to a comfortable listening position.
7. Rotate the INPUT 1 TRIM knob as high as possible without allowing it's LED to light red (input clipping),
and adjust the PHONE LEVEL again, if needed.
Check the Pre Fader Level: 1. Press the METER / TRACK VIEW key.
2. Press the Popup button in the upper-left of the display, and press the PreFdr radio button in the menu,
followed by the OK button. Now speak into your mic, and watch the Pre Fader level meter as you speak.
3. If the CLP indicator flashes, lower the INPUT 1 TRIM knob. When you have plenty of input signal (-6dB),
with no clipping…
Record Track 1: 1. Press the REC key.
2. Press the PLAY key and then record some measures (Example: "This is Track 1…recording Track 1.."),
etc. While you're recording, watch the Counter run in the display, and record for about 8 measures.
3. When you're finished, press the STOP key, then press the IN / LOC1 key (lit) to reset the song to the
beginning (check the Counter: 001.01.000).
4. Press the PLAY key to hear your new track, then press STOP key. Note: Later, you can hold STOP and press REW once to go to the beginning of the song, if you stop playback or recording at a point further into the song. For now, use the IN / LOC1 key.
KORG D16 Guide
23
Select another track for recording: 1. Press the IN / LOC1 key (lit).
2. Press the Track 1 TRACK STATUS key two times, until it's LED lights GREEN (play status).
3. Press the Track 2 TRACK STATUS key repeatedly, until it's LED lights RED (record status).
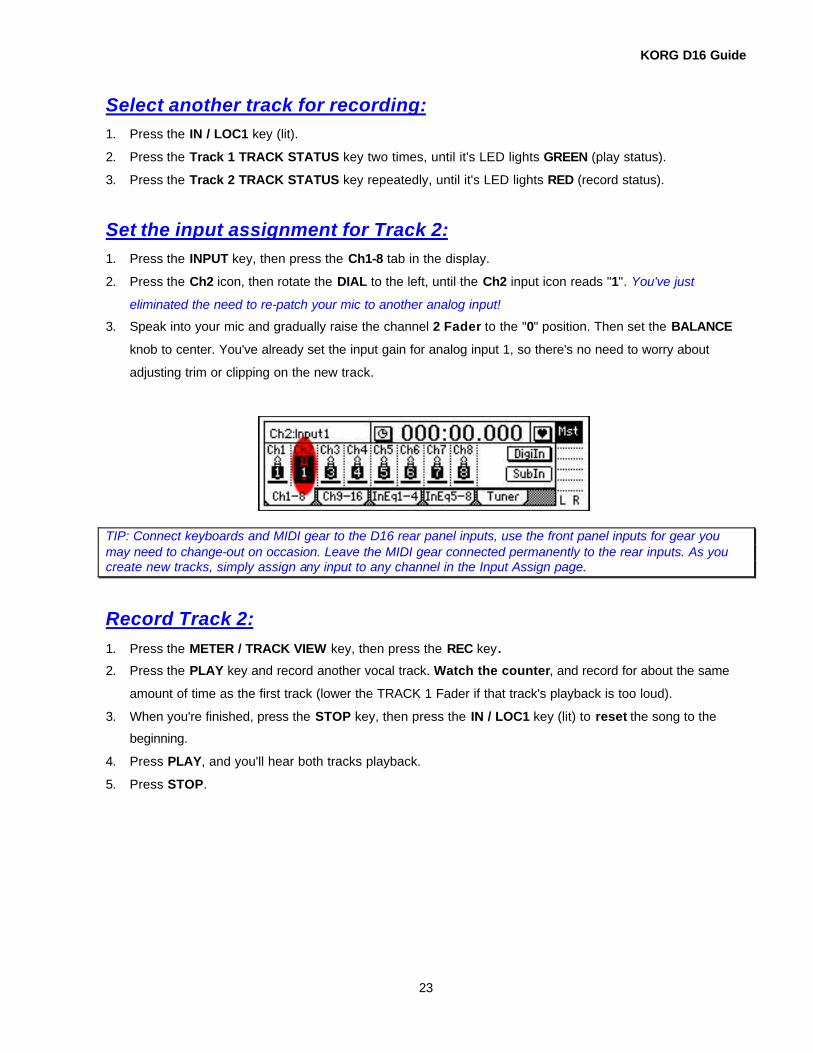
Set the input assignment for Track 2: 1. Press the INPUT key, then press the Ch1-8 tab in the display.
2. Press the Ch2 icon, then rotate the DIAL to the left, until the Ch2 input icon reads "1". You've just
eliminated the need to re-patch your mic to another analog input!
3. Speak into your mic and gradually raise the channel 2 Fader to the "0" position. Then set the BALANCE
knob to center. You've already set the input gain for analog input 1, so there's no need to worry about
adjusting trim or clipping on the new track.
TIP: Connect keyboards and MIDI gear to the D16 rear panel inputs, use the front panel inputs for gear you may need to change-out on occasion. Leave the MIDI gear connected permanently to the rear inputs. As you create new tracks, simply assign any input to any channel in the Input Assign page.
Record Track 2: 1. Press the METER / TRACK VIEW key, then press the REC key.
2. Press the PLAY key and record another vocal track. Watch the counter, and record for about the same
amount of time as the first track (lower the TRACK 1 Fader if that track's playback is too loud).
3. When you're finished, press the STOP key, then press the IN / LOC1 key (lit) to reset the song to the
beginning.
4. Press PLAY, and you'll hear both tracks playback.
5. Press STOP.
KORG D16 Guide
24
Recording with EQ On – Input: 1. Press the channel 2 TRACK STATUS key two times, until it's LED lights GREEN (play status).
2. Press the INPUT key, and make sure that the Ch1-8 tab is selected in the display.
3. Press the Ch3 icon, then rotate the DIAL to the left, to set the analog input to "1". (Again, you've bussed
the signal from analog input 1 to Channel (track) 3 on the D16).
4. On the front panel, press the channel 3 TRACK STATUS key repeatedly, until it lights RED (record
status).
5. Gradually move the channel 3 Fader to the "0" position, center the BALANCE knob, and test your mic to
confirm input.
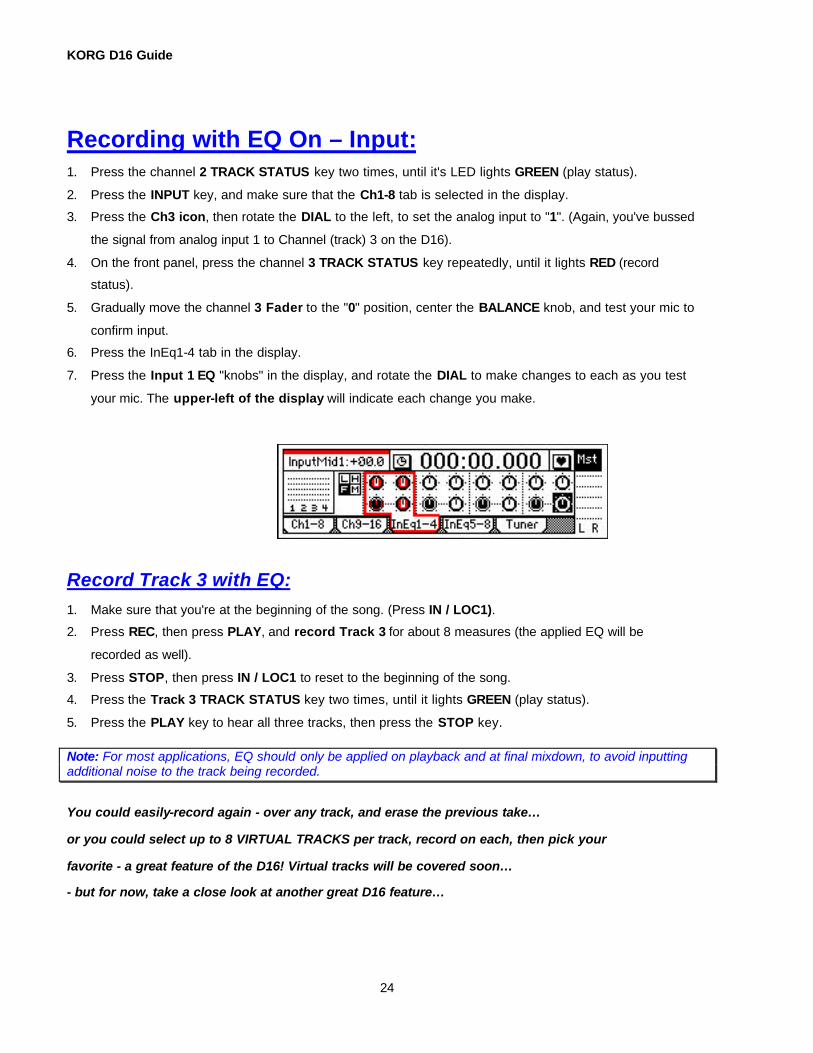
6. Press the InEq1-4 tab in the display.
7. Press the Input 1 EQ "knobs" in the display, and rotate the DIAL to make changes to each as you test
your mic. The upper-left of the display will indicate each change you make.
Record Track 3 with EQ: 1. Make sure that you're at the beginning of the song. (Press IN / LOC1).
2. Press REC, then press PLAY, and record Track 3 for about 8 measures (the applied EQ will be
recorded as well).
3. Press STOP, then press IN / LOC1 to reset to the beginning of the song.
4. Press the Track 3 TRACK STATUS key two times, until it lights GREEN (play status).
5. Press the PLAY key to hear all three tracks, then press the STOP key. Note: For most applications, EQ should only be applied on playback and at final mixdown, to avoid inputting additional noise to the track being recorded.
You could easily-record again - over any track, and erase the previous take…
or you could select up to 8 VIRTUAL TRACKS per track, record on each, then pick your
favorite - a great feature of the D16! Virtual tracks will be covered soon…
- but for now, take a close look at another great D16 feature…

KORG D16 Guide
25
Working with the UNDO / REDO function: 1. Press the UNDO key (lit).
2. If you've followed this guide step-by-step, you'll see 3 levels in the display - a "list" of what you've
accomplished (recording tracks) thus-far in your new song.
3. Press to highlight Level01. That's the last track (Track 3) that you recorded.
4. Press the Undo button in the display, then press the OK button.
5. Press In / LOC1, then press PLAY and you'll only hear Tracks 1 and 2 playback.
6. Press STOP, then press the UNDO key again, and make sure that Level01 is still highlighted in the
display.
7. Press the Redo button, followed by pressing the OK button.
8. Press In / LOC1 again, and press PLAY, and you'll hear all three tracks again.
99 levels of UNDO / REDO! And with TouchView, it’s easy to keep "track" of your tracks
and editing procedures on the D16! The previous example shows you the basics about
UNDO / REDO. When you spend some more time with the D16 - especially in track and Note: You'll find more information about the Undo function on pages 10 and 73 in the D16 owner's manual.
KORG D16 Guide
26
Working with the Manual Punch In - Out function
There's nothing more frustrating than making a mistake midway in a track, and then having
no other means to correct it, other than to re-record an entire new take. The D16 easily - solves
this issue with Manual and Auto Punch In and Out!
Manual Punch In - Out: -Lets you Punch In - Out "on - the - fly". You'll work with Track 3 for this exercise…
1. Press the SONG key, and make sure that the SongSel tab is selected in the display.
2. Record - enable Track 3 (TRACK STATUS key RED), and don't change previous input level or EQ
settings for this track!
3. Press IN / LOC1 to reset the song to the beginning.
4. Press PLAY and listen to Track 3 - if you like, you can quickly - mute tracks 1 and 2 by pressing their
TRACK STATUS keys until they're both unlit.
5. Watch the Counter and make a decision where you want to manually punch-in and out (Example:
between measures 002 and 004). When you know, press the STOP key, then press the IN /LOC1 key to
reset the song to the beginning.
Now to Punch In - Out:
1. Press the PLAY key, and watch the Counter. When you're ready to punch-in…
2. Press the REC key, and record your voice again (Example: "Punch in on track 3…"), etc.
3. When you've reached the point where you want to punch -out, press the REC or PLAY key, and normal
playback will continue. (If you want to re-record the punch-in, restart the song and repeat from step 1)
4. Un-mute tracks 1 and 2 if they are muted (press the TRACK STATUS keys once, to light GREEN), then
press the In / LOC1 key to playback the song, complete with your punch-in.
5. Press the STOP key, then press the Track 3 TRACK STATUS key two times, until it lights GREEN (play
status). Note: You can connect and use a footswitch (sold separately) to manually Punch in - out. See the D16 Owner's manual (page 20) for more information.
Now you've learned how to manually punch in - out of a track. But wait! There's more! Its called
AUTO PUNCH IN-OUT recording! First you'll need to know how to set LOCATE points…
KORG D16 Guide
27
Storing Locate Points
Locate points are used to: - Instantly-move to a registered time location
- Loop playback in / out points
- Set in / out points for auto-punch recording
- Specify locations for track editing
- Set locations for song playback
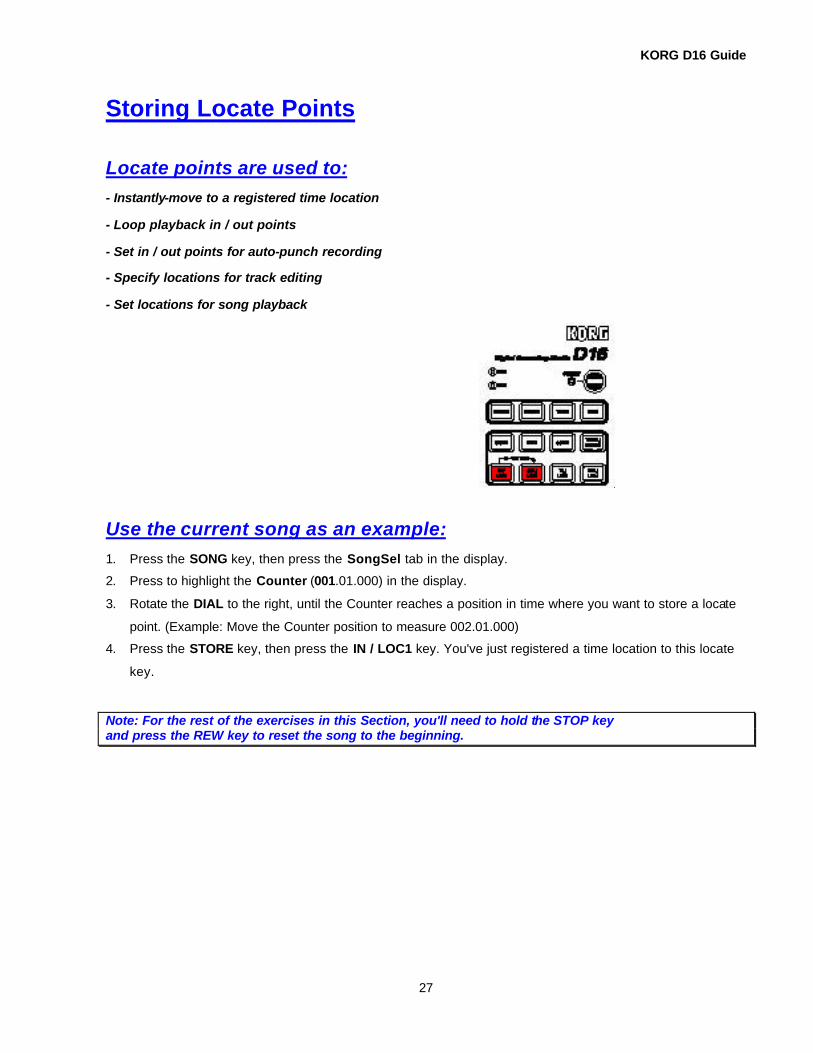
Use the current song as an example: 1. Press the SONG key, then press the SongSel tab in the display.
2. Press to highlight the Counter (001.01.000) in the display.
3. Rotate the DIAL to the right, until the Counter reaches a position in time where you want to store a locate
point. (Example: Move the Counter position to measure 002.01.000)
4. Press the STORE key, then press the IN / LOC1 key. You've just registered a time location to this locate
key. Note: For the rest of the exercises in this Section, you'll need to hold the STOP key and press the REW key to reset the song to the beginning.
KORG D16 Guide
28
TIP: You can rewind or fast - forward through a song rapidly, by pressing the REW or FF keys once, while the song plays back. You can also press these keys repeatedly, to move back or forward in a song by measure - while the song is stopped.
Store an "Out" point, so you can use the AUTO-PUNCH function: 1. Rotate the DIAL to the right, to your desired OUT point (Example: If you set 002.01.000 as your IN point,
set measure 006.01.000 as your OUT point).
2. Store the OUT point by pressing the STORE key, followed by pressing the OUT / LOC2 key.
View the new IN / OUT locations: 1. Press the IN / LOC1 key - the Counter will jump to the registered time location.
2. Press the OUT / LOC2 key - the Counter will jump to the registered time location. Note: You can store and recall LOCATE points while the song is running - just press the STORE key, followed by any of the 4 LOC keys.
There’s a lot more to learn about Locate points - check out the D16 owner's manual
(Page 70). For now, continue with this guide, and try some "Auto-Punching"…
KORG D16 Guide
29
Auto Punch In - Out Recording: 1. Record - enable Track 2, because you're going to use it for the Auto - Punch procedure (Press the
Track 2 TRACK STATUS key two times, until it lights RED (record status).
2. Reset the song to measure 001.01.000. (Hold the STOP key, then press the REW key once
REHEARSE the Auto-Punch before actually recording it: 1. Press the RHSL (Rehearsal) key (to the right of the REC key). The RHSL key's LED will light GREEN.
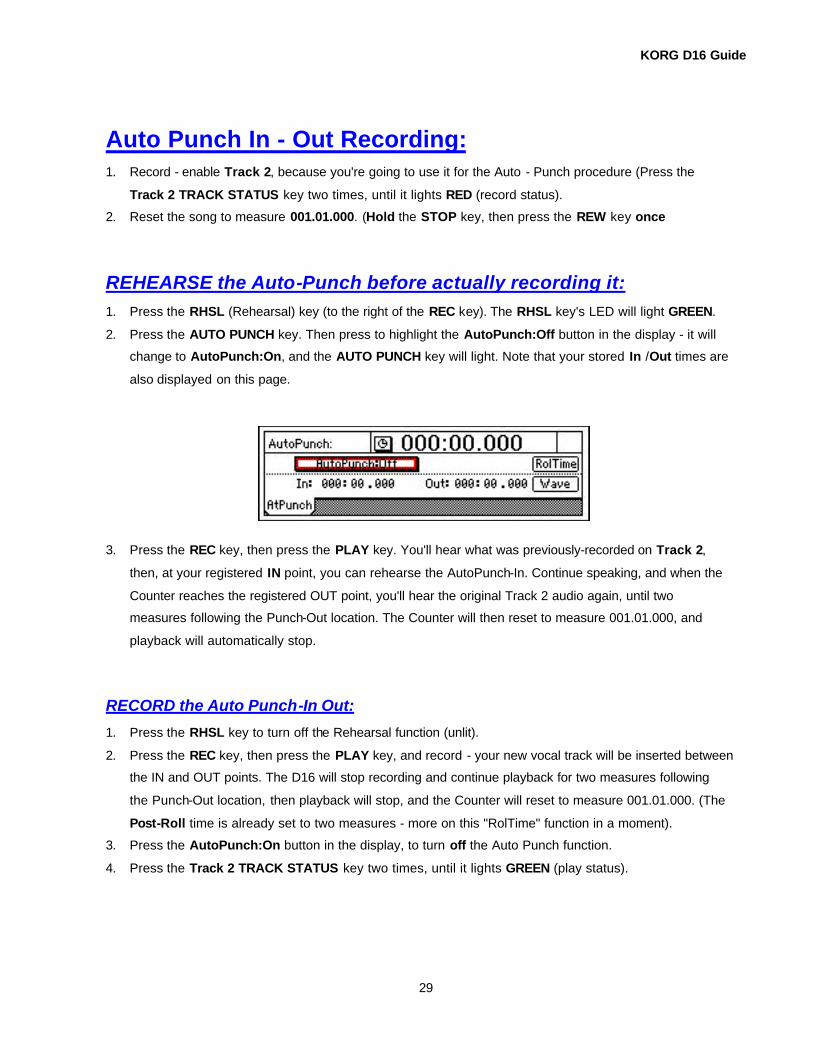
2. Press the AUTO PUNCH key. Then press to highlight the AutoPunch:Off button in the display - it will
change to AutoPunch:On, and the AUTO PUNCH key will light. Note that your stored In /Out times are
also displayed on this page.
3. Press the REC key, then press the PLAY key. You'll hear what was previously-recorded on Track 2,
then, at your registered IN point, you can rehearse the AutoPunch-In. Continue speaking, and when the
Counter reaches the registered OUT point, you'll hear the original Track 2 audio again, until two
measures following the Punch-Out location. The Counter will then reset to measure 001.01.000, and
playback will automatically stop.
RECORD the Auto Punch-In Out:
1. Press the RHSL key to turn off the Rehearsal function (unlit).
2. Press the REC key, then press the PLAY key, and record - your new vocal track will be inserted between
the IN and OUT points. The D16 will stop recording and continue playback for two measures following
the Punch-Out location, then playback will stop, and the Counter will reset to measure 001.01.000. (The
Post-Roll time is already set to two measures - more on this "RolTime" function in a moment).
3. Press the AutoPunch:On button in the display, to turn off the Auto Punch function.
4. Press the Track 2 TRACK STATUS key two times, until it lights GREEN (play status).
KORG D16 Guide
30
Note: In the Auto Punch display page, you can set Pre and Post - Roll times to make it easier and more accurate to perform Auto Punch In - Out procedures. You can also view the Wave data of the track you're working with on this page, to set even more accurate In - Out points. See the D16 owner's manual (page 71) for more information.
Storing Mark Points
With Mark Points, you can: - Set100 locations within each song to quickly - go to specific sections
- Name your mark points for easy identification (like "Intro", "Verse", "Chorus", etc.)
STORE some Mark Points: 1. Press the SONG key, and make sure that the SongSel tab is selected in the display. (You'll use the
same song for this exercise)
2. Make sure the counter is set to measure 001.01.000 (If not, reset it by holding the STOP key, and
pressing the REW key once).
3. Highlight the Counter (001.01.000), then rotate the DIAL to measure 003.01.000 (or press the FF key
repeatedly, until measure 003.01.000 appears in the display).
4. Press the STORE key (lit), then press the MARK key. The display will briefly-indicate the stored Mark
point and time.
5. Press the MARK key to view your stored Mark point and it's location in the display.
6. Press the SONG key again, then reset the song to the beginning (hold the STOP key and press REW).
7. Press the PLAY key. Now you'll store a Mark point while the song plays back…
8. At any time during playback, press the STORE key, then press the MARK key. The display will briefly-
indicate the newly stored Mark point and time.
9. Store one or two additional Mark points (step 8) while the song plays.
10. Press STOP, then reset the song to the beginning (hold STOP and press REW).
View all of the stored MARK points: 1. Press the MARK key.
2. Slowly rotate the DIAL to the left, to view each of the Mark points you've stored.
KORG D16 Guide
31
Rename a MARK point: 1. Select one of the Mark points (Rotate the DIAL to select any one of the Mark points in the display), then
press the Rename button in the upper-right of the display.
2. Press the ClearAll button to clear the current name field.
3. Input new characters to name the Mark point (Example: "VERSE 1”). Use the < > and Space buttons to
move the cursor left or right in the song name field, and press the A../ a.., 0..9 or Mark (symbol) buttons
to choose the character type.
4. When finished, press the OK button. Your newly named Mark point will appear in the display, along with
its registered time location. Note: To recall a stored Mark point, highlight it in the display, then press the Recall button - the Counter will indicate that you've recalled the registered time location of the selected Mark point, and you can playback, record or edit from that point!
Working with Scene Memory The D16 features100 Scene Memory per song! That's "snapshot" automation of many
functions, and Scenes can be recalled automatically during playback - even named!
In a Scene, you can store:
- Channel Fader and Pan settings
- Channel Pairing
- EQ settings
- Insert Effect Assign, Effect Type, Insert To, and Effect Program
- Master Effect Send levels, Effect Program and Effect Return levels
- Final Effect Program
- Aux Send levels
- Scenes can also be changed via MIDI program change messages! Note: The D16 provides Scene Filtering so that you can select whether or not any of the above functions get stored in a Scene. See the owner's manual (page 65) for more information.
KORG D16 Guide
32
Playback the song and adjust mixer settings: 1. Press the SONG key, then restart the song from the beginning (hold the STOP key and press the REW
key once, then press the PLAY key), and work with the Channel Faders and Balance Knobs until you
are satisfied with the overall mix.
2. Press the STOP key, and reset the song to the beginning (hold STOP and press REW once).
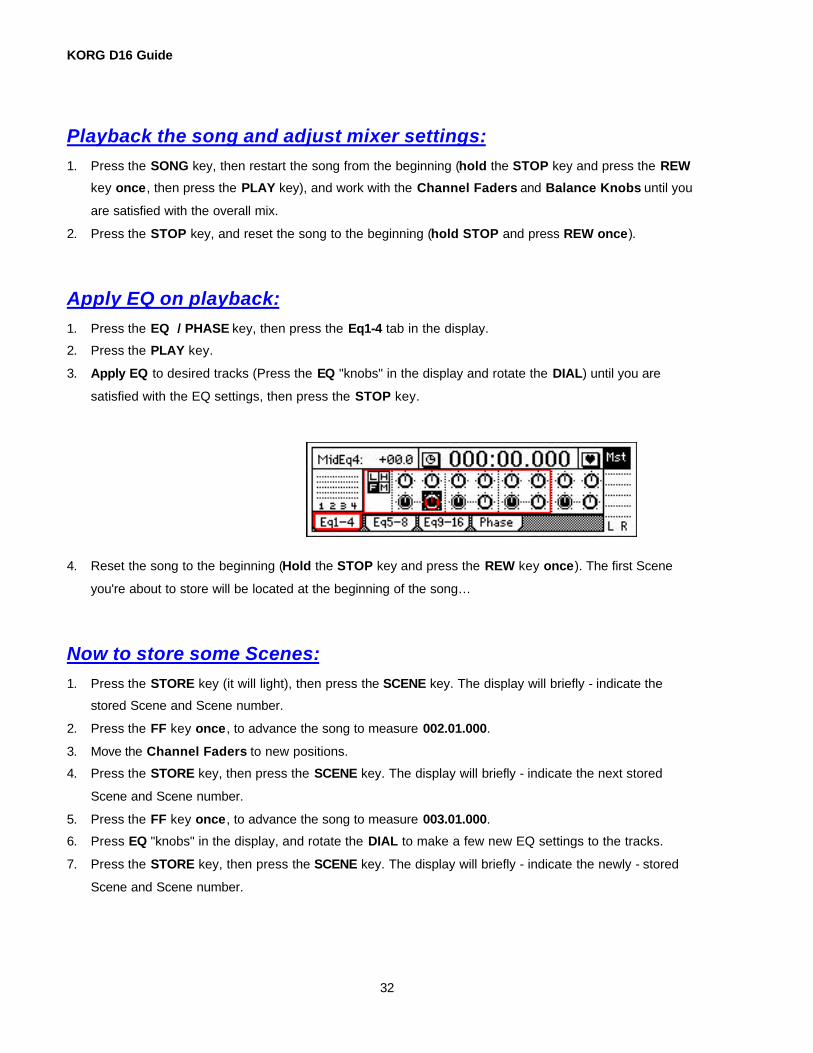
Apply EQ on playback: 1. Press the EQ / PHASE key, then press the Eq1-4 tab in the display.
2. Press the PLAY key.
3. Apply EQ to desired tracks (Press the EQ "knobs" in the display and rotate the DIAL) until you are
satisfied with the EQ settings, then press the STOP key.
4. Reset the song to the beginning (Hold the STOP key and press the REW key once). The first Scene
you're about to store will be located at the beginning of the song…
Now to store some Scenes: 1. Press the STORE key (it will light), then press the SCENE key. The display will briefly - indicate the
stored Scene and Scene number.
2. Press the FF key once, to advance the song to measure 002.01.000.
3. Move the Channel Faders to new positions.
4. Press the STORE key, then press the SCENE key. The display will briefly - indicate the next stored
Scene and Scene number.
5. Press the FF key once, to advance the song to measure 003.01.000.
6. Press EQ "knobs" in the display, and rotate the DIAL to make a few new EQ settings to the tracks.
7. Press the STORE key, then press the SCENE key. The display will briefly - indicate the newly - stored
Scene and Scene number.

KORG D16 Guide
33
Note: You can store Scenes during playback and recording too! Plus, you can automate Scene changes via MIDI! For more information, check out page 65 in the D16 owner's manual.
Playback your song, complete with Scenes: 1. Reset your song to the beginning (Hold the STOP key and press the REW key once).
2. Press the SCENE key (unlit), then press the ReadDel tab in the display.
3. Press to highlight the SceneRead:Off button in the display. The SCENE key will light.
4. Press the PLAY key to playback your song. The Scenes you stored will be recalled as the song plays,
and each Scene and location will be indicated in the upper -right of the display during playback.
Name one of the Scenes: 1. Press the STOP key to stop playback.
2. Press the Rename button in the display.
3. Press the ClearAll button in the display.
4. Input new characters to rename the Scene (Example: "Intro Mix”). Use the < > and Space buttons to
move left or right in the song name field, and press the A../ a.., 0..9 and Mark (symbol) buttons to choose
the character type.
5. When you've finished naming the Scene, press the OK button in the display.
You'll be viewing your new Scene name in a moment - Remain on the "Scene" page for now…
KORG D16 Guide
34
Check out the MixView tab: 1. Press the MixView tab in the display. The currently - selected Scene's Fader and Pan settings are
displayed.
You can't change mix settings or Scenes by pressing objects and rotating the DIAL
on this page or on by using the front panel controls - this is just a quick way
to view the selected Scene's mix…
…But you CAN playback your song, and view the Fader and Pan knob changes as
each Scene is recalled:
1. Reset your song to the beginning (Hold the STOP key and press the REW key once).
2. Press the PLAY key, and watch the MixView display - you'll see the mix settings change as the song
plays back.
3. Press the STOP key.
View the Scene Names as the song plays back: 1. Reset your song to the beginning (Hold the STOP key and press the REW key once).
2. Press the SONG key.
3. Press the Popup button to the left of Tempo Manu 120.
4. Press the Scene radio button, then press the OK button.
5. Press the PLAY key to playback your song, and watch the display - you'll see each Scene number and
name change in the display as the song plays.
6. Press the STOP key.
KORG D16 Guide
35
Loop Recording and Playback
Recording sources and monitoring: You'll be recording with an external microphone for some of the exercises in this section, so make sure to use headphones! Note: When you power off the D16, hold down the POWER key for a few seconds, until the display prompts you with "Power Off: Are You Sure?” Then press "Yes" to power-off. The D16 will Auto-Save any work you've done to that point - before it powers-down.
Working with the Loop Functions In order to use the Loop Playback / Record functions on the D16, you'll need to set specific
IN and OUT points in a song. The following exercises will familiarize you with the Loop
Playback / Recording and the Scrub function, when used with Loop Playback…
The Loop Playback Function lets you:
- Loop a range of time specified by the registered IN and OUT points in the song
- Listen to, and rehearse along with intricate solo lines, etc.
Create a new song and set IN and OUT Points:
1. Press the SONG key, then press the SelSong tab in the display. (Any currently-selected song is fine)
2. Press the New button, then press the OK button in the display. The D16 will automatically select the
next-available empty song location.
3. Press the STORE key (it will light), then press the IN / LOC1 key (it will light), to set an IN point at
measure 001.01.000.
4. Press to highlight the Counter (001.01.000) in the display, then rotate the DIAL to the right, until the
Counter reads 005.01.000.
5. Press the STORE key, then press the OUT / LOC2 key, to set the OUT point at measure 005.01.000.
6. Press the LOOP key. You'll see the registered IN and OUT Points in the display.
7. Press to highlight the Loop:Off button in the display. The LOOP key will light.
8. Press the PLAY key, and watch the Counter - measures 1-4 will loop repeatedly.
9. Press the STOP key, then press the Loop:On button in the display to turn off loop playback.
KORG D16 Guide
36
Good! But what fun is it without some audio to work with? Get ready to be "accelerated"
through some great D16 features and functions! First, you'll copy one of the factory
demo songs to a new song location and un-protect the copied song…
Copy a demo song to a new location:
1. Press the SONG key, then press the SelSong tab in the display.
2. Rotate the DIAL to the left, until song I001: Alone appears in the display, and those famous Korg Inc.
words "NowSongLoading" appear briefly.
3. Press the EditSong tab in the display, then press the Popup button to the left of the current Edit List
selection.
4. Press to highlight Copy, then press the OK button.
5. Press the Exec. button in the display - don't worry, the D16 "knows" where the next-available empty
song location is, as indicated in the display.
6. Press the Yes button in the dialog box, then press the OK button to confirm the copy procedure.
"NowSongLoading" will appear briefly.
7. Press the SelSong tab, and you'll see the results of your efforts - Song I001: Alone has been copied to
the new song location. Just like the original, the new copy is still protected. That's the next step…
Un-protect the copied song:
1. Press the EditSong tab in the display, then press the Popup button to the left of CopySong.
2. Press to highlight Protect, then press the OK button.
3. Now press the Exec. button in the display - to the right of the "padlock" icon (protect). The icon will
disappear.
4. Press the SelSong tab in the display. Now you can work freely with the copied song.
Change the Counter Time Display Type:
The original factory demos all display the time in real time - now you'll set the copied song so
the Counter reads in measures, beats and ticks:
1. Press to highlight the "clock" to the left of the Counter.
2. Press to highlight 001.01.000 in the display, then press the OK button. The Counter will now read in units
of measures, beats and ticks.
KORG D16 Guide
37
Rename the copied song:
1. Press the Rename button in the display.
2. Press the > button five times, to reach the first empty space following Alone.
3. Using the A../ a.. button (toggle to select upper and lower case), DIAL, and the > button to move through
the name field, and input the following characters: l > y > R > e> p.
4. Press the OK button in the display, and your copied song will be renamed appropriately.
Take a break, and listen to this fine demo song:
1. Press the PLAY key and confirm that your copied song is intact, and raise the MASTER Fader and
PHONE LEVEL knob to comfortable listening levels. Don't worry about the position of the Channel
Faders at this point, because the mix was previously stored as a Scene in the original song location, as
indicated by the SCENE key (lit).
2. Listen to the lead vocal line carefully, because you're going to be recording your own lead vocal over
this track - very soon (just kidding)!
3. Press the STOP key when you've finished listening to the demo song.
OK..the next sections get a little "deeper", so hang in there and follow the steps closely…
Set Loop Playback on a track, and work with the Wave and Scrub functions:
1. Press the IN /LOC1 key, to locate to measure 001.01.000.
2. Press the LOOP key, then press the Wave button in the display.
3. Press the Popup button to the left of the current Trk that is indicated in the lower right of the display,
and from the dialog box, press to highlight Trk6.
4. Press the OK button in the display to confirm that you want to view the waveform data for Track 6 (the
lead guitar track). Note that the SCRUB key lights.
5. Notice the waveform display. Press the "zoom" buttons in the bottom of the display, to increase or
decrease the waveform view - horizontally and vertically.
6. Raise the Track 6 Channel Fader to the "0" position.
7. Slowly-rotate the DIAL to the right, to Scrub the audio data, until the vertical line (crosshair) reaches
approximately 002.01.078 (watch the In: time in the upper-left of the display) - the IN time suggested is
in the first dominant waveform representation of Track 6.
KORG D16 Guide
38
Continue working with the Scrub function in Loop Playback mode:
1. Press the PLAY key, watch the waveform display, and listen: Track 6 plays from the IN point at normal
speed for two seconds, then automatically stops (because the Scrub function is on).
2. Now hold the STOP key and press the PLAY key. The audio data will play at normal speed, from two
seconds before the registered IN point, and then playback will stop.
3. Press to highlight the Out: 000.000.000 time in the display, and rotate the DIAL to scrub the audio, until
the Out: time reaches approximately 003.01.087. If you go past this Out time, rotate the DIAL to the left.
4. Press the PLAY key. The audio data will play from that point at normal speed, for two seconds, then
stop.
5. Hold the STOP key and press the PLAY key. The audio data will play at normal speed, from two
seconds before the OUT point and then stop.
6. Press the OK button in the display, and note the registered IN and OUT time in the display.
7. Press the Loop:Off button in the display, and the LOOP key will light.
8. Press the PLAY key. Now the registered time will loop repeatedly.
9. After you've listened to the loop, press the STOP key, then press the Loop:On button in the display to
exit Loop Playback mode. Tip: By using the WAVE and SCRUB functions, you can be more precise in locating IN and OUT points to set for Loop Playback (and Loop Recording). You can register IN and OUT Points while the D16 is stopped or during playback, first by using the STORE and IN / OUT keys, and then by "fine-tuning" the loop points with the WAVE and SCRUB functions.
Set IN and OUT points while the song plays back:
1. Press the SONG key, then locate to measure 001.01.000, by holding the STOP key and pressing the
REW key once).
2. Press the PLAY key, and listen to the song to get a feel for the rhythm. While the song plays, press the
STORE key, followed by pressing the IN / LOC1 key, to store an IN point wherever you like.
3. Continue to let the song play, and in that same "perfect tempo you were born with", press the STORE
key, followed by pressing the OUT / LOC2 key, to store the OUT point wherever you like.
4. Press the STOP key, then press the LOOP key.
5. Press the Loop:Off button in the display, and the LOOP key will light.
6. Press the PLAY key and the registered IN and OUT time will loop repeatedly.
7. Press the STOP key, then press the Loop:On button in the display to turn off Loop Playback.
KORG D16 Guide
39
Note: You can re-set IN and OUT points as many times as you like, while the song plays back. Each time you do, the previous IN and OUT points will be overwritten. You can set the IN and OUT points "on-the-fly", as above, and then be more precise in the Loop Wave mode. Note: Loop Recording is used in conjunction with the Auto Punch function. For more information, see the D16 owner's manual (page 72). Note: Trigger Recording is used to initiate recording when the input exceeds a set threshold level. See the D16 owner's manual (page 73) for more information.
Working with Virtual Tracks The D16 features 8 Virtual tracks for every track - that's128 Virtual tracks per song! Virtual
tracks give you the benefit of being able to record several takes without overwriting any
previous takes. Then you can select from your favorite Virtual track(s) for playback,
bouncing or mixdown.
Create a new song and record some audio:
1. Press the SONG key, then press the New button in the display.
2. Press the OK button in the display to create a new song.
3. Lower the MASTER Fader and Channel Faders to their minimum positions.
4. Connect a lo-impedance microphone to the D16 INPUT 1 XLR connector, and center the Track 1 PAN
control.
5. Press the INPUT key, and make sure that Input 1 is routed to Ch1 - if not, press to highlight the Ch1
"jack" icon, and rotate the DIAL to the left, to set the input to 1.
6. Press the Track1 TRACK STATUS key two times, until the LED lights RED (record status). Note: If Track 2's RED LED lights as well, press the RECORD key and set the RecMode to Input.
KORG D16 Guide
40
7. Press the METER / TRACK VIEW key, then set your input gain while speaking into the mic, by adjusting
the INPUT 1 TRIM knob and watching the TRIM LED to avoid input clipping.
8. Set the Pre Fader view in the display - press the Popup button in the upper-left of the display, and
press to highlight PreFdr, followed by pressing the OK button in the display. Make sure to set the input
gain so that clipping does not occur (watch the TRIM LED and PreFdr "CLP" indicator line as you speak).
9. Raise the Track 1 Fader to the "0" position, then slowly-raise the MASTER Fader and PHONE LEVEL
knob to a comfortable listening position.
10. Press the Popup button to the left of PreFdr in the METER VIEW page, then press to highlight
PostFaderLev, followed by pressing the OK button in the display.
11. Check your mic, and watch the Post Fader level meter. Make sure that clipping does not occur due to
the Track 1 Channel Fader position.
12. Press the REC key, then press the PLAY key, and record about 6 - 8 measures of your voice (Example:
"This is Track One", etc.), then press the STOP key.
13. Press the IN /LOC1 key to locate to measure 001.01.000.
Select a new Virtual track to record a second take:
1. Press the TRACK key, then press the Vtr1-8 tab in the display.
2. Press the PLAY key to hear the first track. Note the highlighted 1a in the left column of the display. The
entire top "bar" is black in this column, because you just recorded on Virtual track 1a.
3. Press the STOP key, then press the IN /LOC1 key to locate to measure 001.01.000.
4. Slowly-rotate the DIAL to the right (one click) until the upper-left of the display reads 1b (Virtual track
"1b").
5. Press the METER / TRACK VIEW key, then press the REC key.
6. Press the PLAY key, and record another 6-8 measures of your voice on Virtual track 1b (Example: "This
is Virtual track 1b", etc.).
7. Press the STOP key, then press the IN / LOC1 key to locate to measure 001.01.000.
8. Press the PLAY key to hear Virtual track 1b, then press the STOP key. Leave the cursor set at 1b.
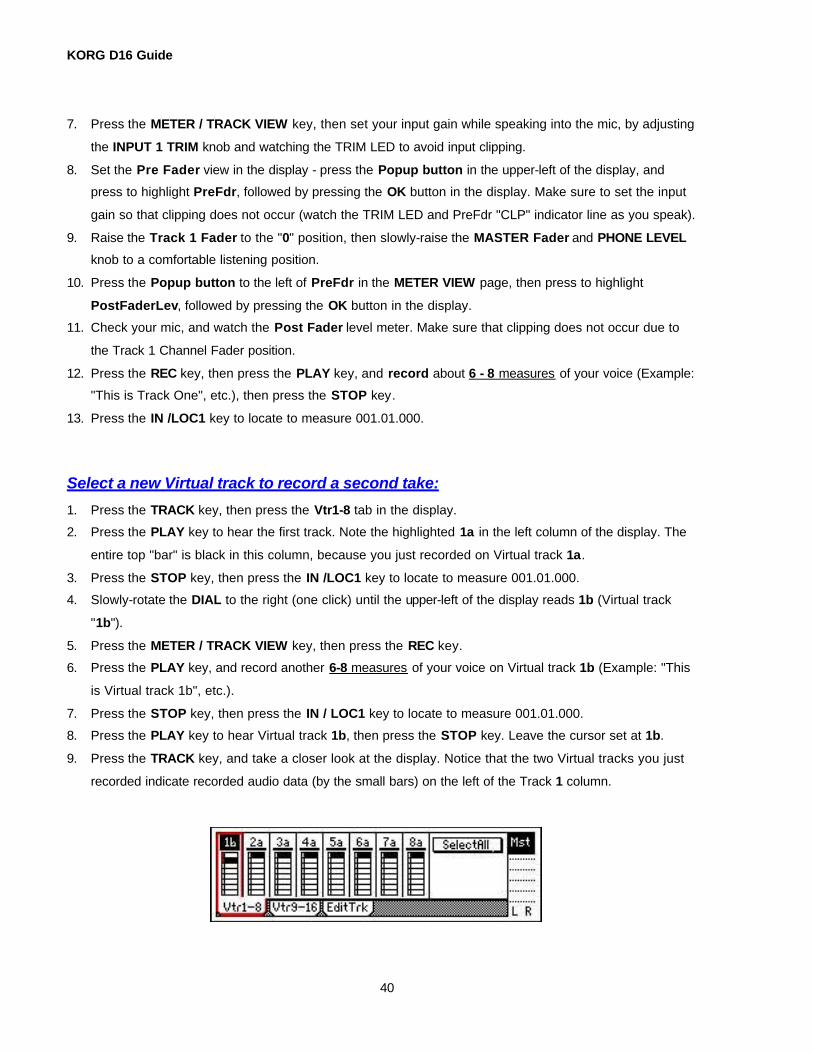
9. Press the TRACK key, and take a closer look at the display. Notice that the two Virtual tracks you just
recorded indicate recorded audio data (by the small bars) on the left of the Track 1 column.
KORG D16 Guide
41
Track Bouncing:
The D16 features a number of ways to bounce multiple tracks, including a 14-2 function
(bounce up to 14 tracks down to two tracks), plus the ability to bounce 16 tracks down to
two currently selected tracks. Best of all, the D16 provides an "exclusive" feature:
A "16-2" function that lets you select Virtual tracks as the destination bounce tracks.
This means you can bounce multiple16 track mixes down to two selected Virtual tracks,
complete with varied effects and EQ, if desired, and then select your favorite mixdown
from the Virtual tracks!
Record on Track 2:
1. Press the Track 1 TRACK STATUS key two times, until the LED lights GREEN (play status).
2. Press the Track 2 TRACK STATUS key two times, until the LED lights RED (record status).
3. Press the INPUT key, then press to highlight the Ch2 icon, and rotate the DIAL to the left, until you
assign Input 1 to Ch2.
4. Raise the Track 2 Channel Fader to the "0" position, and center the PAN knob.
5. Press the METER /TRACK VIEW key, check your mic, and watch the Post Fader level meter. Make
sure that clipping does not occur due to the Track 1 Channel Fader position.
6. Make sure to locate the song to the beginning (press the IN / LOC1 key).
7. Press the REC key, then press the PLAY key and record about 6 - 8 measures of your voice (Example:
"This is Track 2a", etc.). You'll hear Track 1b playback as you record - lower it's Fader if needed.
8. Press the STOP key, then press the IN / LOC1 key to locate to measure 001.01.000.
9. Press the Track 2 TRACK STATUS key two times, until the LED lights GREEN (play status).
10. Press the PLAY key to hear your tracks, then press the STOP key and press the IN /LOC1 key to locate
to measure 001.01.000.
KORG D16 Guide
42
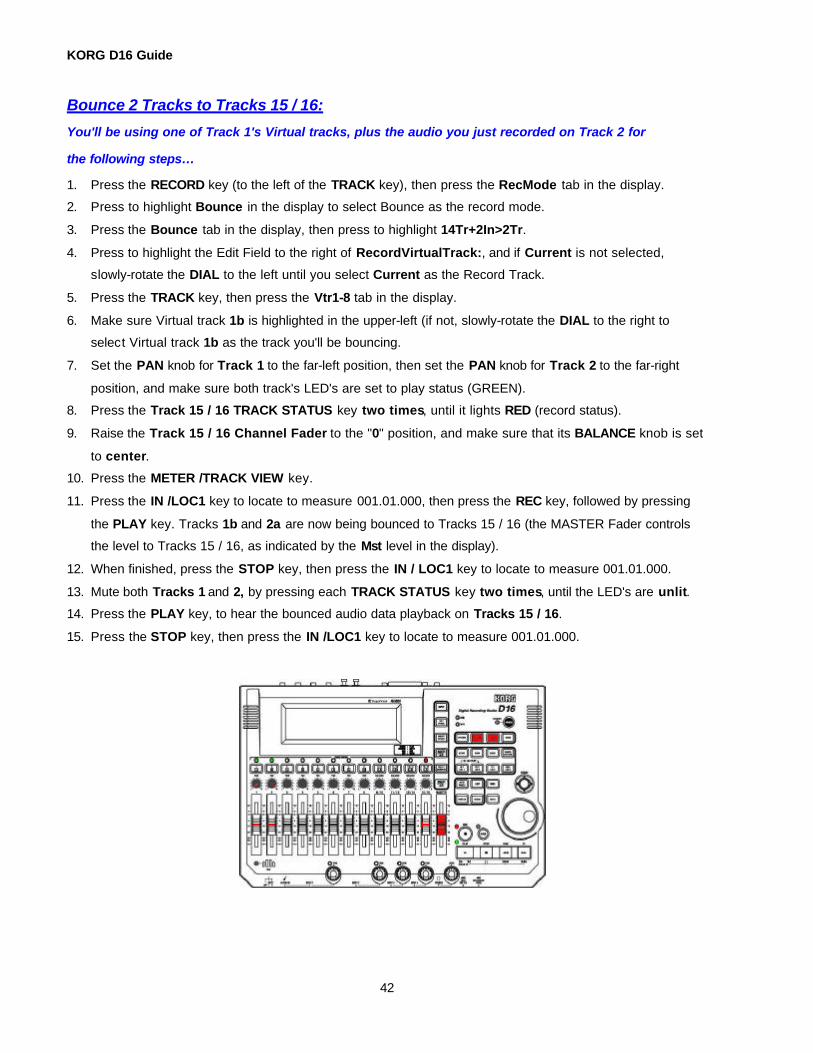
Bounce 2 Tracks to Tracks 15 / 16:
You'll be using one of Track 1's Virtual tracks, plus the audio you just recorded on Track 2 for
the following steps…
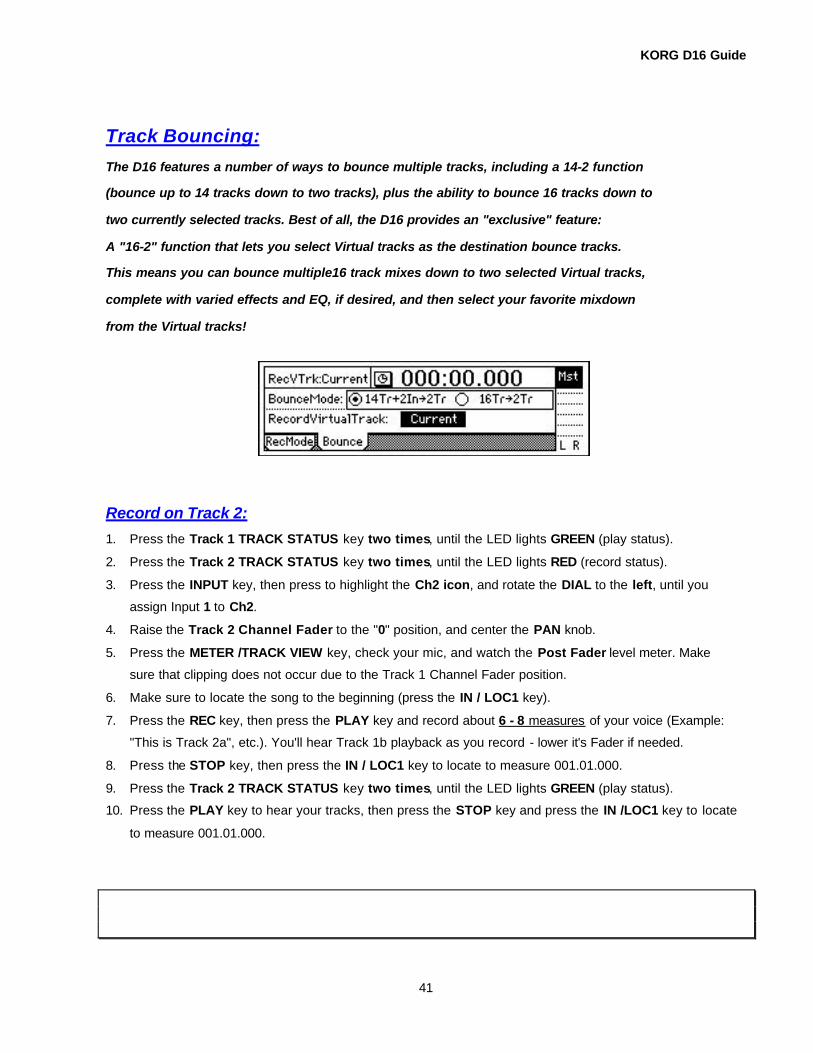
1. Press the RECORD key (to the left of the TRACK key), then press the RecMode tab in the display.
2. Press to highlight Bounce in the display to select Bounce as the record mode.
3. Press the Bounce tab in the display, then press to highlight 14Tr+2In>2Tr.
4. Press to highlight the Edit Field to the right of RecordVirtualTrack:, and if Current is not selected,
slowly-rotate the DIAL to the left until you select Current as the Record Track.
5. Press the TRACK key, then press the Vtr1-8 tab in the display.
6. Make sure Virtual track 1b is highlighted in the upper-left (if not, slowly-rotate the DIAL to the right to
select Virtual track 1b as the track you'll be bouncing.
7. Set the PAN knob for Track 1 to the far-left position, then set the PAN knob for Track 2 to the far-right
position, and make sure both track's LED's are set to play status (GREEN).
8. Press the Track 15 / 16 TRACK STATUS key two times, until it lights RED (record status).
9. Raise the Track 15 / 16 Channel Fader to the "0" position, and make sure that its BALANCE knob is set
to center.
10. Press the METER /TRACK VIEW key.
11. Press the IN /LOC1 key to locate to measure 001.01.000, then press the REC key, followed by pressing
the PLAY key. Tracks 1b and 2a are now being bounced to Tracks 15 / 16 (the MASTER Fader controls
the level to Tracks 15 / 16, as indicated by the Mst level in the display).
12. When finished, press the STOP key, then press the IN / LOC1 key to locate to measure 001.01.000.
13. Mute both Tracks 1 and 2, by pressing each TRACK STATUS key two times, until the LED's are unlit.
14. Press the PLAY key, to hear the bounced audio data playback on Tracks 15 / 16.
15. Press the STOP key, then press the IN /LOC1 key to locate to measure 001.01.000.
KORG D16 Guide
43
Perform a Virtual 16-2 Mixdown:
For the next exercise, you'll copy a factory demo song to a new song location, then
bounce all 16 tracks of audio down to 2 Virtual tracks…
Copy a demo song to a new location:
1. Press the SONG key, then press the SelSong tab in the display.
2. Press the Popup button to the left of the current song name, then repeatedly -press theé Popup
button in the right of the display to scroll up in the song list, until song I002 is highlighted.
3. Press the OK button in the display to load the demo song: I002: Clarity.
4. Press the EditSong tab in the display, then press the Popup button to the left of the current Edit List
selection.
5. Press to highlight Copy, then press the OK button.
6. Press the Exec. button in the display - a dialog box appears, prompting you to "CopySong: I002 Clarity >
IXXX" (the next available empty song location).
7. Press the Yes button in the dialog box, then press the OK button to confirm the copy procedure.
"NowSongLoading" will appear briefly.
Un-protect the copied demo song:
1. Press the Popup button to the left of CopySong in the display.
2. Press to highlight Protect, then press the OK button in the display.
3. Now press the Exec. button in the display - to the right of the "padlock" icon (protect). The icon will
disappear.
4. Press the SelSong tab in the display. Now you can work freely with the copied song.
Rename the copied song:
1. Press the Rename button in the display, then press the > repeatedly, until you highlight the first empty
space following Clarity.
2. Press the 0..9 button in the display, then rotate the DIAL until the number 2 appears.
3. Press the OK button in the display, and your copied song will be renamed "Clarity 2".
KORG D16 Guide
44
Set the Record mode and select the Virtual track for Bouncing:
1. Press the RECORD key (to the left of the TRACK key), then press the RecMode tab in the display.
2. Make sure that Bounce is selected in the display - if not, press to highlight it.
3. Press the Bounce tab in the display, then press to highlight 16Tr>2Tr.
4. Press to highlight the Edit Field to the right of RecordVirtualTrack in the display, and slowly-rotate the
DIAL to set this to "b" (Virtual track "b”). Note: The previous step is very important - if you leave the setting at "Current", and continue the Bounce procedure, you'll bounce all 16 tracks and overwrite the two existing record tracks! For Virtual mixdowns, always select Virtual tracks as the destination tracks! (See page 21 in the D16 owner's manual)
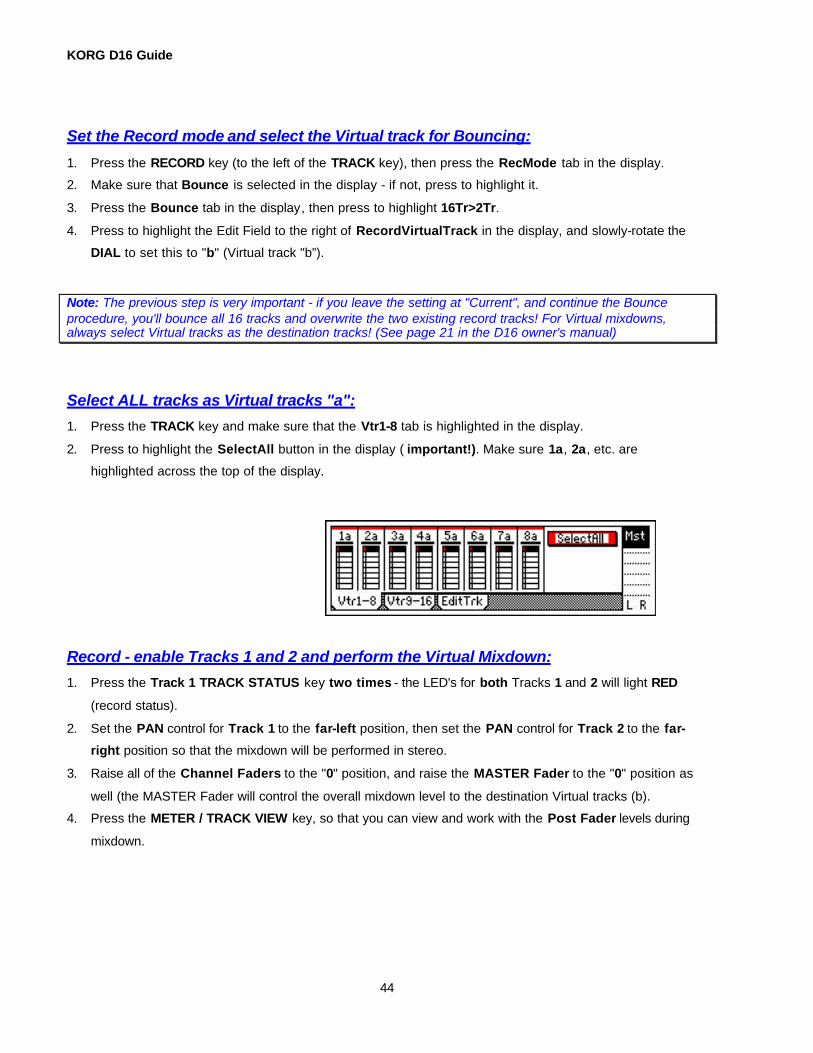
Select ALL tracks as Virtual tracks "a":
1. Press the TRACK key and make sure that the Vtr1-8 tab is highlighted in the display.
2. Press to highlight the SelectAll button in the display ( important!). Make sure 1a, 2a, etc. are
highlighted across the top of the display.
Record - enable Tracks 1 and 2 and perform the Virtual Mixdown:
1. Press the Track 1 TRACK STATUS key two times - the LED's for both Tracks 1 and 2 will light RED
(record status).
2. Set the PAN control for Track 1 to the far-left position, then set the PAN control for Track 2 to the far-
right position so that the mixdown will be performed in stereo.
3. Raise all of the Channel Faders to the "0" position, and raise the MASTER Fader to the "0" position as
well (the MASTER Fader will control the overall mixdown level to the destination Virtual tracks (b).
4. Press the METER / TRACK VIEW key, so that you can view and work with the Post Fader levels during
mixdown.
KORG D16 Guide
45
5. Press the IN / LOC1 key to locate to measure 001.01.000.
6. Press the REC key, then press the PLAY key, and make any Channel Fader and Pan / Balance
changes you like as the song mixes down to the two selected Virtual tracks. Remember that the
MASTER Fader controls the level to the Virtual tracks - watch the Mst level in the display.
7. When finished, press the STOP key, then press the IN / LOC1 key to locate to measure 001.01.000. Note: If you don't want to bounce-down the entire song, you can lower the MASTER Fader as you're bouncing (whenever you like) and perform a "fade-out" as part of the mixdown, then STOP and locate to measure 001.01.000.
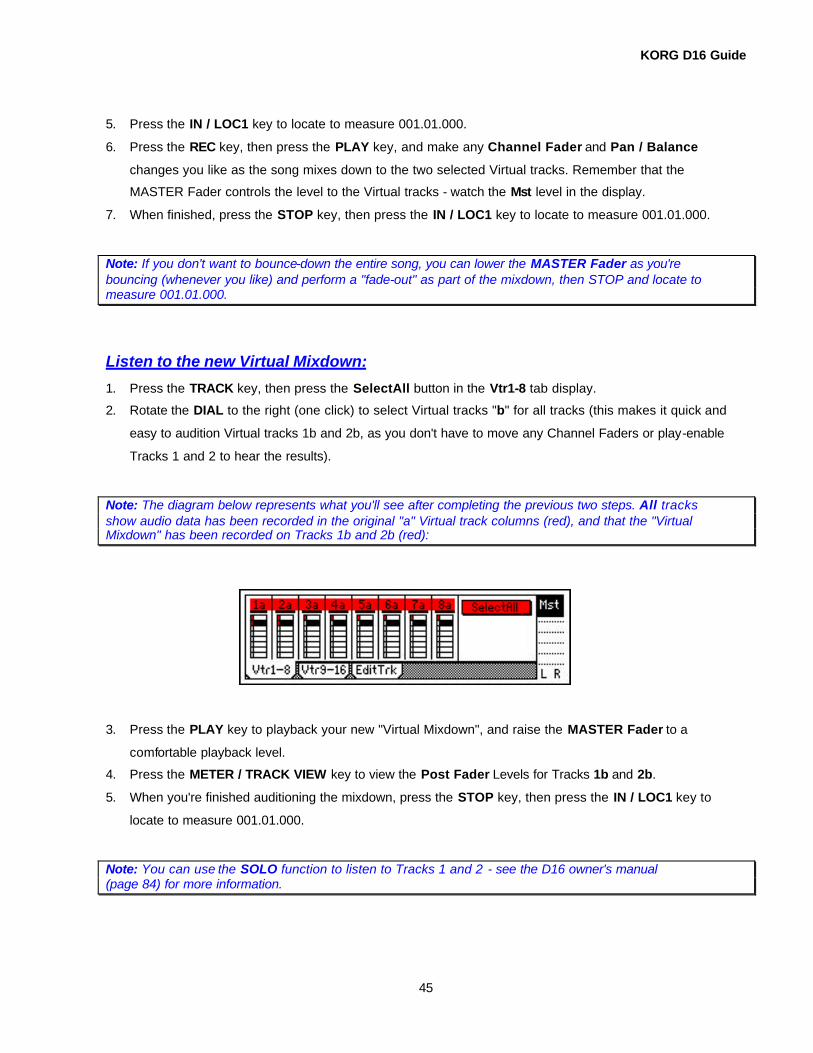
Listen to the new Virtual Mixdown:
1. Press the TRACK key, then press the SelectAll button in the Vtr1-8 tab display.
2. Rotate the DIAL to the right (one click) to select Virtual tracks "b" for all tracks (this makes it quick and
easy to audition Virtual tracks 1b and 2b, as you don't have to move any Channel Faders or play-enable
Tracks 1 and 2 to hear the results). Note: The diagram below represents what you'll see after completing the previous two steps. All tracks show audio data has been recorded in the original "a" Virtual track columns (red), and that the "Virtual Mixdown" has been recorded on Tracks 1b and 2b (red):
3. Press the PLAY key to playback your new "Virtual Mixdown", and raise the MASTER Fader to a
comfortable playback level.
4. Press the METER / TRACK VIEW key to view the Post Fader Levels for Tracks 1b and 2b.
5. When you're finished auditioning the mixdown, press the STOP key, then press the IN / LOC1 key to
locate to measure 001.01.000. Note: You can use the SOLO function to listen to Tracks 1 and 2 - see the D16 owner's manual (page 84) for more information.
KORG D16 Guide
46
Tip: If you want to remix again, press "Select All" from the TRACK page, rotate the DIAL to select "a" as the Virtual tracks for all tracks, locate to measure 001.01.000 and re-record the mixdown. The alternative is to use the UNDO function, or to select bounce destination Virtual tracks "c" - "h" and finally select from your favorite mixdown. Just remember that the "a" Virtual tracks are the original audio tracks! See the D16 owner's manual (pages 19, 22 and 52) for more information on Virtual tracking and Bouncing. TIP: You can record an additional "live" source to the destination bounce tracks as you are mixing down to your Virtual tracks! See the D16 owner's manual (page 21) for more information.
Working with the Effects The D16 features up to 8 insert effects per song - a huge collection of built-in world-class
effect algorithms - all fully programmable! In addition, there are 2 Master Effects available
for each song, with send level control for each track! And last but not least, there's a Final
Effect for overall processing of your song during final mixdown! That's 3 simultaneous
processors and up to 11 simultaneous effects for every song!
The factory demo songs (Alone, Clarity, Someday) do not have Insert Effects applied
on playback, however some of the tracks in the songs have been recorded with Insert
Effects on input. In the following exercises you'll be applying and editing Insert Effects
on playback with one of the demo songs…
KORG D16 Guide
47
Familiarize yourself with the Demo Song:
For the following exercise, you'll copy the demo song: I001: Alone to a new song location…
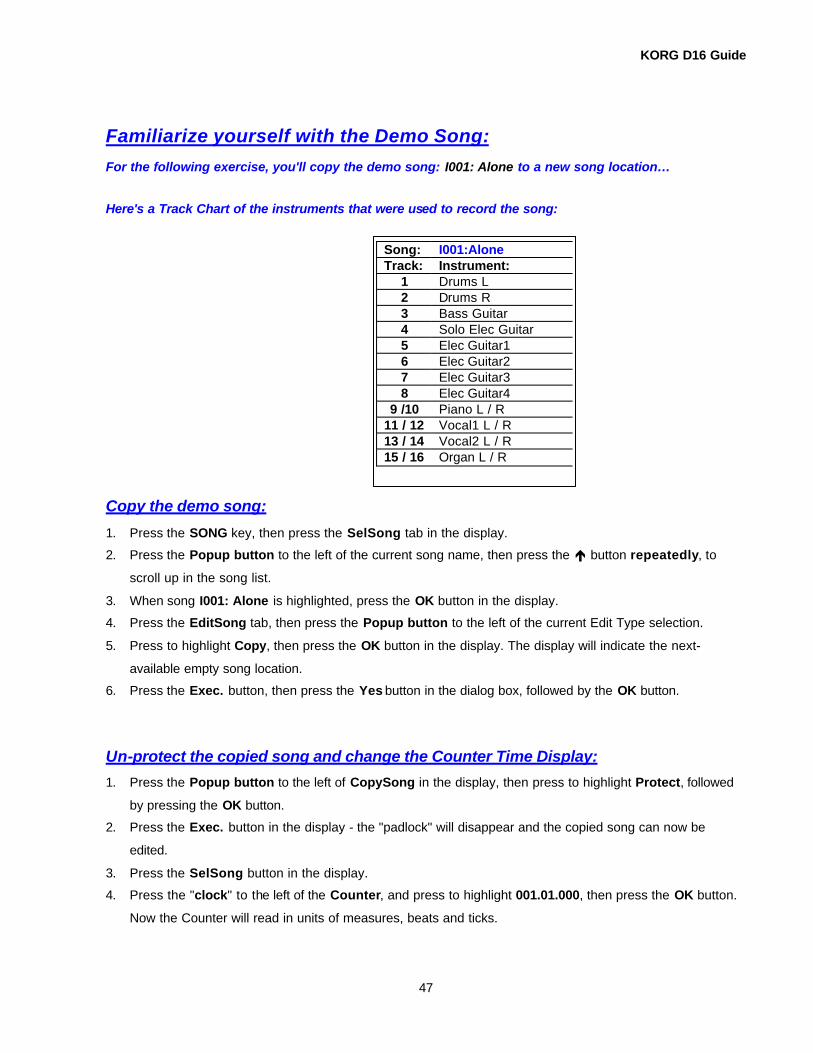
Here's a Track Chart of the instruments that were used to record the song:
Copy the demo song:
1. Press the SONG key, then press the SelSong tab in the display.
2. Press the Popup button to the left of the current song name, then press the é button repeatedly, to
scroll up in the song list.
3. When song I001: Alone is highlighted, press the OK button in the display.
4. Press the EditSong tab, then press the Popup button to the left of the current Edit Type selection.
5. Press to highlight Copy, then press the OK button in the display. The display will indicate the next-
available empty song location.
6. Press the Exec. button, then press the Yes button in the dialog box, followed by the OK button.
Un-protect the copied song and change the Counter Time Display:
1. Press the Popup button to the left of CopySong in the display, then press to highlight Protect, followed
by pressing the OK button.
2. Press the Exec. button in the display - the "padlock" will disappear and the copied song can now be
edited.
3. Press the SelSong button in the display.
4. Press the "clock" to the left of the Counter, and press to highlight 001.01.000, then press the OK button.
Now the Counter will read in units of measures, beats and ticks.
Song: I001:Alone Track: Instrument:
1 Drums L 2 Drums R 3 Bass Guitar 4 Solo Elec Guitar 5 Elec Guitar1 6 Elec Guitar2 7 Elec Guitar3 8 Elec Guitar4
9 /10 Piano L / R 11 / 12 Vocal1 L / R 13 / 14 Vocal2 L / R 15 / 16 Organ L / R
KORG D16 Guide
48
Note that the SCENE key is lit - Fader and Pan / Balance positions, as well as Master
Effect send levels and Master / Final Effect numbers have been stored in this song,
with the SCENE memory function. You can override the Scene by working with the
Faders, Pan / Balance controls, etc.
Disable Scene Memory:
1. Press the SCENE key (lit), then press the MixView tab in the display, and note the stored settings for
Fader and Pan / Balance controls. There is one Scene stored in this song, and each time you restart the
song, that Scene will be recalled, so…
2. Press the ReadDel tab in the display, then press the SceneRead:On button in the display, to turn off
Scene Memory for this song.
Playback the song, and view and work with the mix:
1. Press the SONG key, followed by the PLAY key.
2. Press the METER / TRACK VIEW key, and make sure that the display mode is set for Post Fader. Let
the song continue to play, and…
3. Work with the Channel Faders and Pan controls to develop "your own" overall mix of the song. Note: If the song ends before you've finished editing, press the IN / LOC1 key to restart.
When you're finished mixing and ready to store a new Scene at the beginning of the song…
4. Once you've created a mix you like, press the STOP key, then press the IN / LOC1 key to locate to
measure 001.01.000.
Store the new Scene:
1. Press the STORE key (it will light), then press the SCENE key to store a Scene at the beginning of the
song. Don't enable Scene Memory at this time…
Now you'll work with the song - in particular the Insert Effects. You'll be isolating a couple
tracks next…
KORG D16 Guide
49
Work with the Lead Guitar Track:
1. Lower all the Channel Faders to their minimum positions, then press the PLAY key to restart the song.
2. Press the METER / TRACK VIEW key to view the Post Fader mix and…
3. Raise the Track 6 Channel Fader to the "0" position. Listen to the Lead Guitar track - note that some
effect processing was applied to this track when it was originally recorded.
Set Loop Playback for the Track: 1. Press the STOP key, then press the IN / LOC1 key to locate to measure 001.01.000.
2. Press the SONG key, then press to highlight 001.01.000 in the display.
3. Press the FF key once, to advance the Counter to measure 002.01.000.
4. Press the STORE key, then press the IN / LOC1 key, to store the IN point.
5. Now slowly-rotate the DIAL to the right, until the Counter reads 013.01.000.
6. Press the STORE key, then press the OUT / LOC2 key, to set the OUT point. Now you can set Loop
Playback for the song, and concentrate on working with the Insert Effect you'll apply to the track.
7. Press the LOOP key, then press the Loop:Off button in the display to enable Loop Playback (the LOOP
key lights).
8. Press the PLAY key - the track will loop continuously as you work with the next exercises…
Working with the Insert Effects
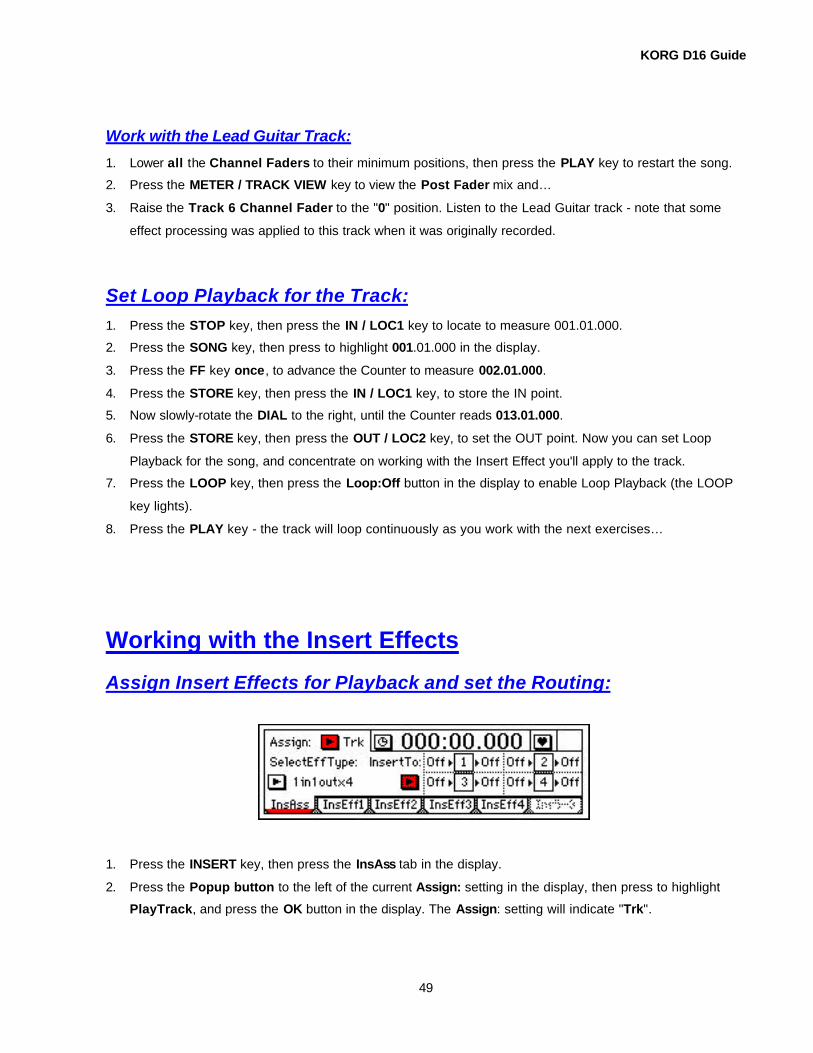
Assign Insert Effects for Playback and set the Routing:
1. Press the INSERT key, then press the InsAss tab in the display.
2. Press the Popup button to the left of the current Assign: setting in the display, then press to highlight
PlayTrack, and press the OK button in the display. The Assign: setting will indicate "Trk".
KORG D16 Guide
50
A better understanding of the D16 Insert Effect Routing…
There are four configurations available in the Select Effect Type menu:
- 1in2outx2: Primarily Guitar and Bass Chains of 3-5 effects each - For Insert Effect assignment
as you record ONLY - good for mono-in / stereo-out sources
- 2in2outx2: Great for keyboards and stereo-in / stereo-out instruments
- 1in1outx4: The default setting, and the one you'll use in the following exercise. Good to use for
fixed panning sources like rhythm guitar - selecting this configuration lets you select from four
mono Insert Effects to be used in the song.
- 1in1outx8: The largest configuration of multiple effect choices - use this one when you need up
to eight mono effects in a song - ideal for fixed pan sources that need effect isolation - like
drums.
Although you won't be changing the Effect Type configuration right now, its good to know when
and where to apply the four types. 1in1outx4 is the default setup in a new song, as indicated in
the display…
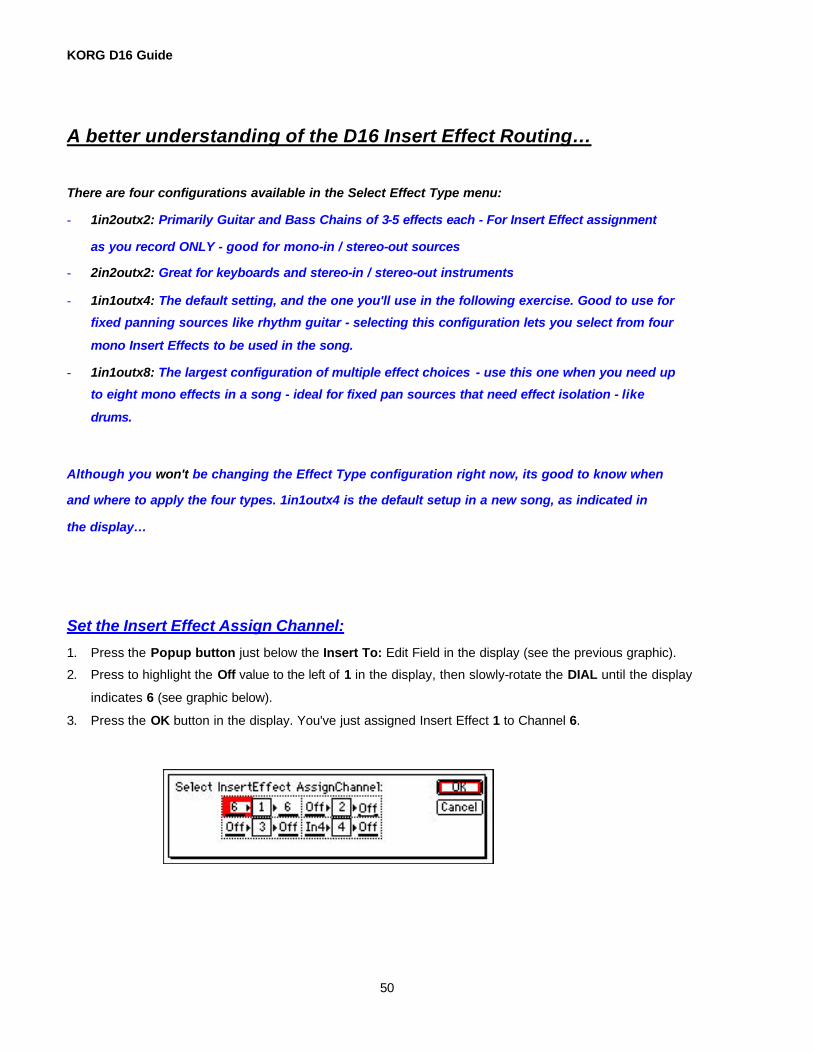
Set the Insert Effect Assign Channel:
1. Press the Popup button just below the Insert To: Edit Field in the display (see the previous graphic).
2. Press to highlight the Off value to the left of 1 in the display, then slowly-rotate the DIAL until the display
indicates 6 (see graphic below).
3. Press the OK button in the display. You've just assigned Insert Effect 1 to Channel 6.
KORG D16 Guide
51
Try out some Insert Effects on the Guitar Track:
1. As the track plays, press the InsEff1 tab in the display.
2. Make sure that the effect number to the left of the current effect selection is highlighted, then slowly-
rotate the DIAL, to access and listen to different Insert Effect programs while the track loops. TIP: Bring the Channel Faders for the other tracks back into the mix (or use the SOLO function), to see how your selected effect works along with the rest of the instrumentation.
Edit the Insert Effect you've chosen for this track:
1. Press the selected Insert Effect program button in the display (the name of the effect selected), then
press to select one of the effect icons. The edit parameters for the selected effect will be indicated in the
display.
2. Press to highlight desired effect parameters, and rotate the DIAL to make changes. Once you're satisfied
with the settings you've made, press the OK button two times - in the upper-right of the display. The
previous Insert Effect program number will indicate EDIT in the display.
Store the edited Insert Effect:
1. Press the Store button in the display. A dialog box appears, and the first of 128 User Programs is
highlighted in the display (U001).
2. Rotate the DIAL to select Program U100, then press the Exec. button to store the new effect. If you like,
you can also Rename the new Effect in the same way as naming songs, locate and mark points.
3. Press and hold the STOP key, then press the REW key once, to reset the song to the beginning.
More Insert Effect application and study suggestions: - Try assigning additional Insert Effects to specific channels, and selecting / editing various
effect programs.
- Work with the Insert Effects in "on-input" recording applications - try out the 1in2outx2
configuration with guitar and bass to access some of the chained effects for these
instruments.
- Work with additional Effect Type configurations in recording and playback assignments.
Note: For more information on Insert Effects, see pages 29-32 and page 79 in the D16 owner's manual.
KORG D16 Guide
52
Working with the Master Effects
Two Master Effect processors can be used simultaneously, with individual send levels
for each channel! - Used mainly for ambient processing of the overall mix - 32 Preset
programs plus 32 user programs available!
You'll use the currently selected song "Alone" for the following exercise…
View the current Master Effects and Send Levels:
1. Press the MASTER EFFECT / AUX key, then press the MstEff1 tab in the display - note that Master
Effect M009 RV4: BrightPlate has already been assigned - also note the RetLev (return level) and
RetBal (return balance) "knobs" and the current settings in the display.
2. Press the EffSnd1 tab in the display, and view the channel send levels ("knobs") to this effect.
3. Press the MstEff2 tab in the display (M021 DL6:AutoPanDelay), then press the EffSnd2 tab to view the
send levels to this effect.
Enable Scene Memory and disable Loop Playback:
1. Press the SCENE key, then press to highlight the SceneRead:Off button in the display - to enable
Scene Memory.
2. Press the LOOP key, then press to highlight to Loop:On button in the display - to disable Loop
Playback.
Enable Channel Pairing to control effect send levels:
1. Press the Channel Pairing (heart) icon in the upper-right of the display, then press Send.
2. Press the 1 2 button in the display, then press the OK button to set Channel Pairing for the Track 1 and
2 send levels. Adjusting Track 1's send level in the following steps will simultaneously-control the send
level for Track 2.
KORG D16 Guide
53
Work with the send levels:
1. Press the PLAY key, then press the MASTER EFFECT / AUX key.
2. Press the MstEff1 tab, then press the EffSnd1 tab.
3. Work with the mix: Lower the Track 3-16 Channel faders (or use the SOLO function) to isolate the
drums on Tracks 1 and 2, then adjust the Master Effect1 send levels for the drums - press the Send1
"knob" in the display (indicated in the upper-left when you press a "knob") and rotate the DIAL to
increase / decrease the send levels for Tracks 1 and 2.
4. Press the STOP key. Note: Channel Pairing can be used with adjacent odd / even-numbered channels to simultaneously- control Track Status, EQ, Effect and Aux send, Pan and Faders. When enabled, the odd-numbered channel will control both channels. See the D16 owner's manual (pg. 26) for more information. Note: When Scene Memory is enabled, the originally stored send levels will be recalled each time you restart the song. Disable Scene Memory if you want to spend more time working with various track send levels.
Additional suggestions: Once you develop a new mix and send levels for your tracks, try storing a new Scene at
the beginning of the song. Also try storing additional Scenes with new effect send levels,
EQ, etc. at different locations, then playback the Song with the Scene Memory function
enabled.
Working with the Final Effect The Final Effect is an independent processor with 32 preset and 32 user effect programs
available. Its at the end of the effect routing scheme in the D16, and is used for "mastering"
and dynamics applications. During mixdown you can use a Final Effect to "polish" your
mix as you master your work to external DAT, MD or CD.
Like the Master Effects, the currently selected song includes an already assigned
Final Effect.
KORG D16 Guide
54
Check out this song's Final Effect:
1. Press and hold the STOP key, then press the REW key once, to reset the song to the beginning.
2. Press the PLAY key to playback the song.
3. Press the MASTER EFFECT / AUX key, then press the FinalEff tab in the display. Note that F012
LS2:St.MBLimiter has been assigned as the Final Effect for this song.
4. Press to highlight F012 in the display, and slowly-rotate the DIAL to select and try some more of the
Final Effects available.
5. Press the selected effect name program button in the display, then press the effect icon (s), and work
with the effect parameters. When you're satisfied with the results, press the OK button in the display, and
then press the Store button and rotate the DIAL to select one of the User Effect programs.
6. Press the OK button to write your new Final Effect into memory. Tip: You can use the Bypass button in the display to "toggle" between the original settings and your edits, when working with the Insert, Master and Final Effects. Note: The factory User Effect programs for Insert, Master and Final effects are duplicates of the Preset Effect programs, so don't worry if you write over any User Programs - you can recall the original Presets at any time! Tip:Use the Rename button in the display to name your newly-edited Insert, Master and Final Effects. Note: Please be aware that any custom effect programming or new song data could be lost when new data is loaded into the D16. Use the backup / copy procedures to save your User effects and song data to external drives (see page 43 in the D16 owner's manual)

KORG D16 Guide
55
Metronome and Pattern Applications
The following section deals with using the metronome and built-in PCM rhythm patterns in
a recording application.
Recording sources and monitoring for this section: If possible, use a guitar, bass or keyboard as the recording source for the following exercises. If you’re not a player, and want to use a microphone as your source, no problem – just speak, sing, count…whatever you like – in time with the metronome / rhythm patterns.
Create a new song:
1. Press the SONG key, then press the SelSong tab in the display.
2. Press the New button, then press the OK button in the display to select a new empty song location.
Connect your source device:
1. Lower the PHONE level to “0”, and MASTER / Channel faders to “oo”.
2. Connect a guitar, bass, keyboard or microphone to INPUT 1 on the front panel.
3. Press the Track 1 TRACK STATUS key two times, until it lights red (record status).
4. Rotate the INPUT 1 TRIM knob as high as possible without allowing it’s LED to light red (input clipping),
then raise the Track 1 channel fader to the “0” position. Remember: You can view the Pre Fader level in
the METER/TRACK VIEW display.
5. Raise the MASTER Fader / PHONE LEVELS to comfortable listening positions. Note: If desired, apply an insert effect to your source instrument (See the “Working with Insert Effects” section of this guide for more information). Otherwise, continue on with this exercise…
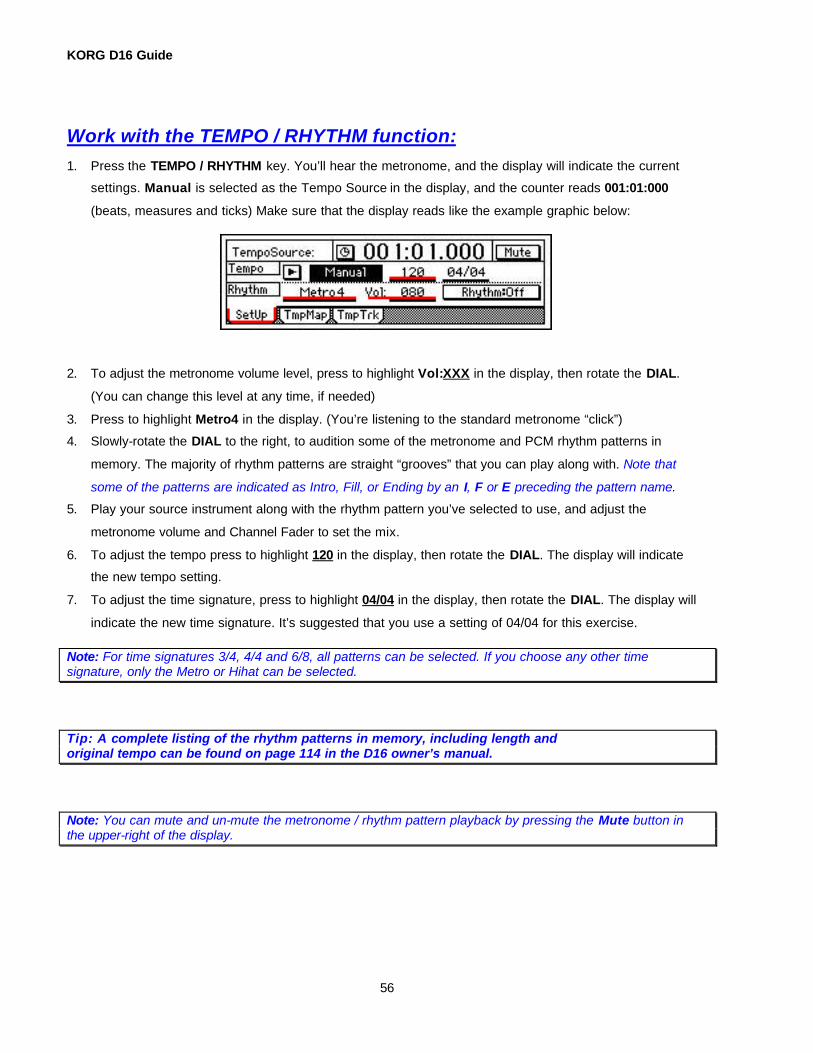
KORG D16 Guide
56
Work with the TEMPO / RHYTHM function: 1. Press the TEMPO / RHYTHM key. You’ll hear the metronome, and the display will indicate the current
settings. Manual is selected as the Tempo Source in the display, and the counter reads 001:01:000
(beats, measures and ticks) Make sure that the display reads like the example graphic below:
2. To adjust the metronome volume level, press to highlight Vol:XXX in the display, then rotate the DIAL.
(You can change this level at any time, if needed)
3. Press to highlight Metro4 in the display. (You’re listening to the standard metronome “click”)
4. Slowly-rotate the DIAL to the right, to audition some of the metronome and PCM rhythm patterns in
memory. The majority of rhythm patterns are straight “grooves” that you can play along with. Note that
some of the patterns are indicated as Intro, Fill, or Ending by an I, F or E preceding the pattern name.
5. Play your source instrument along with the rhythm pattern you’ve selected to use, and adjust the
metronome volume and Channel Fader to set the mix.
6. To adjust the tempo press to highlight 120 in the display, then rotate the DIAL. The display will indicate
the new tempo setting.
7. To adjust the time signature, press to highlight 04/04 in the display, then rotate the DIAL. The display will
indicate the new time signature. It’s suggested that you use a setting of 04/04 for this exercise. Note: For time signatures 3/4, 4/4 and 6/8, all patterns can be selected. If you choose any other time signature, only the Metro or Hihat can be selected. Tip: A complete listing of the rhythm patterns in memory, including length and original tempo can be found on page 114 in the D16 owner’s manual. Note: You can mute and un-mute the metronome / rhythm pattern playback by pressing the Mute button in the upper-right of the display.
KORG D16 Guide
57
Record on Track 1 while listening to the metronome / rhythm pattern:
1. After you’ve selected the desired pattern and set your levels (make sure that Track 1 is record-enabled),
press the REC key (the REC and PLAY keys LED’s will flash).
2. Press the Rhythm:Off button in the display. You’ll hear the pattern play.
3. Press the PLAY key and record your source instrument as the pattern plays.
4. Press the STOP key to stop recording, then press the IN/LOC1 key to locate to the beginning of the
song.
5. Press the PLAY key to playback the song. The pattern will playback along with your recorded track.
6. Press the STOP key to stop playback, then press the IN/LOC1 key to locate to the beginning of the
song.
7. Press the Track 1 TRACK STATUS key two times, until its LED lights green (play status). Note: You can mute and un-mute the metronome / rhythm pattern playback by pressing the Mute button in the upper-right of the display.
Assign the metronome pattern to stereo tracks and set record levels:
You’ll use the same song number as above, and re-record over the previous recording…
1. Make sure that you’ve located to the song beginning (step 6 above), then press the Rhythm:Off button
in the display – if you don’t do this, the recorded patterns will be doubled on the selected tracks and
master L/R bus.
2. Lower the Track 1 Channel Fader to the “oo” position.
3. Press the INPUT key, then press the Ch9-16 tab at the bottom of the display.
4. Press the Ch15 icon, then rotate the DIAL all the way to the right, to select L in the display.
5. Press the Ch16 icon, then rotate the DIAL all the way to the right, to select R in the display. Now the
metronome has been routed to the Channel 15/16 inputs.
6. Press the Track 15/16 TRACK STATUS key two times, until its LED lights red (record status).
7. Press the TEMPO/RHYTHM key again, and raise the Track 15/16 Channel Fader to “0”.
8. Make sure that the pattern is playing (un-muted), and that the display reads Rhythm:Off.
9. Press the METER/TRACK VIEW key, and adjust the channel fader to prevent clipping. When you’re
satisfied with the level, press the TEMPO/RHYTHM key.
KORG D16 Guide
58
Record the pattern:
1. Press the REC key, then press the PLAY key, and record the pattern to Tracks 15/16 for about 8
measures. Press the STOP key when you’ve finished recording.
2. Press the IN/LOC1 key to locate to the song beginning.
3. Press the Mute button in the TEMPO / RHYTHM display, to mute the metronome playback.
4. Press the Track 15/16 TRACK STATUS key two times, until the LED lights green (play status).
5. Press the PLAY key to hear the recorded pattern playback, then press the STOP key, followed by
pressing the IN/LOC1 key to locate to the song beginning.
6. If you like, you can record-enable Track 1, raise it’s Channel Fader and re-record your source instrument
on Track 1, while Tracks 15/16 playback. Otherwise, continue on with the next exercise: Note: EQ and Insert effects can be added to the recorded patterns, in the same ways as any other recording source.
Work with the Tempo Map function:
You can create a Tempo Map to change the tempo, time signature and rhythm pattern for
each measure of a song. Up to 200 tempo map events can be stored for each song. For
instance you might create a tempo map that includes specific rhythm patterns for song intro,
verse, fill-in, chorus and ending.
Create a simple Tempo Map:
1. Press the SONG key, then press the SelSong tab in the display.
2. Press the New button, then press the OK button in the display.
3. Press the TEMPO / RHYTHM key, then raise the MASTER Fader to the “0” position.
4. Press the Popup button to the left of Manual in the display, then press the TempoMap radio button,
followed by pressing OK in the display. The display will indicate TempoMap as the tempo source.
5. Press the Rhythm:Off button so that it indicates Rhythm:On.
6. Press the TmpMap tab at the bottom of the display, then press the Edit button in the display.
7. Press to highlight Metro4 to the right of Rhythm in the display, and then rotate the DIAL to the right, until
I R&Funk 3 (intro) is selected. (Don’t worry, it’s there…just keep rotating that DIAL!)
KORG D16 Guide
59
8. Press to highlight 120 to the right of Tempo:, then rotate the DIAL to the left until the tempo is set to
098.
9. Press the OK button, followed by pressing the New button in the display. Note that TempoMap002
appears at the top of the display. Now to enter the second tempo map event:
10. Press to highlight 001 to the right of Meas:, and slowly-rotate the DIAL to the right, until the display
indicates Meas: 003.
11. Press to highlight I R&Funk 3 , then slowly-rotate the DIAL to the left to select R&Funk 3.
12. Press the OK button, followed by pressing the New button in the display.
13. Press to highlight 003 to the right of Meas:, then rotate the DIAL to the right to select Meas: 006.
14. Press to highlight R&Funk 3 , and then slowly-rotate the DIAL to the right to select F R&Funk 3. (fill).
15. Press the OK button, followed by pressing the New button in the display.
16. Press to highlight 006 to the right of Meas:, then rotate the DIAL to the right to select Meas: 007.
17. Press to highlight F R&Funk 3 to the right of Rhythm, and then slowly-rotate the DIAL to the left to
select R&Funk 7.
18. Press the OK button.
Playback the new Tempo Map:
1. Press the SetUp tab in the lower left of the display.
2. Press the PLAY key, and watch the display. Your new tempo map will playback, and the display will
indicate each tempo map events as the counter runs. The last tempo map event you entered will
continue to run indefinitely, until you press the STOP key. Tip: You can create a tempo map for an entire song, and then record it to tracks as a “scratch” or final “rhythm bed” for your song. To record the tempo map to tracks, follow the procedure in “Record the pattern”, earlier in this section. Note: Remember that each tempo map event can contain new tempo and time signature settings, in addition to different patterns! For more information, see the D16 owner’s manual pages 40 and 68. Tip: D16 tempo can be recorded and controlled in two more ways: MIDI Clock and Tap Tempo. Recording MIDI clock data lets you synchronize the D16 to external MIDI devices, and created a tempo map in the D16 allows precise sync when an external MIDI sequence contains tempo changes. The Tap Tempo feature lets you record new tempo after a song is recorded. This means that you can edit previously recorded tracks in units of measures, as well as synchronize to MIDI devices, even if no tempo settings were recorded in the original song! See the D16 owner’s manual pages 41 and 69 for more information.
KORG D16 Guide
60
Song and Track Editing
The following section overviews edit functions, and provides quick steps for various song and
track editing procedures. To access the display pages that contain these edit functions,
press the SONG or TRACK keys, followed by the EditSong or EditTrack tabs in the display…
Song Editing
Copy Song: Copy a song to another location on any drive. Use this when you want to
backup your song on an external hard disk, etc, and when creating different mixes and arrangements.
SONG> EditSong> Copy > OK> select destination drive / song> Exec> Yes> OK
Move Song: Move a song to another song number on the same drive. Use this to change the
order of songs.
SONG> EditSong> Move> OK> select destination song> Exec> Yes> OK
Delete Song: Deletes the entire selected song.
SONG> EditSong> Delete> OK> Exec> Yes> OK
Protect Song: Protects the selected song. Use this to avoid recording over or modifying
your song data.
SONG> EditSong> Protect> OK> Exec (“padlock” icon appears next to Exec)
Copy All Songs: Copies all songs from the currently selected drive to another drive. Use this
versus Backup Songs if you need immediate access to play and edit the copied songs. Be aware
that this procedure writes over all data on the destination drive!
SONG> EditSong> CopyAll> OK> Drive > select destination drive > OK> Exec> Yes
KORG D16 Guide
61
Track Editing
Copy Track: Copies recorded track data from one region to another. You can copy single or
multiple tracks with this function, and input how many times you want the selected region to be
copied. You could use this function when you want to copy a recorded drum or bass groove
repeatedly – to create track data for the entire song. You can also copy to the “clipboard”,
allowing you to copy track data from one song to another. To perform Copy Track, you’ll first
need to set the IN, OUT and TO times to copy…
TRACK> EditTrack> Copy> OK> select destination track(s) and times> Exec> Yes> OK
Insert Track: Inserts blank data between a pre-selected region (IN/OUT time). Use this to insert
a blank area in single or multiple tracks, then add new audio to the blank region. The previous
data will move towards the end of the song. To perform Insert Track, you’ll first need to set the
IN and OUT times…
TRACK> EditTrack> Insert> OK> select track(s)> Exec> Yes> OK
Erase Track: Erases a pre-selected region (IN/OUT time). Use this to erase audio from single
or multiple tracks, and then re-record in the erased region. Unlike the Delete Track function, the
data following the OUT time will not be moved forward (snipped). To perform Erase Track, you’ll
first need to set the IN and OUT times…
TRACK> EditTrack> Erase> OK> select track(s)> Exec> Yes> OK
Delete Track: Deletes a pre-selected region (IN/OUT time). Use this to delete audio from single
or multiple tracks. When you perform the Delete Track function, the data following the OUT time
will be moved forward (snipped). To perform Delete Track, you’ll first need to set the IN and
OUT times…
TRACK> EditTrack> Delete> OK> select track(s)> Exec> Yes> OK
Swap Track: This procedure exchanges the selected region of single or multiple tracks with
the same region of other selected track(s). To perform Swap Track, you’ll first need to set the
IN and OUT times…
TRACK> EditTrack> Swap> OK> select track(s)> Exec> Yes> OK

KORG D16 Guide
62
Reverse Track: This procedure lets you select the IN and OUT time for a region of audio, and
then places a reversed copy of the selected region in the TO location. You can select a track or
multiple tracks to be reversed – repeatedly, if desired. To perform Reverse Track, you’ll first need
to set the IN, OUT and TO times…
TRACK> EditTrack> Reverse> OK> select track(s)and times> Exec> Yes> OK
Optimize Track: This procedure “de-fragments” track data on your hard drive. If you repeatedly
edit or re-record on single track or multiple tracks, the hard drive can become fragmented and
valuable drive space can be lost. Errors can occur in playback if the data is fragmented – use this
procedure whenever you overwrite record or do extensive editing to tracks! To perform Optimize
Track, you’ll first need to set the IN and OUT times…
TRACK> EditTrack> Optimize> OK> select track(s)> Exec> Yes> OK
ExpCmp Track: With this function, audio data can be expanded or compressed (time stretched)
to fit into a specific region. You can also use ExpCmp to match the tempos of different drum loops.
You set a range determined by the IN and OUT times, as well as setting specific TO and END times.
This way the original audio data is left untouched, and the results of the expansion or compression
procedures are processed to the destination track(s). In addition, you can specify pitch conversion,
and expand or compress multiple tracks, repeatedly if needed.
TRACK> EditTrack> ExpCmpTrk> Mode> ExpCmpMode> Pitch>
select track(s) and times> Exec> Yes> OK
Copy Whole Track: This procedure lets you copy entire tracks (single or multiple) to a different
track. This includes the Virtual tracks; in fact, you can copy a selected track or Virtual track to
multiple Virtual tracks and perform editing to create multiple variations of the original tracks!
TRACK> EditTrack> CopyWhole> OK> select track(s) and Virtual tracks a-h> Exec> Yes> OK
Swap Whole Track: This function lets you exchange single or multiple track data – the entire track
Data with another track or tracks. Swapping tracks helps you to organize Virtual tracks –audio data that
resides across several Virtual tracks can be rearranged into “Virtual track a” etc. Another benefit to
this procedure is the ability to re-order the numbering of tracks. This means you can swap tracks
so that the same type of instruments will be located on the same track number.
TRACK> EditTrack> SwapWhole> OK> select track(s) and Virtual tracks a-h> Exec> Yes> OK
KORG D16 Guide
63
Note: For more information on Song and Track editing, see the D16 owner’s manual pages 36 and 38.
Additional D16 Owner’s Manual References: Syncing the D16 to a MIDI Sequencer 46 Recording MIDI Clock from and External Sequencer 41 Recording Tap Tempo 42 Initializing, Formatting an External Drive 47 Backing up and Restoring Data 49 Producing an Audio CD 62 Troubleshooting 103