Embed Size (px)
Citation preview
ENGLISH
Quick Start Guide
Contents About this manual . . . . . . . . . . . . . . . . . . . . 4Main Features . . . . . . . . . . . . . . . . . . . . . . . . 5Front Panel . . . . . . . . . . . . . . . . . . . . . . . . . . 6Rear Panel . . . . . . . . . . . . . . . . . . . . . . . . . . 11
Connections and power . . . . . . . . . . . . . . . . . 12
TouchView user interface . . . . . . . . . . . . 13Selecting modes. . . . . . . . . . . . . . . . . . . . . 14Playing sounds . . . . . . . . . . . . . . . . . . . . . . 16
Playing sounds in Set Lists . . . . . . . . . . . . . . . 16Playing Programs and Combinations . . . . . 17Using controllers to modify the sound. . . . 18Using KARMA. . . . . . . . . . . . . . . . . . . . . . . . . . . . 20Using the Drum Track. . . . . . . . . . . . . . . . . . . . 21
Using the sequencer . . . . . . . . . . . . . . . . . 22Recording MIDI and audio . . . . . . . . . . . . . . . 22Editing MIDI . . . . . . . . . . . . . . . . . . . . . . . . . . . . . 23Template Songs . . . . . . . . . . . . . . . . . . . . . . . . . 23
Saving and loading data . . . . . . . . . . . . . 24Saving your edits . . . . . . . . . . . . . . . . . . . . . . . . 24Saving to and loading from disk . . . . . . . . . . 24Listening to the demo songs . . . . . . . . . . . . . 27
Specifications (abbreviated) . . . . . . . . . 28

IMPORTANT SAFETY INSTRUCTIONS
• Read these instructions.• Keep these instructions.• Heed all warnings.• Follow all instructions.• Do not use this apparatus near water.• Mains powered apparatus shall not be exposed to dripping or splashing.
No objects filled with liquids, such as vases or drinking glasses, shall be placed on the apparatus.
• Clean only with dry cloth.• Do not block any ventilation openings. Install in accordance with the
manufacturer’s instructions.• Do not install near any heat sources such as radiators, heat registers,
stoves, or other apparatus (including amplifiers) that produce heat.• WARNING—This apparatus shall be connected to a mains socket
outlet with a protective earthing connection.• Do not defeat the safety purpose of the polarized or grounding-type
plug. A polarized plug has two blades with one wider than the other. A grounding type plug has two blades and a third grounding prong. The wide blade or the third prong are provided for your safety. If the provided plug does not fit into your outlet, consult an electrician for replacement of the obsolete outlet. (for USA and Canada)
• Protect the power cord from being walked on or pinched, particularly at plugs, convenience receptacles, and the point where they exit from the apparatus.
• Only use attachments/accessories specified by the manufacturer.• Unplug this apparatus during lightning storms or when unused for long
periods of time.• Turning off the power switch does not completely isolate this product
from the power line.• Keep the power plug easily accessible. Do not install this equipment far
from a power outlet and/or power strip.• Refer all servicing to qualified service personnel. Servicing is required
when the apparatus has been damaged in any way, such as power-supply cord or plug is damaged, liquid has been spilled or objects have fallen into the apparatus, the apparatus has been exposed to rain or moisture, does not operate normally, or has been dropped.
• Do not install this equipment in a confined space, such as a moving box or other enclosure.
• Excessive sound pressure from earphones and headphones can cause hearing loss.
• Use only with the cart, stand, tripod, bracket, or table specified by the manufacturer, or sold with the apparatus. When a cart is used, use caution when moving the cart/apparatus combination to avoid injury from tip-over.
En-2
The lightning flash with arrowhead symbol, within an equilateral triangle, is intended to alert the user to the presence of uninsulated “dangerous voltage” within the product’s enclosure that may be of sufficient magnitude to constitute a risk of electric shock to persons.
The exclamation point within an equilateral triangle is intended to alert the user to the presence of important operating and maintenance (servicing) instructions in the literature accompanying the product.
THE FCC REGULATION WARNING (for USA)This equipment has been tested and found to comply with the limits for a Class B digital device, pursuant to Part 15 of the FCC Rules. These limits are designed to provide reasonable protection against harmful interference in a residential installation. This equipment generates, uses, and can radiate radio frequency energy and, if not installed and used in accordance with the instructions, may cause harmful interference to radio communications. However, there is no guarantee that interference will not occur in a particular installation. If this equipment does cause harmful interference to radio or television reception, which can be determined by turning the equipment off and on, the user is encouraged to try to correct the interference by one or more of the following measures:• Reorient or relocate the receiving antenna.• Increase the separation between the equipment and receiver.• Connect the equipment into an outlet on a circuit different from that
to which the receiver is connected.• Consult the dealer or an experienced radio/TV technician for help.
Unauthorized changes or modification to this system can void the user’s authority to operate this equipment.
Notice regarding disposal (EU only)When this “crossed-out wheeled bin” symbol is displayed on the product, owner’s manual, battery, or battery package, it signifies that when you wish to dispose of this product, man-ual, package or battery you must do so in an approved man-ner. Do not discard this product, manual, package or battery along with ordinary household waste. Disposing in the cor-rect manner will prevent harm to human health and potential
damage to the environment. Since the correct method of disposal will depend on the applicable laws and regulations in your locality, please contact your local administrative body for details. If the battery con-tains heavy metals in excess of the regulated amount, a chemical sym-bol is displayed below the “crossed-out wheeled bin” symbol on the battery or battery package.

Handling of the internal disk drive• When this device is moved to a location where the
temperature is radically different, water droplets may condense on the internal disk drive. If the device is used in this condition, it may malfunction, so please allow several hours to pass before operating the device.
• Do not turn the power on and off repeatedly. This may damage the KRONOS.
• This device begins to access the internal disk drive immediately after the power is turned on.
• Never turn off the power while the internal disk drive is being accessed. Doing so can cause data on the disk to be lost, so that the next time the KRONOS is turned on, it may fail to start up normally.
Regarding the LCD screenThe KRONOS LCD screen is a precision device, and careful attention has been paid to its product quality. Although you may notice some of the issues listed below, please be aware that these are due to the characteristics of LCD screens, and are not malfunctions.• There may be pixels in the screen that are always dark
(unlit) or always bright (lit).• Depending on the displayed content, the brightness of the
screen may appear uneven.• Depending on the displayed content, horizontal stripes of
shading may be visible.• Depending on the displayed content, flickering or moire
patterns may be visible.
Data handlingIncorrect operation or malfunction may cause the contents of memory to be lost, so we recommend that you save important data on a CD or other media. Please be aware that Korg will accept no responsibility for any damages which may result from loss of data.Also, when digitally recording copyrighted audio material from a DAT or CD etc., you must obtain permission for use. Please be aware that Korg will accept no responsibility for any copyright violations which may occur through your use of this product.
COPYRIGHT WARNINGThis professional device is intended only for use with works for which you yourself own the copyright, for which you have received permission from the copyright holder to publicly perform, record, broadcast, sell, and duplicate, or in connection with activities which constitute “fair use” under copyright law. If you are not the copyright holder, have not received permission from the copyright holder, or have not engaged in fair use of the works, you may be violating copyright law, and may be liable for damages and penalties. If you are unsure about your rights to a work, please consult a copyright attorney. KORG TAKES NO RESPONSIBILITY FOR ANY INFRINGEMENT COMMITTED THROUGH USE OF KORG PRODUCTS.
* KARMA® (Kay Algorithmic Realtime Music Architecture) Technology has been licensed from Stephen Kay, and is pro‐tected by U.S. Patents 5,486,647, 5,521,327, 6,084,171, 6,087,578, 6,103,964, 6,121,532, 6,121,533, 6,326,538, 6,639,141, 7,169,997, and 7,342,166.
* KARMA® and the KARMA Logo are registered trademarks, and Kay Algorithmic Realtime Music Architecture, Generated Effect (GE), Melodic Repeat, Direct Index, Manual Advance, SmartScan, Freeze Randomize, Random Capture, Random FF/REW and Scene Matrix are trademarks of Stephen Kay, Karma‐Lab LLC. This manual copyright © 1994‐2010 by Korg Inc. and Stephen Kay. All rights reserved.
* Screen shots from the KARMA software that appear throughout this guide are © 1994‐2010 by Stephen Kay, Karma Lab LLC. Used by permission. All rights reserved.
* KARMA Technology can be located on the internet at: www.karma‐lab.com.
* This product was developed under license of physical model‐ling tone generator patents (http://www.sondius‐xg.com) owned by Stanford University USA and Yamaha Corporation.
* Linux is a trademark or registered trademark of Linus Torvalds in the United States and in other countries.
* All product names and company names are the trademarks or registered trademarks of their respective owners.
En-3

About this manual
En-4
Thank you for purchasing the Korg KRONOS. To help you get the most out of your new instrument, please read this manual carefully.
About this manual
The KRONOS includes four owner’s manuals: the Quick Start Guide, Operation Guide, Parameter Guide, and Voice Name List.All of these manuals are available as PDFs on Accessory Disc 2, and are included in the on‐board Help system. A printed version of the Quick Start Guide is also included.Quick Start GuidePlease read this first. It introduces all of the basic features of the KRONOS, and is designed to get you up and running quickly.
Operation GuidePut simply, the Operation Guide is designed to answer the question, “How do I do this?”It explains the names and functions of each part of the KRONOS, basic operation, an overview of each mode, how to edit sounds, how to record on the sequencer, and how to sample. This guide also explains the basics of KARMA, effects, Wave Sequences, Drum Kits, and the Drum Track.Finally, it also contains a troubleshooting guide and supplemental information such as specifications.
Parameter GuideThe Parameter Guide is designed to answer the question, “What does this do?”Organized by mode and page, the Parameter Guide includes information on each and every parameter in the KRONOS.
Voice Name ListThe Voice Name List lists all of the sounds and setups that are in the KRONOS when it is shipped from the factory, including Programs, Combinations, Multisamples, Drum Samples, Drum Kits, KARMA GEs, Wave Sequences, Drum Track Patterns, Template Songs, and Effect Presets.
PDF versionsThe KRONOS PDF manuals are designed for easy navigation and searching. They include extensive PDF contents information, which generally appears on the side of the window in your PDF reader and lets you jump quickly to a specific section. All cross‐references are hyper‐links, so that clicking on them automatically takes you to the source of the reference.
On-board Help system*The HELP button gives you built‐in, context‐sensitive access to the user manuals, right from the front panel. For information on any front‐panel button, knob, slider, or real‐time controller, just hold down HELP and then press the button or move the controller in question.For information on the current LCD page, press and release the HELP button.
While the help page is on the screen, you can touch any of the on‐screen links (highlighted in blue text) for more information. You can scroll through the text by using the on‐screen scroll bars, pressing the Inc and Dec buttons, or spinning the Value dial.The top of the Help page has “breadcrumb” links, which show the hierarchy of pages above the current one. Touch any of these links to jump to the corresponding page.The backwards and forwards buttons function like the similar buttons on a standard web browser. If you use links to jump between pages, you can then use the backwards and forwards buttons to move through the pages you’ve already viewed.The Contents page lets you access any part of the Help system, including almost all of the text and graphics in both the Parameter and Operation Guides. The Index contains a shorter list of links to important articles.To close the help display, just press the HELP button again, or press the on‐screen Done button.*Help is English‐language only.
Conventions in this manual
References to the KRONOSThe KRONOS is available in 88‐key, 73‐key, and 61‐key models. The manuals refer to all models without distinction as “the KRONOS.” The front panel and rear panel illustrations in the manual show the 61‐key model, but they apply identically to the other models.
Abbreviations for the manuals: OG, PG, VNLIn the documentation, references to the manuals are abbreviated as follows.OG: Operation GuidePG: Parameter GuideVNL: The Voice Name List
Symbols , , Note, TipsThese symbols respectively indicate a caution, a MIDI‐related explanation, a supplementary note, or a tip.
Example screen displaysThe parameter values shown in the example screens of this manual are only for explanatory purposes, and may not necessary match the values that appear in the LCD screen of your instrument.
MIDI-related explanationsCC# is an abbreviation for Control Change Number.In explanations of MIDI messages, numbers in square brackets [ ] indicate hexadecimal numbers.

nglish
Main Features
Main Features
EFrançais
Deu
tsch
Espa
ñol
Nine World-Class Synthesis EnginesThe KRONOS features nine completely different synthesis engines:• Three engines dedicated to the most important
traditional keyboard instruments: the SGX‐1 premium acoustic piano, EP‐1 MDS electric piano, and CX‐3 tonewheel organ.
• Three different virtual analog synths, each with tons of programmability and its own distinct sonic character: the AL‐1, MS‐20EX, and PolysixEX.
• A full‐featured sampling and Wave Sequencing synthesizer, the HD‐1.
• The STR‐1 physical modeling synth, for creating both traditional timbres and unique new sounds.
• The MOD‐7 VPM/waveshaping/PCM‐mangling powerhouse.
Each is worthy of a separate product in its own right, but the KRONOS brings them all together into a single, integrated musical instrument. There are no separate cards to manage or polyphony barriers between them—and no “CPU overs” to worry about.All of the synthesis engines share a common theme: superior sound quality. You’ll easily hear the sonic benefits of Korg’s proprietary HD‐1 low‐aliasing sample playback oscillators, patented low‐aliasing analog oscillators, full‐bandwidth resonant filters, and extraordinarily fast & smooth envelopes and LFOs.
Optimized for live performanceSmooth Sound Transitions (SST) provide overlapping effects and voices when you change sounds, with no special mode necessary.Set Lists provide easy on‐screen selection of Programs, Combinations, and Songs from a single screen. Set Lists also make it easy to rearrange sounds and save lyrics or notes, and provide a dedicated graphic EQ on the main outputs for adjusting to live acoustics.
EffectsThe KRONOS includes 185 different effects types, from choruses and delays to amp models, a vocoder, and much more. These aren’t just simple effects, either; there are up to 72 parameters per effect, and plenty of real‐time modulation. Effect Presets let you easily store and recall all of the settings for an individual effect.You can use up to 16 of these effects simultaneously, with 12 Insert Effects, 2 Master Effects (for reverb sends, for instance), and 2 Total Effects (for stereo bus processing). There are also 32 dedicated three‐band EQs—one for each MIDI and audio track. Finally, many of the synth engines feature specialized signal processing. The CX‐3, PolysixEX, and EP‐1 include dedicated effects, and you can process live audio through the AL‐1, MS‐20EX, STR‐1, and MOD‐7.
KARMAKARMA (Kay Algorithmic Music Architecture) is an astonishingly flexible interactive MIDI data generator. Much more than a simple arpeggiator, it combines many different algorithms into a powerful music generation engine, collaborating with you as you play.These include drum and instrument grooves, gated/chopped effects, complex controller gestures, musical phrase generation, arpeggiation, and much more. Sliders and switches let you reconfigure and modulate the algorithms in real‐time.
SamplingStereo sampling captures audio from any analog or digital input, as well as audio CDs (via a USB CDR/RW drive). You can also sample through effects, resample the output of the KRONOS itself, or import sounds in Akai, SoundFont 2.0, WAV, and AIFF formats.
Audio and MIDI sequencer16 MIDI tracks and 16 audio tracks (24‐bit, 48kHz) let you record directly on the KRONOS whenever inspiration strikes. You can import and export SMF and WAVE files when working with other platforms.The Drum Track provides built‐in drum grooves, fueled by the KRONOS’s high‐quality drum sounds.
Computer Interface and USB StorageUSB 2.0 audio and MIDI I/O provide a single‐cable connection to computer DAWs, and the KRONOS Editor software lets you edit sounds directly from your computer. You can download the most recent software and drivers from http://www.korg.com/kronos.Two USB 2.0 A‐type connectors are built‐in, making it easy to expand your storage via external hard disks, removable disks, flash media, and so on.
Superb Musical Interface Highlighted by a large color TouchView LCD display, the KRONOS features a vast array of assignable physical controllers—sliders, knobs, joysticks, ribbon, and switches—all designed to provide effortless, supremely musical control at your fingertips. The context‐sensitive online help system makes the manuals available right on the instrument’s display.The KRONOS 73‐key and 88‐key models features the RH3 (Real Weighted Hammer Action 3) keyboard, which replicates the touch of an acoustic grand piano with heavier action on the lower keys and lighter action in the higher ranges, responding to every nuance of your playing.
En-5

Front Panel
En-6
Front Panel
9. Vector Joystick
11. SW 1&2
12. Joystick
13. Ribbon
14. Headphone Jack
1. Volume 2. Control Surface 5. Mode
4. Disk Access Indicator
6. Utility 7. Bank Select
18. Sampling16. Sequencer15. Exit
17. Tempo
3. Data Entry
19. TouchViewDisplay
8. KARMA
10. Drum Track
1. VOLUME knob (MAIN/HEADPHONE)This adjusts the volume of the main L/R audio outputs, as well as the volume of the headphone jack.It does not affect any of the other outputs, including S/P DIF, individual outputs 1‐4, or the USB output.
2. Control SurfaceThe Control Surface is the set of 9 sliders, 8 knobs, and 16 switches to the left of the LCD screen. It looks like a mixer, but can do a variety of things such as editing sounds, controlling the KARMA function, and sending MIDI messages to external devices. You can freely change back and forth between the different functions without losing any of your edits. Names and values of the controls are shown on the Control Surface page.
CONTROL ASSIGN buttonsAs explained below, you can use the front panel CONTROL ASSIGN buttons to switch between the various control surface functions.
TIMBRE/TRACKTIMBRE/TRACK lets you use the control surface to adjust the volume, pan, EQ, and send levels for OSC 1/2 or EXi 1/2 in Program mode (plus similar controls for the Drum Track, with the exception of pan), the current Multisample in Sample mode, and each of the 16 Timbres or Tracks in Combi and Sequence modes. The LEDs to the right of the switch show whether you’re currently editing Timbres (or Tracks) 1‐8 or 9‐16; press the TIMBRE/TRACK button to toggle between the two.
AUDIOAUDIO lets you use the control surface to adjust the volume, play/mute status, solo, pan, and send levels of the analog, S/P DIF, and USB inputs. In Sequencer mode, you can also choose to control audio tracks 1–8 (HDR 1‐8) or 9–16 (HDR 9‐16).
EXTEXT (External) lets you use the control surface to transmit MIDI messages to external MIDI devices.
RT KNOBS/KARMART KNOBS/KARMA lets you modulate sounds and effects with the knobs, and control KARMA with the sliders and switches.
TONE ADJ/EQTONE ADJ (Tone Adjust) gives you hands‐on access to sound editing, using the sliders, knobs, and switches. In Combination and Sequence modes, it also lets you edit Programs within the context of the Combi or Song, without making any changes to the original Program data.EQ is available only in Set Lists. This is a nine‐band graphic EQ applied to the sound after TFX2, which tailors the sound from the main stereo outputs (including the analog L/R outputs, S/P DIF, and USB).
MIXER KNOBS buttonThis applies only when CONTROL ASSIGN is set to TIMBRE/TRACK or AUDIO. It toggles the knobs between controlling the pan of all channels or controlling the pan, EQ, and sends of the currently selected channel.
RESET CONTROLS buttonThis feature lets you reset the Vector Joystick to the center position, or reset any of the Control Surface sliders, knobs, or switches to their saved value.To reset a single control, hold down RESET CONTROLS and then move a Control Surface slider or knob, press one of the control surface buttons, or move the Vector Joystick.To reset all of the sliders, knobs, and switches of the current CONTROL ASSIGN mode at once, hold down RESET CONTROLS and then press the currently‐lit CONTROL ASSIGN button again.

English
Français
Deu
tsch
Espa
ñol
Front Panel
You can also reset all of the sliders and switches in the KARMA Module by holding RESET CONTROLS and then pressing the KARMA MODULE CONTROL button. Similarly, to reset a single KARMA Scene, hold RESET CONTROLS and press any of the SCENE buttons.Finally, you can clear all solos by holding RESET CONTROLS and then pressing the SOLO button.
SOLO buttonThis applies only when CONTROL ASSIGN is set to TIMBRE/TRACK or AUDIO. It toggles the SELECT buttons (the bottom row of 8) between selecting the current Oscillator, Timbre, Track, or Audio Input (when SOLO is off) or soloing the channel (when SOLO is on).
3. Data EntryWhen you’ve selected a parameter on the TouchView display, you can edit it using any of the four front‐panel data entry controls: the VALUE slider, the Inc
and Dec buttons, the VALUE dial, and the numeric keypad.
VALUE sliderUse this to edit the selected parameter’s value. This control is convenient for making large changes to the value, such as moving quickly to the minimum or maximum setting.In two special cases, the value slider sends MIDI CC #18 and can be used as a modulation source, and is not used for data entry:• On the Program mode P0‐Main page,
when the big Program name is selected, or• On the Combination mode P0– Prog Select/Mixer
page, when the big Combination name is selected.
Inc and Dec buttonsThese are used to increase or decrease the parameter value by individual steps. They’re convenient for making fine parameter adjustments.
VALUE dialUse this dial to edit the selected parameter’s value. This control is convenient when you want to scroll through a very long list of selections.
0-9, –, ., and ENTER buttonsThese buttons are convenient when you know the exact value that you want to enter. Use the 0–9, –, and decimal (.) buttons to enter the value, and then press the ENTER button to confirm the entry. The – button inverts the sign (+/–) of the parameter value; the decimal (.) button inserts a decimal, for entering fractional values.ENTER is also used for a number of shortcut commands, described throughout this guide. For instance, if a parameter specifies a note number or velocity, you can use ENTER to edit the value directly from the keyboard:1. Select a note number or velocity parameter.2. Hold down the ENTER key.
3. While holding ENTER, play a note on the keyboard.
4. DISK access indicatorThis LED lights up when data is being saved to or read from the internal drive.
Never turn off the power while this LED is lit. Doing so can cause all or part of the data on the disk to be lost, or may cause malfunctions such as disk damage.
5. MODE buttonsThe KRONOS is organized into seven different “modes,” each optimized for a different purpose: Set List, Program, Combination, Sequencer, Sampling, Global, and Disk. Each mode has a corresponding button on the front panel, with an LED to show which one is selected. For more information, see “Selecting modes” on page 14.
6. UTILITY buttons
HELP buttonThe HELP button gives you built‐in, context‐sensitive access to the user manuals, right from the front panel. For more information, see “On‐board Help system*” on page 4.
COMPARE buttonUse this button to compare the sound of the Program or Combination that you are currently editing with the saved, un‐edited version of the sound. You can also use this button to make “before and after” comparisons when recording or editing in Sequencer mode.
7. BANK SELECT buttonsUse these buttons to change banks when selecting Programs or Combinations. The LEDs in the buttons light up to show the current bank. There are fourteen bank buttons, in two groups: Internal (I‐A…G) and User (U‐A…G).
In Program mode, these buttons select the Program bank. They are active only on the Play pages. For details on the contents of the Program banks, see “Program Bank Contents” on page 18.In Combination mode, these buttons have two functions:• When you’re selecting Combinations, they choose
the Combination bank.
En-7
Front Panel
En-8
• When you’re assigning a Program to a timbre within the Combination, they select the Program bank.
In Sequencer mode, when a track’s Program name is selected, these buttons change the Program bank.
General MIDI banksSelecting General MIDI Program banks is a little different from selecting other banks. Each time you press the I‐G button, the bank will step to the next GM(2) bank or GM drum bank in the following order: G, g(1), g(2)–g(8), g(9), g(d), G, g(1), etc.
8. KARMA buttons
ON/OFF buttonThis turns KARMA on and off. As with the other KARMA buttons, the button’s LED will light up to show you that it is turned on.
LATCH buttonWhen LATCH is turned on, KARMA will continue to play even after you’ve stopped holding notes on the keyboard or MIDI In.This is convenient when you want to play on top of a KARMA‐generated groove, for instance.
MODULE CONTROL buttonIn Combi and Sequencer modes, KARMA has four independent Modules, each of which can generate a different musical effect. When used to control KARMA, the Control Surface sliders and switches are five layers deep: one for each Module (A‐D), and then a Master Layer which controls selected parameters from all of the Modules at once.The MODULE CONTROL button selects whether the KARMA Sliders, Switches, and Scenes will control either a single Module independently, or the Master Layer.Note that Modules A‐D can only be selected for Combinations and Songs. Programs use only a single Module, controlled by the Master Layer.
9. Vector JoystickThe Vector Joystick is a powerful real‐time controller. Depending on the particular Program, Combi, or Song, it may modulate Program or effects parameters, or adjust the volumes of different components of the sound.For more information on how Vector Synthesis works, see “Using Vector Synthesis” in the “Playing and editing Programs” chapter of the OG.
10. Drum TrackThe Drum Track is a built‐in drum machine, fueled by the KRONOS’s high‐quality drum sounds. This button turns the Drum Track on and off.Depending on various settings, the Drum Track may begin to play immediately, or may wait until you start to play on the keyboard. If the button’s LED is blinking on and off, it’s waiting for you to play.
LINKED LEDIf the front panel LINKED LED and KARMA ON/OFF switches are lit, KARMA will start and stop together with the Drum Track. For more information, see “Linking KARMA and the Drum Track” on page 21.
11. SW1 and SW2These on/off switches can perform a number of different functions, such as modulating sounds or locking the modulation values of the joystick, ribbon, or aftertouch. Each has an LED which lights up when the switch is on.Also, each one may work either as a toggle, or as a momentary switch. In toggle mode, each press alternates between on and off; in momentary mode, the switch only changes for as long as you hold it down.Each Program, Combination, and Song stores its own settings for what the switches will do, and whether each switch defaults to being on or off.
12. JoystickThe joystick moves in four directions: left, right, forwards (away from yourself), and backwards (towards yourself). Each of the four directions can be used to control different program or effects parameters. The specific assignments can change depending on the current Program, Combination, or Song. Generally, though, they will do something like the functions shown below:Standard Joystick functions
13. Ribbon controllerThe Ribbon controller lets you modulate Program or effects parameters by sliding your finger left and right along its touch‐sensitive strip.As with the other controllers, its specific function will change depending on the current Program, Combination, or Song.
14. Headphone jackThis stereo 1/4” headphone jack carries the same signal as the Main L/R outputs. The volume is controlled by the VOLUME knob.
Move the joystick…
Controller Name Normally controls…
Left JS–X Pitch bend down
Right JS+X Pitch bend up
Forwards (away from yourself )
JS+Y Vibrato
Backwards (towards yourself )
JS–Y Filter LFO (wah)

English
Français
Deu
tsch
Espa
ñol
Front Panel
15. EXIT buttonThis button makes it easy to return to the main page of the current mode:• Press it once to go to the previously‐selected tab on
the main P0 page.• Press it again to go to the first tab on the main P0
page.• Press it a third time to select the main parameter on
the P0 page, such as the Program name in Program mode.
Wherever you are in Program, Combi, or Sequencer modes, pressing EXIT three times (or fewer) will take you back to Program/Combination/Song Select, where you can immediately use the numeric keys or and
buttons to select a Program, Combination, or Song.When a dialog box is open, this button cancels the settings made in the dialog box and closes the dialog box, just like pressing the Cancel button. If a popup menu or page menu is open, pressing EXIT closes the menu.
16. SEQUENCER buttonsMost of the buttons in this section apply only to Sequencer mode and, in Disk and Sampling modes, to audio CD playback from a connected USB CD‐R/RW drive. REC/WRITE is the exception; it has special functions in Program, Combination, Set List and Global modes, as described below.
PAUSE buttonIn Sequencer mode, this button pauses the playback of the song. When paused, the button’s LED will light up. Press PAUSE once again to resume playback, and the LED will turn off.In Disk and Sampling modes, this button pauses audio CD playback.
<<REW buttonIn Sequencer mode, when the Song is playing or paused, this button will rewind the song. When you press and hold this button, its LED will light up, and the playback will rewind. (Rewind is disabled during recording, and while the Song is stopped.)In Disk and Sampling modes, this button rewinds the audio CD.
FF>> buttonIn Sequencer mode, when the Song is playing or paused, this button will fast‐forward the song. When you press and hold this button, the button will light,
and the playback will fast‐forward. (Fast‐forward is disabled during recording, and while the Song is stopped.)In Disk and Sampling modes, this button fast‐forwards the audio CD.
LOCATE buttonIn Sequencer mode, this button will advance or rewind the song to the specified locate point. This lets you jump immediately to any point in the current Song. The default locate point is the first beat of measure 1.To set the locate point to the current position, hold down ENTER and then press LOCATE. You can also set the Locate point via the on‐screen menu.
REC/WRITE buttonIn Sequencer mode, pressing this button puts the system in record‐ready mode. Once you’re in record‐ready mode (shown by the button’s lit LED), you can begin recording by pressing the SEQUENCER START/STOP button. REC/WRITE also provides two very handy shortcuts. For more information, see “Auto Song Setup” on page 22, and “Shortcut: Update via SEQUENCER REC/WRITE” on page 24.
START/STOP buttonThis starts or stops recording and playback in Sequencer mode. In Disk and Sampling modes, this button starts and stops playback on audio CDs.
17. TEMPO controls
TEMPO knobThis knob adjusts the tempo for the KRONOS as a whole, including Songs, KARMA, the Drum Track, Tempo‐synced LFOs and BPM delays, and EXi Step Sequencers. The LED will blink at quarter‐note intervals of the current tempo.Note: If the GLOBAL MIDI page MIDI CLOCK parameter is set to External MIDI or USB, or if it is set to Auto and a clock is currently being received, then neither the TEMPO Knob nor the TAP TEMPO button will have any effect.
TAP TEMPO buttonThis button lets you enter tempos simply by tapping your finger on the button. Two taps are enough to change the tempo; for greater accuracy, tap multiple times.Notice that the “q =” in the upper right of the LCD screen will change to show the new tempo. You can also enter tempos directly into this field using the data entry controls, such as the numeric keypad.Note: You can also tap tempos using a foot switch. For more information, see “Foot Switch Assignments” in the Appendix of the PG.
En-9
Front Panel
En-1
18. SAMPLING buttons
REC buttonIn Sampling, Program, Combination, and Sequencer modes, pressing this button puts the system in sampling‐ready mode. The button’s LED will light up.To continue, press the SAMPLING START/STOP button, as described below.Note: Program, Combination, and Sequencer modes all have an Audio Input/Sampling page, with various sampling‐related settings. These pages also have an Auto Sampling Setup menu command, with options to make various common settings in a single step.
START/STOP buttonIn Sampling, Program, Combination, and Sequencer modes, pressing this when the SAMPLING REC button is lit will do one of three things, depending on the setting of the Trigger parameter (on the Sampling mode Recording ‐ Audio Input page):• If Trigger is set to Sampling START SW, sampling
will begin immediately.• If Trigger is set to Note On, sampling will begin as
soon as you play a note on the keyboard.• If Trigger is set to Threshold, sampling will begin
as soon as the selected audio source reaches a preset volume level.
On the Sample Edit page in Sampling mode, pressing this button will play the selected range of the current sample.Also, whenever you’re viewing a list of files on disk, you can press this button to play 44.1kHz or 48kHz WAVE files directly from disk.
19. TouchView displayThe KRONOS features Korg’s exclusive TouchView graphic interface, based on a touch‐panel LCD screen.By touching items on the LCD screen, you can navigate between pages, set parameter values via on‐screen menus and buttons, execute commands, and so on. For more information, see “TouchView user interface” on page 13.
0

English
Rear Panel
Rear Panel
2. Power Switch 5. AnalogAudio Outputs
4. AnalogAudio Inputs
3. USB
8. Pedals6. MIDI1. AC Powerconnector
7. S/PDIFIn & Out
Français
Deu
tsch
Espa
ñol
1. AC Power connectorConnect the included power cable here.We recommend that you first connect the power cable to the KRONOS, and then connect the other end of the cable to an AC outlet.
2. POWER switchThis switch turns the power on and off. Before turning KRONOS off, make sure that you’ve saved any edits to your Programs, Combis, Songs, or other user data.
After turning the power off, please wait for at least ten seconds before you turn the power on again.
3. USB 2.0 A & B portsThere are two high‐speed USB A ports, for connecting storage media such as hard disks, CD‐R drives, and flash media.The high‐speed USB B port lets you connect to a Mac or Windows PC, for sending and receiving MIDI and audio, and for connecting to the computer editor program.
4. Analog AUDIO INPUTSYou can use the audio inputs for recording, sampling, and real‐time mixing through the built‐in effects.
Mic/Line Inputs 1 and 2The inputs use balanced 1/4” TRS connectors, and can accept either microphone‐level or line‐level signals. Each of the two inputs has an identical set of controls, as described below.
MIC/LINE switchesThese set the input’s nominal signal level. Set these switches according to the type of device that you’re connecting, and then use the LEVEL knobs (described below) to optimize the gain.Use the LINE setting (switch pressed in) when connecting to mixers, computer audio systems, signal processors, electric guitars, or other synthesizers. The nominal level is +4dBu, with 12dB of headroom.Note: Guitars and basses with active pickups can be connected directly. Passive pickups can also be used, but the impedance mismatch will cause both a change in tone and a reduction in volume. For best results, route such guitars through a pre‐amp or effects unit before connecting them.
Use the MIC setting (switch in out position) only when connecting a microphone. Note that some microphones, such as condensers, may require external phantom power, which is not supplied by the KRONOS. In this case, use an external mic preamp, and then connect the preamp to the KRONOS.
LEVEL knobsThese knobs let you make more precise adjustments to the input level, after setting the basic levels with the MIC/LINE switches.The MIN setting is unity gain; the MAX setting provides about 40dB of gain above unity.
5. Analog AUDIO OUTPUTSAll of the analog audio outputs use balanced TRS 1/4” connectors, and are referenced to a +4dBu signal level.
(MAIN) L/MONO, RThese are the main stereo outputs; their volume is controlled by the VOLUME knob. All of the factory Programs and Combis are programmed to play through these outputs.If no cable is connected to the R output, L/MONO will carry a mono summation of the stereo signal. Use this when connecting to a device (such as a keyboard amp) which has only a mono input.
(INDIVIDUAL) 1…4These 4 additional audio outputs let you isolate sounds, audio inputs, or audio tracks for recording or complex live sound setups. For more information, see “Effects selection and routing” in the “Using Effects” chapter of the OG. Note that these outputs are not affected by the VOLUME knob.
6. MIDIMIDI lets you connect KRONOS to computers or other MIDI devices, for sending and receiving notes, controller gestures, sound settings, and so on.
7. S/P DIF IN & OUTThese jacks provide 24‐bit optical S/P DIF input and output. Make sure to use optical cables desig1ned for digital audio.Whenever you use digital audio connections, make sure that all connected systems are set so that there is one and only one word clock master. Set the KRONOS word clock using the System Clock parameter on the Global P0: Basic Setup page.
En-11
Rear Panel
En-1
8. Pedals
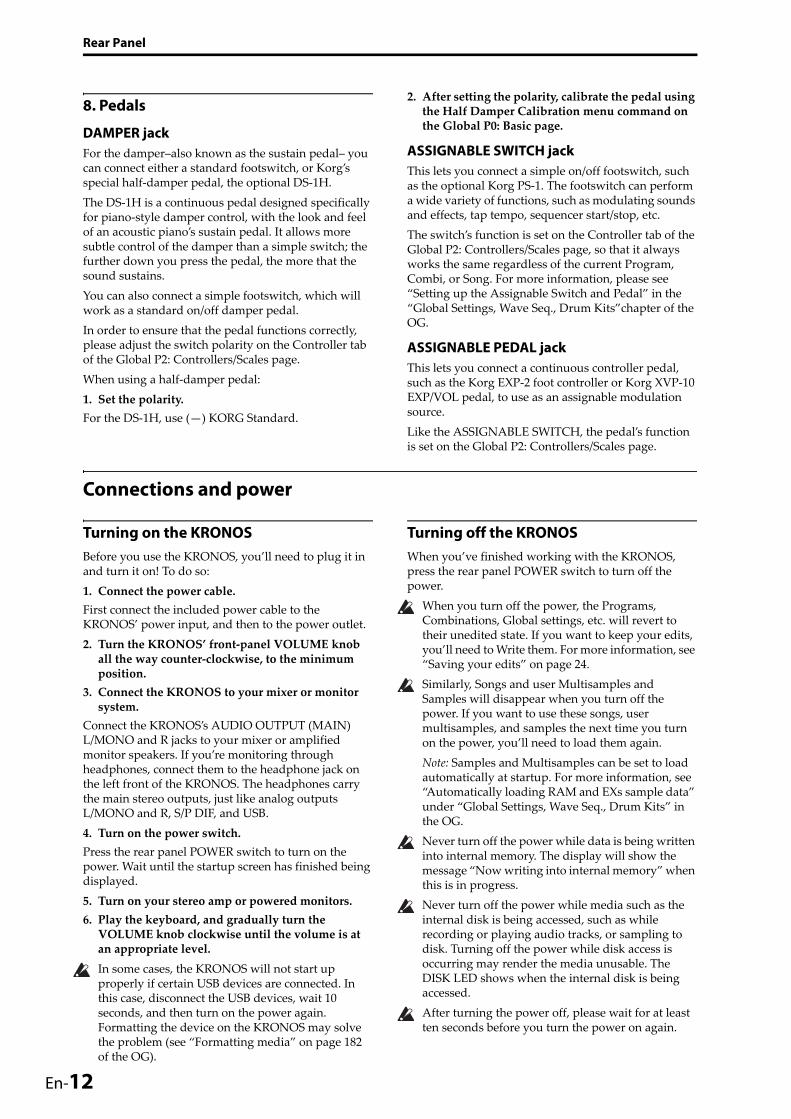
DAMPER jackFor the damper–also known as the sustain pedal– you can connect either a standard footswitch, or Korg’s special half‐damper pedal, the optional DS‐1H.The DS‐1H is a continuous pedal designed specifically for piano‐style damper control, with the look and feel of an acoustic piano’s sustain pedal. It allows more subtle control of the damper than a simple switch; the further down you press the pedal, the more that the sound sustains.You can also connect a simple footswitch, which will work as a standard on/off damper pedal.In order to ensure that the pedal functions correctly, please adjust the switch polarity on the Controller tab of the Global P2: Controllers/Scales page. When using a half‐damper pedal:1. Set the polarity.For the DS‐1H, use (—) KORG Standard.
2
2. After setting the polarity, calibrate the pedal using the Half Damper Calibration menu command on the Global P0: Basic page.
ASSIGNABLE SWITCH jackThis lets you connect a simple on/off footswitch, such as the optional Korg PS‐1. The footswitch can perform a wide variety of functions, such as modulating sounds and effects, tap tempo, sequencer start/stop, etc.The switch’s function is set on the Controller tab of the Global P2: Controllers/Scales page, so that it always works the same regardless of the current Program, Combi, or Song. For more information, please see “Setting up the Assignable Switch and Pedal” in the “Global Settings, Wave Seq., Drum Kits”chapter of the OG.
ASSIGNABLE PEDAL jackThis lets you connect a continuous controller pedal, such as the Korg EXP‐2 foot controller or Korg XVP‐10 EXP/VOL pedal, to use as an assignable modulation source.Like the ASSIGNABLE SWITCH, the pedal’s function is set on the Global P2: Controllers/Scales page.
Connections and power
Turning on the KRONOSBefore you use the KRONOS, you’ll need to plug it in and turn it on! To do so:1. Connect the power cable.First connect the included power cable to the KRONOS’ power input, and then to the power outlet.2. Turn the KRONOS’ front‐panel VOLUME knob all the way counter‐clockwise, to the minimum position.
3. Connect the KRONOS to your mixer or monitor system.
Connect the KRONOS’s AUDIO OUTPUT (MAIN) L/MONO and R jacks to your mixer or amplified monitor speakers. If you’re monitoring through headphones, connect them to the headphone jack on the left front of the KRONOS. The headphones carry the main stereo outputs, just like analog outputs L/MONO and R, S/P DIF, and USB.4. Turn on the power switch.Press the rear panel POWER switch to turn on the power. Wait until the startup screen has finished being displayed.5. Turn on your stereo amp or powered monitors.6. Play the keyboard, and gradually turn the VOLUME knob clockwise until the volume is at an appropriate level.In some cases, the KRONOS will not start up properly if certain USB devices are connected. In this case, disconnect the USB devices, wait 10 seconds, and then turn on the power again. Formatting the device on the KRONOS may solve the problem (see “Formatting media” on page 182 of the OG).
Turning off the KRONOSWhen you’ve finished working with the KRONOS, press the rear panel POWER switch to turn off the power.
When you turn off the power, the Programs, Combinations, Global settings, etc. will revert to their unedited state. If you want to keep your edits, you’ll need to Write them. For more information, see “Saving your edits” on page 24.Similarly, Songs and user Multisamples and Samples will disappear when you turn off the power. If you want to use these songs, user multisamples, and samples the next time you turn on the power, you’ll need to load them again. Note: Samples and Multisamples can be set to load automatically at startup. For more information, see “Automatically loading RAM and EXs sample data” under “Global Settings, Wave Seq., Drum Kits” in the OG.Never turn off the power while data is being written into internal memory. The display will show the message “Now writing into internal memory” when this is in progress.Never turn off the power while media such as the internal disk is being accessed, such as while recording or playing audio tracks, or sampling to disk. Turning off the power while disk access is occurring may render the media unusable. The DISK LED shows when the internal disk is being accessed. After turning the power off, please wait for at least ten seconds before you turn the power on again.

English
Français
Deu
tsch
TouchView user interface
TouchView user interface
The KRONOS uses Korg’s TouchView graphical user
h: Page group tab
e: Knob
f: Slider
g: Page tab
a: Current page
d: Edit cell
b: Category popup button
c: Popup button
i: Check box j: Page menu buttonMode name Page namePage group number and name
Espa
ñol
interface. By touching objects displayed in the LCD screen, you can select pages, set parameter values, enter text, connect virtual patch cables, and more.
Important - calibrate before using!Make sure to calibrate the touch‐screen before using, or when you change the angle of view (for instance, when you move between sitting and standing):1. Press the GLOBAL button to go to the GLOBAL P0:BASIC SETUP page.
2. Press the page menu button to open the menu, and select the Touch Panel Calibration command.
3. Follow the on‐screen instructions.For best results, calibrate using a stylus or fingernail, and press the exact centers of the calibration boxes.
a: Current pageFrom the left, the top of the display shows the current mode, the number and name of the page group, and finally the name of the individual page.
b: Category popup buttonWhen you press this button, a tabbed popup menu will appear, allowing you to select Programs, Combinations, or GEs organized by category.
c: Popup button & menuWhen this button is pressed, a popup menu will appear, showing a list of options. In some cases, these will be parameter values. In others, they may be lists of items, such as Multisamples or FX Presets. To enter a parameter value, touch the desired value.
PinMany popup menus have a “Pin” in the upper left. This controls what happens after you select a value. Touch the pin graphic to switch between open (unlocked) and closed (locked).When locked (pin closed), the popup menu will remain displayed even after you select a parameter value. To close the popup, either unlock the pin, or press EXIT.When unlocked (pin open), the popup menu will close immediately when you press a parameter value, or when you touch the screen outside the menu.
d: Edit cellWhen you touch a parameter in the LCD screen, the parameter or its value will usually be highlighted (displayed in inverse video). This is called the edit cell, and the highlighted item is now selected for editing.The parameter value of the edit cell can be modified using the VALUE controllers.
e & f: On-screen sliders and knobsTo modify the value of an on‐screen slider or knob, first touch the object, and then use the VALUE controllers to modify the value.
Pin
En-13
TouchView user interface
En-1
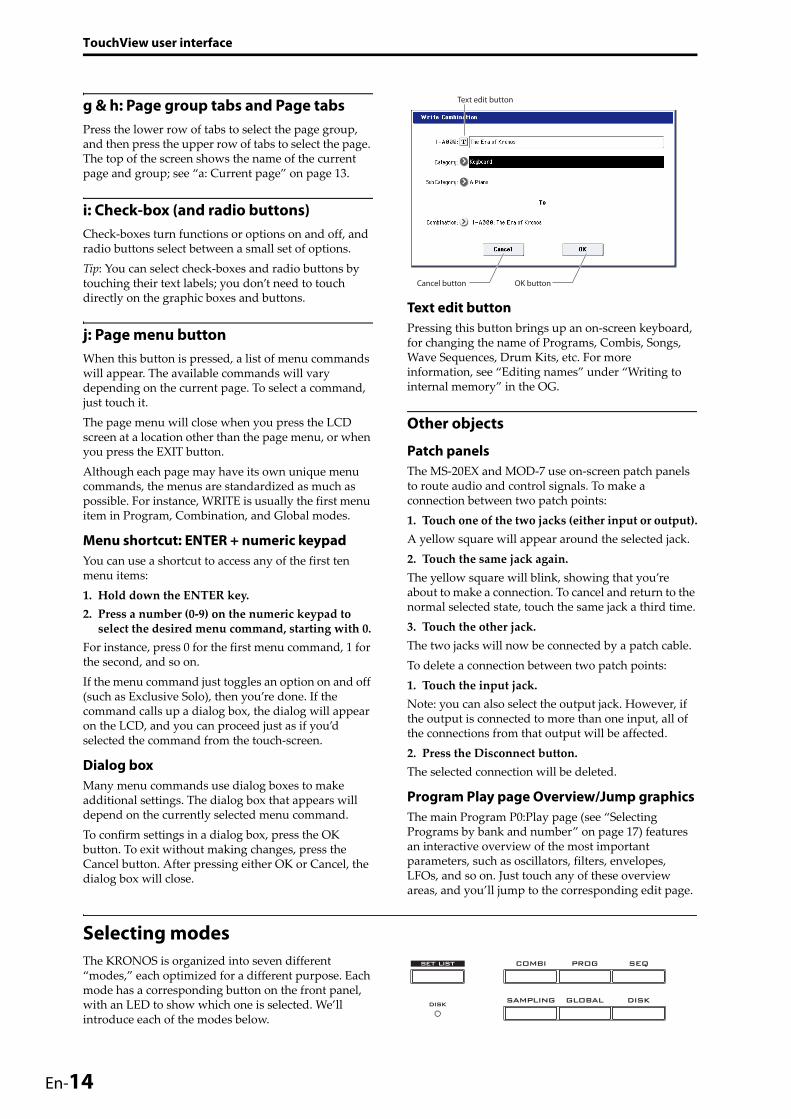
g & h: Page group tabs and Page tabsPress the lower row of tabs to select the page group, and then press the upper row of tabs to select the page. The top of the screen shows the name of the current page and group; see “a: Current page” on page 13.
i: Check-box (and radio buttons)Check‐boxes turn functions or options on and off, and radio buttons select between a small set of options. Tip: You can select check‐boxes and radio buttons by touching their text labels; you don’t need to touch directly on the graphic boxes and buttons.
j: Page menu buttonWhen this button is pressed, a list of menu commands will appear. The available commands will vary depending on the current page. To select a command, just touch it. The page menu will close when you press the LCD screen at a location other than the page menu, or when you press the EXIT button.Although each page may have its own unique menu commands, the menus are standardized as much as possible. For instance, WRITE is usually the first menu item in Program, Combination, and Global modes.
Menu shortcut: ENTER + numeric keypadYou can use a shortcut to access any of the first ten menu items:1. Hold down the ENTER key.2. Press a number (0‐9) on the numeric keypad to select the desired menu command, starting with 0.
For instance, press 0 for the first menu command, 1 for the second, and so on.If the menu command just toggles an option on and off (such as Exclusive Solo), then you’re done. If the command calls up a dialog box, the dialog will appear on the LCD, and you can proceed just as if you’d selected the command from the touch‐screen.
Dialog boxMany menu commands use dialog boxes to make additional settings. The dialog box that appears will depend on the currently selected menu command.To confirm settings in a dialog box, press the OK button. To exit without making changes, press the Cancel button. After pressing either OK or Cancel, the dialog box will close.
4
Text edit buttonPressing this button brings up an on‐screen keyboard, for changing the name of Programs, Combis, Songs, Wave Sequences, Drum Kits, etc. For more information, see “Editing names” under “Writing to internal memory” in the OG.
Other objects
Patch panelsThe MS‐20EX and MOD‐7 use on‐screen patch panels to route audio and control signals. To make a connection between two patch points:1. Touch one of the two jacks (either input or output).A yellow square will appear around the selected jack.2. Touch the same jack again.The yellow square will blink, showing that you’re about to make a connection. To cancel and return to the normal selected state, touch the same jack a third time.3. Touch the other jack.The two jacks will now be connected by a patch cable.To delete a connection between two patch points:1. Touch the input jack.Note: you can also select the output jack. However, if the output is connected to more than one input, all of the connections from that output will be affected.2. Press the Disconnect button.The selected connection will be deleted.
Program Play page Overview/Jump graphicsThe main Program P0:Play page (see “Selecting Programs by bank and number” on page 17) features an interactive overview of the most important parameters, such as oscillators, filters, envelopes, LFOs, and so on. Just touch any of these overview areas, and you’ll jump to the corresponding edit page.
Cancel button OK button
Text edit button
Selecting modes
The KRONOS is organized into seven different “modes,” each optimized for a different purpose. Each mode has a corresponding button on the front panel, with an LED to show which one is selected. We’ll introduce each of the modes below.
English
Français
Deu
tsch
Espa
ñol
TouchView user interface
Program modePrograms are the basic sounds of KRONOS. In Program mode, you can:• Select and play Programs• Edit Programs
Make detailed settings for oscillators, filters, amps, EGs, LFOs, effects, KARMA, vector synthesis, Drum Track, etc. The specific parameters will vary depending on the synthesis engine being used.
• Play and control one KARMA module• Sample external audio, or resample the sound of
the Program
Combination modeCombinations are sets of up to 16 Programs that can be played simultaneously, letting you create sounds more complex than a single Program. In Combination mode, you can:• Select and play Combinations• Use KRONOS as a 16‐channel multitimbral tone
generator• Edit Combinations
Assign Programs to each of the 16 Timbres, each with separate volume, pan, EQ, and keyboard and velocity zones; make settings for effects, vector synthesis, Drum Track, and KARMA.
• Control and play up to four KARMA modules• Sample or resample
Sequencer modeSequencer mode lets you record, play back, and edit 16 MIDI tracks and 16 audio tracks. You can:• Select and play Songs• Use KRONOS as a 16‐channel multitimbral tone
generator• Assign Programs to each of the 16 MIDI Tracks,
with separate volume, pan, EQ, and keyboard and velocity zones; make settings for effects, vector synthesis, Drum Track, and KARMA
• Edit MIDI data• Record up to 16 MIDI tracks and/or 4 audio tracks
simultaneously• Mix using automation• Control and play up to four KARMA modules• Sample or resample
Sample audio inputs during playback, and use In‐Track Sampling to automatically create a note event that triggers the sample in the Song.Resample an entire song, and then use Disk mode to create an audio CD.
• Record patterns and assign them to keys, using RPPR (Real‐time Pattern Play/Recording)
Set List modeSet Lists make it simple to play and organize any of the sounds loaded into the KRONOS, without regard for whether they’re Programs, Combinations, or even Songs. You can:• Use large on‐screen buttons for fast sound selection• Re‐order the sounds using cut, copy, and paste• Create sets of sounds for live performance,
recording projects, or keeping your favorites close at hand
Sampling modeSampling mode lets you record and edit user Samples and Multisamples. For example, you can:• Sample external audio sources, including sampling
through effects• Edit RAM Samples, set loop points etc.• Create and edit Multisamples, which consist of one
or more Samples spread out across the keyboard• Quickly convert Multisamples into Programs• Sample (“rip”) directly from an audio CD
Global modeGlobal mode lets you make overall settings for the entire KRONOS, and edit Wave Sequences and Drum Kits. For instance, you can:• Make settings that affect the entire KRONOS, such
as master tune and global MIDI channel• Set up sample (.KSC) auto‐loading at startup, and
manage sample data in memory• Create Drum Kits, Wave Sequences, and user scales• Rename Program, Combination, and KARMA GE
categories• Set up the assignable pedals and switches• Transmit MIDI System Exclusive data dumps
Disk modeDisk mode lets you save, load, and manage data using the internal SSD drive and external USB 2.0 storage devices. You can:• Save and load Programs, Combinations, Songs, Set
Lists, Drum Kits, Wave Sequences, Drum Track Patterns, KARMA User GEs, Samples, and Global setup data
• Format disks and storage media, copy and rename files, etc.
• Load AKAI, SoundFont 2.0, AIFF, and WAVE samples, and export RAM samples in AIFF or WAVE formats
• Export and import sequences to and from SMF (Standard MIDI Files)
• Save and load MIDI System Exclusive data for other devices
• Create and play back audio CDs
En-15
Playing sounds
En-1
Playing sounds
Playing sounds in Set Lists
OverviewSet Lists make it simple to play and organize any of the sounds loaded into the KRONOS, without regard for what bank they’re stored in or whether they’re Programs, Combinations, or even Songs.Large on‐screen buttons make sound selection fast and foolproof, and the Program Up or Down footswitch assignments can be used for hands‐free sound changes. Cut, copy, paste, and insert tools make re‐ordering a snap.
6
Smooth Sound Transitions (SST) let the previous sound and its effects ring out naturally, making it easy to change sounds during a live performance. SST is active in all of the KRONOS modes—not just in Set Lists.There are 128 Set Lists, and each Set List has 128 Slots, each of which can be assigned to any Program, Combination, or Song. One way of thinking about this is that a Set List is a “bank” of Slots.
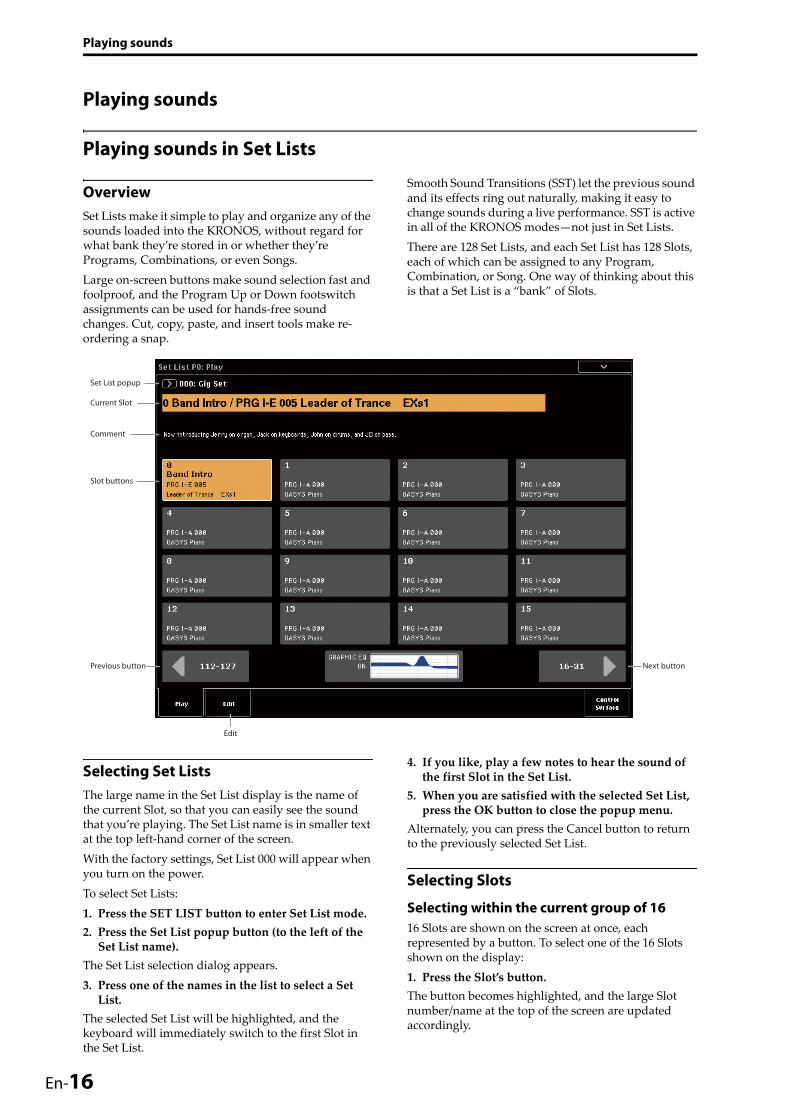
Set List popup
Slot buttons
Current Slot
Previous button
Comment
Next button
Edit
Selecting Set ListsThe large name in the Set List display is the name of the current Slot, so that you can easily see the sound that you’re playing. The Set List name is in smaller text at the top left‐hand corner of the screen.With the factory settings, Set List 000 will appear when you turn on the power.To select Set Lists:1. Press the SET LIST button to enter Set List mode.2. Press the Set List popup button (to the left of the Set List name).
The Set List selection dialog appears.3. Press one of the names in the list to select a Set List.
The selected Set List will be highlighted, and the keyboard will immediately switch to the first Slot in the Set List.
4. If you like, play a few notes to hear the sound of the first Slot in the Set List.
5. When you are satisfied with the selected Set List, press the OK button to close the popup menu.
Alternately, you can press the Cancel button to return to the previously selected Set List.
Selecting Slots
Selecting within the current group of 1616 Slots are shown on the screen at once, each represented by a button. To select one of the 16 Slots shown on the display:1. Press the Slot’s button.The button becomes highlighted, and the large Slot number/name at the top of the screen are updated accordingly.

English
Français
Deu
tsch
Espa
ñol
Playing sounds
Also notice that the comments area, above the Slot buttons, updates to show the contents for the selected Slot.
Selecting outside the current group of 16To select a new Slot outside of the current group of 16:1. Use the next and previous arrow‐buttons at the bottom of the screen to browse through the groups of 16.
The labels for next/previous will vary depending on the current group of 16; for instance, if the current group is 0‐15, the buttons will show 112‐127 and 16‐31, respectively.As you browse, the current selection does not change until you actually press one of the 16 buttons.NOTE: If you browse outside of the current Set List, any edits to the Set List will be lost. Be sure to write your edits first.2. When you see the desired Slot, press the Slot’s button.
The button becomes highlighted, and the comments and large Slot number/name at the top of the screen are updated accordingly.
Other ways to select Set Lists and SlotsYou can also select Set Lists and Slots using the front‐panel Inc/Dec buttons, the VALUE dial, or the numeric keypad, or step through Slots using the assignable footswitch. For more information, see “Selecting and playing sounds” in the “Set Lists” chapter of the OG.
Choosing a sound for a Slot1. Press the Edit tab to go to the Set List Edit page.2. Select the Slot that you’d like to edit.Notice the parameters which appear above the 16 Slot buttons. These let you set up the current Slot.3. At the top left of the parameter box, select the desired Type: Program, Combination, or Song.
Each Slot can play either a Program, a Combination, or a Song. When you change the Type, the Bank & Number and Category or Track parameters will update accordingly. Category appears for Programs and Combinations; Track appears for Songs.4. Using either the Bank & Number or Category popup menus, select the desired Program, Combination, or Song.
Note that you can use the same sound in multiple Slots within the same Set List. For instance, you might have a favorite piano sound which you use in a number of different songs. You can create any number of Slots which use this same piano sound, each with different names and comments.
Writing your editsWhen you’ve finished adding sounds, make sure to save your edits by writing the Set List:1. Select Write Set List from the page menu.The Write Set List dialog will appear.2. If you wish, edit the name by pressing on the “T” text edit button.
3. Optionally, use the Set List popup menu to write the Set List into a different number in memory.
4. Press OK to write the Set List, or Cancel to exit without writing.
For more information on the Write command, see “Saving your edits” on page 24.
Adding items to the Set List from other modesProgram, Combination, and Sequencer modes each have an Add to Set List command in their P0 page menus.When you use the Add to Set List command, the current Program, Combination, or Song is inserted at the current Slot of the current Set List, similar to using the Set List Edit page’s Insert command.
Playing Programs and Combinations
Selecting Programs by bank and numberPrograms are the basic sounds of the KRONOS.1. Press the front‐panel PROG button (the LED will light) to enter Program mode.
The upper left of the LCD screen shows the name of the current page, PROGRAM P0: Play. This is a good home base for playing Programs.Notice the large, highlighted characters in the upper part of the LCD display.These are the name and number of the current Program. When these are highlighted, you can press the / buttons to select the next or previously numbered Program.You can also turn the VALUE dial to move through the Programs in larger steps, or enter Program numbers directly from the numeric keypad.
2. Use the BANK SELECT I‐A…G and U‐A…G buttons to select Programs from other banks.
Press the I‐G switch repeatedly to cycle through banks GM, g(1)…g(9), and g(d).
En-17
Playing sounds
En-1
Selecting Programs by CategoryThere are other ways to select Programs, but here we’ll explain how to select programs by their category, such as keyboard, organ, bass, or drum sounds.For other ways to select Programs, see the “Playing and editing Programs” chapter of the OG.1. In the LCD screen, press the Category popup button.
See “b: Category popup button” on page 13.The Category popup menu will appear.2. Use the tabs at the left to select a category. The space on the right will then show all of the Programs in that category, in all of the internal banks.3. Optionally, press one of the inner tabs to select a sub‐category, to narrow the selection.
If any of the categories or sub‐categories can’t be selected, this means that no Programs have been assigned to that category.4. Select a Program from the list. You can either touch the name of a Program in the list, press the / buttons, or use the Value dial. You can play the highlighted Program from the keyboard without leaving the popup.5. If not all the items in the list can be shown in the screen, use the scroll bars to view the rest of the list.
6. When you’ve found a Program you like, press the OK button to close the dialog box. Then go ahead and play!
Make sure to try out all of the controllers, too. For more information, see “Using controllers to modify the sound” on page 18.
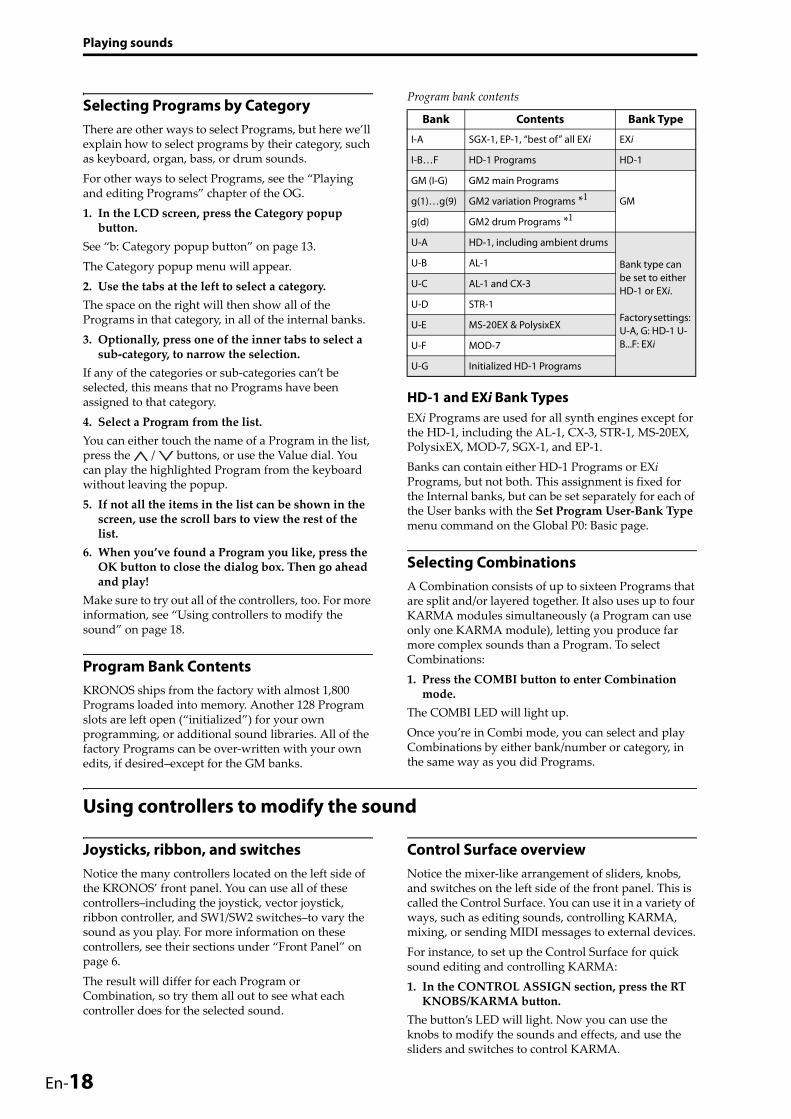
Program Bank ContentsKRONOS ships from the factory with almost 1,800 Programs loaded into memory. Another 128 Program slots are left open (“initialized”) for your own programming, or additional sound libraries. All of the factory Programs can be over‐written with your own edits, if desired–except for the GM banks.
8
Program bank contents
HD-1 and EXi Bank TypesEXi Programs are used for all synth engines except for the HD‐1, including the AL‐1, CX‐3, STR‐1, MS‐20EX, PolysixEX, MOD‐7, SGX‐1, and EP‐1.Banks can contain either HD‐1 Programs or EXi Programs, but not both. This assignment is fixed for the Internal banks, but can be set separately for each of the User banks with the Set Program User‐Bank Type menu command on the Global P0: Basic page.
Selecting CombinationsA Combination consists of up to sixteen Programs that are split and/or layered together. It also uses up to four KARMA modules simultaneously (a Program can use only one KARMA module), letting you produce far more complex sounds than a Program. To select Combinations:1. Press the COMBI button to enter Combination mode.
The COMBI LED will light up.Once you’re in Combi mode, you can select and play Combinations by either bank/number or category, in the same way as you did Programs.
Bank Contents Bank Type
I-A SGX-1, EP-1, “best of” all EXi EXi
I-B…F HD-1 Programs HD-1
GM (I-G) GM2 main Programs
GMg(1)…g(9) GM2 variation Programs *1
g(d) GM2 drum Programs *1
U-A HD-1, including ambient drums
Bank type can be set to either HD-1 or EXi.
Factory settings: U-A, G: HD-1 U-B...F: EXi
U-B AL-1
U-C AL-1 and CX-3
U-D STR-1
U-E MS-20EX & PolysixEX
U-F MOD-7
U-G Initialized HD-1 Programs
Using controllers to modify the sound
Joysticks, ribbon, and switchesNotice the many controllers located on the left side of the KRONOS’ front panel. You can use all of these controllers–including the joystick, vector joystick, ribbon controller, and SW1/SW2 switches–to vary the sound as you play. For more information on these controllers, see their sections under “Front Panel” on page 6.The result will differ for each Program or Combination, so try them all out to see what each controller does for the selected sound.
Control Surface overviewNotice the mixer‐like arrangement of sliders, knobs, and switches on the left side of the front panel. This is called the Control Surface. You can use it in a variety of ways, such as editing sounds, controlling KARMA, mixing, or sending MIDI messages to external devices.For instance, to set up the Control Surface for quick sound editing and controlling KARMA:1. In the CONTROL ASSIGN section, press the RT KNOBS/KARMA button.
The button’s LED will light. Now you can use the knobs to modify the sounds and effects, and use the sliders and switches to control KARMA.
English
Français
Deu
tsch
Espa
ñol
Playing sounds
You can use these controls regardless of the page shown on the LCD display. However, there is a page which provides more information about the Control Surface assignments and values.2. Go to the P0: Control Surface page by pressing the Control Surface tab, located in the lower right of the LCD screen.
This page shows all of the Control Surface sliders, knobs, and switches, along with their current assignments and values. When you move a controller, the corresponding object in the LCD screen will also move.
Using knobs to vary the timbreWhen the RT KNOBS/KARMA button is lit, the eight knobs at the top of the Control Surface modulate various aspects of the sounds and effects.Knobs 1‐4 have dedicated functions, as printed on the front panel: Filter Cutoff, Filter Resonance, Filter EG Intensity, and Release Time.Knobs 5‐8 can be assigned to a wide variety of functions. Often (though not always), knobs 5 and 6 modulate synthesis parameters, knob 7 controls the depth of a chorus or other modulation effect, and knob 8 controls reverb depth.For a detailed tutorial, see “Editing sounds & effects with the Realtime Knobs” in the OG, under “Quick edits using the knobs, sliders, and switches.”
Using Tone AdjustTone Adjust lets you use all of the sliders, knobs, and switches on the Control Surface to edit Program parameters, like the knobs and sliders on an analog synth. Each physical control can be assigned to any one of a number of Program parameters. The specific parameters available through Tone Adjust will vary depending on the type of Program. HD‐1 Programs support a certain set of parameters; each EXi also has its own set of parameters. The PolysixEX works particularly well with Tone Adjust, so let’s take a look at it now.1. In Program mode, press the button for Bank I‐A.2. Select Program I‐A074 Phunky Power Bass.This uses the PolysixEX.3. Under CONTROL ASSIGN, press the TONE ADJ/EQ button.
4. Play the keyboard while moving sliders 1‐4 and knobs 1‐2.
Notice as the knob graphics on the display move as well. Sliders 1‐4 control the envelope shape; knobs 1‐2 control the filter cutoff and resonance.5. On the display, press the Control Surface tab.This page shows the assignments and values for all of the sliders, knobs, and switches. 6. Press the Main tab to return to the main Play page.7. Touch the PolysixEX graphic around the Cutoff and Resonance knobs.
The display jumps to the main PolysixEX page.
8. Experiment with playing while using the Control Surface sliders, knobs, and switches.
Notice how the graphics respond, as well. You can also select a graphic control on the screen and edit its value using any of the data entry controls.
Restoring the sound to its original stateWhen you’re editing a Program, you can compare back and forth between the edited and saved versions.1. Press the front‐panel COMPARE switch.The COMPARE LED will light, and the Program’s saved settings will be recalled.2. Press the COMPARE switch again, to return to the edited settings.
The COMPARE LED will go dark, and the sound will return to the edited version. You can switch back and forth as many times as you like.
Resetting individual controllersYou can also reset individual controllers to their saved values, such as the vector joystick or any control surface slider, knob, or switch. To do so:1. Hold down the front‐panel RESET CONTROLS switch.
2. While holding down the switch, move or press the control that you’d like to reset.
3. Release the RESET CONTROLS switch.The controller will be reset.
En-19

Playing sounds
En-2
Using KARMA
Turning KARMA on and offTo turn KARMA on and off:1. Press the KARMA ON/OFF switch, so that the LED is lit.
When the LED is lit, KARMA is on.2. Press a key, and KARMA will begin to play.(Note that in some sounds, KARMA may be set to respond only to notes played in a specific keyboard range.)Note the front‐panel LATCH switch. This switch controls whether or not KARMA continues to play after you remove your hand from the keyboard.If the LED is lit, Latch is on. KARMA will continue to play even after you remove your hand from the keyboard. If the LED is dark, Latch is off; KARMA will stop when you remove your hand from the keyboard.
Link to Drum TrackIf the front panel LINKED LED and KARMA ON/OFF switches are lit, KARMA will start and stop together with the Drum Track. Importantly, KARMA will not start if the Drum Track is not turned on. For more information, see “Linking KARMA and the Drum Track” on page 21.
Using the KARMA controllersAll factory sounds are set up for use with KARMA. Some are stored with KARMA on by default, and others are stored with KARMA off, as shown by the LED on the KARMA ON/OFF switch. 1. Press the PROG button to enter Program mode.2. Select a sound that you like, and press the KARMA ON/OFF button to turn on KARMA.
The button will light up.3. Press the RT KNOBS/KARMA button under CONTROL ASSIGN.
When this button is lit, the Control Surface sliders and switches will control KARMA.4. Go to the Control Surface page.This shows all of the assignments and current values for the sliders, knobs, and buttons.The sliders and the lower row of buttons are the KARMA Sliders and Switches. These control parameters within KARMA, which will vary depending on the Program.The upper row of buttons select KARMA Scenes, which store values for the KARMA Sliders and Switches. 5. Press the upper row of buttons, one by one, to select different KARMA Scenes.
Notice how this also changes the KARMA SWITCH and KARMA SLIDER values, as shown in the display. You can move between entirely different settings of all these controls simply by pressing a KARMA SCENE switch.
0
Each scene independently remembers any edits that you make via the sliders and switches. Edits to all 8 scenes are stored when you write the Program.6. Move the sliders and press the bottom row of switches, and listen to the effect that they have on the sound.
The sliders and switches will control different things depending on the current Program and its KARMA settings.
Using KARMA in Combination modeKARMA uses “modules” to generate phrases or patterns. Programs can use a single KARMA module, but Combinations can use up to four simultaneously. Each module can play a separate sound (or group of sounds) if desired. Modules are routed to different sounds via the module’s MIDI input and output channels.1. Use the front panel MODULE CONTROL switch to select the module that you want to control.
Select MASTER to control all four KARMA modules simultaneously.Select A–D to control the individual KARMA modules.2. Move and press the KARMA sliders and switches.The sliders and switches will control the pattern or phrase generated by the selected module.
On-screen padsYou can use the on‐screen Pads to trigger chords for KARMA.1. Press the EQ/Vector/Control tab, and then select the Pads tab.
This takes you to the Pads page.2. Make sure that the on‐screen Enable Pad Play button is lit.
3. Touch the pads to play their chords.Dynamics are controlled by where you touch the pad; touch higher for louder, and lower for softer.

English
Playing sounds
Using the Drum Track
Français
Deu
tsch
Espa
ñol
Turning the Drum Track on and off1. Press the DRUM TRACK switch.Depending on various settings, the Drum Track may begin to play immediately, or may wait until you start to play on the keyboard. If the button’s LED is blinking on and off, it’s waiting for you to play.For more details on Drum Track start/stop and synchronization, see the chapter “Using the Drum Track”in the OG.
Selecting the Drum Track pattern & sound
Program modeIn Program mode, the Drum Track has a special reserved mixer slot and a dedicated Program select parameter. To set up the Drum Track in Program mode:1. Press the Basic/Vector tab, and then press the Drum Track tab.
The Drum Track page will appear. Note the Drum Pattern section, in the upper left of the display. The Pattern parameter has two popup menus. The one on the left selects between the Preset and User banks; the one on the right selects the pattern within the bank.2. Set the Bank and Pattern as desired.Note: If the selected pattern is an empty User pattern or Preset P000: Off, the DRUM TRACK button won’t turn on.Next, note the Drum Track Parameters section of the page (to the right of the Drum Pattern section). This area contains a few parameters for adjusting the basic sound of the Drum Track.3. Press the Program popup button.The Category/Program Select dialog appears. By default, the Drum category will already be selected.4. Select a drum Program for the Drum Track to play.You can actually select any sound, even outside of the Drum category—but in general, the patterns will only make sense when playing a drum Program.
Combination modeIn Combinations (and Songs), the Drum Track simply sends MIDI to play one or more of the 16 Timbres/Tracks.For more information, see “Drum Track settings in Combination mode”in the “Using the Drum Track”chapter of the OG.
Linking KARMA and the Drum TrackYou can link KARMA and the Drum Track so that they start and stop together. This is controlled by the Link to Drum Track check‐box on the KARMA Triggers page.1. Go to the Program P7: KARMA Module Parameters‐Trigger page.
2. In the Control section, enable the Link to Drum Track check‐box.
The front panel LINKED LED will light.3. Turn the KARMA ON/OFF switch on.When linked, KARMA will always wait for the Drum Track. So, unless the DRUM TRACK switch is on, KARMA won’t start yet.4. Turn the DRUM TRACK switch on.KARMA will start to play along with the Drum Track, according to the Drum Track’s Trigger Mode. For more details, please see “Using KARMA and the Drum Track together”in the “Using the Drum Track”chapter of the OG.
En-21

Using the sequencer
En-2
Using the sequencer
Recording MIDI and audio
Auto Song SetupThe Auto Song Setup feature copies the current Program or Combination into a Song, and then puts the system in record‐ready mode. When inspiration strikes, you can use this function to start recording immediately. To do so from Program mode:1. Hold down the ENTER key and press the SEQUENCER REC/WRITE key.
The Setup to Record dialog box will open and ask “Are you sure?”2. Press OK.The system switches to Sequencer mode, with record already enabled.3. Press the START/STOP key to start the sequencer and begin recording.
With the default settings, there will be a two measure count‐down before recording starts. 4. Play what you’d like to record, and then press START/STOP to stop recording.
The sequencer will automatically return to the beginning of the Song (beat 1 of measure 1, as shown in the upper right‐hand corner: 001 : 01 . 000).5. Press START/STOP to hear what you recorded.Since you started in Program mode, your playing will have been recorded on Track 1. If you used the Drum Track, it will have been recorded on Track 10. For Combinations, more tracks are used as needed.
Adding another MIDI track1. If KARMA was on, press the front‐panel KARMA button to turn it off.
2. Turn off the Multi REC check‐box, in the upper right of the display.
Auto Song Setup turns this on to record the Program’s Drum Track, or multiple channels in a Combination.
3. Below the Song name, open the Track Select popup and select MIDI Track 02.
This controls both the track that you play from the keyboard, and (with Multi REC turned off) the track that’s recorded.4. Using the Category or Bank/Program Select popup menus, select a Program for Track 02.
5. Press LOCATE to go back to the start of the Song.6. Press REC/WRITE to enable recording, and then press START/STOP to start.
Multi REC
Track Select
Bank/ProgramSelect Popup
CategorySelect Popup
2
7. Play what you’d like to record, and then press START/STOP when you’re done.
Adding an audio trackContinuing from above, let’s record an audio overdub.1. Connect a dynamic microphone, guitar, bass, other synth, etc. to AUDIO INPUT 1.
For more details on connecting different types of mics and guitars, see “MIC/LINE switches” on page 11.2. If you’re using a mic, set the input’s MIC/LINE switch to MIC; otherwise, set it to LINE.
3. Go to the Audio Track Mixer tab of the Sequencer P0: Play/Rec page.
4. Turn the Multi REC check‐box on again.In general, Multi REC is the best choice when recording audio.5. Press Track 1’s PLAY button once, so that it turns red and says REC.
Note that the Input is already set to 1 by default. Next, we need to set the level. 6. Press the Preference tab.This takes you to the Preference page, which includes a meter for the record‐enabled audio tracks.7. Keeping an eye on the meter, adjust the rear‐panel LEVEL knob until the level is high but not clipping.
Use the rear‐panel LEVEL knob, and not the on‐screen slider. If the signal clips, you’ll see the message “ADC OVERLOAD!” appear over the meter. 8. Press LOCATE to go back to the start of the Song.9. Press REC/WRITE to enable recording, and then press START/STOP to start.
10.Play what you’d like to record, and then press START/STOP when you’re done.
Un-saved audio filesWhen you record audio tracks, they’re initially stored in a folder named “TEMP” on the internal disk. If you then turn off the power before saving the Song, the Song will be lost, but the audio files will still be on the disk. The next time that you start up, you’ll see the following message:
There are un‐saved audio files from your previous recording session.Do you want to restore these files, or delete them from the disk?[Restore] [Delete]
Since the Song was not saved, all the track audio event data and region data is gone, but you can still restore the WAVE files and use them to create a new song.If you want to keep this data, press Restore. If you want to delete this data, press Delete.

English
Using the sequencer
Editing MIDI
Français
You can modify your performance after recording, if you wish. For instance, you can erase misplayed notes, or correct their pitch and timing.Timing correction is done through Quantization. This takes the notes you played and lines them up to the nearest beat or fraction of a beat, based on the resolution you select. It can also be used to add a “swing” feel. Let’s try quantizing the MIDI track we just recorded.1. Go to the Sequencer P4: Track Edit page.This page includes a graphic which shows each track in the sequence. The small rectangles represent measures which contain audio or MIDI data.2. Select MIDI Track 01 from the popup above the graphic.
Using the From Measure and To End of Measure parameters at the bottom of the display, set the range of measures that you wish to modify. For now, set From to 001, and To End to 064.
3. In the page menu, select the Quantize command.The Quantize dialog appears.4. Set the Resolution to the desired rhythmic value.As a general rule, choose the shortest note‐value used in the recorded performance.5. Press the OK button to quantize the selected data.If the result was different from what you had expected, press the COMPARE switch to restore the song to the original state before the quantization was applied. Experiment with different Resolutions, set Intensity to less than 100% in order to preserve some of the natural feel, or raise the Swing value to create a shuffle or swing feel.You can also apply quantization during recording, using the REC Resolution parameter at the top of the P0 page. Choose the desired resolution, and quantization will be applied as you record.For more information, see “Song editing” in the “Creating songs (Sequencer mode)” chapter of the OG.
sch
Template Songs
Deu
tEspa
ñol
Template Songs store pretty much everything in the Song except for the MIDI and audio data itself. This includes Program selections, track parameters, effects and KARMA settings, and the Song’s name and tempo. The factory preset Template Songs let you get up and running quickly with matched sets of sounds and effects for various styles of music. You can also create your own Template Songs with your favorite sounds and setups.Note that Template Songs do not include MIDI data for song tracks and patterns, audio data, and so on. While loading a Template Song, you can also optionally load one or more Drum patterns to a specified Track.1. In the Sequencer P0: Play/REC page, press the page menu button and select the Load Template Song command.
A dialog box will appear.
2. In the From field, choose the Template Song you want to load.
3. Check the “Copy Pattern to MIDI Track too?” check‐box.
When this box is checked, a dialog box for copying a pattern will automatically appear after Load Template Song is complete.If this is not checked, only the selected Template Song will be loaded.
4. Press the OK button to load the template song, or press the Cancel button to exit without making changes.
When you press OK, the Template Song’s settings will be copied into the current Song.If Copy Pattern to MIDI Track too? was checked in step 3, the Copy Pattern To MIDI Track dialog box will appear.5. Use the Bank (User or Preset) and Pattern popups to select a pattern to copy.
6. In the To MIDI Track field, select the track to use for the pattern.
Note: In each of the eighteen preset Template Songs, track 1 is always assigned to a Drum Program. (In some cases, other tracks may also have Drum Programs.)7. In the Measure field, set the measure on which you’d like the pattern to start.
Following the names for each of the 697 preset patterns, the musical style and the name of the most suitable Drum Programs are partially displayed.By loading a Drum Program and the corresponding preset pattern, you can instantly set up a drum track to match the Template Song.8. To load the pattern, press the OK button.After the pattern is loaded, the Measure will count up automatically. You can then copy another pattern if desired. For instance, you can use different patterns one after the other to build up a song, with different patterns for verse, chorus, and bridge. After you’ve finished adding patterns, press the Exit button, and you’re done!
En-23

Saving and loading data
En-2
Saving and loading data
Saving your edits
Understanding Write and SaveThere are two ways to store your work on the KRONOS: Write and Save. You can use Write for Programs, Combinations, Set Lists, Wave Sequences, Drum Kits, and FX Presets—everything except for Songs, Samples, and Multisamples. Write stores into the internal memory, which persists even if you turn power off and on again.Save stores data to files on disk—either the internal drive or USB storage devices. You must use Save for Songs, Samples, and Multisamples. Save is also handy for all the other data types, though. For instance, you can easily Save the entire state of the KRONOS, including all user‐editable data, in a single step. Hundreds of these files will fit onto the internal drive. You can use this for backups, and for saving and recalling setups for particular projects, gigs, and so on.
Writing ProgramsTo write a Program to the internal memory:1. Select the Write Program command from the page menu, at the upper right‐hand corner of the screen.
You can also call up this menu command by holding ENTER and pressing 0 on the numeric keypad.This brings up a dialog box which allows you to save the Program. Optionally, you can also select a new location, change the Program’s name, and assign it to a sound category (such as keyboard, guitar, etc.).2. Press the “T” button to bring up the text edit dialog.
You can give the Program a descriptive name using the on‐screen keyboard.
4
3. After entering the name, press OK.The text edit window will disappear, returning you to the main Write dialog.4. Under “To” at the bottom of the dialog, press the popup button next to Program to bring up the save location dialog.
5. Select a location to save the edited Program.From the factory, bank U‐G is left blank for your own HD‐1 sounds. You can also overwrite any of the factory sounds, if you like, and easily load them back from disk later. Important: HD‐1 Programs can only be written to HD‐1 Banks, and EXi Programs can only be written to EXi Banks. For more information on the default Bank types, and on how to change them, please see “Program Bank Contents” on page 18.
6. After selecting the location, press OK.7. Press OK again to start the write process.8. If you’re sure you want to write to this location, press OK one more time.
After that, you’re done!
Saving edits to GM ProgramsYou can edit GM Programs, but you must then save them to a Bank other than I‐G; the GM Programs themselves cannot be over‐written.
Shortcut: Update via SEQUENCER REC/WRITEYou can also use the SEQUENCER REC/WRITE button to quickly update the current Program, using the existing name, bank, number, and category. To do so:1. Press the SEQUENCER REC/WRITE button.The Update Program dialog will appear.2. Press OK to write the program.
Saving to and loading from disk
Saving dataAnything that you create or edit in the KRONOS can be saved to disk. There are a number of file types for different types of data, but for now we’ll concentrate on the three main types: .PCG, ,.SNG, and .KSC files.PCG stands for “Program, Combination, and Global.” These files can also include Set Lists, Wave Sequences, Drum Kits, user Drum Track patterns, and user KARMA GEs. PCGs are variable in size; they may include only a single bank of Programs, for instance, or all 13 banks of all data types.SNG stands for “Song.” These files store all of the Songs from Sequencer mode.KSC stands for “Korg Sample Collection.” This is a list all of the RAM multisamples and samples in internal memory, along with all of the loaded EXs
Multisamples and Drum Samples. Note that this is just a list of which samples are loaded; the actual data is stored separately.You can store all of this data together in a single step.1. Press the front‐panel DISK button to enter Disk mode.
2. Press the File tab, and then the Save tab, to go to the Disk–Save page.
3. Optionally, Press Drive Select to select the drive to which to save.
The internal disk is the default. Unless you want to use an external USB device, you don’t need to select anything different.4. Select the directory in which you want to save the data.

English
Français
Deu
tsch
Espa
ñol
Saving and loading data
Press the Open button to move to a lower level, or press the Up button to move to an upper level.Depending on how you work, you may wish to create directories for different projects. To create a new directory, move to the level at which you want to create the directory, and use the Create Directory menu command on the Disk–Utility page.5. On the Disk–Save page, press the page menu button to open the page menu, and select the Save All command.
This command will save a set of .PCG, .SNG, and .KSC files all at once.A dialog box will appear.
6. Press the text edit button (“T”) and enter a name for the files.
All of the files will share the same name, with different suffixes to show the data type (.PCG, .SNG, .KSC).Note: If the Songs include audio tracks, the audio data will be saved as WAVE files. These are stored in a directory named after the .SNG plus “_A” (for Audio) at the end, in the same directory as the .SNG file itself.7. Press each Selection button to note the items being saved, such as the individual banks of Programs and Combinations.
You can choose to save only some of the data. This is handy, for instance, when saving a bank of sounds to share with other musicians. For now, however, let’s leave all of the boxes checked, so that all of the internal data is saved. 8. Press the OK button to Save the data to disk.When the save is complete, the system returns to the Save page, and the display will show the resulting file(s). The amount of time required will depend on the amount of data being saved.If there are User Multisamples and Samples in RAM, they will be saved to disk as .KMP and .KSF files, respectively. Directories for these files will be created automatically.NOTE: When saving Combinations, remember to also save the Programs it uses, as well as the Drum Kits and Wave Sequences used by the Programs. Similarly, when saving Programs, remember to save the Drum Kits and Wave Sequences used by the programs.
When you use Load PCG to load a .PCG file, the identically‐named .KSC file will also be loaded so that the correct multisamples/samples will correspond automatically.
Loading dataYou can load the entire contents of memory at once, including sound data (Programs, Combinations, etc.), Songs, and sample data. To do so:1. Press the DISK button to enter Disk mode.2. Press the File tab, and then the Load tab, to go to the Disk–Load page.
3. Optionally, Press Drive Select to select the drive from which to load.
The internal drive is the default. 4. Navigate to the directory that contains the file you want to load, and select the .SNG file.
Select a directory (shown as a folder icon) and press the Open button to move to a lower level, or press the Up button to move to a higher level.The selected .SNG file will be highlighted.
5. Press the red Load button at the bottom of the page.
(You can also use the Load Selected menu command.)A dialog box will appear, containing a number of options.6. Select the “Load [filename].PCG too” and “Load [filename].KSC too” check boxes.
When these boxes are checked, the system looks for .PCG and .KSC files with the same name as the main .SNG file.7. Set “.PCG Contents” to All.Optionally, you can load only some of the data from the .PCG file. 8. Use “Select .SNG Allocation” to specify how the Songs will be loaded, and whether or not existing Songs will be erased.
Append loads the Songs into the first free Song numbers following the song(s) which are already in memory.Clear will erase all songs from internal memory, and load the Songs into the exact numbers from which they were saved.
En-25
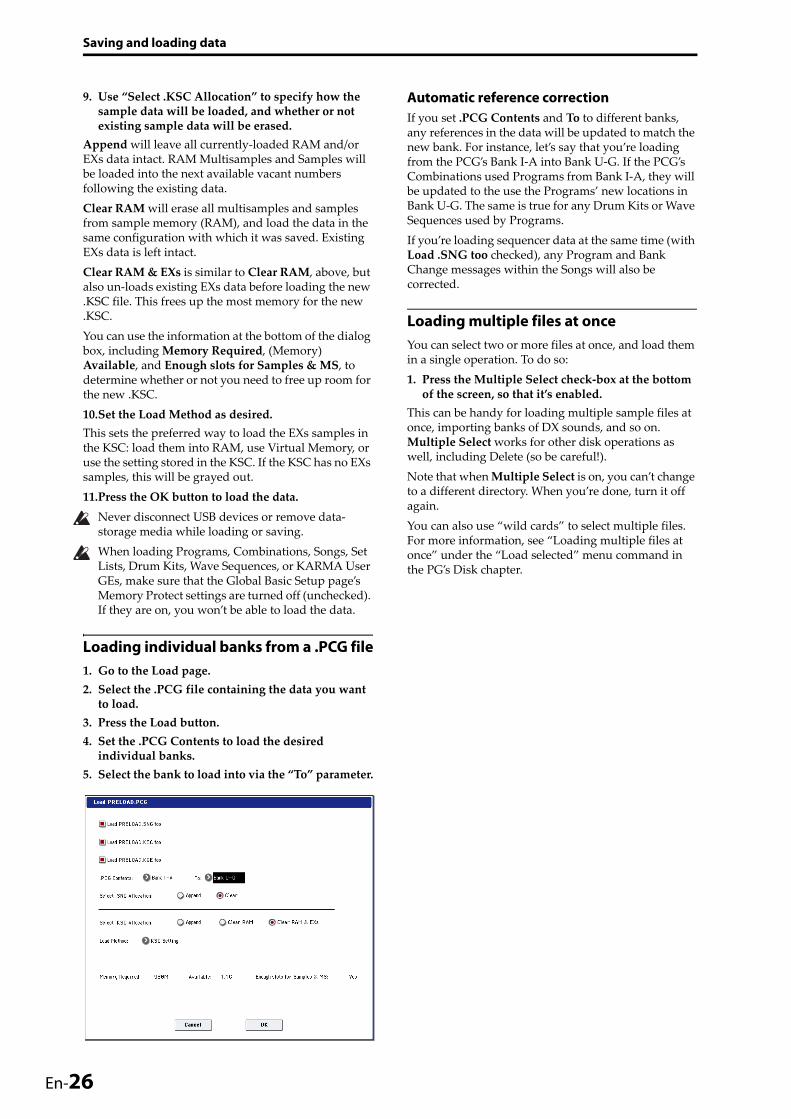
Saving and loading data
En-2
9. Use “Select .KSC Allocation” to specify how the sample data will be loaded, and whether or not existing sample data will be erased.
Append will leave all currently‐loaded RAM and/or EXs data intact. RAM Multisamples and Samples will be loaded into the next available vacant numbers following the existing data.Clear RAM will erase all multisamples and samples from sample memory (RAM), and load the data in the same configuration with which it was saved. Existing EXs data is left intact.Clear RAM & EXs is similar to Clear RAM, above, but also un‐loads existing EXs data before loading the new .KSC file. This frees up the most memory for the new .KSC.You can use the information at the bottom of the dialog box, including Memory Required, (Memory) Available, and Enough slots for Samples & MS, to determine whether or not you need to free up room for the new .KSC.10.Set the Load Method as desired.This sets the preferred way to load the EXs samples in the KSC: load them into RAM, use Virtual Memory, or use the setting stored in the KSC. If the KSC has no EXs samples, this will be grayed out.11.Press the OK button to load the data.
Never disconnect USB devices or remove data‐storage media while loading or saving.When loading Programs, Combinations, Songs, Set Lists, Drum Kits, Wave Sequences, or KARMA User GEs, make sure that the Global Basic Setup page’s Memory Protect settings are turned off (unchecked). If they are on, you won’t be able to load the data.
Loading individual banks from a .PCG file1. Go to the Load page.2. Select the .PCG file containing the data you want to load.
3. Press the Load button. 4. Set the .PCG Contents to load the desired individual banks.
5. Select the bank to load into via the “To” parameter.
6
Automatic reference correction If you set .PCG Contents and To to different banks, any references in the data will be updated to match the new bank. For instance, let’s say that you’re loading from the PCG’s Bank I‐A into Bank U‐G. If the PCG’s Combinations used Programs from Bank I‐A, they will be updated to the use the Programs’ new locations in Bank U‐G. The same is true for any Drum Kits or Wave Sequences used by Programs.If you’re loading sequencer data at the same time (with Load .SNG too checked), any Program and Bank Change messages within the Songs will also be corrected.
Loading multiple files at onceYou can select two or more files at once, and load them in a single operation. To do so:1. Press the Multiple Select check‐box at the bottom of the screen, so that it’s enabled.
This can be handy for loading multiple sample files at once, importing banks of DX sounds, and so on. Multiple Select works for other disk operations as well, including Delete (so be careful!).Note that when Multiple Select is on, you can’t change to a different directory. When you’re done, turn it off again.You can also use “wild cards” to select multiple files. For more information, see “Loading multiple files at once” under the “Load selected” menu command in the PG’s Disk chapter.

English
Saving and loading data
Listening to the demo songs
Français
Deu
tsch
Espa
ñol
Loading the demo songs1. Press the DISK button (the LED will light) to enter Disk mode.
2. If you’ve edited or created any new sounds or songs, save them before proceeding!Loading the demo songs will replace the contents of the internal memory, including Programs, Combinations, Songs, sample data, and so on. If you’ve made any edits, save them to the internal disk or a USB drive before you proceed.
3. Press the File tab and then the Load tab, to go to the Load page.
4. Make sure that “Drive Select” is set to HDD:INTERNAL HD.
The contents of the hard disk will appear.5. Touch the FACTORY directory to select it.6. Press the Open button to enter the directory.7. Touch the PRELOAD.SNG file to select it.This file contains the demo song, along with all of the sounds that it needs.
8. Press the Load button to open the dialog box.9. Select the “Load PRELOAD.PCG too” check box.With this option checked, the matching .PCG file will be loaded along with the .SNG file.10.Select the “Load PRELOAD.KSC too” check box.With this option checked, the matching .KSC file will be loaded as well.11.Set Select .SNG Allocation to Clear.12.Set .KSC Allocation to Clear RAM & EXs.13.Press the OK button to load the data.
Drive SelectFile tab Load tabPRELOAD.SNG
Load tab
Playing the demo songs1. Press the SEQ button (the LED will light) to enter Sequencer mode.
If you haven’t done anything with Sequencer mode since turning on the power, the P0: Play/REC– MIDI Track Prog Select/Mixer page will appear.
If this page is not displayed, press the EXIT switch several times. Although the exact number will depend on the page you’re in, pressing the EXIT switch no more than three times will always bring you back to this page.Let’s start by listening to song S000.2. Verify that song S000 is selected. If another song is selected, touch the song name to highlight it. Then press the numeric key 0, and then the ENTER switch.3. Press the SEQUENCER START/STOP switch.The LED will blink, and the song will begin playing back.4. If you want to stop playback mid‐way through the song, press the START/STOP switch once again.
Let’s listen to the next song.5. Select the song name by touching it on the display. 6. Press numeric key 1, and then press the ENTER switch.
This selects Song S001.Alternatively, you can press the Song Select popup (the round button located at the left of the song name), and a list of song names will appear. Select a song, and press the OK button.7. Press the SEQUENCER START/STOP switch to begin playback. To stop playback, press the same switch once again.
En-27

Specifications (abbreviated)
En-2
Specifications (abbreviated)
Operating conditions+5 – +35 °C (no condensation)Keyboard61‐note Natural Touch Semi‐weighted action with aftertouch, or 73‐ or 88‐note RH3 Real Weighted Hammer Action with aftertouch
PowerAC Power Supply terminal, POWER On/Off switch
Dimensions (W x D x H)61 Keys: 1052 x 362 x 134 (mm) / 41.42”× 14.25” × 5.28”73 Keys: 1243 x 411 x 145 (mm) / 48.94”× 16.18” × 5.71”88 Keys: 1455 x 411 x 145 (mm) / 57.28”× 16.18” × 5.71”
Weight61 Keys: 12.5 kg / 27.56 lbs73 Keys: 20.3 kg / 44.75 lbs88 Keys: 23.0 kg / 50.71 lbs
Power consumption60W
Included itemsAC cableKRONOS Quick Start GuideAccessory Discs including PDF manuals (Operation Guide, Parameter Guide, Voice Name List), Korg USB‐MIDI driver, and system restore data
OptionsXVP‐10 expression/volume pedal EXP‐2 foot controller DS‐1H damper pedal PS‐1 or PS‐3 pedal switch
8