Embed Size (px)
Citation preview
Judy Honaker PowerPoint Tutorial - 1 -
CONTENTS
1. Introduction
2. Starting PowerPoint
3. Creating A New Slideshow
4. Entering & Moving Text
5. Adding New Slides
6. Adding ClipArt
7. Saving Your Work
8. Views in PowerPoint
9. Adding Charts
10. Resizing Text
11. Stars and Banners
12. Viewing Your Slideshow
13. Animated Transitions
14. Animated Text
15. Sounds
16. Add Color
17. Backgrounds
18. Using Pictures from the Internet
19. Using Templates
20. Run the Show

Judy Honaker PowerPoint Tutorial - 2 -
1. Introduction
Microsoft Powerpoint, part of Microsoft Office, is a complete presentation graphics package. It gives you everything you need to produce a professional-looking presentation. PowerPoint offers word processing, outlining, drawing, graphing, and presentation management tools- all designed to be easy to use and learn. With it, you can create slide shows that incorporate sounds, graphics and animations as well as printed handouts and even web pages to present your information in exciting ways.
2. Starting PowerPoint
Lesson 1 Opening PowerPoint and Creating a New Presentation
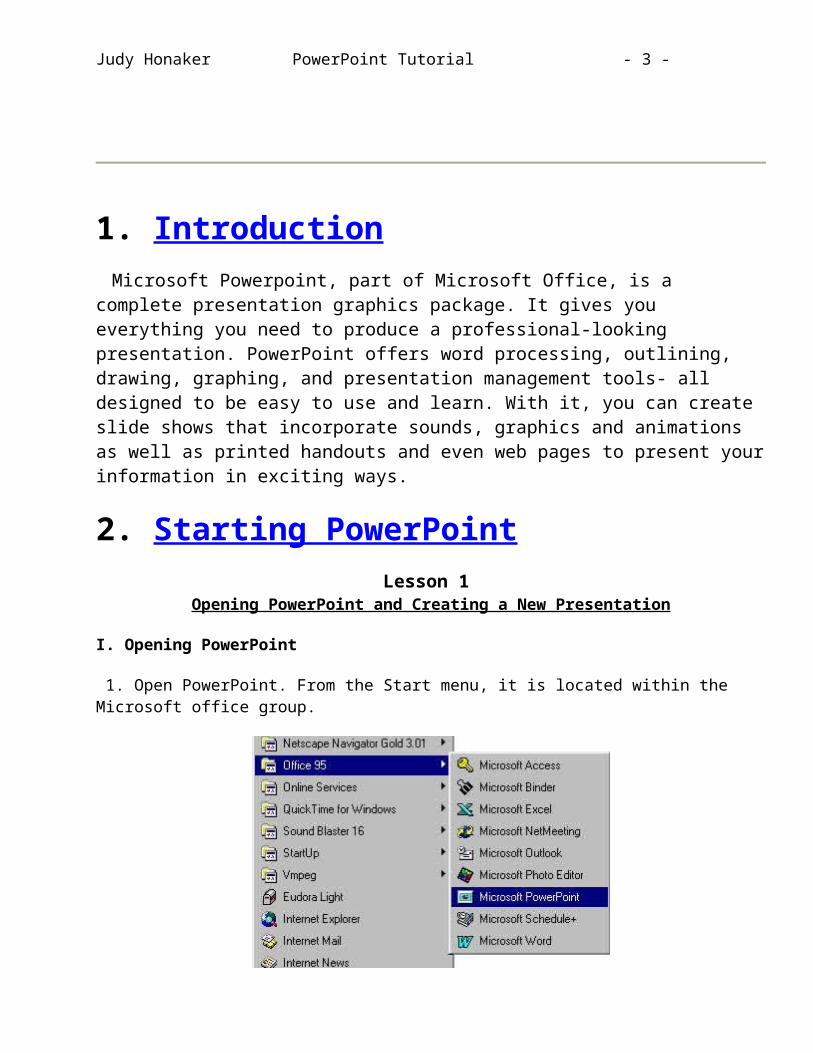
I. Opening PowerPoint
1. Open PowerPoint. From the Start menu, it is located within the Microsoft office group.
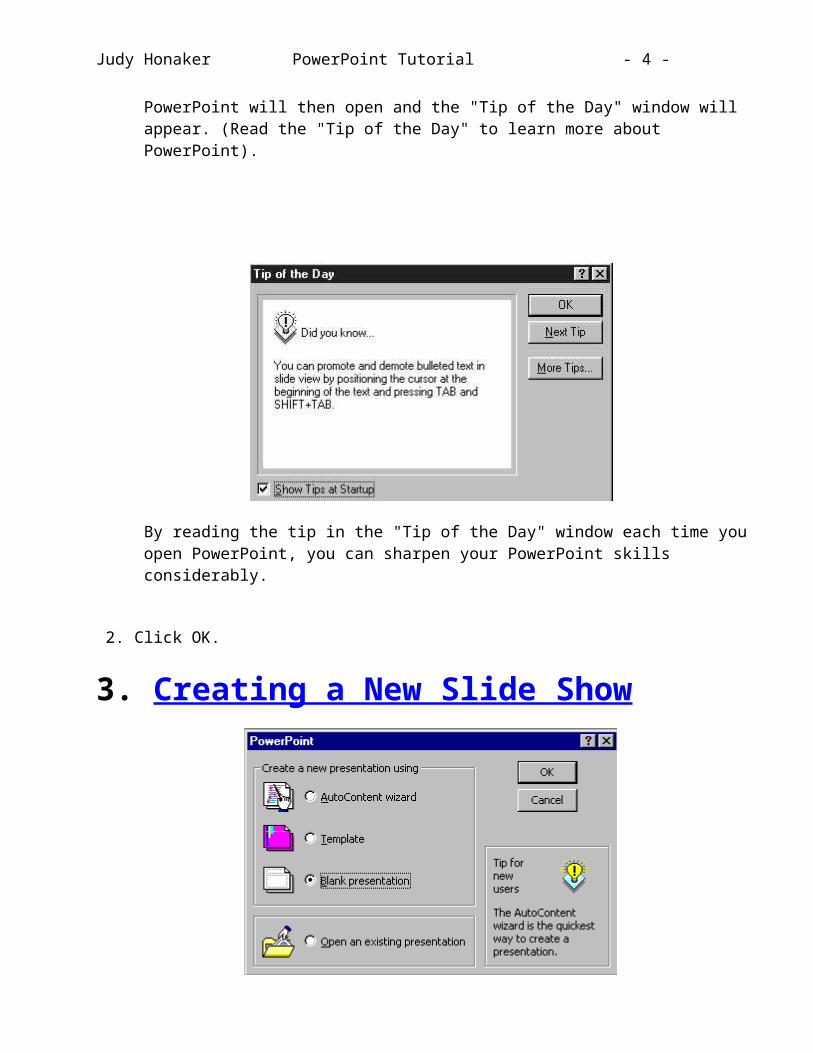
PowerPoint will then open and the "Tip of the Day" window will appear. (Read the "Tip of the Day" to learn more about PowerPoint).
Judy Honaker PowerPoint Tutorial - 3 -
By reading the tip in the "Tip of the Day" window each time you open PowerPoint, you can sharpen your PowerPoint skills considerably.
2. Click OK.
3. Creating a New Slide Show
In the window above, PowerPoint, Click-in the small "circle" to the left of Blank presentation, and then click-on OK.
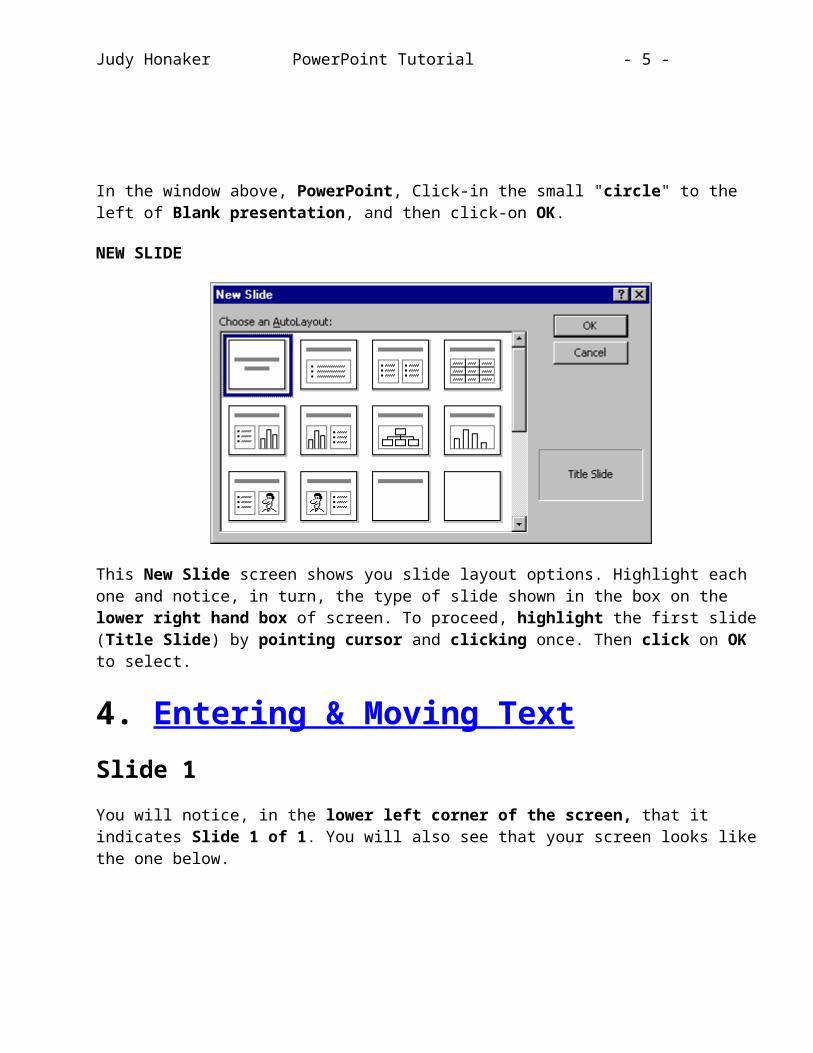
NEW SLIDE
Judy Honaker PowerPoint Tutorial - 4 -
This New Slide screen shows you slide layout options. Highlight each one and notice, in turn, the type of slide shown in the box on the lower right hand box of screen. To proceed, highlight the first slide (Title Slide) by pointing cursor and clicking once. Then click on OK to select.
4. Entering & Moving Text
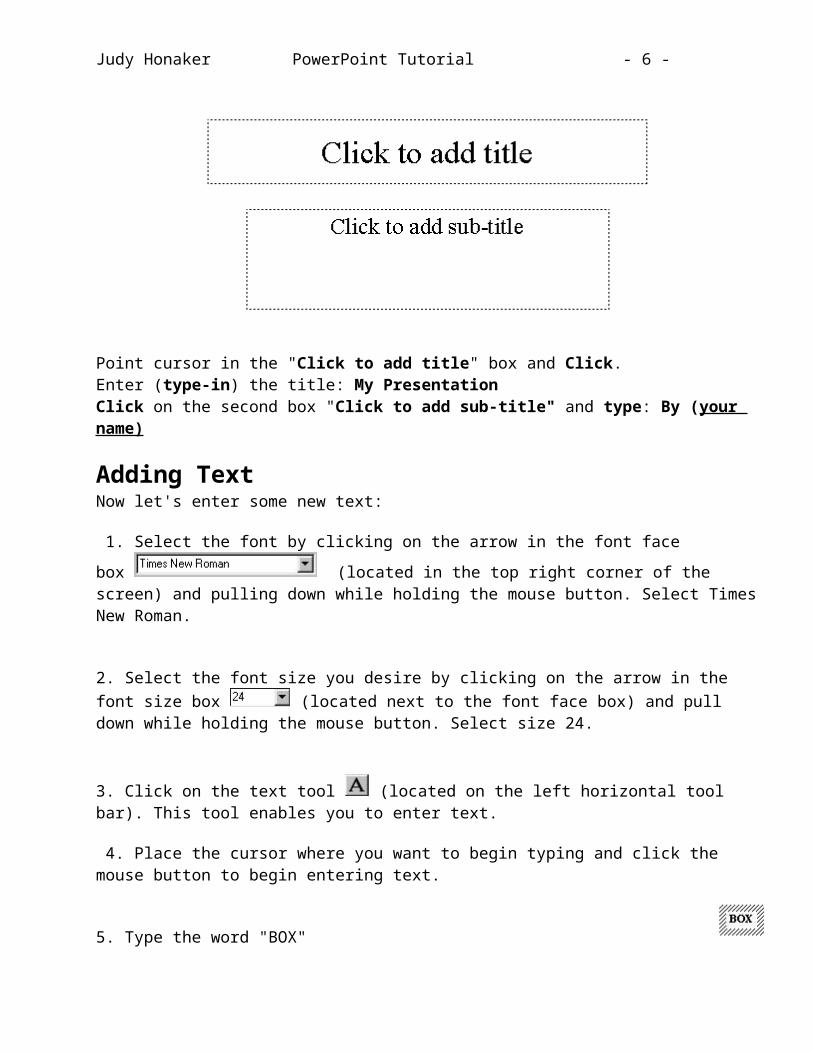
Slide 1
You will notice, in the lower left corner of the screen, that it indicates Slide 1 of 1. You will also see that your screen looks like the one below.
Point cursor in the "Click to add title" box and Click. Enter (type-in) the title: My Presentation Click on the second box "Click to add sub-title" and type: By (your name)
Adding Text Now let's enter some new text:
Judy Honaker PowerPoint Tutorial - 5 -
1. Select the font by clicking on the arrow in the font face box (located in the top right corner of the screen) and pulling down while holding the mouse button. Select Times New Roman.
2. Select the font size you desire by clicking on the arrow in the font size box (located next to the font face box) and pull down while holding the mouse button. Select size 24.
3. Click on the text tool (located on the left horizontal tool bar). This tool enables you to enter text.
4. Place the cursor where you want to begin typing and click the mouse button to begin entering text.
5. Type the word "BOX"
Notice that the text appears in its own text box. Click outside this box to make the box disappear and then click back on the text to make the box reappear.
Moving Text & Objects
1. Click on the text object so that the box appears.
2. Put the cursor on the box itself and while holding the mouse button down, move the text object.
3. Try moving the text to different areas on the screen.
Judy Honaker PowerPoint Tutorial - 6 -
5. Adding New Slides
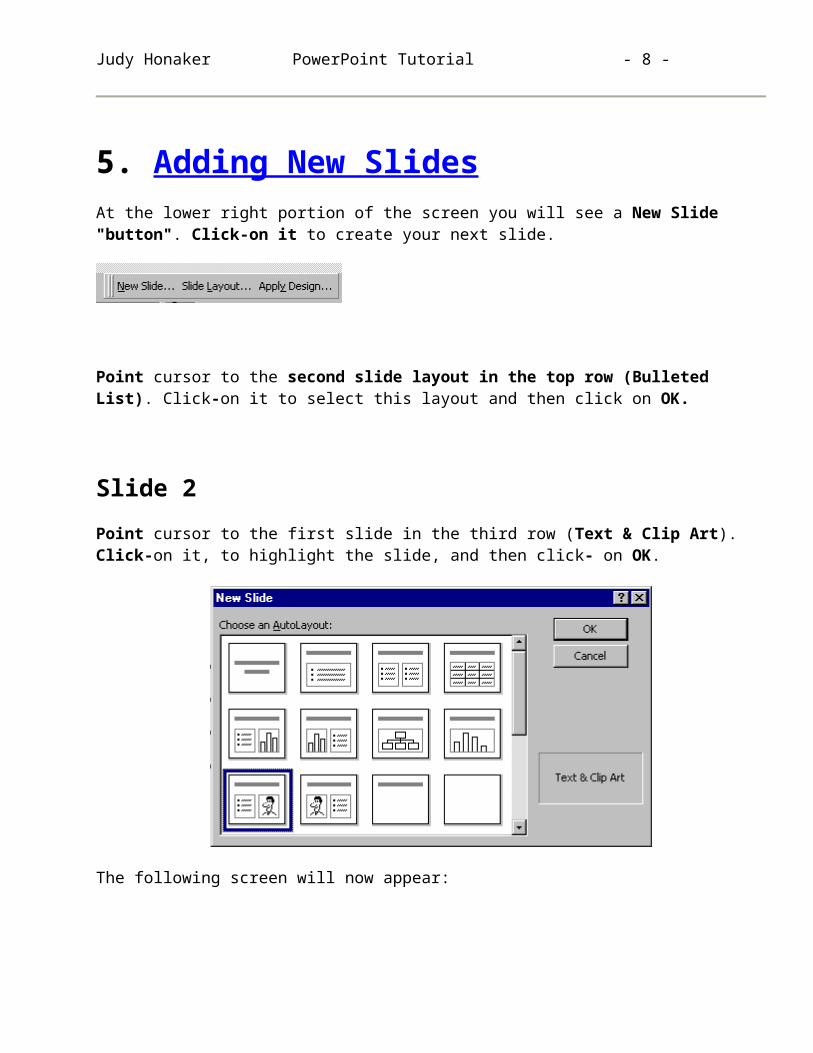
At the lower right portion of the screen you will see a New Slide "button". Click-on it to create your next slide.
Point cursor to the second slide layout in the top row (Bulleted List). Click-on it to select this layout and then click on OK.
Slide 2
Point cursor to the first slide in the third row (Text & Clip Art). Click-on it, to highlight the slide, and then click- on OK.
The following screen will now appear:

Judy Honaker PowerPoint Tutorial - 7 -
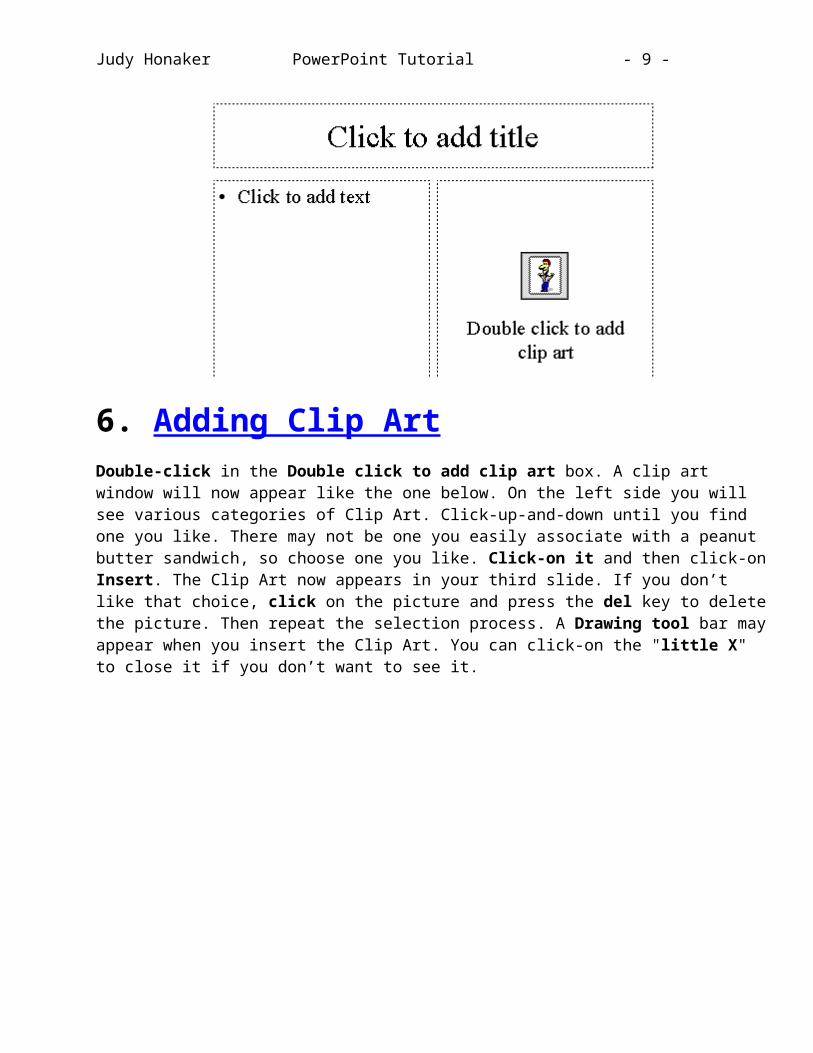
6. Adding Clip Art
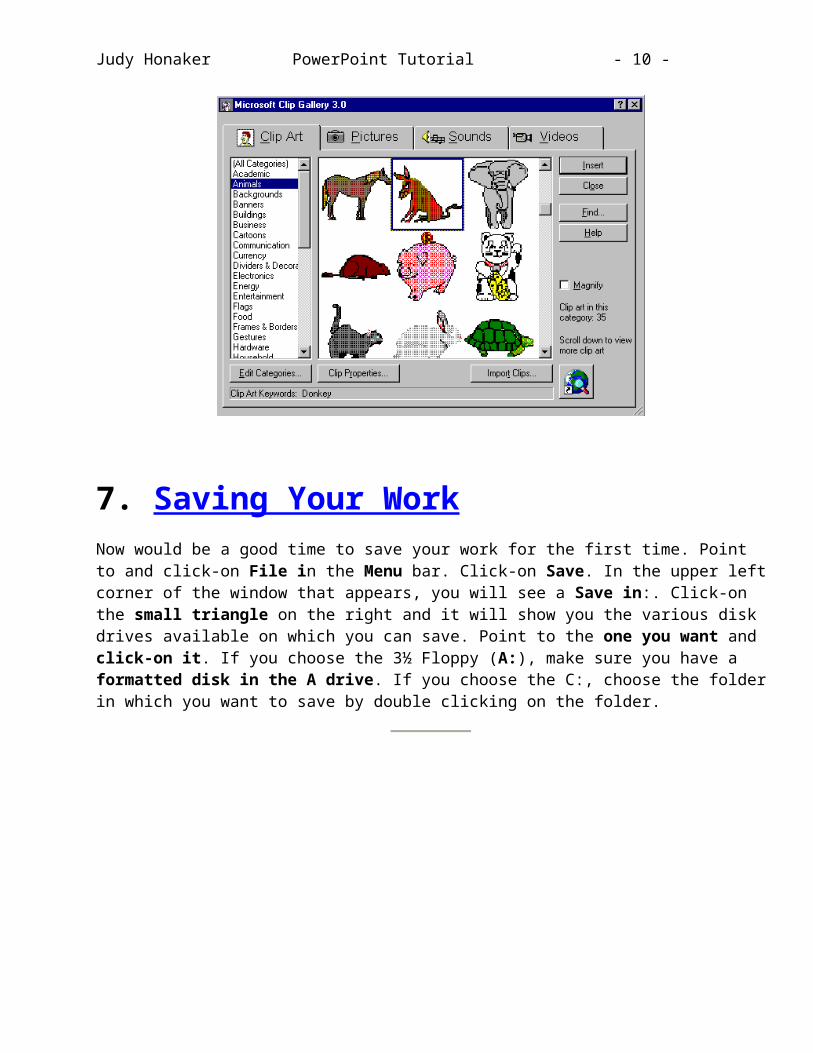
Double-click in the Double click to add clip art box. A clip art window will now appear like the one below. On the left side you will see various categories of Clip Art. Click-up-and-down until you find one you like. There may not be one you easily associate with a peanut butter sandwich, so choose one you like. Click-on it and then click-on Insert. The Clip Art now appears in your third slide. If you don’t like that choice, click on the picture and press the del key to delete the picture. Then repeat the selection process. A Drawing tool bar may appear when you insert the Clip Art. You can click-on the "little X" to close it if you don’t want to see it.
Judy Honaker PowerPoint Tutorial - 8 -
7. Saving Your Work
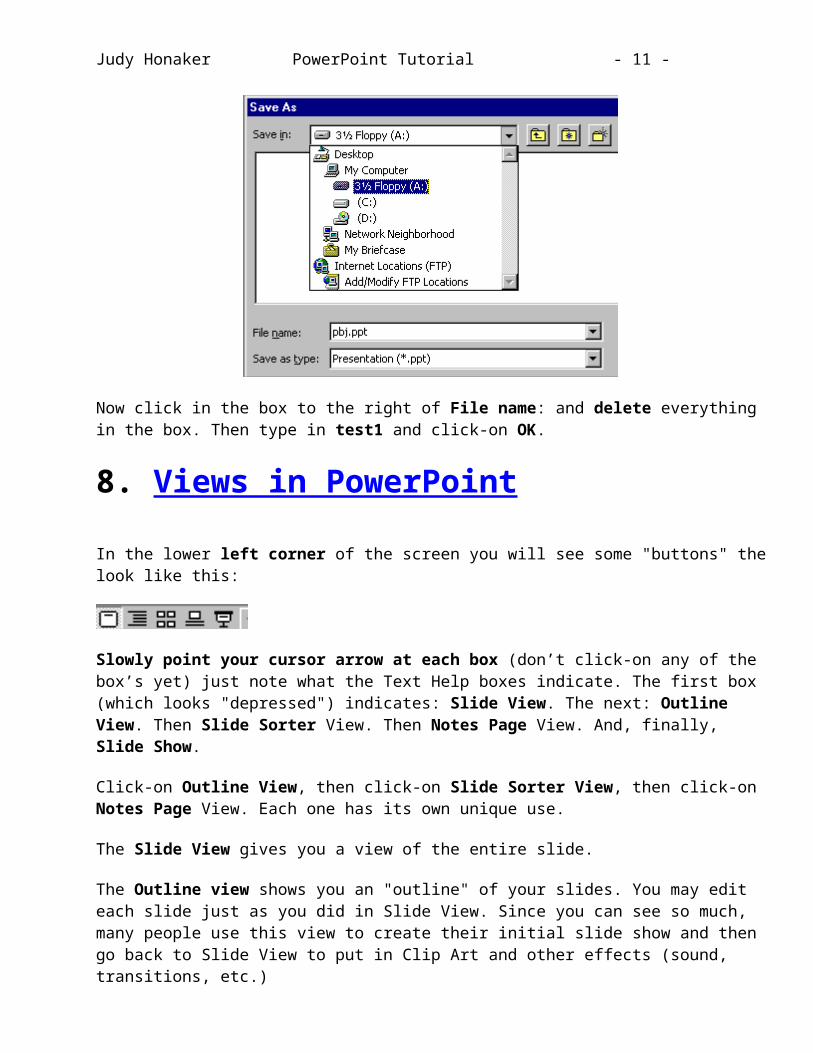
Now would be a good time to save your work for the first time. Point to and click-on File in the Menu bar. Click-on Save. In the upper left corner of the window that appears, you will see a Save in:. Click-on the small triangle on the right and it will show you the various disk drives available on which you can save. Point to the one you want and click-on it. If you choose the 3½ Floppy (A:), make sure you have a formatted disk in the A drive. If you choose the C:, choose the folder in which you want to save by double clicking on the folder.
Now click in the box to the right of File name: and delete everything in the box. Then type in test1 and click-on OK.
8. Views in PowerPoint
In the lower left corner of the screen you will see some "buttons" the look like this:
Slowly point your cursor arrow at each box (don’t click-on any of the box’s yet) just note what the Text Help boxes indicate. The first box (which looks "depressed") indicates: Slide View. The next: Outline View. Then Slide Sorter View. Then Notes Page View. And, finally, Slide Show.
Click-on Outline View, then click-on Slide Sorter View, then click-on Notes Page View. Each one has its own unique use.
The Slide View gives you a view of the entire slide.
Judy Honaker PowerPoint Tutorial - 9 -
The Outline view shows you an "outline" of your slides. You may edit each slide just as you did in Slide View. Since you can see so much, many people use this view to create their initial slide show and then go back to Slide View to put in Clip Art and other effects (sound, transitions, etc.)
In Slide Sorter View you can see small versions of your slides. In this view you can click-on, and drag your slides to the positions you desire. This view assists you to arrange your slides in the order that you desire for your presentation.
In Notes Pages View you can type "speaker notes" for each slide in the lower half of the screen.
9. Adding Charts
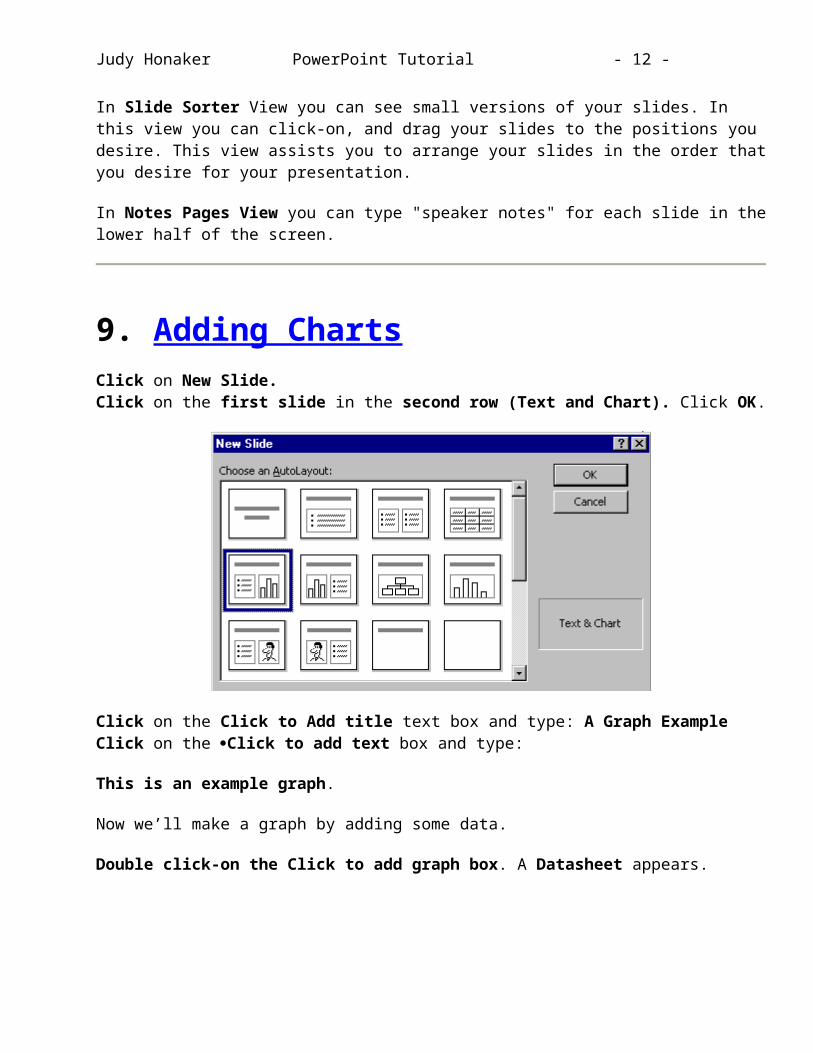
Click on New Slide. Click on the first slide in the second row (Text and Chart). Click OK.
Click on the Click to Add title text box and type: A Graph Example Click on the Click to add text box and type:
This is an example graph.
Now we’ll make a graph by adding some data.
Double click-on the Click to add graph box. A Datasheet appears.
Judy Honaker PowerPoint Tutorial - 10 -
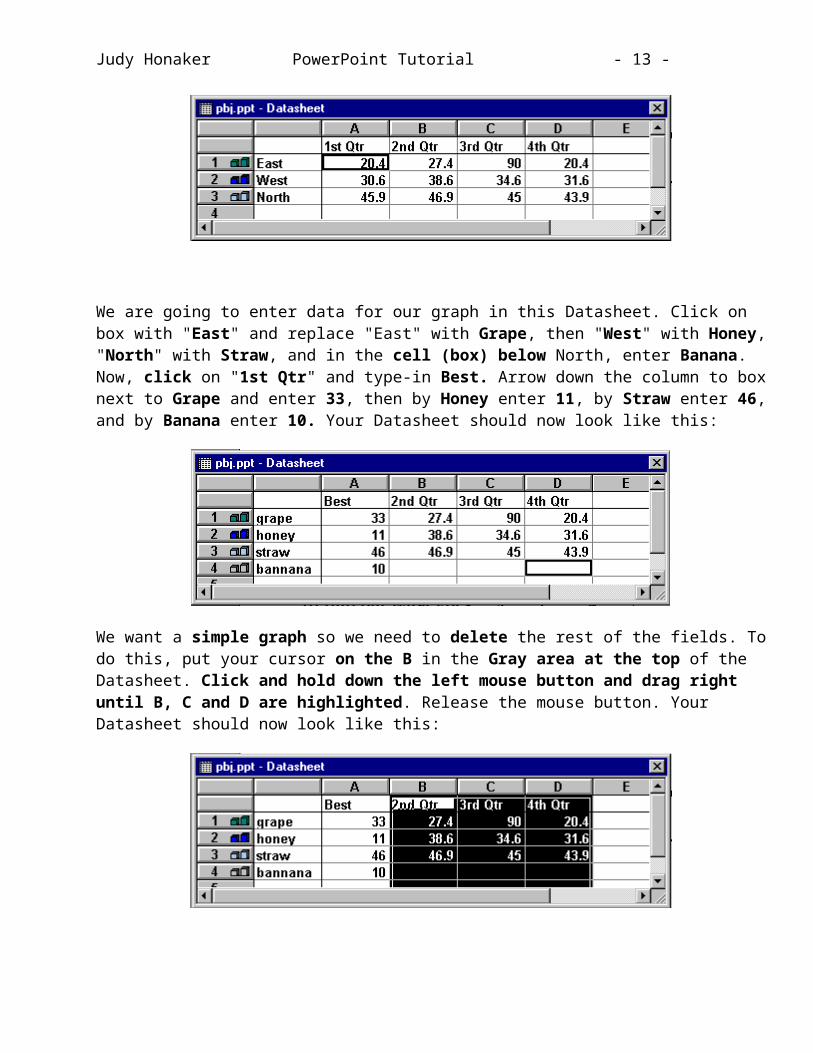
We are going to enter data for our graph in this Datasheet. Click on box with "East" and replace "East" with Grape, then "West" with Honey, "North" with Straw, and in the cell (box) below North, enter Banana. Now, click on "1st Qtr" and type-in Best. Arrow down the column to box next to Grape and enter 33, then by Honey enter 11, by Straw enter 46, and by Banana enter 10. Your Datasheet should now look like this:
We want a simple graph so we need to delete the rest of the fields. To do this, put your cursor on the B in the Gray area at the top of the Datasheet. Click and hold down the left mouse button and drag right until B, C and D are highlighted. Release the mouse button. Your Datasheet should now look like this:
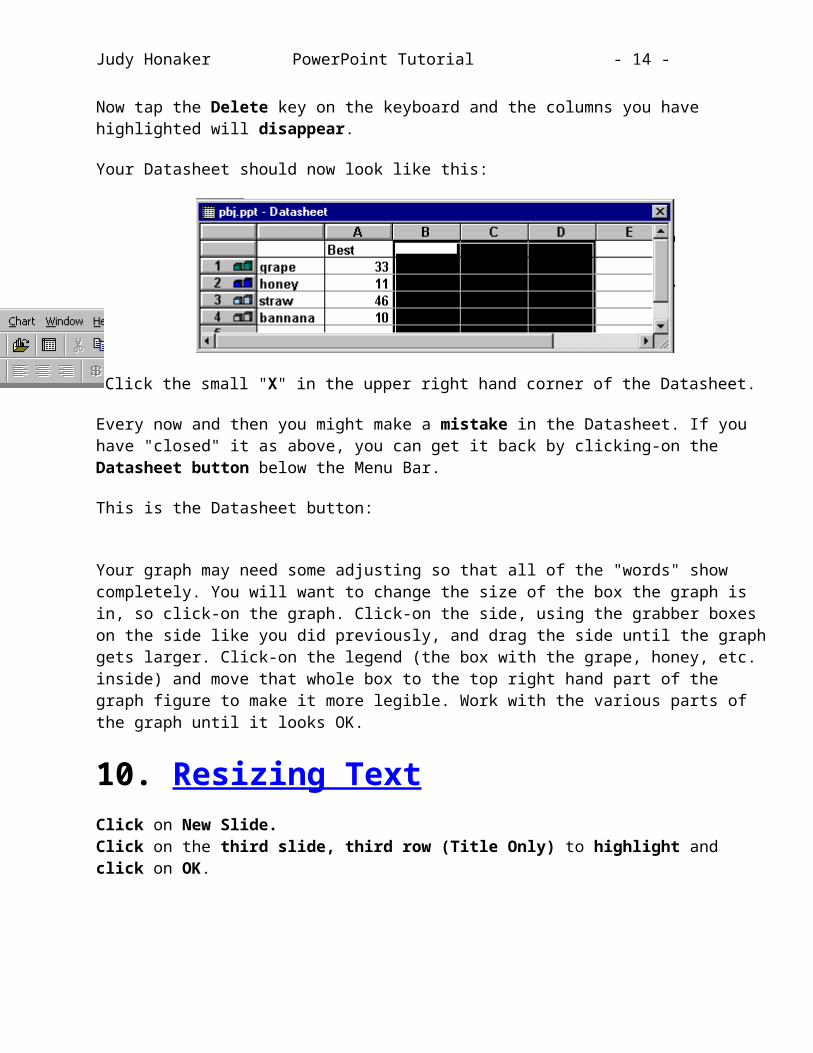
Now tap the Delete key on the keyboard and the columns you have highlighted will disappear.
Your Datasheet should now look like this:
Judy Honaker PowerPoint Tutorial - 11 -
Click the small "X" in the upper right hand corner of the Datasheet.
Every now and then you might make a mistake in the Datasheet. If you have "closed" it as above, you can get it back by clicking-on the Datasheet button below the Menu Bar.
This is the Datasheet button:
Your graph may need some adjusting so that all of the "words" show completely. You will want to change the size of the box the graph is in, so click-on the graph. Click-on the side, using the grabber boxes on the side like you did previously, and drag the side until the graph gets larger. Click-on the legend (the box with the grape, honey, etc. inside) and move that whole box to the top right hand part of the graph figure to make it more legible. Work with the various parts of the graph until it looks OK.
10. Resizing Text
Click on New Slide. Click on the third slide, third row (Title Only) to highlight and click on OK.
Click in the Click to add title box and type: Enjoy your sandwich! Now, let’s make the letters larger. Highlight your ending (Enjoy your sandwich!) by putting your cursor at the beginning of the first
Judy Honaker PowerPoint Tutorial - 12 -
word, click and hold down the left mouse button and drag it across the words, then let up. The Title should be highlighted. Now, put your cursor on the box under the tool bar that has a number in it (when your cursor is on it the Text Help box will indicate Font Size). Click on the arrow there and scroll down to 72 and click.
Now point the cursor away from the Title box and click the left mouse button. This is called "clicking away." This will "turn-off" the box.
11. Stars and Banners
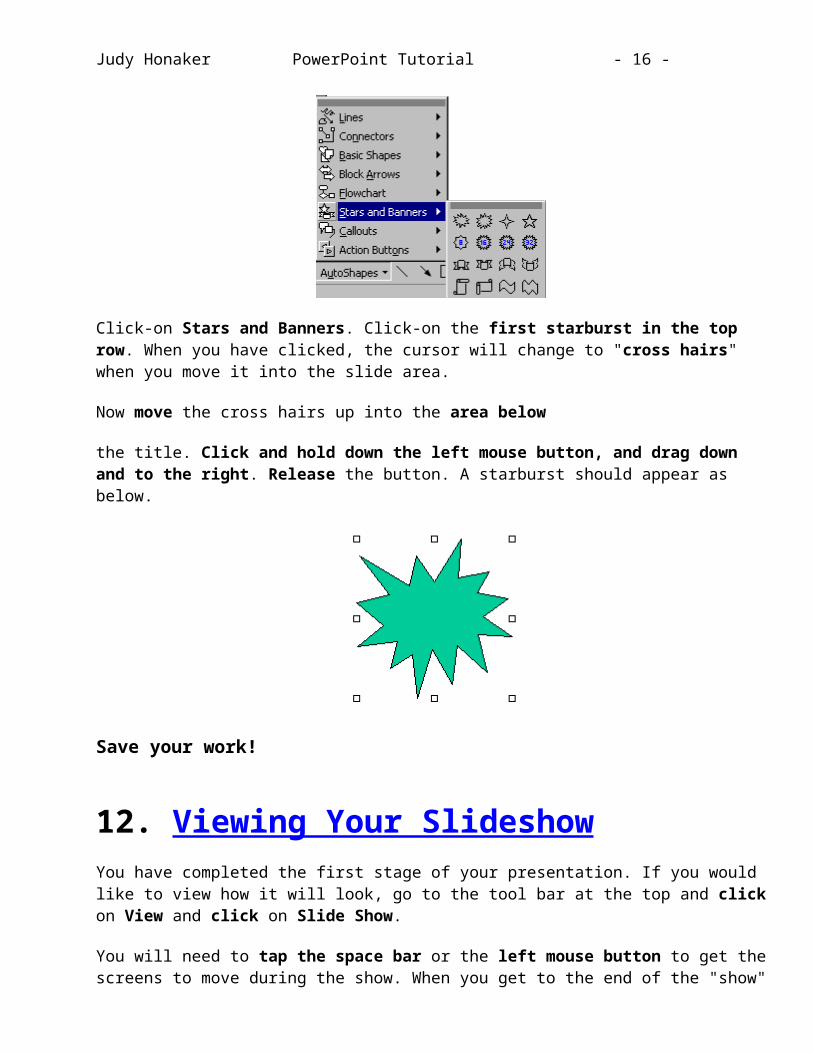
Point to View in the Menu Bar and click. When the menu list appears, move the cursor down to Toolbars. When the list appears, click-on Drawing. The Drawing toolbar will appear at the top, side or bottom of the screen. Now click-on AutoShapes and a small box of shapes will appear.
Click-on Stars and Banners. Click-on the first starburst in the top row. When you have clicked, the cursor will change to "cross hairs" when you move it into the slide area.
Now move the cross hairs up into the area below
the title. Click and hold down the left mouse button, and drag down and to the right. Release the button. A starburst should appear as below.
Judy Honaker PowerPoint Tutorial - 13 -
Save your work!
12. Viewing Your Slideshow
You have completed the first stage of your presentation. If you would like to view how it will look, go to the tool bar at the top and click on View and click on Slide Show.
You will need to tap the space bar or the left mouse button to get the screens to move during the show. When you get to the end of the "show" the presentation will return to your slides. Anytime you want to end the show, simply tap the Esc key in the upper left hand corner of the keyboard or tap the right mouse button and click on end show.
13. Animated Transitions
Go to the Slide Sorter button at the bottom left. Click on the button with four white squares.
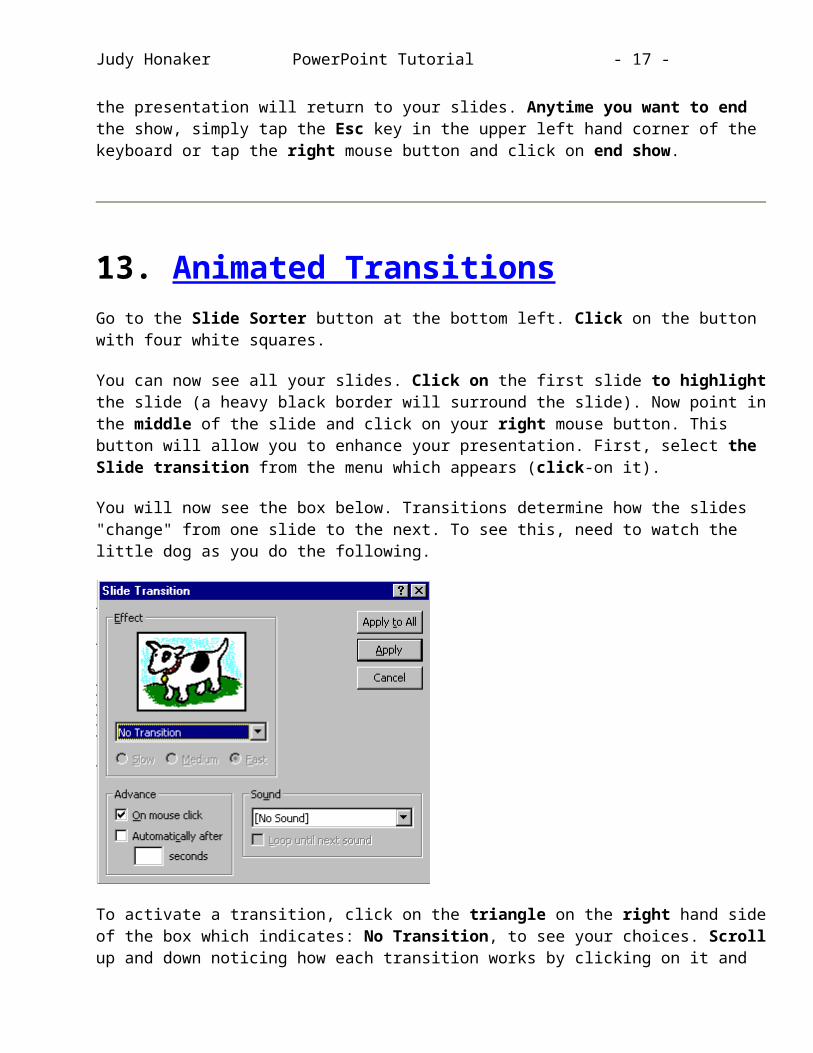
You can now see all your slides. Click on the first slide to highlight the slide (a heavy black border will surround the slide). Now point in the middle of the slide and click on your right mouse button. This button will allow you to enhance your presentation. First, select the Slide transition from the menu which appears (click-on it).
You will now see the box below. Transitions determine how the slides "change" from one slide to the next. To see this, need to watch the little dog as you do the following.
Judy Honaker PowerPoint Tutorial - 14 -
To activate a transition, click on the triangle on the right hand side of the box which indicates: No Transition, to see your choices. Scroll up and down noticing how each transition works by clicking on it and then watching the dog or key in the Slide Transition box. If you think it is moving too fast, click in the little circle to the left of Slow.
This screen also allows you to time you transitions from slide to slide. For now, leave it as it is. Later on, return here and Clickon Advance Automatically After, and insert 5 to 10 (for seconds) in the box. Then, click on OK. Follow this procedure for each of the seven slides. Highlight the next slide, right click the mouse, select transition, choose your effect, and select automatically.
Also notice in the lower right corner the Sound. Currently, the box indicates [No Sound]. You can click-on the down triangle and see Microsoft "Clip Sounds". If you choose one of these it will "sound" as your slide transitions. You can pick one now, or wait until later.
Notice in the upper right corner of the Slide Transition box that it indicates Apply to All and also Apply. If you click-on Apply to All, PowerPoint will apply the transition and sound you chose to ALL of the slides. This is wonderful if you want the same sound, each time, a slide transitions. If you don’t want this effect, click-on Apply, and the transition and sound will only apply to the slide your on. I like to hold off on the sounds here. However, if you "run" all the way down to the bottom of the Effects box, you will see Random Transition. If you click-on Random Transition, and then click-on Apply to All, then all the slides will each transition randomly. You can alternately click-on the dog and key to view the transition effects. When you have decided which transition you want click-on either Apply or Apply to All.
When you return to Slide Sorter View, you will notice a small box with an arrow at the lower left corner. This indicates a slide will transition. If you click-on it you will see the effect each time you click.
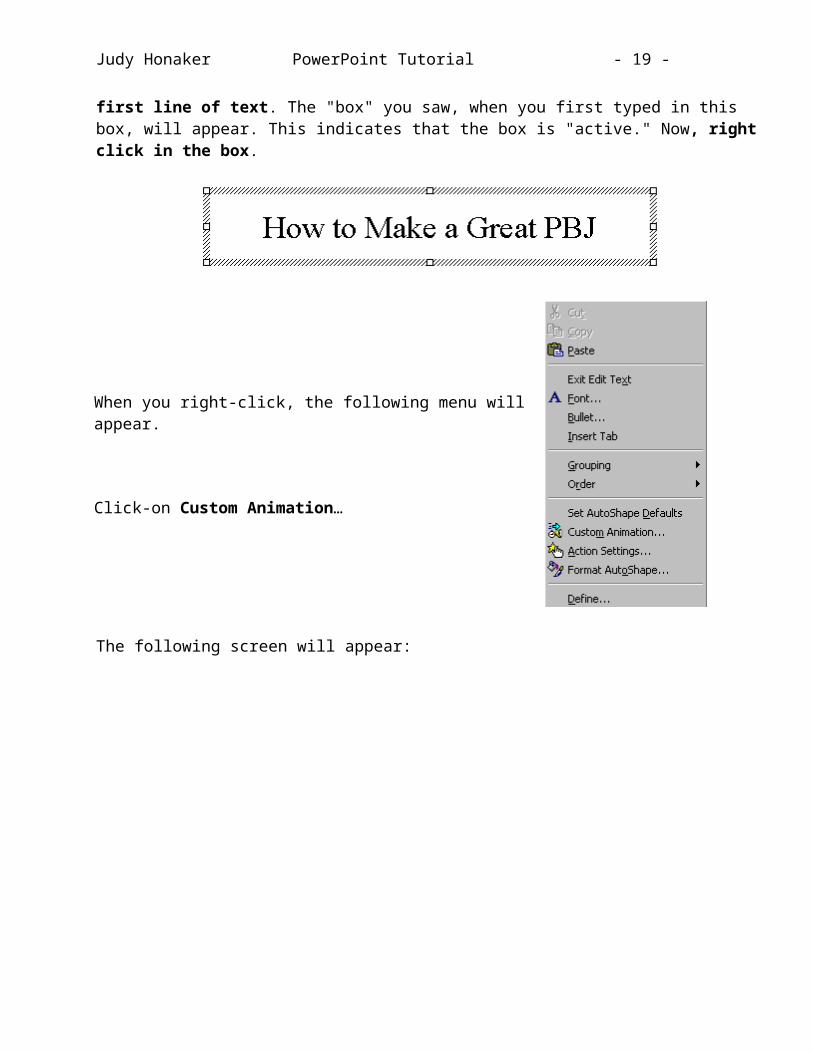
14. Animated Text Building is a term indicating how each line of the text, on a slide, will enter the screen. The lines can fly in from almost any direction. To Build the text on each slide, follow these directions. Go back to Slide View. You can do this in Slide Sorter View by double clicking-on the first slide, or Clicking on the Slide View button on the lower left of the screen. When the Slide View screen appears, click-on the first line of text. The "box" you saw, when you first typed in this box, will appear. This indicates that the box is "active." Now, right click in the box.

Judy Honaker PowerPoint Tutorial - 15 -
When you right-click, the following menu will appear.
Click-on Custom Animation…
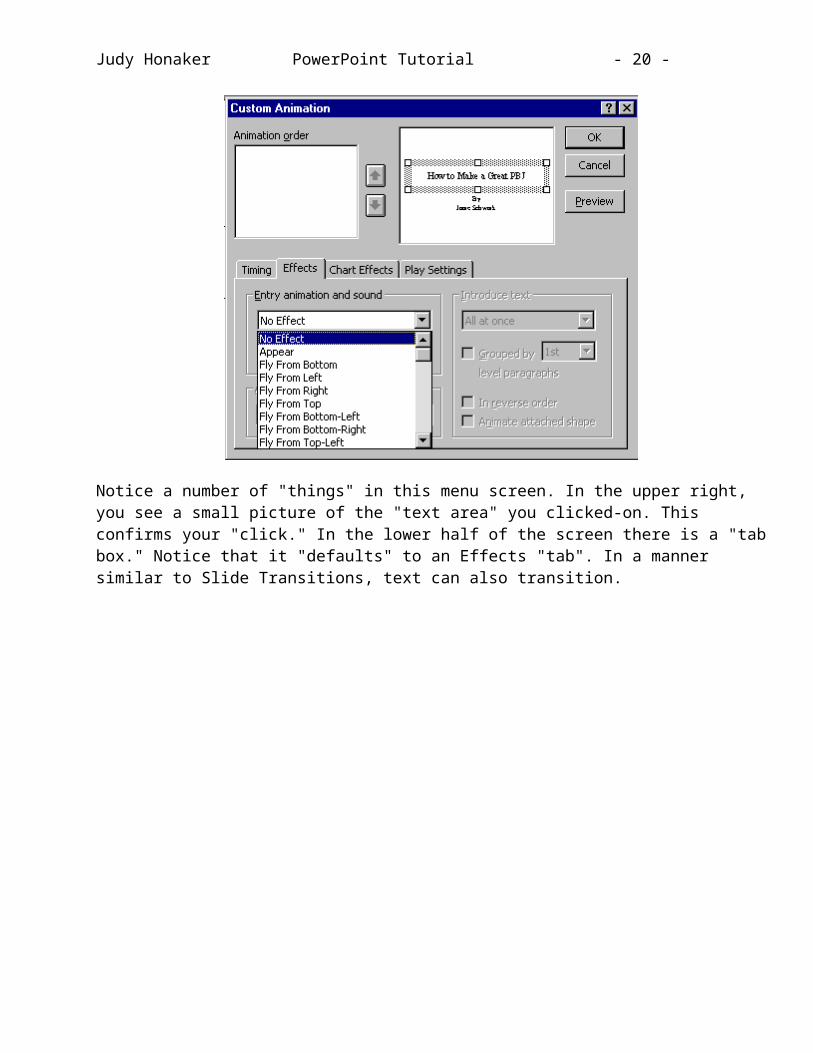
The following screen will appear:
Notice a number of "things" in this menu screen. In the upper right, you see a small picture of the "text area" you clicked-on. This confirms your "click." In the lower half of the screen there is a "tab box." Notice that it "defaults" to an Effects "tab". In a manner similar to Slide Transitions, text can also transition.
Judy Honaker PowerPoint Tutorial - 16 -
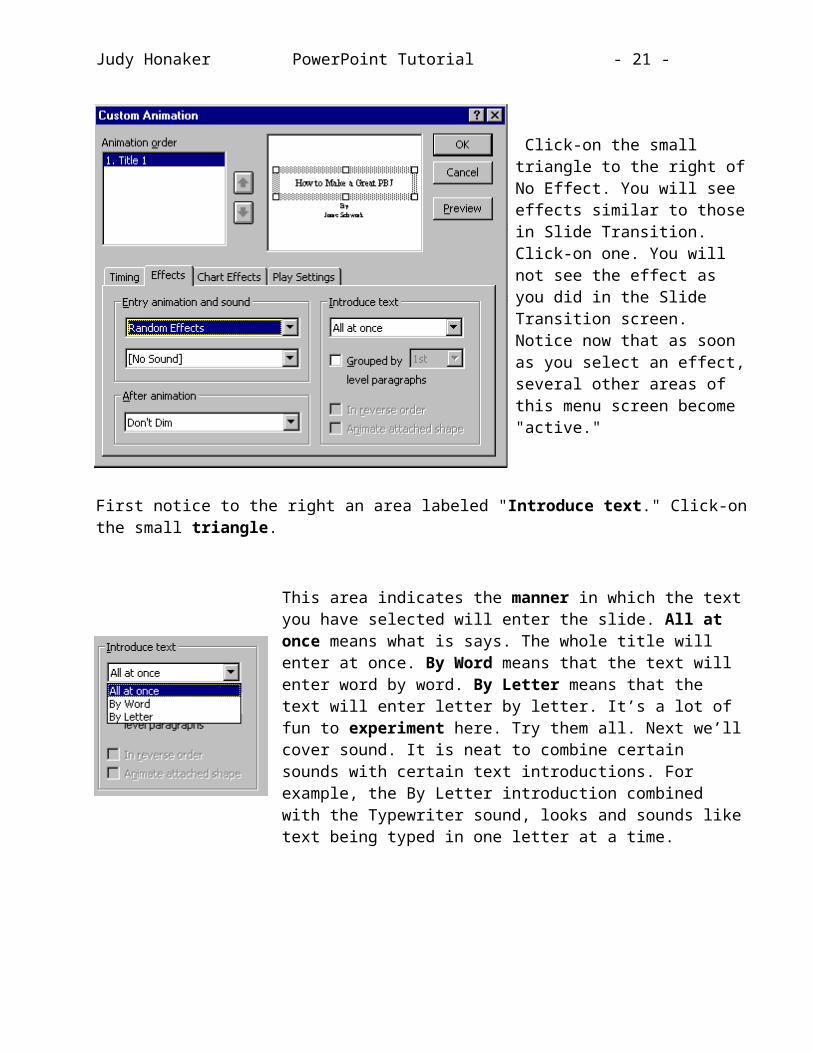
Click-on the small triangle to the right of No Effect. You will see effects similar to those in Slide Transition. Click-on one. You will not see the effect as you did in the Slide Transition screen. Notice now that as soon as you select an effect, several other areas of this menu screen become "active."
First notice to the right an area labeled "Introduce text." Click-on the small triangle.
This area indicates the manner in which the text you have selected will enter the slide. All at once means what is says. The whole title will enter at once. By Word means that the text will enter word by word. By Letter means that the text will enter letter by letter. It’s a lot of fun to experiment here. Try them all. Next we’ll cover sound. It is neat to combine certain sounds with certain text introductions. For example, the By Letter introduction combined with the Typewriter sound, looks and sounds like text being typed in one letter at a time.
Now notice the Sound area on the left. Click-on the small triangle and select a sound from the list.
When you have selected all the effect you desire, click-on OK.
You can view these build effects by clicking on the Slide Show button (on bottom left-it looks like a movie screen). You will need to press space bar or left mouse button to make each line of text enter.
Judy Honaker PowerPoint Tutorial - 17 -
When you have viewed your effect, tap the Escape key (upper left corner of keyboard) and you will return to Slide View. When you are back in Slide View for the first slide, click on the next text box and repeat the above. When you have completed the first slide, move to each successive slide, click-on the various text boxes, and repeat the process.
When you click-on a text area that is a bulleted list you will see an additional effect. The Grouped by "1st" level paragraph indicates whether one line, or multiple lines will enter. Here is another area where it is fun to experiment.
15. Sounds
Be careful. Sound files can be very large! Also, too many effects can overwhelm and detract from a presentation. Just as there are many picture formats, there are many formats for sound files. Some are smaller than others. MP3 is one of the smallest and best sound formats on the Internet, but PowerPoint can play only sound files that end in ".wav", or ".mid". You'll get an error if you try to insert an MP3 file or some other format. You can find some .wav file sounds in the clip art collection that may (or may not) have been installed with Microsoft Office when PowerPoint was first installed on your computer. There are many more on the Internet. Again, make sure you don't violate copyright laws by using only authorized sounds!
To insert a sound, select Movies and Sounds from the Insert menu in Slide View Next, select Sound from Gallery or Sound from File.
See the section about using pictures from the Internet to learn more about saving sound files to your computer.
16. Add Color
Now for some color!!
Judy Honaker PowerPoint Tutorial - 18 -
There are a number of different methods you can use to add color. First we’ll use some basic methods and then try some "exotic" effects.
First go to Slide View and then go to Slide 1. Then click-on Format in the Menu Bar and then click-on Slide Color Scheme.
The following menu screen will appear.
As you can see in the above screen, there are several color schemes you can choose from. Click-on one, and then click-on Apply. The first slide will now have those effects. Repeat the process until you find one you like. Note: if you click-on Apply, this applies the colors to Slide 1. And, if you click-on Apply to All, then all of the slides have the selected color scheme.
You will notice at the top of the Menu screen that there are two tabs. You are currently on the Standard tab. Click-on the Custom tab. This allows you to change specific colors in the Slide Scheme that you chose. Click-on a couple of these to see how this works.
Judy Honaker PowerPoint Tutorial - 19 -
You can try this on several slides if you want. Once you have the hang of it, there are several ways you can enhance these effects.
17. Backgroundstop
Now click-on Format in the Menu Bar again. Next, click-on Background.
The following Menu Screen will appear.
Click-on the small triangle in the bottom portion of this screen.
Now click-on Fill Effects. Notice in the Screen Menu below that there are a number of choices.
Judy Honaker PowerPoint Tutorial - 20 -
Click-on several of the Shading Styles and observe the effects on the right. Also, note the tabs at the top. Click-on Texture and Pattern and observe the effects. If you want your entire slide to be a picture, this is what the last tab is for. When you have an effect you like, click-on OK and then click-on Apply.
18. Using Pictures from the Internet
Copyright law regarding the Internet is still fairly new. For now, you can use graphics from the Internet in your presentations as long as you give credit your source somewhere in your presentation and as long as the site you find the graphics on does not contain wording prohibiting such use.
Using Netscape Navigator, or Internet Explorer, click with your Right Mouse Button on any graphic you see on the web. You should see a dialog box that allows you to save that graphic. Click on Save image As, or Save picture As. Save the .gif or .jpg image to a floppy disk or to a temporary folder on your Desktop. Rename the picture as something you can easily recognize.
NOTE: It is essential to understand Microsoft Windows or MacOS well enough that you know where you are saving the graphic! Make sure you save to a location you will be able to access later. Do NOT save to your C:\Windows\System or C:\windows directories since these are very full and are heavily used by your operating system. You should also never save documents or pictures to the root of you C: drive, but rather in a folder on the Desktop or in My Documents as My Pictures.
After you've saved pictures on your computer, you may place them in your presentation by following the steps for adding backgrounds above.
19. Using Templates
Judy Honaker PowerPoint Tutorial - 21 -
You can be in any Slide View (Slide View and Slide Sorter View are preferable). Click-on Format in the Menu Bar, and then Click-on Apply Design.
Click on the choices on the left side of the window. On the right side a special template will appear with its own formatting. Pick one you like and then click on Apply. Be sure to scroll up and down and to click on additional choices. Note: with Templates, they are automatically applied to all of the slides. You may choose additional effects for the Templates by using the Background and Slide Color Scheme.
20. Run the Show
Go to the tool bar at the top and click on View. Then click on Slide Show, or you can just click on the Slide Show button at the bottom.
If you have set times, Click on Use Slide Timings and then on Show.
Now save the presentation as you did before. Then File, Exit Power Point.
These are the basics for a Power Point presentation.