Embed Size (px)
Citation preview

Basic Turning – Spindle to Bowl 5/22/12 11:40 PM
Beads and coves – all you can do, yes there are flat places and “V” cuts, but what are they but parts of a bead or a cove. That is all you can do on a lathe. One must know how to achieve a smooth cut to advance in turning skills. The following is some information about woodturning that I have learned over the past 40 years, mostly the hard way! The A – B – C’s of turning. Imagine controlling a tool that has a long straight metal rod between a cutting edge and a handle and that has tremendous forces acting upon the cutting edge. There must be 2 points of contact maintained between two unyielding objects otherwise you will be tied with a short rope to a harpoon lodged in a very angry whale while standing in a very small row boat! What are the two points of contact? The easiest one to guess is the tool rest and it is ALWAYS the first one to contact the tool. The tool rest acts as a fulcrum; that point upon which the teeter-totter balances. When at the playground with the granddaughter what does she want to do, “Come on Grandpa, I want to teeter-totter with you!” Now if she is 35 lbs. and grandpa is 350 lbs., guess what, she needs to be 10 times farther away from that fulcrum than Gramps if she is to have any chance at all of lifting his heavy butt off of the ground! Now lets apply that fact to the lathe. The further away from the tool rest the cutting edge is, the more force we feel from the action of cutting. If you must hang lots of the tool off of the tool rest, be sure it is way strong!
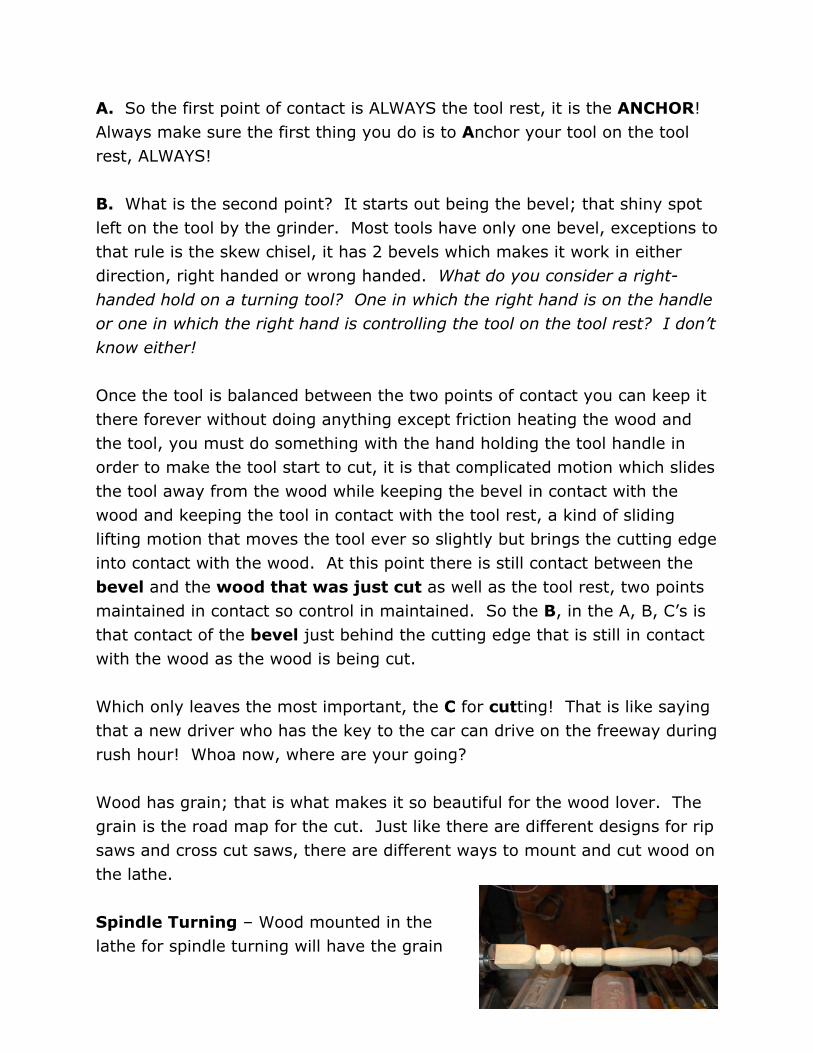
A. So the first point of contact is ALWAYS the tool rest, it is the ANCHOR! Always make sure the first thing you do is to Anchor your tool on the tool rest, ALWAYS! B. What is the second point? It starts out being the bevel; that shiny spot left on the tool by the grinder. Most tools have only one bevel, exceptions to that rule is the skew chisel, it has 2 bevels which makes it work in either direction, right handed or wrong handed. What do you consider a right-handed hold on a turning tool? One in which the right hand is on the handle or one in which the right hand is controlling the tool on the tool rest? I don’t know either! Once the tool is balanced between the two points of contact you can keep it there forever without doing anything except friction heating the wood and the tool, you must do something with the hand holding the tool handle in order to make the tool start to cut, it is that complicated motion which slides the tool away from the wood while keeping the bevel in contact with the wood and keeping the tool in contact with the tool rest, a kind of sliding lifting motion that moves the tool ever so slightly but brings the cutting edge into contact with the wood. At this point there is still contact between the bevel and the wood that was just cut as well as the tool rest, two points maintained in contact so control in maintained. So the B, in the A, B, C’s is that contact of the bevel just behind the cutting edge that is still in contact with the wood as the wood is being cut. Which only leaves the most important, the C for cutting! That is like saying that a new driver who has the key to the car can drive on the freeway during rush hour! Whoa now, where are your going? Wood has grain; that is what makes it so beautiful for the wood lover. The grain is the road map for the cut. Just like there are different designs for rip saws and cross cut saws, there are different ways to mount and cut wood on the lathe. Spindle Turning – Wood mounted in the lathe for spindle turning will have the grain

running from headstock to tailstock between some kind of driving center on the headstock end and some kind of revolving center on the tailstock end. In this orientation the cut must be made from larger diameter to smaller diameter. This is necessary to make the cut as smooth as it can be made. The reason the cut is as smooth as it can be is because the fibers in the wood are being cut in such a way that the underlying fiber is supporting the fiber that is being cut. If you try to cut the other way the tool will lift the grain and it will chip out very badly and leave a rough surface. Faceplate Turning – Wood mounted in the lathe with the grain running through the axis of rotation is considered faceplate turning. Consider the bowl form hidden in a half log mounted faceplate fashion, once you knock off the square corners and bark lets imagine the bottom of the bowl at the headstock end. The outside of this bowl must be turned from smaller diameter to larger diameter for the underlying fiber to support the fibers being cut. There will be two stripes where this is not exactly what is going on, those two stripes occur where the grain is parallel with the cutting edge. On the inside of the bowl the cut must be made from larger diameter to smaller diameter for all of the same reasons stated for the outside. Ok, then new driver you have your roadmap given by the grain of the wood, what about speed limits? In the paragraph above were you thinking about those rough areas inside your bowl that occur on opposite sides and just won’t sand out? They both start at the stripe where the grain is parallel to
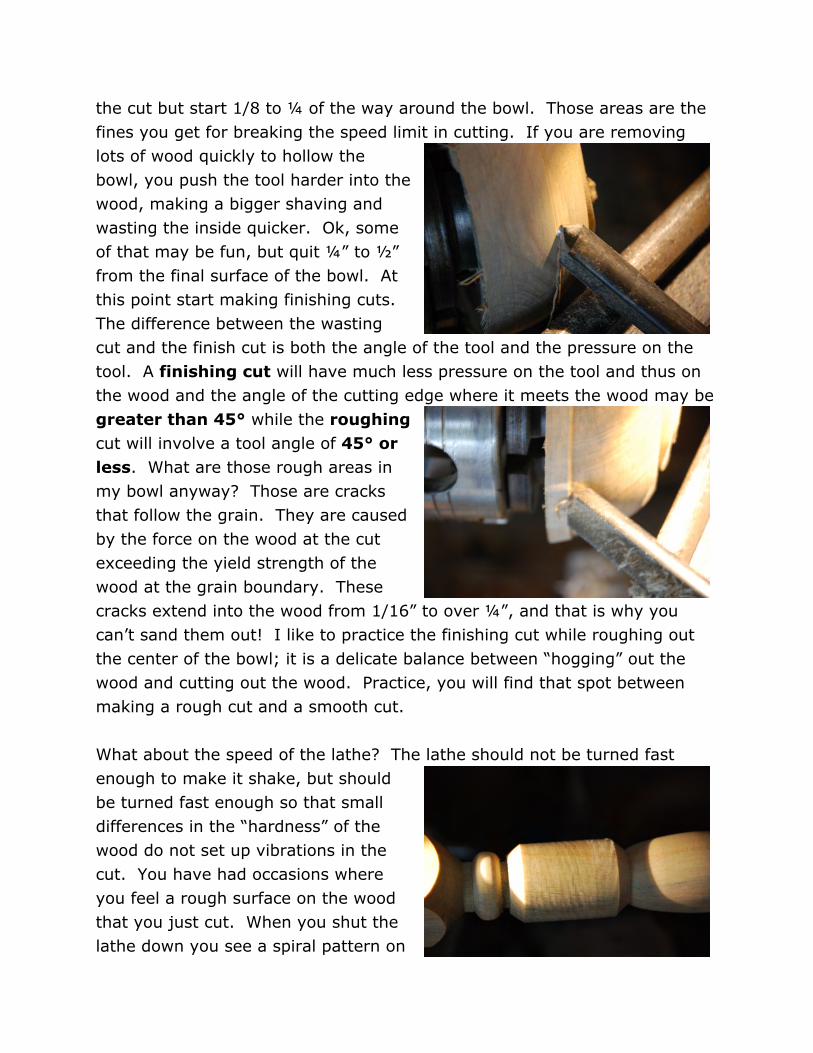
the cut but start 1/8 to ¼ of the way around the bowl. Those areas are the fines you get for breaking the speed limit in cutting. If you are removing lots of wood quickly to hollow the bowl, you push the tool harder into the wood, making a bigger shaving and wasting the inside quicker. Ok, some of that may be fun, but quit ¼” to ½” from the final surface of the bowl. At this point start making finishing cuts. The difference between the wasting cut and the finish cut is both the angle of the tool and the pressure on the tool. A finishing cut will have much less pressure on the tool and thus on the wood and the angle of the cutting edge where it meets the wood may be greater than 45° while the roughing cut will involve a tool angle of 45° or less. What are those rough areas in my bowl anyway? Those are cracks that follow the grain. They are caused by the force on the wood at the cut exceeding the yield strength of the wood at the grain boundary. These cracks extend into the wood from 1/16” to over ¼”, and that is why you can’t sand them out! I like to practice the finishing cut while roughing out the center of the bowl; it is a delicate balance between “hogging” out the wood and cutting out the wood. Practice, you will find that spot between making a rough cut and a smooth cut. What about the speed of the lathe? The lathe should not be turned fast enough to make it shake, but should be turned fast enough so that small differences in the “hardness” of the wood do not set up vibrations in the cut. You have had occasions where you feel a rough surface on the wood that you just cut. When you shut the lathe down you see a spiral pattern on
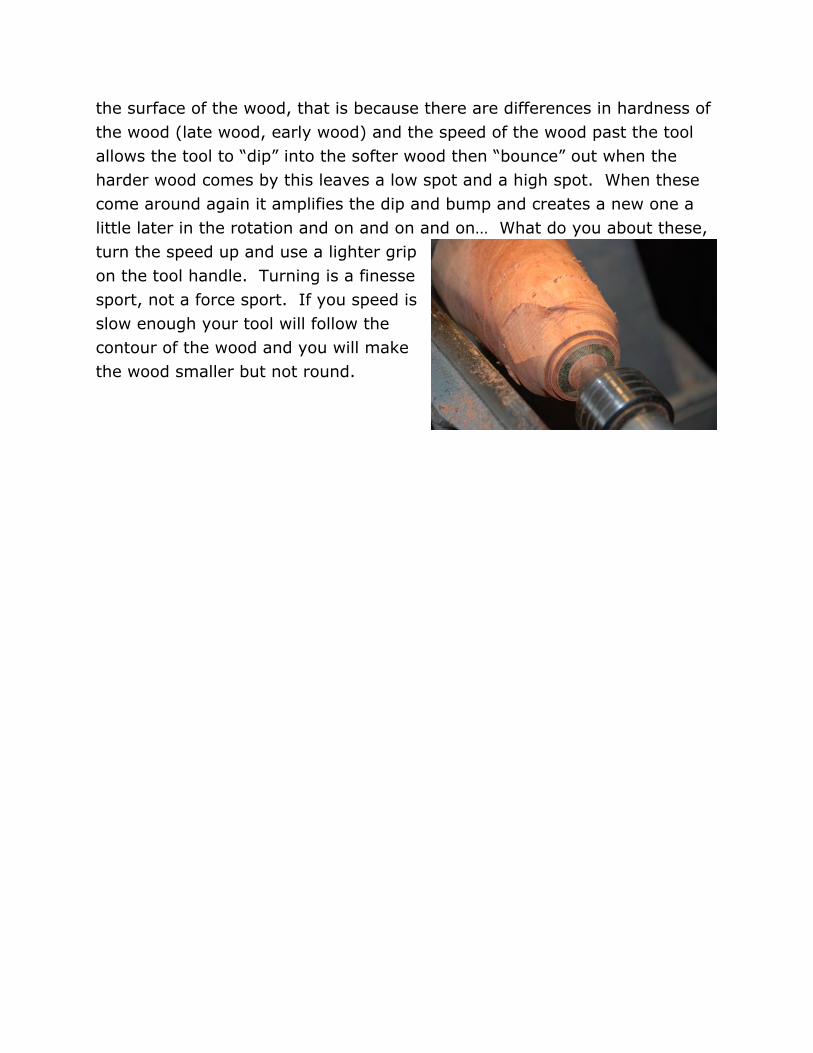
the surface of the wood, that is because there are differences in hardness of the wood (late wood, early wood) and the speed of the wood past the tool allows the tool to “dip” into the softer wood then “bounce” out when the harder wood comes by this leaves a low spot and a high spot. When these come around again it amplifies the dip and bump and creates a new one a little later in the rotation and on and on and on… What do you about these, turn the speed up and use a lighter grip on the tool handle. Turning is a finesse sport, not a force sport. If you speed is slow enough your tool will follow the contour of the wood and you will make the wood smaller but not round.
Spindle Turning – Use of the Skew 5/22/12 11:40 PM
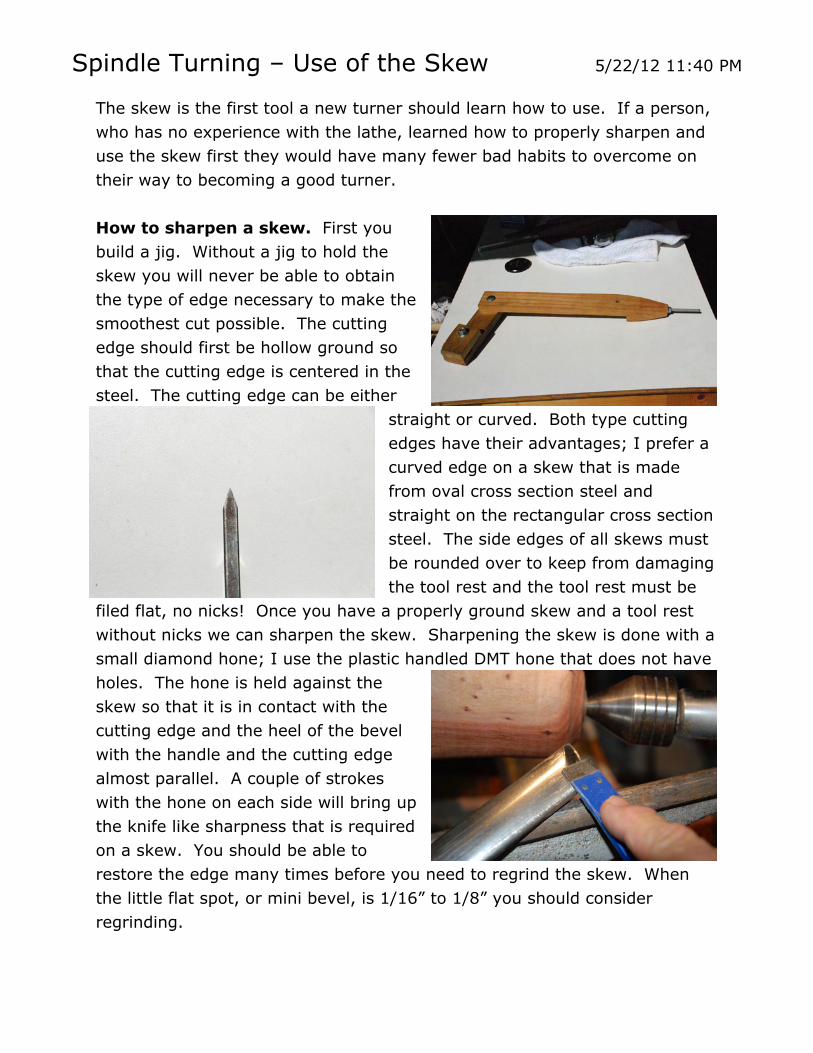
The skew is the first tool a new turner should learn how to use. If a person, who has no experience with the lathe, learned how to properly sharpen and use the skew first they would have many fewer bad habits to overcome on their way to becoming a good turner. How to sharpen a skew. First you build a jig. Without a jig to hold the skew you will never be able to obtain the type of edge necessary to make the smoothest cut possible. The cutting edge should first be hollow ground so that the cutting edge is centered in the steel. The cutting edge can be either
straight or curved. Both type cutting edges have their advantages; I prefer a curved edge on a skew that is made from oval cross section steel and straight on the rectangular cross section steel. The side edges of all skews must be rounded over to keep from damaging the tool rest and the tool rest must be
filed flat, no nicks! Once you have a properly ground skew and a tool rest without nicks we can sharpen the skew. Sharpening the skew is done with a small diamond hone; I use the plastic handled DMT hone that does not have holes. The hone is held against the skew so that it is in contact with the cutting edge and the heel of the bevel with the handle and the cutting edge almost parallel. A couple of strokes with the hone on each side will bring up the knife like sharpness that is required on a skew. You should be able to restore the edge many times before you need to regrind the skew. When the little flat spot, or mini bevel, is 1/16” to 1/8” you should consider regrinding.

A good instructor will have learning stock prepared that is already round. I will take a little rabbit trail here to talk about the spindle-roughing gouge. The spindle-roughing gouge is that strange “U” shaped tool that has a very small cross section tang with which it is attached to the handle. This tool should only be used for wood that is mounted spindle fashioned; it is NOT a faceplate tool. To use this tool for roughing it should be anchored on the tool rest. Then the bevel will contact the wood on a tangent that will bring the bevel into contact with the wood. Then the cut is made simply by letting the cutting edge at the bottom of the “U” to turn away the high spots. To turn using a skew, first you must know the shape you are trying to achieve then mark the maximum and minimum diameters on the stick. Look at a Sorby tool handle it has a maximum diameter about ¼ of the way down from the tool end and a minimum diameter about 1/3 the way from the end away from the tool. Marking a line at these locations start to turn by anchoring the skew to the tool rest so that you will be cutting just before the tool end of the blank. Rub the bevel on the rotating wood then make that little sliding motion that keeps the tool on the tool rest and the bevel on the wood till you just see the sawdust beginning to form on the cutting edge. It should be coming over the tool 1/3 of the way up the cutting edge of the skew, if not a slight rotation of the tool is necessary to find that 1/3 sweet spot. Now all you have to do is push the tool in the direction of the cut to remove wood. When you get to the end of the blank all you have to do is pick the tool up and reset to a new spot a little further up the blank then ABC and take a little more off of the blank. Repeat as necessary to make the shape you want, as you get closer to the mark on the blank, the diameter of the blank on the end should be what you want on the end, if not cut some more till it is! Remember to keep the cut a flowing curve; Sorby tools don’t have straight sides! On the other end you will have to change directions start a
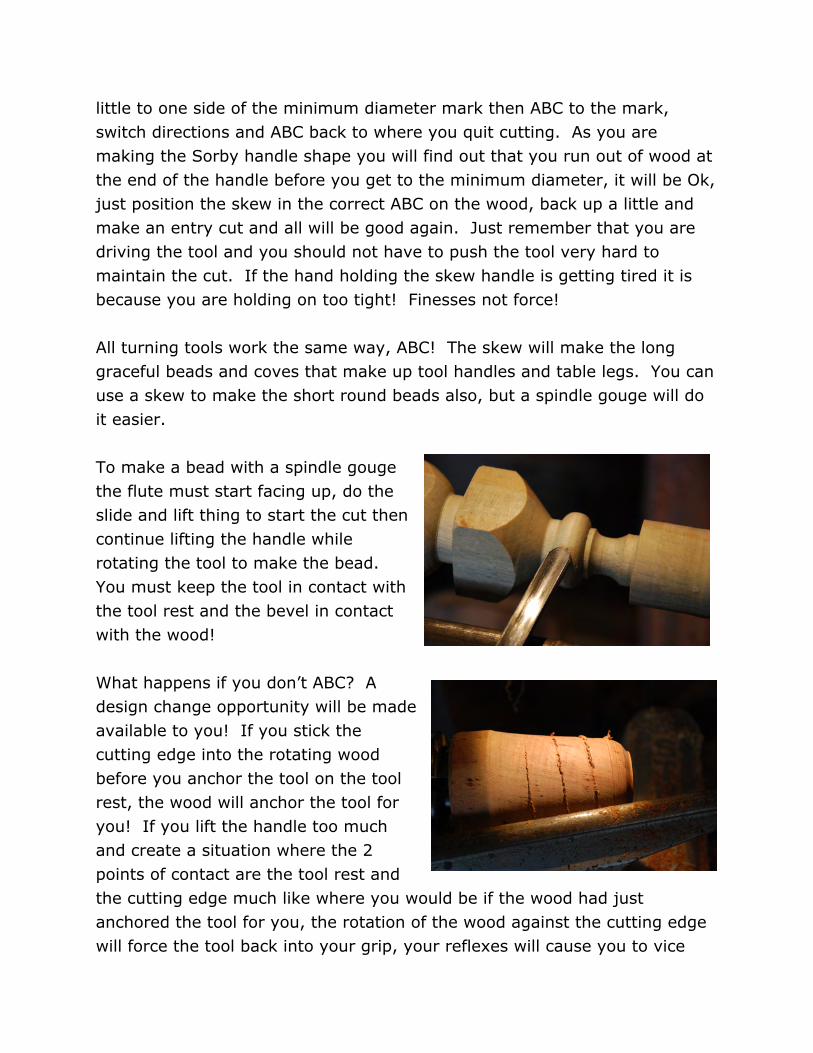
little to one side of the minimum diameter mark then ABC to the mark, switch directions and ABC back to where you quit cutting. As you are making the Sorby handle shape you will find out that you run out of wood at the end of the handle before you get to the minimum diameter, it will be Ok, just position the skew in the correct ABC on the wood, back up a little and make an entry cut and all will be good again. Just remember that you are driving the tool and you should not have to push the tool very hard to maintain the cut. If the hand holding the skew handle is getting tired it is because you are holding on too tight! Finesses not force! All turning tools work the same way, ABC! The skew will make the long graceful beads and coves that make up tool handles and table legs. You can use a skew to make the short round beads also, but a spindle gouge will do it easier. To make a bead with a spindle gouge the flute must start facing up, do the slide and lift thing to start the cut then continue lifting the handle while rotating the tool to make the bead. You must keep the tool in contact with the tool rest and the bevel in contact with the wood! What happens if you don’t ABC? A design change opportunity will be made available to you! If you stick the cutting edge into the rotating wood before you anchor the tool on the tool rest, the wood will anchor the tool for you! If you lift the handle too much and create a situation where the 2 points of contact are the tool rest and the cutting edge much like where you would be if the wood had just anchored the tool for you, the rotation of the wood against the cutting edge will force the tool back into your grip, your reflexes will cause you to vice
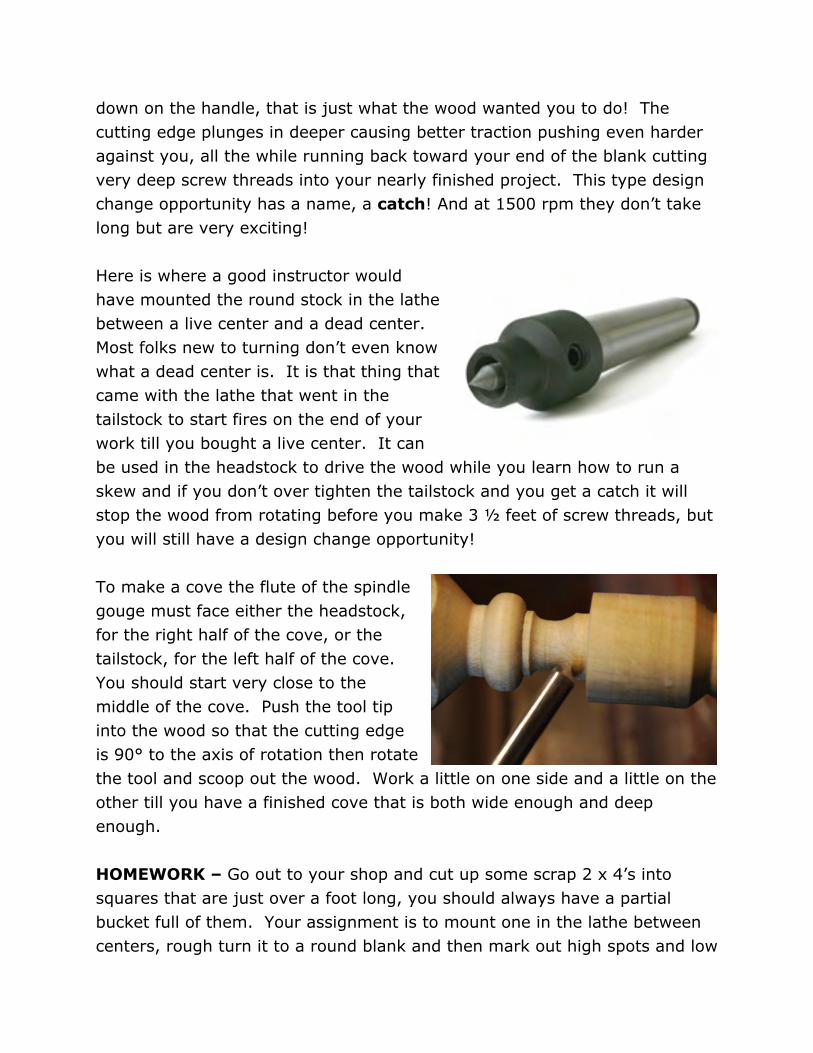
down on the handle, that is just what the wood wanted you to do! The cutting edge plunges in deeper causing better traction pushing even harder against you, all the while running back toward your end of the blank cutting very deep screw threads into your nearly finished project. This type design change opportunity has a name, a catch! And at 1500 rpm they don’t take long but are very exciting! Here is where a good instructor would have mounted the round stock in the lathe between a live center and a dead center. Most folks new to turning don’t even know what a dead center is. It is that thing that came with the lathe that went in the tailstock to start fires on the end of your work till you bought a live center. It can be used in the headstock to drive the wood while you learn how to run a skew and if you don’t over tighten the tailstock and you get a catch it will stop the wood from rotating before you make 3 ½ feet of screw threads, but you will still have a design change opportunity! To make a cove the flute of the spindle gouge must face either the headstock, for the right half of the cove, or the tailstock, for the left half of the cove. You should start very close to the middle of the cove. Push the tool tip into the wood so that the cutting edge is 90° to the axis of rotation then rotate the tool and scoop out the wood. Work a little on one side and a little on the other till you have a finished cove that is both wide enough and deep enough. HOMEWORK – Go out to your shop and cut up some scrap 2 x 4’s into squares that are just over a foot long, you should always have a partial bucket full of them. Your assignment is to mount one in the lathe between centers, rough turn it to a round blank and then mark out high spots and low

spots and any flats that you want between beads and coves. Now use the parting tool to establish the flats between the beads and coves. Next you can establish the low spots, be sure to stay just shy of the finished low diameter. Now use a combination of the skew and spindle gouges to make a finished turning. Ok, got one done. Now make another that is identical! Keep trying till you can get 4 that look close enough to make table legs from. Technique drill – Mount one of your blanks from the bucket on the lathe and mark a line 3 inches from one end, usually the headstock end. Rough turn the long end of the blank to round staying at least 1 inch away from the 3-inch line. Now mark out a design for a leg, mark the highs and lows but be sure to mark a high 1 inch away from the 3 inch line. Use the skew to make a straight cut from the 3-inch line to the high marked 1 inch away. That is harder than it looks, use only the long point of the skew and make sure to leave just a little clearance between the cutting edge of the skew and the edge you are cutting. Now turn off the lathe and look at the results, you should have a very graceful curve on the square portion of the turning. Now, lay out another that is identical to the first, but this time use a spindle gouge to make the cut and have it take the shape of a half bead. Compare the two see the difference? Keep practicing till you can get 4 legs that look the same.
Faceplate Turning and the Bowl Gouge 5/22/12 11:40 PM
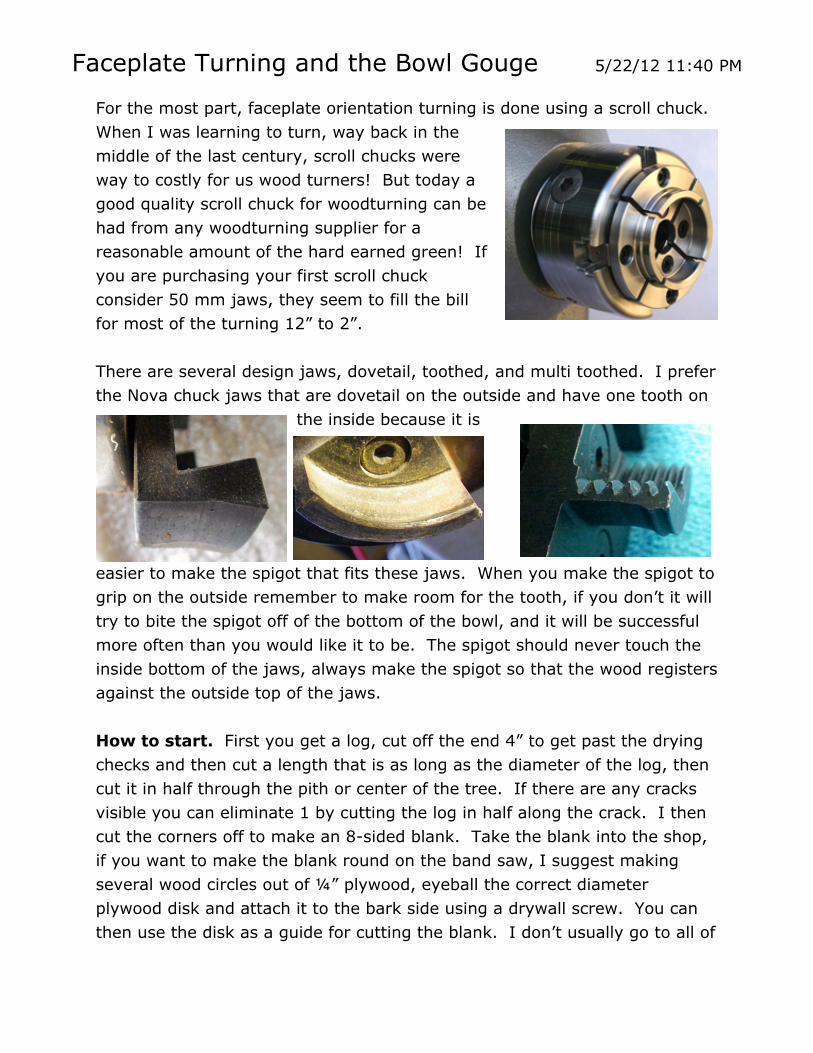
For the most part, faceplate orientation turning is done using a scroll chuck. When I was learning to turn, way back in the middle of the last century, scroll chucks were way to costly for us wood turners! But today a good quality scroll chuck for woodturning can be had from any woodturning supplier for a reasonable amount of the hard earned green! If you are purchasing your first scroll chuck consider 50 mm jaws, they seem to fill the bill for most of the turning 12” to 2”. There are several design jaws, dovetail, toothed, and multi toothed. I prefer the Nova chuck jaws that are dovetail on the outside and have one tooth on
the inside because it is
easier to make the spigot that fits these jaws. When you make the spigot to grip on the outside remember to make room for the tooth, if you don’t it will try to bite the spigot off of the bottom of the bowl, and it will be successful more often than you would like it to be. The spigot should never touch the inside bottom of the jaws, always make the spigot so that the wood registers against the outside top of the jaws. How to start. First you get a log, cut off the end 4” to get past the drying checks and then cut a length that is as long as the diameter of the log, then cut it in half through the pith or center of the tree. If there are any cracks visible you can eliminate 1 by cutting the log in half along the crack. I then cut the corners off to make an 8-sided blank. Take the blank into the shop, if you want to make the blank round on the band saw, I suggest making several wood circles out of ¼” plywood, eyeball the correct diameter plywood disk and attach it to the bark side using a drywall screw. You can then use the disk as a guide for cutting the blank. I don’t usually go to all of

this trouble and use the lathe to make the blank round. If the bark is heavy or loose you may want to remove some of it in the area where the tailstock will be holding the blank. Next, hang the blank between the live center and the center of the drive center. Make small adjustments in the positioning to make the grain of the wood as close to 90° to the axis of rotation and balance the blank at the same time. When done you should be able to rotate the blank by hand and have it come to rest with no indication of a heavy side. I now use the drive center as a really bad drill, hold the blank, start the lathe and apply pressure with the tailstock to drill a recess into the blank, I quit when the recess has a flat bottom. Turn the lathe off and tighten the tailstock. You can now start the lathe without turning the speed all the way down because it is already balanced. With the lathe off, position the tool rest and check for clearance by rotating by hand. Bring the speed up to a point before it starts vibrating and make the initial cuts by coming in from the headstock side with the bowl gouge held with the flute facing away from the wood and cutting edge almost parallel with the face of the blank. Start cutting by advancing the tool into the wood; what I try to do is face off the chain saw cut face of the bowl to see where a complete circle will be. I can then rough turn bark and wood to that point. When you have a complete circle you can cause the tool to enter the wood and create a ledge to ride the bevel against, then it is back to ABC. For this handout I am starting with a small limb section and am using the lathe to turn to round from the half log. I started by cutting the log down the middle with the band saw, and then
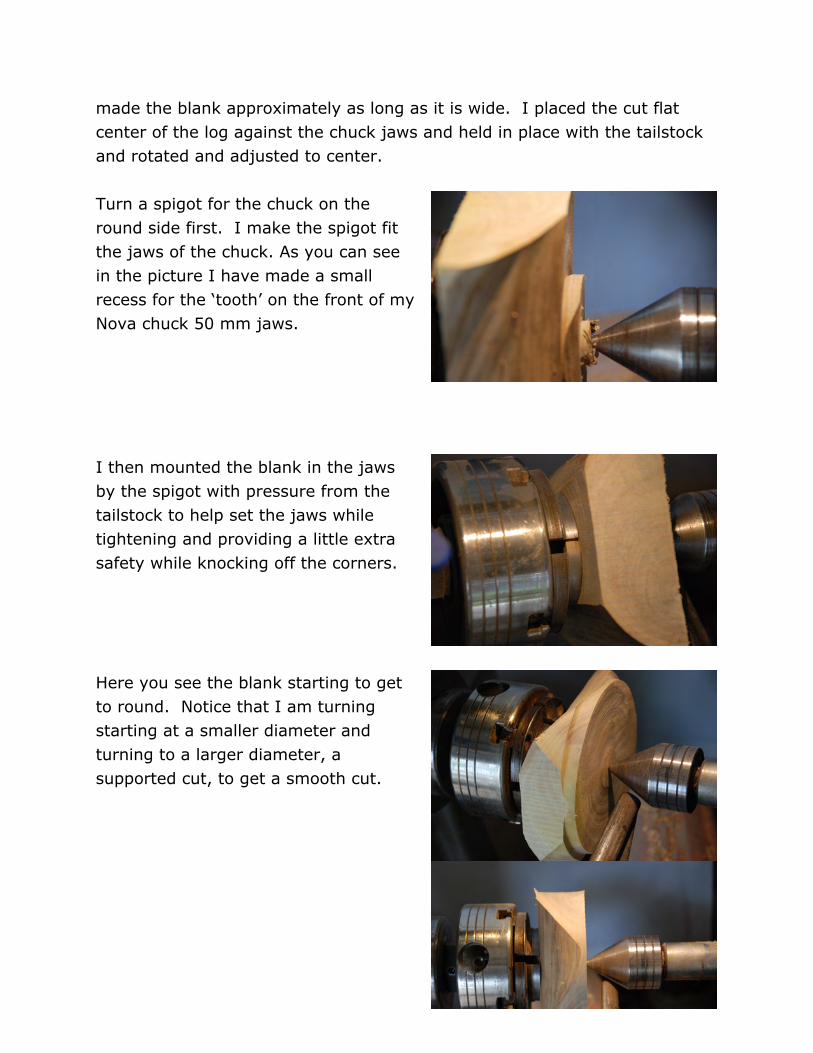
made the blank approximately as long as it is wide. I placed the cut flat center of the log against the chuck jaws and held in place with the tailstock and rotated and adjusted to center. Turn a spigot for the chuck on the round side first. I make the spigot fit the jaws of the chuck. As you can see in the picture I have made a small recess for the ‘tooth’ on the front of my Nova chuck 50 mm jaws. I then mounted the blank in the jaws by the spigot with pressure from the tailstock to help set the jaws while tightening and providing a little extra safety while knocking off the corners. Here you see the blank starting to get to round. Notice that I am turning starting at a smaller diameter and turning to a larger diameter, a supported cut, to get a smooth cut.
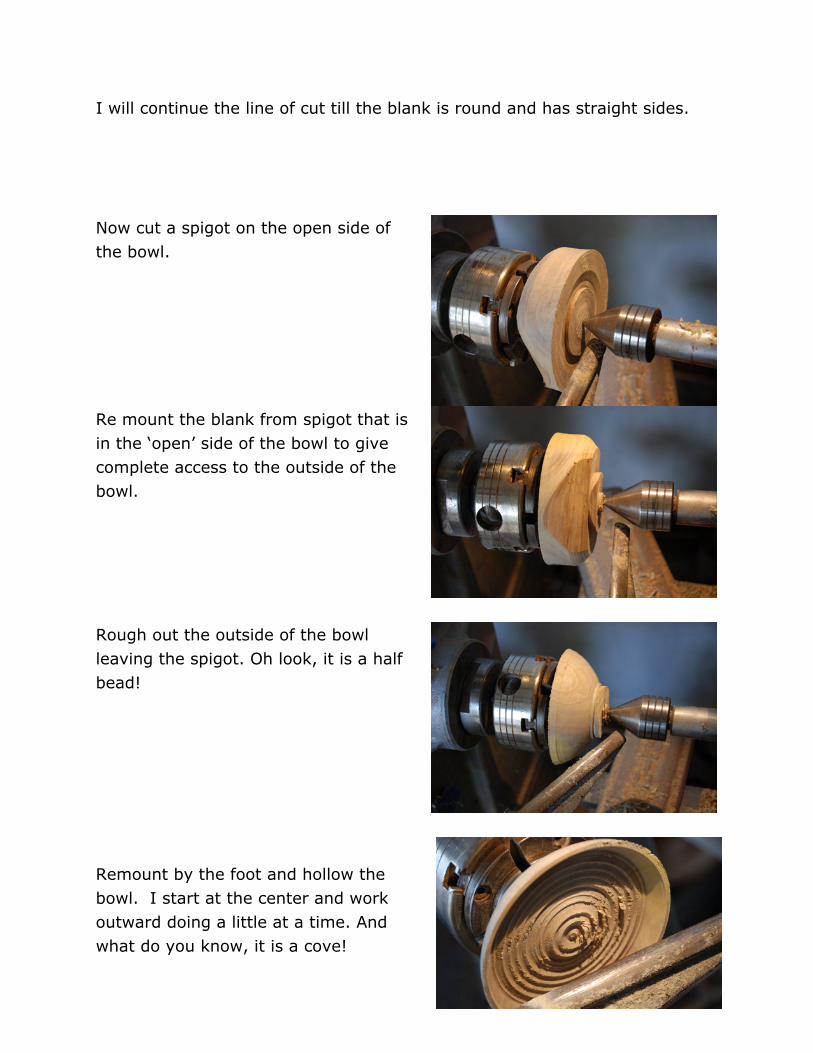
I will continue the line of cut till the blank is round and has straight sides. Now cut a spigot on the open side of the bowl. Re mount the blank from spigot that is in the ‘open’ side of the bowl to give complete access to the outside of the bowl. Rough out the outside of the bowl leaving the spigot. Oh look, it is a half bead! Remount by the foot and hollow the bowl. I start at the center and work outward doing a little at a time. And what do you know, it is a cove!
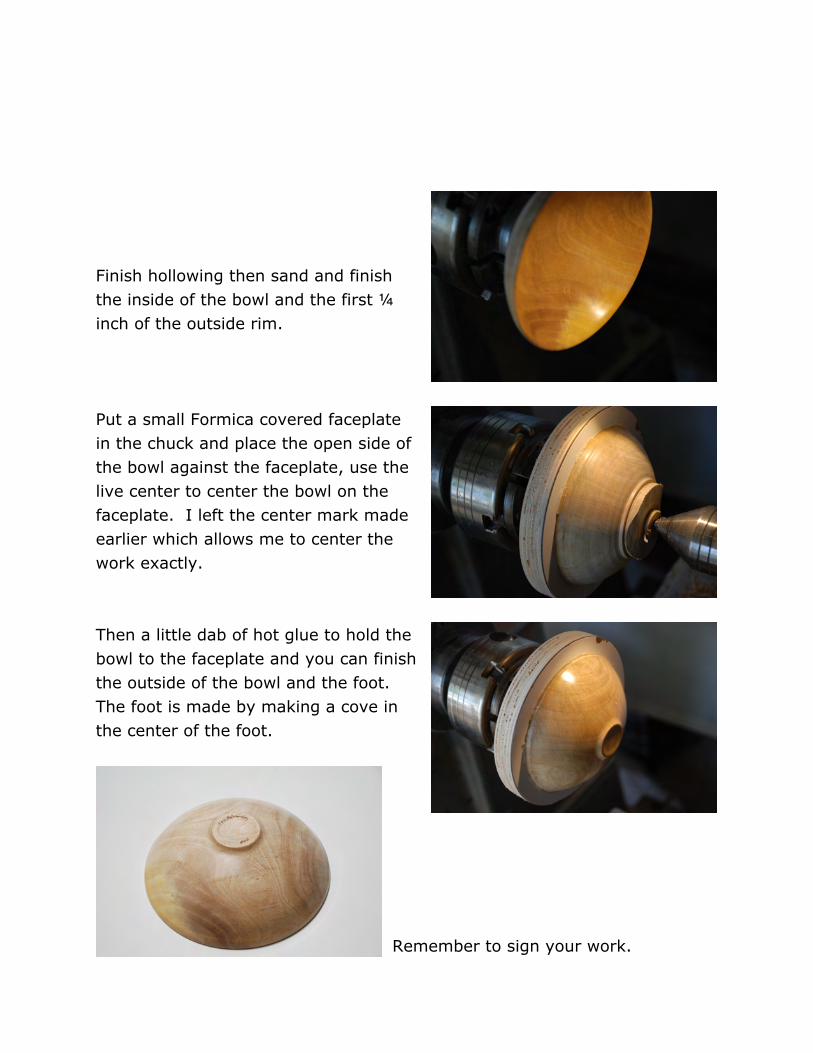
Finish hollowing then sand and finish the inside of the bowl and the first ¼ inch of the outside rim. Put a small Formica covered faceplate in the chuck and place the open side of the bowl against the faceplate, use the live center to center the bowl on the faceplate. I left the center mark made earlier which allows me to center the work exactly. Then a little dab of hot glue to hold the bowl to the faceplate and you can finish the outside of the bowl and the foot. The foot is made by making a cove in the center of the foot.
Remember to sign your work.

My website is www.browningwoodturning.com and you may contact me by email at [email protected]