Embed Size (px)
Citation preview
Brenda Hoddinott
P-01 INTERMEDIATE: PEOPLE In this project, you use a grid to draw a soft and gentle frontal portrait of a little girl, with emphasis on correct facial proportions. Hatching is used to shade realistic textures features, hair, and the forms of her face.
Ashley is approximately 5-7 years old. In a younger child, the eyes would appear to be lower on the face and the nose and mouth would be higher, closer to the eyes. As a child matures into an adult, the nose and mouth seem to shift downward on the face.
This project is divided into the following three sections:
DRAWING OUTLINES WITHIN A GRID: A grid helps identify the outlines of various parts of the drawing subject. You use careful observation of spaces and lines within individual grid squares to measure for accurate proportions. Remember to press very lightly with your pencil in this section because all your grid lines and most of your outlines will need to be erased (or lightened) later.
SHADING LIGHT AND MEDIUM VALUES: You need 2H, HB, and 2B pencils to add light and medium values. The dominant light source, which is to the front and right of Ashley’s face, determines where the various light and medium values are located.
ADDING THE FINAL SHADING: In this section you use mostly 2B, 4B, and 6B pencils to add final details and darker values.
You need 2H, HB, 2B, 4B, and 6B pencils, vinyl and kneaded erasers, ruler, pencil sharpener, and good quality drawing paper.
19 PAGES – 17 ILLUSTRATIONS This lesson is recommended for artists from age twelve through adulthood with basic drawing
skills, as well as home schooling, academic and recreational fine art educators.
Published by Hoddinott Fine Art Publishers, Halifax, NS, Canada – 2004 (Revised 2006)
Copyright to all articles, images, text, projects, lessons and exercises within this drawing class belong to Brenda Hoddinott and may not be reproduced or used for any commercial purposes whatsoever without the written permission of Brenda Hoddinott.
E-mail [email protected] Web sites http://www.finearteducation.com and http://www.drawspace.com
2
DRAWING OUTLINES WITHIN A GRID Throughout this section, you use careful observation of spaces and lines within individual grid squares to measure for accurate proportions. A grid is a framework of vertical and horizontal reference lines on an image and/or drawing paper, used by artists to either enlarge or reduce the size of the original image. Proportion is the relationship in size of one component of a drawing to another or others.
Remember to press very lightly with your pencil because all your grid lines and most of your contour lines will need to be erased (or lightened) later. Contour lines are created when the shared edges of spaces and/or objects meet. Contour lines can define complete objects or small sections or details within drawing subjects. The lines in the following illustrations have been darkened in a computer program and appear much darker that they actually are.
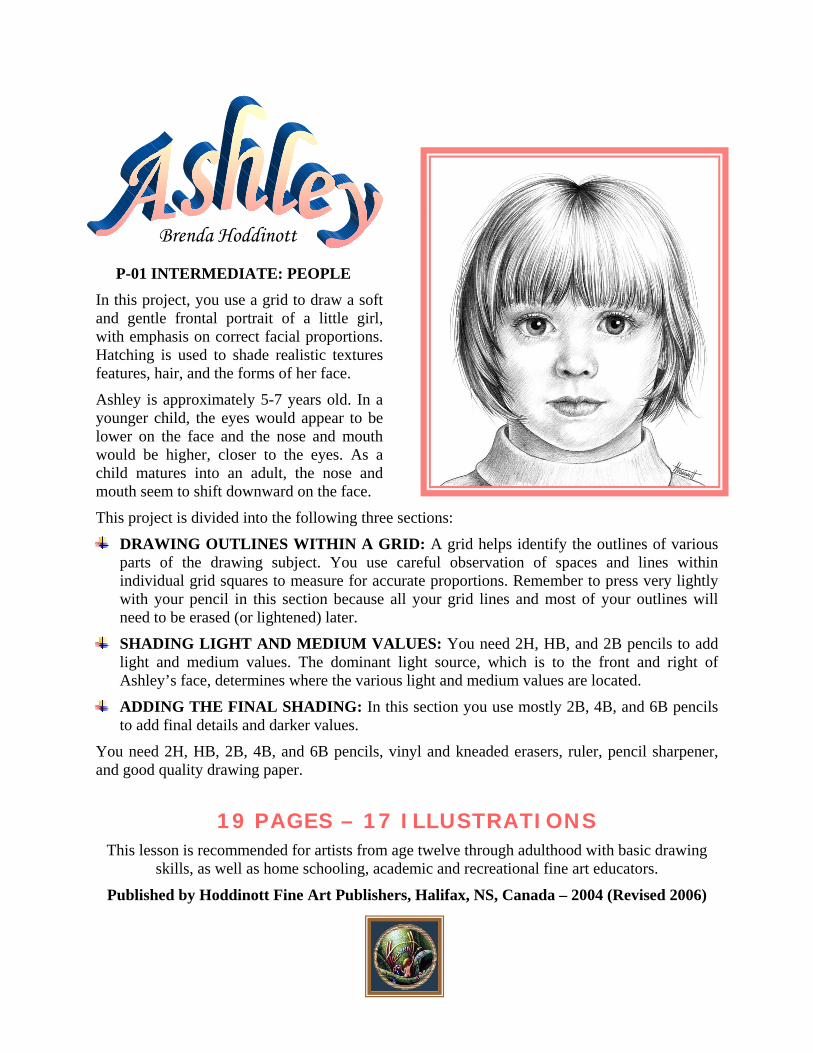
1) Draw a rectangle as your drawing space, and then measure and divide your rectangle into 56 equal squares, seven across by eight down. A drawing space (sometimes called a drawing format) refers to the area of a drawing surface within a specific perimeter, outlined by a shape of any size, such as a square, rectangle or circle.
Use a light pencil (2H or HB). You will have 7 squares across and 8 squares down (a total of 56 squares). My drawing format is 7 by 8 inches with 1-inch squares. You may choose to use a larger drawing format for a larger drawing; simply make each of the 56 squares larger. Suggested alternative sizes include 10.5 by 12 inches (with 1.5-inch squares) or 14 by 16 inches (with 2-inch squares).
ILLUSTRATION 01-01
2) Starting from the left, number the vertical squares along the top and bottom of with numbers 1 through 7. Lettering and numbering your grid squares helps you keep track of each square as you draw. For example, the nostrils will be drawn in square F-4.
3) Starting from the top, letter the horizontal squares down both sides with letters A through H.
Copyright to all articles, images, text, projects, lessons and exercises within this drawing class belong to Brenda Hoddinott and may not be reproduced or used for any commercial purposes whatsoever without the written permission of Brenda Hoddinott.
E-mail [email protected] Web sites http://www.finearteducation.com and http://www.drawspace.com
3
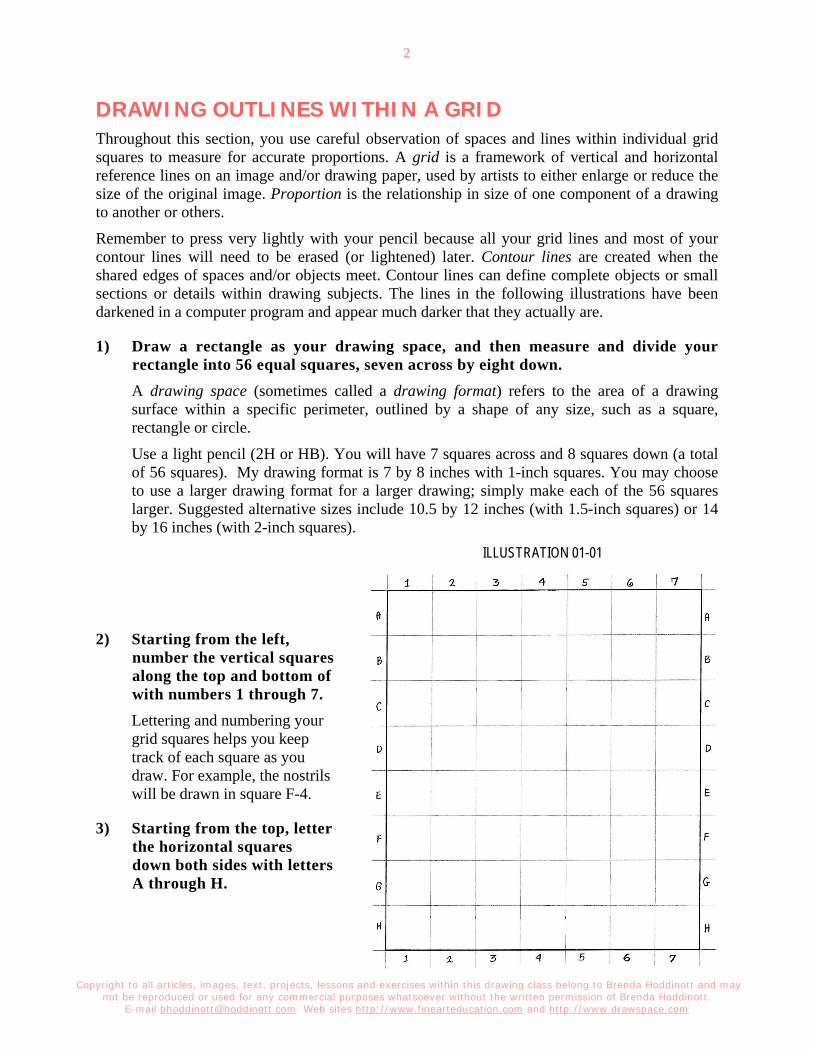
4) With your HB pencil, very lightly draw the outline of the head and chin. Until your eye is well trained to draw accurate proportions, using a grid is a huge help. When working with a grid, think of each square as a separate drawing.
Following is the basic procedure for drawing with a grid:
Focus on one square
Pretend this one square is the total drawing.
Look at each line (or lines) and its position within this one square.
Note the shape of the spaces on either side of each line.
Take note of the areas where the various curved lines meet straight lines (such as the sides of the grid squares).
ILLUSTRATION 01-02
As you draw, don’t think about what the subject is; rather, focus on the shapes, and spaces that define the actual lines.
Constantly double-check your proportions!
Copyright to all articles, images, text, projects, lessons and exercises within this drawing class belong to Brenda Hoddinott and may not be reproduced or used for any commercial purposes whatsoever without the written permission of Brenda Hoddinott.
E-mail [email protected] Web sites http://www.finearteducation.com and http://www.drawspace.com
4
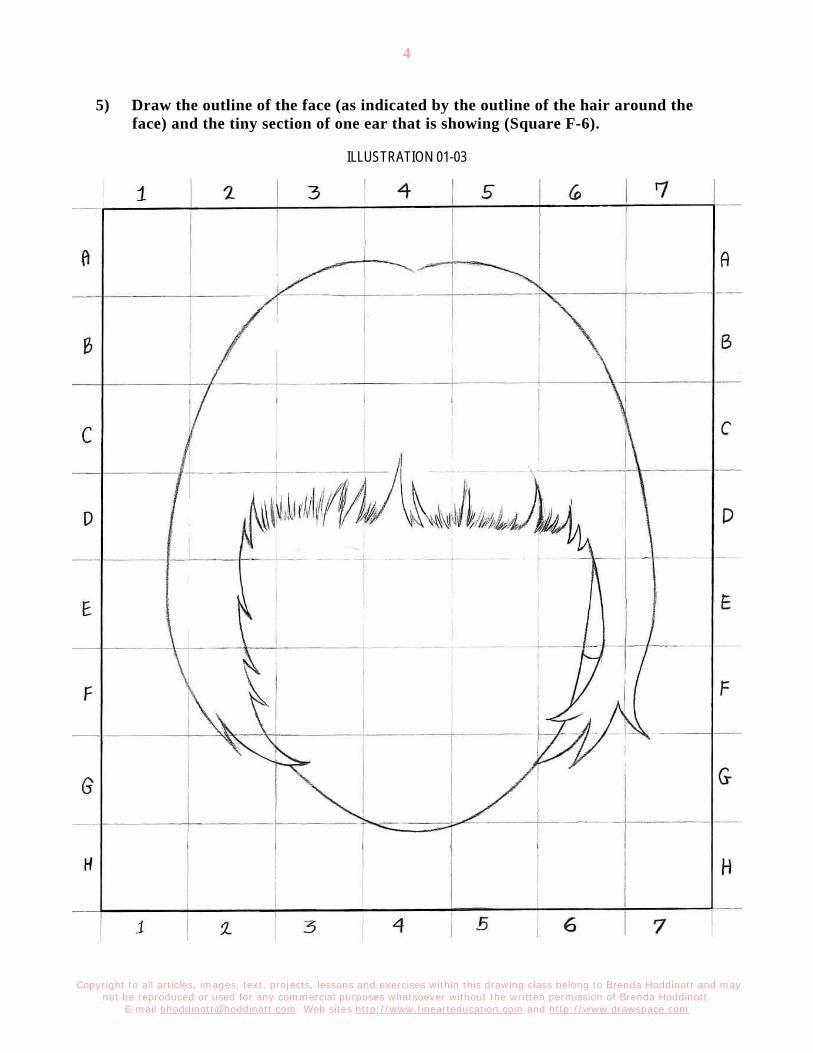
5) Draw the outline of the face (as indicated by the outline of the hair around the face) and the tiny section of one ear that is showing (Square F-6).
ILLUSTRATION 01-03
Copyright to all articles, images, text, projects, lessons and exercises within this drawing class belong to Brenda Hoddinott and may not be reproduced or used for any commercial purposes whatsoever without the written permission of Brenda Hoddinott.
E-mail [email protected] Web sites http://www.finearteducation.com and http://www.drawspace.com
5
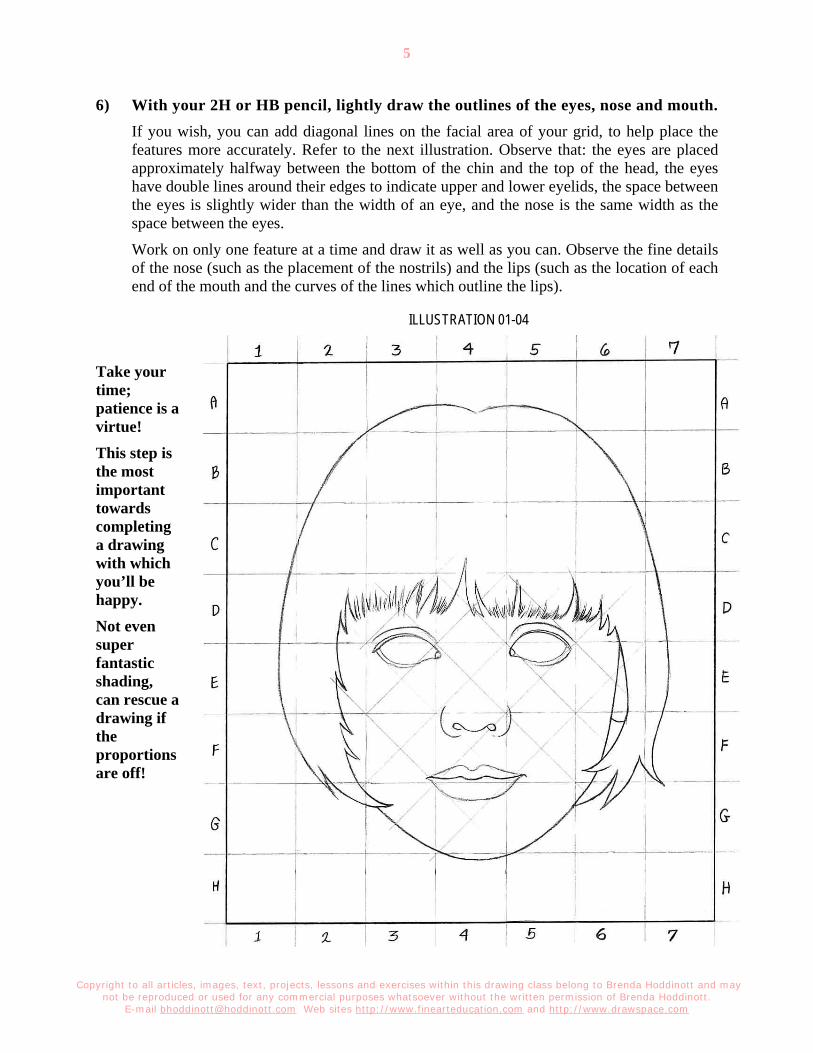
6) With your 2H or HB pencil, lightly draw the outlines of the eyes, nose and mouth. If you wish, you can add diagonal lines on the facial area of your grid, to help place the features more accurately. Refer to the next illustration. Observe that: the eyes are placed approximately halfway between the bottom of the chin and the top of the head, the eyes have double lines around their edges to indicate upper and lower eyelids, the space between the eyes is slightly wider than the width of an eye, and the nose is the same width as the space between the eyes.
Work on only one feature at a time and draw it as well as you can. Observe the fine details of the nose (such as the placement of the nostrils) and the lips (such as the location of each end of the mouth and the curves of the lines which outline the lips).
ILLUSTRATION 01-04
Take your time; patience is a virtue! This step is the most important towards completing a drawing with which you’ll be happy. Not even super fantastic shading, can rescue a drawing if the proportions are off!
Copyright to all articles, images, text, projects, lessons and exercises within this drawing class belong to Brenda Hoddinott and may not be reproduced or used for any commercial purposes whatsoever without the written permission of Brenda Hoddinott.
E-mail [email protected] Web sites http://www.finearteducation.com and http://www.drawspace.com
6
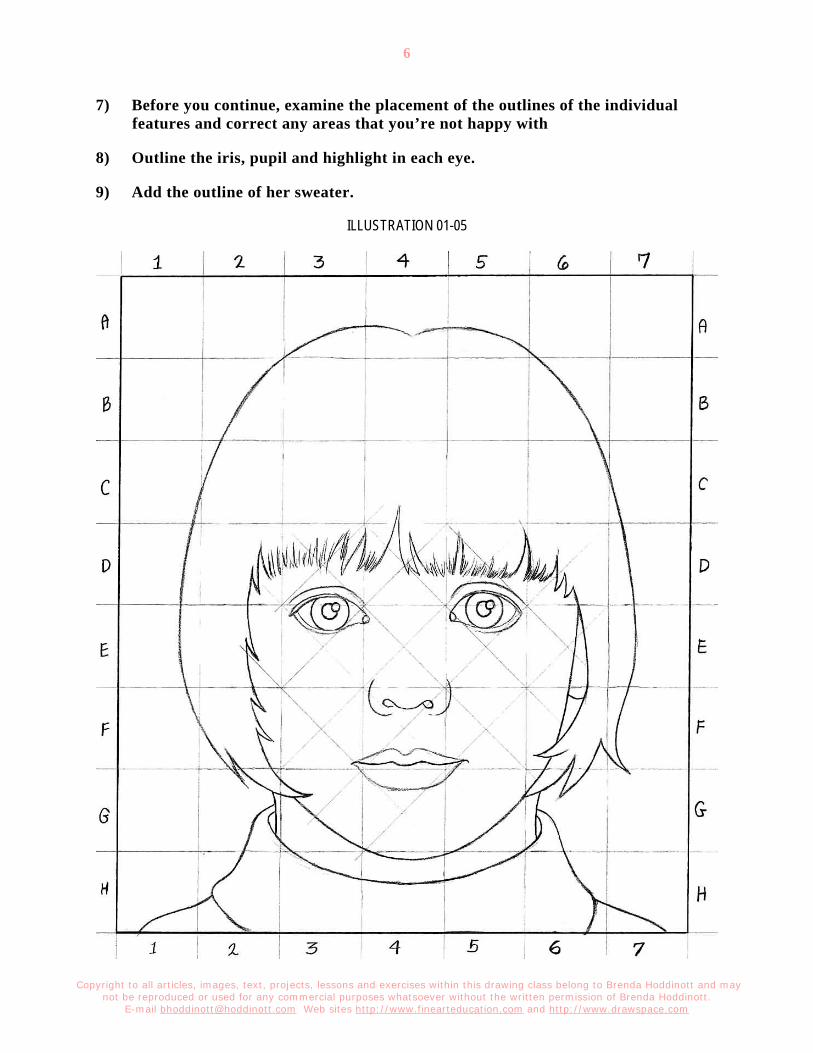
7) Before you continue, examine the placement of the outlines of the individual features and correct any areas that you’re not happy with
8) Outline the iris, pupil and highlight in each eye.
9) Add the outline of her sweater.
ILLUSTRATION 01-05
Copyright to all articles, images, text, projects, lessons and exercises within this drawing class belong to Brenda Hoddinott and may not be reproduced or used for any commercial purposes whatsoever without the written permission of Brenda Hoddinott.
E-mail [email protected] Web sites http://www.finearteducation.com and http://www.drawspace.com
7
SHADING LIGHT AND MEDIUM VALUES You need 2H, HB, and 2B pencils to add the light and medium values. Values are the different shades of gray created when you draw by varying both the density of the shading lines, and the pressure used in holding various pencils. Density refers to whether the individual lines are close together or far apart.
The dominant light source, which is to the front and right of Ashley’s face, determines where the various light and medium values are located. Light source refers to the direction from which a dominant light originates. The placement of this light source affects every aspect of a drawing and subsequently tells you where to draw all the light values and shadows.
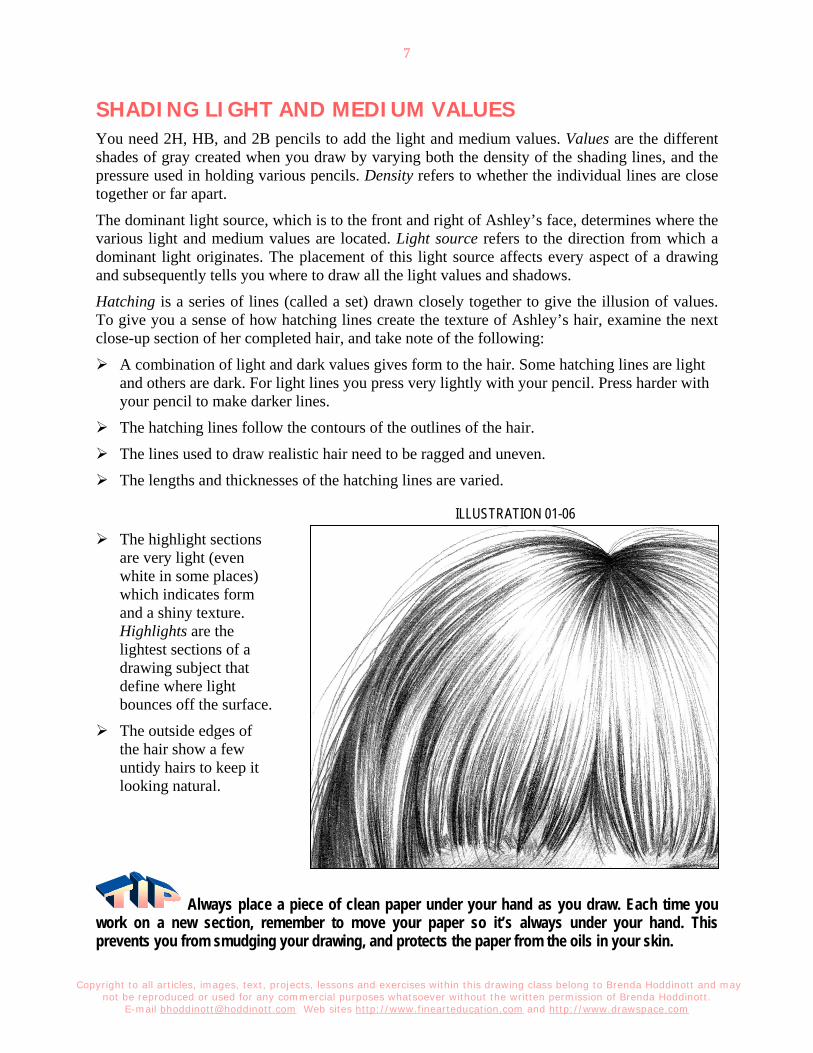
Hatching is a series of lines (called a set) drawn closely together to give the illusion of values. To give you a sense of how hatching lines create the texture of Ashley’s hair, examine the next close-up section of her completed hair, and take note of the following:
A combination of light and dark values gives form to the hair. Some hatching lines are light and others are dark. For light lines you press very lightly with your pencil. Press harder with your pencil to make darker lines.
The hatching lines follow the contours of the outlines of the hair.
The lines used to draw realistic hair need to be ragged and uneven.
The lengths and thicknesses of the hatching lines are varied.
ILLUSTRATION 01-06
The highlight sections are very light (even white in some places) which indicates form and a shiny texture. Highlights are the lightest sections of a drawing subject that define where light bounces off the surface.
The outside edges of the hair show a few untidy hairs to keep it looking natural.
Always place a piece of clean paper under your hand as you draw. Each time you work on a new section, remember to move your paper so it’s always under your hand. This prevents you from smudging your drawing, and protects the paper from the oils in your skin.
Copyright to all articles, images, text, projects, lessons and exercises within this drawing class belong to Brenda Hoddinott and may not be reproduced or used for any commercial purposes whatsoever without the written permission of Brenda Hoddinott.
E-mail [email protected] Web sites http://www.finearteducation.com and http://www.drawspace.com
8
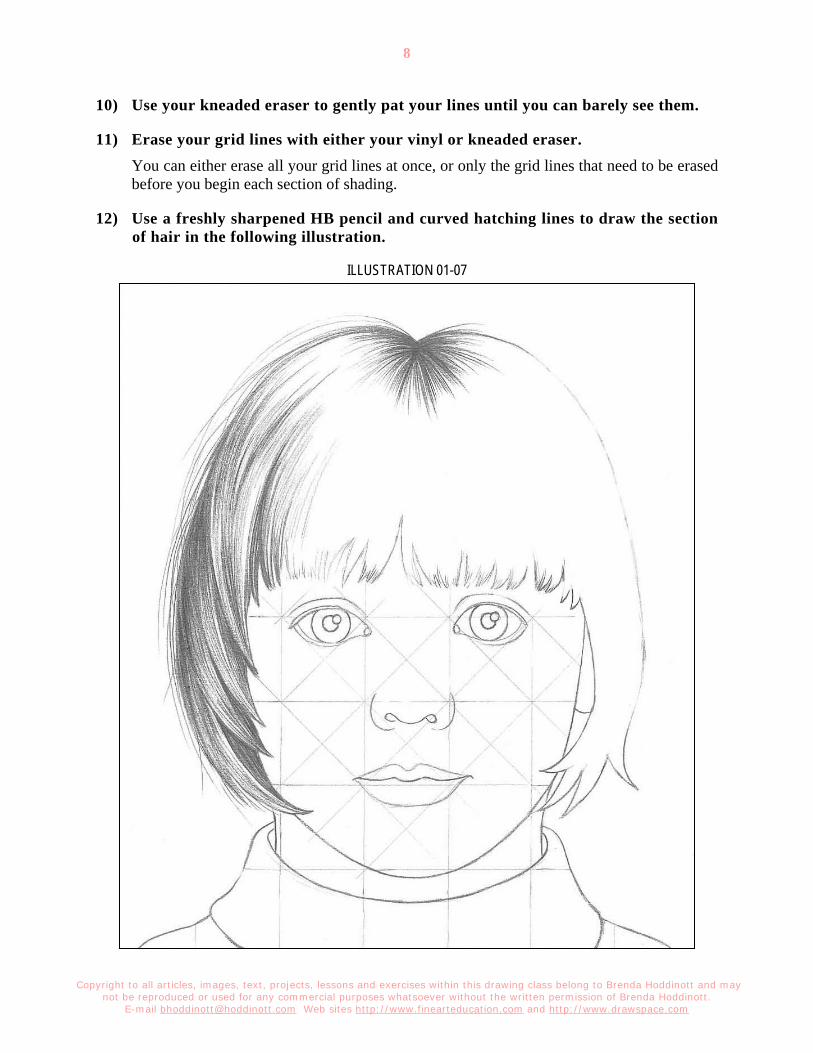
10) Use your kneaded eraser to gently pat your lines until you can barely see them.
11) Erase your grid lines with either your vinyl or kneaded eraser. You can either erase all your grid lines at once, or only the grid lines that need to be erased before you begin each section of shading.
12) Use a freshly sharpened HB pencil and curved hatching lines to draw the section of hair in the following illustration.
ILLUSTRATION 01-07
Copyright to all articles, images, text, projects, lessons and exercises within this drawing class belong to Brenda Hoddinott and may not be reproduced or used for any commercial purposes whatsoever without the written permission of Brenda Hoddinott.
E-mail [email protected] Web sites http://www.finearteducation.com and http://www.drawspace.com
9
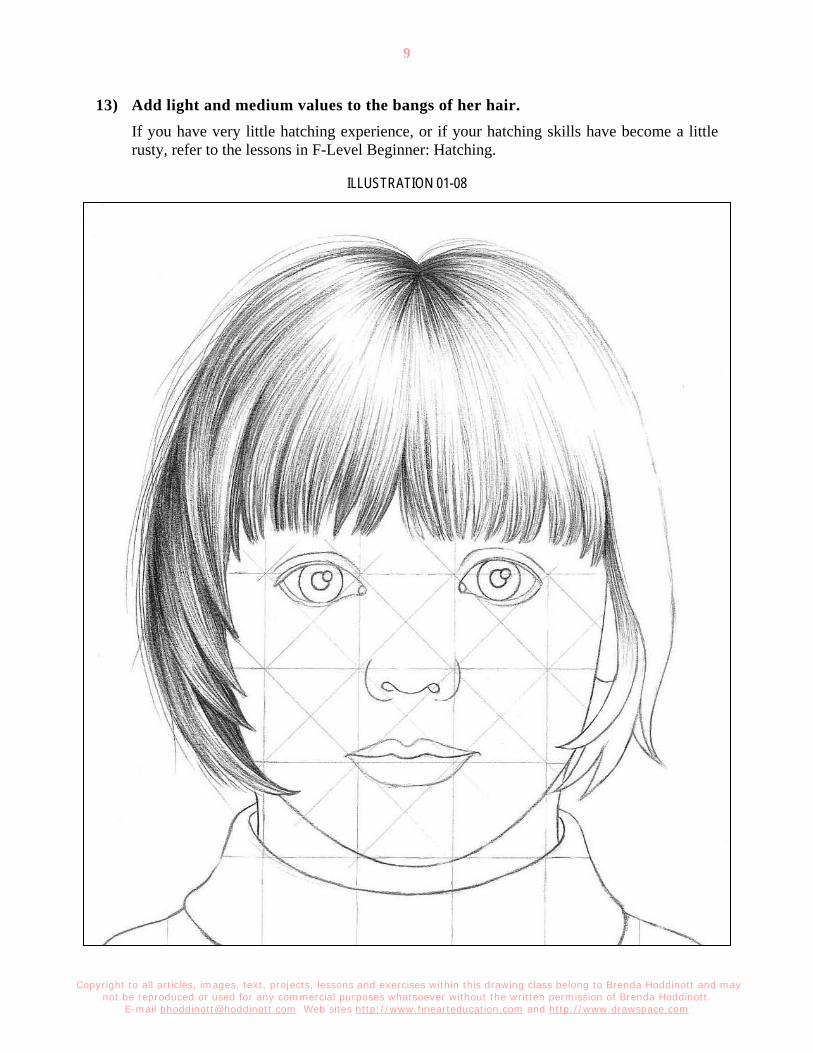
13) Add light and medium values to the bangs of her hair. If you have very little hatching experience, or if your hatching skills have become a little rusty, refer to the lessons in F-Level Beginner: Hatching.
ILLUSTRATION 01-08
Copyright to all articles, images, text, projects, lessons and exercises within this drawing class belong to Brenda Hoddinott and may not be reproduced or used for any commercial purposes whatsoever without the written permission of Brenda Hoddinott.
E-mail [email protected] Web sites http://www.finearteducation.com and http://www.drawspace.com
10
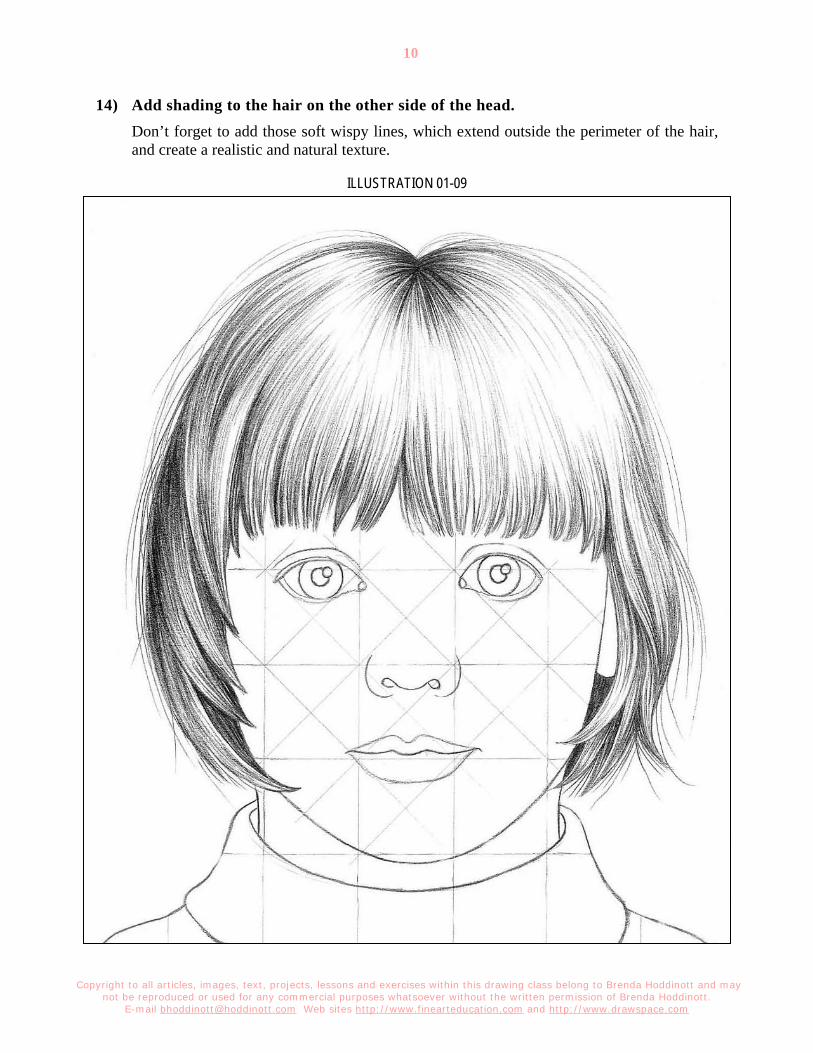
14) Add shading to the hair on the other side of the head. Don’t forget to add those soft wispy lines, which extend outside the perimeter of the hair, and create a realistic and natural texture.
ILLUSTRATION 01-09
Copyright to all articles, images, text, projects, lessons and exercises within this drawing class belong to Brenda Hoddinott and may not be reproduced or used for any commercial purposes whatsoever without the written permission of Brenda Hoddinott.
E-mail [email protected] Web sites http://www.finearteducation.com and http://www.drawspace.com
11
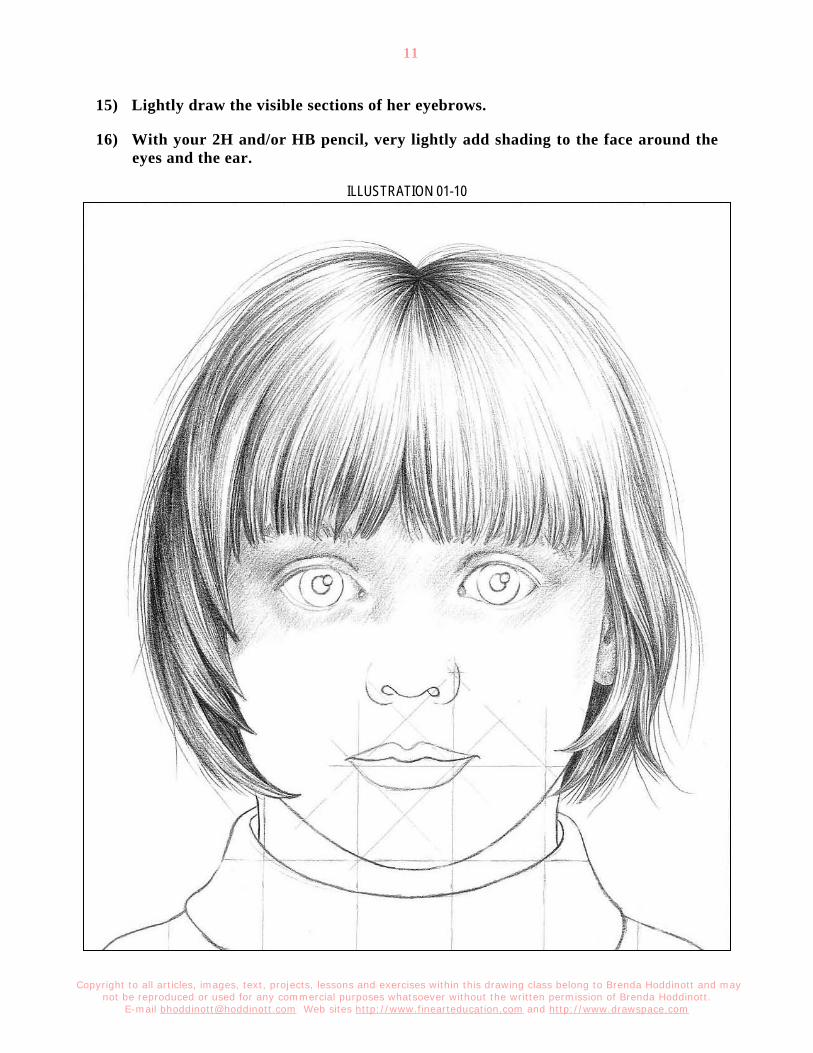
15) Lightly draw the visible sections of her eyebrows.
16) With your 2H and/or HB pencil, very lightly add shading to the face around the eyes and the ear.
ILLUSTRATION 01-10
Copyright to all articles, images, text, projects, lessons and exercises within this drawing class belong to Brenda Hoddinott and may not be reproduced or used for any commercial purposes whatsoever without the written permission of Brenda Hoddinott.
E-mail [email protected] Web sites http://www.finearteducation.com and http://www.drawspace.com
12
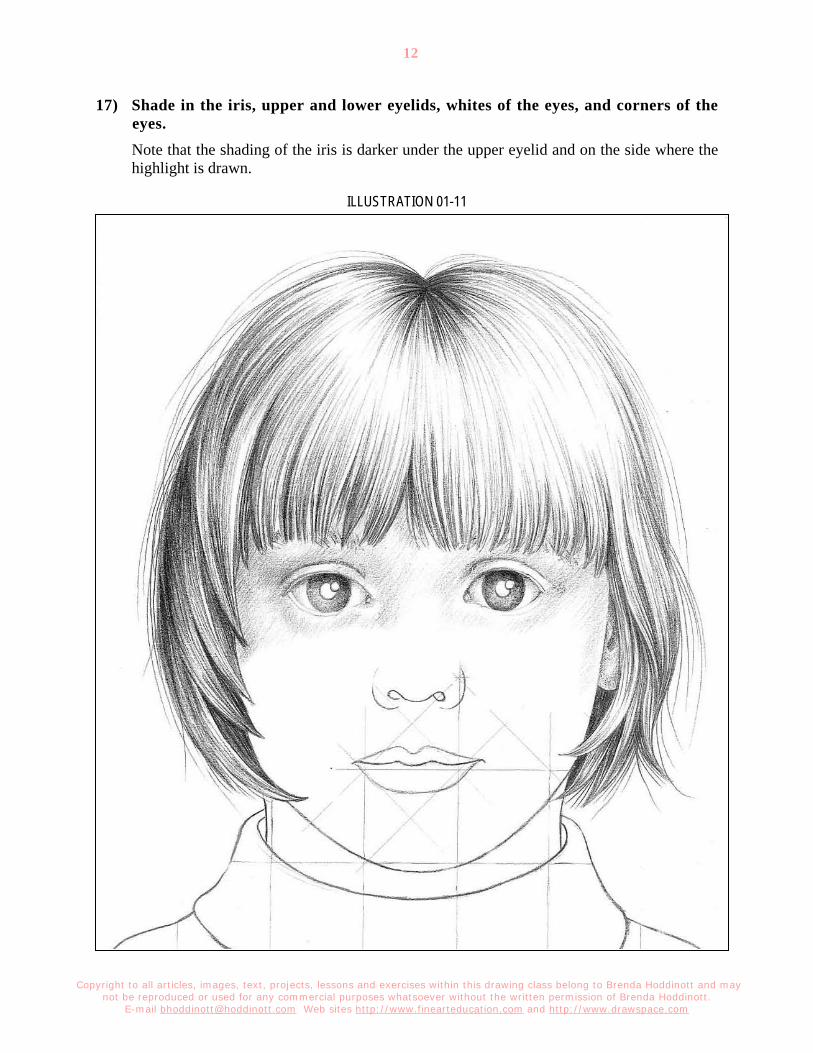
17) Shade in the iris, upper and lower eyelids, whites of the eyes, and corners of the eyes. Note that the shading of the iris is darker under the upper eyelid and on the side where the highlight is drawn.
ILLUSTRATION 01-11
Copyright to all articles, images, text, projects, lessons and exercises within this drawing class belong to Brenda Hoddinott and may not be reproduced or used for any commercial purposes whatsoever without the written permission of Brenda Hoddinott.
E-mail [email protected] Web sites http://www.finearteducation.com and http://www.drawspace.com
13
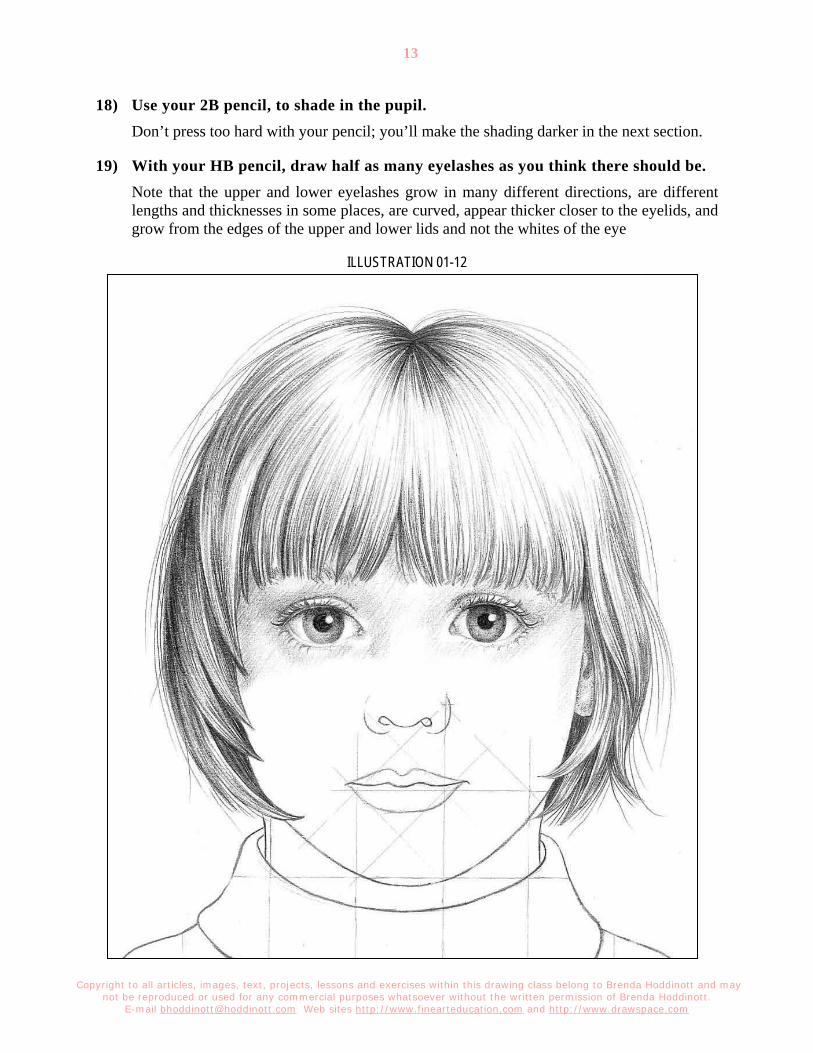
18) Use your 2B pencil, to shade in the pupil. Don’t press too hard with your pencil; you’ll make the shading darker in the next section.
19) With your HB pencil, draw half as many eyelashes as you think there should be. Note that the upper and lower eyelashes grow in many different directions, are different lengths and thicknesses in some places, are curved, appear thicker closer to the eyelids, and grow from the edges of the upper and lower lids and not the whites of the eye
ILLUSTRATION 01-12
Copyright to all articles, images, text, projects, lessons and exercises within this drawing class belong to Brenda Hoddinott and may not be reproduced or used for any commercial purposes whatsoever without the written permission of Brenda Hoddinott.
E-mail [email protected] Web sites http://www.finearteducation.com and http://www.drawspace.com
14
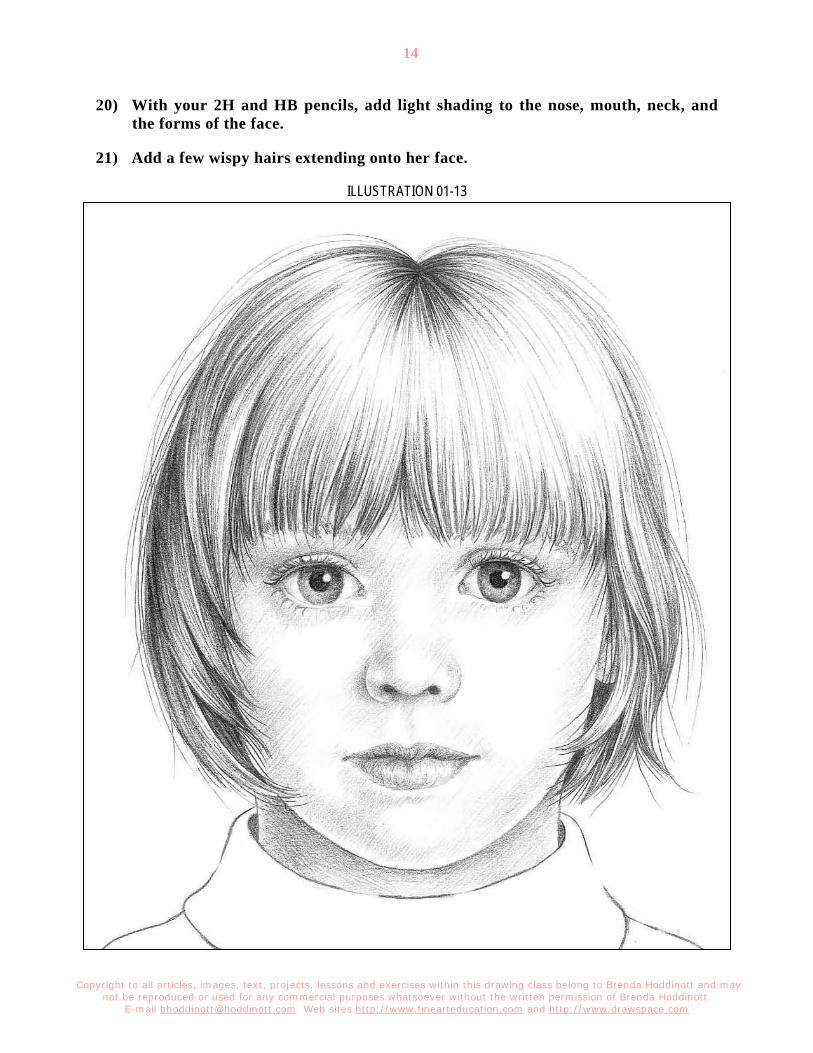
20) With your 2H and HB pencils, add light shading to the nose, mouth, neck, and the forms of the face.
21) Add a few wispy hairs extending onto her face.
ILLUSTRATION 01-13
Copyright to all articles, images, text, projects, lessons and exercises within this drawing class belong to Brenda Hoddinott and may not be reproduced or used for any commercial purposes whatsoever without the written permission of Brenda Hoddinott.
E-mail [email protected] Web sites http://www.finearteducation.com and http://www.drawspace.com
15
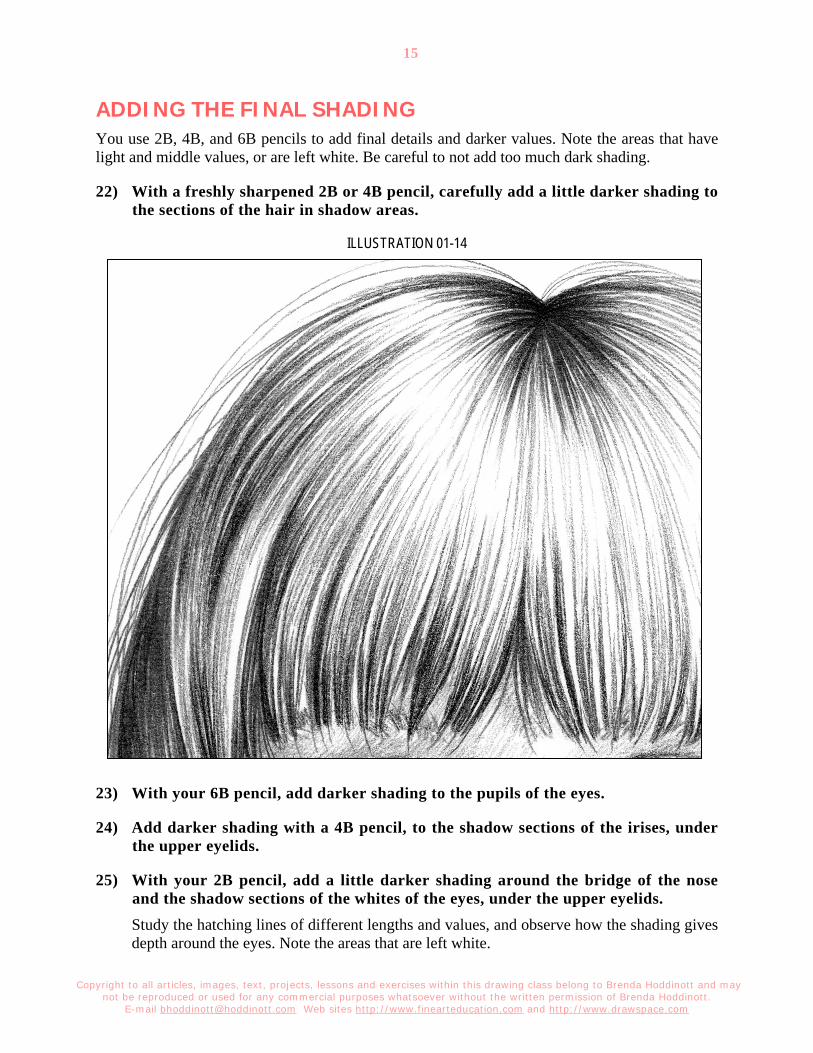
ADDING THE FINAL SHADING You use 2B, 4B, and 6B pencils to add final details and darker values. Note the areas that have light and middle values, or are left white. Be careful to not add too much dark shading.
22) With a freshly sharpened 2B or 4B pencil, carefully add a little darker shading to the sections of the hair in shadow areas.
ILLUSTRATION 01-14
23) With your 6B pencil, add darker shading to the pupils of the eyes.
24) Add darker shading with a 4B pencil, to the shadow sections of the irises, under the upper eyelids.
25) With your 2B pencil, add a little darker shading around the bridge of the nose and the shadow sections of the whites of the eyes, under the upper eyelids. Study the hatching lines of different lengths and values, and observe how the shading gives depth around the eyes. Note the areas that are left white.
Copyright to all articles, images, text, projects, lessons and exercises within this drawing class belong to Brenda Hoddinott and may not be reproduced or used for any commercial purposes whatsoever without the written permission of Brenda Hoddinott.
E-mail [email protected] Web sites http://www.finearteducation.com and http://www.drawspace.com
16
ILLUSTRATION 01-15
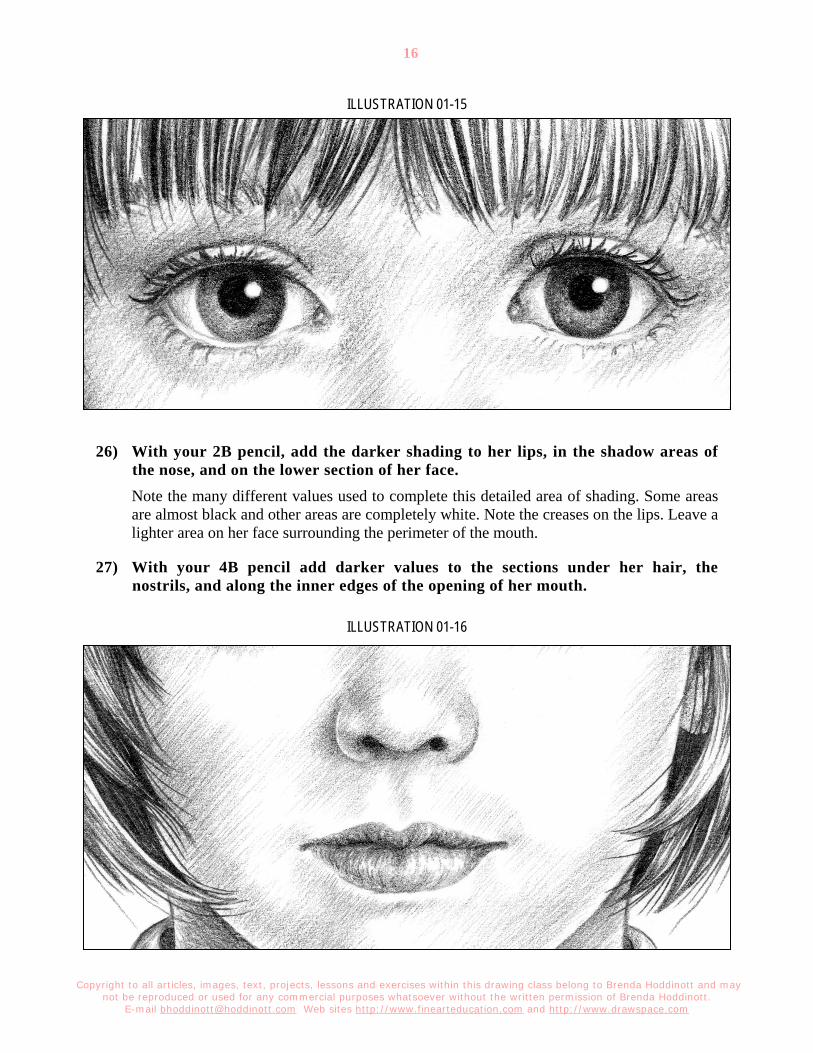
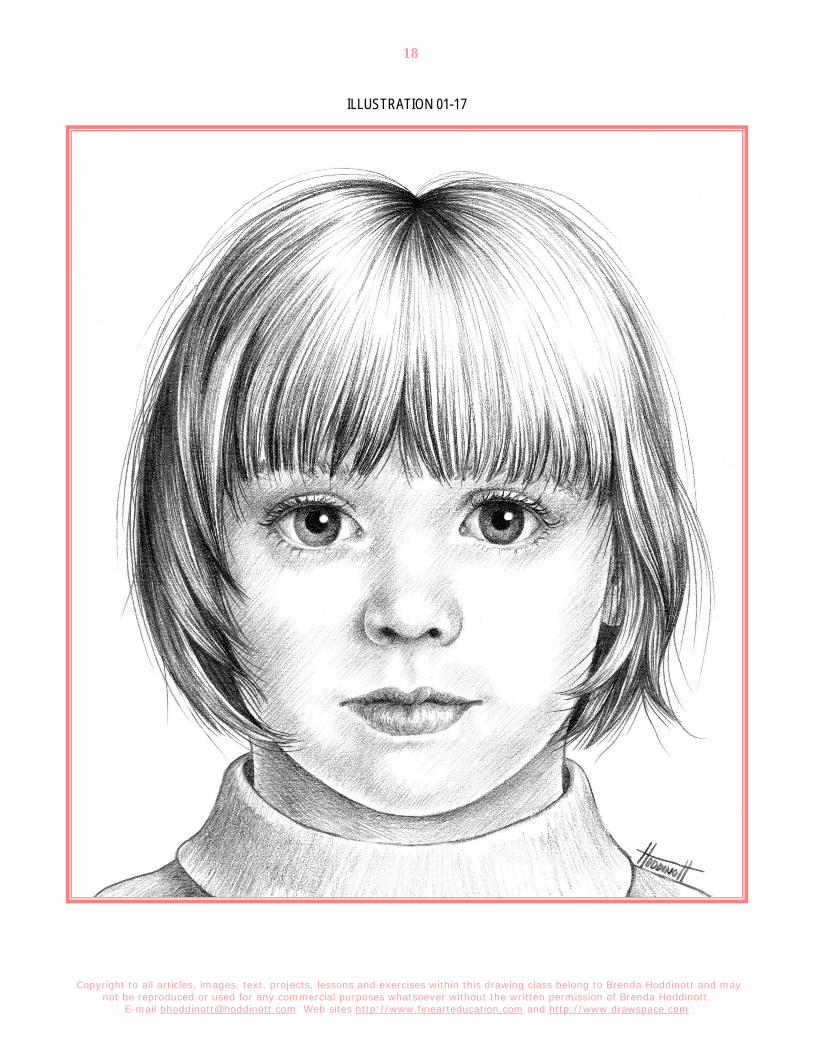
26) With your 2B pencil, add the darker shading to her lips, in the shadow areas of the nose, and on the lower section of her face. Note the many different values used to complete this detailed area of shading. Some areas are almost black and other areas are completely white. Note the creases on the lips. Leave a lighter area on her face surrounding the perimeter of the mouth.
27) With your 4B pencil add darker values to the sections under her hair, the nostrils, and along the inner edges of the opening of her mouth.
ILLUSTRATION 01-16

Copyright to all articles, images, text, projects, lessons and exercises within this drawing class belong to Brenda Hoddinott and may not be reproduced or used for any commercial purposes whatsoever without the written permission of Brenda Hoddinott.
E-mail [email protected] Web sites http://www.finearteducation.com and http://www.drawspace.com
17
28) Slightly darken the shading on her neck and sweater.
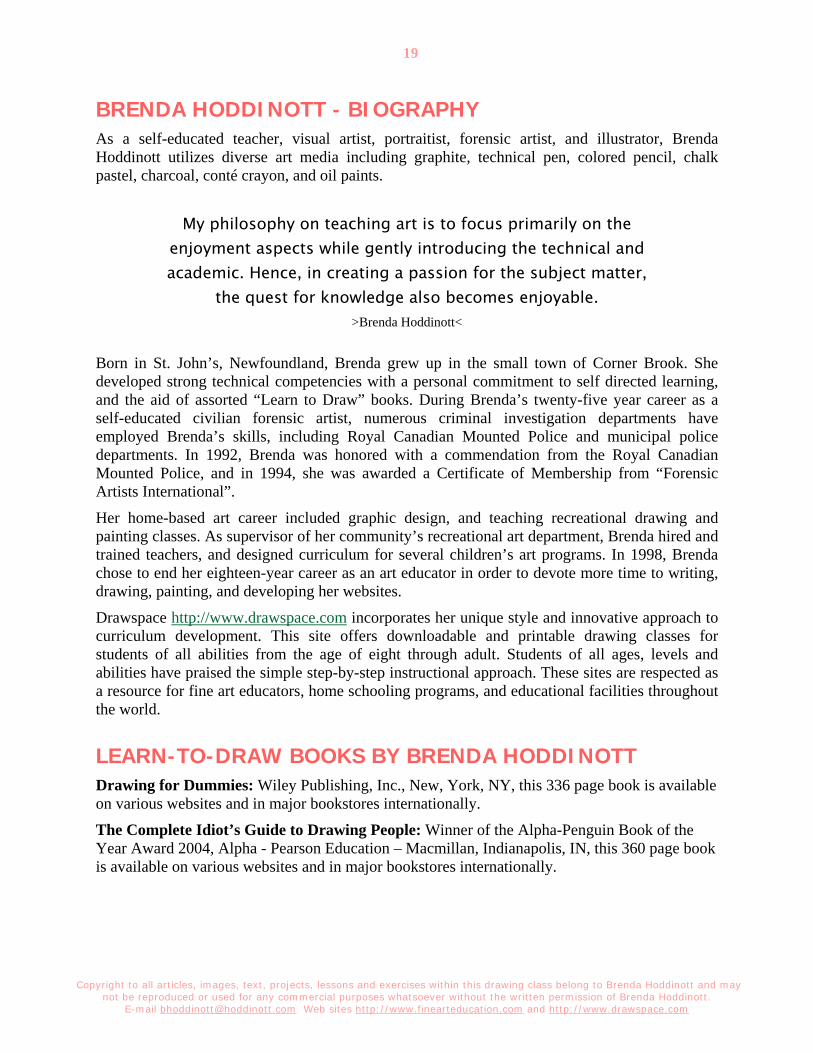
29) Touch up any areas you are not happy with. Have another look at your drawing and compare it to mine (refer to my final drawing on the next page).
If an area is too light, you can make it darker by adding more shading with hatching lines.
If you wish to make a section lighter, pull and stretch your kneaded eraser until it becomes soft, and then gently pat the shading that is too dark.
Use your vinyl eraser to clean up any smudges or fingerprints on your drawing paper.
Put today’s date on the back, sign your name and pat yourself on the back!
You draw the three-dimensional forms of a face more accurately, when you have
carefully observed and done drawings from the faces of actual models, such as yourself and your
family and friends. Remember there is no right or wrong way to
draw. As an artist, you can draw the forms and features of a frontal view of a face in many
different ways, such as drawing just the light and shadow areas, or outlining with detailed lines and
then adding shading. Take time to experiment with different ways of drawing, until you find the
styles with which you are most comfortable. There are only three ways to improve your
drawing skills… practice, practice and more practice!
So grab another piece of paper, choose another lesson, and draw some more!
Copyright to all articles, images, text, projects, lessons and exercises within this drawing class belong to Brenda Hoddinott and may not be reproduced or used for any commercial purposes whatsoever without the written permission of Brenda Hoddinott.
E-mail [email protected] Web sites http://www.finearteducation.com and http://www.drawspace.com
18
ILLUSTRATION 01-17
Copyright to all articles, images, text, projects, lessons and exercises within this drawing class belong to Brenda Hoddinott and may not be reproduced or used for any commercial purposes whatsoever without the written permission of Brenda Hoddinott.
E-mail [email protected] Web sites http://www.finearteducation.com and http://www.drawspace.com
19
BRENDA HODDINOTT - BIOGRAPHY As a self-educated teacher, visual artist, portraitist, forensic artist, and illustrator, Brenda Hoddinott utilizes diverse art media including graphite, technical pen, colored pencil, chalk pastel, charcoal, conté crayon, and oil paints.
My philosophy on teaching art is to focus primarily on the enjoyment aspects while gently introducing the technical and academic. Hence, in creating a passion for the subject matter,
the quest for knowledge also becomes enjoyable. >Brenda Hoddinott<
Born in St. John’s, Newfoundland, Brenda grew up in the small town of Corner Brook. She developed strong technical competencies with a personal commitment to self directed learning, and the aid of assorted “Learn to Draw” books. During Brenda’s twenty-five year career as a self-educated civilian forensic artist, numerous criminal investigation departments have employed Brenda’s skills, including Royal Canadian Mounted Police and municipal police departments. In 1992, Brenda was honored with a commendation from the Royal Canadian Mounted Police, and in 1994, she was awarded a Certificate of Membership from “Forensic Artists International”.
Her home-based art career included graphic design, and teaching recreational drawing and painting classes. As supervisor of her community’s recreational art department, Brenda hired and trained teachers, and designed curriculum for several children’s art programs. In 1998, Brenda chose to end her eighteen-year career as an art educator in order to devote more time to writing, drawing, painting, and developing her websites.
Drawspace http://www.drawspace.com incorporates her unique style and innovative approach to curriculum development. This site offers downloadable and printable drawing classes for students of all abilities from the age of eight through adult. Students of all ages, levels and abilities have praised the simple step-by-step instructional approach. These sites are respected as a resource for fine art educators, home schooling programs, and educational facilities throughout the world.
LEARN-TO-DRAW BOOKS BY BRENDA HODDINOTT Drawing for Dummies: Wiley Publishing, Inc., New, York, NY, this 336 page book is available on various websites and in major bookstores internationally.
The Complete Idiot’s Guide to Drawing People: Winner of the Alpha-Penguin Book of the Year Award 2004, Alpha - Pearson Education – Macmillan, Indianapolis, IN, this 360 page book is available on various websites and in major bookstores internationally.
Brenda Hoddinott
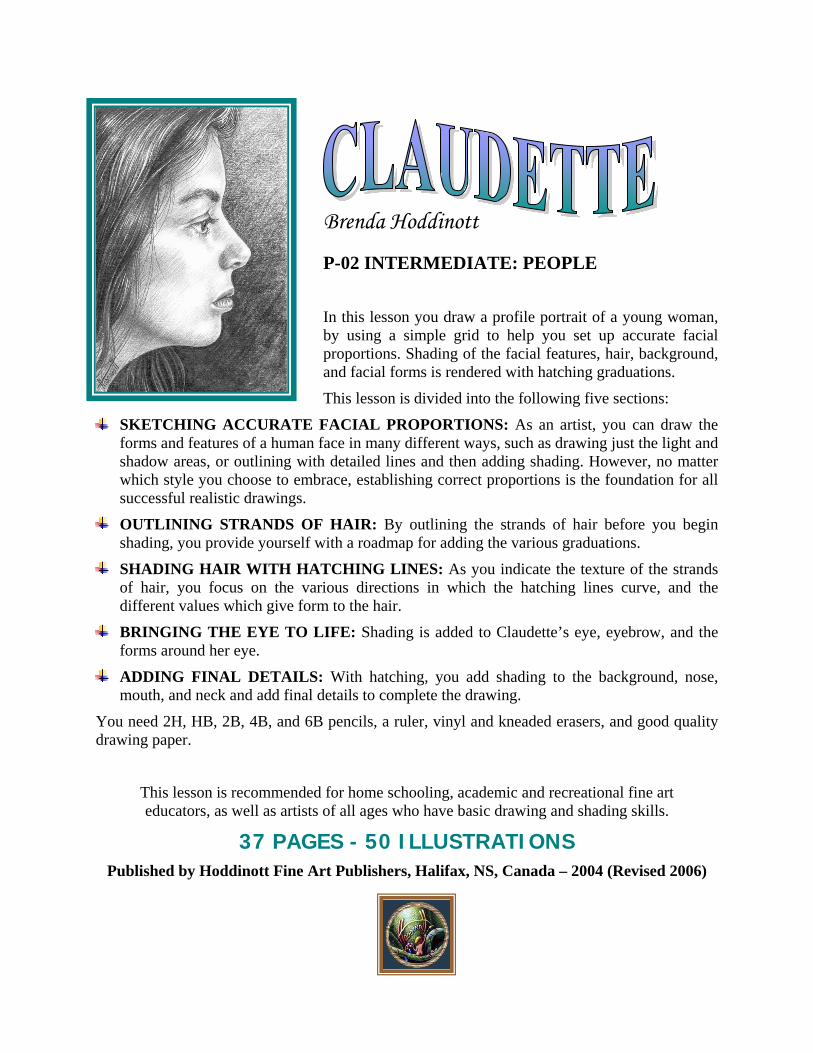
P-02 INTERMEDIATE: PEOPLE
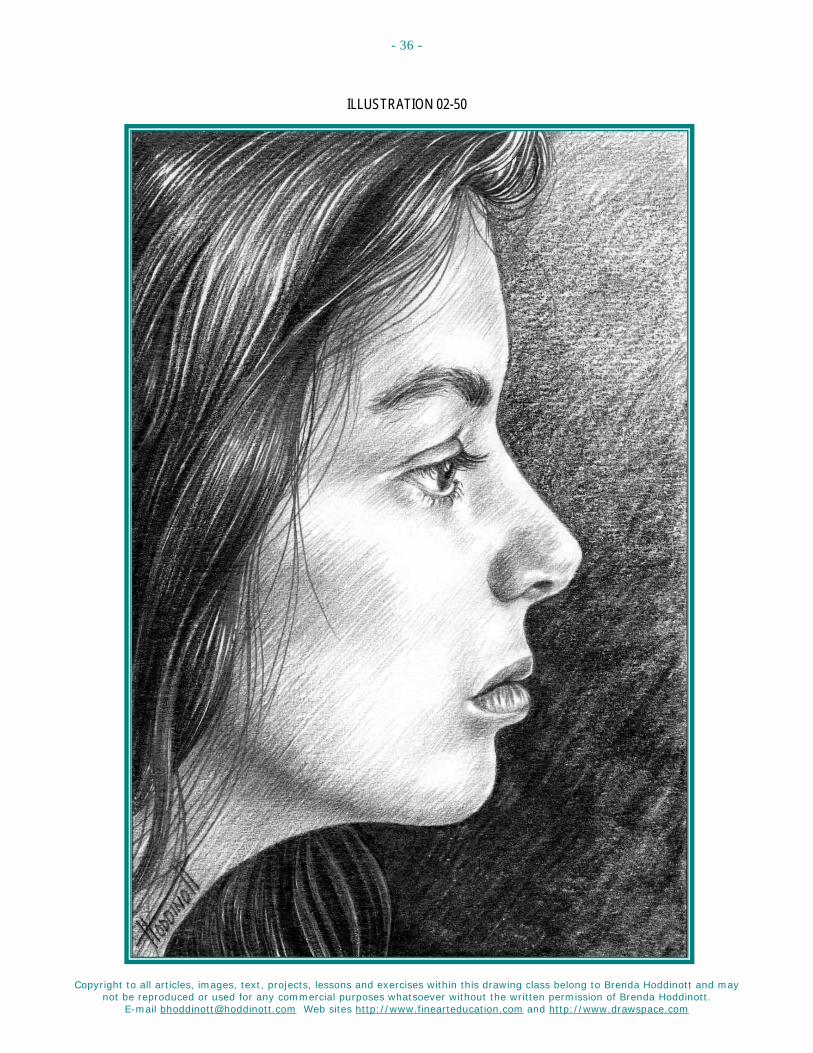
In this lesson you draw a profile portrait of a young woman, by using a simple grid to help you set up accurate facial proportions. Shading of the facial features, hair, background, and facial forms is rendered with hatching graduations.
This lesson is divided into the following five sections:
SKETCHING ACCURATE FACIAL PROPORTIONS: As an artist, you can draw the forms and features of a human face in many different ways, such as drawing just the light and shadow areas, or outlining with detailed lines and then adding shading. However, no matter which style you choose to embrace, establishing correct proportions is the foundation for all successful realistic drawings.
OUTLINING STRANDS OF HAIR: By outlining the strands of hair before you begin shading, you provide yourself with a roadmap for adding the various graduations.
SHADING HAIR WITH HATCHING LINES: As you indicate the texture of the strands of hair, you focus on the various directions in which the hatching lines curve, and the different values which give form to the hair.
BRINGING THE EYE TO LIFE: Shading is added to Claudette’s eye, eyebrow, and the forms around her eye.
ADDING FINAL DETAILS: With hatching, you add shading to the background, nose, mouth, and neck and add final details to complete the drawing.
You need 2H, HB, 2B, 4B, and 6B pencils, a ruler, vinyl and kneaded erasers, and good quality drawing paper.
This lesson is recommended for home schooling, academic and recreational fine art educators, as well as artists of all ages who have basic drawing and shading skills.
37 PAGES - 50 ILLUSTRATIONS Published by Hoddinott Fine Art Publishers, Halifax, NS, Canada – 2004 (Revised 2006)
Copyright to all articles, images, text, projects, lessons and exercises within this drawing class belong to Brenda Hoddinott and may not be reproduced or used for any commercial purposes whatsoever without the written permission of Brenda Hoddinott.
E-mail [email protected] Web sites http://www.finearteducation.com and http://www.drawspace.com
- 2 -
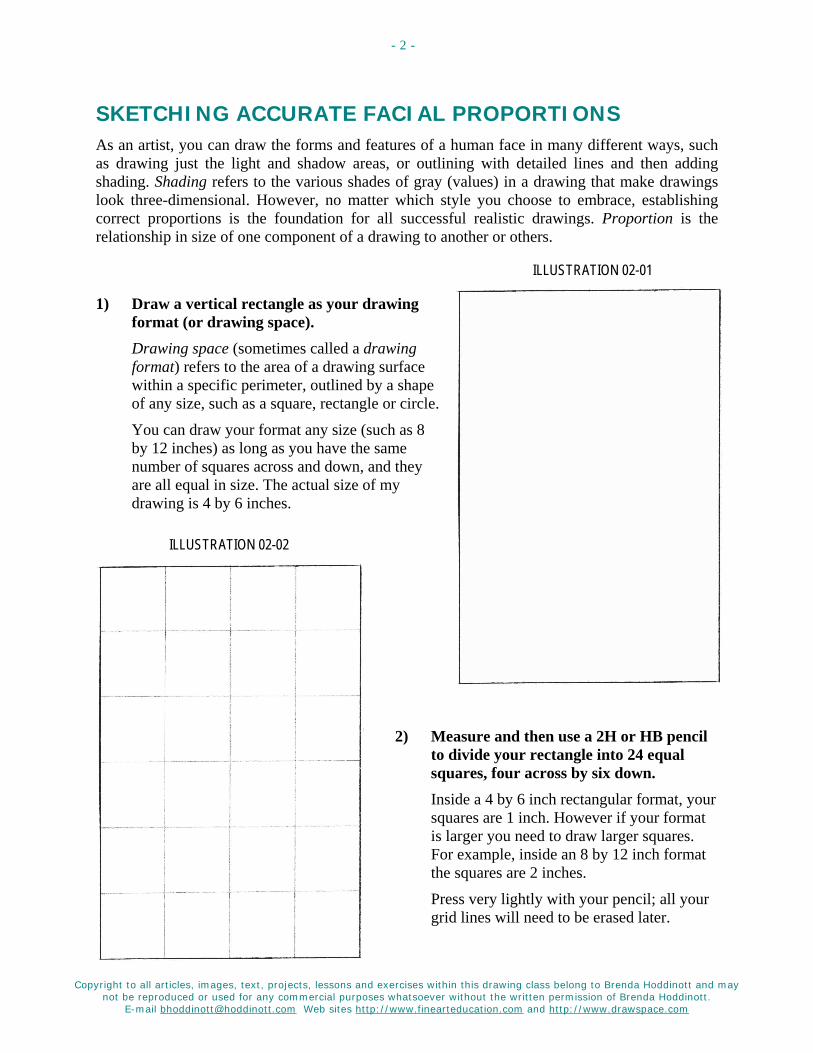
SKETCHING ACCURATE FACIAL PROPORTIONS As an artist, you can draw the forms and features of a human face in many different ways, such as drawing just the light and shadow areas, or outlining with detailed lines and then adding shading. Shading refers to the various shades of gray (values) in a drawing that make drawings look three-dimensional. However, no matter which style you choose to embrace, establishing correct proportions is the foundation for all successful realistic drawings. Proportion is the relationship in size of one component of a drawing to another or others.
ILLUSTRATION 02-01
1) Draw a vertical rectangle as your drawing format (or drawing space). Drawing space (sometimes called a drawing format) refers to the area of a drawing surface within a specific perimeter, outlined by a shape of any size, such as a square, rectangle or circle.
You can draw your format any size (such as 8 by 12 inches) as long as you have the same number of squares across and down, and they are all equal in size. The actual size of my drawing is 4 by 6 inches.
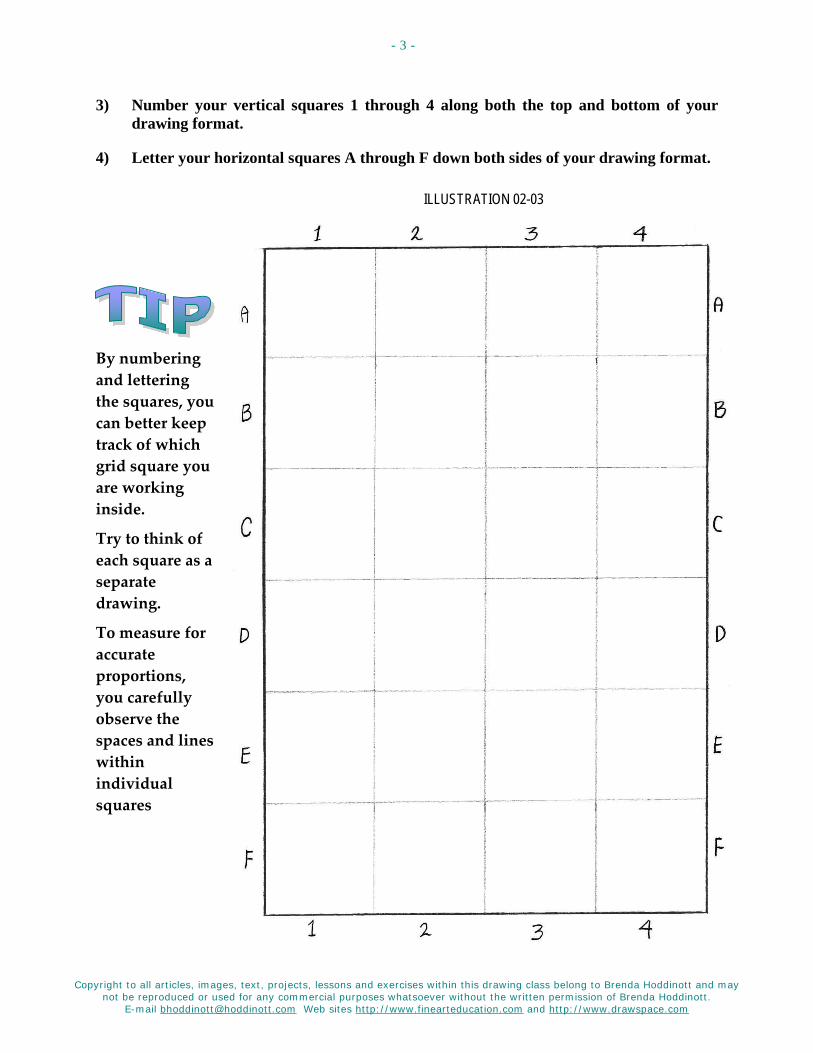
ILLUSTRATION 02-02
2) Measure and then use a 2H or HB pencil to divide your rectangle into 24 equal squares, four across by six down. Inside a 4 by 6 inch rectangular format, your squares are 1 inch. However if your format is larger you need to draw larger squares. For example, inside an 8 by 12 inch format the squares are 2 inches.
Press very lightly with your pencil; all your grid lines will need to be erased later.
Copyright to all articles, images, text, projects, lessons and exercises within this drawing class belong to Brenda Hoddinott and may not be reproduced or used for any commercial purposes whatsoever without the written permission of Brenda Hoddinott.
E-mail [email protected] Web sites http://www.finearteducation.com and http://www.drawspace.com
- 3 -
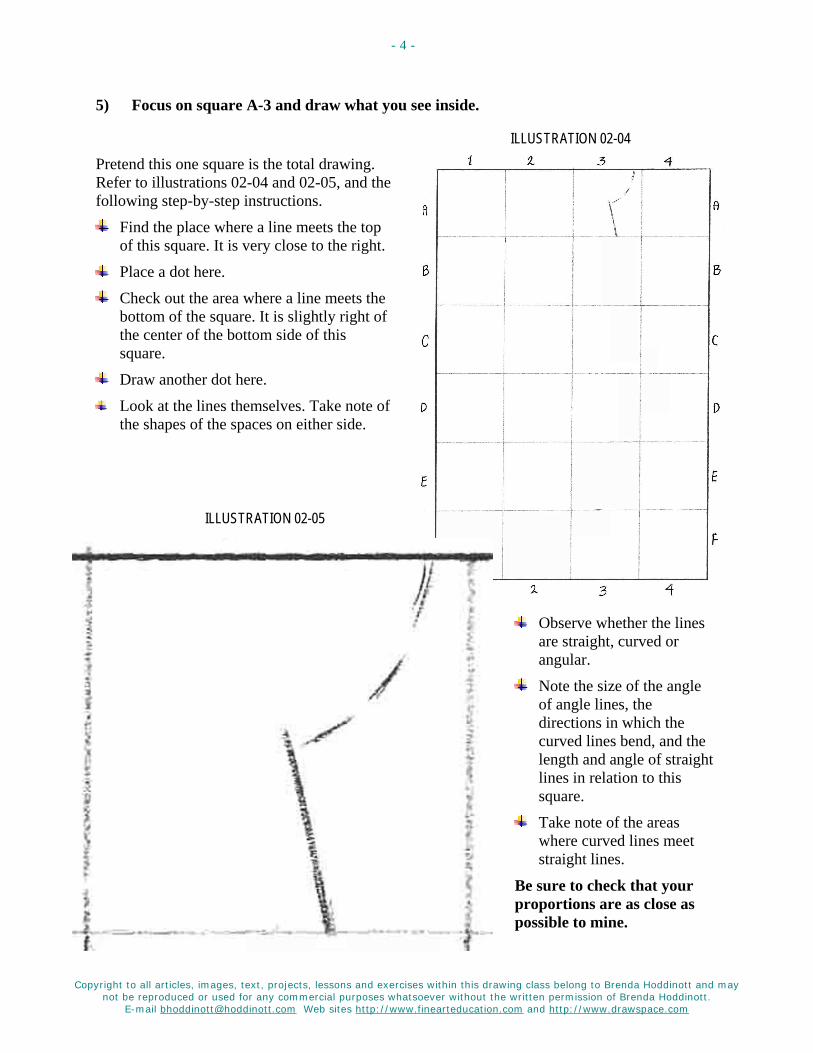
3) Number your vertical squares 1 through 4 along both the top and bottom of your drawing format.
4) Letter your horizontal squares A through F down both sides of your drawing format.
ILLUSTRATION 02-03
By numbering and lettering the squares, you can better keep track of which grid square you are working inside.
Try to think of each square as a separate drawing.
To measure for accurate proportions, you carefully observe the spaces and lines within individual squares
Copyright to all articles, images, text, projects, lessons and exercises within this drawing class belong to Brenda Hoddinott and may not be reproduced or used for any commercial purposes whatsoever without the written permission of Brenda Hoddinott.
E-mail [email protected] Web sites http://www.finearteducation.com and http://www.drawspace.com
- 4 -
5) Focus on square A-3 and draw what you see inside.
ILLUSTRATION 02-04
Pretend this one square is the total drawing. Refer to illustrations 02-04 and 02-05, and the following step-by-step instructions.
Find the place where a line meets the top of this square. It is very close to the right.
Place a dot here.
Check out the area where a line meets the bottom of the square. It is slightly right of the center of the bottom side of this square.
Draw another dot here.
Look at the lines themselves. Take note of the shapes of the spaces on either side.
ILLUSTRATION 02-05
Observe whether the lines are straight, curved or angular.
Note the size of the angle of angle lines, the directions in which the curved lines bend, and the length and angle of straight lines in relation to this square.
Take note of the areas where curved lines meet straight lines.
Be sure to check that your proportions are as close as possible to mine.
Copyright to all articles, images, text, projects, lessons and exercises within this drawing class belong to Brenda Hoddinott and may not be reproduced or used for any commercial purposes whatsoever without the written permission of Brenda Hoddinott.
E-mail [email protected] Web sites http://www.finearteducation.com and http://www.drawspace.com
- 5 -
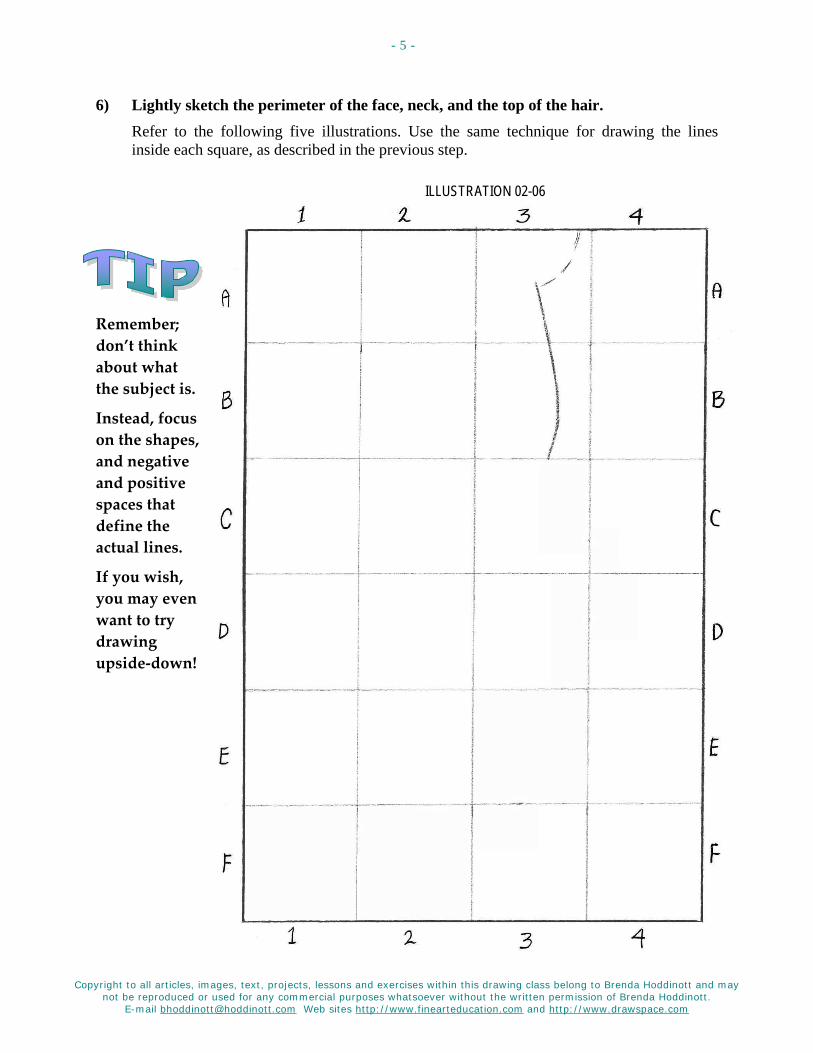
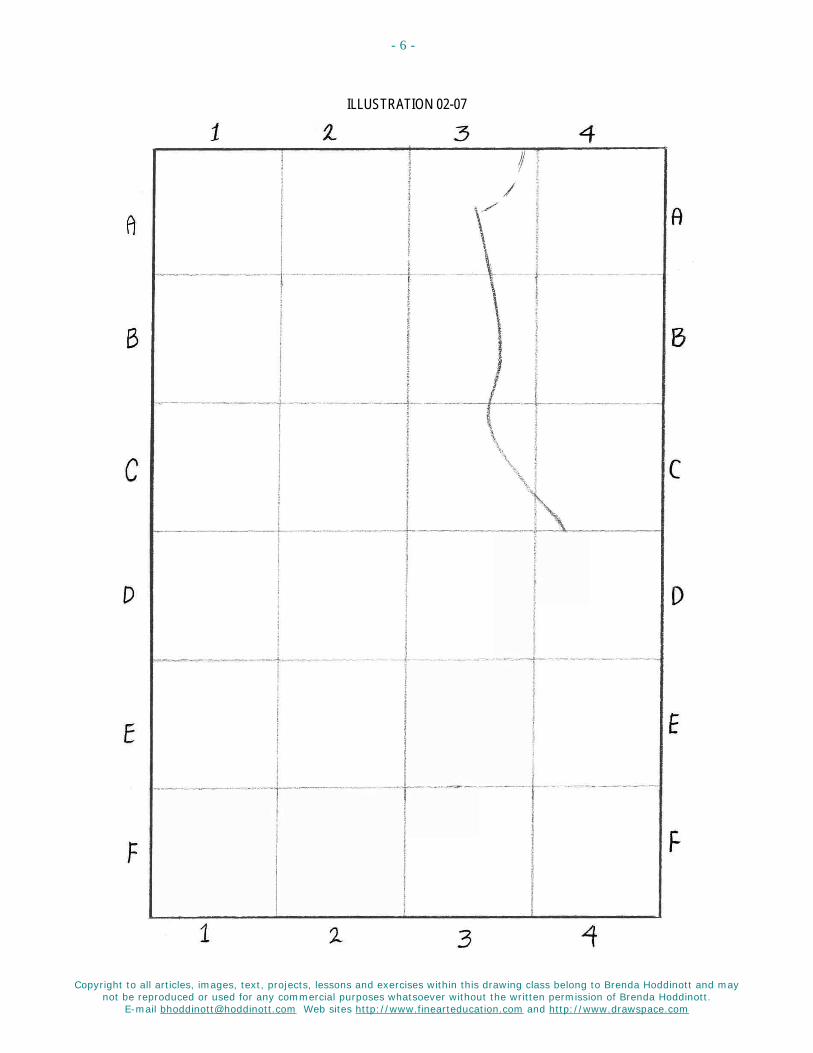
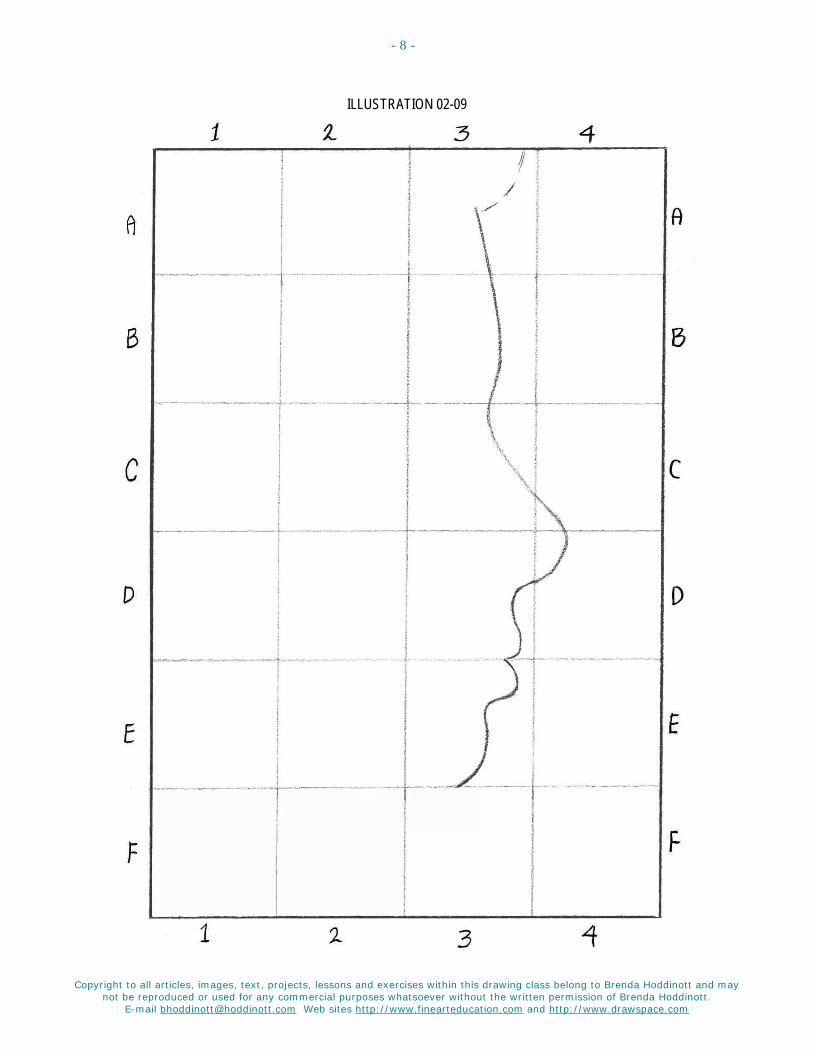
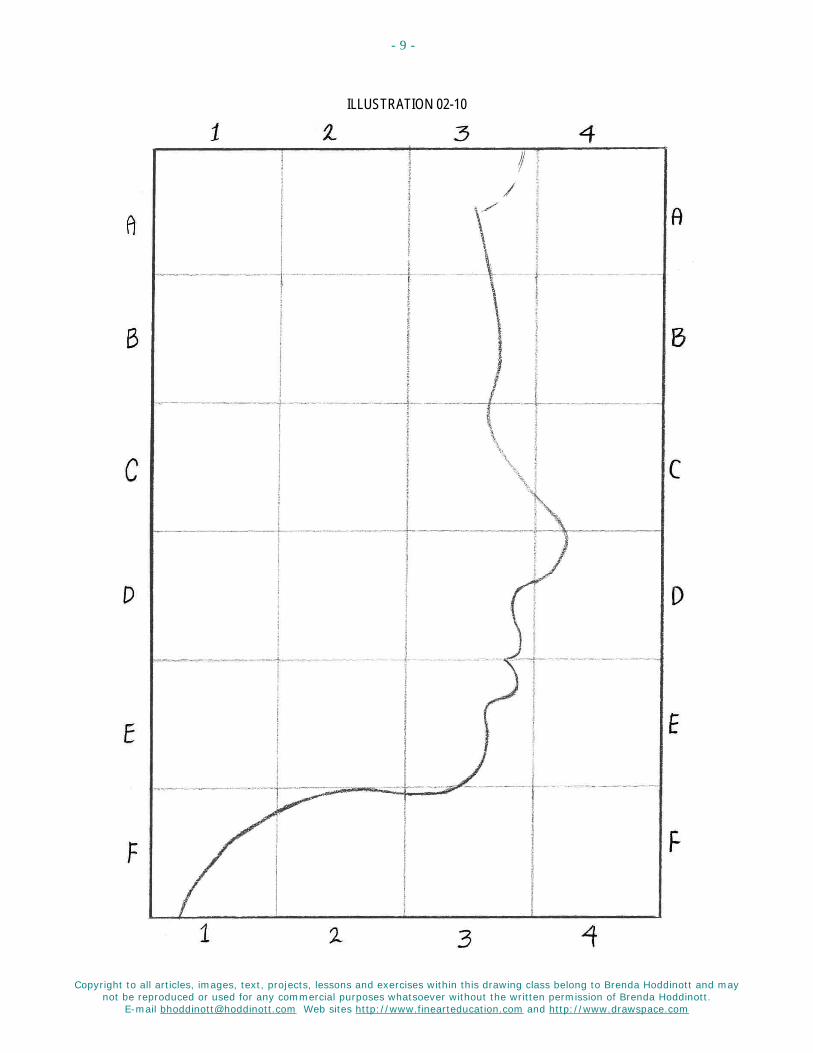
6) Lightly sketch the perimeter of the face, neck, and the top of the hair. Refer to the following five illustrations. Use the same technique for drawing the lines inside each square, as described in the previous step.
ILLUSTRATION 02-06
Remember; don’t think about what the subject is.
Instead, focus on the shapes, and negative and positive spaces that define the actual lines.
If you wish, you may even want to try drawing upside-down!
Copyright to all articles, images, text, projects, lessons and exercises within this drawing class belong to Brenda Hoddinott and may not be reproduced or used for any commercial purposes whatsoever without the written permission of Brenda Hoddinott.
E-mail [email protected] Web sites http://www.finearteducation.com and http://www.drawspace.com
- 6 -
ILLUSTRATION 02-07

Copyright to all articles, images, text, projects, lessons and exercises within this drawing class belong to Brenda Hoddinott and may not be reproduced or used for any commercial purposes whatsoever without the written permission of Brenda Hoddinott.
E-mail [email protected] Web sites http://www.finearteducation.com and http://www.drawspace.com
- 7 -
ILLUSTRATION 02-08
Copyright to all articles, images, text, projects, lessons and exercises within this drawing class belong to Brenda Hoddinott and may not be reproduced or used for any commercial purposes whatsoever without the written permission of Brenda Hoddinott.
E-mail [email protected] Web sites http://www.finearteducation.com and http://www.drawspace.com
- 8 -
ILLUSTRATION 02-09
Copyright to all articles, images, text, projects, lessons and exercises within this drawing class belong to Brenda Hoddinott and may not be reproduced or used for any commercial purposes whatsoever without the written permission of Brenda Hoddinott.
E-mail [email protected] Web sites http://www.finearteducation.com and http://www.drawspace.com
- 9 -
ILLUSTRATION 02-10
Copyright to all articles, images, text, projects, lessons and exercises within this drawing class belong to Brenda Hoddinott and may not be reproduced or used for any commercial purposes whatsoever without the written permission of Brenda Hoddinott.
E-mail [email protected] Web sites http://www.finearteducation.com and http://www.drawspace.com
- 10 -
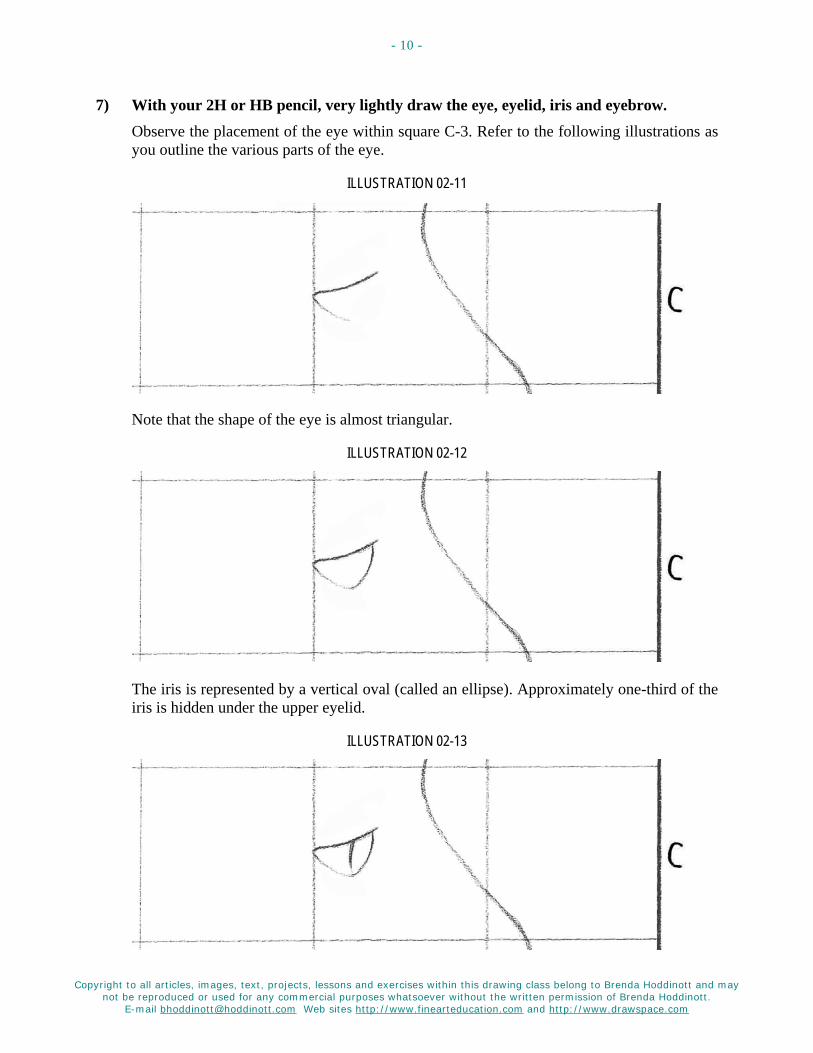
7) With your 2H or HB pencil, very lightly draw the eye, eyelid, iris and eyebrow. Observe the placement of the eye within square C-3. Refer to the following illustrations as you outline the various parts of the eye.
ILLUSTRATION 02-11
Note that the shape of the eye is almost triangular.
ILLUSTRATION 02-12
The iris is represented by a vertical oval (called an ellipse). Approximately one-third of the iris is hidden under the upper eyelid.
ILLUSTRATION 02-13
Copyright to all articles, images, text, projects, lessons and exercises within this drawing class belong to Brenda Hoddinott and may not be reproduced or used for any commercial purposes whatsoever without the written permission of Brenda Hoddinott.
E-mail [email protected] Web sites http://www.finearteducation.com and http://www.drawspace.com
- 11 -
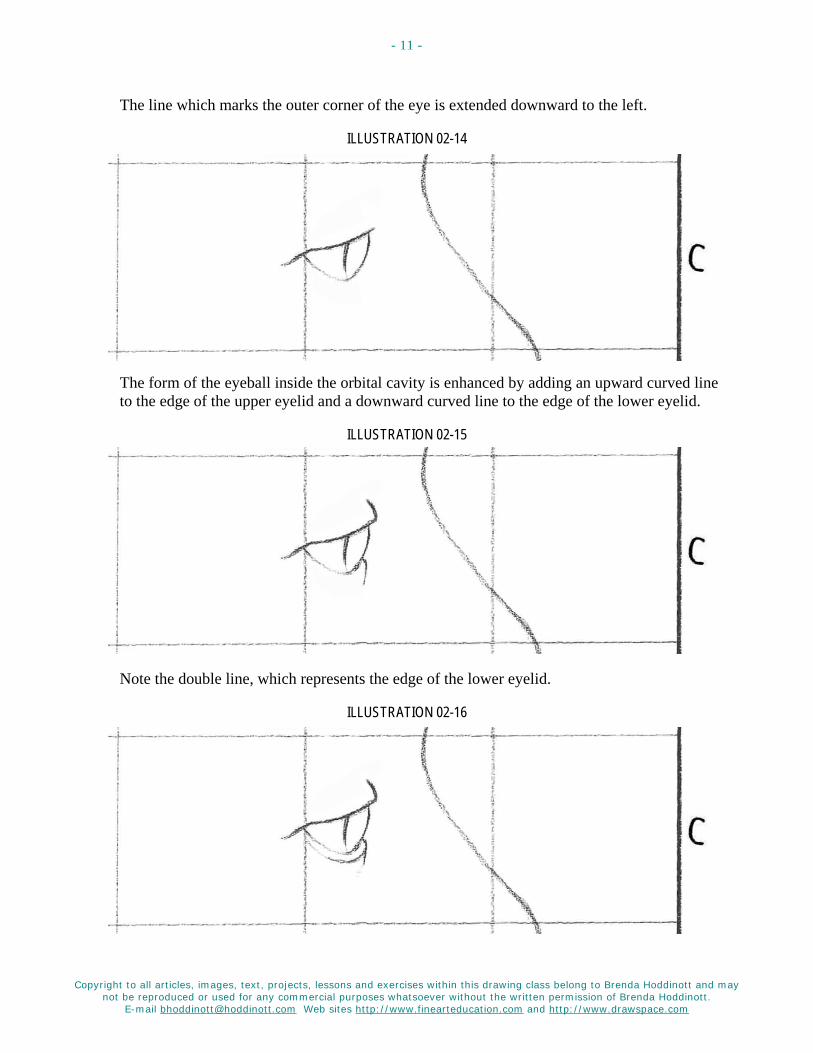
The line which marks the outer corner of the eye is extended downward to the left.
ILLUSTRATION 02-14
The form of the eyeball inside the orbital cavity is enhanced by adding an upward curved line to the edge of the upper eyelid and a downward curved line to the edge of the lower eyelid.
ILLUSTRATION 02-15
Note the double line, which represents the edge of the lower eyelid.
ILLUSTRATION 02-16
Copyright to all articles, images, text, projects, lessons and exercises within this drawing class belong to Brenda Hoddinott and may not be reproduced or used for any commercial purposes whatsoever without the written permission of Brenda Hoddinott.
E-mail [email protected] Web sites http://www.finearteducation.com and http://www.drawspace.com
- 12 -
ILLUSTRATION 02-17
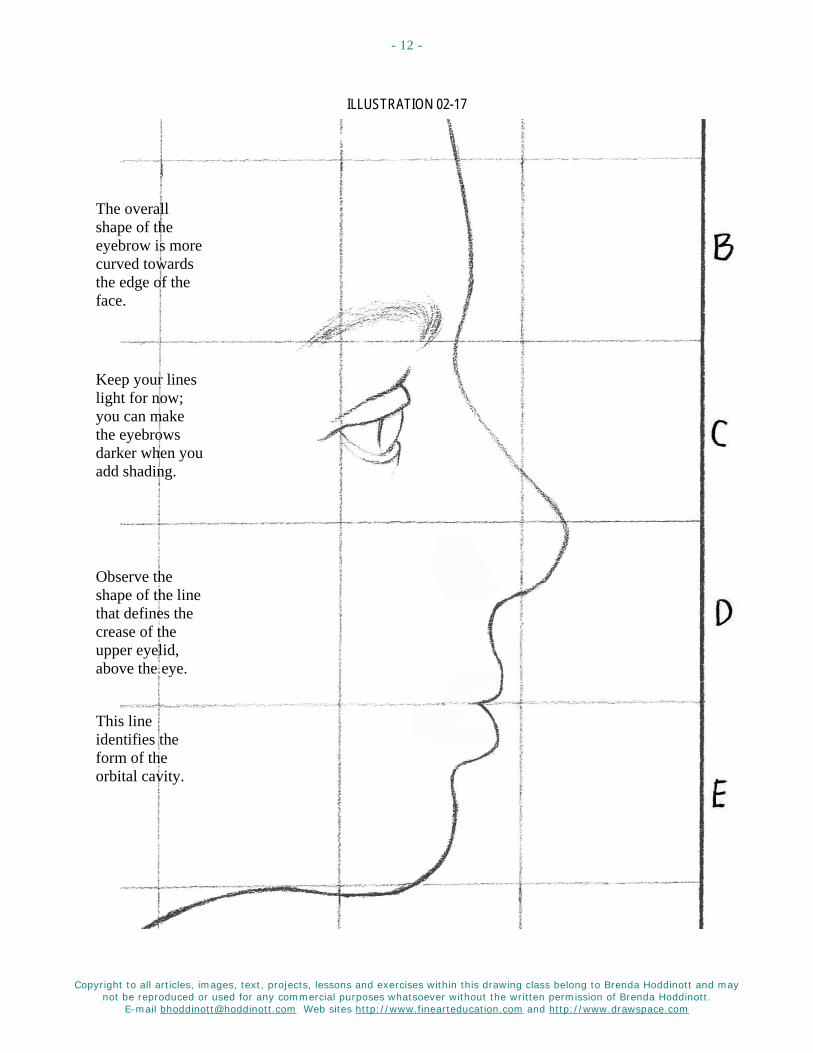
The overall shape of the eyebrow is more curved towards the edge of the face.
Keep your lines light for now; you can make the eyebrows darker when you add shading.
Observe the shape of the line that defines the crease of the upper eyelid, above the eye.
This line identifies the form of the orbital cavity.
Copyright to all articles, images, text, projects, lessons and exercises within this drawing class belong to Brenda Hoddinott and may not be reproduced or used for any commercial purposes whatsoever without the written permission of Brenda Hoddinott.
E-mail [email protected] Web sites http://www.finearteducation.com and http://www.drawspace.com
- 13 -
ILLUSTRATION 02-18
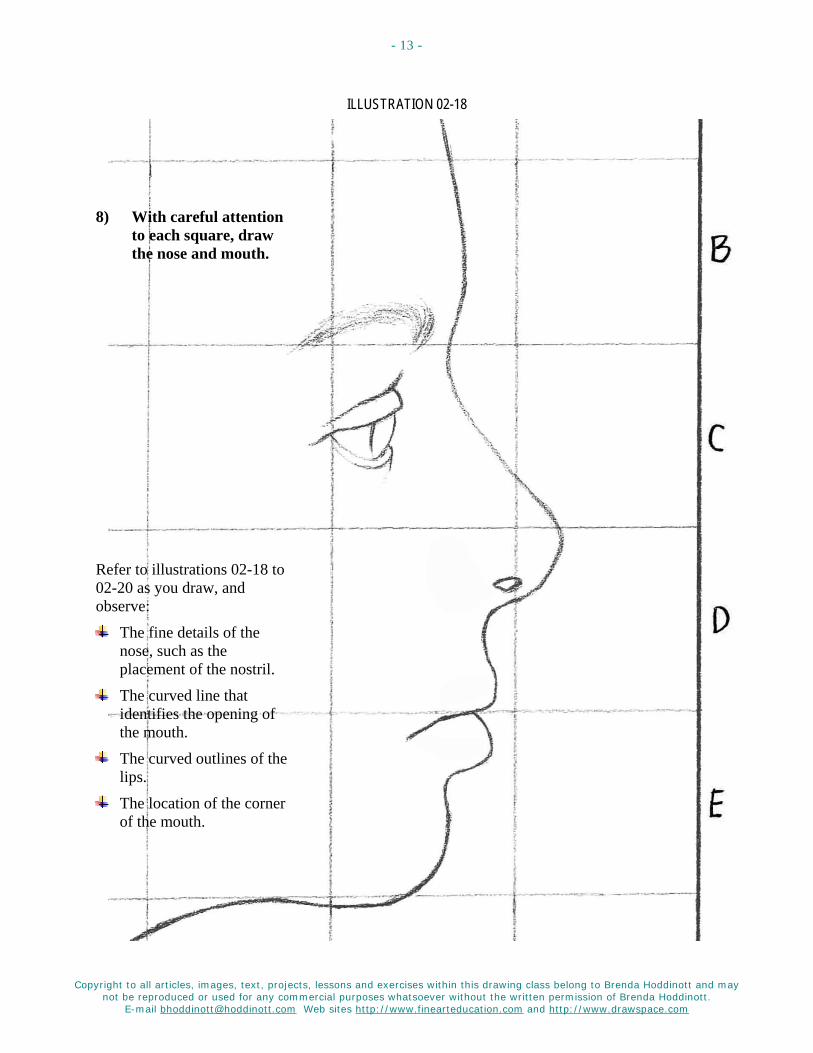
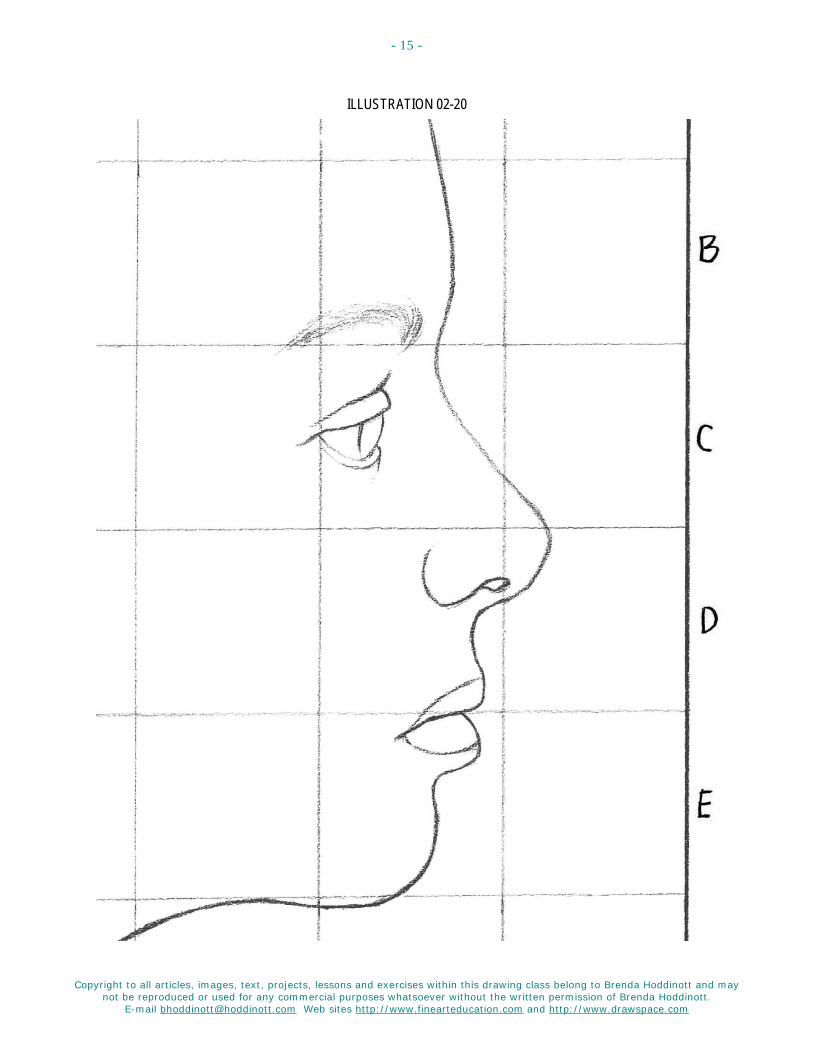
8) With careful attention to each square, draw the nose and mouth.
Refer to illustrations 02-18 to 02-20 as you draw, and observe:
The fine details of the nose, such as the placement of the nostril.
The curved line that identifies the opening of the mouth.
The curved outlines of the lips.
The location of the corner of the mouth.

Copyright to all articles, images, text, projects, lessons and exercises within this drawing class belong to Brenda Hoddinott and may not be reproduced or used for any commercial purposes whatsoever without the written permission of Brenda Hoddinott.
E-mail [email protected] Web sites http://www.finearteducation.com and http://www.drawspace.com
- 14 -
ILLUSTRATION 02-19
Copyright to all articles, images, text, projects, lessons and exercises within this drawing class belong to Brenda Hoddinott and may not be reproduced or used for any commercial purposes whatsoever without the written permission of Brenda Hoddinott.
E-mail [email protected] Web sites http://www.finearteducation.com and http://www.drawspace.com
- 15 -
ILLUSTRATION 02-20
Copyright to all articles, images, text, projects, lessons and exercises within this drawing class belong to Brenda Hoddinott and may not be reproduced or used for any commercial purposes whatsoever without the written permission of Brenda Hoddinott.
E-mail [email protected] Web sites http://www.finearteducation.com and http://www.drawspace.com
- 16 -
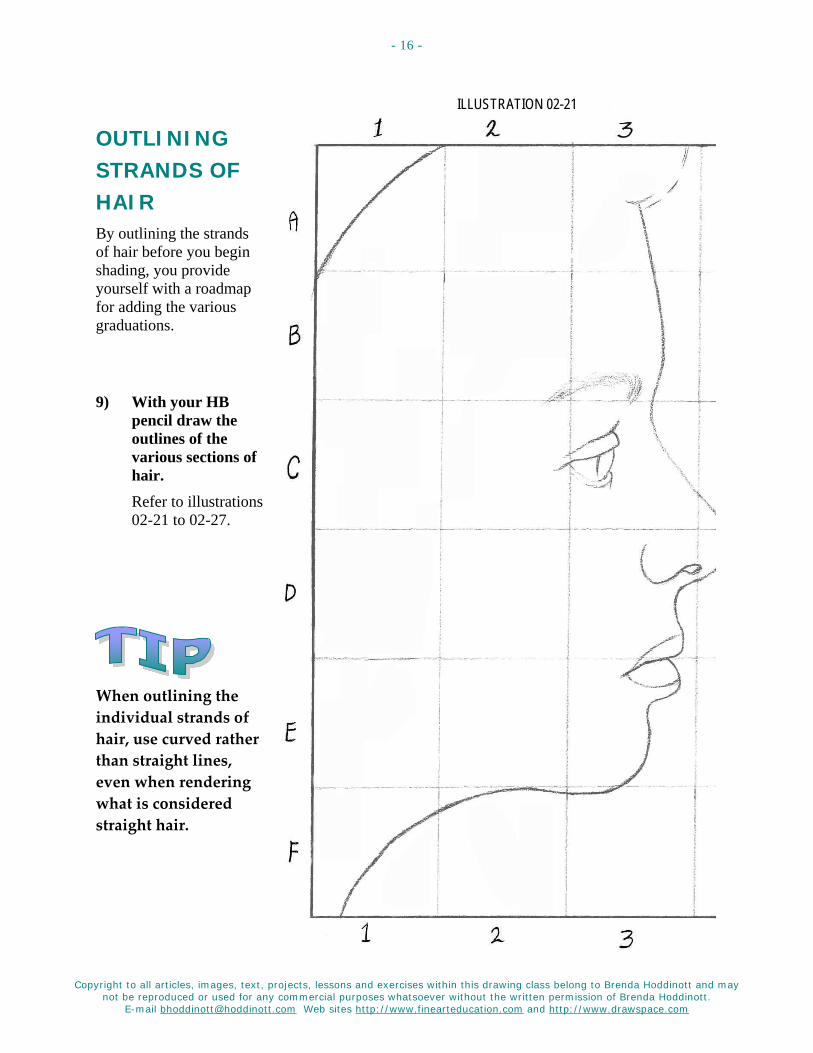
ILLUSTRATION 02-21
OUTLINING STRANDS OF HAIR By outlining the strands of hair before you begin shading, you provide yourself with a roadmap for adding the various graduations.
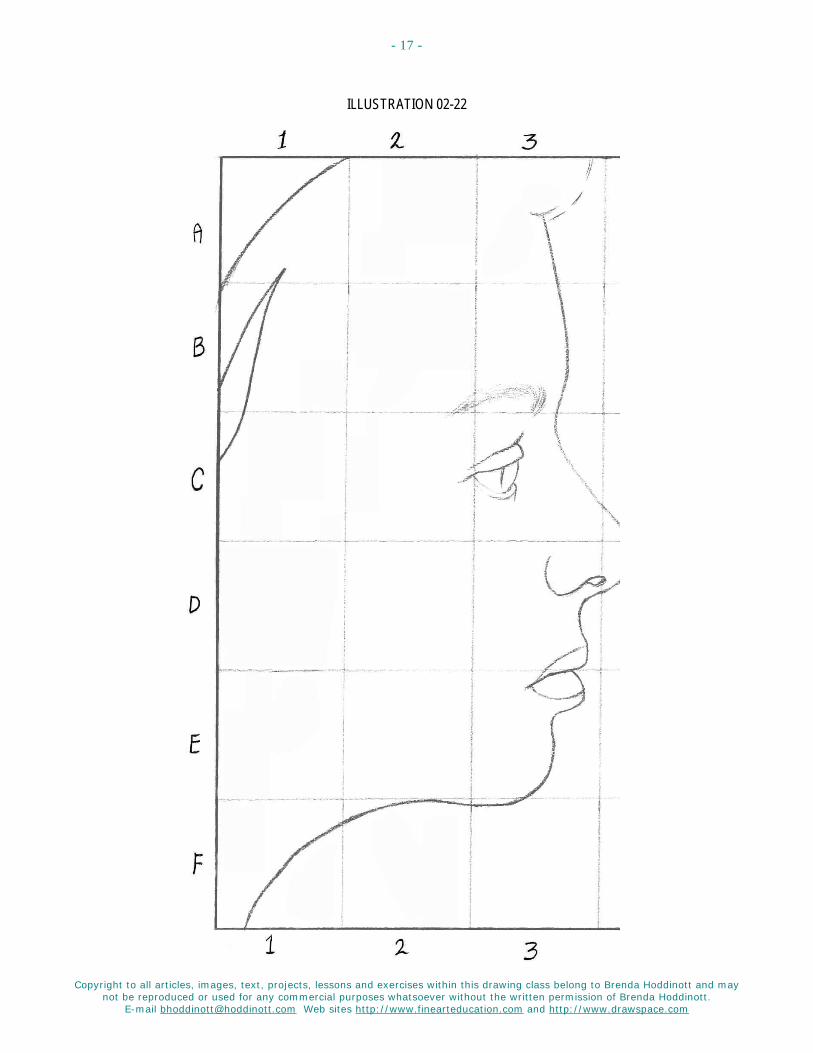
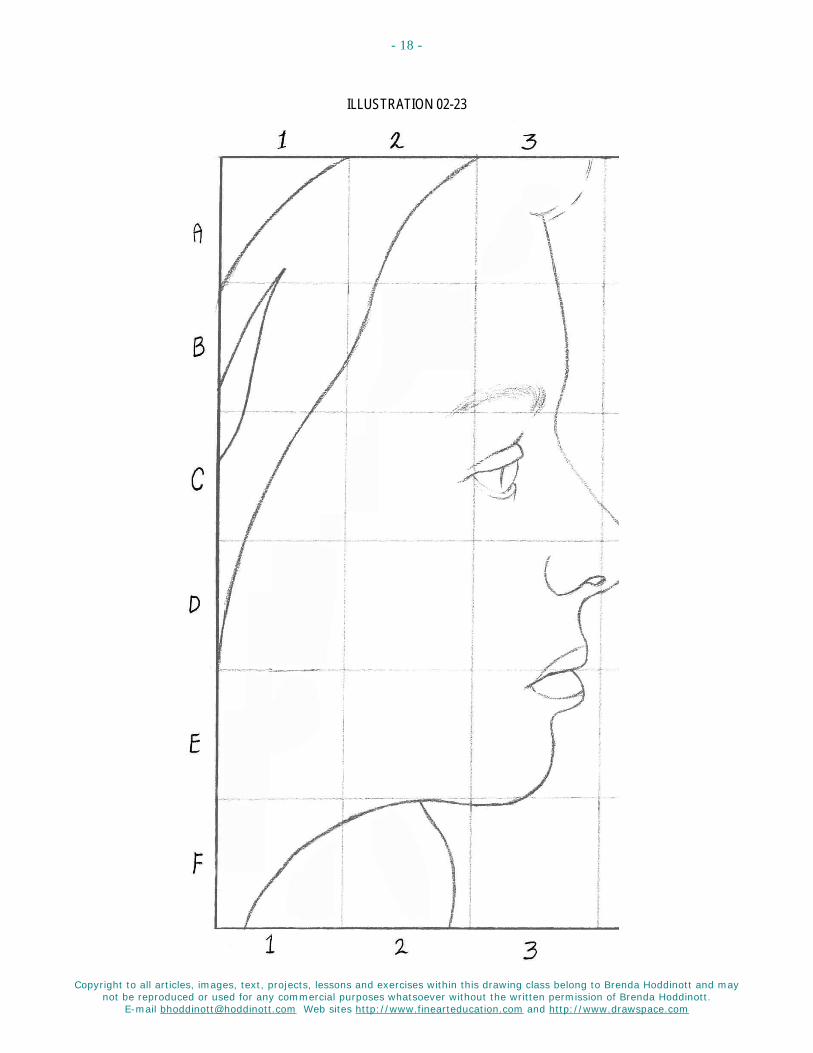
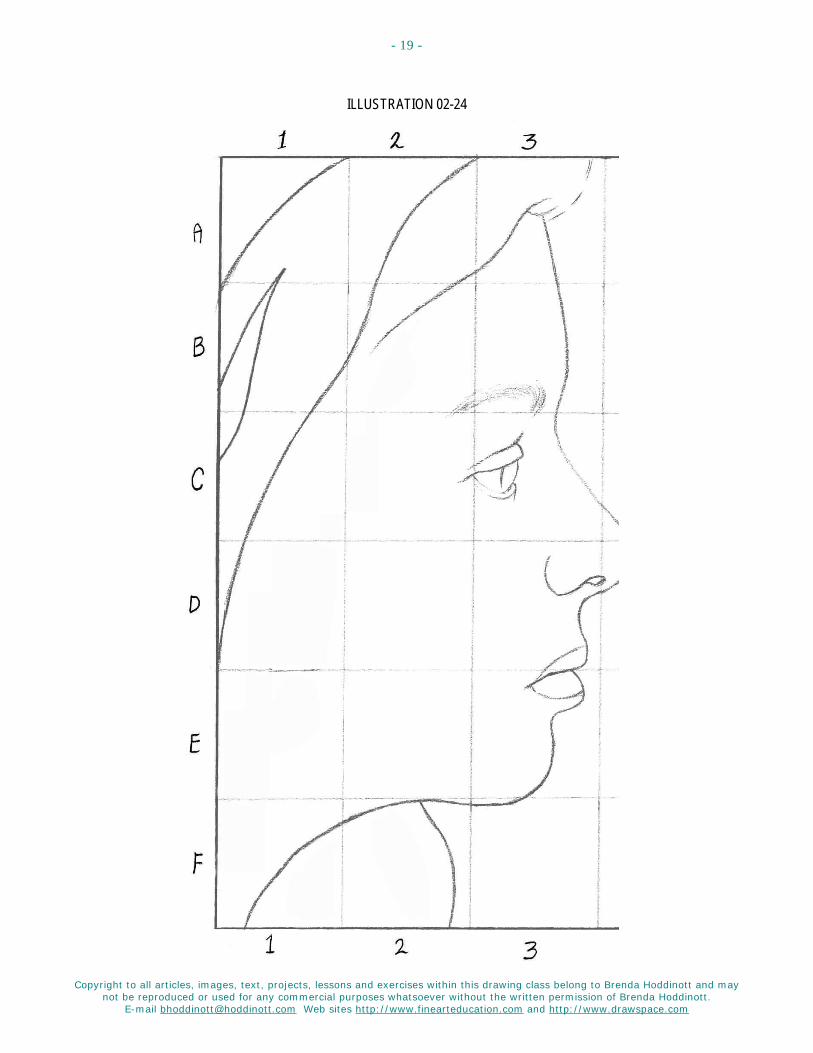
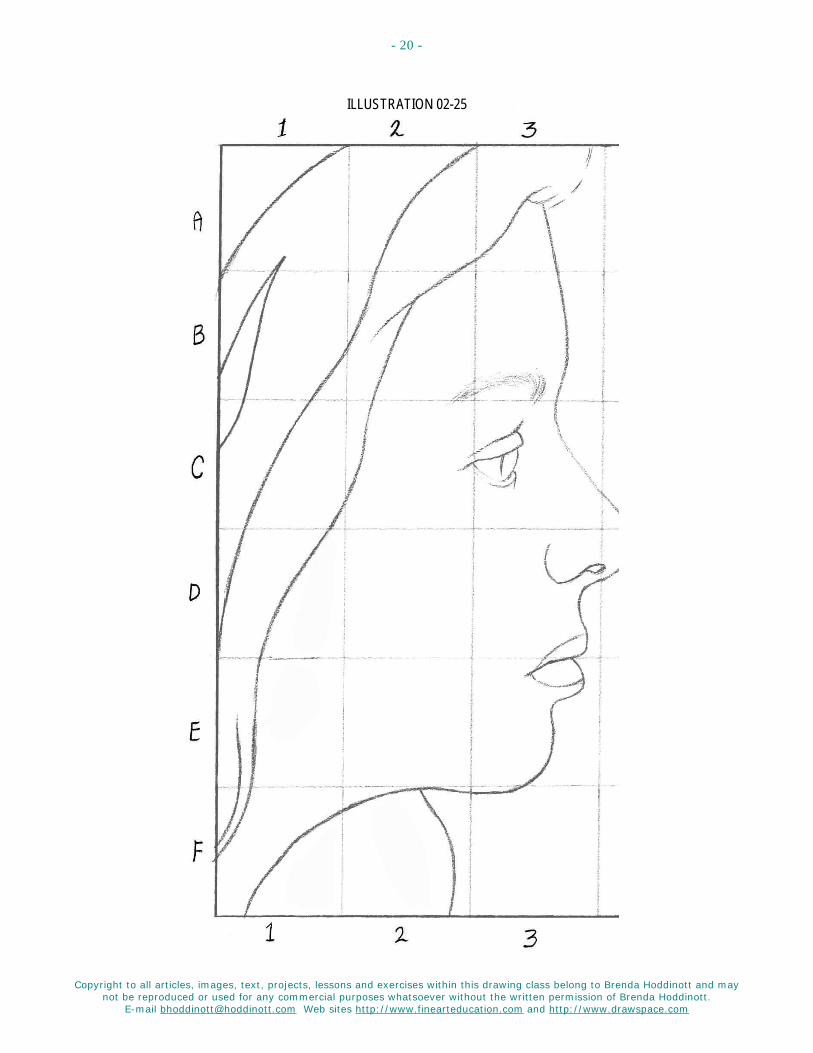
9) With your HB pencil draw the outlines of the various sections of hair. Refer to illustrations 02-21 to 02-27.
When outlining the individual strands of hair, use curved rather than straight lines, even when rendering what is considered straight hair.
Copyright to all articles, images, text, projects, lessons and exercises within this drawing class belong to Brenda Hoddinott and may not be reproduced or used for any commercial purposes whatsoever without the written permission of Brenda Hoddinott.
E-mail [email protected] Web sites http://www.finearteducation.com and http://www.drawspace.com
- 17 -
ILLUSTRATION 02-22
Copyright to all articles, images, text, projects, lessons and exercises within this drawing class belong to Brenda Hoddinott and may not be reproduced or used for any commercial purposes whatsoever without the written permission of Brenda Hoddinott.
E-mail [email protected] Web sites http://www.finearteducation.com and http://www.drawspace.com
- 18 -
ILLUSTRATION 02-23
Copyright to all articles, images, text, projects, lessons and exercises within this drawing class belong to Brenda Hoddinott and may not be reproduced or used for any commercial purposes whatsoever without the written permission of Brenda Hoddinott.
E-mail [email protected] Web sites http://www.finearteducation.com and http://www.drawspace.com
- 19 -
ILLUSTRATION 02-24
Copyright to all articles, images, text, projects, lessons and exercises within this drawing class belong to Brenda Hoddinott and may not be reproduced or used for any commercial purposes whatsoever without the written permission of Brenda Hoddinott.
E-mail [email protected] Web sites http://www.finearteducation.com and http://www.drawspace.com
- 20 -
ILLUSTRATION 02-25

Copyright to all articles, images, text, projects, lessons and exercises within this drawing class belong to Brenda Hoddinott and may not be reproduced or used for any commercial purposes whatsoever without the written permission of Brenda Hoddinott.
E-mail [email protected] Web sites http://www.finearteducation.com and http://www.drawspace.com
- 21 -
ILLUSTRATION 02-26
Copyright to all articles, images, text, projects, lessons and exercises within this drawing class belong to Brenda Hoddinott and may not be reproduced or used for any commercial purposes whatsoever without the written permission of Brenda Hoddinott.
E-mail [email protected] Web sites http://www.finearteducation.com and http://www.drawspace.com
- 22 -
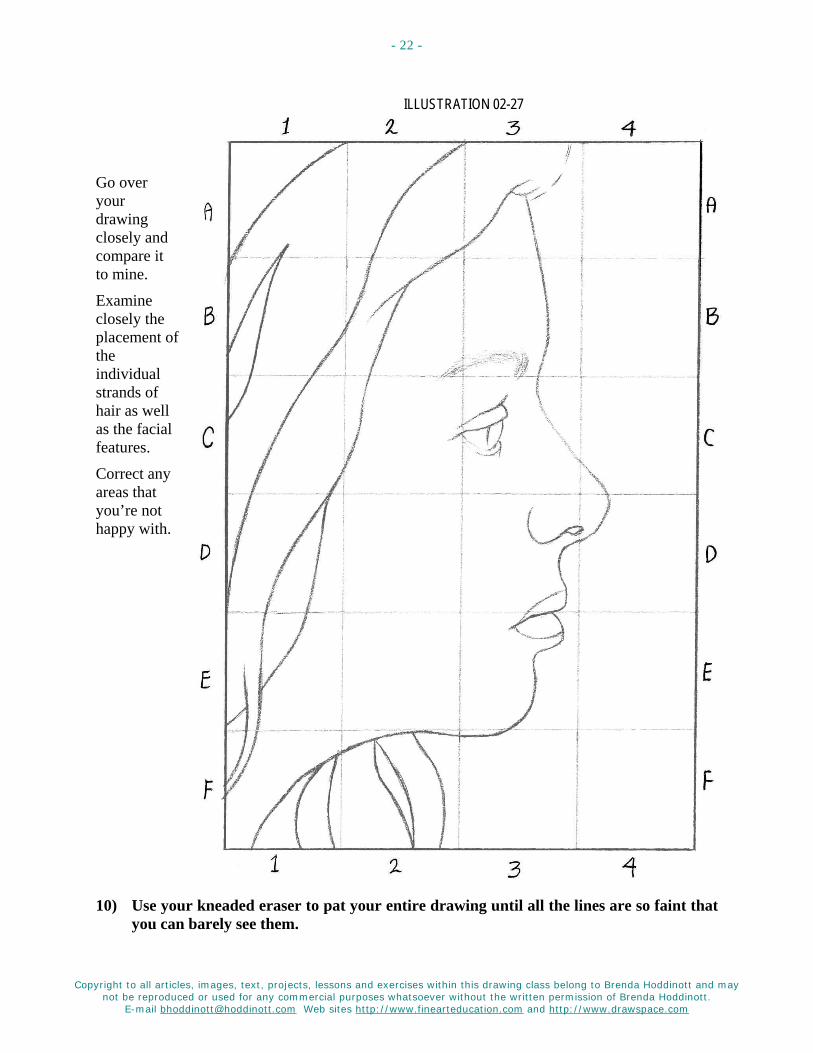
ILLUSTRATION 02-27
Go over your drawing closely and compare it to mine.
Examine closely the placement of the individual strands of hair as well as the facial features.
Correct any areas that you’re not happy with.
10) Use your kneaded eraser to pat your entire drawing until all the lines are so faint that you can barely see them.
Copyright to all articles, images, text, projects, lessons and exercises within this drawing class belong to Brenda Hoddinott and may not be reproduced or used for any commercial purposes whatsoever without the written permission of Brenda Hoddinott.
E-mail [email protected] Web sites http://www.finearteducation.com and http://www.drawspace.com
- 23 -
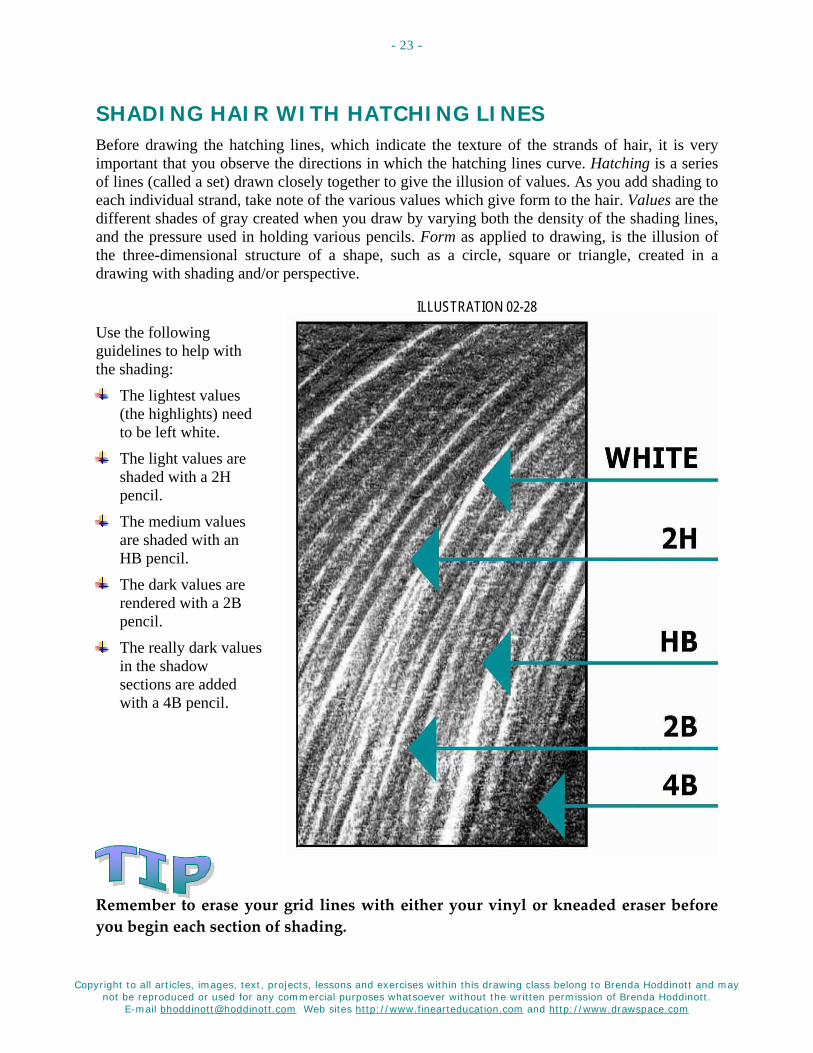
SHADING HAIR WITH HATCHING LINES Before drawing the hatching lines, which indicate the texture of the strands of hair, it is very important that you observe the directions in which the hatching lines curve. Hatching is a series of lines (called a set) drawn closely together to give the illusion of values. As you add shading to each individual strand, take note of the various values which give form to the hair. Values are the different shades of gray created when you draw by varying both the density of the shading lines, and the pressure used in holding various pencils. Form as applied to drawing, is the illusion of the three-dimensional structure of a shape, such as a circle, square or triangle, created in a drawing with shading and/or perspective.
ILLUSTRATION 02-28
Use the following guidelines to help with the shading:
The lightest values (the highlights) need to be left white.
The light values are shaded with a 2H pencil.
The medium values are shaded with an HB pencil.
The dark values are rendered with a 2B pencil.
The really dark values in the shadow sections are added with a 4B pencil.
Remember to erase your grid lines with either your vinyl or kneaded eraser before you begin each section of shading.
Copyright to all articles, images, text, projects, lessons and exercises within this drawing class belong to Brenda Hoddinott and may not be reproduced or used for any commercial purposes whatsoever without the written permission of Brenda Hoddinott.
E-mail [email protected] Web sites http://www.finearteducation.com and http://www.drawspace.com
- 24 -
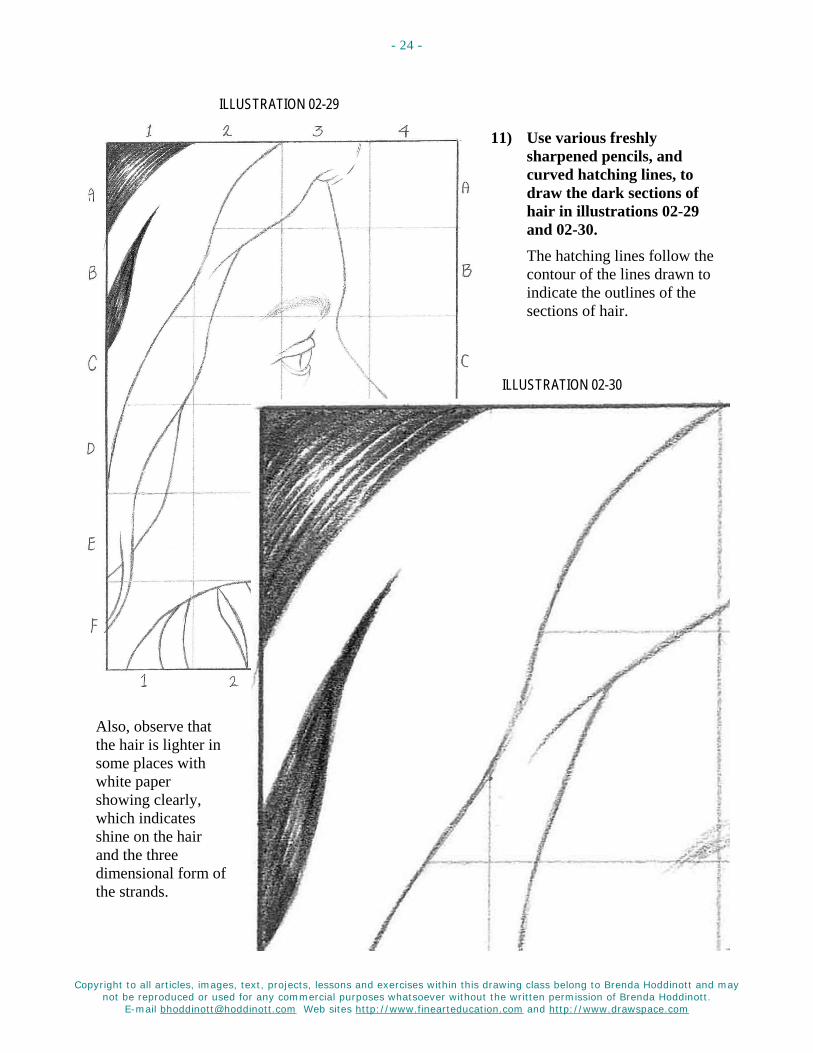
ILLUSTRATION 02-29
11) Use various freshly sharpened pencils, and curved hatching lines, to draw the dark sections of hair in illustrations 02-29 and 02-30. The hatching lines follow the contour of the lines drawn to indicate the outlines of the sections of hair.
ILLUSTRATION 02-30
Also, observe that the hair is lighter in some places with white paper showing clearly, which indicates shine on the hair and the three dimensional form of the strands.
Copyright to all articles, images, text, projects, lessons and exercises within this drawing class belong to Brenda Hoddinott and may not be reproduced or used for any commercial purposes whatsoever without the written permission of Brenda Hoddinott.
E-mail [email protected] Web sites http://www.finearteducation.com and http://www.drawspace.com
- 25 -
ILLUSTRATION 02-31
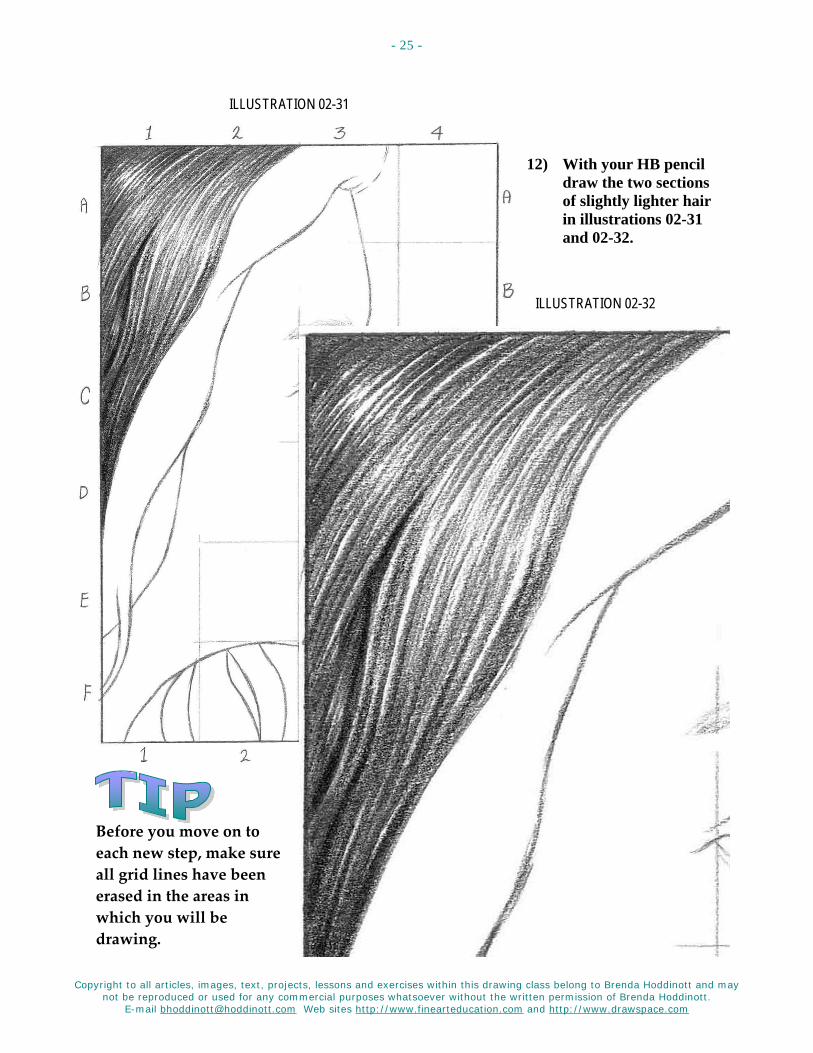
12) With your HB pencil draw the two sections of slightly lighter hair in illustrations 02-31 and 02-32.
ILLUSTRATION 02-32
Before you move on to each new step, make sure all grid lines have been erased in the areas in which you will be drawing.
Copyright to all articles, images, text, projects, lessons and exercises within this drawing class belong to Brenda Hoddinott and may not be reproduced or used for any commercial purposes whatsoever without the written permission of Brenda Hoddinott.
E-mail [email protected] Web sites http://www.finearteducation.com and http://www.drawspace.com
- 26 -
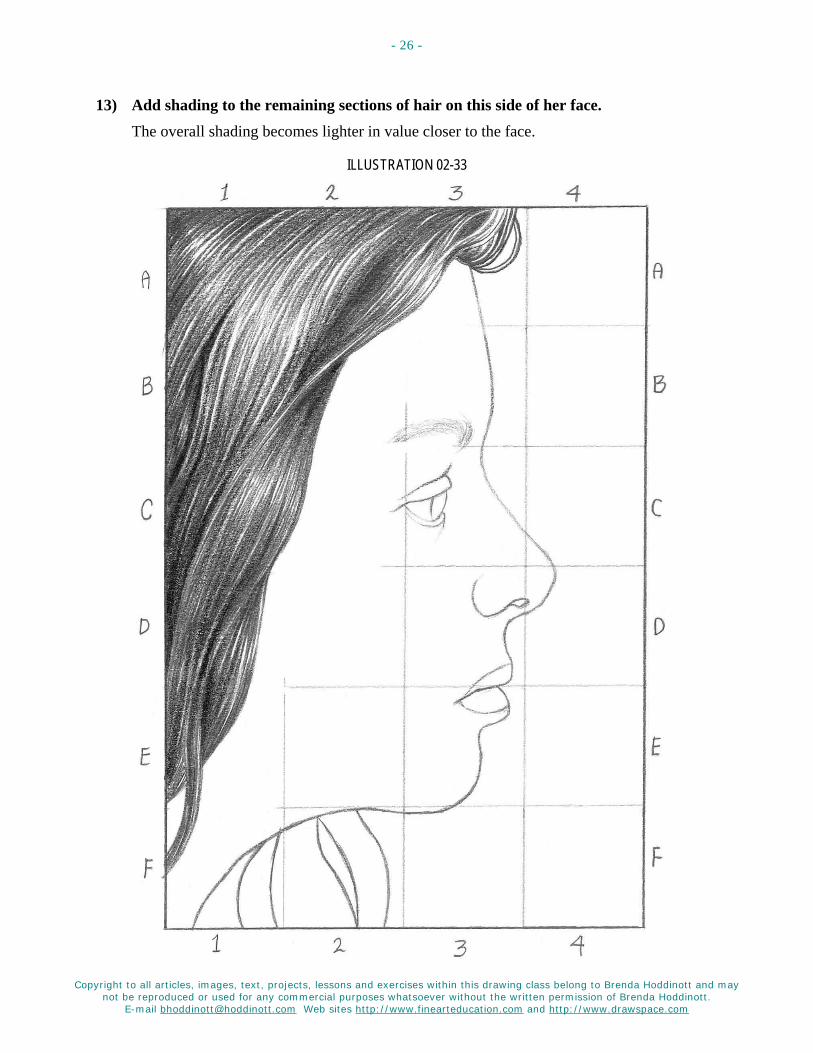
13) Add shading to the remaining sections of hair on this side of her face. The overall shading becomes lighter in value closer to the face.
ILLUSTRATION 02-33
Copyright to all articles, images, text, projects, lessons and exercises within this drawing class belong to Brenda Hoddinott and may not be reproduced or used for any commercial purposes whatsoever without the written permission of Brenda Hoddinott.
E-mail [email protected] Web sites http://www.finearteducation.com and http://www.drawspace.com
- 27 -
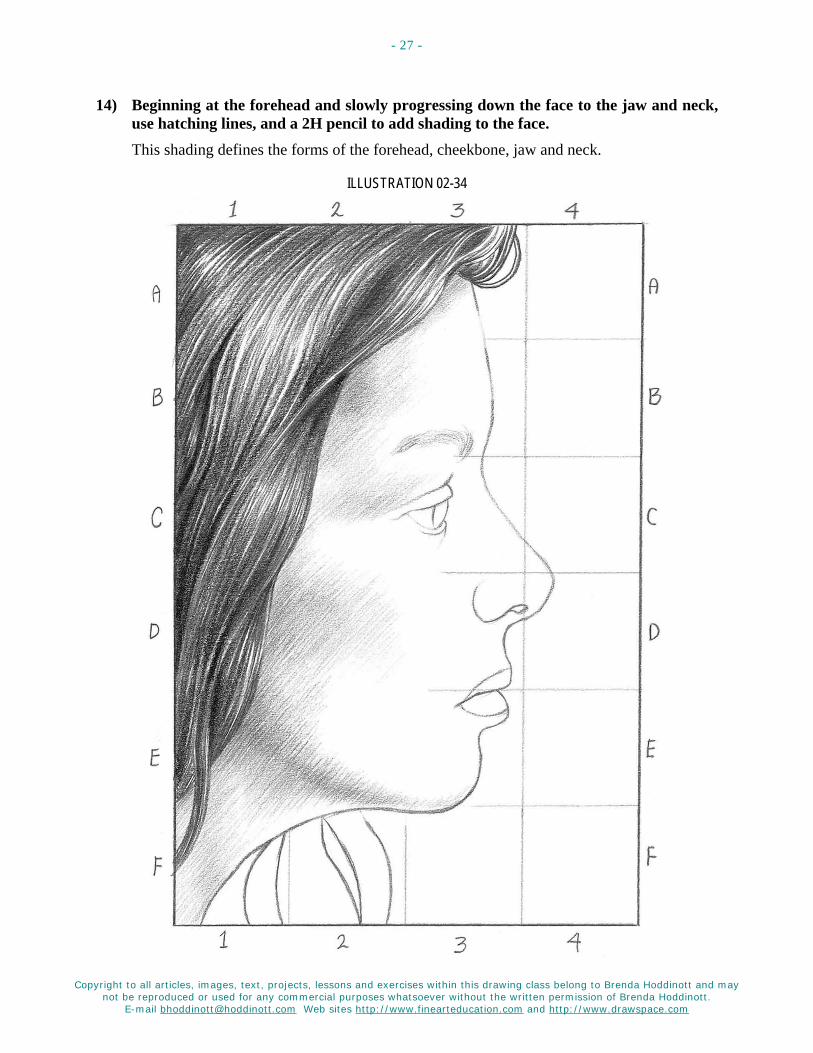
14) Beginning at the forehead and slowly progressing down the face to the jaw and neck, use hatching lines, and a 2H pencil to add shading to the face. This shading defines the forms of the forehead, cheekbone, jaw and neck.
ILLUSTRATION 02-34
Copyright to all articles, images, text, projects, lessons and exercises within this drawing class belong to Brenda Hoddinott and may not be reproduced or used for any commercial purposes whatsoever without the written permission of Brenda Hoddinott.
E-mail [email protected] Web sites http://www.finearteducation.com and http://www.drawspace.com
- 28 -
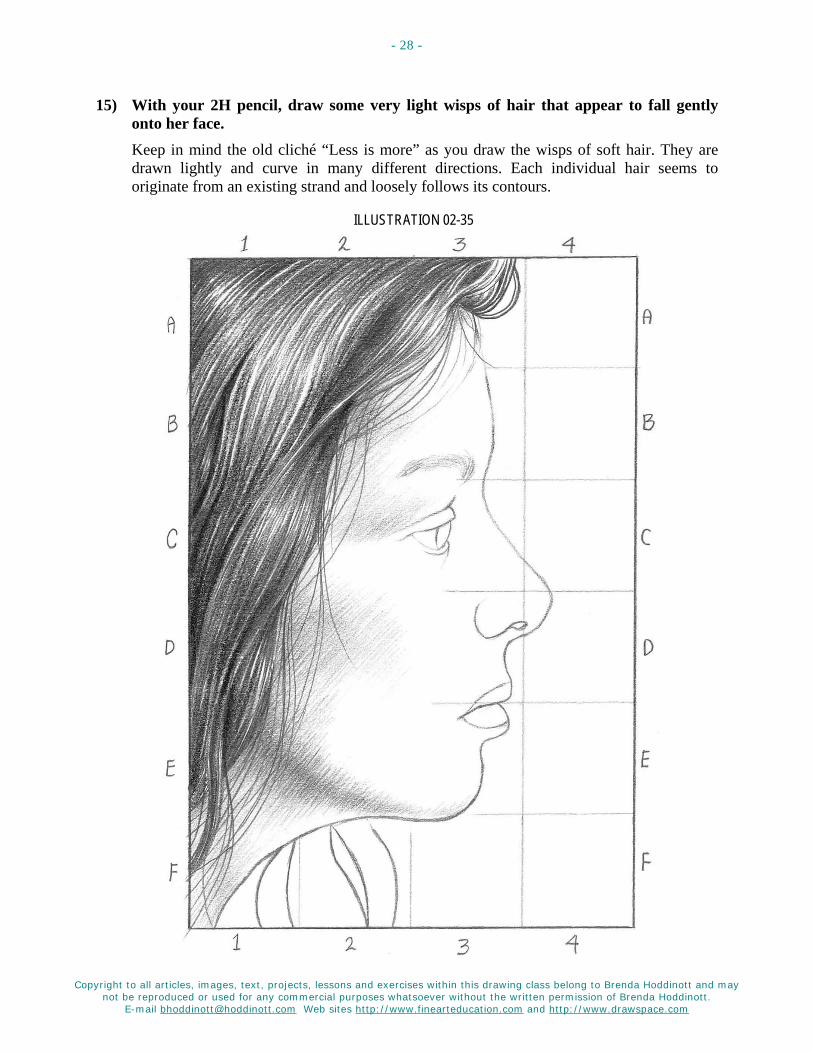
15) With your 2H pencil, draw some very light wisps of hair that appear to fall gently onto her face. Keep in mind the old cliché “Less is more” as you draw the wisps of soft hair. They are drawn lightly and curve in many different directions. Each individual hair seems to originate from an existing strand and loosely follows its contours.
ILLUSTRATION 02-35
Copyright to all articles, images, text, projects, lessons and exercises within this drawing class belong to Brenda Hoddinott and may not be reproduced or used for any commercial purposes whatsoever without the written permission of Brenda Hoddinott.
E-mail [email protected] Web sites http://www.finearteducation.com and http://www.drawspace.com
- 29 -
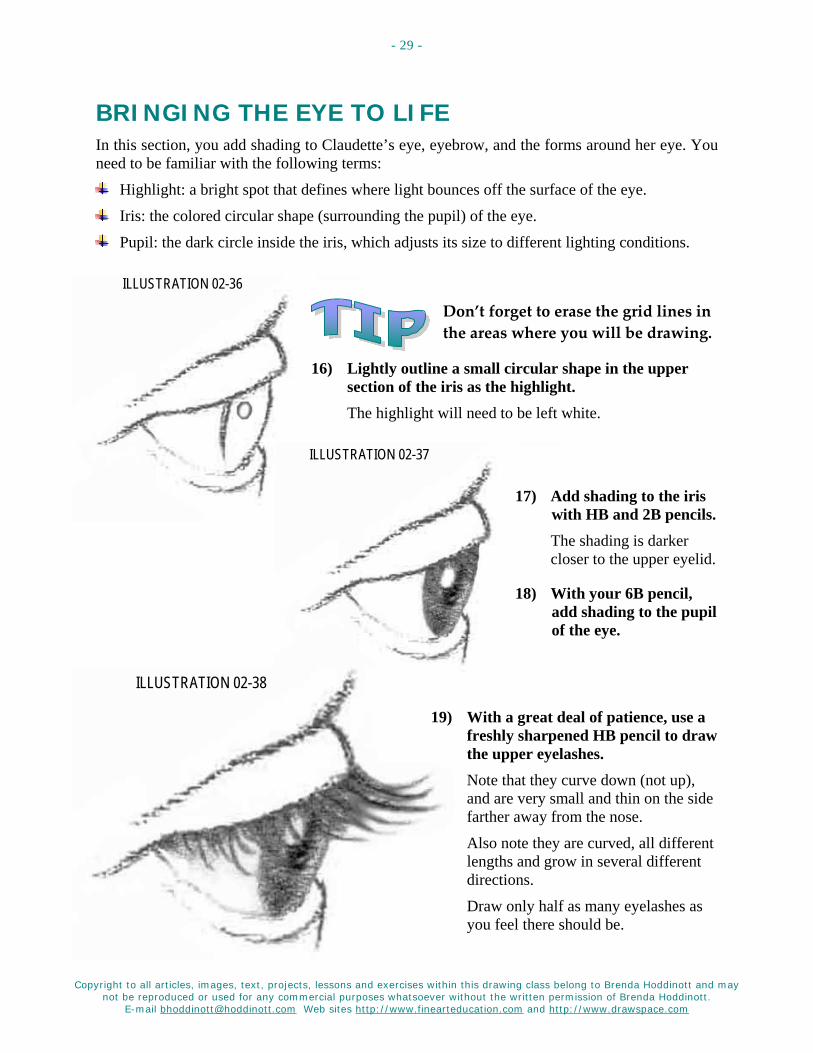
BRINGING THE EYE TO LIFE In this section, you add shading to Claudette’s eye, eyebrow, and the forms around her eye. You need to be familiar with the following terms:
Highlight: a bright spot that defines where light bounces off the surface of the eye.
Iris: the colored circular shape (surrounding the pupil) of the eye.
Pupil: the dark circle inside the iris, which adjusts its size to different lighting conditions.
ILLUSTRATION 02-36
Don’t forget to erase the grid lines in the areas where you will be drawing.
16) Lightly outline a small circular shape in the upper section of the iris as the highlight. The highlight will need to be left white.
ILLUSTRATION 02-37
17) Add shading to the iris with HB and 2B pencils. The shading is darker closer to the upper eyelid.
18) With your 6B pencil, add shading to the pupil of the eye.
ILLUSTRATION 02-38
19) With a great deal of patience, use a freshly sharpened HB pencil to draw the upper eyelashes. Note that they curve down (not up), and are very small and thin on the side farther away from the nose.
Also note they are curved, all different lengths and grow in several different directions.
Draw only half as many eyelashes as you feel there should be.
Copyright to all articles, images, text, projects, lessons and exercises within this drawing class belong to Brenda Hoddinott and may not be reproduced or used for any commercial purposes whatsoever without the written permission of Brenda Hoddinott.
E-mail [email protected] Web sites http://www.finearteducation.com and http://www.drawspace.com
- 30 -
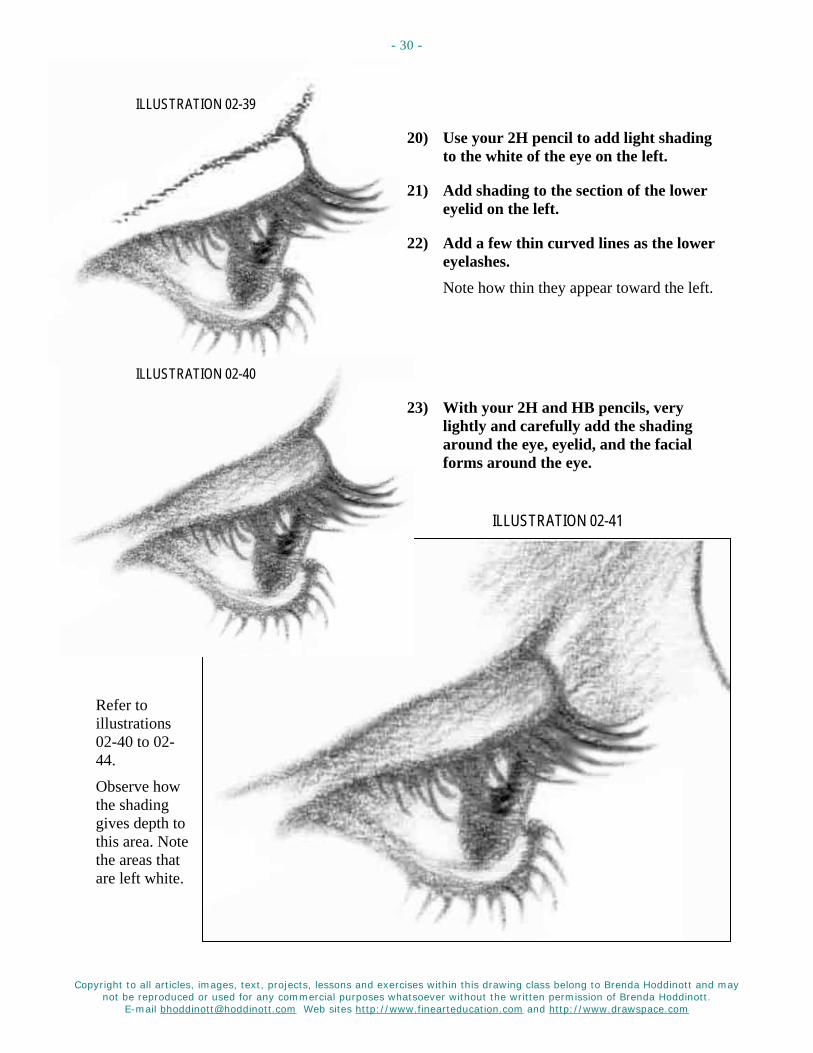
ILLUSTRATION 02-39
20) Use your 2H pencil to add light shading to the white of the eye on the left.
21) Add shading to the section of the lower eyelid on the left.
22) Add a few thin curved lines as the lower eyelashes. Note how thin they appear toward the left.
ILLUSTRATION 02-40
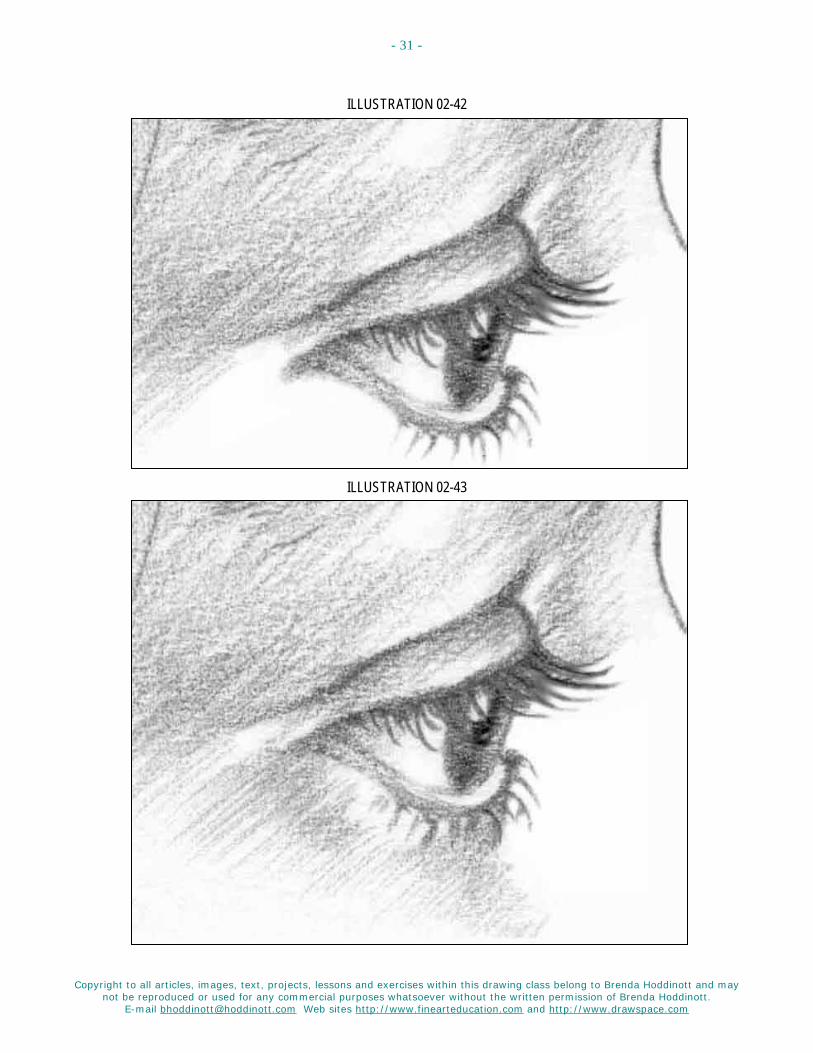
23) With your 2H and HB pencils, very lightly and carefully add the shading around the eye, eyelid, and the facial forms around the eye.
ILLUSTRATION 02-41
Refer to illustrations 02-40 to 02-44.
Observe how the shading gives depth to this area. Note the areas that are left white.
Copyright to all articles, images, text, projects, lessons and exercises within this drawing class belong to Brenda Hoddinott and may not be reproduced or used for any commercial purposes whatsoever without the written permission of Brenda Hoddinott.
E-mail [email protected] Web sites http://www.finearteducation.com and http://www.drawspace.com
- 31 -
ILLUSTRATION 02-42
ILLUSTRATION 02-43
Copyright to all articles, images, text, projects, lessons and exercises within this drawing class belong to Brenda Hoddinott and may not be reproduced or used for any commercial purposes whatsoever without the written permission of Brenda Hoddinott.
E-mail [email protected] Web sites http://www.finearteducation.com and http://www.drawspace.com
- 32 -
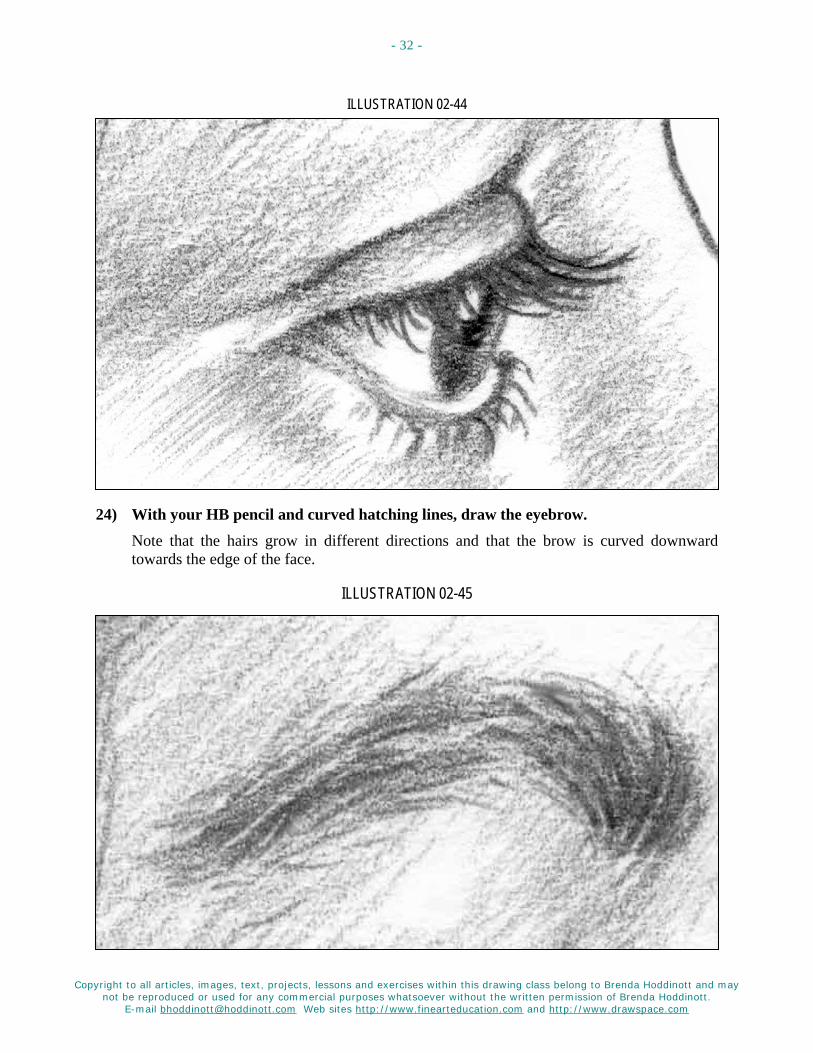
ILLUSTRATION 02-44
24) With your HB pencil and curved hatching lines, draw the eyebrow. Note that the hairs grow in different directions and that the brow is curved downward towards the edge of the face.
ILLUSTRATION 02-45
Copyright to all articles, images, text, projects, lessons and exercises within this drawing class belong to Brenda Hoddinott and may not be reproduced or used for any commercial purposes whatsoever without the written permission of Brenda Hoddinott.
E-mail [email protected] Web sites http://www.finearteducation.com and http://www.drawspace.com
- 33 -
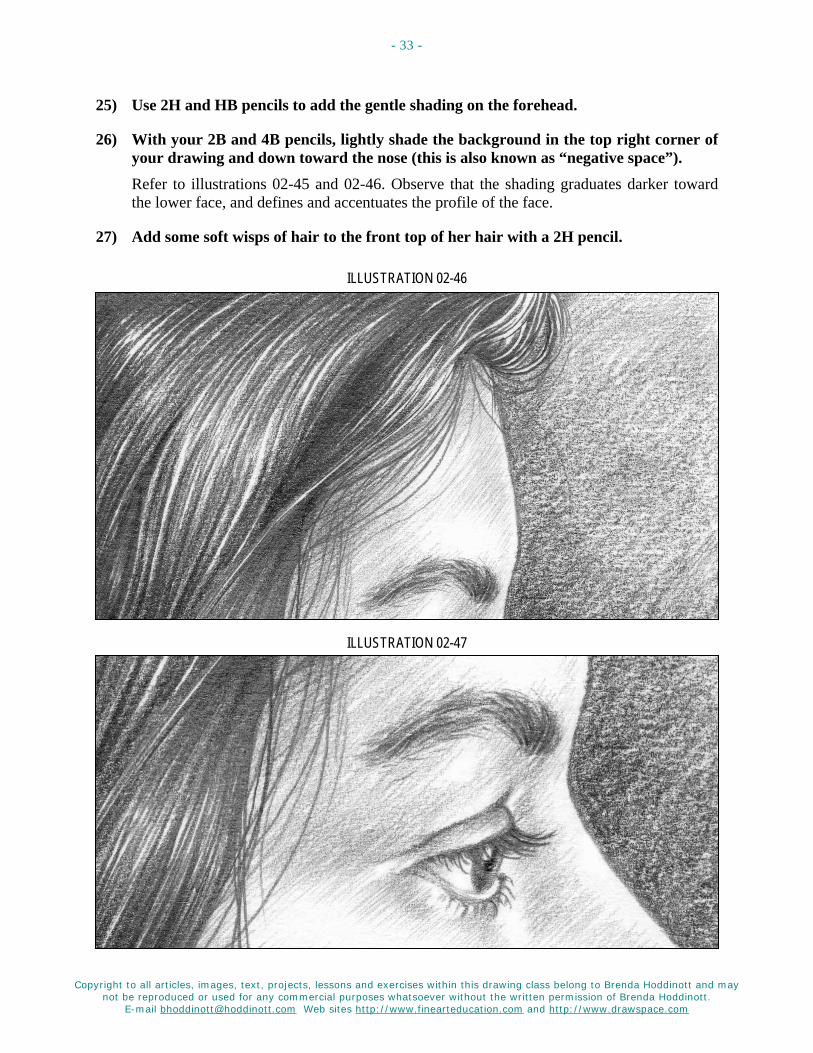
25) Use 2H and HB pencils to add the gentle shading on the forehead.
26) With your 2B and 4B pencils, lightly shade the background in the top right corner of your drawing and down toward the nose (this is also known as “negative space”). Refer to illustrations 02-45 and 02-46. Observe that the shading graduates darker toward the lower face, and defines and accentuates the profile of the face.
27) Add some soft wisps of hair to the front top of her hair with a 2H pencil.
ILLUSTRATION 02-46
ILLUSTRATION 02-47
Copyright to all articles, images, text, projects, lessons and exercises within this drawing class belong to Brenda Hoddinott and may not be reproduced or used for any commercial purposes whatsoever without the written permission of Brenda Hoddinott.
E-mail [email protected] Web sites http://www.finearteducation.com and http://www.drawspace.com
- 34 -
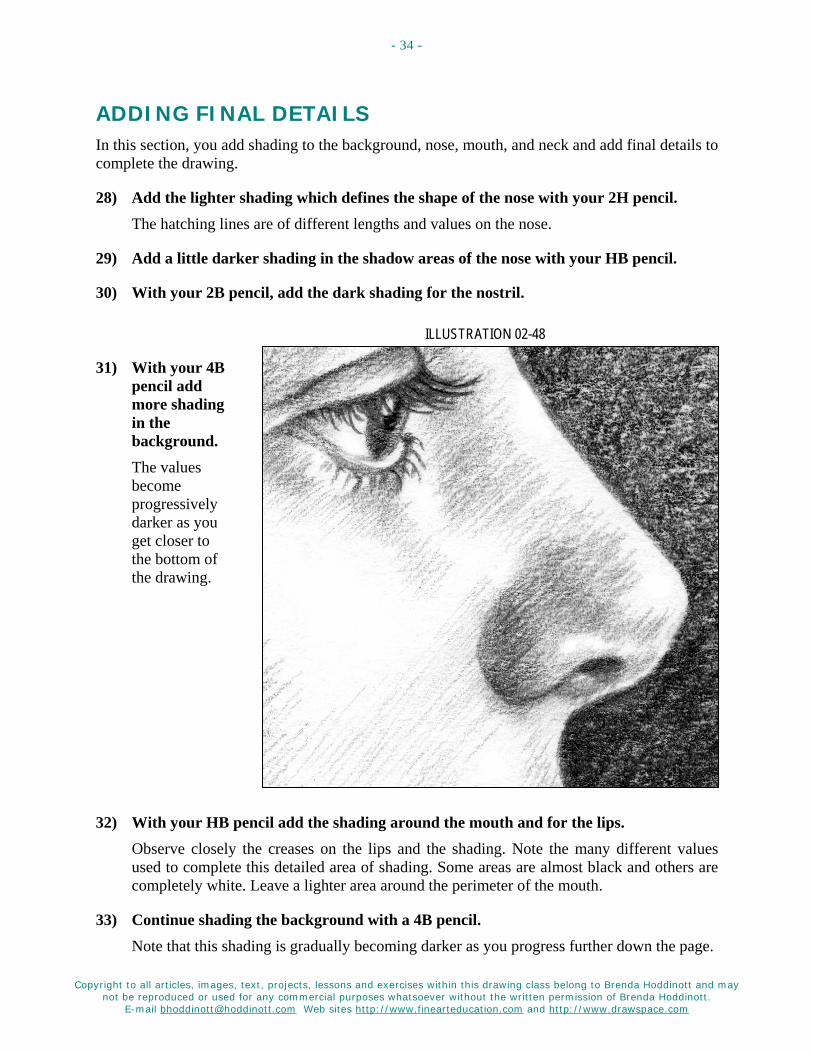
ADDING FINAL DETAILS In this section, you add shading to the background, nose, mouth, and neck and add final details to complete the drawing.
28) Add the lighter shading which defines the shape of the nose with your 2H pencil. The hatching lines are of different lengths and values on the nose.
29) Add a little darker shading in the shadow areas of the nose with your HB pencil.
30) With your 2B pencil, add the dark shading for the nostril.
ILLUSTRATION 02-48
31) With your 4B pencil add more shading in the background. The values become progressively darker as you get closer to the bottom of the drawing.
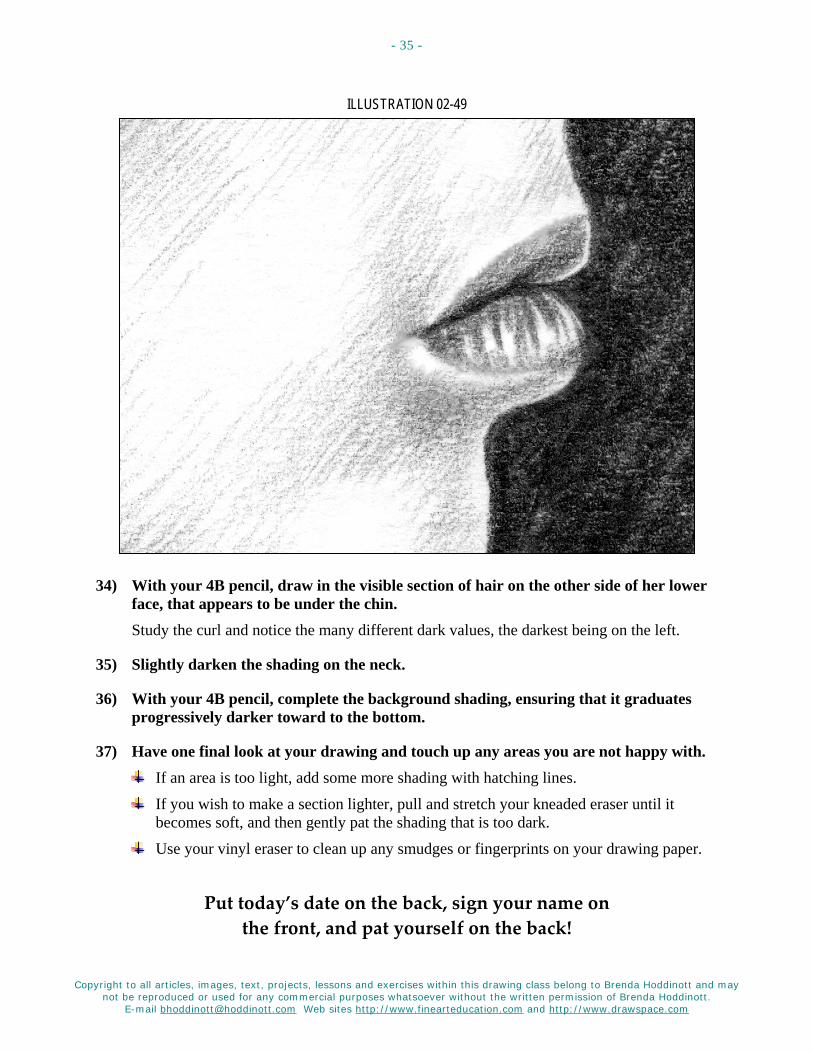
32) With your HB pencil add the shading around the mouth and for the lips. Observe closely the creases on the lips and the shading. Note the many different values used to complete this detailed area of shading. Some areas are almost black and others are completely white. Leave a lighter area around the perimeter of the mouth.
33) Continue shading the background with a 4B pencil. Note that this shading is gradually becoming darker as you progress further down the page.
Copyright to all articles, images, text, projects, lessons and exercises within this drawing class belong to Brenda Hoddinott and may not be reproduced or used for any commercial purposes whatsoever without the written permission of Brenda Hoddinott.
E-mail [email protected] Web sites http://www.finearteducation.com and http://www.drawspace.com
- 35 -
ILLUSTRATION 02-49
34) With your 4B pencil, draw in the visible section of hair on the other side of her lower face, that appears to be under the chin. Study the curl and notice the many different dark values, the darkest being on the left.
35) Slightly darken the shading on the neck.
36) With your 4B pencil, complete the background shading, ensuring that it graduates progressively darker toward to the bottom.
37) Have one final look at your drawing and touch up any areas you are not happy with. If an area is too light, add some more shading with hatching lines.
If you wish to make a section lighter, pull and stretch your kneaded eraser until it becomes soft, and then gently pat the shading that is too dark.
Use your vinyl eraser to clean up any smudges or fingerprints on your drawing paper.
Put today’s date on the back, sign your name on the front, and pat yourself on the back!
Copyright to all articles, images, text, projects, lessons and exercises within this drawing class belong to Brenda Hoddinott and may not be reproduced or used for any commercial purposes whatsoever without the written permission of Brenda Hoddinott.
E-mail [email protected] Web sites http://www.finearteducation.com and http://www.drawspace.com
- 36 -
ILLUSTRATION 02-50
Copyright to all articles, images, text, projects, lessons and exercises within this drawing class belong to Brenda Hoddinott and may not be reproduced or used for any commercial purposes whatsoever without the written permission of Brenda Hoddinott.
E-mail [email protected] Web sites http://www.finearteducation.com and http://www.drawspace.com
- 37 -
There are only three ways to improve your drawing skills… practice, practice and more practice! So grab another piece of
paper, choose another lesson, and draw some more!
BRENDA HODDINOTT - BIOGRAPHY As a self-educated teacher, visual artist, portraitist, forensic artist, and illustrator, Brenda Hoddinott utilizes diverse art media including graphite, technical pen, colored pencil, chalk pastel, charcoal, conté crayon, and oil paints.
My philosophy on teaching art is to focus primarily on the enjoyment aspects while gently introducing the technical and academic. Hence, in creating a passion for the subject matter,
the quest for knowledge also becomes enjoyable. >Brenda Hoddinott<
Born in St. John’s, Newfoundland, Brenda grew up in the small town of Corner Brook. She developed strong technical competencies with a personal commitment to self directed learning, and the aid of assorted “Learn to Draw” books. During Brenda’s twenty-five year career as a self-educated civilian forensic artist, numerous criminal investigation departments have employed Brenda’s skills, including Royal Canadian Mounted Police and municipal police departments. In 1992, Brenda was honored with a commendation from the Royal Canadian Mounted Police, and in 1994, she was awarded a Certificate of Membership from “Forensic Artists International”.
Her home-based art career included graphic design, and teaching recreational drawing and painting classes. As supervisor of her community’s recreational art department, Brenda hired and trained teachers, and designed curriculum for several children’s art programs. In 1998, Brenda chose to end her eighteen-year career as an art educator in order to devote more time to writing, drawing, painting, and developing her websites.
Drawspace http://www.drawspace.com incorporates her unique style and innovative approach to curriculum development. This site offers downloadable and printable drawing classes for students of all abilities from the age of eight through adult. Students of all ages, levels and abilities have praised the simple step-by-step instructional approach. This site is respected as a resource for fine art educators, home schooling programs, and educational facilities throughout the world.
LEARN-TO-DRAW BOOKS BY BRENDA HODDINOTT Drawing for Dummies (2003): Wiley Publishing, Inc., New, York, NY, this 336 page book
is available on various websites and in major bookstores internationally.
The Complete Idiot’s Guide to Drawing People (2004): Winner of the Alpha-Penguin Book of the Year Award 2004, Alpha - Pearson Education – Macmillan, Indianapolis, IN, this 360 page book is available on various websites and in major bookstores internationally.
Brenda Hoddinott
P-03 INTERMEDIATE: PEOPLE
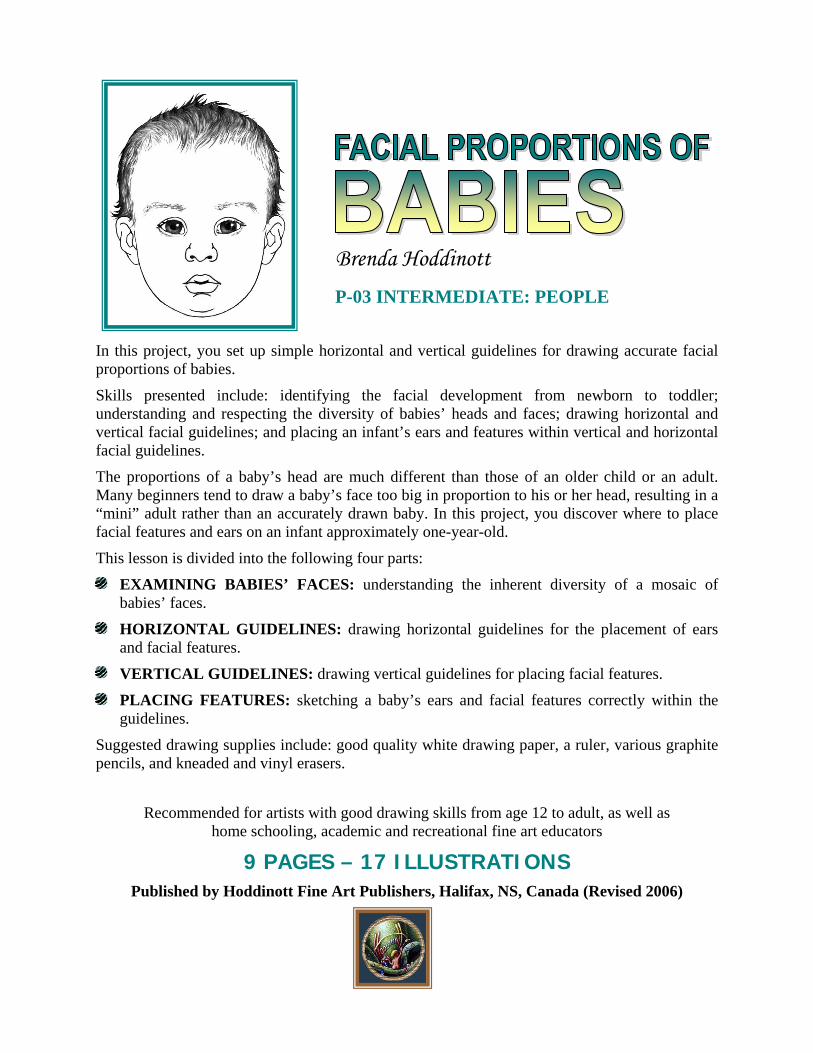
In this project, you set up simple horizontal and vertical guidelines for drawing accurate facial proportions of babies.
Skills presented include: identifying the facial development from newborn to toddler; understanding and respecting the diversity of babies’ heads and faces; drawing horizontal and vertical facial guidelines; and placing an infant’s ears and features within vertical and horizontal facial guidelines.
The proportions of a baby’s head are much different than those of an older child or an adult. Many beginners tend to draw a baby’s face too big in proportion to his or her head, resulting in a “mini” adult rather than an accurately drawn baby. In this project, you discover where to place facial features and ears on an infant approximately one-year-old.
This lesson is divided into the following four parts:
EXAMINING BABIES’ FACES: understanding the inherent diversity of a mosaic of babies’ faces.
HORIZONTAL GUIDELINES: drawing horizontal guidelines for the placement of ears and facial features.
VERTICAL GUIDELINES: drawing vertical guidelines for placing facial features.
PLACING FEATURES: sketching a baby’s ears and facial features correctly within the guidelines.
Suggested drawing supplies include: good quality white drawing paper, a ruler, various graphite pencils, and kneaded and vinyl erasers.
Recommended for artists with good drawing skills from age 12 to adult, as well as home schooling, academic and recreational fine art educators
9 PAGES – 17 ILLUSTRATIONS Published by Hoddinott Fine Art Publishers, Halifax, NS, Canada (Revised 2006)
Copyright to all articles, images, text, projects, lessons and exercises within this drawing class belong to Brenda Hoddinott and may not be reproduced or used for any commercial purposes whatsoever without the written permission of Brenda Hoddinott.
E-mail [email protected] Web sites http://www.finearteducation.com and http://www.drawspace.com
- 2 -
EXAMINING BABIES’ FACES Before you attempt to draw individual features on a baby’s face, it helps to know how to plan a place for everything, sort of like a blueprint. Some variations of rules for remembering human facial proportions are simple and others are quite complex. I prefer simple guidelines that are easy to remember. The heads and faces of babies come in many shapes and sizes. However, the same basic guidelines for proportions, apply to each of them. Proportion is the relationship in size of one component of a drawing to another or others.
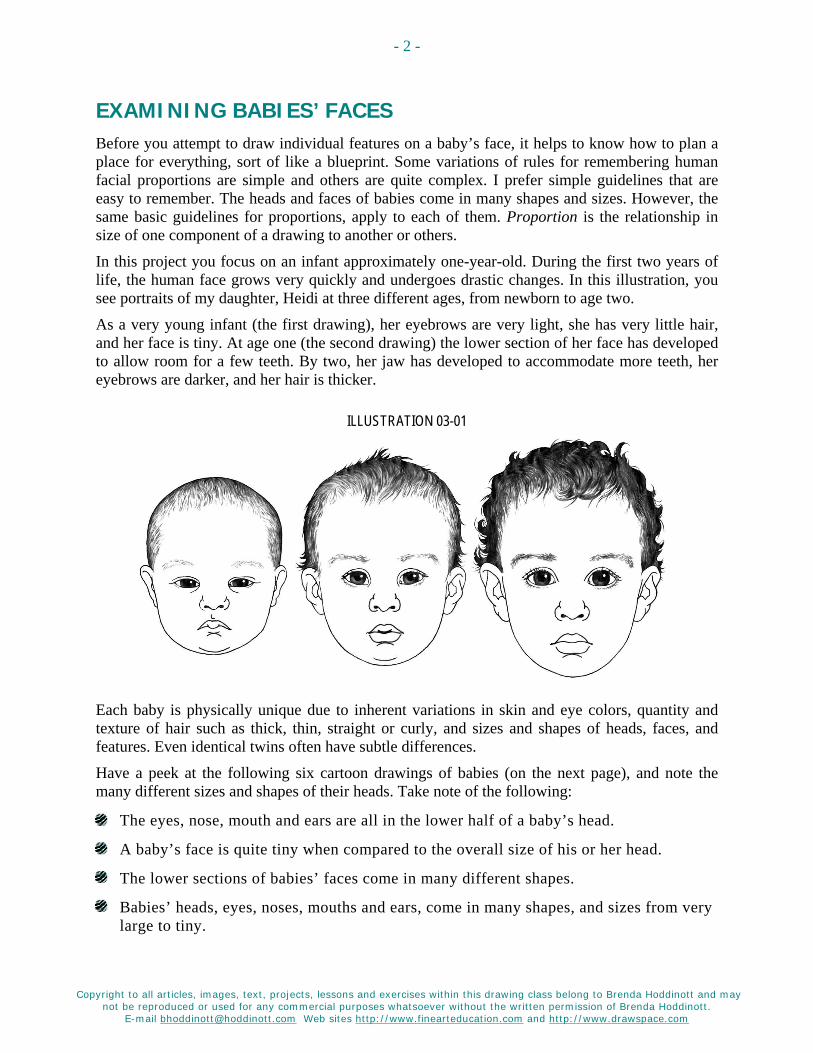
In this project you focus on an infant approximately one-year-old. During the first two years of life, the human face grows very quickly and undergoes drastic changes. In this illustration, you see portraits of my daughter, Heidi at three different ages, from newborn to age two.
As a very young infant (the first drawing), her eyebrows are very light, she has very little hair, and her face is tiny. At age one (the second drawing) the lower section of her face has developed to allow room for a few teeth. By two, her jaw has developed to accommodate more teeth, her eyebrows are darker, and her hair is thicker.
ILLUSTRATION 03-01
Each baby is physically unique due to inherent variations in skin and eye colors, quantity and texture of hair such as thick, thin, straight or curly, and sizes and shapes of heads, faces, and features. Even identical twins often have subtle differences.
Have a peek at the following six cartoon drawings of babies (on the next page), and note the many different sizes and shapes of their heads. Take note of the following:
The eyes, nose, mouth and ears are all in the lower half of a baby’s head.
A baby’s face is quite tiny when compared to the overall size of his or her head.
The lower sections of babies’ faces come in many different shapes.
Babies’ heads, eyes, noses, mouths and ears, come in many shapes, and sizes from very large to tiny.
Copyright to all articles, images, text, projects, lessons and exercises within this drawing class belong to Brenda Hoddinott and may not be reproduced or used for any commercial purposes whatsoever without the written permission of Brenda Hoddinott.
E-mail [email protected] Web sites http://www.finearteducation.com and http://www.drawspace.com
- 3 -
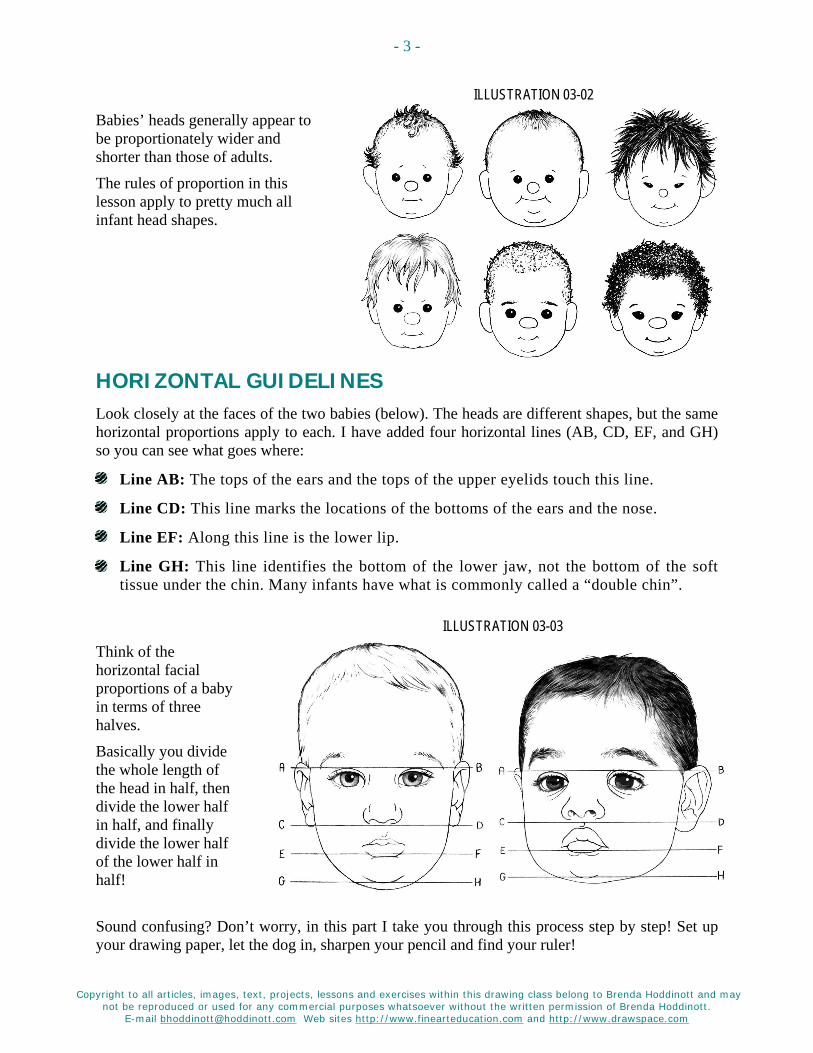
ILLUSTRATION 03-02
Babies’ heads generally appear to be proportionately wider and shorter than those of adults.
The rules of proportion in this lesson apply to pretty much all infant head shapes.
HORIZONTAL GUIDELINES Look closely at the faces of the two babies (below). The heads are different shapes, but the same horizontal proportions apply to each. I have added four horizontal lines (AB, CD, EF, and GH) so you can see what goes where:
Line AB: The tops of the ears and the tops of the upper eyelids touch this line.
Line CD: This line marks the locations of the bottoms of the ears and the nose.
Line EF: Along this line is the lower lip.
Line GH: This line identifies the bottom of the lower jaw, not the bottom of the soft tissue under the chin. Many infants have what is commonly called a “double chin”.
ILLUSTRATION 03-03
Think of the horizontal facial proportions of a baby in terms of three halves.
Basically you divide the whole length of the head in half, then divide the lower half in half, and finally divide the lower half of the lower half in half!
Sound confusing? Don’t worry, in this part I take you through this process step by step! Set up your drawing paper, let the dog in, sharpen your pencil and find your ruler!
Copyright to all articles, images, text, projects, lessons and exercises within this drawing class belong to Brenda Hoddinott and may not be reproduced or used for any commercial purposes whatsoever without the written permission of Brenda Hoddinott.
E-mail [email protected] Web sites http://www.finearteducation.com and http://www.drawspace.com
- 4 -
ILLUSTRATION 03-04
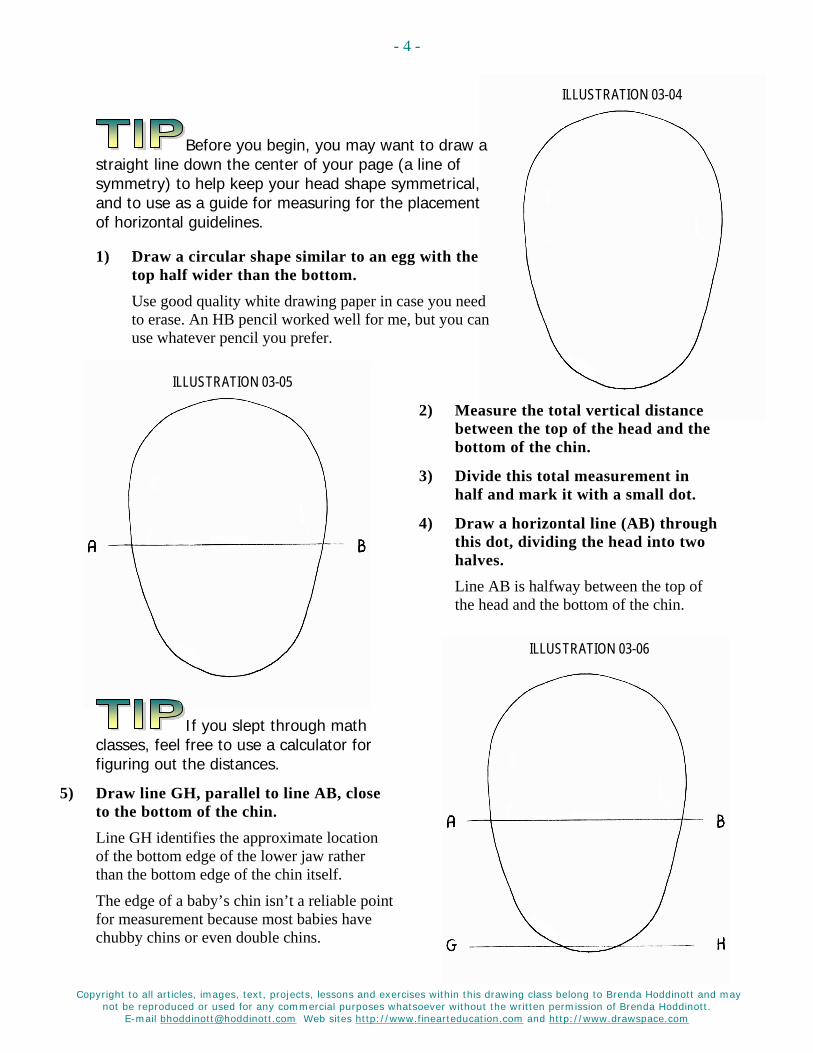
Before you begin, you may want to draw a straight line down the center of your page (a line of symmetry) to help keep your head shape symmetrical, and to use as a guide for measuring for the placement of horizontal guidelines.
1) Draw a circular shape similar to an egg with the top half wider than the bottom. Use good quality white drawing paper in case you need to erase. An HB pencil worked well for me, but you can use whatever pencil you prefer.
ILLUSTRATION 03-05
2) Measure the total vertical distance between the top of the head and the bottom of the chin.
3) Divide this total measurement in half and mark it with a small dot.
4) Draw a horizontal line (AB) through this dot, dividing the head into two halves. Line AB is halfway between the top of the head and the bottom of the chin.
ILLUSTRATION 03-06
If you slept through math classes, feel free to use a calculator for figuring out the distances.
5) Draw line GH, parallel to line AB, close to the bottom of the chin. Line GH identifies the approximate location of the bottom edge of the lower jaw rather than the bottom edge of the chin itself.
The edge of a baby’s chin isn’t a reliable point for measurement because most babies have chubby chins or even double chins.
Copyright to all articles, images, text, projects, lessons and exercises within this drawing class belong to Brenda Hoddinott and may not be reproduced or used for any commercial purposes whatsoever without the written permission of Brenda Hoddinott.
E-mail [email protected] Web sites http://www.finearteducation.com and http://www.drawspace.com
- 5 -
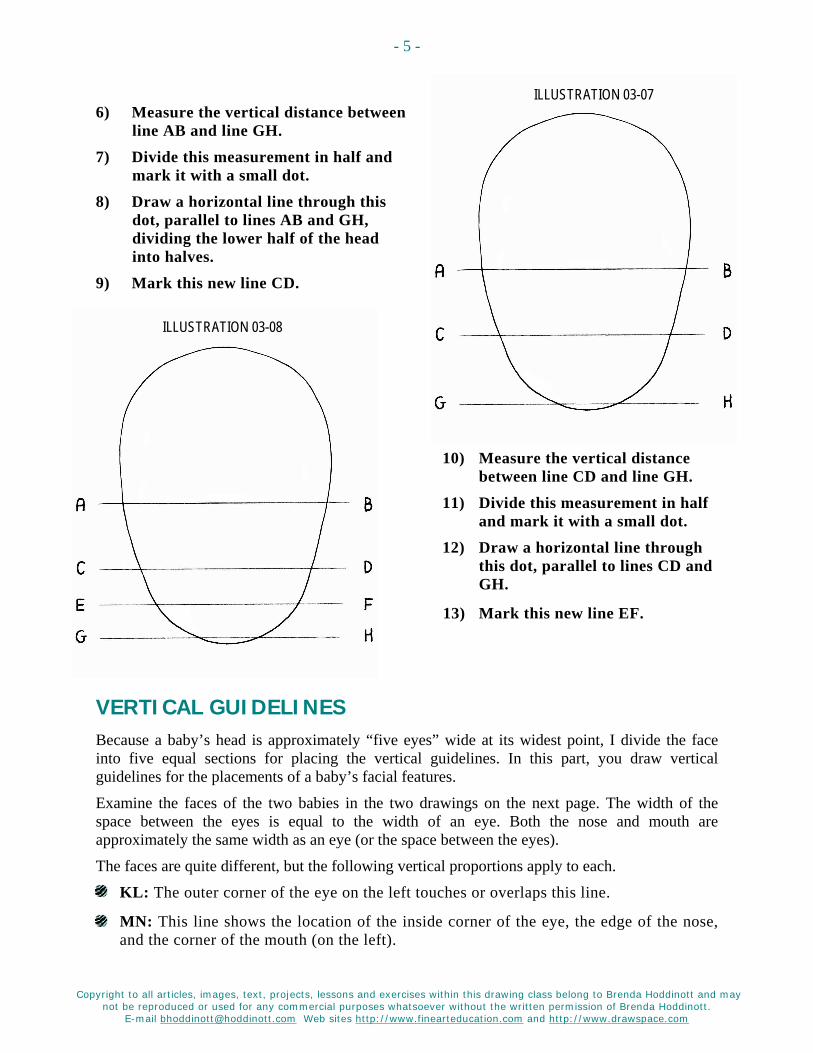
ILLUSTRATION 03-07 6) Measure the vertical distance between
line AB and line GH. 7) Divide this measurement in half and
mark it with a small dot. 8) Draw a horizontal line through this
dot, parallel to lines AB and GH, dividing the lower half of the head into halves.
9) Mark this new line CD.
ILLUSTRATION 03-08
10) Measure the vertical distance between line CD and line GH.
11) Divide this measurement in half and mark it with a small dot.
12) Draw a horizontal line through this dot, parallel to lines CD and GH.
13) Mark this new line EF.
VERTICAL GUIDELINES Because a baby’s head is approximately “five eyes” wide at its widest point, I divide the face into five equal sections for placing the vertical guidelines. In this part, you draw vertical guidelines for the placements of a baby’s facial features.
Examine the faces of the two babies in the two drawings on the next page. The width of the space between the eyes is equal to the width of an eye. Both the nose and mouth are approximately the same width as an eye (or the space between the eyes).
The faces are quite different, but the following vertical proportions apply to each.
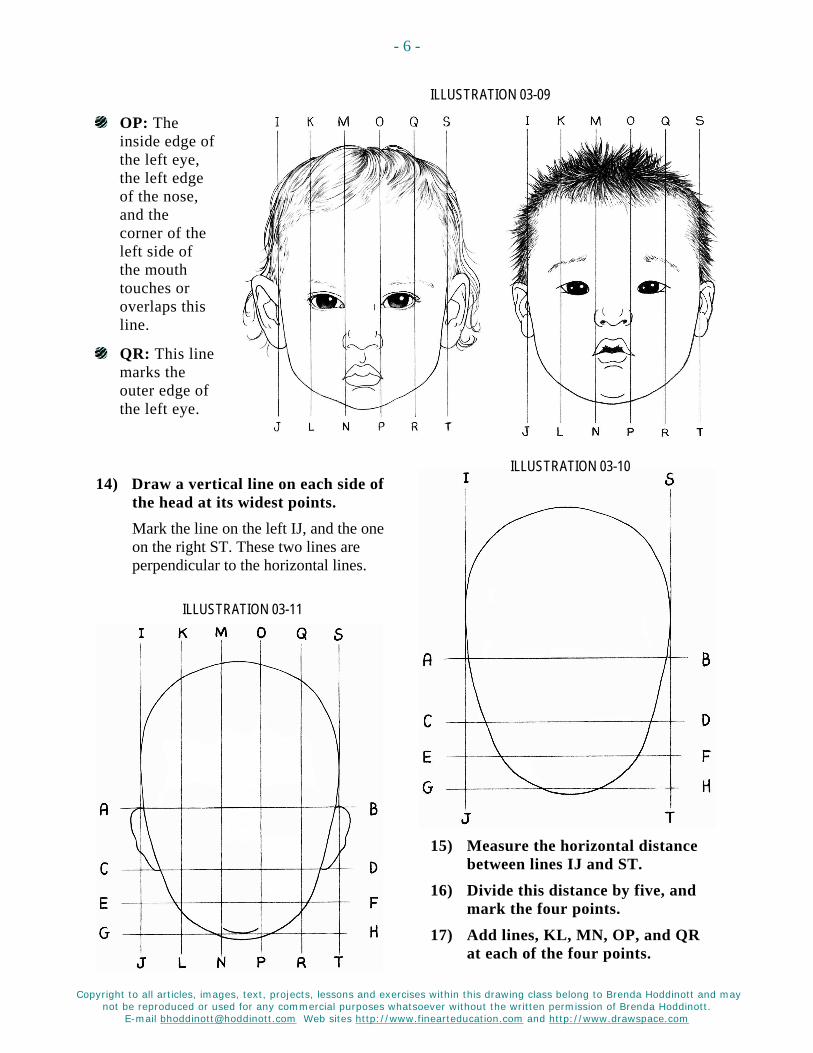
KL: The outer corner of the eye on the left touches or overlaps this line.
MN: This line shows the location of the inside corner of the eye, the edge of the nose, and the corner of the mouth (on the left).
Copyright to all articles, images, text, projects, lessons and exercises within this drawing class belong to Brenda Hoddinott and may not be reproduced or used for any commercial purposes whatsoever without the written permission of Brenda Hoddinott.
E-mail [email protected] Web sites http://www.finearteducation.com and http://www.drawspace.com
- 6 -
ILLUSTRATION 03-09
OP: The inside edge of the left eye, the left edge of the nose, and the corner of the left side of the mouth touches or overlaps this line.
QR: This line marks the outer edge of the left eye.
ILLUSTRATION 03-10 14) Draw a vertical line on each side of
the head at its widest points. Mark the line on the left IJ, and the one on the right ST. These two lines are perpendicular to the horizontal lines.
ILLUSTRATION 03-11
15) Measure the horizontal distance between lines IJ and ST.
16) Divide this distance by five, and mark the four points.
17) Add lines, KL, MN, OP, and QR at each of the four points.
Copyright to all articles, images, text, projects, lessons and exercises within this drawing class belong to Brenda Hoddinott and may not be reproduced or used for any commercial purposes whatsoever without the written permission of Brenda Hoddinott.
E-mail [email protected] Web sites http://www.finearteducation.com and http://www.drawspace.com
- 7 -
ILLUSTRATION 03-12
PLACING FEATURES Your blueprint is complete and it’s time to add a face to your drawing. You may prefer to draw different features, as you follow along with the steps.
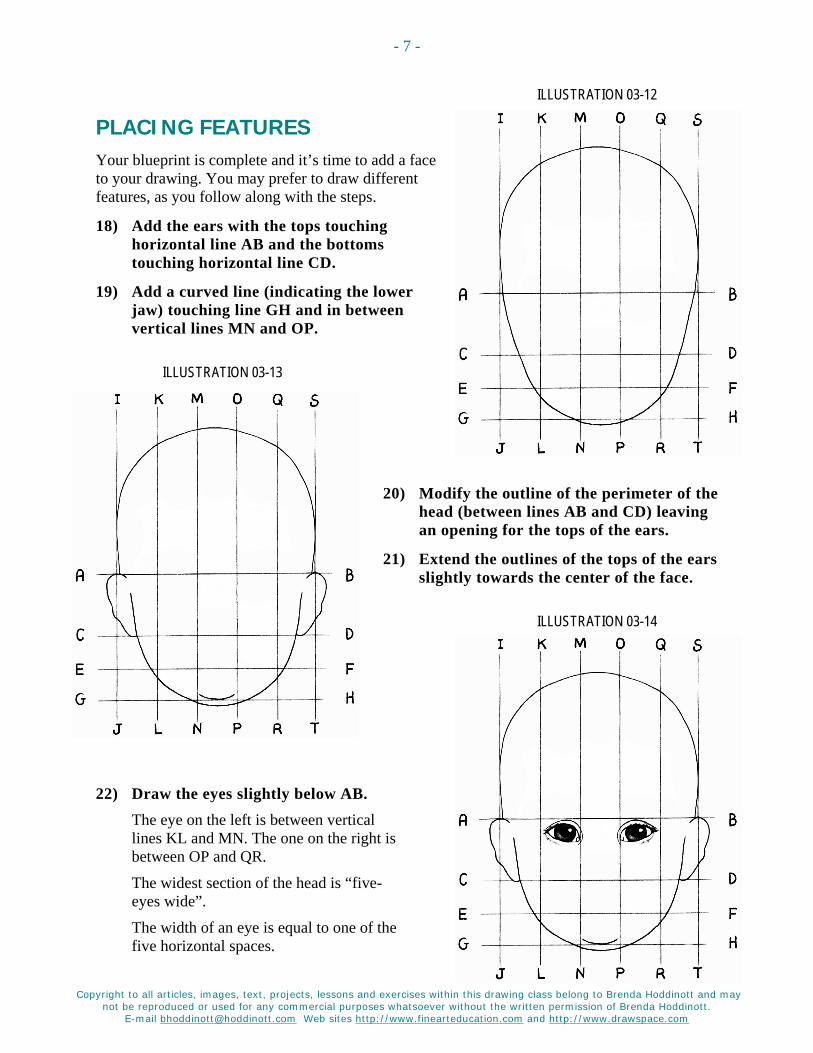
18) Add the ears with the tops touching horizontal line AB and the bottoms touching horizontal line CD.
19) Add a curved line (indicating the lower jaw) touching line GH and in between vertical lines MN and OP.
ILLUSTRATION 03-13
20) Modify the outline of the perimeter of the head (between lines AB and CD) leaving an opening for the tops of the ears.
21) Extend the outlines of the tops of the ears slightly towards the center of the face.
ILLUSTRATION 03-14
22) Draw the eyes slightly below AB.
The eye on the left is between vertical lines KL and MN. The one on the right is between OP and QR.
The widest section of the head is “five-eyes wide”.
The width of an eye is equal to one of the five horizontal spaces.
Copyright to all articles, images, text, projects, lessons and exercises within this drawing class belong to Brenda Hoddinott and may not be reproduced or used for any commercial purposes whatsoever without the written permission of Brenda Hoddinott.
E-mail [email protected] Web sites http://www.finearteducation.com and http://www.drawspace.com
- 8 -
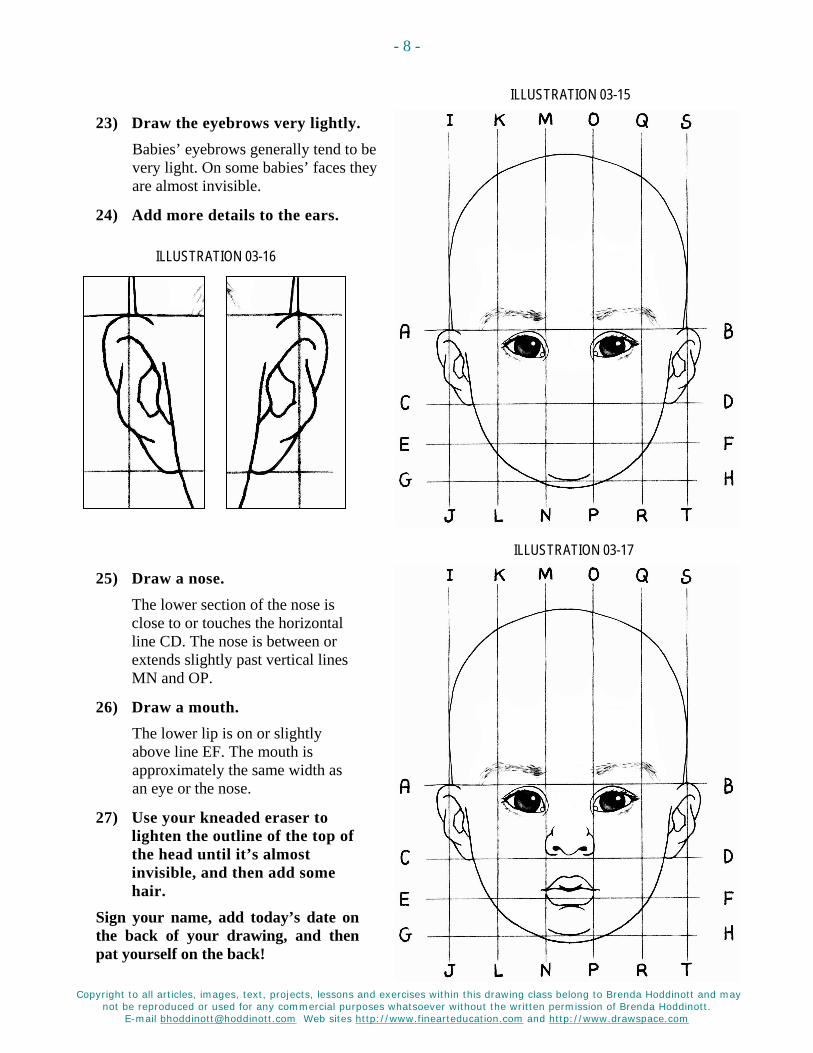
ILLUSTRATION 03-15
23) Draw the eyebrows very lightly. Babies’ eyebrows generally tend to be very light. On some babies’ faces they are almost invisible.
24) Add more details to the ears.
ILLUSTRATION 03-16
ILLUSTRATION 03-17
25) Draw a nose. The lower section of the nose is close to or touches the horizontal line CD. The nose is between or extends slightly past vertical lines MN and OP.
26) Draw a mouth. The lower lip is on or slightly above line EF. The mouth is approximately the same width as an eye or the nose.
27) Use your kneaded eraser to lighten the outline of the top of the head until it’s almost invisible, and then add some hair.
Sign your name, add today’s date on the back of your drawing, and then pat yourself on the back!
Copyright to all articles, images, text, projects, lessons and exercises within this drawing class belong to Brenda Hoddinott and may not be reproduced or used for any commercial purposes whatsoever without the written permission of Brenda Hoddinott.
E-mail [email protected] Web sites http://www.finearteducation.com and http://www.drawspace.com
- 9 -
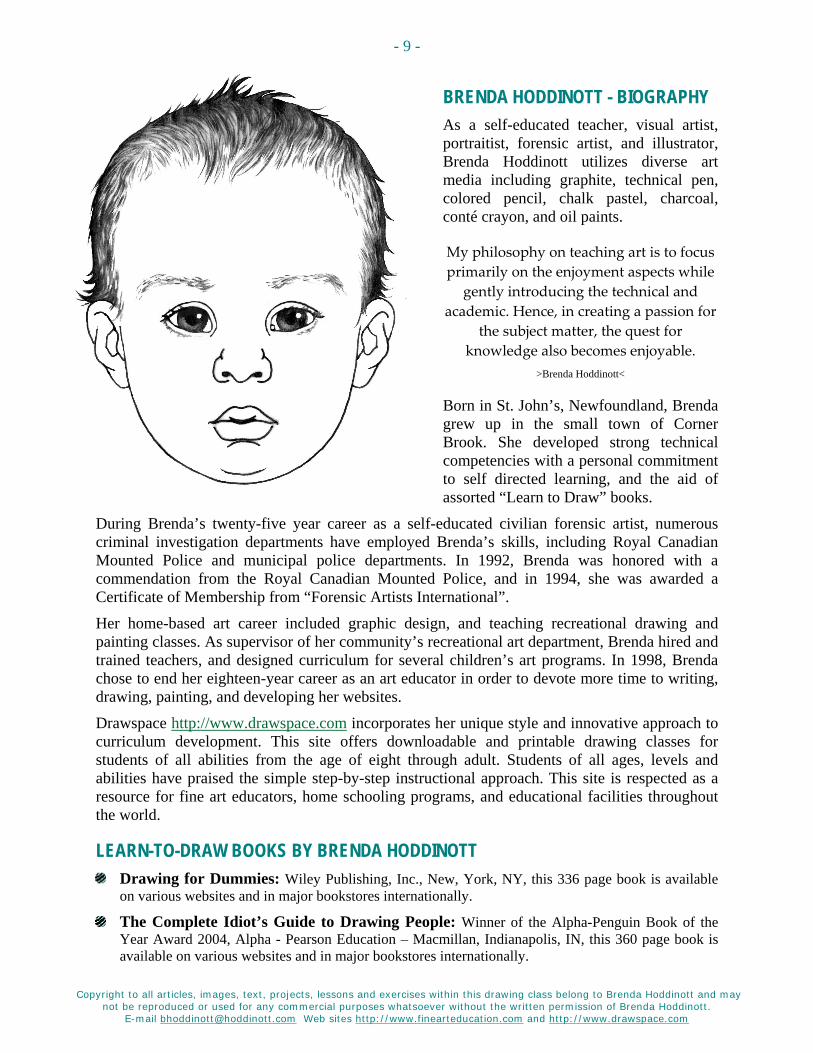
BRENDA HODDINOTT - BIOGRAPHY As a self-educated teacher, visual artist, portraitist, forensic artist, and illustrator, Brenda Hoddinott utilizes diverse art media including graphite, technical pen, colored pencil, chalk pastel, charcoal, conté crayon, and oil paints.
My philosophy on teaching art is to focus primarily on the enjoyment aspects while
gently introducing the technical and academic. Hence, in creating a passion for
the subject matter, the quest for knowledge also becomes enjoyable.
>Brenda Hoddinott<
Born in St. John’s, Newfoundland, Brenda grew up in the small town of Corner Brook. She developed strong technical competencies with a personal commitment to self directed learning, and the aid of assorted “Learn to Draw” books.
During Brenda’s twenty-five year career as a self-educated civilian forensic artist, numerous criminal investigation departments have employed Brenda’s skills, including Royal Canadian Mounted Police and municipal police departments. In 1992, Brenda was honored with a commendation from the Royal Canadian Mounted Police, and in 1994, she was awarded a Certificate of Membership from “Forensic Artists International”.
Her home-based art career included graphic design, and teaching recreational drawing and painting classes. As supervisor of her community’s recreational art department, Brenda hired and trained teachers, and designed curriculum for several children’s art programs. In 1998, Brenda chose to end her eighteen-year career as an art educator in order to devote more time to writing, drawing, painting, and developing her websites.
Drawspace http://www.drawspace.com incorporates her unique style and innovative approach to curriculum development. This site offers downloadable and printable drawing classes for students of all abilities from the age of eight through adult. Students of all ages, levels and abilities have praised the simple step-by-step instructional approach. This site is respected as a resource for fine art educators, home schooling programs, and educational facilities throughout the world.
LEARN-TO-DRAW BOOKS BY BRENDA HODDINOTT Drawing for Dummies: Wiley Publishing, Inc., New, York, NY, this 336 page book is available
on various websites and in major bookstores internationally.
The Complete Idiot’s Guide to Drawing People: Winner of the Alpha-Penguin Book of the Year Award 2004, Alpha - Pearson Education – Macmillan, Indianapolis, IN, this 360 page book is available on various websites and in major bookstores internationally.
GUIDELINES FOR THE
Brenda Hoddinott
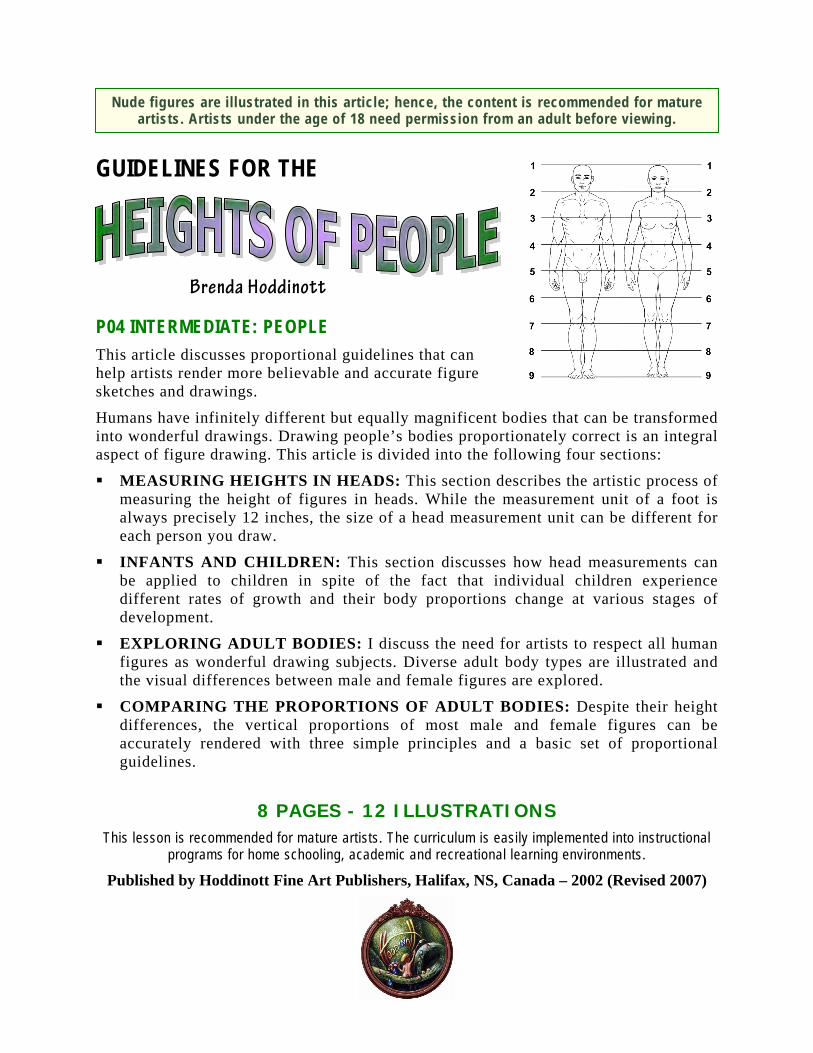
P04 INTERMEDIATE: PEOPLE This article discusses proportional guidelines that can help artists render more believable and accurate figure sketches and drawings.
Humans have infinitely different but equally magnificent bodies that can be transformed into wonderful drawings. Drawing people’s bodies proportionately correct is an integral aspect of figure drawing. This article is divided into the following four sections:
MEASURING HEIGHTS IN HEADS: This section describes the artistic process of measuring the height of figures in heads. While the measurement unit of a foot is always precisely 12 inches, the size of a head measurement unit can be different for each person you draw.
INFANTS AND CHILDREN: This section discusses how head measurements can be applied to children in spite of the fact that individual children experience different rates of growth and their body proportions change at various stages of development.
EXPLORING ADULT BODIES: I discuss the need for artists to respect all human figures as wonderful drawing subjects. Diverse adult body types are illustrated and the visual differences between male and female figures are explored.
COMPARING THE PROPORTIONS OF ADULT BODIES: Despite their height differences, the vertical proportions of most male and female figures can be accurately rendered with three simple principles and a basic set of proportional guidelines.
8 PAGES - 12 ILLUSTRATIONS This lesson is recommended for mature artists. The curriculum is easily implemented into instructional
programs for home schooling, academic and recreational learning environments.
Published by Hoddinott Fine Art Publishers, Halifax, NS, Canada – 2002 (Revised 2007)
Nude figures are illustrated in this article; hence, the content is recommended for mature artists. Artists under the age of 18 need permission from an adult before viewing.
Copyright to al l art icles, images, text, projects, lessons and exercises within this drawing class belong to Brenda Hoddinott and may not be reproduced or used for any commercial purposes whatsoever without the wri t ten permission of Brenda Hoddinott .
E-mail bhoddinott@hoddinott .com Web si tes http:/ /www.f inearteducat ion.com and ht tp:/ /www.drawspace.com
2
MEASURING HEIGHTS IN HEADS When drawing figures, forget about measuring their height in feet, inches, or centimeters! Artists measure the height of a human figure in heads! This simply means using the length a person’s head to measure the height of his or her body (naturally, the measurement unit of a head excludes hair). For example, an average one-year-old child is between 4 and 4 ½ heads tall.
While the measurement unit of a foot is always precisely 12 inches, the size of a head measurement unit can be different for each person you draw. Human heads become larger as they grow from birth through adulthood. For example, as a child matures from a baby to an adult, the overall length of his or her head grows approximately three inches. Even fully grown adult heads come in a vast range of sizes.
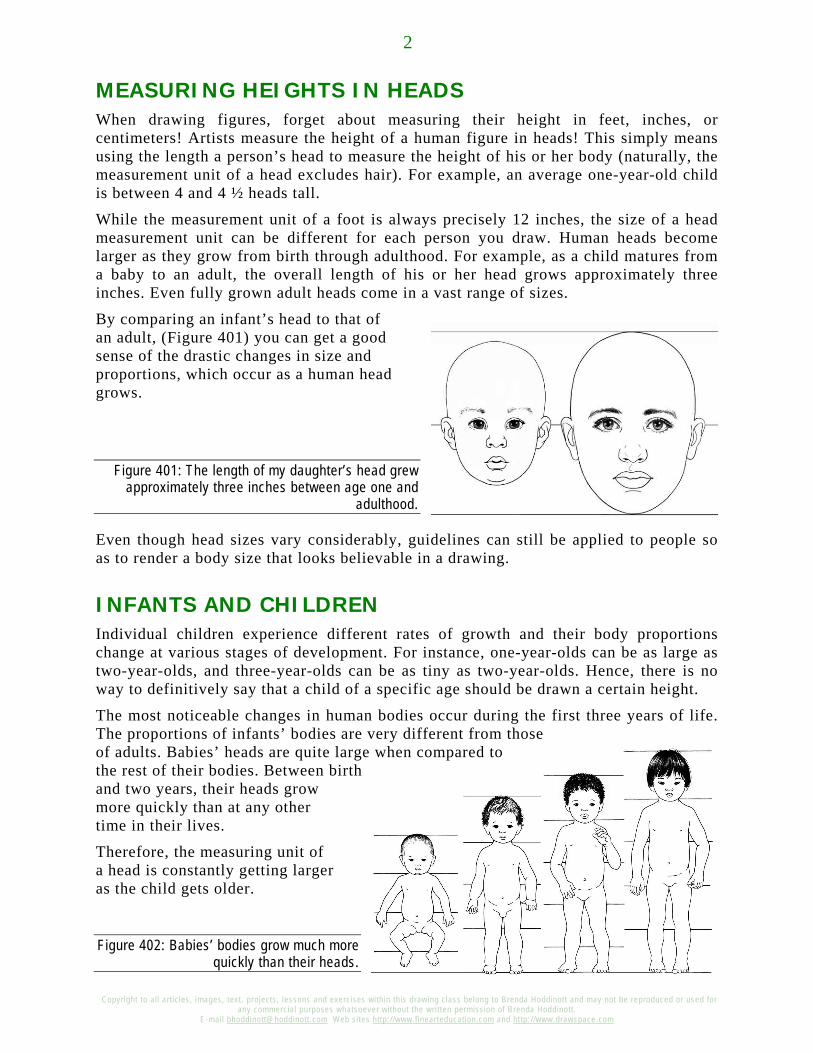
By comparing an infant’s head to that of an adult, (Figure 401) you can get a good sense of the drastic changes in size and proportions, which occur as a human head grows.
Figure 401: The length of my daughter’s head grew approximately three inches between age one and
adulthood.
Even though head sizes vary considerably, guidelines can still be applied to people so as to render a body size that looks believable in a drawing.
INFANTS AND CHILDREN Individual children experience different rates of growth and their body proportions change at various stages of development. For instance, one-year-olds can be as large as two-year-olds, and three-year-olds can be as tiny as two-year-olds. Hence, there is no way to definitively say that a child of a specific age should be drawn a certain height.
The most noticeable changes in human bodies occur during the first three years of life. The proportions of infants’ bodies are very different from those of adults. Babies’ heads are quite large when compared to the rest of their bodies. Between birth and two years, their heads grow more quickly than at any other time in their lives.
Therefore, the measuring unit of a head is constantly getting larger as the child gets older.
Figure 402: Babies’ bodies grow much more quickly than their heads.
Copyright to al l art icles, images, text, projects, lessons and exercises within this drawing class belong to Brenda Hoddinott and may not be reproduced or used for any commercial purposes whatsoever without the wri t ten permission of Brenda Hoddinott .
E-mail bhoddinott@hoddinott .com Web si tes http:/ /www.f inearteducat ion.com and ht tp:/ /www.drawspace.com
3
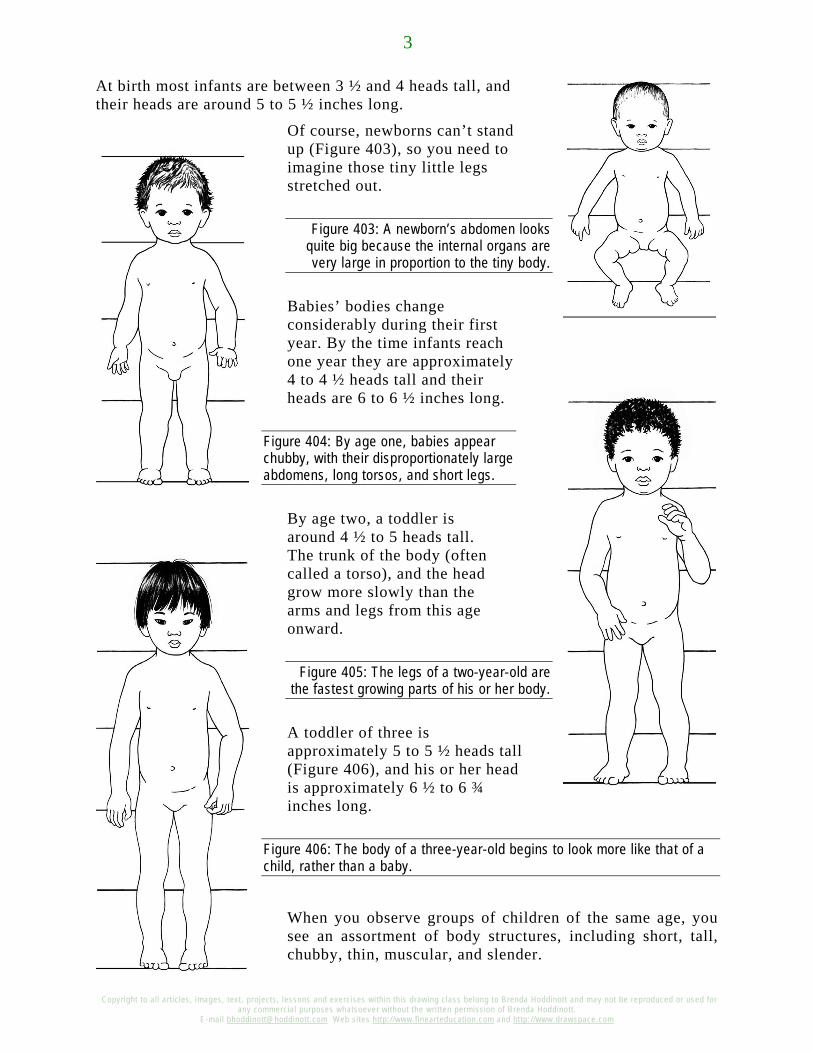
At birth most infants are between 3 ½ and 4 heads tall, and their heads are around 5 to 5 ½ inches long.
Of course, newborns can’t stand up (Figure 403), so you need to imagine those tiny little legs stretched out.
Figure 403: A newborn’s abdomen looks quite big because the internal organs are very large in proportion to the tiny body.
Babies’ bodies change considerably during their first year. By the time infants reach one year they are approximately 4 to 4 ½ heads tall and their heads are 6 to 6 ½ inches long.
Figure 404: By age one, babies appear chubby, with their disproportionately large abdomens, long torsos, and short legs.
By age two, a toddler is around 4 ½ to 5 heads tall. The trunk of the body (often called a torso), and the head grow more slowly than the arms and legs from this age onward.
Figure 405: The legs of a two-year-old are the fastest growing parts of his or her body.
A toddler of three is approximately 5 to 5 ½ heads tall (Figure 406), and his or her head is approximately 6 ½ to 6 ¾ inches long.
Figure 406: The body of a three-year-old begins to look more like that of a child, rather than a baby.
When you observe groups of children of the same age, you see an assortment of body structures, including short, tall, chubby, thin, muscular, and slender.
Copyright to al l art icles, images, text, projects, lessons and exercises within this drawing class belong to Brenda Hoddinott and may not be reproduced or used for any commercial purposes whatsoever without the wri t ten permission of Brenda Hoddinott .
E-mail bhoddinott@hoddinott .com Web si tes http:/ /www.f inearteducat ion.com and ht tp:/ /www.drawspace.com
4
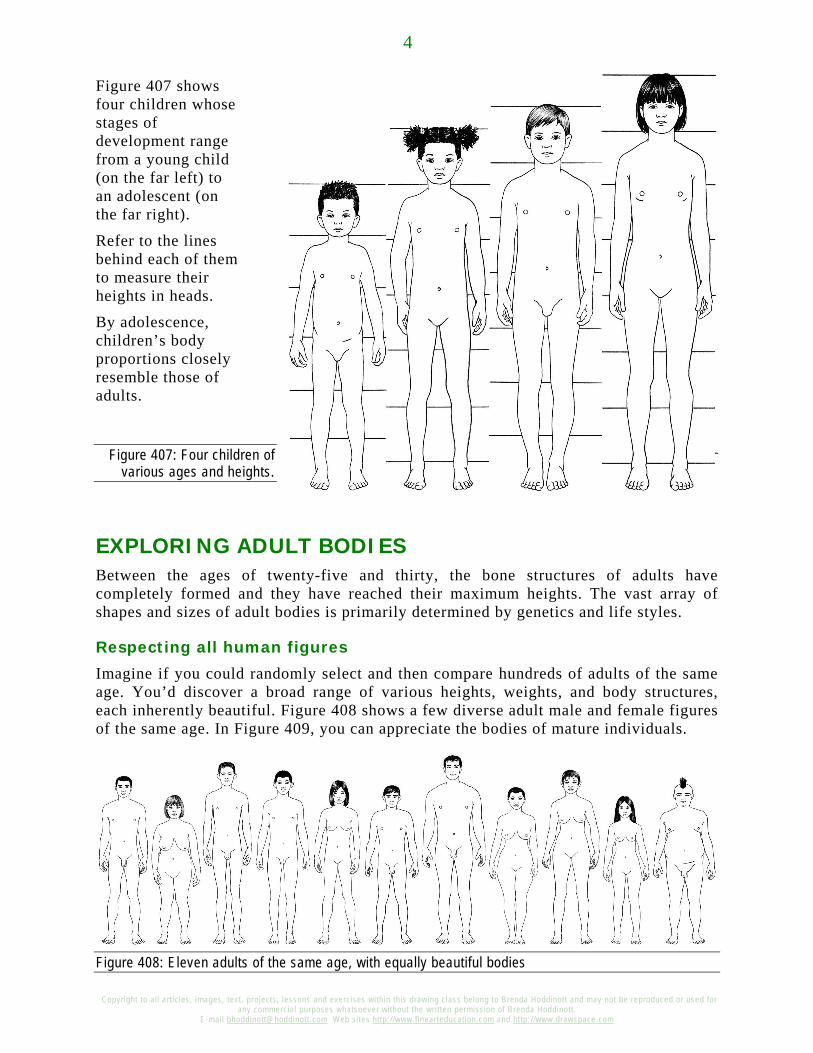
Figure 407 shows four children whose stages of development range from a young child (on the far left) to an adolescent (on the far right).
Refer to the lines behind each of them to measure their heights in heads.
By adolescence, children’s body proportions closely resemble those of adults.
Figure 407: Four children of various ages and heights.
EXPLORING ADULT BODIES Between the ages of twenty-five and thirty, the bone structures of adults have completely formed and they have reached their maximum heights. The vast array of shapes and sizes of adult bodies is primarily determined by genetics and life styles.
Respecting all human figures
Imagine if you could randomly select and then compare hundreds of adults of the same age. You’d discover a broad range of various heights, weights, and body structures, each inherently beautiful. Figure 408 shows a few diverse adult male and female figures of the same age. In Figure 409, you can appreciate the bodies of mature individuals.
Figure 408: Eleven adults of the same age, with equally beautiful bodies
Copyright to al l art icles, images, text, projects, lessons and exercises within this drawing class belong to Brenda Hoddinott and may not be reproduced or used for any commercial purposes whatsoever without the wri t ten permission of Brenda Hoddinott .
E-mail bhoddinott@hoddinott .com Web si tes http:/ /www.f inearteducat ion.com and ht tp:/ /www.drawspace.com
5
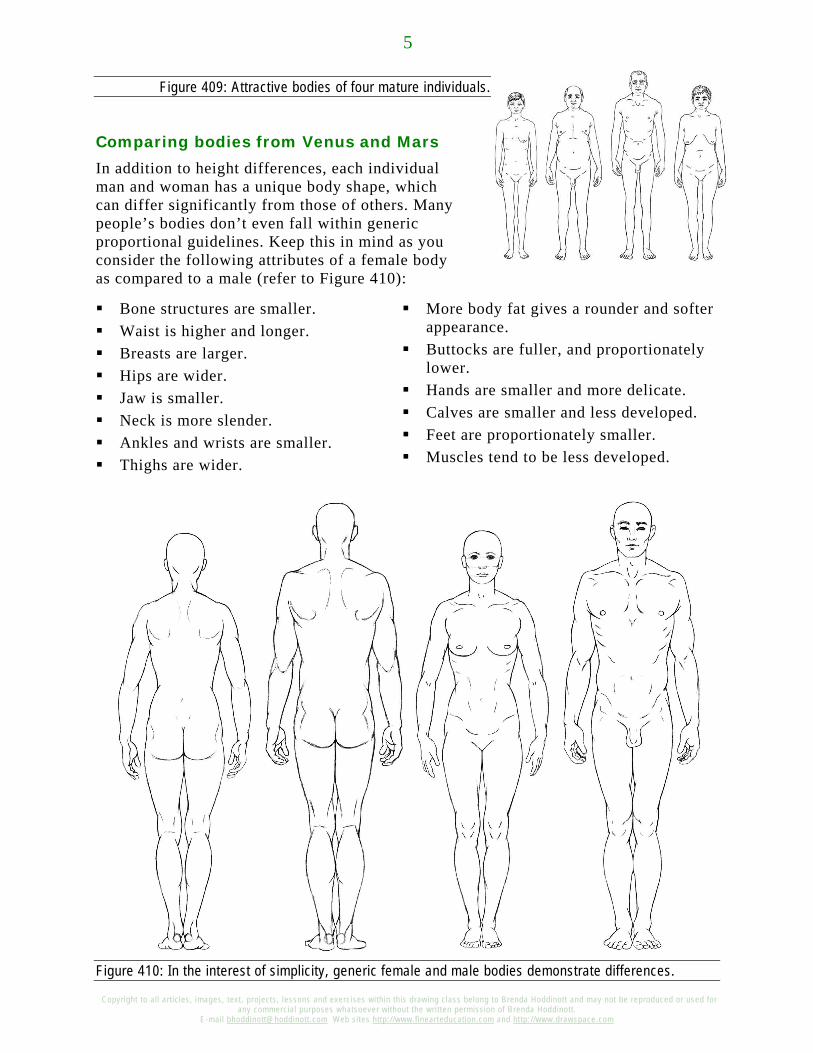
Figure 409: Attractive bodies of four mature individuals.
Comparing bodies from Venus and Mars
In addition to height differences, each individual man and woman has a unique body shape, which can differ significantly from those of others. Many people’s bodies don’t even fall within generic proportional guidelines. Keep this in mind as you consider the following attributes of a female body as compared to a male (refer to Figure 410):
Bone structures are smaller. Waist is higher and longer. Breasts are larger. Hips are wider. Jaw is smaller. Neck is more slender. Ankles and wrists are smaller. Thighs are wider.
More body fat gives a rounder and softer appearance.
Buttocks are fuller, and proportionately lower.
Hands are smaller and more delicate. Calves are smaller and less developed. Feet are proportionately smaller. Muscles tend to be less developed.
Figure 410: In the interest of simplicity, generic female and male bodies demonstrate differences.
Copyright to al l art icles, images, text, projects, lessons and exercises within this drawing class belong to Brenda Hoddinott and may not be reproduced or used for any commercial purposes whatsoever without the wri t ten permission of Brenda Hoddinott .
E-mail bhoddinott@hoddinott .com Web si tes http:/ /www.f inearteducat ion.com and ht tp:/ /www.drawspace.com
6
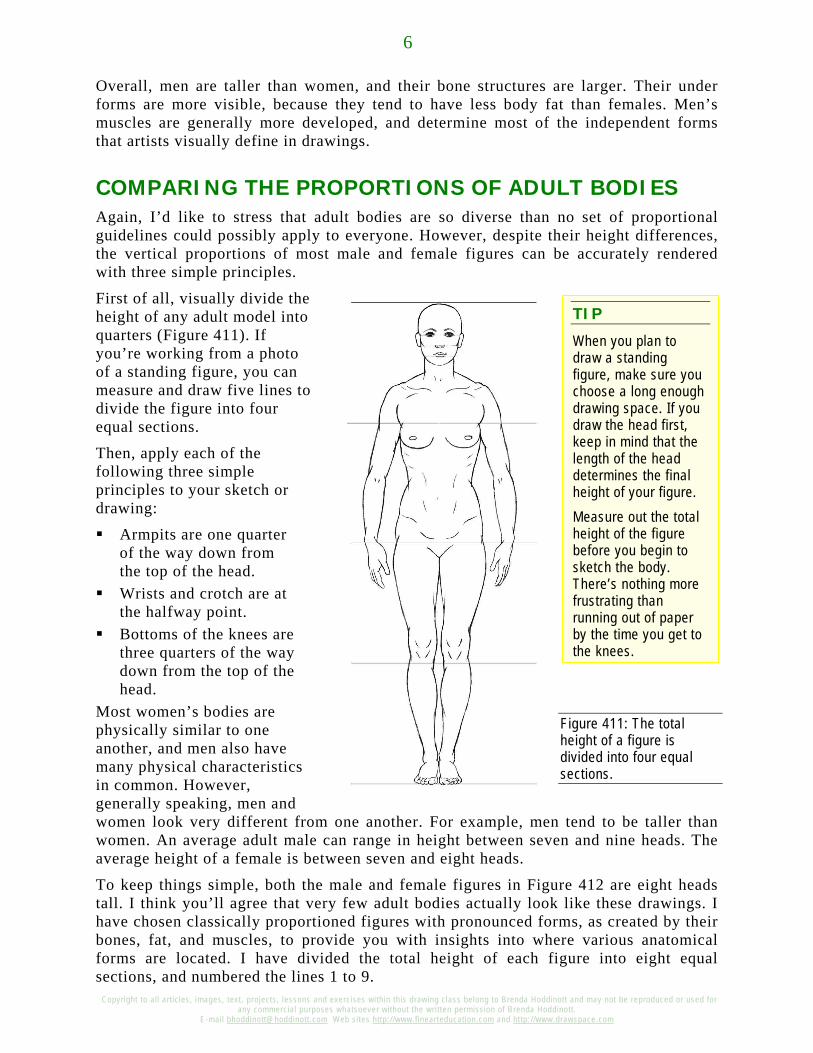
TIP
When you plan to draw a standing figure, make sure you choose a long enough drawing space. If you draw the head first, keep in mind that the length of the head determines the final height of your figure. Measure out the total height of the figure before you begin to sketch the body. There’s nothing more frustrating than running out of paper by the time you get to the knees.
Overall, men are taller than women, and their bone structures are larger. Their under forms are more visible, because they tend to have less body fat than females. Men’s muscles are generally more developed, and determine most of the independent forms that artists visually define in drawings.
COMPARING THE PROPORTIONS OF ADULT BODIES Again, I’d like to stress that adult bodies are so diverse than no set of proportional guidelines could possibly apply to everyone. However, despite their height differences, the vertical proportions of most male and female figures can be accurately rendered with three simple principles.
First of all, visually divide the height of any adult model into quarters (Figure 411). If you’re working from a photo of a standing figure, you can measure and draw five lines to divide the figure into four equal sections.
Then, apply each of the following three simple principles to your sketch or drawing:
Armpits are one quarter of the way down from the top of the head.
Wrists and crotch are at the halfway point.
Bottoms of the knees are three quarters of the way down from the top of the head.
Most women’s bodies are physically similar to one another, and men also have many physical characteristics in common. However, generally speaking, men and women look very different from one another. For example, men tend to be taller than women. An average adult male can range in height between seven and nine heads. The average height of a female is between seven and eight heads.
To keep things simple, both the male and female figures in Figure 412 are eight heads tall. I think you’ll agree that very few adult bodies actually look like these drawings. I have chosen classically proportioned figures with pronounced forms, as created by their bones, fat, and muscles, to provide you with insights into where various anatomical forms are located. I have divided the total height of each figure into eight equal sections, and numbered the lines 1 to 9.
Figure 411: The total height of a figure is divided into four equal sections.
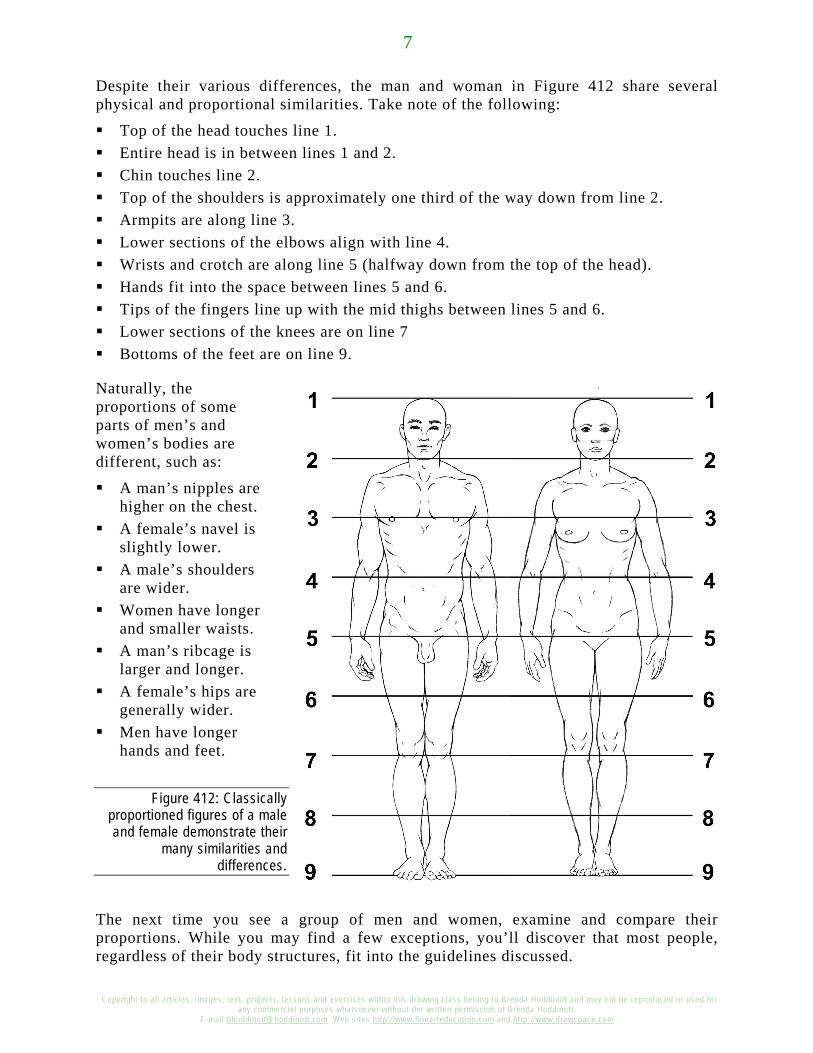
Copyright to al l art icles, images, text, projects, lessons and exercises within this drawing class belong to Brenda Hoddinott and may not be reproduced or used for any commercial purposes whatsoever without the wri t ten permission of Brenda Hoddinott .
E-mail bhoddinott@hoddinott .com Web si tes http:/ /www.f inearteducat ion.com and ht tp:/ /www.drawspace.com
7
Despite their various differences, the man and woman in Figure 412 share several physical and proportional similarities. Take note of the following:
Top of the head touches line 1. Entire head is in between lines 1 and 2. Chin touches line 2. Top of the shoulders is approximately one third of the way down from line 2. Armpits are along line 3. Lower sections of the elbows align with line 4. Wrists and crotch are along line 5 (halfway down from the top of the head). Hands fit into the space between lines 5 and 6. Tips of the fingers line up with the mid thighs between lines 5 and 6. Lower sections of the knees are on line 7 Bottoms of the feet are on line 9.
Naturally, the proportions of some parts of men’s and women’s bodies are different, such as:
A man’s nipples are higher on the chest.
A female’s navel is slightly lower.
A male’s shoulders are wider.
Women have longer and smaller waists.
A man’s ribcage is larger and longer.
A female’s hips are generally wider.
Men have longer hands and feet.
Figure 412: Classically proportioned figures of a male and female demonstrate their
many similarities and differences.
The next time you see a group of men and women, examine and compare their proportions. While you may find a few exceptions, you’ll discover that most people, regardless of their body structures, fit into the guidelines discussed.
Copyright to al l art icles, images, text, projects, lessons and exercises within this drawing class belong to Brenda Hoddinott and may not be reproduced or used for any commercial purposes whatsoever without the wri t ten permission of Brenda Hoddinott .
E-mail bhoddinott@hoddinott .com Web si tes http:/ /www.f inearteducat ion.com and ht tp:/ /www.drawspace.com
8
Brenda Hoddinott As a self-educated teacher, visual artist, portraitist, forensic artist, and illustrator, Brenda utilizes diverse art media including graphite, technical pen, colored pencil, chalk pastel, charcoal, conté crayon, and oil paints.
My philosophy on teaching art is to focus primarily on the enjoyment aspects while gently introducing the technical and academic. Hence, in creating a passion for the subject matter, the quest for knowledge also
becomes enjoyable. Brenda Hoddinott
Biography
Born in St. John’s, Newfoundland, Brenda grew up in the small town of Corner Brook. She developed strong technical competencies with a personal commitment to self directed learning, and the aid of assorted “Learn to Draw” books. During Brenda’s twenty-five year career as a self-educated civilian forensic artist, numerous criminal investigation departments have employed Brenda’s skills, including Royal Canadian Mounted Police and municipal police departments. In 1992, Brenda was honored with a commendation from the Royal Canadian Mounted Police, and in 1994, she was awarded a Certificate of Membership from “Forensic Artists International”.
Her home-based art career included graphic design, and teaching recreational drawing and painting classes. As supervisor of her community’s recreational art department, Brenda hired and trained teachers, and designed curriculum for several children’s art programs. In 1998, Brenda chose to end her eighteen-year career as an art educator in order to devote more time to writing, drawing, painting, and developing her websites.
Drawspace http://www.drawspace.com incorporates her unique style and innovative approach to curriculum development. This site offers downloadable and printable drawing classes for students of all abilities from the age of eight through adult. Students of all ages, levels and abilities have praised the simple step-by-step instructional approach. This site is respected as a resource for fine art educators, home schooling programs, and educational facilities throughout the world.
Learn-to-draw books
Drawing for Dummies: Wiley Publishing, Inc., New, York, NY, this 336 page book is available on various websites and in major bookstores internationally.
The Complete Idiot’s Guide to Drawing People: Winner of the Alpha-Penguin Book of the Year Award 2004, Alpha - Pearson Education – Macmillan, Indianapolis, IN, this 360 page book is available on various websites and in major bookstores internationally.
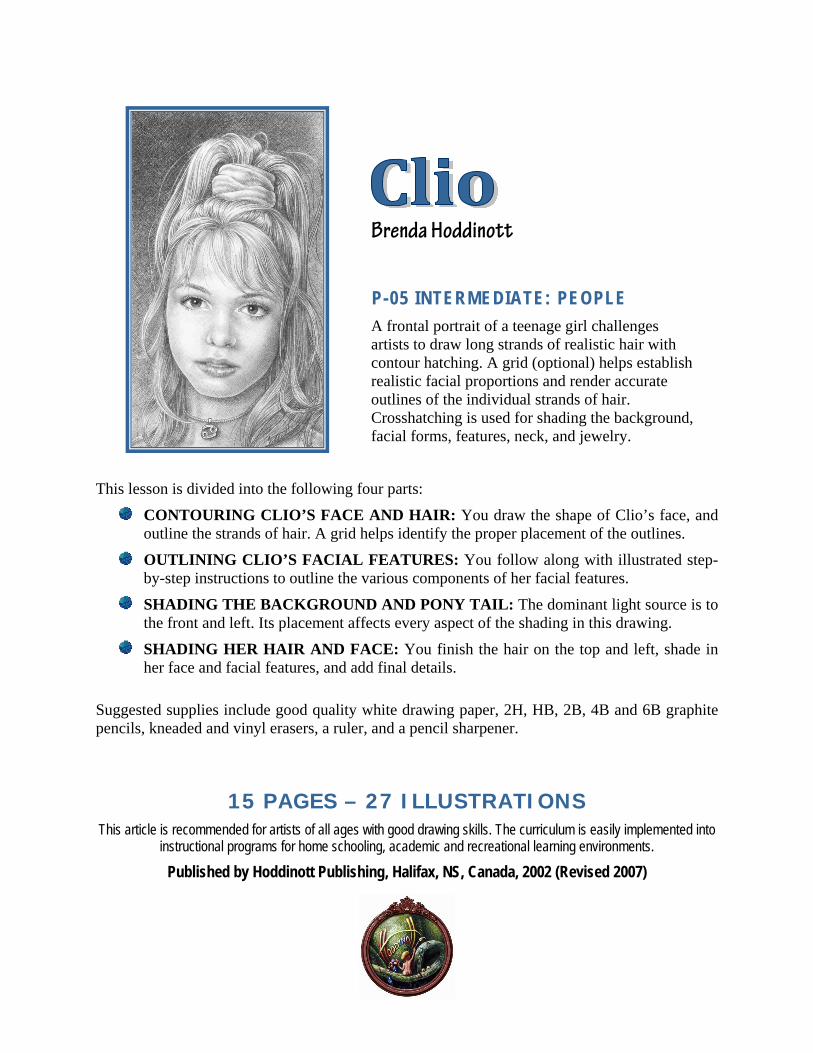
Brenda Hoddinott
P-05 INTERMEDIATE: PEOPLE A frontal portrait of a teenage girl challenges artists to draw long strands of realistic hair with contour hatching. A grid (optional) helps establish realistic facial proportions and render accurate outlines of the individual strands of hair. Crosshatching is used for shading the background, facial forms, features, neck, and jewelry.
This lesson is divided into the following four parts:
CONTOURING CLIO’S FACE AND HAIR: You draw the shape of Clio’s face, and outline the strands of hair. A grid helps identify the proper placement of the outlines.
OUTLINING CLIO’S FACIAL FEATURES: You follow along with illustrated step-by-step instructions to outline the various components of her facial features.
SHADING THE BACKGROUND AND PONY TAIL: The dominant light source is to the front and left. Its placement affects every aspect of the shading in this drawing.
SHADING HER HAIR AND FACE: You finish the hair on the top and left, shade in her face and facial features, and add final details.
Suggested supplies include good quality white drawing paper, 2H, HB, 2B, 4B and 6B graphite pencils, kneaded and vinyl erasers, a ruler, and a pencil sharpener.
15 PAGES – 27 ILLUSTRATIONS This article is recommended for artists of all ages with good drawing skills. The curriculum is easily implemented into
instructional programs for home schooling, academic and recreational learning environments.
Published by Hoddinott Publishing, Halifax, NS, Canada, 2002 (Revised 2007)
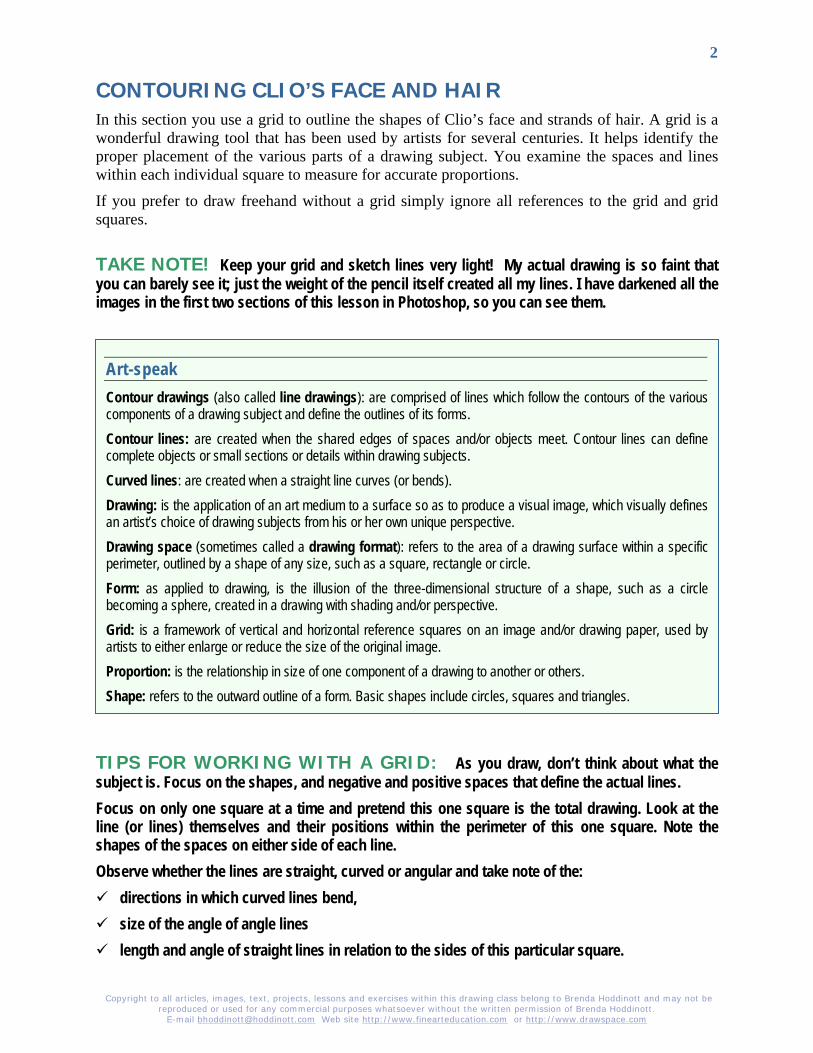
Copyright to all articles, images, text, projects, lessons and exercises within this drawing class belong to Brenda Hoddinott and may not be reproduced or used for any commercial purposes whatsoever without the written permission of Brenda Hoddinott.
E-mail [email protected] Web site http://www.finearteducation.com or http://www.drawspace.com
2
Art-speak Contour drawings (also called line drawings): are comprised of lines which follow the contours of the various components of a drawing subject and define the outlines of its forms. Contour lines: are created when the shared edges of spaces and/or objects meet. Contour lines can define complete objects or small sections or details within drawing subjects. Curved lines: are created when a straight line curves (or bends). Drawing: is the application of an art medium to a surface so as to produce a visual image, which visually defines an artist’s choice of drawing subjects from his or her own unique perspective. Drawing space (sometimes called a drawing format): refers to the area of a drawing surface within a specific perimeter, outlined by a shape of any size, such as a square, rectangle or circle. Form: as applied to drawing, is the illusion of the three-dimensional structure of a shape, such as a circle becoming a sphere, created in a drawing with shading and/or perspective. Grid: is a framework of vertical and horizontal reference squares on an image and/or drawing paper, used by artists to either enlarge or reduce the size of the original image. Proportion: is the relationship in size of one component of a drawing to another or others. Shape: refers to the outward outline of a form. Basic shapes include circles, squares and triangles.
CONTOURING CLIO’S FACE AND HAIR In this section you use a grid to outline the shapes of Clio’s face and strands of hair. A grid is a wonderful drawing tool that has been used by artists for several centuries. It helps identify the proper placement of the various parts of a drawing subject. You examine the spaces and lines within each individual square to measure for accurate proportions.
If you prefer to draw freehand without a grid simply ignore all references to the grid and grid squares.
TAKE NOTE! Keep your grid and sketch lines very light! My actual drawing is so faint that you can barely see it; just the weight of the pencil itself created all my lines. I have darkened all the images in the first two sections of this lesson in Photoshop, so you can see them.
TIPS FOR WORKING WITH A GRID: As you draw, don’t think about what the subject is. Focus on the shapes, and negative and positive spaces that define the actual lines. Focus on only one square at a time and pretend this one square is the total drawing. Look at the line (or lines) themselves and their positions within the perimeter of this one square. Note the shapes of the spaces on either side of each line. Observe whether the lines are straight, curved or angular and take note of the: directions in which curved lines bend, size of the angle of angle lines length and angle of straight lines in relation to the sides of this particular square.
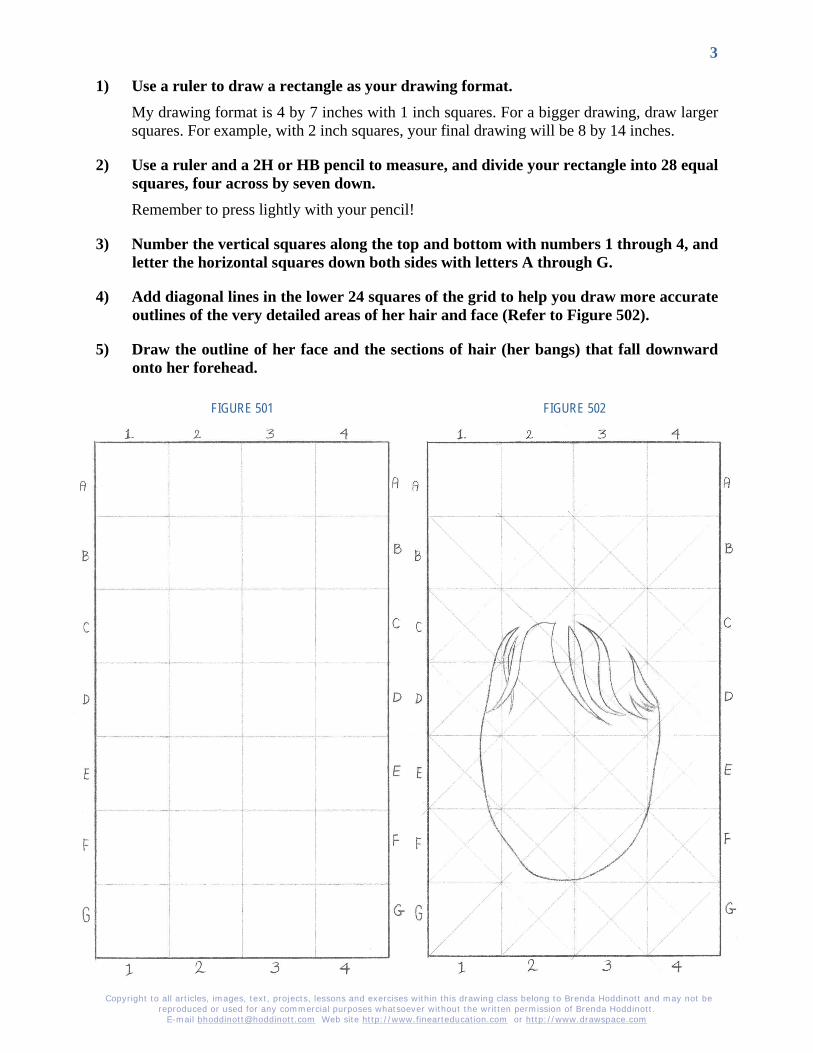
Copyright to all articles, images, text, projects, lessons and exercises within this drawing class belong to Brenda Hoddinott and may not be reproduced or used for any commercial purposes whatsoever without the written permission of Brenda Hoddinott.
E-mail [email protected] Web site http://www.finearteducation.com or http://www.drawspace.com
3
1) Use a ruler to draw a rectangle as your drawing format. My drawing format is 4 by 7 inches with 1 inch squares. For a bigger drawing, draw larger squares. For example, with 2 inch squares, your final drawing will be 8 by 14 inches.
2) Use a ruler and a 2H or HB pencil to measure, and divide your rectangle into 28 equal squares, four across by seven down. Remember to press lightly with your pencil!
3) Number the vertical squares along the top and bottom with numbers 1 through 4, and letter the horizontal squares down both sides with letters A through G.
4) Add diagonal lines in the lower 24 squares of the grid to help you draw more accurate outlines of the very detailed areas of her hair and face (Refer to Figure 502).
5) Draw the outline of her face and the sections of hair (her bangs) that fall downward onto her forehead.
FIGURE 501 FIGURE 502
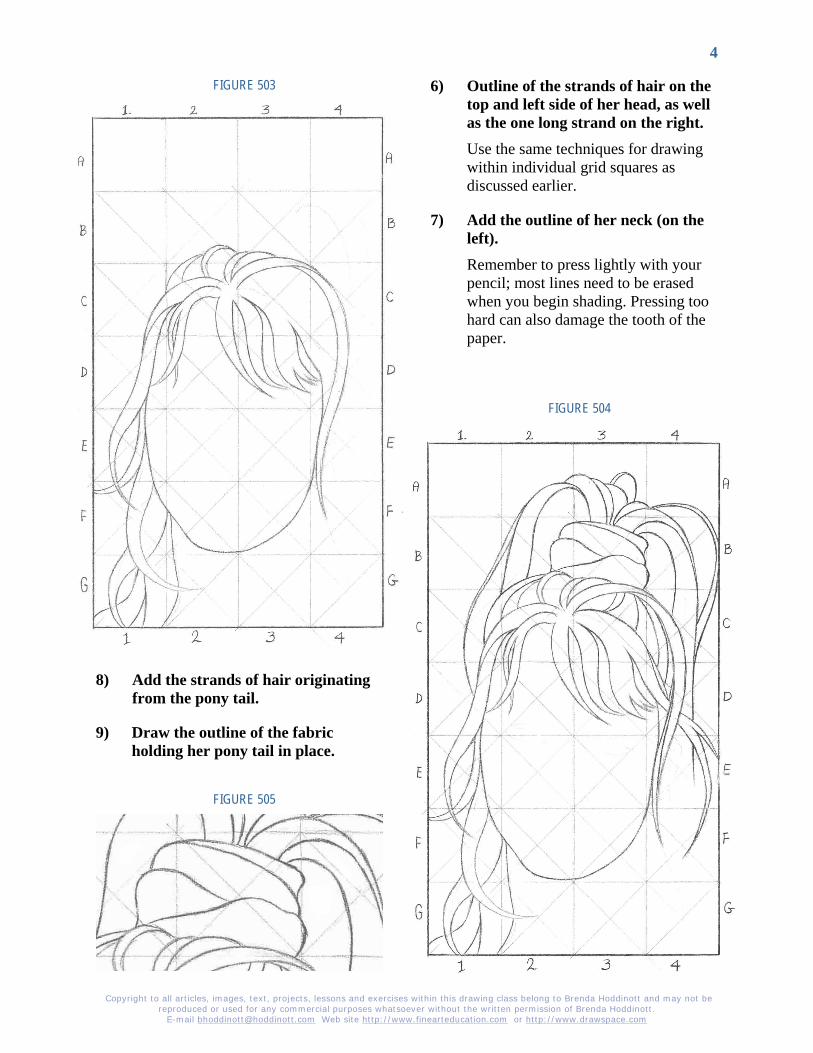
Copyright to all articles, images, text, projects, lessons and exercises within this drawing class belong to Brenda Hoddinott and may not be reproduced or used for any commercial purposes whatsoever without the written permission of Brenda Hoddinott.
E-mail [email protected] Web site http://www.finearteducation.com or http://www.drawspace.com
4
FIGURE 503
FIGURE 504
FIGURE 505
6) Outline of the strands of hair on the top and left side of her head, as well as the one long strand on the right. Use the same techniques for drawing within individual grid squares as discussed earlier.
7) Add the outline of her neck (on the left). Remember to press lightly with your pencil; most lines need to be erased when you begin shading. Pressing too hard can also damage the tooth of the paper.
8) Add the strands of hair originating from the pony tail.
9) Draw the outline of the fabric holding her pony tail in place.
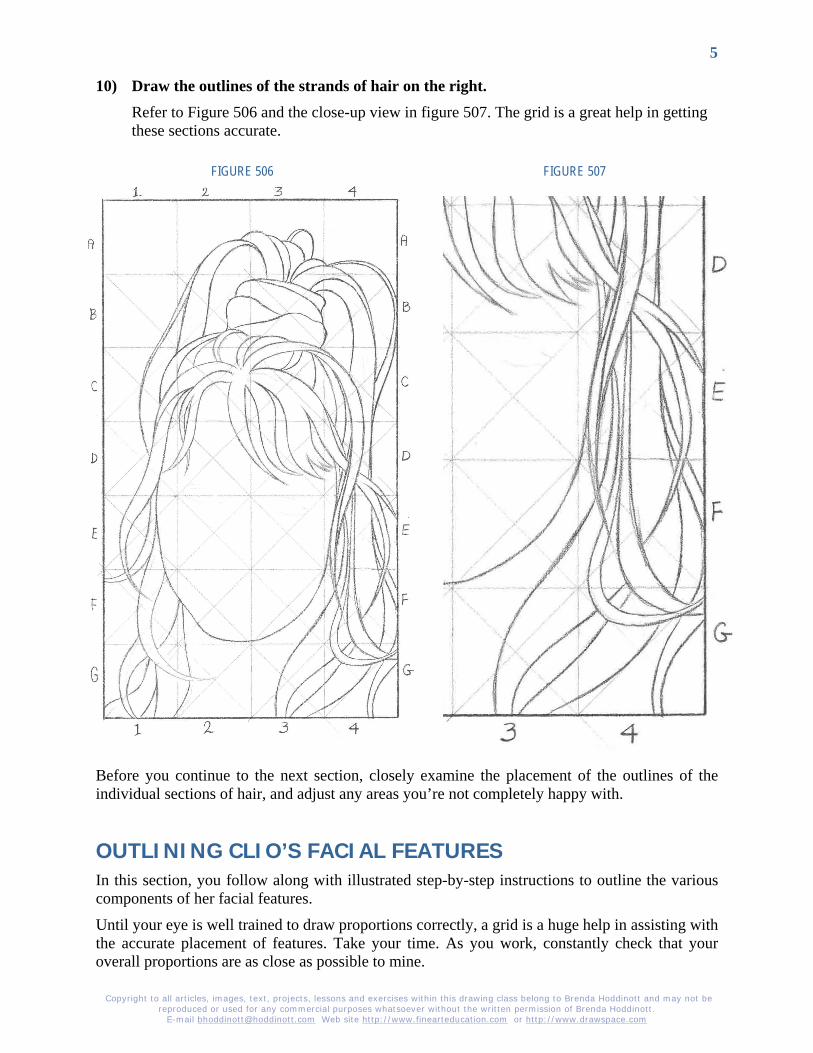
Copyright to all articles, images, text, projects, lessons and exercises within this drawing class belong to Brenda Hoddinott and may not be reproduced or used for any commercial purposes whatsoever without the written permission of Brenda Hoddinott.
E-mail [email protected] Web site http://www.finearteducation.com or http://www.drawspace.com
5
10) Draw the outlines of the strands of hair on the right. Refer to Figure 506 and the close-up view in figure 507. The grid is a great help in getting these sections accurate.
FIGURE 506 FIGURE 507
Before you continue to the next section, closely examine the placement of the outlines of the individual sections of hair, and adjust any areas you’re not completely happy with.
OUTLINING CLIO’S FACIAL FEATURES In this section, you follow along with illustrated step-by-step instructions to outline the various components of her facial features.
Until your eye is well trained to draw proportions correctly, a grid is a huge help in assisting with the accurate placement of features. Take your time. As you work, constantly check that your overall proportions are as close as possible to mine.
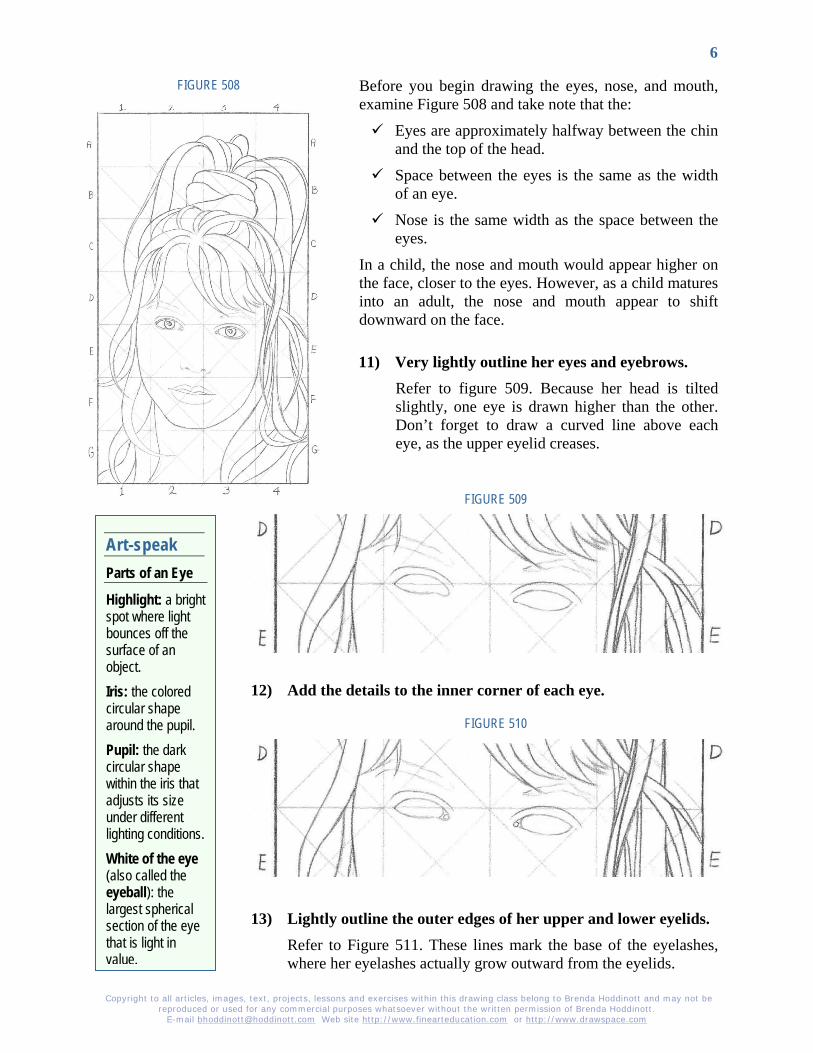
Copyright to all articles, images, text, projects, lessons and exercises within this drawing class belong to Brenda Hoddinott and may not be reproduced or used for any commercial purposes whatsoever without the written permission of Brenda Hoddinott.
E-mail [email protected] Web site http://www.finearteducation.com or http://www.drawspace.com
6
FIGURE 509
FIGURE 508
Art-speak Parts of an Eye
Highlight: a bright spot where light bounces off the surface of an object. Iris: the colored circular shape around the pupil. Pupil: the dark circular shape within the iris that adjusts its size under different lighting conditions. White of the eye (also called the eyeball): the largest spherical section of the eye that is light in value.
FIGURE 510
Before you begin drawing the eyes, nose, and mouth, examine Figure 508 and take note that the:
Eyes are approximately halfway between the chin and the top of the head.
Space between the eyes is the same as the width of an eye.
Nose is the same width as the space between the eyes.
In a child, the nose and mouth would appear higher on the face, closer to the eyes. However, as a child matures into an adult, the nose and mouth appear to shift downward on the face.
11) Very lightly outline her eyes and eyebrows. Refer to figure 509. Because her head is tilted slightly, one eye is drawn higher than the other. Don’t forget to draw a curved line above each eye, as the upper eyelid creases.
12) Add the details to the inner corner of each eye.
13) Lightly outline the outer edges of her upper and lower eyelids. Refer to Figure 511. These lines mark the base of the eyelashes, where her eyelashes actually grow outward from the eyelids.
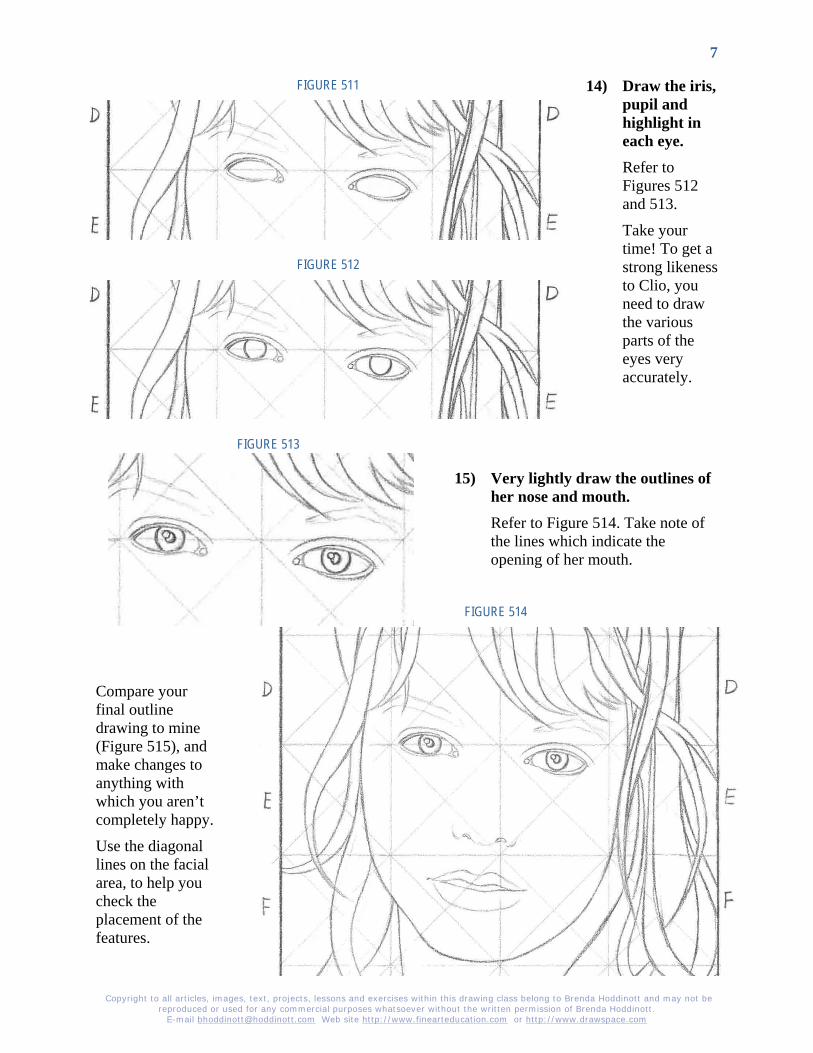
Copyright to all articles, images, text, projects, lessons and exercises within this drawing class belong to Brenda Hoddinott and may not be reproduced or used for any commercial purposes whatsoever without the written permission of Brenda Hoddinott.
E-mail [email protected] Web site http://www.finearteducation.com or http://www.drawspace.com
7
FIGURE 511
FIGURE 514
FIGURE 513
FIGURE 512
14) Draw the iris, pupil and highlight in each eye. Refer to Figures 512 and 513.
Take your time! To get a strong likeness to Clio, you need to draw the various parts of the eyes very accurately.
15) Very lightly draw the outlines of her nose and mouth. Refer to Figure 514. Take note of the lines which indicate the opening of her mouth.
Compare your final outline drawing to mine (Figure 515), and make changes to anything with which you aren’t completely happy.
Use the diagonal lines on the facial area, to help you check the placement of the features.
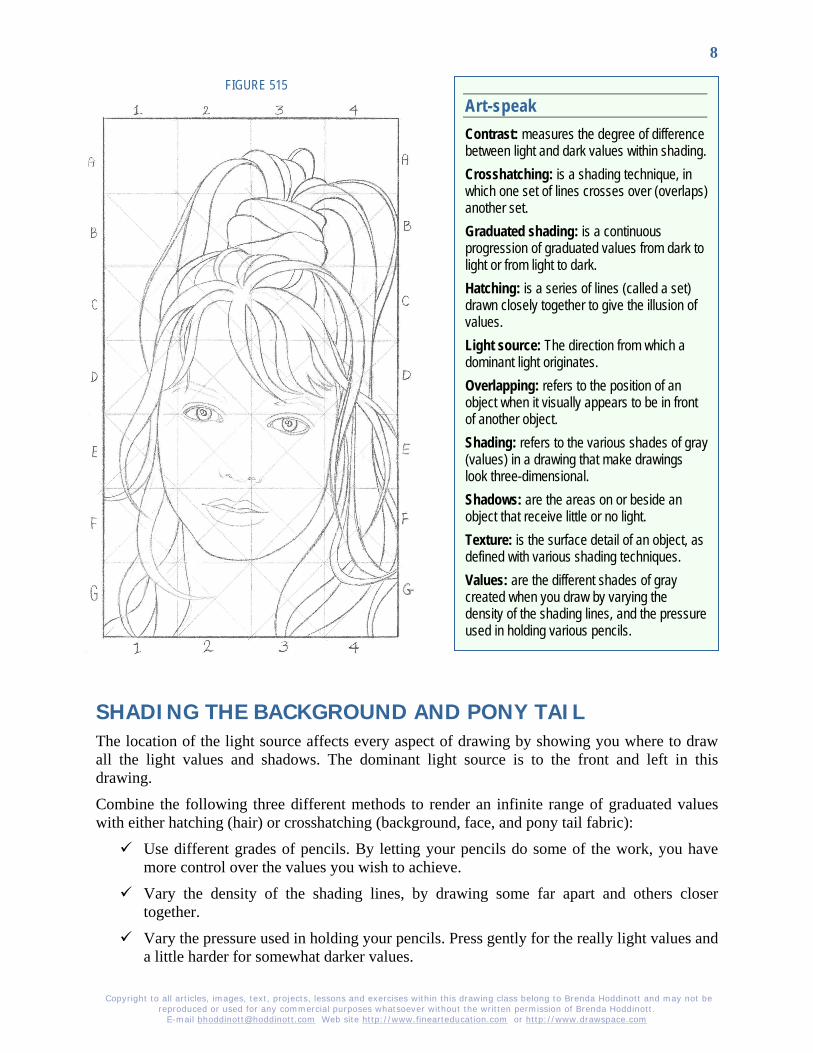
Copyright to all articles, images, text, projects, lessons and exercises within this drawing class belong to Brenda Hoddinott and may not be reproduced or used for any commercial purposes whatsoever without the written permission of Brenda Hoddinott.
E-mail [email protected] Web site http://www.finearteducation.com or http://www.drawspace.com
8
FIGURE 515 Art-speak Contrast: measures the degree of difference between light and dark values within shading. Crosshatching: is a shading technique, in which one set of lines crosses over (overlaps) another set. Graduated shading: is a continuous progression of graduated values from dark to light or from light to dark. Hatching: is a series of lines (called a set) drawn closely together to give the illusion of values. Light source: The direction from which a dominant light originates. Overlapping: refers to the position of an object when it visually appears to be in front of another object. Shading: refers to the various shades of gray (values) in a drawing that make drawings look three-dimensional. Shadows: are the areas on or beside an object that receive little or no light. Texture: is the surface detail of an object, as defined with various shading techniques. Values: are the different shades of gray created when you draw by varying the density of the shading lines, and the pressure used in holding various pencils.
SHADING THE BACKGROUND AND PONY TAIL The location of the light source affects every aspect of drawing by showing you where to draw all the light values and shadows. The dominant light source is to the front and left in this drawing.
Combine the following three different methods to render an infinite range of graduated values with either hatching (hair) or crosshatching (background, face, and pony tail fabric):
Use different grades of pencils. By letting your pencils do some of the work, you have more control over the values you wish to achieve.
Vary the density of the shading lines, by drawing some far apart and others closer together.
Vary the pressure used in holding your pencils. Press gently for the really light values and a little harder for somewhat darker values.
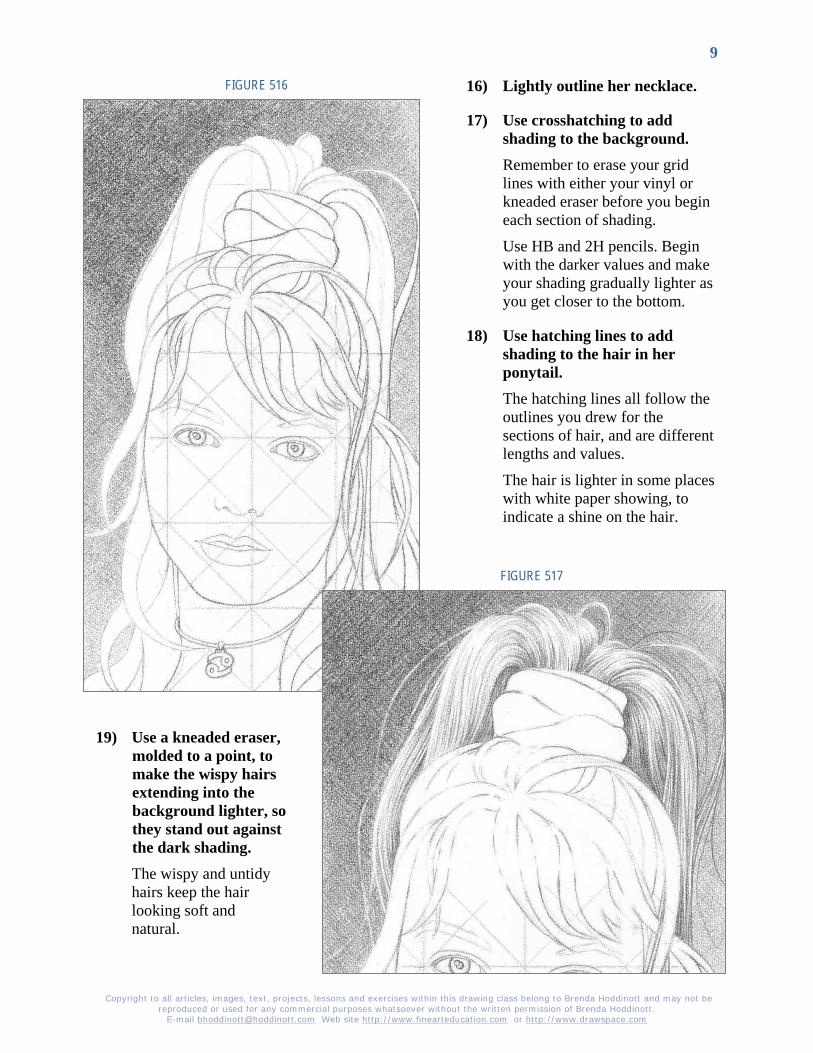
Copyright to all articles, images, text, projects, lessons and exercises within this drawing class belong to Brenda Hoddinott and may not be reproduced or used for any commercial purposes whatsoever without the written permission of Brenda Hoddinott.
E-mail [email protected] Web site http://www.finearteducation.com or http://www.drawspace.com
9
FIGURE 516
FIGURE 517
16) Lightly outline her necklace.
17) Use crosshatching to add shading to the background. Remember to erase your grid lines with either your vinyl or kneaded eraser before you begin each section of shading.
Use HB and 2H pencils. Begin with the darker values and make your shading gradually lighter as you get closer to the bottom.
18) Use hatching lines to add shading to the hair in her ponytail. The hatching lines all follow the outlines you drew for the sections of hair, and are different lengths and values.
The hair is lighter in some places with white paper showing, to indicate a shine on the hair.
19) Use a kneaded eraser, molded to a point, to make the wispy hairs extending into the background lighter, so they stand out against the dark shading. The wispy and untidy hairs keep the hair looking soft and natural.
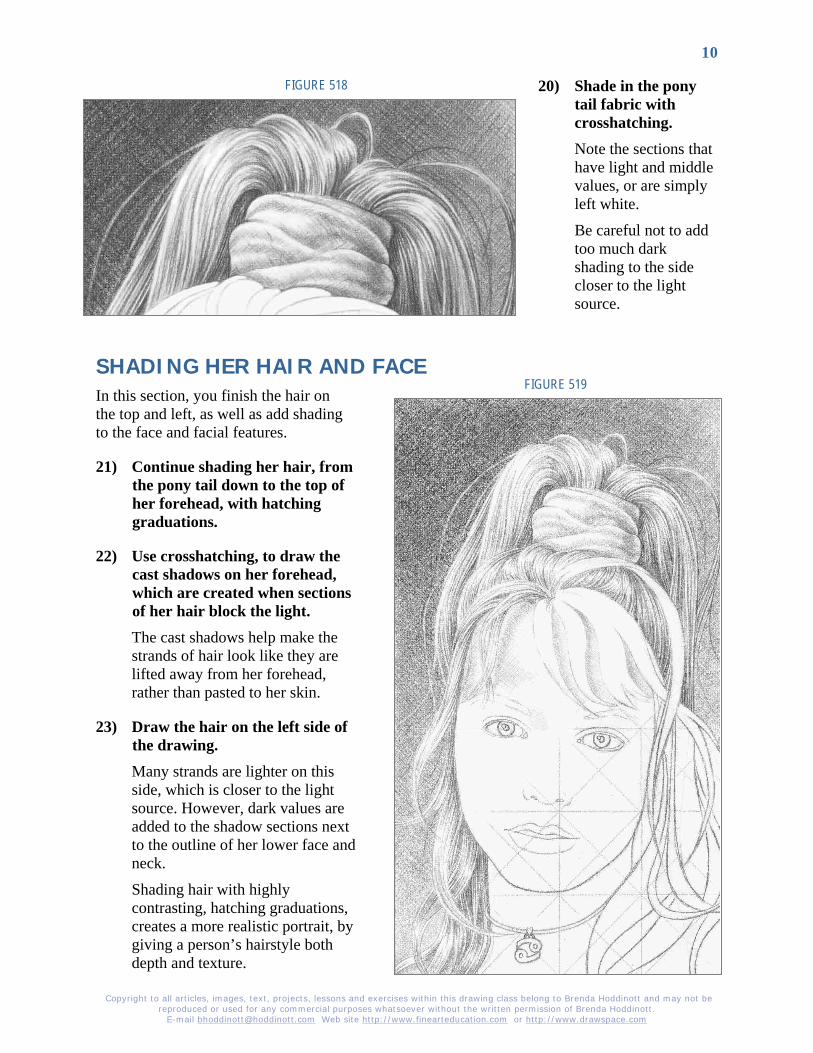
Copyright to all articles, images, text, projects, lessons and exercises within this drawing class belong to Brenda Hoddinott and may not be reproduced or used for any commercial purposes whatsoever without the written permission of Brenda Hoddinott.
E-mail [email protected] Web site http://www.finearteducation.com or http://www.drawspace.com
10
FIGURE 518
FIGURE 519
20) Shade in the pony tail fabric with crosshatching. Note the sections that have light and middle values, or are simply left white.
Be careful not to add too much dark shading to the side closer to the light source.
SHADING HER HAIR AND FACE In this section, you finish the hair on the top and left, as well as add shading to the face and facial features.
21) Continue shading her hair, from the pony tail down to the top of her forehead, with hatching graduations.
22) Use crosshatching, to draw the cast shadows on her forehead, which are created when sections of her hair block the light. The cast shadows help make the strands of hair look like they are lifted away from her forehead, rather than pasted to her skin.
23) Draw the hair on the left side of the drawing. Many strands are lighter on this side, which is closer to the light source. However, dark values are added to the shadow sections next to the outline of her lower face and neck.
Shading hair with highly contrasting, hatching graduations, creates a more realistic portrait, by giving a person’s hairstyle both depth and texture.
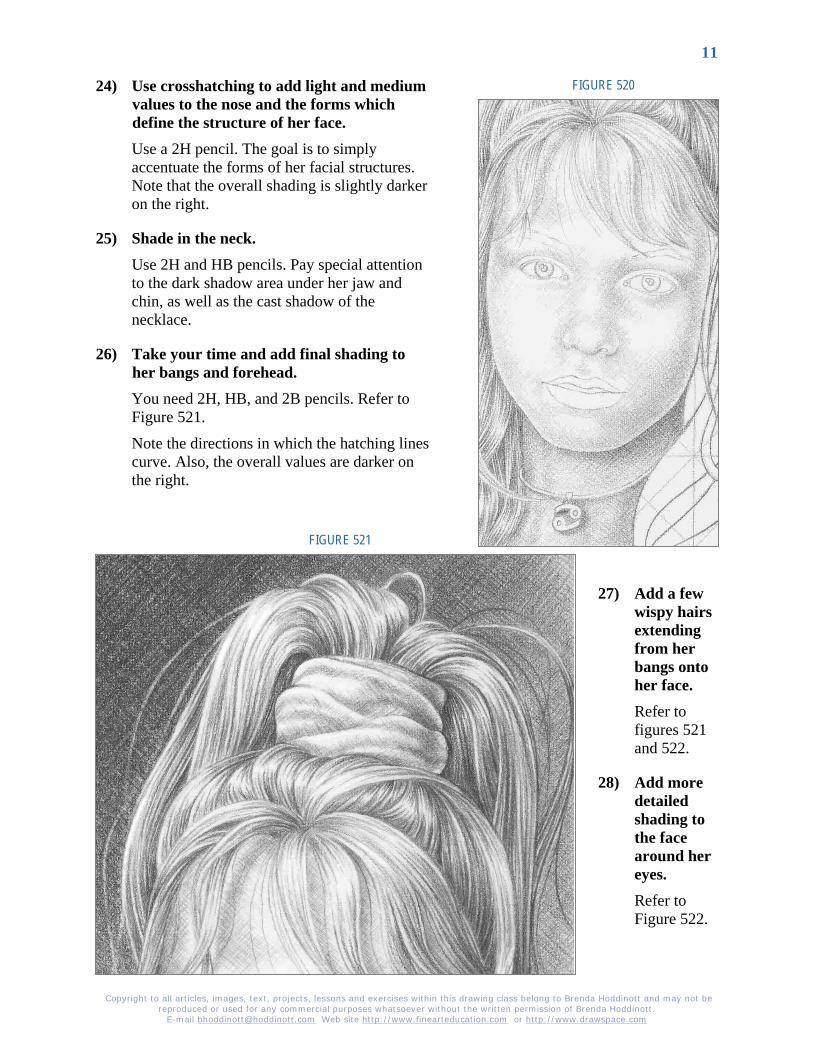
Copyright to all articles, images, text, projects, lessons and exercises within this drawing class belong to Brenda Hoddinott and may not be reproduced or used for any commercial purposes whatsoever without the written permission of Brenda Hoddinott.
E-mail [email protected] Web site http://www.finearteducation.com or http://www.drawspace.com
11
FIGURE 520
FIGURE 521
24) Use crosshatching to add light and medium values to the nose and the forms which define the structure of her face. Use a 2H pencil. The goal is to simply accentuate the forms of her facial structures. Note that the overall shading is slightly darker on the right.
25) Shade in the neck. Use 2H and HB pencils. Pay special attention to the dark shadow area under her jaw and chin, as well as the cast shadow of the necklace.
26) Take your time and add final shading to her bangs and forehead. You need 2H, HB, and 2B pencils. Refer to Figure 521.
Note the directions in which the hatching lines curve. Also, the overall values are darker on the right.
27) Add a few wispy hairs extending from her bangs onto her face. Refer to figures 521 and 522.
28) Add more detailed shading to the face around her eyes. Refer to Figure 522.
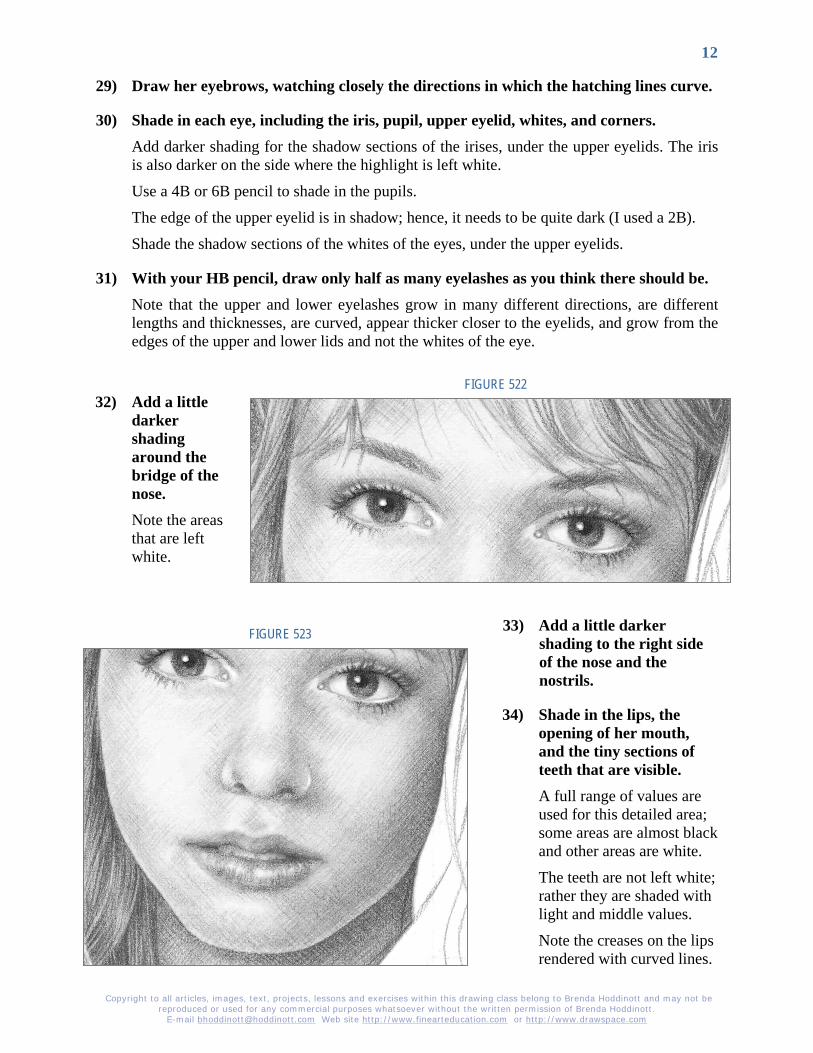
Copyright to all articles, images, text, projects, lessons and exercises within this drawing class belong to Brenda Hoddinott and may not be reproduced or used for any commercial purposes whatsoever without the written permission of Brenda Hoddinott.
E-mail [email protected] Web site http://www.finearteducation.com or http://www.drawspace.com
12
FIGURE 522
FIGURE 523
29) Draw her eyebrows, watching closely the directions in which the hatching lines curve.
30) Shade in each eye, including the iris, pupil, upper eyelid, whites, and corners. Add darker shading for the shadow sections of the irises, under the upper eyelids. The iris is also darker on the side where the highlight is left white.
Use a 4B or 6B pencil to shade in the pupils.
The edge of the upper eyelid is in shadow; hence, it needs to be quite dark (I used a 2B).
Shade the shadow sections of the whites of the eyes, under the upper eyelids.
31) With your HB pencil, draw only half as many eyelashes as you think there should be. Note that the upper and lower eyelashes grow in many different directions, are different lengths and thicknesses, are curved, appear thicker closer to the eyelids, and grow from the edges of the upper and lower lids and not the whites of the eye.
32) Add a little darker shading around the bridge of the nose. Note the areas that are left white.
33) Add a little darker shading to the right side of the nose and the nostrils.
34) Shade in the lips, the opening of her mouth, and the tiny sections of teeth that are visible. A full range of values are used for this detailed area; some areas are almost black and other areas are white.
The teeth are not left white; rather they are shaded with light and middle values.
Note the creases on the lips rendered with curved lines.
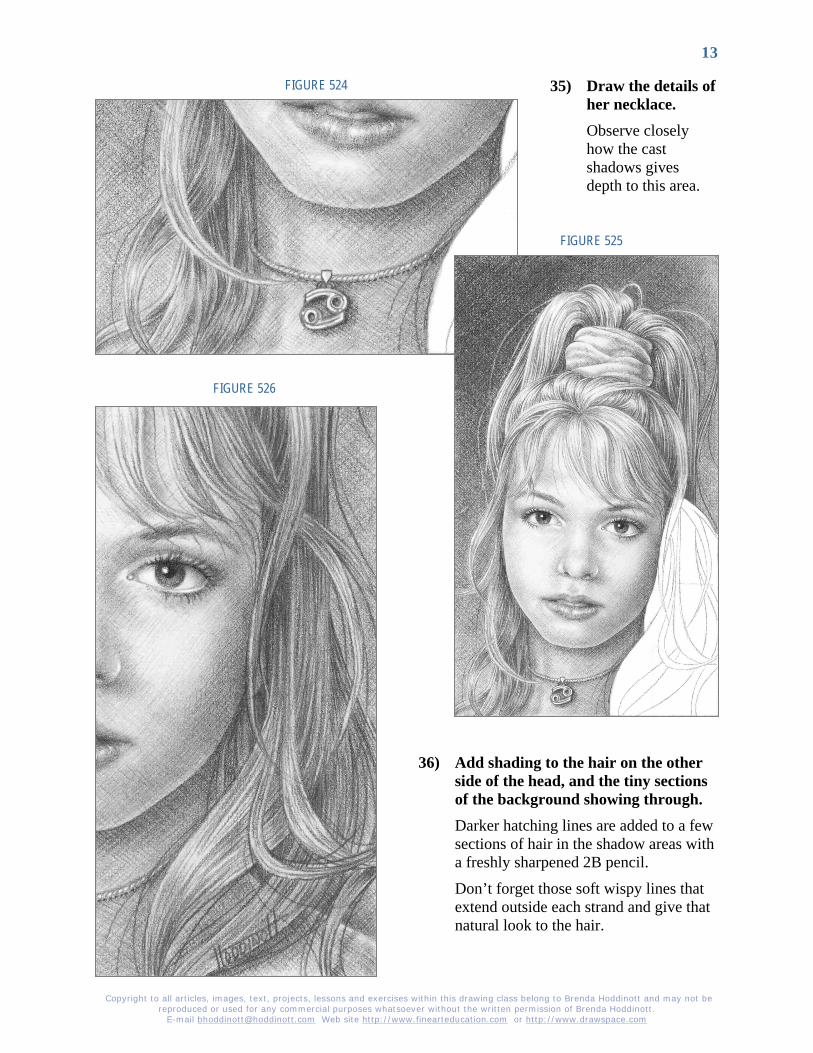
Copyright to all articles, images, text, projects, lessons and exercises within this drawing class belong to Brenda Hoddinott and may not be reproduced or used for any commercial purposes whatsoever without the written permission of Brenda Hoddinott.
E-mail [email protected] Web site http://www.finearteducation.com or http://www.drawspace.com
13
FIGURE 524
FIGURE 525
FIGURE 526
35) Draw the details of her necklace. Observe closely how the cast shadows gives depth to this area.
36) Add shading to the hair on the other side of the head, and the tiny sections of the background showing through. Darker hatching lines are added to a few sections of hair in the shadow areas with a freshly sharpened 2B pencil.
Don’t forget those soft wispy lines that extend outside each strand and give that natural look to the hair.
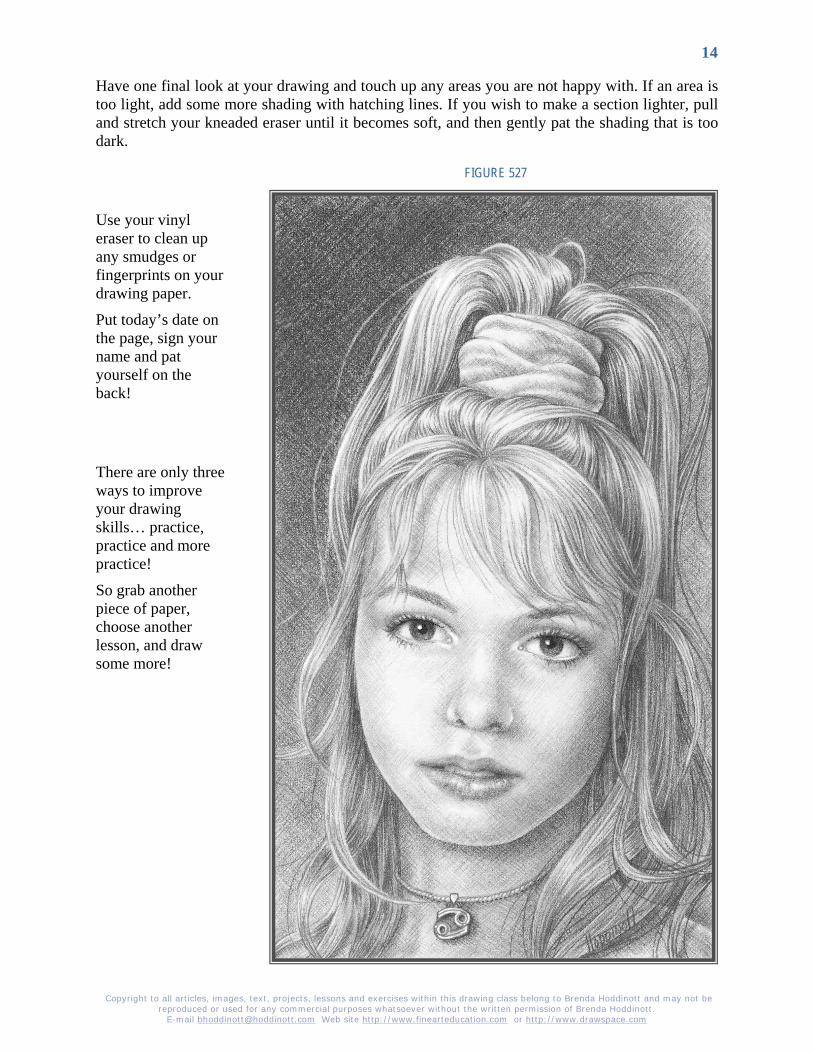
Copyright to all articles, images, text, projects, lessons and exercises within this drawing class belong to Brenda Hoddinott and may not be reproduced or used for any commercial purposes whatsoever without the written permission of Brenda Hoddinott.
E-mail [email protected] Web site http://www.finearteducation.com or http://www.drawspace.com
14
FIGURE 527
Have one final look at your drawing and touch up any areas you are not happy with. If an area is too light, add some more shading with hatching lines. If you wish to make a section lighter, pull and stretch your kneaded eraser until it becomes soft, and then gently pat the shading that is too dark.
Use your vinyl eraser to clean up any smudges or fingerprints on your drawing paper.
Put today’s date on the page, sign your name and pat yourself on the back!
There are only three ways to improve your drawing skills… practice, practice and more practice!
So grab another piece of paper, choose another lesson, and draw some more!
Copyright to all articles, images, text, projects, lessons and exercises within this drawing class belong to Brenda Hoddinott and may not be reproduced or used for any commercial purposes whatsoever without the written permission of Brenda Hoddinott.
E-mail [email protected] Web site http://www.finearteducation.com or http://www.drawspace.com
15
Brenda Hoddinott As a self-educated teacher, visual artist, portraitist, forensic artist, and illustrator, Brenda utilizes diverse art media including graphite, technical pen, colored pencil, chalk pastel, charcoal, conté crayon, and oil paints.
My philosophy on teaching art is to focus primarily on the enjoyment aspects while gently introducing the technical and academic. Hence, in creating a passion for the subject matter, the quest for knowledge also becomes enjoyable.
Brenda Hoddinott
Biography
Born in St. John’s, Newfoundland, Brenda grew up in the small town of Corner Brook. She developed strong technical competencies with a personal commitment to self directed learning, and the aid of assorted “Learn to Draw” books. During Brenda’s twenty-five year career as a self-educated civilian forensic artist, numerous criminal investigation departments have employed Brenda’s skills, including Royal Canadian Mounted Police and municipal police departments. In 1992, Brenda was honored with a commendation from the Royal Canadian Mounted Police, and in 1994, she was awarded a Certificate of Membership from “Forensic Artists International”.
Her home-based art career included graphic design, and teaching recreational drawing and painting classes. As supervisor of her community’s recreational art department, Brenda hired and trained teachers, and designed curriculum for several children’s art programs. In 1998, Brenda chose to end her eighteen-year career as an art educator in order to devote more time to writing, drawing, painting, and developing her websites.
Drawspace http://www.drawspace.com incorporates her unique style and innovative approach to curriculum development. This site offers downloadable and printable drawing classes for students of all abilities from the age of eight through adult. Students of all ages, levels and abilities have praised the simple step-by-step instructional approach. This site is respected as a resource for fine art educators, home schooling programs, and educational facilities throughout the world.
Learn-to-draw books
Drawing for Dummies: Wiley Publishing, Inc., New, York, NY, this 336 page book is available on various websites and in major bookstores internationally.
The Complete Idiot’s Guide to Drawing People: Winner of the Alpha-Penguin Book of the Year Award 2004, Alpha - Pearson Education – Macmillan, Indianapolis, IN, this 360 page book is available on various websites and in major bookstores internationally.
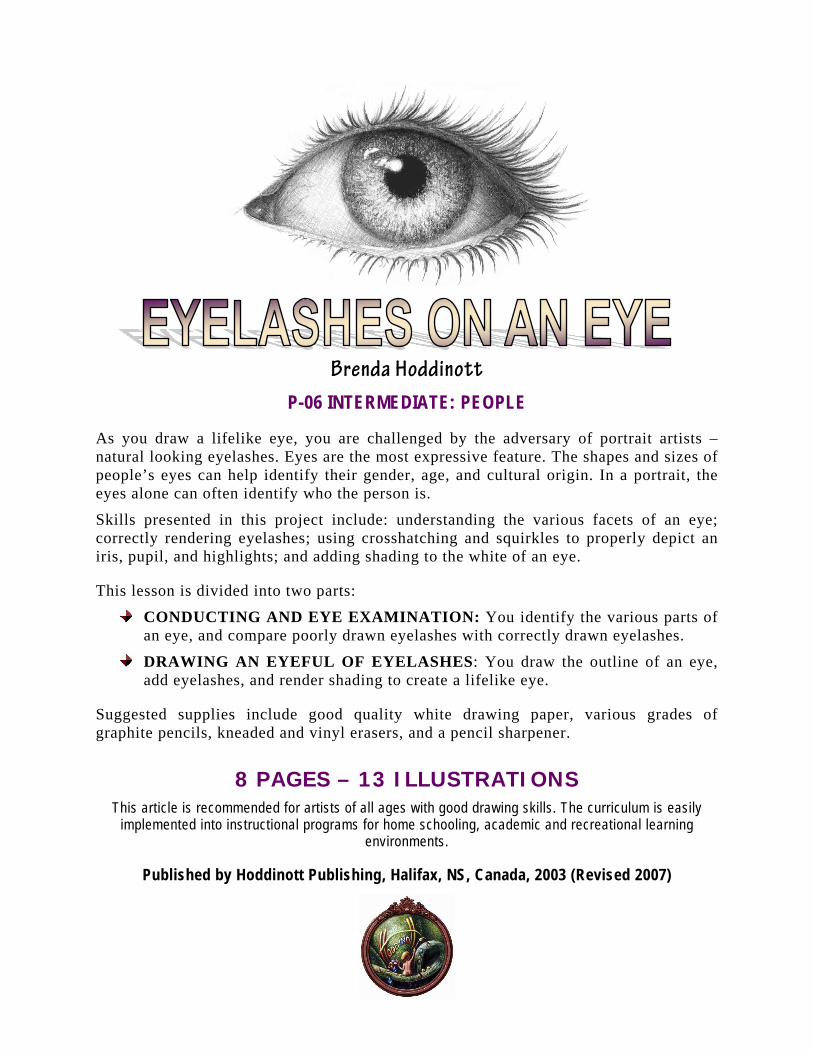
Brenda Hoddinott P-06 INTERMEDIATE: PEOPLE
As you draw a lifelike eye, you are challenged by the adversary of portrait artists –natural looking eyelashes. Eyes are the most expressive feature. The shapes and sizes of people’s eyes can help identify their gender, age, and cultural origin. In a portrait, the eyes alone can often identify who the person is.
Skills presented in this project include: understanding the various facets of an eye; correctly rendering eyelashes; using crosshatching and squirkles to properly depict an iris, pupil, and highlights; and adding shading to the white of an eye.
This lesson is divided into two parts:
CONDUCTING AND EYE EXAMINATION: You identify the various parts of an eye, and compare poorly drawn eyelashes with correctly drawn eyelashes.
DRAWING AN EYEFUL OF EYELASHES: You draw the outline of an eye, add eyelashes, and render shading to create a lifelike eye.
Suggested supplies include good quality white drawing paper, various grades of graphite pencils, kneaded and vinyl erasers, and a pencil sharpener.
8 PAGES – 13 ILLUSTRATIONS This article is recommended for artists of all ages with good drawing skills. The curriculum is easily
implemented into instructional programs for home schooling, academic and recreational learning environments.
Published by Hoddinott Publishing, Halifax, NS, Canada, 2003 (Revised 2007)
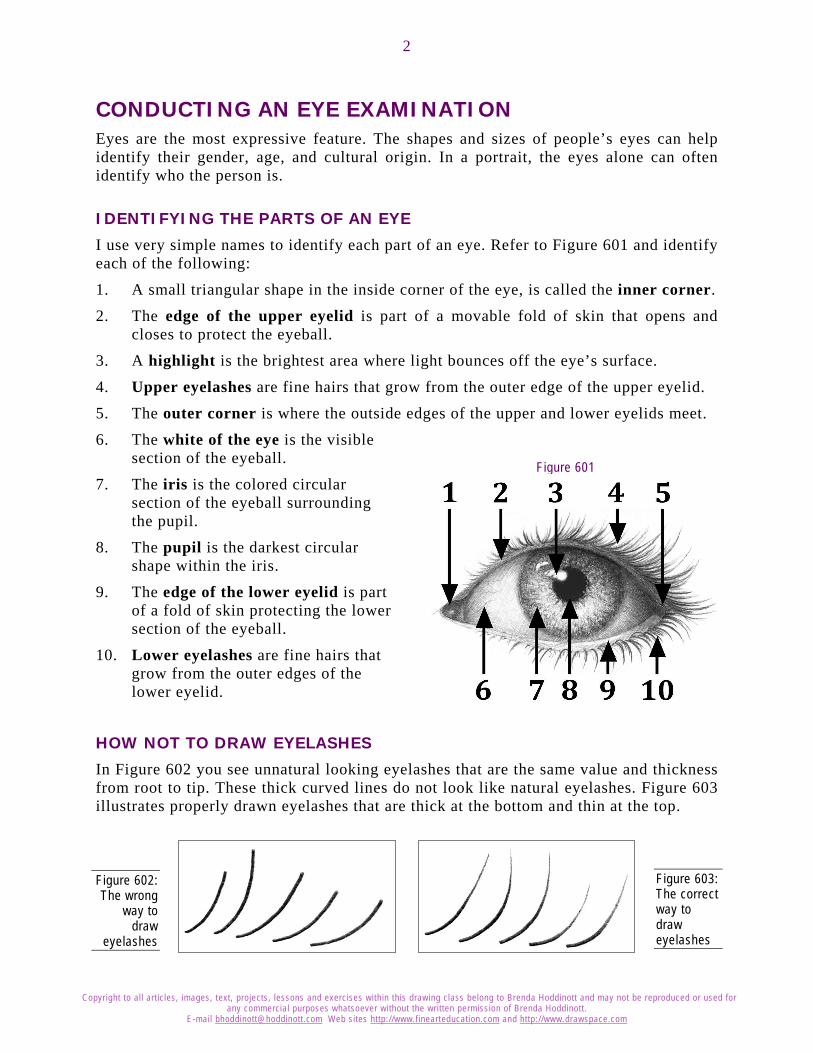
Copyright to al l art icles, images, text, projects, lessons and exercises within this drawing class belong to Brenda Hoddinott and may not be reproduced or used for any commercial purposes whatsoever without the written permission of Brenda Hoddinott.
E-mail [email protected] Web sites http://www.f inearteducation.com and http://www.drawspace.com
2
CONDUCTING AN EYE EXAMINATION Eyes are the most expressive feature. The shapes and sizes of people’s eyes can help identify their gender, age, and cultural origin. In a portrait, the eyes alone can often identify who the person is.
IDENTIFYING THE PARTS OF AN EYE
I use very simple names to identify each part of an eye. Refer to Figure 601 and identify each of the following:
1. A small triangular shape in the inside corner of the eye, is called the inner corner.
2. The edge of the upper eyelid is part of a movable fold of skin that opens and closes to protect the eyeball.
3. A highlight is the brightest area where light bounces off the eye’s surface.
4. Upper eyelashes are fine hairs that grow from the outer edge of the upper eyelid.
5. The outer corner is where the outside edges of the upper and lower eyelids meet.
6. The white of the eye is the visible section of the eyeball.
7. The iris is the colored circular section of the eyeball surrounding the pupil.
8. The pupil is the darkest circular shape within the iris.
9. The edge of the lower eyelid is part of a fold of skin protecting the lower section of the eyeball.
10. Lower eyelashes are fine hairs that grow from the outer edges of the lower eyelid.
HOW NOT TO DRAW EYELASHES
In Figure 602 you see unnatural looking eyelashes that are the same value and thickness from root to tip. These thick curved lines do not look like natural eyelashes. Figure 603 illustrates properly drawn eyelashes that are thick at the bottom and thin at the top.
Figure 601
Figure 603: The correct way to draw eyelashes
Figure 602: The wrong
way to draw
eyelashes

Copyright to al l art icles, images, text, projects, lessons and exercises within this drawing class belong to Brenda Hoddinott and may not be reproduced or used for any commercial purposes whatsoever without the written permission of Brenda Hoddinott.
E-mail [email protected] Web sites http://www.f inearteducation.com and http://www.drawspace.com
3
Figure 604 shows three drawings of the same eye with a few major problems, such as eyelashes that are too thick, too straight or too long.
CORRECTLY DRAWN EYELASHES
Curved lines help make eyelashes look natural and lifelike. A simple little drawing technique provides a realistic looking eyelash every time. Curved lines are created when a straight line curves (or bends). Curved lines can be drawn thick and/or thin.
Grab some paper and a 2B pencil. Refer to the next drawing, and try your hand at drawing realistic looking lashes.
1. Begin at the base of the eyelash and press firmly with your pencil.
2. Slowly release the pressure as your curved line extends toward the tip. Realistic eyelashes look like inverted commas – thick at the bottom and thin at the top.
3. Gently lift your pencil from the paper when the tip of the line is very thin and light in value.
Never draw eyelashes from the tip down toward the eyelid. Always draw them in the direction in which they grow, from the eyelid (or root) outward. With lots of practice, you can draw natural eyelashes that are thick and bold close to the base, and thin and light at the tip.
The following criteria provide insights into various aspects of drawing realistic eyelashes. Refer to Figure 606, and note that correctly drawn eyelashes:
Grow in many different directions, mostly outward from the eyelids. Are rendered with lines of different lengths. Are curved. Appear thicker closer to the eyelids. Grow from the outer edges of the upper and lower eyelids and not the white of the
eye. Are drawn in groups rather than single lines. Are unevenly spaced.
Gradually become longer and thicker toward the outer corner of the eye.
Figure 604: Incorrectly drawn eyelashes can ruin a drawing of an eye.
Figure 605: Five correctly drawn eyelashes.
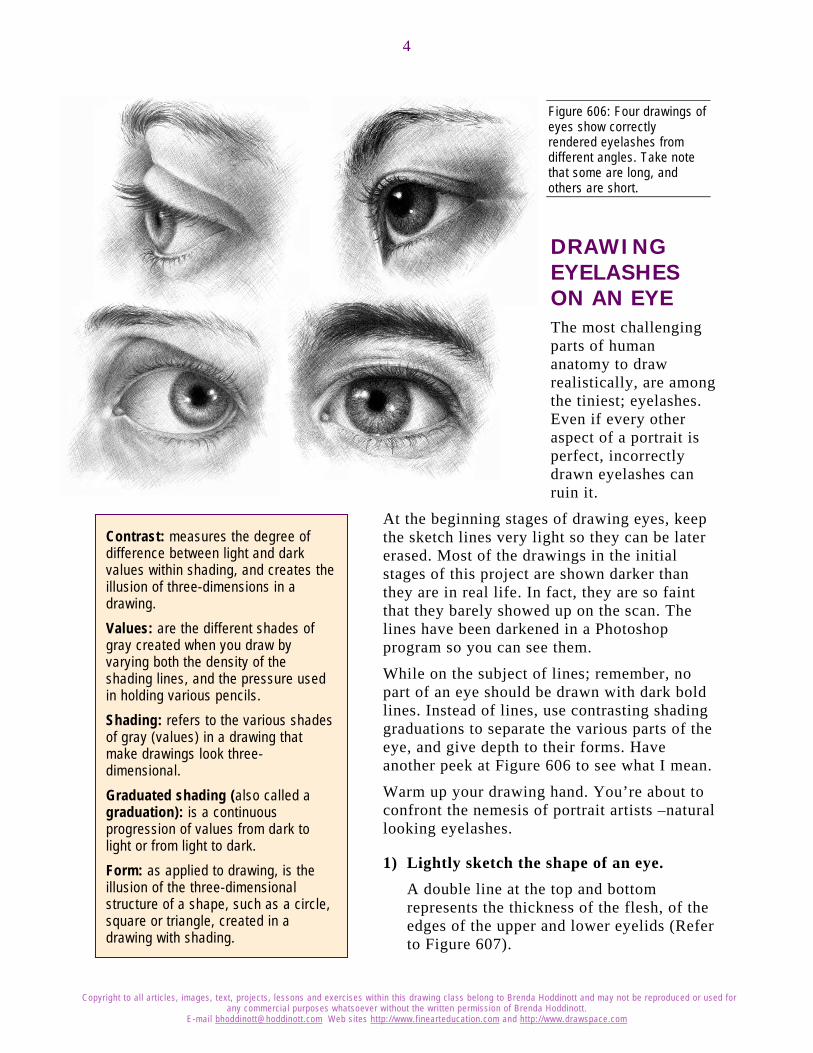
Copyright to al l art icles, images, text, projects, lessons and exercises within this drawing class belong to Brenda Hoddinott and may not be reproduced or used for any commercial purposes whatsoever without the written permission of Brenda Hoddinott.
E-mail [email protected] Web sites http://www.f inearteducation.com and http://www.drawspace.com
4
Figure 606: Four drawings of eyes show correctly rendered eyelashes from different angles. Take note that some are long, and others are short.
Contrast: measures the degree of difference between light and dark values within shading, and creates the illusion of three-dimensions in a drawing. Values: are the different shades of gray created when you draw by varying both the density of the shading lines, and the pressure used in holding various pencils. Shading: refers to the various shades of gray (values) in a drawing that make drawings look three-dimensional. Graduated shading (also called a graduation): is a continuous progression of values from dark to light or from light to dark. Form: as applied to drawing, is the illusion of the three-dimensional structure of a shape, such as a circle, square or triangle, created in a drawing with shading.
DRAWING EYELASHES ON AN EYE The most challenging parts of human anatomy to draw realistically, are among the tiniest; eyelashes. Even if every other aspect of a portrait is perfect, incorrectly drawn eyelashes can ruin it.
At the beginning stages of drawing eyes, keep the sketch lines very light so they can be later erased. Most of the drawings in the initial stages of this project are shown darker than they are in real life. In fact, they are so faint that they barely showed up on the scan. The lines have been darkened in a Photoshop program so you can see them.
While on the subject of lines; remember, no part of an eye should be drawn with dark bold lines. Instead of lines, use contrasting shading graduations to separate the various parts of the eye, and give depth to their forms. Have another peek at Figure 606 to see what I mean.
Warm up your drawing hand. You’re about to confront the nemesis of portrait artists –natural looking eyelashes.
1) Lightly sketch the shape of an eye. A double line at the top and bottom represents the thickness of the flesh, of the edges of the upper and lower eyelids (Refer to Figure 607).
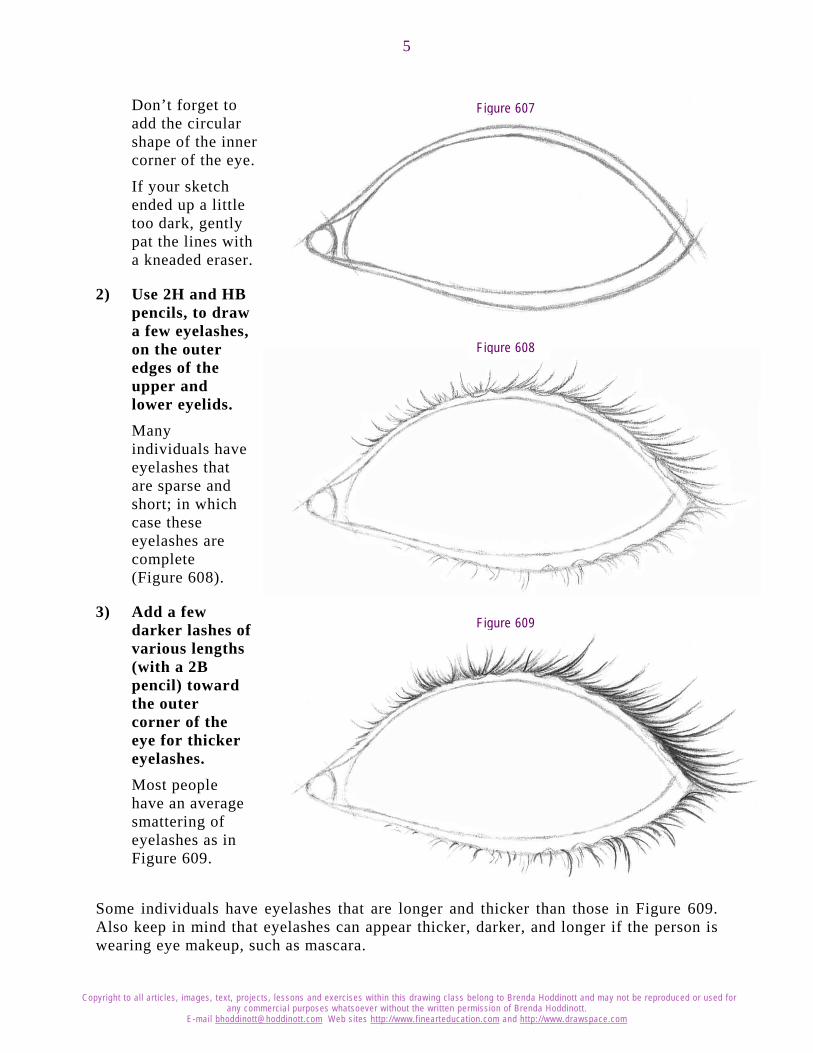
Copyright to al l art icles, images, text, projects, lessons and exercises within this drawing class belong to Brenda Hoddinott and may not be reproduced or used for any commercial purposes whatsoever without the written permission of Brenda Hoddinott.
E-mail [email protected] Web sites http://www.f inearteducation.com and http://www.drawspace.com
5
Don’t forget to add the circular shape of the inner corner of the eye.
If your sketch ended up a little too dark, gently pat the lines with a kneaded eraser.
2) Use 2H and HB pencils, to draw a few eyelashes, on the outer edges of the upper and lower eyelids. Many individuals have eyelashes that are sparse and short; in which case these eyelashes are complete (Figure 608).
3) Add a few darker lashes of various lengths (with a 2B pencil) toward the outer corner of the eye for thicker eyelashes. Most people have an average smattering of eyelashes as in Figure 609.
Some individuals have eyelashes that are longer and thicker than those in Figure 609. Also keep in mind that eyelashes can appear thicker, darker, and longer if the person is wearing eye makeup, such as mascara.
Figure 607
Figure 608
Figure 609
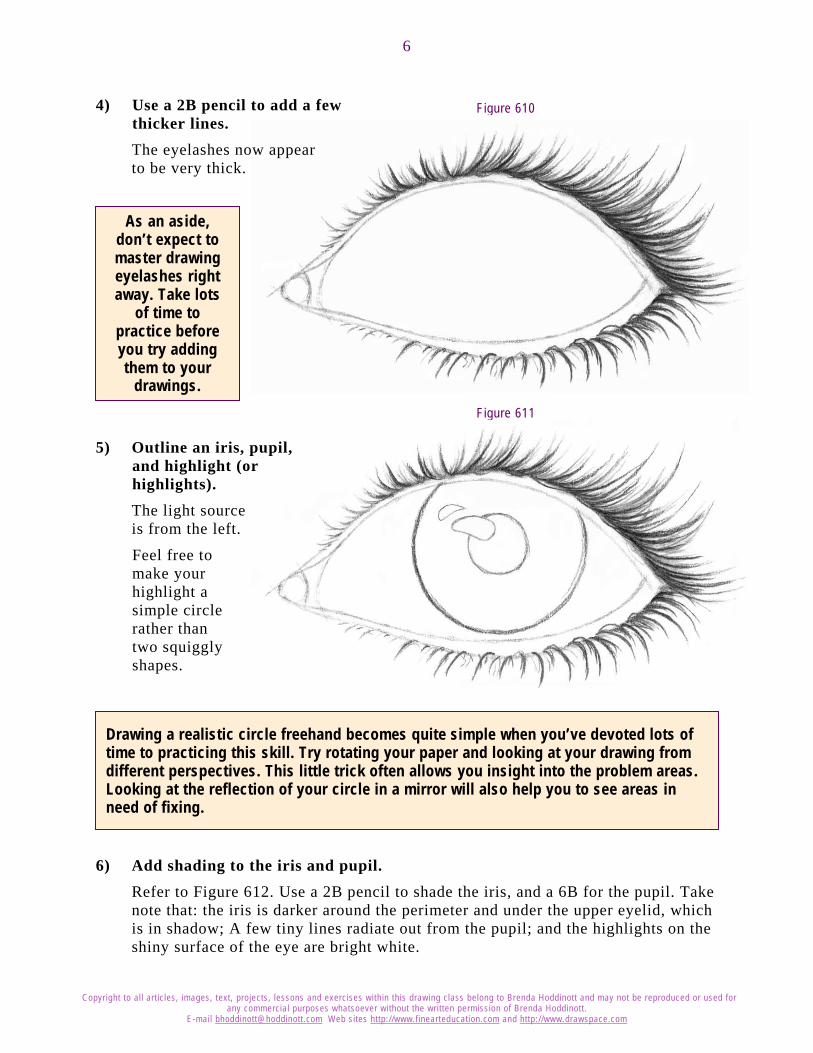
Copyright to al l art icles, images, text, projects, lessons and exercises within this drawing class belong to Brenda Hoddinott and may not be reproduced or used for any commercial purposes whatsoever without the written permission of Brenda Hoddinott.
E-mail [email protected] Web sites http://www.f inearteducation.com and http://www.drawspace.com
6
Drawing a realistic circle freehand becomes quite simple when you’ve devoted lots of time to practicing this skill. Try rotating your paper and looking at your drawing from different perspectives. This little trick often allows you insight into the problem areas. Looking at the reflection of your circle in a mirror will also help you to see areas in need of fixing.
As an aside, don’t expect to master drawing eyelashes right away. Take lots
of time to practice before you try adding them to your
drawings.
4) Use a 2B pencil to add a few thicker lines. The eyelashes now appear to be very thick.
5) Outline an iris, pupil, and highlight (or highlights). The light source is from the left.
Feel free to make your highlight a simple circle rather than two squiggly shapes.
6) Add shading to the iris and pupil. Refer to Figure 612. Use a 2B pencil to shade the iris, and a 6B for the pupil. Take note that: the iris is darker around the perimeter and under the upper eyelid, which is in shadow; A few tiny lines radiate out from the pupil; and the highlights on the shiny surface of the eye are bright white.
Figure 610
Figure 611
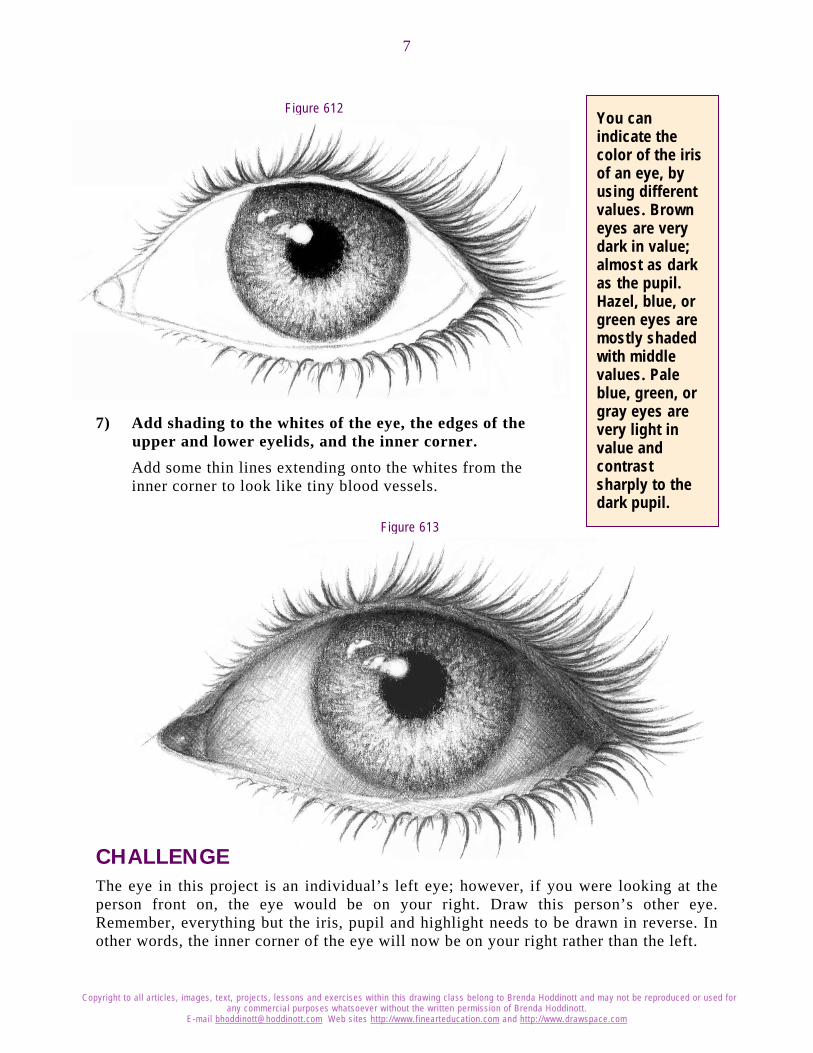
Copyright to al l art icles, images, text, projects, lessons and exercises within this drawing class belong to Brenda Hoddinott and may not be reproduced or used for any commercial purposes whatsoever without the written permission of Brenda Hoddinott.
E-mail [email protected] Web sites http://www.f inearteducation.com and http://www.drawspace.com
7
You can indicate the color of the iris of an eye, by using different values. Brown eyes are very dark in value; almost as dark as the pupil. Hazel, blue, or green eyes are mostly shaded with middle values. Pale blue, green, or gray eyes are very light in value and contrast sharply to the dark pupil.
7) Add shading to the whites of the eye, the edges of the upper and lower eyelids, and the inner corner. Add some thin lines extending onto the whites from the inner corner to look like tiny blood vessels.
CHALLENGE The eye in this project is an individual’s left eye; however, if you were looking at the person front on, the eye would be on your right. Draw this person’s other eye. Remember, everything but the iris, pupil and highlight needs to be drawn in reverse. In other words, the inner corner of the eye will now be on your right rather than the left.
Figure 612
Figure 613
Copyright to al l art icles, images, text, projects, lessons and exercises within this drawing class belong to Brenda Hoddinott and may not be reproduced or used for any commercial purposes whatsoever without the written permission of Brenda Hoddinott.
E-mail [email protected] Web sites http://www.f inearteducation.com and http://www.drawspace.com
8
Brenda Hoddinott As a self-educated teacher, visual artist, portraitist, forensic artist, and illustrator, Brenda utilizes diverse art media including graphite, technical pen, colored pencil, chalk pastel, charcoal, conté crayon, and oil paints.
My philosophy on teaching art is to focus primarily on the enjoyment aspects while gently introducing the technical and academic. Hence, in creating a passion for the subject matter, the quest for knowledge also
becomes enjoyable. Brenda Hoddinott
Biography
Born in St. John’s, Newfoundland, Brenda grew up in the small town of Corner Brook. She developed strong technical competencies with a personal commitment to self directed learning, and the aid of assorted “Learn to Draw” books. During Brenda’s twenty-five year career as a self-educated civilian forensic artist, numerous criminal investigation departments have employed Brenda’s skills, including Royal Canadian Mounted Police and municipal police departments. In 1992, Brenda was honored with a commendation from the Royal Canadian Mounted Police, and in 1994, she was awarded a Certificate of Membership from “Forensic Artists International”.
Her home-based art career included graphic design, and teaching recreational drawing and painting classes. As supervisor of her community’s recreational art department, Brenda hired and trained teachers, and designed curriculum for several children’s art programs. In 1998, Brenda chose to end her eighteen-year career as an art educator in order to devote more time to writing, drawing, painting, and developing her websites.
Drawspace http://www.drawspace.com incorporates her unique style and innovative approach to curriculum development. This site offers downloadable and printable drawing classes for students of all abilities from the age of eight through adult. Students of all ages, levels and abilities have praised the simple step-by-step instructional approach. This site is respected as a resource for fine art educators, home schooling programs, and educational facilities throughout the world.
Learn-to-draw books
Drawing for Dummies: Wiley Publishing, Inc., New, York, NY, this 336 page book is available on various websites and in major bookstores internationally.
The Complete Idiot’s Guide to Drawing People: Winner of the Alpha-Penguin Book of the Year Award 2004, Alpha - Pearson Education – Macmillan, Indianapolis, IN, this 360 page book is available on various websites and in major bookstores internationally.
Brenda Hoddinott
U07 ADVANCED: FACES & FIGURES Hmmm…this face looks a little familiar. Gee, she sort of looks like…maybe, when she was a teenager…or maybe she’s a relative?
This project requires a lot of patience, time, and strong skills with both hatching and crosshatching graduations. Expect to spend a day or two completing this drawing.
With help from a complex grid, you draw a female face with emphasis on both correct facial proportions and the forms of individual features, as defined by the dominant light source. Hatching and crosshatching graduations illustrate the various textures of soft hair, smooth skin, shiny eyes, eyebrows and lips.
Find your drawing supplies and draw along with me as I take you step-by-step through the following two sections:
THE CONTOUR DRAWING: You create a contour drawing by using careful observation of spaces and lines within individual squares to measure for accurate proportions.
ADDING SHADING TO YOUR DRAWING: You add shading to the face with crosshatching graduations, and to the hair with hatching graduations. Close up illustrations show the work in progress with mostly light and medium values. Additional close-ups demonstrate how the completed shading in each section should look with a full range of values.
Skills presented include: shading facial forms with crosshatching graduations, drawing with detailed contour lines within a grid format, and illustrating the texture of hair with hatching graduations. Suggested supplies include 2H, HB, 2B, 4B and 6B pencils, vinyl and kneaded erasers, a pencil sharpener, a sandpaper block, and good quality drawing paper.
14 PAGES - 22 ILLUSTRATIONS This lesson is recommended for artists with good drawing skills, especially graduated hatching and
crosshatching techniques. The curriculum is easily implemented into instructional programs for home schooling, academic and recreational learning environments.
Published by Hoddinott Fine Art Publishers, Halifax, NS, Canada – 2001 (Revised 2007)
Copyright to al l art icles, images, text, projects, lessons and exercises within this drawing class belong to Brenda Hoddinott and may not be reproduced or used for any commercial purposes whatsoever without the wri t ten permission of Brenda Hoddinott .
E-mail bhoddinott@hoddinott .com Web si tes http:/ /www.f inearteducat ion.com and ht tp:/ /www.drawspace.com
2
TAKE NOTE… You need to press lightly on your pencil, because the grid lines will need to be erased later. Many of the drawings in this section have been darkened in Photoshop so you can better make out the details. In fact, the lines in my drawing are so faint that they are barely visible.
TIPS FOR WORKING WITH A GRID As you draw, don’t think about what the subject is. Focus on the shapes, and negative and positive spaces that define the actual lines. Try to think of each square as a separate drawing. 1. Focus on only one square at a time and pretend this one square is the total drawing. 2. Look at the line (or lines) themselves and their positions within the perimeter of this one square. 3. Note the shape of the spaces on either side of each line. 4. Observe whether the lines are straight, curved or angular. Take note of the directions in which
curved lines bend, and the length and angle of straight lines, in relation to the sides of this particular square.
5. Take note of the areas where curved lines meet straight lines.
THE CONTOUR DRAWING A grid is a fantastic tool to help artists identify the proper placement of the outlines of various parts of a drawing subject. A grid is a framework of vertical and horizontal squares on an image and/or drawing paper, used by artists to enlarge or reduce the size of the original image.
In this section, you create a contour drawing by using careful observation of spaces and lines within individual squares to measure for accurate proportions. Contour drawings (also called line drawings) are comprised of contour lines which follow the contours of the various components of a drawing subject and define the outlines of its forms. Contour lines are created when the shared edges of spaces and/or objects meet. Contour lines can define complete objects or small sections or details within drawing subjects. Proportion is the relationship in size of one component of a drawing to another or others. Form as applied to drawing, is the illusion of the three-dimensional structure of a shape, such as a circle, square or triangle, created in a drawing with shading and/or perspective.
1. Draw a rectangular drawing format 6 by 5.5 inches (or 12 by 11 inches if you want a larger drawing). Drawing format (also called drawing space) refers to the area of a drawing surface within a specific perimeter, outlined by a shape of any size, such as a square, rectangle or circle. My drawing format is 6 by 5.5 inches with .5 inch squares. With 1 inch squares, your final drawing will be 12 by 11 inches.
2. Divide your rectangle into 132 equal squares, 12 across by 11 down. If you prefer to draw freehand, simply ignore grid references.
3. Starting from the left, number the vertical squares along the top and bottom of the 6 inch (or 12 inch) sides with 1 through 12.
4. Starting from the top, letter the horizontal squares down both the 5.5 inch (or 11 inch) sides with A to K.
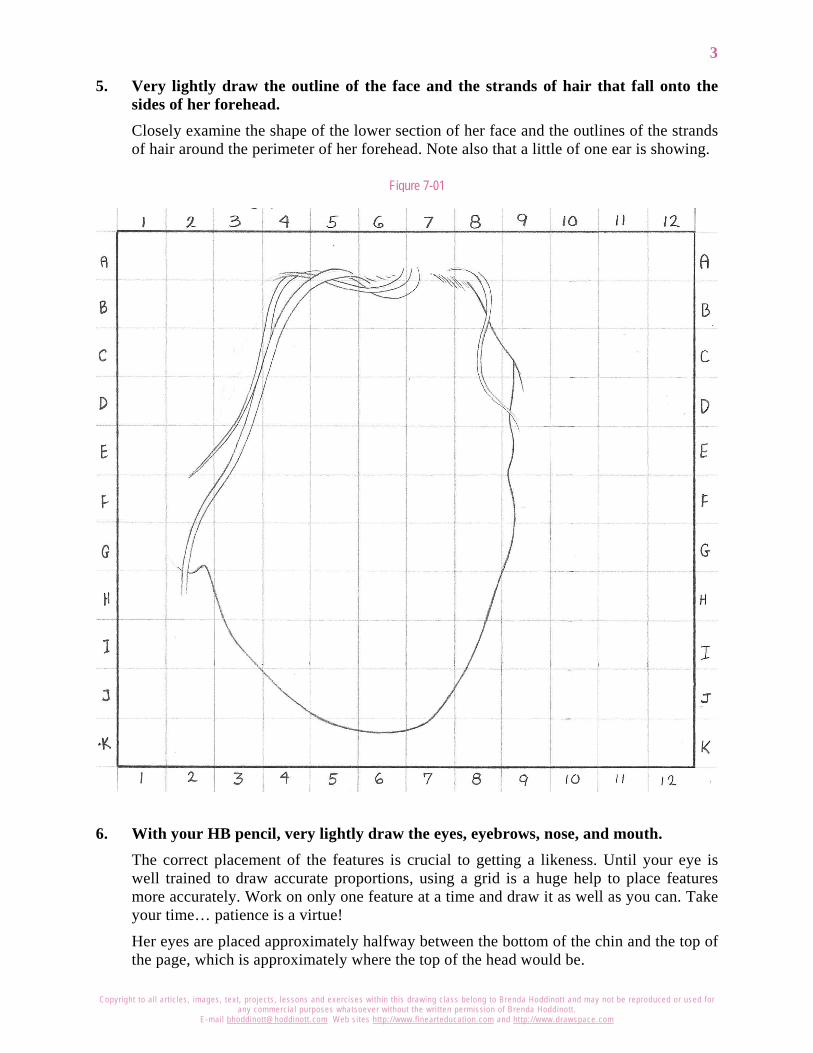
Copyright to al l art icles, images, text, projects, lessons and exercises within this drawing class belong to Brenda Hoddinott and may not be reproduced or used for any commercial purposes whatsoever without the wri t ten permission of Brenda Hoddinott .
E-mail bhoddinott@hoddinott .com Web si tes http:/ /www.f inearteducat ion.com and ht tp:/ /www.drawspace.com
3
Figure 7-01
5. Very lightly draw the outline of the face and the strands of hair that fall onto the sides of her forehead. Closely examine the shape of the lower section of her face and the outlines of the strands of hair around the perimeter of her forehead. Note also that a little of one ear is showing.
6. With your HB pencil, very lightly draw the eyes, eyebrows, nose, and mouth. The correct placement of the features is crucial to getting a likeness. Until your eye is well trained to draw accurate proportions, using a grid is a huge help to place features more accurately. Work on only one feature at a time and draw it as well as you can. Take your time… patience is a virtue!
Her eyes are placed approximately halfway between the bottom of the chin and the top of the page, which is approximately where the top of the head would be.
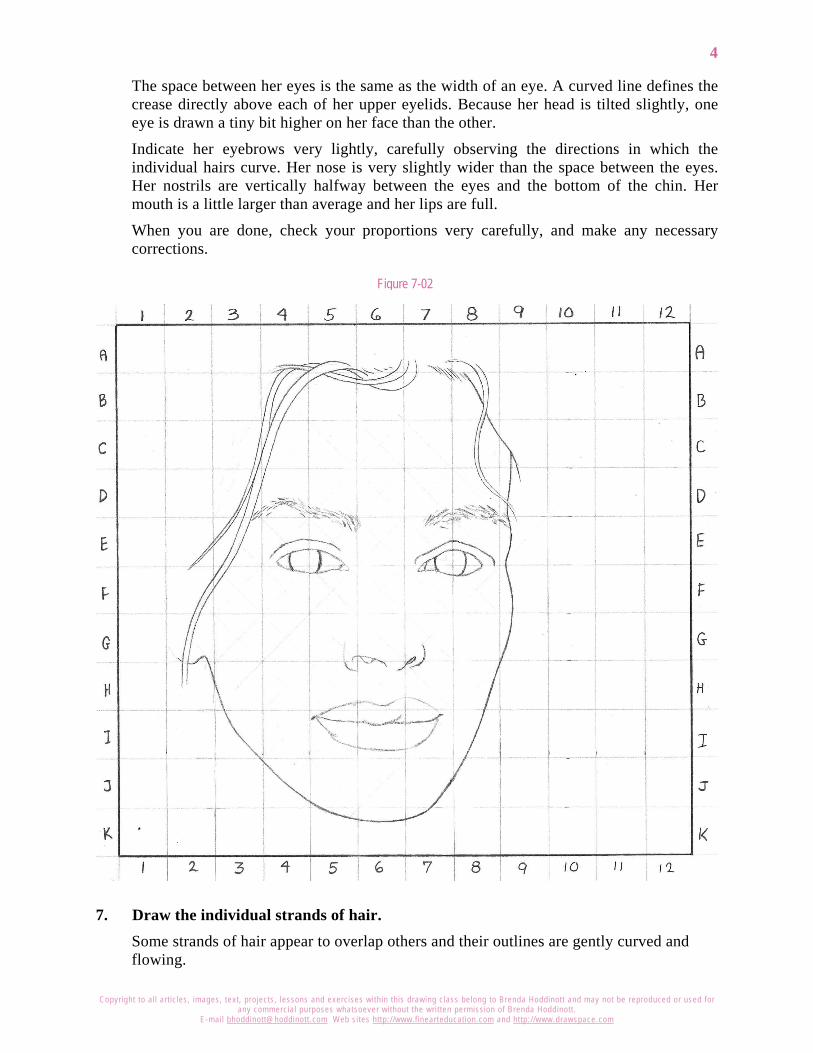
Copyright to al l art icles, images, text, projects, lessons and exercises within this drawing class belong to Brenda Hoddinott and may not be reproduced or used for any commercial purposes whatsoever without the wri t ten permission of Brenda Hoddinott .
E-mail bhoddinott@hoddinott .com Web si tes http:/ /www.f inearteducat ion.com and ht tp:/ /www.drawspace.com
4
Figure 7-02
The space between her eyes is the same as the width of an eye. A curved line defines the crease directly above each of her upper eyelids. Because her head is tilted slightly, one eye is drawn a tiny bit higher on her face than the other.
Indicate her eyebrows very lightly, carefully observing the directions in which the individual hairs curve. Her nose is very slightly wider than the space between the eyes. Her nostrils are vertically halfway between the eyes and the bottom of the chin. Her mouth is a little larger than average and her lips are full.
When you are done, check your proportions very carefully, and make any necessary corrections.
7. Draw the individual strands of hair. Some strands of hair appear to overlap others and their outlines are gently curved and flowing.
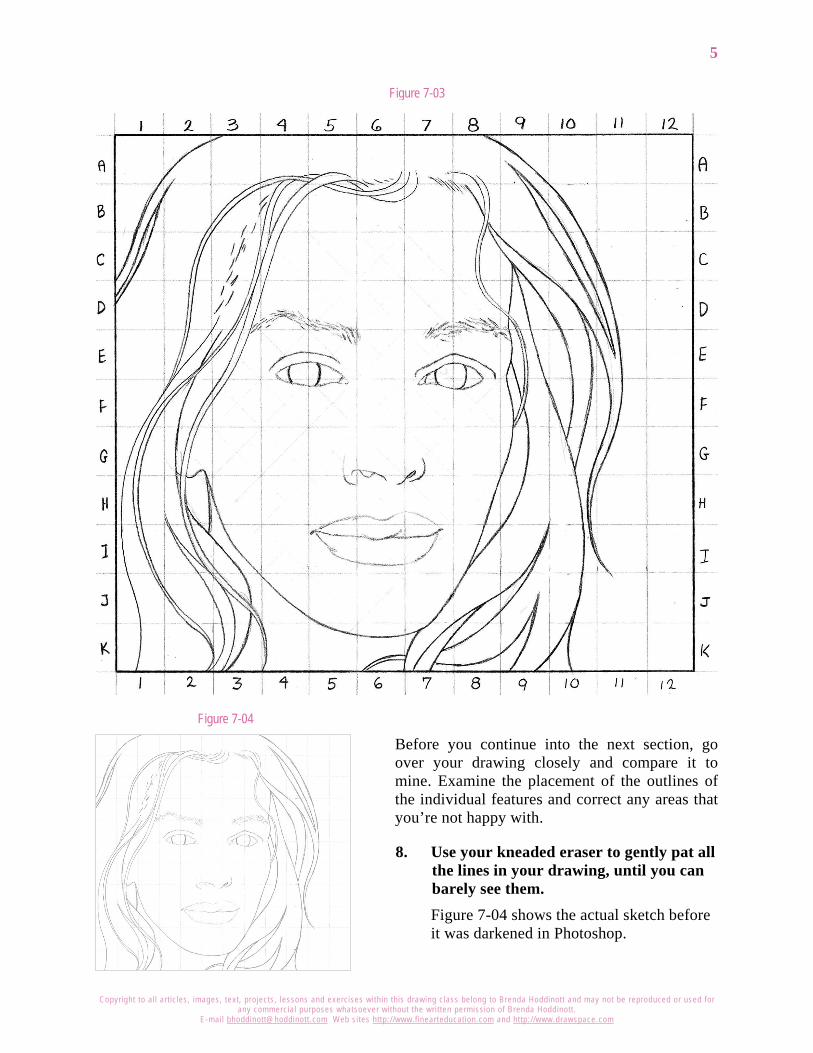
Copyright to al l art icles, images, text, projects, lessons and exercises within this drawing class belong to Brenda Hoddinott and may not be reproduced or used for any commercial purposes whatsoever without the wri t ten permission of Brenda Hoddinott .
E-mail bhoddinott@hoddinott .com Web si tes http:/ /www.f inearteducat ion.com and ht tp:/ /www.drawspace.com
5
Figure 7-04
Figure 7-03
Before you continue into the next section, go over your drawing closely and compare it to mine. Examine the placement of the outlines of the individual features and correct any areas that you’re not happy with.
8. Use your kneaded eraser to gently pat all the lines in your drawing, until you can barely see them. Figure 7-04 shows the actual sketch before it was darkened in Photoshop.
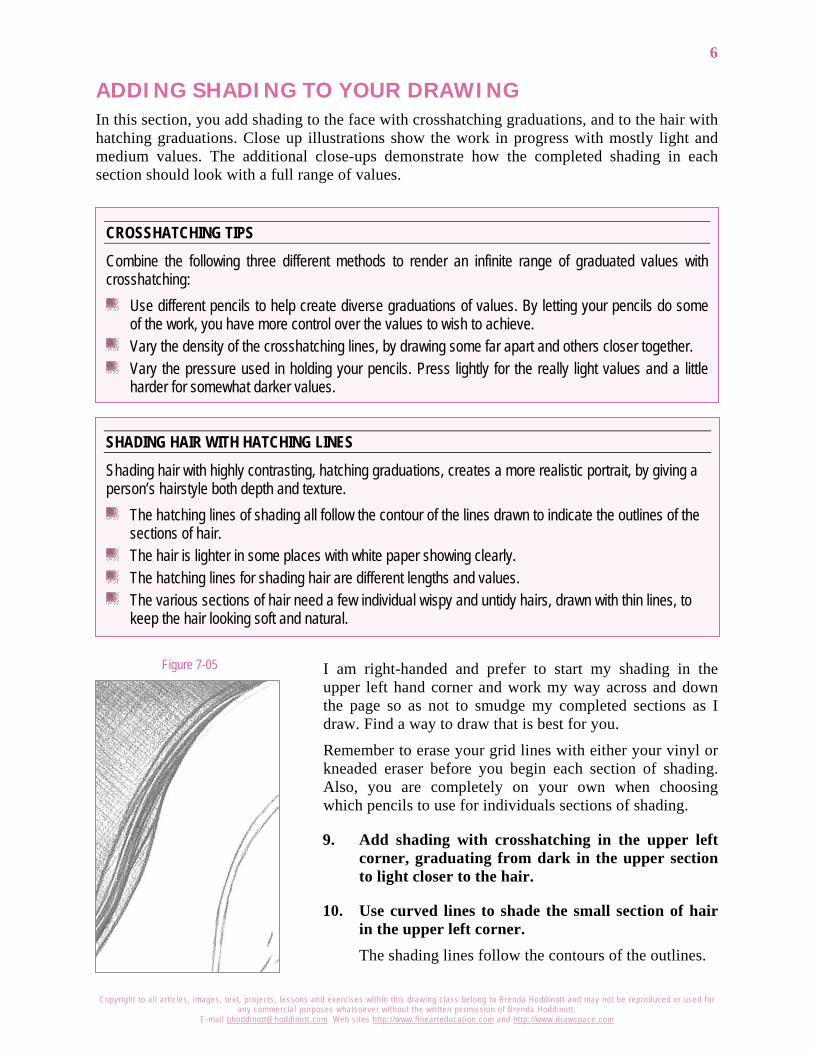
Copyright to al l art icles, images, text, projects, lessons and exercises within this drawing class belong to Brenda Hoddinott and may not be reproduced or used for any commercial purposes whatsoever without the wri t ten permission of Brenda Hoddinott .
E-mail bhoddinott@hoddinott .com Web si tes http:/ /www.f inearteducat ion.com and ht tp:/ /www.drawspace.com
6
CROSSHATCHING TIPS Combine the following three different methods to render an infinite range of graduated values with crosshatching:
Use different pencils to help create diverse graduations of values. By letting your pencils do some of the work, you have more control over the values to wish to achieve.
Vary the density of the crosshatching lines, by drawing some far apart and others closer together. Vary the pressure used in holding your pencils. Press lightly for the really light values and a little
harder for somewhat darker values.
Figure 7-05
SHADING HAIR WITH HATCHING LINES Shading hair with highly contrasting, hatching graduations, creates a more realistic portrait, by giving a person’s hairstyle both depth and texture.
The hatching lines of shading all follow the contour of the lines drawn to indicate the outlines of the sections of hair.
The hair is lighter in some places with white paper showing clearly. The hatching lines for shading hair are different lengths and values. The various sections of hair need a few individual wispy and untidy hairs, drawn with thin lines, to
keep the hair looking soft and natural.
ADDING SHADING TO YOUR DRAWING In this section, you add shading to the face with crosshatching graduations, and to the hair with hatching graduations. Close up illustrations show the work in progress with mostly light and medium values. The additional close-ups demonstrate how the completed shading in each section should look with a full range of values.
I am right-handed and prefer to start my shading in the upper left hand corner and work my way across and down the page so as not to smudge my completed sections as I draw. Find a way to draw that is best for you.
Remember to erase your grid lines with either your vinyl or kneaded eraser before you begin each section of shading. Also, you are completely on your own when choosing which pencils to use for individuals sections of shading.
9. Add shading with crosshatching in the upper left corner, graduating from dark in the upper section to light closer to the hair.
10. Use curved lines to shade the small section of hair in the upper left corner. The shading lines follow the contours of the outlines.
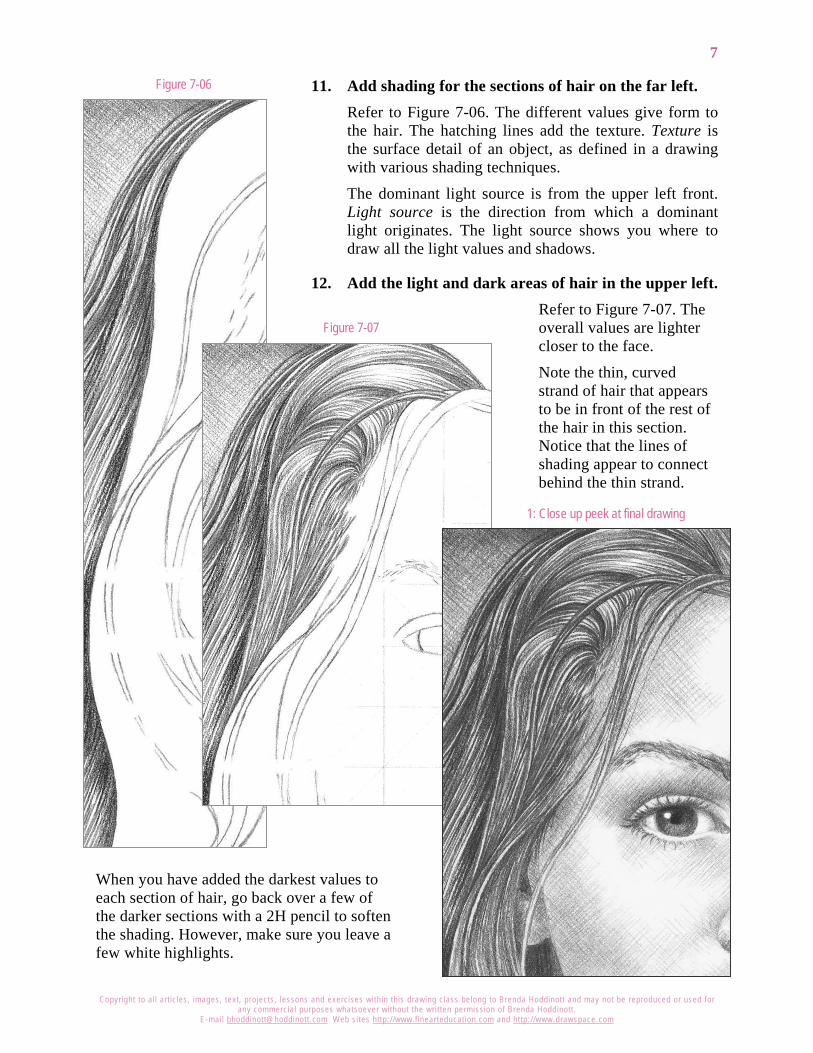
Copyright to al l art icles, images, text, projects, lessons and exercises within this drawing class belong to Brenda Hoddinott and may not be reproduced or used for any commercial purposes whatsoever without the wri t ten permission of Brenda Hoddinott .
E-mail bhoddinott@hoddinott .com Web si tes http:/ /www.f inearteducat ion.com and ht tp:/ /www.drawspace.com
7
Figure 7-06
Figure 7-07
1: Close up peek at final drawing
11. Add shading for the sections of hair on the far left. Refer to Figure 7-06. The different values give form to the hair. The hatching lines add the texture. Texture is the surface detail of an object, as defined in a drawing with various shading techniques.
The dominant light source is from the upper left front. Light source is the direction from which a dominant light originates. The light source shows you where to draw all the light values and shadows.
12. Add the light and dark areas of hair in the upper left. Refer to Figure 7-07. The overall values are lighter closer to the face.
Note the thin, curved strand of hair that appears to be in front of the rest of the hair in this section. Notice that the lines of shading appear to connect behind the thin strand.
When you have added the darkest values to each section of hair, go back over a few of the darker sections with a 2H pencil to soften the shading. However, make sure you leave a few white highlights.
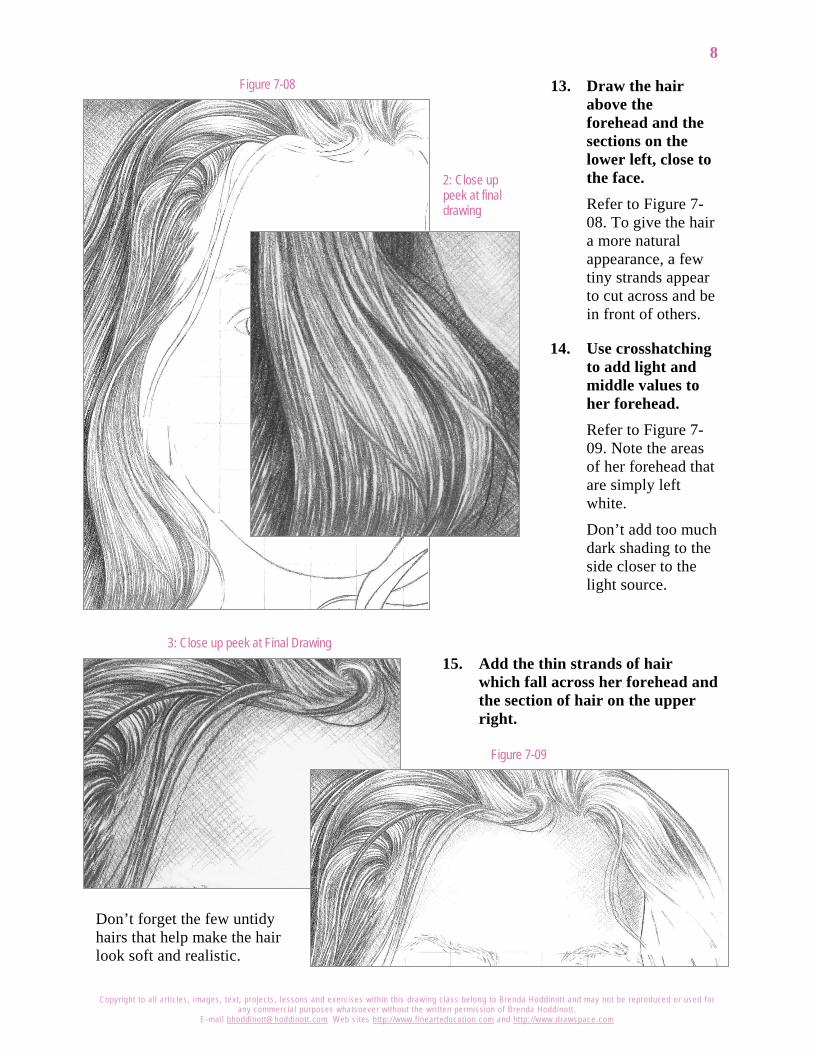
Copyright to al l art icles, images, text, projects, lessons and exercises within this drawing class belong to Brenda Hoddinott and may not be reproduced or used for any commercial purposes whatsoever without the wri t ten permission of Brenda Hoddinott .
E-mail bhoddinott@hoddinott .com Web si tes http:/ /www.f inearteducat ion.com and ht tp:/ /www.drawspace.com
8
Figure 7-08
Figure 7-09
2: Close up peek at final drawing
3: Close up peek at Final Drawing
2: Close up peek at final drawing
13. Draw the hair above the forehead and the sections on the lower left, close to the face. Refer to Figure 7-08. To give the hair a more natural appearance, a few tiny strands appear to cut across and be in front of others.
14. Use crosshatching to add light and middle values to her forehead. Refer to Figure 7-09. Note the areas of her forehead that are simply left white.
Don’t add too much dark shading to the side closer to the light source.
15. Add the thin strands of hair which fall across her forehead and the section of hair on the upper right.
Don’t forget the few untidy hairs that help make the hair look soft and realistic.
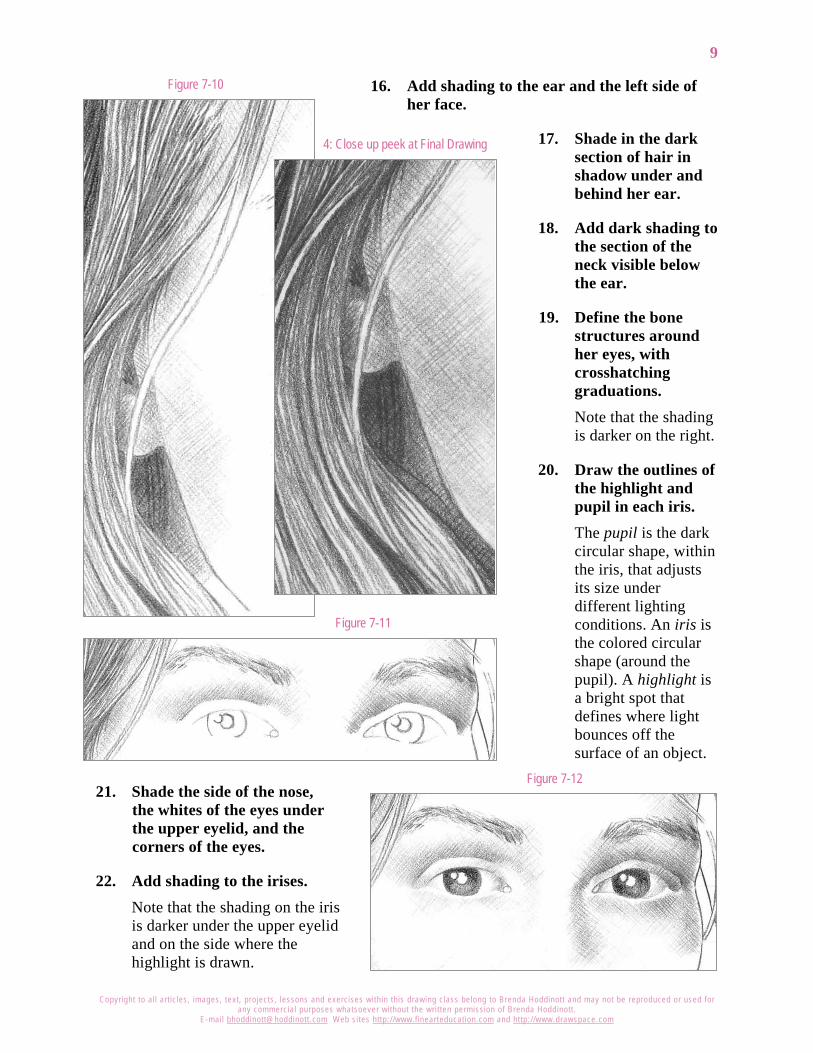
Copyright to al l art icles, images, text, projects, lessons and exercises within this drawing class belong to Brenda Hoddinott and may not be reproduced or used for any commercial purposes whatsoever without the wri t ten permission of Brenda Hoddinott .
E-mail bhoddinott@hoddinott .com Web si tes http:/ /www.f inearteducat ion.com and ht tp:/ /www.drawspace.com
9
Figure 7-10
4: Close up peek at Final Drawing
Figure 7-11
Figure 7-12
16. Add shading to the ear and the left side of her face.
17. Shade in the dark section of hair in shadow under and behind her ear.
18. Add dark shading to the section of the neck visible below the ear.
19. Define the bone structures around her eyes, with crosshatching graduations. Note that the shading is darker on the right.
20. Draw the outlines of the highlight and pupil in each iris. The pupil is the dark circular shape, within the iris, that adjusts its size under different lighting conditions. An iris is the colored circular shape (around the pupil). A highlight is a bright spot that defines where light bounces off the surface of an object.
21. Shade the side of the nose, the whites of the eyes under the upper eyelid, and the corners of the eyes.
22. Add shading to the irises. Note that the shading on the iris is darker under the upper eyelid and on the side where the highlight is drawn.
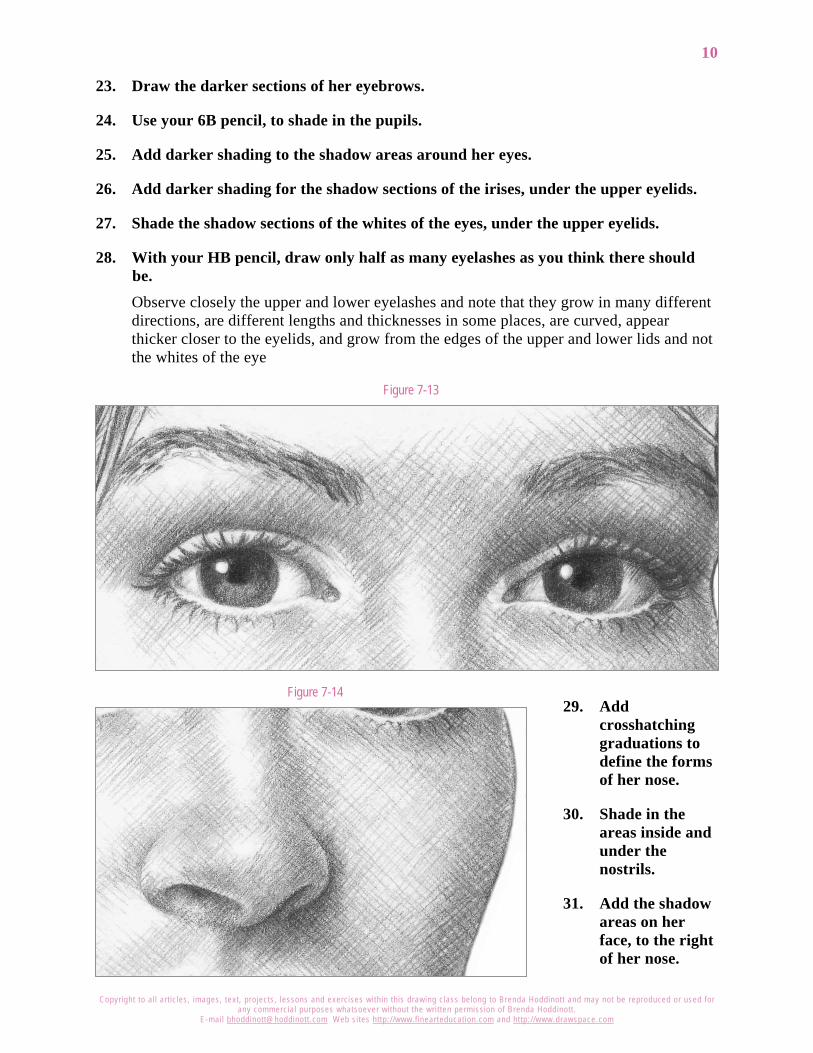
Copyright to al l art icles, images, text, projects, lessons and exercises within this drawing class belong to Brenda Hoddinott and may not be reproduced or used for any commercial purposes whatsoever without the wri t ten permission of Brenda Hoddinott .
E-mail bhoddinott@hoddinott .com Web si tes http:/ /www.f inearteducat ion.com and ht tp:/ /www.drawspace.com
10
Figure 7-13
Figure 7-14
23. Draw the darker sections of her eyebrows.
24. Use your 6B pencil, to shade in the pupils.
25. Add darker shading to the shadow areas around her eyes.
26. Add darker shading for the shadow sections of the irises, under the upper eyelids.
27. Shade the shadow sections of the whites of the eyes, under the upper eyelids.
28. With your HB pencil, draw only half as many eyelashes as you think there should be. Observe closely the upper and lower eyelashes and note that they grow in many different directions, are different lengths and thicknesses in some places, are curved, appear thicker closer to the eyelids, and grow from the edges of the upper and lower lids and not the whites of the eye
29. Add crosshatching graduations to define the forms of her nose.
30. Shade in the areas inside and under the nostrils.
31. Add the shadow areas on her face, to the right of her nose.
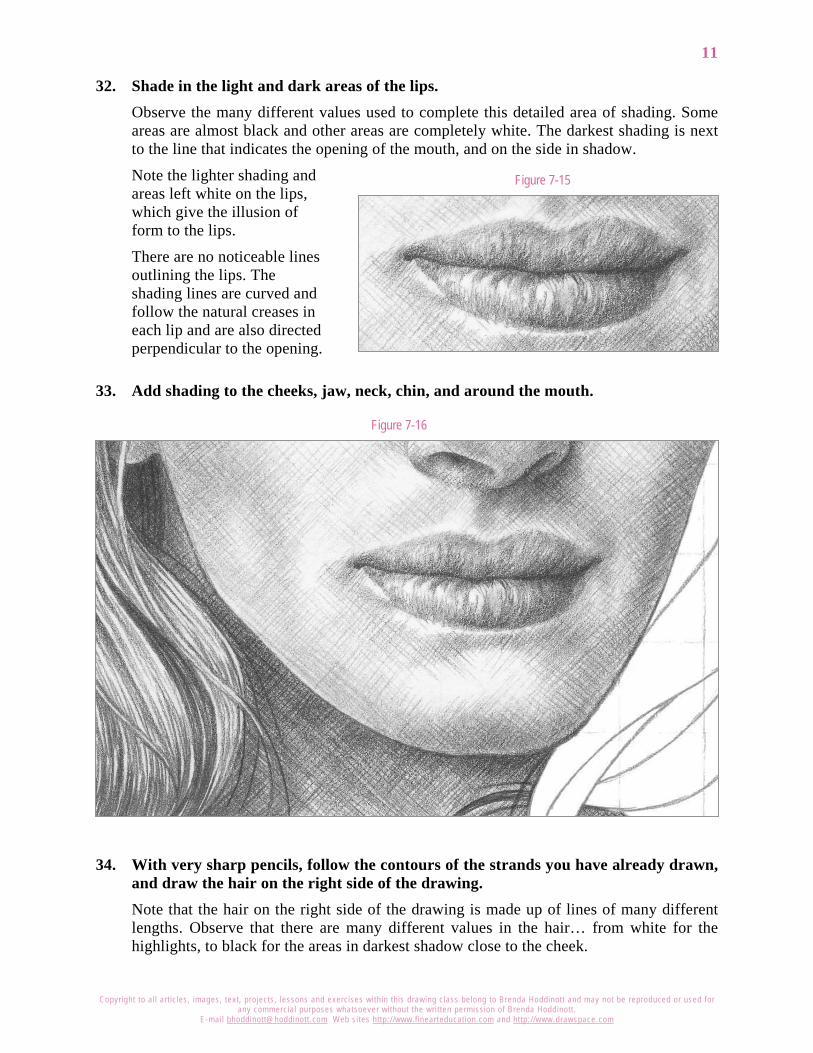
Copyright to al l art icles, images, text, projects, lessons and exercises within this drawing class belong to Brenda Hoddinott and may not be reproduced or used for any commercial purposes whatsoever without the wri t ten permission of Brenda Hoddinott .
E-mail bhoddinott@hoddinott .com Web si tes http:/ /www.f inearteducat ion.com and ht tp:/ /www.drawspace.com
11
Figure 7-15
Figure 7-16
32. Shade in the light and dark areas of the lips. Observe the many different values used to complete this detailed area of shading. Some areas are almost black and other areas are completely white. The darkest shading is next to the line that indicates the opening of the mouth, and on the side in shadow.
Note the lighter shading and areas left white on the lips, which give the illusion of form to the lips.
There are no noticeable lines outlining the lips. The shading lines are curved and follow the natural creases in each lip and are also directed perpendicular to the opening.
33. Add shading to the cheeks, jaw, neck, chin, and around the mouth.
34. With very sharp pencils, follow the contours of the strands you have already drawn, and draw the hair on the right side of the drawing. Note that the hair on the right side of the drawing is made up of lines of many different lengths. Observe that there are many different values in the hair… from white for the highlights, to black for the areas in darkest shadow close to the cheek.
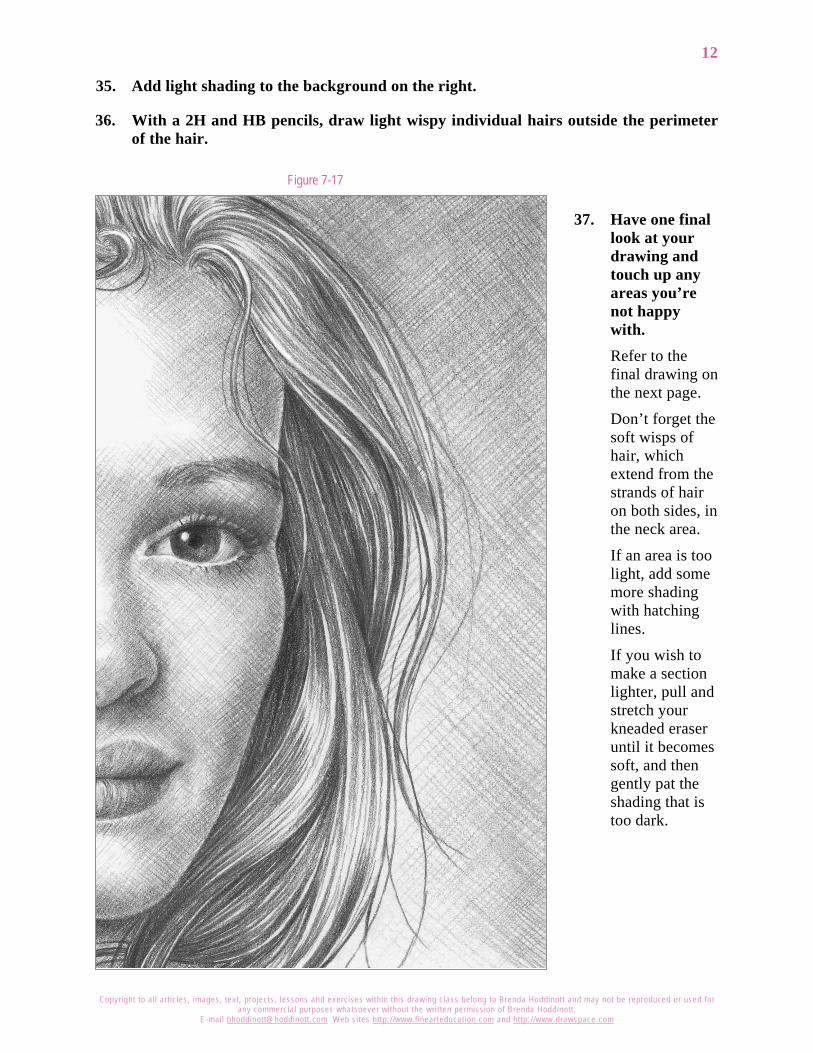
Copyright to al l art icles, images, text, projects, lessons and exercises within this drawing class belong to Brenda Hoddinott and may not be reproduced or used for any commercial purposes whatsoever without the wri t ten permission of Brenda Hoddinott .
E-mail bhoddinott@hoddinott .com Web si tes http:/ /www.f inearteducat ion.com and ht tp:/ /www.drawspace.com
12
Figure 7-17
35. Add light shading to the background on the right.
36. With a 2H and HB pencils, draw light wispy individual hairs outside the perimeter of the hair.
37. Have one final look at your drawing and touch up any areas you’re not happy with. Refer to the final drawing on the next page.
Don’t forget the soft wisps of hair, which extend from the strands of hair on both sides, in the neck area.
If an area is too light, add some more shading with hatching lines.
If you wish to make a section lighter, pull and stretch your kneaded eraser until it becomes soft, and then gently pat the shading that is too dark.
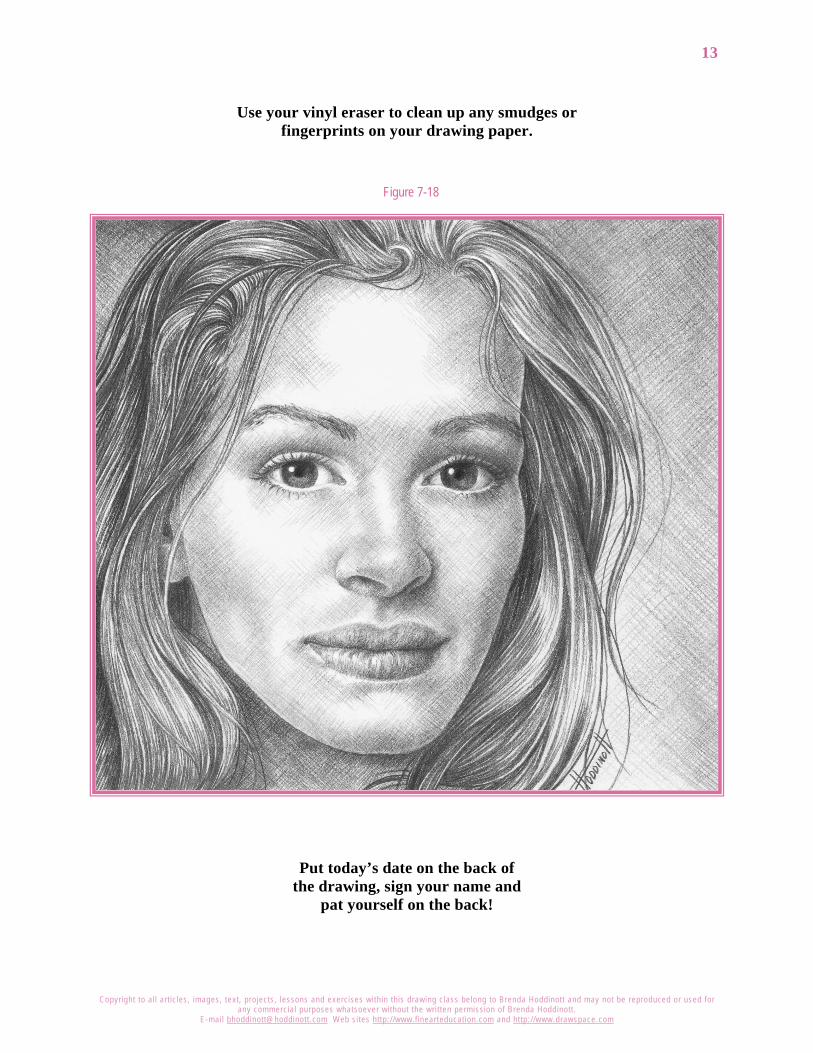
Copyright to al l art icles, images, text, projects, lessons and exercises within this drawing class belong to Brenda Hoddinott and may not be reproduced or used for any commercial purposes whatsoever without the wri t ten permission of Brenda Hoddinott .
E-mail bhoddinott@hoddinott .com Web si tes http:/ /www.f inearteducat ion.com and ht tp:/ /www.drawspace.com
13
Figure 7-18
Use your vinyl eraser to clean up any smudges or
fingerprints on your drawing paper.
Put today’s date on the back of the drawing, sign your name and
pat yourself on the back!
Copyright to al l art icles, images, text, projects, lessons and exercises within this drawing class belong to Brenda Hoddinott and may not be reproduced or used for any commercial purposes whatsoever without the wri t ten permission of Brenda Hoddinott .
E-mail bhoddinott@hoddinott .com Web si tes http:/ /www.f inearteducat ion.com and ht tp:/ /www.drawspace.com
14
Brenda Hoddinott As a self-educated teacher, visual artist, portraitist, forensic artist, and illustrator, Brenda utilizes diverse art media including graphite, technical pen, colored pencil, chalk pastel, charcoal, conté crayon, and oil paints.
My philosophy on teaching art is to focus primarily on the enjoyment aspects while gently introducing the technical and academic. Hence, in creating a passion for the subject matter,
the quest for knowledge also becomes enjoyable. Brenda Hoddinott
Biography Born in St. John’s, Newfoundland, Brenda grew up in the small town of Corner Brook. She developed strong technical competencies with a personal commitment to self directed learning, and the aid of assorted “Learn to Draw” books. During Brenda’s twenty-five year career as a self-educated civilian forensic artist, numerous criminal investigation departments have employed Brenda’s skills, including Royal Canadian Mounted Police and municipal police departments. In 1992, Brenda was honored with a commendation from the Royal Canadian Mounted Police, and in 1994, she was awarded a Certificate of Membership from “Forensic Artists International”.
Her home-based art career included graphic design, and teaching recreational drawing and painting classes. As supervisor of her community’s recreational art department, Brenda hired and trained teachers, and designed curriculum for several children’s art programs. In 1998, Brenda chose to end her eighteen-year career as an art educator in order to devote more time to writing, drawing, painting, and developing her websites.
Drawspace http://www.drawspace.com incorporates her unique style and innovative approach to curriculum development. This site offers downloadable and printable drawing classes for students of all abilities from the age of eight through adult. Students of all ages, levels and abilities have praised the simple step-by-step instructional approach. This site is respected as a resource for fine art educators, home schooling programs, and educational facilities throughout the world.
Learn-to-draw books Drawing for Dummies: Wiley Publishing, Inc., New, York, NY, this 336 page book is available on various websites and in major bookstores internationally.
The Complete Idiot’s Guide to Drawing People: Winner of the Alpha-Penguin Book of the Year Award 2004, Alpha - Pearson Education – Macmillan, Indianapolis, IN, this 360 page book is available on various websites and in major bookstores internationally.
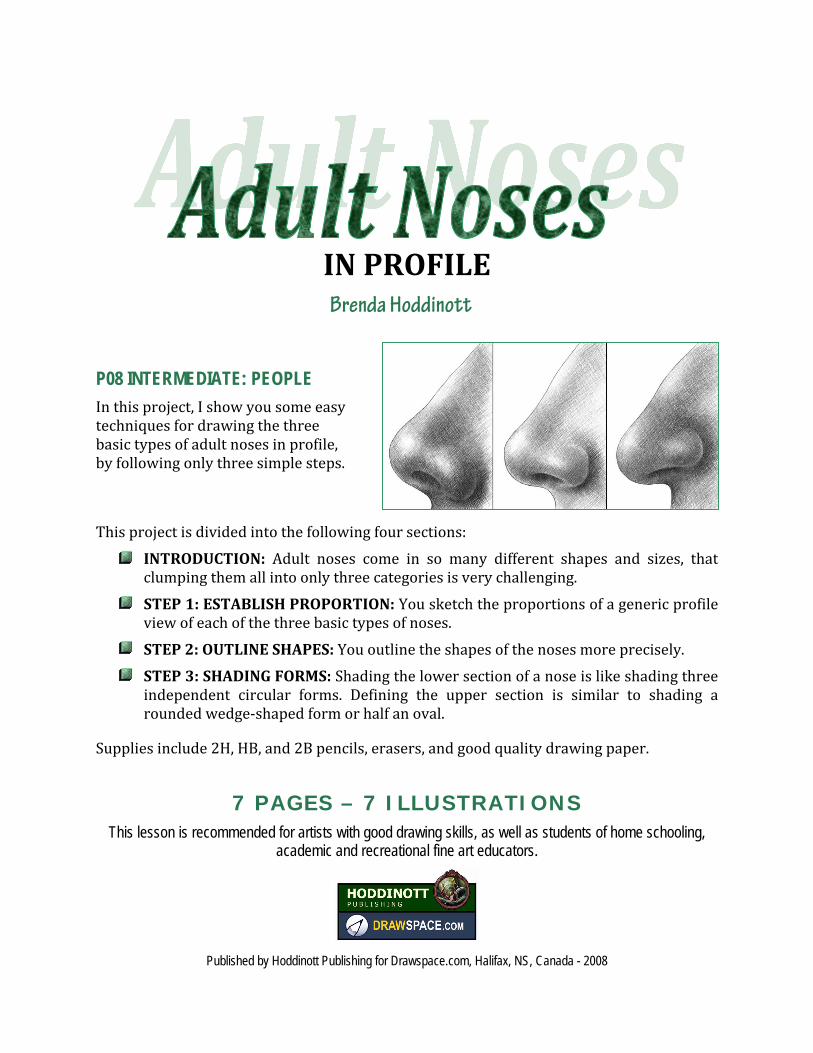
IN PROFILE Brenda Hoddinott
P08 INTERMEDIATE: PEOPLE In this project, I show you some easy techniques for drawing the three basic types of adult noses in profile, by following only three simple steps.
This project is divided into the following four sections:
INTRODUCTION: Adult noses come in so many different shapes and sizes, that clumping them all into only three categories is very challenging.
STEP 1: ESTABLISH PROPORTION: You sketch the proportions of a generic profile view of each of the three basic types of noses.
STEP 2: OUTLINE SHAPES: You outline the shapes of the noses more precisely.
STEP 3: SHADING FORMS: Shading the lower section of a nose is like shading three independent circular forms. Defining the upper section is similar to shading a rounded wedge-shaped form or half an oval.
Supplies include 2H, HB, and 2B pencils, erasers, and good quality drawing paper.
7 PAGES – 7 ILLUSTRATIONS This lesson is recommended for artists with good drawing skills, as well as students of home schooling,
academic and recreational fine art educators.
Published by Hoddinott Publishing for Drawspace.com, Halifax, NS, Canada - 2008

Copyright to all articles, images, text, projects, lessons and exercises within this document belong to Brenda Hoddinott and may not be reproduced or used for any commercial purposes whatsoever without the written permission of Brenda Hoddinott. E-mail [email protected] Web site http://www.drawspace.com
2
Figure 801
Figure 802
Shape refers to the outward outline of a form. Basic shapes include circles, squares and triangles. Forms are created in drawings by adding shading to transform a shape into three-dimensional structures, such as a circle becoming a sphere. Proportion is the relationship in size of one component of a drawing to another or others.
INTRODUCTION Adult noses come in so many different shapes and sizes, that clumping them all into only three categories is very challenging.
Before you draw a nose, you should become familiar with its different parts (See Figure 801). Find a mirror, examine your own nose, and identify each of the following:
1. Bridge (sometimes called the nasal bone) is the section of the nose where the upper bony section joins the cartilage. While barely visible on young children, the bridge on an adult nose often protrudes as a noticeable bulge or bump. The contoured shape of the bridge is most obvious when the nose is viewed in profile.
2. Ball (also called the tip) refers to the largest, central rounded form on the lower half of the nose. The ball is not necessarily spherical. It can also appear oval-shaped, triangular, or even rectangular (with rounded edges of course).
3. Wings are two soft, rounded (often triangular shaped) forms extending from the sides of the ball of the nose.
4. Nostrils are the openings on the lower section of each side of a nose.
5. Base of a nose (also called a septum) is in between the nostrils and connects with the lower face above the upper lip.
All adult noses fall somewhere into one of the following three types (Figure 802):
Upturned noses angle upward and the ball is higher than the wings.
The ball and nostrils of straight noses line up horizontally with the wings.
On down-turned noses the ball is lower than the wings creating a downward angle.
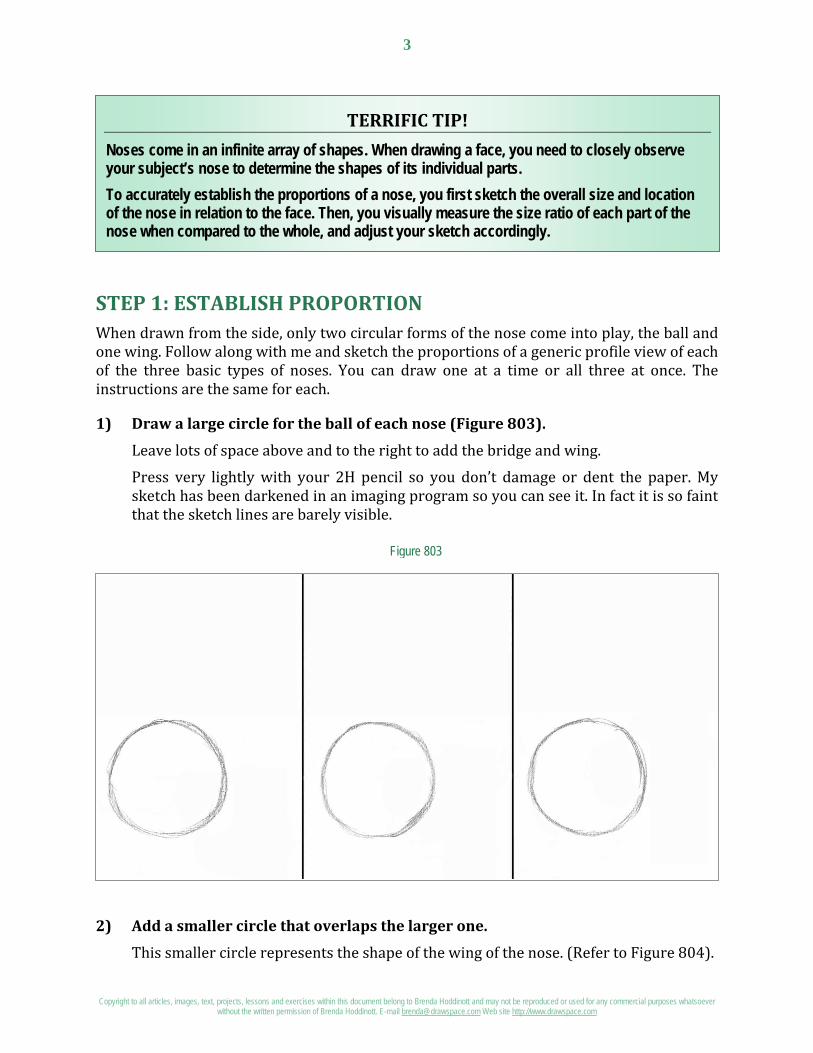
Copyright to all articles, images, text, projects, lessons and exercises within this document belong to Brenda Hoddinott and may not be reproduced or used for any commercial purposes whatsoever without the written permission of Brenda Hoddinott. E-mail [email protected] Web site http://www.drawspace.com
3
Figure 803
TERRIFIC TIP! Noses come in an infinite array of shapes. When drawing a face, you need to closely observe your subject’s nose to determine the shapes of its individual parts. To accurately establish the proportions of a nose, you first sketch the overall size and location of the nose in relation to the face. Then, you visually measure the size ratio of each part of the nose when compared to the whole, and adjust your sketch accordingly.
STEP 1: ESTABLISH PROPORTION When drawn from the side, only two circular forms of the nose come into play, the ball and one wing. Follow along with me and sketch the proportions of a generic profile view of each of the three basic types of noses. You can draw one at a time or all three at once. The instructions are the same for each.
1) Draw a large circle for the ball of each nose (Figure 803).
Leave lots of space above and to the right to add the bridge and wing.
Press very lightly with your 2H pencil so you don’t damage or dent the paper. My sketch has been darkened in an imaging program so you can see it. In fact it is so faint that the sketch lines are barely visible.
2) Add a smaller circle that overlaps the larger one.
This smaller circle represents the shape of the wing of the nose. (Refer to Figure 804).
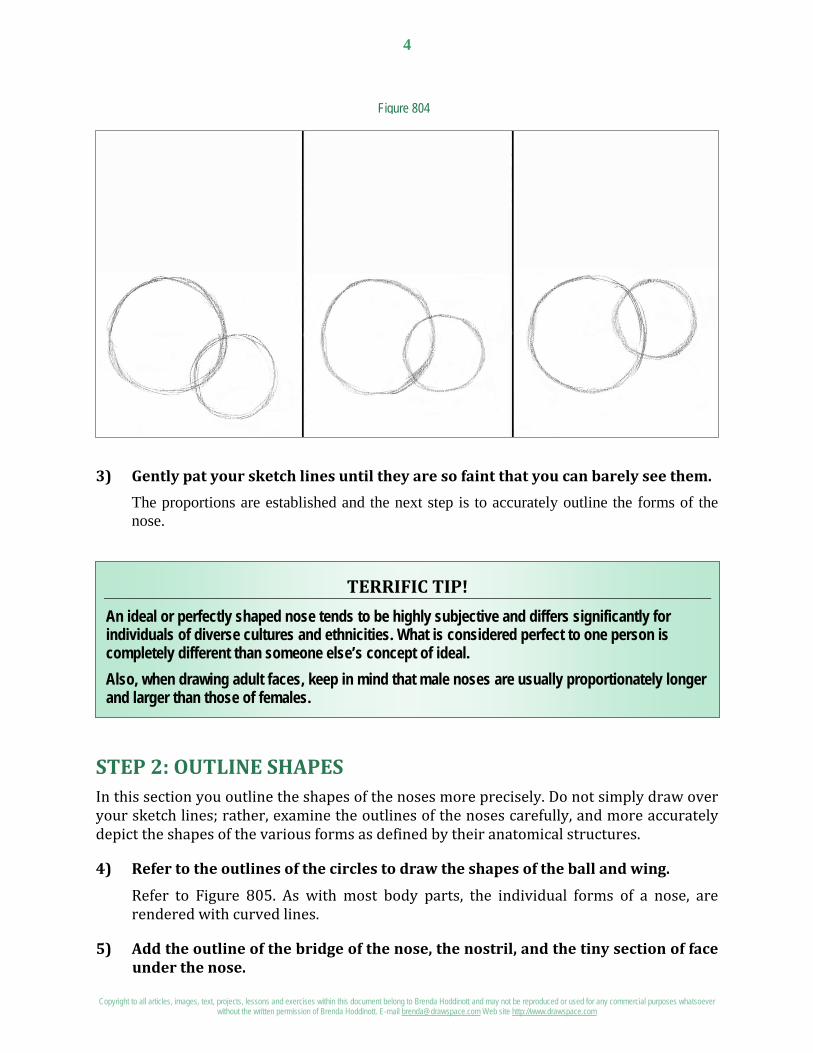
Copyright to all articles, images, text, projects, lessons and exercises within this document belong to Brenda Hoddinott and may not be reproduced or used for any commercial purposes whatsoever without the written permission of Brenda Hoddinott. E-mail [email protected] Web site http://www.drawspace.com
4
Figure 804
TERRIFIC TIP! An ideal or perfectly shaped nose tends to be highly subjective and differs significantly for individuals of diverse cultures and ethnicities. What is considered perfect to one person is completely different than someone else’s concept of ideal. Also, when drawing adult faces, keep in mind that male noses are usually proportionately longer and larger than those of females.
3) Gently pat your sketch lines until they are so faint that you can barely see them. The proportions are established and the next step is to accurately outline the forms of the nose.
STEP 2: OUTLINE SHAPES In this section you outline the shapes of the noses more precisely. Do not simply draw over your sketch lines; rather, examine the outlines of the noses carefully, and more accurately depict the shapes of the various forms as defined by their anatomical structures.
4) Refer to the outlines of the circles to draw the shapes of the ball and wing.
Refer to Figure 805. As with most body parts, the individual forms of a nose, are rendered with curved lines.
5) Add the outline of the bridge of the nose, the nostril, and the tiny section of face under the nose.
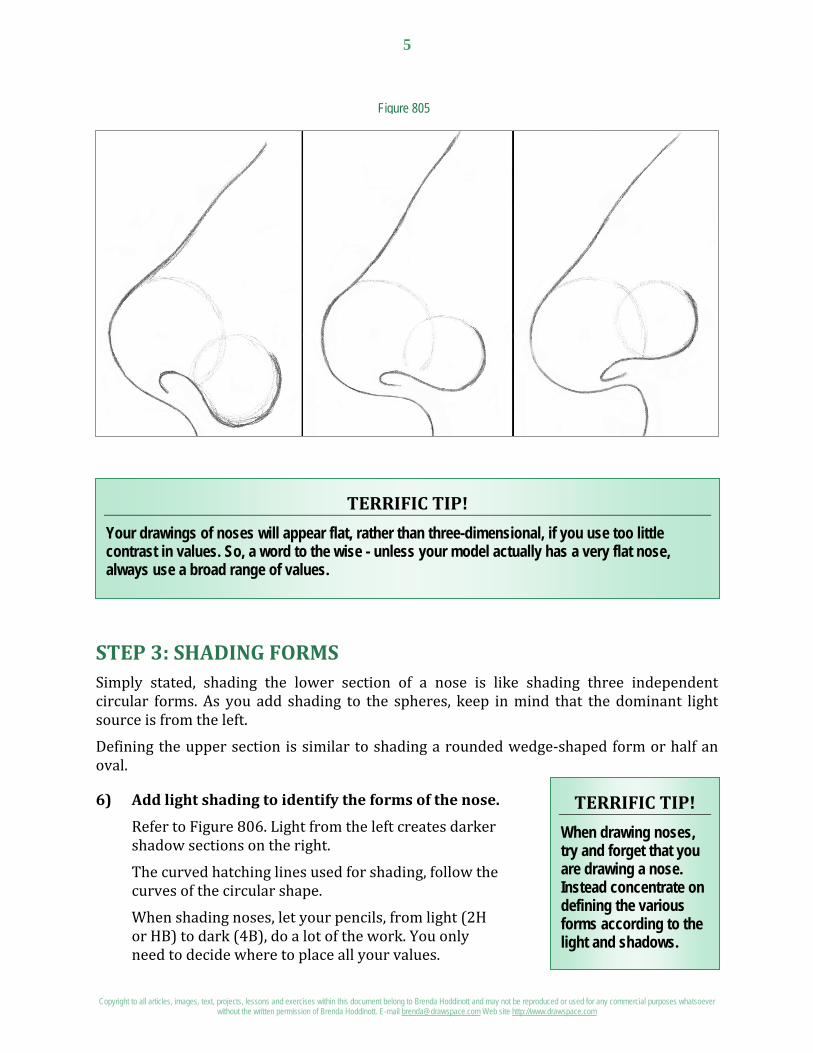
Copyright to all articles, images, text, projects, lessons and exercises within this document belong to Brenda Hoddinott and may not be reproduced or used for any commercial purposes whatsoever without the written permission of Brenda Hoddinott. E-mail [email protected] Web site http://www.drawspace.com
5
Figure 805
TERRIFIC TIP! Your drawings of noses will appear flat, rather than three-dimensional, if you use too little contrast in values. So, a word to the wise - unless your model actually has a very flat nose, always use a broad range of values.
TERRIFIC TIP! When drawing noses, try and forget that you are drawing a nose. Instead concentrate on defining the various forms according to the light and shadows.
STEP 3: SHADING FORMS Simply stated, shading the lower section of a nose is like shading three independent circular forms. As you add shading to the spheres, keep in mind that the dominant light source is from the left.
Defining the upper section is similar to shading a rounded wedge-shaped form or half an oval.
6) Add light shading to identify the forms of the nose.
Refer to Figure 806. Light from the left creates darker shadow sections on the right.
The curved hatching lines used for shading, follow the curves of the circular shape.
When shading noses, let your pencils, from light (2H or HB) to dark (4B), do a lot of the work. You only need to decide where to place all your values.
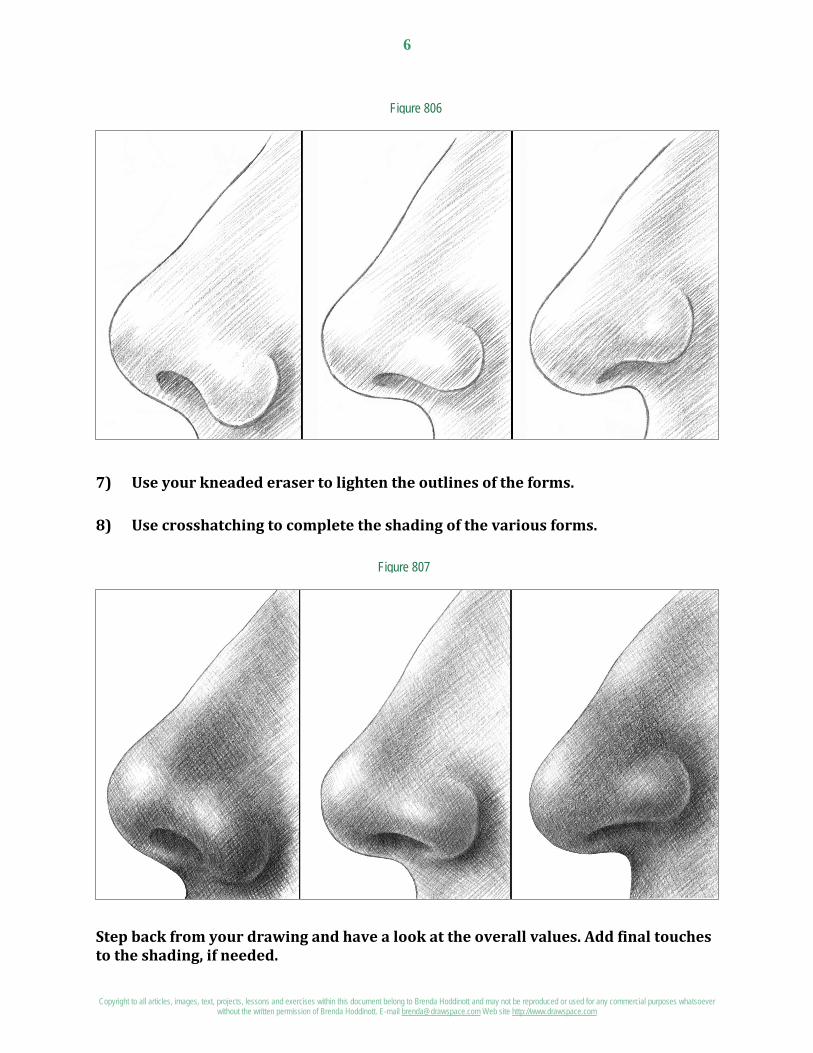
Copyright to all articles, images, text, projects, lessons and exercises within this document belong to Brenda Hoddinott and may not be reproduced or used for any commercial purposes whatsoever without the written permission of Brenda Hoddinott. E-mail [email protected] Web site http://www.drawspace.com
6
Figure 806
Figure 807
7) Use your kneaded eraser to lighten the outlines of the forms.
8) Use crosshatching to complete the shading of the various forms.
Step back from your drawing and have a look at the overall values. Add final touches to the shading, if needed.
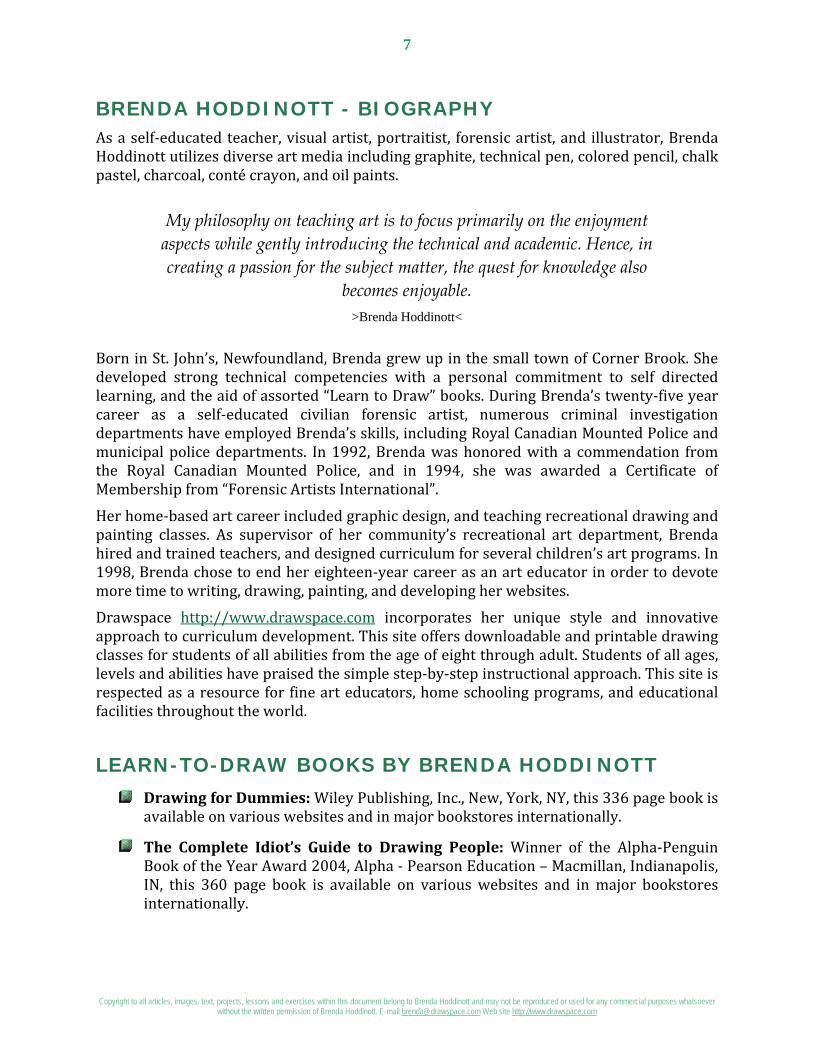
Copyright to all articles, images, text, projects, lessons and exercises within this document belong to Brenda Hoddinott and may not be reproduced or used for any commercial purposes whatsoever without the written permission of Brenda Hoddinott. E-mail [email protected] Web site http://www.drawspace.com
7
BRENDA HODDINOTT - BIOGRAPHY As a self-educated teacher, visual artist, portraitist, forensic artist, and illustrator, Brenda Hoddinott utilizes diverse art media including graphite, technical pen, colored pencil, chalk pastel, charcoal, conté crayon, and oil paints.
My philosophy on teaching art is to focus primarily on the enjoyment aspects while gently introducing the technical and academic. Hence, in creating a passion for the subject matter, the quest for knowledge also
becomes enjoyable. >Brenda Hoddinott<
Born in St. John’s, Newfoundland, Brenda grew up in the small town of Corner Brook. She developed strong technical competencies with a personal commitment to self directed learning, and the aid of assorted “Learn to Draw” books. During Brenda’s twenty-five year career as a self-educated civilian forensic artist, numerous criminal investigation departments have employed Brenda’s skills, including Royal Canadian Mounted Police and municipal police departments. In 1992, Brenda was honored with a commendation from the Royal Canadian Mounted Police, and in 1994, she was awarded a Certificate of Membership from “Forensic Artists International”.
Her home-based art career included graphic design, and teaching recreational drawing and painting classes. As supervisor of her community’s recreational art department, Brenda hired and trained teachers, and designed curriculum for several children’s art programs. In 1998, Brenda chose to end her eighteen-year career as an art educator in order to devote more time to writing, drawing, painting, and developing her websites.
Drawspace http://www.drawspace.com incorporates her unique style and innovative approach to curriculum development. This site offers downloadable and printable drawing classes for students of all abilities from the age of eight through adult. Students of all ages, levels and abilities have praised the simple step-by-step instructional approach. This site is respected as a resource for fine art educators, home schooling programs, and educational facilities throughout the world.
LEARN-TO-DRAW BOOKS BY BRENDA HODDINOTT Drawing for Dummies: Wiley Publishing, Inc., New, York, NY, this 336 page book is
available on various websites and in major bookstores internationally.
The Complete Idiot’s Guide to Drawing People: Winner of the Alpha-Penguin Book of the Year Award 2004, Alpha - Pearson Education – Macmillan, Indianapolis, IN, this 360 page book is available on various websites and in major bookstores internationally.
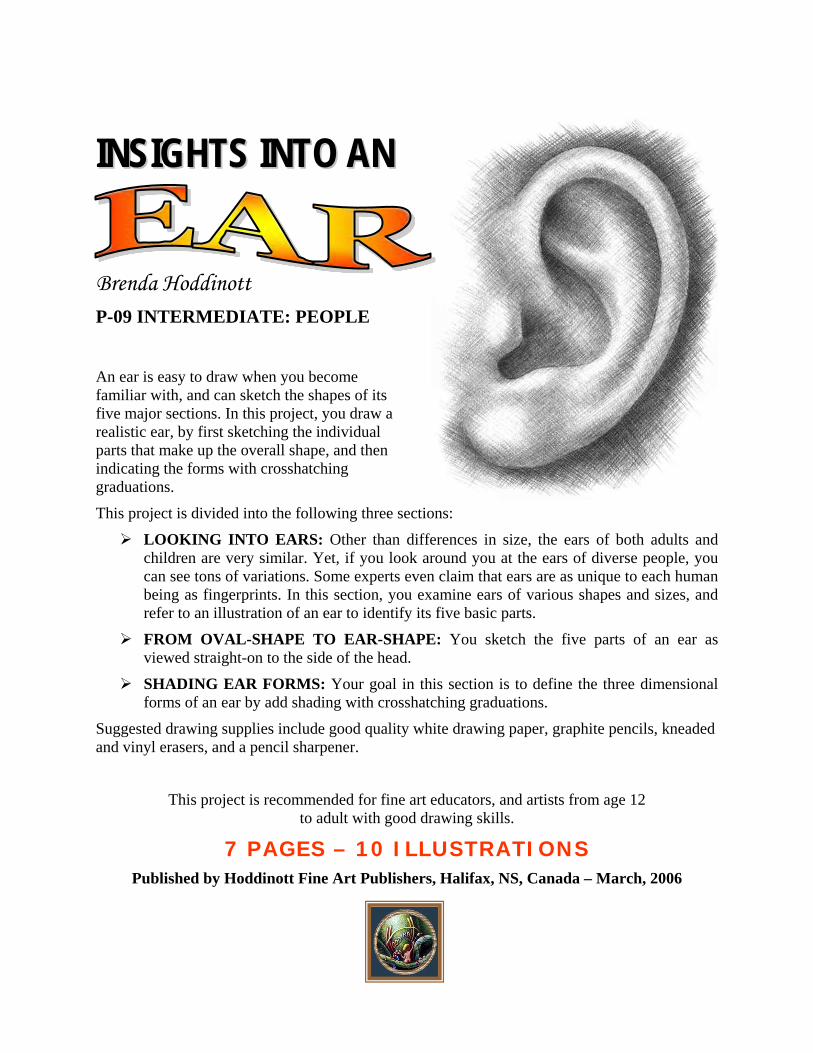
IINNSSIIGGHHTTSS IINNTTOO AANN
Brenda Hoddinott P-09 INTERMEDIATE: PEOPLE
An ear is easy to draw when you become familiar with, and can sketch the shapes of its five major sections. In this project, you draw a realistic ear, by first sketching the individual parts that make up the overall shape, and then indicating the forms with crosshatching graduations.
This project is divided into the following three sections:
LOOKING INTO EARS: Other than differences in size, the ears of both adults and children are very similar. Yet, if you look around you at the ears of diverse people, you can see tons of variations. Some experts even claim that ears are as unique to each human being as fingerprints. In this section, you examine ears of various shapes and sizes, and refer to an illustration of an ear to identify its five basic parts.
FROM OVAL-SHAPE TO EAR-SHAPE: You sketch the five parts of an ear as viewed straight-on to the side of the head.
SHADING EAR FORMS: Your goal in this section is to define the three dimensional forms of an ear by add shading with crosshatching graduations.
Suggested drawing supplies include good quality white drawing paper, graphite pencils, kneaded and vinyl erasers, and a pencil sharpener.
This project is recommended for fine art educators, and artists from age 12 to adult with good drawing skills.
7 PAGES – 10 ILLUSTRATIONS Published by Hoddinott Fine Art Publishers, Halifax, NS, Canada – March, 2006
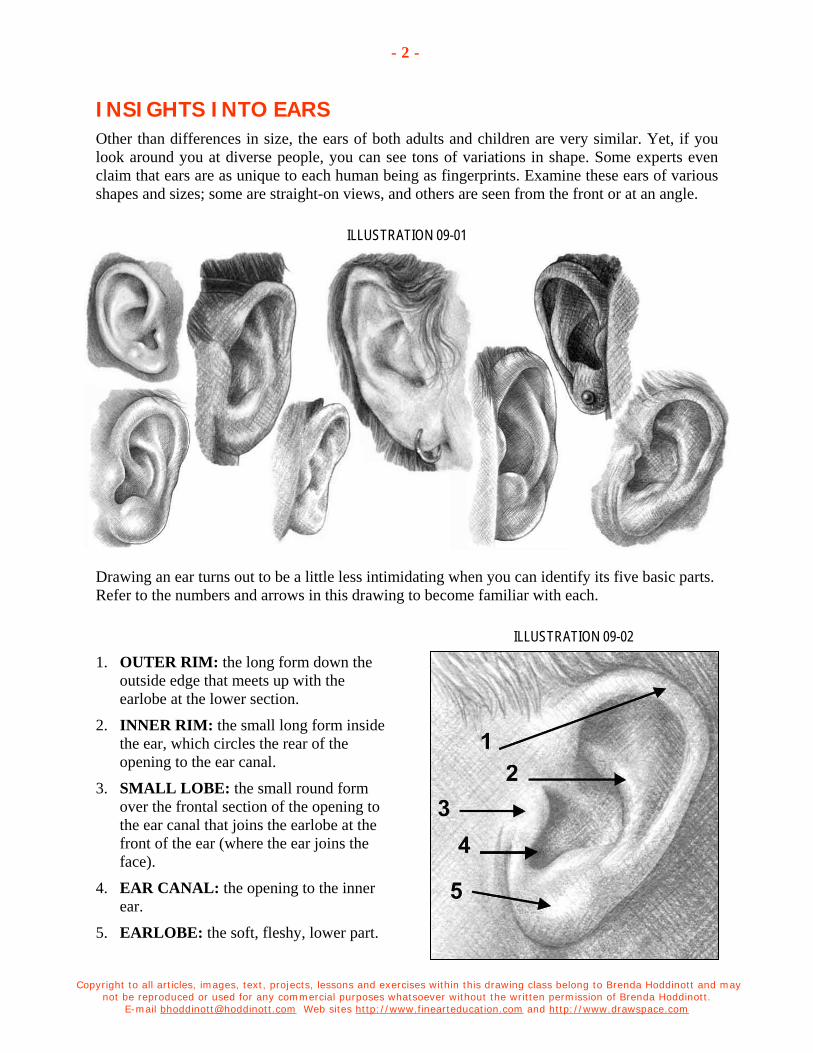
Copyright to all articles, images, text, projects, lessons and exercises within this drawing class belong to Brenda Hoddinott and may not be reproduced or used for any commercial purposes whatsoever without the written permission of Brenda Hoddinott.
E-mail [email protected] Web sites http://www.finearteducation.com and http://www.drawspace.com
- 2 -
INSIGHTS INTO EARS Other than differences in size, the ears of both adults and children are very similar. Yet, if you look around you at diverse people, you can see tons of variations in shape. Some experts even claim that ears are as unique to each human being as fingerprints. Examine these ears of various shapes and sizes; some are straight-on views, and others are seen from the front or at an angle.
ILLUSTRATION 09-01
Drawing an ear turns out to be a little less intimidating when you can identify its five basic parts. Refer to the numbers and arrows in this drawing to become familiar with each.
ILLUSTRATION 09-02
1. OUTER RIM: the long form down the outside edge that meets up with the earlobe at the lower section.
2. INNER RIM: the small long form inside the ear, which circles the rear of the opening to the ear canal.
3. SMALL LOBE: the small round form over the frontal section of the opening to the ear canal that joins the earlobe at the front of the ear (where the ear joins the face).
4. EAR CANAL: the opening to the inner ear.
5. EARLOBE: the soft, fleshy, lower part.
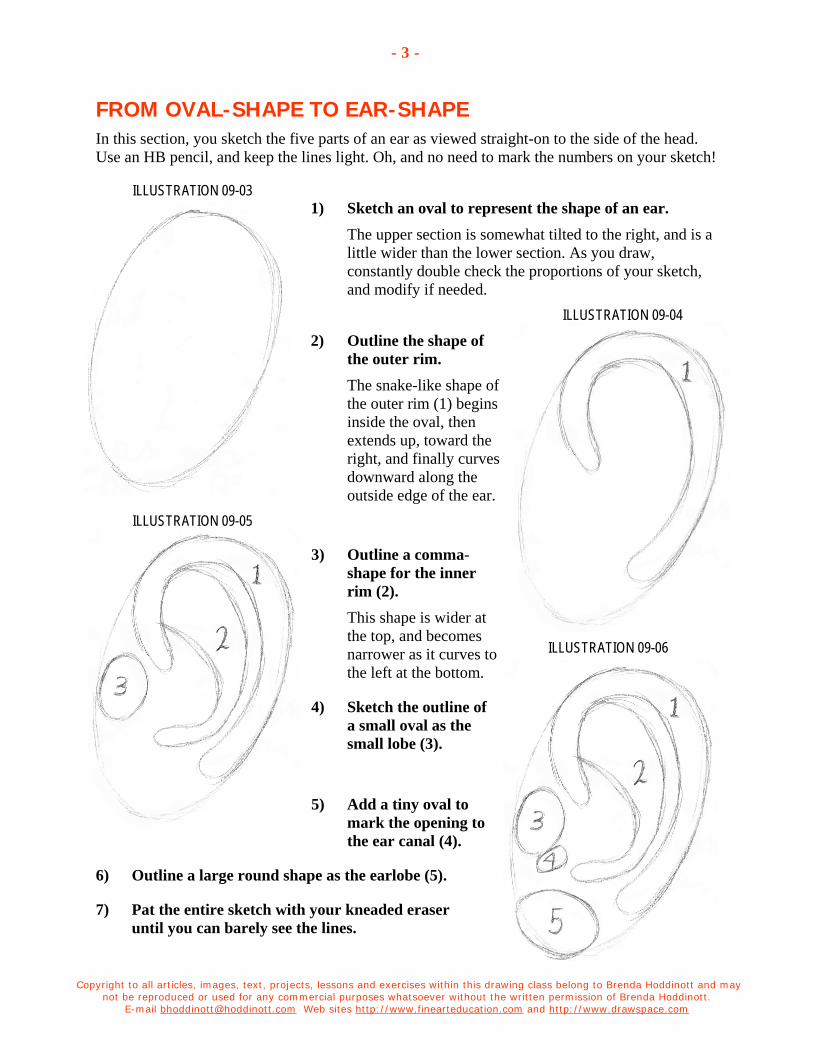
Copyright to all articles, images, text, projects, lessons and exercises within this drawing class belong to Brenda Hoddinott and may not be reproduced or used for any commercial purposes whatsoever without the written permission of Brenda Hoddinott.
E-mail [email protected] Web sites http://www.finearteducation.com and http://www.drawspace.com
- 3 -
ILLUSTRATION 09-06
FROM OVAL-SHAPE TO EAR-SHAPE In this section, you sketch the five parts of an ear as viewed straight-on to the side of the head. Use an HB pencil, and keep the lines light. Oh, and no need to mark the numbers on your sketch!
ILLUSTRATION 09-03 1) Sketch an oval to represent the shape of an ear.
The upper section is somewhat tilted to the right, and is a little wider than the lower section. As you draw, constantly double check the proportions of your sketch, and modify if needed.
ILLUSTRATION 09-04
2) Outline the shape of the outer rim. The snake-like shape of the outer rim (1) begins inside the oval, then extends up, toward the right, and finally curves downward along the outside edge of the ear.
ILLUSTRATION 09-05
3) Outline a comma-shape for the inner rim (2). This shape is wider at the top, and becomes narrower as it curves to the left at the bottom.
4) Sketch the outline of a small oval as the small lobe (3).
5) Add a tiny oval to mark the opening to the ear canal (4).
6) Outline a large round shape as the earlobe (5).
7) Pat the entire sketch with your kneaded eraser until you can barely see the lines.
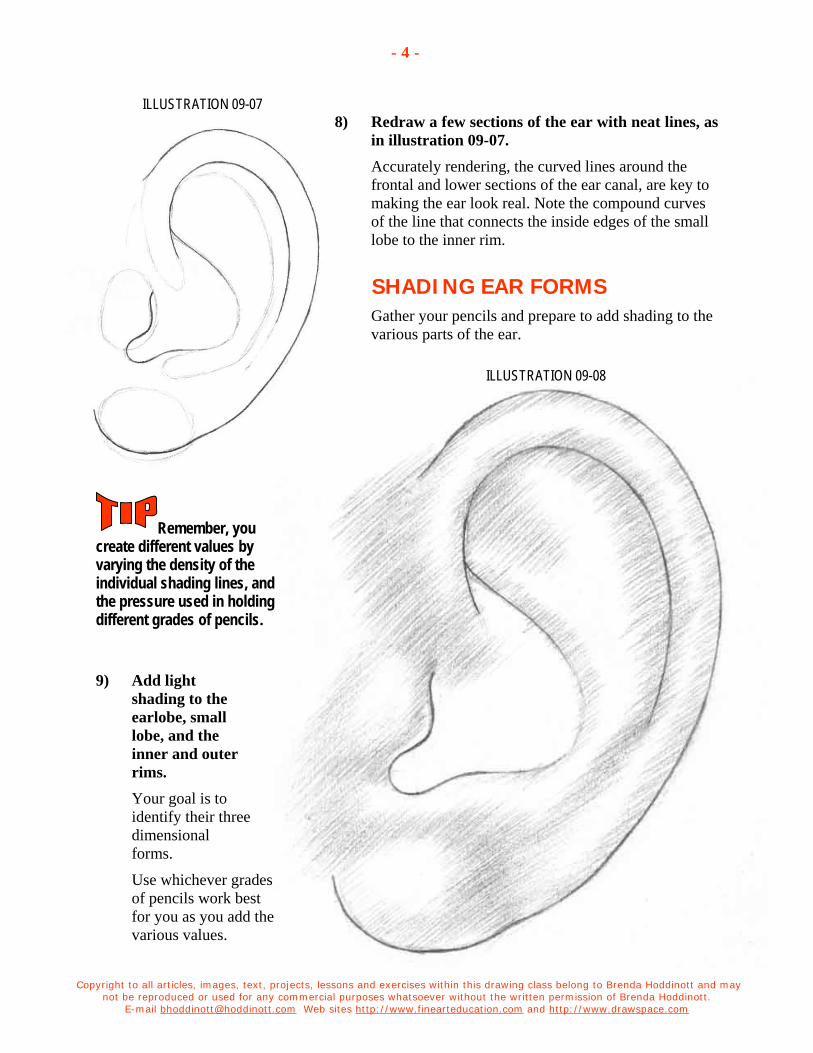
Copyright to all articles, images, text, projects, lessons and exercises within this drawing class belong to Brenda Hoddinott and may not be reproduced or used for any commercial purposes whatsoever without the written permission of Brenda Hoddinott.
E-mail [email protected] Web sites http://www.finearteducation.com and http://www.drawspace.com
- 4 -
ILLUSTRATION 09-07 8) Redraw a few sections of the ear with neat lines, as
in illustration 09-07. Accurately rendering, the curved lines around the frontal and lower sections of the ear canal, are key to making the ear look real. Note the compound curves of the line that connects the inside edges of the small lobe to the inner rim.
SHADING EAR FORMS Gather your pencils and prepare to add shading to the various parts of the ear.
ILLUSTRATION 09-08
Remember, you create different values by varying the density of the individual shading lines, and the pressure used in holding different grades of pencils.
9) Add light shading to the earlobe, small lobe, and the inner and outer rims. Your goal is to identify their three dimensional forms.
Use whichever grades of pencils work best for you as you add the various values.
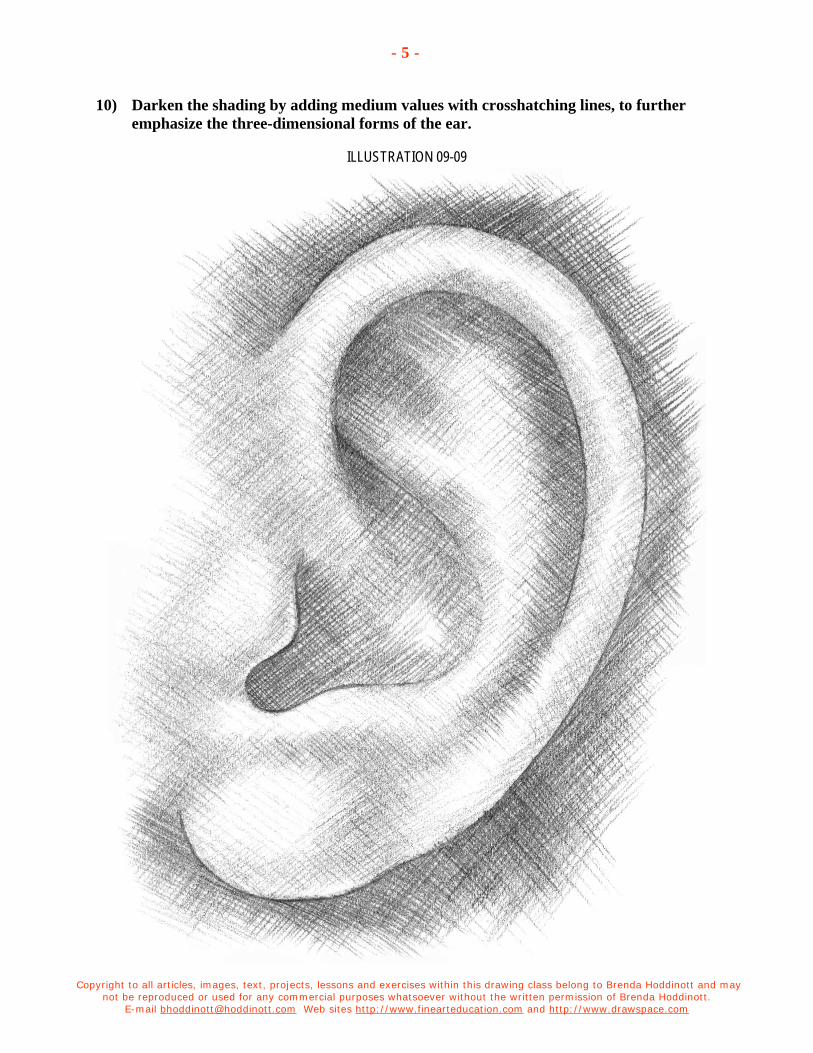
Copyright to all articles, images, text, projects, lessons and exercises within this drawing class belong to Brenda Hoddinott and may not be reproduced or used for any commercial purposes whatsoever without the written permission of Brenda Hoddinott.
E-mail [email protected] Web sites http://www.finearteducation.com and http://www.drawspace.com
- 5 -
10) Darken the shading by adding medium values with crosshatching lines, to further emphasize the three-dimensional forms of the ear.
ILLUSTRATION 09-09
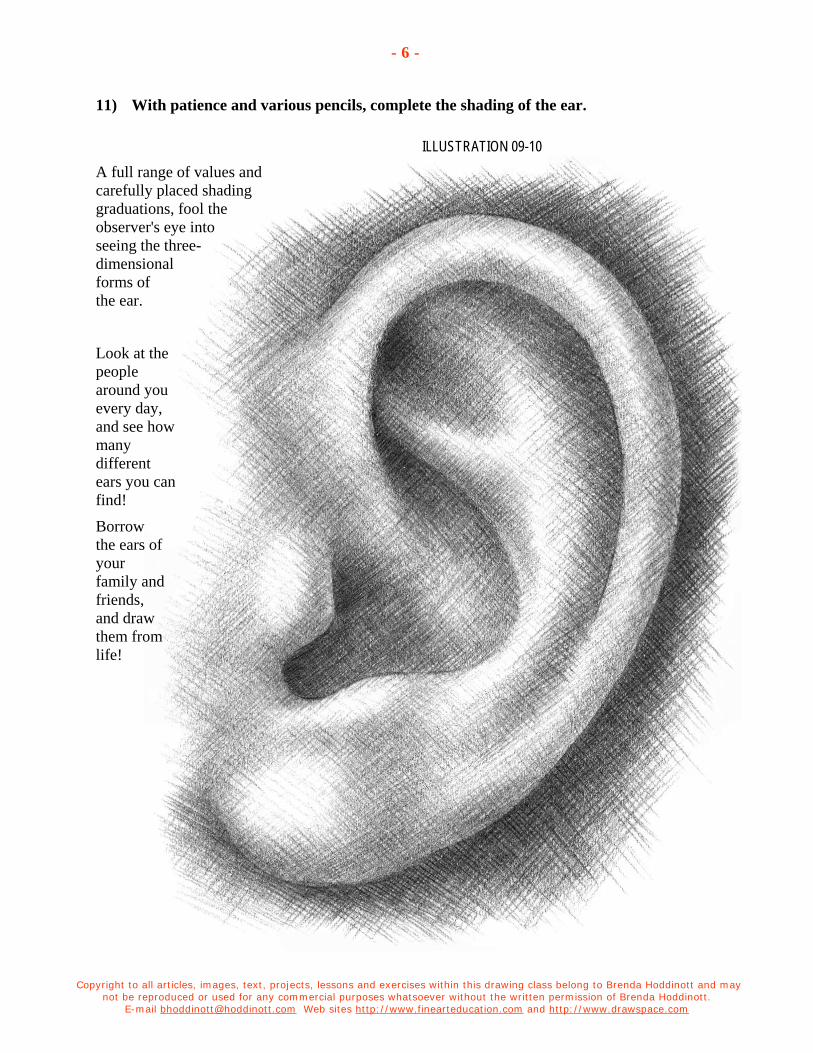
Copyright to all articles, images, text, projects, lessons and exercises within this drawing class belong to Brenda Hoddinott and may not be reproduced or used for any commercial purposes whatsoever without the written permission of Brenda Hoddinott.
E-mail [email protected] Web sites http://www.finearteducation.com and http://www.drawspace.com
- 6 -
11) With patience and various pencils, complete the shading of the ear.
ILLUSTRATION 09-10
A full range of values and carefully placed shading graduations, fool the observer's eye into seeing the three-dimensional forms of the ear.
Look at the people around you every day, and see how many different ears you can find!
Borrow the ears of your family and friends, and draw them from life!
Copyright to all articles, images, text, projects, lessons and exercises within this drawing class belong to Brenda Hoddinott and may not be reproduced or used for any commercial purposes whatsoever without the written permission of Brenda Hoddinott.
E-mail [email protected] Web sites http://www.finearteducation.com and http://www.drawspace.com
- 7 -
BRENDA HODDINOTT - BIOGRAPHY As a self-educated teacher, visual artist, portraitist, forensic artist, and illustrator, Brenda Hoddinott utilizes diverse art media including graphite, technical pen, colored pencil, chalk pastel, charcoal, conté crayon, and oil paints.
My philosophy on teaching art is to focus primarily on the enjoyment aspects while gently introducing the technical and academic. Hence, in creating a passion for the subject matter,
the quest for knowledge also becomes enjoyable. >Brenda Hoddinott<
Born in St. John’s, Newfoundland, Brenda grew up in the small town of Corner Brook. She developed strong technical competencies with a personal commitment to self directed learning, and the aid of assorted “Learn to Draw” books. During Brenda’s twenty-five year career as a self-educated civilian forensic artist, numerous criminal investigation departments have employed Brenda’s skills, including Royal Canadian Mounted Police and municipal police departments. In 1992, Brenda was honored with a commendation from the Royal Canadian Mounted Police, and in 1994, she was awarded a Certificate of Membership from “Forensic Artists International”.
Her home-based art career included graphic design, and teaching recreational drawing and painting classes. As supervisor of her community’s recreational art department, Brenda hired and trained teachers, and designed curriculum for several children’s art programs. In 1998, Brenda chose to end her eighteen-year career as an art educator in order to devote more time to writing, drawing, painting, and developing her websites.
Drawspace http://www.drawspace.com incorporates her unique style and innovative approach to curriculum development. This site offers downloadable and printable drawing classes for students of all abilities from the age of eight through adult. Students of all ages, levels and abilities have praised the simple step-by-step instructional approach. This site is respected as a resource for fine art educators, home schooling programs, and educational facilities throughout the world.
LEARN-TO-DRAW BOOKS BY BRENDA HODDINOTT Drawing for Dummies (2003): Wiley Publishing, Inc., New, York, NY, this 336 page book
is available on various websites and in major bookstores internationally.
The Complete Idiot’s Guide to Drawing People (2004): Winner of the Alpha-Penguin Book of the Year Award 2004, Alpha - Pearson Education – Macmillan, Indianapolis, IN, this 360 page book is available on various websites and in major bookstores internationally.
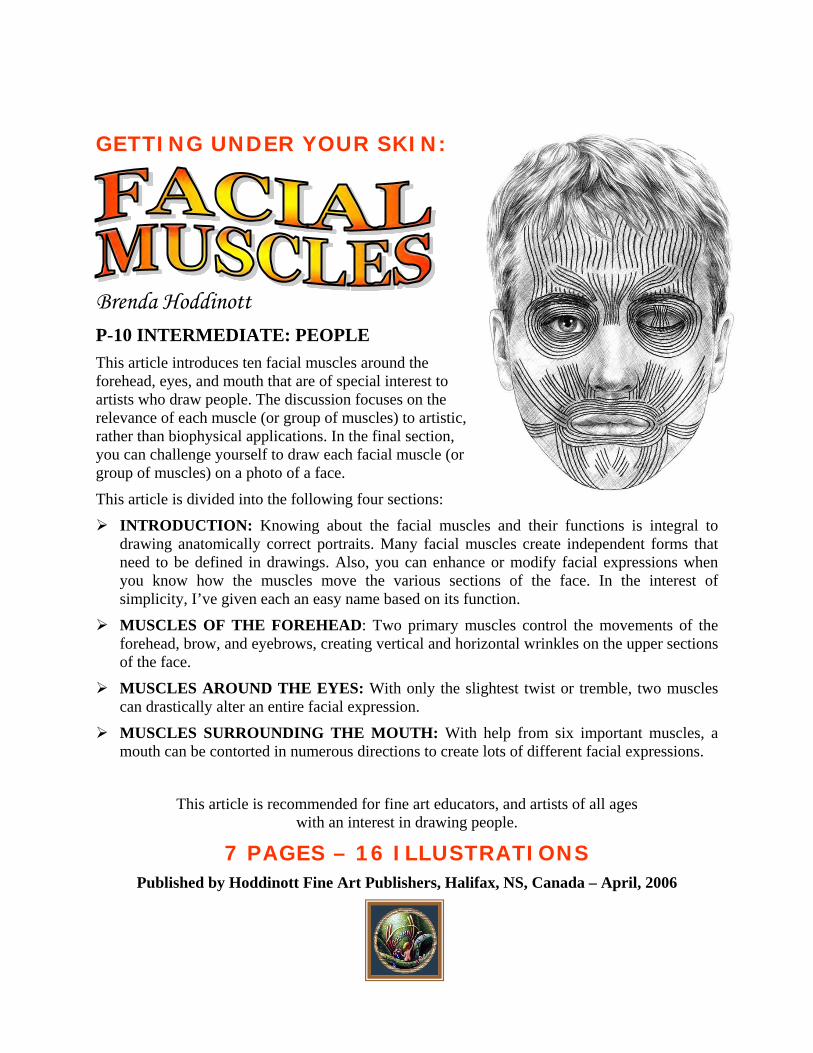
GETTING UNDER YOUR SKIN:
Brenda Hoddinott P-10 INTERMEDIATE: PEOPLE This article introduces ten facial muscles around the forehead, eyes, and mouth that are of special interest to artists who draw people. The discussion focuses on the relevance of each muscle (or group of muscles) to artistic, rather than biophysical applications. In the final section, you can challenge yourself to draw each facial muscle (or group of muscles) on a photo of a face.
This article is divided into the following four sections:
INTRODUCTION: Knowing about the facial muscles and their functions is integral to drawing anatomically correct portraits. Many facial muscles create independent forms that need to be defined in drawings. Also, you can enhance or modify facial expressions when you know how the muscles move the various sections of the face. In the interest of simplicity, I’ve given each an easy name based on its function.
MUSCLES OF THE FOREHEAD: Two primary muscles control the movements of the forehead, brow, and eyebrows, creating vertical and horizontal wrinkles on the upper sections of the face.
MUSCLES AROUND THE EYES: With only the slightest twist or tremble, two muscles can drastically alter an entire facial expression.
MUSCLES SURROUNDING THE MOUTH: With help from six important muscles, a mouth can be contorted in numerous directions to create lots of different facial expressions.
This article is recommended for fine art educators, and artists of all ages with an interest in drawing people.
7 PAGES – 16 ILLUSTRATIONS Published by Hoddinott Fine Art Publishers, Halifax, NS, Canada – April, 2006
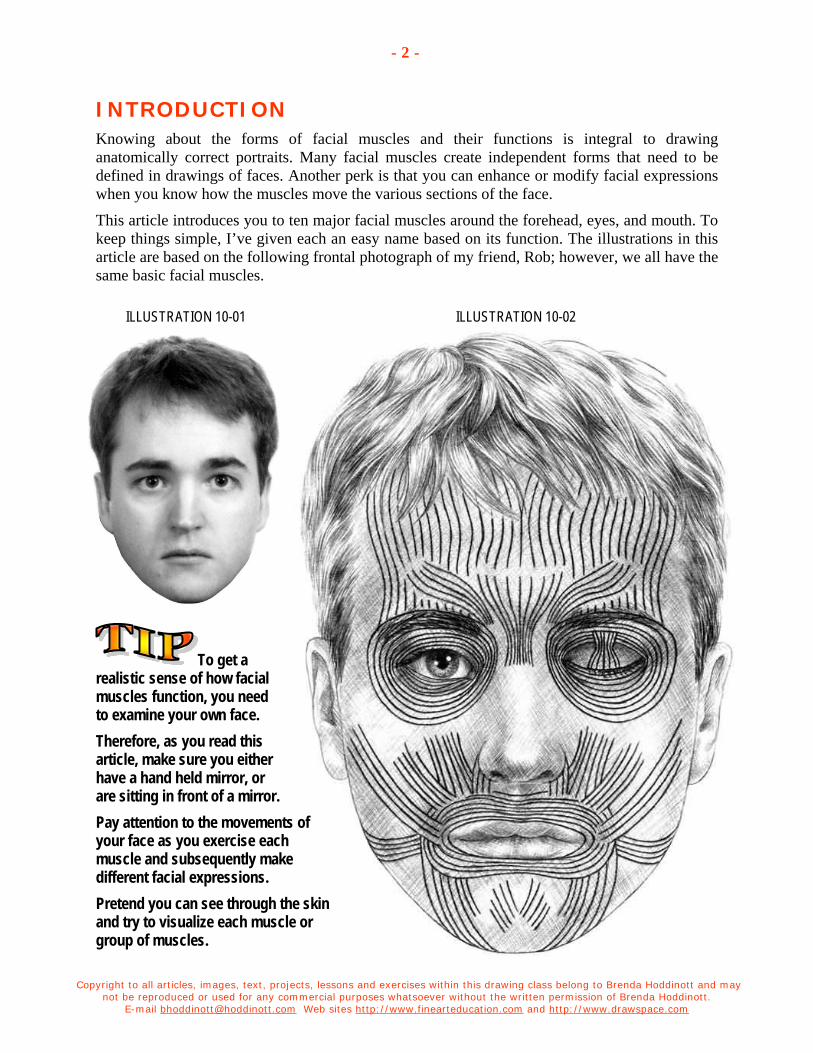
Copyright to all articles, images, text, projects, lessons and exercises within this drawing class belong to Brenda Hoddinott and may not be reproduced or used for any commercial purposes whatsoever without the written permission of Brenda Hoddinott.
E-mail [email protected] Web sites http://www.finearteducation.com and http://www.drawspace.com
- 2 -
INTRODUCTION Knowing about the forms of facial muscles and their functions is integral to drawing anatomically correct portraits. Many facial muscles create independent forms that need to be defined in drawings of faces. Another perk is that you can enhance or modify facial expressions when you know how the muscles move the various sections of the face.
This article introduces you to ten major facial muscles around the forehead, eyes, and mouth. To keep things simple, I’ve given each an easy name based on its function. The illustrations in this article are based on the following frontal photograph of my friend, Rob; however, we all have the same basic facial muscles.
ILLUSTRATION 10-01 ILLUSTRATION 10-02
To get a realistic sense of how facial muscles function, you need to examine your own face. Therefore, as you read this article, make sure you either have a hand held mirror, or are sitting in front of a mirror. Pay attention to the movements of your face as you exercise each muscle and subsequently make different facial expressions. Pretend you can see through the skin and try to visualize each muscle or group of muscles.
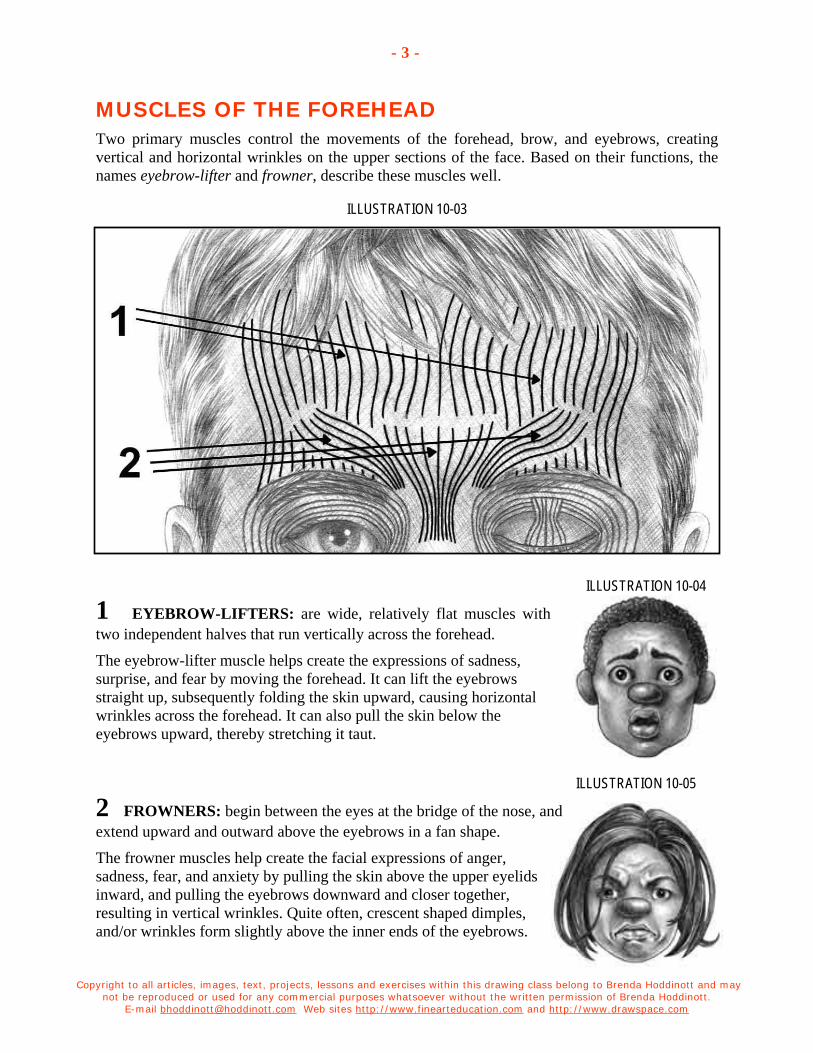
Copyright to all articles, images, text, projects, lessons and exercises within this drawing class belong to Brenda Hoddinott and may not be reproduced or used for any commercial purposes whatsoever without the written permission of Brenda Hoddinott.
E-mail [email protected] Web sites http://www.finearteducation.com and http://www.drawspace.com
- 3 -
MUSCLES OF THE FOREHEAD Two primary muscles control the movements of the forehead, brow, and eyebrows, creating vertical and horizontal wrinkles on the upper sections of the face. Based on their functions, the names eyebrow-lifter and frowner, describe these muscles well.
ILLUSTRATION 10-03
ILLUSTRATION 10-04
1 EYEBROW-LIFTERS: are wide, relatively flat muscles with two independent halves that run vertically across the forehead.
The eyebrow-lifter muscle helps create the expressions of sadness, surprise, and fear by moving the forehead. It can lift the eyebrows straight up, subsequently folding the skin upward, causing horizontal wrinkles across the forehead. It can also pull the skin below the eyebrows upward, thereby stretching it taut.
ILLUSTRATION 10-05
2 FROWNERS: begin between the eyes at the bridge of the nose, and extend upward and outward above the eyebrows in a fan shape.
The frowner muscles help create the facial expressions of anger, sadness, fear, and anxiety by pulling the skin above the upper eyelids inward, and pulling the eyebrows downward and closer together, resulting in vertical wrinkles. Quite often, crescent shaped dimples, and/or wrinkles form slightly above the inner ends of the eyebrows.
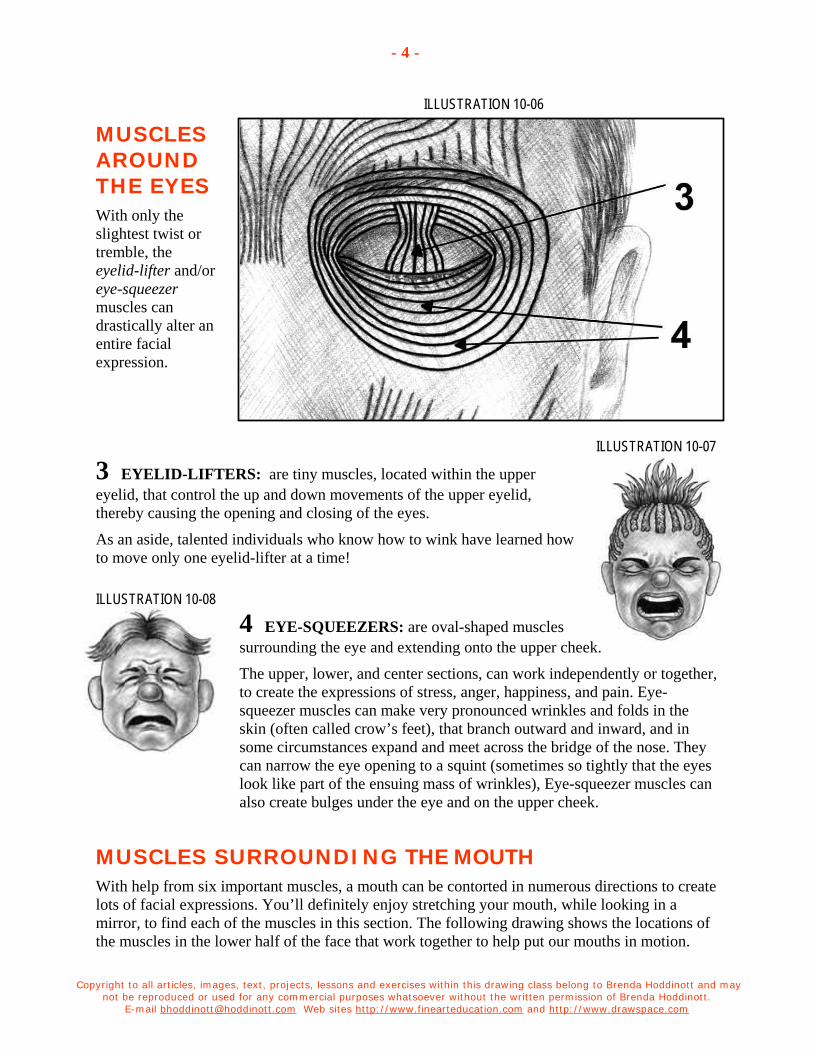
Copyright to all articles, images, text, projects, lessons and exercises within this drawing class belong to Brenda Hoddinott and may not be reproduced or used for any commercial purposes whatsoever without the written permission of Brenda Hoddinott.
E-mail [email protected] Web sites http://www.finearteducation.com and http://www.drawspace.com
- 4 -
ILLUSTRATION 10-06
MUSCLES AROUND THE EYES With only the slightest twist or tremble, the eyelid-lifter and/or eye-squeezer muscles can drastically alter an entire facial expression.
ILLUSTRATION 10-07
3 EYELID-LIFTERS: are tiny muscles, located within the upper eyelid, that control the up and down movements of the upper eyelid, thereby causing the opening and closing of the eyes.
As an aside, talented individuals who know how to wink have learned how to move only one eyelid-lifter at a time!
ILLUSTRATION 10-08
4 EYE-SQUEEZERS: are oval-shaped muscles surrounding the eye and extending onto the upper cheek.
The upper, lower, and center sections, can work independently or together, to create the expressions of stress, anger, happiness, and pain. Eye-squeezer muscles can make very pronounced wrinkles and folds in the skin (often called crow’s feet), that branch outward and inward, and in some circumstances expand and meet across the bridge of the nose. They can narrow the eye opening to a squint (sometimes so tightly that the eyes look like part of the ensuing mass of wrinkles), Eye-squeezer muscles can also create bulges under the eye and on the upper cheek.
MUSCLES SURROUNDING THE MOUTH With help from six important muscles, a mouth can be contorted in numerous directions to create lots of facial expressions. You’ll definitely enjoy stretching your mouth, while looking in a mirror, to find each of the muscles in this section. The following drawing shows the locations of the muscles in the lower half of the face that work together to help put our mouths in motion.
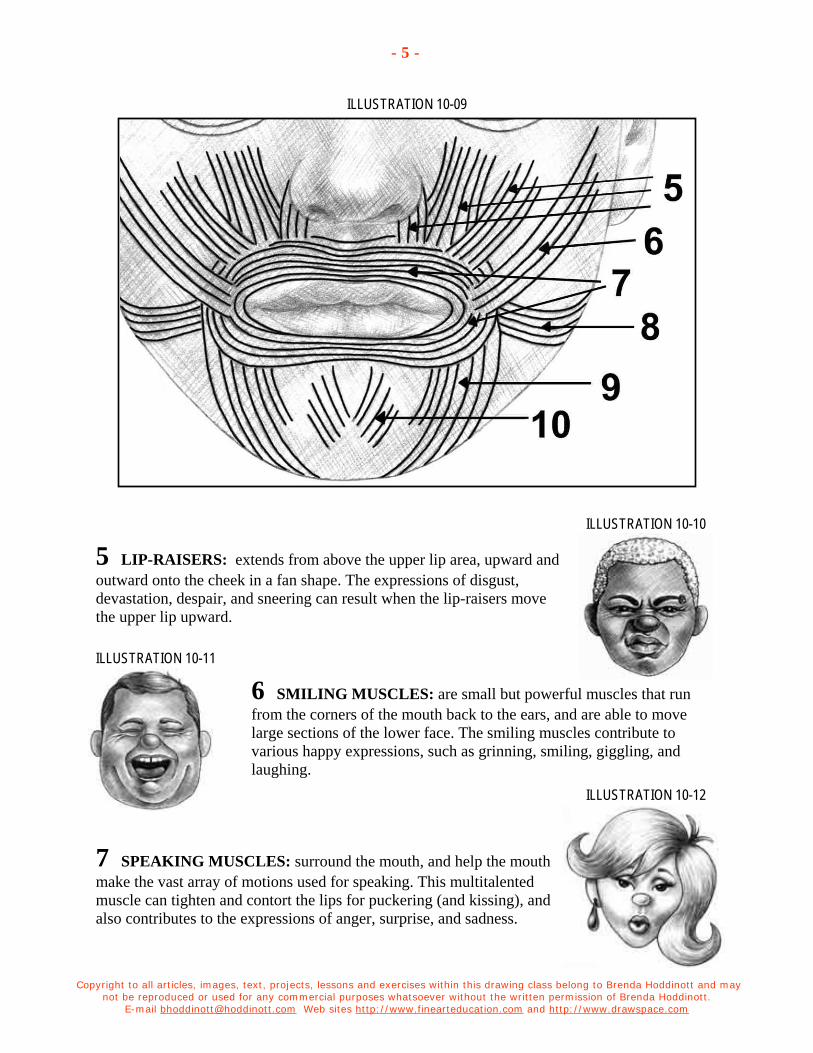
Copyright to all articles, images, text, projects, lessons and exercises within this drawing class belong to Brenda Hoddinott and may not be reproduced or used for any commercial purposes whatsoever without the written permission of Brenda Hoddinott.
E-mail [email protected] Web sites http://www.finearteducation.com and http://www.drawspace.com
- 5 -
ILLUSTRATION 10-09
ILLUSTRATION 10-10
5 LIP-RAISERS: extends from above the upper lip area, upward and outward onto the cheek in a fan shape. The expressions of disgust, devastation, despair, and sneering can result when the lip-raisers move the upper lip upward.
ILLUSTRATION 10-11
6 SMILING MUSCLES: are small but powerful muscles that run from the corners of the mouth back to the ears, and are able to move large sections of the lower face. The smiling muscles contribute to various happy expressions, such as grinning, smiling, giggling, and laughing.
ILLUSTRATION 10-12
7 SPEAKING MUSCLES: surround the mouth, and help the mouth make the vast array of motions used for speaking. This multitalented muscle can tighten and contort the lips for puckering (and kissing), and also contributes to the expressions of anger, surprise, and sadness.
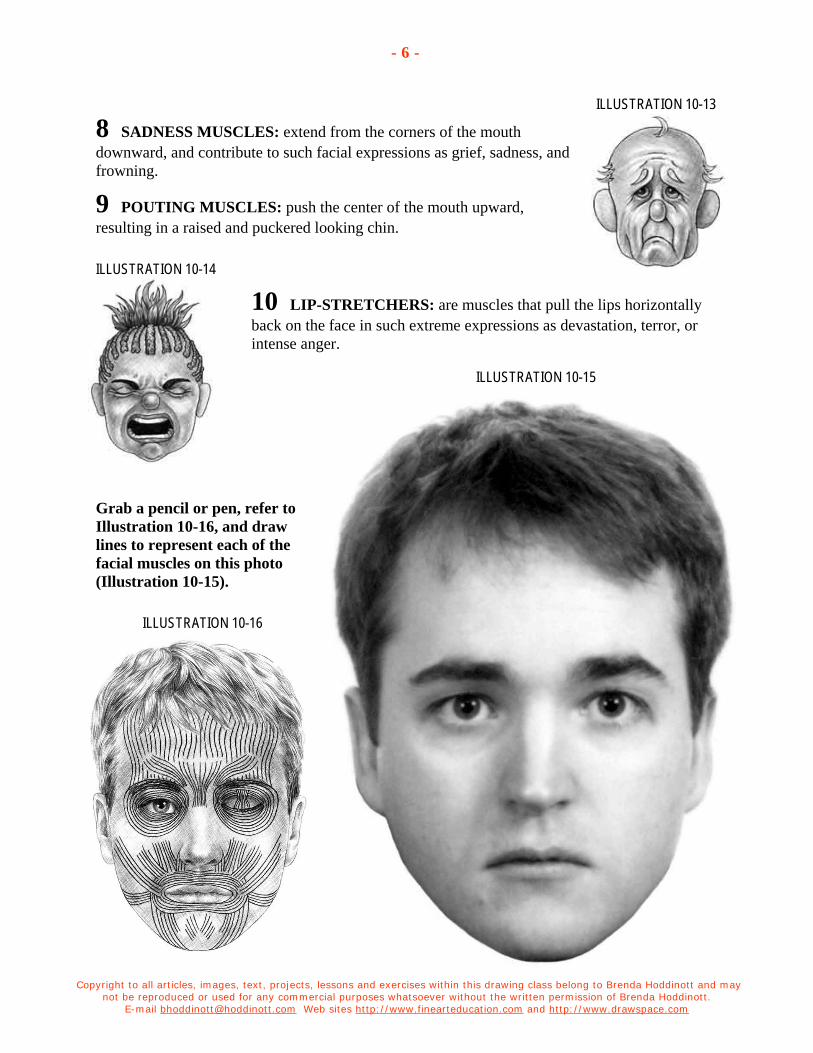
Copyright to all articles, images, text, projects, lessons and exercises within this drawing class belong to Brenda Hoddinott and may not be reproduced or used for any commercial purposes whatsoever without the written permission of Brenda Hoddinott.
E-mail [email protected] Web sites http://www.finearteducation.com and http://www.drawspace.com
- 6 -
ILLUSTRATION 10-13
8 SADNESS MUSCLES: extend from the corners of the mouth downward, and contribute to such facial expressions as grief, sadness, and frowning.
9 POUTING MUSCLES: push the center of the mouth upward, resulting in a raised and puckered looking chin.
ILLUSTRATION 10-14
10 LIP-STRETCHERS: are muscles that pull the lips horizontally back on the face in such extreme expressions as devastation, terror, or intense anger.
ILLUSTRATION 10-15
Grab a pencil or pen, refer to Illustration 10-16, and draw lines to represent each of the facial muscles on this photo (Illustration 10-15).
ILLUSTRATION 10-16
Copyright to all articles, images, text, projects, lessons and exercises within this drawing class belong to Brenda Hoddinott and may not be reproduced or used for any commercial purposes whatsoever without the written permission of Brenda Hoddinott.
E-mail [email protected] Web sites http://www.finearteducation.com and http://www.drawspace.com
- 7 -
BRENDA HODDINOTT - BIOGRAPHY As a self-educated teacher, visual artist, portraitist, forensic artist, and illustrator, Brenda Hoddinott utilizes diverse art media including graphite, technical pen, colored pencil, chalk pastel, charcoal, conté crayon, and oil paints.
My philosophy on teaching art is to focus primarily on the enjoyment aspects while gently introducing the technical and academic. Hence, in creating a passion for the subject matter,
the quest for knowledge also becomes enjoyable. >Brenda Hoddinott<
Born in St. John’s, Newfoundland, Brenda grew up in the small town of Corner Brook. She developed strong technical competencies with a personal commitment to self directed learning, and the aid of assorted “Learn to Draw” books. During Brenda’s twenty-five year career as a self-educated civilian forensic artist, numerous criminal investigation departments have employed Brenda’s skills, including Royal Canadian Mounted Police and municipal police departments. In 1992, Brenda was honored with a commendation from the Royal Canadian Mounted Police, and in 1994, she was awarded a Certificate of Membership from “Forensic Artists International”.
Her home-based art career included graphic design, and teaching recreational drawing and painting classes. As supervisor of her community’s recreational art department, Brenda hired and trained teachers, and designed curriculum for several children’s art programs. In 1998, Brenda chose to end her eighteen-year career as an art educator in order to devote more time to writing, drawing, painting, and developing her websites.
Drawspace http://www.drawspace.com incorporates her unique style and innovative approach to curriculum development. This site offers downloadable and printable drawing classes for students of all abilities from the age of eight through adult. Students of all ages, levels and abilities have praised the simple step-by-step instructional approach. This site is respected as a resource for fine art educators, home schooling programs, and educational facilities throughout the world.
LEARN-TO-DRAW BOOKS BY BRENDA HODDINOTT Drawing for Dummies: Wiley Publishing, Inc., New, York, NY, this 336 page book is
available on various websites and in major bookstores internationally.
The Complete Idiot’s Guide to Drawing People: Winner of the Alpha-Penguin Book of the Year Award 2004, Alpha - Pearson Education – Macmillan, Indianapolis, IN, this 360 page book is available on various websites and in major bookstores internationally.
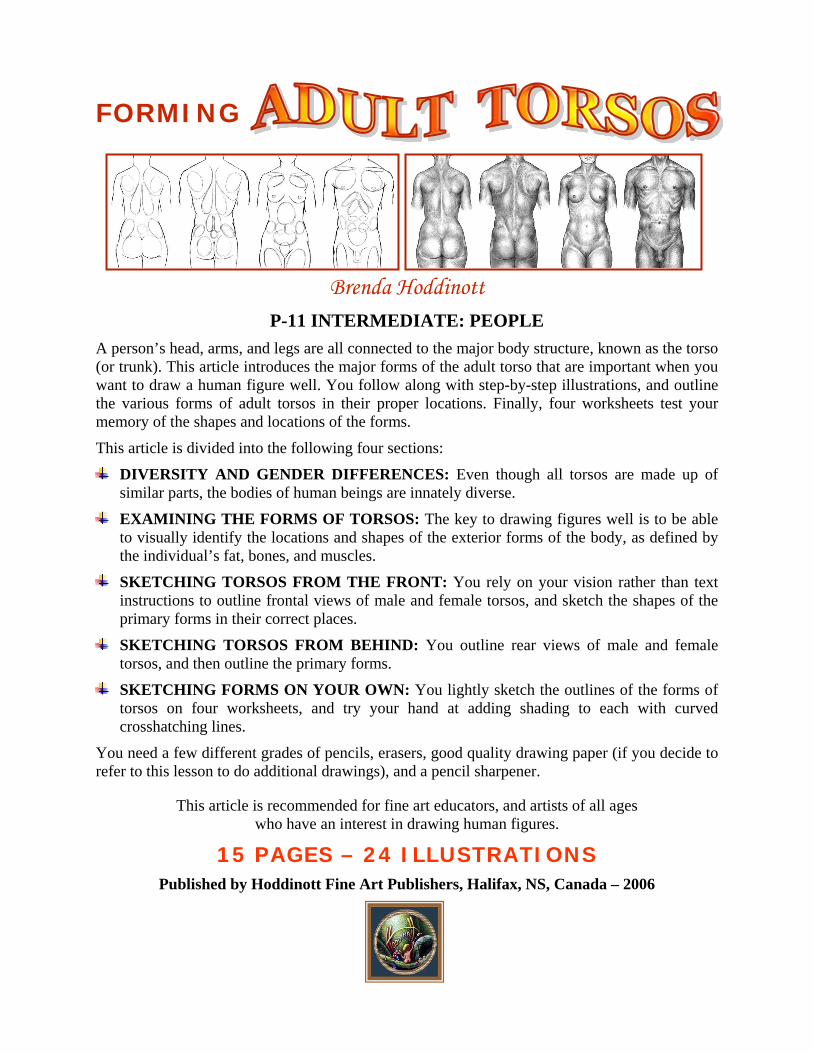
FORMING
Brenda Hoddinott P-11 INTERMEDIATE: PEOPLE
A person’s head, arms, and legs are all connected to the major body structure, known as the torso (or trunk). This article introduces the major forms of the adult torso that are important when you want to draw a human figure well. You follow along with step-by-step illustrations, and outline the various forms of adult torsos in their proper locations. Finally, four worksheets test your memory of the shapes and locations of the forms.
This article is divided into the following four sections:
DIVERSITY AND GENDER DIFFERENCES: Even though all torsos are made up of similar parts, the bodies of human beings are innately diverse.
EXAMINING THE FORMS OF TORSOS: The key to drawing figures well is to be able to visually identify the locations and shapes of the exterior forms of the body, as defined by the individual’s fat, bones, and muscles.
SKETCHING TORSOS FROM THE FRONT: You rely on your vision rather than text instructions to outline frontal views of male and female torsos, and sketch the shapes of the primary forms in their correct places.
SKETCHING TORSOS FROM BEHIND: You outline rear views of male and female torsos, and then outline the primary forms.
SKETCHING FORMS ON YOUR OWN: You lightly sketch the outlines of the forms of torsos on four worksheets, and try your hand at adding shading to each with curved crosshatching lines.
You need a few different grades of pencils, erasers, good quality drawing paper (if you decide to refer to this lesson to do additional drawings), and a pencil sharpener.
This article is recommended for fine art educators, and artists of all ages who have an interest in drawing human figures.
15 PAGES – 24 ILLUSTRATIONS Published by Hoddinott Fine Art Publishers, Halifax, NS, Canada – 2006
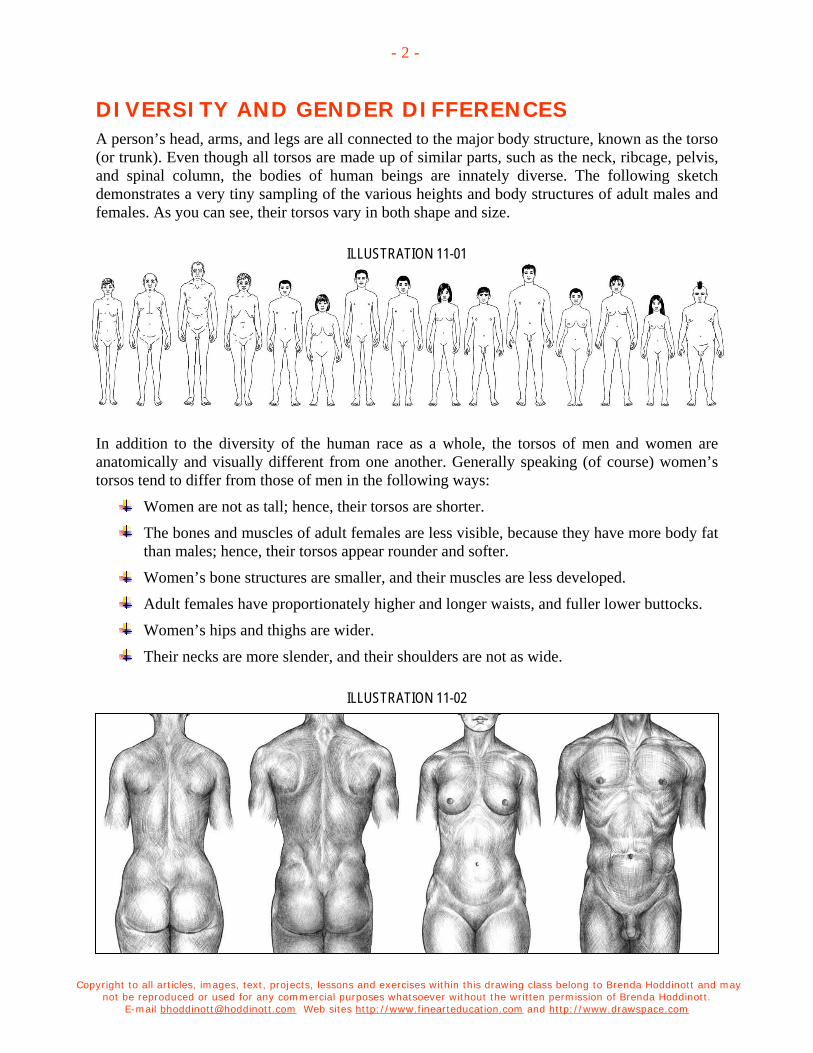
Copyright to all articles, images, text, projects, lessons and exercises within this drawing class belong to Brenda Hoddinott and may not be reproduced or used for any commercial purposes whatsoever without the written permission of Brenda Hoddinott.
E-mail [email protected] Web sites http://www.finearteducation.com and http://www.drawspace.com
- 2 -
DIVERSITY AND GENDER DIFFERENCES A person’s head, arms, and legs are all connected to the major body structure, known as the torso (or trunk). Even though all torsos are made up of similar parts, such as the neck, ribcage, pelvis, and spinal column, the bodies of human beings are innately diverse. The following sketch demonstrates a very tiny sampling of the various heights and body structures of adult males and females. As you can see, their torsos vary in both shape and size.
ILLUSTRATION 11-01
In addition to the diversity of the human race as a whole, the torsos of men and women are anatomically and visually different from one another. Generally speaking (of course) women’s torsos tend to differ from those of men in the following ways:
Women are not as tall; hence, their torsos are shorter.
The bones and muscles of adult females are less visible, because they have more body fat than males; hence, their torsos appear rounder and softer.
Women’s bone structures are smaller, and their muscles are less developed.
Adult females have proportionately higher and longer waists, and fuller lower buttocks.
Women’s hips and thighs are wider.
Their necks are more slender, and their shoulders are not as wide.
ILLUSTRATION 11-02
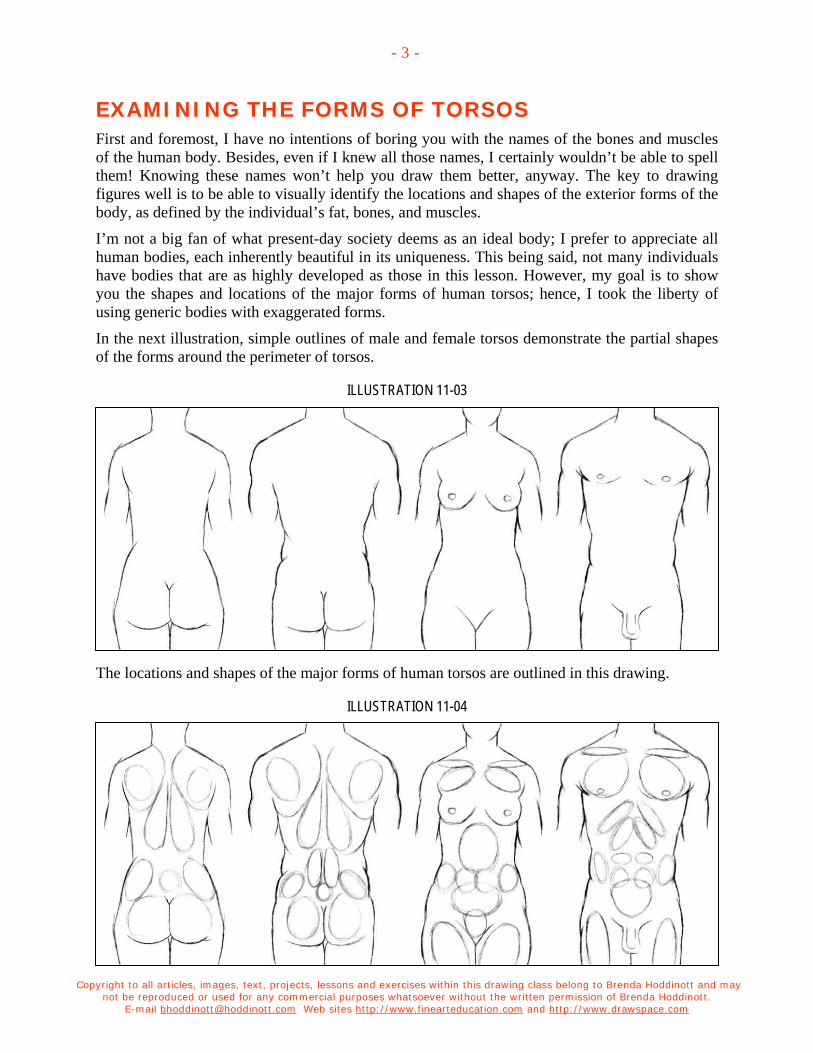
Copyright to all articles, images, text, projects, lessons and exercises within this drawing class belong to Brenda Hoddinott and may not be reproduced or used for any commercial purposes whatsoever without the written permission of Brenda Hoddinott.
E-mail [email protected] Web sites http://www.finearteducation.com and http://www.drawspace.com
- 3 -
EXAMINING THE FORMS OF TORSOS First and foremost, I have no intentions of boring you with the names of the bones and muscles of the human body. Besides, even if I knew all those names, I certainly wouldn’t be able to spell them! Knowing these names won’t help you draw them better, anyway. The key to drawing figures well is to be able to visually identify the locations and shapes of the exterior forms of the body, as defined by the individual’s fat, bones, and muscles.
I’m not a big fan of what present-day society deems as an ideal body; I prefer to appreciate all human bodies, each inherently beautiful in its uniqueness. This being said, not many individuals have bodies that are as highly developed as those in this lesson. However, my goal is to show you the shapes and locations of the major forms of human torsos; hence, I took the liberty of using generic bodies with exaggerated forms.
In the next illustration, simple outlines of male and female torsos demonstrate the partial shapes of the forms around the perimeter of torsos.
ILLUSTRATION 11-03
The locations and shapes of the major forms of human torsos are outlined in this drawing.
ILLUSTRATION 11-04
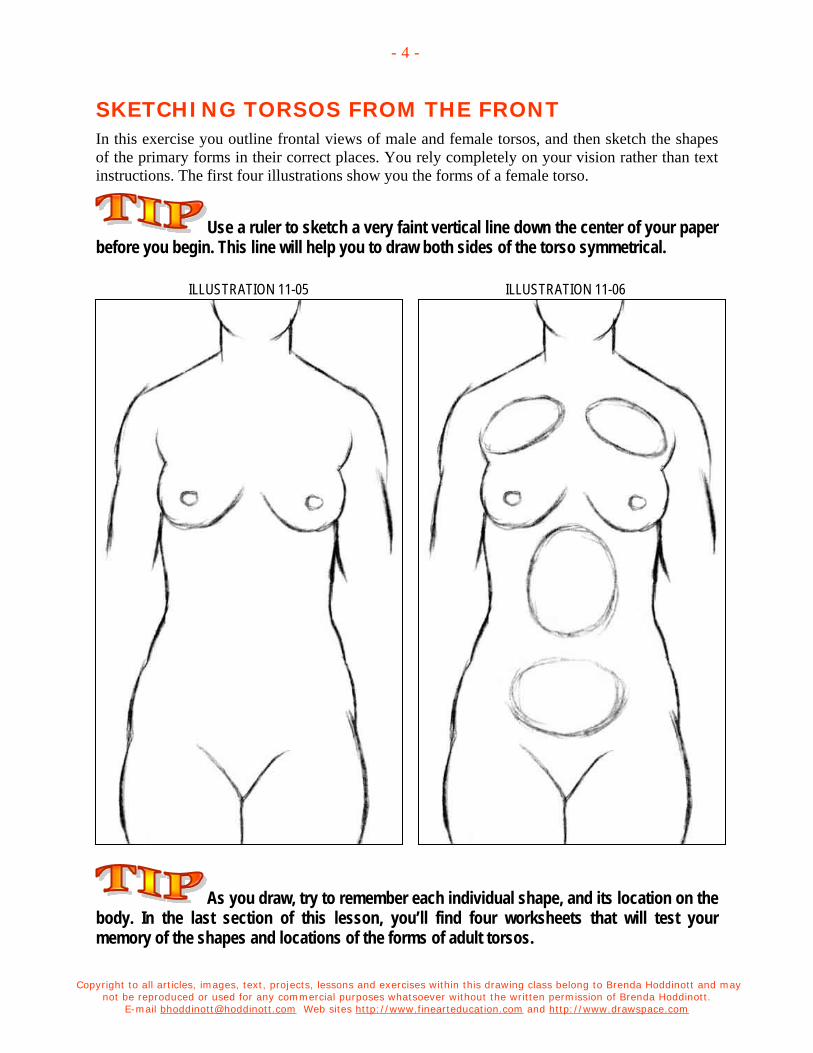
Copyright to all articles, images, text, projects, lessons and exercises within this drawing class belong to Brenda Hoddinott and may not be reproduced or used for any commercial purposes whatsoever without the written permission of Brenda Hoddinott.
E-mail [email protected] Web sites http://www.finearteducation.com and http://www.drawspace.com
- 4 -
SKETCHING TORSOS FROM THE FRONT In this exercise you outline frontal views of male and female torsos, and then sketch the shapes of the primary forms in their correct places. You rely completely on your vision rather than text instructions. The first four illustrations show you the forms of a female torso.
Use a ruler to sketch a very faint vertical line down the center of your paper before you begin. This line will help you to draw both sides of the torso symmetrical.
ILLUSTRATION 11-05 ILLUSTRATION 11-06
As you draw, try to remember each individual shape, and its location on the body. In the last section of this lesson, you’ll find four worksheets that will test your memory of the shapes and locations of the forms of adult torsos.
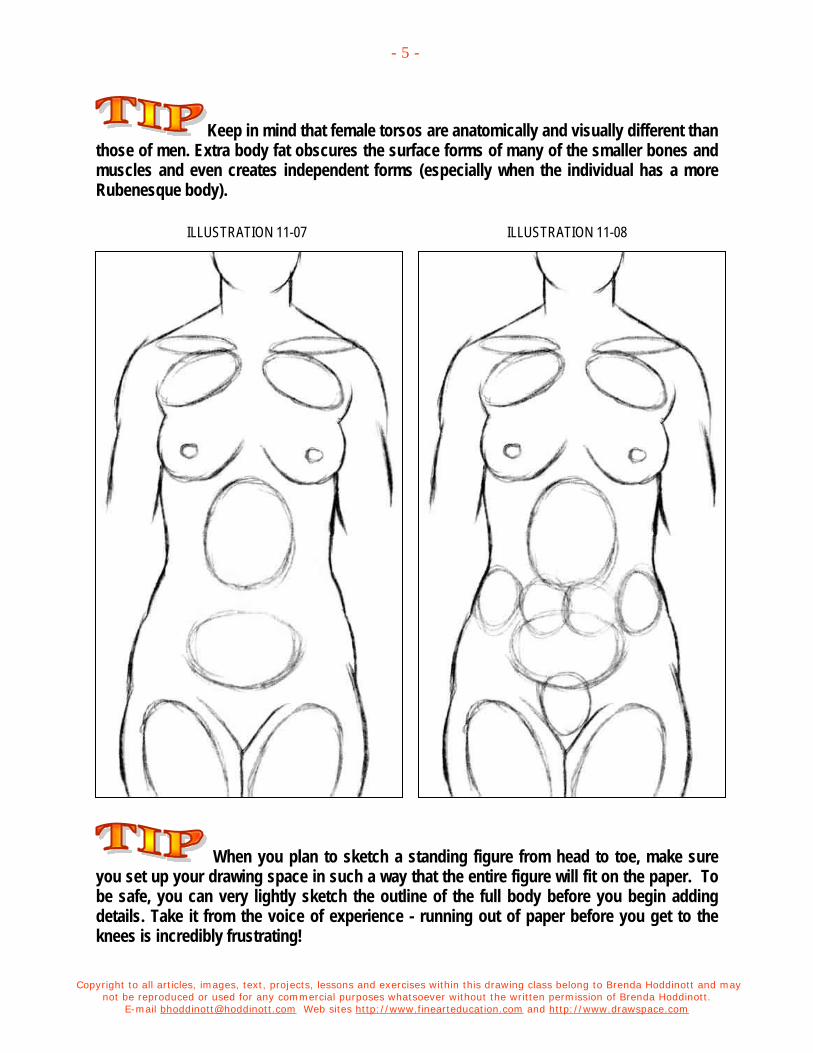
Copyright to all articles, images, text, projects, lessons and exercises within this drawing class belong to Brenda Hoddinott and may not be reproduced or used for any commercial purposes whatsoever without the written permission of Brenda Hoddinott.
E-mail [email protected] Web sites http://www.finearteducation.com and http://www.drawspace.com
- 5 -
Keep in mind that female torsos are anatomically and visually different than those of men. Extra body fat obscures the surface forms of many of the smaller bones and muscles and even creates independent forms (especially when the individual has a more Rubenesque body).
ILLUSTRATION 11-07 ILLUSTRATION 11-08
When you plan to sketch a standing figure from head to toe, make sure you set up your drawing space in such a way that the entire figure will fit on the paper. To be safe, you can very lightly sketch the outline of the full body before you begin adding details. Take it from the voice of experience - running out of paper before you get to the knees is incredibly frustrating!
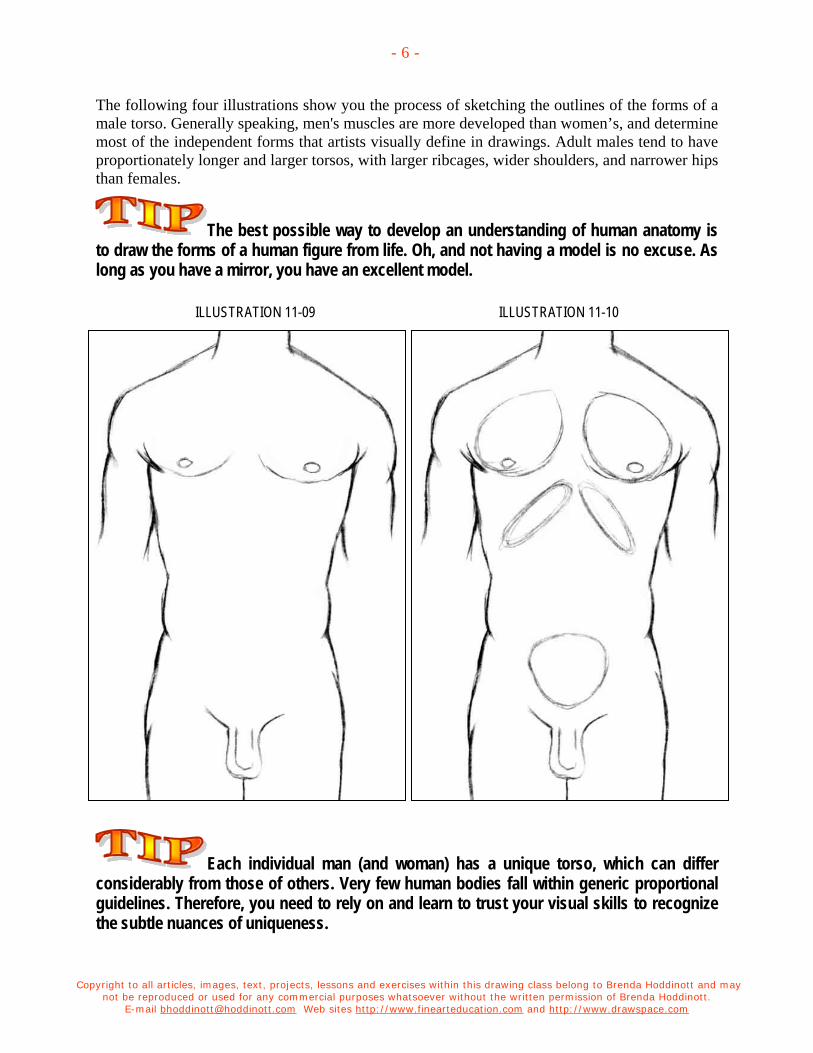
Copyright to all articles, images, text, projects, lessons and exercises within this drawing class belong to Brenda Hoddinott and may not be reproduced or used for any commercial purposes whatsoever without the written permission of Brenda Hoddinott.
E-mail [email protected] Web sites http://www.finearteducation.com and http://www.drawspace.com
- 6 -
The following four illustrations show you the process of sketching the outlines of the forms of a male torso. Generally speaking, men's muscles are more developed than women’s, and determine most of the independent forms that artists visually define in drawings. Adult males tend to have proportionately longer and larger torsos, with larger ribcages, wider shoulders, and narrower hips than females.
The best possible way to develop an understanding of human anatomy is to draw the forms of a human figure from life. Oh, and not having a model is no excuse. As long as you have a mirror, you have an excellent model.
ILLUSTRATION 11-09 ILLUSTRATION 11-10
Each individual man (and woman) has a unique torso, which can differ considerably from those of others. Very few human bodies fall within generic proportional guidelines. Therefore, you need to rely on and learn to trust your visual skills to recognize the subtle nuances of uniqueness.
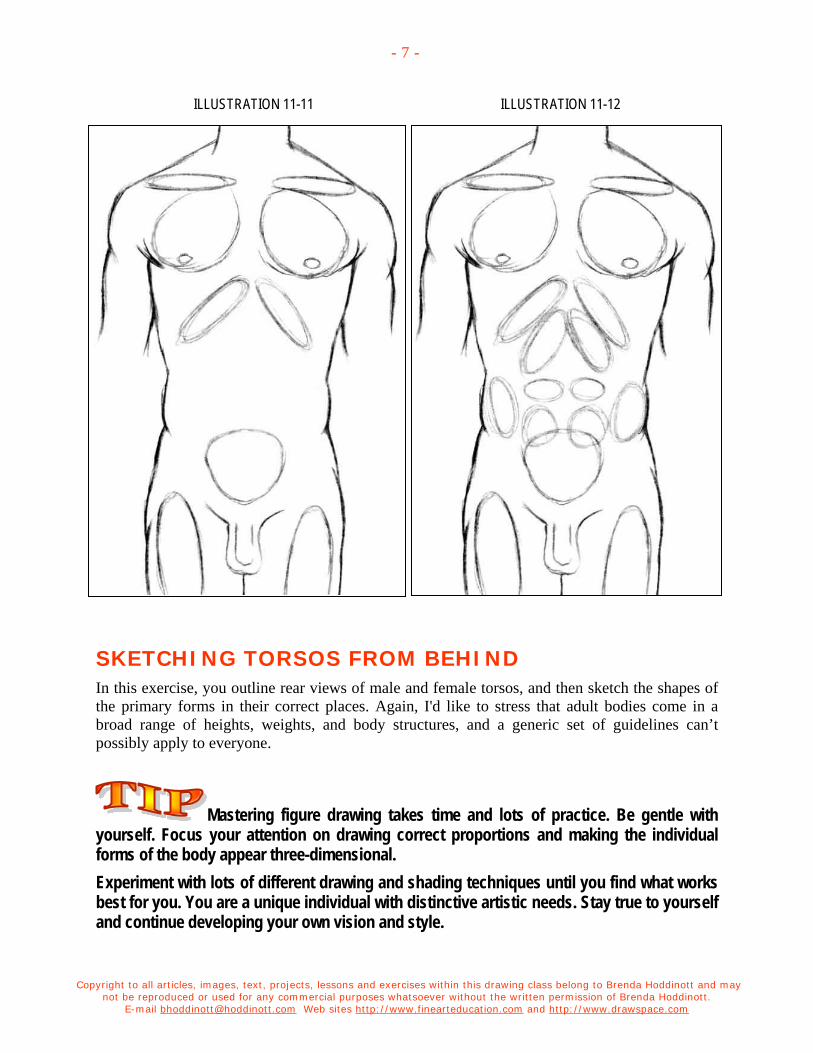
Copyright to all articles, images, text, projects, lessons and exercises within this drawing class belong to Brenda Hoddinott and may not be reproduced or used for any commercial purposes whatsoever without the written permission of Brenda Hoddinott.
E-mail [email protected] Web sites http://www.finearteducation.com and http://www.drawspace.com
- 7 -
ILLUSTRATION 11-11 ILLUSTRATION 11-12
SKETCHING TORSOS FROM BEHIND In this exercise, you outline rear views of male and female torsos, and then sketch the shapes of the primary forms in their correct places. Again, I'd like to stress that adult bodies come in a broad range of heights, weights, and body structures, and a generic set of guidelines can’t possibly apply to everyone.
Mastering figure drawing takes time and lots of practice. Be gentle with yourself. Focus your attention on drawing correct proportions and making the individual forms of the body appear three-dimensional. Experiment with lots of different drawing and shading techniques until you find what works best for you. You are a unique individual with distinctive artistic needs. Stay true to yourself and continue developing your own vision and style.
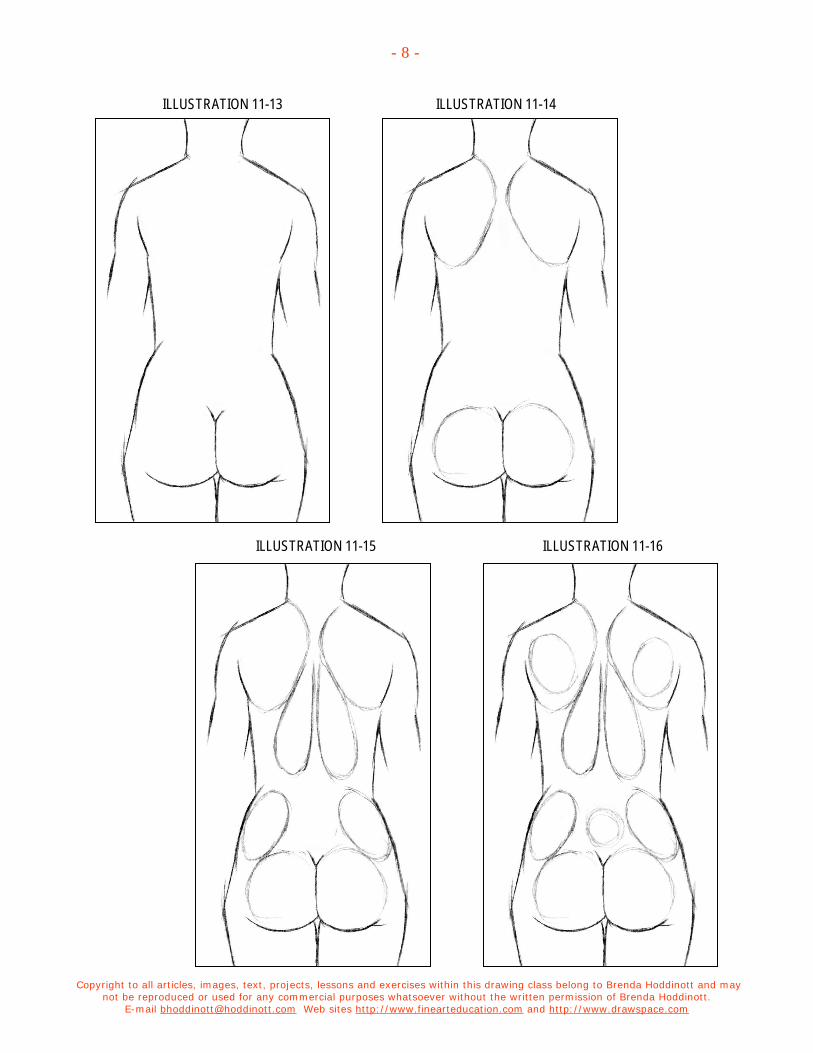
Copyright to all articles, images, text, projects, lessons and exercises within this drawing class belong to Brenda Hoddinott and may not be reproduced or used for any commercial purposes whatsoever without the written permission of Brenda Hoddinott.
E-mail [email protected] Web sites http://www.finearteducation.com and http://www.drawspace.com
- 8 -
ILLUSTRATION 11-13 ILLUSTRATION 11-14
ILLUSTRATION 11-15 ILLUSTRATION 11-16
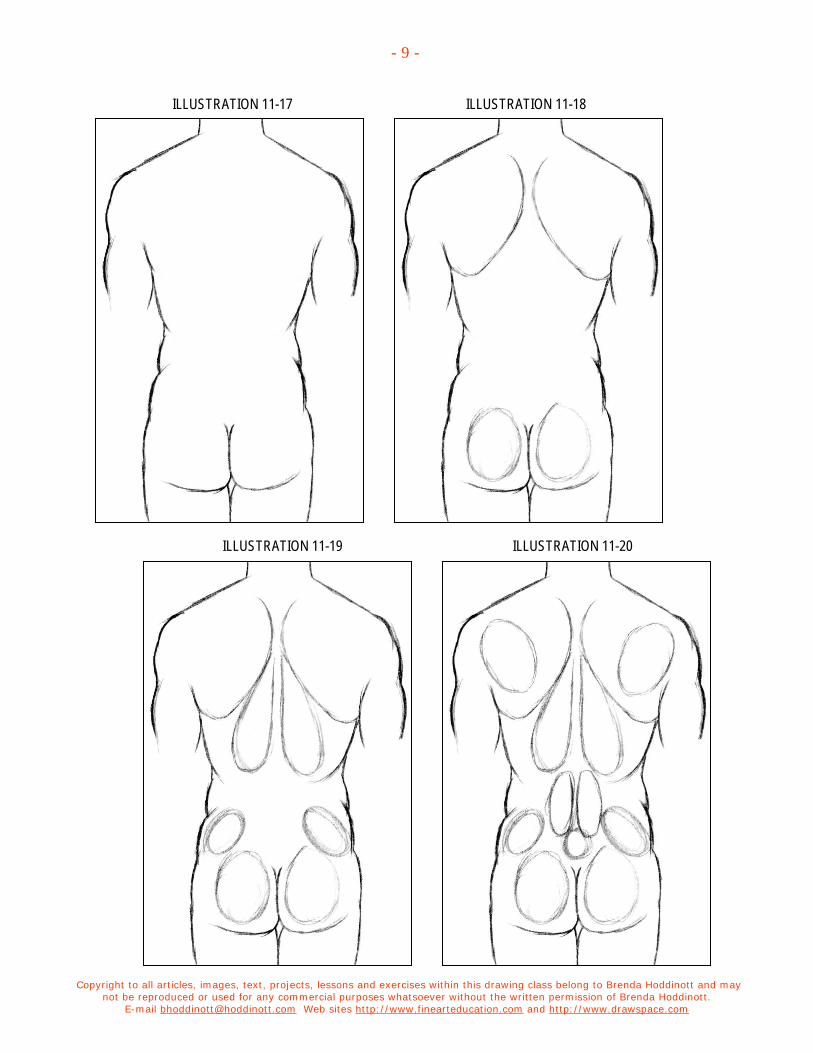
Copyright to all articles, images, text, projects, lessons and exercises within this drawing class belong to Brenda Hoddinott and may not be reproduced or used for any commercial purposes whatsoever without the written permission of Brenda Hoddinott.
E-mail [email protected] Web sites http://www.finearteducation.com and http://www.drawspace.com
- 9 -
ILLUSTRATION 11-17 ILLUSTRATION 11-18
ILLUSTRATION 11-19 ILLUSTRATION 11-20
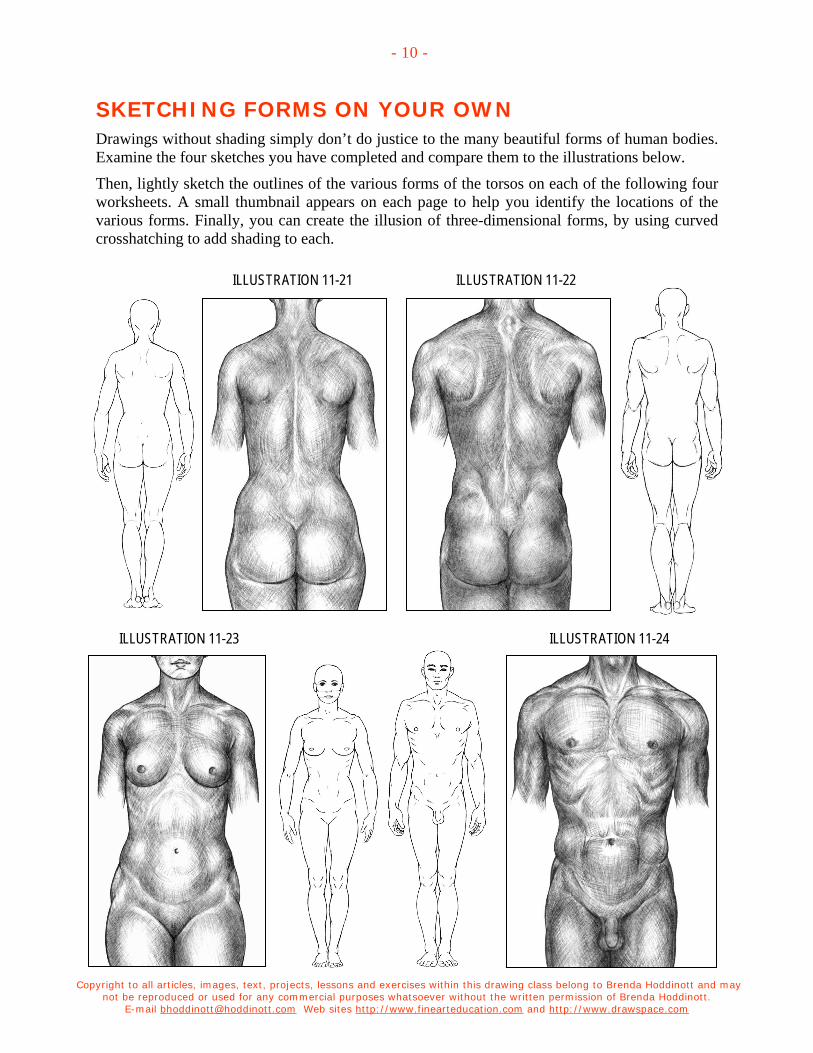
Copyright to all articles, images, text, projects, lessons and exercises within this drawing class belong to Brenda Hoddinott and may not be reproduced or used for any commercial purposes whatsoever without the written permission of Brenda Hoddinott.
E-mail [email protected] Web sites http://www.finearteducation.com and http://www.drawspace.com
- 10 -
SKETCHING FORMS ON YOUR OWN Drawings without shading simply don’t do justice to the many beautiful forms of human bodies. Examine the four sketches you have completed and compare them to the illustrations below.
Then, lightly sketch the outlines of the various forms of the torsos on each of the following four worksheets. A small thumbnail appears on each page to help you identify the locations of the various forms. Finally, you can create the illusion of three-dimensional forms, by using curved crosshatching to add shading to each.
ILLUSTRATION 11-21 ILLUSTRATION 11-22
ILLUSTRATION 11-23 ILLUSTRATION 11-24
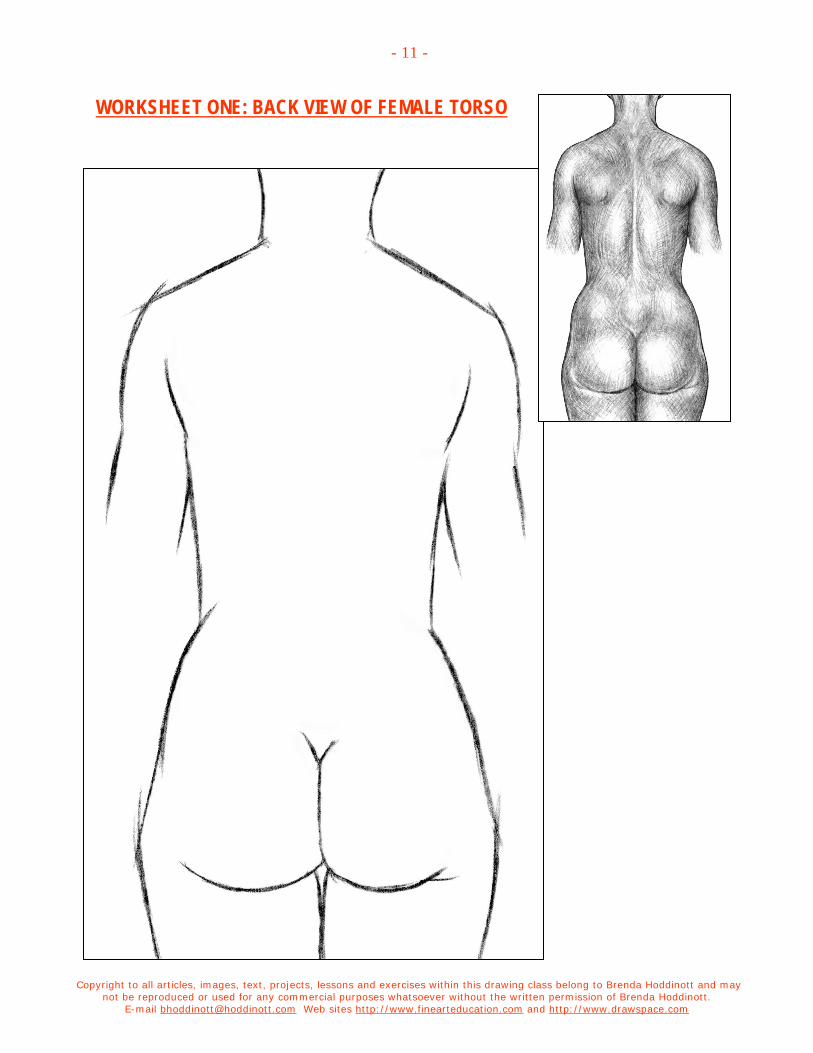
Copyright to all articles, images, text, projects, lessons and exercises within this drawing class belong to Brenda Hoddinott and may not be reproduced or used for any commercial purposes whatsoever without the written permission of Brenda Hoddinott.
E-mail [email protected] Web sites http://www.finearteducation.com and http://www.drawspace.com
- 11 -
WORKSHEET ONE: BACK VIEW OF FEMALE TORSO
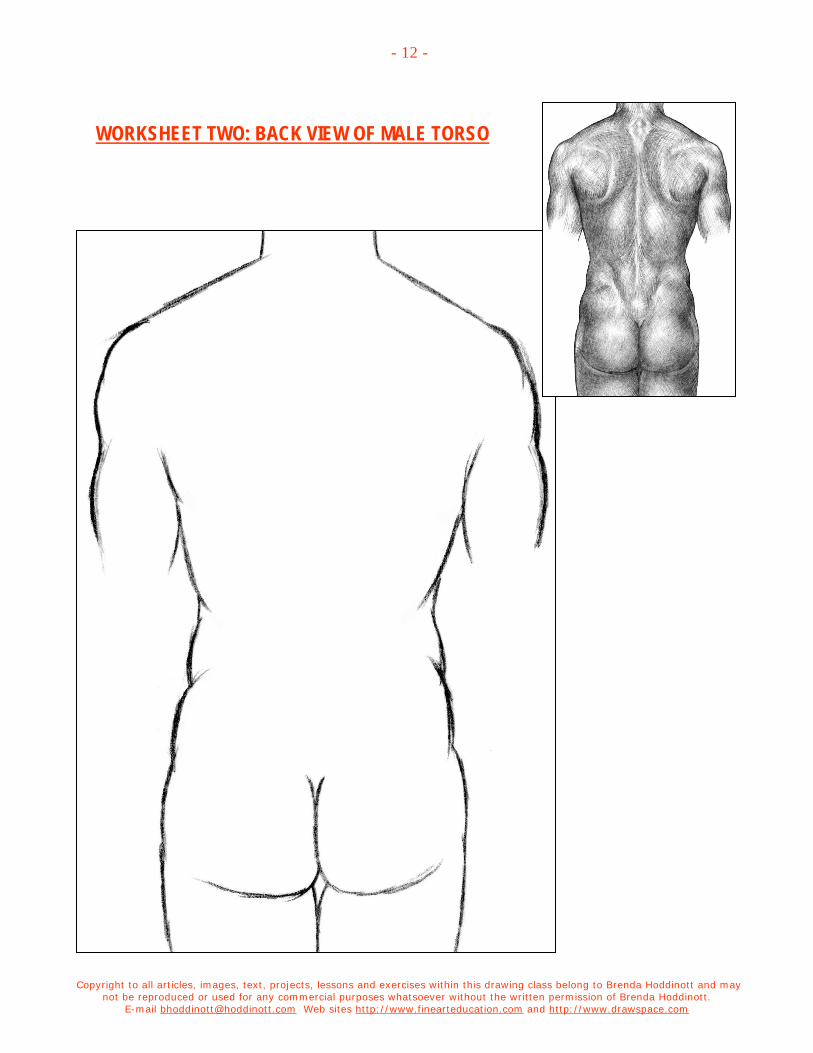
Copyright to all articles, images, text, projects, lessons and exercises within this drawing class belong to Brenda Hoddinott and may not be reproduced or used for any commercial purposes whatsoever without the written permission of Brenda Hoddinott.
E-mail [email protected] Web sites http://www.finearteducation.com and http://www.drawspace.com
- 12 -
WORKSHEET TWO: BACK VIEW OF MALE TORSO
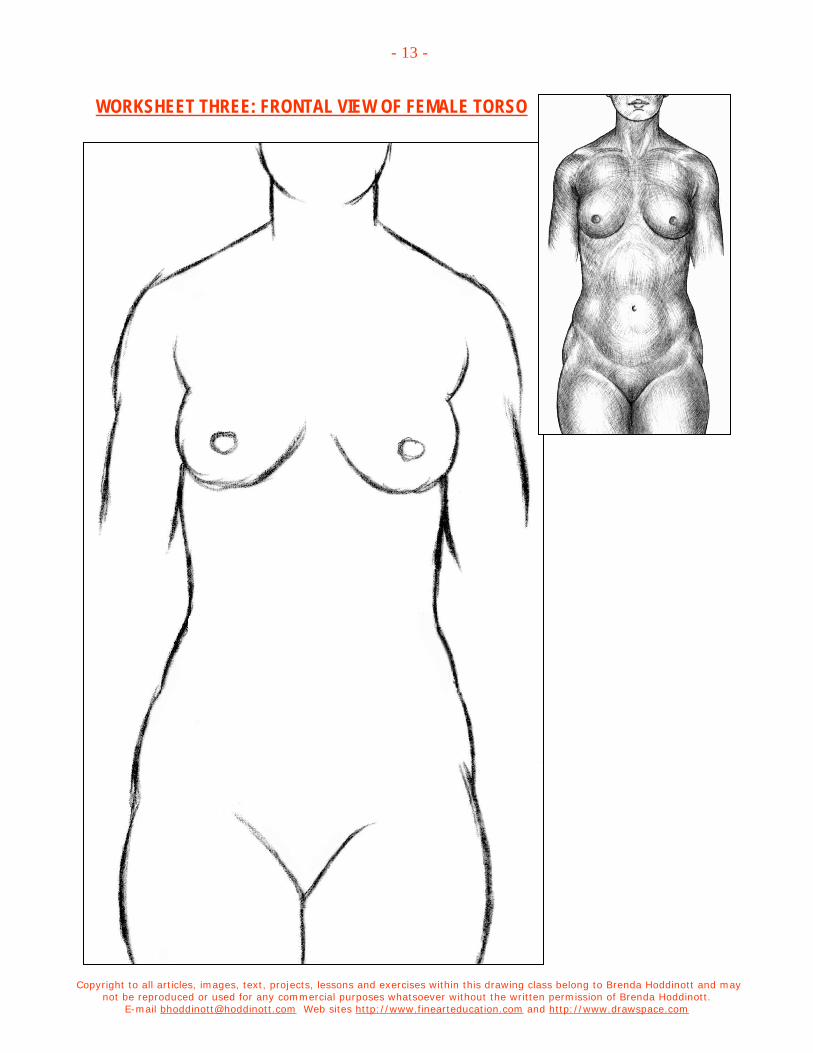
Copyright to all articles, images, text, projects, lessons and exercises within this drawing class belong to Brenda Hoddinott and may not be reproduced or used for any commercial purposes whatsoever without the written permission of Brenda Hoddinott.
E-mail [email protected] Web sites http://www.finearteducation.com and http://www.drawspace.com
- 13 -
WORKSHEET THREE: FRONTAL VIEW OF FEMALE TORSO
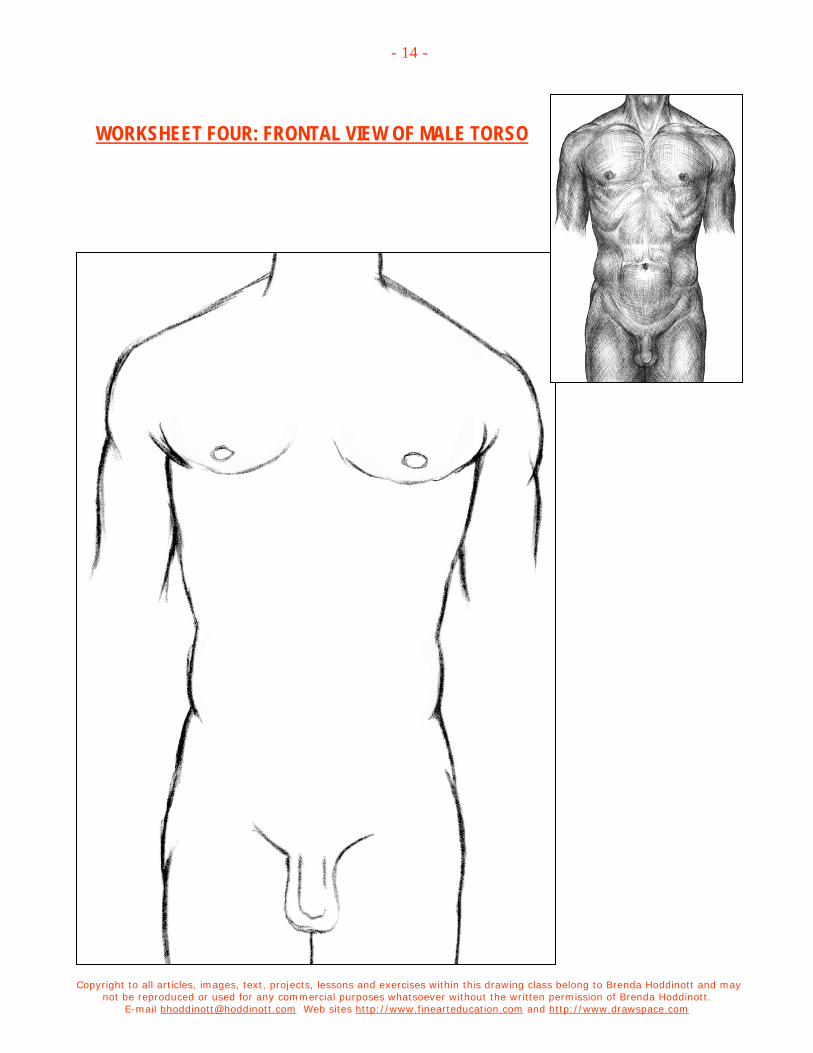
Copyright to all articles, images, text, projects, lessons and exercises within this drawing class belong to Brenda Hoddinott and may not be reproduced or used for any commercial purposes whatsoever without the written permission of Brenda Hoddinott.
E-mail [email protected] Web sites http://www.finearteducation.com and http://www.drawspace.com
- 14 -
WORKSHEET FOUR: FRONTAL VIEW OF MALE TORSO
Copyright to all articles, images, text, projects, lessons and exercises within this drawing class belong to Brenda Hoddinott and may not be reproduced or used for any commercial purposes whatsoever without the written permission of Brenda Hoddinott.
E-mail [email protected] Web sites http://www.finearteducation.com and http://www.drawspace.com
- 15 -
BRENDA HODDINOTT - BIOGRAPHY As a self-educated teacher, visual artist, portraitist, forensic artist, and illustrator, Brenda Hoddinott utilizes diverse art media including graphite, technical pen, colored pencil, chalk pastel, charcoal, conté crayon, and oil paints.
My philosophy on teaching art is to focus primarily on the enjoyment aspects while gently introducing the technical and academic. Hence, in creating a passion for the subject matter,
the quest for knowledge also becomes enjoyable. >Brenda Hoddinott<
Born in St. John’s, Newfoundland, Brenda grew up in the small town of Corner Brook. She developed strong technical competencies with a personal commitment to self directed learning, and the aid of assorted “Learn to Draw” books. During Brenda’s twenty-five year career as a self-educated civilian forensic artist, numerous criminal investigation departments have employed Brenda’s skills, including Royal Canadian Mounted Police and municipal police departments. In 1992, Brenda was honored with a commendation from the Royal Canadian Mounted Police, and in 1994, she was awarded a Certificate of Membership from “Forensic Artists International”.
Her home-based art career included graphic design, and teaching recreational drawing and painting classes. As supervisor of her community’s recreational art department, Brenda hired and trained teachers, and designed curriculum for several children’s art programs. In 1998, Brenda chose to end her eighteen-year career as an art educator in order to devote more time to writing, drawing, painting, and developing her websites.
Drawspace http://www.drawspace.com incorporates her unique style and innovative approach to curriculum development. This site offers downloadable and printable drawing classes for students of all abilities from the age of eight through adult. Students of all ages, levels and abilities have praised the simple step-by-step instructional approach. This site is respected as a resource for fine art educators, home schooling programs, and educational facilities throughout the world.
LEARN-TO-DRAW BOOKS BY BRENDA HODDINOTT Drawing for Dummies: Wiley Publishing, Inc., New, York, NY, this 336 page book is
available on various websites and in major bookstores internationally.
The Complete Idiot’s Guide to Drawing People: Winner of the Alpha-Penguin Book of the Year Award 2004, Alpha - Pearson Education – Macmillan, Indianapolis, IN, this 360 page book is available on various websites and in major bookstores internationally.
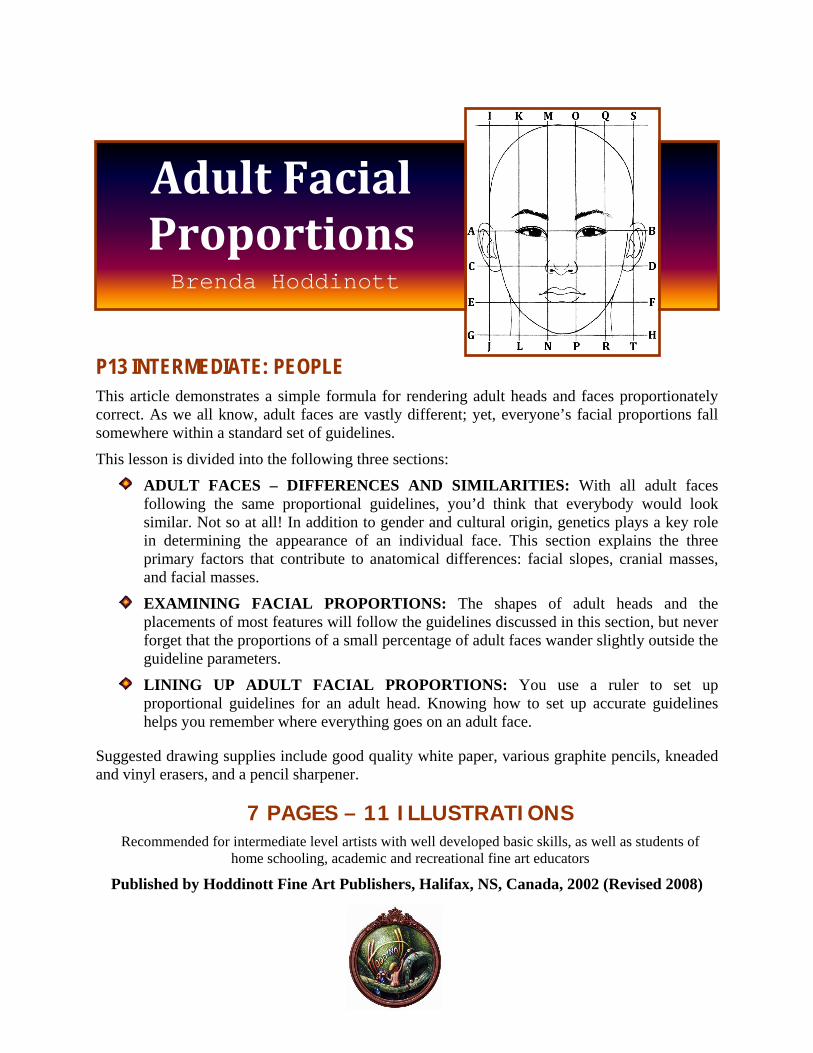
Adult Facial Proportions Brenda Hoddinott
P13 INTERMEDIATE: PEOPLE This article demonstrates a simple formula for rendering adult heads and faces proportionately correct. As we all know, adult faces are vastly different; yet, everyone’s facial proportions fall somewhere within a standard set of guidelines.
This lesson is divided into the following three sections:
ADULT FACES – DIFFERENCES AND SIMILARITIES: With all adult faces following the same proportional guidelines, you’d think that everybody would look similar. Not so at all! In addition to gender and cultural origin, genetics plays a key role in determining the appearance of an individual face. This section explains the three primary factors that contribute to anatomical differences: facial slopes, cranial masses, and facial masses.
EXAMINING FACIAL PROPORTIONS: The shapes of adult heads and the placements of most features will follow the guidelines discussed in this section, but never forget that the proportions of a small percentage of adult faces wander slightly outside the guideline parameters.
LINING UP ADULT FACIAL PROPORTIONS: You use a ruler to set up proportional guidelines for an adult head. Knowing how to set up accurate guidelines helps you remember where everything goes on an adult face.
Suggested drawing supplies include good quality white paper, various graphite pencils, kneaded and vinyl erasers, and a pencil sharpener.
7 PAGES – 11 ILLUSTRATIONS Recommended for intermediate level artists with well developed basic skills, as well as students of
home schooling, academic and recreational fine art educators
Published by Hoddinott Fine Art Publishers, Halifax, NS, Canada, 2002 (Revised 2008)
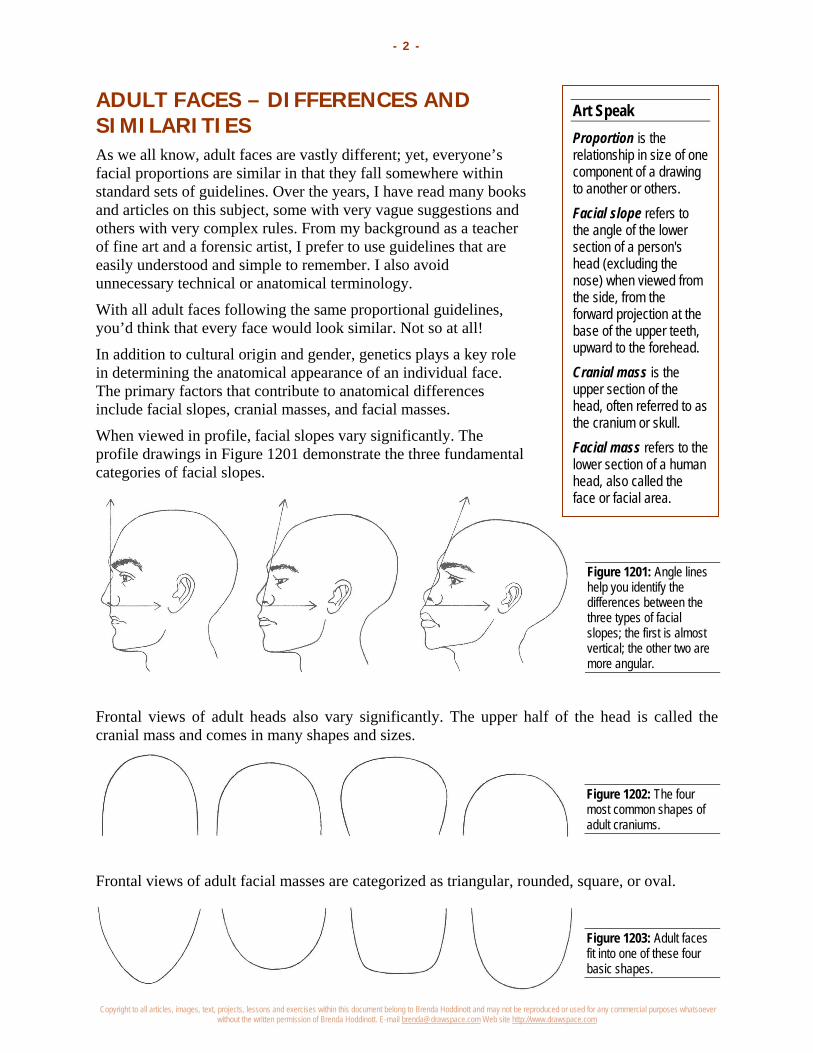
Copyright to all articles, images, text, projects, lessons and exercises within this document belong to Brenda Hoddinott and may not be reproduced or used for any commercial purposes whatsoever without the written permission of Brenda Hoddinott. E-mail [email protected] Web site http://www.drawspace.com
- 2 -
Art Speak Proportion is the relationship in size of one component of a drawing to another or others. Facial slope refers to the angle of the lower section of a person's head (excluding the nose) when viewed from the side, from the forward projection at the base of the upper teeth, upward to the forehead. Cranial mass is the upper section of the head, often referred to as the cranium or skull. Facial mass refers to the lower section of a human head, also called the face or facial area.
ADULT FACES – DIFFERENCES AND SIMILARITIES As we all know, adult faces are vastly different; yet, everyone’s facial proportions are similar in that they fall somewhere within standard sets of guidelines. Over the years, I have read many books and articles on this subject, some with very vague suggestions and others with very complex rules. From my background as a teacher of fine art and a forensic artist, I prefer to use guidelines that are easily understood and simple to remember. I also avoid unnecessary technical or anatomical terminology.
With all adult faces following the same proportional guidelines, you’d think that every face would look similar. Not so at all!
In addition to cultural origin and gender, genetics plays a key role in determining the anatomical appearance of an individual face. The primary factors that contribute to anatomical differences include facial slopes, cranial masses, and facial masses.
When viewed in profile, facial slopes vary significantly. The profile drawings in Figure 1201 demonstrate the three fundamental categories of facial slopes.
Figure 1201: Angle lines help you identify the differences between the three types of facial slopes; the first is almost vertical; the other two are more angular.
Frontal views of adult heads also vary significantly. The upper half of the head is called the cranial mass and comes in many shapes and sizes.
Figure 1202: The four most common shapes of adult craniums.
Frontal views of adult facial masses are categorized as triangular, rounded, square, or oval.
Figure 1203: Adult faces fit into one of these four basic shapes.
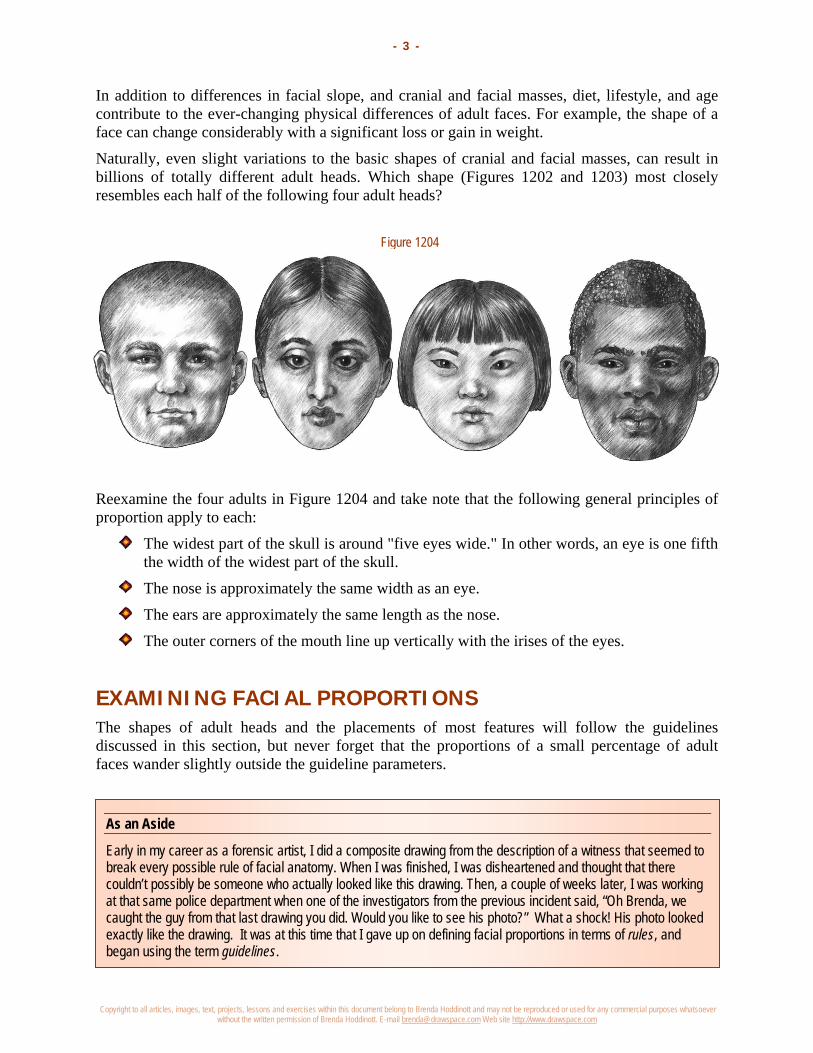
Copyright to all articles, images, text, projects, lessons and exercises within this document belong to Brenda Hoddinott and may not be reproduced or used for any commercial purposes whatsoever without the written permission of Brenda Hoddinott. E-mail [email protected] Web site http://www.drawspace.com
- 3 -
As an Aside
Early in my career as a forensic artist, I did a composite drawing from the description of a witness that seemed to break every possible rule of facial anatomy. When I was finished, I was disheartened and thought that there couldn’t possibly be someone who actually looked like this drawing. Then, a couple of weeks later, I was working at that same police department when one of the investigators from the previous incident said, “Oh Brenda, we caught the guy from that last drawing you did. Would you like to see his photo?” What a shock! His photo looked exactly like the drawing. It was at this time that I gave up on defining facial proportions in terms of rules, and began using the term guidelines.
Figure 1204
In addition to differences in facial slope, and cranial and facial masses, diet, lifestyle, and age contribute to the ever-changing physical differences of adult faces. For example, the shape of a face can change considerably with a significant loss or gain in weight.
Naturally, even slight variations to the basic shapes of cranial and facial masses, can result in billions of totally different adult heads. Which shape (Figures 1202 and 1203) most closely resembles each half of the following four adult heads?
Reexamine the four adults in Figure 1204 and take note that the following general principles of proportion apply to each:
The widest part of the skull is around "five eyes wide." In other words, an eye is one fifth the width of the widest part of the skull.
The nose is approximately the same width as an eye.
The ears are approximately the same length as the nose.
The outer corners of the mouth line up vertically with the irises of the eyes.
EXAMINING FACIAL PROPORTIONS The shapes of adult heads and the placements of most features will follow the guidelines discussed in this section, but never forget that the proportions of a small percentage of adult faces wander slightly outside the guideline parameters.
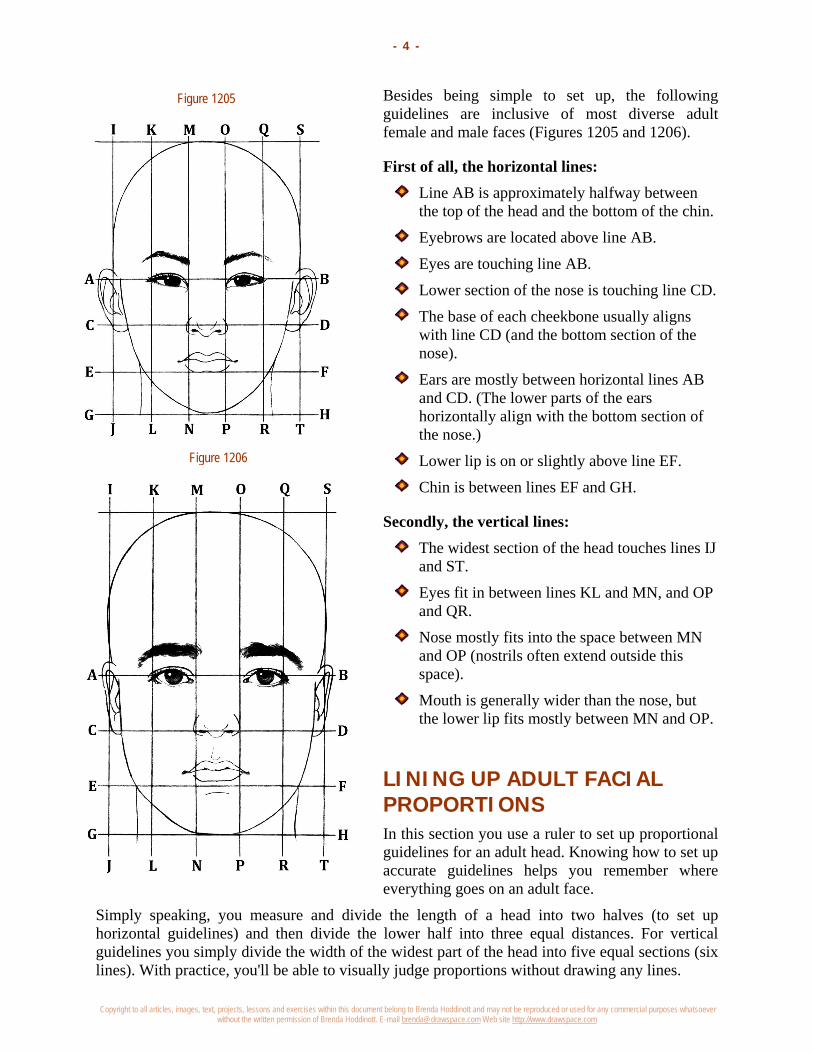
Copyright to all articles, images, text, projects, lessons and exercises within this document belong to Brenda Hoddinott and may not be reproduced or used for any commercial purposes whatsoever without the written permission of Brenda Hoddinott. E-mail [email protected] Web site http://www.drawspace.com
- 4 -
Figure 1206
Figure 1205 Besides being simple to set up, the following guidelines are inclusive of most diverse adult female and male faces (Figures 1205 and 1206).
First of all, the horizontal lines: Line AB is approximately halfway between
the top of the head and the bottom of the chin.
Eyebrows are located above line AB.
Eyes are touching line AB.
Lower section of the nose is touching line CD.
The base of each cheekbone usually aligns with line CD (and the bottom section of the nose).
Ears are mostly between horizontal lines AB and CD. (The lower parts of the ears horizontally align with the bottom section of the nose.)
Lower lip is on or slightly above line EF.
Chin is between lines EF and GH.
Secondly, the vertical lines: The widest section of the head touches lines IJ
and ST.
Eyes fit in between lines KL and MN, and OP and QR.
Nose mostly fits into the space between MN and OP (nostrils often extend outside this space).
Mouth is generally wider than the nose, but the lower lip fits mostly between MN and OP.
LINING UP ADULT FACIAL PROPORTIONS In this section you use a ruler to set up proportional guidelines for an adult head. Knowing how to set up accurate guidelines helps you remember where everything goes on an adult face.
Simply speaking, you measure and divide the length of a head into two halves (to set up horizontal guidelines) and then divide the lower half into three equal distances. For vertical guidelines you simply divide the width of the widest part of the head into five equal sections (six lines). With practice, you'll be able to visually judge proportions without drawing any lines.
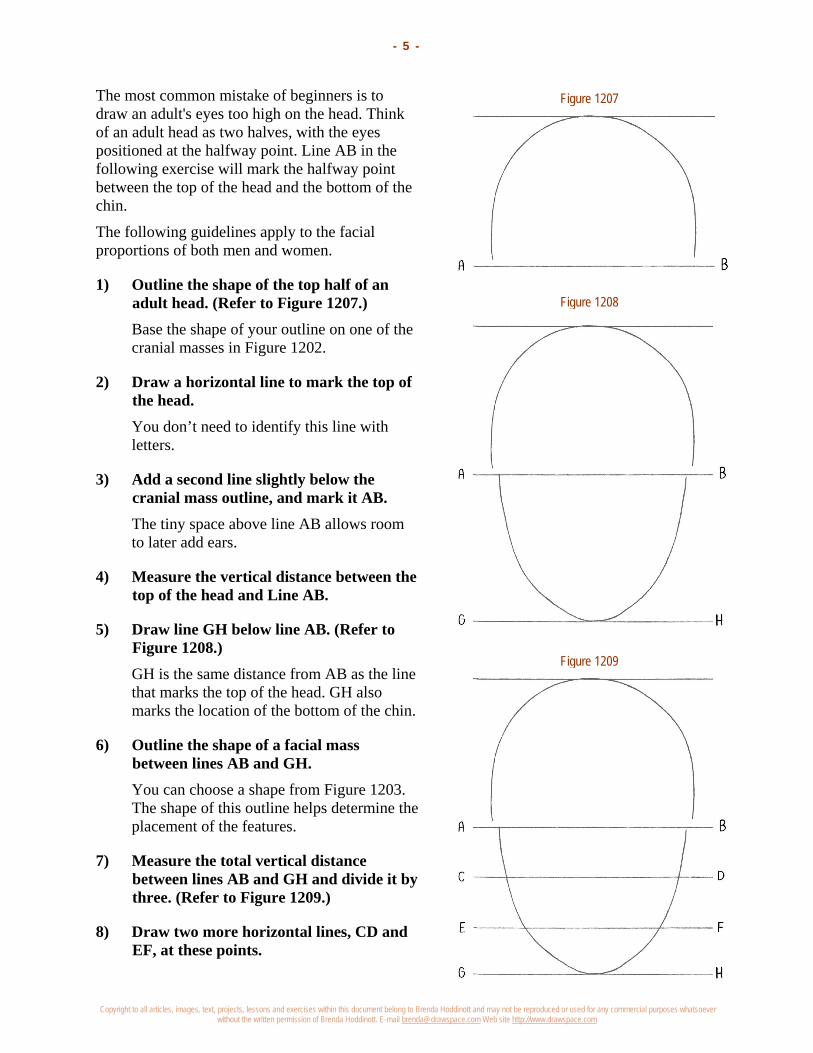
Copyright to all articles, images, text, projects, lessons and exercises within this document belong to Brenda Hoddinott and may not be reproduced or used for any commercial purposes whatsoever without the written permission of Brenda Hoddinott. E-mail [email protected] Web site http://www.drawspace.com
- 5 -
Figure 1207
Figure 1208
Figure 1209
The most common mistake of beginners is to draw an adult's eyes too high on the head. Think of an adult head as two halves, with the eyes positioned at the halfway point. Line AB in the following exercise will mark the halfway point between the top of the head and the bottom of the chin.
The following guidelines apply to the facial proportions of both men and women.
1) Outline the shape of the top half of an adult head. (Refer to Figure 1207.) Base the shape of your outline on one of the cranial masses in Figure 1202.
2) Draw a horizontal line to mark the top of the head. You don’t need to identify this line with letters.
3) Add a second line slightly below the cranial mass outline, and mark it AB. The tiny space above line AB allows room to later add ears.
4) Measure the vertical distance between the top of the head and Line AB.
5) Draw line GH below line AB. (Refer to Figure 1208.) GH is the same distance from AB as the line that marks the top of the head. GH also marks the location of the bottom of the chin.
6) Outline the shape of a facial mass between lines AB and GH. You can choose a shape from Figure 1203. The shape of this outline helps determine the placement of the features.
7) Measure the total vertical distance between lines AB and GH and divide it by three. (Refer to Figure 1209.)
8) Draw two more horizontal lines, CD and EF, at these points.
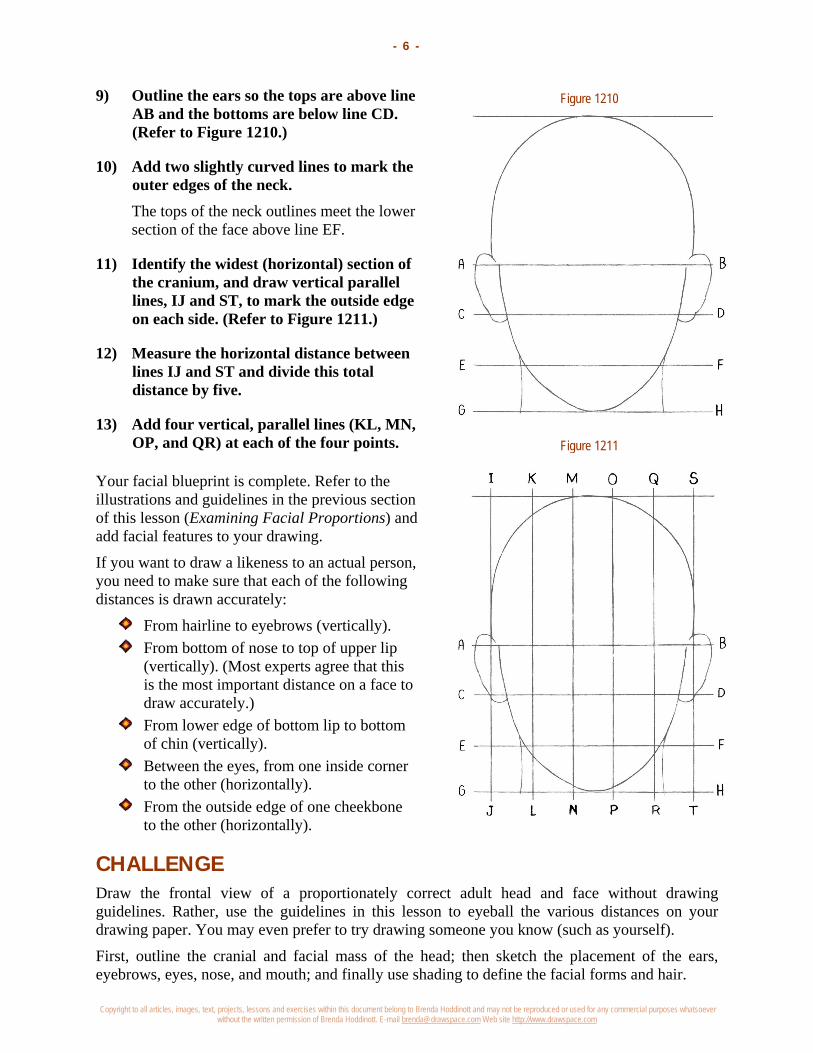
Copyright to all articles, images, text, projects, lessons and exercises within this document belong to Brenda Hoddinott and may not be reproduced or used for any commercial purposes whatsoever without the written permission of Brenda Hoddinott. E-mail [email protected] Web site http://www.drawspace.com
- 6 -
Figure 1210
Figure 1211
9) Outline the ears so the tops are above line AB and the bottoms are below line CD. (Refer to Figure 1210.)
10) Add two slightly curved lines to mark the outer edges of the neck. The tops of the neck outlines meet the lower section of the face above line EF.
11) Identify the widest (horizontal) section of the cranium, and draw vertical parallel lines, IJ and ST, to mark the outside edge on each side. (Refer to Figure 1211.)
12) Measure the horizontal distance between lines IJ and ST and divide this total distance by five.
13) Add four vertical, parallel lines (KL, MN, OP, and QR) at each of the four points.
Your facial blueprint is complete. Refer to the illustrations and guidelines in the previous section of this lesson (Examining Facial Proportions) and add facial features to your drawing.
If you want to draw a likeness to an actual person, you need to make sure that each of the following distances is drawn accurately:
From hairline to eyebrows (vertically). From bottom of nose to top of upper lip
(vertically). (Most experts agree that this is the most important distance on a face to draw accurately.)
From lower edge of bottom lip to bottom of chin (vertically).
Between the eyes, from one inside corner to the other (horizontally).
From the outside edge of one cheekbone to the other (horizontally).
CHALLENGE Draw the frontal view of a proportionately correct adult head and face without drawing guidelines. Rather, use the guidelines in this lesson to eyeball the various distances on your drawing paper. You may even prefer to try drawing someone you know (such as yourself).
First, outline the cranial and facial mass of the head; then sketch the placement of the ears, eyebrows, eyes, nose, and mouth; and finally use shading to define the facial forms and hair.
Copyright to all articles, images, text, projects, lessons and exercises within this document belong to Brenda Hoddinott and may not be reproduced or used for any commercial purposes whatsoever without the written permission of Brenda Hoddinott. E-mail [email protected] Web site http://www.drawspace.com
- 7 -
BRENDA HODDINOTT - BIOGRAPHY As a self-educated teacher, visual artist, portraitist, forensic artist, and illustrator, Brenda Hoddinott utilizes diverse art media including graphite, technical pen, colored pencil, chalk pastel, charcoal, conté crayon, and oil paints.
My philosophy on teaching art is to focus primarily on the enjoyment aspects while gently introducing the technical and academic. Hence, in creating a passion for the subject matter, the quest for knowledge also
becomes enjoyable. >Brenda Hoddinott<
Born in St. John’s, Newfoundland, Brenda grew up in the small town of Corner Brook. She developed strong technical competencies with a personal commitment to self directed learning, and the aid of assorted “Learn to Draw” books. During Brenda’s twenty-five year career as a self-educated civilian forensic artist, numerous criminal investigation departments have employed Brenda’s skills, including Royal Canadian Mounted Police and municipal police departments. In 1992, Brenda was honored with a commendation from the Royal Canadian Mounted Police, and in 1994, she was awarded a Certificate of Membership from “Forensic Artists International”.
Her home-based art career included graphic design, and teaching recreational drawing and painting classes. As supervisor of her community’s recreational art department, Brenda hired and trained teachers, and designed curriculum for several children’s art programs. In 1998, Brenda chose to end her eighteen-year career as an art educator in order to devote more time to writing, drawing, painting, and developing her websites.
Drawspace http://www.drawspace.com incorporates her unique style and innovative approach to curriculum development. This site offers downloadable and printable drawing classes for students of all abilities from the age of eight through adult. Students of all ages, levels and abilities have praised the simple step-by-step instructional approach. This site is respected as a resource for fine art educators, home schooling programs, and educational facilities throughout the world.
LEARN-TO-DRAW BOOKS BY BRENDA HODDINOTT Drawing for Dummies: Wiley Publishing, Inc., New, York, NY, this 336 page book is
available on various websites and in major bookstores internationally.
The Complete Idiot’s Guide to Drawing People: Winner of the Alpha-Penguin Book of the Year Award 2004, Alpha - Pearson Education – Macmillan, Indianapolis, IN, this 360 page book is available on various websites and in major bookstores internationally.
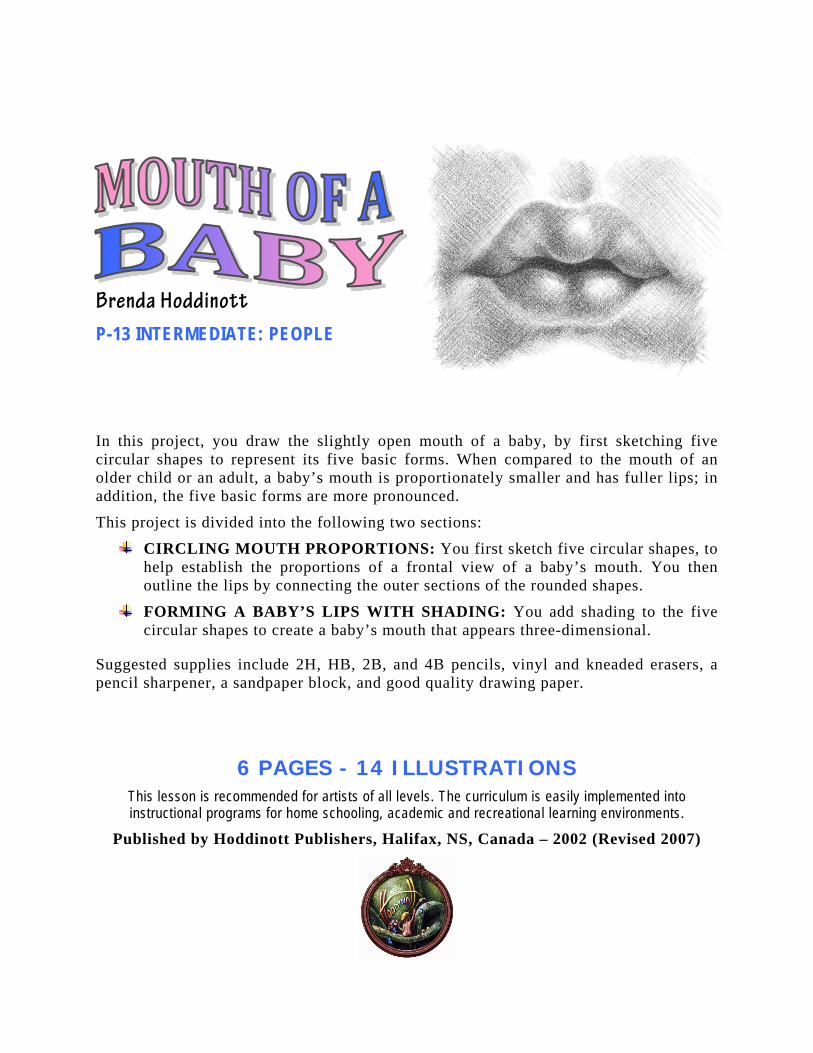
Brenda Hoddinott P-13 INTERMEDIATE: PEOPLE
In this project, you draw the slightly open mouth of a baby, by first sketching five circular shapes to represent its five basic forms. When compared to the mouth of an older child or an adult, a baby’s mouth is proportionately smaller and has fuller lips; in addition, the five basic forms are more pronounced.
This project is divided into the following two sections:
CIRCLING MOUTH PROPORTIONS: You first sketch five circular shapes, to help establish the proportions of a frontal view of a baby’s mouth. You then outline the lips by connecting the outer sections of the rounded shapes.
FORMING A BABY’S LIPS WITH SHADING: You add shading to the five circular shapes to create a baby’s mouth that appears three-dimensional.
Suggested supplies include 2H, HB, 2B, and 4B pencils, vinyl and kneaded erasers, a pencil sharpener, a sandpaper block, and good quality drawing paper.
6 PAGES - 14 ILLUSTRATIONS This lesson is recommended for artists of all levels. The curriculum is easily implemented into instructional programs for home schooling, academic and recreational learning environments.
Published by Hoddinott Publishers, Halifax, NS, Canada – 2002 (Revised 2007)
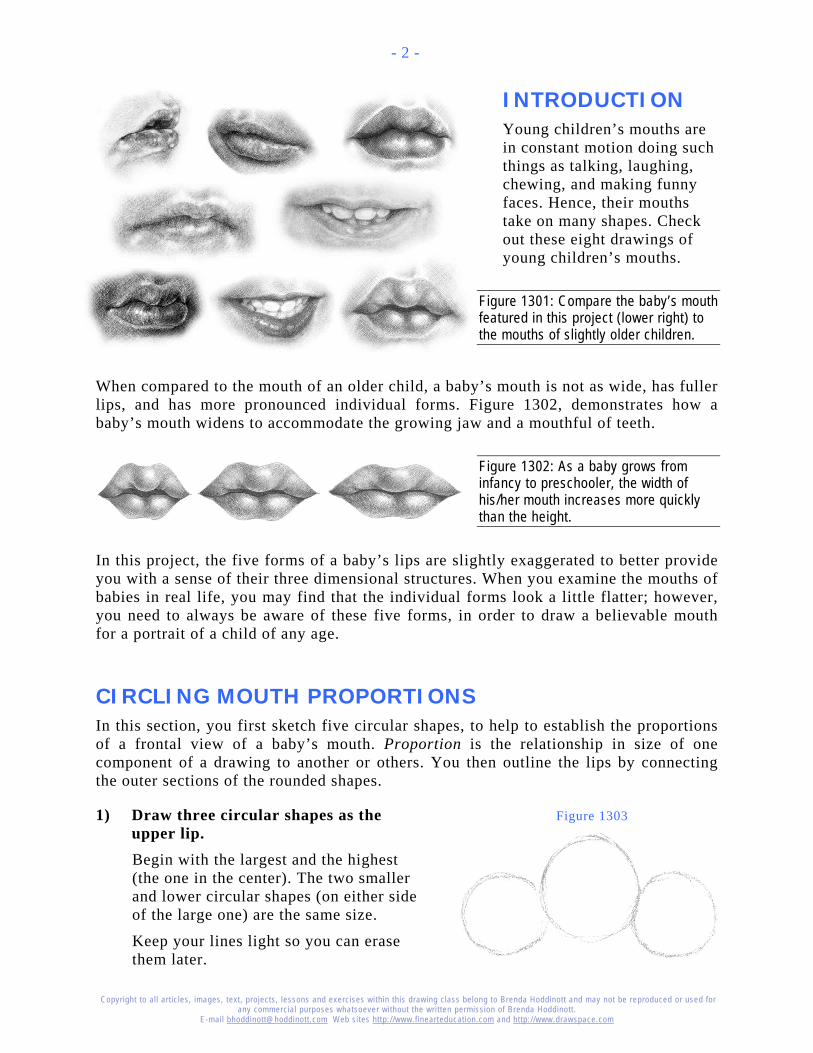
Copyright to al l art ic les, images, text, projects, lessons and exercises within this drawing class belong to Brenda Hoddinott and may not be reproduced or used for any commercial purposes whatsoever without the wri t ten permission of Brenda Hoddinott .
E-mail bhoddinott@hoddinott .com Web si tes http:/ /www.f inearteducat ion.com and ht tp:/ /www.drawspace.com
- 2 -
INTRODUCTION Young children’s mouths are in constant motion doing such things as talking, laughing, chewing, and making funny faces. Hence, their mouths take on many shapes. Check out these eight drawings of young children’s mouths.
Figure 1301: Compare the baby’s mouth featured in this project (lower right) to the mouths of slightly older children.
When compared to the mouth of an older child, a baby’s mouth is not as wide, has fuller lips, and has more pronounced individual forms. Figure 1302, demonstrates how a baby’s mouth widens to accommodate the growing jaw and a mouthful of teeth.
Figure 1302: As a baby grows from infancy to preschooler, the width of his/her mouth increases more quickly than the height.
In this project, the five forms of a baby’s lips are slightly exaggerated to better provide you with a sense of their three dimensional structures. When you examine the mouths of babies in real life, you may find that the individual forms look a little flatter; however, you need to always be aware of these five forms, in order to draw a believable mouth for a portrait of a child of any age.
CIRCLING MOUTH PROPORTIONS In this section, you first sketch five circular shapes, to help to establish the proportions of a frontal view of a baby’s mouth. Proportion is the relationship in size of one component of a drawing to another or others. You then outline the lips by connecting the outer sections of the rounded shapes.
1) Draw three circular shapes as the upper lip. Begin with the largest and the highest (the one in the center). The two smaller and lower circular shapes (on either side of the large one) are the same size.
Keep your lines light so you can erase them later.
Figure 1303
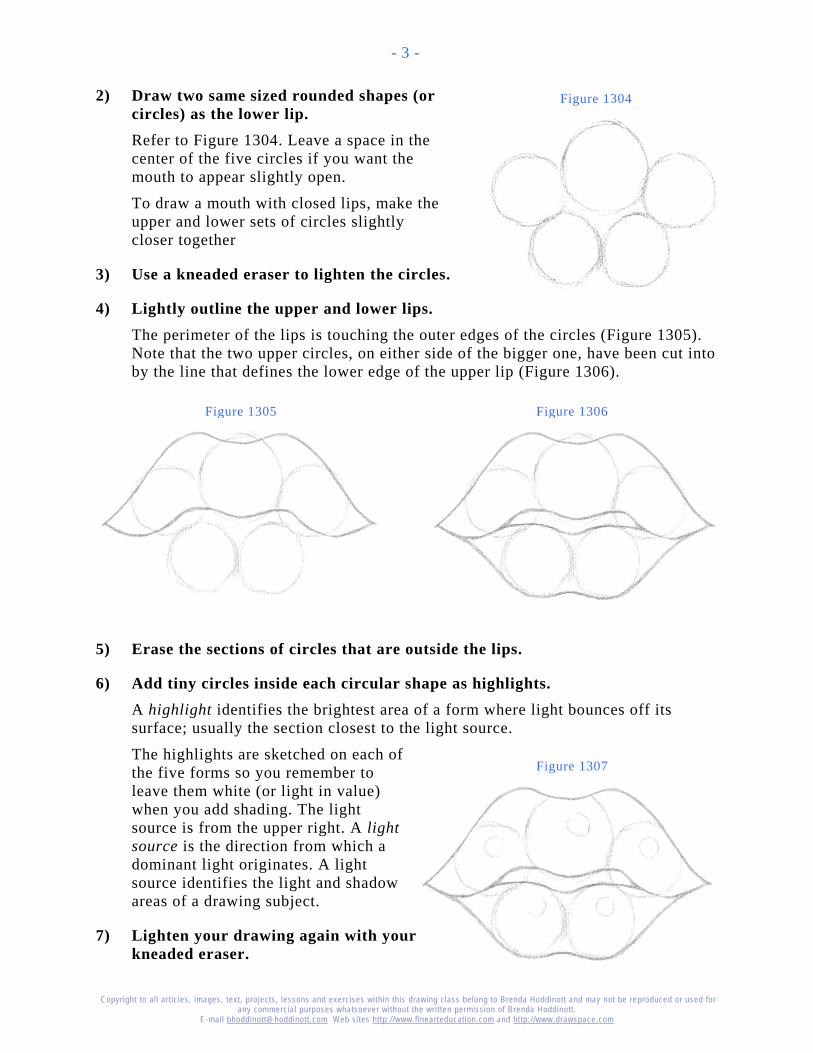
Copyright to al l art ic les, images, text, projects, lessons and exercises within this drawing class belong to Brenda Hoddinott and may not be reproduced or used for any commercial purposes whatsoever without the wri t ten permission of Brenda Hoddinott .
E-mail bhoddinott@hoddinott .com Web si tes http:/ /www.f inearteducat ion.com and ht tp:/ /www.drawspace.com
- 3 -
2) Draw two same sized rounded shapes (or circles) as the lower lip. Refer to Figure 1304. Leave a space in the center of the five circles if you want the mouth to appear slightly open.
To draw a mouth with closed lips, make the upper and lower sets of circles slightly closer together
3) Use a kneaded eraser to lighten the circles.
4) Lightly outline the upper and lower lips. The perimeter of the lips is touching the outer edges of the circles (Figure 1305). Note that the two upper circles, on either side of the bigger one, have been cut into by the line that defines the lower edge of the upper lip (Figure 1306).
5) Erase the sections of circles that are outside the lips.
6) Add tiny circles inside each circular shape as highlights. A highlight identifies the brightest area of a form where light bounces off its surface; usually the section closest to the light source.
The highlights are sketched on each of the five forms so you remember to leave them white (or light in value) when you add shading. The light source is from the upper right. A light source is the direction from which a dominant light originates. A light source identifies the light and shadow areas of a drawing subject.
7) Lighten your drawing again with your kneaded eraser.
Figure 1304
Figure 1305 Figure 1306
Figure 1307
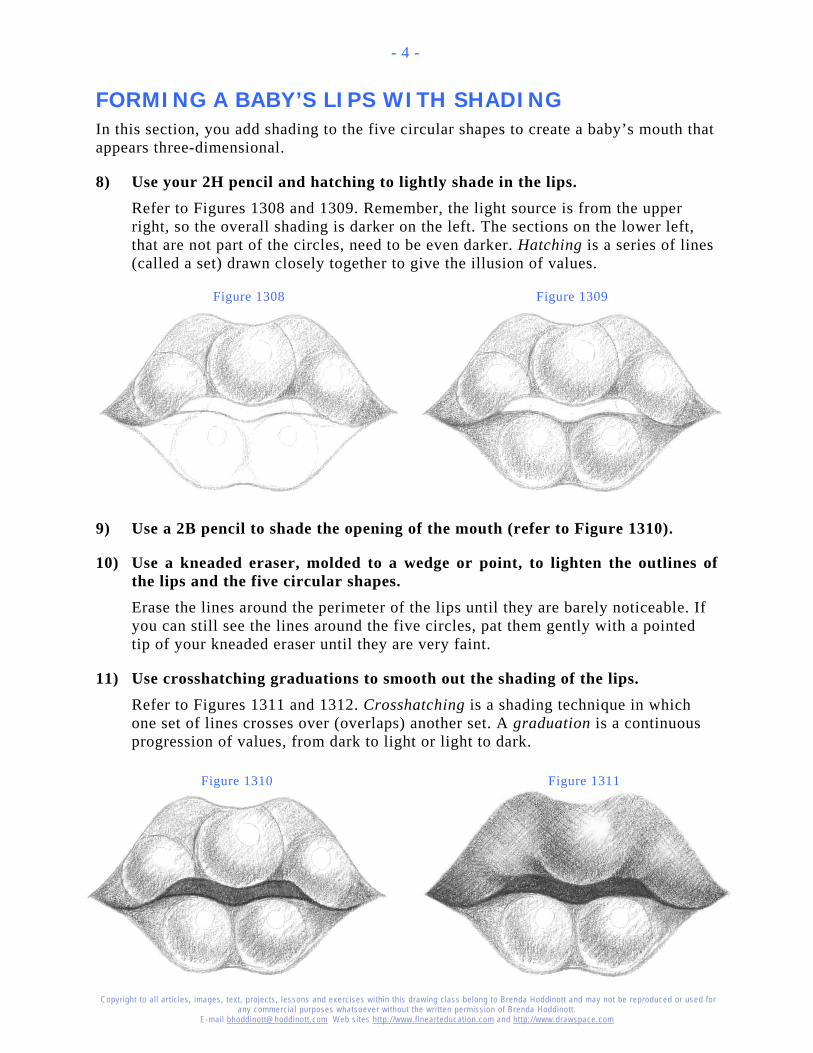
Copyright to al l art ic les, images, text, projects, lessons and exercises within this drawing class belong to Brenda Hoddinott and may not be reproduced or used for any commercial purposes whatsoever without the wri t ten permission of Brenda Hoddinott .
E-mail bhoddinott@hoddinott .com Web si tes http:/ /www.f inearteducat ion.com and ht tp:/ /www.drawspace.com
- 4 -
FORMING A BABY’S LIPS WITH SHADING In this section, you add shading to the five circular shapes to create a baby’s mouth that appears three-dimensional.
8) Use your 2H pencil and hatching to lightly shade in the lips. Refer to Figures 1308 and 1309. Remember, the light source is from the upper right, so the overall shading is darker on the left. The sections on the lower left, that are not part of the circles, need to be even darker. Hatching is a series of lines (called a set) drawn closely together to give the illusion of values.
9) Use a 2B pencil to shade the opening of the mouth (refer to Figure 1310).
10) Use a kneaded eraser, molded to a wedge or point, to lighten the outlines of the lips and the five circular shapes. Erase the lines around the perimeter of the lips until they are barely noticeable. If you can still see the lines around the five circles, pat them gently with a pointed tip of your kneaded eraser until they are very faint.
11) Use crosshatching graduations to smooth out the shading of the lips. Refer to Figures 1311 and 1312. Crosshatching is a shading technique in which one set of lines crosses over (overlaps) another set. A graduation is a continuous progression of values, from dark to light or light to dark.
Figure 1308 Figure 1309
Figure 1310 Figure 1311
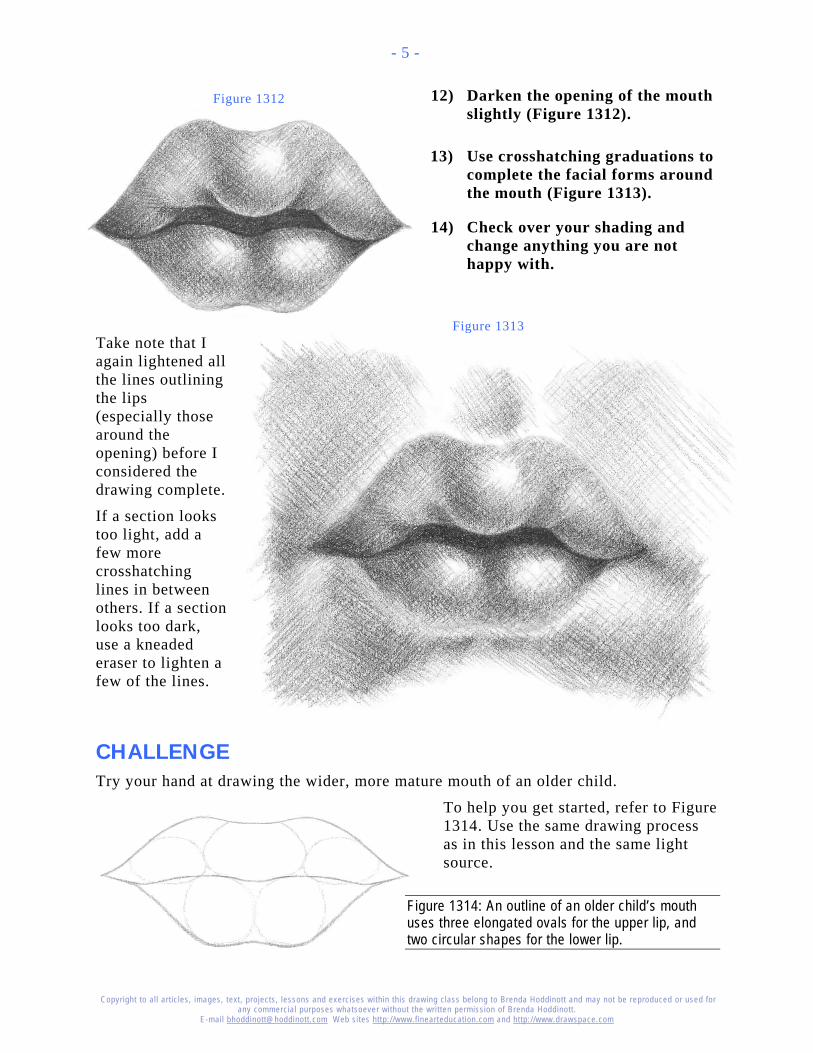
Copyright to al l art ic les, images, text, projects, lessons and exercises within this drawing class belong to Brenda Hoddinott and may not be reproduced or used for any commercial purposes whatsoever without the wri t ten permission of Brenda Hoddinott .
E-mail bhoddinott@hoddinott .com Web si tes http:/ /www.f inearteducat ion.com and ht tp:/ /www.drawspace.com
- 5 -
12) Darken the opening of the mouth slightly (Figure 1312).
13) Use crosshatching graduations to complete the facial forms around the mouth (Figure 1313).
14) Check over your shading and change anything you are not happy with.
Take note that I again lightened all the lines outlining the lips (especially those around the opening) before I considered the drawing complete.
If a section looks too light, add a few more crosshatching lines in between others. If a section looks too dark, use a kneaded eraser to lighten a few of the lines.
CHALLENGE Try your hand at drawing the wider, more mature mouth of an older child.
To help you get started, refer to Figure 1314. Use the same drawing process as in this lesson and the same light source.
Figure 1314: An outline of an older child’s mouth uses three elongated ovals for the upper lip, and two circular shapes for the lower lip.
Figure 1312
Figure 1313
Copyright to al l art ic les, images, text, projects, lessons and exercises within this drawing class belong to Brenda Hoddinott and may not be reproduced or used for any commercial purposes whatsoever without the wri t ten permission of Brenda Hoddinott .
E-mail bhoddinott@hoddinott .com Web si tes http:/ /www.f inearteducat ion.com and ht tp:/ /www.drawspace.com
- 6 -
BRENDA HODDINOTT - BIOGRAPHY As a self-educated teacher, visual artist, portraitist, forensic artist, and illustrator, Brenda Hoddinott utilizes diverse art media including graphite, technical pen, colored pencil, chalk pastel, charcoal, conté crayon, and oil paints.
My philosophy on teaching art is to focus primarily on the enjoyment aspects while gently introducing the technical and academic. Hence, in creating a passion for the subject matter, the quest for knowledge also becomes enjoyable.
>Brenda Hoddinott<
Born in St. John’s, Newfoundland, Brenda grew up in the small town of Corner Brook. She developed strong technical competencies with a personal commitment to self directed learning, and the aid of assorted “Learn to Draw” books. During Brenda’s twenty-five year career as a self-educated civilian forensic artist, numerous criminal investigation departments have employed Brenda’s skills, including Royal Canadian Mounted Police and municipal police departments. In 1992, Brenda was honored with a commendation from the Royal Canadian Mounted Police, and in 1994, she was awarded a Certificate of Membership from “Forensic Artists International”.
Her home-based art career included graphic design, and teaching recreational drawing and painting classes. As supervisor of her community’s recreational art department, Brenda hired and trained teachers, and designed curriculum for several children’s art programs. In 1998, Brenda chose to end her eighteen-year career as an art educator in order to devote more time to writing, drawing, painting, and developing her websites.
Drawspace http://www.drawspace.com incorporates her unique style and innovative approach to curriculum development. This site offers downloadable and printable drawing classes for students of all abilities from the age of eight through adult. Students of all ages, levels and abilities have praised the simple step-by-step instructional approach. This site is respected as a resource for fine art educators, home schooling programs, and educational facilities throughout the world.
LEARN-TO-DRAW BOOKS BY BRENDA HODDINOTT Drawing for Dummies: Wiley Publishing, Inc., New, York, NY, this 336 page book
is available on various websites and in major bookstores internationally.
The Complete Idiot’s Guide to Drawing People: Winner of the Alpha-Penguin Book of the Year Award 2004, Alpha - Pearson Education – Macmillan, Indianapolis, IN, this 360 page book is available on various websites and in major bookstores internationally.
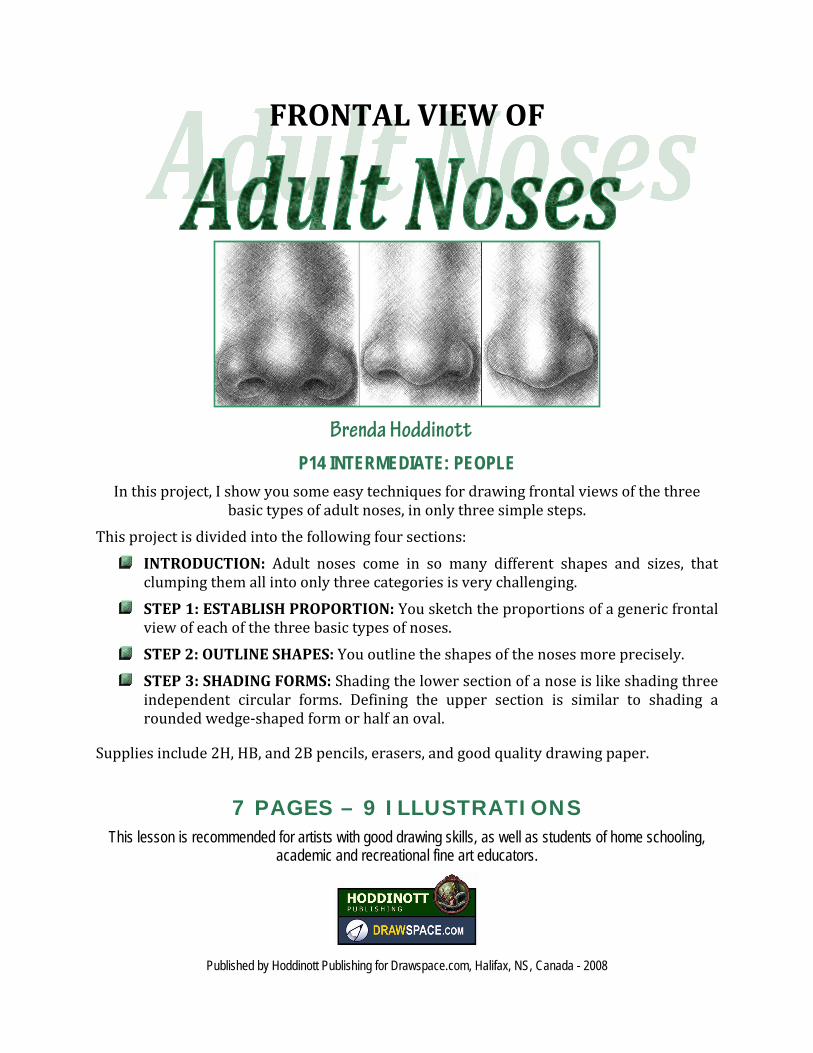
FRONTAL VIEW OF
Brenda Hoddinott P14 INTERMEDIATE: PEOPLE
In this project, I show you some easy techniques for drawing frontal views of the three basic types of adult noses, in only three simple steps.
This project is divided into the following four sections:
INTRODUCTION: Adult noses come in so many different shapes and sizes, that clumping them all into only three categories is very challenging.
STEP 1: ESTABLISH PROPORTION: You sketch the proportions of a generic frontal view of each of the three basic types of noses.
STEP 2: OUTLINE SHAPES: You outline the shapes of the noses more precisely.
STEP 3: SHADING FORMS: Shading the lower section of a nose is like shading three independent circular forms. Defining the upper section is similar to shading a rounded wedge-shaped form or half an oval.
Supplies include 2H, HB, and 2B pencils, erasers, and good quality drawing paper.
7 PAGES – 9 ILLUSTRATIONS This lesson is recommended for artists with good drawing skills, as well as students of home schooling,
academic and recreational fine art educators.
Published by Hoddinott Publishing for Drawspace.com, Halifax, NS, Canada - 2008
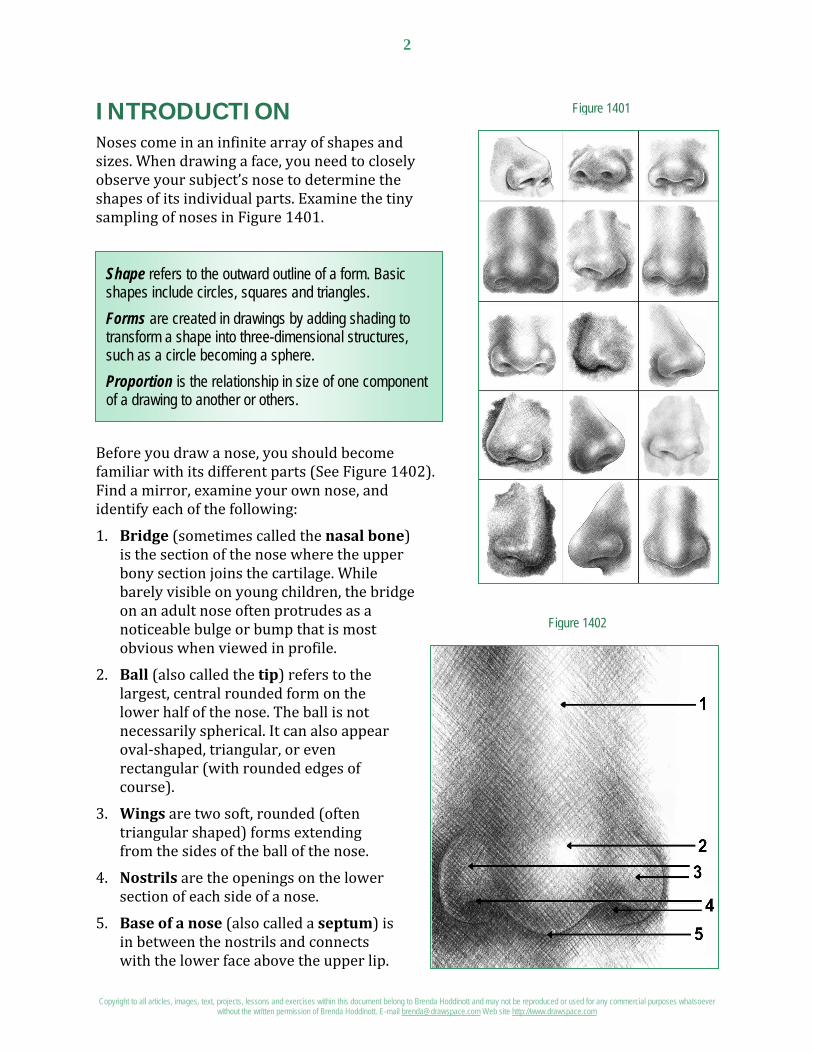
Copyright to all articles, images, text, projects, lessons and exercises within this document belong to Brenda Hoddinott and may not be reproduced or used for any commercial purposes whatsoever without the written permission of Brenda Hoddinott. E-mail [email protected] Web site http://www.drawspace.com
2
Figure 1401
Shape refers to the outward outline of a form. Basic shapes include circles, squares and triangles. Forms are created in drawings by adding shading to transform a shape into three-dimensional structures, such as a circle becoming a sphere. Proportion is the relationship in size of one component of a drawing to another or others.
Figure 1402
INTRODUCTION Noses come in an infinite array of shapes and sizes. When drawing a face, you need to closely observe your subject’s nose to determine the shapes of its individual parts. Examine the tiny sampling of noses in Figure 1401.
Before you draw a nose, you should become familiar with its different parts (See Figure 1402). Find a mirror, examine your own nose, and identify each of the following:
1. Bridge (sometimes called the nasal bone) is the section of the nose where the upper bony section joins the cartilage. While barely visible on young children, the bridge on an adult nose often protrudes as a noticeable bulge or bump that is most obvious when viewed in profile.
2. Ball (also called the tip) refers to the largest, central rounded form on the lower half of the nose. The ball is not necessarily spherical. It can also appear oval-shaped, triangular, or even rectangular (with rounded edges of course).
3. Wings are two soft, rounded (often triangular shaped) forms extending from the sides of the ball of the nose.
4. Nostrils are the openings on the lower section of each side of a nose.
5. Base of a nose (also called a septum) is in between the nostrils and connects with the lower face above the upper lip.
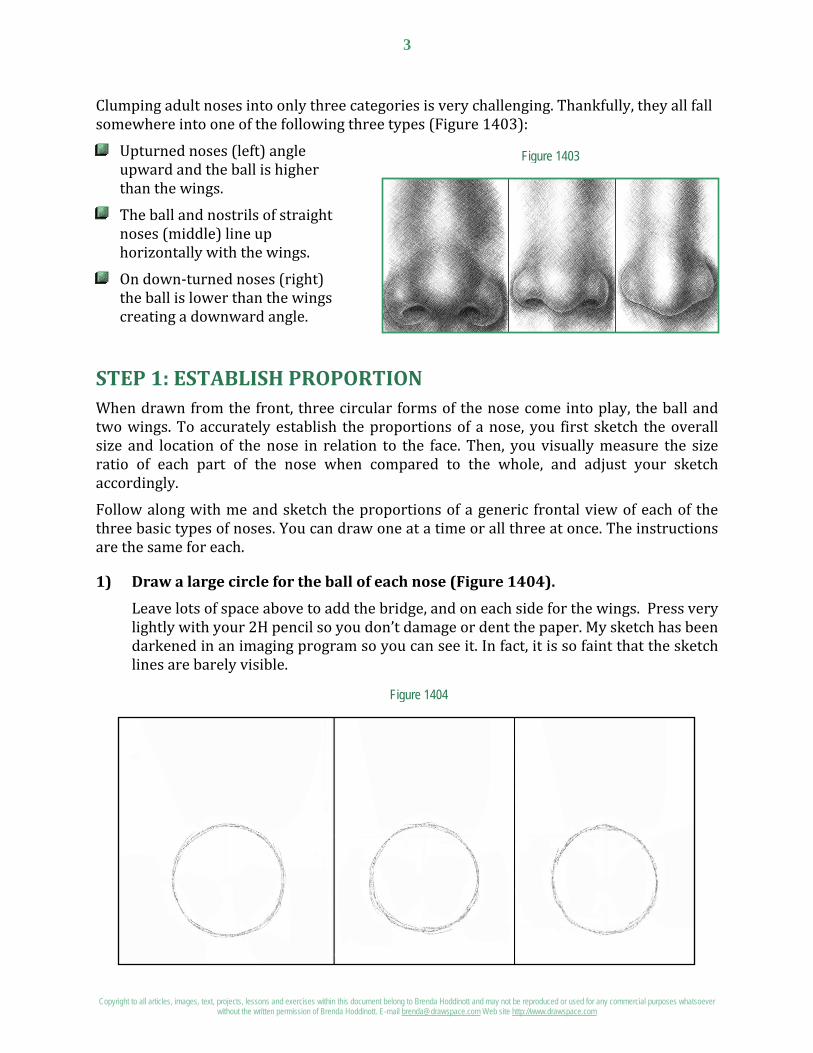
Copyright to all articles, images, text, projects, lessons and exercises within this document belong to Brenda Hoddinott and may not be reproduced or used for any commercial purposes whatsoever without the written permission of Brenda Hoddinott. E-mail [email protected] Web site http://www.drawspace.com
3
Figure 1404
Figure 1403
Clumping adult noses into only three categories is very challenging. Thankfully, they all fall somewhere into one of the following three types (Figure 1403):
Upturned noses (left) angle upward and the ball is higher than the wings.
The ball and nostrils of straight noses (middle) line up horizontally with the wings.
On down-turned noses (right) the ball is lower than the wings creating a downward angle.
STEP 1: ESTABLISH PROPORTION When drawn from the front, three circular forms of the nose come into play, the ball and two wings. To accurately establish the proportions of a nose, you first sketch the overall size and location of the nose in relation to the face. Then, you visually measure the size ratio of each part of the nose when compared to the whole, and adjust your sketch accordingly.
Follow along with me and sketch the proportions of a generic frontal view of each of the three basic types of noses. You can draw one at a time or all three at once. The instructions are the same for each.
1) Draw a large circle for the ball of each nose (Figure 1404).
Leave lots of space above to add the bridge, and on each side for the wings. Press very lightly with your 2H pencil so you don’t damage or dent the paper. My sketch has been darkened in an imaging program so you can see it. In fact, it is so faint that the sketch lines are barely visible.
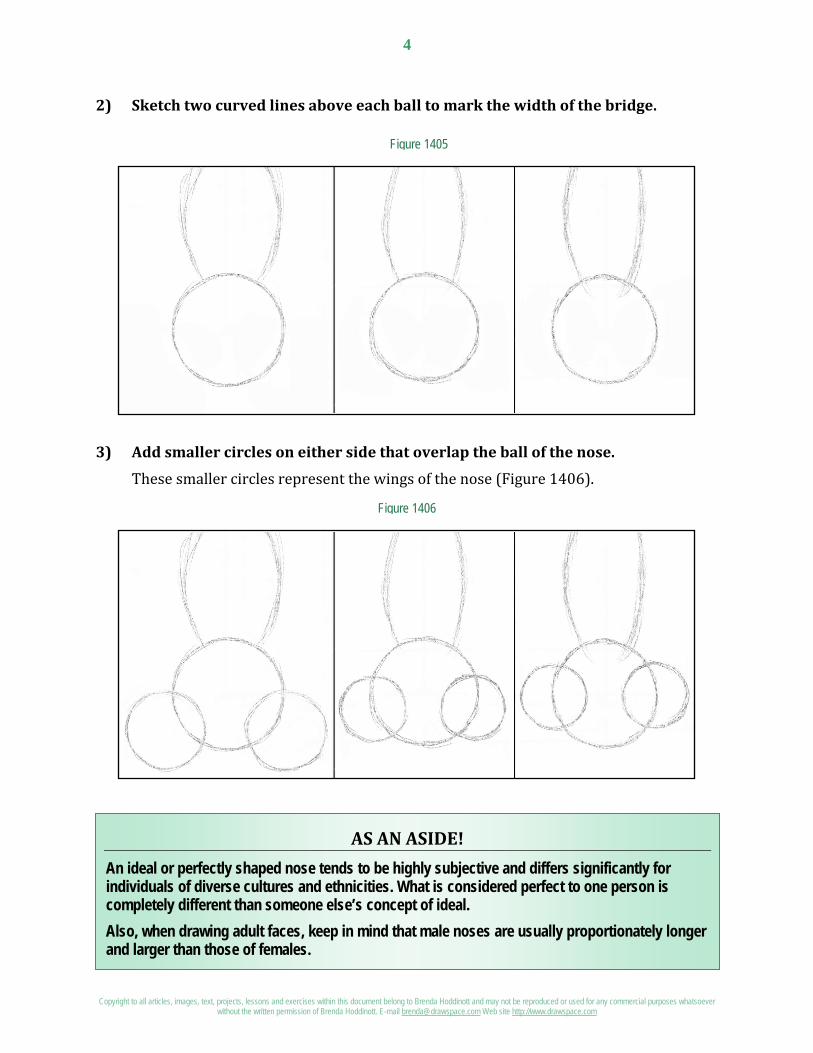
Copyright to all articles, images, text, projects, lessons and exercises within this document belong to Brenda Hoddinott and may not be reproduced or used for any commercial purposes whatsoever without the written permission of Brenda Hoddinott. E-mail [email protected] Web site http://www.drawspace.com
4
Figure 1406
AS AN ASIDE! An ideal or perfectly shaped nose tends to be highly subjective and differs significantly for individuals of diverse cultures and ethnicities. What is considered perfect to one person is completely different than someone else’s concept of ideal. Also, when drawing adult faces, keep in mind that male noses are usually proportionately longer and larger than those of females.
Figure 1405
2) Sketch two curved lines above each ball to mark the width of the bridge.
3) Add smaller circles on either side that overlap the ball of the nose.
These smaller circles represent the wings of the nose (Figure 1406).
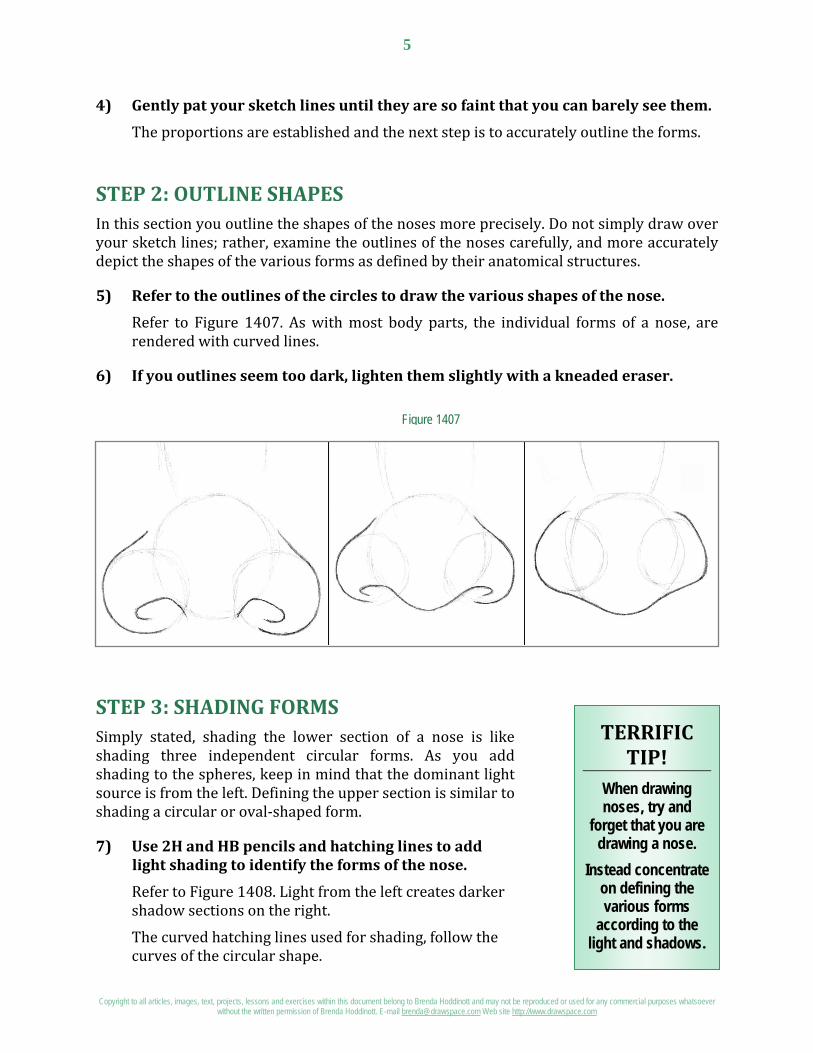
Copyright to all articles, images, text, projects, lessons and exercises within this document belong to Brenda Hoddinott and may not be reproduced or used for any commercial purposes whatsoever without the written permission of Brenda Hoddinott. E-mail [email protected] Web site http://www.drawspace.com
5
Figure 1407
TERRIFIC TIP!
When drawing noses, try and
forget that you are drawing a nose.
Instead concentrate on defining the various forms
according to the light and shadows.
4) Gently pat your sketch lines until they are so faint that you can barely see them.
The proportions are established and the next step is to accurately outline the forms.
STEP 2: OUTLINE SHAPES In this section you outline the shapes of the noses more precisely. Do not simply draw over your sketch lines; rather, examine the outlines of the noses carefully, and more accurately depict the shapes of the various forms as defined by their anatomical structures.
5) Refer to the outlines of the circles to draw the various shapes of the nose.
Refer to Figure 1407. As with most body parts, the individual forms of a nose, are rendered with curved lines.
6) If you outlines seem too dark, lighten them slightly with a kneaded eraser.
STEP 3: SHADING FORMS Simply stated, shading the lower section of a nose is like shading three independent circular forms. As you add shading to the spheres, keep in mind that the dominant light source is from the left. Defining the upper section is similar to shading a circular or oval-shaped form.
7) Use 2H and HB pencils and hatching lines to add light shading to identify the forms of the nose.
Refer to Figure 1408. Light from the left creates darker shadow sections on the right.
The curved hatching lines used for shading, follow the curves of the circular shape.
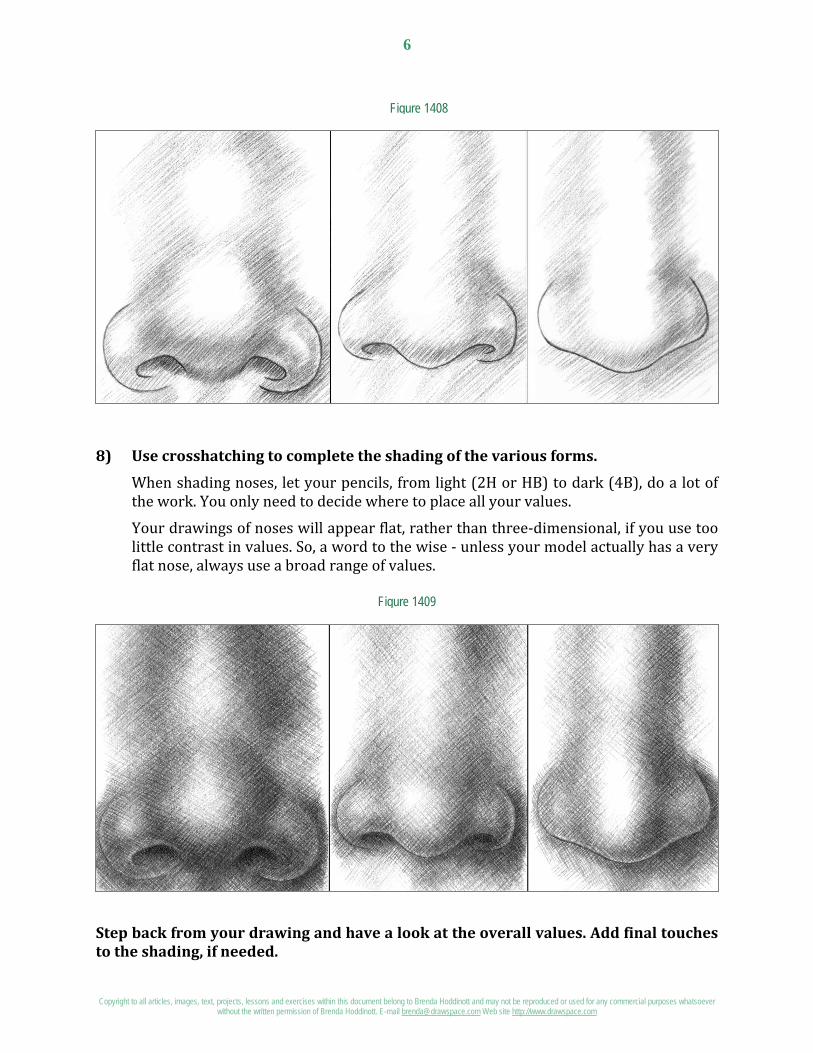
Copyright to all articles, images, text, projects, lessons and exercises within this document belong to Brenda Hoddinott and may not be reproduced or used for any commercial purposes whatsoever without the written permission of Brenda Hoddinott. E-mail [email protected] Web site http://www.drawspace.com
6
Figure 1408
Figure 1409
8) Use crosshatching to complete the shading of the various forms.
When shading noses, let your pencils, from light (2H or HB) to dark (4B), do a lot of the work. You only need to decide where to place all your values.
Your drawings of noses will appear flat, rather than three-dimensional, if you use too little contrast in values. So, a word to the wise - unless your model actually has a very flat nose, always use a broad range of values.
Step back from your drawing and have a look at the overall values. Add final touches to the shading, if needed.
Copyright to all articles, images, text, projects, lessons and exercises within this document belong to Brenda Hoddinott and may not be reproduced or used for any commercial purposes whatsoever without the written permission of Brenda Hoddinott. E-mail [email protected] Web site http://www.drawspace.com
7
BRENDA HODDINOTT - BIOGRAPHY As a self-educated teacher, visual artist, portraitist, forensic artist, and illustrator, Brenda Hoddinott utilizes diverse art media including graphite, technical pen, colored pencil, chalk pastel, charcoal, conté crayon, and oil paints.
My philosophy on teaching art is to focus primarily on the enjoyment aspects while gently introducing the technical and academic. Hence, in creating a passion for the subject matter, the quest for knowledge also
becomes enjoyable. >Brenda Hoddinott<
Born in St. John’s, Newfoundland, Brenda grew up in the small town of Corner Brook. She developed strong technical competencies with a personal commitment to self directed learning, and the aid of assorted “Learn to Draw” books. During Brenda’s twenty-five year career as a self-educated civilian forensic artist, numerous criminal investigation departments have employed Brenda’s skills, including Royal Canadian Mounted Police and municipal police departments. In 1992, Brenda was honored with a commendation from the Royal Canadian Mounted Police, and in 1994, she was awarded a Certificate of Membership from “Forensic Artists International”.
Her home-based art career included graphic design, and teaching recreational drawing and painting classes. As supervisor of her community’s recreational art department, Brenda hired and trained teachers, and designed curriculum for several children’s art programs. In 1998, Brenda chose to end her eighteen-year career as an art educator in order to devote more time to writing, drawing, painting, and developing her websites.
Drawspace http://www.drawspace.com incorporates her unique style and innovative approach to curriculum development. This site offers downloadable and printable drawing classes for students of all abilities from the age of eight through adult. Students of all ages, levels and abilities have praised the simple step-by-step instructional approach. This site is respected as a resource for fine art educators, home schooling programs, and educational facilities throughout the world.
LEARN-TO-DRAW BOOKS BY BRENDA HODDINOTT Drawing for Dummies: Wiley Publishing, Inc., New, York, NY, this 336 page book is
available on various websites and in major bookstores internationally.
The Complete Idiot’s Guide to Drawing People: Winner of the Alpha-Penguin Book of the Year Award 2004, Alpha - Pearson Education – Macmillan, Indianapolis, IN, this 360 page book is available on various websites and in major bookstores internationally.
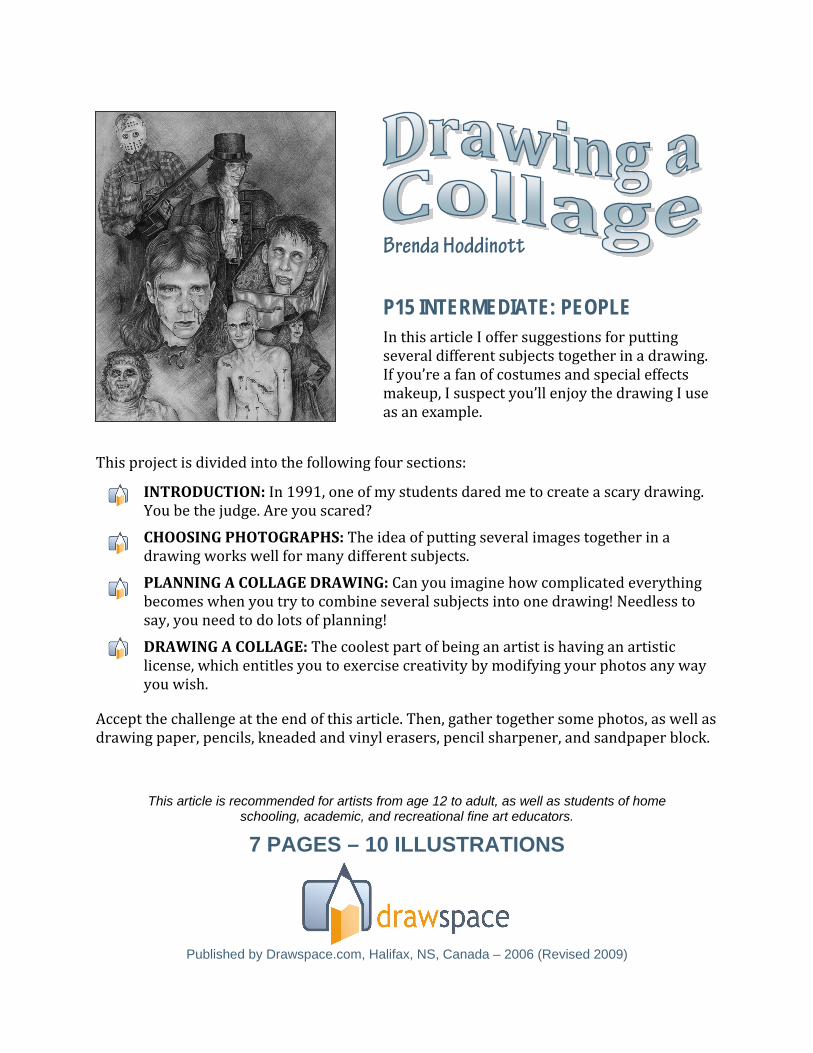
Brenda Hoddinott
P15 INTERMEDIATE: PEOPLE In this article I offer suggestions for putting several different subjects together in a drawing. If you’re a fan of costumes and special effects makeup, I suspect you’ll enjoy the drawing I use as an example.
This project is divided into the following four sections:
INTRODUCTION: In 1991, one of my students dared me to create a scary drawing. You be the judge. Are you scared?
CHOOSING PHOTOGRAPHS: The idea of putting several images together in a drawing works well for many different subjects.
PLANNING A COLLAGE DRAWING: Can you imagine how complicated everything becomes when you try to combine several subjects into one drawing! Needless to say, you need to do lots of planning!
DRAWING A COLLAGE: The coolest part of being an artist is having an artistic license, which entitles you to exercise creativity by modifying your photos any way you wish.
Accept the challenge at the end of this article. Then, gather together some photos, as well as drawing paper, pencils, kneaded and vinyl erasers, pencil sharpener, and sandpaper block.
This article is recommended for artists from age 12 to adult, as well as students of home schooling, academic, and recreational fine art educators.
7 PAGES – 10 ILLUSTRATIONS
Published by Drawspace.com, Halifax, NS, Canada – 2006 (Revised 2009)
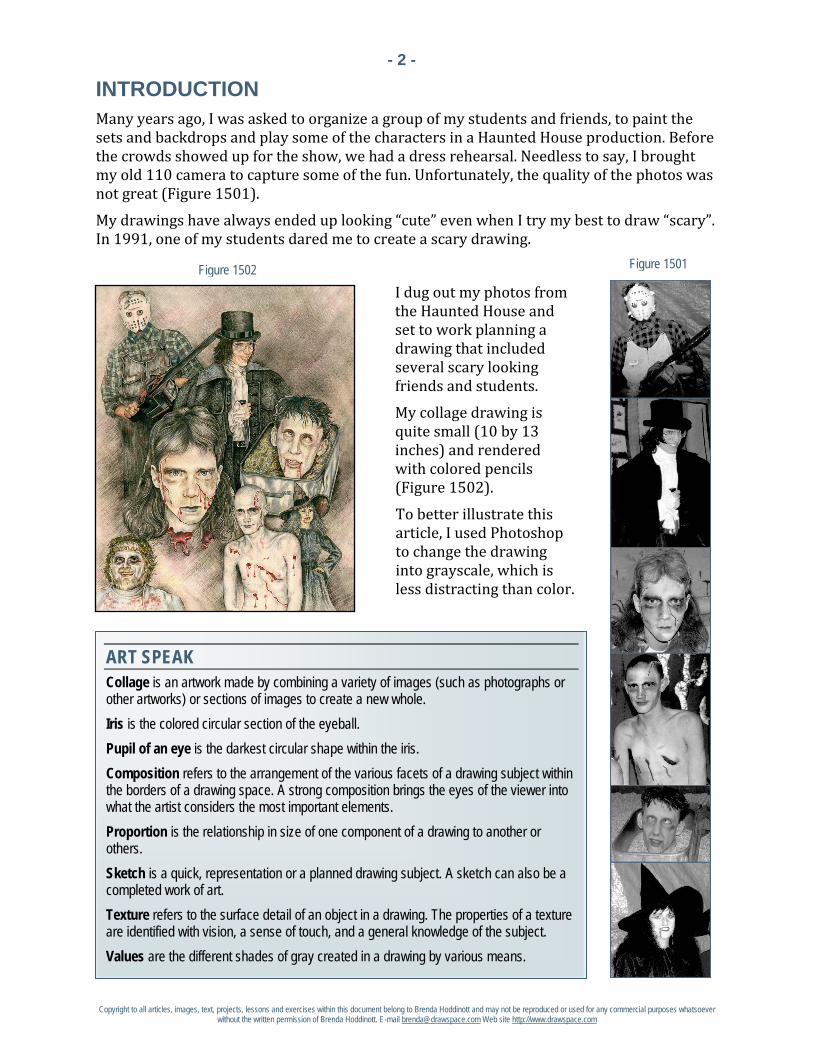
Copyright to all articles, images, text, projects, lessons and exercises within this document belong to Brenda Hoddinott and may not be reproduced or used for any commercial purposes whatsoever without the written permission of Brenda Hoddinott. E-mail [email protected] Web site http://www.drawspace.com
- 2 -
Figure 1501
ART SPEAK Collage is an artwork made by combining a variety of images (such as photographs or other artworks) or sections of images to create a new whole. Iris is the colored circular section of the eyeball. Pupil of an eye is the darkest circular shape within the iris. Composition refers to the arrangement of the various facets of a drawing subject within the borders of a drawing space. A strong composition brings the eyes of the viewer into what the artist considers the most important elements. Proportion is the relationship in size of one component of a drawing to another or others. Sketch is a quick, representation or a planned drawing subject. A sketch can also be a completed work of art. Texture refers to the surface detail of an object in a drawing. The properties of a texture are identified with vision, a sense of touch, and a general knowledge of the subject. Values are the different shades of gray created in a drawing by various means.
Figure 1502
INTRODUCTION Many years ago, I was asked to organize a group of my students and friends, to paint the sets and backdrops and play some of the characters in a Haunted House production. Before the crowds showed up for the show, we had a dress rehearsal. Needless to say, I brought my old 110 camera to capture some of the fun. Unfortunately, the quality of the photos was not great (Figure 1501).
My drawings have always ended up looking “cute” even when I try my best to draw “scary”. In 1991, one of my students dared me to create a scary drawing.
I dug out my photos from the Haunted House and set to work planning a drawing that included several scary looking friends and students.
My collage drawing is quite small (10 by 13 inches) and rendered with colored pencils (Figure 1502).
To better illustrate this article, I used Photoshop to change the drawing into grayscale, which is less distracting than color.
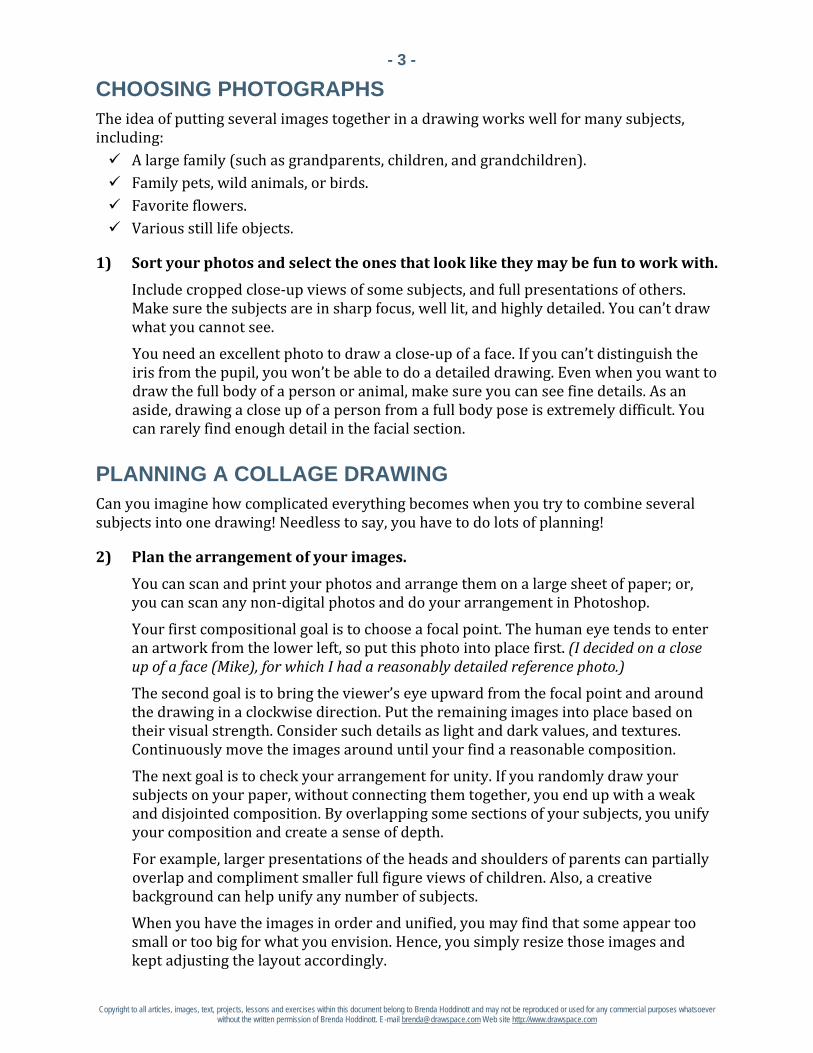
Copyright to all articles, images, text, projects, lessons and exercises within this document belong to Brenda Hoddinott and may not be reproduced or used for any commercial purposes whatsoever without the written permission of Brenda Hoddinott. E-mail [email protected] Web site http://www.drawspace.com
- 3 -
CHOOSING PHOTOGRAPHS The idea of putting several images together in a drawing works well for many subjects, including: A large family (such as grandparents, children, and grandchildren). Family pets, wild animals, or birds. Favorite flowers. Various still life objects.
1) Sort your photos and select the ones that look like they may be fun to work with.
Include cropped close-up views of some subjects, and full presentations of others. Make sure the subjects are in sharp focus, well lit, and highly detailed. You can’t draw what you cannot see.
You need an excellent photo to draw a close-up of a face. If you can’t distinguish the iris from the pupil, you won’t be able to do a detailed drawing. Even when you want to draw the full body of a person or animal, make sure you can see fine details. As an aside, drawing a close up of a person from a full body pose is extremely difficult. You can rarely find enough detail in the facial section.
PLANNING A COLLAGE DRAWING Can you imagine how complicated everything becomes when you try to combine several subjects into one drawing! Needless to say, you have to do lots of planning!
2) Plan the arrangement of your images.
You can scan and print your photos and arrange them on a large sheet of paper; or, you can scan any non-digital photos and do your arrangement in Photoshop.
Your first compositional goal is to choose a focal point. The human eye tends to enter an artwork from the lower left, so put this photo into place first. (I decided on a close up of a face (Mike), for which I had a reasonably detailed reference photo.)
The second goal is to bring the viewer’s eye upward from the focal point and around the drawing in a clockwise direction. Put the remaining images into place based on their visual strength. Consider such details as light and dark values, and textures. Continuously move the images around until your find a reasonable composition.
The next goal is to check your arrangement for unity. If you randomly draw your subjects on your paper, without connecting them together, you end up with a weak and disjointed composition. By overlapping some sections of your subjects, you unify your composition and create a sense of depth.
For example, larger presentations of the heads and shoulders of parents can partially overlap and compliment smaller full figure views of children. Also, a creative background can help unify any number of subjects.
When you have the images in order and unified, you may find that some appear too small or too big for what you envision. Hence, you simply resize those images and kept adjusting the layout accordingly.
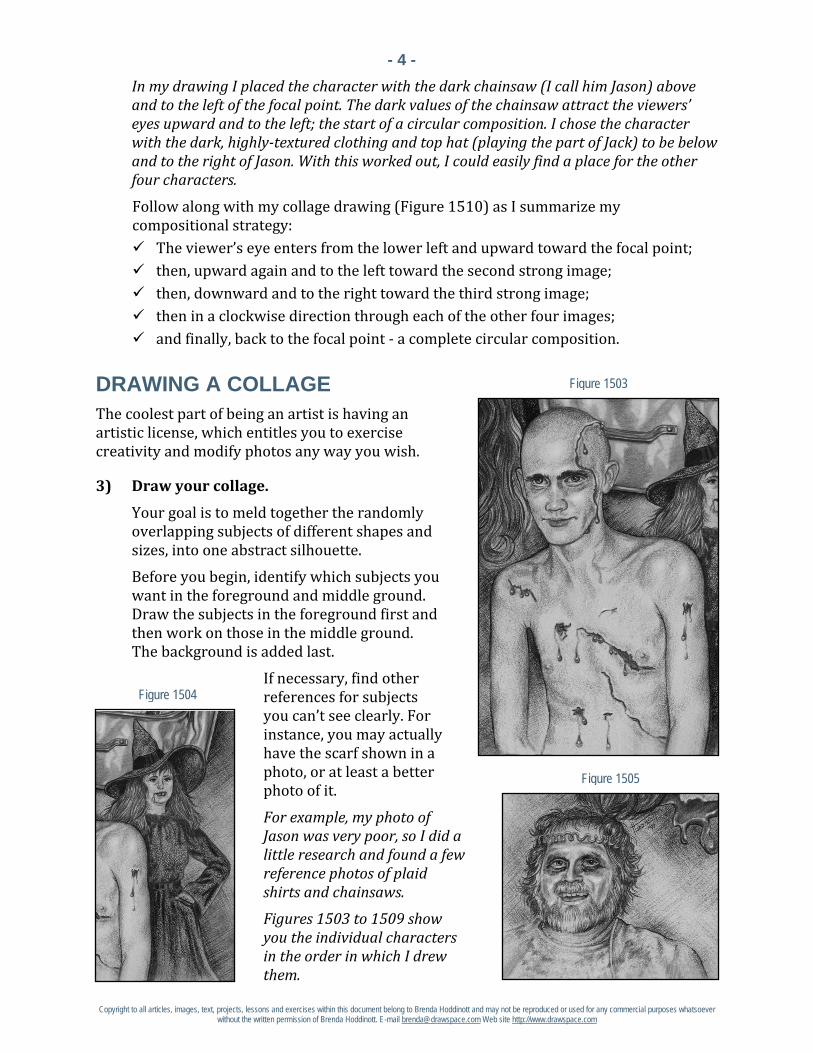
Copyright to all articles, images, text, projects, lessons and exercises within this document belong to Brenda Hoddinott and may not be reproduced or used for any commercial purposes whatsoever without the written permission of Brenda Hoddinott. E-mail [email protected] Web site http://www.drawspace.com
- 4 -
Figure 1503
Figure 1504
Figure 1505
In my drawing I placed the character with the dark chainsaw (I call him Jason) above and to the left of the focal point. The dark values of the chainsaw attract the viewers’ eyes upward and to the left; the start of a circular composition. I chose the character with the dark, highly-textured clothing and top hat (playing the part of Jack) to be below and to the right of Jason. With this worked out, I could easily find a place for the other four characters.
Follow along with my collage drawing (Figure 1510) as I summarize my compositional strategy: The viewer’s eye enters from the lower left and upward toward the focal point; then, upward again and to the left toward the second strong image; then, downward and to the right toward the third strong image; then in a clockwise direction through each of the other four images; and finally, back to the focal point - a complete circular composition.
DRAWING A COLLAGE The coolest part of being an artist is having an artistic license, which entitles you to exercise creativity and modify photos any way you wish.
3) Draw your collage.
Your goal is to meld together the randomly overlapping subjects of different shapes and sizes, into one abstract silhouette.
Before you begin, identify which subjects you want in the foreground and middle ground. Draw the subjects in the foreground first and then work on those in the middle ground. The background is added last.
If necessary, find other references for subjects you can’t see clearly. For instance, you may actually have the scarf shown in a photo, or at least a better photo of it.
For example, my photo of Jason was very poor, so I did a little research and found a few reference photos of plaid shirts and chainsaws.
Figures 1503 to 1509 show you the individual characters in the order in which I drew them.
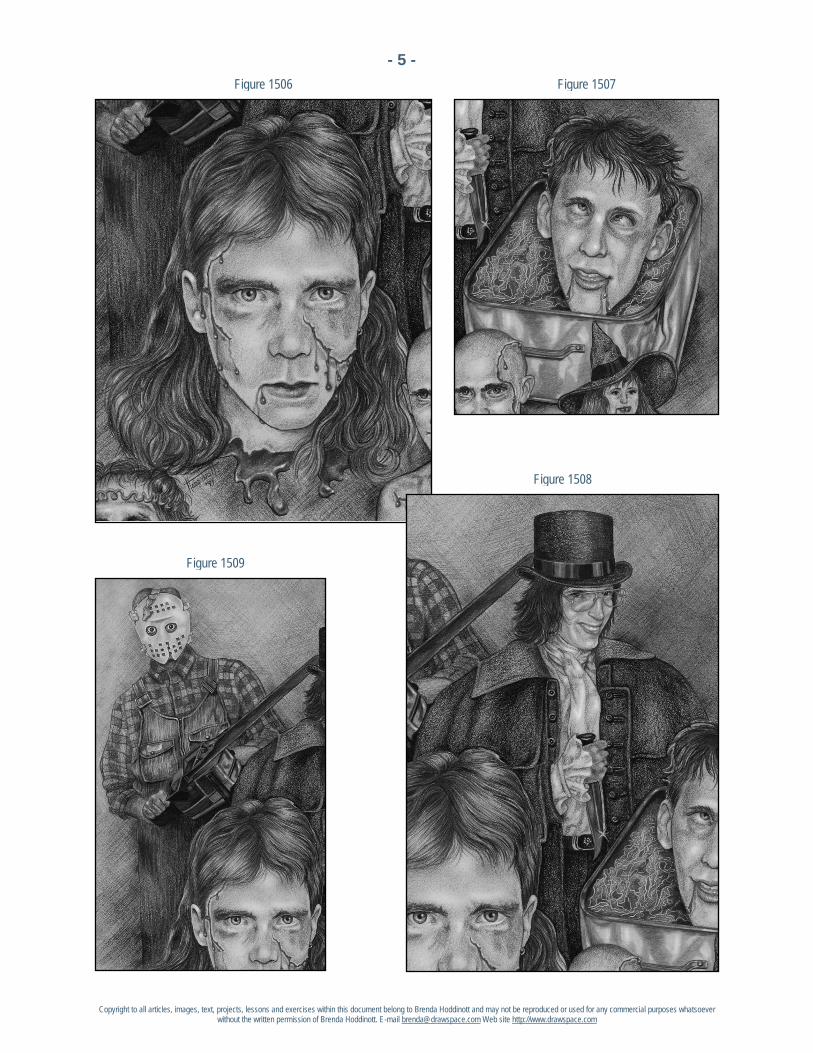
Copyright to all articles, images, text, projects, lessons and exercises within this document belong to Brenda Hoddinott and may not be reproduced or used for any commercial purposes whatsoever without the written permission of Brenda Hoddinott. E-mail [email protected] Web site http://www.drawspace.com
- 5 - Figure 1506
Figure 1508
Figure 1507
Figure 1509
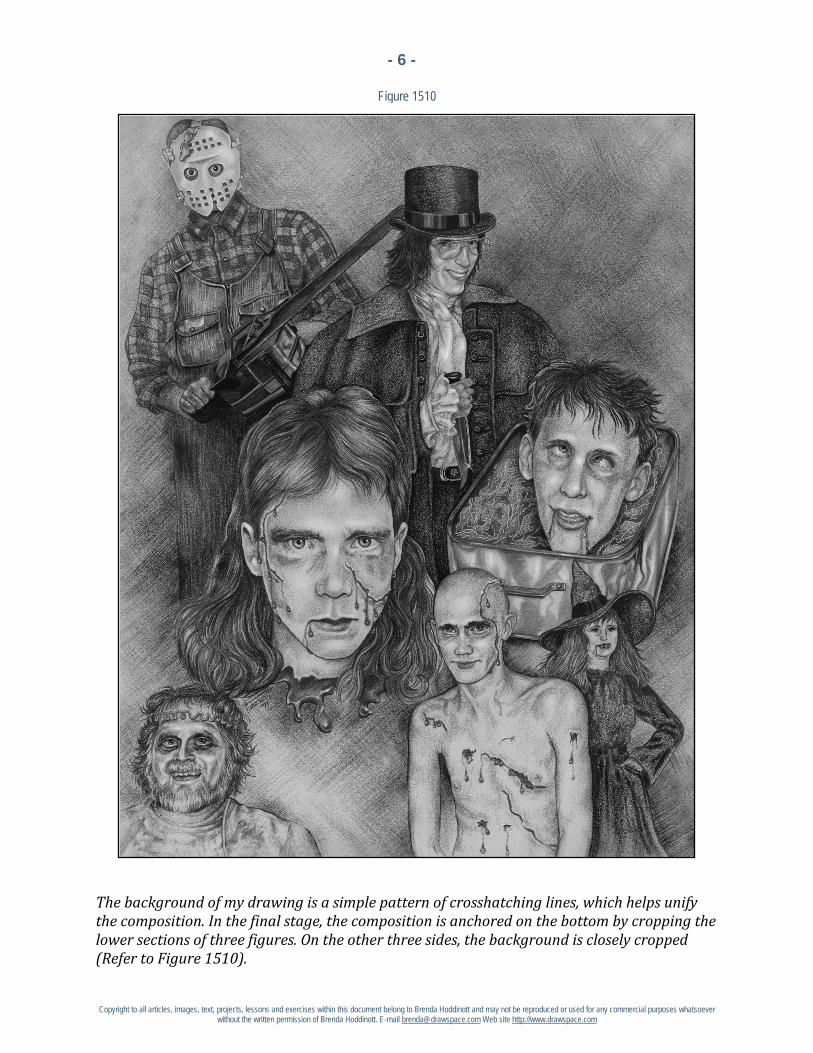
Copyright to all articles, images, text, projects, lessons and exercises within this document belong to Brenda Hoddinott and may not be reproduced or used for any commercial purposes whatsoever without the written permission of Brenda Hoddinott. E-mail [email protected] Web site http://www.drawspace.com
- 6 -
Figure 1510
The background of my drawing is a simple pattern of crosshatching lines, which helps unify the composition. In the final stage, the composition is anchored on the bottom by cropping the lower sections of three figures. On the other three sides, the background is closely cropped (Refer to Figure 1510).
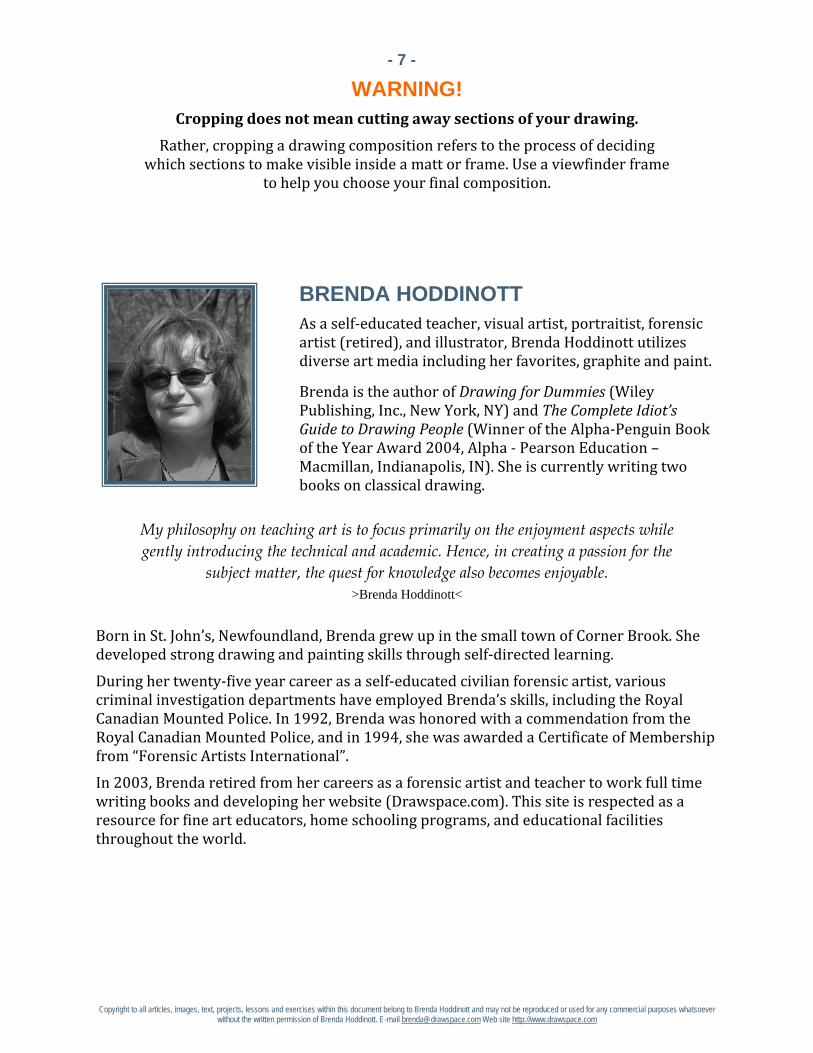
Copyright to all articles, images, text, projects, lessons and exercises within this document belong to Brenda Hoddinott and may not be reproduced or used for any commercial purposes whatsoever without the written permission of Brenda Hoddinott. E-mail [email protected] Web site http://www.drawspace.com
- 7 -
WARNING!
Cropping does not mean cutting away sections of your drawing.
Rather, cropping a drawing composition refers to the process of deciding which sections to make visible inside a matt or frame. Use a viewfinder frame
to help you choose your final composition.
BRENDA HODDINOTT As a self-educated teacher, visual artist, portraitist, forensic artist (retired), and illustrator, Brenda Hoddinott utilizes diverse art media including her favorites, graphite and paint.
Brenda is the author of Drawing for Dummies (Wiley Publishing, Inc., New York, NY) and The Complete Idiot’s Guide to Drawing People (Winner of the Alpha-Penguin Book of the Year Award 2004, Alpha - Pearson Education – Macmillan, Indianapolis, IN). She is currently writing two books on classical drawing.
My philosophy on teaching art is to focus primarily on the enjoyment aspects while gently introducing the technical and academic. Hence, in creating a passion for the
subject matter, the quest for knowledge also becomes enjoyable. >Brenda Hoddinott<
Born in St. John’s, Newfoundland, Brenda grew up in the small town of Corner Brook. She developed strong drawing and painting skills through self-directed learning.
During her twenty-five year career as a self-educated civilian forensic artist, various criminal investigation departments have employed Brenda’s skills, including the Royal Canadian Mounted Police. In 1992, Brenda was honored with a commendation from the Royal Canadian Mounted Police, and in 1994, she was awarded a Certificate of Membership from “Forensic Artists International”.
In 2003, Brenda retired from her careers as a forensic artist and teacher to work full time writing books and developing her website (Drawspace.com). This site is respected as a resource for fine art educators, home schooling programs, and educational facilities throughout the world.
How to Draw
Cindy Wider Author of: Draw and Paint in Your Pyjamas!
P16 INTERMEDIATE: PEOPLE
Medium: Charcoal and white conté
In this lesson you will be taught how to draw curly hair and the step-by-step process presented can be altered to suit any hair style. Before you begin this lesson, you need to study J08-How to draw with charcoal where you will learn four popular techniques for drawing with charcoal. You might also consider enrolling into unit four portraiture in your pyjamas where you will learn another two hairstyles; long hair and short male hair as well as 8 charcoal techniques among many other wonderful things.
This lesson is divided into the following eleven sections:
Art materials list
General information on drawing hair
Step one: create a template for the head shape
Step two: draw your head and neck
Step three: begin to draw the curly hair
Step four: begin shading the dark tones
Step five: blend the dark tones and add some curly hairs
Step six: erase some areas for the highlights
Step seven: erase some fine hairs
Step eight: add some individual clumps of dark hairs
Step nine: add some fine highlighted hairs for the finishing touch
This project is recommended for artists age 14 and up, as well as students of home schooling, academic, and recreational fine-art educators.
11 PAGES – 13 ILLUSTRATIONS
Published by Drawspace.com, Halifax, NS, Canada – September, 2010

2
Copyright to all articles images, text, projects, lessons and exercises within this course belong to StuartCindy Art and may not be reproduced or used for any commercial purposes whatsoever without the written permission of StuartCindy Art.
Email [email protected] Web site http://www.paintpj.com
If you need help with how to use charcoal, please complete lesson J08-How to draw with charcoal by Cindy Wider before beginning this lesson.
ART MATERIALS LIST In addition to a computer with internet connection, printer, digital camera and scanner, you need the following art supplies:
HB Charcoal Pencil (for fine lines)
White charcoal pencil
Several Willow charcoal sticks preferably 6mm and 9mm in diameter
Automatic or click eraser or normal plastic eraser and craft knife to cut into a thin slither or chisel shape
Putty Eraser (or kneaded eraser)
Ruler
Piece of thin cardboard 10cm x 20cm (for drawing a template of a head shape.) The cover of a cereal box will do
Pencil Sharpener to sharpen the charcoal pencils (optional extra; you could consider buying a special charcoal or pastel pencil sharpener.)
Medium to coarse sandpaper 80 grit (to prepare your willow charcoal)
Special Paper for drawing on; Canson Mi-Teintes Drawing Paper – light grey; suggest Flannel Gray (colour 122)
Soft, clean water colour brush (I recommend the 3/4" size) or a new and clean make-up brush for gently removing eraser particles
Can of fixative is optional to spray your charcoal drawing afterwards
Non-greasy baking paper to place under your hand while you work and protect the image from smudging. This is optional but recommended.
Glassine sheets (special paper purchased from an art supply store which prevent your work from smudging.) This is optional.
GENERAL INFORMATION ON DRAWING HAIR One of the most important things to consider when drawing realistic hair is to concentrate on depicting the overall structure. Imagine the hair as a solid object and look with your eyes squinted to help you see the outline of the overall mass and then the major light and dark masses within that outline. Seek out which direction the light source is coming from and constantly be aware of that throughout the entire drawing.
If you concentrate on drawing the overall shape of the major masses of light and dark it will help your drawings of hair appear more realistic rather than attempting to draw individual hairs. It is the contrast of the occasional strands of hair drawn against the broader areas of light and shadow that create the overall impression of realistic hair.
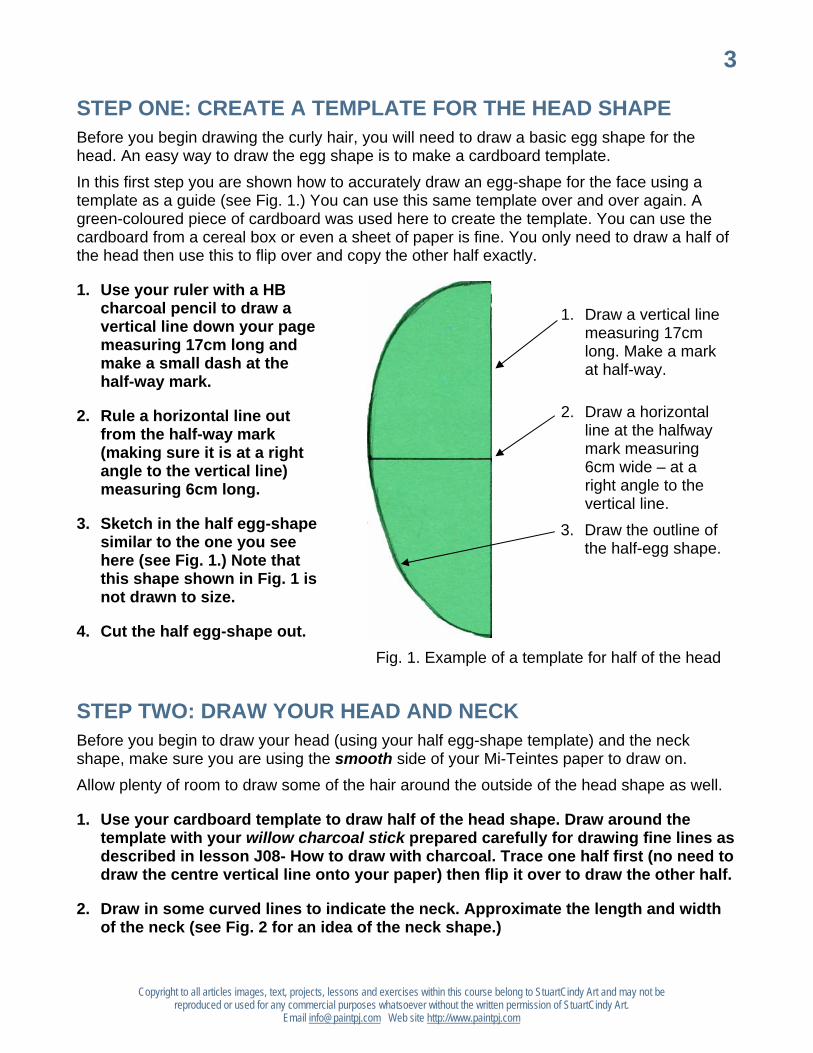
3
Copyright to all articles images, text, projects, lessons and exercises within this course belong to StuartCindy Art and may not be reproduced or used for any commercial purposes whatsoever without the written permission of StuartCindy Art.
Email [email protected] Web site http://www.paintpj.com
STEP ONE: CREATE A TEMPLATE FOR THE HEAD SHAPE Before you begin drawing the curly hair, you will need to draw a basic egg shape for the head. An easy way to draw the egg shape is to make a cardboard template.
In this first step you are shown how to accurately draw an egg-shape for the face using a template as a guide (see Fig. 1.) You can use this same template over and over again. A green-coloured piece of cardboard was used here to create the template. You can use the cardboard from a cereal box or even a sheet of paper is fine. You only need to draw a half of the head then use this to flip over and copy the other half exactly.
1. Use your ruler with a HB charcoal pencil to draw a vertical line down your page measuring 17cm long and make a small dash at the half-way mark.
2. Rule a horizontal line out from the half-way mark (making sure it is at a right angle to the vertical line) measuring 6cm long.
3. Sketch in the half egg-shape similar to the one you see here (see Fig. 1.) Note that this shape shown in Fig. 1 is not drawn to size.
4. Cut the half egg-shape out.
Fig. 1. Example of a template for half of the head
STEP TWO: DRAW YOUR HEAD AND NECK Before you begin to draw your head (using your half egg-shape template) and the neck shape, make sure you are using the smooth side of your Mi-Teintes paper to draw on.
Allow plenty of room to draw some of the hair around the outside of the head shape as well.
1. Use your cardboard template to draw half of the head shape. Draw around the template with your willow charcoal stick prepared carefully for drawing fine lines as described in lesson J08- How to draw with charcoal. Trace one half first (no need to draw the centre vertical line onto your paper) then flip it over to draw the other half.
2. Draw in some curved lines to indicate the neck. Approximate the length and width of the neck (see Fig. 2 for an idea of the neck shape.)
1. Draw a vertical line measuring 17cm long. Make a mark at half-way.
2. Draw a horizontal line at the halfway mark measuring 6cm wide – at a right angle to the vertical line.
3. Draw the outline of the half-egg shape.
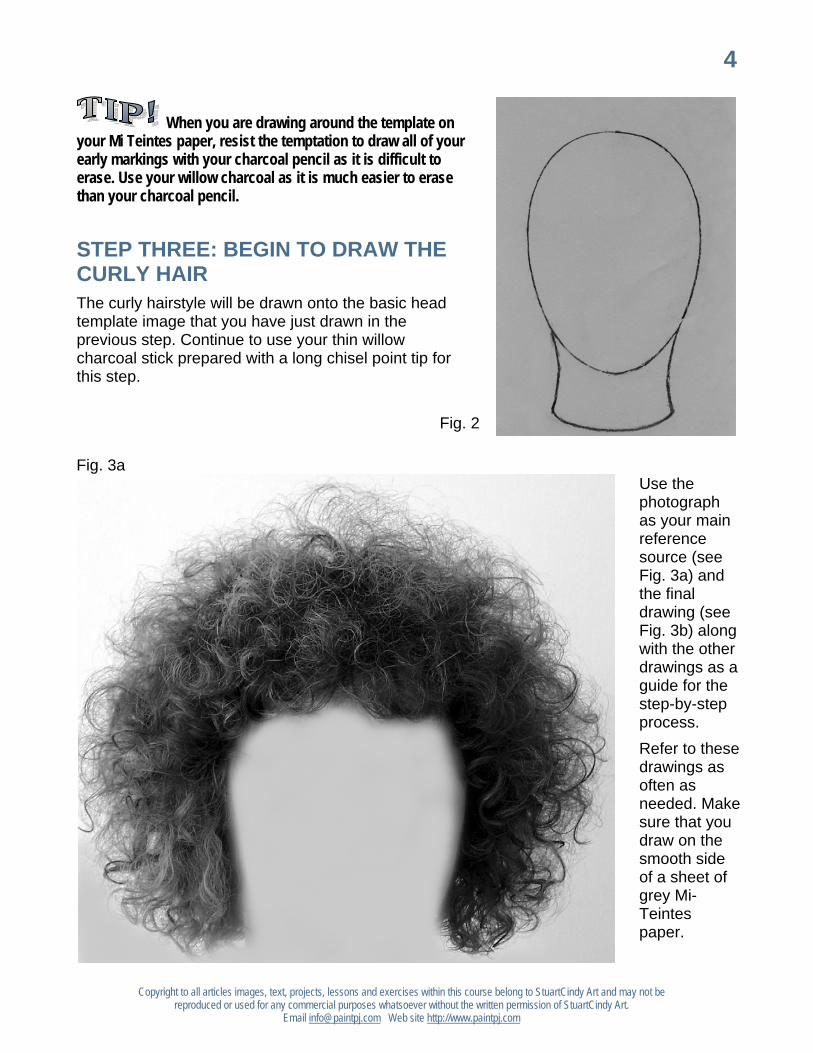
4
Copyright to all articles images, text, projects, lessons and exercises within this course belong to StuartCindy Art and may not be reproduced or used for any commercial purposes whatsoever without the written permission of StuartCindy Art.
Email [email protected] Web site http://www.paintpj.com
When you are drawing around the template on your Mi Teintes paper, resist the temptation to draw all of your early markings with your charcoal pencil as it is difficult to erase. Use your willow charcoal as it is much easier to erase than your charcoal pencil.
STEP THREE: BEGIN TO DRAW THE CURLY HAIR The curly hairstyle will be drawn onto the basic head template image that you have just drawn in the previous step. Continue to use your thin willow charcoal stick prepared with a long chisel point tip for this step.
Use the photograph as your main reference source (see Fig. 3a) and the final drawing (see Fig. 3b) along with the other drawings as a guide for the step-by-step process.
Refer to these drawings as often as needed. Make sure that you draw on the smooth side of a sheet of grey Mi-Teintes paper.
Fig. 2
Fig. 3a
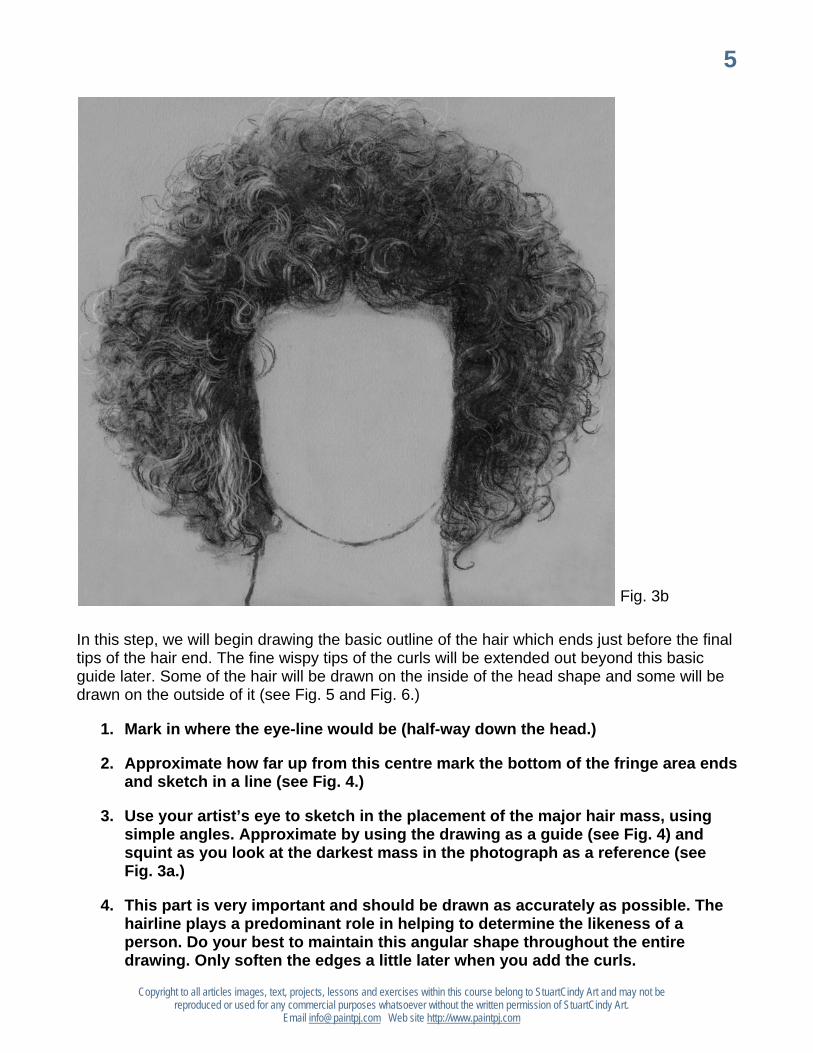
5
Copyright to all articles images, text, projects, lessons and exercises within this course belong to StuartCindy Art and may not be reproduced or used for any commercial purposes whatsoever without the written permission of StuartCindy Art.
Email [email protected] Web site http://www.paintpj.com
In this step, we will begin drawing the basic outline of the hair which ends just before the final tips of the hair end. The fine wispy tips of the curls will be extended out beyond this basic guide later. Some of the hair will be drawn on the inside of the head shape and some will be drawn on the outside of it (see Fig. 5 and Fig. 6.)
1. Mark in where the eye-line would be (half-way down the head.)
2. Approximate how far up from this centre mark the bottom of the fringe area ends and sketch in a line (see Fig. 4.)
3. Use your artist’s eye to sketch in the placement of the major hair mass, using simple angles. Approximate by using the drawing as a guide (see Fig. 4) and squint as you look at the darkest mass in the photograph as a reference (see Fig. 3a.)
4. This part is very important and should be drawn as accurately as possible. The hairline plays a predominant role in helping to determine the likeness of a person. Do your best to maintain this angular shape throughout the entire drawing. Only soften the edges a little later when you add the curls.
Fig. 3b
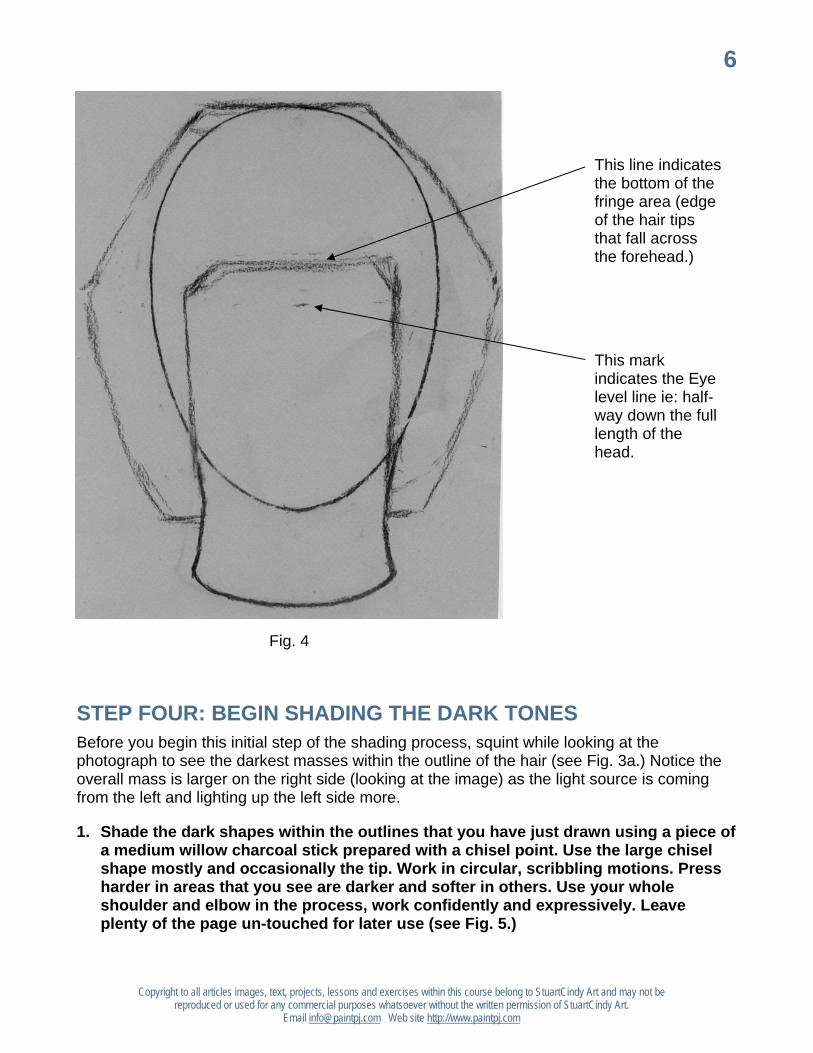
6
Copyright to all articles images, text, projects, lessons and exercises within this course belong to StuartCindy Art and may not be reproduced or used for any commercial purposes whatsoever without the written permission of StuartCindy Art.
Email [email protected] Web site http://www.paintpj.com
Fig. 4
STEP FOUR: BEGIN SHADING THE DARK TONES Before you begin this initial step of the shading process, squint while looking at the photograph to see the darkest masses within the outline of the hair (see Fig. 3a.) Notice the overall mass is larger on the right side (looking at the image) as the light source is coming from the left and lighting up the left side more.
1. Shade the dark shapes within the outlines that you have just drawn using a piece of a medium willow charcoal stick prepared with a chisel point. Use the large chisel shape mostly and occasionally the tip. Work in circular, scribbling motions. Press harder in areas that you see are darker and softer in others. Use your whole shoulder and elbow in the process, work confidently and expressively. Leave plenty of the page un-touched for later use (see Fig. 5.)
This line indicates the bottom of the fringe area (edge of the hair tips that fall across the forehead.)
This mark indicates the Eye level line ie: half-way down the full length of the head.
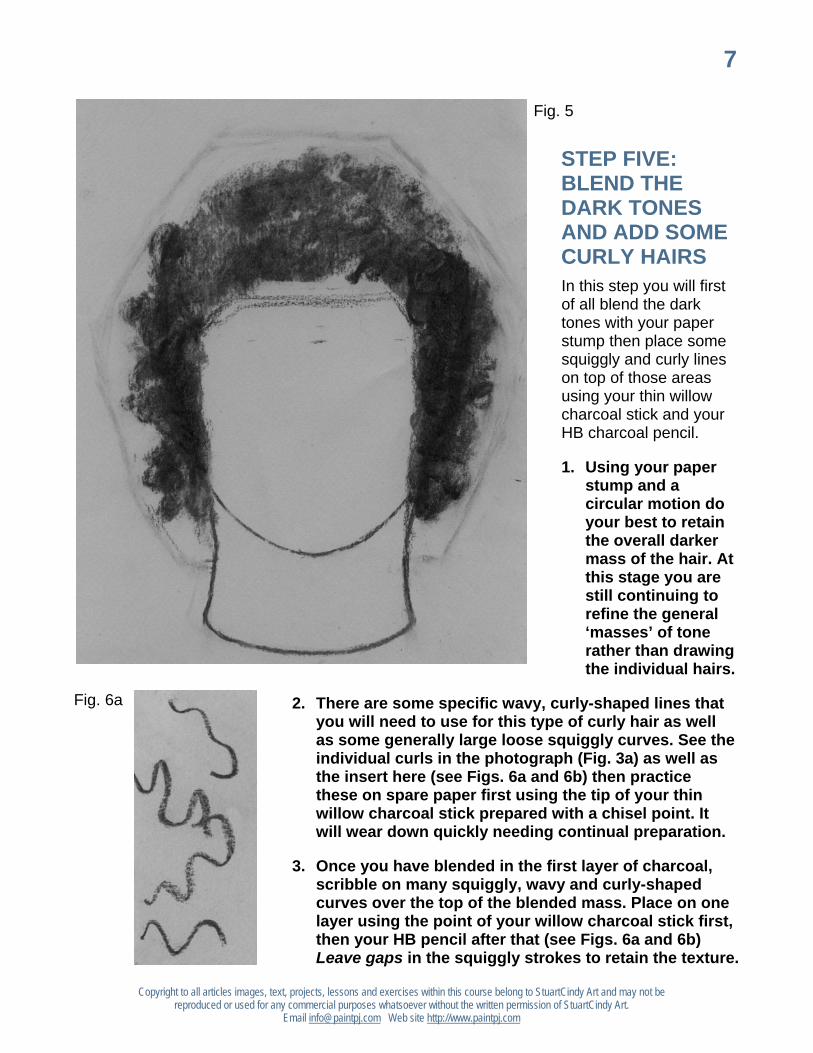
7
Copyright to all articles images, text, projects, lessons and exercises within this course belong to StuartCindy Art and may not be reproduced or used for any commercial purposes whatsoever without the written permission of StuartCindy Art.
Email [email protected] Web site http://www.paintpj.com
STEP FIVE: BLEND THE DARK TONES AND ADD SOME CURLY HAIRS In this step you will first of all blend the dark tones with your paper stump then place some squiggly and curly lines on top of those areas using your thin willow charcoal stick and your HB charcoal pencil.
1. Using your paper stump and a circular motion do your best to retain the overall darker mass of the hair. At this stage you are still continuing to refine the general ‘masses’ of tone rather than drawing the individual hairs.
2. There are some specific wavy, curly-shaped lines that you will need to use for this type of curly hair as well as some generally large loose squiggly curves. See the individual curls in the photograph (Fig. 3a) as well as the insert here (see Figs. 6a and 6b) then practice these on spare paper first using the tip of your thin willow charcoal stick prepared with a chisel point. It will wear down quickly needing continual preparation.
3. Once you have blended in the first layer of charcoal, scribble on many squiggly, wavy and curly-shaped curves over the top of the blended mass. Place on one layer using the point of your willow charcoal stick first, then your HB pencil after that (see Figs. 6a and 6b) Leave gaps in the squiggly strokes to retain the texture.
Fig. 5
Fig. 6a
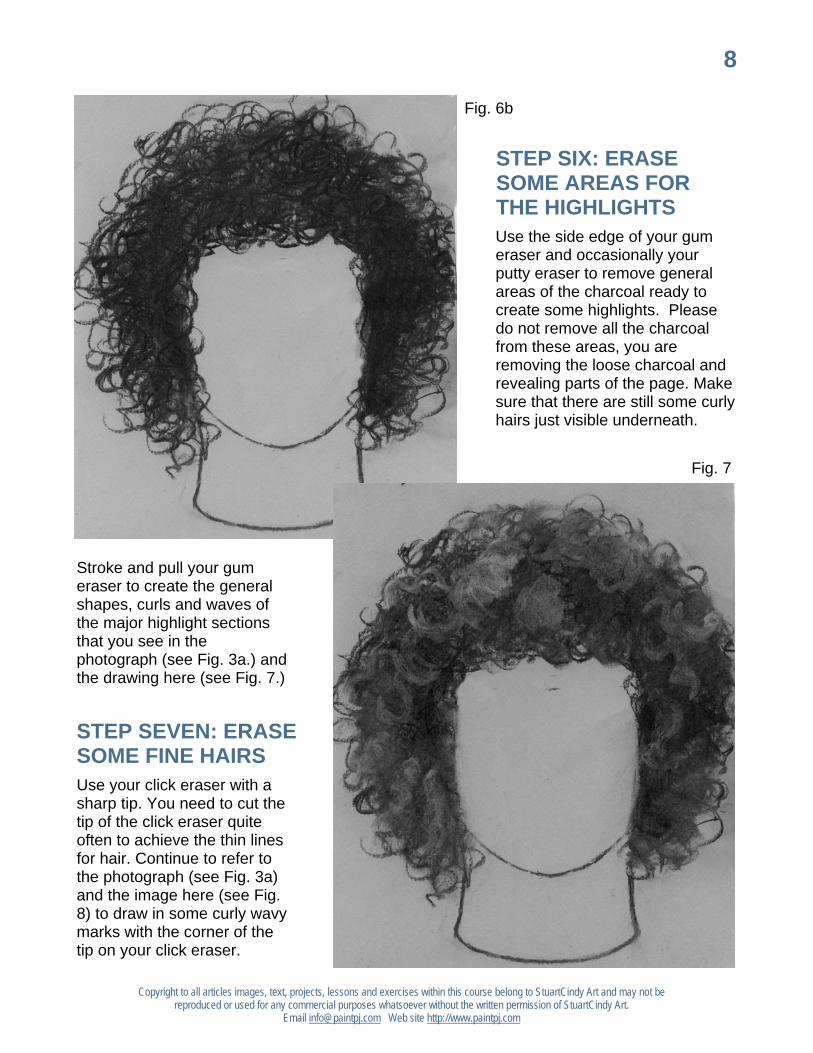
8
Copyright to all articles images, text, projects, lessons and exercises within this course belong to StuartCindy Art and may not be reproduced or used for any commercial purposes whatsoever without the written permission of StuartCindy Art.
Email [email protected] Web site http://www.paintpj.com
STEP SIX: ERASE SOME AREAS FOR THE HIGHLIGHTS Use the side edge of your gum eraser and occasionally your putty eraser to remove general areas of the charcoal ready to create some highlights. Please do not remove all the charcoal from these areas, you are removing the loose charcoal and revealing parts of the page. Make sure that there are still some curly hairs just visible underneath.
Stroke and pull your gum eraser to create the general shapes, curls and waves of the major highlight sections that you see in the photograph (see Fig. 3a.) and the drawing here (see Fig. 7.)
STEP SEVEN: ERASE SOME FINE HAIRS Use your click eraser with a sharp tip. You need to cut the tip of the click eraser quite often to achieve the thin lines for hair. Continue to refer to the photograph (see Fig. 3a) and the image here (see Fig. 8) to draw in some curly wavy marks with the corner of the tip on your click eraser.
Fig. 6b
Fig. 7
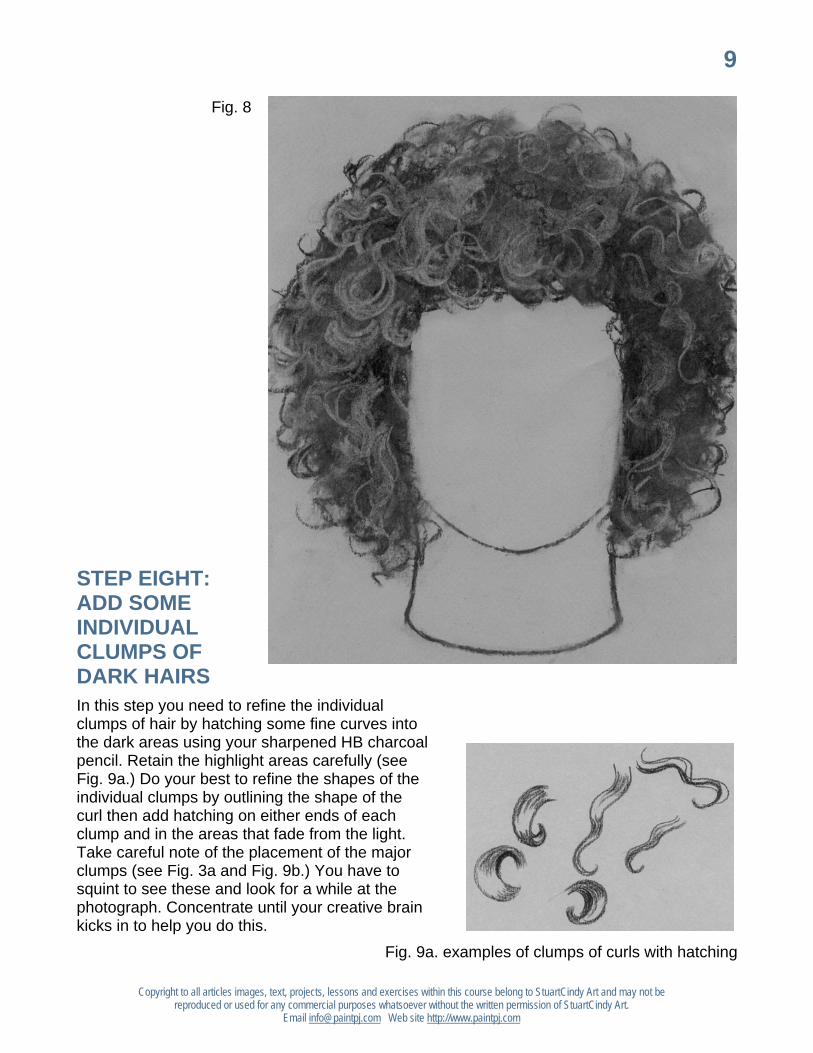
9
Copyright to all articles images, text, projects, lessons and exercises within this course belong to StuartCindy Art and may not be reproduced or used for any commercial purposes whatsoever without the written permission of StuartCindy Art.
Email [email protected] Web site http://www.paintpj.com
STEP EIGHT: ADD SOME INDIVIDUAL CLUMPS OF DARK HAIRS In this step you need to refine the individual clumps of hair by hatching some fine curves into the dark areas using your sharpened HB charcoal pencil. Retain the highlight areas carefully (see Fig. 9a.) Do your best to refine the shapes of the individual clumps by outlining the shape of the curl then add hatching on either ends of each clump and in the areas that fade from the light. Take careful note of the placement of the major clumps (see Fig. 3a and Fig. 9b.) You have to squint to see these and look for a while at the photograph. Concentrate until your creative brain kicks in to help you do this.
Fig. 9a. examples of clumps of curls with hatching
Fig. 8
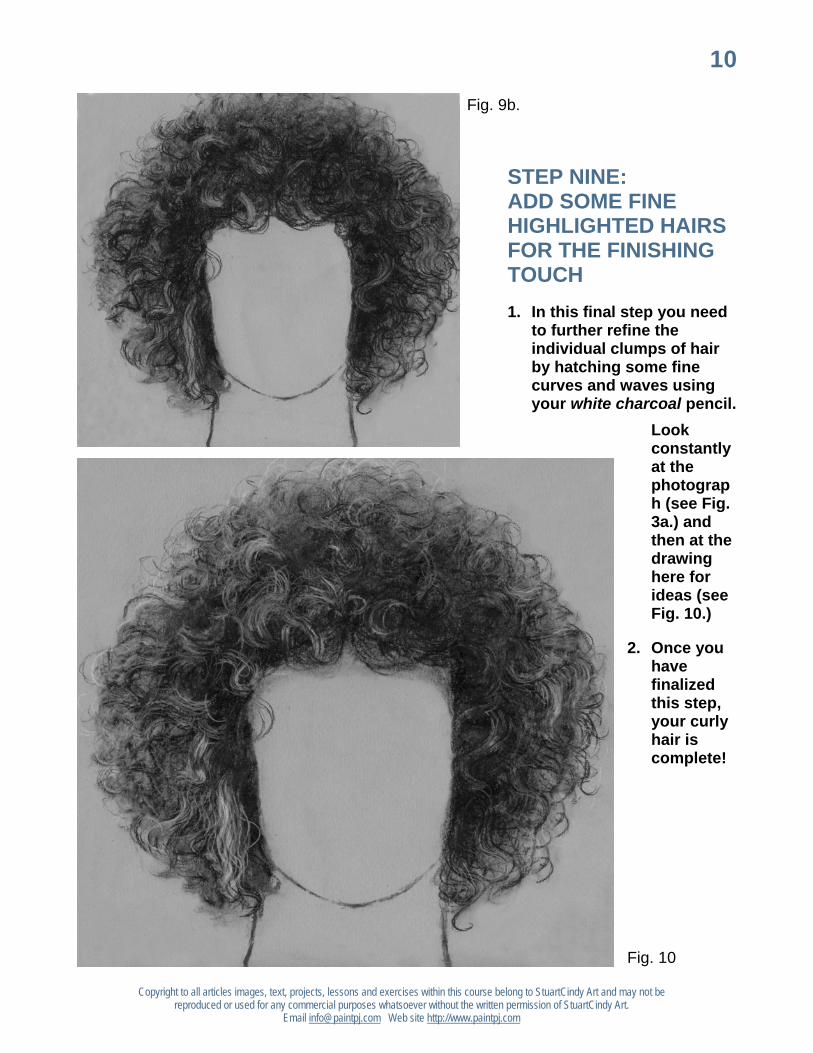
10
Copyright to all articles images, text, projects, lessons and exercises within this course belong to StuartCindy Art and may not be reproduced or used for any commercial purposes whatsoever without the written permission of StuartCindy Art.
Email [email protected] Web site http://www.paintpj.com
Fig. 9b.
STEP NINE: ADD SOME FINE HIGHLIGHTED HAIRS FOR THE FINISHING TOUCH
1. In this final step you need to further refine the individual clumps of hair by hatching some fine curves and waves using your white charcoal pencil.
Look constantly at the photograph (see Fig. 3a.) and then at the drawing here for ideas (see Fig. 10.)
2. Once you have finalized this step, your curly hair is complete!
Fig. 10

11
Copyright to all articles images, text, projects, lessons and exercises within this course belong to StuartCindy Art and may not be reproduced or used for any commercial purposes whatsoever without the written permission of StuartCindy Art.
Email [email protected] Web site http://www.paintpj.com
Drawspace.com is proud to introduce
Cindy Wider Art educator, art curricula designer, award-winning gallery-represented artist, and author of Paint in Your Pyjamas.
Cindy Wider currently resides in Noosa on the Sunshine Coast of Queensland, Australia with her husband Stuart, and daughters Isha and Sumaya.
Art philosophy
I believe that almost everyone has the natural gifts needed for learning to draw and paint, and that art has the ability to heal and help us to reach our full human potential. Art is the missing language that can bridge the gap in communication when words are not enough. It is my life purpose to share my love of art, through inspiring and motivating others to realize their natural gifts for drawing and painting.
My passion for helping others to learn to draw and paint comes from the joy and excitement I experience through the process of creating art and my desire to share that feeling! I stumbled upon my natural gifts for art at the age of 23years and wished I had known about it sooner.
Professional accomplishments
After ten years of serious art study Cindy went on to become one of her community’s leading artists with her artworks gracing the walls of many of the major hotels, corporate boardrooms and private homes as well as selling overseas. She began tutoring at the local Technical and Further Education College in 1988 and then went on to establish the largest on-going private art tuition school in Port Lincoln, then several years later in Noosa Queensland.
For many years Cindy worked as a part time freelance illustrator for the internationally renowned rubber stamp company, ‘Annaleey crafts.’ In 2005, along with her husband Stuart she was commissioned by the Microsoft Corporation to produce an original artwork for their Sydney headquarters, and limited edition prints for the annual corporate gift to their business associates.
You can view Cindy’s paintings at: http://www.thecoopergallery.com.au/wider/wider.htm
Paint in Your Pyjamas
Have you been asking yourself, "Who am I and what do I really want out of life?” Perhaps you've been selflessly dedicating all your energy to your children or partner to help them fulfill their dreams and goals. Maybe you're working hard just to earn a living.
But now you feel the time has come to do something for yourself. If so, this book is just for you...
You can buy Cindy’s book, ‘Paint in Your Pyjamas – every Woman’s guide to finding your life purpose through art’ at:
http://www.drawspace.com/bookshop


![Oameni Si Semizei Vol1 [v1.0]](https://img.pdfslide.us/doc/110x75/55cf8a8d55034654898ba7b4/oameni-si-semizei-vol1-v10.jpg)