Embed Size (px)
Citation preview
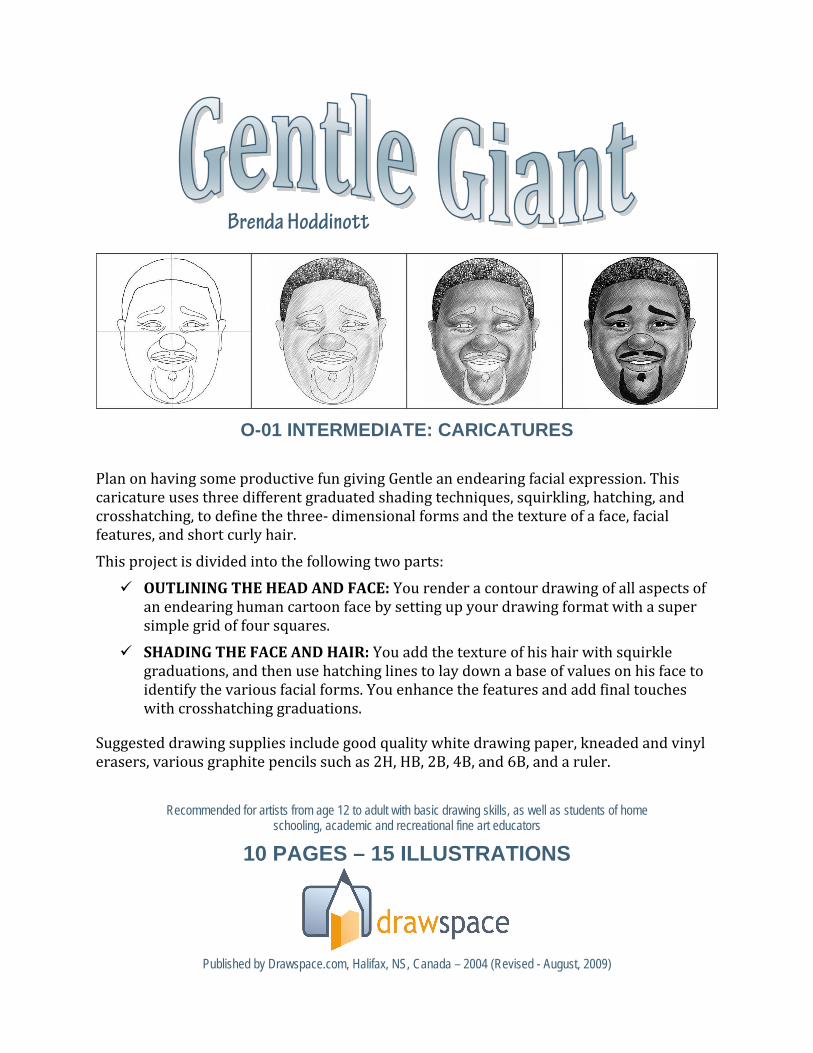
Brenda Hoddinott
O-01 INTERMEDIATE: CARICATURES
Plan on having some productive fun giving Gentle an endearing facial expression. This caricature uses three different graduated shading techniques, squirkling, hatching, and crosshatching, to define the three- dimensional forms and the texture of a face, facial features, and short curly hair.
This project is divided into the following two parts:
OUTLINING THE HEAD AND FACE: You render a contour drawing of all aspects of an endearing human cartoon face by setting up your drawing format with a super simple grid of four squares.
SHADING THE FACE AND HAIR: You add the texture of his hair with squirkle graduations, and then use hatching lines to lay down a base of values on his face to identify the various facial forms. You enhance the features and add final touches with crosshatching graduations.
Suggested drawing supplies include good quality white drawing paper, kneaded and vinyl erasers, various graphite pencils such as 2H, HB, 2B, 4B, and 6B, and a ruler.
Recommended for artists from age 12 to adult with basic drawing skills, as well as students of home schooling, academic and recreational fine art educators
10 PAGES – 15 ILLUSTRATIONS
Published by Drawspace.com, Halifax, NS, Canada – 2004 (Revised - August, 2009)
Copyright to all articles, images, text, projects, lessons and exercises within this document belong to Brenda Hoddinott and may not be reproduced or used for any commercial purposes whatsoever without the written permission of Brenda Hoddinott. E-mail [email protected] Web site http://www.drawspace.com
2
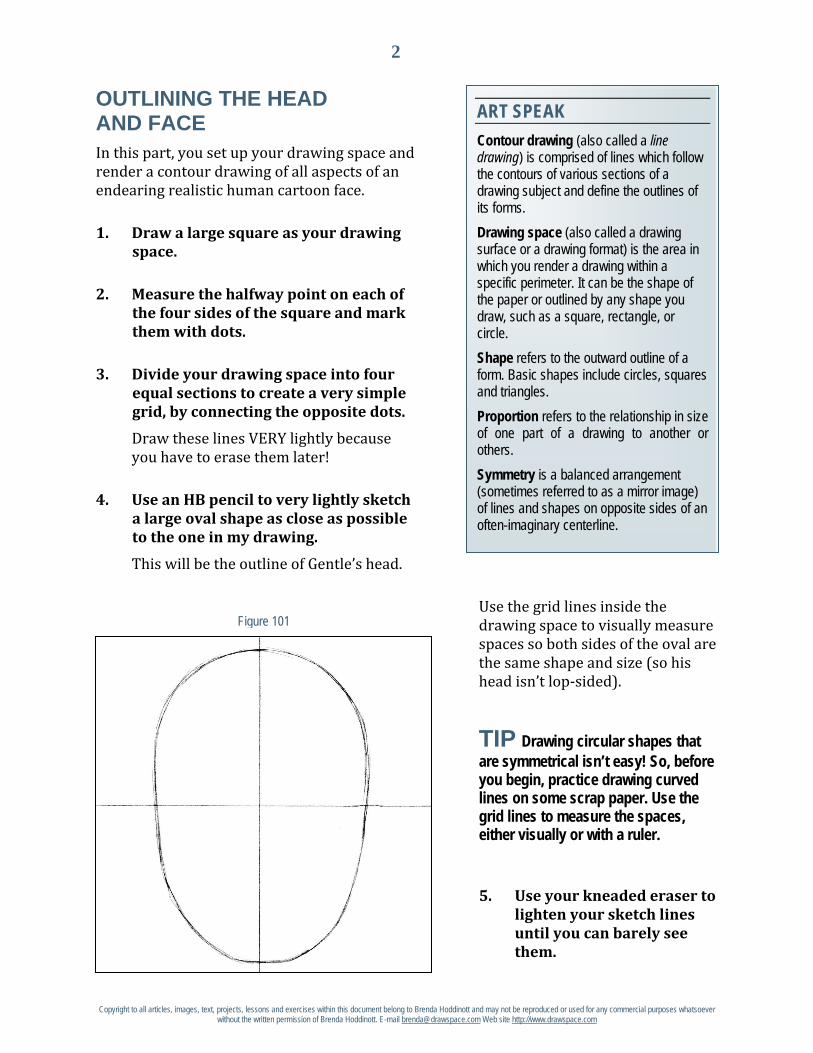
ART SPEAK Contour drawing (also called a line drawing) is comprised of lines which follow the contours of various sections of a drawing subject and define the outlines of its forms. Drawing space (also called a drawing surface or a drawing format) is the area in which you render a drawing within a specific perimeter. It can be the shape of the paper or outlined by any shape you draw, such as a square, rectangle, or circle. Shape refers to the outward outline of a form. Basic shapes include circles, squares and triangles. Proportion refers to the relationship in size of one part of a drawing to another or others. Symmetry is a balanced arrangement (sometimes referred to as a mirror image) of lines and shapes on opposite sides of an often-imaginary centerline.
OUTLINING THE HEAD AND FACE In this part, you set up your drawing space and render a contour drawing of all aspects of an endearing realistic human cartoon face.
1. Draw a large square as your drawing space.
2. Measure the halfway point on each of the four sides of the square and mark them with dots.
3. Divide your drawing space into four equal sections to create a very simple grid, by connecting the opposite dots.
Draw these lines VERY lightly because you have to erase them later!
4. Use an HB pencil to very lightly sketch a large oval shape as close as possible to the one in my drawing.
This will be the outline of Gentle’s head.
Use the grid lines inside the drawing space to visually measure spaces so both sides of the oval are the same shape and size (so his head isn’t lop-sided).
TIP Drawing circular shapes that are symmetrical isn’t easy! So, before you begin, practice drawing curved lines on some scrap paper. Use the grid lines to measure the spaces, either visually or with a ruler.
5. Use your kneaded eraser to lighten your sketch lines until you can barely see them.
Figure 101
Copyright to all articles, images, text, projects, lessons and exercises within this document belong to Brenda Hoddinott and may not be reproduced or used for any commercial purposes whatsoever without the written permission of Brenda Hoddinott. E-mail [email protected] Web site http://www.drawspace.com
3
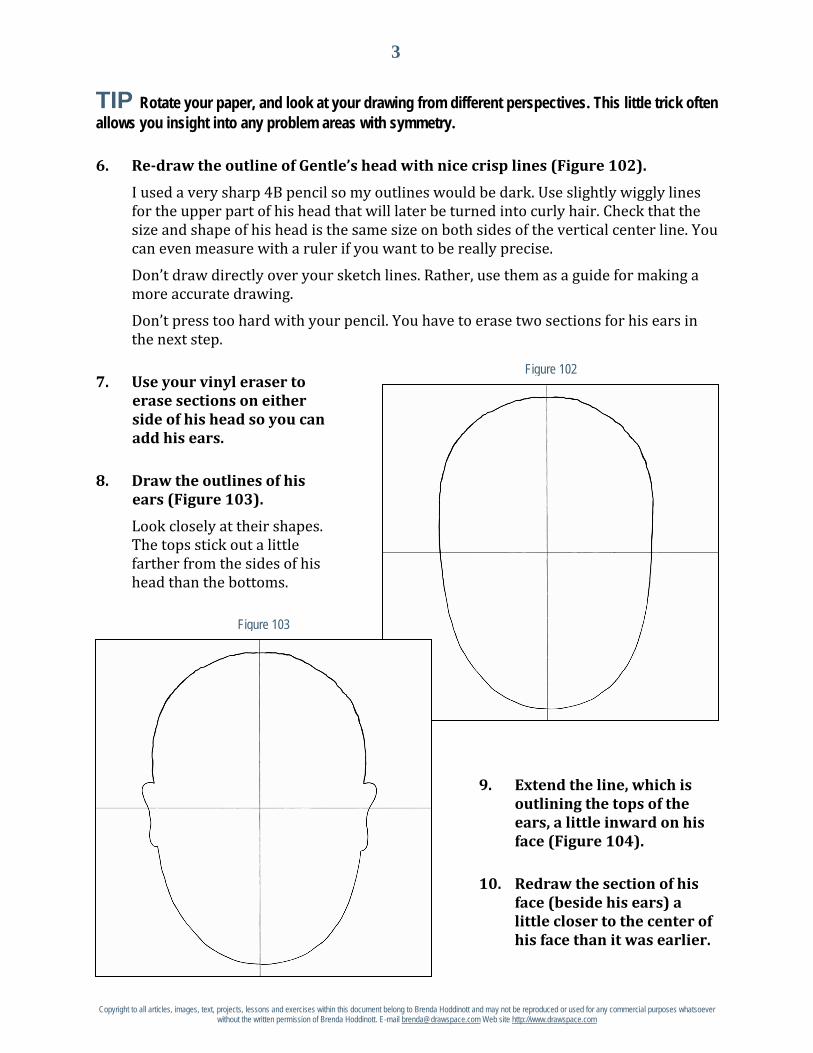
TIP Rotate your paper, and look at your drawing from different perspectives. This little trick often allows you insight into any problem areas with symmetry.
6. Re-draw the outline of Gentle’s head with nice crisp lines (Figure 102).
I used a very sharp 4B pencil so my outlines would be dark. Use slightly wiggly lines for the upper part of his head that will later be turned into curly hair. Check that the size and shape of his head is the same size on both sides of the vertical center line. You can even measure with a ruler if you want to be really precise.
Don’t draw directly over your sketch lines. Rather, use them as a guide for making a more accurate drawing.
Don’t press too hard with your pencil. You have to erase two sections for his ears in the next step.
7. Use your vinyl eraser to erase sections on either side of his head so you can add his ears.
8. Draw the outlines of his ears (Figure 103).
Look closely at their shapes. The tops stick out a little farther from the sides of his head than the bottoms.
9. Extend the line, which is outlining the tops of the ears, a little inward on his face (Figure 104).
10. Redraw the section of his face (beside his ears) a little closer to the center of his face than it was earlier.
Figure 103
Figure 102
Copyright to all articles, images, text, projects, lessons and exercises within this document belong to Brenda Hoddinott and may not be reproduced or used for any commercial purposes whatsoever without the written permission of Brenda Hoddinott. E-mail [email protected] Web site http://www.drawspace.com
4
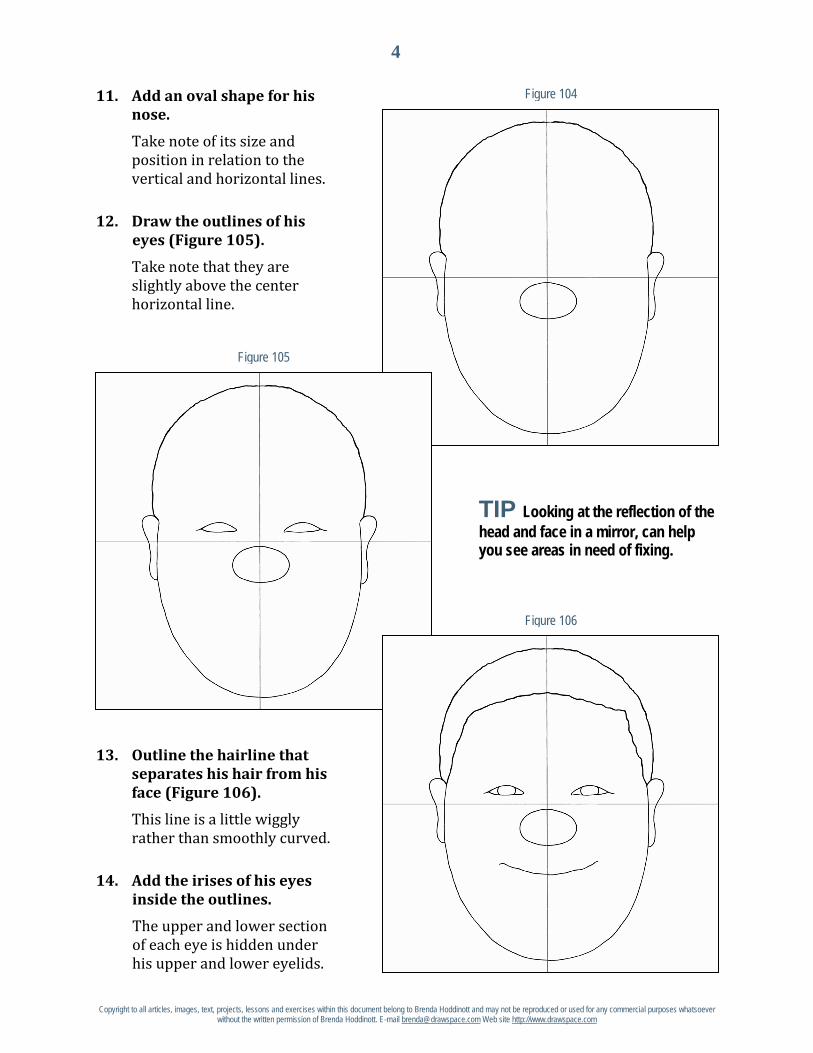
11. Add an oval shape for his nose.
Take note of its size and position in relation to the vertical and horizontal lines.
12. Draw the outlines of his eyes (Figure 105).
Take note that they are slightly above the center horizontal line.
TIP Looking at the reflection of the head and face in a mirror, can help you see areas in need of fixing.
13. Outline the hairline that separates his hair from his face (Figure 106).
This line is a little wiggly rather than smoothly curved.
14. Add the irises of his eyes inside the outlines.
The upper and lower section of each eye is hidden under his upper and lower eyelids.
Figure 105
Figure 104
Figure 106
Copyright to all articles, images, text, projects, lessons and exercises within this document belong to Brenda Hoddinott and may not be reproduced or used for any commercial purposes whatsoever without the written permission of Brenda Hoddinott. E-mail [email protected] Web site http://www.drawspace.com
5
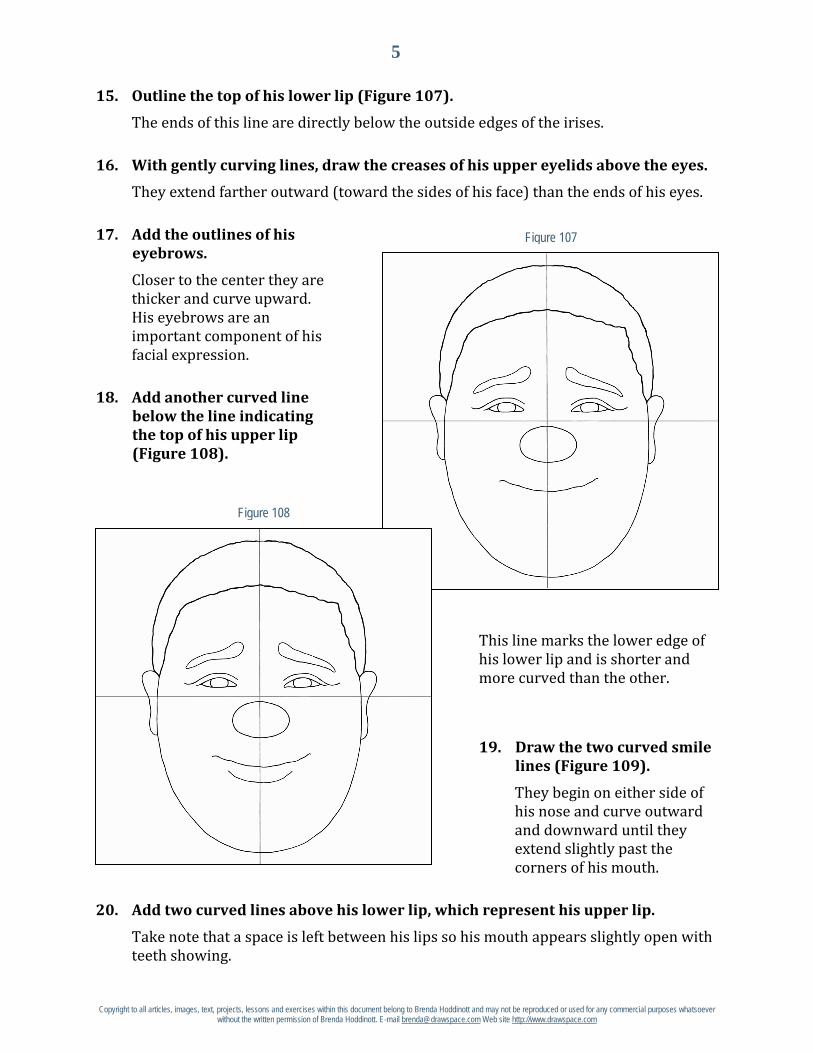
15. Outline the top of his lower lip (Figure 107).
The ends of this line are directly below the outside edges of the irises.
16. With gently curving lines, draw the creases of his upper eyelids above the eyes.
They extend farther outward (toward the sides of his face) than the ends of his eyes.
17. Add the outlines of his eyebrows.
Closer to the center they are thicker and curve upward. His eyebrows are an important component of his facial expression.
18. Add another curved line below the line indicating the top of his upper lip (Figure 108).
This line marks the lower edge of his lower lip and is shorter and more curved than the other.
19. Draw the two curved smile lines (Figure 109).
They begin on either side of his nose and curve outward and downward until they extend slightly past the corners of his mouth.
20. Add two curved lines above his lower lip, which represent his upper lip.
Take note that a space is left between his lips so his mouth appears slightly open with teeth showing.
Figure 107
Figure 108
Copyright to all articles, images, text, projects, lessons and exercises within this document belong to Brenda Hoddinott and may not be reproduced or used for any commercial purposes whatsoever without the written permission of Brenda Hoddinott. E-mail [email protected] Web site http://www.drawspace.com
6
ART SPEAK Texture is the surface detail of an object, as defined in a drawing with various shading techniques. The senses of touch and sight help identify the surface texture of drawing subject. Squirkling © is a method of shading incorporating randomly drawn curved lines to create textured values and graduated value scales. I chose this name based on the method of morphing squiggles with circles to create shading. Graduated shading (also called graduations) is a continuous progression of values from dark to light or from light to dark. Hatching is a series of lines (called a set) drawn closely together to give the illusion of values.
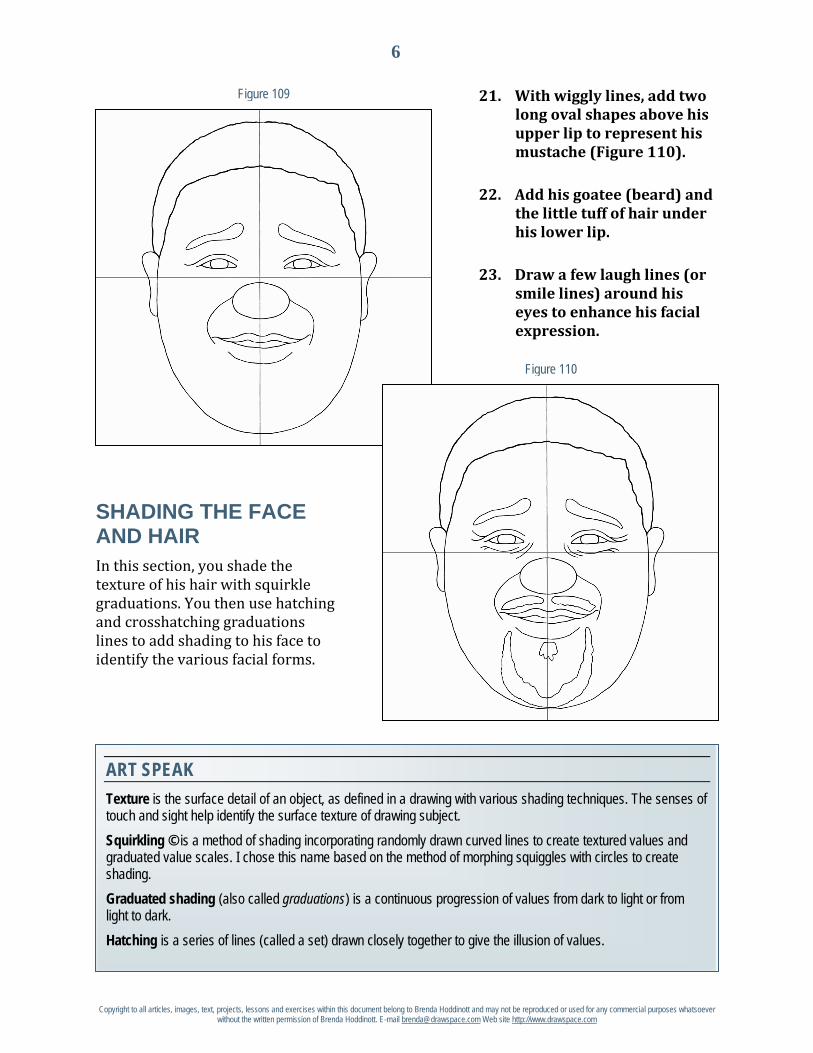
21. With wiggly lines, add two long oval shapes above his upper lip to represent his mustache (Figure 110).
22. Add his goatee (beard) and the little tuff of hair under his lower lip.
23. Draw a few laugh lines (or smile lines) around his eyes to enhance his facial expression.
SHADING THE FACE AND HAIR In this section, you shade the texture of his hair with squirkle graduations. You then use hatching and crosshatching graduations lines to add shading to his face to identify the various facial forms.
Figure 109
Figure 110
Copyright to all articles, images, text, projects, lessons and exercises within this document belong to Brenda Hoddinott and may not be reproduced or used for any commercial purposes whatsoever without the written permission of Brenda Hoddinott. E-mail [email protected] Web site http://www.drawspace.com
7
ART SPEAK Crosshatching is a technique for rendering an infinite range of values within shading, in which one set of lines crosses over (overlaps) another set. Form as applied to drawing, is the illusion of the three-dimensional structure of a shape, such as a circle, square or triangle, created in a drawing with shading and/or perspective. Light source refers to the direction from which a dominant light originates. The placement of this light source affects every aspect of a drawing. The light source tells you where to draw all the light values and shadows. Contrast measures the degree of difference between the light and dark values within shading, and creates the illusion of three-dimensions. Reflected light is a faint rim of light reflected or bounced back on an object (especially noticeable on a sphere) from the surfaces close to and around the object, such as the surface on which the object is sitting.
TIP Remember, a full range of different values is created by varying the density of the lines, varying the pressure used in holding your pencils, and using various grades of pencils. For refresher courses on various shading techniques, refer to sections D Beginner: Squirkling, F Beginner: Hatching, and L Intermediate: Crosshatching.
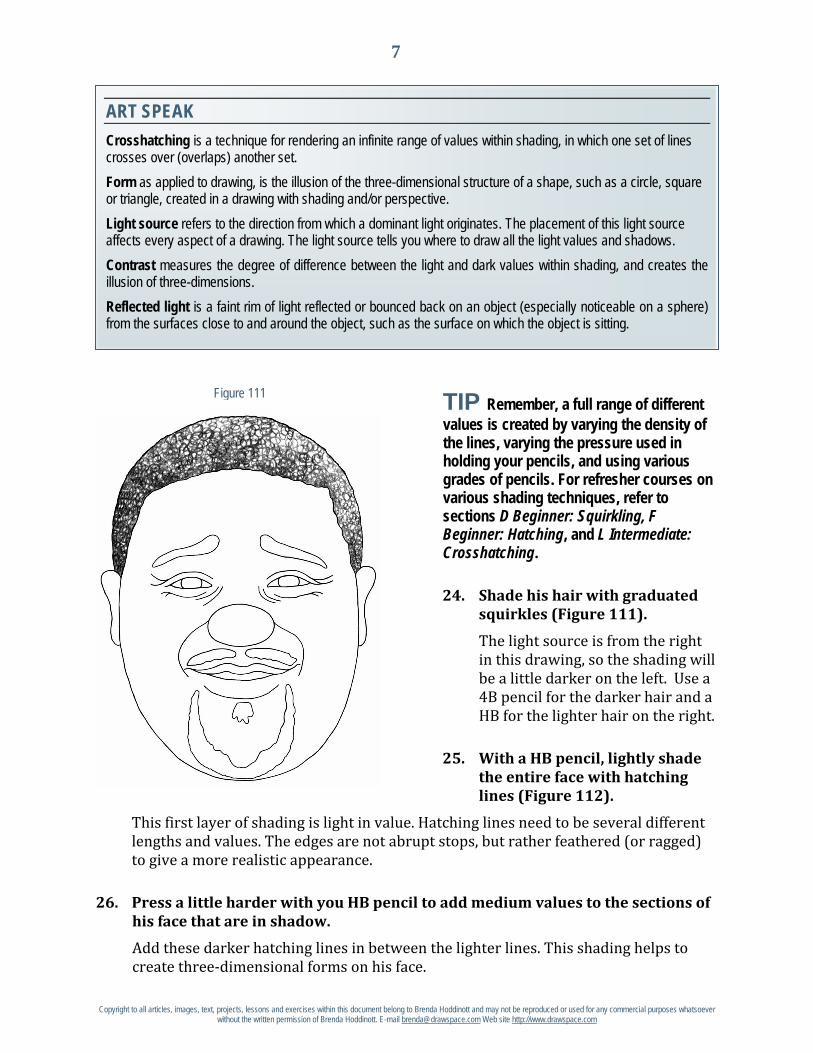
24. Shade his hair with graduated squirkles (Figure 111).
The light source is from the right in this drawing, so the shading will be a little darker on the left. Use a 4B pencil for the darker hair and a HB for the lighter hair on the right.
25. With a HB pencil, lightly shade the entire face with hatching lines (Figure 112).
This first layer of shading is light in value. Hatching lines need to be several different lengths and values. The edges are not abrupt stops, but rather feathered (or ragged) to give a more realistic appearance.
26. Press a little harder with you HB pencil to add medium values to the sections of his face that are in shadow.
Add these darker hatching lines in between the lighter lines. This shading helps to create three-dimensional forms on his face.
Figure 111
Copyright to all articles, images, text, projects, lessons and exercises within this document belong to Brenda Hoddinott and may not be reproduced or used for any commercial purposes whatsoever without the written permission of Brenda Hoddinott. E-mail [email protected] Web site http://www.drawspace.com
8
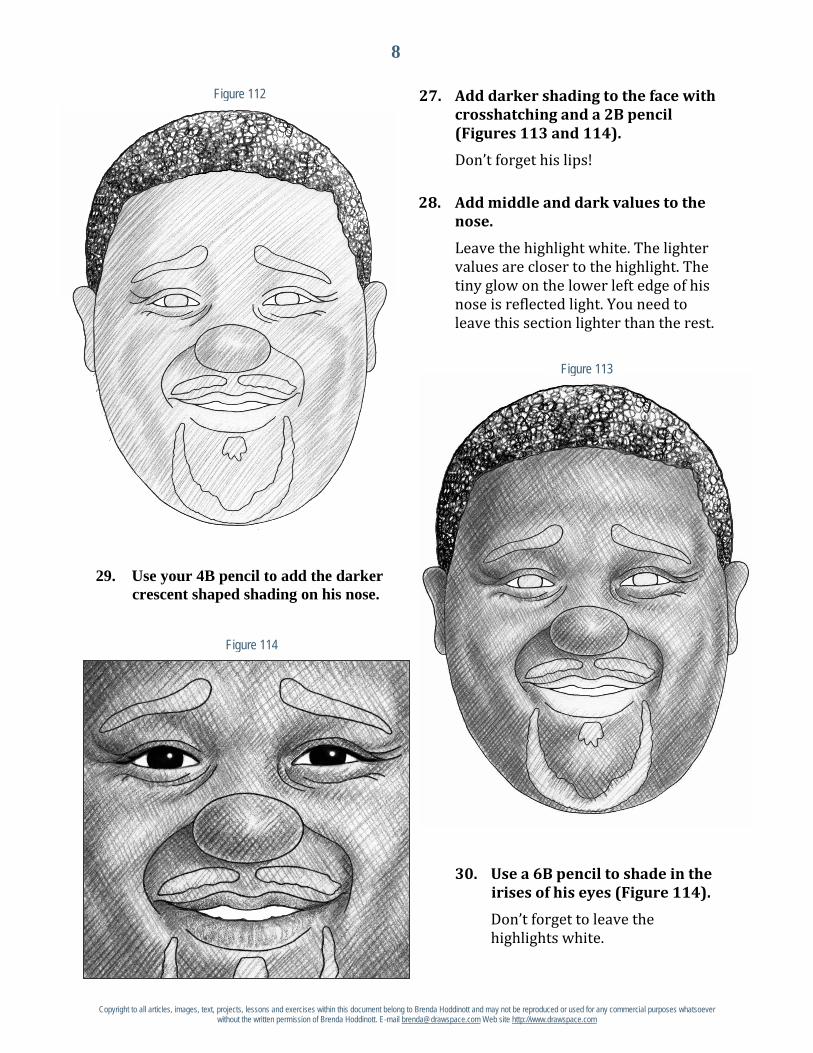
27. Add darker shading to the face with crosshatching and a 2B pencil (Figures 113 and 114).
Don’t forget his lips!
28. Add middle and dark values to the nose.
Leave the highlight white. The lighter values are closer to the highlight. The tiny glow on the lower left edge of his nose is reflected light. You need to leave this section lighter than the rest.
29. Use your 4B pencil to add the darker crescent shaped shading on his nose.
30. Use a 6B pencil to shade in the irises of his eyes (Figure 114).
Don’t forget to leave the highlights white.
Figure 112
Figure 113
Figure 114
Copyright to all articles, images, text, projects, lessons and exercises within this document belong to Brenda Hoddinott and may not be reproduced or used for any commercial purposes whatsoever without the written permission of Brenda Hoddinott. E-mail [email protected] Web site http://www.drawspace.com
9
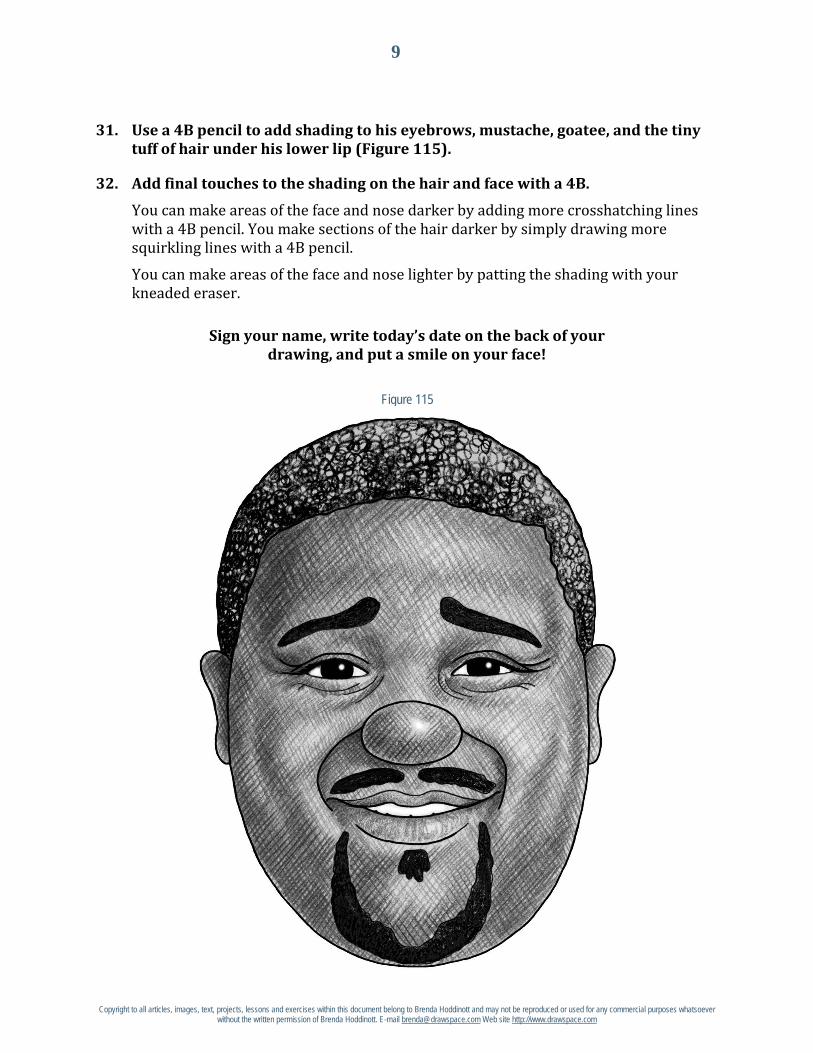
31. Use a 4B pencil to add shading to his eyebrows, mustache, goatee, and the tiny tuff of hair under his lower lip (Figure 115).
32. Add final touches to the shading on the hair and face with a 4B.
You can make areas of the face and nose darker by adding more crosshatching lines with a 4B pencil. You make sections of the hair darker by simply drawing more squirkling lines with a 4B pencil.
You can make areas of the face and nose lighter by patting the shading with your kneaded eraser.
Sign your name, write today’s date on the back of your drawing, and put a smile on your face!
Figure 115
Copyright to all articles, images, text, projects, lessons and exercises within this document belong to Brenda Hoddinott and may not be reproduced or used for any commercial purposes whatsoever without the written permission of Brenda Hoddinott. E-mail [email protected] Web site http://www.drawspace.com
10
BRENDA HODDINOTT As a self-educated teacher, visual artist, portraitist, forensic artist (retired), and illustrator, Brenda Hoddinott utilizes diverse art media including her favorites: graphite and paint.
Brenda is the author of Drawing for Dummies (Wiley Publishing, Inc., New York, NY) and The Complete Idiot’s Guide to Drawing People (Winner of the Alpha-Penguin Book of the Year Award 2004, Alpha - Pearson Education – Macmillan, Indianapolis, IN). She is currently writing two books on classical drawing.
My philosophy on teaching art is to focus primarily on the enjoyment aspects while gently introducing the technical and academic. Hence, in creating a passion for the subject matter, the quest for knowledge also becomes enjoyable. >Brenda Hoddinott<
Born in St. John’s, Newfoundland, Brenda grew up in the small town of Corner Brook. She developed strong drawing and painting skills through self-directed learning.
During her twenty-five year career as a self-educated civilian forensic artist, various criminal investigation departments have employed Brenda’s skills, including the Royal Canadian Mounted Police. In 1992, Brenda was honored with a commendation from the Royal Canadian Mounted Police, and in 1994, she was awarded a Certificate of Membership from “Forensic Artists International”.
In 2003, Brenda retired from her careers as a forensic artist and teacher to work full time writing books and developing her website (Drawspace.com). This site is respected as a resource for fine art educators, home schooling programs, and educational facilities throughout the world.
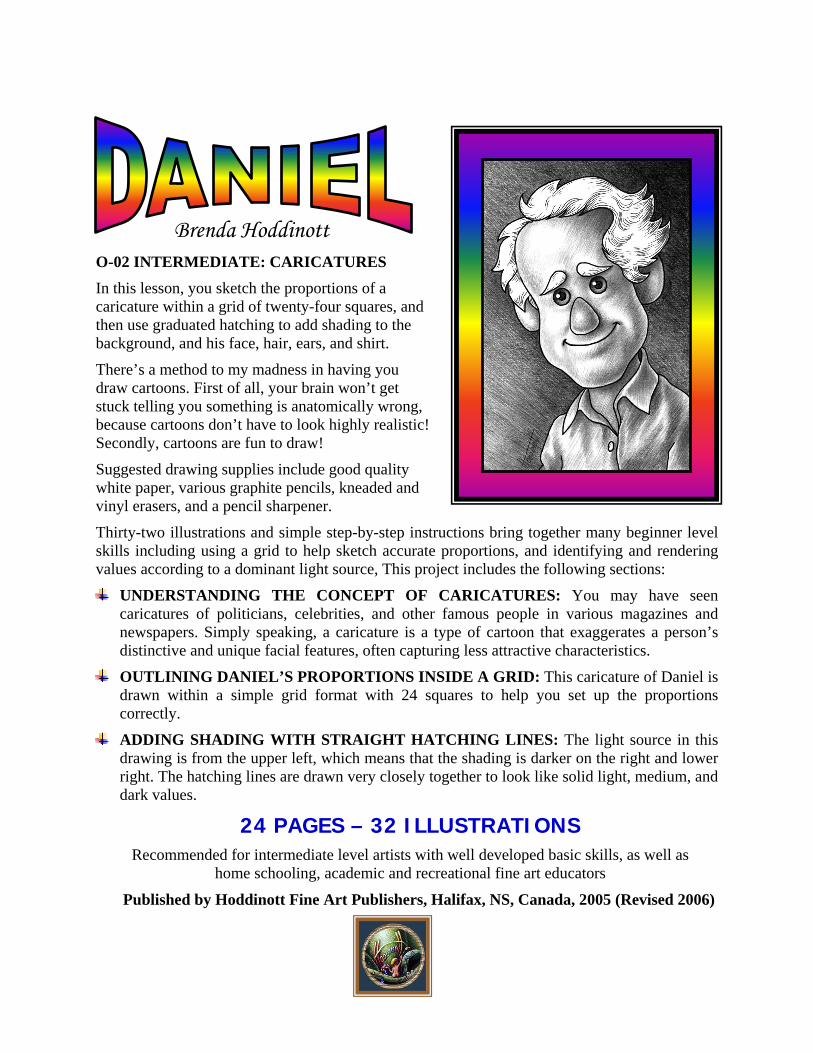
Brenda Hoddinott O-02 INTERMEDIATE: CARICATURES In this lesson, you sketch the proportions of a caricature within a grid of twenty-four squares, and then use graduated hatching to add shading to the background, and his face, hair, ears, and shirt.
There’s a method to my madness in having you draw cartoons. First of all, your brain won’t get stuck telling you something is anatomically wrong, because cartoons don’t have to look highly realistic! Secondly, cartoons are fun to draw!
Suggested drawing supplies include good quality white paper, various graphite pencils, kneaded and vinyl erasers, and a pencil sharpener.
Thirty-two illustrations and simple step-by-step instructions bring together many beginner level skills including using a grid to help sketch accurate proportions, and identifying and rendering values according to a dominant light source, This project includes the following sections:
UNDERSTANDING THE CONCEPT OF CARICATURES: You may have seen caricatures of politicians, celebrities, and other famous people in various magazines and newspapers. Simply speaking, a caricature is a type of cartoon that exaggerates a person’s distinctive and unique facial features, often capturing less attractive characteristics.
OUTLINING DANIEL’S PROPORTIONS INSIDE A GRID: This caricature of Daniel is drawn within a simple grid format with 24 squares to help you set up the proportions correctly.
ADDING SHADING WITH STRAIGHT HATCHING LINES: The light source in this drawing is from the upper left, which means that the shading is darker on the right and lower right. The hatching lines are drawn very closely together to look like solid light, medium, and dark values.
24 PAGES – 32 ILLUSTRATIONS Recommended for intermediate level artists with well developed basic skills, as well as
home schooling, academic and recreational fine art educators
Published by Hoddinott Fine Art Publishers, Halifax, NS, Canada, 2005 (Revised 2006)
Copyright to all articles, images, text, projects, lessons and exercises within this drawing class belong to Brenda Hoddinott and may not be reproduced or used for any commercial purposes whatsoever without the written permission of Brenda Hoddinott.
E-mail [email protected] Web sites http://www.finearteducation.com and http://www.drawspace.com
- 2 -
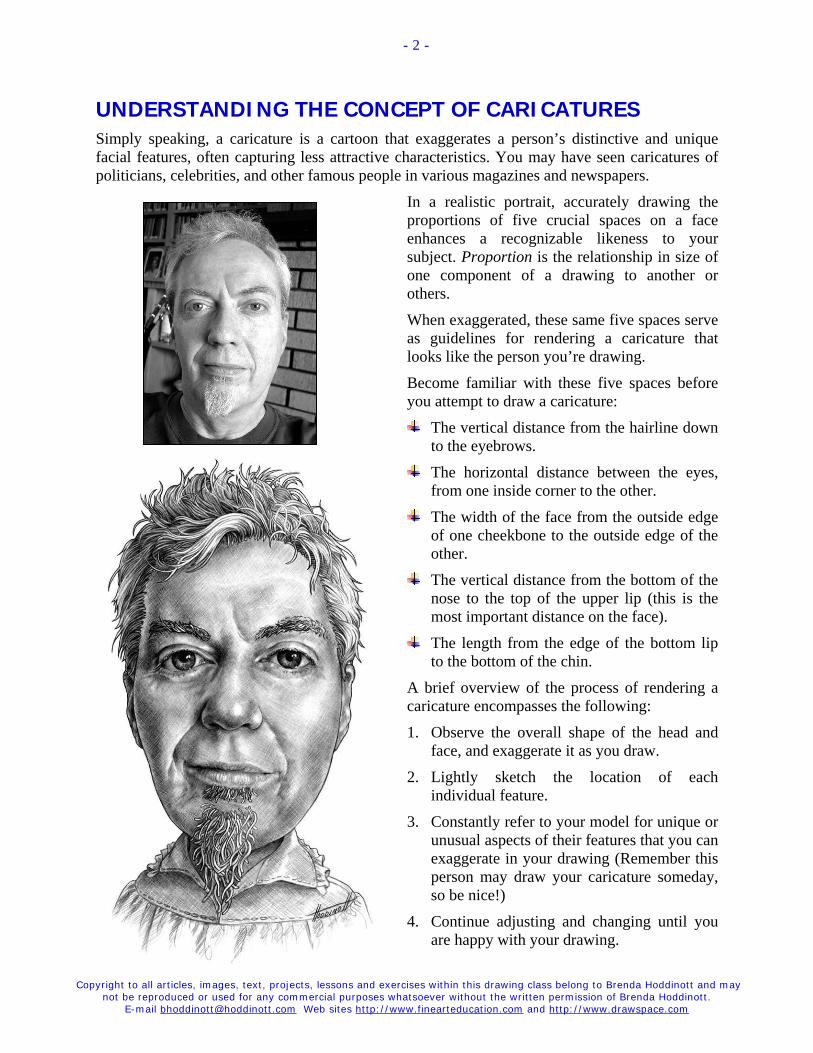
UNDERSTANDING THE CONCEPT OF CARICATURES Simply speaking, a caricature is a cartoon that exaggerates a person’s distinctive and unique facial features, often capturing less attractive characteristics. You may have seen caricatures of politicians, celebrities, and other famous people in various magazines and newspapers.
In a realistic portrait, accurately drawing the proportions of five crucial spaces on a face enhances a recognizable likeness to your subject. Proportion is the relationship in size of one component of a drawing to another or others.
When exaggerated, these same five spaces serve as guidelines for rendering a caricature that looks like the person you’re drawing.
Become familiar with these five spaces before you attempt to draw a caricature:
The vertical distance from the hairline down to the eyebrows.
The horizontal distance between the eyes, from one inside corner to the other.
The width of the face from the outside edge of one cheekbone to the outside edge of the other.
The vertical distance from the bottom of the nose to the top of the upper lip (this is the most important distance on the face).
The length from the edge of the bottom lip to the bottom of the chin.
A brief overview of the process of rendering a caricature encompasses the following:
1. Observe the overall shape of the head and face, and exaggerate it as you draw.
2. Lightly sketch the location of each individual feature.
3. Constantly refer to your model for unique or unusual aspects of their features that you can exaggerate in your drawing (Remember this person may draw your caricature someday, so be nice!)
4. Continue adjusting and changing until you are happy with your drawing.

Copyright to all articles, images, text, projects, lessons and exercises within this drawing class belong to Brenda Hoddinott and may not be reproduced or used for any commercial purposes whatsoever without the written permission of Brenda Hoddinott.
E-mail [email protected] Web sites http://www.finearteducation.com and http://www.drawspace.com
- 3 -
You can draw a caricature of someone you know, such as one your family members or a friend, either from life or a photo! Choose a good photo or find a patient model. If you work from life, be prepared for a few giggles!
Remember, an important key to drawing a caricature of an actual person is to exaggerate prominent features. If the eyes are far apart, draw them even farther apart. If his or her eyebrows are heavy, thick and dark, draw them heavier, thicker, and darker! If he or she has a big chin or nose, draw it larger! If the hair is thin, make it thinner and if it’s thick, draw it thicker!
OUTLINING DANIEL’S PROPORTIONS INSIDE A GRID This caricature of Daniel is drawn within a simple grid format of 24 squares to help you set up the proportions correctly. I’ve chosen a rectangular drawing format, 4 by 6 inches with one inch squares. For a 6 by 9 inch drawing use 1.5 inch squares, or use 2 inch squares for an 8 by 12 inch drawing format.
ILLUSTRATION 02-01
1. Draw a grid that is four squares wide by six squares long. Draw your lines very lightly, preferably with your HB mechanical pencil. You will need to erase these lines later. No matter how careful you are, accidents still happen.
2. Add numbers and letters outside the perimeter to mark the grid squares. If you’re not used to drawing with a grid, using numbers along the top and bottom, and letters down each side, to help you identify individual squares as you work.
Starting from the left, add numbers 1 through 4 to identify the vertical squares along the top and bottom.
Letter the horizontal squares down both sides of the 6 inch sides with letters A through F.
Never underestimate the importance of strong drawing skills and a good knowledge of facial anatomy in cartoon drawing.
Copyright to all articles, images, text, projects, lessons and exercises within this drawing class belong to Brenda Hoddinott and may not be reproduced or used for any commercial purposes whatsoever without the written permission of Brenda Hoddinott.
E-mail [email protected] Web sites http://www.finearteducation.com and http://www.drawspace.com
- 4 -
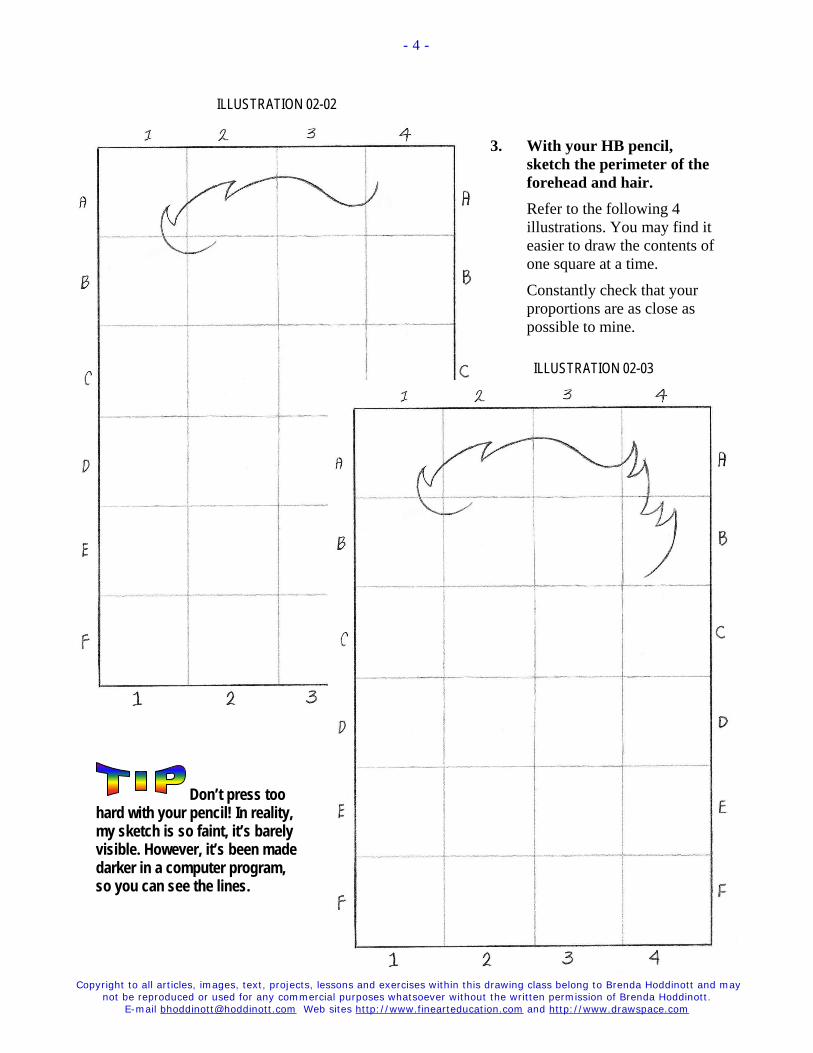
ILLUSTRATION 02-02
3. With your HB pencil, sketch the perimeter of the forehead and hair. Refer to the following 4 illustrations. You may find it easier to draw the contents of one square at a time.
Constantly check that your proportions are as close as possible to mine.
ILLUSTRATION 02-03
Don’t press too hard with your pencil! In reality, my sketch is so faint, it’s barely visible. However, it’s been made darker in a computer program, so you can see the lines.
Copyright to all articles, images, text, projects, lessons and exercises within this drawing class belong to Brenda Hoddinott and may not be reproduced or used for any commercial purposes whatsoever without the written permission of Brenda Hoddinott.
E-mail [email protected] Web sites http://www.finearteducation.com and http://www.drawspace.com
- 5 -
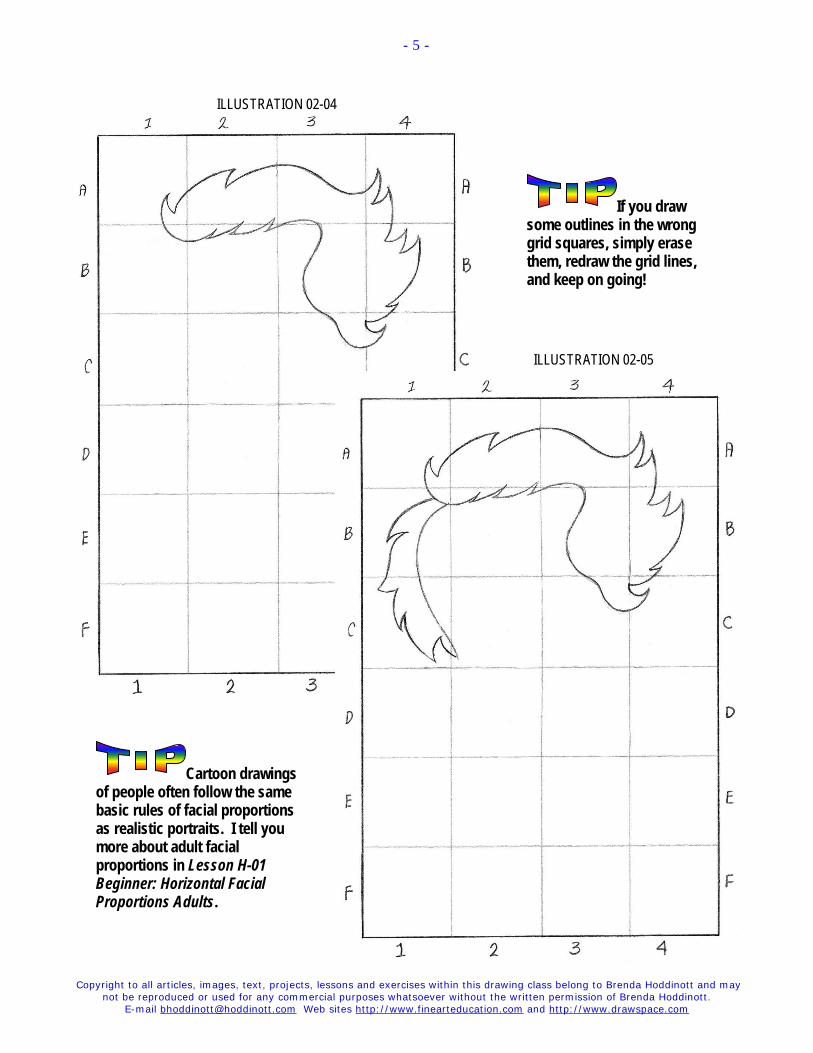
ILLUSTRATION 02-04
If you draw some outlines in the wrong grid squares, simply erase them, redraw the grid lines, and keep on going!
ILLUSTRATION 02-05
Cartoon drawings of people often follow the same basic rules of facial proportions as realistic portraits. I tell you more about adult facial proportions in Lesson H-01 Beginner: Horizontal Facial Proportions Adults.
Copyright to all articles, images, text, projects, lessons and exercises within this drawing class belong to Brenda Hoddinott and may not be reproduced or used for any commercial purposes whatsoever without the written permission of Brenda Hoddinott.
E-mail [email protected] Web sites http://www.finearteducation.com and http://www.drawspace.com
- 6 -
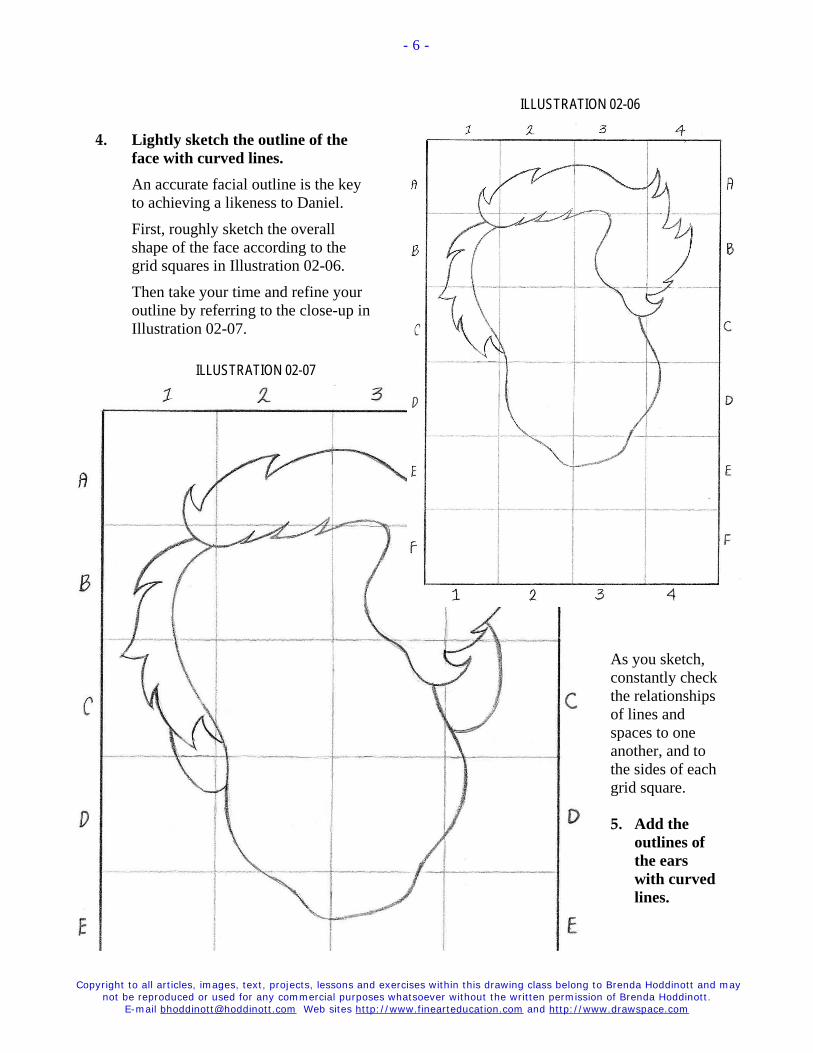
ILLUSTRATION 02-06
4. Lightly sketch the outline of the face with curved lines. An accurate facial outline is the key to achieving a likeness to Daniel.
First, roughly sketch the overall shape of the face according to the grid squares in Illustration 02-06.
Then take your time and refine your outline by referring to the close-up in Illustration 02-07.
ILLUSTRATION 02-07
As you sketch, constantly check the relationships of lines and spaces to one another, and to the sides of each grid square.
5. Add the outlines of the ears with curved lines.

Copyright to all articles, images, text, projects, lessons and exercises within this drawing class belong to Brenda Hoddinott and may not be reproduced or used for any commercial purposes whatsoever without the written permission of Brenda Hoddinott.
E-mail [email protected] Web sites http://www.finearteducation.com and http://www.drawspace.com
- 7 -
ILLUSTRATION 02-08
6. Outline the perimeter of the eyes and eyebrows. The eyes and eyebrows are located at the vertical midway point on the face, as you can see in Illustration 02-08.
Refer to the close up of the four grid squares in which all the features are located (Illustration 02-09).
7. Lightly sketch the nose and mouth. Pay close attention to their locations and sizes in relation to the four grid squares.
ILLUSTRATION 02-09
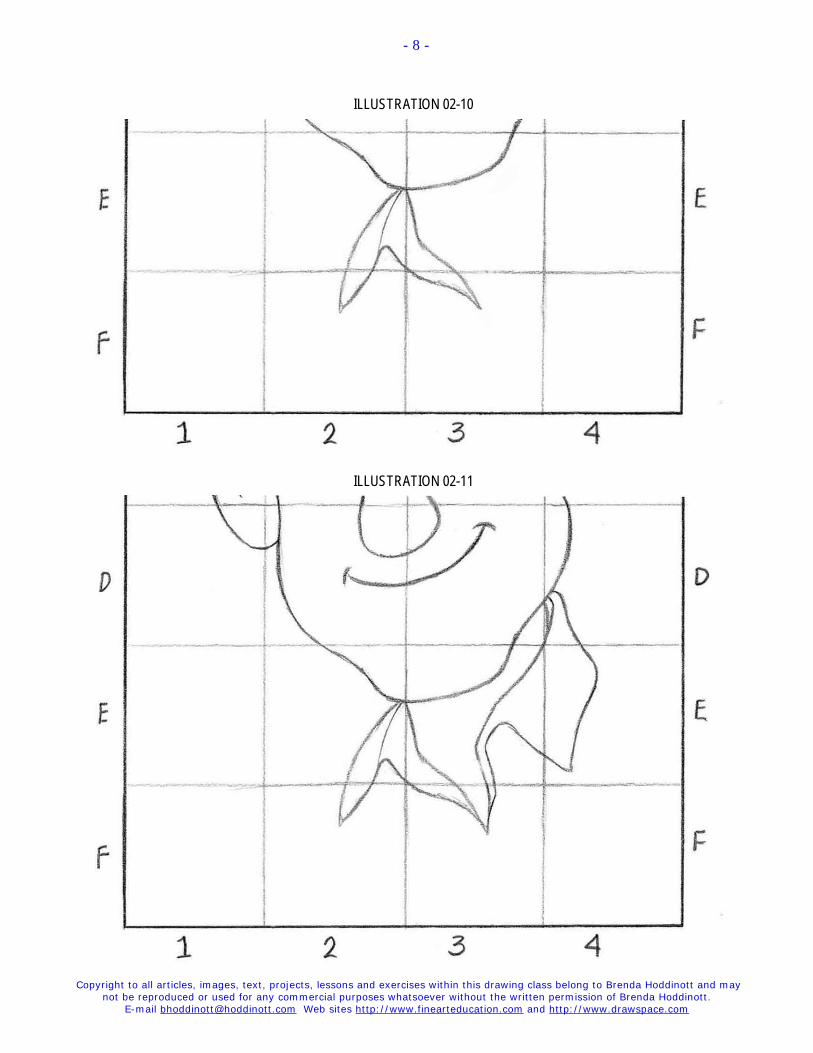
8. Outline the neck, the collar of the shirt, and the shirt. Closely examine the neck and the details of the shirt in the three illustrations on the next two pages.
Copyright to all articles, images, text, projects, lessons and exercises within this drawing class belong to Brenda Hoddinott and may not be reproduced or used for any commercial purposes whatsoever without the written permission of Brenda Hoddinott.
E-mail [email protected] Web sites http://www.finearteducation.com and http://www.drawspace.com
- 8 -
ILLUSTRATION 02-10
ILLUSTRATION 02-11
Copyright to all articles, images, text, projects, lessons and exercises within this drawing class belong to Brenda Hoddinott and may not be reproduced or used for any commercial purposes whatsoever without the written permission of Brenda Hoddinott.
E-mail [email protected] Web sites http://www.finearteducation.com and http://www.drawspace.com
- 9 -
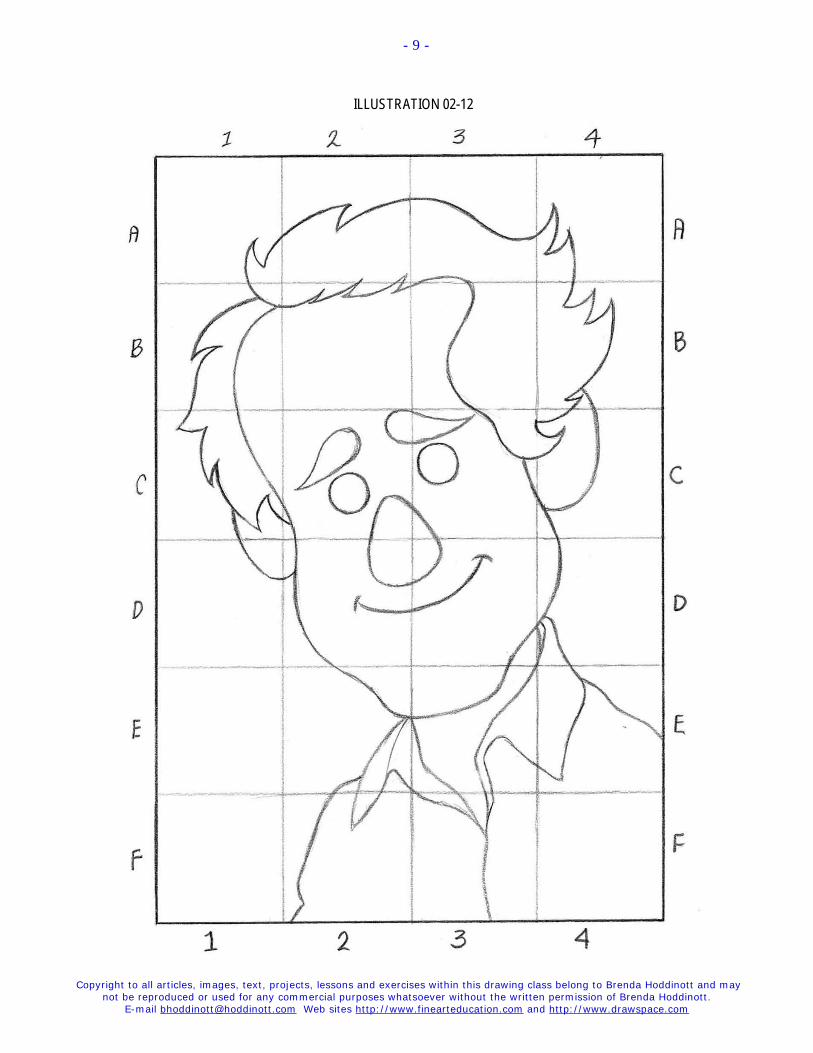
ILLUSTRATION 02-12
Copyright to all articles, images, text, projects, lessons and exercises within this drawing class belong to Brenda Hoddinott and may not be reproduced or used for any commercial purposes whatsoever without the written permission of Brenda Hoddinott.
E-mail [email protected] Web sites http://www.finearteducation.com and http://www.drawspace.com
- 10 -
9. Before you continue, check that everything is in the correct place, and change anything you’re not happy with.
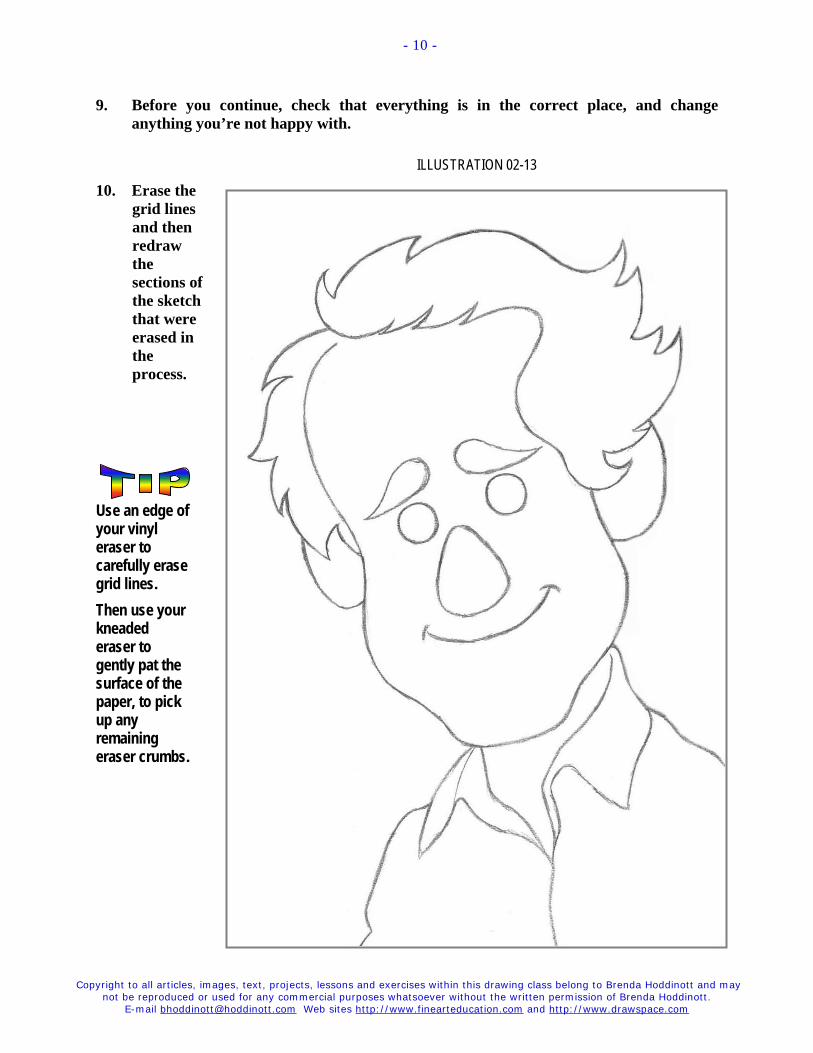
ILLUSTRATION 02-13
10. Erase the grid lines and then redraw the sections of the sketch that were erased in the process.
Use an edge of your vinyl eraser to carefully erase grid lines. Then use your kneaded eraser to gently pat the surface of the paper, to pick up any remaining eraser crumbs.
Copyright to all articles, images, text, projects, lessons and exercises within this drawing class belong to Brenda Hoddinott and may not be reproduced or used for any commercial purposes whatsoever without the written permission of Brenda Hoddinott.
E-mail [email protected] Web sites http://www.finearteducation.com and http://www.drawspace.com
- 11 -
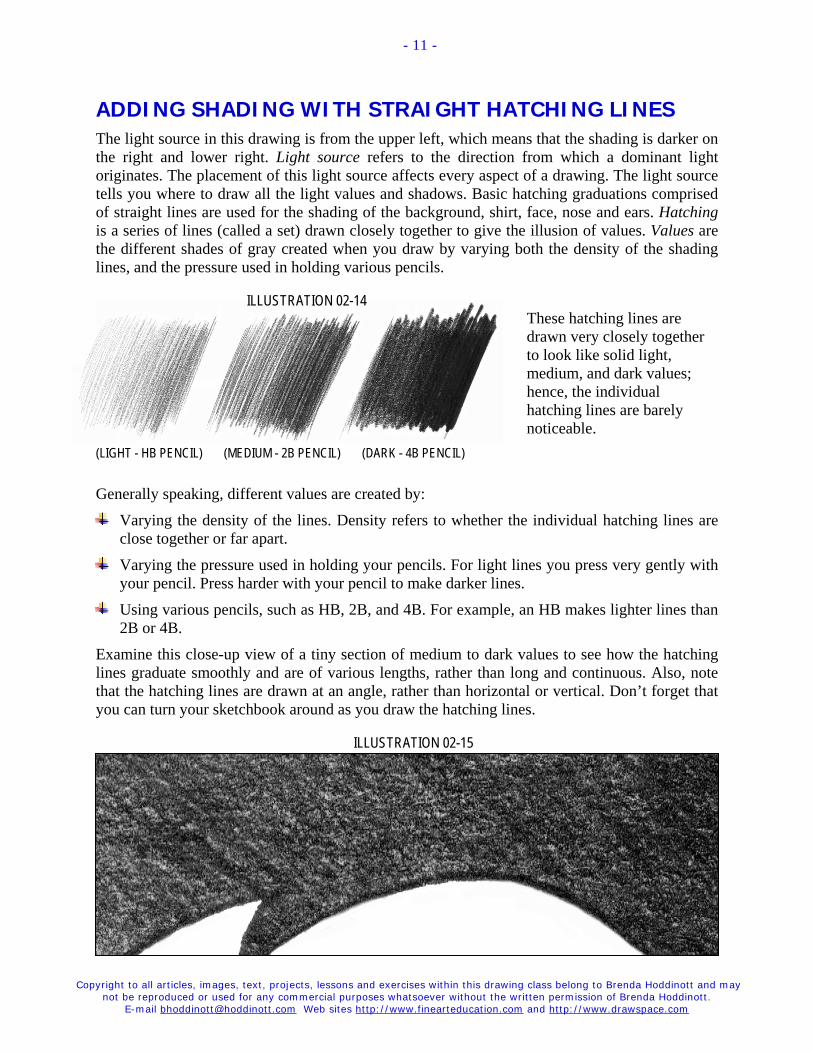
ADDING SHADING WITH STRAIGHT HATCHING LINES The light source in this drawing is from the upper left, which means that the shading is darker on the right and lower right. Light source refers to the direction from which a dominant light originates. The placement of this light source affects every aspect of a drawing. The light source tells you where to draw all the light values and shadows. Basic hatching graduations comprised of straight lines are used for the shading of the background, shirt, face, nose and ears. Hatching is a series of lines (called a set) drawn closely together to give the illusion of values. Values are the different shades of gray created when you draw by varying both the density of the shading lines, and the pressure used in holding various pencils.
ILLUSTRATION 02-14 These hatching lines are drawn very closely together to look like solid light, medium, and dark values; hence, the individual hatching lines are barely noticeable.
(LIGHT - HB PENCIL) (MEDIUM - 2B PENCIL) (DARK - 4B PENCIL)
Generally speaking, different values are created by:
Varying the density of the lines. Density refers to whether the individual hatching lines are close together or far apart.
Varying the pressure used in holding your pencils. For light lines you press very gently with your pencil. Press harder with your pencil to make darker lines.
Using various pencils, such as HB, 2B, and 4B. For example, an HB makes lighter lines than 2B or 4B.
Examine this close-up view of a tiny section of medium to dark values to see how the hatching lines graduate smoothly and are of various lengths, rather than long and continuous. Also, note that the hatching lines are drawn at an angle, rather than horizontal or vertical. Don’t forget that you can turn your sketchbook around as you draw the hatching lines.
ILLUSTRATION 02-15
Copyright to all articles, images, text, projects, lessons and exercises within this drawing class belong to Brenda Hoddinott and may not be reproduced or used for any commercial purposes whatsoever without the written permission of Brenda Hoddinott.
E-mail [email protected] Web sites http://www.finearteducation.com and http://www.drawspace.com
- 12 -
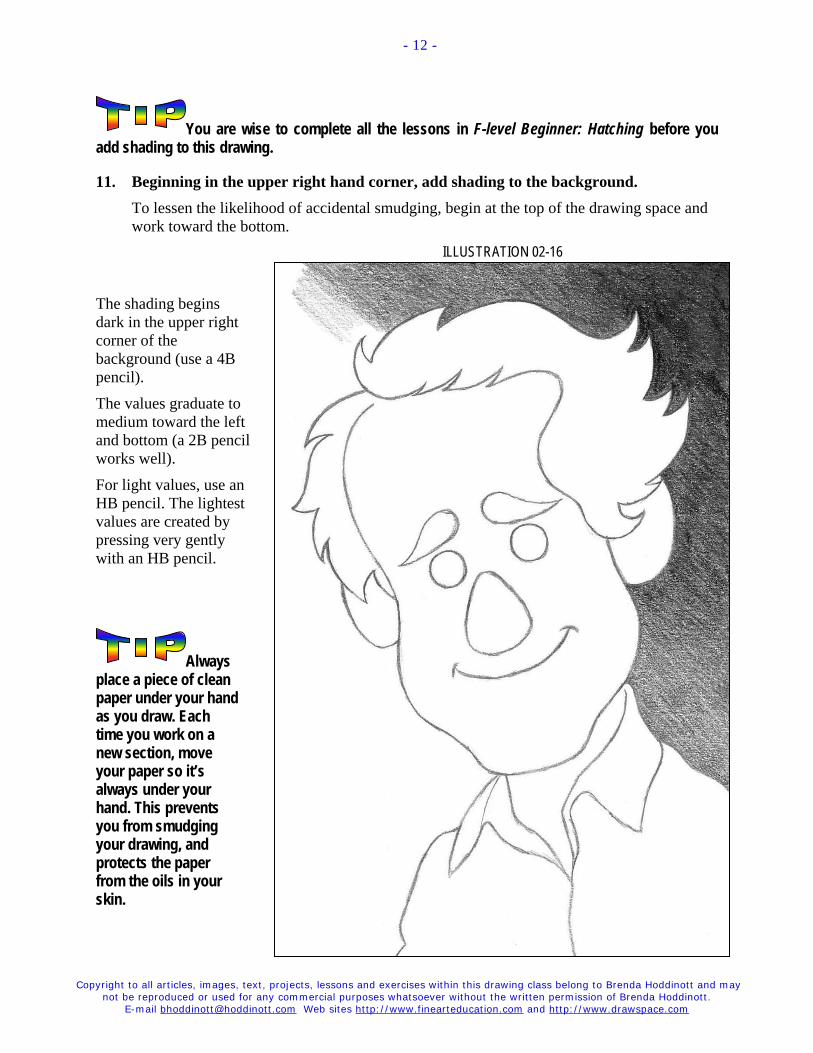
You are wise to complete all the lessons in F-level Beginner: Hatching before you add shading to this drawing.
11. Beginning in the upper right hand corner, add shading to the background. To lessen the likelihood of accidental smudging, begin at the top of the drawing space and work toward the bottom.
ILLUSTRATION 02-16
The shading begins dark in the upper right corner of the background (use a 4B pencil).
The values graduate to medium toward the left and bottom (a 2B pencil works well).
For light values, use an HB pencil. The lightest values are created by pressing very gently with an HB pencil.
Always place a piece of clean paper under your hand as you draw. Each time you work on a new section, move your paper so it’s always under your hand. This prevents you from smudging your drawing, and protects the paper from the oils in your skin.
Copyright to all articles, images, text, projects, lessons and exercises within this drawing class belong to Brenda Hoddinott and may not be reproduced or used for any commercial purposes whatsoever without the written permission of Brenda Hoddinott.
E-mail [email protected] Web sites http://www.finearteducation.com and http://www.drawspace.com
- 13 -
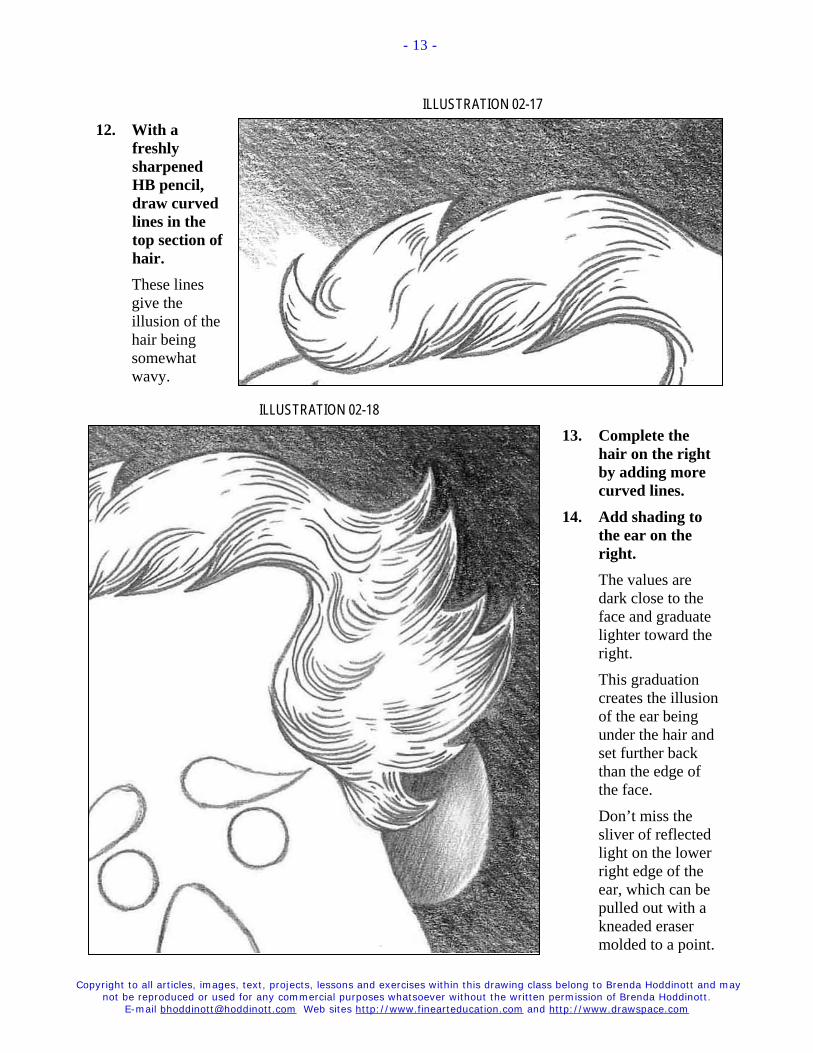
ILLUSTRATION 02-17
12. With a freshly sharpened HB pencil, draw curved lines in the top section of hair. These lines give the illusion of the hair being somewhat wavy.
ILLUSTRATION 02-18
13. Complete the hair on the right by adding more curved lines.
14. Add shading to the ear on the right. The values are dark close to the face and graduate lighter toward the right.
This graduation creates the illusion of the ear being under the hair and set further back than the edge of the face.
Don’t miss the sliver of reflected light on the lower right edge of the ear, which can be pulled out with a kneaded eraser molded to a point.
Copyright to all articles, images, text, projects, lessons and exercises within this drawing class belong to Brenda Hoddinott and may not be reproduced or used for any commercial purposes whatsoever without the written permission of Brenda Hoddinott.
E-mail [email protected] Web sites http://www.finearteducation.com and http://www.drawspace.com
- 14 -
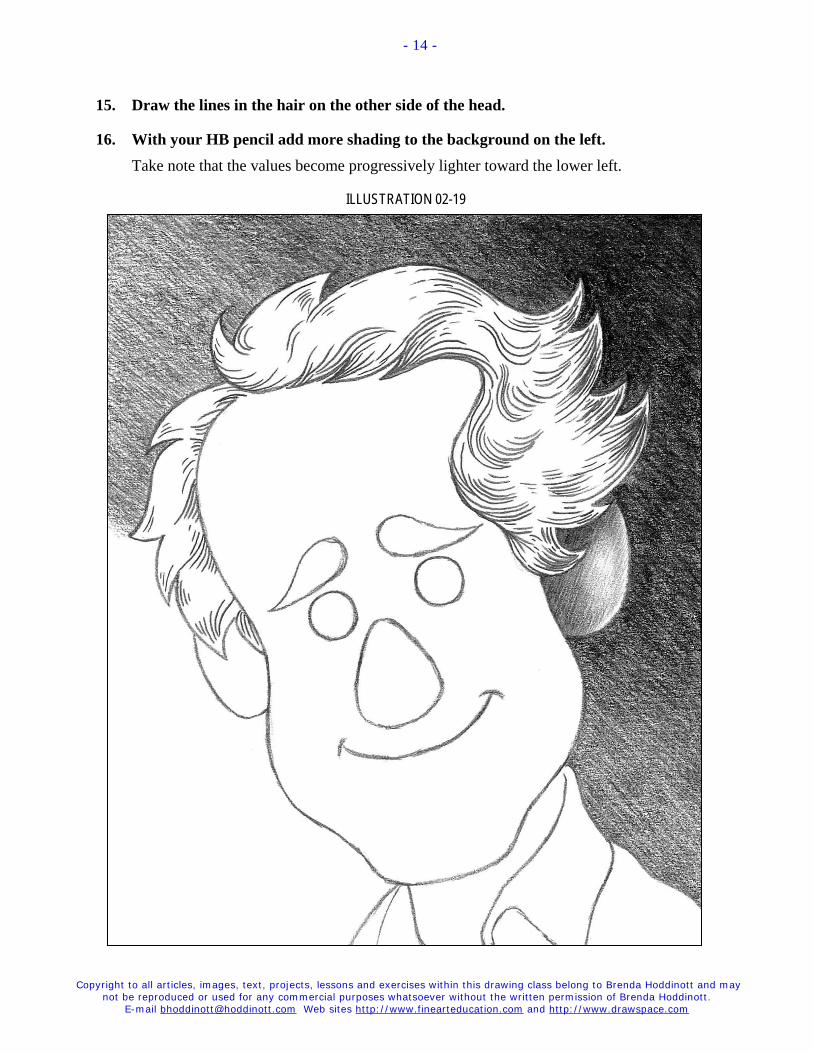
15. Draw the lines in the hair on the other side of the head.
16. With your HB pencil add more shading to the background on the left. Take note that the values become progressively lighter toward the lower left.
ILLUSTRATION 02-19
Copyright to all articles, images, text, projects, lessons and exercises within this drawing class belong to Brenda Hoddinott and may not be reproduced or used for any commercial purposes whatsoever without the written permission of Brenda Hoddinott.
E-mail [email protected] Web sites http://www.finearteducation.com and http://www.drawspace.com
- 15 -
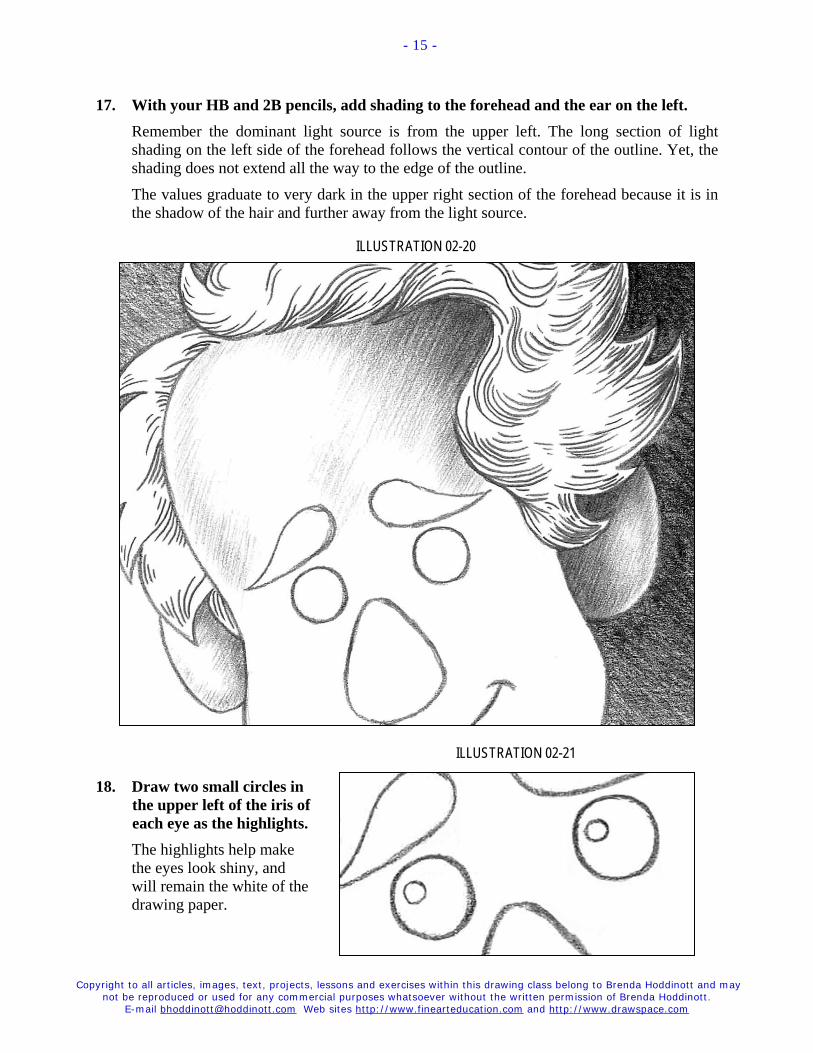
17. With your HB and 2B pencils, add shading to the forehead and the ear on the left. Remember the dominant light source is from the upper left. The long section of light shading on the left side of the forehead follows the vertical contour of the outline. Yet, the shading does not extend all the way to the edge of the outline.
The values graduate to very dark in the upper right section of the forehead because it is in the shadow of the hair and further away from the light source.
ILLUSTRATION 02-20
ILLUSTRATION 02-21
18. Draw two small circles in the upper left of the iris of each eye as the highlights. The highlights help make the eyes look shiny, and will remain the white of the drawing paper.
Copyright to all articles, images, text, projects, lessons and exercises within this drawing class belong to Brenda Hoddinott and may not be reproduced or used for any commercial purposes whatsoever without the written permission of Brenda Hoddinott.
E-mail [email protected] Web sites http://www.finearteducation.com and http://www.drawspace.com
- 16 -
ILLUSTRATION 02-22
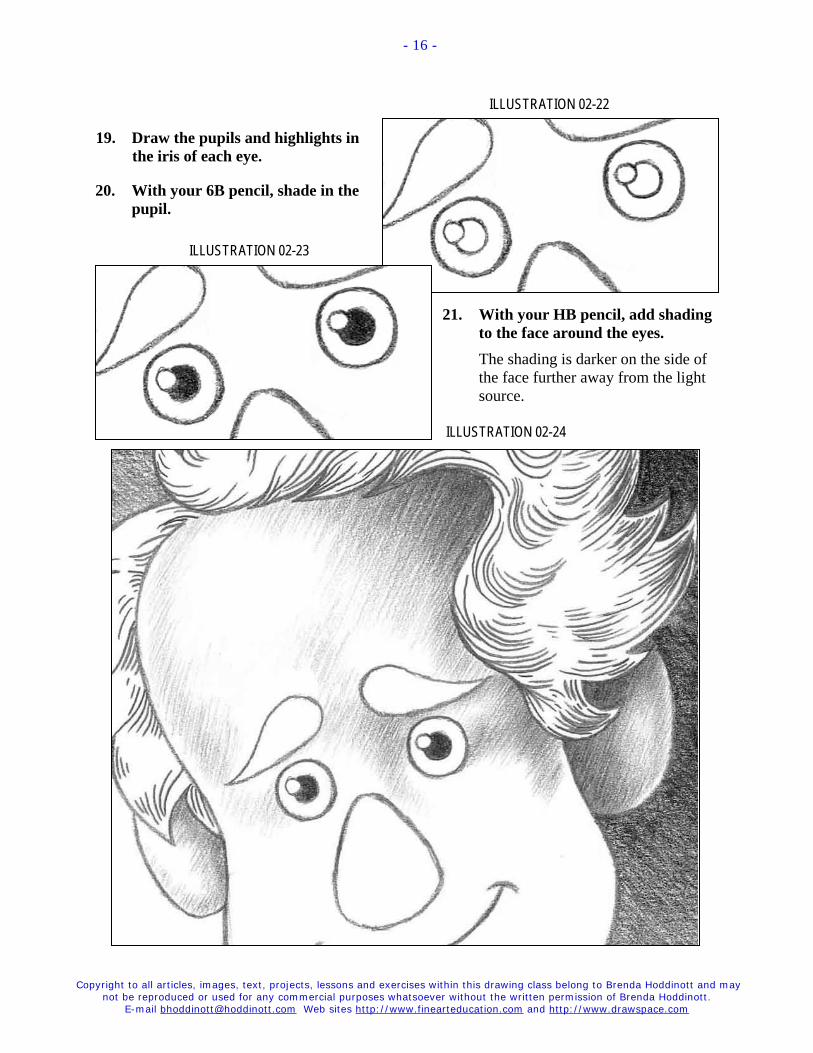
19. Draw the pupils and highlights in the iris of each eye.
20. With your 6B pencil, shade in the pupil.
ILLUSTRATION 02-23
21. With your HB pencil, add shading to the face around the eyes. The shading is darker on the side of the face further away from the light source.
ILLUSTRATION 02-24
Copyright to all articles, images, text, projects, lessons and exercises within this drawing class belong to Brenda Hoddinott and may not be reproduced or used for any commercial purposes whatsoever without the written permission of Brenda Hoddinott.
E-mail [email protected] Web sites http://www.finearteducation.com and http://www.drawspace.com
- 17 -
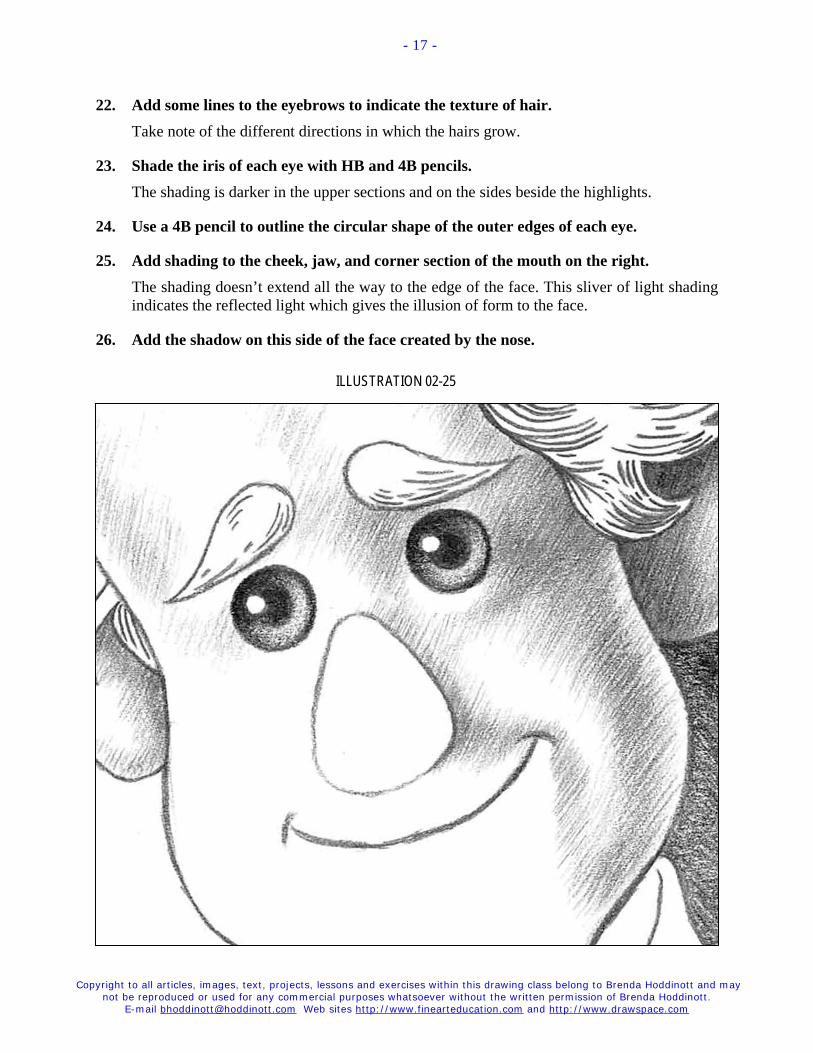
22. Add some lines to the eyebrows to indicate the texture of hair. Take note of the different directions in which the hairs grow.
23. Shade the iris of each eye with HB and 4B pencils. The shading is darker in the upper sections and on the sides beside the highlights.
24. Use a 4B pencil to outline the circular shape of the outer edges of each eye.
25. Add shading to the cheek, jaw, and corner section of the mouth on the right. The shading doesn’t extend all the way to the edge of the face. This sliver of light shading indicates the reflected light which gives the illusion of form to the face.
26. Add the shadow on this side of the face created by the nose.
ILLUSTRATION 02-25
Copyright to all articles, images, text, projects, lessons and exercises within this drawing class belong to Brenda Hoddinott and may not be reproduced or used for any commercial purposes whatsoever without the written permission of Brenda Hoddinott.
E-mail [email protected] Web sites http://www.finearteducation.com and http://www.drawspace.com
- 18 -
ILLUSTRATION 02-26
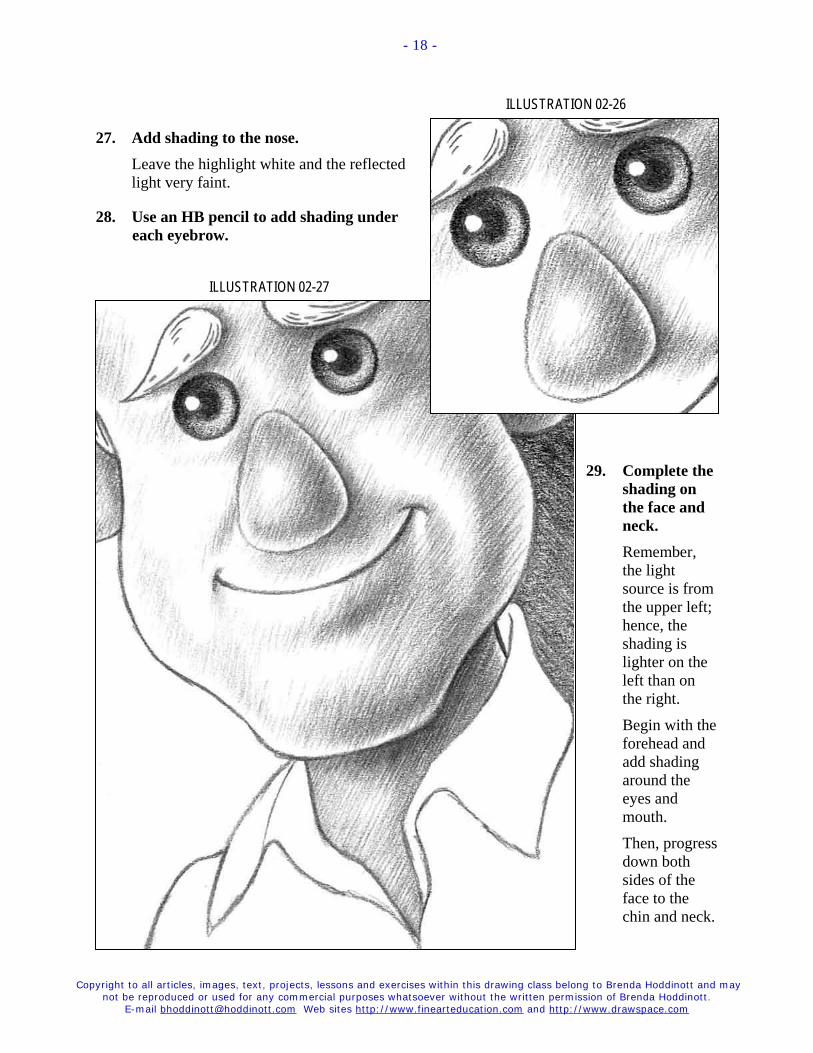
27. Add shading to the nose. Leave the highlight white and the reflected light very faint.
28. Use an HB pencil to add shading under each eyebrow.
ILLUSTRATION 02-27
29. Complete the shading on the face and neck. Remember, the light source is from the upper left; hence, the shading is lighter on the left than on the right.
Begin with the forehead and add shading around the eyes and mouth.
Then, progress down both sides of the face to the chin and neck.
Copyright to all articles, images, text, projects, lessons and exercises within this drawing class belong to Brenda Hoddinott and may not be reproduced or used for any commercial purposes whatsoever without the written permission of Brenda Hoddinott.
E-mail [email protected] Web sites http://www.finearteducation.com and http://www.drawspace.com
- 19 -
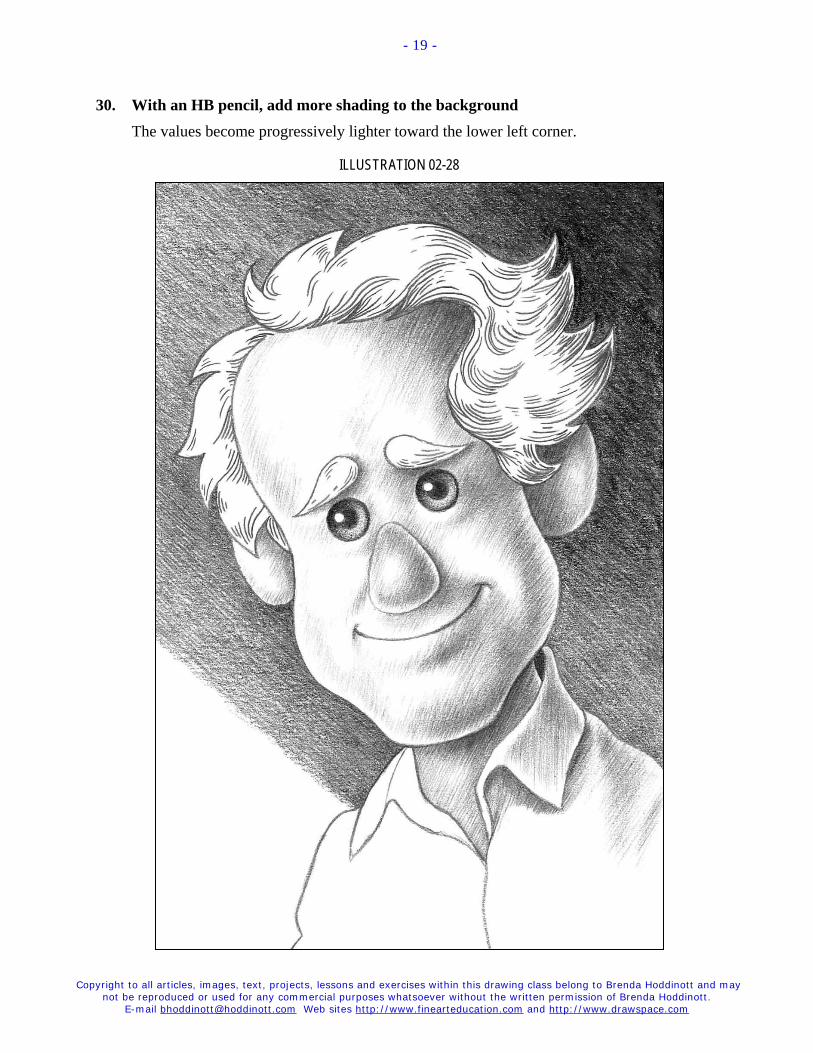
30. With an HB pencil, add more shading to the background The values become progressively lighter toward the lower left corner.
ILLUSTRATION 02-28
Copyright to all articles, images, text, projects, lessons and exercises within this drawing class belong to Brenda Hoddinott and may not be reproduced or used for any commercial purposes whatsoever without the written permission of Brenda Hoddinott.
E-mail [email protected] Web sites http://www.finearteducation.com and http://www.drawspace.com
- 20 -
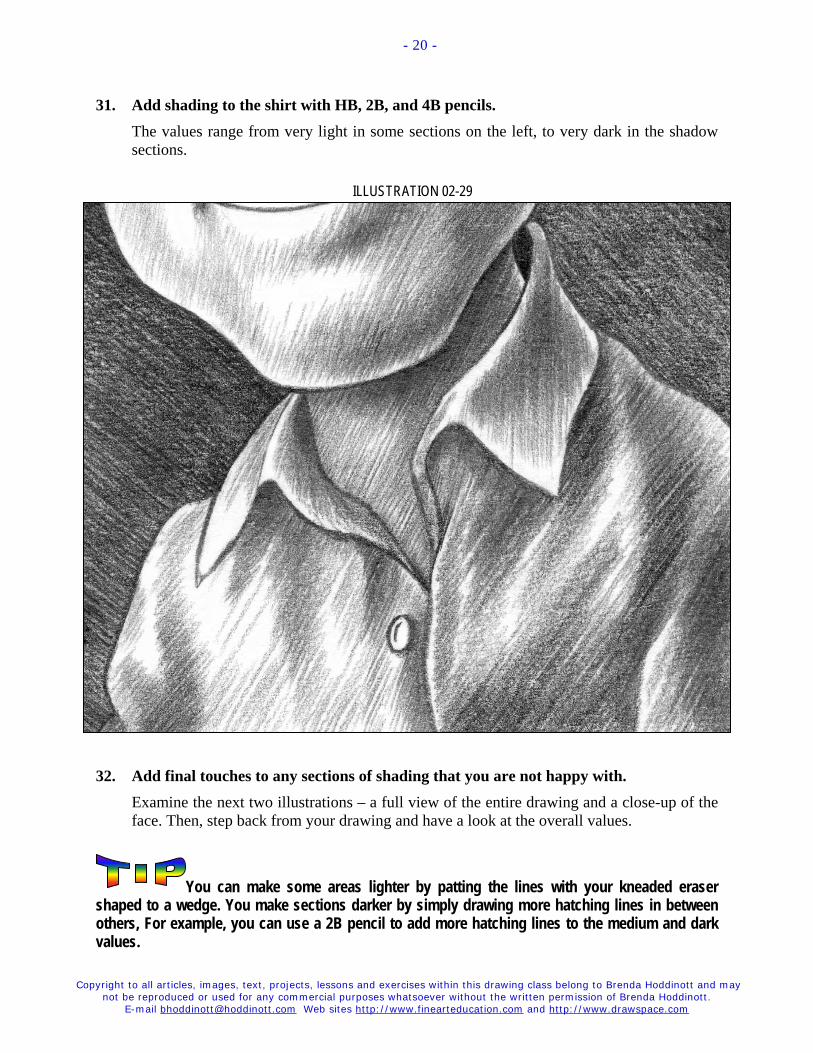
31. Add shading to the shirt with HB, 2B, and 4B pencils. The values range from very light in some sections on the left, to very dark in the shadow sections.
ILLUSTRATION 02-29
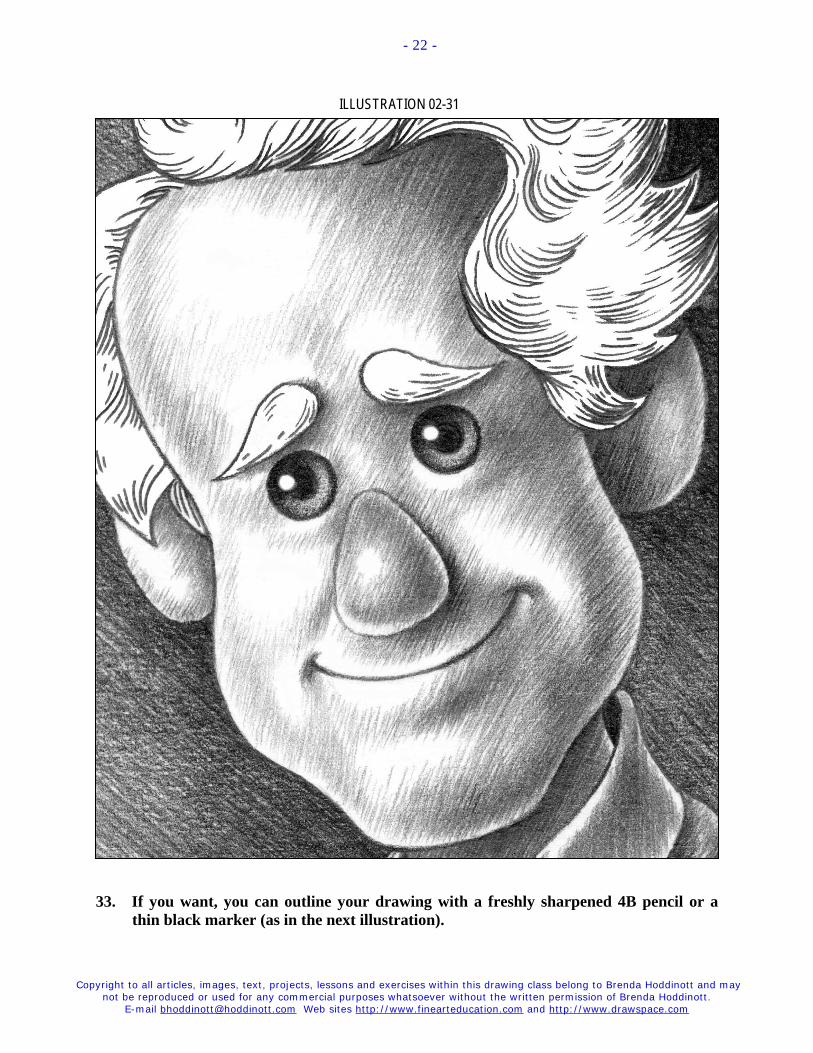
32. Add final touches to any sections of shading that you are not happy with. Examine the next two illustrations – a full view of the entire drawing and a close-up of the face. Then, step back from your drawing and have a look at the overall values.
You can make some areas lighter by patting the lines with your kneaded eraser shaped to a wedge. You make sections darker by simply drawing more hatching lines in between others, For example, you can use a 2B pencil to add more hatching lines to the medium and dark values.

Copyright to all articles, images, text, projects, lessons and exercises within this drawing class belong to Brenda Hoddinott and may not be reproduced or used for any commercial purposes whatsoever without the written permission of Brenda Hoddinott.
E-mail [email protected] Web sites http://www.finearteducation.com and http://www.drawspace.com
- 21 -
ILLUSTRATION 02-30
Copyright to all articles, images, text, projects, lessons and exercises within this drawing class belong to Brenda Hoddinott and may not be reproduced or used for any commercial purposes whatsoever without the written permission of Brenda Hoddinott.
E-mail [email protected] Web sites http://www.finearteducation.com and http://www.drawspace.com
- 22 -
ILLUSTRATION 02-31
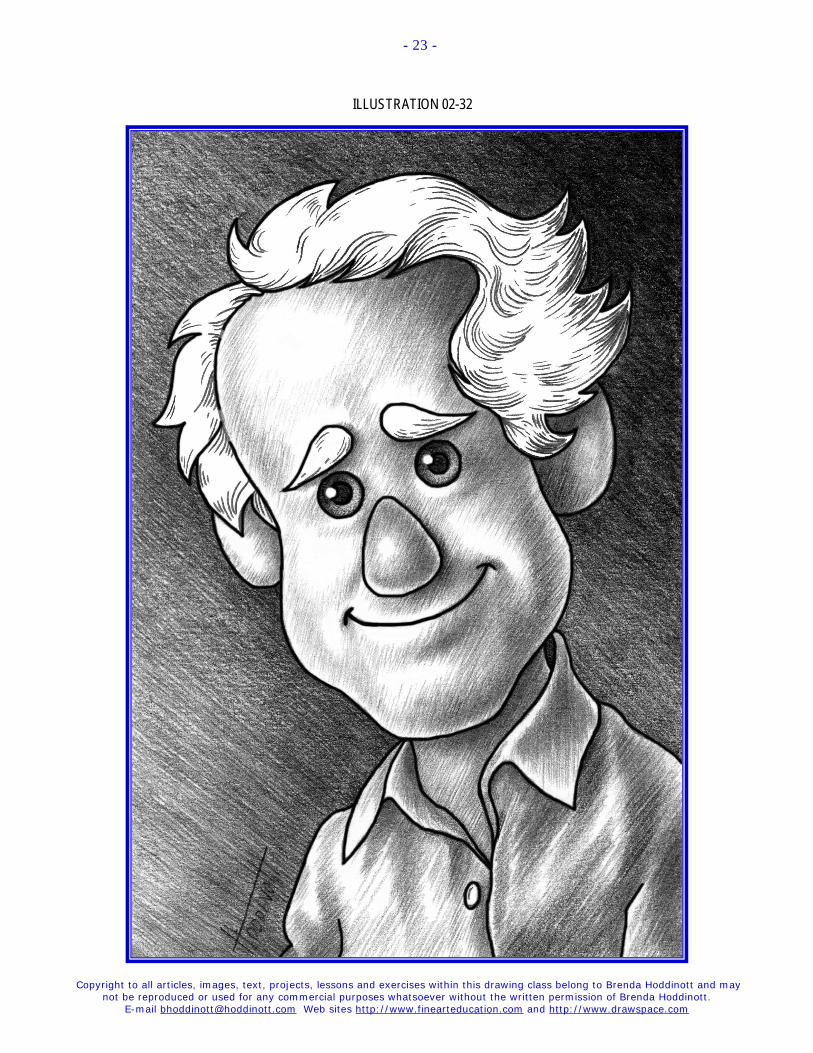
33. If you want, you can outline your drawing with a freshly sharpened 4B pencil or a thin black marker (as in the next illustration).
Copyright to all articles, images, text, projects, lessons and exercises within this drawing class belong to Brenda Hoddinott and may not be reproduced or used for any commercial purposes whatsoever without the written permission of Brenda Hoddinott.
E-mail [email protected] Web sites http://www.finearteducation.com and http://www.drawspace.com
- 23 -
ILLUSTRATION 02-32
Copyright to all articles, images, text, projects, lessons and exercises within this drawing class belong to Brenda Hoddinott and may not be reproduced or used for any commercial purposes whatsoever without the written permission of Brenda Hoddinott.
E-mail [email protected] Web sites http://www.finearteducation.com and http://www.drawspace.com
- 24 -
BRENDA HODDINOTT - BIOGRAPHY As a self-educated teacher, visual artist, portraitist, forensic artist, and illustrator, Brenda Hoddinott utilizes diverse art media including graphite, technical pen, colored pencil, chalk pastel, charcoal, conté crayon, and oil paints.
My philosophy on teaching art is to focus primarily on the enjoyment aspects while gently introducing the technical and academic. Hence, in creating a
passion for the subject matter, the quest for knowledge also becomes enjoyable. >Brenda Hoddinott<
Born in St. John’s, Newfoundland, Brenda grew up in the small town of Corner Brook. She developed strong technical competencies with a personal commitment to self directed learning, and the aid of assorted “Learn to Draw” books. During Brenda’s twenty-five year career as a self-educated civilian forensic artist, numerous criminal investigation departments have employed Brenda’s skills, including Royal Canadian Mounted Police and municipal police departments. In 1992, Brenda was honored with a commendation from the Royal Canadian Mounted Police, and in 1994, she was awarded a Certificate of Membership from “Forensic Artists International”.
Her home-based art career included graphic design, and teaching recreational drawing and painting classes. As supervisor of her community’s recreational art department, Brenda hired and trained teachers, and designed curriculum for several children’s art programs. In 1998, Brenda chose to end her eighteen-year career as an art educator in order to devote more time to writing, drawing, painting, and developing her websites.
Drawspace http://www.drawspace.com incorporates her unique style and innovative approach to curriculum development. This site offers downloadable and printable drawing classes for students of all abilities from the age of eight through adult. Students of all ages, levels and abilities have praised the simple step-by-step instructional approach. This site is respected as a resource for fine art educators, home schooling programs, and educational facilities throughout the world.
LEARN-TO-DRAW BOOKS BY BRENDA HODDINOTT Drawing for Dummies: Wiley Publishing, Inc., New, York, NY, this 336 page book is
available on various websites and in major bookstores internationally.
The Complete Idiot’s Guide to Drawing People: Winner of the Alpha-Penguin Book of the Year Award 2004, Alpha - Pearson Education – Macmillan, Indianapolis, IN, this 360 page book is available on various websites and in major bookstores internationally.
SSiiggnn yyoouurr nnaammee,, wwrriittee ttooddaayy’’ss ddaattee oonn tthhee bbaacckk ooff yyoouurr ddrraawwiinngg,, aanndd ppuutt aa
ssmmiillee oonn yyoouurr ffaaccee!! TThheenn ggrraabb aannootthheerr ppiieeccee ooff ppaappeerr,, cchhoooossee aannootthheerr lleessssoonn aanndd ddrraaww ssoommee mmoorree!!
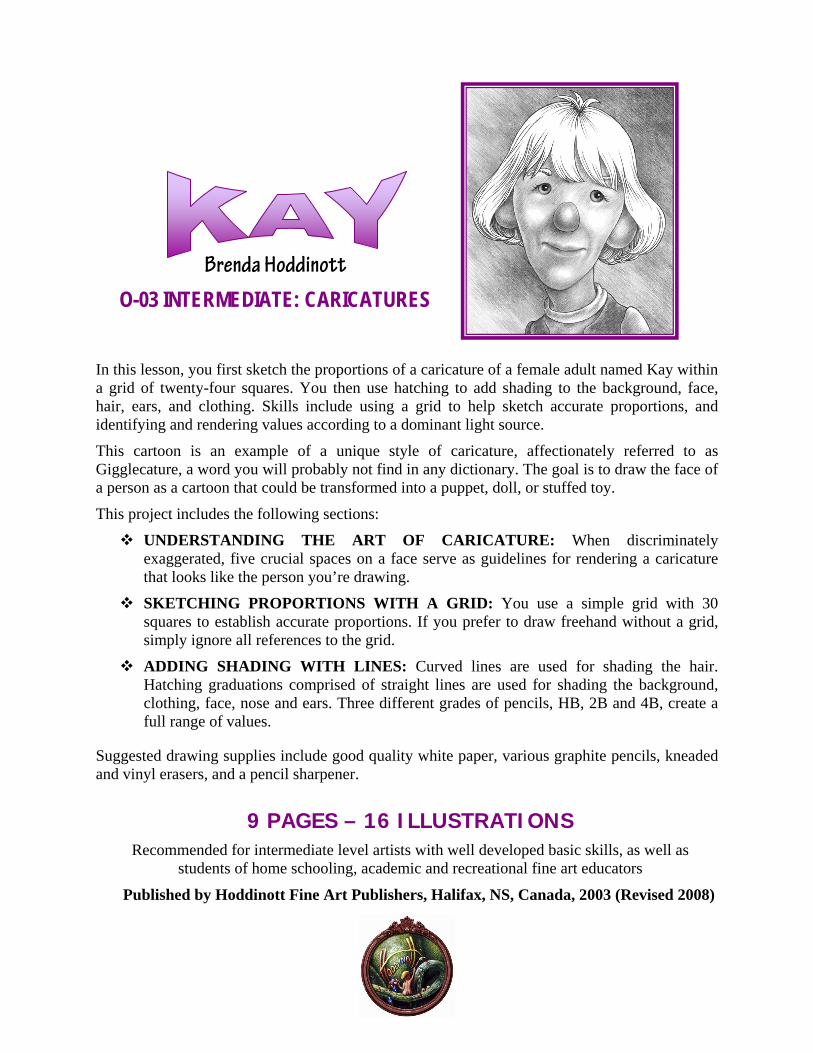
Brenda Hoddinott O-03 INTERMEDIATE: CARICATURES
In this lesson, you first sketch the proportions of a caricature of a female adult named Kay within a grid of twenty-four squares. You then use hatching to add shading to the background, face, hair, ears, and clothing. Skills include using a grid to help sketch accurate proportions, and identifying and rendering values according to a dominant light source.
This cartoon is an example of a unique style of caricature, affectionately referred to as Gigglecature, a word you will probably not find in any dictionary. The goal is to draw the face of a person as a cartoon that could be transformed into a puppet, doll, or stuffed toy.
This project includes the following sections:
UNDERSTANDING THE ART OF CARICATURE: When discriminately exaggerated, five crucial spaces on a face serve as guidelines for rendering a caricature that looks like the person you’re drawing.
SKETCHING PROPORTIONS WITH A GRID: You use a simple grid with 30 squares to establish accurate proportions. If you prefer to draw freehand without a grid, simply ignore all references to the grid.
ADDING SHADING WITH LINES: Curved lines are used for shading the hair. Hatching graduations comprised of straight lines are used for shading the background, clothing, face, nose and ears. Three different grades of pencils, HB, 2B and 4B, create a full range of values.
Suggested drawing supplies include good quality white paper, various graphite pencils, kneaded and vinyl erasers, and a pencil sharpener.
9 PAGES – 16 ILLUSTRATIONS Recommended for intermediate level artists with well developed basic skills, as well as
students of home schooling, academic and recreational fine art educators
Published by Hoddinott Fine Art Publishers, Halifax, NS, Canada, 2003 (Revised 2008)
Copyright to all articles, images, text, projects, lessons and exercises within this document belong to Brenda Hoddinott and may not be reproduced or used for any commercial purposes whatsoever without the written permission of Brenda Hoddinott. E-mail [email protected] Web site http://www.drawspace.com
- 2 -
ARTSPEAK Caricature is a cartoon that exaggerates a person’s distinctive and unique facial features, often capturing less attractive characteristics. Proportion is the relationship in size of one component of a drawing to another or others. Shape refers to the outward outline of a form. Sketch (noun) is a simple drawing that captures the integral aspects of a subject quickly and efficiently; (verb) refers to the process of rendering a sketch.
Figure 302
TO LEARN MORE To get a sense of what are considered average facial distances, refer to P-12 Intermediate: Adult Facial Proportions.
Figure 301
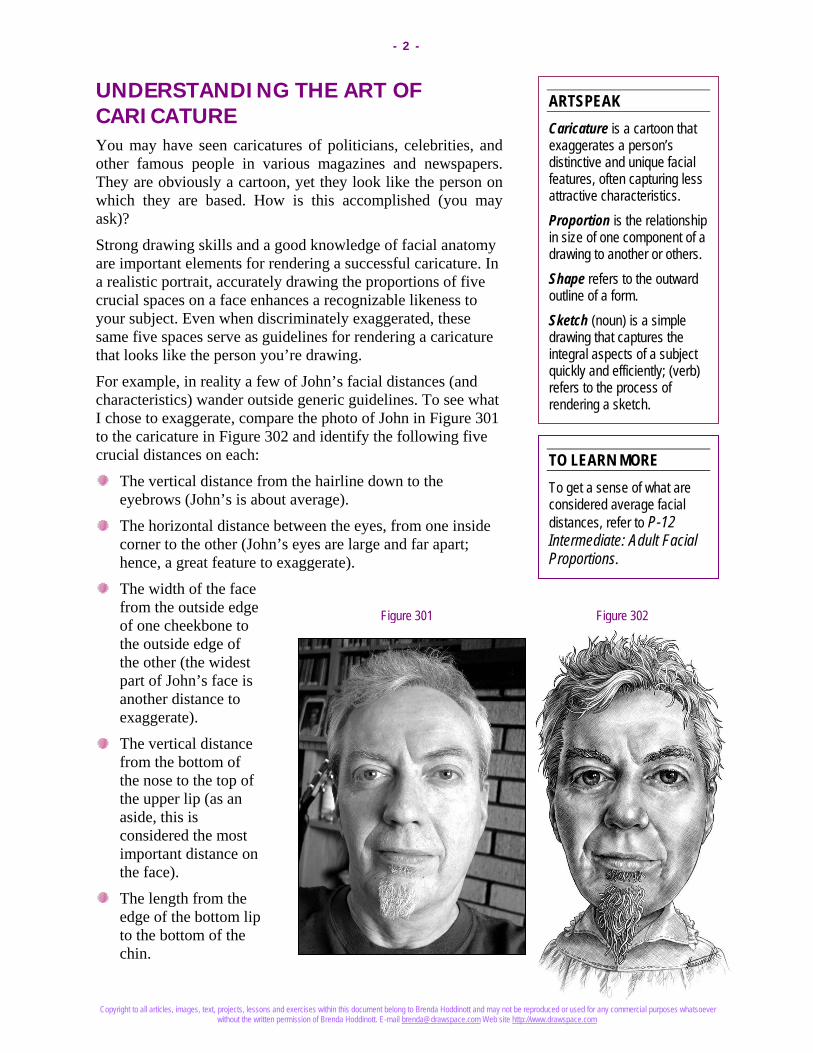
UNDERSTANDING THE ART OF CARICATURE You may have seen caricatures of politicians, celebrities, and other famous people in various magazines and newspapers. They are obviously a cartoon, yet they look like the person on which they are based. How is this accomplished (you may ask)?
Strong drawing skills and a good knowledge of facial anatomy are important elements for rendering a successful caricature. In a realistic portrait, accurately drawing the proportions of five crucial spaces on a face enhances a recognizable likeness to your subject. Even when discriminately exaggerated, these same five spaces serve as guidelines for rendering a caricature that looks like the person you’re drawing.
For example, in reality a few of John’s facial distances (and characteristics) wander outside generic guidelines. To see what I chose to exaggerate, compare the photo of John in Figure 301 to the caricature in Figure 302 and identify the following five crucial distances on each:
The vertical distance from the hairline down to the eyebrows (John’s is about average).
The horizontal distance between the eyes, from one inside corner to the other (John’s eyes are large and far apart; hence, a great feature to exaggerate).
The width of the face from the outside edge of one cheekbone to the outside edge of the other (the widest part of John’s face is another distance to exaggerate).
The vertical distance from the bottom of the nose to the top of the upper lip (as an aside, this is considered the most important distance on the face).
The length from the edge of the bottom lip to the bottom of the chin.
Copyright to all articles, images, text, projects, lessons and exercises within this document belong to Brenda Hoddinott and may not be reproduced or used for any commercial purposes whatsoever without the written permission of Brenda Hoddinott. E-mail [email protected] Web site http://www.drawspace.com
- 3 -
Figure 303
Figure 304
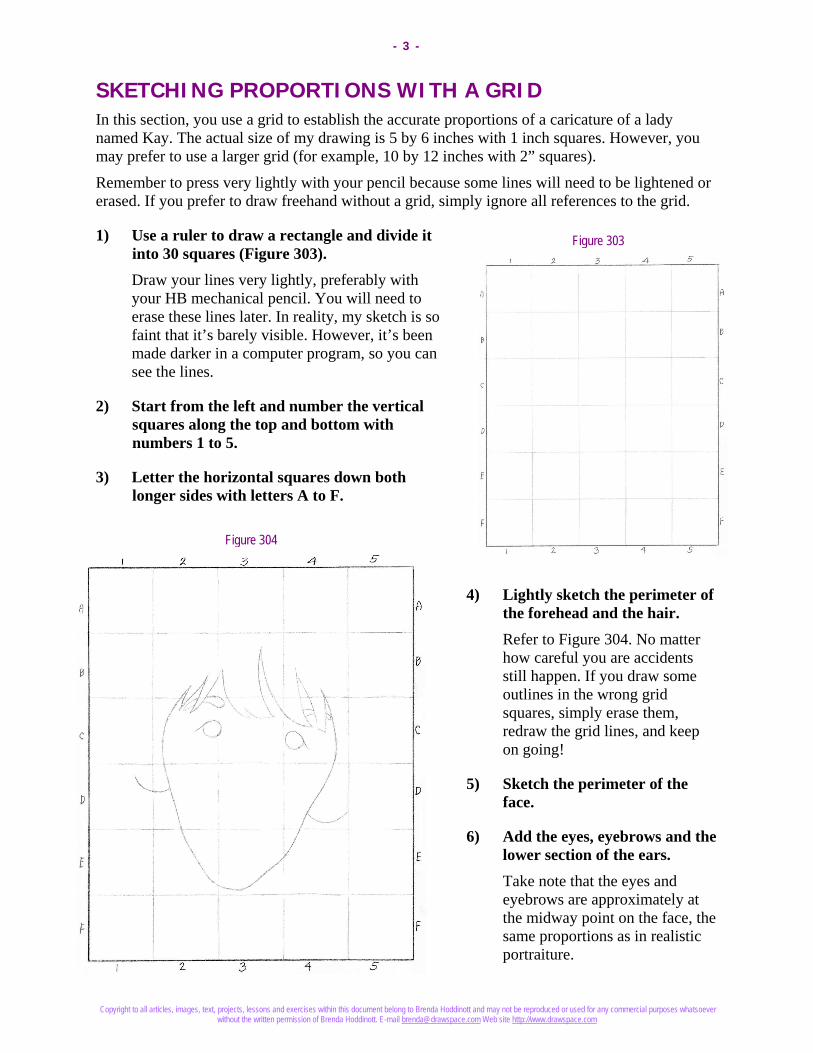
SKETCHING PROPORTIONS WITH A GRID In this section, you use a grid to establish the accurate proportions of a caricature of a lady named Kay. The actual size of my drawing is 5 by 6 inches with 1 inch squares. However, you may prefer to use a larger grid (for example, 10 by 12 inches with 2” squares).
Remember to press very lightly with your pencil because some lines will need to be lightened or erased. If you prefer to draw freehand without a grid, simply ignore all references to the grid.
1) Use a ruler to draw a rectangle and divide it into 30 squares (Figure 303). Draw your lines very lightly, preferably with your HB mechanical pencil. You will need to erase these lines later. In reality, my sketch is so faint that it’s barely visible. However, it’s been made darker in a computer program, so you can see the lines.
2) Start from the left and number the vertical squares along the top and bottom with numbers 1 to 5.
3) Letter the horizontal squares down both longer sides with letters A to F.
4) Lightly sketch the perimeter of the forehead and the hair. Refer to Figure 304. No matter how careful you are accidents still happen. If you draw some outlines in the wrong grid squares, simply erase them, redraw the grid lines, and keep on going!
5) Sketch the perimeter of the face.
6) Add the eyes, eyebrows and the lower section of the ears. Take note that the eyes and eyebrows are approximately at the midway point on the face, the same proportions as in realistic portraiture.
Copyright to all articles, images, text, projects, lessons and exercises within this document belong to Brenda Hoddinott and may not be reproduced or used for any commercial purposes whatsoever without the written permission of Brenda Hoddinott. E-mail [email protected] Web site http://www.drawspace.com
- 4 -
Figure 305
Figure 306
Figure 307
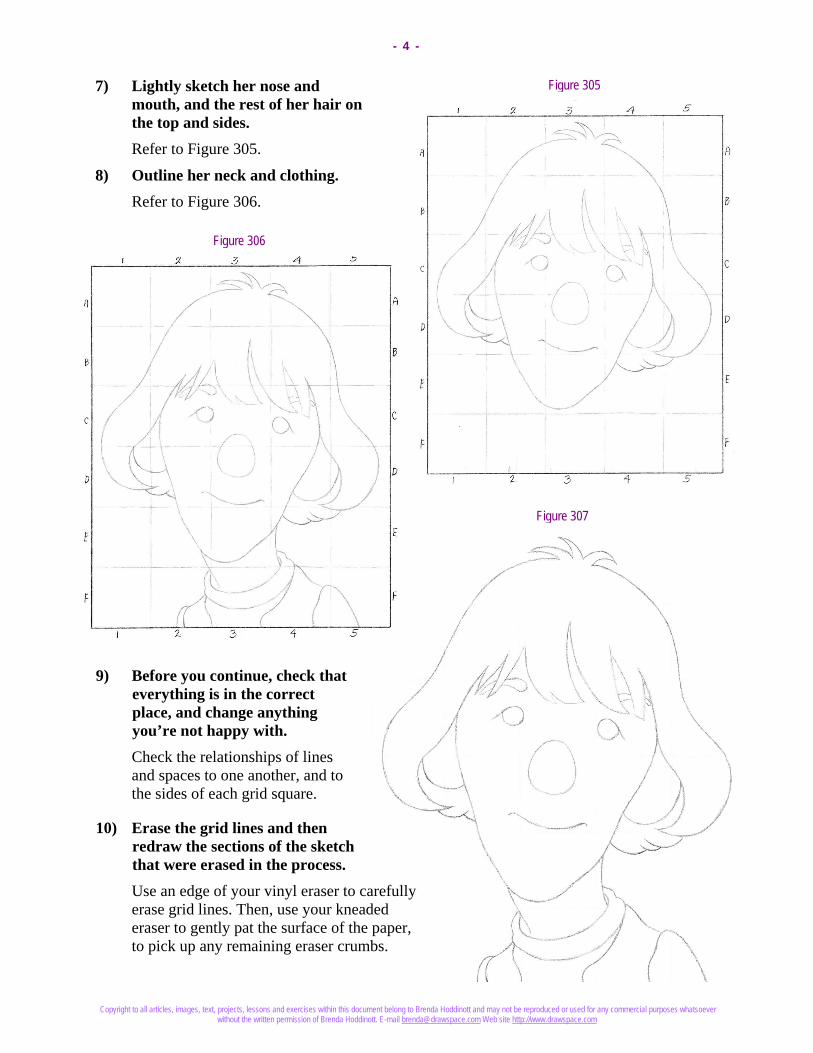
7) Lightly sketch her nose and mouth, and the rest of her hair on the top and sides. Refer to Figure 305.
8) Outline her neck and clothing. Refer to Figure 306.
9) Before you continue, check that everything is in the correct place, and change anything you’re not happy with. Check the relationships of lines and spaces to one another, and to the sides of each grid square.
10) Erase the grid lines and then redraw the sections of the sketch that were erased in the process. Use an edge of your vinyl eraser to carefully erase grid lines. Then, use your kneaded eraser to gently pat the surface of the paper, to pick up any remaining eraser crumbs.
Copyright to all articles, images, text, projects, lessons and exercises within this document belong to Brenda Hoddinott and may not be reproduced or used for any commercial purposes whatsoever without the written permission of Brenda Hoddinott. E-mail [email protected] Web site http://www.drawspace.com
- 5 -
ARTSPEAK Light source refers to the direction from which a dominant light originates. The placement of this light source affects every aspect of a drawing. The light source tells you where to draw all the light values and shadows. Hatching is a series of lines (called a set) drawn closely together to give the illusion of values. Values are the different shades of gray created when you draw by varying both the density of the shading lines, and the pressure used in holding various pencils.
Figure 308
Figure 309
Figure 310
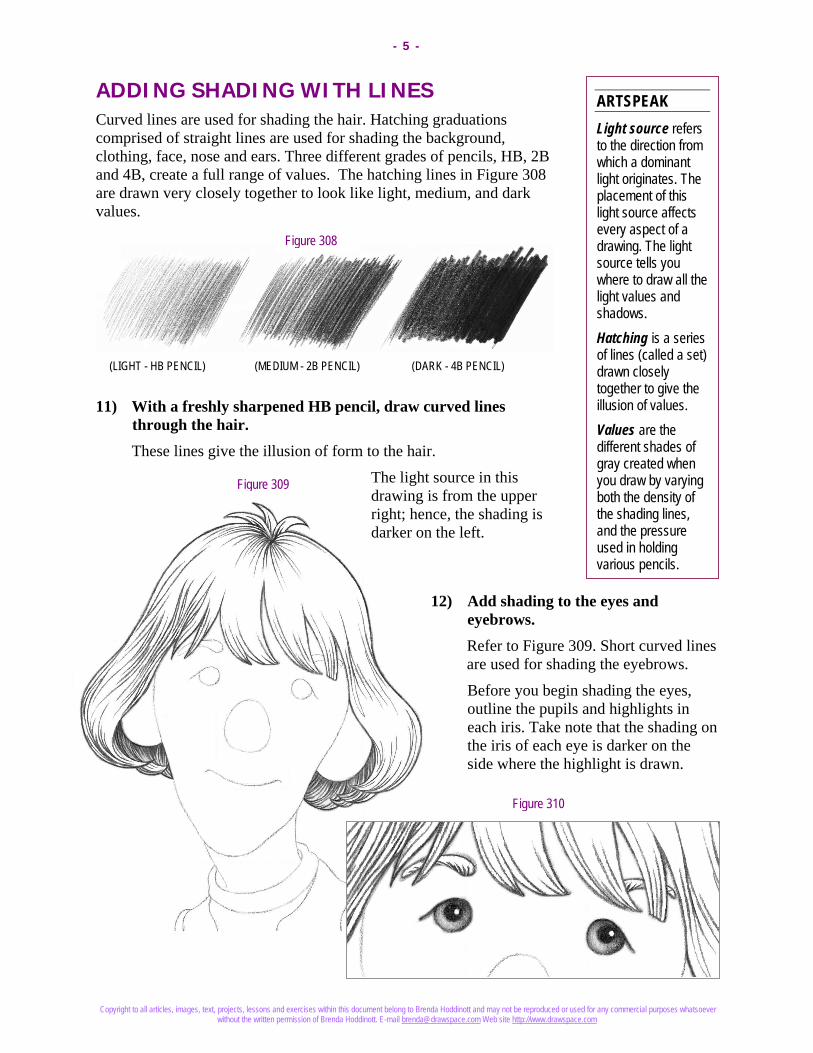
ADDING SHADING WITH LINES Curved lines are used for shading the hair. Hatching graduations comprised of straight lines are used for shading the background, clothing, face, nose and ears. Three different grades of pencils, HB, 2B and 4B, create a full range of values. The hatching lines in Figure 308 are drawn very closely together to look like light, medium, and dark values.
(LIGHT - HB PENCIL) (MEDIUM - 2B PENCIL) (DARK - 4B PENCIL)
11) With a freshly sharpened HB pencil, draw curved lines through the hair. These lines give the illusion of form to the hair.
The light source in this drawing is from the upper right; hence, the shading is darker on the left.
12) Add shading to the eyes and eyebrows. Refer to Figure 309. Short curved lines are used for shading the eyebrows.
Before you begin shading the eyes, outline the pupils and highlights in each iris. Take note that the shading on the iris of each eye is darker on the side where the highlight is drawn.
Copyright to all articles, images, text, projects, lessons and exercises within this document belong to Brenda Hoddinott and may not be reproduced or used for any commercial purposes whatsoever without the written permission of Brenda Hoddinott. E-mail [email protected] Web site http://www.drawspace.com
- 6 -
Figure 312
Figure 311
TIP
Always place a piece of clean paper under your hand as you draw. Each time you work on a new section, move your paper so it’s always under your hand. This prevents you from smudging your
drawing, and protects the paper from the oils in your skin.
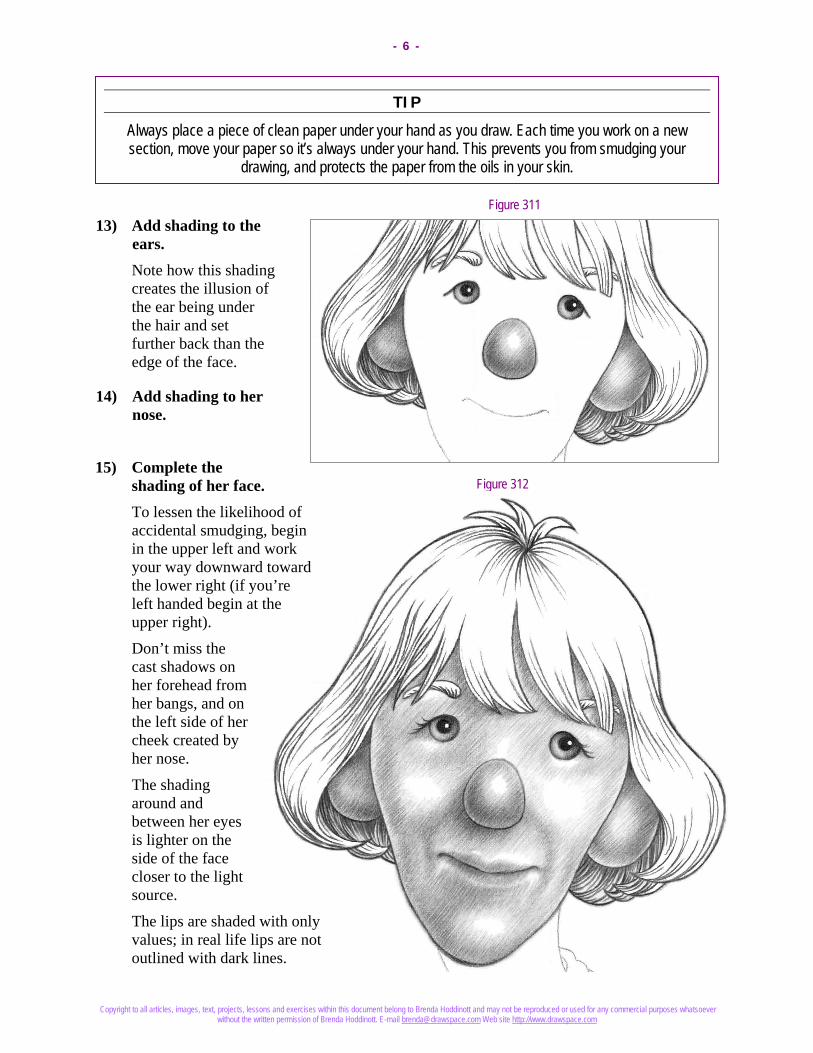
13) Add shading to the ears. Note how this shading creates the illusion of the ear being under the hair and set further back than the edge of the face.
14) Add shading to her nose.
15) Complete the shading of her face. To lessen the likelihood of accidental smudging, begin in the upper left and work your way downward toward the lower right (if you’re left handed begin at the upper right).
Don’t miss the cast shadows on her forehead from her bangs, and on the left side of her cheek created by her nose.
The shading around and between her eyes is lighter on the side of the face closer to the light source.
The lips are shaded with only values; in real life lips are not outlined with dark lines.

Copyright to all articles, images, text, projects, lessons and exercises within this document belong to Brenda Hoddinott and may not be reproduced or used for any commercial purposes whatsoever without the written permission of Brenda Hoddinott. E-mail [email protected] Web site http://www.drawspace.com
- 7 -
Figure 313
Figure 314
Figure 315
16) Beginning in the upper sections, add shading to the background.
17) Add shading to her neck and clothing. Refer to Figures 314 and 315.
When you are done, step back from your drawing and have a look at the overall values (Refer to Figure 316).
18) Add final touches to any sections of shading that you are not happy with.
You can make some areas lighter by patting the lines with your kneaded eraser shaped to a wedge.
You make sections darker by simply drawing more hatching lines in between others. For example, you can use a 2B pencil to add more hatching lines to the medium and dark values.
Copyright to all articles, images, text, projects, lessons and exercises within this document belong to Brenda Hoddinott and may not be reproduced or used for any commercial purposes whatsoever without the written permission of Brenda Hoddinott. E-mail [email protected] Web site http://www.drawspace.com
- 8 -
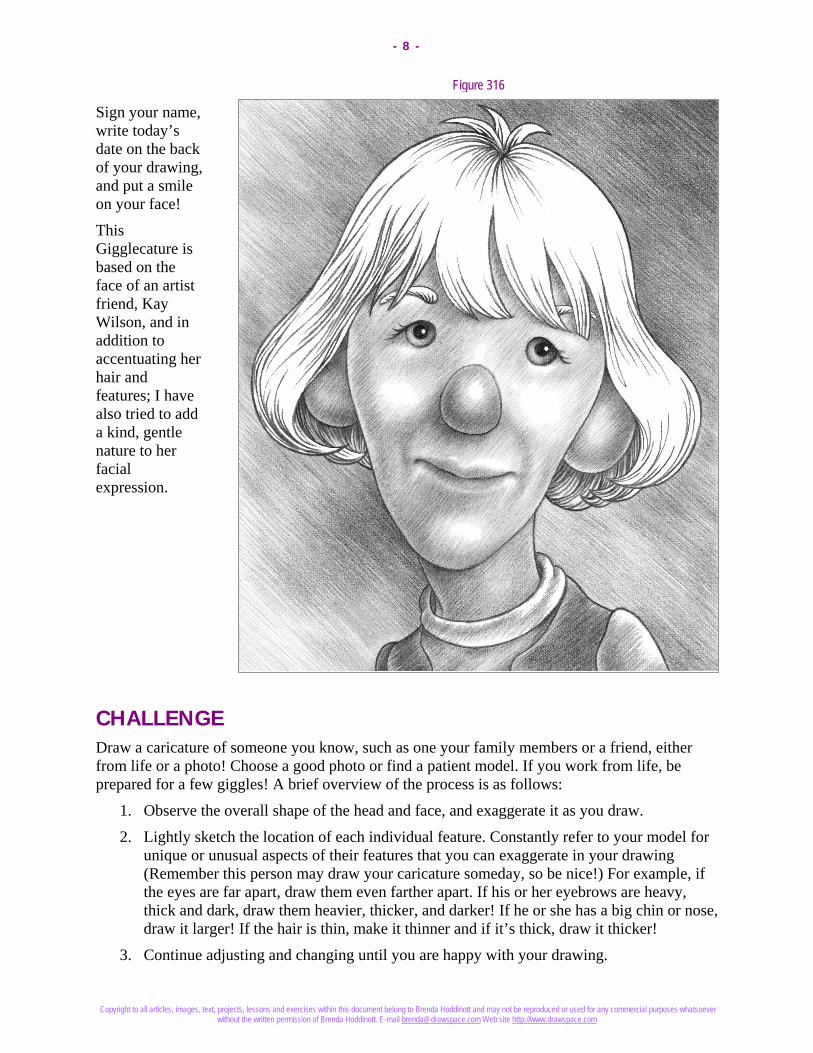
Figure 316
Sign your name, write today’s date on the back of your drawing, and put a smile on your face!
This Gigglecature is based on the face of an artist friend, Kay Wilson, and in addition to accentuating her hair and features; I have also tried to add a kind, gentle nature to her facial expression.
CHALLENGE Draw a caricature of someone you know, such as one your family members or a friend, either from life or a photo! Choose a good photo or find a patient model. If you work from life, be prepared for a few giggles! A brief overview of the process is as follows:
1. Observe the overall shape of the head and face, and exaggerate it as you draw.
2. Lightly sketch the location of each individual feature. Constantly refer to your model for unique or unusual aspects of their features that you can exaggerate in your drawing (Remember this person may draw your caricature someday, so be nice!) For example, if the eyes are far apart, draw them even farther apart. If his or her eyebrows are heavy, thick and dark, draw them heavier, thicker, and darker! If he or she has a big chin or nose, draw it larger! If the hair is thin, make it thinner and if it’s thick, draw it thicker!
3. Continue adjusting and changing until you are happy with your drawing.
Copyright to all articles, images, text, projects, lessons and exercises within this document belong to Brenda Hoddinott and may not be reproduced or used for any commercial purposes whatsoever without the written permission of Brenda Hoddinott. E-mail [email protected] Web site http://www.drawspace.com
- 9 -
BRENDA HODDINOTT - BIOGRAPHY As a self-educated teacher, visual artist, portraitist, forensic artist, and illustrator, Brenda Hoddinott utilizes diverse art media including graphite, technical pen, colored pencil, chalk pastel, charcoal, conté crayon, and oil paints.
My philosophy on teaching art is to focus primarily on the enjoyment aspects while gently introducing the technical and academic. Hence, in creating a passion for the subject matter, the quest for knowledge also
becomes enjoyable. >Brenda Hoddinott<
Born in St. John’s, Newfoundland, Brenda grew up in the small town of Corner Brook. She developed strong technical competencies with a personal commitment to self directed learning, and the aid of assorted “Learn to Draw” books. During Brenda’s twenty-five year career as a self-educated civilian forensic artist, numerous criminal investigation departments have employed Brenda’s skills, including Royal Canadian Mounted Police and municipal police departments. In 1992, Brenda was honored with a commendation from the Royal Canadian Mounted Police, and in 1994, she was awarded a Certificate of Membership from “Forensic Artists International”.
Her home-based art career included graphic design, and teaching recreational drawing and painting classes. As supervisor of her community’s recreational art department, Brenda hired and trained teachers, and designed curriculum for several children’s art programs. In 1998, Brenda chose to end her eighteen-year career as an art educator in order to devote more time to writing, drawing, painting, and developing her websites.
Drawspace http://www.drawspace.com incorporates her unique style and innovative approach to curriculum development. This site offers downloadable and printable drawing classes for students of all abilities from the age of eight through adult. Students of all ages, levels and abilities have praised the simple step-by-step instructional approach. This site is respected as a resource for fine art educators, home schooling programs, and educational facilities throughout the world.
LEARN-TO-DRAW BOOKS BY BRENDA HODDINOTT Drawing for Dummies: Wiley Publishing, Inc., New, York, NY, this 336 page book is
available on various websites and in major bookstores internationally.
The Complete Idiot’s Guide to Drawing People: Winner of the Alpha-Penguin Book of the Year Award 2004, Alpha - Pearson Education – Macmillan, Indianapolis, IN, this 360 page book is available on various websites and in major bookstores internationally.