Embed Size (px)
Citation preview

I have removed the green screen by using the rubber tool and then used the magic wand to select the background image. I right clicked onto the subject and selected “Select inverse” which meant that the program instantly selected the subject instead of the background. I then pressed “File” and then “New”. Then I selected the template “ International paper” what this means is that a blank template would be opened on a different tab, this blank image is the ideal size of a magazine cover so it has been a good choice due to the final idea of a magazine that I want to achieve. I previously experimented with a different image of the group of subjects but the way in which the image took over the cover of the magazine was unsuitable for the writing which has to be hjadded
I have used an two NME covers as sources of inspiration but also guidance of what my Indie rock magazine should look like. I have selected the main colours which will be bold red and black due to the theme and genre of the magazine. The magazine shown in the photograph above is not entirely finished and the background will not remain white. I wish to add a variety of posters to be won in the rectangle on the left hand side as it has been done
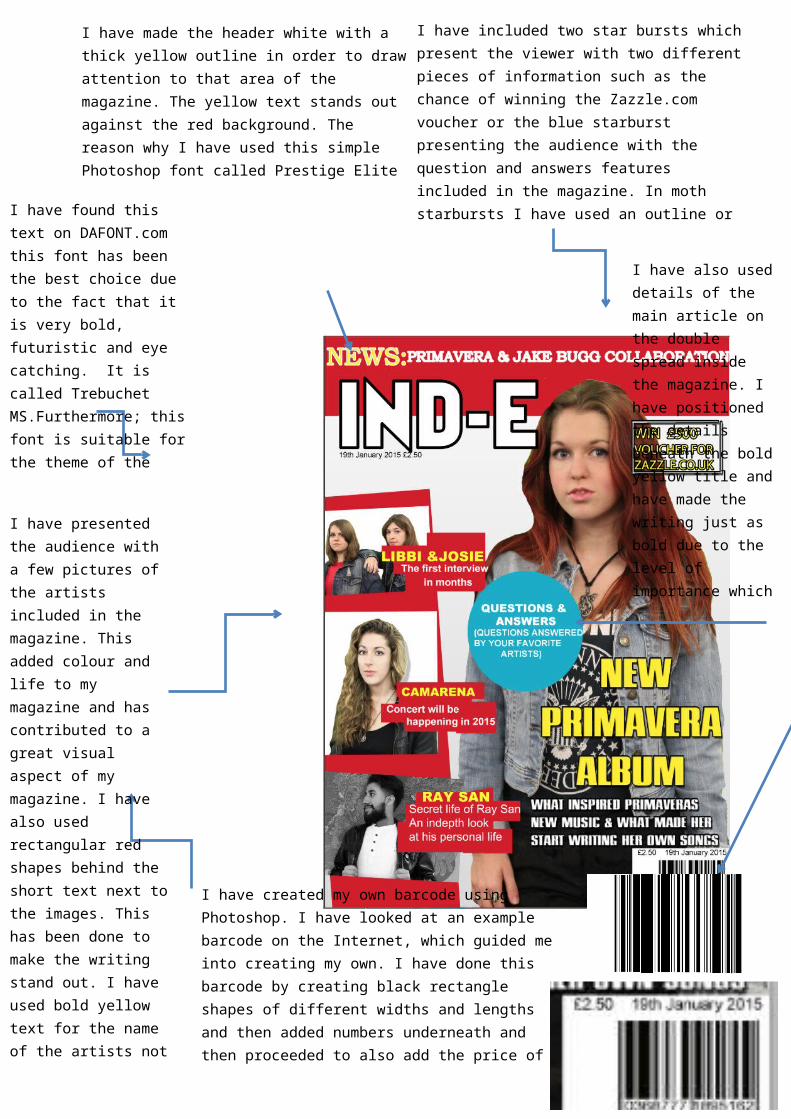
I have found this text on DAFONT.com this font has been the best choice due to the fact that it is very bold, futuristic and eye catching. It is called Trebuchet MS.Furthermore; this font is suitable for the theme of the magazine and the target audience at which it is aimed at. It is easy to read and goes well with the background.
I have made the header white with a thick yellow outline in order to draw attention to that area of the magazine. The yellow text stands out against the red background. The reason why I have used this simple Photoshop font called Prestige Elite Std in size 72p due to the other fonts I have imported from Dafont.com, this has allowed me to show a wider range of fonts on my magazine cover.
I have included two star bursts which present the viewer with two different pieces of information such as the chance of winning the Zazzle.com voucher or the blue starburst presenting the audience with the question and answers features included in the magazine. In moth starbursts I have used an outline or a shape to make the writing stand out. The level of importance is measured through the colour of the text, the most important text on the cover of the magazine is yellow and the least important text is white.
I have presented the audience with a few pictures of the artists included in the magazine. This added colour and life to my magazine and has contributed to a great visual aspect of my magazine. I have also used rectangular red shapes behind the short text next to the images. This has been done to make the writing stand out. I have used bold yellow text for the name of the artists not only to look bold and to stand out but to differentiate it from the rest of the text beneath.
I have created my own barcode using Photoshop. I have looked at an example barcode on the Internet, which guided me into creating my own. I have done this barcode by creating black rectangle shapes of different widths and lengths and then added numbers underneath and then proceeded to also add the price of the magazine and the date of the day in which the magazine is perhaps published on.
I have also used details of the main article on the double spread inside the magazine. I have positioned the details beneath the bold yellow title and have made the writing just as bold due to the level of importance which is seen in the content of the magazine through the boldness of the text and where it is presented on the page.

I have taken a variety of photographs of my subject and I have chosen to use one picture for the making of an imaginary poster which will be promoted on the cover of the magazine on the left hand side. I will also take the first photograph and edit it in Photoshop later on and then possibly finishing off by adding it to the content page.
As you could see I have selected an image and removed the green screen background. I have experimented with a variety of lighting; contrast and colour balance options and then selected a good background design for the backdrop of the image and created two new layers and added the photographs behind the main layer of my subject.I have selected one image out of a wide range of
images to choose from. I have then removed the green screen on Photoshop using the rubber and magic wand tools. I have then removed any excess hair, which I could not remove the green from and then created a shadow around my subject to make her stand out more from the background and outline the subject well. I then placed the image of my models onto the cover of the magazine in the box on the left hand side where all the names of the articles are written in yellow.

I repeated this process for the picture of Libbi and Josie where I have selected a photograph out of many other images which best suited the cover of the magazine. I have removed the green screen and have applied the image in the article section on the cover page of the magazine.