Embed Size (px)
Citation preview
8/3/2019 Util Install Guide en US
http://slidepdf.com/reader/full/util-install-guide-en-us 1/86
Version 1.600
April 2006
English
Installation Guide
SAP AG
Neurottstr. 1669190 Walldorf Germany
8/3/2019 Util Install Guide en US
http://slidepdf.com/reader/full/util-install-guide-en-us 2/86
SAP Best Practices Water Utilities: Installation Guide
Copyright
© Copyright 2006 SAP AG. All rights reserved.
No part of this publication may be reproduced or transmitted in any form or for any purpose without
the express permission of SAP AG. The information contained herein may be changed without prior notice.
Some software products marketed by SAP AG and its distributors contain proprietary software componentsof other software vendors.
Microsoft®, WINDOWS®, NT®, EXCEL®, Word®, PowerPoint® and SQL Server® are registeredtrademarks of Microsoft Corporation.
IBM®, DB2®, DB2 Universal Database, OS/2®, Parallel Sysplex®, MVS/ESA, AIX®, S/390®, AS/400®,OS/390®, OS/400®, iSeries, pSeries, xSeries, zSeries, z/OS, AFP, Intelligent Miner, WebSphere®,Netfinity®, Tivoli®, Informix and Informix® Dynamic ServerTM are trademarks of IBM Corporation in USAand/or other countries.
ORACLE® is a registered trademark of ORACLE Corporation.
UNIX®, X/Open®, OSF/1®, and Motif® are registered trademarks of the Open Group.
Citrix®, the Citrix logo, ICA®, Program Neighborhood®, MetaFrame®, WinFrame®, VideoFrame®,MultiWin® and other Citrix product names referenced herein are trademarks of Citrix Systems, Inc.
HTML, DHTML, XML, XHTML are trademarks or registered trademarks of W3C®, World Wide WebConsortium, Massachusetts Institute of Technology.
JAVA® is a registered trademark of Sun Microsystems, Inc.
DISCLAIMER OF WARRANTIES
SAP Best Practices is being provided to you free of charge. You agree that SAP has made no expresswarranties to you regarding SAP Best Practices and SAP Best Practices are being provided “as is” without awarranty of any kind. To the fullest extent permissible by law, SAP disclaims all warranties with respect toSAP Best Practices, express or implied including, but not limited to any implied warranties of fitness for a
particular purpose, merchantability, merchantable quality of any third party rights.
LIMITATION OF LIABILITY
To the maximum extent permitted by applicable law, in no event shall SAP or its licensors be liable for anyspecial, incidental, indirect or consequential damages whatsoever (including, without limitation, damages for loss of business profits, business interruption, loss of business information, or any other pecuniary loss)arising out of the use of or inability to use SAP Best Practices, even if SAP has been advised of thepossibility of such damages. Because some states and jurisdictions do not allow the exclusion or limitationof liability for consequential or incidental damages, the above limitation may not apply to you.
© SAP AG Page 2 of 86
8/3/2019 Util Install Guide en US
http://slidepdf.com/reader/full/util-install-guide-en-us 3/86
SAP Best Practices Water Utilities: Installation Guide
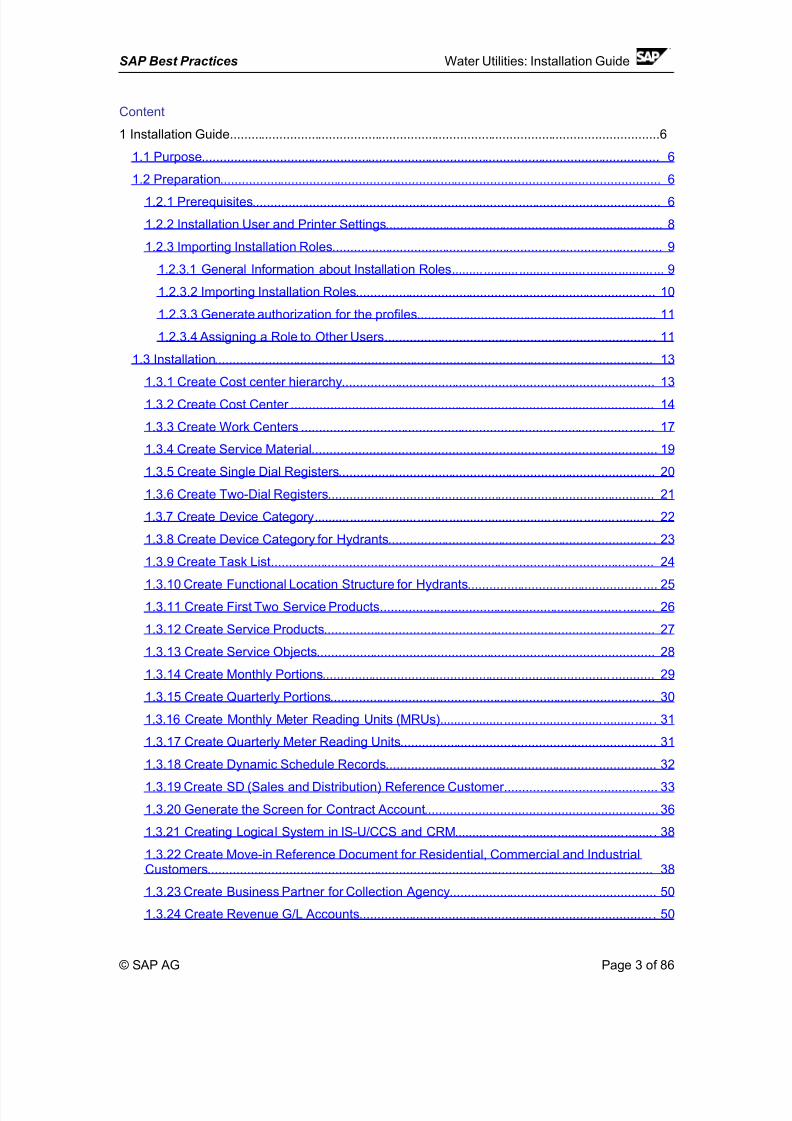
Content
1 Installation Guide.........................................................................................................................6
1.1 Purpose .................................................................................................................................6
1.2 Preparation ............................................................................................................................6
1.2.1 Prerequisites ...................................................................................................................6
1.2.2 Installation User and Printer Settings ..............................................................................8
1.2.3 Importing Installation Roles .............................................................................................9
1.2.3.1 General Information about Installation Roles ............................................................9
1.2.3.2 Importing Installation Roles ................................................................................ ....10
1.2.3.3 Generate authorization for the profiles ...................................................................11
1.2.3.4 Assigning a Role to Other Users ........................................................................... .11
1.3 Installation ...........................................................................................................................13
1.3.1 Create Cost center hierarchy ........................................................................................13
1.3.2 Create Cost Center ......................................................................................................14
1.3.3 Create Work Centers ............................................................................................ .......17
1.3.4 Create Service Material................................................................................................19
1.3.5 Create Single Dial Registers .........................................................................................20
1.3.6 Create Two-Dial Registers ............................................................................................21
1.3.7 Create Device Category ................................................................................................22
1.3.8 Create Device Category for Hydrants .......................................................................... .23
1.3.9 Create Task List............................................................................................................24
1.3.10 Create Functional Location Structure for Hydrants ................................................. ....251.3.11 Create First Two Service Products .................................................................... .........26
1.3.12 Create Service Products .............................................................................................27
1.3.13 Create Service Objects ...............................................................................................28
1.3.14 Create Monthly Portions ................................................................................. ............29
1.3.15 Create Quarterly Portions ....................................................................................... ....30
1.3.16 Create Monthly Meter Reading Units (MRUs) ............................................................ .31
1.3.17 Create Quarterly Meter Reading Units ........................................................................31
1.3.18 Create Dynamic Schedule Records ............................................................................32
1.3.19 Create SD (Sales and Distribution) Reference Customer ...........................................33
1.3.20 Generate the Screen for Contract Account.................................................................36
1.3.21 Creating Logical System in IS-U/CCS and CRM ........................................................ .38
1.3.22 Create Move-in Reference Document for Residential, Commercial and IndustrialCustomers .................................................................................................................. ...........38
1.3.23 Create Business Partner for Collection Agency ..........................................................50
1.3.24 Create Revenue G/L Accounts .................................................................................. .50
© SAP AG Page 3 of 86
8/3/2019 Util Install Guide en US
http://slidepdf.com/reader/full/util-install-guide-en-us 4/86
SAP Best Practices Water Utilities: Installation Guide
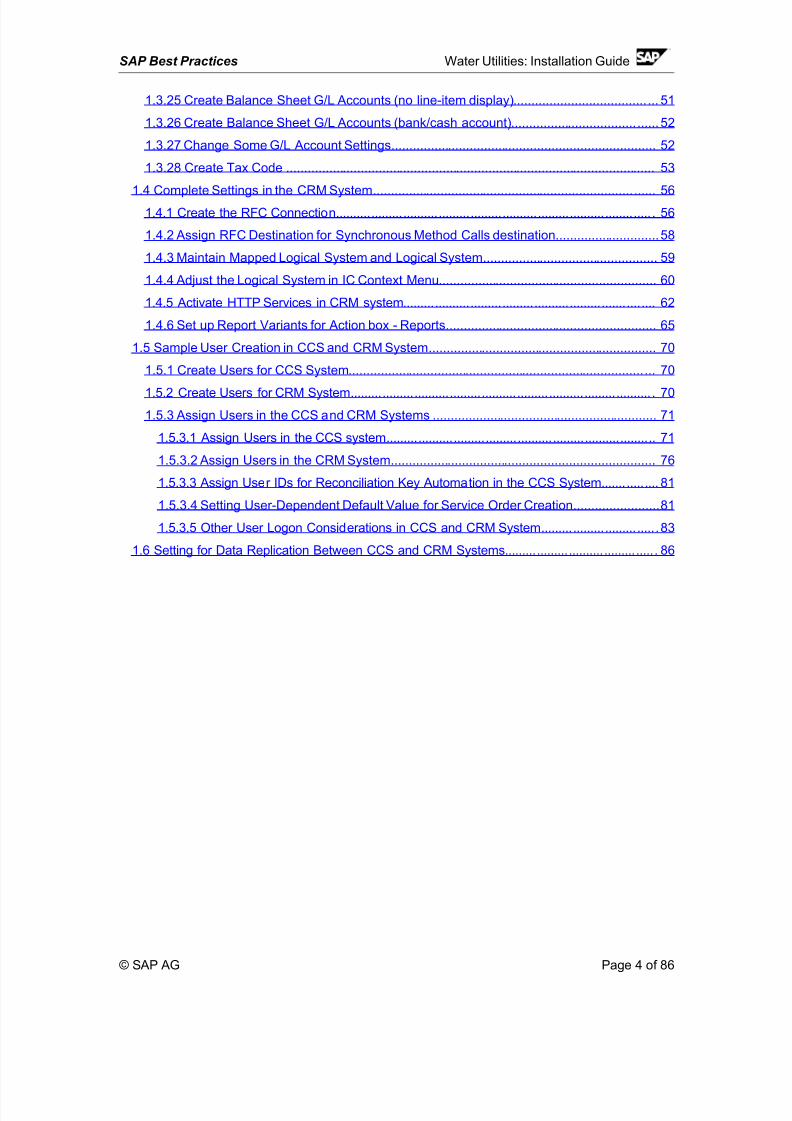
1.3.25 Create Balance Sheet G/L Accounts (no line-item display) ..................................... ...51
1.3.26 Create Balance Sheet G/L Accounts (bank/cash account) ................................... ......52
1.3.27 Change Some G/L Account Settings ..........................................................................52
1.3.28 Create Tax Code ........................................................................................................53
1.4 Complete Settings in the CRM System ......................................................................... ......561.4.1 Create the RFC Connection ......................................................................................... .56
1.4.2 Assign RFC Destination for Synchronous Method Calls destination .............................58
1.4.3 Maintain Mapped Logical System and Logical System .................................................59
1.4.4 Adjust the Logical System in IC Context Menu .............................................................60
1.4.5 Activate HTTP Services in CRM system .......................................................................62
1.4.6 Set up Report Variants for Action box - Reports ...........................................................65
1.5 Sample User Creation in CCS and CRM System ................................................................70
1.5.1 Create Users for CCS System ................................................................................... ...70
1.5.2 Create Users for CRM System ..................................................................................... .70
1.5.3 Assign Users in the CCS and CRM Systems ...............................................................71
1.5.3.1 Assign Users in the CCS system ............................................................................71
1.5.3.2 Assign Users in the CRM System ..........................................................................76
1.5.3.3 Assign User IDs for Reconciliation Key Automation in the CCS System ....... .........81
1.5.3.4 Setting User-Dependent Default Value for Service Order Creation ........................81
1.5.3.5 Other User Logon Considerations in CCS and CRM System ........................... ..... .83
1.6 Setting for Data Replication Between CCS and CRM Systems .......................................... .86
© SAP AG Page 4 of 86
8/3/2019 Util Install Guide en US
http://slidepdf.com/reader/full/util-install-guide-en-us 5/86
SAP Best Practices Water Utilities: Installation Guide
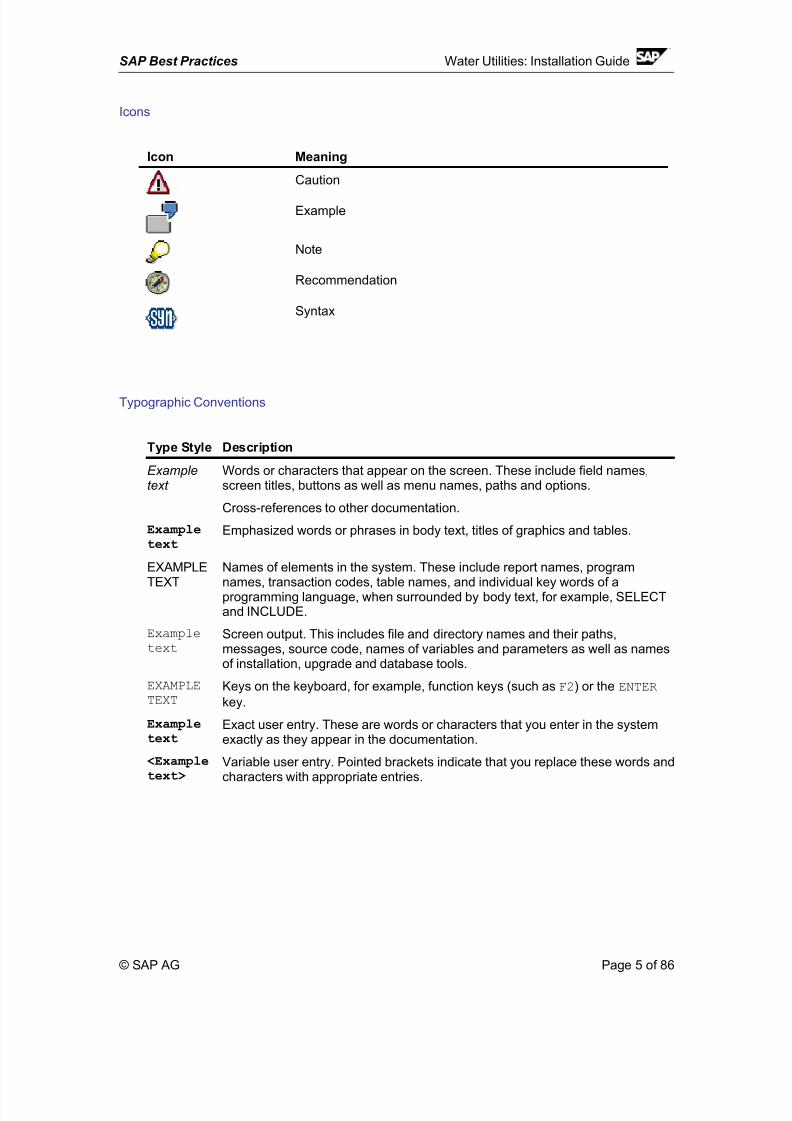
Icons
Icon Meaning
Caution
Example
Note
Recommendation
Syntax
Typographic Conventions
Type Style Description
Exampletext
Words or characters that appear on the screen. These include field names,screen titles, buttons as well as menu names, paths and options.
Cross-references to other documentation.
Exampletext
Emphasized words or phrases in body text, titles of graphics and tables.
EXAMPLETEXT
Names of elements in the system. These include report names, programnames, transaction codes, table names, and individual key words of aprogramming language, when surrounded by body text, for example, SELECTand INCLUDE.
Example
text
Screen output. This includes file and directory names and their paths,messages, source code, names of variables and parameters as well as namesof installation, upgrade and database tools.
EXAMPLE
TEXTKeys on the keyboard, for example, function keys (such as F2) or the ENTER
key.
Exampletext
Exact user entry. These are words or characters that you enter in the systemexactly as they appear in the documentation.
<Exampletext>
Variable user entry. Pointed brackets indicate that you replace these words andcharacters with appropriate entries.
© SAP AG Page 5 of 86
8/3/2019 Util Install Guide en US
http://slidepdf.com/reader/full/util-install-guide-en-us 6/86
SAP Best Practices Water Utilities: Installation Guide
1 Installation Guide
1.1 PurposeThis Installation Guide provides you with the information you need to set up the configuration of SAP Best Practices for Water Utilities using automated configuration tools, such as CATT or eCATT Procedures. These procedures need only be executed once at the beginning for theentire SAP Best Practices installation. After this installation is completed, follow the CRM DataReplication Guide to set up the replication between the CRM and CCS systems.
1.2 PreparationBefore starting the installation of SAP Best Practices for Water Utilities, some prerequisite
activities must be performed. All of these activities are described in the following sections.
1.2.1 Prerequisites
IS-U / CCS System Setup:
1. Install mySAP ERP 2005 (Utilities industry solution is part of SAP Enterprise CentralComponent 6.0, which is included in ERP 2005)
2. Apply the following support packages:
Notes: SAP Best Practices for Water Utilities were tested with the following support packagelevel; the lower support package level was not validated
IS-UT AOSP 3 SAP Utilities/Telecommunication
SAP_BASIS AOSP 6 SAP Basis ComponentSAP_ABA AOSP 6 Cross-Application Component
PI_BASIS AOSP 6 PI_BASIS 2005_1_700
SAP_APPL AOSP 3 Logistics and Accounting
EA-APPL AOSP 1 SAP R/3 Enterprise Add-On PLM, SCM, Financials
EA-FINSERV AOSP 1 SAP R/3 Enterprise Financial Services
FI-CA AOSP 3 FI-CA
3. Use SFW5 to switch IS-U on in client 000 and activate it. Read the following notes, before
activating IS-U.874416: Additions to Inst/Activtn of Utilities on ECC 6.0
881842: Release strategy for Utilities as of ECC 6.0
4. Create a “working” client by making a client copy from 000, which will be used to activate andcustomize IS-U/CCS. This client can also be used as a template for the subsequent Utilitiesclients.
5. Apply the following notes:
© SAP AG Page 6 of 86

8/3/2019 Util Install Guide en US
http://slidepdf.com/reader/full/util-install-guide-en-us 7/86
SAP Best Practices Water Utilities: Installation Guide
306695 Execute ISU_XPRA_IS_TABLE_CREATION report
326930 Trans. types U61 and U62 not maintained completely
517315 Missing fields in contract account transactions586260 Incorrect data type reference for H_EVBSD in ES60674686 Handling of OK codes in enhancement EMDP0001
810748 Shortdump 'TABLE_FREE_IN_LOOP' for transaction EA05859631 Coredump in syntax check when checking global types880003 Contract partner: Transactions FPPx do not start915225 Outsorted invoice & Print document can not be reversed919283 Suppress pop-up message during multiple release of documents924268 Missing fields in contract account transactions926649 FPL9: wrong subtotal after sorting (field FSWSL)
6. Import the master Best Practices transport requests for IS-U into the target system and clientusing the transport tools (OS or through transaction STMS). Transport administration shouldbe handled by the Basis support team.
7. Confirm the success of the imports into the system. Transport-unconditional codes may berequired to bypass any system restrictions. (Refer to SAP note 556941)
CRM System Setup:
1. CRM 5.0
2. Apply, at a minimum, the following AOSP
Notes: SAP Best Practices for Water Utilities were tested with the following support packagelevel; the lower support package level was not validated
BBPCRM AOSP 3 BBPCRM
SAP_BASIS AOSP 7 SAP Basis Component
SAP_ABA AOSP 7 Cross-Application Component
PI_BASIS AOSP 7 PI_BASIS 2005_1_700
SAP_AP AOSP 3 Application Platform
3. Apply the following notes:
935740: Termination during BP relationship replicationOptional note:918112: Enabling LayoutSwitch(FullScreen) from CRM4.0 Add-On
4. Import the master Best Practices transport requests for CRM into the target system and clientusing the transport tools (OS or through transaction STMS). Transport administration shouldbe handled by the Basis support team.
5. Confirm the success of the imports into the system. Transport unconditional codes may berequired to bypass any system restrictions. (Refer to SAP note 556941)
© SAP AG Page 7 of 86
8/3/2019 Util Install Guide en US
http://slidepdf.com/reader/full/util-install-guide-en-us 8/86
SAP Best Practices Water Utilities: Installation Guide
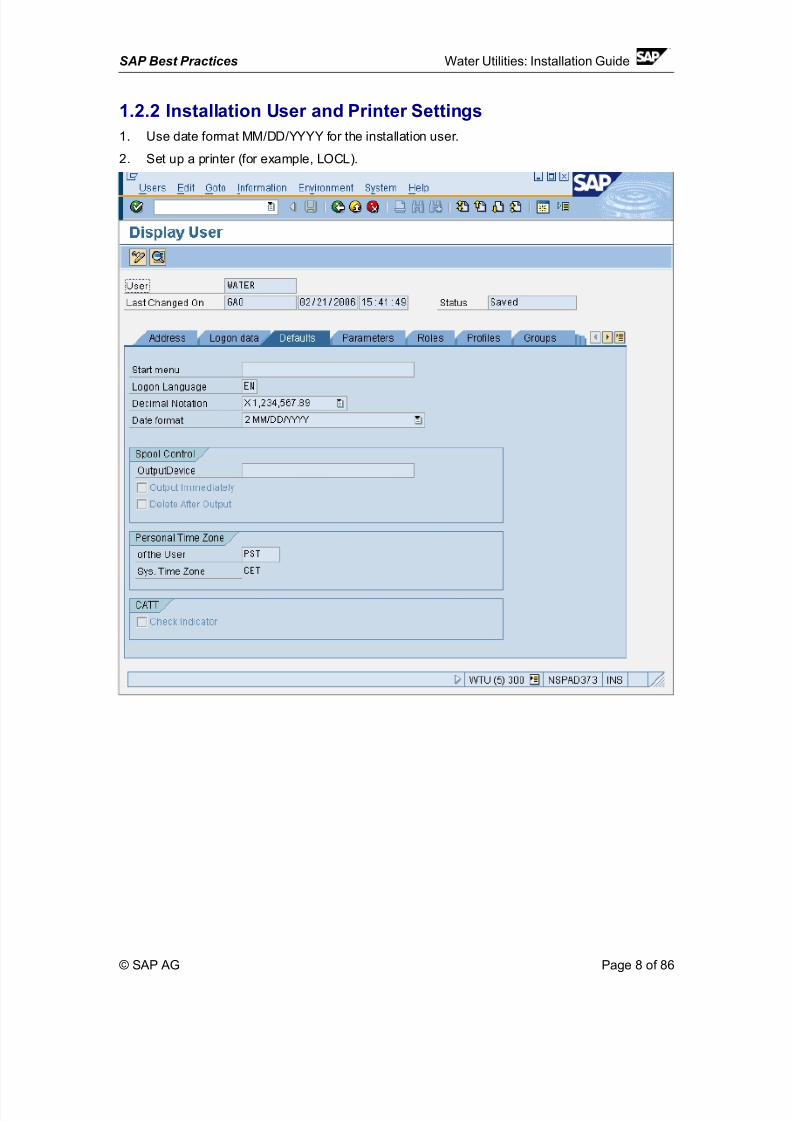
1.2.2 Installation User and Printer Settings
1. Use date format MM/DD/YYYY for the installation user.
2. Set up a printer (for example, LOCL).
© SAP AG Page 8 of 86
8/3/2019 Util Install Guide en US
http://slidepdf.com/reader/full/util-install-guide-en-us 9/86
SAP Best Practices Water Utilities: Installation Guide
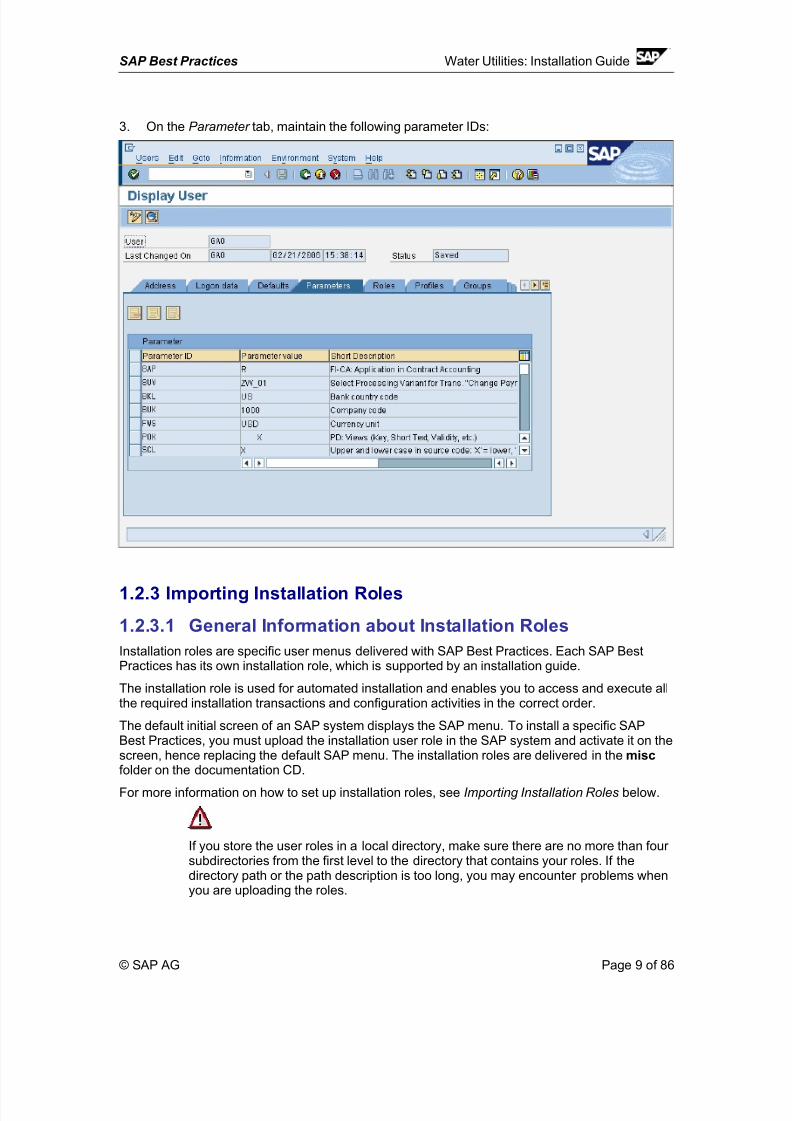
3. On the Parameter tab, maintain the following parameter IDs:
1.2.3 Importing Installation Roles
1.2.3.1 General Information about Installation Roles
Installation roles are specific user menus delivered with SAP Best Practices. Each SAP BestPractices has its own installation role, which is supported by an installation guide.
The installation role is used for automated installation and enables you to access and execute allthe required installation transactions and configuration activities in the correct order.
The default initial screen of an SAP system displays the SAP menu. To install a specific SAPBest Practices, you must upload the installation user role in the SAP system and activate it on thescreen, hence replacing the default SAP menu. The installation roles are delivered in the miscfolder on the documentation CD.
For more information on how to set up installation roles, see Importing Installation Roles below.
If you store the user roles in a local directory, make sure there are no more than four subdirectories from the first level to the directory that contains your roles. If thedirectory path or the path description is too long, you may encounter problems whenyou are uploading the roles.
© SAP AG Page 9 of 86
8/3/2019 Util Install Guide en US
http://slidepdf.com/reader/full/util-install-guide-en-us 10/86
SAP Best Practices Water Utilities: Installation Guide
1.2.3.2 Importing Installation Roles
Use
This procedure describes how to import installation roles into a SAP system.
Procedure
1. To import the user role into the SAP system, choose one of the following navigation options:
Transactioncode
PFCG
SAP Menu Tools →Administration→User maintenance →Role Administration →Roles
We deliver two roles for the CCS system and one role for the CRM system. Each role mustbe uploaded into the target system following the steps described below:
Two roles for CCS system:
Technical name Description File name for upload
ZW_INSTALL Best Practices for Water Utilities installation roleZW_INSTALL.SAP
ZW_RFC_SECUREZW_RFC_SECURE ZW_RFC_SECURE.SAP
One role for CRM system:
Technical name Description File name for upload
ZW_RFC_SECURE ZW_RFC_SECURE ZW_RFC_SECURE.SAP
2. Choose Role →Upload .
3. Confirm the warning message.
4. Select the relevant *.SAP file from the misc directory on the documentation CD and chooseOpen.
5. Confirm the information screen indicating which roles already exist in the system.
6. Import the appropriate user role into the system.
7. To assign the role to a user, choose Change and go to the User tab.
8. Enter the user ID of your (or another) installation user.
9. Save the user role.
Result
The user role can be displayed in the system and any user assigned to it can start using it.
© SAP AG Page 10 of 86
8/3/2019 Util Install Guide en US
http://slidepdf.com/reader/full/util-install-guide-en-us 11/86
SAP Best Practices Water Utilities: Installation Guide
1.2.3.3 Generate authorization for the profiles
Use
For the role ZW_RFC_SECURE you must generate authorization profiles in the CCS and CRMsystems.
Procedure
1. In the CCS system, to generate the authorization profiles for the role ZW_RFC_SECURE inthe SAP system, choose one of the following navigation options:
Transactioncode
PFCG
SAP Menu Tools →Administration→User maintenance →Role Administration →Roles
2. Enter role ZW_RFC_SECURE and go to change mode
3. Choose the authorization tab and change authorization data
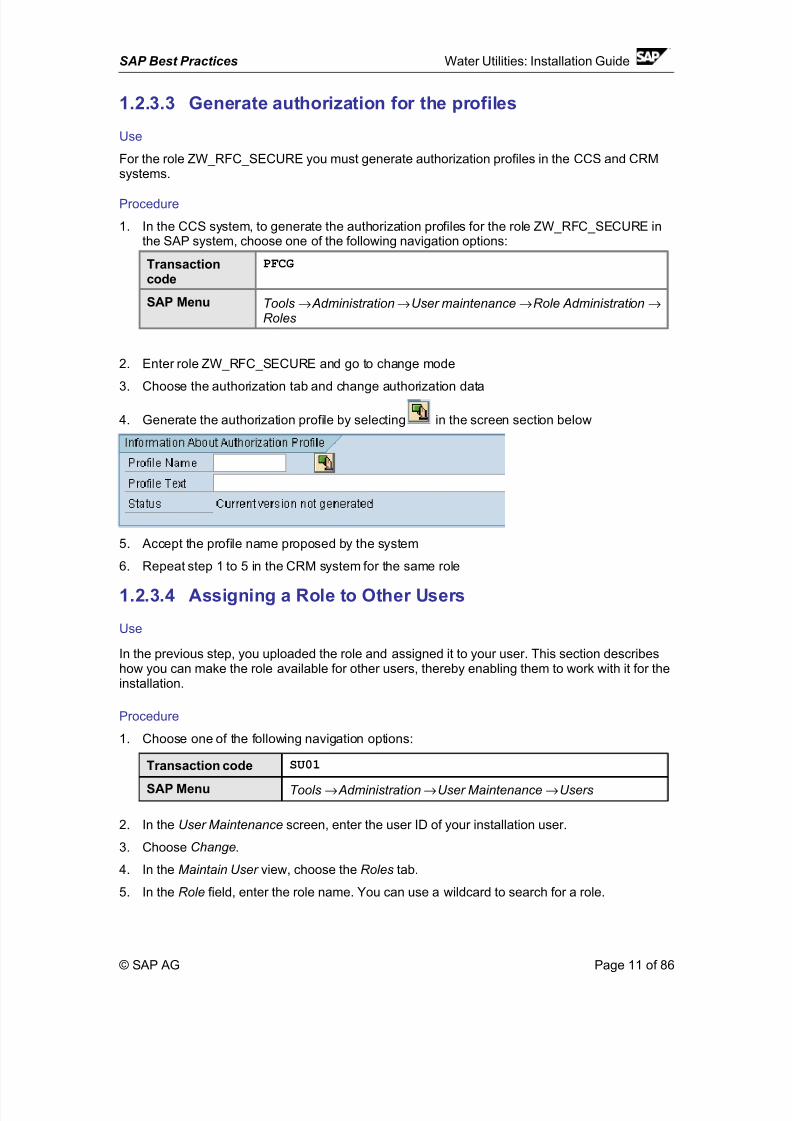
4. Generate the authorization profile by selecting in the screen section below
5. Accept the profile name proposed by the system
6. Repeat step 1 to 5 in the CRM system for the same role
1.2.3.4 Assigning a Role to Other Users
Use
In the previous step, you uploaded the role and assigned it to your user. This section describeshow you can make the role available for other users, thereby enabling them to work with it for theinstallation.
Procedure
1. Choose one of the following navigation options:
Transaction code SU01
SAP Menu Tools →Administration→User Maintenance →Users
2. In the User Maintenance screen, enter the user ID of your installation user.
3. Choose Change.
4. In the Maintain User view, choose the Roles tab.
5. In the Role field, enter the role name. You can use a wildcard to search for a role.
© SAP AG Page 11 of 86
8/3/2019 Util Install Guide en US
http://slidepdf.com/reader/full/util-install-guide-en-us 12/86
SAP Best Practices Water Utilities: Installation Guide
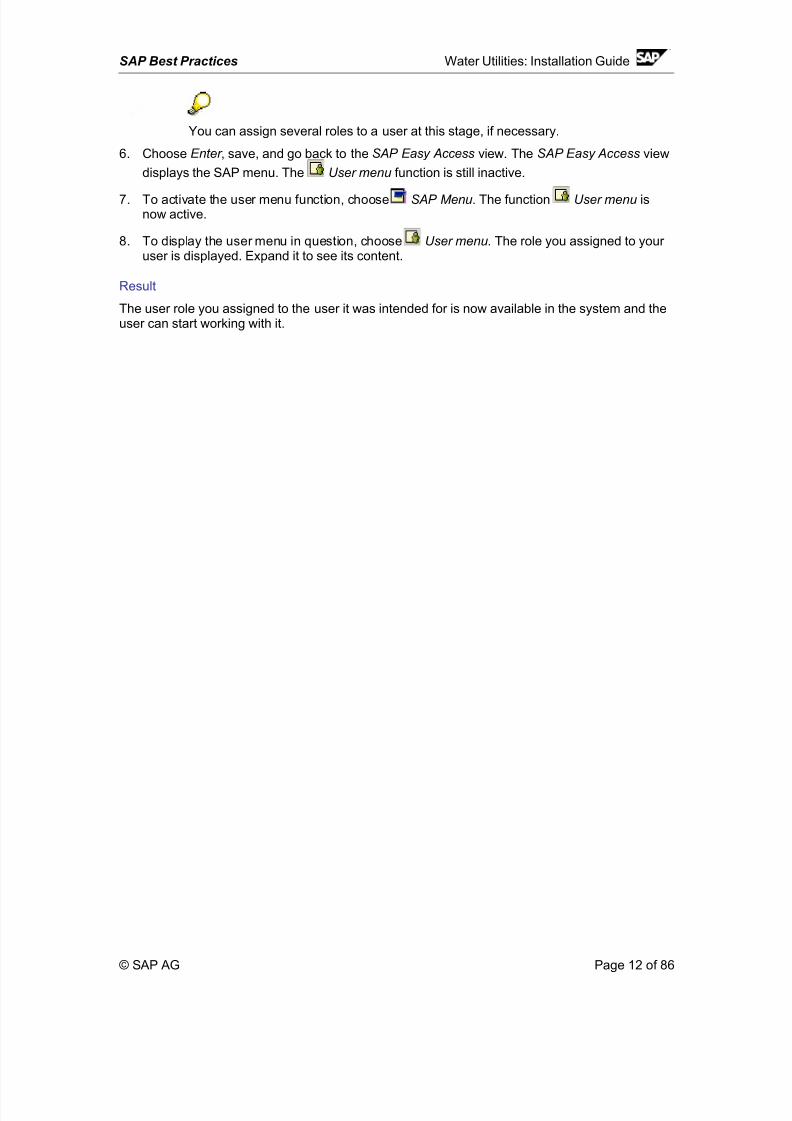
You can assign several roles to a user at this stage, if necessary.
6. Choose Enter , save, and go back to the SAP Easy Access view. The SAP Easy Access view
displays the SAP menu. The User menu function is still inactive.
7. To activate the user menu function, choose SAP Menu . The function User menu isnow active.
8. To display the user menu in question, choose User menu. The role you assigned to your user is displayed. Expand it to see its content.
Result
The user role you assigned to the user it was intended for is now available in the system and theuser can start working with it.
© SAP AG Page 12 of 86
8/3/2019 Util Install Guide en US
http://slidepdf.com/reader/full/util-install-guide-en-us 13/86
SAP Best Practices Water Utilities: Installation Guide
1.3 Installation
Process these activities to set up the SAP Best Practices for Water Utilities required data. Followthe steps in the installation role as described in the following sections.
1.3.1 Create Cost center hierarchy
Use
Create the cost center hierarchy, which is required for the work management
Procedure
SAP EasyAccess Menu
Easy Access → Accounting → Controlling → Cost
Center Accounting → Master data → Standard
Hierarchy → Change
Transaction
Code
OKEON
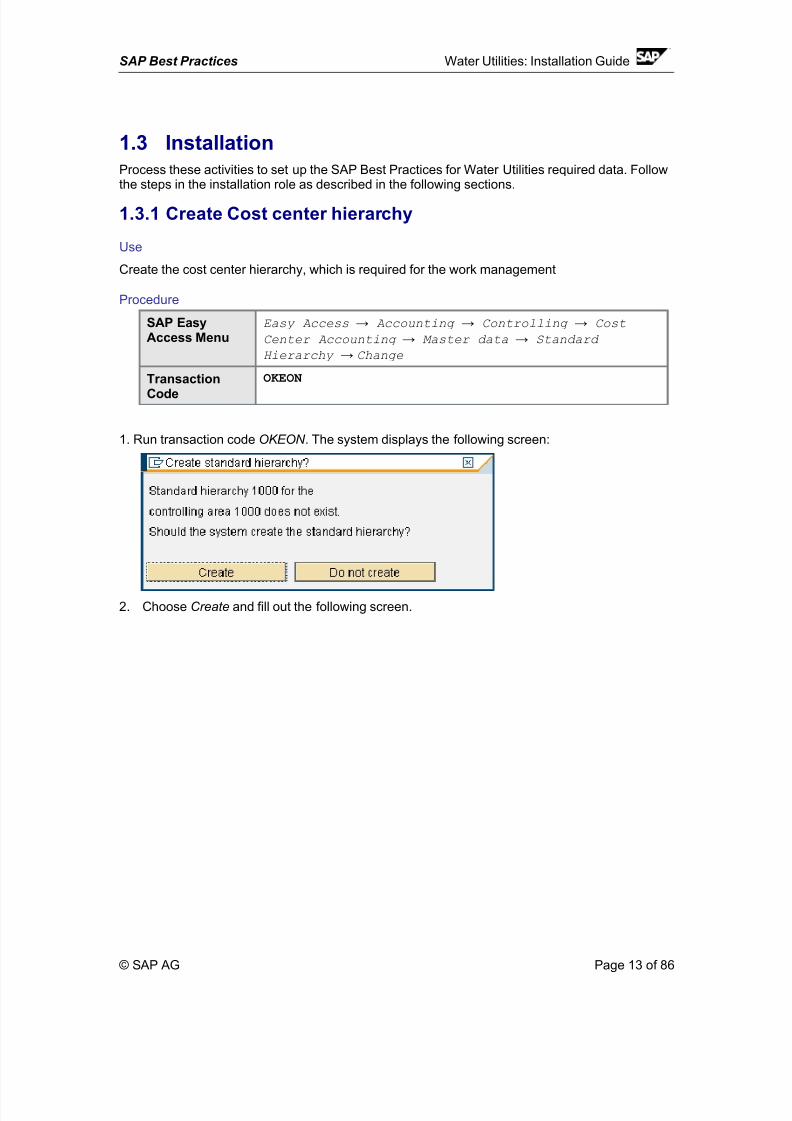
1. Run transaction code OKEON . The system displays the following screen:
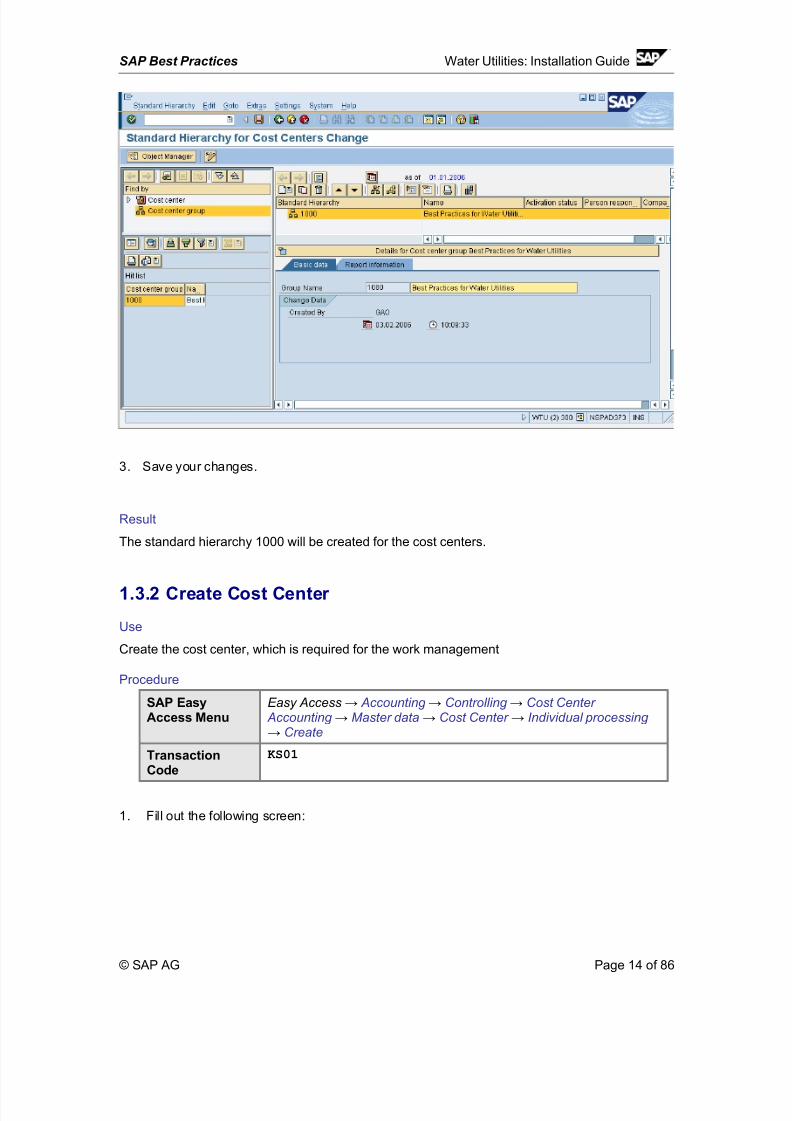
2. Choose Create and fill out the following screen.
© SAP AG Page 13 of 86
8/3/2019 Util Install Guide en US
http://slidepdf.com/reader/full/util-install-guide-en-us 14/86
SAP Best Practices Water Utilities: Installation Guide
3. Save your changes.
Result
The standard hierarchy 1000 will be created for the cost centers.
1.3.2 Create Cost Center
Use
Create the cost center, which is required for the work management
Procedure
SAP EasyAccess Menu
Easy Access → Accounting → Controlling → Cost Center Accounting → Master data → Cost Center → Individual processing → Create
TransactionCode
KS01
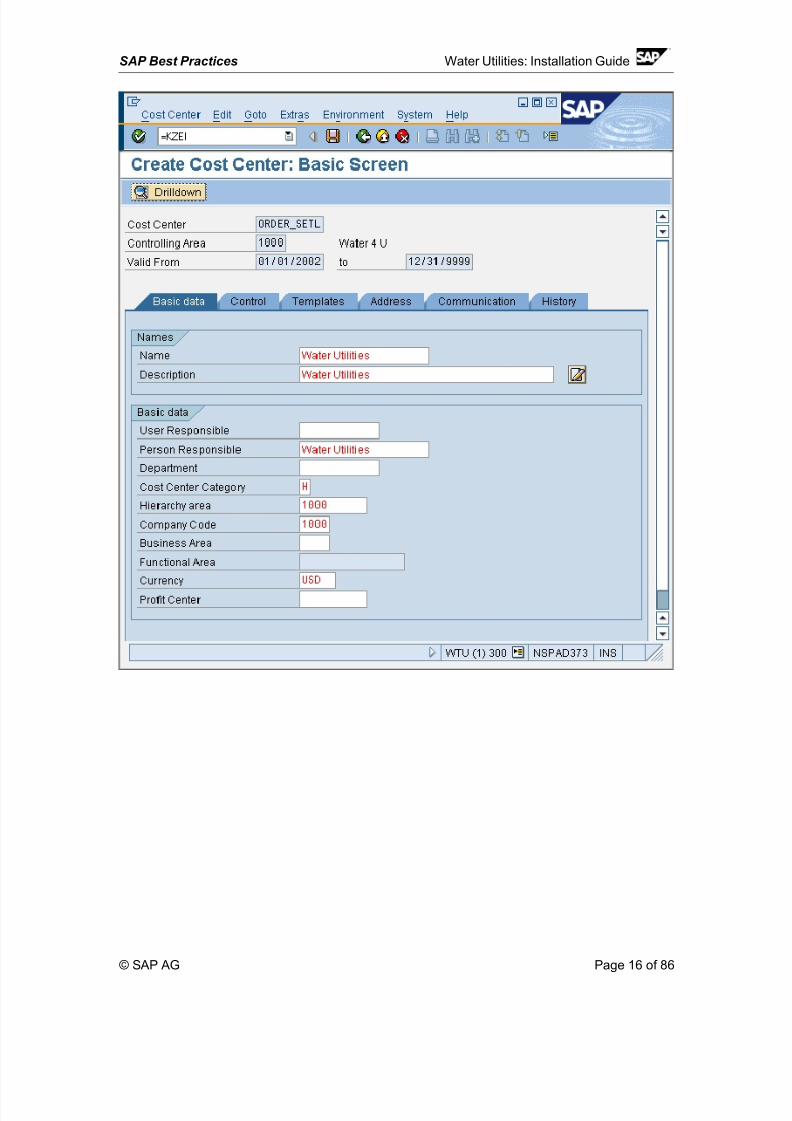
1. Fill out the following screen:
© SAP AG Page 14 of 86
8/3/2019 Util Install Guide en US
http://slidepdf.com/reader/full/util-install-guide-en-us 15/86
SAP Best Practices Water Utilities: Installation Guide
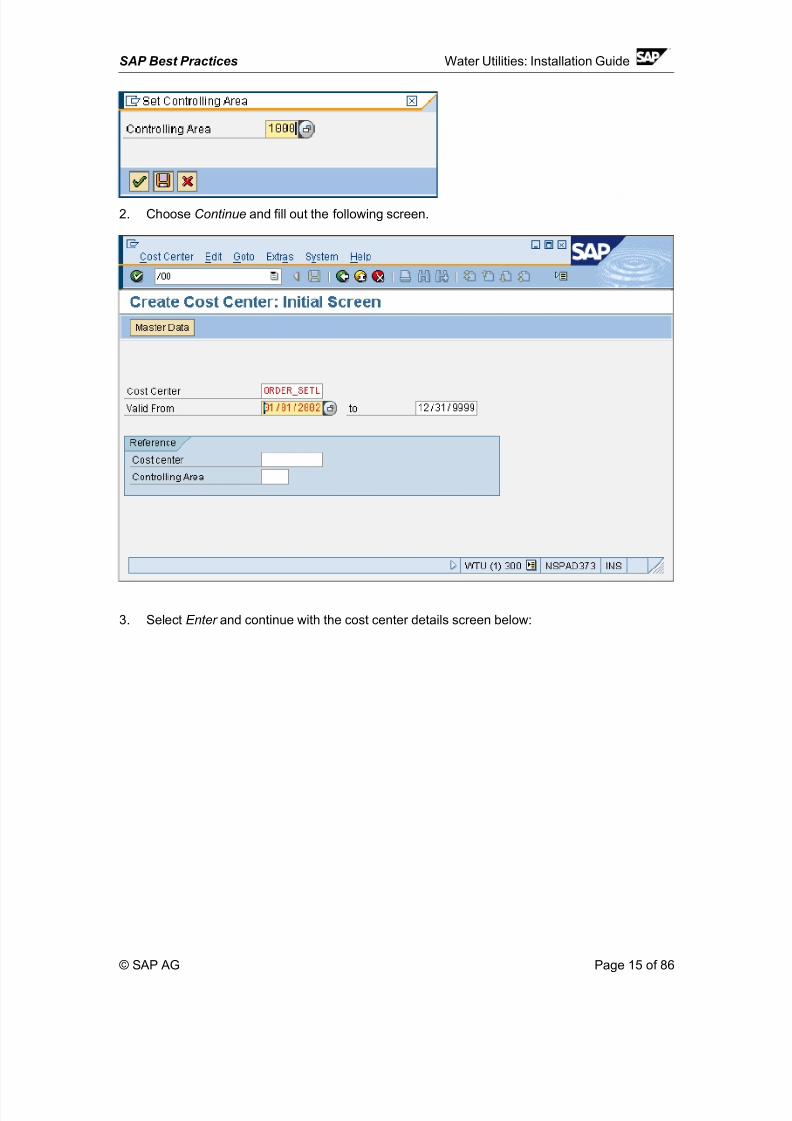
2. Choose Continue and fill out the following screen.
3. Select Enter and continue with the cost center details screen below:
© SAP AG Page 15 of 86
8/3/2019 Util Install Guide en US
http://slidepdf.com/reader/full/util-install-guide-en-us 16/86
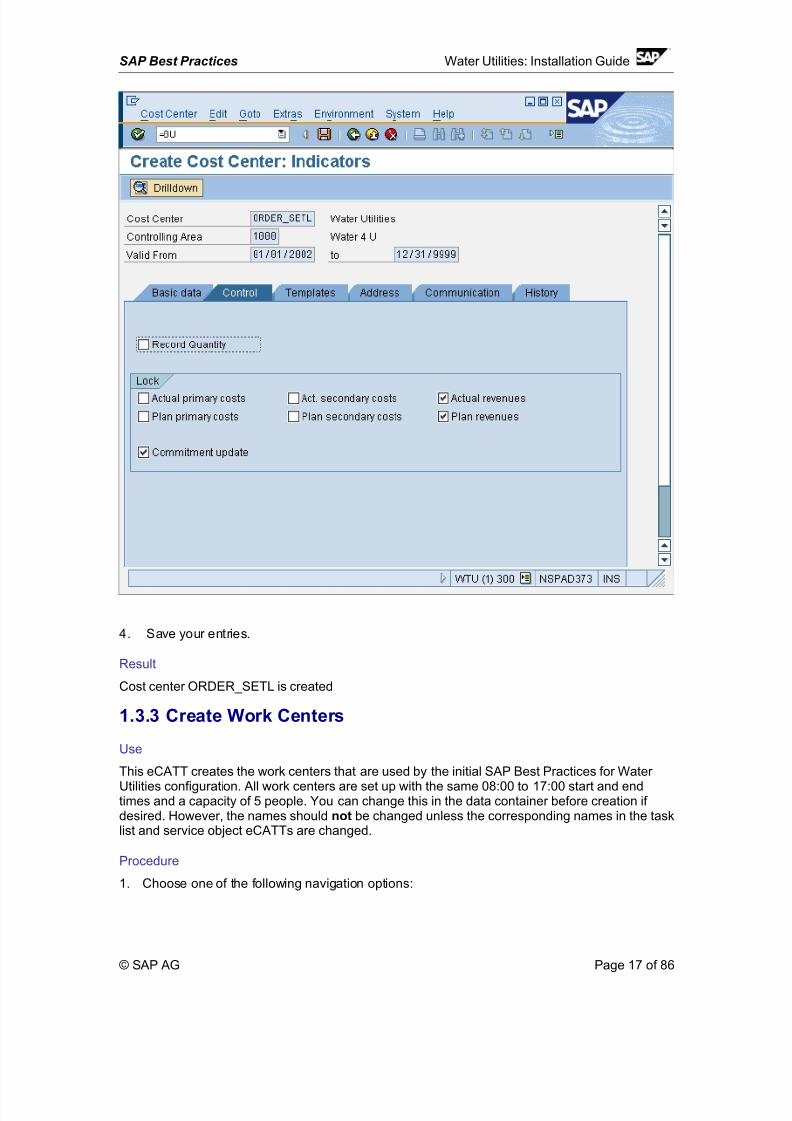
SAP Best Practices Water Utilities: Installation Guide
© SAP AG Page 16 of 86
8/3/2019 Util Install Guide en US
http://slidepdf.com/reader/full/util-install-guide-en-us 17/86
SAP Best Practices Water Utilities: Installation Guide
4. Save your entries.
Result
Cost center ORDER_SETL is created
1.3.3 Create Work Centers
Use
This eCATT creates the work centers that are used by the initial SAP Best Practices for Water
Utilities configuration. All work centers are set up with the same 08:00 to 17:00 start and endtimes and a capacity of 5 people. You can change this in the data container before creation if desired. However, the names should not be changed unless the corresponding names in the tasklist and service object eCATTs are changed.
Procedure
1. Choose one of the following navigation options:
© SAP AG Page 17 of 86
8/3/2019 Util Install Guide en US
http://slidepdf.com/reader/full/util-install-guide-en-us 18/86
SAP Best Practices Water Utilities: Installation Guide
SAP RoleMenu
Best Practices for Water Utilities Installation Role Create master data for connection and device management -> Create work center
TransactionCode
ZW_CREATE_WORKCENTER
The transaction runs the following eCATT
eCATT: Z_TC_CREATE_WORKCENTER
Test configuration: Z_TC_CREATE_WORKCENTER
Test Script(s): Z_TS_CREATE_WORKCENTER
Test Data: Z_TD_CREATE_WORKCENTER
2. Enter parameters.
Input parameters:
I_PLANT Plant
I_WORKCENTER Work Center name
I_WCCAT Work center category
I_PERSRESP Person responsible
I_WCNAME Work center text name
I_SHIFTSTART Start of shift
I_SHIFTEND End of shift
I_CAPUTIL Capacity utilization
I_NUMCAP Number indiv capacities
I_FACTCAL Factory calendar
I_UNITMEAS Base unit of measureI_OVERLOAD Cap overload factor
I_COSTCENTER Cost center
Result
The following work centers are created.
ENGINEER
FLDSVR
FLDSVR1
FLDSVR2
MAINCRW
MAINCRW1
MAINCRW2
METERRD
© SAP AG Page 18 of 86
8/3/2019 Util Install Guide en US
http://slidepdf.com/reader/full/util-install-guide-en-us 19/86
SAP Best Practices Water Utilities: Installation Guide
1.3.4 Create Service Material
Use
This eCATT creates the service materials from which the service products are created.
Procedure
1. choose one of the following navigation options:
SAP RoleMenu
Best Practices for Water Utilities Installation Role → Create master datafor connection and device management → Create service material
TransactionCode
ZW_CREATE_SERVICEMAT
The transaction runs the following eCATT
eCATT: Z_TC_CREATE_SERVICEMATERIAL
Test configuration: Z_TC_CREATE_SERVICEMATERIAL
Test Script(s): Z_CREATE_SERVMATERIAL_V1
Test Data: Z_TD_CREATE_SERVICEMATERIAL
Input parameters:
I_MATERIALNAME Material Number
I_PLANT Plant
I_MATDESCRIPT Material Description
Result
Only the very basic shell of the material is created. The materials created are:
SM_METREP_GLASS Meter repair, glass
SM_METREP_LEAK Meter repair for leak
SM_METREP_NOTMET Meter repair - not metering
SM_METREP_OTHER Meter repair - other
SM_MHREP_CARDAMAGE Car damage to a hydrant
SM_MHREP_HYDAMAGE Hydrant damaged
SM_MHREP_ICE Ice due to a water leak
SM_MHREP_OTHER Main or hydrant repair - other
SM_MHREP_WATER Main or feeder water leak
SM_PRREP_LAWNWAT Premise level repair for water in lawn
SM_PRREP_NOWATER Premise level repair for no water
SM_PRREP_OTHER Premise level repair for other problems
SM_PRREP_PRWAT Premise level repair for water in prem
SM_PRREP_RUST Premise level repair for rusty water
© SAP AG Page 19 of 86
8/3/2019 Util Install Guide en US
http://slidepdf.com/reader/full/util-install-guide-en-us 20/86
SAP Best Practices Water Utilities: Installation Guide
1.3.5 Create Single Dial Registers
UseThis eCATT creates single dial registers. The next eCATT — Z_TS_REGISTER_GROUP_2D —is used for the two dial register groups.
Procedure
1. Choose one of the following navigation options:
SAP RoleMenu
Best Practices for Water Utilities Installation Role → Create master datafor connection and device management → Create single dial registers
TransactionCode
ZW_REGISTER_GROUP
This transaction runs the following eCATT
eCATT: Z_TC_CRT_REGISTER_GROUP
Test configuration: Z_TC_CRT_REGISTER_GROUP
Test Script(s): Z_TS_CRT_REGISTER_GROUP
Test Data: Z_TS_CRT_REGISTER_GROUP
Input parameters:
I_REGNAME Register Name
I_REGINFO Register Info
I_BEFORE_DEC Number before decimal
I_UNITOFMEAS Unit of measure
I_REGID Register ID
I_REGFACTOR Register factor
I_RESULTPERRD Results per reading
Result
Register groups created by this eCATT are:
Register group Register info
1CCF3D CCF 1Reg. 3 Dials
1CCF4D CCF 1 Reg. 4 Dials
1CCF5D CCF 1 Reg. 5 Dials
1CCF6D CCF 1 Reg. 6 Dials
1CCF7D CCF 1 Reg. 7 Dials
1CCF8D CCF 1 Reg. 8 Dials
© SAP AG Page 20 of 86
8/3/2019 Util Install Guide en US
http://slidepdf.com/reader/full/util-install-guide-en-us 21/86
SAP Best Practices Water Utilities: Installation Guide
1CGL3D 100 Gal. 1 Reg. 3 Dials
1CGL4D 100 Gal. 1 Reg. 4 Dials
1CGL5D 100 Gal. 1 Reg. 5 Dials
1CGL6D 100 Gal. 1 Reg. 6 Dials
1CGL7D 100 Gal. 1 Reg. 7 Dials1CGL8D 100 Gal. 1 Reg. 8 Dials
1MGL3D 1000 Gal. 1 Reg. 3 Dials
1MGL4D 1000 Gal. 1 Reg. 4 Dials
1MGL5D 1000 Gal. 1 Reg. 5 Dials
1MGL6D 1000 Gal. 1 Reg. 6 Dials
1MGL7D 1000 Gal. 1 Reg. 7 Dials
1MGL8D 1000 Gal. 1 Reg. 8 Dials
1.3.6 Create Two-Dial Registers
Use
This eCATT creates two dial registers. The previous eCATT — Z_TS_REGISTER_GROUP — isused for the single dial register groups.
Procedure
1. Choose one of the following navigation options
SAP RoleMenu
Best Practices for Water Utilities Installation Role → Create master datafor connection and device management → Create two dial registers
TransactionCode
ZW_REGISTER_GROUP_2D
This transaction runs the following eCATT:
eCATT: Z_TC_CRT_REGISTER_GROUP_2D
Test configuration: Z_TC_CRT_REGISTER_GROUP_2D
Test Script(s): Z_TS_CRT_REGISTER_GROUP_2D
Test Data: Z_TD_CRT_REGISTER_GROUP_2D
Input parameters:
I_RESULTPER_2 Results per readingI_REGFACTOR_2 Register factor
I_BEFORE_DEC_2 Number before decimal
I_REGNAME Register Name
I_REGINFO Register Info
I_BEFORE_DEC Number before decimal
I_UNITOFMEAS Unit of measure
© SAP AG Page 21 of 86
8/3/2019 Util Install Guide en US
http://slidepdf.com/reader/full/util-install-guide-en-us 22/86
SAP Best Practices Water Utilities: Installation Guide
I_REGID Register ID
I_REGFACTOR Register factor
I_RESULTPERRD Results per reading
Result
Register groups created by this eCATT are:
Regname Reginfo
2CCF4D CCF 2 Reg. 4 Dials
2CCF5D CCF 2 Reg. 5 Dials
2CCF6D CCF 2 Reg. 6 Dials
2CCF46D CCF 2 Reg. 4 and 6 Dial
2CCF56D CCF 2 Reg. 5 and 6 Dial
2CCF54D CCF 2 Reg. 5 and 4 Dial
2CCF64D CCF 2 Reg. 6 and 4 Dial
2CGL4D 100 Gal. 2 Reg. 4 Dials
2CGL5D 100 Gal. 2 Reg. 5 Dials
2CGL6D 100 Gal. 2 Reg. 6 Dials
2CGL46D 100 Gal. 2 Reg. 4 and 6 Dial
2CGL56D 100 Gal. 2 Reg. 5 and 6 Dial
2CGL54D 100 Gal. 2 Reg. 5 and 4 Dial
2CGL64D 100 Gal. 2 Reg. 6 and 4 Dial2MGL4D 1000 Gal. 2 Reg. 4 Dials
2MGL5D 1000 Gal. 2 Reg. 5 Dials
2MGL6D 1000 Gal. 2 Reg. 6 Dials
2MGL46D 1000 Gal. 2 Reg. 4 and 6 Dial
2MGL56D 1000 Gal. 2 Reg. 5 and 6 Dial
2MGL54D 1000 Gal. 2 Reg. 5 and 4 Dial
2MGL64D 1000 Gal. 2 Reg. 6 and 4 Dial
1.3.7 Create Device Category
Use
This eCATT creates the example device categories and corresponding materials.
Procedure
1. Choose one of the following navigation options:
© SAP AG Page 22 of 86
8/3/2019 Util Install Guide en US
http://slidepdf.com/reader/full/util-install-guide-en-us 23/86
SAP Best Practices Water Utilities: Installation Guide
SAP RoleMenu
Best Practices for Water Utilities Installation Role → Create master datafor connection and device management → Create device category
TransactionCode
ZW_DEV_CAT
This transaction runs the following eCATT:
eCATT: Z_TC_CREATE_DEV_CAT
Test configuration: Z_TC_CREATE_DEV_CAT
Test Script(s): Z_TS_CREATE_DEV_CAT
Test Data: Z_TD_CREATE_DEV_CAT
Input parameters:
I_MATNR Material number/name
I_MATDESCRIP Material Description
I_GROSSWT Gross weight
I_SERIALPRO Serial number profile
I_STDPRICE Standard price
I_DEVDESCRIP Device Description
I_DIVISION Division
I_REGGROUP Register Group
I_CERTREQ Certification required
I_CALVAL Calibration validity period
Result
The device categories created are:
COMP_0150 Compound meter, 1 1/5 inch
DIS_5834 Displacement meter, 5/8 X ¾ inch
TURB_1000 Turbine meter, 10 inch
1.3.8 Create Device Category for Hydrants
Use
This eCATT creates the device category for the virtual fire hydrant to be used for billing.
Procedure
1. Choose one of the following navigation options:
© SAP AG Page 23 of 86
8/3/2019 Util Install Guide en US
http://slidepdf.com/reader/full/util-install-guide-en-us 24/86
SAP Best Practices Water Utilities: Installation Guide
SAP RoleMenu
Best Practices for Water Utilities Installation Role → Create master datafor connection and device management → Create device category for hydrant
TransactionCode
ZW_BILL_HYDRANT
This transaction runs the following eCATT:
eCATT: Z_TC_BILL_HYDRANT
Test configuration: Z_TC_BILL_HYDRANT
Test Script(s): Z_TS_BILL_HYDRANT
Test Data: Z_TD_BILL_HYDRANT
Input parameters:
I_MATNR Material number/name
I_MATDESCRIP Material Description
I_PRICECLASS Price Class
Result
The device category FIRE_HYDRANT and the corresponding material are created.
1.3.9 Create Task List
Use
This eCATT creates the task lists that are subsequently used in the service objects supplied withthe Best Practices.
Procedure
1. Choose one of the following navigation options:
SAP RoleMenu
Best Practices for Water Utilities Installation Role → Create master datafor connection and device management → Create task list
TransactionCode
ZW_TASKLIST_V1
This transaction runs the following eCATT:
eCATT: Z_TC_CREATE_TASKLIST_V1
Test configuration: Z_TC_CREATE_TASKLIST_V1
Test Script(s): Z_CREATE_TASKLIST_V1
Test Data: Z_TD_TASKLISTS
Input parameters:
I_GROUP Key for Task List Group
© SAP AG Page 24 of 86
8/3/2019 Util Install Guide en US
http://slidepdf.com/reader/full/util-install-guide-en-us 25/86
SAP Best Practices Water Utilities: Installation Guide
I_DESCRIPT Task list description
I_PLANT Plant
I_WORKCENTER Work Center
I_WCPLANT Plant
I_OPDESCRIP Operation short textI_WORKHRS Work involved in the activity
I_WKUNITS Unit for work
I_REQPEOPLE Number of capacities required
I_DURUNITS Normal duration/unit
Result
The following task lists are created.
PREREP Premise Level Repair
MAIN_HYD Main and Hydrant Repair
METREPLC Meter Replacement
EMERG02 Device or Premise Emergency
EMERG01 Main and Hydrant Emergency
CONDISC Service conn/disconn
METERREP Meter repair
1.3.10 Create Functional Location Structure for Hydrants
Procedure
1. Choose one of the following navigation options:
SAP RoleMenu
Best Practices for Water Utilities Installation Role → Create master datafor connection and device management → Create functional locationstructure for hydrants
TransactionCode
ZW_HYD_STRUCT
This transaction runs the following eCATT:eCATT: Z_TC_CREATE_HYD_STRUCT
Test configuration: Z_TC_CREATE_HYD_STRUCT
Test Script(s): Z_CREATE_HYD_STRUCT_V2
Test Data: Z_TD_CREATE_HYD_STRUCT
Input parameters:
I_FLNAME Functional location label
© SAP AG Page 25 of 86
8/3/2019 Util Install Guide en US
http://slidepdf.com/reader/full/util-install-guide-en-us 26/86
SAP Best Practices Water Utilities: Installation Guide
I_NAME Description of functional location
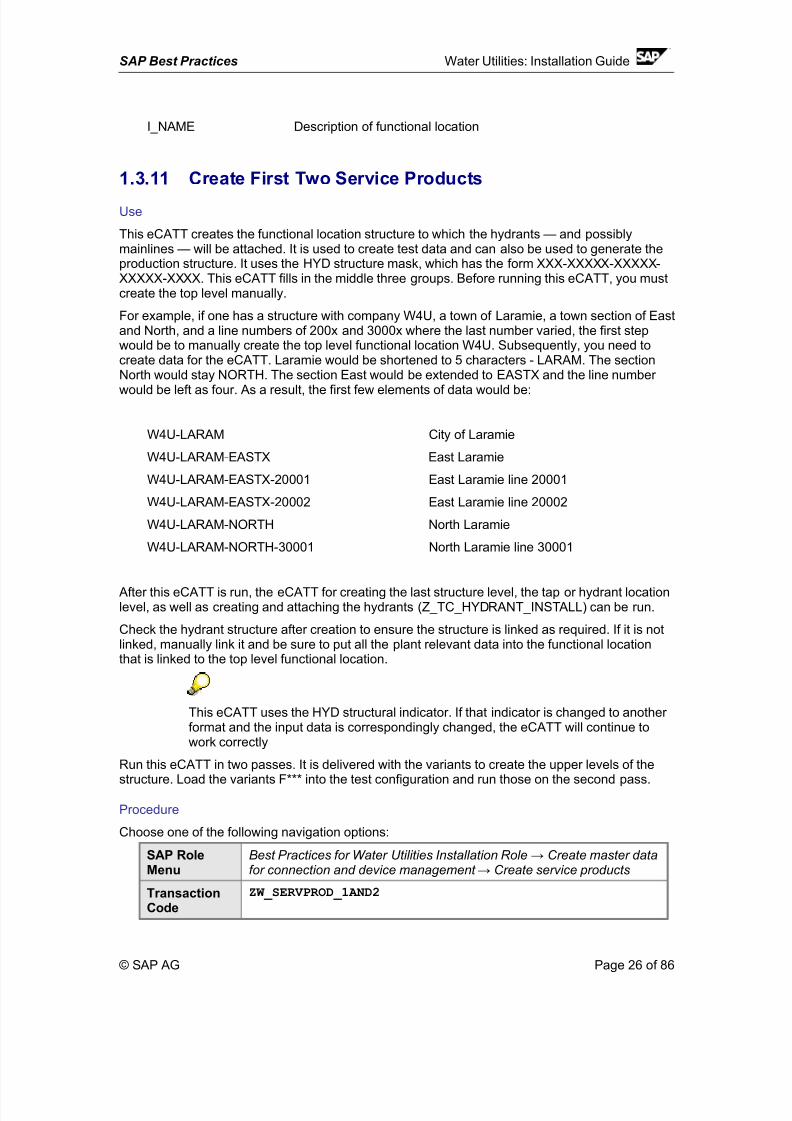
1.3.11 Create First Two Service Products
Use
This eCATT creates the functional location structure to which the hydrants — and possiblymainlines — will be attached. It is used to create test data and can also be used to generate theproduction structure. It uses the HYD structure mask, which has the form XXX-XXXXX-XXXXX-XXXXX-XXXX. This eCATT fills in the middle three groups. Before running this eCATT, you mustcreate the top level manually.
For example, if one has a structure with company W4U, a town of Laramie, a town section of Eastand North, and a line numbers of 200x and 3000x where the last number varied, the first stepwould be to manually create the top level functional location W4U. Subsequently, you need tocreate data for the eCATT. Laramie would be shortened to 5 characters - LARAM. The sectionNorth would stay NORTH. The section East would be extended to EASTX and the line number
would be left as four. As a result, the first few elements of data would be:
W4U-LARAM City of Laramie
W4U-LARAM-EASTX East Laramie
W4U-LARAM-EASTX-20001 East Laramie line 20001
W4U-LARAM-EASTX-20002 East Laramie line 20002
W4U-LARAM-NORTH North Laramie
W4U-LARAM-NORTH-30001 North Laramie line 30001
After this eCATT is run, the eCATT for creating the last structure level, the tap or hydrant locationlevel, as well as creating and attaching the hydrants (Z_TC_HYDRANT_INSTALL) can be run.
Check the hydrant structure after creation to ensure the structure is linked as required. If it is notlinked, manually link it and be sure to put all the plant relevant data into the functional locationthat is linked to the top level functional location.
This eCATT uses the HYD structural indicator. If that indicator is changed to another format and the input data is correspondingly changed, the eCATT will continue towork correctly
Run this eCATT in two passes. It is delivered with the variants to create the upper levels of the
structure. Load the variants F*** into the test configuration and run those on the second pass.
Procedure
Choose one of the following navigation options:
SAP RoleMenu
Best Practices for Water Utilities Installation Role → Create master datafor connection and device management → Create service products
TransactionCode
ZW_SERVPROD_1AND2
© SAP AG Page 26 of 86
8/3/2019 Util Install Guide en US
http://slidepdf.com/reader/full/util-install-guide-en-us 27/86
SAP Best Practices Water Utilities: Installation Guide
This transaction runs the following eCATT:
eCATT: Z_TC_CREATE_FIRSTSP
Test configuration: Z_TC_CREATE_FIRSTSP
Test Script(s): Z_TS_CREATE_FIRSTSPTest Data: Z_TD_CREATE_FIRSTSP
Input parameters:
None
Description: This eCATT creates the first two service products that are used by the solution.Since the screen sequence when creating the first service product is different than when creatingsubsequent products, a separate eCATT is necessary.
Result
The following service products are created
SM_METREP_GLASS
SM_METREP_LEAK
1.3.12 Create Service Products
Use
This eCATT creates the service products that are used by the solution.
Procedure
1. Choose one of the following navigation options:
SAP RoleMenu
Best Practices for Water Utilities Installation Role → Create master datafor connection and device management → Create service products
TransactionCode
ZW_SERVPROD
This transaction runs the following eCATT:
eCATT: Z_TC_CREATE_SERVPROD
Test configuration: Z_TC_CREATE_SERVPROD
Test Script(s): Z_CREATE_SERVPROD_V1
Test Data: Z_TD_CREATE_SERVPRODInput parameters:
I_PLPLANT Maintenance Planning Plant
I_SERVPROD CATT - Parameter value
I_ORDERTYPE Order Type
I_WORKCENTER Main work center for maintenance tasks
I_WCPLANT Plant associated with main work center
© SAP AG Page 27 of 86
8/3/2019 Util Install Guide en US
http://slidepdf.com/reader/full/util-install-guide-en-us 28/86
SAP Best Practices Water Utilities: Installation Guide
I_TLGROUP Key for Task List Group
I_TLCOUNTER Group Counter
I_CAPACITY Required Capacity in Minutes
I_REFTYPE Reference type when creating PM/SM order automatically
I_REFOBJTYPE Technical reference object type
Result
The following service products are created
SM_METREP_NOTMET
SM_METREP_OTHER
SM_MHREP_CARDAMAGE
SM_MHREP_HYDAMAGE
SM_MHREP_ICE
SM_MHREP_OTHER
SM_MHREP_WATER
SM_PRREP_LAWNWAT
SM_PRREP_NOWATER
SM_PRREP_OTHER
SM_PRREP_PRWAT
SM_PRREP_RUST
1.3.13 Create Service Objects
Use
This eCATT creates the service objects used by the SAP Best Practices for Water Utilities.
Procedure
Choose one of the following navigation options:
SAP RoleMenu
Best Practices for Water Utilities Installation Role → Create master datafor connection and device management → Create service objects
TransactionCode
ZW_SERVOBJECT
This transaction runs the following eCATT:
eCATT: Z_TC_CREATE_SERVOBJECT
Test configuration: Z_TC_CREATE_SERVOBJECT
Test Script(s): Z_CREATE_SERVOBJECT_V3
Test Data: Z_TD_CREATE_SERVOBJECT
© SAP AG Page 28 of 86
8/3/2019 Util Install Guide en US
http://slidepdf.com/reader/full/util-install-guide-en-us 29/86
SAP Best Practices Water Utilities: Installation Guide
Input parameters:
I_PLNPLANT Maintenance Planning Plant
I_OBJNAME Service object
I_ORDERTYPE Order Type
I_WORKCENTER Main work center for maintenance tasksI_WCPLANT Plant associated with main work center
I_TLGROUP Key for Task List Group
I_TLCOUNTER Group Counter
I_CAPACITY Required Capacity in Minutes
I_REFTYPE Reference type when creating PM/SM order automatically
I_REFOBJTYPE Technical reference object type
Result
The service objects created are:
APERIODIC METER READ
DISCONNECT
EMERGENCY DEVICE ORDER
EMERGENCY SERVICE ORDER
MAIN OR HYDRANT EMERGENCY
PREMISE EMERGENCY ORDER
RECONNECTION
SM_METER_REPLACE
1.3.14 Create Monthly Portions
Use
This eCATT creates the example Monthly Portions. These portions are created as dynamicportions.
The factory calendar US is identified and the “correct” holiday field is set to 2.
Procedure
Choose one of the following navigation options:
SAP RoleMenu
Best Practices for Water Utilities Installation Role → Create master data for billing → Create monthly portion
TransactionCode
ZW_MONTHLY_PORTIONS
This transaction runs the following eCATT:
© SAP AG Page 29 of 86
8/3/2019 Util Install Guide en US
http://slidepdf.com/reader/full/util-install-guide-en-us 30/86
SAP Best Practices Water Utilities: Installation Guide
eCATT: Z_TC_E41B_MONTHLY_PORTIONS
Test configuration: Z_TC_E41B_MONTHLY_PORTIONS
Test Script(s): Z_TS_E41B_MONTHLY_PORTIONS
Test Data: Z_TD_E41B_MONTHLY_PORTIONS
Input parameters:I_MOPORTION Monthly Portion key
I_ENDDATE The end of the billing period
I_ALLOCDATE The allocation date for billing purposes
I_TEXT The description of the portion
Result
Twenty monthly portions 01M to 20M are created.
1.3.15 Create Quarterly PortionsUse
This eCATT creates the sample quarterly portions. The quarterly portions are not dynamic andyou must define the beginning of the billing period and the end date when creating these portions.
Procedure
Choose one of the following navigation options:
SAP RoleMenu
Best Practices for Water Utilities Installation Role → Create master data for billing → Create quarterly portion
TransactionCode
ZW_QUARTERLY_PORTION
This transaction runs the following eCATT:
eCATT: Z_TC_ E41B_QUARTERLY_PORTIONS
Test configuration: Z_TC_ E41B_QUARTERLY_PORTIONS
Test Script(s): Z_TS_E41B_QUARTERLY_PORTIONS
Test Data: Z_TD_E41B_QUARTERLY_PORTIONS
Input parameters:
I_QTPORTION The quarterly portion key
I_ENDDATE The end of the billing period
I_ALLOCDATE The allocation date for billing
I_SCHEDDATE The scheduled billing date
I_TEXT The description of the portion
© SAP AG Page 30 of 86
8/3/2019 Util Install Guide en US
http://slidepdf.com/reader/full/util-install-guide-en-us 31/86
SAP Best Practices Water Utilities: Installation Guide
Result
Sixty quarterly portions 1Q – 60Q are created as well as one “dummy” portion for potential use ininitial data creation.
1.3.16 Create Monthly Meter Reading Units (MRUs)
Use
This eCATT creates the example monthly MRUs: one per portion. These MRUs are dynamic withall other values stored as constants: factory calendar, correct holiday field, and so on.
Procedure
Choose one of the following navigation options:
SAP RoleMenu
Best Practices for Water Utilities Installation Role → Create master data for billing → Create monthly meter reading units
TransactionCode
ZW_MONTHLY_MRUS
This transaction runs the following eCATT:
eCATT: Z_TC_E41H_MONTHLY_MRUS
Test configuration: Z_TC_E41H_MONTHLY_MRUS
Test Script(s): Z_TS_E41H_MONTHLY_MRUS
Test Data: Z_TD_E41H_MONTHLY_MRUS
Input parameters:
I_MOMRU The monthly MRU key
I_TEXT The description of the MRU
I_MRUNO The portion number allocated to the premise
Result
A single MRU is created for each of the twenty monthly portions as a sample only.
The created MRUs are:
01M-200
02M-200
…
20M-200
1.3.17 Create Quarterly Meter Reading Units
Use
This eCATT creates the quarterly MRUs. The values are determined from the portions createdusing the eCATT above.
© SAP AG Page 31 of 86
8/3/2019 Util Install Guide en US
http://slidepdf.com/reader/full/util-install-guide-en-us 32/86
SAP Best Practices Water Utilities: Installation Guide
Procedure
Choose one of the following navigation options:
SAP RoleMenu
Best Practices for Water Utilities Installation Role → Create master datafor billing → Create quarterly meter reading units
Transaction
Code
ZW_QUARTERLY_MRUS
This transaction runs the following eCATT:
eCATT: Z_TC_E41B_QUARTERLY_MRUS
Test configuration: Z_TC_E41B_QUARTERLY_MRUS
Test Script(s): Z_TS_E41H_QUARTERLY_MRUS
Test Data: Z_TD_E41B_QUARTERLY_MRUS
Input parameters:
I_QTMRU The key for the quarterly MRU
I_TEXT The description of the MRU
I_QTPORTION The referenced portion
Result
A single quarterly MRU is created for each of the quarterly portions.
The created MRUs are:
01Q-100
02Q-100
…
60Q-100
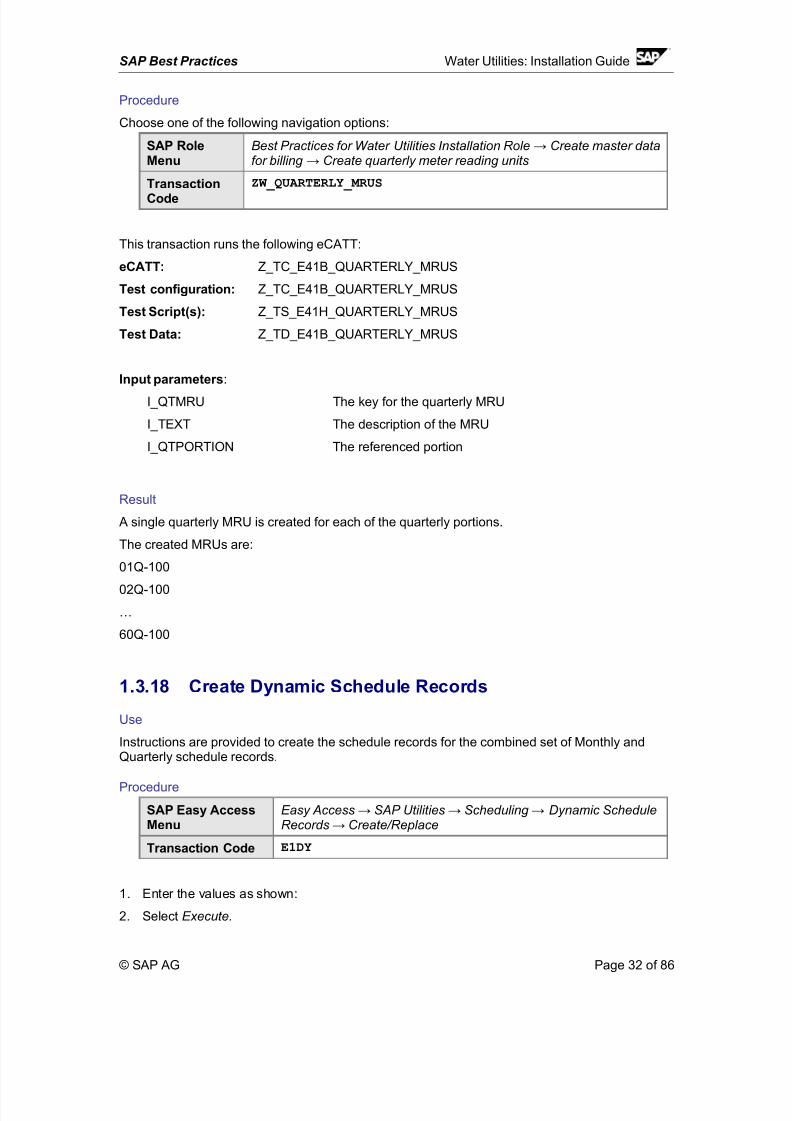
1.3.18 Create Dynamic Schedule Records
Use
Instructions are provided to create the schedule records for the combined set of Monthly andQuarterly schedule records.
Procedure
SAP Easy AccessMenu
Easy Access → SAP Utilities → Scheduling → Dynamic ScheduleRecords → Create/Replace
Transaction Code E1DY
1. Enter the values as shown:
2. Select Execute.
© SAP AG Page 32 of 86
8/3/2019 Util Install Guide en US
http://slidepdf.com/reader/full/util-install-guide-en-us 33/86
SAP Best Practices Water Utilities: Installation Guide
3. When the dialog box is displayed, confirm that you do not want to perform a check for billingorders.
Result
Schedule records are created for 01/01/2004 through 12/31/2007.
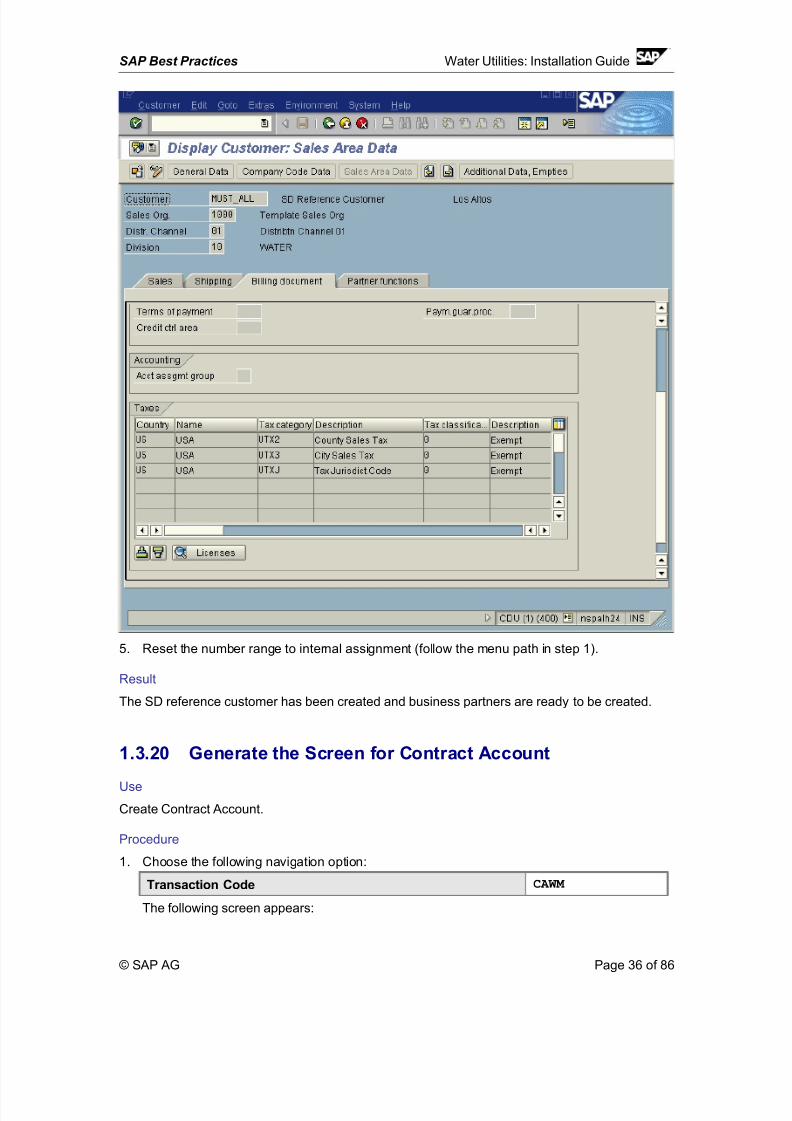
1.3.19 Create SD (Sales and Distribution) Reference Customer
Use
An SD reference Customer must be created before any business partners are created. The SDReference Customer is used for any SD billing (sold-to party) and for work management activities(sold-to and ship-to parties).
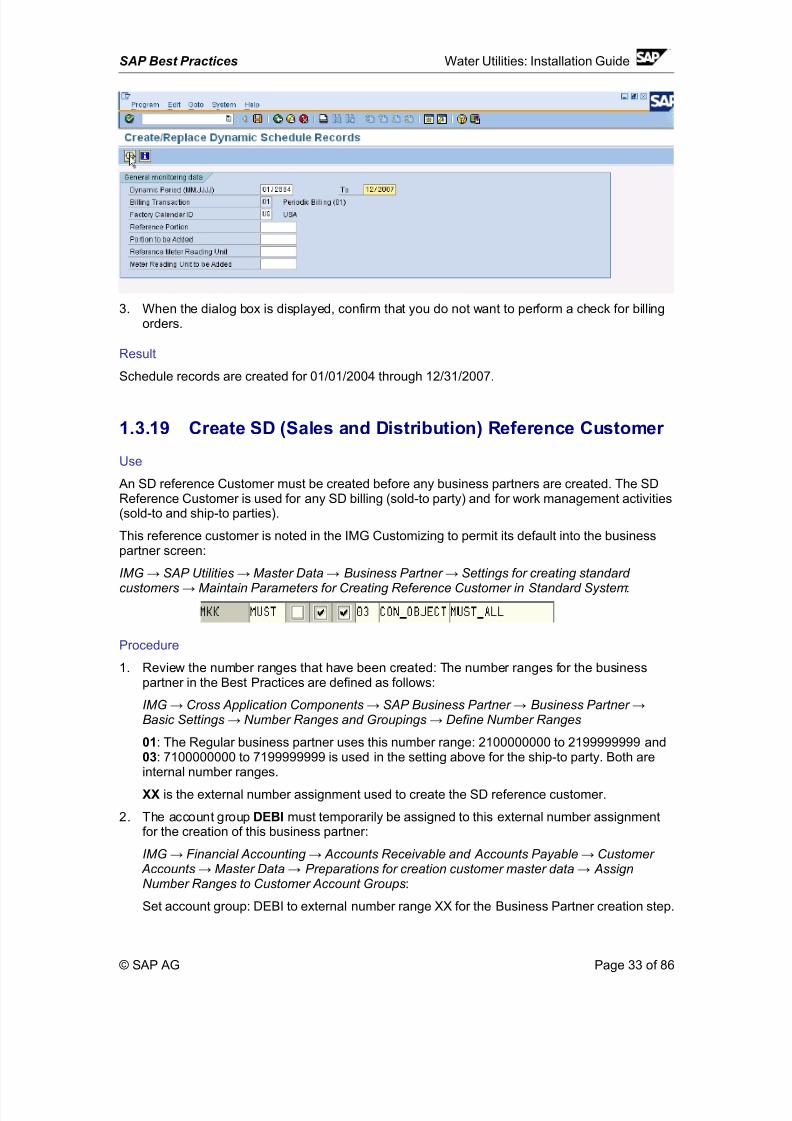
This reference customer is noted in the IMG Customizing to permit its default into the businesspartner screen:
IMG → SAP Utilities → Master Data → Business Partner → Settings for creating standard
customers → Maintain Parameters for Creating Reference Customer in Standard System:
Procedure
1. Review the number ranges that have been created: The number ranges for the businesspartner in the Best Practices are defined as follows:
IMG → Cross Application Components → SAP Business Partner → Business Partner →Basic Settings → Number Ranges and Groupings → Define Number Ranges
01: The Regular business partner uses this number range: 2100000000 to 2199999999 and03: 7100000000 to 7199999999 is used in the setting above for the ship-to party. Both areinternal number ranges.
XX is the external number assignment used to create the SD reference customer.
2. The account group DEBI must temporarily be assigned to this external number assignmentfor the creation of this business partner:
IMG → Financial Accounting → Accounts Receivable and Accounts Payable → Customer Accounts → Master Data → Preparations for creation customer master data → AssignNumber Ranges to Customer Account Groups:
Set account group: DEBI to external number range XX for the Business Partner creation step.
© SAP AG Page 33 of 86
8/3/2019 Util Install Guide en US
http://slidepdf.com/reader/full/util-install-guide-en-us 34/86
SAP Best Practices Water Utilities: Installation Guide
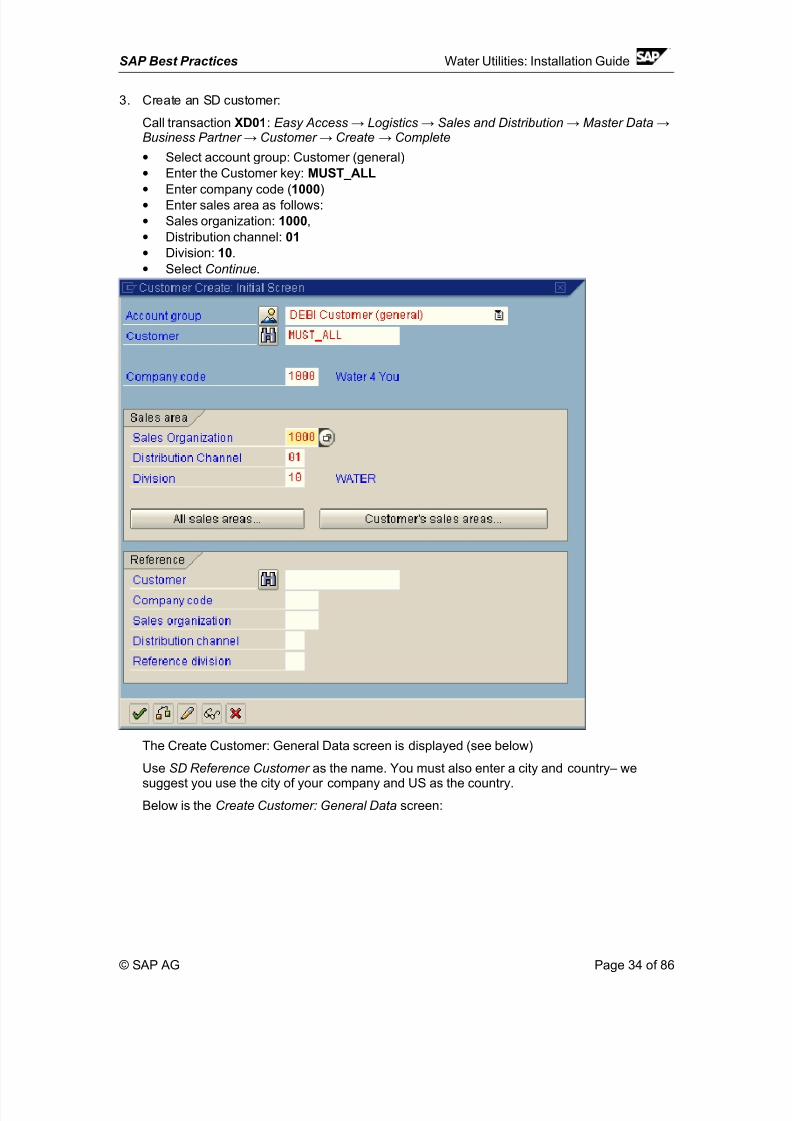
3. Create an SD customer:
Call transaction XD01: Easy Access → Logistics → Sales and Distribution → Master Data →Business Partner → Customer → Create → Complete
• Select account group: Customer (general)• Enter the Customer key: MUST_ALL
• Enter company code (1000)• Enter sales area as follows:• Sales organization: 1000,• Distribution channel: 01 • Division: 10.• Select Continue.
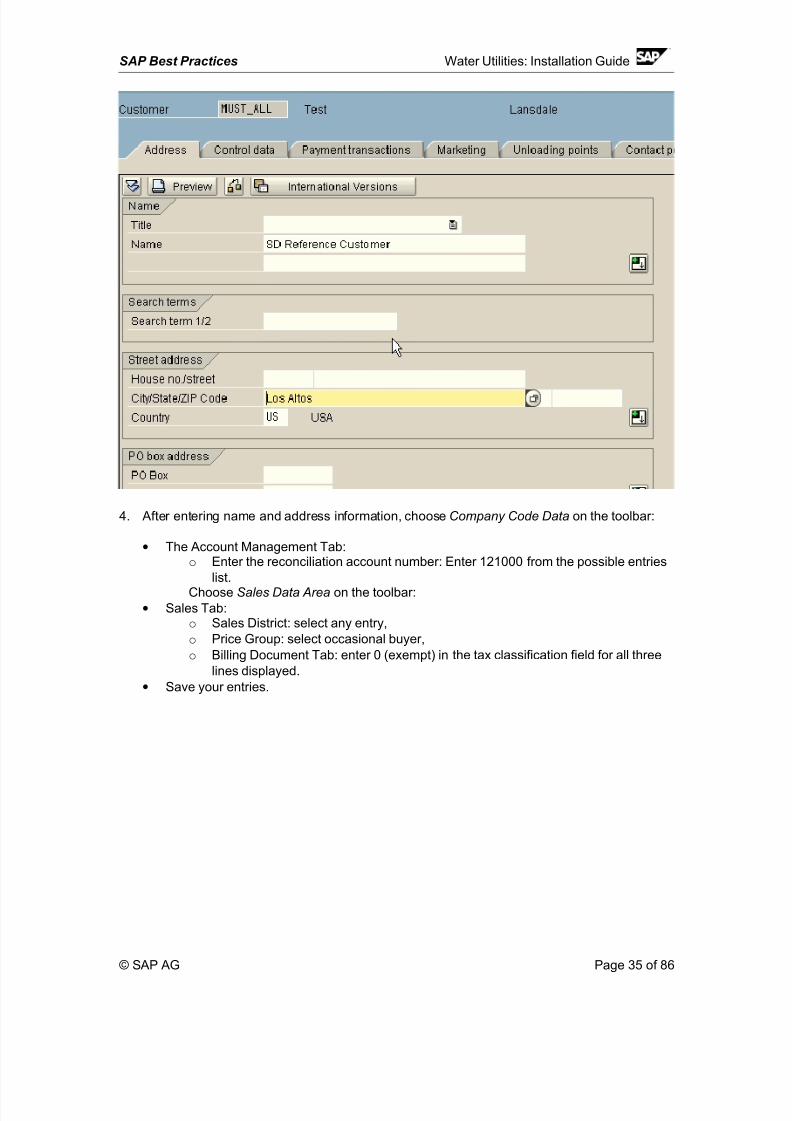
The Create Customer: General Data screen is displayed (see below)
Use SD Reference Customer as the name. You must also enter a city and country– we
suggest you use the city of your company and US as the country.Below is the Create Customer: General Data screen:
© SAP AG Page 34 of 86
8/3/2019 Util Install Guide en US
http://slidepdf.com/reader/full/util-install-guide-en-us 35/86
SAP Best Practices Water Utilities: Installation Guide
4. After entering name and address information, choose Company Code Data on the toolbar:
• The Account Management Tab:o Enter the reconciliation account number: Enter 121000 from the possible entries
list.
Choose Sales Data Area on the toolbar:• Sales Tab:
o Sales District: select any entry,o Price Group: select occasional buyer,o Billing Document Tab: enter 0 (exempt) in the tax classification field for all three
lines displayed.• Save your entries.
© SAP AG Page 35 of 86
8/3/2019 Util Install Guide en US
http://slidepdf.com/reader/full/util-install-guide-en-us 36/86
SAP Best Practices Water Utilities: Installation Guide
5. Reset the number range to internal assignment (follow the menu path in step 1).
Result
The SD reference customer has been created and business partners are ready to be created.
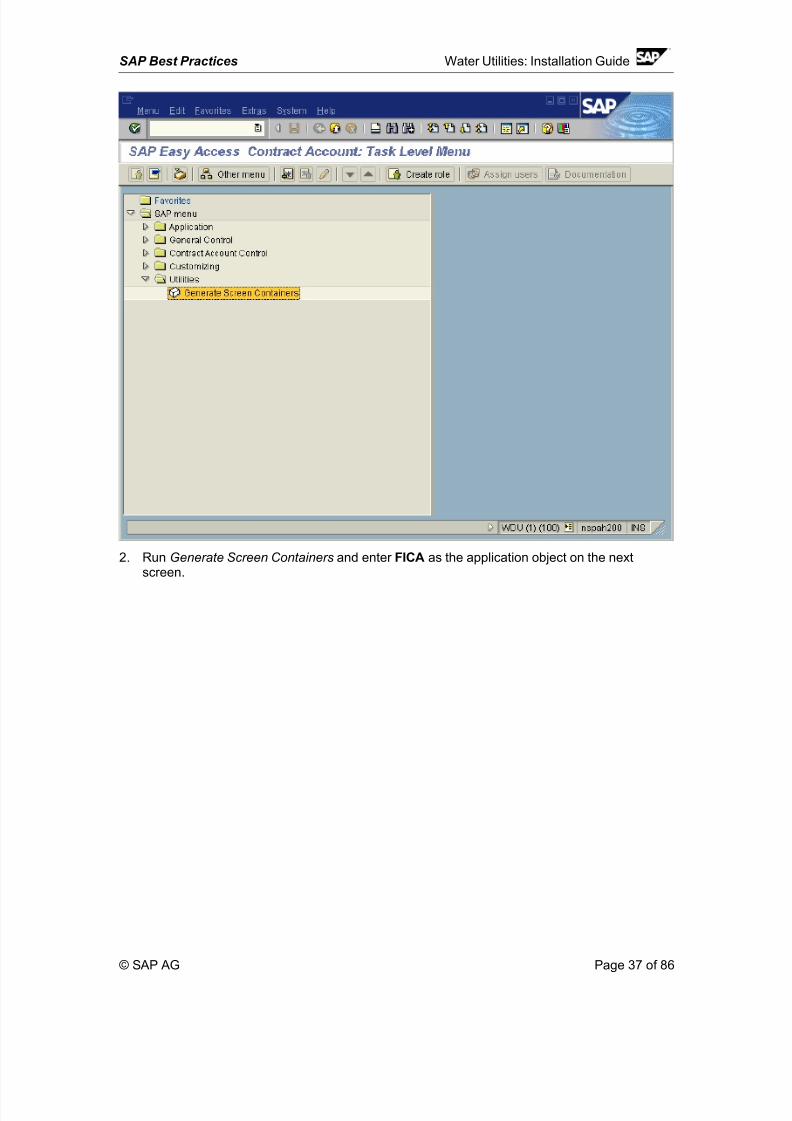
1.3.20 Generate the Screen for Contract Account
Use
Create Contract Account.
Procedure
1. Choose the following navigation option:
Transaction Code CAWM
The following screen appears:
© SAP AG Page 36 of 86
8/3/2019 Util Install Guide en US
http://slidepdf.com/reader/full/util-install-guide-en-us 37/86
SAP Best Practices Water Utilities: Installation Guide
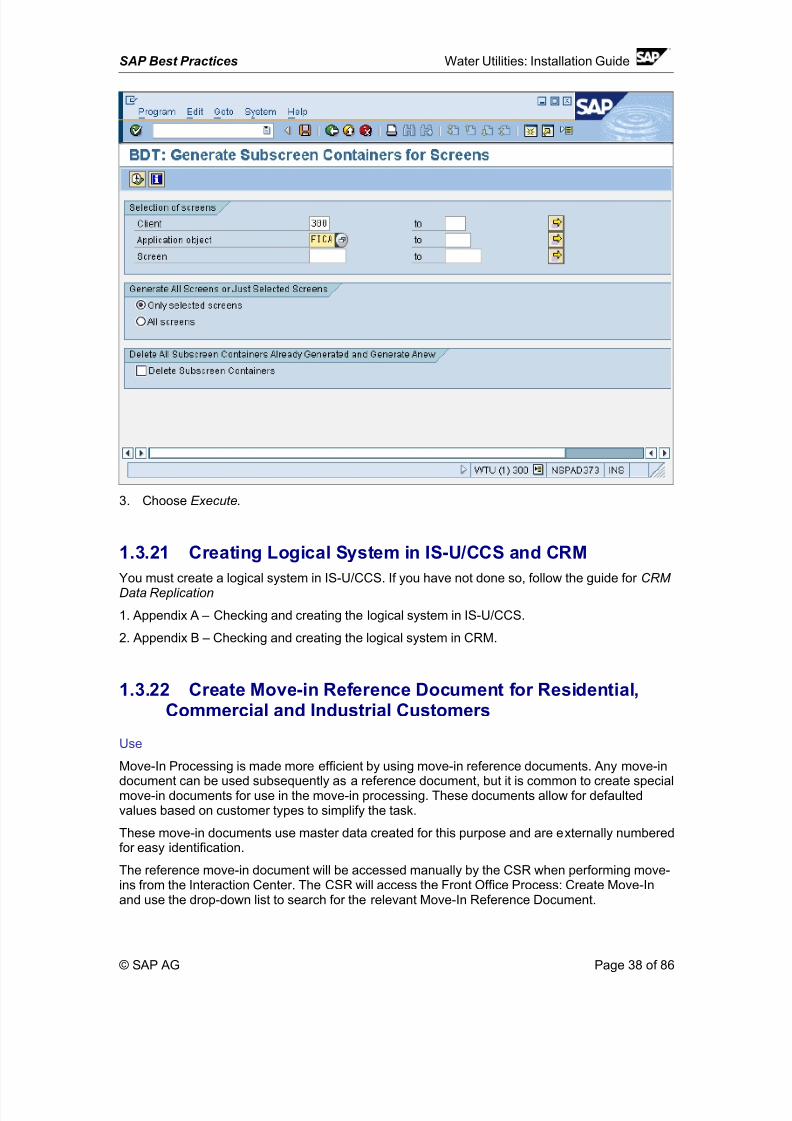
2. Run Generate Screen Containers and enter FICA as the application object on the nextscreen.
© SAP AG Page 37 of 86
8/3/2019 Util Install Guide en US
http://slidepdf.com/reader/full/util-install-guide-en-us 38/86
SAP Best Practices Water Utilities: Installation Guide
3. Choose Execute.
1.3.21 Creating Logical System in IS-U/CCS and CRM
You must create a logical system in IS-U/CCS. If you have not done so, follow the guide for CRM
Data Replication
1. Appendix A – Checking and creating the logical system in IS-U/CCS.
2. Appendix B – Checking and creating the logical system in CRM.
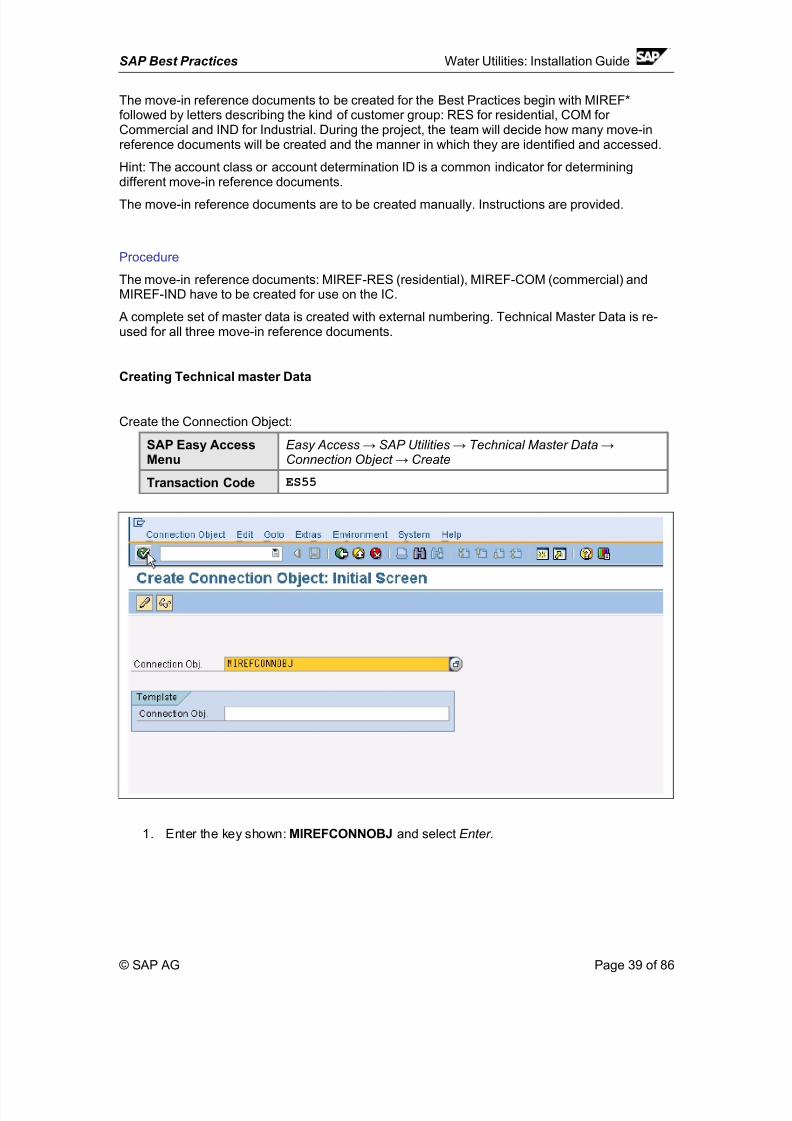
1.3.22 Create Move-in Reference Document for Residential,Commercial and Industrial Customers
Use
Move-In Processing is made more efficient by using move-in reference documents. Any move-in
document can be used subsequently as a reference document, but it is common to create specialmove-in documents for use in the move-in processing. These documents allow for defaultedvalues based on customer types to simplify the task.
These move-in documents use master data created for this purpose and are externally numberedfor easy identification.
The reference move-in document will be accessed manually by the CSR when performing move-ins from the Interaction Center. The CSR will access the Front Office Process: Create Move-Inand use the drop-down list to search for the relevant Move-In Reference Document.
© SAP AG Page 38 of 86
8/3/2019 Util Install Guide en US
http://slidepdf.com/reader/full/util-install-guide-en-us 39/86
SAP Best Practices Water Utilities: Installation Guide
The move-in reference documents to be created for the Best Practices begin with MIREF*followed by letters describing the kind of customer group: RES for residential, COM for Commercial and IND for Industrial. During the project, the team will decide how many move-inreference documents will be created and the manner in which they are identified and accessed.
Hint: The account class or account determination ID is a common indicator for determiningdifferent move-in reference documents.
The move-in reference documents are to be created manually. Instructions are provided.
Procedure
The move-in reference documents: MIREF-RES (residential), MIREF-COM (commercial) andMIREF-IND have to be created for use on the IC.
A complete set of master data is created with external numbering. Technical Master Data is re-used for all three move-in reference documents.
Creating Technical master Data
Create the Connection Object:
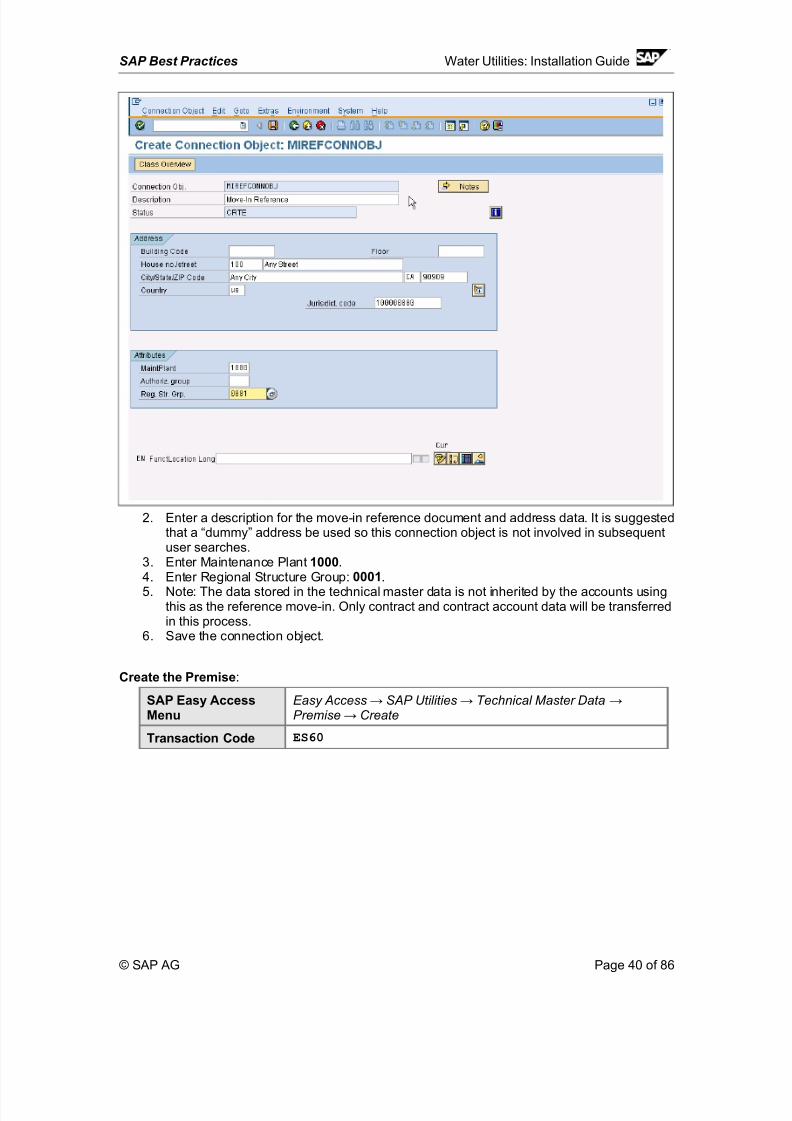
SAP Easy AccessMenu
Easy Access → SAP Utilities → Technical Master Data →Connection Object → Create
Transaction Code ES55
1. Enter the key shown: MIREFCONNOBJ and select Enter .
© SAP AG Page 39 of 86
8/3/2019 Util Install Guide en US
http://slidepdf.com/reader/full/util-install-guide-en-us 40/86
SAP Best Practices Water Utilities: Installation Guide
2. Enter a description for the move-in reference document and address data. It is suggestedthat a “dummy” address be used so this connection object is not involved in subsequentuser searches.
3. Enter Maintenance Plant 1000.4. Enter Regional Structure Group: 0001.
5. Note: The data stored in the technical master data is not inherited by the accounts usingthis as the reference move-in. Only contract and contract account data will be transferredin this process.
6. Save the connection object.
Create the Premise:
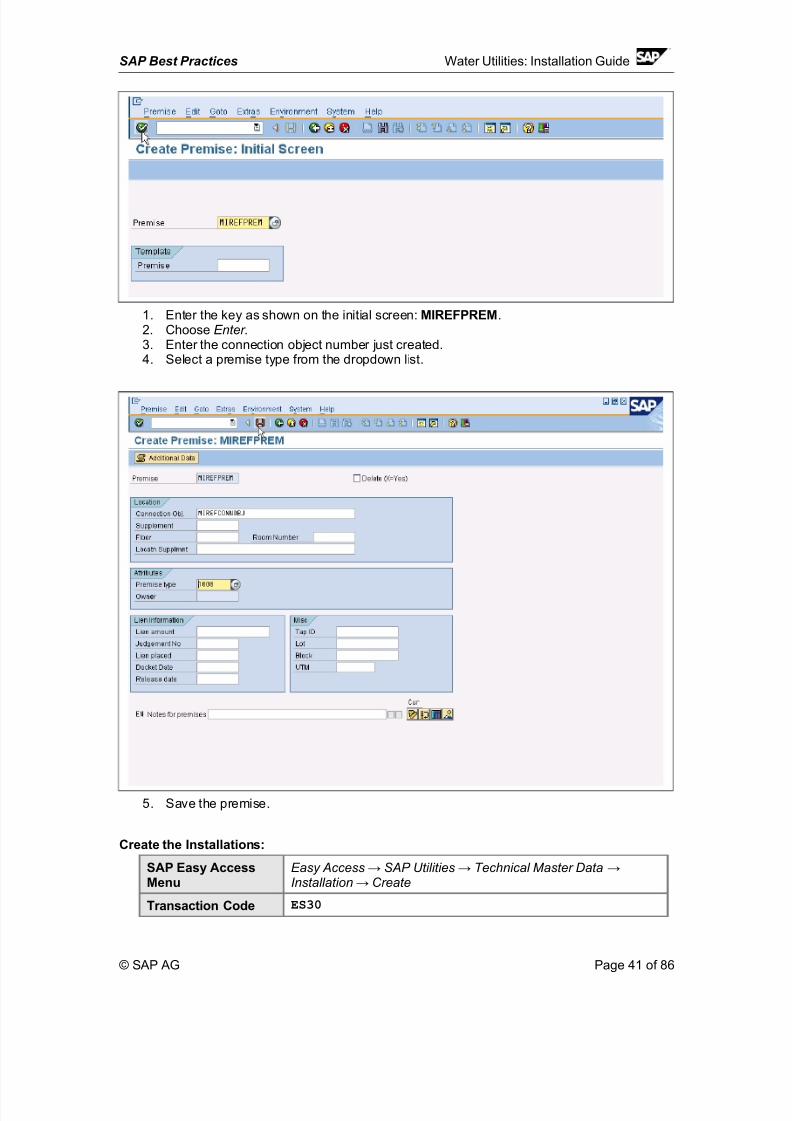
SAP Easy AccessMenu
Easy Access → SAP Utilities → Technical Master Data →Premise → Create
Transaction Code ES60
© SAP AG Page 40 of 86
8/3/2019 Util Install Guide en US
http://slidepdf.com/reader/full/util-install-guide-en-us 41/86
SAP Best Practices Water Utilities: Installation Guide
1. Enter the key as shown on the initial screen: MIREFPREM.2. Choose Enter .3. Enter the connection object number just created.4. Select a premise type from the dropdown list.
5. Save the premise.
Create the Installations:
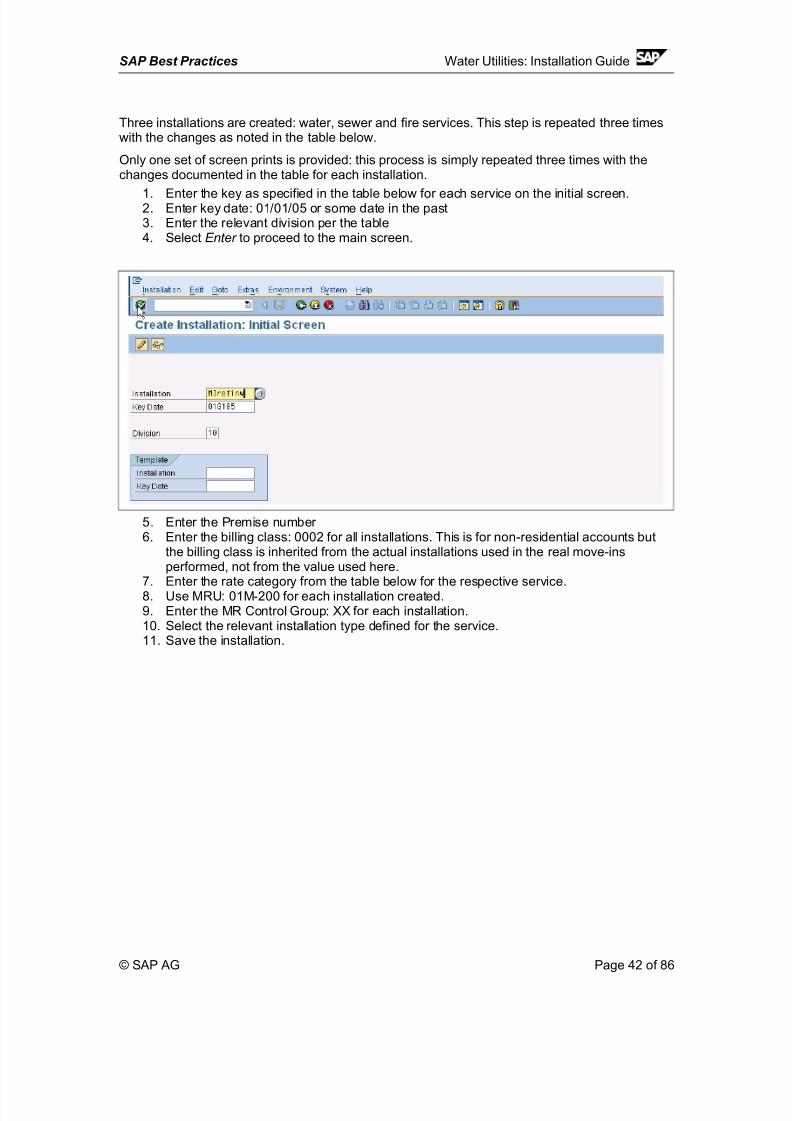
SAP Easy AccessMenu
Easy Access → SAP Utilities → Technical Master Data →Installation → Create
Transaction Code ES30
© SAP AG Page 41 of 86
8/3/2019 Util Install Guide en US
http://slidepdf.com/reader/full/util-install-guide-en-us 42/86
SAP Best Practices Water Utilities: Installation Guide
Three installations are created: water, sewer and fire services. This step is repeated three timeswith the changes as noted in the table below.
Only one set of screen prints is provided: this process is simply repeated three times with thechanges documented in the table for each installation.
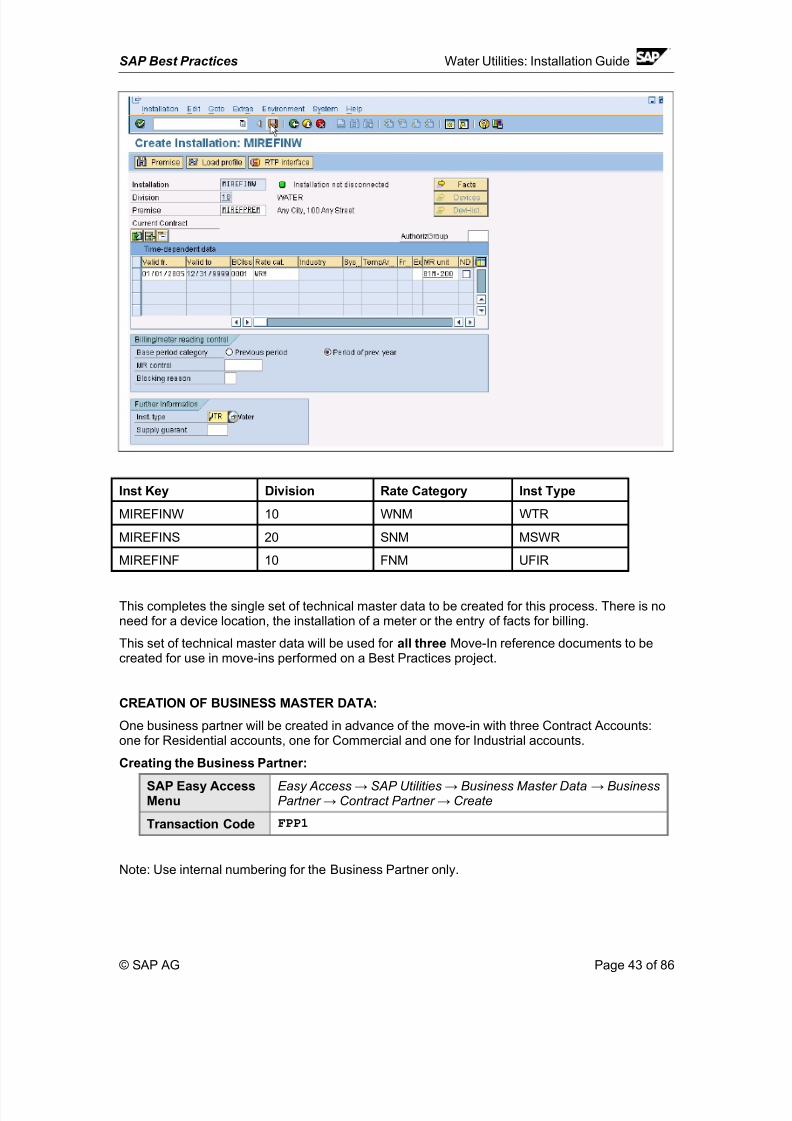
1. Enter the key as specified in the table below for each service on the initial screen.2. Enter key date: 01/01/05 or some date in the past3. Enter the relevant division per the table4. Select Enter to proceed to the main screen.
5. Enter the Premise number 6. Enter the billing class: 0002 for all installations. This is for non-residential accounts but
the billing class is inherited from the actual installations used in the real move-insperformed, not from the value used here.
7. Enter the rate category from the table below for the respective service.8. Use MRU: 01M-200 for each installation created.9. Enter the MR Control Group: XX for each installation.10. Select the relevant installation type defined for the service.11. Save the installation.
© SAP AG Page 42 of 86
8/3/2019 Util Install Guide en US
http://slidepdf.com/reader/full/util-install-guide-en-us 43/86
SAP Best Practices Water Utilities: Installation Guide
Inst Key Division Rate Category Inst Type
MIREFINW 10 WNM WTR
MIREFINS 20 SNM MSWR
MIREFINF 10 FNM UFIR
This completes the single set of technical master data to be created for this process. There is noneed for a device location, the installation of a meter or the entry of facts for billing.
This set of technical master data will be used for all three Move-In reference documents to becreated for use in move-ins performed on a Best Practices project.
CREATION OF BUSINESS MASTER DATA:
One business partner will be created in advance of the move-in with three Contract Accounts:one for Residential accounts, one for Commercial and one for Industrial accounts.
Creating the Business Partner:
SAP Easy AccessMenu
Easy Access → SAP Utilities → Business Master Data → BusinessPartner → Contract Partner → Create
Transaction Code FPP1
Note: Use internal numbering for the Business Partner only.
© SAP AG Page 43 of 86
8/3/2019 Util Install Guide en US
http://slidepdf.com/reader/full/util-install-guide-en-us 44/86
SAP Best Practices Water Utilities: Installation Guide
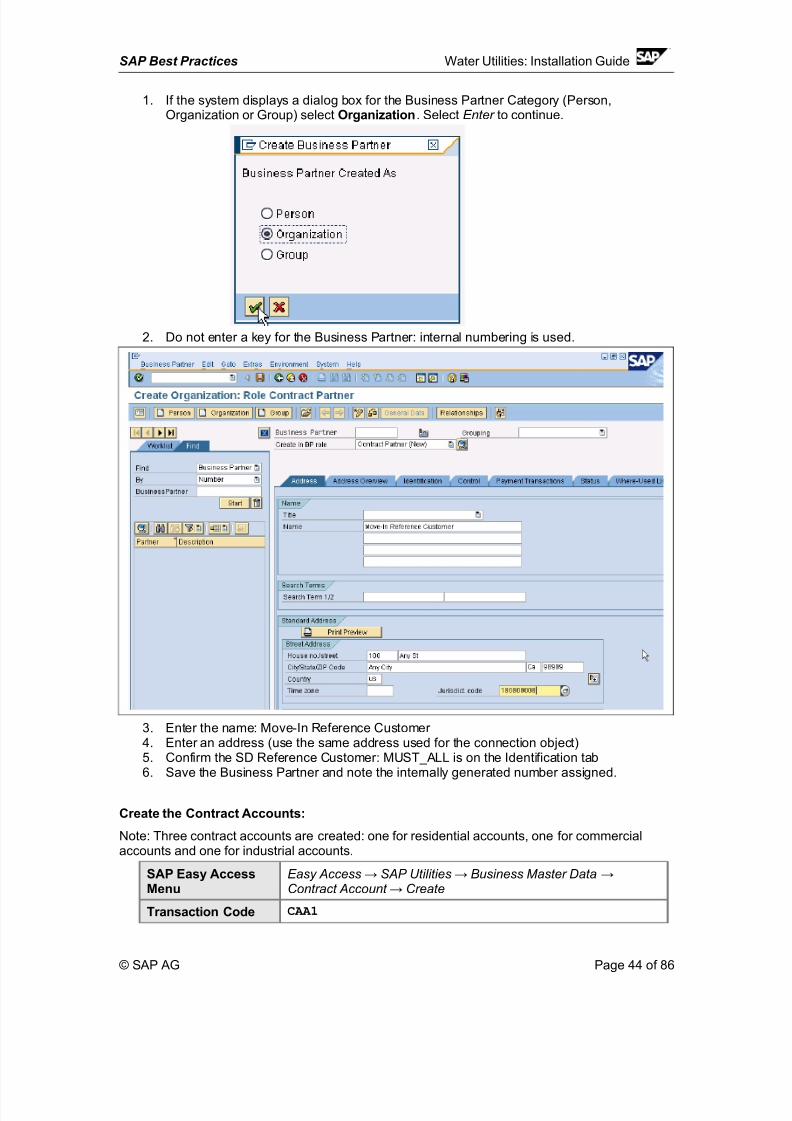
1. If the system displays a dialog box for the Business Partner Category (Person,Organization or Group) select Organization. Select Enter to continue.
2. Do not enter a key for the Business Partner: internal numbering is used.
3. Enter the name: Move-In Reference Customer 4. Enter an address (use the same address used for the connection object)5. Confirm the SD Reference Customer: MUST_ALL is on the Identification tab6. Save the Business Partner and note the internally generated number assigned.
Create the Contract Accounts:
Note: Three contract accounts are created: one for residential accounts, one for commercialaccounts and one for industrial accounts.
SAP Easy AccessMenu
Easy Access → SAP Utilities → Business Master Data →Contract Account → Create
Transaction Code CAA1
© SAP AG Page 44 of 86
8/3/2019 Util Install Guide en US
http://slidepdf.com/reader/full/util-install-guide-en-us 45/86
SAP Best Practices Water Utilities: Installation Guide
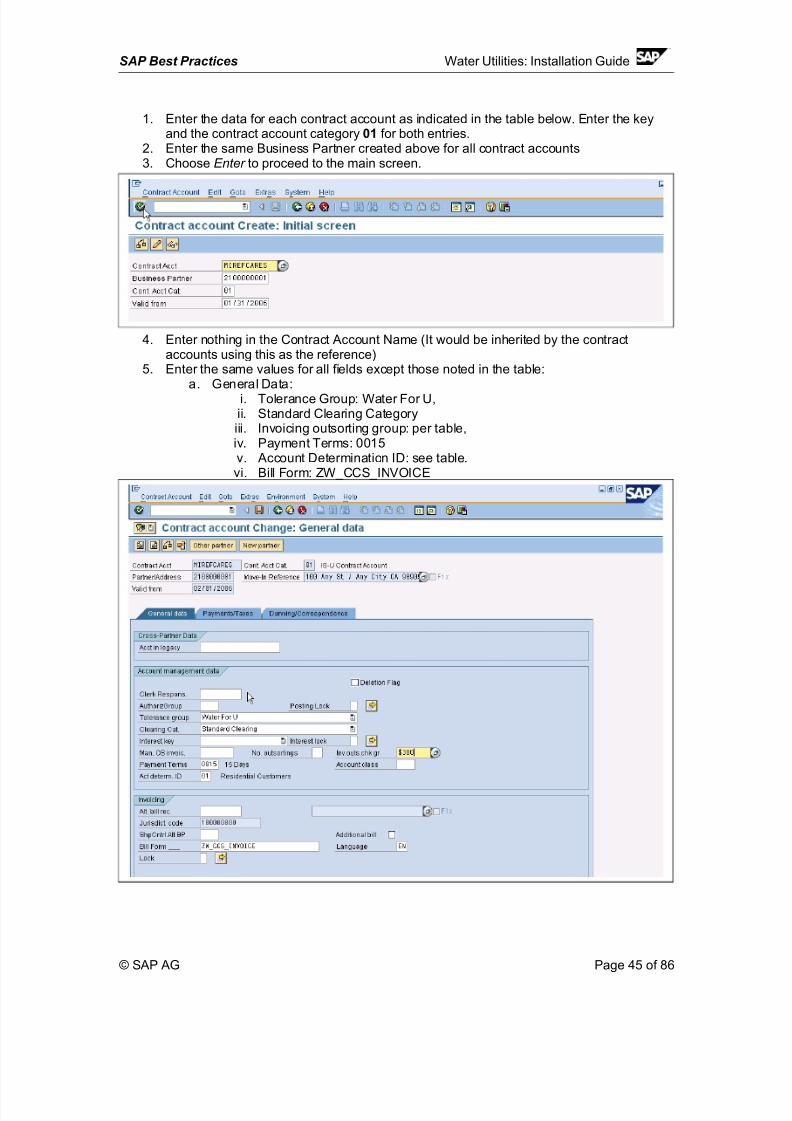
1. Enter the data for each contract account as indicated in the table below. Enter the keyand the contract account category 01 for both entries.
2. Enter the same Business Partner created above for all contract accounts3. Choose Enter to proceed to the main screen.
4. Enter nothing in the Contract Account Name (It would be inherited by the contractaccounts using this as the reference)
5. Enter the same values for all fields except those noted in the table:a. General Data:
i. Tolerance Group: Water For U,ii. Standard Clearing Categoryiii. Invoicing outsorting group: per table,iv. Payment Terms: 0015v. Account Determination ID: see table.vi. Bill Form: ZW_CCS_INVOICE
© SAP AG Page 45 of 86
8/3/2019 Util Install Guide en US
http://slidepdf.com/reader/full/util-install-guide-en-us 46/86
SAP Best Practices Water Utilities: Installation Guide
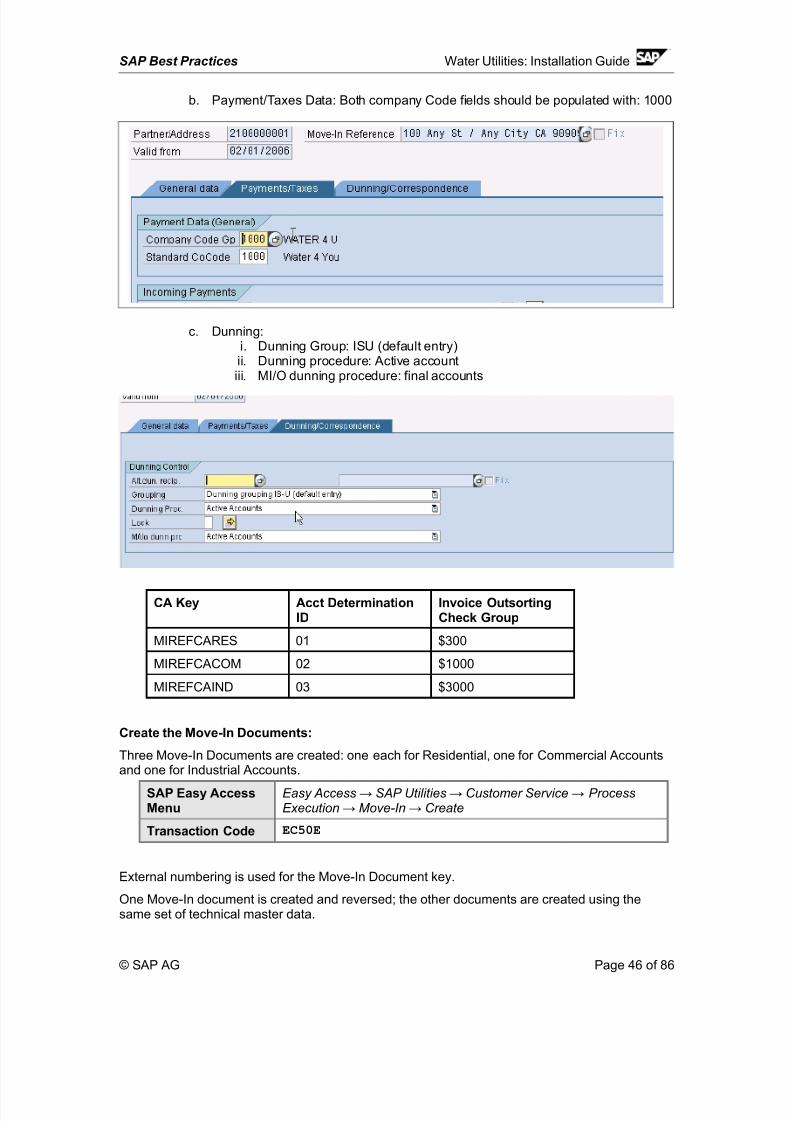
b. Payment/Taxes Data: Both company Code fields should be populated with: 1000
c. Dunning:i. Dunning Group: ISU (default entry)ii. Dunning procedure: Active accountiii. MI/O dunning procedure: final accounts
CA Key Acct DeterminationID
Invoice OutsortingCheck Group
MIREFCARES 01 $300
MIREFCACOM 02 $1000
MIREFCAIND 03 $3000
Create the Move-In Documents:
Three Move-In Documents are created: one each for Residential, one for Commercial Accountsand one for Industrial Accounts.
SAP Easy AccessMenu
Easy Access → SAP Utilities → Customer Service → ProcessExecution → Move-In → Create
Transaction Code EC50E
External numbering is used for the Move-In Document key.
One Move-In document is created and reversed; the other documents are created using thesame set of technical master data.
© SAP AG Page 46 of 86
8/3/2019 Util Install Guide en US
http://slidepdf.com/reader/full/util-install-guide-en-us 47/86
SAP Best Practices Water Utilities: Installation Guide
The Move-In Reference Documents are reversed to prevent subsequent display on error logs for billing (an active contract would be processed by the billing engine)
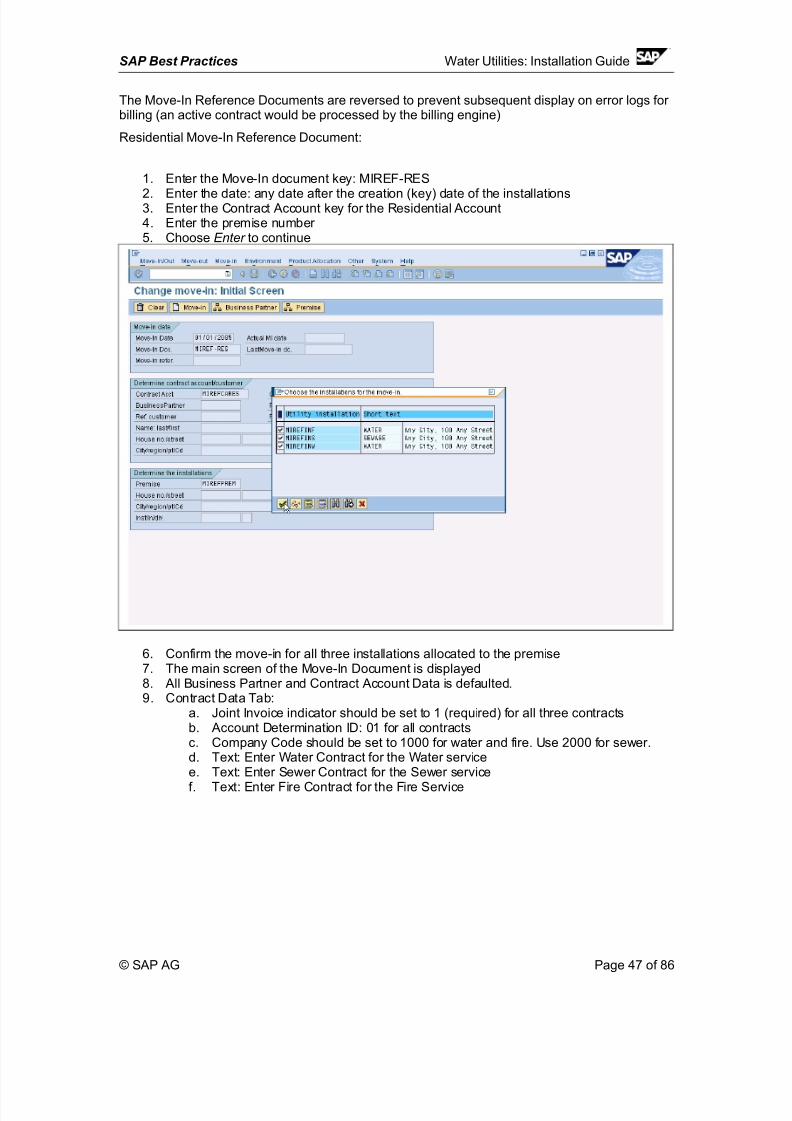
Residential Move-In Reference Document:
1. Enter the Move-In document key: MIREF-RES
2. Enter the date: any date after the creation (key) date of the installations3. Enter the Contract Account key for the Residential Account4. Enter the premise number 5. Choose Enter to continue
6. Confirm the move-in for all three installations allocated to the premise7. The main screen of the Move-In Document is displayed8. All Business Partner and Contract Account Data is defaulted.9. Contract Data Tab:
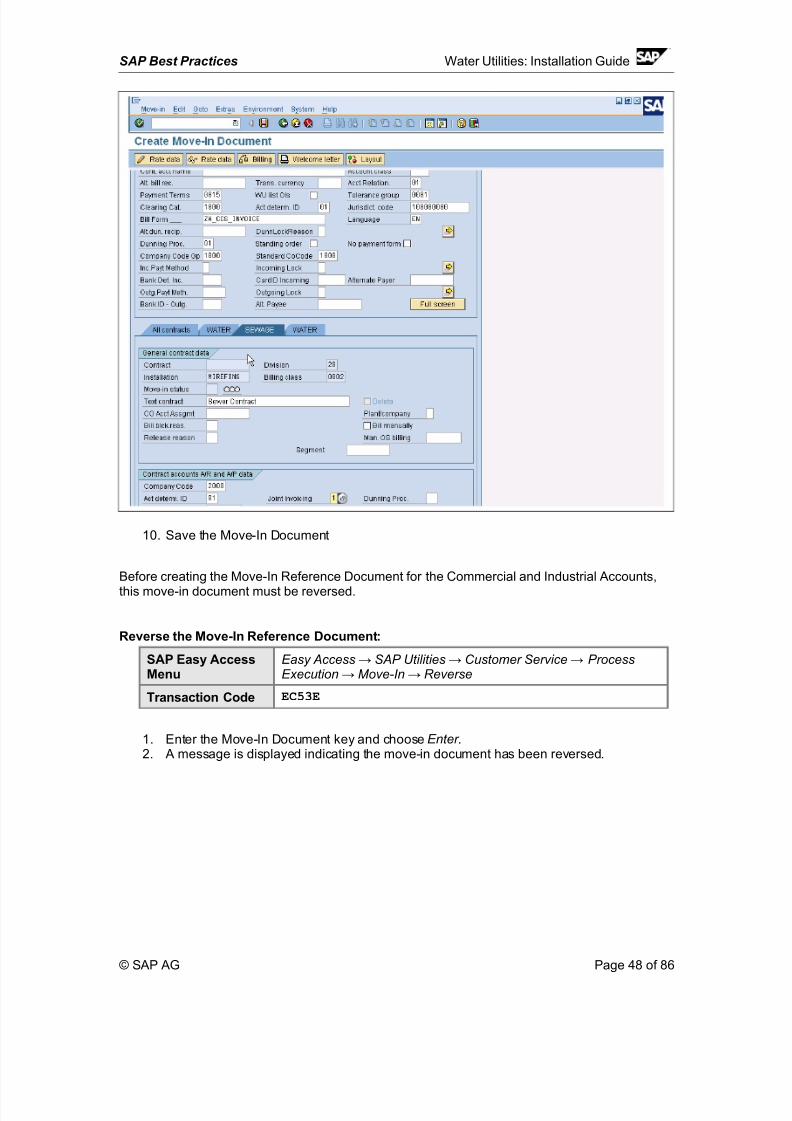
a. Joint Invoice indicator should be set to 1 (required) for all three contractsb. Account Determination ID: 01 for all contractsc. Company Code should be set to 1000 for water and fire. Use 2000 for sewer.d. Text: Enter Water Contract for the Water servicee. Text: Enter Sewer Contract for the Sewer service
f. Text: Enter Fire Contract for the Fire Service
© SAP AG Page 47 of 86
8/3/2019 Util Install Guide en US
http://slidepdf.com/reader/full/util-install-guide-en-us 48/86
SAP Best Practices Water Utilities: Installation Guide
10. Save the Move-In Document
Before creating the Move-In Reference Document for the Commercial and Industrial Accounts,
this move-in document must be reversed.
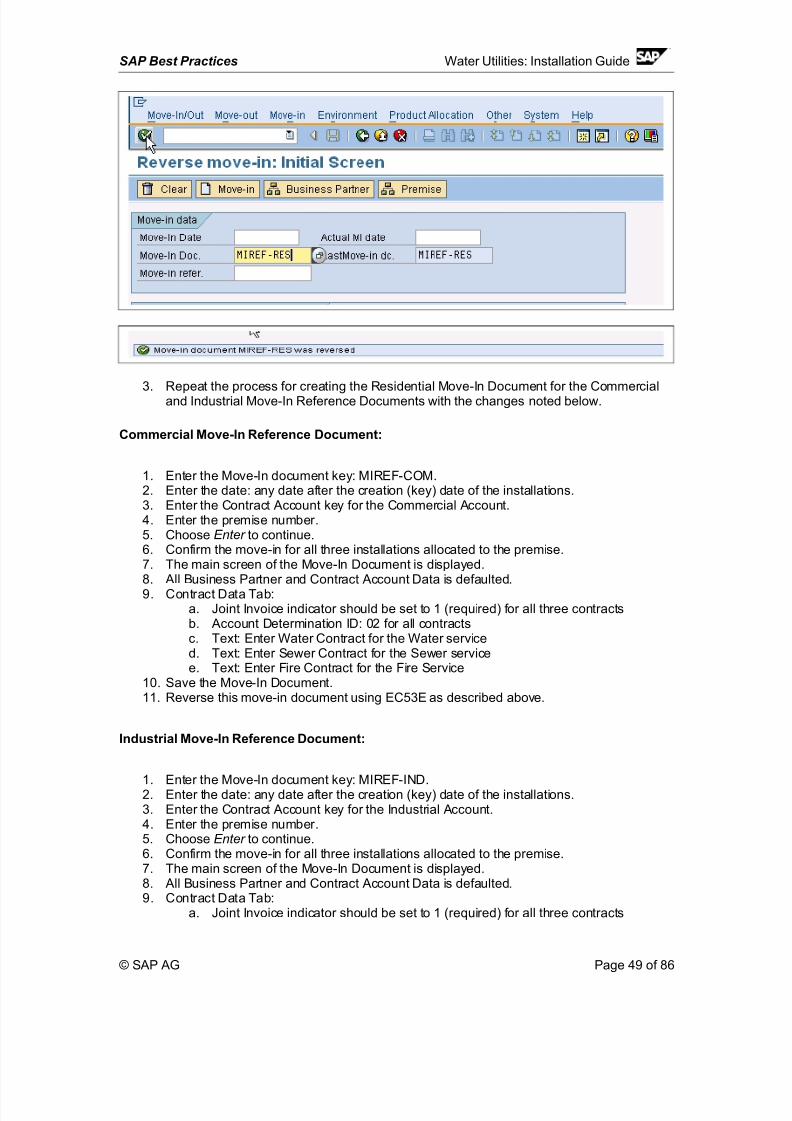
Reverse the Move-In Reference Document:
SAP Easy AccessMenu
Easy Access → SAP Utilities → Customer Service → ProcessExecution → Move-In → Reverse
Transaction Code EC53E
1. Enter the Move-In Document key and choose Enter .2. A message is displayed indicating the move-in document has been reversed.
© SAP AG Page 48 of 86
8/3/2019 Util Install Guide en US
http://slidepdf.com/reader/full/util-install-guide-en-us 49/86
SAP Best Practices Water Utilities: Installation Guide
3. Repeat the process for creating the Residential Move-In Document for the Commercialand Industrial Move-In Reference Documents with the changes noted below.
Commercial Move-In Reference Document:
1. Enter the Move-In document key: MIREF-COM.2. Enter the date: any date after the creation (key) date of the installations.3. Enter the Contract Account key for the Commercial Account.4. Enter the premise number.5. Choose Enter to continue.6. Confirm the move-in for all three installations allocated to the premise.7. The main screen of the Move-In Document is displayed.8. All Business Partner and Contract Account Data is defaulted.9. Contract Data Tab:
a. Joint Invoice indicator should be set to 1 (required) for all three contractsb. Account Determination ID: 02 for all contractsc. Text: Enter Water Contract for the Water serviced. Text: Enter Sewer Contract for the Sewer servicee. Text: Enter Fire Contract for the Fire Service
10. Save the Move-In Document.11. Reverse this move-in document using EC53E as described above.
Industrial Move-In Reference Document:
1. Enter the Move-In document key: MIREF-IND.2. Enter the date: any date after the creation (key) date of the installations.3. Enter the Contract Account key for the Industrial Account.4. Enter the premise number.5. Choose Enter to continue.6. Confirm the move-in for all three installations allocated to the premise.7. The main screen of the Move-In Document is displayed.8. All Business Partner and Contract Account Data is defaulted.9. Contract Data Tab:
a. Joint Invoice indicator should be set to 1 (required) for all three contracts
© SAP AG Page 49 of 86
8/3/2019 Util Install Guide en US
http://slidepdf.com/reader/full/util-install-guide-en-us 50/86
SAP Best Practices Water Utilities: Installation Guide
b. Account Determination ID: 03 for all contractsc. Text: Enter Water Contract for the Water serviced. Text: Enter Sewer Contract for the Sewer servicee. Text: Enter Fire for the Fire Service
10. Save the Move-In Document11. Reverse this move-in document using EC53E as described above
Result
All Move-In Reference Documents have been created and reversed and can be used for theadoption of values in subsequent move-ins.
1.3.23 Create Business Partner for Collection Agency
Use
Create two business partners.
Procedure
1. Choose one of the following navigation options:
SAP RoleMenu
Best Practices for Water Utilities Installation Role → Create master datafor customer financial management → Create business partner for collection agency
TransactionCode
ZW_COLLECTIONAGENCY
Result
The following two business partners are created:
• Collect_A: regular collection agency
• CITY: Municipality, which can process lien
1.3.24 Create Revenue G/L Accounts
Use
Create revenue accounts in the foreground.
Procedure
Choose one of the following navigation options:
SAP RoleMenu
Best Practices for Water Utilities Installation Role → Create master datafor customer financial management → Create revenue G/L accounts
Transaction
Code
ZW_ACT_REVENUE
© SAP AG Page 50 of 86
8/3/2019 Util Install Guide en US
http://slidepdf.com/reader/full/util-install-guide-en-us 51/86
SAP Best Practices Water Utilities: Installation Guide
Result
The following revenue accounts are created.
1.3.25 Create Balance Sheet G/L Accounts (no line-item
display)Use
Create balance sheet G/L accounts with no line-item display in foreground.
Procedure
Choose one of the following navigation options:
SAP RoleMenu
Best Practices for Water Utilities Installation Role → Create master datafor customer financial management → Create balance sheet G/Laccounts (no line item display)
Transaction
Code
ZW_ACT_BALSHEET_NL
Result
The following revenue accounts are created.
© SAP AG Page 51 of 86
G/L account Company code Short text Long text
440001 1000 Service Revenue Consumption Service Revenue
440001 2000 Service Revenue Consumption Service Revenue
440002 1000 Return Fee Return Fee Revenue
500010 1000 Goodwill/Leak Goodwill or Leak Expense
500011 1000 Uncollectible Uncollectible/Write Off expense
500011 2000 Uncollectible Uncollectible/Write Off expense
8/3/2019 Util Install Guide en US
http://slidepdf.com/reader/full/util-install-guide-en-us 52/86
SAP Best Practices Water Utilities: Installation Guide
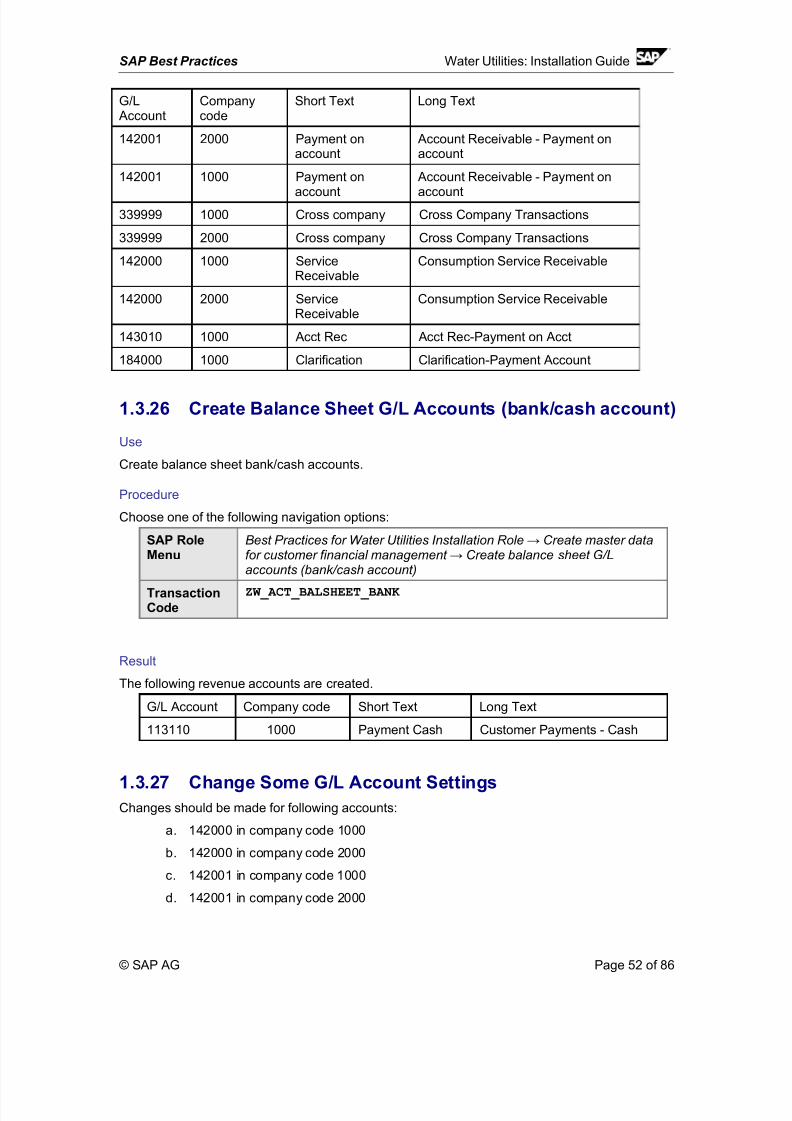
1.3.26 Create Balance Sheet G/L Accounts (bank/cash account)
Use
Create balance sheet bank/cash accounts.
Procedure
Choose one of the following navigation options:
SAP RoleMenu
Best Practices for Water Utilities Installation Role → Create master datafor customer financial management → Create balance sheet G/Laccounts (bank/cash account)
TransactionCode
ZW_ACT_BALSHEET_BANK
Result
The following revenue accounts are created.
G/L Account Company code Short Text Long Text
113110 1000 Payment Cash Customer Payments - Cash
1.3.27 Change Some G/L Account SettingsChanges should be made for following accounts:
a. 142000 in company code 1000
b. 142000 in company code 2000
c. 142001 in company code 1000
d. 142001 in company code 2000
© SAP AG Page 52 of 86
G/LAccount
Companycode
Short Text Long Text
142001 2000 Payment onaccount
Account Receivable - Payment onaccount
142001 1000 Payment on
account
Account Receivable - Payment on
account339999 1000 Cross company Cross Company Transactions
339999 2000 Cross company Cross Company Transactions
142000 1000 ServiceReceivable
Consumption Service Receivable
142000 2000 ServiceReceivable
Consumption Service Receivable
143010 1000 Acct Rec Acct Rec-Payment on Acct
184000 1000 Clarification Clarification-Payment Account
8/3/2019 Util Install Guide en US
http://slidepdf.com/reader/full/util-install-guide-en-us 53/86
SAP Best Practices Water Utilities: Installation Guide
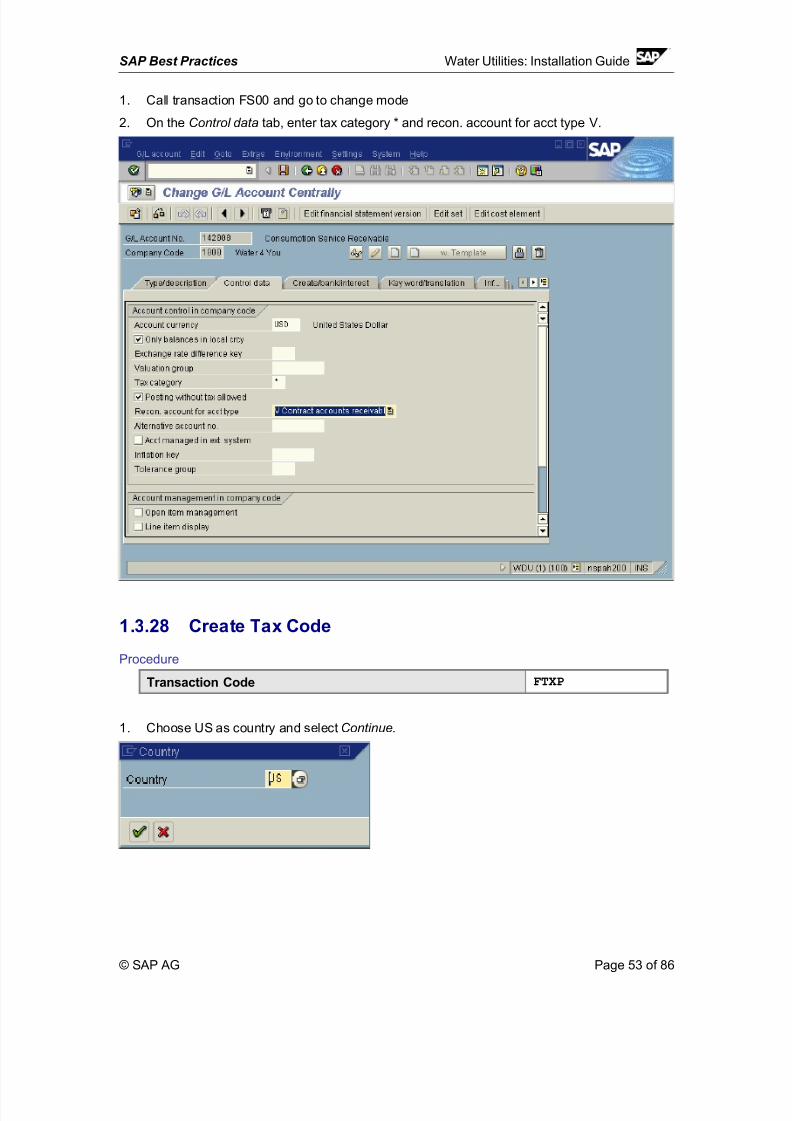
1. Call transaction FS00 and go to change mode
2. On the Control data tab, enter tax category * and recon. account for acct type V.
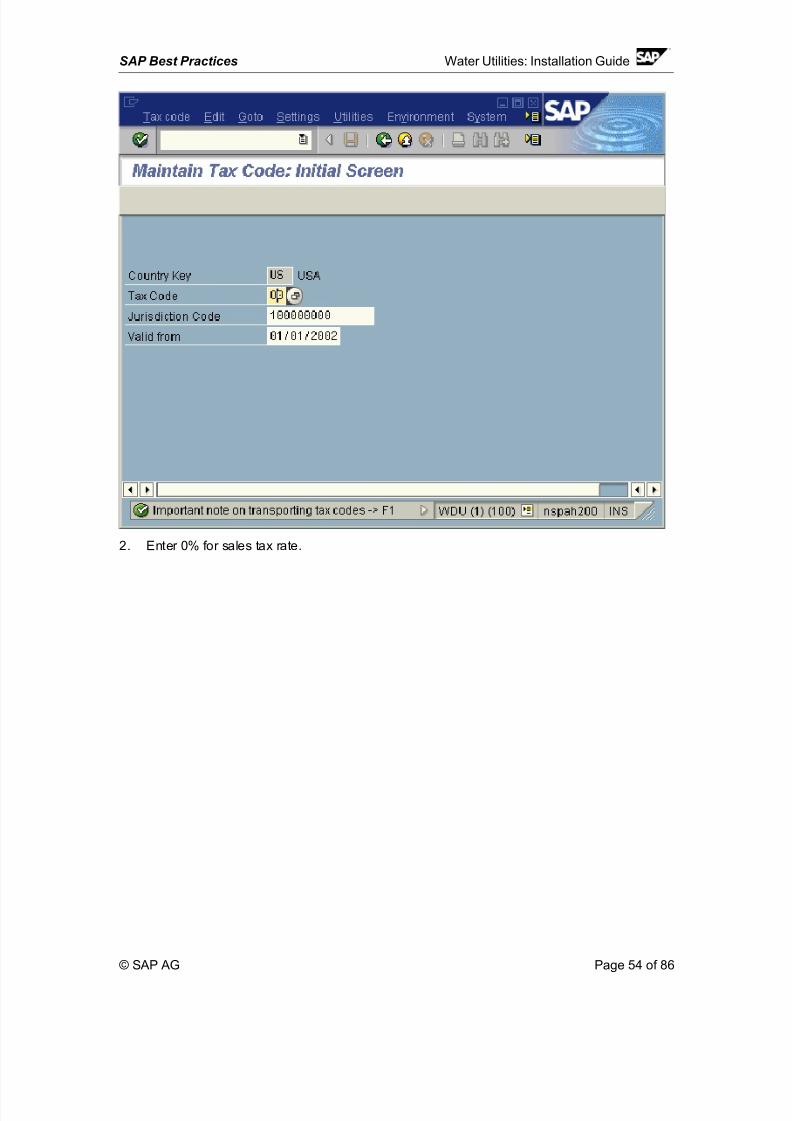
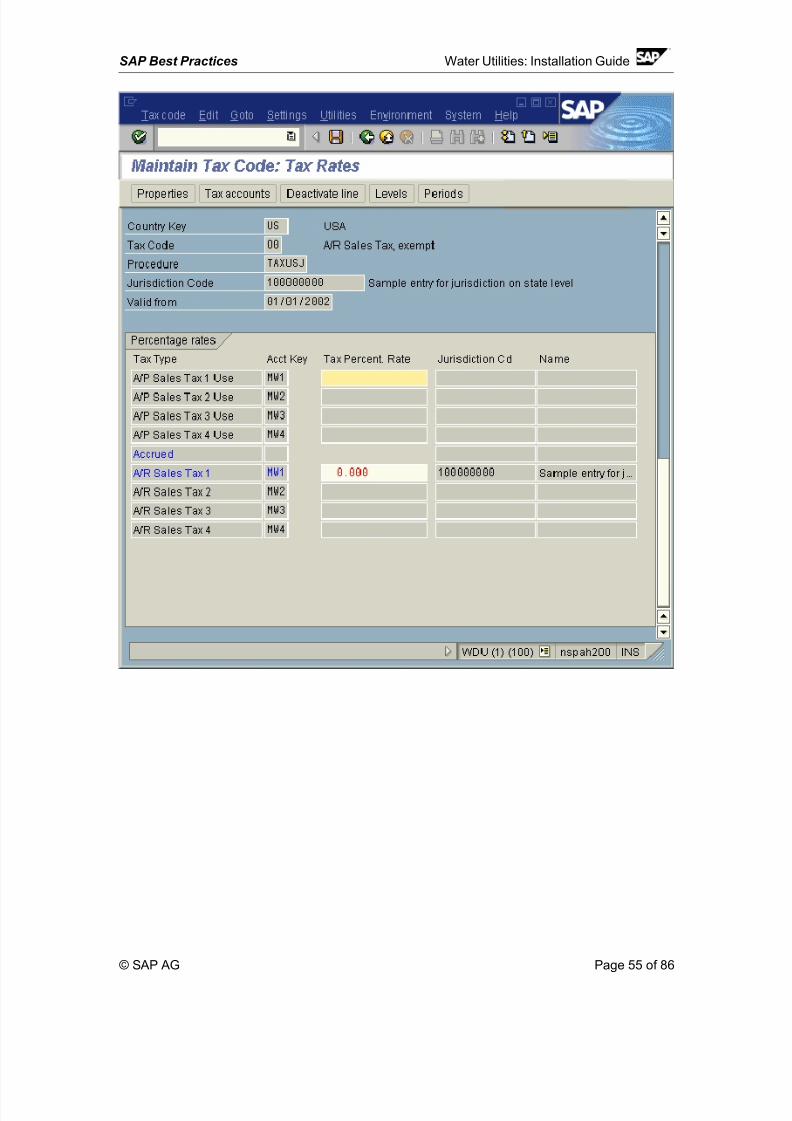
1.3.28 Create Tax Code
Procedure
Transaction Code FTXP
1. Choose US as country and select Continue.
© SAP AG Page 53 of 86
8/3/2019 Util Install Guide en US
http://slidepdf.com/reader/full/util-install-guide-en-us 54/86
SAP Best Practices Water Utilities: Installation Guide
2. Enter 0% for sales tax rate.
© SAP AG Page 54 of 86
8/3/2019 Util Install Guide en US
http://slidepdf.com/reader/full/util-install-guide-en-us 55/86
SAP Best Practices Water Utilities: Installation Guide
© SAP AG Page 55 of 86
8/3/2019 Util Install Guide en US
http://slidepdf.com/reader/full/util-install-guide-en-us 56/86
SAP Best Practices Water Utilities: Installation Guide
1.4 Complete Settings in the CRM System
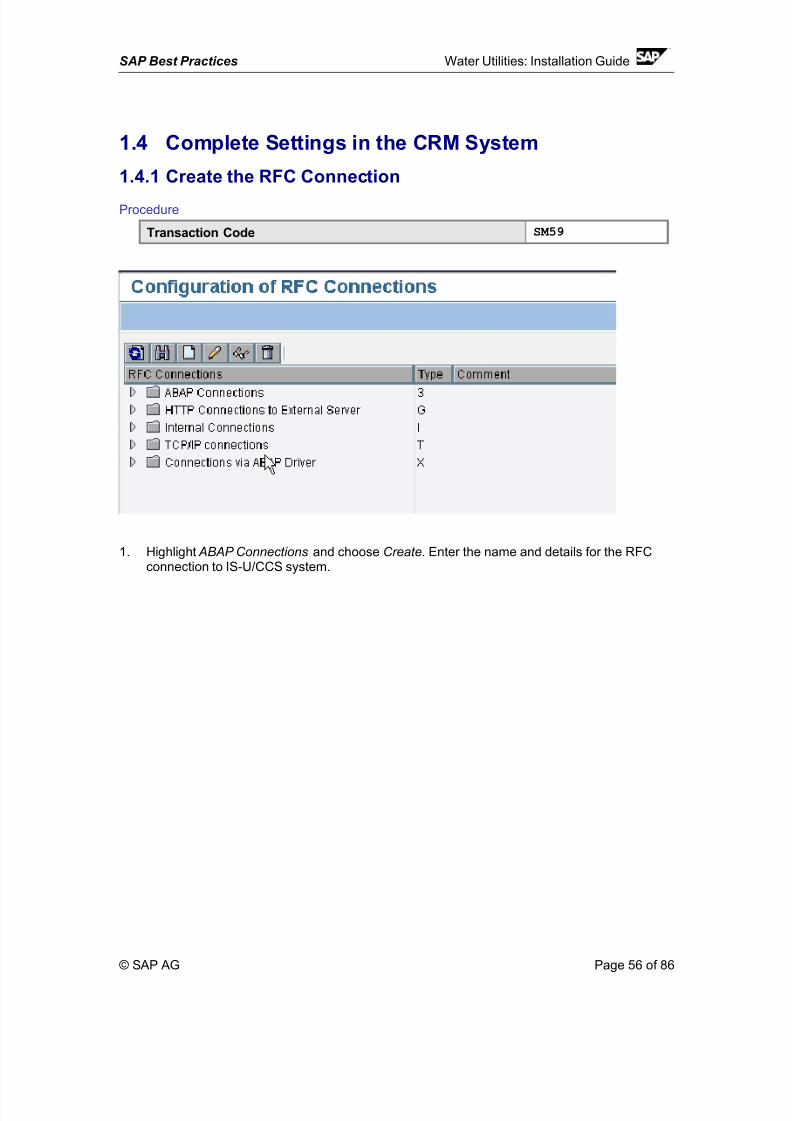
1.4.1 Create the RFC Connection
Procedure
Transaction Code SM59
1. Highlight ABAP Connections and choose Create. Enter the name and details for the RFCconnection to IS-U/CCS system.
© SAP AG Page 56 of 86
8/3/2019 Util Install Guide en US
http://slidepdf.com/reader/full/util-install-guide-en-us 57/86
SAP Best Practices Water Utilities: Installation Guide
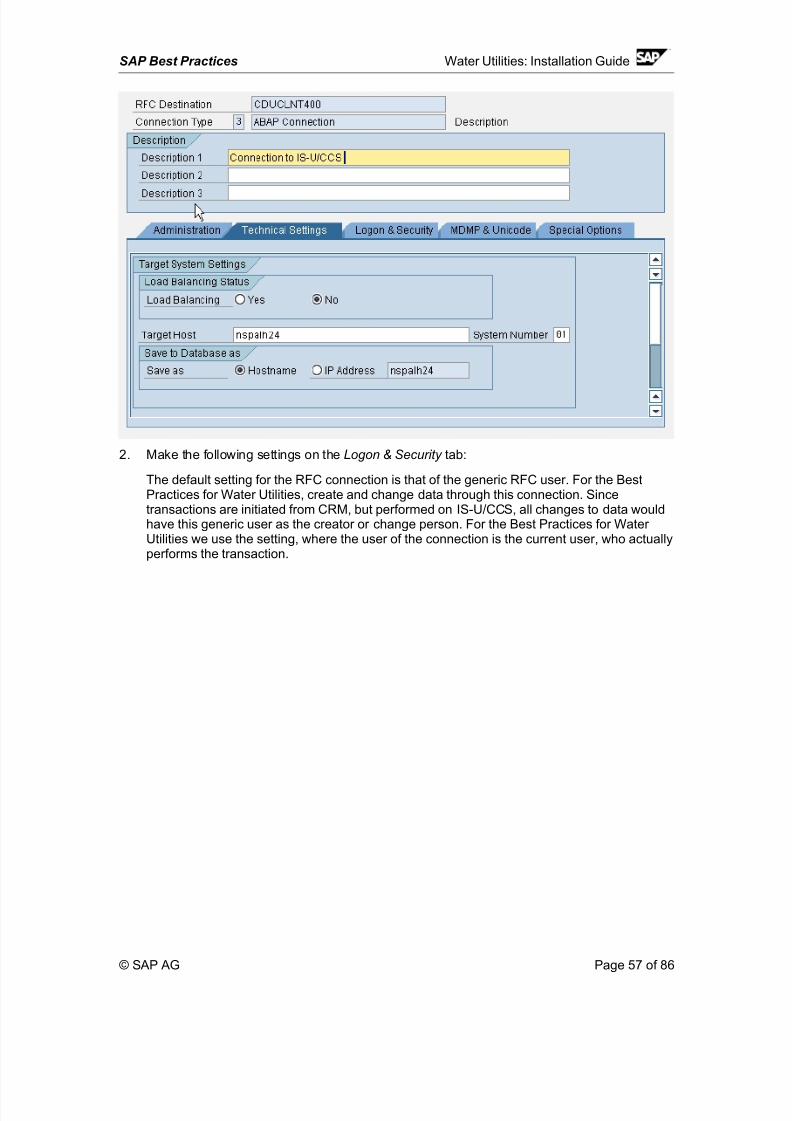
2. Make the following settings on the Logon & Security tab:
The default setting for the RFC connection is that of the generic RFC user. For the BestPractices for Water Utilities, create and change data through this connection. Sincetransactions are initiated from CRM, but performed on IS-U/CCS, all changes to data wouldhave this generic user as the creator or change person. For the Best Practices for Water Utilities we use the setting, where the user of the connection is the current user, who actuallyperforms the transaction.
© SAP AG Page 57 of 86
8/3/2019 Util Install Guide en US
http://slidepdf.com/reader/full/util-install-guide-en-us 58/86
SAP Best Practices Water Utilities: Installation Guide
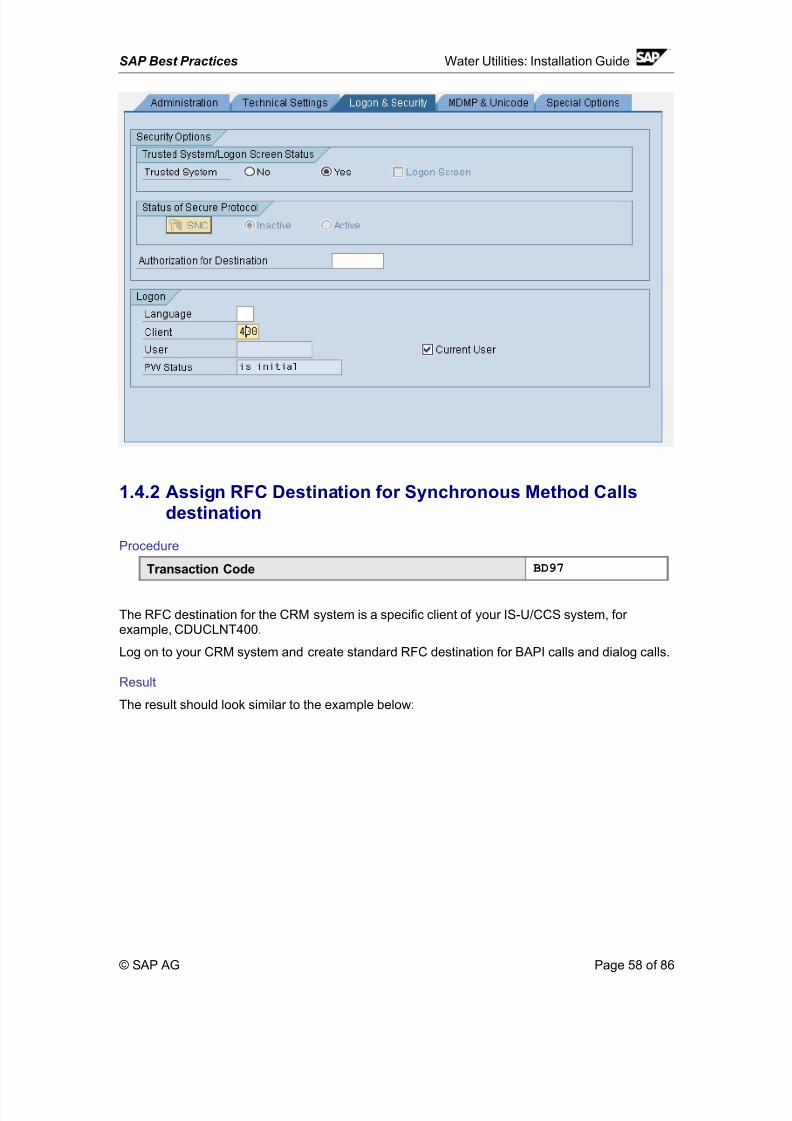
1.4.2 Assign RFC Destination for Synchronous Method Callsdestination
Procedure
Transaction Code BD97
The RFC destination for the CRM system is a specific client of your IS-U/CCS system, for example, CDUCLNT400.
Log on to your CRM system and create standard RFC destination for BAPI calls and dialog calls.
Result
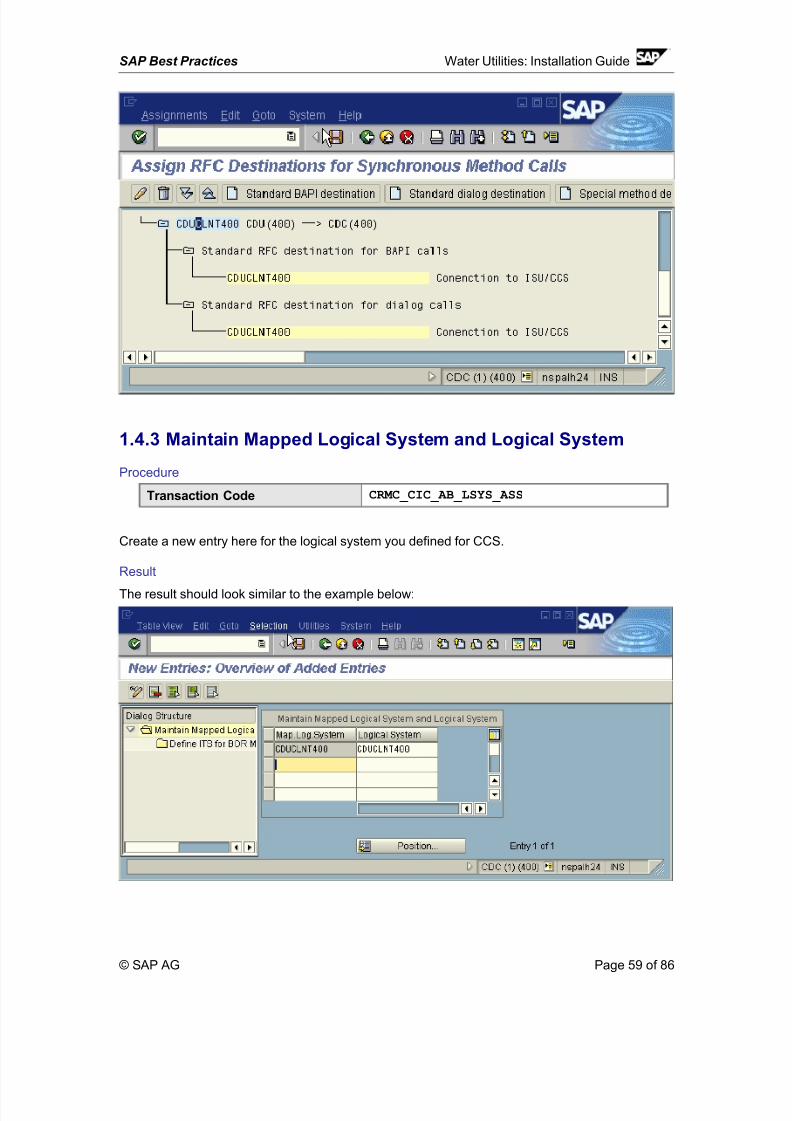
The result should look similar to the example below:
© SAP AG Page 58 of 86
8/3/2019 Util Install Guide en US
http://slidepdf.com/reader/full/util-install-guide-en-us 59/86
SAP Best Practices Water Utilities: Installation Guide
1.4.3 Maintain Mapped Logical System and Logical System
Procedure
Transaction Code CRMC_CIC_AB_LSYS_ASS
Create a new entry here for the logical system you defined for CCS.
Result
The result should look similar to the example below:
© SAP AG Page 59 of 86

8/3/2019 Util Install Guide en US
http://slidepdf.com/reader/full/util-install-guide-en-us 60/86
SAP Best Practices Water Utilities: Installation Guide
1.4.4 Adjust the Logical System in IC Context Menu
Procedure
Transaction Code SE38
Enter the program name: Z_CIC_CHANGE_LOGICAL_SYSTEM and choose Execute. The SAPBest Practices configured a dummy logical system CDUCLNT100. Here, you must replace it withyour real logical system for CCS. Assuming you want to replace the pre-configuration by the realtarget system CDUCLNT400, enter following parameter into the screen.
Result
The program will replace the logical system automatically and provide a log at the end. The logsshould look similar to the example below::
© SAP AG Page 60 of 86

8/3/2019 Util Install Guide en US
http://slidepdf.com/reader/full/util-install-guide-en-us 61/86
SAP Best Practices Water Utilities: Installation Guide
1. Double check the entries with the updated logical system in TransactionCRMC_CIC_COMP_ACTION for context menu profile ZW_ISUCM.
2. Optional step: If you use the call for CCS inbox under action box “inbox”, you need to changethe data source for CCS inbox process.
a. Call transaction EWFC0 and enter profile ZW_ISUb. Click on transaction INBX under transaction group INBX
© SAP AG Page 61 of 86
8/3/2019 Util Install Guide en US
http://slidepdf.com/reader/full/util-install-guide-en-us 62/86
SAP Best Practices Water Utilities: Installation Guide
c. Select the data flow and update the data source based on your systemlandscape.
1.4.5 Activate HTTP Services in CRM system
Procedure
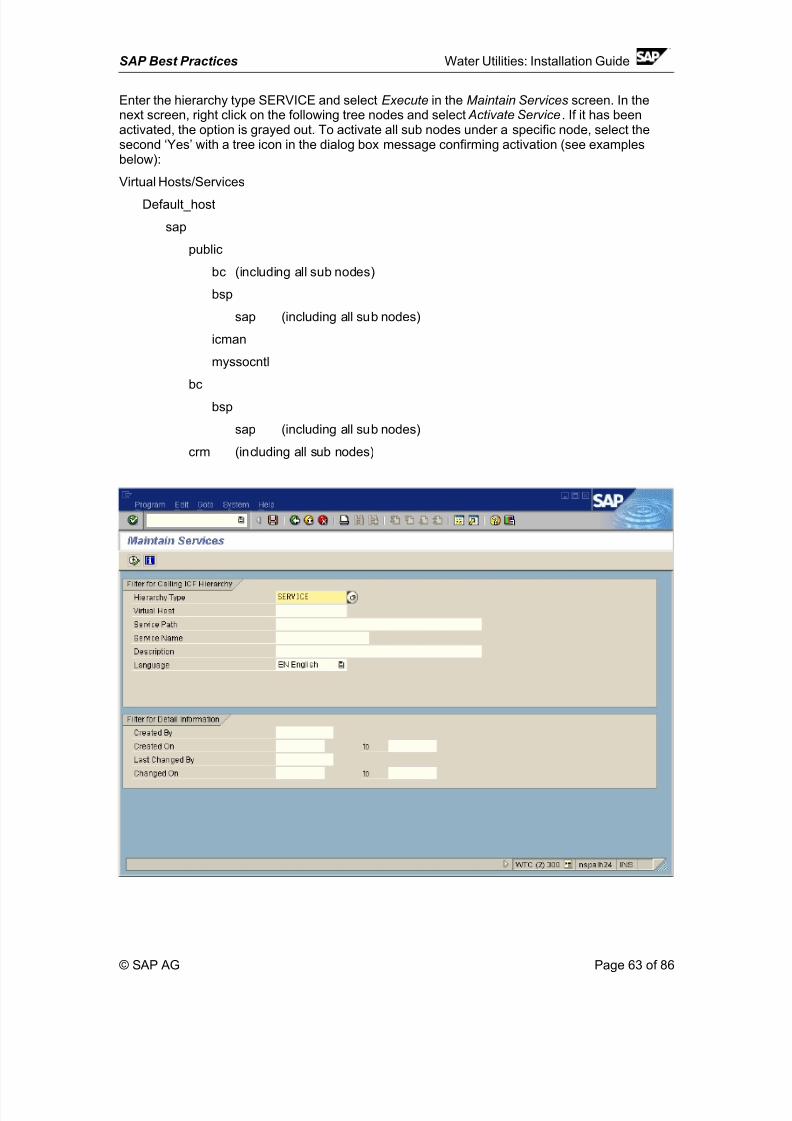
Transaction Code SICF
© SAP AG Page 62 of 86
8/3/2019 Util Install Guide en US
http://slidepdf.com/reader/full/util-install-guide-en-us 63/86
SAP Best Practices Water Utilities: Installation Guide
Enter the hierarchy type SERVICE and select Execute in the Maintain Services screen. In thenext screen, right click on the following tree nodes and select Activate Service . If it has beenactivated, the option is grayed out. To activate all sub nodes under a specific node, select thesecond ‘Yes’ with a tree icon in the dialog box message confirming activation (see examplesbelow):
Virtual Hosts/Services
Default_host
sap
public
bc (including all sub nodes)
bsp
sap (including all sub nodes)
icman
myssocntl
bc
bsp
sap (including all sub nodes)
crm (including all sub nodes)
© SAP AG Page 63 of 86
8/3/2019 Util Install Guide en US
http://slidepdf.com/reader/full/util-install-guide-en-us 64/86
SAP Best Practices Water Utilities: Installation Guide
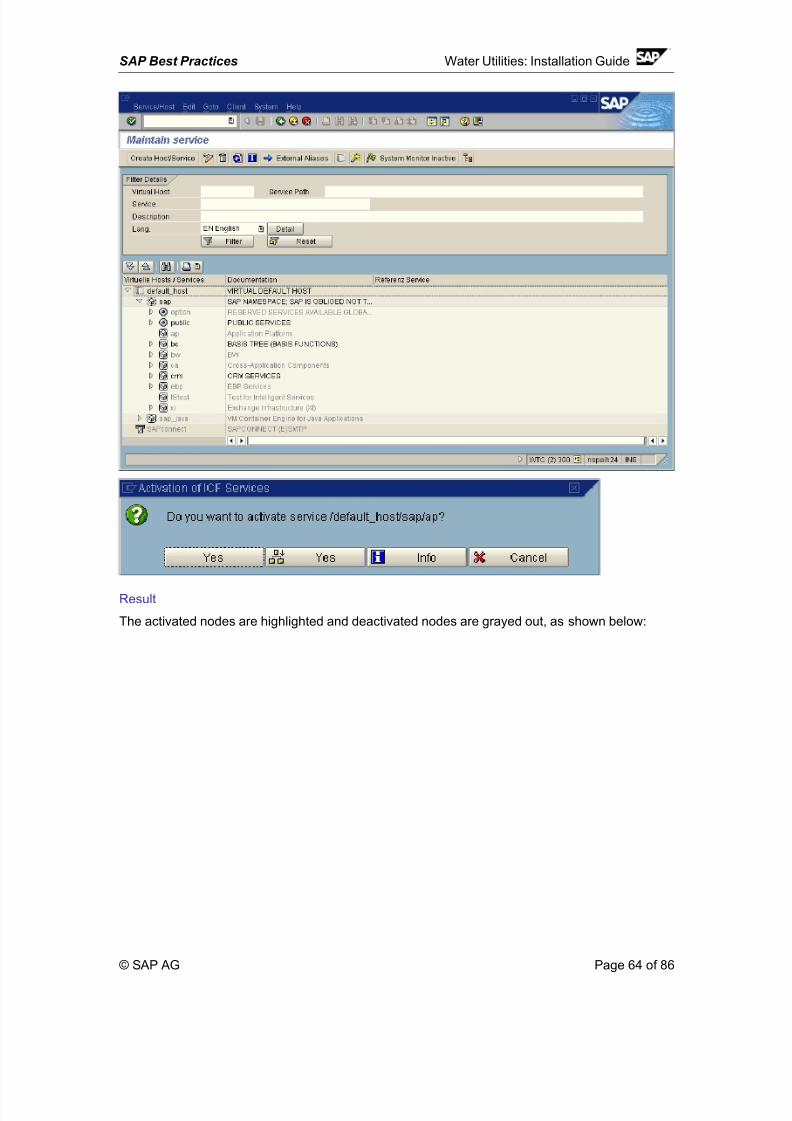
Result
The activated nodes are highlighted and deactivated nodes are grayed out, as shown below:
© SAP AG Page 64 of 86
8/3/2019 Util Install Guide en US
http://slidepdf.com/reader/full/util-install-guide-en-us 65/86
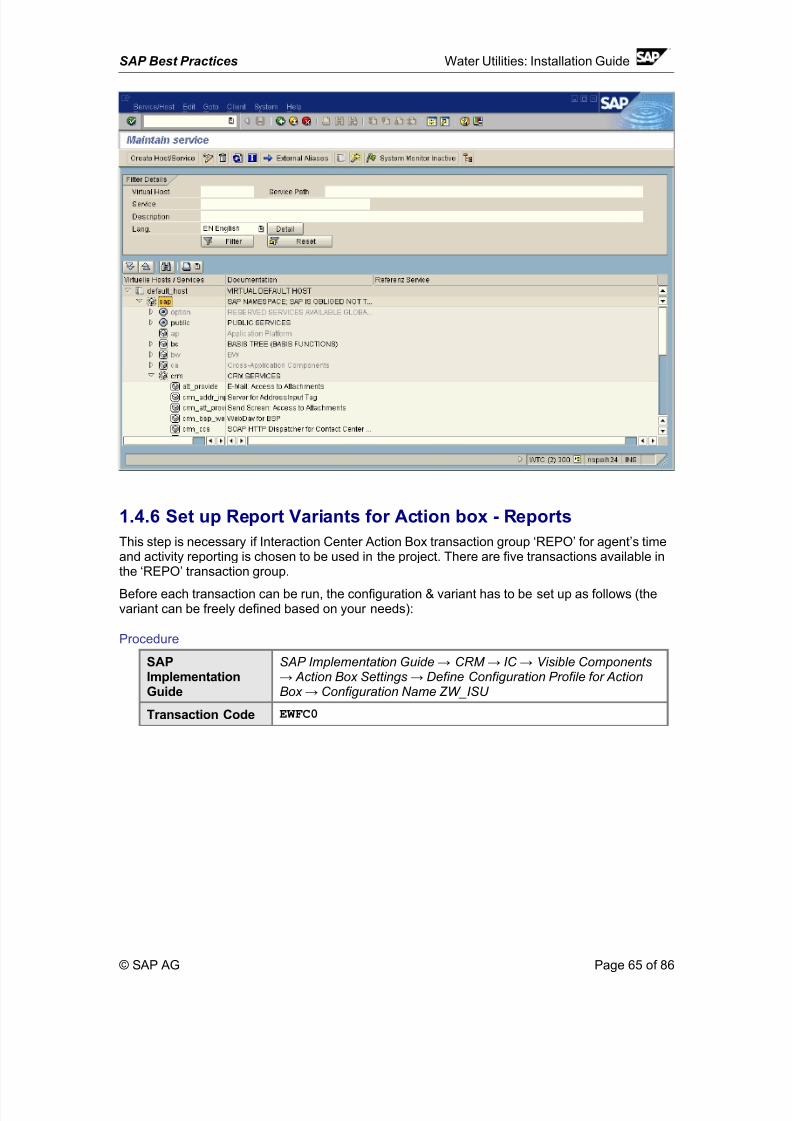
SAP Best Practices Water Utilities: Installation Guide
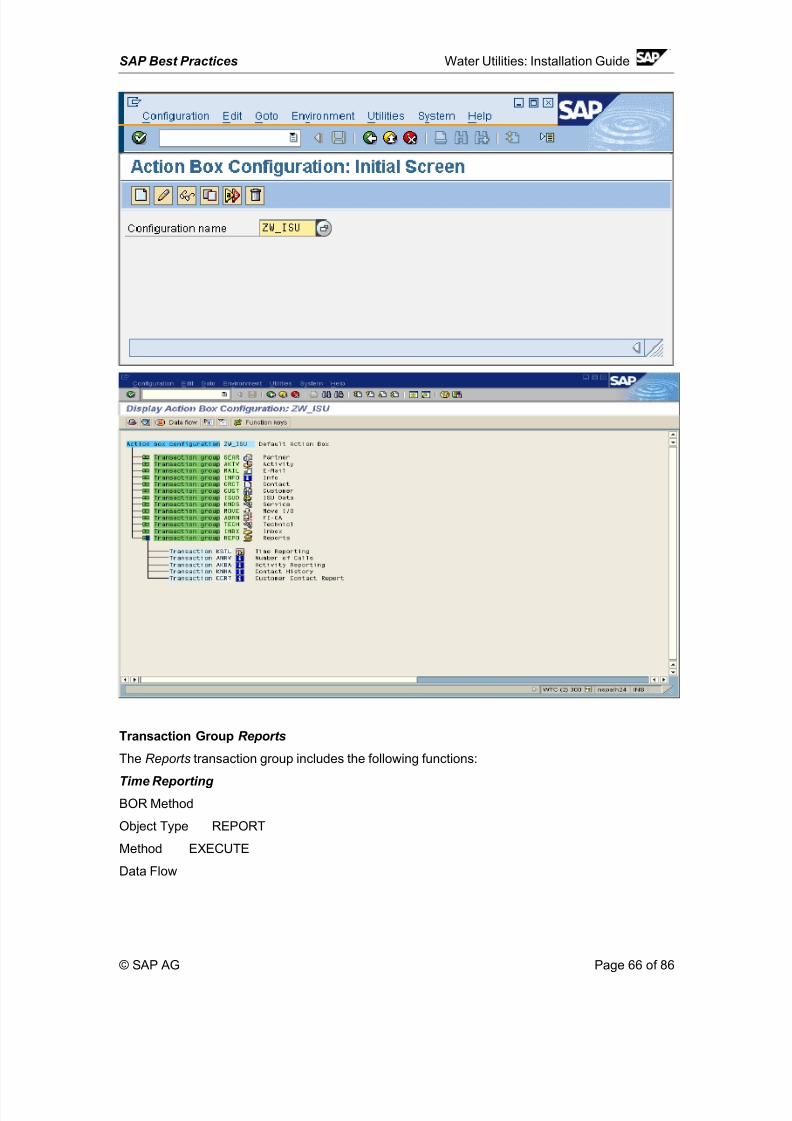
1.4.6 Set up Report Variants for Action box - Reports
This step is necessary if Interaction Center Action Box transaction group ‘REPO’ for agent’s timeand activity reporting is chosen to be used in the project. There are five transactions available inthe ‘REPO’ transaction group.
Before each transaction can be run, the configuration & variant has to be set up as follows (thevariant can be freely defined based on your needs):
Procedure
SAPImplementationGuide
SAP Implementation Guide → CRM → IC → Visible Components→ Action Box Settings → Define Configuration Profile for ActionBox → Configuration Name ZW_ISU
Transaction Code EWFC0
© SAP AG Page 65 of 86
8/3/2019 Util Install Guide en US
http://slidepdf.com/reader/full/util-install-guide-en-us 66/86
SAP Best Practices Water Utilities: Installation Guide
Transaction Group Reports
The Reports transaction group includes the following functions:
Time Reporting BOR Method
Object Type REPORT
Method EXECUTE
Data Flow
© SAP AG Page 66 of 86
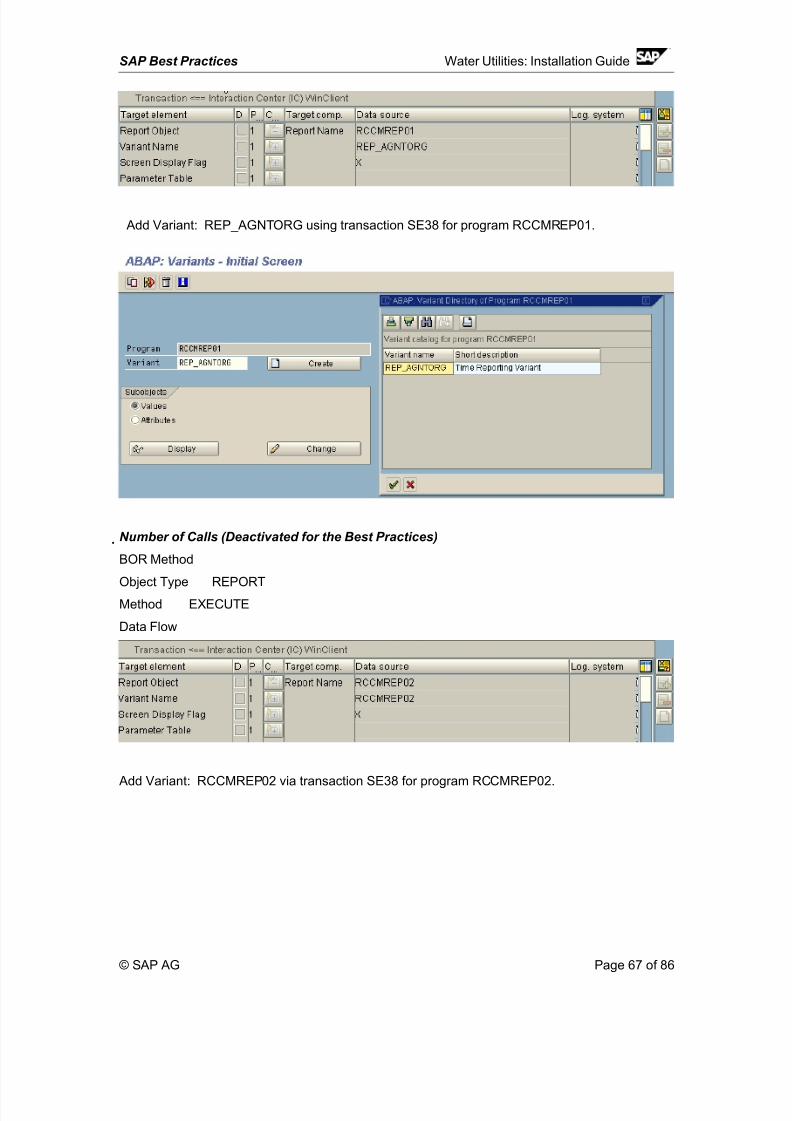
8/3/2019 Util Install Guide en US
http://slidepdf.com/reader/full/util-install-guide-en-us 67/86
SAP Best Practices Water Utilities: Installation Guide
Add Variant: REP_AGNTORG using transaction SE38 for program RCCMREP01.
Number of Calls (Deactivated for the Best Practices)
BOR Method
Object Type REPORT
Method EXECUTE
Data Flow
Add Variant: RCCMREP02 via transaction SE38 for program RCCMREP02.
© SAP AG Page 67 of 86
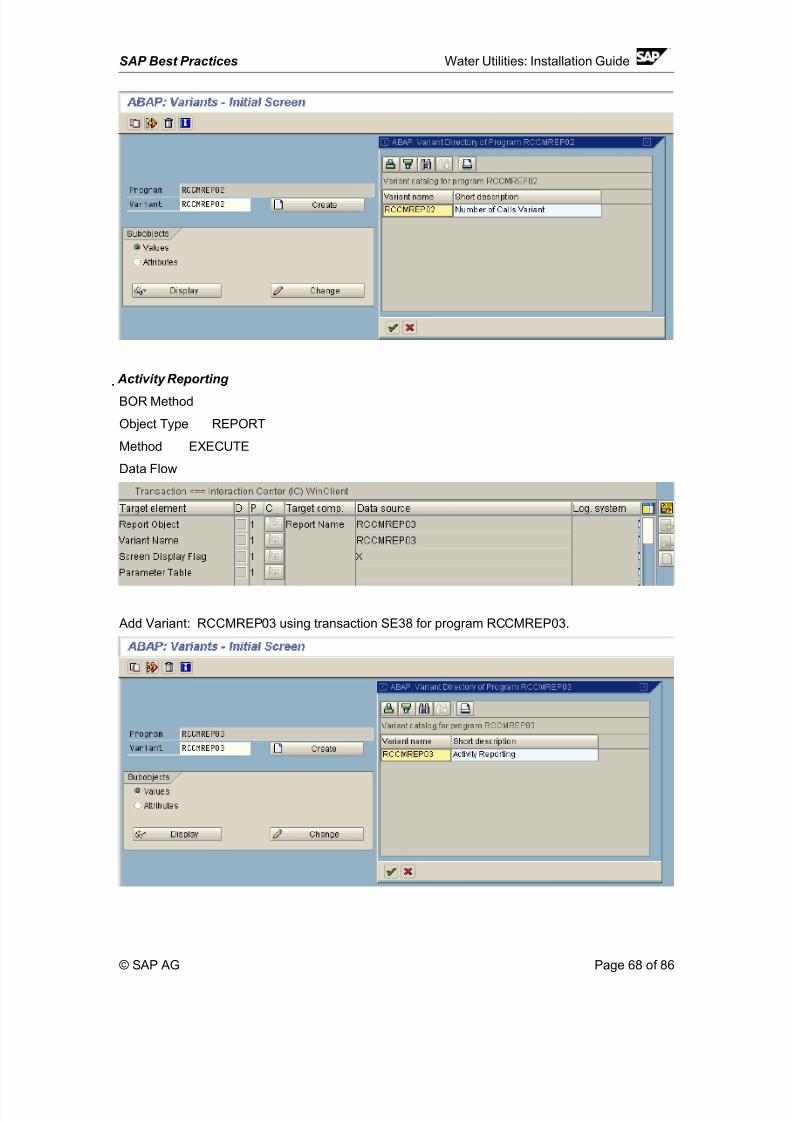
8/3/2019 Util Install Guide en US
http://slidepdf.com/reader/full/util-install-guide-en-us 68/86
SAP Best Practices Water Utilities: Installation Guide
Activity Reporting
BOR Method
Object Type REPORT
Method EXECUTE
Data Flow
Add Variant: RCCMREP03 using transaction SE38 for program RCCMREP03.
© SAP AG Page 68 of 86
8/3/2019 Util Install Guide en US
http://slidepdf.com/reader/full/util-install-guide-en-us 69/86
SAP Best Practices Water Utilities: Installation Guide
Contact History (Deactivated for the Best Practices)
BOR Method
Object Type REPORT
Method EXECUTE
Data Flow
Add Variant: RCCMREP07 using transaction SE38 for program RCCMREP07.
Customer Contact Report
BOR Method
Logical System (Replace with the actual logical system name)
Object Type REPORT
Method EXECUTE
Data Flow
© SAP AG Page 69 of 86
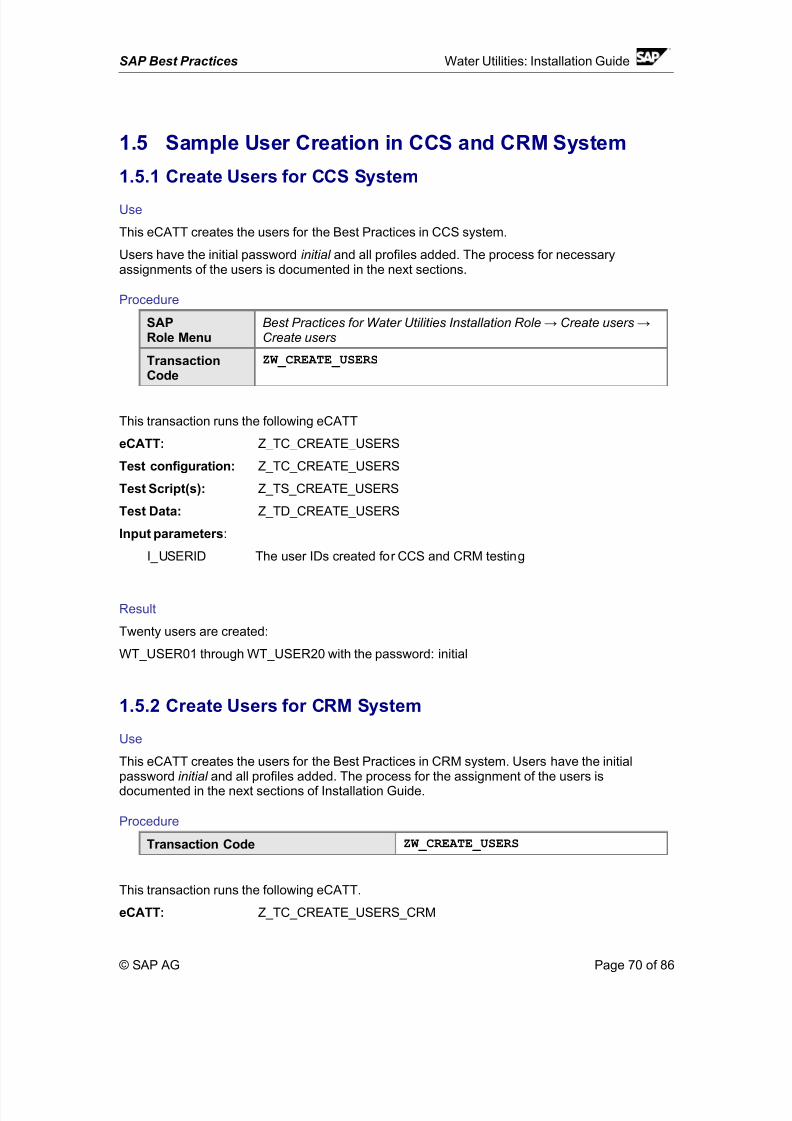
8/3/2019 Util Install Guide en US
http://slidepdf.com/reader/full/util-install-guide-en-us 70/86
SAP Best Practices Water Utilities: Installation Guide
1.5 Sample User Creation in CCS and CRM System
1.5.1 Create Users for CCS System
Use
This eCATT creates the users for the Best Practices in CCS system.
Users have the initial password initial and all profiles added. The process for necessaryassignments of the users is documented in the next sections.
Procedure
SAPRole Menu
Best Practices for Water Utilities Installation Role → Create users →Create users
TransactionCode
ZW_CREATE_USERS
This transaction runs the following eCATT
eCATT: Z_TC_CREATE_USERS
Test configuration: Z_TC_CREATE_USERS
Test Script(s): Z_TS_CREATE_USERS
Test Data: Z_TD_CREATE_USERS
Input parameters:
I_USERID The user IDs created for CCS and CRM testing
Result
Twenty users are created:
WT_USER01 through WT_USER20 with the password: initial
1.5.2 Create Users for CRM System
Use
This eCATT creates the users for the Best Practices in CRM system. Users have the initialpassword initial and all profiles added. The process for the assignment of the users isdocumented in the next sections of Installation Guide.
Procedure
Transaction Code ZW_CREATE_USERS
This transaction runs the following eCATT.
eCATT: Z_TC_CREATE_USERS_CRM
© SAP AG Page 70 of 86

8/3/2019 Util Install Guide en US
http://slidepdf.com/reader/full/util-install-guide-en-us 71/86
SAP Best Practices Water Utilities: Installation Guide
Test configuration: Z_TC_CREATE_USERS_CRM
Test Script(s): Z_TS_CREATE_USERS_CRM
Test Data: Z_TD_CREATE_USERS_CRM
Input parameters:
I_USERID The user IDs created for CCS and CRM testing
Result
Twenty users are created:
WT_USER01 through WT_USER20 with the password initial .
1.5.3 Assign Users in the CCS and CRM Systems
Follow these steps to assign user IDs before the logons can be used for testing:
1.5.3.1 Assign Users in the CCS system
Model an Organizational Structure
1. CCS: Transaction code: PPOCE
Menu path: Human Resources → Organizational Management → Organizational Plan →Organization and Staffing → Create
This dialog box is displayed. Keep the system date to default as shown:
2. Confirm the dates.
The Organization and Staffing screen is displayed:
© SAP AG Page 71 of 86
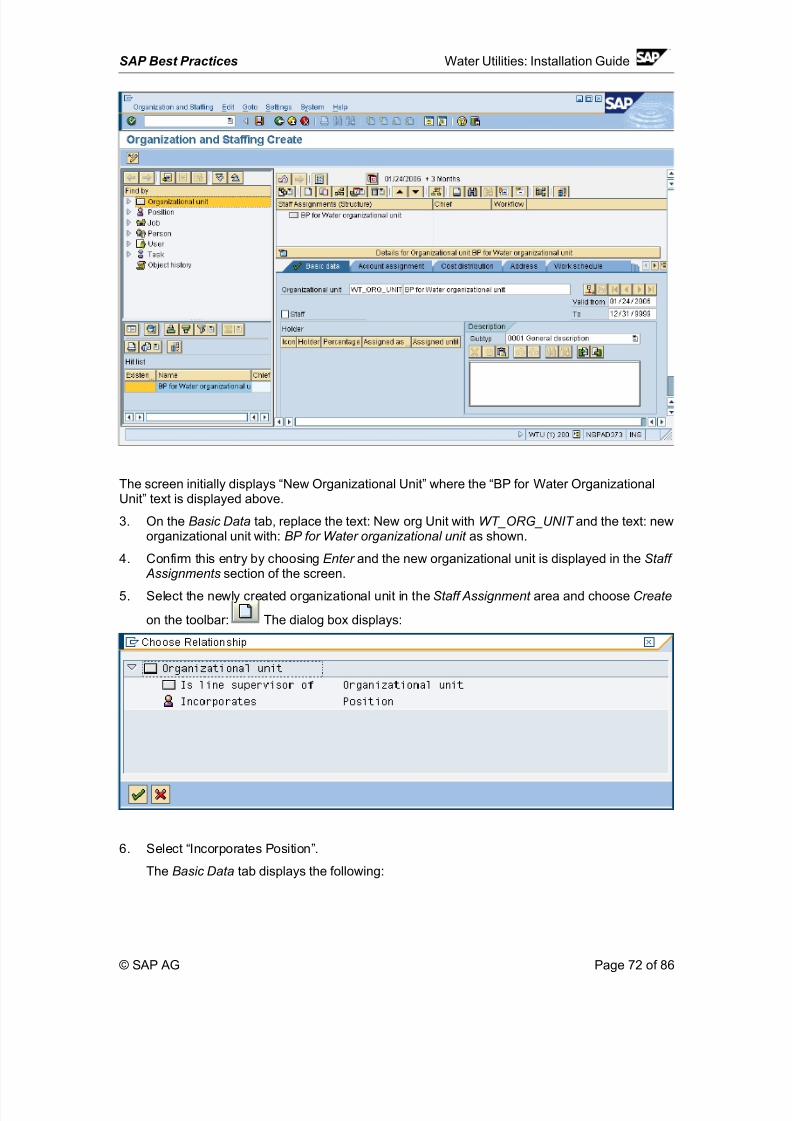
8/3/2019 Util Install Guide en US
http://slidepdf.com/reader/full/util-install-guide-en-us 72/86
SAP Best Practices Water Utilities: Installation Guide
The screen initially displays “New Organizational Unit” where the “BP for Water OrganizationalUnit” text is displayed above.
3. On the Basic Data tab, replace the text: New org Unit with WT_ORG_UNIT and the text: neworganizational unit with: BP for Water organizational unit as shown.
4. Confirm this entry by choosing Enter and the new organizational unit is displayed in the Staff Assignments section of the screen.
5. Select the newly created organizational unit in the Staff Assignment area and choose Create
on the toolbar: The dialog box displays:
6. Select “Incorporates Position”.
The Basic Data tab displays the following:
© SAP AG Page 72 of 86
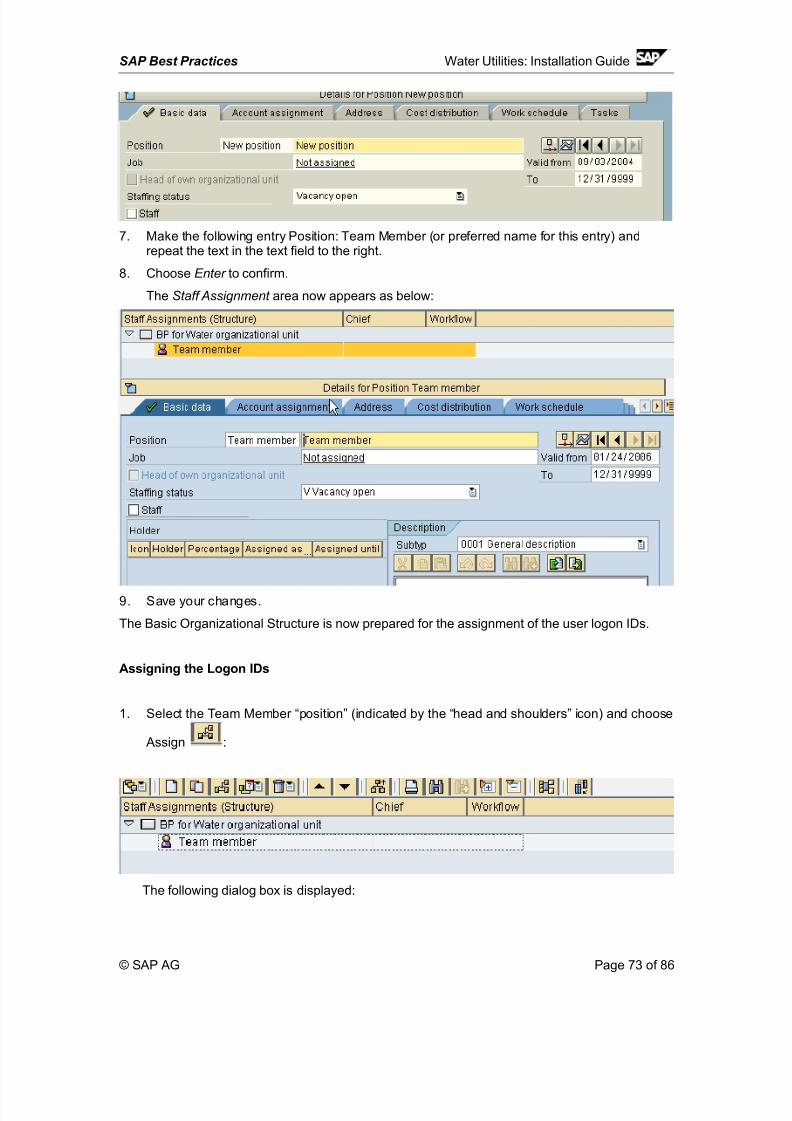
8/3/2019 Util Install Guide en US
http://slidepdf.com/reader/full/util-install-guide-en-us 73/86
SAP Best Practices Water Utilities: Installation Guide
7. Make the following entry Position: Team Member (or preferred name for this entry) andrepeat the text in the text field to the right.
8. Choose Enter to confirm.
The Staff Assignment area now appears as below:
9. Save your changes.
The Basic Organizational Structure is now prepared for the assignment of the user logon IDs.
Assigning the Logon IDs
1. Select the Team Member “position” (indicated by the “head and shoulders” icon) and choose
Assign :
The following dialog box is displayed:
© SAP AG Page 73 of 86
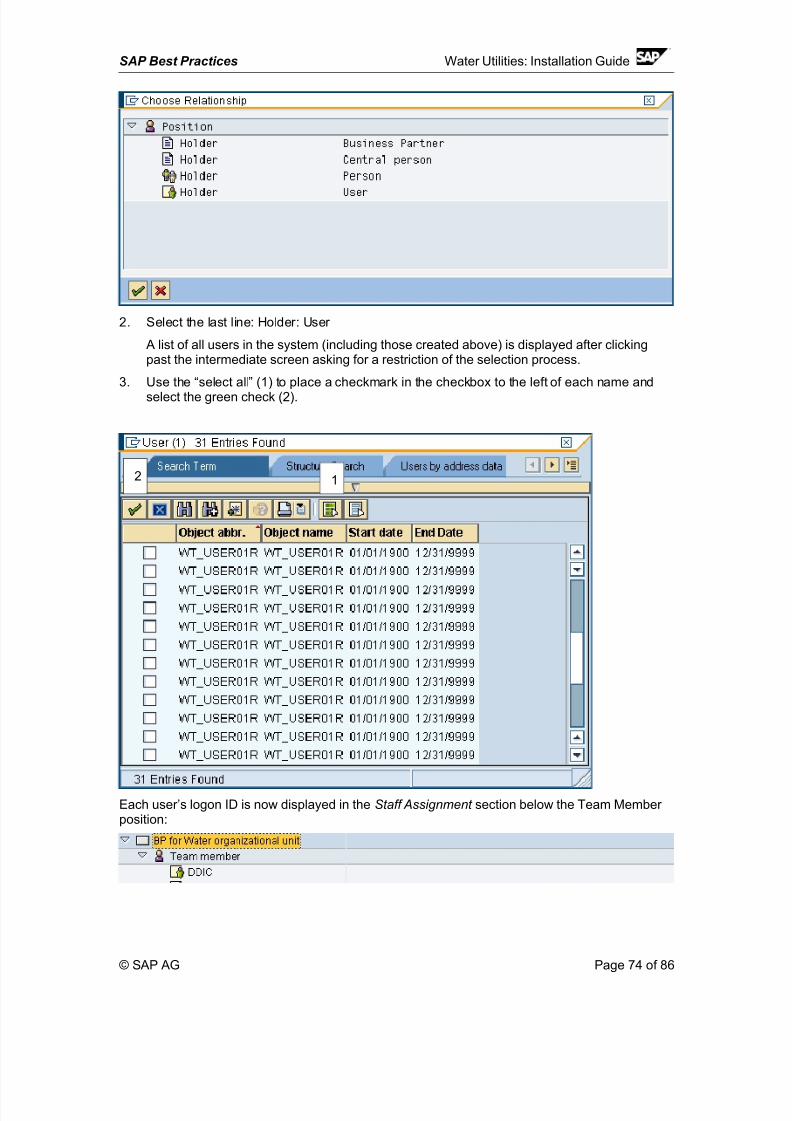
8/3/2019 Util Install Guide en US
http://slidepdf.com/reader/full/util-install-guide-en-us 74/86
SAP Best Practices Water Utilities: Installation Guide
2. Select the last line: Holder: User
A list of all users in the system (including those created above) is displayed after clickingpast the intermediate screen asking for a restriction of the selection process.
3. Use the “select all” (1) to place a checkmark in the checkbox to the left of each name and
select the green check (2).
Each user’s logon ID is now displayed in the Staff Assignment section below the Team Member position:
© SAP AG Page 74 of 86
12
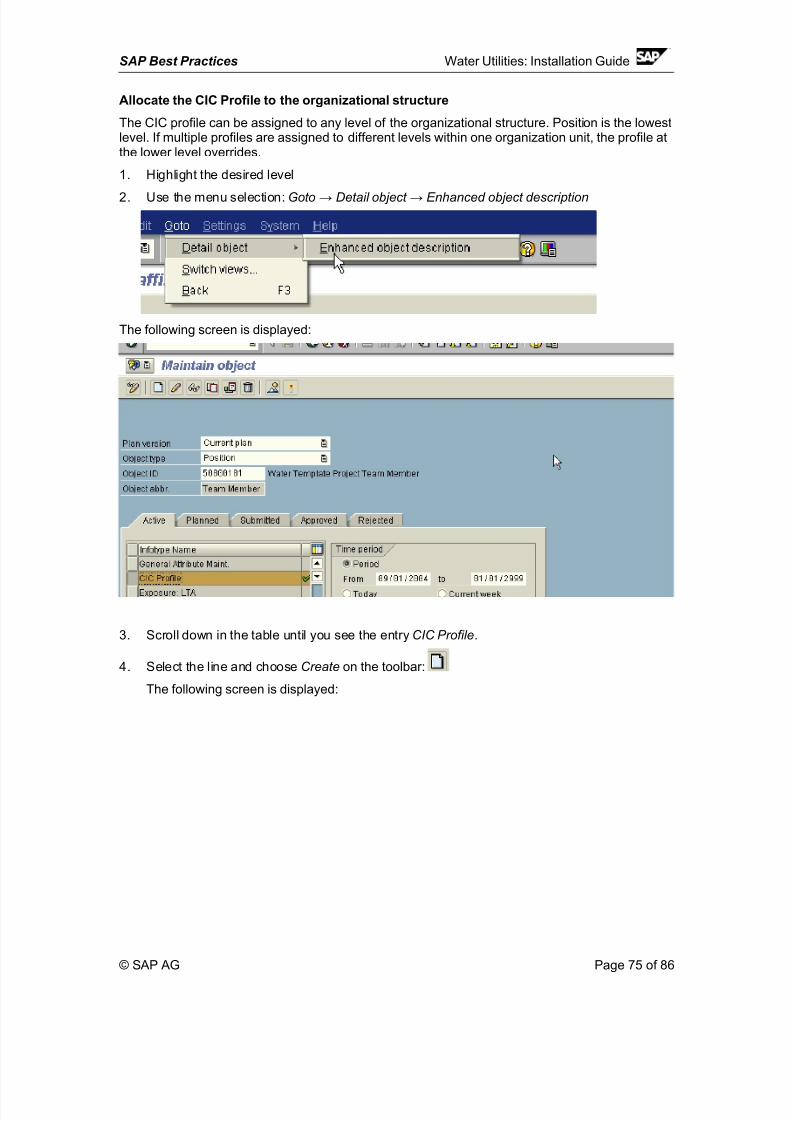
8/3/2019 Util Install Guide en US
http://slidepdf.com/reader/full/util-install-guide-en-us 75/86
SAP Best Practices Water Utilities: Installation Guide
Allocate the CIC Profile to the organizational structure
The CIC profile can be assigned to any level of the organizational structure. Position is the lowestlevel. If multiple profiles are assigned to different levels within one organization unit, the profile atthe lower level overrides.
1. Highlight the desired level
2. Use the menu selection: Goto → Detail object → Enhanced object description
The following screen is displayed:
3. Scroll down in the table until you see the entry CIC Profile.
4. Select the line and choose Create on the toolbar:
The following screen is displayed:
© SAP AG Page 75 of 86
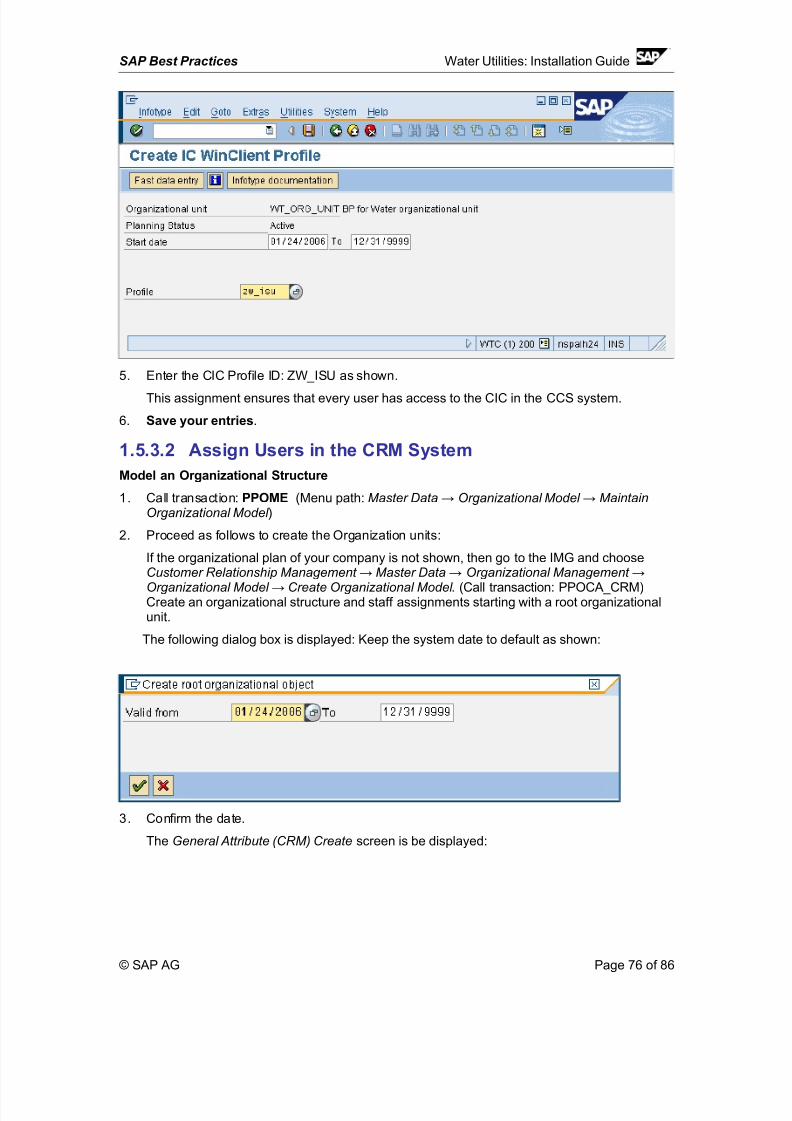
8/3/2019 Util Install Guide en US
http://slidepdf.com/reader/full/util-install-guide-en-us 76/86
SAP Best Practices Water Utilities: Installation Guide
5. Enter the CIC Profile ID: ZW_ISU as shown.
This assignment ensures that every user has access to the CIC in the CCS system.
6. Save your entries.
1.5.3.2 Assign Users in the CRM System
Model an Organizational Structure
1. Call transaction: PPOME (Menu path: Master Data → Organizational Model → MaintainOrganizational Model )
2. Proceed as follows to create the Organization units:
If the organizational plan of your company is not shown, then go to the IMG and chooseCustomer Relationship Management → Master Data → Organizational Management →
Organizational Model → Create Organizational Model . (Call transaction: PPOCA_CRM)Create an organizational structure and staff assignments starting with a root organizationalunit.
The following dialog box is displayed: Keep the system date to default as shown:
3. Confirm the date.
The General Attribute (CRM) Create screen is be displayed:
© SAP AG Page 76 of 86
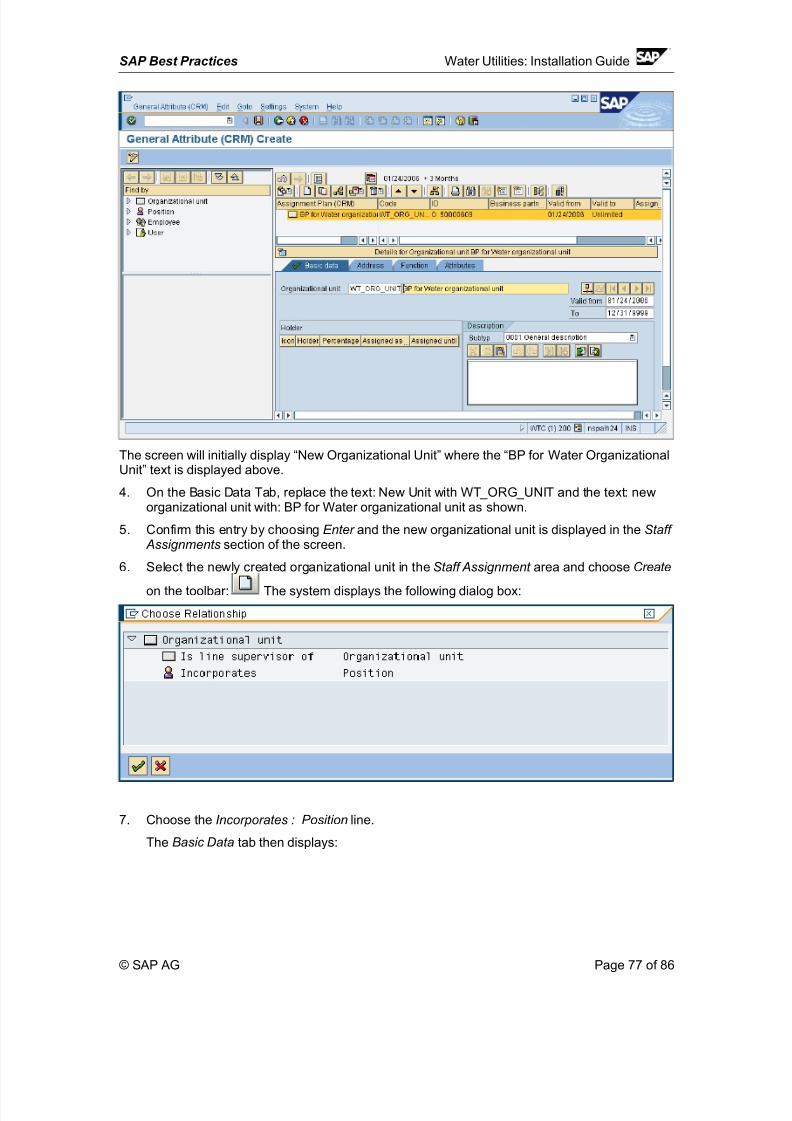
8/3/2019 Util Install Guide en US
http://slidepdf.com/reader/full/util-install-guide-en-us 77/86
SAP Best Practices Water Utilities: Installation Guide
The screen will initially display “New Organizational Unit” where the “BP for Water OrganizationalUnit” text is displayed above.
4. On the Basic Data Tab, replace the text: New Unit with WT_ORG_UNIT and the text: neworganizational unit with: BP for Water organizational unit as shown.
5. Confirm this entry by choosing Enter and the new organizational unit is displayed in the Staff Assignments section of the screen.
6. Select the newly created organizational unit in the Staff Assignment area and choose Create
on the toolbar: The system displays the following dialog box:
7. Choose the Incorporates : Position line.
The Basic Data tab then displays:
© SAP AG Page 77 of 86
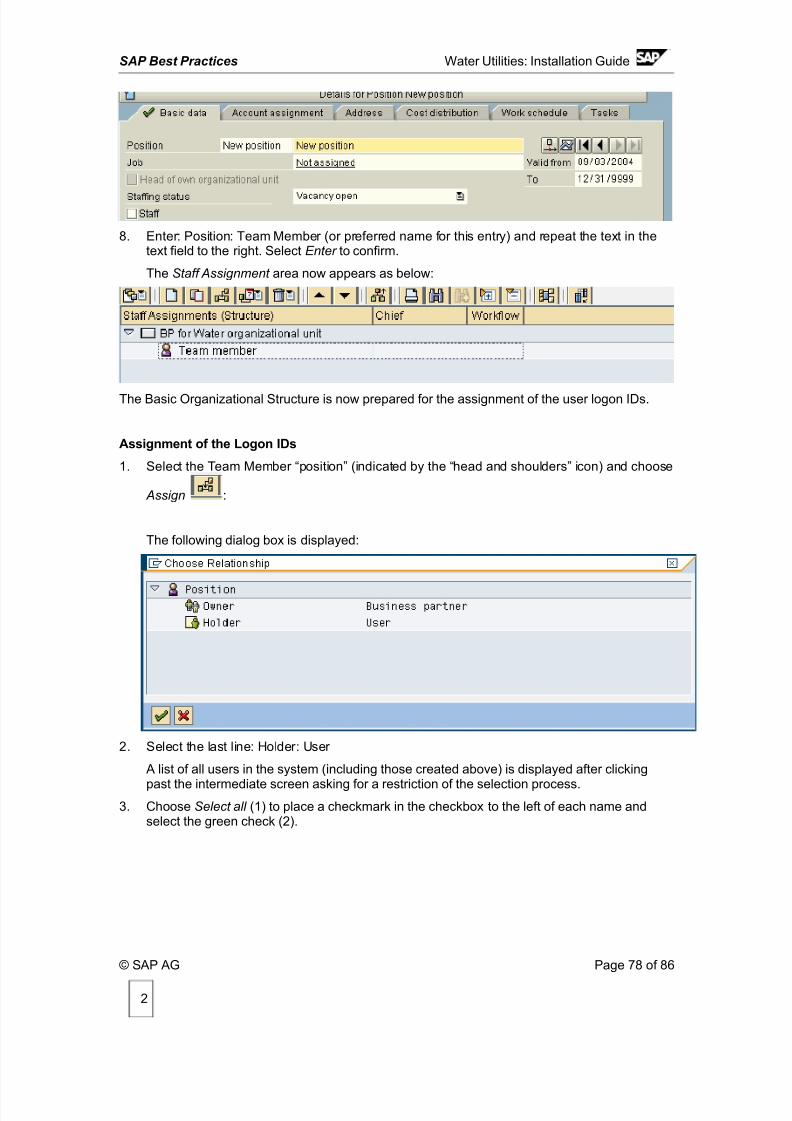
8/3/2019 Util Install Guide en US
http://slidepdf.com/reader/full/util-install-guide-en-us 78/86
SAP Best Practices Water Utilities: Installation Guide
8. Enter: Position: Team Member (or preferred name for this entry) and repeat the text in thetext field to the right. Select Enter to confirm.
The Staff Assignment area now appears as below:
The Basic Organizational Structure is now prepared for the assignment of the user logon IDs.
Assignment of the Logon IDs
1. Select the Team Member “position” (indicated by the “head and shoulders” icon) and choose
Assign :
The following dialog box is displayed:
2. Select the last line: Holder: User
A list of all users in the system (including those created above) is displayed after clicking
past the intermediate screen asking for a restriction of the selection process.3. Choose Select all (1) to place a checkmark in the checkbox to the left of each name and
select the green check (2).
© SAP AG Page 78 of 86
2
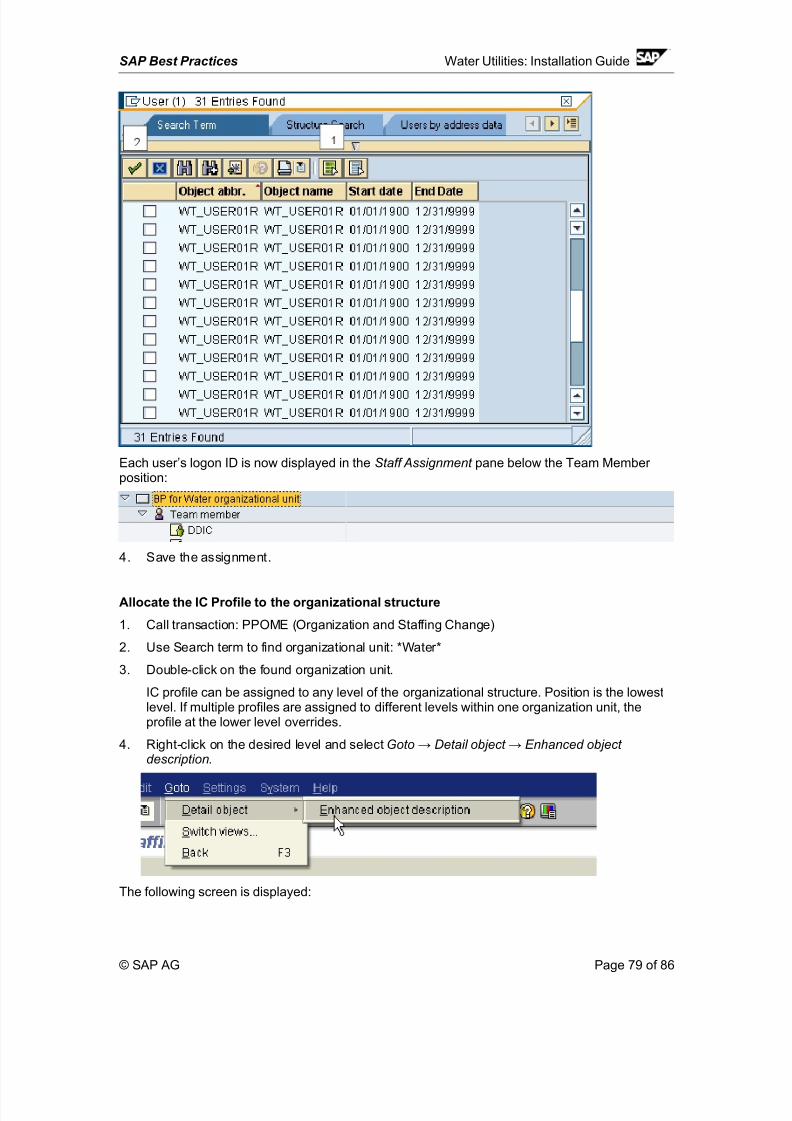
8/3/2019 Util Install Guide en US
http://slidepdf.com/reader/full/util-install-guide-en-us 79/86
SAP Best Practices Water Utilities: Installation Guide
Each user’s logon ID is now displayed in the Staff Assignment pane below the Team Member position:
4. Save the assignment.
Allocate the IC Profile to the organizational structure
1. Call transaction: PPOME (Organization and Staffing Change)
2. Use Search term to find organizational unit: *Water*
3. Double-click on the found organization unit.
IC profile can be assigned to any level of the organizational structure. Position is the lowestlevel. If multiple profiles are assigned to different levels within one organization unit, theprofile at the lower level overrides.
4. Right-click on the desired level and select Goto → Detail object → Enhanced object description.
The following screen is displayed:
© SAP AG Page 79 of 86
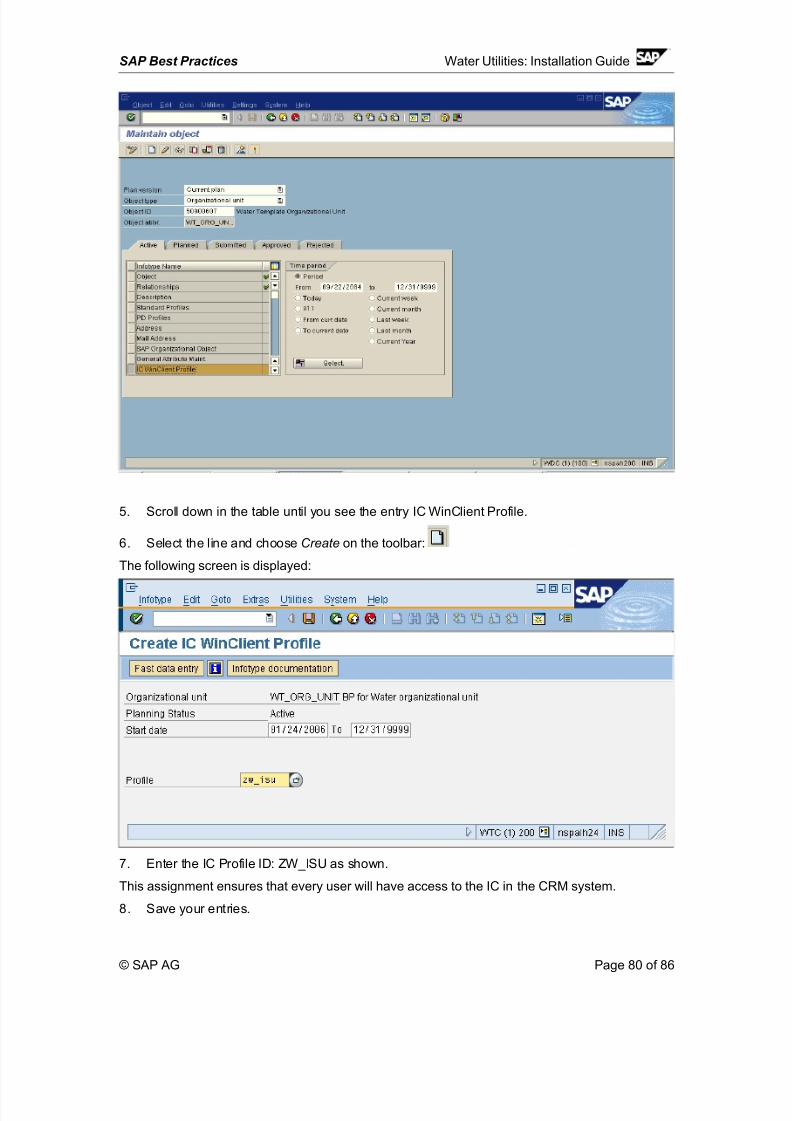
8/3/2019 Util Install Guide en US
http://slidepdf.com/reader/full/util-install-guide-en-us 80/86
SAP Best Practices Water Utilities: Installation Guide
5. Scroll down in the table until you see the entry IC WinClient Profile.
6. Select the line and choose Create on the toolbar:
The following screen is displayed:
7. Enter the IC Profile ID: ZW_ISU as shown.
This assignment ensures that every user will have access to the IC in the CRM system.
8. Save your entries.
© SAP AG Page 80 of 86
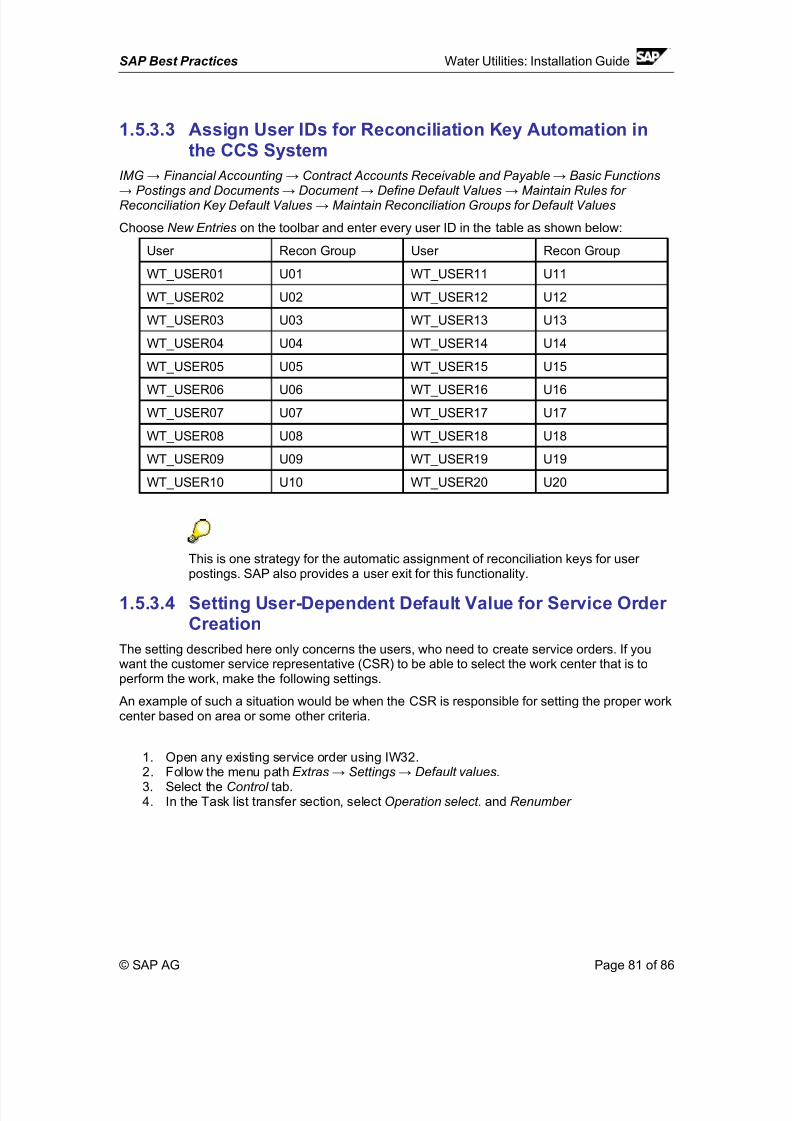
8/3/2019 Util Install Guide en US
http://slidepdf.com/reader/full/util-install-guide-en-us 81/86
SAP Best Practices Water Utilities: Installation Guide
1.5.3.3 Assign User IDs for Reconciliation Key Automation inthe CCS System
IMG → Financial Accounting → Contract Accounts Receivable and Payable → Basic Functions
→ Postings and Documents → Document → Define Default Values → Maintain Rules for Reconciliation Key Default Values → Maintain Reconciliation Groups for Default Values
Choose New Entries on the toolbar and enter every user ID in the table as shown below:
User Recon Group User Recon Group
WT_USER01 U01 WT_USER11 U11
WT_USER02 U02 WT_USER12 U12
WT_USER03 U03 WT_USER13 U13
WT_USER04 U04 WT_USER14 U14
WT_USER05 U05 WT_USER15 U15
WT_USER06 U06 WT_USER16 U16WT_USER07 U07 WT_USER17 U17
WT_USER08 U08 WT_USER18 U18
WT_USER09 U09 WT_USER19 U19
WT_USER10 U10 WT_USER20 U20
This is one strategy for the automatic assignment of reconciliation keys for user postings. SAP also provides a user exit for this functionality.
1.5.3.4 Setting User-Dependent Default Value for Service Order Creation
The setting described here only concerns the users, who need to create service orders. If youwant the customer service representative (CSR) to be able to select the work center that is toperform the work, make the following settings.
An example of such a situation would be when the CSR is responsible for setting the proper workcenter based on area or some other criteria.
1. Open any existing service order using IW32.2. Follow the menu path Extras → Settings → Default values.
3. Select the Control tab.4. In the Task list transfer section, select Operation select. and Renumber
© SAP AG Page 81 of 86
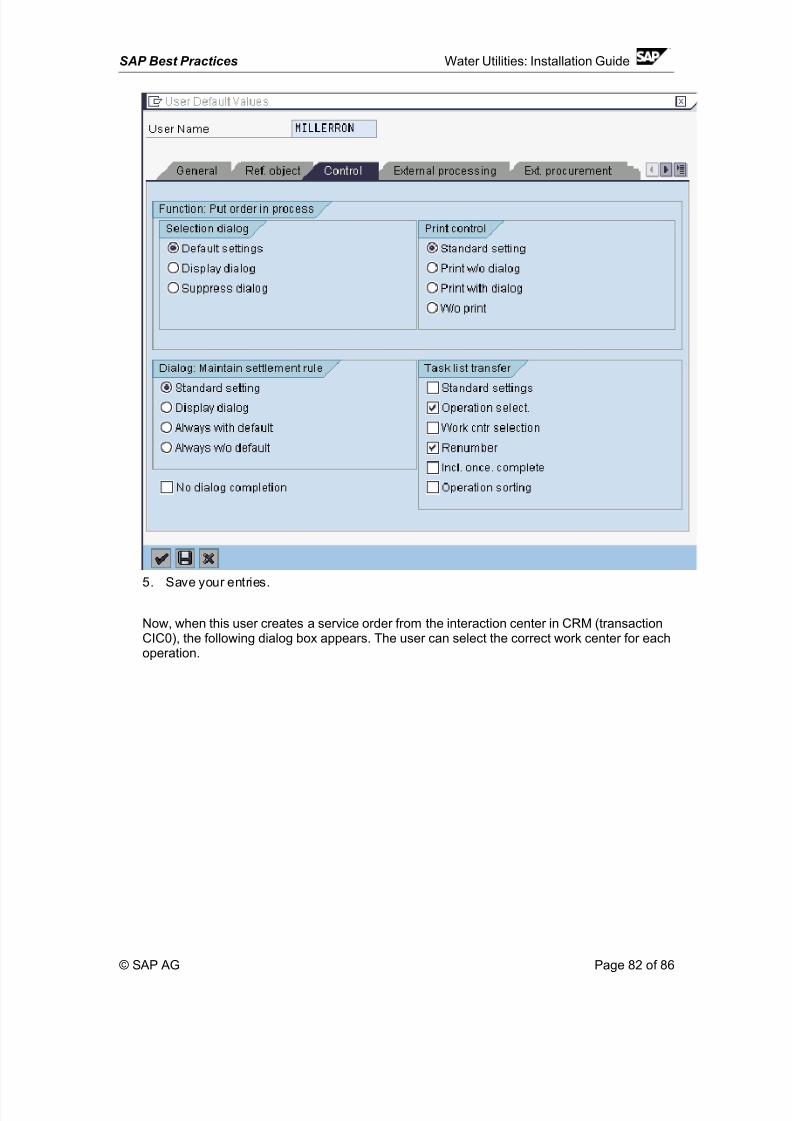
8/3/2019 Util Install Guide en US
http://slidepdf.com/reader/full/util-install-guide-en-us 82/86
SAP Best Practices Water Utilities: Installation Guide
5. Save your entries.
Now, when this user creates a service order from the interaction center in CRM (transactionCIC0), the following dialog box appears. The user can select the correct work center for eachoperation.
© SAP AG Page 82 of 86
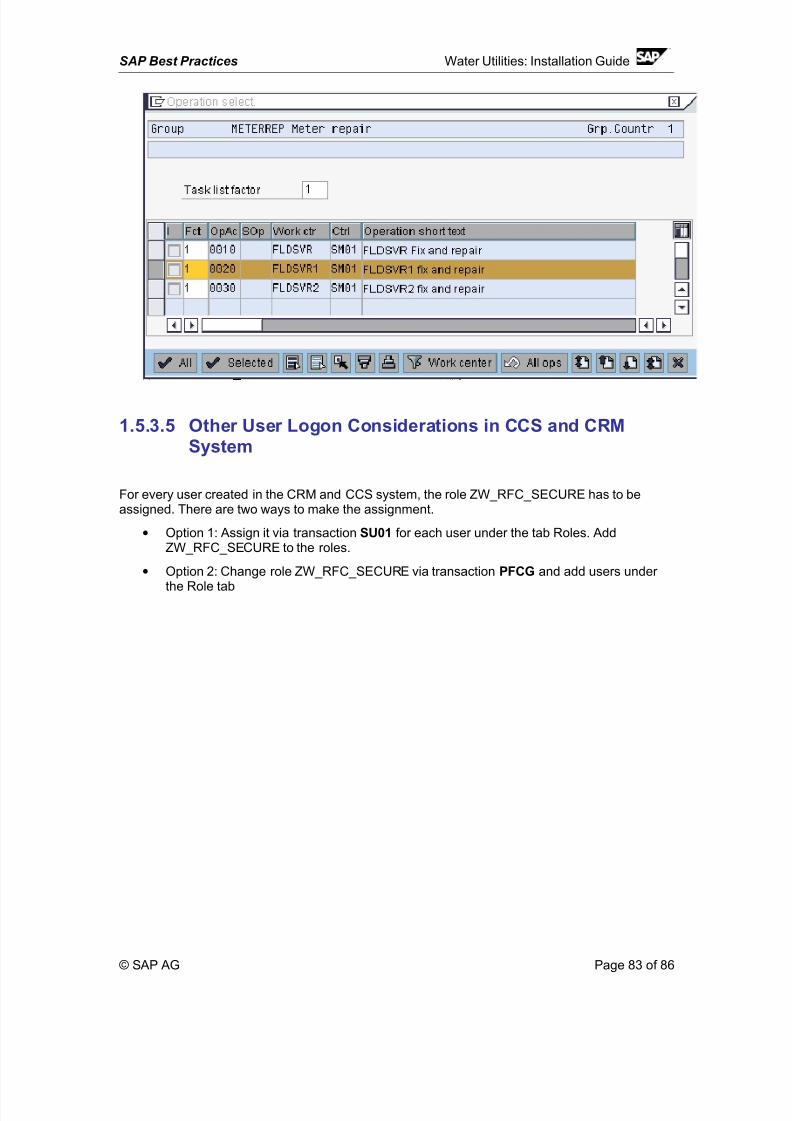
8/3/2019 Util Install Guide en US
http://slidepdf.com/reader/full/util-install-guide-en-us 83/86
SAP Best Practices Water Utilities: Installation Guide
1.5.3.5 Other User Logon Considerations in CCS and CRMSystem
For every user created in the CRM and CCS system, the role ZW_RFC_SECURE has to beassigned. There are two ways to make the assignment.
• Option 1: Assign it via transaction SU01 for each user under the tab Roles. AddZW_RFC_SECURE to the roles.
• Option 2: Change role ZW_RFC_SECURE via transaction PFCG and add users under
the Role tab
© SAP AG Page 83 of 86
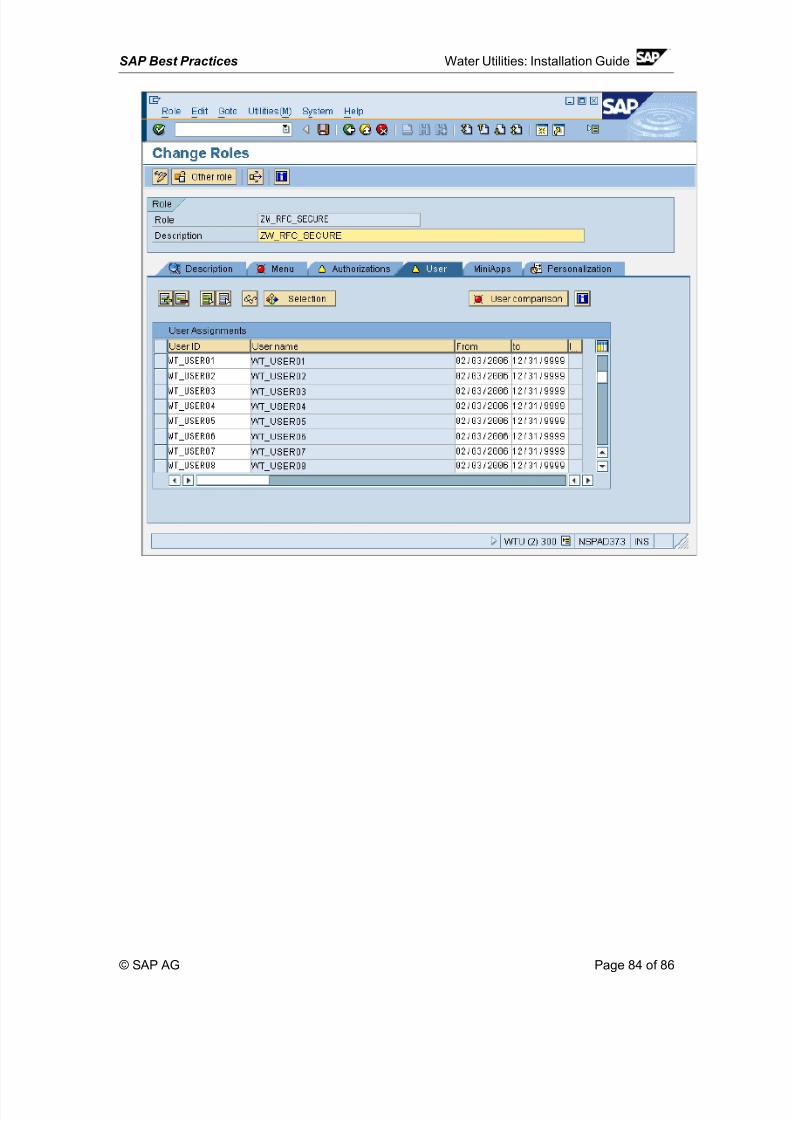
8/3/2019 Util Install Guide en US
http://slidepdf.com/reader/full/util-install-guide-en-us 84/86
SAP Best Practices Water Utilities: Installation Guide
© SAP AG Page 84 of 86
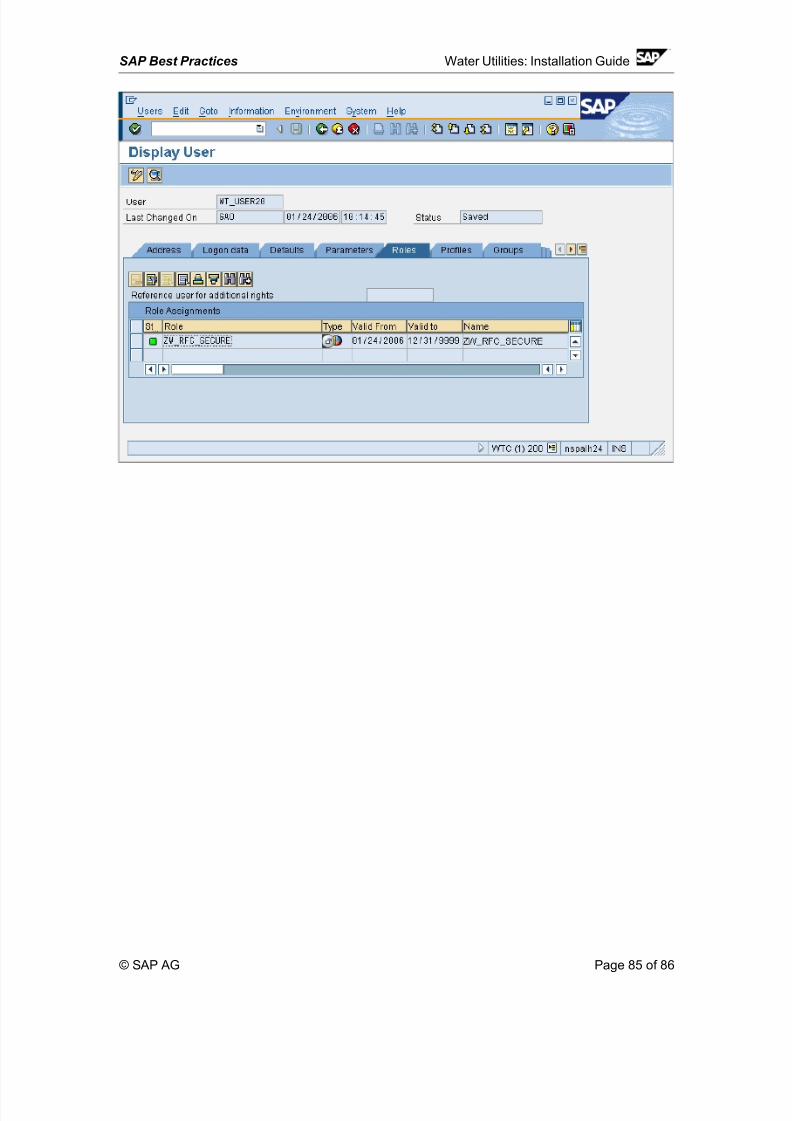
8/3/2019 Util Install Guide en US
http://slidepdf.com/reader/full/util-install-guide-en-us 85/86
SAP Best Practices Water Utilities: Installation Guide
© SAP AG Page 85 of 86
8/3/2019 Util Install Guide en US
http://slidepdf.com/reader/full/util-install-guide-en-us 86/86
SAP Best Practices Water Utilities: Installation Guide
1.6 Setting for Data Replication Between CCS and CRMSystems
Follow the CRM Data Replication Guide to set up the replication between CRM and CCSsystems.
1