Embed Size (px)
Citation preview
User Guide – Office 365 Administration
Prepared by:
Vodafone Shared Services Limited
This document is meant for Vodafone cloud customers only and is confidential & legally privileged. Please do not
reproduce copy or disclose this document or its contents with any third party/ies nor use it for purposes other than
this document has been shared for.
2 | P a g e
Table of Contents
EXCHANGE ADMIN CENTER ...................................................................................................................................................... 4
LOGIN TO EXCHANGE ADMIN CENTER (EAC) ................................................................................................................................... 4
OVERVIEW OF EAC ................................................................................................................................................................... 7
Feature pane .................................................................................................................................................................. 7
Tabs ............................................................................................................................................................................... 9
List view ........................................................................................................................................................................ 10
Toolbar ......................................................................................................................................................................... 11
Details pane ................................................................................................................................................................. 13
DASHBOARD ........................................................................................................................................................................ 14
RECIPIENTS .......................................................................................................................................................................... 15
Mailboxes ..................................................................................................................................................................... 16
Groups ......................................................................................................................................................................... 18
Resources..................................................................................................................................................................... 22
Contacts ....................................................................................................................................................................... 24
Mail User ...................................................................................................................................................................... 26
Shared ......................................................................................................................................................................... 27
Migration ...................................................................................................................................................................... 29
PERMISSION ........................................................................................................................................................................ 30
Admin Roles ................................................................................................................................................................. 31
User roles ..................................................................................................................................................................... 35
Outlook web app Policy ................................................................................................................................................. 36
COMPLIANCE MANAGEMENT ..................................................................................................................................................... 37
In-place eDiscovery & hold ............................................................................................................................................ 37
Auditing ........................................................................................................................................................................ 38
Data loss prevention ..................................................................................................................................................... 39
Retention Policy ............................................................................................................................................................ 41
Retention tag ................................................................................................................................................................ 43
Journal rules ................................................................................................................................................................. 44
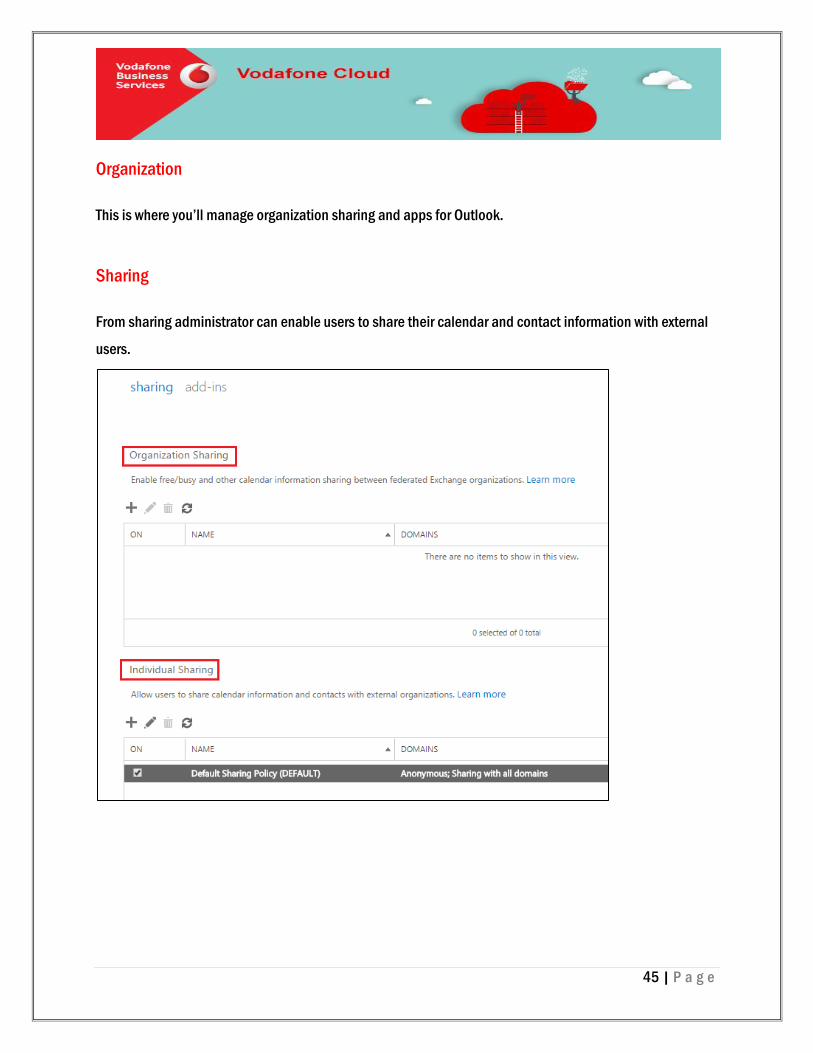
ORGANIZATION ...................................................................................................................................................................... 45
Sharing ......................................................................................................................................................................... 45
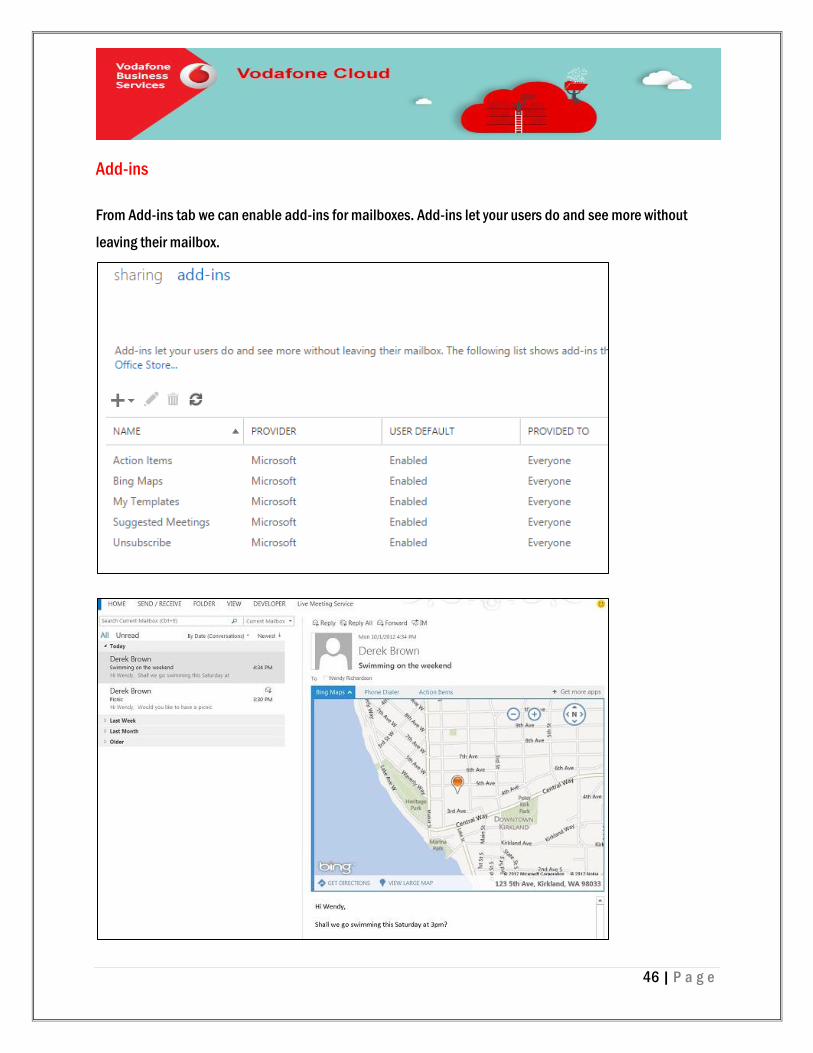
Add-ins ......................................................................................................................................................................... 46
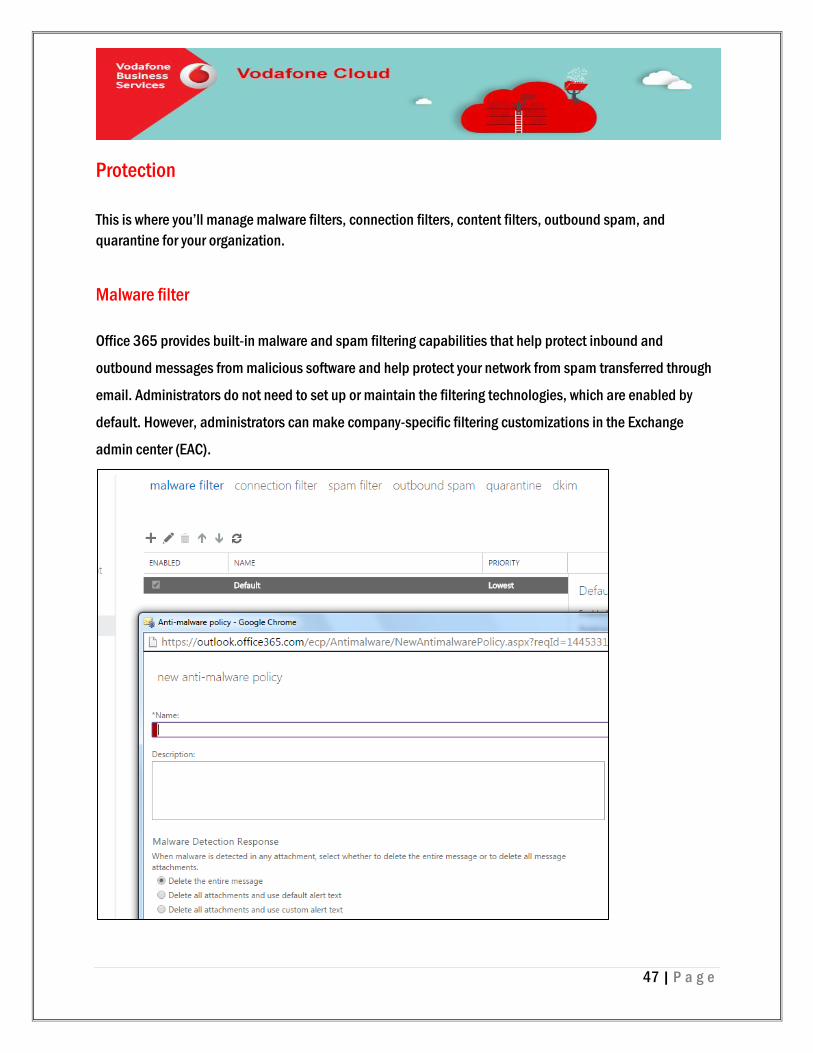
PROTECTION ......................................................................................................................................................................... 47
3 | P a g e
Malware filter................................................................................................................................................................ 47
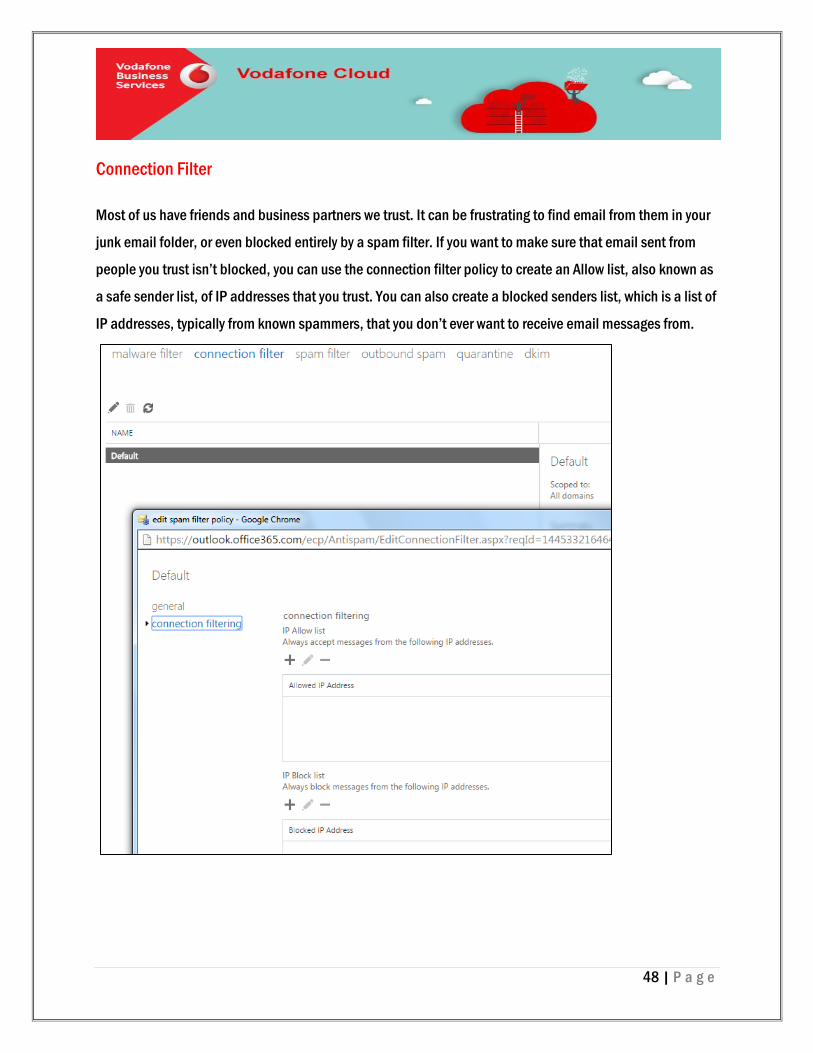
Connection Filter .......................................................................................................................................................... 48
Spam Filter ................................................................................................................................................................... 49
Outbound Filter ............................................................................................................................................................. 50
Quarantine ................................................................................................................................................................... 51
Dkim ............................................................................................................................................................................ 52
MAIL FLOW .......................................................................................................................................................................... 53
Rules ............................................................................................................................................................................ 54
Message Trace .............................................................................................................................................................. 55
Accepted domain .......................................................................................................................................................... 62
Remote domain ............................................................................................................................................................ 63
Connectors ................................................................................................................................................................... 64
MOBILE ................................................................................................................................................................................. 65
Mobile device access .................................................................................................................................................... 65
Mobile device mailbox policies ...................................................................................................................................... 68
PUBLIC FOLDERS ................................................................................................................................................................... 70
Create a public folder in Office 365 Exchange Online ..................................................................................................... 70
Add the public folder to Outlook Web App ...................................................................................................................... 76
UNIFIED MESSAGING ............................................................................................................................................................. 79
UM dial plans ............................................................................................................................................................... 80
UM IP gateways ............................................................................................................................................................ 81
REFERENCE LINKS ................................................................................................................................................................. 82
4 | P a g e
Exchange Admin Center
The Exchange admin center (EAC) is the web-based management console you use to manage the items
related to email that you can’t manage by using the Office 365 admin center. The EAC replaces the
Exchange Control Panel (ECP), which was the interface used to manage your Exchange organization in the
earlier releases of Exchange Online.
In this section we will see the administration controls and support that are available to customize Exchange
Online settings and keep an organization’s Exchange Online environment up, running.
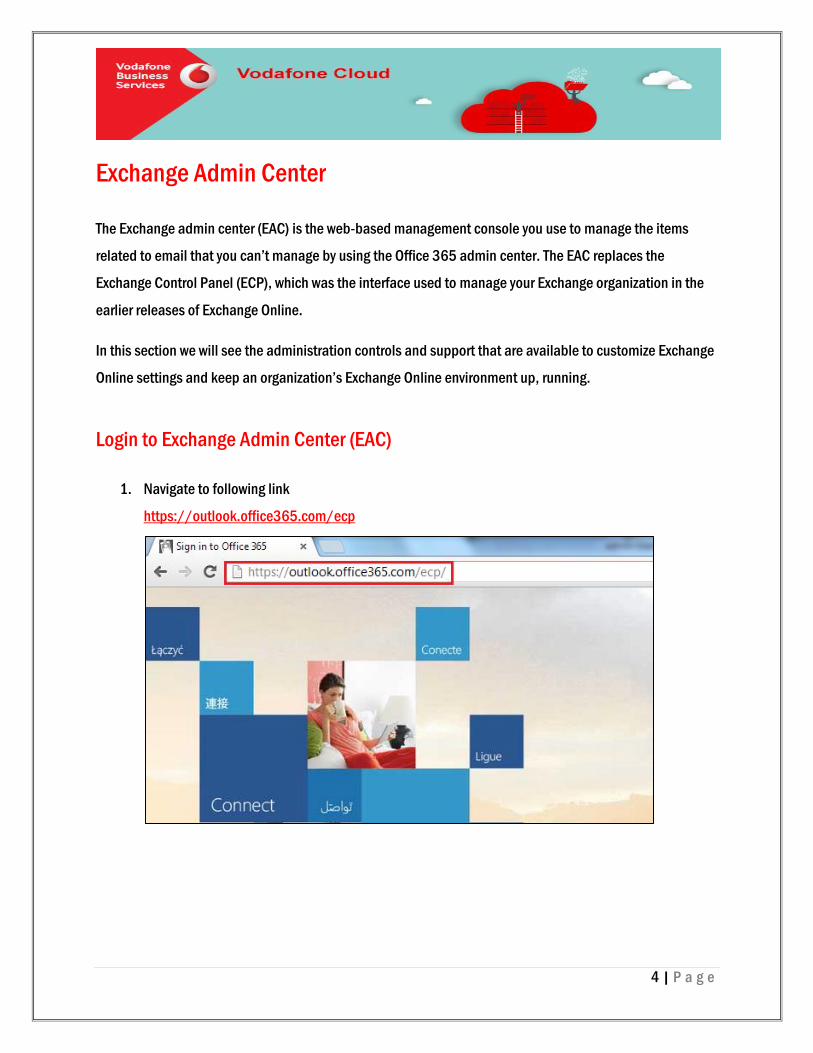
Login to Exchange Admin Center (EAC)
1. Navigate to following link
https://outlook.office365.com/ecp
5 | P a g e
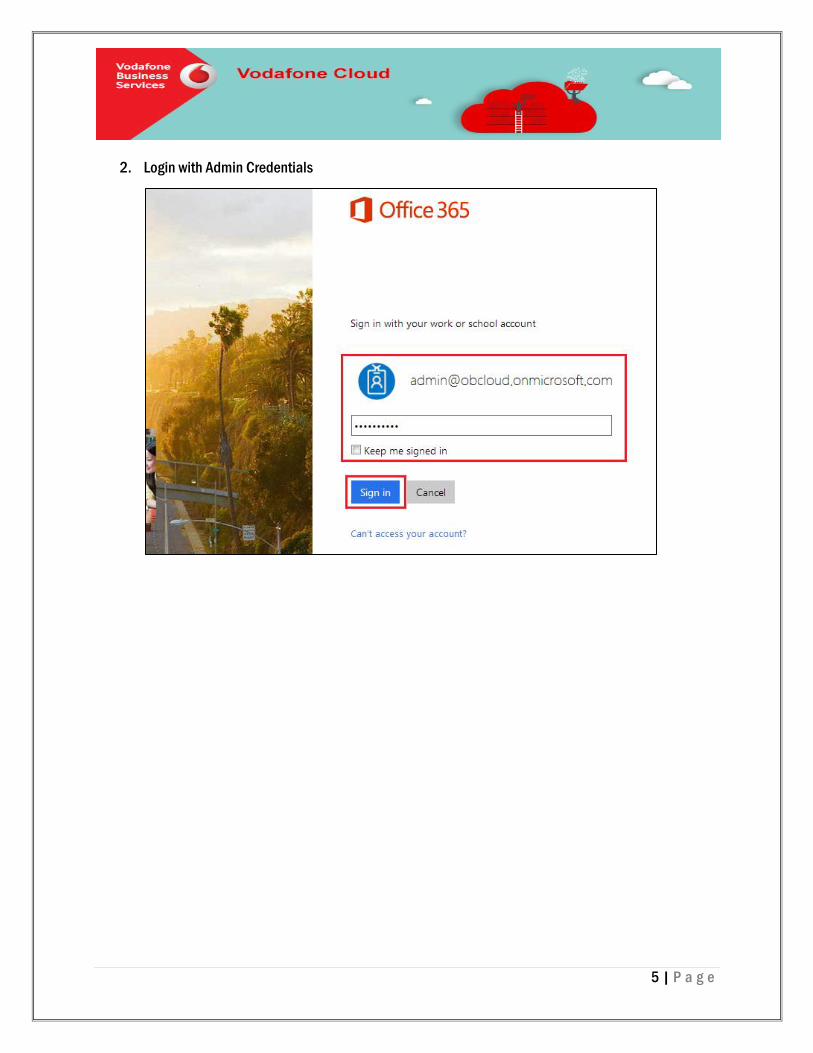
2. Login with Admin Credentials
6 | P a g e
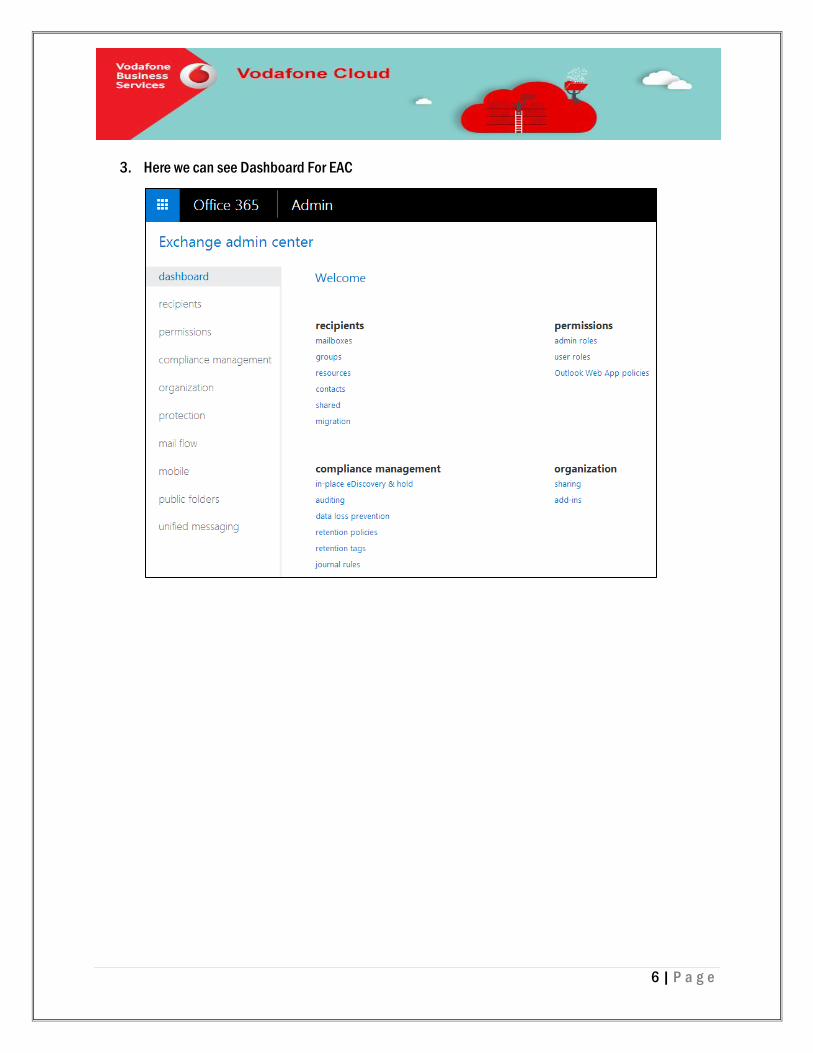
3. Here we can see Dashboard For EAC
7 | P a g e
Overview of EAC
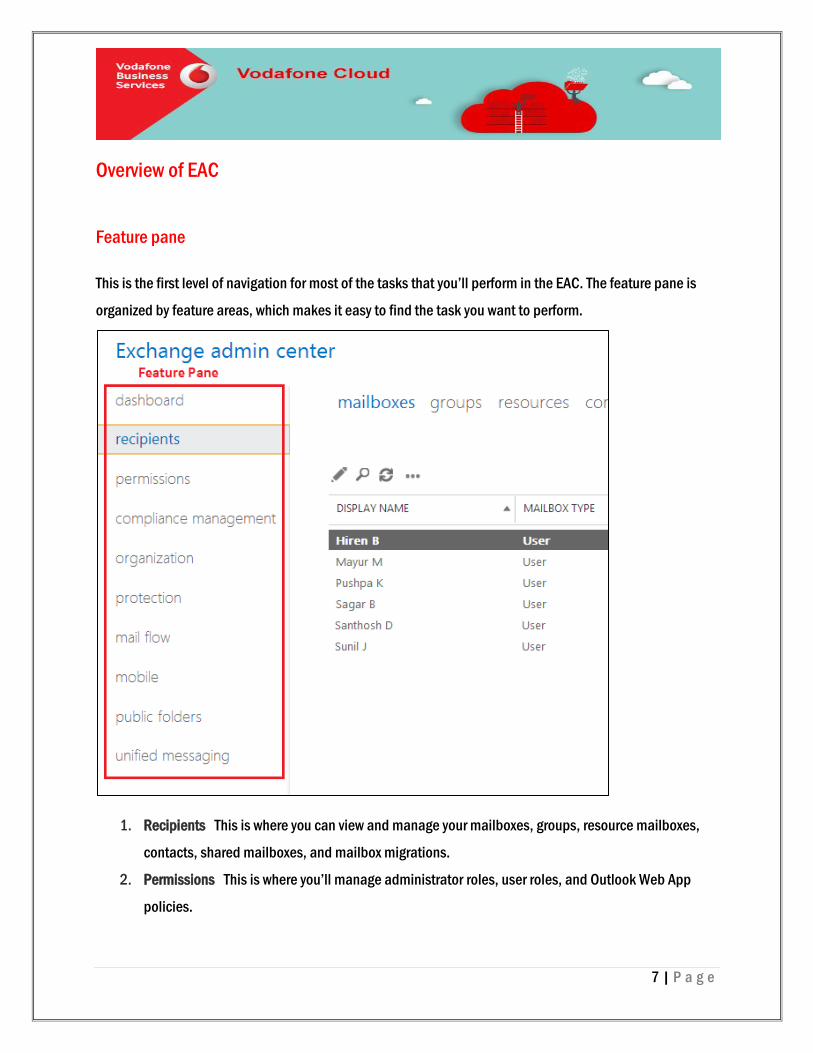
Feature pane
This is the first level of navigation for most of the tasks that you’ll perform in the EAC. The feature pane is
organized by feature areas, which makes it easy to find the task you want to perform.
1. Recipients This is where you can view and manage your mailboxes, groups, resource mailboxes,
contacts, shared mailboxes, and mailbox migrations.
2. Permissions This is where you’ll manage administrator roles, user roles, and Outlook Web App
policies.
8 | P a g e
3. Compliance management this is where you’ll manage In-Place eDiscovery & Hold, auditing, data
loss prevention (DLP), retention policies, retention tags, and journal rules.
4. Organization This is where you’ll manage organization sharing and apps for Outlook.
5. Protection This is where you’ll manage malware filters, connection filters, content filters, outbound
spam, and quarantine for your organization.
6. Mail flow this is where you’ll manage rules, delivery reports, message tracing, accepted domains,
and sends and receive connectors.
7. Mobile This is where you’ll manage the mobile devices that you allow to connect to your
organization. You can manage mobile device access and mobile device mailbox policies.
8. Public folders this is where you’ll manage public folders and public folder mailboxes.
9. Unified messaging this is where you’ll manage Unified Messaging (UM) dial plans and UM IP
gateways.
9 | P a g e
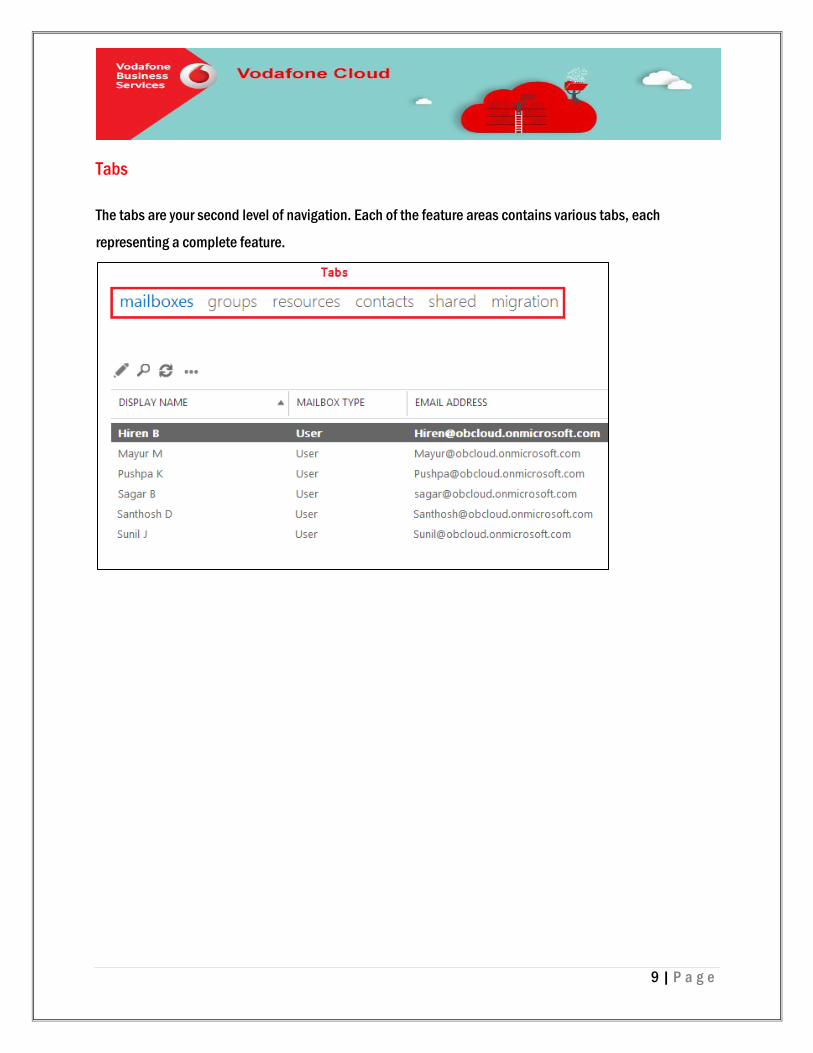
Tabs
The tabs are your second level of navigation. Each of the feature areas contains various tabs, each
representing a complete feature.
10 | P a g e
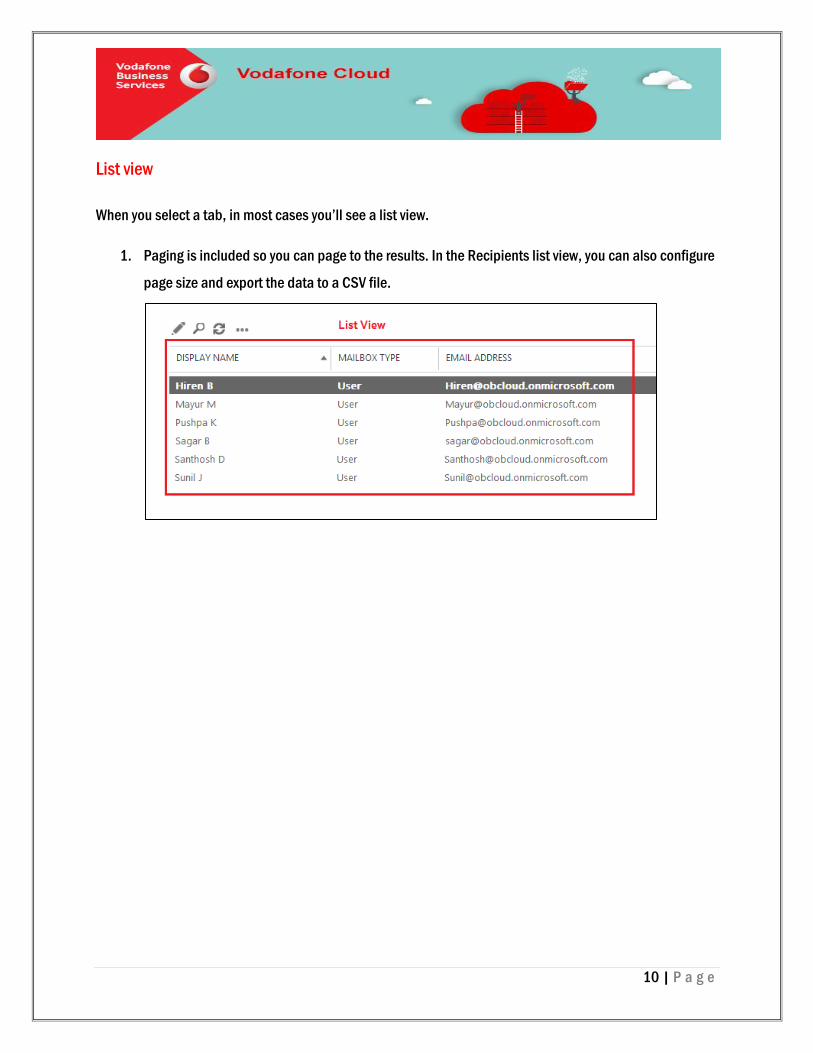
List view
When you select a tab, in most cases you’ll see a list view.
1. Paging is included so you can page to the results. In the Recipients list view, you can also configure
page size and export the data to a CSV file.
11 | P a g e
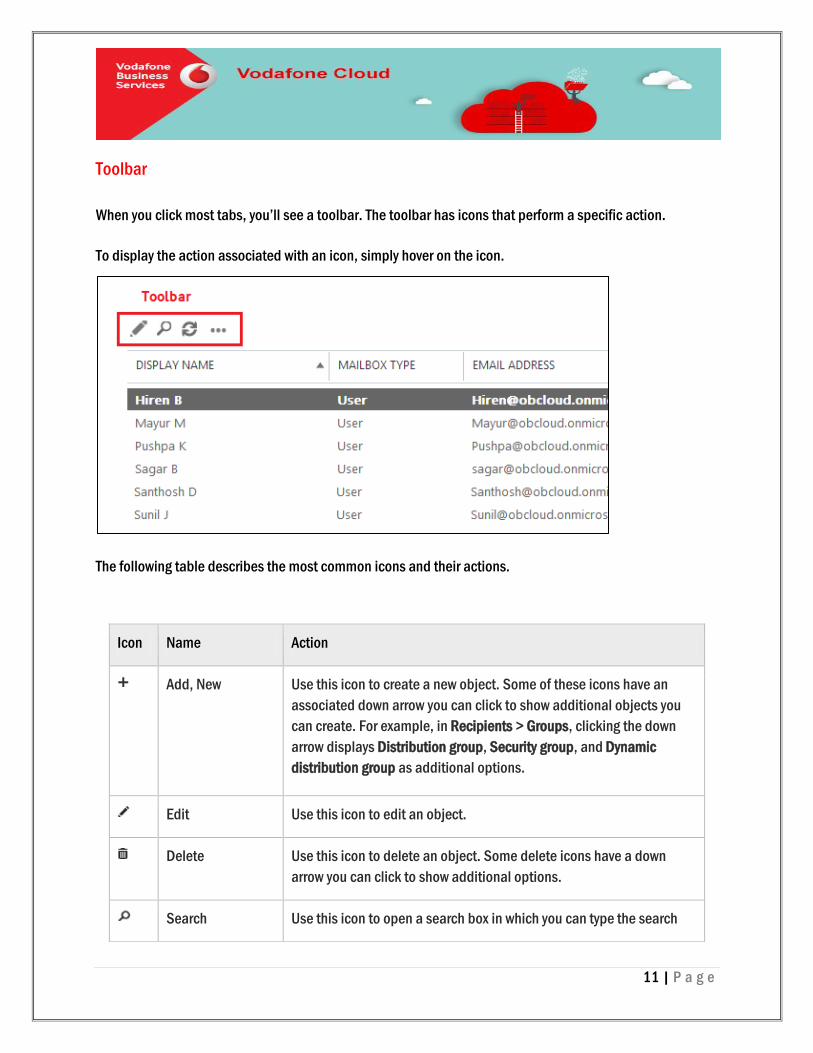
Toolbar
When you click most tabs, you’ll see a toolbar. The toolbar has icons that perform a specific action.
To display the action associated with an icon, simply hover on the icon.
The following table describes the most common icons and their actions.
Icon Name Action
Add, New Use this icon to create a new object. Some of these icons have an
associated down arrow you can click to show additional objects you
can create. For example, in Recipients > Groups, clicking the down
arrow displays Distribution group, Security group, and Dynamic
distribution group as additional options.
Edit Use this icon to edit an object.
Delete Use this icon to delete an object. Some delete icons have a down
arrow you can click to show additional options.
Search Use this icon to open a search box in which you can type the search
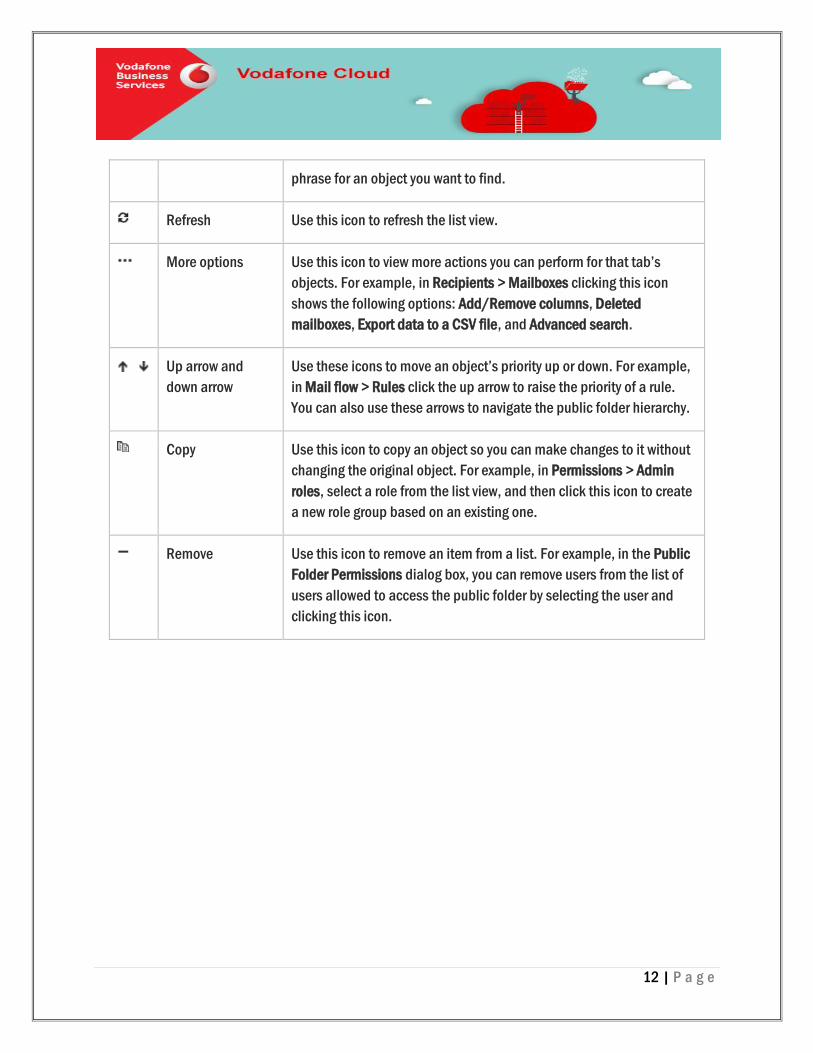
12 | P a g e
phrase for an object you want to find.
Refresh Use this icon to refresh the list view.
More options Use this icon to view more actions you can perform for that tab’s
objects. For example, in Recipients > Mailboxes clicking this icon
shows the following options: Add/Remove columns, Deleted
mailboxes, Export data to a CSV file, and Advanced search.
Up arrow and
down arrow
Use these icons to move an object’s priority up or down. For example,
in Mail flow > Rules click the up arrow to raise the priority of a rule.
You can also use these arrows to navigate the public folder hierarchy.
Copy Use this icon to copy an object so you can make changes to it without
changing the original object. For example, in Permissions > Admin
roles, select a role from the list view, and then click this icon to create
a new role group based on an existing one.
Remove Use this icon to remove an item from a list. For example, in the Public
Folder Permissions dialog box, you can remove users from the list of
users allowed to access the public folder by selecting the user and
clicking this icon.
13 | P a g e
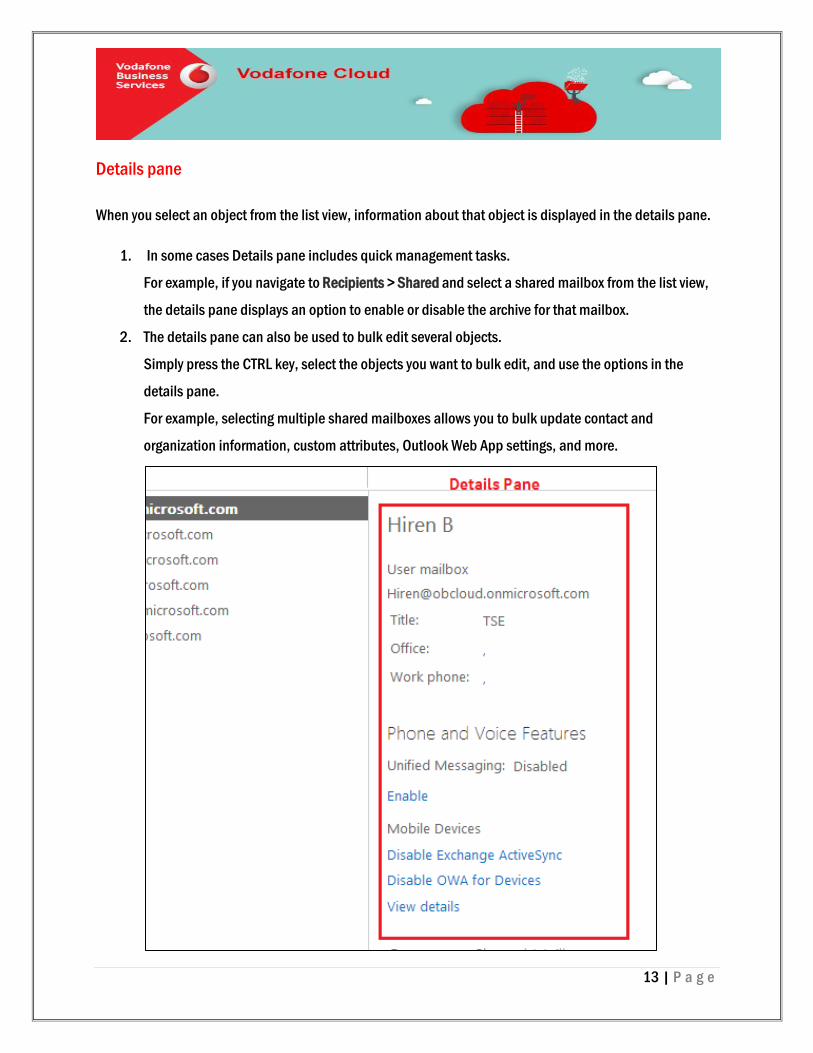
Details pane
When you select an object from the list view, information about that object is displayed in the details pane.
1. In some cases Details pane includes quick management tasks.
For example, if you navigate to Recipients > Shared and select a shared mailbox from the list view,
the details pane displays an option to enable or disable the archive for that mailbox.
2. The details pane can also be used to bulk edit several objects.
Simply press the CTRL key, select the objects you want to bulk edit, and use the options in the
details pane.
For example, selecting multiple shared mailboxes allows you to bulk update contact and
organization information, custom attributes, Outlook Web App settings, and more.
14 | P a g e
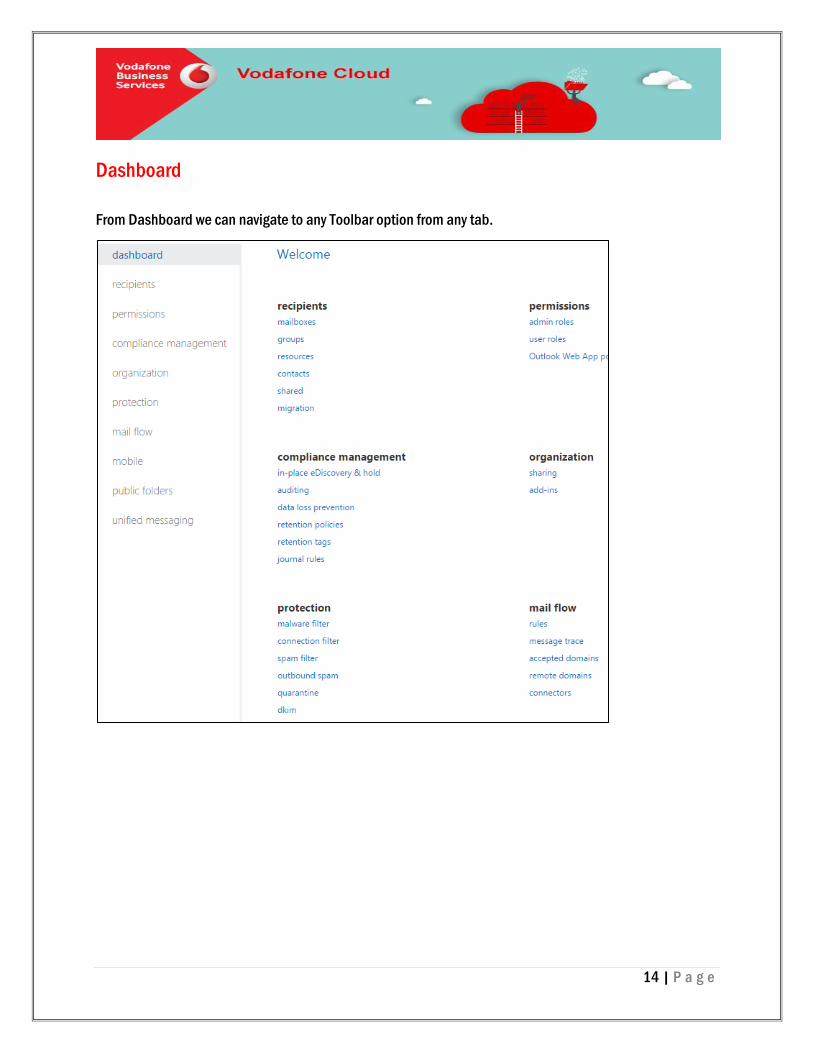
Dashboard
From Dashboard we can navigate to any Toolbar option from any tab.
15 | P a g e
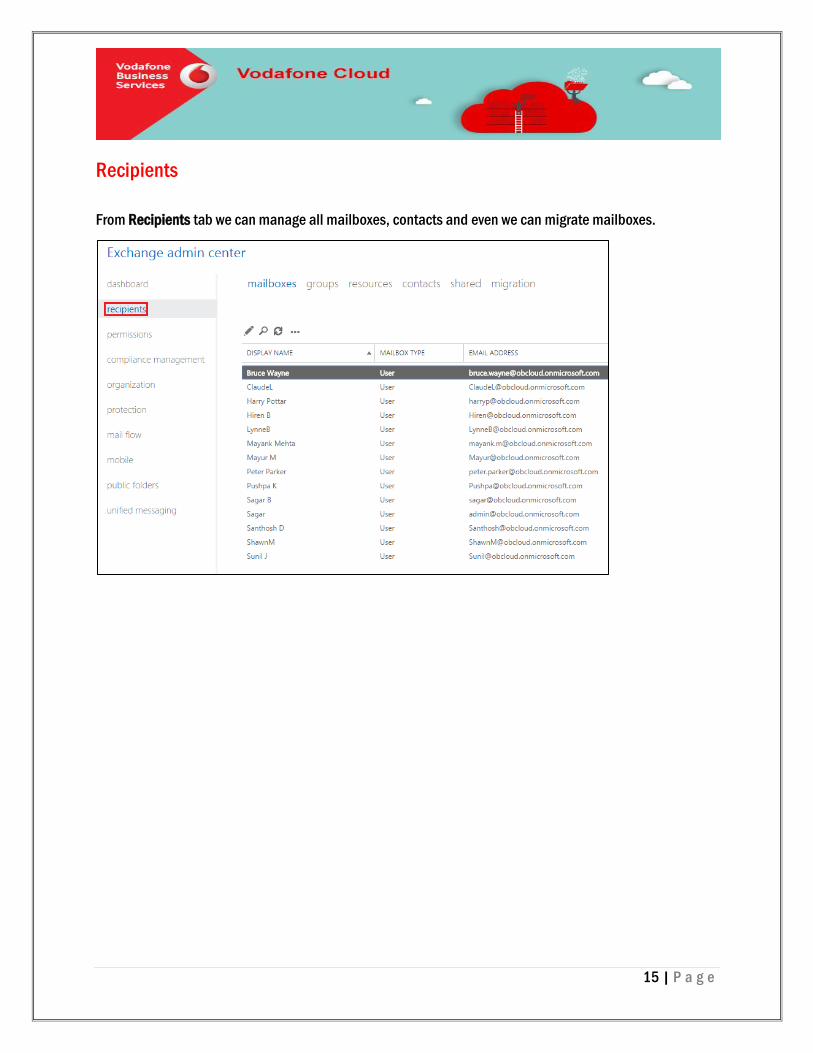
Recipients
From Recipients tab we can manage all mailboxes, contacts and even we can migrate mailboxes.
16 | P a g e
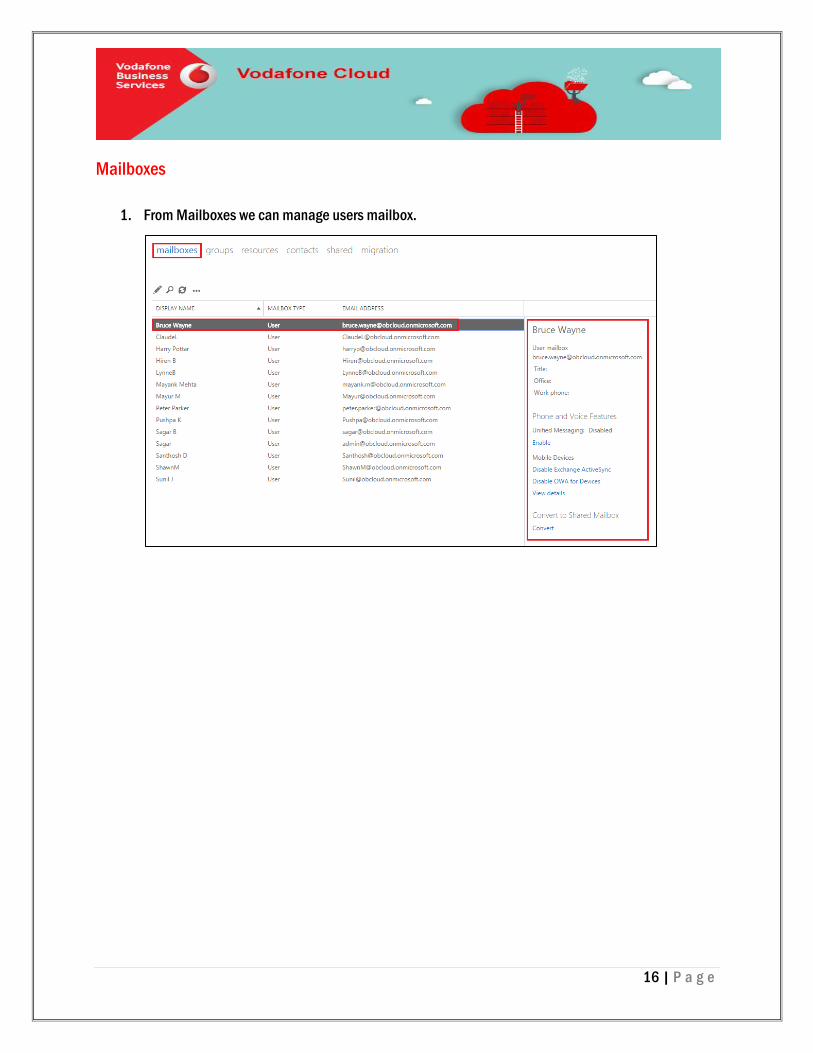
Mailboxes
1. From Mailboxes we can manage users mailbox.
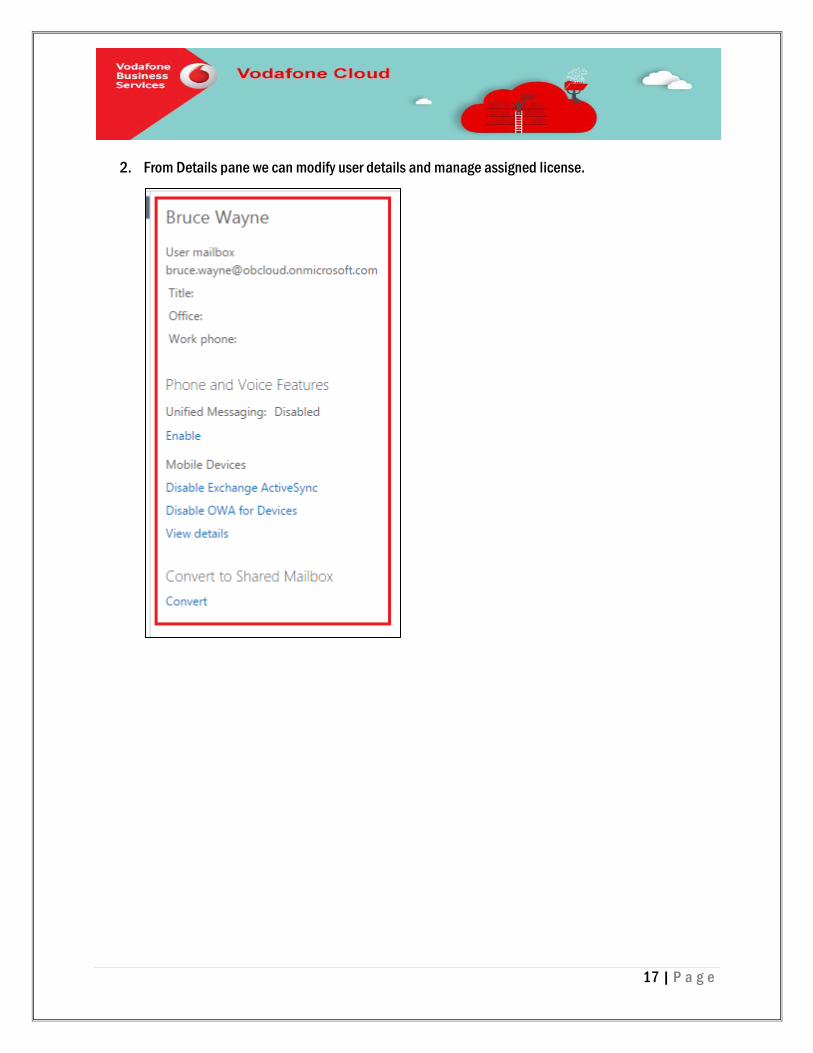
17 | P a g e
2. From Details pane we can modify user details and manage assigned license.
18 | P a g e
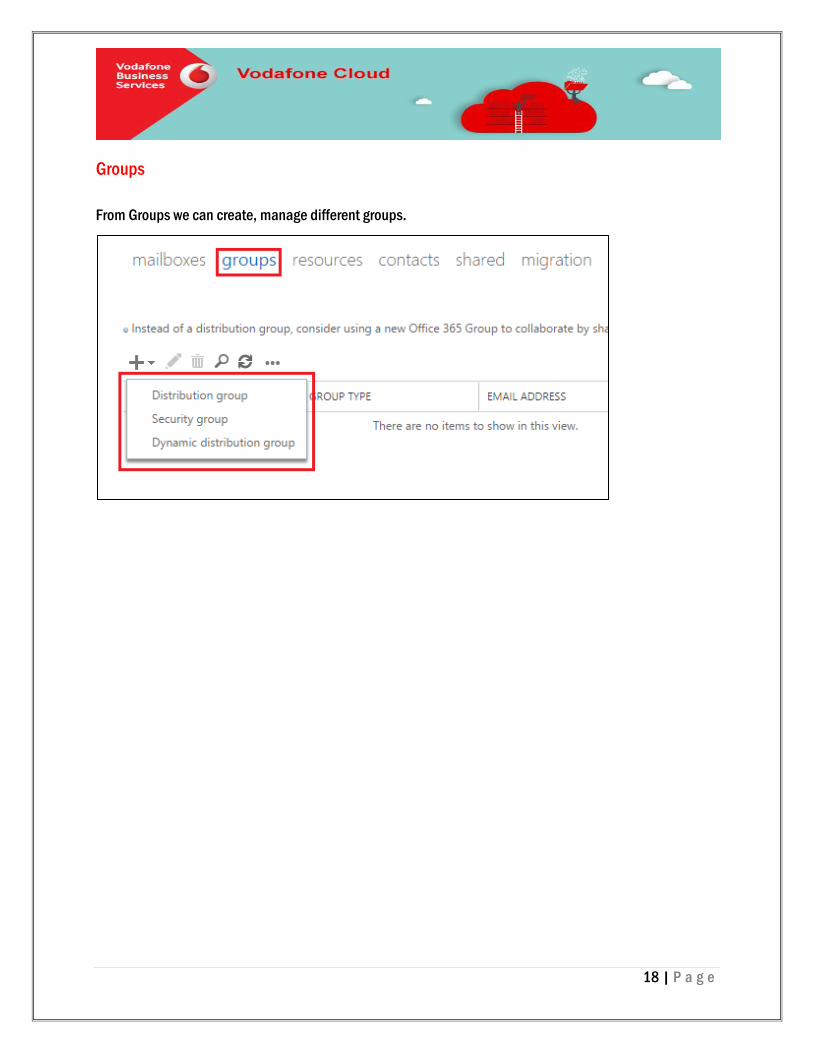
Groups
From Groups we can create, manage different groups.
19 | P a g e
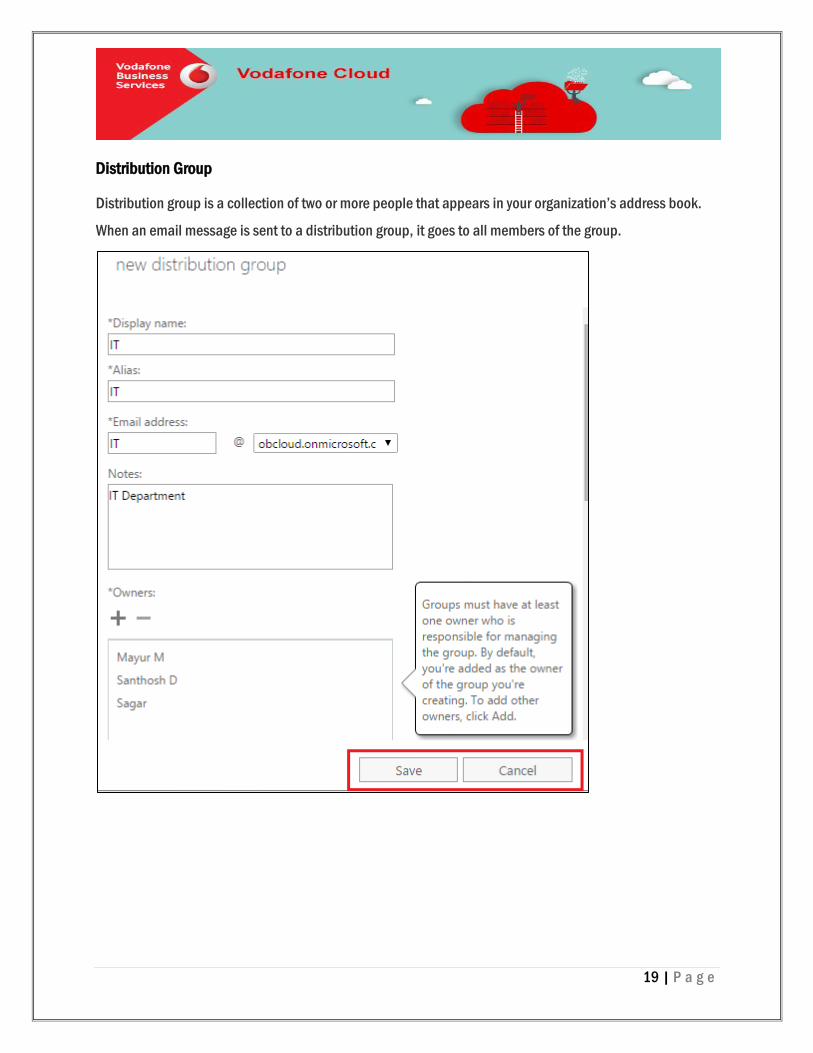
Distribution Group
Distribution group is a collection of two or more people that appears in your organization’s address book.
When an email message is sent to a distribution group, it goes to all members of the group.
20 | P a g e
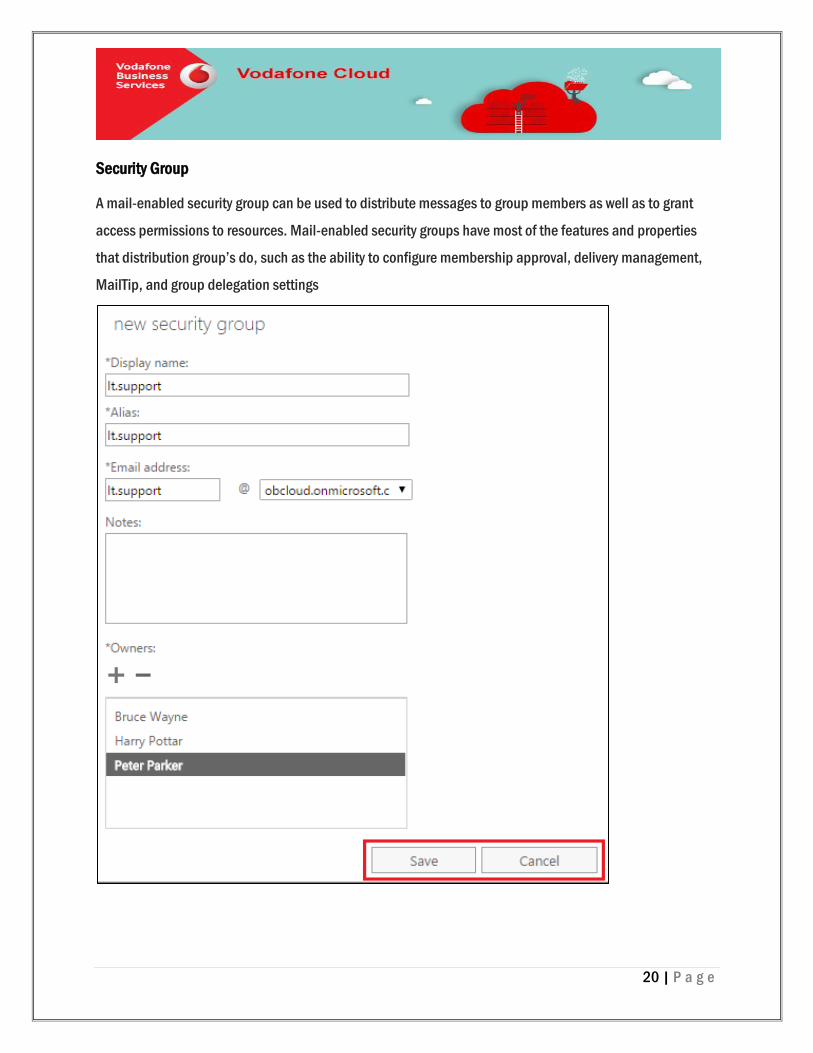
Security Group
A mail-enabled security group can be used to distribute messages to group members as well as to grant
access permissions to resources. Mail-enabled security groups have most of the features and properties
that distribution group’s do, such as the ability to configure membership approval, delivery management,
MailTip, and group delegation settings
21 | P a g e
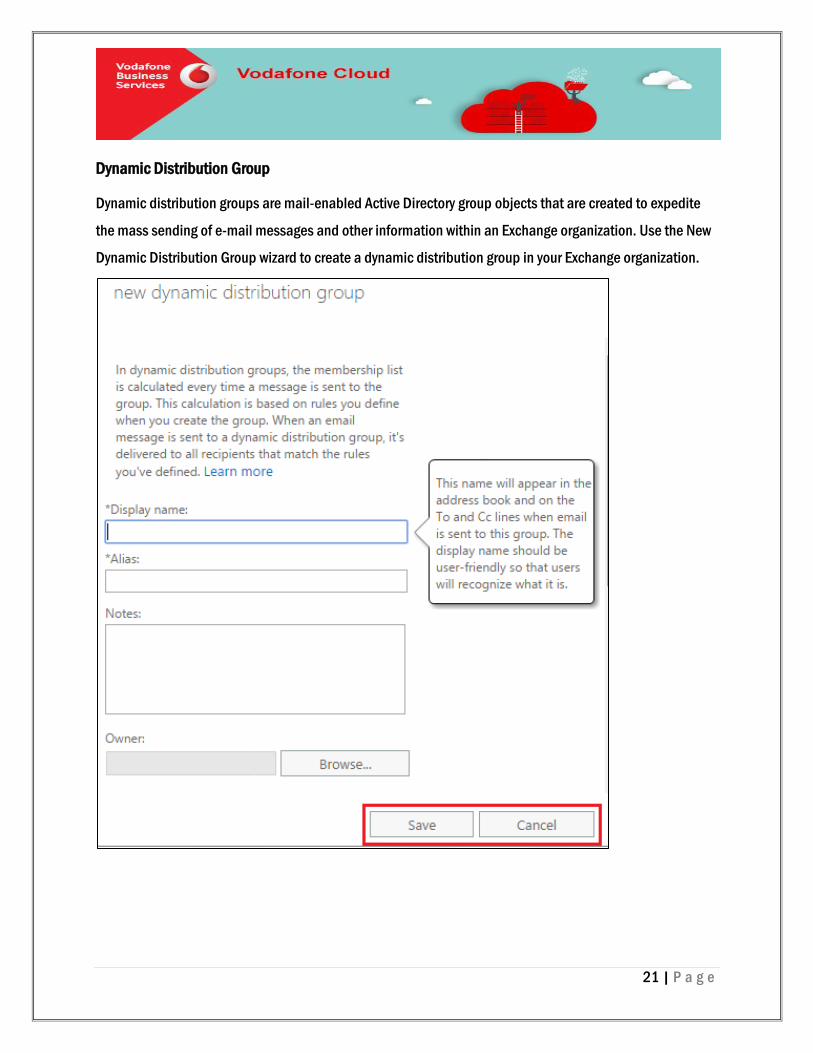
Dynamic Distribution Group
Dynamic distribution groups are mail-enabled Active Directory group objects that are created to expedite
the mass sending of e-mail messages and other information within an Exchange organization. Use the New
Dynamic Distribution Group wizard to create a dynamic distribution group in your Exchange organization.
22 | P a g e
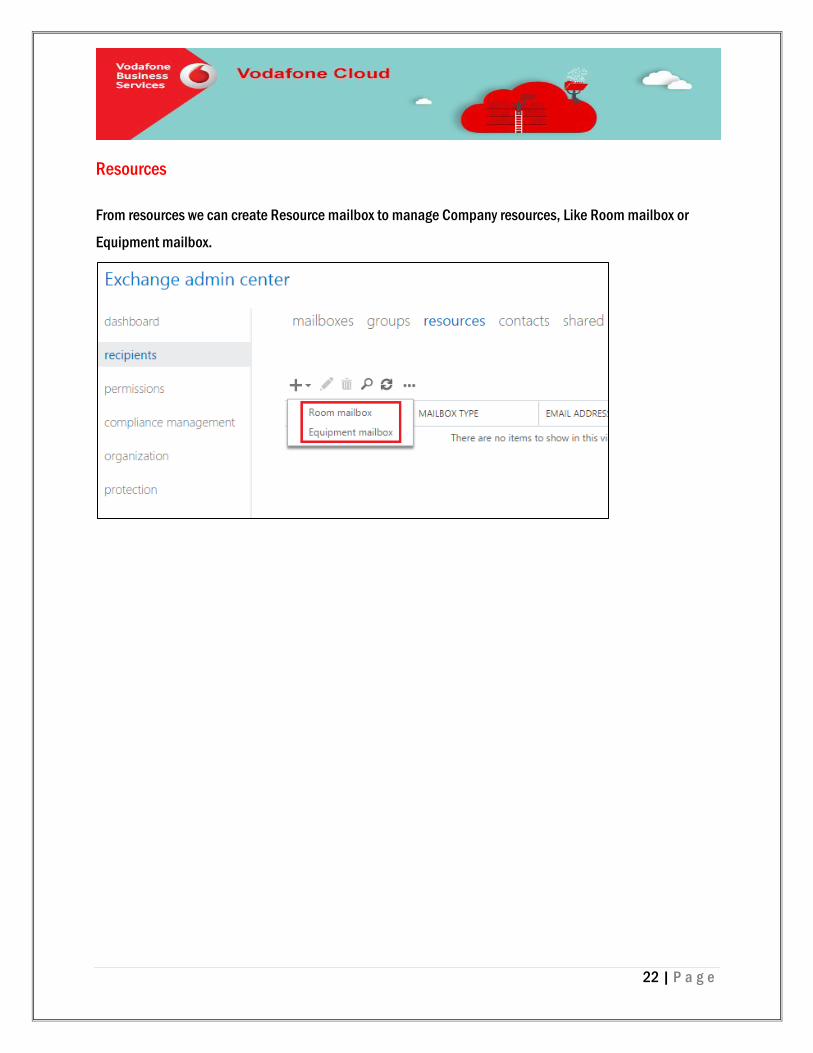
Resources
From resources we can create Resource mailbox to manage Company resources, Like Room mailbox or
Equipment mailbox.
23 | P a g e
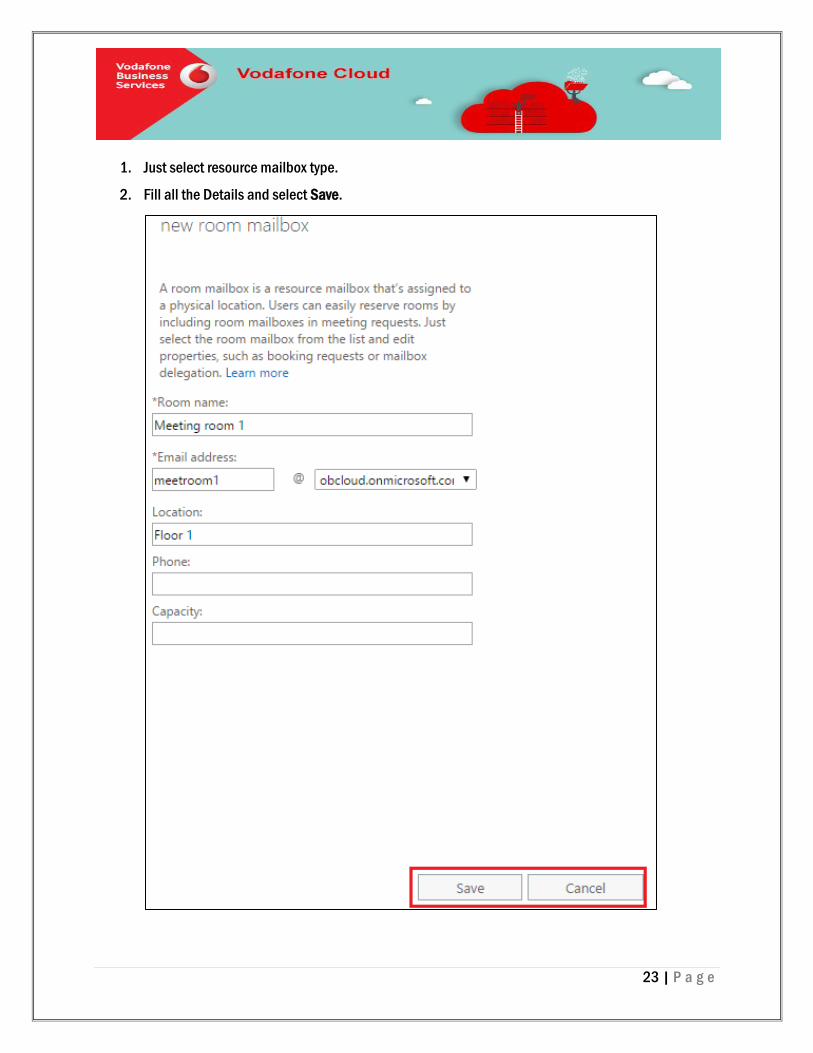
1. Just select resource mailbox type.
2. Fill all the Details and select Save.
24 | P a g e
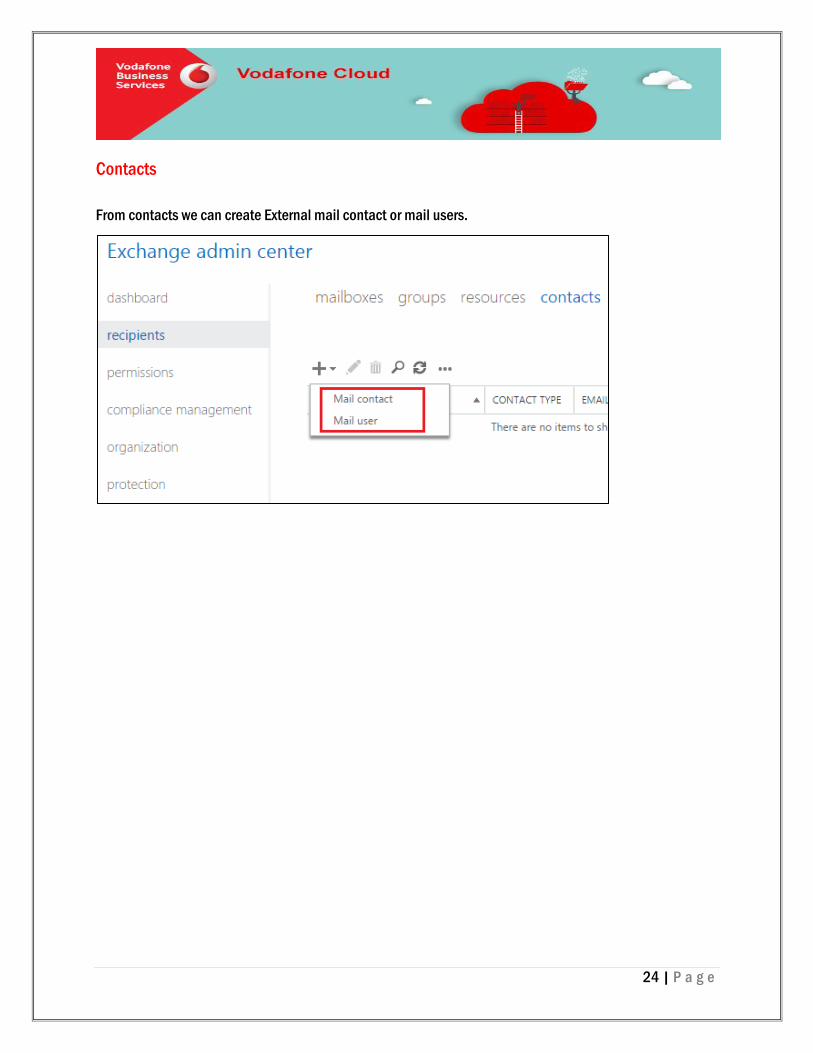
Contacts
From contacts we can create External mail contact or mail users.
25 | P a g e
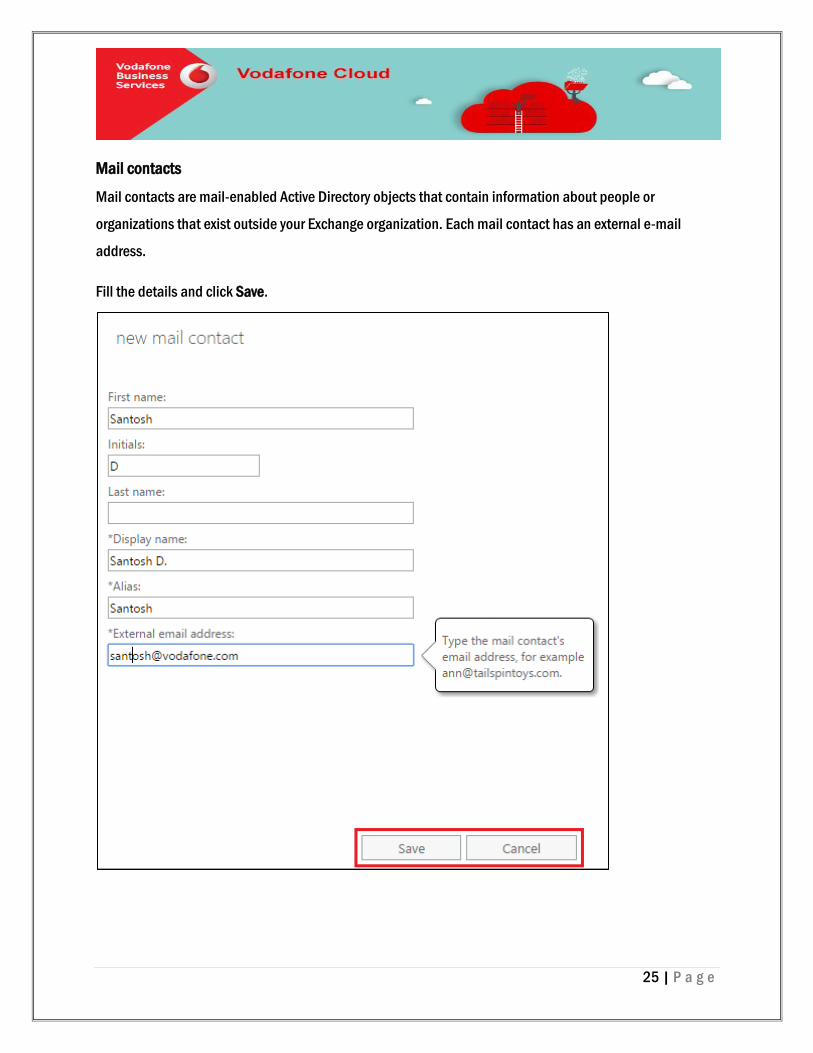
Mail contacts
Mail contacts are mail-enabled Active Directory objects that contain information about people or
organizations that exist outside your Exchange organization. Each mail contact has an external e-mail
address.
Fill the details and click Save.
26 | P a g e
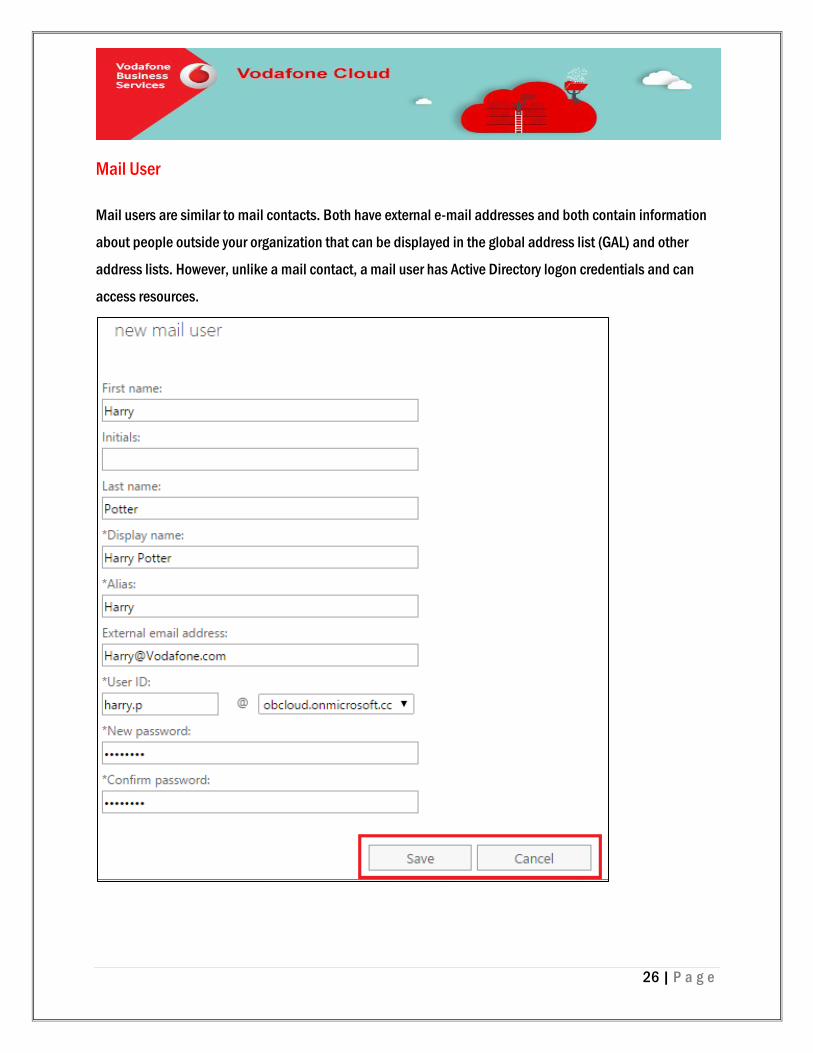
Mail User
Mail users are similar to mail contacts. Both have external e-mail addresses and both contain information
about people outside your organization that can be displayed in the global address list (GAL) and other
address lists. However, unlike a mail contact, a mail user has Active Directory logon credentials and can
access resources.
27 | P a g e
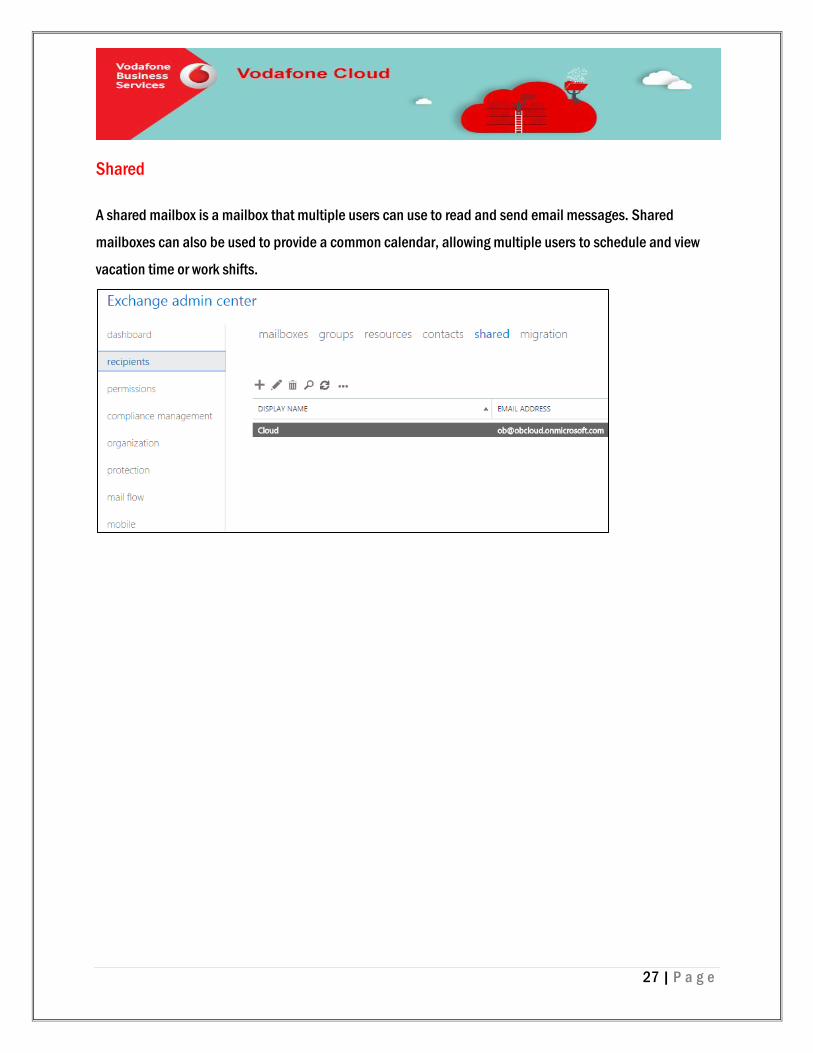
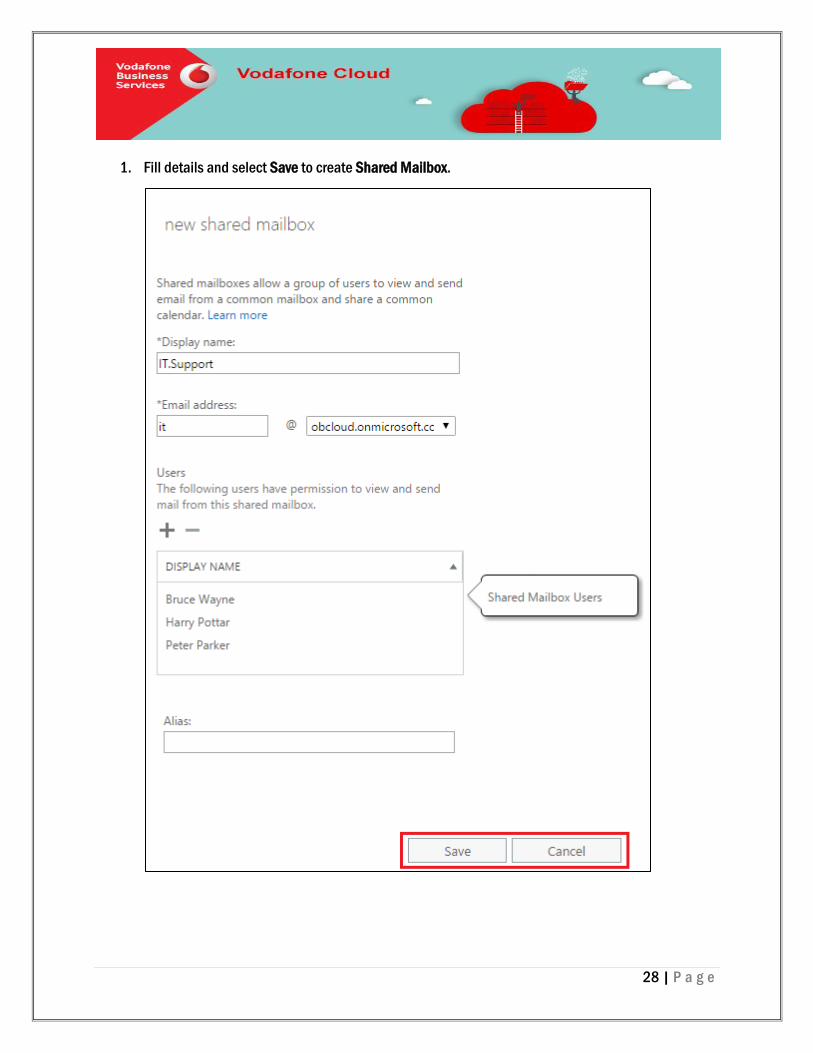
Shared
A shared mailbox is a mailbox that multiple users can use to read and send email messages. Shared
mailboxes can also be used to provide a common calendar, allowing multiple users to schedule and view
vacation time or work shifts.
28 | P a g e
1. Fill details and select Save to create Shared Mailbox.
29 | P a g e
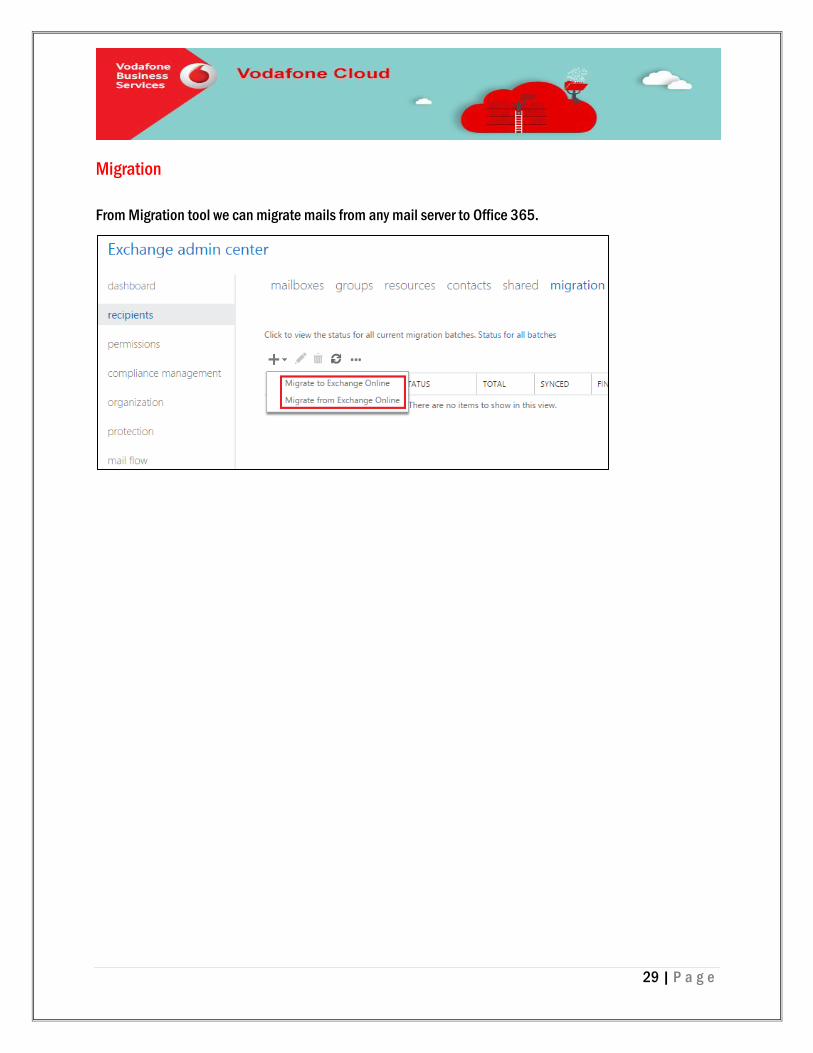
Migration
From Migration tool we can migrate mails from any mail server to Office 365.
30 | P a g e
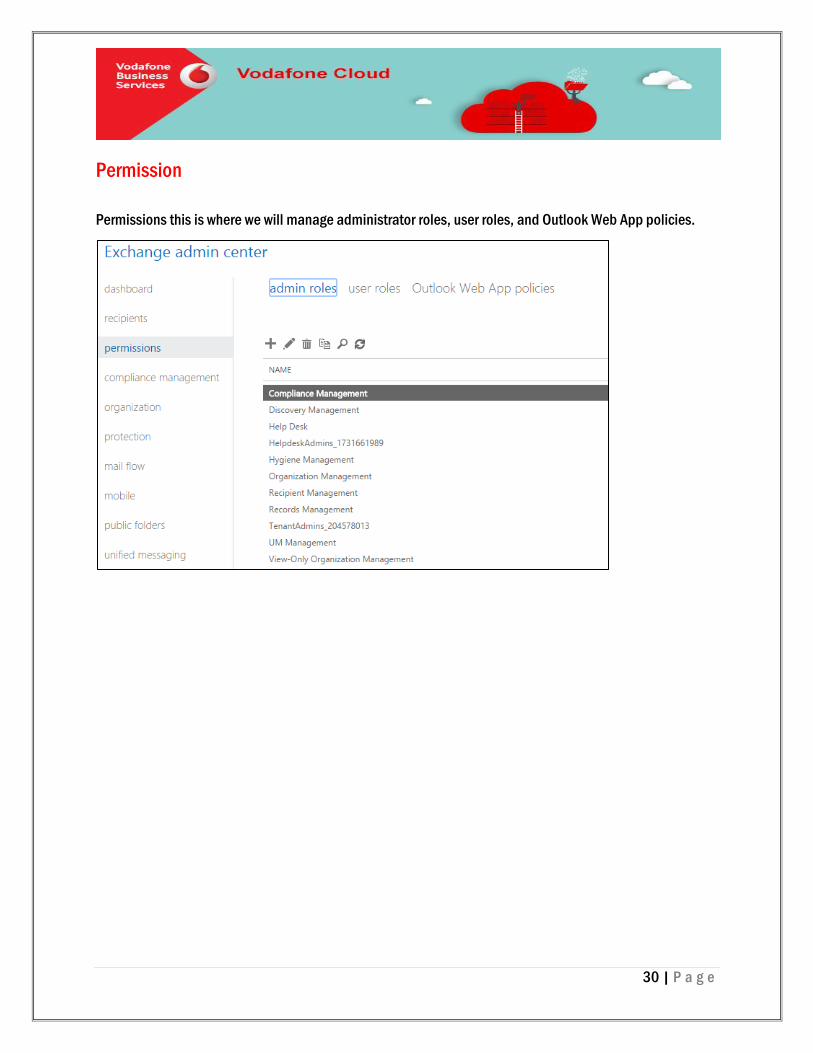
Permission
Permissions this is where we will manage administrator roles, user roles, and Outlook Web App policies.
31 | P a g e
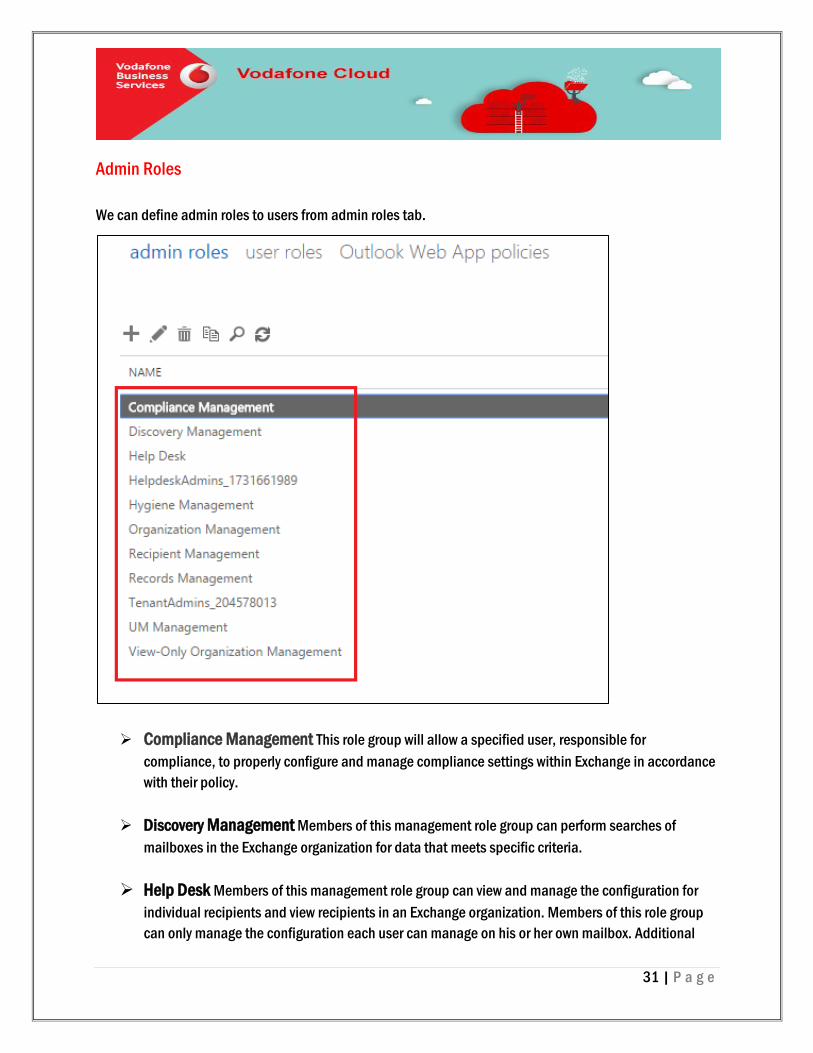
Admin Roles
We can define admin roles to users from admin roles tab.
Compliance Management This role group will allow a specified user, responsible for
compliance, to properly configure and manage compliance settings within Exchange in accordance
with their policy.
Discovery Management Members of this management role group can perform searches of
mailboxes in the Exchange organization for data that meets specific criteria.
Help Desk Members of this management role group can view and manage the configuration for
individual recipients and view recipients in an Exchange organization. Members of this role group
can only manage the configuration each user can manage on his or her own mailbox. Additional
32 | P a g e
permissions can be added by assigning additional management roles to this role group.
Helpdesk Admins Membership in this role group is synchronized across services and managed
centrally. This role group is not manageable through Microsoft Exchange. Members of this role
group may include cross-service helpdesk or password administrators, as well as external partner
groups and Microsoft Support. By default, this group is not assigned any roles. However, it will be a
member of the View-Only Organization Management role group and will inherit the rights of that
group.
Hygiene Management Members of this management role group can manage Exchange anti-
spam features and grant permissions for antivirus products to integrate with Exchange.
Organization Management Members of this management role group have permissions to
manage Exchange objects and their properties in the Exchange organization. Members can also
delegate role groups and management roles in the organization. This role group shouldn't be
deleted.
Recipient Management Members of this management role group have rights to create, manage,
and remove Exchange recipient objects in the Exchange organization.
Records Management Members of this management role group can configure compliance
features such as retention policy tags, message classifications, transport rules, and more.
Tenant Admins Membership in this role group is synchronized across services and managed
centrally. This role group is not manageable through Microsoft Exchange. Members of this role
group may include cross-service administrators, as well as external partner groups and Microsoft
Support. By default, this group may not be assigned any roles. However, it will be a member of the
Organization Management role group and will inherit the capabilities of that role group.
UM Management Members of this management role group can manage Unified Messaging
organization, server, and recipient configuration.
View-Only Organization Management Members of this management role group can view
recipient and configuration objects and their properties in the Exchange organization.
33 | P a g e
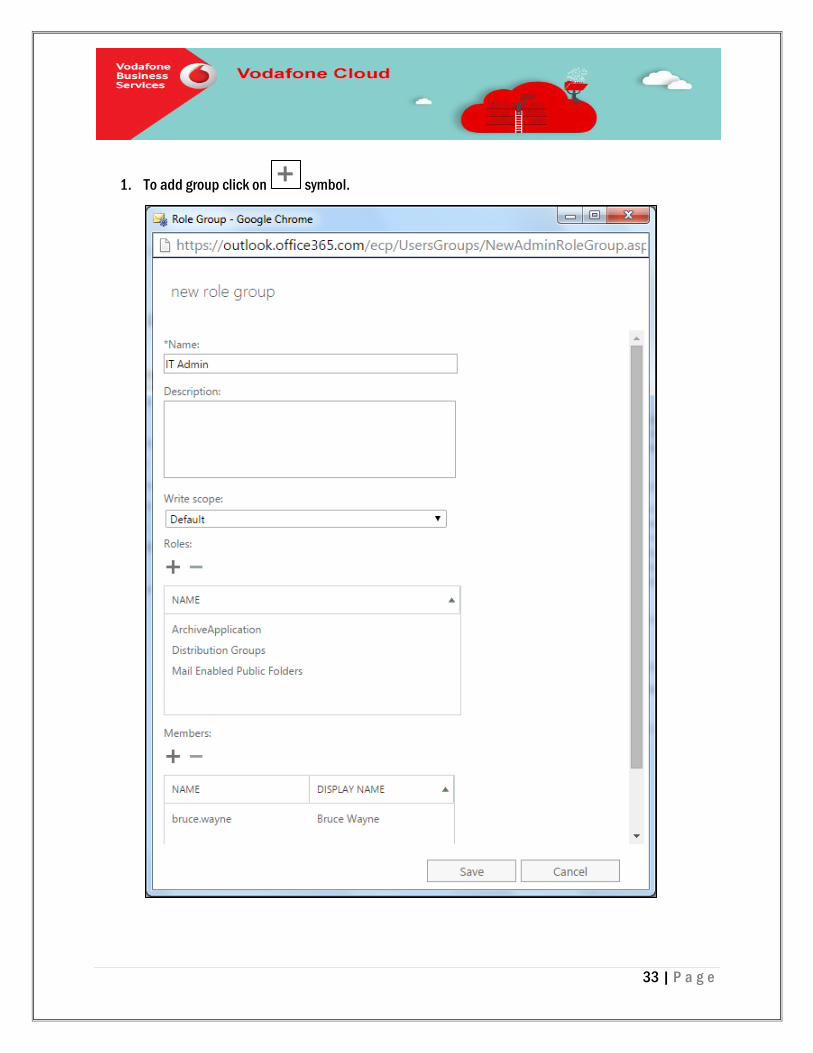
1. To add group click on symbol.
34 | P a g e
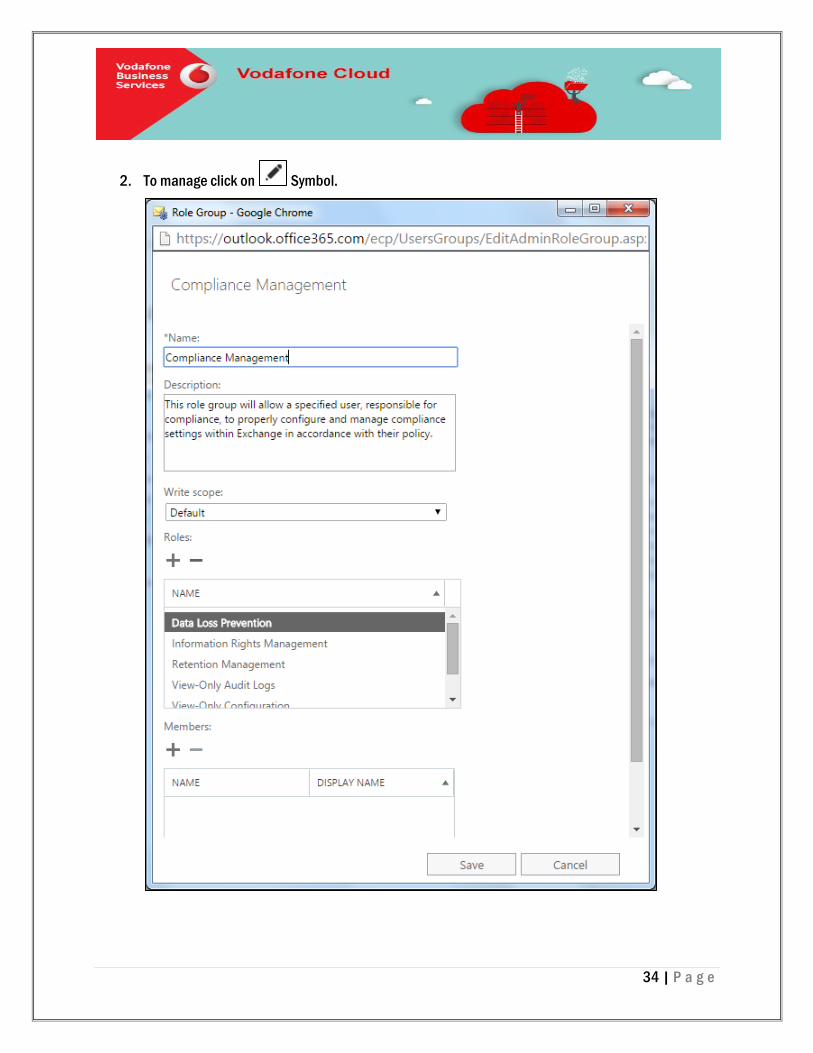
2. To manage click on Symbol.
35 | P a g e
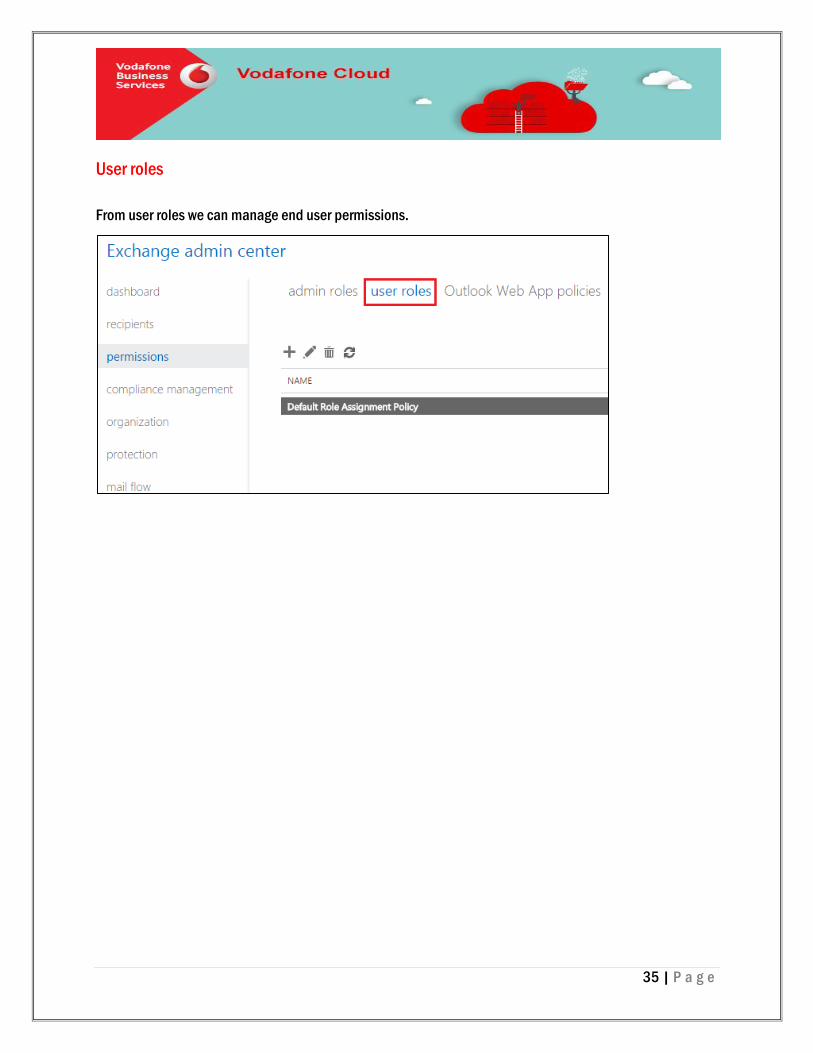
User roles
From user roles we can manage end user permissions.

36 | P a g e
Outlook web app Policy
From Outlook web app policy tab we can manage default features of OWA.
Example
1. Communication management
a. Instant Messaging
b. Text messaging
c. Exchange ActiveSync
2. Information management
a. Journaling
b. Notes
c. Inbox Rules
3. User experience
a. Themes
b. Premium client
c. Email signature
37 | P a g e
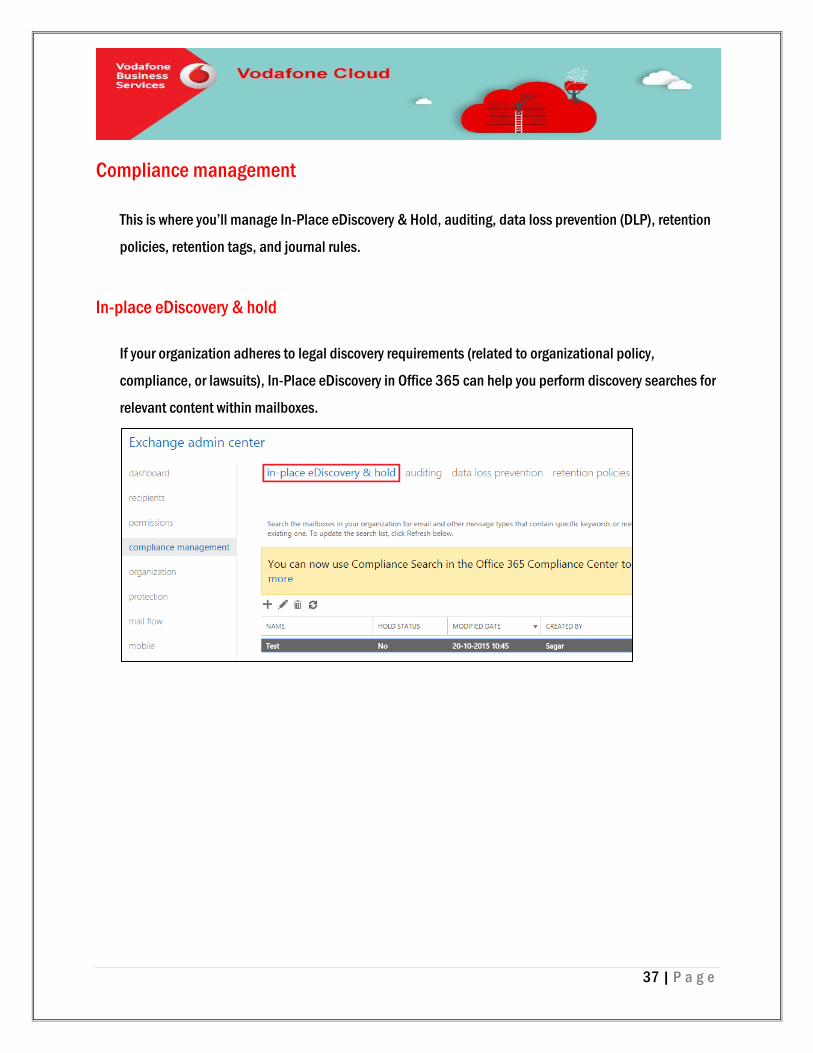
Compliance management
This is where you’ll manage In-Place eDiscovery & Hold, auditing, data loss prevention (DLP), retention
policies, retention tags, and journal rules.
In-place eDiscovery & hold
If your organization adheres to legal discovery requirements (related to organizational policy,
compliance, or lawsuits), In-Place eDiscovery in Office 365 can help you perform discovery searches for
relevant content within mailboxes.
38 | P a g e
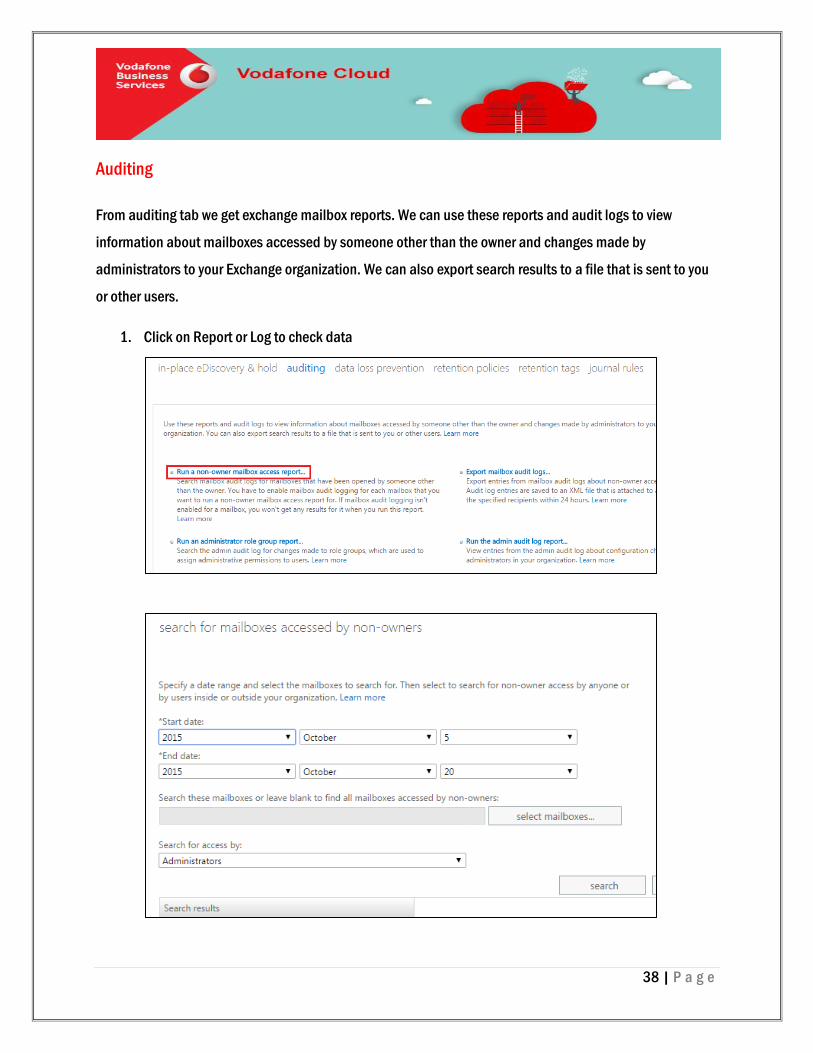
Auditing
From auditing tab we get exchange mailbox reports. We can use these reports and audit logs to view
information about mailboxes accessed by someone other than the owner and changes made by
administrators to your Exchange organization. We can also export search results to a file that is sent to you
or other users.
1. Click on Report or Log to check data
39 | P a g e
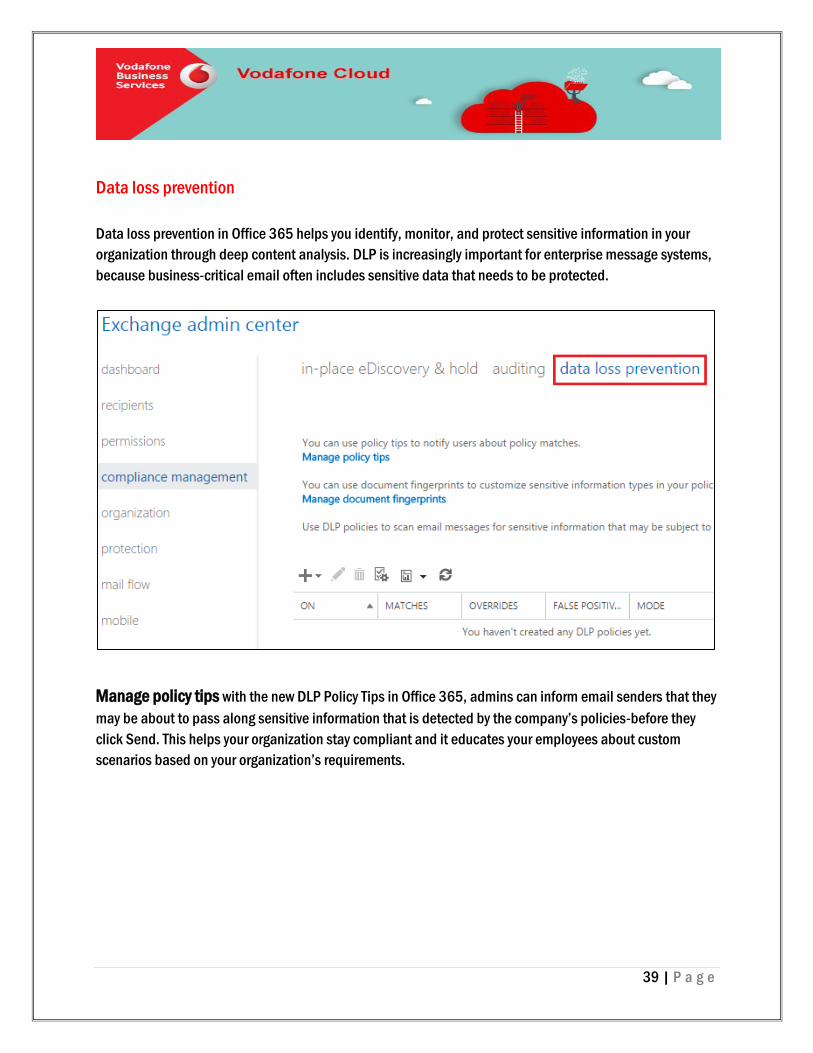
Data loss prevention
Data loss prevention in Office 365 helps you identify, monitor, and protect sensitive information in your
organization through deep content analysis. DLP is increasingly important for enterprise message systems,
because business-critical email often includes sensitive data that needs to be protected.
Manage policy tips with the new DLP Policy Tips in Office 365, admins can inform email senders that they
may be about to pass along sensitive information that is detected by the company’s policies-before they
click Send. This helps your organization stay compliant and it educates your employees about custom
scenarios based on your organization’s requirements.
40 | P a g e
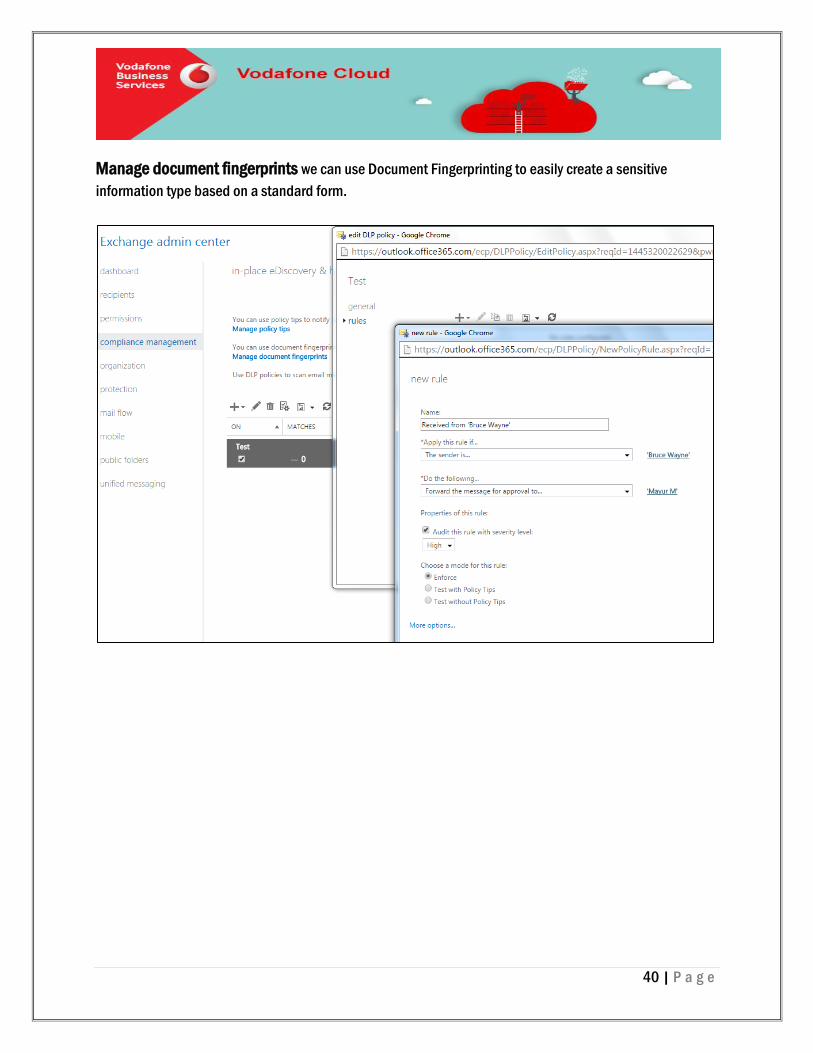
Manage document fingerprints we can use Document Fingerprinting to easily create a sensitive
information type based on a standard form.
41 | P a g e
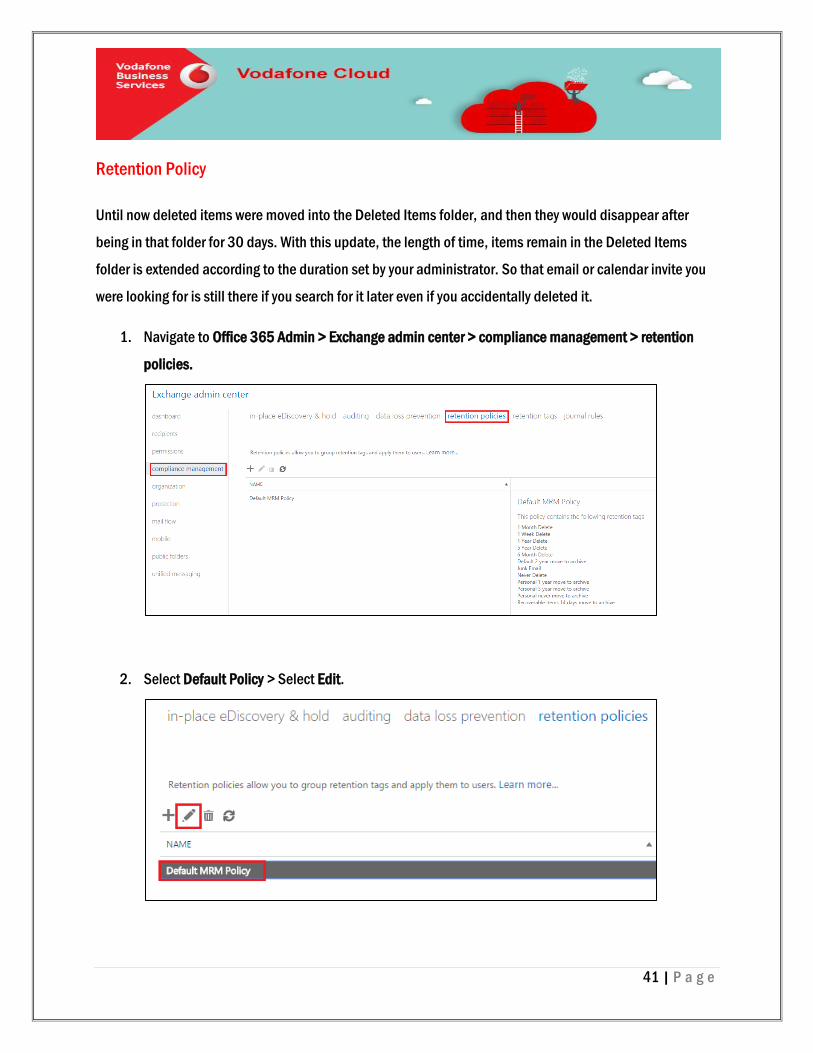
Retention Policy
Until now deleted items were moved into the Deleted Items folder, and then they would disappear after
being in that folder for 30 days. With this update, the length of time, items remain in the Deleted Items
folder is extended according to the duration set by your administrator. So that email or calendar invite you
were looking for is still there if you search for it later even if you accidentally deleted it.
1. Navigate to Office 365 Admin > Exchange admin center > compliance management > retention
policies.
2. Select Default Policy > Select Edit.
42 | P a g e
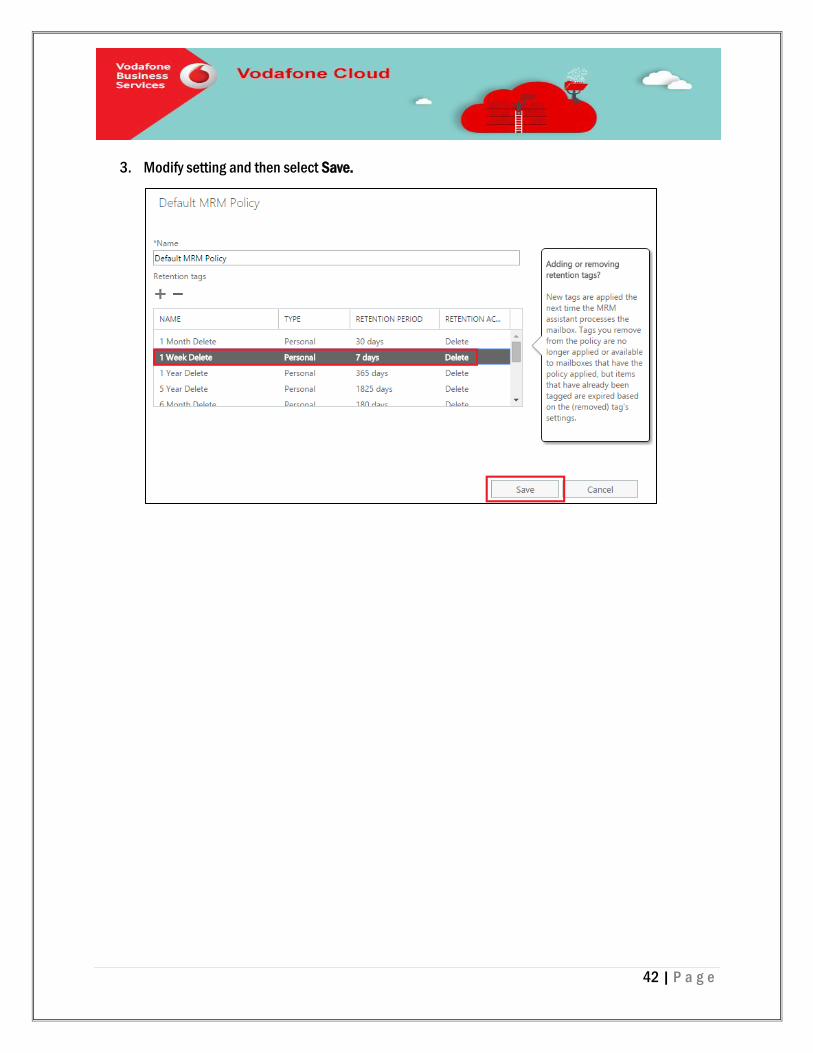
3. Modify setting and then select Save.
43 | P a g e
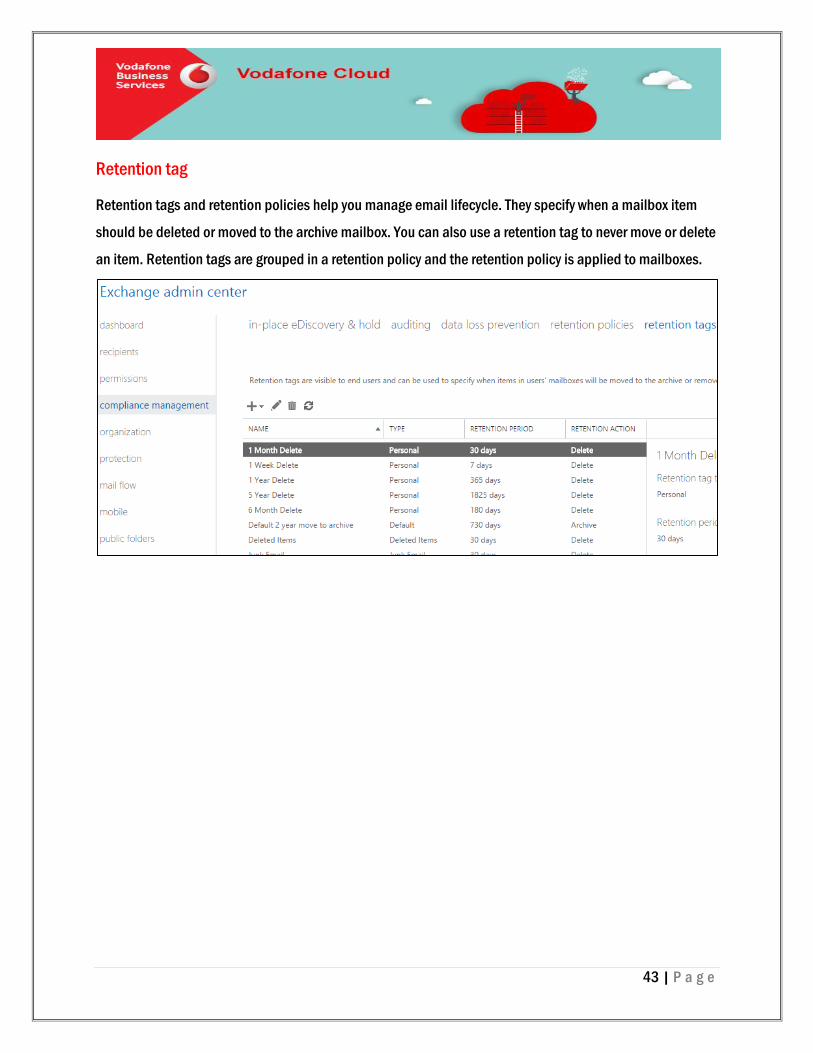
Retention tag
Retention tags and retention policies help you manage email lifecycle. They specify when a mailbox item
should be deleted or moved to the archive mailbox. You can also use a retention tag to never move or delete
an item. Retention tags are grouped in a retention policy and the retention policy is applied to mailboxes.
44 | P a g e
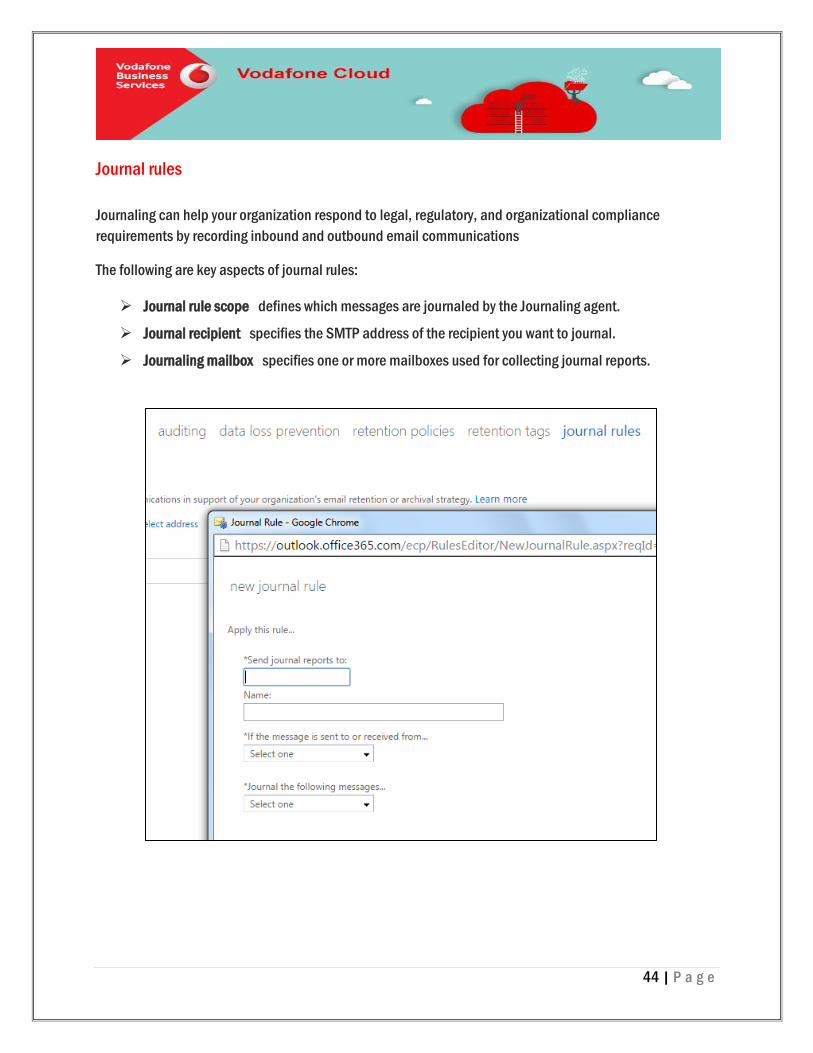
Journal rules
Journaling can help your organization respond to legal, regulatory, and organizational compliance
requirements by recording inbound and outbound email communications
The following are key aspects of journal rules:
Journal rule scope defines which messages are journaled by the Journaling agent.
Journal recipient specifies the SMTP address of the recipient you want to journal.
Journaling mailbox specifies one or more mailboxes used for collecting journal reports.
45 | P a g e
Organization
This is where you’ll manage organization sharing and apps for Outlook.
Sharing
From sharing administrator can enable users to share their calendar and contact information with external
users.
46 | P a g e
Add-ins
From Add-ins tab we can enable add-ins for mailboxes. Add-ins let your users do and see more without
leaving their mailbox.
47 | P a g e
Protection
This is where you’ll manage malware filters, connection filters, content filters, outbound spam, and
quarantine for your organization.
Malware filter
Office 365 provides built-in malware and spam filtering capabilities that help protect inbound and
outbound messages from malicious software and help protect your network from spam transferred through
email. Administrators do not need to set up or maintain the filtering technologies, which are enabled by
default. However, administrators can make company-specific filtering customizations in the Exchange
admin center (EAC).
48 | P a g e
Connection Filter
Most of us have friends and business partners we trust. It can be frustrating to find email from them in your
junk email folder, or even blocked entirely by a spam filter. If you want to make sure that email sent from
people you trust isn’t blocked, you can use the connection filter policy to create an Allow list, also known as
a safe sender list, of IP addresses that you trust. You can also create a blocked senders list, which is a list of
IP addresses, typically from known spammers, that you don’t ever want to receive email messages from.
49 | P a g e
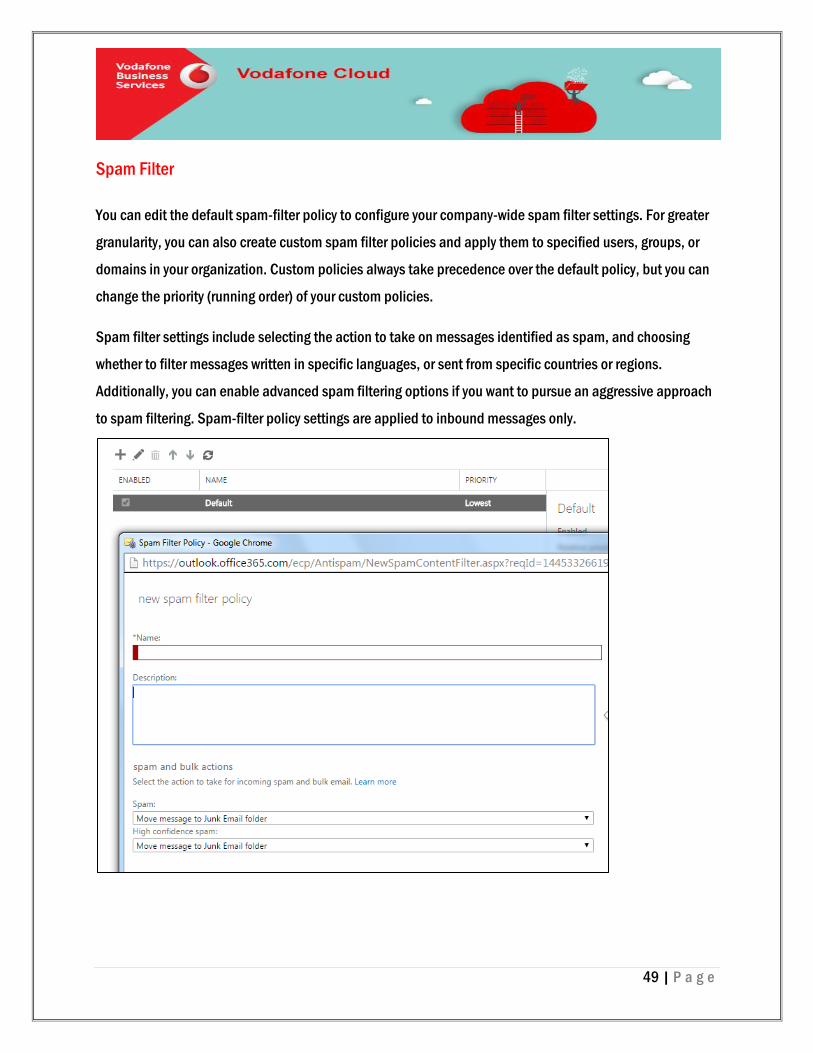
Spam Filter
You can edit the default spam-filter policy to configure your company-wide spam filter settings. For greater
granularity, you can also create custom spam filter policies and apply them to specified users, groups, or
domains in your organization. Custom policies always take precedence over the default policy, but you can
change the priority (running order) of your custom policies.
Spam filter settings include selecting the action to take on messages identified as spam, and choosing
whether to filter messages written in specific languages, or sent from specific countries or regions.
Additionally, you can enable advanced spam filtering options if you want to pursue an aggressive approach
to spam filtering. Spam-filter policy settings are applied to inbound messages only.
50 | P a g e
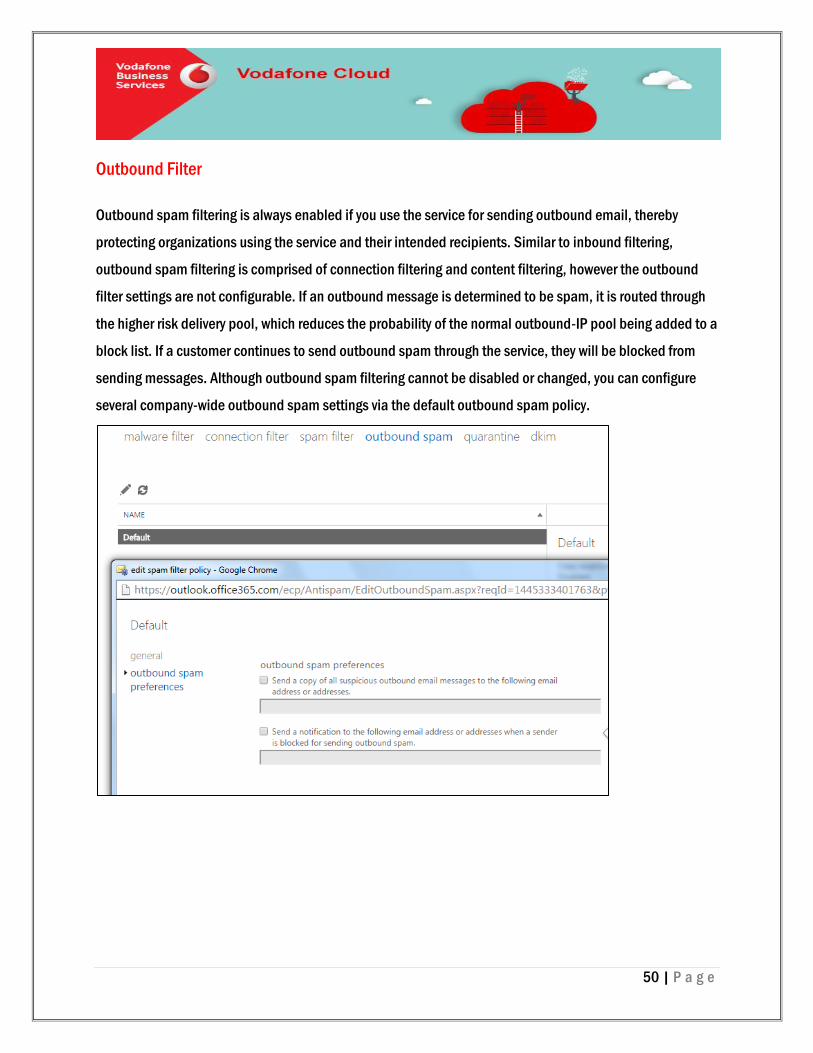
Outbound Filter
Outbound spam filtering is always enabled if you use the service for sending outbound email, thereby
protecting organizations using the service and their intended recipients. Similar to inbound filtering,
outbound spam filtering is comprised of connection filtering and content filtering, however the outbound
filter settings are not configurable. If an outbound message is determined to be spam, it is routed through
the higher risk delivery pool, which reduces the probability of the normal outbound-IP pool being added to a
block list. If a customer continues to send outbound spam through the service, they will be blocked from
sending messages. Although outbound spam filtering cannot be disabled or changed, you can configure
several company-wide outbound spam settings via the default outbound spam policy.
51 | P a g e
Quarantine
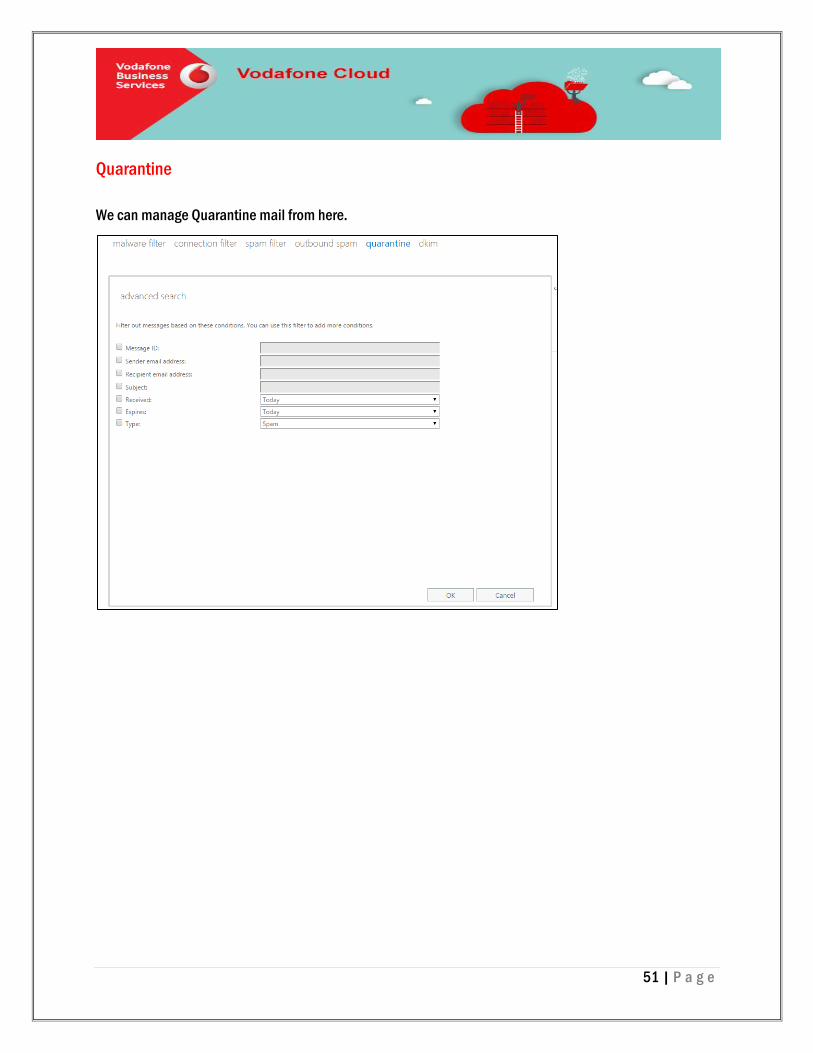
We can manage Quarantine mail from here.
52 | P a g e
Dkim
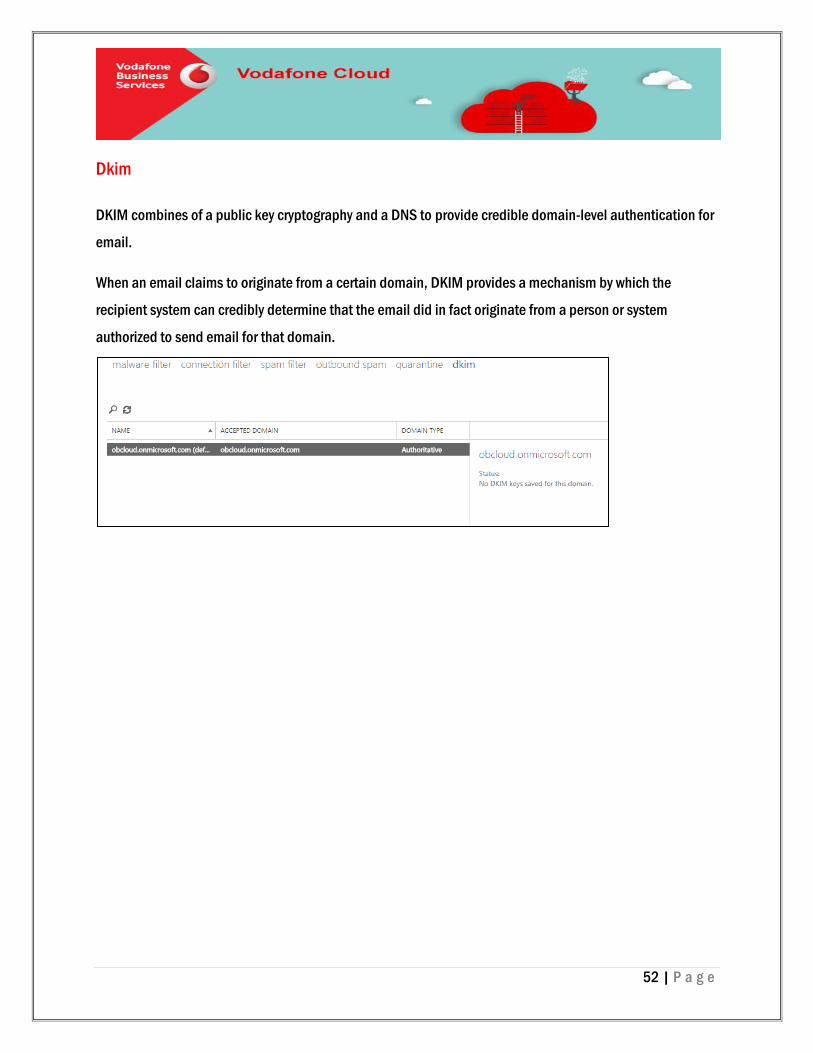
DKIM combines of a public key cryptography and a DNS to provide credible domain-level authentication for
email.
When an email claims to originate from a certain domain, DKIM provides a mechanism by which the
recipient system can credibly determine that the email did in fact originate from a person or system
authorized to send email for that domain.
53 | P a g e
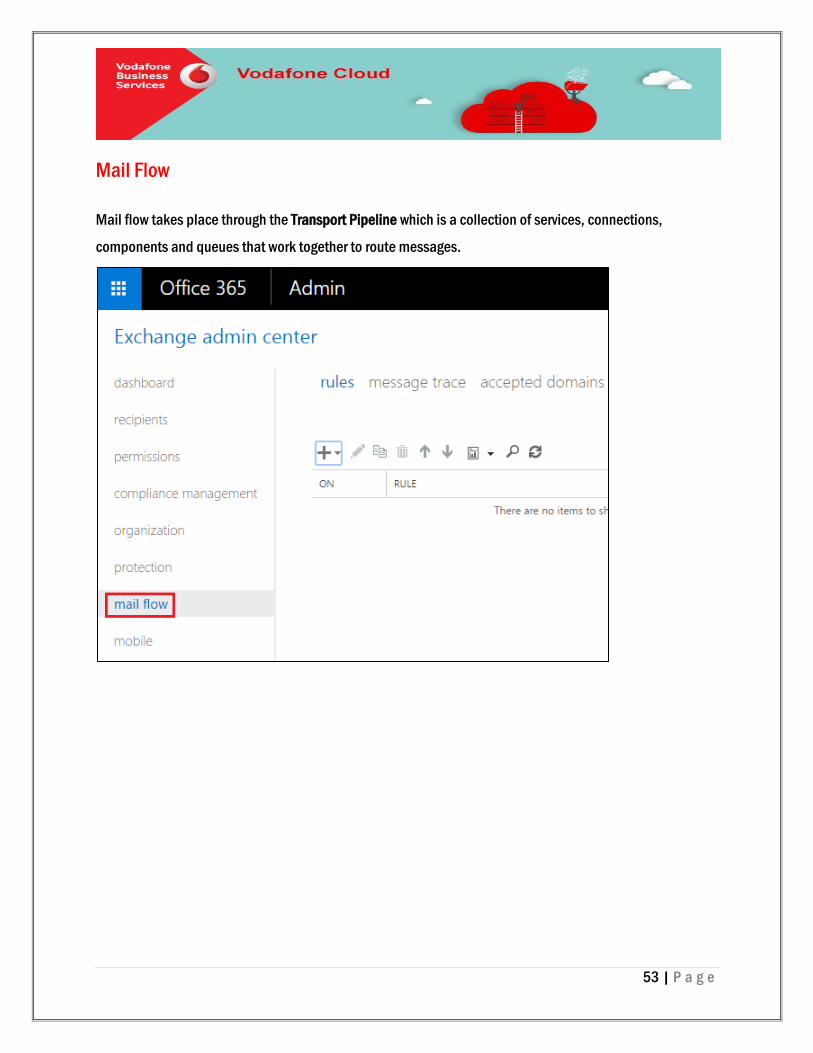
Mail Flow
Mail flow takes place through the Transport Pipeline which is a collection of services, connections,
components and queues that work together to route messages.
54 | P a g e
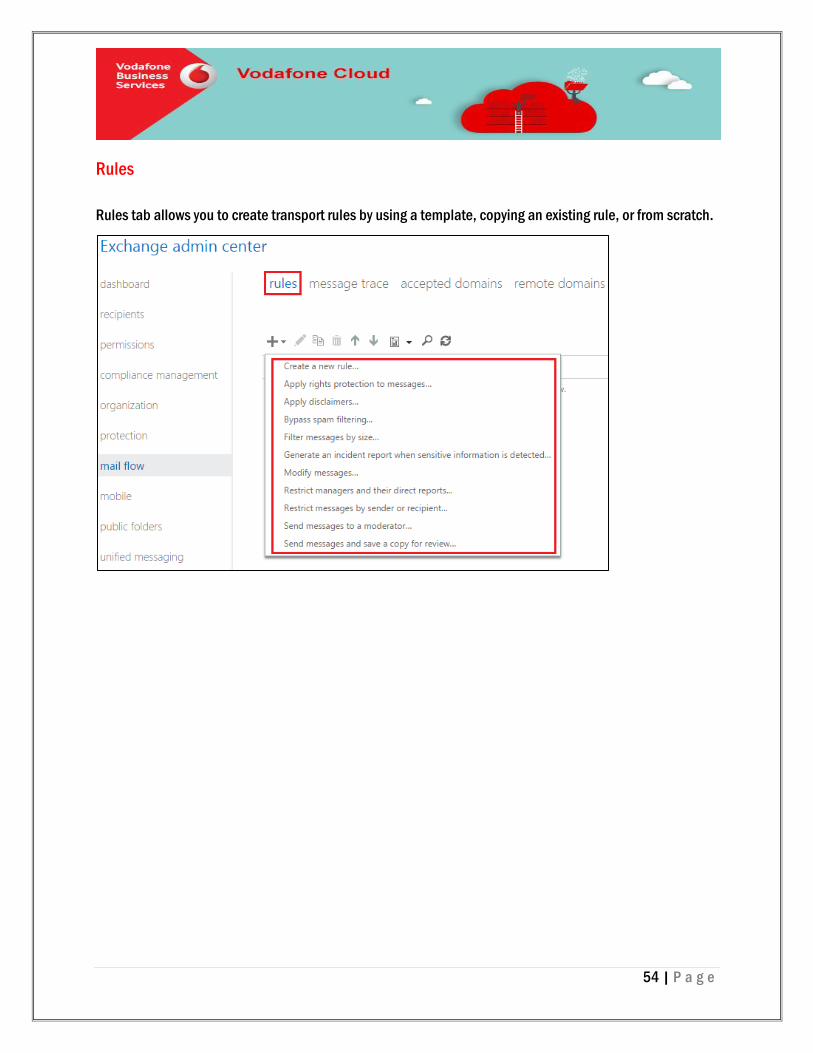
Rules
Rules tab allows you to create transport rules by using a template, copying an existing rule, or from scratch.

55 | P a g e
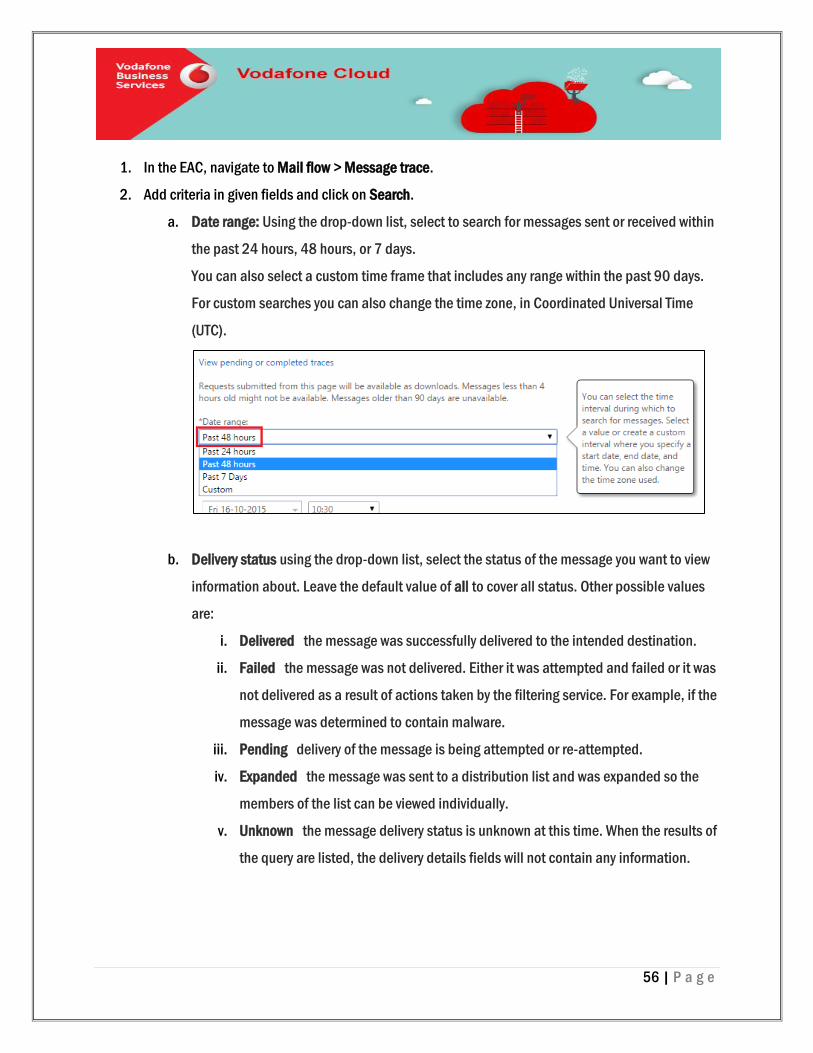
Message Trace
As an administrator, you can find out what happened to an email message by running a message trace in
the Exchange admin center (EAC). After running the message trace, you can view the results in a list, and
then view the details about a specific message.
1. Message trace data is available for the past 90 days.
2. If a message is greater than 7 days old, the results can only be viewed in a downloadable .CSV file.
56 | P a g e
1. In the EAC, navigate to Mail flow > Message trace.
2. Add criteria in given fields and click on Search.
a. Date range: Using the drop-down list, select to search for messages sent or received within
the past 24 hours, 48 hours, or 7 days.
You can also select a custom time frame that includes any range within the past 90 days.
For custom searches you can also change the time zone, in Coordinated Universal Time
(UTC).
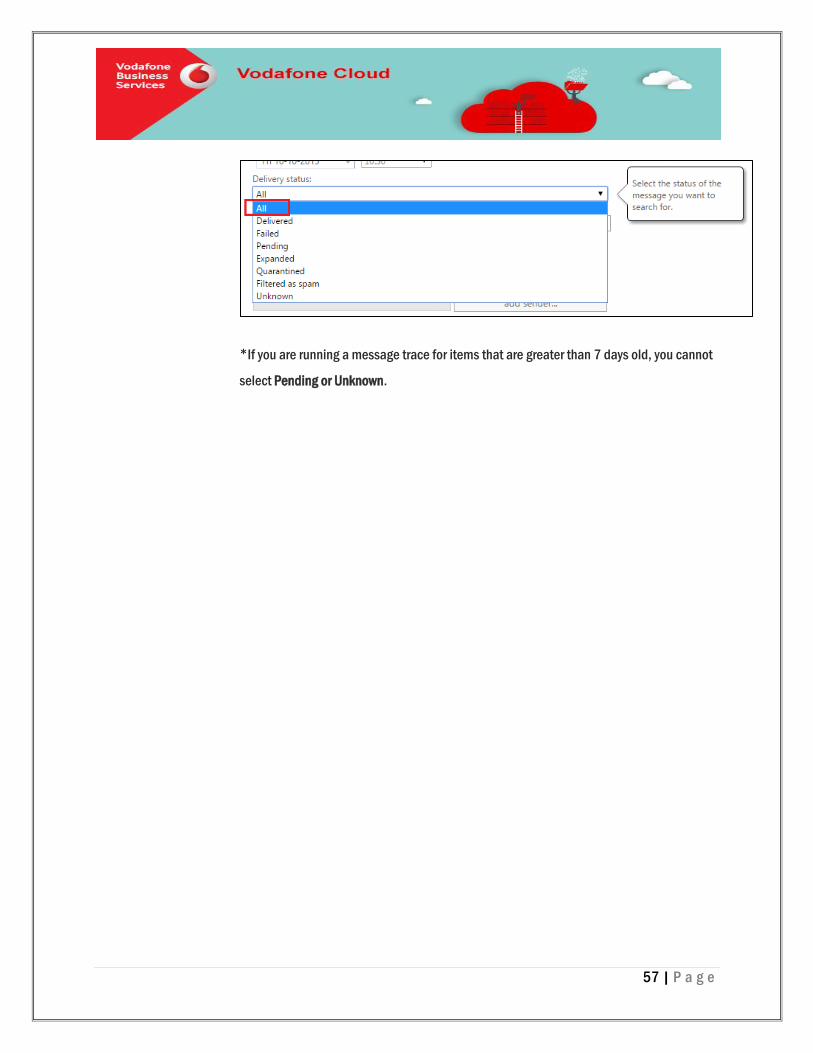
b. Delivery status using the drop-down list, select the status of the message you want to view
information about. Leave the default value of all to cover all status. Other possible values
are:
i. Delivered the message was successfully delivered to the intended destination.
ii. Failed the message was not delivered. Either it was attempted and failed or it was
not delivered as a result of actions taken by the filtering service. For example, if the
message was determined to contain malware.
iii. Pending delivery of the message is being attempted or re-attempted.
iv. Expanded the message was sent to a distribution list and was expanded so the
members of the list can be viewed individually.
v. Unknown the message delivery status is unknown at this time. When the results of
the query are listed, the delivery details fields will not contain any information.
57 | P a g e
*If you are running a message trace for items that are greater than 7 days old, you cannot
select Pending or Unknown.
58 | P a g e
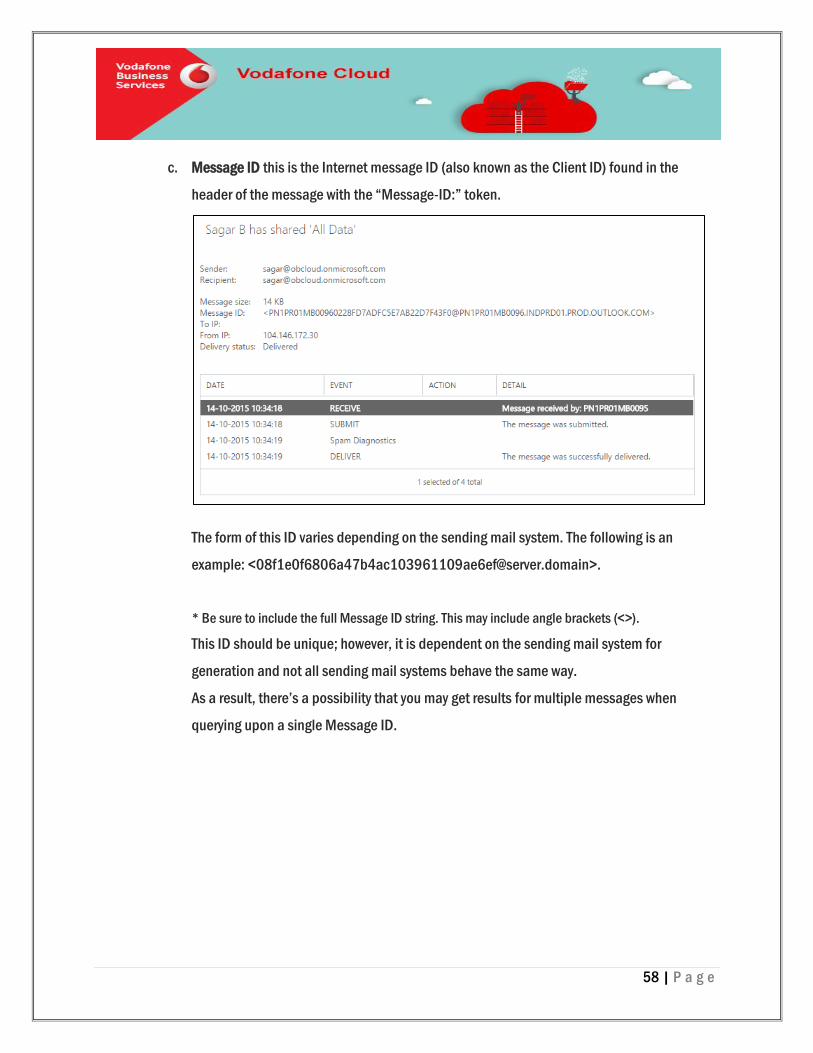
c. Message ID this is the Internet message ID (also known as the Client ID) found in the
header of the message with the ―Message-ID:‖ token.
The form of this ID varies depending on the sending mail system. The following is an
example: <[email protected]>.
* Be sure to include the full Message ID string. This may include angle brackets (<>).
This ID should be unique; however, it is dependent on the sending mail system for
generation and not all sending mail systems behave the same way.
As a result, there’s a possibility that you may get results for multiple messages when
querying upon a single Message ID.
59 | P a g e
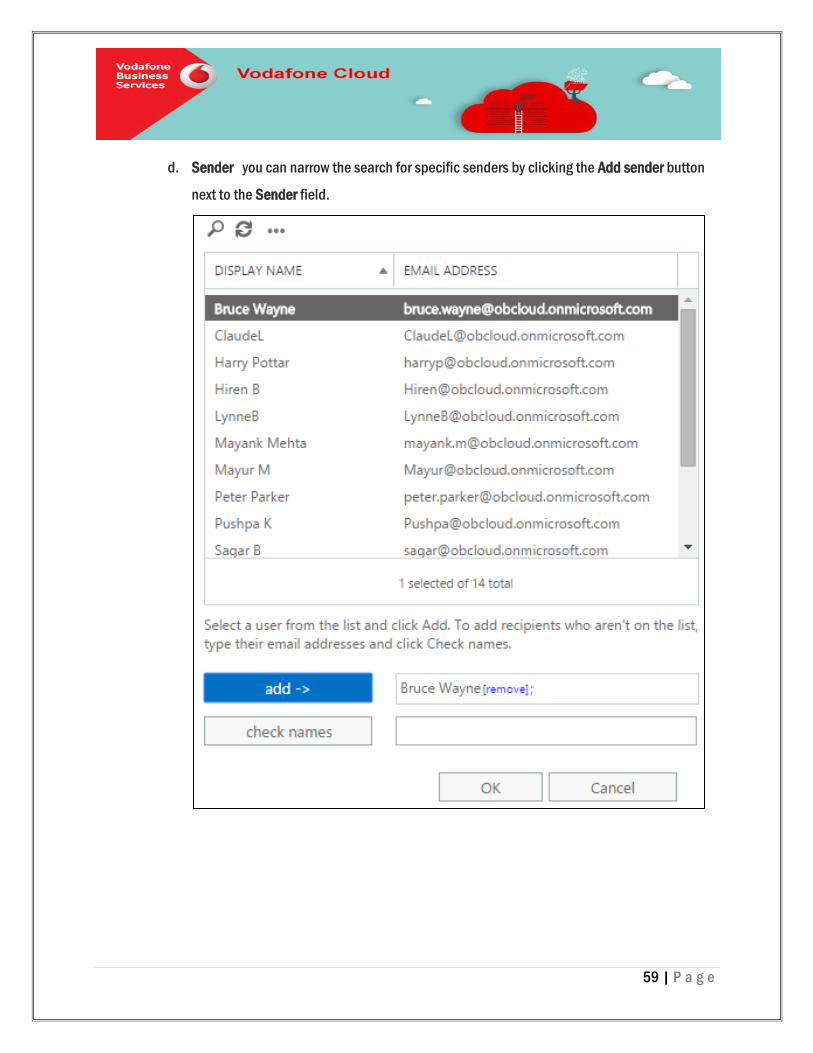
d. Sender you can narrow the search for specific senders by clicking the Add sender button
next to the Sender field.
60 | P a g e
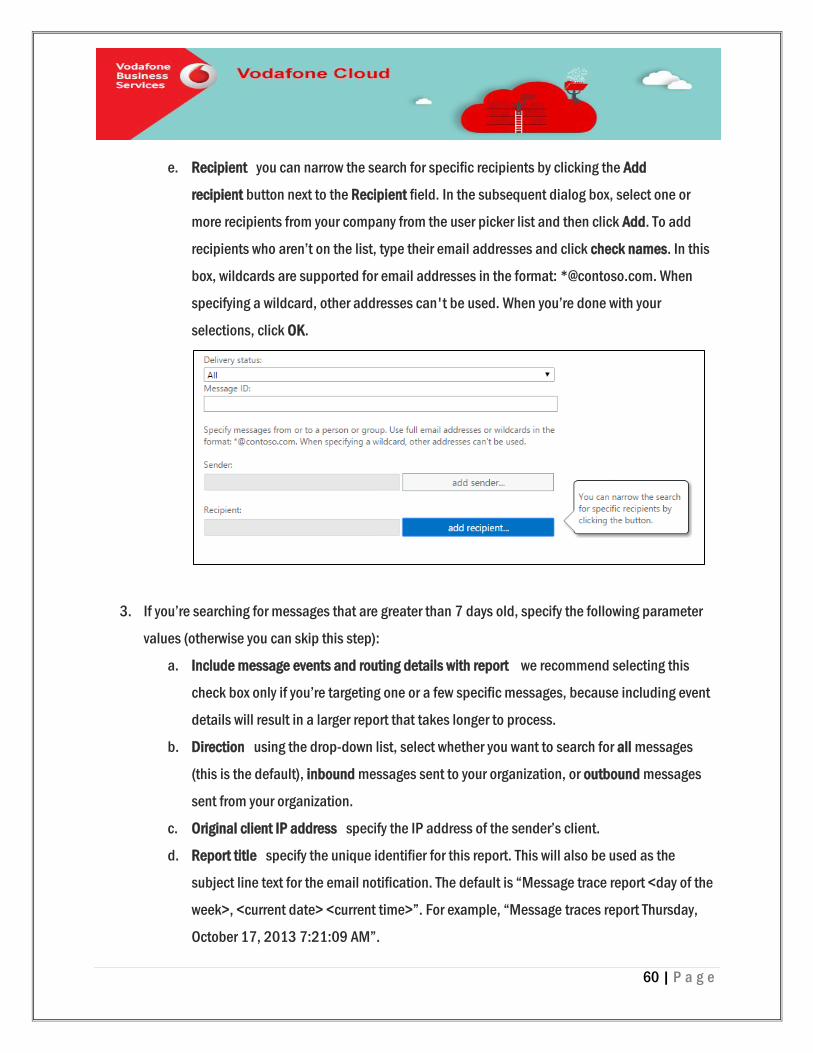
e. Recipient you can narrow the search for specific recipients by clicking the Add
recipient button next to the Recipient field. In the subsequent dialog box, select one or
more recipients from your company from the user picker list and then click Add. To add
recipients who aren’t on the list, type their email addresses and click check names. In this
box, wildcards are supported for email addresses in the format: *@contoso.com. When
specifying a wildcard, other addresses can't be used. When you’re done with your
selections, click OK.
3. If you’re searching for messages that are greater than 7 days old, specify the following parameter
values (otherwise you can skip this step):
a. Include message events and routing details with report we recommend selecting this
check box only if you’re targeting one or a few specific messages, because including event
details will result in a larger report that takes longer to process.
b. Direction using the drop-down list, select whether you want to search for all messages
(this is the default), inbound messages sent to your organization, or outbound messages
sent from your organization.
c. Original client IP address specify the IP address of the sender’s client.
d. Report title specify the unique identifier for this report. This will also be used as the
subject line text for the email notification. The default is ―Message trace report <day of the
week>, <current date> <current time>‖. For example, ―Message traces report Thursday,
October 17, 2013 7:21:09 AM‖.
61 | P a g e
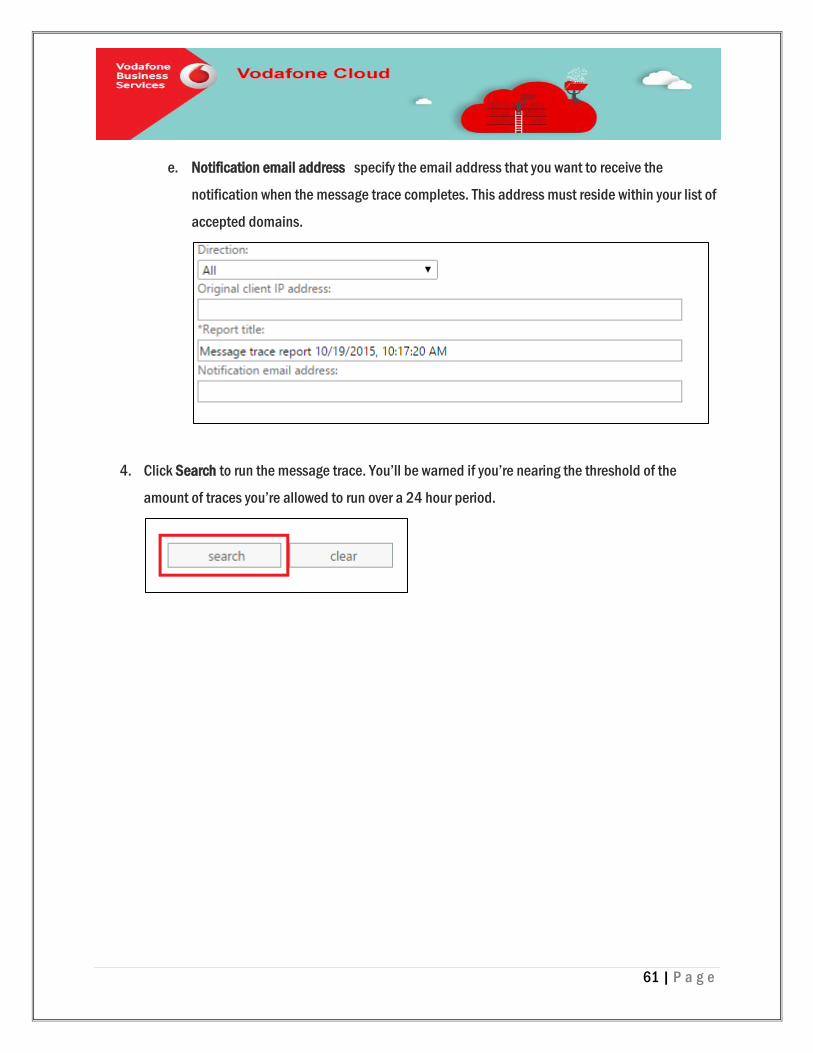
e. Notification email address specify the email address that you want to receive the
notification when the message trace completes. This address must reside within your list of
accepted domains.
4. Click Search to run the message trace. You’ll be warned if you’re nearing the threshold of the
amount of traces you’re allowed to run over a 24 hour period.
62 | P a g e
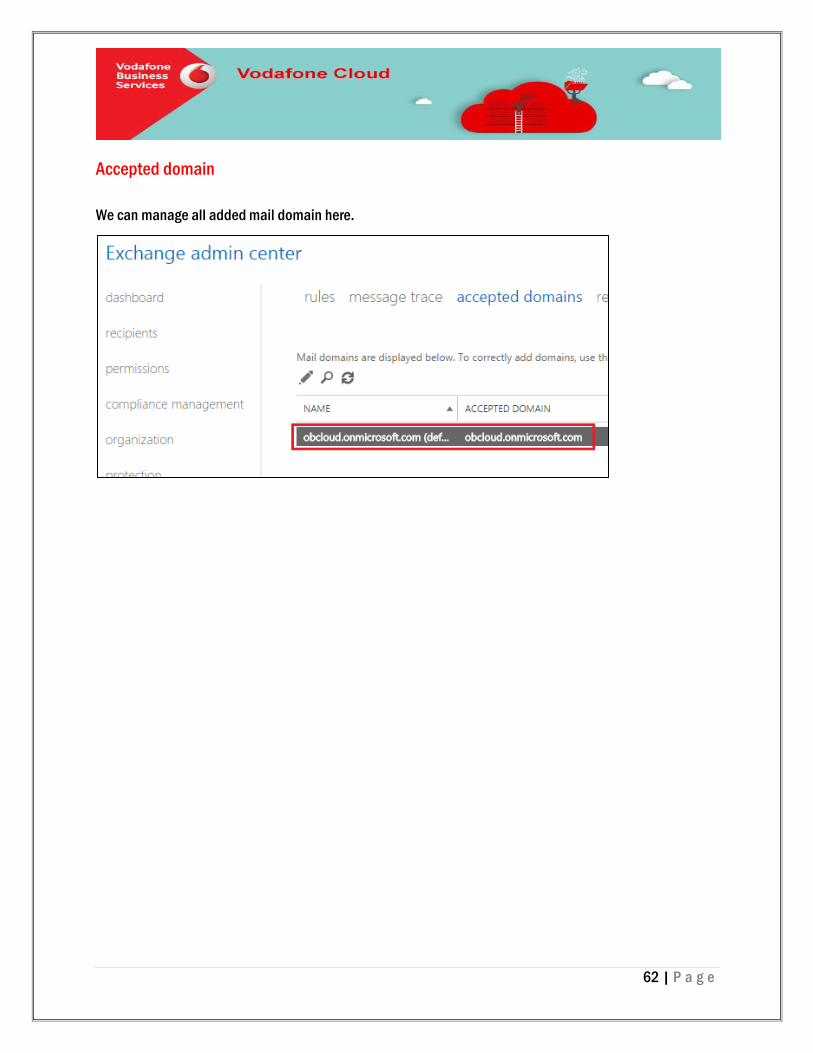
Accepted domain
We can manage all added mail domain here.
63 | P a g e
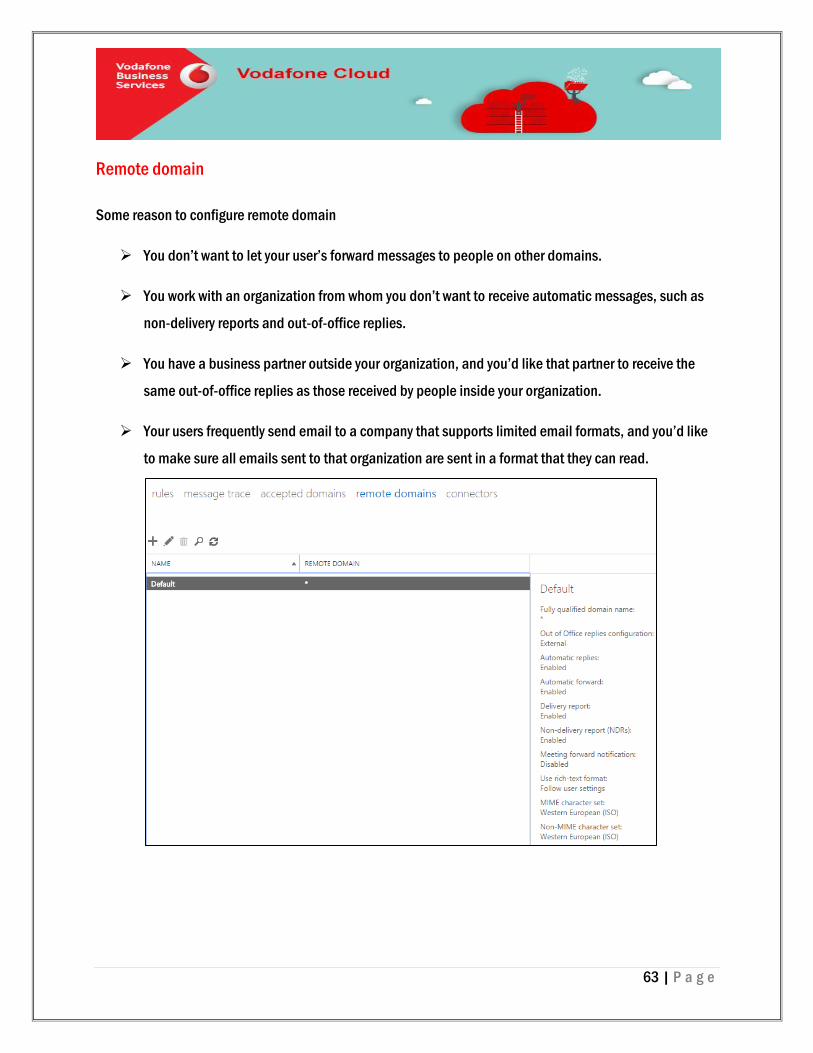
Remote domain
Some reason to configure remote domain
You don’t want to let your user’s forward messages to people on other domains.
You work with an organization from whom you don’t want to receive automatic messages, such as
non-delivery reports and out-of-office replies.
You have a business partner outside your organization, and you’d like that partner to receive the
same out-of-office replies as those received by people inside your organization.
Your users frequently send email to a company that supports limited email formats, and you’d like
to make sure all emails sent to that organization are sent in a format that they can read.
64 | P a g e
Connectors
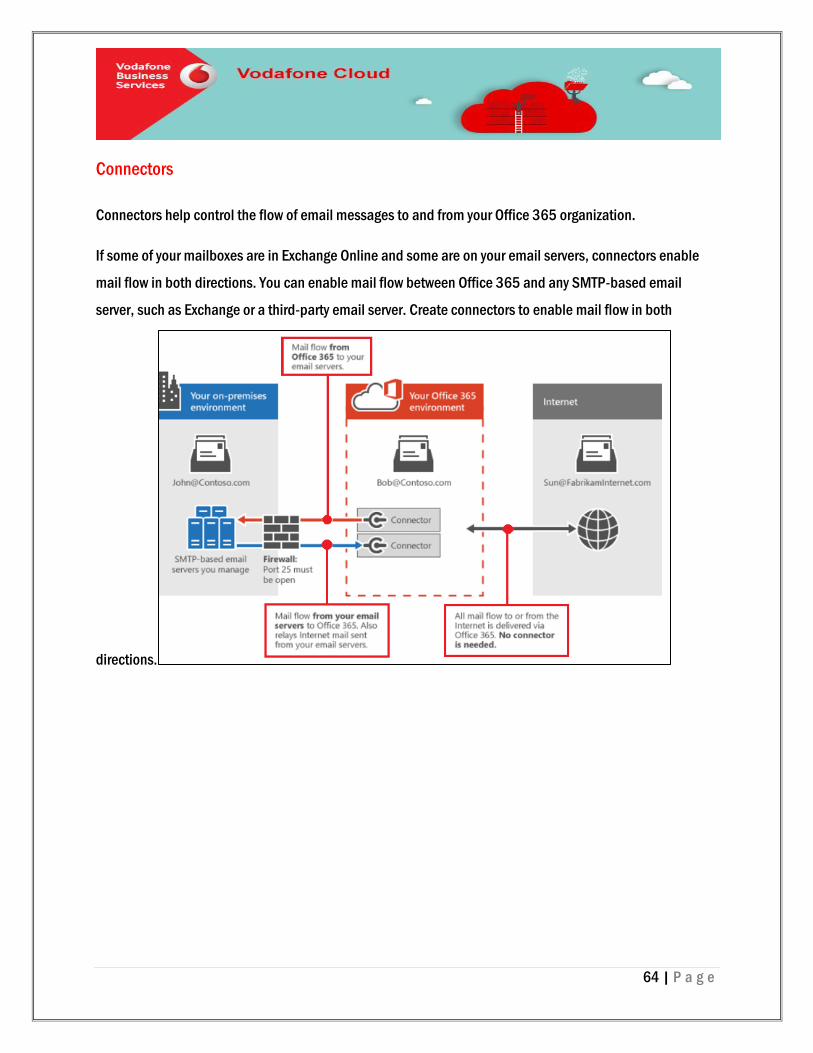
Connectors help control the flow of email messages to and from your Office 365 organization.
If some of your mailboxes are in Exchange Online and some are on your email servers, connectors enable
mail flow in both directions. You can enable mail flow between Office 365 and any SMTP-based email
server, such as Exchange or a third-party email server. Create connectors to enable mail flow in both
directions.
65 | P a g e
Mobile
Windows Phone, iPhone, iPad, Android, BlackBerry®, or other phones or tablets can be set up to send and
receive Office 365 email, access calendar and contacts information, and share documents on SharePoint
and OneDrive sites. Your users can also access their email on their phone or tablet by signing in to Outlook
Web App.
Mobile device access is turned on by default. If, however, you want to use a BlackBerry device with
Exchange ActiveSync, you’ll need to enable BlackBerry® Business Cloud Services for BlackBerry devices for
an integrated email and calendaring experience.
As an administrator, you can turn mobile access on or off and tell your users how to set up their phone or
tablet.
Mobile device access
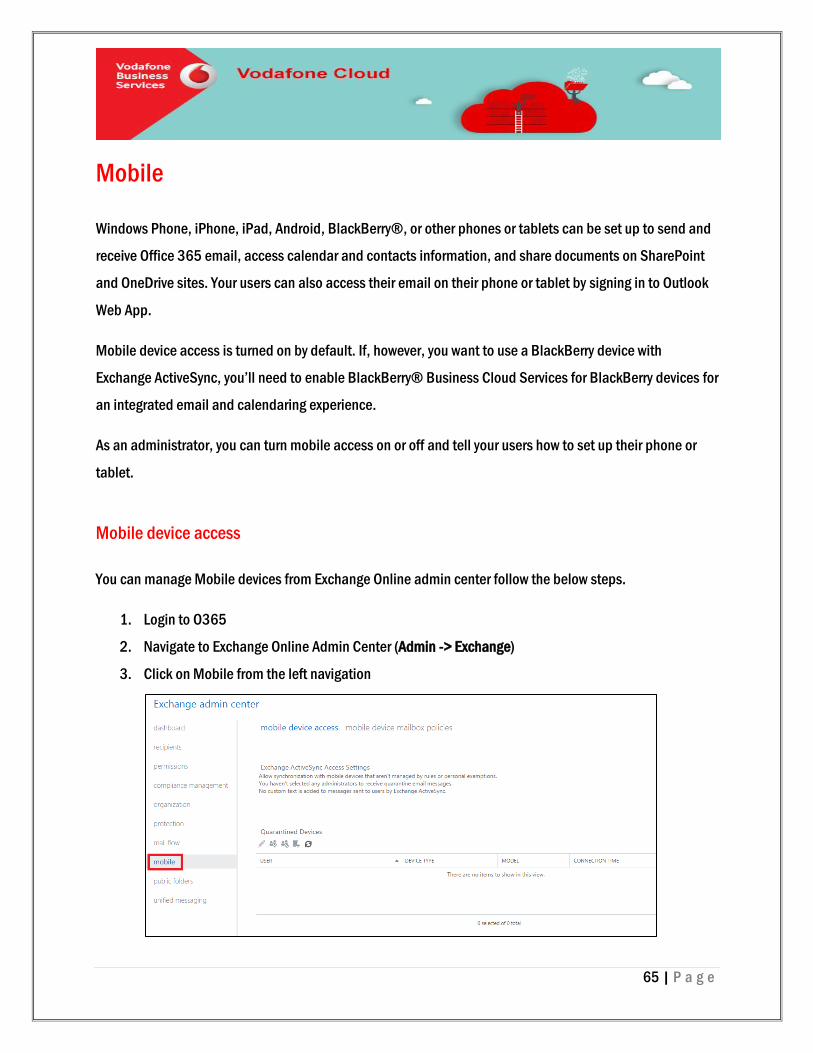
You can manage Mobile devices from Exchange Online admin center follow the below steps.
1. Login to O365
2. Navigate to Exchange Online Admin Center (Admin -> Exchange)
3. Click on Mobile from the left navigation
66 | P a g e
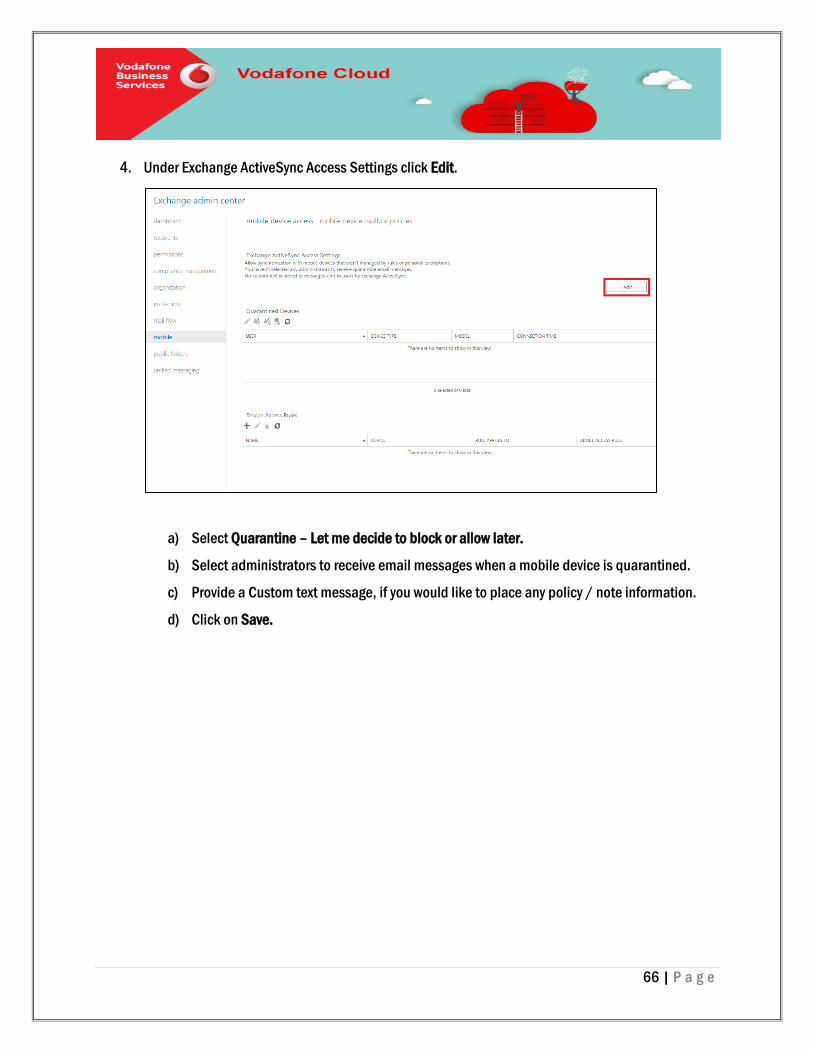
4. Under Exchange ActiveSync Access Settings click Edit.
a) Select Quarantine – Let me decide to block or allow later.
b) Select administrators to receive email messages when a mobile device is quarantined.
c) Provide a Custom text message, if you would like to place any policy / note information.
d) Click on Save.

67 | P a g e
5. Now when a user tries to access email from his mobile Outlook, it automatically places the device
under Quarantine Devices.
a. The requester will receive an notification email, with the custom message which was
included in the earlier configuration 4(a)
b. Send’s an email to Quarantine Notification email address for approval.
68 | P a g e
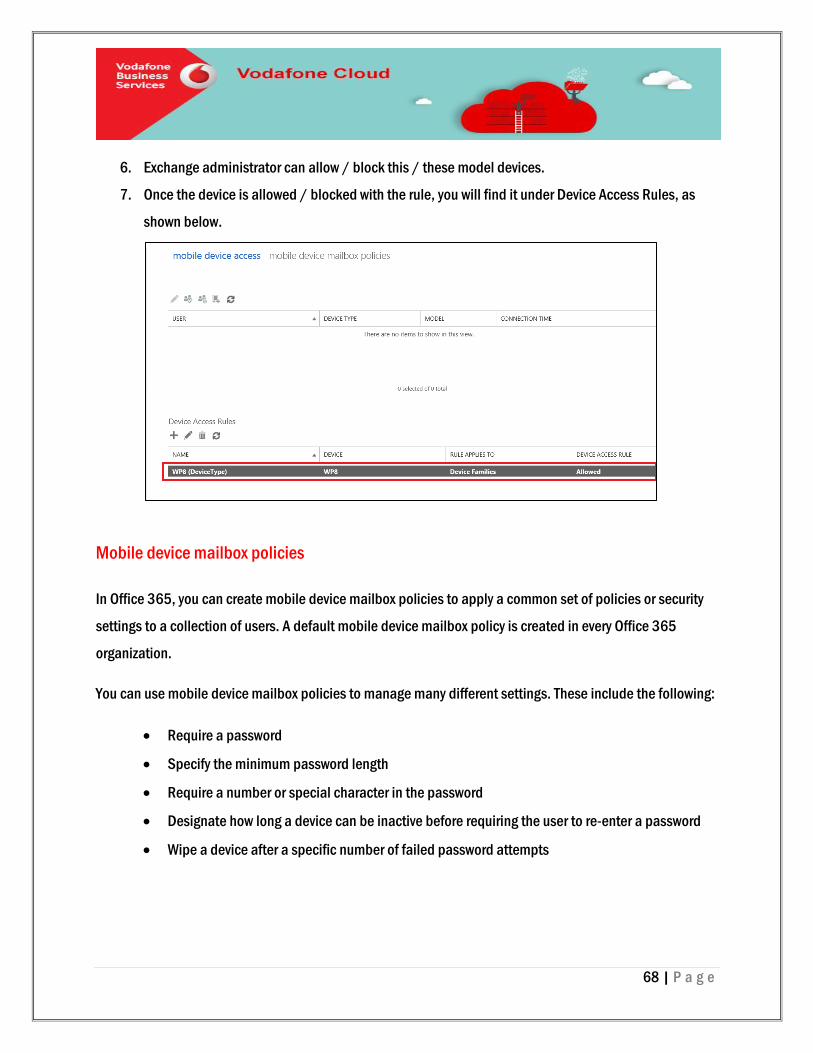
6. Exchange administrator can allow / block this / these model devices.
7. Once the device is allowed / blocked with the rule, you will find it under Device Access Rules, as
shown below.
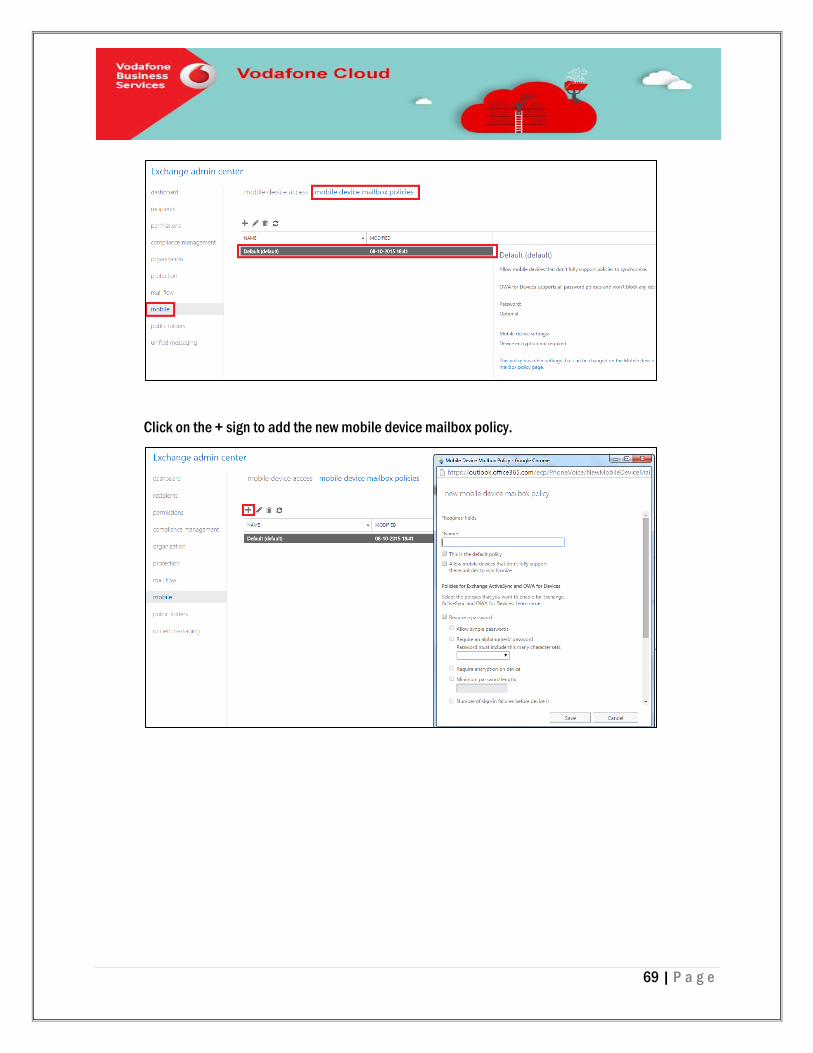
Mobile device mailbox policies
In Office 365, you can create mobile device mailbox policies to apply a common set of policies or security
settings to a collection of users. A default mobile device mailbox policy is created in every Office 365
organization.
You can use mobile device mailbox policies to manage many different settings. These include the following:
Require a password
Specify the minimum password length
Require a number or special character in the password
Designate how long a device can be inactive before requiring the user to re-enter a password
Wipe a device after a specific number of failed password attempts
69 | P a g e
Click on the + sign to add the new mobile device mailbox policy.

70 | P a g e
Public folders
Public folders are designed for shared access and provide an easy and effective way to collect, organize,
and share information with other people in your workgroup or organization. Public folders help organize
content in a deep hierarchy that’s easy to browse. Users will see the full hierarchy in Outlook, which makes
it easy for them to browse for the content they’re interested in.
Create a public folder in Office 365 Exchange Online
1. In the Exchange admin center, select public folders. A new dialog will appear. Select public folder
mailboxes in the top menu, because you have to create a public folder mailbox before you can
create a public folder.
71 | P a g e
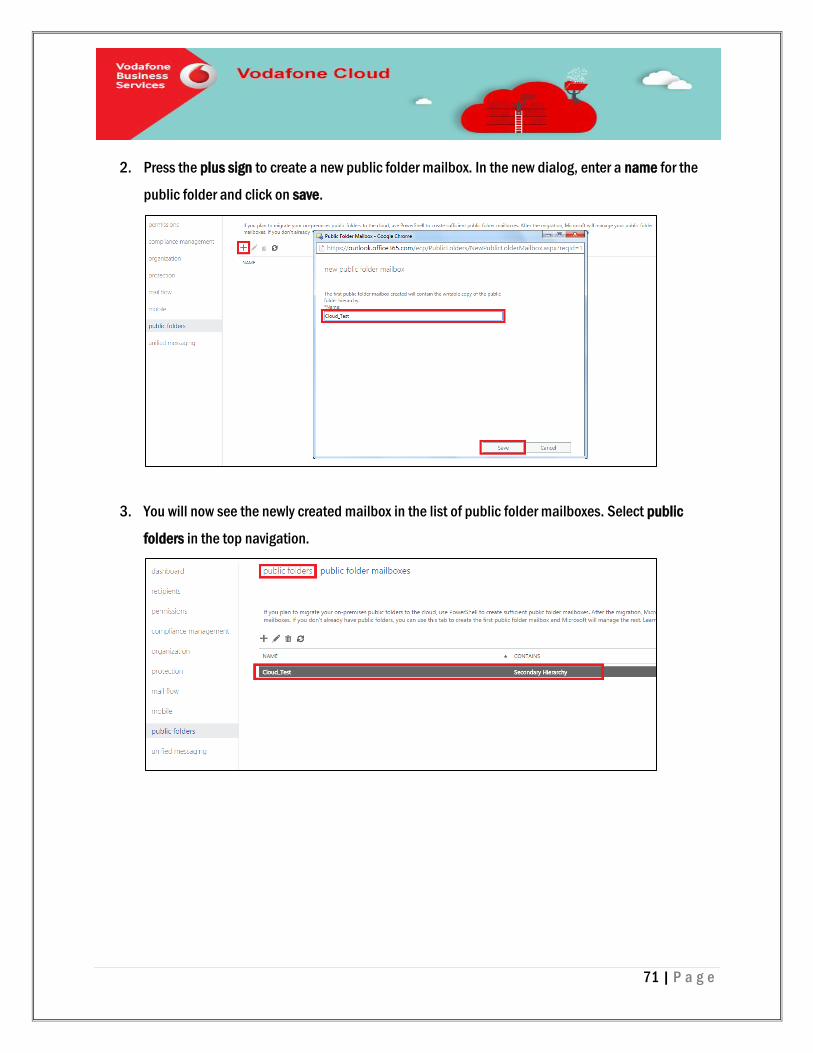
2. Press the plus sign to create a new public folder mailbox. In the new dialog, enter a name for the
public folder and click on save.
3. You will now see the newly created mailbox in the list of public folder mailboxes. Select public
folders in the top navigation.
72 | P a g e
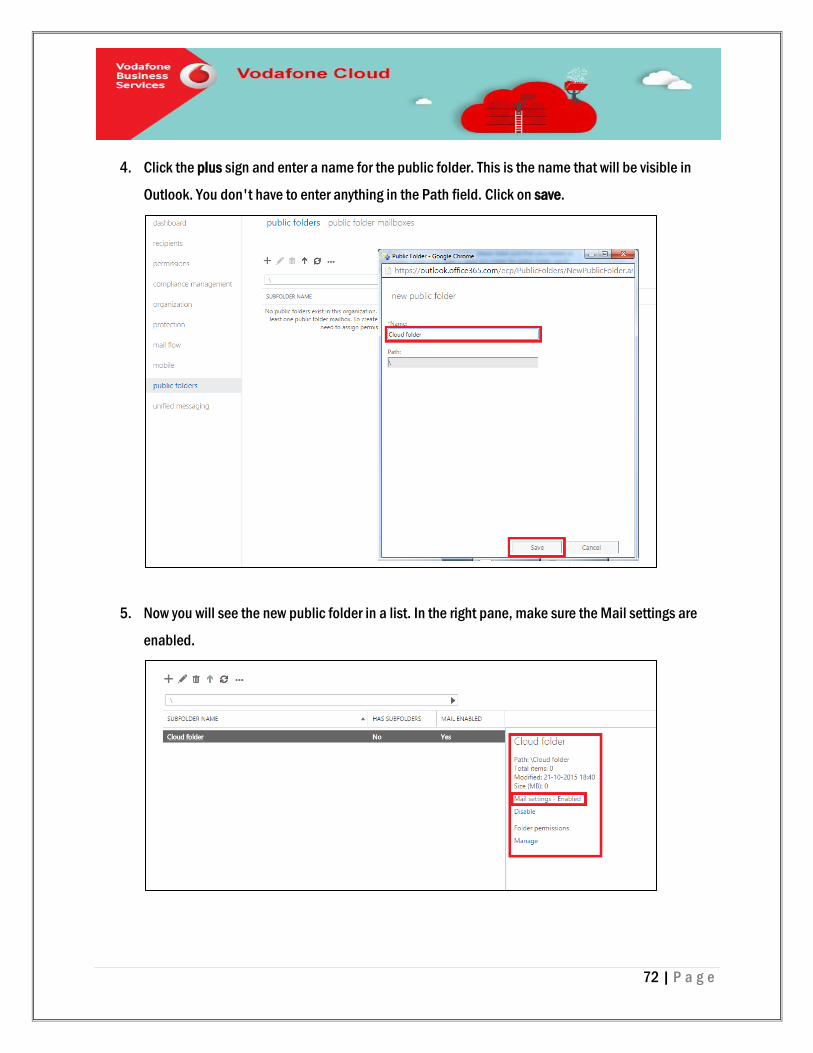
4. Click the plus sign and enter a name for the public folder. This is the name that will be visible in
Outlook. You don't have to enter anything in the Path field. Click on save.
5. Now you will see the new public folder in a list. In the right pane, make sure the Mail settings are
enabled.
73 | P a g e
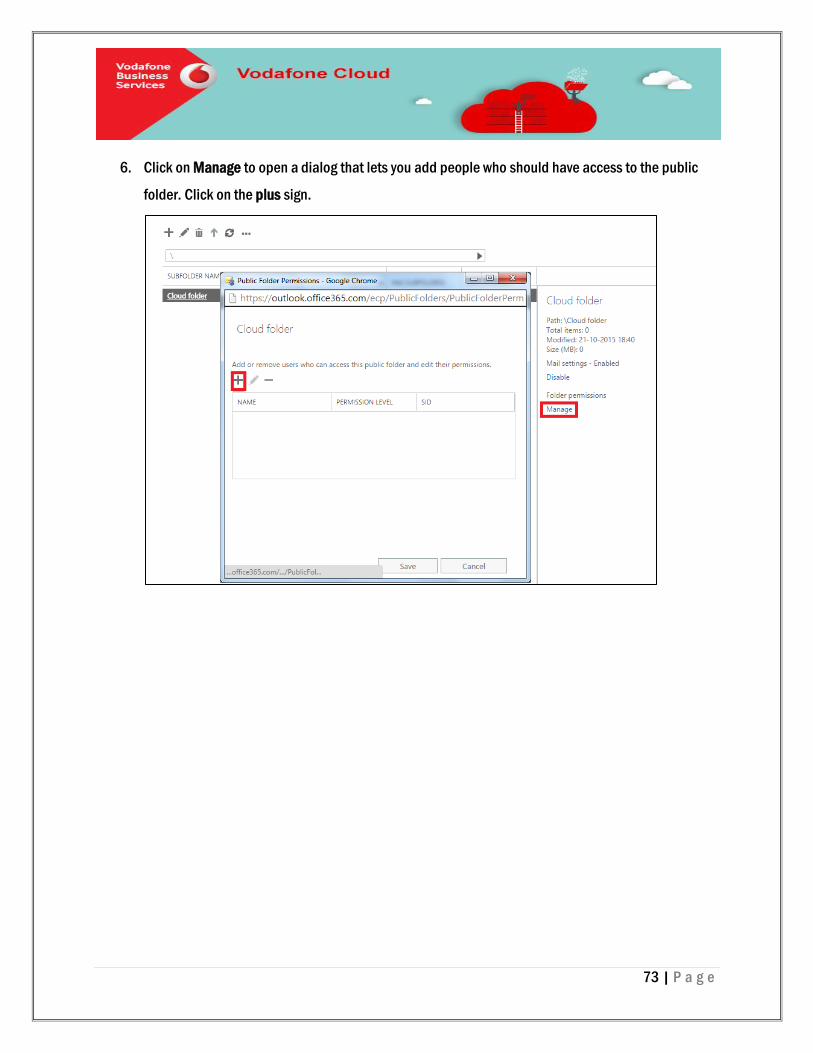
6. Click on Manage to open a dialog that lets you add people who should have access to the public
folder. Click on the plus sign.
74 | P a g e
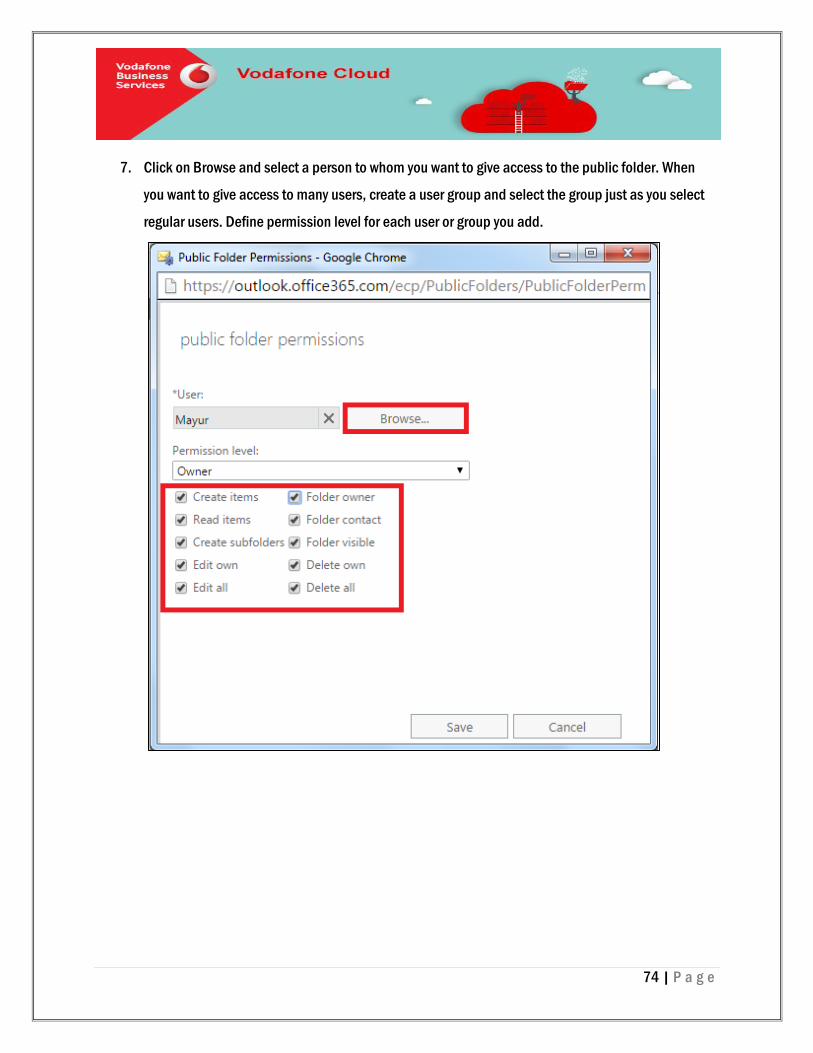
7. Click on Browse and select a person to whom you want to give access to the public folder. When
you want to give access to many users, create a user group and select the group just as you select
regular users. Define permission level for each user or group you add.
75 | P a g e
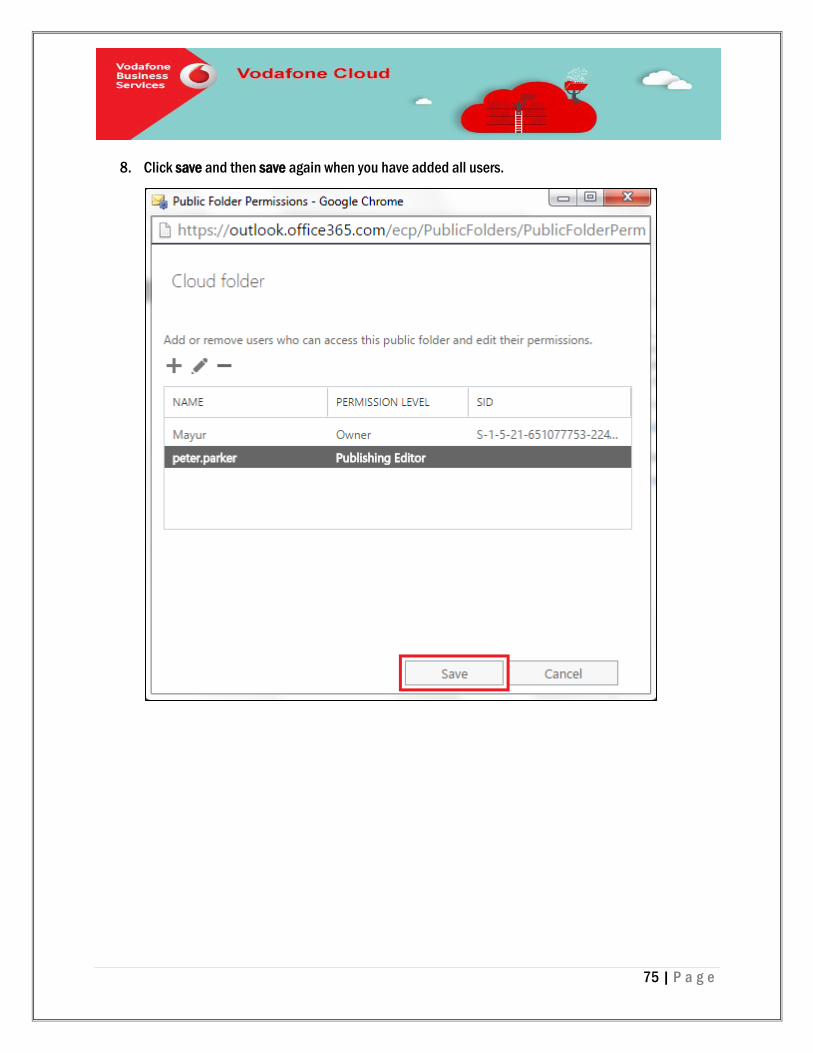
8. Click save and then save again when you have added all users.
76 | P a g e
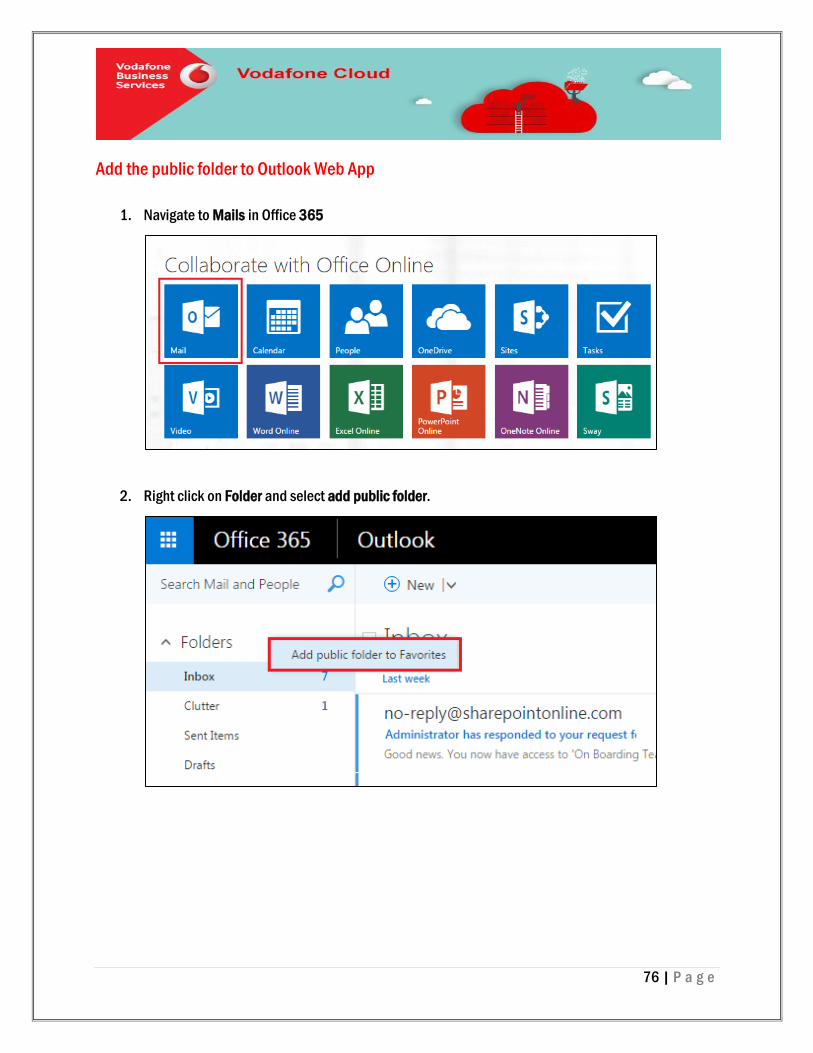
Add the public folder to Outlook Web App
1. Navigate to Mails in Office 365
2. Right click on Folder and select add public folder.
77 | P a g e
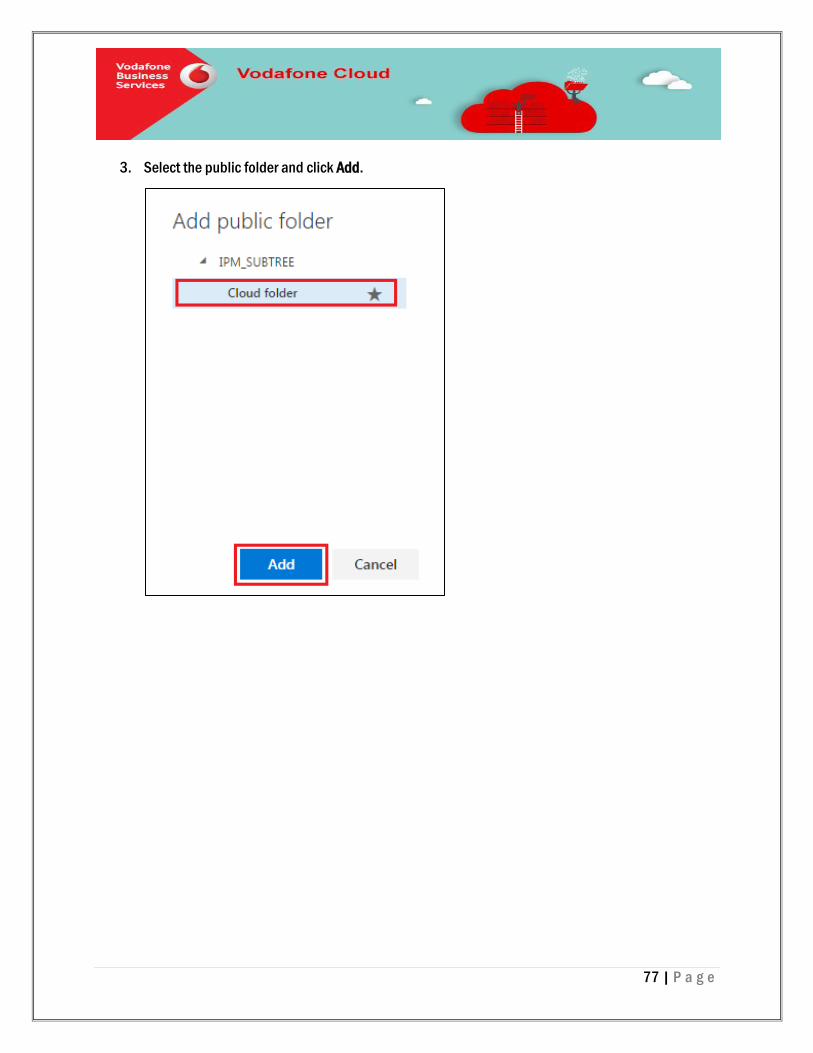
3. Select the public folder and click Add.

78 | P a g e
4. You can find public folder in folders.
79 | P a g e
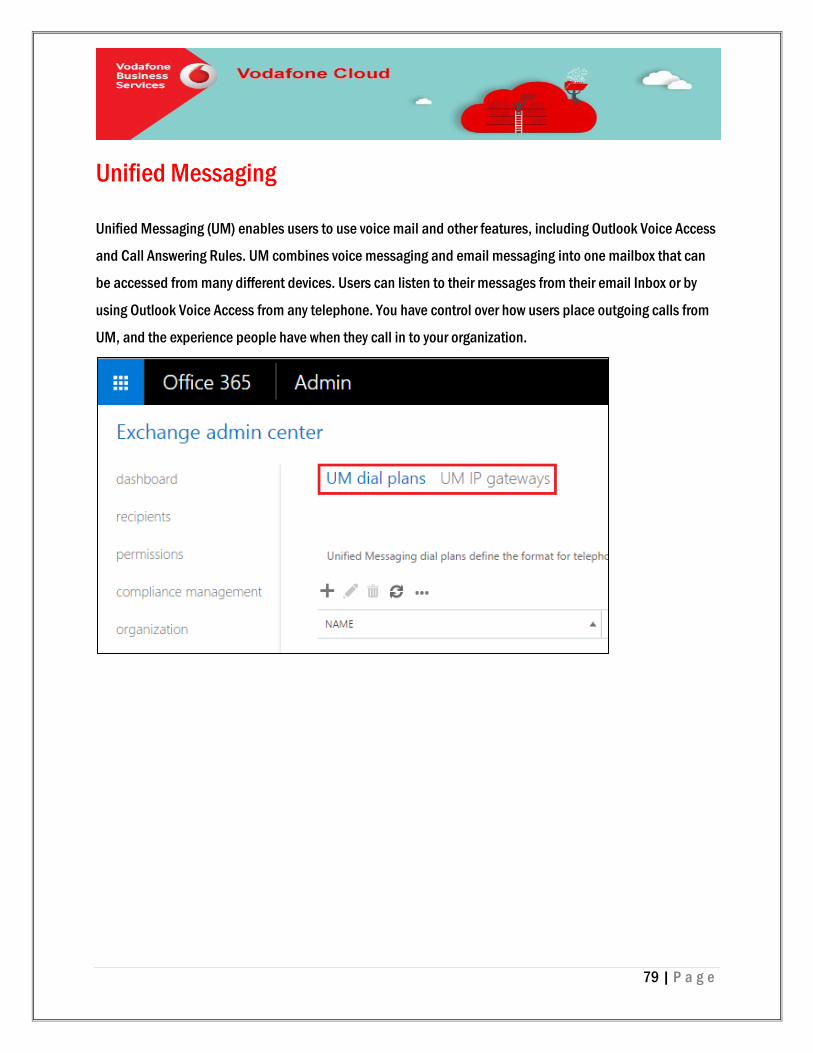
Unified Messaging
Unified Messaging (UM) enables users to use voice mail and other features, including Outlook Voice Access
and Call Answering Rules. UM combines voice messaging and email messaging into one mailbox that can
be accessed from many different devices. Users can listen to their messages from their email Inbox or by
using Outlook Voice Access from any telephone. You have control over how users place outgoing calls from
UM, and the experience people have when they call in to your organization.
80 | P a g e
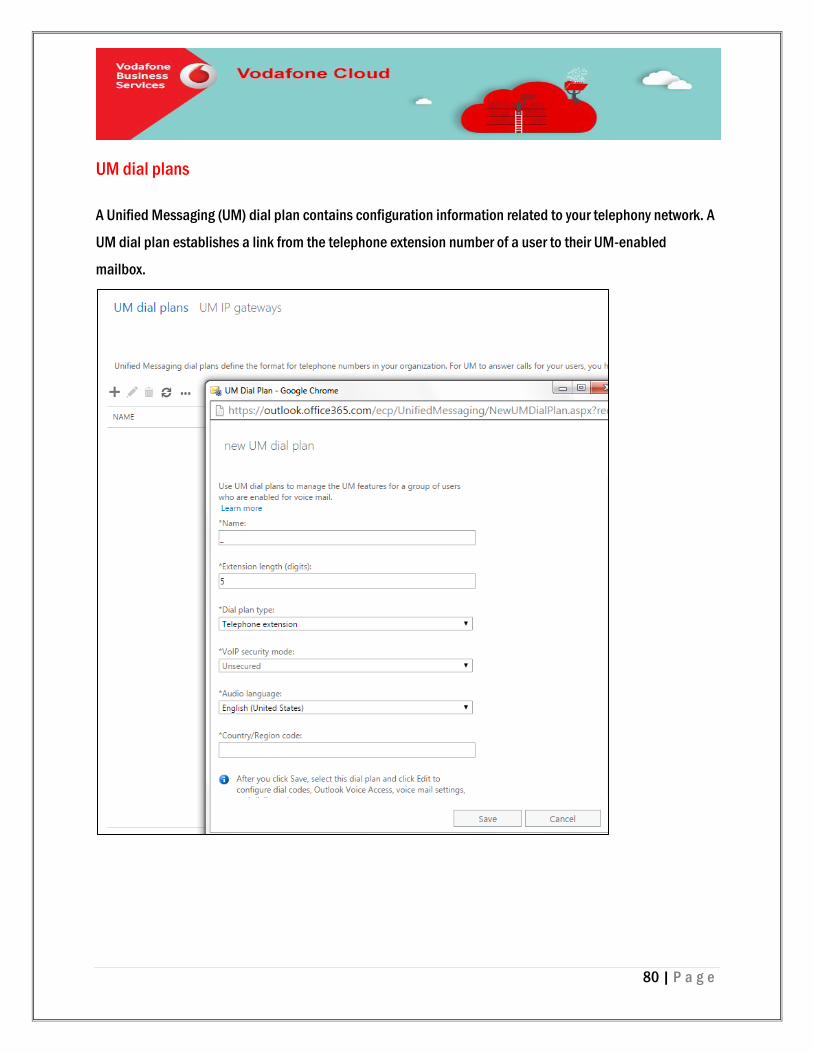
UM dial plans
A Unified Messaging (UM) dial plan contains configuration information related to your telephony network. A
UM dial plan establishes a link from the telephone extension number of a user to their UM-enabled
mailbox.
81 | P a g e
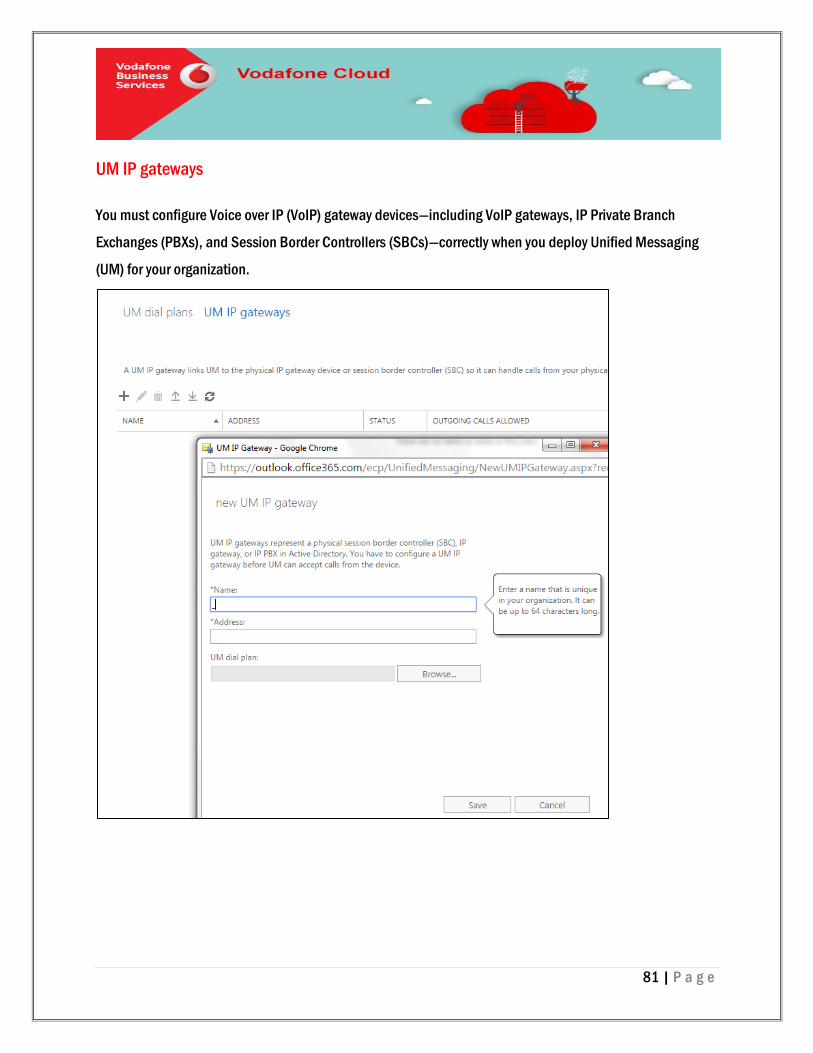
UM IP gateways
You must configure Voice over IP (VoIP) gateway devices—including VoIP gateways, IP Private Branch
Exchanges (PBXs), and Session Border Controllers (SBCs)—correctly when you deploy Unified Messaging
(UM) for your organization.
82 | P a g e
Reference links
1. Exchange admin center
https://technet.microsoft.com/en-GB/library/jj200743(v=exchg.150).aspx
2. Exchange Administration
https://technet.microsoft.com/EN-US/library/exchange-online-recipients.aspx