Embed Size (px)
Citation preview
University of Arkansas Libraries ArcGIS Desktop Tutorial
(http://libinfo.uark.edu/gis/tutorial.asp) Section 1
Page 1
Section 1: Getting Started with ArcGIS Desktop v.9 ‐ ArcInfo™ Functional Level (ArcCatalog™, ArcMap, and ArcToolbox™)
ArcGIS Applications Description:
• ArcCatalog:
ArcCatalog™ allows the user to easily access and manage geographic data that is stored in folders on local disks or relational databases that are available on the user's network. Data can be copied, moved, deleted, and quickly viewed before it is added to a map. In addition, metadata can be either read or created using this ArcGIS application.
• ArcMap:
ArcMap allows the user to display and query maps, create quality hardcopy maps and perform many spatial analysis tasks. ArcMap provides an easy transition from viewing a map to editing its spatial features.
• ArcToolbox™:
ArcToolbox™ provides an environment for performing geoprocessing operations (i.e., operations that involve alteration or information extraction). Tools step the user through the many geoprocessing tasks. ArcToolbox is embedded in both ArcCatalog and ArcMap.
Data Retrieval:
Data collection and preparation is one of the most expensive and time‐consuming aspects of creating a GIS facility. There are many governmental and commercial data sources that provide digital and tabular data sets as well as analogue data including maps, aerial photographs, and satellite imagery.
ArcGIS Supported Data Formats:
ArcGIS allows the user to work with an extensive array of data sources. These are listed below.
• Data Types Supported in ArcGIS (ArcView, ArcEditor, and ArcInfo) o ArcIMS feature services o ArcIMS map services o ArcInfo coverages o DGN (through v8) o DWG (through v2004) o DXF o Geodatabases o Geography Network connections o OLE DB Tables o PC ARC/INFO coverages o Raster Formats
University of Arkansas Libraries ArcGIS Desktop Tutorial
(http://libinfo.uark.edu/gis/tutorial.asp) Section 1
Page 2
ARC Digitized Raster Graphics (ADRG) (*.img or *.ovr and *.lgg) ArcSDE Rasters Band Interleaved by Line (ESRI BIL) (*.bil and *.hdr, *.clr, *.stx) Band Interleaved by Pixel (ESRI BIP) (*.bip and *.hdr, *.clr, *.stx) Band Sequential (ESRI BSQ) (*.bsq and *.hdr, *.clr, *.stx) Bitmap (BMP), Device Independent Bitmap (DIB) format, or Microsoft Windows
Bitmap (*.bmp) Compressed ARC Digitized Raster Graphics (CADRG) Controlled Image Base (CIB) Digital Geographic Information Exchange Standard (DIGEST) Arc Standard Raster
Product (ASRP), UTM/UPS Standard Raster Product (USRP) (*.img and *.gen, *.ger, *.sou, *.qal, *.thf)
Digital Terrain Elevation Data (DTED) Level 0, 1 and 2 (*.dt0, *.dt1, *.dt2) ER Mapper (*.ers) ERDAS 7.5 GIS (*.gis and *.trl) ERDAS 7.5 LAN (*.lan and *.trl) ERDAS IMAGINE (*.img) ERDAS RAW (*.raw) ESRI GRID (*.clr) ESRI GRID Stack ESRI GRID Stack File (*.stk) ESRI SDE Raster Graphics Interchange Format (GIF) (*.gif) Intergraph Raster Files (*.cit and *.cot) JPEG File interchange Format, JIFF (*.jpg, *.jpeg, *jpe) JPEG 2000 (.jp2) Multiresolution Seamless Image Database (MrSID) (*.sid; generations 2 and 3;
Note that the export command Raster to MrSID outputs in MrSID generation 2 format)
National Image Transfer Format (NITF) (*.ntf) Portable Network Graphics (*.png) Tagged Image File Format (TIFF) (*.tif, *.tiff, *.tff)
o SDC (Smart Data Compression) o SDE layers o Shapefiles o Text Files (.TXT) o TIN o VPF
• Additional Data Types Supported via Importers in ArcInfo Direct conversion of the following formats into a native ArcInfo format:
o ADS o DFAD o DIME o DLG o ETAK
University of Arkansas Libraries ArcGIS Desktop Tutorial
(http://libinfo.uark.edu/gis/tutorial.asp) Section 1
Page 3
o GIRAS o IGDS o IGES o MOSS o S‐57 o SDTS (Point, Raster, and Vector) o SLF o TIGER (through v2000) o Sun Raster
• Additional Data Types Supported via Importers in ArcView and ArcEditor Direct conversion of the following formats into native ArcView and ArcEditor formats:
o AGF o MIF o SDTS (Points and Raster)
About Data Sources:
A data source is any geographic data that may be used as input to or output from a geoprocessing tool. Supported data sources include:
• Geodatabase feature datasets • Geodatabase feature classes • Shapefile datasets • Coverage datasets • Coverage feature classes • CAD feature datasets • CAD feature classes • SDC datasets • SDC feature classes • VPF datasets • VPF feature classes • Raster datasets • Raster dataset bands • Raster catalogs • TIN datasets • Layers • Layer files • Tables • Table views
When working with data it is helpful to understand how ArcGIS organizes the data sources with which the program's tools work. Data sources are organized into folder hierarchies on your computer. ArcGIS generally recognizes three different workspaces:
University of Arkansas Libraries ArcGIS Desktop Tutorial
(http://libinfo.uark.edu/gis/tutorial.asp) Section 1
Page 4
• Folders • Personal geodatabases • ArcSDE® geodatabases
‐ with the option set more. When you open ArcCatalog you will likely see one or more of the following workspaces in the catalog tree with various data sources contained within them.
About Workspaces
Folders
Folders may contain other folders, geodatabases, data sources (e.g., rasters, shapefiles, tables, etc.), and toolboxes. Some data sources (coverages, shapefiles, TIN datasets, layers, and layer files) can only live inside folders. Other data sources (raster data, feature classes, and tables, and more) can be exported from a folder to a geodatabase ‐ either personal or ArcSDE. Feature datasets within a folder (coverages, Smart Data Compression [SDC], Vector Product Format [VPF] and more) can be set as workspaces.
Geodatabases
There are two types of geodatabases in ArcGIS:
• Personal • ArcSDE.
Geodatabases contain geographic information organized in the form of feature classes, feature datasets, tables, and toolboxes. Feature classes can be organized into feature datasets or may exist independently in geodatabases.
Personal geodatabases
Personal geodatabases can be created in which to store and manage your own spatial database. Microsoft Access is the database used. With personal geodtabases many users may read the database simultaneously but only one user may edit.
ArcSDE geodatabases
With ArcSDE geodatabases many simultaineous editors are supported.
About Data Sources
Geographic data used as input to or output from a geoprocessing tool is considered a data source. The list of supported data sources includes:
University of Arkansas Libraries ArcGIS Desktop Tutorial
(http://libinfo.uark.edu/gis/tutorial.asp) Section 1
Page 5
• Geodatabase feature datasets and feature classes • Shapefile datasets • Coverage datasets and feature classes • Computer‐aided design (CAD) datasets and feature classes • SDC feature datasets and feature classes • VPF datasets and feature classes • Raster datasets and raster dataset bands • TIN datasets, layers, layer files, tables, and table views
The feature class is one of the most commonly used data sources. A feature class is composed of a collection of geographic features with identical type of geometry (point, line, polygon) and the same set of attributes. Feature classes can be found within a geodatabase feature, shapefile, coverage, CAD, SDC, and VPF, as well as within a geodatabase.
Feature data
Geodatabase feature datasets
Geodatabase feature datasets live inside personal or ArcSDE geodatabases. Feature datasets contain feature classes that are of the same extent and coordinate system.
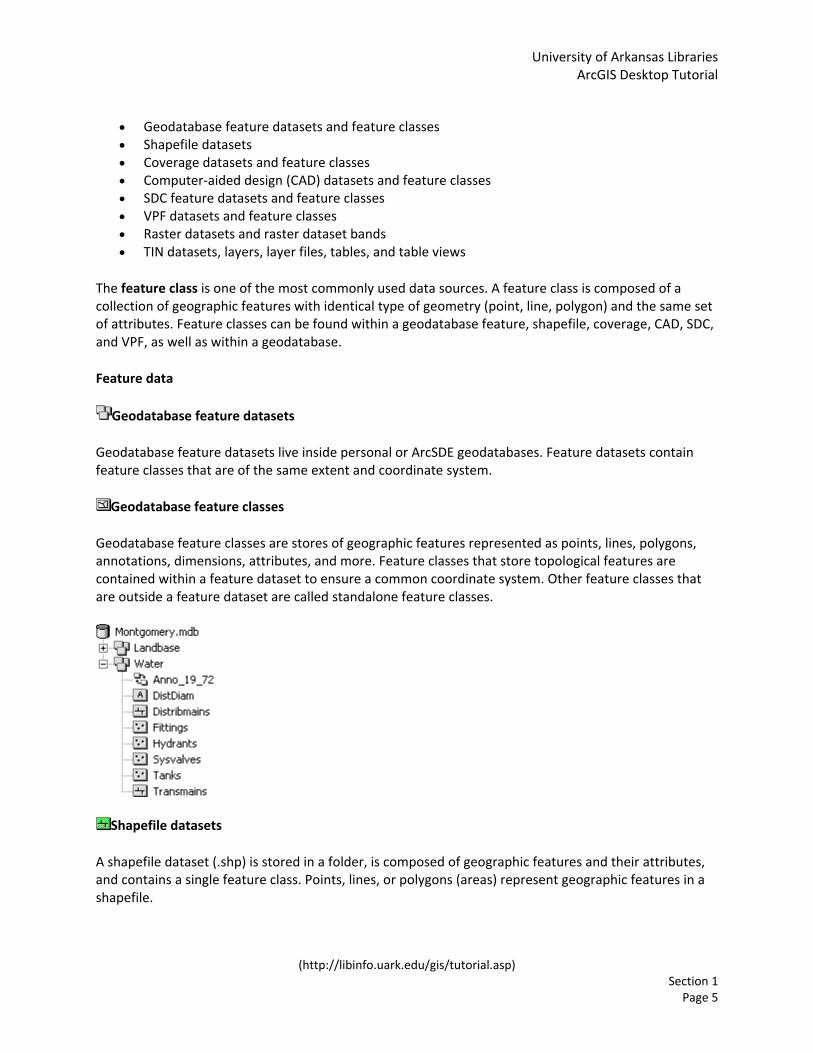
Geodatabase feature classes
Geodatabase feature classes are stores of geographic features represented as points, lines, polygons, annotations, dimensions, attributes, and more. Feature classes that store topological features are contained within a feature dataset to ensure a common coordinate system. Other feature classes that are outside a feature dataset are called standalone feature classes.
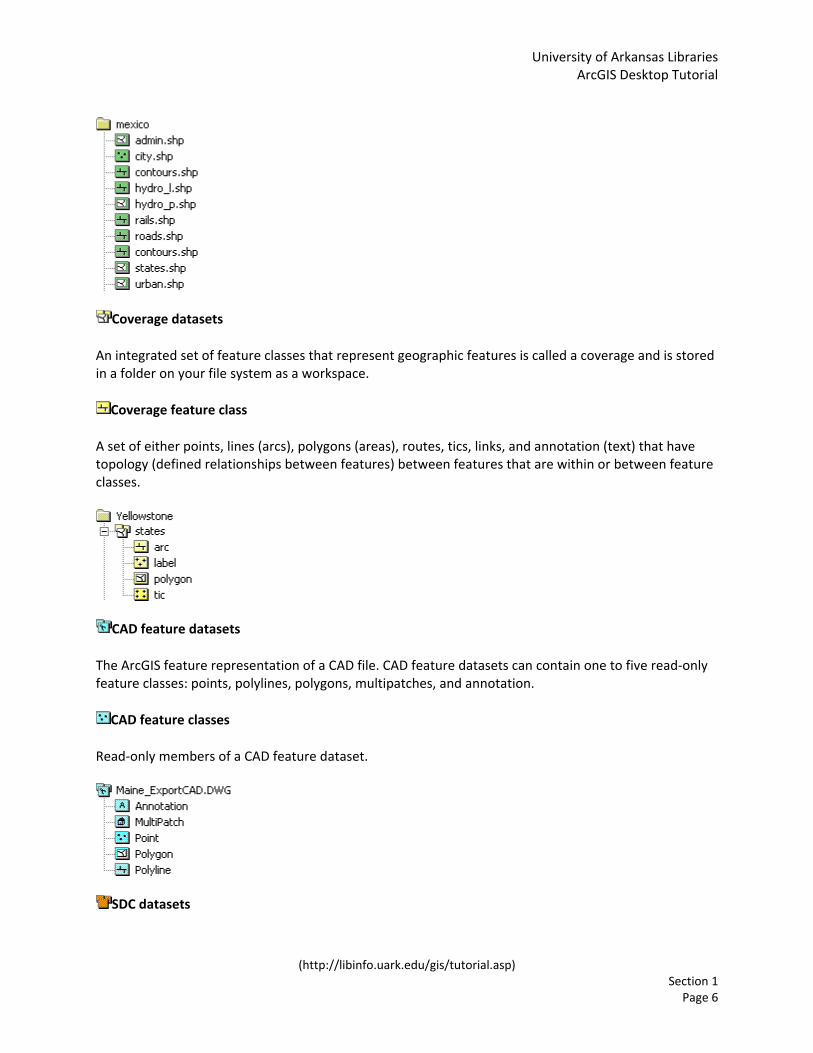
Shapefile datasets
A shapefile dataset (.shp) is stored in a folder, is composed of geographic features and their attributes, and contains a single feature class. Points, lines, or polygons (areas) represent geographic features in a shapefile.
University of Arkansas Libraries ArcGIS Desktop Tutorial
(http://libinfo.uark.edu/gis/tutorial.asp) Section 1
Page 6
Coverage datasets
An integrated set of feature classes that represent geographic features is called a coverage and is stored in a folder on your file system as a workspace.
Coverage feature class
A set of either points, lines (arcs), polygons (areas), routes, tics, links, and annotation (text) that have topology (defined relationships between features) between features that are within or between feature classes.
CAD feature datasets
The ArcGIS feature representation of a CAD file. CAD feature datasets can contain one to five read‐only feature classes: points, polylines, polygons, multipatches, and annotation.
CAD feature classes
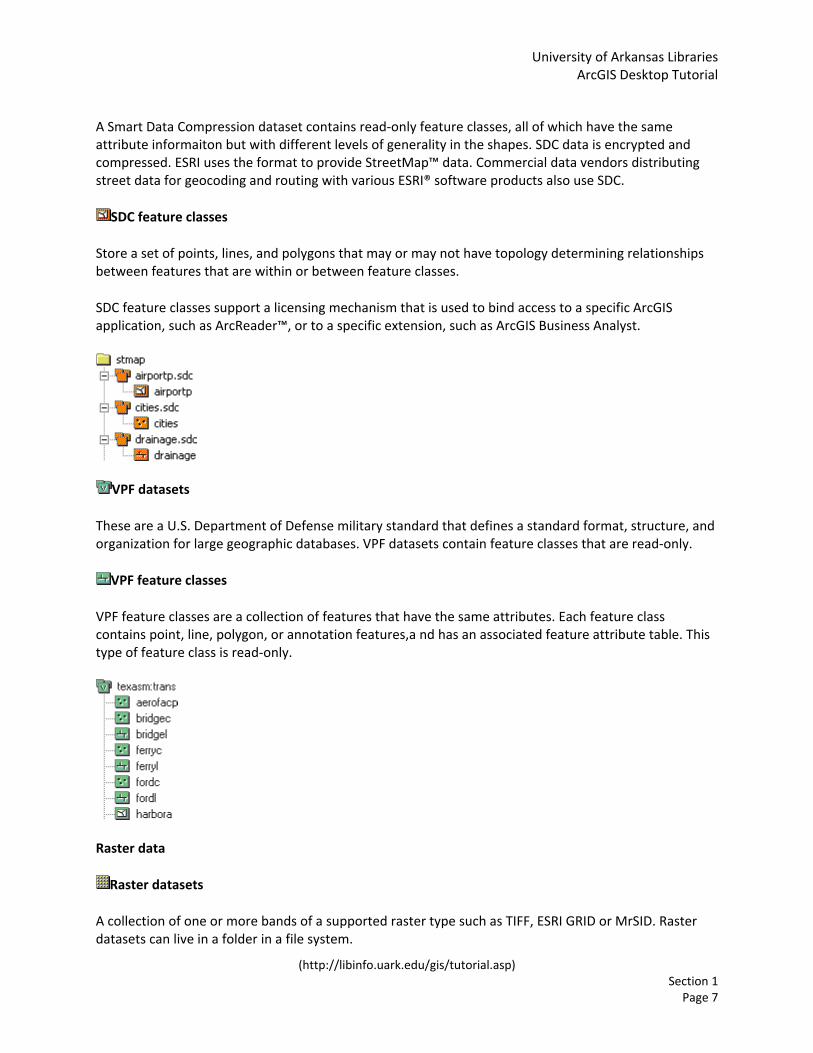
Read‐only members of a CAD feature dataset.
SDC datasets
University of Arkansas Libraries ArcGIS Desktop Tutorial
(http://libinfo.uark.edu/gis/tutorial.asp) Section 1
Page 7
A Smart Data Compression dataset contains read‐only feature classes, all of which have the same attribute informaiton but with different levels of generality in the shapes. SDC data is encrypted and compressed. ESRI uses the format to provide StreetMap™ data. Commercial data vendors distributing street data for geocoding and routing with various ESRI® software products also use SDC.
SDC feature classes
Store a set of points, lines, and polygons that may or may not have topology determining relationships between features that are within or between feature classes.
SDC feature classes support a licensing mechanism that is used to bind access to a specific ArcGIS application, such as ArcReader™, or to a specific extension, such as ArcGIS Business Analyst.
VPF datasets
These are a U.S. Department of Defense military standard that defines a standard format, structure, and organization for large geographic databases. VPF datasets contain feature classes that are read‐only.
VPF feature classes
VPF feature classes are a collection of features that have the same attributes. Each feature class contains point, line, polygon, or annotation features,a nd has an associated feature attribute table. This type of feature class is read‐only.
Raster data
Raster datasets
A collection of one or more bands of a supported raster type such as TIFF, ESRI GRID or MrSID. Raster datasets can live in a folder in a file system.
University of Arkansas Libraries ArcGIS Desktop Tutorial
(http://libinfo.uark.edu/gis/tutorial.asp) Section 1
Page 8
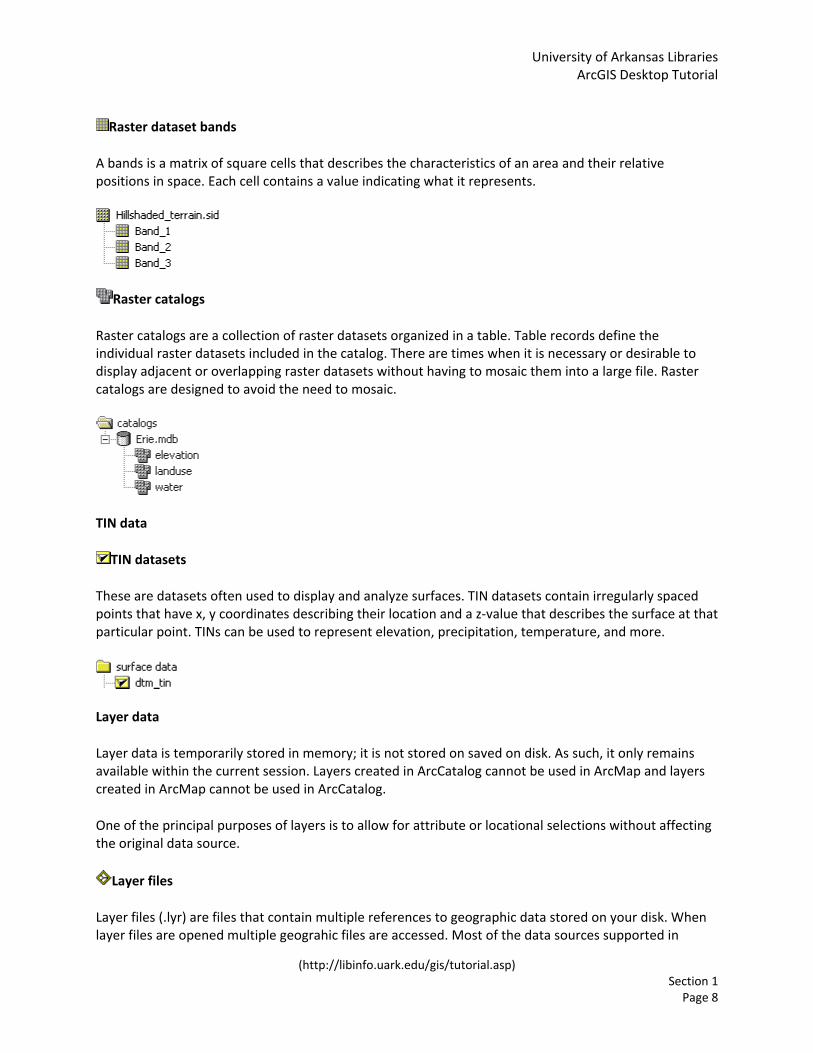
Raster dataset bands
A bands is a matrix of square cells that describes the characteristics of an area and their relative positions in space. Each cell contains a value indicating what it represents.
Raster catalogs
Raster catalogs are a collection of raster datasets organized in a table. Table records define the individual raster datasets included in the catalog. There are times when it is necessary or desirable to display adjacent or overlapping raster datasets without having to mosaic them into a large file. Raster catalogs are designed to avoid the need to mosaic.
TIN data
TIN datasets
These are datasets often used to display and analyze surfaces. TIN datasets contain irregularly spaced points that have x, y coordinates describing their location and a z‐value that describes the surface at that particular point. TINs can be used to represent elevation, precipitation, temperature, and more.
Layer data
Layer data is temporarily stored in memory; it is not stored on saved on disk. As such, it only remains available within the current session. Layers created in ArcCatalog cannot be used in ArcMap and layers created in ArcMap cannot be used in ArcCatalog.
One of the principal purposes of layers is to allow for attribute or locational selections without affecting the original data source.
Layer files
Layer files (.lyr) are files that contain multiple references to geographic data stored on your disk. When layer files are opened multiple geograhic files are accessed. Most of the data sources supported in
University of Arkansas Libraries ArcGIS Desktop Tutorial
(http://libinfo.uark.edu/gis/tutorial.asp) Section 1
Page 9
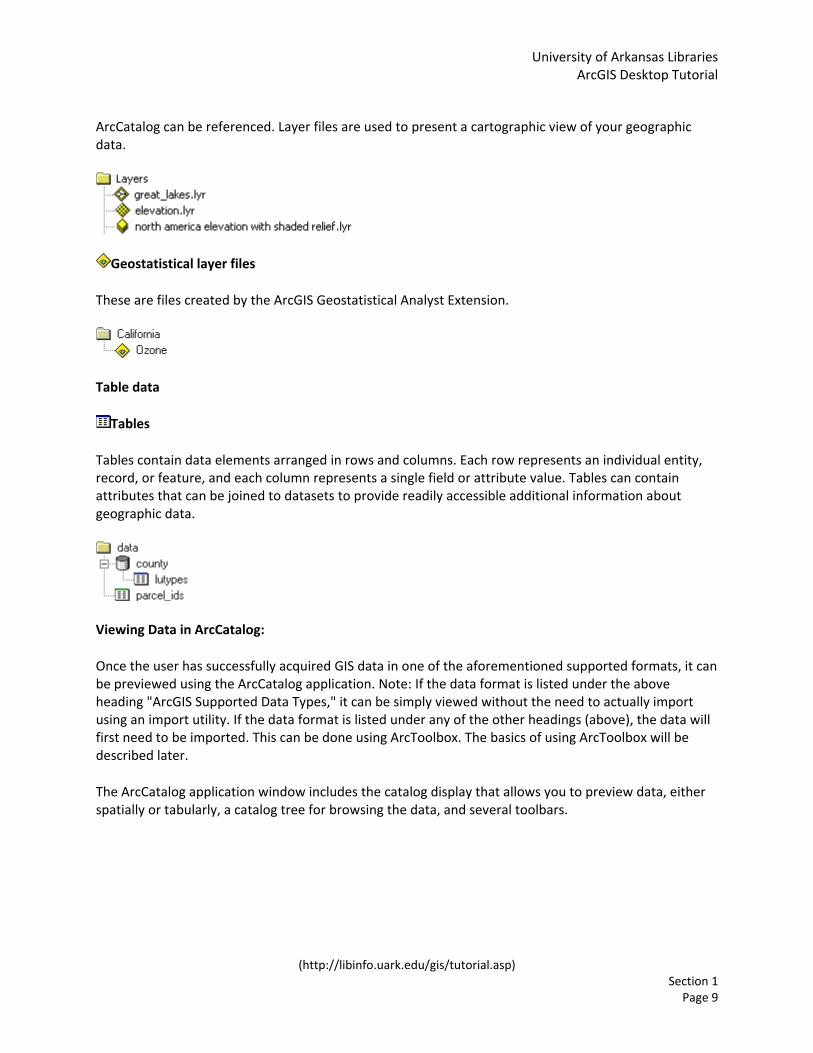
ArcCatalog can be referenced. Layer files are used to present a cartographic view of your geographic data.
Geostatistical layer files
These are files created by the ArcGIS Geostatistical Analyst Extension.
Table data
Tables
Tables contain data elements arranged in rows and columns. Each row represents an individual entity, record, or feature, and each column represents a single field or attribute value. Tables can contain attributes that can be joined to datasets to provide readily accessible additional information about geographic data.
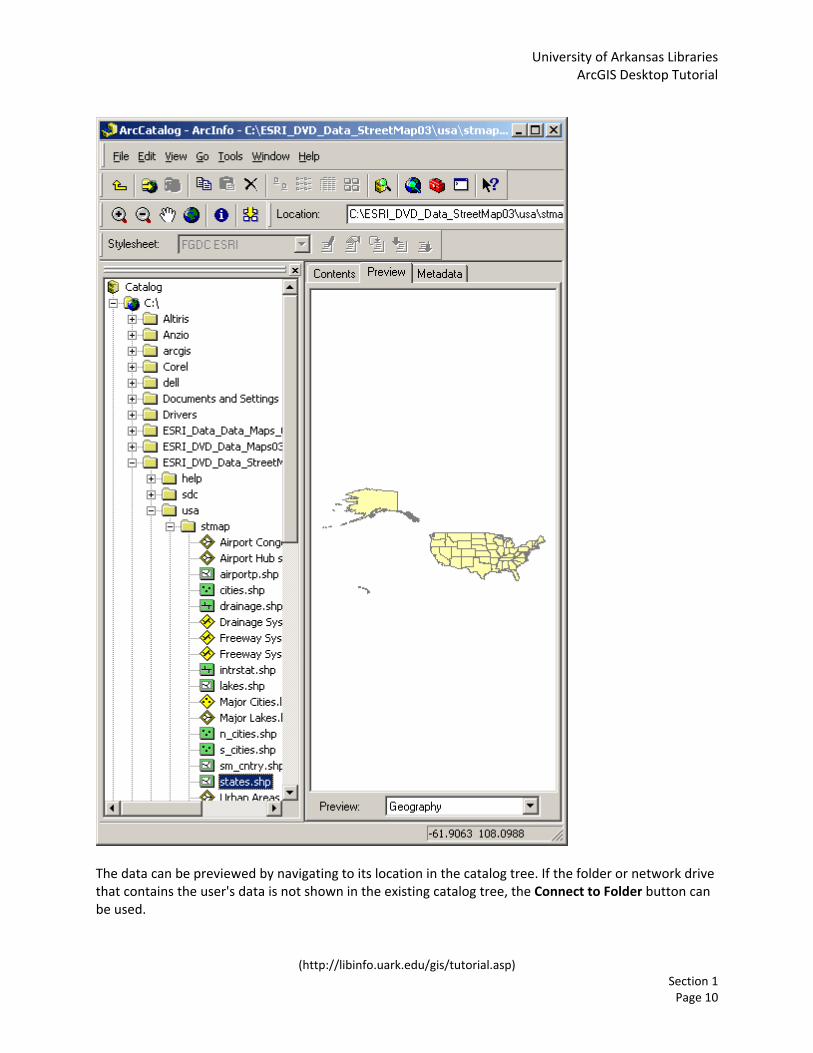
Viewing Data in ArcCatalog:
Once the user has successfully acquired GIS data in one of the aforementioned supported formats, it can be previewed using the ArcCatalog application. Note: If the data format is listed under the above heading "ArcGIS Supported Data Types," it can be simply viewed without the need to actually import using an import utility. If the data format is listed under any of the other headings (above), the data will first need to be imported. This can be done using ArcToolbox. The basics of using ArcToolbox will be described later.
The ArcCatalog application window includes the catalog display that allows you to preview data, either spatially or tabularly, a catalog tree for browsing the data, and several toolbars.
University of Arkansas Libraries ArcGIS Desktop Tutorial
(http://libinfo.uark.edu/gis/tutorial.asp) Section 1 Page 10
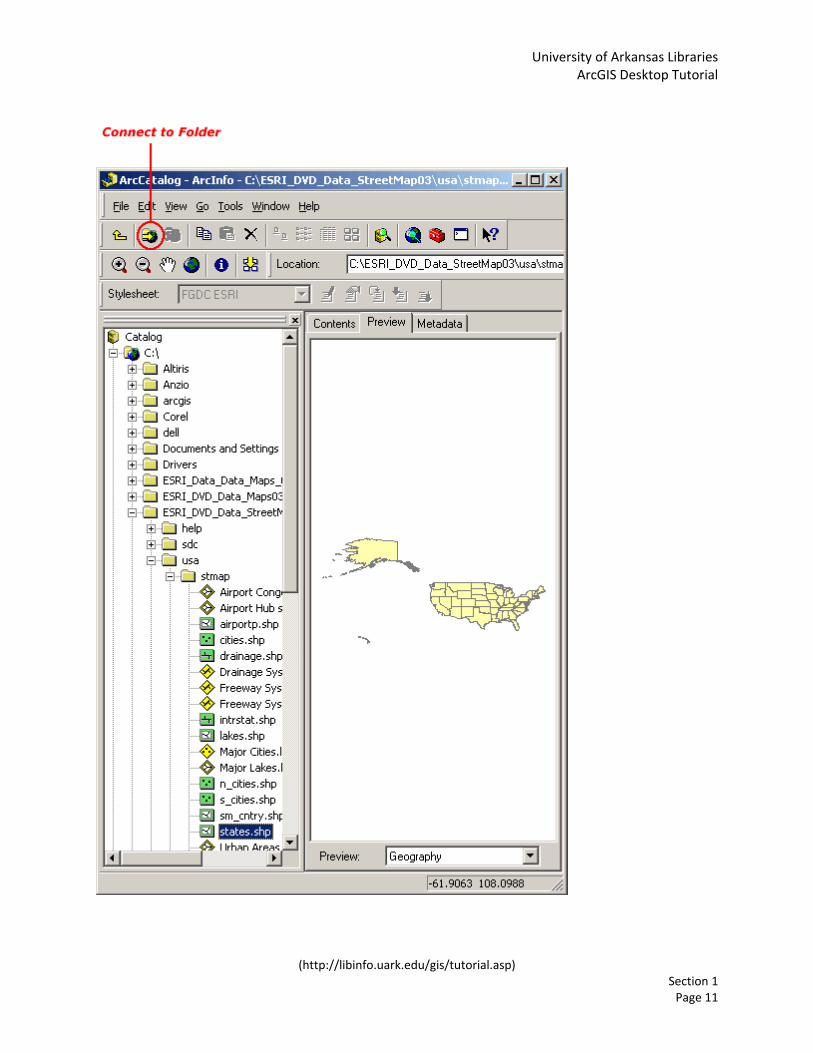
The data can be previewed by navigating to its location in the catalog tree. If the folder or network drive that contains the user's data is not shown in the existing catalog tree, the Connect to Folder button can be used.
University of Arkansas Libraries ArcGIS Desktop Tutorial
(http://libinfo.uark.edu/gis/tutorial.asp) Section 1 Page 11

University of Arkansas Libraries ArcGIS Desktop Tutorial
(http://libinfo.uark.edu/gis/tutorial.asp) Section 1 Page 12
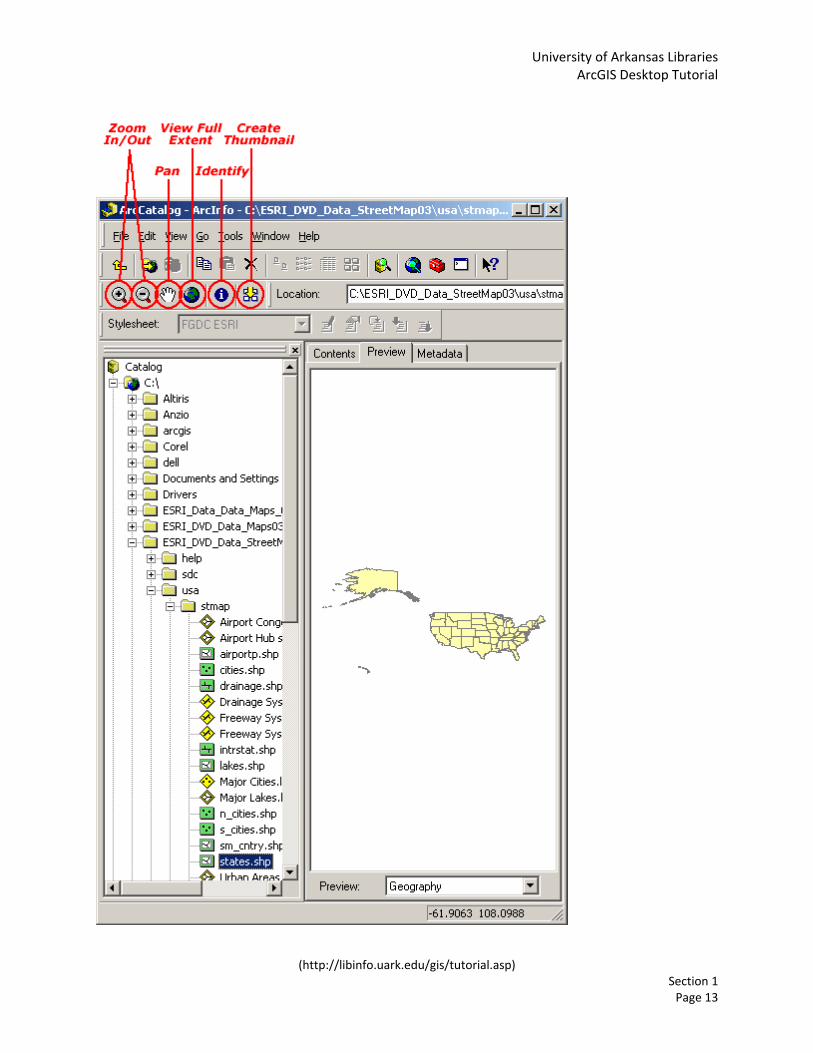
Once the GIS data is listed in the catalog tree, navigate to it using the plus sign ("+") next to the data folders and simply click on the data layer. Select the Preview tab at the top of the catalog display. The layer will now be visible in the catalog display section of ArcCatalog.
The geography toolbar can be used to zoom in and out, pan around the image, view the full extent of the data layer, identify attributes contained within the features of the data layer, and create a thumbnail view of the image.
University of Arkansas Libraries ArcGIS Desktop Tutorial
(http://libinfo.uark.edu/gis/tutorial.asp) Section 1 Page 13
University of Arkansas Libraries ArcGIS Desktop Tutorial
(http://libinfo.uark.edu/gis/tutorial.asp) Section 1 Page 14
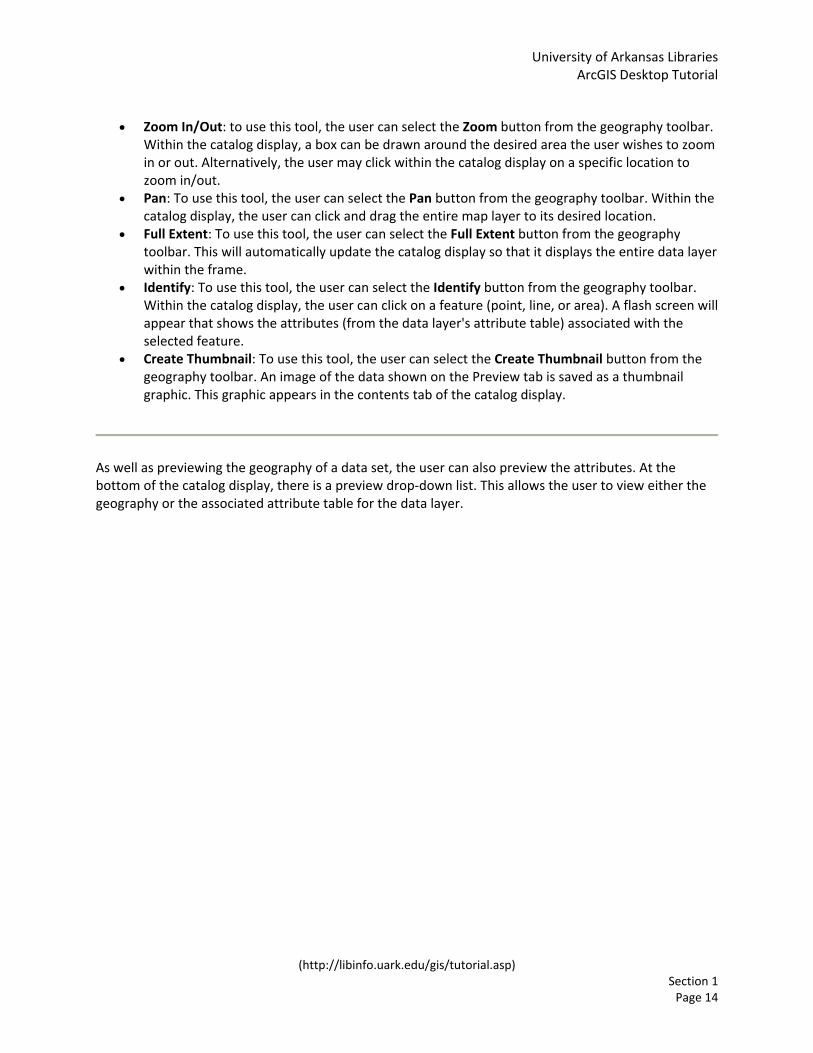
• Zoom In/Out: to use this tool, the user can select the Zoom button from the geography toolbar. Within the catalog display, a box can be drawn around the desired area the user wishes to zoom in or out. Alternatively, the user may click within the catalog display on a specific location to zoom in/out.
• Pan: To use this tool, the user can select the Pan button from the geography toolbar. Within the catalog display, the user can click and drag the entire map layer to its desired location.
• Full Extent: To use this tool, the user can select the Full Extent button from the geography toolbar. This will automatically update the catalog display so that it displays the entire data layer within the frame.
• Identify: To use this tool, the user can select the Identify button from the geography toolbar. Within the catalog display, the user can click on a feature (point, line, or area). A flash screen will appear that shows the attributes (from the data layer's attribute table) associated with the selected feature.
• Create Thumbnail: To use this tool, the user can select the Create Thumbnail button from the geography toolbar. An image of the data shown on the Preview tab is saved as a thumbnail graphic. This graphic appears in the contents tab of the catalog display.
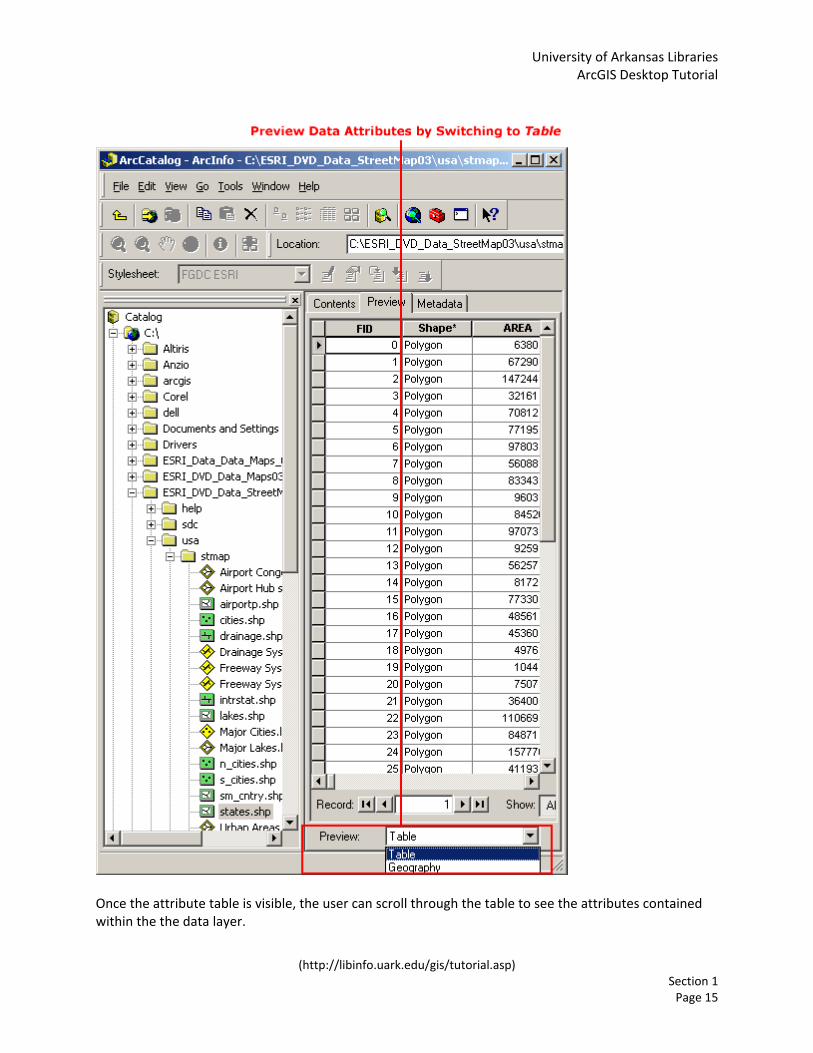
As well as previewing the geography of a data set, the user can also preview the attributes. At the bottom of the catalog display, there is a preview drop‐down list. This allows the user to view either the geography or the associated attribute table for the data layer.
University of Arkansas Libraries ArcGIS Desktop Tutorial
(http://libinfo.uark.edu/gis/tutorial.asp) Section 1 Page 15
Once the attribute table is visible, the user can scroll through the table to see the attributes contained within the the data layer.
University of Arkansas Libraries ArcGIS Desktop Tutorial
(http://libinfo.uark.edu/gis/tutorial.asp) Section 1 Page 16
In addition to previewing the geography and the attribute table of a data layer, the user can view or create metadata. By clicking on the Metadata tab in the catalog display, technical information about the data set (such as its coordinate system, its spatial extent, description of its attributes, and descriptive information about when and how the data was created) can be obtained.
The technical metadata is maintained automatically by ArcCatalog. However, the descriptive information must be updated by the users who manipulate and manage the data. Though ArcCatalog does not require the user to maintain this information, it is important for the GIS user to do this. For more information on how to manage metadata click the Contents tab in the ArcGIS Desktop Help and navigate to ArcCatalog/Working with Metadata.
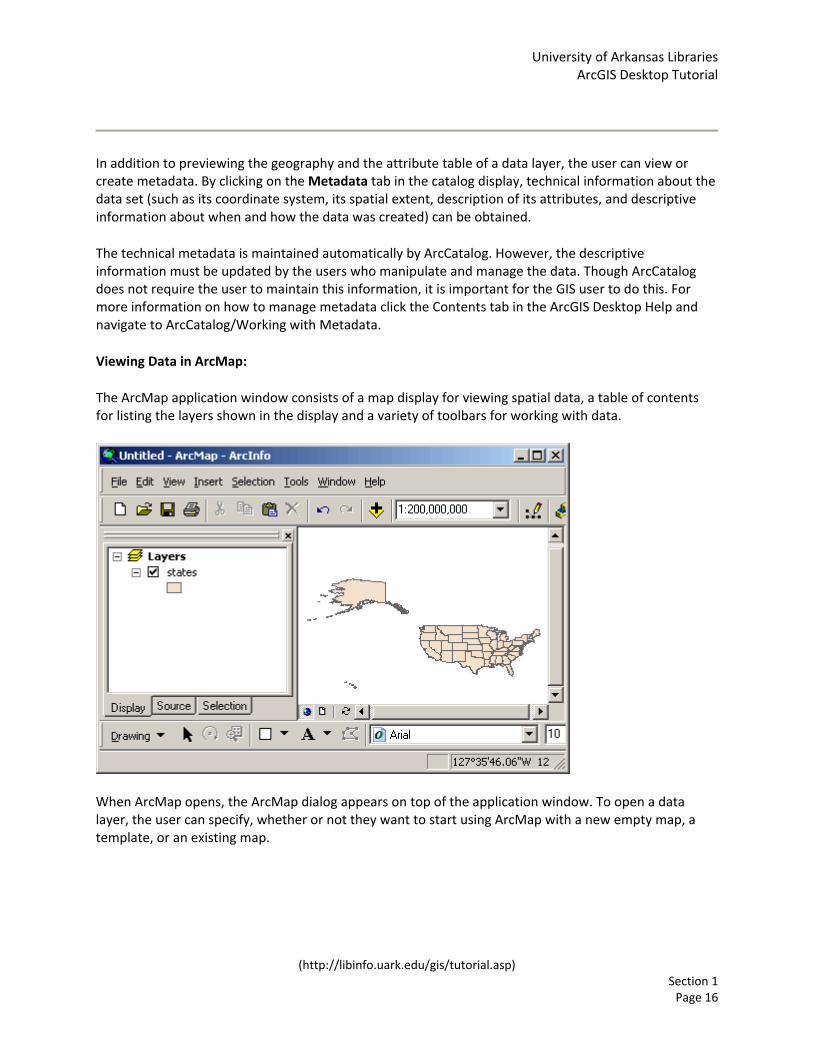
Viewing Data in ArcMap:
The ArcMap application window consists of a map display for viewing spatial data, a table of contents for listing the layers shown in the display and a variety of toolbars for working with data.
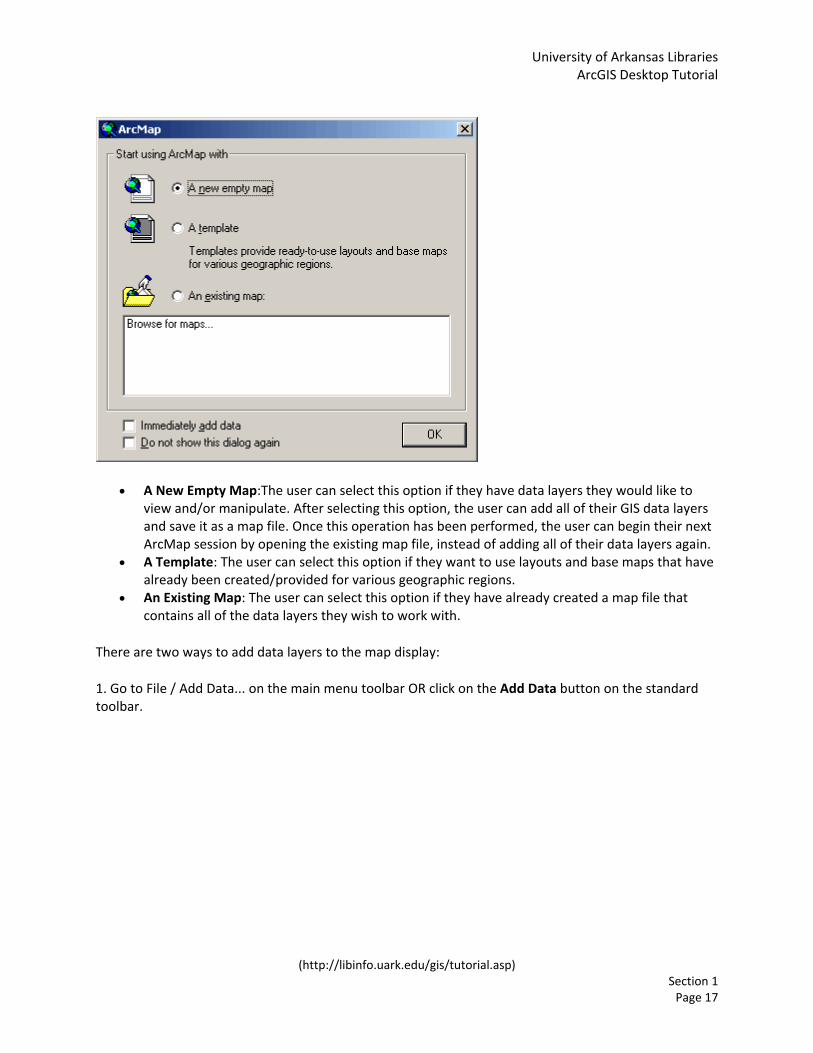
When ArcMap opens, the ArcMap dialog appears on top of the application window. To open a data layer, the user can specify, whether or not they want to start using ArcMap with a new empty map, a template, or an existing map.
University of Arkansas Libraries ArcGIS Desktop Tutorial
(http://libinfo.uark.edu/gis/tutorial.asp) Section 1 Page 17
• A New Empty Map:The user can select this option if they have data layers they would like to view and/or manipulate. After selecting this option, the user can add all of their GIS data layers and save it as a map file. Once this operation has been performed, the user can begin their next ArcMap session by opening the existing map file, instead of adding all of their data layers again.
• A Template: The user can select this option if they want to use layouts and base maps that have already been created/provided for various geographic regions.
• An Existing Map: The user can select this option if they have already created a map file that contains all of the data layers they wish to work with.
There are two ways to add data layers to the map display:
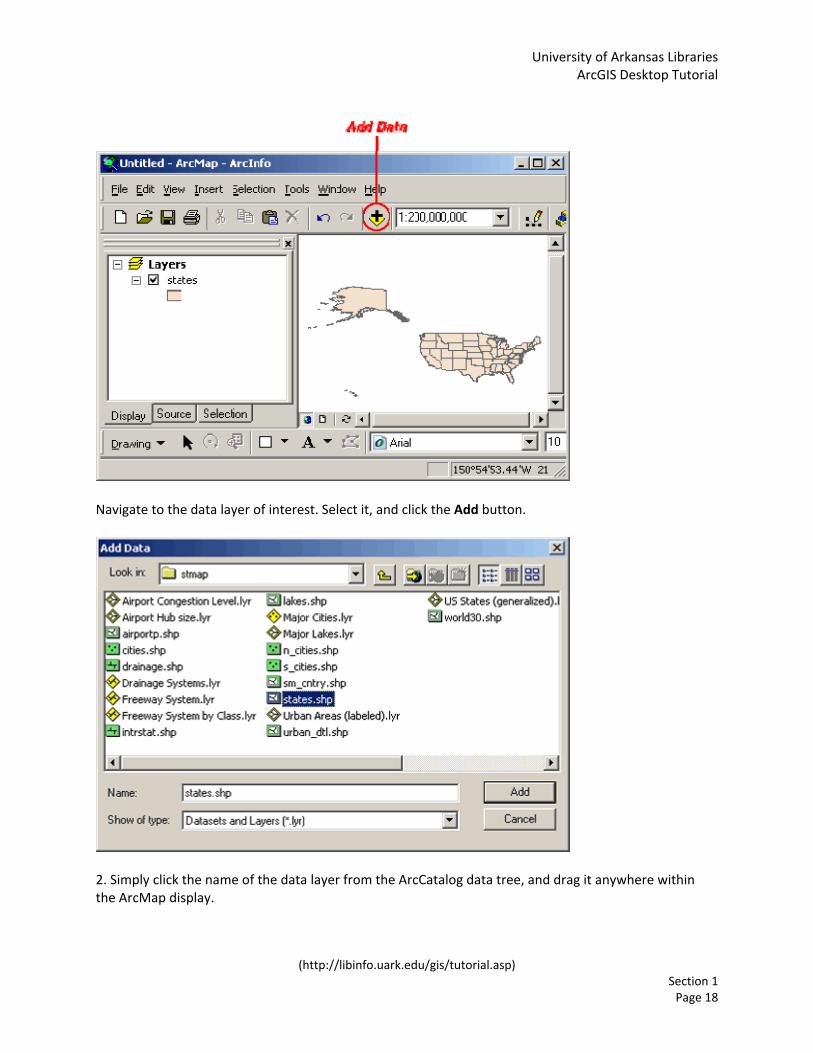
1. Go to File / Add Data... on the main menu toolbar OR click on the Add Data button on the standard toolbar.
University of Arkansas Libraries ArcGIS Desktop Tutorial
(http://libinfo.uark.edu/gis/tutorial.asp) Section 1 Page 18
Navigate to the data layer of interest. Select it, and click the Add button.
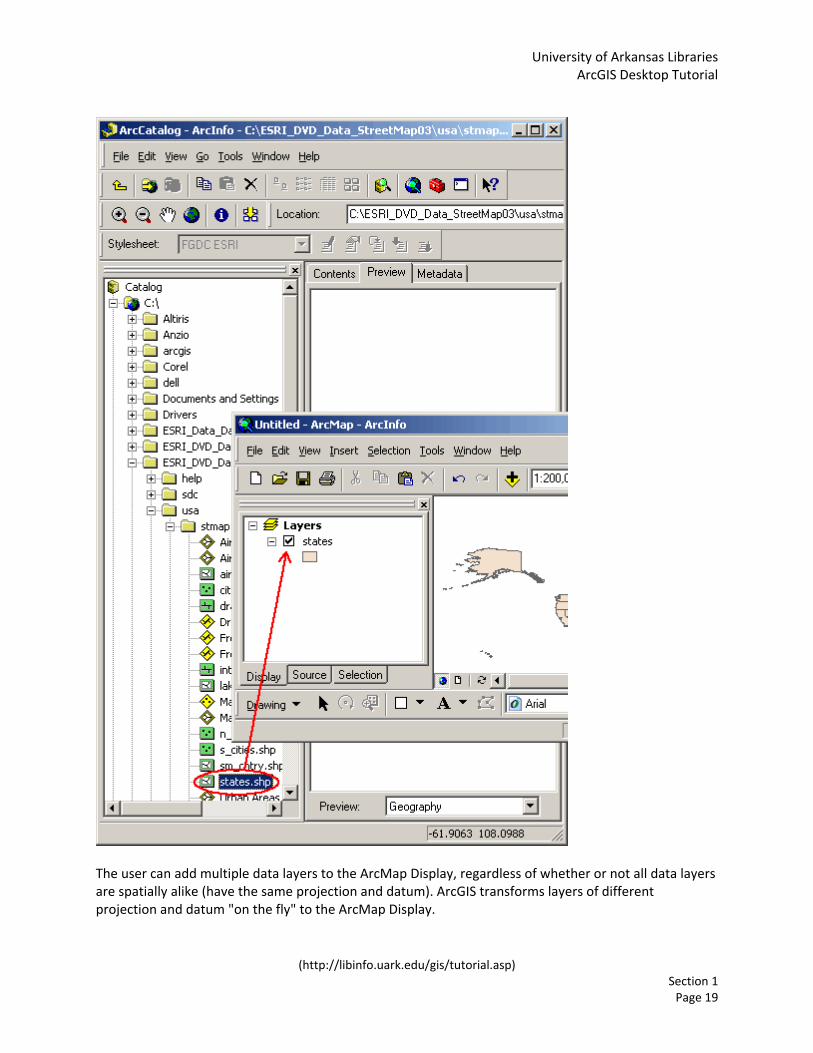
2. Simply click the name of the data layer from the ArcCatalog data tree, and drag it anywhere within the ArcMap display.
University of Arkansas Libraries ArcGIS Desktop Tutorial
(http://libinfo.uark.edu/gis/tutorial.asp) Section 1 Page 19
The user can add multiple data layers to the ArcMap Display, regardless of whether or not all data layers are spatially alike (have the same projection and datum). ArcGIS transforms layers of different projection and datum "on the fly" to the ArcMap Display.
University of Arkansas Libraries ArcGIS Desktop Tutorial
(http://libinfo.uark.edu/gis/tutorial.asp) Section 1 Page 20
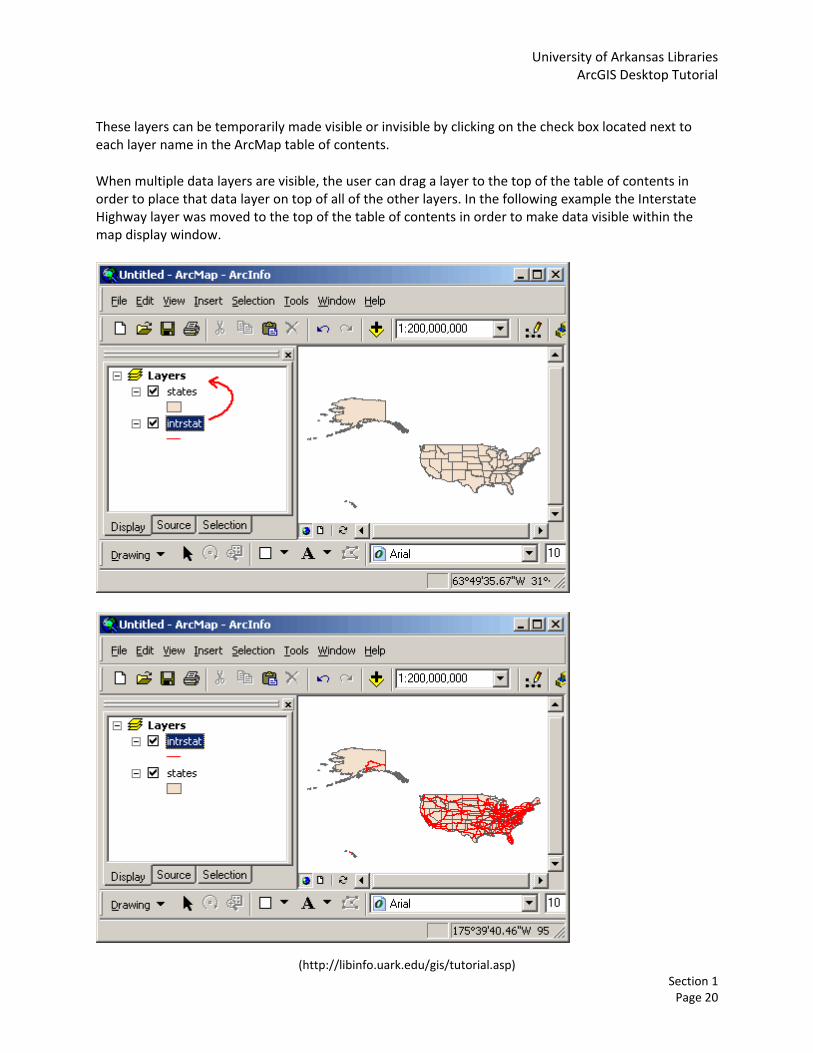
These layers can be temporarily made visible or invisible by clicking on the check box located next to each layer name in the ArcMap table of contents.
When multiple data layers are visible, the user can drag a layer to the top of the table of contents in order to place that data layer on top of all of the other layers. In the following example the Interstate Highway layer was moved to the top of the table of contents in order to make data visible within the map display window.
University of Arkansas Libraries ArcGIS Desktop Tutorial
(http://libinfo.uark.edu/gis/tutorial.asp) Section 1 Page 21
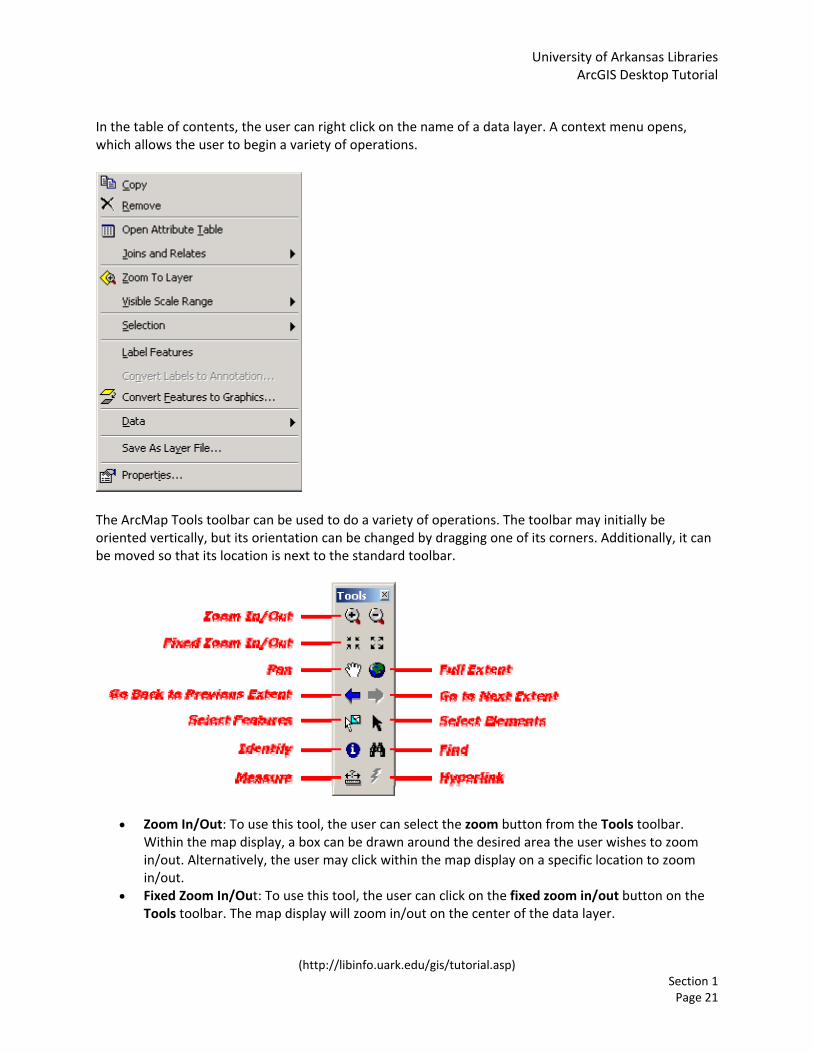
In the table of contents, the user can right click on the name of a data layer. A context menu opens, which allows the user to begin a variety of operations.
The ArcMap Tools toolbar can be used to do a variety of operations. The toolbar may initially be oriented vertically, but its orientation can be changed by dragging one of its corners. Additionally, it can be moved so that its location is next to the standard toolbar.
• Zoom In/Out: To use this tool, the user can select the zoom button from the Tools toolbar. Within the map display, a box can be drawn around the desired area the user wishes to zoom in/out. Alternatively, the user may click within the map display on a specific location to zoom in/out.
• Fixed Zoom In/Out: To use this tool, the user can click on the fixed zoom in/out button on the Tools toolbar. The map display will zoom in/out on the center of the data layer.
University of Arkansas Libraries ArcGIS Desktop Tutorial
(http://libinfo.uark.edu/gis/tutorial.asp) Section 1 Page 22
• Pan: To use this tool, the user can select the pan button from the Tools toolbar. Within the map display, the user can click and drag the entire map layer to its desired location.
• Full Extent: To use this tool, the user can select the full extent button from the Tools toolbar. This will automatically update the map display so that it displays the entire data layer within the frame.
• Go Back to Previous Extent: To use this tool, the user can select the go back to previous extent button on the Tools toolbar. The map display automatically goes back to the previous extent the user was viewing.
• Go to Next Extent: To use this tool, the user can select the go to next extent button on the Tools toolbar. The map display will go forward again through the sequence of extents the user has been viewing in the map display.
• Select Features: To use this tool, the user can select the select features button on the Tools toolbar. Then, the user can click on a feature within the data layer to select it. The tool can also be used to draw a box around a set of features to select them all. Additionally, the SHIFT key can be held down in order to select multiple features.
o The user can use the SET SELECTABLE LAYERS command in the selection pull‐down menu to control which layers this tool will select features from. This tool will only select features from layers that are checked in the Set Selectable layers dialog. By default, all the layers containing features are selectable.
o The user can use the INTERACTIVE SELECTION METHOD pull‐right in the selection pull‐down menu to control whether selecting features with this tool will unselect any features that are already selected, or add the features selected to the set of currently selected features.
o The user can use the OPTIONS command in the selection pull‐down menu to control other aspects of how this tool works, such as whether or not features have to fall completely inside the box the user drags with this tool in order to be selected.
• Select Elements: To use this tool, the user can select the select elements button on the Tools toolbar. This button allows the user to select, resize, and move graphics such as lines, boxes, text, labels, north arrows, scale bars, and picture drawn on your map. The user can click on a graphic to select it; hold down SHIFT while clicking to select multiple graphics; or draw a box with the tool to select all the graphics inside the box.
• Identify: To use this tool, the user can select the identify button from the Tools toolbar. Within the map display, the user can click on a feature (point, line, or area). A flash screen will appear that shows the attributes associated with that feature that is contained in the data layer's attribute table.
• Find: To use this tool, the user can select the find button from the Tools toolbar. This finds particular geographic features in the map. Features can be found based on the value of one of their attributes.
• Measure: To use this tool, the user can select the measure button from the Tools toolbar. This tool allows the user to measure distances on the data layer. As a line is drawn with this tool, the length of the line is shown in the status bar. A line can be drawn with multiple segments. The user can click once to start a new segment, and double click or press ESC to finish. The distance is shown in the distance units specified in the data frame properties dialog.
• Hyperlink: To use this tool, the user can select the hyperlink button from the Tools toolbar. This tool allows the user to click on a feature to trigger a hyperlink. This tool will be inactive if no hyperlinks have been defined for any of the feature layers in the map display. If a user wants to
University of Arkansas Libraries ArcGIS Desktop Tutorial
(http://libinfo.uark.edu/gis/tutorial.asp) Section 1 Page 23
use hyperlinks they have to be defined before this tool can be used. More about hyperlinks can be found in the ArcMap help section.
A user can zoom into a region of interest within their data layer, and save that zoomed location. This allows the user to easily navigate back to that region of interest. This can be done by going to the View Menu, pointing to Bookmarks, and clicking Create.
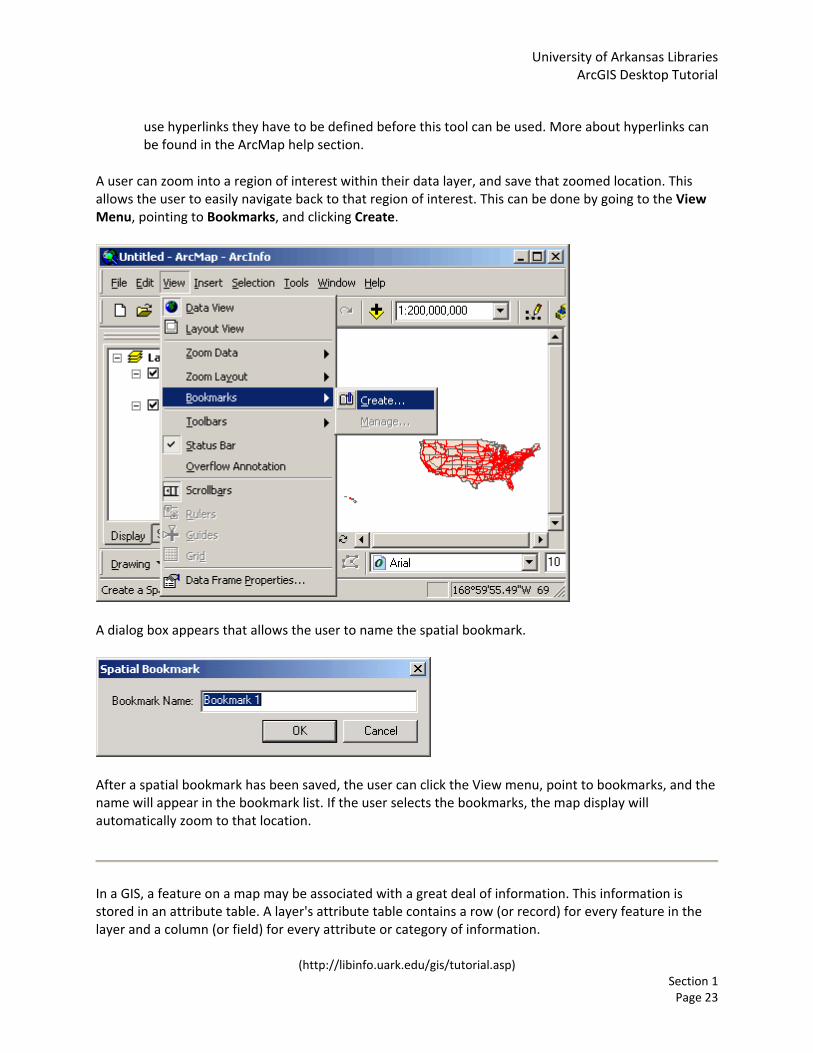
A dialog box appears that allows the user to name the spatial bookmark.
After a spatial bookmark has been saved, the user can click the View menu, point to bookmarks, and the name will appear in the bookmark list. If the user selects the bookmarks, the map display will automatically zoom to that location.
In a GIS, a feature on a map may be associated with a great deal of information. This information is stored in an attribute table. A layer's attribute table contains a row (or record) for every feature in the layer and a column (or field) for every attribute or category of information.
University of Arkansas Libraries ArcGIS Desktop Tutorial
(http://libinfo.uark.edu/gis/tutorial.asp) Section 1 Page 24
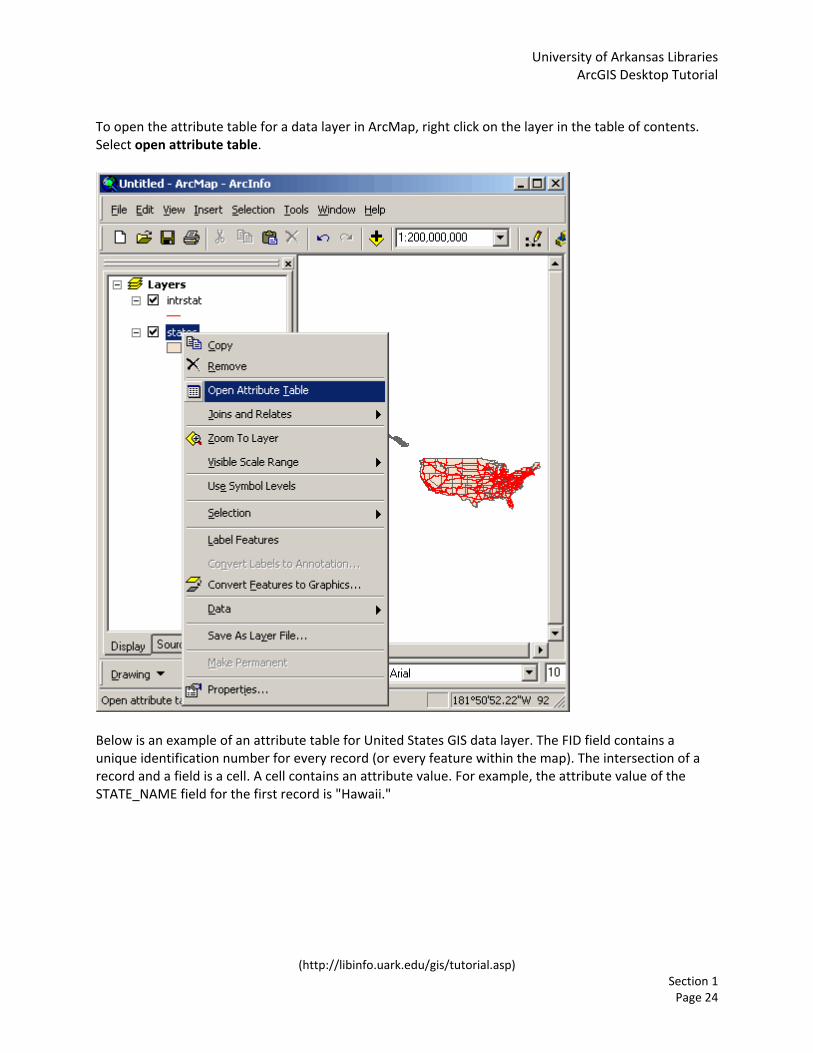
To open the attribute table for a data layer in ArcMap, right click on the layer in the table of contents. Select open attribute table.
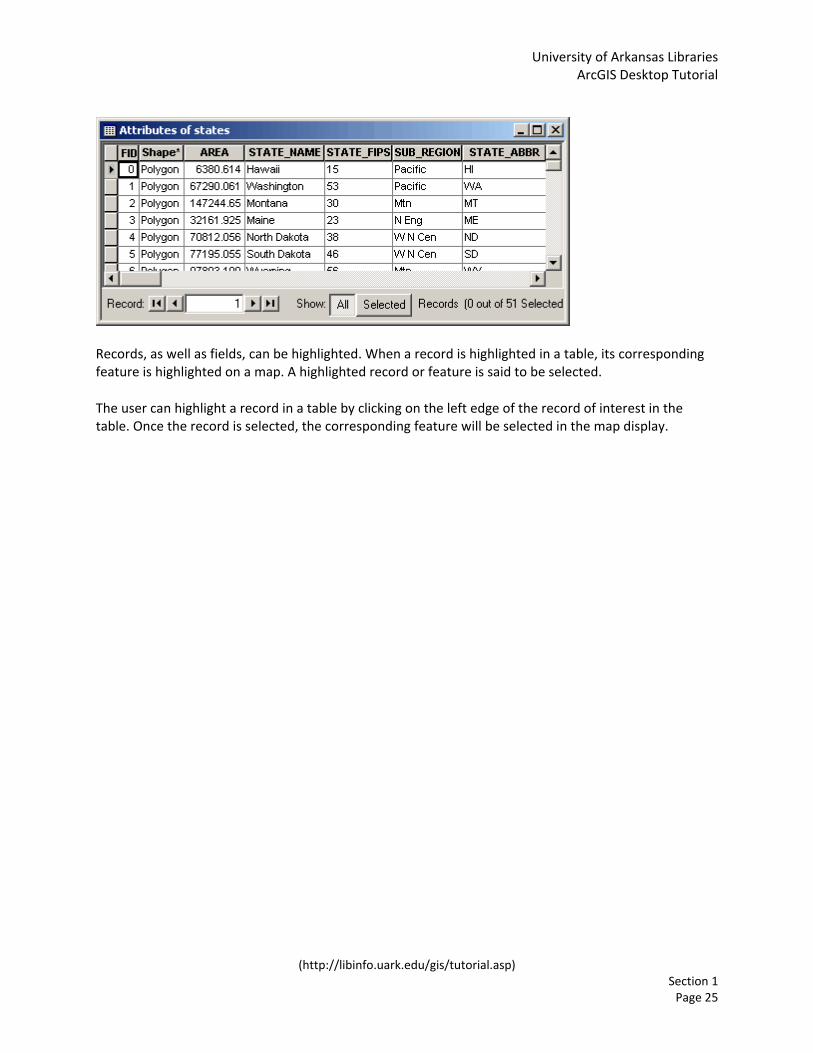
Below is an example of an attribute table for United States GIS data layer. The FID field contains a unique identification number for every record (or every feature within the map). The intersection of a record and a field is a cell. A cell contains an attribute value. For example, the attribute value of the STATE_NAME field for the first record is "Hawaii."
University of Arkansas Libraries ArcGIS Desktop Tutorial
(http://libinfo.uark.edu/gis/tutorial.asp) Section 1 Page 25
Records, as well as fields, can be highlighted. When a record is highlighted in a table, its corresponding feature is highlighted on a map. A highlighted record or feature is said to be selected.
The user can highlight a record in a table by clicking on the left edge of the record of interest in the table. Once the record is selected, the corresponding feature will be selected in the map display.

University of Arkansas Libraries ArcGIS Desktop Tutorial
(http://libinfo.uark.edu/gis/tutorial.asp) Section 1 Page 26
The user can clear selections by clicking on the options menu at the bottom of the attribute table and selecting the clear selection option. The record becomes unselected in the table and in the map display.
University of Arkansas Libraries ArcGIS Desktop Tutorial
(http://libinfo.uark.edu/gis/tutorial.asp) Section 1 Page 27
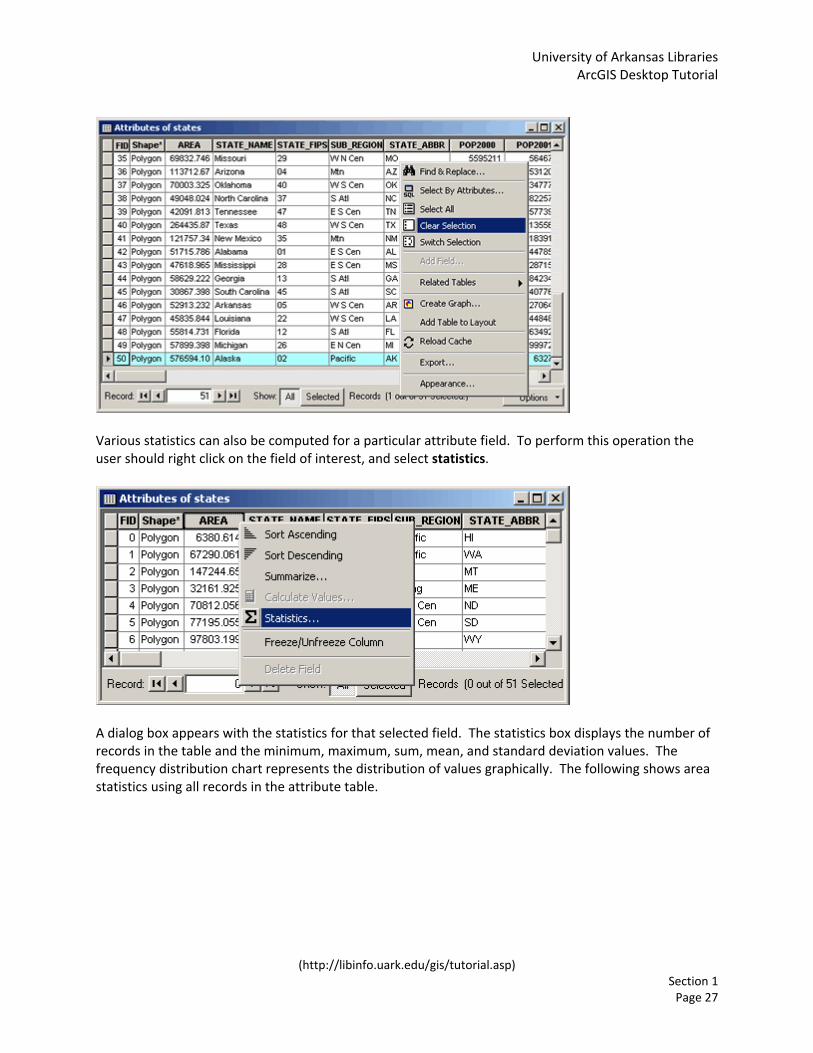
Various statistics can also be computed for a particular attribute field. To perform this operation the user should right click on the field of interest, and select statistics.
A dialog box appears with the statistics for that selected field. The statistics box displays the number of records in the table and the minimum, maximum, sum, mean, and standard deviation values. The frequency distribution chart represents the distribution of values graphically. The following shows area statistics using all records in the attribute table.
University of Arkansas Libraries ArcGIS Desktop Tutorial
(http://libinfo.uark.edu/gis/tutorial.asp) Section 1 Page 28
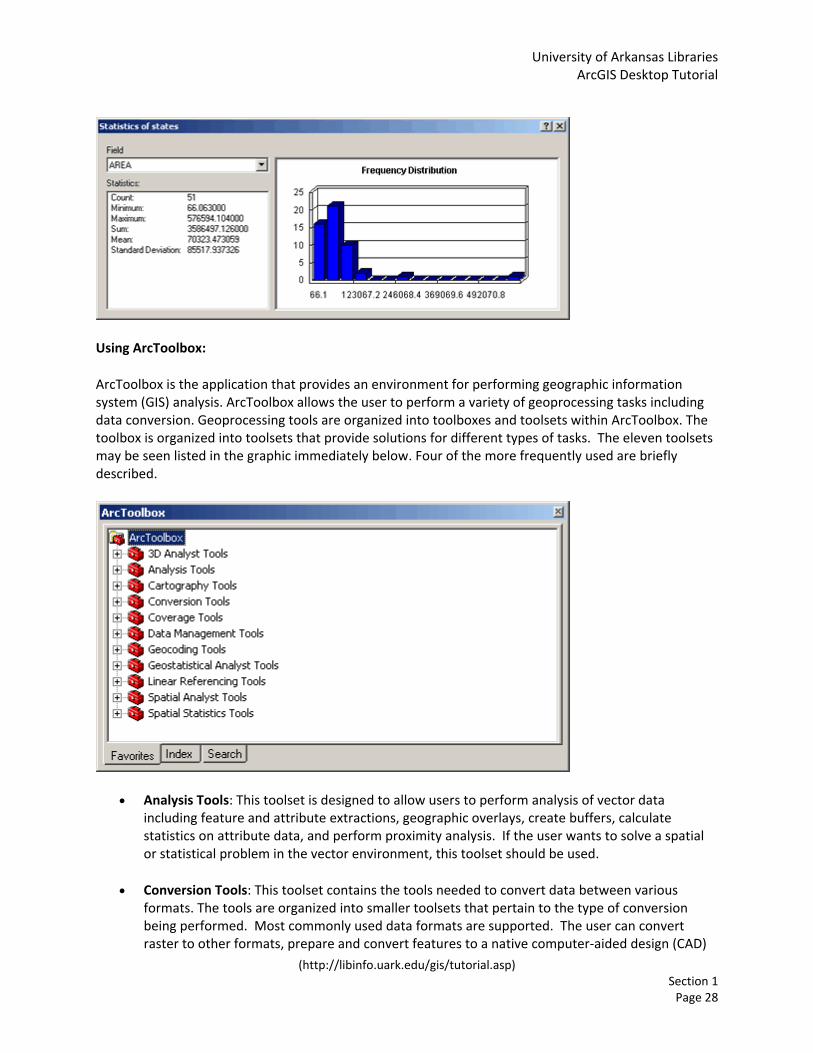
Using ArcToolbox:
ArcToolbox is the application that provides an environment for performing geographic information system (GIS) analysis. ArcToolbox allows the user to perform a variety of geoprocessing tasks including data conversion. Geoprocessing tools are organized into toolboxes and toolsets within ArcToolbox. The toolbox is organized into toolsets that provide solutions for different types of tasks. The eleven toolsets may be seen listed in the graphic immediately below. Four of the more frequently used are briefly described.
• Analysis Tools: This toolset is designed to allow users to perform analysis of vector data including feature and attribute extractions, geographic overlays, create buffers, calculate statistics on attribute data, and perform proximity analysis. If the user wants to solve a spatial or statistical problem in the vector environment, this toolset should be used.
• Conversion Tools: This toolset contains the tools needed to convert data between various formats. The tools are organized into smaller toolsets that pertain to the type of conversion being performed. Most commonly used data formats are supported. The user can convert raster to other formats, prepare and convert features to a native computer‐aided design (CAD)

University of Arkansas Libraries ArcGIS Desktop Tutorial
(http://libinfo.uark.edu/gis/tutorial.asp) Section 1 Page 29
format, convert: feature classes to coverage format; tables to dBase format; features and CAD files to geodatabase feature classes; data to rasters; and convert features to shapefiles. This toolset should be used whenever a user needs to change from one type of dataset to another.
• Data Management Tools: This toolset allows the user to manage and maintain feature classes, datasets, layers, and raster data structures. Database join operations, topology building, projections and transformations operations, workspace management, and much more. If the user needs to modify the characteristics of a particular dataset they can do so using this toolset.
• Spatial Analyst Tools: This toolset is designed to allow users to perform cell‐based (raster) analysis including a variety of neighborhood, overlay, reclass, map algebra, extractions, density, distance, cost surface functions, and more. If the user wants to solve a spatial or statistical problem in the raster environment, this toolset should be used.
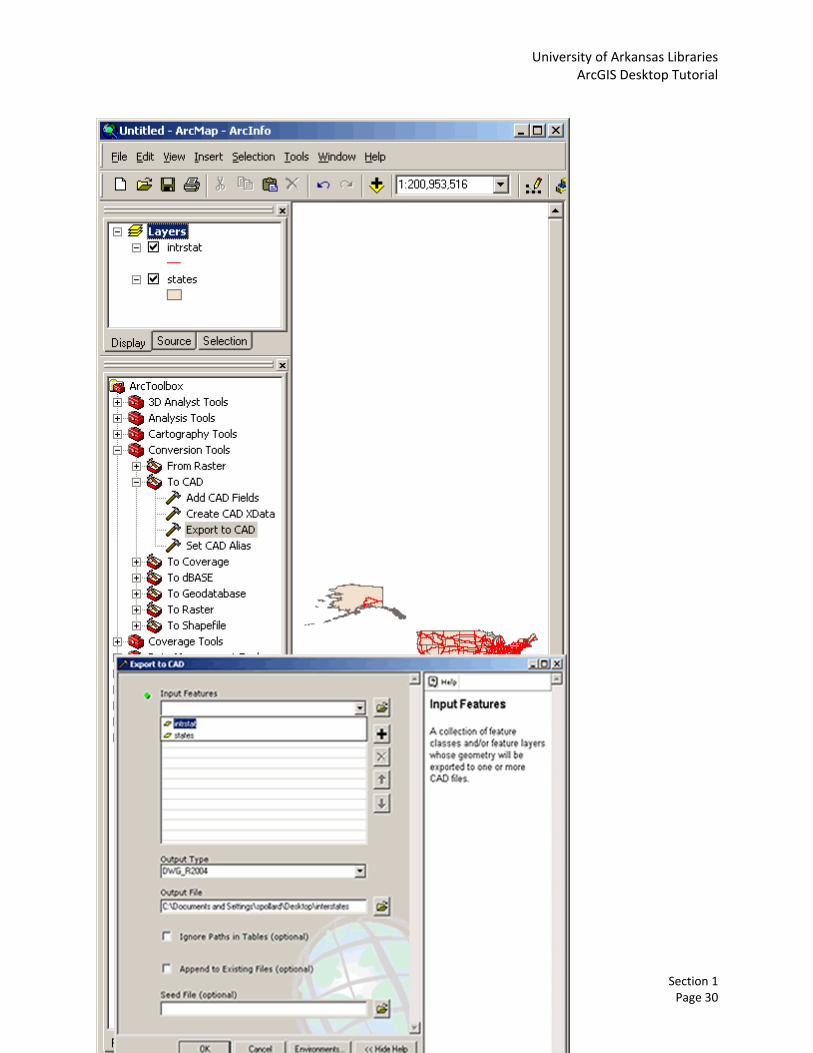
The user can access ArcToolbox through either ArcCatalog or ArcMap via the ArcToolbox (red toolbox) icon on the standard toolbar. In the graphic below two shapefiles (intrstat.shp and states.shp) have been added to ArcMap. From ArcMap ArcToolbox was called up, the Conversion Tools toolbox opened, and the Export to CAD tool selected to convert the intrstat.shp file's features to the DWG_R2004 format.
In both ArcMap and ArcCatalog the user may either navigate to the data to be used within a particular tool, or the data layer can be drag and dropped from the table of contents or catalog tree respectively, into the dialog box of the toolbox of interest. To perform this operation the ArcToolbox icon should can be selected. In the Toolbox, a tool of interest can be double‐clicked to start. The user can then click and drag on the dataset (in the table of contents or catalog tree) and drop in the "add data" box of the tool.
University
(http://libinfo.uark.edu/gis/tutorial.asp)
of Arkansas Libraries ArcGIS Desktop Tutorial
Section 1 Page 30


![Mrs. Daisy Bates - University of Arkansas Libraries · Daisy Bates, 1958. Photo from the Daisy Bates Papers, MC 582 [Poste r created December 2007] Mrs. Daisy Bates President, Arkansas](https://img.pdfslide.us/doc/110x75/60215293a9b77c5aef685620/mrs-daisy-bates-university-of-arkansas-libraries-daisy-bates-1958-photo-from.jpg)