Embed Size (px)
Citation preview
Notice
Note that when converting this document from its original format to a .pdf file, some minor font and format changes may occur. When viewing and printing this document, we cannot guarantee that your specific PC or printer will support all of the fonts or graphics. Therefore, when you view the document, fonts may be substituted and your individual printer may not have the capability to print the document correctly.


NEC NEC Corporation of America
UNIVERGE UM4730
User GuideRelease 11.3
July 2010NDA-31067, Issue 2

Liability Disclaimer
NEC Corporation of America reserve the right to change thespecifications, functions, or features at any time without notice.
NEC Corporation of America has prepared this document for theexclusive use of its employees and customers. The informationcontained herein is the property of NEC Corporation of America andshall not be reproduced without prior written approval from NECInfrontia Inc.
Dterm, NEAX and UNIVERGE are registered trademarks of NECCorporation and Electra Elite is a registered trademark of NEC America,Inc. Windows is a registered trademark of Microsoft Corporation. AT&Tis a registered trademark of AT&T Wireless Services, Inc. Pentium is atrademark or registered trademark of Intel Corporation or itssubsidiaries in the United States and other countries. AutoTalk is atrademark of Uniden America Corporation. ViewCall and ViewMail areregistered trademarks of Active Voice, LLC.
© 2010 NEC Corporation of America
All other brand or product names are or may be trademarks or registered trademarks of, and are used to identify products or services
of, their respective owners.
NEC Corporation of America 6535 N. State Highway 161
Irving, TX 75039-2402
Communications Technology Group

UNIVERGE UM4730 USER GUIDE i
■ CONTENTS
Introduction 1Introducing the Messaging System ............................................ 2
About this Guide ................................................................. 2Document Conventions ........................................................ 2
Mailbox Manager Icons ............................................................ 4Optional Licensed Features....................................................... 5
Visual Messaging Applications ............................................... 5Phone Numbers, Names, and IP Addresses ................................. 6
Getting Started 7Enrolling on the System ........................................................... 8
Using the Messaging System Tools 11Using a Phone ...................................................................... 12Using Mailbox Manager .......................................................... 13Using Mailbox Manager Search ............................................... 15Using the Audio Applet........................................................... 16Using Your E-mail Inbox......................................................... 18
Checking Messages 19E-Mail Integration ............................................................. 19
Checking Messages ............................................................... 20Mailbox Manager Message Icons.......................................... 20New Messages .................................................................. 20
Reviewing Old and Archived Messages ..................................... 23Saving Heard Messages as New Messages ............................ 24
Replying to Messages ............................................................ 25Archiving Messages ............................................................... 26Forwarding Messages to Another Subscriber ............................. 27
Sending Messages 29Sending Messages Directly to a Subscriber Mailbox.................... 30Listening to and Editing Messages Before Delivery .................... 31Sending Urgent Messages ...................................................... 32Sending Private Messages ...................................................... 33Requesting Message Delivery Receipt ...................................... 34Sending a Message with Future Delivery................................... 35Canceling a Sent Message ...................................................... 36Sending a Message to Additional Subscribers ............................ 37Sending a Message to a Group................................................ 38
Finding Out Who Has Not Received a Group Message ............. 38Sending Messages to Guest Subscribers ................................... 40Sending Messages to a Remote Subscriber ............................... 41
Recording Conversations and Monitoring Messages 43Recording a Conversation....................................................... 44Monitoring a Message as it is Recorded .................................... 45
Turning Live Monitor On and Off.......................................... 45

ii UNIVERGE UM4730 USER GUIDE
Working with Message Groups 47Creating Message Groups....................................................... 48Changing a Message Group Name ........................................... 51Adding or Deleting Message Group Members............................. 53Listing Groups and Group Members ......................................... 55Deleting Message Groups ....................................................... 56Recording a Group Name ....................................................... 57
Working with Greetings 59System Greetings.................................................................. 60
Using the System Default Greetings..................................... 60Using System Greetings with Recorded Names ...................... 60
Changing Standard Greetings ................................................. 61Changing Alternate Greetings ................................................. 62Switching Between the Standard and Alternate Greetings ........... 63Changing Busy Greetings ....................................................... 64Turning the Busy Greetings On or Off ...................................... 65
Changing Mailbox Setup Options 67Changing Security Codes........................................................ 68Changing Recorded Name ...................................................... 69Changing the Spelling of Your Name ........................................ 70Changing Message Playback Options........................................ 71Turning Call Transfer On or Off ............................................... 72Changing the Call Transfer Number ......................................... 73Turning Call Screening On or Off ............................................. 74Changing Call Screening Options ............................................. 75Turning Call Holding On or Off ................................................ 76Listing Your Extension in the Directory ..................................... 77Automatically Copy Messages to Another Extension ................... 78
Changing Message Notification Device Settings 79Initial Device Message Notification Setup.................................. 80
Notification Devices ........................................................... 80Enabling or Disabling a Device ................................................ 81Changing Notification Device Options ....................................... 82Temporarily Stopping Message Notification ............................... 85
Using a Phone to Check E-mail 87Configuring E-mail Settings .................................................... 88Checking E-mail Messages Using a Phone ................................. 90Hearing Who Else Received an E-mail Message.......................... 91Using a Phone to Enter Your E-mail Password ........................... 92
Password Table................................................................. 92Turning Your E-mail Message Count On or Off ........................... 93Faxing an E-mail Message ...................................................... 94Faxing All Messages in a Single Fax ......................................... 95Changing Your E-mail Password .............................................. 96
Working with Faxes 97

UNIVERGE UM4730 USER GUIDE iii
Receiving Faxes .................................................................... 98Receiving All Faxes with One Call ............................................ 99Changing Fax Delivery Options............................................... 100Changing Fax Greetings ........................................................ 101
Using Web Feeds 103Subscribing to a RSS Web Feed.............................................. 104Subscribing to a Podcast Web Feed......................................... 105
Index 107

iv UNIVERGE UM4730 USER GUIDE

UNIVERGE UM4730 USER GUIDE INTRODUCTION — 1
■ Introduction
Welcome to UNIVERGE UM4730, a simple yet powerful unified messaging system that greets your callers and records caller messages. When the e-mail integration is installed, the messaging system enables you to manage your e-mail and voice messages using a phone or an e-mail client.
This means you can listen to messages, reply to messages, forward messages, delete messages, and archive messages using the e-mail client or a phone. You can also manage your personal preferences.
This chapter provides a basic introduction to the messaging system and instructions for accessing the system using a phone or an Internet connection.
In this Chapter...
Introducing the Messaging System .............................................................................2About this Guide....................................................................................................2Document Conventions ...........................................................................................2
Mailbox Manager Icons .............................................................................................4Optional Licensed Features ........................................................................................5
Visual Messaging Applications..................................................................................5Phone Numbers, Names, and IP Addresses ..................................................................6

2 — INTRODUCTION UNIVERGE UM4730 USER GUIDE
Introducing the Messaging SystemOn the unified messaging system, you and other associates in the organization are known as subscribers. Subscribers of the messaging system manage their voice messages, faxes, and e-mail messages using a touchtone phone or a computer that is connected to the Internet.
About this GuideSome system features documented in this guide require additional licensing that may not be available in your organization. For detailed information about the messaging system features available in your organization contact your system manager.
This document provides instructions for using a full-featured unified messaging system. Some of the features available in your organization might behave differently or are not available.
This document explains how to manage your voice messages, fax messages, e-mail messages, and change settings that define how you work with the messaging system. Detailed information about managing e-mail messages should be obtained from the manufacturer’s documentation.
Instructions for using any of the Visual Messaging applications can be found in the online Help for those applications, a list of the Visual Messaging applications is available in “Visual Messaging Applications” on page 5.
Document ConventionsThe following conventions are used in this document:
● System Manager. The system manager is responsible for the messaging system and configuring the messaging system. This person might be the same as the network system administrator in your IT department.
● Key Names. Names of keys on the keyboard are shown in capital letters. For example, ESC, ALT, SHIFT, and so on.
When two keys must be pressed simultaneously they are joined by a + sign; for example, ALT+TAB.
● Icon and Button Names. Names of icons and buttons on the application are shown in bold font. The capitalization matches the user interface. For example, OK, Ok, DELETE, or Delete.
● Menu Selections. Menu selections are shown in a distinctive font. For example: File > Save and Actions > New Voice Message.
● User Input. Information you are required to type is shown in a distinctive font. For example, type msgorder.
Caution is required when typing a zero (0) or capital-O (O); a one (1) or a lowercase l.
● Phone Input—Keypad. Keys you are required to press on the phone keypad are shown in a special font.
For example, 1 to press one; 2 to press 2; # to press #; and so on.
NOTE
When using the command line prompt, always press the ENTER after typing a command.

UNIVERGE UM4730 USER GUIDE INTRODUCTION — 3
● Placeholder Text. Variable text that is replaced by specific text is shown in italics between angle brackets. Do not type the angle brackets. For example,
vm_ctl <action> <service>
where <action> = the command and
<service> = the name of the service.
● Hypertext Links. When viewing the Adobe® Acrobat® PDF document, links to other locations within the document and external Internet links appear in blue. Click a link to go to the referenced topic, page, or URL.
● Notes, Cautions, and Warnings. Text for notes, cautions, and warnings appear as shown:
● Procedural Icons. Different tools can be used to configure your personal preferences in the messaging system:
Additional details about these tools can be found in “Using the Messaging System Tools” on page 11.
NOTE
A note provides additional information to supplement the main text. A note provides helpful information, but is not essential to understanding the current topic.
CAUTION!
A caution advises you that failure to avoid or to take a specific action might lead to unwanted or undesirable results.
WARNING!
A warning advises you that failure to avoid or to take a specific action might result in physical harm to the user, damage to the hardware or loss of data.
Icon Tool
Phone. Use the phone to listen to and send messages, set personal profiles, and set personal preferences for greetings, playback, call transfer/screening, message notification, groups, and e-mail.
Mailbox Manager. Use the Mailbox Manager to read and send messages, set personal profiles, and set personal preferences for greetings, playback, call transfer/screening, message notification, groups, and e-mail.
This document provides detailed information about using the Mailbox Manager.
E-mail Inbox. Use e-mail tool to send or listen to your unified messages.

4 — INTRODUCTION UNIVERGE UM4730 USER GUIDE
Mailbox Manager IconsThe following are Mailbox Manager icons. If an icon is gray it is not available:
Icon Description
Mobile. Click to open the Mobile Home Page. Use this page to configure mobile device settings.
RSS Feed. Click to subscribe to messages using a RSS web feed.
Podcast Feed. Click to subscribe to message using a Podcast.
PDF-View Fax. Click to view the fax message as an Adobe®
Acrobat® PDF.
View Fax. Click to view the fax message. The messaging system provides a TIF file and a PDF for viewing the fax.
Archived Message. Indicates the message is archived. The number of days the message is archived is displayed.
Play Message. Click to play the message.
Stop Message Playback. Click to stop message playback.
Private Message. Indicates a private message.
Urgent Message. Indicates an urgent message.
Message Receipt. This icon appears on the Sent Items page. When this icon appears next to a message, it indicates that the message has been read.

UNIVERGE UM4730 USER GUIDE INTRODUCTION — 5
Optional Licensed FeaturesSome system features documented require additional licensing that might not be available in your organization. See your system manager for details about which features are available.
● Mailbox Manager. A Web-based application that enables you to control many of your personal mailbox settings, listen to voice messages, view fax messages, as well as archive any of your messages using a Web browser on any computer connected to the same network as the messaging system.
Place check in the Available column if the feature is installed in your organization.
● ActiveFax®. When your system is licensed for ActiveFax, you can manage your faxes using a phone or the Mailbox Manager. Faxes are included with voice messages, and can be delivered to a fax machine using a phone. See “Working with Faxes” on page 97.
● Unified Messaging. When your system is licensed for unified messaging, voice and fax messages can be automatically forwarded to your e-mail inbox. You can manage all of your messages using your e-mail application. Refer to your e-mail application documentation for help managing messages in your e-mail inbox.
● Text-to-speech. When your system is licensed for text-to-speech, you can use a phone to listen to your e-mail messages. See “Using a Phone to Check E-mail” on page 87.
Visual Messaging ApplicationsIf the messaging system in your organization includes Visual Messaging applications, you can manage all types of messages and phone calls using your computer.
The Visual Messaging applications provide alternate interfaces for working with voice and fax messages. The Visual Messaging applications include:
● ViewMail®. All of your voice and fax messages are brought together in one place using ViewMail. You can access and prioritize your messages and respond to them using your computer.
● ViewFax™. Send, receive, and redirect faxes using your computer.
● ViewCall® Plus. Manage all of your inbound and outbound calls using your computer. You can customize your call control by integrating ViewCall Plus with other programs when PhoneBASIC® is installed.
Available Feature Name Feature Description
✔ Mailbox Manager The Mailbox Manager is a Web-based application that enables you to personalize your messaging system phone settings.
Text-to-speech Text-to-speech enables you to hear the text portion of e-mail messages and meeting requests using computer speakers or a phone.
ActiveFax® With ActiveFax, you can manage faxes using a phone.
Unified Messaging Unified Messaging enables you to manage all of your messages, no matter what type, using your e-mail application.
Visual Messaging Applications
ViewMail® ViewMail brings all of your voice and fax messages are brought together in one place.
ViewFax™ ViewFax enables you to send, receive, and redirect faxes from your computer.
ViewCall® Plus ViewCall enables you to view and manage your phone calls directly from your computer.

6 — INTRODUCTION UNIVERGE UM4730 USER GUIDE
Phone Numbers, Names, and IP AddressesUse this space to record information for your messaging system. This information is required to configure computer connections or using a phone to retrieve and send messages.
Messaging System Internal Phone Extension: __________________________________________
Messaging System External Phone (calling from outside): _______________________________
Personal ID (usually 9 + your extension number): ______________________________________
Mailbox Manager URL: ______________________________________________________________
Server Name or IP Address:___________________________________________________________
System Administrator (network) Name: _______________________________________________
System Manager-Phone Number/Extension: ___________________________________________
NOTE
The system administrator is the organization’s IT administrator, the system manager is the messaging system administrator. The system manager has the rights necessary to change messaging system configurations and provides support for the messaging system only.
UNIVERGE UM4730 USER GUIDE GETTING STARTED — 7
■ Getting Started
If your organization requires you to enroll before you can start to access your messages, use the procedures described in this chapter
This chapter provides the information you need to use the first-time enrollment process.
CAUTION!
Whenever you use the Mailbox Manager to make configuration changes, you must remember to save your changes. If you do not save your changes before navigating away from a page, the change made might be lost.
In this Chapter...
Enrolling on the System ............................................................................................8To enroll on the messaging system using Mailbox Manager ..........................................9

8 — GETTING STARTED UNIVERGE UM4730 USER GUIDE
Enrolling on the SystemThe first-time enrollment process requires you to:
● Verify Your First and Last Names. the system manager has already typed your name and/or extension number into the messaging system.
Contact your system manager if your name is incorrect.
● Record Your Name. Record a name that is used to greet callers. If you do not record your name, the messaging system announces your extension number instead of your name.
● Record a Greeting. Record a personal greeting that callers hear when they reach your phone and your phone is not answered. When you do not record a greeting, a default system greeting is played.
● Specify a Phone Directory Setting. The phone directory enables callers to search for your name in the company directory when they do not know your extension number.
There are two types of directory assistance: automatic directory assistance and numeric directory assistance. Depending on how the administrator has configured the messaging system, your organization might use either one or both types of directory assistance.
● Configure a Security Code. A security code is a password that enables you to log on to Mailbox Manager and provides security for the messaging system data.
The system manager might provide a default security code, you must change this code during first-time enrollment or when the administrator resets your password. Although the first-time enrollment task is optional, you should configure a security code the first time you log on.
After completing these requirements, you are enrolled as a subscriber, and your mailbox is ready to use.
First-time enrollment can be done using a phone or Mailbox Manager on your computer.
USING A PHONE
To enroll on the messaging system using a phone
1 Dial the messaging system extension. Your system manager can provide the extension number.
See “Phone Numbers, Names, and IP Addresses” on page 6.
2 Enter your personal ID.
3 Enter the default security code.
4 Answer the system questions (prompts) by pressing the appropriate phone keys.
5 When the system informs you that your mailbox is set up, press 1 to confirm your settings.
If you do not press 1, your changes might be discarded.

UNIVERGE UM4730 USER GUIDE GETTING STARTED — 9
USING THE MAILBOX MANAGER
To enroll on the messaging system using Mailbox Manager1 Open a Web browser.
2 Type the URL for the messaging system in the Browser Address bar, then press ENTER.
http://<server name or IP Address>/mm
If you do not know the server name or IP Address, contact your system administrator or system manager.
The Mailbox Manager Welcome page appears.
3 Verify the information in the Last Name and First Name fields.
Your name might appear as greyed out data. This means that only your system manager can update the information.
4 Type the default security code you used to log on to the Mailbox Manager in the Enter current code field.
5 Type a new security code in the Enter New Code field.
The minimum length of the security code is set by your system manager.
Your new security code must be the minimum length, must be numeric, and must not be shared with anyone. Using this code to log on to Mailbox Manager provides an additional level of security for your mailbox.
6 Retype the new security code in the Verify New Code field.
7 Click the Recorded name Edit button to record your name.
8 Click Standard greeting Edit button to record your standard greeting.
9 Click Busy greeting Edit button to record the greeting callers hear if your line is busy.
10 Select if you want to be listed in the company phone directory:
■ Confirm that the List in the phone directory check box is selected to be listed in the phone directory.
■ Clear the check box if you do not want to be listed in the company phone directory.
11 Click Save.
The Enrollment page closes and the Messages page appears.
NOTE
Contact your system manager if your name is not correctly spelled.

10 — GETTING STARTED UNIVERGE UM4730 USER GUIDE

UNIVERGE UM4730 USER GUIDE USING THE MESSAGING SYSTEM TOOLS — 11
■ Using the Messaging System Tools
This chapter explains the three tools you use to manage your messages and your messaging system settings:
This chapter assumes that you have completed the first-time enrollment process and know how to dial the messaging system from an outside phone or from an extension within your organization.
Icon Tool
Touchtone phone. Use a touchtone phone to listen to messages, record greetings, change your security code.
Mailbox Manager. Use the Mailbox Manager to manage your messaging system settings and preferences.
E-mail Inbox. Use your e-mail tool to send or listen to your unified messages.
In this Chapter...
Using a Phone .......................................................................................................12Using Mailbox Manager Search.................................................................................15Using Mailbox Manager ...........................................................................................13Using the Audio Applet............................................................................................16Using Your E-mail Inbox..........................................................................................18

12 — USING THE MESSAGING SYSTEM TOOLS UNIVERGE UM4730 USER GUIDE
Using a PhoneCall the messaging system using the phone number for outside calls or the internal extension number. After you are connected, enter your personal ID and security code. The procedures in this chapter assume that you are using a digital phone with a key pad.
USING A PHONE
To access your mailbox
1 Call the messaging system.
2 When the system greets you, use the phone keys to enter your Personal ID and Security Code.
The system conversation prompts you for responses. Use the following tables to skip the prompts.
Use these keys on the Main Menu
Use these keys anytime
3 Press 4, to check new messages.
TASK KEY TASK KEY
Check new messages 4 Send a message 5
Check old messages 6 Change setup options 7
TASK KEY TASK KEY
Main menu * Previous menu #
Answer Yes 1 Answer No 2

UNIVERGE UM4730 USER GUIDE USING THE MESSAGING SYSTEM TOOLS — 13
Using Mailbox ManagerThe Mailbox Manager is a Web-based application that enables you to manage your messages and personalize your messaging system settings.
Use Mailbox Manager to create and change the following settings. If you find that you cannot change some of these settings, it is due to configuration restrictions set by the system manager:
● security code
● spelled name (only a system manager might be able to respell your name)
● recorded name
● greetings
● playback options
● call transfer options
● call screening options
● call holding options
● message delivery options
● message groups
● e-mail settings
● default language
This document and the Mailbox Manager online help topics provide detailed instructions for personalizing these settings.
USING THE MAILBOX MANAGER
To access your mailbox1 Open a Web browser.
2 Type the messaging system URL in the Location bar (Firefox) or Address bar (Internet Explorer), then press ENTER.
http://<server name or IP Address>/mm
If you do not know the server name or IP Address, contact your system manager.
3 Bookmark the Mailbox Manager site in your list of Favorites, or add a shortcut on your desktop.
To add a shortcut to your desktop■ Drag the URL in the Address or Location bar to the desktop.
4 Type your User ID and Security Code.
Optionally, if you do not want to provide your logon credentials each time you access the Mailbox Manager, select Remember me on this computer. The next time you sign in, Mailbox Manager automatically opens to the Messages page.
NOTE
If your logon credentials have changed, the messaging system is restarted, or if you sign out of Mailbox Manager by clicking the Sign out link on a page. The next time you sign in to Mailbox Manager you are prompted to supply the new credentials.

14 — USING THE MESSAGING SYSTEM TOOLS UNIVERGE UM4730 USER GUIDE
5 Select a Web UI language from the Language list.
6 Click Sign in.
The Messages page appears and you are now able to start using the Mailbox Manager.
USING THE MAILBOX MANAGER
To set your playback device1 Sign in to the Mailbox Manager.
2 Click the Profile tab.
The Profile page appears.
3 Select Message playback device you want to use:
● Speakers. Your messages are played back through the computer speakers.
● Extension. Your messages are played back through your phone.
● Alternate phone. Your messages are played back through the phone number listed in the Automatically login calls from field on the Profile page.
4 Click Save.
USING THE MAILBOX MANAGER
To log off Mailbox Manager❚ Click Sign out on the upper-right hand corner of any Mailbox Manager page.
Signing out of the Mailbox Manager returns you to the Sign In page. Any credentials stored on this computer are erased. The next time you open Mailbox Manager, you are prompted to resupply your logon credentials.
NOTE
The language displayed in the interface is not the same as the language used for spoken voice messaging prompts.
NOTE
This selection is only available if a number is entered in the Automatically login calls from field.

UNIVERGE UM4730 USER GUIDE USING THE MESSAGING SYSTEM TOOLS — 15
Using Mailbox Manager Search Mailbox Manager provides a search tool to search for and select subscribers or extensions. Use the following procedure to search for and select subscribers or extensions.
USING THE MAILBOX MANAGER
To search for a subscriber Use this procedure to find subscribers in the messaging system.
1 Click Search on the page where you want to search for a specific subscriber or extension.
The Search for page appears.
2 Use any of the following methods to search for subscribers or extensions in the Search for section:
■ On the Group:<Group Name> page, select Subscriber, My guests, or All as the search type.
Alternatively, on the Transfer|Screening page, select Subscriber or Extension. Leave the Search for member field blank.
■ Type the full last name, then the first name of the subscriber. For example, type Simmons, Sandy.
■ Type an extension number. For example, 9102.
■ Type any part of the subscriber’s name using wild cards (*) before and after a range of letters in the name.
For example, type *tons* to retrieve all member records with tons in the first or last name. Or, type any part of the extension number. For example, type *102* to retrieve all extension numbers where 102 is a part of the extension number.
■ Type any part of the member’s last name, then type a wildcard at the end.
For example, type Sim* to retrieve all member records where the last name starts with Sim. Or, type 102* to retrieve a list of extensions that start with 102.
■ Type a wildcard at the start of the member’s first name or at the start of the extension.
For example, type *Sandy to retrieve any records where the first name of the member is Sandy. Or, type *102 to retrieve a list of extensions that end with 102.
3 Click Search.
4 Select the subscriber.
5 Click Add or the appropriate command to transfer the information back to the starting point.
6 Click Close Window to close the search window.
The Search page closes and returns you to the page where you clicked Search. The selected members or extension numbers automatically populates the field.
NOTE
Guests are special clients, contacts, friends, or family. These callers are enrolled on the system as guests of a host subscriber and are greeted by name. Guests are given direct access to exchange messages with the host subscriber.
NOTE
On the Transfer|Screening page the Search for page automatically closes after selecting an extension for auto copy messages.

16 — USING THE MESSAGING SYSTEM TOOLS UNIVERGE UM4730 USER GUIDE
Using the Audio AppletThe Audio Applet is used to record or change your voice name, greetings, or record group names. A voice name identifies you to other callers and subscribers, while greetings are used to personalize the messages callers hear when you are unable to answer the phone.
Voice names and greetings are recorded on the following Mailbox Manager pages:
● Profile page
● Greetings page
● Groups - Group Name page, where Group Name is the name of a message group you created.
For more information about using the Audio Applet, see the Mailbox Manager Help.
USING THE MAILBOX MANAGER
To Record or Rerecord a Name or GreetingUse the following procedure to record a name or greeting.
1 Sign in to the Mailbox Manager.
2 Click the button to edit a recording on the appropriate Mailbox Manager page.
The Audio Applet appears.
3 If you have already selected your recording and playback devices, skip this step. Otherwise, select the recording and playback devices:
a Click Options Menu and select Playback device.
b Select Speakers or Phone.
If you select Speakers, a speaker system must be connected to the computer.
If you select Phone, you are prompted to type an Extension of a phone to use as the device.
c Click Options Menu and select Recording device.
d Select either Microphone or Phone.
If you select Microphone, a microphone must be connected to the computer.
If you select Phone, you must type an Extension of a phone to use as the device.
Options MenuPlayStop playback/recordingStart recordingSave

UNIVERGE UM4730 USER GUIDE USING THE MESSAGING SYSTEM TOOLS — 17
e To set a permanent extension for the playback and recording devices, click Options Menu > Options.
f Type an extension in the Extension field, then click OK.
If a phone is used for both the recording and playback device, the same phone number must be used in the Extension field. Multiple phone numbers cannot be used.
4 Click Record.
■ When a Microphone is the recording device, begin speaking into the microphone.
■ When a Phone is the recording device, the phone rings at the extension set in the Extension field. Pick up the handset and begin speaking.
5 Click Stop to stop recording.
6 Click Play to listen to the recording.
The Audio Applet displays the length of the recording in minutes and seconds. If a name or greeting has not been recorded 00:00 is displayed.
7 If you are satisfied with the recording, click Save.
8 When prompted to save the recording to the voice messaging server, click Yes.
9 Close the Audio Applet.
NOTE
Greetings and prompts can be created using WAV files that are copied into the audio applet using Paste from File. WAV files must be in the (AD) PCM audio format, with 16-bit audio sample size, 96-kbps bit rate, 1 (mono) channel and 8-kHz audio sample rate. No other formats are supported.

18 — USING THE MESSAGING SYSTEM TOOLS UNIVERGE UM4730 USER GUIDE
Using Your E-mail InboxWith unified messaging, you can access your voice, fax, and e-mail messages in your e-mail inbox. All of your messages, no matter what type, are stored in your e-mail inbox.
In your e-mail inbox:
● a voice message is attached as a WAV file to an e-mail message.
● a fax message is attached as a tiff image.
For steps to manage messages in your e-mail inbox, see your e-mail program’s online help.
If your messaging system includes text-to-speech, you can hear your e-mail messages using a phone or speakers attached to your computer. See “Using a Phone to Check E-mail” on page 87.

UNIVERGE UM4730 USER GUIDE CHECKING MESSAGES — 19
■ Checking Messages
This chapter describes how to check your new messages, review old messages, reply to a message, delete a message, archive a message, and forward a message to another subscriber.
You can manage your messages using a phone or Mailbox Manager.
E-Mail IntegrationIf your organization has the optional unified messaging e-mail integration installed, your messages can be forwarded to your e-mail inbox. From your e-mail client application you can manage your messages.
The list of new messages in your e-mail inbox might include voice, fax, and your e-mail messages.
Refer to your e-mail documentation for information about managing messages in your inbox.
In this Chapter...
Checking Messages ................................................................................................20Reviewing Old and Archived Messages ......................................................................23Replying to Messages .............................................................................................25Archiving Messages ................................................................................................26Forwarding Messages to Another Subscriber ..............................................................27
20 — CHECKING MESSAGES UNIVERGE UM4730 USER GUIDE
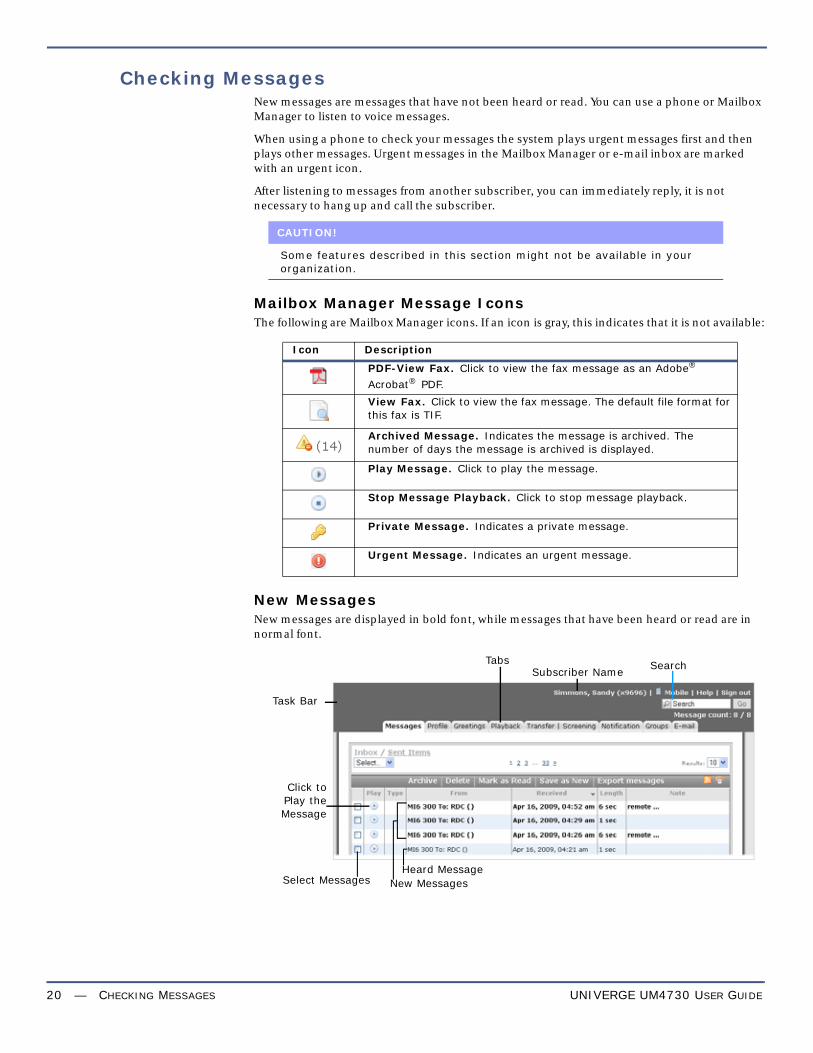
Checking MessagesNew messages are messages that have not been heard or read. You can use a phone or Mailbox Manager to listen to voice messages.
When using a phone to check your messages the system plays urgent messages first and then plays other messages. Urgent messages in the Mailbox Manager or e-mail inbox are marked with an urgent icon.
After listening to messages from another subscriber, you can immediately reply, it is not necessary to hang up and call the subscriber.
Mailbox Manager Message IconsThe following are Mailbox Manager icons. If an icon is gray, this indicates that it is not available:
New MessagesNew messages are displayed in bold font, while messages that have been heard or read are in normal font.
CAUTION!
Some features described in this section might not be available in your organization.
Icon Description
PDF-View Fax. Click to view the fax message as an Adobe®
Acrobat® PDF.
View Fax. Click to view the fax message. The default file format for this fax is TIF.
Archived Message. Indicates the message is archived. The number of days the message is archived is displayed.
Play Message. Click to play the message.
Stop Message Playback. Click to stop message playback.
Private Message. Indicates a private message.
Urgent Message. Indicates an urgent message.
New MessagesHeard Message
Tabs
Select Messages
Click toPlay theMessage
Task Bar
SearchSubscriber Name

UNIVERGE UM4730 USER GUIDE CHECKING MESSAGES — 21
USING A PHONE
To check messages
1 Call the messaging system and log on.
2 Press 4 to check new messages.
Follow the system instructions. Press 1 for Yes or 2 for No to respond to any questions.
3 Use the following commands during and after message playback:
During a Message
After a Message
USING THE MAILBOX MANAGER
To check messagesUse this procedure to check messages using your computer and an Internet browser.
1 Start your Internet browser.
2 Sign in to the Mailbox Manager.
3 Click the Messages tab
4 Click Play.
The message is played using the selected Playback Device. See “Changing Message Playback Options” on page 71.
5 After listening to the message, you can save it as a new message, archive the message, or delete the message.
TASK KEY TASK KEY
Menu options 3 Adjust volume 5
Rewind 7 Pause or continue 8
Fast forward 9 Repeat #
Save as new * Skip to the next message 35
TASK KEY TASK KEY
Menu options 3 Repeat message #
Save as new 0 Reply to sender 4
Check next message 5 Delete message 6
Archive message 7 Hear time stamp 8
Redirect message 9
Tabs
Commands
Select List
Select Individual Messages

22 — CHECKING MESSAGES UNIVERGE UM4730 USER GUIDE
To save a message as newa Select the message check box or use the Select list to select All messages, Read
messages, or Unread messages.
b Click Save as New.
The selected messages are flagged as new. The Message count field is updated to include these messages in the new messages count.
To archive a messagea Select the message check box or use the Select list to select All messages, Archived
messages, Read messages, or Unread messages.
b Click Archive.
The messages are archived for the default number of days set by the system manager.
The Archived message icon appears in the Play column for each message archived. The number of days that the message will be archived appears next to the icon.
For example, if the icon displays (14), the message is archived for fourteen days. After the archive expires, the message is deleted when old messages are deleted from the system. Messages can be re-archived before its expiration date.
To delete a messagea Select the message check box or use the Select list to select All messages, Archived
messages, Read messages, or Unread messages.
b Click Delete.
The selected messages are deleted.
USING E-MAIL
To check messages
Use the following procedure to check messages using your e-mail inbox.
1 Open your e-mail inbox.
2 Open the e-mail message that contains a file attachment.
3 Double-click the attachment to open it.
■ Voice messages are played on your computer speakers with your multi-media software.
■ Fax messages are displayed in your graphics viewer software.
NOTE
Archived messages cannot be marked Save as New.
NOTE
This procedure is only applicable if one of the optional unified messaging applications installed. These applications send messages to your e-mail inbox. Voice messages are attached to your e-mail messages as WAV files. A fax message has the fax attached to your e-mail message as a graphics file.

UNIVERGE UM4730 USER GUIDE CHECKING MESSAGES — 23
Reviewing Old and Archived MessagesOld messages are messages you have already heard, this includes messages that you have archived.
After you have listened to a message, the system saves it for a specified period of time. To keep a message for an extended period of time, you must archive the message before it expires. Archived messages are also kept for a specified period of time as configured by your system manager.
Contact your system manager to find out how long your system saves old messages and archived messages.
Old messages are retained for ___________________________________________________ days.
Archived messages are retained for ______________________________________________ days.
USING A PHONE
To review old messages
1 Call the messaging system and log on.
2 Press 6 to check old messages.
Follow the system instructions. Press 1 for Yes or 2 for No to respond to any questions.
3 Use the following commands during and after message playback.
Use these keys during a message
Use these keys after a message
USING THE MAILBOX MANAGER
To review old messages1 Sign in to the Mailbox Manager.
2 Click the Messages tab.
3 Select Read from the Select list to review messages you have already listened to (or read) or select Archive from the Select list to review archived messages.
A check mark appears in the message check box for the messages
4 Find the message you want to review and click Play to play a message.
The message is played using the selected Playback Device.
NOTE
After you listen to an archived message, the system gives you the option of archive the message again. If you do not archive the message, it will be deleted.
TASK KEY TASK KEY
Menu options 3 Adjust volume 5
Rewind 7 Pause or continue 8
Fast forward 9 Repeat #
Skip to next message 35
TASK KEY TASK KEY
Menu options 3 Repeat message #
Reply to sender 4 Check next message 5
Delete message 6 Archive message 7
Hear time stamp 8 Redirect message 9

24 — CHECKING MESSAGES UNIVERGE UM4730 USER GUIDE
5 After listening to the message you can save the message as new, archive the message, or delete the message.
Saving Heard Messages as New MessagesYou can save an old message you have heard as a new message. Use the following procedure to save an old message as a new message.
USING THE MAILBOX MANAGER
To save a message as newa Select the message check box or use the Select list to select All messages, Read
messages, or Unread messages.
b Click Save as New. The selected messages are flagged as new. The Message count field updates to include these messages in the new messages count.
USING THE MAILBOX MANAGER
To archive a messagea Select the message check box or use the Select list to select All messages, Archived
messages, Read messages, or Unread messages.
b Click Archive. The messages are archived for the default number of days set by the system manager.
The Archived message icon appears in the Play column of each message. Next to the icon is the number of days that the message will be archived. For example, if the icon displays (2), the message is archived for two days. After that, it is deleted the next time old messages are deleted from the system. You can re-archive a message before its expiration date.
USING THE MAILBOX MANAGER
To delete a messagea Select the message check box or use the Select list to select All messages, Archived
messages, Read messages, or Unread messages.
b Click Delete.
The selected messages are deleted.
NOTE
Archived messages cannot be marked Save as New.

UNIVERGE UM4730 USER GUIDE CHECKING MESSAGES — 25
Replying to MessagesIf the message is from another subscriber on the messaging system, you can record a reply using the messaging system.
USING A PHONE
To reply to a message
1 While listening to a message, press 3 4, or listen to the message, and then press 4.
2 Record your reply after the beep, and then press * to end the recording.
3 Press * to send the reply, or follow the system prompts to edit the reply, set special delivery, or address the reply to others.
4 After you send your reply, follow the system prompts to handle the original message.

26 — CHECKING MESSAGES UNIVERGE UM4730 USER GUIDE
Archiving MessagesThe system saves old messages for a specified period of time. Your system manager configures the length of time old messages are retained in the database. You can archive a message to save it for a longer period of time.
Contact your system manager to find out how long your system saves old and archived messages.
Archived messages are retained for ______________________________________________ days.
USING A PHONE
To archive a message using a phone
1 While listening to a message, press 3 7, or after listening to the message, press 7.
2 After archiving the message, follow the system prompts.
USING THE MAILBOX MANAGER
To archive a message using Mailbox Manager1 Sign in to the Mailbox Manager.
2 Click the Messages tab.
3 To archive a message
a Select the message or use the Select list to select All messages, Read messages, or Unread messages.
b Click Archive. The selected messages are archived for the default number of days set by the system manager.
The Archived message icon appears in the Play column of each message. Next to the icon is the number of days that the message is archived.
For example, if the icon displays (2), the message is archived for two days. After that, it is deleted the next time old messages are deleted from the system. A message can be archived again before its expiration date.
NOTE
Archived messages cannot be marked Save as New.

UNIVERGE UM4730 USER GUIDE CHECKING MESSAGES — 27
Forwarding Messages to Another SubscriberWhen you forward a message, you send a copy of the message to another subscriber.
The messaging system enables you to:
● redirect a message to another subscriber.
● record an introduction for the message.
● edit your introduction or set special delivery options for the redirected message.
USING A PHONE
To redirect a message
1 During message playback, press 3 9 to interrupt it, or after listening to the message, press 9.
2 Press 1 to start recording an introduction for the message, then press * when finished.
Or, press 2 to skip recording an introduction.
3 Follow the system prompts to edit the introduction or set special delivery options.
4 Use the phone keys to spell the last name of the subscriber, usually the first three letters of the subscriber’s last name. Or enter the subscriber’s extension number.
The system lists the subscribers that match last name or extension criteria you entered.
■ Press 1 when you hear the name of the subscriber you want.
■ Press 2 to hear the next matching name.
5 Wait while the system redirects the message.
6 After the message is redirected, press 1 to redirect the message to additional subscribers, then follow the system prompts.
Or, press 2 to skip redirecting the message to other subscribers.
7 After redirecting the message, follow the system prompts to handle the original message.
NOTE
Private messages cannot be redirected to another subscriber.

28 — CHECKING MESSAGES UNIVERGE UM4730 USER GUIDE

UNIVERGE UM4730 USER GUIDE SENDING MESSAGES — 29
■ Sending Messages
This chapter describes how to send messages using the messaging system.
You can use a phone to:
● send a message to one or more subscribers or guests.
● mark a message for urgent, private, return receipt, or future delivery.
● modify or cancel a message after leaving it.
● leave a message to a group.
● send a message to a subscriber at another messaging system location.
In this Chapter...
Sending Messages Directly to a Subscriber Mailbox.....................................................30Listening to and Editing Messages Before Delivery ......................................................31Sending Urgent Messages .......................................................................................32Sending Private Messages .......................................................................................33Requesting Message Delivery Receipt........................................................................34Sending a Message with Future Delivery....................................................................35Canceling a Sent Message .......................................................................................36Sending a Message to Additional Subscribers .............................................................37Sending a Message to a Group.................................................................................38Finding Out Who Has Not Received a Group Message ..................................................38Sending Messages to Guest Subscribers ....................................................................40Sending Messages to a Remote Subscriber ................................................................41

30 — SENDING MESSAGES UNIVERGE UM4730 USER GUIDE
Sending Messages Directly to a Subscriber MailboxThe messaging system enables you to leave voice messages for subscribers, groups, or subscriber guests. When the e-mail integration is installed, you can also send messages directly to a another subscriber’s mailbox without calling the extension.
Messages sent directly to another subscriber can be addressed by name or extension number. Ask your system manager which method of message addressing is configured for your organization.
USING A PHONE
To send a message to a subscriber mailbox
1 Call the messaging system and log on.
2 Press 5 to leave a message.
3 Use the phone keys to spell the subscriber’s last name or enter the subscriber’s extension number.
Usually the first three letters of the subscriber’s last name are sufficient enough to identify a subscriber.
The system lists the subscribers that meet last name or extension criteria entered.
■ Press 1 when you hear the name of the correct subscriber.
■ Press 2 to hear the next matching name.
4 Record your message after the beep.
5 Press # to re-record the message, or press * to stop recording the message.
6 Press * to send the message to the subscriber’s mailbox.
CAUTION!
The message must be at least two seconds in duration or it will not be delivered.

UNIVERGE UM4730 USER GUIDE SENDING MESSAGES — 31
Listening to and Editing Messages Before Delivery Depending on system settings, you can listen to and edit a message before you send it.
When editing a message, you can add to the end of the message, review the message you recorded, or rerecord the entire message.
If you do not know if these options are available on your message system, contact your system manager.
USING A PHONE
To listen to and edit a message before sending
1 After recording a message, press 4 5 to review to the message.
2 After listening to the message, you can:
■ Press 4 to add to the end of the message.
Record after the beep and press * to stop recording.
■ Press 6 to delete the current message and rerecord it.
Record the new message after the beep and press * to stop recording.
3 Press 5 to listen to the edited message.
4 Press * after editing the message.
5 Press * to send the message.

32 — SENDING MESSAGES UNIVERGE UM4730 USER GUIDE
Sending Urgent MessagesYou can mark a message as urgent before sending the message. The system plays urgent messages before other messages.
Messages can be marked as urgent when you leave a message directly in a subscriber’s mailbox or when you call an unanswered extension.
USING A PHONE
To send an urgent message
1 Call the messaging system and log on.
2 Press 5 to leave a message.
3 Use the phone keys to spell the last name of the subscriber, usually the first three letters of the subscriber’s last name. Or enter the extension number.
The system lists the subscribers that meet last name or extension criteria you entered.
■ Press 1 when you hear the name of the subscriber you want.
■ Press 2 to hear the next matching name.
4 Record your message after the beep.
5 Press # to start over, or press * to stop recording.
6 Press 5 4 * to mark the message as urgent.
7 Press * to send the message and return to the main menu.
CAUTION!
The message must be at least two seconds in duration or it will not be delivered.

UNIVERGE UM4730 USER GUIDE SENDING MESSAGES — 33
Sending Private MessagesYou can mark a message as private. A private message cannot be redirected (forwarded) to another subscriber.
USING A PHONE
To send a private message
1 Call the messaging system and log on.
2 Press 5 to leave a message.
3 Use the phone keys to spell the last name of the subscriber, or enter the subscriber’s extension number.
The system lists the subscribers that meet last name or extension criteria entered.
■ Press 1 when you hear the name of the subscriber you want.
■ Press 2 to hear the next matching name.
4 Record your message after the beep. The message must be at least two seconds long to be delivered.
5 Press # to start over, or press * to stop recording.
6 Press 5 5 * to mark the message private.
7 Press * to send the message and return to the main menu.

34 — SENDING MESSAGES UNIVERGE UM4730 USER GUIDE
Requesting Message Delivery Receipt You can request a return receipt delivery option for messages you send. The messaging system sends a receipt to your mailbox when the recipient listens to or opens the message.
When you request a return receipt delivery for a message sent to a group, the messaging system sends a receipt for each group member that listens to or opens the message.
USING A PHONE
To request a delivery receipt
1 Call the messaging system and log on.
2 Press 5 to leave a message.
3 Use the phone keys to spell the subscriber’s last name or enter the subscriber’s extension.
The system lists the subscribers that meet last name or extension criteria you entered.
■ Press 1 when you hear the name of the subscriber you want.
■ Press 2 to hear the next matching name.
4 Record your message after the beep.
The message must be at least three seconds long to be delivered.
5 Press # to start over, or press * to stop recording.
6 Press 5 6 * to request a delivery receipt.
7 Press * to send the message and return to the main menu.

UNIVERGE UM4730 USER GUIDE SENDING MESSAGES — 35
Sending a Message with Future DeliveryMessages can be marked for future delivery. The messaging system does not send the message until the specified date and time.
USING A PHONE
To send a message with future delivery
1 Call the messaging system and log on.
2 Press 5 to leave a message.
3 Use the phone keys to spell the last name of the subscriber, usually the first three letters of the subscriber’s last name or enter the extension number.
The system lists the subscribers that meet last name or extension criteria you entered.
■ Press 1 when you hear the name of the subscriber you want.
■ Press 2 to hear the next matching name.
4 Record your message after the beep.
The message must be at least three seconds long to be delivered.
5 Press # to start over, or press * to stop recording.
6 Press 5 7 to mark the message for future delivery
7 Select the delivery day for the message:
■ Press 0 to have the message delivered later today.
■ Press 1 to have the message delivered tomorrow.
■ Press 2 to have the message delivered in two days.
■ Press 9 to have the message delivered on a specific date.
Enter the month using a number for the month, 1 through 12. Enter the date using a number from 1 to 31.
8 Enter the message delivery time, include the hour and minutes, then press *.
For an A.M. delivery, press 1. For a P. M. delivery, press 2.
9 The messaging system confirms the date and time specified.
10 Press * to exit special delivery menu.
11 Press * to send the message and return to the Main Menu.

36 — SENDING MESSAGES UNIVERGE UM4730 USER GUIDE
Canceling a Sent MessageYou can cancel a message if the recipient has not heard the message.
USING A PHONE
To cancel a sent message
1 Call the messaging system and log on.
2 Start to leave another message to the same subscriber.
3 If the subscriber has not yet heard your last message, the messaging system asks if you want to review it.
Press 1 to review the message.
4 When you hear the message you want to cancel, press 5 to cancel the message.
5 Press 1 to confirm the cancellation.
USING THE MAILBOX MANAGER
To cancel a sent message1 Sign in to the Mailbox Manager.
2 On the Messages tab, click the Sent items to review messages you have sent.
3 Select the check box adjacent to each message you want to cancel.
4 Click Delete.
The selected messages are deleted.

UNIVERGE UM4730 USER GUIDE SENDING MESSAGES — 37
Sending a Message to Additional SubscribersAfter sending a message to one subscriber, the messaging system allows you to send the message to additional subscribers.
USING A PHONE
To send a message to additional subscribers
1 Call the messaging system and log on.
2 Press 5 to leave a message.
3 Use the phone keys to spell the last name of the subscriber, usually the first three letters of the subscriber’s last name, to whom you sending the message. Or enter the extension number of the subscriber to whom you are sending the message.
The system lists the subscribers that meet last name or extension criteria you entered.
■ Press 1 when you hear the name of the subscriber you want.
■ Press 2 to hear the next matching name.
4 Record your message after the beep. The message must be at least three seconds long to be delivered.
Press # to start recording the message again, or press * 6 to stop recording the message.
5 Follow the system prompts to address the message.
After you select a name, The messaging system confirms that a copy of the message has been sent.
Repeat this step for each additional recipient.
6 Press * to send.

38 — SENDING MESSAGES UNIVERGE UM4730 USER GUIDE
Sending a Message to a GroupA message group is a mailing list of subscribers and guests. A message group makes it easier to send the same message to several subscribers. Your system manager can create message groups or you can create your own.
See “Working with Message Groups” on page 47 for more information about group settings.
USING A PHONE
To send a message to a group
1 Call the messaging system and log on.
2 Press 5 to leave a message.
3 Use the phone keys to spell the group name or enter the group number.
The system lists the groups that match the search criteria you entered.
■ Press 1 when you hear the name of the group.
■ Press 2 to hear the next matching group name.
4 Record your message after the beep.
The message must be at least three seconds long to be delivered.
Press # to start recording the message again, or press * to stop recording the message.
5 Follow the system prompts to edit the message, set special delivery options, or address the message to others.
6 Press * to send the message.
Finding Out Who Has Not Received a Group MessageThe system tells you who in the group has not yet heard the message.
NOTE
When searching for group names, the digit 1 is used as a wild card. Minimize the use of the digit (wild card) since it can result in increased search times and use additional messaging system resources.
After pressing the first few letters of a group name, pressing * can reduce the amount of time the system takes to return group names.

UNIVERGE UM4730 USER GUIDE SENDING MESSAGES — 39
USING A PHONE
To find out who has not received a group message
1 Call the messaging system and log on.
2 Press 5 to leave a message.
3 Use the phone keys to spell the group member’s name.
The system lists the names that meet criteria you specified.
■ Press 1 when you hear the name of the group member you want.
■ Press 2 to hear the next matching name.
4 The system informs you that some members have not heard your last message.
Press 1 to review the message.
5 Listen to the message or press 2 to interrupt it.
6 Press 2 to listen to a list who has not heard the message.
7 Press * to stop the list.
NOTE
When searching for group names, the digit 1 is used as a wild card. Minimize the use of the digit (wild card) since it can result in increased search times and use additional messaging system resources.
After pressing the first few letters of a group name, pressing * can reduce the amount of time the system takes to return group names.

40 — SENDING MESSAGES UNIVERGE UM4730 USER GUIDE
Sending Messages to Guest SubscribersYou can host special clients, contacts, friends, or family on the messaging system by asking your system manager to add them as your guests. The system manager configures a recorded name, personal ID, language, and message notification for the guest. Guests cannot use a phone to change their recorded name or notification options.
Once added, your guests can call the messaging system and enter their personal ID to hear messages and to leave messages directly in your mailbox without having to dial your extension.
If your guests want to leave a message for another subscriber or try another extension, they must do so as an unidentified caller.
USING A PHONE
To send a message to a guest subscriber
1 Call the messaging system and log on.
2 Press 5 to leave a message.
3 Use the phone keys to spell the guest’s name.
The system lists the names that meet criteria you entered.
■ Press 1 when you hear the name of the guest you want.
■ Press 2 to hear the next matching name.
4 Record your message after the beep. The message must be at least three seconds long to be delivered.
Press # to start recording the message again, or press * to stop recording the message.
5 Follow the system prompts to edit the message, set special delivery options, or address the message to others.
6 Press * to send the message.

UNIVERGE UM4730 USER GUIDE SENDING MESSAGES — 41
Sending Messages to a Remote Subscriber Messages can be sent to subscribers who use a messaging system at another location. When addressing a message to a subscriber at a remote site, you must identify the location as well as the subscriber. Remote subscribers are subscribers who use a different messaging system server that is connected using a wide-area network.
Your system manager can provide location names or numbers you should use.
USING A PHONE
To send a message to a subscriber at another location
1 Call the messaging system and log on.
2 Press 5 to leave a message.
3 Use the phone keys to find the subscriber.
Depending on how your system works with the other location, use the phone keys to spell the location name, then the subscriber’s extension OR use the phone keys to spell the subscriber’s name.
The system lists the names that match the search criteria entered.
■ Press 1 when you hear the name of the subscriber.
■ Press 2 to hear the next matching name.
4 Record your message after the beep. The message must be at least three seconds long to be delivered.
Press # to start recording the message again, or press * to stop recording the message.
5 Follow the system prompts to edit the message, set special delivery options, or address the message to others.
6 Press * to send the message.
NOTE
This feature is only available if your organization has purchased a remote site license.

42 — SENDING MESSAGES UNIVERGE UM4730 USER GUIDE

UNIVERGE UM4730 USER GUIDE RECORDING CONVERSATIONS — 43
■ Recording Conversations
This chapter describes how to use the Live Record feature.
Depending on how your phone messaging system is configured you can record calls and store them as voice messages
Some NEC phone systems can use the Live Record feature. But the phone system must be configured and telephone keys programmed to enable this feature. Contact your system manager to see if this feature is enabled.
In this Chapter...
Recording a Conversation........................................................................................44

44 — RECORDING CONVERSATIONS UNIVERGE UM4730 USER GUIDE
Recording a ConversationWhen your messaging system supports recording conversations, you can record a phone conversation and manage the recorded conversation. This feature is called Live Record.
The recorded conversation is stored as a message in your mailbox. In your mailbox, you can review, delete, or add an introduction and then redirect the recorded message to another subscriber.
Use the keys on your phone to manage the recording for Live Record.
USING A PHONE
To record a conversation
1 Press the phone pad RECORD key during the phone conversation.
The Record lamp turns on.
2 Press the phone pad END key or disconnect the call to save the recorded message to your mailbox.
The Record lamp turns off.
See “Checking Messages” on page 20 for information about reviewing, redirecting, and deleting a recorded message.
WARNING!
The use of monitoring, recording or listening devices to eavesdrop, monitor, retrieve, or record phone conversations or other sound activities—whether or not contemporaneous with transmission—might be illegal in certain circumstances under local laws. Legal advice should be sought prior to implementing any practice that monitors or records any phone conversation. Some laws require some form of notification to all parties to a phone conversation—such as using a beep tone or other notification method, or requiring the consent of all parties to the phone conversation—prior to monitoring or recording the phone conversation. Some of these laws incorporate strict penalties.

UNIVERGE UM4730 USER GUIDE WORKING WITH MESSAGE GROUPS — 47
■ Working with Message Groups
This chapter describes how to create, manage, and delete message groups.
Message groups provide a convenient way to deliver the same message to several subscribers at the same time. When you send a message to a message group, it is automatically sent to all subscribers who are members of the group.
In this Chapter...
Creating Message Groups........................................................................................48Changing a Message Group Name ............................................................................51Adding or Deleting Message Group Members..............................................................53Listing Groups and Group Members ..........................................................................55Deleting Message Groups ........................................................................................56Recording a Group Name ........................................................................................57

48 — WORKING WITH MESSAGE GROUPS UNIVERGE UM4730 USER GUIDE
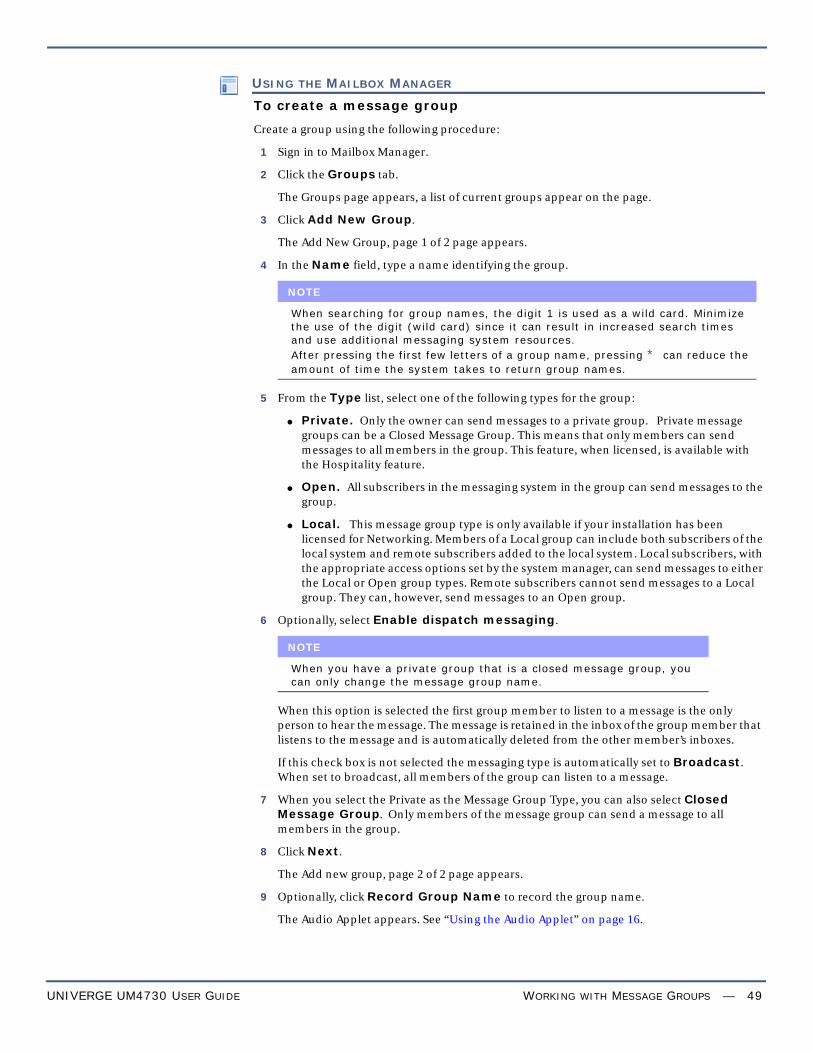
Creating Message GroupsMessage groups provide a convenient way to deliver the same message to several subscribers at the same time. When you send a message to a message group, it is automatically sent to all subscribers who are members of the group.
You can create as many message groups as you need and customize membership in each of the groups.
There are three types of groups:
● Open Groups. All subscribers can send messages to an open group.
● Private Groups. Only the owner can send messages to the private groups. Private message groups can be a Closed Message Group. This means that only members can send messages to all members in the group. This feature, when licensed, is available with the Hospitality feature.
● Local Groups. This message group type is only available if your installation has been licensed for Networking.
Members of a Local group can include both subscribers of the local system and remote subscribers added to the local system.
Local subscribers, with the appropriate access options set by the system manager, can send messages to either the Local or Open group types. Remote subscribers cannot send messages to a Local group. They can, however, send messages to an Open group.
You can use a phone or Mailbox Manager to create groups.
USING A PHONE
To create a message group
1 Call the messaging system and log on.
2 Press 7 5 4 to create a new group.
■ For numbered groups, use the phone keys to enter a three-digit group number.
■ For named groups, use the phone keys to enter the first three letters of the group’s name.
3 Record a name for the group.
4 Press * when you have finished recording the name.
5 Specify the type of group you are creating:
Press 1 to make the group an open group or Press 2 to make the group a private group.
6 Follow the system instructions to add members to the group. Members can be added by name or extension number.
Guests do not have extension numbers, spell their names or enter their personal IDs to add them to the group.
7 Press * when you are finished adding members.
8 Press 1 to leave a message for this group or press 2 to continue.
NOTE
When searching for group names, the digit 1 is used as a wild card. Minimize the use of the digit (wild card) since it can result in increased search times and use additional messaging system resources.
After pressing the first few letters of a group name, pressing * can reduce the amount of time the system takes to return group names.
UNIVERGE UM4730 USER GUIDE WORKING WITH MESSAGE GROUPS — 49
USING THE MAILBOX MANAGER
To create a message group
Create a group using the following procedure:
1 Sign in to Mailbox Manager.
2 Click the Groups tab.
The Groups page appears, a list of current groups appear on the page.
3 Click Add New Group.
The Add New Group, page 1 of 2 page appears.
4 In the Name field, type a name identifying the group.
5 From the Type list, select one of the following types for the group:
● Private. Only the owner can send messages to a private group. Private message groups can be a Closed Message Group. This means that only members can send messages to all members in the group. This feature, when licensed, is available with the Hospitality feature.
● Open. All subscribers in the messaging system in the group can send messages to the group.
● Local. This message group type is only available if your installation has been licensed for Networking. Members of a Local group can include both subscribers of the local system and remote subscribers added to the local system. Local subscribers, with the appropriate access options set by the system manager, can send messages to either the Local or Open group types. Remote subscribers cannot send messages to a Local group. They can, however, send messages to an Open group.
6 Optionally, select Enable dispatch messaging.
When this option is selected the first group member to listen to a message is the only person to hear the message. The message is retained in the inbox of the group member that listens to the message and is automatically deleted from the other member’s inboxes.
If this check box is not selected the messaging type is automatically set to Broadcast. When set to broadcast, all members of the group can listen to a message.
7 When you select the Private as the Message Group Type, you can also select Closed Message Group. Only members of the message group can send a message to all members in the group.
8 Click Next.
The Add new group, page 2 of 2 page appears.
9 Optionally, click Record Group Name to record the group name.
The Audio Applet appears. See “Using the Audio Applet” on page 16.
NOTE
When searching for group names, the digit 1 is used as a wild card. Minimize the use of the digit (wild card) since it can result in increased search times and use additional messaging system resources.After pressing the first few letters of a group name, pressing * can reduce the amount of time the system takes to return group names.
NOTE
When you have a private group that is a closed message group, you can only change the message group name.

50 — WORKING WITH MESSAGE GROUPS UNIVERGE UM4730 USER GUIDE
10 Click Search to select members of the group.
The Search for page appears, displaying the list of subscribers. If a subscriber is not listed, contact your system manager.
The Search for member page appears:
a The list of system members is shown. You cannot add subscribers to this list. If a subscriber is not listed, contact the system manager.
See “Using Mailbox Manager Search” on page 15.
b From the list of subscribers, select the subscriber to add to the group, then click Add.
The check box for each subscriber you add to the message group is then grayed out and cannot be selected again unless you delete the member from the group.
c Click Close Window to close the Search for member page.
The Add new group, page 2 of 2 page appears.
11 Click Save and Return.
The new group appears on the Groups page.

UNIVERGE UM4730 USER GUIDE WORKING WITH MESSAGE GROUPS — 51
Changing a Message Group NameYou can change and rerecord a group name, or change a group number.
USING A PHONE
To change a message group name or number
1 Call the messaging system and log on.
2 Press 7 5 5 to change a group name or number.
3 Use the phone keys to enter the first three letters of the group’s name.
Press 1 when you hear the name of the group.
Press 2 to hear the next matching name.
4 Press 7 to change the group name or group number.
5 Follow the system prompts to change the group name.
USING THE MAILBOX MANAGER
To change a message group name or number
1 Sign in to the Mailbox Manager.
2 Click the Groups tab.
The Groups page appears, displaying the list of current groups.
3 Click the message group name for the group you want to modify.
The Groups: <Group Name> page appears. The basic information about the group, including the name of the group and the current membership, appears.
NOTE
When searching for group names, the digit 1 is used as a wild card. Minimize the use of the digit (wild card) since it can result in increased search times and use additional messaging system resources.
After pressing the first few letters of a group name, pressing * can reduce the amount of time the system takes to return group names.

52 — WORKING WITH MESSAGE GROUPS UNIVERGE UM4730 USER GUIDE
4 On the Groups:< Group Name> page, you can do any of the following:
■ Type a new Name.
■ Select or clear Enable dispatch messaging.
When selected the first group member to listen to a message sent to the group can listen to the message. The message is deleted automatically after it is listened to. If this is not selected, messages are set as Broadcast messages, which are heard by the entire group.
■ Click Record Group Name to recording of the group name.
5 Click Save.
The Groups: Group Name page closes, returning you to the Groups page.
NOTE
When searching for group names, the digit 1 is used as a wild card. Minimize the use of the digit (wild card) since it can result in increased search times and use additional messaging system resources.
After pressing the first few letters of a group name, pressing * can reduce the amount of time the system takes to return group names.
NOTE
When you have a private group that is a closed message group, you can only change the message group name.

UNIVERGE UM4730 USER GUIDE WORKING WITH MESSAGE GROUPS — 53
Adding or Deleting Message Group MembersYou can add and delete members of your message groups.
USING A PHONE
To add or delete message group members
1 Call the messaging system and log on.
2 Press 7 5 5 to edit a group.
3 Use the phone keys to enter the group name or number:
Press 1 when you hear the name of the group.
Press 2 to hear the next matching name.
4 After selecting the group:
Press 4 to add members. Follow the system instructions to add members to the group. You can add members by name or extension number.
Press 5 to delete members from the group. To delete a group member, use the phone keys to enter the first three letters of the person’s last name, or press 1 1 1 to list each group member, then select the members you want to delete.
5 To confirm your changes, press 1.
6 Press * when finished.
USING THE MAILBOX MANAGER
To add or delete message group members
1 Sign in to the Mailbox Manager.
2 Click the Groups tab.
The Groups page appears, displaying the list of current groups.
3 Click the message group name for the group to add or delete members.
4 The Groups: <Group Name> page appears.
To add group members a Click Add. The Search for page appears.
b From the list of members, select the check box by each member whom you want to add to the group, then click Add.
c When all new members are added, click Close Window.
The Search for page closes, returning you to the Groups: Group Name page.
NOTE
The list of members you can add to a group are only those added to the voice messaging system by the system manager. You cannot add subscribers. If a member is not listed, contact the system manager.

54 — WORKING WITH MESSAGE GROUPS UNIVERGE UM4730 USER GUIDE
USING THE MAILBOX MANAGER
To delete group members
a In the membership list field, select the name of the member you want to remove.
◆ To delete multiple members, press and hold CTRL while selecting each member to be removed from the message group. Members are highlighted as they are selected.
◆ To delete a range of members, click the first member in the range then press and hold SHIFT while selecting the last member in the range to be removed from the group. All members within the first and last selected members are highlighted.
b Click Delete.
1 The updated group membership appears in the current members field on the page.
2 Click Save.
The Groups: <Group Name> page closes, returning you to the Groups page.

UNIVERGE UM4730 USER GUIDE WORKING WITH MESSAGE GROUPS — 55
Listing Groups and Group MembersThe messaging system can provide you with a list of the groups, as well as a list of members belonging to each group.
USING A PHONE
To hear a list of groups and group members
1 Call the messaging system and log on.
■ To list your groups, press 7 5 6.
■ To list members of a group:
1 Press 7 5 5.
2 Use the phone keys to enter the group name or number.
3 Press 1 when you hear the name of the group or Press 2 to hear the next matching name.
4 After selecting the group, press 6 to list group members.
2 Follow the system prompts to list group members and other groups.
USING THE MAILBOX MANAGER
To see a list of groups and group members
1 Sign in to the Mailbox Manager.
2 Click the Groups tab.
The Groups page appears, displaying the list of current groups.
3 Click the message group name to view the members of the group.
4 Click the Groups tab to return to the Groups page.
NOTE
Only the groups that you own are displayed. Although, you are able to send messages to other open message groups, you cannot view groups owned by other subscribers.

56 — WORKING WITH MESSAGE GROUPS UNIVERGE UM4730 USER GUIDE
Deleting Message GroupsYou can delete any message group that you own.
USING A PHONE
To delete a message group
1 Call the messaging system and log on.
2 Press 7 5 7 to delete a group.
3 Use the phone keys to enter the group name or number:
Press 1 when you hear the name of the group.
Press 2 to hear the next matching name.
4 Follow the system prompts to delete the group.
USING THE MAILBOX MANAGER
To delete a message group
1 Sign in to the Mailbox Manager.
2 Click the Groups tab.
The Groups page appears, displaying the list of your current groups.
3 On the Groups page, select the check box next to the group you want to delete.
4 Click Delete.
NOTE
When you delete a group, all the group messages, including archived messages, are automatically deleted.

UNIVERGE UM4730 USER GUIDE WORKING WITH MESSAGE GROUPS — 57
Recording a Group Name
USING THE MAILBOX MANAGER
To record or rerecord a group name
1 Sign in to the Mailbox Manager.
2 Click the Groups tab.
The Groups page appears, displaying the list of current groups.
3 Click the message group name for the group name or greeting you want to record or rerecord.
The Groups: <Group Name> page appears.
4 Click Record Group Name.
The Audio Applet appears.
See “Using the Audio Applet” on page 16 for information about using the Audio Applet.
5 Click Record.
■ If a Microphone is the recording device, begin speaking into the microphone.
■ If a Phone is the recording device, the phone rings at the extension set in the Extension field. Pick up the handset and begin speaking.
6 Click Stop to stop recording.
7 Click Play to listen to the recording.
The Audio Applet displays the length of the recording in minutes and seconds. If a name has not been recorded 00:00 is displayed.
8 When you are satisfied with the recording, click Save.
9 When prompted to save the recording to the voice messaging server, click Yes.
10 Close the Audio Applet.
NOTE
Greetings and prompts can be created using WAV files that are copied into the media control using Paste from File. WAV files must be in the (AD) PCM audio format, with 16-bit audio sample size, 96-kbps bit rate, 1 (mono) channel and 8-kHz audio sample rate. No other formats are supported.

58 — WORKING WITH MESSAGE GROUPS UNIVERGE UM4730 USER GUIDE

UNIVERGE UM4730 USER GUIDE WORKING WITH GREETINGS — 59
■ Working with Greetings
This chapter explains how to use and change your greetings.
Greetings are used to provide callers with information and instructions when you are not able to take calls. The messaging system plays your greetings in the appropriate situations, depending on business hours and the currently selected greeting.
When callers leave you a message, or you are recording a greeting using a phone, there are three ways to stop the recording:
● press * on the phone keypad.
● hang up. or
● pause for more than 5-seconds. The messaging system stops recording after 5-seconds.
You can change your greeting settings using a phone or Mailbox Manager.
In this Chapter...
System Greetings...................................................................................................60Changing Standard Greetings ..................................................................................61Changing Alternate Greetings ..................................................................................62Switching Between the Standard and Alternate Greetings ............................................63Changing Busy Greetings ........................................................................................64Turning the Busy Greetings On or Off........................................................................65Using the System Default Greetings..........................................................................60

60 — WORKING WITH GREETINGS UNIVERGE UM4730 USER GUIDE
System GreetingsThe greetings that are available in the messaging system include:
● Standard Greeting. The standard greeting plays when your phone is unanswered.
● Alternate Greeting. The alternate greeting is played during special occasions, such as when you are out of the office or on vacation. When you enable your alternate greeting, the system plays it in place of all standard or busy greetings.
● Busy Greeting. The busy greeting is played when you are on your phone. You must enable the busy greeting. Otherwise, callers hear the standard greeting.
● Default Greetings. The system includes default standard, alternate, and busy greetings.
You should record a standard greeting, but you can use the default recordings for other system greetings. You can record your own greeting for any system greeting. You can enable or disable the greetings using the phone or the Mailbox Manager.
Using the System Default GreetingsThe messaging system plays the default greetings when you do not record personalized greetings.
For example:
● A standard greeting plays: “The person you are trying to reach is not available right now.”
● A busy greeting plays: “The person you are trying to reach is on the phone now.”
● An alternate greeting plays: “The person you are trying to reach is out today.”
During enrollment, you are asked to record your own standard greeting. When your phone is unanswered the system plays the default standard greeting that comes with the system if you do not record a personalized greeting.
Using System Greetings with Recorded NamesWhen you record your name, but do not record custom greetings, the messaging system plays greetings that include your recorded name.
For example, for Paul Green:
● A standard greeting plays: “Paul Green is not available right now.”
● A busy greeting plays: “Paul Green is on the phone now.”
● An alternate greeting plays: “Paul Green is out today.”
To use the default alternate greeting, you must turn it on to activate the greeting. When an alternate greeting is active, the system plays it instead of any of your other greetings. See “Switching Between the Standard and Alternate Greetings” on page 63.
You must turn on the Busy Greetings to set the system to play the greeting when you are on the phone. See “Turning the Busy Greetings On or Off” on page 65.
To return to using a default standard, alternate, or busy greeting after you have recorded a custom recording, you must delete the custom recording.
Ask your system manager for assistance, or use the Mailbox Manager to delete the greeting.
NOTE
Your greetings should include references to any available one-key dial options that your system manager has enabled for you. This may include transfer to a fax box, park & page, and other call routing information.

UNIVERGE UM4730 USER GUIDE WORKING WITH GREETINGS — 61
Changing Standard GreetingsThe standard greeting plays when your extension is unanswered. A typical standard greeting is “Hello, this is Paul Green. I am not at my desk right now. Please leave a message.”
When you do not record a personalized standard greeting, the messaging system plays the default greeting and includes your recorded name. For example, “Paul Green is not available right now.”
During enrollment, record your custom greeting, if you prefer to use the standard greeting, do not record a greeting. Your personalized greeting might say, “Hi this is Paul, I cannot take your call right now. Please leave a message and I will return your call as soon as I am available.”
USING A PHONE
To change your standard greeting
1 Call the messaging system and log on.
2 Press 7 4 6 1 to record a standard greeting.
3 After the beep, start recording your greeting.
4 When you have finished your recording, press * to stop recording.
The system plays the new recording.
5 Press 1 to rerecord the greeting, or press 2 to accept the default greeting.
USING THE MAILBOX MANAGER
To change your standard greeting
1 Sign in to the Mailbox Manager.
2 Click the Greetings tab.
3 Click Edit next to Enable standard greeting, Enable busy greeting, or Enable alternate greeting.
The Audio Applet window appears.
4 Use the Audio Applet to record the greeting.
See “Using the Audio Applet” on page 16 for more information about using the applet.
5 When you are satisfied with the recording, click Save.
6 When prompted to save the recording to the voice messaging server, click Yes.
7 Close the Audio Applet.
NOTE
To stop recording you can also hang up or pause for more than five seconds.
NOTE
Greetings and prompts can be created using WAV files that are copied into the media control using Paste from File. WAV files must be in the (AD) PCM audio format, with 16-bit audio sample size, 96-kbps bit rate, 1 (mono) channel and 8-kHz audio sample rate. No other formats are supported.

62 — WORKING WITH GREETINGS UNIVERGE UM4730 USER GUIDE
Changing Alternate GreetingsThe alternate greeting is used for special occasions. Use an alternate greeting if you will be on vacation or out of the office. A typical alternate greeting is “Hello, this is Paul Green. I am out of the office during the week of July 3rd and will return on July 10th.”
The alternate greeting is activated using the configuration options. When your alternate greeting is active, the system plays it instead of your other greetings.
When you do not record an alternate greeting, the system plays the default alternate greeting that includes your recorded name. For example, “Paul Green is out today.”
When you record an alternate greeting, you should include any special instructions for your callers.
USING A PHONE
To change your alternate greeting
1 Call the messaging system and log on.
2 Press 7 4 7 1 to record your alternate greeting.
3 Record your greeting after the beep, then press * to stop recording.
The system plays the new recording. Press 1 to rerecord the greeting or press 2 to accept the greeting.
4 Press 1 to make the alternate greeting active, or press 2 to turn off the busy greeting.
USING THE MAILBOX MANAGER
To change your alternate greeting
1 Sign in to the Mailbox Manager.
2 Click the Greetings tab.
3 Click Edit adjacent to Enable alternate greeting.
The Audio Applet window appears.
4 Use the Audio Applet to record a new greeting.
See “Using the Audio Applet” on page 16 for more information about using the applet. The Audio Applet displays the length of the greeting. If a greeting has not been recorded then 00:00 is displayed.
5 When you are satisfied with the recording, click Save.
6 When prompted to save the recording to the voice messaging server, click Yes.
7 Close the Audio Applet.
NOTE
Greetings and prompts can be created using WAV files that are copied into the media control using Paste from File. WAV files must be in the (AD) PCM audio format, with 16-bit audio sample size, 96-kbps bit rate, 1 (mono) channel and 8-kHz audio sample rate. No other formats are supported.

UNIVERGE UM4730 USER GUIDE WORKING WITH GREETINGS — 63
Switching Between the Standard and Alternate GreetingsWhen you switch between standard and alternate greetings, one greeting becomes active while the other is inactive. The system stores the inactive greeting so that it can be activated again at a later time.
USING A PHONE
To switch between the standard and alternate greetings
1 Call the messaging system and log on.
2 Press 7 4 5 to switch your greeting.
3 Follow the system prompts.
USING THE MAILBOX MANAGER
To switch between the standard and alternate greetings
1 Sign in to the Mailbox Manager.
2 Click the Greetings tab.
3 On the Greetings page, select your greeting option:
● Enable standard greeting. Select this option if you want callers to hear the standard greeting. If you select this option, but do not record a greeting, a system-generated standard greeting is used.
● Enable alternate greeting. Select this option if you want callers to hear your alternate greeting. If you select this option, but do not record a greeting, a system-generated alternate greeting is used.
4 Click Save.
NOTE
The standard and alternate greetings cannot be enabled at the same time.

64 — WORKING WITH GREETINGS UNIVERGE UM4730 USER GUIDE
Changing Busy GreetingsPersonalized busy greetings can replace the standard busy greeting. The busy greeting might be “Hello, this is Paul Green. I am on the phone now. Please leave a message.” The busy greeting must be activated or callers will not hear the greeting.
The messaging system plays the default busy greeting if you activate the busy greeting but do not record a personalized busy greeting.
USING A PHONE
To change your busy greeting
1 Call the messaging system and log on.
2 Press 7 4 8 1 to record a busy greeting.
3 Record the greeting after the Beep.
4 Press * to stop recording.
The system plays the new recording.
5 Press 1 to rerecord the greeting or press 2 to accept the greeting.
6 Press 1 to turn on the busy greeting, or press 2 to turn off the busy greeting.
USING THE MAILBOX MANAGER
To change your busy greeting
1 Sign in to the Mailbox Manager.
2 Click the Greetings tab.
3 Click Edit next to Enable busy greeting.
The Audio Applet window appears.
4 Use the Audio Applet to record a new greeting.
See “Using the Audio Applet” on page 16 for more information about using the applet.
5 If you are satisfied with the recording, click Save.
6 When prompted to save the recording to the voice messaging server, click Yes.
7 Close the Audio Applet.
NOTE
Greetings and prompts can be created using WAV files that are copied into the media control using Paste from File. WAV files must be in the (AD) PCM audio format, with 16-bit audio sample size, 96-kbps bit rate, 1 (mono) channel and 8-kHz audio sample rate. No other formats are supported.

UNIVERGE UM4730 USER GUIDE WORKING WITH GREETINGS — 65
Turning the Busy Greetings On or OffYou must turn on busy greetings before callers will hear the busy greeting.
USING A PHONE
To turn the busy greeting on or off
1 Call the messaging system and log on.
2 Press 7 4 8 to hear your busy greeting.
3 Press 1 to record or rerecord your busy greeting. Otherwise, press 2 and go to step 4.
Record your greeting after the beep, then press * to stop recording.
The system plays the new recording. Press 1 to rerecord the greeting or press 2 to accept the greeting.
4 Press 1 to turn on the busy greeting, or press 2 to turn off the busy greeting.
USING THE MAILBOX MANAGER
To turn the busy greeting on or off
1 Sign in to the Mailbox Manager.
2 Click the Greetings tab.
3 On the Greetings page
■ Select Enable busy greeting to turn on the busy greeting.
■ Clear Enable busy greeting to turn off the busy greeting.
4 Click Save.
NOTE
The Standard Greeting must be enabled to use the Busy greeting.

66 — WORKING WITH GREETINGS UNIVERGE UM4730 USER GUIDE

UNIVERGE UM4730 USER GUIDE CHANGING MAILBOX SETUP OPTIONS — 67
■ Changing Mailbox Setup Options
This chapter explains how to change your mailbox setup options. Mailbox options are initially configured by your system manager when you are added to the messaging system database. After enrolling on the messaging system and depending on your system configuration, you can change the following mailbox options.
● security code
● recorded and spelled names
● playback options
● call transfer options
● call screening options
● call holding options
● directory listing
● automatically copy messages to another extension
CAUTION!
Save your changes before going to another page in Mailbox Manager or the changes are lost.
In this Chapter...
Changing Security Codes.........................................................................................68Changing Recorded Name .......................................................................................69Changing the Spelling of Your Name .........................................................................70Changing Message Playback Options.........................................................................71Turning Call Transfer On or Off .................................................................................72Changing the Call Transfer Number...........................................................................73Turning Call Screening On or Off ..............................................................................74Changing Call Screening Options ..............................................................................75Turning Call Holding On or Off..................................................................................76Listing Your Extension in the Directory ......................................................................77Automatically Copy Messages to Another Extension ....................................................78

68 — CHANGING MAILBOX SETUP OPTIONS UNIVERGE UM4730 USER GUIDE
Changing Security CodesYour security code prevents others from using your personal ID to listen to your messages. Your security code should be three to ten digits long, based on the policy for your organization. The messaging system informs you if the security code you are trying to use does not meet the minimum security code length for your organization. You can change your security code as often as you like.
When you change your mailbox security code, you should also update your security code for any Visual Messaging applications. See the Mailbox Manager Help for steps to update the security code in Visual Messaging applications.
USING A PHONE
To change your security code
1 Call the messaging system and log on.
2 Enter your personal ID.
3 Enter the default or temporary password.
4 Press 7 7 4 to change your security code.
5 Follow the system prompts to change your code.
6 Press 1 for Yes or 2 for No to respond to system questions.
USING THE MAILBOX MANAGER
To change your security code
1 Sign in to the Mailbox Manager using the default/temporary password.
2 Click the Profile tab.
3 Click Change Code.
The Change Security Code page appears.
4 Type your current security code in the Enter current code field.
If there was no security code assigned to you, leave this field blank. If you do not remember your security code, contact your system manager.
5 Type a new security code in the Enter new code field.
6 Confirm the new security code by typing it in the Verify new code field.
7 Click Save.
The Change Security Code page closes.
CAUTION!
Your system manager cannot look up your security code. If you forget your security code, your administrator can reset the password, enabling you to log on and then select a new security code.
NOTE
You cannot change your security code to be the same as the initial security code given to you by your system manager.

UNIVERGE UM4730 USER GUIDE CHANGING MAILBOX SETUP OPTIONS — 69
Changing Recorded NameThe messaging system uses your recorded name to identify you and your messages to other callers.
USING A PHONE
To change your recorded name
1 Call the messaging system and log on.
2 Press 7 7 5 to change your recorded name.
3 Follow the system prompts to change your recorded name.
4 Press 1 for Yes or 2 for No to respond to system questions.
USING THE MAILBOX MANAGER
To change your recorded name
1 Sign in to the Mailbox Manager.
2 Click the Profile tab.
3 Click Edit below the Recorded name field.
The Audio Applet dialog box appears.
4 Use the Audio Applet to record your name.
See “Using the Audio Applet” on page 16.
5 When you are satisfied with the recording, click Save.
6 When prompted to save the recording to the voice messaging server, click Yes.
7 Close the Audio Applet.
NOTE
Greetings and prompts can be created using WAV files that are copied into the media control using Paste from File. WAV files must be in the (AD) PCM audio format, with 16-bit audio sample size, 96-kbps bit rate, 1 (mono) channel and 8-kHz audio sample rate. No other formats are supported.

70 — CHANGING MAILBOX SETUP OPTIONS UNIVERGE UM4730 USER GUIDE
Changing the Spelling of Your NameYou can only change your spelled name using a phone. If the spelling of your name is incorrect, contact your system manager.
Your spelled name is used by the messaging system for the directory. Callers can enter the first letters, usually three or more letters, of your name to locate you. You can remove your name from the directory.
USING A PHONE
To change the spelling of your name
1 Call the messaging system and log on.
2 Press 7 7 6 to change your spelled name.
3 Follow the system prompts to change your spelled name.
4 Press 1 for Yes or 2 for No to respond to system questions.
NOTE
If your system uses unified messaging features, such as e-mail or a Visual Messaging application, and your name is misspelled, contact your system manager to fix the spelling of your name.
NOTE
Changing your name using this method changes how your name is displayed in messages and e-mail notifications. Your name appears as the first letter on the first key pressed followed by the other numbers pressed.
For example: When your phone uses phones that have keys assigned as: 2=ABC, 3=DEF,4=GHI, 6=MNO, and 7=PQRS; the directory displays the first character of your name as a letter followed by two digits. If your name is Smith, the display lists P64.

UNIVERGE UM4730 USER GUIDE CHANGING MAILBOX SETUP OPTIONS — 71
Changing Message Playback OptionsMessage playback options are options available to you when you call the messaging system to listen to your messages. These playback options can only be changed using the Mailbox Manager.
USING THE MAILBOX MANAGER
To change your message playback options
1 Sign in to the Mailbox Manager.
2 Click the Playback tab.
3 Select or clear Voice message length.
When selected, the system announces the total length, in minutes, of new voice messages. For example, the system might say “You have three new messages totaling 3 minutes, 20 seconds. Would you like to hear them?”
4 Select one of the following Telephone conversation type options:
● Menu mode conversation. The system plays menus of options instead of the Yes/No conversation mode. This option requires that you enter the number associated with the option to perform the particular task.
● Yes/No conversation. The system plays a series of yes-and-no questions throughout the conversation. This option requires that you press 1 for Yes or 2 for No at the end of every question.
5 Select one of the following Announce voice message timestamp options:
● Before the message. Before playing the message, the system plays the date and time that the message was recorded, or
● After the message. After playing the message, the system plays the date and time that the message was recorded.
6 Set the New Message Order option:
● LIFO. (Last In First Out). The most recent message is played first.
● FIFO. (First In First Out). The oldest message is played first.
7 Set the Old Message Order option:
● LIFO. (Last In First Out). The most recent message is played first.
● FIFO. (First In First Out). The oldest message is played first.
8 Click Save.

72 — CHANGING MAILBOX SETUP OPTIONS UNIVERGE UM4730 USER GUIDE
Turning Call Transfer On or OffThe messaging system automatically transfers calls to your extension. When you are unavailable or busy with another call, the system takes a message . If you will be away for a while, you can turn off call transfer or transfer your calls to a different extension or phone number.
Call transfer must be turned on before your calls can be transferred to a different phone number.
USING A PHONE
To turn call transfer on or off
1 Call the messaging system and log on.
2 Press 7 6 4 to turn call transfer on or off.
3 Follow the system prompts.
4 Press 1 for Yes or 2 for No to respond to system questions.
USING THE MAILBOX MANAGER
To set call transfer options
1 Sign in to the Mailbox Manager.
2 Click the Transfer|Screening tab.
3 Select one of the following options under Transfer incoming calls from the automated attendant to:
● My extension. Transfer callers to the extension number assigned to you by the system manager. Your extension number appears in the Extension field of the Profile page.
● This number. Transfer callers to a number other than your extension. If you select this option, you must type the phone number or extension where the calls are sent.
● My voice mail. Transfer callers directly to your voice mail.
4 Click Save.
NOTE
This feature might not be available in your organization. Speak with your system manager to determine if the feature is available and if any special numbers or settings are needed to dial an external number.
NOTE
The system does not accept ten digit numbers.
NOTE
If you select My voice mail as a transfer option, you will not be able to select any screening options or allow callers to hold if the line is busy.

UNIVERGE UM4730 USER GUIDE CHANGING MAILBOX SETUP OPTIONS — 73
Changing the Call Transfer NumberThe messaging system automatically transfers calls to your extension. When you are unavailable or busy with another call, the system takes a message for you. If you will be away for a while, you can turn off call transfer or transfer your calls to a different phone number.
You can enter up to nine digits for the transfer-to phone number.
Call transfer must be turned on before your calls can be transferred to a different phone number.
USING A PHONE
To change the call transfer number
1 Call the messaging system and log on.
2 Press 7 6 4 1 4 to change the call transfer number.
3 Follow the system prompts.
4 Press 1 for Yes or 2 for No to respond to system questions.
USING THE MAILBOX MANAGER
To change the call transfer number
1 Sign in to the Mailbox Manager.
2 Click the Transfer|Screening tab.
3 Select This number.
4 Type the phone number or extension to where calls should be transferred.
5 Click Save.
NOTE
This feature might not be available in your organization. Speak with your system manager to determine if the feature is available and if any special numbers or settings are needed to dial an external number.
NOTE
The system does not accept ten digit numbers.

74 — CHANGING MAILBOX SETUP OPTIONS UNIVERGE UM4730 USER GUIDE
Turning Call Screening On or OffCall screening options set what you hear when you answer your phone.
This feature must be enabled by your system manager. When the feature is enabled, you can turn call screening on and off using a phone. However, call screening options can only be changed using Mailbox Manager. See “Changing Call Screening Options” on page 75 for more information.
USING A PHONE
To turn call screening on or off
1 Call the messaging system and log on.
2 Press 7 6 4 1 5 to turn call screening on or off.
3 Press 1 to turn call screening on or 2 to turn call screening off.
USING THE MAILBOX MANAGER
To turn call screening on or off
1 Sign in to the Mailbox Manager.
2 Click the Transfer|Screening tab.
3 Select Enable screening options to turn call screening on or clear to turn call screening off.
4 Click Save.

UNIVERGE UM4730 USER GUIDE CHANGING MAILBOX SETUP OPTIONS — 75
Changing Call Screening OptionsWhen the call screening feature is available, you can ask your system manager to change your call screening options. Call screening options affect what you hear when you answer your phone.
If your system manager has set up call screening for your extension, you can turn call screening on and off using a phone. However, call screening options can only be changed using the Mailbox Manager.
USING THE MAILBOX MANAGER
To change your call screening options
1 Sign in to the Mailbox Manager.
2 Click the Transfer|Screening tab.
3 Select Enable screening options.
4 Select any of the following call screening options.
● Play a tone before connecting a caller. The system plays a tone before connecting the call.
● Play screened name before connecting. The system asks the caller for his or her name before ringing your extension. The system plays “Call from <caller’s name spoken by the caller>” before connecting the call.
● Ask me if I want to take the call. The system plays “Press 1 to take the call, or 2 and I’ll take a message” then waits for your response before connecting the call.
● Play screened name in voice message. The system plays the caller’s name in the body of the message.
● Announce who the call is for. The system plays the subscriber name before transferring the call. This option can be used if multiple people share one extension.
These options can be combined. For example, if you select Play screened name before connecting and Ask me if I want to take the call, the system asks for the caller for his or her name, then rings your extension. When you answer the call, the system plays the recorded name, then asks if you want to take the call.
5 Click Save.
NOTE
You can only select Play the caller’s name before connecting or Play the screened name in voice message. You cannot select both of these options.

76 — CHANGING MAILBOX SETUP OPTIONS UNIVERGE UM4730 USER GUIDE
Turning Call Holding On or OffDepending on your phone system, the messaging system can hold a call until your extension is available. If your system manager has set up call holding for your extension, you can turn call holding on and off.
When call holding is turned on and your extension is busy, the messaging system asks callers if they want to hold until you are available or if they want to leave a message. The messaging system also tells the callers how many calls are holding ahead of them.
The system manager sets the number of calls that the messaging system can hold for you.
USING A PHONE
To turn call holding on or off
1 Call the messaging system and log on.
2 Press 7 6 4 1 6 to turn call holding on or off.
3 Press 1 to turn call holding on or 2 to turn call holding off.
USING THE MAILBOX MANAGER
To turn call holding on or off
1 Sign in to the Mailbox Manager.
2 Click the Transfer|Screening tab.
3 Select Allow incoming callers to hold to turn call holding on or clear the check box to turn call holding off.
4 Click Save.

UNIVERGE UM4730 USER GUIDE CHANGING MAILBOX SETUP OPTIONS — 77
Listing Your Extension in the DirectoryYour system might use automatic directory assistance, numeric directory assistance, or both, to help callers find subscribers’ extension numbers.
If your name is listed in your company phone directory, callers can enter the first three letters of your name to locate you in the directory.
You can turn directory listing on and off using a phone or from the Mailbox Manager.
USING A PHONE
To list your extension in the directory
1 Call the messaging system and log on.
2 Press 7 7 7 to change your directory listing.
3 Press 1 to turn directory listing on or 2 to turn directory listing off.
USING THE MAILBOX MANAGER
To list your extension in the directory
1 Sign in to the Mailbox Manager.
2 Click the Profile tab.
3 Select if you want to be listed in the company phone directory:
■ Select List in the phone directory to have your extension listed in the directory.
■ Clear List in the phone directory to remove your extension from the directory.
4 Click Save.
NOTE
You must have a spelled name to be listed in your company phone directory.
NOTE
If you do not save your changes before navigating away from the page, the changes are not saved.

78 — CHANGING MAILBOX SETUP OPTIONS UNIVERGE UM4730 USER GUIDE
Automatically Copy Messages to Another ExtensionWhen the message auto-copy feature is available, you can automatically send a copy of a new voice messages to another mailbox. Your system manager can tell you whether this feature is available.
USING THE MAILBOX MANAGER
To auto copy messages to another extension
1 Sign in to the Mailbox Manager.
2 Click the Transfer|Screening tab.
3 Select Message Auto Copy to and then:
■ Type the extension number where messages are copied, or
■ Click Search to search for and select an extension. See “Using Mailbox Manager Search” on page 15
4 Click Save.

UNIVERGE UM4730 USER GUIDE CHANGING MESSAGE NOTIFICATION DEVICE SETTINGS — 79
■ Changing Message Notification Device Settings
The messaging system can call a phone or pager to notify you when new messages arrive. When you answer a notification call, you can immediately log on to the messaging system to check your messages.
The messaging system calls a phone or pager based on notification schedules and options that are configured in the Mailbox Manager. The phone or pager must be turned on to receive the notifications.
Notification can be turned on and off, change notification numbers, notification schedules, and delivery type options using a phone or using the Mailbox Manager.
In this Chapter...
Initial Device Message Notification Setup...................................................................80Enabling or Disabling a Device .................................................................................81Changing Notification Device Options........................................................................82Temporarily Stopping Message Notification ................................................................85

80 — CHANGING MESSAGE NOTIFICATION DEVICE SETTINGS UNIVERGE UM4730 USER GUIDE
Initial Device Message Notification SetupThere are some differences in how the messaging system interacts with phones and pagers, phones and pagers are called notification devices.
Notification DevicesWhen the messaging system receives a new message, and message notification is enabled for a device, the system contacts the device. You can have up to five notification devices. Each device has a configurable schedule:
● Work Phone
● Home Phone
● Pager
● Spare Phone
● Fax
When setting notification options, note that:
● You cannot add devices to this list. Your system manager must configure the messaging system to enable notification devices for subscribers.
● You cannot modify notification settings unless the system manager has enabled message notification and given you permission to make changes to your devices.
You can also set a specified device to temporarily stop receiving message notification.
After your system manager has configured the default values for each of notification device, you can modify the values to more closely fit your schedule, or simply leave the values as-is and enable the device for message delivery.
The Mailbox Manager Notifications page displays message delivery devices and schedules, allowing you to set alternate devices and phone numbers to notify you when a new message is received. You can customize the delivery by setting specific days, times, and phone numbers for each of the devices. you can set the interval between delivery attempts, along with the number of rings to wait before ending the notification call, or set the system to deliver only urgent messages.

UNIVERGE UM4730 USER GUIDE CHANGING MESSAGE NOTIFICATION DEVICE SETTINGS — 81
Enabling or Disabling a DeviceYou can use a phone or Mailbox Manager to turn device notification on or off. Turning off a device does not change the configured notification settings.
USING A PHONE
To enable or disable a notification device
1 Call the messaging system and log on.
2 To enable or disable the device, press the keys: :
3 Press 1 to turn on delivery for that number or 2 to turn off delivery.
Repeat this procedure to change other device settings.
USING THE MAILBOX MANAGER
To enable or disable a notification device
1 Sign in to the Mailbox Manager.
2 Click the Notification tab.
3 Use the following to enable or disable the device:
■ To enable the device:
a click the link for the device you want to enable. The Notifications.
Device page appears, where Device is the message device, such as Home Phone or Pager.
b Verify the information on the page is correct and click Save.
If the information is not correct, See “Changing Notification Device Options” on page 82.
■ Clear the Enable check box to disable the device.
4 Click Save.
DEVICE NAME ENABLE/DISABLE
Work phone 7 6 5 4
Home phone 7 6 5 5
Pager 7 6 5 6
Spare phone 7 6 5 7
Fax 7 6 5 8
NOTE
If the notification device does not have a link, the system manager has not configured this option for you.

82 — CHANGING MESSAGE NOTIFICATION DEVICE SETTINGS UNIVERGE UM4730 USER GUIDE
Changing Notification Device OptionsYou can change the options for your notification devices using the phone or the Mailbox Manager.
The messaging system does not contact a device if the device schedule is set to inactive. You can customize message notification schedules: setting specific days, times, and phone numbers for each notification device, as well as the interval between delivery attempts. You can also set the system to deliver only urgent messages.
The system manager may have already set default values for each of these devices. You can modify the values to more closely fit your schedule, or use the default schedule.
USING A PHONE
To change notification device options
1 Call the messaging system and log on.
2 To change the options for your device: :
3 Press 1 to turn on delivery for the device or 2 to turn off delivery.
4 Press 4 to change the phone number.
Enter the new phone number, then press * after you enter a phone number to end the entry.
5 Press 5 to change the schedule, then follow the system prompts, pressing 1 for Yes, or pressing 2 for No.
6 Press 6 to change the delivery type for messages delivered to this number, then follow the system prompts, pressing 1 for Yes, or pressing 2 for No.
7 Change any other device options by repeating the previous steps.
USING THE MAILBOX MANAGER
To change notification device options
1 Sign in to the Mailbox Manager.
2 Click the Notification tab.
3 Click the device link to modify.
The Notifications - Device page appears, where Device is the message device, such as Home Phone or Pager.
DEVICE NAME ENABLE/DISABLE
Work phone 7 6 5 4
Home phone 7 6 5 5
Pager 7 6 5 6
Spare phone 7 6 5 7
Fax 7 6 5 8
NOTE
To include pauses in a dialing string, use the # key on the phone key pad.

UNIVERGE UM4730 USER GUIDE CHANGING MESSAGE NOTIFICATION DEVICE SETTINGS — 83
4 Type the device Area Code + Phone Number.
The messaging system assumes that any delivery to an external number will include the outside line access code.
Do not use special characters, hyphens and parentheses, when typing the area code and phone number. If the notification number is 555-1212, type 5551212 or 555 1212, if an area code is required type 1235551212 or 123 555 1212.
Type a comma to insert a one-second pause where you want the system to pause between the digits that are being dialing.
5 Set the schedule for the device.
a Select the From and To times when the schedule for the device is in effect.
For example, if notification for the device is in effect from 10:00 AM to 3:30 PM, select 10, 00, and AM from the From time lists and select 3, 30, and PM from the To time lists.
b Select the check box for each day that the schedule is in effect.
6 Select a Delivery type option:
● Each. Starts message delivery as soon as each new message arrives, then repeats delivery each time a new message arrives. Selecting Each overrides the Initial Delay (min.) setting.
● Urgent. Starts message delivery only when a new urgent message arrives, then repeats delivery each time a new urgent message arrives.
● Batch. Starts message delivery using the Deliver interval (min.) time. The system does not deliver messages more frequently than the set interval.
7 Type a delay time in the Initial delay (min.) field.
Initial delay (min.) is the time between the arrival of the first message and the first attempt to deliver it. Use this setting to assign priorities to each message delivery device. For example, if you specify 0 (zero) for Work Phone and 60 for Home Phone: for the first 60 minutes the messaging system tries to deliver new messages only to the Work Phone. After 60 minutes, it tries to deliver new messages to both phones.
8 Type the number of Rings to wait for answer, indicating how many rings the messaging system waits for an answer before ending the notification attempt.
9 Type the time the messaging system waits before trying the notification device again if a new message still exists in the Delivery Interval (min.) field.
10 Type the number of times the messaging system tries to contact the device before considering the notification a failure in the Number of retries field.
11 If you selected the Fax notification device, select Phones to notify for fax. For other notification devices, this option is not displayed on the page.
12 Click Save.
The Notifications - Device page closes and returns to the Notifications page. The Notifications page is updated to display the current information for each device.
NOTE
When entering dialing pause characters on the phone use #. When typing pause strings on the Mailbox Manager use the comma (,).
NOTE
If the Delivery Method is set to Each or Urgent, you cannot configure an initial delay. Messages are forwarded to the notification device immediately without an initial delay.

84 — CHANGING MESSAGE NOTIFICATION DEVICE SETTINGS UNIVERGE UM4730 USER GUIDE
13 Click Save.
Repeat steps 3 through 13 to modify another notification device.

UNIVERGE UM4730 USER GUIDE CHANGING MESSAGE NOTIFICATION DEVICE SETTINGS — 85
Temporarily Stopping Message NotificationYou can temporarily stop message notification to a device. When message notification is stopped, the messaging system stops sending notification messages to the device for the last message. Message notification restarts when a new message arrives or all new messages have been retrieved. Stopping message notification applies only to the selected device and the latest message.
USING A PHONE
To stop message notification
❚ When receiving a notification on the device, answer the phone and then press # on the device keypad.
This turns off message notification on the device, and the messaging system suspends message notification for the last message received.

86 — CHANGING MESSAGE NOTIFICATION DEVICE SETTINGS UNIVERGE UM4730 USER GUIDE

UNIVERGE UM4730 USER GUIDE USING A PHONE TO CHECK E-MAIL — 87
■ Using a Phone to Check E-mail
Depending on how your system is configured, you can check your voice and fax messages using your e-mail inbox. Message can be delivered to the email address and deleted from the VM box, delivered and kept as new in the VM box, or delivered and kept as old in the VM box.
With Text-to-Speech technology, when you use a phone to check your messages, the system reads the text portion of your e-mail messages and plays any attached WAV files.
With e-mail integration, when you check voice and fax messages using a phone, you can hear the number of new e-mail messages you have received. You can also turn off e-mail count.
With ActiveFax, you can fax your e-mail messages to any fax machine.
In this Chapter...
Configuring E-mail Settings .....................................................................................88Checking E-mail Messages Using a Phone..................................................................90Hearing Who Else Received an E-mail Message...........................................................91Using a Phone to Enter Your E-mail Password.............................................................92Turning Your E-mail Message Count On or Off ............................................................93Faxing an E-mail Message .......................................................................................94Faxing All Messages in a Single Fax ..........................................................................95Changing Your E-mail Password ...............................................................................96

88 — USING A PHONE TO CHECK E-MAIL UNIVERGE UM4730 USER GUIDE
Configuring E-mail SettingsUse the Mailbox Manager to configure e-mail settings. Depending upon how the options were configured by the system manager when your account was created, some of the following options might not be available, while others might be selected for you by default. If you do not see an option as described in a procedure, or if an option has been preselected that you want to change, contact the system manager.
USING THE MAILBOX MANAGER
To set e-mail options1 Sign in to the Mailbox Manager.
2 Click the E-mail tab.
3 In the E-mail address field, type the e-mail address where you want to receive notifications of new voice and fax messages.
4 Select an option for forwarding voice mail to e-mail:
a Select Forward voice mail to the e-mail system to forward voice messages to your e-mail inbox. Voice messages are forwarded as WAV attachments.
b Select an option for processing old and new voice mail:
● Remove forwarded messages from voice mail system. The messaging system deletes the message after forwarding it to the e-mail system.
● Keep old messages in the voice mail system. The messaging system keeps a copy of the message and marks it as an old message after forwarding it to the e-mail system.
● Keep new messages in the voice mail system. The messaging system keeps a copy of the message and announces it as a new message when you check voice messages after forwarding it to the e-mail system.
5 Select an option for forwarding fax messages to e-mail:
a Select Forward faxes to the e-mail system to forward any incoming faxes as an attachment to your e-mail inbox.
b Select an option for processing old and new fax messages:
● Remove forwarded messages from voice mail system. The messaging system deletes the fax message after forwarding it to the e-mail system.
NOTE
If your messaging system is not setup to process e-mail, this option is not available in Mailbox Manager.
NOTE
The system manager might have already set an e-mail address. You can only change the e-mail address if the administrator has configured your account to allow changes to the e-mail notification address.
When you use an e-mail address outside of the company, the E-mail Reader feature is not available.
NOTE
When you select this check box, the Receive e-mail notification of messages option is not available. Selecting this option also requires that your voice messaging system is able to process faxes.

UNIVERGE UM4730 USER GUIDE USING A PHONE TO CHECK E-MAIL — 89
● Keep old messages in the voice mail system. The messaging system keeps a copy of the fax and marks it as an old message after forwarding it to the e-mail system.
● Keep new messages in voice mail system. The messaging system keeps a copy of the fax and announces it as a new message when you check fax messages after forwarding it to the e-mail system.
This option is only available if Forward faxes to the e-mail system is selected.
6 Select Receive e-mail notification of new messages if you want to receive notification of a new voice message or fax, but do not want the voice message or fax forwarded to your e-mail inbox.
This option is not available when you select Forward voice mail to the e-mail system or Forward faxes to the e-mail system.
7 Optionally, select Set saved e-mail password to change the password used to retrieve voice messages through e-mail.
See “Changing Your E-mail Password” on page 96 to change your e-mail password.
8 Click Save.

90 — USING A PHONE TO CHECK E-MAIL UNIVERGE UM4730 USER GUIDE
Checking E-mail Messages Using a PhoneThe e-mail integration and Text-to-Speech features enables you to manage your e-mail messages using a phone. For example, you can:
● Hear the e-mail message, its length, who sent it, the time it was sent, who else received it, and any attachments.
● Record a reply. Depending on the system, subscribers can hear the reply using a phone or receive the reply as an e-mail attachment (WAV file).
● Redirect an e-mail message to another subscriber’s e-mail inbox.
● Delete any e-mail message you have heard from the e-mail system.
USING A PHONE
To check your e-mail messages
1 Call the messaging system and log on.
2 Select the messages you want to check
■ Press 4 to check new e-mail messages.
■ Press 6 to check e-mail messages you have already read.
The system presents any voice or fax messages first.
3 If prompted, enter your e-mail password, followed by *.
If your password uses letters, press # #. Refer to “Password Table” on page 92 to enter your password, then press *.
4 Follow the system prompts. Press 1 for Yes or 2 for No after any questions.
5 Use the following commands during and after message playback.
Use these keys during a message
Use these keys after a message
NOTE
The system cannot read e-mail messages sent in UTF-8 encoded HTML format. If you cannot hear an e-mail message using a phone, contact your system manager.
TASK KEY TASK KEY
Menu options 3 Adjust volume 5
Rewind 7 Pause or continue 8
Fast forward 9 Repeat #
Save as new * Skip to next message 3 5
TASK KEY TASK KEY
Menu options 3 Repeat message #
Save as new * Reply to sender 4
Check next message 5 Delete message 6
Archive message 7 Hear time stamp 8
Redirect message 9

UNIVERGE UM4730 USER GUIDE USING A PHONE TO CHECK E-MAIL — 91
Hearing Who Else Received an E-mail MessageWhile listening to an e-mail message, you can hear who else received the e-mail message.
USING A PHONE
To hear who else received an e-mail message
1 Call the messaging system and log on.
2 Select the messages you want to check:
■ Press 4 to check new e-mail messages.
■ Press 6 to check e-mail messages you have already read.
The system presents any voice or fax messages first.
3 If prompted, enter your e-mail password, followed by *.
If your password uses letters, press # #. Refer to “Password Table” on page 92 to enter your password, then press *.
4 While listening to the message, press 3 3 to hear the other recipients.

92 — USING A PHONE TO CHECK E-MAIL UNIVERGE UM4730 USER GUIDE
Using a Phone to Enter Your E-mail PasswordIn addition to using a phone to entering your security code to check your e-mail messages, you might be required to enter your e-mail password. When your e-mail password uses numbers only, press each digit for the password, then press *.
When your e-mail password has letters use the corresponding phone keys below followed by #
#.
Password Table
E-mail Password Examples:
LOWERCASE LETTERS UPPERCASE LETTERS NUMBERS
A = 21 n = 62 A = 24 N = 65 1 = 11
B = 22 o = 63 B = 25 O = 66 2 = 12
C = 23 p = 71 C = 26 P = 74 3 = 13
D = 31 q = 01 D = 34 Q = 04 4 = 14
E = 32 r = 72 E = 35 R = 75 5 = 15
F = 33 s = 73 F = 36 S = 76 6 = 16
G = 41 t = 81 G = 44 T = 84 7 = 17
H = 42 u = 82 H = 45 U = 85 8 = 18
I = 43 v = 83 I = 46 V = 86 9 = 19
J = 51 w = 91 J = 54 W = 94 0 = 10
K = 52 x = 92 K = 55 X = 95 End = *
L = 53 y = 93 L = 56 Y = 96
M = 61 z = 02 M = 64 Z = 05
End = * End = *
Password Phone Keys
today 81 63 31 21 93
TODAY 84 66 34 24 96
2day 12 31 21 93
ToDay 84 63 34 21 93

UNIVERGE UM4730 USER GUIDE USING A PHONE TO CHECK E-MAIL — 93
Turning Your E-mail Message Count On or OffWhen you call the messaging system to check your messages, the messaging system gives you a count of the total number of messages you have. E-mail messages can be included in the message count.
USING A PHONE
To turn you e-mail message totaling on or off
1 Call the messaging system and log on.
2 Press 7 7 8 4.
3 Press 1 to turn on e-mail message count or press 2 to turn off e-mail message count.

94 — USING A PHONE TO CHECK E-MAIL UNIVERGE UM4730 USER GUIDE
Faxing an E-mail MessageWith the messaging system fax features, you can deliver your e-mail messages, plus any text attachments, to any fax machine. Your system manager must turn on this feature for you.
You can receive a fax of a particular e-mail message, or you can receive all new fax and e-mail messages plus their text attachments. See “Faxing All Messages in a Single Fax” on page 95 to receive all messages with a single call.
When you have a fax machine that is used to receive your faxes, you can use that fax machine. To deliver faxes to a different fax machine, you need to enter that fax number.
USING A PHONE
To fax an e-mail message
1 Call the messaging system and log on.
2 Select the messages you want to check
■ Press 4 to check new e-mail messages.
■ Press 6 to check e-mail messages you have already read.
The system presents any voice or fax messages first.
3 If prompted, enter your e-mail password, followed by *.
If your password uses letters, press # #. Refer to “Password Table” on page 92 to enter your password, then press *.
4 When presented with the e-mail message you want fax, press 1.
5 Press 3 7 to fax the message.
Follow the system prompts. Press 1 for Yes or 2 for No after any questions.
UNIVERGE UM4730 USER GUIDE USING A PHONE TO CHECK E-MAIL — 95
Faxing All Messages in a Single FaxWith the messaging system fax features, you can deliver all of your e-mail messages, plus any text attachments, to any fax machine. Your system manager must configure this feature.
You can also receive a fax of a particular e-mail message. See “Faxing an E-mail Message” on page 94.
When you have a fax machine that is used to receive your faxes, you can use that fax machine. To deliver faxes to a different fax machine, you need to enter that fax number.
USING A PHONE
To fax all of your e-mail messages with a single call
1 Call the messaging system and log on.
2 Press 4 5 to fax your e-mail messages.
3 Follow the system prompts. Press 1 for Yes or 2 for No after any questions.

96 — USING A PHONE TO CHECK E-MAIL UNIVERGE UM4730 USER GUIDE
Changing Your E-mail PasswordYou can change your e-mail password using a phone or using the Mailbox Manager.
USING A PHONE
To change your e-mail password
1 Call the messaging system and log on.
2 Press 7 7 8 5.
3 Enter your current e-mail password, followed by *.
If your password uses any letters, press # #, use the password table on page 90 to enter your password, then press *.
4 Enter your new e-mail password.
■ If your new password uses numbers only, enter the numbers.
■ If your password uses letters, press # #. Refer to “Password Table” on page 92 to enter your password, then press *.
When finished, press *.
5 Enter your new e-mail password again to confirm.
6 When finished, press *.
USING THE MAILBOX MANAGER
To change your e-mail password 1 Sign in to the Mailbox Manager.
2 Click the E-mail tab.
3 Click Set saved e-mail password.
The Change E-mail Password page appears.
4 Type your password in the Enter new password field.
5 Retype the password in the Verify new password field exactly as you typed it the first time, including any capitalization, spaces, or special characters.
6 Click Save.

UNIVERGE UM4730 USER GUIDE WORKING WITH FAXES — 97
■ Working with Faxes
Fax includes your faxes with your voice messages. When the optional Visual Messaging application is licensed and installed, ViewFax might also be available.
● ViewFax. Sends, receives, and redirects faxes through your computer.
● Fax mail. Stores faxes with your other messages in your e-mail inbox. Callers can record a short message to accompany each fax sent. Faxes can be forwarded from your mailbox to a fax machine using a phone.
● Print-to-fax. Fax documents to other subscribers, groups, personal database contacts, or recipients.
In this Chapter...
Receiving Faxes .....................................................................................................98Receiving All Faxes with One Call..............................................................................99Changing Fax Delivery Options............................................................................... 100Changing Fax Greetings ........................................................................................ 101
98 — WORKING WITH FAXES UNIVERGE UM4730 USER GUIDE
Receiving FaxesWith ActiveFax, your faxes are stored in your mailbox as fax messages and might consist of two parts: the fax and an optional voice message.
Callers can record a voice message, which you hear when you check your messages. If a fax message does not have a voice message, only the time the fax arrived is announced.
A fax and its voice message always remain together as a single fax message. When a fax message is archived, the associated voice message is also archived.
Depending on your system configuration, you might have a separate fax number or a single extension for faxes and phone calls.
Your fax mailbox can have a personal greeting. The messaging system greets calls with your name or fax number if a personal fax greeting is not recorded.
The messaging system also enables you to redirect a fax to an alternate fax number. specify a fax number for the redirect.
Multiple faxes can be delivered in the same fax delivery. The messaging system adds its own cover sheet to each delivery bundle. The bundle lists which faxes are included and the number of pages in each fax. See “Receiving All Faxes with One Call” on page 99.
Faxes in your Mailbox Manager inbox are saved as TIF files and can be viewed using a TIF viewer.
USING A PHONE
To receive a fax
1 Call the messaging system and log on.
2 Press 4 to check new messages.
The messaging system plays your new voice messages, then any fax messages.
3 After listening to the fax message, press 9 to deliver or redirect the fax message.
Follow the system prompts. Press 1 for Yes or 2 for No after any questions.
USING THE MAILBOX MANAGER
To view a fax1 Sign in to the Mailbox Manager.
2 Click the Messages tab.
3 Click the View fax icon adjacent to the fax message.
4 When prompted, do one of the following:
■ Click Open to open the fax in a TIF viewer.
■ Click Save to save the fax to a file on your computer or on the network.
■ Click Cancel to cancel this action and return to the Messages page.

UNIVERGE UM4730 USER GUIDE WORKING WITH FAXES — 99
Receiving All Faxes with One CallYou can use a shortcut to deliver all of your new faxes to your usual fax machine.
If you do not have a fax box, you can still have faxes redirected to your message box; however, the shortcut feature is not available. Instead you must use the procedure previously described, see “Receiving Faxes” on page 98.
USING A PHONE
To receive all your faxes with one call
1 Call the messaging system and log on.
2 At the main menu, press 4 5 to send all of your new faxes to your usual fax machine.

100 — WORKING WITH FAXES UNIVERGE UM4730 USER GUIDE
Changing Fax Delivery OptionsYou can turn fax delivery on or off, change the phone number where your faxes are delivered, change the schedule used to deliver your faxes, and change the fax delivery type.
The messaging system can deliver your faxes in three ways:
Standard delivery. The messaging system stores your faxes until you request them. When you check messages, the system tells you which faxes are waiting.
Fully automatic delivery. The messaging system automatically delivers faxes to the fax number specified in your profile. Your system manager may have set up this option for you.
Custom delivery. Other fax delivery options may be available depending on your messaging system set up. Contact your system manager for information about custom delivery options.
USING A PHONE
To change your fax delivery options
1 Call the messaging system and log on.
2 Press 7 6 5 8 to change the options for your fax.
3 Press 1 to turn on delivery for that number or 2 to turn off delivery.
4 Press 4 to change the phone number.
Enter the new fax phone number, the press * after you enter the number to end the entry.
5 Press 5 to change the schedule, then follow the system prompts, pressing 1 for Yes, or pressing 2 for No.
6 Press 6 to change the delivery type for fax messages, then follow the system prompts, pressing 1 for Yes, or pressing 2 for No.

UNIVERGE UM4730 USER GUIDE WORKING WITH FAXES — 101
Changing Fax GreetingsYou can change the greeting callers hear before they send you a fax.
USING A PHONE
To change your fax greeting
1 Call the messaging system and log on.
2 Press 7 4 9 to change your fax greeting.
3 Follow the system prompts to change the greeting. Press 1 for Yes or 2 for No after any questions.

102 — WORKING WITH FAXES UNIVERGE UM4730 USER GUIDE

UNIVERGE UM4730 USER GUIDE USING WEB FEEDS — 103
■ Using Web Feeds
Unified messaging subscribers can use a RSS (Really Simple Syndication) feed reader or Podcast client to receive automatic notification when new messages are received.
The RSS and Podcast web feed features are available to unified messaging subscribers with access to the Mailbox Manager.
NOTE
RSS feeds are a one-way read-only notification method that does not allow synchronization from the RSS client back to the messaging system. For example, deleting a message in the RSS client will not delete it on the messaging system.
For some RSS clients to work correctly, Mailbox Manager must be accessible from the Internet. In most cases this requires the firewall to be configured to enable outside access to the messaging system.
In this Chapter...
Subscribing to a RSS Web Feed.............................................................................. 104Subscribing to a Podcast Web Feed......................................................................... 105

104 — USING WEB FEEDS UNIVERGE UM4730 USER GUIDE
Subscribing to a RSS Web FeedYou can automatically receive new message notification using the Mailbox Manager to subscribe to a RSS web feed.
Once configured, RSS notifications are received as often as the RSS reader refreshes the subscription. The refresh interval is typically configured using the RSS reader application. The RSS read application automatically downloads the most up-to-date web feed list.
USING THE MAILBOX MANAGER
To Subscribe to a RSS Web Feed1 Sign in to the Mailbox Manager.
2 Click the RSS feed icon.
The RSS web feed page appears. The appearance of the RSS web feed page varies depending on the browser you are using.
3 Follow the on-screen instructions to subscribe to the web feed.
4 Click Subscribe to this Feed.
5 Click Subscribe or Subscribe Now.
NOTE
Certain RSS applications only synchronize new messages and continue to cache and display old messages that might have been deleted from the messaging system.

UNIVERGE UM4730 USER GUIDE USING WEB FEEDS — 105
Subscribing to a Podcast Web FeedYou can automatically receive new message notification and listen to your messages using the a Podcast web feed. Use Mailbox Manager to subscribe to a podcast web feed.
You must have a podcast application installed to use this feature.
Once configured, message notifications are received as often as the podcast application synchronizes with the subscription. This is typically configured through the podcast application.
USING THE MAILBOX MANAGER
To Subscribe to a Podcast Web Feed1 Sign in to the Mailbox Manager.
2 Click the podcast icon.
The podcast application automatically opens and a new subscription, with the message system name, is added to the subscription list.

106 — USING WEB FEEDS UNIVERGE UM4730 USER GUIDE
UNIVERGE UM4730 USER GUIDE 107
■ INDEX
Aabout this guide 2ActiveFax
about 5alternate greeting
changing 62description 60switching to standard 63
Audio Applet 16automatically copying messages 78
Bbusy greeting
changing 64description 60turning on or off 65
Ccall holding
about 76turning on or off 76
call screeningabout options 75changing options 75turning on or off 74
call transfer optionsabout 72changing transfer number 73turning on or off 72
canceling a sent message 36changing
alternate greeting 62busy greeting 64call screening options 75fax greeting 101message group name 51playback options 71security code 68standard greeting 61
changing recorded name 69changing spelled name 70changing your spelled name 70conventions
document 2conventions used in documentation 2
Ddefault greeting
description 60using 60
directory listingabout 77changing 77
Documentconventions 2
Ee-mail
settings 88E-mail inbox 18e-mail options
about 88e-mail password
changing 96entering by phone 92
enrolling on the system 8
Ffaxes
changing greeting 101changing options 100delivery options 100receiving 98
featuresoptional 5
first-time enrollment 8
Ggreeting
record using Mailbox Manager 16, 57greetings
alternate 60busy 60changing alternate 62changing busy 64changing standard 61default 60standard 60switching between standard and alternate 63turning busy greeting on or off 65
Hhypertext links 3
Iicons

108 UNIVERGE UM4730 USER GUIDE
Mailbox Manager 4, 20procedural 3
KKey names 2
LLive Monitor
turning on or off 45using 45
Live Recordusing 44
Mmailbox
accessing by phone 12accessing with Mailbox Manager 13initial setup 8
Mailbox Managerdescription 5icons 20logging off 14logging on 13search 15
menu mode conversation 71message auto-copy
about 78message groups
adding members 53changing group name 51creating 48deleting 56deleting members 53list of 55recording group name 57
message notification. See notificationmessages
archiving 26automatically copying 78canceling 36checking 20checking e-mail by phone 90editing before sending 31forwarding 27future delivery of 35group 38old 23private 33redirecting 27replying 25return receipt for 34reviewing 23sending 30sending to remote subscribers 41urgent 32
monitoring messages 45
Nnotification
about 79notification devices
about 80changing options 82delivery types 83turning on or off 81
Ppassword-phone table 92Placeholder text 3playback options
changing 71prompt
record through Mailbox Manager 16, 57
Rrecorded name
about 8changing 69
recordingphone conversations 44play through Mailbox Manager 16, 57
return receipt 34
Ssecurity code
about 8changing 68
sendingmessages to a group 38messages to a subscriber mailbox 30messages to additional subscribers 37messages to guest subscribers 40messages to remote subscribers 41messages with future delivery 35private messages 33urgent messages 32
settingse-mail 88
standard greetingchanging 61description 60switching to alternate 63
Ttelephone conversations
menu mode 71Yes/No 71

UNIVERGE UM4730 USER GUIDE 109
text-to-speechabout 5
Uunified messaging 5User input 2, 3
VViewCall Plus See visual messagingapplicationsViewFax See visual messaging applicationsViewMail See visual messaging applicationsvisual messaging applications 5voice field
record 16, 57voice name
record using Mailbox Manager 16, 57
WWAV files 18, 22, 87, 88Web administration console
record with 16, 57web feeds
subscribing to a podcast web feed 105subscribing to a RSS web feed 104
YYes/No conversation 71

110 UNIVERGE UM4730 USER GUIDE