Embed Size (px)
Citation preview
Getting StartOL-25954-01
C H A P T E R 3
Understanding the Cisco Prime LMS InterfaceThis chapter provides a brief description of the elements in the Cisco Prime LMS user interface.
It explains:
• Understanding Interface Elements
• Understanding the Sitemap
• Navigating Menus
• Adding and Configuring Portlets
• Changing the Portal Layout
• Adding and Configuring Dashboards
• Understanding the Search Bar
• Understanding the Fault Bar
• Understanding the Technical Assistance Center (TAC) Service Requests Pane
• Adding Links to Favorites
• Navigating Legacy Menu
• Using Online Help
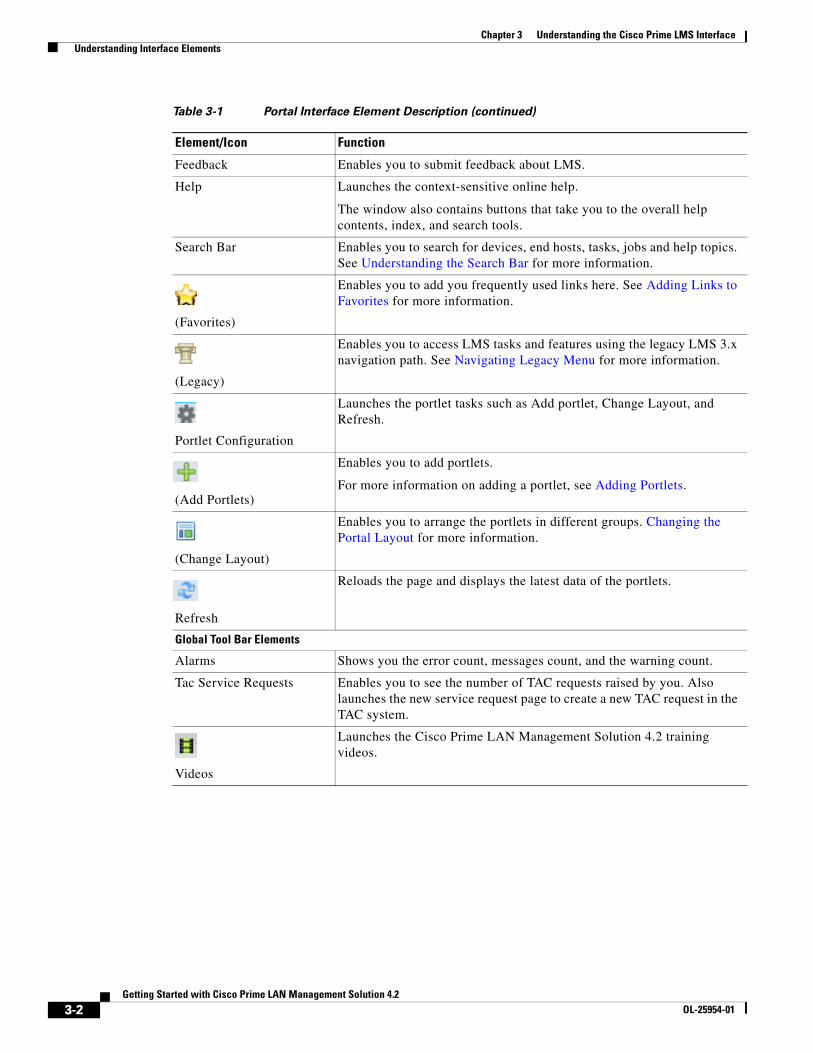
Understanding Interface ElementsThe Table 3-1 describes the elements and icons in the portal interface.
.Table 3-1 Portal Interface Element Description
Element/Icon Function
Banner Elements
Sitemap Contains an organized listing of links to all the pages in LMS. See Understanding the Sitemap.
User Shows the name of the user who is logged into the application. For example, Admin.
Logout Enables you to exit from the application.
About Enables you to see the license details of the application. You can click the links displayed in the page to see the purchase licence information.
3-1ed with Cisco Prime LAN Management Solution 4.2
Chapter 3 Understanding the Cisco Prime LMS Interface Understanding Interface Elements
Feedback Enables you to submit feedback about LMS.
Help Launches the context-sensitive online help.
The window also contains buttons that take you to the overall help contents, index, and search tools.
Search Bar Enables you to search for devices, end hosts, tasks, jobs and help topics. See Understanding the Search Bar for more information.
(Favorites)
Enables you to add you frequently used links here. See Adding Links to Favorites for more information.
(Legacy)
Enables you to access LMS tasks and features using the legacy LMS 3.x navigation path. See Navigating Legacy Menu for more information.
Portlet Configuration
Launches the portlet tasks such as Add portlet, Change Layout, and Refresh.
(Add Portlets)
Enables you to add portlets.
For more information on adding a portlet, see Adding Portlets.
(Change Layout)
Enables you to arrange the portlets in different groups. Changing the Portal Layout for more information.
Refresh
Reloads the page and displays the latest data of the portlets.
Global Tool Bar Elements
Alarms Shows you the error count, messages count, and the warning count.
Tac Service Requests Enables you to see the number of TAC requests raised by you. Also launches the new service request page to create a new TAC request in the TAC system.
Videos
Launches the Cisco Prime LAN Management Solution 4.2 training videos.
Table 3-1 Portal Interface Element Description (continued)
Element/Icon Function
3-2Getting Started with Cisco Prime LAN Management Solution 4.2
OL-25954-01
Chapter 3 Understanding the Cisco Prime LMS Interface Understanding the Sitemap
Understanding the SitemapSitemap contains an organized listing of links to all the pages in LMS. From the Sitemap page you can directly launch the down-level menu of all the available LMS menu.
Following sections provide you information on the navigation path of the links:
• Understanding Monitor Menu
• Understanding Inventory Menu
• Understanding Configuration Menu
• Understanding Reports Menu
• Understanding Admin Menu
• Understanding Work Centers Menu
Navigating MenusThis section describes the menus available in LMS. It also explains the sub-menu items in each function menu.
The menus are explained as:
• Understanding My Menu
• Understanding Monitor Menu
• Understanding Inventory Menu
• Understanding Configuration Menu
• Understanding Reports Menu
• Understanding Admin Menu
• Understanding Work Centers Menu
Understanding My MenuMy Menu helps you to consolidate information that is specific to a particular function as dashboards. It also enables you to group data from different functions into a single page. You can add, view and manage dashboards using:
• My Dashboard
• Public Dashboard
• Default Dashboard
My Dashboard
My Dashboard lists the dashboards created by you. These user-defined dashboards can be accessed only by the user who created them and not by others.
3-3Getting Started with Cisco Prime LAN Management Solution 4.2
OL-25954-01
Chapter 3 Understanding the Cisco Prime LMS Interface Navigating Menus
Public Dashboard
You can add or modify portlets or dashboards from the public dashboard list. Public dashboards can be accessed by all users.
Default Dashboard
The Default Dashboard displays links to the following system-defined dashboards in LMS:
• Configuration (See Configuration Dashboard)
• Device Status (See Device Status Dashboard)
• Inventory (See Inventory Dashboard)
• Monitoring (See Monitoring Dashboard)
• System (See System Dashboard)
• EnergyWise (See EnergyWise Dashboard)
• TrustSec (See TrustSec Dashboard)
See Dashboards in LMS for more information.
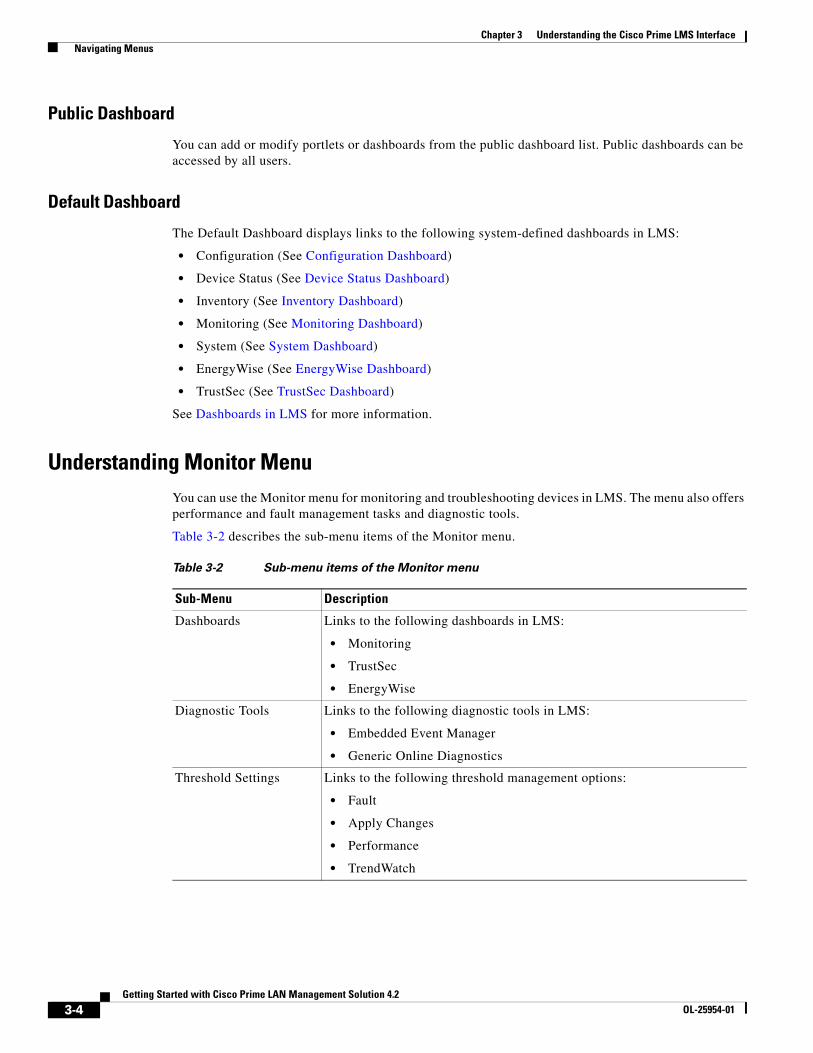
Understanding Monitor MenuYou can use the Monitor menu for monitoring and troubleshooting devices in LMS. The menu also offers performance and fault management tasks and diagnostic tools.
Table 3-2 describes the sub-menu items of the Monitor menu.
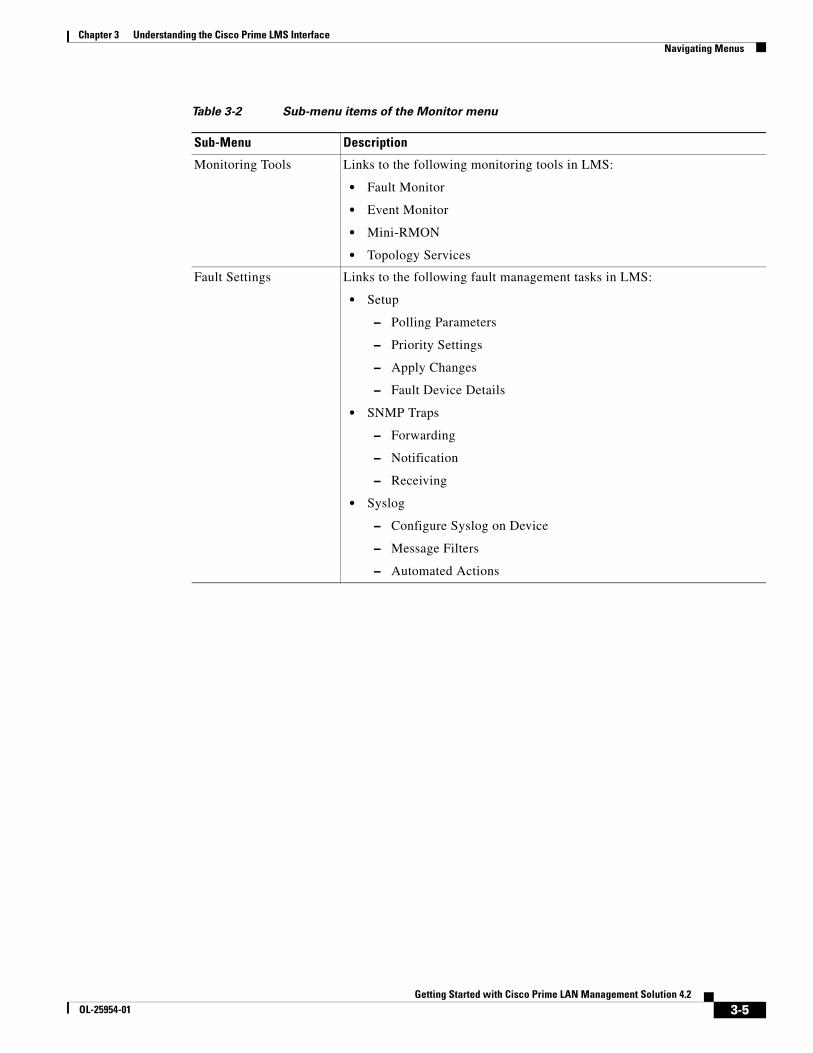
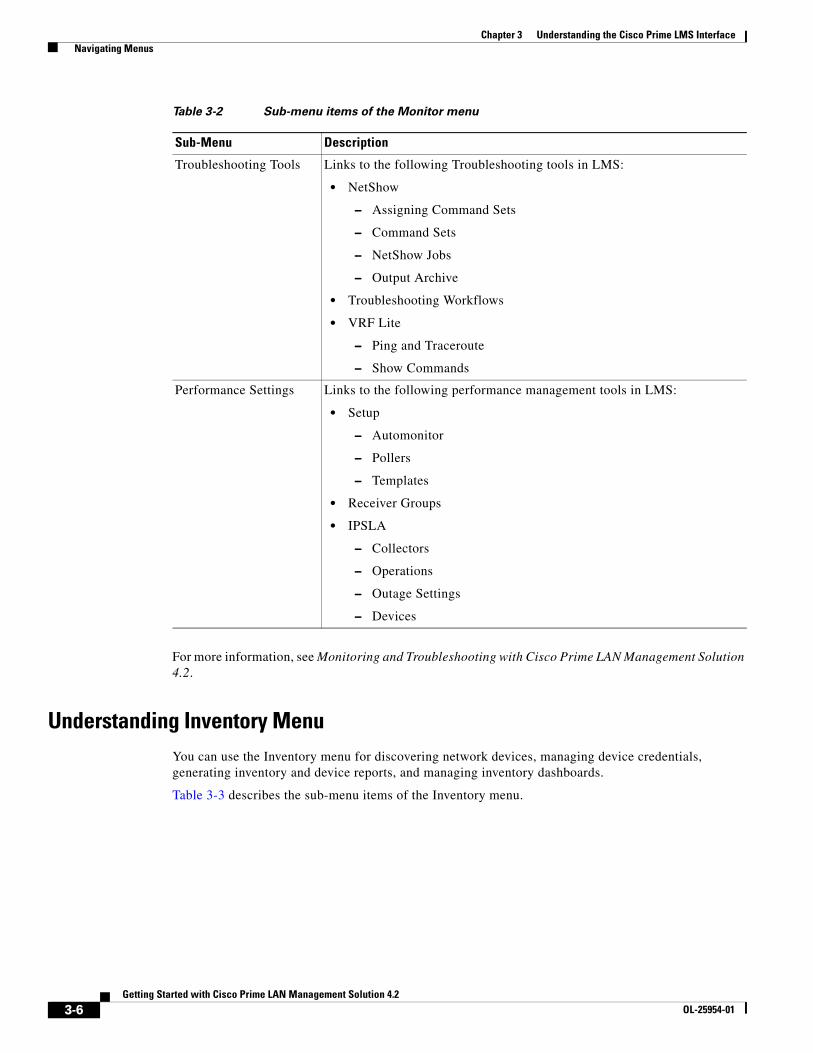
Table 3-2 Sub-menu items of the Monitor menu
Sub-Menu Description
Dashboards Links to the following dashboards in LMS:
• Monitoring
• TrustSec
• EnergyWise
Diagnostic Tools Links to the following diagnostic tools in LMS:
• Embedded Event Manager
• Generic Online Diagnostics
Threshold Settings Links to the following threshold management options:
• Fault
• Apply Changes
• Performance
• TrendWatch
3-4Getting Started with Cisco Prime LAN Management Solution 4.2
OL-25954-01
Chapter 3 Understanding the Cisco Prime LMS Interface Navigating Menus
Monitoring Tools Links to the following monitoring tools in LMS:
• Fault Monitor
• Event Monitor
• Mini-RMON
• Topology Services
Fault Settings Links to the following fault management tasks in LMS:
• Setup
– Polling Parameters
– Priority Settings
– Apply Changes
– Fault Device Details
• SNMP Traps
– Forwarding
– Notification
– Receiving
• Syslog
– Configure Syslog on Device
– Message Filters
– Automated Actions
Table 3-2 Sub-menu items of the Monitor menu
Sub-Menu Description
3-5Getting Started with Cisco Prime LAN Management Solution 4.2
OL-25954-01
Chapter 3 Understanding the Cisco Prime LMS Interface Navigating Menus
For more information, see Monitoring and Troubleshooting with Cisco Prime LAN Management Solution 4.2.
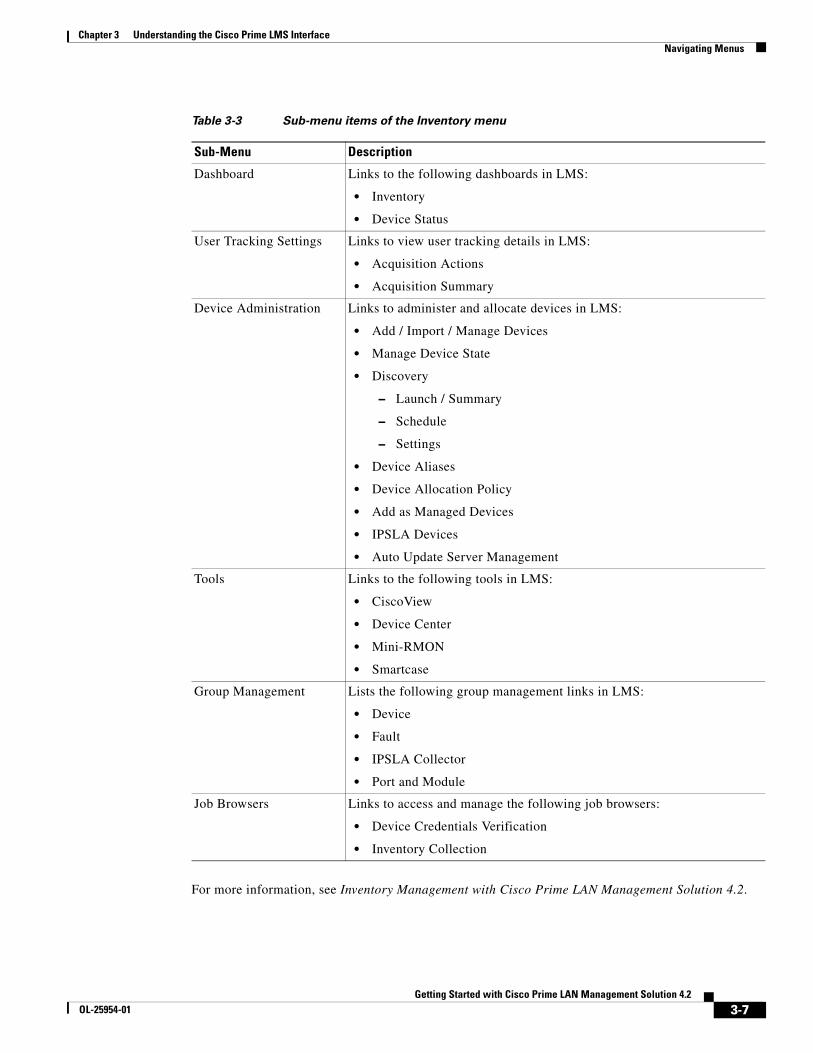
Understanding Inventory MenuYou can use the Inventory menu for discovering network devices, managing device credentials, generating inventory and device reports, and managing inventory dashboards.
Table 3-3 describes the sub-menu items of the Inventory menu.
Troubleshooting Tools Links to the following Troubleshooting tools in LMS:
• NetShow
– Assigning Command Sets
– Command Sets
– NetShow Jobs
– Output Archive
• Troubleshooting Workflows
• VRF Lite
– Ping and Traceroute
– Show Commands
Performance Settings Links to the following performance management tools in LMS:
• Setup
– Automonitor
– Pollers
– Templates
• Receiver Groups
• IPSLA
– Collectors
– Operations
– Outage Settings
– Devices
Table 3-2 Sub-menu items of the Monitor menu
Sub-Menu Description
3-6Getting Started with Cisco Prime LAN Management Solution 4.2
OL-25954-01
Chapter 3 Understanding the Cisco Prime LMS Interface Navigating Menus
For more information, see Inventory Management with Cisco Prime LAN Management Solution 4.2.
Table 3-3 Sub-menu items of the Inventory menu
Sub-Menu Description
Dashboard Links to the following dashboards in LMS:
• Inventory
• Device Status
User Tracking Settings Links to view user tracking details in LMS:
• Acquisition Actions
• Acquisition Summary
Device Administration Links to administer and allocate devices in LMS:
• Add / Import / Manage Devices
• Manage Device State
• Discovery
– Launch / Summary
– Schedule
– Settings
• Device Aliases
• Device Allocation Policy
• Add as Managed Devices
• IPSLA Devices
• Auto Update Server Management
Tools Links to the following tools in LMS:
• CiscoView
• Device Center
• Mini-RMON
• Smartcase
Group Management Lists the following group management links in LMS:
• Device
• Fault
• IPSLA Collector
• Port and Module
Job Browsers Links to access and manage the following job browsers:
• Device Credentials Verification
• Inventory Collection
3-7Getting Started with Cisco Prime LAN Management Solution 4.2
OL-25954-01
Chapter 3 Understanding the Cisco Prime LMS Interface Navigating Menus
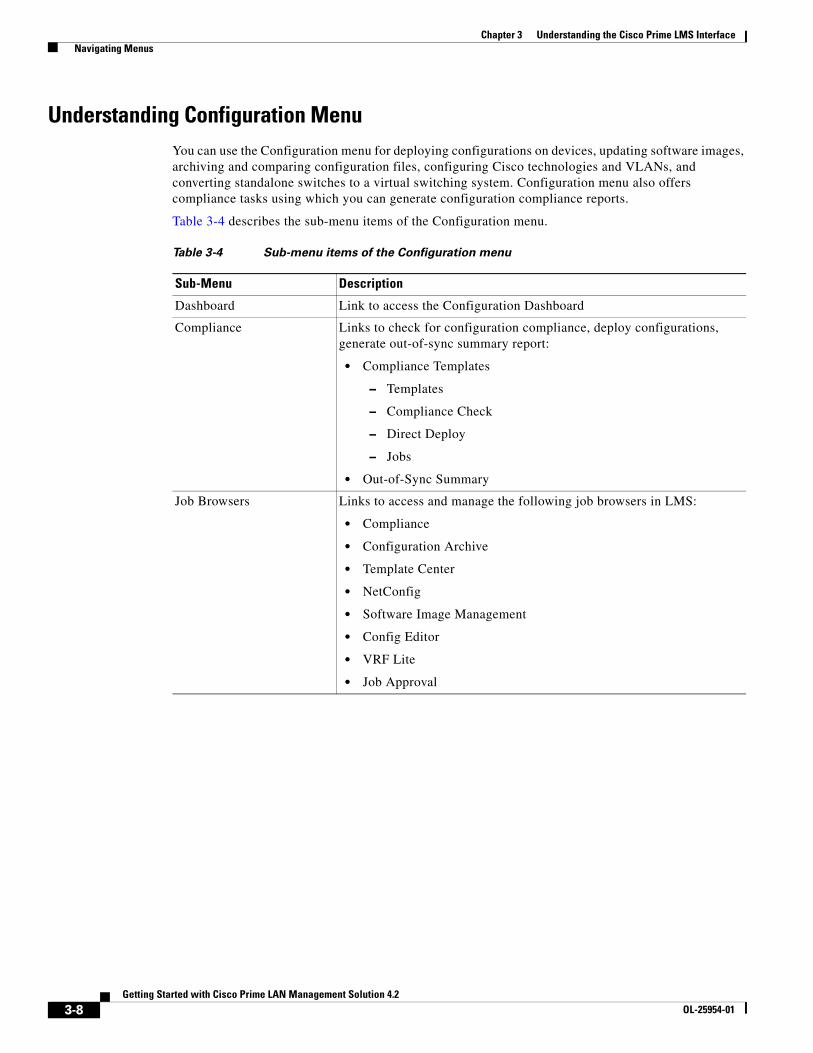
Understanding Configuration MenuYou can use the Configuration menu for deploying configurations on devices, updating software images, archiving and comparing configuration files, configuring Cisco technologies and VLANs, and converting standalone switches to a virtual switching system. Configuration menu also offers compliance tasks using which you can generate configuration compliance reports.
Table 3-4 describes the sub-menu items of the Configuration menu.
Table 3-4 Sub-menu items of the Configuration menu
Sub-Menu Description
Dashboard Link to access the Configuration Dashboard
Compliance Links to check for configuration compliance, deploy configurations, generate out-of-sync summary report:
• Compliance Templates
– Templates
– Compliance Check
– Direct Deploy
– Jobs
• Out-of-Sync Summary
Job Browsers Links to access and manage the following job browsers in LMS:
• Compliance
• Configuration Archive
• Template Center
• NetConfig
• Software Image Management
• Config Editor
• VRF Lite
• Job Approval
3-8Getting Started with Cisco Prime LAN Management Solution 4.2
OL-25954-01
Chapter 3 Understanding the Cisco Prime LMS Interface Navigating Menus
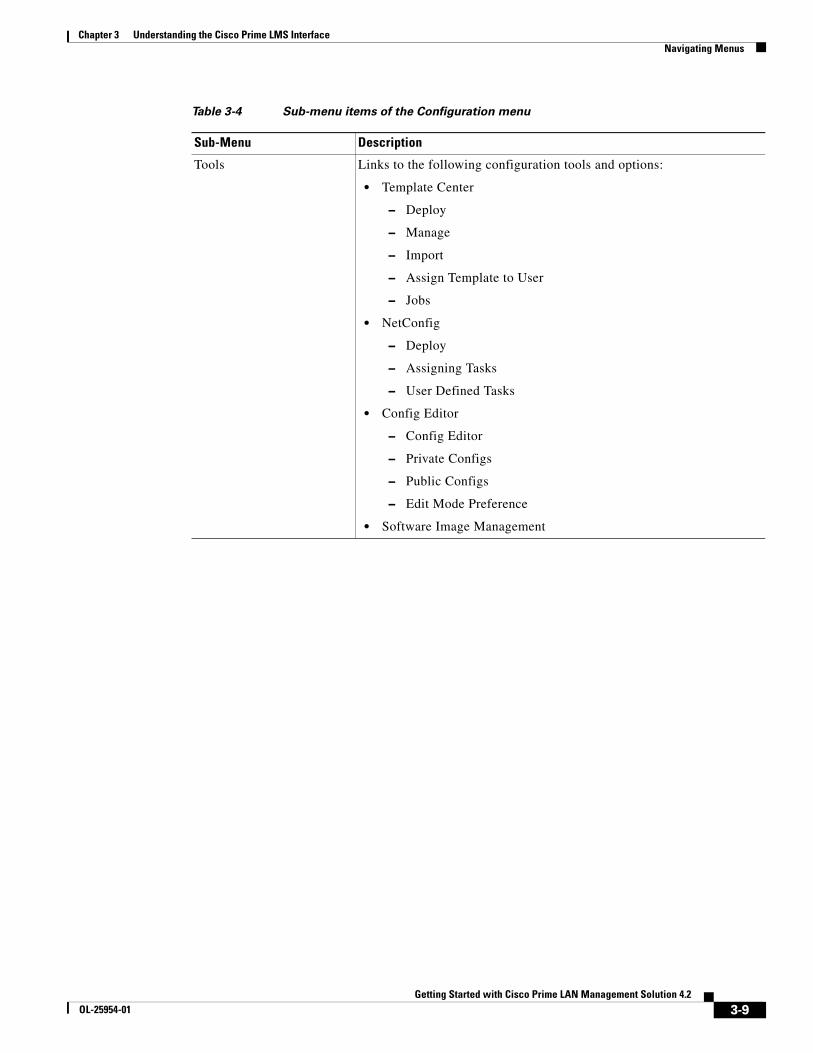
Tools Links to the following configuration tools and options:
• Template Center
– Deploy
– Manage
– Import
– Assign Template to User
– Jobs
• NetConfig
– Deploy
– Assigning Tasks
– User Defined Tasks
• Config Editor
– Config Editor
– Private Configs
– Public Configs
– Edit Mode Preference
• Software Image Management
Table 3-4 Sub-menu items of the Configuration menu
Sub-Menu Description
3-9Getting Started with Cisco Prime LAN Management Solution 4.2
OL-25954-01
Chapter 3 Understanding the Cisco Prime LMS Interface Navigating Menus
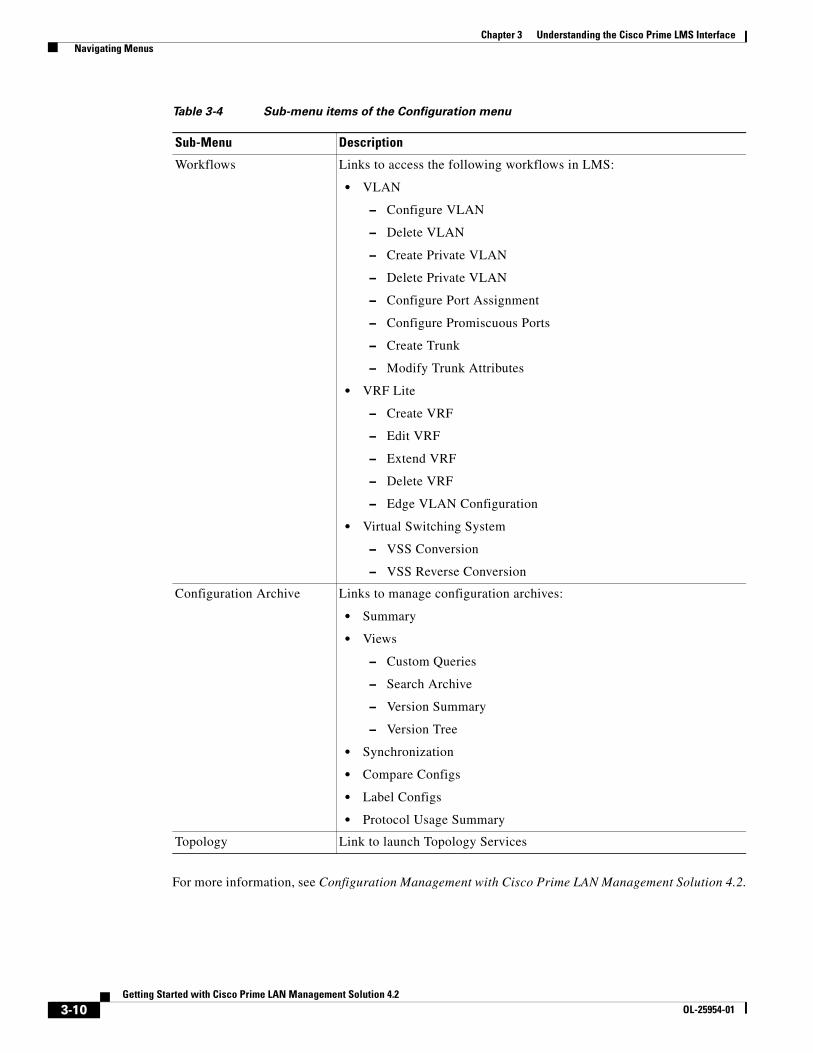
For more information, see Configuration Management with Cisco Prime LAN Management Solution 4.2.
Workflows Links to access the following workflows in LMS:
• VLAN
– Configure VLAN
– Delete VLAN
– Create Private VLAN
– Delete Private VLAN
– Configure Port Assignment
– Configure Promiscuous Ports
– Create Trunk
– Modify Trunk Attributes
• VRF Lite
– Create VRF
– Edit VRF
– Extend VRF
– Delete VRF
– Edge VLAN Configuration
• Virtual Switching System
– VSS Conversion
– VSS Reverse Conversion
Configuration Archive Links to manage configuration archives:
• Summary
• Views
– Custom Queries
– Search Archive
– Version Summary
– Version Tree
• Synchronization
• Compare Configs
• Label Configs
• Protocol Usage Summary
Topology Link to launch Topology Services
Table 3-4 Sub-menu items of the Configuration menu
Sub-Menu Description
3-10Getting Started with Cisco Prime LAN Management Solution 4.2
OL-25954-01
Chapter 3 Understanding the Cisco Prime LMS Interface Navigating Menus
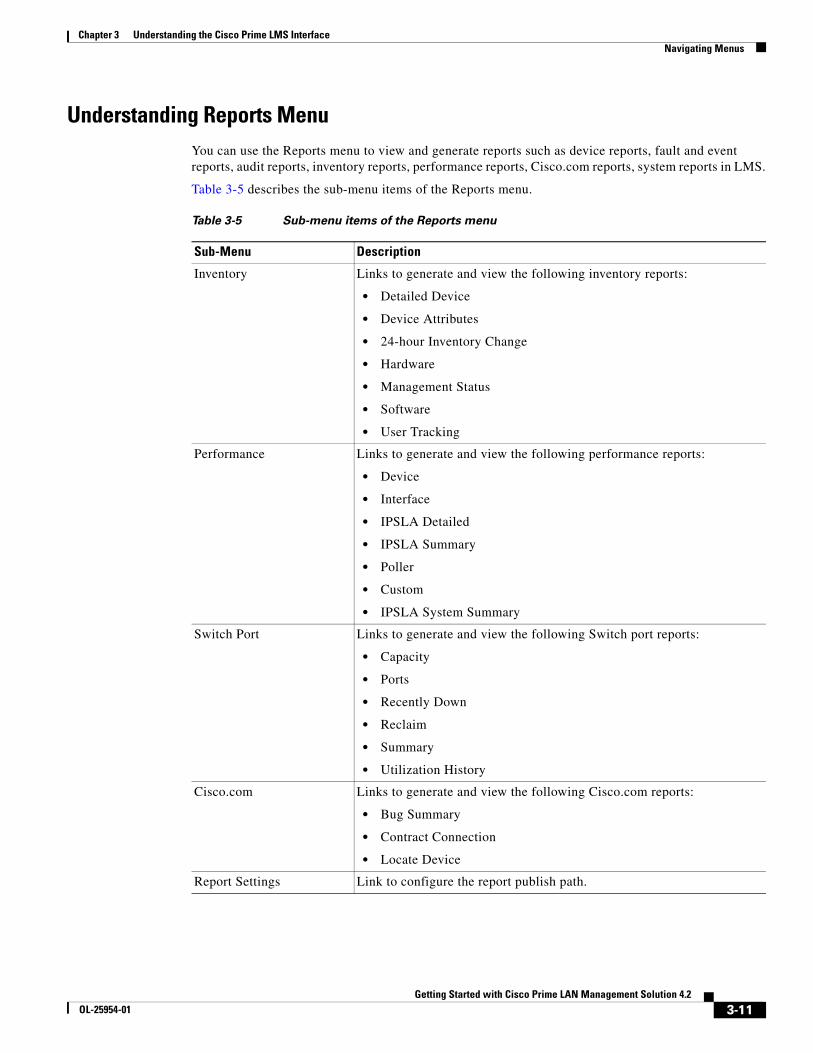
Understanding Reports MenuYou can use the Reports menu to view and generate reports such as device reports, fault and event reports, audit reports, inventory reports, performance reports, Cisco.com reports, system reports in LMS.
Table 3-5 describes the sub-menu items of the Reports menu.
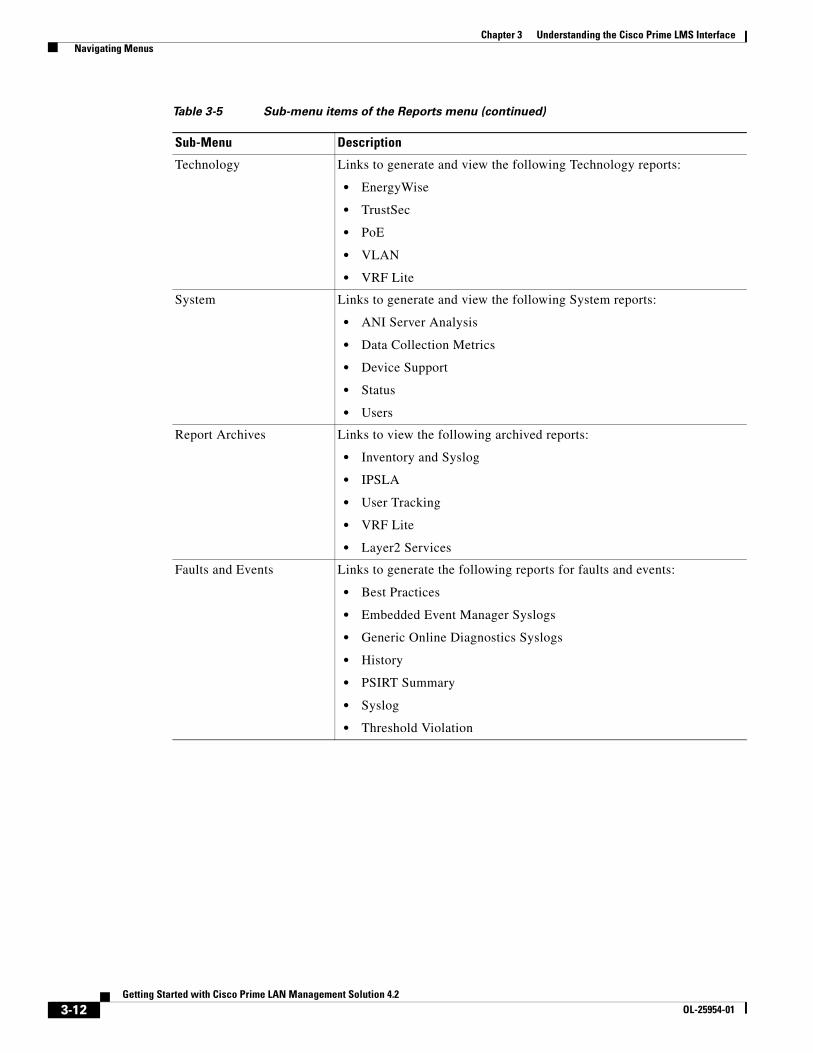
Table 3-5 Sub-menu items of the Reports menu
Sub-Menu Description
Inventory Links to generate and view the following inventory reports:
• Detailed Device
• Device Attributes
• 24-hour Inventory Change
• Hardware
• Management Status
• Software
• User Tracking
Performance Links to generate and view the following performance reports:
• Device
• Interface
• IPSLA Detailed
• IPSLA Summary
• Poller
• Custom
• IPSLA System Summary
Switch Port Links to generate and view the following Switch port reports:
• Capacity
• Ports
• Recently Down
• Reclaim
• Summary
• Utilization History
Cisco.com Links to generate and view the following Cisco.com reports:
• Bug Summary
• Contract Connection
• Locate Device
Report Settings Link to configure the report publish path.
3-11Getting Started with Cisco Prime LAN Management Solution 4.2
OL-25954-01
Chapter 3 Understanding the Cisco Prime LMS Interface Navigating Menus
Technology Links to generate and view the following Technology reports:
• EnergyWise
• TrustSec
• PoE
• VLAN
• VRF Lite
System Links to generate and view the following System reports:
• ANI Server Analysis
• Data Collection Metrics
• Device Support
• Status
• Users
Report Archives Links to view the following archived reports:
• Inventory and Syslog
• IPSLA
• User Tracking
• VRF Lite
• Layer2 Services
Faults and Events Links to generate the following reports for faults and events:
• Best Practices
• Embedded Event Manager Syslogs
• Generic Online Diagnostics Syslogs
• History
• PSIRT Summary
• Syslog
• Threshold Violation
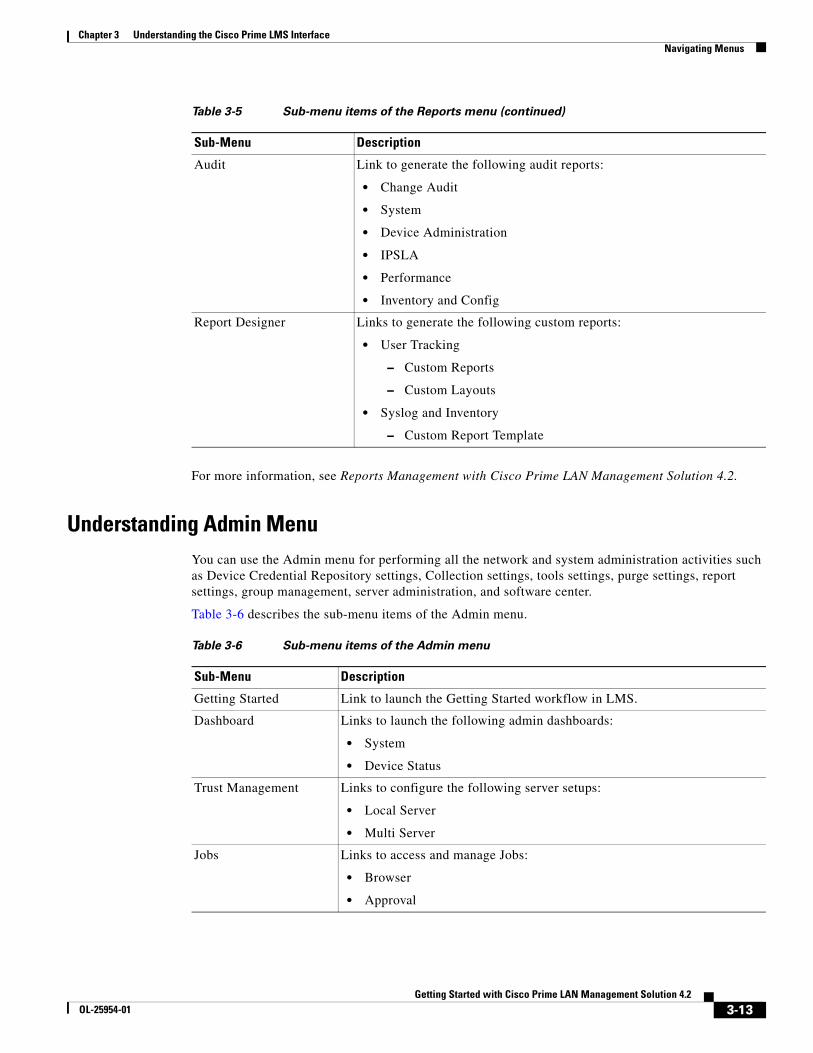
Table 3-5 Sub-menu items of the Reports menu (continued)
Sub-Menu Description
3-12Getting Started with Cisco Prime LAN Management Solution 4.2
OL-25954-01
Chapter 3 Understanding the Cisco Prime LMS Interface Navigating Menus
For more information, see Reports Management with Cisco Prime LAN Management Solution 4.2.
Understanding Admin MenuYou can use the Admin menu for performing all the network and system administration activities such as Device Credential Repository settings, Collection settings, tools settings, purge settings, report settings, group management, server administration, and software center.
Table 3-6 describes the sub-menu items of the Admin menu.
Audit Link to generate the following audit reports:
• Change Audit
• System
• Device Administration
• IPSLA
• Performance
• Inventory and Config
Report Designer Links to generate the following custom reports:
• User Tracking
– Custom Reports
– Custom Layouts
• Syslog and Inventory
– Custom Report Template
Table 3-5 Sub-menu items of the Reports menu (continued)
Sub-Menu Description
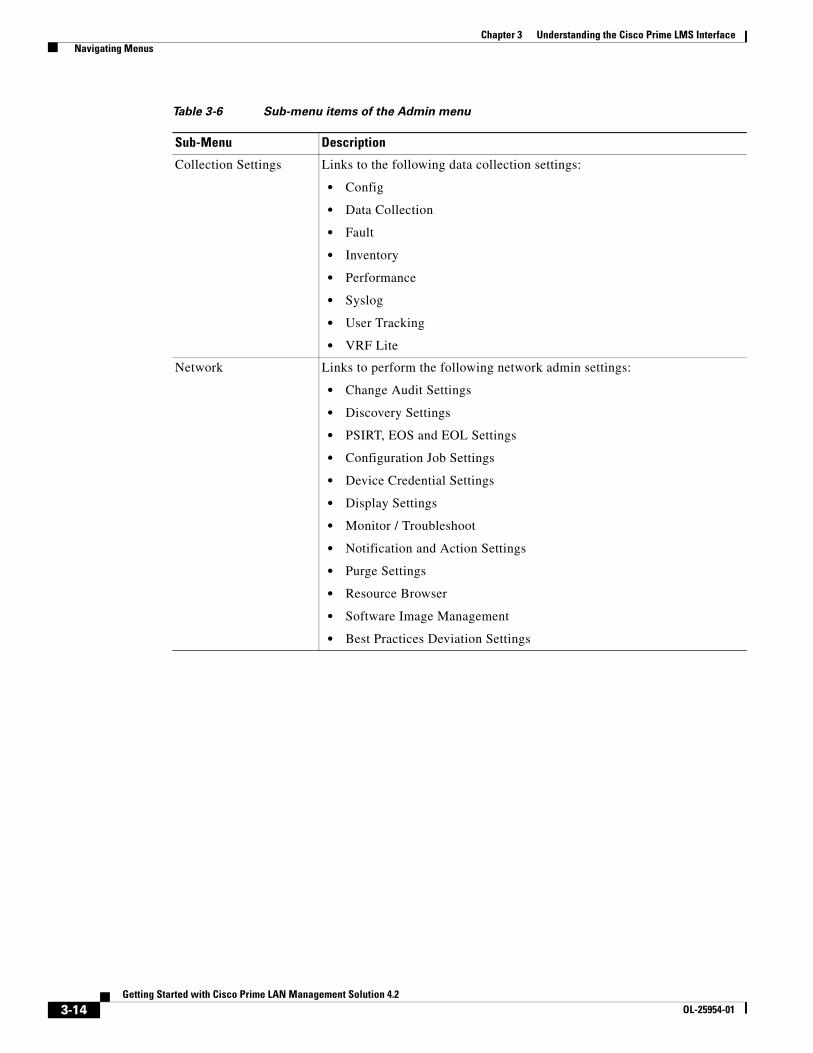
Table 3-6 Sub-menu items of the Admin menu
Sub-Menu Description
Getting Started Link to launch the Getting Started workflow in LMS.
Dashboard Links to launch the following admin dashboards:
• System
• Device Status
Trust Management Links to configure the following server setups:
• Local Server
• Multi Server
Jobs Links to access and manage Jobs:
• Browser
• Approval
3-13Getting Started with Cisco Prime LAN Management Solution 4.2
OL-25954-01
Chapter 3 Understanding the Cisco Prime LMS Interface Navigating Menus
Collection Settings Links to the following data collection settings:
• Config
• Data Collection
• Fault
• Inventory
• Performance
• Syslog
• User Tracking
• VRF Lite
Network Links to perform the following network admin settings:
• Change Audit Settings
• Discovery Settings
• PSIRT, EOS and EOL Settings
• Configuration Job Settings
• Device Credential Settings
• Display Settings
• Monitor / Troubleshoot
• Notification and Action Settings
• Purge Settings
• Resource Browser
• Software Image Management
• Best Practices Deviation Settings
Table 3-6 Sub-menu items of the Admin menu
Sub-Menu Description
3-14Getting Started with Cisco Prime LAN Management Solution 4.2
OL-25954-01

Chapter 3 Understanding the Cisco Prime LMS Interface Navigating Menus
For more information, see Administration of Cisco Prime LAN Management Solution 4.2.
System Links to perform the following system settings:
• Authentication Mode Setup
• Backup
• Cisco.com Settings
• Debug Settings
• Group Management
• License Management
• Log Rotation
• Server Monitoring
• Device Management Functions
• SMTP Default Server
• Software Center
• System Preferences
• User Management
Table 3-6 Sub-menu items of the Admin menu
Sub-Menu Description
3-15Getting Started with Cisco Prime LAN Management Solution 4.2
OL-25954-01
Chapter 3 Understanding the Cisco Prime LMS Interface Navigating Menus
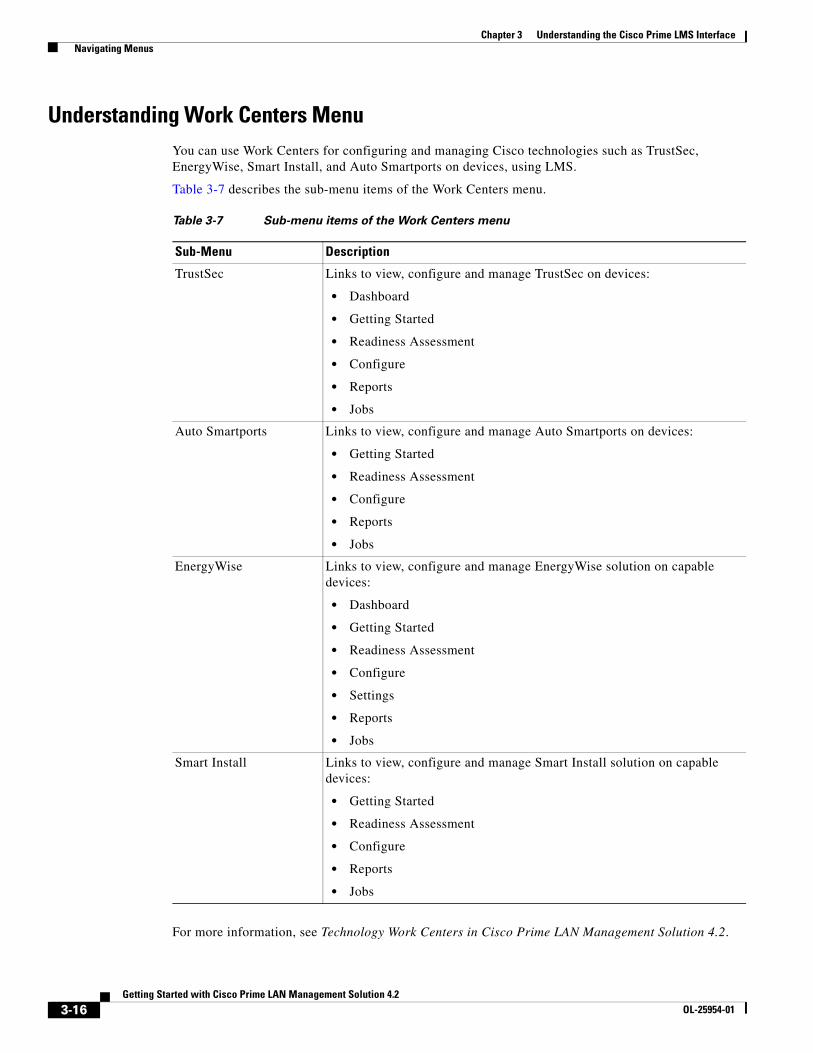
Understanding Work Centers MenuYou can use Work Centers for configuring and managing Cisco technologies such as TrustSec, EnergyWise, Smart Install, and Auto Smartports on devices, using LMS.
Table 3-7 describes the sub-menu items of the Work Centers menu.
For more information, see Technology Work Centers in Cisco Prime LAN Management Solution 4.2.
Table 3-7 Sub-menu items of the Work Centers menu
Sub-Menu Description
TrustSec Links to view, configure and manage TrustSec on devices:
• Dashboard
• Getting Started
• Readiness Assessment
• Configure
• Reports
• Jobs
Auto Smartports Links to view, configure and manage Auto Smartports on devices:
• Getting Started
• Readiness Assessment
• Configure
• Reports
• Jobs
EnergyWise Links to view, configure and manage EnergyWise solution on capable devices:
• Dashboard
• Getting Started
• Readiness Assessment
• Configure
• Settings
• Reports
• Jobs
Smart Install Links to view, configure and manage Smart Install solution on capable devices:
• Getting Started
• Readiness Assessment
• Configure
• Reports
• Jobs
3-16Getting Started with Cisco Prime LAN Management Solution 4.2
OL-25954-01
Chapter 3 Understanding the Cisco Prime LMS Interface Adding and Configuring Portlets
Adding and Configuring PortletsPortlets are the basic units of Cisco Prime LMS. They are features that can be plugged into, displayed in, and managed using the portal.
You can add portlets to any dashboard in Cisco Prime LMS.
This section explains:
• Adding Portlets
• Understanding Portlet Icons
• Launching Portlets
• Configuring Portlets
• Changing the Title of a Portlet
Adding PortletsYou can add a portlet to any dashboard in LMS. Portlets in LMS are grouped into two categories, Cisco Prime and Miscellaneous portlets.
• Cisco Prime portlets are function-based dashboard portlets that show information specific to network performance, monitoring, reporting, messages, device status, faults, alerts, inventory, and syslogs.
• Other Cisco Prime portlets are portlets used for adding external links, frequently used links, and remote server portlets. See Adding Frequently Used Links Portlet, Adding External Links Portlet, and Adding Portlets From the Remote Server for more information.
• Miscellaneous portlets are portlets used for viewing information that are not specific to LMS data. See Adding RSS Portlet and Adding IFrame Portlet for more information.
You can view the latest updates on Cisco Prime products using Cisco Prime Product Updates portlet.
To add a portlet:
Step 1 Click the Add Portlet icon at the top right corner of the Cisco Prime LMS page.
The Add portlet pop-up window appears.
• To expand the sections displayed, select the expand icon next to the section title.
• To collapse the sections displayed, select the collapse icon next to the section title.
Each section in this window contains a list of portlets.
Step 2 Click Add next to the name of a portlet.
The portlet is added to the selected Dashboard.
3-17Getting Started with Cisco Prime LAN Management Solution 4.2
OL-25954-01
Chapter 3 Understanding the Cisco Prime LMS Interface Adding and Configuring Portlets
Step 3 Repeat this step as many times as necessary.
• If the portlet is multi-instance (allows you to add the same portlets more than once) the portlet name will continue to appear in the list. For multi-instance portlets two boxes are displayed against the name of the portlet.
For example, the RSS or IFrame portlets are multi-instance portlets. You can add these portlets as many times to any view.
• If the portlet is single-instance, a single box is displayed against the name of the portlet. You can add this portlet only once to the View.
For example, if you want to view the Change Audit portlet, it displays only the audit details. Hence it is a single-instance portlet.
• If the portlet is already displayed in the particular view, the portlet name will be disabled.
You can also arrange the portlets in Cisco Prime LMS using the Change Layout option.
For more information on changing the layout, see Changing the Portal Layout.
Step 4 Click Close to close the pop-up window
Adding Frequently Used Links Portlet
The Frequently Used Links portlet allows you to add the most commonly used links.
You can also add, modify, and remove the frequently accessed links. For details, see Adding a New Link to the Frequently Used Links Portlet.
To add the Frequently Used Links portlet:
Step 1 Click the Add Portlet icon at the top right corner of the Cisco Prime LMS page.
A pop-up window appears. Each section in this window contains a list of portlets.
You can expand and collapse the sections by clicking the arrows next to the section titles.
Step 2 Click Cisco Prime and select Others.
A list of portlet names appears.
Step 3 Click Add next to the Frequently Used Links portlet.
The Frequently Used Links portlet is displayed in the dashboard.
Step 4 Click Close to close the pop-up window.
3-18Getting Started with Cisco Prime LAN Management Solution 4.2
OL-25954-01
Chapter 3 Understanding the Cisco Prime LMS Interface Adding and Configuring Portlets
Step 5 Move the mouse over the Frequently Used Links portlet to view the icons.
Step 6 Click the Configuration icon.
The default link names in the Frequently Used Links portlet are displayed. These are:
• Local User Setup
• Add Device
• Log File Status
• Process Status
To add a new link to the Frequently Used portlet, see Adding a New Link to the Frequently Used Links Portlet.
Note Select the check box against the names to view the default links in the Frequently Used Links portlet.
Adding a New Link to the Frequently Used Links Portlet.
To add a new link:
Step 1 Click the configuration icon in the Frequently Used Links portlet.
The list of default link names is displayed in the portlet.
Step 2 Enter the new name in the Device Name field.
Step 3 Enter the URL in the URL field.
For example, http://servername:port/rme/workcenter/identity/configRadius.jsp?navid=Identity_Configure_Radius
You can also use the relative path of the URL by removing http://servername:port from the URL
For example, /rme/workcenter/identity/configRadius.jsp?navid=Identity_Configure_Radius.
You must also add the navid along with the URL. In the above instance, the navid is Identity_Configure_Radius.
Step 4 Click Add to add the new link name.
The newly added link is added to the configuration screen and appears in bold.
Step 5 Click Save to save the new link and the name changes from bold to plain.
Or
Click Reset to clear all the newly added link names.
Note The link name changes from bold to plain only after it is saved.
Step 6 Select the check box against the newly added link name.
Click Save to save all the changes.
3-19Getting Started with Cisco Prime LAN Management Solution 4.2
OL-25954-01
Chapter 3 Understanding the Cisco Prime LMS Interface Adding and Configuring Portlets
Editing and Deleting Link Names
You can edit and delete link names:
• Click the Edit button corresponding to the link to modify the link name.
• Click the Delete button corresponding to the link name to remove the link.
To re-arrange the links, click on the link name, drag it to the position of your choice, and drop it.
Adding External Links Portlet
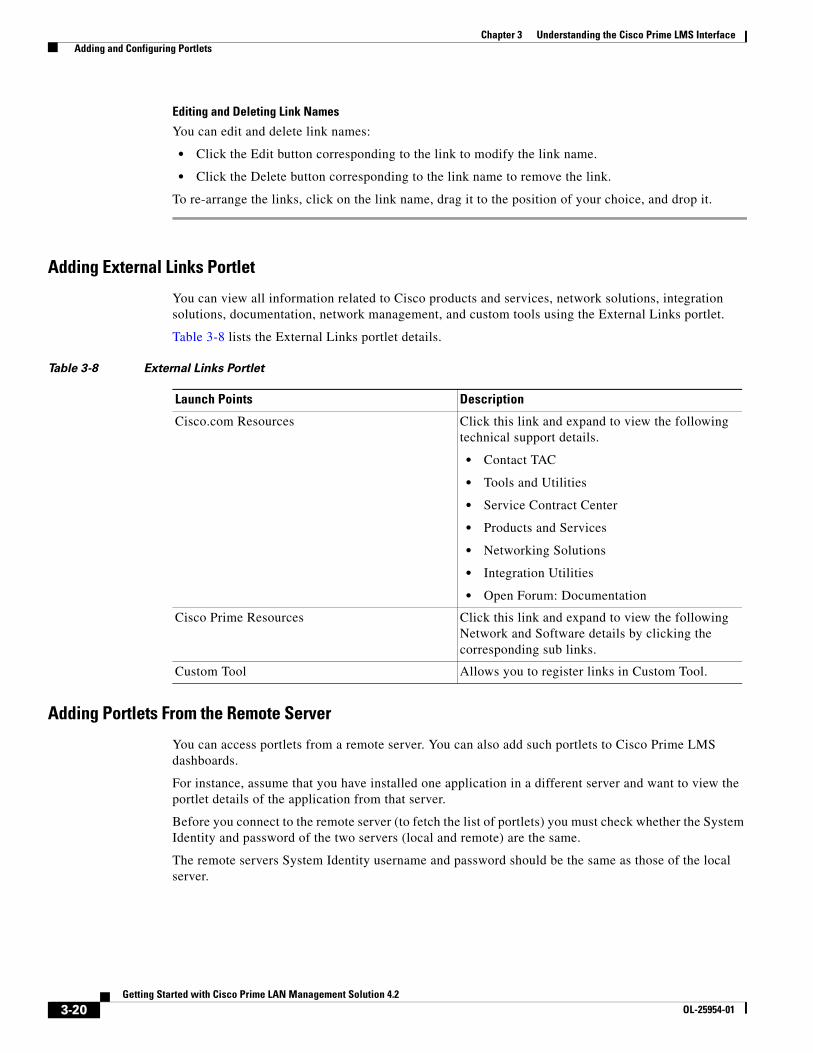
You can view all information related to Cisco products and services, network solutions, integration solutions, documentation, network management, and custom tools using the External Links portlet.
Table 3-8 lists the External Links portlet details.
Adding Portlets From the Remote Server
You can access portlets from a remote server. You can also add such portlets to Cisco Prime LMS dashboards.
For instance, assume that you have installed one application in a different server and want to view the portlet details of the application from that server.
Before you connect to the remote server (to fetch the list of portlets) you must check whether the System Identity and password of the two servers (local and remote) are the same.
The remote servers System Identity username and password should be the same as those of the local server.
Table 3-8 External Links Portlet
Launch Points Description
Cisco.com Resources Click this link and expand to view the following technical support details.
• Contact TAC
• Tools and Utilities
• Service Contract Center
• Products and Services
• Networking Solutions
• Integration Utilities
• Open Forum: Documentation
Cisco Prime Resources Click this link and expand to view the following Network and Software details by clicking the corresponding sub links.
Custom Tool Allows you to register links in Custom Tool.
3-20Getting Started with Cisco Prime LAN Management Solution 4.2
OL-25954-01
Chapter 3 Understanding the Cisco Prime LMS Interface Adding and Configuring Portlets
If the remote server is in the HTTPS mode (SSL mode), the remote server certificate should be imported.
Note You cannot access LMS 4.2 portlets from a remote server that has LMS 3.2, or earlier installed.
To add portlets from a remote server:
Step 1 Click the Add Portlet icon at the top right corner of the Cisco Prime LMS page.
A pop-up window appears. Each section in this window contains a list of portlets.
You can expand and collapse the sections by clicking the arrows next to the section titles.
Step 2 Click Cisco Prime and select Others.
A list of portlet names appear.
Step 3 Click Add next to the Remote portlet that you wish to add.
The Remote portlet is displayed in Cisco Prime LMS Portal.
Step 4 Click the Configuration icon.
Step 5 To fetch the portlet from the remote server, enter a server name in the Server field, and click Fetch.
This fetches the portlet from a remote server.
Step 6 Select the portlet from the Portlet drop-down list.
Step 7 Click Save to view the portlet with the configured settings.
In remote portlets, you cannot view any pop-ups when you mouse hover the columns.
Adding RSS Portlet
Really Simple Syndication (RSS) is an XML-based format used to distribute Web content (such as news headlines). RSS allows web content publishers to create and disseminate the most current news headlines and URLs.
You can configure RSS in the Cisco Prime LMS application. You can create, add, modify any URL in the RSS portlet and view the details. You can also change the content and the title while configuring the RSS portlet.
To add the RSS portlet:
Step 1 Click the Add Portlet icon at the top right corner of the Cisco Prime LMS page.
A pop-up window appears. Each section in this window contains a list of portlets.
You can expand and collapse the sections by clicking the arrows next to the section titles.
Step 2 Click Miscellaneous.
The RSS portlet appears along with other portlets.
3-21Getting Started with Cisco Prime LAN Management Solution 4.2
OL-25954-01
Chapter 3 Understanding the Cisco Prime LMS Interface Adding and Configuring Portlets
Step 3 Click Add next to the RSS portlet.
The RSS portlet is displayed in Cisco Prime LMS Portal.
Step 4 Click Close to close the pop-up window.
To configure RSS portlet, see Configuring RSS.
Configuring RSS
To configure RSS portlet:
Step 1 Go to Cisco Prime LMS page and add RSS portlet. For more information, see Adding RSS Portlet.
Step 2 Move the mouse over the title bar of the RSS portlet.
Step 3 Click the Configuration icon and do the following:
a. Enter one URL on each line.
b. Select the number of URLs to be displayed in the RSS portlet from the # of Items Per Channel drop-down list.
For instance, if you have entered ten URLs in RSS portlet and if you want to view only two URLs, you can select 2 from the # of Items Per Channel drop-down list.
Step 4 Click Save to view the portlet with the configured settings.
Adding IFrame Portlet
Intra Frame (IFrame) portlet enables you to open new or multiple pages inside the same browser window. You can change the content, title and the size of the IFrame portlet.
If you browse or check your mail regularly, you can have a portlet exclusively for this purpose. To do this you need to configure the URLs or websites within the IFrame portlet. You can also change the title, customize the URL, and the width and height of the portlet.
To add an IFrame portlet:
Step 1 Click the Add Portlet icon at the top right corner of the Cisco Prime LMS page.
A pop-up window appears. Each section in this window contains a list of portlets.
You can expand and collapse these sections by clicking the arrows next to the section titles.
Step 2 Click Miscellaneous.
The IFrame portlet name appears along with other portlets.
Step 3 Click Add next to the IFrame portlet name.
The IFrame portlet is displayed in Cisco Prime LMS Portal.
Step 4 Click Close to close the pop-up window.
To configure the IFrame portlet, see Configuring IFrame Portlet.
.
3-22Getting Started with Cisco Prime LAN Management Solution 4.2
OL-25954-01
Chapter 3 Understanding the Cisco Prime LMS Interface Adding and Configuring Portlets
Configuring IFrame Portlet
To configure the IFrame portlet:
Step 1 Go to the IFrame portlet and click the Configuration icon
The Setup tab is displayed. Do the following:
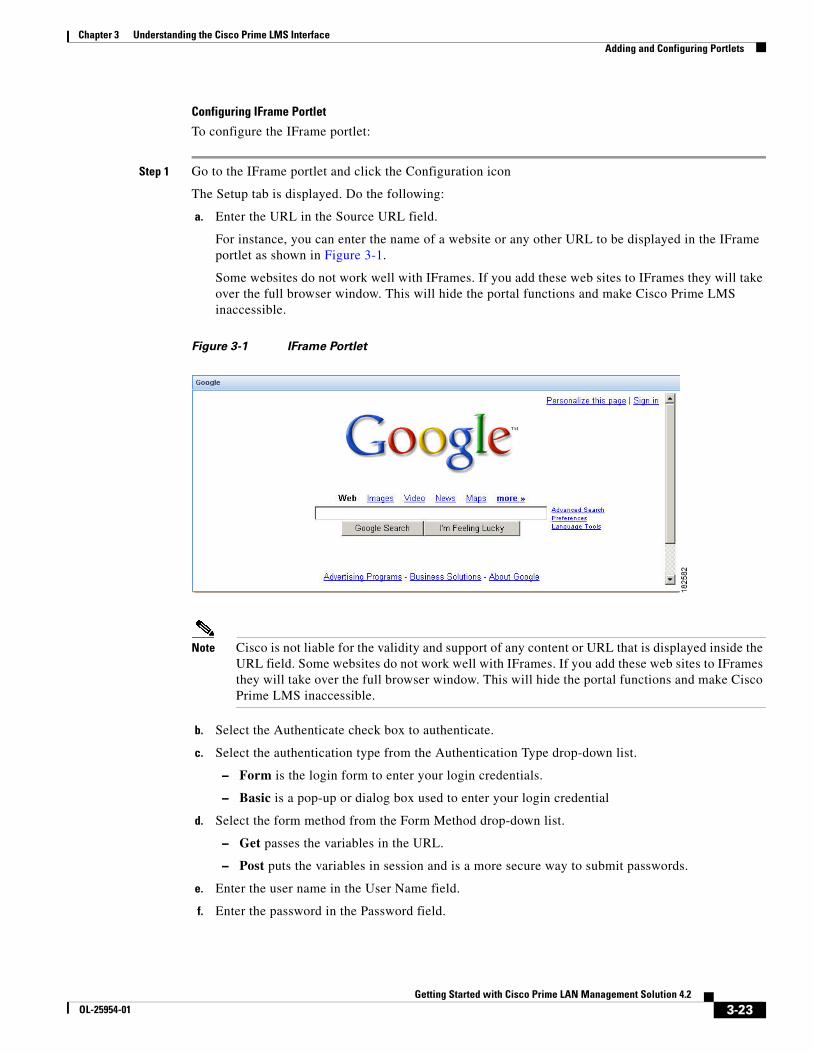
a. Enter the URL in the Source URL field.
For instance, you can enter the name of a website or any other URL to be displayed in the IFrame portlet as shown in Figure 3-1.
Some websites do not work well with IFrames. If you add these web sites to IFrames they will take over the full browser window. This will hide the portal functions and make Cisco Prime LMS inaccessible.
Figure 3-1 IFrame Portlet
Note Cisco is not liable for the validity and support of any content or URL that is displayed inside the URL field. Some websites do not work well with IFrames. If you add these web sites to IFrames they will take over the full browser window. This will hide the portal functions and make Cisco Prime LMS inaccessible.
b. Select the Authenticate check box to authenticate.
c. Select the authentication type from the Authentication Type drop-down list.
– Form is the login form to enter your login credentials.
– Basic is a pop-up or dialog box used to enter your login credential
d. Select the form method from the Form Method drop-down list.
– Get passes the variables in the URL.
– Post puts the variables in session and is a more secure way to submit passwords.
e. Enter the user name in the User Name field.
f. Enter the password in the Password field.
3-23Getting Started with Cisco Prime LAN Management Solution 4.2
OL-25954-01
Chapter 3 Understanding the Cisco Prime LMS Interface Adding and Configuring Portlets
g. Enter the hidden variables in the Hidden Variable field.
If you would like to view a URL and that page requires some variables to be initialized, you can set these variables using the Hidden Variables option. You can enter the hidden variables you want to pass from one form to another without re-typing the information.
h. Enter the HTML attributes in the HTML Attributes field.
The HTML attributes enable you to increase or decrease the frame border, height, space and width of a portlet. For instance, the normal height of a portlet is 300. If you want to increase the height you can enter the variables, accordingly.
i. Click Save to save these settings.
Step 2 Click Save to save all of the settings.
If you encounter any problem after entering and saving the URL in the IFrame portlet follow this Recovery procedure:
Step 1 Click the URL http://servername:portno/cwportal/c/portal/RemoveIframe.
Step 2 Click the Remove Iframe Portlets button.
The IFrame portlet gets deleted.
Now you can create new IFrame portlets.
Cisco Prime Product Updates
You can view the recent updates and announcements of Cisco Prime products using Cisco Prime Product Updates.
Understanding Portlet IconsPortlets are the basic user interface components that are managed and displayed in LMS dashboards. Each portlet contains six icons at the top right corner of the portlet.
The portlet icons appear only when you move the mouse over the top right corner of each portlet.
The icons that appear in a portlet are shown in Table 3-9.
Move the mouse over each icon to view the names of the corresponding icons.
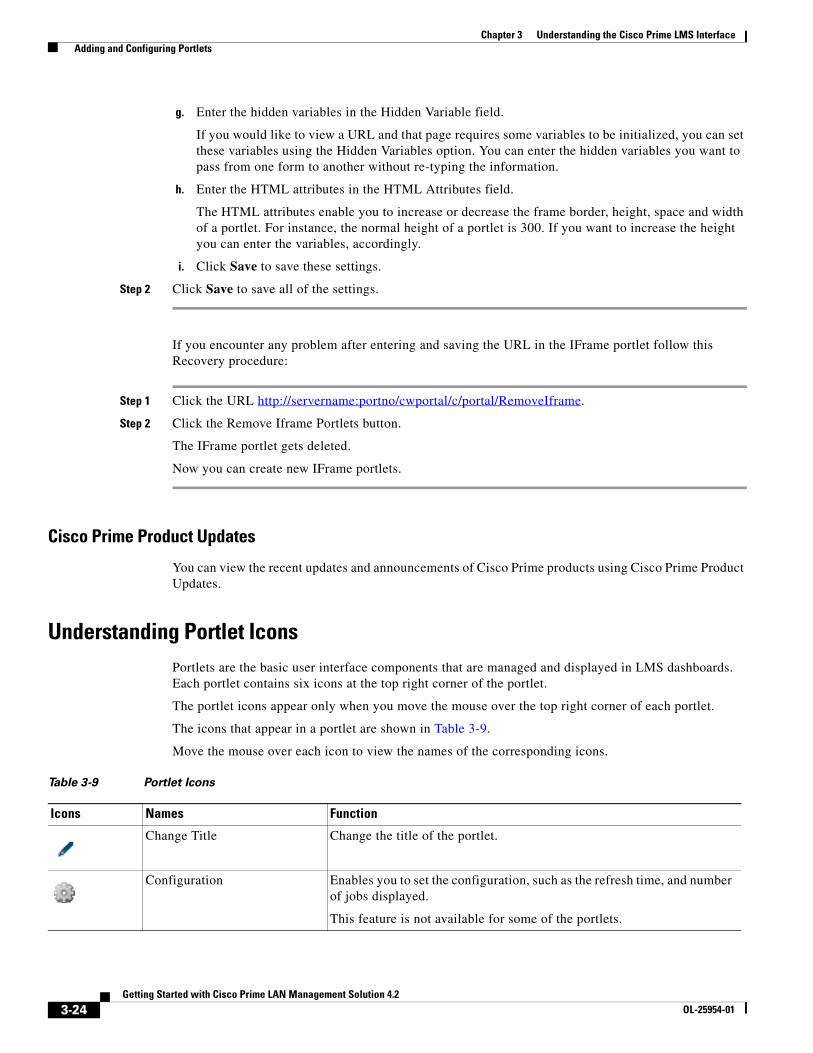
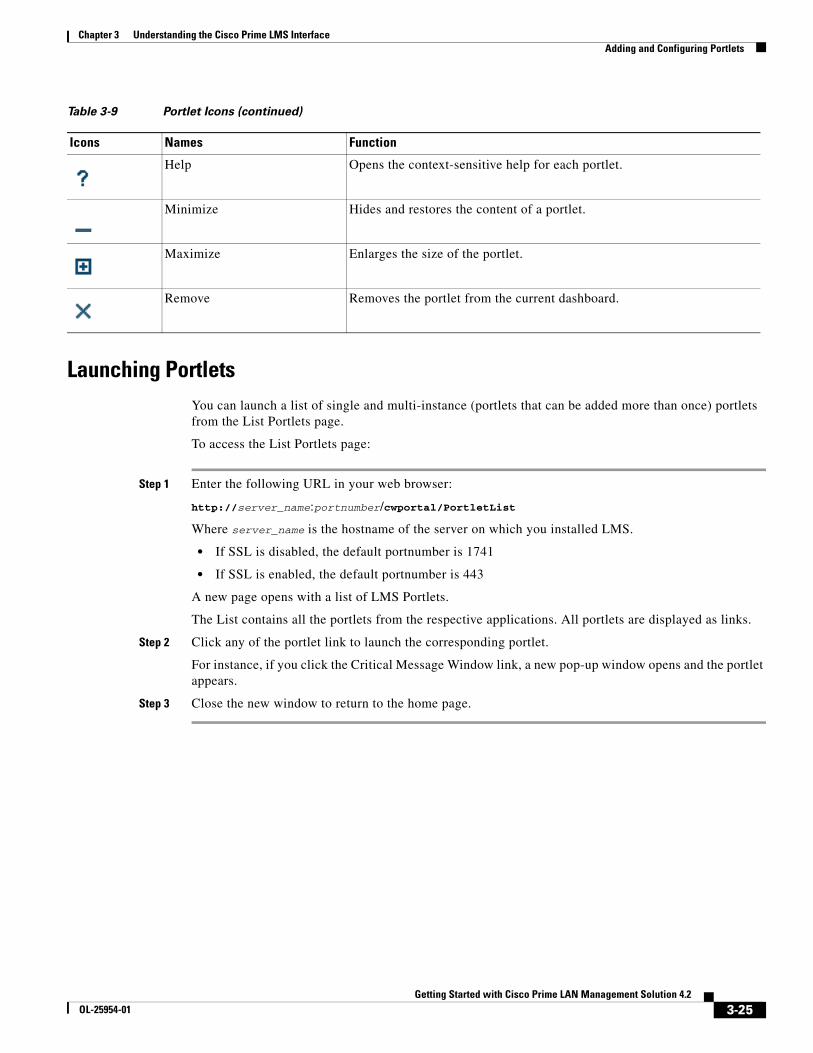
Table 3-9 Portlet Icons
Icons Names Function
Change Title Change the title of the portlet.
Configuration Enables you to set the configuration, such as the refresh time, and number of jobs displayed.
This feature is not available for some of the portlets.
3-24Getting Started with Cisco Prime LAN Management Solution 4.2
OL-25954-01
Chapter 3 Understanding the Cisco Prime LMS Interface Adding and Configuring Portlets
Launching PortletsYou can launch a list of single and multi-instance (portlets that can be added more than once) portlets from the List Portlets page.
To access the List Portlets page:
Step 1 Enter the following URL in your web browser:
http://server_name:portnumber/cwportal/PortletList
Where server_name is the hostname of the server on which you installed LMS.
• If SSL is disabled, the default portnumber is 1741
• If SSL is enabled, the default portnumber is 443
A new page opens with a list of LMS Portlets.
The List contains all the portlets from the respective applications. All portlets are displayed as links.
Step 2 Click any of the portlet link to launch the corresponding portlet.
For instance, if you click the Critical Message Window link, a new pop-up window opens and the portlet appears.
Step 3 Close the new window to return to the home page.
Help Opens the context-sensitive help for each portlet.
Minimize Hides and restores the content of a portlet.
Maximize Enlarges the size of the portlet.
Remove Removes the portlet from the current dashboard.
Table 3-9 Portlet Icons (continued)
Icons Names Function
3-25Getting Started with Cisco Prime LAN Management Solution 4.2
OL-25954-01
Chapter 3 Understanding the Cisco Prime LMS Interface Adding and Configuring Portlets
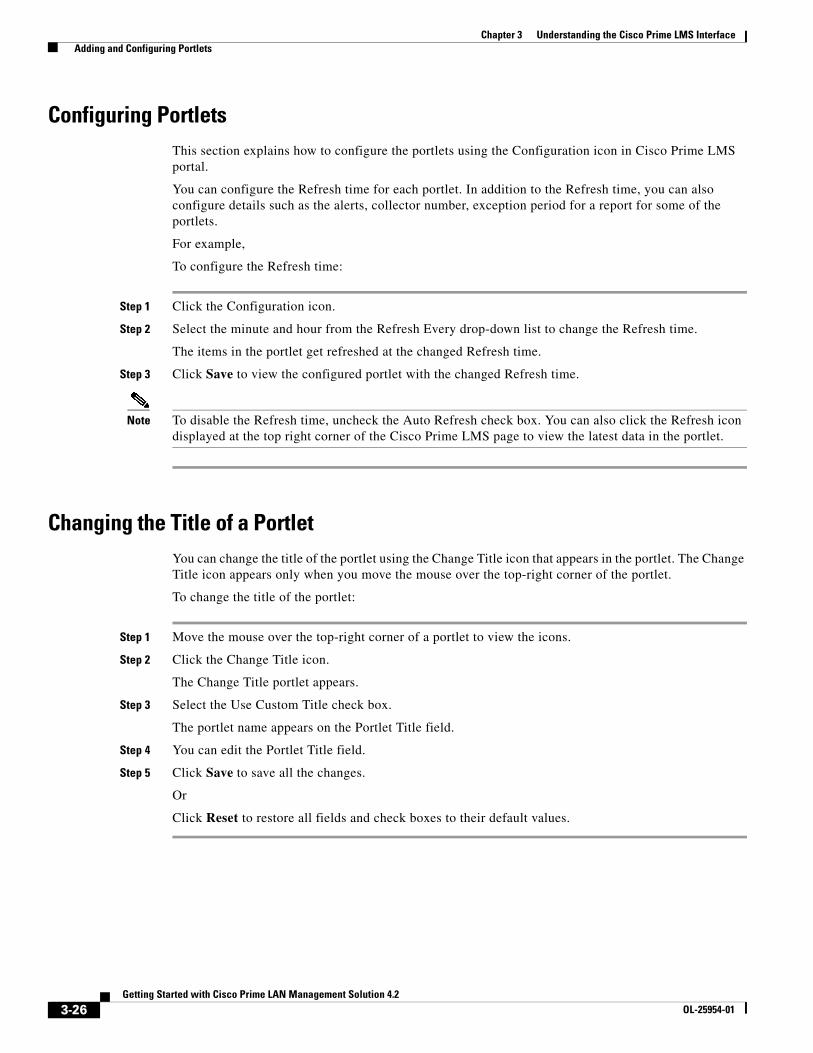
Configuring PortletsThis section explains how to configure the portlets using the Configuration icon in Cisco Prime LMS portal.
You can configure the Refresh time for each portlet. In addition to the Refresh time, you can also configure details such as the alerts, collector number, exception period for a report for some of the portlets.
For example,
To configure the Refresh time:
Step 1 Click the Configuration icon.
Step 2 Select the minute and hour from the Refresh Every drop-down list to change the Refresh time.
The items in the portlet get refreshed at the changed Refresh time.
Step 3 Click Save to view the configured portlet with the changed Refresh time.
Note To disable the Refresh time, uncheck the Auto Refresh check box. You can also click the Refresh icon displayed at the top right corner of the Cisco Prime LMS page to view the latest data in the portlet.
Changing the Title of a PortletYou can change the title of the portlet using the Change Title icon that appears in the portlet. The Change Title icon appears only when you move the mouse over the top-right corner of the portlet.
To change the title of the portlet:
Step 1 Move the mouse over the top-right corner of a portlet to view the icons.
Step 2 Click the Change Title icon.
The Change Title portlet appears.
Step 3 Select the Use Custom Title check box.
The portlet name appears on the Portlet Title field.
Step 4 You can edit the Portlet Title field.
Step 5 Click Save to save all the changes.
Or
Click Reset to restore all fields and check boxes to their default values.
3-26Getting Started with Cisco Prime LAN Management Solution 4.2
OL-25954-01

Chapter 3 Understanding the Cisco Prime LMS Interface Changing the Portal Layout
Changing the Portal LayoutYou can organize the portlets into various columnar layouts as required.
You can display the rows and columns in different layouts using the Change Layout icon displayed at the top right corner of the Cisco Prime LMS page.
To change the columnar layout of portlets:
Step 1 Click the Change Layout icon at the top right corner of the Cisco Prime LMS page.
A pop-up window appears.
Step 2 Select a layout option from the Layout window and click Save.
Step 3 Click the Close button to close the pop-up window.
Table 3-10 lists the details of the column layouts.
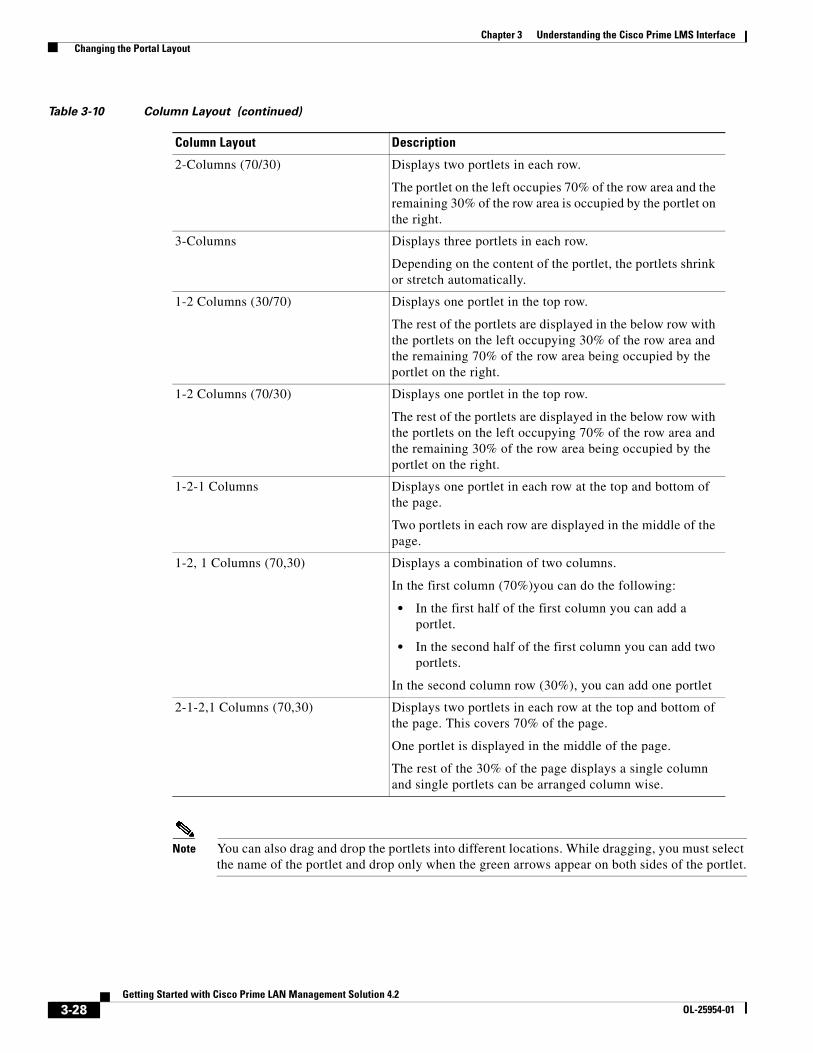
Table 3-10 Column Layout
Column Layout Description
1-Column Displays one portlet in each row. Each portlet occupies the entire width of a row.
2-Columns (50/50) Displays two portlets in each row. Each portlet occupies 50% of the row area.
2-Columns (30/70) Displays two portlets in each row.
The portlet on the left occupies 30% of the row area and the remaining 70% of the row area is occupied by the portlet on the right.
3-27Getting Started with Cisco Prime LAN Management Solution 4.2
OL-25954-01
Chapter 3 Understanding the Cisco Prime LMS Interface Changing the Portal Layout
Note You can also drag and drop the portlets into different locations. While dragging, you must select the name of the portlet and drop only when the green arrows appear on both sides of the portlet.
2-Columns (70/30) Displays two portlets in each row.
The portlet on the left occupies 70% of the row area and the remaining 30% of the row area is occupied by the portlet on the right.
3-Columns Displays three portlets in each row.
Depending on the content of the portlet, the portlets shrink or stretch automatically.
1-2 Columns (30/70) Displays one portlet in the top row.
The rest of the portlets are displayed in the below row with the portlets on the left occupying 30% of the row area and the remaining 70% of the row area being occupied by the portlet on the right.
1-2 Columns (70/30) Displays one portlet in the top row.
The rest of the portlets are displayed in the below row with the portlets on the left occupying 70% of the row area and the remaining 30% of the row area being occupied by the portlet on the right.
1-2-1 Columns Displays one portlet in each row at the top and bottom of the page.
Two portlets in each row are displayed in the middle of the page.
1-2, 1 Columns (70,30) Displays a combination of two columns.
In the first column (70%)you can do the following:
• In the first half of the first column you can add a portlet.
• In the second half of the first column you can add two portlets.
In the second column row (30%), you can add one portlet
2-1-2,1 Columns (70,30) Displays two portlets in each row at the top and bottom of the page. This covers 70% of the page.
One portlet is displayed in the middle of the page.
The rest of the 30% of the page displays a single column and single portlets can be arranged column wise.
Table 3-10 Column Layout (continued)
Column Layout Description
3-28Getting Started with Cisco Prime LAN Management Solution 4.2
OL-25954-01
Chapter 3 Understanding the Cisco Prime LMS Interface Adding and Configuring Dashboards
Adding and Configuring DashboardsYou can perform the following operations:
• Add Dashboards (see Add Dashboards)
• Set Dashboard Types (see Set Dashboard Types)
• Hide Dashboards (see Hide Dashboards)
• Copy Dashboards (see Copy Dashboard Contents to a New Dashboard)
• Delete Dashboards (see Delete Dashboards)
• Set Default Dashboards (see Set Default Dashboard)
Add DashboardsThis section explains the procedure for adding a new dashboard for the following dashboard types:
• My Dashboard—User-defined dashboards accessible only to the user who created them
• Public Dashboard—User-defined dashboards accessible to all users
• Default Dashboard—Default dashboards accessible to all users
To add a new dashboard:
Step 1 Select Manage Dashboards.
The Dashboard Settings page appears.
Step 2 Select the LMS (or username) root node from the tree.
Step 3 Enter a name for the dashboard in the Name field.
Step 4 Click Add Dashboard.
A new dashboard is created. A new dashboard with the name you entered appears under the corresponding dashboard type.
3-29Getting Started with Cisco Prime LAN Management Solution 4.2
OL-25954-01
Chapter 3 Understanding the Cisco Prime LMS Interface Adding and Configuring Dashboards
Set Dashboard TypesYou can add dashboards based on the types such as Portlet, URL and Embedded.
To select the dashboard type as portlet:
Step 1 Select Manage Dashboards.
The Dashboard Settings page appears.
Step 2 Select the LMS (or username) root node from the tree.
a. Select New-Dashboard.
b. Enter the name of the dashboard in the Name field.
c. Select the dashboard type as Portlet from the Type drop-down list.
d. Click Add Dashboard.
The new dashboard of the type Portlet gets added.
To select the dashboard type as Embedded:
Step 1 Select Manage Dashboards.
The Dashboard Settings page appears.
Step 2 Select the LMS root node from the tree.
a. Select New-Dashboard.
b. Enter the name of the dashboard in the Name field.
c. Select the dashboard type as Embedded from the Type drop-down list.
d. Click Add Dashboard.
The dashboard is added and appears in the tree.
Step 3 Click the embedded dashboard from the tree.
Step 4 Enter the URL and click Save.
The URL gets embedded within the dashboard.
Note The URL must be either http or https type.
3-30Getting Started with Cisco Prime LAN Management Solution 4.2
OL-25954-01
Chapter 3 Understanding the Cisco Prime LMS Interface Adding and Configuring Dashboards
To select the dashboard type as a URL:
Step 1 Select Manage Dashboards.
The Dashboard Settings page appears.
Step 2 Select the LMS root node from the tree.
a. Select New-Dashboard.
b. Enter the name of the dashboard in the Name field
c. Select the dashboard type as URL from the Type drop-down list.
A URL field appears.
d. Enter the URL in the URL field.
e. Click Add Dashboard.
The URL is saved in the view.
Hide DashboardsLMS allows you to hide the user-defined dashboards from the menu list.
To hide an existing user-defined dashboard:
Step 1 Select Manage Dashboards.
The Dashboard Settings page appears.
Step 2 Select the user-defined dashboard you want to hide from the tree.
The selected dashboard name appears in the Name field.
Step 3 Select Hidden check box to enable this feature.
Step 4 Click Add Dashboard.
The user-defined dashboard is saved with hide settings and the link to the dashboard will be removed from the My Menu list.
3-31Getting Started with Cisco Prime LAN Management Solution 4.2
OL-25954-01
Chapter 3 Understanding the Cisco Prime LMS Interface Adding and Configuring Dashboards
Copy Dashboard Contents to a New DashboardYou can copy an existing dashboard. This allows you to create a new dashboard with the attributes of the original dashboard. However, you must name each dashboard with a unique name. You can modify the attributes of the new dashboard, as required.
To copy a dashboard:
Step 1 Select Manage Dashboards.
The Dashboard Settings page appears.
Step 2 Select the dashboard you want to copy to, from the tree.
The selected dashboard name appears in the Name field.
Step 3 Select the dashboard you want to copy from the Copy Dashboard drop-down list.
When you copy an existing dashboard to a new dashboard, it will overwrite the contents of the previous dashboard.
For example, if you copy all the contents of a Configuration dashboard to Monitoring dashboard, the Monitoring dashboard contents will be overwritten by Configuration dashboard.
Step 4 Click Save to save the changes.
3-32Getting Started with Cisco Prime LAN Management Solution 4.2
OL-25954-01
Chapter 3 Understanding the Cisco Prime LMS Interface Adding and Configuring Dashboards
Delete DashboardsYou can delete only user-defined dashboards. For instance, you create a dashboard and add contents into it as required and later delete it.
Note You cannot delete system-defined dashboards.
The Default Dashboards (system-defined) are available by default with the application. These are Configuration, Device Status, Inventory, Monitoring, System, EnergyWise, and TrustSec.
To delete a dashboard:
Step 1 Select Manage Dashboards.
The Dashboard Settings page appears.
Step 2 Select the dashboard you want to delete from the tree.
The selected dashboard name appears in the Name field.
Step 3 Click Delete to delete the dashboard.
A message appears prompting you to confirm your decision.
Step 4 Click OK to confirm.
A message appears confirming that the dashboard has been deleted. The dashboard is permanently deleted after you click the Update button.
You can also delete dashboards by selecting the dashboards from The Set the display order of dashboards list box and click Delete (icon). See Set Default Dashboard for more information.
Deleting a Child Dashboard
You can delete a newly created Child dashboard.
To delete a Child dashboard:
Step 1 Select Manage Dashboards.
The Dashboard Settings page appears.
Step 2 Select the LMS dashboard node from the tree.
Step 3 Click Children.
The name of the Child dashboards appear.
Step 4 Select the Child dashboard to be deleted and click Delete.
A warning appears that the selected dashboard will be deleted when you click Update to apply the changes.
The Child dashboard is permanently deleted after you click Update.
3-33Getting Started with Cisco Prime LAN Management Solution 4.2
OL-25954-01
Chapter 3 Understanding the Cisco Prime LMS Interface Understanding the Search Bar
Set Default DashboardYou can set a dashboard to be shown by default whenever you login to LMS. This is done by reordering the dashboard list in My Menu using the Manage Dashboards option. The default dashboard can be viewed by all users.
Note The default dashboard setup is applicable only for Public and Default Dashboards.
To set a default dashboard:
Step 1 Select Manage Dashboards.
The Dashboard Settings page appears.
Step 2 Select the dashboard node from the tree.
Step 3 Click Display Order.
The Set the display order of dashboards list box appears, displaying the list of dashboards.
Step 4 Select a dashboard from the list, and click Up Arrow or Down Arrow button to rearrange the dashboard.
Step 5 Click Update to apply the settings.
The dashboard that appears first in the list is set as the default dashboard. This dashboard is shown by default whenever you login to LMS.
Understanding the Search BarCisco Prime LMS comes with a new search bar that can be accessed from across all pages. Using the new improved search, you can perform simple keyword and object-based search and the results are displayed in a pop-up window.
To perform a search:
Step 1 Select one of the following object types from drop-down list:
• Device—Search for devices by entering one of the device attributes as the search input.
You can perform an attribute-based search for devices by using the pattern:
<device attribute>=<value>. For example: managementip=10.77.108.21
Note There should be no blank space between the attribute type and the delimiter in the Global Search text box.
The supported device attributes are:
– displayname
– managementip
– deviceid
3-34Getting Started with Cisco Prime LAN Management Solution 4.2
OL-25954-01
Chapter 3 Understanding the Cisco Prime LMS Interface Understanding the Search Bar
Note For the deviceid search attribute, you must give the exact value and search results will appear for the exact match. For example, If deviceid=12, you will get the search results of device having the device id as 12.
– sysobjectid
– category
– series
– model
– hostname
For example, 10.77.108.21 or hostname of the device.
You can also use the wildcard character (*). For example, you can use 10.77.* to view all the devices starting with the IP address 10.77.
• Jobs—Search for jobs by entering one of the job attributes as the search input.
You can perform an attribute-based search for jobs by using the pattern: <job attribute>=<value>.
For example: Jobid=1026
Note There should be no blank space between the attribute type and the delimiter in the Global Search text box.
The supported job attributes are:
– jobid
– description
– jobtype
– owner
For example, 1016, or 1026
You can also use the wildcard character (*). For example, you can use 100*, or system* to view all jobs starting with 100, or system.
• End Hosts—Search for end hosts by entering one of the endhost attributes as the search input.
In LMS 4.0.1, you can search endpoints configured with various location attributes by using the pattern:
<end host attribute>=<value>, example: city=Chicago, or macaddress=01-36-6a-d7-02-05.
Note There should be no blank space between the attribute type and the delimiter in the Global Search text box.
The supported endhost attributes are:
– macaddress
– ipaddress
– hostname
– username
3-35Getting Started with Cisco Prime LAN Management Solution 4.2
OL-25954-01
Chapter 3 Understanding the Cisco Prime LMS Interface Understanding the Search Bar
– devicename
– vlanid
– device
– state
– county
– city
– citydivision
– neighborhood
– streetgroup
– leadingstreetdirection
– trailingstreetdirection
– streetsuffix
– house
– streetnumber
– landmark
– additionalloc
– name
– zipcode
– building
– unit
– floor
– room
– place
– postalcommunityname
– postofficebox
– additionalcode
– seat
– primaryroad
– roadsection
– roadbranch
– roadsubbranch
– streetnamepremod
– streetnamepostmod
– countrycode
For example,01-36-6a-d7-02-05, 10.77.209.209, 10.77.209.209 or admin
You can also use the wildcard character (*). For example, you can use 01-36-6a-d7-02-* to view all the devices starting with the MAC address 01-36-6a-d7-02-
3-36Getting Started with Cisco Prime LAN Management Solution 4.2
OL-25954-01
Chapter 3 Understanding the Cisco Prime LMS Interface Understanding the Search Bar
• Help—Search for help topics by entering the help text as the search input. For example, deploying templates.
• Tasks—Search for a task by entering the task name as the search input. For example, Troubleshooting or EnergyWise.
You cannot use wildcard character (*) for searching tasks.
Step 2 Enter the search input and click the continue icon.
A pop-up window appears, showing the first 20 results.
If there are more than 20 results, then a hyperlink (for example, Showing first 20 results of 300 records) shown in the pop-up window takes you to a global search results page the next 500 records.
Note The search results for Help object are shown in a separate pop-up window.
See Understanding Global Search Results Page for more information.
Understanding Global Search Results PageThe Global Search results page shows a maximum of 500 search records for a search object. See Understanding the Search Bar for more information.
Table 3-11 describes the Global Search results page for Device search.
Table 3-12 describes the Global Search results page for Task search.
Table 3-13 describes the Global Search results page for Jobs search.
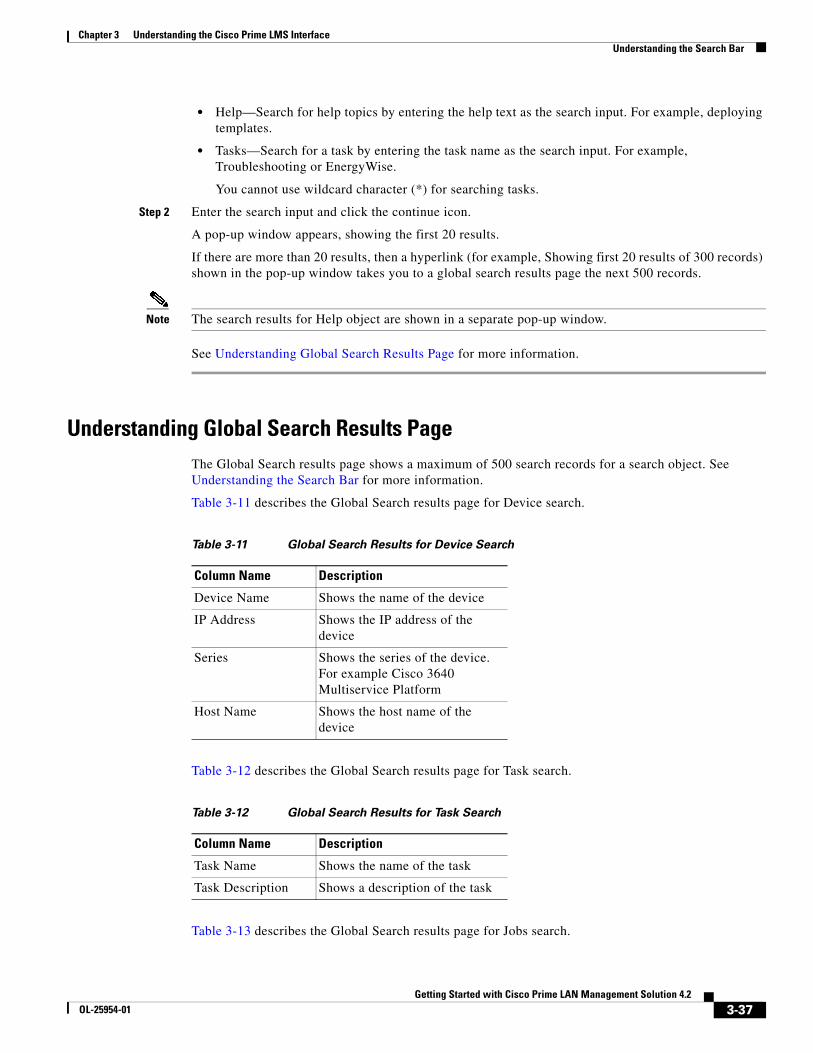
Table 3-11 Global Search Results for Device Search
Column Name Description
Device Name Shows the name of the device
IP Address Shows the IP address of the device
Series Shows the series of the device. For example Cisco 3640 Multiservice Platform
Host Name Shows the host name of the device
Table 3-12 Global Search Results for Task Search
Column Name Description
Task Name Shows the name of the task
Task Description Shows a description of the task
3-37Getting Started with Cisco Prime LAN Management Solution 4.2
OL-25954-01
Chapter 3 Understanding the Cisco Prime LMS Interface Understanding the Fault Bar
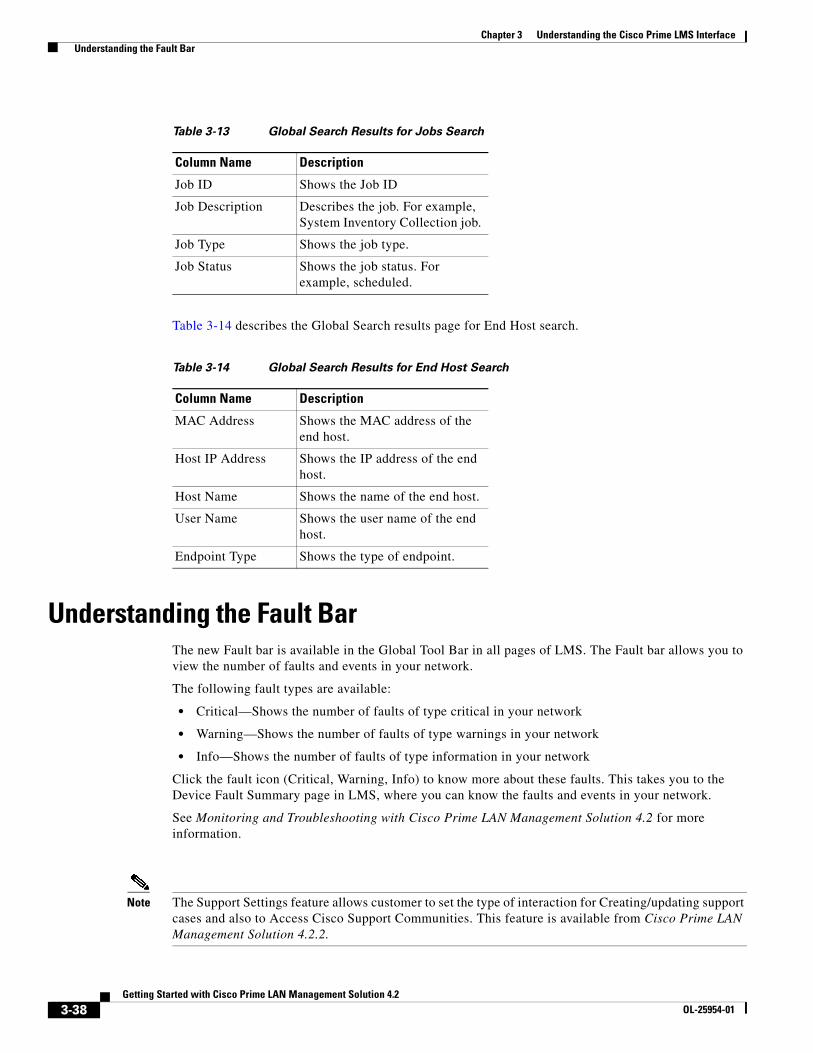
Table 3-14 describes the Global Search results page for End Host search.
Understanding the Fault BarThe new Fault bar is available in the Global Tool Bar in all pages of LMS. The Fault bar allows you to view the number of faults and events in your network.
The following fault types are available:
• Critical—Shows the number of faults of type critical in your network
• Warning—Shows the number of faults of type warnings in your network
• Info—Shows the number of faults of type information in your network
Click the fault icon (Critical, Warning, Info) to know more about these faults. This takes you to the Device Fault Summary page in LMS, where you can know the faults and events in your network.
See Monitoring and Troubleshooting with Cisco Prime LAN Management Solution 4.2 for more information.
Note The Support Settings feature allows customer to set the type of interaction for Creating/updating support cases and also to Access Cisco Support Communities. This feature is available from Cisco Prime LAN Management Solution 4.2.2.
Table 3-13 Global Search Results for Jobs Search
Column Name Description
Job ID Shows the Job ID
Job Description Describes the job. For example, System Inventory Collection job.
Job Type Shows the job type.
Job Status Shows the job status. For example, scheduled.
Table 3-14 Global Search Results for End Host Search
Column Name Description
MAC Address Shows the MAC address of the end host.
Host IP Address Shows the IP address of the end host.
Host Name Shows the name of the end host.
User Name Shows the user name of the end host.
Endpoint Type Shows the type of endpoint.
3-38Getting Started with Cisco Prime LAN Management Solution 4.2
OL-25954-01
Chapter 3 Understanding the Cisco Prime LMS Interface Understanding the Technical Assistance Center (TAC) Service Requests Pane
Understanding the Technical Assistance Center (TAC) Service Requests Pane
The TAC Service Request list is one of the services provided by the Smart Interactions in LMS. The other two services are Opening a TAC Service Request and Accessing the Cisco Support Communities.
The TAC Service Request tool allows you to create online Cisco Technical Assistance Center (TAC) service requests for support issues covered under the terms of your Cisco support contracts.
Once you create a TAC service request, you will receive notifications. So ensure that you configure the SMTP server before you create a TAC service request.
To configure SMTP server, go to Admin > System > System Preferences. The maximum file size of the attachment can be 20MB.
The TAC Service Request Query Tool allows you to view the history and status of your existing or historical service requests and update the status of your open service requests.
The new TAC panel lists all active and closed TAC cases created by you. Clicking the TAC Service Requests bar lists a brief summary of all the TAC cases.
You can update an existing TAC request by selecting the respective request and clicking Update tab. A new widget opens and allows you to add more information and attachments to the selected TAC request.
Each case number is a link which opens a new browser page to show the TAC request details.
The columns in the TAC request table are:
• Case Number
• Contract Number
• Severity
• Title
• Date Created
• Last Updated On
• Cisco Owner
• Status
• Party
The TAC requests table is sorted on the date by default. It can be sorted on any of the columns. You can use the Filter and Advanced Filter options to filter the TAC cases.
Note The table displays the message “No data available” if there are no relevant TAC requests and the Update tab will be disabled.
3-39Getting Started with Cisco Prime LAN Management Solution 4.2
OL-25954-01
Chapter 3 Understanding the Cisco Prime LMS Interface Understanding the Technical Assistance Center (TAC) Service Requests Pane
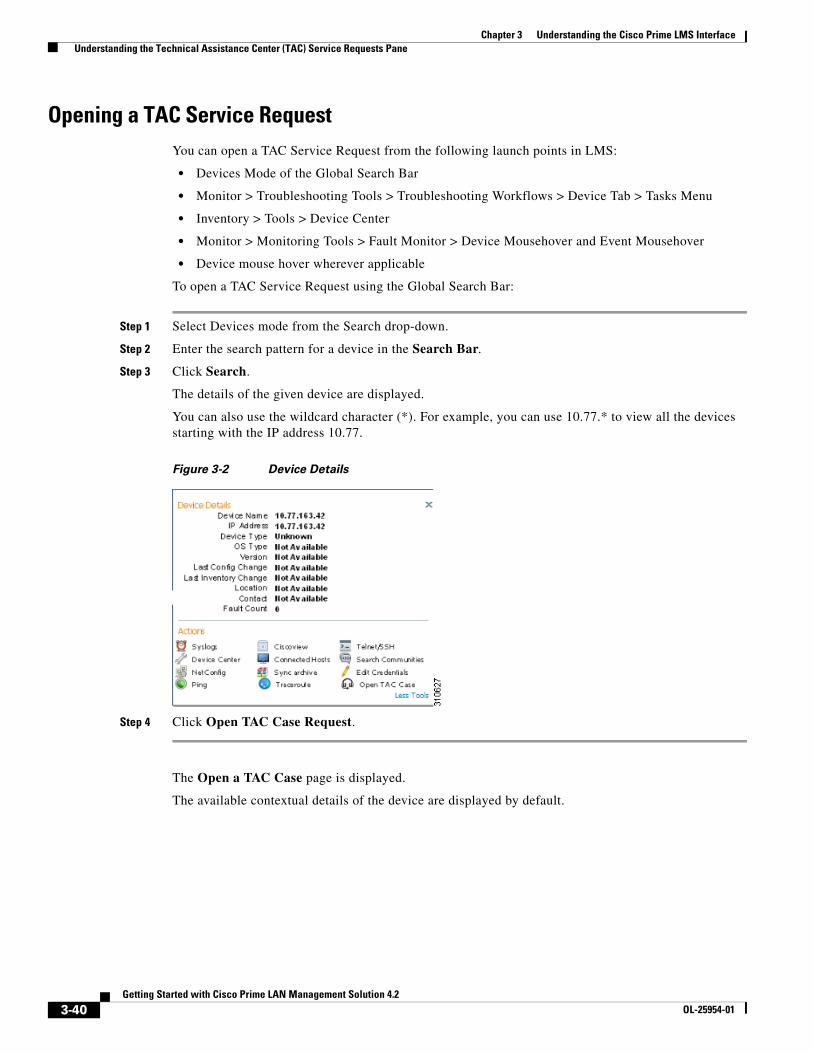
Opening a TAC Service RequestYou can open a TAC Service Request from the following launch points in LMS:
• Devices Mode of the Global Search Bar
• Monitor > Troubleshooting Tools > Troubleshooting Workflows > Device Tab > Tasks Menu
• Inventory > Tools > Device Center
• Monitor > Monitoring Tools > Fault Monitor > Device Mousehover and Event Mousehover
• Device mouse hover wherever applicable
To open a TAC Service Request using the Global Search Bar:
Step 1 Select Devices mode from the Search drop-down.
Step 2 Enter the search pattern for a device in the Search Bar.
Step 3 Click Search.
The details of the given device are displayed.
You can also use the wildcard character (*). For example, you can use 10.77.* to view all the devices starting with the IP address 10.77.
Figure 3-2 Device Details
Step 4 Click Open TAC Case Request.
The Open a TAC Case page is displayed.
The available contextual details of the device are displayed by default.
3-40Getting Started with Cisco Prime LAN Management Solution 4.2
OL-25954-01
Chapter 3 Understanding the Cisco Prime LMS Interface Understanding the Technical Assistance Center (TAC) Service Requests Pane
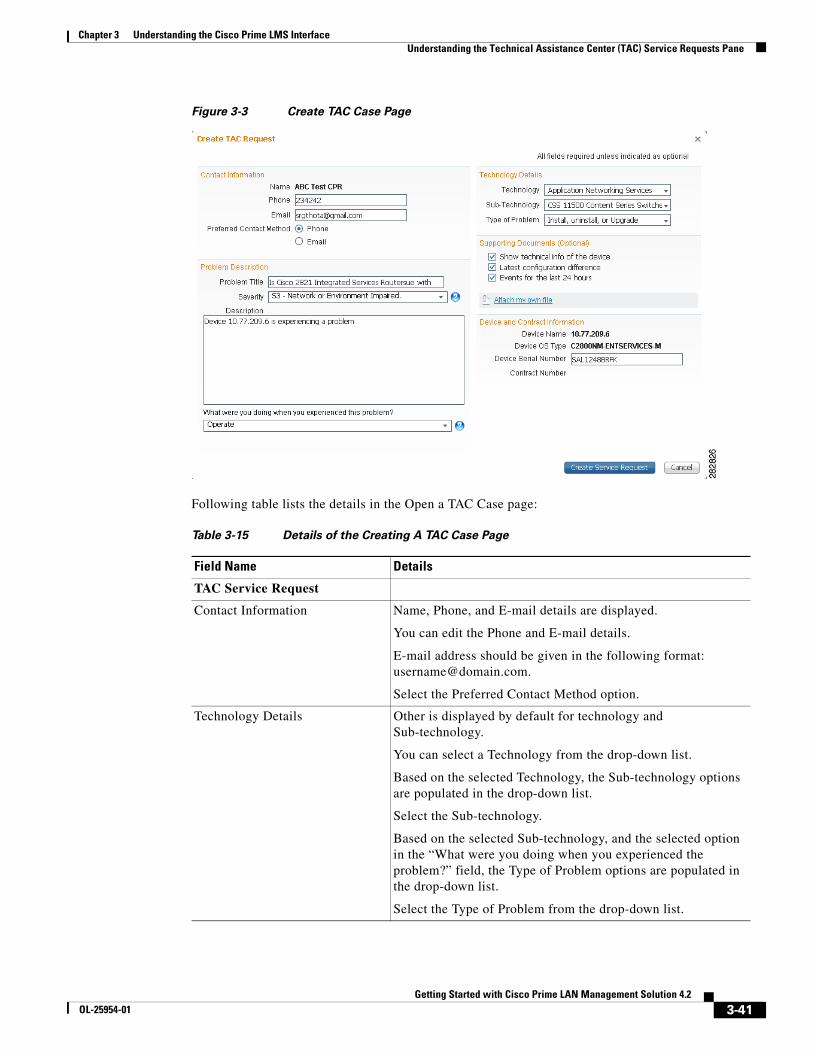
Figure 3-3 Create TAC Case Page
Following table lists the details in the Open a TAC Case page:
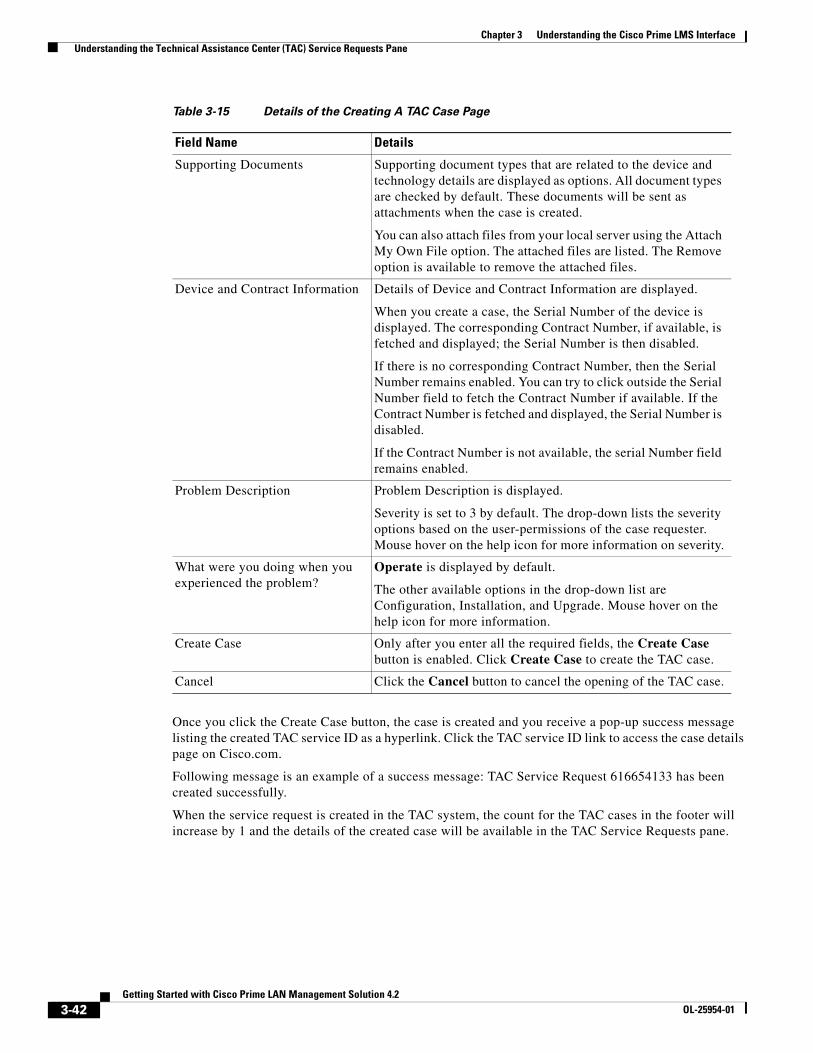
Table 3-15 Details of the Creating A TAC Case Page
Field Name Details
TAC Service Request
Contact Information Name, Phone, and E-mail details are displayed.
You can edit the Phone and E-mail details.
E-mail address should be given in the following format: [email protected].
Select the Preferred Contact Method option.
Technology Details Other is displayed by default for technology and Sub-technology.
You can select a Technology from the drop-down list.
Based on the selected Technology, the Sub-technology options are populated in the drop-down list.
Select the Sub-technology.
Based on the selected Sub-technology, and the selected option in the “What were you doing when you experienced the problem?” field, the Type of Problem options are populated in the drop-down list.
Select the Type of Problem from the drop-down list.
3-41Getting Started with Cisco Prime LAN Management Solution 4.2
OL-25954-01
Chapter 3 Understanding the Cisco Prime LMS Interface Understanding the Technical Assistance Center (TAC) Service Requests Pane
Once you click the Create Case button, the case is created and you receive a pop-up success message listing the created TAC service ID as a hyperlink. Click the TAC service ID link to access the case details page on Cisco.com.
Following message is an example of a success message: TAC Service Request 616654133 has been created successfully.
When the service request is created in the TAC system, the count for the TAC cases in the footer will increase by 1 and the details of the created case will be available in the TAC Service Requests pane.
Supporting Documents Supporting document types that are related to the device and technology details are displayed as options. All document types are checked by default. These documents will be sent as attachments when the case is created.
You can also attach files from your local server using the Attach My Own File option. The attached files are listed. The Remove option is available to remove the attached files.
Device and Contract Information Details of Device and Contract Information are displayed.
When you create a case, the Serial Number of the device is displayed. The corresponding Contract Number, if available, is fetched and displayed; the Serial Number is then disabled.
If there is no corresponding Contract Number, then the Serial Number remains enabled. You can try to click outside the Serial Number field to fetch the Contract Number if available. If the Contract Number is fetched and displayed, the Serial Number is disabled.
If the Contract Number is not available, the serial Number field remains enabled.
Problem Description Problem Description is displayed.
Severity is set to 3 by default. The drop-down lists the severity options based on the user-permissions of the case requester. Mouse hover on the help icon for more information on severity.
What were you doing when you experienced the problem?
Operate is displayed by default.
The other available options in the drop-down list are Configuration, Installation, and Upgrade. Mouse hover on the help icon for more information.
Create Case Only after you enter all the required fields, the Create Case button is enabled. Click Create Case to create the TAC case.
Cancel Click the Cancel button to cancel the opening of the TAC case.
Table 3-15 Details of the Creating A TAC Case Page
Field Name Details
3-42Getting Started with Cisco Prime LAN Management Solution 4.2
OL-25954-01
Chapter 3 Understanding the Cisco Prime LMS Interface Understanding the Technical Assistance Center (TAC) Service Requests Pane
Accessing the Cisco Support CommunitiesThe Cisco Support Communities page lists the links of the cisco forums and posts related to the key words of the device type.
You can access the search for the Cisco Support Communities from the following launch points in LMS:
• Devices Mode of the Global Search Bar
• Monitor > Troubleshooting Tools > Troubleshooting Workflows > Device Tab > Tasks Menu
• Inventory > Tools > Device Center
• Monitor > Monitoring Tools > Fault Monitor > Device Mousehover and Event Mousehover
• All Device mouse hover where ever applicable
To access the search for the Cisco Support Communities using the Global Search Bar:
Step 1 Select Devices mode from the Search drop-down.
Step 2 Enter the search pattern for a device in the Search Bar.
Step 3 Click Search.
The details of the given device are displayed.
You can also use the wildcard character (*). For example, you can use 10.77.* to view all the devices starting with the IP address 10.77.
Step 4 Click Search Communities. See Figure 3-2
The Cisco Support Communities page is displayed. The randomly selected relevant posts related to the device type are listed. If you need more relevant posts, either refine the search or go to Cisco Support Community at: https://supportforums.cisco.com/index.jspa
Each listed post contains the following details: username of the owner of the post, title of the post, when was the post last updated, groupname under which the post was posted, and the number of replies for the post in brackets.
3-43Getting Started with Cisco Prime LAN Management Solution 4.2
OL-25954-01

Chapter 3 Understanding the Cisco Prime LMS Interface Understanding the Technical Assistance Center (TAC) Service Requests Pane
Figure 3-4 Cisco Support Communities Page
Step 5 Use Filter by Time option to filter the displayed posts.
The available time options in the drop-down list are Anytime, Past Day, Past Week, Past Month, and Past Year. The list is filtered based on the last updated time.
Step 6 Click the username of the post to see the profile of the owner of the post.
Step 7 Click Join the Discussion to join the respective discussion.
Step 8 Click Post a New Question to post a question to the Cisco Support Community forum. You can also click Visit the Cisco Support Community link to visit the community page.
Step 9 Click Close to close the page.
3-44Getting Started with Cisco Prime LAN Management Solution 4.2
OL-25954-01
Chapter 3 Understanding the Cisco Prime LMS Interface Adding Links to Favorites
Adding Links to FavoritesLMS allows you to add the frequently used task links (URL link) as favorites.
To add links to favorites:
Step 1 Go to Cisco Prime LMS page.
Step 2 Click the favorite icon from the toolbar.
The Add to favorites pop-up menu appears, displaying the list of links added to favorites.
Step 3 Click Add Favorite from the pop-up menu to add the current page URL to the favorites list.
The Add to favorites dialog box appears, displaying the current page name and the URL link.
Step 4 Click Add to bookmark the current page to favorites list.
Navigating Legacy MenuYou can perform LMS functions by using the legacy LMS 3.x navigation menus.
To access the legacy navigation path:
Step 1 Go to Cisco Prime LMS page.
Step 2 Click the legacy icon from the toolbar.
The legacy menu appears displaying LMS 3.x links to access LMS features.
See Navigation Guide for Cisco Prime LAN Management Solution 4.2 for more information.
Using Online HelpThe Online help provides procedural and conceptual information for the functions in LMS. The Online help also contains:
• A search engine—Allows you to search the topics in Online help, based on keywords.
• An index—Contains typical network tasks.
• A dropin list—Contains functional help modules.
• View PDF—View the user guide in PDF format.
• A glossary.
To access Online help, click the Help link on the top-right corner.
3-45Getting Started with Cisco Prime LAN Management Solution 4.2
OL-25954-01

Chapter 3 Understanding the Cisco Prime LMS Interface Using Online Help
This opens a window that displays help contents. From this window, you can access help for device packages and for the following LMS functions:
• Getting Started
• Monitor
• Inventory
• Configuration
• Reports
• Admin
• Work Centers
To view the help for a functional module (For example, Configuration), use the dropin list on the left and select the specific functional module help.
3-46Getting Started with Cisco Prime LAN Management Solution 4.2
OL-25954-01