Embed Size (px)
Citation preview
AdministrOL-25947-01
C H A P T E R 2
Setting up SecurityLMS 4.2 provides security mechanisms that help to prevent unauthenticated access to LMS server, LMS applications, and data. LMS provides features for managing security while operating in single-server and multi-server modes.
You can specify the user authentication mode using the Authentication Mode Setup.
This chapter explains the following:
• Managing Security in Single-Server Mode
• Managing Security in Multi-Server Mode
• Setting up the Authentication Mode
• Managing Roles
• Managing Cisco.com Connection
• Support Settings
Managing Security in Single-Server ModeYou can configure the following in Single-Server mode:
• Browser-Server Security Mode Setup: LMS 4.2 Server uses Secure Socket Layer encryption to provide secure access between the client browser and management server and also among the management server and the devices. You can enable or disable SSL depending on your need to use secure access between the client browser and management server.
• Local User Policy Setup: Set up username and password policies for local users using this option.
• Local User Setup: Edit user settings, add users and assign roles, modify your profile and delete a user, or view a user’s settings using this option.
• Self Signed Certificate Setup: Create self-signed certificates that can enable SSL connections between the client browser and the management server.
You can set up browser-server security, add and modify users, and create self signed certificate using the features that come under Single-Server Management in the Security Settings user interface.
The Single-Server Management page displays the mode of server security and the information on self signed certificate.
2-1ation of Cisco Prime LAN Management Solution 4.2

Chapter 2 Setting up Security Managing Security in Single-Server Mode
To open the Single-Server Management page:
Step 1 Select Admin > Trust Management > Local Server
The Browser-Server Security Mode Setup page appears.
Step 2 Click Single-Server Management in TOC.
The Single-Server Management page displays the mode of server security and the information on self signed certificate.
This section contains the following:
• Setting up Browser-Server Security
• Setting up Local User Policy
• Setting up Local Users
• Creating Self Signed Certificates
Setting up Browser-Server SecurityLMS provides secure access between the client browser and management server. It does this using SSL (Secure Socket Layer).
SSL encrypts the transmission channel between the client, and server. LMS provides secure access between the client browser, and management server.
SSL is an application-level protocol that enables secure transactions of data through privacy, authentication, and data integrity. It relies upon certificates, public keys, and private keys.
You can enable SSL if you want to open the LMS application in secure mode. If you want to open the LMS application in non-secure mode (http), you can disable SSL. The login pages always open in SSL mode, irrespective of the Browser-Server security mode.
LMS Server uses certificates for authenticating secure access between the client browser and the management server. To enable SSL from the client browser, you must have the necessary security certificates on your computer. See Creating Self Signed Certificates for more information.
You can enable or disable the Browser Server Security using LMS Server GUI or Command Line Interface CLI.
This section has the following:
• Enabling Browser-Server Security From the LMS Server
• Disabling Browser-Server Security From the LMS Server
2-2Administration of Cisco Prime LAN Management Solution 4.2
OL-25947-01

Chapter 2 Setting up Security Managing Security in Single-Server Mode
Enabling Browser-Server Security From the LMS Server
To enable Browser-Server Security:
Step 1 Select Admin > Trust Management > Local Server > Browser-Server Security Mode Setup.
The Browser-Server Security Mode Setup dialog box appears.
Step 2 Select the Enable option to enable SSL.
Step 3 Click Apply.
Step 4 Log out from your Cisco Prime session and close all browser sessions.
Step 5 Restart the Daemon Manager from the LMS Server CLI:
On Windows:
a. Enter net stop crmdmgtd
b. Enter net start crmdmgtd
On Solaris/Soft Appliance:
a. Enter /etc/init.d/dmgtd stop
b. Enter /etc/init.d/dmgtd start
Step 6 Restart the browser and the Cisco Prime session.
When you restart the Cisco Prime session after enabling SSL, you must enter the URL with the following changes:
• The URL should begin with https instead of http to indicate secure connection. Cisco Prime will automatically redirect you to HTTPS mode if SSL is enabled.
• Change the port number suffix from 1741 to 443.
If you do not make the above changes, LMS Server will automatically redirect you to https mode with port number 443. The port numbers mentioned above are applicable for LMS Server running on Windows.
On Solaris/Soft Appliance, if the default port (1741) is used by another application, you can select a different port during LMS Server installation.
Disabling Browser-Server Security From the LMS Server
To disable Browser-Server Security:
Step 1 Select Admin > Trust Management > Local Server > Browser-Server Security Mode Setup.
The Browser-Server Security Mode Setup dialog box appears.
Step 2 Select the Disable option to disable SSL.
Step 3 Click Apply.
Step 4 Log out from your Cisco Prime session, and close all browser sessions.
2-3Administration of Cisco Prime LAN Management Solution 4.2
OL-25947-01

Chapter 2 Setting up Security Managing Security in Single-Server Mode
Step 5 Restart the Daemon Manager from the LMS Server CLI:
On Windows:
a. Enter net stop crmdmgtd
b. Enter net start crmdmgtd
On Solaris/Soft Appliance:
a. Enter /etc/init.d/dmgtd stop
b. Enter /etc/init.d/dmgtd start
Step 6 Restart the browser, and the Cisco Prime session.
When you restart the Cisco Prime session after disabling SSL, you must enter the URL with the following changes:
• The URL should begin with http instead of https to indicate that connection is not secure.
• Change the port number suffix from 443 to 1741.
The port numbers mentioned above are applicable for LMS Server running on Windows.
On Solaris/Soft Appliance, if the default port (1741) is used by another application, you can select a different port during LMS Server installation.
Setting up Local User PolicyYou can setup username and password policies for Local Authentication users in LMS. With the new local user policy, you can:
• Start the local username with a number
• Include special characters in local username
• Specify the length of local username
• Specify the length of local user password
• Include at least characters from lowercase, uppercase, digits and special characters in password.
The password should not be:
• Same as the username, or the username in reverse
• Have the same character repeated three times, in sequence
• A variant of the word Cisco
You can apply only one local user policy at a time.
You cannot define policies for each local user. The local user policy you set up applies to all users including the administrative users.
The local usernames that begin with numbers and contain special characters are not subject to the security limitations of authentication and authorization in LMS Servers integrated with pluggable authentication modules such as Active Directory.
2-4Administration of Cisco Prime LAN Management Solution 4.2
OL-25947-01
Chapter 2 Setting up Security Managing Security in Single-Server Mode
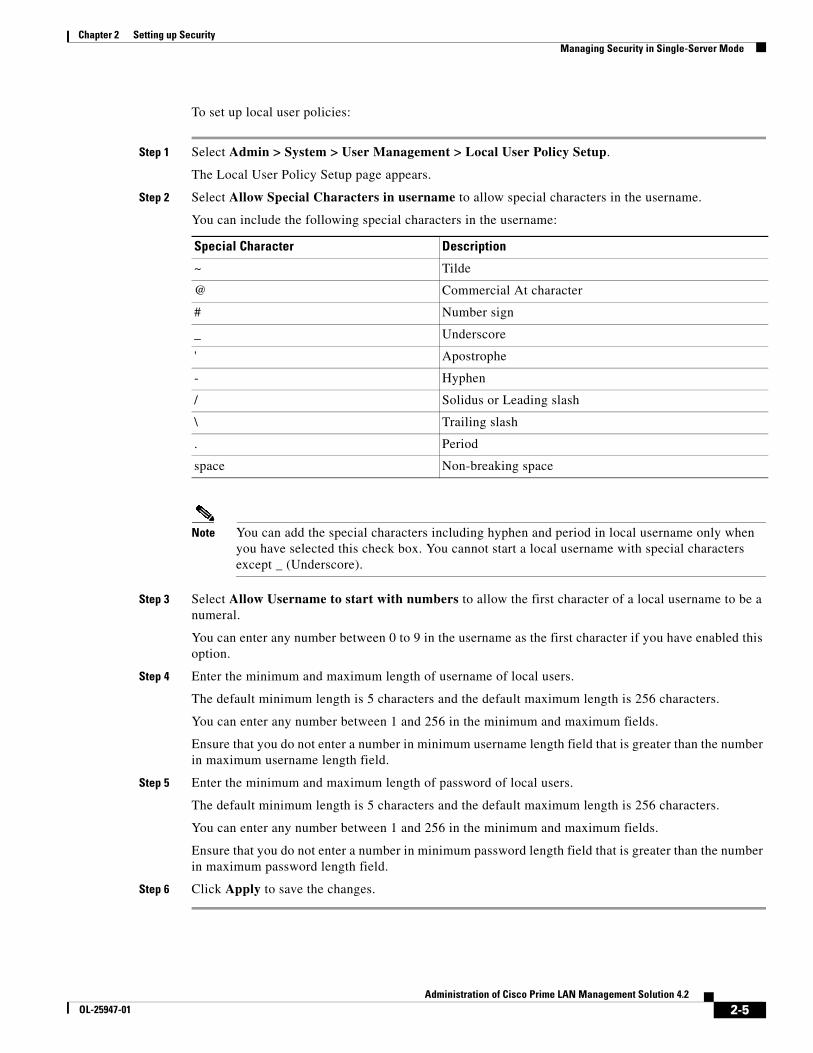
To set up local user policies:
Step 1 Select Admin > System > User Management > Local User Policy Setup.
The Local User Policy Setup page appears.
Step 2 Select Allow Special Characters in username to allow special characters in the username.
You can include the following special characters in the username:
Note You can add the special characters including hyphen and period in local username only when you have selected this check box. You cannot start a local username with special characters except _ (Underscore).
Step 3 Select Allow Username to start with numbers to allow the first character of a local username to be a numeral.
You can enter any number between 0 to 9 in the username as the first character if you have enabled this option.
Step 4 Enter the minimum and maximum length of username of local users.
The default minimum length is 5 characters and the default maximum length is 256 characters.
You can enter any number between 1 and 256 in the minimum and maximum fields.
Ensure that you do not enter a number in minimum username length field that is greater than the number in maximum username length field.
Step 5 Enter the minimum and maximum length of password of local users.
The default minimum length is 5 characters and the default maximum length is 256 characters.
You can enter any number between 1 and 256 in the minimum and maximum fields.
Ensure that you do not enter a number in minimum password length field that is greater than the number in maximum password length field.
Step 6 Click Apply to save the changes.
Special Character Description
~ Tilde
@ Commercial At character
# Number sign
_ Underscore
' Apostrophe
- Hyphen
/ Solidus or Leading slash
\ Trailing slash
. Period
space Non-breaking space
2-5Administration of Cisco Prime LAN Management Solution 4.2
OL-25947-01
Chapter 2 Setting up Security Managing Security in Single-Server Mode
Setting up Local UsersLocal User Setup feature helps you to:
• Import users
• Export users
• Modify your profile
• Add a local user
• Edit user profiles
• Delete local users
You can also set up local users and reset Cisco Prime password through CLI.
This section explains:
• About User Accounts
• Understanding Security Levels
• Importing and Exporting Local Users
• Importing Local Users Using CLI
• Importing Users From ACS
• Adding and Modifying a Local User
• Adding Local Users Using CLI
• Assigning Roles on NDG Basis
• Modifying Your Profile
About User Accounts
Several Cisco Prime network management and application management operations are potentially disruptive to the network, or to the applications themselves, and must be protected.
To prevent such operations from being used accidentally or maliciously, Cisco Prime uses a multi-level security system that allows access only to certain features, to users who can authenticate themselves at the appropriate level.
LMS provides two predefined login IDs for which the password is specified during installation:
• guest—After authentication and authorization, user will have the default role. After a fresh installation, the default role is Help Desk. You can change the default roles, see Managing Roles for more information.
• admin—This login provides the user access to all Cisco Prime tasks.
However, as an administrator, you can create additional unique login IDs for users in your company.
Note The LMS Server Administrator can set the passwords for admin and guest users during installation. Contact the LMS Server Administrator if you do not know the password for admin.
2-6Administration of Cisco Prime LAN Management Solution 4.2
OL-25947-01
Chapter 2 Setting up Security Managing Security in Single-Server Mode
Understanding Security Levels
System administrators determine user security levels when users are granted access to Cisco Prime. When users are granted logins to the Cisco Prime application, they are assigned one or more roles.
A role is a collection of privileges that dictate the type of system access you have. A privilege is a task or operation defined within the application. The set of privileges assigned to you, defines your role and dictates how much and what type of system access you have.
The user role or combination of roles, dictates the tasks that are presented to the users. For information on tasks that can be performed with each role, see Permissions Report (Reports > System > Users > Permission). See also About Cisco Prime Pluggable Authentication. Other roles are displayed, depending on your applications.
Importing and Exporting Local Users
You can import local users from the client. If you want to import local users to the local server from a remote LMS Server, you must first import the file from the remote server to the client and then use the import function from the LMS UI.
Note When you import local users, if there are no roles associated with the users, the default role will be associated with them.
You can also export the local users to an output file.
You can import local users from the client through CLI. See, Importing Local Users Using CLI for more information.
You can import local users from ACS through CLI. See, Importing Users From ACS for more information.
Before you import users from the client, you must install the peer certificate of the remote server in the local LMS Server, if the LMS Server is in HTTPS mode. See Setting up Peer Server Certificate for more information.
2-7Administration of Cisco Prime LAN Management Solution 4.2
OL-25947-01
Chapter 2 Setting up Security Managing Security in Single-Server Mode
To import users from a remote server:
Step 1 Select Admin > System > User Management > Local User Setup.
The Local User Setup page appears.
Step 2 You can do one of the following:
• Import:
– Click Import Users. You can import only files in the XML format.
– Click Browse and select a file from the client.
– Click Submit. To return to the Local User Setup page, click Cancel.
• Export:
– Select the users for whom you want to export information. If you want to select all the users, you can check the check box next to the User field.
– Click Export. The files exported are in XML format.
A message appears prompting you to open or save the LMSuserExport.xml file. This file is saved in the client. Click Cancel to return to the Local User Setup page.
Importing Local Users Using CLI
This feature allows you to import information about local users to the local server, from a remote LMS Server.
You should have the privileges to import local users from the remote LMS Server through CLI.
Before you import users from a remote server, you should install the peer certificate of the remote server in the local LMS Server, if the LMS Server is in HTTPS mode. See Setting up Peer Server Certificate for more information.
To import users from a remote server, enter the following commands:
• NMSROOT/bin/perl NMSROOT/bin/AddUserCli.pl -import Protocol Hostname Portnumber Username Password (on Solaris/Soft Appliance)
• NMSROOT\bin\perl NMSROOT\bin\AddUserCli.pl -import Protocol Hostname Portnumber Username Password (on Windows)
where,
• Protocol — Protocol of the remote LMS Server.
The supported values are HTTP or HTTPS.
• Hostname — Hostname or IP address of the remote LMS Server.
• Portnumber — Port Number of the remote LMS Server.
• Username — Remote LMS Server login Username.
• Password — Remote LMS Server login Password.
For example, enter the following command to import the local users from the remote LMS Server lmsdocpc:
NMSROOT\bin\perl NMSROOT\bin\AddUserCli.pl -import HTTP lmsdocpc 1741 admin admin
2-8Administration of Cisco Prime LAN Management Solution 4.2
OL-25947-01
Chapter 2 Setting up Security Managing Security in Single-Server Mode
Importing Users From ACS
To import users from ACS through CLI, enter the following commands:
• NMSROOT/bin/perl NMSROOT/bin/AddUserCli.pl -importFromAcs Filename Password (on Solaris/Soft Appliance)
• NMSROOT\bin\perl NMSROOT\bin\AddUserCli.pl -importFromAcs Filename Password (on Windows)
where,
• Filename — Output of executing CSUtil.exe.
• Password — Default password assigned to all the importing users.
To execute CSUtil.exe follow the steps below:
Step 1 Go to Start > Run in the ACS server.
Step 2 Enter services.msc in the Run command and click OK
It will list all the services registered.
Step 3 Select CSAuth and right click to get the Stop option.
Step 4 Click Stop to stop the CSAuth service
Step 5 Execute the command <ACS install directory>/bin/CSUtil.exe -q -d <output file> from CLI.
The output file which we got by running the CSUtil.exe should be given as the input while importing users.
Log Files
The information on the users added or imported into the LMS Server is stored in the following files, when you use the import local user CLI commands:
• /var/adm/CSCOpx/log/AddUser.log (on Solaris/Soft Appliance)
• NMSROOT\log\AddUser.log (on Windows)
The AddUser.log file registers the information on the number of users added or imported into LMS Server, number of duplicate users, error messages, and other information that you can use for troubleshooting.
Adding and Modifying a Local User
You can add more users into Cisco Prime as required.
You can add only one user at a time through the user interface. See Adding Local Users Using CLI for adding bulk users. You can delete Stale Users From Cisco Prime LMS Portal. See Deleting Stale Users From LMS Portal for more details.
To add or edit a user:
Step 1 Select Admin > System > User Management > Local User Setup.
The Local User Setup page appears.
Step 2 Click Add or Edit.
2-9Administration of Cisco Prime LAN Management Solution 4.2
OL-25947-01
Chapter 2 Setting up Security Managing Security in Single-Server Mode
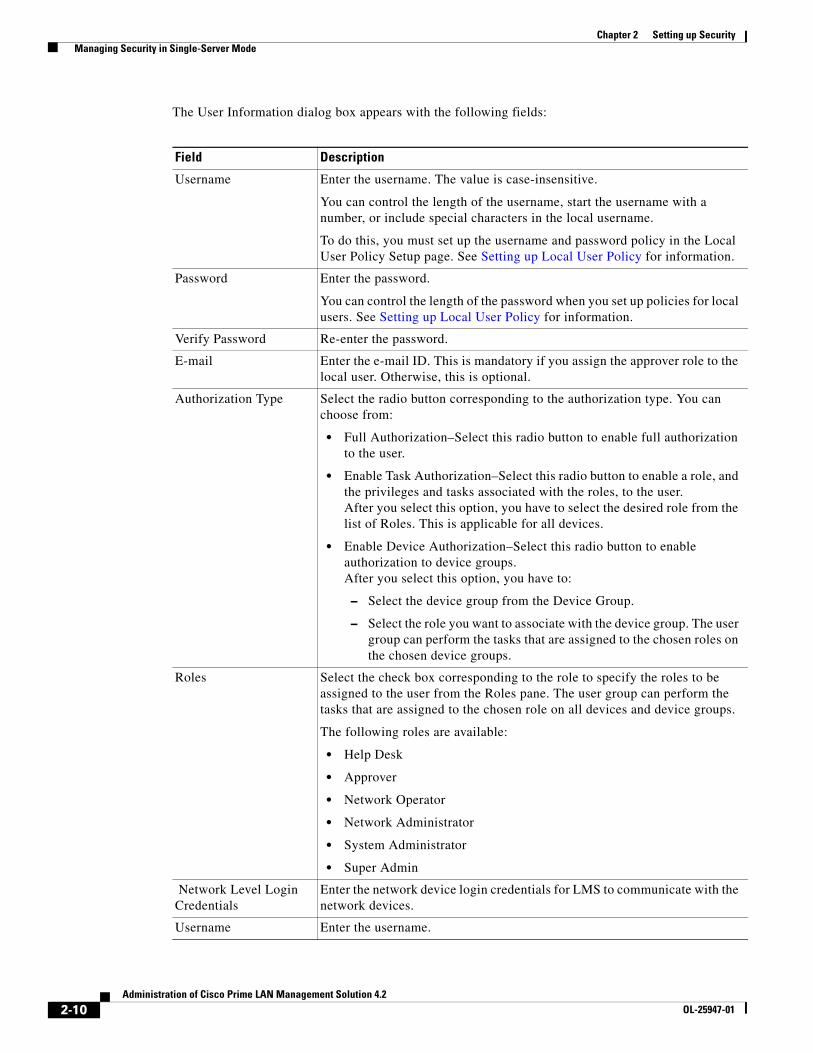
The User Information dialog box appears with the following fields:
Field Description
Username Enter the username. The value is case-insensitive.
You can control the length of the username, start the username with a number, or include special characters in the local username.
To do this, you must set up the username and password policy in the Local User Policy Setup page. See Setting up Local User Policy for information.
Password Enter the password.
You can control the length of the password when you set up policies for local users. See Setting up Local User Policy for information.
Verify Password Re-enter the password.
E-mail Enter the e-mail ID. This is mandatory if you assign the approver role to the local user. Otherwise, this is optional.
Authorization Type Select the radio button corresponding to the authorization type. You can choose from:
• Full Authorization–Select this radio button to enable full authorization to the user.
• Enable Task Authorization–Select this radio button to enable a role, and the privileges and tasks associated with the roles, to the user.After you select this option, you have to select the desired role from the list of Roles. This is applicable for all devices.
• Enable Device Authorization–Select this radio button to enable authorization to device groups.After you select this option, you have to:
– Select the device group from the Device Group.
– Select the role you want to associate with the device group. The user group can perform the tasks that are assigned to the chosen roles on the chosen device groups.
Roles Select the check box corresponding to the role to specify the roles to be assigned to the user from the Roles pane. The user group can perform the tasks that are assigned to the chosen role on all devices and device groups.
The following roles are available:
• Help Desk
• Approver
• Network Operator
• Network Administrator
• System Administrator
• Super Admin
Network Level Login Credentials
Enter the network device login credentials for LMS to communicate with the network devices.
Username Enter the username.
2-10Administration of Cisco Prime LAN Management Solution 4.2
OL-25947-01
Chapter 2 Setting up Security Managing Security in Single-Server Mode
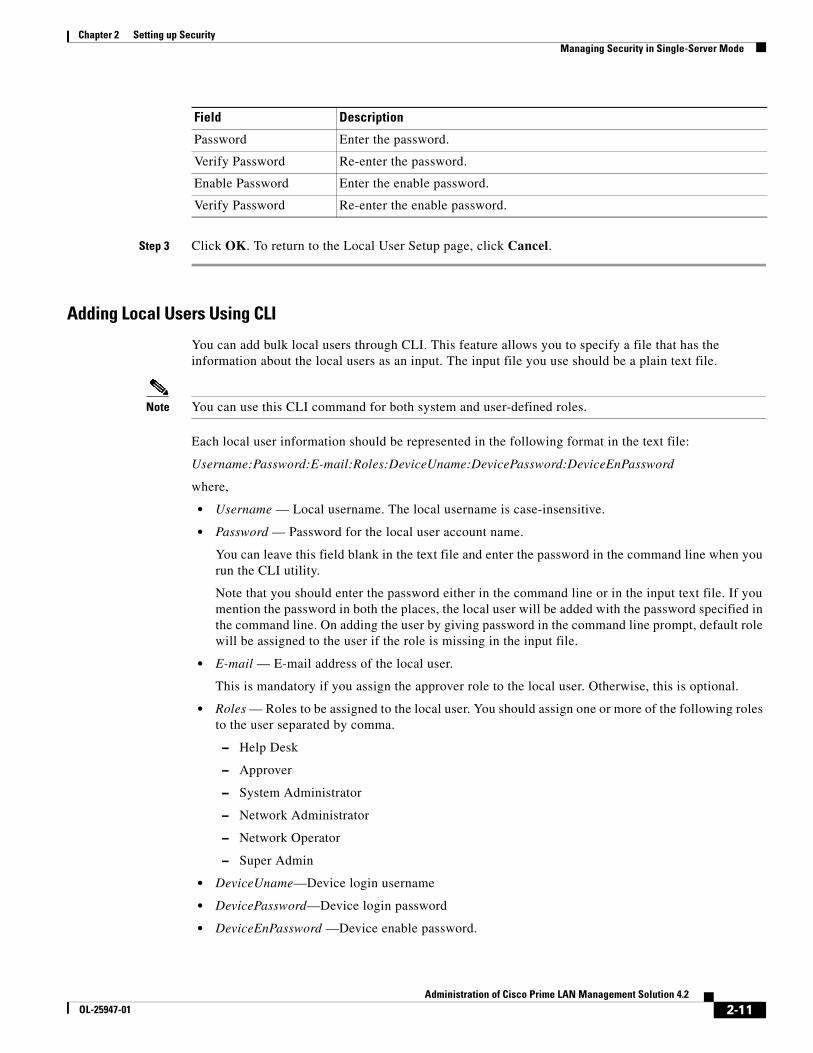
Step 3 Click OK. To return to the Local User Setup page, click Cancel.
Adding Local Users Using CLI
You can add bulk local users through CLI. This feature allows you to specify a file that has the information about the local users as an input. The input file you use should be a plain text file.
Note You can use this CLI command for both system and user-defined roles.
Each local user information should be represented in the following format in the text file:
Username:Password:E-mail:Roles:DeviceUname:DevicePassword:DeviceEnPassword
where,
• Username — Local username. The local username is case-insensitive.
• Password — Password for the local user account name.
You can leave this field blank in the text file and enter the password in the command line when you run the CLI utility.
Note that you should enter the password either in the command line or in the input text file. If you mention the password in both the places, the local user will be added with the password specified in the command line. On adding the user by giving password in the command line prompt, default role will be assigned to the user if the role is missing in the input file.
• E-mail — E-mail address of the local user.
This is mandatory if you assign the approver role to the local user. Otherwise, this is optional.
• Roles — Roles to be assigned to the local user. You should assign one or more of the following roles to the user separated by comma.
– Help Desk
– Approver
– System Administrator
– Network Administrator
– Network Operator
– Super Admin
• DeviceUname—Device login username
• DevicePassword—Device login password
• DeviceEnPassword —Device enable password.
Password Enter the password.
Verify Password Re-enter the password.
Enable Password Enter the enable password.
Verify Password Re-enter the enable password.
Field Description
2-11Administration of Cisco Prime LAN Management Solution 4.2
OL-25947-01
Chapter 2 Setting up Security Managing Security in Single-Server Mode
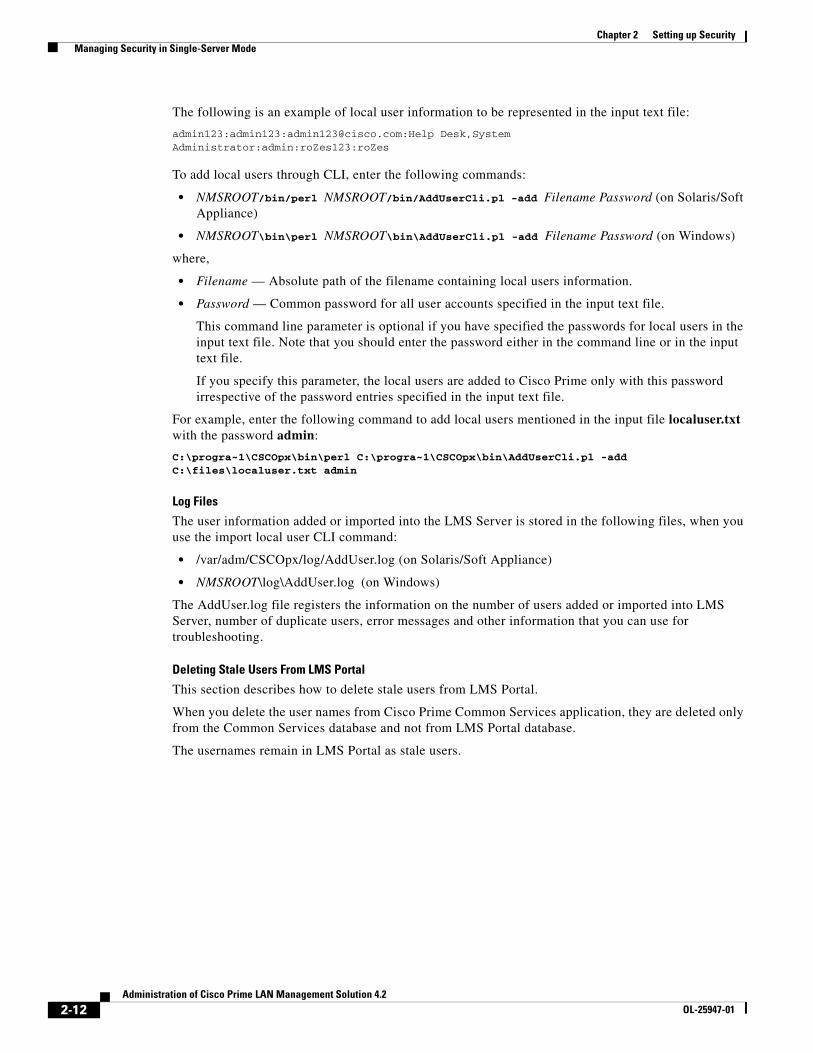
The following is an example of local user information to be represented in the input text file:
admin123:admin123:[email protected]:Help Desk,SystemAdministrator:admin:roZes123:roZes
To add local users through CLI, enter the following commands:
• NMSROOT/bin/perl NMSROOT/bin/AddUserCli.pl -add Filename Password (on Solaris/Soft Appliance)
• NMSROOT\bin\perl NMSROOT\bin\AddUserCli.pl -add Filename Password (on Windows)
where,
• Filename — Absolute path of the filename containing local users information.
• Password — Common password for all user accounts specified in the input text file.
This command line parameter is optional if you have specified the passwords for local users in the input text file. Note that you should enter the password either in the command line or in the input text file.
If you specify this parameter, the local users are added to Cisco Prime only with this password irrespective of the password entries specified in the input text file.
For example, enter the following command to add local users mentioned in the input file localuser.txt with the password admin:
C:\progra~1\CSCOpx\bin\perl C:\progra~1\CSCOpx\bin\AddUserCli.pl -add C:\files\localuser.txt admin
Log Files
The user information added or imported into the LMS Server is stored in the following files, when you use the import local user CLI command:
• /var/adm/CSCOpx/log/AddUser.log (on Solaris/Soft Appliance)
• NMSROOT\log\AddUser.log (on Windows)
The AddUser.log file registers the information on the number of users added or imported into LMS Server, number of duplicate users, error messages and other information that you can use for troubleshooting.
Deleting Stale Users From LMS Portal
This section describes how to delete stale users from LMS Portal.
When you delete the user names from Cisco Prime Common Services application, they are deleted only from the Common Services database and not from LMS Portal database.
The usernames remain in LMS Portal as stale users.
2-12Administration of Cisco Prime LAN Management Solution 4.2
OL-25947-01
Chapter 2 Setting up Security Managing Security in Single-Server Mode
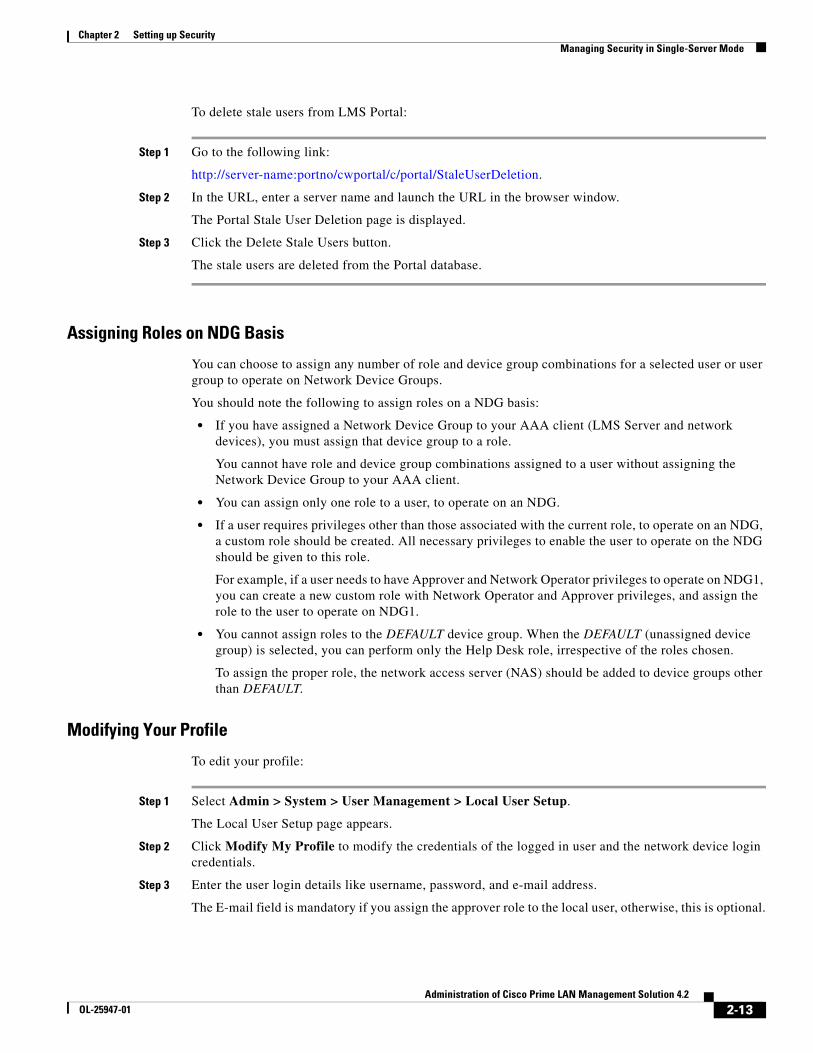
To delete stale users from LMS Portal:
Step 1 Go to the following link:
http://server-name:portno/cwportal/c/portal/StaleUserDeletion.
Step 2 In the URL, enter a server name and launch the URL in the browser window.
The Portal Stale User Deletion page is displayed.
Step 3 Click the Delete Stale Users button.
The stale users are deleted from the Portal database.
Assigning Roles on NDG Basis
You can choose to assign any number of role and device group combinations for a selected user or user group to operate on Network Device Groups.
You should note the following to assign roles on a NDG basis:
• If you have assigned a Network Device Group to your AAA client (LMS Server and network devices), you must assign that device group to a role.
You cannot have role and device group combinations assigned to a user without assigning the Network Device Group to your AAA client.
• You can assign only one role to a user, to operate on an NDG.
• If a user requires privileges other than those associated with the current role, to operate on an NDG, a custom role should be created. All necessary privileges to enable the user to operate on the NDG should be given to this role.
For example, if a user needs to have Approver and Network Operator privileges to operate on NDG1, you can create a new custom role with Network Operator and Approver privileges, and assign the role to the user to operate on NDG1.
• You cannot assign roles to the DEFAULT device group. When the DEFAULT (unassigned device group) is selected, you can perform only the Help Desk role, irrespective of the roles chosen.
To assign the proper role, the network access server (NAS) should be added to device groups other than DEFAULT.
Modifying Your Profile
To edit your profile:
Step 1 Select Admin > System > User Management > Local User Setup.
The Local User Setup page appears.
Step 2 Click Modify My Profile to modify the credentials of the logged in user and the network device login credentials.
Step 3 Enter the user login details like username, password, and e-mail address.
The E-mail field is mandatory if you assign the approver role to the local user, otherwise, this is optional.
2-13Administration of Cisco Prime LAN Management Solution 4.2
OL-25947-01
Chapter 2 Setting up Security Managing Security in Single-Server Mode
Step 4 Enter the network device login credentials for LMS to communicate with the network devices.
Enter the values for username, password, and enable password.
Step 5 Click OK. To return to the Local User Setup page without saving the modifications, click Cancel.
Creating Self Signed CertificatesCisco Prime allows you to create security certificates that enable SSL communication between your client browser and management server.
Self signed certificates are valid for five years from the date of creation. When the certificate expires, the browser prompts you to install the certificate again from the server where you have installed Cisco Prime.
Note If you regenerate the certificate, when you are in multi-server mode, existing peer relations might break. The peers need to re-import the certificate in this scenario.
This section explains the following:
• Creating a Self Signed Certificate From the User Interface
• Working With Third Party Security Certificates
2-14Administration of Cisco Prime LAN Management Solution 4.2
OL-25947-01
Chapter 2 Setting up Security Managing Security in Single-Server Mode
Creating a Self Signed Certificate From the User Interface
To create a certificate from the user interface:
Step 1 Select Admin > Trust Management > Local Server > Certificate Setup.
The Certificate Setup page appears.
Step 2 Enter the values required for the fields described in the following table:
Step 3 Click Apply to create the certificate.
The process generates the following files:
• server.key—Private key of the server.
• server.crt—Self- signed certificate of the server.
• server.pk8—Private key of the server in PKCS#8 format.
• server.csr—Certificate Signing Request (CSR) file.
You can use the CSR file to request a security certificate, if you want to use a third party security certificate.
If the certificate is not a Self signed certificate, you cannot modify it.
To return to the Cisco Prime home page, click Cancel.
Field Usage Notes
Country Name Two character country code.
State or Province Two character state or province code or the complete name of the state or province.
City Two character city or town code or the complete name of the city or town.
Organization Name Complete name of your organization or an abbreviation.
Organization Unit Name Complete name of your department or an abbreviation.
Server Name DNS name, IP Address, or hostname of the computer.
Enter the server name with a proper and resolvable domain name. This is displayed on your certificate (whether self-signed or third party issued). Local host or 127.0.0.1 should not be given.
Email Address E-mail address to which the mail has to be sent.
2-15Administration of Cisco Prime LAN Management Solution 4.2
OL-25947-01
Chapter 2 Setting up Security Managing Security in Multi-Server Mode
Working With Third Party Security Certificates
Cisco Prime provides an option to use security certificates issued by third party certificate authorities (CAs). You may want to use this option in cases where your organizational policy prevents you from using Cisco Prime self-signed certificates or requires you to use security certificates obtained from a particular CA.
You can use these certificates to enable SSL when you need secure access between LMS Server and your client browser.
You can upload Third Party Security Certificates using the SSL Utility Script. See Working With Third Party Security Certificates.
Managing Security in Multi-Server ModeCommunication among peer servers that are part of a multi-server domain has to be secure. In multi-server mode the server is configured as DCR Master/Slave or Single Sign-On Master/Slave. In a multi-server scenario, secure communication between peer LMS Servers is enabled using certificates and shared secrets.
You must copy certificates between the LMS Servers. You should also generate a shared secret on one server, and configure it on the other servers that need to communicate with the server. The shared secret is tied to a particular Cisco Prime user (for authorization).
You can configure the following in Multi-Server mode:
• Peer Server Account Setup: Helps you create users who can log into LMS Servers and perform certain tasks. These users should be set up to enable communication among multiple LMS Servers.
• System Identity Setup: Enables communication among multiple LMS Servers based on a trust model addressed by Certificates and shared secrets. System Identity setup should be used to create a trust user on slave or regular servers for communication to happen in multi-server scenarios.
• Peer Server Certificate Setup: Adds the certificate of another LMS Server into its trusted store. This allows LMS Servers to communicate with one another using SSL.
• Single Sign-On Setup: Enables you to use your browser session to transparently navigate to multiple LMS Servers without authenticating to each server.
The Current Multi-Server Settings page displays the mode of server security and the information on self signed certificate.
To open the Current Multi-Server Settings page:
Step 1 Select Admin > Trust Management > Multi Server.
Step 2 Click Current Multi-Server Setting in TOC.
The Current Multi-Server Settings page displays the Single Sign-On details.
2-16Administration of Cisco Prime LAN Management Solution 4.2
OL-25947-01

Chapter 2 Setting up Security Managing Security in Multi-Server Mode
This section has the following information that helps you to understand better, the features that enable secure communication between peer servers in a multi-server domain:
This section contains:
• Setting up Peer Server Account
• Setting up System Identity Account
• Setting up Peer Server Certificate
• Enabling Single Sign-On
Setting up Peer Server AccountPeer Server Account Setup helps you create users who can login to LMS Servers and perform certain tasks. These users should be set up to enable communication among multiple LMS Servers. Users created using Peer Server Account Setup can authenticate processes running on remote LMS Servers.
You can add a Peer Server user, edit user information and role, and delete a user.
To add a Peer Server user:
Step 1 Select Admin > Trust Management > Multi Server > Peer Server Account Setup.
The Peer Server Account Setup page appears.
Step 2 Click Add.
The Peer Server Account Setup page appears.
Step 3 Enter the username in the Username field.
Step 4 Enter the password in the Password field.
Step 5 Re-enter the password in the Verify field.
Step 6 Click OK. To return to the Peer Server Account Setup page without saving the changes, click Cancel.
To edit Peer Server user information:
Step 1 Select Admin > Trust Management > Multi Server > Peer Server Account Setup.
Step 2 Click Edit.
The Peer Server Account Setup page appears.
Step 3 Enter the password in the Password field.
Step 4 Re-enter the password in the Verify field.
Step 5 Click OK. To return to the Peer Server Account Setup page without saving the changes, click Cancel.
2-17Administration of Cisco Prime LAN Management Solution 4.2
OL-25947-01
Chapter 2 Setting up Security Managing Security in Multi-Server Mode
To delete a Peer Server user:
Step 1 Select Admin > Trust Management > Multi Server > Peer Server Account Setup.
The Peer Server Account Setup page appears.
Step 2 Select the check box corresponding to the user you want to delete.
Step 3 Click Delete.
The confirmation dialog box appears.
Step 4 Click OK to confirm. To return to the Peer Server Account Setup page without saving the changes, click Cancel.
Setting up System Identity AccountCommunication between multiple LMS Servers is enabled based on a trust model addressed by certificates and shared secrets. System Identity setup helps you to create a trust user on servers that are part of a multi-server setup. This user enables communication among servers that are part of a domain.
There can be only one System Identity User for each machine.
The System Identity User you configure must be a Peer Server User. The System Identity User you create must be a local user with all privileges.
You can either configure the System Identity User with the predefined Super Admin role or with a custom role created with all privileges. If you change the System Identity User later, you must ensure that you add the local user with all privileges in Cisco Prime.
Cisco Prime installation program allows you to have the admin user configured as the default System Identity User.
For the admin user to work as a System Identity User, the same password should be configured on all machines that are part of the domain, while installing Cisco Prime on the machines part of that domain. If this is done, the user admin serves the purpose of System Identity user. See Installing and Migrating to Cisco Prime LAN Management Solution 4.2 for details.
If you create a System Identity User, the default System Identity User, admin, is replaced by the newly created user.
While you create the System Identity User, LMS checks whether:
• The user is a Local User with all privileges. If the user is not present, or if the user does not have all privileges, an error message appears.
• The System Identity User is also a Peer Server User. If not, the user will be made a Peer Server User.
For peer to peer communication to work in a multi-server domain, you have to configure the same System Identity User on all the machines that are part of the domain.
For example, if S1, S2, S3, S4 are part of a domain, and you configure a new System Identity User, say Joe, on S1, you have to configure the same user, Joe, with the same password you specified on S1, on all the other servers, S2, S3, and S4, to enable communication between them.
See Master-Slave Configuration Prerequisites and Enabling Single Sign-On to know more on the usage of this features.
2-18Administration of Cisco Prime LAN Management Solution 4.2
OL-25947-01
Chapter 2 Setting up Security Managing Security in Multi-Server Mode
To add a System Identity user:
Step 1 Select Admin > Trust Management > Multi Server > System Identity Setup
Step 2 Enter the username in the Username field.
Step 3 Enter the password in the Password field.
Step 4 Re-enter the password in the Verify field.
Step 5 Click Apply.
Single Sign-On uses the System Identity User password as the secret key to provide confidentiality and authenticity between Master and Slave.
The System Identity User password you specify in Master and Slave should be the same.
We recommend that you have the same user name and password across Master and Slave.
Setting up Peer Server CertificateYou can add the certificate of another LMS Server into its trusted store. This will allow one LMS Server to communicate with another using SSL. If a LMS Server needs to communicate with another LMS Server, it must possess the certificate of the other server. You can add certificates of any number of peer LMS Servers to the trusted store of each server.
You must add peer server certificates if LMS Servers are configured with Self-Signed Certificates. If the certificates have been signed by popular CAs such as Verisign, and GlobalSign. this is not compulsory. However we recommend that you add peer server certificates to avoid any possible problems with SSL communication.
You can setup peer server certificates from the client browser and from a browser session on the server where LMS Server is installed.
Ensure that there are no mismatches in the date and time settings between the servers. In case you find any date or time mismatch, you need to correct it before proceeding.
If you change the date or time of the peer server, you must regenerate the self signed certificate of the peer server.
To add peer LMS Server certificates:
Step 1 Select Admin > Trust Management > Multi Server > Peer Server Certificate Setup.
The Peer Server Certificate page appears with a list of certificates imported from other servers.
Step 2 Click Add.
Step 3 Enter the IP address/hostname of peer LMS Server in the corresponding fields.
If you specify a server name, it must be entered in DNS. Otherwise specify the IP Address.
Step 4 Enter the value of the SSL (HTTPS) Port of the peer LMS Server. The default SSL(HTTPS) Port of the peer LMS Server is 443.
Step 5 Click OK. To return to the Peer Server Certificate page, click Cancel.
2-19Administration of Cisco Prime LAN Management Solution 4.2
OL-25947-01
Chapter 2 Setting up Security Managing Security in Multi-Server Mode
To delete peer certificates:
Step 1 Select the check box corresponding to the certificate you want to delete.
Step 2 Click Delete.
The confirmation dialog box appears.
Step 3 Click OK to confirm. To return to the Peer Server Certificate page, click Cancel.
You can also view the details of the client certificates. For this, select the check box corresponding to the certificate and click View.
Enabling Single Sign-OnWith Single Sign-On (SSO), you can use your browser session to transparently navigate to multiple LMS Servers without authenticating to each of them. Communication among multiple LMS Servers is enabled based on a trust model addressed by Certificates and shared secrets.
This section explains:
• Single Sign-On Setup
• Navigating Through the Single Sign-On Domain
• Changing the Single Sign-On Mode
Single Sign-On Setup
The following tasks need to be done initially:
• One of the LMS Servers should be set up as the Authentication Server (AS).
• Trust should be built between the LMS Servers, using self signed certificates. A trusted certificate is created by adding it in the trust key store of the server. Cisco Prime TrustStore or KeyStore is maintained by the certificate management framework in LMS.
• Each LMS Server should setup a shared secret with the authentication server. The System Identity user password acts as a secret key for Single Sign-On.
The Single Sign-On Authentication Server is called the Master, and the Single Sign-On Regular Server (RS) is called the Slave.
You must perform the following tasks if the server is configured either as Master or as Slave:
• Configure the System Identity User and password in both Master and Slave. The System Identity User name and password you specify in Master and Slave should be the same.
• Configure the Master Self Signed Certificate in Slave.
Single Sign-On uses System Identity user password as the secret key to provide confidentiality and authenticity between Master and Slave. We recommend that you have the same user name and password for both Master and Slave.
The Common Name (CN) in the certificate should match with that of the Master server name. Otherwise it would not be considered as a valid certificate.
2-20Administration of Cisco Prime LAN Management Solution 4.2
OL-25947-01
Chapter 2 Setting up Security Managing Security in Multi-Server Mode
Single Sign-On is used only for authentication and not for authorization. In Single Sign-On, authentication always takes place from the Single Sign-On Master server (Authentication Server-AS). Hence, you need to provide the username and password as configured in Single Sign-On AS. Authorization happens at the respective servers.
If Regular Server (RS) is configured for any Pluggable Authentication Module (PAM), say Active Directory (AD), and AS is configured for Local Authentication, then authentication happens as per the credentials in Local Authentication (AS) and vice versa.
For example, if server A is configured as Single Sign-On Master (AS) and the AAA mode setup is Active Directory (AD) and Server B is configured as Single Sign-On Slave (RS) and the AAA mode setup is Local Authentication:
When you login to server B (http://B:1741), your authentication request is forwarded to server A (AS) and you get authenticated according to the username and password configured in AD. However, authorization happens only in server B.
The privileges for the logged in user in any server within the Single Sign-On domain will depend upon the user roles configured in that server. If the user is present only in the Single Sign-On Authentication Server and not in the Regular Server, then that user gets authenticated according to the credentials in the authentication server, but has only HelpDesk privileges in the Regular Server.
We recommend that you:
• Add the user across all servers within the Single Sign-On domain.
• Assign appropriate roles to the user, in each of the LMS Servers.
See Setting up System Identity Account for more information on how to set up System Identity User. Single Sign-On uses the System Identity User password as the secret key to provide confidentiality and authenticity between Master and Slave.
The System Identity User password you specify in Master and Slave should be the same.
We recommend that you have the same user name and password across Master and Slave.
To configure the Master Self Signed Certificate in the Slave, select Admin > Trust Management > Multi Server > Peer Server Certificate Setup.
The Common Name (CN) in the certificate should match with the Master server name. Otherwise, it would not be considered as a valid certificate.
Navigating Through the Single Sign-On Domain
The Authentication Server and all Regular Servers that are configured on this Authentication Server forms an Single Sign-On domain. If you login to any of the servers that are part of the same Single Sign-On domain, you can launch any other server that is part of the domain.
You can navigate through the Single Sign-On domain in two ways:
• Registering Server Links
• Launching a New Browser Instance
Registering Server Links
You can register the links of the servers’ part of the Single Sign-On domain, in any of the servers, using the Link registration feature.
The registered links will appear either under Third Party or Custom tools, depending on what you specify during registration. If you click on the registered link, it launches the page corresponding to the registered link.
2-21Administration of Cisco Prime LAN Management Solution 4.2
OL-25947-01
Chapter 2 Setting up Security Managing Security in Multi-Server Mode
You must specify the URL, with the context while registering the server link.
For example, let ABC and XYZ be part of the same Single Sign-On domain. You can register the link for ABC on XYZ. While registering server ABC in XYZ, you have to specify the URL as:http://ABC:1741/cwhp/cwhp.applications.do
If ABC is running in HTTPS mode, you have to specify the URL as:https://ABC:443/cwhp/cwhp.applications.do
In the above example, clicking on the registered link will launch the Cisco Prime home page of server ABC.
Launching a New Browser Instance
After logging into any of the servers that are part of the Single Sign-On domain, you can open a new browser instance from that server, and provide the URL of any other server of the Single Sign-On domain, to which you need to navigate.
Note We recommend that you do not use the IP address of the servers that are part of Single Sign-On or localhost, while specifying the URL.
For example, suppose ABC and XYZ are part of an Single Sign-On domain.
Step 1 Login to ABC.
Step 2 Launch a new browser instance (File > New > Window, in Internet Explorer) from the same browser window.
Step 3 Enter the URL, with the context (http://XYZ:1741/cwhp/cwhp.applications.do) of XYZ in the new browser instance.
This launches the Cisco Prime home page of XYZ, directly.
Changing the Single Sign-On Mode
The LMS server can be configured for Single Sign-On. It can also be configured to be in Standalone mode (Normal mode, without Single Sign-On).
When the server is configured for Single Sign-On, it can either be in:
• Master mode—The Single Sign-On Authentication Server does the authentication and sends the result to the Regular Server.
Change the Single Sign-On mode to Master, if login is required for all Single Sign-On regular servers. Login requests for all the Single Sign-On regular servers will be served from the Master.
• Slave mode—Single Sign-On Regular server for which authentication is done at the Master.
While logging into regular server, if the authentication server is not reachable, the following message appears:
SSO unreachable
2-22Administration of Cisco Prime LAN Management Solution 4.2
OL-25947-01
Chapter 2 Setting up Security Managing Security in Multi-Server Mode
Only one server is configured to be in the Master mode. All other servers are configured as Slaves. If the server is configured as an Single Sign-On Regular server (Slave), you should provide the following details:
• Master server name
The Master server name must be DNS resolvable. If you change the name of the Single Sign-On Master server, in the /etc/hosts file, you must restart the Daemon Manager for the name resolution to reflect in the Slave.
If you have configured more than one Single Sign-On Slave servers for a Single Sign-On Master server, you must ensure that you enter either the fully qualified domain name or hostname of the Master consistently in all the Slave servers.
Authentication will not occur if you enter a domain name of the Master in a Single Sign-On Slave and hostname of the Master in another Single Sign-On Slave of the same Master server.
• Login Port of the Master (443)
To change the Single Sign-On mode to Standalone:
Step 1 Select Admin > Trust Management > Multi Server > Single Sign-On Setup.
The Single Sign-On Setup page shows the current Single Sign-On mode.
Step 2 Select Standalone (Normal) radio button.
Step 3 Click Apply. To return to the Cisco Prime home page, click Cancel.
To change the Single Sign-On mode to Master:
Step 1 Select Admin > Trust Management > Multi Server > Single Sign-On Setup.
The Single Sign-On Setup page shows the current Single Sign On mode.
Step 2 Select the Master (SSO Authentication Server) radio button.
Step 3 Click Apply. To return to the Cisco Prime home page, click Cancel.
To change the SSO mode to Slave:
Step 1 Select Admin > Trust Management > Multi Server > Single Sign-On Setup.
The Single Sign-On Setup page shows the current Single Sign-On mode.
Step 2 Select the Slave (SSO Regular Server) radio button.
Step 3 Enter the Master server name and port number.
If you select the Slave mode, ensure that you specify the Master server name and port. The default port is 443. The server configured as Master (or Authentication Server) should be DNS resolvable.
2-23Administration of Cisco Prime LAN Management Solution 4.2
OL-25947-01

Chapter 2 Setting up Security Setting up the Authentication Mode
Step 4 Click Apply.
It checks if:
• The System Identity user password of the Slave matches that of the Master.
• The Self Signed Certificate of the Master is added as the peer certificate in the Slave. The Common Name (CN) in the certificate matches with the Master server name.
• The Master is up and running on the specified port.
In case any of these checks fail, you are prompted to perform these steps before proceeding.
To return to the Cisco Prime home page, click Cancel.
Setting up the Authentication ModeDepending on your LMS Server platform (UNIX or Windows), different login modules that provide Authentication, Authorization, and Accounting services are available. This feature allows you to select login modules and set their options.
The LMS Server provides mechanisms used to authenticate users for Cisco Prime applications.
However, many network managers already have a means of authenticating users. To use your current authentication database for Cisco Prime authentication, you can select a login module (TACACS+, RADIUS, and others).
This section contains the following topics:
• Authentication Using Login Modules - Overview
• Cisco Secure ACS Support for LMS Applications
• Setting the Login Module to Pluggable Authentication Modules
After you select and configure a login module, all authentication transactions are performed by that module.
To assign a user to a different role, such as the System Admin role, you must configure the user locally. Such users must have the same user ID locally, as they have in the alternative authentication source. Users log in with the user ID and password associated with the current login module.
Authentication Using Login Modules - OverviewCisco Prime login modules allow administrators to add new users using a source of authentication other than the native LMS Server mechanism (that is, the Local Authentication login module).
This section contains:
• About Cisco Prime Pluggable Authentication
• Understanding Fallback Options
• Debugging
2-24Administration of Cisco Prime LAN Management Solution 4.2
OL-25947-01
Chapter 2 Setting up Security Setting up the Authentication Mode
About Cisco Prime Pluggable Authentication
By default, Cisco Prime LMS uses LMS Server authentication (Local Authentication) to authenticate users, and authorize them to access Cisco Prime LMS.
After authentication, your authorization is based on the privileges that have been assigned to you.
A privilege is a task or an operation defined within the application. The set of privileges assigned to you, defines your role. It dictates how much, and what type of system access you have.
The LMS Server authorization scheme has the following default or predefined roles. You can also create user defined roles and assign the user with a set of privileges, that would suit your needs. See Managing Roles for more information. The predefined roles are listed here in order from the least privileged to most privileged:
• Help Desk — Can access network status information only. Can access persisted data on the system and cannot perform any action on a device, or schedule a job that will reach the network.
• Approver — Can approve all LMS tasks.
• Network Operator — Can perform all Help Desk tasks. Can perform tasks related to network data collection. Cannot perform any task that requires write access on the network.
• Network Administrator — Can perform all Network Operators tasks. Can perform tasks that result in a network configuration change.
• System Administrator — Can perform all Cisco Prime system administration tasks.
• Super Admin — Can perform all Cisco Prime operations including administration and approval tasks. By default, this role has full privileges.
The LMS Server determines user roles. Therefore, all users must be in the local database of user IDs and passwords. Users who are authenticated by an alternative service and who are not in the local database are assigned to the same role as the guest user (by default, the Help Desk role).
The LMS Server determines user roles. Therefore, all users must be in the local database of user IDs and passwords. Users who are authenticated by an alternative service and who are not in the local database are assigned to the same role as the guest user (by default, the Help Desk role).
Understanding Fallback Options
Fallback options allow you to access the software if the login module fails, or you accidentally lock yourself or others. There are three login module fallback options. These are available on all platforms. The following table gives you the details:
Option Description
Allow all Local Authentication users to fallback to the Local Authentication login.
Warning Selecting this option allows local authentication for users when the external authentication server is unreachable.
All users can access Cisco Prime using the Local login if the current login module fails and only if PAM is unreachable.
Only allow the following user to fallback to the Local Authentication login if preceding login fails: username.
Specified users can access Cisco Prime using the Local login if the current login module fails. Use commas between user names.
Allow no fallbacks to the Local Authentication login.
No access is allowed if the current login module fails.
2-25Administration of Cisco Prime LAN Management Solution 4.2
OL-25947-01
Chapter 2 Setting up Security Setting up the Authentication Mode
Debugging
Cisco Prime allows you to enable debugging on the current login module so that you have additional information in the log files that you can use for troubleshooting. Turn debugging on only when requested to do so by your customer service representative.
Enabling debugging does not alter the behavior of the modules.
Debugging information is not exposed in the user interface, but is stored in the stdout.log file in the following locations:
• NMSROOT/MDC/tomcat/logs/stdout.log (on Solaris/Soft Appliance)
• NMSROOT\MDC\tomcat\logs\stdout.log (on Windows)
where NMSROOT is the Cisco Prime installation directory.
Cisco Secure ACS Support for LMS ApplicationsCisco Prime LMS supports TACACS+ mode of authentication. To use this mode, you must have a Cisco Secure ACS (Access Control Server), installed on your network. LMS 4.2 supports the following versions of Cisco Secure ACS:
• Cisco Secure ACS 4.2 for Windows Server
• Cisco Secure ACS 5.x for Windows Server
• Cisco Secure Appliance 4.2
• Cisco Secure Appliance 5.x
Note Cisco Secure ACS also supports RADIUS mode of authentication.
Setting the Login Module to Pluggable Authentication ModulesThe Login Module defines how authorization and authentication are performed and how the login modules are changed.
This section explains the following:
• Changing Login Module to Local Authentication
• Changing Login Module to Local Unix System
• Changing Login Module to Local NT System
• Changing Login Module to MS Active Directory
• Changing Login Module to RADIUS
• Changing Login Module to TACACS+
To set the login module:
Step 1 Select Admin > System > Authentication Mode Setup.
The Authentication Mode Setup page appears.
Step 2 The Authentication Mode Setup page displays the current login module, and the available login modules.
The available login modules are:
2-26Administration of Cisco Prime LAN Management Solution 4.2
OL-25947-01

Chapter 2 Setting up Security Setting up the Authentication Mode
• Local Authentication
• Local Unix System
• Local NT System
• MS Active Directory
• RADIUS
• TACACS+
2-27Administration of Cisco Prime LAN Management Solution 4.2
OL-25947-01
Chapter 2 Setting up Security Setting up the Authentication Mode
The login username is case sensitive when you use the following login modules:
• Local Unix System
• RADIUS (only on Solaris)
• TACACS+ (only on Solaris)
Step 3 Select a login module.
Step 4 Click Change.
The Login Module Options popup window appears.
Step 5 Enter the corresponding login module information.
See the respective login module section for login module options.
Step 6 Click OK. To return to the Authentication Mode Setup page, click Cancel.
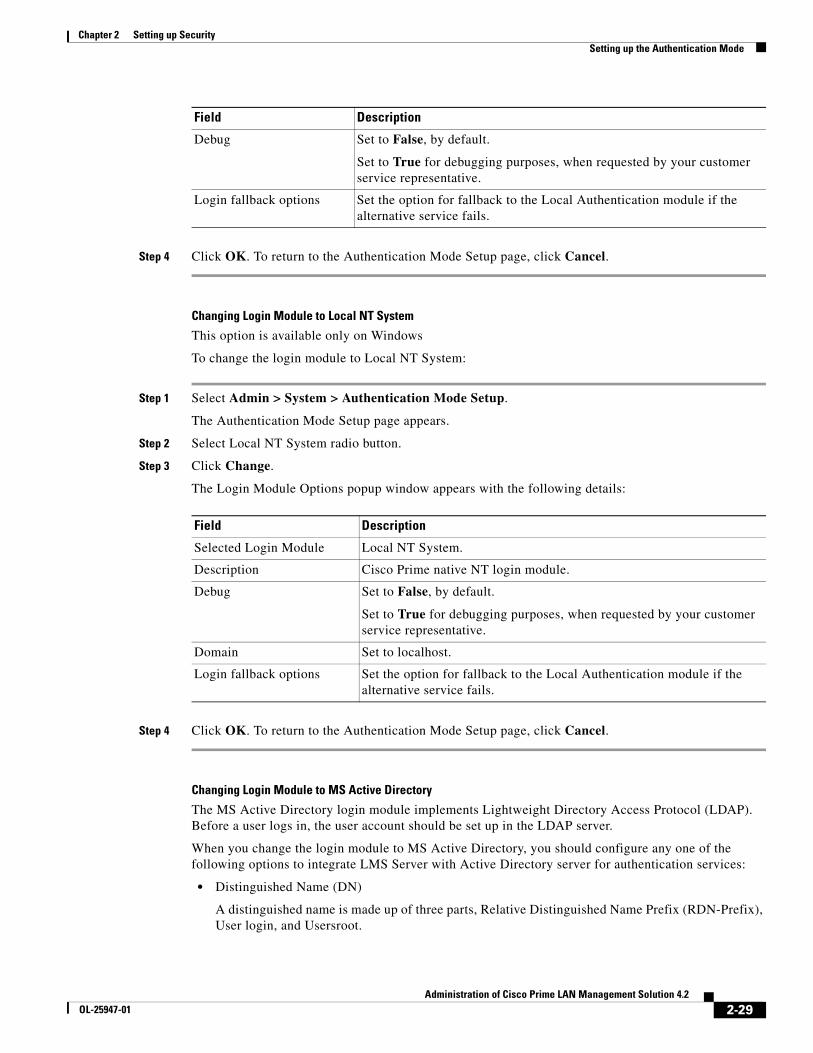
Changing Login Module to Local Authentication
To change the login module to Local Authentication:
Step 1 Select Admin > System > Authentication Mode Setup.
The Authentication Mode Setup page appears.
Step 2 Select the Local Authentication radio button.
Step 3 Click Change.
The Login Module Options popup window appears.
Step 4 Set the Debug option to False.
Set it to True for debugging purposes, when requested by your customer service representative.
Step 5 Click OK. To return to the Authentication Mode Setup page, click Cancel.
Changing Login Module to Local Unix System
This option is available only on Unix systems.
To change the login module to Local Unix System:
Step 1 Select Admin > System > Authentication Mode Setup.
The Authentication Mode Setup page appears.
Step 2 Select the Local Unix System radio button.
Step 3 Click Change.
The Login Module Options popup window appears with the following details:
Field Description
Selected Login Module Local UNIX System.
Description Cisco Prime native Solaris module.
2-28Administration of Cisco Prime LAN Management Solution 4.2
OL-25947-01
Chapter 2 Setting up Security Setting up the Authentication Mode
Step 4 Click OK. To return to the Authentication Mode Setup page, click Cancel.
Changing Login Module to Local NT System
This option is available only on Windows
To change the login module to Local NT System:
Step 1 Select Admin > System > Authentication Mode Setup.
The Authentication Mode Setup page appears.
Step 2 Select Local NT System radio button.
Step 3 Click Change.
The Login Module Options popup window appears with the following details:
Step 4 Click OK. To return to the Authentication Mode Setup page, click Cancel.
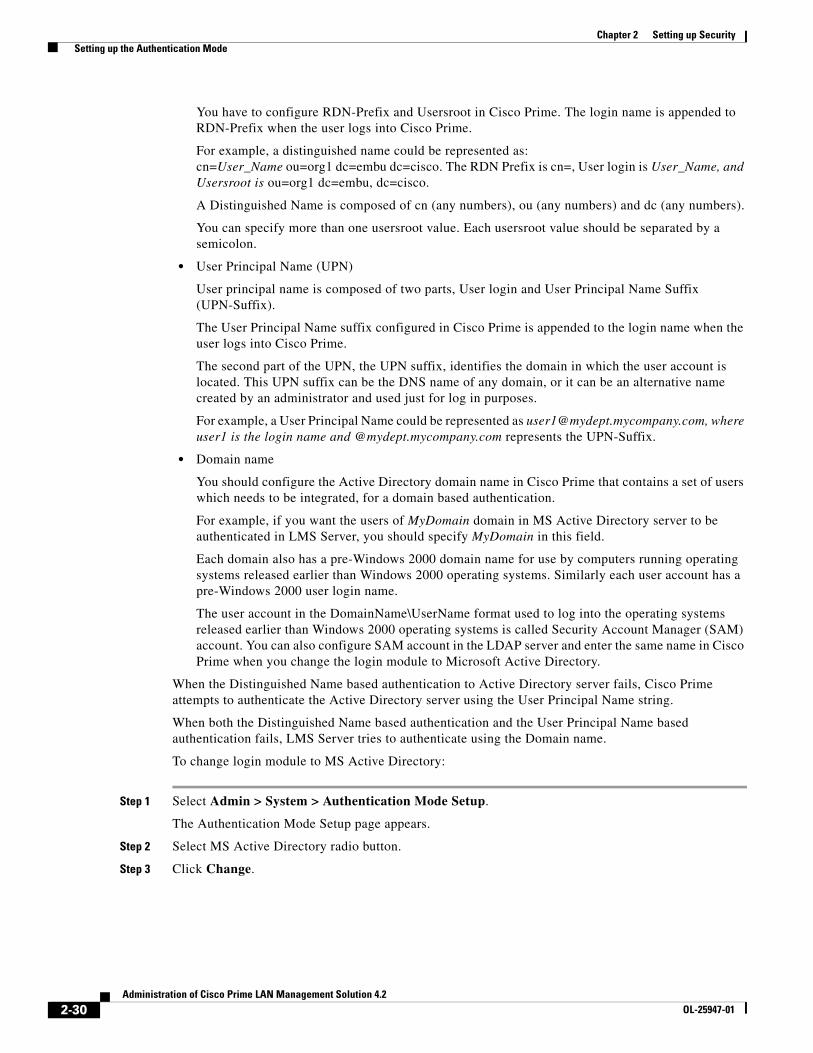
Changing Login Module to MS Active Directory
The MS Active Directory login module implements Lightweight Directory Access Protocol (LDAP). Before a user logs in, the user account should be set up in the LDAP server.
When you change the login module to MS Active Directory, you should configure any one of the following options to integrate LMS Server with Active Directory server for authentication services:
• Distinguished Name (DN)
A distinguished name is made up of three parts, Relative Distinguished Name Prefix (RDN-Prefix), User login, and Usersroot.
Debug Set to False, by default.
Set to True for debugging purposes, when requested by your customer service representative.
Login fallback options Set the option for fallback to the Local Authentication module if the alternative service fails.
Field Description
Field Description
Selected Login Module Local NT System.
Description Cisco Prime native NT login module.
Debug Set to False, by default.
Set to True for debugging purposes, when requested by your customer service representative.
Domain Set to localhost.
Login fallback options Set the option for fallback to the Local Authentication module if the alternative service fails.
2-29Administration of Cisco Prime LAN Management Solution 4.2
OL-25947-01
Chapter 2 Setting up Security Setting up the Authentication Mode
You have to configure RDN-Prefix and Usersroot in Cisco Prime. The login name is appended to RDN-Prefix when the user logs into Cisco Prime.
For example, a distinguished name could be represented as: cn=User_Name ou=org1 dc=embu dc=cisco. The RDN Prefix is cn=, User login is User_Name, and Usersroot is ou=org1 dc=embu, dc=cisco.
A Distinguished Name is composed of cn (any numbers), ou (any numbers) and dc (any numbers).
You can specify more than one usersroot value. Each usersroot value should be separated by a semicolon.
• User Principal Name (UPN)
User principal name is composed of two parts, User login and User Principal Name Suffix (UPN-Suffix).
The User Principal Name suffix configured in Cisco Prime is appended to the login name when the user logs into Cisco Prime.
The second part of the UPN, the UPN suffix, identifies the domain in which the user account is located. This UPN suffix can be the DNS name of any domain, or it can be an alternative name created by an administrator and used just for log in purposes.
For example, a User Principal Name could be represented as [email protected], where user1 is the login name and @mydept.mycompany.com represents the UPN-Suffix.
• Domain name
You should configure the Active Directory domain name in Cisco Prime that contains a set of users which needs to be integrated, for a domain based authentication.
For example, if you want the users of MyDomain domain in MS Active Directory server to be authenticated in LMS Server, you should specify MyDomain in this field.
Each domain also has a pre-Windows 2000 domain name for use by computers running operating systems released earlier than Windows 2000 operating systems. Similarly each user account has a pre-Windows 2000 user login name.
The user account in the DomainName\UserName format used to log into the operating systems released earlier than Windows 2000 operating systems is called Security Account Manager (SAM) account. You can also configure SAM account in the LDAP server and enter the same name in Cisco Prime when you change the login module to Microsoft Active Directory.
When the Distinguished Name based authentication to Active Directory server fails, Cisco Prime attempts to authenticate the Active Directory server using the User Principal Name string.
When both the Distinguished Name based authentication and the User Principal Name based authentication fails, LMS Server tries to authenticate using the Domain name.
To change login module to MS Active Directory:
Step 1 Select Admin > System > Authentication Mode Setup.
The Authentication Mode Setup page appears.
Step 2 Select MS Active Directory radio button.
Step 3 Click Change.
2-30Administration of Cisco Prime LAN Management Solution 4.2
OL-25947-01
Chapter 2 Setting up Security Setting up the Authentication Mode
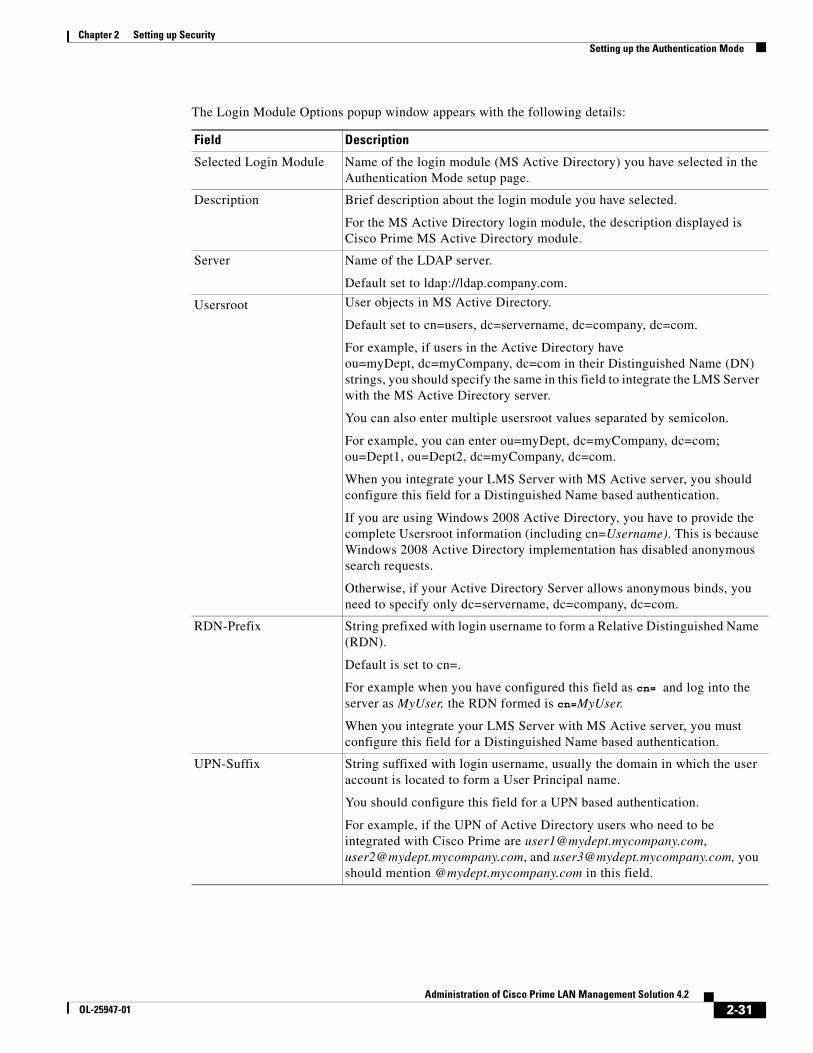
The Login Module Options popup window appears with the following details:
Field Description
Selected Login Module Name of the login module (MS Active Directory) you have selected in the Authentication Mode setup page.
Description Brief description about the login module you have selected.
For the MS Active Directory login module, the description displayed is Cisco Prime MS Active Directory module.
Server Name of the LDAP server.
Default set to ldap://ldap.company.com.
Usersroot User objects in MS Active Directory.
Default set to cn=users, dc=servername, dc=company, dc=com.
For example, if users in the Active Directory have ou=myDept, dc=myCompany, dc=com in their Distinguished Name (DN) strings, you should specify the same in this field to integrate the LMS Server with the MS Active Directory server.
You can also enter multiple usersroot values separated by semicolon.
For example, you can enter ou=myDept, dc=myCompany, dc=com; ou=Dept1, ou=Dept2, dc=myCompany, dc=com.
When you integrate your LMS Server with MS Active server, you should configure this field for a Distinguished Name based authentication.
If you are using Windows 2008 Active Directory, you have to provide the complete Usersroot information (including cn=Username). This is because Windows 2008 Active Directory implementation has disabled anonymous search requests.
Otherwise, if your Active Directory Server allows anonymous binds, you need to specify only dc=servername, dc=company, dc=com.
RDN-Prefix String prefixed with login username to form a Relative Distinguished Name (RDN).
Default is set to cn=.
For example when you have configured this field as cn= and log into the server as MyUser, the RDN formed is cn=MyUser.
When you integrate your LMS Server with MS Active server, you must configure this field for a Distinguished Name based authentication.
UPN-Suffix String suffixed with login username, usually the domain in which the user account is located to form a User Principal name.
You should configure this field for a UPN based authentication.
For example, if the UPN of Active Directory users who need to be integrated with Cisco Prime are [email protected], [email protected], and [email protected], you should mention @mydept.mycompany.com in this field.
2-31Administration of Cisco Prime LAN Management Solution 4.2
OL-25947-01
Chapter 2 Setting up Security Setting up the Authentication Mode
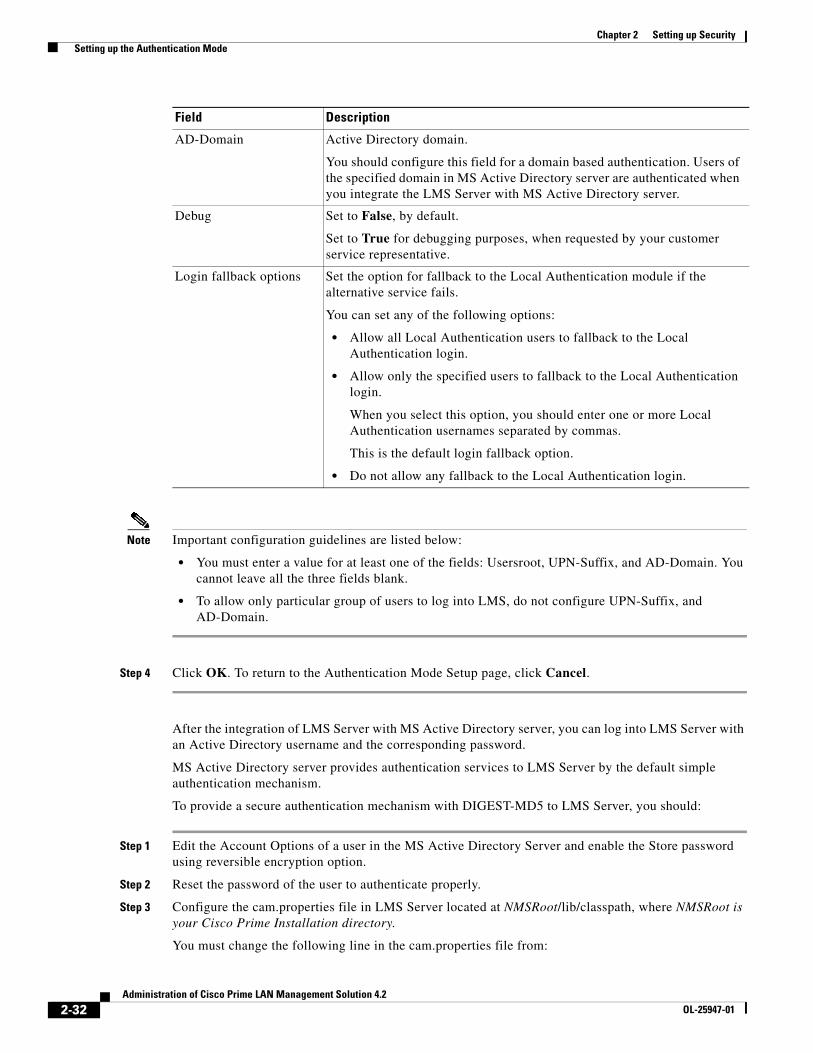
Note Important configuration guidelines are listed below:
• You must enter a value for at least one of the fields: Usersroot, UPN-Suffix, and AD-Domain. You cannot leave all the three fields blank.
• To allow only particular group of users to log into LMS, do not configure UPN-Suffix, and AD-Domain.
Step 4 Click OK. To return to the Authentication Mode Setup page, click Cancel.
After the integration of LMS Server with MS Active Directory server, you can log into LMS Server with an Active Directory username and the corresponding password.
MS Active Directory server provides authentication services to LMS Server by the default simple authentication mechanism.
To provide a secure authentication mechanism with DIGEST-MD5 to LMS Server, you should:
Step 1 Edit the Account Options of a user in the MS Active Directory Server and enable the Store password using reversible encryption option.
Step 2 Reset the password of the user to authenticate properly.
Step 3 Configure the cam.properties file in LMS Server located at NMSRoot/lib/classpath, where NMSRoot is your Cisco Prime Installation directory.
You must change the following line in the cam.properties file from:
AD-Domain Active Directory domain.
You should configure this field for a domain based authentication. Users of the specified domain in MS Active Directory server are authenticated when you integrate the LMS Server with MS Active Directory server.
Debug Set to False, by default.
Set to True for debugging purposes, when requested by your customer service representative.
Login fallback options Set the option for fallback to the Local Authentication module if the alternative service fails.
You can set any of the following options:
• Allow all Local Authentication users to fallback to the Local Authentication login.
• Allow only the specified users to fallback to the Local Authentication login.
When you select this option, you should enter one or more Local Authentication usernames separated by commas.
This is the default login fallback option.
• Do not allow any fallback to the Local Authentication login.
Field Description
2-32Administration of Cisco Prime LAN Management Solution 4.2
OL-25947-01
Chapter 2 Setting up Security Setting up the Authentication Mode
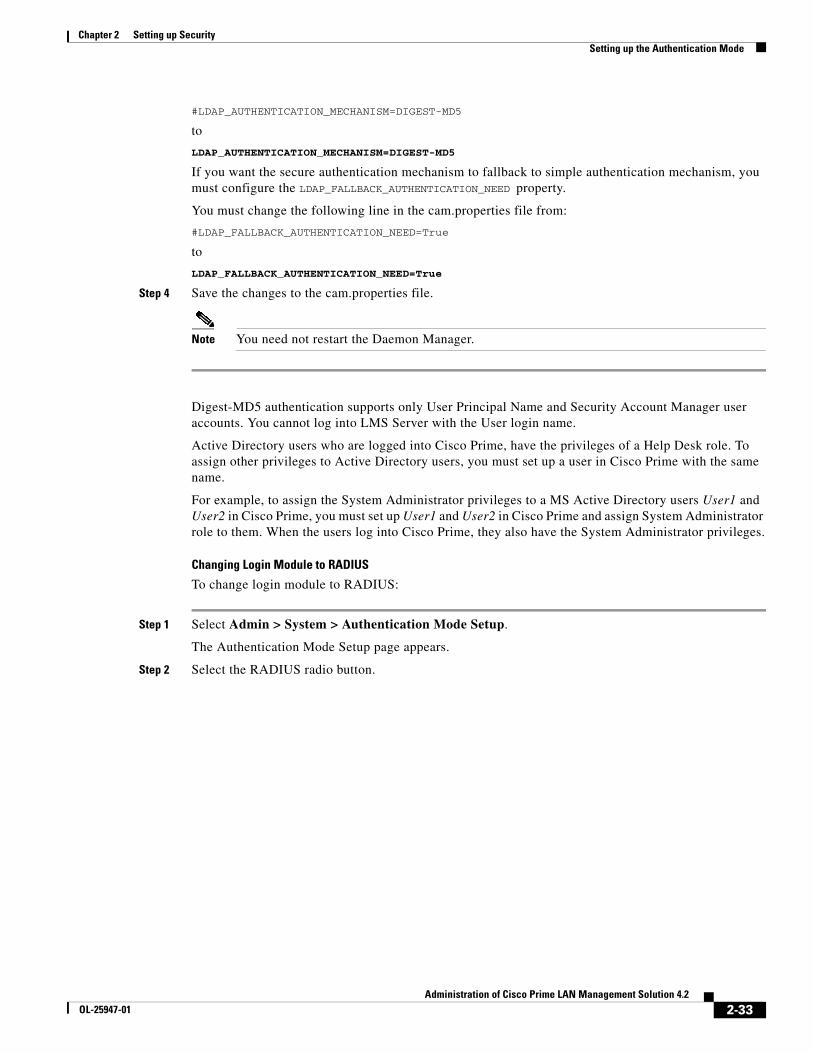
#LDAP_AUTHENTICATION_MECHANISM=DIGEST-MD5
to
LDAP_AUTHENTICATION_MECHANISM=DIGEST-MD5
If you want the secure authentication mechanism to fallback to simple authentication mechanism, you must configure the LDAP_FALLBACK_AUTHENTICATION_NEED property.
You must change the following line in the cam.properties file from:
#LDAP_FALLBACK_AUTHENTICATION_NEED=True
to
LDAP_FALLBACK_AUTHENTICATION_NEED=True
Step 4 Save the changes to the cam.properties file.
Note You need not restart the Daemon Manager.
Digest-MD5 authentication supports only User Principal Name and Security Account Manager user accounts. You cannot log into LMS Server with the User login name.
Active Directory users who are logged into Cisco Prime, have the privileges of a Help Desk role. To assign other privileges to Active Directory users, you must set up a user in Cisco Prime with the same name.
For example, to assign the System Administrator privileges to a MS Active Directory users User1 and User2 in Cisco Prime, you must set up User1 and User2 in Cisco Prime and assign System Administrator role to them. When the users log into Cisco Prime, they also have the System Administrator privileges.
Changing Login Module to RADIUS
To change login module to RADIUS:
Step 1 Select Admin > System > Authentication Mode Setup.
The Authentication Mode Setup page appears.
Step 2 Select the RADIUS radio button.
2-33Administration of Cisco Prime LAN Management Solution 4.2
OL-25947-01
Chapter 2 Setting up Security Setting up the Authentication Mode
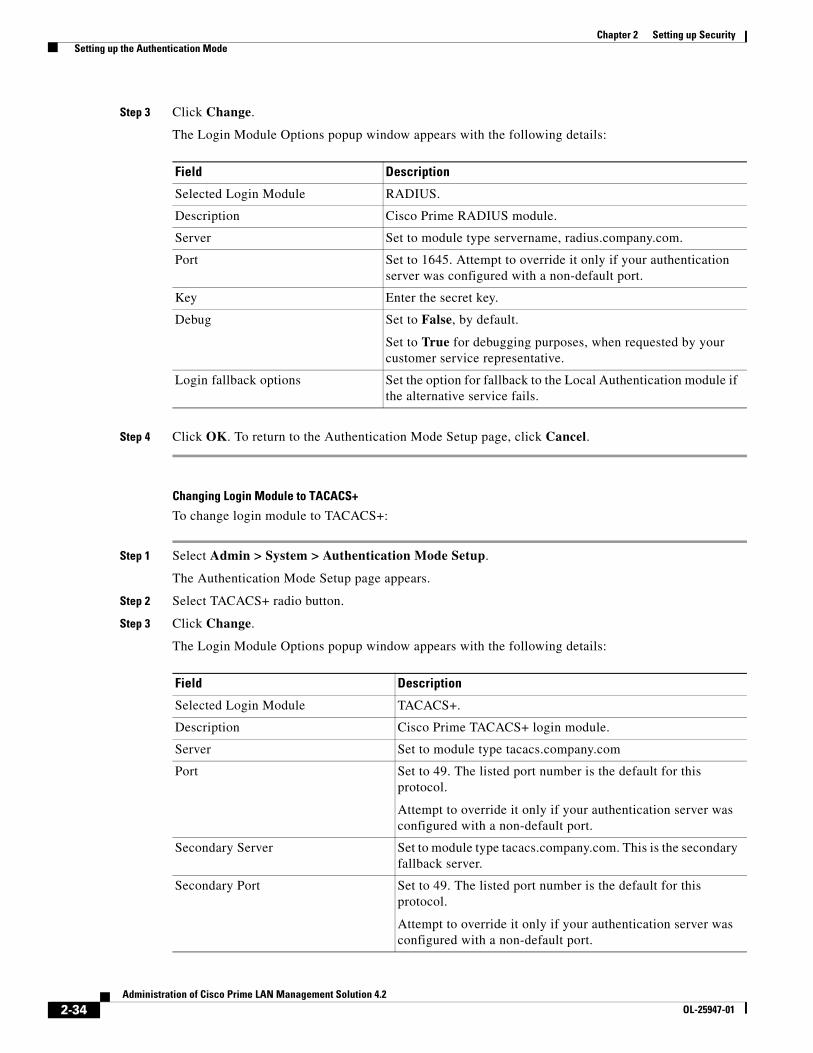
Step 3 Click Change.
The Login Module Options popup window appears with the following details:
Step 4 Click OK. To return to the Authentication Mode Setup page, click Cancel.
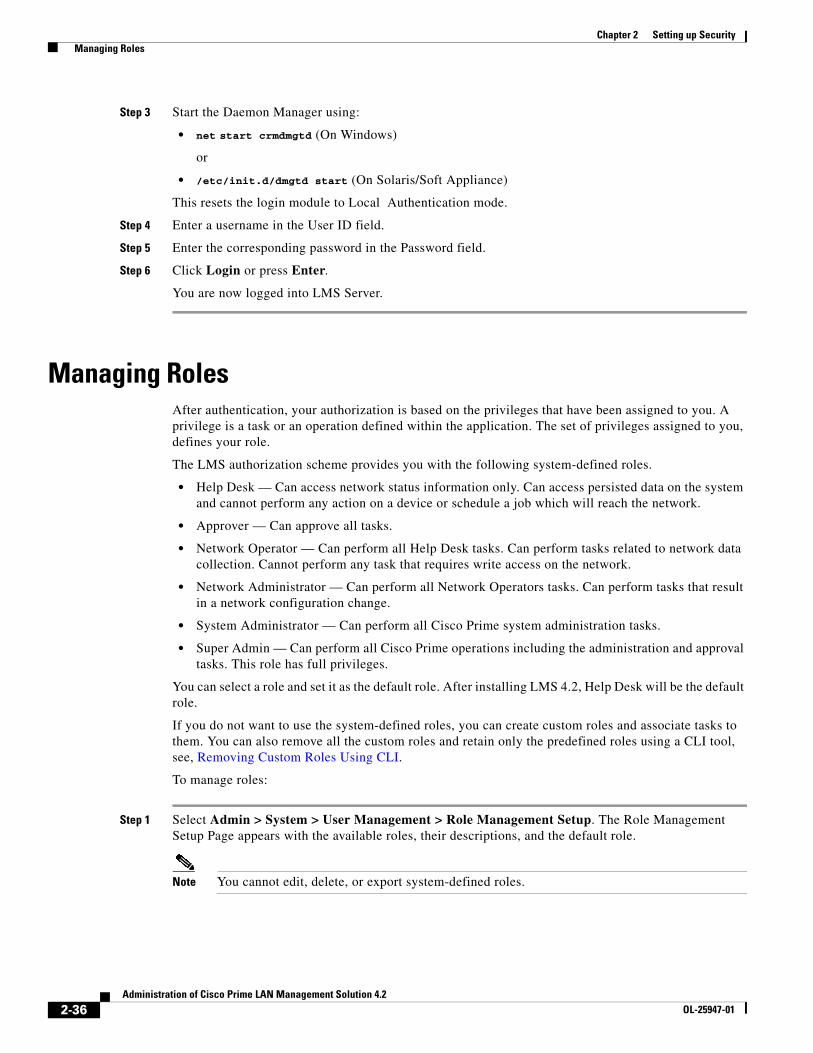
Changing Login Module to TACACS+
To change login module to TACACS+:
Step 1 Select Admin > System > Authentication Mode Setup.
The Authentication Mode Setup page appears.
Step 2 Select TACACS+ radio button.
Step 3 Click Change.
The Login Module Options popup window appears with the following details:
Field Description
Selected Login Module RADIUS.
Description Cisco Prime RADIUS module.
Server Set to module type servername, radius.company.com.
Port Set to 1645. Attempt to override it only if your authentication server was configured with a non-default port.
Key Enter the secret key.
Debug Set to False, by default.
Set to True for debugging purposes, when requested by your customer service representative.
Login fallback options Set the option for fallback to the Local Authentication module if the alternative service fails.
Field Description
Selected Login Module TACACS+.
Description Cisco Prime TACACS+ login module.
Server Set to module type tacacs.company.com
Port Set to 49. The listed port number is the default for this protocol.
Attempt to override it only if your authentication server was configured with a non-default port.
Secondary Server Set to module type tacacs.company.com. This is the secondary fallback server.
Secondary Port Set to 49. The listed port number is the default for this protocol.
Attempt to override it only if your authentication server was configured with a non-default port.
2-34Administration of Cisco Prime LAN Management Solution 4.2
OL-25947-01

Chapter 2 Setting up Security Setting up the Authentication Mode
Note The values True or False should not be entered in the Server, Secondary Server and Tertiary Server fields, the corresponding Port fields or the Key field.
Step 4 Click OK. To return to the Authentication Mode Setup page, click Cancel.
After you change the login module, you do not have to restart Cisco Prime. The user who logs in after the change, automatically uses the new module. Changes to the login module are logged in the following files:
• NMSROOT/MDC/Tomcat/logs/stdout.log (On Solaris/Soft Appliance)
• NMSROOT\MDC\Tomcat\logs\stdout.log (On Windows)
where NMSROOT is your Cisco Prime Installation directory.
Resetting Login Module
To reset the login module of LMS Server to Local Authentication:
Step 1 Stop the Daemon Manager using:
• net stop crmdmgtd (On Windows)
or
• /etc/init.d/dmgtd stop (On Solaris/Soft Appliance)
Step 2 Run the following script:
• NMSROOT\bin\perl NMSROOT\bin\ResetLoginModule.pl (On Windows)
or
• NMSROOT/bin/perl NMSROOT/bin/ResetLoginModule.pl (On Solaris/Soft Appliance)
where NMSROOT is your Cisco Prime Installation directory.
Tertiary Server Set to module type tacacs.company.com. This is the tertiary fallback server.
Tertiary Port Set to 49. The listed port number is the default for this protocol.
Attempt to override it only if your authentication server was configured with a non-default port.
Key Enter the secret key.
Debug Set to False, by default.
Set to True for debugging purposes, when requested by your customer service representative.
Login fallback options Set the option for fallback to the Local Authentication module if the alternative service fails.
Field Description
2-35Administration of Cisco Prime LAN Management Solution 4.2
OL-25947-01
Chapter 2 Setting up Security Managing Roles
Step 3 Start the Daemon Manager using:
• net start crmdmgtd (On Windows)
or
• /etc/init.d/dmgtd start (On Solaris/Soft Appliance)
This resets the login module to Local Authentication mode.
Step 4 Enter a username in the User ID field.
Step 5 Enter the corresponding password in the Password field.
Step 6 Click Login or press Enter.
You are now logged into LMS Server.
Managing RolesAfter authentication, your authorization is based on the privileges that have been assigned to you. A privilege is a task or an operation defined within the application. The set of privileges assigned to you, defines your role.
The LMS authorization scheme provides you with the following system-defined roles.
• Help Desk — Can access network status information only. Can access persisted data on the system and cannot perform any action on a device or schedule a job which will reach the network.
• Approver — Can approve all tasks.
• Network Operator — Can perform all Help Desk tasks. Can perform tasks related to network data collection. Cannot perform any task that requires write access on the network.
• Network Administrator — Can perform all Network Operators tasks. Can perform tasks that result in a network configuration change.
• System Administrator — Can perform all Cisco Prime system administration tasks.
• Super Admin — Can perform all Cisco Prime operations including the administration and approval tasks. This role has full privileges.
You can select a role and set it as the default role. After installing LMS 4.2, Help Desk will be the default role.
If you do not want to use the system-defined roles, you can create custom roles and associate tasks to them. You can also remove all the custom roles and retain only the predefined roles using a CLI tool, see, Removing Custom Roles Using CLI.
To manage roles:
Step 1 Select Admin > System > User Management > Role Management Setup. The Role Management Setup Page appears with the available roles, their descriptions, and the default role.
Note You cannot edit, delete, or export system-defined roles.
2-36Administration of Cisco Prime LAN Management Solution 4.2
OL-25947-01

Chapter 2 Setting up Security Managing Roles
Step 2 You can do the following:
Button Description
Add Click Add to add user-defined roles. The Role Management Page appears.
To add a role:
1. Enter the role name and description.
2. Select the tasks that have to be assigned to the new role.
The task can be identified using the search option. The search uses the task name and the task description to perform a complete search. The search results and All tab contents are synchronized. Any selections made on search results will reflected in all tab. For more details see Searching LMS Tasks.
3. Click OK to add the new role or click Cancel to return to the Role Management Setup Page.
For more information on the various tasks in LMS 4.2, see Understanding LMS Tasks.
Edit Select a user-defined role and click Edit to edit the role. The Role Management Page appears. To edit a role:
1. Modify the role description if required.
2. Select or deselect the check box corresponding to the required tasks.
3. Click OK to save the changes, or click Cancel to return to the Role Management Setup Page.
Delete To delete a role:
1. Select one or more user-defined roles and click Delete to delete the roles.
2. Click OK to confirm or Cancel to return to the Role Management Setup Page.
If the deleted role is assigned to any user, then it will remove the association of this role with the user.
Copy You can use this option to modify a system-defined role.
To copy a role:
1. Select a role from the roles and click Copy. The Role Management Page appears.
2. Enter the role name and description.
3. Select or deselect the check box corresponding to the tasks.
4. Click OK to add the new role, or click Cancel to return to the Role Management Setup Page.
Export You can export roles only in the XML format. The file will be saved in the client.
To export roles:
Select the user-defined roles that you want to export and click Export. A message appears prompting you to open or save the LMSRoleExport.xml file.
2-37Administration of Cisco Prime LAN Management Solution 4.2
OL-25947-01
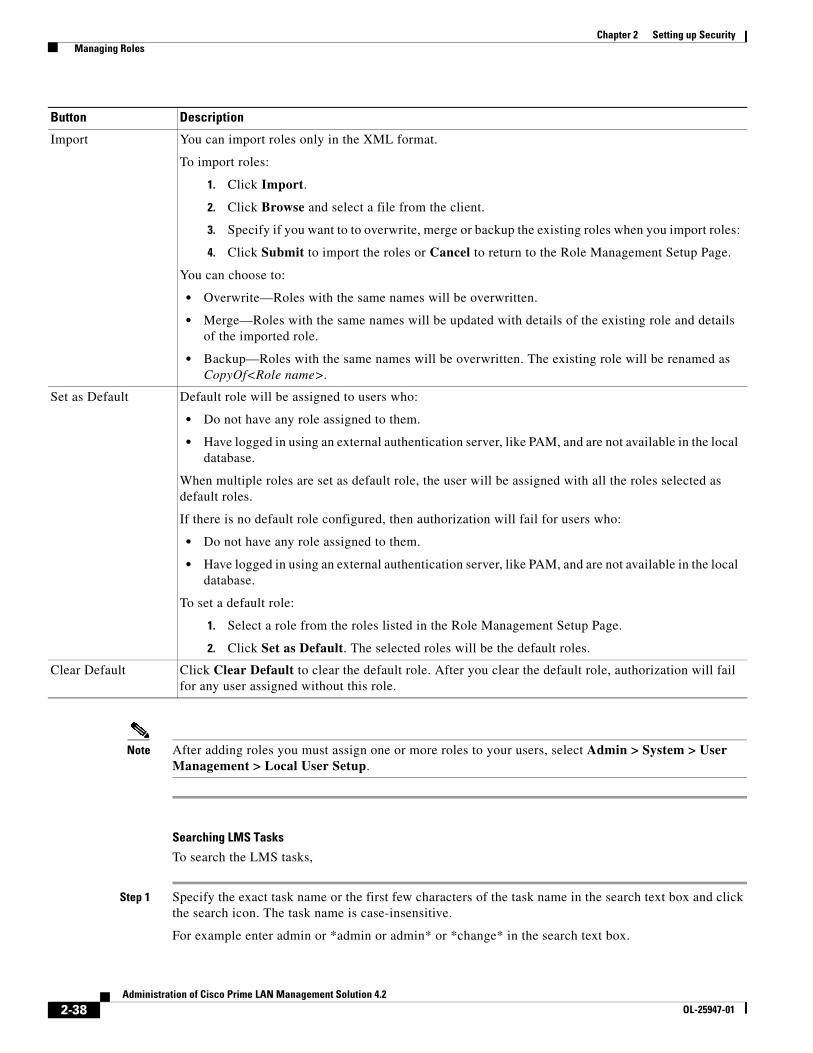
Chapter 2 Setting up Security Managing Roles
Note After adding roles you must assign one or more roles to your users, select Admin > System > User Management > Local User Setup.
Searching LMS Tasks
To search the LMS tasks,
Step 1 Specify the exact task name or the first few characters of the task name in the search text box and click the search icon. The task name is case-insensitive.
For example enter admin or *admin or admin* or *change* in the search text box.
Import You can import roles only in the XML format.
To import roles:
1. Click Import.
2. Click Browse and select a file from the client.
3. Specify if you want to to overwrite, merge or backup the existing roles when you import roles:
4. Click Submit to import the roles or Cancel to return to the Role Management Setup Page.
You can choose to:
• Overwrite—Roles with the same names will be overwritten.
• Merge—Roles with the same names will be updated with details of the existing role and details of the imported role.
• Backup—Roles with the same names will be overwritten. The existing role will be renamed as CopyOf<Role name>.
Set as Default Default role will be assigned to users who:
• Do not have any role assigned to them.
• Have logged in using an external authentication server, like PAM, and are not available in the local database.
When multiple roles are set as default role, the user will be assigned with all the roles selected as default roles.
If there is no default role configured, then authorization will fail for users who:
• Do not have any role assigned to them.
• Have logged in using an external authentication server, like PAM, and are not available in the local database.
To set a default role:
1. Select a role from the roles listed in the Role Management Setup Page.
2. Click Set as Default. The selected roles will be the default roles.
Clear Default Click Clear Default to clear the default role. After you clear the default role, authorization will fail for any user assigned without this role.
Button Description
2-38Administration of Cisco Prime LAN Management Solution 4.2
OL-25947-01

Chapter 2 Setting up Security Managing Cisco.com Connection
• admin – will search for the task and task description that contains the exact term admin.
• *admin – will search for the task and task description that ends with the term admin either in task name or description.
• admin* – will search for the task and task description that begins with the term admin either in task name or description.
• *change* – will search for the task and task description that contains the term change.
If there are no search results generated, then a pop-up window appears.
Note You are not allowed to use any other wildcard character apart from *.
Step 2 Click the Search Results tab to see the corresponding search result.
In the All tab, the task tree will be in a collapsed state, whereas in the Search Results tab, the task tree will be in the expanded state.
You will note that when you select or unselect a particular set of tasks in the Search Results tab, the same set of tasks will be automatically selected or unselected in the All tab.
Removing Custom Roles Using CLI
You can use a CLI tool to remove all the user-defined roles and retain only the system-defined roles.
To do this:
On Windows, run:
NMSRoot\bin\ResetToFactoryRole.pl
On Solaris/Soft Appliance, run:
NMSRoot/bin/ResetToFactoryRole.pl
Managing Cisco.com ConnectionCertain Software Center features require Cisco.com access. This means that Cisco Prime must be configured with a Cisco.com account, which is to be used when downloading new and updated packages.
This section explains:
• Setting up Cisco.com User Account
• Setting Up the Proxy Server
To view the Cisco.com Connection Details, select Admin > System > Cisco.com Settings > Connection Management. The Cisco.com Connection Management page displays the current Proxy Server settings.
Setting up Cisco.com User AccountThis feature lets you add and modify Cisco.com user login names and password.
To set up Cisco.com login account:
2-39Administration of Cisco Prime LAN Management Solution 4.2
OL-25947-01
Chapter 2 Setting up Security Support Settings
Step 1 Select Admin > System > Cisco.com Settings.
Step 2 Click User Account Setup in the TOC list.
The User Account Setup page appears.
Step 3 Enter your Cisco.com Username, and Cisco.com Password.
Step 4 Re-enter the password in the Verify Password field.
Step 5 Click Apply.
Setting Up the Proxy ServerYou can update the proxy server configuration using the Proxy Server set up option.
To update your proxy server configuration:
Step 1 Select Admin > System > Cisco.com Settings.
Step 2 Click Proxy Server Setup in the TOC list.
The Proxy Server Setup page appears.
Step 3 Enter the Proxy Server host name or IP address, and the port number.
Optionally, you can enter the Username and Password for accessing the proxy server.
If you have entered your password, re-enter the same password in the Verify Password field.
Step 4 Click Apply.
Support SettingsFrom LMS 4.2.2, Cisco Prime LAN Management Solution will support the Support Settings feature to allow user to set the following two types of interactions:
• Enabling interactions directly from the LMS server
• Enabling interactions only through client system
For more information on creating a new service request and updating an existing service request, see Creating/Updating Support Case section in Getting Started with Cisco Prime LAN Management Solution 4.2.
2-40Administration of Cisco Prime LAN Management Solution 4.2
OL-25947-01


![Polypropylenedocshare01.docshare.tips/files/25947/259470741.pdf · 2016. 6. 24. · Polypropylene 1 Polypropylene Polypropylene Identifiers CAS number 9003-07-0 [1] Properties Molecular](https://img.pdfslide.us/doc/110x75/60a5a5416bf21a1eb672e956/pol-2016-6-24-polypropylene-1-polypropylene-polypropylene-identifiers-cas-number.jpg)