Embed Size (px)
Citation preview
Uncle John's 5229 Choupique Road - Sulphur, LA 70665 - www.unclejohns.com - copyright 2002
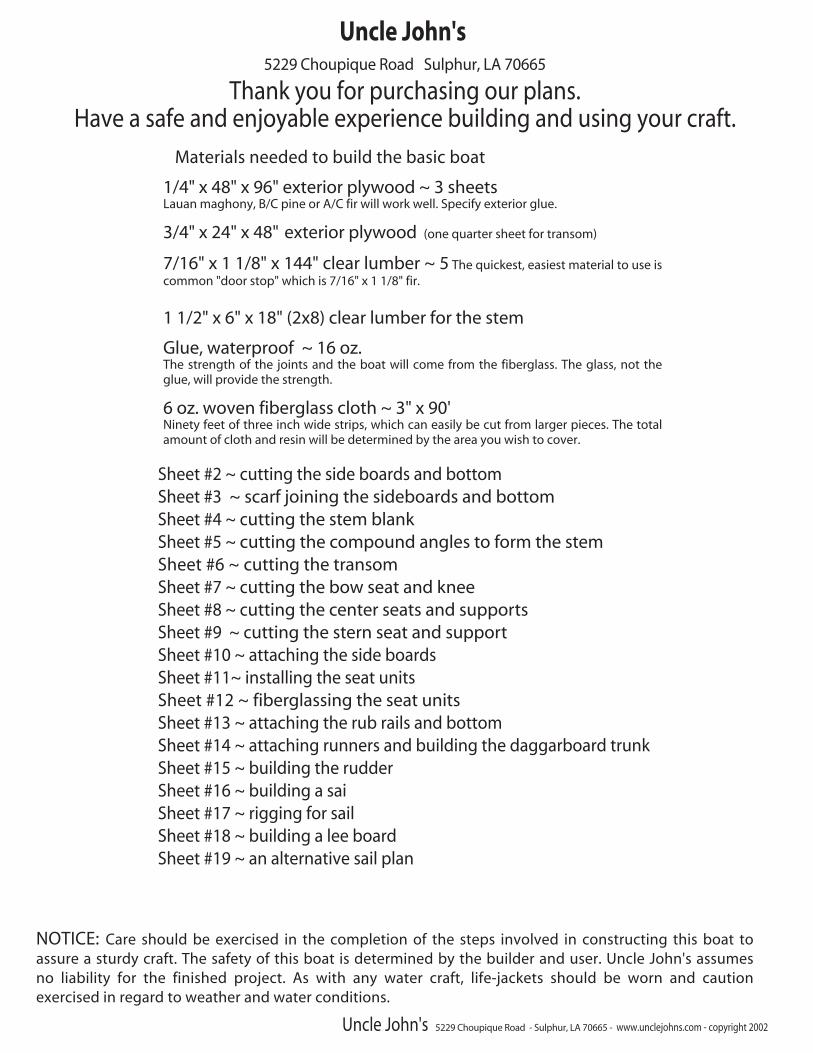
Thank you for purchasing our plans.Have a safe and enjoyable experience building and using your craft.
Uncle John's 5229 Choupique Road Sulphur, LA 70665
Materials needed to build the basic boat
1/4" x 48" x 96" exterior plywood ~ 3 sheetsLauan maghony, B/C pine or A/C fir will work well. Specify exterior glue.
3/4" x 24" x 48" exterior plywood (one quarter sheet for transom)
7/16" x 1 1/8" x 144" clear lumber ~ 5 The quickest, easiest material to use is common "door stop" which is 7/16" x 1 1/8" fir.
1 1/2" x 6" x 18" (2x8) clear lumber for the stem
Glue, waterproof ~ 16 oz.The strength of the joints and the boat will come from the fiberglass. The glass, not the glue, will provide the strength.
6 oz. woven fiberglass cloth ~ 3" x 90'Ninety feet of three inch wide strips, which can easily be cut from larger pieces. The total amount of cloth and resin will be determined by the area you wish to cover.
NOTICE: Care should be exercised in the completion of the steps involved in constructing this boat to assure a sturdy craft. The safety of this boat is determined by the builder and user. Uncle John's assumes no liability for the finished project. As with any water craft, life-jackets should be worn and caution exercised in regard to weather and water conditions.
Sheet #2 ~ cutting the side boards and bottomSheet #3 ~ scarf joining the sideboards and bottomSheet #4 ~ cutting the stem blank Sheet #5 ~ cutting the compound angles to form the stemSheet #6 ~ cutting the transomSheet #7 ~ cutting the bow seat and kneeSheet #8 ~ cutting the center seats and supportsSheet #9 ~ cutting the stern seat and supportSheet #10 ~ attaching the side boardsSheet #11~ installing the seat unitsSheet #12 ~ fiberglassing the seat unitsSheet #13 ~ attaching the rub rails and bottomSheet #14 ~ attaching runners and building the daggarboard trunkSheet #15 ~ building the rudderSheet #16 ~ building a saiSheet #17 ~ rigging for sailSheet #18 ~ building a lee boardSheet #19 ~ an alternative sail plan
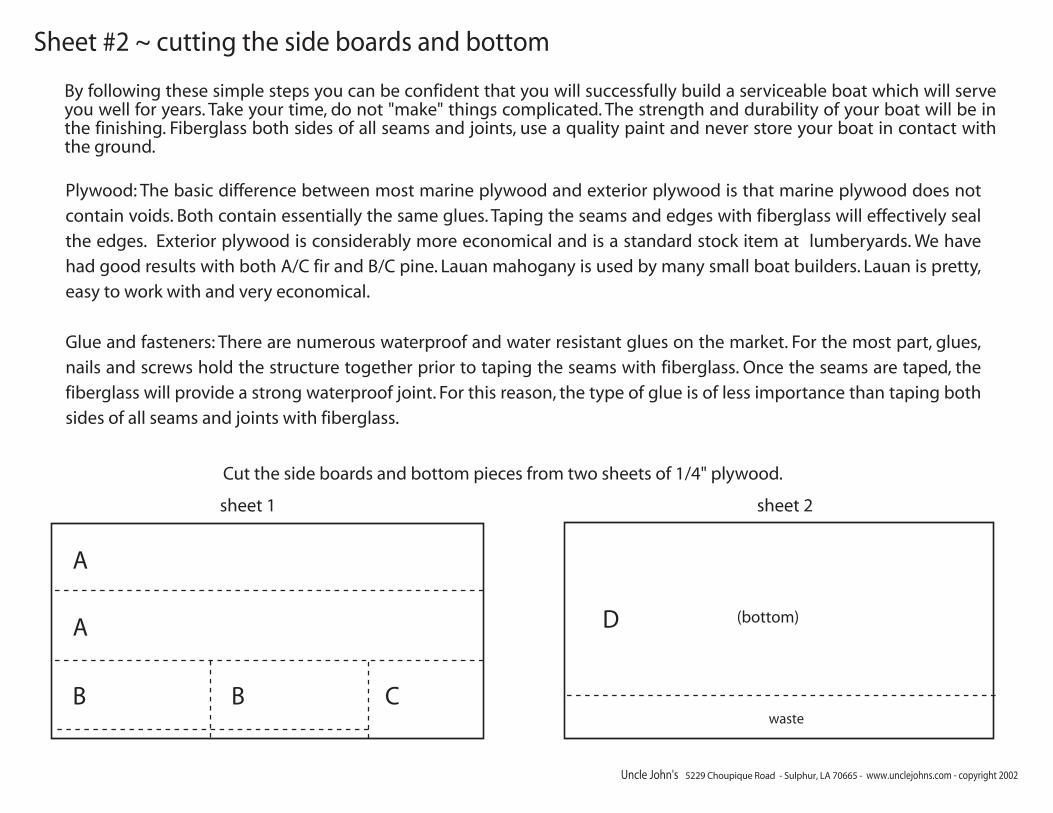
By following these simple steps you can be confident that you will successfully build a serviceable boat which will serve you well for years. Take your time, do not "make" things complicated. The strength and durability of your boat will be in the finishing. Fiberglass both sides of all seams and joints, use a quality paint and never store your boat in contact with the ground.
Sheet #2 ~ cutting the side boards and bottom
(bottom)
waste
Uncle John's 5229 Choupique Road - Sulphur, LA 70665 - www.unclejohns.com - copyright 2002
A
A
B B C
D
Plywood: The basic difference between most marine plywood and exterior plywood is that marine plywood does not
contain voids. Both contain essentially the same glues. Taping the seams and edges with fiberglass will effectively seal
the edges. Exterior plywood is considerably more economical and is a standard stock item at lumberyards. We have
had good results with both A/C fir and B/C pine. Lauan mahogany is used by many small boat builders. Lauan is pretty,
easy to work with and very economical.
Glue and fasteners: There are numerous waterproof and water resistant glues on the market. For the most part, glues,
nails and screws hold the structure together prior to taping the seams with fiberglass. Once the seams are taped, the
fiberglass will provide a strong waterproof joint. For this reason, the type of glue is of less importance than taping both
sides of all seams and joints with fiberglass.
Cut the side boards and bottom pieces from two sheets of 1/4" plywood.
sheet 1 sheet 2
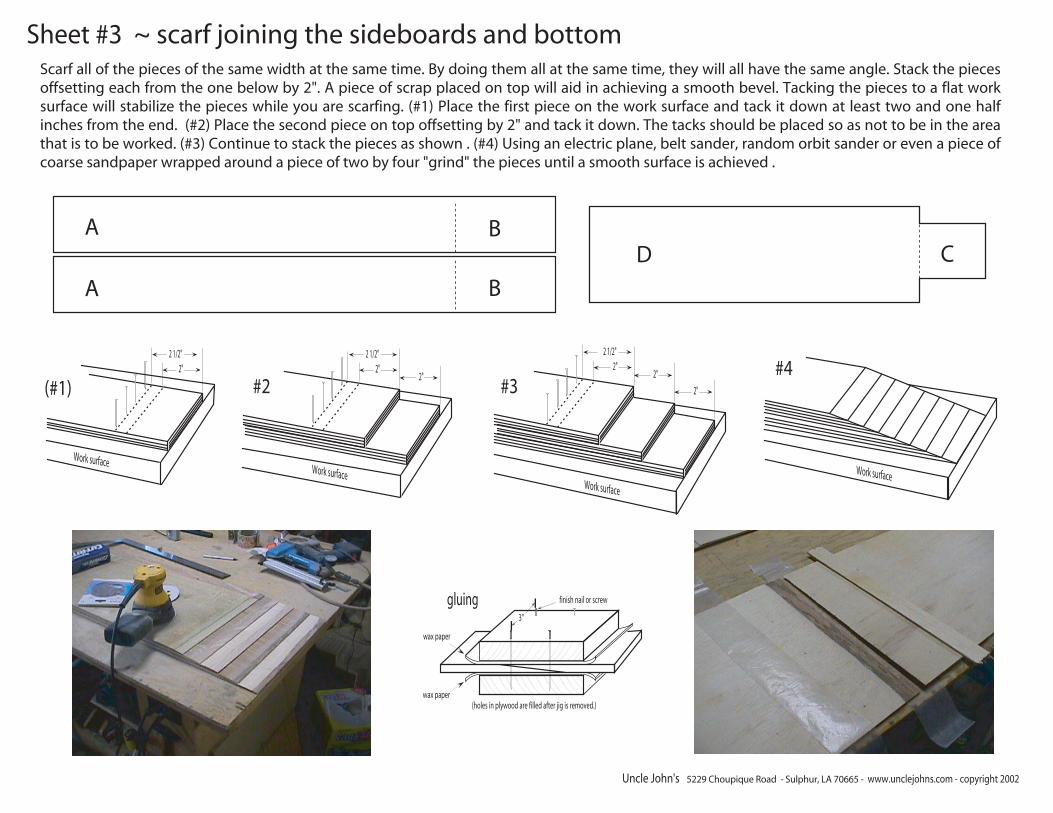
Scarf all of the pieces of the same width at the same time. By doing them all at the same time, they will all have the same angle. Stack the pieces offsetting each from the one below by 2". A piece of scrap placed on top will aid in achieving a smooth bevel. Tacking the pieces to a flat work surface will stabilize the pieces while you are scarfing. (#1) Place the first piece on the work surface and tack it down at least two and one half inches from the end. (#2) Place the second piece on top offsetting by 2" and tack it down. The tacks should be placed so as not to be in the area that is to be worked. (#3) Continue to stack the pieces as shown . (#4) Using an electric plane, belt sander, random orbit sander or even a piece of coarse sandpaper wrapped around a piece of two by four "grind" the pieces until a smooth surface is achieved .
wax paper
wax paper
gluing finish nail or screw
3"
(holes in plywood are filled after jig is removed.)
2 1/2"2"
Work surface
(#1)
2 1/2"2"
2"
Work surface
#2
Work surface
#42 1/2"
2"2"
2"
Work surface
#3
A
A
B
B
CD
Sheet #3 ~ scarf joining the sideboards and bottom
Uncle John's 5229 Choupique Road - Sulphur, LA 70665 - www.unclejohns.com - copyright 2002
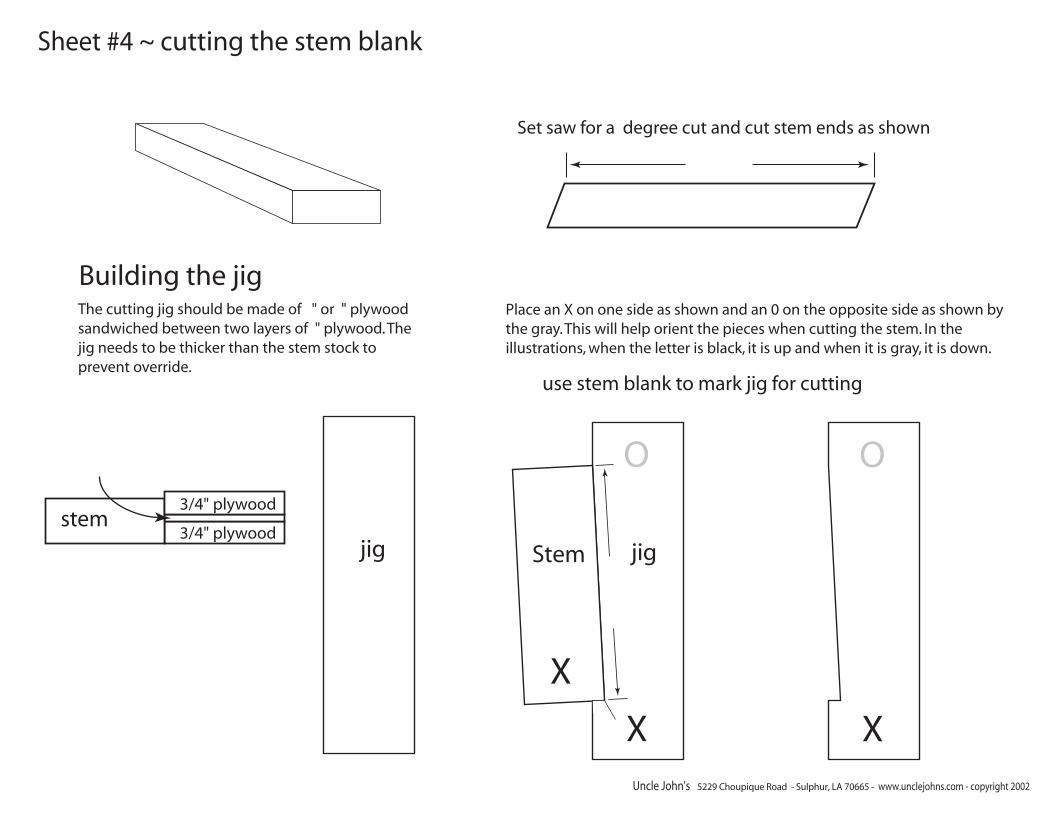
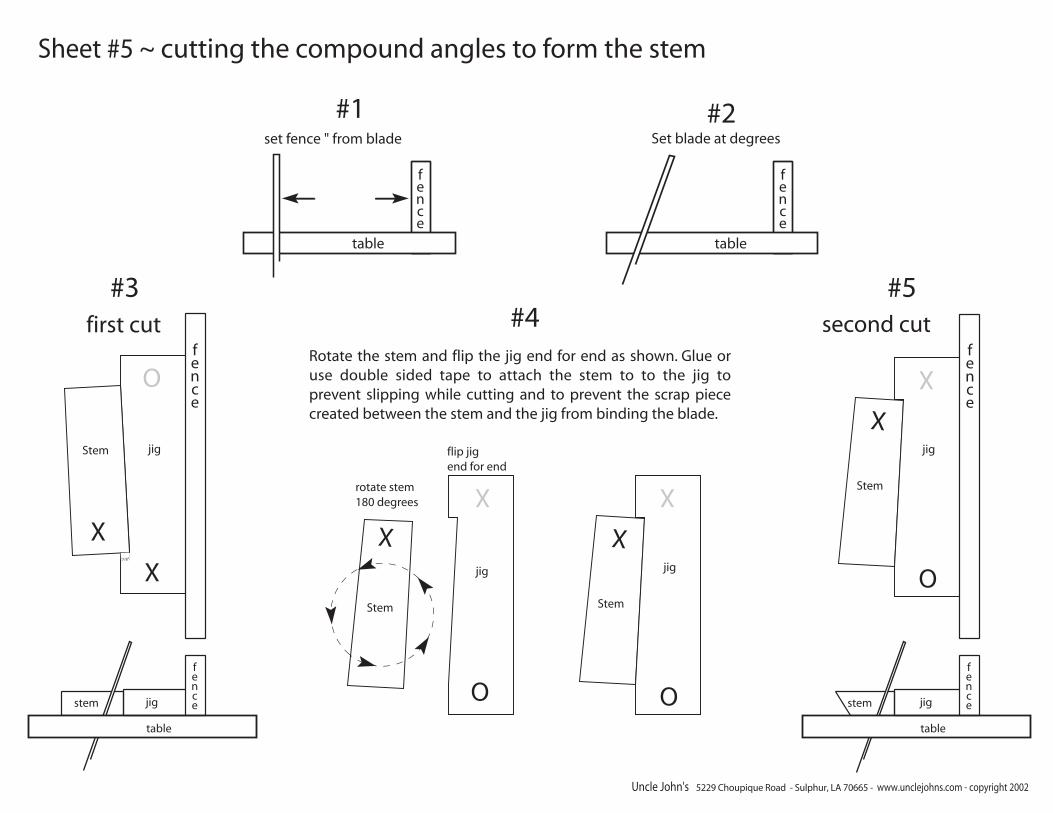
Set saw for a degree cut and cut stem ends as shown
Sheet #4 ~ cutting the stem blank
use stem blank to mark jig for cutting
Stem jigjig
X
X
O
X
O
Building the jigThe cutting jig should be made of " or " plywood sandwiched between two layers of " plywood. The jig needs to be thicker than the stem stock to prevent override.
Place an X on one side as shown and an 0 on the opposite side as shown by the gray. This will help orient the pieces when cutting the stem. In the illustrations, when the letter is black, it is up and when it is gray, it is down.
stem3/4" plywood
3/4" plywood
Uncle John's 5229 Choupique Road - Sulphur, LA 70665 - www.unclejohns.com - copyright 2002
7/8"
Stem jig
X
X
O
Stem
X
X
XO
XO
flip jigend for end
rotate stem180 degrees
second cut
table
fence
fence
fence
fence
fence
set fence " from blade Set blade at degrees
Sheet #5 ~ cutting the compound angles to form the stem
first cut
jig
Stem
jig
X
XO
Stem
jig
table
Rotate the stem and flip the jig end for end as shown. Glue or use double sided tape to attach the stem to to the jig to prevent slipping while cutting and to prevent the scrap piece created between the stem and the jig from binding the blade.
table
jigstem
fence
table
jigstem
#3#4
#5
#1 #2
Uncle John's 5229 Choupique Road - Sulphur, LA 70665 - www.unclejohns.com - copyright 2002
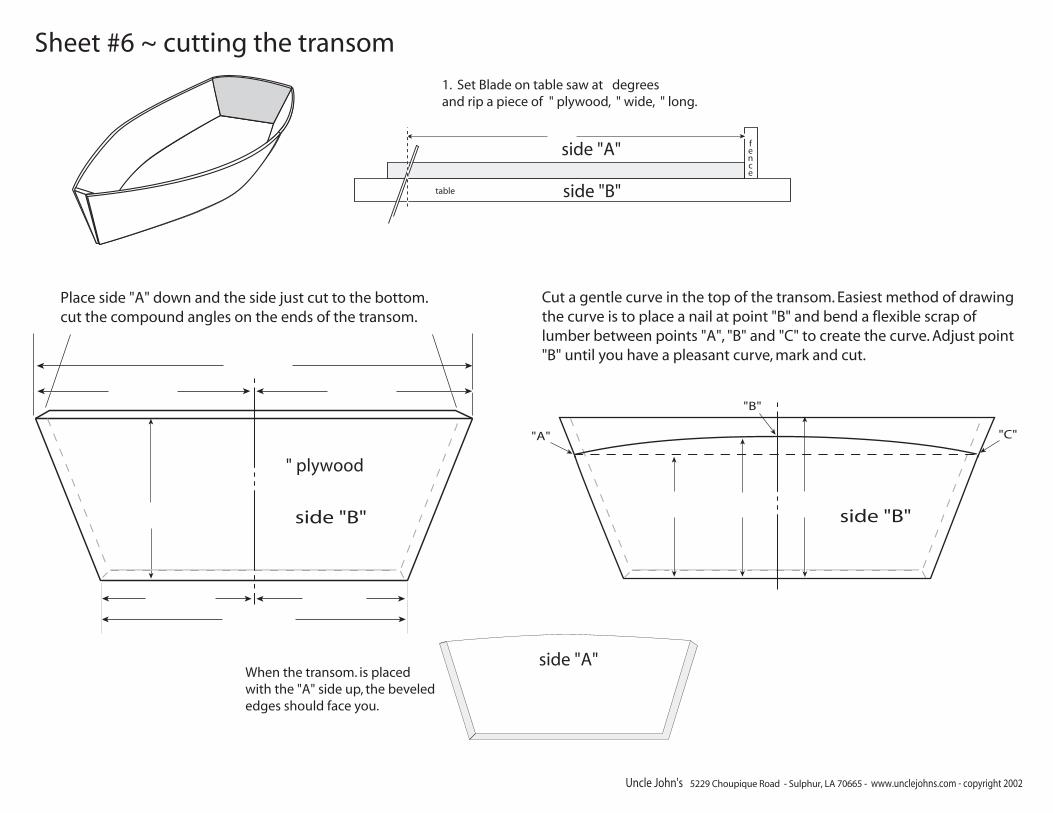
When the transom. is placedwith the "A" side up, the bevelededges should face you.
side "A"
side "B"
Cut a gentle curve in the top of the transom. Easiest method of drawing the curve is to place a nail at point "B" and bend a flexible scrap of lumber between points "A", "B" and "C" to create the curve. Adjust point "B" until you have a pleasant curve, mark and cut.
side "B"
"A"
"B"
"C"
1. Set Blade on table saw at degrees and rip a piece of " plywood, " wide, " long.
Sheet #6 ~ cutting the transom
table
fence
side "B"
side "A"
Place side "A" down and the side just cut to the bottom. cut the compound angles on the ends of the transom.
" plywood
Uncle John's 5229 Choupique Road - Sulphur, LA 70665 - www.unclejohns.com - copyright 2002
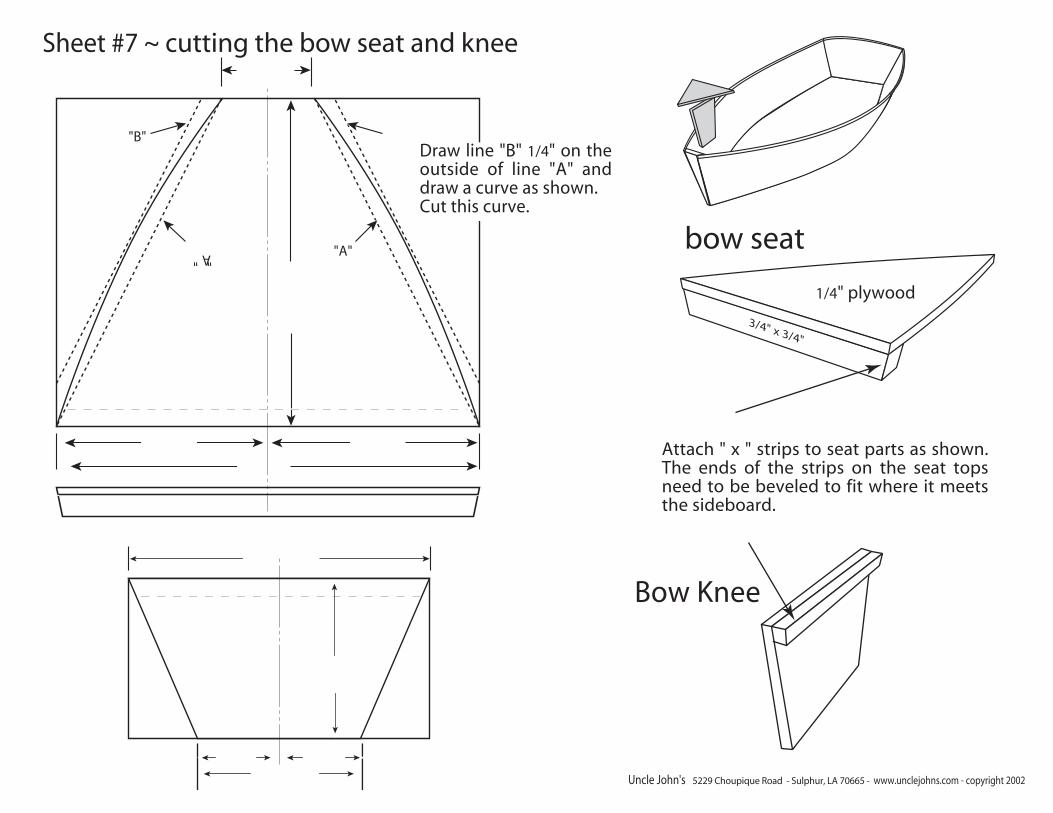
Sheet #7 ~ cutting the bow seat and knee
Bow Knee
Attach " x " strips to seat parts as shown. The ends of the strips on the seat tops need to be beveled to fit where it meets the sideboard.
"A"
"B"
"A" bow seat
Draw line "B" 1/4" on the outside of line "A" and draw a curve as shown.Cut this curve.
1/4" plywood
3/4" x 3/4"
Uncle John's 5229 Choupique Road - Sulphur, LA 70665 - www.unclejohns.com - copyright 2002
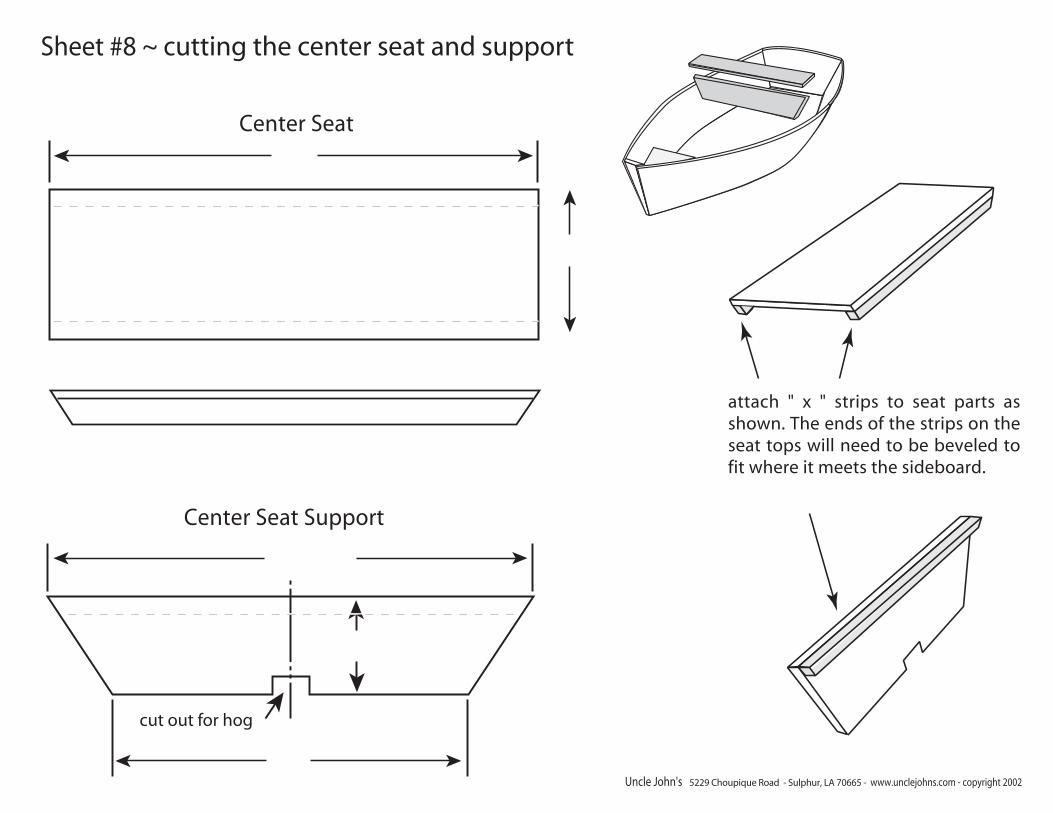
Sheet #8 ~ cutting the center seat and support
attach " x " strips to seat parts as shown. The ends of the strips on the seat tops will need to be beveled to fit where it meets the sideboard.
Center Seat Support
Center Seat
cut out for hog
Uncle John's 5229 Choupique Road - Sulphur, LA 70665 - www.unclejohns.com - copyright 2002
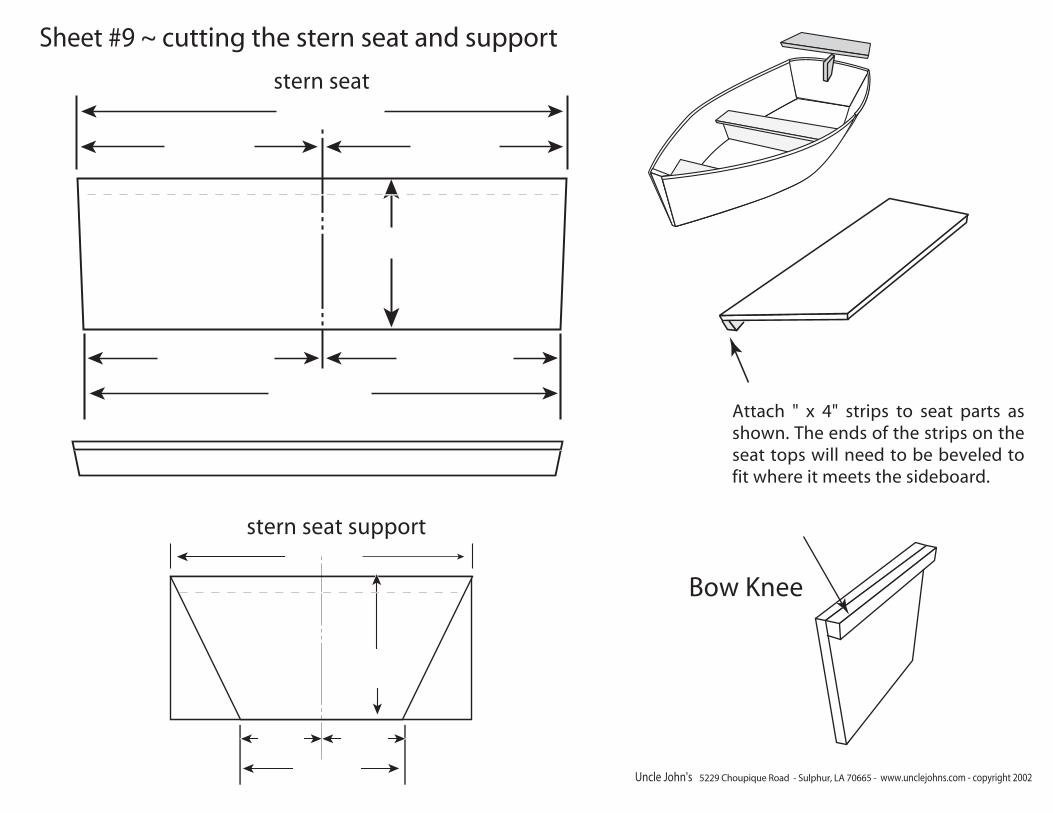
Sheet #9 ~ cutting the stern seat and support
stern seat
stern seat support
Attach " x 4" strips to seat parts as shown. The ends of the strips on the seat tops will need to be beveled to fit where it meets the sideboard.
Bow Knee
Uncle John's 5229 Choupique Road - Sulphur, LA 70665 - www.unclejohns.com - copyright 2002
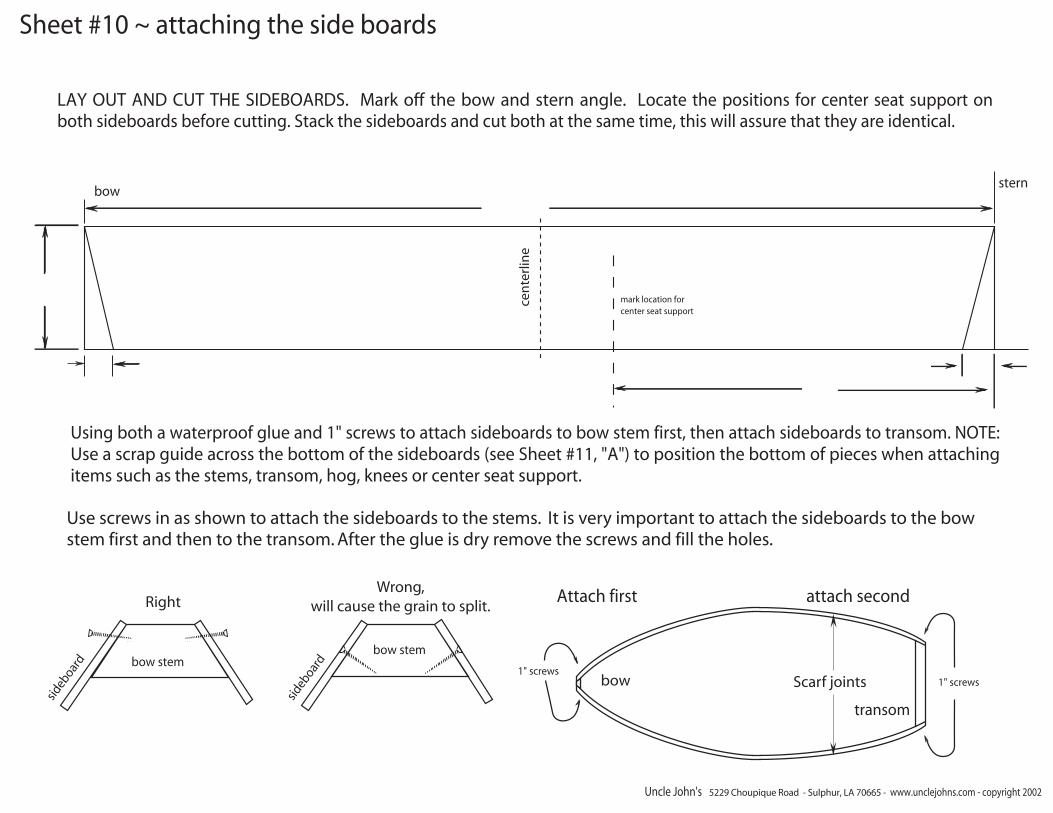
LAY OUT AND CUT THE SIDEBOARDS. Mark off the bow and stern angle. Locate the positions for center seat support on both sideboards before cutting. Stack the sideboards and cut both at the same time, this will assure that they are identical.
bowstern
cen
terl
ine
mark location for center seat support
Sheet #10 ~ attaching the side boards
1" screws
transom
1" screwsbow
Using both a waterproof glue and 1" screws to attach sideboards to bow stem first, then attach sideboards to transom. NOTE: Use a scrap guide across the bottom of the sideboards (see Sheet #11, "A") to position the bottom of pieces when attaching items such as the stems, transom, hog, knees or center seat support.
Scarf joints
Use screws in as shown to attach the sideboards to the stems. It is very important to attach the sideboards to the bow stem first and then to the transom. After the glue is dry remove the screws and fill the holes.
RightWrong,
will cause the grain to split.Attach first attach second
bow stembow stem
sideb
oard
sideb
oard
Uncle John's 5229 Choupique Road - Sulphur, LA 70665 - www.unclejohns.com - copyright 2002
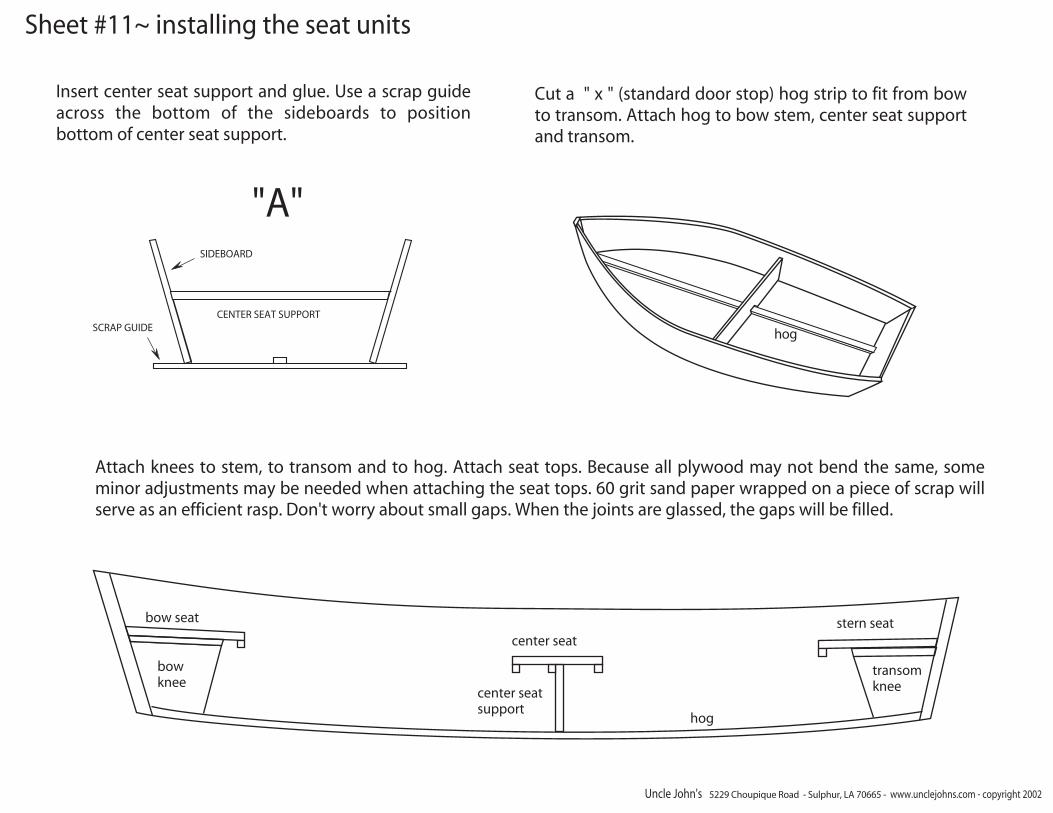
Insert center seat support and glue. Use a scrap guide across the bottom of the sideboards to position bottom of center seat support.
hog
Cut a " x " (standard door stop) hog strip to fit from bow to transom. Attach hog to bow stem, center seat support and transom.
CENTER SEAT SUPPORT
SIDEBOARD
SCRAP GUIDE
Sheet #11~ installing the seat units
center seatsupport
transomknee
bowknee
hog
Attach knees to stem, to transom and to hog. Attach seat tops. Because all plywood may not bend the same, some minor adjustments may be needed when attaching the seat tops. 60 grit sand paper wrapped on a piece of scrap will serve as an efficient rasp. Don't worry about small gaps. When the joints are glassed, the gaps will be filled.
bow seat
center seatstern seat
"A"
Uncle John's 5229 Choupique Road - Sulphur, LA 70665 - www.unclejohns.com - copyright 2002

Sheet #12 ~ fiber glassing the seat units
Fiberglass: All seams and joints should be fiber glassed inside and out with 3" wide 6 oz. cloth for strength and to seal the edges. Epoxy resin is the best, polyester is the most economical and the easiest to obtain. Polyester resin can be found lumberyards and auto parts stores. A good source for epoxy may be found from www.raka.com
1st.
2nd.
Use a tongue depressor to create a cove on the inside seams with a mixture of fiberglass resin mixed with filler or fine sawdust.
Paint resin on the area to be glassed. If you use polyester resin, for the first application, add one tablespoon of acetone to each ounce of resin, thinning the resin to increase penetration into the wood fiber and holding strength. This is not necessary when using epoxy and is only for the first coat using polyester.
3rd. Put cloth in place and saturate with resin. When the cloth is saturated it will become virtually invisible. It is important to saturate the cloth but not to the extent to "float" the cloth off the surface. The texture of the weave may be floated with a second coat of resin. Overlap cloth by 2" where needed.
4th. After the resin has cured, puncture any bubbles and re-glass. The edges of the cloth may be feather on by sanding to blend the cloth into the wood.
Paint: Epoxy must be protected from sunlight or it will degrade. Painting is easy and durable. 100% acrylic exterior latex (water based) house paint works well. It is economical, fast drying and very durable. Water based paints generally stick well to epoxy where some oil based paints have adhesion problems and often require more preparation. If you wish to stain your boat and use a clear finish you should use a water or alcohol and not oil based stain. Allow the stain to dry thoroughly before applying the resin. A good marine varnish will protect the epoxy and show the beauty of the wood.
Uncle John's 5229 Choupique Road - Sulphur, LA 70665 - www.unclejohns.com - copyright 2002
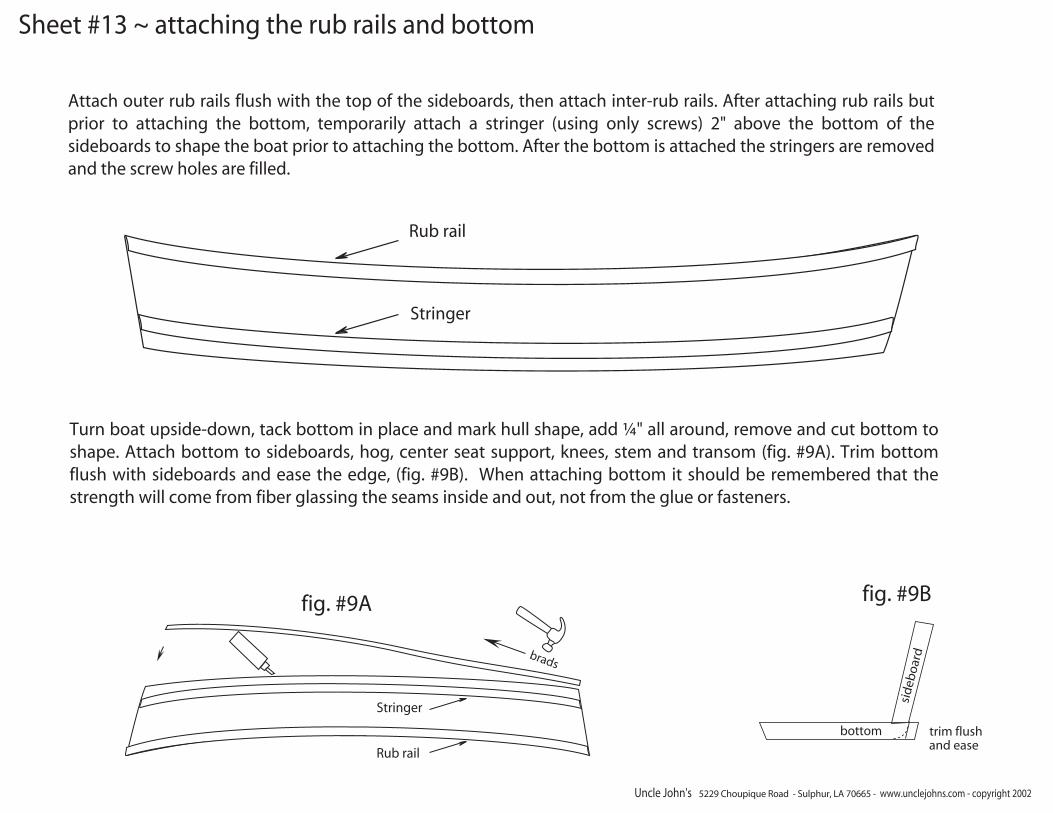
Turn boat upside-down, tack bottom in place and mark hull shape, add ¼" all around, remove and cut bottom to shape. Attach bottom to sideboards, hog, center seat support, knees, stem and transom (fig. #9A). Trim bottom flush with sideboards and ease the edge, (fig. #9B). When attaching bottom it should be remembered that the strength will come from fiber glassing the seams inside and out, not from the glue or fasteners.
sid
eboa
rd
bottom trim flushand ease
fig. #9Bfig. #9A
Attach outer rub rails flush with the top of the sideboards, then attach inter-rub rails. After attaching rub rails but prior to attaching the bottom, temporarily attach a stringer (using only screws) 2" above the bottom of the sideboards to shape the boat prior to attaching the bottom. After the bottom is attached the stringers are removed and the screw holes are filled.
Sheet #13 ~ attaching the rub rails and bottom
Rub rail
Stringer
Rub rail
Stringer
brads
Uncle John's 5229 Choupique Road - Sulphur, LA 70665 - www.unclejohns.com - copyright 2002
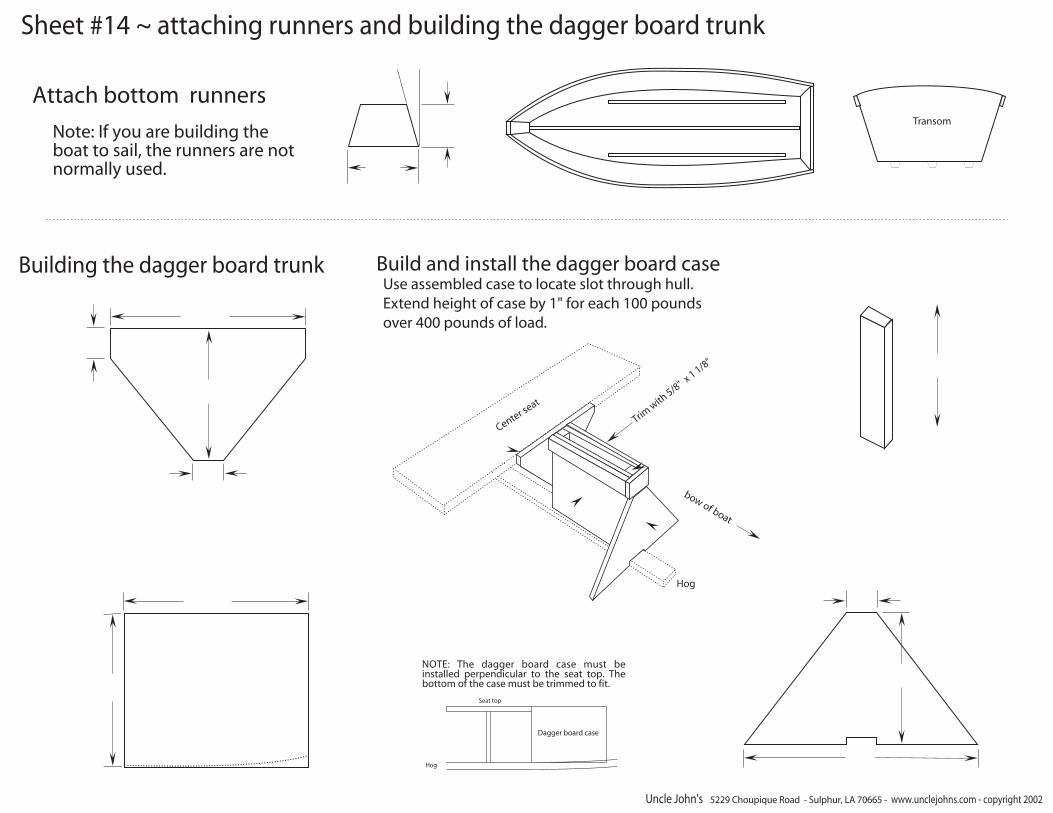
Sheet #14 ~ attaching runners and building the dagger board trunk
Note: If you are building theboat to sail, the runners are notnormally used.
Center seat
Hog
Trim w
ith 5/8" x
1 1/8"
NOTE: The dagger board case must be installed perpendicular to the seat top. The bottom of the case must be trimmed to fit.
Dagger board case
Seat top
Hog
Attach bottom runners
Build and install the dagger board caseUse assembled case to locate slot through hull.Extend height of case by 1" for each 100 poundsover 400 pounds of load.
Building the dagger board trunk
Transom
bow of boat
Uncle John's 5229 Choupique Road - Sulphur, LA 70665 - www.unclejohns.com - copyright 2002
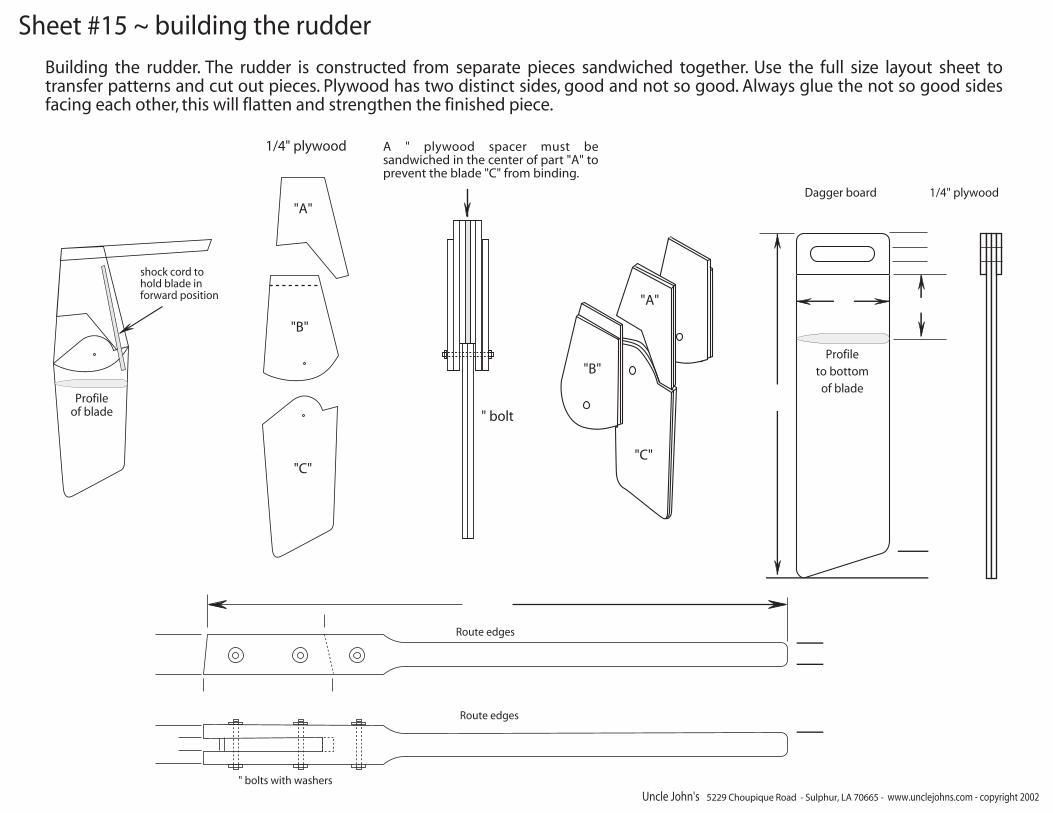
Sheet #15 ~ building the rudder
Building the rudder. The rudder is constructed from separate pieces sandwiched together. Use the full size layout sheet to transfer patterns and cut out pieces. Plywood has two distinct sides, good and not so good. Always glue the not so good sides facing each other, this will flatten and strengthen the finished piece.
1/4" plywood
" bolt
Route edges
Route edges
Profileto bottom
of bladeProfile
of blade
Dagger board 1/4" plywood
" bolts with washers
A " plywood spacer must be sandwiched in the center of part "A" to prevent the blade "C" from binding.
"A"
"A"
"B"
"B"
"C""C"
shock cord to hold blade in forward position
Uncle John's 5229 Choupique Road - Sulphur, LA 70665 - www.unclejohns.com - copyright 2002
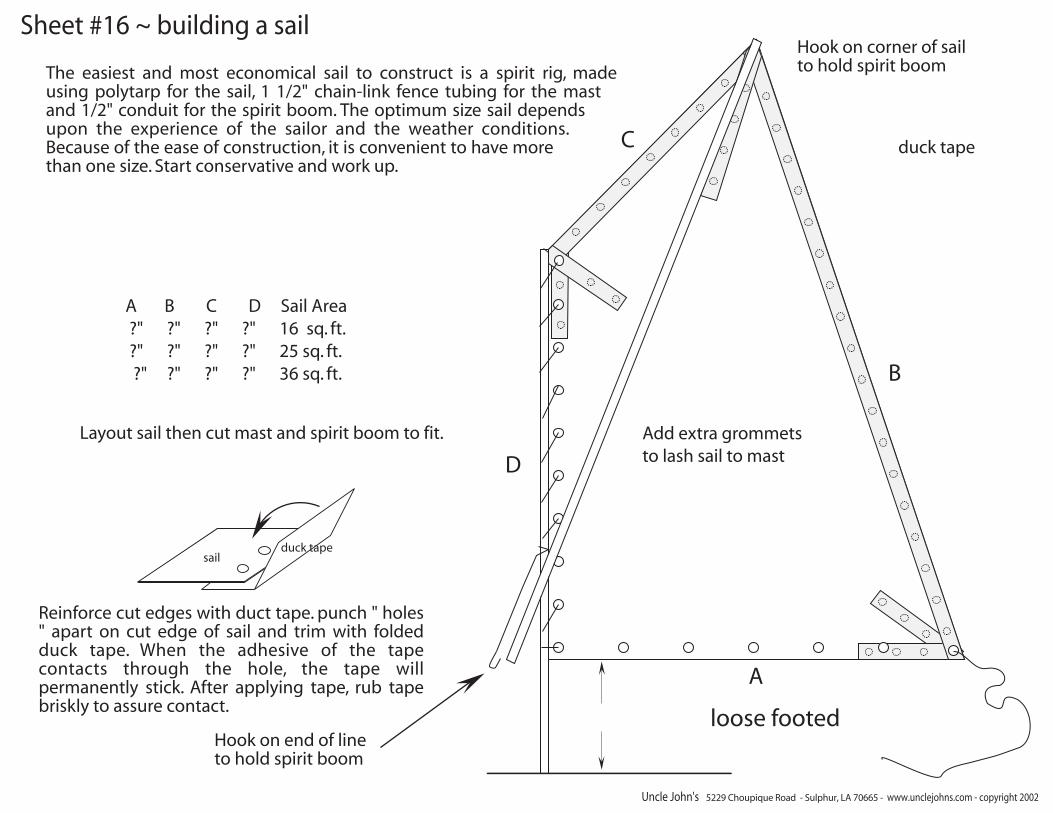
Sheet #16 ~ building a sail
The easiest and most economical sail to construct is a spirit rig, made using polytarp for the sail, 1 1/2" chain-link fence tubing for the mast and 1/2" conduit for the spirit boom. The optimum size sail depends upon the experience of the sailor and the weather conditions. Because of the ease of construction, it is convenient to have more than one size. Start conservative and work up.
Reinforce cut edges with duct tape. punch " holes " apart on cut edge of sail and trim with folded duck tape. When the adhesive of the tape contacts through the hole, the tape will permanently stick. After applying tape, rub tape briskly to assure contact.
A B C D Sail Area ?" ?" ?" ?" 16 sq. ft. ?" ?" ?" ?" 25 sq. ft. ?" ?" ?" ?" 36 sq. ft.
Layout sail then cut mast and spirit boom to fit.
sailduck tape
Add extra grommetsto lash sail to mast
duck tape
loose footed
A
B
D
C
Hook on end of lineto hold spirit boom
Hook on corner of sailto hold spirit boom
Uncle John's 5229 Choupique Road - Sulphur, LA 70665 - www.unclejohns.com - copyright 2002
NOTICE: Care should be exercised in the completion of the steps involved in constructing this kit to assure a sturdy craft. The safety of this boat is determined by the builder and user. This kit is not rated for either number of occupants, maximum weight or motor size. The purpose of this kit is to provide the builder with those parts that require precision cutting and a set of easy to follow building plans. Uncle John's assumes no liability for the finished project. As with any water craft, life-jackets should be worn and caution exercised in regard to weather and water conditions.
Bow knee
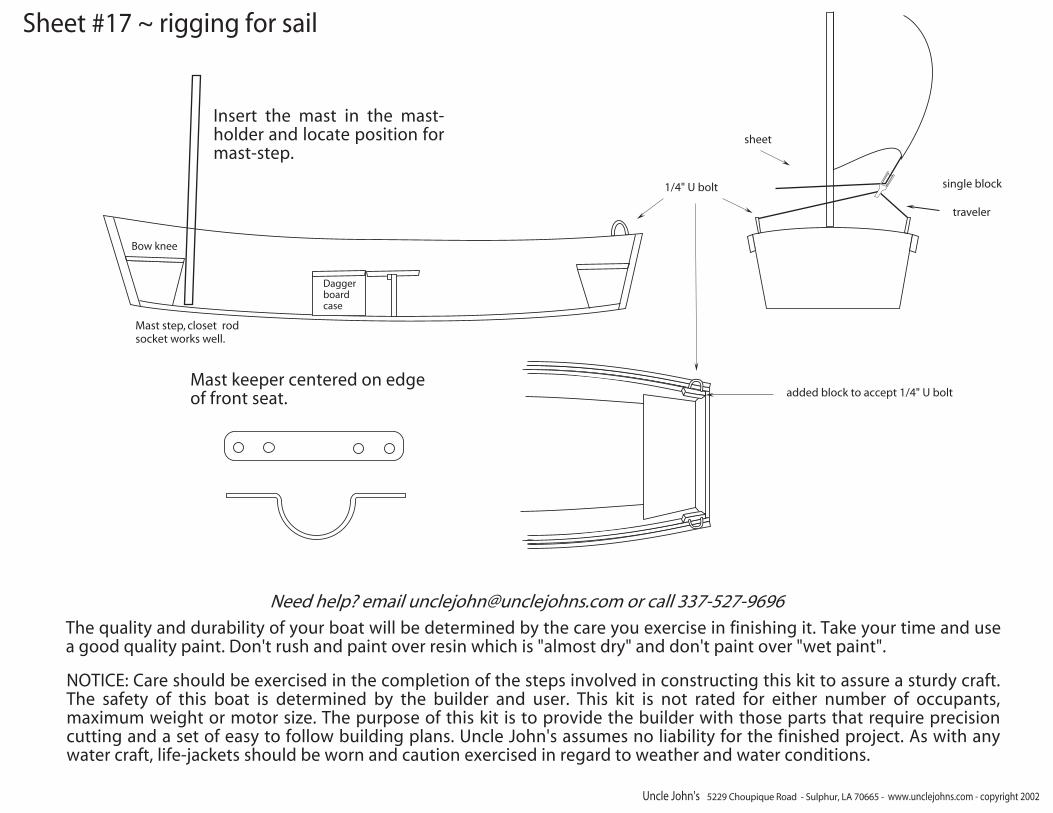
Sheet #17 ~ rigging for sail
The quality and durability of your boat will be determined by the care you exercise in finishing it. Take your time and use a good quality paint. Don't rush and paint over resin which is "almost dry" and don't paint over "wet paint".
Insert the mast in the mast-holder and locate position for mast-step.
Mast keeper centered on edgeof front seat.
Mast step, closet rodsocket works well.
single block
traveler
sheet
added block to accept 1/4" U bolt
1/4" U bolt
Need help? email [email protected] or call 337-527-9696
Daggerboardcase
Uncle John's 5229 Choupique Road - Sulphur, LA 70665 - www.unclejohns.com - copyright 2002
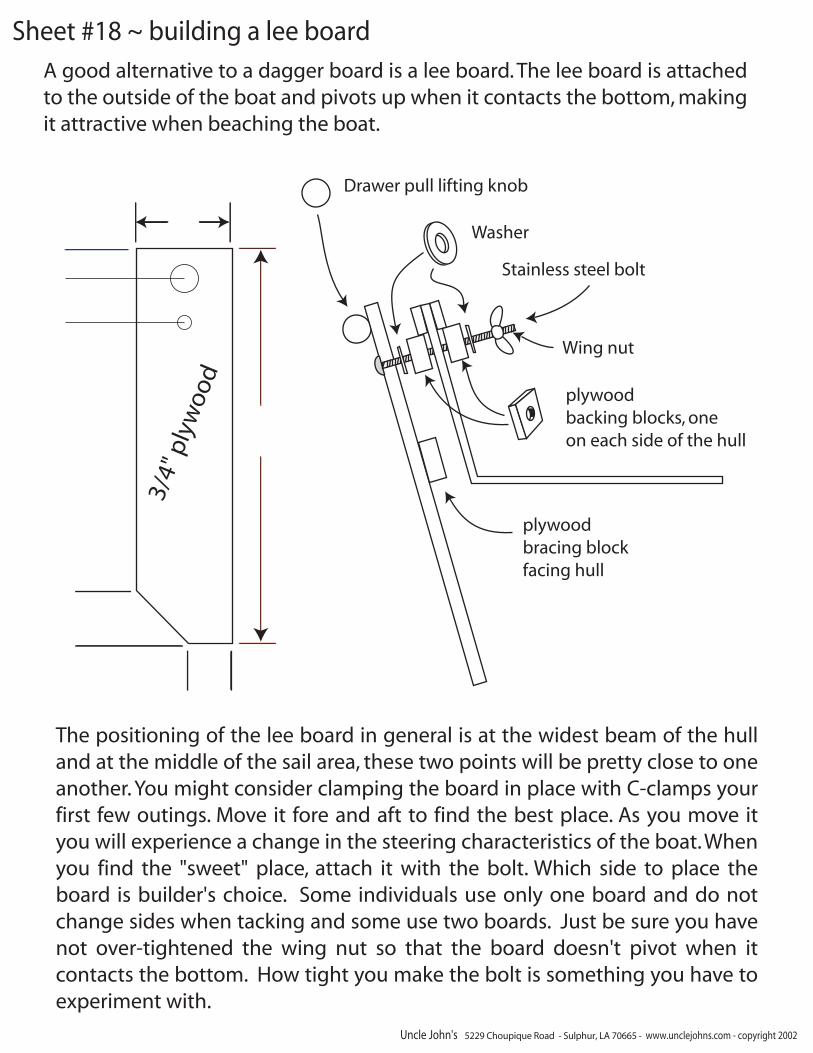
Washer
Wing nut
Stainless steel bolt
plywoodbracing blockfacing hull
plywoodbacking blocks, one on each side of the hull
3/4"
ply
woo
dDrawer pull lifting knob
The positioning of the lee board in general is at the widest beam of the hull and at the middle of the sail area, these two points will be pretty close to one another. You might consider clamping the board in place with C-clamps your first few outings. Move it fore and aft to find the best place. As you move it you will experience a change in the steering characteristics of the boat. When you find the "sweet" place, attach it with the bolt. Which side to place the board is builder's choice. Some individuals use only one board and do not change sides when tacking and some use two boards. Just be sure you have not over-tightened the wing nut so that the board doesn't pivot when it contacts the bottom. How tight you make the bolt is something you have to experiment with.
A good alternative to a dagger board is a lee board. The lee board is attached to the outside of the boat and pivots up when it contacts the bottom, making it attractive when beaching the boat.
Sheet #18 ~ building a lee board
Uncle John's 5229 Choupique Road - Sulphur, LA 70665 - www.unclejohns.com - copyright 2002
Leec
h
Luff
Boom
halyard
Mas
t
Gaff'
Foot
Diagonal
Peak
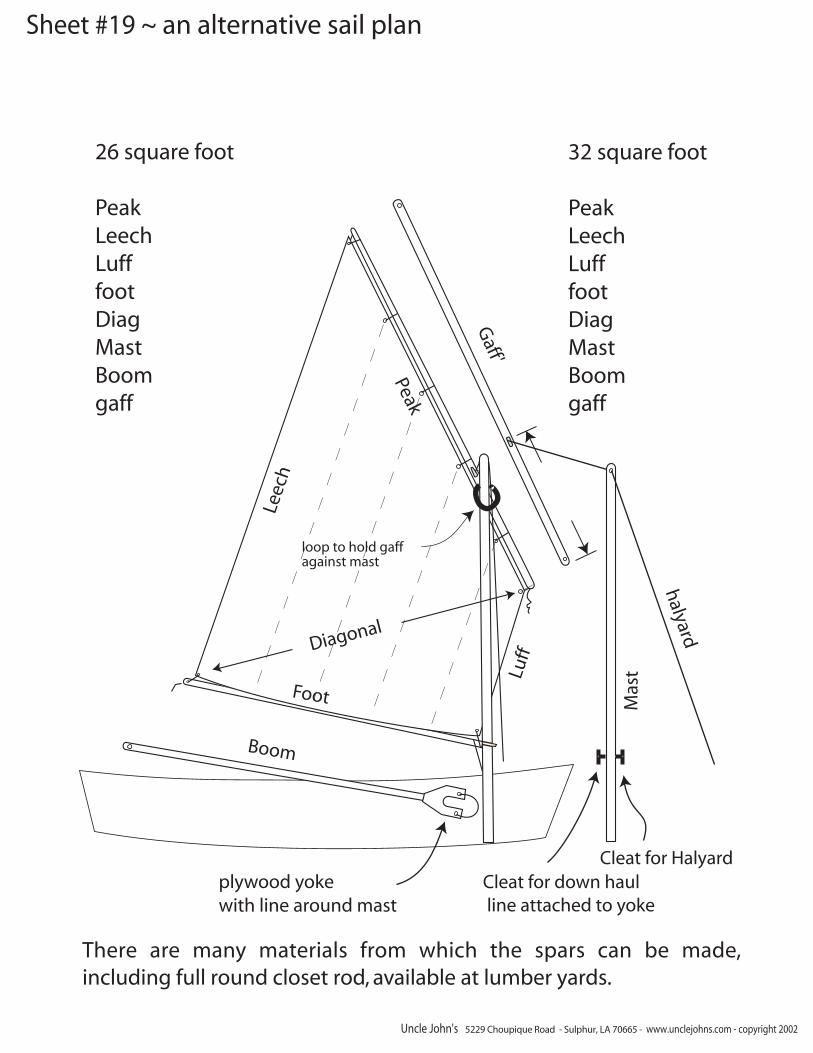
32 square foot
Peak Leech Luff foot Diag Mast Boom gaff
26 square foot
Peak Leech Luff foot Diag Mast Boom gaff
Cleat for HalyardCleat for down haul line attached to yoke
plywood yokewith line around mast
loop to hold gaffagainst mast
There are many materials from which the spars can be made, including full round closet rod, available at lumber yards.
Sheet #19 ~ an alternative sail plan
Uncle John's 5229 Choupique Road - Sulphur, LA 70665 - www.unclejohns.com - copyright 2002