Embed Size (px)
Citation preview
Project Number. GFP1003
DESIGN OF A ROBITICS DSL
A Major Qualifying Project Report:
submitted to the faculty of the
WORCESTER POLYTECHNIC INSTITUTE
in partial fulfillment of the requirements for the
Degree of Bachelor of Science
by:
Terry Tata
Ethan Truong
Date: December 16, 2010
Approved:
______________________________
Professor Gary F. Pollice, Major Advisor
1. domain specific language
2. robotics
3. language translation
Abstract
Our MQP focused on building a domain specific language (DSL) to be used with Neuron
Robotics‟ flagship product, the DyIO (Dynamic Input/Ouput). Devices, such as sensors
and servos, connected to the DyIO can be manipulated through Java, but there is a steep
learning curve for those with no prior programming experience which we sought to
eliminate.
Our DSL, Fez, is developed in Ruby and ANTLR and interacts with Neuron Robotics
Java libraries as a façade. We define a class hierarchy of the DyIO, abstractions for
common devices that can be connected, and functionality for such devices. We develop a
grammar and parser for our DSL which translates Fez to Ruby and execute the resulting
code interactively.
Fez is a fully functional language that properly translates all supported statements into
Ruby. It was designed to somewhat mirror writing English as opposed to writing in a
programming language. The main interface to Fez is a Read-Eval-Print-Loop (REPL) and
it is run in a terminal window.
Acknowledgements
We would like to thank Bob Breznak and Kevin Harrington of Neuron Robotics for
agreeing to let us develop this Domain Specific Language on their product, the DyIO. We
would also like to thank them for all of the resources they provided, as well as valuable
insight and guidance, to make this project a success. We would also like to thank our
advisor, Gary Pollice, for everything he has done in helping progress our thinking to the
point where we were able to develop a successful DSL prototype.
Table of Contents
Abstract ................................................................................................................................ i
Acknowledgements ............................................................................................................. ii List of Illustrations .............................................................................................................. 1 List of Tables ...................................................................................................................... 2 Introduction ......................................................................................................................... 3 Background ......................................................................................................................... 6
Domain Specific Languages ........................................................................................... 6 Neuron Robotics ............................................................................................................. 9 Similar Products ............................................................................................................ 10
Methodology ..................................................................................................................... 12
Iterations ....................................................................................................................... 12 Inception ................................................................................................................... 12
Design ....................................................................................................................... 13 Choosing Our Language ........................................................................................... 15
Developing the DSL ................................................................................................. 15 Translation from Fez to Ruby ................................................................................... 16 Tools ......................................................................................................................... 18
Results and Analysis ......................................................................................................... 19 Comparing the NRSDK with Fez ................................................................................. 19 Extending Fez ............................................................................................................... 22
Peripheral Creation ................................................................................................... 22 Peripheral Extension ................................................................................................. 22
Robotics Modules ..................................................................................................... 23
Metrics .......................................................................................................................... 24
Analysis..................................................................................................................... 25 Future Work and Conclusions .......................................................................................... 26
Appendix A : ANTLR Grammar ...................................................................................... 29 Appendix B: User Manual ................................................................................................ 37
Fez ................................................................................................................................. 37
User Manual .............................................................................................................. 37 Developer Documentation ........................................................................................ 43
JRuby Interface ............................................................................................................. 45 Connecting to DyIO and Peripherals ........................................................................ 45 Creating code for a Peripheral .................................................................................. 46 Extending a Peripheral .............................................................................................. 47
Setting Up Asynchronous Events ............................................................................. 48 Setting Up Robotics Modules ................................................................................... 48
Appendix C: Metrics Calculation ..................................................................................... 50
Comparison 1 ................................................................................................................ 50 NRSDK ..................................................................................................................... 50 Fez ............................................................................................................................. 50 Measurements ........................................................................................................... 50
Comparison 2 ................................................................................................................ 51 NRSDK ..................................................................................................................... 51
Fez ............................................................................................................................. 51
Measurements ........................................................................................................... 51 Comparison 3 ................................................................................................................ 51
NRSDK ..................................................................................................................... 51
Fez ............................................................................................................................. 52 Measurements ........................................................................................................... 52
Comparison 4 ................................................................................................................ 53 NRSDK ..................................................................................................................... 53 Fez ............................................................................................................................. 53
Comparison 5 ................................................................................................................ 54 NRSDK ..................................................................................................................... 54 Fez ............................................................................................................................. 54
Glossary ............................................................................................................................ 55
References ......................................................................................................................... 57
1
List of Illustrations
Figure 1. Interface Flow Pages 3-4
Figure 2. DyIO Page 9
Figure 3. Class Hierarchy Page 14

2
List of Tables
Table 1. Comparison of Fez to NRDSK Page 25
3
Introduction
The task of developing and using software and hardware cannot be taken lightly.
Developers take time and energy in the precise and delicate construction of a product that
suits the customer's needs. The difficulty is how the consumer responds to using the
actual product. Most importantly, does it suit their interests and fulfill their needs? A big
obstacle to overcome is the prerequisite amount of technical experience required to use
certain types of interesting technologies. For example, commercial appeal may be altered
if a staggering amount of programming knowledge is necessary to use a technology.
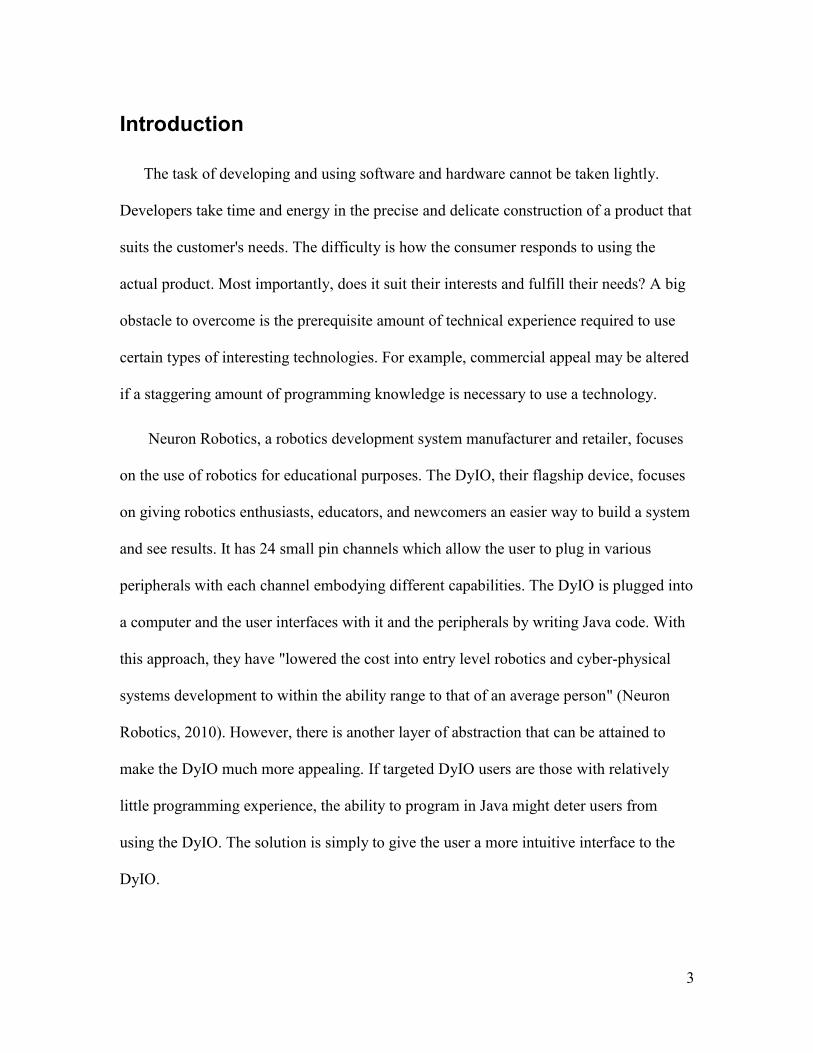
Neuron Robotics, a robotics development system manufacturer and retailer, focuses
on the use of robotics for educational purposes. The DyIO, their flagship device, focuses
on giving robotics enthusiasts, educators, and newcomers an easier way to build a system
and see results. It has 24 small pin channels which allow the user to plug in various
peripherals with each channel embodying different capabilities. The DyIO is plugged into
a computer and the user interfaces with it and the peripherals by writing Java code. With
this approach, they have "lowered the cost into entry level robotics and cyber-physical
systems development to within the ability range to that of an average person" (Neuron
Robotics, 2010). However, there is another layer of abstraction that can be attained to
make the DyIO much more appealing. If targeted DyIO users are those with relatively
little programming experience, the ability to program in Java might deter users from
using the DyIO. The solution is simply to give the user a more intuitive interface to the
DyIO.
4
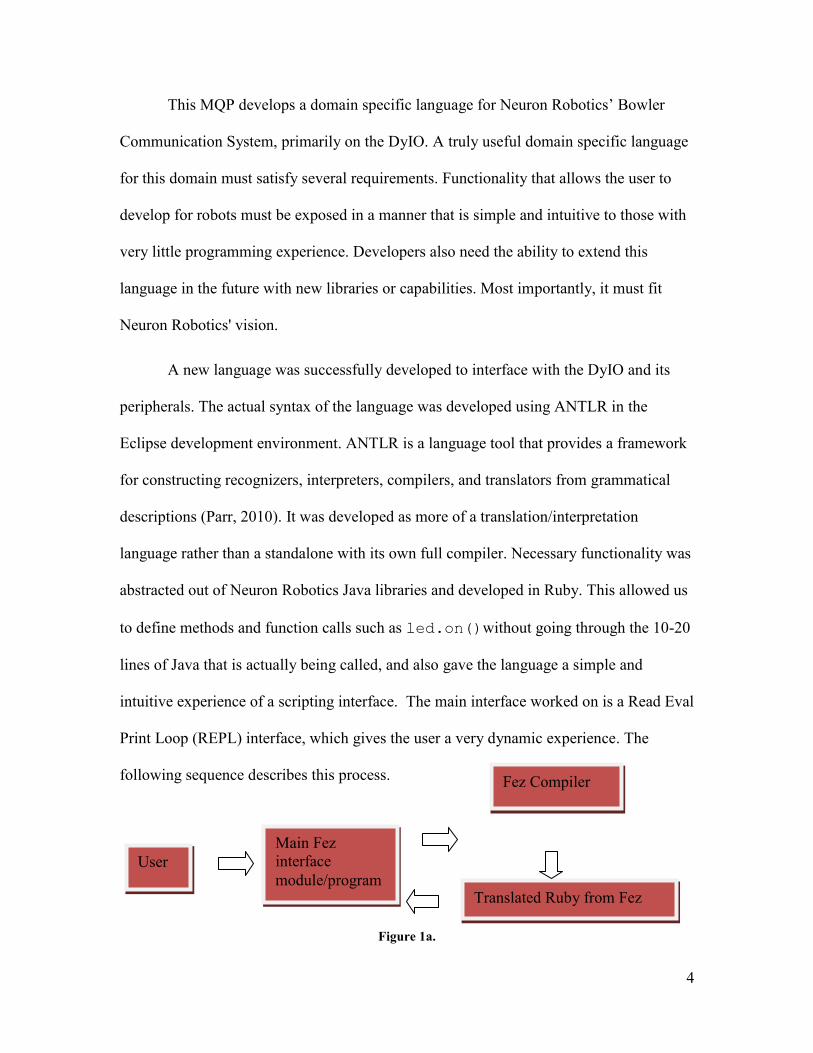
This MQP develops a domain specific language for Neuron Robotics‟ Bowler
Communication System, primarily on the DyIO. A truly useful domain specific language
for this domain must satisfy several requirements. Functionality that allows the user to
develop for robots must be exposed in a manner that is simple and intuitive to those with
very little programming experience. Developers also need the ability to extend this
language in the future with new libraries or capabilities. Most importantly, it must fit
Neuron Robotics' vision.
A new language was successfully developed to interface with the DyIO and its
peripherals. The actual syntax of the language was developed using ANTLR in the
Eclipse development environment. ANTLR is a language tool that provides a framework
for constructing recognizers, interpreters, compilers, and translators from grammatical
descriptions (Parr, 2010). It was developed as more of a translation/interpretation
language rather than a standalone with its own full compiler. Necessary functionality was
abstracted out of Neuron Robotics Java libraries and developed in Ruby. This allowed us
to define methods and function calls such as led.on()without going through the 10-20
lines of Java that is actually being called, and also gave the language a simple and
intuitive experience of a scripting interface. The main interface worked on is a Read Eval
Print Loop (REPL) interface, which gives the user a very dynamic experience. The
following sequence describes this process.
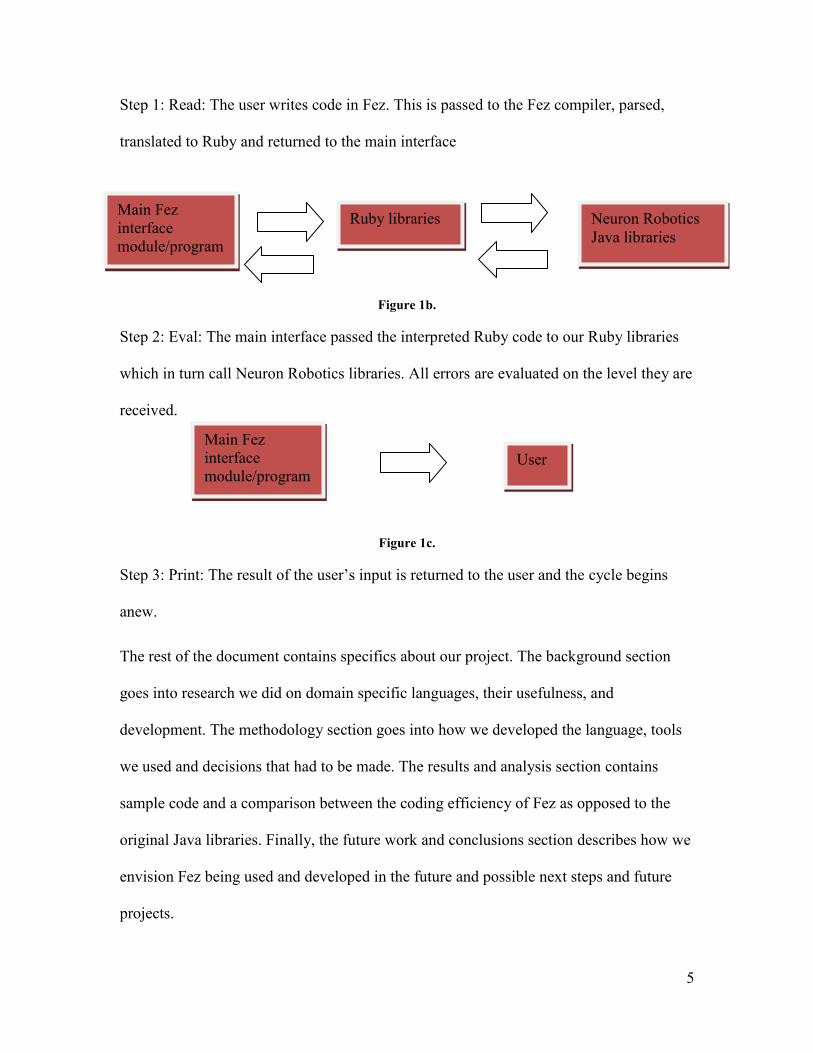
Figure 1a.
Main Fez
interface
module/program
Fez Compiler
Translated Ruby from Fez
User
5
Step 1: Read: The user writes code in Fez. This is passed to the Fez compiler, parsed,
translated to Ruby and returned to the main interface
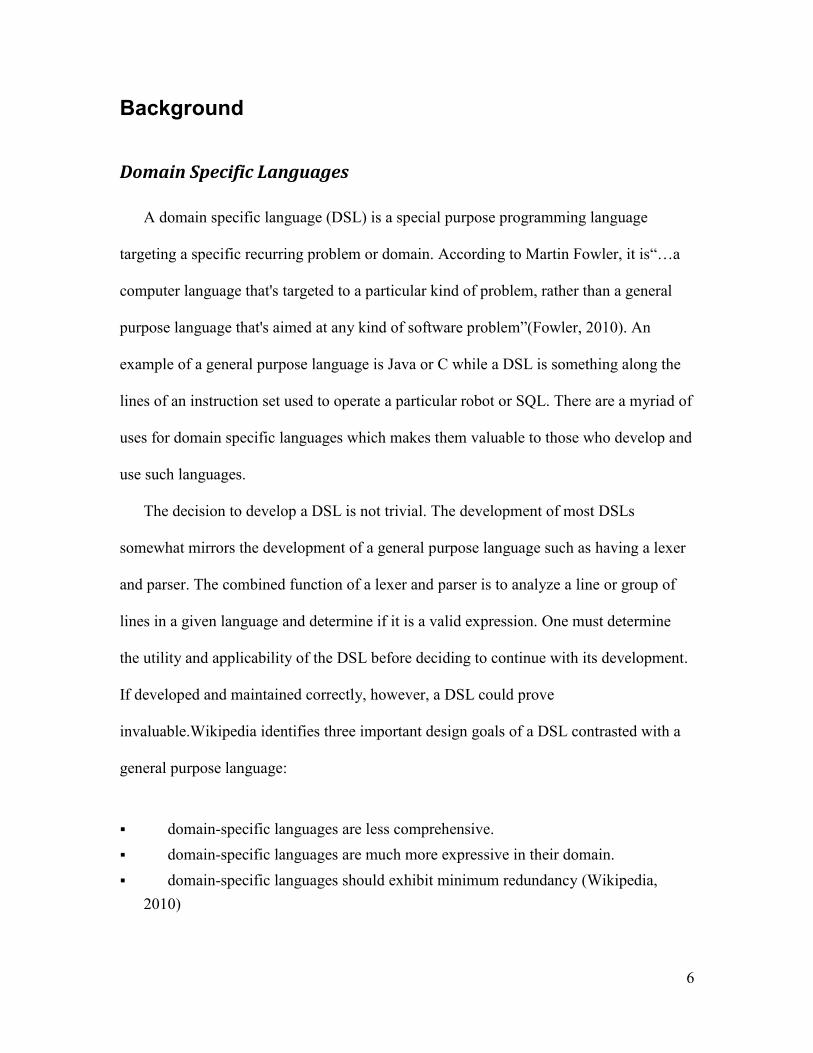
Figure 1b.
Step 2: Eval: The main interface passed the interpreted Ruby code to our Ruby libraries
which in turn call Neuron Robotics libraries. All errors are evaluated on the level they are
received.
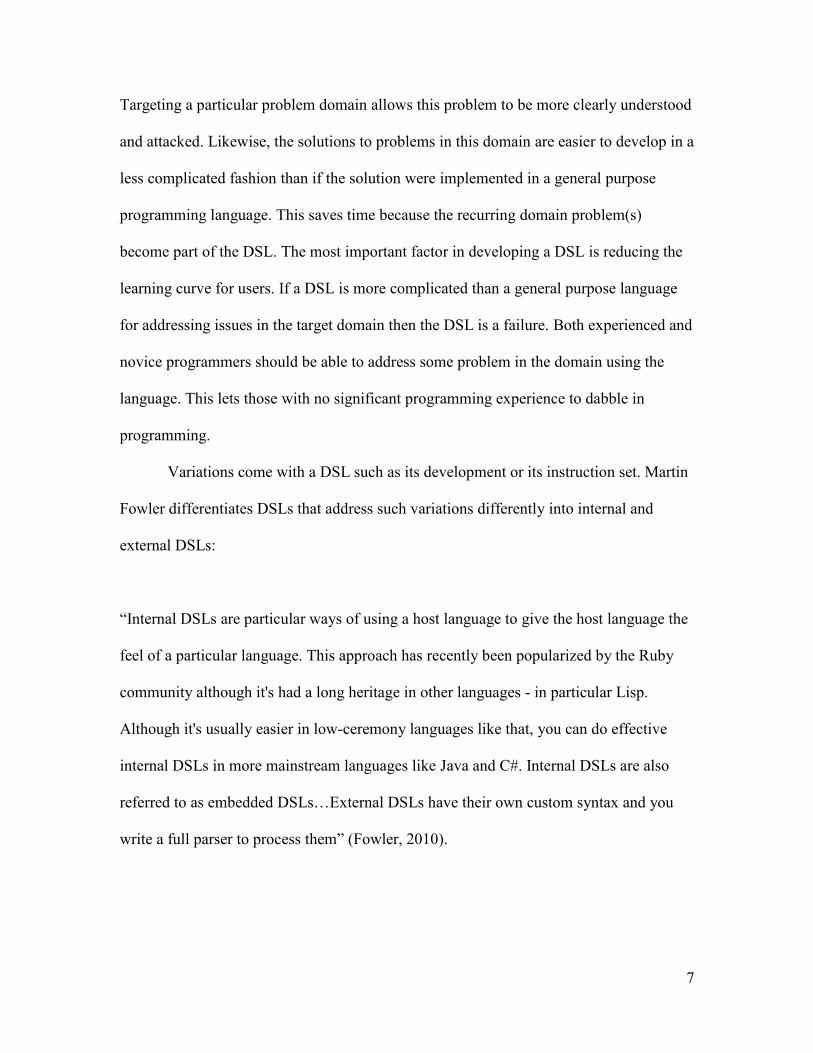
Figure 1c.
Step 3: Print: The result of the user‟s input is returned to the user and the cycle begins
anew.
The rest of the document contains specifics about our project. The background section
goes into research we did on domain specific languages, their usefulness, and
development. The methodology section goes into how we developed the language, tools
we used and decisions that had to be made. The results and analysis section contains
sample code and a comparison between the coding efficiency of Fez as opposed to the
original Java libraries. Finally, the future work and conclusions section describes how we
envision Fez being used and developed in the future and possible next steps and future
projects.
Ruby libraries Neuron Robotics
Java libraries
Main Fez
interface
module/program
Main Fez
interface
module/program
User
6
Background
Domain Specific Languages
A domain specific language (DSL) is a special purpose programming language
targeting a specific recurring problem or domain. According to Martin Fowler, it is“…a
computer language that's targeted to a particular kind of problem, rather than a general
purpose language that's aimed at any kind of software problem”(Fowler, 2010). An
example of a general purpose language is Java or C while a DSL is something along the
lines of an instruction set used to operate a particular robot or SQL. There are a myriad of
uses for domain specific languages which makes them valuable to those who develop and
use such languages.
The decision to develop a DSL is not trivial. The development of most DSLs
somewhat mirrors the development of a general purpose language such as having a lexer
and parser. The combined function of a lexer and parser is to analyze a line or group of
lines in a given language and determine if it is a valid expression. One must determine
the utility and applicability of the DSL before deciding to continue with its development.
If developed and maintained correctly, however, a DSL could prove
invaluable.Wikipedia identifies three important design goals of a DSL contrasted with a
general purpose language:
domain-specific languages are less comprehensive.
domain-specific languages are much more expressive in their domain.
domain-specific languages should exhibit minimum redundancy (Wikipedia,
2010)
7
Targeting a particular problem domain allows this problem to be more clearly understood
and attacked. Likewise, the solutions to problems in this domain are easier to develop in a
less complicated fashion than if the solution were implemented in a general purpose
programming language. This saves time because the recurring domain problem(s)
become part of the DSL. The most important factor in developing a DSL is reducing the
learning curve for users. If a DSL is more complicated than a general purpose language
for addressing issues in the target domain then the DSL is a failure. Both experienced and
novice programmers should be able to address some problem in the domain using the
language. This lets those with no significant programming experience to dabble in
programming.
Variations come with a DSL such as its development or its instruction set. Martin
Fowler differentiates DSLs that address such variations differently into internal and
external DSLs:
“Internal DSLs are particular ways of using a host language to give the host language the
feel of a particular language. This approach has recently been popularized by the Ruby
community although it's had a long heritage in other languages - in particular Lisp.
Although it's usually easier in low-ceremony languages like that, you can do effective
internal DSLs in more mainstream languages like Java and C#. Internal DSLs are also
referred to as embedded DSLs…External DSLs have their own custom syntax and you
write a full parser to process them” (Fowler, 2010).

8
Internal DSLs are easier to create because they do not require a special purpose parser.
They are parsed like any other code written in the underlying language. This means the
DSL is constrained by the limitations of the underlying language. External DSLs remove
this constraint. The downside of external DSLs is the requirement to write and use a
reliable custom compiler.
Probably the most difficult decisions in designing a DSL are choosing the tools to
use to build it and determining the internal architecture. Some languages like Ruby,
Groovy, Scala or Clojure have extensive literature written about building a domain
specific language. We reference some sources on our blog detailing development in these
languages (http://rdsl2010.wordpress.com/2010/09/30/resources/). This does not mean
that languages such as Java, Python, or C/C++ are unsuitable for such tasks. There are
also tools such as JetBrains Meta Programming System (MPS) or the Eclipse Modeling
Framework that aid in constructing a DSL. Subjects of meta-programming, reflection,
efficiency, extendibility, supporting libraries, internal DSL or external DSL come into the
choice of language.
There are further questions that arise from the internal or external debate.
Decisions concerning external DSLs such as what tools to use writing the parser or
compilation efficiency need to be addressed. Internal DSLs need to determine exactly
what its instructions invoke in the underlying language. There is also the possibility for a
hybrid between the two – custom syntax that generates code in an underlying language –
that can be considered. This functions more along the lines of an interpreter.
Building a DSL requires careful planning and consideration just like any major
software engineering project and perhaps at an increased sense of urgency depending on
9
its uses.If the planning and architecture of all related activities to DSL development is
handled carefully, the finished product could be a wondrous tool uniting programming
veterans and novices in a cornucopia of computing efficiency and reliability.
Neuron Robotics
Neuron Robotics, LLC founded in 2008 by Bob Breznak, Kevin Harrington, and
Alex Camilo strives to provide developers an easy, powerful means to program
microcontrollers which power physical devices. Inspired by repeated exposure to a
common problem, they set out to build a system linking software to hardware. As a
result, they produced the Bowler Communications System and eventually the Dynamic
Input Output Device (DyIO).
The DyIO is a general purpose module that allows users to dynamically change
the function of any of the 24 channels during standard operation. All channels are capable
of the standard Digital I/O functionality while some channels are capable of extended
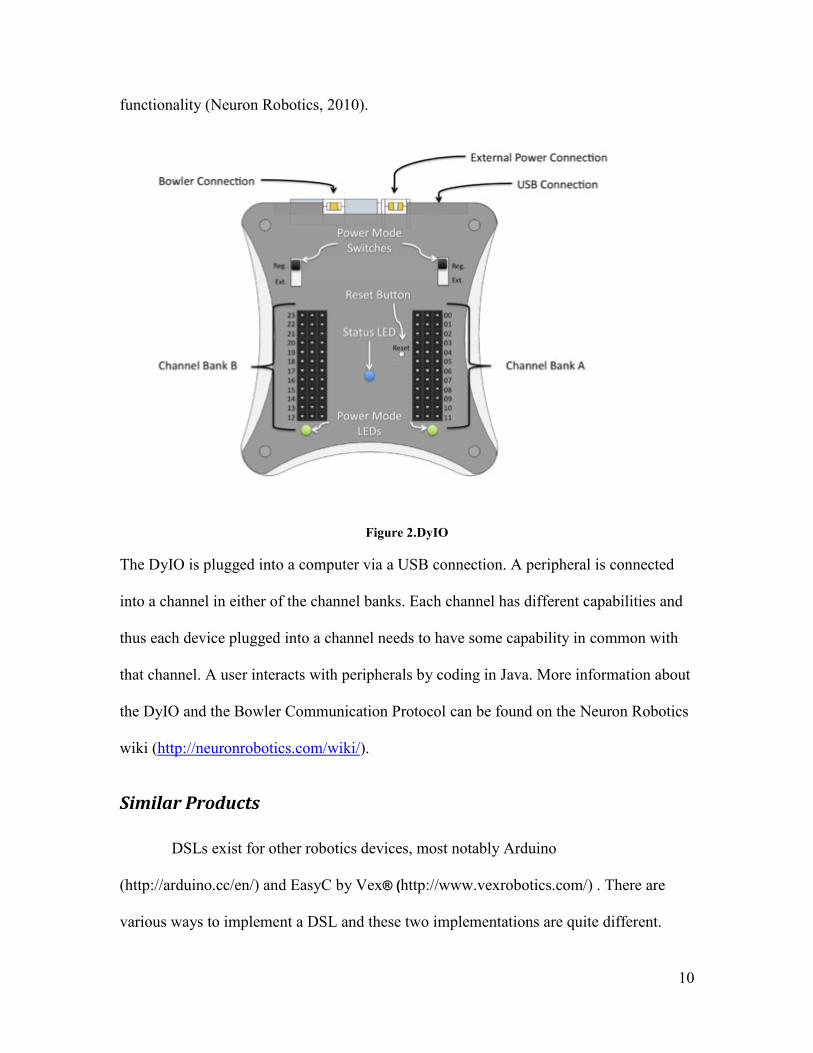
10
functionality (Neuron Robotics, 2010).
Figure 2.DyIO
The DyIO is plugged into a computer via a USB connection. A peripheral is connected
into a channel in either of the channel banks. Each channel has different capabilities and
thus each device plugged into a channel needs to have some capability in common with
that channel. A user interacts with peripherals by coding in Java. More information about
the DyIO and the Bowler Communication Protocol can be found on the Neuron Robotics
wiki (http://neuronrobotics.com/wiki/).
Similar Products
DSLs exist for other robotics devices, most notably Arduino
(http://arduino.cc/en/) and EasyC by Vex® (http://www.vexrobotics.com/) . There are
various ways to implement a DSL and these two implementations are quite different.
11
Arduino works with a piece of hardware called the Arduino board. The language
is very similar to C/C++ with some additions and modifications to provide better ease of
use. The key of the language and the translation is in the IDE. The code the user writes is
passed through a C++ compiler, even though their code isn't actually C/C++. The IDE
maps Arduino 1:1 to C/C++ after a user presses a button. The program is then compiled
and executed. The work of their language is just translation or interpretation to C/C++.
They still achieve the desired effect of giving the user a different language interface using
the same product they could have just programmed in C/C++ (Wikipedia, 2010).
EasyC by Vex is very innovative. It works with products made by Vex and is a
graphical, drag and drop interface of programming. Vex's website claims : "EasyC is a
drag-and-drop programming interface, designed to make it easy for students to program
Vex Robots in C while learning C syntax at the same time" (Vex, 2010).
12
Methodology
We decided on our MQP topic around May of 2010 and started work in August 2010.
During the summer, we researched DSLs and what building one entails. We had not yet
been in contact with Neuron Robotics, so we did not have any time to adequately
understand our DSL's domain. During our MQP, we kept a blog of our progress and
milestones at http://rdsl2010.wordpress.com/.
Iterations
The duration of our iterations was one week, in order to coincide with our weekly
meetings with Professor Pollice, Bob Breznak, and Kevin Harrington.
Inception
In order to understand our domain we contacted Neuron Robotics. Kevin
Harrington and Bob Breznak, NR founders, made a DyIO and various servos and sensors
available to us.
We formed a vision of our project by laying out our goals and requirements. We
used two iteration periods: one iteration to research and roughly form our vision and a
second iteration to hone that vision and establish its scope. Our primary goal is to create a
comprehensible robotics domain specific language (RDSL). For the purposes of this
MQP, we use Neuron Robotics Dynamic Input Output (DyIO) program as a proof of
concept for our DSL.
Our initial steps to meeting these goals included identifying the problem domain
and its scope. One possible consideration is to have the scope include robotics
functionality in general. This was far too large of scope, so we focused instead on just the
13
DyIO. Even though the focus is limited to DyIO, we made a language that is clean,
robust, maintainable, and extensible so that it may account for changes and new features
of DyIO.
Design
Our next order of business was to design the application. We started perusing the
design of the Neuron Robotics Standard Development Kit (NRSDK), and we based a lot
of our design off of that. We proceeded to establish the domain objects that our DSL
utilizes. Our analysis identified the following domain objects:
DyIO
o Channel[24]
Channel
o Peripheral
Peripheral
o Channel
Input (subclass Device)
Output (subclass Device)
SpecificInput (subclass Acuator)
SpecificOuput (subclass Sensor)
The DyIO in this case is a concrete DyIO object with 24 channels, although any type of
Bowler device with any number of channels is possible. These base objects eventually
spawned our model. However, our application quickly obsoleted this model as we were
in an object oriented mode of thinking while in the design phase. This is very different
from the metaprogramming thinking that is extremely useful, if not required, when

14
making a DSL. Our different peripherals are all separate objects, but the actual
implementation is not hierarchal as our model presents:
Figure 3. Class hierarchy
15
Choosing Our Language
We did not want to stay at the conceptualizing stage of our project for too long
and shortchange our development time, so we moved on to deciding what language to
base our DSL. The primary choices that we considered were Ruby and Python. We knew
that this DSL would integrate with the Java-based NRSDK, and so we knew that JRuby
and Jython would be indispensible elements of the solution. JRuby and Jython are Ruby
and Python, respectively, written in Java. The main advantage of these languages over
their vanilla versions is the ability to integrate Java libraries and applications.
So with some research into the two languages, we found a wealth of resources for
coding a domain specific language in Ruby. We also found the community, support, and
general resources for Ruby to be more available and abundant in general. These finds
swayed us, and we decided to use Ruby and JRuby.
Developing the DSL
Our initial start into development was painfully slow as we familiarized ourselves
with the NRSDK and JRuby and tried to integrate them. Our first step was to simply call
NRSDK functions in a JRuby script. Although we had so many resources on Ruby,
JRuby, developing a DSL in Ruby and JRuby, and importing Java classes into JRuby,
this first step proved to be an annoyance.
As we started to expose the NRSDK functionality that our DSL is built upon, we
delved more deeply into the dynamic and metaprogramming aspects of Ruby. This
proved to be extremely powerful as we could use the NRSDK as our base but manipulate
it dynamically with Ruby‟s duck typing and reflection. Duck typing is a style of
programming that is more concerned with what an object does rather than what it actually
16
is. We immediately saw great potential in developing a powerful user experience with a
much smaller development time than using a strongly typed language like Java.
Once the scripts were running, we developed a read-eval-print-loop (REPL) so
that the end-user can quickly interact with the DyIO using a shell interface. We struggled
for a time to evaluate multi-line commands. These multi-line commands are vital since
many Ruby control functionalities (such as if statements and loops) are parsed using
newlines. With the REPL working, we could finally demo much of the end user
experience in our weekly meetings.
Translation from Fez to Ruby
A major tool and design decision was how to build and define our language. The first
and most important thing we did was define the grammar that built the language. The
goal was to make Fez very intuitive for the user and almost like writing English. Thus,
we were constantly seeking feedback from Neuron Robotics, our advisor, and most
importantly people with no background in programming. We had to make sure that even
novices had an idea of what was going in one line of Fez. Throughout development, the
grammar constantly evolved to provide more functionality.
We also had to make a decision about how to run our programs. Based on the
success of Arduino, we decided on translation/interpretation to Ruby. This is really the
only course of action that made sense in hindsight. The libraries we drew upon were
written in Java. There is no reason to write a complete compiler including lexer, parser,
symbol table, semantic analysis and code emission to just call Java libraries at the end. It
also takes substantially more time to write a complete compiler, rather than just the lexer
and parser with code emission. This is another area that made Ruby‟s simple scripting
17
interface so important. Translating a line of Fez into a line of Ruby is much simpler than
generating a .java file as well as compiling through the JVM.
Now we had to decide on a way to parse and interpret a line of Fez into Ruby. The
only parts of a compiler that are needed are the lexer and parser. If a line is a valid line of
Fez, it has a correspondence to a Ruby statement. We decided on using ANTLR, a parser
generator, with a plug-in to Eclipse. Our group had experience using ANTLR previously
and knew that adding code emission is relatively simple. Emitting code is our process of
inputting a line of Fez and translating that to Ruby. Our ANTLR grammar can be found
in Appendix A, complete with statements that lead to the emission of Ruby. ANTLR
grammars are written using EBNF syntax. EBNF is one type of notation that is used in
defining the grammars for programming languages. ANTLR lets the programmer add
lines of actual Java to be executed in the exact context they are found. This means that if
you place a line of Java in the middle of a grammar rule, that line is executed as the line
is being parsed.
During the actual parse of Fez, a lot of tokens are discarded when it comes to the
actual generation of Ruby. The reason for many of the languages tokens is just to make
the syntax and statements more intuitive for the user. Some tokens, such as “break, true,
false,” are translated just as they are into Ruby. The same goes for arithmetic operators
and literals. The user still provides everything that a normal Ruby line needs to be
executed; they just present it in a different syntax. We were, however, able to add some
keywords that Ruby doesn‟t directly offer by manipulating Ruby. For example, we added
the “every” keyword which is a looping statement where the body of the loop is executed
at an interval the user specifies in the loop. This is simply a while loop with a sleep
18
statement inside in Ruby. We also were able to add functionality between the grammar
and our actual Ruby library of a “when” statement through the use of lambda statements
and multithreading in Ruby.
A design decision had to be made having to do with loops and the REPL interface.
Because the experience is dynamic, the system cannot afford to rob the user of a prompt
if an “every” or “while” statement is being executed. All loops are spawned in a new
thread by default as of the initial release of Fez. In the future, this functionality may be
changed as we support a statement to spawn a thread manually. This statement, the
“start” statement, has the user give an identifier to a block of code to be run in a new
thread. It could be argued that the default multithread support is not needed if the user
can always spawn a multithreaded version. However, there is no reason to make users
type the extra “start” statement if they always want a loop to be a new thread, which in
most cases they would have to so they can get their prompt back.
Tools
1. Eclipse& Subclipse – We started out developing in Eclipse using the Subclipse
plugin for Subversion programming version control. This quickly proved to be a
cumbersome environment for this project‟s Ruby development and we moved to
basic text editors. Eclipse still served a vital role in developing the Fez parser
using ANTLR as described in the previous section.
2. Dropbox – Dropbox replaced Subversion for our version control system as it
quickly and automatically pushed changes for us. As a two person team, this
minimal collaboration tool was more than sufficient.
19
Results and Analysis
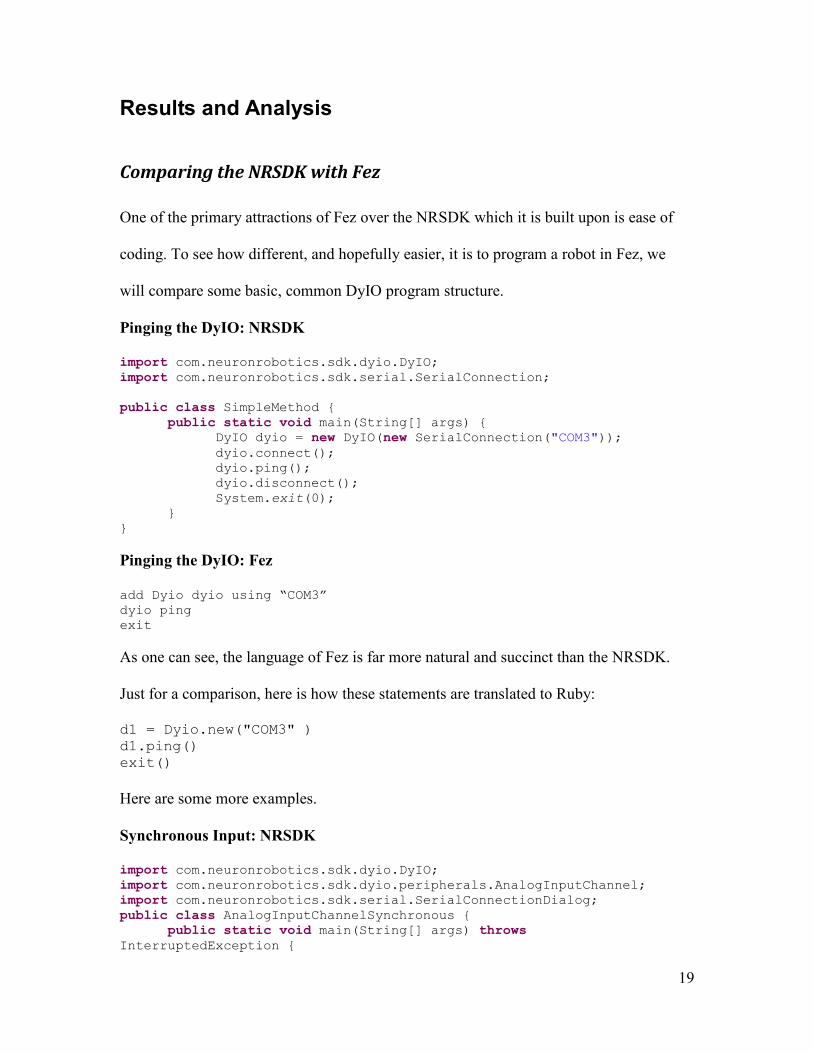
Comparing the NRSDK with Fez
One of the primary attractions of Fez over the NRSDK which it is built upon is ease of
coding. To see how different, and hopefully easier, it is to program a robot in Fez, we
will compare some basic, common DyIO program structure.
Pinging the DyIO: NRSDK
import com.neuronrobotics.sdk.dyio.DyIO;
import com.neuronrobotics.sdk.serial.SerialConnection;
public class SimpleMethod {
public static void main(String[] args) {
DyIO dyio = new DyIO(new SerialConnection("COM3"));
dyio.connect();
dyio.ping();
dyio.disconnect();
System.exit(0);
}
}
Pinging the DyIO: Fez
add Dyio dyio using “COM3”
dyio ping
exit
As one can see, the language of Fez is far more natural and succinct than the NRSDK.
Just for a comparison, here is how these statements are translated to Ruby:
d1 = Dyio.new("COM3" )
d1.ping()
exit()
Here are some more examples.
Synchronous Input: NRSDK
import com.neuronrobotics.sdk.dyio.DyIO;
import com.neuronrobotics.sdk.dyio.peripherals.AnalogInputChannel;
import com.neuronrobotics.sdk.serial.SerialConnectionDialog;
public class AnalogInputChannelSynchronous {
public static void main(String[] args) throws
InterruptedException {
20
DyIO dyio=new DyIO();
SerialConnectionDialog ser = new SerialConnectionDialog();
if (!ser.getBowlerDevice(dyio)){
System.exit(0);
}
AnalogInputChannel ana = new
AnalogInputChannel(dyio.getChannel(11));
//Loop forever printing out the voltage on the pin
while(true){
System.out.println(ana.getVoltage());
Thread.sleep(10);
}
}
}
Synchronous Input: Fez
add Dyio dyio
add Dial dial to dyio using channel 11
every 10 ms dial printvoltage
Ruby
dyio = Dyio.new()
dial = Dial.new(dyio.channel(11 ))
Thread.new{
while true
sleep((10 )/1000)
dial.printvoltage()
end
}
Asynchronous Input: NRSDK
import com.neuronrobotics.sdk.dyio.DyIO;
import com.neuronrobotics.sdk.dyio.peripherals.AnalogInputChannel;
import com.neuronrobotics.sdk.dyio.peripherals.IAnalogInputListener;
import com.neuronrobotics.sdk.serial.SerialConnectionDialog;
//Tester class implements the analog event listener
"IAnalogInputListener"
public class AnalogInputChannelAsynchronous implements
IAnalogInputListener{
//The analog channel is a property of the class
private AnalogInputChannel ana;
public AnalogInputChannelAsynchronous() throws
InterruptedException{
//Start the dyio with serial dialog
DyIO dyio=new DyIO();
SerialConnectionDialog ser = new SerialConnectionDialog();
if (!ser.getBowlerDevice(dyio)){
System.exit(0);
}
21
//Instantiate a new analog channel
//The second parameter tells the analog channel that is it
an asynchronous channel
ana = new AnalogInputChannel(dyio.getChannel(11),true);
//Add this instance of the Tester class to the analog
channel
ana.addAnalogInputListener(this);
//Run forever printing out analog events
while (true){
Thread.sleep(100);
}
}
@Override
public void onAnalogValueChange(AnalogInputChannel channel,double
value) {
//Check the source of the event
if (channel == ana)
System.out.println("Analog
event:"+channel.getVoltage());
}
public static void main(String[] args) throws
InterruptedException {
//Start the tester class
new AnalogInputChannelAsynchronous();
}
}
Asynchronous Input: Fez
add Dyio dyio using “COM3”
add Dial dial to dyio using channel 11
when dial changes then dial printvoltage
Ruby
dyio = Dyio.new("COM3" )
dial = Dial.new(dyio.channel(11 ))
Thread.new{
dial.changes(lambda{
dial.printvoltage()
})}
22
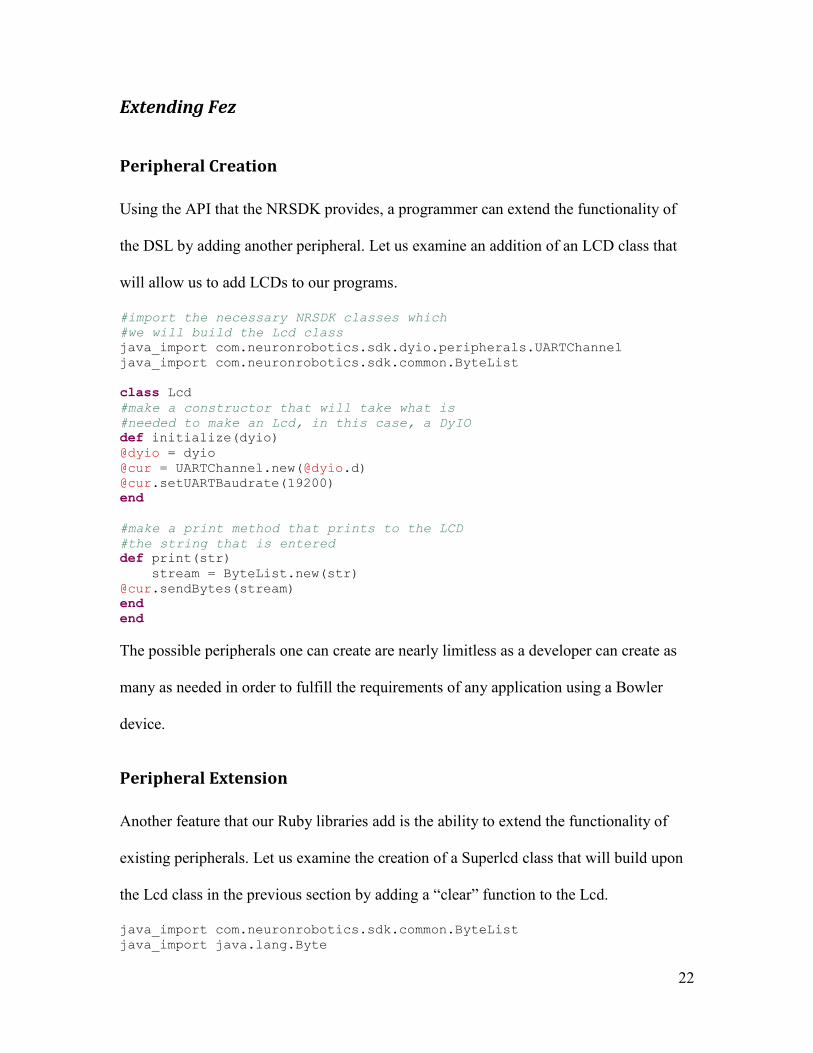
Extending Fez
Peripheral Creation
Using the API that the NRSDK provides, a programmer can extend the functionality of
the DSL by adding another peripheral. Let us examine an addition of an LCD class that
will allow us to add LCDs to our programs.
#import the necessary NRSDK classes which
#we will build the Lcd class
java_import com.neuronrobotics.sdk.dyio.peripherals.UARTChannel
java_import com.neuronrobotics.sdk.common.ByteList
class Lcd
#make a constructor that will take what is
#needed to make an Lcd, in this case, a DyIO
def initialize(dyio)
@dyio = dyio
@cur = UARTChannel.new(@dyio.d)
@cur.setUARTBaudrate(19200)
end
#make a print method that prints to the LCD
#the string that is entered
def print(str)
stream = ByteList.new(str)
@cur.sendBytes(stream)
end
end
The possible peripherals one can create are nearly limitless as a developer can create as
many as needed in order to fulfill the requirements of any application using a Bowler
device.
Peripheral Extension
Another feature that our Ruby libraries add is the ability to extend the functionality of
existing peripherals. Let us examine the creation of a Superlcd class that will build upon
the Lcd class in the previous section by adding a “clear” function to the Lcd.
java_import com.neuronrobotics.sdk.common.ByteList
java_import java.lang.Byte
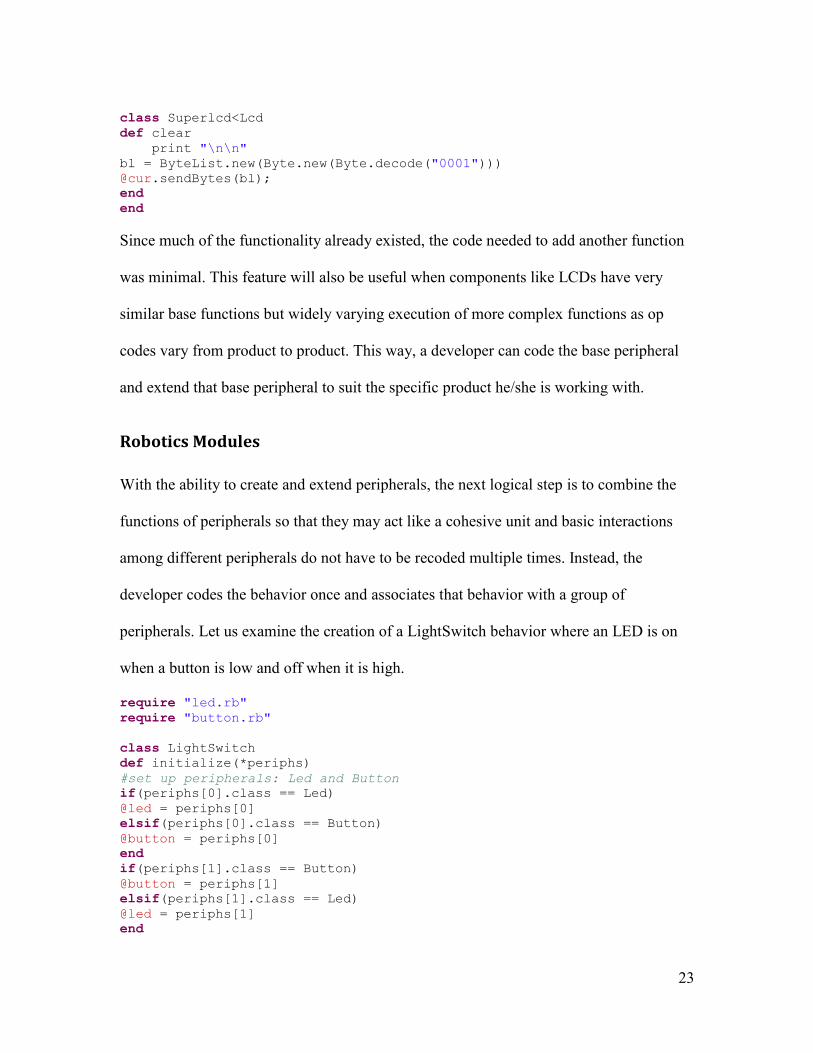
23
class Superlcd<Lcd
def clear
print "\n\n"
bl = ByteList.new(Byte.new(Byte.decode("0001")))
@cur.sendBytes(bl);
end
end
Since much of the functionality already existed, the code needed to add another function
was minimal. This feature will also be useful when components like LCDs have very
similar base functions but widely varying execution of more complex functions as op
codes vary from product to product. This way, a developer can code the base peripheral
and extend that base peripheral to suit the specific product he/she is working with.
Robotics Modules
With the ability to create and extend peripherals, the next logical step is to combine the
functions of peripherals so that they may act like a cohesive unit and basic interactions
among different peripherals do not have to be recoded multiple times. Instead, the
developer codes the behavior once and associates that behavior with a group of
peripherals. Let us examine the creation of a LightSwitch behavior where an LED is on
when a button is low and off when it is high.
require "led.rb"
require "button.rb"
class LightSwitch
def initialize(*periphs)
#set up peripherals: Led and Button
if(periphs[0].class == Led)
@led = periphs[0]
elsif(periphs[0].class == Button)
@button = periphs[0]
end
if(periphs[1].class == Button)
@button = periphs[1]
elsif(periphs[1].class == Led)
@led = periphs[1]
end

24
if(@led == nil || @button == nil)
raise "Bad LightSwitch parameters"
end
#set up default behavior
#on button high, led on
#on button low, led off
@bp = Proc.new{
if(@button.state == true)
@led.on
else
@led.off
end
};
@button.onChange(@bp)
end
end
Here, we used Ruby‟s reflective nature to allow the constructor to accept a button and an
LED in any order. Once the LightSwitch has determined that the entered parameters are
indeed a button and an LED, it creates that behavior between the two peripherals. This
feature can become increasingly useful as applications grow in scope when there are
many peripherals which act cohesively as a robotics module. This feature will foster code
reuse and this behavior can be further extended just as the functionality of a peripheral
can be further extended.
Metrics
The team derived the following numbers of lines and charactersof the NRSDK from code
posted on the Neuron Robotics wiki on how to program using the DyIO. We ignored
comments when deriving these numbers and used the same name scheme when recreating
the program in Fez. Refer to Appendix C to see the actual NRSDK code, the Fez and
Ruby recreations.

25
Table 1. Comparison of Fez to NRSDK
Column1
Number of Characters for Fez
Number of Lines for Fez
Number of Characters for NRSDK
Number of Lines for NRSDK
Number of Characters for Translated Ruby
Number of Lines for Translated Ruby
1 39 3 286 12 41 3
2 17 2 341 14 37 2
3 87 3 962 28 121 7
4 81 3 573 18 110 5
5 54 3 701 25 56 3
Total 278 14 2863 97 365 20
89.7% reduction of characters when using Fez instead of the original NRSDK
86.5% reduction of lines of code.
23.8% reduction of characters between Fez and Ruby
30% reduction of lines between Fez and Ruby
Analysis
The example code that Neuron Robotics posted consists of very basic programs. We
expect that as the program grows in complexity, the percent reduction in code (keystrokes
or lines) will not be as dramatic. However, these basic programs also execute some of the
most common functionalities of the DyIO, so we find that streamlining the calls for these
most basic functions has the most effect across DyIO programs.
26
Future Work and Conclusions
We were able to successfully prototype and implement a DSL for the DyIO. It has
all of the base features that were required and still leaves room for future work. Other
features can be added to the DSL. Some of the following features may be too sparse for
an MQP, but they all provide nice added functionality to the language and its capabilities.
Allow the language to run in a non-REPL environment
Fez's only real interface to run programs is with the REPL. While this is
obviously very nice, it is also be nice to write a program and execute it. This also
increases the portability of the language because saved files could be executed
rather than forcing the user to type out commands. Fez has limited support for this
already. Our Java source code has a method that writes the Ruby translated from
Fez into a file. This was our primary way to see if translation was properly
occurring. The future project has to introduce a user interface as well as execute a
generated Ruby file. Fez could turn into a Ruby-like coding style with the user
opting for either REPL or text editor.
Error handling
Fez currently has very limited error handling. It is not a very easy problem to
address during the limited time we had to develop the languages and its libraries.
There are three possible levels of failure in Fez: the Fez language, the Ruby
libraries, and Neuron Robotics Java libraries. This could include an invalid line of
Fez, an invalid parameter to a function, calling a function that doesn't exist etc.
Each one of these can have its own failures during the parse, translation, or
27
execution of a single line of Fez. Fez currently can decipher what most errors
mean and trace it to the level where it occurs. Intended Fez users may find current
error messages confusing making debugging harder. Delivering precise and
correct error messages is an important and difficult feature to fully implement.
More language features
The syntax of Fez could be extended and add new functionality. This has to be
addressed if non-REPL environment development started. For example, every
loop runs as a new thread currently, regardless of whether the "start" command is
specified or not, because it is a REPL environment and the user should never lose
the prompt. In a file execution, running something as a thread could completely
change the program. There are also other functionality that could be added. This
could include new loops, new syntax, or new Ruby features that forces some new
development in Fez.
More Ruby features
Not every peripheral was addressed in the initial development of the DSL. If a
user wants to add a robot arm to the DyIO, there is no support in Ruby to
currently add one. Existing peripherals could also be extended too. For example,
two LEDs could have functionality added to make them operate like a police
light. One could add Ruby support for another Bowler device to make it
compatible with Fez. Extending the Ruby libraries is most likely where the bulk
of future development should take place. This is because Ruby development
directly leads to new functionality and more capabilities for users to enjoy.
Eclipse plugin/Text editor
28
This is a slight extension of the non-REPL environment suggestion. If an Eclipse
plugin or separate text editor was developed it is a huge step for Fez in general
with easy access and installation.
All of these possible extensions to Fez are worthwhile. Future projects are not limited to
these suggestions. Fez has a good foundation as a language that is easy for new users to
understand and has enough capabilities for more experienced users to utilize.
29
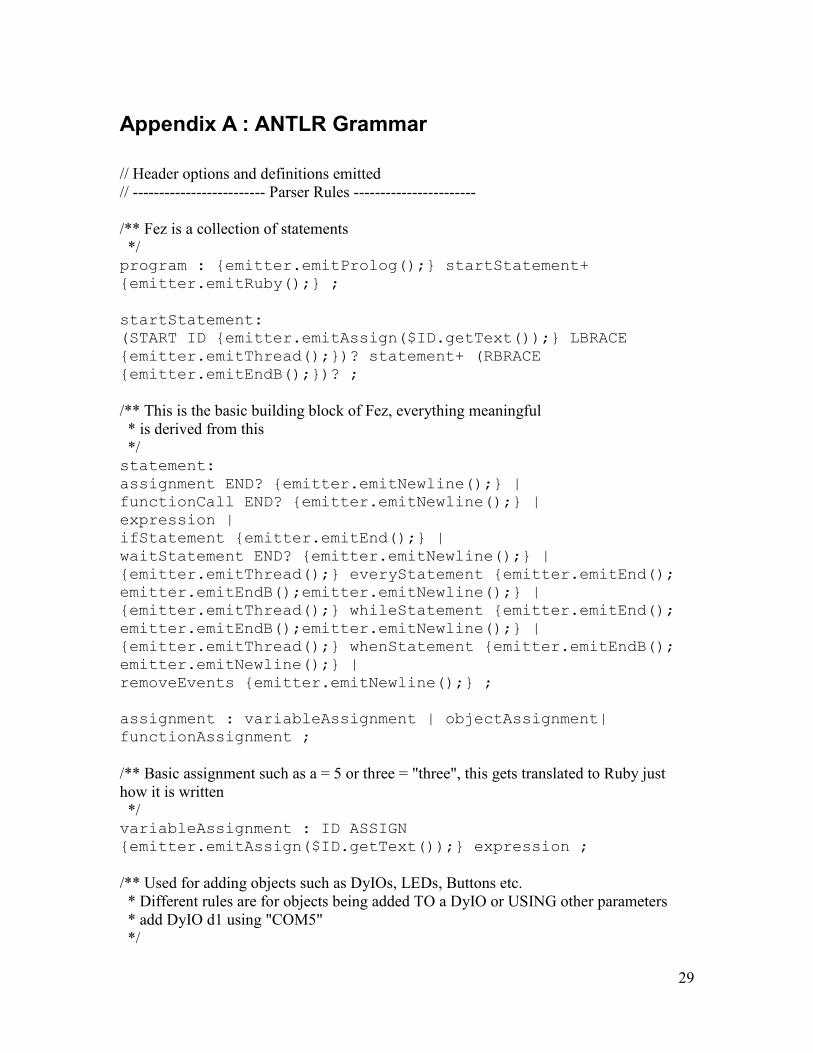
Appendix A : ANTLR Grammar
// Header options and definitions emitted
// ------------------------- Parser Rules -----------------------
/** Fez is a collection of statements
*/ program : {emitter.emitProlog();} startStatement+
{emitter.emitRuby();} ;
startStatement:
(START ID {emitter.emitAssign($ID.getText());} LBRACE
{emitter.emitThread();})? statement+ (RBRACE
{emitter.emitEndB();})? ;
/** This is the basic building block of Fez, everything meaningful
* is derived from this
*/ statement:
assignment END? {emitter.emitNewline();} |
functionCall END? {emitter.emitNewline();} |
expression |
ifStatement {emitter.emitEnd();} |
waitStatement END? {emitter.emitNewline();} |
{emitter.emitThread();} everyStatement {emitter.emitEnd();
emitter.emitEndB();emitter.emitNewline();} |
{emitter.emitThread();} whileStatement {emitter.emitEnd();
emitter.emitEndB();emitter.emitNewline();} |
{emitter.emitThread();} whenStatement {emitter.emitEndB();
emitter.emitNewline();} |
removeEvents {emitter.emitNewline();} ;
assignment : variableAssignment | objectAssignment|
functionAssignment ;
/** Basic assignment such as a = 5 or three = "three", this gets translated to Ruby just
how it is written
*/ variableAssignment : ID ASSIGN
{emitter.emitAssign($ID.getText());} expression ;
/** Used for adding objects such as DyIOs, LEDs, Buttons etc.
* Different rules are for objects being added TO a DyIO or USING other parameters
* add DyIO d1 using "COM5"
*/
30
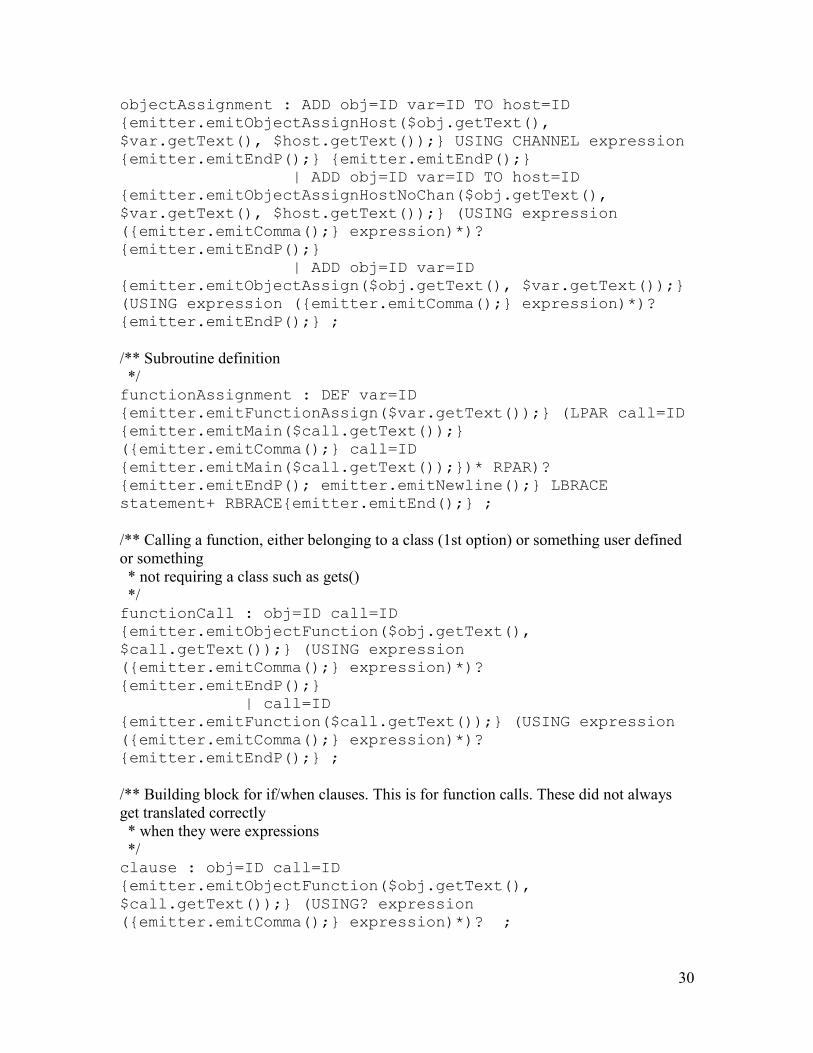
objectAssignment : ADD obj=ID var=ID TO host=ID
{emitter.emitObjectAssignHost($obj.getText(),
$var.getText(), $host.getText());} USING CHANNEL expression
{emitter.emitEndP();} {emitter.emitEndP();}
| ADD obj=ID var=ID TO host=ID
{emitter.emitObjectAssignHostNoChan($obj.getText(),
$var.getText(), $host.getText());} (USING expression
({emitter.emitComma();} expression)*)?
{emitter.emitEndP();}
| ADD obj=ID var=ID
{emitter.emitObjectAssign($obj.getText(), $var.getText());}
(USING expression ({emitter.emitComma();} expression)*)?
{emitter.emitEndP();} ;
/** Subroutine definition
*/ functionAssignment : DEF var=ID
{emitter.emitFunctionAssign($var.getText());} (LPAR call=ID
{emitter.emitMain($call.getText());}
({emitter.emitComma();} call=ID
{emitter.emitMain($call.getText());})* RPAR)?
{emitter.emitEndP(); emitter.emitNewline();} LBRACE
statement+ RBRACE{emitter.emitEnd();} ;
/** Calling a function, either belonging to a class (1st option) or something user defined
or something
* not requiring a class such as gets()
*/ functionCall : obj=ID call=ID
{emitter.emitObjectFunction($obj.getText(),
$call.getText());} (USING expression
({emitter.emitComma();} expression)*)?
{emitter.emitEndP();}
| call=ID
{emitter.emitFunction($call.getText());} (USING expression
({emitter.emitComma();} expression)*)?
{emitter.emitEndP();} ;
/** Building block for if/when clauses. This is for function calls. These did not always
get translated correctly
* when they were expressions
*/ clause : obj=ID call=ID
{emitter.emitObjectFunction($obj.getText(),
$call.getText());} (USING? expression
({emitter.emitComma();} expression)*)? ;
31
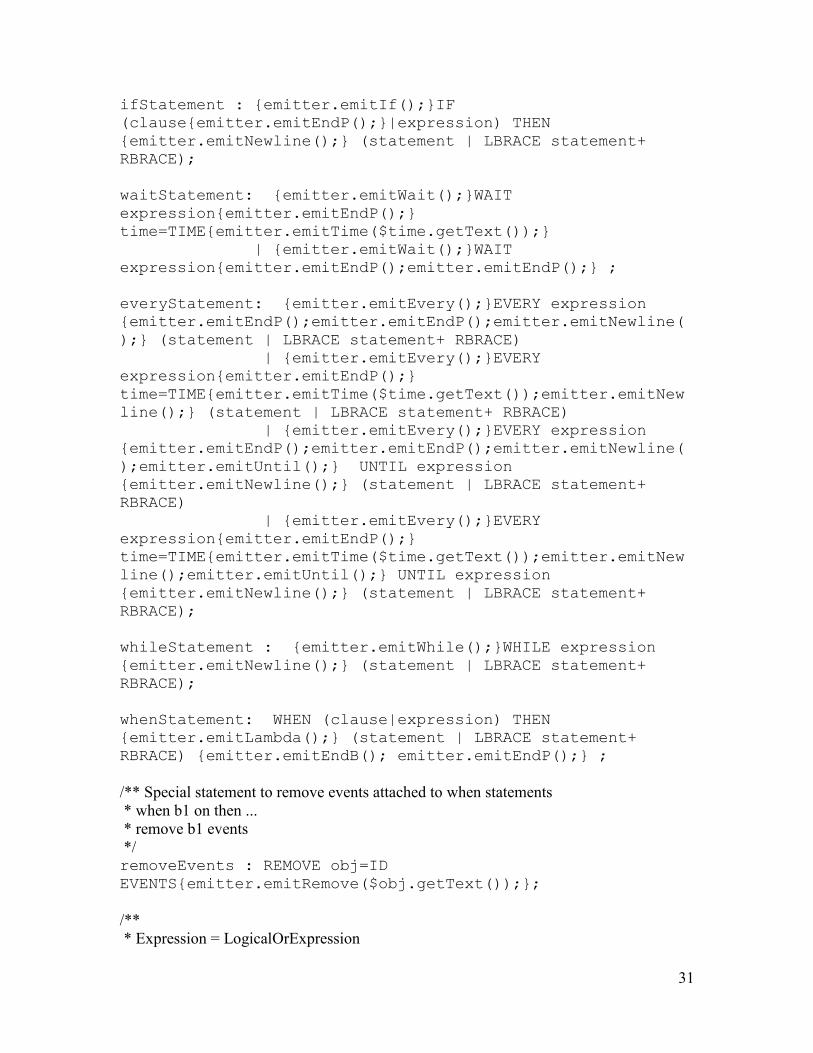
ifStatement : {emitter.emitIf();}IF
(clause{emitter.emitEndP();}|expression) THEN
{emitter.emitNewline();} (statement | LBRACE statement+
RBRACE);
waitStatement: {emitter.emitWait();}WAIT
expression{emitter.emitEndP();}
time=TIME{emitter.emitTime($time.getText());}
| {emitter.emitWait();}WAIT
expression{emitter.emitEndP();emitter.emitEndP();} ;
everyStatement: {emitter.emitEvery();}EVERY expression
{emitter.emitEndP();emitter.emitEndP();emitter.emitNewline(
);} (statement | LBRACE statement+ RBRACE)
| {emitter.emitEvery();}EVERY
expression{emitter.emitEndP();}
time=TIME{emitter.emitTime($time.getText());emitter.emitNew
line();} (statement | LBRACE statement+ RBRACE)
| {emitter.emitEvery();}EVERY expression
{emitter.emitEndP();emitter.emitEndP();emitter.emitNewline(
);emitter.emitUntil();} UNTIL expression
{emitter.emitNewline();} (statement | LBRACE statement+
RBRACE)
| {emitter.emitEvery();}EVERY
expression{emitter.emitEndP();}
time=TIME{emitter.emitTime($time.getText());emitter.emitNew
line();emitter.emitUntil();} UNTIL expression
{emitter.emitNewline();} (statement | LBRACE statement+
RBRACE);
whileStatement : {emitter.emitWhile();}WHILE expression
{emitter.emitNewline();} (statement | LBRACE statement+
RBRACE);
whenStatement: WHEN (clause|expression) THEN
{emitter.emitLambda();} (statement | LBRACE statement+
RBRACE) {emitter.emitEndB(); emitter.emitEndP();} ;
/** Special statement to remove events attached to when statements
* when b1 on then ...
* remove b1 events
*/ removeEvents : REMOVE obj=ID
EVENTS{emitter.emitRemove($obj.getText());};
/**
* Expression = LogicalOrExpression
32
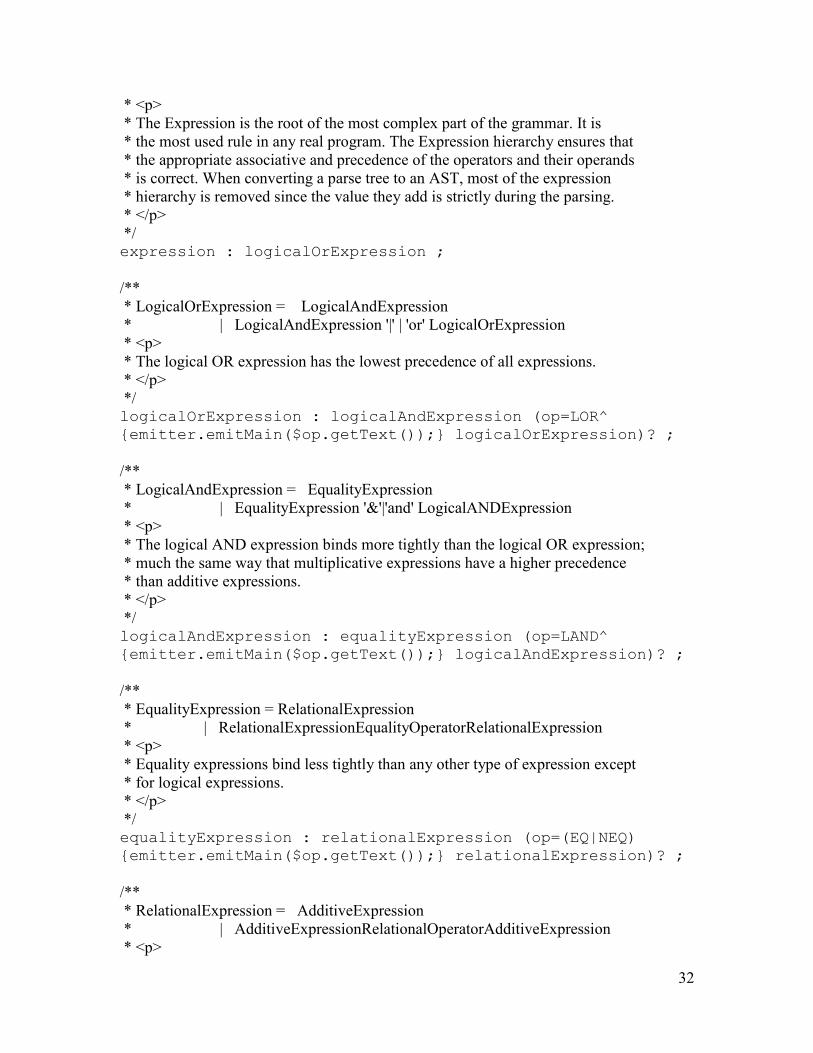
* <p>
* The Expression is the root of the most complex part of the grammar. It is
* the most used rule in any real program. The Expression hierarchy ensures that
* the appropriate associative and precedence of the operators and their operands
* is correct. When converting a parse tree to an AST, most of the expression
* hierarchy is removed since the value they add is strictly during the parsing.
* </p>
*/ expression : logicalOrExpression ;
/**
* LogicalOrExpression = LogicalAndExpression
* | LogicalAndExpression '|' | 'or' LogicalOrExpression
* <p>
* The logical OR expression has the lowest precedence of all expressions.
* </p>
*/ logicalOrExpression : logicalAndExpression (op=LOR^
{emitter.emitMain($op.getText());} logicalOrExpression)? ;
/**
* LogicalAndExpression = EqualityExpression
* | EqualityExpression '&'|'and' LogicalANDExpression
* <p>
* The logical AND expression binds more tightly than the logical OR expression;
* much the same way that multiplicative expressions have a higher precedence
* than additive expressions.
* </p>
*/ logicalAndExpression : equalityExpression (op=LAND^
{emitter.emitMain($op.getText());} logicalAndExpression)? ;
/**
* EqualityExpression = RelationalExpression
* | RelationalExpressionEqualityOperatorRelationalExpression
* <p>
* Equality expressions bind less tightly than any other type of expression except
* for logical expressions.
* </p>
*/ equalityExpression : relationalExpression (op=(EQ|NEQ)
{emitter.emitMain($op.getText());} relationalExpression)? ;
/**
* RelationalExpression = AdditiveExpression
* | AdditiveExpressionRelationalOperatorAdditiveExpression
* <p>
33
* The relational expressions bind the <, >, <=, and >= operators tighter than
* equality and logical operators. Notice that unlike the additive and multiplicative
* expressions, relational expressions do not propagate to the right.
* </p>
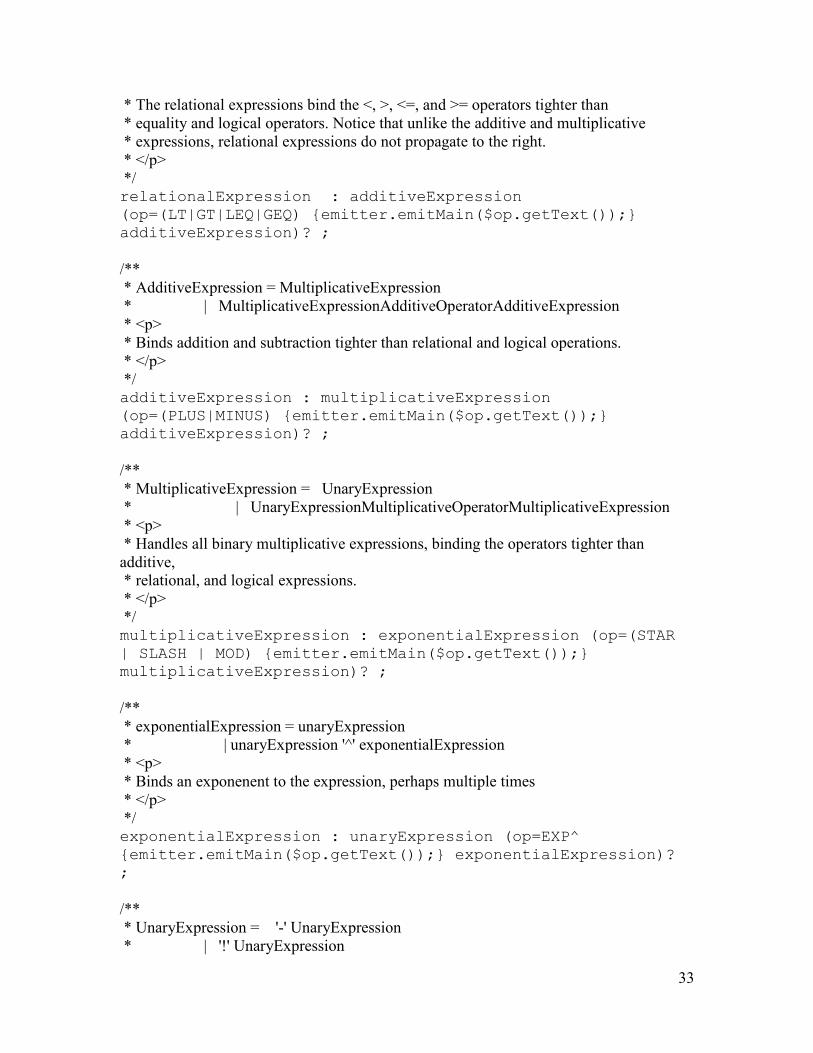
*/ relationalExpression : additiveExpression
(op=(LT|GT|LEQ|GEQ) {emitter.emitMain($op.getText());}
additiveExpression)? ;
/**
* AdditiveExpression = MultiplicativeExpression
* | MultiplicativeExpressionAdditiveOperatorAdditiveExpression
* <p>
* Binds addition and subtraction tighter than relational and logical operations.
* </p>
*/ additiveExpression : multiplicativeExpression
(op=(PLUS|MINUS) {emitter.emitMain($op.getText());}
additiveExpression)? ;
/**
* MultiplicativeExpression = UnaryExpression
* | UnaryExpressionMultiplicativeOperatorMultiplicativeExpression
* <p>
* Handles all binary multiplicative expressions, binding the operators tighter than
additive,
* relational, and logical expressions.
* </p>
*/ multiplicativeExpression : exponentialExpression (op=(STAR
| SLASH | MOD) {emitter.emitMain($op.getText());}
multiplicativeExpression)? ;
/**
* exponentialExpression = unaryExpression
* | unaryExpression '^' exponentialExpression
* <p>
* Binds an exponenent to the expression, perhaps multiple times
* </p>
*/ exponentialExpression : unaryExpression (op=EXP^
{emitter.emitMain($op.getText());} exponentialExpression)?
;
/**
* UnaryExpression = '-' UnaryExpression
* | '!' UnaryExpression

34
* | PrimaryExpression
* <p>
* The unary expressions bind a leading operator to the expression.
* </p>
*/ unaryExpression
: op=(MINUS|NOT) {emitter.emitMain($op.getText());}
unaryExpression
| primaryExpression ;
/**
* PrimaryExpression = '(' Expression ')' | integer | floating | 'true' | 'false' | ID |
methodCall
* <p>
* This is the lowest level of the expression hierarchy. Parenthesized expressions are
* processed at this level. This ensures the proper precedence of such expressions.
* </p>
*/ primaryExpression : LPAR expression RPAR -> expression
| INTEGER {emitter.emitMain($INTEGER.getText());}
| FLOAT {emitter.emitMain($FLOAT.getText());}
| ID {emitter.emitMain($ID.getText());}
| LITERAL {emitter.emitMain($LITERAL.getText());}
| TRUE {emitter.emitMain("true");}
| FALSE {emitter.emitMain("false");}
| BREAK {emitter.emitMain("break");}
| functionCall END? ;
//----------Lexical Rules ---------
COMMENT : '#' (~'\n')* {skip();} ;
NEWLINE : '\n' {skip();};
WHITESPACE : (' ' | NEWLINE | '\t' | '\r' | '\u000C')
{skip();} ;
//reserved words
TRUE : 'true' ;
FALSE : 'false' ;
TIME : 'seconds' | 'second' | 'milliseconds' |
'millisecond' | 's' | 'ms' ;
IF : 'if' ;
35
WHEN : 'when' ;
WHILE : 'while' ;
EVERY : 'every' ;
WAIT: 'wait' ;
USING : 'using' ;
UNTIL : 'until' ;
TO : 'to';
THEN : 'then';
ADD : 'add';
DEF : 'def' ;
CHANNEL : 'channel' ;
BREAK : 'break' ;
REMOVE: 'remove' ;
EVENTS : 'events' ;
START : 'start' ;
// Operators
// Logical LOR : '|' | 'or' ;
LAND : '&' | 'and' ;
NOT : '!' | 'not' ;
// Relational EQ : '==' | '.equal?' | '.eql?' ;
NEQ : '!=' ;
LT : '<' ;
LEQ : '<=' ;
36
GT : '>' ;
GEQ : '>=' ;
// Arithmetic PLUS : '+' ;
MINUS : '-' ;
STAR : '*' ;
SLASH : '/' ;
MOD : '%' ;
EXP : '**' ;
// Other ASSIGN : '=' ;
//Separators LPAR : '(' ;
RPAR : ')' ;
LBRACE : '{' ;
RBRACE : '}';
DOT : '.';
COMMA : ',';
SEMICOLON : ';';
//constants and other things
INTEGER : ('0'..'9')+ ;
FLOAT : INTEGER DOT INTEGER ;
ID : ('a'..'z'|'A'..'Z') ('a'..'z'|'A'..'Z'|'0'..'9')* ;
END : 'end' DOT;
LITERAL : '"' (~'"')* '"' ;
37
Appendix B: User Manual
Fez
Fez is a language developed to be used with the Neuron Robotics DyIO. It was
developed using ANTLR in Eclipse and interfaces with class definitions developed in
Ruby. If you just want to understand how to use Fez, read the user manual. Developers
wishing to extend the work done will have a section devoted to them.
User Manual
1. Where do I start?
Accessing interactive REPL module and how it works.
2. Basic Fez
So now that you have your interactive window into Fez set up, it's time to start using it!
First plug your DyIO into your computer via a USB cable. Your computer knows that
you plugged your DyIO in but Fez doesn't. In Fez you have to tell it exactly what is
plugged in and what it's working with. However, it isn't as simple as typing into the
window "I just plugged in a DyIO." Fez is its own language and has a certain way to say
that you just plugged in a DyIO or that you want to turn a LED on.
To add a new DyIO, you would type this line:
add DyIO d1 using "COM3"
DyIO is the type of the device or object that you're adding and d1 is the name of that
particular DyIO. For example, now that you have told Fez a DyIO named d1 exists on
"COM3", you can just refer to it as d1 throughout the rest of the program. Note that
"COM3" may not work, you may have to use "COM4" or "COM5". So if you wanted to
ping the DyIO, you would type:
d1 ping
The other part of adding the DyIO is the using clause. In most cases, adding a new device
or object takes more than just saying you want to add it. You may have to tell it what
38
channel to add the new device to or something similar. For example, if I plugged an LED
into channel 1 on the d1 I would have to type this:
add LED l1 to d1 using channel 1
In the same vain as before, if I wanted to do something to the LED I just added, such as
turn it on, I would type :
led1 on
3. Summary of Language and Commands
Fez is a language with its own syntax, but everything is actually run as code from the
language Ruby. If you understand Ruby, you will probably better understand Fez.
However, no Ruby experience is needed to program in Fez. Fez currently supports
integers, floating point numbers, strings and booleans.
KEYWORDS AND OPERATORS: //reserved words
TRUE : 'true'
FALSE : 'false'
TIME : 'seconds' | 'second' | 'milliseconds' | 'millisecond' | 's' |
'ms'
IF : 'if'
WHEN : 'when'
WHILE : 'while'
EVERY : 'every'
WAIT: 'wait'
USING : 'using'
UNTIL : 'until'
TO : 'to'
THEN : 'then'
ADD : 'add'
DEF : 'def'
CHANNEL : 'channel'
BREAK : 'break'
39
REMOVE: 'remove'
EVENTS : 'events'
START : 'start'
// Operators
// Logical
OR : '|' | 'or'
AND : '&' | 'and'
NOT : '!' | 'not'
// Relational
EQUALS : '==' | '.equal?' | '.eql?'
NOT EQUALS : '!='
LESS THAN : '<'
LESS THAN OR EQUAL TO : '<='
GREATER THAN : '>'
GREATER THAN OR EQUAL TO : '>='
// Arithmetic
PLUS : '+'
MINUS : '-'
MULTIPLICATION : '*'
DIVISION : '/'
MODULO : '%'
EXPONENT : '**'
ASSIGN : '='
IMPORTANT: READ BEFORE USING LOOPS!
If writing Fez in a repl interface, you are going to want to use the start statement
using loops. The start statement encloses any other statement in Fez and runs the
statement(s) in the background. For example:
start loops{
while true led1 switch
}

40
After entering this statement, the repl prompt will return and you will be able to input
more commands. However, you can use the start statement to proceed any number of
statements. For example this is perfectly valid:
start test{
a = 2
add Dyio d1 using "COM3"
a = 5
if a == 5 add led l1 to d1 using channel 4
}
Now, the task you created using the start statement will run in the background until you
tell it to stop. It is important that you manage these because there may be unintended side
effects from your code running for a good amount of time. To end a task type in : <id
used to create task> exit. For example, ending my start statements above would look like:
loops exit
test exit
ASSIGNMENT:
a = 5
hello = a + 2
add Dyio d1 using "COM3"
add LED l1 to d1 using channel 1
add LCD lcd1 to d1
FUNCTIONS/FUNCTION CALLS:
You can define your own functions in Fez. You can call the function at a later time and
everything you wrote in the definition will be executed:
def <name>(<parameters>){
<any number of statements>
To call:
<name> using <parameters>
For example:
def startup(dname lname){
add Dyio dname using "COM3"
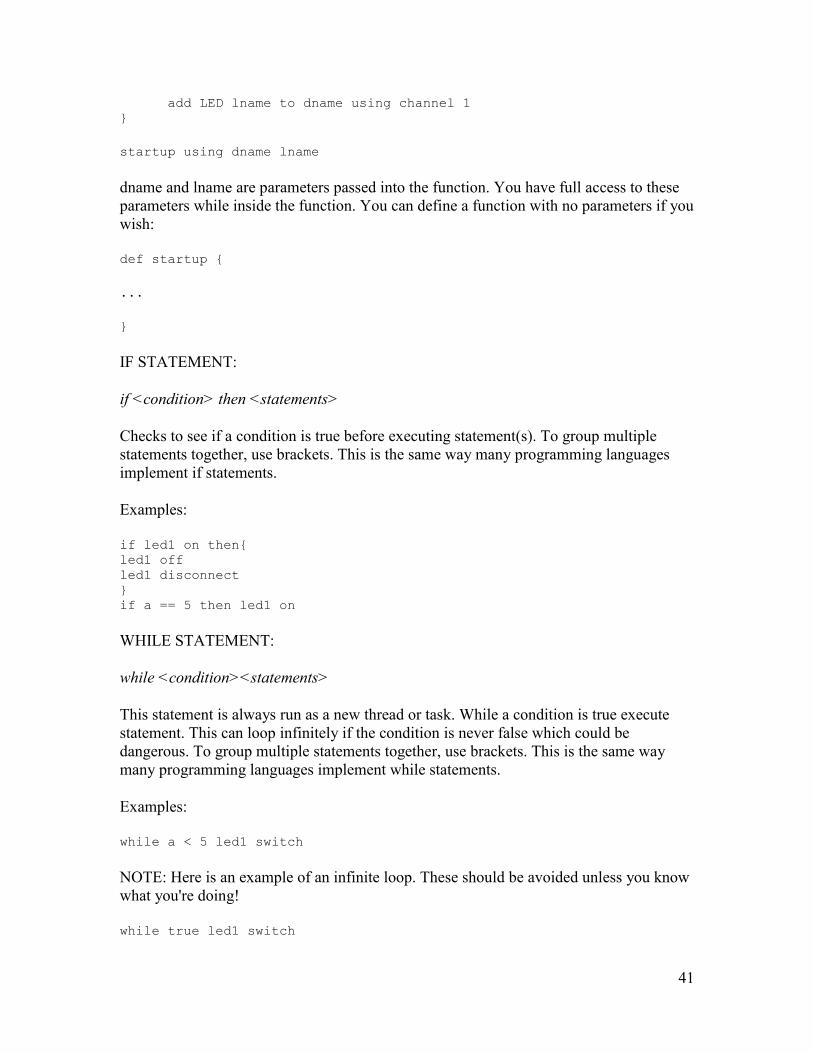
41
add LED lname to dname using channel 1
}
startup using dname lname
dname and lname are parameters passed into the function. You have full access to these
parameters while inside the function. You can define a function with no parameters if you
wish:
def startup {
...
}
IF STATEMENT:
if <condition> then <statements>
Checks to see if a condition is true before executing statement(s). To group multiple
statements together, use brackets. This is the same way many programming languages
implement if statements.
Examples:
if led1 on then{
led1 off
led1 disconnect
}
if a == 5 then led1 on
WHILE STATEMENT:
while <condition><statements>
This statement is always run as a new thread or task. While a condition is true execute
statement. This can loop infinitely if the condition is never false which could be
dangerous. To group multiple statements together, use brackets. This is the same way
many programming languages implement while statements.
Examples:
while a < 5 led1 switch
NOTE: Here is an example of an infinite loop. These should be avoided unless you know
what you're doing!
while true led1 switch
42
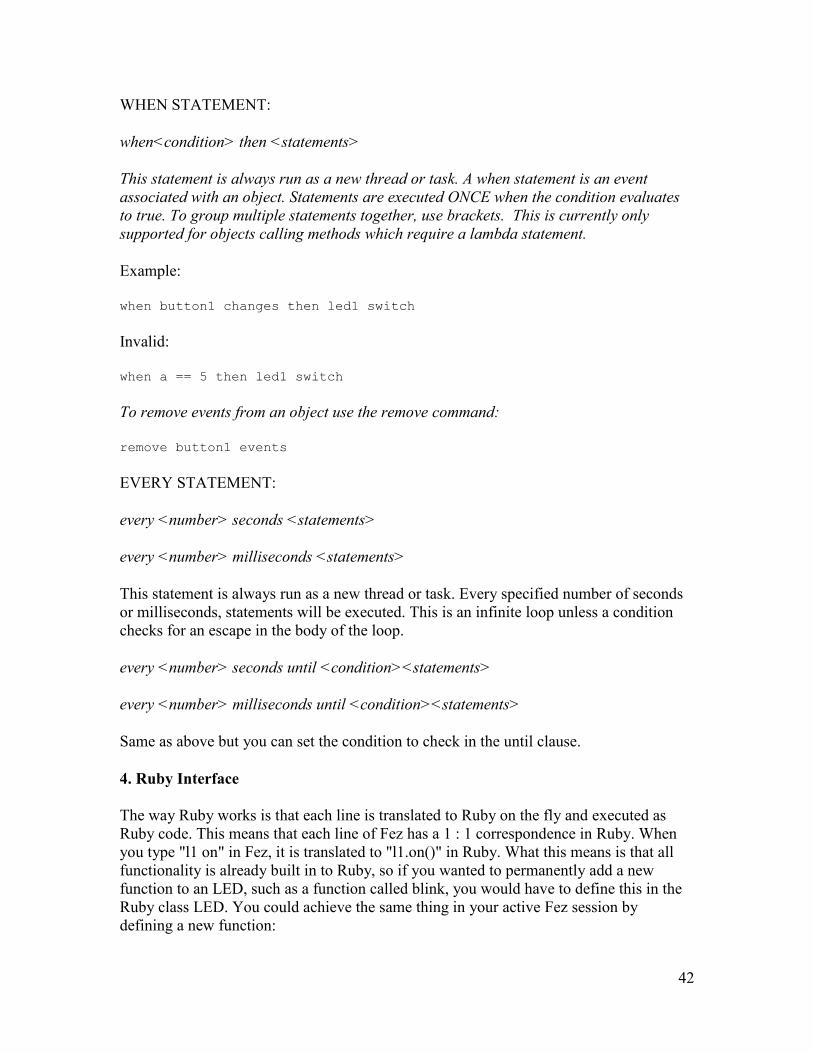
WHEN STATEMENT:
when<condition> then <statements>
This statement is always run as a new thread or task. A when statement is an event
associated with an object. Statements are executed ONCE when the condition evaluates
to true. To group multiple statements together, use brackets. This is currently only
supported for objects calling methods which require a lambda statement.
Example:
when button1 changes then led1 switch
Invalid:
when a == 5 then led1 switch
To remove events from an object use the remove command:
remove button1 events
EVERY STATEMENT:
every <number> seconds <statements>
every <number> milliseconds <statements>
This statement is always run as a new thread or task. Every specified number of seconds
or milliseconds, statements will be executed. This is an infinite loop unless a condition
checks for an escape in the body of the loop.
every <number> seconds until <condition><statements>
every <number> milliseconds until <condition><statements>
Same as above but you can set the condition to check in the until clause.
4. Ruby Interface
The way Ruby works is that each line is translated to Ruby on the fly and executed as
Ruby code. This means that each line of Fez has a 1 : 1 correspondence in Ruby. When
you type "l1 on" in Fez, it is translated to "l1.on()" in Ruby. What this means is that all
functionality is already built in to Ruby, so if you wanted to permanently add a new
function to an LED, such as a function called blink, you would have to define this in the
Ruby class LED. You could achieve the same thing in your active Fez session by
defining a new function:
43
def blink(times){
while times > 0{
l1 on
wait 2 seconds
l1 off
times = times - 1
}
}
Times would represent the number of times to blink the LED, and you would decrement
the counter every time you performed a blink. Obviously, the LED l1 used in the function
would have to already be defined before calling this function.
Developer Documentation
Most functionality for Fez will have to be extended through the Ruby libraries built upon
the NRDSK. What is important is that while adding new functionality, you are aware of
how Fez will translate to your new function.
Fez is written using ANTLR (http://www.antlr.org/) in Eclipse
(http://antlrv3ide.sourceforge.net/). If you don‟t have experience using ANTLR, changing
grammar rules and code emission should probably be avoided. However, here is a brief
sample of an ANTLR grammar rule and what it actually does. In order for the changes to
be seen while writing Fez after making edits to the translation the project must be written
to Fezparser.jar, and put in the directory relative to all of the Ruby source.
objectAssignment :
ADD obj=ID var=ID TO host=ID
{emitter.emitObjectAssignHost($obj.getText(), $var.getText(),
$host.getText());} USING CHANNEL expression {emitter.emitEndP();}
{emitter.emitEndP();}
| ADD obj=ID var=ID TO host=ID
{emitter.emitObjectAssignHostNoChan($obj.getText(), $var.getText(),
$host.getText());} (USING expression ({emitter.emitComma();}
expression)*)? {emitter.emitEndP();}
| ADD obj=ID var=ID {emitter.emitObjectAssign($obj.getText(),
$var.getText());} (USING expression ({emitter.emitComma();}
expression)*)? {emitter.emitEndP();} ;
44
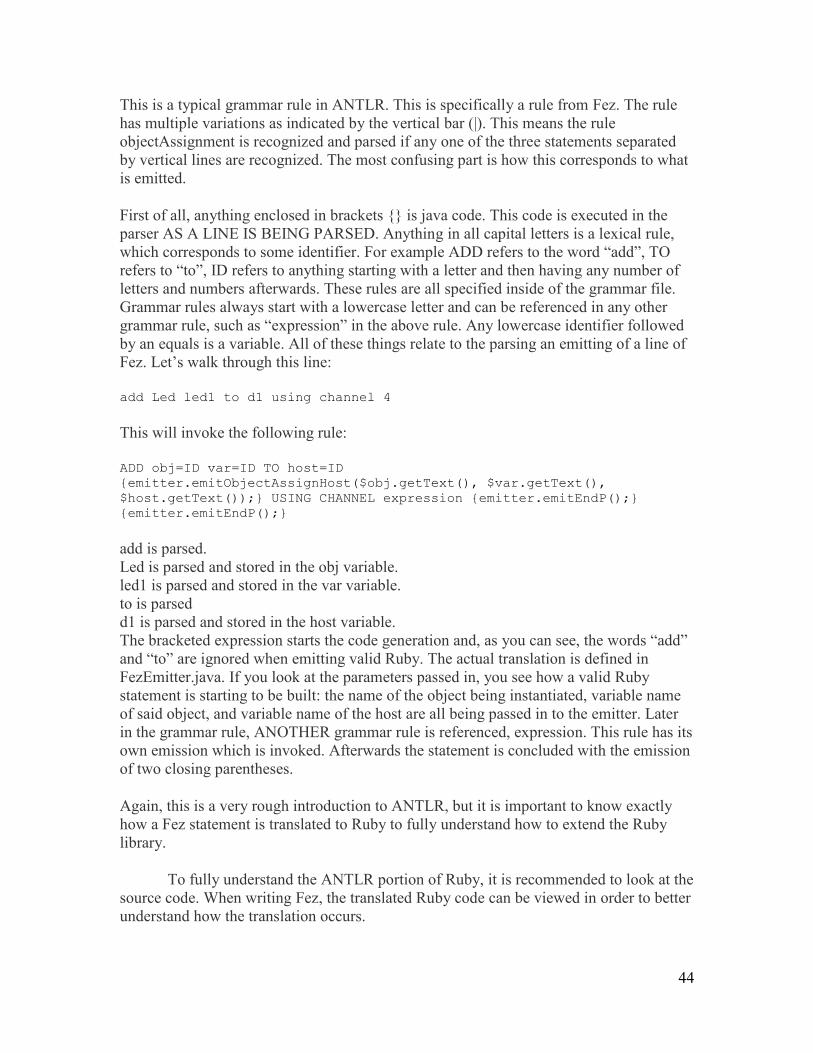
This is a typical grammar rule in ANTLR. This is specifically a rule from Fez. The rule
has multiple variations as indicated by the vertical bar (|). This means the rule
objectAssignment is recognized and parsed if any one of the three statements separated
by vertical lines are recognized. The most confusing part is how this corresponds to what
is emitted.
First of all, anything enclosed in brackets {} is java code. This code is executed in the
parser AS A LINE IS BEING PARSED. Anything in all capital letters is a lexical rule,
which corresponds to some identifier. For example ADD refers to the word “add”, TO
refers to “to”, ID refers to anything starting with a letter and then having any number of
letters and numbers afterwards. These rules are all specified inside of the grammar file.
Grammar rules always start with a lowercase letter and can be referenced in any other
grammar rule, such as “expression” in the above rule. Any lowercase identifier followed
by an equals is a variable. All of these things relate to the parsing an emitting of a line of
Fez. Let‟s walk through this line:
add Led led1 to d1 using channel 4
This will invoke the following rule:
ADD obj=ID var=ID TO host=ID
{emitter.emitObjectAssignHost($obj.getText(), $var.getText(),
$host.getText());} USING CHANNEL expression {emitter.emitEndP();}
{emitter.emitEndP();}
add is parsed.
Led is parsed and stored in the obj variable.
led1 is parsed and stored in the var variable.
to is parsed
d1 is parsed and stored in the host variable.
The bracketed expression starts the code generation and, as you can see, the words “add”
and “to” are ignored when emitting valid Ruby. The actual translation is defined in
FezEmitter.java. If you look at the parameters passed in, you see how a valid Ruby
statement is starting to be built: the name of the object being instantiated, variable name
of said object, and variable name of the host are all being passed in to the emitter. Later
in the grammar rule, ANOTHER grammar rule is referenced, expression. This rule has its
own emission which is invoked. Afterwards the statement is concluded with the emission
of two closing parentheses.
Again, this is a very rough introduction to ANTLR, but it is important to know exactly
how a Fez statement is translated to Ruby to fully understand how to extend the Ruby
library.
To fully understand the ANTLR portion of Ruby, it is recommended to look at the
source code. When writing Fez, the translated Ruby code can be viewed in order to better
understand how the translation occurs.
45
Currently, while, every, and when statements spawn a new thread no matter what.
This is because the main interface to Fez is a repl interface and we want the users to
always be able to get the prompt back. Now, if Fez is ever going to be written to a file
and then executed, you will want to either remove the base functionality or perhaps check
what kind of Ruby code to emit based on the interface to Fez.
JRuby Interface
Connecting to DyIO and Peripherals
Unless the machine already has JRuby installed, install JRuby
1. Extract JRuby into a directory.
2. Add that directory‟s bin subdirectory to the end of your path.
3. Test it: jruby -v
Download and unzip Fez
Open your command prompt and navigate to the unzipped Fez folder
Run “Fez.bat”
This is the Read-eval-print-loop that our DSL is using to load all of the necessary files,
classes, and modules in order to interpret jRuby commands line by line.
Then run in JRuby mode by entering “jruby” into the console.
Attach your DyIO device to your machine.
Now we can start connecting to our DyIO by entering the following line:
dyio = Dyio.new
“dyio” is our identifier. We can use any name we like, such as “dyio1″, “d1″, or “fred”.
By running this line, a dialog box will appear asking for the serial connection port and
baud rate. Leave the baud rate at its default 115200 and select the serial connection port
that your DyIO is connected. If you do not know what connection port your DyIO device
is attached to (on Windows, the naming scheme is „COMx‟ where „x‟ is a natural
number), you can check your device manager and look for the COM port with the device
named “DyIO”. You can also try the different ports until one works. If it works, it will
return some packet information from the DyIO. If it does not, it will raise an exception.
If you do know the serial connection port name (e.g. COM3), then you can enter it via
command-line by entering the following line instead:
dyio = Dyio.new(“COM3″)
46
Now we will connect to some peripherals. Let‟s start by attaching an LED to channel 4
on our dyio. We can now connect to it on our console by entering the following:
led = Led.new(dyio.channel(4))
“led” is the identifier, and unlike before, our new Led requires a parameter; in this case,
that parameter is the DyIO channel it is on. We use the DyIO identifier from before
(“dyio”) and calling channel(4).
Now we can interact with the LED. To turn it on, call its „on‟ function by entering:
led.on
You can also turn it off by calling its „off‟ function. Other functions include „switch‟
which turns the LED on if it is not on and turns it off if it is on.
Creating code for a Peripheral
This is probably the most difficult usage of the RDSL as it requires knowledge on the
NRSDK and the appropriate calls to what you want to do. We will go over the steps in
creating a SimpleButton peripheral, although one is already included in Fez v0.1. The one
we are about to make is stripped down and does not handle asynchronicity (just to keep
things simple).
Create the Ruby Class
Create a new Ruby file. For this example, let‟s name it simple_button.rb.
Open config.ini and add the following line
load “directory\simple_button.rb”
where „directory‟ is the directory in which you created simple_button.rb. You can use
relative addressing which is relative to the repl.rb file in the Fez folder.
The file will contain the following:
java_importcom.neuronrobotics.sdk.dyio.peripherals.DigitalInputChannel
class SimpleButton
#set button to a dyio channel
def initialize(channel)
@chan = channel
@type = DigitalInputChannel.new(@chan)
end
#returns button state, true is high (5v), false is low (0v)
def state
return @type.isHigh

47
end
end
The first line in the code imports the Java code from the NRSDK which allows a digital
input device to connect to the DyIO.
We name this class "SimpleButton", and this class will contain all of the behavior we
want for a button.
Everything following a '#' is a comment and does not execute. We use this to describe our
code.
We define our 'initialize' method. We place all the parameters that a button will need in
order to function in this method, which in this case is the DyIO channel to which our
button to connected.
We make a class variable called @chan to store the DyIO channel.
We make a class variable called @type to wrap the channel into a particular type of
channel; in this case, that channel type is a Digital Input Channel.
We created on method of actual functionality called 'state', which return which of two
states a button is actually in.
Extending a Peripheral
Let's extend the button by creating another peripheral which contains all of functionality
of the original button. We can easily increase functionality to suit our needs by adding to
or changing an established peripheral. We will name our new button CrazyButton.
Create a new Ruby. Let's name it crazy_button.rb.
Open config.ini and add a line like before in order to tell the DSL where you have placed
the new file.
The put the following into the file:
class CrazyButton<SimpleButton
def antiState
return !state
end
end
48
You have now created a new peripheral which (rather trivially) extends an established
peripheral!
Protip: The config.ini file is simply a default loading whenever you start repl.rb. You can
manually load a file when you run 'jrubyrepl.rb' by calling
load "whatever.rb"
in the actual REPL of our DSL.
Setting Up Asynchronous Events
All input peripherals in the basic package (button, dial, etc) have the option of setting up
an asynchronous event which will fire every time the device changes state. Setting these
up are extremely easy. First, let‟s set up our DyIO. For this example, let‟s attach a button
to channel 0 and an LED to channel 4. Now run the following:
dyio = Dyio.new #this will bring up a dialog box asking what channel
the DyIO is connected to
button = Button.new(dyio.channel(0))
led = Led.new(dyio.channel(4))
This will set up all the devices. Now let‟s add an event that will fire every time the button
changes state. We do this by calling onChange on the button and putting in a lambda
function as a parameter. This lambda function will execute whatever we want executed.
In this example, it will call switch on the LED (this will cause the LED to turn on if it is
not on and off if it is on).
button.onChange(lambda{led.switch})
Setting Up Robotics Modules
Suppose you have a set of peripherals which act very cohesively as a unit. It could be a
set of LEDs, sensors, etc. Much like how we extended a peripheral by creating a new one
which contained all of the functionality of the original, we will create a robotics module
which will take in a set of peripherals. This is a natural progression of the power of this
DSL that makes its extensibility far-reaching.
49
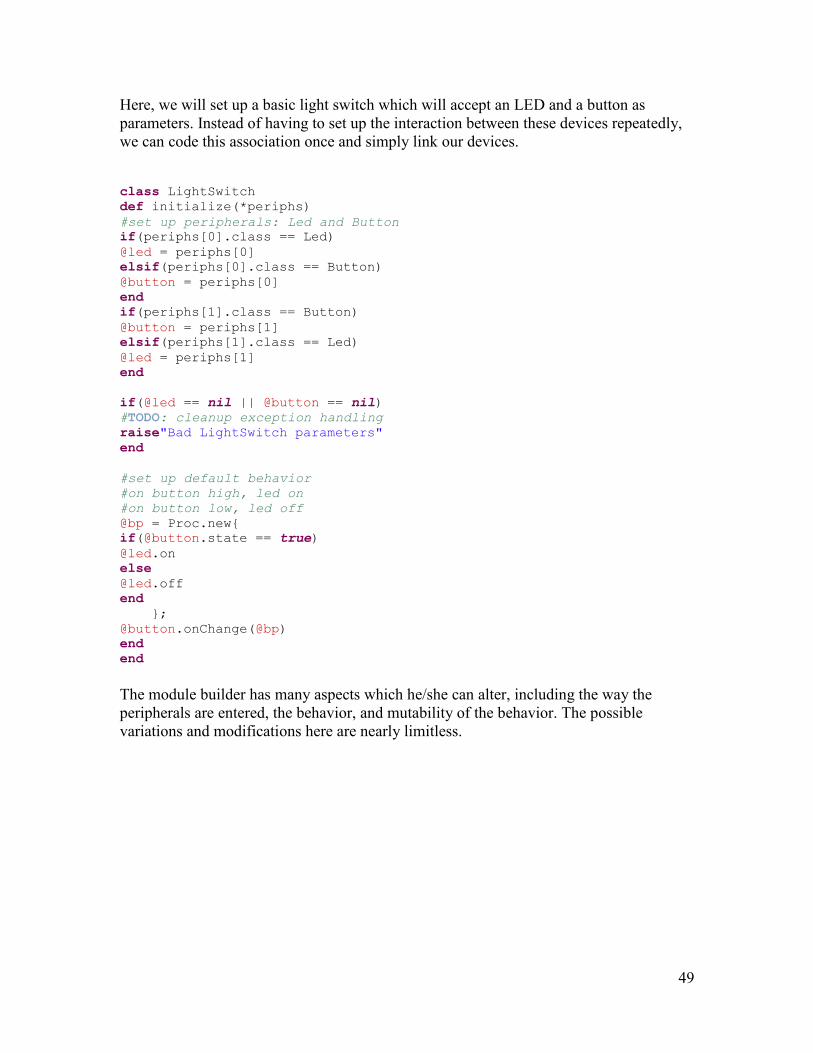
Here, we will set up a basic light switch which will accept an LED and a button as
parameters. Instead of having to set up the interaction between these devices repeatedly,
we can code this association once and simply link our devices.
class LightSwitch
def initialize(*periphs)
#set up peripherals: Led and Button
if(periphs[0].class == Led)
@led = periphs[0]
elsif(periphs[0].class == Button)
@button = periphs[0]
end
if(periphs[1].class == Button)
@button = periphs[1]
elsif(periphs[1].class == Led)
@led = periphs[1]
end
if(@led == nil || @button == nil)
#TODO: cleanup exception handling
raise"Bad LightSwitch parameters"
end
#set up default behavior
#on button high, led on
#on button low, led off
@bp = Proc.new{
if(@button.state == true)
@led.on
else
@led.off
end
};
@button.onChange(@bp)
end
end
The module builder has many aspects which he/she can alter, including the way the
peripherals are entered, the behavior, and mutability of the behavior. The possible
variations and modifications here are nearly limitless.
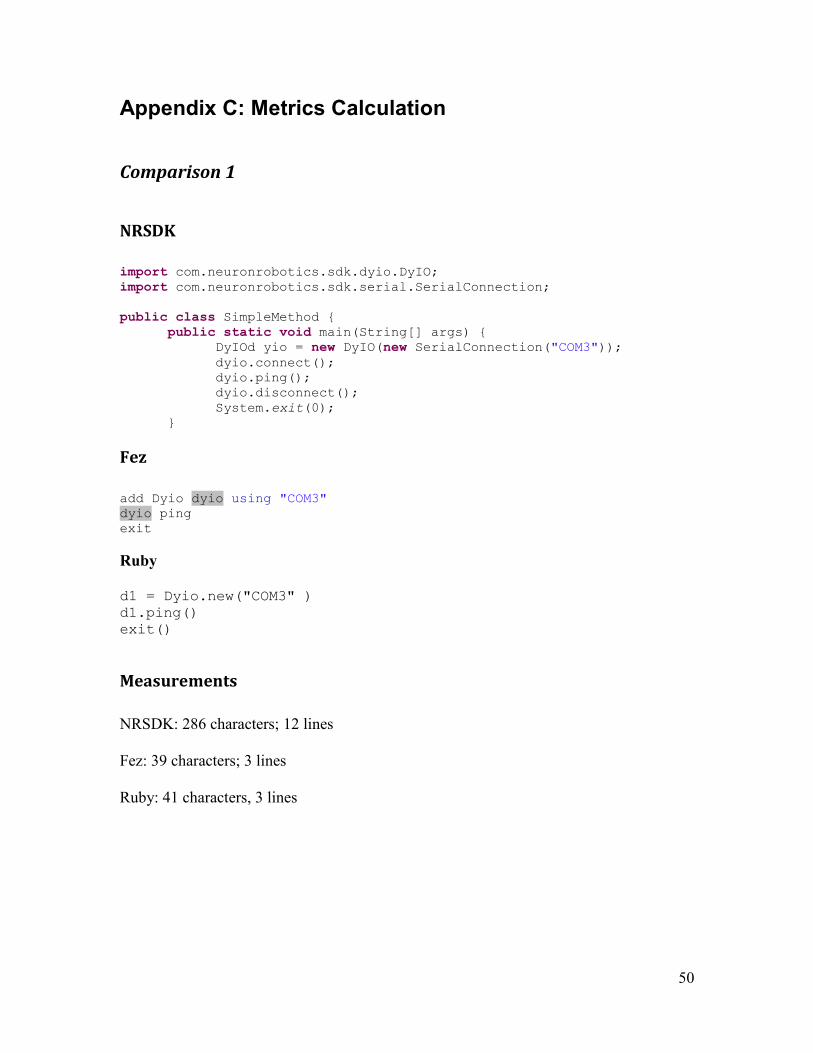
50
Appendix C: Metrics Calculation
Comparison 1
NRSDK
import com.neuronrobotics.sdk.dyio.DyIO;
import com.neuronrobotics.sdk.serial.SerialConnection;
public class SimpleMethod {
public static void main(String[] args) {
DyIOd yio = new DyIO(new SerialConnection("COM3"));
dyio.connect();
dyio.ping();
dyio.disconnect();
System.exit(0);
}
Fez
add Dyio dyio using "COM3"
dyio ping
exit
Ruby
d1 = Dyio.new("COM3" )
d1.ping()
exit()
Measurements
NRSDK: 286 characters; 12 lines
Fez: 39 characters; 3 lines
Ruby: 41 characters, 3 lines
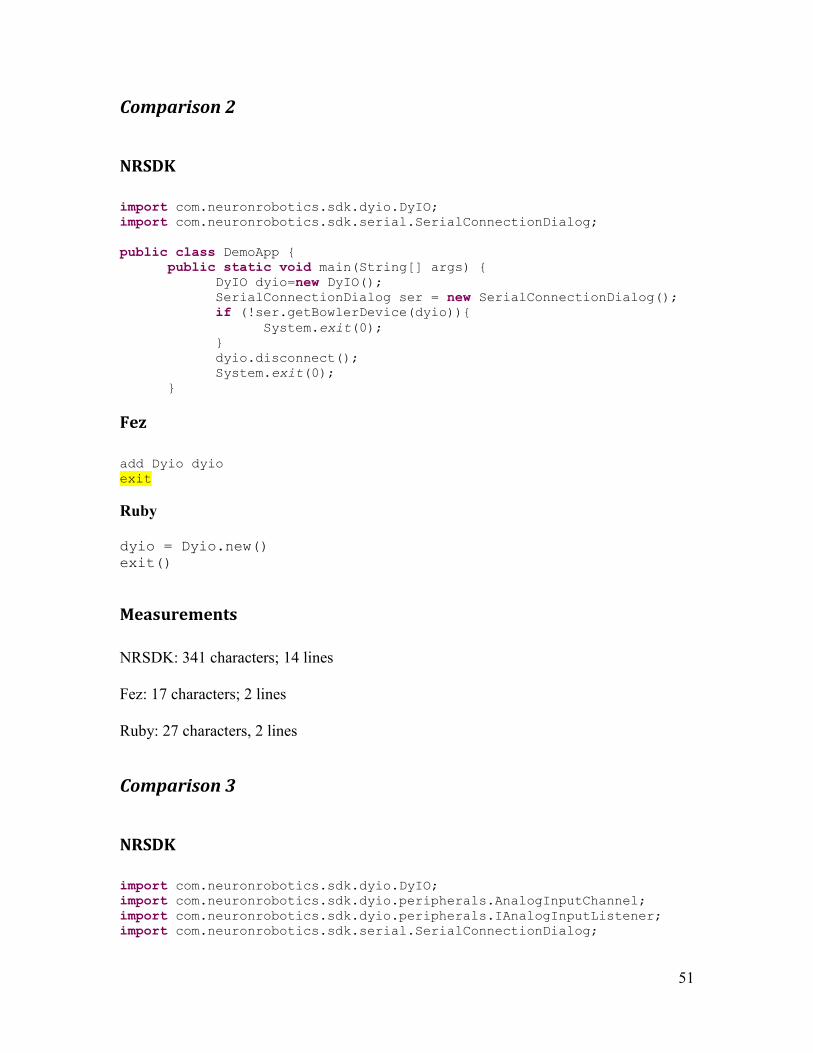
51
Comparison 2
NRSDK
import com.neuronrobotics.sdk.dyio.DyIO;
import com.neuronrobotics.sdk.serial.SerialConnectionDialog;
public class DemoApp {
public static void main(String[] args) {
DyIO dyio=new DyIO();
SerialConnectionDialog ser = new SerialConnectionDialog();
if (!ser.getBowlerDevice(dyio)){
System.exit(0);
}
dyio.disconnect();
System.exit(0);
}
Fez
add Dyio dyio
exit
Ruby
dyio = Dyio.new()
exit()
Measurements
NRSDK: 341 characters; 14 lines
Fez: 17 characters; 2 lines
Ruby: 27 characters, 2 lines
Comparison 3
NRSDK
import com.neuronrobotics.sdk.dyio.DyIO;
import com.neuronrobotics.sdk.dyio.peripherals.AnalogInputChannel;
import com.neuronrobotics.sdk.dyio.peripherals.IAnalogInputListener;
import com.neuronrobotics.sdk.serial.SerialConnectionDialog;
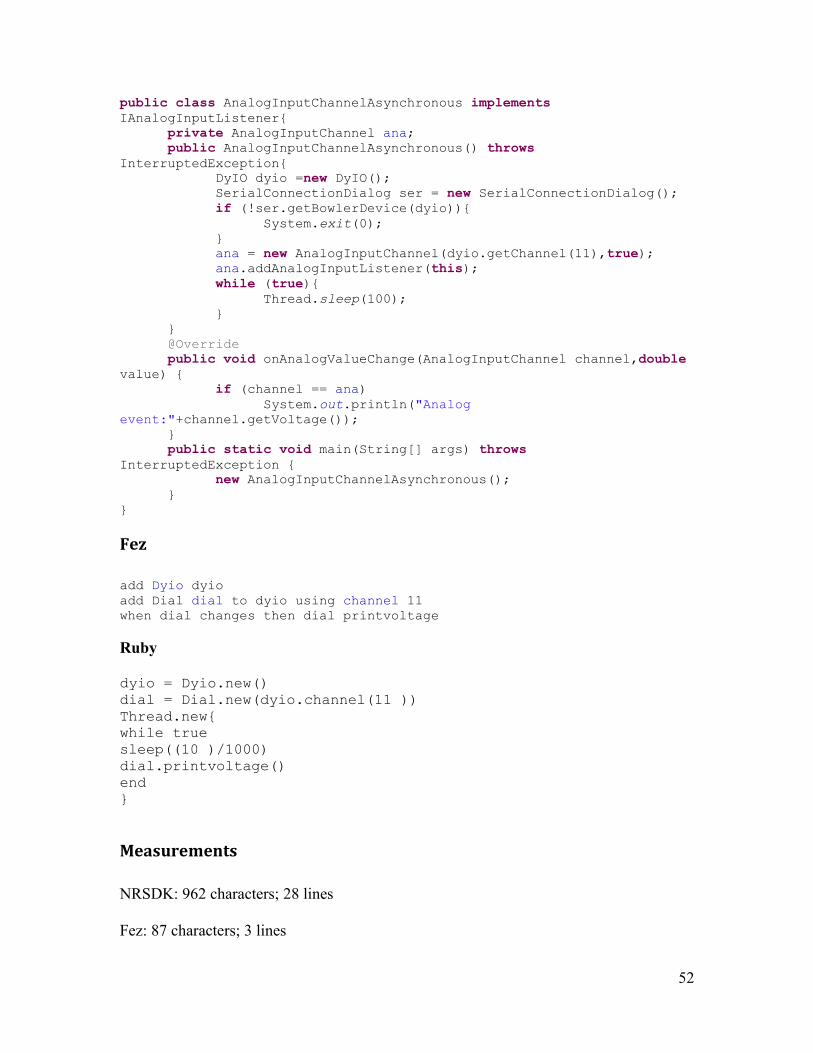
52
public class AnalogInputChannelAsynchronous implements
IAnalogInputListener{
private AnalogInputChannel ana;
public AnalogInputChannelAsynchronous() throws
InterruptedException{
DyIO dyio =new DyIO();
SerialConnectionDialog ser = new SerialConnectionDialog();
if (!ser.getBowlerDevice(dyio)){
System.exit(0);
}
ana = new AnalogInputChannel(dyio.getChannel(11),true);
ana.addAnalogInputListener(this);
while (true){
Thread.sleep(100);
}
}
@Override
public void onAnalogValueChange(AnalogInputChannel channel,double
value) {
if (channel == ana)
System.out.println("Analog
event:"+channel.getVoltage());
}
public static void main(String[] args) throws
InterruptedException {
new AnalogInputChannelAsynchronous();
}
}
Fez
add Dyio dyio
add Dial dial to dyio using channel 11
when dial changes then dial printvoltage
Ruby
dyio = Dyio.new()
dial = Dial.new(dyio.channel(11 ))
Thread.new{
while true
sleep((10 )/1000)
dial.printvoltage()
end
}
Measurements
NRSDK: 962 characters; 28 lines
Fez: 87 characters; 3 lines

53
Ruby: 121 characters, 7 lines
Comparison 4
NRSDK
import com.neuronrobotics.sdk.dyio.DyIO;
import com.neuronrobotics.sdk.dyio.peripherals.AnalogInputChannel;
import com.neuronrobotics.sdk.serial.SerialConnectionDialog;
public class AnalogInputChannelSynchronous {
public static void main(String[] args) throws
InterruptedException {
DyIO dyio = new DyIO();
SerialConnectionDialog ser = new SerialConnectionDialog();
if (!ser.getBowlerDevice(dyio)) {
System.exit(0);
}
AnalogInputChannel ana = new
AnalogInputChannel(dyio.getChannel(11));
while (true) {
System.out.println(ana.getVoltage());
Thread.sleep(10);
}
}
Fez
add Dyio dyio
add Dial dial to dyio using channel 11
every 10 ms dial printvoltage
Ruby
dyio = Dyio.new()
dial = Dial.new(dyio.channel(11 ))
Thread.new{
dial.changes(lambda{
dial.printvoltage()
})}
Measurements
NRSDK: 573 characters; 18 lines
Fez: 81 characters; 3 lines
Ruby: 110 characters, 5 lines
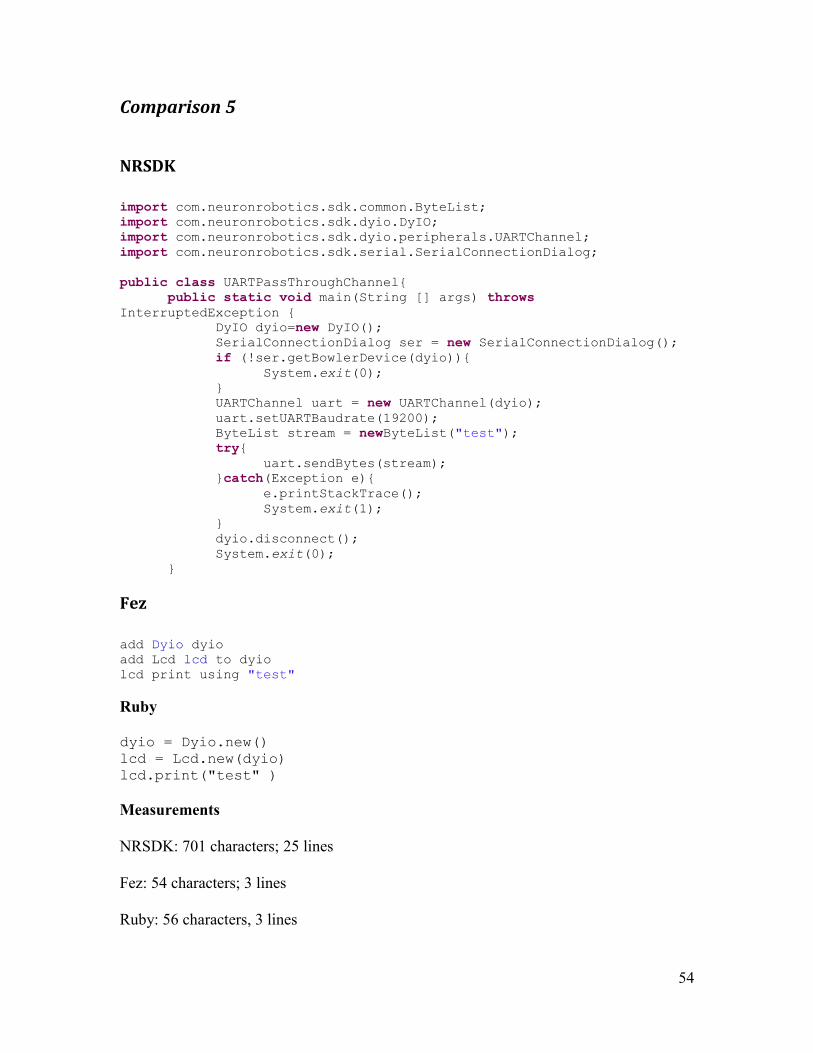
54
Comparison 5
NRSDK
import com.neuronrobotics.sdk.common.ByteList;
import com.neuronrobotics.sdk.dyio.DyIO;
import com.neuronrobotics.sdk.dyio.peripherals.UARTChannel;
import com.neuronrobotics.sdk.serial.SerialConnectionDialog;
public class UARTPassThroughChannel{
public static void main(String [] args) throws
InterruptedException {
DyIO dyio=new DyIO();
SerialConnectionDialog ser = new SerialConnectionDialog();
if (!ser.getBowlerDevice(dyio)){
System.exit(0);
}
UARTChannel uart = new UARTChannel(dyio);
uart.setUARTBaudrate(19200);
ByteList stream = newByteList("test");
try{
uart.sendBytes(stream);
}catch(Exception e){
e.printStackTrace();
System.exit(1);
}
dyio.disconnect();
System.exit(0);
}
Fez
add Dyio dyio
add Lcd lcd to dyio
lcd print using "test"
Ruby
dyio = Dyio.new()
lcd = Lcd.new(dyio)
lcd.print("test" )
Measurements
NRSDK: 701 characters; 25 lines
Fez: 54 characters; 3 lines
Ruby: 56 characters, 3 lines
55
Glossary
7-Zip an open source archiver which can operate with the 7z and zip archive formats and
generate self extracting archives
ANTLR aka ANother Tool for Language Recognition is the name of a parser generator
that takes as input a grammar that specifies a language and generates as output, source
code for a recognizer for that language.
Bowler Communication a network protocol developed by Neuron Robotics used in their
devices. Read more http://neuronrobotics.com/wiki/Bowler_Communications_System
Fez a domain specific language built by Terry Tata and Ethan Truong to represent
robotics coding using the NRSDK as its foundation
DyIO aka Dynamic Input/Output a Bowler protocol device developed by Neuron
Robotics which allows sensors and servos to be plugged in and operated. Read more
http://neuronrobotics.com/wiki/DyIO_module
Domain Specific Language a programming language dedicated to a particular domain
Dropbox a Web-based file hosting service operated by Dropbox, Inc. which enables
users to store and share files and folders with others across the Internet using file
synchronization
DSL acronym for Domain Specific Language (see Domain Specific Language)
Duck typing a style of dynamic typing in which an object's current set of methods and
properties determines the valid semantics, rather than its inheritance from a particular
class or implementation of a specific interface
Eclipse a multi-language software development environment comprising an integrated
development environment (IDE) and an extensible plug-in system
JRuby a Java implementation of the Ruby programming language which allows full two-
way access between the Java and the Ruby code
Neuron Robotics robotics company founded by WPI alumni. Developers of the DyIO
and Bowler Communication Protocol. Their website http://neuronrobotics.com/
Neuron Robotics Standard Development Kita development package that allows users
to quickly develop with the DyIO and other products compatible with the Bowler
Communications Systems
56
NRSDK aka Neuron Robotics Standard Development Kit (see Neuron Robotics
Standard Development Kit)
Peripheral a device which connects to the DyIO which expands the DyIO‟s capabilities -
examples included previously in this document are LEDs and buttons
RDSL Acronym for Robotics Domain Specific Language (see Domain Specific
Language)
Read-Eval-Print-Loop a simple, command-line, interactive computer programming
environment where users enter expressions to be evaluated and executed with the results
shown
REPL aka Read-Eval-Print-Loop (see Read-Eval-Print-Loop)
Robotics Module a group of peripherals whose functionality should combine to serve a
more complex purpose
Ruby a dynamic, reflective, general purpose object-oriented programming languagefirst
developed and designed by Yukihiro Matsumoto
Sensor a device that measures a physical quantity and converts it into a signal which can
be read by an observer or by an instrument e.g. button, thermometer, and voltmeter
Servo short for servomechanism, an automatic device used to correct the performance of
a mechanism by means of an error-sensing feedback
57
References
Breznak, Bob, and Kevin Harrington. Neuron Robotics - Better Tools for Better Ideas. Web. 08
Dec. 2010. <http://neuronrobotics.com>.
Fowler, Martin. "MF Bliki: DomainSpecificLanguage." Martin Fowler. Web. 08 Dec. 2010.
<http://martinfowler.com/bliki/DomainSpecificLanguage.html>.
Chapter 11. Domain-Specific Languages in Scala. Web. 08 Dec. 2010. <http://programming-
scala.labs.oreilly.com/ch11.html>.
"InfoQ: An Approach to Internal Domain-Specific Languages in Java." InfoQ: Tracking Change
and Innovation in the Enterprise Software Development Community. Web. 08 Dec. 2010.
<http://www.infoq.com/articles/internal-dsls-java>.
Parr, Terrance. ANTLR Parser Generator. Web. 09 Dec. 2010. <http://www.antlr.org/>.
Domain-specific language. (2010, November 22). In Wikipedia, The Free Encyclopedia.
Retrieved 03:38, November 23, 2010,
from http://en.wikipedia.org/w/index.php?title=Domain-
specific_language&oldid=398339404
Arduino. (2010, November 22). In Wikipedia, The Free Encyclopedia. Retrieved 03:37,
November 23, 2010,
from http://en.wikipedia.org/w/index.php?title=Arduino&oldid=398168536

58
VEX Robotics Design System - VEX Robotics. Web. 10 Dec. 2010.
<http://www.vexrobotics.com/>.
Arduino - HomePage. Web. 11 Dec. 2010. <http://arduino.cc/en/>.


![Demanding First-Class Equality for Domain Specific Aspect ...Related Work Language Workbenches – [Fowler, 2005] Language workbenches: The killer-app for domain specific languages](https://img.pdfslide.us/doc/110x75/605360dcde603a02de4f5d5a/demanding-first-class-equality-for-domain-specific-aspect-related-work-language.jpg)


![[Conference];[Social Media_Tony Truong]](https://img.pdfslide.us/doc/110x75/55585b64d8b42a993b8b50b4/conferencesocial-mediatony-truong.jpg)