Embed Size (px)
Citation preview
WebEx™ and EventCenter™ are either registered trademarks or trademarks of WebEx Communications Inc. in the United States and other countries.
Last modified on: 10/15/2007
For more information: 800.374.2441 www.intercall.com [email protected]
SupportCenter Getting Started Guide
InterCall, a subsidiary of West Corporation, in partnership with WebEx Communications, Inc provides SupportCenter web conferencing services. Because SupportCenter is powered by WebExTM, this guide makes several references to the company name, platform and features.
About SupportCenter SupportCenter provides you with a rich and dynamic environment for conducting real-time customer support sessions over the Web. Using the Support Manager software, you can view, remotely control, and annotate a customer's applications or entire desktop to analyze and solve problems, thereby allowing you to enhance the effectiveness of traditional telephone-based customer support. For example, you can show a customer how to use an application, or you can troubleshoot it directly on the customer's computer. You can also transfer files to and from a customer's computer to analyze them or to install updates or patches. To start a support session using SupportCenter, you must have a user account. If you do not yet have a user account, ask your site administrator to set up an account for you.
Components of SupportCenter SupportCenter includes two primary components: Your SupportCenter Website: The site on which you start or join support sessions. A site administrator manages your SupportCenter website and provides user accounts to support representatives. Your SupportCenter website also includes My WebEx, a set of account management features that can help you to maximize your productivity with SupportCenter. Using My WebEx, you can maintain your user profile, important files, and an online address book. You can also access detailed usage reports and activity logs for your support sessions. Support Manager Software: The online environment in which you provide support to your customers. Support Manager provides you with a comprehensive set of support tools, called the CSR dashboard, which you can use to deliver support your customers. For your customers, Support Manager presents a simple user interface, eliminating the need for customer training.
Support Manager Features Support Manager provides the following features.
Email invitations – Send an invitation by email to a primary customer, other customers to observe the support session, or another customer support representative. Desktop sharing – View, remotely control, or annotate a customer's entire desktop. Application sharing – View, remotely control, and annotate a customer's application. Remote printing – Print documents from your customer's computer or another remote computer to a local printer. Recording and playback – Record all or part of a support session for training or archival purposes. You can start recording at any time during a session, or your site administrator can set up your account such that all of your support sessions are recorded automatically and saved on your computer. System information retrieval – View detailed information about a customer's computer, including information about the operating system, hardware, and Web browser. Save or print the information for reference. Remote system management – Log on to a customer's computer as a different user, or restart the computer remotely. Chat – Send messages to and receive them from a customer or another support representative. File transfer – Transfer any types of files to and from a customer's computer. Video – Send live video images to a customer. Reports and activity logs – Keep track of the support sessions that you conduct.
Setting Up Support Manager on Your Computer To conduct a support session with a customer, both you and your customer must set up the Support Manager software on your computers. Once you start or join a support session for the first time, your SupportCenter website automatically starts the Support Manager setup process. Or, you can install Support Manager manually.
System Requirements for Support Manager
Windows 98, NT, 2000, XP, 2003 or Vista Microsoft Internet Explorer 6, 7, Mozilla 1.7, Firefox 1.5, 2.0 or Netscape 7.2 JavaScript and cookies enabled in the browser 56 K or faster Internet connection
A localized version of Windows is required to start or attend fully interactive Remote Support sessions on Asian versions of WebEx Remote Support (Japanese, Korean, Traditional Chinese and Simplified Chinese).
Setting Up Support Manager You can let your SupportCenter website automatically install Support Manager on your computer when you start or join a session, or you can install it manually if your system or network policies restrict the automated setup.
Before installing Support Manager, ensure that your computer meets the minimum system requirements.
SETTING UP SUPPORT MANAGER AUTOMATICALLY
SupportCenter automatically installs Support Manager on your computer the first time you either start or join a support session. Installation takes only a few moments, so you normally do not experience a delay in starting or joining a session.
SETTING UP SUPPORT MANAGER MANUALLY
You can install Support Manager at any time, by downloading the installer from your SupportCenter Website. The installer is useful if your system or network policies do not allow you to install software directly from a Website. To set up the Support Manager manually:
1 Go to your SupportCenter website. 2 On the navigation bar, expand Assistance, and then click Support. The Support
page appears. 3 Under Downloads, click Download Support Manager Installer for Windows. 4 If a security dialog box appears, do one of the following:
- If you are installing Support Manager on Microsoft Internet Explorer, click Yes. - If you are installing Support Manager on Netscape Navigator, click Grant.
5 The Support Manager is set up on your computer. 6 Click OK. 7 Log in to your Remote Access website.
UNINSTALLING SUPPORT MANAGER
You can uninstall, or remove, Support Manager from your computer at any time. To uninstall Support Manager:
1 In the Windows Control Panel, double-click Add/Remove Programs or Add or Remove Programs, depending on the version of Windows you are using.
2 In the list of programs installed on your computer, select WebEx. 3 Click Add/Remove or Change/Remove, depending on the version of Windows
you are using. 4 In the message that appears, click Yes to confirm the removal. 5 In the Uninstall WebEx Software dialog box that appears, select the Support
Manager check box. 6 Click Uninstall. The Uninstall WebEx Software program removes the software
from your computer. 7 Click Finish. 8 Restart your computer.
Overview of Support Manager
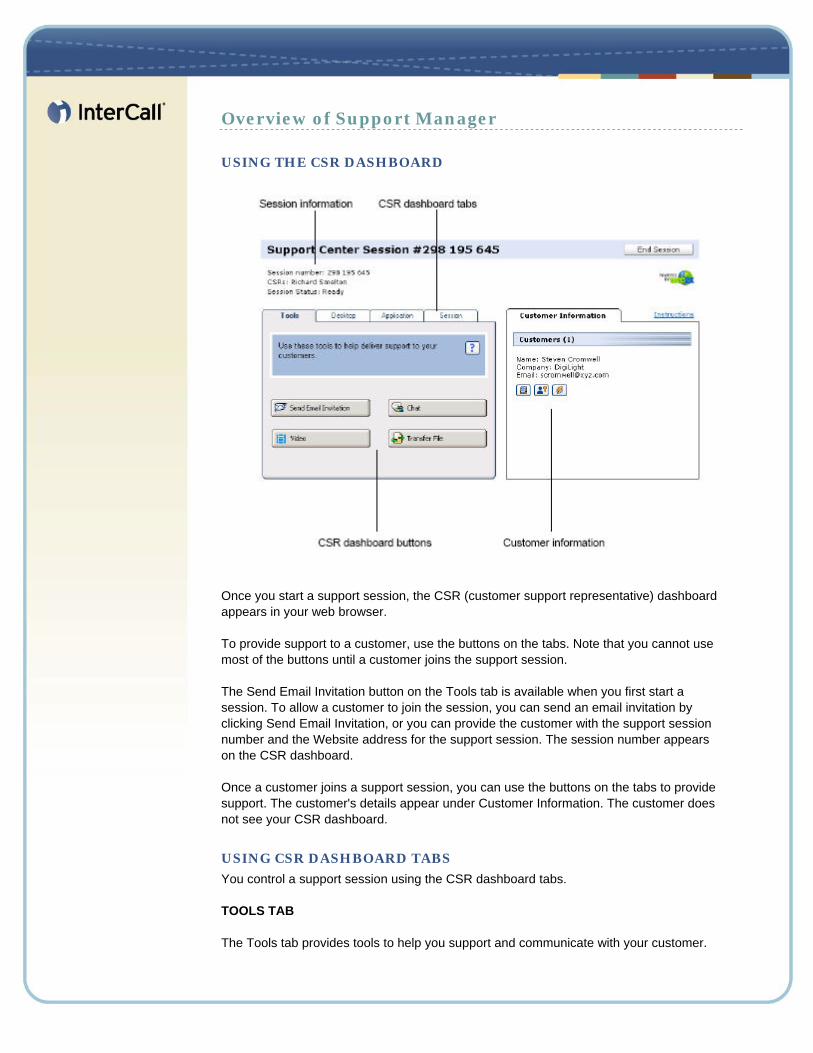
USING THE CSR DASHBOARD
Once you start a support session, the CSR (customer support representative) dashboard appears in your web browser. To provide support to a customer, use the buttons on the tabs. Note that you cannot use most of the buttons until a customer joins the support session. The Send Email Invitation button on the Tools tab is available when you first start a session. To allow a customer to join the session, you can send an email invitation by clicking Send Email Invitation, or you can provide the customer with the support session number and the Website address for the support session. The session number appears on the CSR dashboard. Once a customer joins a support session, you can use the buttons on the tabs to provide support. The customer's details appear under Customer Information. The customer does not see your CSR dashboard.
USING CSR DASHBOARD TABS
You control a support session using the CSR dashboard tabs. TOOLS TAB The Tools tab provides tools to help you support and communicate with your customer.
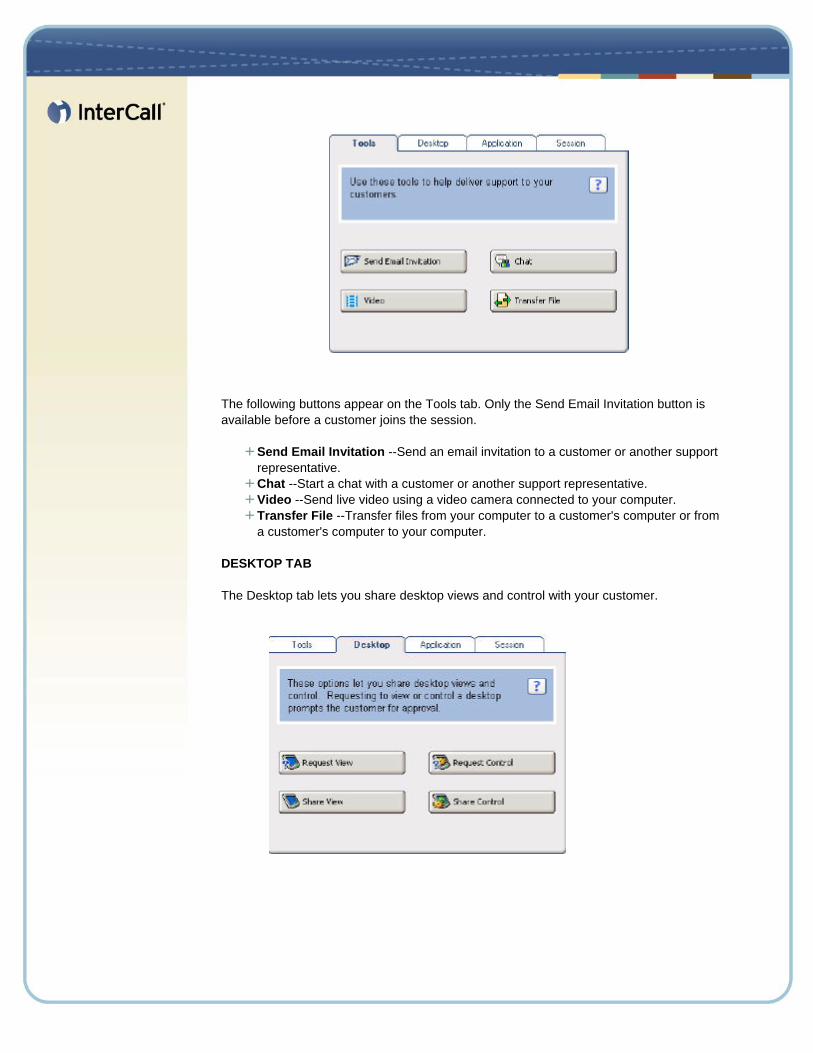
The following buttons appear on the Tools tab. Only the Send Email Invitation button is available before a customer joins the session.
Send Email Invitation --Send an email invitation to a customer or another support representative. Chat --Start a chat with a customer or another support representative. Video --Send live video using a video camera connected to your computer. Transfer File --Transfer files from your computer to a customer's computer or from a customer's computer to your computer.
DESKTOP TAB The Desktop tab lets you share desktop views and control with your customer.
The following buttons appear on the Desktop tab. None of these buttons are available until a customer joins your support session.
Request View --Request to view a customer's desktop. Request Control --Request to control a customer's desktop. Share View --Let a customer view your desktop. Share Control --Give control of your desktop to a customer.
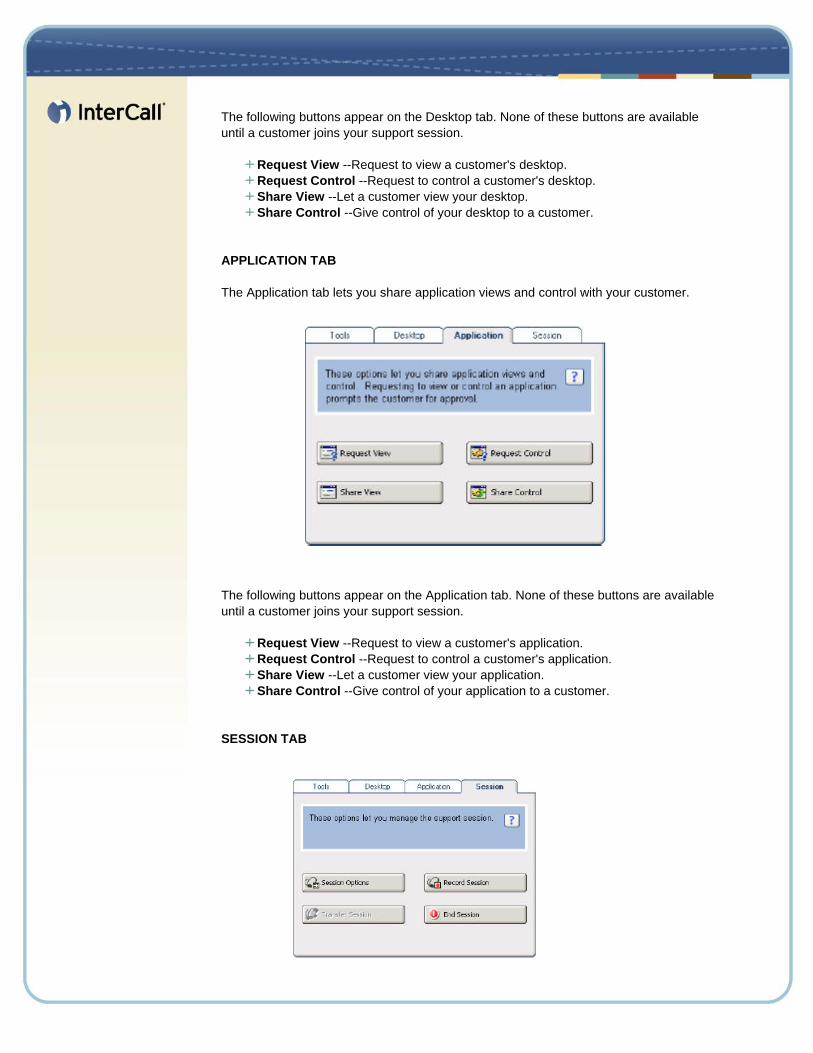
APPLICATION TAB The Application tab lets you share application views and control with your customer.
The following buttons appear on the Application tab. None of these buttons are available until a customer joins your support session.
Request View --Request to view a customer's application. Request Control --Request to control a customer's application. Share View --Let a customer view your application. Share Control --Give control of your application to a customer.
SESSION TAB
The Session tab lets you set options for your desktop display, record your session, transfer control to another support representative, and end or leave the support session. The following buttons appear on the Session tab.
Session Options --Set your display options for the session. These options affect how shared software appears on participants' screens. Record Session --Record your support session using WebEx Recorder. This button is not available if your site administrator has set up auto recording for your support sessions. Transfer Session --Transfer control of your support session to another support representative. End Session --End the support session. If you have transferred control to another support representative, this button allows you to leave the session instead of end it.
Using Panels Support Manager includes the following panels:
Chat panel: You can open from the CSR dashboard or the floating icon tray during application or desktop sharing. Video panel: You can open on the CSR dashboard or the floating icon tray during application or desktop sharing Annotation panel: You can open from the floating icon tray during application or desktop sharing
You can expand, close, or minimize the panels quickly and easily. You can also reduce the panels to icons, providing greater space for sharing applications and your desktop with customers.
MINIMIZING AND RESTORING PANELS
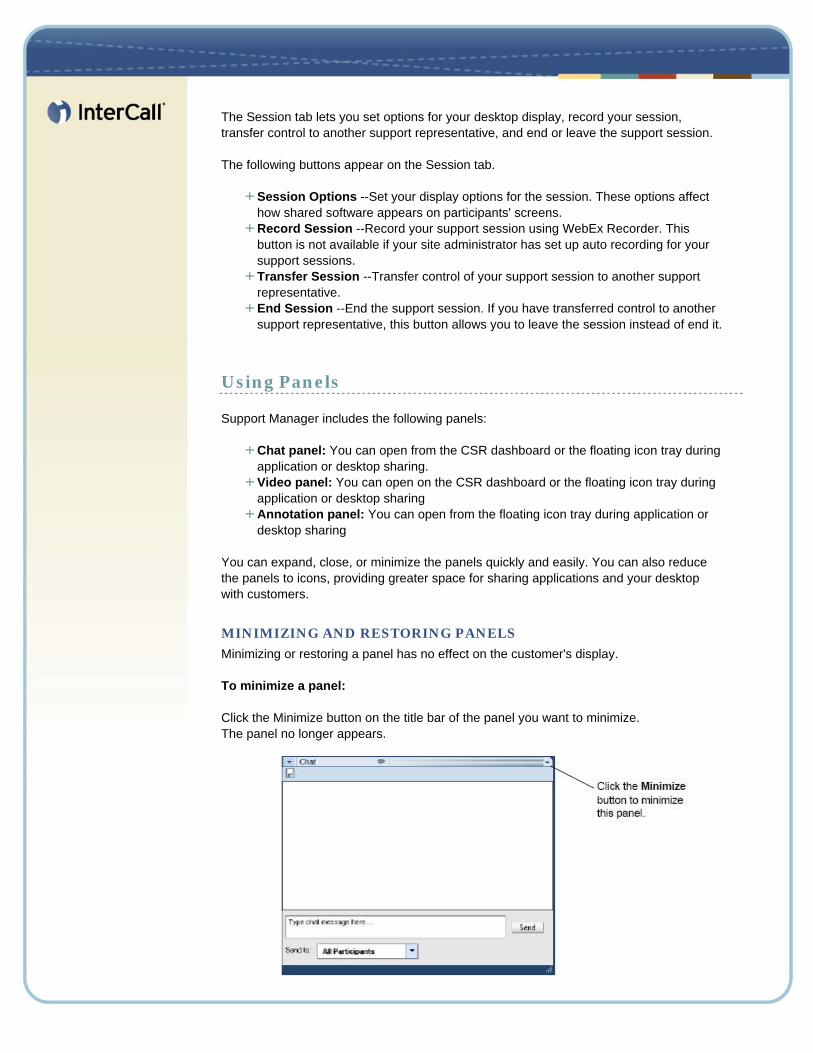
Minimizing or restoring a panel has no effect on the customer's display. To minimize a panel: Click the Minimize button on the title bar of the panel you want to minimize. The panel no longer appears.
To restore a minimized panel: Do one of following:
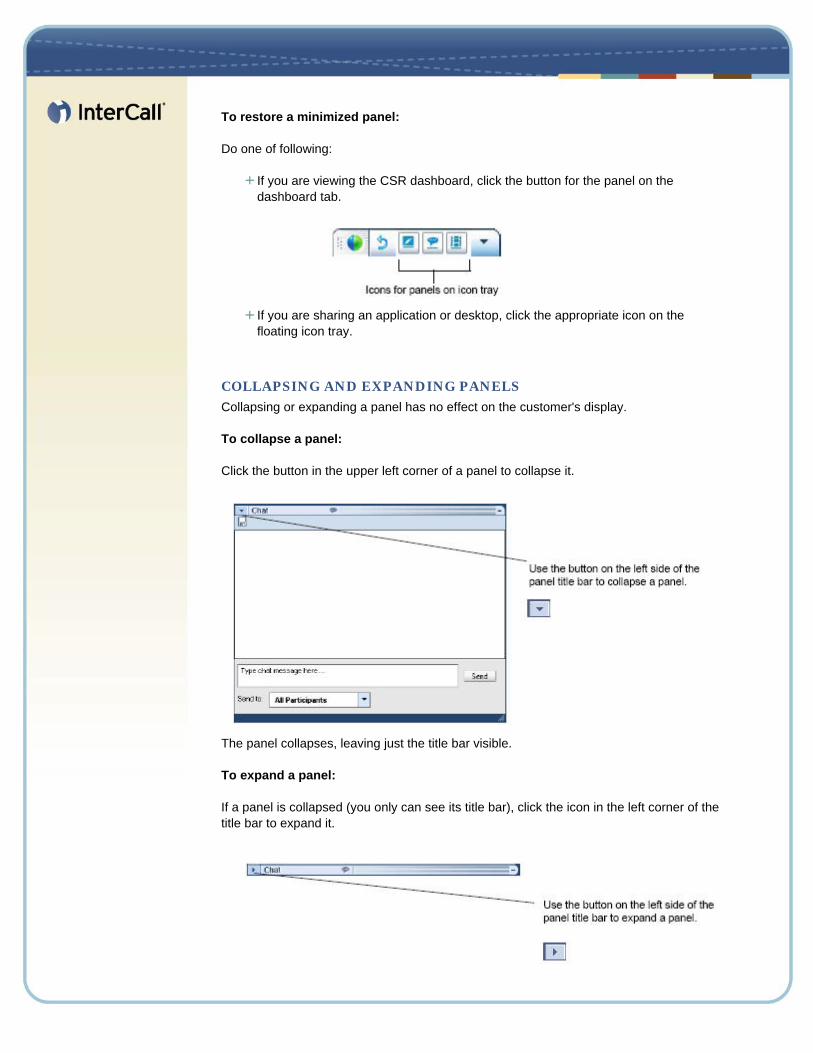
If you are viewing the CSR dashboard, click the button for the panel on the dashboard tab.
If you are sharing an application or desktop, click the appropriate icon on the floating icon tray.
COLLAPSING AND EXPANDING PANELS
Collapsing or expanding a panel has no effect on the customer's display. To collapse a panel: Click the button in the upper left corner of a panel to collapse it.
The panel collapses, leaving just the title bar visible. To expand a panel: If a panel is collapsed (you only can see its title bar), click the icon in the left corner of the title bar to expand it.
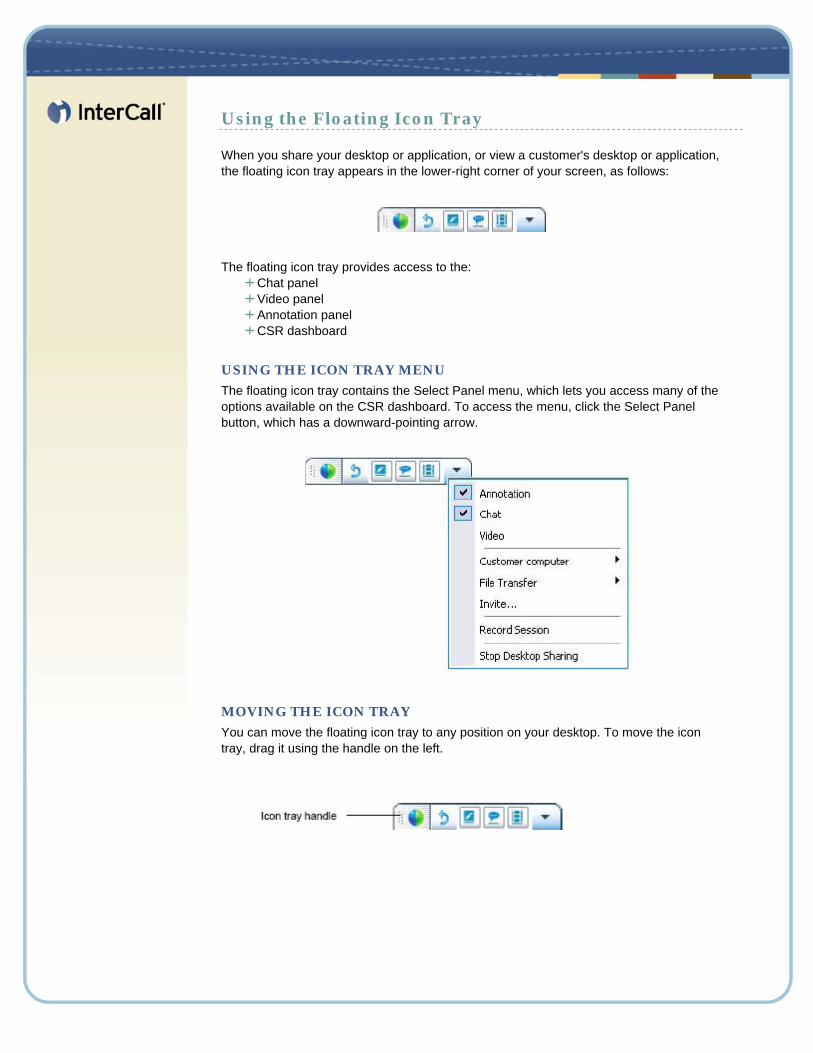
Using the Floating Icon Tray When you share your desktop or application, or view a customer's desktop or application, the floating icon tray appears in the lower-right corner of your screen, as follows:
The floating icon tray provides access to the:
Chat panel Video panel Annotation panel CSR dashboard
USING THE ICON TRAY MENU
The floating icon tray contains the Select Panel menu, which lets you access many of the options available on the CSR dashboard. To access the menu, click the Select Panel button, which has a downward-pointing arrow.
MOVING THE ICON TRAY
You can move the floating icon tray to any position on your desktop. To move the icon tray, drag it using the handle on the left.
Managing a Support Session
STARTING A SUPPORT SESSION
To support a customer, you must first start a support session. Then you can provide the customer with information about joining the session. You must have a user account to start a support session. To start a support session:
1 Log in to your SupportCenter website. 2 Do either of the following:
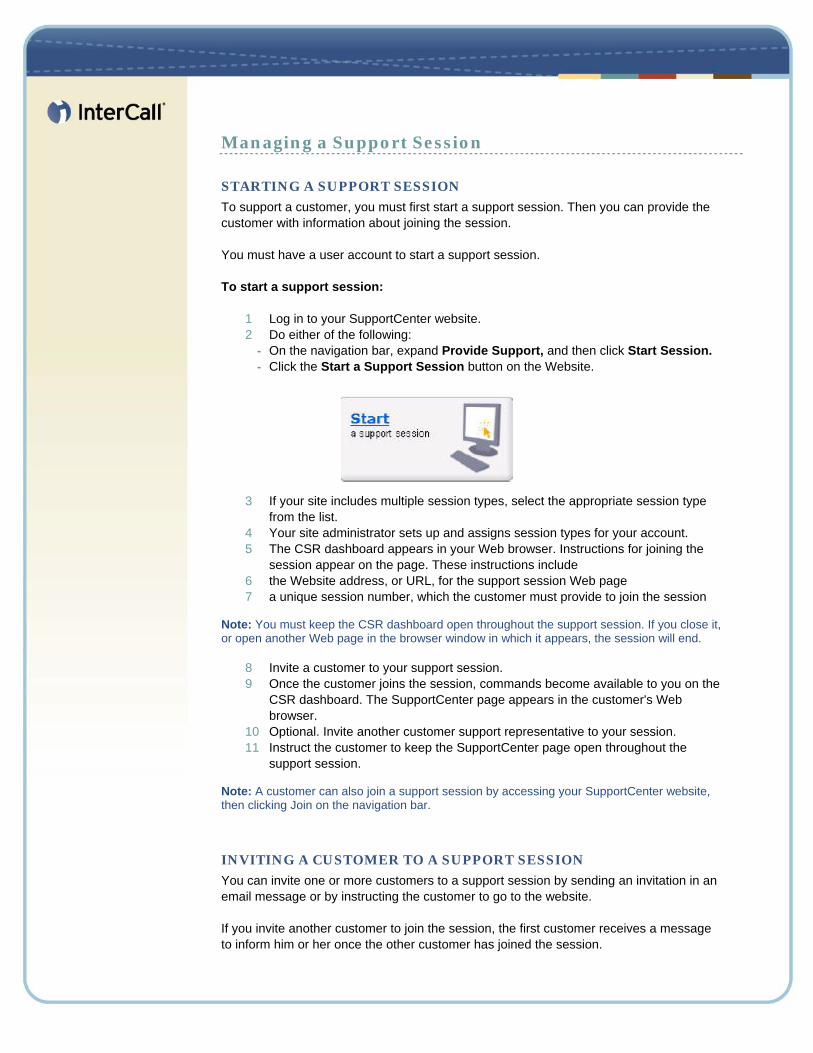
- On the navigation bar, expand Provide Support, and then click Start Session. - Click the Start a Support Session button on the Website.
3 If your site includes multiple session types, select the appropriate session type from the list.
4 Your site administrator sets up and assigns session types for your account. 5 The CSR dashboard appears in your Web browser. Instructions for joining the
session appear on the page. These instructions include 6 the Website address, or URL, for the support session Web page 7 a unique session number, which the customer must provide to join the session
Note: You must keep the CSR dashboard open throughout the support session. If you close it, or open another Web page in the browser window in which it appears, the session will end.
8 Invite a customer to your support session. 9 Once the customer joins the session, commands become available to you on the
CSR dashboard. The SupportCenter page appears in the customer's Web browser.
10 Optional. Invite another customer support representative to your session. 11 Instruct the customer to keep the SupportCenter page open throughout the
support session. Note: A customer can also join a support session by accessing your SupportCenter website, then clicking Join on the navigation bar.
INVITING A CUSTOMER TO A SUPPORT SESSION
You can invite one or more customers to a support session by sending an invitation in an email message or by instructing the customer to go to the website. If you invite another customer to join the session, the first customer receives a message to inform him or her once the other customer has joined the session.
You can provide support to any customer who has joined the session, by selecting the customer in the Customer Information panel. To invite a customer to a support session by email:
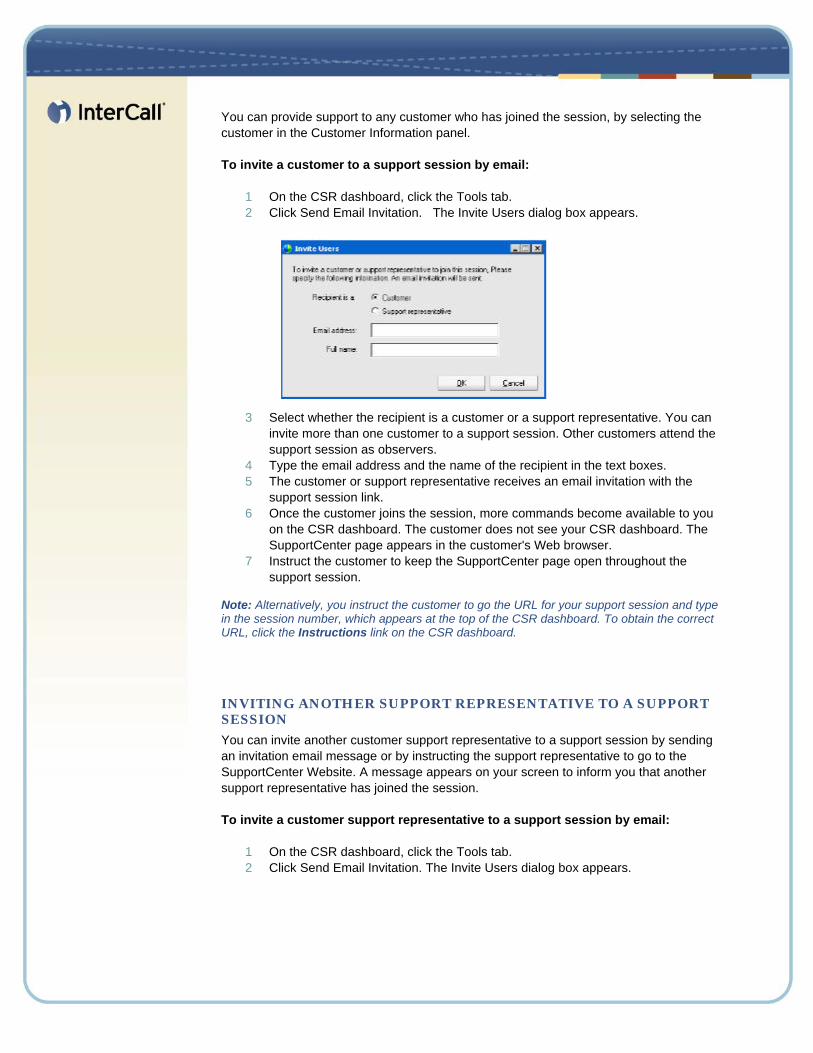
1 On the CSR dashboard, click the Tools tab. 2 Click Send Email Invitation. The Invite Users dialog box appears.
3 Select whether the recipient is a customer or a support representative. You can invite more than one customer to a support session. Other customers attend the support session as observers.
4 Type the email address and the name of the recipient in the text boxes. 5 The customer or support representative receives an email invitation with the
support session link. 6 Once the customer joins the session, more commands become available to you
on the CSR dashboard. The customer does not see your CSR dashboard. The SupportCenter page appears in the customer's Web browser.
7 Instruct the customer to keep the SupportCenter page open throughout the support session.
Note: Alternatively, you instruct the customer to go the URL for your support session and type in the session number, which appears at the top of the CSR dashboard. To obtain the correct URL, click the Instructions link on the CSR dashboard.
INVITING ANOTHER SUPPORT REPRESENTATIVE TO A SUPPORT SESSION
You can invite another customer support representative to a support session by sending an invitation email message or by instructing the support representative to go to the SupportCenter Website. A message appears on your screen to inform you that another support representative has joined the session. To invite a customer support representative to a support session by email:
1 On the CSR dashboard, click the Tools tab. 2 Click Send Email Invitation. The Invite Users dialog box appears.
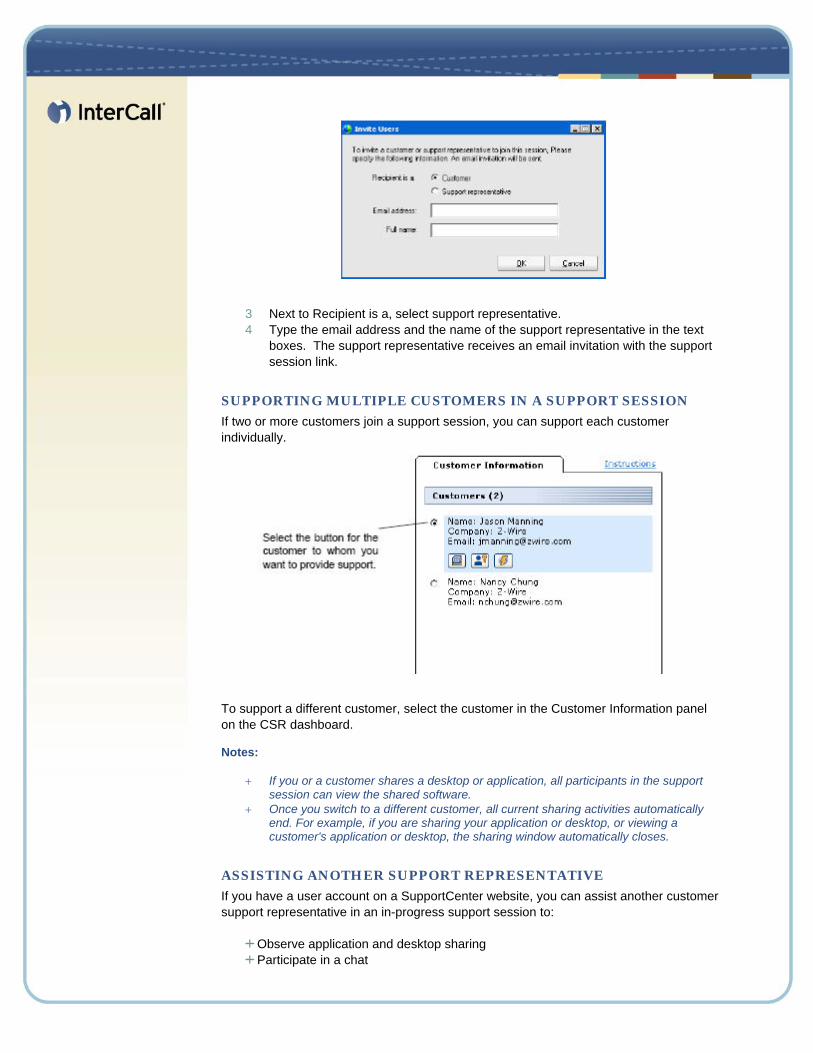
3 Next to Recipient is a, select support representative. 4 Type the email address and the name of the support representative in the text
boxes. The support representative receives an email invitation with the support session link.
SUPPORTING MULTIPLE CUSTOMERS IN A SUPPORT SESSION
If two or more customers join a support session, you can support each customer individually.
To support a different customer, select the customer in the Customer Information panel on the CSR dashboard. Notes:
+ If you or a customer shares a desktop or application, all participants in the support session can view the shared software.
+ Once you switch to a different customer, all current sharing activities automatically end. For example, if you are sharing your application or desktop, or viewing a customer's application or desktop, the sharing window automatically closes.
ASSISTING ANOTHER SUPPORT REPRESENTATIVE
If you have a user account on a SupportCenter website, you can assist another customer support representative in an in-progress support session to:
Observe application and desktop sharing Participate in a chat
View video that the support representative is sending Take control of the support session, if the support representative transfers control to you
You can join a support session as an assistant from:
An invitation email message, if the support representative sent you an invitation Your SupportCenter website.
To join a support session as an assistant from an invitation email message:
1 Click the link in the email message to join the session. If you are not already logged in to your SupportCenter website, the Log In page appears.
2 Log in to your SupportCenter website. The Assist Support Session in Progress page appears.
3 Click Join. To join a support session as an assistant from your SupportCenter Website:
1 Ensure that the support representative who is currently controlling the support session provides you with the session number for the session.
2 Go to your SupportCenter website. 3 Log in to your SupportCenter website. 4 On the navigation bar, expand Provide Support, and then click Assist Session.
The Assist Support Session In Progress page appears. 5 Type the Support Session number in the text box, and then click Join. You are
now an assistant in the support session.
Note: As an assisting support representative, you do not have control of the support session. However, the primary support representative can transfer control to you.
TRANSFERRING SESSION CONTROL TO ANOTHER SUPPORT REPRESENTATIVE
You can transfer control of a support session to another support representative who is assisting you in your session. This option is useful, for example, if you need to escalate a call. Once you transfer a session, you can remain in the session to observe application and desktop sharing, participate in a chat, and view video. At any time, the support representative to whom you transferred a session can transfer the session back to you. The support representative to whom you want to transfer control of the support session must first join your session by doing one of the following:
Click the link to join the support session in the invitation email message, if you sent an invitation to the support representative. Click the Assist Session link on the navigation bar on your SupportCenter website, log in to your site, and then provide the Support Session number.
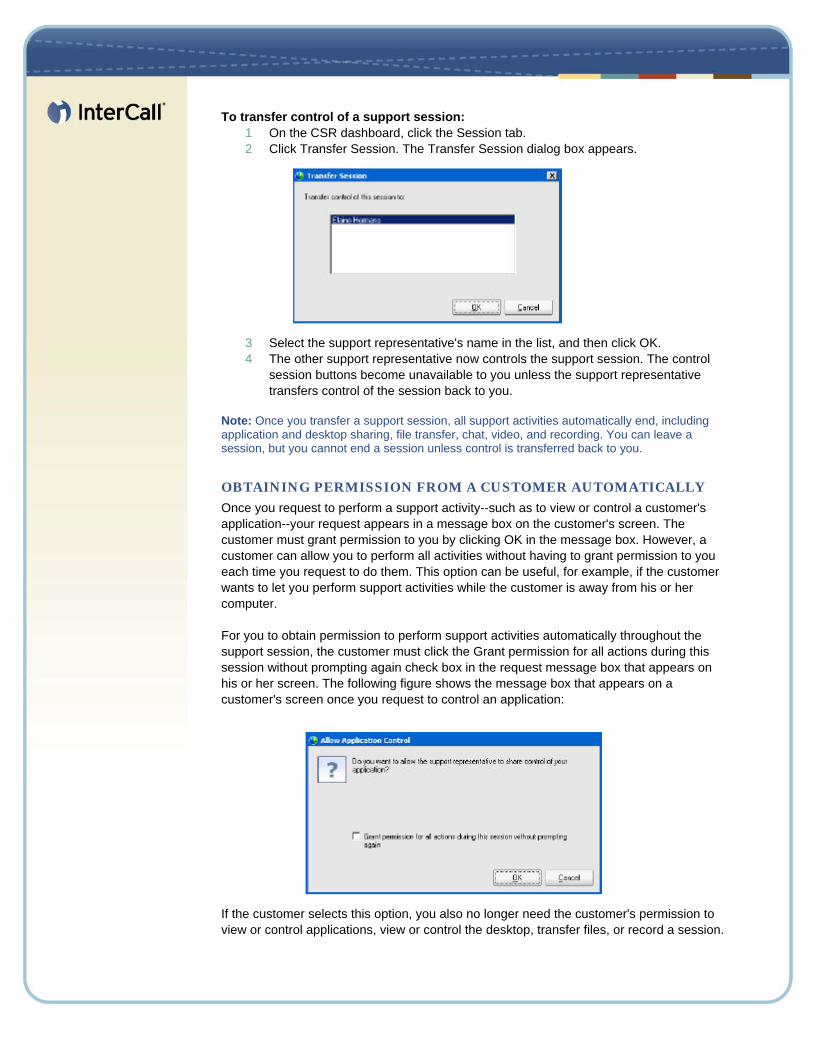
To transfer control of a support session: 1 On the CSR dashboard, click the Session tab. 2 Click Transfer Session. The Transfer Session dialog box appears.
3 Select the support representative's name in the list, and then click OK. 4 The other support representative now controls the support session. The control
session buttons become unavailable to you unless the support representative transfers control of the session back to you.
Note: Once you transfer a support session, all support activities automatically end, including application and desktop sharing, file transfer, chat, video, and recording. You can leave a session, but you cannot end a session unless control is transferred back to you.
OBTAINING PERMISSION FROM A CUSTOMER AUTOMATICALLY
Once you request to perform a support activity--such as to view or control a customer's application--your request appears in a message box on the customer's screen. The customer must grant permission to you by clicking OK in the message box. However, a customer can allow you to perform all activities without having to grant permission to you each time you request to do them. This option can be useful, for example, if the customer wants to let you perform support activities while the customer is away from his or her computer. For you to obtain permission to perform support activities automatically throughout the support session, the customer must click the Grant permission for all actions during this session without prompting again check box in the request message box that appears on his or her screen. The following figure shows the message box that appears on a customer's screen once you request to control an application:
If the customer selects this option, you also no longer need the customer's permission to view or control applications, view or control the desktop, transfer files, or record a session.
ENDING A SUPPORT SESSION
You can end a support session at any time. To end a support session:
1 On the CSR dashboard, click the Session tab. 2 Click End Session. A message appears, asking you to confirm that you want to
end the session. 3 Click OK.
Notes:
+ A customer can leave a support session at any time, by clicking Leave Session on the SupportCenter page.
+ A customer cannot end a support session.
Recording a Support Session Support Manager includes WebEx Recorder, which lets you record all the actions that you take during a support session, including any annotations that you make when sharing your desktop or application. You can also optionally capture audio in a recording. WebEx Recorder saves your recorded data to a WebEx Recording Format (WRF) file, which has a .wrf extension. To play a WRF file, you must use WebEx Player. Once you record a support session for the first time, Support Manager downloads and installs WebEx Player on your computer. Notes:
+ Your SupportCenter site administrator can turn on the Auto-Record option for your support service, which automatically records all support sessions and saves the recording files to a specified location. The default location is C:\My Recorded Sessions.
+ A customer cannot record a support session using WebEx Recorder. You can also install a standalone version of WebEx Recorder on your computer. Using this version, you can make recordings outside of a support session. You can install WebEx Recorder on your computer. Using WebEx Recorder, you can add or delete recorded data and dub audio.
RECORDING A SUPPORT SESSION
You can start recording a support session once a customer joins the session and you obtain permission from the customer. If you want to capture audio in your recording, you must set up your sound card and ensure you have connected the necessary audio input device to your computer.
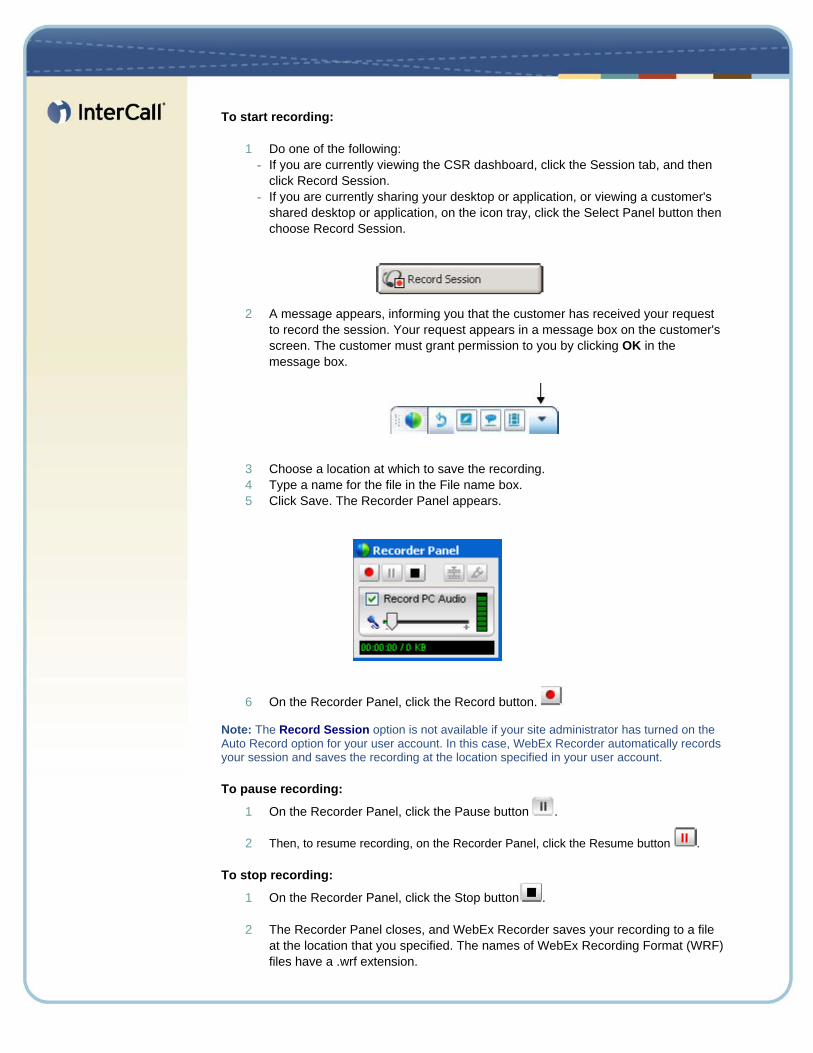
To start recording:
1 Do one of the following: - If you are currently viewing the CSR dashboard, click the Session tab, and then
click Record Session. - If you are currently sharing your desktop or application, or viewing a customer's
shared desktop or application, on the icon tray, click the Select Panel button then choose Record Session.
2 A message appears, informing you that the customer has received your request to record the session. Your request appears in a message box on the customer's screen. The customer must grant permission to you by clicking OK in the message box.
3 Choose a location at which to save the recording. 4 Type a name for the file in the File name box. 5 Click Save. The Recorder Panel appears.
6 On the Recorder Panel, click the Record button. Note: The Record Session option is not available if your site administrator has turned on the Auto Record option for your user account. In this case, WebEx Recorder automatically records your session and saves the recording at the location specified in your user account. To pause recording:
1 On the Recorder Panel, click the Pause button .
2 Then, to resume recording, on the Recorder Panel, click the Resume button . To stop recording:
1 On the Recorder Panel, click the Stop button . 2 The Recorder Panel closes, and WebEx Recorder saves your recording to a file
at the location that you specified. The names of WebEx Recording Format (WRF) files have a .wrf extension.
Note: Your SupportCenter site administrator can turn on the Auto Record option for your support service, which automatically records all support sessions and saves the recording files to a specified location.
INSERTING MARKERS IN A RECORDING
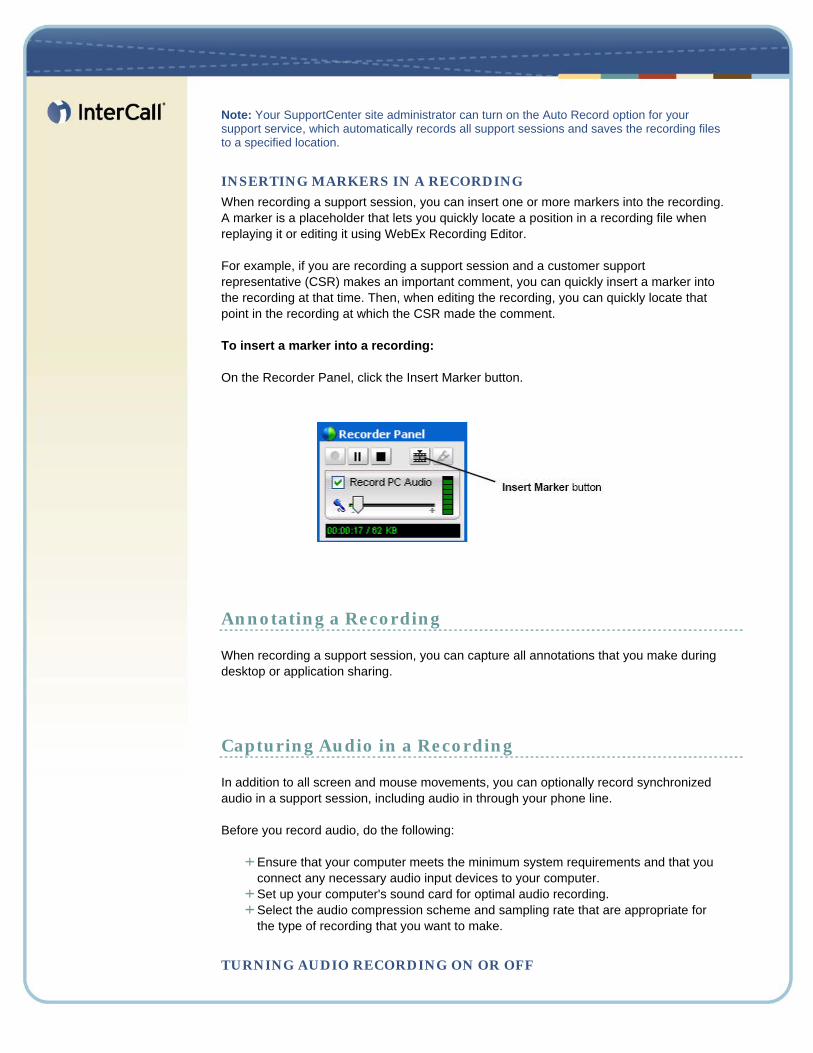
When recording a support session, you can insert one or more markers into the recording. A marker is a placeholder that lets you quickly locate a position in a recording file when replaying it or editing it using WebEx Recording Editor. For example, if you are recording a support session and a customer support representative (CSR) makes an important comment, you can quickly insert a marker into the recording at that time. Then, when editing the recording, you can quickly locate that point in the recording at which the CSR made the comment. To insert a marker into a recording: On the Recorder Panel, click the Insert Marker button.
Annotating a Recording When recording a support session, you can capture all annotations that you make during desktop or application sharing.
Capturing Audio in a Recording In addition to all screen and mouse movements, you can optionally record synchronized audio in a support session, including audio in through your phone line. Before you record audio, do the following:
Ensure that your computer meets the minimum system requirements and that you connect any necessary audio input devices to your computer. Set up your computer's sound card for optimal audio recording. Select the audio compression scheme and sampling rate that are appropriate for the type of recording that you want to make.
TURNING AUDIO RECORDING ON OR OFF

When recording a support session, you can choose to capture audio in the recording. Before you record audio, ensure that your computer meets the minimum system requirements and that you connect any necessary audio input devices to your computer. To turn audio recording on or off:
1 Start WebEx Recorder, and then start recording. 2 On the Recorder Panel, do the following:
- To turn audio recording on, select the Record PC Audio check box. - To turn audio recording off, clear the Record PC Audio check box.
ADJUSTING AUDIO INPUT VOLUME WHEN RECORDING
When recording a support session, you can specify the sound volume that WebEx Recorder captures from your microphone (including a telephone), by adjusting the audio input volume on the Recorder Panel. To adjust audio input volume while recording:
1 Start WebEx Recorder, and then start recording. 2 On the WebEx Recorder Panel, ensure that the Record PC Audio check box is
selected.
3 While speaking into your microphone, use the Microphone Volume slider to adjust your microphone level.
4 Ensure that the microphone level remains below the topmost level of the Microphone Volume indicator.
Note: It is recommended that you adjust the audio input volume for your microphone before you begin recording, and adjust the volume during recording only to make minor adjustments, if necessary.
Managing a Customer's Computer
VIEWING A CUSTOMER'S SYSTEM INFORMATION
During a support session, you can view detailed information about a customer's computer. This information can help you to diagnose and repair a customer's computer. If you or the customer makes any changes to the system, you can restart the customer's computer remotely, and then view the changes to the system information. Once you display information about a customer's computer, you can either print it or save it to a file. The following information is available: General System Information:
the user name with which the customer logged in to the computer the date, time, and time zone that the customer's system clock displays the network domain that the user logged in to whether or not the user has administrator rights on the computer the system directory on the computer the Windows directory on the computer the computer's operating system the service pack that is installed on the computer
Hardware Information:
the name of the computer's processor the type, or architecture, of the computer's processor the processor's speed the number of processors on the computer the total amount of physical memory on the computer the available physical memory on the computer the total amount of virtual memory on the computer the number of hours since the computer was last restarted the language setting for the system the number of drives, including network drives, on the computer the types of drives on the computer, and the letters to which they are mapped the amount of free space on each drive the total space available for each drive the name of the computer's volume the type of file system on the computer
Web Browser:
the name of the browser--for example Microsoft Internet Explorer the version of the browser the version of the Java virtual machine the proxy setting, if any the proxy override, if any the proxy configuration, if any the proxy server, if any whether a proxy bypass is set for the browser the name of the customer's intranet
Installed Software
A list of software installed on the customer's computer.
Running Software
A list of software that is currently running on the customer's computer.
VIEWING A CUSTOMER'S SYSTEM INFORMATION
During a support session, you can view detailed information about a customer's computer. At any time, you can refresh the system information that you are viewing. To view system information:
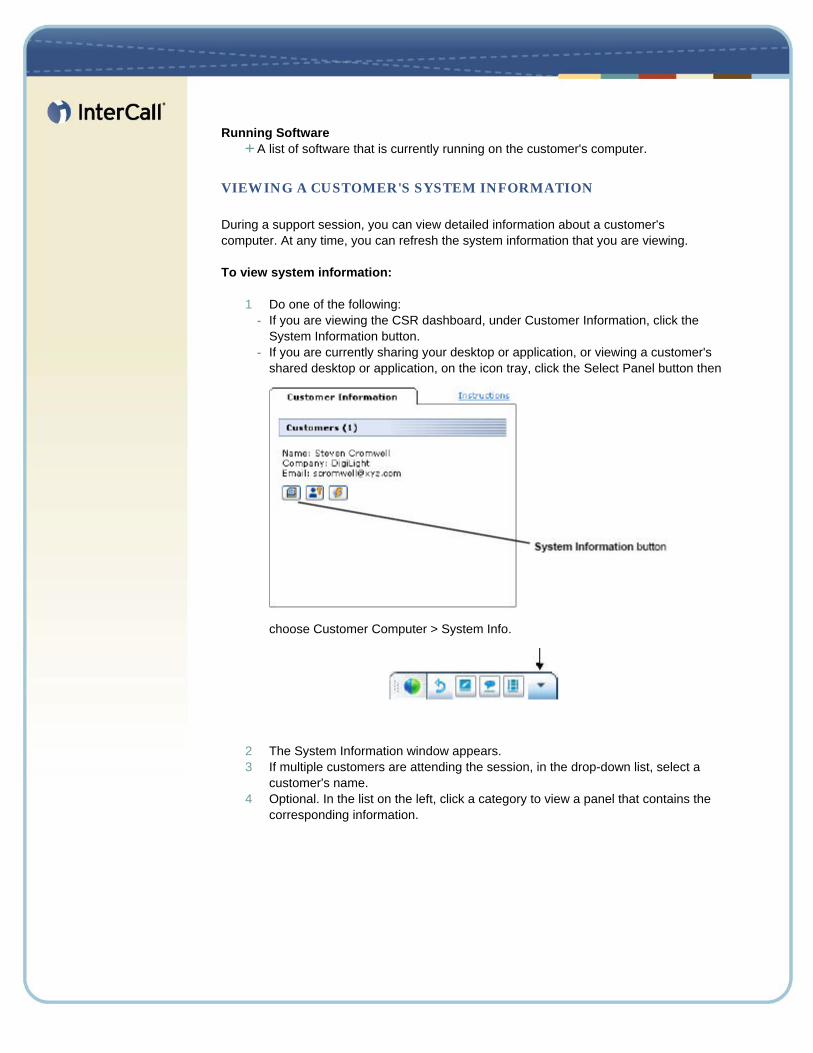
1 Do one of the following: - If you are viewing the CSR dashboard, under Customer Information, click the
System Information button. - If you are currently sharing your desktop or application, or viewing a customer's
shared desktop or application, on the icon tray, click the Select Panel button then
choose Customer Computer > System Info.
2 The System Information window appears. 3 If multiple customers are attending the session, in the drop-down list, select a
customer's name. 4 Optional. In the list on the left, click a category to view a panel that contains the
corresponding information.
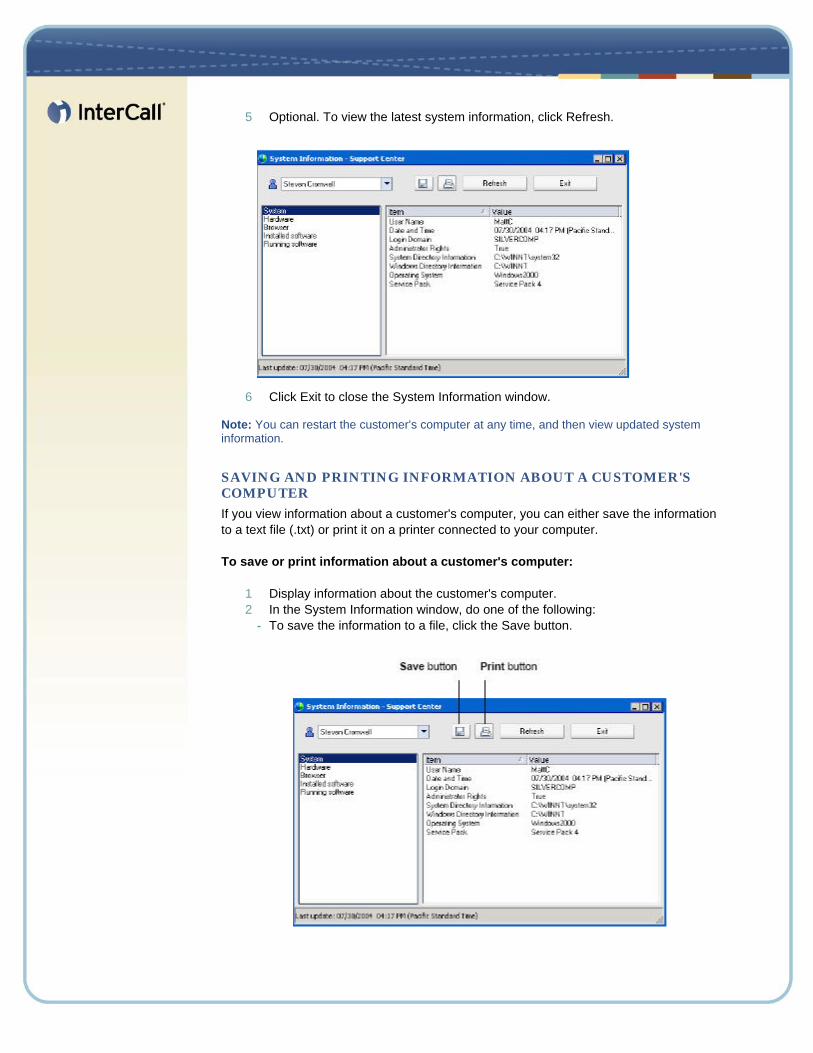
5 Optional. To view the latest system information, click Refresh.
6 Click Exit to close the System Information window. Note: You can restart the customer's computer at any time, and then view updated system information.
SAVING AND PRINTING INFORMATION ABOUT A CUSTOMER'S COMPUTER
If you view information about a customer's computer, you can either save the information to a text file (.txt) or print it on a printer connected to your computer. To save or print information about a customer's computer:
1 Display information about the customer's computer. 2 In the System Information window, do one of the following:
- To save the information to a file, click the Save button.
- To print the information, click the Print button.
Note: Support Manager displays categories of information about a customer's computer on separate panels. However, the saved file or printout includes the system information in all of the categories. You need not save or print each category of information individually.
LOGGING ON TO A CUSTOMER'S COMPUTER AS A DIFFERENT USER
During a support session, you can log on to a customer's computer as another user. For example, you may want to log on to the computer using an administrator account so you can perform additional activities on the computer. If the customer's computer is attached to an internal network, you must log on using an account on that network. You can log off the customer's computer at any time during the session, and automatically log the customer back on the computer. If you are logged on to the customer's computer when you end the session, Support Manager automatically logs the customer back on to his or her computer. Note: Logging on as a different user temporarily logs the customer off of the computer; however, it does not close any programs that are running on the customer's computer.
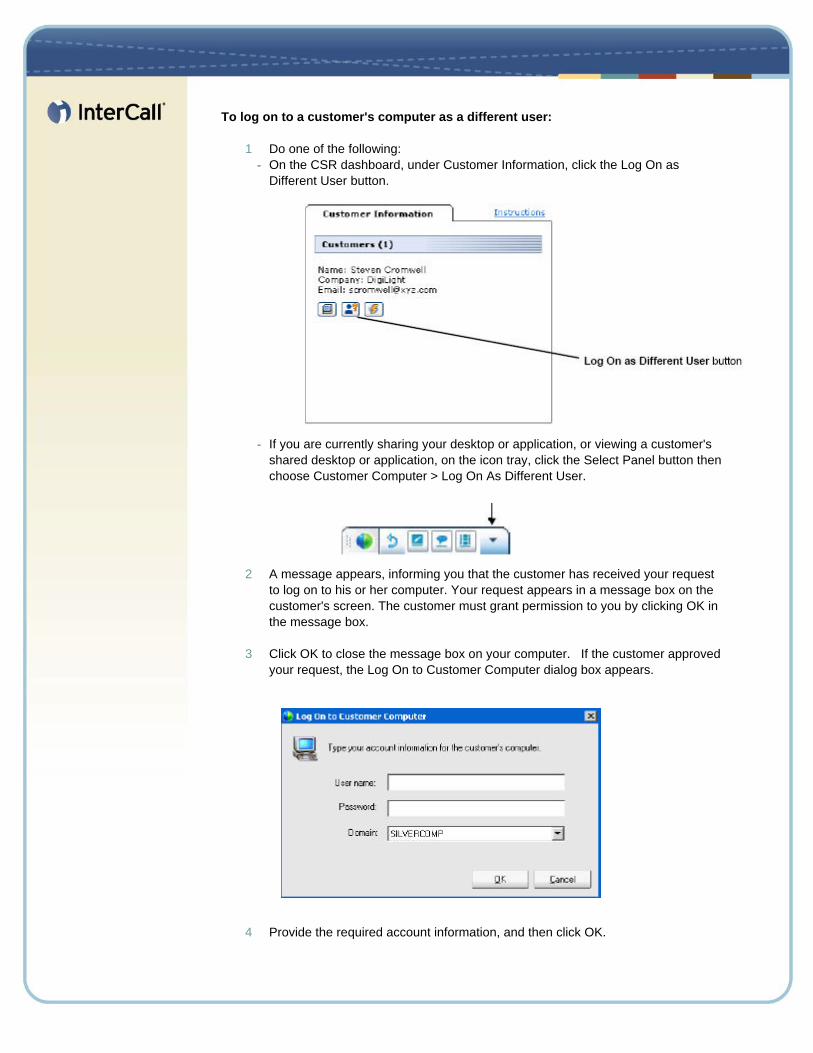
To log on to a customer's computer as a different user:
1 Do one of the following: - On the CSR dashboard, under Customer Information, click the Log On as
Different User button.
- If you are currently sharing your desktop or application, or viewing a customer's shared desktop or application, on the icon tray, click the Select Panel button then choose Customer Computer > Log On As Different User.
2 A message appears, informing you that the customer has received your request to log on to his or her computer. Your request appears in a message box on the customer's screen. The customer must grant permission to you by clicking OK in the message box.
3 Click OK to close the message box on your computer. If the customer approved
your request, the Log On to Customer Computer dialog box appears.
4 Provide the required account information, and then click OK.
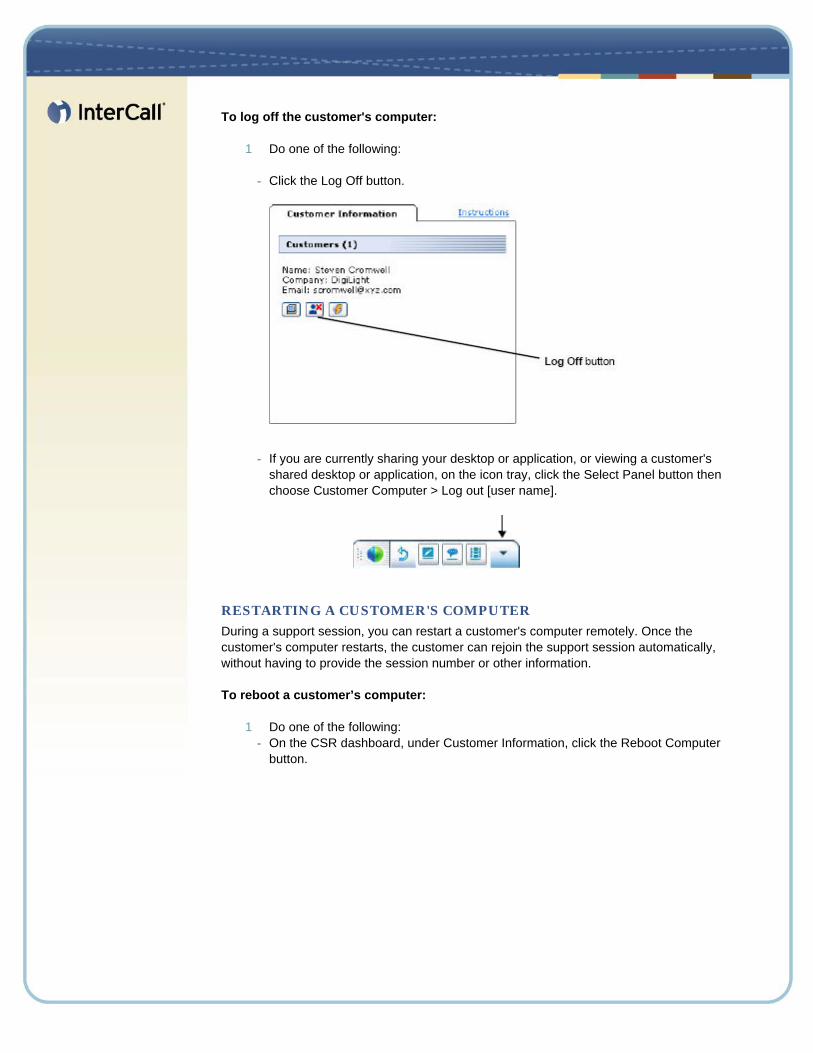
To log off the customer's computer:
1 Do one of the following:
- Click the Log Off button.
- If you are currently sharing your desktop or application, or viewing a customer's
shared desktop or application, on the icon tray, click the Select Panel button then choose Customer Computer > Log out [user name].
RESTARTING A CUSTOMER'S COMPUTER
During a support session, you can restart a customer's computer remotely. Once the customer's computer restarts, the customer can rejoin the support session automatically, without having to provide the session number or other information. To reboot a customer’s computer:
1 Do one of the following: - On the CSR dashboard, under Customer Information, click the Reboot Computer
button.
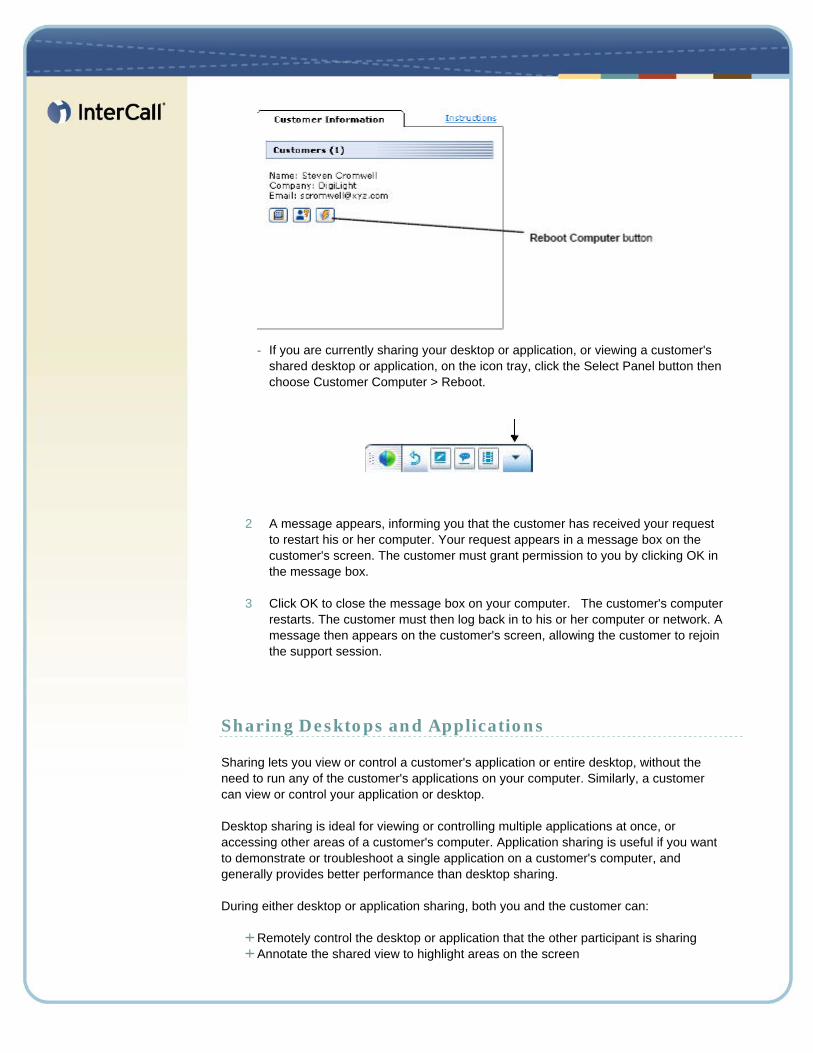
- If you are currently sharing your desktop or application, or viewing a customer's shared desktop or application, on the icon tray, click the Select Panel button then choose Customer Computer > Reboot.
2 A message appears, informing you that the customer has received your request to restart his or her computer. Your request appears in a message box on the customer's screen. The customer must grant permission to you by clicking OK in the message box.
3 Click OK to close the message box on your computer. The customer's computer
restarts. The customer must then log back in to his or her computer or network. A message then appears on the customer's screen, allowing the customer to rejoin the support session.
Sharing Desktops and Applications Sharing lets you view or control a customer's application or entire desktop, without the need to run any of the customer's applications on your computer. Similarly, a customer can view or control your application or desktop. Desktop sharing is ideal for viewing or controlling multiple applications at once, or accessing other areas of a customer's computer. Application sharing is useful if you want to demonstrate or troubleshoot a single application on a customer's computer, and generally provides better performance than desktop sharing. During either desktop or application sharing, both you and the customer can:
Remotely control the desktop or application that the other participant is sharing Annotate the shared view to highlight areas on the screen
Sharing Desktops
VIEWING A CUSTOMER'S DESKTOP
You can view the customer's computer desktop. This option does not allow you to control the customer's desktop remotely. To view a customer’s desktop:
1 On the CSR dashboard, click the Desktop tab. 2 Click Request View.
3 A message appears, informing you that the customer has received your request to view his or her desktop. Your request appears in a message box on the customer's screen. The customer must grant permission to you by clicking OK in the message box.
4 Click OK to close the message box on your computer. Once the customer grants
permission to you, the customer's desktop appears in a sharing window on your screen. On the customer's screen, the Desktop View window appears, indicating that the customer is sharing his or her desktop.
Notes:
+ By default, the customer's desktop appears in a full-screen view on your computer. You can switch your display to a standard window at any time.
+ A customer can allow you to view the desktop during the support session, without having to grant permission to you each time you request to do so.
+ When viewing a customer's desktop, you can transfer files to or from the customer's computer.
CONTROLLING A CUSTOMER'S DESKTOP
You can remotely control a customer's entire desktop. To control a customer's desktop:
1 On the CSR dashboard, click the Desktop tab. 2 Click Request Control.
3 A message appears, informing you that the customer has received your request to control the desktop. Your request appears in a message box on the customer's screen. The customer must grant permission to you by clicking OK in the message box.
4 Click OK to close the message box on your computer. Once the customer grants permission to you, the customer's desktop appears in a sharing window on your screen. On the customer's screen, the Desktop Control window appears, indicating that the customer is sharing his or her desktop.
5 To begin controlling the desktop, click your mouse button in the sharing window on your screen.
Notes:
+ By default, the customer's desktop appears in a full-screen view on your computer. You can switch your display to a standard window at any time.
+ A customer can take back control of the desktop at any time by clicking his or her mouse on the desktop. You can also take control again by clicking your mouse in the window in which the shared desktop appears.
+ A customer can allow you to control the desktop during the support session, without having to grant permission to you each time you request to do so.
+ When controlling a customer's desktop, you can transfer files to or from the customer's computer.
HELPING A CUSTOMER TO STOP DESKTOP SHARING
If a customer is sharing his or her desktop, he or she can stop sharing at any time. To stop desktop sharing:
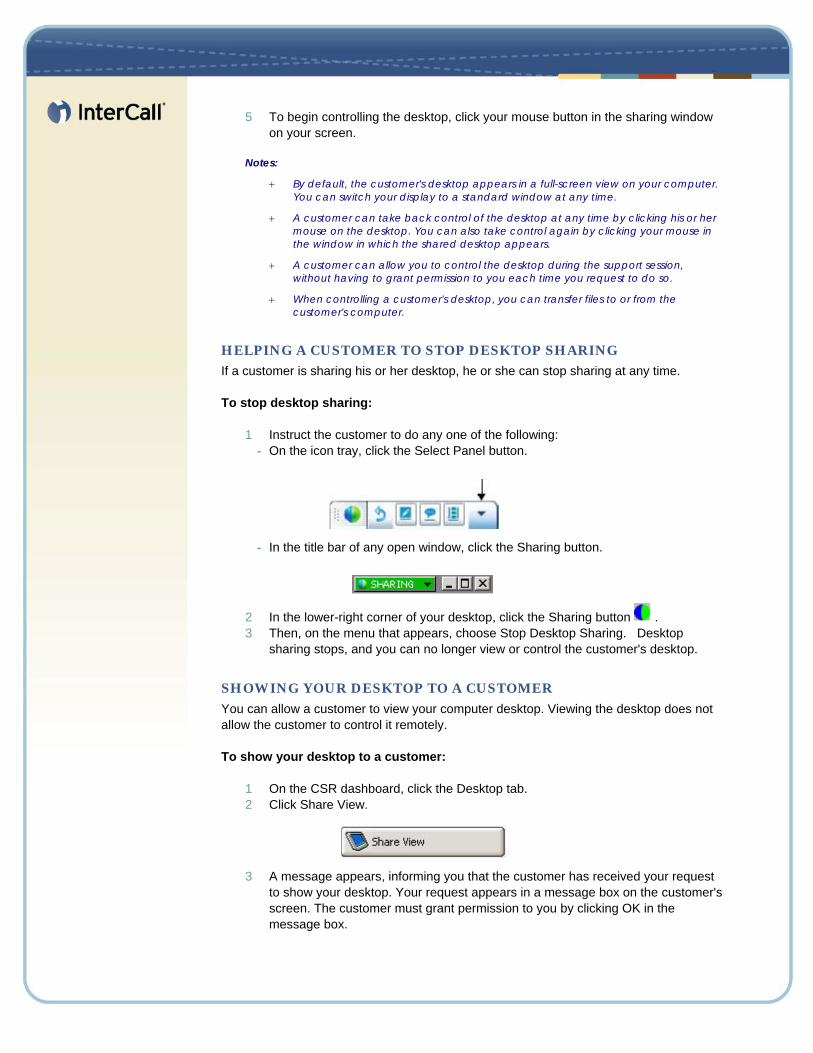
1 Instruct the customer to do any one of the following: - On the icon tray, click the Select Panel button.
- In the title bar of any open window, click the Sharing button.
2 In the lower-right corner of your desktop, click the Sharing button . 3 Then, on the menu that appears, choose Stop Desktop Sharing. Desktop
sharing stops, and you can no longer view or control the customer's desktop.
SHOWING YOUR DESKTOP TO A CUSTOMER
You can allow a customer to view your computer desktop. Viewing the desktop does not allow the customer to control it remotely. To show your desktop to a customer:
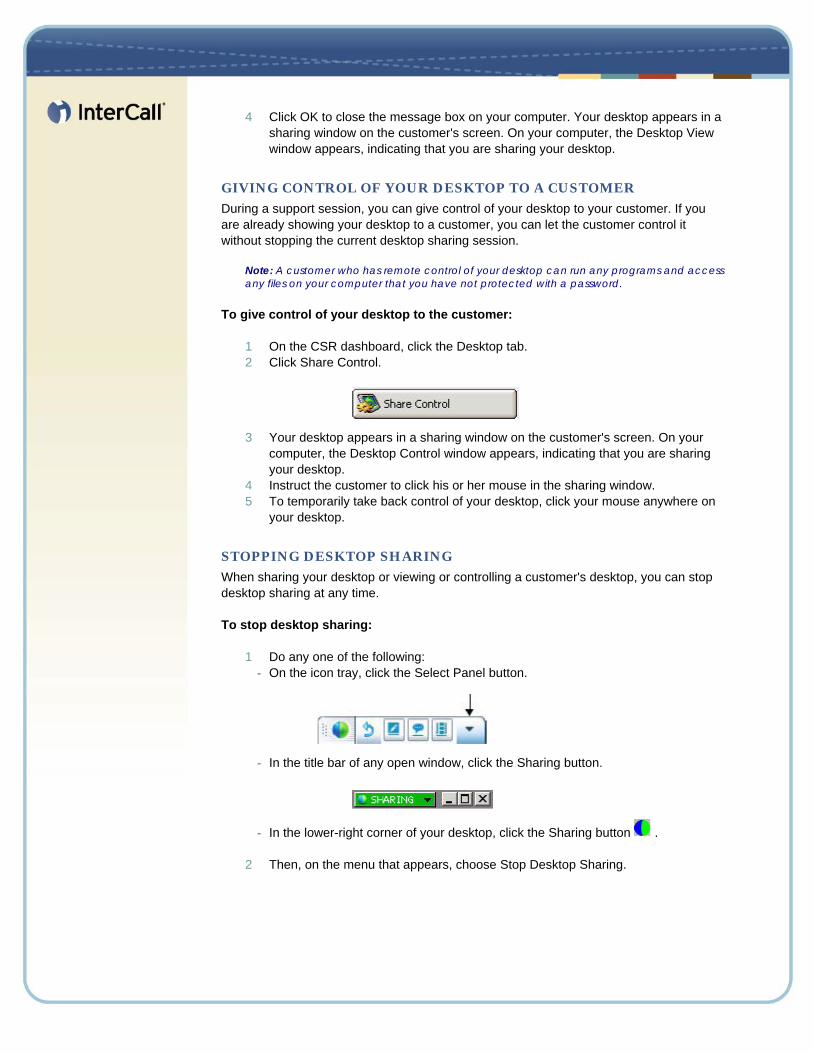
1 On the CSR dashboard, click the Desktop tab. 2 Click Share View.
3 A message appears, informing you that the customer has received your request to show your desktop. Your request appears in a message box on the customer's screen. The customer must grant permission to you by clicking OK in the message box.
4 Click OK to close the message box on your computer. Your desktop appears in a sharing window on the customer's screen. On your computer, the Desktop View window appears, indicating that you are sharing your desktop.
GIVING CONTROL OF YOUR DESKTOP TO A CUSTOMER
During a support session, you can give control of your desktop to your customer. If you are already showing your desktop to a customer, you can let the customer control it without stopping the current desktop sharing session.
Note: A customer who has remote control of your desktop can run any programs and access any files on your computer that you have not protected with a password.
To give control of your desktop to the customer:
1 On the CSR dashboard, click the Desktop tab. 2 Click Share Control.
3 Your desktop appears in a sharing window on the customer's screen. On your computer, the Desktop Control window appears, indicating that you are sharing your desktop.
4 Instruct the customer to click his or her mouse in the sharing window. 5 To temporarily take back control of your desktop, click your mouse anywhere on
your desktop.
STOPPING DESKTOP SHARING
When sharing your desktop or viewing or controlling a customer's desktop, you can stop desktop sharing at any time. To stop desktop sharing:
1 Do any one of the following: - On the icon tray, click the Select Panel button.
- In the title bar of any open window, click the Sharing button.
- In the lower-right corner of your desktop, click the Sharing button .
2 Then, on the menu that appears, choose Stop Desktop Sharing.
Sharing Applications
VIEWING A CUSTOMER'S APPLICATION
You can view an application that is running on the customer's computer. Viewing an application does not allow you to control it remotely.
To view a customer’s application:
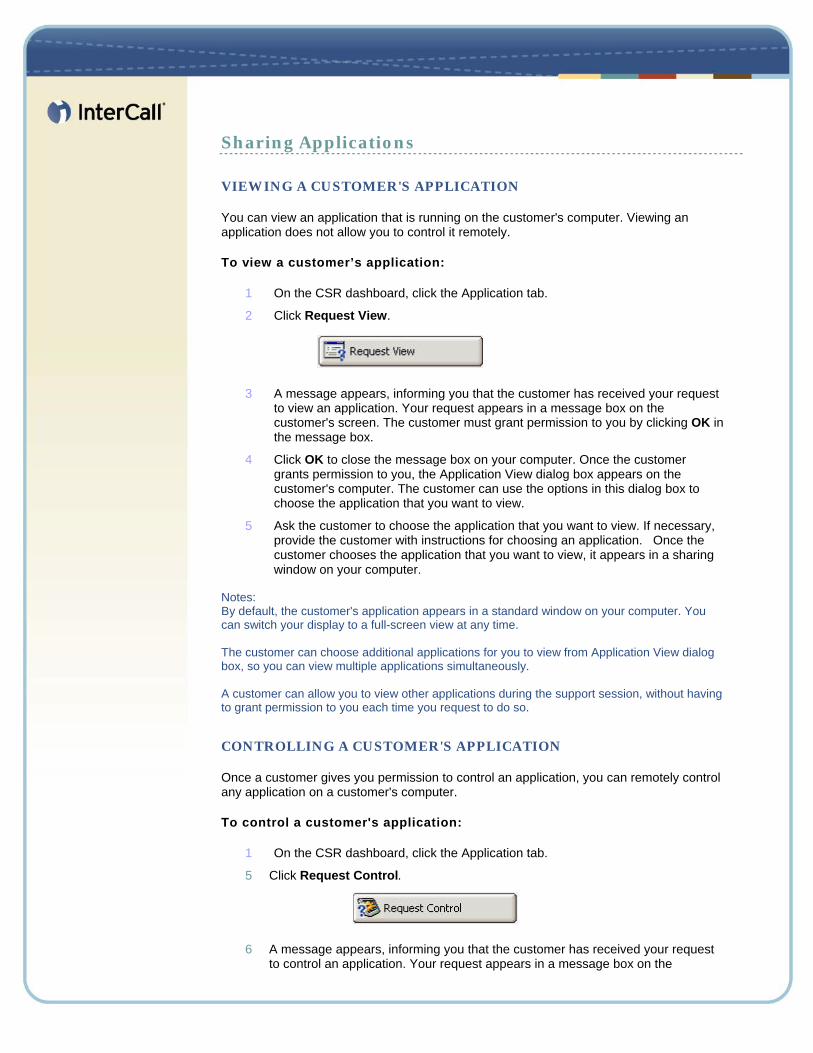
1 On the CSR dashboard, click the Application tab.
2 Click Request View.
3 A message appears, informing you that the customer has received your request to view an application. Your request appears in a message box on the customer's screen. The customer must grant permission to you by clicking OK in the message box.
4 Click OK to close the message box on your computer. Once the customer grants permission to you, the Application View dialog box appears on the customer's computer. The customer can use the options in this dialog box to choose the application that you want to view.
5 Ask the customer to choose the application that you want to view. If necessary, provide the customer with instructions for choosing an application. Once the customer chooses the application that you want to view, it appears in a sharing window on your computer.
Notes: By default, the customer's application appears in a standard window on your computer. You can switch your display to a full-screen view at any time. The customer can choose additional applications for you to view from Application View dialog box, so you can view multiple applications simultaneously. A customer can allow you to view other applications during the support session, without having to grant permission to you each time you request to do so.
CONTROLLING A CUSTOMER'S APPLICATION
Once a customer gives you permission to control an application, you can remotely control any application on a customer's computer.
To control a customer's application:
1 On the CSR dashboard, click the Application tab.
5 Click Request Control.
6 A message appears, informing you that the customer has received your request to control an application. Your request appears in a message box on the
customer's screen. The customer must grant permission to you by clicking OK in the message box.
7 Click OK to close the message box on your computer. Once the customer grants permission to you, the Application Control dialog box appears on the customer's computer. The customer can use the options in this dialog box to choose the application that you want to control.
8 Ask the customer to choose the application that you want to control. If necessary, provide the customer with instructions for choosing an application. Once the customer chooses the application that you want to control, it appears in a sharing window on your computer.
9 To begin controlling the application, click your mouse button in the sharing window.
Notes:
+ If you are already viewing a customer's application, requesting remote control allows you to control only that application. If you want to control another application, you must first stop sharing the application that you are viewing, and then request remote control. The customer
+ can then choose the application that you want to control.
+ By default, the customer's application appears in a standard window on your computer. You can switch your display to a full-screen view at any time.
+ A customer can take back control of an application at any time by clicking his or her
mouse button in the application. You can also take control again by clicking your mouse button in the sharing window.
+ The customer can choose additional applications for you to control from Application
Control dialog box, so you can control multiple applications simultaneously.
+ A customer can allow you to control other applications during the support session, without having to grant permission to you each time you request to do so.
HELPING A CUSTOMER TO SHARE AN APPLICATION
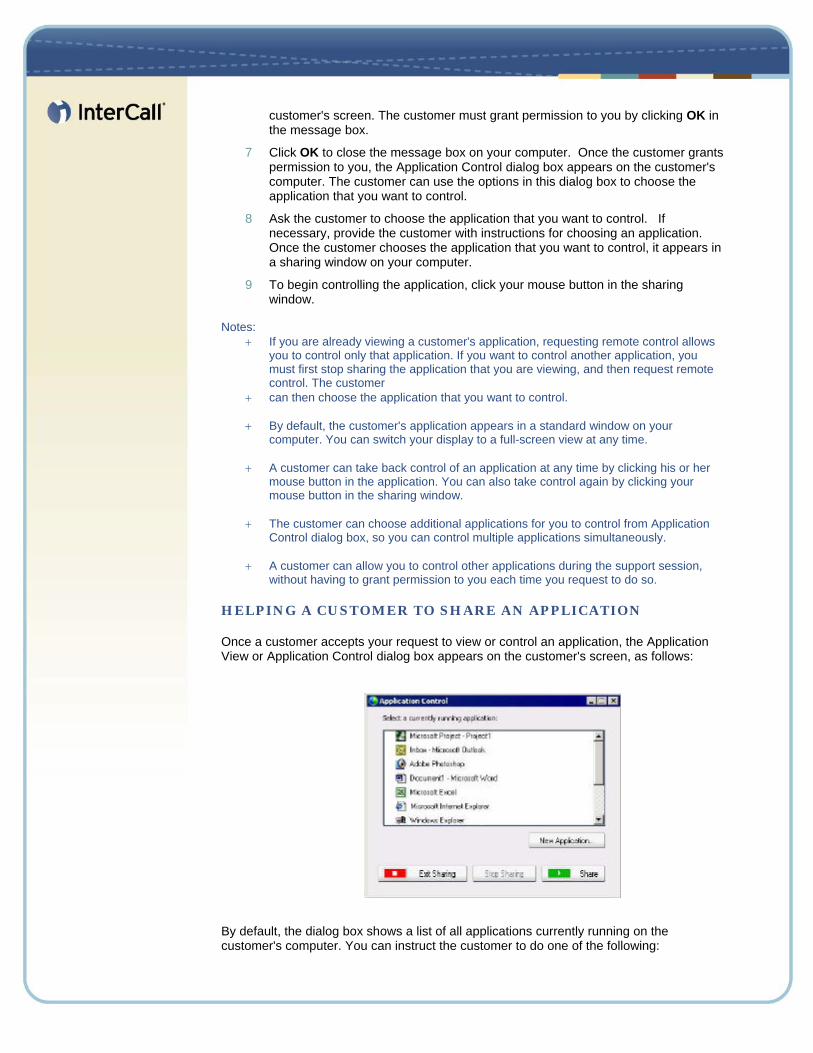
Once a customer accepts your request to view or control an application, the Application View or Application Control dialog box appears on the customer's screen, as follows:
By default, the dialog box shows a list of all applications currently running on the customer's computer. You can instruct the customer to do one of the following:
If the application you want to you want to view or control is currently running, ask the customer to select it in the list, and then click Share. If the application you want to view or control is not currently running, ask the customer to click New Application. The New Application dialog box appears, showing a list of all applications on the computer. Ask the customer to select the application, and then click Share.
HELPING A CUSTOMER TO STOP APPLICATION SHARING
If a customer is sharing an application, he or she can stop sharing it at any time.
To stop application sharing:
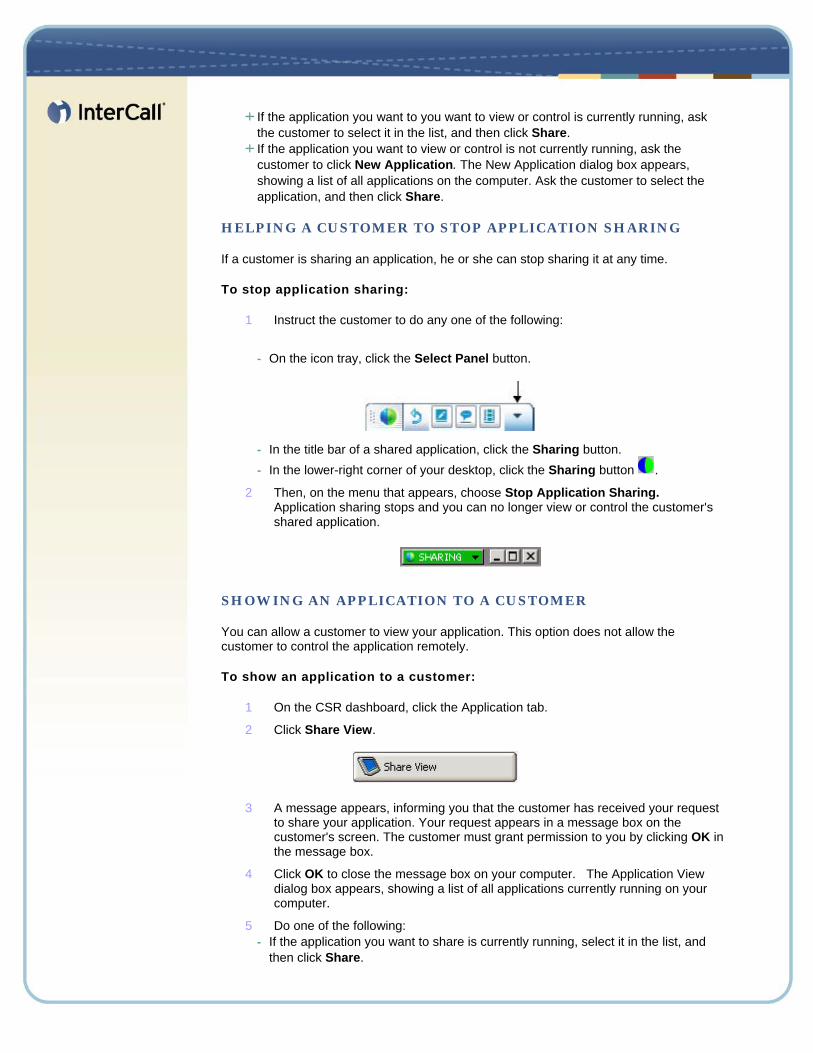
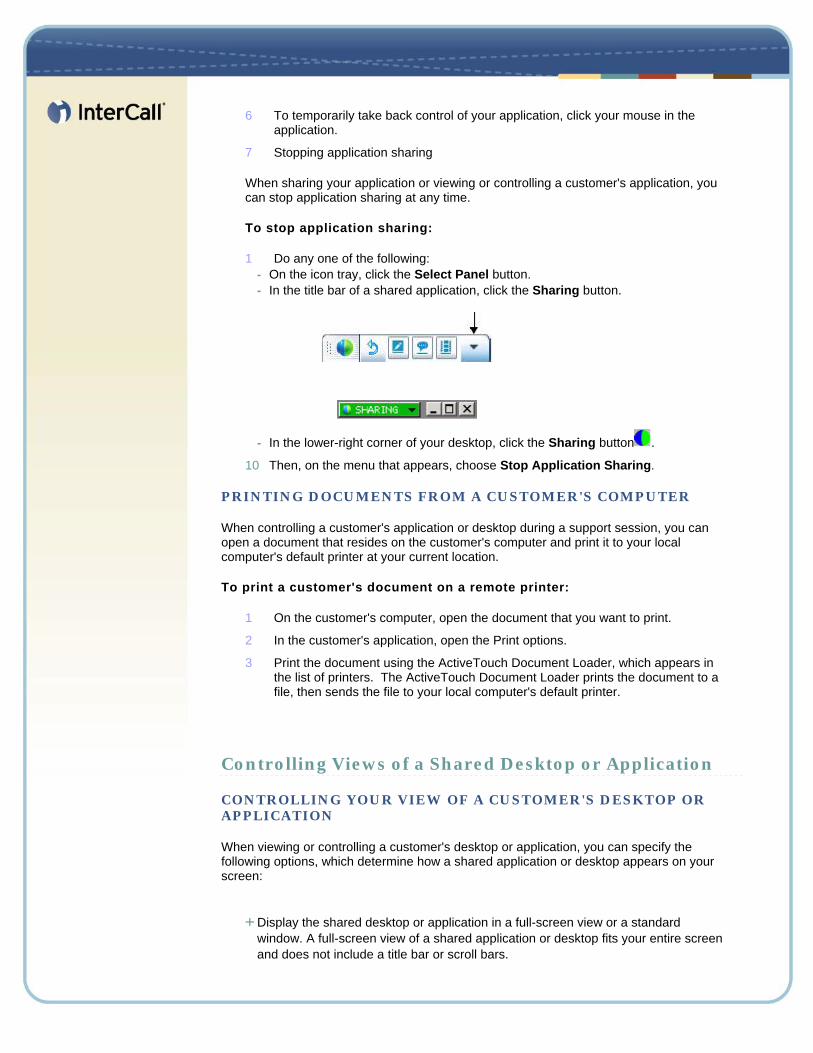
1 Instruct the customer to do any one of the following:
- On the icon tray, click the Select Panel button.
- In the title bar of a shared application, click the Sharing button. - In the lower-right corner of your desktop, click the Sharing button .
2 Then, on the menu that appears, choose Stop Application Sharing. Application sharing stops and you can no longer view or control the customer's shared application.
SHOWING AN APPLICATION TO A CUSTOMER
You can allow a customer to view your application. This option does not allow the customer to control the application remotely.
To show an application to a customer:
1 On the CSR dashboard, click the Application tab.
2 Click Share View.
3 A message appears, informing you that the customer has received your request to share your application. Your request appears in a message box on the customer's screen. The customer must grant permission to you by clicking OK in the message box.
4 Click OK to close the message box on your computer. The Application View dialog box appears, showing a list of all applications currently running on your computer.
5 Do one of the following: - If the application you want to share is currently running, select it in the list, and
then click Share.
- If the application you want to share is not currently running, click New Application. The New Application dialog box appears, showing a list of all applications on your computer. Select the application, and then click Share.
6 The CSR dashboard minimizes on your computer. If the application is not already running, it starts automatically.
7 Your application appears in a sharing window on the customer's screen.
SHARING MULTIPLE APPLICATIONS
If you are already sharing an application with a customer, you can share additional applications simultaneously. Each application that you share appears in the sharing window on the customer's screen.
To share an additional application:
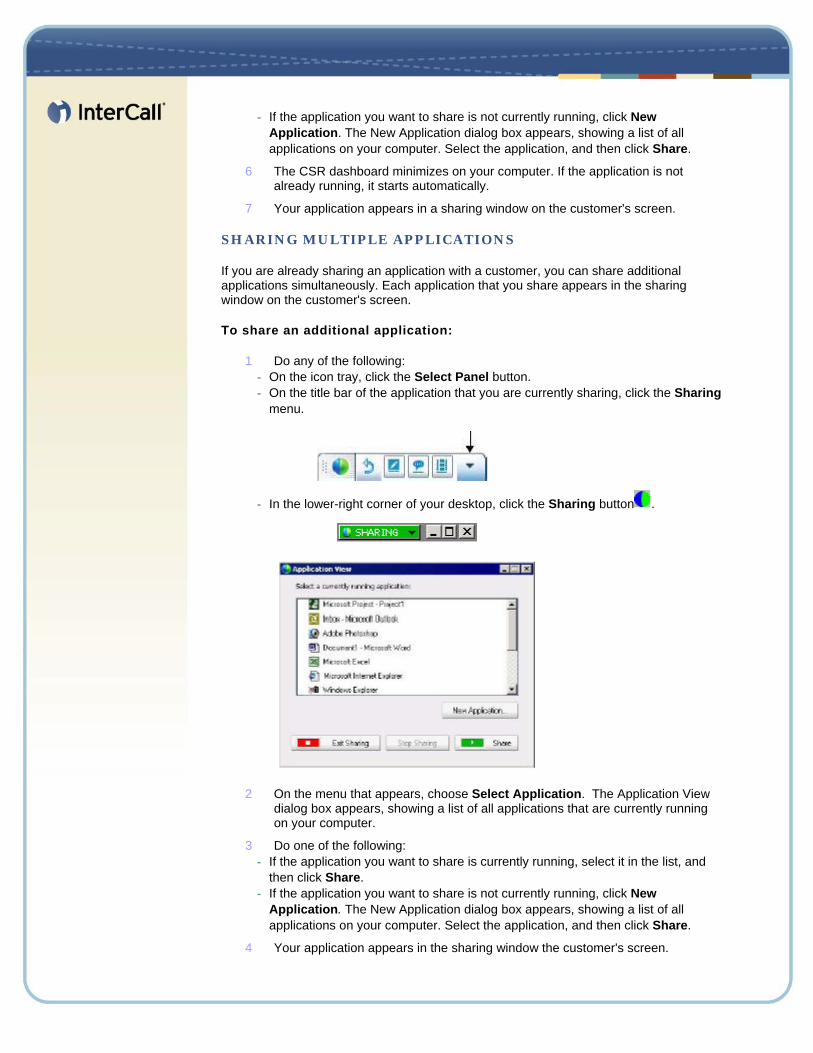
1 Do any of the following: - On the icon tray, click the Select Panel button. - On the title bar of the application that you are currently sharing, click the Sharing
menu.
- In the lower-right corner of your desktop, click the Sharing button .
2 On the menu that appears, choose Select Application. The Application View dialog box appears, showing a list of all applications that are currently running on your computer.
3 Do one of the following: - If the application you want to share is currently running, select it in the list, and
then click Share. - If the application you want to share is not currently running, click New
Application. The New Application dialog box appears, showing a list of all applications on your computer. Select the application, and then click Share.
4 Your application appears in the sharing window the customer's screen.
GIVING CONTROL OF YOUR APPLICATION TO A CUSTOMER
During a support session, you can give control of an application to your customer. If you are already showing an application to a customer, you can let the customer control it remotely without stopping the current application sharing session.
Note: A customer who has remote control of your application can open any files associated with that application on your computer that you have not protected with a password.
To give control of an application to the customer:
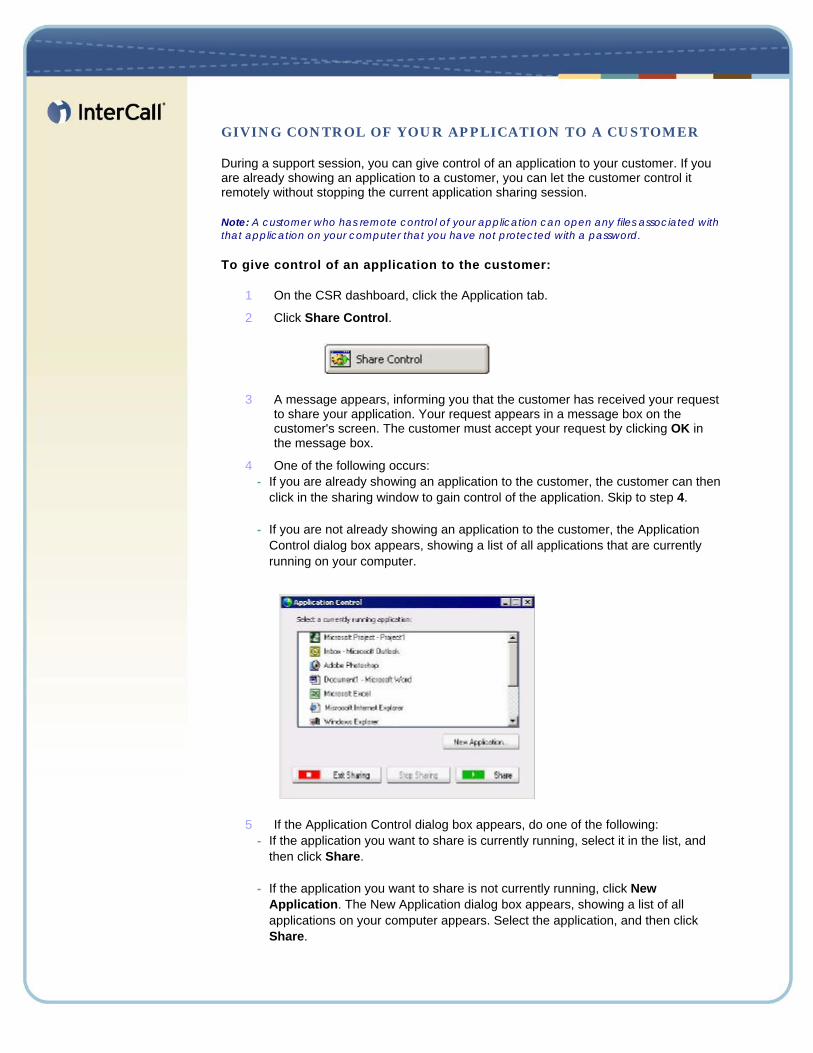
1 On the CSR dashboard, click the Application tab.
2 Click Share Control.
3 A message appears, informing you that the customer has received your request to share your application. Your request appears in a message box on the customer's screen. The customer must accept your request by clicking OK in the message box.
4 One of the following occurs: - If you are already showing an application to the customer, the customer can then
click in the sharing window to gain control of the application. Skip to step 4. - If you are not already showing an application to the customer, the Application
Control dialog box appears, showing a list of all applications that are currently running on your computer.
5 If the Application Control dialog box appears, do one of the following: - If the application you want to share is currently running, select it in the list, and
then click Share. - If the application you want to share is not currently running, click New
Application. The New Application dialog box appears, showing a list of all applications on your computer appears. Select the application, and then click Share.
6 To temporarily take back control of your application, click your mouse in the application.
7 Stopping application sharing
When sharing your application or viewing or controlling a customer's application, you can stop application sharing at any time.
To stop application sharing:
1 Do any one of the following: - On the icon tray, click the Select Panel button. - In the title bar of a shared application, click the Sharing button.
- In the lower-right corner of your desktop, click the Sharing button .
10 Then, on the menu that appears, choose Stop Application Sharing.
PRINTING DOCUMENTS FROM A CUSTOMER'S COMPUTER
When controlling a customer's application or desktop during a support session, you can open a document that resides on the customer's computer and print it to your local computer's default printer at your current location.
To print a customer's document on a remote printer:
1 On the customer's computer, open the document that you want to print.
2 In the customer's application, open the Print options.
3 Print the document using the ActiveTouch Document Loader, which appears in the list of printers. The ActiveTouch Document Loader prints the document to a file, then sends the file to your local computer's default printer.
Controlling Views of a Shared Desktop or Application
CONTROLLING YOUR VIEW OF A CUSTOMER'S DESKTOP OR APPLICATION
When viewing or controlling a customer's desktop or application, you can specify the following options, which determine how a shared application or desktop appears on your screen:
Display the shared desktop or application in a full-screen view or a standard window. A full-screen view of a shared application or desktop fits your entire screen and does not include a title bar or scroll bars.

Scale, or resize, a shared desktop or application to fit the full-screen view or standard window in which it appears.
Your site administrator sets the default view for your user account. A customer can also specify these options when viewing or controlling your desktop or application.
To control your view of a shared application or desktop:
1 Do either of the following:
- On the icon tray, click the Select Panel button. - In the title bar of the sharing window, click the Sharing button.
11 On the menu that appears, choose View, then choose an option for viewing the shared desktop or application.
Note: If you are using the screen sampling option for displaying shared desktops and applications, you can also specify the number of colors with which to view the shared desktop or application.
SPECIFYING THE COLOR MODE FOR A SHARED DESKTOP OR APPLICATION
When viewing or controlling a customer's desktop or application, you can choose one of the following color modes:
256 colors --Specifies that a shared desktop or application appears in 256 colors in the viewer on your screen. This option requires less bandwidth for sharing desktops or applications than does the High color option, but provides lower imaging quality. Thus, this option is useful if a customer is using a dial-up connection to attend a support session. High color (16-bit) --Specifies that a shared desktop or application appears in 16-bit color in the viewer on your screen. This option requires more bandwidth than the 256 color option, but provides better imaging quality.
Your site administrator sets the default color mode for your user account. A customer can also specify a color mode when viewing or controlling your desktop or application.
To specify the color mode for a shared desktop or application:
1 Do either of the following: - On the icon tray, click the Select Panel button.
- In the title bar of the sharing window, click the Sharing button.
12 On the menu that appears, choose Color Mode, and then choose color option.
RETURNING TO THE CSR DASHBOARD WHEN SHARING A DESKTOP OR APPLICATION
When sharing your desktop or application, or viewing or controlling a customer's desktop or application, you can return to the CSR dashboard at any time.
To return to the CSR dashboard:
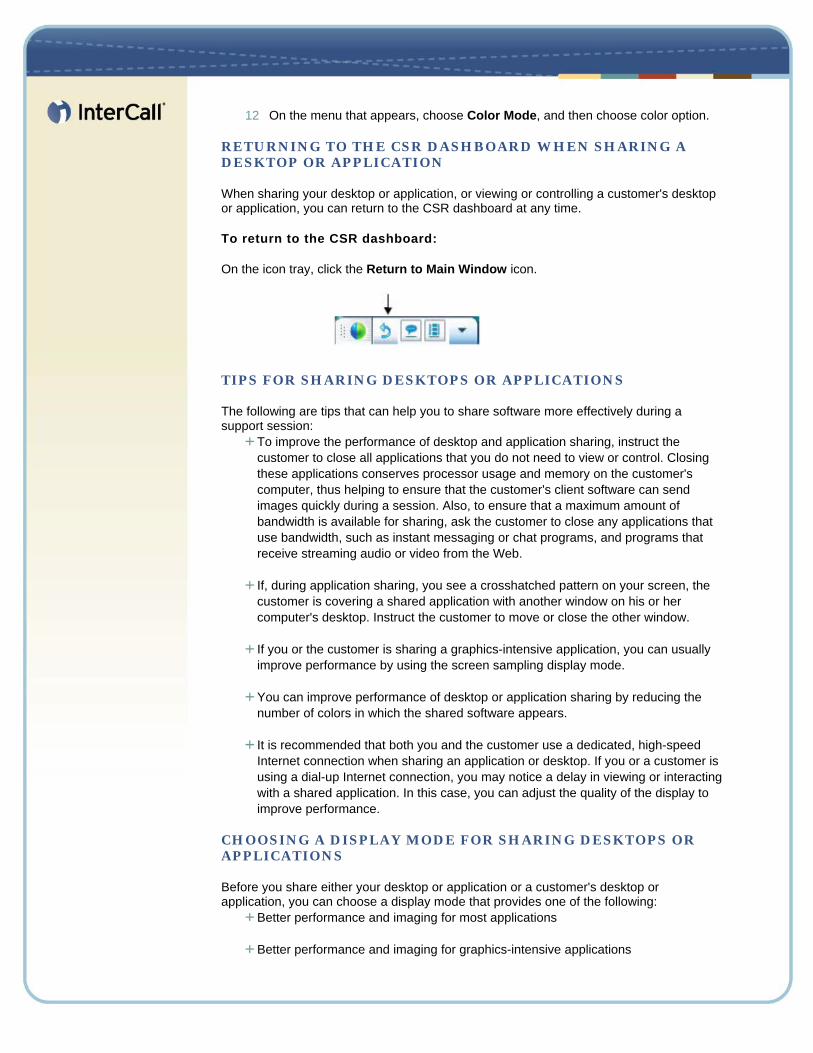
On the icon tray, click the Return to Main Window icon.
TIPS FOR SHARING DESKTOPS OR APPLICATIONS
The following are tips that can help you to share software more effectively during a support session:
To improve the performance of desktop and application sharing, instruct the customer to close all applications that you do not need to view or control. Closing these applications conserves processor usage and memory on the customer's computer, thus helping to ensure that the customer's client software can send images quickly during a session. Also, to ensure that a maximum amount of bandwidth is available for sharing, ask the customer to close any applications that use bandwidth, such as instant messaging or chat programs, and programs that receive streaming audio or video from the Web.
If, during application sharing, you see a crosshatched pattern on your screen, the customer is covering a shared application with another window on his or her computer's desktop. Instruct the customer to move or close the other window.
If you or the customer is sharing a graphics-intensive application, you can usually improve performance by using the screen sampling display mode.
You can improve performance of desktop or application sharing by reducing the number of colors in which the shared software appears.
It is recommended that both you and the customer use a dedicated, high-speed Internet connection when sharing an application or desktop. If you or a customer is using a dial-up Internet connection, you may notice a delay in viewing or interacting with a shared application. In this case, you can adjust the quality of the display to improve performance.
CHOOSING A DISPLAY MODE FOR SHARING DESKTOPS OR APPLICATIONS
Before you share either your desktop or application or a customer's desktop or application, you can choose a display mode that provides one of the following:
Better performance and imaging for most applications
Better performance and imaging for graphics-intensive applications
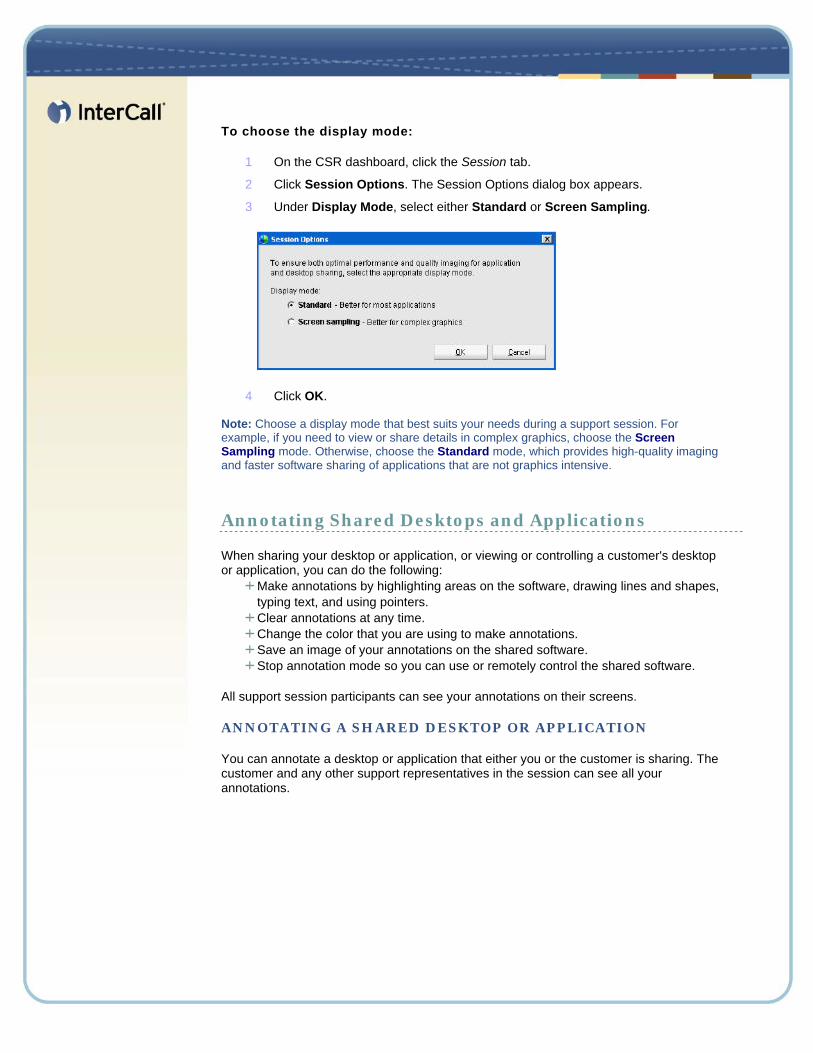
To choose the display mode:
1 On the CSR dashboard, click the Session tab.
2 Click Session Options. The Session Options dialog box appears.
3 Under Display Mode, select either Standard or Screen Sampling.
4 Click OK. Note: Choose a display mode that best suits your needs during a support session. For example, if you need to view or share details in complex graphics, choose the Screen Sampling mode. Otherwise, choose the Standard mode, which provides high-quality imaging and faster software sharing of applications that are not graphics intensive.
Annotating Shared Desktops and Applications
When sharing your desktop or application, or viewing or controlling a customer's desktop or application, you can do the following:
Make annotations by highlighting areas on the software, drawing lines and shapes, typing text, and using pointers. Clear annotations at any time. Change the color that you are using to make annotations. Save an image of your annotations on the shared software. Stop annotation mode so you can use or remotely control the shared software.
All support session participants can see your annotations on their screens.
ANNOTATING A SHARED DESKTOP OR APPLICATION
You can annotate a desktop or application that either you or the customer is sharing. The customer and any other support representatives in the session can see all your annotations.
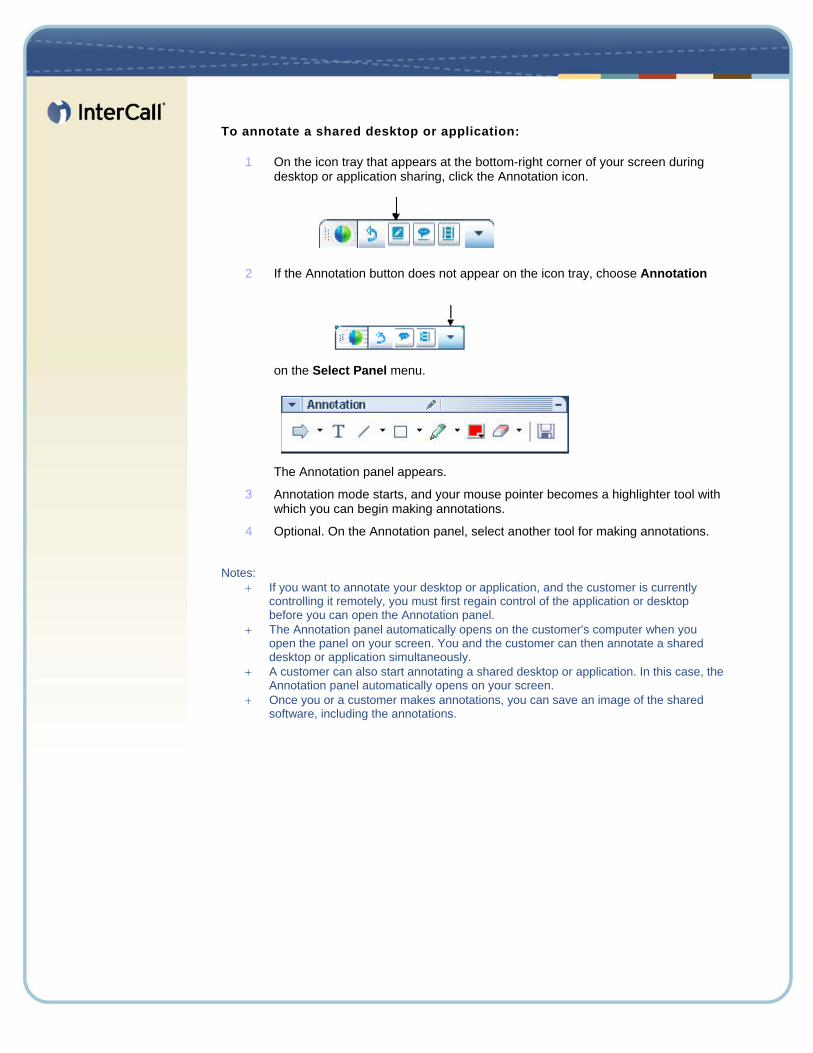
To annotate a shared desktop or application:
1 On the icon tray that appears at the bottom-right corner of your screen during desktop or application sharing, click the Annotation icon.
2 If the Annotation button does not appear on the icon tray, choose Annotation
on the Select Panel menu.
The Annotation panel appears.
3 Annotation mode starts, and your mouse pointer becomes a highlighter tool with which you can begin making annotations.
4 Optional. On the Annotation panel, select another tool for making annotations. Notes:
+ If you want to annotate your desktop or application, and the customer is currently controlling it remotely, you must first regain control of the application or desktop before you can open the Annotation panel.
+ The Annotation panel automatically opens on the customer's computer when you open the panel on your screen. You and the customer can then annotate a shared desktop or application simultaneously.
+ A customer can also start annotating a shared desktop or application. In this case, the Annotation panel automatically opens on your screen.
+ Once you or a customer makes annotations, you can save an image of the shared software, including the annotations.
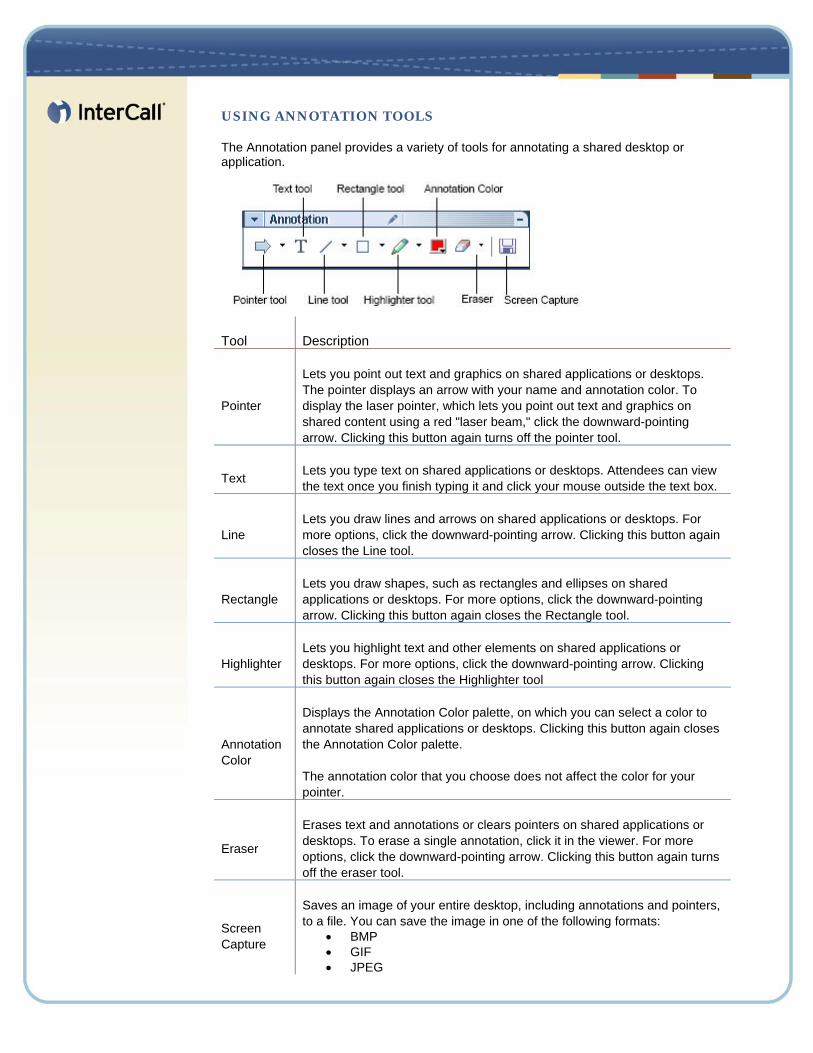
USING ANNOTATION TOOLS
The Annotation panel provides a variety of tools for annotating a shared desktop or application.
Tool Description
Pointer
Lets you point out text and graphics on shared applications or desktops. The pointer displays an arrow with your name and annotation color. To display the laser pointer, which lets you point out text and graphics on shared content using a red "laser beam," click the downward-pointing arrow. Clicking this button again turns off the pointer tool.
Text Lets you type text on shared applications or desktops. Attendees can view the text once you finish typing it and click your mouse outside the text box.
Line Lets you draw lines and arrows on shared applications or desktops. For more options, click the downward-pointing arrow. Clicking this button again closes the Line tool.
Rectangle Lets you draw shapes, such as rectangles and ellipses on shared applications or desktops. For more options, click the downward-pointing arrow. Clicking this button again closes the Rectangle tool.
Highlighter Lets you highlight text and other elements on shared applications or desktops. For more options, click the downward-pointing arrow. Clicking this button again closes the Highlighter tool
Annotation Color
Displays the Annotation Color palette, on which you can select a color to annotate shared applications or desktops. Clicking this button again closes the Annotation Color palette.
The annotation color that you choose does not affect the color for your pointer.
Eraser
Erases text and annotations or clears pointers on shared applications or desktops. To erase a single annotation, click it in the viewer. For more options, click the downward-pointing arrow. Clicking this button again turns off the eraser tool.
Screen Capture
Saves an image of your entire desktop, including annotations and pointers, to a file. You can save the image in one of the following formats:
• BMP • GIF • JPEG
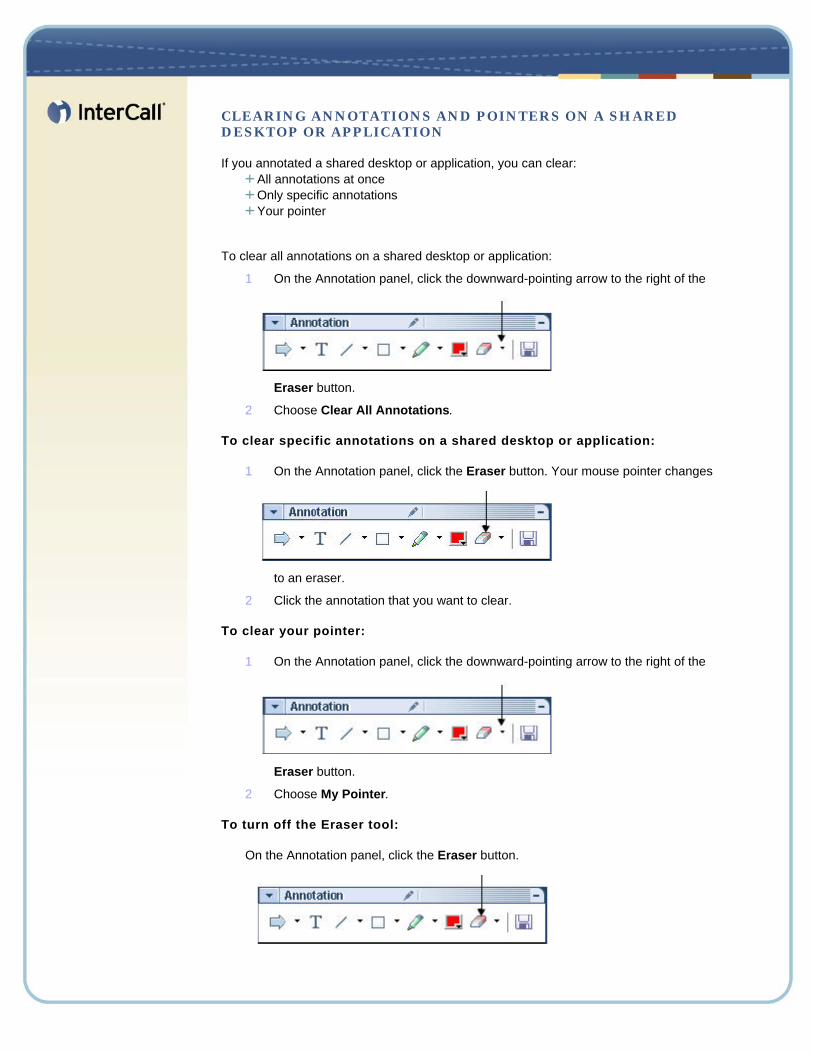
CLEARING ANNOTATIONS AND POINTERS ON A SHARED DESKTOP OR APPLICATION
If you annotated a shared desktop or application, you can clear: All annotations at once Only specific annotations Your pointer
To clear all annotations on a shared desktop or application:
1 On the Annotation panel, click the downward-pointing arrow to the right of the
Eraser button.
2 Choose Clear All Annotations.
To clear specific annotations on a shared desktop or application:
1 On the Annotation panel, click the Eraser button. Your mouse pointer changes
to an eraser.
2 Click the annotation that you want to clear.
To clear your pointer:
1 On the Annotation panel, click the downward-pointing arrow to the right of the
Eraser button.
2 Choose My Pointer.
To turn off the Eraser tool:
On the Annotation panel, click the Eraser button.
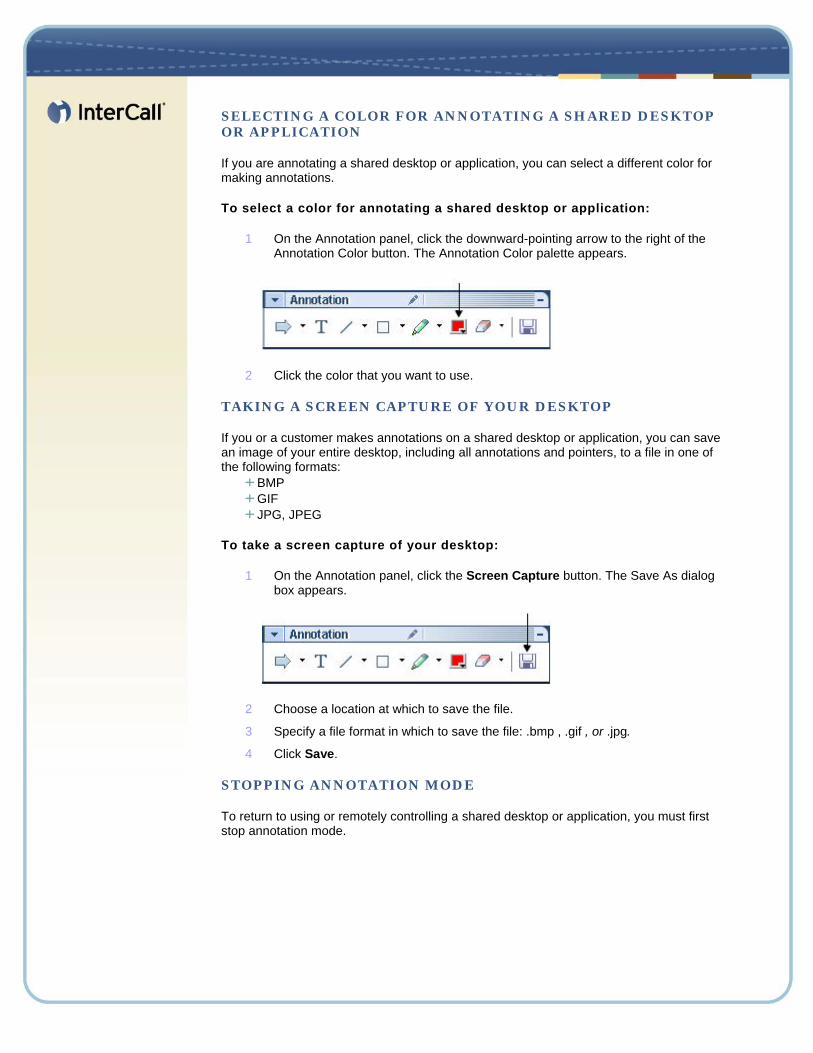
SELECTING A COLOR FOR ANNOTATING A SHARED DESKTOP OR APPLICATION
If you are annotating a shared desktop or application, you can select a different color for making annotations.
To select a color for annotating a shared desktop or application:
1 On the Annotation panel, click the downward-pointing arrow to the right of the Annotation Color button. The Annotation Color palette appears.
2 Click the color that you want to use.
TAKING A SCREEN CAPTURE OF YOUR DESKTOP
If you or a customer makes annotations on a shared desktop or application, you can save an image of your entire desktop, including all annotations and pointers, to a file in one of the following formats:
BMP GIF JPG, JPEG
To take a screen capture of your desktop:
1 On the Annotation panel, click the Screen Capture button. The Save As dialog box appears.
2 Choose a location at which to save the file.
3 Specify a file format in which to save the file: .bmp , .gif , or .jpg.
4 Click Save.
STOPPING ANNOTATION MODE
To return to using or remotely controlling a shared desktop or application, you must first stop annotation mode.
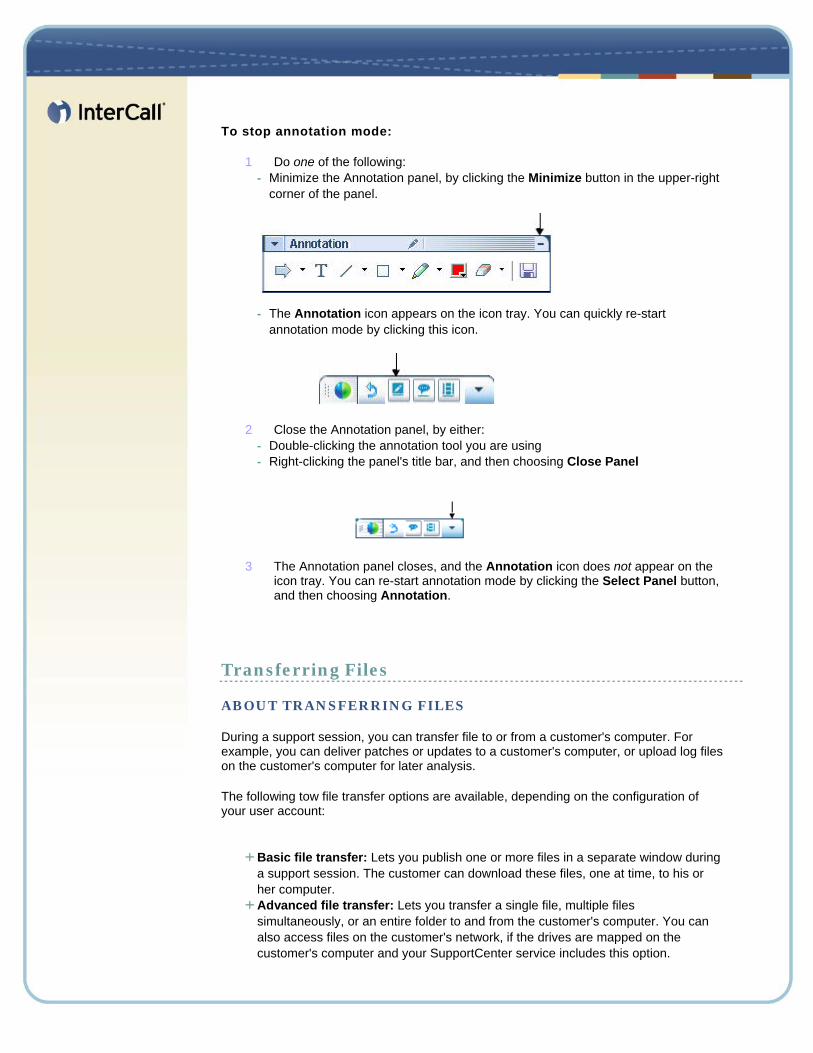
To stop annotation mode:
1 Do one of the following: - Minimize the Annotation panel, by clicking the Minimize button in the upper-right
corner of the panel.
- The Annotation icon appears on the icon tray. You can quickly re-start annotation mode by clicking this icon.
2 Close the Annotation panel, by either: - Double-clicking the annotation tool you are using - Right-clicking the panel's title bar, and then choosing Close Panel
3 The Annotation panel closes, and the Annotation icon does not appear on the icon tray. You can re-start annotation mode by clicking the Select Panel button, and then choosing Annotation.
Transferring Files
ABOUT TRANSFERRING FILES
During a support session, you can transfer file to or from a customer's computer. For example, you can deliver patches or updates to a customer's computer, or upload log files on the customer's computer for later analysis.
The following tow file transfer options are available, depending on the configuration of your user account:
Basic file transfer: Lets you publish one or more files in a separate window during a support session. The customer can download these files, one at time, to his or her computer. Advanced file transfer: Lets you transfer a single file, multiple files simultaneously, or an entire folder to and from the customer's computer. You can also access files on the customer's network, if the drives are mapped on the customer's computer and your SupportCenter service includes this option.
The customer must grant permission for you to transfer any files, can view all actions that you take when transferring files, and can stop a file transfer at any time. Optionally, you can use the advanced file transfer option when viewing or controlling the customer's desktop.
Support Manager supports file transfers of up to 150 MB.
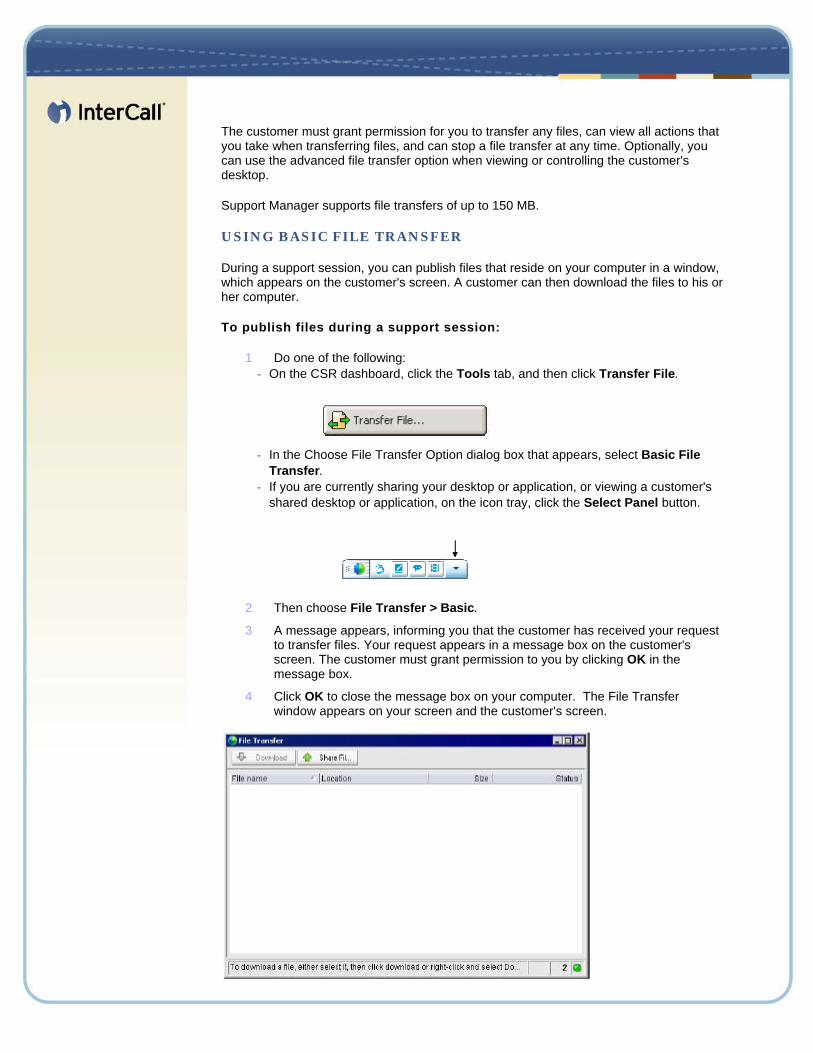
USING BASIC FILE TRANSFER
During a support session, you can publish files that reside on your computer in a window, which appears on the customer's screen. A customer can then download the files to his or her computer.
To publish files during a support session:
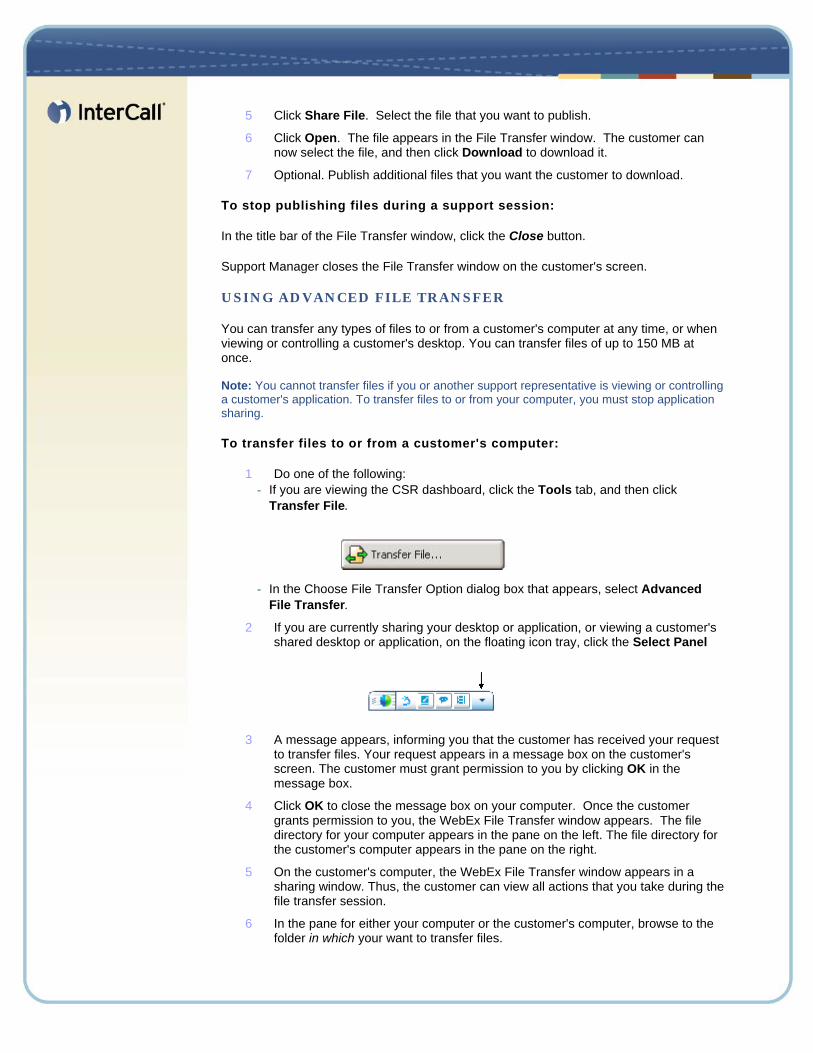
1 Do one of the following: - On the CSR dashboard, click the Tools tab, and then click Transfer File.
- In the Choose File Transfer Option dialog box that appears, select Basic File Transfer.
- If you are currently sharing your desktop or application, or viewing a customer's shared desktop or application, on the icon tray, click the Select Panel button.
2 Then choose File Transfer > Basic.
3 A message appears, informing you that the customer has received your request to transfer files. Your request appears in a message box on the customer's screen. The customer must grant permission to you by clicking OK in the message box.
4 Click OK to close the message box on your computer. The File Transfer window appears on your screen and the customer's screen.
5 Click Share File. Select the file that you want to publish.
6 Click Open. The file appears in the File Transfer window. The customer can now select the file, and then click Download to download it.
7 Optional. Publish additional files that you want the customer to download.
To stop publishing files during a support session:
In the title bar of the File Transfer window, click the Close button.
Support Manager closes the File Transfer window on the customer's screen.
USING ADVANCED FILE TRANSFER
You can transfer any types of files to or from a customer's computer at any time, or when viewing or controlling a customer's desktop. You can transfer files of up to 150 MB at once. Note: You cannot transfer files if you or another support representative is viewing or controlling a customer's application. To transfer files to or from your computer, you must stop application sharing.
To transfer files to or from a customer's computer:
1 Do one of the following: - If you are viewing the CSR dashboard, click the Tools tab, and then click
Transfer File.
- In the Choose File Transfer Option dialog box that appears, select Advanced File Transfer.
2 If you are currently sharing your desktop or application, or viewing a customer's shared desktop or application, on the floating icon tray, click the Select Panel
3 A message appears, informing you that the customer has received your request to transfer files. Your request appears in a message box on the customer's screen. The customer must grant permission to you by clicking OK in the message box.
4 Click OK to close the message box on your computer. Once the customer grants permission to you, the WebEx File Transfer window appears. The file directory for your computer appears in the pane on the left. The file directory for the customer's computer appears in the pane on the right.
5 On the customer's computer, the WebEx File Transfer window appears in a sharing window. Thus, the customer can view all actions that you take during the file transfer session.
6 In the pane for either your computer or the customer's computer, browse to the folder in which your want to transfer files.
7 To create a new folder, click the New Folder button .
8 In the other pane, select the files or folder that you want to transfer.
9 To select multiple files, hold down the Ctrl key when clicking the files.
10 Click the appropriate Send button to transfer the files or folder from one
computer to the other .
11 If you are not also using desktop sharing, a message appears on the customer's screen, asking the customer to grant permission for you to transfer the file. The customer must click OK in the message box for the file transfer to proceed.
12 Once Support Manager transfers a file, the status bar on the WebEx File Transfer window displays a message to indicate that the transfer is complete.
Note: A customer can allow you to transfer files during the support session, without having to grant permission to you each time you request to do so.
STOPPING AN ADVANCED FILE TRANSFER SESSION
Either you or the customer can stop a file transfer session.
To stop an advanced file transfer session:
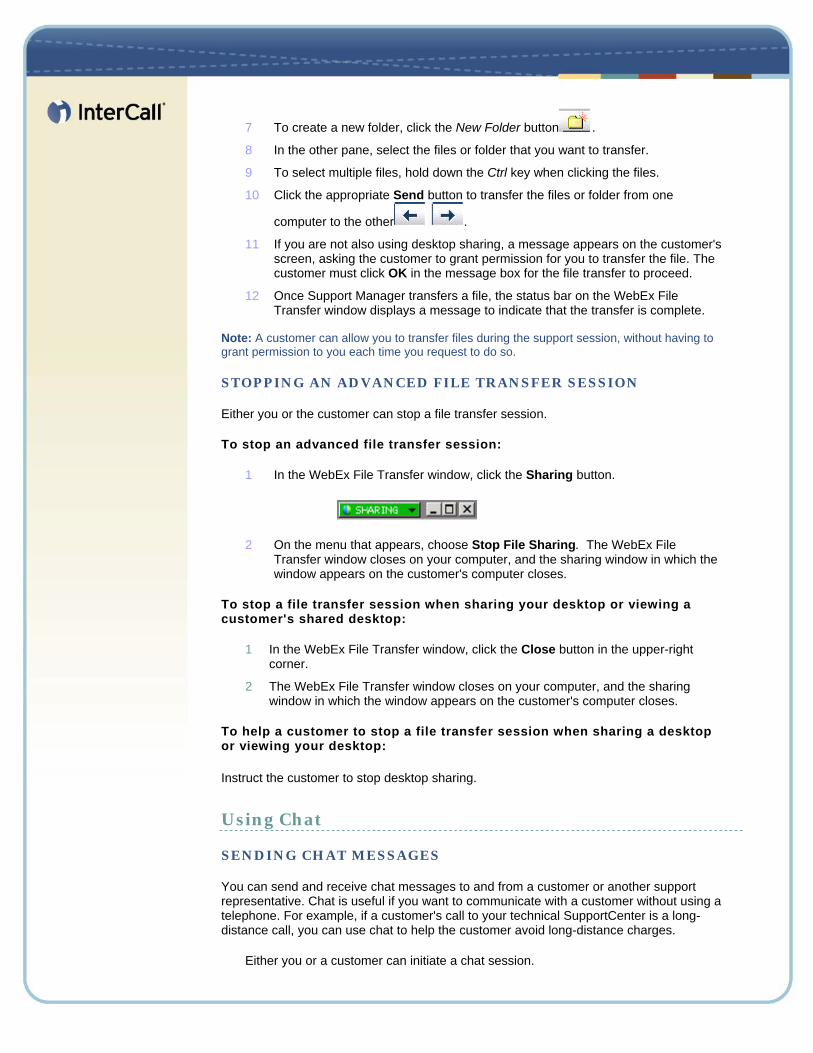
1 In the WebEx File Transfer window, click the Sharing button.
2 On the menu that appears, choose Stop File Sharing. The WebEx File Transfer window closes on your computer, and the sharing window in which the window appears on the customer's computer closes.
To stop a file transfer session when sharing your desktop or viewing a customer's shared desktop:
1 In the WebEx File Transfer window, click the Close button in the upper-right corner.
2 The WebEx File Transfer window closes on your computer, and the sharing window in which the window appears on the customer's computer closes.
To help a customer to stop a file transfer session when sharing a desktop or viewing your desktop:
Instruct the customer to stop desktop sharing.
Using Chat
SENDING CHAT MESSAGES
You can send and receive chat messages to and from a customer or another support representative. Chat is useful if you want to communicate with a customer without using a telephone. For example, if a customer's call to your technical SupportCenter is a long-distance call, you can use chat to help the customer avoid long-distance charges.
Either you or a customer can initiate a chat session.
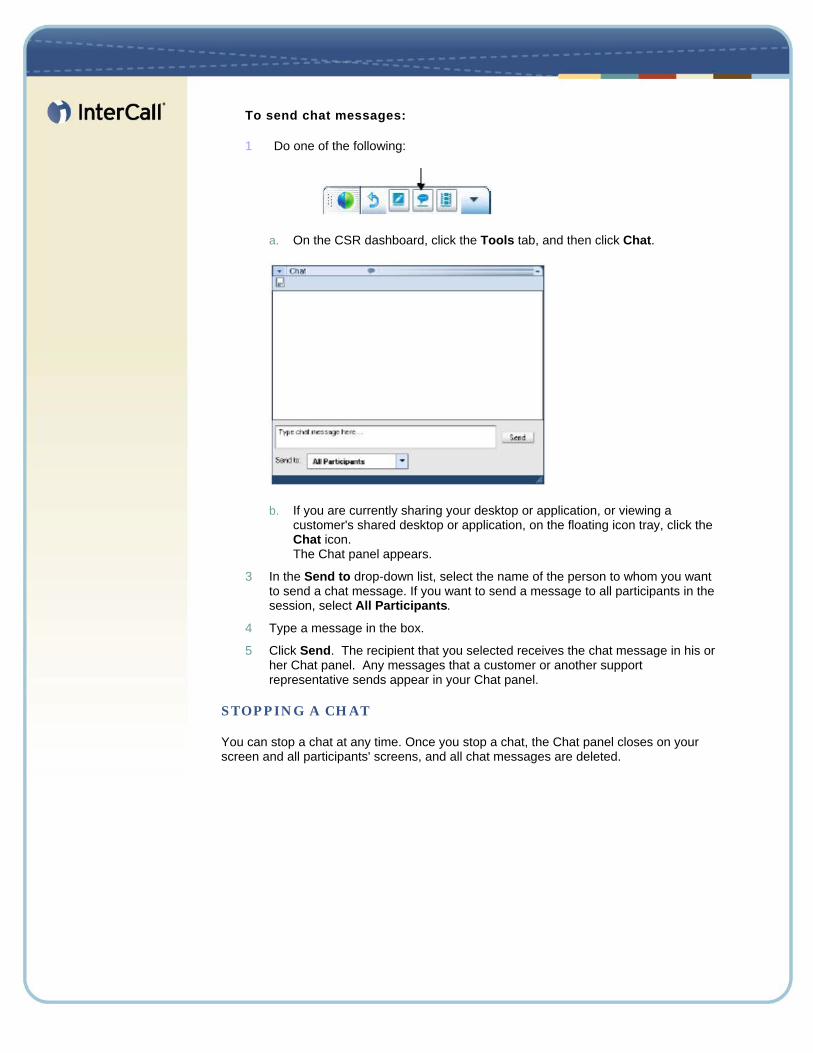
To send chat messages:
1 Do one of the following:
a. On the CSR dashboard, click the Tools tab, and then click Chat.
b. If you are currently sharing your desktop or application, or viewing a customer's shared desktop or application, on the floating icon tray, click the Chat icon. The Chat panel appears.
3 In the Send to drop-down list, select the name of the person to whom you want to send a chat message. If you want to send a message to all participants in the session, select All Participants.
4 Type a message in the box.
5 Click Send. The recipient that you selected receives the chat message in his or her Chat panel. Any messages that a customer or another support representative sends appear in your Chat panel.
STOPPING A CHAT
You can stop a chat at any time. Once you stop a chat, the Chat panel closes on your screen and all participants' screens, and all chat messages are deleted.
To stop a chat:
1 Right-click on the title bar of the Chat panel.
2 On the menu that appears, choose Close Panel.
Note: Alternatively, you can minimize or collapse the Chat panel instead of closing it. In this case, all chat messages remain in the panel.
SAVING A CHAT
You can save the chat messages that appear in your Chat panel to a text (. txt ) file.
To save a chat:
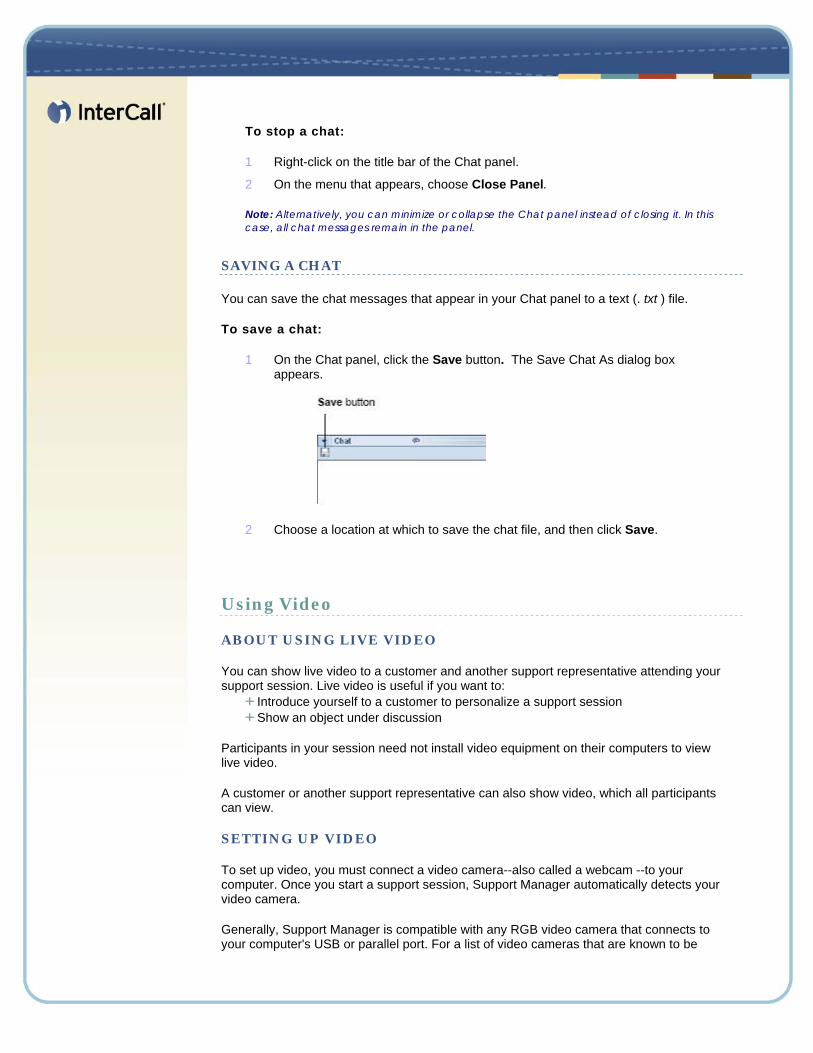
1 On the Chat panel, click the Save button. The Save Chat As dialog box appears.
2 Choose a location at which to save the chat file, and then click Save.
Using Video
ABOUT USING LIVE VIDEO
You can show live video to a customer and another support representative attending your support session. Live video is useful if you want to:
Introduce yourself to a customer to personalize a support session Show an object under discussion
Participants in your session need not install video equipment on their computers to view live video.
A customer or another support representative can also show video, which all participants can view.
SETTING UP VIDEO
To set up video, you must connect a video camera--also called a webcam --to your computer. Once you start a support session, Support Manager automatically detects your video camera.
Generally, Support Manager is compatible with any RGB video camera that connects to your computer's USB or parallel port. For a list of video cameras that are known to be

compatible with Support Manager, refer to the Support page on your SupportCenter Website.
SHOWING LIVE VIDEO
Once you connect a video camera to your computer, you can show live video to a customer.
To show live video:
1 Do one of the following: - On the CSR dashboard, click the Tools tab, and then click Video.
- If you are currently sharing your desktop or application, or viewing a customer's shared desktop or application, on the floating icon tray, click the Video icon.
2 The Video panel appears on both your computer and the customer's computer, and Support Manager begins sending live video images.
ADJUSTING VIDEO OUTPUT
When showing live video during a support session you can adjust video output to control the quality of the video image the resolution, or size, of the video image other settings that your camera's software provides, such as lighting and contrast
If more than one camera is attached to your computer, you can also select the video camera that you want to use.
To adjust video output:
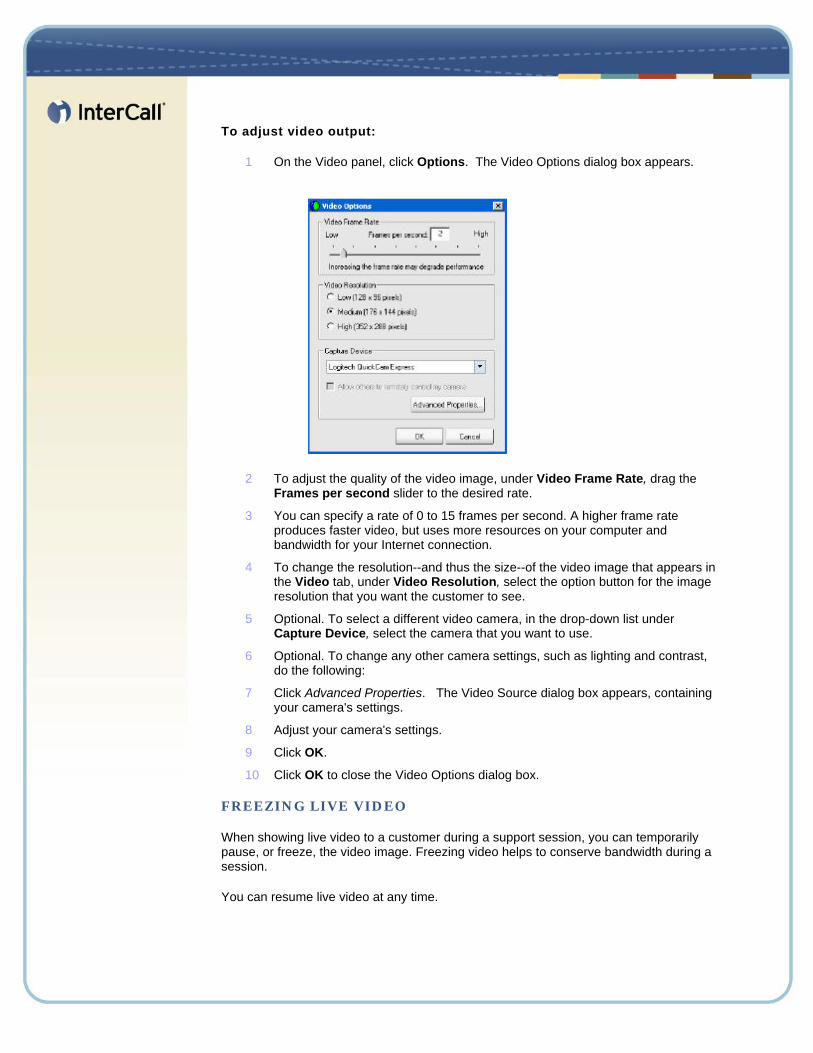
1 On the Video panel, click Options. The Video Options dialog box appears.
2 To adjust the quality of the video image, under Video Frame Rate, drag the Frames per second slider to the desired rate.
3 You can specify a rate of 0 to 15 frames per second. A higher frame rate produces faster video, but uses more resources on your computer and bandwidth for your Internet connection.
4 To change the resolution--and thus the size--of the video image that appears in the Video tab, under Video Resolution, select the option button for the image resolution that you want the customer to see.
5 Optional. To select a different video camera, in the drop-down list under Capture Device, select the camera that you want to use.
6 Optional. To change any other camera settings, such as lighting and contrast, do the following:
7 Click Advanced Properties. The Video Source dialog box appears, containing your camera's settings.
8 Adjust your camera's settings.
9 Click OK.
10 Click OK to close the Video Options dialog box.
FREEZING LIVE VIDEO
When showing live video to a customer during a support session, you can temporarily pause, or freeze, the video image. Freezing video helps to conserve bandwidth during a session.
You can resume live video at any time.
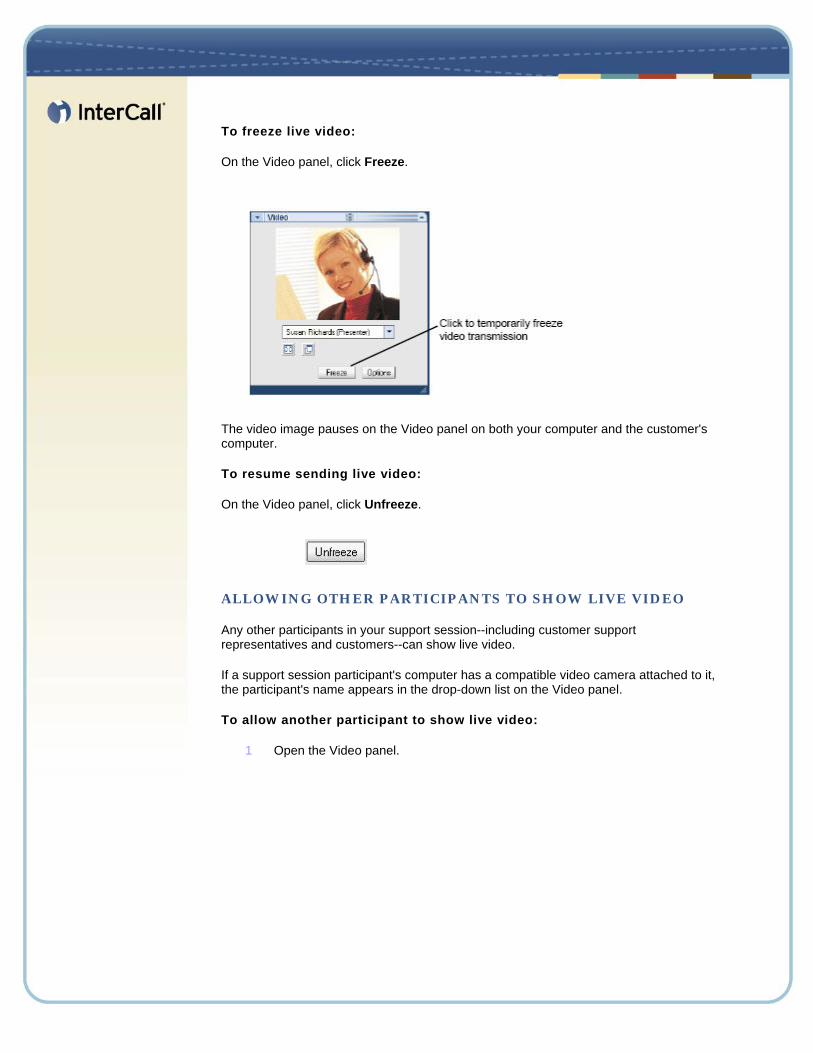
To freeze live video:
On the Video panel, click Freeze.
The video image pauses on the Video panel on both your computer and the customer's computer.
To resume sending live video:
On the Video panel, click Unfreeze.
ALLOWING OTHER PARTICIPANTS TO SHOW LIVE VIDEO
Any other participants in your support session--including customer support representatives and customers--can show live video.
If a support session participant's computer has a compatible video camera attached to it, the participant's name appears in the drop-down list on the Video panel.
To allow another participant to show live video:
1 Open the Video panel.
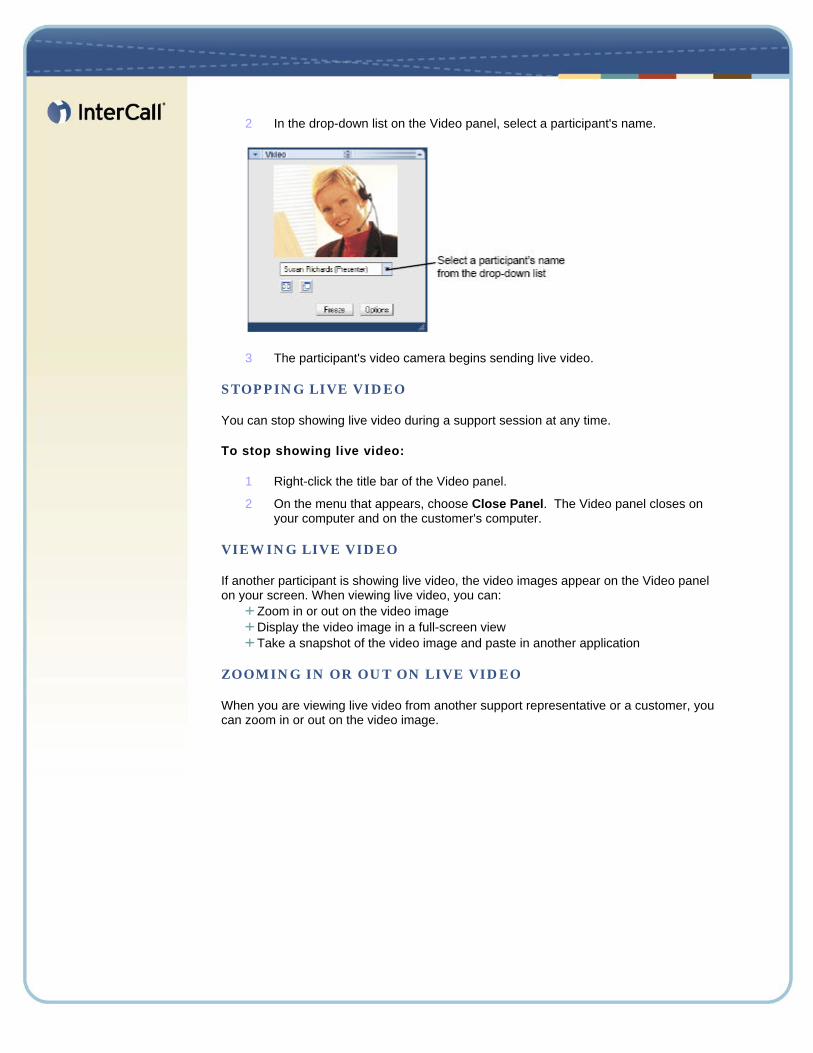
2 In the drop-down list on the Video panel, select a participant's name.
3 The participant's video camera begins sending live video.
STOPPING LIVE VIDEO
You can stop showing live video during a support session at any time.
To stop showing live video:
1 Right-click the title bar of the Video panel.
2 On the menu that appears, choose Close Panel. The Video panel closes on your computer and on the customer's computer.
VIEWING LIVE VIDEO
If another participant is showing live video, the video images appear on the Video panel on your screen. When viewing live video, you can:
Zoom in or out on the video image Display the video image in a full-screen view Take a snapshot of the video image and paste in another application
ZOOMING IN OR OUT ON LIVE VIDEO
When you are viewing live video from another support representative or a customer, you can zoom in or out on the video image.
To zoom in or out on live video:
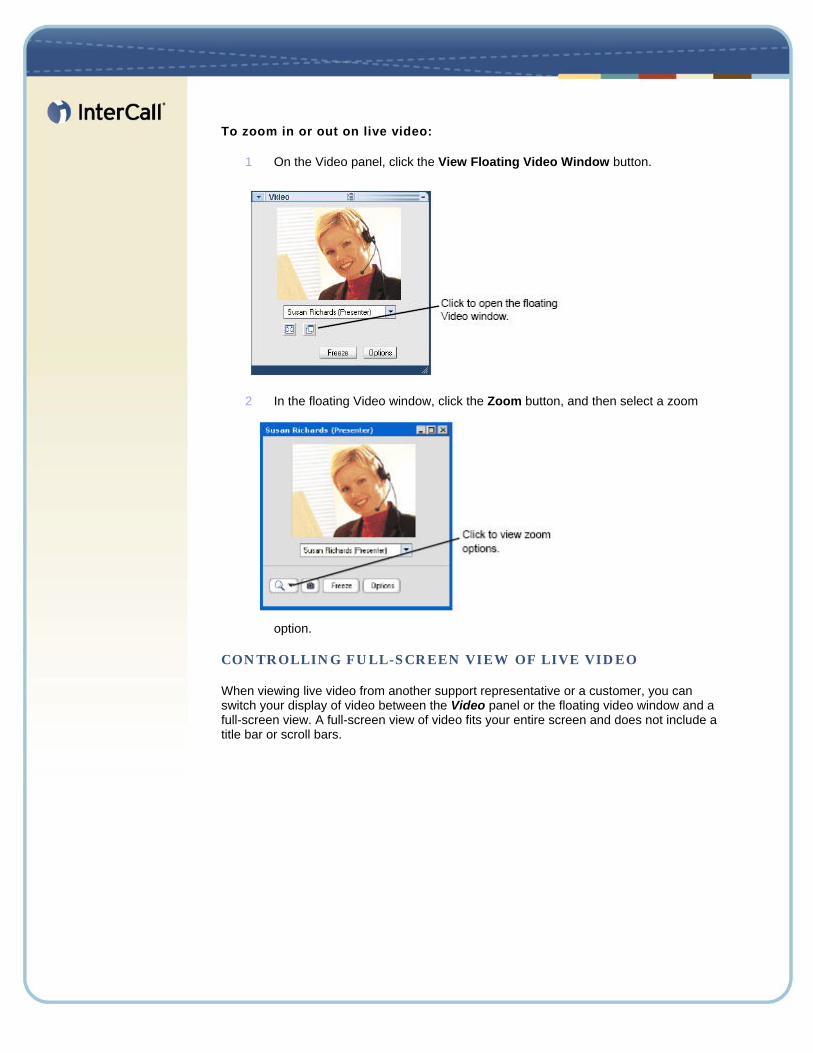
1 On the Video panel, click the View Floating Video Window button.
2 In the floating Video window, click the Zoom button, and then select a zoom
option.
CONTROLLING FULL-SCREEN VIEW OF LIVE VIDEO
When viewing live video from another support representative or a customer, you can switch your display of video between the Video panel or the floating video window and a full-screen view. A full-screen view of video fits your entire screen and does not include a title bar or scroll bars.
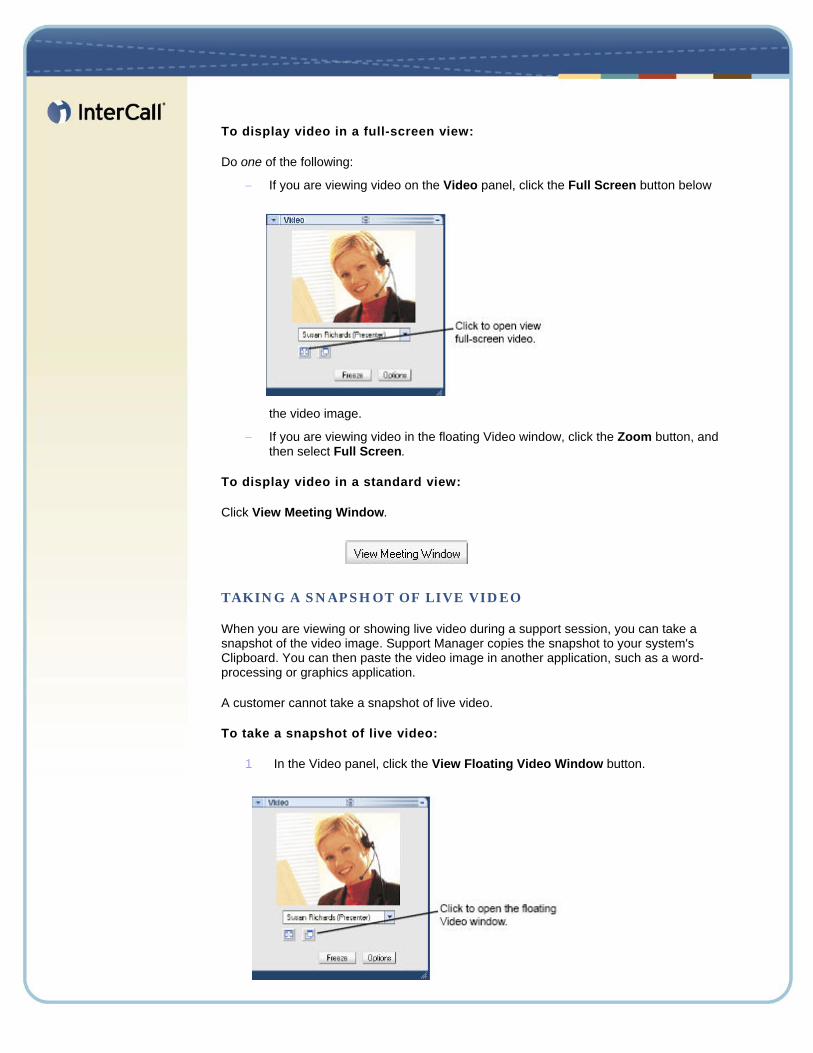
To display video in a full-screen view:
Do one of the following:
− If you are viewing video on the Video panel, click the Full Screen button below
the video image.
− If you are viewing video in the floating Video window, click the Zoom button, and then select Full Screen.
To display video in a standard view:
Click View Meeting Window.
TAKING A SNAPSHOT OF LIVE VIDEO
When you are viewing or showing live video during a support session, you can take a snapshot of the video image. Support Manager copies the snapshot to your system's Clipboard. You can then paste the video image in another application, such as a word-processing or graphics application.
A customer cannot take a snapshot of live video.
To take a snapshot of live video:
1 In the Video panel, click the View Floating Video Window button.
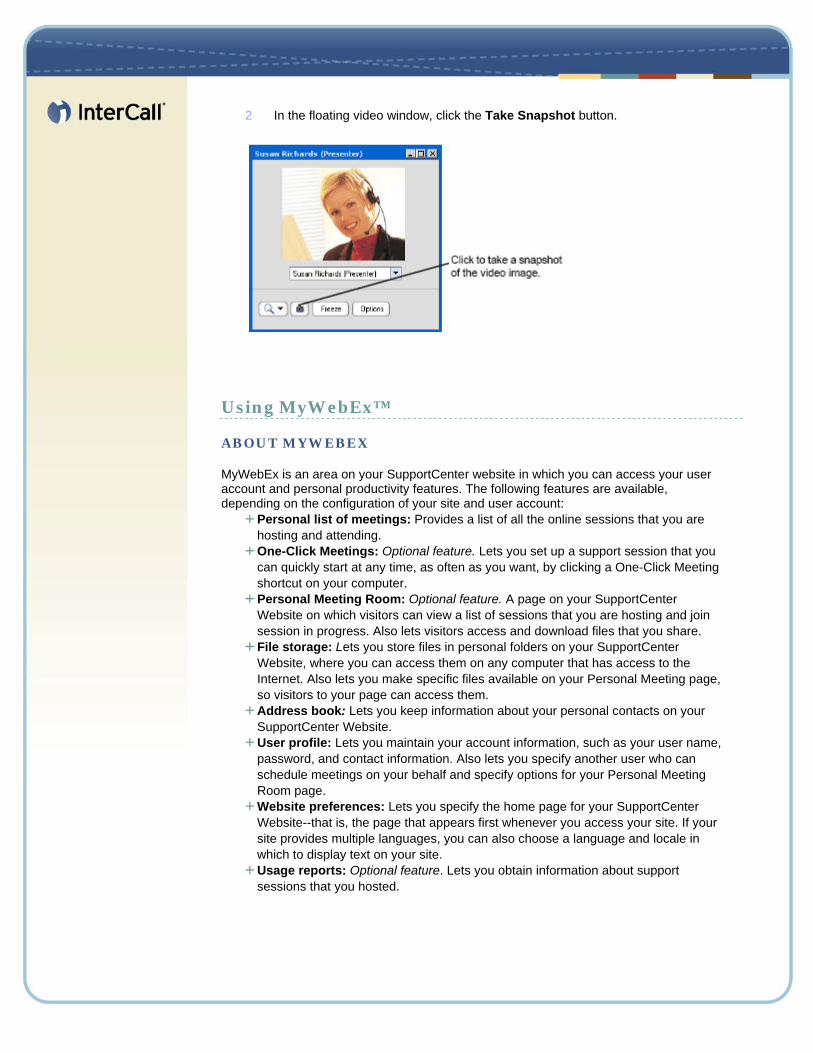
2 In the floating video window, click the Take Snapshot button.
Using MyWebEx™
ABOUT MYWEBEX
MyWebEx is an area on your SupportCenter website in which you can access your user account and personal productivity features. The following features are available, depending on the configuration of your site and user account:
Personal list of meetings: Provides a list of all the online sessions that you are hosting and attending. One-Click Meetings: Optional feature. Lets you set up a support session that you can quickly start at any time, as often as you want, by clicking a One-Click Meeting shortcut on your computer. Personal Meeting Room: Optional feature. A page on your SupportCenter Website on which visitors can view a list of sessions that you are hosting and join session in progress. Also lets visitors access and download files that you share. File storage: Lets you store files in personal folders on your SupportCenter Website, where you can access them on any computer that has access to the Internet. Also lets you make specific files available on your Personal Meeting page, so visitors to your page can access them. Address book: Lets you keep information about your personal contacts on your SupportCenter Website. User profile: Lets you maintain your account information, such as your user name, password, and contact information. Also lets you specify another user who can schedule meetings on your behalf and specify options for your Personal Meeting Room page. Website preferences: Lets you specify the home page for your SupportCenter Website--that is, the page that appears first whenever you access your site. If your site provides multiple languages, you can also choose a language and locale in which to display text on your site. Usage reports: Optional feature. Lets you obtain information about support sessions that you hosted.
OBTAINING A USER ACCOUNT
Once you obtain a user account, you can use MyWebEx features and host support sessions on the Web.
You can obtain a user account in one of two ways:
− The site administrator for your SupportCenter website can create a user account for you. In this case, you need not sign up for an account on your site, and you can begin hosting support sessions immediately.
− If your site administrator has made the self-registration feature available, you can sign up for an account on your SupportCenter website at any time.
LOGGING IN TO AND OUT FROM YOUR SUPPORTCENTER SITE
To manage your online support sessions maintain your user account, you must log in to your SupportCenter website.
To log in to your SupportCenter site:
1 Go to your SupportCenter website.
2 In the upper-right corner of the page, click Log In. The Log In page appears.
3 Enter your user name and password. Passwords are case-sensitive, so you must type your password exactly as you specified it in your user profile.
4 Click Log In.
To log out from your SupportCenter site
In the upper-right corner of the page, click Log Out.
USING YOUR LIST OF MEETINGS
On your SupportCenter website, your My Meetings page in MyWebEx includes:
− A list of the support sessions that you are currently conducting.
− The One-Click Meeting Wizard, which lets you set up a One-Click Meeting
.
OPENING YOUR LIST OF MEETINGS
Your list of meetings, which appears on your My Meetings page on your SupportCenter website, shows any support sessions that you are currently conducting.
To open your list of meetings:
1 Log in to your SupportCenter website, and then click MyWebEx.
2 Optional. To view the list of support sessions to which you are invited, click the Invited tab.
Note: You can specify that your My WebEx Meetings page is the home page that appears once you log in to your SupportCenter Website.
MAINTAINING YOUR LIST OF SCHEDULED MEETINGS
Once you start a support session, it appears on your list of meetings.
A support session remains on your list of meetings until you end the session.
ABOUT THE MY WEBEX MEETINGS PAGE
How to access this page
On your SupportCenter website, click MyWebEx.
What you can do here
Access the following: A list of support sessions you are hosting A list of any a support sessions to which you are invited The One-Click Meeting Wizard
Options on this page
Use this option... To...
Scheduled View a list all of the online support sessions that you are hosting.
Invited View a list all of the support sessions to which you have been invited.
Set Up One-Click Start the Set Up One-Click Meeting Wizard, to specify options for a support session and shortcuts on your computer. You can click a shortcut to start the support session at any time.
One-Click Meeting Start the Set Up One-Click Meeting Wizard, to modify the options a One-Click Meeting that you have already set up.
Personal Meeting Room URL
Go to your Personal Meeting Room page.
Your Personal Meeting Room page lists any support sessions that you scheduled and any in-progress meetings that you are currently hosting.
Users to whom you provide your personal URL can use this page to join any support session that you are hosting. They can also download files in any folders that you share.
Refresh Refresh the information in the meeting list.
ABOUT THE MY WEBEX MEETINGS - SCHEDULED TAB
How to access this tab
On your SupportCenter Website, click MyWebEx > My Meetings.
Links on this tab:
Link on the Schedule tab Description
Topic The topic for a support session that you are hosting. If you are the alternate host for a support session, the topic appears in italics.
Type Indicates the type of online session that you are hosting. Available session types depend on the configuration of your SupportCenter website.
Requests Pending
Applies only to sessions that require registration. The number of registration requests that are pending--that is, requests that you have neither accepted nor rejected.
Click the link for the number to open a page on which you can view details about and accept or reject each registration request.
Requests Accepted
Applies only to sessions that require registration. The number of registration requests that you have accepted.
Click the link for the number to open a page on which you can view details about each accepted registration request.
Requests Rejected
Applies only to sessions that require registration. The number of registration requests that you have rejected. Click the link for the number to open a page on which you can view details about each rejected registration request.
Starting Time The date and time at which you scheduled the support session to begin.
Status The status of the support session.
Select All Not applicable to support sessions.
Clear All Not applicable to support sessions.
Delete Not applicable to support sessions.
ABOUT THE MY WEBEX MEETINGS - INVITED TAB
How to access this tab
On your SupportCenter website, click My WebEx > Invited.
Links on this tab
Link on the Invited tab Description
Topic The topic for the support session. Click the link to display a page on which you can view detailed information about the support session.
Type The type of session to which you are invited. Available session types depend on the configuration of your SupportCenter Website.
Starting Time The date and time at which the support session will start.
Status The status of the support session.
MAINTAINING YOUR PERSONAL MEETING ROOM PAGE
Your user account includes a Personal Meeting Room page on your SupportCenter Website. Users who visit your page can:
View a list of any online sessions that you are hosting, either scheduled or in currently progress. Join a session in progress View your personal folders and upload or download files to or from your folders, depending on the settings you specify for your folders
You can customize your Personal Meeting Room page by adding images and text to it.
To provide users with access to your Personal Meeting Room page, you must provide them with your Personal Meeting Room URL.
VIEWING YOUR PERSONAL MEETING ROOM PAGE
You can view your Personal Meeting Room page at any time, by going to the URL for the page. The URL for your Personal Meeting Room page is available on your:
My WebEx Meetings page My WebEx Profile page
To view your Personal Meeting Room page:
1 Log in to your SupportCenter website, and then click My WebEx. The My WebEx Meetings page appears.
2 Click the link for Personal Meeting Room URL. Alternatively, in My WebEx, click My Profile, and then click the Personal Meeting Room URL link, which is under the Personal Meeting Room section.
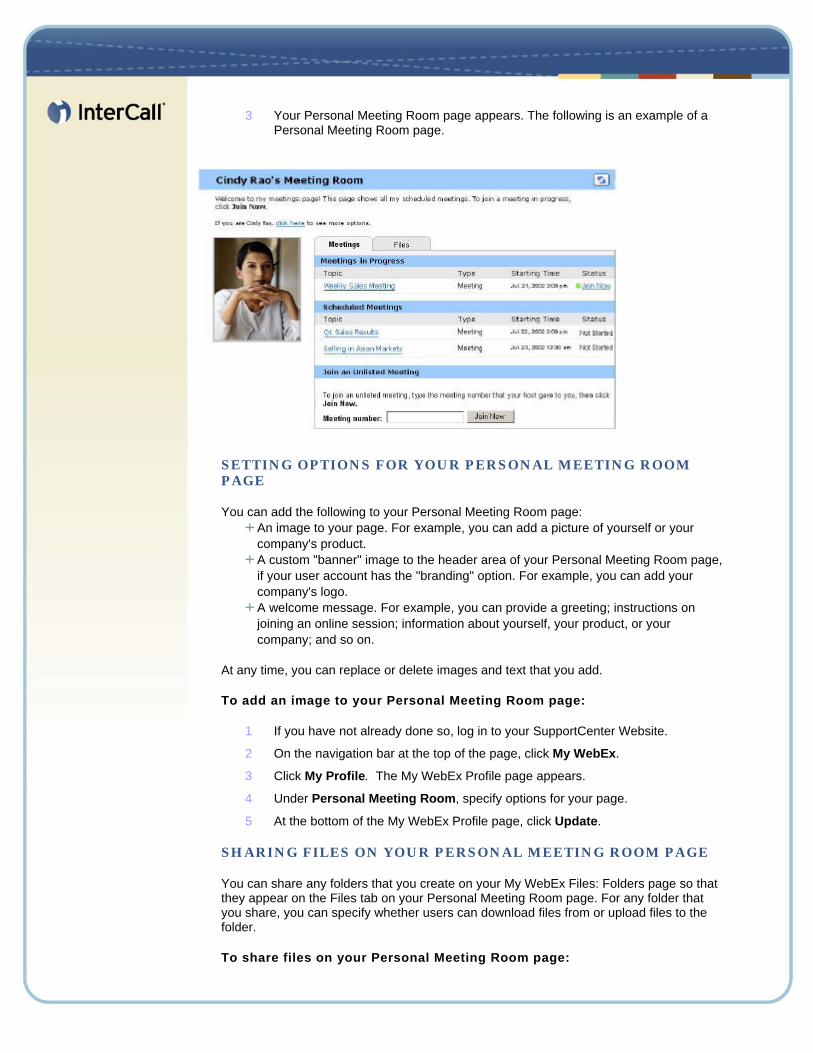
3 Your Personal Meeting Room page appears. The following is an example of a Personal Meeting Room page.
SETTING OPTIONS FOR YOUR PERSONAL MEETING ROOM PAGE
You can add the following to your Personal Meeting Room page: An image to your page. For example, you can add a picture of yourself or your company's product. A custom "banner" image to the header area of your Personal Meeting Room page, if your user account has the "branding" option. For example, you can add your company's logo. A welcome message. For example, you can provide a greeting; instructions on joining an online session; information about yourself, your product, or your company; and so on.
At any time, you can replace or delete images and text that you add.
To add an image to your Personal Meeting Room page:
1 If you have not already done so, log in to your SupportCenter Website.
2 On the navigation bar at the top of the page, click My WebEx.
3 Click My Profile. The My WebEx Profile page appears.
4 Under Personal Meeting Room, specify options for your page.
5 At the bottom of the My WebEx Profile page, click Update.
SHARING FILES ON YOUR PERSONAL MEETING ROOM PAGE
You can share any folders that you create on your My WebEx Files: Folders page so that they appear on the Files tab on your Personal Meeting Room page. For any folder that you share, you can specify whether users can download files from or upload files to the folder.
To share files on your Personal Meeting Room page:
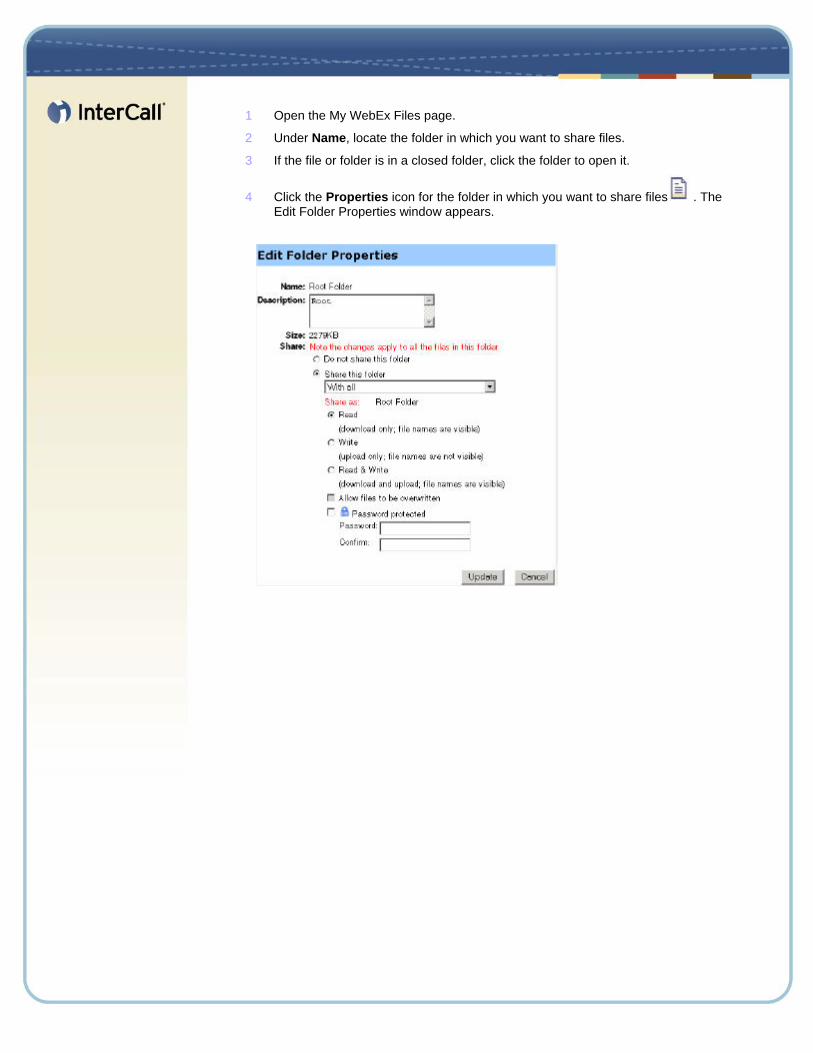
1 Open the My WebEx Files page.
2 Under Name, locate the folder in which you want to share files.
3 If the file or folder is in a closed folder, click the folder to open it.
4 Click the Properties icon for the folder in which you want to share files . The Edit Folder Properties window appears.
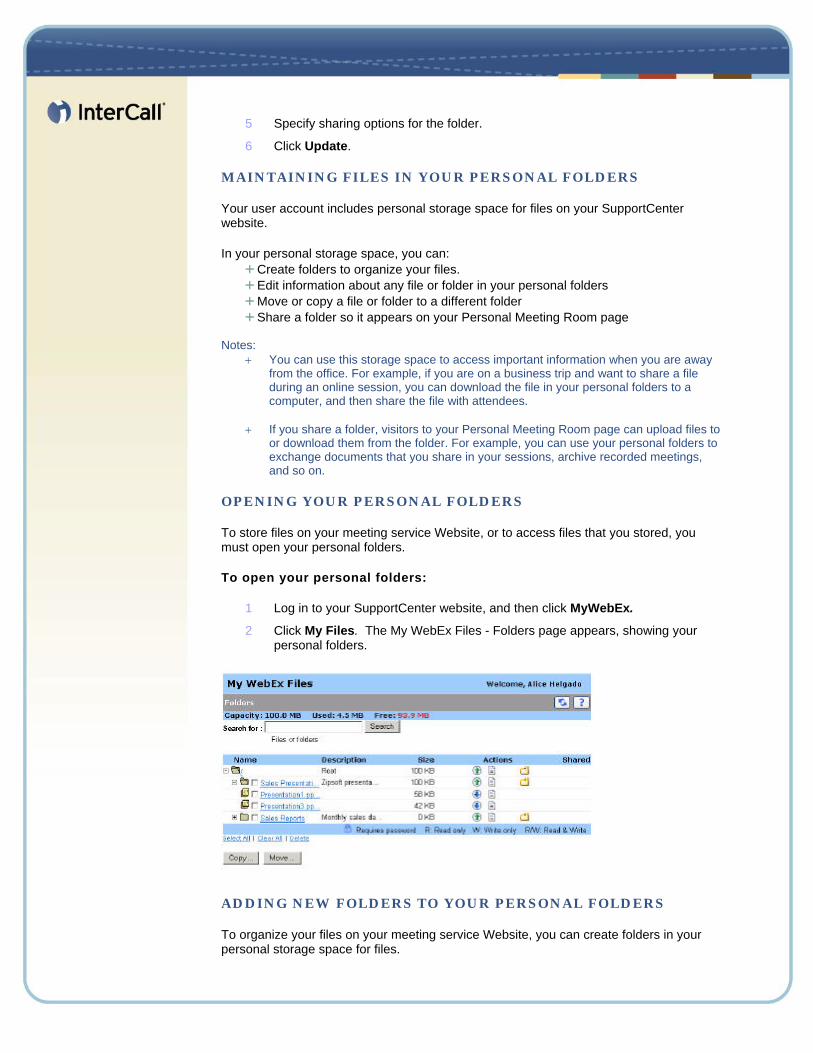
5 Specify sharing options for the folder.
6 Click Update.
MAINTAINING FILES IN YOUR PERSONAL FOLDERS
Your user account includes personal storage space for files on your SupportCenter website.
In your personal storage space, you can: Create folders to organize your files. Edit information about any file or folder in your personal folders Move or copy a file or folder to a different folder Share a folder so it appears on your Personal Meeting Room page
Notes:
+ You can use this storage space to access important information when you are away from the office. For example, if you are on a business trip and want to share a file during an online session, you can download the file in your personal folders to a computer, and then share the file with attendees.
+ If you share a folder, visitors to your Personal Meeting Room page can upload files to
or download them from the folder. For example, you can use your personal folders to exchange documents that you share in your sessions, archive recorded meetings, and so on.
OPENING YOUR PERSONAL FOLDERS
To store files on your meeting service Website, or to access files that you stored, you must open your personal folders.
To open your personal folders:
1 Log in to your SupportCenter website, and then click MyWebEx.
2 Click My Files. The My WebEx Files - Folders page appears, showing your personal folders.
ADDING NEW FOLDERS TO YOUR PERSONAL FOLDERS
To organize your files on your meeting service Website, you can create folders in your personal storage space for files.
To create a new folder:
1 Open the My Folders page.
2 Under Action, click the Create Folder button for the folder in which you want a
new folder. The Create Folder window appears.
3 In the Folder Name box, type a name for the folder.
4 Optional. In the Description box, type a description to help you to identify the folder's contents.
5 Click OK.
UPLOADING FILES TO YOUR PERSONAL FOLDERS
To store files in your personal folders on your SupportCenter website, you must upload them from your computer or a local server.
You can upload: Up to three files at once Any file that is less than 5076K
The amount of space available for storing files is determined by your site administrator. If you require more disk space, contact your site administrator.
To upload files to your personal folders:
1 Open the My Folders page.
2 Locate the folder in which you want to store the file.
3 Under Action for the folder, click the Upload button for the folder in which you want to store the file. The Upload File window appears.
4 Click Browse. The Choose File dialog box appears.
5 Select the file that you want to upload to your folder.
6 Click Open. The file appears in the File name box.
7 Optional. In the Description box, type a description to help you to identify the file.
8 Optional. Select up to two additional files to upload.
9 Click Upload. The files are uploaded to the folder that you selected.
10 Once you are finished uploading files, click Finish.
MOVING OR COPYING FILES OR FOLDERS IN YOUR PERSONAL FOLDERS
In your personal folders on your SupportCenter website, you can move one or more files or folders to another folder.
To move or copy a file or folder:
1 Open the My Folders page.
2 Locate the file or folder that you want to move.
3 Select the check box for the file or folder that you want move.

4 You can select multiple files or folders.
5 Click Move or Copy. The Move/Copy File or Folder window appears, showing a list of your folders.
6 Select the option button for the folder in which you want to move or copy the file or folder.
7 Click OK.
EDITING INFORMATION ABOUT FILES OR FOLDERS IN YOUR PERSONAL FOLDERS
You can edit the following information about a file or folder in your personal folders on your SupportCenter website:
Name Description
You can also specify sharing options for folders that appear on your Personal Meeting Room page.
To edit information about a file or folder:
1 Open the My Folders page.
2 Locate the file or folder for which you want to edit information.
3 Click the Properties icon for the file or folder for which you want to edit
information. The Edit File Properties or Edit Folder Properties window appears.
4 In the Description box, type a new name for the file or folder.
5 In the Name box, type a new name for the file or folder.

6 Click Update.
SEARCHING FOR FILES OR FOLDERS IN YOUR PERSONAL FOLDERS
In your personal folders on your SupportCenter website, you can quickly locate a file or folder by searching for it. You can search for a file or folder by text that appears in either its name or description.
To search for a file or folder:
1 Open the My Folders page.
2 In the Search For box type all or part of the file's name or description.
3 Click Search. A list of any files or folders that contain the search text appears.
DOWNLOADING FILES IN YOUR PERSONAL FOLDERS
In your personal folders on your SupportCenter Website, you can download any files to your computer or a local server.
To download files:
1 Open the My Folders page.
2 Locate the file that you want to download.
3 Under Action, click the Download button for the file that you want to download.
The File Download dialog box appears.
4 Follow any instructions that your Web browser or operating system provides to download the file.
DELETING FILES OR FOLDERS IN YOUR PERSONAL FOLDERS
You can delete any files or folders that reside in your personal folders on your SupportCenter Website.
To delete a file or folder:
1 Open the My Folders page.
2 Under Name, locate the file or folder that you want to delete.
3 Select the check box for the file or folder that you want delete. You can select multiple files or folders.
4 Click Delete. A message appears, asking you confirm that you want to delete the file or folder.
5 Click OK.
ABOUT THE MY WEBEX FILES PAGE
How to access this page
On your SupportCenter website, click My WebEx > My Files.
What you can do here
Store files that you use in your online sessions or that you want to access when away from your office. Specify in which folders visitors to your Personal Meeting Room can download or upload files.
Options on this page
Link or option Description
Capacity The storage space available for your files, in megabytes (MB).
Used The amount of storage space that your files occupy, in megabytes (MB). Once this value exceeds your capacity, you can no longer store files until you remove existing files from your folders.
Free The amount of storage space that is available either in your personal storage space or on your entire site, depending on the configuration of your site.
Search for
Lets you locate a file or folder by searching for it. You can search for a file or folder by text that appears in either its name or description. To search for a file or folder, type all or part of it's name or description in the box, and then click Search.
Go Back Returns you to the page that you previously accessed.
Refresh Click this button to refresh the information on the page.
Name
The name of the folder or file. Click a folder or file name to open the Folder Information page or File Information page. From the Information page, you can access the properties of a folder or file.
Indicates that the item is a folder. Click the image to display the contents of the folder.
Indicates that the item is a file.
Path The folder hierarchy for the folder or file. The Root folder is the top-most folder in which all other folders and files reside.
Size The size of the folder or file, in kilobytes (KB).
Actions
Click the icons to perform an action on the folder or file that is associated with it.
Upload file: Available only for files. Click this icon to open the File Upload page, on which you can select up to three files at a time to upload to a specified folder.
Download file: Available only for files. Click this icon to download the file associated with it.
Edit File Properties or Edit Folder Properties: Click this icon to open the Edit File Properties page or Edit Folder Properties page, on which you can edit information about the file or folder, respectively.
Create Folder: Available for folders only. Click this icon to open the Create Folder page on which you can create a new folder in your personal storage space.
Shared
Specifies the sharing settings for a folder that is, how others who visit your Personal Meetings Room can access your folder and its files.
R: Read only. Visitors to your Personal Meeting Room can view the list of files in the folder and download the files.
W: Write only. Visitors to your Personal Meeting Room can upload files to the folder, but they cannot view the files in it.
R/W: Read and write. Users can view files in the folder, download files from the folder, and upload files to the folder.
Password Protected: Indicates that the folder is password protected. Visitors to your Personal Meeting Room must provide the password you specify to access the folder.
Select All Selects the check boxes for all the folders and files that are visible in the list. You can then click the Copy or Move button or click the Delete link to perform an action on the selected folders or files.
Clear All Clears the check boxes for all the folders and files that are selected in the list.
Delete Deletes the selected folders and files from the list.
Copy Opens a page on which you can copy the selected folder or file to another folder.
Move Opens a page on which you can move the selected folder or file to another folder.
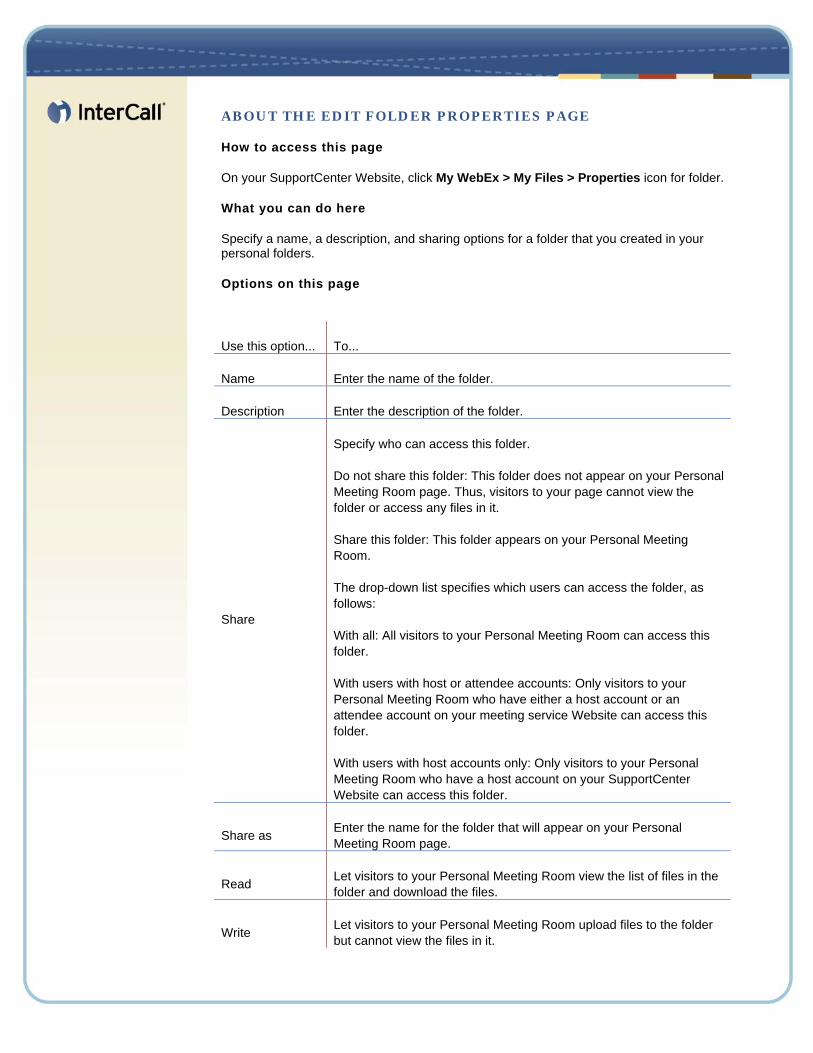
ABOUT THE EDIT FOLDER PROPERTIES PAGE
How to access this page
On your SupportCenter Website, click My WebEx > My Files > Properties icon for folder.
What you can do here
Specify a name, a description, and sharing options for a folder that you created in your personal folders.
Options on this page
Use this option... To...
Name Enter the name of the folder.
Description Enter the description of the folder.
Share
Specify who can access this folder.
Do not share this folder: This folder does not appear on your Personal Meeting Room page. Thus, visitors to your page cannot view the folder or access any files in it.
Share this folder: This folder appears on your Personal Meeting Room.
The drop-down list specifies which users can access the folder, as follows:
With all: All visitors to your Personal Meeting Room can access this folder.
With users with host or attendee accounts: Only visitors to your Personal Meeting Room who have either a host account or an attendee account on your meeting service Website can access this folder.
With users with host accounts only: Only visitors to your Personal Meeting Room who have a host account on your SupportCenter Website can access this folder.
Share as Enter the name for the folder that will appear on your Personal Meeting Room page.
Read Let visitors to your Personal Meeting Room view the list of files in the folder and download the files.
Write Let visitors to your Personal Meeting Room upload files to the folder but cannot view the files in it.
Read & write Let users view files in the folder, download files from the folder, and upload files to the folder.
Allow files to be overwritten
Let users upload a file with the same name as an existing file in the folder and replace the existing file. If this option is not selected, users cannot overwrite any files in the folder.
Password protected
Let only visitors to your Personal Meeting Room who know the password view the list of files in the folder, download files from the folder, or upload files to the folder, depending on the read/write settings for the folder.
Password: The password that visitors to your Personal Meeting Room must provide to access the folder.
Confirm: If you specified a password, type it again to verify that you typed it correctly.
Update Save any changes that you made to folder's properties, and then closes the Edit Folder Properties window.
Cancel Close the Edit Folder Properties window, without saving any of the changes that you made.
MAINTAINING CONTACT INFORMATION
You can maintain a personal online address book, in which you can add information about contacts and create contact groups.
You can add contacts to your address book in any of the following ways: Specify information about contacts one at a time. Import contact information from your Microsoft Outlook contacts. Import contact information from a comma-separated/comma-delimited values (CSV) file in which you add contact information.
You can also edit or delete the information about any contact or contact group in your personal address book.
OPENING YOUR ADDRESS BOOK
You can open your personal address book on your SupportCenter Website, to view or maintain information about your contacts.
To open your address book:
1 Log in to your SupportCenter website.
2 On the navigation bar at the top of the page, click My WebEx.
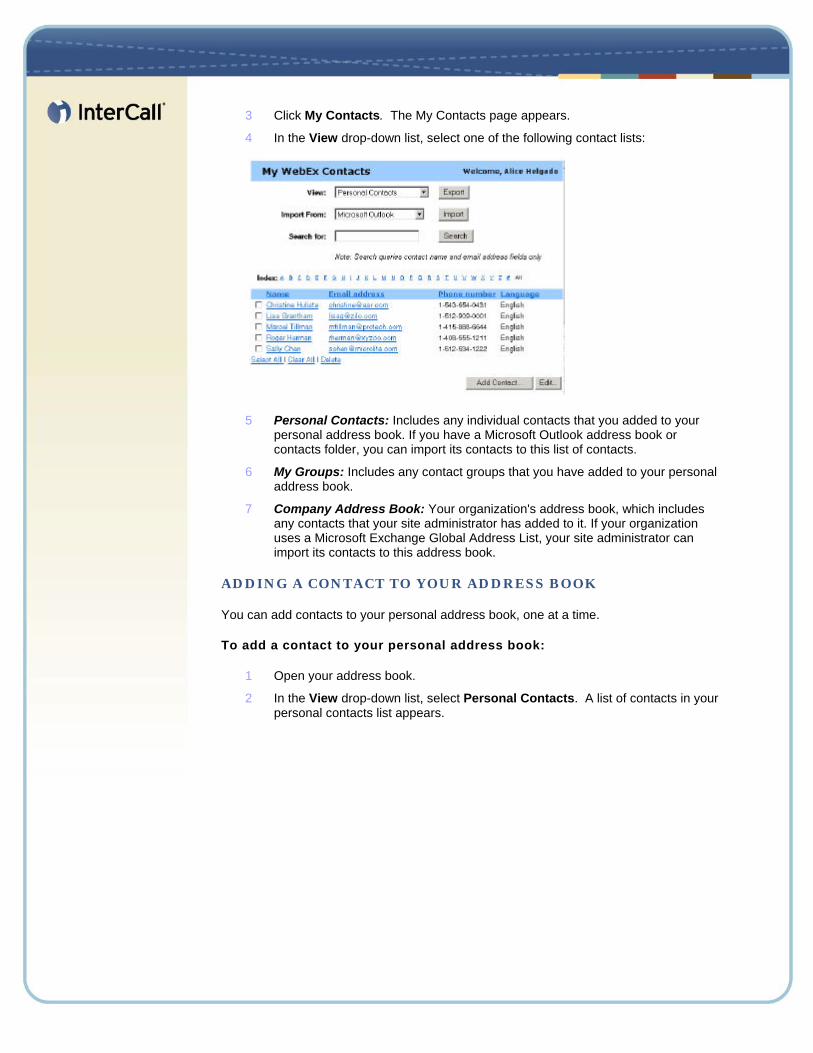
3 Click My Contacts. The My Contacts page appears.
4 In the View drop-down list, select one of the following contact lists:
5 Personal Contacts: Includes any individual contacts that you added to your personal address book. If you have a Microsoft Outlook address book or contacts folder, you can import its contacts to this list of contacts.
6 My Groups: Includes any contact groups that you have added to your personal address book.
7 Company Address Book: Your organization's address book, which includes any contacts that your site administrator has added to it. If your organization uses a Microsoft Exchange Global Address List, your site administrator can import its contacts to this address book.
ADDING A CONTACT TO YOUR ADDRESS BOOK
You can add contacts to your personal address book, one at a time.
To add a contact to your personal address book:
1 Open your address book.
2 In the View drop-down list, select Personal Contacts. A list of contacts in your personal contacts list appears.
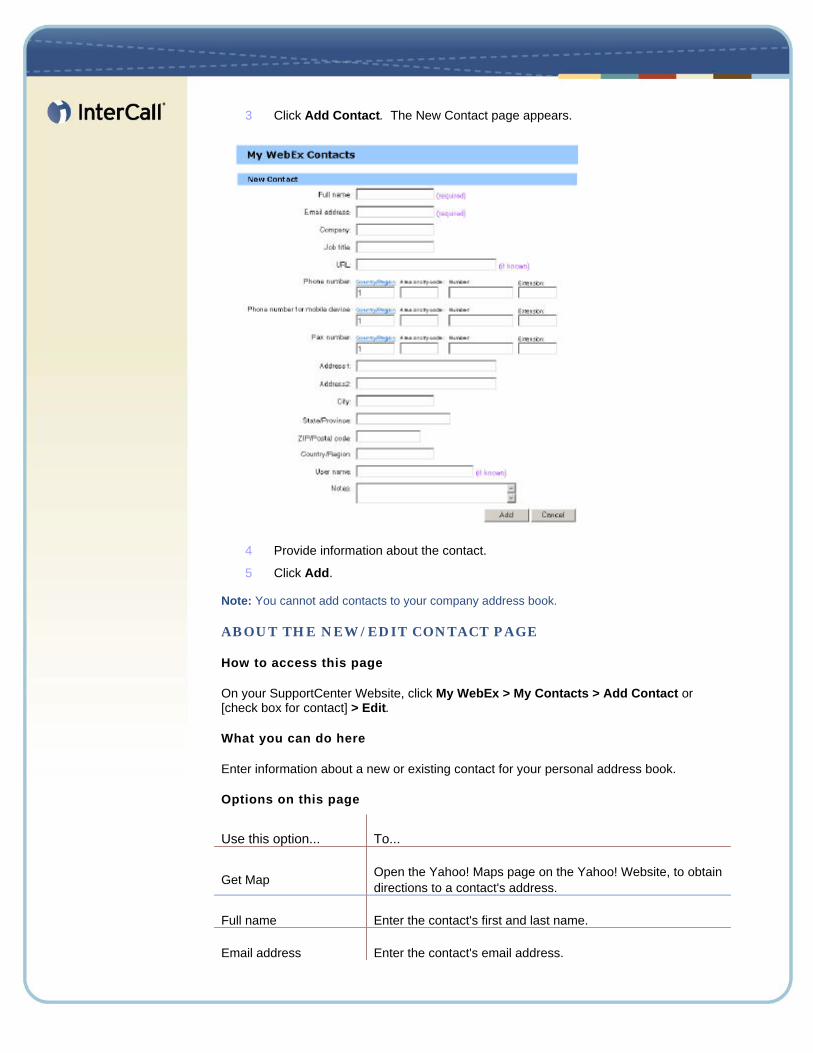
3 Click Add Contact. The New Contact page appears.
4 Provide information about the contact.
5 Click Add. Note: You cannot add contacts to your company address book.
ABOUT THE NEW/EDIT CONTACT PAGE
How to access this page
On your SupportCenter Website, click My WebEx > My Contacts > Add Contact or [check box for contact] > Edit.
What you can do here
Enter information about a new or existing contact for your personal address book.
Options on this page
Use this option... To...
Get Map Open the Yahoo! Maps page on the Yahoo! Website, to obtain directions to a contact's address.
Full name Enter the contact's first and last name.
Email address Enter the contact's email address.
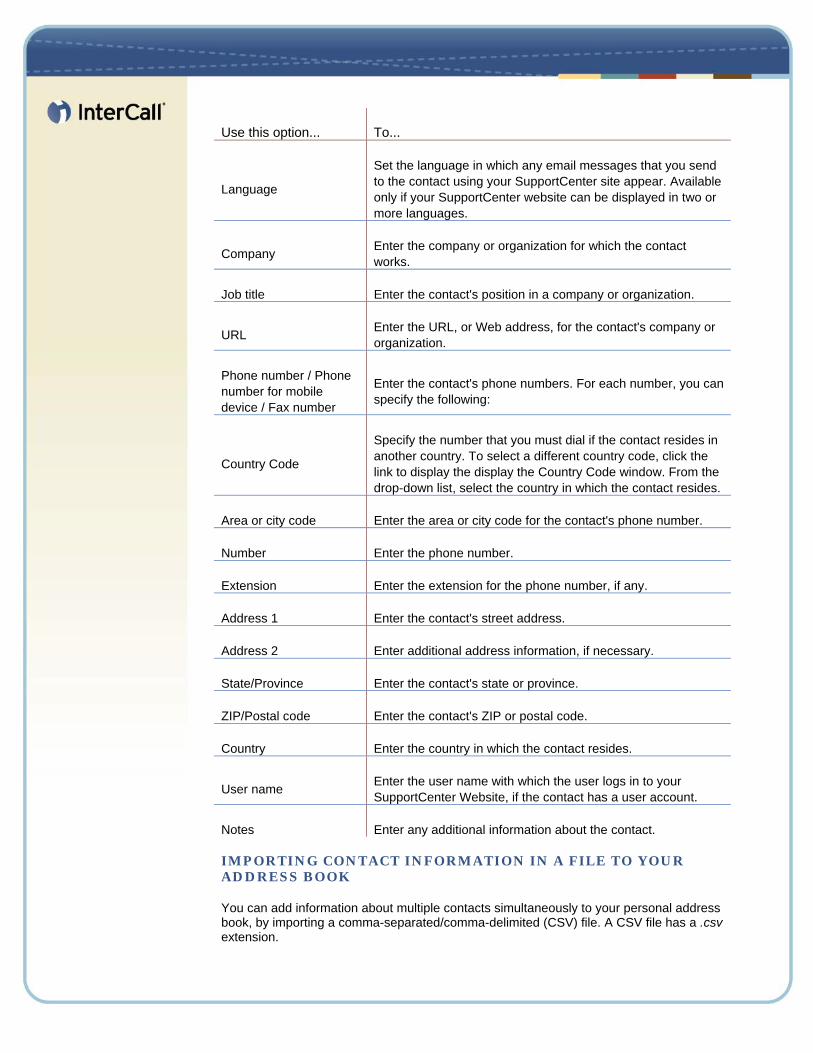
Use this option... To...
Language
Set the language in which any email messages that you send to the contact using your SupportCenter site appear. Available only if your SupportCenter website can be displayed in two or more languages.
Company Enter the company or organization for which the contact works.
Job title Enter the contact's position in a company or organization.
URL Enter the URL, or Web address, for the contact's company or organization.
Phone number / Phone number for mobile device / Fax number
Enter the contact's phone numbers. For each number, you can specify the following:
Country Code
Specify the number that you must dial if the contact resides in another country. To select a different country code, click the link to display the display the Country Code window. From the drop-down list, select the country in which the contact resides.
Area or city code Enter the area or city code for the contact's phone number.
Number Enter the phone number.
Extension Enter the extension for the phone number, if any.
Address 1 Enter the contact's street address.
Address 2 Enter additional address information, if necessary.
State/Province Enter the contact's state or province.
ZIP/Postal code Enter the contact's ZIP or postal code.
Country Enter the country in which the contact resides.
User name Enter the user name with which the user logs in to your SupportCenter Website, if the contact has a user account.
Notes Enter any additional information about the contact.
IMPORTING CONTACT INFORMATION IN A FILE TO YOUR ADDRESS BOOK
You can add information about multiple contacts simultaneously to your personal address book, by importing a comma-separated/comma-delimited (CSV) file. A CSV file has a .csv extension.
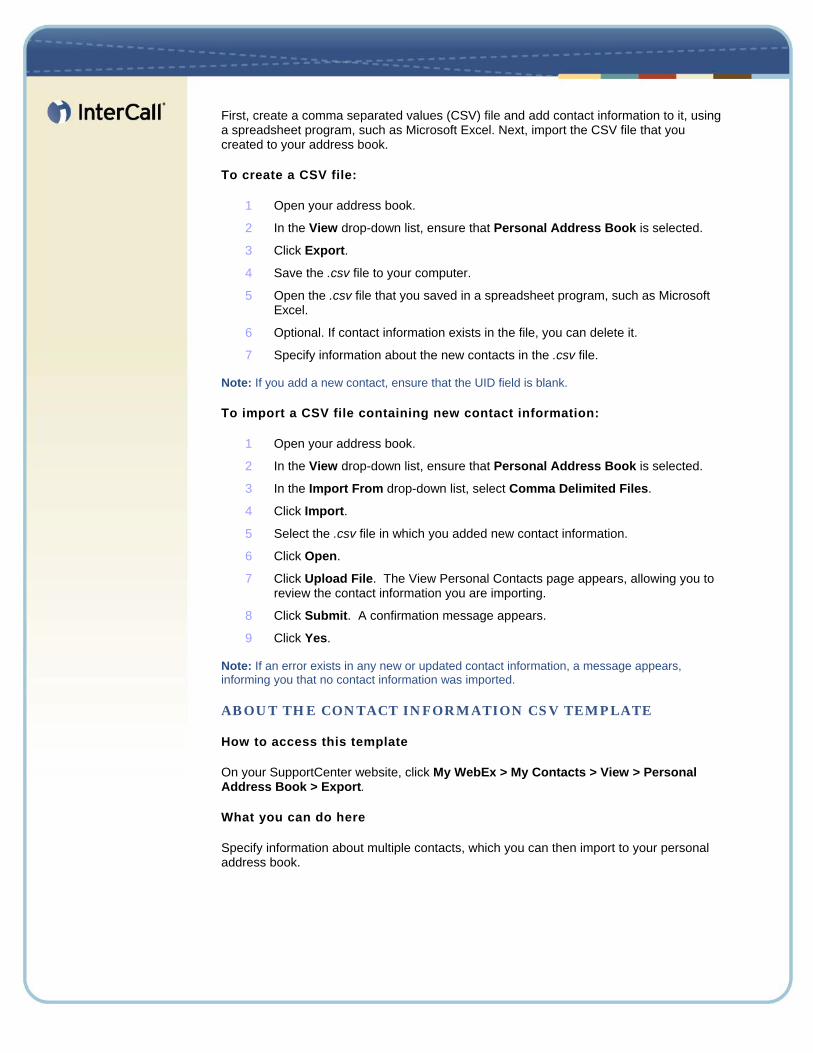
First, create a comma separated values (CSV) file and add contact information to it, using a spreadsheet program, such as Microsoft Excel. Next, import the CSV file that you created to your address book.
To create a CSV file:
1 Open your address book.
2 In the View drop-down list, ensure that Personal Address Book is selected.
3 Click Export.
4 Save the .csv file to your computer.
5 Open the .csv file that you saved in a spreadsheet program, such as Microsoft Excel.
6 Optional. If contact information exists in the file, you can delete it.
7 Specify information about the new contacts in the .csv file. Note: If you add a new contact, ensure that the UID field is blank.
To import a CSV file containing new contact information:
1 Open your address book.
2 In the View drop-down list, ensure that Personal Address Book is selected.
3 In the Import From drop-down list, select Comma Delimited Files.
4 Click Import.
5 Select the .csv file in which you added new contact information.
6 Click Open.
7 Click Upload File. The View Personal Contacts page appears, allowing you to review the contact information you are importing.
8 Click Submit. A confirmation message appears.
9 Click Yes. Note: If an error exists in any new or updated contact information, a message appears, informing you that no contact information was imported.
ABOUT THE CONTACT INFORMATION CSV TEMPLATE
How to access this template
On your SupportCenter website, click My WebEx > My Contacts > View > Personal Address Book > Export.
What you can do here
Specify information about multiple contacts, which you can then import to your personal address book.
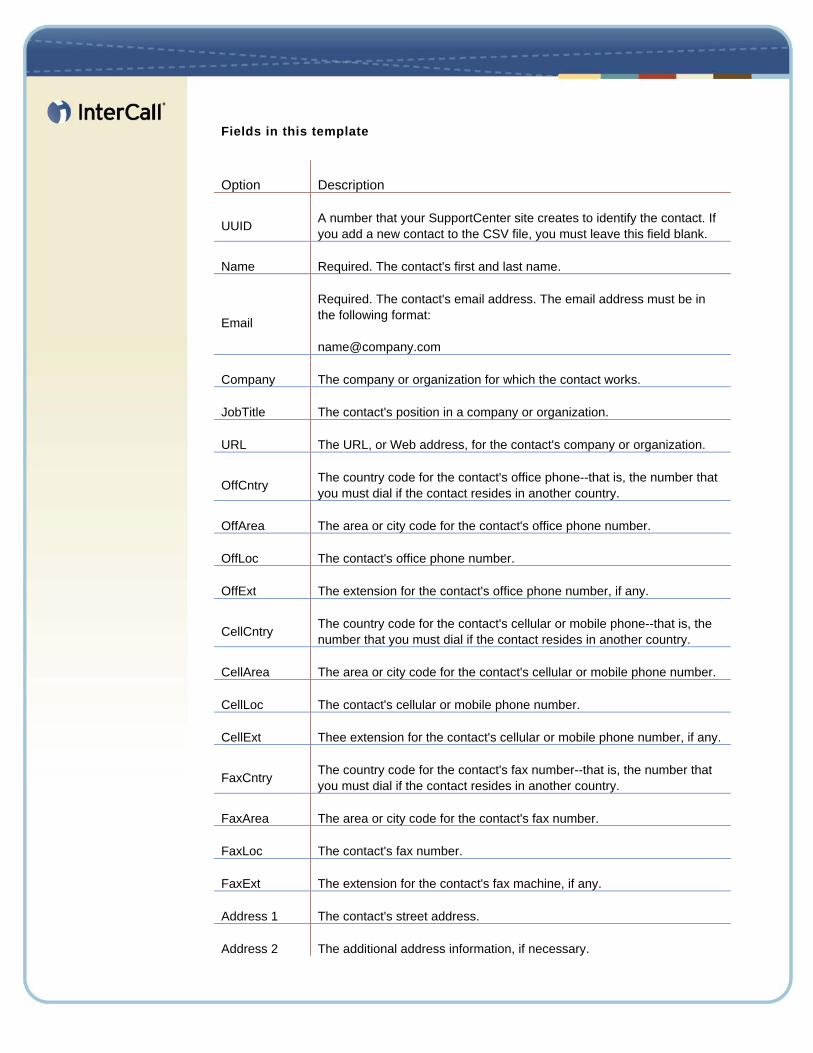
Fields in this template
Option Description
UUID A number that your SupportCenter site creates to identify the contact. If you add a new contact to the CSV file, you must leave this field blank.
Name Required. The contact's first and last name.
Required. The contact's email address. The email address must be in the following format:
Company The company or organization for which the contact works.
JobTitle The contact's position in a company or organization.
URL The URL, or Web address, for the contact's company or organization.
OffCntry The country code for the contact's office phone--that is, the number that you must dial if the contact resides in another country.
OffArea The area or city code for the contact's office phone number.
OffLoc The contact's office phone number.
OffExt The extension for the contact's office phone number, if any.
CellCntry The country code for the contact's cellular or mobile phone--that is, the number that you must dial if the contact resides in another country.
CellArea The area or city code for the contact's cellular or mobile phone number.
CellLoc The contact's cellular or mobile phone number.
CellExt Thee extension for the contact's cellular or mobile phone number, if any.
FaxCntry The country code for the contact's fax number--that is, the number that you must dial if the contact resides in another country.
FaxArea The area or city code for the contact's fax number.
FaxLoc The contact's fax number.
FaxExt The extension for the contact's fax machine, if any.
Address 1 The contact's street address.
Address 2 The additional address information, if necessary.
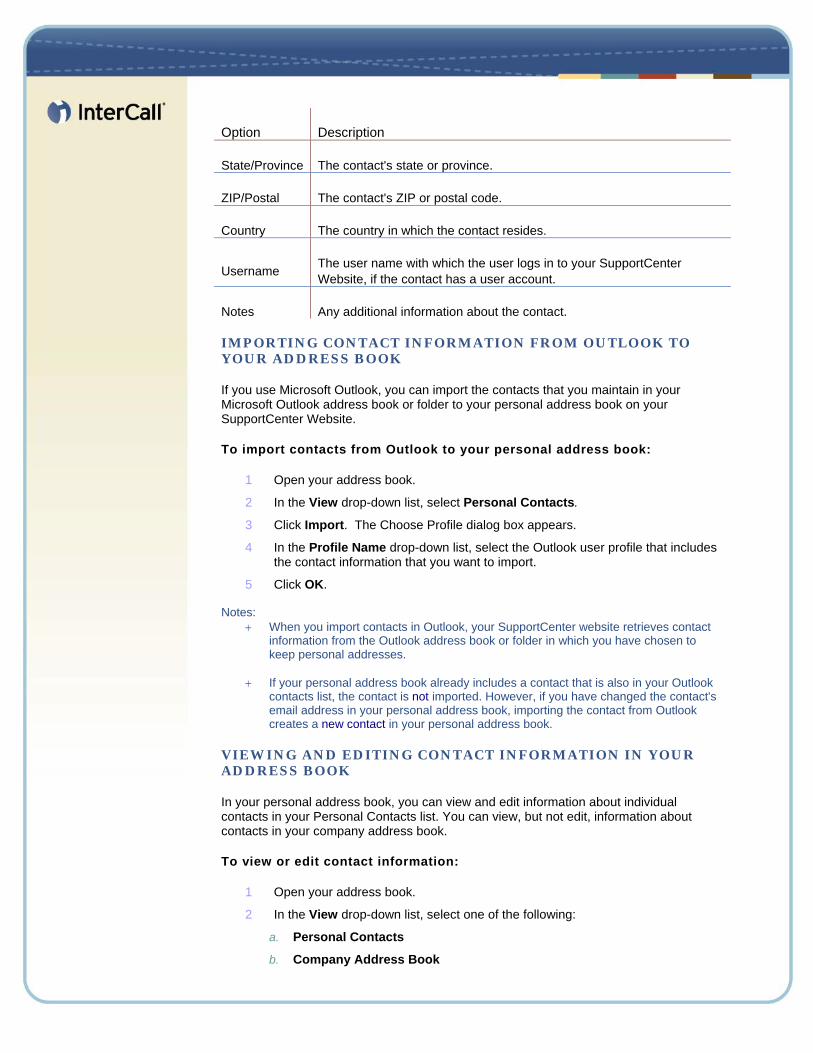
Option Description
State/Province The contact's state or province.
ZIP/Postal The contact's ZIP or postal code.
Country The country in which the contact resides.
Username The user name with which the user logs in to your SupportCenter Website, if the contact has a user account.
Notes Any additional information about the contact.
IMPORTING CONTACT INFORMATION FROM OUTLOOK TO YOUR ADDRESS BOOK
If you use Microsoft Outlook, you can import the contacts that you maintain in your Microsoft Outlook address book or folder to your personal address book on your SupportCenter Website.
To import contacts from Outlook to your personal address book:
1 Open your address book.
2 In the View drop-down list, select Personal Contacts.
3 Click Import. The Choose Profile dialog box appears.
4 In the Profile Name drop-down list, select the Outlook user profile that includes the contact information that you want to import.
5 Click OK. Notes:
+ When you import contacts in Outlook, your SupportCenter website retrieves contact information from the Outlook address book or folder in which you have chosen to keep personal addresses.
+ If your personal address book already includes a contact that is also in your Outlook
contacts list, the contact is not imported. However, if you have changed the contact's email address in your personal address book, importing the contact from Outlook creates a new contact in your personal address book.
VIEWING AND EDITING CONTACT INFORMATION IN YOUR ADDRESS BOOK
In your personal address book, you can view and edit information about individual contacts in your Personal Contacts list. You can view, but not edit, information about contacts in your company address book.
To view or edit contact information:
1 Open your address book.
2 In the View drop-down list, select one of the following:
a. Personal Contacts
b. Company Address Book
A list of contacts appears.
3 Locate the contact whose information you want to view or edit.
4 Under Name, select the contact whose information you want to view or edit.
5 Do one of the following:
c. If you the contact is in your personal contacts list, click Edit.
d. If the contact is in your company address book, click View Info.
Information about the contact appears.
6 Optional. If the contact is in your personal contacts list, edit the information that you want to change on the Edit Contact's Information page.
7 Click OK.
SEARCHING FOR CONTACTS IN YOUR ADDRESS BOOK
You can quickly locate a contact in your personal address book, using one of several methods.
To search for a contact in your address book:
1 Open your address book.
2 In the View drop-down list, select a contacts list.
3 Do any of the following: - In the Index, click a letter of the alphabet to display a list of contacts whose
names begin with that letter. For example, the name Susan Jones appears under S.
- To search for a contact in the list you are currently viewing, type text that appears in either the contact's name or email address in the Search for box, and then click Search.
- If the entire list of contacts does not fit on a single page, view another page by clicking the links for the page numbers.
- Sort your personal contacts or company address book by name, email address, or phone number by clicking the column headings.
CREATING A CONTACT GROUP IN YOUR ADDRESS BOOK
You can create contact groups for your personal address book. A contact group includes two or more contacts for which you provide a common name. For example, you can create a contact group named Sales Department, which includes contacts who are members of the department.
To create a group:
1 Open your address book.
2 In the View drop-down list, select My Groups. A list of any groups that you
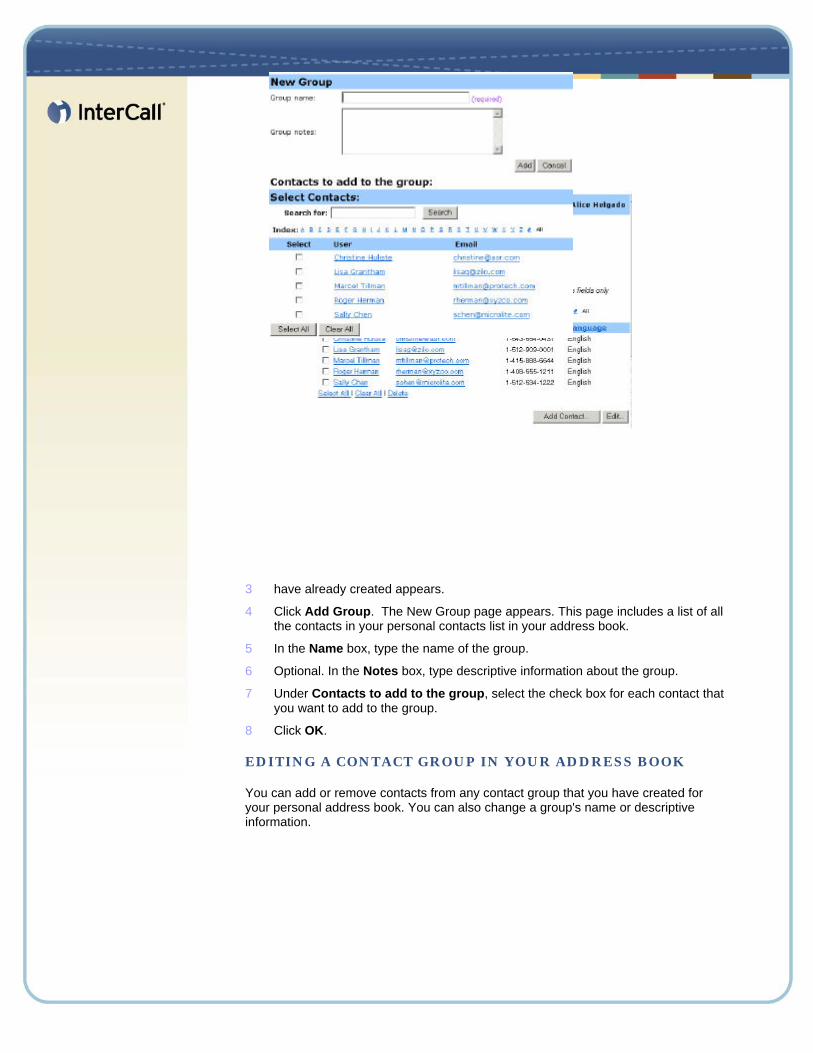
3 have already created appears.
4 Click Add Group. The New Group page appears. This page includes a list of all the contacts in your personal contacts list in your address book.
5 In the Name box, type the name of the group.
6 Optional. In the Notes box, type descriptive information about the group.
7 Under Contacts to add to the group, select the check box for each contact that you want to add to the group.
8 Click OK.
EDITING A CONTACT GROUP IN YOUR ADDRESS BOOK
You can add or remove contacts from any contact group that you have created for your personal address book. You can also change a group's name or descriptive information.
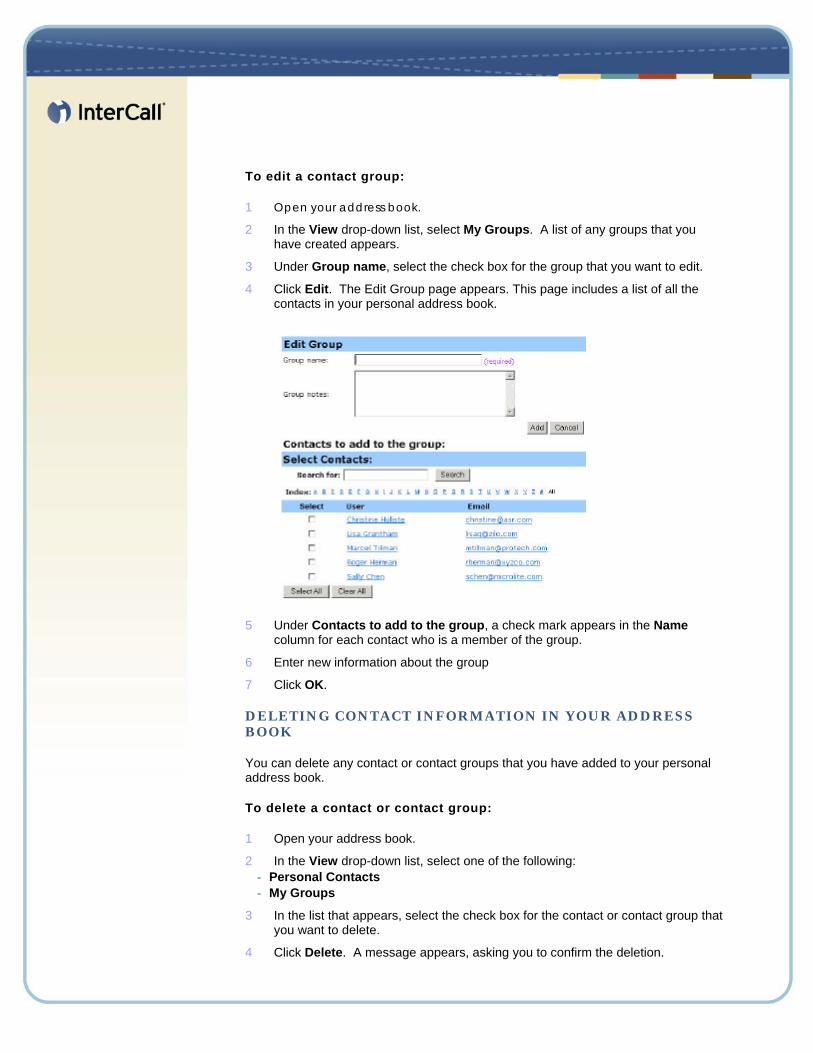
To edit a contact group:
1 Open your address book.
2 In the View drop-down list, select My Groups. A list of any groups that you have created appears.
3 Under Group name, select the check box for the group that you want to edit.
4 Click Edit. The Edit Group page appears. This page includes a list of all the contacts in your personal address book.
5 Under Contacts to add to the group, a check mark appears in the Name column for each contact who is a member of the group.
6 Enter new information about the group
7 Click OK.
DELETING CONTACT INFORMATION IN YOUR ADDRESS BOOK
You can delete any contact or contact groups that you have added to your personal address book.
To delete a contact or contact group:
1 Open your address book.
2 In the View drop-down list, select one of the following: - Personal Contacts - My Groups
3 In the list that appears, select the check box for the contact or contact group that you want to delete.
4 Click Delete. A message appears, asking you to confirm the deletion.
5 Click OK.
Maintaining Your User Profile
Once you obtain a user account, you can edit your user profile at any time to change the following information:
Your full name Your user name, if your site administrator provides this option Your password Your contact information, including your street address, email address, and phone numbers Your personal conference numbers, if your site includes the personal audio option Tracking codes that your organization uses to keep records of your support sessions, such as project, department, and division numbers Personal Meeting Room options, including the images and welcome message that appear on the page Default options for your online sessions, including the default session type that you want to use, if your account includes multiple session types The order in which tabs appear on the CSR Dashboard.
EDITING YOUR USER PROFILE
Once you obtain a user account, you can edit your user profile at any time to change account login information, contact information, and other options available for your account.
To edit your user profile:
Log in to your SupportCenter website.

On the navigation bar, click MyWebEx.Click My Profile. The My Profile page appears. The following page is an example only. Your My Profile page may include different options.
1 Edit the information on the page.
2 When you are finished editing your user profile, click Update.
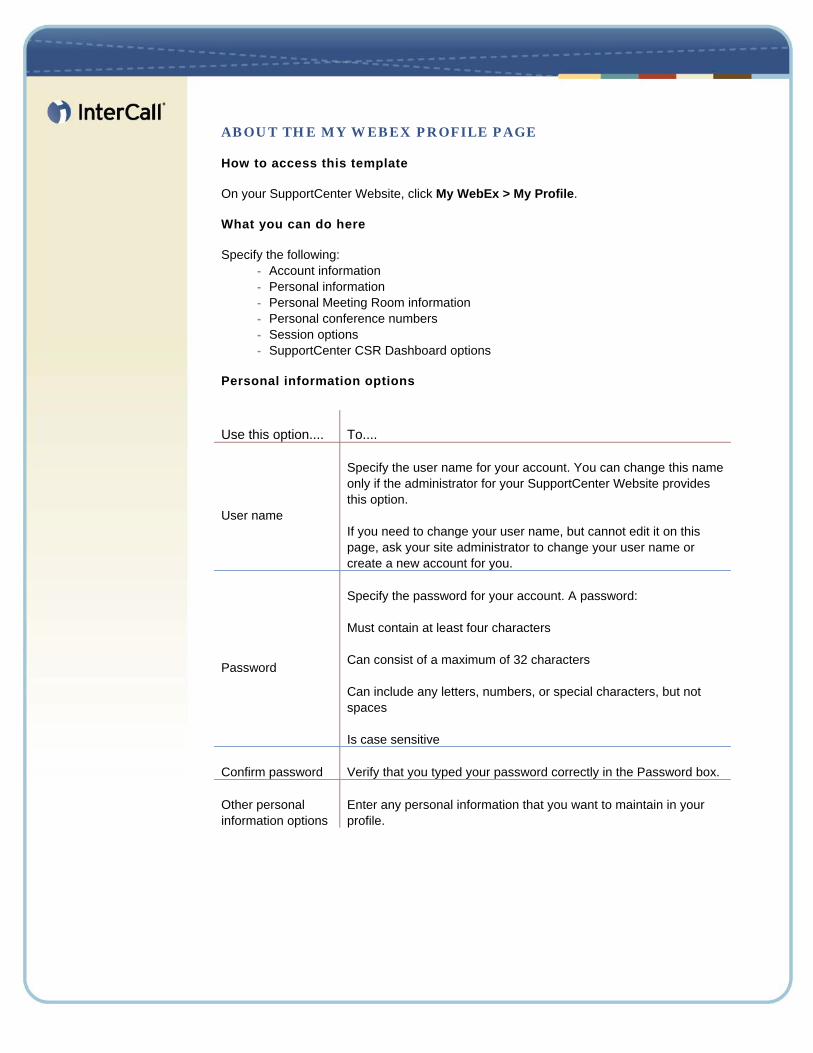
ABOUT THE MY WEBEX PROFILE PAGE
How to access this template
On your SupportCenter Website, click My WebEx > My Profile.
What you can do here
Specify the following: - Account information - Personal information - Personal Meeting Room information - Personal conference numbers - Session options - SupportCenter CSR Dashboard options
Personal information options
Use this option.... To....
User name
Specify the user name for your account. You can change this name only if the administrator for your SupportCenter Website provides this option.
If you need to change your user name, but cannot edit it on this page, ask your site administrator to change your user name or create a new account for you.
Password
Specify the password for your account. A password:
Must contain at least four characters
Can consist of a maximum of 32 characters
Can include any letters, numbers, or special characters, but not spaces
Is case sensitive
Confirm password Verify that you typed your password correctly in the Password box.
Other personal information options
Enter any personal information that you want to maintain in your profile.
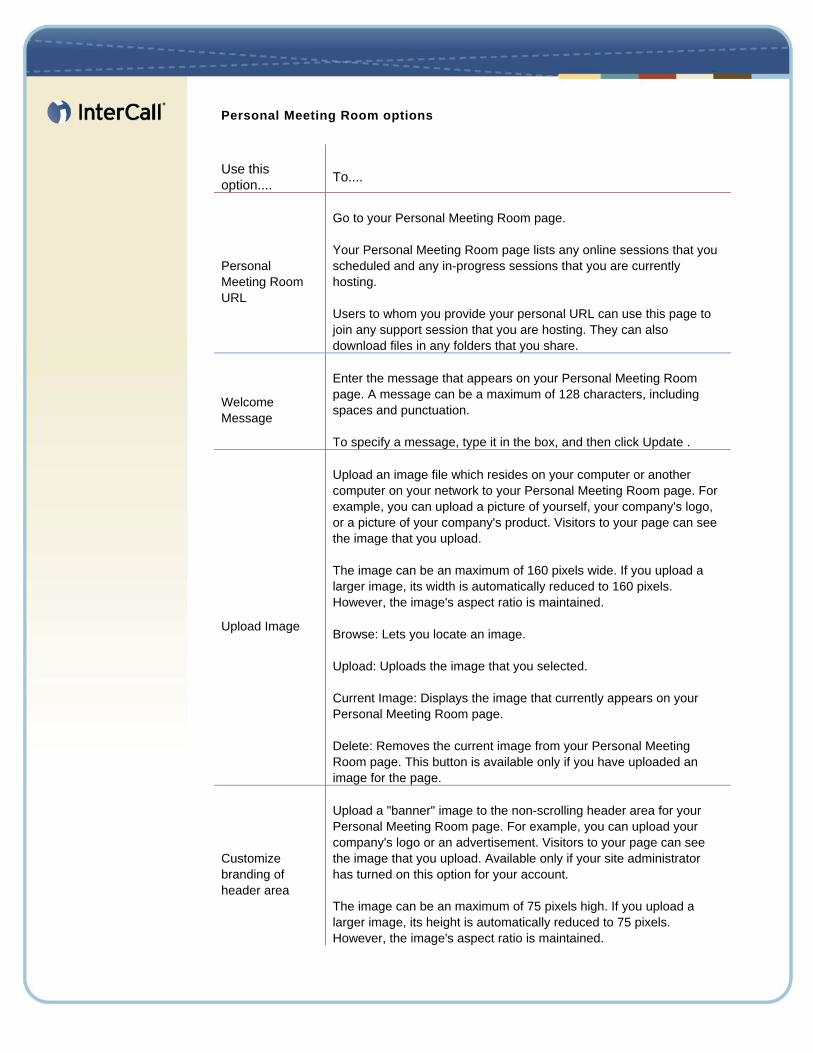
Personal Meeting Room options
Use this option.... To....
Personal Meeting Room URL
Go to your Personal Meeting Room page.
Your Personal Meeting Room page lists any online sessions that you scheduled and any in-progress sessions that you are currently hosting.
Users to whom you provide your personal URL can use this page to join any support session that you are hosting. They can also download files in any folders that you share.
Welcome Message
Enter the message that appears on your Personal Meeting Room page. A message can be a maximum of 128 characters, including spaces and punctuation.
To specify a message, type it in the box, and then click Update .
Upload Image
Upload an image file which resides on your computer or another computer on your network to your Personal Meeting Room page. For example, you can upload a picture of yourself, your company's logo, or a picture of your company's product. Visitors to your page can see the image that you upload.
The image can be an maximum of 160 pixels wide. If you upload a larger image, its width is automatically reduced to 160 pixels. However, the image's aspect ratio is maintained.
Browse: Lets you locate an image.
Upload: Uploads the image that you selected.
Current Image: Displays the image that currently appears on your Personal Meeting Room page.
Delete: Removes the current image from your Personal Meeting Room page. This button is available only if you have uploaded an image for the page.
Customize branding of header area
Upload a "banner" image to the non-scrolling header area for your Personal Meeting Room page. For example, you can upload your company's logo or an advertisement. Visitors to your page can see the image that you upload. Available only if your site administrator has turned on this option for your account.
The image can be an maximum of 75 pixels high. If you upload a larger image, its height is automatically reduced to 75 pixels. However, the image's aspect ratio is maintained.
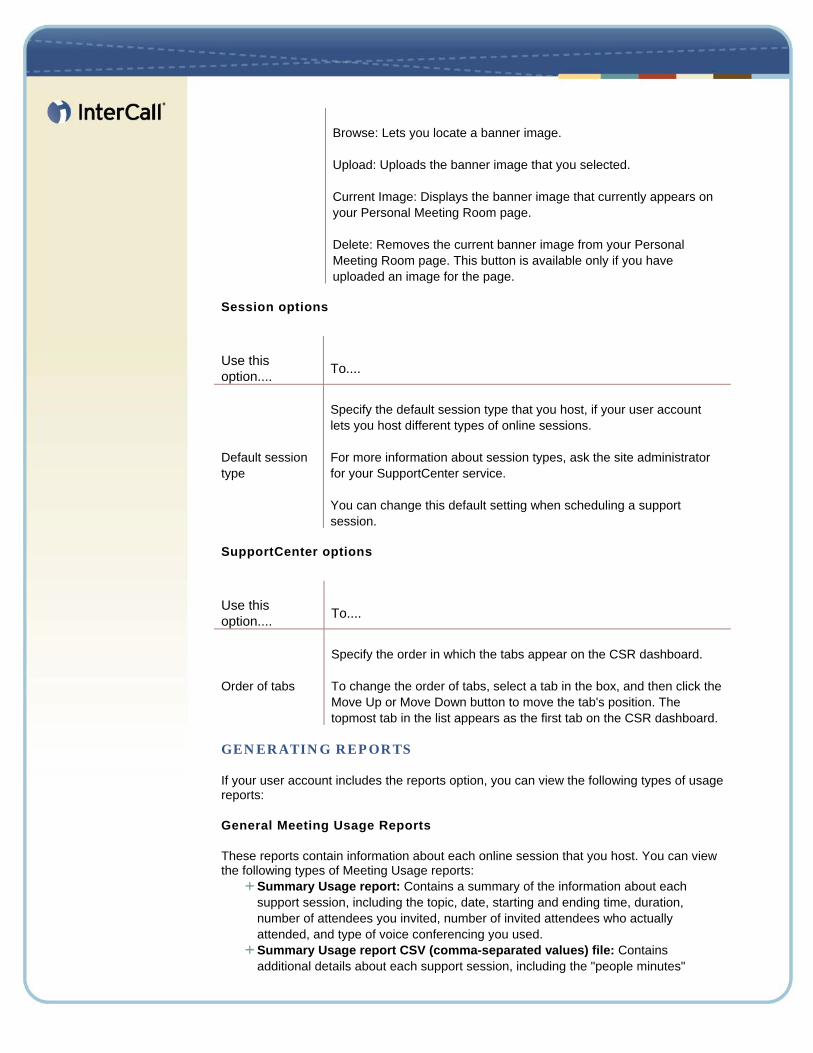
Browse: Lets you locate a banner image.
Upload: Uploads the banner image that you selected.
Current Image: Displays the banner image that currently appears on your Personal Meeting Room page.
Delete: Removes the current banner image from your Personal Meeting Room page. This button is available only if you have uploaded an image for the page.
Session options
Use this option.... To....
Default session type
Specify the default session type that you host, if your user account lets you host different types of online sessions.
For more information about session types, ask the site administrator for your SupportCenter service.
You can change this default setting when scheduling a support session.
SupportCenter options
Use this option.... To....
Order of tabs
Specify the order in which the tabs appear on the CSR dashboard.
To change the order of tabs, select a tab in the box, and then click the Move Up or Move Down button to move the tab's position. The topmost tab in the list appears as the first tab on the CSR dashboard.
GENERATING REPORTS
If your user account includes the reports option, you can view the following types of usage reports:
General Meeting Usage Reports
These reports contain information about each online session that you host. You can view the following types of Meeting Usage reports:
Summary Usage report: Contains a summary of the information about each support session, including the topic, date, starting and ending time, duration, number of attendees you invited, number of invited attendees who actually attended, and type of voice conferencing you used. Summary Usage report CSV (comma-separated values) file: Contains additional details about each support session, including the "people minutes"
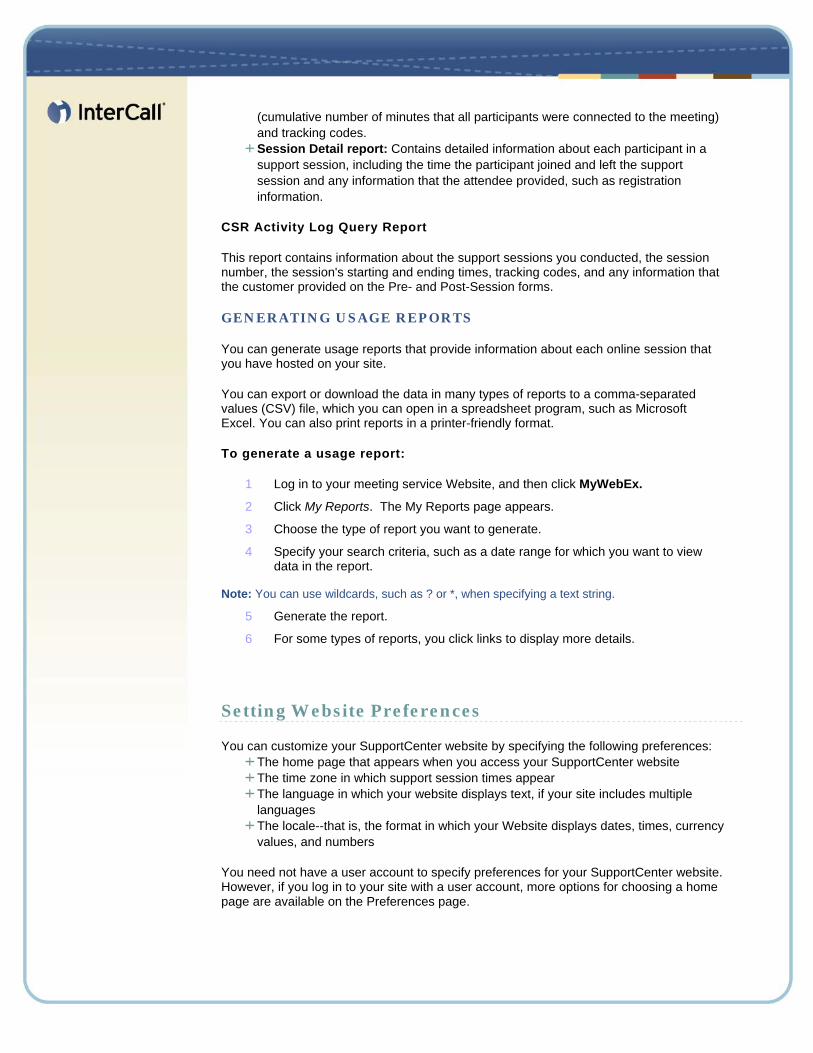
(cumulative number of minutes that all participants were connected to the meeting) and tracking codes. Session Detail report: Contains detailed information about each participant in a support session, including the time the participant joined and left the support session and any information that the attendee provided, such as registration information.
CSR Activity Log Query Report
This report contains information about the support sessions you conducted, the session number, the session's starting and ending times, tracking codes, and any information that the customer provided on the Pre- and Post-Session forms.
GENERATING USAGE REPORTS
You can generate usage reports that provide information about each online session that you have hosted on your site.
You can export or download the data in many types of reports to a comma-separated values (CSV) file, which you can open in a spreadsheet program, such as Microsoft Excel. You can also print reports in a printer-friendly format.
To generate a usage report:
1 Log in to your meeting service Website, and then click MyWebEx.
2 Click My Reports. The My Reports page appears.
3 Choose the type of report you want to generate.
4 Specify your search criteria, such as a date range for which you want to view data in the report.
Note: You can use wildcards, such as ? or *, when specifying a text string.
5 Generate the report.
6 For some types of reports, you click links to display more details.
Setting Website Preferences
You can customize your SupportCenter website by specifying the following preferences: The home page that appears when you access your SupportCenter website The time zone in which support session times appear The language in which your website displays text, if your site includes multiple languages The locale--that is, the format in which your Website displays dates, times, currency values, and numbers
You need not have a user account to specify preferences for your SupportCenter website. However, if you log in to your site with a user account, more options for choosing a home page are available on the Preferences page.
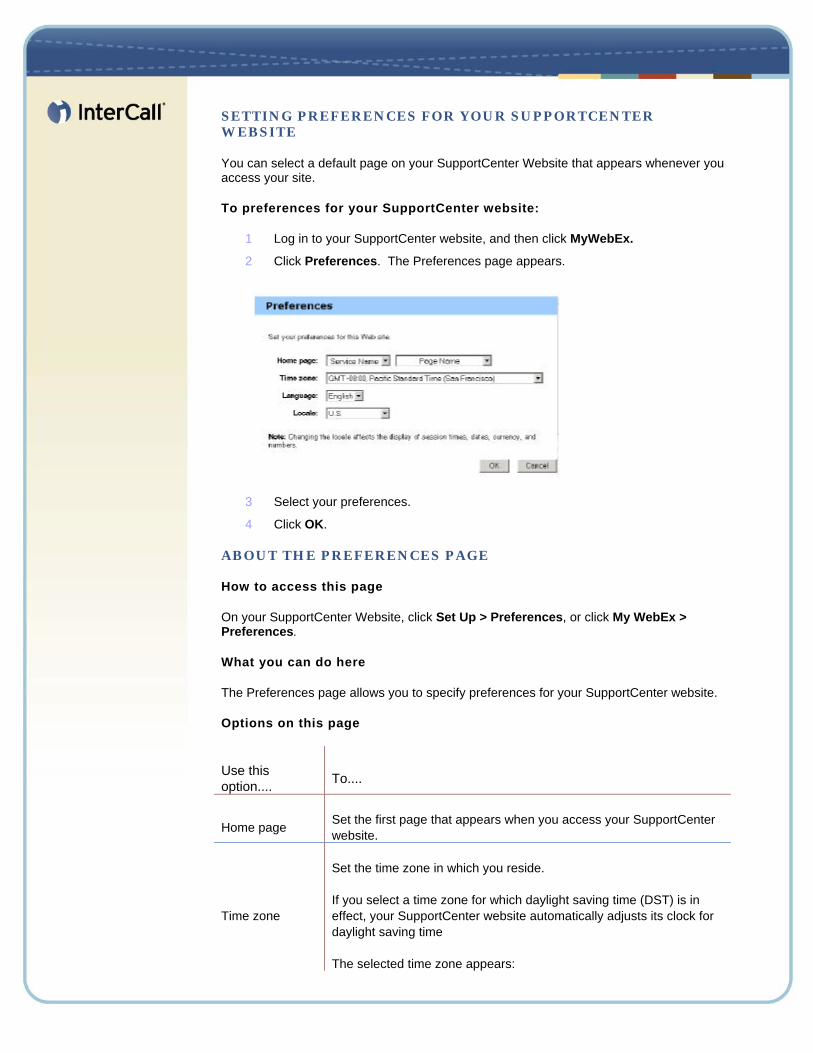
SETTING PREFERENCES FOR YOUR SUPPORTCENTER WEBSITE
You can select a default page on your SupportCenter Website that appears whenever you access your site.
To preferences for your SupportCenter website:
1 Log in to your SupportCenter website, and then click MyWebEx.
2 Click Preferences. The Preferences page appears.
3 Select your preferences.
4 Click OK.
ABOUT THE PREFERENCES PAGE
How to access this page
On your SupportCenter Website, click Set Up > Preferences, or click My WebEx > Preferences.
What you can do here
The Preferences page allows you to specify preferences for your SupportCenter website.
Options on this page
Use this option.... To....
Home page Set the first page that appears when you access your SupportCenter website.
Time zone
Set the time zone in which you reside.
If you select a time zone for which daylight saving time (DST) is in effect, your SupportCenter website automatically adjusts its clock for daylight saving time
The selected time zone appears:
Use this option.... To....
Only on your view of your SupportCenter Website, not other users' views
In all support session invitations that you send using your SupportCenter website
Language
Set in which language your SupportCenter website displays texts.
The languages that appear in this list are limited to the languages that have been set up for your Website.
Locale Set the format in which your website displays dates, times, currency values, and numbers.
Setting Up a One-Click Meeting
A One-Click Meeting lets you quickly and easily start a support session at any time, with just a single click of your mouse. Use your One-Click Meeting whenever you want to meet with others instantly.
To set up a One-Click Meeting, you use the One-Click Meeting Wizard, which asks you to specify the options you want for your support session. You can specify a password, set up a voice conference, assign attendee privileges, and so on. Once you complete this simple, one-time setup, you can start your One-Click Meeting whenever you want--as often as you want--without having to set up the support session again.
You can start your One-Click Meeting from the navigation bar on your SupportCenter website, or by clicking a shortcut on your:
Desktop Web browser toolbar WebEx menu in Microsoft Office applications Right-click menu for any file or application icon
At any time, you can return to the One-Click Meeting Wizard to quickly change any details about your One-Click Meeting, as well as which shortcuts you want to download. Note: Because you do not schedule a One-Click Meeting, you cannot invite attendees to a support session before you start it. However, you can send them an invitation after you start the support session.
SETTING UP A ONE-CLICK MEETING
The Set Up One-Click Meeting Wizard guides you through the process of setting up a One-Click Meeting. You can return to the wizard at any time to modify your support session.
To set up a One-Click Meeting:
1 Log in to your SupportCenter Website.

2 Do any of the following: - Click My WebEx > Set Up One-Click. - If you already set up a Once-Click Meeting previously, click My WebEx > One-
Click Meeting. - On the navigation bar, click Set Up > One-Click Meeting.
3 Provide support session information in the One-Click Meeting Wizard.
4 Optional. Click Download shortcuts, and then choose the One-Click Meeting Shortcuts you want to install.
ABOUT THE ONE-CLICK MEETING WIZARD
How to access this page:
On your SupportCenter Website, click My WebEx > Set Up One-Click or One-Click Meeting tab.
What you can do here:
Set options for a support session, and then create shortcuts on your computer that you can click to start the support session at any time.
Topic, Service Type, and Access
Use this option... To...
Topic Specify the topic, or name, for the support session
Set meeting password Specify the password for the support session.
Confirm password Type the password again to prevent typing errors.
List support session on Personal Meetings page
Specify that the support session appears on your Personal Meetings page.
Service type Select the type of online session for which you want to create a One-Click Meeting. This option lists only the session types available for your site and user account.
Tracking Codes
Use this option... To...
Tracking code
Identify your department, project, or other information that your organization wants to associate with your support sessions. Tracking codes can be optional or required, depending on how your site administrator set them up.
If your site administrator requires you to select a code from a predefined list, click the link Select Code, and then select a code
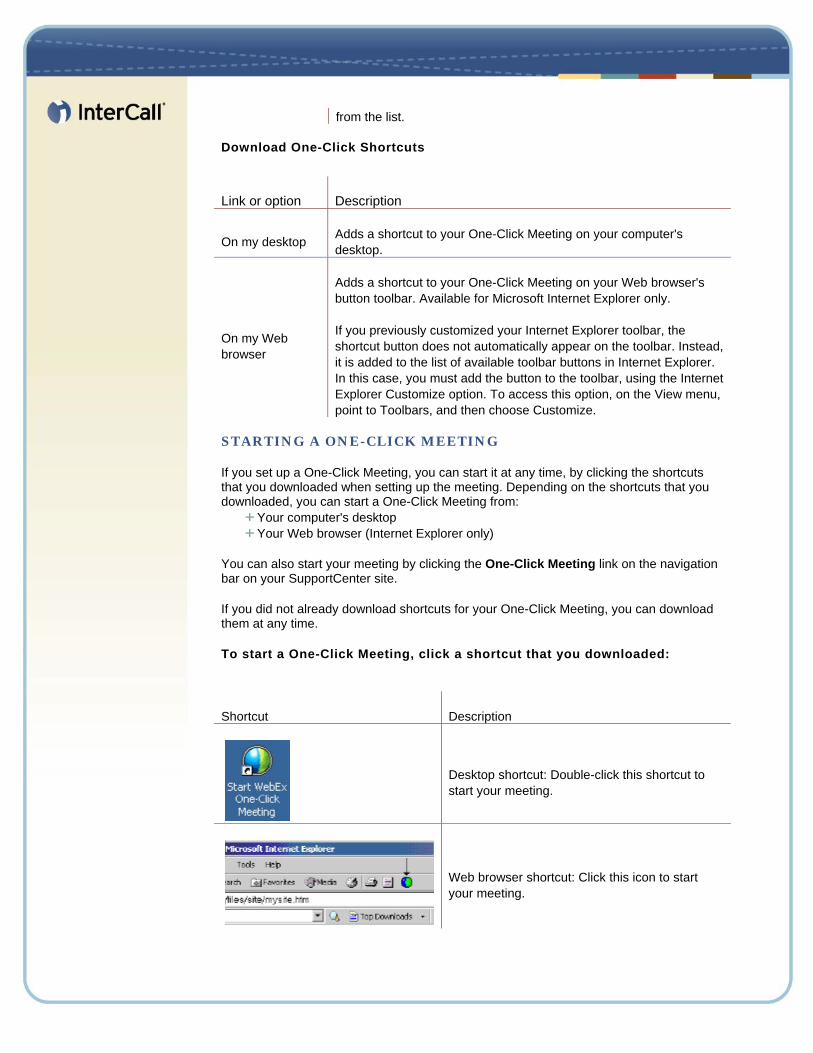
from the list.
Download One-Click Shortcuts
Link or option Description
On my desktop Adds a shortcut to your One-Click Meeting on your computer's desktop.
On my Web browser
Adds a shortcut to your One-Click Meeting on your Web browser's button toolbar. Available for Microsoft Internet Explorer only.
If you previously customized your Internet Explorer toolbar, the shortcut button does not automatically appear on the toolbar. Instead, it is added to the list of available toolbar buttons in Internet Explorer. In this case, you must add the button to the toolbar, using the Internet Explorer Customize option. To access this option, on the View menu, point to Toolbars, and then choose Customize.
STARTING A ONE-CLICK MEETING
If you set up a One-Click Meeting, you can start it at any time, by clicking the shortcuts that you downloaded when setting up the meeting. Depending on the shortcuts that you downloaded, you can start a One-Click Meeting from:
Your computer's desktop Your Web browser (Internet Explorer only)
You can also start your meeting by clicking the One-Click Meeting link on the navigation bar on your SupportCenter site.
If you did not already download shortcuts for your One-Click Meeting, you can download them at any time.
To start a One-Click Meeting, click a shortcut that you downloaded:
Shortcut Description
Desktop shortcut: Double-click this shortcut to start your meeting.
Web browser shortcut: Click this icon to start your meeting.
Note: Once you start a One-Click Meeting, it appears on your Personal Meeting Room page. If you provide others with the URL for this page, they can quickly join your meeting by clicking the link for the meeting on this page.
REMOVING ONE-CLICK MEETING SHORTCUTS
If you downloaded shortcuts for your One-Click Meeting, you can remove them at any time.
To remove One-Click Meeting shortcuts from your computer:
1 Open the Windows Add/Remove Programs utility on your computer.
2 Select WebEx One-Click Shortcuts or WebEx One-Click Meeting, depending on how you installed the program.
3 Select the Option to remove the program.
4 Follow the instructions on your screen.
Contacting InterCall
TECHNICAL SUPPORT
For information about receiving technical support for SupportCenter, refer to the InterCall Centers website at www.intercallcenters.com and select Contact Us.
TRAINING
For information about receiving Training on SupportCenter, refer to the InterCall Centers website at www.intercallcenters.com and select Training.
SALES
For information about InterCall’s conferencing services, please contact your sales representative or visit www.intercall.com. For additional information about using SupportCenter, please refer to the Help section on the SupportCenter website at www.intercallcenters.com/supportcenter.