Embed Size (px)
Citation preview
SRM SUS - Supplier Self Service - v3 0 Page 1 of 22
SRM SUPPLIER SELF SERVICE (SUS) V 3.0 USER GUIDE
SRM SUS - Supplier Self Service - v3 0 Page 2 of 22
INDEX
1. Purpose of this Document 3 2. Prerequisites to Suppliers 3 3. Minimum System Requirements for SRM SUS 3 4. Menu Path to access SRM SUS Portal 3 5. Display Purchase Order 4
5.1. Description/Function of Fields/Links 7 5.2. Basic Data 7 5.3. Item Overview 8 5.4. Messages (Header & Item level) 8 5.5. Partner Information (Header & Item level) 8 5.6. Price Information (Header & Item level) 9 5.7. Terms of Payment / Delivery 9 5.8. Attachments 9
6. Create Purchase Order Response 10 6.1. Process Purchase Order Response 10
6.1.1. Item Overview 11 6.1.2. Item Details 12
6.1.2.1. Basic Data in Item Detail Screen 12 6.1.2.2. Creating Schedule Lines 13 6.1.2.3. Price Information (Item Detail Screen) 13 6.1.2.4. Adding Messages to Supplier (Item Detail Screen) 13
6.1.3. Adding Messages to Supplier (Header Level) 14 6.2. Posting the Purchase Order Response 14
7. Create Advanced Shipment Note (ASN) 17 7.1. Purchase Order Selection 17 7.2. ASN Processing 18
7.2.1. Basic Data (Header Level) 19 7.2.2. Delivery Information (Header Level) 20 7.2.3. Item Overview (Header Level) 20 7.2.4. Item Detail Screen 21
7.2.4.1. Basic Data (Item Level) 21 7.2.4.2. Partner Information (Item Level) 21 7.2.4.3. Terms of Delivery (Item Level) 22
7.3. Posting the ASN 22
SRM SUS - Supplier Self Service - v3 0 Page 3 of 22
1. Purpose of this Document
This User Guide serves to provide Borouge Suppliers, guidelines on the following:
Access and Use the SUS Portal
Collect and process Purchase Orders
Respond to Purchase Orders (Purchase Order Response – POR)
Communicate using “Message to Purchaser” function in the POR
Create Advance Shipment Note
.
2. Prerequisites to Suppliers
Supplier must be registered onto the Borouge SRM as a SUS supplier, and have a User ID* and Password to access the SUS Portal
* Borouge shall send an e-mail with their SUS User ID and Password.
3. Minimum System Requirements for SRM SUS
Suppliers are recommended to use Internet Explorer (IE) 7.0.
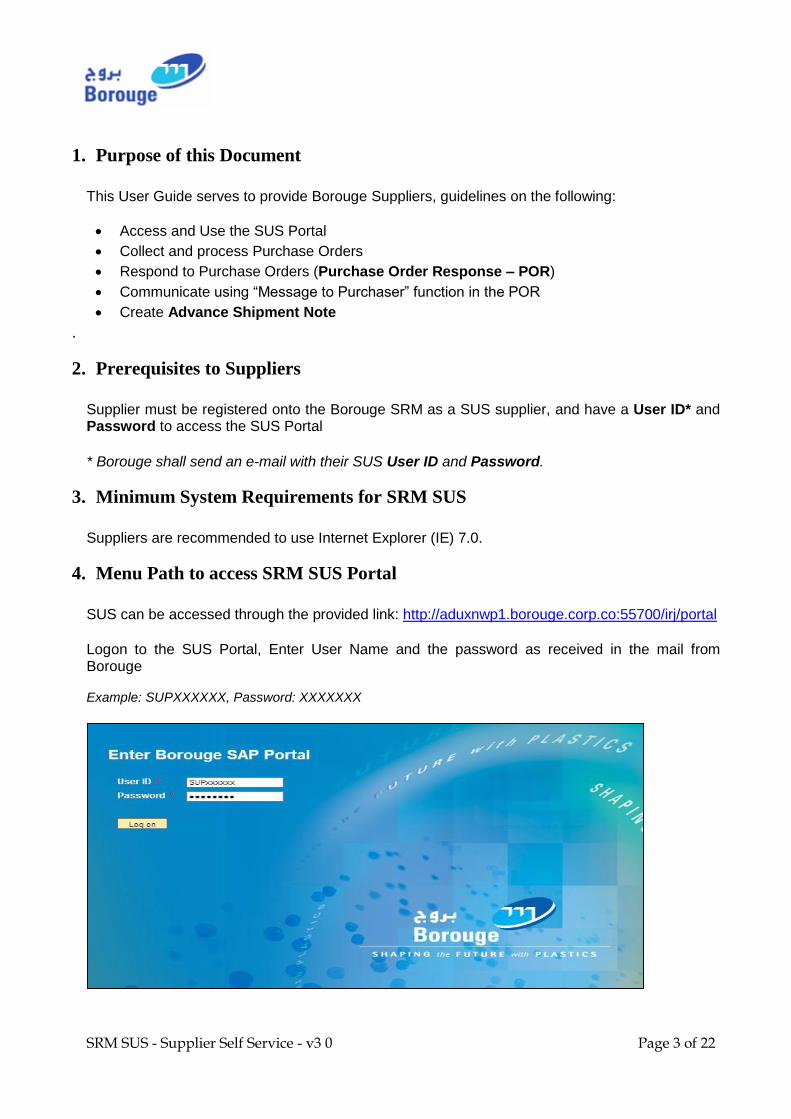
4. Menu Path to access SRM SUS Portal
SUS can be accessed through the provided link: http://aduxnwp1.borouge.corp.co:55700/irj/portal Logon to the SUS Portal, Enter User Name and the password as received in the mail from Borouge Example: SUPXXXXXX, Password: XXXXXXX
SRM SUS - Supplier Self Service - v3 0 Page 4 of 22
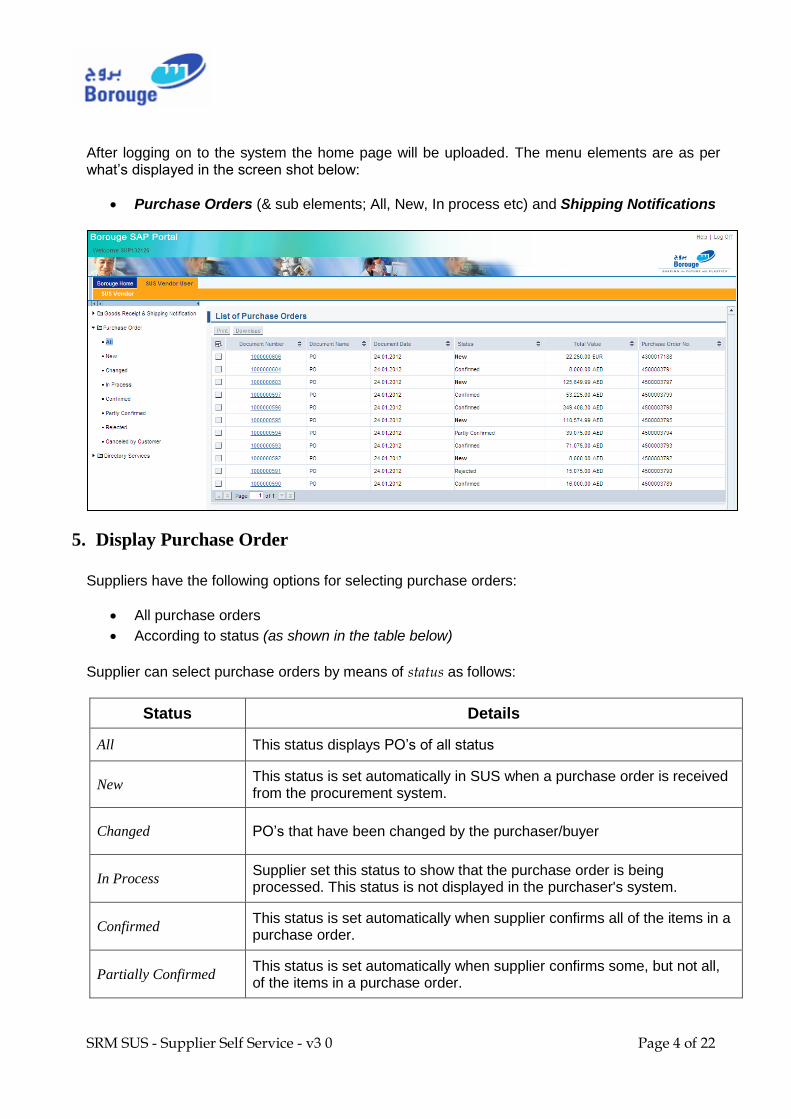
After logging on to the system the home page will be uploaded. The menu elements are as per what’s displayed in the screen shot below:
Purchase Orders (& sub elements; All, New, In process etc) and Shipping Notifications
5. Display Purchase Order
Suppliers have the following options for selecting purchase orders:
All purchase orders
According to status (as shown in the table below)
Supplier can select purchase orders by means of status as follows:
Status Details
All This status displays PO’s of all status
New This status is set automatically in SUS when a purchase order is received from the procurement system.
Changed PO’s that have been changed by the purchaser/buyer
In Process Supplier set this status to show that the purchase order is being processed. This status is not displayed in the purchaser's system.
Confirmed This status is set automatically when supplier confirms all of the items in a purchase order.
Partially Confirmed This status is set automatically when supplier confirms some, but not all, of the items in a purchase order.

SRM SUS - Supplier Self Service - v3 0 Page 5 of 22
Rejected This status is set automatically when supplier rejects all of the items in a purchase order.
Cancelled by Customer This status is set automatically if the purchaser cancels a purchase order
Note
The status of a purchase order is shown in bold type if the customer (Borouge) has made changes to the purchase order and Suppliers have not opened it yet.
Select the Purchase Order by clicking on the PO Number to display the Purchase Order details
SRM SUS - Supplier Self Service - v3 0 Page 6 of 22
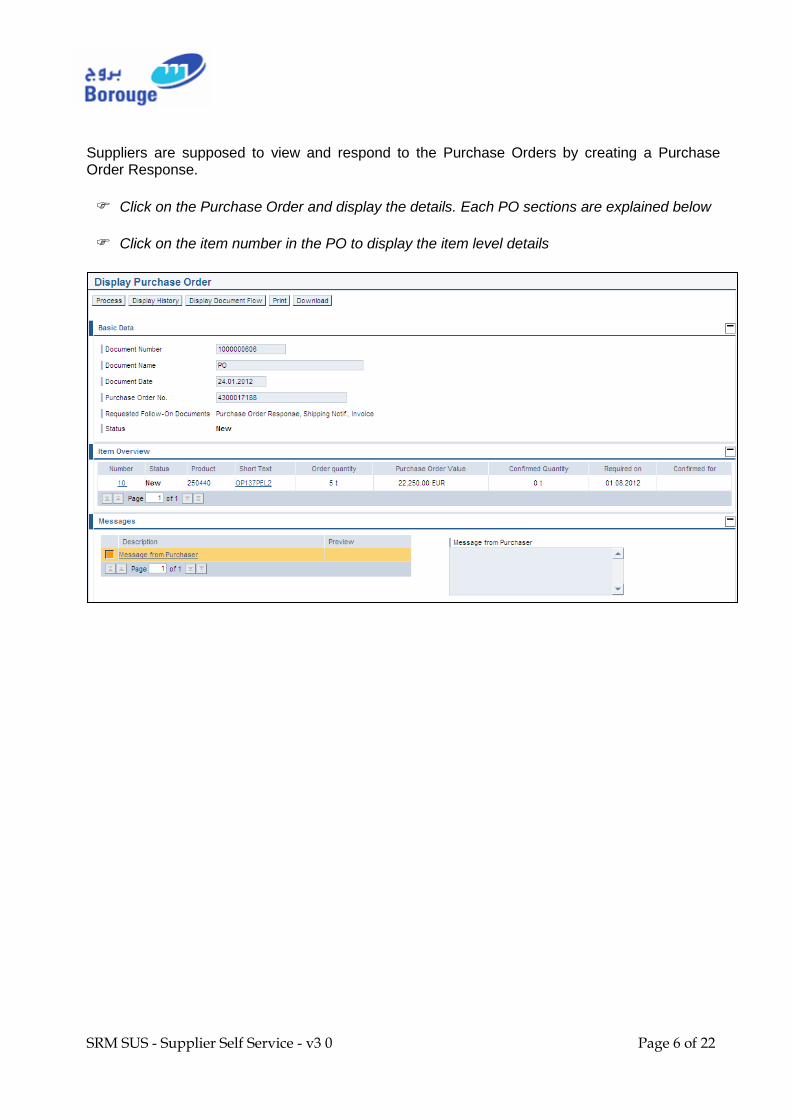
Suppliers are supposed to view and respond to the Purchase Orders by creating a Purchase Order Response.
Click on the Purchase Order and display the details. Each PO sections are explained below
Click on the item number in the PO to display the item level details

SRM SUS - Supplier Self Service - v3 0 Page 7 of 22
5.1. Description/Function of Fields/Links
Buttons Description
The Process button is used to begin processing the Purchase Order. During processing, the status of the Purchase Order will change from New to In Process
The Display history button will show previous versions of the Purchase Order, if any. If the events that change have been made to the Purchase Order, suppliers will be able to view the previous versions.
The Display Document Flow button is used to display information about the Purchase Order and how far it has been processed. Suppliers will be able to view the current status of the Purchase Order.
The Print button is used to open up a PDF version of the Purchase Order in order to print the document.
The Download button is used to save the Purchase Order as a zip file to suppliers PC. This will allow suppliers to have a comma delimited file on the information of the Purchase Order. Suppliers will have the option to upload the file to suppliers own system if needed.
5.2. Basic Data
Under Basic Data, fields like Document Number, Document Date, and Purchase Order Number
are defaulted. Basic Data gives the details of Required Follow-on Documents for the PO. Example: Purchase Order Response, Shipment Notification, Invoice. Further, it also gives the Present Status of the Document.
SRM SUS - Supplier Self Service - v3 0 Page 8 of 22
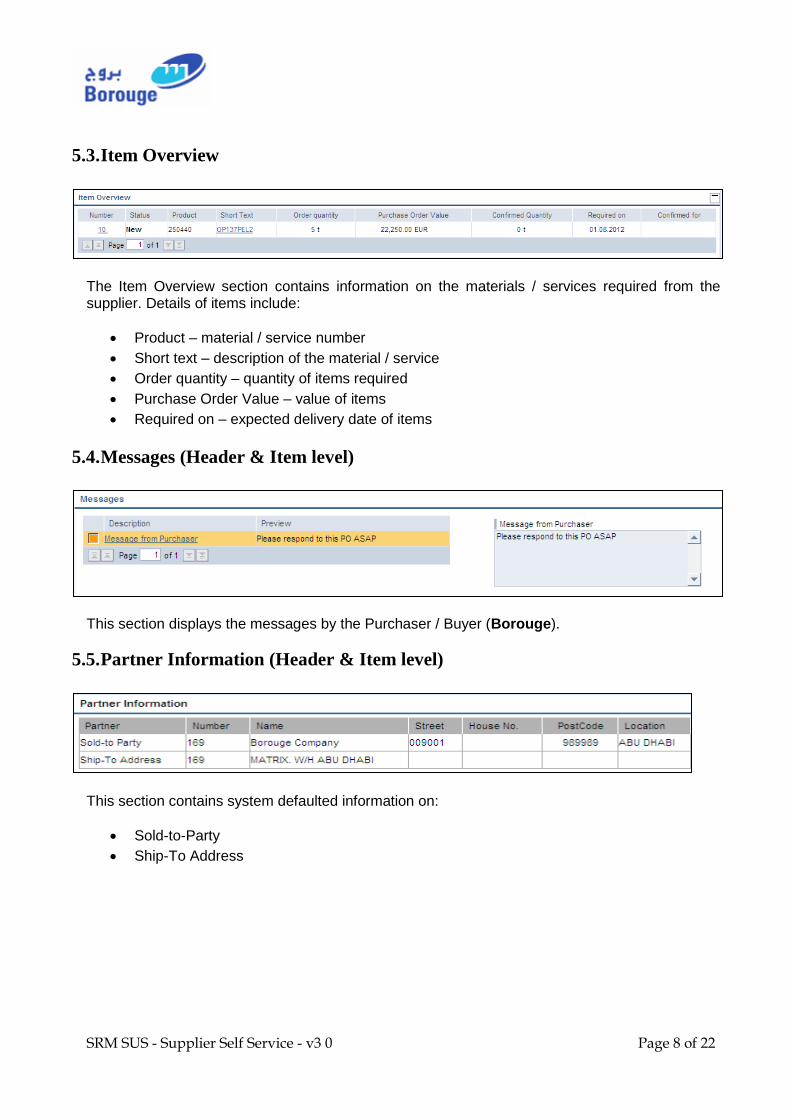
5.3. Item Overview
The Item Overview section contains information on the materials / services required from the supplier. Details of items include:
Product – material / service number
Short text – description of the material / service
Order quantity – quantity of items required
Purchase Order Value – value of items
Required on – expected delivery date of items
5.4. Messages (Header & Item level)
This section displays the messages by the Purchaser / Buyer (Borouge).
5.5. Partner Information (Header & Item level)
This section contains system defaulted information on:
Sold-to-Party
Ship-To Address
SRM SUS - Supplier Self Service - v3 0 Page 9 of 22
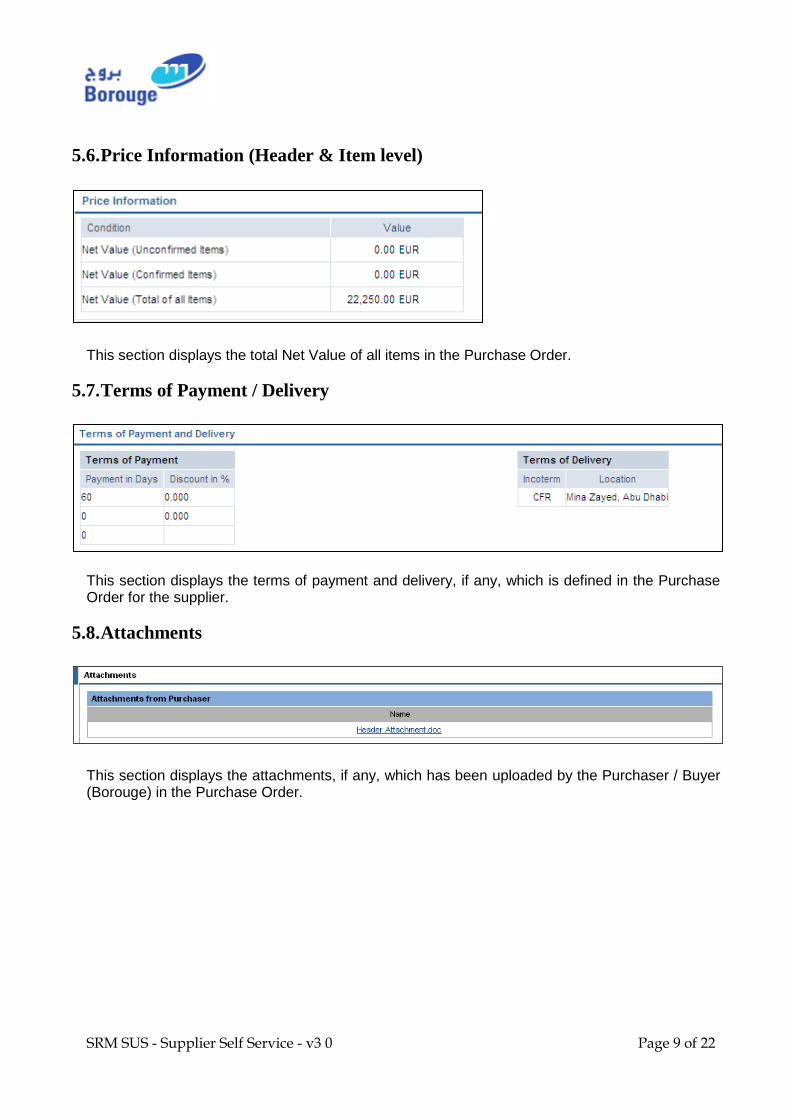
5.6. Price Information (Header & Item level)
This section displays the total Net Value of all items in the Purchase Order.
5.7. Terms of Payment / Delivery
This section displays the terms of payment and delivery, if any, which is defined in the Purchase Order for the supplier.
5.8. Attachments
This section displays the attachments, if any, which has been uploaded by the Purchaser / Buyer (Borouge) in the Purchase Order.
SRM SUS - Supplier Self Service - v3 0 Page 10 of 22
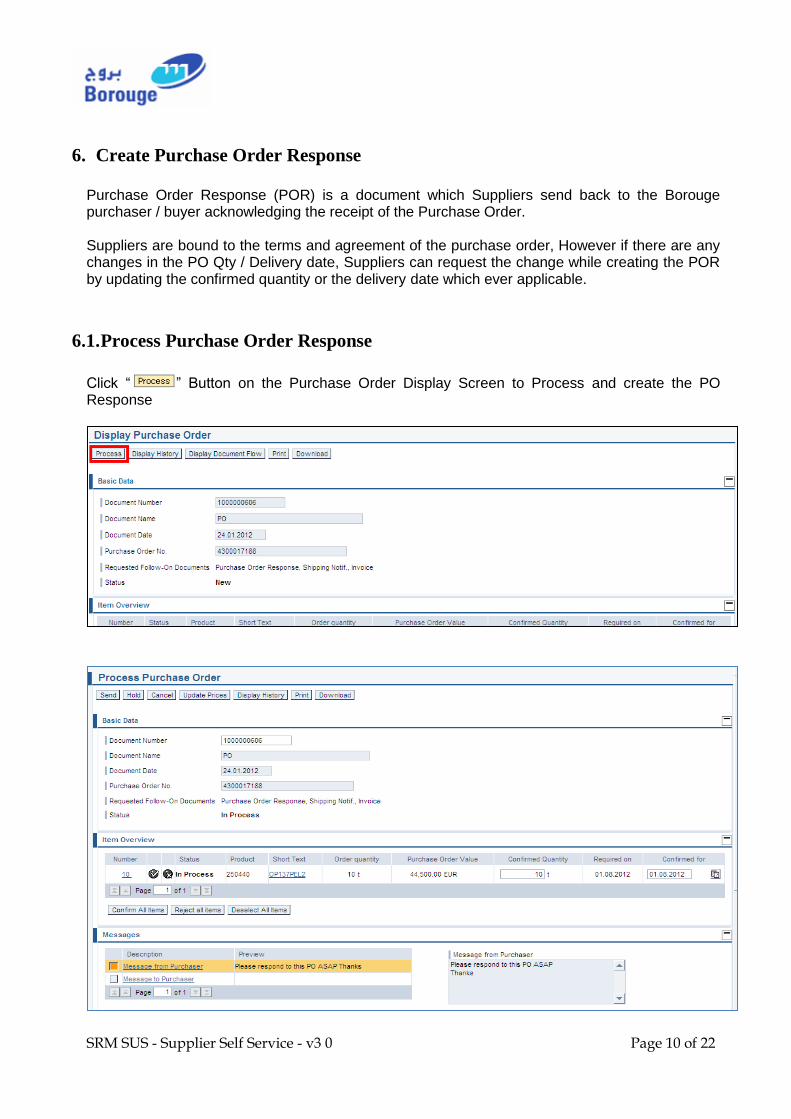
6. Create Purchase Order Response
Purchase Order Response (POR) is a document which Suppliers send back to the Borouge purchaser / buyer acknowledging the receipt of the Purchase Order. Suppliers are bound to the terms and agreement of the purchase order, However if there are any changes in the PO Qty / Delivery date, Suppliers can request the change while creating the POR by updating the confirmed quantity or the delivery date which ever applicable.
6.1. Process Purchase Order Response
Click “ ” Button on the Purchase Order Display Screen to Process and create the PO Response
SRM SUS - Supplier Self Service - v3 0 Page 11 of 22
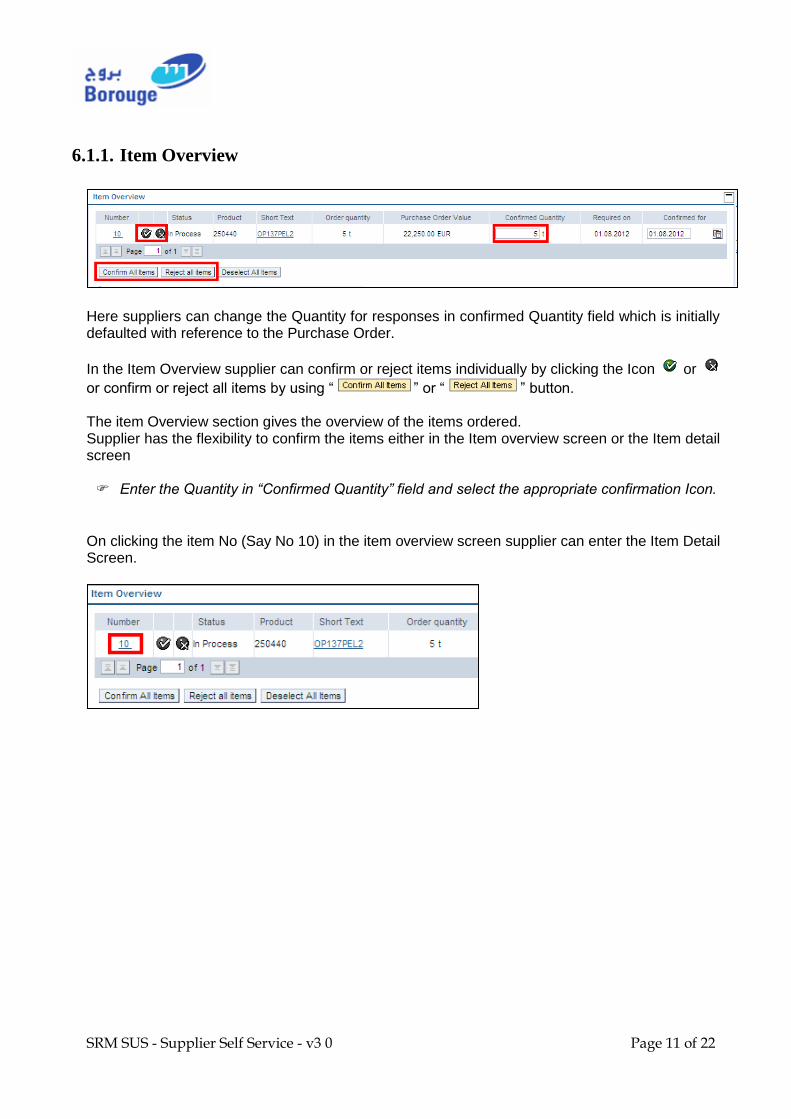
6.1.1. Item Overview
Here suppliers can change the Quantity for responses in confirmed Quantity field which is initially defaulted with reference to the Purchase Order.
In the Item Overview supplier can confirm or reject items individually by clicking the Icon or
or confirm or reject all items by using “ ” or “ ” button. The item Overview section gives the overview of the items ordered. Supplier has the flexibility to confirm the items either in the Item overview screen or the Item detail screen Enter the Quantity in “Confirmed Quantity” field and select the appropriate confirmation Icon.
On clicking the item No (Say No 10) in the item overview screen supplier can enter the Item Detail Screen.
SRM SUS - Supplier Self Service - v3 0 Page 12 of 22
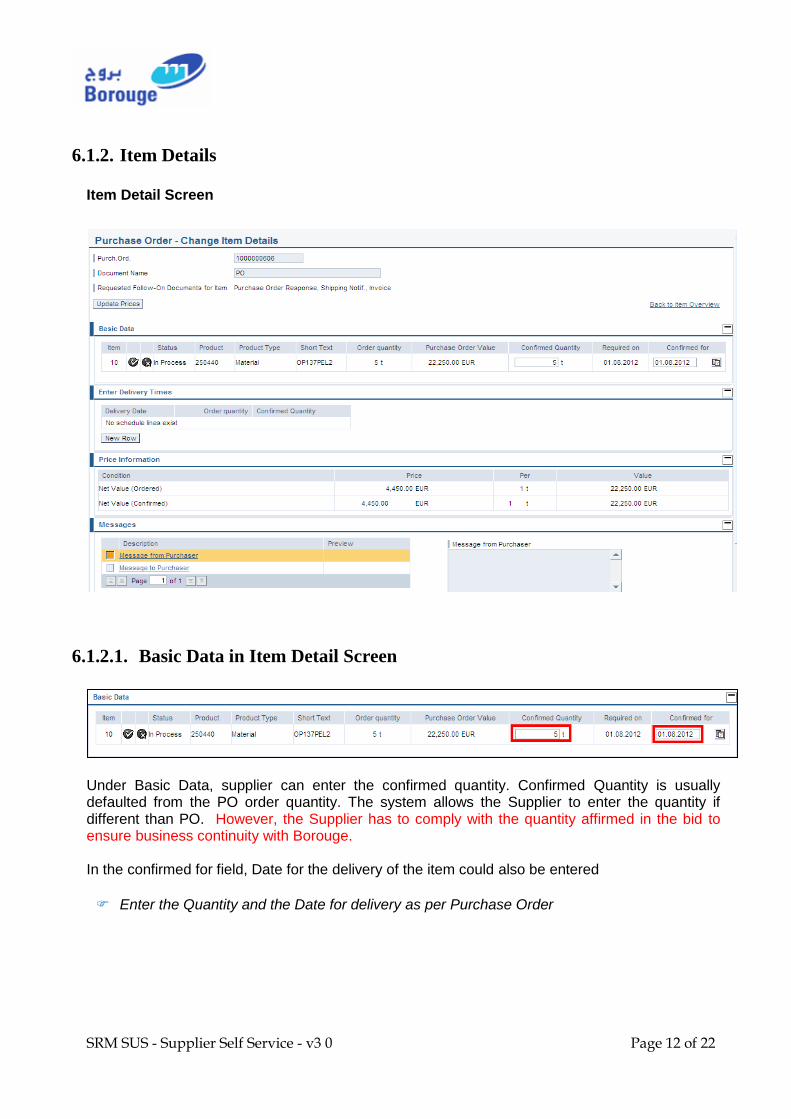
6.1.2. Item Details
Item Detail Screen
6.1.2.1. Basic Data in Item Detail Screen
Under Basic Data, supplier can enter the confirmed quantity. Confirmed Quantity is usually defaulted from the PO order quantity. The system allows the Supplier to enter the quantity if different than PO. However, the Supplier has to comply with the quantity affirmed in the bid to ensure business continuity with Borouge. In the confirmed for field, Date for the delivery of the item could also be entered
Enter the Quantity and the Date for delivery as per Purchase Order

SRM SUS - Supplier Self Service - v3 0 Page 13 of 22
6.1.2.2. Creating Schedule Lines
Under Enter Delivery Times, Suppliers can enter the delivery dates for a new schedule line, as well as separate confirmed quantities for each delivery date if required. This could be done by clicking on the “ ” button and adding the Delivery date and Confirmed Quantity.
Click on the icon to confirm the item in the Basic Data view
6.1.2.3. Price Information (Item Detail Screen)
Under Price information Net Value ordered is displayed and the Net Value confirmed is usually defaulted with reference to Net Value Ordered.
6.1.2.4. Adding Messages to Supplier (Item Detail Screen)
Under Messages, supplier can enter messages to the purchaser and view any message from purchaser. (This Message is Item Level Message and will not be displayed in the Header) Message from Purchaser: This could be viewed by clicking on the Message from purchaser
link. Message to Purchaser: To Create a Message to Purchaser, Click on the link Message to
Purchaser (1) and in the text box (2) displayed enter the required text and save the text by clicking the “ ” button
Enter a Message to the Purchaser (Optional)

SRM SUS - Supplier Self Service - v3 0 Page 14 of 22
6.1.3. Adding Messages to Supplier (Header Level)
Under Messages, Supplier can enter messages to the purchaser and view any message from purchaser. Message from Purchaser: This could be viewed by clicking on the Message from purchaser
link. Message to Purchaser: To Create a Message to the Purchaser, Click on the link Message to
Purchaser and in the text box displayed enter the required text and save the text by clicking the “ ” Button
Enter a Header Level Message to Purchaser (Optional)
Note
Suppliers can enter “Message to Purchaser” at header as well as Item level. Any PO header correspondence/information can be entered at header level and item specific information can be entered at Item level
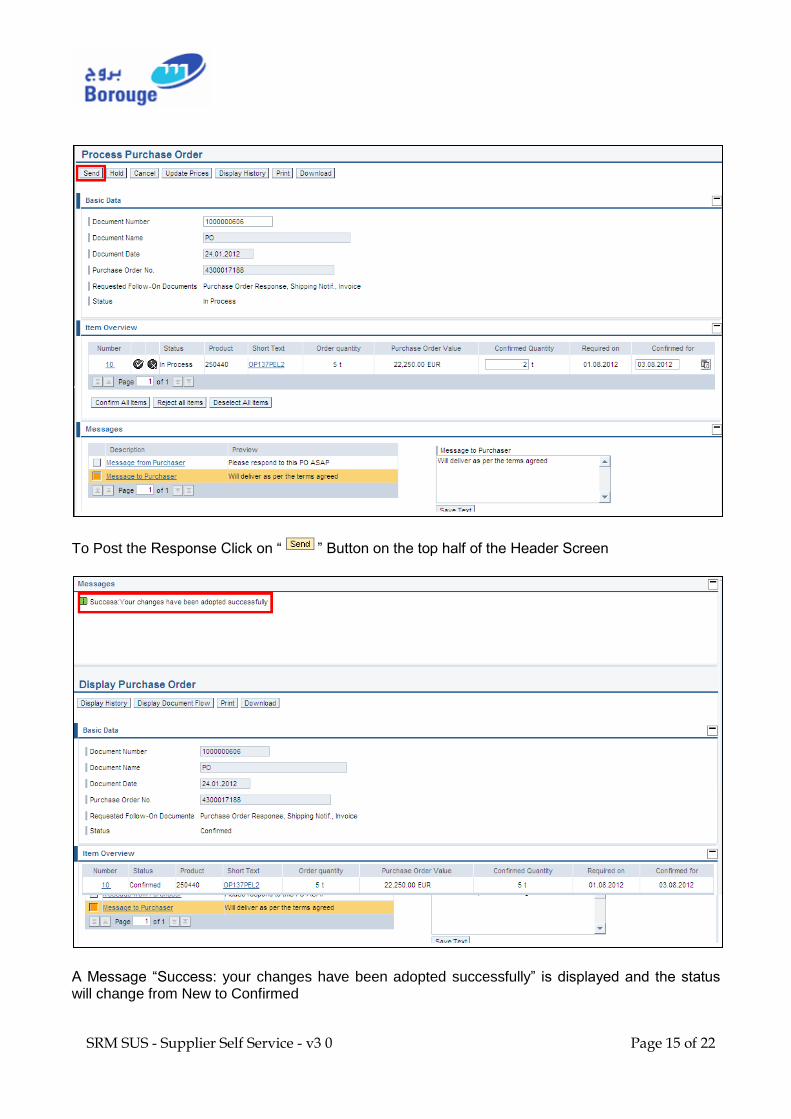
6.2. Posting the Purchase Order Response
SRM SUS - Supplier Self Service - v3 0 Page 15 of 22
To Post the Response Click on “ ” Button on the top half of the Header Screen
A Message “Success: your changes have been adopted successfully” is displayed and the status will change from New to Confirmed

SRM SUS - Supplier Self Service - v3 0 Page 16 of 22
Key notes: Every time a POR is created and saved, Borouge Buyer will enter a note in the PO to acknowledge that they have received your POR. The acknowledgement note would be displayed in the Header text of PO. For any change in the PO, which may addition of note, change in quantity etc, you as a supplier will receive an email intimation informing that the PO has been updated/changed
SRM SUS - Supplier Self Service - v3 0 Page 17 of 22
7. Create Advanced Shipment Note (ASN)
This function enables suppliers to create and edit Shipment Notifications in Supplier Self-Services (SUS), and send them to customer (Borouge). Supplier can create ASN’s for purchase orders with the statuses
In Process or
Confirmed
Note
Suppliers can create an ASN only if the PO and the POR are in synch, meaning the PO Qty and the delivery date are same as the latest POR. Create ASN button only appears if the PO and POR are in synch
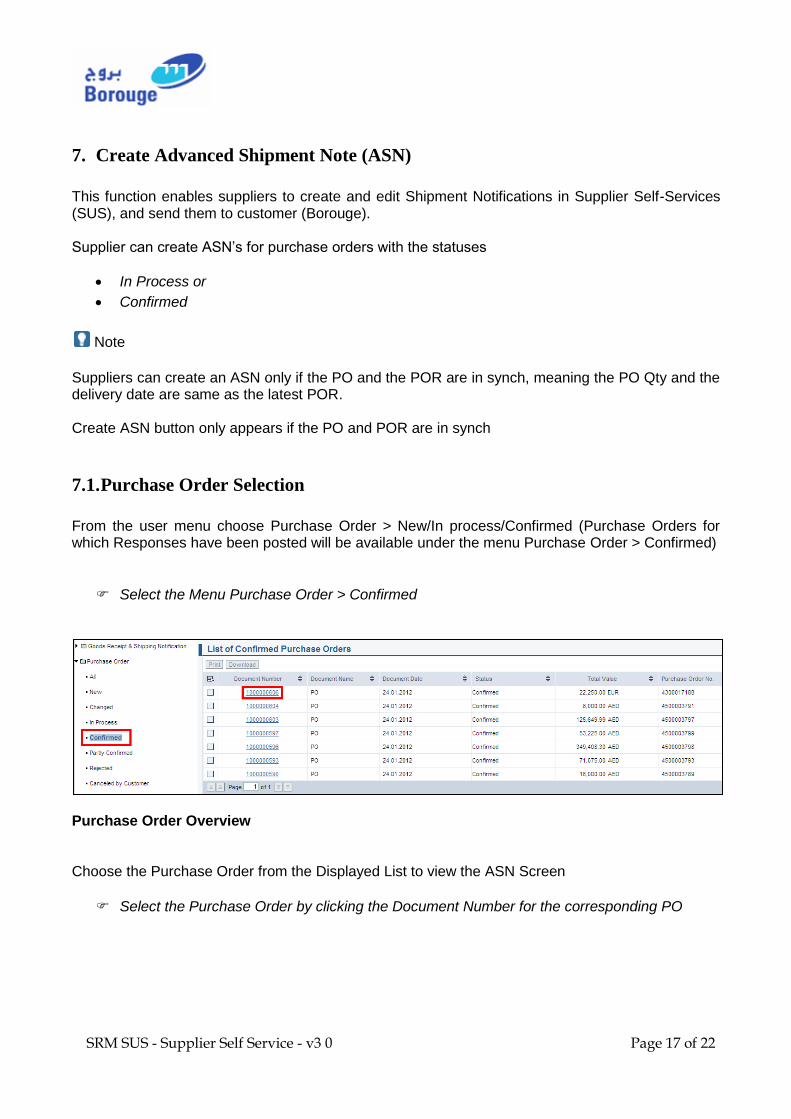
7.1. Purchase Order Selection
From the user menu choose Purchase Order > New/In process/Confirmed (Purchase Orders for which Responses have been posted will be available under the menu Purchase Order > Confirmed) Select the Menu Purchase Order > Confirmed
Purchase Order Overview Choose the Purchase Order from the Displayed List to view the ASN Screen
Select the Purchase Order by clicking the Document Number for the corresponding PO
SRM SUS - Supplier Self Service - v3 0 Page 18 of 22
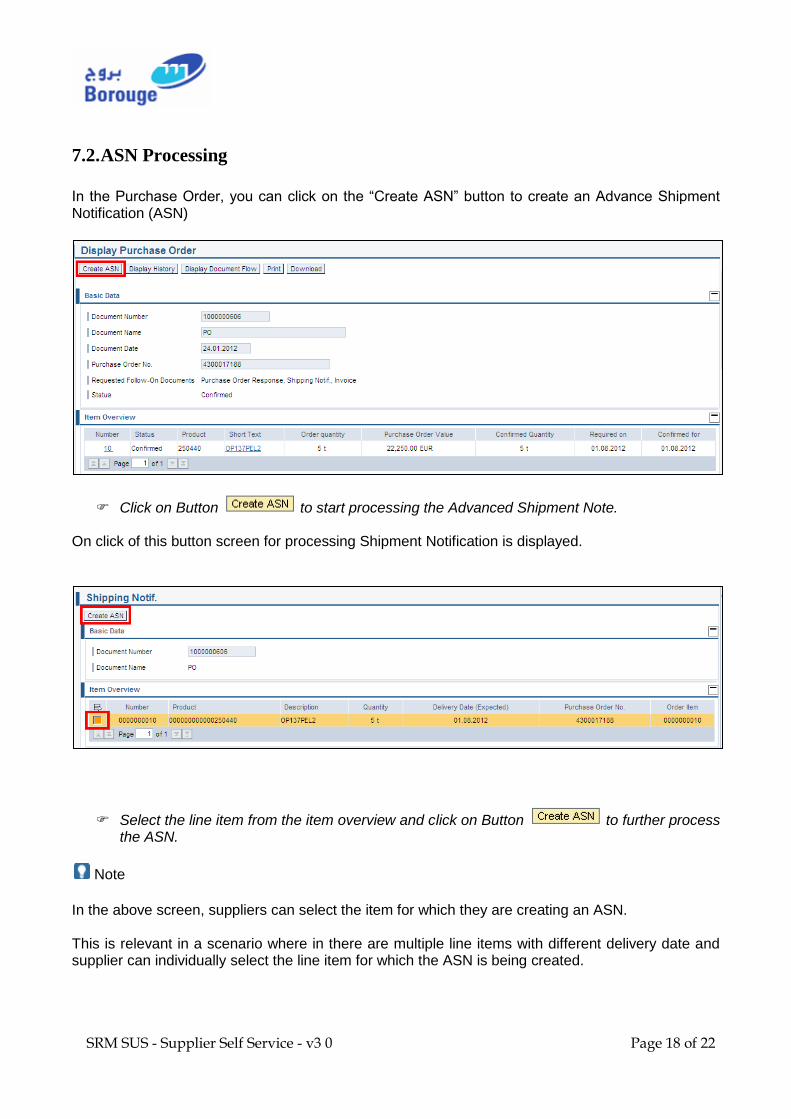
7.2. ASN Processing
In the Purchase Order, you can click on the “Create ASN” button to create an Advance Shipment Notification (ASN)
Click on Button to start processing the Advanced Shipment Note. On click of this button screen for processing Shipment Notification is displayed.
Select the line item from the item overview and click on Button to further process the ASN.
Note
In the above screen, suppliers can select the item for which they are creating an ASN. This is relevant in a scenario where in there are multiple line items with different delivery date and supplier can individually select the line item for which the ASN is being created.
SRM SUS - Supplier Self Service - v3 0 Page 19 of 22
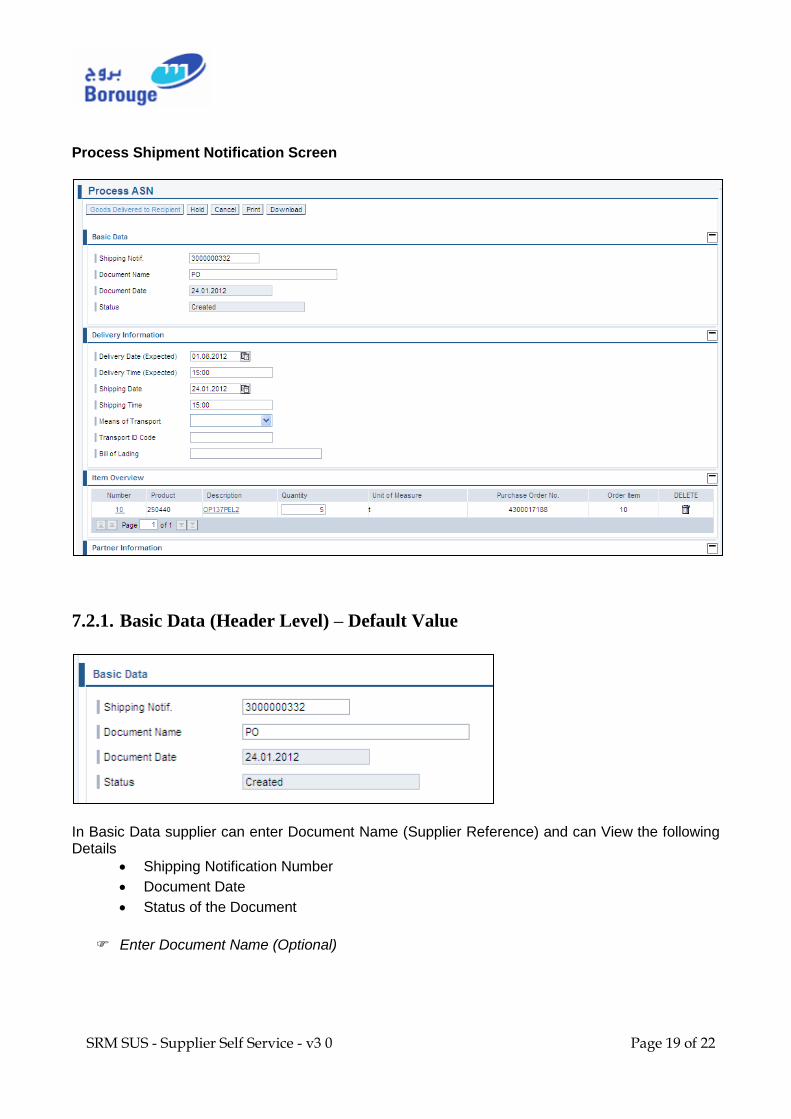
Process Shipment Notification Screen
7.2.1. Basic Data (Header Level) – Default Value
In Basic Data supplier can enter Document Name (Supplier Reference) and can View the following Details
Shipping Notification Number
Document Date
Status of the Document
Enter Document Name (Optional)
SRM SUS - Supplier Self Service - v3 0 Page 20 of 22
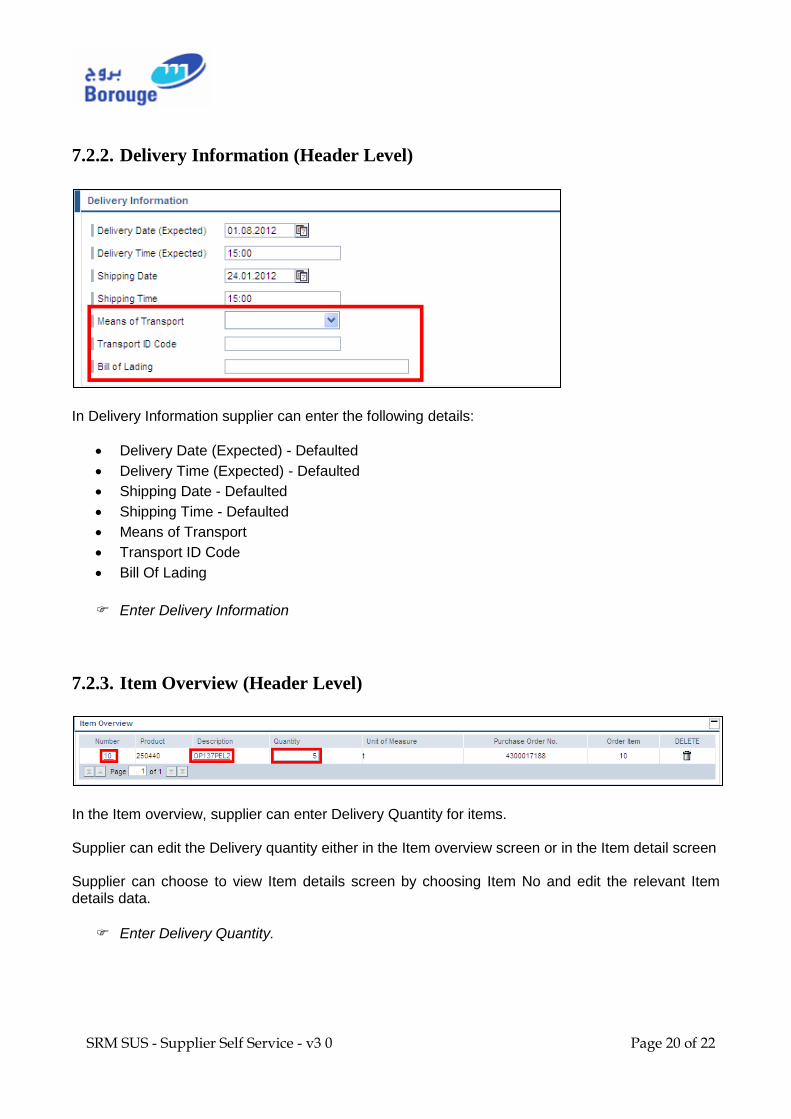
7.2.2. Delivery Information (Header Level)
In Delivery Information supplier can enter the following details:
Delivery Date (Expected) - Defaulted
Delivery Time (Expected) - Defaulted
Shipping Date - Defaulted
Shipping Time - Defaulted
Means of Transport
Transport ID Code
Bill Of Lading
Enter Delivery Information
7.2.3. Item Overview (Header Level)
In the Item overview, supplier can enter Delivery Quantity for items. Supplier can edit the Delivery quantity either in the Item overview screen or in the Item detail screen Supplier can choose to view Item details screen by choosing Item No and edit the relevant Item details data.
Enter Delivery Quantity.
SRM SUS - Supplier Self Service - v3 0 Page 21 of 22
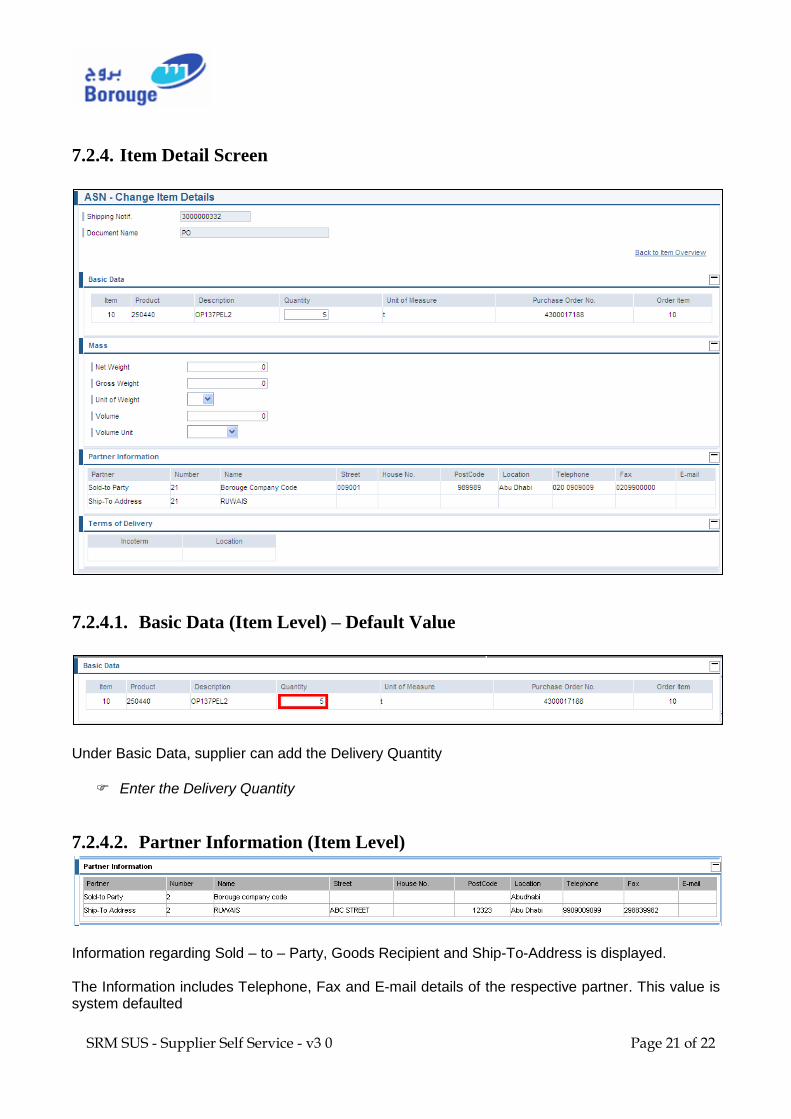
7.2.4. Item Detail Screen
7.2.4.1. Basic Data (Item Level) – Default Value
Under Basic Data, supplier can add the Delivery Quantity
Enter the Delivery Quantity
7.2.4.2. Partner Information (Item Level)
Information regarding Sold – to – Party, Goods Recipient and Ship-To-Address is displayed. The Information includes Telephone, Fax and E-mail details of the respective partner. This value is system defaulted
SRM SUS - Supplier Self Service - v3 0 Page 22 of 22
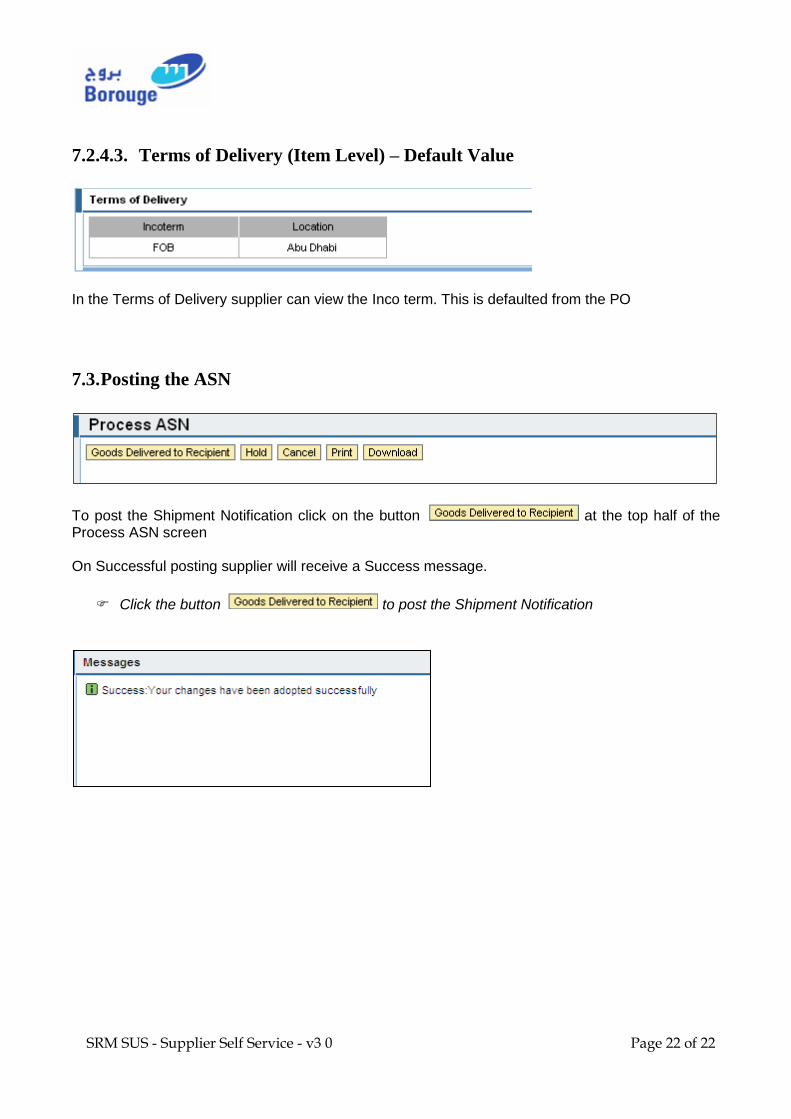
7.2.4.3. Terms of Delivery (Item Level) – Default Value
In the Terms of Delivery supplier can view the Inco term. This is defaulted from the PO
7.3. Posting the ASN
To post the Shipment Notification click on the button at the top half of the Process ASN screen On Successful posting supplier will receive a Success message.
Click the button to post the Shipment Notification