Embed Size (px)
Citation preview

w
Contents
Quick Links .............................................................................................................................................. 3
Introduction ............................................................................................................................................ 4
SRM Settings ........................................................................................................................................... 4
Where to find SRM ................................................................................................................................ 12
SRM Page .............................................................................................................................................. 14
SRM
Supplier Relationship
Management
August 2018

August 2018 Copyright by SourceDogg 2
Supplier Relationship Management User Guide
ww
w.s
ou
rced
ogg
.co
m
Contents
Quick Start ............................................................................................................................................... 3
Introduction ............................................................................................................................................ 4
SRM Settings ........................................................................................................................................... 4
SRM Permissions ................................................................................................................................. 4
Permission levels outline ................................................................................................................ 5
User Groups .................................................................................................................................... 6
KPI Custom Fields ................................................................................................................................ 7
Add New Custom Field .................................................................................................................... 8
Where to find SRM ................................................................................................................................ 12
SRM Page .............................................................................................................................................. 14
Reviews ............................................................................................................................................. 15
Add Review ................................................................................................................................... 16
Updating a Review ........................................................................................................................ 18
Key Actions ........................................................................................................................................ 19
Add Key Action .............................................................................................................................. 20
Action Status ................................................................................................................................. 21
Key Action Filters .......................................................................................................................... 24
SRM Team ......................................................................................................................................... 27
Notes ................................................................................................................................................. 28
August 2018 Copyright by SourceDogg 3
Supplier Relationship Management User Guide
ww
w.s
ou
rced
ogg
.co
m
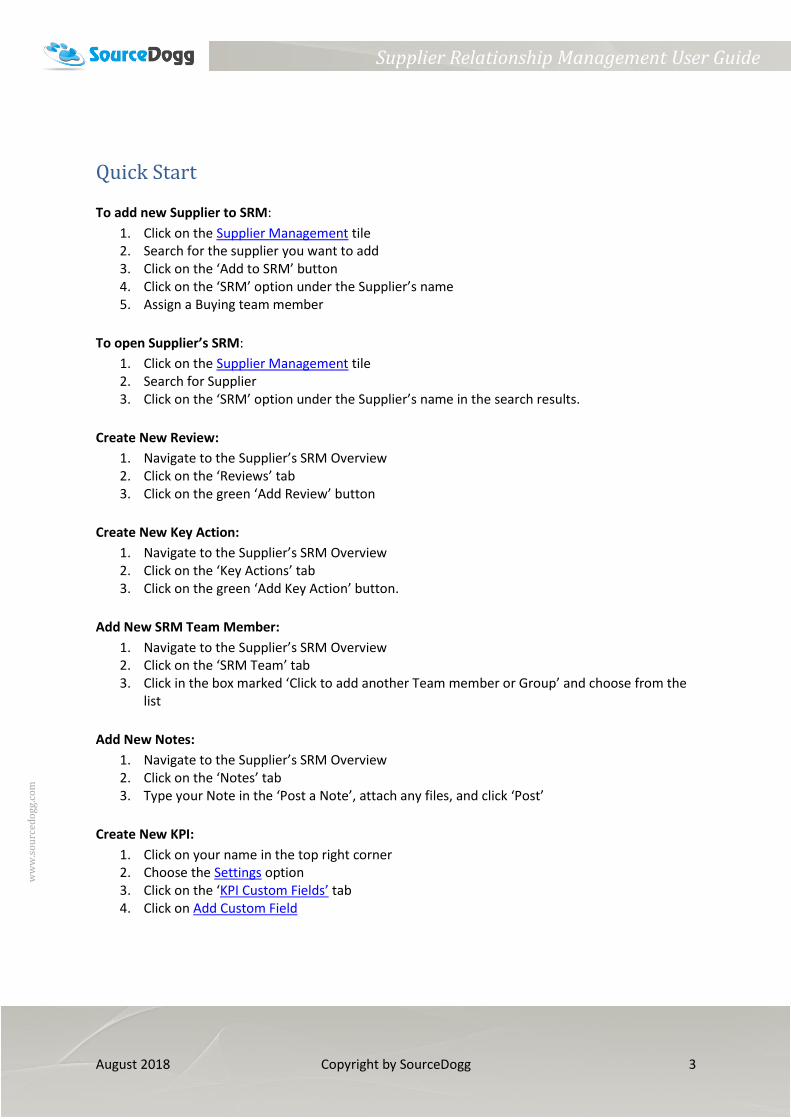
Quick Start
To add new Supplier to SRM:
1. Click on the Supplier Management tile 2. Search for the supplier you want to add 3. Click on the ‘Add to SRM’ button 4. Click on the ‘SRM’ option under the Supplier’s name 5. Assign a Buying team member
To open Supplier’s SRM:
1. Click on the Supplier Management tile 2. Search for Supplier 3. Click on the ‘SRM’ option under the Supplier’s name in the search results.
Create New Review:
1. Navigate to the Supplier’s SRM Overview 2. Click on the ‘Reviews’ tab 3. Click on the green ‘Add Review’ button
Create New Key Action:
1. Navigate to the Supplier’s SRM Overview 2. Click on the ‘Key Actions’ tab 3. Click on the green ‘Add Key Action’ button.
Add New SRM Team Member:
1. Navigate to the Supplier’s SRM Overview 2. Click on the ‘SRM Team’ tab 3. Click in the box marked ‘Click to add another Team member or Group’ and choose from the
list
Add New Notes:
1. Navigate to the Supplier’s SRM Overview 2. Click on the ‘Notes’ tab 3. Type your Note in the ‘Post a Note’, attach any files, and click ‘Post’
Create New KPI:
1. Click on your name in the top right corner 2. Choose the Settings option 3. Click on the ‘KPI Custom Fields’ tab 4. Click on Add Custom Field

August 2018 Copyright by SourceDogg 4
Supplier Relationship Management User Guide
ww
w.s
ou
rced
ogg
.co
m
Introduction
The Supplier Relationship Management (SRM) module in SourceDogg will allow you to strategically
plan for, and manage, all interactions with the suppliers that provide you goods and/or services in
order to maximize the value of those interactions. It will enable you to create closer, more
collaborative relationships with your key suppliers.
The module will also provide you with key performance metrics for your most important suppliers.
• Key actions for buyer and supplier can be created and tracked.
• Performance review meetings or calls can be scheduled and logged. Reminders can be sent
and supplier interaction summary documents can be downloaded.
SRM Settings
SRM Permissions
Account administrators can control the permission levels for existing and new users through each
user’s settings in the ‘Users’ tab of your Settings area. As a default each user is set to ‘No SRM’.
These can be found when you click on your name in the top right corner (1) followed by ‘Settings’ (2)
and then the ‘Users’ tab (3).

August 2018 Copyright by SourceDogg 5
Supplier Relationship Management User Guide
ww
w.s
ou
rced
ogg
.co
m
Permission levels outline
• SRM Admins
▪ Create and edit ‘Reviews’ and ‘Key Actions’
▪ Can add or remove suppliers to and from SRM
▪ Create and edit the KPI Custom Fields used
▪ Can mark Actions as Complete/Incomplete
▪ Can post notes
• SRM Editors
▪ Can create and edit ‘Reviews’ and ‘Key Actions’
▪ Can post notes
▪ Can only view a supplier’s SRM if part of their SRM team
• SRM readers
▪ Can only view the various aspects of SRM when part of a supplier’s SRM team but may
not edit any of them and may not create any new content there
• No SRM
▪ The module is not visible at all to any users with ‘No SRM’ selected

August 2018 Copyright by SourceDogg 6
Supplier Relationship Management User Guide
ww
w.s
ou
rced
ogg
.co
m
User Groups
For convenience when creating SRM Reviews you can set up a User Group specifically for the SRM
module. This will mean that in the event of a new staff member coming in you only need to add
them to this group and not to each individual supplier.
To create a group, navigate to the ‘User Groups’ tab (1) and then click on ‘Create’ (2).

August 2018 Copyright by SourceDogg 7
Supplier Relationship Management User Guide
ww
w.s
ou
rced
ogg
.co
m
KPI Custom Fields
KPI Custom Fields can be created and used to measure supplier’s performance on any metric your
processes require.
SRM Admins can create and edit the KPI Custom Fields, this is found in the ‘KPI Custom Fields’ (1) tab
of your Settings.
To create a new custom field, click on ‘Add Custom Field’ (2).
To edit an existing one, click on the wheel opposite the Custom Field you want to change. (3).
August 2018 Copyright by SourceDogg 8
Supplier Relationship Management User Guide
ww
w.s
ou
rced
ogg
.co
m
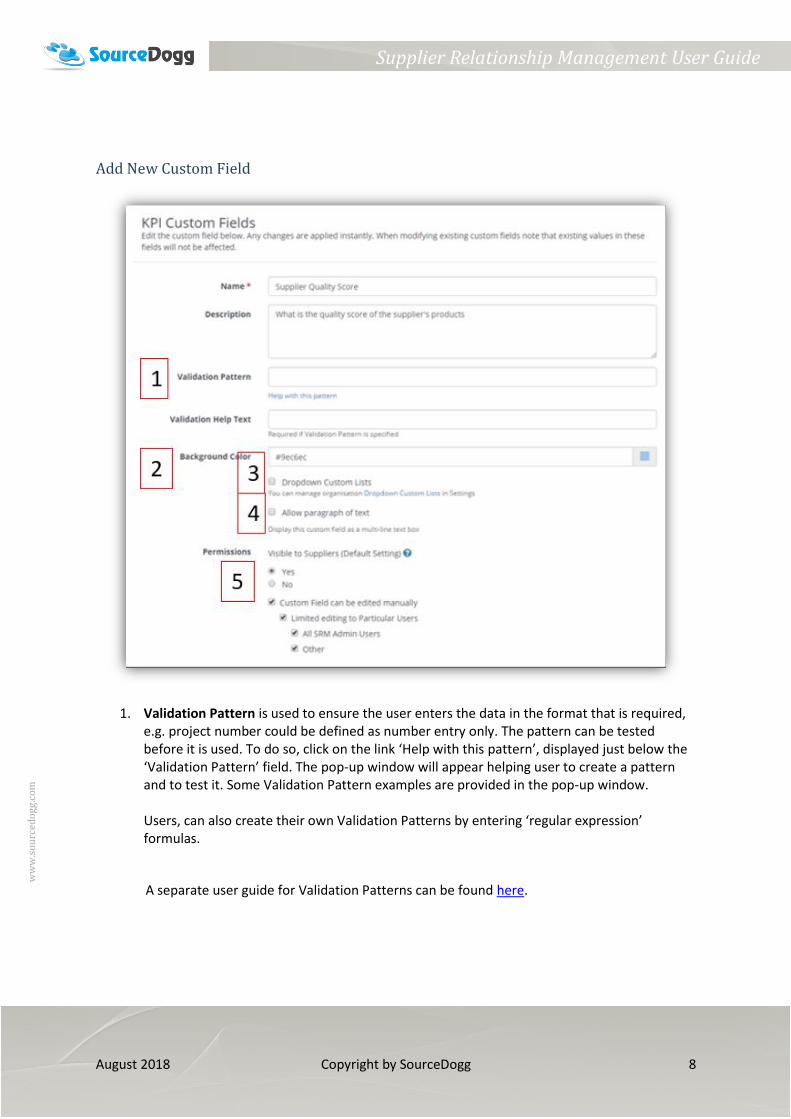
Add New Custom Field
1. Validation Pattern is used to ensure the user enters the data in the format that is required, e.g. project number could be defined as number entry only. The pattern can be tested before it is used. To do so, click on the link ‘Help with this pattern’, displayed just below the ‘Validation Pattern’ field. The pop-up window will appear helping user to create a pattern and to test it. Some Validation Pattern examples are provided in the pop-up window. Users, can also create their own Validation Patterns by entering ‘regular expression’ formulas.
A separate user guide for Validation Patterns can be found here.

August 2018 Copyright by SourceDogg 9
Supplier Relationship Management User Guide
ww
w.s
ou
rced
ogg
.co
m
2. Background Colour - Users can define the background colour of the custom field. To do so,
click on the grey square at the end of the Background Colour field and the colour palette will
appear. Once the colour is selected, the colour code will be populated into the field in the
‘Settings’ section, and the coloured field will be observed in the SRM.

August 2018 Copyright by SourceDogg 10
Supplier Relationship Management User Guide
ww
w.s
ou
rced
ogg
.co
m
3. Dropdown Custom List - is used to give users the option to select from a list of pre-defined
values, when entering information for SRM. When creating a Dropdown Custom Field, users
can select from previously created Lists or can create a new one. To create a new Dropdown
Custom List please go to Settings > Dropdown Custom Lists > Add Custom List
4. Allow paragraph of text - This allows users to enter a paragraph of text rather than just one
line of text.
5. Permissions - Here you can define the permissions for the individual custom field.
You can choose to make this custom field visible to suppliers or not while you can also define
what members of your SRM team can view the custom field.

August 2018 Copyright by SourceDogg 11
Supplier Relationship Management User Guide
ww
w.s
ou
rced
ogg
.co
m
6. Triggers - it is possible to set up triggers based on the values that are entered into the
custom field and the consequent action that occurs if the defined value is entered.
The example above can be used in the process of Continuous Supplier Performance Evaluation and if
a score of a supplier drops below designated point, Users will be blocked from adding them to
requests and they will be removed from the Supplier Pool.

August 2018 Copyright by SourceDogg 12
Supplier Relationship Management User Guide
ww
w.s
ou
rced
ogg
.co
m
Where to find SRM
The SRM module can be found from your SourceDogg homepage through 2 areas – The ‘Supplier
Management’ option in the black bar at the top of the page or through the yellow ‘Manage
Suppliers’ tile.
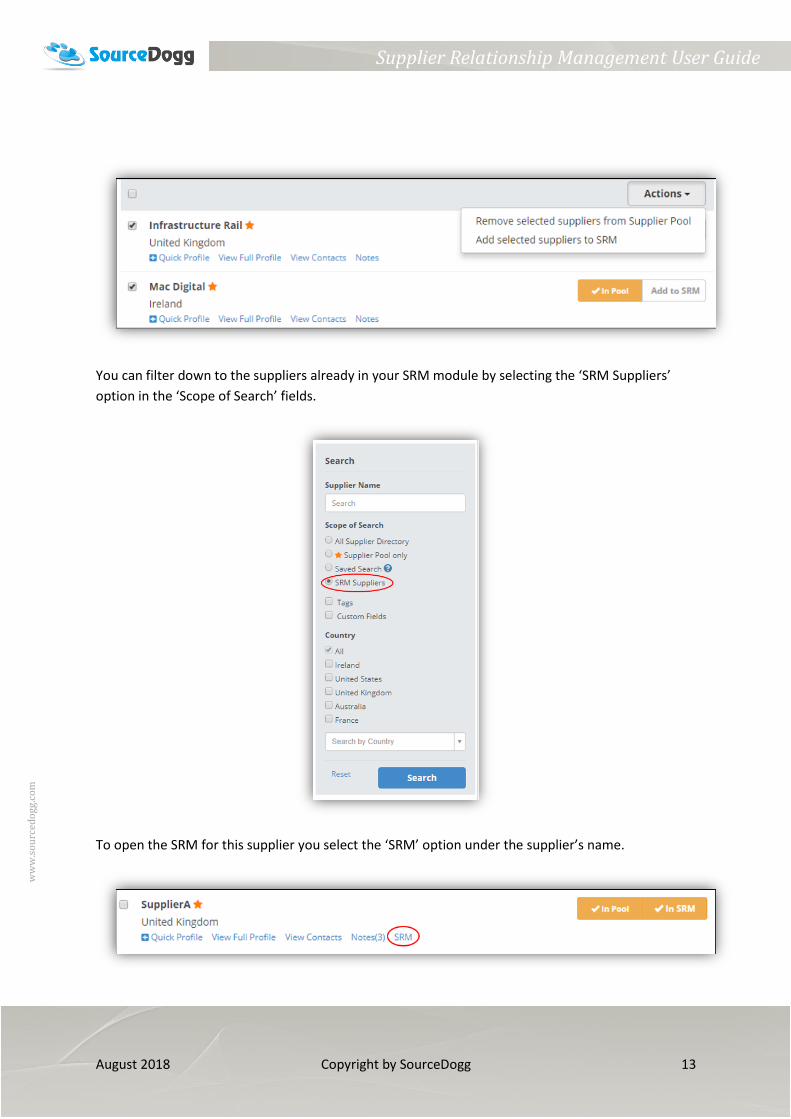
When looking at your full Supplier Directory you can add suppliers to your SRM by clicking on the
‘Add to SRM’ button opposite the company’s name.
You can add multiple suppliers at one time by ticking the box to the left of the company name and
then choosing ‘Add selected suppliers to SRM’ from the ‘Actions dropdown menu.
August 2018 Copyright by SourceDogg 13
Supplier Relationship Management User Guide
ww
w.s
ou
rced
ogg
.co
m
You can filter down to the suppliers already in your SRM module by selecting the ‘SRM Suppliers’
option in the ‘Scope of Search’ fields.
To open the SRM for this supplier you select the ‘SRM’ option under the supplier’s name.

August 2018 Copyright by SourceDogg 14
Supplier Relationship Management User Guide
ww
w.s
ou
rced
ogg
.co
m
Alternatively you can get there by clicking on ‘SRM Profile’ when you are viewing the supplier’s full
profile.
SRM Page
This is where you manage the relationship you have with each Supplier. Below is an example of the
‘Overview’ tab which is a breakdown of all performance reviews and improvement actions. Later
sections in this guide cover the Review, Key Actions, SRM Team, and Notes areas.

August 2018 Copyright by SourceDogg 15
Supplier Relationship Management User Guide
ww
w.s
ou
rced
ogg
.co
m
1. Search - When viewing your supplier relationship you can also search for other suppliers.
2. View Main Profile – This brings you back to this suppliers full Profile page.
3. Outstanding Actions – The number of actions still to be carried out by either the buyer or
the supplier, these are created in the ‘Key Actions’ tab.
4. Next Review – This gives you the date when the next review is and how many will attend.
This is managed from the ‘Reviews’ tab and clicking on the date will take you to the review
details.
5. Key Stats – This tells you the number of expired certificates this supplier has provided you
with, and the expired contracts that they are listed as a participant in.
6. Key Perfomance Indicators – These are created in your ‘Settings’ and can be selected for
Actions in the ‘Key Actions’ tab. See section ‘KPI Custom Fields’ above.
Reviews
The ‘Reviews’ tab is where you create and manage any performance related reviews you arrange
with your suppliers.
The information covered in this view includes: - The date of the review - Any notes you have included - How many will be attending it - Whether the review is upcoming or if it’s been completed.
To create a new review, click on ‘Add Review’ (1). To edit/delete an existing review, click on the cog
(2) opposite the review you want to change.
August 2018 Copyright by SourceDogg 16
Supplier Relationship Management User Guide
ww
w.s
ou
rced
ogg
.co
m
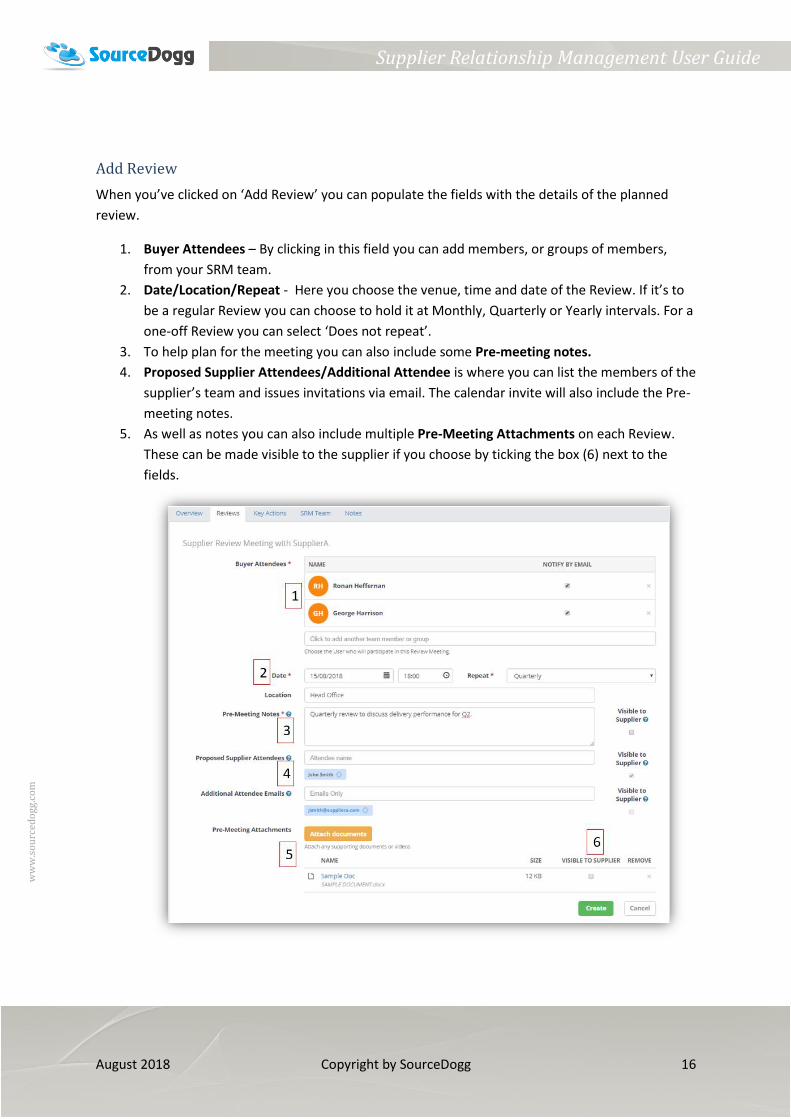
Add Review
When you’ve clicked on ‘Add Review’ you can populate the fields with the details of the planned
review.
1. Buyer Attendees – By clicking in this field you can add members, or groups of members,
from your SRM team.
2. Date/Location/Repeat - Here you choose the venue, time and date of the Review. If it’s to
be a regular Review you can choose to hold it at Monthly, Quarterly or Yearly intervals. For a
one-off Review you can select ‘Does not repeat’.
3. To help plan for the meeting you can also include some Pre-meeting notes.
4. Proposed Supplier Attendees/Additional Attendee is where you can list the members of the
supplier’s team and issues invitations via email. The calendar invite will also include the Pre-
meeting notes.
5. As well as notes you can also include multiple Pre-Meeting Attachments on each Review.
These can be made visible to the supplier if you choose by ticking the box (6) next to the
fields.

August 2018 Copyright by SourceDogg 17
Supplier Relationship Management User Guide
ww
w.s
ou
rced
ogg
.co
m
Attach Documents
If you have clicked on ‘Attach Documents’ (1) this will bring up a list of the documents stored in your
Documents library. You can also choose from the documents saved on your own computer by
selecting the ‘My Computer’ (2) option.
When you have located the document you want to upload, click on Add (3) and then Close (4). This
will save the document to the Review.
Both Buyer and Suppliers will receive reminders in advance of an SRM review meeting.

August 2018 Copyright by SourceDogg 18
Supplier Relationship Management User Guide
ww
w.s
ou
rced
ogg
.co
m
Updating a Review
After the review meeting occurred, you can update the progress on SourceDogg by clicking on the
wheel opposite it and selecting ‘Log Meeting Details’.
This page carries over the details from the pre-meeting notes and similar to when you created the
Review, you can include some post meeting notes and any documents that resulted from the
meeting and these can be shared with the supplier when you tick the box beside each field.

August 2018 Copyright by SourceDogg 19
Supplier Relationship Management User Guide
ww
w.s
ou
rced
ogg
.co
m
Key Actions
You can create actions to be completed by your own team or suppliers. Users will need to upload
evidence of completion and have this reviewed before the actions is marked as completed and
closed. These actions can be assigned to buyers or suppliers.
From this view you can filter the Actions through 4 different filters (1) – ‘Type’, ‘Status’, ‘Aggregate
Filter’ and the fourth filter ‘Options’ is a further filter depending on what Aggregate Filter you have
chosen. These will be covered in more detail in a following section. You can also change the order in
which the Actions appear by clicking on the different column headers.
To create a new Key Action, click on ‘Add Key Action’ (2)
To edit/delete a ‘Created’ Key Action, click on the cog (3) opposite the review you want to change.
For a ‘Completed’ Key Action the wheel allows you to view the details or to delete it.

August 2018 Copyright by SourceDogg 20
Supplier Relationship Management User Guide
ww
w.s
ou
rced
ogg
.co
m
Add Key Action
When you’ve clicked on ‘Add Key Action’ you can populate the field for the action that resulted from
a Review.
1. Type/Priority: You choose whether it’s to be an action for the buyer or supplier to complete
and what level of importance it has – Lowest, Low, Medium, High and Highest.
2. Due Date: What time and date it is due to be completed by.
3. Associated KPI: This box gives you a dropdown list of the KPIs you created through your
Settings and are listed on the Overview tab.
4. Associated Review: Here you choose in which Review the Action was decided; this
dropdown will give you a list of the Reviews you have previously created.
5. Description: This provides details as to what the Action involves and what is to be
completed.
6. Assigned to: What member of this SRM team is responsible for the Action. If this is a
supplier action you don’t have to assign it to anyone, the supplier will be completing it.
7. Notes: As with Reviews you can attach any supporting documents for the Action.

August 2018 Copyright by SourceDogg 21
Supplier Relationship Management User Guide
ww
w.s
ou
rced
ogg
.co
m
Action Status
The path of an Action’s status is as follows:
Created > For approval > Completed/Incomplete > Reassigned > Completed
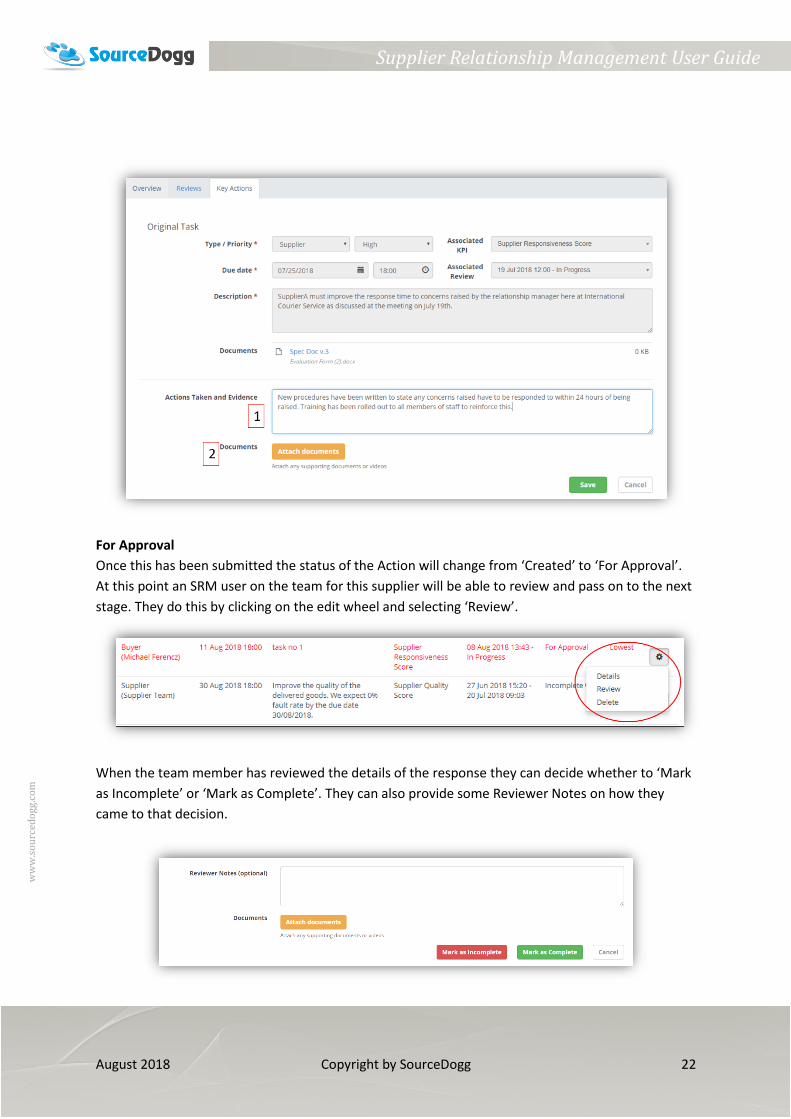
Created
When an Action has been created and assigned the person responsible must complete it by the due
date. When they have done so, the status will need to be progressed. To do this click on the edit
wheel opposite the Action and choose ‘Log as Complete’.
Here, the person responsible for the Action needs to populate the ‘Actions Taken and Evidence’ box
(1) and provide any supporting documentation (2).
August 2018 Copyright by SourceDogg 22
Supplier Relationship Management User Guide
ww
w.s
ou
rced
ogg
.co
m
For Approval
Once this has been submitted the status of the Action will change from ‘Created’ to ‘For Approval’.
At this point an SRM user on the team for this supplier will be able to review and pass on to the next
stage. They do this by clicking on the edit wheel and selecting ‘Review’.
When the team member has reviewed the details of the response they can decide whether to ‘Mark
as Incomplete’ or ‘Mark as Complete’. They can also provide some Reviewer Notes on how they
came to that decision.

August 2018 Copyright by SourceDogg 23
Supplier Relationship Management User Guide
ww
w.s
ou
rced
ogg
.co
m
Incomplete
If, upon review, the reviewer feels the task has not been sufficiently completed, they can choose the
‘Mark as Incomplete’ option and provide reasons for this. This changes the status of the Action to
‘Incomplete’ at which point the SRM Admin can choose to reassign the task or to delete it.
Reassigned
When the Admin chooses to reassign the Action, the status will change to ‘Reassigned’ at which
point the person responsible will be able to record any actions taken and provide any supporting
documentation and resubmit to be reassessed.
Completed
If, upon review, the reviewer is satisfied with the work done regarding the Action, they choose the
‘Mark as Complete’ option and provide reasons for this.

August 2018 Copyright by SourceDogg 24
Supplier Relationship Management User Guide
ww
w.s
ou
rced
ogg
.co
m
This will change the status of the Action to ‘Completed’.
Key Action Filters
As mentioned in the ‘Key Action’ section, there are four filter boxes for your list of Key Actions.
1. Type – filters to who is responsible for the action, the Buyer or Supplier.
2. Status – Whether the action is:
(i) Created – The Action was created from a Review, and a member of your team or the
supplier is to work on it
(ii) Reassigned – When you have reviewed an Action and marked it as Incomplete, you
can then delete the Action or Reassign it to the Supplier
(iii) For Approval – This is a supplier Action and the supplier has told you it is completed
on their end and it is there for you and your team to approve
(iv) Incomplete – When reviewing a Supplier Action if you feel there is more to be done
on it, you can mark it as ‘incomplete’
(v) Completed – You choose this when a Buyer or Supplier Action is completed to your
satisfaction

August 2018 Copyright by SourceDogg 25
Supplier Relationship Management User Guide
ww
w.s
ou
rced
ogg
.co
m
Aggregate Filter & Options – When you choose one of the selections from the ‘Aggregate Filter’ list
you activate the ‘Options’ dropdown. I have listed the various permutations below.
Associated KPI – This will filter your list to show you the Actions that contain this KPI.

August 2018 Copyright by SourceDogg 26
Supplier Relationship Management User Guide
ww
w.s
ou
rced
ogg
.co
m
Associated Review – This will filter your list to show you the Actions connected to this Review.
Assigned To – This will filter your list to show you the Actions that have been assigned to this SRM
Admin, Editor or Reader.

August 2018 Copyright by SourceDogg 27
Supplier Relationship Management User Guide
ww
w.s
ou
rced
ogg
.co
m
Date Range - This will filter your list to show you the Actions that were scheduled between those
dates.
SRM Team
The SRM Team tab is where SRM Admins can select the team that is to manage this supplier.
To add a member to this SRM team simply click in the box (1) and the list of SRM Admins, Editors
and Readers will show and you can choose from this list.

August 2018 Copyright by SourceDogg 28
Supplier Relationship Management User Guide
ww
w.s
ou
rced
ogg
.co
m
You can also choose to drop in a User Group as shown in the previous section – Organisational
Groups.
Notes
The Notes section allows SRM Admins and Editors to make Internal Notes if necessary. Files can also
be attached (1) here. For audit purposes any Note recorded cannot be removed.
The SourceDogg Note feature allows the User to ‘Save’ (2) the Note as a draft before finalising it.
Each Note is date and time stamped (3) and the User who created the note is recorded.