Embed Size (px)
Citation preview
ProgressBook SpecialServices User Guide

© 2015 Software Answers, Inc. All Rights Reserved. All other company and product names included in this material may be Trademarks, Registered Trademarks or Service Marks of the companies with which they are associated. Software Answers, Inc. reserves the right at any time and without notice to change these materials or any of the functions, features or specifications of any of the software described herein.
ProgressBook SpecialServices User Guide(This document is current for v15.0.0 or later.)
Software Answers, Inc. www.progressbook.com6770 Snowville Rd., Suite 200 www.software-answers.comBrecksville, Ohio 44141
Change Log
The following Change Log explains by Product Version, Heading, Page and Reason where changes in the ProgressBook SpecialServices User Guide have been made.
ProductVersion
Heading Page Reason
15.0.0 Entire guide N/A Removed all references to integration with student information systems other than ProgressBook StudentInformation.
15.0.0 “Administrator Home Page” N/A Deleted section since non-administrative users cannot access this functionality.
15.0.0 “Import Phrases from Bank” N/A Removed section. This functionality is being redesigned and is covered in a different topic.
15.0.0 “Add Standards” N/A Removed section. This functionality is being redesigned and is not currently available.
15.0.0 “Automatic Sign Out” 5 Revised wording to clarify meaning.
15.0.0 “Set Student Properties” 24 Updated and renamed previous “Modify Student Properties” topic to reflect redesigned Student Properties window with contact information coming live from StudentInformation.
15.0.0 “Add Forms” 39 Updated topic to reflect change in procedure to no longer require separate step to create pages.
15.0.0 “Edit Pages” 43 Replaced introduction with links to tasks. Updated images of several page edit screen to show removal of Bank Import button.
15.0.0 “Navigate to Pages on the Quick Task Menu”
49 Updated section to reflect redesigned Quick Task Menu area.
15.0.0 “Import Contact Information” 50 Renamed and updated “Import Parent Information” topic to reflect new functionality that allows importing of all non-professional contacts.
15.0.0 “Complete Pages” 61 Updated image of page edit screen to show removal of Bank Import button.
15.0.0 “User Banks” 75 Renamed and rewrote previous Set Up User Banks chapter to include topics on creating bank items from both within and outside forms and inserting bank items into forms.
15.0.0 “View the EMIS Data Collection Form for Completed Tasks”
123 Updated image of EMIS Data Collection Form to show removal of field representing “grade next.”
14.7.0 “Edit Pages” 43 Updated images of Page Edit screen to show newly abbreviated Incl. Pg. No. and Incl. Watermark check box labels.
Removed references to “web forms.”
14.7.0 “Rich Text Fields” 45 Added section.
ProgressBook SpecialServices User Guide i
Change Log
14.7.0 “Close Pages” 49 Updated steps based on new Confirmation window and deleted save confirmation message that displayed even if no changes were present.
14.7.0 “Navigate to Pages on the Quick Task Menu”
49 Updated steps based on new Confirmation window and deleted save confirmation message that displayed even if no changes were present.
14.7.0 “Print Student Forms” 60 Updated image of Page Edit screen to show newly abbreviated Incl. Pg. No. and Incl. Watermark check box labels.
14.7.0 “Complete Pages” 61 Updated image of Page Edit screen to show newly abbreviated Incl. Pg. No. and Incl. Watermark check box labels.
14.7.0 “Verify EMIS” 63 Updated image of EMIS Data Collection Form to show new SEMD line.
14.7.0 “View IEP Summary Report” 72 Updated steps and image for rewritten IEP Summary Report.
14.7.0 “View the EMIS Data Collection Form for Completed Tasks”
123 Updated image of EMIS Data Collection Form to show new SEMD line.
14.6.0 Entire Guide N/A Updated all images of the Open Tasks screen that showed “Optional” forms to show as “Additional” instead.
Changed all “optional” form references to “additional.”
Updated all images of the Open Tasks screen to include the new Include Page Numbers and Include Draft Watermark print options.
14.6.0 Entire Guide N/A Updated all images of page edit screens to include the new Include Page Numbers and Include Draft Watermark print options.
14.6.0 “Modify Student Properties” N/A Updated text and image of Student Properties window to include new District ID and Date of Birth fields.
14.6.0 “SpecialServices Tasks” 26 Removed FIEP task and added Summary of Performance task.
14.6.0 “Add Forms” 39 Renamed “Add Optional Forms” topic and updated text and images to show renamed Add a Form window and the change from “Optional” to “Additional” on the form name.
14.6.0 “Delete Added Forms” 41 Renamed “Delete Optional Forms” topic and updated text to reflect renaming of “Optional” to “Additional” forms.
14.6.0 “Import Contact Information” 50 Updated section to include the General Invitation form.
14.6.0 “Print Student Forms” 60 Updated procedure and image to include new options to Include Page Numbers and Include Draft Watermark.
14.6.0 “View the EMIS Data Collection Form for Completed Tasks”
123 Updated image of EMIS Data Collection Form to show removal of FIEP task and availability of the PSTC Outcome ID field.
14.5.0 Entire Guide N/A Removed all references to Adobe Live Cycle.
14.5.0 “Print Blank Forms” 117 Updated procedure to show new option to choose individual blank forms to print.
ProductVersion
Heading Page Reason
ii ProgressBook SpecialServices User Guide

Change Log
14.3.0 “Modify Student Properties” N/A Updated note to reflect changed process for saving changes made to Student Properties.
14.3.0 “Print Blank Forms” 117 Updated screen shot and table to include new available Section 504 forms.
14.2.0 Entire Guide N/A Added links to demonstration videos.
14.2.0 “Change View” 7 Added section describing the ability to switch between schools and classes for users who have access to both.
14.1.1 “View the EMIS Data Collection Form for Completed Tasks”
123 Updated screen shot to show additional EMIS selection items.
Updated screen shot to show availability of IISP and RISP start and end dates on the EMIS Data Collection Form.
14.1.0 “Find the Information You Need” 1 Updated link to the Knowledge Base.
14.1.0 “Create New Tasks” 26 Updated screen shots to reflect renamed Due Date field in the Start a New Task window.
14.1.0 “EMIS” 121 Updated screen shot to show additions to the EMIS Selection Form.
ProductVersion
Heading Page Reason
ProgressBook SpecialServices User Guide iii

Change Log
This page intentionally left blank.
iv ProgressBook SpecialServices User Guide

Table of Contents
Change Log i
Welcome to SpecialServices 1
Find the Information You Need ................................................................................... 1
Use SpecialServices Help ........................................................................................... 1
Access SpecialServices .............................................................................................. 2
Sign In to SpecialServices..................................................................................... 3
Sign Out of SpecialServices.................................................................................. 5
Automatic Sign Out ............................................................................................... 5
Navigate SpecialServices............................................................................................ 6
Change Districts .................................................................................................... 7
Change View......................................................................................................... 7
Select Students ..................................................................................................... 7
Navigate ProgressBook .............................................................................................. 9
Special Education Process Flow................................................................................. 9
Task Queue 11
Change Task Display Options on the Task Queue Screen ....................................... 13
Class List Option in the Narrow Results Area ..................................................... 14
Student Search Option in the Narrow Results Area ............................................ 14
Priority Option in the Narrow Results Area.......................................................... 15
Pages Complete Option in the Narrow Results Area .......................................... 16
Due Date Option in the Narrow Results Area...................................................... 17
Task Group Option in the Narrow Results Area .................................................. 19
Only Tasks I Have Worked On Option in the Narrow Results Area..................... 20
View Tasks ................................................................................................................ 20
Delete Tasks.............................................................................................................. 21
Sort Tasks in the Task Results Area.......................................................................... 21
Open Tasks 23
Set Student Properties .............................................................................................. 24
Create New Tasks..................................................................................................... 26
Creating a New Task ........................................................................................... 29
Create a New Task from an Existing Task........................................................... 31
Rename Open Tasks................................................................................................. 34
ProgressBook SpecialServices User Guide v

Create New Pages.....................................................................................................35
Creating a New Page...........................................................................................35
Creating a New Page from an Existing Page.......................................................37
Add Forms .................................................................................................................39
Delete Added Forms ............................................................................................41
Edit Pages..................................................................................................................43
Open Pages .........................................................................................................43
Save Pages..........................................................................................................47
Close Pages.........................................................................................................49
Navigate to Pages on the Quick Task Menu ........................................................49
Import Contact Information ..................................................................................50
Rename Pages ....................................................................................................52
Lock Pages ..........................................................................................................53
Delete Pages .......................................................................................................55
Add Attachments........................................................................................................55
Upload Pages ............................................................................................................57
Delete Uploaded Pages .......................................................................................58
Add Tasks as Priority Tasks on the Task Queue Screen............................................58
Print Student Forms ...................................................................................................60
Complete Pages ........................................................................................................61
Verify EMIS ................................................................................................................63
Complete Tasks .........................................................................................................64
Completed Tasks 67
View Completed Tasks...............................................................................................67
Rename Completed Tasks.........................................................................................68
Delete Completed Tasks ............................................................................................69
View Archived Forms .................................................................................................69
Rename Archived Forms .....................................................................................71
Delete Archived Forms ........................................................................................72
View IEP Summary Report ........................................................................................72
User Banks 75
Create Bank Items Within Forms...............................................................................75
Modify Bank Items Within Forms .........................................................................79
Create Bank Items Outside Forms.............................................................................79
Insert Bank Items Into Forms.....................................................................................79
Reports 85
vi ProgressBook SpecialServices User Guide

Report Builder Reports ..............................................................................................85
Report Screen......................................................................................................86
Open Tasks Report ..............................................................................................87
Completed Tasks Report......................................................................................91
Due Date Report ..................................................................................................94
Accommodations Report......................................................................................97
Student Demographics Report...........................................................................101
EMIS Related Services Report ..........................................................................105
EMIS Special Ed Events Report ........................................................................109
Report Builder Reports Available Features........................................................113
Progress Reports 115
Print Progress Reports.............................................................................................115
Blank Forms 117
Print Blank Forms ....................................................................................................117
EMIS 121
How Tasks Are Selected by Date Range in EMIS ...................................................122
View the EMIS Data Collection Form for Completed Tasks.....................................123
ProgressBook SpecialServices User Guide vii

This page intentionally left blank.
viii ProgressBook SpecialServices User Guide

Welcome to SpecialServices
SpecialServices focuses on the tasks special educators perform to identify, evaluate and monitor a student's progress in a special education program by providing the state and district forms necessary for each stage of the process. SpecialServices keeps the state required forms up-to-date, so districts can remain in compliance with state and federal laws. SpecialServices also contains a state reporting tool to extract information entered onto the forms for Individualized Education Plans (IEPs), Evaluation Team Reports (ETRs), Individual Service Plans (ISPs) and other required forms in the state mandated format. This information can then be imported into StudentInformation or a state data collection tool.
Find the Information You Need
The following sources of information are available to assist you while you are using SpecialServices:
• Tool Tips – To view a description of a button or symbol, place your cursor over the icon.
• SpecialServices Help – Click Help on any screen to display information that describes the main task being performed on that screen.
• Knowledge Base – To access the ProgressBook Suite Knowledge Base, click http://kb.progressbook.com. The Knowledge Base contains the following documentation:
• SpecialServices Release Notes
• SpecialServices Product Guides
• Knowledge Base Articles
• Contact Us Link – Click Contact Us on the banner to send an email to the SpecialServices Support Team. Use this feature to request support and provide valuable feedback on the SpecialServices application.
Use SpecialServices Help
Online Help provides overview, procedural and reference information about SpecialServices. View the help topic related to the screen you are viewing by clicking Help in the banner.
SpecialServices Help displays in a separate browser window where you can browse the Table of Contents for specific topic titles, search for information in the Index by using keywords or type a word or phrase in the Search field to return a list of possible help topics.
Note: Due to a known issue with the Search feature, if you do not find the help topic you need, try adding an asterisk (*) to the end of your search term to improve your search results.
To print a help topic, click the Print icon located in the Navigation pane of the SpecialServices Help window, and then click Print on the Print window.
ProgressBook SpecialServices User Guide 1

Welcome to SpecialServices
Access SpecialServices
Before you start using SpecialServices, you must sign in. There are three ways to access SpecialServices:
1. If you are already logged in to another ProgressBook application, you can access SpecialServices by clicking the application quick launch icon in the banner beside the application’s logo and clicking SpecialServices. SpecialServices opens in a new window or tab, depending on your browser settings.
2. Teachers in ProgressBook GradeBook with the security privileges to view or edit
SpecialServices tasks can access the forms for their students by clicking next to the student’s name on the Class Dashboard. This icon displays for students with completed tasks in SpecialServices. It appears for 13 months after the last task was completed.
Help Link in SpecialServices
SpecialServices Logo on GradeBook Banner Drop-Down List
2 ProgressBook SpecialServices User Guide

Welcome to SpecialServices
3. If you are not already signed in to ProgressBook CentralAdmin or if your district provides stand-alone access to SpecialServices via a URL, you must sign in. See “Sign In to SpecialServices.”
Sign In to SpecialServicesYou access SpecialServices by signing in from the ProgressBook CentralAdmin login screen.
1. In a web browser, enter the URL provided by your district.
The ProgressBook CentralAdmin login screen displays.
Access SpecialServices from Class Dashboard
ProgressBook CentralAdmin Login Screen
ProgressBook SpecialServices User Guide 3

Welcome to SpecialServices
2. On the CentralAdmin login screen, in the Domain list, select your domain.
Note: Once you select a domain, the system remembers the last domain accessed on the current computer.
Note: If you do not select a domain, you receive the following message: “Please select your domain.”
3. In the User Name field, enter your user name.
Note: If you do not enter a user name, you receive the following message: “Please enter your user name.”
4. In the Password field, enter your password.
Note: By default, password requirements are eight characters with at least one uppercase letter, one lowercase letter, one number and one special character; however, your district may have different requirements.
Note: If you do not enter a password, your receive the following message: “Please enter your password.”
5. Click Sign In.
Note: Signing in to any ProgressBook application signs you in to all ProgressBook applications to which you have access.
Your default home page displays, based on security as follows:
• For users with editing privileges, the Task Queue screen opens, displaying the first 50 open tasks in ascending order in the Due column. The tasks for students that display are based on the default Narrow Results area view, which is All classes, no student selected, All priorities, Any completed pages, due in the Next 30 days and IEP and ETR task groups.
• For users with read-only privileges, the Completed Tasks screen opens, enabling you to access the completed tasks for the students to whom you have access.
• For users with administrative privileges, the Administrator Home Page displays, enabling you to perform a variety of administrative functions. For more information, see the ProgressBook SpecialServices System Manager Guide.
Note: If you have access to multiple districts, the first time you log in to SpecialServices, you are logged in to the first district listed alphabetically in the district selection drop-down list. On subsequent logins, the district selection defaults to the last district you selected on the current machine. To change districts, see “Change Districts.”
4 ProgressBook SpecialServices User Guide

Welcome to SpecialServices
Sign Out of SpecialServicesIt is recommended that you sign out of SpecialServices if you plan to leave your computer unattended for any length of time where someone might have access to it. To sign out, on the banner, click Logout.
The CentralAdmin sign out screen displays, confirming that you are signed out.
Note: Signing out of SpecialServices also signs you out of all ProgressBook applications to which you have access.
Note: Click Sign In to sign in again. For more information about signing in, see “Sign In to SpecialServices.”
Automatic Sign OutTo prevent unauthorized use, ProgressBook automatically signs you out after a period of inactivity, the length of which is defined by your system administrator. The timer calculating inactivity is reset each time you perform an activity anywhere in the ProgressBook suite.
Be sure to save your form data frequently. If you are editing a form in SpecialServices and click one of the save button options and get the timeout message, you are allowed to sign back in, and your changes are saved. However, if you are editing a form and try to close it (or navigate away from it) and get the timeout message, any unsaved changes are not saved, and you cannot retrieve them by signing back in.
Note: There is an exception for the EMIS Data Collection Form for Students with Disabilities. If you are signed out due to inactivity while attempting to save information on that form, your information is not saved!
Logout Option
ProgressBook CentralAdmin Sign Out Screen
ProgressBook SpecialServices User Guide 5

Welcome to SpecialServices
Navigate SpecialServices
The banner, which appears at the top of every screen, enables you to navigate to the main screens in SpecialServices. The screens you can access depend on the security role assigned to your user account. The banner contains the buttons described in “Banner Buttons.”
Banner Buttons
SpecialServices Banner
Buttons Label Description
Task Queue Displays the first 50 open tasks in ascending order in the Due column. The tasks for students that display are based on the default Narrow Results area view, which is All classes, no student selected, All priorities, Any completed pages, due in the Next 30 days and IEP and ETR task groups.
Open Tasks Enables you to work on a specific task for a student. You can create and edit the pages of a student’s task on this screen as well as start a new task.
Completed Tasks Displays the completed tasks for a student. You can view, but not edit, any tasks listed on this screen.
D2D Enables you to transfer a student’s forms to another district or import a student’s forms into your district. You must have district transfer security privileges to access this screen.
Report Enables you to run reports on the information in certain tasks. You can also access the Class Print screen to print progress reports and Print Blank Forms screen to print blank versions of certain forms.
EMIS Accesses the EMIS Tools from which you can, depending on your security role, run the EMIS Review Report, view or edit the completed EMIS Data Collection Form, build and process the EMIS Extract and view the EMIS transaction log.
Setup Enables you to set up User Banks.
Admin Accesses the Administrator Home Page. Only users assigned the School Administrator or Master role in ProgressBook GradeBook can access this screen.
When the screen is open, the button displays shaded.
6 ProgressBook SpecialServices User Guide

Welcome to SpecialServices
Change DistrictsIf you have access to multiple districts in SpecialServices, you can switch between them at any time while signed in. On the district selection drop-down list, select the district.
You are signed in to the selected district, and your default home page displays.
Change ViewIf you have both school and class access, a View option appears on all active district switching pages to allow you to switch between schools and classes.
Select StudentsThe Open Tasks and Completed Tasks screens both display tasks for a single student. The search fields available for locating the student whose task(s) you want to view vary depending on the level of access assigned to your user account.
If you can only view those students in your assigned classes, the Class drop-down list displays. Select a class to populate the Student drop-down list with those students who are assigned to the class. In the Student drop-down list, you can then select the student whose tasks you want to view.
Change District Option
View Schools and Classes
Class List on Open Tasks Screen
ProgressBook SpecialServices User Guide 7

Welcome to SpecialServices
If you can view students in one or multiple schools and you have no classes assigned to you, the School drop-down list displays. You can perform the following steps to select the student:
1. In the Building drop-down list, select a school.
The Student drop-down list populates with those students who are assigned to the selected school.
2. To further narrow your search, in the Last Name field, enter all or part of the student’s last name, and then click Filter.
The Student drop-down list populates with only the students whose last name matches or most closely matches the criteria entered in the Last Name field.
3. In the Student drop-down list, select the student.
Class List on Completed Tasks Screen
School Drop-down List and Last Name Search Field on Open Tasks Screen
School Drop-down List and Last Name Search Field on Completed Tasks Screen
Search by student’s last name.
Search by student’s last name.
8 ProgressBook SpecialServices User Guide

Welcome to SpecialServices
Navigate ProgressBook
You can use the application quick launch to easily navigate between ProgressBook applications.
1. In the banner, to the right of the SpecialServices logo, click the application quick launch icon.
In the application quick launch area, logos display for all other ProgressBook applications that are registered in CentralAdmin.
2. To open another application that you are authorized to use, click the application’s logo.
The application opens in another window or tab, depending on your browser’s settings.
Note: To close the application quick launch without navigating to another application, click the application quick launch icon again, or click the screen anywhere outside the application quick launch area.
Special Education Process Flow
SpecialServices is designed to follow federal and state mandated time lines and procedures. To accommodate these requirements, SpecialServices uses tasks that correspond with special education events and contain required and additional forms to complete the task. For more information about each of the tasks, see “SpecialServices Tasks.”
In SpecialServices, an open task is the task in which the members of a special education team are editing the forms. Only users with the appropriate security privileges can view or edit open tasks; users with view-only access to SpecialServices cannot access open tasks.
Once the task is complete, a member of the team handling the task must complete the task to allow users with view-only access to view the effective version of the forms. You might complete a task to keep a historical copy of a draft form set, such as an IEP, or only when the effective version of the form set is implemented.
The last component of the special education process that SpecialServices provides is EMIS reporting. Certain tasks, such as an initial IEP or review ETR, are reported to the state to ensure compliance with the federal and state mandated standards and ensure funding of special education programs for the district. The EMIS Extract—as well as the EMIS reporting tools—only select data from completed tasks.
The following illustration shows the special education process flow, the corresponding tasks provided by SpecialServices and the forms associated with each task.
Application Quick Launch
ProgressBook SpecialServices User Guide 9

Welcome to SpecialServices
10 ProgressBook SpecialServices User Guide

Task Queue
For users with the appropriate security privileges to create and modify open tasks, the Task Queue is the first screen that displays when you access SpecialServices. You can access the
Task Queue from any screen in the application by clicking Task Queue on the banner. If tasks have been created for students to whom you have access or for whom you have previously created a task, the open tasks that meet the filter criteria in the Narrow Results area display on the Task Queue screen in the task results area.
Note: The tasks you select as priority only appear as priority tasks for your login account. Other users may select different tasks to display as priority. For more information about adding tasks as priority tasks, see “Add Tasks as Priority Tasks on the Task Queue Screen.”
For users with editing privileges, the Task Queue screen opens, displaying the first 50 open tasks in ascending order in the Due column. The tasks for students that display are based on the default Narrow Results area view, which is All classes, no student selected, All priorities, Any completed pages, due in the Next 30 days and IEP and ETR task groups.
Task Queue Screen Narrow Results Area Default View
Narrow Results Area Default View
ProgressBook SpecialServices User Guide 11
Task Queue
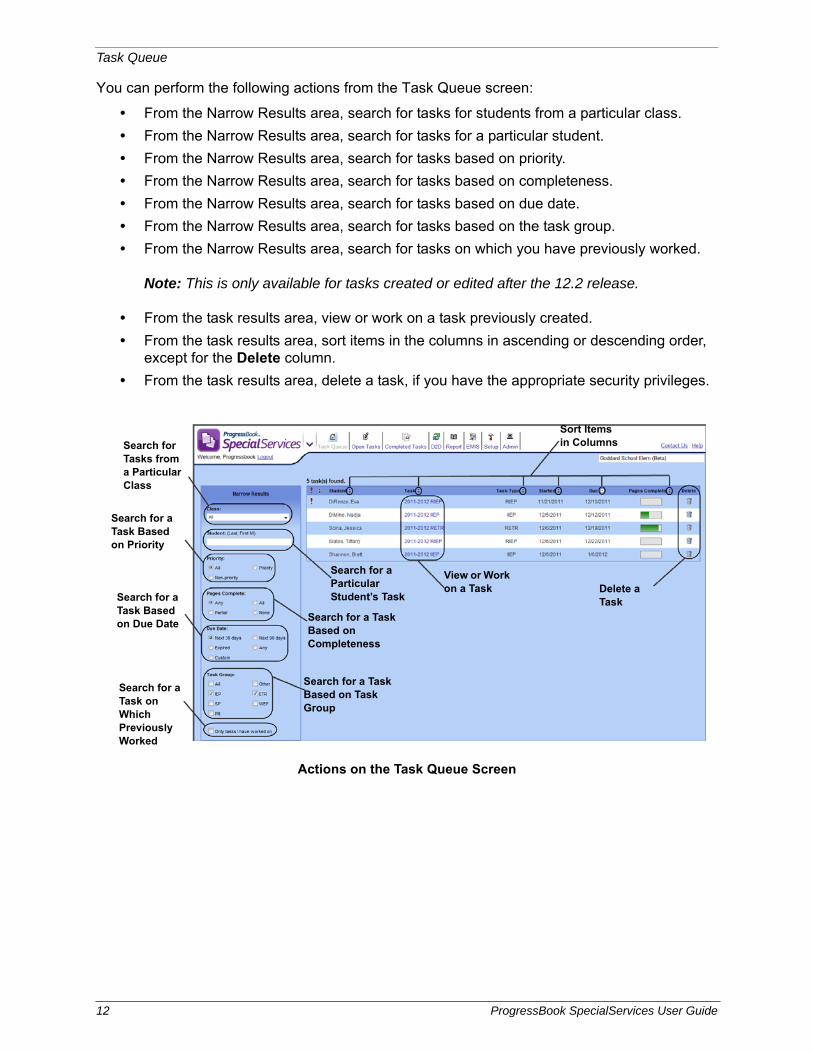
You can perform the following actions from the Task Queue screen:
• From the Narrow Results area, search for tasks for students from a particular class.
• From the Narrow Results area, search for tasks for a particular student.
• From the Narrow Results area, search for tasks based on priority.
• From the Narrow Results area, search for tasks based on completeness.
• From the Narrow Results area, search for tasks based on due date.
• From the Narrow Results area, search for tasks based on the task group.
• From the Narrow Results area, search for tasks on which you have previously worked.
Note: This is only available for tasks created or edited after the 12.2 release.
• From the task results area, view or work on a task previously created.
• From the task results area, sort items in the columns in ascending or descending order, except for the Delete column.
• From the task results area, delete a task, if you have the appropriate security privileges.
Actions on the Task Queue Screen
Delete a Task
Sort Items in Columns
View or Work on a Task
Search for Tasks from a Particular Class
Search for a Particular Student’s Task
Search for a Task Based on Priority
Search for a Task Based on Completeness
Search for a Task Based on Due Date
Search for a Task Based on Task Group
Search for a Task on Which Previously Worked
12 ProgressBook SpecialServices User Guide

Task Queue
Change Task Display Options on the Task Queue Screen
You can change the tasks that display on the Task Queue screen by selecting the filter criteria in the Narrow Results area. You can filter the displayed tasks by class, student, priority, completeness, due date, task group and tasks on which you previously worked.
Note: If there are no tasks that meet your search criteria, the following message displays in the task results area, “No tasks found.”
When you access the Task Queue screen in the Narrow Results area, the options default to the following:
• The Class drop-down list defaults to All.
• The Student field is empty.
• The Priority option defaults to All.
• The Pages Complete option defaults to Any.
• The Due Date option defaults to Next 30 days.
• The Task Group option defaults to IEP and ETR.
• The Only tasks I have worked on option is not selected.
Note: Once you navigate from the Task Queue screen, the values in the Narrow Results area remain on the filter options you selected. These values remain for as long as you are in SpecialServices for that session.
Task Queue Screen Filter Options in the Narrow Results Area
Search for Tasks from a Particular Class
Search for a Particular Student’s Task
Search for a Task Based on Priority
Search for a Task Based on Completeness
Search for a Task Based on Due Date
Search for a Task Based on Task Group
Search for a Task on Which Previously Worked
ProgressBook SpecialServices User Guide 13

Task Queue
Class List Option in the Narrow Results AreaIn the Narrow Results area, you can use any combination of filter options to display the tasks that match your specific search criteria. If you have access to multiple classes, you can choose to display only tasks associated with students in a specific class by selecting the class from the Class drop-down list. The screen automatically updates displaying tasks only associated with the class.
Note: Hidden classes do not display in the Class drop-down list.
Student Search Option in the Narrow Results AreaIn the Narrow Results area, you can use any combination of filter options to display the tasks that match your specific search criteria. To search for tasks associated with a specific student:
1. On the Task Queue screen in the Narrow Results area, ensure the following options are selected to return all tasks for the student:
• For Class, All
• For Priority, All
• For Due Date, Any
• For Task Group, All
• For Only tasks I have worked on, deselected.
2. In the Student field, type at least the first three letters of a student’s last name.
3. From the populated list, select the student’s name.
The screen automatically updates displaying tasks only associated with the student.
Task Queue Screen Class List Filter Option in the Narrow Results Area
14 ProgressBook SpecialServices User Guide
Task Queue
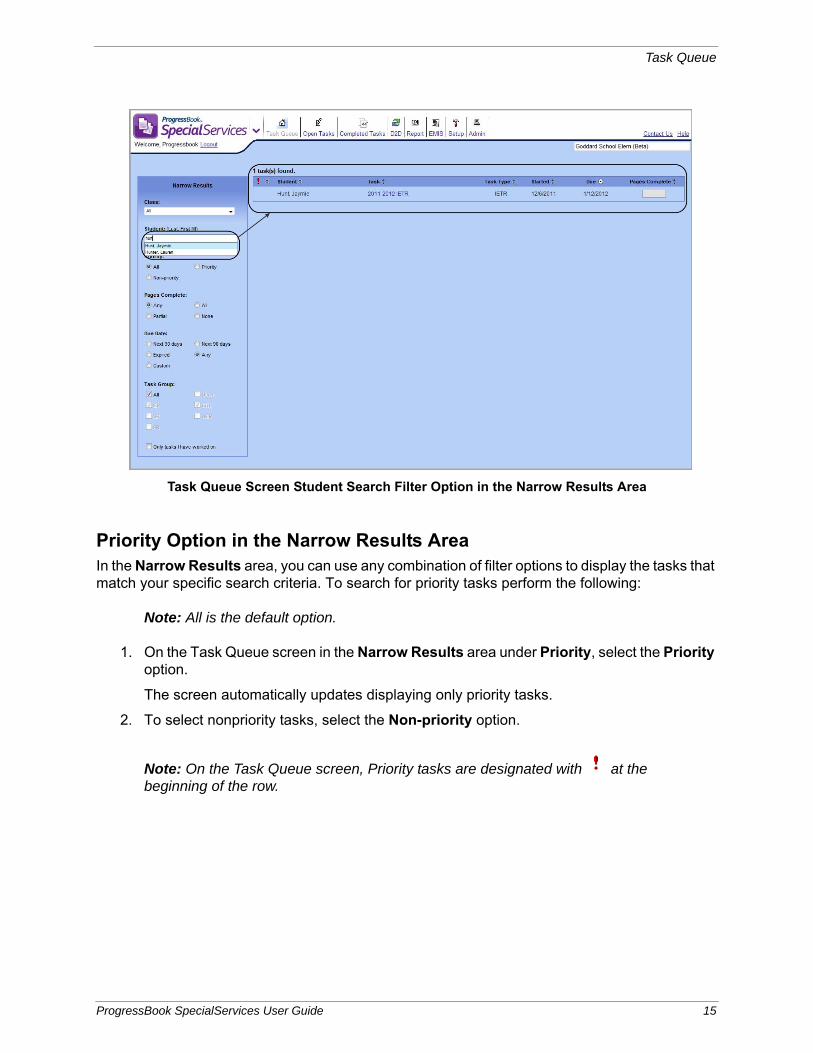
Priority Option in the Narrow Results AreaIn the Narrow Results area, you can use any combination of filter options to display the tasks that match your specific search criteria. To search for priority tasks perform the following:
Note: All is the default option.
1. On the Task Queue screen in the Narrow Results area under Priority, select the Priority option.
The screen automatically updates displaying only priority tasks.
2. To select nonpriority tasks, select the Non-priority option.
Note: On the Task Queue screen, Priority tasks are designated with at the beginning of the row.
Task Queue Screen Student Search Filter Option in the Narrow Results Area
ProgressBook SpecialServices User Guide 15

Task Queue
Pages Complete Option in the Narrow Results AreaIn the Narrow Results area, you can use any combination of filter options to display the tasks that match your specific search criteria. To search for tasks with pages complete perform the following:
Note: Any is the default option.
1. On the Task Queue screen in the Narrow Results area under Pages Complete, select the All option.
The screen automatically updates displaying only tasks with all pages complete.
2. To select tasks with partial pages complete, select the Partial option.
3. To select task with none of the pages complete, select the None option.
Note: On the Task Queue screen in the Pages Complete column, the green shading present in the rectangle indicates the number of completed pages out of the total pages for the task. When you hover over the icon, a tool tip displays, “X of X pages complete.”
Task Queue Screen Priority Filter Option in the Narrow Results Area
Priority Tasks
Non-priority Tasks
16 ProgressBook SpecialServices User Guide

Task Queue
Due Date Option in the Narrow Results AreaIn the Narrow Results area, you can use any combination of filter options to display the tasks that match your specific search criteria. To search for tasks within a due date range perform the following:
Note: Next 30 days is the default option.
1. On the Task Queue screen in the Narrow Results area under Due Date, select the Next 90 days option.
The screen automatically updates displaying only tasks due within the next 90 days.
2. To select expired tasks, select the Expired option.
Note: The icon indicates that a task has expired. When you hover over the icon, a tool tip displays, “This task has expired.” Another indication of an expired task is that all the text in the row displays in red except for the task name.
Task Queue Screen Pages Complete Filter Option in the Narrow Results Area
All Pages Complete
Partial Pages Complete
None Pages Complete
ProgressBook SpecialServices User Guide 17

Task Queue
3. To select tasks with any due date, select the Any option.
4. To select tasks with a custom due date, select the Custom option.
Note: The default for the Custom option is the first and last days of the current month.
a. In the Begin field, type the desired date, or click to select from the calendar.
Note: You can enter dates in multiple formats, such as MM/DD/YYYY, MM/DD/YY or MM-DD-YY.
b. In the End field, type the desired date, or click to select from the calendar.
Note: If you enter an end date that is before the begin date, the following message displays, “End date cannot be before begin date.”
Note: If you enter an invalid date, the following message displays, “Please enter a valid date.”
Task Queue Screen Expired Tasks
Task Queue Screen Custom Due Date Filter Option in the Narrow Results Area
18 ProgressBook SpecialServices User Guide

Task Queue
Task Group Option in the Narrow Results AreaIn the Narrow Results area, you can use any combination of filter options to display the tasks that match your specific search criteria. To search for tasks within a task group perform the following:
Note: IEP and ETR is the default option.
1. On the Task Queue screen in the Narrow Results area under Task Group, select the All option.
The screen automatically updates displaying tasks within all task groups.
Note: If you select the All option and previously selected other task group options, those previously selected options still display as selected but are disabled.
2. To select a specific task group, deselect the All option, and choose any of the following options or a combination of options:
• IEP - Only IEP tasks.
• SP - Only Individual Service Plan tasks.
• PR - Only Progress Report tasks.
• Other - Task types that are not IEP, ISP, PR, ETR or WEP tasks.
• ETR - Only Evaluation Team Report tasks.
• WEP - Only Written Education Plan tasks.
Task Queue Screen All Task Group Option in the Narrow Results Area
All selected, and IEP and ETR disabled.
ProgressBook SpecialServices User Guide 19
Task Queue
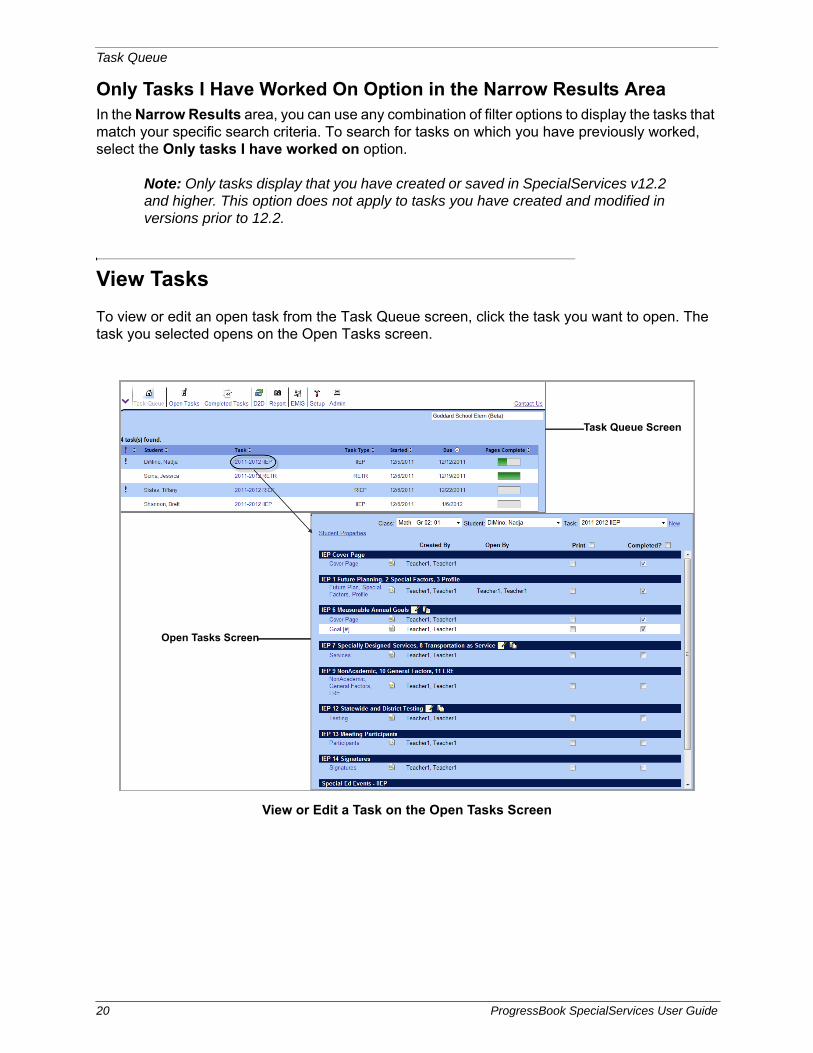
Only Tasks I Have Worked On Option in the Narrow Results AreaIn the Narrow Results area, you can use any combination of filter options to display the tasks that match your specific search criteria. To search for tasks on which you have previously worked, select the Only tasks I have worked on option.
Note: Only tasks display that you have created or saved in SpecialServices v12.2 and higher. This option does not apply to tasks you have created and modified in versions prior to 12.2.
View Tasks
To view or edit an open task from the Task Queue screen, click the task you want to open. The task you selected opens on the Open Tasks screen.
View or Edit a Task on the Open Tasks Screen
Task Queue Screen
Open Tasks Screen
20 ProgressBook SpecialServices User Guide

Task Queue
Delete Tasks
Only users with the appropriate security privileges can delete open tasks from the Task Queue screen. When you delete a task, it is permanently removed from the system.
1. On the Task Queue screen, in the row of the task you want to delete, click .
2. On the deletion confirmation box, click Delete.
The task is deleted and no longer displays on the Task Queue screen.
Sort Tasks in the Task Results Area
You can sort items in all of the columns in ascending and descending order except for the Delete column.When you open the Task Queue screen for the first time, the sort order is ascending in
the Due column. When you hover over in any unsorted column, the icon is highlighted with a white background, and the tool tip displays, “Click to sort ascending.” After you click the icon, it
changes to , and the tool tip displays, “Click to sort descending. Click the icon again, and the
icon changes to , and the tool tip displays, “Click to sort ascending.”
Delete a Task
Deleted task no longer displays on the Task Queue and is permanently deleted from the system.
ProgressBook SpecialServices User Guide 21

Task Queue
Sort Columns in the Task Results Area
22 ProgressBook SpecialServices User Guide
Open Tasks
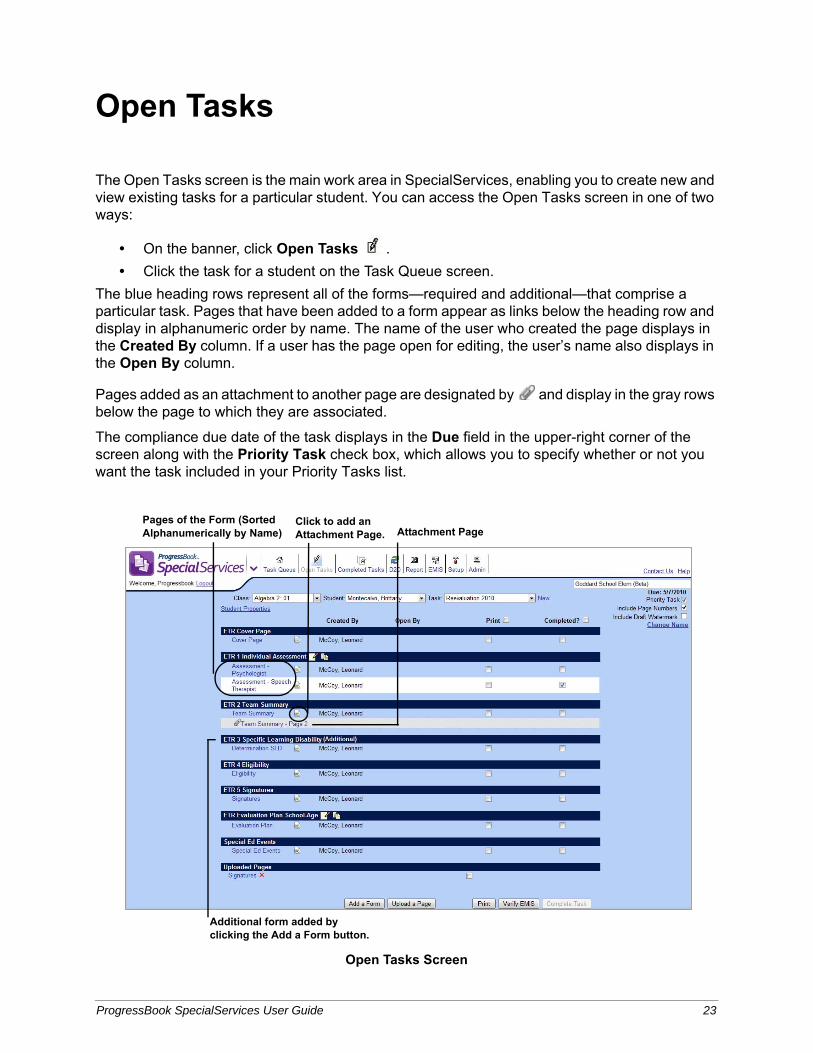
The Open Tasks screen is the main work area in SpecialServices, enabling you to create new and view existing tasks for a particular student. You can access the Open Tasks screen in one of two ways:
• On the banner, click Open Tasks .
• Click the task for a student on the Task Queue screen.
The blue heading rows represent all of the forms—required and additional—that comprise a particular task. Pages that have been added to a form appear as links below the heading row and display in alphanumeric order by name. The name of the user who created the page displays in the Created By column. If a user has the page open for editing, the user’s name also displays in the Open By column.
Pages added as an attachment to another page are designated by and display in the gray rows below the page to which they are associated.
The compliance due date of the task displays in the Due field in the upper-right corner of the screen along with the Priority Task check box, which allows you to specify whether or not you want the task included in your Priority Tasks list.
Open Tasks Screen
Click to add an Attachment Page.
Pages of the Form (Sorted Alphanumerically by Name) Attachment Page
Additional form added by clicking the Add a Form button.
ProgressBook SpecialServices User Guide 23

Open Tasks
Set Student Properties
If you have the appropriate security privileges, you can set a student’s demographic information, such as parent contact information and school district of residence. This information flows to multiple forms, including forms on open tasks.
1. On the Open Tasks screen, select the Student whose demographic information you want to set.
2. Click Student Properties.
The Student Properties window opens.
3. Select the appropriate information in the drop-down lists.
Note: Parent contact information is live data from StudentInformation.
Note: To update information other than parent contacts, make the changes in StudentInformation. The new values are then updated in SpecialServices during the nightly integration process.
4. Click Save Properties.
Select Student to Set Properties
24 ProgressBook SpecialServices User Guide

Open Tasks
5. On the confirmation window, click OK.
Set Student Properties
Save Confirmation
ProgressBook SpecialServices User Guide 25

Open Tasks
Create New Tasks
You can create tasks in one of two ways: create a completely new task with blank forms or create a new task using the information entered on the forms from a completed task. Both options are available on the Start a New Task window, which displays when you click New on the Open Tasks screen. The method you use to create the new task depends on the purpose for which you are creating the task. For example, if you are creating a new IEP based on a completed draft IEP, you would create the new IEP task from the IEP draft.
The following table lists all the available tasks in SpecialServices. Your district may provide additional tasks or custom versions of these tasks. Refer to your district procedures for more details about any custom tasks that do not appear in the list.
SpecialServices Tasks
Task Description
IEP Tasks
RIEP - Periodic Review IEP Contains the Individualized Education Plan (IEP) (PR-07) forms required for students under the age of 14. Select this task for students who already receive special education services, are under the age of 14 and for whom a periodic review has determined that a new IEP is required.
RIEP - Periodic Review IEP (age 14+) Contains the required IEP forms, including the IEP 4 PostSecondary Transition and IEP 5 PostSecondary Transition Services forms, for students age 14 or over. Select this task for students who are already receiving special education services, are 14 years old or older and for whom a periodic review has determined that a new IEP is required.
IIEP - Initial IEP Contains the IEP forms required for students for whom the district will provide special education services. Select this task only for the student’s first IEP upon initial entry into a special education program. For all subsequent IEPs—for example, those created following an annual review—create the applicable RIEP task.
AIEP - Amended IEP Contains the Individualized Education Plan (IEP) (PR-07) forms required for students under the age of 14. Select this task for students who already receive special education services, are under the age of 14 and for whom an amended IEP is required.
AIEP - Amended IEP (age 14+) Contains the required IEP forms, including the IEP 4 PostSecondary Transition and IEP 5 PostSecondary Transition Services forms, for students age 14 or over. Select this task for students who are already receiving special education services, are 14 years old or older and for whom an amended IEP is required.
Progress Report (IEP) Tasks
Progress Report (IEP) Contains the IEP progress report form that provides a single column for entering the student’s progress for each objective/benchmark, a goal field and one comment field.
PR (IEP) - 4 - Progress Goals & Obj Contains the IEP progress report form that provides four columns for entering the student’s progress for the student’s goal, four columns for entering the student’s progress for each objective/benchmark and one comment field.
Progress Report (IEP) - 4 - Goals & Objectives
Contains the IEP progress report form that provides four columns for entering the student’s progress for each objective/benchmark, a goal field and one comment field.
26 ProgressBook SpecialServices User Guide

Open Tasks
Progress Report (IEP) - 4 - Goals Only, 1 Comment
Contains the IEP progress report that provides four columns for entering the student’s progress for the goal and one comment field.
ProgressReport (IEP) - 4 - Goals Only, 4 Comments
Contains the IEP progress report that provides four columns for entering the student’s progress for the goal and four comment fields.
PR (IEP) - 6 - Progress Goals & Obj Contains the IEP progress report that provides six columns for entering the student’s progress for the student’s goal, six columns for entering the student’s progress for each objective/benchmark and one comment field.
Progress Report (IEP) - 6 - Goals & Objectives
Contains the IEP progress report that provides six columns for entering the student’s progress for each objective/benchmark, a goal field and one comment field.
Progress Report (IEP) - 6 - Goals Only, 1 Comment
Contains the IEP progress report that provides six columns for entering the student’s progress for the goal and one comment field.
Progress Report (IEP) - 6 - Goals Only, 6 Comments
Contains the IEP progress report that provides six columns for entering the student’s progress for the goal and six comment fields.
PR (IEP) - 8 - Progress Goals & Obj Contains the IEP progress report that provides eight columns for entering the student’s progress for the student’s goal, eight columns for entering the student’s progress for each objective/benchmark and one comment field.
Progress Report (IEP) - 8 - Goals & Objectives
Contains the IEP progress report that provides eight columns for entering the student’s progress for each objective/benchmark, a goal field and one comment field.
Progress Report (IEP) - 8 - Goals Only, 1 Comment
Contains the IEP progress report that provides eight columns for entering the student’s progress for the goal and one comment field.
Progress Report (IEP) - 8 - Goals Only, 8 Comments
Contains the IEP progress report that provides eight columns for entering the student’s progress for the goal and eight comment fields.
ETR and ETR-Related Tasks
RFRL - Referral for Evaluation Contains the Referral for Evaluation (PR-04) form used to refer a student in the general curriculum for evaluation by a special education services team.
CNST - Parent Consent Contains the Parent Consent for Evaluation (PR-05) form used to obtain a parent’s consent for evaluation by a special education services team.
RETR - Reevaluation (School-Age) Contains the required Evaluation Team Report (ETR) (PR-06) forms, including the Evaluation Plan School-Age form, for school-aged students. Select this task for school-aged students already receiving special services who are subject to re-evaluation.
RETR - Reevaluation (Preschool) Contains the required ETR forms, including the Evaluation Plan Preschool form, for preschool students. Select this task for preschool students already receiving special services who are subject to re-evaluation.
IETR - Initial Evaluation (School-Age) Contains the required ETR forms, including the Evaluation Plan School-Age form, for school-aged students. Select this task only for school-aged students for whom you want to begin the initial evaluation to determine eligibility for special services. For all subsequent ETRs for this student, create the applicable RETR task.
IETR - Initial Evaluation (Preschool) Contains the required ETR forms, including the Evaluation Plan Preschool form, for preschool students who are not already enrolled in a special services program. Select this task only for preschool students for whom you want to begin the initial evaluation to determine eligibility for special services. For all subsequent ETRs for this student, create the applicable RETR task.
Transfer Student IEP & ETR Tasks
Task Description
ProgressBook SpecialServices User Guide 27
Open Tasks
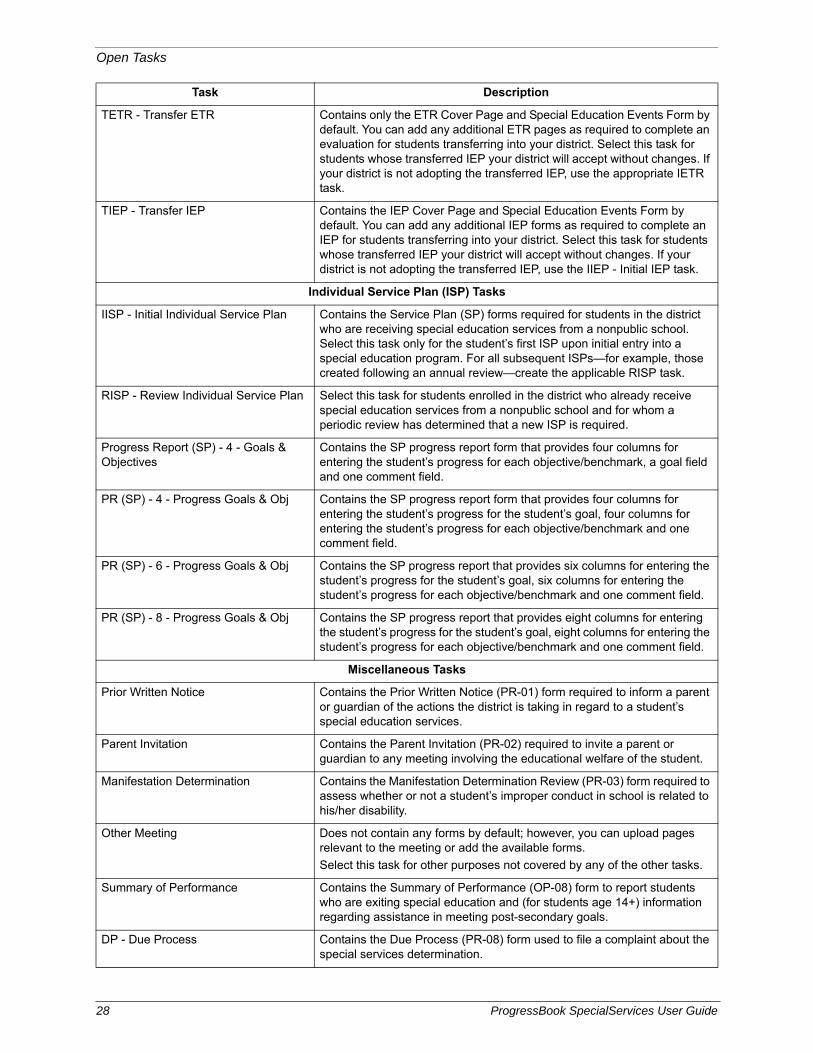
TETR - Transfer ETR Contains only the ETR Cover Page and Special Education Events Form by default. You can add any additional ETR pages as required to complete an evaluation for students transferring into your district. Select this task for students whose transferred IEP your district will accept without changes. If your district is not adopting the transferred IEP, use the appropriate IETR task.
TIEP - Transfer IEP Contains the IEP Cover Page and Special Education Events Form by default. You can add any additional IEP forms as required to complete an IEP for students transferring into your district. Select this task for students whose transferred IEP your district will accept without changes. If your district is not adopting the transferred IEP, use the IIEP - Initial IEP task.
Individual Service Plan (ISP) Tasks
IISP - Initial Individual Service Plan Contains the Service Plan (SP) forms required for students in the district who are receiving special education services from a nonpublic school. Select this task only for the student’s first ISP upon initial entry into a special education program. For all subsequent ISPs—for example, those created following an annual review—create the applicable RISP task.
RISP - Review Individual Service Plan Select this task for students enrolled in the district who already receive special education services from a nonpublic school and for whom a periodic review has determined that a new ISP is required.
Progress Report (SP) - 4 - Goals & Objectives
Contains the SP progress report form that provides four columns for entering the student’s progress for each objective/benchmark, a goal field and one comment field.
PR (SP) - 4 - Progress Goals & Obj Contains the SP progress report form that provides four columns for entering the student’s progress for the student’s goal, four columns for entering the student’s progress for each objective/benchmark and one comment field.
PR (SP) - 6 - Progress Goals & Obj Contains the SP progress report that provides six columns for entering the student’s progress for the student’s goal, six columns for entering the student’s progress for each objective/benchmark and one comment field.
PR (SP) - 8 - Progress Goals & Obj Contains the SP progress report that provides eight columns for entering the student’s progress for the student’s goal, eight columns for entering the student’s progress for each objective/benchmark and one comment field.
Miscellaneous Tasks
Prior Written Notice Contains the Prior Written Notice (PR-01) form required to inform a parent or guardian of the actions the district is taking in regard to a student’s special education services.
Parent Invitation Contains the Parent Invitation (PR-02) required to invite a parent or guardian to any meeting involving the educational welfare of the student.
Manifestation Determination Contains the Manifestation Determination Review (PR-03) form required to assess whether or not a student’s improper conduct in school is related to his/her disability.
Other Meeting Does not contain any forms by default; however, you can upload pages relevant to the meeting or add the available forms.
Select this task for other purposes not covered by any of the other tasks.
Summary of Performance Contains the Summary of Performance (OP-08) form to report students who are exiting special education and (for students age 14+) information regarding assistance in meeting post-secondary goals.
DP - Due Process Contains the Due Process (PR-08) form used to file a complaint about the special services determination.
Task Description
28 ProgressBook SpecialServices User Guide

Open Tasks
Creating a New TaskTo view a video of this procedure, go to:http://www.progressbook.com/Videos/SpS/Creating-New-Task
When you create a new task, the system provides all of the required forms, creating a page for each form that you can begin editing. You can add forms once the task is created. All of the pages generated at the time the task is created display your name in the Created By field.
1. On the Open Tasks screen, select the student for whom you want to create the new task.
2. Click New.
Written Education Plan (WEP) Tasks
WEP - Gifted WEP Contains the Written Education Plan (WEP) forms required for students who will receive gifted services.
Progress Report (WEP) Contains the progress report forms for students receiving gifted services who have a WEP.
Behavior Intervention Plan (BIP) Tasks
BIP - Behavior Intervention Plan Contains the Behavior Intervention Plan (BIP) forms required for students who will receive special education services.
Section 504 Plan Tasks
504P - Section 504 Plan Contains the forms required for students for whom the district provides services under Section 504.
504E - Section 504 Eval Contains the forms required to determine a student’s eligibility for services under Section 504.
504R - Section 504 Referral Contains the form used to refer a student to be evaluated to receive services under a 504 Plan.
504N - Section 504 Notification Contains the form used to notify parents or guardians of a meeting regarding their child’s 504 Plan.
504G - Section 504 Grievances Contains the form a parent or student can use to express dissatisfaction with the services the student is receiving under a 504 Plan.
504PW - Section 504 Prior Written Notice
Contains the form required to inform parents or guardians of the actions the district is taking in regard to services their child is receiving under a 504 Plan.
504C - Section 504 Consent Contains the form used to obtain parents’ or guardians’ consent for their child to be evaluated to receive services under a 504 Plan.
Task Description
ProgressBook SpecialServices User Guide 29
Open Tasks
The Start a New Task window displays.
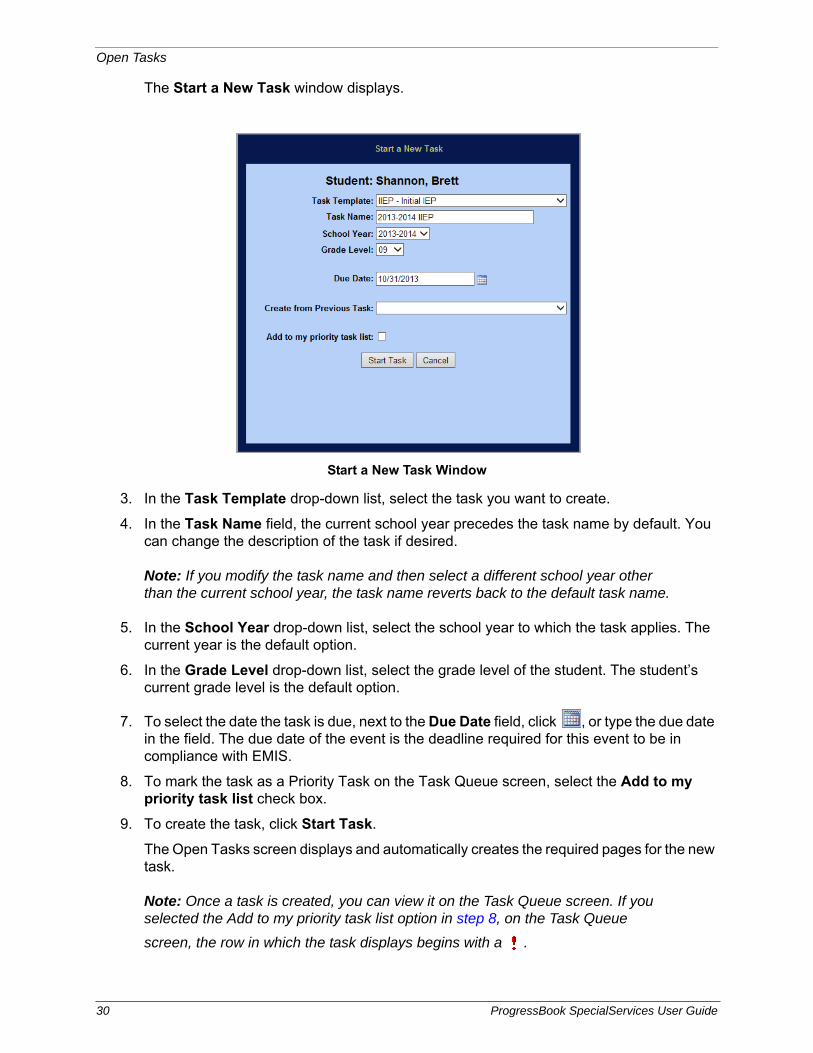
3. In the Task Template drop-down list, select the task you want to create.
4. In the Task Name field, the current school year precedes the task name by default. You can change the description of the task if desired.
Note: If you modify the task name and then select a different school year other than the current school year, the task name reverts back to the default task name.
5. In the School Year drop-down list, select the school year to which the task applies. The current year is the default option.
6. In the Grade Level drop-down list, select the grade level of the student. The student’s current grade level is the default option.
7. To select the date the task is due, next to the Due Date field, click , or type the due date in the field. The due date of the event is the deadline required for this event to be in compliance with EMIS.
8. To mark the task as a Priority Task on the Task Queue screen, select the Add to my priority task list check box.
9. To create the task, click Start Task.
The Open Tasks screen displays and automatically creates the required pages for the new task.
Note: Once a task is created, you can view it on the Task Queue screen. If you selected the Add to my priority task list option in step 8, on the Task Queue
screen, the row in which the task displays begins with a .
Start a New Task Window
30 ProgressBook SpecialServices User Guide

Open Tasks
10. You can now perform any of the following actions:
• Add additional pages for the task. If you selected to add forms, you will need to create a page for the form. See “Create New Pages.”
• Add a form to the task. See “Add Forms.”
• Add an attachment to a page. See “Add Attachments.”
• Upload a read-only page. See “Upload Pages.”
• Open a page to begin entering information. See “Open Pages.”
Create a New Task from an Existing TaskTo view a video of this procedure, go to:http://www.progressbook.com/Videos/SpS/New-From-Existing-Task
You can create a new task for a student by copying information from any of the student’s open or completed tasks. You could use this feature to create an addendum to an existing IEP, copy a prior draft to create a new IEP or copy the goals from an IEP task to a Progress Report task.
When you create a new task from an existing task of the same type, all of the information entered in the sections of the forms from the original task are copied to the corresponding forms or sections in the new task. Additionally, any uploaded pages, additional forms and attachments added to the original task are copied to the new task.
When you create a new task from an existing task of a different type, only the information common between both forms is copied to the new task. For example, when creating a Progress Report (IEP) task, you could select the student’s IEP task. The system copies the information entered on the IEP 6 Measurable Annual Goals form to the corresponding sections on the progress report form as well as creates a progress report page for each goal page in the IEP.
New IEP Task with Required Pages
ProgressBook SpecialServices User Guide 31
Open Tasks
The demographic information is not copied from the original task to the new task. The system uses the most current demographic information from StudentInformation and the Student Properties window.
1. On the Open Tasks screen, select the student for whom you want to create the new task. See “Select Students.”
2. Click New.
The Start a New Task window displays.
3. In the Task Template drop-down list, select the task you want to create.
4. In the Task Name field, the current school year precedes the task name by default. You can change the description of the task if desired.
Note: If you modify the task name and then select a different school year other than the current school year, the task name reverts back to the default task name.
5. In the School Year drop-down list, select the school year to which the task applies. The current year is the default option.
6. In the Grade Level drop-down list, select the grade level of the student. The student’s current grade level is the default option.
7. To select the date the task is due, next to the Due Date field, click , or type the due date in the field. The due date of the task is the deadline required for this event to be in compliance with EMIS.
8. In the Create from Previous Task drop-down list, select the task from which you want to create the new task.
Note: Completed tasks display as the task name preceded by “Comp:” in the Create from Previous Task drop-down list.
Start a New Task Window
32 ProgressBook SpecialServices User Guide

Open Tasks
Note: Only tasks completed between the current date and 18 months in the past are available for selection in the Create from Previous Task drop-down list.
Note: SSEM archived forms, Classic View forms created in a district prior to the Task Model conversion and Classic View forms that were transferred using District-to-District Transfer form sets are not available.
9. To mark the task as a Priority Task on the Task Queue screen, select the Add to my priority task list check box.
10. To create the task, click Start Task.
All of the forms and attachments from the original task are created and display on the Open Tasks screen. When you open a page, the information from the original task displays in all of the sections. If the original task was a different task type than the new task, only the information relevant between the two tasks was copied to the appropriate pages.
Note: Once a task is created, you can view it on the Task Queue screen. If you selected the Add to priority task list option in step 9, on the Task Queue screen,
the row in which the task displays begins with a .
Create New Task from Existing Task with Pages from the Original Task
ProgressBook SpecialServices User Guide 33

Open Tasks
11. You can now perform any of the following actions:
• Add additional pages. If you selected to add forms, you will need to create a page for the form. See “Create New Pages.”
• Add a form to the task. See “Add Forms.”
• Add an attachment to a page. See “Add Attachments.”
• Upload a read-only page. See “Upload Pages.”
• Open a page to begin entering information. See “Open Pages.”
Rename Open Tasks
1. On the Open Tasks screen, in the Class drop-down list, select the class, and in the Student drop-down list, select the student whose open tasks you want to rename.
2. In the Task drop-down list, select the task you want to rename.
3. Click Change Name.
4. On the Change Task Name window, in the Name field, enter the new name.
5. Click Save.
Change Name Link on the Open Tasks Screen
Change Task Name Window
34 ProgressBook SpecialServices User Guide

Open Tasks
The new name displays for the task on the Open Tasks screen.
Create New Pages
All of the required pages you need to complete the task are automatically generated when you create the task. However, you may need to create multiple pages of the same type. For example, if your student has multiple goals to meet for his/her IEP, you will need to create an IEP 6 Goals page for each goal. You can create a new page by generating an entirely new page or copying an existing page from a previous task.
Additionally, you can create new pages by copying an existing page from the current task, another open task or completed task. For example, you could copy the goals from the Measurable Annual Goals page in an IEP to create a new progress report page.
Creating a New Page
You can create a new page for any form next to which displays. If a page has already been created for a form that does not allow multiple pages, such as IEP 1 Future Planning, 2 Special
Factors, 3 Profile, does not display unless the page has been deleted.
1. On the Open Tasks screen, select the student for whom you want to create the page. See “Select Students.”
2. In the Task drop-down list, select the task to which you want to add a page.
Renamed Task on the Open Tasks Screen
ProgressBook SpecialServices User Guide 35

Open Tasks
The pages created for the task display on the Open Tasks screen.
Forms with Multiple Pages in an IEP Task on the Open Tasks Screen
36 ProgressBook SpecialServices User Guide

Open Tasks
3. In the row of the page you want to add, click .
A new page is created and displays in a new row.
4. To open the page and begin working on it, click the page name. See “Open Pages.”
Creating a New Page from an Existing PageYou can create a new page based on the information from an existing page in the current task, another open task or completed task, including those tasks or forms transferred from another district using the District-to-District Transfer tool. You can create a new page using the information
from an existing page for any form next to which displays.
1. On the Open Tasks screen, select the student for whom you want to create a new page from an existing page. See “Select Students.”
2. In the Task drop-down list, select the task to which you want to add a page.
New Page Added to Form
ProgressBook SpecialServices User Guide 37

Open Tasks
The pages created for the task display in the grid on the Open Tasks screen.
3. In the row of the page you want to create from an existing page, click .
The Create from Existing window displays.
4. In the Select Task drop-down list, select the task from which you want to copy the page.
The Select Page to Create From drop-down list is populated with the pages that comprise the selected task.
Note: Available completed tasks display with the “Completed Task:” prefix to assist you in selecting the correct task. All other listed tasks are currently open tasks.
Note: SSEM archived forms, Classic View forms created in a district prior to the Task Model conversion and Classic View forms that were transferred using District-to-District Transfer form sets are not available.
5. In the Select Page to Create From drop-down list, select the page from which you want to copy information for your new page.
6. Click Create Page.
A new page, including any attachments associated with the page, displays containing the information from the page you selected to copy in step 5.
Form with Copy from Existing Page Icon on Open Tasks Screen
Create from Existing Window
38 ProgressBook SpecialServices User Guide
Open Tasks
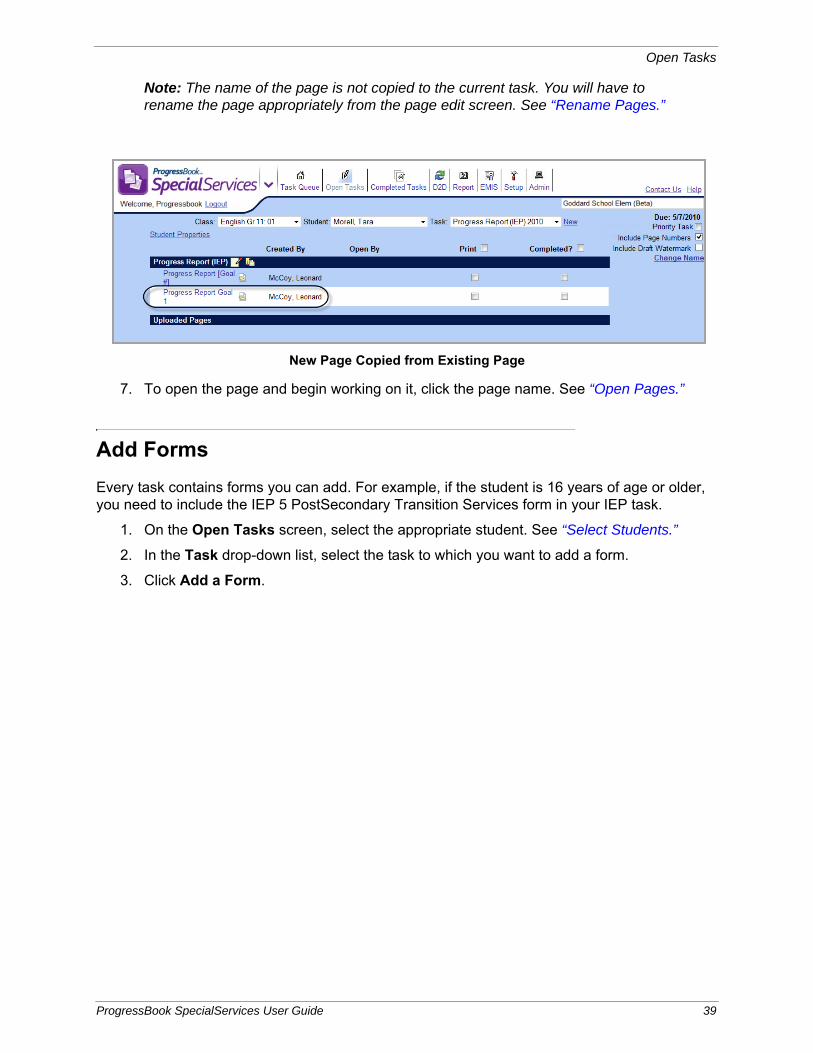
Note: The name of the page is not copied to the current task. You will have to rename the page appropriately from the page edit screen. See “Rename Pages.”
7. To open the page and begin working on it, click the page name. See “Open Pages.”
Add Forms
Every task contains forms you can add. For example, if the student is 16 years of age or older, you need to include the IEP 5 PostSecondary Transition Services form in your IEP task.
1. On the Open Tasks screen, select the appropriate student. See “Select Students.”
2. In the Task drop-down list, select the task to which you want to add a form.
3. Click Add a Form.
New Page Copied from Existing Page
ProgressBook SpecialServices User Guide 39

Open Tasks
The Add a Form window displays, listing the additional forms available for the task.
4. Select the check box beside the form(s) you want to add to the task.
5. Click Add Forms.
Add a Form
Add a Form to the Task
40 ProgressBook SpecialServices User Guide

Open Tasks
The selected form(s) and corresponding page(s) display on the Open Tasks screen.
Delete Added FormsUsers with the appropriate security privileges can delete added forms from the task.
Before you can delete an added form, you must first delete all pages that have been created for the form. See “Delete Pages.” If no pages have been created for the form you want to delete, displays next to the form name.
1. With the task displayed on the Open Tasks screen, next to the form you want to delete, click .
Forms Added to Task
Delete Added Forms
ProgressBook SpecialServices User Guide 41

Open Tasks
2. On the confirmation window, click Delete.
The selected form is deleted and no longer displays in the list of forms for the task.
Confirm Delete
Added Form Deleted
42 ProgressBook SpecialServices User Guide

Open Tasks
Edit Pages
On the page edit screen, you can perform the following actions:
• “Open Pages”
• “Save Pages”
• “Close Pages”
• “Navigate to Pages on the Quick Task Menu”
• “Import Contact Information”
• “Rename Pages”
• “Lock Pages”
• “Delete Pages”
• “Delete Uploaded Pages”
Note: You can also set up and maintain user banks on the page edit screen. (See “Create Bank Items Within Forms.”)
Open PagesOnce you have added pages to a task on the Open Tasks screen, click the name of the page to open it on the page edit screen. The page edit screen displays the page in a format that enables you to enter the appropriate information.
The page edit screen toolbar displays on the page edit screen. The toolbar provides functions available for updating the page information in SpecialServices, such as changing the page name, marking the page as complete, locking the page, deleting the page or importing parent information on the Parent Invitation form and General Invitation form. The options that display on the page edit screen toolbar vary depending on the type of page that is open.
Page Edit Screen
Page Edit Screen Toolbar Page
ProgressBook SpecialServices User Guide 43

Open Tasks
Note: The Adobe Acrobat Toolbar displays only for custom forms, which are PDFs, and provides functions that pertain only to the displayed page, such as printing and changing the page magnification. The options that display in this toolbar are determined by the settings in Adobe Reader.
The Open By column on the Open Tasks screen indicates the user who currently has the page open. If a page is opened to another user, you can open it. However, if you intend to edit the page, be aware that the system stores the changes made by the first user to save the page.
Note: You cannot open pages locked by another user unless you have the
appropriate security privileges. If a page is locked, displays next to the page name.
Read-Only and Editable Fields
Editable fields are distinguishable by a box around the area in which you can type. Read-only fields are shown without a box around them.
Expandable Fields
Expandable fields appear two text lines high. As you type, scroll bars appear on the right side of the field. When you are finished, click outside the field; the field expands; and the scroll bars disappear.
Read-Only and Editable Fields
Editable Fields
Read-only Fields
44 ProgressBook SpecialServices User Guide

Open Tasks
Rich Text Fields
Some fields have rich text formatting capabilities. When you click in any of these fields, the rich text toolbar displays at the top of the screen.
Expandable Fields
Rich Text Fields
Scroll bars appear as you type. Click outside the field, and the field expands.
Click in field. Rich text toolbar displays above.
ProgressBook SpecialServices User Guide 45

Open Tasks
Spell Check
Spell check is available for forms. Click Check Spelling, and a window displays that checks the spelling in every text box on the form. You have the option to select the following in the window:
• Ignore
• Ignore All
• Add
• Change
• Change All
• Undo
• Finish
Note: For Internet Explorer and Firefox users, Change All will correct all occurrences on the form of the misspelled word, and Ignore All will ignore all occurrences on the form of the misspelled word. For Safari users, Change All will correct all occurrences in the text box of the misspelled word, and Ignore All will ignore all occurrences in the text box of the misspelled word.
Spell Check
Click on an option to correct the spelling.
46 ProgressBook SpecialServices User Guide
Open Tasks
Save PagesOne or more users may have a page open at one time. However, SpecialServices only stores the information entered on the page for the first user to save the page. Therefore, if multiple users are editing the page and one user saves the page first, the information entered by all other users will not be stored. After the information on the page is stored, the saved copy becomes the most current page, and the system will not store any other open copies of the page. In this case, the following message displays, “Checked out page is no longer the current page. Unable to save changes.”
Make sure that you do not begin editing a page already opened by another user. To verify that the page is not already opened by another user, check the Open By column for the page on the Open Tasks screen.
Note: Make sure that the user displayed in the Open By column still has the page open. The field will not update if the user closed the web browser instead of clicking the Close button on the page edit screen or the web server running SpecialServices recently experienced network “hanging.”
The following options are available when saving changes you have made to a page on the page edit screen:
• Click to print the page and save the changes. When you click the button, a message displays stating the form has saved successfully. Once you click OK on the message, the form appears in another window as a PDF where you can click the print button to print the page.
ProgressBook SpecialServices User Guide 47

Open Tasks
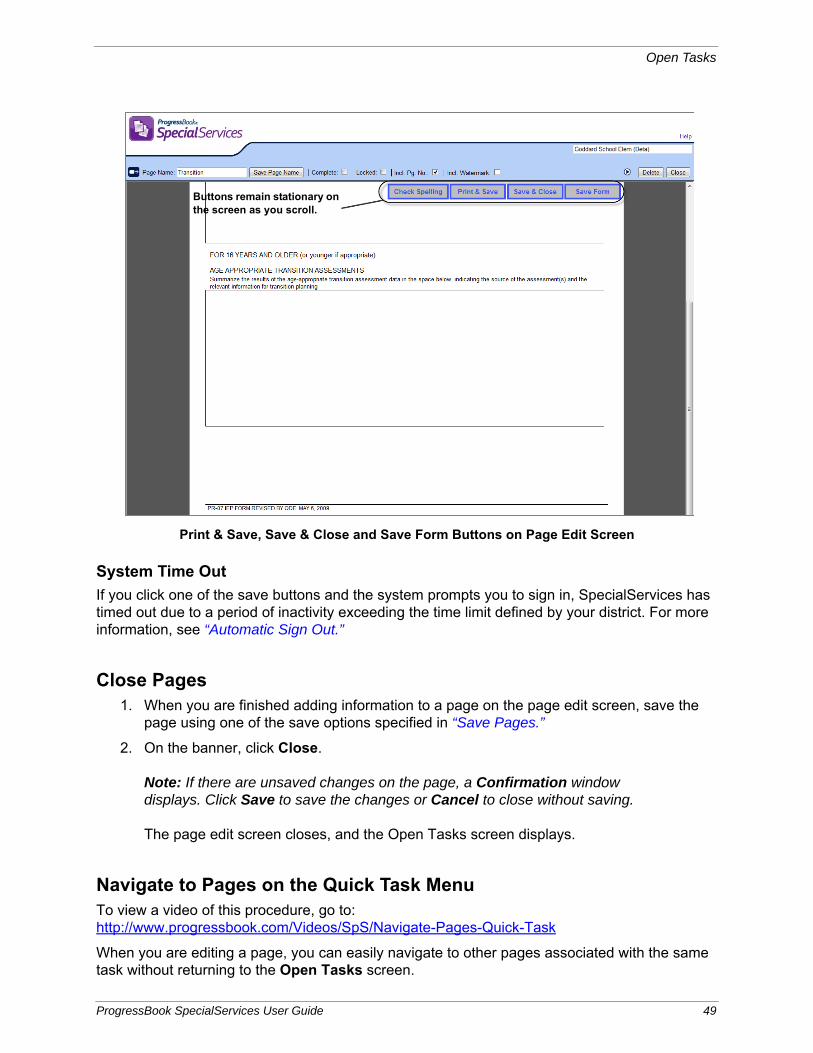
• Click to save the page and close the page edit screen. When the page closes, the Open Tasks screen displays.
• Click to save changes and continue editing the page.
The buttons remain stationary at the top of the screen as you scroll to the bottom of the screen.
Print & Save
48 ProgressBook SpecialServices User Guide
Open Tasks
System Time Out
If you click one of the save buttons and the system prompts you to sign in, SpecialServices has timed out due to a period of inactivity exceeding the time limit defined by your district. For more information, see “Automatic Sign Out.”
Close Pages1. When you are finished adding information to a page on the page edit screen, save the
page using one of the save options specified in “Save Pages.”
2. On the banner, click Close.
Note: If there are unsaved changes on the page, a Confirmation window displays. Click Save to save the changes or Cancel to close without saving.
The page edit screen closes, and the Open Tasks screen displays.
Navigate to Pages on the Quick Task MenuTo view a video of this procedure, go to:http://www.progressbook.com/Videos/SpS/Navigate-Pages-Quick-Task
When you are editing a page, you can easily navigate to other pages associated with the same task without returning to the Open Tasks screen.
Print & Save, Save & Close and Save Form Buttons on Page Edit Screen
Buttons remain stationary on the screen as you scroll.
ProgressBook SpecialServices User Guide 49
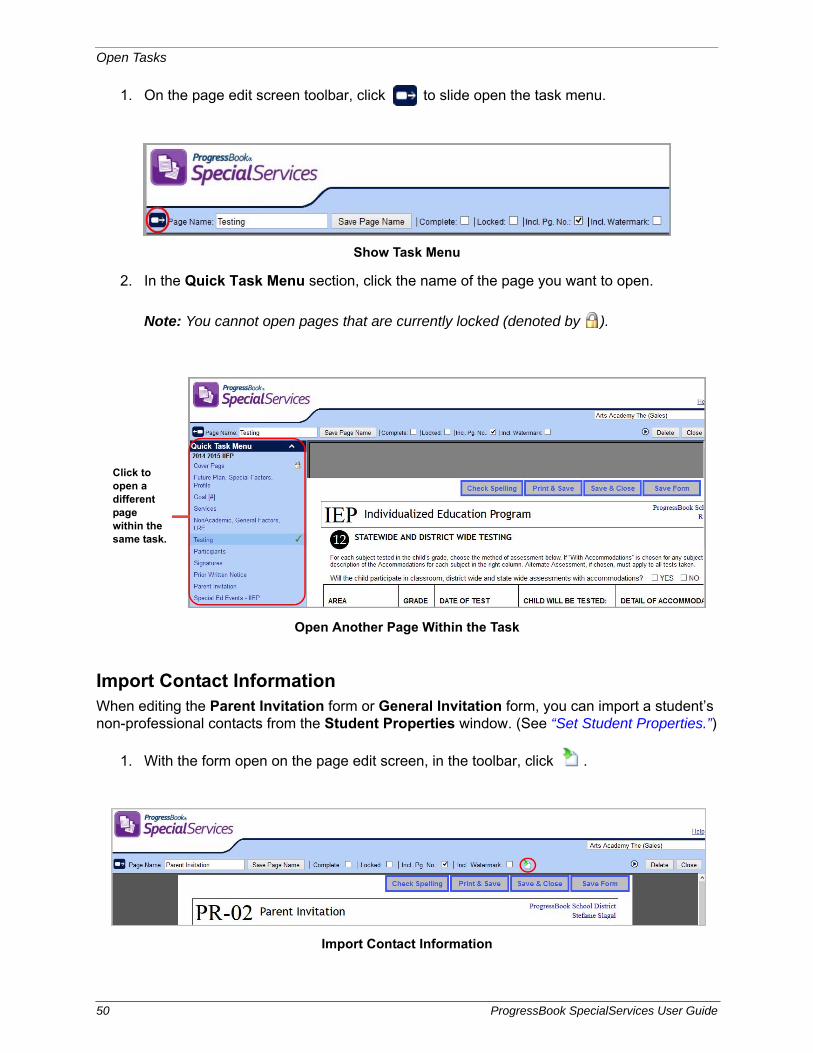
Open Tasks
1. On the page edit screen toolbar, click to slide open the task menu.
2. In the Quick Task Menu section, click the name of the page you want to open.
Note: You cannot open pages that are currently locked (denoted by ).
Import Contact InformationWhen editing the Parent Invitation form or General Invitation form, you can import a student’s non-professional contacts from the Student Properties window. (See “Set Student Properties.”)
1. With the form open on the page edit screen, in the toolbar, click .
Show Task Menu
Open Another Page Within the Task
Import Contact Information
Click to open a different page within the same task.
50 ProgressBook SpecialServices User Guide

Open Tasks
2. On the confirmation window, click OK.
3. On the Import Contact Information window, select the correct contact that should display on the form.
4. Click Import.
The selected contact’s information displays on the form.
5. Save the page using one of the save options specified in “Save Pages.”
Confirmation
Select Contact to Import
Contact Information Imported
ProgressBook SpecialServices User Guide 51

Open Tasks
Rename PagesWhen you create a new page, the system assigns a name by default. For example, the system assigns “Goal [#]” as the name for IEP 6 Measurable Annual Goals. You can change the name of the page to something more descriptive and easily recognizable to you and anyone else accessing the task.
Pages are sorted on the Open Tasks screen in alphanumeric order by name. Therefore, to change the order in which the pages display, you must assign names using numbers or letters to specify the sequence. For example, a page named “Goal 1” would display immediately before a page named “Goal 2” beneath the IEP 6 Measurable Annual Goals section of an IEP task on the Open Tasks screen. Likewise, a page named “Behavior Goals” would display before a page named “Reading Goals.”
1. With the task displayed on the Open Tasks screen, click the link for the page you want to rename.
The selected page opens on the page edit screen.
2. At the top of the editor window, in the Page Name field, modify the current name as desired, and then click Save Page Name.
3. On the save confirmation message, click OK.
Page Name Field on Page Edit Screen
New Page Name
52 ProgressBook SpecialServices User Guide

Open Tasks
4. When you are finished working on the page, click one of the following buttons:
• Print & Save – Prints the page and saves the changes.
• Save & Close – Saves the changes you have made, and closes the page edit screen. When the page closes, the Open Tasks screen displays.
• Close – Closes the page edit screen without saving. Select this option only if you have not made changes on the page that you want to save.
The new name displays as the link for the page on the Open Tasks screen.
Lock PagesYou can lock a page you are working on to prevent other users from viewing, editing, opening, printing or completing a page. You can only access a locked page if you are the user who locked the page or you have the appropriate security privileges.
1. With the desired task displayed on the Open Tasks screen, click the link for the page you want to lock.
The selected page opens on the page edit screen.
Note: When you lock the main page, any attachments are also automatically locked.
2. Select the Locked check box.
Renamed Page
ProgressBook SpecialServices User Guide 53

Open Tasks
3. If you have no additional changes to make to the page, click Close.
On the Open Tasks screen, displays next to the page name, indicating that the page is now locked. Any attachments associated to the page are also locked.
Unlock Pages
Only the user who locked the page or users with Confidential Override security privileges can unlock a page. All pages must be unlocked before you can complete a task unless you are the user who locked the page or you have Confidential Override security privileges.
1. With the desired task displayed on the Open Tasks screen, click the link for the page you want to unlock.
The selected page opens on the page edit screen.
2. Deselect the Locked check box.
3. If you have no additional changes to make to the page, click Close.
On the Open Tasks screen, no longer displays next to the page name. Users can now open and edit the page or complete the task.
Locked Page
Locked Page and Attachment on the Open Tasks Screen
54 ProgressBook SpecialServices User Guide

Open Tasks
Delete PagesIf you have the appropriate security privileges, you can delete pages and attachment pages from a task. You can individually delete attachment pages; however, when you delete a page with an attachment, the attachment page is also deleted.
1. With the task displayed on the Open Tasks screen, click the page you want to delete.
The selected page opens on the page edit screen.
2. Click Delete.
A message displays, “You are about to delete this page from the task.”
3. Click OK.
The Open Tasks screen displays, and the page you selected to delete, as well as any associated attachment pages, no longer appears on the screen.
Note: If the page you deleted was the only page for that type of form, and display to allow you to add a new page. If the page was for an added form and you have the correct security privileges, you can delete the form from the task by
clicking . (See “Delete Added Forms.”)
Add Attachments
You can add attachment pages to a specific page in an open task. When you select to print all of the pages in a task, the attachment appears in the merged document immediately after the page to which it is attached. When you select to print only the page, the attachment is automatically merged with the selected page.
1. On the Open Tasks screen, select the appropriate student. See “Select Students.”
2. In the Task drop-down list, select the appropriate task.
Delete Button
ProgressBook SpecialServices User Guide 55

Open Tasks
3. Next to the page to which you want to add an attachment, click .
The Add an attachment window displays, listing the forms that can be attached to the page.
4. To preview the form in a new window, click .
5. Next to the name of the form you want to attach, select the check box, or click the form name.
6. Click OK.
The attachment displays in a row beneath the page to which it is now attached.
Add Attachment Icon on Open Tasks Screen
Add an Attachment Window
Attachment for the Future Planning, Special Factors, Profile Page
56 ProgressBook SpecialServices User Guide

Open Tasks
7. You can perform one of the following optional actions:
• To open the attachment and begin working on it, click the attachment name. See “Open Pages.”
• Rename the attachment page. See “Rename Pages.”
Note: The order in which an attachment displays beneath a page is determined by the name of the attachment. To change the order in which attachments display beneath the page to which they are attached, you must assign a name using numbers or letters to specify the sequence.
Note: Attachment pages are an extension of the page to which they are attached. Therefore, you can only lock or complete the attachment by choosing these options on the page edit screen when the associated page is open.
Upload Pages
You can upload additional pages to a task, such as the signature page for an evaluation, an example of the student’s work or scanned pages from participants in the task who do not have access to SpecialServices. Once the page is uploaded, it appears in the Uploaded Pages section on the Open Task screen. You can view, but not edit, the page by clicking the link. Any pages you wish to upload must be in PDF format and be no larger than 5 megabytes.
1. On the Open Tasks screen, select the student for whom you want to upload a page. See “Select Students.”
2. In the Task drop-down list, select the task to which you want to upload a page.
3. Click Upload a Page.
4. On the Upload Additional Student Files window, in the PDF File field, enter the path and file name of the page you want to upload; or click Browse, and select the file in the Choose file window.
Upload Additional Student Files Window
ProgressBook SpecialServices User Guide 57

Open Tasks
5. In the Enter a name for the uploaded form field, enter the name you want to display on the Open Tasks screen for the uploaded page.
6. Click Upload Form.
Once the file is uploaded, it displays in the Uploaded Pages heading on the Open Tasks screen. You can view the page by clicking the link.
Delete Uploaded Pages1. With the task displayed on the Open Tasks screen, locate the Uploaded Pages heading,
and then, next to the uploaded page you want to delete, click .
The message displays, “This will permanently delete this uploaded page.”
2. On the message, click OK.
The selected page is deleted and no longer displays under the Uploaded Pages heading.
Add Tasks as Priority Tasks on the Task Queue Screen
You can specify a task as priority, and it will display as a priority task on the Task Queue screen. The status applies only to your login account; other users will not see tasks you have selected as priority task unless they have also set the task as priority.
Uploaded Page on the Open Tasks Screen
58 ProgressBook SpecialServices User Guide

Open Tasks
To set a task as priority, in the upper-right corner of the Open Tasks screen, select the Priority Task check box.
You can also designate a task as priority on the Start a New Task window when you are creating a new task by selecting the Add to my priority task list check box.
Priority Tasks on Task Queue Screen
Priority Task Check Box on Open Tasks Screen
Add to My Priority Task List Check Box on Start a New Task Window
Priority Tasks on the Task Queue Screen
ProgressBook SpecialServices User Guide 59

Open Tasks
Print Student Forms
The Print option on the Open Tasks screen merges the pages you select from a student’s task into a single document and displays them in Adobe Reader. You can then print the document on a local printer.
The pages are merged in the order in which they appear on the Open Tasks screen. To change the order in which the pages display in the printed document, you must rename the pages. See “Rename Pages.”
Note: You cannot print a page if it is locked by another user. For more information about locked pages, see “Lock Pages.”
1. On the Open Tasks screen, select the student for whom you want to print forms. See “Select Students.”
2. In the Task drop-down list, select the task that contains the forms you want to print.
3. Select which form(s) to print:
• To print specific pages, in the row of each page you want to print, select the Print check box.
• To print all of the pages, select the Print check box at the top of the column.
4. Optional: If you do not want page numbers to print on the forms, deselect the Include Page Numbers check box.
5. Optional: If you want to print the forms with a “Draft” watermark, select the Include Draft Watermark check box.
6. At the bottom of the screen, click Print.
Print Student Forms
Select to print a specific page.Select to print all pages.
Select print options.
60 ProgressBook SpecialServices User Guide

Open Tasks
The selected pages are merged into a single document.
7. In the browser window that opens, select the option to open the document.
Note: You can also save the merged document.
The merged document displays in Adobe Reader. The pages display in the same order as on the Open Tasks screen.
8. Print the forms.
Complete Pages
As you finish editing pages, you can mark each page as complete. On the Task Queue screen in the Pages Complete column, the green shading represents the amount of pages completed for that task. If you hover over the shading, the number of completed pages out of the total pages for the task displays. Once all of the pages are marked as complete, you can complete the task, which removes it from the Task Queue screen.
Note: Attachments are an extension of the page to which they are attached. Therefore, the option to complete a page is only available for the original page.
Print Button
Pages Complete Column on the Task Queue Screen
Hover to display the total amount of completed pages for a task.
ProgressBook SpecialServices User Guide 61

Open Tasks
You can complete a page using either of the following methods:
• On the Open Tasks screen, in the row of the page you want to mark as complete, select the Completed? check box. To mark all the pages as complete, select the Completed? check box at the top of the column.
• With the page open on the page edit screen, click the Complete check box.
Options for Completing Pages on the Open Tasks Screen
Complete Check Box on the Page Edit Screen
Select to complete a specific page. Select to complete all pages.
62 ProgressBook SpecialServices User Guide

Open Tasks
Verify EMIS
You can view or print the EMIS Data Collection Form to verify that the information is complete for the student and to maintain a hard-copy record of the information that will be sent to the EMIS Extract. The EMIS Data Collection Form only displays EMIS reportable information for the current task.
Note: To view the EMIS Data Collection Form for a completed task, you must run the EMIS Review Report. See “View the EMIS Data Collection Form for Completed Tasks.”
1. On the Open Tasks screen, select the student for whom you want to view the EMIS Data Collection Form. See “Select Students.”
2. Select a task.
3. Click Verify EMIS.
Note: The Verify EMIS button is only enabled for the current task if the task contains information that is reportable to EMIS. If you hover over the button when it is disabled, the following tool tip displays: "EMIS is not reportable for this task type."
The EMIS Data Collection Form opens in a new browser window and displays the most current EMIS reportable information about the current student and task.
4. To return to the Open Tasks screen, click Close.
EMIS Data Collection Form for an Open Task
ProgressBook SpecialServices User Guide 63

Open Tasks
Complete Tasks
Once all of the pages are marked as complete, if you are assigned the appropriate security role, you can complete the task and merge the pages into a read-only form set that is viewable from the Completed Tasks screen. It is important to complete a task when all the pages are complete for the following reasons:
• Users with read-only security privileges can view the forms within the task.
• You or other users can start the next cycle of forms for the task. You cannot open a new task if a task of the same type is currently open.
• You or other users can generate data using the EMIS Tools. The system only extracts EMIS data from completed tasks.
• You or other users can transfer a student’s forms to another district. The District-to-District Transfer function only transfers forms from completed tasks.
You cannot complete a task if any of the pages is currently locked by another user. If you are the user who locked the page, you can complete the task because the system automatically unlocks the page during the complete task process. If you are not the user who locked the form, but you have the appropriate security privileges, you can also complete the task without unlocking any page; however, the system will warn you that a page is locked. It is recommended that you verify the locked page is complete before closing the task.
1. On the Open Tasks screen, select the student for whom you want to complete a task. See “Select Students.”
2. In the Task drop-down list, select the task you want to complete .
3. Ensure all of the required pages for the task are marked as complete and none of the pages is currently locked by another user.
• To mark a page as complete, see “Complete Pages.”
• To unlock a page, see “Unlock Pages.”
Note: If all of the required forms are marked as complete, the Complete Task button is active.
64 ProgressBook SpecialServices User Guide

Open Tasks
4. Click Complete Task.
Once the task is completed, it appears in the list of completed tasks for the student on the Completed Tasks screen.
Complete Task Button on Open Tasks Screen
ProgressBook SpecialServices User Guide 65

Open Tasks
This page intentionally left blank.
66 ProgressBook SpecialServices User Guide

Completed Tasks
The Completed Tasks screen contains all of the completed tasks for a student, including any tasks or forms transferred from another district using the District-to-District Transfer tool. To access this
screen, on the banner, click Completed Tasks .
By default, the completed tasks display collapsed so that you only see the name of the task. You
can expand a task by clicking . The associated pages display below the task. Click to collapse a task.
From the Completed Tasks screen, you can perform the following actions:
• View completed tasks. See “View Completed Tasks.”
• Rename completed tasks. See “Rename Completed Tasks.”
• Delete completed tasks, if you have the appropriate security privileges. See “Delete Completed Tasks.”
• View forms created in Classic view or a version of SpecialServices prior to 9.1. See “View Archived Forms.”
• View a summary of the last completed IEP task including goals, objectives, services, etc. See “View IEP Summary Report.”
View Completed Tasks
To view a video of this procedure, go to:http://www.progressbook.com/Videos/SpS/View-Completed-Tasks
1. On the Completed Tasks screen, select the student whose completed tasks you want to view. See “Select Students.”
The completed tasks for the student display.
2. Click the task you want to view.
Expanded Task on Completed Tasks Screen
ProgressBook SpecialServices User Guide 67

Completed Tasks
All of the pages that comprise the task display.
Rename Completed Tasks
1. On the Completed Tasks screen, select the student whose completed tasks you want to view.
The completed tasks for the student display.
2. In the row of the task you want to rename, click .
3. On the Rename Task window, in the Task Name field, enter the new name.
4. Click Save.
Completed Task Pages
Rename Task Window
68 ProgressBook SpecialServices User Guide

Completed Tasks
The new name displays for the task on the Completed Tasks screen.
Delete Completed Tasks
Only users with the appropriate security privileges can delete completed tasks. When you delete a completed task, it is permanently removed from the system.
1. On the Completed Tasks screen, select the student for whom you want to delete the task. See “Select Students.”
All of the completed tasks for the student display.
2. In the row of the task you want to delete, click .
3. On the deletion confirmation message, click Delete.
The task is removed from the list of completed tasks on the Completed Tasks screen.
View Archived Forms
To view a video of this procedure, go to:http://www.progressbook.com/Videos/SpS/View-Archived-Forms
You can view forms that were completed (finalized) in a version of SpecialServices prior to 9.1 or using the Classic View mode of SpecialServices 9.1. Archived forms are read-only.
1. On the Completed Tasks screen, select the student for whom you want to view the archived forms. See “Select Students.”
Renamed Task on the Completed Tasks Screen
ProgressBook SpecialServices User Guide 69

Completed Tasks
The completed tasks for the student display.
2. Click View Archived Forms.
If there are completed forms for the student in the default form set type of IEP/EMIS Sets, they display below the selection fields on the Finalized Forms View screen.
3. If forms for the student exist in another form set type, in the Choose Finalized Set Types drop-down list, select one of the following form set types.
• IEP/EMIS Sets – Displays all completed (finalized) IEP form sets.
• Other Sets – Displays any other completed form sets.
• Archived Form Sets – Displays any completed form sets from a legacy version of SpecialServices.
• All Finalized Form Sets – Displays all completed form sets, including IEP and other form sets.
4. Next to the form set you want to view, click .
View Archived Forms Link
Finalized Forms View Screen
70 ProgressBook SpecialServices User Guide

Completed Tasks
The selected forms display.
5. When you are finished viewing the form set, close the browser.
6. On the Finalized Forms View screen, you can also perform the following actions:
• Rename the form set, as described in “Rename Archived Forms.”
• Remove the archived form set, as described in “Delete Archived Forms.”
Rename Archived FormsYou can change the name of archived forms as desired.
1. On the Finalized Forms View screen, in the Student drop-down list, select the student whose form set you want to rename.
2. Next to the form set you want to rename, click .
Save and Cancel buttons display in the Edit column of the selected form set, and the cell beneath the Finalized Group Name field becomes editable.
Selected Archived Forms
Finalized Group Name Field on Finalized Form View Screen
ProgressBook SpecialServices User Guide 71

Completed Tasks
3. In the Finalized Group Name field, enter a new name.
4. Click Save.
The new name displays in the Finalized Group Name field for the form set.
Delete Archived FormsOnly users with the appropriate security privileges can permanently delete archived forms.
1. On the Finalized Forms View screen, in the Student drop-down list, select the student whose form set you want to remove.
2. Next to the row of the form set you want to delete, click .
The message displays, “Are you sure want to delete this form package?”
3. On deletion confirmation message, click OK.
The form set is removed from the list of archived form sets.
View IEP Summary Report
To view a video of this procedure, go to:http://www.progressbook.com/Videos/SpS/View-IEP-Summary
The IEP Summary Report is a summary of a student’s last completed IEP task, including goals, objectives, services, etc.
1. On the Completed Tasks screen, select the School or Class and the Student for whom you want to run the report.
New Archived Form Name
Select Student on Completed Tasks Screen
72 ProgressBook SpecialServices User Guide

Completed Tasks
A list of the student’s completed tasks displays.
2. Click IEP Summary.
The student’s IEP Summary Report displays.
3. Optional: To open the report in PDF format to view, print or save it, click Print.
4. Optional: To open the IEP task within SpecialServices, click View Task.
List of Student’s Completed Tasks
IEP Summary Report
Open PDF to view, print or save report.
Open IEP task.
ProgressBook SpecialServices User Guide 73

Completed Tasks
This page intentionally left blank.
74 ProgressBook SpecialServices User Guide

User Banks
You can set up and maintain your own bank of phrases that you plan to reuse later on forms.
• To create bank items:
• when you have a student form open, see “Create Bank Items Within Forms.”
• when you do not have a student form open, see “Create Bank Items Outside Forms.”
• To use available bank items, see “Insert Bank Items Into Forms.”
Create Bank Items Within Forms
You can maintain bank items within the Page Edit screen of many forms. (If you do not have a student form open, see “Create Bank Items Outside Forms.”)
Note: This functionality is not available on all forms.
1. On the page edit screen, click to open the task menu.
2. Place the cursor in any field with banks functionality. (If a field does not have this functionality, the message “Banks are not available for this field” displays in the Banks area.)
Note: Bank items are field-specific.
3. In the side panel under Banks, click New Bank Item.
Open Task Menu
ProgressBook SpecialServices User Guide 75

User Banks
4. On the My Banks window, in the Alias field, enter a short description of the new bank item.
Note: The alias is the text that displays in the Banks section of the side panel, so you should choose something that will help you recognize this bank item the next time you might want to use it.
5. In the main text field, enter the specific phrase you want to use for this bank item, noting the following:
• For fields that support rich text formatting, you can format bank item text using the rich text toolbar on the My Banks window.
• You can use the following predefined codes to insert the student’s name or the appropriate pronoun in the phrase when you insert it into a form:
Create Bank Item
76 ProgressBook SpecialServices User Guide
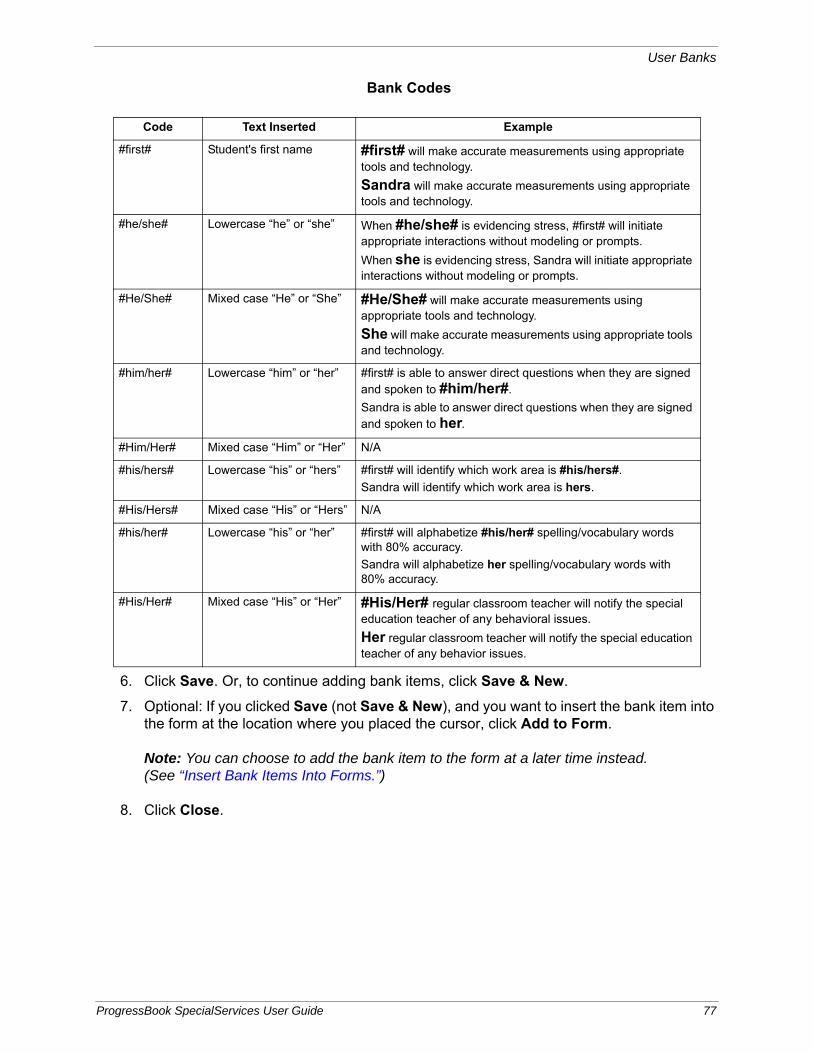
User Banks
Bank Codes
6. Click Save. Or, to continue adding bank items, click Save & New.
7. Optional: If you clicked Save (not Save & New), and you want to insert the bank item into the form at the location where you placed the cursor, click Add to Form.
Note: You can choose to add the bank item to the form at a later time instead. (See “Insert Bank Items Into Forms.”)
8. Click Close.
Code Text Inserted Example
#first# Student's first name #first# will make accurate measurements using appropriate tools and technology.
Sandra will make accurate measurements using appropriate tools and technology.
#he/she# Lowercase “he” or “she” When #he/she# is evidencing stress, #first# will initiate appropriate interactions without modeling or prompts.
When she is evidencing stress, Sandra will initiate appropriate interactions without modeling or prompts.
#He/She# Mixed case “He” or “She” #He/She# will make accurate measurements using appropriate tools and technology.
She will make accurate measurements using appropriate tools and technology.
#him/her# Lowercase “him” or “her” #first# is able to answer direct questions when they are signed and spoken to #him/her#.
Sandra is able to answer direct questions when they are signed and spoken to her.
#Him/Her# Mixed case “Him” or “Her” N/A
#his/hers# Lowercase “his” or “hers” #first# will identify which work area is #his/hers#.
Sandra will identify which work area is hers.
#His/Hers# Mixed case “His” or “Hers” N/A
#his/her# Lowercase “his” or “her” #first# will alphabetize #his/her# spelling/vocabulary words with 80% accuracy.
Sandra will alphabetize her spelling/vocabulary words with 80% accuracy.
#His/Her# Mixed case “His” or “Her” #His/Her# regular classroom teacher will notify the special education teacher of any behavioral issues.
Her regular classroom teacher will notify the special education teacher of any behavior issues.
ProgressBook SpecialServices User Guide 77

User Banks
The new bank item now displays in the side panel under My Banks. If you selected to add the bank item to the form, the bank item wording is also inserted into the form at the location of the cursor.
Save New Bank Item
Bank Item Created and Added to Form
78 ProgressBook SpecialServices User Guide

User Banks
Modify Bank Items Within FormsYou can modify existing bank items created while you have a student form open. The changes are saved for you to use again later on other forms and for other students.
Note: You can only modify the bank items that you have created. District bank items can only be edited by a system administrator.
• To edit an existing bank item, in the side panel under My Banks, hover over the bank item and click ; then make the needed changes. (For field descriptions, see “Create Bank Items Within Forms.”)
• To delete an existing item, in the side panel under My Banks, hover over the bank item and click .
Create Bank Items Outside Forms
You can set up and maintain bank items even when you do not have a student form open. (If you have a student form open, see “Create Bank Items Within Forms.”)
Note: This functionality is currently being redesigned and is temporarily unavailable.
Insert Bank Items Into Forms
You can add predefined wording from existing bank items (your own and those created by your district) to student forms. (For information on setting up bank items, see “Create Bank Items Within Forms” or “Create Bank Items Outside Forms,” as appropriate.)
1. On the page edit screen, click to open the task menu.
Modify Bank Item
Delete bank item
Edit bank item
ProgressBook SpecialServices User Guide 79
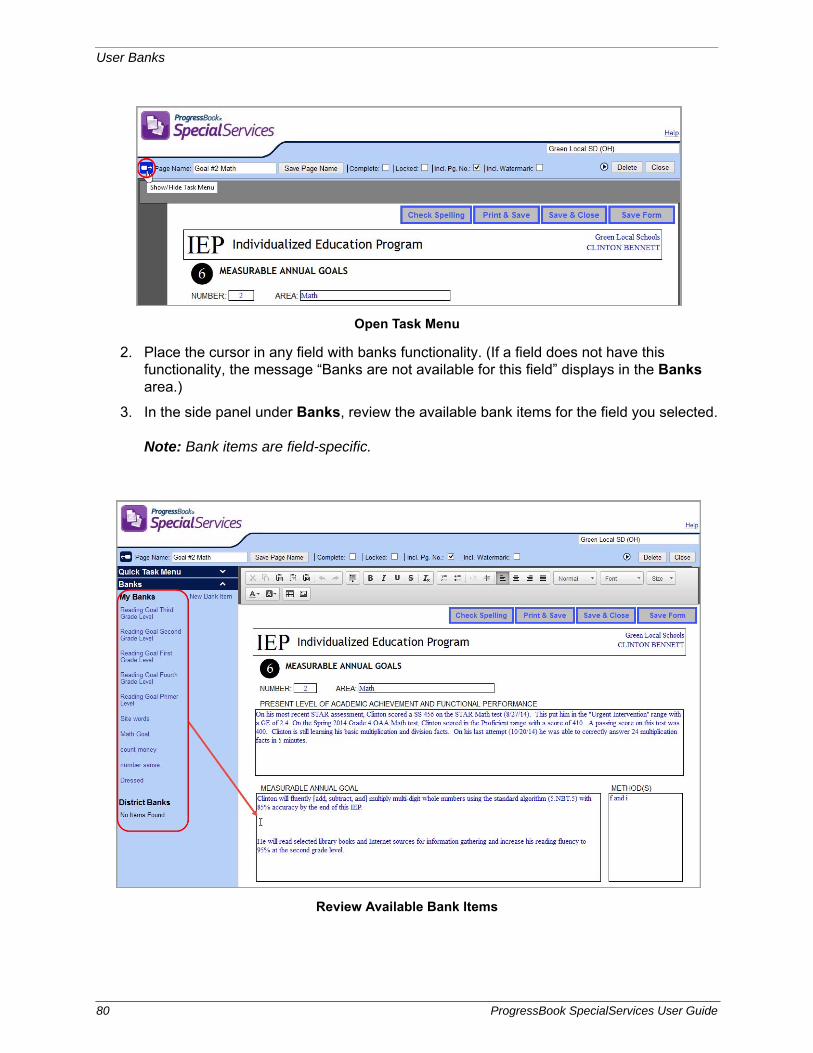
User Banks
2. Place the cursor in any field with banks functionality. (If a field does not have this functionality, the message “Banks are not available for this field” displays in the Banks area.)
3. In the side panel under Banks, review the available bank items for the field you selected.
Note: Bank items are field-specific.
Open Task Menu
Review Available Bank Items
80 ProgressBook SpecialServices User Guide
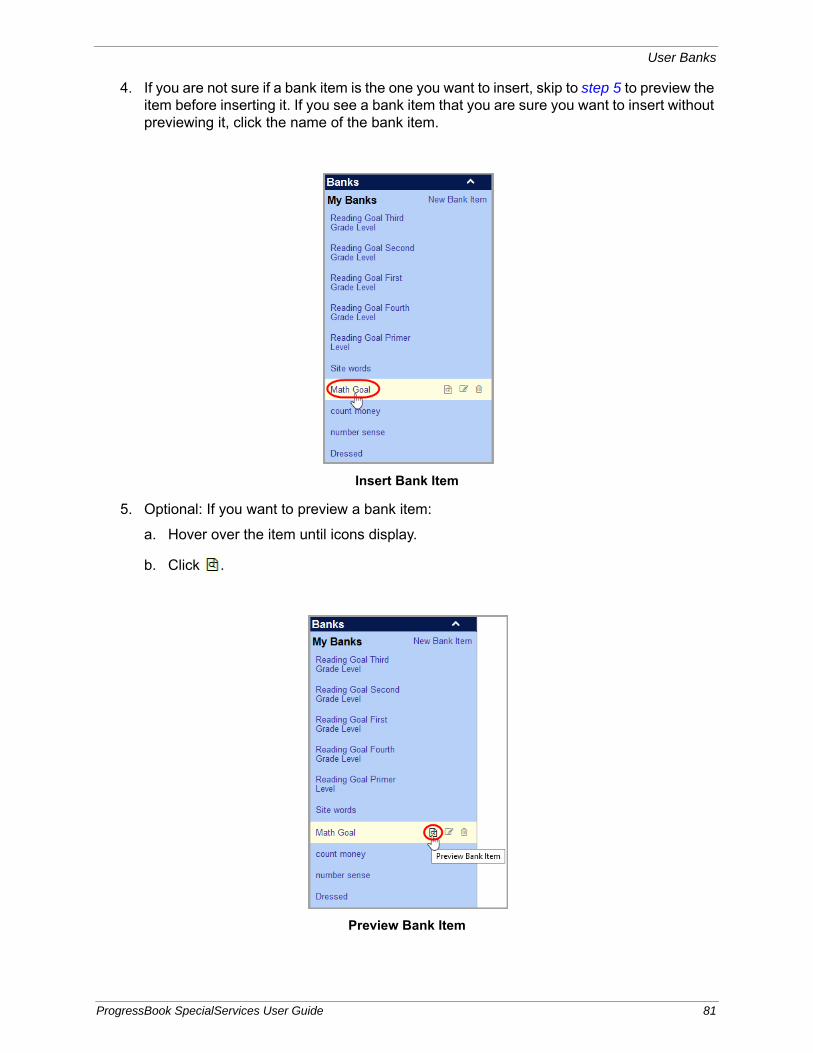
User Banks
4. If you are not sure if a bank item is the one you want to insert, skip to step 5 to preview the item before inserting it. If you see a bank item that you are sure you want to insert without previewing it, click the name of the bank item.
5. Optional: If you want to preview a bank item:
a. Hover over the item until icons display.
b. Click .
Insert Bank Item
Preview Bank Item
ProgressBook SpecialServices User Guide 81

User Banks
c. On the My Banks or District Banks window, review the wording of the bank item.
d. Optional: To edit the wording of the bank item, click Edit, make any necessary changes, and click Save. (For field descriptions, see “Create Bank Items Within Forms.”)
e. Optional: To preview a different bank item, in the Bank Item drop-down list, select a different item.
f. When you are satisfied with the bank item, click Add to Form.
g. Click Close.
Add Previewed Item to Form
82 ProgressBook SpecialServices User Guide

User Banks
The bank item wording is inserted into the form in the field where you placed the cursor.
Bank Item Added to Form
ProgressBook SpecialServices User Guide 83

User Banks
This page intentionally left blank.
84 ProgressBook SpecialServices User Guide

Reports
Report Builder reports are available from the Report screen if they are enabled for your district and you have the appropriate user privileges. You can select required parameters and numerous optional filters and columns for displaying desired report results. Once you select the desired settings, you can save the report with those settings to use in the future.
For information on managing Report Builder reports and users’ access to the reports, as well as guidelines for creating custom reports in Microsoft SQL Server Report Builder 2.0 for use in ProgressBook, refer to ProgressBook Report Builder Management Guide.
Report Builder Reports
The following Report Builder reports are available, by default, from the Report screen to users with the following privileges. These reports are available in two versions: one for users whose privileges allow access to school buildings and another for those with access to classes.
• Open Tasks – Displays existing open tasks for one or more task types for students in individual or multiple school(s) or class(es), depending on the report version.
• Completed Tasks – Displays existing completed tasks for one or more task types where the date the task was completed falls within the specified date range for students in individual or multiple school(s) or class(es), depending on the report version.
• Due Date – Displays completed IEP and/or ETR tasks due for review within the specified date range for students in individual or multiple school(s) or class(es).
• Accommodations – Displays statewide testing accommodations listed on the IEP 12 or SP 3 Statewide and District Testing Pages of the completed IEP or ISP tasks whose event dates fall within the specified date range for students in individual or multiple school(s) or class(es).
• Student Demographics – Displays student demographic information for individual or multiple schools, or multiple classes, class groups or homerooms.
• EMIS Related Services – Displays related services information listed on the Services page of the completed IEP or ISP tasks whose meeting or start and end dates fall within the specified date range for students in individual or multiple school(s) or class(es), depending on the report version.
• EMIS Special Ed Events – Displays Special Education events information listed on the Special Education Events page of the completed IEP, ETR and ISP tasks whose event dates fall within the specified date range for students in individual or multiple school(s) or class(es), depending on the report version.
Specific reports display on the Report screen based on whether districts have assigned user roles access to those reports. For example, the Accommodations report is available by default to all users whose privileges allow access to school buildings. Even though a guidance counselor may have access to multiple school buildings, if the district does not assign the guidance counselor role access to the Accommodations report, that report does not display on the Report screen.
ProgressBook SpecialServices User Guide 85

Reports
Report ScreenYou can run any of the reports available to you on the Report screen from either the list on the left side of the screen or the main portion of the screen.
When you click the name of the report in the left column, that report is highlighted by a blue rectangle in the main area of the screen. This report remains highlighted until you select a different report or move to another screen.
When you hover anywhere over the icon, report name, description or Run button in the main area of the screen, the report is highlighted by a yellow rectangle.
When you click anywhere in the yellow highlighted rectangle area, the Report window opens displaying a description of the report.
Blue Highlighting of Selected Report
Yellow Highlighting of Hovered Report
86 ProgressBook SpecialServices User Guide

Reports
You can generate the report by clicking on the Report window or on the main Report
screen.
The appearance of the following icons next to a report indicates the report type.
You have the ability to delete any reports you have customized and saved in My Reports. You cannot delete Core or Add-on reports.
Open Tasks Report To view a video of this procedure, go to:http://www.progressbook.com/Videos/SpS/Open-Tasks-Report
The Open Tasks Report provides numerous options for displaying existing open tasks for one or more task types for students in individual or multiple school(s) or class(es), depending on the report version.
1. On the Report screen, under the description of the Open Tasks Report, click Run.
The SpecialServices Report Viewer window displays.
2. By default, in the Report Header field, Open Tasks Report or Open Tasks by Class Report displays, but you may change the name if desired.
Report Window
Icon Description
(red)
Core Report – Report provided by ProgressBook SpecialServices.
(green)
My Report – Version of a report with selection criteria saved by the user.
(blue)
Add-on Report – Customized report uploaded by district support staff.
ProgressBook SpecialServices User Guide 87

Reports
3. In the Select Required Parameters area, if you have access to buildings, in the School(s) drop-down list, select the appropriate school(s). If you have access to classes, in the Class(es) drop-down list, select the appropriate class(es).
Note: Only school buildings to which you have access or classes and class groups to which you have been assigned display in the list. Hidden classes do not display.
4. In the Select Required Parameters area, in the Task Type(s) drop-down list, select the appropriate task type(s).
Note: Only tasks enabled for your district display in the list.
5. In the Set Optional Filters area, in the Field Name drop-down list, select the appropriate option(s).
• Compliance Due Date – Compliance due date of the task selected on the Start a New Task window in SpecialServices
• District Student ID – Code that identifies the student (imported from StudentInformation)
• Grade Level Code – Code that represents the grade level in which the student is enrolled (imported from StudentInformation)
• Grade Level Description – Description of the grade level in which the student is enrolled (imported from StudentInformation)
• Student Name – Full name of student in the form of last name, first name, middle name (imported from StudentInformation)
• Task Name – Name of the task selected on the Start a New Task window in SpecialServices
• Task Start Date – Date the task was created in SpecialServices.
6. If the Operation drop-down list is available, select one of the following options. The available options may vary depending on the option you selected in the Field Name drop-down list.
• Is Equal To
• Is Not Equal To
• Is Before
• Is Before or On
• Is After
• Is After or On
• Begins With
• Does Not Begin With
• Ends With
• Does Not End With
• Contains
• Does Not Contain
• Has a Value
• Does Not Have a Value
88 ProgressBook SpecialServices User Guide

Reports
7. In the Value field, type the appropriate value.
Note: The available options and acceptable values vary depending on the option you selected in the Field Name drop-down list. You may be able to enter only alphabetical or only numeric characters depending on the option you selected in the Field Name drop-down list. If you selected an option in the Field Name drop-down list that requires a date, a calendar becomes available in the Value field. If you selected Grade Level Code in the Field Name drop-down list, for grades 1 through 9 you must enter 0 before the grade in the Value field. If you selected Has a Value or Does Not Have a Value in the Operation drop-down list, then the Value field is not available.
Open Tasks Report Setup
ProgressBook SpecialServices User Guide 89

Reports
8. By default, specific columns display on the report. If you have selected specific filter options in the Field Name drop-down list and you want that information to display on the report, in the Columns drop-down list, select the corresponding column name.
9. Click View Report.
The report displays. If multiple events exist for a student, each event displays in a separate row.
Note: The field or list displays red indicating an unacceptable value was entered or a required field was left blank.
10. To save the report with your selected parameters, filters and columns, complete the following steps:
a. On the Report Viewer window, click Save Setup As.
b. On the Save Setup As window, in the New report name field, type the unique report name.
c. In the New description field, type the description of the report.
d. Click Save.
The following message displays at the bottom of the window, “Report setup saved successfully.”
The report displays in the My Reports section on the Report screen.
Open Tasks by Class Report Setup
90 ProgressBook SpecialServices User Guide

Reports
Completed Tasks ReportThe Completed Tasks Report provides numerous options for displaying existing completed tasks for one or more task types where the date the task was completed falls within the specified date range for students in individual or multiple school(s) or class(es), depending on the report version.
1. On the Report screen, under the description of the Completed Tasks Report, click Run.
The SpecialServices Report Viewer window displays.
2. By default, in the Report Header field, Completed Tasks Report or Completed Tasks Report by Class displays, but you may change the name if desired.
3. In the Select Required Parameters area, if you have access to buildings, in the School(s) drop-down list, select the appropriate school(s). If you have access to classes, in the Class(es) drop-down list, select the appropriate class(es).
Note: Only school buildings to which you have access display in the list.
4. In the Select Required Parameters area, in the Task Type(s) drop-down list, select the appropriate task type(s).
Note: Only tasks enabled for your district display in the list.
5. If you have access to classes, in the Select Required Parameters area, in the Start Date and End Date fields, select the appropriate dates.
6. In the Set Optional Filters area, in the Field Name drop-down list, select the appropriate option(s).
• District Student ID – Code that identifies the student (imported from StudentInformation)
• Grade Level Code – Code that represents the grade level in which the student is enrolled (imported from StudentInformation)
• Grade Level Description – Description of the grade level in which the student is enrolled (imported from StudentInformation)
• Student Name – Full name of student in the form of last name, first name, middle name (imported from StudentInformation)
• Task Completed Date – Date the task was completed in SpecialServices
• Task Event Date – Date entered in the Meeting Date field on an IEP, ISP or ETR task Cover Page
• Task Name – Name of the task selected on the Start a New Task window in SpecialServices.
7. If the Operation drop-down list is available, select one of the following options. The available options may vary depending on the option you selected in the Field Name drop-down list.
• Is Equal To
• Is Not Equal To
• Is Before
• Is Before or On
• Is After
ProgressBook SpecialServices User Guide 91

Reports
• Is After or On
• Begins With
• Does Not Begin With
• Ends With
• Does Not End With
• Contains
• Does Not Contain
• Has a Value
• Does Not Have a Value
8. In the Value field, type the appropriate value.
Note: The available options and acceptable values vary depending on the option you selected in the Field Name drop-down list. You may be able to enter only alphabetical or only numeric characters depending on the option you selected in the Field Name drop-down list. If you selected an option in the Field Name drop-down list that requires a date, a calendar becomes available in the Value field. If you selected Grade Level Code in the Field Name drop-down list, for grades 1 through 9, you must enter 0 before the grade in the Value field. If you selected Has a Value or Does Not Have a Value in the Operation drop-down list, then the Value field is not available.
Completed Tasks Report Setup
92 ProgressBook SpecialServices User Guide
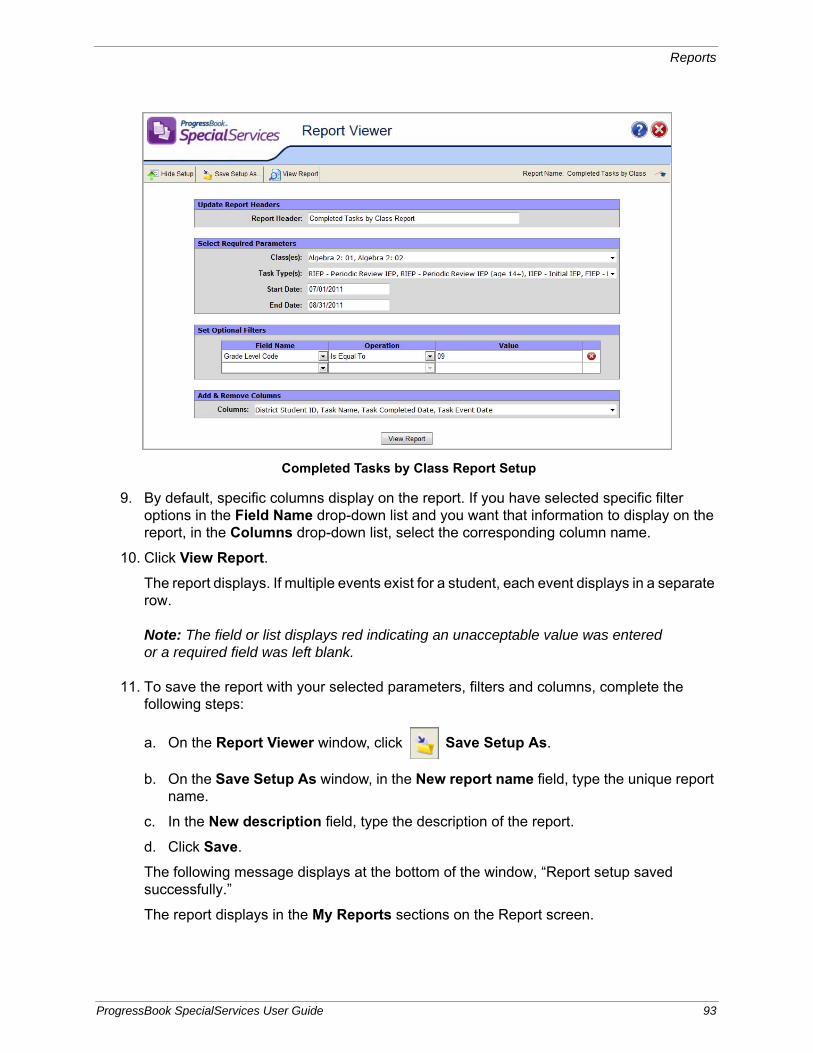
Reports
9. By default, specific columns display on the report. If you have selected specific filter options in the Field Name drop-down list and you want that information to display on the report, in the Columns drop-down list, select the corresponding column name.
10. Click View Report.
The report displays. If multiple events exist for a student, each event displays in a separate row.
Note: The field or list displays red indicating an unacceptable value was entered or a required field was left blank.
11. To save the report with your selected parameters, filters and columns, complete the following steps:
a. On the Report Viewer window, click Save Setup As.
b. On the Save Setup As window, in the New report name field, type the unique report name.
c. In the New description field, type the description of the report.
d. Click Save.
The following message displays at the bottom of the window, “Report setup saved successfully.”
The report displays in the My Reports sections on the Report screen.
Completed Tasks by Class Report Setup
ProgressBook SpecialServices User Guide 93

Reports
Due Date ReportTo view a video of this procedure, go to:http://www.progressbook.com/Videos/SpS/Due-Date-Report
The Due Date Report provides numerous options for displaying completed IEP and/or ETR tasks due for review within the specified date range for students in individual or multiple school(s) or class(es), depending on the report version.
1. On the Report screen, under the description of the Due Date Report, click Run.
The SpecialServices Report Viewer window displays.
2. By default, in the Report Header field, Due Date Report or Due Date by Class Report displays, but you may change the name if desired.
3. In the Select Required Parameters area, if you have access to buildings, in the School(s) drop-down list, select the appropriate school(s). If you have access to classes, in the Class(es) drop-down list, select the appropriate class(es).
Note: Only school buildings to which you have access or classes and class groups to which you have been assigned display in the list. Hidden classes do not display in the list.
4. In the Select Required Parameters area, in the Start Date and End Date fields, select the appropriate date(s).
Note: You may enter dates in multiple formats using different types of separators, such as 11/01/11, 01.01.2011 or 1-1-11.
5. In the Select Required Parameters area, select one of the following Show ETRs options:
• Yes – Include students with any of the following ETR tasks: IETR - Initial Evaluation (School-Age), IETR - Initial Evaluation (Preschool), RETR - Reevaluation (School-Age), RETR - Reevaluation (Preschool) and TETR - Transfer ETR, if they are enabled for your district.
• No – Do not include students with ETR tasks.
6. In the Select Required Parameters area, select one of the following Show IEPs options:
• Yes – Include students with any of the following IEP tasks: IIEP - Initial IEP, RIEP - Periodic Review IEP, RIEP - Periodic Review IEP (14+) and TIEP - Transfer IEP, if they are enabled for your district.
• No – Do not include students with IEP tasks.
7. In the Set Optional Filters area, in the Field Name drop-down list, select the appropriate option(s).
• District Student ID – Code that identifies the student (imported from StudentInformation)
• Due Date – Date by which the task must be complete to be in compliance. The system determines the due date of the IEP by adding one year minus one day to the date entered in the Meeting Date field on the IEP Cover Page. The system determines the due date of the ETR by adding three years minus one day to the date entered in the Meeting Date field on the ETR Cover Page. If the calculated IEP or ETR due date falls within the date range entered in the Start Date and End Date fields entered above, the student displays on the report.
94 ProgressBook SpecialServices User Guide

Reports
• Event Date – Date entered in the Meeting Date field on an IEP, ISP or ETR task Cover Page
• Grade Level Code – Code that represents the grade level in which the student is enrolled (imported from StudentInformation)
• Grade Level Description – Description of the grade level in which the student is enrolled (imported from StudentInformation)
• Student Name – Full name of student in the form of last name, first name, middle name (imported from StudentInformation)
• Task Type – Type of the task selected on the Start a New Task window in SpecialServices.
8. If the Operation drop-down list is available, select one of the following options. The available options may vary depending on the option you selected in the Field Name drop-down list.
• Is Equal To
• Is Not Equal To
• Is Before
• Is Before or On
• Is After
• Is After or On
• Begins With
• Does Not Begin With
• Ends With
• Does Not End With
• Contains
• Does Not Contain
• Has a Value
• Does Not Have a Value
9. In the Value field, type the appropriate value.
Note: The available options and acceptable values vary depending on the option you selected in the Field Name drop-down list. You may be able to enter only alphabetical or only numeric characters depending on the option you selected in the Field Name drop-down list. If you selected an option in the Field Name drop-down list that requires a date, a calendar becomes available in the Value field. If you selected Grade Level Code in the Field Name drop-down list, for grades 1 through 9 you must enter 0 before the grade in the Value field. If you selected Has a Value or Does Not Have a Value in the Operation drop-down list, then the Value field is not available.
ProgressBook SpecialServices User Guide 95

Reports
10. By default, specific columns display on the report. If you have selected specific filter options in the Field Name drop-down list and you want that information to display on the report, in the Columns drop-down list, select the corresponding column name.
Due Date Report Setup
Due Date by Class Report Setup
96 ProgressBook SpecialServices User Guide

Reports
Note: Only the most recent task displays in the report results, if a student has multiple tasks of one task type and the following information is the same: Student Name, School Name, District Student ID, Task Type, Event Date, Grade Level Code and Grade Level Description. If any of this information is different, then multiple tasks display.
Note: If a student has a TIEP - Transfer IEP or TETR - Transfer ETR, “See IEP” or “See ETR” displays in the Due Date column.
11. Click View Report.
The report displays. If multiple events exist for a student, each event displays in a separate row.
Note: The field or list displays red indicating an unacceptable value was entered or a required field was left blank.
12. To save the report with your selected parameters, filters and columns, complete the following steps:
a. On the Report Viewer window, click Save Setup As.
b. On the Save Setup As window, in the New report name field, type the unique report name.
c. In the New description field, type the description of the report.
d. Click Save.
The following message displays at the bottom of the window, “Report setup saved successfully.”
The report displays in the My Reports sections on the Report screen.
Accommodations ReportThe Accommodations Report provides numerous options for displaying statewide testing accommodations listed on the IEP 12 or SP 3 Statewide and District Testing Pages of the completed IEP or ISP tasks whose event dates fall within the specified date range for students in individual or multiple school(s) or class(es), depending on the report version.
1. On the Report screen, under the description of the Accommodations Report, click Run.
The SpecialServices Report Viewer window displays.
2. By default, in the Report Header field, Accommodations Report or Accommodations by Class Report displays, but you may change the name if desired.
3. In the Select Required Parameters area, if you have access to buildings, in the School(s) drop-down list, select the appropriate school(s). If you have access to classes, in the Class(es) drop-down list, select the appropriate class(es).
Note: Only school buildings to which you have access or classes and class groups to which you have been assigned display in the list. Hidden classes do not display.
ProgressBook SpecialServices User Guide 97
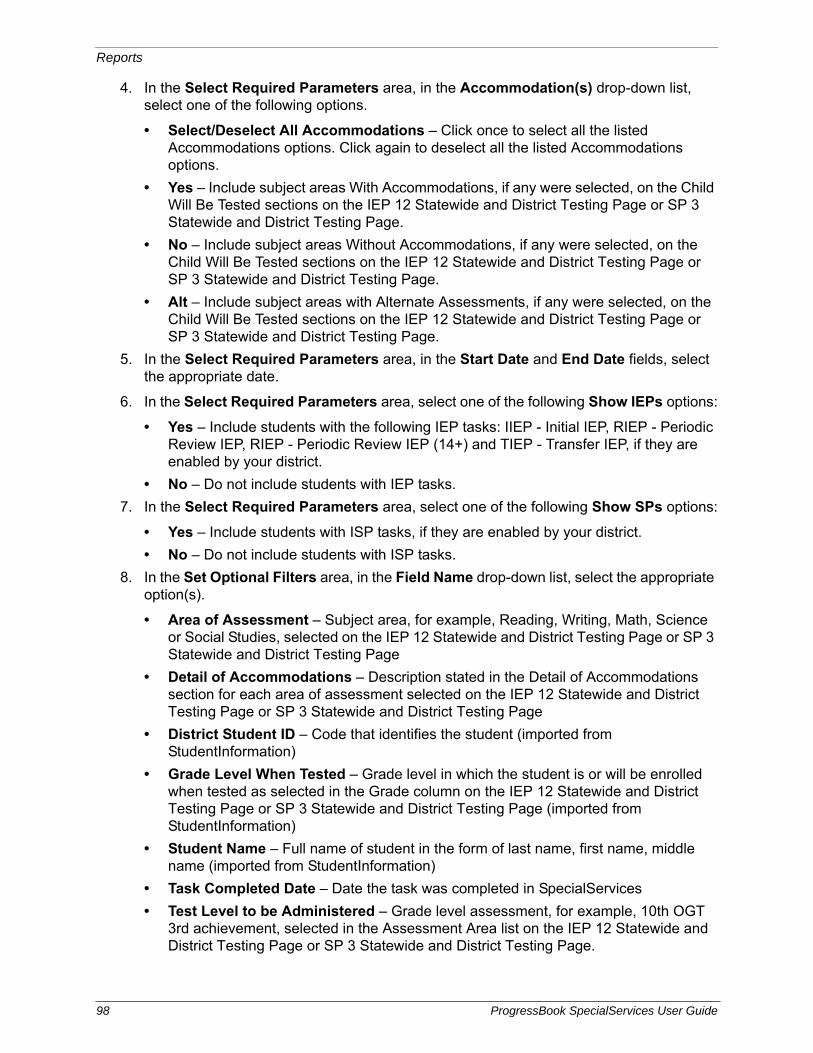
Reports
4. In the Select Required Parameters area, in the Accommodation(s) drop-down list, select one of the following options.
• Select/Deselect All Accommodations – Click once to select all the listed Accommodations options. Click again to deselect all the listed Accommodations options.
• Yes – Include subject areas With Accommodations, if any were selected, on the Child Will Be Tested sections on the IEP 12 Statewide and District Testing Page or SP 3 Statewide and District Testing Page.
• No – Include subject areas Without Accommodations, if any were selected, on the Child Will Be Tested sections on the IEP 12 Statewide and District Testing Page or SP 3 Statewide and District Testing Page.
• Alt – Include subject areas with Alternate Assessments, if any were selected, on the Child Will Be Tested sections on the IEP 12 Statewide and District Testing Page or SP 3 Statewide and District Testing Page.
5. In the Select Required Parameters area, in the Start Date and End Date fields, select the appropriate date.
6. In the Select Required Parameters area, select one of the following Show IEPs options:
• Yes – Include students with the following IEP tasks: IIEP - Initial IEP, RIEP - Periodic Review IEP, RIEP - Periodic Review IEP (14+) and TIEP - Transfer IEP, if they are enabled by your district.
• No – Do not include students with IEP tasks.
7. In the Select Required Parameters area, select one of the following Show SPs options:
• Yes – Include students with ISP tasks, if they are enabled by your district.
• No – Do not include students with ISP tasks.
8. In the Set Optional Filters area, in the Field Name drop-down list, select the appropriate option(s).
• Area of Assessment – Subject area, for example, Reading, Writing, Math, Science or Social Studies, selected on the IEP 12 Statewide and District Testing Page or SP 3 Statewide and District Testing Page
• Detail of Accommodations – Description stated in the Detail of Accommodations section for each area of assessment selected on the IEP 12 Statewide and District Testing Page or SP 3 Statewide and District Testing Page
• District Student ID – Code that identifies the student (imported from StudentInformation)
• Grade Level When Tested – Grade level in which the student is or will be enrolled when tested as selected in the Grade column on the IEP 12 Statewide and District Testing Page or SP 3 Statewide and District Testing Page (imported from StudentInformation)
• Student Name – Full name of student in the form of last name, first name, middle name (imported from StudentInformation)
• Task Completed Date – Date the task was completed in SpecialServices
• Test Level to be Administered – Grade level assessment, for example, 10th OGT 3rd achievement, selected in the Assessment Area list on the IEP 12 Statewide and District Testing Page or SP 3 Statewide and District Testing Page.
98 ProgressBook SpecialServices User Guide

Reports
9. If the Operation drop-down list is available, select one of the following options. The available options may vary depending on the option you selected in the Field Name drop-down list.
• Is Equal To
• Is Not Equal To
• Is Before
• Is Before or On
• Is After
• Is After or On
• Begins With
• Does Not Begin With
• Ends With
• Does Not End With
• Contains
• Does Not Contain
• Has a Value
• Does Not Have a Value
10. In the Value field, type the appropriate value.
Note: The available options and acceptable values vary depending on the option you selected in the Field Name drop-down list. You may be able to enter only alphabetical or only numeric characters depending on the option you selected in the Field Name drop-down list. If you selected an option in the Field Name drop-down list that requires a date, a calendar becomes available in the Value field. If you selected Grade Level Code in the Field Name drop-down list, for grades 1 through 9 you must enter 0 before the grade in the Value field. If you selected Has a Value or Does Not Have a Value in the Operation drop-down list, then the Value field is not available.
ProgressBook SpecialServices User Guide 99

Reports
Accommodations Report Setup
Accommodations by Class Report Setup
100 ProgressBook SpecialServices User Guide
Reports
11. By default, specific columns display on the report. If you have selected specific filter options in the Field Name drop-down list and you want that information to display on the report, in the Columns drop-down list, select the corresponding column name.
Note: Only accommodations from the most recent task displays in the report results, if a student has multiple tasks of one task type and the following information is the same: District Student ID, Task Type and Meeting Date. If any of this information is different, then accommodations from multiple tasks display.
12. Click View Report.
The report displays. A separate row displays for each test and subject area combination; therefore, multiple rows may display for a single student.
Note: The field or list displays red indicating an unacceptable value was entered or a required field was left blank.
13. To save the report with your selected parameters, filters and columns, complete the following steps:
a. On the Report Viewer window, click Save Setup As.
b. On the Save Setup As window, in the New report name field, type the unique report name.
c. In the New description field, type the description of the report.
d. Click Save.
The following message displays at the bottom of the window, “Report setup saved successfully.”
The report displays in the My Reports sections on the Report screen.
Student Demographics ReportTo view a video of this procedure, go to:http://www.progressbook.com/Videos/SpS/Student-Demographics-Report
The Student Demographics report provides numerous options for displaying student demographic information for individual or multiple schools, or individual or multiple classes, class groups or homerooms.
1. On the Report screen, under the description of the Student Demographics Report, click Run.
The SpecialServices Report Viewer window displays.
2. By default, in the Report Header field, Student Demographics or Student Demographics by Class Report displays, but you may change the name if desired.
3. In the Select Required Parameters area, if you have access to buildings, in the School(s) drop-down list, select the appropriate school(s). If you have access to classes, in the Class drop-down list, select the appropriate class(es).
ProgressBook SpecialServices User Guide 101
Reports
Note: Only school buildings to which you have access or classes and class groups to which you have been assigned display in the list. Hidden classes do not display.
4. In the Set Optional Filters area, in the Field Name drop-down list, select the appropriate option(s). See “Available Filters for Student Demographics Report” for descriptions of all the available options.
5. If the Operation drop-down list is available, select one of the following options. The available options may vary depending on the option you selected in the Field Name drop-down list.
• Is Equal To
• Is Not Equal To
• Is Before
• Is Before or On
• Is After
• Is After or On
• Begins With
• Does Not Begin With
• Ends With
• Does Not End With
• Contains
• Does Not Contain
• Has a Value
• Does Not Have a Value
6. In the Value field, type the appropriate value.
Note: The available options and acceptable values vary depending on the option you selected in the Field Name drop-down list. You may be able to enter only alphabetical or only numeric characters depending on the option you selected in the Field Name drop-down list. If you selected an option in the Field Name drop-down list that requires a date, a calendar becomes available in the Value field. If you selected Grade Level Code in the Field Name drop-down list, for grades 1 through 9 you must enter 0 before the grade in the Value field.
102 ProgressBook SpecialServices User Guide

Reports
7. By default, specific columns display on the report. If you have selected specific filter options in the Field Name drop-down list and you want that information to display on the report, in the Columns drop-down list, select the corresponding column name.
8. Click View Report.
The report displays.
Note: The field or list displays red indicating an unacceptable value was entered or a required field was left blank.
Student Demographics Report Setup
Student Demographics by Class Report Setup
ProgressBook SpecialServices User Guide 103
Reports
9. To save the report with your selected parameters, filters and columns, complete the following steps:
a. On the Report Viewer window, click Save Setup As.
b. On the Save Setup As window, in the New report name field, type the unique report name.
c. In the New description field, type the description of the report.
d. Click Save.
The following message displays at the bottom of the window, “Report setup saved successfully.”
The report displays in the My Reports sections on the Report screen.
The following table lists available filter options.
Available Filters for Student Demographics Report
Option Description
Birth Date Date of birth of the student.
Calendar Name Calendar used by the school in which the student is enrolled.
Class Name Name of the class in which the student is enrolled. If no class name is assigned, then course name and section display.
Counselor Name Name of the guidance counselor assigned to the student.
Disability Code Code that represents a disability which is included in a list of disabilities recognized by the state department of education. These codes are also used in ProgressBook SpecialServices. If you select this option, you must type 01, 02, 03, 04, 05, 06, 08, 09, 10, 11, 12, 13, 14, 15 or ** in the Value field.
Disability Name Full name of a disability which is included in a list of disabilities recognized by the state department of education. These codes are also used in ProgressBook SpecialServices. If you select this option, you must type the full or partial disability name in the Value field.
District of Residence District in which the student resides.
District of Service District in which the student receives services.
Enrollment Date Date on which the student enrolled in the school.
Enrollment Status Code Code that represents whether the student is active or inactive in the school in which the student is enrolled.
Gender Code Code that represents whether a student is female or male.
Grade Level Code Code that represents the grade level in which the student is enrolled.
Grade Level Name Name of the grade level in which the student is enrolled.
Graduation Date Date on which the student will graduate from high school.
Home School ID Code that represents the school building in which the student was originally enrolled.
Homeroom ID Code that identifies the homeroom to which the student is assigned.
104 ProgressBook SpecialServices User Guide

Reports
EMIS Related Services ReportTo view a video of this procedure, go to:http://www.progressbook.com/Videos/SpS/EMIS-Related-Services
The EMIS Related Services Report provides numerous options for displaying related services information listed on the Services page of the completed IEP or ISP tasks whose meeting or start and end dates fall within the specified date range for students in individual or multiple school(s) or class(es), depending on the report version.
1. On the Report screen, under the description of the EMIS Related Services Report, click Run.
The SpecialServices Report Viewer window displays.
Parent Access Disabled Indicator Indicates whether the student's information has been disabled on the Parent Access Web Site. If a parent account is associated with multiple student accounts, the parent account can still access the other student accounts. If you select this option, you must select Yes or No in the Value field.
Parent Access Disabled Status Name Indicates whether the student's information has been disabled on the Parent Access Web Site. If you select this option, you must type Disabled in the Value field.
PB School ID ProgressBook code that identifies the school in which the student is enrolled.
PB Student ID ProgressBook code that identifies the student.
School Enrollment Status Name Indicates whether the student's record is active in ProgressBook. If you select this option, you must type Active or Withdrawn in the Value field.
School ID Code that identifies the school in which the student is enrolled.
School Name Name of the school in which the student is enrolled.
Student Address Line 1 Street address where the student lives.
Student Address Line 2 Street address where the student lives.
Student Address Line 3 Street address where the student lives.
Student Address Apt No Apartment number where the student lives.
Student City City where the student lives.
Student Email Address Email address of the student.
Student First Name First name of the student.
Student ID District code that identifies the student.
Student Last Name Last name of the student.
Student Middle Name Middle name of the student.
Student Phone Number Student's primary phone number.
Student State State where the student lives.
Student Zip Code Postal code of the address where the student lives.
Student's Last Parent Access Login Date
Date of the last time the student logged in to the Parent Access Web Site.
Option Description
ProgressBook SpecialServices User Guide 105

Reports
2. By default, in the Report Header field, EMIS Related Services Report or EMIS Related Services by Class Report displays, but you may change the name if desired.
3. In the Select Required Parameters area, if you have access to buildings, in the School(s) drop-down list, select the appropriate school(s). If you have access to classes, in the Class(es) drop-down list, select the appropriate class(es).
Note: Only school buildings to which you have access or classes and class groups to which you have been assigned display in the list. Hidden classes do not display in the list.
4. In the Select Required Parameters area, select one of the following Task Included In EMIS options:
• Yes – Include tasks that are marked Include in Emis on the Completed Tasks screen.
• No – Do not include tasks that are marked Include in Emis on the Completed Tasks screen.
5. In the Select Required Parameters area, select one of the following Task Excluded From EMIS options:
• Yes – Include tasks that are not marked Include in Emis on the Completed Tasks screen.
• No – Do not include tasks that are not marked Include in Emis on the Completed Tasks screen.
6. In the Select Required Parameters area, in the Start Date and End Date fields, select the appropriate date(s).
Note: You may enter dates in multiple formats using different types of separators, such as 11/01/11, 01.01.2011 or 1-1-11.
7. In the Set Optional Filters area, in the Field Name drop-down list, select the appropriate option(s).
• District Student ID – Code that identifies the student (imported from StudentInformation)
• Duration – The amount of time the student receives services
• EMIS ID – State Student ID code that identifies the student (imported from StudentInformation)
• Frequency – How often the student receives services
• Goals Addressed – Goals that the services address
• Location Of Services – Location where the student receives services
• Provider Title – Title of the person providing the services
• Service Code – Code that represents the description of the service the student is receiving entered on the Specially Designed Services page of the task
• Service Description – Description of the service the student is receiving entered on the Specially Designed Services page of the task
• Service End Date – Date by which the student should stop receiving services entered on the Services page of the task
• Service Start Date – Date by which the student should begin receiving services entered on the Services page of the task
106 ProgressBook SpecialServices User Guide

Reports
• Student Name – Full name of student in the form of last name, first name, middle name (imported from StudentInformation)
• Task Name – Name of the task selected on the Start a New Task window in SpecialServices.
8. If the Operation drop-down list is available, select one of the following options. The available options may vary depending on the option you selected in the Field Name drop-down list.
• Is Equal To
• Is Not Equal To
• Is Before
• Is Before or On
• Is After
• Is After or On
• Begins With
• Does Not Begin With
• Ends With
• Does Not End With
• Contains
• Does Not Contain
• Has a Value
• Does Not Have a Value
9. In the Value field, type the appropriate value.
Note: The available options and acceptable values vary depending on the option you selected in the Field Name drop-down list. You may be able to enter only alphabetical or only numeric characters depending on the option you selected in the Field Name drop-down list. If you selected an option in the Field Name drop-down list that requires a date, a calendar becomes available in the Value field. If you selected Has a Value or Does Not Have a Value in the Operation drop-down list, then the Value field is not available.
ProgressBook SpecialServices User Guide 107

Reports
10. By default, specific columns display on the report. If you have selected specific filter options in the Field Name drop-down list and you want that information to display on the report, in the Columns drop-down list, select the corresponding column name.
11. Click View Report.
EMIS Related Services Report Setup
EMIS Related Services by Class Report Setup
108 ProgressBook SpecialServices User Guide

Reports
The report displays. If multiple events exist for a student, each event displays in a separate row.
Note: The field or list displays red indicating an unacceptable value was entered or a required field was left blank.
Note: Only nonhidden students in classes appear in the report.
12. To save the report with your selected parameters, filters and columns, complete the following steps:
a. On the Report Viewer window, click Save Setup As.
b. On the Save Setup As window, in the New report name field, type the unique report name.
c. In the New description field, type the description of the report.
d. Click Save.
The following message displays at the bottom of the window, “Report setup saved successfully.”
The report displays in the My Reports sections on the Report screen.
EMIS Special Ed Events ReportTo view a video of this procedure, go to:http://www.progressbook.com/Videos/SpS/EMIS-Special-Ed-Events
The EMIS Special Ed Events Report displays special education events information listed on the Special Ed Events page of the completed IEP, ETR and ISP tasks whose event dates fall within the specified date range for students in individual or multiple school(s) or class(es), depending on the report version. This report is available in two versions: one to users whose privileges allow access to school buildings and another version to users whose privileges provide access to classes.
1. On the Report screen, under the description of the EMIS Special Ed Events Report, click Run.
The SpecialServices Report Viewer window displays.
2. By default, in the Report Header field, EMIS Special Education Events or EMIS Special Education Events by Class displays, but you may change the name if desired.
3. In the Select Required Parameters area, if you have access to buildings, in the School(s) drop-down list, select the appropriate school(s). If you have access to classes, in the Class(es) drop-down list, select the appropriate class(es).
Note: Only school buildings to which you have access or classes and class groups to which you have been assigned display in the list. Hidden classes do not display in the list.
4. In the Select Required Parameters area, in the Start Date and End Date fields, select the appropriate date(s).
ProgressBook SpecialServices User Guide 109

Reports
Note: You may enter dates in multiple formats using different types of separators, such as 11/01/11, 01.01.2011 or 1-1-11.
5. In the Select Required Parameters area, in the Task Type(s) drop-down list, select the appropriate task type(s).
6. In the Select Required Parameters area, select one of the following Task Included In EMIS options:
• Yes – Include tasks that are marked Include in Emis on the Completed Tasks screen.
• No – Do not include tasks that are marked Include in Emis on the Completed Tasks screen.
7. In the Select Required Parameters area, select one of the following Task Excluded From EMIS options:
• Yes – Include tasks that are not marked Include in Emis on the Completed Tasks screen.
• No – Do not include tasks that are not marked Include in Emis on the Completed Tasks screen.
8. In the Set Optional Filters area, in the Field Name drop-down list, select the appropriate option(s).
• District Student ID – Code that identifies the student (imported from StudentInformation)
• EMIS ID – State Student ID code that identifies the student. (imported from StudentInformation)
• Event Date – Date entered in the Meeting Date field on the task Cover Page
• Event End Date – Date the event ended
• Event Start Date – Date the event started
• Event Type – The type of event
• Non Compliance ID – The noncompliance identification
• Outcome ID – The outcome identification
• Required IEP Test Type – The IEP test type that is required
• Secondary Planning – The secondary plan
• Student Name – Full name of student in the form of last name, first name, middle name (imported from StudentInformation)
• Task Name – Name of the task selected on the Start a New Task window in SpecialServices.
9. If the Operation drop-down list is available, select one of the following options. The available options may vary depending on the option you selected in the Field Name drop-down list.
• Is Equal To
• Is Not Equal To
• Is Less Than
• Is Less Than Or Equal To
• Is Greater Than
• Is Greater Than Or Equal To
110 ProgressBook SpecialServices User Guide

Reports
• Is Before
• Is Before or On
• Is After
• Is After or On
• Begins With
• Does Not Begin With
• Ends With
• Does Not End With
• Contains
• Does Not Contain
• Has a Value
• Does Not Have a Value
10. In the Value field, type the appropriate value.
Note: The available options and acceptable values vary depending on the option you selected in the Field Name drop-down list. You may be able to enter only alphabetical or only numeric characters depending on the option you selected in the Field Name drop-down list. If you selected an option in the Field Name drop-down list that requires a date, a calendar becomes available in the Value field. If you selected Has a Value or Does Not Have a Value in the Operation drop-down list, then the Value field is not available.
EMIS Special Ed Events Report Setup
ProgressBook SpecialServices User Guide 111

Reports
11. By default, specific columns display on the report. If you have selected specific filter options in the Field Name drop-down list and you want that information to display on the report, in the Columns drop-down list, select the corresponding column name.
12. Click View Report.
The report displays. If multiple events exist for a student, each event displays in a separate row.
Note: The field or list displays red indicating an unacceptable value was entered or a required field was left blank.
13. To save the report with your selected parameters, filters and columns, complete the following steps:
a. On the Report Viewer window, click Save Setup As.
b. On the Save Setup As window, in the New report name field, type the unique report name.
c. In the New description field, type the description of the report.
d. Click Save.
The following message displays at the bottom of the window, “Report setup saved successfully.”
The report displays in the My Reports sections on the Report screen.
EMIS Special Ed Events by Class Report Setup
112 ProgressBook SpecialServices User Guide

Reports
Report Builder Reports Available FeaturesOn the Special Services Report Viewer window, once you have selected required parameters and optional filters to create customized reports, you can save the report with those settings to use in the future. Once you have generated the report, numerous features are available as shown in the following table.
Features for Report Builder Reports
Feature Description
Click this icon to view the report.
Click this icon to view the report.
Click this icon to show report headers, required parameters, optional filters and columns.
Click this icon to hide report headers, required parameters, optional filters and columns.
Click this icon to save the report with the selected parameters, filters and columns, type the unique report name in the New report name field and click Save.
Click this icon to navigate to the next page in the report.
Click this icon to navigate to the last page in the report.
Click this icon to navigate to the previous page.
Click this icon to navigate to the first page.
Type the page number in the field and then press Enter.
Select the desired percentage in the list that represents the display size. This feature is only available when using Internet Explorer.
Type the word or phrase in the blank field next to Find and click Find. Click Next to search for next instance of the word or phrase. This feature is only available when using Internet Explorer.
ProgressBook SpecialServices User Guide 113

Reports
Select the desired format in the list and click Export. When prompted, click either Open or Save. If you select Open, the report opens in the software application associated with the file format you selected. You must have the appropriate application installed on your computer to read and modify the report file. The following file formats are available:
• XML File with report data - Extensible Markup Language file format viewed in a Web browser with only data; there is no page formatting, headers, footers, lines or graphic images.
• CSV - Comma-separated values file format in plain text format.
• Acrobat (PDF) file - Portable document file format than can be viewed in Adobe Reader but not edited.
• MHTML (Web archive) - Short for MIME HTML file format and also referred to as MHT. This is a Web page archive format used to bind images, Flash animations, Java applets, audio files, etc., together with HTML code into a single file. This file format can be viewed in a Web browser and is supported in the following browser versions: Internet Explorer 5.5 and later, Firefox 1.5 and later and Safari 3.0 and later.
• Excel - Format provides full functionality of Microsoft Excel.
• TIFF - Large graphic file format that may take longer to open than other file types and cannot be edited.
• Word - Format provides full functionality of Microsoft Word.
Click this icon to print the report. If prompted to install SQL Server Reporting Services 2008 ActiveX control, continue to install it on the computer, so you can print the report. The print feature is only available when using Internet Explorer. If you are not able to install the ActiveX control, proceed to export the report to an acceptable file format and then print the report from that software application.
Click this icon to sort the columns in ascending or descending order.
Click this icon to close the Special Services Report Viewer window.
Click this icon to view Help for Report Builder reports.
Feature Description
114 ProgressBook SpecialServices User Guide

Progress Reports
You can print progress reports for one or more students in a class on the Class Print screen. The progress reports for the students you select are merged into a single PDF document, which you can send to print on a local printer.
Note: To print progress reports, you must be assigned to at least one class.
Print Progress Reports
To view a video of this procedure, go to:http://www.progressbook.com/Videos/SpS/Print-Progress-Reports
1. On the banner, click Report .
The Report screen displays with additional menu options beneath the banner.
2. Click Class Print.
The Class Print screen displays with Progress Report (IEP) selected in the Form drop-down list by default.
3. In the Class drop-down list, select the class for which you want to print progress reports.
4. In the Form drop-down list, select the type of progress report you want to print.
The students in the selected class who have an open progress report task of the selected type display. The Form Count field displays the number of pages contained in the student’s progress report.
Class Print Link on Report Screen
ProgressBook SpecialServices User Guide 115

Progress Reports
5. Perform one of the following actions to select the students whose progress reports you want to print:
• To select individual students, in the row of the desired student, select the check box.
• To select all students, on the column heading at the top of the grid, select the check box.
6. Click Print Forms.
The progress reports for the selected students are merged into a single document and display in a new window.
7. To print, on the toolbar, click .
8. To return to the Class Print screen, close the window displaying the merged forms.
Class Print Screen
Selected Student Progress Reports
116 ProgressBook SpecialServices User Guide

Blank Forms
You can print blank versions of several SpecialServices forms to use offline. For example, you might print a blank set of the ETR forms to fill out during an ETR team meeting.
Print Blank Forms
To view a video of this procedure, go to:http://www.progressbook.com/Videos/SpS/Print-Blank-Forms
1. On the banner, click Report .
The Reports screen displays with additional menu options under the banner.
2. Click Print Blank Forms.
The Print Blank Forms screen displays the group names for the forms you can print as well as an option to choose individual forms to print.
Print Blank Forms Link on Report Screen
ProgressBook SpecialServices User Guide 117

Blank Forms
3. Select blank forms to print using one of the following options:
• To print all the forms in a particular form group (such as IEP, ETR, etc.), click the form group.
• To select individual forms:
i. Click ...or Choose Individual Forms.
ii. On the Choose Forms window, select the check box beside each form you want to print. (To select every form, for the Select option, click All. To deselect all, click None.)
iii. Click Get Forms.
Print Blank Forms Screen
118 ProgressBook SpecialServices User Guide
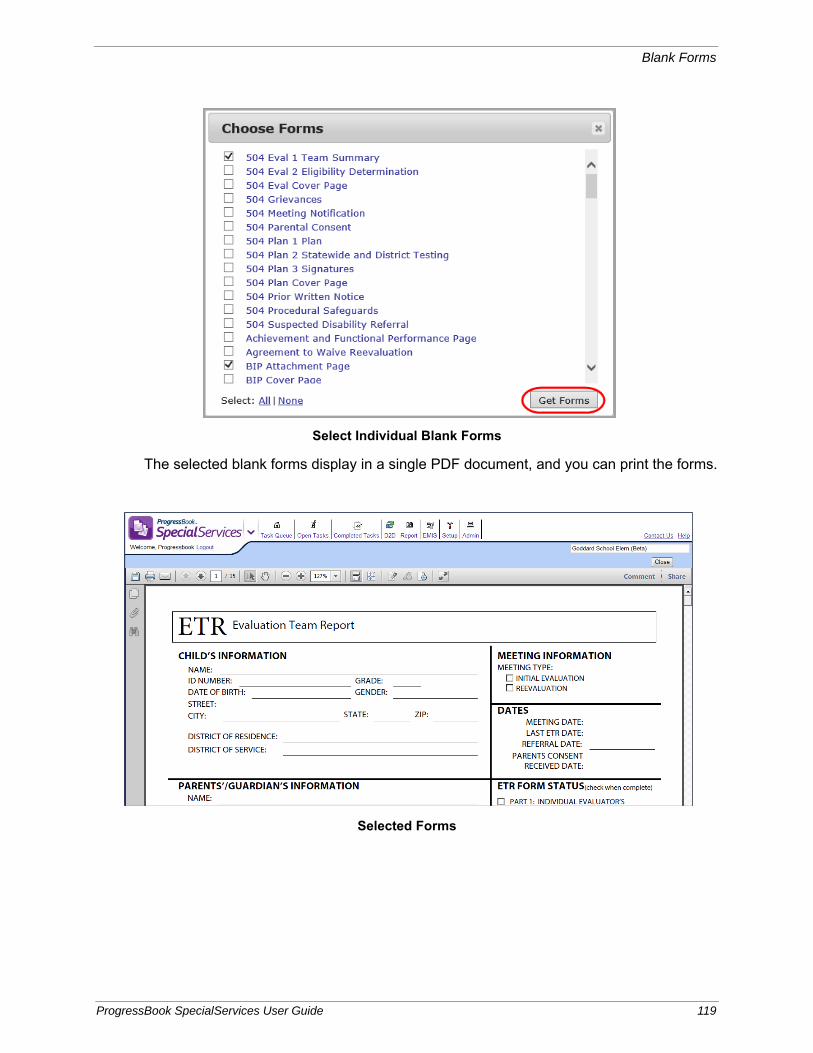
Blank Forms
The selected blank forms display in a single PDF document, and you can print the forms.
Select Individual Blank Forms
Selected Forms
ProgressBook SpecialServices User Guide 119

Blank Forms
This page intentionally left blank.
120 ProgressBook SpecialServices User Guide

EMIS
The EMIS Review Report enables you to view and print the EMIS Data Collection Form for one or more students once the associated task is completed. You can run the EMIS Review Report from
the EMIS Tools screen by clicking EMIS on the banner.
Note: Users with the appropriate security privileges can also access the following EMIS Tools: Build EMIS Extract, Process EMIS Extract and View EMIS Transmission Log. For more information about the EMIS Tools, see ProgressBook SpecialServices System Manager Guide.
EMIS Review Report Options on EMIS Selection Form Screen
ProgressBook SpecialServices User Guide 121

EMIS
How Tasks Are Selected by Date Range in EMIS
When you enter a date range in the Start Date and End Date fields on the EMIS Review Report screen, the system selects tasks based on the following event dates:
• Meeting Date – The value entered in the Meeting Date field on the cover page of an ETR, IEP or ISP task. For tasks to appear on the EMIS Review Report, the meeting date of the task must fall within the entered date range, including the first and last date in the range.
• Effective Dates – The values entered in the Effective Start and End fields on the cover page of an IEP or ISP Task. For tasks to appear on the EMIS Review Report, the effective dates of the task must fall within the entered date range, but can start or end before, after, or during the range.
For example, if the date range entered for the EMIS Review Report is 06/01/2009 - 12/01/2009, tasks with the following meeting or effective dates would appear on the report:
• Any ETR, IEP or ISP task with a meeting date of 06/01/2009 through, and including, 12/01/2009.
• Any IEP or ISP task with an effective start date before 06/01/2009 and an effective end date before 12/01/2009, such as 08/10/2008 - 08/09/2009.
• Any IEP or ISP task with an effective start date after 06/01/2009 and effective end date after 12/01/2009, such as 08/27/2009 - 05/31/2010.
• Any IEP or ISP task with an effective start date after 06/01/2009 and effective end date before 12/01/2009, such as 08/30/2009 - 11/15/2009.
• Any IEP or ISP task with an effective start date before 06/01/2009 and effective end date after 12/01/2009, such as 04/17/2009 - 04/16/2010.
“Tasks Included on EMIS Review Report by Date Range” shows example scenarios where tasks are included in or excluded from the EMIS Review Report or EMIS Extract when run by a date range of 06/01/2009 - 12/01/2009.
Tasks Included on EMIS Review Report by Date Range
122 ProgressBook SpecialServices User Guide

EMIS
View the EMIS Data Collection Form for Completed Tasks
The EMIS Review Report lists all of the students whose information is available for reporting to EMIS within a specified date range and enables you to access the EMIS Data Collection Form after the task has been completed. You can select the information you want to display about the student on the report.
1. Click EMIS on the banner.
The EMIS Selection Form screen displays with the options for the EMIS Review Report.
2. In the Select EMIS Report Criteria section of the EMIS Selection Form, select the building or class for which you want to run the EMIS Review Report.
EMIS Selection Form Screen
ProgressBook SpecialServices User Guide 123

EMIS
Note: Depending on your level of access, either the Select Building or Select Class drop-down list displays on the EMIS Selection Form screen.
3. In the Sort by drop-down list, select the field by which you want the system to sort the information on the report.
4. In the Start Date and End Date fields, enter the start and end date range within which you want to view the applicable tasks. See “How Tasks Are Selected by Date Range in EMIS.” The default date range is the current EMIS event year; for example, 06/01/2012 for the start date and 05/31/2013 for the end date.
5. In the Select EMIS Report Fields to view section, next to the fields you want to display on the EMIS Review Report, select the check box.
Note: To quickly display the report, it is recommended to select Student Name, IEP Create Date and IEP End Date.
6. Click View Report.
The EMIS Review Report displays all of the students whose information falls within the selected criteria.
7. Next to the name of each student whose EMIS Data Collection Form you want to view, select the check box, and then click View Selected.
EMIS Review Report
124 ProgressBook SpecialServices User Guide

EMIS
The EMIS Data Collection Form for the student you selected displays in a new window. If you selected multiple students, all of the forms are merged into a single file.
8. To print, on the toolbar, click .
9. To return to the EMIS Review Report, click Close.
EMIS Data Collection Form
ProgressBook SpecialServices User Guide 125

EMIS
This page intentionally left blank.
126 ProgressBook SpecialServices User Guide