Embed Size (px)
Citation preview

NCC Academic Assessment Portal
User Guide The goal of assessment is to make us more aware of how we contribute to student learning and, as a result, to make more informed choices about educating out students. A second goal involves making our practices more visible to ourselves and others, including the wider higher education community and the NCA, our accrediting body.
The NCC online assessment website has been developed to support these initiatives.
Table of Contents
Login and Navigation 2
Roles and Privileges 3
-VIEW-
Outcomes 4
Plans 6
Reports 8
-ADD-
Outcomes 10
Plans 12
Reports 17
-MODIFY-
Outcomes 20
Plans 22
Reports 26
-PROVIDE FEEDBACK-
Plans 28
Reports 31
-ADMINISTRATIVE PRIVILEGES-
Manage Users 34
Manage Programs 36
Run Queries 38
-UPLOADING DOCUMENTS-
Requirements 40

Login and Navigation The NCC Academic Assessment Portal is accessible at http://acadassess.noctrl.edu.
The login page appears and prompts the user for their network login and password.
After logging in, the main page of the portal appears with a row of buttons to navigate
throughout the portal. (note: the “admin” button is not visible for general users)
The Navigation Bar at the top of the page includes important links for user assistance.
NCC Academic Assessment Portal Returns to portal main page
NCC Home North Central College Website http://noctrl.edu
Contact IT Information Technology Services http://its.noctrl.edu
Contact Admin Email current chair of Assessment Committee Dr. Shereen Ilahi [email protected]
User Guide Portal guide in PDF format
Assessment Committee Website Opens https://cardinalnet.northcentralcollege.edu
/faculty/committees/assessment/
(note: this navigation bar link will return to the portal’s main page.) 2
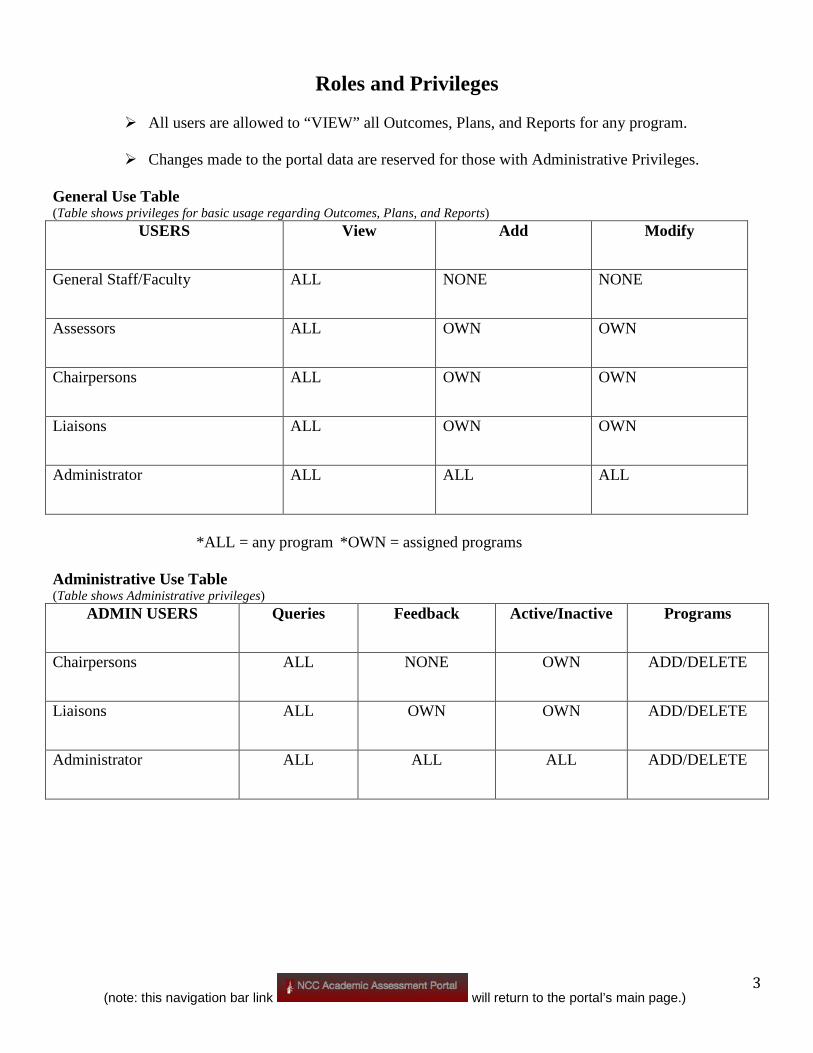
Roles and Privileges
All users are allowed to “VIEW” all Outcomes, Plans, and Reports for any program.
Changes made to the portal data are reserved for those with Administrative Privileges.
General Use Table (Table shows privileges for basic usage regarding Outcomes, Plans, and Reports)
USERS View Add Modify
General Staff/Faculty ALL NONE NONE
Assessors ALL OWN OWN
Chairpersons ALL OWN OWN
Liaisons ALL OWN OWN
Administrator ALL ALL ALL
*ALL = any program *OWN = assigned programs
Administrative Use Table (Table shows Administrative privileges)
ADMIN USERS Queries Feedback Active/Inactive Programs
Chairpersons ALL NONE OWN ADD/DELETE
Liaisons ALL OWN OWN ADD/DELETE
Administrator ALL ALL ALL ADD/DELETE
(note: this navigation bar link will return to the portal’s main page.) 3
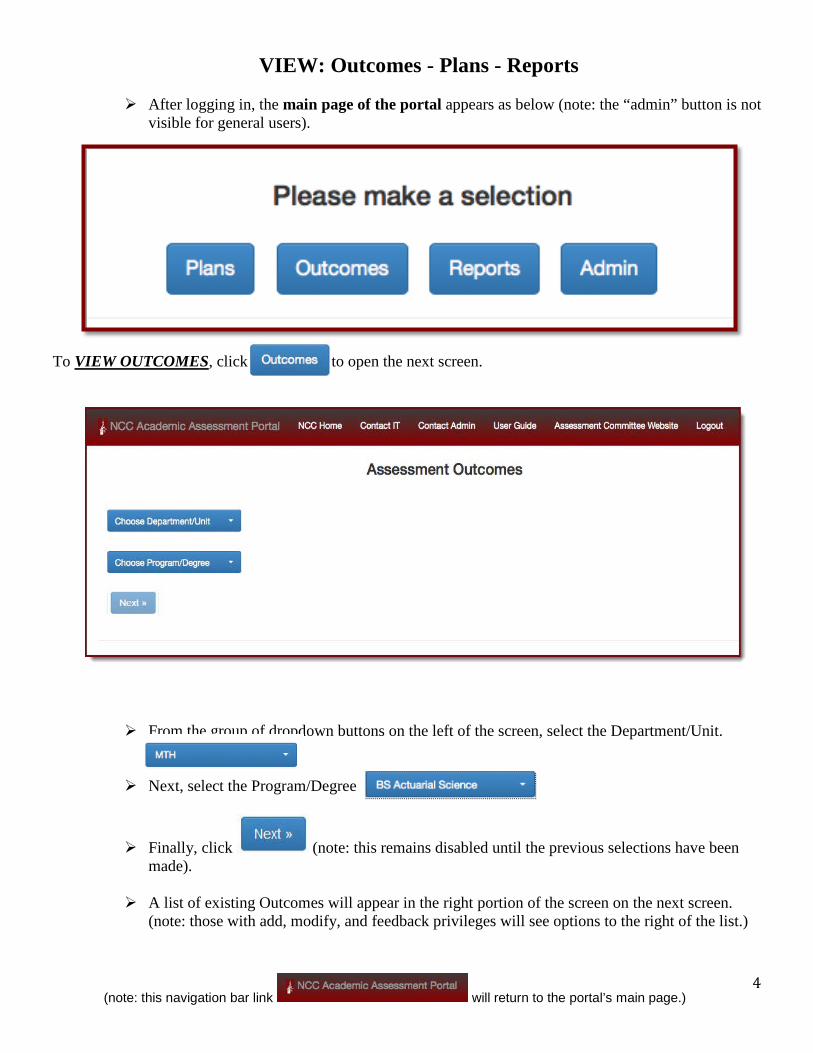
VIEW: Outcomes - Plans - Reports
After logging in, the main page of the portal appears as below (note: the “admin” button is not visible for general users).
To VIEW OUTCOMES, click to open the next screen.
From the group of dropdown buttons on the left of the screen, select the Department/Unit.
Next, select the Program/Degree.
Finally, click (note: this remains disabled until the previous selections have been made).
A list of existing Outcomes will appear in the right portion of the screen on the next screen.
(note: those with add, modify, and feedback privileges will see options to the right of the list.)
(note: this navigation bar link will return to the portal’s main page.) 4

Click for a printable document.
*general user view
*administrative view
(note: this navigation bar link will return to the portal’s main page.) 5
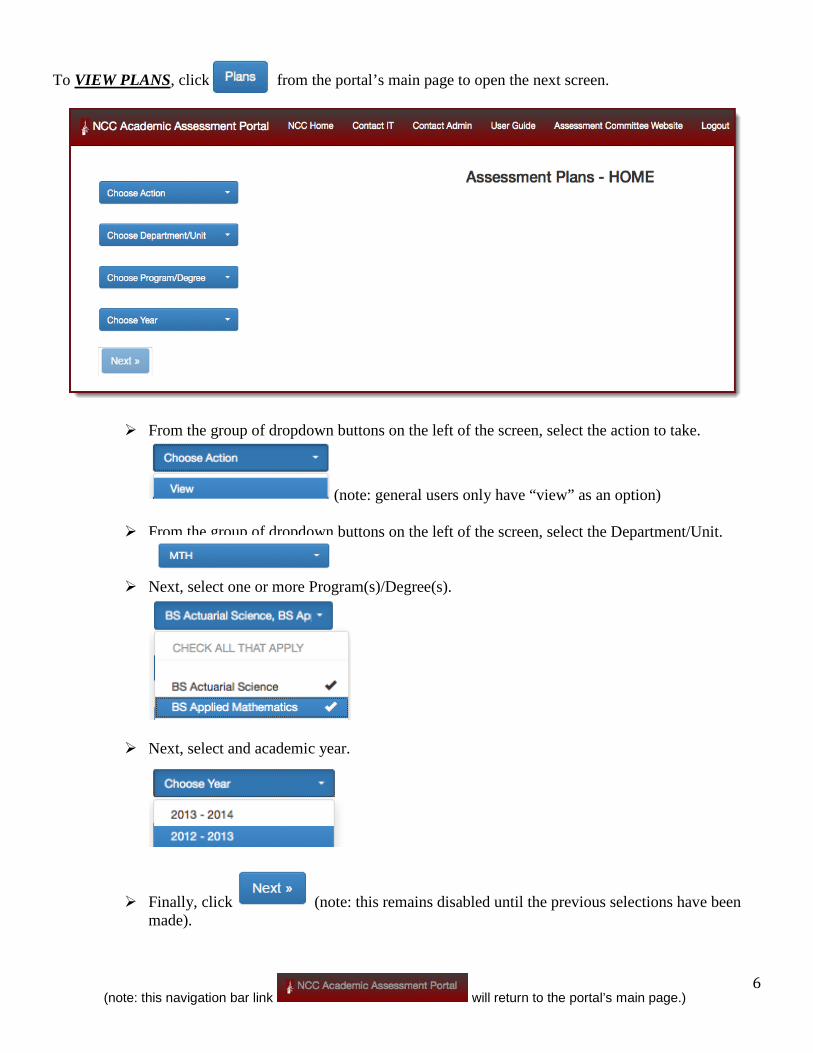
To VIEW PLANS, click on the from the portal’s main page to open the next screen.
From the group of dropdown buttons on the left of the screen, select the action to take.
(note: general users only have “view” as an option)
From the group of dropdown buttons on the left of the screen, select the Department/Unit.
Next, select one or more Program(s)/Degree(s).
Next, select and academic year.
Finally, click (note: this remains disabled until the previous selections have been made).
(note: this navigation bar link will return to the portal’s main page.) 6

A list of existing Plan id’s and corresponding Outcomes will appear in the right portion of the
screen on the next screen.
Click on at the far right of the Plan title to view the entire Plan.
Scroll to the bottom and click for a printable document.
(note: this navigation bar link will return to the portal’s main page.) 7

To VIEW REPORTS click from the portal’s main page to open the next screen.
From the group of dropdown buttons on the left of the screen, select the action to take.
(note: general users only have “view” as an option)
Select the Department/Unit from the next dropdown menu.
Next, select one or more Program(s)/Degree(s).
Next, select and academic year.
Finally, click (note: this remains disabled until the previous selections have been made).
A list of existing Plan id’s and corresponding Outcomes will appear in the right portion of the screen on the next screen.
(note: this navigation bar link will return to the portal’s main page.) 8

Click on at the far right of the Plan title to view the Report on the next screen
Scroll to the bottom and click for a printable document.
(note: this navigation bar link will return to the portal’s main page.) 9

ADD: Outcomes - Plans - Reports
**This action is only available to Assessors, Liaisons, Chairpersons, and Administrators.**
To ADD OUTCOMES, click from the portal’s main page to open the next screen.
From the group of dropdown buttons on the left of the screen, select the Department/Unit.
Next, select the Program/Degree.
Finally, click “\\Submit” (note: this remains disabled until the previous selections have been made).
A list of existing Outcomes will appear in the right portion of the screen on the next screen.
Click above and to the right of the list of Outcomes, which opens a textbox.
(note: this navigation bar link will return to the portal’s main page.) 10
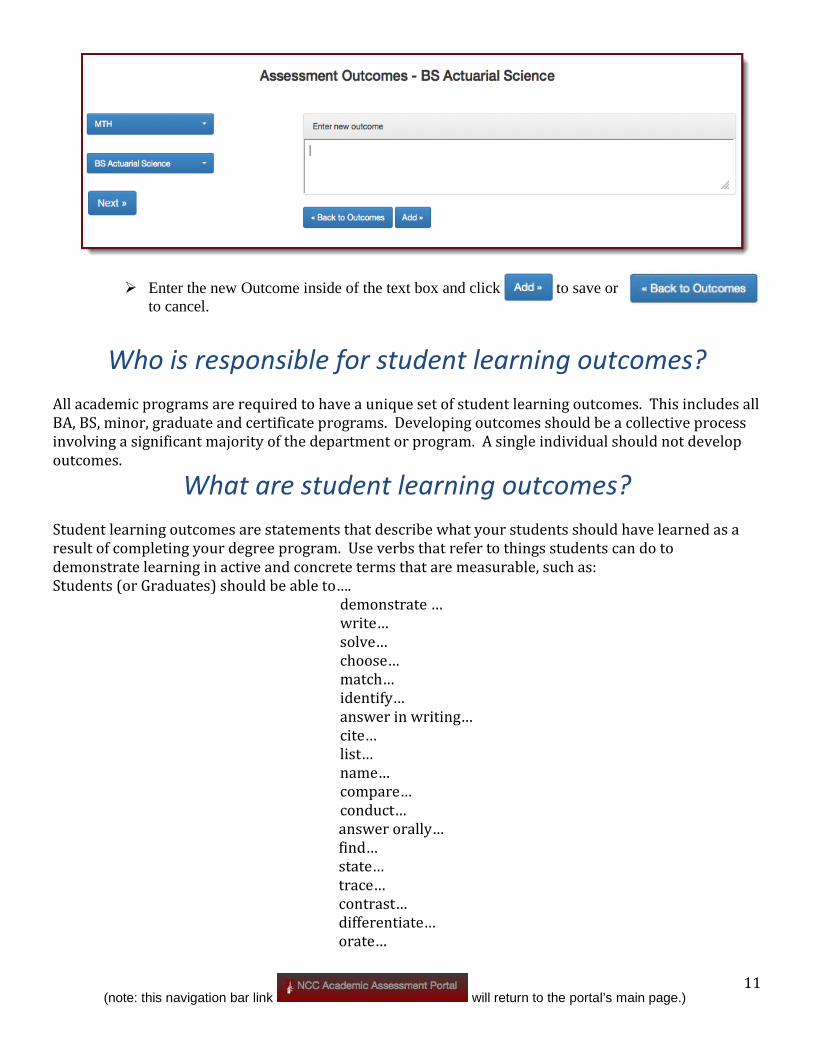
Enter the new Outcome inside of the text box and click to save or to cancel.
Who is responsible for student learning outcomes?
All academic programs are required to have a unique set of student learning outcomes. This includes all BA, BS, minor, graduate and certificate programs. Developing outcomes should be a collective process involving a significant majority of the department or program. A single individual should not develop outcomes.
What are student learning outcomes? Student learning outcomes are statements that describe what your students should have learned as a result of completing your degree program. Use verbs that refer to things students can do to demonstrate learning in active and concrete terms that are measurable, such as: Students (or Graduates) should be able to….
demonstrate … write…
solve… choose… match… identify… answer in writing… cite… list… name… compare… conduct… answer orally… find… state… trace… contrast… differentiate… orate…
(note: this navigation bar link will return to the portal’s main page.) 11

Avoid using verbs that describe processes that may be occurring cognitively but cannot be demonstrated by students, such as:
know… apply critical skills… enjoy… understand… be aware of… grasp the significance of… think… remember… appreciate… comprehend… develop conceptual thinking… learn… perceive… recognize… increase interests… have a working knowledge of…
How many outcomes are needed? There is not one best answer. Generally 2-5 outcomes are sufficient, but it is important to note that any single outcome usually involves a substantial body of knowledge. The rubric used to evaluate a student learning outcome will elaborate on this knowledge.
Assessment Plans
Who is responsible for submitting assessment plans and when are they due?
All academic programs are required to submit an annual assessment plan. This plan is due during the 8th week of each fall term. A plan must be submitted for each program (BA/BS/minor/graduate/certificate). Plans cannot be submitted unless student learning outcomes have been entered. The department or program chair is responsible for submitting these plans, and can designate “assessors” to help with this. See page 33 for information on providing access to additional faculty to add plans. Developing and implementing the assessment plan should be a collective process involving a significant majority of the faculty within a department or program. A single individual should not develop or implement an assessment plan. Assessment plans should consider the results of previous assessment done by the program. The assessment committee will review each plan, and response letters will be sent back to the programs with any comments or questions before the end of fall term. Feedback will also be given online.
(note: this navigation bar link will return to the portal’s main page.) 12

Who is being assessed? Assessment assesses programs, not individual students. The assessment process should be as anonymous as possible so that anyone looking at the assessment data will not be biased when they encounter these students in the future. Programs should remove all personally identifiable information from materials before using them for program assessment. In the event this is not possible, programs must obtain informed consent from the students and apply to the Research Ethics Committee for exemption. Students may freely choose to opt out of assessment activities. Assessment results must not be used to grade students. Programs do not need to assess every student in their program; however, they must assess a significant number of students for proper analysis.
How many outcomes should be assessed each year? At least one outcome for each program must be assessed each year; however, a plan may assess more than one outcome. Every program is required to assess all outcomes within the seven year program review cycle and to continue this process of assessment indefinitely.
Can a program decide to use the same plan as a previous year?
Programs can decide to implement the same plan; however, they must formally enter a plan each year. Some reasons a program may wish to repeat the same plan include inconclusive results and less-than-favorable results. However, it is important to remember that all programs are required to assess all student learning outcomes within a seven year (program review) cycle.
Can programs change their assessment plan at any time? Assessment plans can be modified throughout the school year (July 1, 20XX to June 30, 20XY). Therefore, assessment plans entered during 2013-2014 can be modified until July 1, 2014. They can also be modifed/added for the previous academic year.
How are assessment activities funded? See the Institutional Assessment and Accreditation website for the budget guidelines. A link to the online application for funding is included in the Add/Modify a Plan page.
(note: this navigation bar link will return to the portal’s main page.) 13
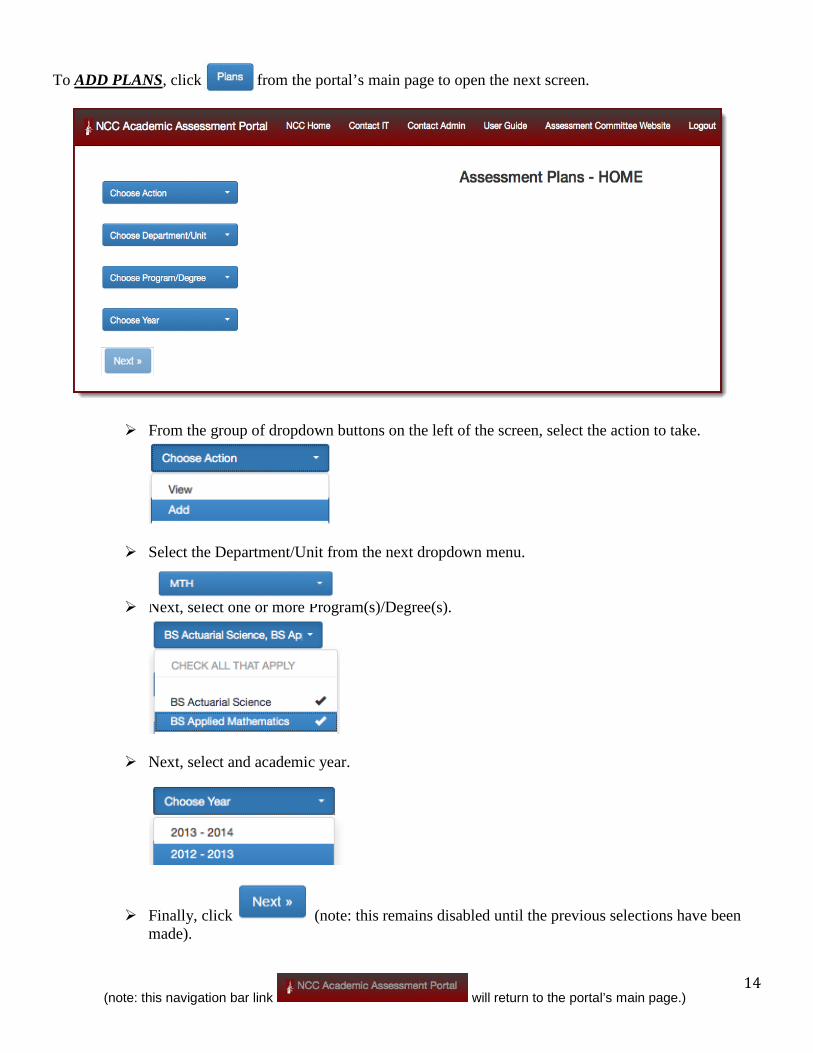
To ADD PLANS, click on the from the portal’s main page to open the next screen.
From the group of dropdown buttons on the left of the screen, select the action to take.
Select the Department/Unit from the next dropdown menu.
Next, select one or more Program(s)/Degree(s).
Next, select and academic year.
Finally, click (note: this remains disabled until the previous selections have been made).
(note: this navigation bar link will return to the portal’s main page.) 14

The first prompt determines the type of Plan to be added. Select Yes or No for conducting a meta-assessment. As of the 2011-12 academic year, programs are invited (but not required) to conduct a “meta-
assessment” exercise in lieu of or in addition to direct assessment as often as once every seven years (corresponding with the program review cycle). See “Guidelines for Meta-Assessment” on the website for the Academic Programs Assessment Committee for more details.
If Yes is selected, a text box will appear as shown below. Note: If a program has conducted meta-assessment within the past seven years, then the
website will not allow another meta-assessment plan to be entered.
Files may be uploaded by clicking
Add a description in the left text field provided. Files may be removed by simply clicking Remove File.
By clicking an alert box will appear to confirm or cancel saving a draft.
If no draft is needed, simply clicking saves the new meta assessment to the database.
(note: this navigation bar link will return to the portal’s main page.) 15

If No is selected or a meta assessment already exists (or has been conducted within the last
seven years), the page redirects to the default Add Plan page as shown below.
Begin by checking one or more Outcomes to add to the new Plan.
Once Outcomes are checked, click each question/title to expand the textbox. Enter the information required for each question/title into each textbox. Files may be uploaded by clicking
Add a description in the left text field provided. Files may be removed by simply clicking Remove File.
By clicking an alert box will appear to confirm or cancel saving a draft.
If no draft is needed, simply clicking saves the new Plan to the database.
(note: this navigation bar link will return to the portal’s main page.) 16
Assessment Reports
Who is responsible for submitting assessment reports? All academic programs are required to submit an annual assessment report. This report is due during the 8th week of each fall term and reflects the assessment activities for the previous academic year. A report must be submitted for each assessment plan. The department or program chair is responsible for submitting these reports. See page 34 for information on providing access to additional faculty “assessors” to add reports. Developing the assessment report should be a collective process involving a significant majority of the faculty within a department or program. A single individual should not develop an assessment report. Assessment reports must show the results of the assessment plan and how these results are used by programs for curricular decisions. Assessment reports will also provide evidence of assessment activity for program review.
Can a program change their assessment report at any
time? Assessment reports can be modified throughout the school year (July 1, 20XX to June 30, 20XY). Therefore, assessment reports entered during 2013-2014 can be modified until July 1, 2014. They can also be modifed/added for the previous academic year.
Where are the assessment materials stored? Programs must keep all assessment data in a secure location so access is limited to only those individuals involved in assessment for that program. After assessing the data, those materials may not be used for other purposes without the explicit permission of the student. Since our accrediting body may wish to review these materials, programs are expected to retain these materials for this purpose.
(note: this navigation bar link will return to the portal’s main page.) 17
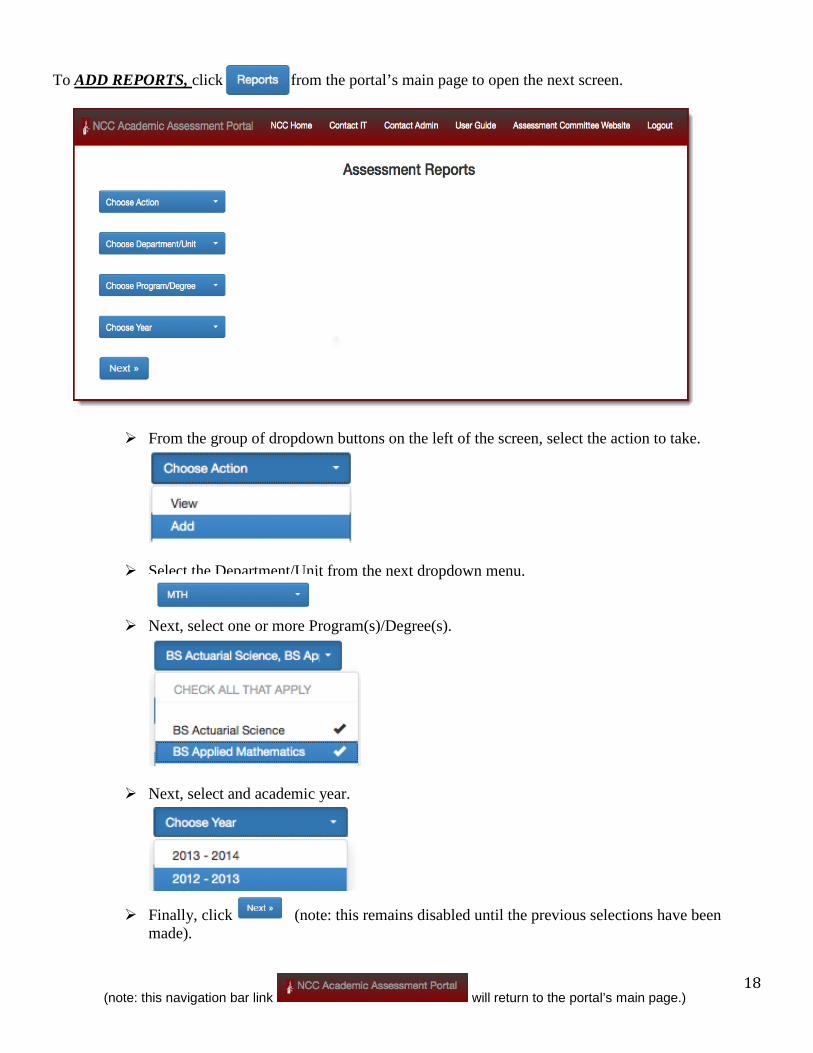
To ADD REPORTS, click from the portal’s main page to open the next screen.
From the group of dropdown buttons on the left of the screen, select the action to take.
Select the Department/Unit from the next dropdown menu.
Next, select one or more Program(s)/Degree(s).
Next, select and academic year.
Finally, click (note: this remains disabled until the previous selections have been made).
(note: this navigation bar link will return to the portal’s main page.) 18

A list of Plans with Outcomes will appear in the right portion of the screen.
Click at the far right of the Plan title to enter a Report for that Plan.
Enter the information required for each question/title into each textbox.
Files may be uploaded by clicking
Add a description in the left text field provided. Files may be removed by simply clicking Remove File.
By clicking an alert box will appear to confirm or cancel saving a draft.
If no draft is needed, simply clicking saves the new Report to the database.
(note: this navigation bar link will return to the portal’s main page.) 19
MODIFY: Outcomes - Plans - Reports
**This action is only available to Assessors, Liaisons, Chairpersons, and Administrators.**
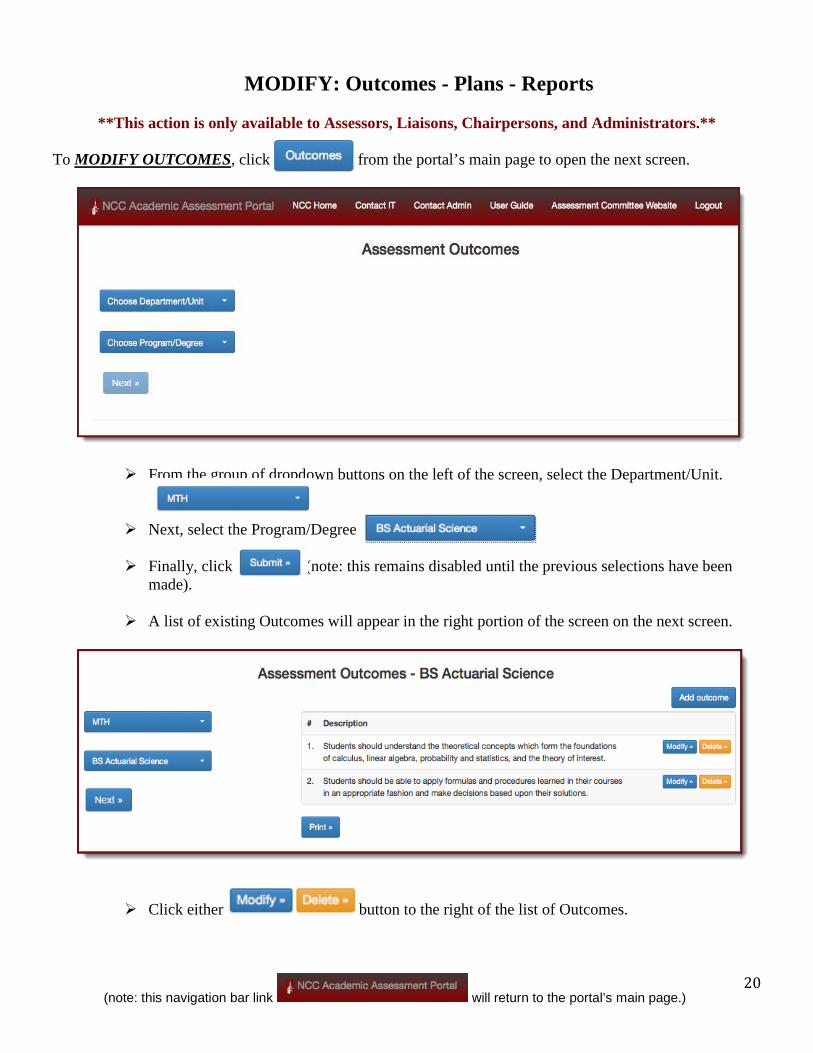
To MODIFY OUTCOMES, click from the portal’s main page to open the next screen.
From the group of dropdown buttons on the left of the screen, select the Department/Unit.
Next, select the Program/Degree.
Finally, click “\\Submit”(note: this remains disabled until the previous selections have been made).
A list of existing Outcomes will appear in the right portion of the screen on the next screen.
Click either button to the right of the list of Outcomes.
(note: this navigation bar link will return to the portal’s main page.) 20

prompts for approval, deletes, and returns to Outcomes’ main page
opens a prepopulated textbox on the next screen.
Modify the Outcome inside of the text box and click to save or to cancel.
(note: this navigation bar link will return to the portal’s main page.) 21

To MODIFY PLANS, click from the portal’s main page to open the next screen.
From the group of dropdown buttons on the left of the screen, select the action to take.
Select the Department/Unit from the next dropdown menu.
Next, select one or more Program(s)/Degree(s).
Next, select and academic year.
Finally, click (note: this remains disabled until the previous selections have been made).
(note: this navigation bar link will return to the portal’s main page.) 22

A list of Plans will appear in the right portion of the screen.
Click either button to the right of the list of Plans and Outcomes.
prompts for approval, deletes, and returns to Outcomes’ main page.
(note: this navigation bar link will return to the portal’s main page.) 23

Click to open a prepopulated collapsible set of textboxes.
(note: this navigation bar link will return to the portal’s main page.) 24

Choose the Outcomes to add or remove as instructed in the first collapsible title.
Click on the collapsible titles to expand each textbox for editing.
Files may be uploaded by clicking
Add a description in the left text field provided. Files may be removed by simply clicking Remove File.
Clicking saves the modified Plan to the database.
(note: this navigation bar link will return to the portal’s main page.) 25

To MODIFY REPORTS, click from the portal’s main page to open the next screen.
From the group of dropdown buttons on the left of the screen, select the action to take.
Select the Department/Unit from the next dropdown menu.
Next, select one or more Program(s)/Degree(s).
Next, select and academic year.
Finally, click note: this remains disabled until the previous selections have been made).
A list of Plans and Outcomes will appear in the right portion of the screen.
(note: this navigation bar link will return to the portal’s main page.) 26

Click at the far right of the Plan title to view the entire Report for that Plan.
Click on the collapsible titles to expand each textbox for editing.
Files may be uploaded by clicking
Add a description in the left text field provided. Files may be removed by simply clicking Remove File.
Clicking saves the modified Report to the database.
Clicking removes the Report from the database.
(note: this navigation bar link will return to the portal’s main page.) 27

PROVIDE FEEDBACK: Plans – Reports
**This action is only available to Liaisons and Administrators.**
To PROVIDE FEEDBACK FOR PLANS, click the from the portal’s main page to open the next screen.
From the group of dropdown buttons on the left of the screen, select the action to take.
Select the Department/Unit from the next dropdown menu.
Next, select one or more Program(s)/Degree(s).
Next, select and academic year.
Finally, click (note: this remains disabled until the previous selections have been made).
(note: this navigation bar link will return to the portal’s main page.) 28

Click to open the feedback textbox and Plan.
(note: this navigation bar link will return to the portal’s main page.) 29

Select a feedback option and enter a message into the textbox below.
Click to enter the Plan’s new feedback into the database.
(note: this navigation bar link will return to the portal’s main page.) 30

To PROVIDE FEEDBACK FOR REPORTS, click from the portal’s main page to open the next screen.
From the group of dropdown buttons on the left of the screen, select the action to take.
Select the Department/Unit from the next dropdown menu.
Next, select one or more Program(s)/Degree(s).
Next, select and academic year.
Finally, click (note: this remains disabled until the previous selections have been made).
(note: this navigation bar link will return to the portal’s main page.) 31
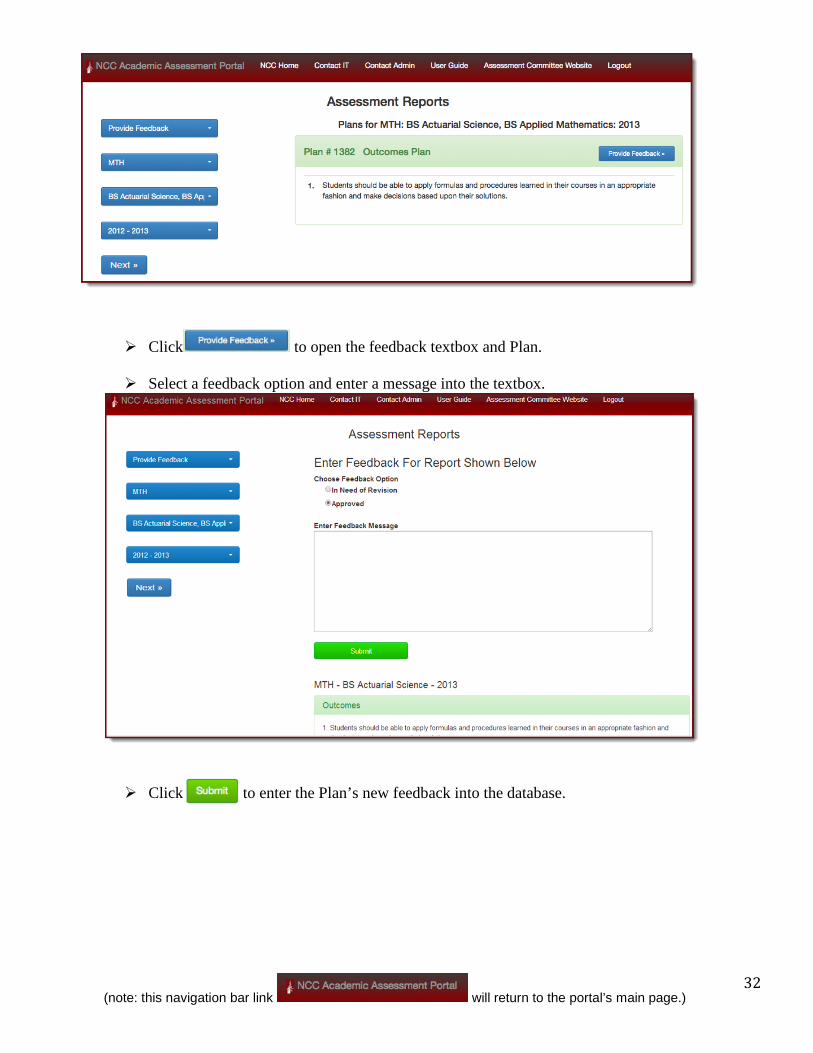
Click to open the feedback textbox and Plan.
Select a feedback option and enter a message into the textbox.
Click to enter the Plan’s new feedback into the database.
(note: this navigation bar link will return to the portal’s main page.) 32

Administrative Privileges
**This action is only available to Liaisons, Chairpersons, and Administrators.**
Starting at the portal main page, click to open the Admin main page.
Actions can be chosen from the tab menu under the portals navigation bar or the buttons appear
that appear on the main page
(note: this navigation bar link will return to the portal’s main page.) 33

MANAGE USERS
**This action is only available to Chairpersons, and Administrators.**
Click next to “Manage Users” from the Admin main page (or “Users” from the admin tab under the portals navigation bar) to open the query interface.
A list of users are displayed by ID. Each user’s privileges can be managed by clicking in the last column.
The user’s name and available privileges appear on the next screen.
Choose the privileges to add or remove by highlighting the option and clicking .
(note: this navigation bar link will return to the portal’s main page.) 34
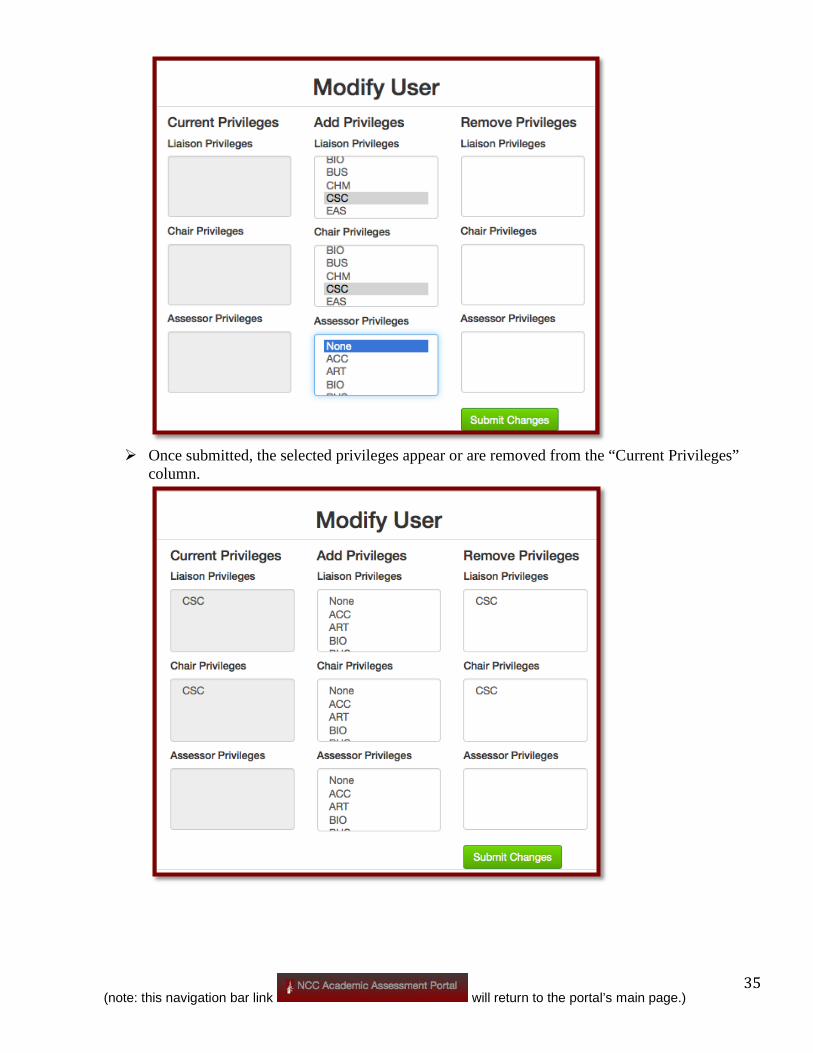
Once submitted, the selected privileges appear or are removed from the “Current Privileges”
column.
(note: this navigation bar link will return to the portal’s main page.) 35

MANAGE PROGRAMS
**This action is only available to Chairpersons, and Administrators.**
Click next to “Manage Programs” from the Admin main page (or “Programs” from the admin tab under the portals navigation bar).
On the left side of the screen, Units and Programs can be added. Select the Division/Unit Name from the dropdown menus, entering the Unit/Program Name
and click .
(note: this navigation bar link will return to the portal’s main page.) 36

On the right side of the screen, existing programs can be edited or deleted.
Deleting will open a prompt for confirmation.
To edit a program, click to open the programs information.
Make changes to the Program, and click
(note: this navigation bar link will return to the portal’s main page.) 37

QUERIES
**This action is only available to Liaisons, Chairpersons, and Administrators.**
Click next to “Run Queries” from the Admin main page (or “Queries” from the admin tab under the portals navigation bar).
A list of queries will appear in the left column of the screen. Select the year or date to query from the dropdown menus or the calendar popups.
(note: this navigation bar link will return to the portal’s main page.) 38
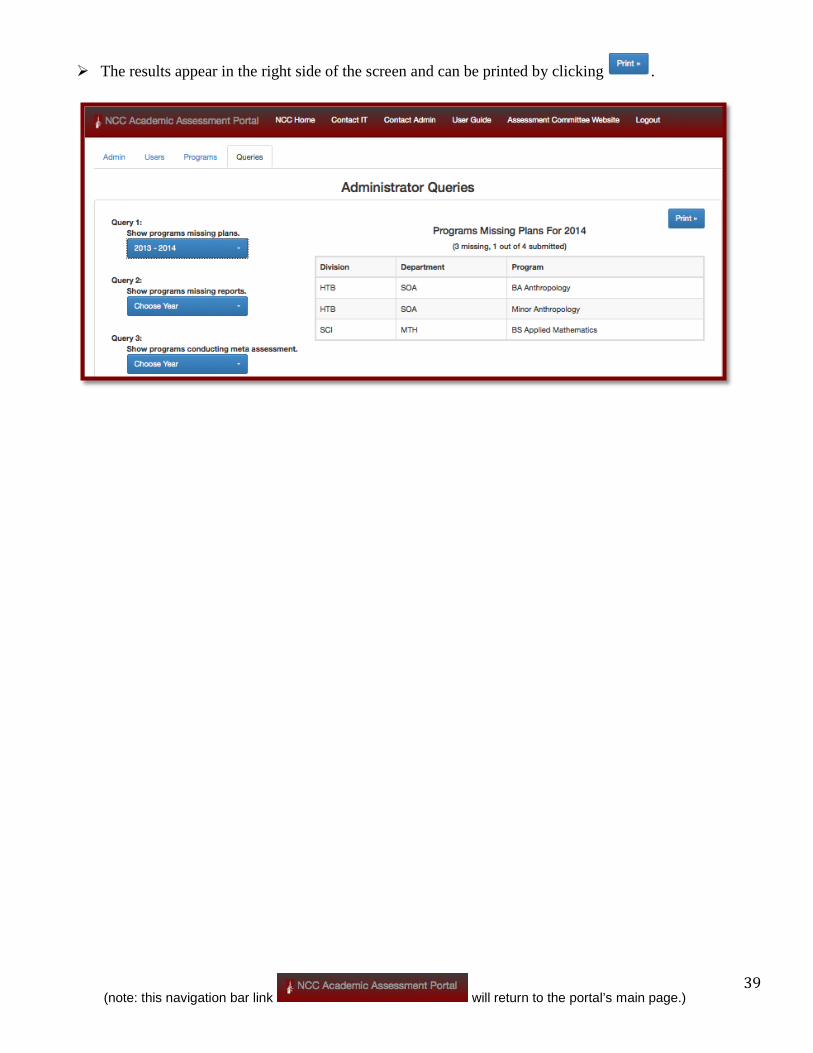
The results appear in the right side of the screen and can be printed by clicking .
(note: this navigation bar link will return to the portal’s main page.) 39

Uploading Documents
Separate files may be uploaded to accompany an added or modified Plan or Report.
Supported File types:
File Size: 2-megabyte limit for each file
Number of Files Allowed: 2
(note: this navigation bar link will return to the portal’s main page.) 40