Embed Size (px)
Citation preview
Page 1 of 19
© 2011 Students 2 Science, Inc. All Rights Reserved.
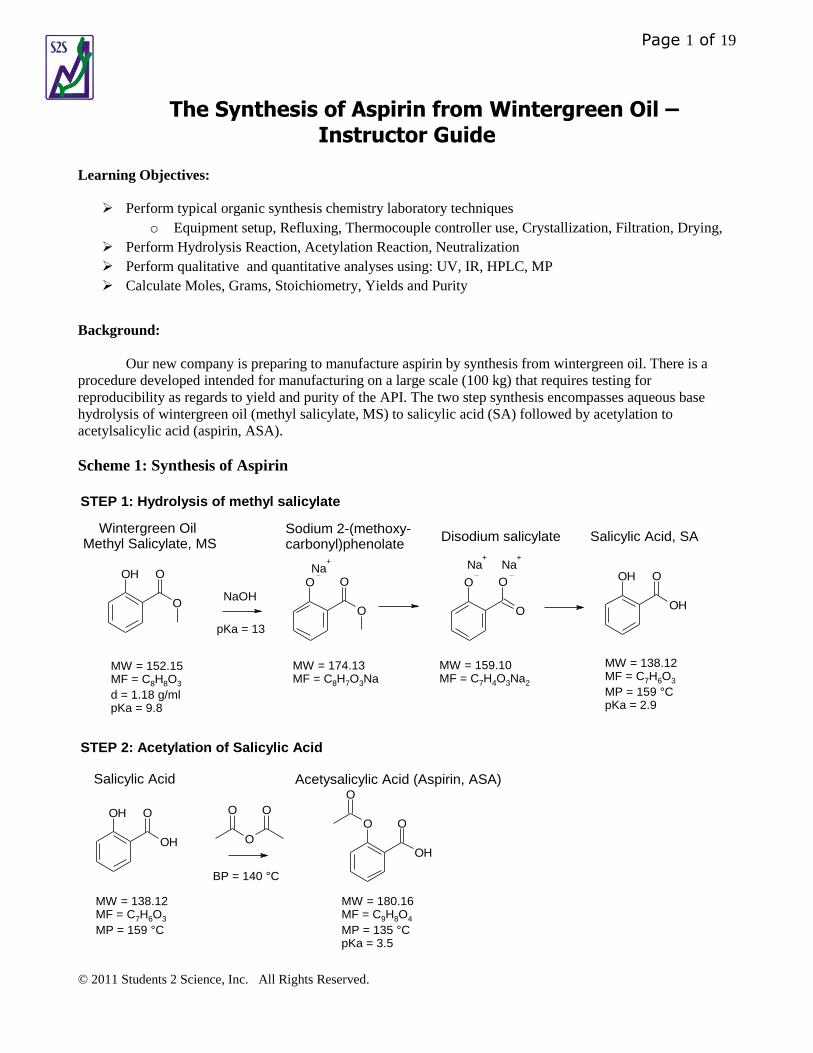
The Synthesis of Aspirin from Wintergreen Oil – Instructor Guide
Learning Objectives:
Perform typical organic synthesis chemistry laboratory techniques
o Equipment setup, Refluxing, Thermocouple controller use, Crystallization, Filtration, Drying,
Perform Hydrolysis Reaction, Acetylation Reaction, Neutralization
Perform qualitative and quantitative analyses using: UV, IR, HPLC, MP
Calculate Moles, Grams, Stoichiometry, Yields and Purity
Background:
Our new company is preparing to manufacture aspirin by synthesis from wintergreen oil. There is a
procedure developed intended for manufacturing on a large scale (100 kg) that requires testing for
reproducibility as regards to yield and purity of the API. The two step synthesis encompasses aqueous base
hydrolysis of wintergreen oil (methyl salicylate, MS) to salicylic acid (SA) followed by acetylation to
acetylsalicylic acid (aspirin, ASA).
Scheme 1: Synthesis of Aspirin
O
OOHO
O
O
Na+
Na+
OH
OOH
OH
OOH
OH
OO
O
O
O ONa
+
O
O O
MW = 152.15MF = C8H8O3
d = 1.18 g/mlpKa = 9.8
MW = 159.10MF = C7H4O3Na2
MW = 138.12MF = C7H6O3
MP = 159 °CpKa = 2.9
Wintergreen OilMethyl Salicylate, MS
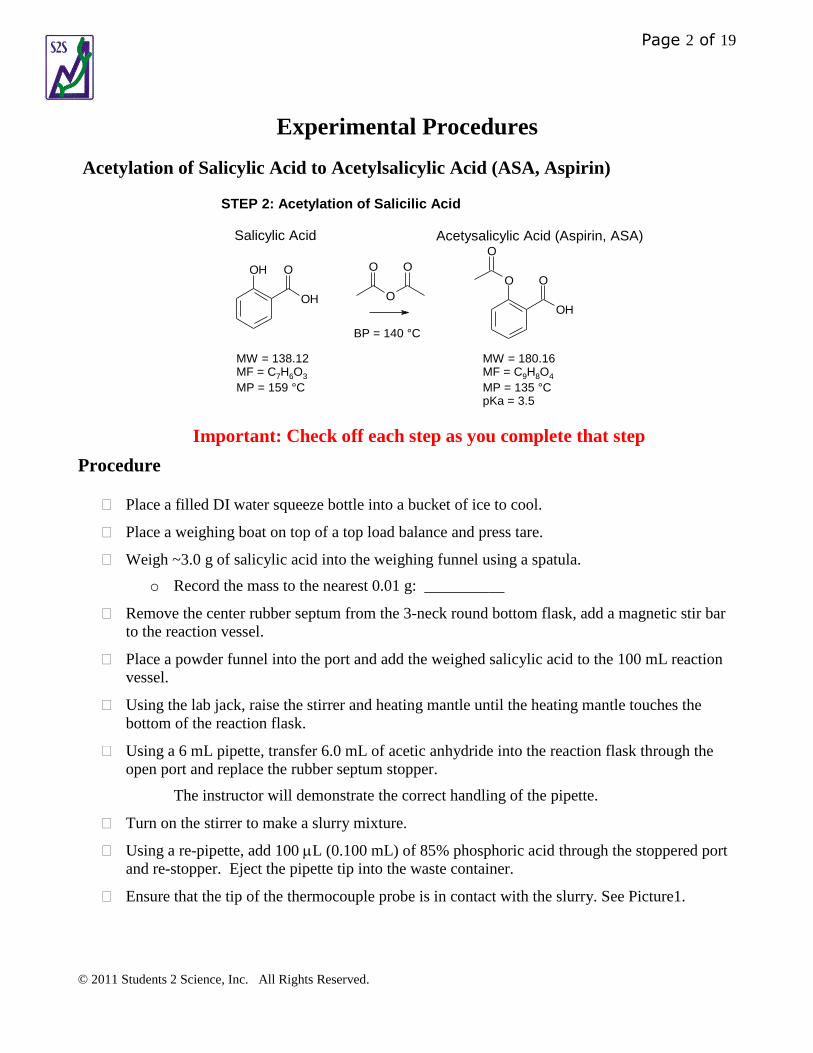
Salicylic Acid, SA
Salicylic Acid
MW = 180.16MF = C9H8O4
MP = 135 °CpKa = 3.5
Acetysalicylic Acid (Aspirin, ASA)
MW = 138.12MF = C7H6O3
MP = 159 °C
MW = 174.13MF = C8H7O3Na
Sodium 2-(methoxy-carbonyl)phenolate
Disodium salicylate
STEP 1: Hydrolysis of methyl salicylate
STEP 2: Acetylation of Salicylic Acid
NaOH
BP = 140 °C
pKa = 13
Page 2 of 19
© 2011 Students 2 Science, Inc. All Rights Reserved.
Experimental Procedures
Acetylation of Salicylic Acid to Acetylsalicylic Acid (ASA, Aspirin)
Important: Check off each step as you complete that step
Procedure
Place a filled DI water squeeze bottle into a bucket of ice to cool.
Place a weighing boat on top of a top load balance and press tare.
Weigh ~3.0 g of salicylic acid into the weighing funnel using a spatula.
o Record the mass to the nearest 0.01 g: __________
Remove the center rubber septum from the 3-neck round bottom flask, add a magnetic stir bar
to the reaction vessel.
Place a powder funnel into the port and add the weighed salicylic acid to the 100 mL reaction
vessel.
Using the lab jack, raise the stirrer and heating mantle until the heating mantle touches the
bottom of the reaction flask.
Using a 6 mL pipette, transfer 6.0 mL of acetic anhydride into the reaction flask through the
open port and replace the rubber septum stopper.
The instructor will demonstrate the correct handling of the pipette.
Turn on the stirrer to make a slurry mixture.
Using a re-pipette, add 100 L (0.100 mL) of 85% phosphoric acid through the stoppered port
and re-stopper. Eject the pipette tip into the waste container.
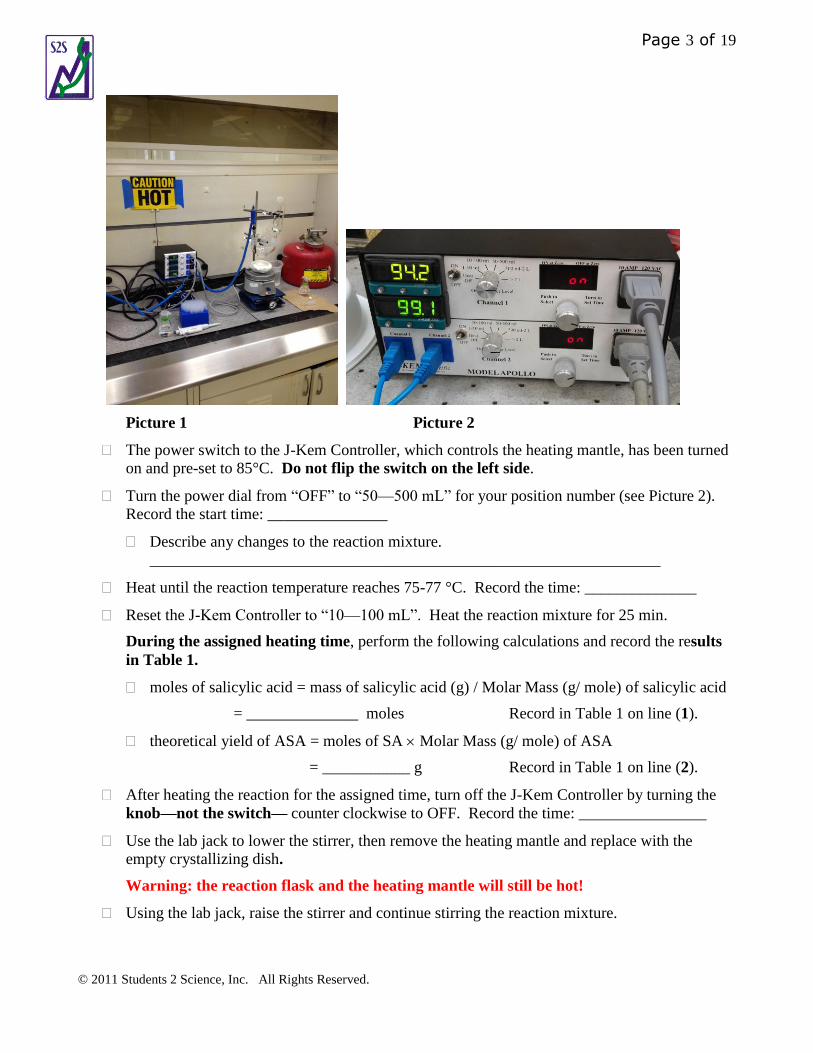
Ensure that the tip of the thermocouple probe is in contact with the slurry. See Picture1.
OH
OOH
OH
OO
O
O
O O
Salicylic Acid
MW = 180.16MF = C9H8O4
MP = 135 °CpKa = 3.5
Acetysalicylic Acid (Aspirin, ASA)
MW = 138.12MF = C7H6O3
MP = 159 °C
STEP 2: Acetylation of Salicilic Acid
BP = 140 °C
Page 3 of 19
© 2011 Students 2 Science, Inc. All Rights Reserved.
Picture 1 Picture 2
The power switch to the J-Kem Controller, which controls the heating mantle, has been turned
on and pre-set to 85°C. Do not flip the switch on the left side.
Turn the power dial from “OFF” to “50—500 mL” for your position number (see Picture 2).
Record the start time: _______________
Describe any changes to the reaction mixture.
________________________________________________________________
Heat until the reaction temperature reaches 75-77 °C. Record the time: ______________
Reset the J-Kem Controller to “10—100 mL”. Heat the reaction mixture for 25 min.
During the assigned heating time, perform the following calculations and record the results
in Table 1.
moles of salicylic acid = mass of salicylic acid (g) / Molar Mass (g/ mole) of salicylic acid
= ______________ moles Record in Table 1 on line (1).
theoretical yield of ASA = moles of SA Molar Mass (g/ mole) of ASA
= ___________ g Record in Table 1 on line (2).
After heating the reaction for the assigned time, turn off the J-Kem Controller by turning the
knob—not the switch— counter clockwise to OFF. Record the time: ________________
Use the lab jack to lower the stirrer, then remove the heating mantle and replace with the
empty crystallizing dish.
Warning: the reaction flask and the heating mantle will still be hot!
Using the lab jack, raise the stirrer and continue stirring the reaction mixture.
Page 4 of 19
© 2011 Students 2 Science, Inc. All Rights Reserved.
Describe any changes to the reaction mixture that have occurred.
________________________________________________________________
When the reaction has cooled to 50 °C, using the re-pipette, add 1.0 mL DI water slowly in 100
L (0.100 mL) portions over 3-5 minutes through the stoppered port. Observe the temperature.
WARNING: The hydrolysis of acetic anhydride is exothermic and no more than 0.1 mL
of water should be added at any time to control the amount of heat produced.
Ensure that the addition funnel stopper is in the closed horizontal direction. Add 15 mL of DI
water to the addition funnel. After you have added the first 1.0 mL, add the 15 mL of DI water
to the reaction vessel all at once through the stoppered port. What happens to the temperature?
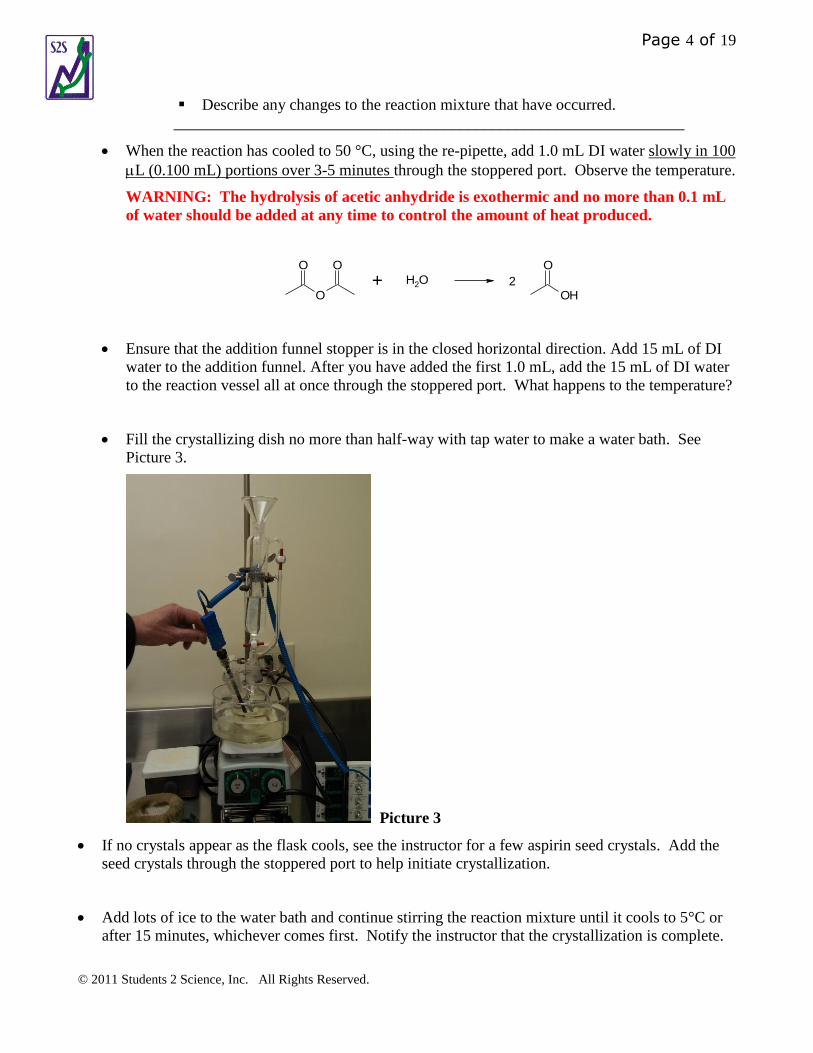
Fill the crystallizing dish no more than half-way with tap water to make a water bath. See
Picture 3.
Picture 3
If no crystals appear as the flask cools, see the instructor for a few aspirin seed crystals. Add the
seed crystals through the stoppered port to help initiate crystallization.
Add lots of ice to the water bath and continue stirring the reaction mixture until it cools to 5°C or
after 15 minutes, whichever comes first. Notify the instructor that the crystallization is complete.
O
O O
OH
O
+ H2O 2
Page 5 of 19
© 2011 Students 2 Science, Inc. All Rights Reserved.
The instructor will help you with the following steps:
Using the lab jack, lower the stirrer and ice bath from the reaction flask.
Remove the additional funnel and lay it aside carefully.
Remove the thermocouple and lay it aside.
Turn off the J-Chem Controller for your position.
Carefully remove the reaction flask from the apparatus.
One member of the team should hold the reaction flask upright so that it does not tip and
spill your product.
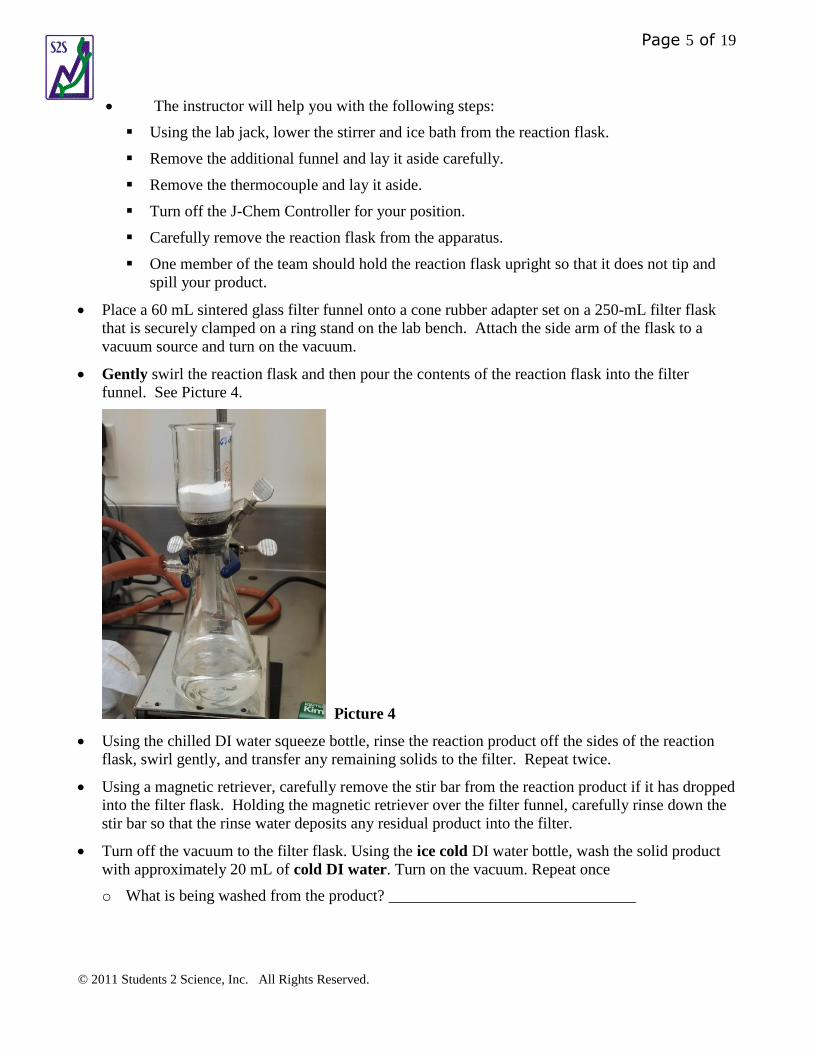
Place a 60 mL sintered glass filter funnel onto a cone rubber adapter set on a 250-mL filter flask
that is securely clamped on a ring stand on the lab bench. Attach the side arm of the flask to a
vacuum source and turn on the vacuum.
Gently swirl the reaction flask and then pour the contents of the reaction flask into the filter
funnel. See Picture 4.
Picture 4
Using the chilled DI water squeeze bottle, rinse the reaction product off the sides of the reaction
flask, swirl gently, and transfer any remaining solids to the filter. Repeat twice.
Using a magnetic retriever, carefully remove the stir bar from the reaction product if it has dropped
into the filter flask. Holding the magnetic retriever over the filter funnel, carefully rinse down the
stir bar so that the rinse water deposits any residual product into the filter.
Turn off the vacuum to the filter flask. Using the ice cold DI water bottle, wash the solid product
with approximately 20 mL of cold DI water. Turn on the vacuum. Repeat once
o What is being washed from the product? _______________________________
Page 6 of 19
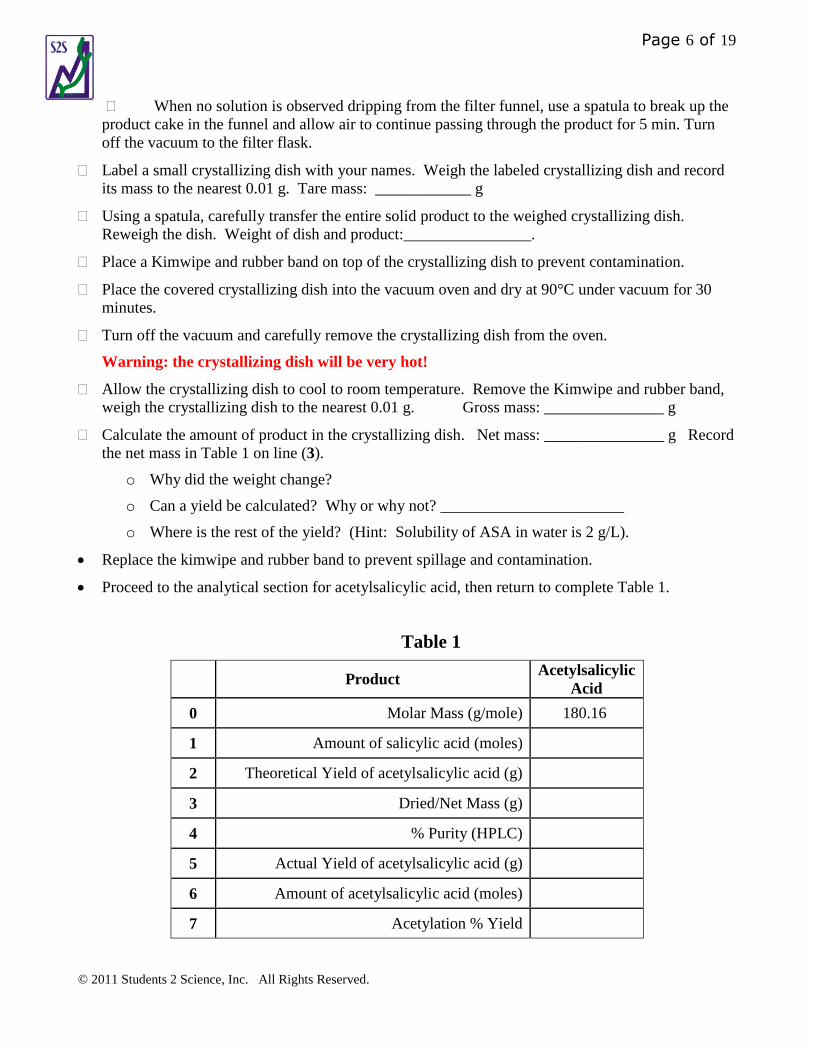
© 2011 Students 2 Science, Inc. All Rights Reserved.
When no solution is observed dripping from the filter funnel, use a spatula to break up the
product cake in the funnel and allow air to continue passing through the product for 5 min. Turn
off the vacuum to the filter flask.
Label a small crystallizing dish with your names. Weigh the labeled crystallizing dish and record
its mass to the nearest 0.01 g. Tare mass: ____________ g
Using a spatula, carefully transfer the entire solid product to the weighed crystallizing dish.
Reweigh the dish. Weight of dish and product:________________.
Place a Kimwipe and rubber band on top of the crystallizing dish to prevent contamination.
Place the covered crystallizing dish into the vacuum oven and dry at 90°C under vacuum for 30
minutes.
Turn off the vacuum and carefully remove the crystallizing dish from the oven.
Warning: the crystallizing dish will be very hot!
Allow the crystallizing dish to cool to room temperature. Remove the Kimwipe and rubber band,
weigh the crystallizing dish to the nearest 0.01 g. Gross mass: _______________ g
Calculate the amount of product in the crystallizing dish. Net mass: _______________ g Record
the net mass in Table 1 on line (3).
o Why did the weight change?
o Can a yield be calculated? Why or why not? _______________________
o Where is the rest of the yield? (Hint: Solubility of ASA in water is 2 g/L).
Replace the kimwipe and rubber band to prevent spillage and contamination.
Proceed to the analytical section for acetylsalicylic acid, then return to complete Table 1.
Table 1
Product Acetylsalicylic
Acid
0 Molar Mass (g/mole) 180.16
1 Amount of salicylic acid (moles)
2 Theoretical Yield of acetylsalicylic acid (g)
3 Dried/Net Mass (g)
4 % Purity (HPLC)
5 Actual Yield of acetylsalicylic acid (g)
6 Amount of acetylsalicylic acid (moles)
7 Acetylation % Yield
Page 7 of 19
© 2011 Students 2 Science, Inc. All Rights Reserved.
Analytical Procedures
IR (identity) The infrared spectrum of each organic compound is unique to the types and number of bonds
in the molecule. Obtain an IR spectrum for methyl salicylate, salicylic acid, and acetylsalicylic acid
and compare to known identified spectra.
Method: Sample preparation:
The instructor reviews the following steps before the students begin their work.
Running a Background IR Spectrum
1. Place one salt plate in the sample holder and lay the holder flat on the bench top.
2. Place a second salt plate over the first.
3. Place the cover over the plates and insert the holder into the IR spectrophotometer.
4. Record the background spectrum.
a. Select “Instrument” from the toolbar
b. Click “Scan Background” from the dropdown menu
c. Enter the sample ID: “Background”
d. Enter the Description: “Air Background”
e. Click “OK” to begin scan
f. Click “Overwrite”
g. Select “File”
h. Click “Close” from the drop down menu
Preparing a Salicylic Acid Sample in Acetone
Using the spatula, transfer a very small amount of your sample to the agate mortar. Note
each spatula is marked with line to provide guidance on the amount of sample required.
Grind the sample to a very fine powder using the agate pestle.
Add 4 drops of Acetone to dissolve the sample.
Place one salt plate flat on the bench top.
Place one drop of the Acetone / sample solution on the face of the salt plate.
Page 8 of 19
© 2011 Students 2 Science, Inc. All Rights Reserved.
Allow to evaporate and the sample to crystallize.
Carefully place the salt plate sandwich into the sample holder.
Carefully place the cover over the plates and insert the holder into the IR spectrophotometer.
Record the sample spectrum.
o Select “Instrument” from the toolbar
o Click “Scan Sample” from the drop down menu
o Enter the sample ID: S A
o Enter Description: “Team 1, 2, 3 or 4”
o Click “OK” to begin scan
o Click “Overwrite”
o Select “View”
o Click “Label Peaks” from the drop down menu
o Print a copy of the spectrum by clicking on the Instrument icon on the toolbar
o Select “File”
o Click “Close” from the drop down menu
After obtaining the spectrum, disassemble the holder
Place a few drops of isopropanol on each plate and wipe clean with a new Kimwipe.
Preparing a Acetyl Salicylic Acid Sample in Acetone
Using the spatula, transfer a very small amount of your sample to the agate mortar. Note
each spatula is marked with line to provide guidance on the amount of sample required.
Grind the sample to a very fine powder using the agate pestle.
Add 4 drops of Acetone to dissolve the sample.
Place one salt plate flat on the bench top.
Place one drop of the Acetone / sample solution on the face of the salt plate.
Allow to evaporate and the sample to crystallize.
Carefully place the salt plate sandwich into the sample holder.
Carefully place the cover over the plates and insert the holder into the IR spectrophotometer.
Record the sample spectrum.
o Select “Instrument” from the toolbar
o Click “Scan Sample” from the drop down menu
o Enter the sample ID: ASA
Page 9 of 19
© 2011 Students 2 Science, Inc. All Rights Reserved.
o Enter Description: “Team 1, 2, 3 or 4”
o Click “OK” to begin scan
o Click “Overwrite”
o Select “View”
o Click “Label Peaks” from the drop down menu
o Print a copy of the spectrum by clicking on the Instrument icon on the toolbar
o Select “File”
o Click “Close” from the drop down menu
After obtaining the spectrum, disassemble the holder
Place a few drops of isopropanol on each plate and wipe clean with a new Kimwipe.
Replace salt plates into their container and dispose of used Kimwipes and micro pipette
Assistant Instructions
Instruct students on basic operation of double beam IR spectrometer using the schematic over each instrument. FTIR spectrometer is too complex to describe.
For background spectrum, ask students for the gases in air that could absorb IR light. Point out carbon dioxide as a green house gas and hence a strong global warming gas. Explain that computer saves the background spectrum and subtracts it from each of the sample spectra.
Point out the loss of background peaks in the Acetone spectrum. Remind students that IR spectra reveal the type of bonds present in a molecule. Point out some bond type absorptions.
Reviewing the Sample IR Spectrum
Look at the IR absorbance bands which are present in the range of 2500 cm-1 to 3500 cm-1. For the unknown spectrum, ask students to assess the difference between the methyl salicylate, salicylic acid and the unknown. Point out the loss of the ester carbonyl and the formation of the carboxylic acid peaks.
MP (identity and purity)
Each crystalline organic compound has a unique melting point related to the stability of its
crystal lattice energy. Measure the melting point of each dried crystalline solid that was obtained and
compare to known values.
Method:
Dip the open end of a melting point capillary into the pile of crystals.
Invert and tap the tube on the desk to collect the crystals at the bottom.
Page 10 of 19
© 2011 Students 2 Science, Inc. All Rights Reserved.
Instructor Note: Use long glass tubes if the samples don’t go to the bottom of the capillaries. Hold the
capillary at the top of the tube and drop causing the capillary to bounce up and down. Slide the glass
tube up, remove the capillary and inspect the sample. Repeat as needed
Place the capillary into the melting point apparatus.
Turn the unit on and watch the sample through the sight glass.
Record the temperature when the sample begins to melt and when fully melted
Record melting point range on the table of Assay results
Aspirin Analysis by HPLC during Synthesis
The Experiment: Your team will prepare samples of aspirin for qualitative and quantitative
analysis by HPLC.
Preparing the Sample
In a 10 mL volumetric flask, add approximately 6 mg of the aspirin that you synthesized.
Record the exact mass to the nearest 0.01 mg: ______________ mg. Give this value to the
instructor.
Dissolve and dilute to the mark with HPLC solvent. Use a plastic transfer pipette to add the
final amount.
Label the flask.
Seal the flask with a stopper. Place your thumb on the stopper, invert the flask and gently
swirl. Repeat this 5 times.
Filter through a 0.45 syringe filter into a labelled HPLC vial (¾ full).
Record the information for your sample in Table 2:
Table 2
Sample Name Sample Amount (g) Dilution Volume (flask size in mL)
Inputting Data into the HPLC Data System
Put the HPLC vial into the autosampler, noting the vial location number: _____________
Input the sample name, sample amount, and dilution volume into the run sequence file.
Once all the samples are in the autosampler and the sample information is added to the run
sequence, start the HPLC and the samples will be analyzed.
Page 11 of 19
© 2011 Students 2 Science, Inc. All Rights Reserved.
Calculating the Amount of Aspirin in a Synthesized Sample
As each sample is analyzed on the HPLC a report will be printed that provides the peak area, the
mg/ mL of aspirin in your sample and its purity. Record purity in Table on line (4)
Calculate the actual yield of acetylsalicylic acid produced (5), the amount of acetylsalicylic
acid synthesized (6), and the % yield from your reaction (7) in Table 1. Remember:
o moles of acetylsalicylic acid (7) = Actual Yield (5) / Molar Mass (0)
o % Yield (7) = moles of product (6) / moles of starting material (1) 100%
or
% Yield (7) = Actual Yield (5) / Theoretical Yield (2) 100%
Page 12 of 19
© 2011 Students 2 Science, Inc. All Rights Reserved.
S2S Team Report Step 2 Acetylation
Salicylic Acid identification
Tests Team 1 Team 2 Team 3 Team 4 MP
Step 2 Aspirin Assays
Tests Team 1 Team 2 Team 3 Team 4 MP-ID HPLC Area% Purity Yield Mother Liquor assay Mass Balance of ASA
Were the procedures clearly written?
What was the reproducibility of the reaction yields?
What difficulties or aberrations do you have to report?
How did the ID and quality of the methyl salicylate compare to the commercial grade?
What other assays might be of value in determining the quality of the products?
Are the procedures ready for scale-up?
How do we know if the samples were dry?
What recommendations does the synthesis team have to make?
Instructor Notes
Equipment and Materials:
Reagents – Acetylation of salicylic acid
Isopropyl Alcohol
Acetone for Cleaning
Acetic Anhydride
Phosphoric Acid (85%)
Diionized water
Page 13 of 19
© 2011 Students 2 Science, Inc. All Rights Reserved.
Lab station Set-up - Acetylation of salicylic acid
Magnetic stirrer controller (4)
J-Kem reaction controller (2 Apollo models) and thermocouples assembly (4)
Heating mantles (4 x 100 mL size)
Rubber septum (4 x 24/40)
Ring Stands (8) with assorted clamps
100 mL reaction flask (4 x 100 mL 2 or 3 neck)
10 ml re-pipette
Dispenser bottles (1 -500 ml size for acetic anhydride)
Pressure equalizing addition funnel (50 ml)
Assorted beakers (4 x 250 4 x 1000 mL)
Stir bar (8 x 1.5 in football shaped)
Small Lab Jacks (4)
Large lab Jacks(2)
Air Displacement pipette with tips (100 - 1000 ul)
Glass stoppers (4)
Erlenmyer Flasks (4 x 250 ml)
Crystalizing Dish (4 – 150 x 75)
Crystalizing Dish (4 – 60 x 35)
Spatulas (4)
Scoopulas (4)
Filtering
Sintered glass funnel (4 x 60 mL coarse)
Filter flask (4 x 500 mL)
Neoprene cone adapter for funnel/filter flask (4)
Vacuum system (4 x aspirator vacuum system)
Vacuum oven (1)
Vacuum pump for oven (1)
Rubber bands
Tissues (4)
Vacuum tubing for filter funnels and vacuum oven
Synthesis Notes - Acetylation of salicylic acid
Turn on vacuum oven, under vacuum, before the class starts to heat up to 80.
The students are in teams of two.
Student should check each step as they complete the step
Add in the timing and logistics of the steps .
Any student with free time should seek his partner and exchange information.
After Student 2 places the isolated aspirin in the vacuum oven, prepares samples for the mother liquor
HPLC assay, which is started and all team members can then have lunch.
Student 1 finishes assays and begins to compile data on the salicylic acid.
Page 14 of 19
© 2011 Students 2 Science, Inc. All Rights Reserved.
Student 2 recovers the dried aspirin, gets weight of product and prepares samples to run HPLC of
the solids. While those assays are in progress Student 2 runs IR (if there is time) and MP.
Student 2 compiles data on aspirin.
Teams prepare final report and team discussion with instructors/mentors, comparing yield, IR, MP,
HPLC, and Spectrophotometer data. They should assess the quality of the tech transfer package (purity,
yields, ID). Make recommendations-does further work need to be performed, gap analysis,
should other assays be performed, or is the process ready to test scale-up on 1 kilogram scale?
Melting Point
Melting Point Apparatus (2)
Melting Point Capillary tubes
Ring Stand and clamp
Glass tube
FT IR
NaCl salt plates (2)
Salt plate holders (2)
Hyman Spatula (2)
Agate Mortar and pestle (2)
Acetone in a Dropping Bottle
Micro pipettes
Isopropanol in a wash bottle for cleaning
Kimwipes
Infrared spectrometer – 2 units
HPLC Equipment and Materials for Instructor:
Reagents:
Aspirin (USP Standard)
Salicylic Acid
Methanol (HPLC grade only)
Acetic acid
DI water
Supplies:
3 appropriate volumetric flasks and stoppers
Minimum of 5 HPLC autosample vials and tops (in drawer #61 opposite LCs)
Plastic transfer pipettes, minimum 10
Waste container
Pencil/marker (for labeling HPLC vial)
Freshly prepared Aspirin / Salicylic acid standard (~600 ppm ASA, ~10 ppm SA)
Prepared Reagents
HPLC Aspirin / Salicylic Acid Standard:

Page 15 of 19
© 2011 Students 2 Science, Inc. All Rights Reserved.
1. In a 25 mL volumetric flask add approximately 150 mg of aspirin and 5 mg salicylic acid.
2. Dissolve and dilute to volume with Stock Standard Diluent.
3. Mix well
4. (Store in the freezer between school visits. Will keep 1-2 weeks)
5. Transfer 1.0 mL to a 10 mL volumetric flask and dilute to volume with Sample Diluent
6. This solution must be prepared fresh daily.
HPLC Diluents
Stock Standard Diluent
1. Combine 190 mL of methanol and 10 mL acetic acid.
2. Mix well
3. Store in freezer
Sample Diluent
1. Combine 300 mL of methanol and 700 mL water.
2. Mix well
HPLC Mobile Phase
1. Combine 400 mL of methanol, 600 mL water, and 5 mL of acetic acid.
2. Mix well by shaking in a closed container, vent, and stir for ~ 30 min to remove dissolved gases.
Setting up the HPLC System:
The following are the HPLC conditions using HPLC 4:
Detector (switch on left rear of unit) at 254 nm, 0.800 Range, 0.05 RSP
HPLC pump (switch on right side front) using Method #07 (1.20 mL/min, 100% mobile phase
A). If not on Method #07, press F6 key (DIR) and arrow up or down to Method #07. Press F4
key (RCL) and recall Method #07.
Autosampler using Method #07 (vials 1-5, 15 uL, 4.0 min run time).
Vacuum degasser (switch on ride side – the rear of the unit)
Mobile phase A = 40/60 methanol plus 0.5% acetic acid
Syringe wash = 30/70 methanol/water
Aspirin standard (position 1 in autosampler)
Before starting up the pump, open the front left door on the pump, place a syringe on the fitting, open
the valve by turning CCW. Use the Purge key and set flow rate to 3 mL/min. Purge for 3 min. Press
STOP. Close valve, remove and empty syringe and press key F8 (STRT). Watch to see that the
pressure only varies by ~50 – 70 psi after a minute or so. If the fluctuation is higher, purge the pump
again to remove trapped air. This start up procedure only needs to be done at the beginning of the day.
NOTE: if the screen becomes unfamiliar, the QUIT key will bring it back to the beginning condition.
Page 16 of 19
© 2011 Students 2 Science, Inc. All Rights Reserved.
At the beginning of the day, press the FLUSH key on the autosampler to remove air from the syringes.
Setting up the TurboChrom Data Acquisition:
The computer should be set up and running. If so, pressing the admin key gets you to the TurboChrom
program screen. If the computer has shut off, follow the procedure below:
• Turn on computer
• Go to the TCNav icon
• Login with a “admin” logon and “admin” password
• Status may start with “Port Comm Error” in red, will become “No Method” in red after 2 to 5
min. If not, shut off computer and start again
The data acquisition system uses “Sequences” and “Methods”. The naming convention for sequences is
as follows:
“Today’s date” as in Mar08
The data files in each of these sequences will also follow the same convention of date.
To find the sequences (and to save them correctly), open the Sequence Editor (Build Sequence) and go
up one directory level. It is in the folder marked “Aspirin”. The entire hierarchy from the C-drive is as
follows:
C:PenExe/TcCS/Ver6.3.2/Aspirin
Copies of all the aspirin files (aspirin.seq, aspirin.mth, and aspirin.rpt) are found in the Templates
directory:
C:PenExe/TcCS/Ver6.3.2/Templates
All the working aspirin files must reside in the Aspirin Data directory.
Running the HPLC Experiment:
The prepared sample will be loaded into an HPLC autosampler vial (only fill 3/4 of the way) and then
taken to the HPLC to input the sample information (sample name, sample volume, flask volume) into
the sequence. Once this is done the vial will be placed into the autosampler in the appropriate position.
When all of the samples have been entered into the sequence file, the data should be saved and the
Sequence Editor MUST be closed prior to initiating Instrument Setup on the screen. (This also goes if
either the Method Editor or the Report Editor is opened. They must be closed for the data system to
initiate setup.)
The autosampler is set for running 5 injections. If you are running less, then the autosampler must be
reset for the lower value. Press the F2 key (METH). Using the arrow keys, move to the “LAST”
column and enter the number for the last injection. Press the yellow ENTER key. Once the value is
accepted, press the F6 key (STOR) and the unit will give you a new method number. Input 1. When
the unit asks if you want to overwrite the method press yes (the #1 key) and when it asks for a new
name press no (the #0 key).
Page 17 of 19
© 2011 Students 2 Science, Inc. All Rights Reserved.
Click Instrument Setup and browse the Aspirin directory for the correct date and team color sequence.
Load it and be sure that lines 1 through 5 are listed for loading (or 1 through the number of rows filled
out in the sequence). Approximately 30 sec. or less after the Instrument Setup is closed the status
screen will change color to green and say SYSTEM READY. If this does not happen, confirm that the
sequence, method, and report editors are closed. Once closed, the Instrument Setup must be re-initiated
as above.
Once the system is ready, press START on the autosampler to begin the run.
Click on Real Time Plot to open a screen that allows viewing of the chromatogram as it is generated.
Open the Sequence Editor and the current file as “Read Only” to be able to see what the upcoming
sample is.
NOTE: If you miss inputting the correct number of injections during the Instrument Setup, after the last
autosampler injection, go to “Run” on the toolbar and “Clear Setup”. Go to the instrument “PE-LC”
under “Lab” to clear and return to the red No Method status.
Discussing the HPLC Experiment:
Once the run is ongoing, the following points can be discussed:
What the void volume is
How the blank is the water used to dilute the samples and the need to prove it is free of aspirin
How chromatography is needed to separate all the impurities of the aspirin sample
How the student’s results compare to a real aspirin sample
How the aspirin samples have other peaks that are due to the impurities they contain
How this is similar to drug testing by pharmaceutical companies
Anything else that seems appropriate…
Clean –up
Reaction Vessel:
Rinse the addition funnel, plastic funnel, ice beaker, crystallizing dish, NaOH beaker and
HCl beaker with di-ionized water
Rinse the reaction vessel, stirring bar, spatulas, temperature probe, filtering flask and
weighing dishes with acetone for cleaning.
Reassemble the reaction vessel
Miscellaneous:
Empty ice from the ice coolers and vacuum traps
Empty vacuum traps and rinse with water
NOTE: Make sure the night-light is on over the sink. If not, reset the GFI outlet so the sink drainage
pump functions properly.

Page 18 of 19
© 2011 Students 2 Science, Inc. All Rights Reserved.
Page 19 of 19
© 2011 Students 2 Science, Inc. All Rights Reserved.
Discussion points
Helpful hints
Power point slides
Wrap-Up:
Applying Your Knowledge


![Artificial Photosynthesis - Macmillan Group...Masamune & Sharpless, Science 1983, 220, 949 HO OH HO O H OH OH OH OH asymmetric epoxidation MeO O O OR OBn OAc + O HO OBn OAc OR R1 [4+2]](https://img.pdfslide.us/doc/110x75/61487d632918e2056c22b90f/artificial-photosynthesis-macmillan-group-masamune-sharpless-science.jpg)

![1.qigroup.nibs.ac.cn/wp-content/uploads/2019/10/Cum-10...neo 9C!q neo gqqugou neo OH OH [01 neo Slqol neo All_JÀloaone D!GCOXISUU HSo HOOC.„, OH HO neo OH OH [o] o neo OH o (2+5)](https://img.pdfslide.us/doc/110x75/5ea8e1ec34c7047f4e7d0df4/1-neo-9cq-neo-gqqugou-neo-oh-oh-01-neo-slqol-neo-alljloaone-dgcoxisuu.jpg)