Embed Size (px)
Citation preview
Technical Support:
914-872-4069
Sage Alerting Systems, Inc.
For update information & downloadable files:
www.sagealertingsystems.com/support
Model 3644
E mergency
A lert
S ystem
Encoder/Decoder
User‟s Guide and Reference Manual Version 1.0
For use with software version 1.0
SAGE DIGITAL ENDEC
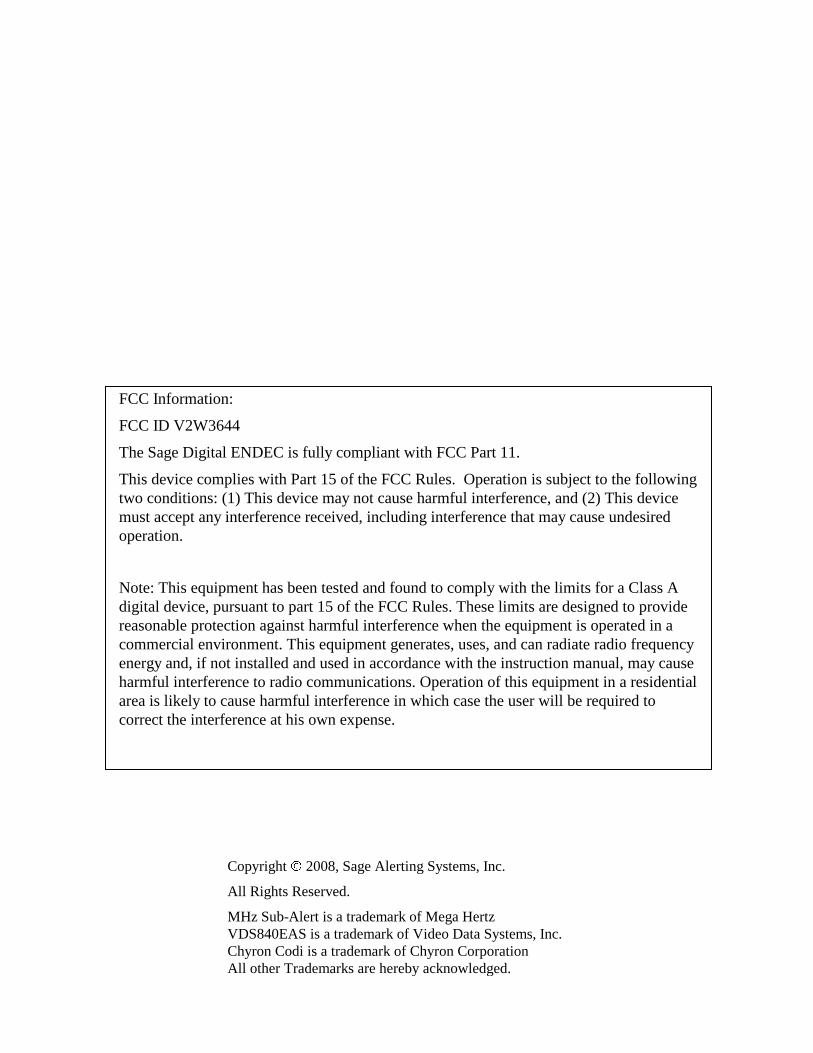
Copyright 2008, Sage Alerting Systems, Inc.
All Rights Reserved.
MHz Sub-Alert is a trademark of Mega Hertz
VDS840EAS is a trademark of Video Data Systems, Inc.
Chyron Codi is a trademark of Chyron Corporation
All other Trademarks are hereby acknowledged.
FCC Information:
FCC ID V2W3644
The Sage Digital ENDEC is fully compliant with FCC Part 11.
This device complies with Part 15 of the FCC Rules. Operation is subject to the following
two conditions: (1) This device may not cause harmful interference, and (2) This device
must accept any interference received, including interference that may cause undesired
operation.
Note: This equipment has been tested and found to comply with the limits for a Class A
digital device, pursuant to part 15 of the FCC Rules. These limits are designed to provide
reasonable protection against harmful interference when the equipment is operated in a
commercial environment. This equipment generates, uses, and can radiate radio frequency
energy and, if not installed and used in accordance with the instruction manual, may cause
harmful interference to radio communications. Operation of this equipment in a residential
area is likely to cause harmful interference in which case the user will be required to
correct the interference at his own expense.

Sage EAS ENDEC - Contents 3
Sage Digital ENDEC Manual Rev 1.0
1. Quick Start 9
1.1 What you need to know about EAS 9 1.2 What you need to know about the Common Alerting Protocol 10 1.3 What you need to do 10 1.4 Bench Testing 11 1.5 Hookup 11 1.6 Customizing using the Web Browser Interface 12 1.7 Customizing using the Front Panel interface 13
1.7.1 Front Panel Menu Basics 13 1.7.2 Passwords 15 1.7.3 Menu Annotation Format 15 1.7.4 Doing the Minimum 15 1.7.5 Sending a Weekly Test 16 1.7.6 Relaying a Monthly Test 17 1.7.7 Sample Instruction Sheet 17
1.8 Customizing using an ENDECSETD serial connection 18
2. Introduction to EAS 19
2.1 The National View 19 2.2 Your Local Area 19 2.3 Your responsibilities 19 2.4 The EAS Alert Format 20
3. Introduction to the ENDEC 23
3.1 Front Panel 23 3.2 ENDEC Back Panel 24 3.3 Memory - What’s Saved and What Isn’t 25
4. ENDEC Hardware Setup 27
4.1 Power 27 4.2 Printer 27 4.3 Analog Audio 27 4.4 Audio Levels 29 4.5 Digital Audio 32
4.5.1 Digital Audio Input, Output, and Pass-through 32 4.5.2 Digital Audio Clock 33 4.5.3 Digital Audio Levels 33 4.5.4 Digital Audio Menu Items 33
4.5.4.1 Enable Digital Audio 33 4.5.4.2 Relay Always On 33 4.5.4.3 Pass Through 33 4.5.4.4 Simulcast 33 4.5.4.5 External Clock 33 4.5.4.6 Clock Rate 34
4.6 Serial Ports 34 4.7 Relays 35
5. ENDEC Software Setup 37
5.1 Call Sign 37 5.2 Time 38 5.3 Local Area 39 5.4 Filtering Incoming Alerts 40 5.5 Outgoing Alerts 45 5.6 Audio Sources 46 5.7 Relay Programming 47
5.7.1 Relay Program Definitions 48 5.7.2 Assigning Relay Programs 50
Sage EAS ENDEC - Contents 4
Sage Digital ENDEC Manual Rev 1.0
5.8 Random Required Weekly Test feature 51 5.9 Marine Location Codes 52 5.10 ENDECSETD program 53 5.11 Using ENDECSETD with the LAN and Web server 53 5.12 Using ENDECSETD with a serial port 54
6. Network 55
6.1 Network Security 55 6.2 Network Settings 56
6.2.1 Time (NTP) servers 56 6.2.2 CAP servers 56 6.2.3 Network Printer 56
6.3 Email/FTP settings 57 6.3.1 SMTP server 57 6.3.2 Email Addresses 57 6.3.3 FTP Server 57
7. Typical Tasks 59
7.1 Weekly Test 59 7.2 Relaying an ALERT 59 7.3 Originating an Alert 60
7.3.1 Originating with templates 60 7.4 Viewing, Reprinting, Sending Old Alerts 61 7.5 Killing a Pending Alert 62 7.6 Playing Incoming Alert audio as it is Received 62
8. ENDEC Peripherals 63
8.1 Hand Control (RC-1) 63 8.1.1 RS-232 Hookup 63 8.1.2 ENDEC Setup 63 8.1.3 Changing the RC-1 Default Parameters 64 8.1.4 Using the Hand Control for Menus 64 8.1.5 Using the Hand Control One-touch buttons 65 8.1.6 Using the Macro Buttons 65
8.2 LED Sign 66 8.3 VDS Character Generator 66 8.4 Chyron CODI Character Generator 66 8.5 Monitor Radio Receivers 67 8.6 Modem Access 67
9. Interfacing with other Devices 69
9.1 Raw EAS input and output 69 9.2 Serial Printer 69 9.3 Alert Text Output (Generic Character Generator) 70 9.4 News Room Software 70 9.5 Commercial Tally 71 9.6 Daylight Only Stations 71 9.7 Older EBS Equipment 71
10. Controlling Multiple Stations 73
10.1 Station Numbers and Names 73 10.2 Configuring the ENDEC for MSRP Use 74 10.3 Controlling an Individual Station 75 10.4 Controlling Other Stations 75 10.5 MSRP Automatic Operation 75 10.6 Unattended Operation 76
11. Cable TV Options 77
11.1 Non-Volatile Audio Storage 77
Sage EAS ENDEC - Contents 5
Sage Digital ENDEC Manual Rev 1.0
11.2 MHz Sub Alert 77 11.2.1 MENU.MHZ SUB-ALERT.ATTN DURATION 78 11.2.2 MENU.MHZ SUB-ALERT.MHZ ENABLE 78 11.2.3 MENU.MHZ SUB-ALERT.REPEATS 78
11.3 MENU.MHZ SUB-ALERT.RWT MODE 78 11.3.1 MENU.MHZ SUB-ALERT.TUNE TO CHAN 78 11.3.2 MENU.MHZ SUB-ALERT.TUNE TO REP 79 11.3.3 MENU.MHZ SUB-ALERT.USER PAGE 79
12. ENDEC Command Reference 81
12.1 MENU.ALERTS.CLEAR ALERT LOG 81 12.2 MENU.ALERTS.CLEAR LED SIGN 81 12.3 MENU.ALERTS.ORIGINATE ALERT 81 12.4 MENU.ALERTS.PREVIEW AUDIO 81 12.5 MENU.ALERTS.PREVIEW NVAUDIO 81 12.6 MENU.ALERTS.RECORD AUDIO 81 12.7 MENU.ALERTS.RECORD NVAUDIO 82 12.8 MENU.ALERTS.SEND PENDING 83 12.9 MENU.ALERTS.VIEW ALERT LOG 84 12.10 MENU.CHANGE ADMIN 85 12.11 MENU.CHANGE PASSWORD 85 12.12 MENU.CHANGE PRO PASS 85 12.13 MENU.CONFIG.ALLOW BUILD EAN 85 12.14 MENU.CONFIG.ATTN DURATION 86 12.15 MENU.CONFIG.AUTO START 86 12.16 MENU.CONFIG.AUTO STOP. 86 12.17 MENU.CONFIG.CALL SIGN 86 12.18 MENU.CONFIG.CODI CRAWL SPEED 86 12.19 MENU.CONFIG.CODI MODE 86 12.20 MENU.CONFIG.CRAWL REPS 86 12.21 MENU.CONFIG.CRAWL RWT 86 12.22 MENU.CONFIG.DEFAULT DURATION 87 12.23 MENU.CONFIG.DEFAULT REC 87 12.24 MENU.CONFIG.LANGUAGE 87 12.25 MENU.CONFIG.LED SIGN MODE 87 12.26 MENU.CONFIG.LED SIGN SOUND 87 12.27 MENU.CONFIG.LED SIGN TIME 87 12.28 MENU.CONFIG.MENU TIMEOUT 88 12.29 MENU.CONFIG.MODE 88 12.30 MENU.CONFIG.NV AUDIO LEN 88 12.31 MENU.CONFIG.NV LEAD-IN 88 12.32 MENU.CONFIG.NWS HUNT TIME 88 12.33 MENU.CONFIG.NWS PRACTICE 89 12.34 MENU.CONFIG.NWS SELECT 89 12.35 MENU.CONFIG.OLD SCAN METHOD 89 12.36 MENU.CONFIG.ORIGINATOR 89 12.37 MENU.CONFIG.PRINT ALL ALERTS 89 12.38 MENU.CONFIG.PRINT ZCZC 89 12.39 MENU.CONFIG.PRINTER 89 12.40 MENU.CONFIG.PRO EXTRA STAT 89 12.41 MENU.CONFIG.PRO READ ONLY 90 12.42 MENU.CONFIG.PROCESSOR LEAD 90 12.43 MENU.CONFIG.SCAN SELECT 90 12.44 MENU.CONFIG.STRICT TIME 90 12.45 MENU.CONFIG.UNKNOWN FIPS 90 12.46 MENU.CONFIG.VDS RELAY ON 90 12.47 MENU.DATE/TIME 90
Sage EAS ENDEC - Contents 6
Sage Digital ENDEC Manual Rev 1.0
12.48 MENU.DEVICES.PORT 91 12.49 MENU.DEVICES.PORT.BAUD 91 12.50 MENU.DEVICES.PORT.DEVICE TYPE 91 12.51 MENU.DEVICES.PORT.STATION 92 12.52 MENU.DEVICES.SHOW 92 12.53 MENU.DIGITAL LEVELS 92 12.54 MENU.LCD CONTRAST 92 12.55 MENU.LEVELS 92 12.56 MENU.MODE 93 12.57 MENU.MONITOR SOURCE 93 12.58 MENU.MSRP.ASSIGN MSRP RELAY 94 12.59 MENU.MSRP.STATION N.CALL SIGN 94 12.60 MENU.MSRP.STATION N.ENABLE 94 12.61 MENU.MSRP.STATION N.MODE 94 12.62 MENU.NETWORK.AUTOMATION 94 12.63 MENU.NETWORK.DNS1 94 12.64 MENU.NETWORK.DNS2 94 12.65 MENU.NETWORK.GATEWAY 94 12.66 MENU.NETWORK.IP ADDRESS 94 12.67 MENU.NETWORK.NETWORK ADDR TYPE 95 12.68 MENU.NETWORK.NETWORK MASK 95 12.69 MENU.NETWORK.PORT BASE 95 12.70 MENU.NETWORK.PRO/DJ 95 12.71 MENU.NETWORK.RESTART NETWORK 95 12.72 MENU.NETWORK. SHOW IP ADDR 95 12.73 MENU.NETWORK.SHOW MAC ADDR 95 12.74 MENU.NETWORK.WEB SERVER 95 12.75 MENU.OVERRIDE USE 96 12.76 MENU.PRACTICE 96 12.77 MENU.PRESETS.INCOMING 97 12.78 MENU.PRESETS.LOCAL AREA 97 12.79 MENU.PRESETS.OUTGOING 97 12.80 MENU.PRINTER FEED 97 12.81 MENU.RELAY 97 12.82 MENU.SHOW INPUT LEVELS 97 12.83 MENU.TEST.PRINTER TEST 97 12.84 MENU.TEST.REBOOT 97 12.85 MENU.TEST.RESET BLINK ERROR 97 12.86 MENU.TEST.SELF TEST 98 12.87 MENU.TEST.SHOW UTC 98 12.88 MENU.TEST.VDS CGEN VERSION 98 12.89 MENU.TIMED RWT.EDIT RWT RAND 98 12.90 MENU.TIMED RWT.ENABLE TIMED RWT 98 12.91 MENU.TIMED RWT.PRINT RWT RAND 99 12.92 MENU.TIMED RWT.RESET RWT RAND 99 12.93 MENU.TIMED RWT.RWT DAY OF WEEK 99 12.94 MENU.TIMED RWT.RWT HOUR 99 12.95 MENU.TIMED RWT.RWT MINUTE 99 12.96 MENU.TIMED RWT.RWT RESET 99
13. Connector Descriptions 101
13.1 Serial Port Pin Out 101 13.2 Accessory Power 101 13.3 Hand Controller Cable 102 13.4 Microphone Connector 103
14. Troubleshooting 105
14.1 Blink Errors 105
Sage EAS ENDEC - Contents 7
Sage Digital ENDEC Manual Rev 1.0
14.1.1 Incoming Alert (IN) LED Only 105 14.1.2 Outgoing Alert (OUT) LED Only 105 14.1.3 Automatic (AUTO) LED 105 14.1.4 Automatic (AUTO) and Incoming Alert (IN) LEDs 106 14.1.5 All LEDs Blinking (except digital lock) 106
14.2 Common Problems 106 14.3 Resetting the passwords 107 14.4 Resetting parameters to factory defaults 107 14.5 Self Test 107
15. What’s New for the Sage Digital ENDEC 109
15.1 Accessory Power 109 15.2 LAN Connection 109 15.3 Printer 109 15.4 Serial Ports 109 15.5 USB Ports 109 15.6 Web Browser 109 15.7 Email 109 15.8 FTP 110
16. Menu Trees 111
17. Warranty 117
18. FIPS Codes 118
18.1 Land Areas 118 18.2 FIPS Codes - Marine Areas 128

Sage EAS ENDEC - Contents 8
Sage Digital ENDEC Manual Rev 1.0
Quick Start 9
Sage Digital ENDEC Manual Rev 1.0
1. Quick Start If you are a long time user of the original Sage EAS ENDEC (the grey box), you can get a quick summary of
the new features of the Sage Digital ENDEC (the blue box) in section 15, What‟s New for the Sage Digital
ENDEC.
About this manual:
The ENDEC has been designed to serve many types of users:
Radio Broadcasters
TV Broadcasters
Cable TV Head Ends
Emergency Services and Public Safety Personnel
Multi-station Locations
Heavy Users of EAS
Light Users of EAS
LP1/LP2 stations
Primary Entry Point Stations
As with many manuals, most of the pages are devoted to lengthy
descriptions of features that 90% of you won‟t ever use. Most of
the remaining 10% you‟ll only use once.
With that in mind, the quick start section will excerpt just those
instructions that everyone will use at least once. This section is sufficient to get the ENDEC installed on the
bench, so you can run a test or two. It also will tell you how to meet the minimum FCC Part 11
requirements. If you read nothing else in this manual, read this. You should read all of it.
You will eventually need to read the detailed sections on hardware and software setup. The Quick Start
section assumes you will be entering commands directly at the front panel. See section 8.1, “Hand Control”
for information on the hand held remote control.
To put things in perspective, look at the sample procedure sheet at the end of this section. Once the ENDEC
is configured with a few options, the procedures your staff needs to know are few. The weekly test can be
configured as a button click on a web page, and the job of relaying the monthly test can be left totally up to
the ENDEC.
This version of the manual is aimed primarily at broadcasters, though the concepts are the same for all users.
1.1 What you need to know about EAS
The Emergency Alert System‟s primary purpose is to allow the President of the United States to gain access,
automatically, to the nation‟s broadcast outlets, to directly speak to the country in times of national disaster.
Secondarily, the EAS system can be used by the National Weather Service and State and Local level
officials to disseminate other types of emergency information. Your EAS encoder/decoder will receive
commands either directly from the source of the emergency information, or from a web of other broadcasters
in your area that will relay the information from the primary source.
You must test the equipment on the air at a random time and day of your choice each week. You must
receive and relay a test once a month that will probably be issued by one of the primary emergency sources
in your area. The ENDEC can be configured by you to send the weekly test with just one button (and a
second “I really meant to hit the first button” button). It can also be configured to automatically relay the
monthly test and any Presidential messages. To meet the minimum requirements of the FCC, this is all you
need to do: send a weekly test, relay the monthly test, and relay the Presidential messages. As of 2008, there
were also other pending changes, such as the Must Carry requirement for messages originated by the state
10 Quick Start
Sage Digital ENDEC Manual Rev 1.0
Governor, and for the ability to receive messages in the Command Alerting Protocol (CAP) format. These
changes are expected to come into effect in late 2009.
You can also configure the ENDEC to relay other types of EAS messages, such as tornado warnings and
civil emergency messages.
All EAS message processing is handled by the ENDEC, and it always performs the following basic steps:
1) Detect an EAS message and record the audio portion.
2) Decide whether to put it on the air. The ENDEC may do this automatically, or it may wait for operator
input, depending on the options you‟ve selected.
3) Put the alert on the air, by re-generating the EAS digital codes, relaying the recorded audio (which you
can replace or delete) and sending the end of alert digital codes.
1.2 What you need to know about the Common Alerting Protocol
The Common Alerting Protocol (CAP) is a new way of sending alert information. A CAP message is not
sent on the main audio output of a broadcaster like an EAS alert. You will receive CAP alerts in a different
way. This will vary from area to area, but could include receiving the alert over the Internet, via an IP
stream from satellite, VHF/UHF narrowband FM, etc. No matter how you get the data, the last hop will
most likely be via the LAN connector on the ENDEC.
There are several advantages to the CAP protocol. One of them is that the text portion of the alert can
contain free-form text – rather than a simple “Child Abduction Warning issued for Allegheny County”, the
alert will contain specific information about the alert. In the case of a missing child, the text could including
a description of the child, last know location, what type of car is involved, and other important information.
This information is the available to any of the text outputs of the ENDEC, such as printer, email, LED sign,
video crawl, etc. In some cases, if the CAP alert does not contain audio from the originator, the ENDEC can
provide audio by converting the text to speech. More information about CAP is available on the Sage web
site (www.sagealertingsystems.com).
In general, a CAP message is converted into an EAS message when it is broadcast by you. The ENDEC
does this automatically. Just as for EAS messages, the ENDEC uses the filter information you provide to
decide what types of CAP alerts to put on the air.
1.3 What you need to do
To meet the requirements of CFR 47 Part 11 (The FCC‟s EAS rules), you need to do at least the following:
1) Place the ENDEC (or a remote relay) in the audio chain. TV stations need to have a character generator
in the video chain.
2) Hook up receivers or other source of alert data to the ENDEC monitor inputs.
3) Configure your ENDEC with the types of messages you want to relay.
Note: Compliance with the FCC rules is ultimately the responsibility of the broadcaster. Staying within the
rules is a combination of the EAS hardware and software, other hardware and software at your facility, and
the various procedures for use of the hardware and software. You need to continue to monitor the proper
operation of your EAS equipment by verifying that the weekly tests go on the air as expected, and that you
receive and relay the Required Monthly Tests. The FCC changes the rules from time to time through its
report and order process. Check the Sage website at www.sagealertingsystems.com periodically to check for
software updates.
Quick Start 11
Sage Digital ENDEC Manual Rev 1.0
1.4 Bench Testing
Just a quick note here about bench testing. The ENDEC includes an internal speaker. Make sure the factory
installed jumper on the back on the ENDEC between the Speaker Out and Speaker In terminals is installed.
If you send an alert, you‟ll hear it through the internal speaker. All of the ENDEC functions except for relay
of a pending message can be bench tested. If you have two ENDECs, you can use one to send a message to
the other in a bench test by wiring the Speaker Line Out of one ENDEC to the Monitor 1 In of the other
ENDEC, and a second wire from any Audio Common of one ENDEC to an Audio Common on the other
ENDEC.
1.5 Hookup
An annotated diagram of the ENDEC front and back panels are provided in section 3. Refer to them if you
need additional information. You‟ll need to:
1) Connect power. Use the supplied 19V 3A power cube. DO NOT USE THE POWER SUPPLY FROM
THE ORIGINAL “GREY BOX” ENDEC.
2) Connect your monitor audio sources to the ENDEC monitor inputs, 0dbm audio level, not to exceed
2Vrms. Connect as many audio sources as you have monitoring requirements to the monitor input
terminals on the back panel of the ENDEC (one source per input terminal).
3) Put the ENDEC into the audio chain (after you have set the parameters and done some bench testing and
familiarization). The point of EAS is that the alert can go on the air automatically, so the ENDEC will
need to be able to switch out your program audio and switch in its alert audio. The easiest way to do
this is to use the included Main Audio IN and Main Audio Out XLR connectors on the back of the
ENDEC to place the ENDEC between the console and other station audio sources and the transmitter (or
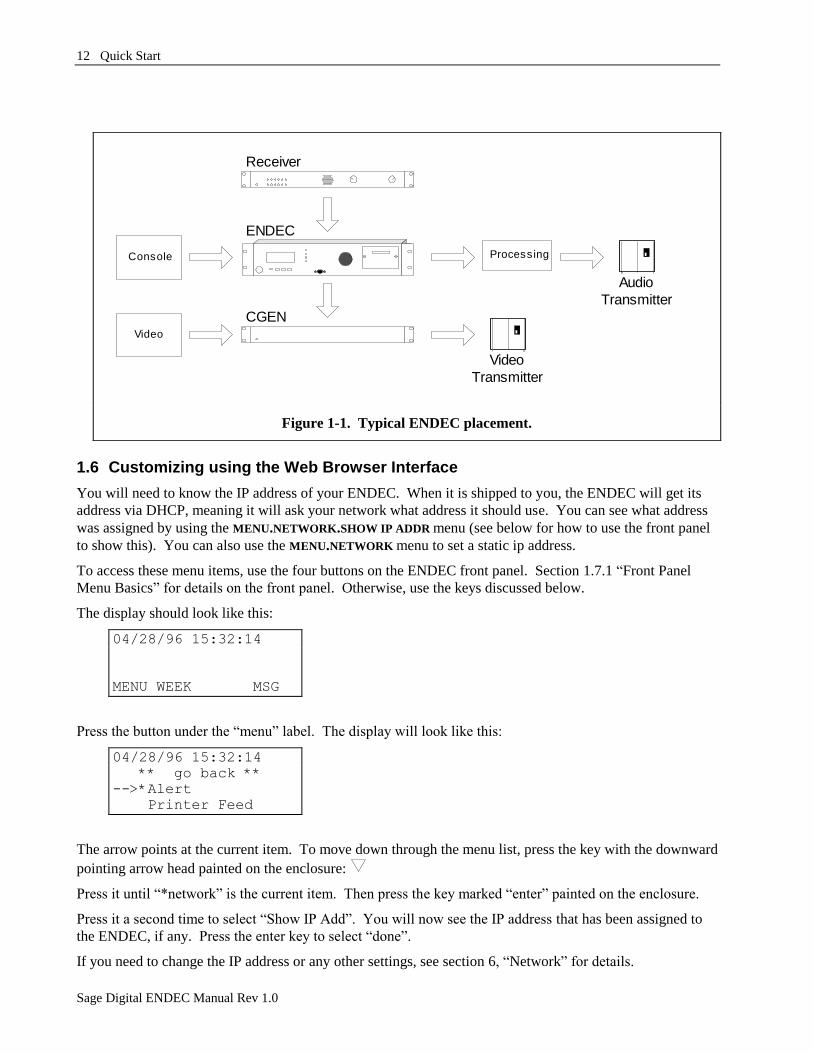
STL). The ENDEC is usually placed before any audio processing1, see Figure 1-1. The ENDEC also
has a digital audio AES/EBU in and out connector. When the digital audio IN and OUT ports are used,
the ENDEC will automatically interrupt digital audio. If you use an external switch, you can use the
digital audio OUT port to provide digital audio to the switcher. In either case, the ENDEC can provide
its own clock, you it can derive clock from the digital audio IN port.
4) If you are a TV station, place the character generator in the video chain and connect the ENDEC to the
CGEN with a serial cable. Cable pin descriptions are in section 13. Use MENU.DEVICES.PORT.DEVICE
TYPE.VDS CGEN or MENU.DEVICES.PORT.DEVICE TYPE.CODI CGEN
5) Connect any other options, such as hand held remote controllers or LED signs.
6) Enable logging. The ENDEC can log to any combination of
an attached USB printer
a LAN-connected network printer
a list of email addresses
internal FLASH memory.
7) Configure the ENDEC software options as discussed below.
1 We have tested the ENDEC with processing. While it is probably possible to adjust (or mis-adjust) processing so that
EAS alert data will not pass through in a way that will be decodable, we had no trouble with processing during testing.
The FCC has certain minimum modulation levels in Part 11.
12 Quick Start
Sage Digital ENDEC Manual Rev 1.0
1.6 Customizing using the Web Browser Interface
You will need to know the IP address of your ENDEC. When it is shipped to you, the ENDEC will get its
address via DHCP, meaning it will ask your network what address it should use. You can see what address
was assigned by using the MENU.NETWORK.SHOW IP ADDR menu (see below for how to use the front panel
to show this). You can also use the MENU.NETWORK menu to set a static ip address.
To access these menu items, use the four buttons on the ENDEC front panel. Section 1.7.1 “Front Panel
Menu Basics” for details on the front panel. Otherwise, use the keys discussed below.
The display should look like this:
04/28/96 15:32:14
MENU WEEK MSG
Press the button under the “menu” label. The display will look like this:
04/28/96 15:32:14
** go back **
-->*Alert
Printer Feed
The arrow points at the current item. To move down through the menu list, press the key with the downward
pointing arrow head painted on the enclosure:
Press it until “*network” is the current item. Then press the key marked “enter” painted on the enclosure.
Press it a second time to select “Show IP Add”. You will now see the IP address that has been assigned to
the ENDEC, if any. Press the enter key to select “done”.
If you need to change the IP address or any other settings, see section 6, “Network” for details.
Console
Receiver
ENDEC
Processing
Audio
Transmitter
Video
Video
Transmitter
CGEN
Figure 1-1. Typical ENDEC placement.

Quick Start 13
Sage Digital ENDEC Manual Rev 1.0
Once you know the address, you can use a PC with access to that address to show the configuration web
pages. For example, assume the ENDEC‟s IP address is 192.168.1.30. Enter this URL to your browser:
http://192.168.1.30
You will need to set at least these settings using the ENDECSETD interface:
Call sign
Local Area
UTC Offset
Time of Day (or provide a list of NTP servers accessible from the ENDEC)
Important: As with any other network device, you should use a firewall to protect the ENDEC from
unauthorized access.
1.7 Customizing using the Front Panel interface
Although there are many options in the ENDEC software, you only need to set a few to meet the minimum
FCC requirements. These are summarized in this section, see section 3 for complete details.
The first time you power up the ENDEC (and every time until you set a local area), the ENDEC will flash
the “Automatic” led. This is an indication that an error message has been stored in the message buffer. Use
the MSG soft key to read the errors (scroll the messages with the up and down keys). The error message for
first time power up is “Local Area not defined”, which is described below.
Many of the ENDEC customization settings can be entered from the front panel. The Sage Digital ENDEC
retains this interface to maintain compatibility with the original Sage EAS ENDEC. The Sage Digital
ENDEC has many new features, however, that would be very tedious to enter from the front panel, length
email addresses, for example. Many, but not all, of the ENDEC parameters can be set from the front panel.
All of the parameters can be set using these two methods:
The ENDECSETD program. This GUI-based windows program allows you to adjust all
parameters off line, and upload them to the ENDEC.
The Web browser interface. This allows you to use a web browser to connect to the ENDEC‟s
internal web server and adjust parameters.
The Sage Digital ENDEC front panel can be used to enter any command that was supported by the Sage
EAS ENDEC, including the generation of weekly tests, forwarding of messages, etc. The intent is that any
training your staff has received on the use of the original ENDEC remains valid. New, and in many cases
simpler, methods can be introduced at your leisure.
1.7.1 Front Panel Menu Basics
First, some menu basics. The four buttons on the front of the ENDEC are used in two ways - as soft keys,
and for menu navigation.
Most of the time, the bottom line of the four line LCD display is used as labels for soft keys, that is, the key
directly beneath the soft key label will do what the label says. The label will change depending on what
configuration you are performing.

14 Quick Start
Sage Digital ENDEC Manual Rev 1.0
Look at the ENDEC front panel. Once you turn on the ENDEC and it completes the self test, the display
looks like this:
04/28/96 15:32:14
MENU WEEK MSG
This shows the time of day on the top line (in local, 24 hour format), and soft keys on the bottom line. In
this case, there are three keys, the MENU, WEEK, and MSG. The third button to the left does not have a
label in this example and is not used. If you push the menu button, you will then see the menu and will use
the four buttons as navigation keys.
Once you push the “MENU” soft key, the display changes to this, called the “default screen”.
04/28/96 15:32:14
** go back **
-->*Alert
Printer Feed
In this mode, you use the physical lettering on the ENDEC front panel to identify the keys. To select the
menu item pointed to by „-->‟, press the key labeled “Enter”. To move down through the menu list, press the
key with the downward pointing arrow head:
Pressing the down key will change the above display into this:
04/28/96 15:32:14
*Alert
--> Printer Feed
Practice
To scroll upwards through the menu, press the key with the upward pointing arrow head.
To move up one menu level, scroll up until the „-->‟ points to ** go back** and press enter. You can also
press the second button from the left, between ENTER and .
Navigating menus is a process of selecting the item you want to do next. For example, to change the call
sign option, you want to select the configuration sub-menu.
1) Assume the ENDEC display shows the default screen. Press the MENU soft key (the left-most button)
to enter the menu. Then press the down key until you see the selection arrow pointing at *Config. Press
the Enter key to select it.
2) Next, scroll down through this menu by pressing the down key until the selection arrow pointing at “Call
Sign”. Press enter to select it.
3) You will be prompted for the Administrators password. The default password is „1111‟, press the enter
key four times.
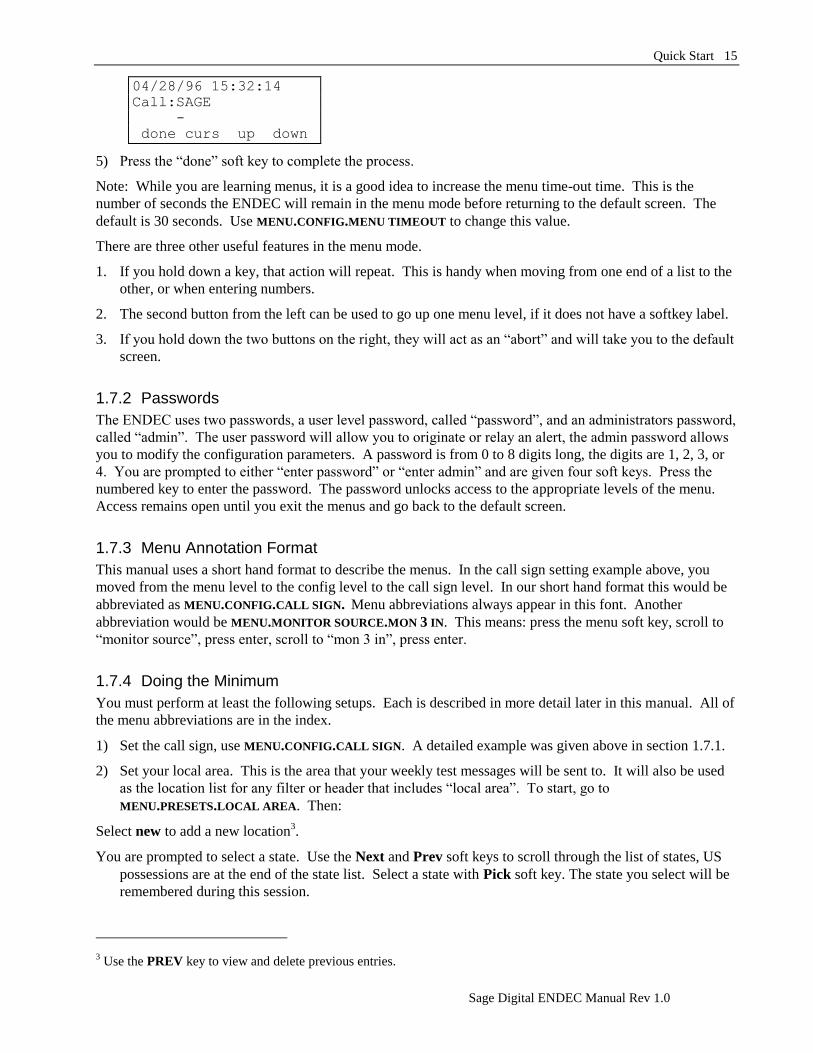
4) You now see a screen with soft keys, labeled “done” “curs” “up” “down”. Use the “Curs” key to move
the cursor around. The cursor is the little underline underneath a character in the call sign. The
character above the cursor will be the character changed by the up and down key. Use the up and down
key to change the characters in the call sign from “SAGE” to your station identifier2.
2 The identifier can be any ID, from one to eight characters in length, that serves to identify you. Some State EAS Plans
will define what ID you are to use.
Quick Start 15
Sage Digital ENDEC Manual Rev 1.0
04/28/96 15:32:14
Call:SAGE
-
done curs up down
5) Press the “done” soft key to complete the process.
Note: While you are learning menus, it is a good idea to increase the menu time-out time. This is the
number of seconds the ENDEC will remain in the menu mode before returning to the default screen. The
default is 30 seconds. Use MENU.CONFIG.MENU TIMEOUT to change this value.
There are three other useful features in the menu mode.
1. If you hold down a key, that action will repeat. This is handy when moving from one end of a list to the
other, or when entering numbers.
2. The second button from the left can be used to go up one menu level, if it does not have a softkey label.
3. If you hold down the two buttons on the right, they will act as an “abort” and will take you to the default
screen.
1.7.2 Passwords
The ENDEC uses two passwords, a user level password, called “password”, and an administrators password,
called “admin”. The user password will allow you to originate or relay an alert, the admin password allows
you to modify the configuration parameters. A password is from 0 to 8 digits long, the digits are 1, 2, 3, or
4. You are prompted to either “enter password” or “enter admin” and are given four soft keys. Press the
numbered key to enter the password. The password unlocks access to the appropriate levels of the menu.
Access remains open until you exit the menus and go back to the default screen.
1.7.3 Menu Annotation Format
This manual uses a short hand format to describe the menus. In the call sign setting example above, you
moved from the menu level to the config level to the call sign level. In our short hand format this would be
abbreviated as MENU.CONFIG.CALL SIGN. Menu abbreviations always appear in this font. Another
abbreviation would be MENU.MONITOR SOURCE.MON 3 IN. This means: press the menu soft key, scroll to
“monitor source”, press enter, scroll to “mon 3 in”, press enter.
1.7.4 Doing the Minimum
You must perform at least the following setups. Each is described in more detail later in this manual. All of
the menu abbreviations are in the index.
1) Set the call sign, use MENU.CONFIG.CALL SIGN. A detailed example was given above in section 1.7.1.
2) Set your local area. This is the area that your weekly test messages will be sent to. It will also be used
as the location list for any filter or header that includes “local area”. To start, go to
MENU.PRESETS.LOCAL AREA. Then:
Select new to add a new location3.
You are prompted to select a state. Use the Next and Prev soft keys to scroll through the list of states, US
possessions are at the end of the state list. Select a state with Pick soft key. The state you select will be
remembered during this session.
3 Use the PREV key to view and delete previous entries.
16 Quick Start
Sage Digital ENDEC Manual Rev 1.0
You are then prompted for a county, island, or other state sub division. Use the Next and Prev soft keys to
scroll through the list of locations. The first choice is “all of” the state or possession, it would be
unusual to pick an entire state as your local area. Select the area with the Pick soft key.
You are now prompted with Done, Delete, or Division. Use Delete if your previous selection was in error.
Use Done if you do not want to pick a sub division. It would be unusual to use a sub division for your
local area.
Use the Done soft key again to exit the local area entry mode, or use new to add another location code to
your list. Some stations might serve more than one county as its local area. You can also add location
codes to specific input filters and output headers, the local area serves only as a short-hand for “my local
counties”.
3) Enable the printer. To use the printer, select MENU.CONFIG.PRINTER.YES.
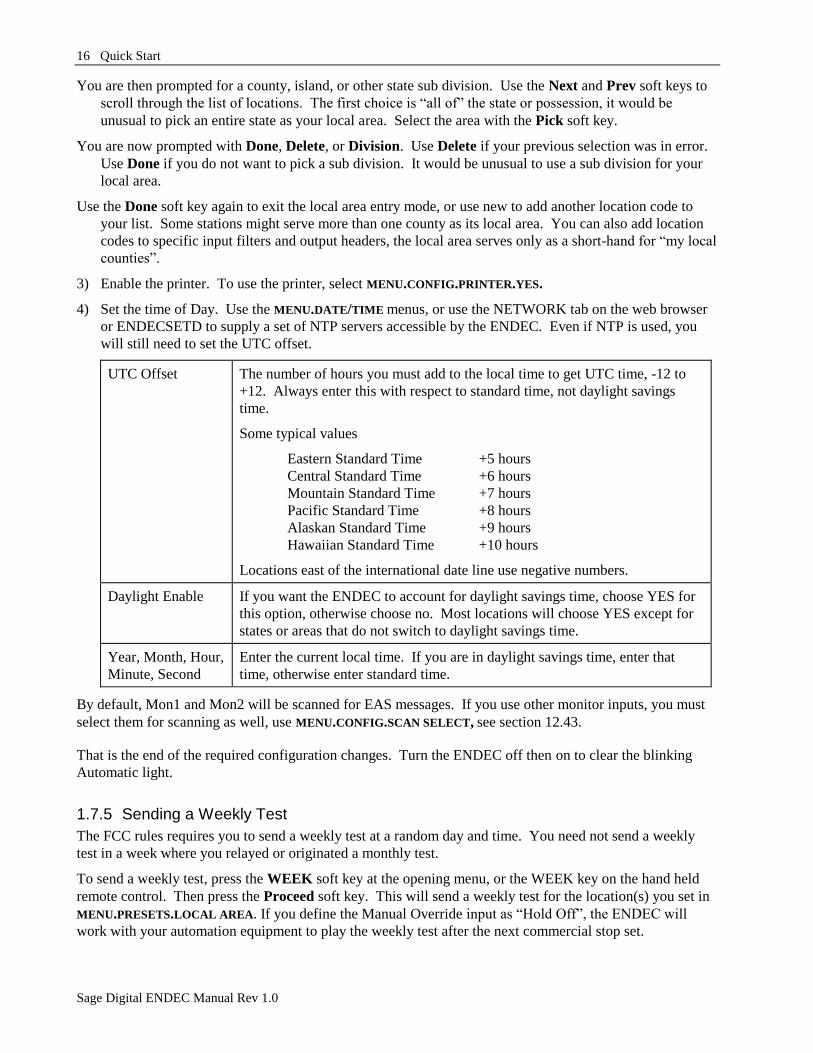
4) Set the time of Day. Use the MENU.DATE/TIME menus, or use the NETWORK tab on the web browser
or ENDECSETD to supply a set of NTP servers accessible by the ENDEC. Even if NTP is used, you
will still need to set the UTC offset.
UTC Offset The number of hours you must add to the local time to get UTC time, -12 to
+12. Always enter this with respect to standard time, not daylight savings
time.
Some typical values
Eastern Standard Time +5 hours
Central Standard Time +6 hours
Mountain Standard Time +7 hours
Pacific Standard Time +8 hours
Alaskan Standard Time +9 hours
Hawaiian Standard Time +10 hours
Locations east of the international date line use negative numbers.
Daylight Enable If you want the ENDEC to account for daylight savings time, choose YES for
this option, otherwise choose no. Most locations will choose YES except for
states or areas that do not switch to daylight savings time.
Year, Month, Hour,
Minute, Second
Enter the current local time. If you are in daylight savings time, enter that
time, otherwise enter standard time.
By default, Mon1 and Mon2 will be scanned for EAS messages. If you use other monitor inputs, you must
select them for scanning as well, use MENU.CONFIG.SCAN SELECT, see section 12.43.
That is the end of the required configuration changes. Turn the ENDEC off then on to clear the blinking
Automatic light.
1.7.5 Sending a Weekly Test
The FCC rules requires you to send a weekly test at a random day and time. You need not send a weekly
test in a week where you relayed or originated a monthly test.
To send a weekly test, press the WEEK soft key at the opening menu, or the WEEK key on the hand held
remote control. Then press the Proceed soft key. This will send a weekly test for the location(s) you set in
MENU.PRESETS.LOCAL AREA. If you define the Manual Override input as “Hold Off”, the ENDEC will
work with your automation equipment to play the weekly test after the next commercial stop set.
Quick Start 17
Sage Digital ENDEC Manual Rev 1.0
1.7.6 Relaying a Monthly Test
The default filters will automatically relay an incoming Required Monthly Test that includes your local area
with a five minute countdown. This means that you can send the message sooner, or let it go automatically
five minutes after it came in.
To send the message sooner than the time-out period, press the pend soft key at the default screen. The
pend key will only be present if a message is pending.
To review the written contents of the message, use PEND.OPT.VIEW or use the default screen‟s MSG soft
key.. To send the message, use PEND.SEND. To hear the audio , use PEND.CUE. If you have a hand held
remote control, you can also use the “play now” key to send the alert, and the “cue” key to hear the audio.
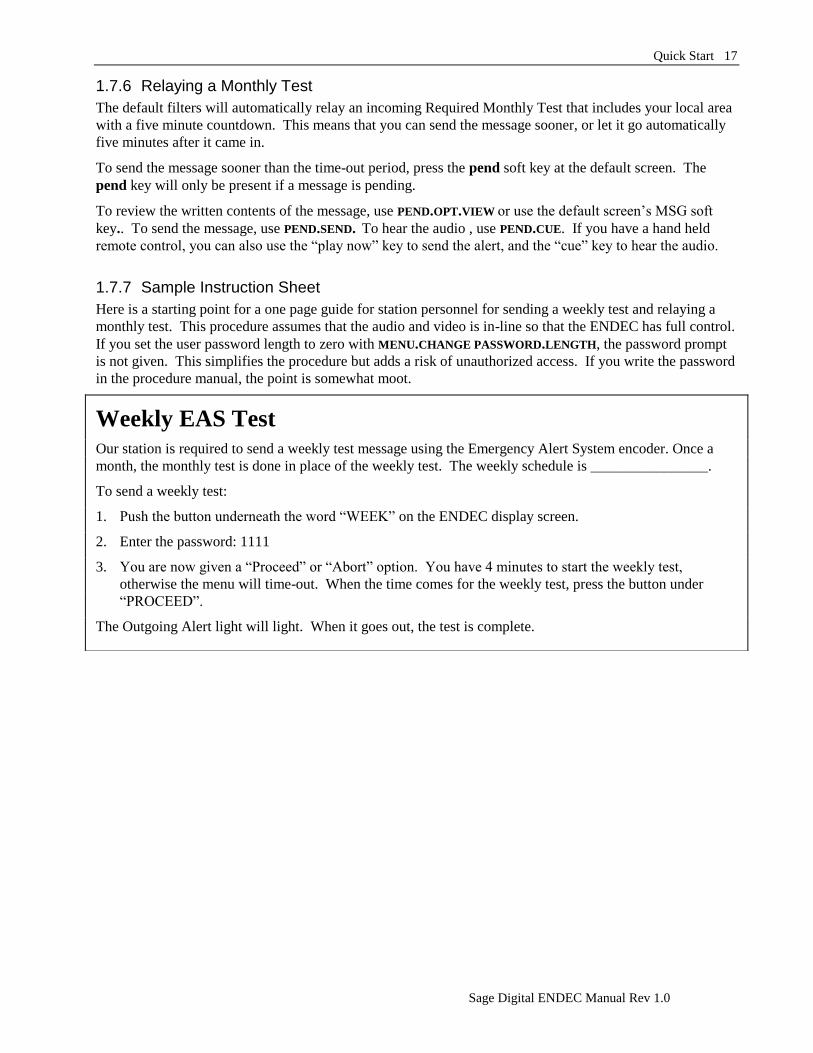
1.7.7 Sample Instruction Sheet
Here is a starting point for a one page guide for station personnel for sending a weekly test and relaying a
monthly test. This procedure assumes that the audio and video is in-line so that the ENDEC has full control.
If you set the user password length to zero with MENU.CHANGE PASSWORD.LENGTH, the password prompt
is not given. This simplifies the procedure but adds a risk of unauthorized access. If you write the password
in the procedure manual, the point is somewhat moot.
Weekly EAS Test
Our station is required to send a weekly test message using the Emergency Alert System encoder. Once a
month, the monthly test is done in place of the weekly test. The weekly schedule is ________________.
To send a weekly test:
1. Push the button underneath the word “WEEK” on the ENDEC display screen.
2. Enter the password: 1111
3. You are now given a “Proceed” or “Abort” option. You have 4 minutes to start the weekly test,
otherwise the menu will time-out. When the time comes for the weekly test, press the button under
“PROCEED”.
The Outgoing Alert light will light. When it goes out, the test is complete.
18 Quick Start
Sage Digital ENDEC Manual Rev 1.0
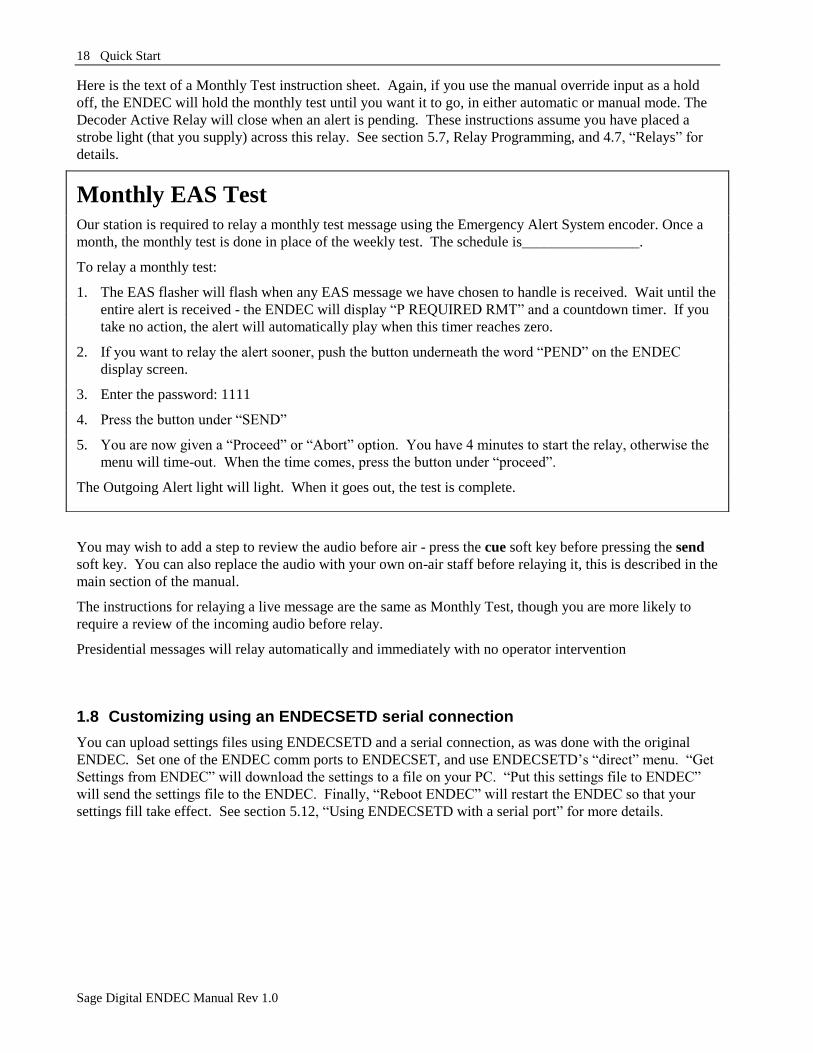
Here is the text of a Monthly Test instruction sheet. Again, if you use the manual override input as a hold
off, the ENDEC will hold the monthly test until you want it to go, in either automatic or manual mode. The
Decoder Active Relay will close when an alert is pending. These instructions assume you have placed a
strobe light (that you supply) across this relay. See section 5.7, Relay Programming, and 4.7, “Relays” for
details.
You may wish to add a step to review the audio before air - press the cue soft key before pressing the send
soft key. You can also replace the audio with your own on-air staff before relaying it, this is described in the
main section of the manual.
The instructions for relaying a live message are the same as Monthly Test, though you are more likely to
require a review of the incoming audio before relay.
Presidential messages will relay automatically and immediately with no operator intervention
1.8 Customizing using an ENDECSETD serial connection
You can upload settings files using ENDECSETD and a serial connection, as was done with the original
ENDEC. Set one of the ENDEC comm ports to ENDECSET, and use ENDECSETD‟s “direct” menu. “Get
Settings from ENDEC” will download the settings to a file on your PC. “Put this settings file to ENDEC”
will send the settings file to the ENDEC. Finally, “Reboot ENDEC” will restart the ENDEC so that your
settings fill take effect. See section 5.12, “Using ENDECSETD with a serial port” for more details.
Monthly EAS Test
Our station is required to relay a monthly test message using the Emergency Alert System encoder. Once a
month, the monthly test is done in place of the weekly test. The schedule is________________.
To relay a monthly test:
1. The EAS flasher will flash when any EAS message we have chosen to handle is received. Wait until the
entire alert is received - the ENDEC will display “P REQUIRED RMT” and a countdown timer. If you
take no action, the alert will automatically play when this timer reaches zero.
2. If you want to relay the alert sooner, push the button underneath the word “PEND” on the ENDEC
display screen.
3. Enter the password: 1111
4. Press the button under “SEND”
5. You are now given a “Proceed” or “Abort” option. You have 4 minutes to start the relay, otherwise the
menu will time-out. When the time comes, press the button under “proceed”.
The Outgoing Alert light will light. When it goes out, the test is complete.
Introduction to EAS 19
Sage Digital ENDEC Manual Rev 1.0
2. Introduction to EAS This section describes the Emergency Alert System as mandated by Part 11 of the FCC rules. This section is
based on the EAS rules as they existed in early 1996. You should review Part 11, and any updates that may
be issued from time to time.
2.1 The National View
The Emergency Alert System is mandated by Congressional order and renewed annually by Presidential
decree as a method of providing the President of the United States with a vehicle for reaching the American
public in times of grave national emergencies such as nuclear war, impending asteroids or large scale
terrorist acts. To date, the Emergency Action Notification Network (EAN) has never been used by any
President of the United States and we all hope it never will be. In November 1995 the Federal
Communications Commission and the Federal Emergency Management Agency disassembled the EAN
which consisted of numerous broadcast and other communications networks linking the White House to
broadcasters. The current national EAS system is based on the President getting a message to primary entry
point (PEP) broadcast stations which would then disseminate it to state primary stations and then filter
through the EAS network. The PEP network now uses several methods to distribute alerts, but the PEP
station will place the Emergency Action Notification (EAN) message into a local area where is a relayed
between local stations. Your obligation as a broadcaster is to carry the EAN without delay once you receive
it. These messages will last an indeterminate length of time, therefore you need to open the communications
channel and have the ability to transmit the digital data and the voice messages that follow for as long a
period of time as required. At the conclusion of the national alert an EAT or Emergency Action
Termination message will be transmitted closing the channel from the White House to the broadcast stations.
Participation at the national level is mandatory for most broadcasters. You may petition the FCC to become
a “Non Participating National” station, but you must still receive and broadcast the EAN code, and then
leave the air. These requirements are always evolving, refer to the FCC rules, in particular CFR 47 Part 11
for details.
2.2 Your Local Area
FCC Part 11 mandates that each state must have a State Emergency Communications Committee (SECC)
made up of broadcasters, cable operators, the emergency management community and the public. The
SECC establishes a statewide EAS plan which must be approved by the Federal Communications
Commission. The State plan will detail monitoring requirements, interconnection between emergency
management and the broadcasters, and will set protocols and priorities for activating the Emergency Alert
System in your area. In most states, Local Areas will be defined within the state which will have their own
plans which tie into the State plan. These Local Area plans may be organized on a county or regional basis
and are designed for use in limited emergency situations. The operational plans may even define local
activation of EAS down to a city or community for very limited emergencies such as hazardous material
spills on highways and limited brush fires.
Your responsibility on the local level is voluntary. Each broadcasters and cable operators will make its own
decision to participate on the local level by transmitting “amber” alerts, severe weather warnings, hazardous
material release details, information about earthquakes and other natural and manmade disasters.
2.3 Your responsibilities
As broadcasters and cable operators, you are obliged to follow the rules as stated in FCC Part 11. The only
mandatory requirements are that you have installed and made operational equipment capable of receiving
and transmitting EAS alerts. It is expected that the FCC will also require stations to be able to receive CAP
20 Introduction to EAS
Sage Digital ENDEC Manual Rev 1.0
messages starting sometime in 2009. The utilization of this equipment is voluntary except for
retransmission of national EAN alerts and the transmission of required weekly and required monthly tests.
There will soon be a requirement to air certain other state alerts, consult Part 11.
The weekly tests will consist of digital data only and can be transmitted anytime of the day or night in weeks
when the monthly test is not conducted. The weekly test will have no test script, and no two-tone
transmission. The rules say that the weekly test will be done on a random basis at all radio, television and
cable facilities as a method of verifying the operation of the equipment and the communications networks.
The monthly tests will be coordinated with all broadcasters in a Local Area. The monthly test may
originate, on a rotating basis, at the National Weather Service, state, county and local emergency operating
centers and other locations where the EAS network can be activated or it may be activated by the LP-1
station. Broadcasters need only relay the monthly test within 15 minutes of receipt and log the receipt of an
incoming monthly test to be in compliance. Monthly tests will be conducted in odd numbered months
between 8:30 AM and local sunset and in even numbered months between local sunset and 8:30 AM.
Monthly tests consist of a digital header, 8 seconds of two-tone, a voice announcement, and end of message
digital data. State and local Communications Committees can set the schedule for the required monthly tests
in advance so that these dates can be noted on program logs.
2.4 The EAS Alert Format
The EAS system distributes EAS Alerts. Even if the alert starts as a CAP alert, it is converted into the EAS
format before being placed on the air. The format of an EAS alert is standardized and is defined by the
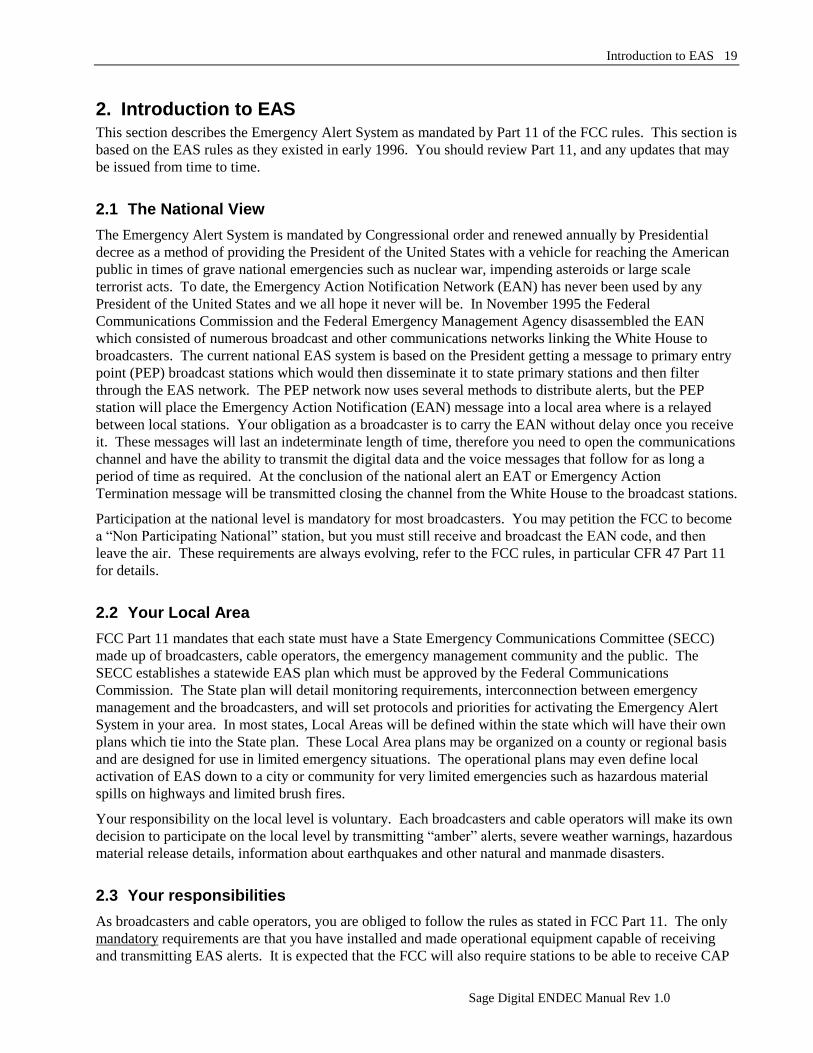
FCC. The parts of an alert are shown in Figure 2-1.
The parts of the Alert are:
Header FSK (frequency shift keyed) data at 520.83 baud, 2083.3 Hz and 1562.5 Hz tones. The
header is sent three times with a second of silence after each one. The header contains
encoded data describing the type of alert, and is described further below. Part 11 specifies
that the tones must modulate your transmitter at 80% of full channel modulation limits.
Two Tone The old EBS alert signal, two simultaneous tones at 853 and 960 Hz. Again, Part 11
specifies that at peak modulation levels each tone must modulate the transmitter at no less
than 40% (80% combined peak). The Two tone signal is only required for Monthly Tests
and National Level messages (EAN and EAT). It is not required for weekly tests.
H
e
a
d
e
r
Two Tone
(sometimes
optional)
Audio (sometimes
optional)
E
O
M
E
O
M
E
O
M
Time
H
e
a
d
e
r
H
e
a
d
e
r
Figure 2-1. EAS Alert Format.
Introduction to EAS 21
Sage Digital ENDEC Manual Rev 1.0
Audio An EAS alert may include an audio message, if so, it appears here. If the alert arrived in
the CAP format, the audio may come from an audio file that was attached to the alert, or it
may come from audio supplied by the ENDEC‟s Text to Speech converter based on text in
the CAP message.
EOM The End Of Message (EOM) data is sent here, a total of three times, using the same
transmission format as the Header.
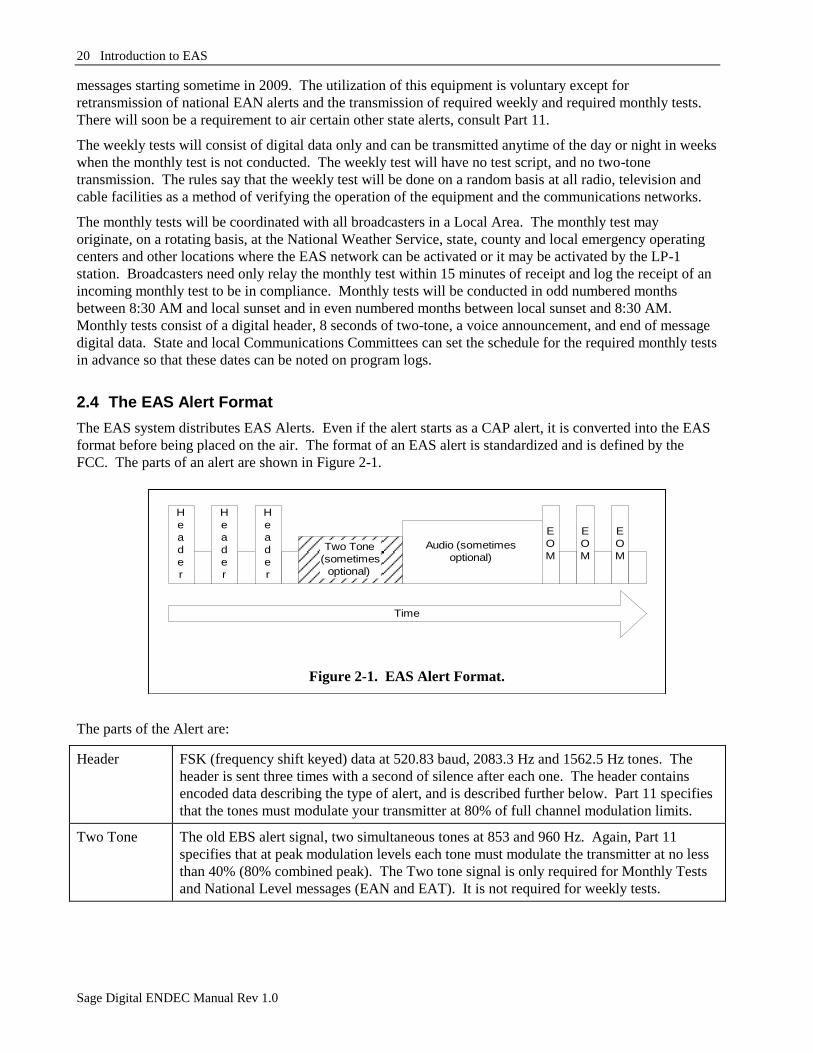
Each of the three copies of the “header” in the alert is identical, and is made up of the following parts:
The parts are:
Preamble A sequence of characters lasting about one quarter second, used to synchronize the data
stream.
Originator Describes who originally activated the EAS. Included are Broadcast or Cable, Civil
Authorities, the National Weather Service, a Primary Entry Point station, or the national
level Emergency Action Notification Network.
Event Describes why the EAS was activated. The FCC has defined several, mostly weather
related events. You can add new events, though they must be coordinated with your state
plan. See Table 5-1 in section 5.4 for a list of the pre-defined codes.
Locations Describes the state or county that the event applies to. About 3300 locations are pre-
defined. You can add new locations, though they must be coordinated with your state plan.
Up to 31 locations (including all of a state) can be present.
Duration The length of time that the alert remains valid (starting at the origination time).
Time The origination time.
ID Eight characters that identify the sending station. Note that this will be the station that
relayed the message to you, and not the station that originated the message.
Depending on the number of locations, one repetition of the header will take one to four seconds to send, or
six to sixteen seconds for all three and the pauses.
There are many more subtleties of the EAS system. The ENDEC will handle the technical elements of the
protocol and signaling requirements. You should review Part 11 to make sure your station is in compliance
with the operational requirements of EAS.
Preamble Originator Event Location(s) Duration Time ID
Figure 2-2. Parts of an EAS Header.

22 Introduction to EAS
Sage Digital ENDEC Manual Rev 1.0
Introduction to the ENDEC 23
Sage Digital ENDEC Manual Rev 1.0
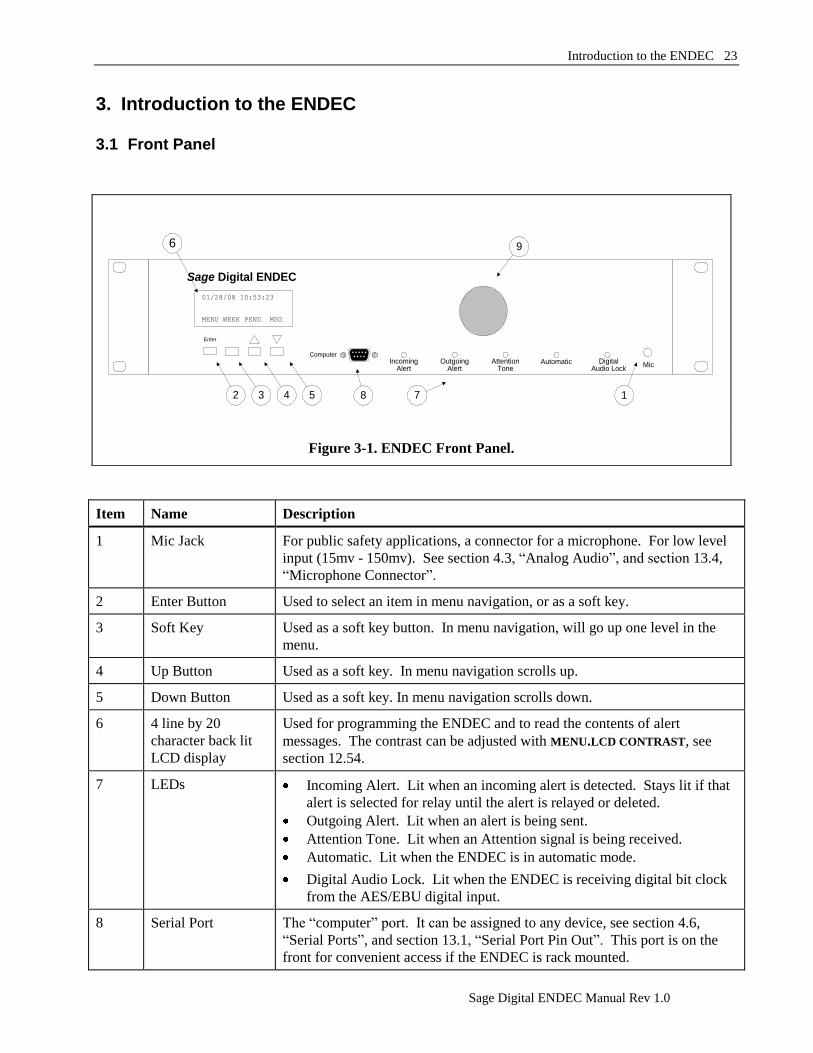
3. Introduction to the ENDEC
3.1 Front Panel
Item Name Description
1 Mic Jack For public safety applications, a connector for a microphone. For low level
input (15mv - 150mv). See section 4.3, “Analog Audio”, and section 13.4,
“Microphone Connector”.
2 Enter Button Used to select an item in menu navigation, or as a soft key.
3 Soft Key Used as a soft key button. In menu navigation, will go up one level in the
menu.
4 Up Button Used as a soft key. In menu navigation scrolls up.
5 Down Button Used as a soft key. In menu navigation scrolls down.
6 4 line by 20
character back lit
LCD display
Used for programming the ENDEC and to read the contents of alert
messages. The contrast can be adjusted with MENU.LCD CONTRAST, see
section 12.54.
7 LEDs Incoming Alert. Lit when an incoming alert is detected. Stays lit if that
alert is selected for relay until the alert is relayed or deleted.
Outgoing Alert. Lit when an alert is being sent.
Attention Tone. Lit when an Attention signal is being received.
Automatic. Lit when the ENDEC is in automatic mode.
Digital Audio Lock. Lit when the ENDEC is receiving digital bit clock
from the AES/EBU digital input.
8 Serial Port The “computer” port. It can be assigned to any device, see section 4.6,
“Serial Ports”, and section 13.1, “Serial Port Pin Out”. This port is on the
front for convenient access if the ENDEC is rack mounted.
01/28/08 10:53:23
MENU WEEK PEND MSG
Sage Digital ENDEC
Computer
Enter
IncomingAlert
OutgoingAlert
AttentionTone
Automatic DigitalAudio Lock
Mic
12
6
73 4 5 8
9
Figure 3-1. ENDEC Front Panel.
24 Introduction to the ENDEC
Sage Digital ENDEC Manual Rev 1.0
Item Name Description
9 Internal Speaker The internal speaker carries alert audio and it can be used to monitor any of
the incoming audio channels. It is fed from the back panel “speaker in”
terminal - usually jumpered to the speaker out terminal, it can also be routed
through the console to allow muting.
Table 3-1. Front Panel Descriptions.
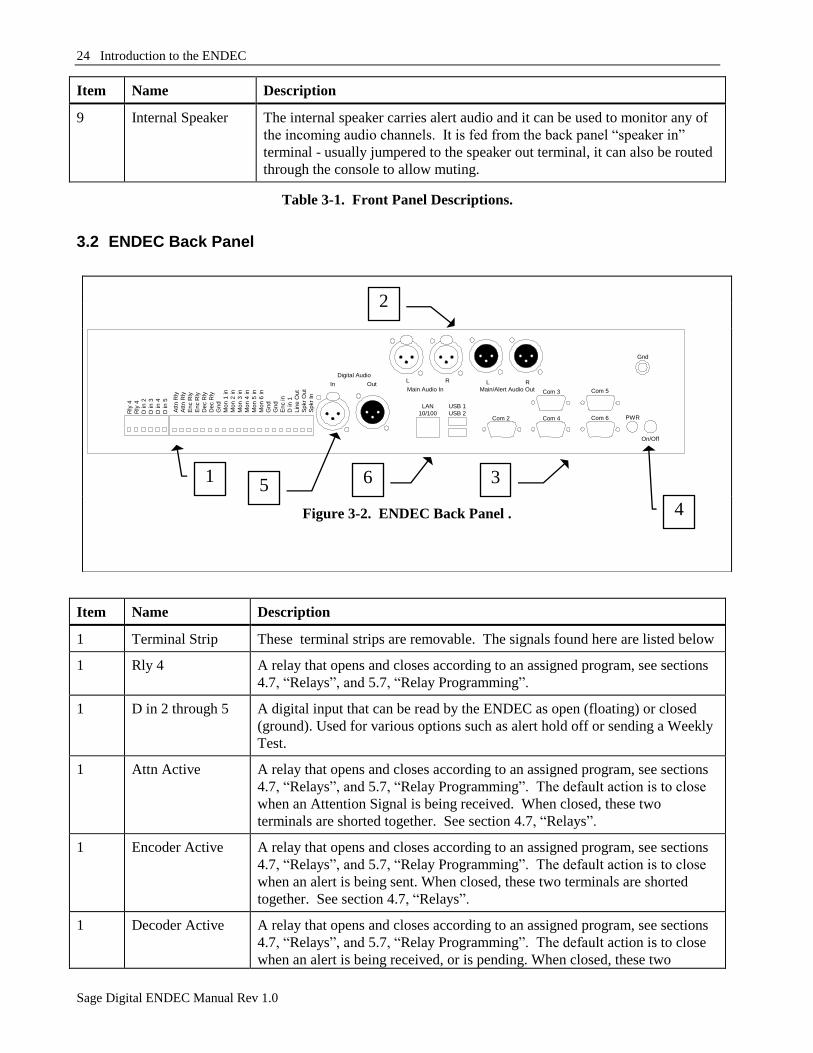
3.2 ENDEC Back Panel
Item Name Description
1 Terminal Strip These terminal strips are removable. The signals found here are listed below
1 Rly 4 A relay that opens and closes according to an assigned program, see sections
4.7, “Relays”, and 5.7, “Relay Programming”.
1 D in 2 through 5 A digital input that can be read by the ENDEC as open (floating) or closed
(ground). Used for various options such as alert hold off or sending a Weekly
Test.
1 Attn Active A relay that opens and closes according to an assigned program, see sections
4.7, “Relays”, and 5.7, “Relay Programming”. The default action is to close
when an Attention Signal is being received. When closed, these two
terminals are shorted together. See section 4.7, “Relays”.
1 Encoder Active A relay that opens and closes according to an assigned program, see sections
4.7, “Relays”, and 5.7, “Relay Programming”. The default action is to close
when an alert is being sent. When closed, these two terminals are shorted
together. See section 4.7, “Relays”.
1 Decoder Active A relay that opens and closes according to an assigned program, see sections
4.7, “Relays”, and 5.7, “Relay Programming”. The default action is to close
when an alert is being received, or is pending. When closed, these two
LAN
10/100
Com 5
Com 6
Com 3
Com 4
Att
n R
ly
Att
n R
ly
En
c R
ly
En
c R
ly
Dec R
ly
Dec R
ly
Gn
d
Mon
1 in
Mon
2 in
Mon
3 in
Mon
4 in
Mon
5 in
Mon
6 in
Gn
d
Gn
d
En
c in
D in 1
Lin
e O
ut
Sp
kr
Ou
t
Sp
kr
In
.
Gnd
USB 1
USB 2Com 2
Digital Audio
In OutMain Audio In Main/Alert Audio Out
L R L R
Rly
4
Rly
4
D in 2
D in 3
D in 4
D in 5
On/Off
PWR
Figure 3-2. ENDEC Back Panel .
1
2
3
4
5 6
Introduction to the ENDEC 25
Sage Digital ENDEC Manual Rev 1.0
Item Name Description
terminals are shorted together. See section 4.7, “Relays”.
1 Audio Common Grounds for the various unbalanced audio inputs.
1 Monitor In 1 - 6 Unbalanced 600 ohm inputs for alert audio sources
., .75Vrms typical, do not exceed 2Vrms.
1 Encoder Audio In A high level audio input for locally originated audio.
1 Manual Override A digital input that can be read by the ENDEC as open (floating) or closed
(ground). Used for various options such as alert hold off or sending a Weekly
Test.
1 Speaker Line Out Unbalanced 600 ohm output for alert audio or monitoring the inputs.
1 Speaker Out Separate unbalanced 600 ohm output, can be used for an external speaker or
to feed the internal speaker through Speaker In.
1 Speaker In The internal speaker, usually fed from Speaker Out. The path is made
available on the back panel to allow routing through a console for muting.
2 XLR In and Out Stereo input and output connectors for station audio. The ENDEC normally
passes this through on a hard relay (no audio processing). During an alert, the
output is switched to the ENDEC‟s internal sources.
3 Serial Ports Five serial ports, COM2 through COM5. They can be assigned to any device,
see section 4.6, “Serial Ports”, and section 13.1, “Serial Port Pin Out”.
4 Power Power input and power switch. Use the power cube supplied with the
ENDEC, 19v, 2A. Do not use the power cube from the original “grey box”
ENDEC.
5 Digital Audio AES/EBU digital input and output.
6 LAN 10/100 LAN connection.
6 USB 1 and 2 USB connection, used for flash drive, printer, etc.
Table 3-2. Back Panel Descriptions.
3.3 Memory - What’s Saved and What Isn’t
The following items are stored in internal FLASH memory:
The ENDEC‟s software program
The default list of events, originators, and county (FIPS) codes The events, originators, and county
codes can be supplemented or overridden the user.
Log files.
All of the configuration parameters, that is, anything set with MENU.CONFIG, MENU.DEVICE,
MENU.PRESET, etc.; outgoing templates, incoming filters, incoming and outgoing alert logs, remote
control macro keys, and new or modified events, originators, and county codes.
The two minute long digital audio.
If a user-supplied flash drive is inserted into the rear panel usb connector, the ENDEC will store the audio
from each alert sent or received. A typical alert requires 360kb of compressed audio, an inexpensive 4GB
flash drive will hold about 11,000 alerts, or 10 alerts a week for 22 years.

26 Introduction to the ENDEC
Sage Digital ENDEC Manual Rev 1.0
ENDEC Hardware Setup 27
Sage Digital ENDEC Manual Rev 1.0
4. ENDEC Hardware Setup This section describes how to set up the ENDEC hardware, including the printer, audio inputs and outputs,
and serial data inputs and outputs. Not all installations require use of all hardware features.
4.1 Power
Use the supplied 19V 3A power supply. DO NOT USE THE POWER SUPPLY FROM THE ORIGINAL
“GREY BOX” ENDEC.
4.2 Printer
The ENDEC supports several types of printers.
1) Serial printer. Set one of the comm ports to Serial Printer.
2) USB printer. Plug in a compatible printer to one of the ENDEC‟s USB ports. See
www.sagealertingsystem.com/support for a list of compatible printers.
3) Network printer. Set the IP address of your printer with the ENDECSETD network tab. See
www.sagealertingsystem.com/support for a list of compatible printers.
The web interface “log” page can be printed using your browser interface.
The ENDEC will email events and errors to a list of email addresses. See section 6.2, Network Settings.
4.3 Analog Audio
The ENDEC has the following audio ins and outs:
Main Audio In,
Left and Right
Audio from your audio chain is inserted here, and is routed through a hardwired relay
that passes your audio in the de-energized state. The ENDEC does not need power to
pass your audio through. The ENDEC does not sample, pick off, or affect your audio
in any way in the pass-through mode. See Figure 4-2.
Main /Alert Audio
Out, Left and Right
The ENDEC passes through whatever audio is on the Main Audio In connectors until
an alert occurs. The internal ENDEC audio is then switched to these outputs. The
output is balanced, 600 ohms. The ENDEC output is fed to both L and R channels.
Speaker Out Alert audio is also sent here. Speaker Out can also be used to monitor any of the
inputs except Main Audio In. Speaker out is jumpered to Speaker In with an external
wire on the main terminal strip. You can provide an external speaker/amplifier, or
you can route the Speaker Out to Speaker In through a console mute switch.
Speaker Line Out A copy of Speaker Out with a separate level control.
Monitor 1 - 6 In Six monitor inputs are provided. Each is monitored for EAS data. Use these inputs
for your monitoring assignments. Any audio source can be used, 600 ohms,
unbalanced, use any Audio Common for ground. Any level from 200mv to 2V can be
used, though all of the monitor inputs should be at the same level so that the output
levels from the stored audio are at the same level. Warning - do not use amplified
speaker level outputs to feed these inputs. Exceeding the 2Vrms level will result
in poor audio, exceeding 10Vrms will damage the ENDEC.
Encoder Audio In This input is the same as the monitor inputs except that it is not checked for FSK data.
This input is used to provide audio for real-time alert origination, or as an input to
record audio in either the two minute volatile store or the 10 or 40 second non-volatile

28 ENDEC Hardware Setup
Sage Digital ENDEC Manual Rev 1.0
audio store. Warning - do not use amplified speaker level outputs to feed this
input. Exceeding the 2Vrms level will result in poor audio, exceeding 10Vrms
will damage the ENDEC.
Mic In This is the only audio input on the front panel. It is meant for use in public safety
applications where a push-to-talk radio microphone is more common. Input level can
be as low as 16mv for high settings of MENU.LEVEL.MIC or as high as 170mv for low
settings of MENU.LEVEL.MIC. See section 13.4, “Microphone Connector” for a
description of the connector.
Table 4-1. Audio inputs and outputs.
In the normal state, the ENDEC passes audio directly from the input XLR connectors to the output XLR
connectors. It also monitors all of the input channels for alert activity. When an alert is heard, the ENDEC
stores the audio in the digital recorder. When an alert is originated or relayed, the ENDEC generates the
FSK data tones and two tone signals and replays the audio.
The ENDEC is designed to have the audio chain pass through, though you can supply your own remote
audio switch and drive the switch with one of the ENDEC programmable relays. Use a relay running the
PTT program, section 5.7, Relay Programming.
During an alert, the alert audio is sent to all audio outputs:
Speaker Line Out, unbalanced, 600 ohms.
Speaker Out, unbalanced, 600 ohms
Main / Alert Audio Out right and left, balanced, 600 ohms.
If you do not want to pass audio through the ENDEC, you may feed your audio switch or console from any
of these sources. The Main/Alert Audio out is only active during a live alert. The speaker and speaker line
out can be active at any time if the MENU.MONITOR SOURCE command has been used to directly monitor
DSP
Pre
Amp
Monitor 1 InMonitor 2 InMonitor 3 InMonitor 4 InMonitor 5 InMonitor 6 InEncoder In
Mic In
Speaker Line Out
Speaker Out
Main Audio Input
Stereo, Balanced Main Audio Output
Stereo, Balanced
ENDEC
Dig ital
Recorder
Figure 4-1. ENDEC Audio Block Diagram
ENDEC Hardware Setup 29
Sage Digital ENDEC Manual Rev 1.0
any of the inputs. These inputs are also active when an alert is being received or when alert audio is being
previewed.
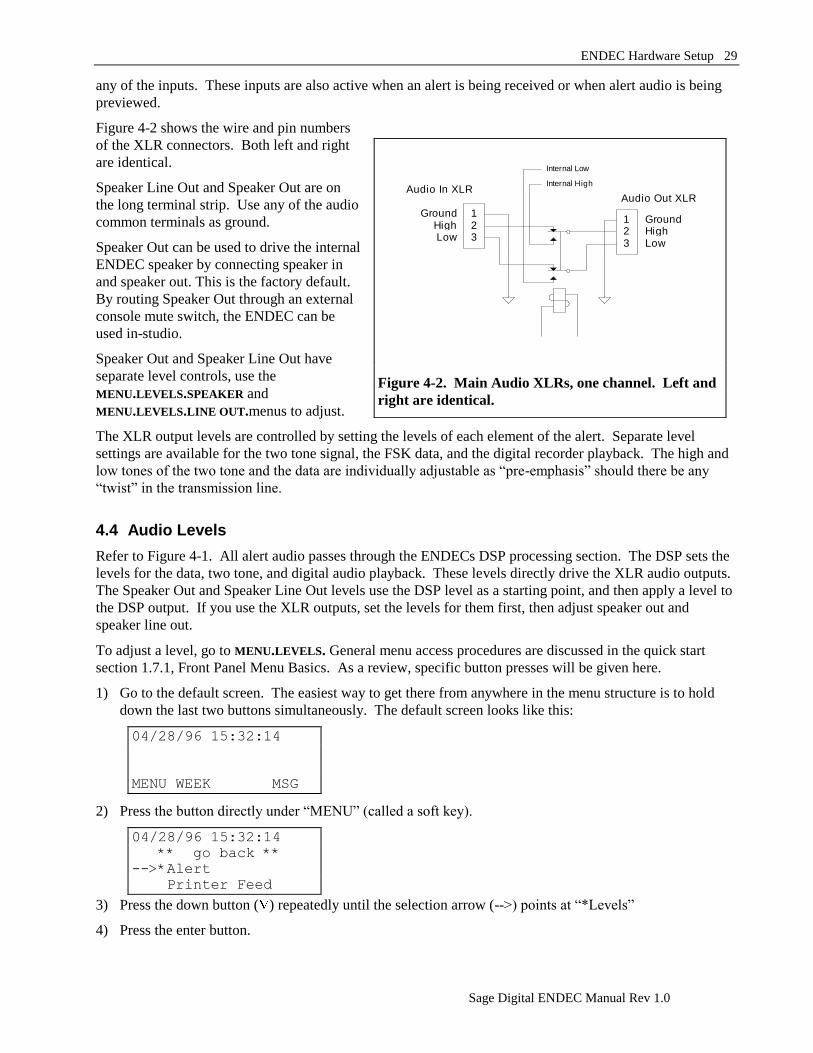
Figure 4-2 shows the wire and pin numbers
of the XLR connectors. Both left and right
are identical.
Speaker Line Out and Speaker Out are on
the long terminal strip. Use any of the audio
common terminals as ground.
Speaker Out can be used to drive the internal
ENDEC speaker by connecting speaker in
and speaker out. This is the factory default.
By routing Speaker Out through an external
console mute switch, the ENDEC can be
used in-studio.
Speaker Out and Speaker Line Out have
separate level controls, use the
MENU.LEVELS.SPEAKER and
MENU.LEVELS.LINE OUT.menus to adjust.
The XLR output levels are controlled by setting the levels of each element of the alert. Separate level
settings are available for the two tone signal, the FSK data, and the digital recorder playback. The high and
low tones of the two tone and the data are individually adjustable as “pre-emphasis” should there be any
“twist” in the transmission line.
4.4 Audio Levels
Refer to Figure 4-1. All alert audio passes through the ENDECs DSP processing section. The DSP sets the
levels for the data, two tone, and digital audio playback. These levels directly drive the XLR audio outputs.
The Speaker Out and Speaker Line Out levels use the DSP level as a starting point, and then apply a level to
the DSP output. If you use the XLR outputs, set the levels for them first, then adjust speaker out and
speaker line out.
To adjust a level, go to MENU.LEVELS. General menu access procedures are discussed in the quick start
section 1.7.1, Front Panel Menu Basics. As a review, specific button presses will be given here.
1) Go to the default screen. The easiest way to get there from anywhere in the menu structure is to hold
down the last two buttons simultaneously. The default screen looks like this:
04/28/96 15:32:14
MENU WEEK MSG
2) Press the button directly under “MENU” (called a soft key).
04/28/96 15:32:14
** go back **
-->*Alert
Printer Feed
3) Press the down button ( ) repeatedly until the selection arrow (-->) points at “*Levels”
4) Press the enter button.
123
123
Audio Out XLRAudio In XLR
GroundHighLow
GroundHighLow
Internal High
Internal Low
Figure 4-2. Main Audio XLRs, one channel. Left and
right are identical.
30 ENDEC Hardware Setup
Sage Digital ENDEC Manual Rev 1.0
5) Press the down button until the selection arrow points at the level you want to change, for example,
“Attn Tone”
6) Press the enter button.
7) If prompted, enter the Admin password. The default password is 1 1 1 1, enter it by pressing the enter
key four times.
8) You are asked if you want the XLR relay to close while the level is being set. If you select Yes (by
pressing the key under “Yes”), the Main Audio XLR relays will close, routing audio to the left and right
output channels. If you route your station audio through the ENDEC this will replace your station
audio. Be sure that is what you want to do. The tone being adjusted will also be put on Speaker Out and
Speaker Line Out. If you choose NO (by pressing the key under “No”) the tone will appear on Speaker
Out and Speaker Line Out only.4
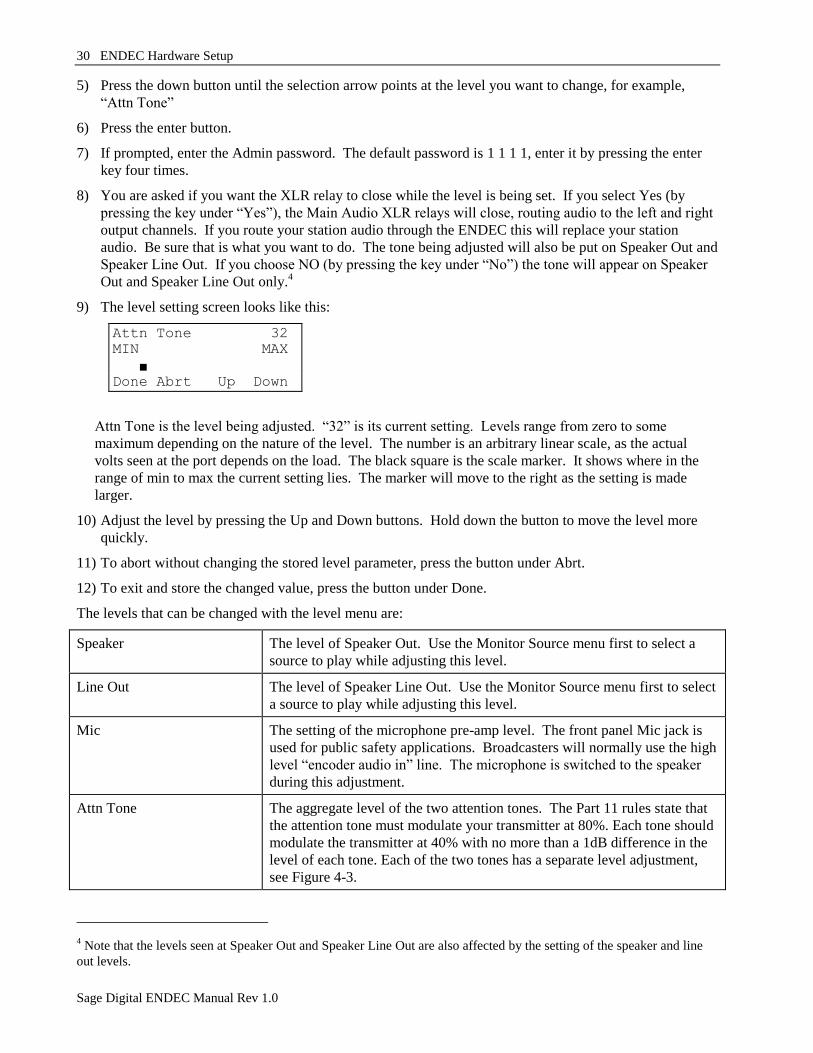
9) The level setting screen looks like this:
Attn Tone 32
MIN MAX
■ Done Abrt Up Down
Attn Tone is the level being adjusted. “32” is its current setting. Levels range from zero to some
maximum depending on the nature of the level. The number is an arbitrary linear scale, as the actual
volts seen at the port depends on the load. The black square is the scale marker. It shows where in the
range of min to max the current setting lies. The marker will move to the right as the setting is made
larger.
10) Adjust the level by pressing the Up and Down buttons. Hold down the button to move the level more
quickly.
11) To abort without changing the stored level parameter, press the button under Abrt.
12) To exit and store the changed value, press the button under Done.
The levels that can be changed with the level menu are:
Speaker The level of Speaker Out. Use the Monitor Source menu first to select a
source to play while adjusting this level.
Line Out The level of Speaker Line Out. Use the Monitor Source menu first to select
a source to play while adjusting this level.
Mic The setting of the microphone pre-amp level. The front panel Mic jack is
used for public safety applications. Broadcasters will normally use the high
level “encoder audio in” line. The microphone is switched to the speaker
during this adjustment.
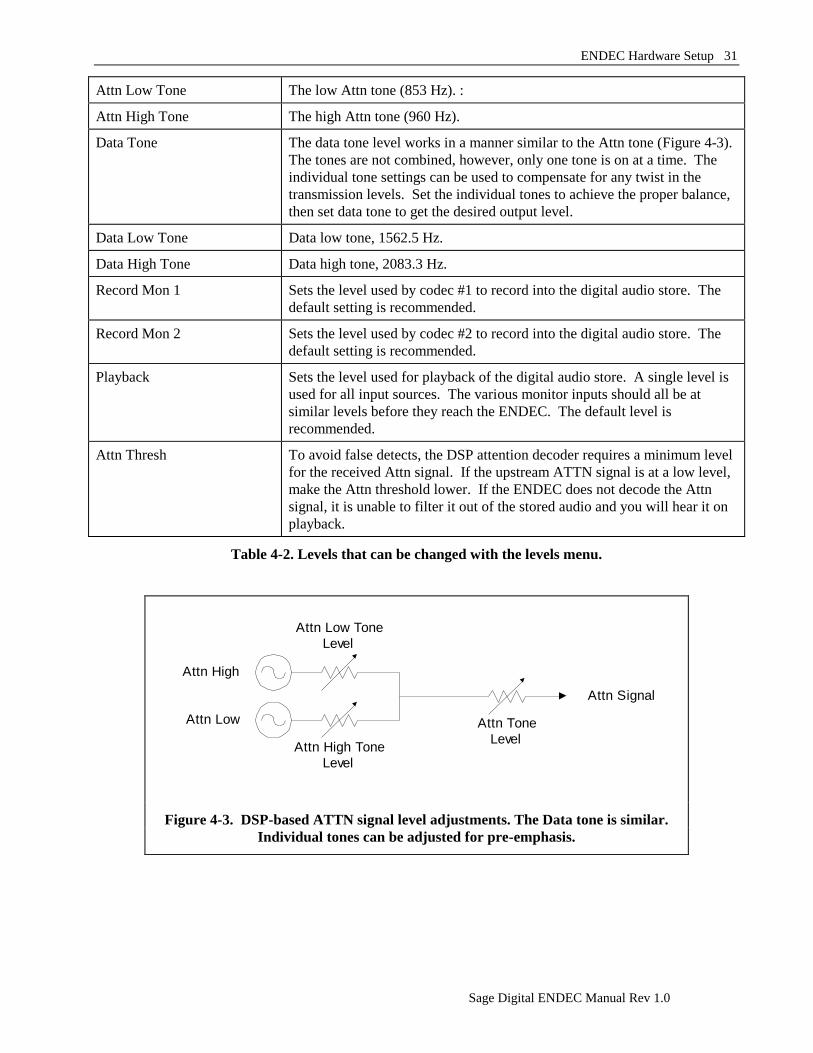
Attn Tone The aggregate level of the two attention tones. The Part 11 rules state that
the attention tone must modulate your transmitter at 80%. Each tone should
modulate the transmitter at 40% with no more than a 1dB difference in the
level of each tone. Each of the two tones has a separate level adjustment,
see Figure 4-3.
4 Note that the levels seen at Speaker Out and Speaker Line Out are also affected by the setting of the speaker and line
out levels.
ENDEC Hardware Setup 31
Sage Digital ENDEC Manual Rev 1.0
Attn Low Tone The low Attn tone (853 Hz). :
Attn High Tone The high Attn tone (960 Hz).
Data Tone The data tone level works in a manner similar to the Attn tone (Figure 4-3).
The tones are not combined, however, only one tone is on at a time. The
individual tone settings can be used to compensate for any twist in the
transmission levels. Set the individual tones to achieve the proper balance,
then set data tone to get the desired output level.
Data Low Tone Data low tone, 1562.5 Hz.
Data High Tone Data high tone, 2083.3 Hz.
Record Mon 1 Sets the level used by codec #1 to record into the digital audio store. The
default setting is recommended.
Record Mon 2 Sets the level used by codec #2 to record into the digital audio store. The
default setting is recommended.
Playback Sets the level used for playback of the digital audio store. A single level is
used for all input sources. The various monitor inputs should all be at
similar levels before they reach the ENDEC. The default level is
recommended.
Attn Thresh To avoid false detects, the DSP attention decoder requires a minimum level
for the received Attn signal. If the upstream ATTN signal is at a low level,
make the Attn threshold lower. If the ENDEC does not decode the Attn
signal, it is unable to filter it out of the stored audio and you will hear it on
playback.
Table 4-2. Levels that can be changed with the levels menu.
Attn High
Attn Low
Attn High Tone
Level
Attn Low Tone
Level
Attn Tone
Level
Attn Signal
Figure 4-3. DSP-based ATTN signal level adjustments. The Data tone is similar.
Individual tones can be adjusted for pre-emphasis.

32 ENDEC Hardware Setup
Sage Digital ENDEC Manual Rev 1.0
4.5 Digital Audio
4.5.1 Digital Audio Input, Output, and Pass-through
The Digital ENDEC has a single AES/EBU in and out. The input is used to accept station audio. The
ENDEC can be configured to actively or passively copy this data to the output. The ENDEC will also send
an alert to the output. The output clock can be generated internally, or derived from the input data stream.
The ENDEC always sends the alert in two channel format.
Use the MENU.DIGITAL front panel or ENDECSETD digital auto tab to control how and if the ENDEC
performs digital audio pass-through. Following are descriptions of how the various settings can be used to
implement several pass-through types.
1) Active Digital Pass-through. In this mode, the ENDEC acts as a audio switch. The station audio is
connected to ENDEC Digital Audio In, and the ENDEC copies the bit stream to Digital Audio Out.
When an alert is sent, the station audio is replaced by the alert audio on a bit boundary, causing a
minimal frame sync loss. The ENDEC‟s mechanical relay is ON all the time, meaning when the
ENDEC is powered, it is performing the active copy function, but as a failsafe, the ENDEC is a
hardwire pass-through when power is removed.
Settings:
Enable Digital Audio: Yes
Pass Through: Yes
Relay always on: Yes
Clock: External
2) Mechanically switched pass-through. In this mode, the ENDEC's mechanical relay is OFF (hardwire
pass-through) unless an alert is being sent. This causes a larger break in the digital audio stream at the
start and the end of an alert. This can cause an audio glitch in the output, but the ENDEC is not inline
unless an alert is in progress.
Settings:
Enable Digital Audio: Yes
Pass Through: No
Relay always on: No
Clock: External or internal
3) Alert generation only. In this mode, a downstream external switcher places the ENDEC's digital audio
into the station's digital signal. Switching occurs as a result of the ENDEC closing one of the four
contact closures (the Push To Talk function). The ENDEC will generate digital data only when an
alert is in progress. An input signal to the ENDEC is not needed, but if the downstream switch wants
to see the ENDEC clock synchronized with house clock, then an input audio stream must be provided
to the ENDEC‟s Digital In.
Settings:
Enable Digital Audio: Yes
Pass Through: No
Relay always on: No
Clock: External or internal
4) Alert generation with idle. This mode is the same as "Alert generation only" except that the ENDEC
will always output a digital signal, sending silence when an alert is not in progress. This mode is used
if the downstream switcher wants to see signal at all times. An input signal to the ENDEC is not
needed, but if the downstream switch wants to see the ENDEC clock synchronized with house clock,
an input signal must be provided.
Settings:
Enable Digital Audio: Yes
Pass Through: No
ENDEC Hardware Setup 33
Sage Digital ENDEC Manual Rev 1.0
Relay always on: Yes
Clock: External or internal
Each digital control setting is described in detail below.
4.5.2 Digital Audio Clock
The ENDEC can derive digital audio clock from the input audio stream, or it can provide its own clock.
Important! Even if you set the ENDEC for external clock, you must still set the ENDEC Clock Rate
parameter. The rate setting also controls the conversion of the various audio sources, both analog (from the
monitor inputs) and digital (from CAP messages), to the proper digital speed. Failure to set the rate
correctly will result in either a playback that is fast and high pitched, or one that sounds like HAL on the last
verse of Bicycle Built for Two.
4.5.3 Digital Audio Levels
The MENU.DIGITAL LEVELS menu or the ENDECSETD Digital Audio tab can be used to set the levels of
the various tones, similar to the setting of the analog audio levels in the menu.levels or Levels tab.
4.5.4 Digital Audio Menu Items
The following items are available on the ENDECSETD Digital Audio tab, or on the front panel
MENU.DIGITAL AUDIO menu.
4.5.4.1 Enable Digital Audio
If enabled, the ENDEC will send alerts to the digital output and will light the front panel Lock led if a digital
input is present.
4.5.4.2 Relay Always On
If enabled, the ENDEC digital relay is always on, meaning the ENDEC‟s digital audio transmitter is always
driving the Digital Output signal. “Always” means after the ENDEC is turned on and starts up. When the
ENDEC is off, and for a short time after it is turned on, the ENDEC relay is OFF, meaning the ENDEC
digital transmitter is bypassed, and Digital In is hardwired to Digital Out.
4.5.4.3 Pass Through
When enabled, the ENDEC copies the Digital In bit stream to the Digital Out bit stream, except when it is
sending an alert.
4.5.4.4 Simulcast
When enabled, the ENDEC will always send an alert on the Digital output at the same time that it sends an
alert on the analog outputs. If Simulcast is not enabled, the digital output can be sent independently of the
analog alert. Note: in the 1.0 release of the ENDEC software, the digital and analog alerts cannot overlap,
one must be sent, and then the other.
4.5.4.5 External Clock
When external clock is enabled, the ENDEC uses the input stream to derive its digital bit clock, otherwise it
will generate its own clock based on the Clock Rate setting. Note: even if External Clock is enabled, Clock
Rate must also be set to the corrected rate.
34 ENDEC Hardware Setup
Sage Digital ENDEC Manual Rev 1.0
4.5.4.6 Clock Rate
The ENDEC supports rates of 32000, 44100, and 48000 bits per second.
4.6 Serial Ports
The ENDEC provides six serial ports that can be used for a variety of purposes. Each serial port is wired
like a desktop PC 9-pin connector. Pin outs are provided in section 13. The Sage Digital ENDEC can
support any device on any serial port, and all serial ports are baud rate selectable. A complete list of all
device types is in section 12.50.
To assign a device type to a comm port, use MENU.DEVICES.PORT.DEVICE TYPES. To change the baud rate
of the variable baud rate ports, use MENU.DEVICES.PORT.BAUD.
ENDEC Hardware Setup 35
Sage Digital ENDEC Manual Rev 1.0
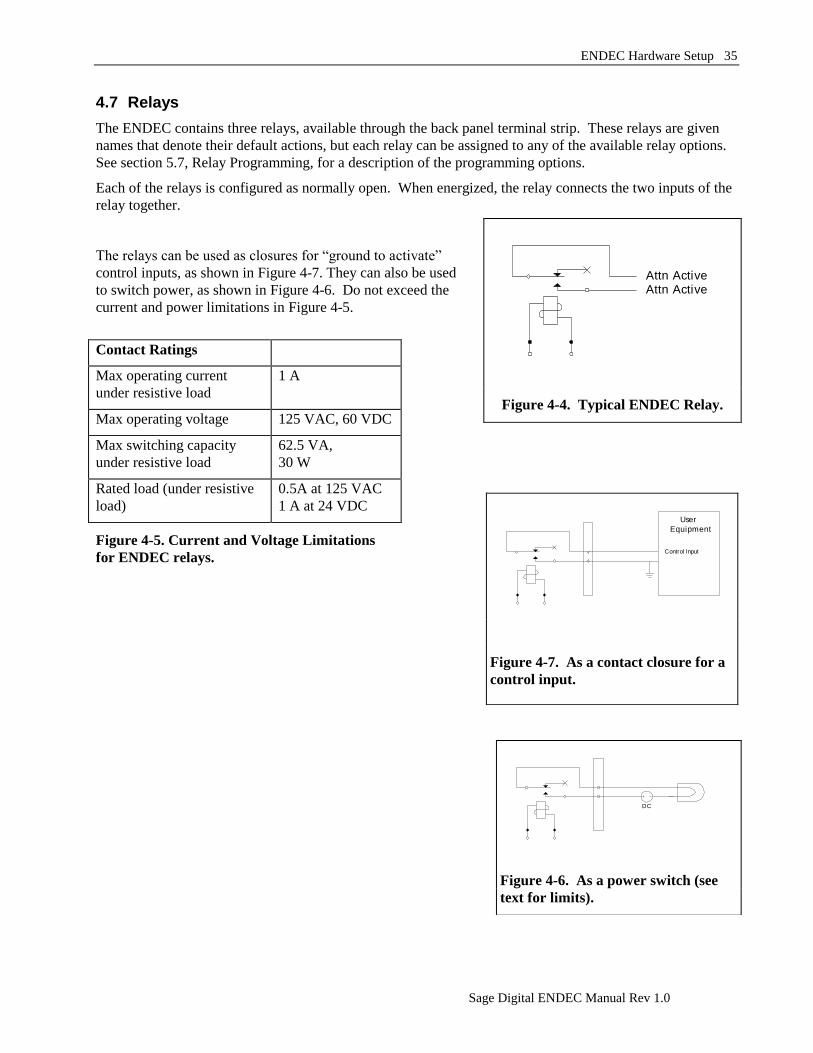
4.7 Relays
The ENDEC contains three relays, available through the back panel terminal strip. These relays are given
names that denote their default actions, but each relay can be assigned to any of the available relay options.
See section 5.7, Relay Programming, for a description of the programming options.
Each of the relays is configured as normally open. When energized, the relay connects the two inputs of the
relay together.
The relays can be used as closures for “ground to activate”
control inputs, as shown in Figure 4-7. They can also be used
to switch power, as shown in Figure 4-6. Do not exceed the
current and power limitations in Figure 4-5.
Attn ActiveAttn Active
Figure 4-4. Typical ENDEC Relay.
Contact Ratings
Max operating current
under resistive load
1 A
Max operating voltage 125 VAC, 60 VDC
Max switching capacity
under resistive load
62.5 VA,
30 W
Rated load (under resistive
load)
0.5A at 125 VAC
1 A at 24 VDC
Figure 4-5. Current and Voltage Limitations
for ENDEC relays.
DC
Figure 4-6. As a power switch (see
text for limits).
User
Equipment
Control Input
Figure 4-7. As a contact closure for a
control input.

36 ENDEC Hardware Setup
Sage Digital ENDEC Manual Rev 1.0
ENDEC Software Setup 37
Sage Digital ENDEC Manual Rev 1.0
5. ENDEC Software Setup The ENDEC has many options that will allow you to make the ENDEC fit into your station design and local
emergency plan. Every station will use the following commands to customize the ENDEC. Examples are
given below, the terse but complete description is in section 12, “ENDEC Command Reference”. You can
enter these commands using the ENDEC front panel display and buttons, or you can use the ENDECSETD
program and a Windows PC to edit a configuration file (See section 5.10, ENDECSETD program for details),
or you can put the ENDEC on your LAN and use the web browser interface (see section 6).
The road map you will follow in general is:
1) (optional) Configure the ENDEC to connect with a LAN, enable the web server, and change the web
access passwords. (Section 6).
2) Set the call sign.(Section5.1)
3) Set the time of day. (Section 5.2)
4) Set the your local area location code(s). (Section 5.3)
5) Set output levels. (Section 4.4)
6) (optional) Customize the incoming filters to select the actions you want the ENDEC to take when alerts
are received. The ENDEC comes pre-programmed with filters for the alerts you are required to relay, the
Presidential Emergency Action Notification (EAN) and Emergency Action Termination (EAT), and the
required monthly test (RMT). (Section 5.4)
7) (optional) Pre-build common alerts you might originate. The ENDEC comes pre-programmed with the
weekly test, the only message you must originate.( Section 5.5)
8) (optional) Configure any add-ons, such as the hand held remote, a character generator, an LED sign, or
the multi-station relay panel. (Section 8)
9) (optional) Configure any of the programmable relays you want to use. The relays can switch on strobe
lights or sounders that you supply, or they can interact with station automation equipment. (section 5.7)
10) (optional) Configure the GP input if you want to use any of the GPIO options such as commercial tally
(hold off non-required alerts until the end of a commercial stop set). (Section 12.62)
The descriptions below assume that you are unfamiliar with the ENDEC menu structure at the beginning, so
the descriptions include almost every button push. Later, the descriptions become more terse.
Again, all of these options, with the exception of the initial network configuration, can be performed using the
ENDECSETD program and the LAN connection. Use of ENDECSETD and the LAN interface is highly
recommended.
Note that the hand held remote control can be used to enter menu options just like the ENDEC front panel, see
section 8.1.4, “Using the Hand Control for Menus”.
5.1 Call Sign
The EAS message format includes an eight character identifier. In many states, the EAS State Plan will
specify your ID or a format to follow. If not, you can use the call sign of the sending station or anything else
that identifies you.
1) Assume the ENDEC display shows the default screen. If it does not, hold down the two buttons on the
right at the same time until the default screen appears. If you have a hand held remote, you can push the
<ABORT> button.
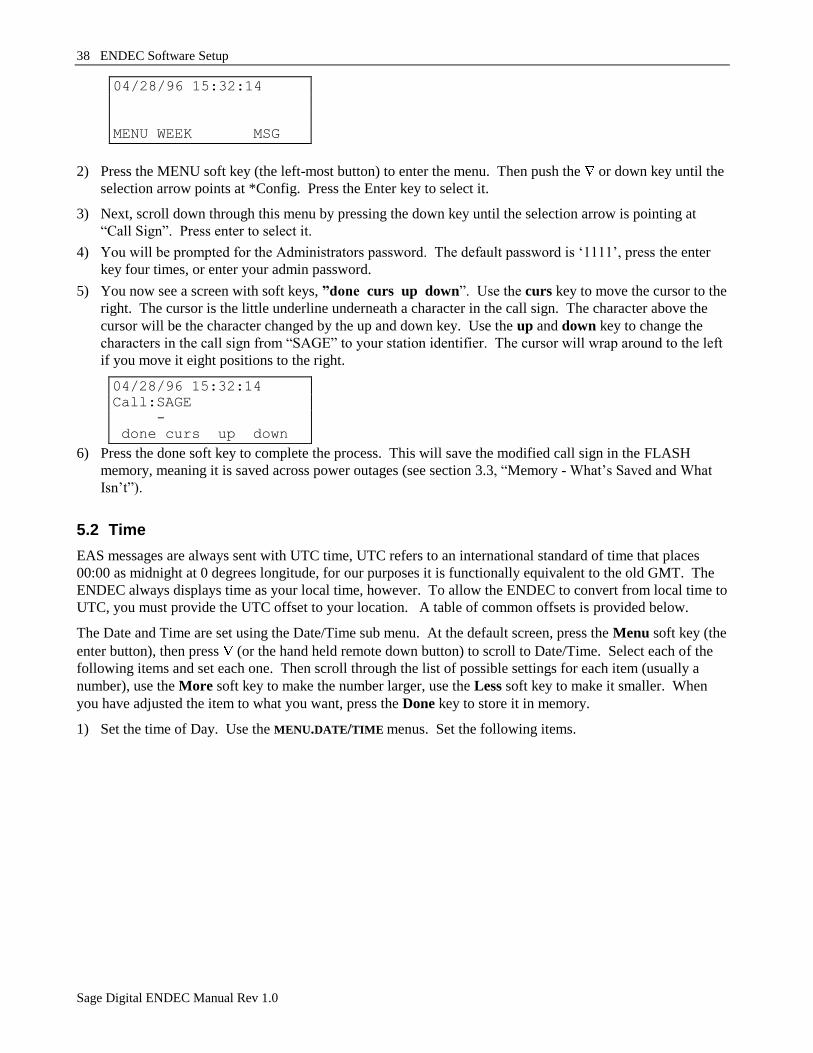
38 ENDEC Software Setup
Sage Digital ENDEC Manual Rev 1.0
04/28/96 15:32:14
MENU WEEK MSG
2) Press the MENU soft key (the left-most button) to enter the menu. Then push the or down key until the
selection arrow points at *Config. Press the Enter key to select it.
3) Next, scroll down through this menu by pressing the down key until the selection arrow is pointing at
“Call Sign”. Press enter to select it.
4) You will be prompted for the Administrators password. The default password is „1111‟, press the enter
key four times, or enter your admin password.
5) You now see a screen with soft keys, ”done curs up down”. Use the curs key to move the cursor to the
right. The cursor is the little underline underneath a character in the call sign. The character above the
cursor will be the character changed by the up and down key. Use the up and down key to change the
characters in the call sign from “SAGE” to your station identifier. The cursor will wrap around to the left
if you move it eight positions to the right.
04/28/96 15:32:14
Call:SAGE
-
done curs up down
6) Press the done soft key to complete the process. This will save the modified call sign in the FLASH
memory, meaning it is saved across power outages (see section 3.3, “Memory - What‟s Saved and What
Isn‟t”).
5.2 Time
EAS messages are always sent with UTC time, UTC refers to an international standard of time that places
00:00 as midnight at 0 degrees longitude, for our purposes it is functionally equivalent to the old GMT. The
ENDEC always displays time as your local time, however. To allow the ENDEC to convert from local time to
UTC, you must provide the UTC offset to your location. A table of common offsets is provided below.
The Date and Time are set using the Date/Time sub menu. At the default screen, press the Menu soft key (the
enter button), then press (or the hand held remote down button) to scroll to Date/Time. Select each of the
following items and set each one. Then scroll through the list of possible settings for each item (usually a
number), use the More soft key to make the number larger, use the Less soft key to make it smaller. When
you have adjusted the item to what you want, press the Done key to store it in memory.
1) Set the time of Day. Use the MENU.DATE/TIME menus. Set the following items.
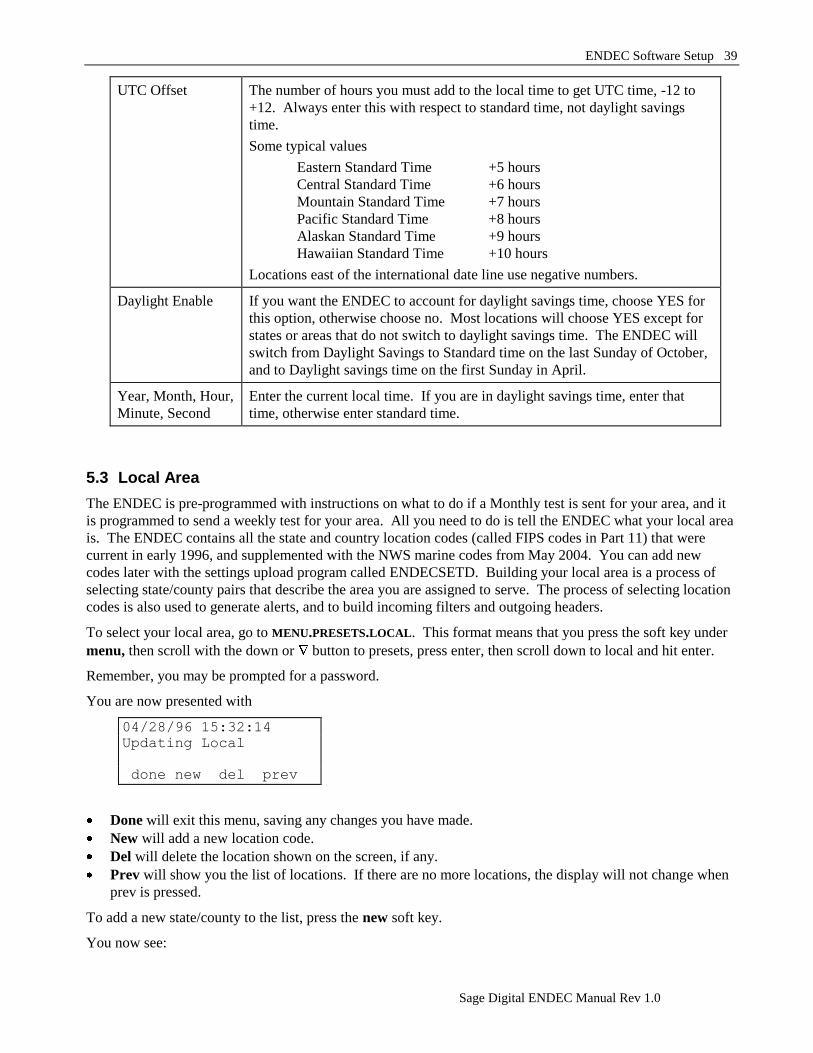
ENDEC Software Setup 39
Sage Digital ENDEC Manual Rev 1.0
UTC Offset The number of hours you must add to the local time to get UTC time, -12 to
+12. Always enter this with respect to standard time, not daylight savings
time.
Some typical values
Eastern Standard Time +5 hours
Central Standard Time +6 hours
Mountain Standard Time +7 hours
Pacific Standard Time +8 hours
Alaskan Standard Time +9 hours
Hawaiian Standard Time +10 hours
Locations east of the international date line use negative numbers.
Daylight Enable If you want the ENDEC to account for daylight savings time, choose YES for
this option, otherwise choose no. Most locations will choose YES except for
states or areas that do not switch to daylight savings time. The ENDEC will
switch from Daylight Savings to Standard time on the last Sunday of October,
and to Daylight savings time on the first Sunday in April.
Year, Month, Hour,
Minute, Second
Enter the current local time. If you are in daylight savings time, enter that
time, otherwise enter standard time.
5.3 Local Area
The ENDEC is pre-programmed with instructions on what to do if a Monthly test is sent for your area, and it
is programmed to send a weekly test for your area. All you need to do is tell the ENDEC what your local area
is. The ENDEC contains all the state and country location codes (called FIPS codes in Part 11) that were
current in early 1996, and supplemented with the NWS marine codes from May 2004. You can add new
codes later with the settings upload program called ENDECSETD. Building your local area is a process of
selecting state/county pairs that describe the area you are assigned to serve. The process of selecting location
codes is also used to generate alerts, and to build incoming filters and outgoing headers.
To select your local area, go to MENU.PRESETS.LOCAL. This format means that you press the soft key under
menu, then scroll with the down or button to presets, press enter, then scroll down to local and hit enter.
Remember, you may be prompted for a password.
You are now presented with
04/28/96 15:32:14
Updating Local
done new del prev
Done will exit this menu, saving any changes you have made.
New will add a new location code.
Del will delete the location shown on the screen, if any.
Prev will show you the list of locations. If there are no more locations, the display will not change when
prev is pressed.
To add a new state/county to the list, press the new soft key.
You now see:

40 ENDEC Software Setup
Sage Digital ENDEC Manual Rev 1.0
04/28/96 15:32:14
Select State:
Alabama
Pick Next Prev
Push Next to scroll through the list of states. You only need to scroll once, unless you serve counties in more
than one state. Once you see your state (or US possession, they‟re at the end of the list), press Pick. Assume
you picked Arizona.
You now see:
04/28/96 15:32:14
All of Arizona
Pick Abrt Next Prev
Pick will select whatever is shown on the second line, either all of a state, or a county in that state.
Abrt will exit the selection process.
Next will scroll to the next county in the state.
Prev will scroll back to the previous county.
Although your assigned area might be all of a state, this is unlikely. You will probably select a county. If you
do select all of a state, however, alerts sent with the local area list will contain the code for all of the state.
Alerts that come in will be matched if they are for any county in that state.
Scroll to the county you want and press Pick to select it.
You now see soft keys for:
Done - adds this county to the list.
Delete - aborts the addition of this county to the list.
Division - allows you to select a subdivision of the country. Select a subdivision in the same way you
selected the county by scrolling though the list of options and pressing Pick to select it.
Once you press Done, you go back to the Updating Local screen. Select Done if you are finished, or New to
add another location.
5.4 Filtering Incoming Alerts
An EAS alert consists of the following information that you can use to determine steps to take when an alert is
received.
Originator Codes Broadcast or Cable source
Civil Authorities
National Weather Service
Primary Entry Point
Emergency Action Notification Network
The latter two are the stations that relay messages from the President.
Event Codes The FCC has defined 53 codes, though you can add more with the
settings upload program called ENDECSETD. Event codes are listed
in Table 5-1.
Location Codes A list of up to 31 locations. A location is all of a state, a county in a
state, or part of a county in a state
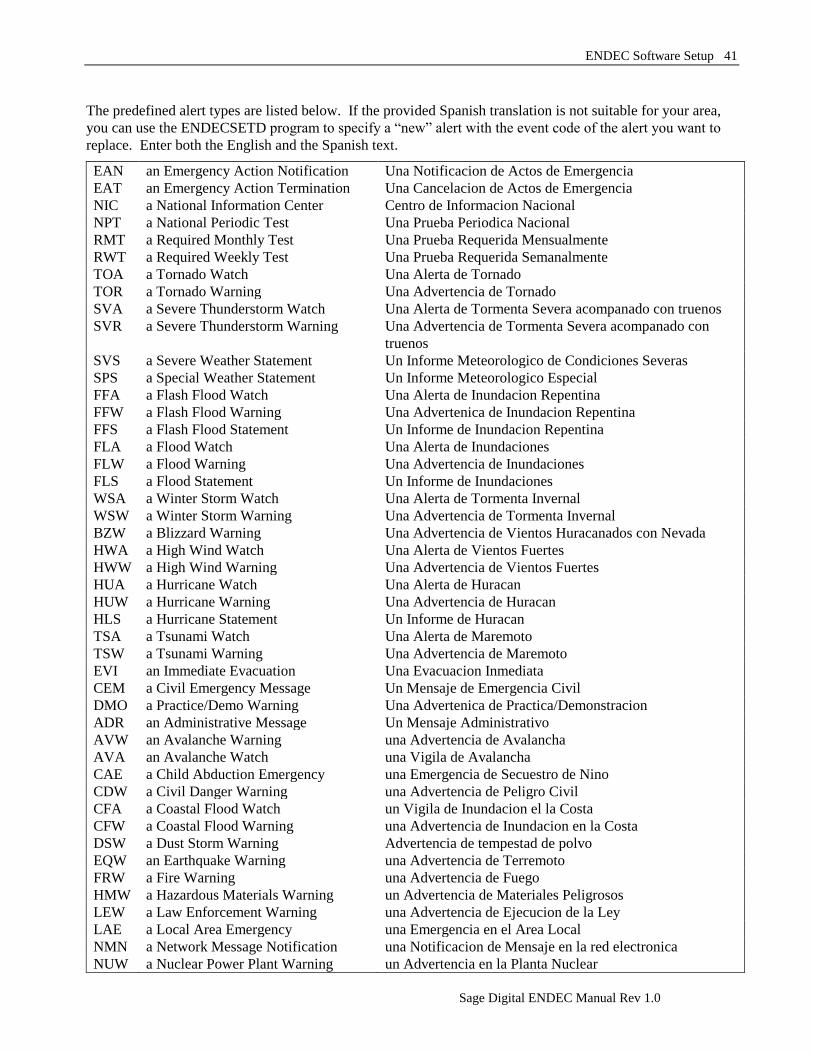
ENDEC Software Setup 41
Sage Digital ENDEC Manual Rev 1.0
The predefined alert types are listed below. If the provided Spanish translation is not suitable for your area,
you can use the ENDECSETD program to specify a “new” alert with the event code of the alert you want to
replace. Enter both the English and the Spanish text.
EAN an Emergency Action Notification Una Notificacion de Actos de Emergencia
EAT an Emergency Action Termination Una Cancelacion de Actos de Emergencia
NIC a National Information Center Centro de Informacion Nacional
NPT a National Periodic Test Una Prueba Periodica Nacional
RMT a Required Monthly Test Una Prueba Requerida Mensualmente
RWT a Required Weekly Test Una Prueba Requerida Semanalmente
TOA a Tornado Watch Una Alerta de Tornado
TOR a Tornado Warning Una Advertencia de Tornado
SVA a Severe Thunderstorm Watch Una Alerta de Tormenta Severa acompanado con truenos
SVR a Severe Thunderstorm Warning Una Advertencia de Tormenta Severa acompanado con
truenos
SVS a Severe Weather Statement Un Informe Meteorologico de Condiciones Severas
SPS a Special Weather Statement Un Informe Meteorologico Especial
FFA a Flash Flood Watch Una Alerta de Inundacion Repentina
FFW a Flash Flood Warning Una Advertenica de Inundacion Repentina
FFS a Flash Flood Statement Un Informe de Inundacion Repentina
FLA a Flood Watch Una Alerta de Inundaciones
FLW a Flood Warning Una Advertencia de Inundaciones
FLS a Flood Statement Un Informe de Inundaciones
WSA a Winter Storm Watch Una Alerta de Tormenta Invernal
WSW a Winter Storm Warning Una Advertencia de Tormenta Invernal
BZW a Blizzard Warning Una Advertencia de Vientos Huracanados con Nevada
HWA a High Wind Watch Una Alerta de Vientos Fuertes
HWW a High Wind Warning Una Advertencia de Vientos Fuertes
HUA a Hurricane Watch Una Alerta de Huracan
HUW a Hurricane Warning Una Advertencia de Huracan
HLS a Hurricane Statement Un Informe de Huracan
TSA a Tsunami Watch Una Alerta de Maremoto
TSW a Tsunami Warning Una Advertencia de Maremoto
EVI an Immediate Evacuation Una Evacuacion Inmediata
CEM a Civil Emergency Message Un Mensaje de Emergencia Civil
DMO a Practice/Demo Warning Una Advertenica de Practica/Demonstracion
ADR an Administrative Message Un Mensaje Administrativo
AVW an Avalanche Warning una Advertencia de Avalancha
AVA an Avalanche Watch una Vigila de Avalancha
CAE a Child Abduction Emergency una Emergencia de Secuestro de Nino
CDW a Civil Danger Warning una Advertencia de Peligro Civil
CFA a Coastal Flood Watch un Vigila de Inundacion el la Costa
CFW a Coastal Flood Warning una Advertencia de Inundacion en la Costa
DSW a Dust Storm Warning Advertencia de tempestad de polvo
EQW an Earthquake Warning una Advertencia de Terremoto
FRW a Fire Warning una Advertencia de Fuego
HMW a Hazardous Materials Warning un Advertencia de Materiales Peligrosos
LEW a Law Enforcement Warning una Advertencia de Ejecucion de la Ley
LAE a Local Area Emergency una Emergencia en el Area Local
NMN a Network Message Notification una Notificacion de Mensaje en la red electronica
NUW a Nuclear Power Plant Warning un Advertencia en la Planta Nuclear
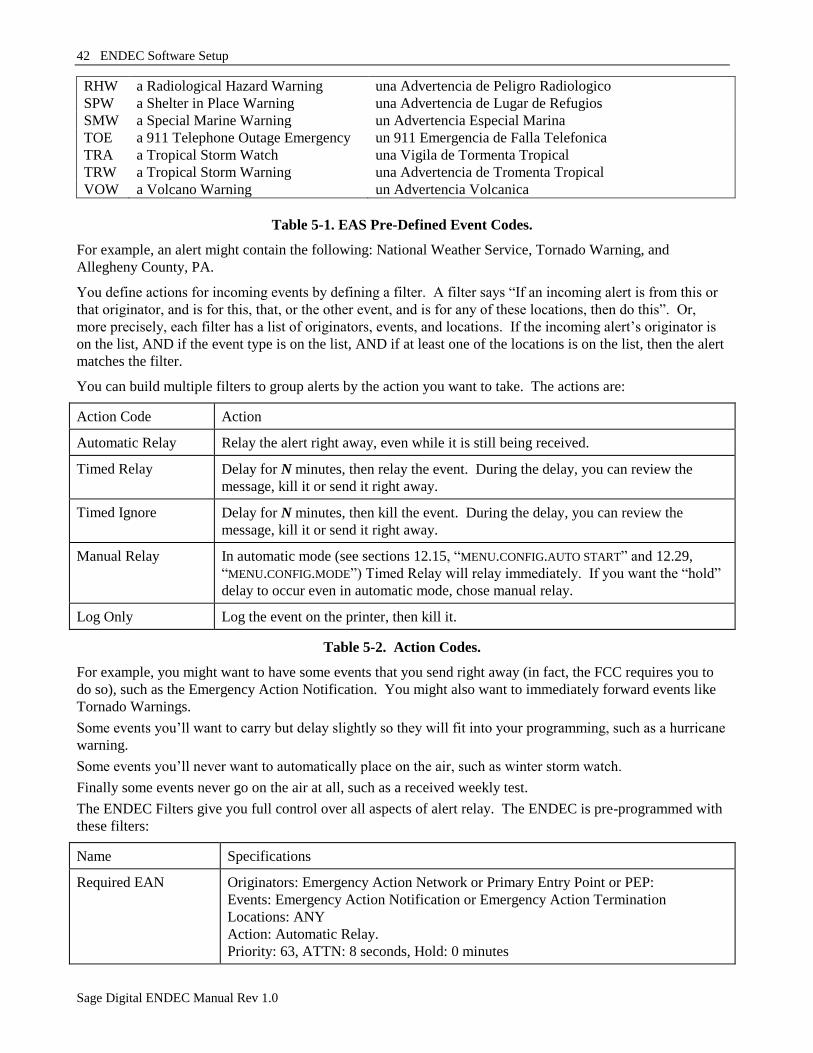
42 ENDEC Software Setup
Sage Digital ENDEC Manual Rev 1.0
RHW a Radiological Hazard Warning una Advertencia de Peligro Radiologico
SPW a Shelter in Place Warning una Advertencia de Lugar de Refugios
SMW a Special Marine Warning un Advertencia Especial Marina
TOE a 911 Telephone Outage Emergency un 911 Emergencia de Falla Telefonica
TRA a Tropical Storm Watch una Vigila de Tormenta Tropical
TRW a Tropical Storm Warning una Advertencia de Tromenta Tropical
VOW a Volcano Warning un Advertencia Volcanica
Table 5-1. EAS Pre-Defined Event Codes.
For example, an alert might contain the following: National Weather Service, Tornado Warning, and
Allegheny County, PA.
You define actions for incoming events by defining a filter. A filter says “If an incoming alert is from this or
that originator, and is for this, that, or the other event, and is for any of these locations, then do this”. Or,
more precisely, each filter has a list of originators, events, and locations. If the incoming alert‟s originator is
on the list, AND if the event type is on the list, AND if at least one of the locations is on the list, then the alert
matches the filter.
You can build multiple filters to group alerts by the action you want to take. The actions are:
Action Code Action
Automatic Relay Relay the alert right away, even while it is still being received.
Timed Relay Delay for N minutes, then relay the event. During the delay, you can review the
message, kill it or send it right away.
Timed Ignore Delay for N minutes, then kill the event. During the delay, you can review the
message, kill it or send it right away.
Manual Relay In automatic mode (see sections 12.15, “MENU.CONFIG.AUTO START” and 12.29,
“MENU.CONFIG.MODE”) Timed Relay will relay immediately. If you want the “hold”
delay to occur even in automatic mode, chose manual relay.
Log Only Log the event on the printer, then kill it.
Table 5-2. Action Codes.
For example, you might want to have some events that you send right away (in fact, the FCC requires you to
do so), such as the Emergency Action Notification. You might also want to immediately forward events like
Tornado Warnings.
Some events you‟ll want to carry but delay slightly so they will fit into your programming, such as a hurricane
warning.
Some events you‟ll never want to automatically place on the air, such as winter storm watch.
Finally some events never go on the air at all, such as a received weekly test.
The ENDEC Filters give you full control over all aspects of alert relay. The ENDEC is pre-programmed with
these filters:
Name Specifications
Required EAN Originators: Emergency Action Network or Primary Entry Point or PEP:
Events: Emergency Action Notification or Emergency Action Termination
Locations: ANY
Action: Automatic Relay.
Priority: 63, ATTN: 8 seconds, Hold: 0 minutes
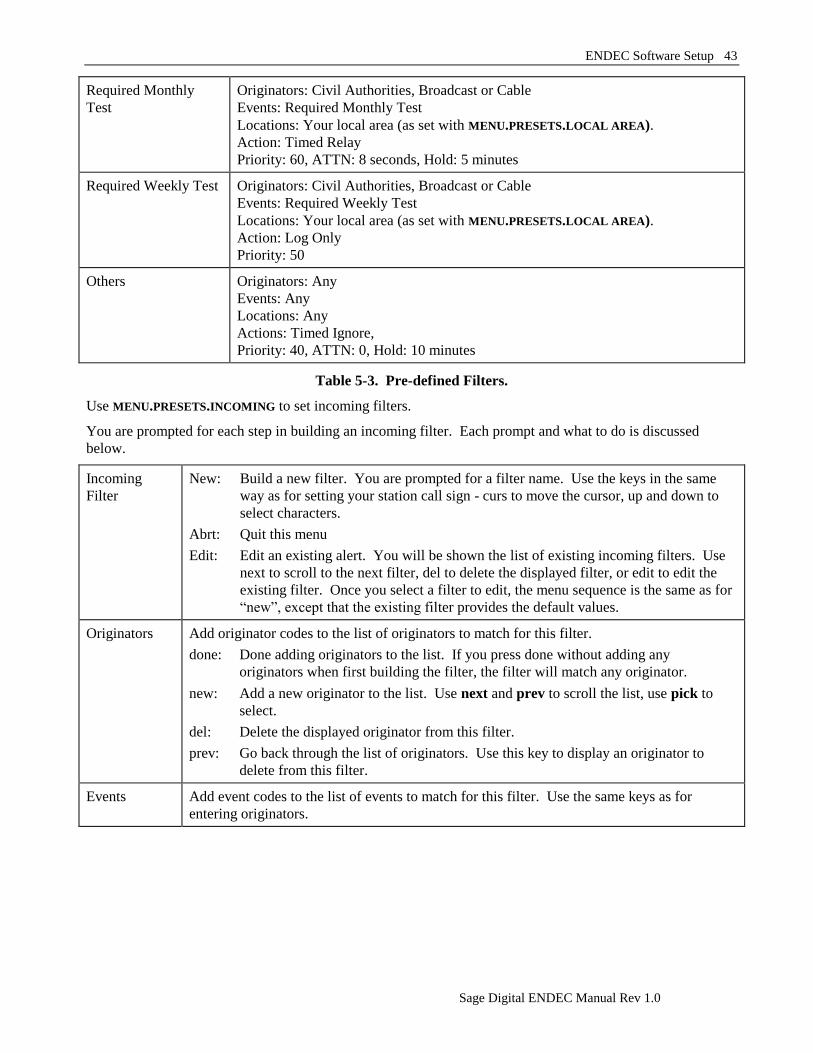
ENDEC Software Setup 43
Sage Digital ENDEC Manual Rev 1.0
Required Monthly
Test
Originators: Civil Authorities, Broadcast or Cable
Events: Required Monthly Test
Locations: Your local area (as set with MENU.PRESETS.LOCAL AREA).
Action: Timed Relay
Priority: 60, ATTN: 8 seconds, Hold: 5 minutes
Required Weekly Test Originators: Civil Authorities, Broadcast or Cable
Events: Required Weekly Test
Locations: Your local area (as set with MENU.PRESETS.LOCAL AREA).
Action: Log Only
Priority: 50
Others Originators: Any
Events: Any
Locations: Any
Actions: Timed Ignore,
Priority: 40, ATTN: 0, Hold: 10 minutes
Table 5-3. Pre-defined Filters.
Use MENU.PRESETS.INCOMING to set incoming filters.
You are prompted for each step in building an incoming filter. Each prompt and what to do is discussed
below.
Incoming
Filter
New: Build a new filter. You are prompted for a filter name. Use the keys in the same
way as for setting your station call sign - curs to move the cursor, up and down to
select characters.
Abrt: Quit this menu
Edit: Edit an existing alert. You will be shown the list of existing incoming filters. Use
next to scroll to the next filter, del to delete the displayed filter, or edit to edit the
existing filter. Once you select a filter to edit, the menu sequence is the same as for
“new”, except that the existing filter provides the default values.
Originators Add originator codes to the list of originators to match for this filter.
done: Done adding originators to the list. If you press done without adding any
originators when first building the filter, the filter will match any originator.
new: Add a new originator to the list. Use next and prev to scroll the list, use pick to
select.
del: Delete the displayed originator from this filter.
prev: Go back through the list of originators. Use this key to display an originator to
delete from this filter.
Events Add event codes to the list of events to match for this filter. Use the same keys as for
entering originators.

44 ENDEC Software Setup
Sage Digital ENDEC Manual Rev 1.0
Adding
Locations
Add location codes to the list of locations for this filter.
done: Done adding locations to the list. If you press done without adding any locations
when first building the list, the filter will match any location.
new: Add a new location to the list. Locations are added in the same way that locations
are added to the local area (see section 5.3 “Local Area”. In addition, you can select
the spec soft key when it appears. You can then select local for local area, all for
all location codes, or new to see a list of location codes that you have added with
the DOS program.
del: Delete the displayed location from this filter.
prev: Go back through the list of locations. Use this key to display a location to delete
from this filter.
Priority Each filter has a priority. If an incoming alert matches more than one filter, the filter with
the highest priority is selected. Priorities are from 63 to 0, with 63 as the highest priority.
Only the EAN/EAT message should be at this priority. If the priority is greater than or equal
to 61, the alert cannot be aborted while it is being relayed. If the priority equals 60, the alert
will not override the manual override commercial tally (holdoff) feature after 15 minutes. It
will instead wait until the hold off is released. Use this feature to hold monthly tests if you
are a daytime only station.
Select Action Use the next, prev, and pick soft keys to select an action from the list. Action codes are
described earlier in this section, see also Table 5-2, “Action Codes.”
Attention
Duration
The number of seconds of attention tone that is added to this alert. EAN and the Monthly
Test are required to have attention tones. The attention tone that was present on the
incoming alert is removed, this parameter defines the length of tone present when your
station resends the alert.
Hold Time The number of minutes that the alert will be held in the timed relay and timed ignore modes.
NV Lead In Use YES to add the contents of the NV audio buffer in front of the EAS header for any alert
selected for relay by this filter.
If MENU.CONFIG.NV AUDIO LEN is set to 10 or 40, that is, if the non volatile audio option is
present and enabled, the NV lead in prompt will appear. You are given three choices,
“Pick”, “Yes” and “No”. The display will show the currently selected setting, to keep it,
press the PICK softkey, otherwise select YES or NO.
YES will play the contents of the non-volatile audio before the EAS header data is sent.
This is typically used if the contents of the NV audio are “This is a test of the Emergency
Alert System”, you would select YES for Required Weekly Tests and Required Monthly
Tests, and no for everything else.
Crawl Only If you have a device assigned to a character generator, you are asked this question. You are
given three choices, “Pick”, “Yes” and “No”. The display will show the currently selected
setting, to keep it, press the PICK softkey, otherwise select YES or NO. If set to YES, the
alert will be sent as a video crawl only - no audio or EAS tones will be sent. This option
should only be used for non-mandated alerts, that is, do not use it for weekly or monthly test,
EAN or EAT alerts.
Save <name> Press save to save the alert, or abort to exit the menu without saving. If you need to go back
and correct an error, save the filter, then select MENU.PRESET.INCOMING and edit this filter.
Table 5-4. Filter Prompts.
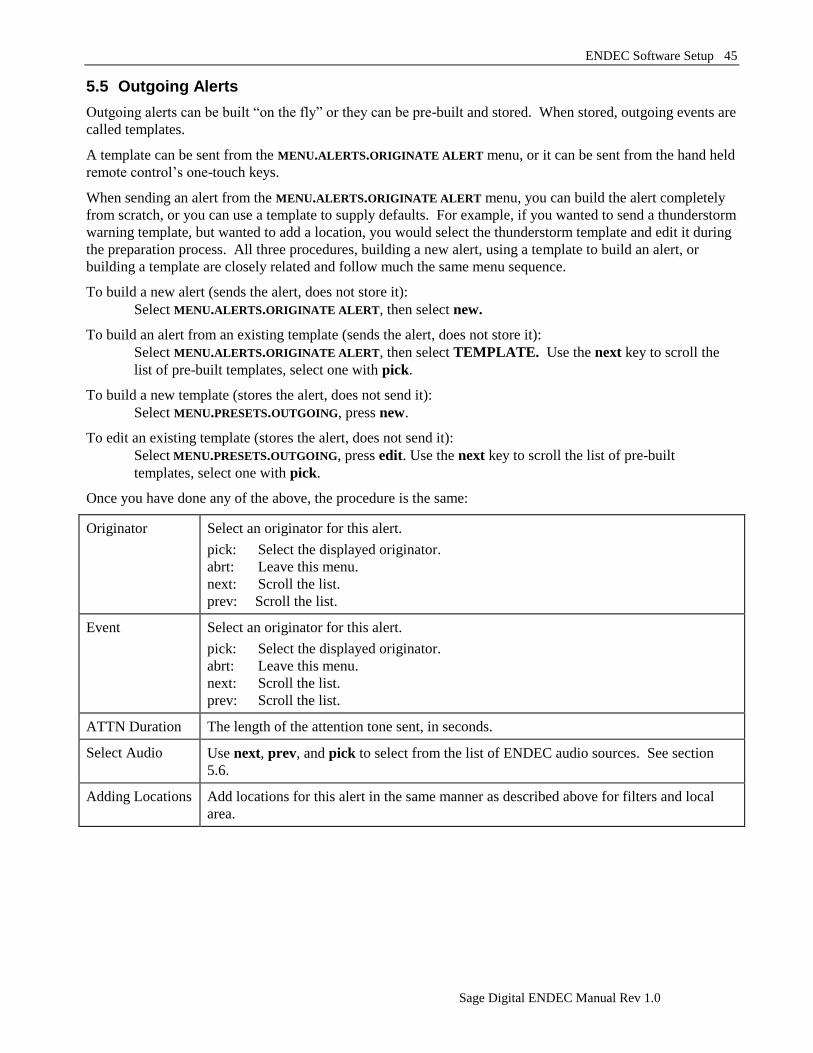
ENDEC Software Setup 45
Sage Digital ENDEC Manual Rev 1.0
5.5 Outgoing Alerts
Outgoing alerts can be built “on the fly” or they can be pre-built and stored. When stored, outgoing events are
called templates.
A template can be sent from the MENU.ALERTS.ORIGINATE ALERT menu, or it can be sent from the hand held
remote control‟s one-touch keys.
When sending an alert from the MENU.ALERTS.ORIGINATE ALERT menu, you can build the alert completely
from scratch, or you can use a template to supply defaults. For example, if you wanted to send a thunderstorm
warning template, but wanted to add a location, you would select the thunderstorm template and edit it during
the preparation process. All three procedures, building a new alert, using a template to build an alert, or
building a template are closely related and follow much the same menu sequence.
To build a new alert (sends the alert, does not store it):
Select MENU.ALERTS.ORIGINATE ALERT, then select new.
To build an alert from an existing template (sends the alert, does not store it):
Select MENU.ALERTS.ORIGINATE ALERT, then select TEMPLATE. Use the next key to scroll the
list of pre-built templates, select one with pick.
To build a new template (stores the alert, does not send it):
Select MENU.PRESETS.OUTGOING, press new.
To edit an existing template (stores the alert, does not send it):
Select MENU.PRESETS.OUTGOING, press edit. Use the next key to scroll the list of pre-built
templates, select one with pick.
Once you have done any of the above, the procedure is the same:
Originator Select an originator for this alert.
pick: Select the displayed originator.
abrt: Leave this menu.
next: Scroll the list.
prev: Scroll the list.
Event Select an originator for this alert.
pick: Select the displayed originator.
abrt: Leave this menu.
next: Scroll the list.
prev: Scroll the list.
ATTN Duration The length of the attention tone sent, in seconds.
Select Audio Use next, prev, and pick to select from the list of ENDEC audio sources. See section
5.6.
Adding Locations Add locations for this alert in the same manner as described above for filters and local
area.
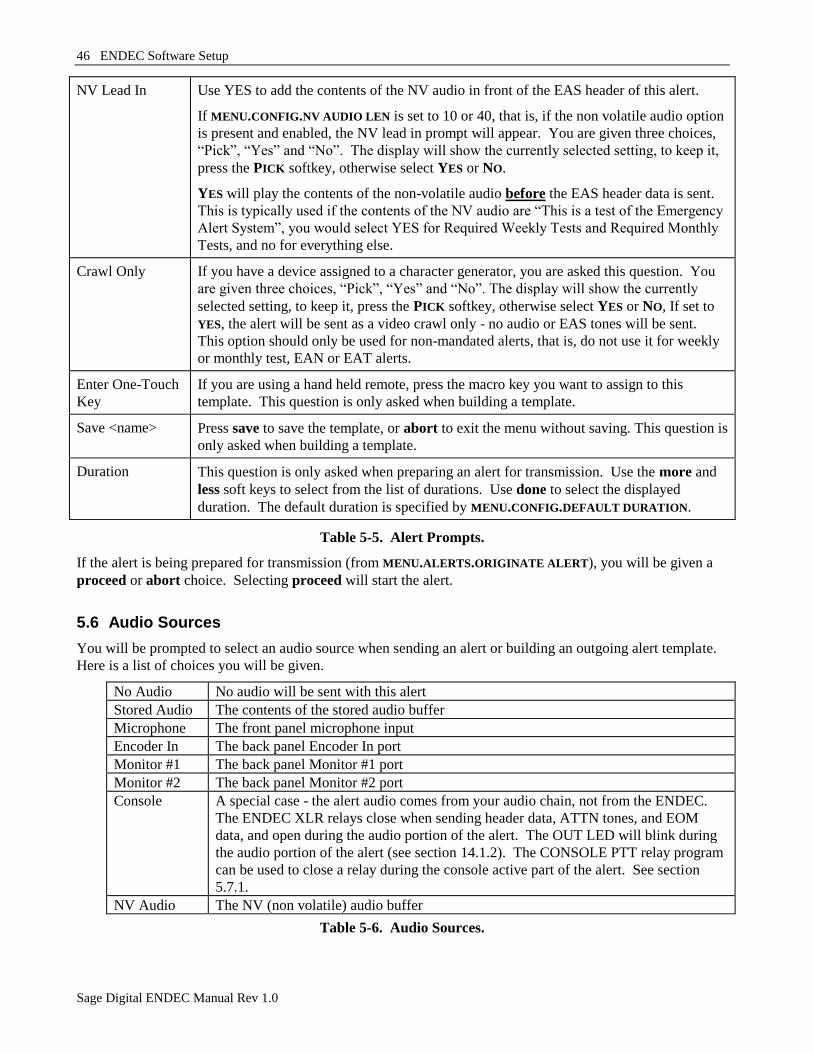
46 ENDEC Software Setup
Sage Digital ENDEC Manual Rev 1.0
NV Lead In Use YES to add the contents of the NV audio in front of the EAS header of this alert.
If MENU.CONFIG.NV AUDIO LEN is set to 10 or 40, that is, if the non volatile audio option
is present and enabled, the NV lead in prompt will appear. You are given three choices,
“Pick”, “Yes” and “No”. The display will show the currently selected setting, to keep it,
press the PICK softkey, otherwise select YES or NO.
YES will play the contents of the non-volatile audio before the EAS header data is sent.
This is typically used if the contents of the NV audio are “This is a test of the Emergency
Alert System”, you would select YES for Required Weekly Tests and Required Monthly
Tests, and no for everything else.
Crawl Only If you have a device assigned to a character generator, you are asked this question. You
are given three choices, “Pick”, “Yes” and “No”. The display will show the currently
selected setting, to keep it, press the PICK softkey, otherwise select YES or NO, If set to
YES, the alert will be sent as a video crawl only - no audio or EAS tones will be sent.
This option should only be used for non-mandated alerts, that is, do not use it for weekly
or monthly test, EAN or EAT alerts.
Enter One-Touch
Key
If you are using a hand held remote, press the macro key you want to assign to this
template. This question is only asked when building a template.
Save <name> Press save to save the template, or abort to exit the menu without saving. This question is
only asked when building a template.
Duration This question is only asked when preparing an alert for transmission. Use the more and
less soft keys to select from the list of durations. Use done to select the displayed
duration. The default duration is specified by MENU.CONFIG.DEFAULT DURATION.
Table 5-5. Alert Prompts.
If the alert is being prepared for transmission (from MENU.ALERTS.ORIGINATE ALERT), you will be given a
proceed or abort choice. Selecting proceed will start the alert.
5.6 Audio Sources
You will be prompted to select an audio source when sending an alert or building an outgoing alert template.
Here is a list of choices you will be given.
No Audio No audio will be sent with this alert
Stored Audio The contents of the stored audio buffer
Microphone The front panel microphone input
Encoder In The back panel Encoder In port
Monitor #1 The back panel Monitor #1 port
Monitor #2 The back panel Monitor #2 port
Console A special case - the alert audio comes from your audio chain, not from the ENDEC.
The ENDEC XLR relays close when sending header data, ATTN tones, and EOM
data, and open during the audio portion of the alert. The OUT LED will blink during
the audio portion of the alert (see section 14.1.2). The CONSOLE PTT relay program
can be used to close a relay during the console active part of the alert. See section
5.7.1.
NV Audio The NV (non volatile) audio buffer
Table 5-6. Audio Sources.
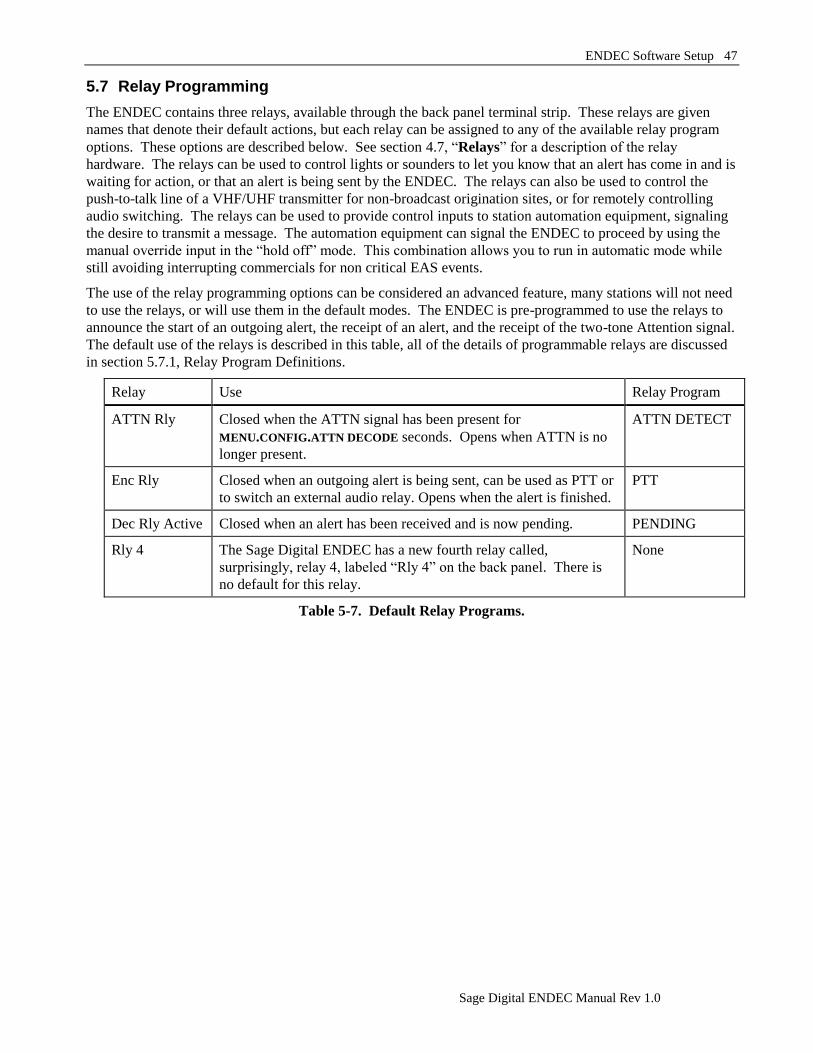
ENDEC Software Setup 47
Sage Digital ENDEC Manual Rev 1.0
5.7 Relay Programming
The ENDEC contains three relays, available through the back panel terminal strip. These relays are given
names that denote their default actions, but each relay can be assigned to any of the available relay program
options. These options are described below. See section 4.7, “Relays” for a description of the relay
hardware. The relays can be used to control lights or sounders to let you know that an alert has come in and is
waiting for action, or that an alert is being sent by the ENDEC. The relays can also be used to control the
push-to-talk line of a VHF/UHF transmitter for non-broadcast origination sites, or for remotely controlling
audio switching. The relays can be used to provide control inputs to station automation equipment, signaling
the desire to transmit a message. The automation equipment can signal the ENDEC to proceed by using the
manual override input in the “hold off” mode. This combination allows you to run in automatic mode while
still avoiding interrupting commercials for non critical EAS events.
The use of the relay programming options can be considered an advanced feature, many stations will not need
to use the relays, or will use them in the default modes. The ENDEC is pre-programmed to use the relays to
announce the start of an outgoing alert, the receipt of an alert, and the receipt of the two-tone Attention signal.
The default use of the relays is described in this table, all of the details of programmable relays are discussed
in section 5.7.1, Relay Program Definitions.
Relay Use Relay Program
ATTN Rly Closed when the ATTN signal has been present for
MENU.CONFIG.ATTN DECODE seconds. Opens when ATTN is no
longer present.
ATTN DETECT
Enc Rly Closed when an outgoing alert is being sent, can be used as PTT or
to switch an external audio relay. Opens when the alert is finished.
PTT
Dec Rly Active Closed when an alert has been received and is now pending. PENDING
Rly 4 The Sage Digital ENDEC has a new fourth relay called,
surprisingly, relay 4, labeled “Rly 4” on the back panel. There is
no default for this relay.
None
Table 5-7. Default Relay Programs.
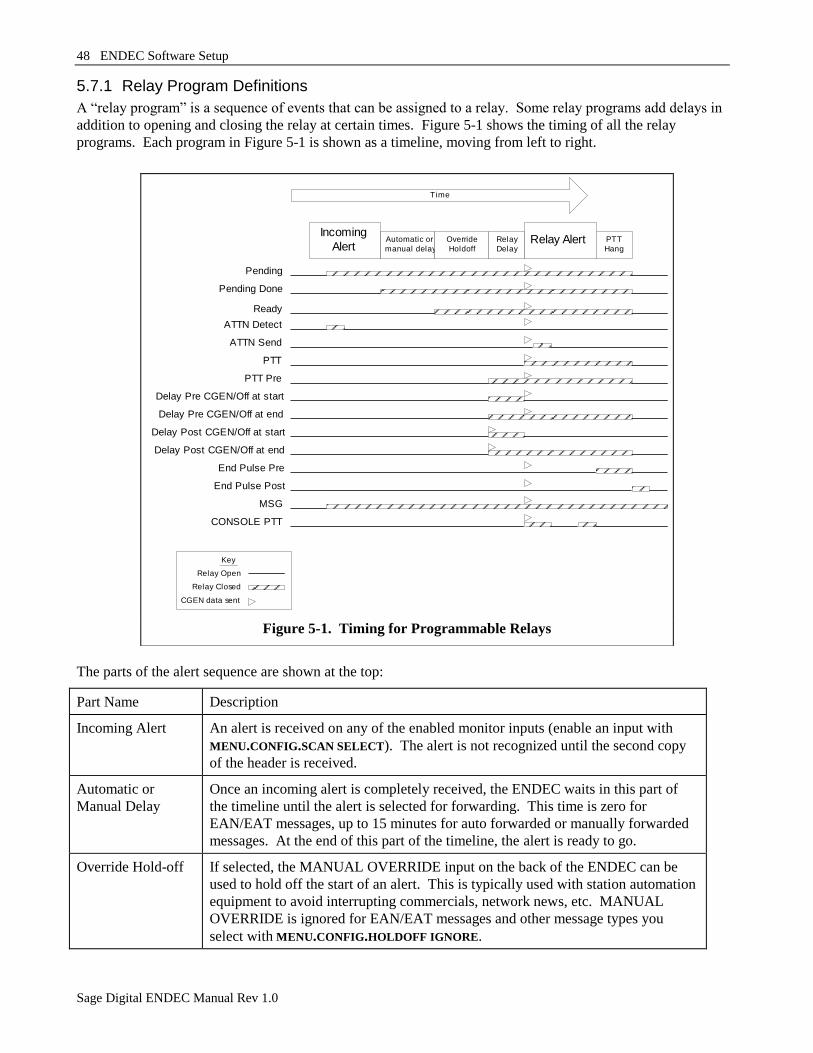
48 ENDEC Software Setup
Sage Digital ENDEC Manual Rev 1.0
5.7.1 Relay Program Definitions
A “relay program” is a sequence of events that can be assigned to a relay. Some relay programs add delays in
addition to opening and closing the relay at certain times. Figure 5-1 shows the timing of all the relay
programs. Each program in Figure 5-1 is shown as a timeline, moving from left to right.
The parts of the alert sequence are shown at the top:
Part Name Description
Incoming Alert An alert is received on any of the enabled monitor inputs (enable an input with
MENU.CONFIG.SCAN SELECT). The alert is not recognized until the second copy
of the header is received.
Automatic or
Manual Delay
Once an incoming alert is completely received, the ENDEC waits in this part of
the timeline until the alert is selected for forwarding. This time is zero for
EAN/EAT messages, up to 15 minutes for auto forwarded or manually forwarded
messages. At the end of this part of the timeline, the alert is ready to go.
Override Hold-off If selected, the MANUAL OVERRIDE input on the back of the ENDEC can be
used to hold off the start of an alert. This is typically used with station automation
equipment to avoid interrupting commercials, network news, etc. MANUAL
OVERRIDE is ignored for EAN/EAT messages and other message types you
select with MENU.CONFIG.HOLDOFF IGNORE.
Incoming
AlertAutomatic or
manual delayRelay Alert
Pending
Override
Holdoff
Pending Done
ATTN Detect
PTT
Delay Pre CGEN/Off at start
Relay
Delay
Delay Pre CGEN/Off at end
Delay Post CGEN/Off at start
Delay Post CGEN/Off at end
ATTN Send
Key
Relay Open
Relay Closed
CGEN data sent
Time
Ready
End Pulse Pre
PTT
Hang
End Pulse Post
PTT Pre
MSG
CONSOLE PTT
Figure 5-1. Timing for Programmable Relays
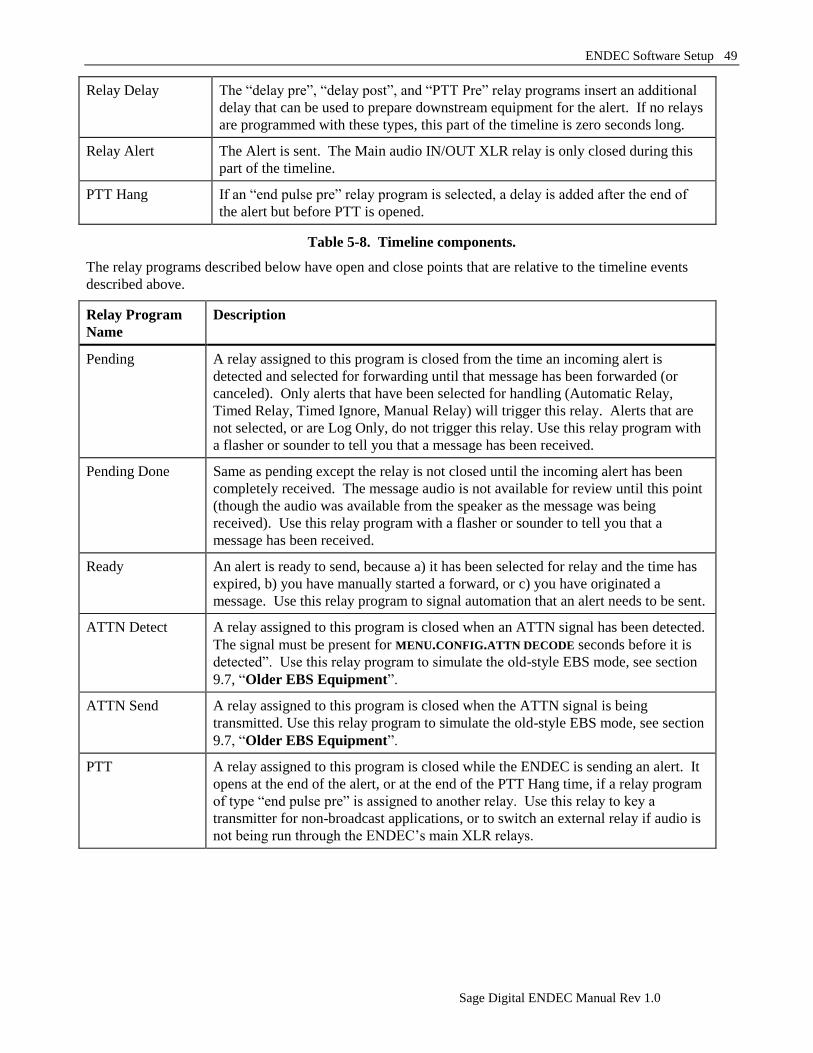
ENDEC Software Setup 49
Sage Digital ENDEC Manual Rev 1.0
Relay Delay The “delay pre”, “delay post”, and “PTT Pre” relay programs insert an additional
delay that can be used to prepare downstream equipment for the alert. If no relays
are programmed with these types, this part of the timeline is zero seconds long.
Relay Alert The Alert is sent. The Main audio IN/OUT XLR relay is only closed during this
part of the timeline.
PTT Hang If an “end pulse pre” relay program is selected, a delay is added after the end of
the alert but before PTT is opened.
Table 5-8. Timeline components.
The relay programs described below have open and close points that are relative to the timeline events
described above.
Relay Program
Name
Description
Pending A relay assigned to this program is closed from the time an incoming alert is
detected and selected for forwarding until that message has been forwarded (or
canceled). Only alerts that have been selected for handling (Automatic Relay,
Timed Relay, Timed Ignore, Manual Relay) will trigger this relay. Alerts that are
not selected, or are Log Only, do not trigger this relay. Use this relay program with
a flasher or sounder to tell you that a message has been received.
Pending Done Same as pending except the relay is not closed until the incoming alert has been
completely received. The message audio is not available for review until this point
(though the audio was available from the speaker as the message was being
received). Use this relay program with a flasher or sounder to tell you that a
message has been received.
Ready An alert is ready to send, because a) it has been selected for relay and the time has
expired, b) you have manually started a forward, or c) you have originated a
message. Use this relay program to signal automation that an alert needs to be sent.
ATTN Detect A relay assigned to this program is closed when an ATTN signal has been detected.
The signal must be present for MENU.CONFIG.ATTN DECODE seconds before it is
detected”. Use this relay program to simulate the old-style EBS mode, see section
9.7, “Older EBS Equipment”.
ATTN Send A relay assigned to this program is closed when the ATTN signal is being
transmitted. Use this relay program to simulate the old-style EBS mode, see section
9.7, “Older EBS Equipment”.
PTT A relay assigned to this program is closed while the ENDEC is sending an alert. It
opens at the end of the alert, or at the end of the PTT Hang time, if a relay program
of type “end pulse pre” is assigned to another relay. Use this relay to key a
transmitter for non-broadcast applications, or to switch an external relay if audio is
not being run through the ENDEC‟s main XLR relays.
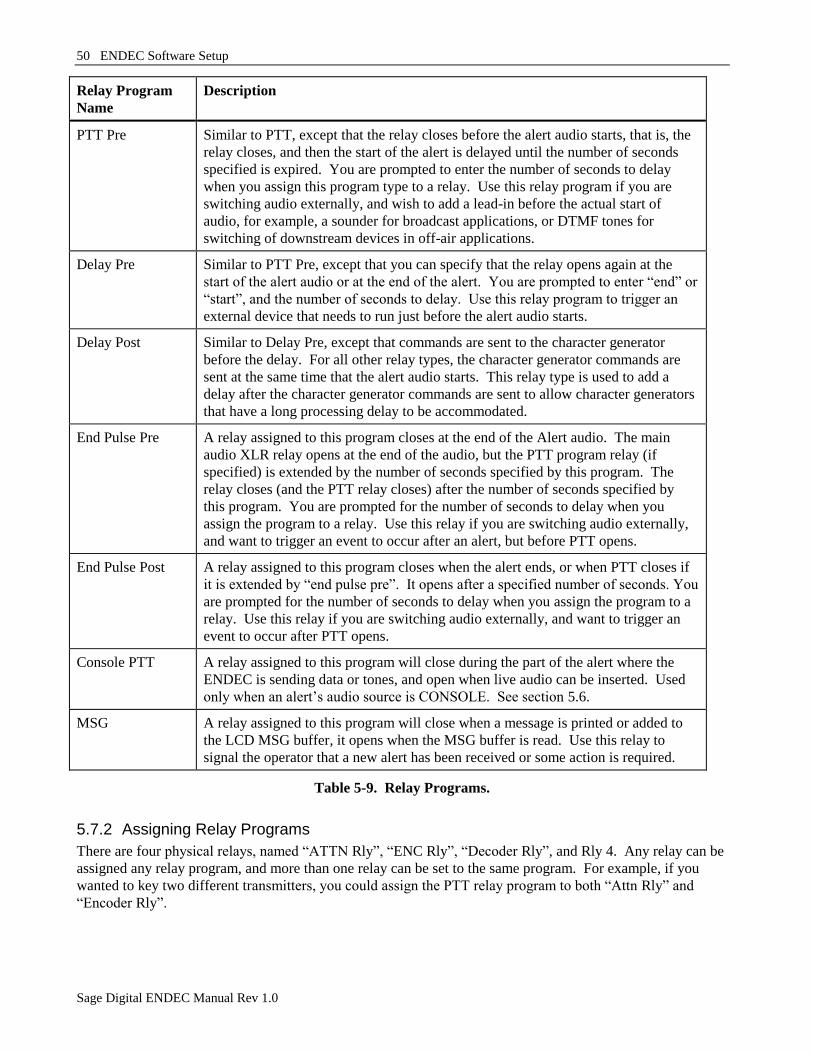
50 ENDEC Software Setup
Sage Digital ENDEC Manual Rev 1.0
Relay Program
Name
Description
PTT Pre Similar to PTT, except that the relay closes before the alert audio starts, that is, the
relay closes, and then the start of the alert is delayed until the number of seconds
specified is expired. You are prompted to enter the number of seconds to delay
when you assign this program type to a relay. Use this relay program if you are
switching audio externally, and wish to add a lead-in before the actual start of
audio, for example, a sounder for broadcast applications, or DTMF tones for
switching of downstream devices in off-air applications.
Delay Pre Similar to PTT Pre, except that you can specify that the relay opens again at the
start of the alert audio or at the end of the alert. You are prompted to enter “end” or
“start”, and the number of seconds to delay. Use this relay program to trigger an
external device that needs to run just before the alert audio starts.
Delay Post Similar to Delay Pre, except that commands are sent to the character generator
before the delay. For all other relay types, the character generator commands are
sent at the same time that the alert audio starts. This relay type is used to add a
delay after the character generator commands are sent to allow character generators
that have a long processing delay to be accommodated.
End Pulse Pre A relay assigned to this program closes at the end of the Alert audio. The main
audio XLR relay opens at the end of the audio, but the PTT program relay (if
specified) is extended by the number of seconds specified by this program. The
relay closes (and the PTT relay closes) after the number of seconds specified by
this program. You are prompted for the number of seconds to delay when you
assign the program to a relay. Use this relay if you are switching audio externally,
and want to trigger an event to occur after an alert, but before PTT opens.
End Pulse Post A relay assigned to this program closes when the alert ends, or when PTT closes if
it is extended by “end pulse pre”. It opens after a specified number of seconds. You
are prompted for the number of seconds to delay when you assign the program to a
relay. Use this relay if you are switching audio externally, and want to trigger an
event to occur after PTT opens.
Console PTT A relay assigned to this program will close during the part of the alert where the
ENDEC is sending data or tones, and open when live audio can be inserted. Used
only when an alert‟s audio source is CONSOLE. See section 5.6.
MSG A relay assigned to this program will close when a message is printed or added to
the LCD MSG buffer, it opens when the MSG buffer is read. Use this relay to
signal the operator that a new alert has been received or some action is required.
Table 5-9. Relay Programs.
5.7.2 Assigning Relay Programs
There are four physical relays, named “ATTN Rly”, “ENC Rly”, “Decoder Rly”, and Rly 4. Any relay can be
assigned any relay program, and more than one relay can be set to the same program. For example, if you
wanted to key two different transmitters, you could assign the PTT relay program to both “Attn Rly” and
“Encoder Rly”.
ENDEC Software Setup 51
Sage Digital ENDEC Manual Rev 1.0
There are also four “virtual” relays. You can assign programs to these relays, named EXT #1 through EXT
#4. Even though a physical relay will not click, the action specified will occur. Use this feature if you want
the side effect of the “relay” but don‟t need an actual contact closure.5
Example #1: Assume that you have a character generator with very fancy fonts that needs 15 seconds to
prepare the crawl. You can assign “Delay Post” to EXT #1, and specify 15 seconds. This will add a 15
second delay after the character generator commands are sent and before the actual alert starts.
Example #2: Assume you want to add five seconds of dead air after an alert and close a relay during that five
seconds. Assign “End Pulse Pre” to “ATTN Active”, “Encoder Active”, or “Decoder Active” and specify 5
seconds.
Example #3. Assume you want to add five seconds of dead air after an alert as in example #2, put you don‟t
need to have a relay close (maybe you are already using all four). Assign “End Pulse Pre” to an unused
virtual relay instead.
To assign programs to relays:
1) Go to MENU.RELAY.
2) Scroll to the name of the relay you want, press the Pick soft key.
3) Scroll to the name of the program you want to assign to this key. The list will start at the current setting,
you may need to move up or down in the list to find the one you want. To select no activity for a relay,
select NONE.
4) If you select Delay Pre or Delay Post, you can select when the relay opens, either the START of the alert
audio, or the END of the alert. Select the appropriate soft key.
5) If you select Delay Pre, Delay Post, PTT Pre, End Pulse Pre, or End Pulse Post, enter the number of
seconds of delay you need, 0 to 60.
5.8 Random Required Weekly Test feature
The ENDEC previously included a “Timed RWT” feature that allowed you to specify a time and day of the
week to send a required weekly test (RWT). This was intended to allow you to set up a weekly test one week
in advance, but did require weekly interaction with the ENDEC.
The “Random RWT” feature allows a different time for each of the 52 weeks in a year. The ENDEC will fill
the table with random times when the feature is enabled, or when MENU.TIMED RWT.RESET RWT RAND is
used. The day, hour, and minute are settable, seconds are always 0.
You can print all of the times to the internal printer or external serial printer by using MENU.TIMED
RWT.PRINT RWT RAND. You can view and edit each time by using MENU.TIMED RWT.EDIT RWT RAND. The
ENDECSETD program provides a more convenient way to edit the times.
To enable the random weekly feature, do the following:
1) Enable random weekly test by selecting MENU.TIMED RWT.ENABLE TIMED RWT.RAND. If you have
not previously enabled random weekly tests, a table of times will be built for you. If the random time
for the current week is earlier than one hour from the current time, the alert will be marked as already
sent. If you want an alert soon, you will need to edit the current week‟s time.
2) View the times by printing them with MENU.TIMED RWT.PRINT RWT RAND, or step through the times
using MENU.TIMED RWT.EDIT RWT RAND.
5 The original Sage EAS ENDEC had three physical relays and five virtual relays.
52 ENDEC Software Setup
Sage Digital ENDEC Manual Rev 1.0
3) Edit the times as required by local agreements or common sense (avoid Super Bowl Sunday, perhaps).
Note on editing: as protection against software or hardware problems that might “hang” the ENDEC
software, the ENDEC uses a command timeout. When not sending an alert, if the ENDEC does not
return to the "idle state", (the top menu level) within 10 minutes, the ENDEC will reboot. You must
leave the edit menu and return to the top menu level (where “MENU WEEK” is displayed) once each
10 minutes, or the ENDEC will restart, and you will lose the changes you have made.
There are several reasons why you might not see an alert when you expected to, and several protections
against an alert occurring unexpectedly. A random RWT will not be sent:
1) if random RWT is not enabled.
2) within 60 seconds of a time change. This allows you to change all parts of the time
(year/month/day/hour/min/sec) and correct mistakes.
3) within one hour of the sending of an RWT by any other means. This keeps software errors, hardware
errors, or user errors from placing the ENDEC into a mode where it will continually send RWTs (for
example, a bad override input with override set to generate weekly tests). For example, if you set the
random RWT to occur soon, have it send, then reset the RWT time to again occur soon, the second
alert will not be sent. In some cases, the ENDEC can detect that you are trying to setup to send too
quickly and will display a error. You can reset this one hour check by using MENU.TIMED RWT.RWT
RESET.
4) if another alert is pending.
5) if a monthly test was already sent in the same week. A week starts at midnight Sunday local standard
time. For daylight savings time months, the week starts at 1:00am Sunday. If an RMT is sent after the
start of the week, but before a schedule RWT, it cancels the random RWT for that week.
The random required weekly test commands are detailed in section 12, ENDEC Command Reference.
5.9 Marine Location Codes
In addition to the original state and territories location codes, the ENDEC supports “marine” states:
57, Eastern N. Pacific
58, N. Pacific Near AK
59, Central Pacific
61, S. Central Pacific
65, Western Pacific
73, NW N. Atlantic
75, West N. Atlantic
77, Gulf Of Mexico
91, Lake Superior
92, Lake Michigan
93, Lake Huron
94, Lake St. Clair
96, Lake Erie
97, Lake Ontario
98, St. Lawrence River
In addition, all of the “counties” defined by the NWS as of May 2004 (including codes scheduled to be placed
in service in July 2004) are included. Some of the names are very long, for example,
“Atlantic waters, beyond the 100 fathom line E of mouth of Rio Guajataca, S of 19.5N and between
64N and 68W, including the nearshore waters inside of 100 fathom line of the NW coast of Puerto
Rico, from Punta Cadena to mouth of Rio Guajataca.”
ENDEC Software Setup 53
Sage Digital ENDEC Manual Rev 1.0
To avoid buffer overflows on the ENDEC, as well as on equipment attached to the ENDEC, a limit of 1000
characters (2000 if both English and Spanish are used) is set. If the length of the decoded alert string exceeds
this limit, the numeric FIPS code is used instead of the complete name. For example, most alerts will appear
as:
“The National Weather Service has issued a Tsunami Warning for Caribbean waters of the south
coast from Punta Viento to Punta Melones, and outside of 12nm of west coast from Punta Melones to
Punta Cadena, east of 68W and N of 17N, Charleston Harbor, Coastal waters from Altamaha Sound to
Fernandina Beach, FL out 20 nm, Coastal waters from Cape Fear, NC to Little River Inlet, SC out 20
nm, Coastal waters from Cape Hatteras to Ocracoke Inlet, NC out 20 nm, Coastal waters from Cape
Lookout to Surf City, NC out 20 nm, Coastal waters from Currituck Beach Light to Oregon Inlet, NC
out 20 nm, Coastal waters from Edisto Beach, SC to Savannah, GA out 20 nm, Coastal waters from
Fernandina Beach to St. Augustine, FL out 20 nm, Coastal waters from Little River Inlet to Murrells
Inlet, SC out 20 nm, Coastal waters from Murrells Inlet to South Santee River, SC out 20 nm, and
Athens, OH beginning at 7:59 pm and ending at 8:59 pm (SAGEREC)”
Very long alerts will appear as :
“The National Weather Service has issued a Tsunami Warning for (75740) in West N. Atlantic,
(75330) in West N. Atlantic, (75450) in West N. Atlantic, (75252) in West N. Atlantic, (75154) in
West N. Atlantic, (75158) in West N. Atlantic, (75150) in West N. Atlantic, (75352) in West N.
Atlantic, (75452) in West N. Atlantic, (75254) in West N. Atlantic, (75256) in West N. Atlantic,
Athens, OH, and Belmont, OH beginning at 7:59 pm and ending at 8:59 pm (SAGEREC)”
The size of the buffer was selected so that the longest combination of non-Marine alerts will always fit. Only
a large number of the longest marine codes will be abbreviated as above.
5.10 ENDECSETD program
The ENDECSETD program can be used to edit settings files. Settings files can be received from and sent to
the ENDEC using the “retrieve settings” and “restore settings” items on the ENDEC‟s web page, or by a serial
port.
When using a serial port, you can also:
Upload and download configuration settings from the ENDEC using a serial port.
Set the ENDEC Time of day.
Reboot the ENDEC
The ENDECSETD program must be used to set the options that require long strings of characters, such as
email lists, NTP servers, etc.
ENDECSETD provides access to each setting on the ENDEC, including incoming and outgoing filters and
headers, custom event and location names, the RWT schedule, etc.
ENDECSETD includes item by item help, accessed with the tool.
ENDECSETD can be called with a command line /t option to set the ENDEC time, which can keep the
ENDEC synced to your station clock.
5.11 Using ENDECSETD with the LAN and Web server
To use the ENDECSETD program with the LAN:
1) Fetch the settings file from the ENDEC using the “retrieve settings” menu item on the ENDEC‟s web
page.
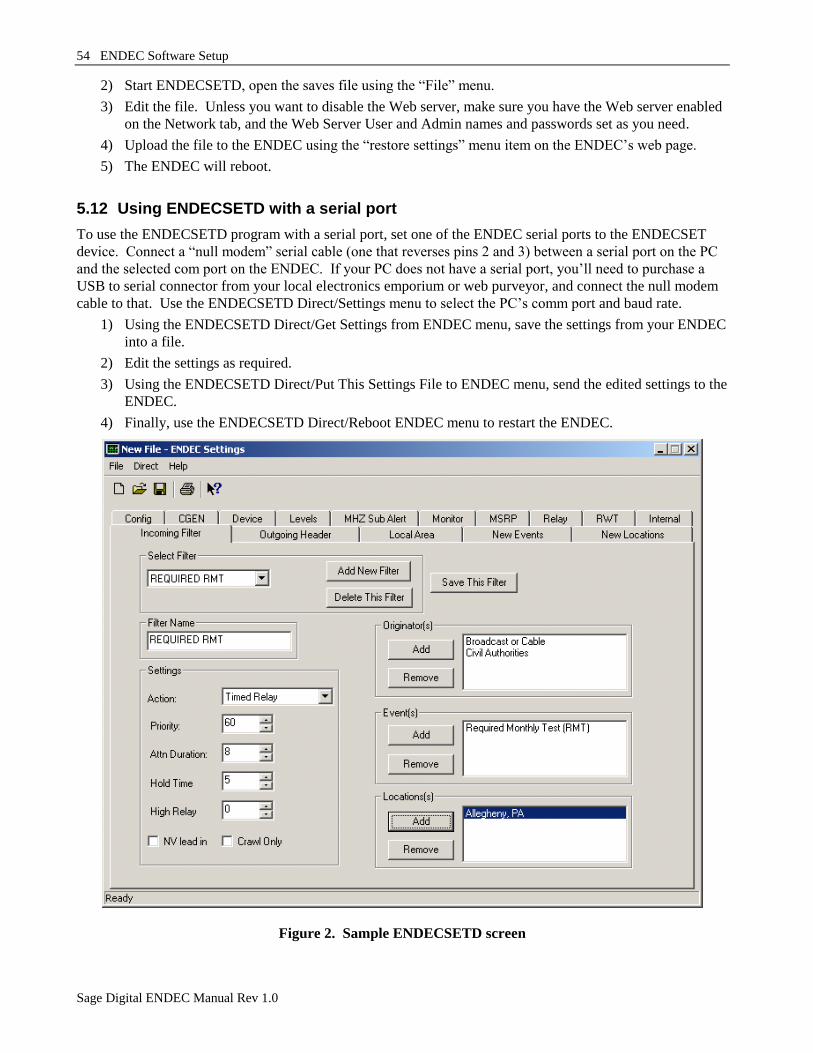
54 ENDEC Software Setup
Sage Digital ENDEC Manual Rev 1.0
2) Start ENDECSETD, open the saves file using the “File” menu.
3) Edit the file. Unless you want to disable the Web server, make sure you have the Web server enabled
on the Network tab, and the Web Server User and Admin names and passwords set as you need.
4) Upload the file to the ENDEC using the “restore settings” menu item on the ENDEC‟s web page.
5) The ENDEC will reboot.
5.12 Using ENDECSETD with a serial port
To use the ENDECSETD program with a serial port, set one of the ENDEC serial ports to the ENDECSET
device. Connect a “null modem” serial cable (one that reverses pins 2 and 3) between a serial port on the PC
and the selected com port on the ENDEC. If your PC does not have a serial port, you‟ll need to purchase a
USB to serial connector from your local electronics emporium or web purveyor, and connect the null modem
cable to that. Use the ENDECSETD Direct/Settings menu to select the PC‟s comm port and baud rate.
1) Using the ENDECSETD Direct/Get Settings from ENDEC menu, save the settings from your ENDEC
into a file.
2) Edit the settings as required.
3) Using the ENDECSETD Direct/Put This Settings File to ENDEC menu, send the edited settings to the
ENDEC.
4) Finally, use the ENDECSETD Direct/Reboot ENDEC menu to restart the ENDEC.
Figure 2. Sample ENDECSETD screen
Network 55
Sage Digital ENDEC Manual Rev 1.0
6. Network This section of the manual will discuss the features of the Sage Digital ENDEC that involve the use of the
LAN connection. Read the section on network security below before using the LAN with your ENDEC.
Except for setting the LAN address and enabling the web server, most of these settings cannot be made from
the front panel, you must use the ENDECSETD or web browser interface. When configuring a LAN
connected ENDEC, for the first time, you must use the front panel:
1) Set the addressing type (DHCP or STATIC). DHCP is the default. If DHCP, use the
MENU.NETWORK.SHOW IP ADDR menu to see the address. If static, set the IP address, gateway,
netmask, and at least one DNS address.
2) If desired, enable access to the ENDEC‟s web server by using the menu.network.web server.
IMPORTANT: see the section on network security below before enabling Web access.
6.1 Network Security
While we have tried to provide you with the tools you need to help keep the ENDEC secure, security is
intimately the responsibility of the user.
What Sage has done:
1) The DHCP server IS enabled, the ENDEC will attempt to get an IP address. If you do not want the
ENDEC on the lan, do not connect a cable to the RJ-45 LAN port on the back of the ENDEC
(labeled LAN 10/100).
2) NTP (Network Time Protocol) IS enabled. The ENDEC does not allow remote control of the NTP
settings via the NTP protocol – it only allows specification of a list of servers via ENDECSETD.
See section 6.2.1, Time (NTP) servers.
3) By default, all control functions that would generate EAS alerts that use the LAN are disabled by
default. This includes the Web server, the automation interface, and the ENDEC PRO/DJ LAN
interface. You must enable these features on the front panel in MENU.NETWORK or on the
ENDECSETD Network tab.
4) The ENDEC‟s web server requires a user name and password to access the web page. There are two
levels of access, the ability to change settings requires an admin name and password, all other
functions require a user name and password. By default, the user name is user and the user
password is user. The admin name and password are both admin. You MUST change these using
ENDECSETD if you want to remain secure. Use the ENDECSETD network tab. If you forget the
admin password, you must restore the factory default settings file at the front panel. Use passwords
that contain upper and lower case letters, numbers, and punctuation. You should also use something
other than “user” and “admin” for the names.
5) The ENDEC‟s web server can use unencrypted (HTTP) or encrypted (HTTPS) access. The ENDEC
uses a self-signed certificate6 for encryption purposes. To access your ENDEC using encryption use
https:// in the URL. For example, if your ENDEC‟s ip address is 192.168.1.100, then you would
enter https://192.168.1.100 in your browser‟s address field. Note: because the ENDEC‟s certificate
can‟t be verified against a signing authority, you will get an error from your browser. Click the
“connect anyway” link to connect to the ENDEC.
6 SSL and certificates are used for several reasons. One is to encrypt the data so a third party can‟t easily snoop on the
session. Another is to allow the web client (user) to be sure that it is talking to expected server, and not a spoof server.
Sage uses SSL to provide encryption, we do not use it for authentication purposes. If you require authentication for your
environment, contact [email protected].
56 Network
Sage Digital ENDEC Manual Rev 1.0
What you must do:
1) Use firewalls as necessary to protect access to the ENDEC. The ENDEC uses the following TCP
ports. “portbase” refers to the portbase number set by MENU.NETWORK.PORTBASE or the portbase
setting on the ENDECSETD network tab.
80 HTTP
443 HTTPS
Portbase Automation
Portbase+2 ENDEC DJ/PRO interface.
Each of these interfaces must be enabled with the ENDECSETD network tab or the front panel
MENU.NETWORK menu.
2) Select appropriately complex passwords for Web Page access and “endecpro pass”. Do not use your
stations call letters.
3) Periodically check the www.sagealertingsystem.com/support web page. Download and install any
security updates.
6.2 Network Settings
Other network settings are described below. For all address lists, addresses can be an IP address or a DNS
name. If you use a DNS name, and your address type is static, you must supply a DNS server address. If
your address type is DHCP, your DHCP server must provide the DNS server address. When using
ENDECSETD, put one address on a line, use as many lines as you need.
6.2.1 Time (NTP) servers
The ENDEC will use this list of NTP (Network Time Protocol) servers to set its time of day clock. When
used on a LAN, NTP will keep the ENDEC clock within a few milliseconds of a local time standard. When
used with an internet server, the time will typically be within several tens of milliseconds. You can specify
a list of NTP severs on the ENDECSETD network tab. Two public access servers are provided by default.
Your facility may also have a NTP server as part of your internal web server or master clock. You can also
configure most Windows or Linux systems to act as a time source. NTP is recommend – the ENDEC will
keep its clock synced to a few tens of milliseconds when it has access to an NTP server.
6.2.2 CAP servers
The ENDEC will poll this list of servers for CAP messages.
6.2.3 Network Printer
The ENDEC will send alert logs to a supported network printer. Current, the ENDEC supports several types
of HP printers.
Network 57
Sage Digital ENDEC Manual Rev 1.0
6.3 Email/FTP settings
See the ENDECSETD Email/FTP tab for these features:
6.3.1 SMTP server
When sending email, the ENDEC will use this address to access the SMTP server. If your SMTP server
requires a password, you can enter the password on the same settings page. The ENDEC does support SSL
(TLS) encryption for email.
6.3.2 Email Addresses
Receiving. Messages are sent to this list as soon as the alert starts arriving, if the alert is one that
might be forwarded. Use this list to notify you in real-time when an alert that requires action, or that
will be automatically relayed, is arriving.
Received. All Alerts are sent to this list. If the alert was something other than a duplicate or Log
Only, then the audio (if any) will be attached to the email message. Use this address list to collect
everything you need for the FCC log.
Error. Error conditions and other engineering status messages are sent to this list.
The text of the email messages can be very long, depending on the number of locations in the alert. If
you send these messages to a cell phone using an SMS email address, for example,
[email protected], the message can be truncated, or multiple text messages can result.
To send a shorter message, place “sms://” in front of the address, for example, sms://[email protected]
Attachments are not sent to sms addresses.
6.3.3 FTP Server
The same data and attachments that are emailed can also be sent to an FTP server. Each message and
attachment is sent as a separate file. Use the FTP section of the ENDECSETD Email/FTP tab to set
your host, username, and password.
You can specify a directory to use by placing it after the host address. For example, if your ftp server
is at 192.168.4.4, and you want to use a directory called eas, then place this in the FTP Host/Path box:
192.168.4.4/eas

58 Network
Sage Digital ENDEC Manual Rev 1.0
Typical Tasks 59
Sage Digital ENDEC Manual Rev 1.0
7. Typical Tasks This section of the manual will tell you how to perform certain common tasks in a “cook book” style. We‟re
going to tell you how to fry an egg, in other words, not all about long chain molecules, coagulation, and the
dangers of excessive cholesterol. All of that is in the reference part of the manual section 12, “ENDEC
Command Reference”
7.1 Weekly Test
Sending a weekly test is the simplest task to perform. The ENDEC is pre-programmed with a weekly test
outgoing header. If you have setup your local area (quick start section 1.6, “Customizing”) all you need to
do to get started is press either the week soft key on the default screen, or the WEEKLY TEST key on the
hand held remote.
If you have a password defined, you‟ll be asked to enter it. If the password is 1 1 1 1 (the default), press the
key under the number “1” on the display, that is, the ENTER button. If the password is 4 4 3 3 1, then press
the keys under those numbers, that is, Enter.
Finally, if you are ready to go on the air, press the proceed soft key. If you are on the wrong plane, press
abort.
7.2 Relaying an ALERT
Relaying an alert is almost as simple. When an alert has been received, and has been selected for relay
(based on the filters that have previously been entered), the Incoming Alert LED on the front panel is lit, the
IN led on the hand held remote is lit, and one of the back panel relays may be closed (depending on options
you‟ve selected). This might flash a strobe if you have provided one.
The display will also show that an alert is pending by showing these two lines:
Length: mm:ss
P Filter Name mm:ss
Length is the total number of minutes and seconds that will be taken up by the alert, include the attention
tone, if any, the audio, if any, and the data (always present).
The mm:ss on the second line will be counting down.
P is a character than says what will happen to this alert when the count reaches zero and you do nothing in
the meantime.
P means it will be played. (p for play)
D means it won‟t (d for delete).
H means your station automation is delaying the message, usually because a commercial is
playing. The countdown counts how long until the ENDEC plays the message anyway.
You can do any of the following:
1) Nothing. If it is an important message (as defined by whoever built your filters) it will play when the
timer expires. If it is not important, it will quietly expire and not play on the air.
2) Listen to the audio that came in with the alert if you missed it the first time. Press pend then press cue.
On the hand held remote, press cue.
3) Send it. To send the alert before the countdown hits zero, press pend then press send, then press
proceed (or abort to cancel).
60 Typical tasks
Sage Digital ENDEC Manual Rev 1.0
4) You can also get fancy and kill the message without playing it, or replace the audio with your own
(either recorded or live), or take audio from another source. See section 12.8, “MENU.ALERTS.SEND
PENDING” for details. The pend soft key will take you to the same menu that MENU.ALERTS.SEND
PENDING describes.
7.3 Originating an Alert
This is a somewhat lengthier recipe. Our assumption is that most broadcasters will be relaying alerts that
have originated elsewhere, therefore you won‟t be asked to originate an alert very often. If you are, you can
place the common alerts into named outgoing templates, or you can assign them to one-touch buttons on the
hand held remote control. If you find that you are acting as a emergency operations center (or you are an
emergency operations center), ask your distributor about the “ENDEC PRO” software package, which can
handle thousands of pre-stored alerts and canned alert audio files.
7.3.1 Originating with templates
With a little pre-planning, you will have a template already built for most of the alert types you‟ll be asked
to build on the fly. In this section, we‟ll assume that this has already been done.
Sending an alert, then, is a simple matter of selecting the proper template. Templates are a description of an
alert, its type (tornado, evacuation, etc.) and its location or locations. Templates are given names by you of
up to 12 characters. You can be descriptive with the name, or simply use it as something to look up in a
procedure book. For example, your book could have:
Template Name Description
Tornado #1 Tornado Warning for Allegheny and Washington
Tornado #2 Tornado Warning for Allegheny
Tornado #3 Tornado Warning for Washington
Clearly, if you regularly issue your own alerts for combinations of 17 different counties, your book could be
unwieldy. Again, your probably won‟t be doing this, and if you are, ENDEC PRO is what you want. Let‟s
assume that you have a small number of possible alerts, and you‟ve built templates for all of them.
The best case is if you have a hand held remote control. It has 22 keys (including shifted keys) that can be
assigned to templates. One key push starts the process.
Originating with hand held remote:
1) Press the one-touch button for the alert you want to send. You don‟t have to be at the default menu
level, though if a question such as “proceed or abort” is being asked you will get an error beep.
2) You will be asked to set the duration of the alert. The display shows hours:minutes. Press more to
increase and less to decrease.7 Press done when done adjusting the duration. The default duration is
specified by MENU.CONFIG.DEFAULT DURATION.
3) Press Proceed to go on the air, or press abort. You will have four minutes to decide8. All other menu
options except proceed/abort time out sooner. See section 10.4, “Controlling Other Stations” if your
configuration includes a multi-station relay panel.
7 Part 11, the FCC EAS rules, specify 15 minute intervals for times less than one hour, and half hour intervals above
that. The display will only show you legal values.
8 All other menu options except proceed/abort time out sooner, set by menu.config.menu timeout.
Typical Tasks 61
Sage Digital ENDEC Manual Rev 1.0
Originating from the front panel
1) Go to MENU.ALERTS.ORIGINATE ALERT.
2) Press Template
3) Scroll through the list with the next soft key.
4) Select a template with pick
5) Press no.
6) You will be asked to set the duration of the alert. The display shows hours:minutes. Press more to
increase and less to decrease.9 Press done with done adjusting the duration. The default duration is
specified by MENU.CONFIG.DEFAULT DURATION.
7) Press Proceed to go on the air, or press abort. You will have four minutes to decide10
. All other menu
options except proceed/abort time out sooner. . See section 10.4, “Controlling Other Stations” if your
configuration includes a multi-station relay panel.
7.4 Viewing, Reprinting, Sending Old Alerts
The ENDEC stores the EAS information from the previous 47 alerts that are sent or received from your
ENDEC. You can access this list to reprint messages lost if your thermal or external printer ran out of
paper. You can also use it to resend an alert that the ENDEC thinks was sent, but that didn‟t make it on to
the air due to mis-configuration of your audio path from the ENDEC.
To see the list of old alerts go to MENU.ALERTS.VIEW ALERT LOG. You will see:
entry 1 of 47
RMT sent at
01/09/98 06:59:44
Done Opt Next Prev
Use Next and Prev to scroll through the list of alerts. Use Done to exit this function. To print an alert or
resend it, pick options (Opt).
entry 1 of 47
RMT sent at
01/09/98 06:59:44
Done View Send
Use View to see the text of the alert. Use the view menu‟s Print soft key to send the text to the printer.
Use Send to send the alert. You will be asked if you really want to send an old alert. You will be asked to
select an audio source. The ENDEC only stores the most recently heard audio. If you try to send an alert
from a week ago, you will probably not get the audio you want. To be sure you are getting the proper audio,
use MENU.ALERTS.PREVIEW AUDIO or the hand held remote‟s CUE button before going to the alert log
menu.
To actually send the alert, use the proceed soft key when it is displayed.
9 Part 11, the FCC EAS rules, specify 15 minute intervals for times less than one hour, and half hour intervals above
that. The display will only show you legal values.
10 All other menu options except proceed/abort time out sooner, set by menu.config.menu timeout.
62 Typical tasks
Sage Digital ENDEC Manual Rev 1.0
7.5 Killing a Pending Alert
In general, in the ENDEC, to “abort” is to stop doing what you are doing, or quite this menu to go up a level.
If you are in the middle of the send pending alert menu, for example, and use the abort soft key, you leave
the menu. The alert stays in the pending condition, though. Just because you aborted the pending menu
doesn‟t mean the you have deleted the alert. If it is on timed relay, it will be sent.
Sometimes, you want to make sure that a pending alert is not sent. To do this, you must KILL it. To kill an
alert, go to MENU.ALERTS.SEND PENDING or use the hand held remote‟s PLAY NOW key.. The soft key
choices will be Send Done Opt Kill. Use the KILL softkey. You will be asked if you want to delete
the alert. Use the DELETE key to delete (kill) the alert. Use abort to leave the menu. If you have a multi
station relay panel, use the STN soft key to kill the alert for stations other than your one.
If you have a hand held remote control, and an alert is pending, and you press the red ABORT key, you will
be taken to the KILL menu.
Important:
If you have started an alert, you must use the abort soft key or the hand held remote‟s ABORT button, and
then let the ENDEC stop the alert. It will finish any heard in progress, not send the spoken audio, and then
send the end of message data. You must allow the end of message data to be sent.
Once you have started an alert, stations that are listening to your station will being to process the alert. If
you panic and turn off the ENDEC, or turn the audio off at the console, the stations listening to yours will
not hear your ENDEC‟s “end of message” data. If they heard the start of the alert, they will wait for two
minutes before timing out. If they are unattended stations, they will then relay the alert with two minutes of
audio - whatever audio you sent after you turned off your ENDEC, placing your program audio on their air.
7.6 Playing Incoming Alert audio as it is Received
The ENDEC will play incoming alert audio on its internal speaker and speaker line out port if you select
ALERTS as your monitor source. Use MENU.MONITOR SOURCE.ALERTS. The speaker will mute again
after the alert is received.
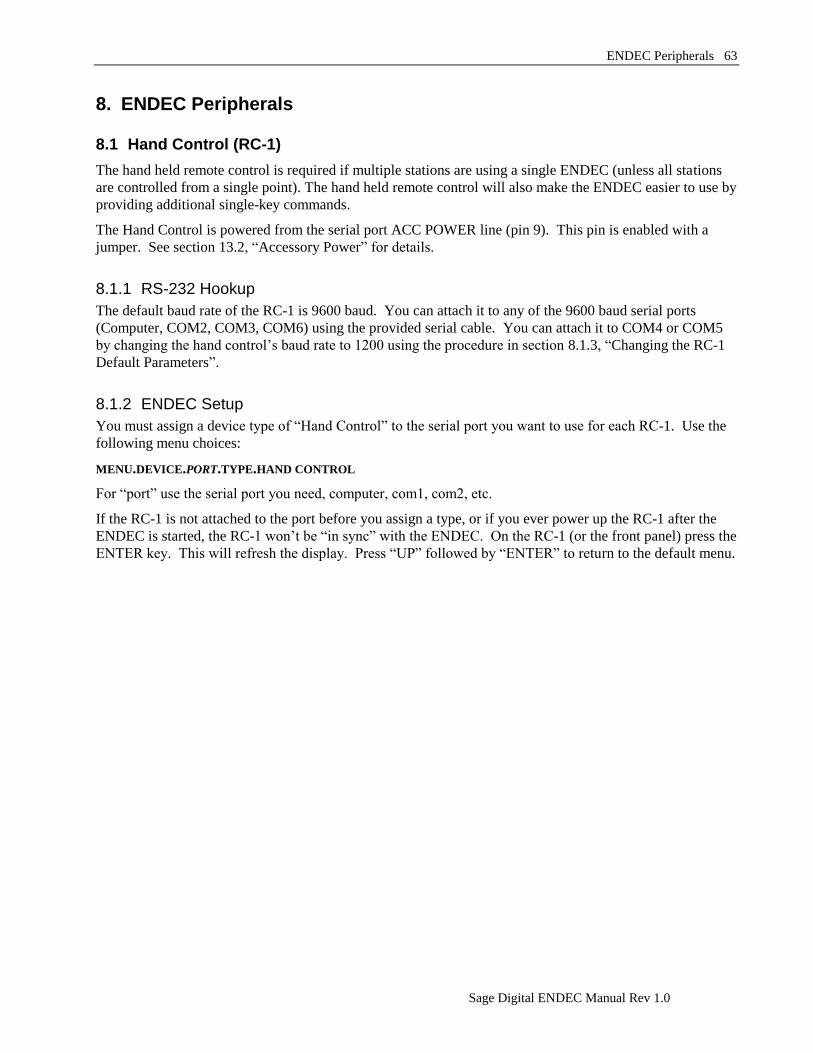
ENDEC Peripherals 63
Sage Digital ENDEC Manual Rev 1.0
8. ENDEC Peripherals
8.1 Hand Control (RC-1)
The hand held remote control is required if multiple stations are using a single ENDEC (unless all stations
are controlled from a single point). The hand held remote control will also make the ENDEC easier to use by
providing additional single-key commands.
The Hand Control is powered from the serial port ACC POWER line (pin 9). This pin is enabled with a
jumper. See section 13.2, “Accessory Power” for details.
8.1.1 RS-232 Hookup
The default baud rate of the RC-1 is 9600 baud. You can attach it to any of the 9600 baud serial ports
(Computer, COM2, COM3, COM6) using the provided serial cable. You can attach it to COM4 or COM5
by changing the hand control‟s baud rate to 1200 using the procedure in section 8.1.3, “Changing the RC-1
Default Parameters”.
8.1.2 ENDEC Setup
You must assign a device type of “Hand Control” to the serial port you want to use for each RC-1. Use the
following menu choices:
MENU.DEVICE.PORT.TYPE.HAND CONTROL
For “port” use the serial port you need, computer, com1, com2, etc.
If the RC-1 is not attached to the port before you assign a type, or if you ever power up the RC-1 after the
ENDEC is started, the RC-1 won‟t be “in sync” with the ENDEC. On the RC-1 (or the front panel) press the
ENTER key. This will refresh the display. Press “UP” followed by “ENTER” to return to the default menu.
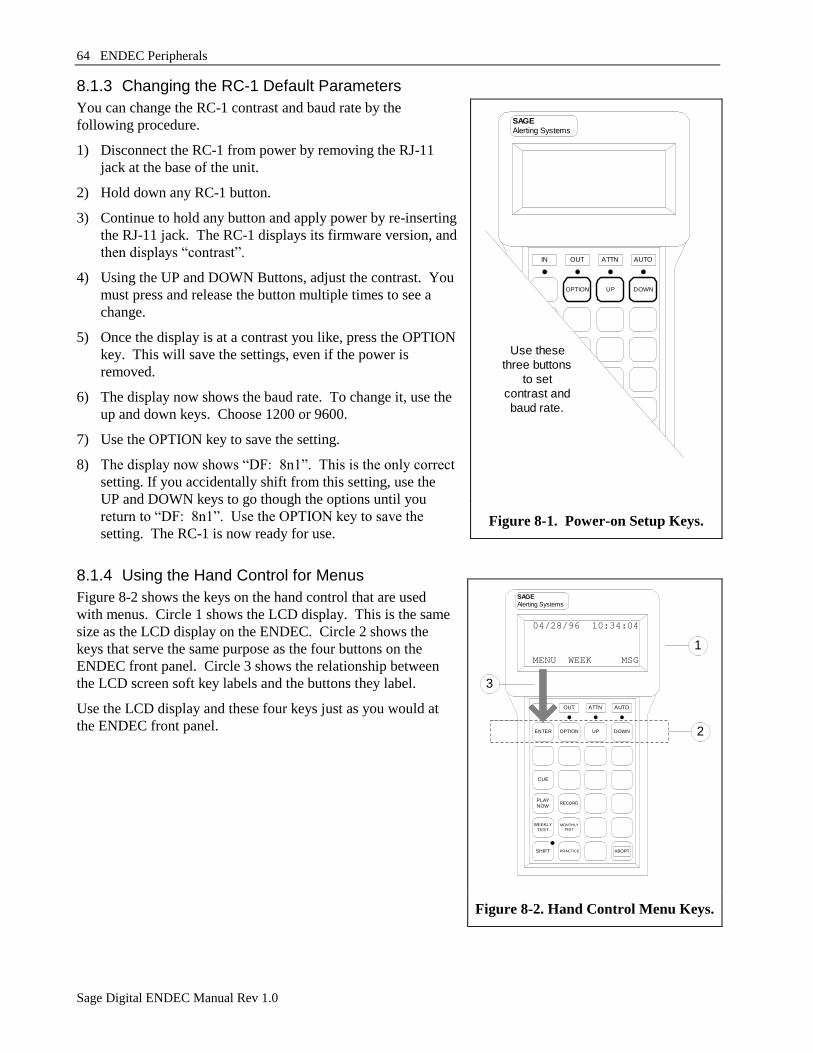
64 ENDEC Peripherals
Sage Digital ENDEC Manual Rev 1.0
8.1.3 Changing the RC-1 Default Parameters
You can change the RC-1 contrast and baud rate by the
following procedure.
1) Disconnect the RC-1 from power by removing the RJ-11
jack at the base of the unit.
2) Hold down any RC-1 button.
3) Continue to hold any button and apply power by re-inserting
the RJ-11 jack. The RC-1 displays its firmware version, and
then displays “contrast”.
4) Using the UP and DOWN Buttons, adjust the contrast. You
must press and release the button multiple times to see a
change.
5) Once the display is at a contrast you like, press the OPTION
key. This will save the settings, even if the power is
removed.
6) The display now shows the baud rate. To change it, use the
up and down keys. Choose 1200 or 9600.
7) Use the OPTION key to save the setting.
8) The display now shows “DF: 8n1”. This is the only correct
setting. If you accidentally shift from this setting, use the
UP and DOWN keys to go though the options until you
return to “DF: 8n1”. Use the OPTION key to save the
setting. The RC-1 is now ready for use.
8.1.4 Using the Hand Control for Menus
Figure 8-2 shows the keys on the hand control that are used
with menus. Circle 1 shows the LCD display. This is the same
size as the LCD display on the ENDEC. Circle 2 shows the
keys that serve the same purpose as the four buttons on the
ENDEC front panel. Circle 3 shows the relationship between
the LCD screen soft key labels and the buttons they label.
Use the LCD display and these four keys just as you would at
the ENDEC front panel.
OPTION UP DOWN
IN OUT ATTN AUTO
SAGE
Alerting Systems
Use these
three buttons
to set
contrast and
baud rate.
Figure 8-1. Power-on Setup Keys.
SHIFT
WEEKLY
TEST
PLAY
NOW
CUE
ENTER
PRACTICE
MONTHLY
TEST
RECORD
OPTION UP
ABORT
DOWN
IN OUT ATTN AUTO
04/28/96 10:34:04
MENU WEEK MSG
SAGE
Alerting Systems
2
1
3
Figure 8-2. Hand Control Menu Keys.
ENDEC Peripherals 65
Sage Digital ENDEC Manual Rev 1.0
8.1.5 Using the Hand Control One-touch buttons
The Hand Control contains a number of useful buttons that can select ENDEC functions with less steps than
the menu system. These commands are pre-printed on the keypad, and are described below.
Key Function
Abort Abort the operation in progress. This can be either a menu item or an active
alert. Note that the ENDEC will always send the End of Message data, even
if an alert is aborted. This will keep you from locking up stations
downstream until they time out. Relayed EAN messages cannot be aborted.
Cue Plays the contents of the digital audio store. Used to preview audio before it
is retransmitted.
Monthly Test Sends the template named “RMT”. There is no default RMT template, you
must build one if you want to use this feature.
Play Now Starts a pending alert, that is, one that has been received and is ready for
retransmission.
Practice Enters the practice mode. See section 12.76.
Record Records from the input selected by MENU.CONFIG.DEFAULT REC into the
digital audio store. This key is used to replace audio from a received
message with local audio before it is rebroadcast.
Shift The shift key is a toggle, meaning that you enter the shift mode by pressing,
then releasing the shift key - don‟t hold it down. The red LED in the shift
key lights to show that the next key you press with be “shifted”. The shift is
released after the next key press.
Shift-Cue Plays the contents of the non-volatile audio store.
Shift-Record Records from the input selected by MENU.CONFIG.DEFAULT REC into the
non-volatile digital audio store.
Weekly Test Sends the template named “RWT”, contains a weekly test by default.
8.1.6 Using the Macro Buttons
Any key that is not pre-printed can be used as a “macro” button. When an outgoing template is built, you
can assign a “one-touch” key to the header. Pressing the “macro” button will send that pre-built header. To
assign a one touch key, press the designed key when prompted with “Enter One-Touch Key or Done”.
To send an alert, press the one-touch key. You will be prompted for the user password (if the user password
length is greater than zero), and then you will be prompted for the duration. Adjust the duration with the
up/down keys and press the done soft key. The default duration is specified by MENU.CONFIG.DEFAULT
DURATION. Then press the proceed key to send the alert. . See section 10.4, “Controlling Other Stations” if
your configuration includes a multi-station relay panel.
Each macro button can be used twice, shifted and unshifted.
66 ENDEC Peripherals
Sage Digital ENDEC Manual Rev 1.0
8.2 LED Sign
The ENDEC supports both Beta-Bright and Alpha LED “marquee” type signs. The text of received and
transmitted alerts are display on the sign, in green for tests, yellow for watches, and red for warnings and
EAN messages.
To configure a sign on the ENDEC, Use MENU.DEVICES.PORT.DEVICE TYPE.LED SIGN. The LED sign
includes a serial cable/RJ-11 to DB-9 interface.
There are two additional options for LED signs:
menu.config.led sign mode Sets display mode - horizontal crawl, vertical crawl. See
section 12.25.
menu.config.led sign
sound
The LED sign will beep when an alert arrives - it can be
disabled with this command. See 12.26.
8.3 VDS Character Generator
The information provided below on the VDS840EAS refers to the use of the VDS840EAS by broadcast TV
stations only. Use by cable systems is covered in the MHz Sub-Alert Manual11
.
The VDS840EAS character generator from Video Data Systems can be used to provide the required alert
information crawl. The crawl is placed at the top of the screen as suggested by Part 11.
To use the VDS840EAS, simply connect a serial cable between any ENDEC serial port and the VDS serial 1
port. You need a 9-pin male on one end and a 9-pin female on the other end, wired as a null modem (2 and 3
reversed).
ENDEC Pin
(male)
Use (ENDEC Point
of View)
VDS 840 Pin
(female)
2 RxD (input) 3
3 TxD (output) 2
5 Ground 5
The VDS factory default is 9600 baud, use the ENDEC COM2, COM3, or COM6 ports, or change the VDS
baud rate jumpers to 1200 and use COM4 or COM5; 9600 baud is recommended. Assign the serial port to
the VDS device with MENU.DEVICES.PORT.DEVICE TYPE.VDS CGEN.
The alert text will crawl with white characters on a background strip that is green for tests, yellow for
watches, and red for warnings or EAN/EAT. The color strip and text is keyed over video.
8.4 Chyron CODI Character Generator
The ENDEC can use the Chyron CODI to provide the required alert information crawl. The crawl is placed
at the top of the screen as suggested by Part 11. The ENDEC will directly support the CODI with a crawl,
no additional hardware or software is required. Third party software is available to provide enhanced
display features, in this case a PC between the ENDEC and the CODI is required. This section assumes that
you will directly connect the ENDEC to the CODI.
Use the serial cable provided with the CODI. You need a cable with a male DB-9 on one end and a female
DB-9 on the other, and pins 2,3, and 5 straight through.
11 Cable systems can have two devices sharing the character generator, the ENDEC commonly uses serial port #2 rather
than #1 as discussed here, and it uses a relay for access arbitration.
ENDEC Peripherals 67
Sage Digital ENDEC Manual Rev 1.0
The CODI rear panel factory switch settings are used, except for baud rate. Change the baud rate to 9600.
The version of the CODI current in 1996 uses 1, 2, and 3 down. Use a unit address of 0-0. All other dip
switches should be down.
Use the ENDEC COM2, COM3, or COM6 ports, or change the CODI baud rate jumpers to 1200 and use
COM4 or COM5; 9600 baud is recommended.
Assign the serial port to the CODI device with MENU.DEVICES.PORT.DEVICE TYPE.CODI CGEN.
The alert text will crawl with white characters on a background strip that is green for tests, yellow for
watches, and red for warnings or EAN/EAT. The color strip and text is keyed over video.
Use MENU.CONFIG.CODI MODE to select between two display modes, fancy and plain. Fancy modifies the
color strip with shading to give a 3D effect.
8.5 Monitor Radio Receivers
The ENDEC supports several audio input points on the rear panel (section 4.3), Monitor In 1 - 6, and
Encoder Audio in.. Levels should be 0.75 to 2Vrms at these inputs. Warning - do not use amplified
speaker level outputs to feed these inputs. Exceeding the 2Vrms level will result in poor audio,
exceeding 10Vrms will damage the ENDEC (specifically U33, U34, U52, and U53).
8.6 Modem Access
The ENDEC supports access via modem. The ENDEC DJ program allows full remote control of the
ENDEC, including remote access to the front panel commands, sending or forwarding alerts, and automatic
log retrieval for any number of ENDECs.
You will need two modems, of course, one on the ENDEC side, and one on the computer running ENDEC
DJ. The ENDEC supports a Hayes Accura 56k compatible modem. Similar modems should also work,
though be sure to use a modem with an internal processor. Do not use a “win modem” for the ENDEC, as
this type of modem depends on a PC to perform most of the modem‟s functions.
You may use any “AT” command set modem on the PC side.
To enable the use of the modem, assign a modem “device” to one of the ENDEC‟s comm ports. See the
ENDEC Manual, MENU.DEVICES command. Use the “modem” device. You will also need to assign a
password for modem use, see the description of the MENU.CHANGE PRO PASS command below.
Be aware that the ENDEC can provide accessory power on pin 9 (see the ENDEC Manual, “Accessory
Power” in the “Connector Descriptions” chapter. Do not use a cable with pin 9 connected when interfacing
the ENDEC to a modem.
It is beyond the scope of this document to provide details on connecting specific types of modems to the
ENDEC. The following general comments apply.
The ENDEC uses this initialization string: ATV1&D0S0=0&K0. The ENDEC will answer the
modem on the first ring, do not attempt to share a phone line with another device or voice user.
The ENDEC expects only a “three wire” interface – RxD, TxD, and ground. Some modems will
want to see DTR. If your modem does not have an “ignore DTR” switch, you will need to build a
connector that loops the modem‟s DSR to its DTR.
The ENDEC‟s “COM2” and COM3 ports provide a DTR signal on pin 4.
Further information is provided in the ENDEC DJ documentation.

68 ENDEC Peripherals
Sage Digital ENDEC Manual Rev 1.0
Interfacing with other Devices 69
Sage Digital ENDEC Manual Rev 1.0
9. Interfacing with other Devices
9.1 Raw EAS input and output
The “encoder” device can be used to send and receive raw EAS messages. The protocol is the same as that
specified in Part 11 for the synchronous EAS data, except that the line format is async, one stop bit. The
sync characters are expected on input, and are sent on output.
The encoder device sends a copy of all bytes that are sent by the ENDEC, that is, when the ENDEC sends an
alert. If you sent data to the encoder device, the ENDEC will interpret it in the same manner as it interprets
FSK data received on an audio port. If the data triggers an alert, the ENDEC uses the Encoder Audio In port
for the audio portion of the message.
The following text is a sample of the output of the encoder device. The „+‟ character is actually the EAS
sync byte, 0xAB.
++++++++++++++++ZCZC-EAS-RWT-006013+0015-1020624-SAGE -
++++++++++++++++ZCZC-EAS-RWT-006013+0015-1020624-SAGE -
++++++++++++++++ZCZC-EAS-RWT-006013+0015-1020624-SAGE -
++++++++++++++++NNNN++++++++++++++++NNNN++++++++++++++++NNNN
Use MENU.DEVICES.PORT.DEVICE TYPE.ENCODER to set an encoder device.
The “decoder” device will show the state of the EAS decoder at the time a message is received or sent.
The general format is:
<type>:<zczc string>
<expanded text>
Type is
local: An alert is being sent by the ENDEC.
match: An alert has been heard by the ENDEC and it matches an input filter.
nomatch: An alert has been heard by the ENDEC and it does not match any filter.
dup: This alert has already been heard.
For example:
local:ZCZC-EAS-RWT-006013+0015-1020638-SAGE -
A Broadcast station or cable system has issued a Required Weekly Test for Contra
Costa, CA beginning at 02:38 am and ending at 02:53 am (SAGE)
Use MENU.DEVICES.PORT.DEVICE TYPE.DECODER to set an encoder device.
9.2 Serial Printer
The ENDEC will print a copy of everything that it sends to the local thermal printer to an external serial
printer. Use MENU.DEVICES.PORT.DEVICE TYPE.SERIAL PRINTER to set an encoder device. The serial
printer will print even if the thermal printer is turned off with MENU.CONFIG.PRINTER.NO.
See section 13.1 for the ENDEC serial pin out, and consult your printer manual to determine your cable
requirements. When connecting the ENDEC to a PC as a serial data capture device, you will typically use a
“null modem” cable, as the pinout for a PC and the ENDEC are identical. A DB-9 null modem cable will
connect pin 2 to 3, 3 to 2, and 5 to 5.
70 Interfacing with other Devices
Sage Digital ENDEC Manual Rev 1.0
9.3 Alert Text Output (Generic Character Generator)
The ENDEC offers an output format suitable for use with devices that want to format alert data for display.
The most common use is for character generators other than those directly supported by the ENDEC (vds840
and Chyron CODI). The format is :
<STX><sev><text><ETX>
Where:
STX 0x02
sev The severity of the alert. For the VDS and Chyron character generators, and
the ENDEC LED signs, the severity is used to set the color of the message.
'1' - 0x31 is most severe (tornado warning, EAN, etc.)
'2' - 0x32 is less severe (tornado watch, etc.)
'3' - 0x33 is not severe (weekly test, etc.)
text The expanded text of the message, length is dependent on the number of
location codes in the alert, the length could be 2000 characters if both English
and Spanish output is selected.
ETX 0x03
The following is a hex dump sample of the output of the GENERIC CGEN device:
00000000 02 33 41 20 42 72 6f 61 64 63 61 73 74 20 73 74 .3A Broadcast st
00000010 61 74 69 6f 6e 20 6f 72 20 63 61 62 6c 65 20 73 ation or cable s
00000020 79 73 74 65 6d 20 68 61 73 20 69 73 73 75 65 64 ystem has issued
00000030 20 61 20 52 65 71 75 69 72 65 64 20 57 65 65 6b a Required Week
00000040 6c 79 20 54 65 73 74 20 66 6f 72 20 43 6c 61 72 ly Test for Clar
00000050 6b 2c 20 4e 56 2c 20 48 75 6d 62 6f 6c 64 74 2c k, NV, Humboldt,
00000060 20 4e 56 2c 20 61 6e 64 20 57 61 73 68 69 6e 67 NV, and Washing
00000070 74 6f 6e 2c 20 44 43 20 62 65 67 69 6e 6e 69 6e ton, DC beginnin
00000080 67 20 61 74 20 30 32 3a 33 34 20 70 6d 20 61 6e g at 02:34 pm an
00000090 64 20 65 6e 64 69 6e 67 20 61 74 20 30 32 3a 34 d ending at 02:4
000000a0 39 20 70 6d 20 28 53 41 47 45 29 03 9 pm (SAGE).
Use MENU.DEVICES.PORT.DEVICE TYPE.GENERIC CGEN to set this device.
9.4 News Room Software
Some stations have news room software, or other wire service software, that watches a serial data stream for
certain tokens. When these tokens are seen, the data is switched to certain terminals, or placed in files, or
other action is taken. To make it easy to interface the ENDEC with this type of software, use the NEWS
FEED device. Use MENU.DEVICES.PORT.DEVICE TYPE.NEWS FEED to set this device. When set, the
ENDEC will send alert and other status messages to this device. Each messages starts with
<ENDECSTART> and ends with <ENDECEND>, for example:
<ENDECSTART>
Local Alert sent at 02/07/97 22:52:55
The National Weather Service has issued a Severe Thunderstorm
Watch for Aleutian Islands, AK beginning at 10:52 pm and ending
at 11:07 pm (SAGE)
ZCZC-WXR-SVA-002010+0015-0390352-SAGE -
<ENDECEND>
<ENDECSTART>
Alert Received at 02/07/97 22:53:14 on monitor #1
Matched Filter REQUIRED RMT
A Broadcast station or cable system has issued a Required Monthly
Interfacing with other Devices 71
Sage Digital ENDEC Manual Rev 1.0
Test for Autauga, AL and Barbour, AL beginning at 10:52 pm and
ending at 11:07 pm (SAGE)
ZCZC-EAS-RMT-001001-001005+0015-0390352-SAGE -
<ENDECEND>
9.5 Commercial Tally
If you want to run the ENDEC in automatic mode, but don‟t want low priority messages to interrupt
commercials, the ENDEC has a “commercial tally” feature. If you can close (or open) a relay during the
time when you don‟t want an alert to interrupt programming the ENDEC‟s manual override Hold Off feature
can be used.
Use MENU.OVERRIDE USE.HOLD OFF to set this mode. Use MENU.OVERRIDE USE.ACTIVE POLARITY to set
the active state (open or close). Wire the relay on your automation equipment to connect the manual
override input to an audio common when the relay is closed, and to float manual override when your relay is
open.
If Hold Off is set, and active polarity is Closed, the ENDEC will hold alerts it wants to send while your relay
is closed. It will send the alert when your relay is open.
The maximum hold off time is 15 minutes. Hold off node is entered after the incoming filter‟s time has
expired. EAN/EAT alerts (the Presidential level) ignore manual override. You can also set other alert
types, such as Tornado Warnings, to ignore manual override by setting their filter priority higher than
MENU.CONFIG.MIN OVERRIDE PRIO.
A two step hold off process can also be initiated by the ENDEC. If your automation equipment can schedule
an interrupt, the ENDEC can close a relay to signal that an alert is pending. See the pending relay program
described in section 5.7, Relay Programming.
9.6 Daylight Only Stations
Stations that operate during day hours only are required to retain Required Monthly Tests that arrive
overnight, and relay them in the morning A special version of the hold off feature, called Hold Off Night
can be used. Use MENU.OVERRIDE USE.HOLD OFF NIGHT to set this mode. When the override is asserted,
monthly test messages will be held without regard to the 15 minute limit.
9.7 Older EBS Equipment
This section is retained as a historical artifact.
The ENDEC may be used to replace old EBS equipment in some cases. Old EBS equipment closed a relay
when the EBS two-tone signal was received. The ENDEC can be set to close one of the four relays when
the two tone signal is received on any input.
The ENDEC will also close a relay if the two-tone signal is heard stand-alone.
The two-tone signal must be received for the number of seconds specified in MENU.CONFIG.ATTN DECODE.
Set a relay to the “ATTN Detect” program with MENU.RELAY. See section 5.7, Relay Programming, for
information on programming relays.

72 Interfacing with other Devices
Sage Digital ENDEC Manual Rev 1.0
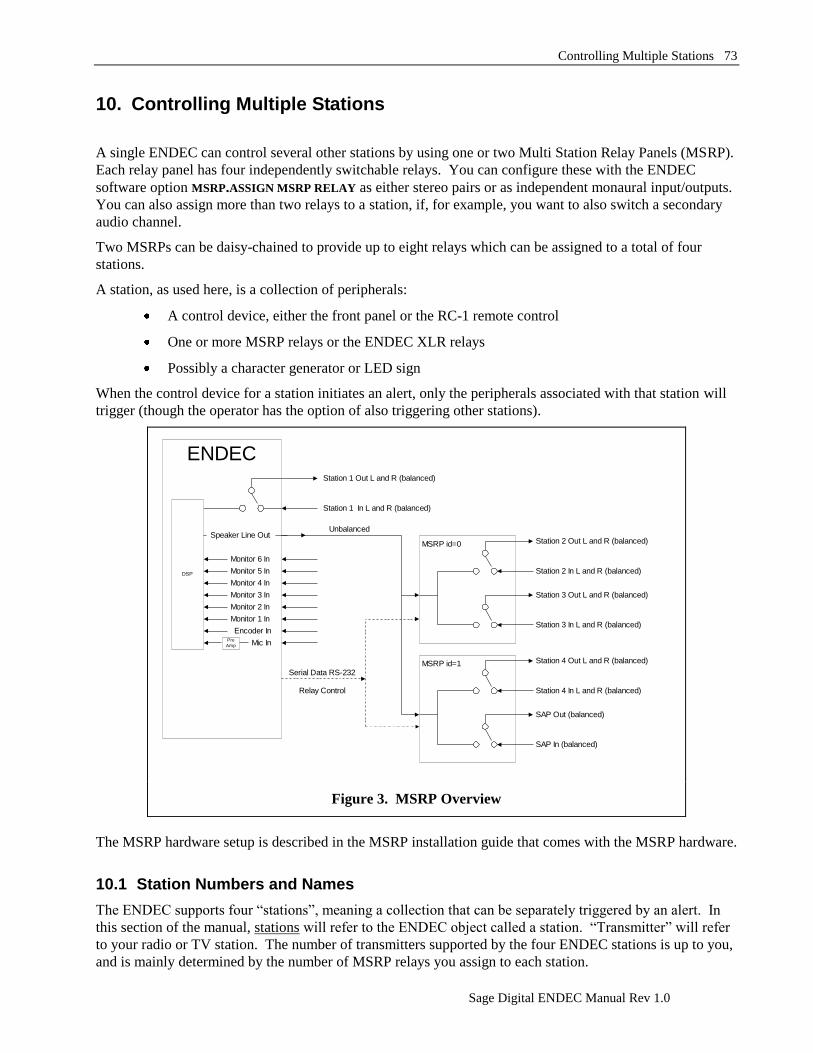
Controlling Multiple Stations 73
Sage Digital ENDEC Manual Rev 1.0
10. Controlling Multiple Stations
A single ENDEC can control several other stations by using one or two Multi Station Relay Panels (MSRP).
Each relay panel has four independently switchable relays. You can configure these with the ENDEC
software option MSRP.ASSIGN MSRP RELAY as either stereo pairs or as independent monaural input/outputs.
You can also assign more than two relays to a station, if, for example, you want to also switch a secondary
audio channel.
Two MSRPs can be daisy-chained to provide up to eight relays which can be assigned to a total of four
stations.
A station, as used here, is a collection of peripherals:
A control device, either the front panel or the RC-1 remote control
One or more MSRP relays or the ENDEC XLR relays
Possibly a character generator or LED sign
When the control device for a station initiates an alert, only the peripherals associated with that station will
trigger (though the operator has the option of also triggering other stations).
The MSRP hardware setup is described in the MSRP installation guide that comes with the MSRP hardware.
10.1 Station Numbers and Names
The ENDEC supports four “stations”, meaning a collection that can be separately triggered by an alert. In
this section of the manual, stations will refer to the ENDEC object called a station. “Transmitter” will refer
to your radio or TV station. The number of transmitters supported by the four ENDEC stations is up to you,
and is mainly determined by the number of MSRP relays you assign to each station.
ENDEC
Monitor 1 In
Speaker Line Out
Monitor 2 In
Monitor 3 In
Monitor 4 In
Monitor 5 In
Monitor 6 In
Station 1 In L and R (balanced)
Station 1 Out L and R (balanced)
DSP
Mic In
Encoder InPre
Amp
Station 2 In L and R (balanced)
Station 2 Out L and R (balanced)
Station 3 In L and R (balanced)
Station 3 Out L and R (balanced)
Station 4 In L and R (balanced)
Station 4 Out L and R (balanced)
SAP In (balanced)
SAP Out (balanced)
MSRP id=0
Serial Data RS-232
Relay Control
MSRP id=1
Unbalanced
Figure 3. MSRP Overview

74 Controlling Multiple Stations
Sage Digital ENDEC Manual Rev 1.0
Station number 1 always owns the internal ENDEC XLR relays. It may also own one or more MSRP relays.
You can not assign the XLR relays to other stations. Only station 1 will be triggered by the manual override
input when it is used as a trigger for a Weekly Test (section 12.62).
You assign MSRP relays to stations by using the MSRP.ASSIGN MSRP RELAY menu. The back panel of the
MSRP labels the relays like this: 1L, 1R, 2L, 2R. Each relay can be separately switched. If a second MSRP
is used, the ENDEC will refer to its relays as 3L, 3R, 4L, 4R.
By default, the MSRP relays are assign to stations like this:
Relay Name Station
1L 2
1R 2
2L 3
2R 3
3L 4
3R 4
4L 0
4R 0
This means that station 1 controls the internal ENDEC XLR relays. Station 2 controls the first pair of
MSRP relays, station 3 the second. If a second MSRP is present, station 4 controls the first pair and the
second pair is unused.
Assume you have a TV transmitter with a SAP channel (station 1), an FM transmitter (station 2), and a
mono AM transmitter (station 3), all controlled from a single ENDEC. You can support these with a single
ENDEC and one MSRP, with relay assignments like this:
Relay Name Station Use
XLR L 1 (fixed) TV Main Channel Left
XLR R 1 (fixed) TV Main Channel Right
1L 2 FM Main Channel Left
1R 2 FM Main Channel Right
2L 3 AM Main Channel
2R 1 TV SAP Channel
In this example, you would assign the character generator to station 1 with MENU.DEVICES.PORT.STATION.
10.2 Configuring the ENDEC for MSRP Use
To configure your ENDEC for use with an MSRP you will need to do at least the following:
1) Assign a comm port to the RELAY device, for example, DEVICES.COM4.DEVICE TYPE.RELAY. Use
either of the two 1200 baud ports, COM4 or COM5. Refer to the MSRP Installation Manual for
information on daisy-chaining two MSRPs.
2) Assign a comm port to the hand held remote control for each station. See the “ENDEC Peripherals”
section of the ENDEC manual for hookup information. Only two Remote controls can be powered from
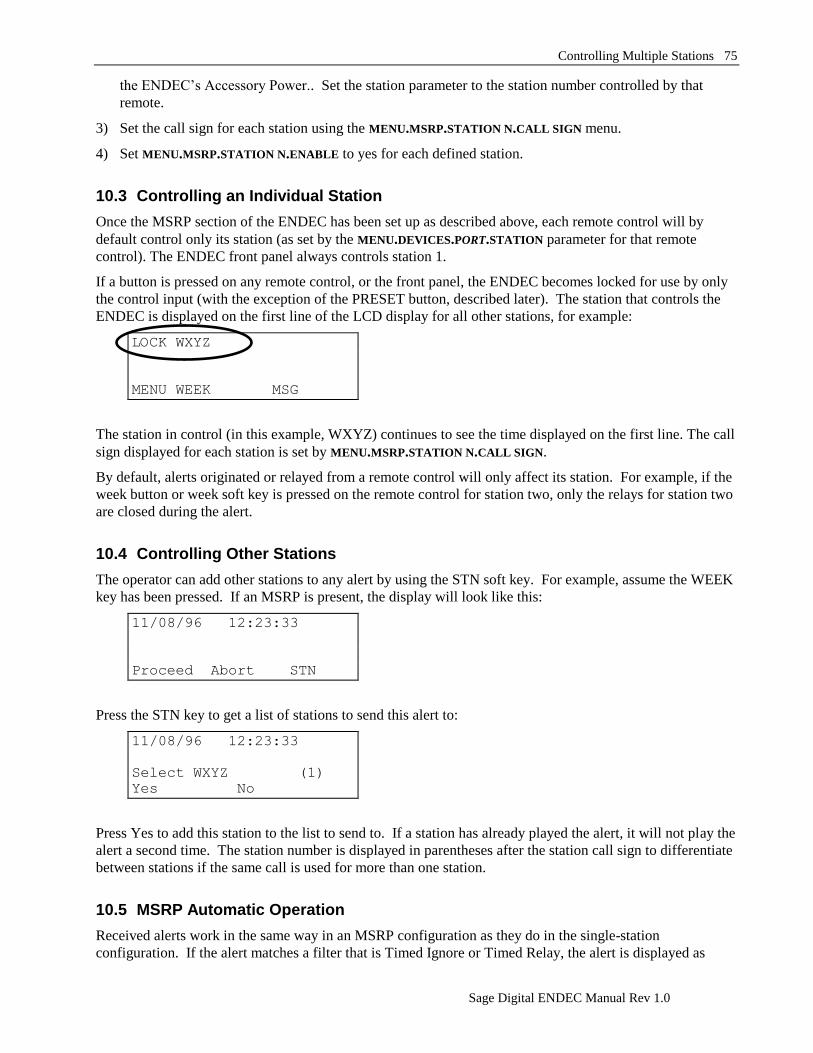
Controlling Multiple Stations 75
Sage Digital ENDEC Manual Rev 1.0
the ENDEC‟s Accessory Power.. Set the station parameter to the station number controlled by that
remote.
3) Set the call sign for each station using the MENU.MSRP.STATION N.CALL SIGN menu.
4) Set MENU.MSRP.STATION N.ENABLE to yes for each defined station.
10.3 Controlling an Individual Station
Once the MSRP section of the ENDEC has been set up as described above, each remote control will by
default control only its station (as set by the MENU.DEVICES.PORT.STATION parameter for that remote
control). The ENDEC front panel always controls station 1.
If a button is pressed on any remote control, or the front panel, the ENDEC becomes locked for use by only
the control input (with the exception of the PRESET button, described later). The station that controls the
ENDEC is displayed on the first line of the LCD display for all other stations, for example:
LOCK WXYZ
MENU WEEK MSG
The station in control (in this example, WXYZ) continues to see the time displayed on the first line. The call
sign displayed for each station is set by MENU.MSRP.STATION N.CALL SIGN.
By default, alerts originated or relayed from a remote control will only affect its station. For example, if the
week button or week soft key is pressed on the remote control for station two, only the relays for station two
are closed during the alert.
10.4 Controlling Other Stations
The operator can add other stations to any alert by using the STN soft key. For example, assume the WEEK
key has been pressed. If an MSRP is present, the display will look like this:
11/08/96 12:23:33
Proceed Abort STN
Press the STN key to get a list of stations to send this alert to:
11/08/96 12:23:33
Select WXYZ (1)
Yes No
Press Yes to add this station to the list to send to. If a station has already played the alert, it will not play the
alert a second time. The station number is displayed in parentheses after the station call sign to differentiate
between stations if the same call is used for more than one station.
10.5 MSRP Automatic Operation
Received alerts work in the same way in an MSRP configuration as they do in the single-station
configuration. If the alert matches a filter that is Timed Ignore or Timed Relay, the alert is displayed as
76 Controlling Multiple Stations
Sage Digital ENDEC Manual Rev 1.0
pending on the display, and the countdown is shown. If a Timed Relay alert times out, it will be sent on all
stations with MENU.MSRP.STATION N.ENABLE set to yes. A Timed Ignore alert is deleted when the hold
time expires.
While an alert is in the pending state, each operator can elect to send the alert on his or her transmitter by
using the play now button or the PEND soft key.
To send the alert:
Press the PEND or Play Now button. If this is the first remote control to do so, the ENDEC will go into the
pending alert menu. If the ENDEC is already locked by another station, the LOCK message will be
displayed.
If the ENDEC is locked, press the PRESET button. This will place this station in a queue waiting to access
the ENDEC. Your position in the queue will be displayed on the LCD display:
LOCK WXYZ q:1
MENU WEEK PEND MSG
The q:n shows your position in the queue, 1 meaning you are next (one station is in front of you and is
controlling the ENDEC), 2 means two stations are in front (one waiting, one controlling), etc.
If you are in control, proceed through the pending menu in the normal manner. If you are queued for
access, the remote control‟s LEDs will flash and a “you may proceed” message appears in the display. Press
the PEND soft key or the play now button to continue. You can relay the alert with the SEND menu, or you
can review the text with the OPT.VIEW menu, preview the audio with the CUE menu, or stop a timed relay
message from playing on your station with the OPT.DEL menu.
10.6 Unattended Operation
The ENDEC relays an incoming alert based in part on whether the ENDEC is in Automatic or Manual
mode. To review the concepts:
Automatic mode: The CONFIG.MODE parameter is set to auto, or CONFIG.MODE is set to timed and the
time of day is in the automatic range.
Manual mode: The config.mode parameter is set to manual, or CONFIG.MODE is set to timed and the time of
day is NOT in the automatic range.
Incoming alert action When relayed if Automatic When relayed if Manual
Automatic Relay Immediate Immediate
Timed Relay Immediate When hold time expires
Timed Ignore Discarded Immediately Discarded after hold time expires
Manual Discarded when hold time expires Discarded when hold time expires
Log Only Never Relayed Never Relayed
In an MSRP configuration, MENU.CONFIG.MODE is an override for all stations. If MENU.CONFIG.MODE is
set to manual, then MENU.MSRP.STATION N.MODE will control each station. The action for each station is
the same as the above table with the following exception: If the incoming alert action is Timed Relay, and
config.mode is manual, and MENU.MSRP.STATION N.MODE is auto, the alert is not immediately relayed. It
is instead held until the hold time expires. This is to allow a manual station to pick the time it will send an
alert, rather than having to wait until the alert is sent on the unattended stations first. When the manual
station does send its alert, MENU.MSRP.STATION N.MODE AUTO stations will trigger along with the manual
station.
Cable TV Options 77
Sage Digital ENDEC Manual Rev 1.0
11. Cable TV Options The ENDEC supports the MHz Sub-Alert to provide EAS to cable operators. Information on the Sub Alert
system is provided by MHz. The ENDEC commands that are specific to cable are described in this section.
11.1 Non-Volatile Audio Storage
When configured with the “Cable TV” option, the ENDEC has either 10 seconds or 40 seconds of
non-volatile audio storage in addition to the standard two minutes of volatile storage. Non-volatile audio is
audio that is retained even when the power is off. See section 3.3 for a description of ENDEC memory.
This audio is normally used to announce a “tune to” channel as part of the all-channel audio interrupt. It can
also be used as a lead-in “sounder” for broadcast stations. See section 12.31, MENU.CONFIG.NV LEAD-IN
for details.
11.2 MHz Sub Alert
For cable operation, you will need to follow the basic customization procedures. You‟ll need to:
Set the time of day (MENU.DATE/TIME)
Set the “call sign”, in your case, the cable system name (MENU.CONFIG.CALL SIGN)
Set incoming filters for any messages you want to automatically forward. (MENU.PRESETS.INCOMING)
Set the desired mode of operation (MENU.MHZ SUB-ALERT.ENABLE), described below.
Set a character generator device to a serial port (MENU.DEVICES)
Set the presence of non-volatile audio storage memory (MENU.CONFIG.NV AUDIO LEN)
The commands to customize cable operation are discussed below. These commands adjust the basic cable
alert time line, which is shown in Figure 11-1. The parts of the time line are:
Attention Signal The second Attention Signal is required for some types of alerts, and is optional for
others. This Attention Signal is part of the FCC requirements. The first Attention
Signal period is optional. It‟s length is controlled by MENU.MHZ SUB-ALERT.ATTN
DURATION and can be zero.
Tune To Audio The contents of the non-volatile audio store are played at this time. This audio is
recorded by you using any of the audio inputs. This audio is retained across power
failures. The audio can be repeated any number of times, set by MENU.MHZ SUB-
ALERT.TUNE TO REP.
EAS Header The standard EAS header is repeated three times and is always present.
EAS Audio The audio that came in with the message that is being relayed was stored in the two
minute audio store. It is relayed once at this time, and a variable number of times at
the end of the alert.
EAS EOM The EAS end of message data is sent three times, and is always present.
EAS Audio Repeat The EAS audio is replayed the number of times specified in MENU.MHZ SUB-
ALERT.REPEATS. It can be zero.
Several operations occur during the timeline. The decoder active and encoder active relays are pre-empted
for use by the sub-alert, any definitions for these relays specified in menu.relay are ignored. Settings for the
ATTN Active relay and the virtual relays are used. See section 5.7, Relay Programming, for information.
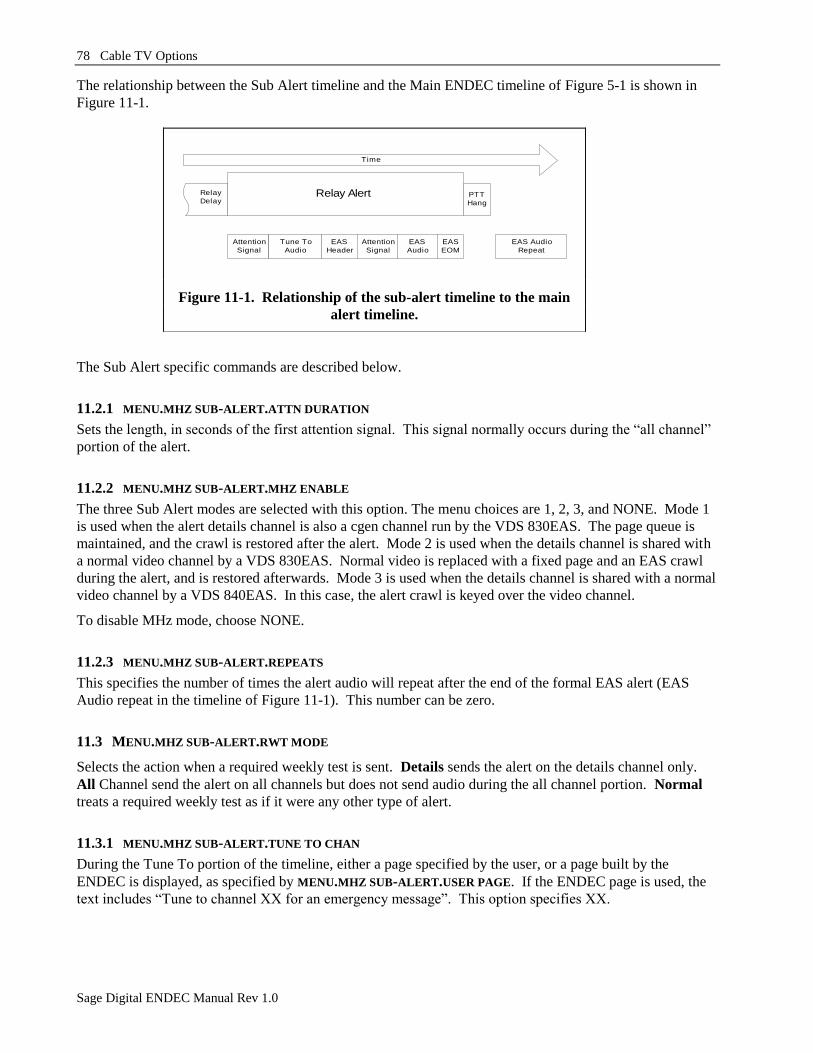
78 Cable TV Options
Sage Digital ENDEC Manual Rev 1.0
The relationship between the Sub Alert timeline and the Main ENDEC timeline of Figure 5-1 is shown in
Figure 11-1.
The Sub Alert specific commands are described below.
11.2.1 MENU.MHZ SUB-ALERT.ATTN DURATION
Sets the length, in seconds of the first attention signal. This signal normally occurs during the “all channel”
portion of the alert.
11.2.2 MENU.MHZ SUB-ALERT.MHZ ENABLE
The three Sub Alert modes are selected with this option. The menu choices are 1, 2, 3, and NONE. Mode 1
is used when the alert details channel is also a cgen channel run by the VDS 830EAS. The page queue is
maintained, and the crawl is restored after the alert. Mode 2 is used when the details channel is shared with
a normal video channel by a VDS 830EAS. Normal video is replaced with a fixed page and an EAS crawl
during the alert, and is restored afterwards. Mode 3 is used when the details channel is shared with a normal
video channel by a VDS 840EAS. In this case, the alert crawl is keyed over the video channel.
To disable MHz mode, choose NONE.
11.2.3 MENU.MHZ SUB-ALERT.REPEATS
This specifies the number of times the alert audio will repeat after the end of the formal EAS alert (EAS
Audio repeat in the timeline of Figure 11-1). This number can be zero.
11.3 MENU.MHZ SUB-ALERT.RWT MODE
Selects the action when a required weekly test is sent. Details sends the alert on the details channel only.
All Channel send the alert on all channels but does not send audio during the all channel portion. Normal
treats a required weekly test as if it were any other type of alert.
11.3.1 MENU.MHZ SUB-ALERT.TUNE TO CHAN
During the Tune To portion of the timeline, either a page specified by the user, or a page built by the
ENDEC is displayed, as specified by MENU.MHZ SUB-ALERT.USER PAGE. If the ENDEC page is used, the
text includes “Tune to channel XX for an emergency message”. This option specifies XX.
Relay Alert PTT
Hang
Time
Tune To
Audio
EAS
Header
Attention
Signal
Attention
Signal
EAS
Audio
EAS
EOM
EAS Audio
Repeat
Relay
Delay
Figure 11-1. Relationship of the sub-alert timeline to the main
alert timeline.

Cable TV Options 79
Sage Digital ENDEC Manual Rev 1.0
11.3.2 MENU.MHZ SUB-ALERT.TUNE TO REP
Specifies the number of times the non-volatile audio message plays. It can be zero. You record this audio, it
usually contains a script such as “Tune to channel xx for an emergency message”.
11.3.3 MENU.MHZ SUB-ALERT.USER PAGE
You are given a choice of “yes” or “no”. If yes, page 98 is displayed during the “tune to” portion of the
timeline.

80 Cable TV Options
Sage Digital ENDEC Manual Rev 1.0
ENDEC Command Reference 81
Sage Digital ENDEC Manual Rev 1.0
12. ENDEC Command Reference
12.1 MENU.ALERTS.CLEAR ALERT LOG
This command will clear the history log of old alerts. The last 47 alerts are saved in non-volatile
RAM where they can be re-issued with MENU.ALERTS.VIEW ALERT LOG.
12.2 MENU.ALERTS.CLEAR LED SIGN
This command will clear the LED sign of any message. Use to clear a long duration alert that is no
longer interesting.
12.3 MENU.ALERTS.ORIGINATE ALERT
Used to build an alert “on the fly”, that is, in real-time. The alert can be built totally from scratch, or
you can modify an existing outgoing template. A template contains an originator and event code, a
list of locations, and other parameters for the alert, such as audio source. See section 7.3,
“Originating an Alert” for details.
12.4 MENU.ALERTS.PREVIEW AUDIO
Hand held remote control key: cue.
This command will play the contents of the digital recorder, if any. The digital recorder contains the
last received alert audio, or the last recorded local audio. You can record local audio with
MENU.ALERTS.RECORD AUDIO or the record hand held remote key. The number of seconds
remaining in the playback is shown on the display.
12.5 MENU.ALERTS.PREVIEW NVAUDIO
Hand held remote control key: shift-cue.
This command will play the contents of the non-volatile audio store, if any. The non-volatile audio
store is loaded with the MENU.ALERTS.NVRECORD AUDIO or the shift-record hand held remote
button. The number of seconds remaining in the playback is shown on the display.
12.6 MENU.ALERTS.RECORD AUDIO
Hand held remote control key: record.
This command will record audio from any of the audio inputs (except the Main Audio XLR, which
is pass-through audio only). Audio stored in this way will be played as the alert audio whenever the
audio type for an alert is “stored audio”.
To record:
1. Go to MENU.ALERTS.RECORD AUDIO.
2. At the “Select Source:” prompt, scroll with next or prev to the input you want, usually “encoder
in” or “microphone”. Press pick to select. Note: The hand held remote record key does not ask
for a source. The intent is to simplify the interface as it is likely that the remote location will
use a fixed input. The audio input for use with the record key is set with
MENU.CONFIG.DEFAULT REC.. A user at the remote control can still set the record source by
using the menu keys and selecting MENU.ALERTS.RECORD AUDIO.
82 ENDEC Command Reference
Sage Digital ENDEC Manual Rev 1.0
3. Use the start soft key, or the microphone push-to-talk button to start recording from the selected
source.
4. The display will count down to the end of the digital recorder storage, 120 seconds.
5. To end recording, press the end soft key, or release the microphone push-to-talk. Recording
will automatically stop at the end of 120 seconds.
To erase the contents of the audio recorder:
1. Go to MENU.ALERTS.RECORD AUDIO.
2. Select any audio source.
3. Use the erase soft key to delete stored audio.
Audio stored in the audio recorder is lost across a power cycle.
12.7 MENU.ALERTS.RECORD NVAUDIO
Hand held remote control key: shift-record.
This command will record audio from any of the audio inputs (except the Main Audio XLR, which
is pass-through audio only). Audio stored in this way can will be played as “tune to” audio for cable
TV applications (see section 11.2, “MHz Sub Alert”). It can also be used as a lead-in sounder
before an alert, see section 12.31, “MENU.CONFIG.NV LEAD-IN”
To record:
1. Go to MENU.ALERTS.RECORD NVAUDIO.
2. At the “Select Source:” prompt, scroll with next or prev to the input you want, usually “encoder
in” or “microphone”. Press pick to select. Note: The hand held remote shift-record key does
not ask for a source. The intent is to simplify the interface as it is likely that the remote location
will use a fixed input. The audio input for use with the shift-record key is set with
MENU.CONFIG.DEFAULT REC.. A user at the remote control can still set the record source by
using the menu keys and selecting MENU.ALERTS.RECORD NVAUDIO.
3. Use the start soft key, or the microphone push-to-talk button to start recording from the selected
source.
4. The display will count down to the end of the non-volatile digital recorder storage, 10 or 40
seconds (as selected by MENU.CONFIG.NV AUDIO LEN).
5. To end recording, press the end soft key, or release the microphone push-to-talk. Recording
will automatically stop at the end of the non-volatile audio store (as set by MENU.CONFIG.NV
AUDIO LEN).
To erase the contents of the non-volatile audio recorder:
1. Go to MENU.ALERTS.RECORD NVAUDIO.
2. Select any audio source.
3. Use the erase soft key to delete stored audio.
Audio stored in the non-volatile audio recorder is retained across a power cycle.
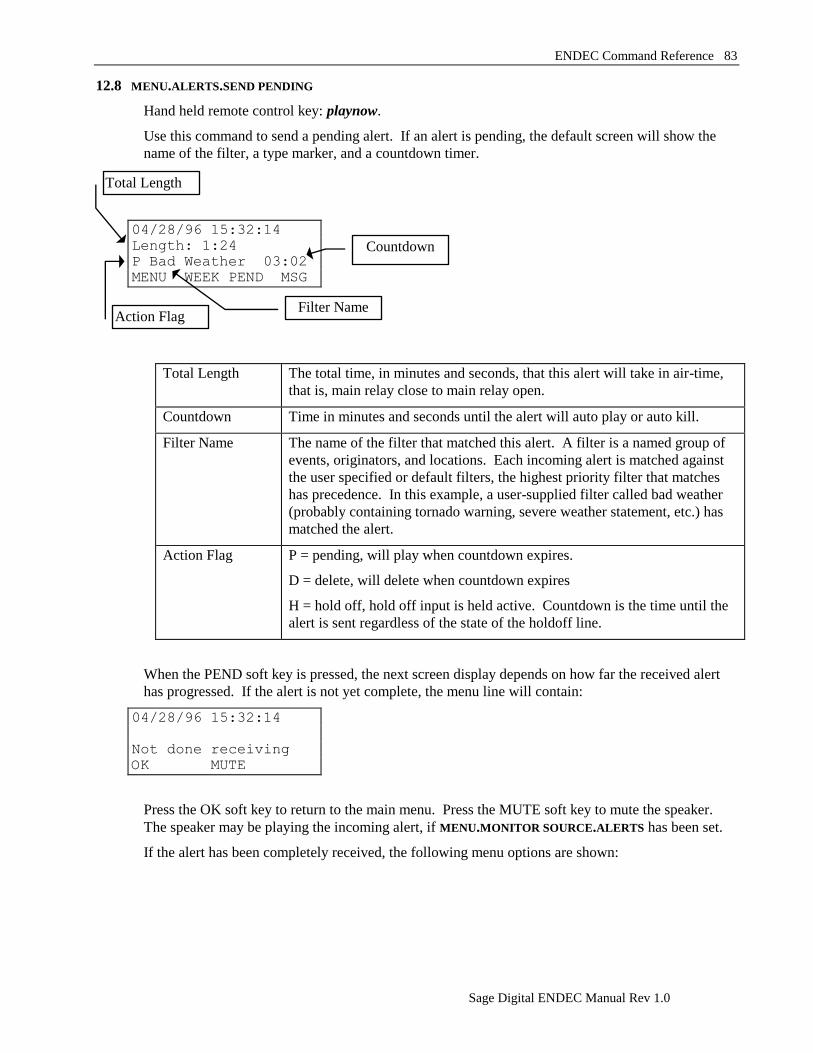
ENDEC Command Reference 83
Sage Digital ENDEC Manual Rev 1.0
12.8 MENU.ALERTS.SEND PENDING
Hand held remote control key: playnow.
Use this command to send a pending alert. If an alert is pending, the default screen will show the
name of the filter, a type marker, and a countdown timer.
04/28/96 15:32:14
Length: 1:24
P Bad Weather 03:02
MENU WEEK PEND MSG
Total Length The total time, in minutes and seconds, that this alert will take in air-time,
that is, main relay close to main relay open.
Countdown Time in minutes and seconds until the alert will auto play or auto kill.
Filter Name The name of the filter that matched this alert. A filter is a named group of
events, originators, and locations. Each incoming alert is matched against
the user specified or default filters, the highest priority filter that matches
has precedence. In this example, a user-supplied filter called bad weather
(probably containing tornado warning, severe weather statement, etc.) has
matched the alert.
Action Flag P = pending, will play when countdown expires.
D = delete, will delete when countdown expires
H = hold off, hold off input is held active. Countdown is the time until the
alert is sent regardless of the state of the holdoff line.
When the PEND soft key is pressed, the next screen display depends on how far the received alert
has progressed. If the alert is not yet complete, the menu line will contain:
04/28/96 15:32:14
Not done receiving
OK MUTE
Press the OK soft key to return to the main menu. Press the MUTE soft key to mute the speaker.
The speaker may be playing the incoming alert, if MENU.MONITOR SOURCE.ALERTS has been set.
If the alert has been completely received, the following menu options are shown:
Countdown
Filter Name Action Flag
Total Length
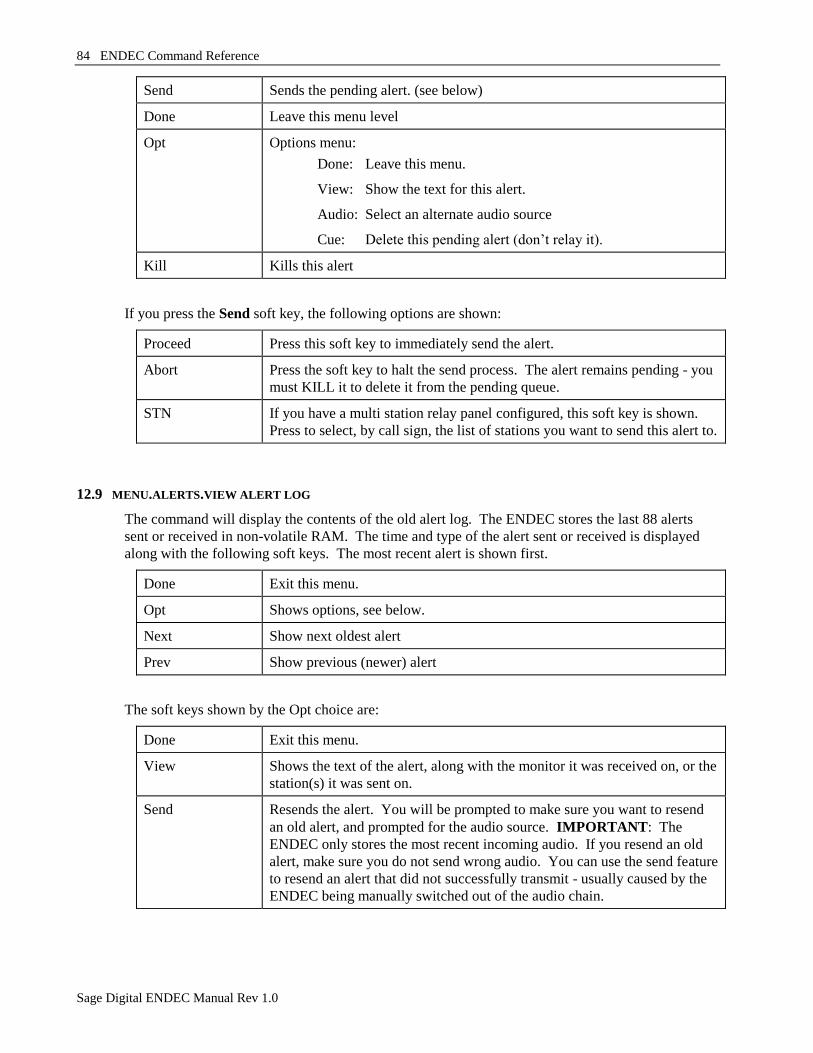
84 ENDEC Command Reference
Sage Digital ENDEC Manual Rev 1.0
Send Sends the pending alert. (see below)
Done Leave this menu level
Opt Options menu:
Done: Leave this menu.
View: Show the text for this alert.
Audio: Select an alternate audio source
Cue: Delete this pending alert (don‟t relay it).
Kill Kills this alert
If you press the Send soft key, the following options are shown:
Proceed Press this soft key to immediately send the alert.
Abort Press the soft key to halt the send process. The alert remains pending - you
must KILL it to delete it from the pending queue.
STN If you have a multi station relay panel configured, this soft key is shown.
Press to select, by call sign, the list of stations you want to send this alert to.
12.9 MENU.ALERTS.VIEW ALERT LOG
The command will display the contents of the old alert log. The ENDEC stores the last 88 alerts
sent or received in non-volatile RAM. The time and type of the alert sent or received is displayed
along with the following soft keys. The most recent alert is shown first.
Done Exit this menu.
Opt Shows options, see below.
Next Show next oldest alert
Prev Show previous (newer) alert
The soft keys shown by the Opt choice are:
Done Exit this menu.
View Shows the text of the alert, along with the monitor it was received on, or the
station(s) it was sent on.
Send Resends the alert. You will be prompted to make sure you want to resend
an old alert, and prompted for the audio source. IMPORTANT: The
ENDEC only stores the most recent incoming audio. If you resend an old
alert, make sure you do not send wrong audio. You can use the send feature
to resend an alert that did not successfully transmit - usually caused by the
ENDEC being manually switched out of the audio chain.
ENDEC Command Reference 85
Sage Digital ENDEC Manual Rev 1.0
12.10 MENU.CHANGE ADMIN
The administrators password is changed with this command. The admin password is used for all
configuration commands. You are prompted for the existing password, then the length of the new
password. You are then prompted to enter the new password. Press the soft key under the numbers,
1, 2, 3, or 4, in the sequence you want. For example, to set the password to 12443, set the length to
five and press 1, 2, 4, 4, and 3 in that order. While you can set the admin length to zero, this is not
recommended.
The last step in the process is to re-enter the admin password, to make sure you and the ENDEC
agree on what it is. If you forget the admin password, you must use the procedure in section 14.3,
“Resetting the passwords” to restore the password to the default, 1111.
12.11 MENU.CHANGE PASSWORD
The user‟s password is changed with this command. The user password is used to send alerts, relay
alerts, replace audio, and feed paper through the printer.
You are prompted for the admin password, then the length of the new user password. You are then
prompted to enter the new user password. Press the soft key under the numbers, 1, 2, 3, or 4, in the
sequence you want. For example, to set the password to 12443, set the length to five and press 1, 2,
4, 4, and 3 in that order. You can set the password length to zero.
The last step in the process is to re-enter the user password, to make sure you and the ENDEC agree
on what it is. If you forget the user password, you can reset it as long as you know the admin
password.
12.12 MENU.CHANGE PRO PASS
This command changes the current password used for access by the ENDEC PRO and ENDEC DJ
software programs. This affects both the “PRO” device and the “MODEM” device.
It is not possible to display the current password. Each time the MENU.CHANGE PRO PASS
command is used, the password is randomized. You can modify the password using the softkeys.
07/01/02 11:06:25
Pro Pass:=WoaZwE3h
_
Done curs up down
Use the curs key to move the edit cursor – the underline shows which character is being edited.
Use the up and down keys to change the character. Upper and lower case can be used as well as
digits and special characters. The password must be 8 characters long.
This password and the ENDEC DJ or ENDEC PRO password for this ENDEC must match exactly.
In versions of ENDEC DJ/PRO that support multiple ENDECs, a password for each ENDEC must
be entered.
As always, password security is up to the user. Select a non-obvious password (not your company
name), use upper and lower case and at least one special character. The space and backslash “\”
characters cannot be used.
12.13 MENU.CONFIG.ALLOW BUILD EAN
Only a few broadcasters will ever originate alerts with EAN or PEP originators, or EAN and EAT
event codes. Set this option to yes to allow building these alerts. The default is no. There are
86 ENDEC Command Reference
Sage Digital ENDEC Manual Rev 1.0
various federal penalties for the improper use of these restricted codes, refer to the Part 11 rules for
details.
12.14 MENU.CONFIG.ATTN DURATION
Not Used.
12.15 MENU.CONFIG.AUTO START
This menu selects the time (hour or minute) each day that the station is in automatic mode. In
automatic mode, filters that have a “timed ignore” action are immediately ignored. Filters that have
a “timed relay” action are relayed immediately.
This menu allows you to select:
None No auto start time.
Hour Auto start hour
Min Auto start minute.
The default is none.
To enable the auto start feature, you must select MENU.CONFIG.MODE.TIMED.
12.16 MENU.CONFIG.AUTO STOP.
The auto stop function selects the time at which the automatic mode is ended each day. Refer to
12.15, “MENU.CONFIG.AUTO START” for details. The default is none.
12.17 MENU.CONFIG.CALL SIGN
The call sign field is placed in EAS alerts sent by this station, in the “LLLLLLLL” field (as defined
in Part 11). You can enter from one to eight characters, either upper case letters, 0 through 9, „(„, „)‟
or the „\‟ character. On the LCD display, the „\‟ appears as „¥‟. The default is “SAGE”.
12.18 MENU.CONFIG.CODI CRAWL SPEED
This selects the speed at which the crawl moves on a Chyron Codi, 1 is fastest, 9 is slowest. The
default is 2.
12.19 MENU.CONFIG.CODI MODE
This selects the display mode used by the ENDEC when displaying a crawl on the Chyron Codi.
“Plain” crawls the text on a simple color bar. “Fancy” crawls the text on a bar with a 3d effect. The
default is plain.
12.20 MENU.CONFIG.CRAWL REPS
This selects the minimum number of times the crawl appears for an alert. The crawl will crawl for
as long as the audio plays, and will finish a repetition that was in progress when the audio finished.
If the number of repetitions was not at least “crawl reps”, more crawls are added.
12.21 MENU.CONFIG.CRAWL RWT
If Yes, a Required Weekly Test will generate a video crawl. If no, it won't.
ENDEC Command Reference 87
Sage Digital ENDEC Manual Rev 1.0
12.22 MENU.CONFIG.DEFAULT DURATION
Selects the default duration for outgoing alerts (hh:mm). This is useful for alerts initiated with a
one-touch remote control button. The default is one hour (01:00).
12.23 MENU.CONFIG.DEFAULT REC
Selects the default audio source for the hand held controller‟s “record” key. Use the Next and Prev
soft keys to select from the list of choices (monitor inputs, encoder audio in, and microphone in),
use Pick to select. The default is encoder in.
12.24 MENU.CONFIG.LANGUAGE
The ENDEC will display the EAS alert information on the LED display, the video character
generator crawl, and other places the text is displayed, using the language selected. The choices are
English, Spanish12
, or Both. If Spanish is selected, the printer outputs will also contain English for
logging purposes. The default is English.
12.25 MENU.CONFIG.LED SIGN MODE
The LED sign has several presentation modes. They are selected by using the up and down keys to
scroll through the following list of mode identifiers, and using the done key to make a selection.
Mode Action
a Message travels left to right.
b Message remains stationary.
c Message remains stationary and flashes.
e Message rolls up.
f Message rolls down
Other modes are possible but are not useful for this application. The default is “a”.
12.26 MENU.CONFIG.LED SIGN SOUND
The LED sign contains a beeper that is triggered when new text is displayed. Use “yes” to enable,
“no” to disable. The display will beep once for test messages, three times for watches, and six times
for warnings or EAN messages. The default is yes.
12.27 MENU.CONFIG.LED SIGN TIME
If set to YES, displays the time in mm/dd/yy hh:mm format on all LED displays when they are
otherwise idle. This is meant as a mechanism to check the operation of the LED sign. The default
is yes.
12 Spanish translations provided by Robyn Baigorria and Carlos Duarte.
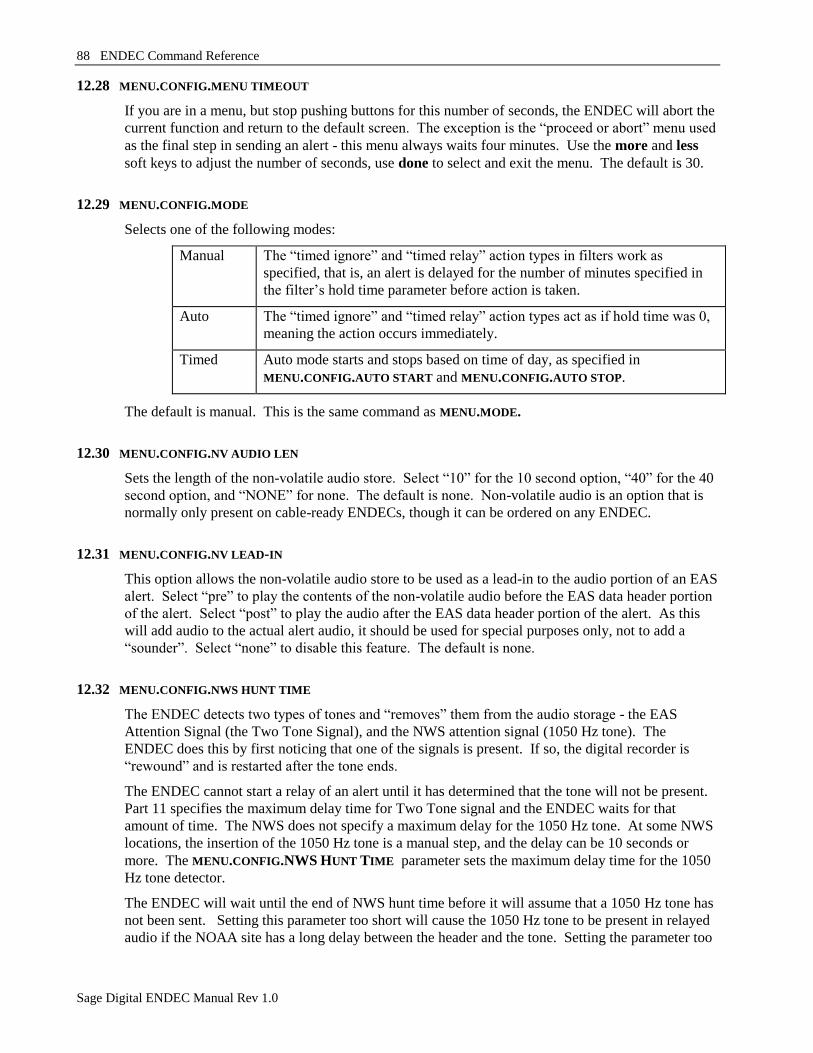
88 ENDEC Command Reference
Sage Digital ENDEC Manual Rev 1.0
12.28 MENU.CONFIG.MENU TIMEOUT
If you are in a menu, but stop pushing buttons for this number of seconds, the ENDEC will abort the
current function and return to the default screen. The exception is the “proceed or abort” menu used
as the final step in sending an alert - this menu always waits four minutes. Use the more and less
soft keys to adjust the number of seconds, use done to select and exit the menu. The default is 30.
12.29 MENU.CONFIG.MODE
Selects one of the following modes:
Manual The “timed ignore” and “timed relay” action types in filters work as
specified, that is, an alert is delayed for the number of minutes specified in
the filter‟s hold time parameter before action is taken.
Auto The “timed ignore” and “timed relay” action types act as if hold time was 0,
meaning the action occurs immediately.
Timed Auto mode starts and stops based on time of day, as specified in
MENU.CONFIG.AUTO START and MENU.CONFIG.AUTO STOP.
The default is manual. This is the same command as MENU.MODE.
12.30 MENU.CONFIG.NV AUDIO LEN
Sets the length of the non-volatile audio store. Select “10” for the 10 second option, “40” for the 40
second option, and “NONE” for none. The default is none. Non-volatile audio is an option that is
normally only present on cable-ready ENDECs, though it can be ordered on any ENDEC.
12.31 MENU.CONFIG.NV LEAD-IN
This option allows the non-volatile audio store to be used as a lead-in to the audio portion of an EAS
alert. Select “pre” to play the contents of the non-volatile audio before the EAS data header portion
of the alert. Select “post” to play the audio after the EAS data header portion of the alert. As this
will add audio to the actual alert audio, it should be used for special purposes only, not to add a
“sounder”. Select “none” to disable this feature. The default is none.
12.32 MENU.CONFIG.NWS HUNT TIME
The ENDEC detects two types of tones and “removes” them from the audio storage - the EAS
Attention Signal (the Two Tone Signal), and the NWS attention signal (1050 Hz tone). The
ENDEC does this by first noticing that one of the signals is present. If so, the digital recorder is
“rewound” and is restarted after the tone ends.
The ENDEC cannot start a relay of an alert until it has determined that the tone will not be present.
Part 11 specifies the maximum delay time for Two Tone signal and the ENDEC waits for that
amount of time. The NWS does not specify a maximum delay for the 1050 Hz tone. At some NWS
locations, the insertion of the 1050 Hz tone is a manual step, and the delay can be 10 seconds or
more. The MENU.CONFIG.NWS HUNT TIME parameter sets the maximum delay time for the 1050
Hz tone detector.
The ENDEC will wait until the end of NWS hunt time before it will assume that a 1050 Hz tone has
not been sent. Setting this parameter too short will cause the 1050 Hz tone to be present in relayed
audio if the NOAA site has a long delay between the header and the tone. Setting the parameter too
ENDEC Command Reference 89
Sage Digital ENDEC Manual Rev 1.0
long will cause delays in forwarding real-time alerts (such as tornado warnings) if the alert source is
not the NWS. The default is 20 seconds.
The delay is used only for channels identified as NWS channels with MENU.CONFIG.NWS SELECT.
12.33 MENU.CONFIG.NWS PRACTICE
The NWS sometimes sends an undefined location code, “999000”. To remove this code from the
expanded text of the message, select “no”, to show it, select yes. The default is no.
12.34 MENU.CONFIG.NWS SELECT
The ENDEC will remove the 1050Hz warning tone used by NOAA stations for weather alerts. If
you want the tone to be removed, select the monitor channel with the next soft key, then select yes.
This feature is available only on odd-numbered monitor channels, if you have an NWS monitoring
assignment, feed its audio to an odd-numbered monitor input.
12.35 MENU.CONFIG.OLD SCAN METHOD
No Longer used.
12.36 MENU.CONFIG.ORIGINATOR
Sets the default originator, used when building new alerts or outgoing templates. The default is
“broadcast or cable”. The PEP and EAN choices are only available if MENU.CONFIG.ALLOW BUILD
EAN is set to yes.
12.37 MENU.CONFIG.PRINT ALL ALERTS
Select YES to print all incoming alerts to the thermal printer. Select NO to print only FCC required
events: Incoming RWT, RMT, EAN, EAT, and any message you originate or relay.
12.38 MENU.CONFIG.PRINT ZCZC
Select YES to print the EAS text string (ZCZC, etc.) along with the translated text of the alert.
12.39 MENU.CONFIG.PRINTER
Select yes to enable the thermal printer. The default is no.
12.40 MENU.CONFIG.PRO EXTRA STAT
When set to YES, enables sending of additional status information for use by the ENDEC Logger
program.
90 ENDEC Command Reference
Sage Digital ENDEC Manual Rev 1.0
12.41 MENU.CONFIG.PRO READ ONLY
If set to YES, this option disallows input from the ENDEC PRO device. The result is that ENDEC
Pro, ENDEC DJ, and ENDEC Logger will receive status information only, but cannot be used to
remotely control the ENDEC. This adds an additional layer of protection when accessing the
ENDEC via a LAN.
12.42 MENU.CONFIG.PROCESSOR LEAD
If you have trouble reaching the necessary output levels for the EAS header data portion of the alert
due to your audio processing, you can specify a lead-in tone. This tone will play for the number of
seconds specified by this option, and can serve to reduce compression and increase the modulation.
The default is zero.
12.43 MENU.CONFIG.SCAN SELECT
This option selects the channels that are scanned for EAS alerts. Select a monitor input with next,
then select yes to scan, or no to ignore.
12.44 MENU.CONFIG.STRICT TIME
All EAS alerts contain a start time and a duration for messages. If strict time is yes, messages that
have expired are ignored. If no, messages are eligible for retransmission even if they appear to be
expired. This feature is provided to compensate for stations or alert originators that allow their
station time to drift substantially away from the actual time of day. The default is no in versions less
than 5.30, yes in 5.30 and higher.
12.45 MENU.CONFIG.UNKNOWN FIPS
This option specifies what to do if an unknown FIPS code appears in an incoming alert. If no,
unknown locations are not shown in the expanded text of the alert. If yes, unknown locations print
as a number. The default is no.
12.46 MENU.CONFIG.VDS RELAY ON
The VDS character generator contains a relay. In the open position, video is passed through on a
wire, that is, the signal is not terminated in the CG, and is not modified by the CG. In the closed
position, the video is terminated in the CG. On loss of power, the relay opens.
The MENU.CONFIG.VDS RELAY ON menu allows you to specify that the relay is closed at all times.
The ENDEC issues a close command to the CG when the ENDEC is powered up. This option
allows the ENDEC to run a crawl without causing a glitch in the video signal.
If MENU.CONFIG.VDS RELAY ON is yes, the relay is left on (closed) at all times (terminated and no
glitch). If no, the relay is normally in the open state (not terminated and glitch), is closed for crawls,
and is then opened again. Some stations prefer this to having the video terminated in the CG.
The default is NO.
12.47 MENU.DATE/TIME
This menu is used to enter the date and time. See section 5.2, “Time” for details.
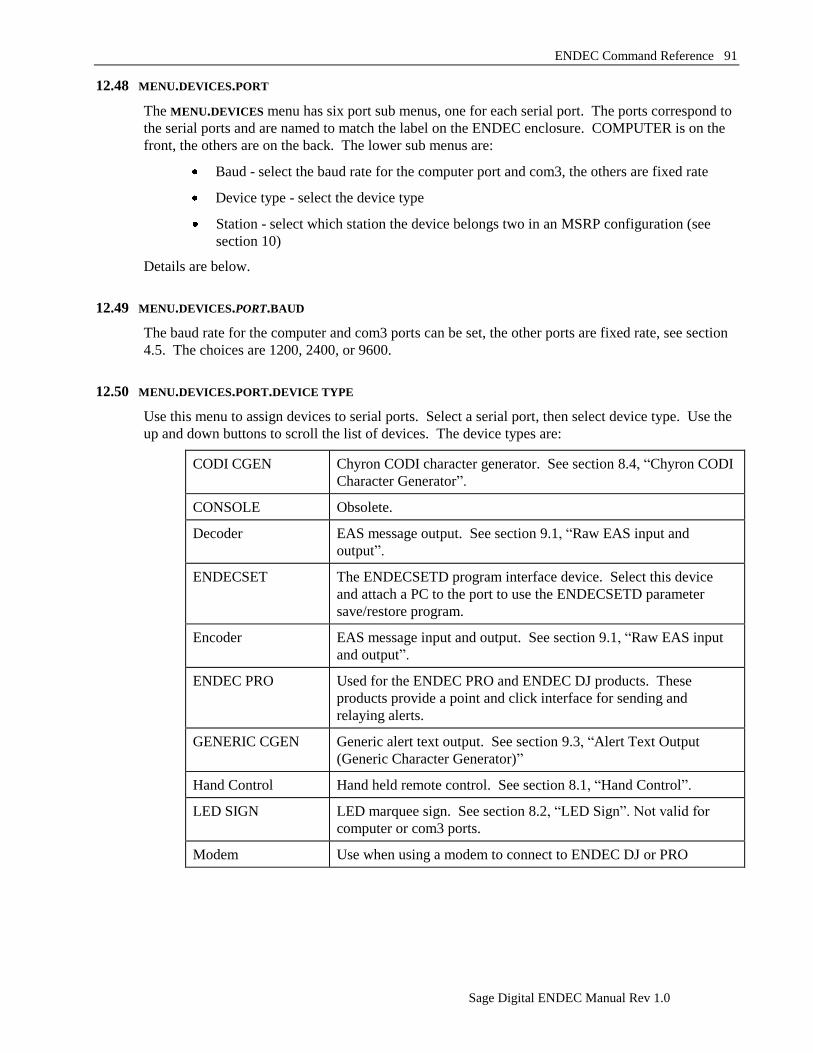
ENDEC Command Reference 91
Sage Digital ENDEC Manual Rev 1.0
12.48 MENU.DEVICES.PORT
The MENU.DEVICES menu has six port sub menus, one for each serial port. The ports correspond to
the serial ports and are named to match the label on the ENDEC enclosure. COMPUTER is on the
front, the others are on the back. The lower sub menus are:
Baud - select the baud rate for the computer port and com3, the others are fixed rate
Device type - select the device type
Station - select which station the device belongs two in an MSRP configuration (see
section 10)
Details are below.
12.49 MENU.DEVICES.PORT.BAUD
The baud rate for the computer and com3 ports can be set, the other ports are fixed rate, see section
4.5. The choices are 1200, 2400, or 9600.
12.50 MENU.DEVICES.PORT.DEVICE TYPE
Use this menu to assign devices to serial ports. Select a serial port, then select device type. Use the
up and down buttons to scroll the list of devices. The device types are:
CODI CGEN Chyron CODI character generator. See section 8.4, “Chyron CODI
Character Generator”.
CONSOLE Obsolete.
Decoder EAS message output. See section 9.1, “Raw EAS input and
output”.
ENDECSET The ENDECSETD program interface device. Select this device
and attach a PC to the port to use the ENDECSETD parameter
save/restore program.
Encoder EAS message input and output. See section 9.1, “Raw EAS input
and output”.
ENDEC PRO Used for the ENDEC PRO and ENDEC DJ products. These
products provide a point and click interface for sending and
relaying alerts.
GENERIC CGEN Generic alert text output. See section 9.3, “Alert Text Output
(Generic Character Generator)”
Hand Control Hand held remote control. See section 8.1, “Hand Control”.
LED SIGN LED marquee sign. See section 8.2, “LED Sign”. Not valid for
computer or com3 ports.
Modem Use when using a modem to connect to ENDEC DJ or PRO
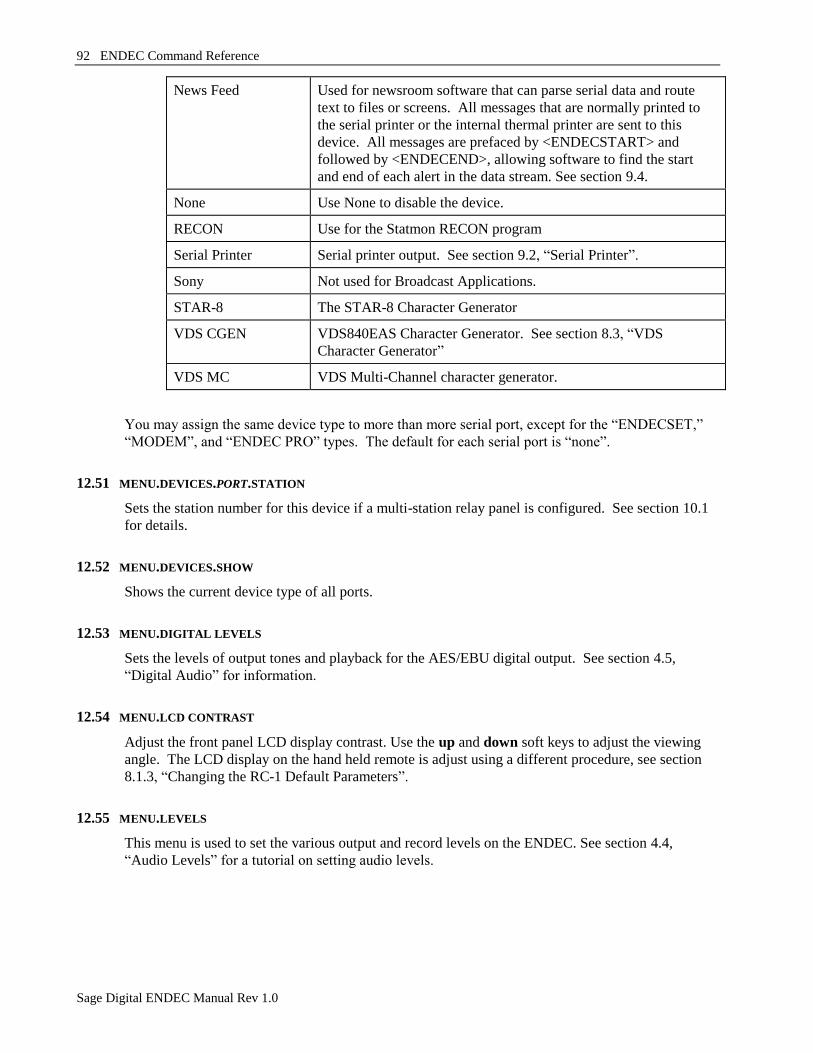
92 ENDEC Command Reference
Sage Digital ENDEC Manual Rev 1.0
News Feed Used for newsroom software that can parse serial data and route
text to files or screens. All messages that are normally printed to
the serial printer or the internal thermal printer are sent to this
device. All messages are prefaced by <ENDECSTART> and
followed by <ENDECEND>, allowing software to find the start
and end of each alert in the data stream. See section 9.4.
None Use None to disable the device.
RECON Use for the Statmon RECON program
Serial Printer Serial printer output. See section 9.2, “Serial Printer”.
Sony Not used for Broadcast Applications.
STAR-8 The STAR-8 Character Generator
VDS CGEN VDS840EAS Character Generator. See section 8.3, “VDS
Character Generator”
VDS MC VDS Multi-Channel character generator.
You may assign the same device type to more than more serial port, except for the “ENDECSET,”
“MODEM”, and “ENDEC PRO” types. The default for each serial port is “none”.
12.51 MENU.DEVICES.PORT.STATION
Sets the station number for this device if a multi-station relay panel is configured. See section 10.1
for details.
12.52 MENU.DEVICES.SHOW
Shows the current device type of all ports.
12.53 MENU.DIGITAL LEVELS
Sets the levels of output tones and playback for the AES/EBU digital output. See section 4.5,
“Digital Audio” for information.
12.54 MENU.LCD CONTRAST
Adjust the front panel LCD display contrast. Use the up and down soft keys to adjust the viewing
angle. The LCD display on the hand held remote is adjust using a different procedure, see section
8.1.3, “Changing the RC-1 Default Parameters”.
12.55 MENU.LEVELS
This menu is used to set the various output and record levels on the ENDEC. See section 4.4,
“Audio Levels” for a tutorial on setting audio levels.

ENDEC Command Reference 93
Sage Digital ENDEC Manual Rev 1.0
12.56 MENU.MODE
Selects one of the following modes:
Manual The “timed ignore” and “timed relay” action types in filters work as
specified, that is, an alert is delayed for the number of minutes specified in
the filter‟s hold time parameter before action is taken.
Auto The “timed ignore” and “timed relay” action types act as if hold time was 0,
meaning the action occurs immediately.
Timed Auto mode starts and stops based on time of day, as specified in
MENU.CONFIG.AUTO START and MENU.CONFIG.AUTO STOP.
The default is manual. This is the same command as MENU.CONFIG.MODE.
12.57 MENU.MONITOR SOURCE
Use this menu to route audio from the selected source to the speaker out and speaker line out
outputs. This can be used to listen to the monitor inputs, or to set an audio source for use with the
MENU.LEVELS menu.
All of the choices refer to actual audio inputs or onboard sources except for ALERTS. If monitor
source is set to alerts, the ENDEC will play alert audio live as it is received. The audio can be
muted with the PEND and then MUTE soft keys (see section 12.8).
The choices for monitor source are listed below.
Monitor Source Description
Alerts Live alert audio as it is received.
Attn Tone High and Low tone together
Attn Tone High High tone only
Attn Tone Low Low tone only
Data Tone Active data tone
Data Tone High High tone
Data Tone Low Low tone
ENC AUD IN Back Panel input
MIC IN Front Panel input
MON 1 IN Back Panel input
MON 2 IN Back Panel input
MON 3 IN Back Panel input
MON 4 IN Back Panel input
MON 5 IN Back Panel input
MON 6 IN Back Panel input
None No Audio
Playback Contents of digital audio recorder
94 ENDEC Command Reference
Sage Digital ENDEC Manual Rev 1.0
12.58 MENU.MSRP.ASSIGN MSRP RELAY
The eight MSRP relays can be assigned to any of the four stations, numbered 1 to 4. Assigning a
relay to station 0 disables the relay. See section 10.1 for details.
12.59 MENU.MSRP.STATION N.CALL SIGN
Sets the call sign for this MSRP station. It is used in the “LOCK” message to show which remote
control is running the ENDEC.
If this station is the only station sending an alert, this call sign is placed in the EAS LLLLLLLL
field, and this call is displayed on the LED signs and character generator crawls. If more than one
station is sending at the same time, the MENU.CONFIG.CALL SIGN call is used. For MSRP
configurations, a generic group name should be used for MENU.CONFIG.CALL SIGN.
12.60 MENU.MSRP.STATION N.ENABLE
If enable is set to yes, the MSRP entries for this station are used, meaning the station will have
automatic alerts sent on it, and the station is presented as a choice to select for manual relay or
origination. EAN alerts, however, will throw all MSRP relays that have a non-zero station number
set in MENU.MSRP.ASSIGN MSRP RELAY, even if the enable parameter for that station is set to no.
12.61 MENU.MSRP.STATION N.MODE
Sets the automatic/manual option for this station. See section 10.6 for details.
12.62 MENU.NETWORK.AUTOMATION
Enables the automation interface TCP port. The port number used is “portbase”, set by
MENU.NETWORK.PORT BASE.
12.63 MENU.NETWORK.DNS1
The ip address of the primary name server to be used by the ENDEC to look up names, for example, for
your SMTP server, NTP servers, etc. It is used only if the network addr type is “static”. If the network addr
type is DHCP, your DHCP server must supply the DNS address.
12.64 MENU.NETWORK.DNS2
The ip address of the secondary name server to be used by the ENDEC to look up names, for example, for
your SMTP server, NTP servers, etc. It is used only if the network addr type is “static”. If the network addr
type is DHCP, your DHCP server must supply the DNS address.
12.65 MENU.NETWORK.GATEWAY
The address of a local router on the same network as the ENDEC that provides access to the Internet or
other network segments.
12.66 MENU.NETWORK.IP ADDRESS
The static IP address that you wish to assign to your ENDEC. It is used only if the network addr type is
“static”. If the network addr type is DHCP, your DHCP server will supply the DNS address.
ENDEC Command Reference 95
Sage Digital ENDEC Manual Rev 1.0
12.67 MENU.NETWORK.NETWORK ADDR TYPE
Select DHCP or static. If DHCP, you must have a DHCP server on your network that will supply an address
to your ENDEC. If you select static, you will also need to specify a gateway address, a netmask, and DNS1
and optionally DNS2 IP addresses. If you don‟t know the proper values to use for these settings, and you
have a Windows PC on the same network segment, you can open a CMD window (start/run/cmd) and enter
ipconfig /all at the prompt. That will display the values your PC is using.
12.68 MENU.NETWORK.NETWORK MASK
This is a value that is combined with your ip address to determine what other IP addresses are on your local
network. It is used only if the network addr type is “static”. If you don‟t know the proper values to use for
this setting, and you have a Windows PC on the same network segment, you can open a CMD window
(start/run/cmd) and enter ipconfig /all at the prompt. That will display the value your PC is using.
12.69 MENU.NETWORK.PORT BASE
The ENDEC uses a block of TCP ports for automation, remote control, etc. Specify the port number at the
start of the block. The default is 8083. Ports less than 1024 should not be used.
12.70 MENU.NETWORK.PRO/DJ
Enables the ENDEC PRO remote control TCP port. The port number used is portbase+2, portbase is set by
MENU.NETWORK.PORT BASE.
12.71 MENU.NETWORK.RESTART NETWORK
The command will cause a restart of the TCP/IP subsystem on the ENDEC. You may need to use this after
making several changes, or if you make a change to your router settings, switch network cables, need a new
DHCP address, etc.
12.72 MENU.NETWORK. SHOW IP ADDR
Shows the ip address in use.
12.73 MENU.NETWORK.SHOW MAC ADDR
Shows the MAC address of the Ethernet controller on the ENDEC.
12.74 MENU.NETWORK.WEB SERVER
Enables the ENDEC‟s web server using port 80 and 443 (for HTTPS).
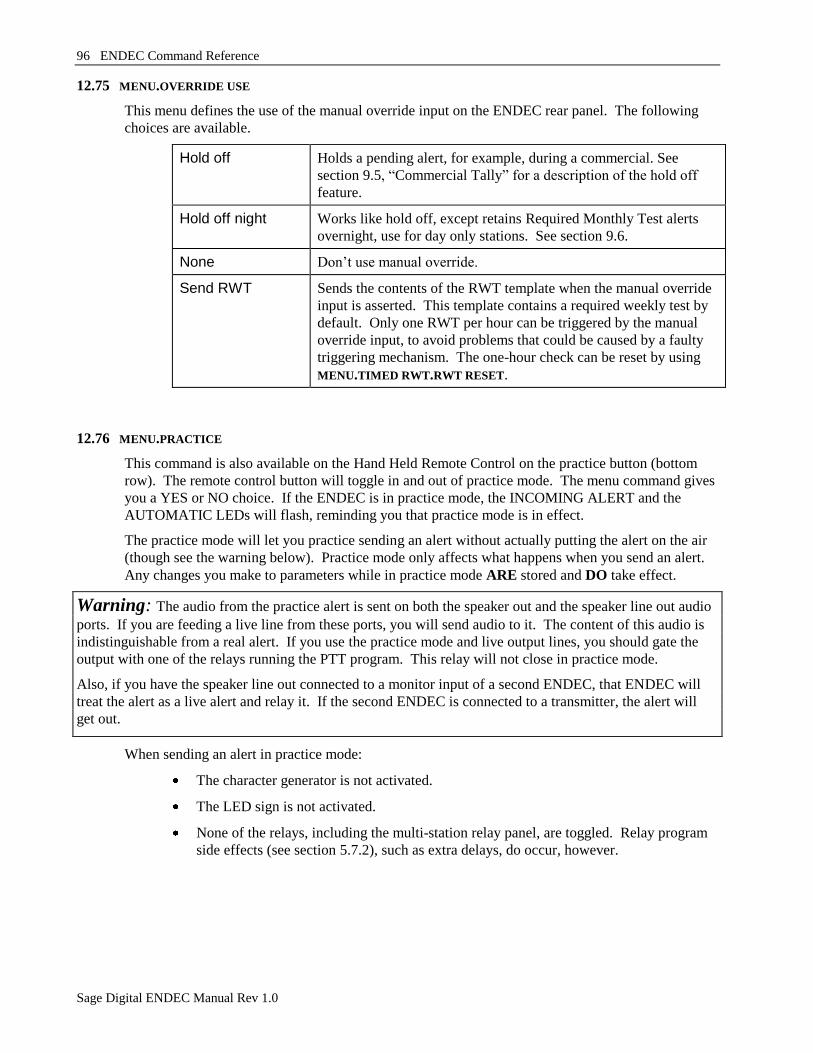
96 ENDEC Command Reference
Sage Digital ENDEC Manual Rev 1.0
12.75 MENU.OVERRIDE USE
This menu defines the use of the manual override input on the ENDEC rear panel. The following
choices are available.
Hold off Holds a pending alert, for example, during a commercial. See
section 9.5, “Commercial Tally” for a description of the hold off
feature.
Hold off night Works like hold off, except retains Required Monthly Test alerts
overnight, use for day only stations. See section 9.6.
None Don‟t use manual override.
Send RWT Sends the contents of the RWT template when the manual override
input is asserted. This template contains a required weekly test by
default. Only one RWT per hour can be triggered by the manual
override input, to avoid problems that could be caused by a faulty
triggering mechanism. The one-hour check can be reset by using
MENU.TIMED RWT.RWT RESET.
12.76 MENU.PRACTICE
This command is also available on the Hand Held Remote Control on the practice button (bottom
row). The remote control button will toggle in and out of practice mode. The menu command gives
you a YES or NO choice. If the ENDEC is in practice mode, the INCOMING ALERT and the
AUTOMATIC LEDs will flash, reminding you that practice mode is in effect.
The practice mode will let you practice sending an alert without actually putting the alert on the air
(though see the warning below). Practice mode only affects what happens when you send an alert.
Any changes you make to parameters while in practice mode ARE stored and DO take effect.
When sending an alert in practice mode:
The character generator is not activated.
The LED sign is not activated.
None of the relays, including the multi-station relay panel, are toggled. Relay program
side effects (see section 5.7.2), such as extra delays, do occur, however.
Warning: The audio from the practice alert is sent on both the speaker out and the speaker line out audio
ports. If you are feeding a live line from these ports, you will send audio to it. The content of this audio is
indistinguishable from a real alert. If you use the practice mode and live output lines, you should gate the
output with one of the relays running the PTT program. This relay will not close in practice mode.
Also, if you have the speaker line out connected to a monitor input of a second ENDEC, that ENDEC will
treat the alert as a live alert and relay it. If the second ENDEC is connected to a transmitter, the alert will
get out.

ENDEC Command Reference 97
Sage Digital ENDEC Manual Rev 1.0
You can end practice mode by pressing the PRACTICE button on the remote, or by selecting NO on
the MENU.PRACTICE menu. Practice mode will automatically end:
After 30 seconds, unless you are in the process of sending a practice alert.
After any attempt to send a practice alert, whether you complete the process or you
abort.
If any incoming message is received.
The Incoming Alert and ATTN LEDs will stop flashing when practice mode is ended.
12.77 MENU.PRESETS.INCOMING
Use this menu to build or edit filters. Filters describe incoming alerts and actions to take if such an
alert is heard. See section 5.4, “Filtering Incoming Alerts” for a tutorial.
12.78 MENU.PRESETS.LOCAL AREA
Use this menu to build or edit your local area. See section 5.3, “Local Area” for a tutorial.
12.79 MENU.PRESETS.OUTGOING
Use this menu to build or edit outgoing templates. See section 5.5, “Outgoing Alerts” for a tutorial.
12.80 MENU.PRINTER FEED
If the printer is selected with MENU.CONFIG.PRINTER.YES, this command will feed paper. It is used
to load paper into the thermal printer, or to bring the last printed line out of the ENDEC paper path.
12.81 MENU.RELAY
This menu allows you to assign “relay programs” to the ENDEC back panel relays. Relays
programs are described section 5.7, Relay Programming.
12.82 MENU.SHOW INPUT LEVELS
This menu will show simple indication of the audio input levels on the six monitor inputs, three inputs at a
time. A "*" character shows the peak, and "-" shows the average. A “VU Meter” function is also available
on the ENDEC‟s web page.
12.83 MENU.TEST.PRINTER TEST
Sends a test string to the printer. The printer must be enabled with MENU.CONFIG.PRINTER.YES.
12.84 MENU.TEST.REBOOT
This command will restart the ENDEC.
12.85 MENU.TEST.RESET BLINK ERROR
This command will reset the blinking LEDs. LEDs blink for any of the reasons show in section
14.1.
98 ENDEC Command Reference
Sage Digital ENDEC Manual Rev 1.0
12.86 MENU.TEST.SELF TEST
Runs the self test and plays the test tones through the speaker. Does not key the main XLR relay.
See section 14.5 for a description of the self test procedure.
12.87 MENU.TEST.SHOW UTC
The ENDEC keeps its internal time in UTC. The show utc menu will display that internal time. It
can be used to verify that your combination of UTC offset and Daylight Savings time results in the
correct local time and UTC time.
12.88 MENU.TEST.VDS CGEN VERSION
Display the version string returned from any connected VDS character generators. This command
also serves as a method of testing connectivity to the character generators.
12.89 MENU.TIMED RWT.EDIT RWT RAND
This command allows you to edit each week‟s time. The display shows:
07/01/02 10:35:12
Week Starts 07/07/02
RWT at 07/09 10:12
Done Edit Next Prev
This shows the starting day for the week, and the date within that week that the alert is scheduled
for. If the week is the current week, and the alert has already been sent (or has been cancelled by a
preceding monthly test), an “S” will appear after the “RWT at” line.
Next will step through the following weeks, Prev will move backwards. Edit will allow a
change to that week‟s scheduled RWT with the following display:
07/01/02 10:35:21
Edit RWT Time
RWT at 07/09 10:12
Done Hour More Less
The Done softkey will exit the edit menu, storing any changes you have made.
The Hour key shows size of the step changed with each press of the more/less keys. When Hour
is showing, More and Less adds or subtracts one hour on each press. Press the Hour key to select
Days or Minutes. For example, to change the alert from July 9 to July 10, press More 24 times to
add 24 hours to the time, or press Hour until it reads Day, then press More once to advance the
time by one day. You can press and hold the more/less keys to rapidly add/remove time.
12.90 MENU.TIMED RWT.ENABLE TIMED RWT
Controls the automatic transmission of the required weekly test alert. The contents of the RWT
template are sent by the ENDEC at times controlled by the settings of the “timed RWT” menu items.
Choices for MENU.TIMED RWT.ENABLE TIMED RWT are:
Off – no automatic transmission of RWT.
Fixed - Permits the automatic transmission of the required weekly test at the time specified
by "RWT Day of Week", "RWT Hour", and "RWT Minute". Automatic transmission is
ENDEC Command Reference 99
Sage Digital ENDEC Manual Rev 1.0
triggered when the time is reached, and will occur at the next time the ENDEC is in the top
menu level and no other alert is pending. This feature can be used to preset a time for the
next RWT. The FCC requires weekly tests at random days and times, this feature should
not be used as the only means of sending an RWT. Alert occurs on station 1 only. The
outgoing header named "RWT" is sent.
Rand – Selects the “random weekly test” mode.
The default is Off.
12.91 MENU.TIMED RWT.PRINT RWT RAND
Print all 52 weekly RWT times to the internal printer (if enabled) or any external serial printers.
12.92 MENU.TIMED RWT.RESET RWT RAND
Assigns a new random time for each of the next 52 weeks. This may or may not generate a RWT for
the current week – an alert will be generated only if the random time is more than one hour in the
future.
12.93 MENU.TIMED RWT.RWT DAY OF WEEK
Selects the time, in concert with "RWT Day of Week", and "RWT Hour" that the station sends the
outgoing header named "RWT", which would normally contain a required weekly test.
To enable this feature, you must set MENU.TIMED RWT.ENABLE TIMED RWT to yes. Days are
numbers, starting with Sunday=0.
12.94 MENU.TIMED RWT.RWT HOUR
Selects the time, in concert with "RWT Day of Week", and "RWT Minute" that the station sends the
outgoing header named "RWT", which would normally contain a required weekly test.
To enable this feature, you must set MENU.TIMED RWT.ENABLE TIMED RWT to yes.
12.95 MENU.TIMED RWT.RWT MINUTE
Selects the time, in concert with "RWT Day of Week", and "RWT Hour" that the station sends the
outgoing header named "RWT", which would normally contain a required weekly test.
To enable this feature, you must set MENU.TIMED RWT.ENABLE TIMED RWT to yes.
12.96 MENU.TIMED RWT.RWT RESET
The ENDEC contains protection software for the automated RWT features (timed RWT and manual
override-initiated RWT) that allows only one RWT to be sent each hour. The reset the hour timer
during testing, use this menu.

100 ENDEC Command Reference
Sage Digital ENDEC Manual Rev 1.0
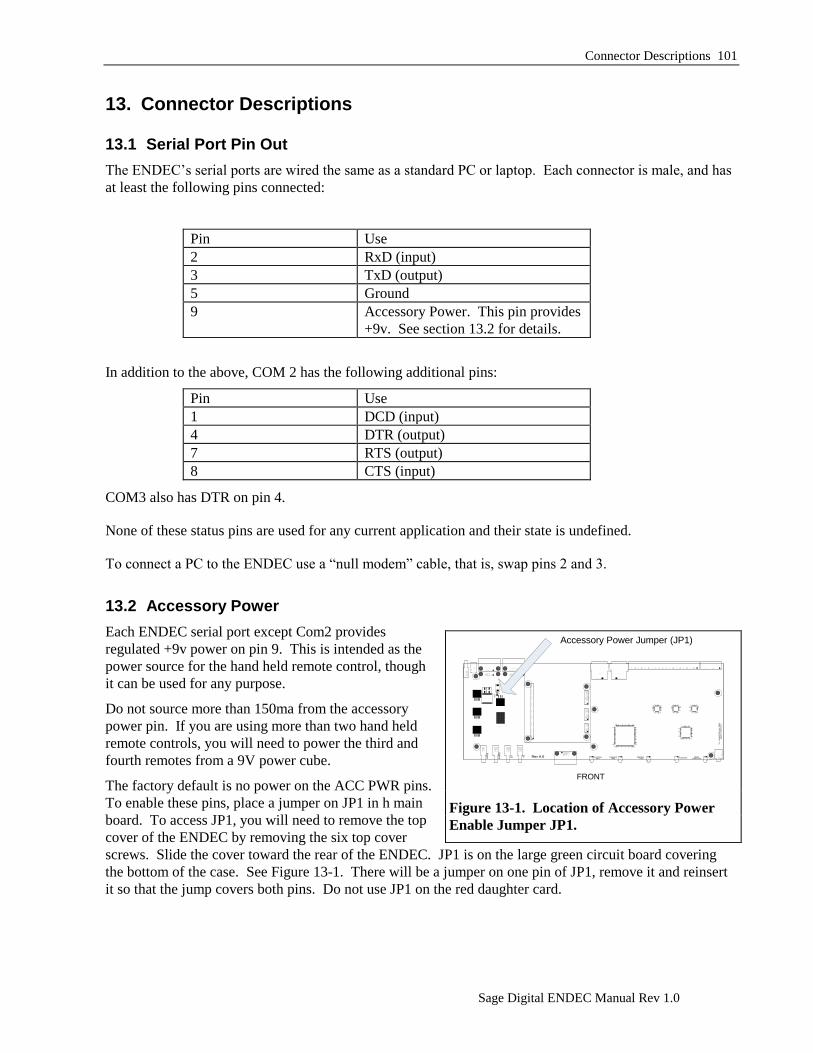
Connector Descriptions 101
Sage Digital ENDEC Manual Rev 1.0
13. Connector Descriptions
13.1 Serial Port Pin Out
The ENDEC‟s serial ports are wired the same as a standard PC or laptop. Each connector is male, and has
at least the following pins connected:
Pin Use
2 RxD (input)
3 TxD (output)
5 Ground
9 Accessory Power. This pin provides
+9v. See section 13.2 for details.
In addition to the above, COM 2 has the following additional pins:
Pin Use
1 DCD (input)
4 DTR (output)
7 RTS (output)
8 CTS (input)
COM3 also has DTR on pin 4.
None of these status pins are used for any current application and their state is undefined.
To connect a PC to the ENDEC use a “null modem” cable, that is, swap pins 2 and 3.
13.2 Accessory Power
Each ENDEC serial port except Com2 provides
regulated +9v power on pin 9. This is intended as the
power source for the hand held remote control, though
it can be used for any purpose.
Do not source more than 150ma from the accessory
power pin. If you are using more than two hand held
remote controls, you will need to power the third and
fourth remotes from a 9V power cube.
The factory default is no power on the ACC PWR pins.
To enable these pins, place a jumper on JP1 in h main
board. To access JP1, you will need to remove the top
cover of the ENDEC by removing the six top cover
screws. Slide the cover toward the rear of the ENDEC. JP1 is on the large green circuit board covering
the bottom of the case. See Figure 13-1. There will be a jumper on one pin of JP1, remove it and reinsert
it so that the jump covers both pins. Do not use JP1 on the red daughter card.
FRONT
DigitalAudio Lock
Incoming Outgoing AutomaticAttentionTone
Sag
e A
lertin
g S
yste
ms, In
c.
JP
1
Rev A.6
Cop
yrig
ht (c
) 200
8
Op
tion
En
ter
Alert Alert
Accessory Power Jumper (JP1)
Figure 13-1. Location of Accessory Power
Enable Jumper JP1.
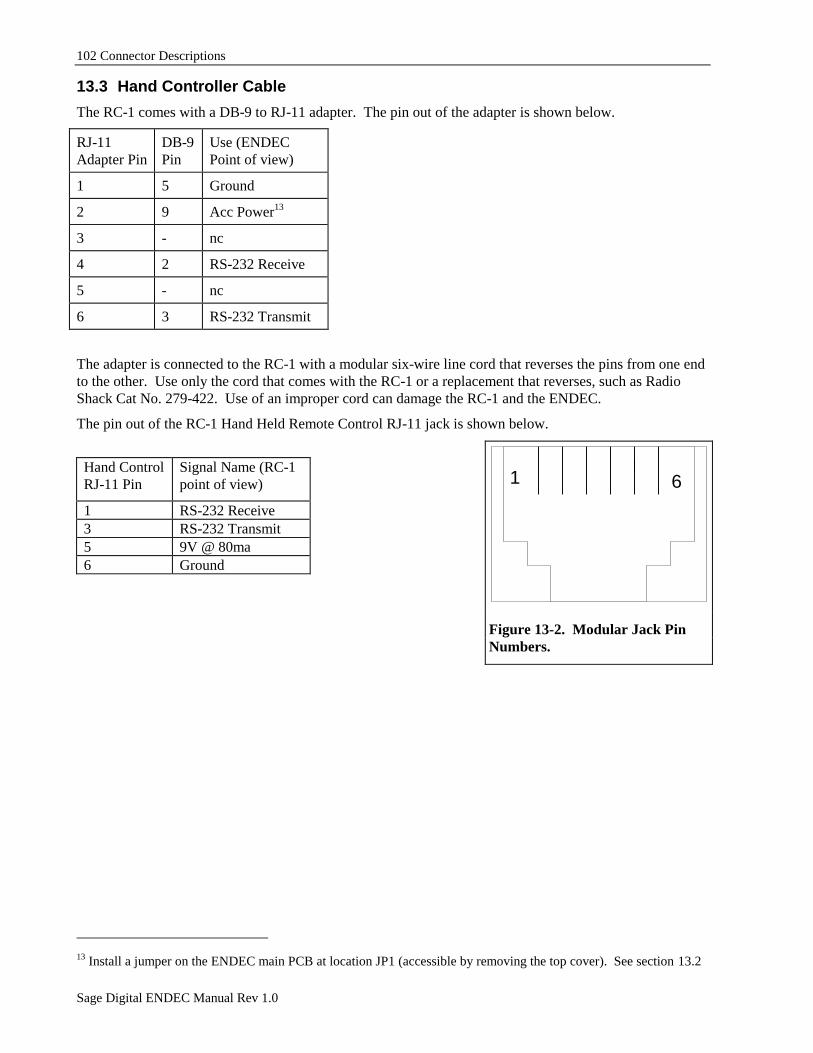
102 Connector Descriptions
Sage Digital ENDEC Manual Rev 1.0
13.3 Hand Controller Cable
The RC-1 comes with a DB-9 to RJ-11 adapter. The pin out of the adapter is shown below.
RJ-11
Adapter Pin
DB-9
Pin
Use (ENDEC
Point of view)
1 5 Ground
2 9 Acc Power13
3 - nc
4 2 RS-232 Receive
5 - nc
6 3 RS-232 Transmit
The adapter is connected to the RC-1 with a modular six-wire line cord that reverses the pins from one end
to the other. Use only the cord that comes with the RC-1 or a replacement that reverses, such as Radio
Shack Cat No. 279-422. Use of an improper cord can damage the RC-1 and the ENDEC.
The pin out of the RC-1 Hand Held Remote Control RJ-11 jack is shown below.
Hand Control
RJ-11 Pin
Signal Name (RC-1
point of view)
1 RS-232 Receive
3 RS-232 Transmit
5 9V @ 80ma
6 Ground
13 Install a jumper on the ENDEC main PCB at location JP1 (accessible by removing the top cover). See section 13.2
1 6
Figure 13-2. Modular Jack Pin
Numbers.
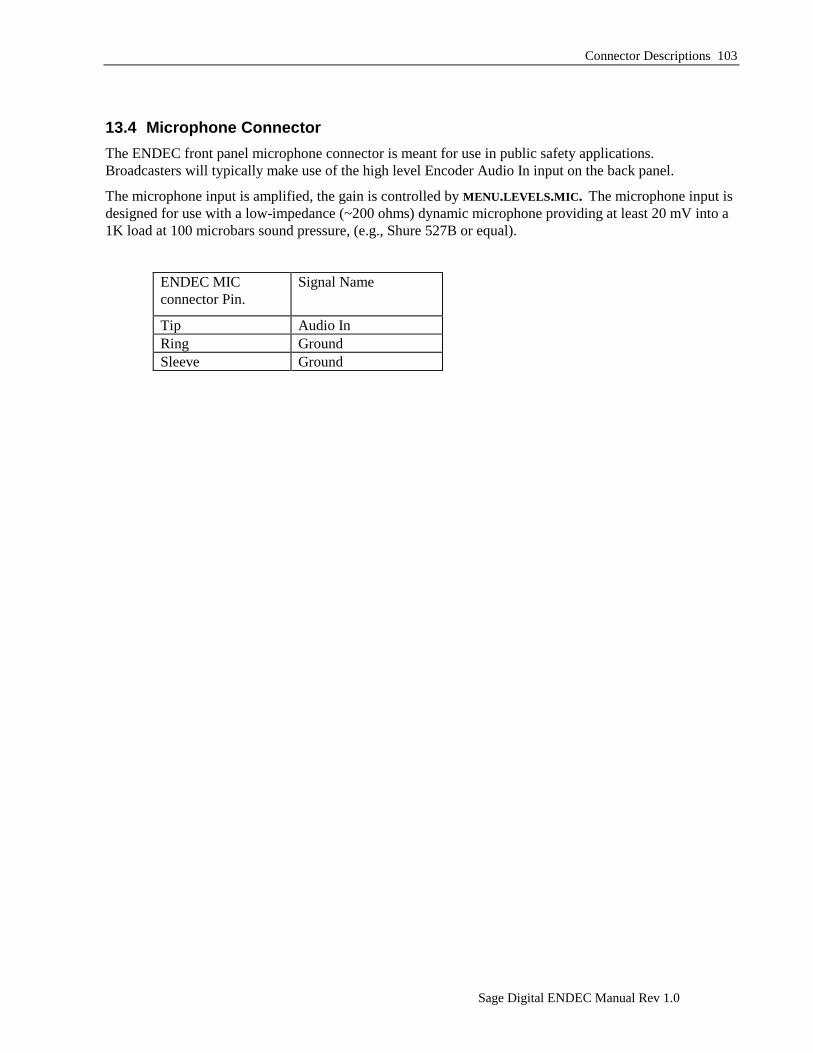
Connector Descriptions 103
Sage Digital ENDEC Manual Rev 1.0
13.4 Microphone Connector
The ENDEC front panel microphone connector is meant for use in public safety applications.
Broadcasters will typically make use of the high level Encoder Audio In input on the back panel.
The microphone input is amplified, the gain is controlled by MENU.LEVELS.MIC. The microphone input is
designed for use with a low-impedance (~200 ohms) dynamic microphone providing at least 20 mV into a
1K load at 100 microbars sound pressure, (e.g., Shure 527B or equal).
ENDEC MIC
connector Pin.
Signal Name
Tip Audio In
Ring Ground
Sleeve Ground

104 Connector Descriptions
Sage Digital ENDEC Manual Rev 1.0
Troubleshooting 105
Sage Digital ENDEC Manual Rev 1.0
14. Troubleshooting
14.1 Blink Errors
If an error occurs in the ENDEC that requires operator action, one or more of the front panel and remote
control LEDs will blink. To turn off the blink, correct the problem and reboot the ENDEC, or use the
TEST.RESET BLINK ERROR menu. Here is a list of all “blink” conditions:
14.1.1 Incoming Alert (IN) LED Only
If the Incoming Alert LED is blinking, there has been an error with the ENDEC‟s self test. The error
message is in the MSG buffer, press the MSG softkey to read it. Power cycle the ENDEC, if the problem
recurs, call for service.
14.1.2 Outgoing Alert (OUT) LED Only
This is not an error condition. If the audio source for an alert is “console”, the OUT LED will blink during
the audio portion of an alert. The ENDEC has dropped out of line and the station audio chain has been
restored, that is, the operator should talk now.
14.1.3 Automatic (AUTO) LED
If the auto LED is blinking, an error message is in the MSG buffer, press the MSG softkey to read it.
Messages and causes are:
Time is not set The internal clock calendar chip has lost battery backup or was
otherwise reset, or the time has been set less than 1996 or greater than
2094. Fix the time and reboot the ENDEC14
.
Configuration file
corrupted.
The saved parameters have been corrupted. The default parameter
settings have been restored - you will need to setup the ENDEC again,
or download saved parameters using the ENDECSETD software.
CGEN com port did not
respond.
The VDS character generator on the named COM port did not respond
to commands. This is usually a problem with the cable or the CG.
Check the cables, check power to the CG. You can test the access to
the CG by using the TEST.VDS CGEN VERSION menu. If a version is
returned, the setup is OK, if “no response” is shown on the ENDEC
display, the ENDEC and CG are not exchanging data.
No Local Area You must define a local area using the MENU.PRESETS.LOCAL AREA
menu.
Validate Error An EAS header generated by the ENDEC did not pass the check for
legal EAS messages. This is an internal software error.
EEPROM-D Corrupted This message may also be followed by diagnostic information such as
“end tag missing” The internal configuration file is not formatted
correctly - Call for service.
14 To reboot the ENDEC, either cycle the power, or use the MENU.TEST.REBOOT menu.
106 Troubleshooting
Sage Digital ENDEC Manual Rev 1.0
14.1.4 Automatic (AUTO) and Incoming Alert (IN) LEDs
This is not an error, the ENDEC is in practice mode. The next alert sent will not close the XLR relays.
14.1.5 All LEDs Blinking (except digital lock)
The EAN and/or EAT event codes are not present in any of your filters. You MUST have a filter for EAN
and EAT to remain legal under Part 11. Add the filter. It should have EAN and EAT for events, and EAN
and PEP for originators.
14.2 Common Problems
Here is a list of common problems that may save you a call to the service center.
ENDEC seems dead. The LCD backlight is wired almost directly to the main power
input. If the backlight is not on (it should be bright
yellowish/green) suspect the power input (plugged in, right
power cube, power switch on)
The backlight is on but shows one or more rows of black
squares: the ENDEC CPU is not running. Call for service.
Alerts not received from a
particular monitor input. The green terminal strip must be completely inserted in the back
of the ENDEC.
The monitor input must be selected for scanning, see
MONITOR.CONFIG.SCAN SELECT.
If the input is selected, the audio levels may not be high enough
for error-free decoding.
The time display is incorrect. The Digital ENDEC will synchronize to a time standard using
the Network Time Protocol (NTP). The ENDEC will retain
time across a power outage, though the time may drift several
seconds if the ENDEC is off for a long period of time. The
NTP protocol can take several minutes to resynchronize the
time, but will typically hold the time to a few tens of
milliseconds of your time standard. If the time is off by an
integer number of hours, adjust your UTC time offset.
The ENDEC resets while entering
commands from the front panel or
hand held remote control.
The ENDEC contains a watchdog timer that will reset the
ENDEC if it does not seem to be operating normally. If the
ENDEC does not return to the highest menu level (the default
screen) for ten minutes, and it is not sending a long alert such as
an EAN, the ENDEC assumes that it is in a loop and resets.
Thus, if you are in a lower level menu for more than ten
minutes, the ENDEC will reset. This is normal. To increase
the watchdog time, use the ENDECSETD software program to
set internal.softdog to a larger value.
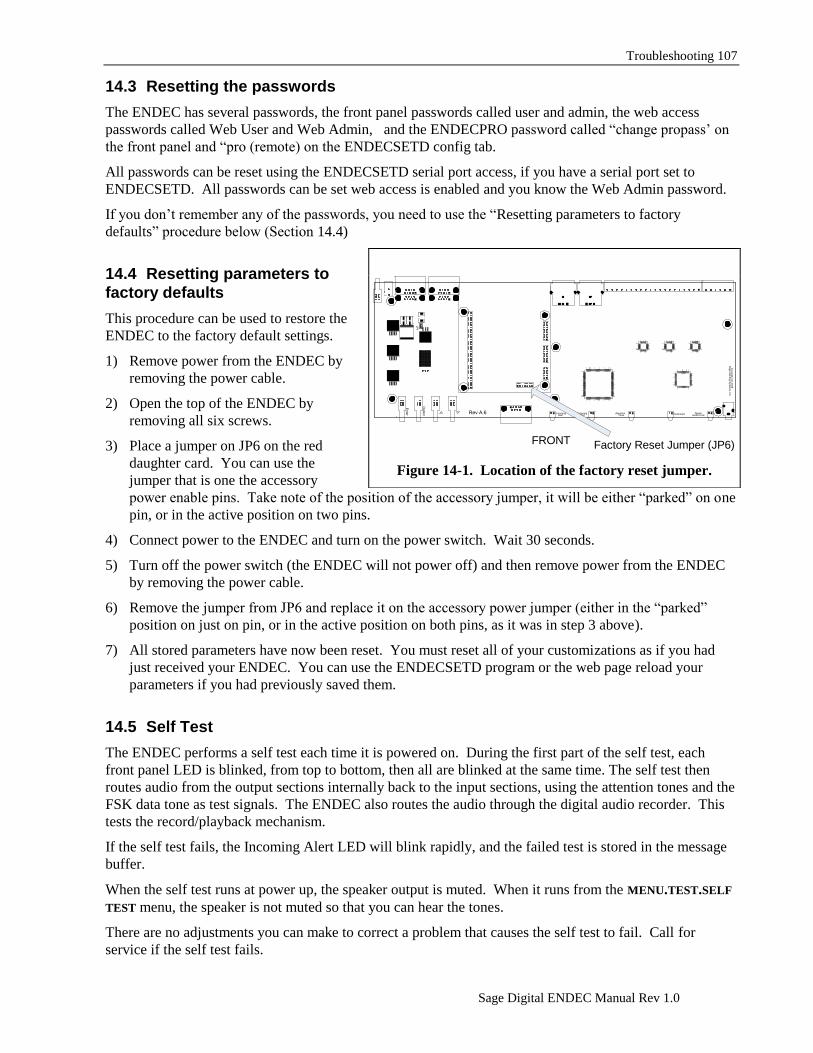
Troubleshooting 107
Sage Digital ENDEC Manual Rev 1.0
14.3 Resetting the passwords
The ENDEC has several passwords, the front panel passwords called user and admin, the web access
passwords called Web User and Web Admin, and the ENDECPRO password called “change propass‟ on
the front panel and “pro (remote) on the ENDECSETD config tab.
All passwords can be reset using the ENDECSETD serial port access, if you have a serial port set to
ENDECSETD. All passwords can be set web access is enabled and you know the Web Admin password.
If you don‟t remember any of the passwords, you need to use the “Resetting parameters to factory
defaults” procedure below (Section 14.4)
14.4 Resetting parameters to
factory defaults
This procedure can be used to restore the
ENDEC to the factory default settings.
1) Remove power from the ENDEC by
removing the power cable.
2) Open the top of the ENDEC by
removing all six screws.
3) Place a jumper on JP6 on the red
daughter card. You can use the
jumper that is one the accessory
power enable pins. Take note of the position of the accessory jumper, it will be either “parked” on one
pin, or in the active position on two pins.
4) Connect power to the ENDEC and turn on the power switch. Wait 30 seconds.
5) Turn off the power switch (the ENDEC will not power off) and then remove power from the ENDEC
by removing the power cable.
6) Remove the jumper from JP6 and replace it on the accessory power jumper (either in the “parked”
position on just on pin, or in the active position on both pins, as it was in step 3 above).
7) All stored parameters have now been reset. You must reset all of your customizations as if you had
just received your ENDEC. You can use the ENDECSETD program or the web page reload your
parameters if you had previously saved them.
14.5 Self Test
The ENDEC performs a self test each time it is powered on. During the first part of the self test, each
front panel LED is blinked, from top to bottom, then all are blinked at the same time. The self test then
routes audio from the output sections internally back to the input sections, using the attention tones and the
FSK data tone as test signals. The ENDEC also routes the audio through the digital audio recorder. This
tests the record/playback mechanism.
If the self test fails, the Incoming Alert LED will blink rapidly, and the failed test is stored in the message
buffer.
When the self test runs at power up, the speaker output is muted. When it runs from the MENU.TEST.SELF
TEST menu, the speaker is not muted so that you can hear the tones.
There are no adjustments you can make to correct a problem that causes the self test to fail. Call for
service if the self test fails.
FRONT
DigitalAudio Lock
Incoming Outgoing AutomaticAttentionTone
Sa
ge
Ale
rting S
yste
ms, In
c.
JP
1
Rev A.6
Co
pyrig
ht (c
) 20
08
Optio
n
En
ter
Alert Alert
Factory Reset Jumper (JP6)
Figure 14-1. Location of the factory reset jumper.

108 Troubleshooting
Sage Digital ENDEC Manual Rev 1.0
What‟s New 109
Sage Digital ENDEC Manual Rev 1.0
15. What’s New for the Sage Digital ENDEC This section of the manual summarizes the differences between the original Sage EAS ENDEC and the
Sage Digital ENDEC.
15.1 Accessory Power
The Digital ENDEC provides +9v at 150ma on the ACC POWER pins of the “computer” serial port and on
Com ports 3, 4, 5, and 6. See section 15.4 for additional information.
15.2 LAN Connection
The rear panel 10/100 baseT RJ-45 LAN connector can be used to connect the ENDEC to a Local Area
Network (LAN). Sage strongly recommends that you use a firewall to protect the ENDEC from
unauthorized access.
15.3 Printer
The internal strip printer has been removed. In its place, the ENDEC can log to a serial printer as in the
past, or to a LAN or USB connected printer. The ENDEC can also send email when alerts are sent or
received. The log can also be accessed using a web browser.
Consult the sage website at www.sagealertingsystems.com for a list of supported printers.
15.4 Serial Ports
Accessory power (pin 9) is not available on com2. The other five ports have accessory power. If you
previously used a hand held remote control (RC-1) on Com 2, it can be swapped with devices on Com 4 or
5, as these ports can now be set to 9600 baud.
All serial ports are now baud rate adjustable.
15.5 USB Ports
The two rear-panel USB ports can be used to connect a printer, or to add additional storage space by
connecting a USB Flash Drive. You can also use a USB to LAN convert to attach the ENDEC to a second
physical network.
15.6 Web Browser
You can use a web browser to control and monitor the ENDEC and to change configuration settings.
Some functions such as the remote VU meter require the use of an ActiveX “plugin”. Others, such as the
ability to stream the monitor inputs to your desktop require the use of a media player. We have tested the
ENDECs web capabilities with Microsoft‟s Internet Explorer and Windows Media Player products. Sage
does not guarantee that other web browsers will work with the ENDEC.
15.7 Email
The ENDEC will email alert logs, received audio log files (in mp3 format), and error reports to a list of
email addresses you provide. You need to provide the address of an SMTP server the ENDEC can relay
mail through. The ENDEC can use various authentication schemes and STARTTLS encryption used by
SMTP servers.

110 What‟s New
Sage Digital ENDEC Manual Rev 1.0
15.8 FTP
The ENDEC will send a file containing alert information to an FTP server for each alert sent and received.
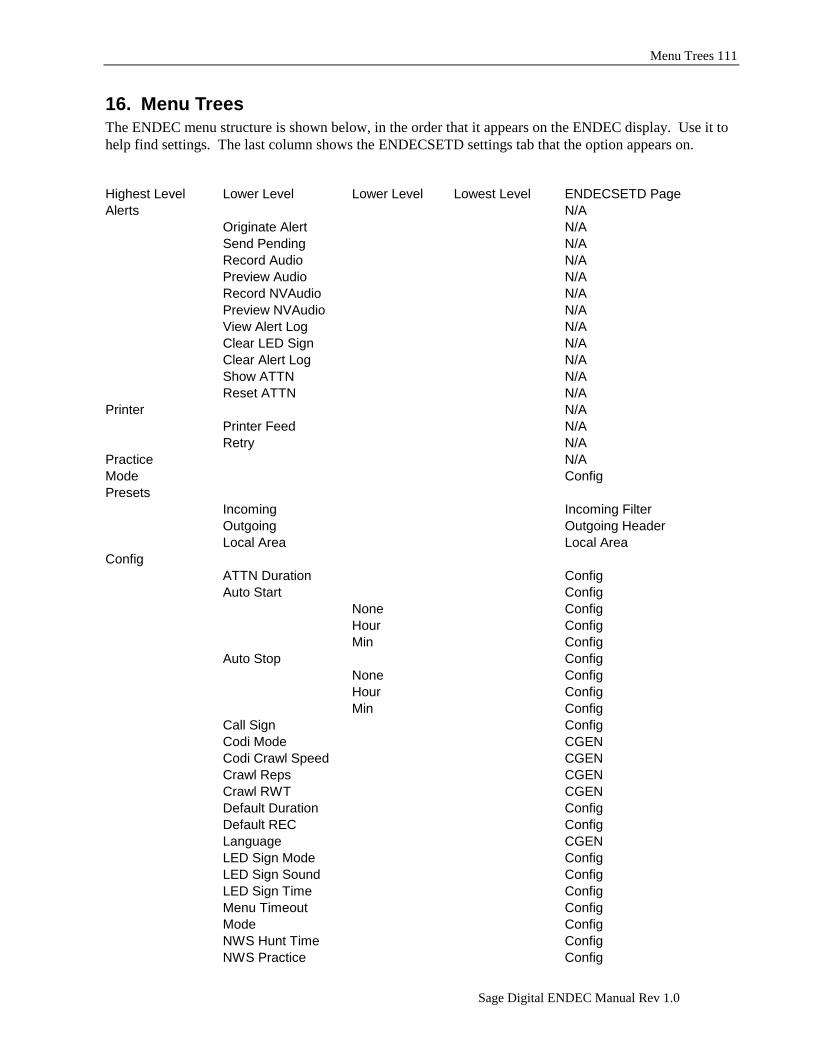
Menu Trees 111
Sage Digital ENDEC Manual Rev 1.0
16. Menu Trees The ENDEC menu structure is shown below, in the order that it appears on the ENDEC display. Use it to
help find settings. The last column shows the ENDECSETD settings tab that the option appears on.
Highest Level Lower Level Lower Level Lowest Level ENDECSETD Page
Alerts N/A
Originate Alert N/A
Send Pending N/A
Record Audio N/A
Preview Audio N/A
Record NVAudio N/A
Preview NVAudio N/A
View Alert Log N/A
Clear LED Sign N/A
Clear Alert Log N/A
Show ATTN N/A
Reset ATTN N/A
Printer N/A
Printer Feed N/A
Retry N/A
Practice N/A
Mode Config
Presets
Incoming Incoming Filter
Outgoing Outgoing Header
Local Area Local Area
Config
ATTN Duration Config
Auto Start Config
None Config
Hour Config
Min Config
Auto Stop Config
None Config
Hour Config
Min Config
Call Sign Config
Codi Mode CGEN
Codi Crawl Speed CGEN
Crawl Reps CGEN
Crawl RWT CGEN
Default Duration Config
Default REC Config
Language CGEN
LED Sign Mode Config
LED Sign Sound Config
LED Sign Time Config
Menu Timeout Config
Mode Config
NWS Hunt Time Config
NWS Practice Config
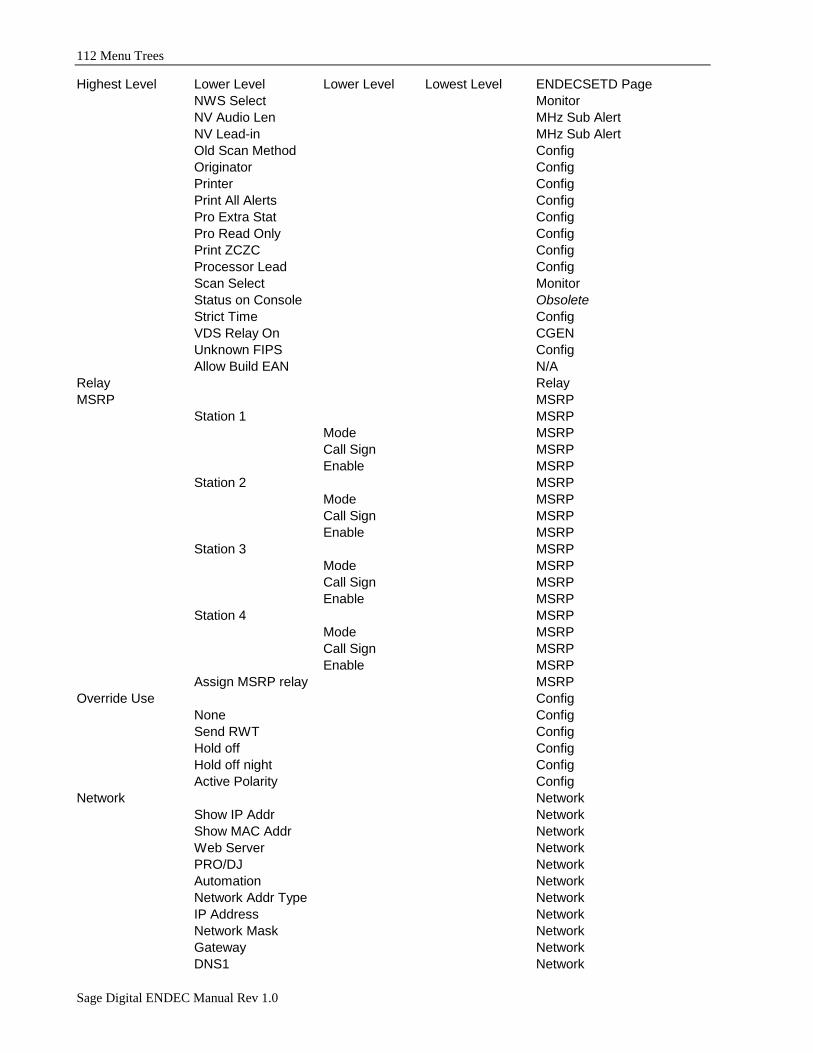
112 Menu Trees
Sage Digital ENDEC Manual Rev 1.0
Highest Level Lower Level Lower Level Lowest Level ENDECSETD Page
NWS Select Monitor
NV Audio Len MHz Sub Alert
NV Lead-in MHz Sub Alert
Old Scan Method Config
Originator Config
Printer Config
Print All Alerts Config
Pro Extra Stat Config
Pro Read Only Config
Print ZCZC Config
Processor Lead Config
Scan Select Monitor
Status on Console Obsolete
Strict Time Config
VDS Relay On CGEN
Unknown FIPS Config
Allow Build EAN N/A
Relay Relay
MSRP MSRP
Station 1 MSRP
Mode MSRP
Call Sign MSRP
Enable MSRP
Station 2 MSRP
Mode MSRP
Call Sign MSRP
Enable MSRP
Station 3 MSRP
Mode MSRP
Call Sign MSRP
Enable MSRP
Station 4 MSRP
Mode MSRP
Call Sign MSRP
Enable MSRP
Assign MSRP relay MSRP
Override Use Config
None Config
Send RWT Config
Hold off Config
Hold off night Config
Active Polarity Config
Network Network
Show IP Addr Network
Show MAC Addr Network
Web Server Network
PRO/DJ Network
Automation Network
Network Addr Type Network
IP Address Network
Network Mask Network
Gateway Network
DNS1 Network
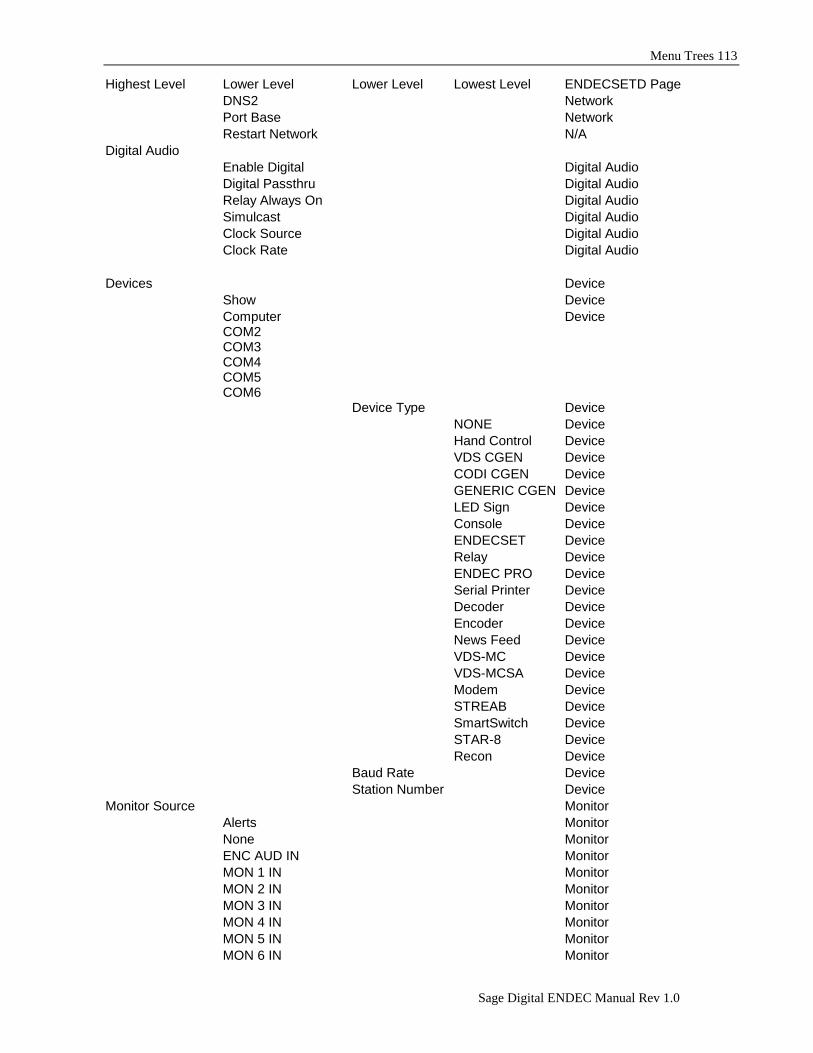
Menu Trees 113
Sage Digital ENDEC Manual Rev 1.0
Highest Level Lower Level Lower Level Lowest Level ENDECSETD Page
DNS2 Network
Port Base Network
Restart Network N/A
Digital Audio
Enable Digital Digital Audio
Digital Passthru Digital Audio
Relay Always On Digital Audio
Simulcast Digital Audio
Clock Source Digital Audio
Clock Rate Digital Audio
Devices Device
Show Device
Computer COM2 COM3 COM4 COM5 COM6
Device
Device Type Device
NONE Device
Hand Control Device
VDS CGEN Device
CODI CGEN Device
GENERIC CGEN Device
LED Sign Device
Console Device
ENDECSET Device
Relay Device
ENDEC PRO Device
Serial Printer Device
Decoder Device
Encoder Device
News Feed Device
VDS-MC Device
VDS-MCSA Device
Modem Device
STREAB Device
SmartSwitch Device
STAR-8 Device
Recon Device
Baud Rate Device
Station Number Device
Monitor Source Monitor
Alerts Monitor
None Monitor
ENC AUD IN Monitor
MON 1 IN Monitor
MON 2 IN Monitor
MON 3 IN Monitor
MON 4 IN Monitor
MON 5 IN Monitor
MON 6 IN Monitor
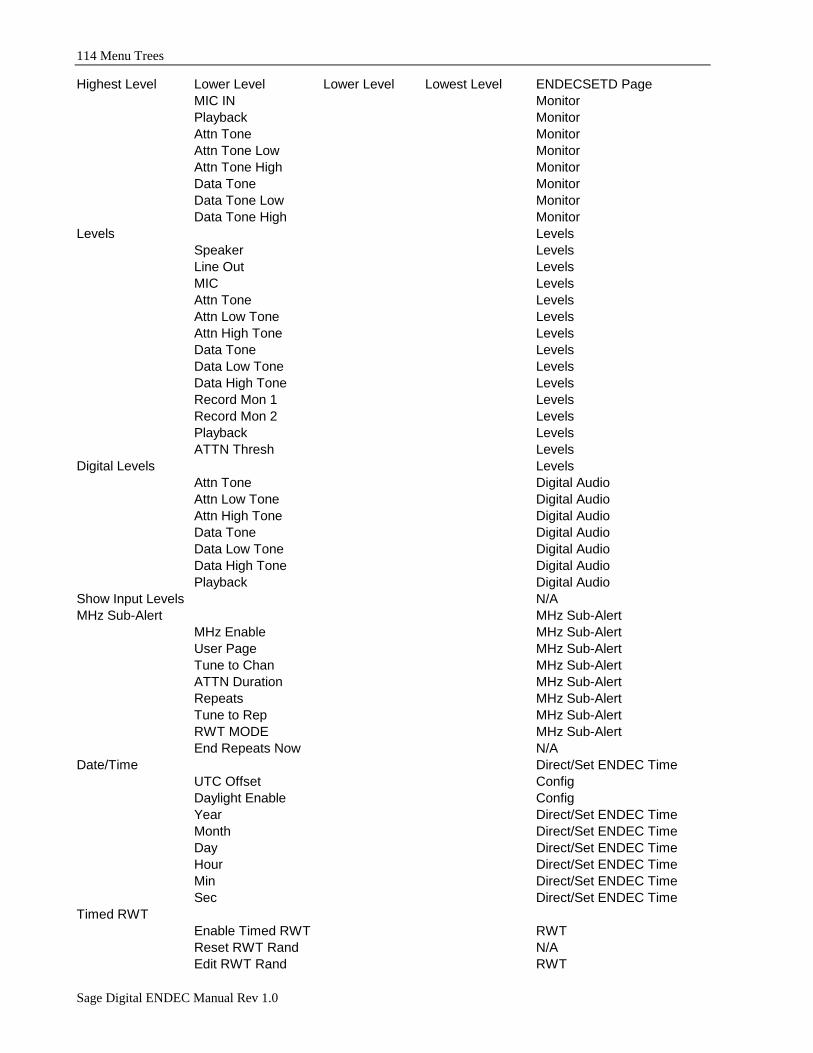
114 Menu Trees
Sage Digital ENDEC Manual Rev 1.0
Highest Level Lower Level Lower Level Lowest Level ENDECSETD Page
MIC IN Monitor
Playback Monitor
Attn Tone Monitor
Attn Tone Low Monitor
Attn Tone High Monitor
Data Tone Monitor
Data Tone Low Monitor
Data Tone High Monitor
Levels Levels
Speaker Levels
Line Out Levels
MIC Levels
Attn Tone Levels
Attn Low Tone Levels
Attn High Tone Levels
Data Tone Levels
Data Low Tone Levels
Data High Tone Levels
Record Mon 1 Levels
Record Mon 2 Levels
Playback Levels
ATTN Thresh Levels
Digital Levels Levels
Attn Tone Digital Audio
Attn Low Tone Digital Audio
Attn High Tone Digital Audio
Data Tone Digital Audio
Data Low Tone Digital Audio
Data High Tone Digital Audio
Playback Digital Audio
Show Input Levels N/A
MHz Sub-Alert MHz Sub-Alert
MHz Enable MHz Sub-Alert
User Page MHz Sub-Alert
Tune to Chan MHz Sub-Alert
ATTN Duration MHz Sub-Alert
Repeats MHz Sub-Alert
Tune to Rep MHz Sub-Alert
RWT MODE MHz Sub-Alert
End Repeats Now N/A
Date/Time Direct/Set ENDEC Time
UTC Offset Config
Daylight Enable Config
Year Direct/Set ENDEC Time
Month Direct/Set ENDEC Time
Day Direct/Set ENDEC Time
Hour Direct/Set ENDEC Time
Min Direct/Set ENDEC Time
Sec Direct/Set ENDEC Time
Timed RWT
Enable Timed RWT RWT
Reset RWT Rand N/A
Edit RWT Rand RWT

Menu Trees 115
Sage Digital ENDEC Manual Rev 1.0
Highest Level Lower Level Lower Level Lowest Level ENDECSETD Page
Print RWT Rand N/A
RWT Reset N/A
RWT Day of Week RWT
RWT Hour RWT
RWT Minute RWT
LCD Contrast Levels
Reset (Restart) N/A
Change Password Config
Change Admin Config
Change Pro Pass N/A
Test
Self Test N/A
Printer Test N/A
VDS CGEN Version N/A
Reset Blink Error N/A
Reboot Direct/Reboot ENDEC
Show UTC N/A

116 Menu Trees
Sage Digital ENDEC Manual Rev 1.0
Warranty 117
Sage Digital ENDEC Manual Rev 1.0
17. Warranty
Sage ENDEC Limited Warranty & Service Information US Warranty Only
Sage warrants to the original end user purchaser that this product and the components thereof, will be free
from defects in workmanship and materials for a period of one year from the date of purchase. Sage will,
without charge, repair or replace, at its option, defective product or component parts upon prepaid delivery
to the service department of Sage accompanied by proof of purchase date in the form of a valid sales
receipt.
This warranty does not apply in the event of misuse or abuse of the product or as a result of unauthorized
alteration or repairs. This warranty is void if the serial number is altered, defaced, or removed.
Sage shall not be liable for any consequential damages, including without limitation damages resulting
from loss of use. Some states do not allow limitation of incidental or consequential damages, so the above
limitation or exclusion may not apply to you.
This warranty gives you specific rights and you may also have other rights which vary from state to state.
The following information is provided for the unlikely event your unit requires service and must be
returned for service.
1. Be sure the unit is the cause of the problem. Check to make sure the unit has power supplied, all
cables are connected correctly and the cables themselves are in working condition.
2. If you find the unit to be at fault, write down a description of the problem including how and when the
problem occurs.
3. Call Sage at 914 872 4069 or email us at [email protected] for a Return Authorization
(RA) number.
4. Pack the unit in its original carton or a reasonable substitute. Put the packaged unit in another box for
shipping. Print the RA number clearly under the address. NOTE: The unit is subject to damage if
poorly packaged. Shipping damage may affect your warranty.
5. Include with your unit: a return shipping address (We cannot ship to a P.O. box), a copy of your
purchase receipt, a daytime phone number, and the description of the problem.
6. A shipping address will be provided with the RA number.
PLEASE NOTE: All returns must have a valid RA number

118 FIPS Codes
Sage Digital ENDEC Manual Rev 1.0
18. FIPS Codes
18.1 Land Areas
01000, All of Alabama 01001, Autauga, AL 01003, Baldwin, AL 01005, Barbour, AL 01007, Bibb, AL 01009, Blount, AL 01011, Bullock, AL 01013, Butler, AL 01015, Calhoun, AL 01017, Chambers, AL 01019, Cherokee, AL 01021, Chilton, AL 01023, Choctaw, AL 01025, Clarke, AL 01027, Clay, AL 01029, Cleburne, AL 01031, Coffee, AL 01033, Colbert, AL 01035, Conecuh, AL 01037, Coosa, AL 01039, Covington, AL 01041, Crenshaw, AL 01043, Cullman, AL 01045, Dale, AL 01047, Dallas, AL 01049, De Kalb, AL 01051, Elmore, AL 01053, Escambia, AL 01055, Etowah, AL 01057, Fayette, AL 01059, Franklin, AL 01061, Geneva, AL 01063, Greene, AL 01065, Hale, AL 01067, Henry, AL 01069, Houston, AL 01071, Jackson, AL 01073, Jefferson, AL 01075, Lamar, AL 01077, Lauderdale, AL 01079, Lawrence, AL 01081, Lee, AL 01083, Limestone, AL 01085, Lowndes, AL 01087, Macon, AL 01089, Madison, AL 01091, Marengo, AL 01093, Marion, AL 01095, Marshall, AL 01097, Mobile, AL 01099, Monroe, AL 01101, Montgomery, AL 01103, Morgan, AL 01105, Perry, AL 01107, Pickens, AL 01109, Pike, AL 01111, Randolph, AL 01113, Russell, AL 01115, St. Clair, AL 01117, Shelby, AL 01119, Sumter, AL 01121, Talladega, AL 01123, Tallapoosa, AL
01125, Tuscaloosa, AL 01127, Walker, AL 01129, Washington, AL 01131, Wilcox, AL 01133, Winston, AL 02000, All of Alaska 02010, Aleutian Islands, AK 02013, Aleutians East, AK 02020, Anchorage, AK 02050, Bethel, AK 02060, Bristol Bay, AK 02070, Dillingham, AK 02090, Fairbanks North Star,
AK 02100, Haines, AK 02110, Juneau, AK 02122, Kenai Peninsula, AK 02130, Ketchikan Gateway,
AK 02150, Kodiak Island, AK 02164, Lake and Peninsula,
AK 02170, Matanuska-Susitna,
AK 02180, Nome, AK 02185, North Slope, AK 02188, Northwest Arctic, AK 02201, Prince of Wales-Outer
Ketchikan, AK 02220, Sitka, AK 02231, Skagway-Yakutat-
Angoon, AK 02240, Southeast Fairbanks,
AK 02261, Valdez-Cordova, AK 02270, Wade Hampton, AK 02280, Wrangell-Petersburg,
AK 02290, Yukon-Koyukuk, AK 04000, All of Arizona 04001, Apache, AZ 04003, Cochise, AZ 04005, Coconino, AZ 04007, Gila, AZ 04009, Graham, AZ 04011, Greenlee, AZ 04012, La Paz, AZ 04013, Maricopa, AZ 04015, Mohave, AZ 04017, Navajo, AZ 04019, Pima, AZ 04021, Pinal, AZ 04023, Santa Cruz, AZ 04025, Yavapai, AZ 04027, Yuma, AZ 05000, All of Arkansas 05001, Arkansas, AR
05003, Ashley, AR 05005, Baxter, AR 05007, Benton, AR 05009, Boone, AR 05011, Bradley, AR 05013, Calhoun, AR 05015, Carroll, AR 05017, Chicot, AR 05019, Clark, AR 05021, Clay, AR 05023, Cleburne, AR 05025, Cleveland, AR 05027, Columbia, AR 05029, Conway, AR 05031, Craighead, AR 05033, Crawford, AR 05035, Crittenden, AR 05037, Cross, AR 05039, Dallas, AR 05041, Desha, AR 05043, Drew, AR 05045, Faulkner, AR 05047, Franklin, AR 05049, Fulton, AR 05051, Garland, AR 05053, Grant, AR 05055, Greene, AR 05057, Hempstead, AR 05059, Hot Spring, AR 05061, Howard, AR 05063, Independence, AR 05065, Izard, AR 05067, Jackson, AR 05069, Jefferson, AR 05071, Johnson, AR 05073, Lafayette, AR 05075, Lawrence, AR 05077, Lee, AR 05079, Lincoln, AR 05081, Little River, AR 05083, Logan, AR 05085, Lonoke, AR 05087, Madison, AR 05089, Marion, AR 05091, Miller, AR 05093, Mississippi, AR 05095, Monroe, AR 05097, Montgomery, AR 05099, Nevada, AR 05101, Newton, AR 05103, Ouachita, AR 05105, Perry, AR 05107, Phillips, AR 05109, Pike, AR 05111, Poinsett, AR 05113, Polk, AR 05115, Pope, AR 05117, Prairie, AR 05119, Pulaski, AR 05121, Randolph, AR 05123, St. Francis, AR 05125, Saline, AR 05127, Scott, AR
05129, Searcy, AR 05131, Sebastian, AR 05133, Sevier, AR 05135, Sharp, AR 05137, Stone, AR 05139, Union, AR 05141, Van Buren, AR 05143, Washington, AR 05145, White, AR 05147, Woodruff, AR 05149, Yell, AR 06000, All of California 06001, Alameda, CA 06003, Alpine, CA 06005, Amador, CA 06007, Butte, CA 06009, Calaveras, CA 06011, Colusa, CA 06013, Contra Costa, CA 06015, Del Norte, CA 06017, El Dorado, CA 06019, Fresno, CA 06021, Glenn, CA 06023, Humboldt, CA 06025, Imperial, CA 06027, Inyo, CA 06029, Kern, CA 06031, Kings, CA 06033, Lake, CA 06035, Lassen, CA 06037, Los Angeles, CA 06039, Madera, CA 06041, Marin, CA 06043, Mariposa, CA 06045, Mendocino, CA 06047, Merced, CA 06049, Modoc, CA 06051, Mono, CA 06053, Monterey, CA 06055, Napa, CA 06057, Nevada, CA 06059, Orange, CA 06061, Placer, CA 06063, Plumas, CA 06065, Riverside, CA 06067, Sacramento, CA 06069, San Benito, CA 06071, San Bernardino, CA 06073, San Diego, CA 06075, San Francisco, CA 06077, San Joaquin, CA 06079, San Luis Obispo, CA 06081, San Mateo, CA 06083, Santa Barbara, CA 06085, Santa Clara, CA 06087, Santa Cruz, CA 06089, Shasta, CA 06091, Sierra, CA 06093, Siskiyou, CA 06095, Solano, CA 06097, Sonoma, CA
06099, Stanislaus, CA 06101, Sutter, CA 06103, Tehama, CA 06105, Trinity, CA 06107, Tulare, CA 06109, Tuolumne, CA 06111, Ventura, CA 06113, Yolo, CA 06115, Yuba, CA 08000, All of Colorado 08001, Adams, CO 08003, Alamosa, CO 08005, Arapahoe, CO 08007, Archuleta, CO 08009, Baca, CO 08011, Bent, CO 08013, Boulder, CO 08015, Chaffee, CO 08017, Cheyenne, CO 08019, Clear Creek, CO 08021, Conejos, CO 08023, Costilla, CO 08025, Crowley, CO 08027, Custer, CO 08029, Delta, CO 08031, Denver, CO 08033, Dolores, CO 08035, Douglas, CO 08037, Eagle, CO 08039, Elbert, CO 08041, El Paso, CO 08043, Fremont, CO 08045, Garfield, CO 08047, Gilpin, CO 08049, Grand, CO 08051, Gunnison, CO 08053, Hinsdale, CO 08055, Huerfano, CO 08057, Jackson, CO 08059, Jefferson, CO 08061, Kiowa, CO 08063, Kit Carson, CO 08065, Lake, CO 08067, La Plata, CO 08069, Larimer, CO 08071, Las Animas, CO 08073, Lincoln, CO 08075, Logan, CO 08077, Mesa, CO 08079, Mineral, CO 08081, Moffat, CO 08083, Montezuma, CO 08085, Montrose, CO 08087, Morgan, CO 08089, Otero, CO 08091, Ouray, CO 08093, Park, CO 08095, Phillips, CO 08097, Pitkin, CO 08099, Prowers, CO 08101, Pueblo, CO 08103, Rio Blanco, CO

FIPS Codes 119
Sage Digital ENDEC Manual Rev 1.0
08105, Rio Grande, CO 08107, Routt, CO 08109, Saguache, CO 08111, San Juan, CO 08113, San Miguel, CO 08115, Sedgwick, CO 08117, Summit, CO 08119, Teller, CO 08121, Washington, CO 08123, Weld, CO 08125, Yuma, CO 09000, All of Connecticut 09001, Fairfield, CT 09003, Hartford, CT 09005, Litchfield, CT 09007, Middlesex, CT 09009, New Haven, CT 09011, New London, CT 09013, Tolland, CT 09015, Windham, CT 10000, All of Delaware 10001, Kent, DE 10003, New Castle, DE 10005, Sussex, DE 11000, All of District Of Columbia 11001, Washington, DC 12000, All of Florida 12001, Alachua, FL 12003, Baker, FL 12005, Bay, FL 12007, Bradford, FL 12009, Brevard, FL 12011, Broward, FL 12013, Calhoun, FL 12015, Charlotte, FL 12017, Citrus, FL 12019, Clay, FL 12021, Collier, FL 12023, Columbia, FL 12025, Dade, FL 12027, De Soto, FL 12029, Dixie, FL 12031, Duval, FL 12033, Escambia, FL 12035, Flagler, FL 12037, Franklin, FL 12039, Gadsden, FL 12041, Gilchrist, FL 12043, Glades, FL 12045, Gulf, FL 12047, Hamilton, FL 12049, Hardee, FL 12051, Hendry, FL 12053, Hernando, FL 12055, Highlands, FL 12057, Hillsborough, FL 12059, Holmes, FL 12061, Indian River, FL 12063, Jackson, FL 12065, Jefferson, FL 12067, Lafayette, FL 12069, Lake, FL 12071, Lee, FL
12073, Leon, FL 12075, Levy, FL 12077, Liberty, FL 12079, Madison, FL 12081, Manatee, FL 12083, Marion, FL 12085, Martin, FL 12087, Monroe, FL 12089, Nassau, FL 12091, Okaloosa, FL 12093, Okeechobee, FL 12095, Orange, FL 12097, Osceola, FL 12099, Palm Beach, FL 12101, Pasco, FL 12103, Pinellas, FL 12105, Polk, FL 12107, Putnam, FL 12109, St. Johns, FL 12111, St. Lucie, FL 12113, Santa Rosa, FL 12115, Sarasota, FL 12117, Seminole, FL 12119, Sumter, FL 12121, Suwannee, FL 12123, Taylor, FL 12125, Union, FL 12127, Volusia, FL 12129, Wakulla, FL 12131, Walton, FL 12133, Washington, FL 13000, All of Georgia 13001, Appling, GA 13003, Atkinson, GA 13005, Bacon, GA 13007, Baker, GA 13009, Baldwin, GA 13011, Banks, GA 13013, Barrow, GA 13015, Bartow, GA 13017, Ben Hill, GA 13019, Berrien, GA 13021, Bibb, GA 13023, Bleckley, GA 13025, Brantley, GA 13027, Brooks, GA 13029, Bryan, GA 13031, Bulloch, GA 13033, Burke, GA 13035, Butts, GA 13037, Calhoun, GA 13039, Camden, GA 13043, Candler, GA 13045, Carroll, GA 13047, Catoosa, GA 13049, Charlton, GA 13051, Chatham, GA 13053, Chattahoochee, GA 13055, Chattooga, GA 13057, Cherokee, GA 13059, Clarke, GA 13061, Clay, GA 13063, Clayton, GA 13065, Clinch, GA 13067, Cobb, GA 13069, Coffee, GA 13071, Colquitt, GA 13073, Columbia, GA 13075, Cook, GA 13077, Coweta, GA
13079, Crawford, GA 13081, Crisp, GA 13083, Dade, GA 13085, Dawson, GA 13087, Decatur, GA 13089, De Kalb, GA 13091, Dodge, GA 13093, Dooly, GA 13095, Dougherty, GA 13097, Douglas, GA 13099, Early, GA 13101, Echols, GA 13103, Effingham, GA 13105, Elbert, GA 13107, Emanuel, GA 13109, Evans, GA 13111, Fannin, GA 13113, Fayette, GA 13115, Floyd, GA 13117, Forsyth, GA 13119, Franklin, GA 13121, Fulton, GA 13123, Gilmer, GA 13125, Glascock, GA 13127, Glynn, GA 13129, Gordon, GA 13131, Grady, GA 13133, Greene, GA 13135, Gwinnett, GA 13137, Habersham, GA 13139, Hall, GA 13141, Hancock, GA 13143, Haralson, GA 13145, Harris, GA 13147, Hart, GA 13149, Heard, GA 13151, Henry, GA 13153, Houston, GA 13155, Irwin, GA 13157, Jackson, GA 13159, Jasper, GA 13161, Jeff Davis, GA 13163, Jefferson, GA 13165, Jenkins, GA 13167, Johnson, GA 13169, Jones, GA 13171, Lamar, GA 13173, Lanier, GA 13175, Laurens, GA 13177, Lee, GA 13179, Liberty, GA 13181, Lincoln, GA 13183, Long, GA 13185, Lowndes, GA 13187, Lumpkin, GA 13189, McDuffie, GA 13191, McIntosh, GA 13193, Macon, GA 13195, Madison, GA 13197, Marion, GA 13199, Meriwether, GA 13201, Miller, GA 13205, Mitchell, GA 13207, Monroe, GA 13209, Montgomery, GA 13211, Morgan, GA 13213, Murray, GA 13215, Muscogee, GA 13217, Newton, GA 13219, Oconee, GA 13221, Oglethorpe, GA 13223, Paulding, GA
13225, Peach, GA 13227, Pickens, GA 13229, Pierce, GA 13231, Pike, GA 13233, Polk, GA 13235, Pulaski, GA 13237, Putnam, GA 13239, Quitman, GA 13241, Rabun, GA 13243, Randolph, GA 13245, Richmond, GA 13247, Rockdale, GA 13249, Schley, GA 13251, Screven, GA 13253, Seminole, GA 13255, Spalding, GA 13257, Stephens, GA 13259, Stewart, GA 13261, Sumter, GA 13263, Talbot, GA 13265, Taliaferro, GA 13267, Tattnall, GA 13269, Taylor, GA 13271, Telfair, GA 13273, Terrell, GA 13275, Thomas, GA 13277, Tift, GA 13279, Toombs, GA 13281, Towns, GA 13283, Treutlen, GA 13285, Troup, GA 13287, Turner, GA 13289, Twiggs, GA 13291, Union, GA 13293, Upson, GA 13295, Walker, GA 13297, Walton, GA 13299, Ware, GA 13301, Warren, GA 13303, Washington, GA 13305, Wayne, GA 13307, Webster, GA 13309, Wheeler, GA 13311, White, GA 13313, Whitfield, GA 13315, Wilcox, GA 13317, Wilkes, GA 13319, Wilkinson, GA 13321, Worth, GA 15000, All of Hawaii 15001, Hawaii, HI 15003, Honolulu, HI 15005, Kalawao, HI 15007, Kauai, HI 15009, Maui, HI 16000, All of Idaho 16001, Ada, ID 16003, Adams, ID 16005, Bannock, ID 16007, Bear Lake, ID 16009, Benewah, ID 16011, Bingham, ID 16013, Blaine, ID 16015, Boise, ID 16017, Bonner, ID 16019, Bonneville, ID 16021, Boundary, ID 16023, Butte, ID
16025, Camas, ID 16027, Canyon, ID 16029, Caribou, ID 16031, Cassia, ID 16033, Clark, ID 16035, Clearwater, ID 16037, Custer, ID 16039, Elmore, ID 16041, Franklin, ID 16043, Fremont, ID 16045, Gem, ID 16047, Gooding, ID 16049, Idaho, ID 16051, Jefferson, ID 16053, Jerome, ID 16055, Kootenai, ID 16057, Latah, ID 16059, Lemhi, ID 16061, Lewis, ID 16063, Lincoln, ID 16065, Madison, ID 16067, Minidoka, ID 16069, Nez Perce, ID 16071, Oneida, ID 16073, Owyhee, ID 16075, Payette, ID 16077, Power, ID 16079, Shoshone, ID 16081, Teton, ID 16083, Twin Falls, ID 16085, Valley, ID 16087, Washington, ID 17000, All of Illinois 17001, Adams, IL 17003, Alexander, IL 17005, Bond, IL 17007, Boone, IL 17009, Brown, IL 17011, Bureau, IL 17013, Calhoun, IL 17015, Carroll, IL 17017, Cass, IL 17019, Champaign, IL 17021, Christian, IL 17023, Clark, IL 17025, Clay, IL 17027, Clinton, IL 17029, Coles, IL 17031, Cook, IL 17033, Crawford, IL 17035, Cumberland, IL 17037, De Kalb, IL 17039, De Witt, IL 17041, Douglas, IL 17043, Du Page, IL 17045, Edgar, IL 17047, Edwards, IL 17049, Effingham, IL 17051, Fayette, IL 17053, Ford, IL 17055, Franklin, IL 17057, Fulton, IL 17059, Gallatin, IL 17061, Greene, IL 17063, Grundy, IL 17065, Hamilton, IL 17067, Hancock, IL 17069, Hardin, IL 17071, Henderson, IL 17073, Henry, IL

120 FIPS Codes
Sage Digital ENDEC Manual Rev 1.0
17075, Iroquois, IL 17077, Jackson, IL 17079, Jasper, IL 17081, Jefferson, IL 17083, Jersey, IL 17085, Jo Daviess, IL 17087, Johnson, IL 17089, Kane, IL 17091, Kankakee, IL 17093, Kendall, IL 17095, Knox, IL 17097, Lake, IL 17099, La Salle, IL 17101, Lawrence, IL 17103, Lee, IL 17105, Livingston, IL 17107, Logan, IL 17109, McDonough, IL 17111, McHenry, IL 17113, McLean, IL 17115, Macon, IL 17117, Macoupin, IL 17119, Madison, IL 17121, Marion, IL 17123, Marshall, IL 17125, Mason, IL 17127, Massac, IL 17129, Menard, IL 17131, Mercer, IL 17133, Monroe, IL 17135, Montgomery, IL 17137, Morgan, IL 17139, Moultrie, IL 17141, Ogle, IL 17143, Peoria, IL 17145, Perry, IL 17147, Piatt, IL 17149, Pike, IL 17151, Pope, IL 17153, Pulaski, IL 17155, Putnam, IL 17157, Randolph, IL 17159, Richland, IL 17161, Rock Island, IL 17163, St. Clair, IL 17165, Saline, IL 17167, Sangamon, IL 17169, Schuyler, IL 17171, Scott, IL 17173, Shelby, IL 17175, Stark, IL 17177, Stephenson, IL 17179, Tazewell, IL 17181, Union, IL 17183, Vermilion, IL 17185, Wabash, IL 17187, Warren, IL 17189, Washington, IL 17191, Wayne, IL 17193, White, IL 17195, Whiteside, IL 17197, Will, IL 17199, Williamson, IL 17201, Winnebago, IL 17203, Woodford, IL 18000, All of Indiana 18001, Adams, IN 18003, Allen, IN 18005, Bartholomew, IN 18007, Benton, IN
18009, Blackford, IN 18011, Boone, IN 18013, Brown, IN 18015, Carroll, IN 18017, Cass, IN 18019, Clark, IN 18021, Clay, IN 18023, Clinton, IN 18025, Crawford, IN 18027, Daviess, IN 18029, Dearborn, IN 18031, Decatur, IN 18033, De Kalb, IN 18035, Delaware, IN 18037, Dubois, IN 18039, Elkhart, IN 18041, Fayette, IN 18043, Floyd, IN 18045, Fountain, IN 18047, Franklin, IN 18049, Fulton, IN 18051, Gibson, IN 18053, Grant, IN 18055, Greene, IN 18057, Hamilton, IN 18059, Hancock, IN 18061, Harrison, IN 18063, Hendricks, IN 18065, Henry, IN 18067, Howard, IN 18069, Huntington, IN 18071, Jackson, IN 18073, Jasper, IN 18075, Jay, IN 18077, Jefferson, IN 18079, Jennings, IN 18081, Johnson, IN 18083, Knox, IN 18085, Kosciusko, IN 18087, Lagrange, IN 18089, Lake, IN 18091, La Porte, IN 18093, Lawrence, IN 18095, Madison, IN 18097, Marion, IN 18099, Marshall, IN 18101, Martin, IN 18103, Miami, IN 18105, Monroe, IN 18107, Montgomery, IN 18109, Morgan, IN 18111, Newton, IN 18113, Noble, IN 18115, Ohio, IN 18117, Orange, IN 18119, Owen, IN 18121, Parke, IN 18123, Perry, IN 18125, Pike, IN 18127, Porter, IN 18129, Posey, IN 18131, Pulaski, IN 18133, Putnam, IN 18135, Randolph, IN 18137, Ripley, IN 18139, Rush, IN 18141, St. Joseph, IN 18143, Scott, IN 18145, Shelby, IN 18147, Spencer, IN 18149, Starke, IN 18151, Steuben, IN
18153, Sullivan, IN 18155, Switzerland, IN 18157, Tippecanoe, IN 18159, Tipton, IN 18161, Union, IN 18163, Vanderburgh, IN 18165, Vermillion, IN 18167, Vigo, IN 18169, Wabash, IN 18171, Warren, IN 18173, Warrick, IN 18175, Washington, IN 18177, Wayne, IN 18179, Wells, IN 18181, White, IN 18183, Whitley, IN 19000, All of Iowa 19001, Adair, IA 19003, Adams, IA 19005, Allamakee, IA 19007, Appanoose, IA 19009, Audubon, IA 19011, Benton, IA 19013, Black Hawk, IA 19015, Boone, IA 19017, Bremer, IA 19019, Buchanan, IA 19021, Buena Vista, IA 19023, Butler, IA 19025, Calhoun, IA 19027, Carroll, IA 19029, Cass, IA 19031, Cedar, IA 19033, Cerro Gordo, IA 19035, Cherokee, IA 19037, Chickasaw, IA 19039, Clarke, IA 19041, Clay, IA 19043, Clayton, IA 19045, Clinton, IA 19047, Crawford, IA 19049, Dallas, IA 19051, Davis, IA 19053, Decatur, IA 19055, Delaware, IA 19057, Des Moines, IA 19059, Dickinson, IA 19061, Dubuque, IA 19063, Emmet, IA 19065, Fayette, IA 19067, Floyd, IA 19069, Franklin, IA 19071, Fremont, IA 19073, Greene, IA 19075, Grundy, IA 19077, Guthrie, IA 19079, Hamilton, IA 19081, Hancock, IA 19083, Hardin, IA 19085, Harrison, IA 19087, Henry, IA 19089, Howard, IA 19091, Humboldt, IA 19093, Ida, IA 19095, Iowa, IA 19097, Jackson, IA 19099, Jasper, IA 19101, Jefferson, IA 19103, Johnson, IA 19105, Jones, IA
19107, Keokuk, IA 19109, Kossuth, IA 19111, Lee, IA 19113, Linn, IA 19115, Louisa, IA 19117, Lucas, IA 19119, Lyon, IA 19121, Madison, IA 19123, Mahaska, IA 19125, Marion, IA 19127, Marshall, IA 19129, Mills, IA 19131, Mitchell, IA 19133, Monona, IA 19135, Monroe, IA 19137, Montgomery, IA 19139, Muscatine, IA 19141, O'Brien, IA 19143, Osceola, IA 19145, Page, IA 19147, Palo Alto, IA 19149, Plymouth, IA 19151, Pocahontas, IA 19153, Polk, IA 19155, Pottawattamie, IA 19157, Poweshiek, IA 19159, Ringgold, IA 19161, Sac, IA 19163, Scott, IA 19165, Shelby, IA 19167, Sioux, IA 19169, Story, IA 19171, Tama, IA 19173, Taylor, IA 19175, Union, IA 19177, Van Buren, IA 19179, Wapello, IA 19181, Warren, IA 19183, Washington, IA 19185, Wayne, IA 19187, Webster, IA 19189, Winnebago, IA 19191, Winneshiek, IA 19193, Woodbury, IA 19195, Worth, IA 19197, Wright, IA 20000, All of Kansas 20001, Allen, KS 20003, Anderson, KS 20005, Atchison, KS 20007, Barber, KS 20009, Barton, KS 20011, Bourbon, KS 20013, Brown, KS 20015, Butler, KS 20017, Chase, KS 20019, Chautauqua, KS 20021, Cherokee, KS 20023, Cheyenne, KS 20025, Clark, KS 20027, Clay, KS 20029, Cloud, KS 20031, Coffey, KS 20033, Comanche, KS 20035, Cowley, KS 20037, Crawford, KS 20039, Decatur, KS 20041, Dickinson, KS 20043, Doniphan, KS 20045, Douglas, KS
20047, Edwards, KS 20049, Elk, KS 20051, Ellis, KS 20053, Ellsworth, KS 20055, Finney, KS 20057, Ford, KS 20059, Franklin, KS 20061, Geary, KS 20063, Gove, KS 20065, Graham, KS 20067, Grant, KS 20069, Gray, KS 20071, Greeley, KS 20073, Greenwood, KS 20075, Hamilton, KS 20077, Harper, KS 20079, Harvey, KS 20081, Haskell, KS 20083, Hodgeman, KS 20085, Jackson, KS 20087, Jefferson, KS 20089, Jewell, KS 20091, Johnson, KS 20093, Kearny, KS 20095, Kingman, KS 20097, Kiowa, KS 20099, Labette, KS 20101, Lane, KS 20103, Leavenworth, KS 20105, Lincoln, KS 20107, Linn, KS 20109, Logan, KS 20111, Lyon, KS 20113, McPherson, KS 20115, Marion, KS 20117, Marshall, KS 20119, Meade, KS 20121, Miami, KS 20123, Mitchell, KS 20125, Montgomery, KS 20127, Morris, KS 20129, Morton, KS 20131, Nemaha, KS 20133, Neosho, KS 20135, Ness, KS 20137, Norton, KS 20139, Osage, KS 20141, Osborne, KS 20143, Ottawa, KS 20145, Pawnee, KS 20147, Phillips, KS 20149, Pottawatomie, KS 20151, Pratt, KS 20153, Rawlins, KS 20155, Reno, KS 20157, Republic, KS 20159, Rice, KS 20161, Riley, KS 20163, Rooks, KS 20165, Rush, KS 20167, Russell, KS 20169, Saline, KS 20171, Scott, KS 20173, Sedgwick, KS 20175, Seward, KS 20177, Shawnee, KS 20179, Sheridan, KS 20181, Sherman, KS 20183, Smith, KS 20185, Stafford, KS 20187, Stanton, KS 20189, Stevens, KS

FIPS Codes 121
Sage Digital ENDEC Manual Rev 1.0
20191, Sumner, KS 20193, Thomas, KS 20195, Trego, KS 20197, Wabaunsee, KS 20199, Wallace, KS 20201, Washington, KS 20203, Wichita, KS 20205, Wilson, KS 20207, Woodson, KS 20209, Wyandotte, KS 21000, All of Kentucky 21001, Adair, KY 21003, Allen, KY 21005, Anderson, KY 21007, Ballard, KY 21009, Barren, KY 21011, Bath, KY 21013, Bell, KY 21015, Boone, KY 21017, Bourbon, KY 21019, Boyd, KY 21021, Boyle, KY 21023, Bracken, KY 21025, Breathitt, KY 21027, Breckinridge, KY 21029, Bullitt, KY 21031, Butler, KY 21033, Caldwell, KY 21035, Calloway, KY 21037, Campbell, KY 21039, Carlisle, KY 21041, Carroll, KY 21043, Carter, KY 21045, Casey, KY 21047, Christian, KY 21049, Clark, KY 21051, Clay, KY 21053, Clinton, KY 21055, Crittenden, KY 21057, Cumberland, KY 21059, Daviess, KY 21061, Edmonson, KY 21063, Elliott, KY 21065, Estill, KY 21067, Fayette, KY 21069, Fleming, KY 21071, Floyd, KY 21073, Franklin, KY 21075, Fulton, KY 21077, Gallatin, KY 21079, Garrard, KY 21081, Grant, KY 21083, Graves, KY 21085, Grayson, KY 21087, Green, KY 21089, Greenup, KY 21091, Hancock, KY 21093, Hardin, KY 21095, Harlan, KY 21097, Harrison, KY 21099, Hart, KY 21101, Henderson, KY 21103, Henry, KY 21105, Hickman, KY 21107, Hopkins, KY 21109, Jackson, KY 21111, Jefferson, KY 21113, Jessamine, KY 21115, Johnson, KY 21117, Kenton, KY
21119, Knott, KY 21121, Knox, KY 21123, Larue, KY 21125, Laurel, KY 21127, Lawrence, KY 21129, Lee, KY 21131, Leslie, KY 21133, Letcher, KY 21135, Lewis, KY 21137, Lincoln, KY 21139, Livingston, KY 21141, Logan, KY 21143, Lyon, KY 21145, McCracken, KY 21147, McCreary, KY 21149, McLean, KY 21151, Madison, KY 21153, Magoffin, KY 21155, Marion, KY 21157, Marshall, KY 21159, Martin, KY 21161, Mason, KY 21163, Meade, KY 21165, Menifee, KY 21167, Mercer, KY 21169, Metcalfe, KY 21171, Monroe, KY 21173, Montgomery, KY 21175, Morgan, KY 21177, Muhlenberg, KY 21179, Nelson, KY 21181, Nicholas, KY 21183, Ohio, KY 21185, Oldham, KY 21187, Owen, KY 21189, Owsley, KY 21191, Pendleton, KY 21193, Perry, KY 21195, Pike, KY 21197, Powell, KY 21199, Pulaski, KY 21201, Robertson, KY 21203, Rockcastle, KY 21205, Rowan, KY 21207, Russell, KY 21209, Scott, KY 21211, Shelby, KY 21213, Simpson, KY 21215, Spencer, KY 21217, Taylor, KY 21219, Todd, KY 21221, Trigg, KY 21223, Trimble, KY 21225, Union, KY 21227, Warren, KY 21229, Washington, KY 21231, Wayne, KY 21233, Webster, KY 21235, Whitley, KY 21237, Wolfe, KY 21239, Woodford, KY 22000, All of Louisiana 22001, Acadia, LA 22003, Allen, LA 22005, Ascension, LA 22007, Assumption, LA 22009, Avoyelles, LA 22011, Beauregard, LA 22013, Bienville, LA 22015, Bossier, LA
22017, Caddo, LA 22019, Calcasieu, LA 22021, Caldwell, LA 22023, Cameron, LA 22025, Catahoula, LA 22027, Claiborne, LA 22029, Concordia, LA 22031, De Soto, LA 22033, East Baton Rouge, LA 22035, East Carroll, LA 22037, East Feliciana, LA 22039, Evangeline, LA 22041, Franklin, LA 22043, Grant, LA 22045, Iberia, LA 22047, Iberville, LA 22049, Jackson, LA 22051, Jefferson, LA 22053, Jefferson Davis, LA 22055, Lafayette, LA 22057, Lafourche, LA 22059, La Salle, LA 22061, Lincoln, LA 22063, Livingston, LA 22065, Madison, LA 22067, Morehouse, LA 22069, Natchitoches, LA 22071, Orleans, LA 22073, Ouachita, LA 22075, Plaquemines, LA 22077, Pointe Coupee, LA 22079, Rapides, LA 22081, Red River, LA 22083, Richland, LA 22085, Sabine, LA 22087, St. Bernard, LA 22089, St. Charles, LA 22091, St. Helena, LA 22093, St. James, LA 22095, St. John the Baptist, LA 22097, St. Landry, LA 22099, St. Martin, LA 22101, St. Mary, LA 22103, St. Tammany, LA 22105, Tangipahoa, LA 22107, Tensas, LA 22109, Terrebonne, LA 22111, Union, LA 22113, Vermilion, LA 22115, Vernon, LA 22117, Washington, LA 22119, Webster, LA 22121, West Baton Rouge, LA 22123, West Carroll, LA 22125, West Feliciana, LA 22127, Winn, LA 23000, All of Maine 23001, Androscoggin, ME 23003, Aroostook, ME 23005, Cumberland, ME 23007, Franklin, ME 23009, Hancock, ME 23011, Kennebec, ME 23013, Knox, ME 23015, Lincoln, ME 23017, Oxford, ME 23019, Penobscot, ME 23021, Piscataquis, ME
23023, Sagadahoc, ME 23025, Somerset, ME 23027, Waldo, ME 23029, Washington, ME 23031, York, ME 24000, All of Maryland 24001, Allegany, MD 24003, Anne Arundel, MD 24005, Baltimore, MD 24009, Calvert, MD 24011, Caroline, MD 24013, Carroll, MD 24015, Cecil, MD 24017, Charles, MD 24019, Dorchester, MD 24021, Frederick, MD 24023, Garrett, MD 24025, Harford, MD 24027, Howard, MD 24029, Kent, MD 24031, Montgomery, MD 24033, Prince George's, MD 24035, Queen Anne's, MD 24037, St. Mary's, MD 24039, Somerset, MD 24041, Talbot, MD 24043, Washington, MD 24045, Wicomico, MD 24047, Worcester, MD 24510, Baltimore city, MD 25000, All of Massachusetts 25001, Barnstable, MA 25003, Berkshire, MA 25005, Bristol, MA 25007, Dukes, MA 25009, Essex, MA 25011, Franklin, MA 25013, Hampden, MA 25015, Hampshire, MA 25017, Middlesex, MA 25019, Nantucket, MA 25021, Norfolk, MA 25023, Plymouth, MA 25025, Suffolk, MA 25027, Worcester, MA 26000, All of Michigan 26001, Alcona, MI 26003, Alger, MI 26005, Allegan, MI 26007, Alpena, MI 26009, Antrim, MI 26011, Arenac, MI 26013, Baraga, MI 26015, Barry, MI 26017, Bay, MI 26019, Benzie, MI 26021, Berrien, MI 26023, Branch, MI 26025, Calhoun, MI 26027, Cass, MI 26029, Charlevoix, MI 26031, Cheboygan, MI 26033, Chippewa, MI 26035, Clare, MI 26037, Clinton, MI 26039, Crawford, MI
26041, Delta, MI 26043, Dickinson, MI 26045, Eaton, MI 26047, Emmet, MI 26049, Genesee, MI 26051, Gladwin, MI 26053, Gogebic, MI 26055, Grand Traverse, MI 26057, Gratiot, MI 26059, Hillsdale, MI 26061, Houghton, MI 26063, Huron, MI 26065, Ingham, MI 26067, Ionia, MI 26069, Iosco, MI 26071, Iron, MI 26073, Isabella, MI 26075, Jackson, MI 26077, Kalamazoo, MI 26079, Kalkaska, MI 26081, Kent, MI 26083, Keweenaw, MI 26085, Lake, MI 26087, Lapeer, MI 26089, Leelanau, MI 26091, Lenawee, MI 26093, Livingston, MI 26095, Luce, MI 26097, Mackinac, MI 26099, Macomb, MI 26101, Manistee, MI 26103, Marquette, MI 26105, Mason, MI 26107, Mecosta, MI 26109, Menominee, MI 26111, Midland, MI 26113, Missaukee, MI 26115, Monroe, MI 26117, Montcalm, MI 26119, Montmorency, MI 26121, Muskegon, MI 26123, Newaygo, MI 26125, Oakland, MI 26127, Oceana, MI 26129, Ogemaw, MI 26131, Ontonagon, MI 26133, Osceola, MI 26135, Oscoda, MI 26137, Otsego, MI 26139, Ottawa, MI 26141, Presque Isle, MI 26143, Roscommon, MI 26145, Saginaw, MI 26147, St. Clair, MI 26149, St. Joseph, MI 26151, Sanilac, MI 26153, Schoolcraft, MI 26155, Shiawassee, MI 26157, Tuscola, MI 26159, Van Buren, MI 26161, Washtenaw, MI 26163, Wayne, MI 26165, Wexford, MI 27000, All of Minnesota 27001, Aitkin, MN 27003, Anoka, MN 27005, Becker, MN 27007, Beltrami, MN 27009, Benton, MN 27011, Big Stone, MN

122 FIPS Codes
Sage Digital ENDEC Manual Rev 1.0
27013, Blue Earth, MN 27015, Brown, MN 27017, Carlton, MN 27019, Carver, MN 27021, Cass, MN 27023, Chippewa, MN 27025, Chisago, MN 27027, Clay, MN 27029, Clearwater, MN 27031, Cook, MN 27033, Cottonwood, MN 27035, Crow Wing, MN 27037, Dakota, MN 27039, Dodge, MN 27041, Douglas, MN 27043, Faribault, MN 27045, Fillmore, MN 27047, Freeborn, MN 27049, Goodhue, MN 27051, Grant, MN 27053, Hennepin, MN 27055, Houston, MN 27057, Hubbard, MN 27059, Isanti, MN 27061, Itasca, MN 27063, Jackson, MN 27065, Kanabec, MN 27067, Kandiyohi, MN 27069, Kittson, MN 27071, Koochiching, MN 27073, Lac qui Parle, MN 27075, Lake, MN 27077, Lake of the Woods, MN 27079, Le Sueur, MN 27081, Lincoln, MN 27083, Lyon, MN 27085, McLeod, MN 27087, Mahnomen, MN 27089, Marshall, MN 27091, Martin, MN 27093, Meeker, MN 27095, Mille Lacs, MN 27097, Morrison, MN 27099, Mower, MN 27101, Murray, MN 27103, Nicollet, MN 27105, Nobles, MN 27107, Norman, MN 27109, Olmsted, MN 27111, Otter Tail, MN 27113, Pennington, MN 27115, Pine, MN 27117, Pipestone, MN 27119, Polk, MN 27121, Pope, MN 27123, Ramsey, MN 27125, Red Lake, MN 27127, Redwood, MN 27129, Renville, MN 27131, Rice, MN 27133, Rock, MN 27135, Roseau, MN 27137, St. Louis, MN 27139, Scott, MN 27141, Sherburne, MN 27143, Sibley, MN 27145, Stearns, MN 27147, Steele, MN 27149, Stevens, MN 27151, Swift, MN 27153, Todd, MN
27155, Traverse, MN 27157, Wabasha, MN 27159, Wadena, MN 27161, Waseca, MN 27163, Washington, MN 27165, Watonwan, MN 27167, Wilkin, MN 27169, Winona, MN 27171, Wright, MN 27173, Yellow Medicine, MN 28000, All of Mississippi 28001, Adams, MS 28003, Alcorn, MS 28005, Amite, MS 28007, Attala, MS 28009, Benton, MS 28011, Bolivar, MS 28013, Calhoun, MS 28015, Carroll, MS 28017, Chickasaw, MS 28019, Choctaw, MS 28021, Claiborne, MS 28023, Clarke, MS 28025, Clay, MS 28027, Coahoma, MS 28029, Copiah, MS 28031, Covington, MS 28033, De Soto, MS 28035, Forrest, MS 28037, Franklin, MS 28039, George, MS 28041, Greene, MS 28043, Grenada, MS 28045, Hancock, MS 28047, Harrison, MS 28049, Hinds, MS 28051, Holmes, MS 28053, Humphreys, MS 28055, Issaquena, MS 28057, Itawamba, MS 28059, Jackson, MS 28061, Jasper, MS 28063, Jefferson, MS 28065, Jefferson Davis, MS 28067, Jones, MS 28069, Kemper, MS 28071, Lafayette, MS 28073, Lamar, MS 28075, Lauderdale, MS 28077, Lawrence, MS 28079, Leake, MS 28081, Lee, MS 28083, Leflore, MS 28085, Lincoln, MS 28087, Lowndes, MS 28089, Madison, MS 28091, Marion, MS 28093, Marshall, MS 28095, Monroe, MS 28097, Montgomery, MS 28099, Neshoba, MS 28101, Newton, MS 28103, Noxubee, MS 28105, Oktibbeha, MS 28107, Panola, MS 28109, Pearl River, MS 28111, Perry, MS 28113, Pike, MS 28115, Pontotoc, MS 28117, Prentiss, MS
28119, Quitman, MS 28121, Rankin, MS 28123, Scott, MS 28125, Sharkey, MS 28127, Simpson, MS 28129, Smith, MS 28131, Stone, MS 28133, Sunflower, MS 28135, Tallahatchie, MS 28137, Tate, MS 28139, Tippah, MS 28141, Tishomingo, MS 28143, Tunica, MS 28145, Union, MS 28147, Walthall, MS 28149, Warren, MS 28151, Washington, MS 28153, Wayne, MS 28155, Webster, MS 28157, Wilkinson, MS 28159, Winston, MS 28161, Yalobusha, MS 28163, Yazoo, MS 29000, All of Missouri 29001, Adair, MO 29003, Andrew, MO 29005, Atchison, MO 29007, Audrain, MO 29009, Barry, MO 29011, Barton, MO 29013, Bates, MO 29015, Benton, MO 29017, Bollinger, MO 29019, Boone, MO 29021, Buchanan, MO 29023, Butler, MO 29025, Caldwell, MO 29027, Callaway, MO 29029, Camden, MO 29031, Cape Girardeau, MO 29033, Carroll, MO 29035, Carter, MO 29037, Cass, MO 29039, Cedar, MO 29041, Chariton, MO 29043, Christian, MO 29045, Clark, MO 29047, Clay, MO 29049, Clinton, MO 29051, Cole, MO 29053, Cooper, MO 29055, Crawford, MO 29057, Dade, MO 29059, Dallas, MO 29061, Daviess, MO 29063, De Kalb, MO 29065, Dent, MO 29067, Douglas, MO 29069, Dunklin, MO 29071, Franklin, MO 29073, Gasconade, MO 29075, Gentry, MO 29077, Greene, MO 29079, Grundy, MO 29081, Harrison, MO 29083, Henry, MO 29085, Hickory, MO 29087, Holt, MO 29089, Howard, MO 29091, Howell, MO
29093, Iron, MO 29095, Jackson, MO 29097, Jasper, MO 29099, Jefferson, MO 29101, Johnson, MO 29103, Knox, MO 29105, Laclede, MO 29107, Lafayette, MO 29109, Lawrence, MO 29111, Lewis, MO 29113, Lincoln, MO 29115, Linn, MO 29117, Livingston, MO 29119, McDonald, MO 29121, Macon, MO 29123, Madison, MO 29125, Maries, MO 29127, Marion, MO 29129, Mercer, MO 29131, Miller, MO 29133, Mississippi, MO 29135, Moniteau, MO 29137, Monroe, MO 29139, Montgomery, MO 29141, Morgan, MO 29143, New Madrid, MO 29145, Newton, MO 29147, Nodaway, MO 29149, Oregon, MO 29151, Osage, MO 29153, Ozark, MO 29155, Pemiscot, MO 29157, Perry, MO 29159, Pettis, MO 29161, Phelps, MO 29163, Pike, MO 29165, Platte, MO 29167, Polk, MO 29169, Pulaski, MO 29171, Putnam, MO 29173, Ralls, MO 29175, Randolph, MO 29177, Ray, MO 29179, Reynolds, MO 29181, Ripley, MO 29183, St. Charles, MO 29185, St. Clair, MO 29186, Ste. Genevieve, MO 29187, St. Francois, MO 29189, St. Louis, MO 29195, Saline, MO 29197, Schuyler, MO 29199, Scotland, MO 29201, Scott, MO 29203, Shannon, MO 29205, Shelby, MO 29207, Stoddard, MO 29209, Stone, MO 29211, Sullivan, MO 29213, Taney, MO 29215, Texas, MO 29217, Vernon, MO 29219, Warren, MO 29221, Washington, MO 29223, Wayne, MO 29225, Webster, MO 29227, Worth, MO 29229, Wright, MO 29510, St. Louis city, MO 30000, All of Montana
30001, Beaverhead, MT 30003, Big Horn, MT 30005, Blaine, MT 30007, Broadwater, MT 30009, Carbon, MT 30011, Carter, MT 30013, Cascade, MT 30015, Chouteau, MT 30017, Custer, MT 30019, Daniels, MT 30021, Dawson, MT 30023, Deer Lodge, MT 30025, Fallon, MT 30027, Fergus, MT 30029, Flathead, MT 30031, Gallatin, MT 30033, Garfield, MT 30035, Glacier, MT 30037, Golden Valley, MT 30039, Granite, MT 30041, Hill, MT 30043, Jefferson, MT 30045, Judith Basin, MT 30047, Lake, MT 30049, Lewis and Clark, MT 30051, Liberty, MT 30053, Lincoln, MT 30055, McCone, MT 30057, Madison, MT 30059, Meagher, MT 30061, Mineral, MT 30063, Missoula, MT 30065, Musselshell, MT 30067, Park, MT 30069, Petroleum, MT 30071, Phillips, MT 30073, Pondera, MT 30075, Powder River, MT 30077, Powell, MT 30079, Prairie, MT 30081, Ravalli, MT 30083, Richland, MT 30085, Roosevelt, MT 30087, Rosebud, MT 30089, Sanders, MT 30091, Sheridan, MT 30093, Silver Bow, MT 30095, Stillwater, MT 30097, Sweet Grass, MT 30099, Teton, MT 30101, Toole, MT 30103, Treasure, MT 30105, Valley, MT 30107, Wheatland, MT 30109, Wibaux, MT 30111, Yellowstone, MT 30113, Yellowstone National Park (part), MT 31000, All of Nebraska 31001, Adams, NE 31003, Antelope, NE 31005, Arthur, NE 31007, Banner, NE 31009, Blaine, NE 31011, Boone, NE 31013, Box Butte, NE 31015, Boyd, NE 31017, Brown, NE 31019, Buffalo, NE 31021, Burt, NE

FIPS Codes 123
Sage Digital ENDEC Manual Rev 1.0
31023, Butler, NE 31025, Cass, NE 31027, Cedar, NE 31029, Chase, NE 31031, Cherry, NE 31033, Cheyenne, NE 31035, Clay, NE 31037, Colfax, NE 31039, Cuming, NE 31041, Custer, NE 31043, Dakota, NE 31045, Dawes, NE 31047, Dawson, NE 31049, Deuel, NE 31051, Dixon, NE 31053, Dodge, NE 31055, Douglas, NE 31057, Dundy, NE 31059, Fillmore, NE 31061, Franklin, NE 31063, Frontier, NE 31065, Furnas, NE 31067, Gage, NE 31069, Garden, NE 31071, Garfield, NE 31073, Gosper, NE 31075, Grant, NE 31077, Greeley, NE 31079, Hall, NE 31081, Hamilton, NE 31083, Harlan, NE 31085, Hayes, NE 31087, Hitchcock, NE 31089, Holt, NE 31091, Hooker, NE 31093, Howard, NE 31095, Jefferson, NE 31097, Johnson, NE 31099, Kearney, NE 31101, Keith, NE 31103, Keya Paha, NE 31105, Kimball, NE 31107, Knox, NE 31109, Lancaster, NE 31111, Lincoln, NE 31113, Logan, NE 31115, Loup, NE 31117, McPherson, NE 31119, Madison, NE 31121, Merrick, NE 31123, Morrill, NE 31125, Nance, NE 31127, Nemaha, NE 31129, Nuckolls, NE 31131, Otoe, NE 31133, Pawnee, NE 31135, Perkins, NE 31137, Phelps, NE 31139, Pierce, NE 31141, Platte, NE 31143, Polk, NE 31145, Red Willow, NE 31147, Richardson, NE 31149, Rock, NE 31151, Saline, NE 31153, Sarpy, NE 31155, Saunders, NE 31157, Scotts Bluff, NE 31159, Seward, NE 31161, Sheridan, NE 31163, Sherman, NE 31165, Sioux, NE
31167, Stanton, NE 31169, Thayer, NE 31171, Thomas, NE 31173, Thurston, NE 31175, Valley, NE 31177, Washington, NE 31179, Wayne, NE 31181, Webster, NE 31183, Wheeler, NE 31185, York, NE 32000, All of Nevada 32001, Churchill, NV 32003, Clark, NV 32005, Douglas, NV 32007, Elko, NV 32009, Esmeralda, NV 32011, Eureka, NV 32013, Humboldt, NV 32015, Lander, NV 32017, Lincoln, NV 32019, Lyon, NV 32021, Mineral, NV 32023, Nye, NV 32027, Pershing, NV 32029, Storey, NV 32031, Washoe, NV 32033, White Pine, NV 32510, Carson City city, NV 33000, All of New Hampshire 33001, Belknap, NH 33003, Carroll, NH 33005, Cheshire, NH 33007, Coos, NH 33009, Grafton, NH 33011, Hillsborough, NH 33013, Merrimack, NH 33015, Rockingham, NH 33017, Strafford, NH 33019, Sullivan, NH 34000, All of New Jersey 34001, Atlantic, NJ 34003, Bergen, NJ 34005, Burlington, NJ 34007, Camden, NJ 34009, Cape May, NJ 34011, Cumberland, NJ 34013, Essex, NJ 34015, Gloucester, NJ 34017, Hudson, NJ 34019, Hunterdon, NJ 34021, Mercer, NJ 34023, Middlesex, NJ 34025, Monmouth, NJ 34027, Morris, NJ 34029, Ocean, NJ 34031, Passaic, NJ 34033, Salem, NJ 34035, Somerset, NJ 34037, Sussex, NJ 34039, Union, NJ 34041, Warren, NJ 35000, All of New Mexico 35001, Bernalillo, NM 35003, Catron, NM
35005, Chaves, NM 35006, Cibola, NM 35007, Colfax, NM 35009, Curry, NM 35011, De Baca, NM 35013, Dona Ana, NM 35015, Eddy, NM 35017, Grant, NM 35019, Guadalupe, NM 35021, Harding, NM 35023, Hidalgo, NM 35025, Lea, NM 35027, Lincoln, NM 35028, Los Alamos, NM 35029, Luna, NM 35031, McKinley, NM 35033, Mora, NM 35035, Otero, NM 35037, Quay, NM 35039, Rio Arriba, NM 35041, Roosevelt, NM 35043, Sandoval, NM 35045, San Juan, NM 35047, San Miguel, NM 35049, Santa Fe, NM 35051, Sierra, NM 35053, Socorro, NM 35055, Taos, NM 35057, Torrance, NM 35059, Union, NM 35061, Valencia, NM 36000, All of New York 36001, Albany, NY 36003, Allegany, NY 36005, Bronx, NY 36007, Broome, NY 36009, Cattaraugus, NY 36011, Cayuga, NY 36013, Chautauqua, NY 36015, Chemung, NY 36017, Chenango, NY 36019, Clinton, NY 36021, Columbia, NY 36023, Cortland, NY 36025, Delaware, NY 36027, Dutchess, NY 36029, Erie, NY 36031, Essex, NY 36033, Franklin, NY 36035, Fulton, NY 36037, Genesee, NY 36039, Greene, NY 36041, Hamilton, NY 36043, Herkimer, NY 36045, Jefferson, NY 36047, Kings, NY 36049, Lewis, NY 36051, Livingston, NY 36053, Madison, NY 36055, Monroe, NY 36057, Montgomery, NY 36059, Nassau, NY 36061, New York, NY 36063, Niagara, NY 36065, Oneida, NY 36067, Onondaga, NY 36069, Ontario, NY 36071, Orange, NY 36073, Orleans, NY 36075, Oswego, NY
36077, Otsego, NY 36079, Putnam, NY 36081, Queens, NY 36083, Rensselaer, NY 36085, Richmond, NY 36087, Rockland, NY 36089, St. Lawrence, NY 36091, Saratoga, NY 36093, Schenectady, NY 36095, Schoharie, NY 36097, Schuyler, NY 36099, Seneca, NY 36101, Steuben, NY 36103, Suffolk, NY 36105, Sullivan, NY 36107, Tioga, NY 36109, Tompkins, NY 36111, Ulster, NY 36113, Warren, NY 36115, Washington, NY 36117, Wayne, NY 36119, Westchester, NY 36121, Wyoming, NY 36123, Yates, NY 37000, All of North Carolina 37001, Alamance, NC 37003, Alexander, NC 37005, Alleghany, NC 37007, Anson, NC 37009, Ashe, NC 37011, Avery, NC 37013, Beaufort, NC 37015, Bertie, NC 37017, Bladen, NC 37019, Brunswick, NC 37021, Buncombe, NC 37023, Burke, NC 37025, Cabarrus, NC 37027, Caldwell, NC 37029, Camden, NC 37031, Carteret, NC 37033, Caswell, NC 37035, Catawba, NC 37037, Chatham, NC 37039, Cherokee, NC 37041, Chowan, NC 37043, Clay, NC 37045, Cleveland, NC 37047, Columbus, NC 37049, Craven, NC 37051, Cumberland, NC 37053, Currituck, NC 37055, Dare, NC 37057, Davidson, NC 37059, Davie, NC 37061, Duplin, NC 37063, Durham, NC 37065, Edgecombe, NC 37067, Forsyth, NC 37069, Franklin, NC 37071, Gaston, NC 37073, Gates, NC 37075, Graham, NC 37077, Granville, NC 37079, Greene, NC 37081, Guilford, NC 37083, Halifax, NC 37085, Harnett, NC 37087, Haywood, NC 37089, Henderson, NC
37091, Hertford, NC 37093, Hoke, NC 37095, Hyde, NC 37097, Iredell, NC 37099, Jackson, NC 37101, Johnston, NC 37103, Jones, NC 37105, Lee, NC 37107, Lenoir, NC 37109, Lincoln, NC 37111, McDowell, NC 37113, Macon, NC 37115, Madison, NC 37117, Martin, NC 37119, Mecklenburg, NC 37121, Mitchell, NC 37123, Montgomery, NC 37125, Moore, NC 37127, Nash, NC 37129, New Hanover, NC 37131, Northampton, NC 37133, Onslow, NC 37135, Orange, NC 37137, Pamlico, NC 37139, Pasquotank, NC 37141, Pender, NC 37143, Perquimans, NC 37145, Person, NC 37147, Pitt, NC 37149, Polk, NC 37151, Randolph, NC 37153, Richmond, NC 37155, Robeson, NC 37157, Rockingham, NC 37159, Rowan, NC 37161, Rutherford, NC 37163, Sampson, NC 37165, Scotland, NC 37167, Stanly, NC 37169, Stokes, NC 37171, Surry, NC 37173, Swain, NC 37175, Transylvania, NC 37177, Tyrrell, NC 37179, Union, NC 37181, Vance, NC 37183, Wake, NC 37185, Warren, NC 37187, Washington, NC 37189, Watauga, NC 37191, Wayne, NC 37193, Wilkes, NC 37195, Wilson, NC 37197, Yadkin, NC 37199, Yancey, NC 38000, All of North Dakota 38001, Adams, ND 38003, Barnes, ND 38005, Benson, ND 38007, Billings, ND 38009, Bottineau, ND 38011, Bowman, ND 38013, Burke, ND 38015, Burleigh, ND 38017, Cass, ND 38019, Cavalier, ND 38021, Dickey, ND 38023, Divide, ND 38025, Dunn, ND 38027, Eddy, ND

124 FIPS Codes
Sage Digital ENDEC Manual Rev 1.0
38029, Emmons, ND 38031, Foster, ND 38033, Golden Valley, ND 38035, Grand Forks, ND 38037, Grant, ND 38039, Griggs, ND 38041, Hettinger, ND 38043, Kidder, ND 38045, La Moure, ND 38047, Logan, ND 38049, McHenry, ND 38051, McIntosh, ND 38053, McKenzie, ND 38055, McLean, ND 38057, Mercer, ND 38059, Morton, ND 38061, Mountrail, ND 38063, Nelson, ND 38065, Oliver, ND 38067, Pembina, ND 38069, Pierce, ND 38071, Ramsey, ND 38073, Ransom, ND 38075, Renville, ND 38077, Richland, ND 38079, Rolette, ND 38081, Sargent, ND 38083, Sheridan, ND 38085, Sioux, ND 38087, Slope, ND 38089, Stark, ND 38091, Steele, ND 38093, Stutsman, ND 38095, Towner, ND 38097, Traill, ND 38099, Walsh, ND 38101, Ward, ND 38103, Wells, ND 38105, Williams, ND 39000, All of Ohio 39001, Adams, OH 39003, Allen, OH 39005, Ashland, OH 39007, Ashtabula, OH 39009, Athens, OH 39011, Auglaize, OH 39013, Belmont, OH 39015, Brown, OH 39017, Butler, OH 39019, Carroll, OH 39021, Champaign, OH 39023, Clark, OH 39025, Clermont, OH 39027, Clinton, OH 39029, Columbiana, OH 39031, Coshocton, OH 39033, Crawford, OH 39035, Cuyahoga, OH 39037, Darke, OH 39039, Defiance, OH 39041, Delaware, OH 39043, Erie, OH 39045, Fairfield, OH 39047, Fayette, OH 39049, Franklin, OH 39051, Fulton, OH 39053, Gallia, OH 39055, Geauga, OH 39057, Greene, OH 39059, Guernsey, OH
39061, Hamilton, OH 39063, Hancock, OH 39065, Hardin, OH 39067, Harrison, OH 39069, Henry, OH 39071, Highland, OH 39073, Hocking, OH 39075, Holmes, OH 39077, Huron, OH 39079, Jackson, OH 39081, Jefferson, OH 39083, Knox, OH 39085, Lake, OH 39087, Lawrence, OH 39089, Licking, OH 39091, Logan, OH 39093, Lorain, OH 39095, Lucas, OH 39097, Madison, OH 39099, Mahoning, OH 39101, Marion, OH 39103, Medina, OH 39105, Meigs, OH 39107, Mercer, OH 39109, Miami, OH 39111, Monroe, OH 39113, Montgomery, OH 39115, Morgan, OH 39117, Morrow, OH 39119, Muskingum, OH 39121, Noble, OH 39123, Ottawa, OH 39125, Paulding, OH 39127, Perry, OH 39129, Pickaway, OH 39131, Pike, OH 39133, Portage, OH 39135, Preble, OH 39137, Putnam, OH 39139, Richland, OH 39141, Ross, OH 39143, Sandusky, OH 39145, Scioto, OH 39147, Seneca, OH 39149, Shelby, OH 39151, Stark, OH 39153, Summit, OH 39155, Trumbull, OH 39157, Tuscarawas, OH 39159, Union, OH 39161, Van Wert, OH 39163, Vinton, OH 39165, Warren, OH 39167, Washington, OH 39169, Wayne, OH 39171, Williams, OH 39173, Wood, OH 39175, Wyandot, OH 40000, All of Oklahoma 40001, Adair, OK 40003, Alfalfa, OK 40005, Atoka, OK 40007, Beaver, OK 40009, Beckham, OK 40011, Blaine, OK 40013, Bryan, OK 40015, Caddo, OK 40017, Canadian, OK 40019, Carter, OK 40021, Cherokee, OK
40023, Choctaw, OK 40025, Cimarron, OK 40027, Cleveland, OK 40029, Coal, OK 40031, Comanche, OK 40033, Cotton, OK 40035, Craig, OK 40037, Creek, OK 40039, Custer, OK 40041, Delaware, OK 40043, Dewey, OK 40045, Ellis, OK 40047, Garfield, OK 40049, Garvin, OK 40051, Grady, OK 40053, Grant, OK 40055, Greer, OK 40057, Harmon, OK 40059, Harper, OK 40061, Haskell, OK 40063, Hughes, OK 40065, Jackson, OK 40067, Jefferson, OK 40069, Johnston, OK 40071, Kay, OK 40073, Kingfisher, OK 40075, Kiowa, OK 40077, Latimer, OK 40079, Le Flore, OK 40081, Lincoln, OK 40083, Logan, OK 40085, Love, OK 40087, McClain, OK 40089, McCurtain, OK 40091, McIntosh, OK 40093, Major, OK 40095, Marshall, OK 40097, Mayes, OK 40099, Murray, OK 40101, Muskogee, OK 40103, Noble, OK 40105, Nowata, OK 40107, Okfuskee, OK 40109, Oklahoma, OK 40111, Okmulgee, OK 40113, Osage, OK 40115, Ottawa, OK 40117, Pawnee, OK 40119, Payne, OK 40121, Pittsburg, OK 40123, Pontotoc, OK 40125, Pottawatomie, OK 40127, Pushmataha, OK 40129, Roger Mills, OK 40131, Rogers, OK 40133, Seminole, OK 40135, Sequoyah, OK 40137, Stephens, OK 40139, Texas, OK 40141, Tillman, OK 40143, Tulsa, OK 40145, Wagoner, OK 40147, Washington, OK 40149, Washita, OK 40151, Woods, OK 40153, Woodward, OK 41000, All of Oregon 41001, Baker, OR 41003, Benton, OR 41005, Clackamas, OR
41007, Clatsop, OR 41009, Columbia, OR 41011, Coos, OR 41013, Crook, OR 41015, Curry, OR 41017, Deschutes, OR 41019, Douglas, OR 41021, Gilliam, OR 41023, Grant, OR 41025, Harney, OR 41027, Hood River, OR 41029, Jackson, OR 41031, Jefferson, OR 41033, Josephine, OR 41035, Klamath, OR 41037, Lake, OR 41039, Lane, OR 41041, Lincoln, OR 41043, Linn, OR 41045, Malheur, OR 41047, Marion, OR 41049, Morrow, OR 41051, Multnomah, OR 41053, Polk, OR 41055, Sherman, OR 41057, Tillamook, OR 41059, Umatilla, OR 41061, Union, OR 41063, Wallowa, OR 41065, Wasco, OR 41067, Washington, OR 41069, Wheeler, OR 41071, Yamhill, OR 42000, All of Pennsylvania 42001, Adams, PA 42003, Allegheny, PA 42005, Armstrong, PA 42007, Beaver, PA 42009, Bedford, PA 42011, Berks, PA 42013, Blair, PA 42015, Bradford, PA 42017, Bucks, PA 42019, Butler, PA 42021, Cambria, PA 42023, Cameron, PA 42025, Carbon, PA 42027, Centre, PA 42029, Chester, PA 42031, Clarion, PA 42033, Clearfield, PA 42035, Clinton, PA 42037, Columbia, PA 42039, Crawford, PA 42041, Cumberland, PA 42043, Dauphin, PA 42045, Delaware, PA 42047, Elk, PA 42049, Erie, PA 42051, Fayette, PA 42053, Forest, PA 42055, Franklin, PA 42057, Fulton, PA 42059, Greene, PA 42061, Huntingdon, PA 42063, Indiana, PA 42065, Jefferson, PA 42067, Juniata, PA 42069, Lackawanna, PA 42071, Lancaster, PA
42073, Lawrence, PA 42075, Lebanon, PA 42077, Lehigh, PA 42079, Luzerne, PA 42081, Lycoming, PA 42083, McKean, PA 42085, Mercer, PA 42087, Mifflin, PA 42089, Monroe, PA 42091, Montgomery, PA 42093, Montour, PA 42095, Northampton, PA 42097, Northumberland, PA 42099, Perry, PA 42101, Philadelphia, PA 42103, Pike, PA 42105, Potter, PA 42107, Schuylkill, PA 42109, Snyder, PA 42111, Somerset, PA 42113, Sullivan, PA 42115, Susquehanna, PA 42117, Tioga, PA 42119, Union, PA 42121, Venango, PA 42123, Warren, PA 42125, Washington, PA 42127, Wayne, PA 42129, Westmoreland, PA 42131, Wyoming, PA 42133, York, PA 44000, All of Rhode Island 44001, Bristol, RI 44003, Kent, RI 44005, Newport, RI 44007, Providence, RI 44009, Washington, RI 45000, All of South Carolina 45001, Abbeville, SC 45003, Aiken, SC 45005, Allendale, SC 45007, Anderson, SC 45009, Bamberg, SC 45011, Barnwell, SC 45013, Beaufort, SC 45015, Berkeley, SC 45017, Calhoun, SC 45019, Charleston, SC 45021, Cherokee, SC 45023, Chester, SC 45025, Chesterfield, SC 45027, Clarendon, SC 45029, Colleton, SC 45031, Darlington, SC 45033, Dillon, SC 45035, Dorchester, SC 45037, Edgefield, SC 45039, Fairfield, SC 45041, Florence, SC 45043, Georgetown, SC 45045, Greenville, SC 45047, Greenwood, SC 45049, Hampton, SC 45051, Horry, SC 45053, Jasper, SC 45055, Kershaw, SC 45057, Lancaster, SC 45059, Laurens, SC

FIPS Codes 125
Sage Digital ENDEC Manual Rev 1.0
45061, Lee, SC 45063, Lexington, SC 45065, McCormick, SC 45067, Marion, SC 45069, Marlboro, SC 45071, Newberry, SC 45073, Oconee, SC 45075, Orangeburg, SC 45077, Pickens, SC 45079, Richland, SC 45081, Saluda, SC 45083, Spartanburg, SC 45085, Sumter, SC 45087, Union, SC 45089, Williamsburg, SC 45091, York, SC 46000, All of South Dakota 46003, Aurora, SD 46005, Beadle, SD 46007, Bennett, SD 46009, Bon Homme, SD 46011, Brookings, SD 46013, Brown, SD 46015, Brule, SD 46017, Buffalo, SD 46019, Butte, SD 46021, Campbell, SD 46023, Charles Mix, SD 46025, Clark, SD 46027, Clay, SD 46029, Codington, SD 46031, Corson, SD 46033, Custer, SD 46035, Davison, SD 46037, Day, SD 46039, Deuel, SD 46041, Dewey, SD 46043, Douglas, SD 46045, Edmunds, SD 46047, Fall River, SD 46049, Faulk, SD 46051, Grant, SD 46053, Gregory, SD 46055, Haakon, SD 46057, Hamlin, SD 46059, Hand, SD 46061, Hanson, SD 46063, Harding, SD 46065, Hughes, SD 46067, Hutchinson, SD 46069, Hyde, SD 46071, Jackson, SD 46073, Jerauld, SD 46075, Jones, SD 46077, Kingsbury, SD 46079, Lake, SD 46081, Lawrence, SD 46083, Lincoln, SD 46085, Lyman, SD 46087, McCook, SD 46089, McPherson, SD 46091, Marshall, SD 46093, Meade, SD 46095, Mellette, SD 46097, Miner, SD 46099, Minnehaha, SD 46101, Moody, SD 46103, Pennington, SD 46105, Perkins, SD 46107, Potter, SD
46109, Roberts, SD 46111, Sanborn, SD 46113, Shannon, SD 46115, Spink, SD 46117, Stanley, SD 46119, Sully, SD 46121, Todd, SD 46123, Tripp, SD 46125, Turner, SD 46127, Union, SD 46129, Walworth, SD 46135, Yankton, SD 46137, Ziebach, SD 47000, All of Tennessee 47001, Anderson, TN 47003, Bedford, TN 47005, Benton, TN 47007, Bledsoe, TN 47009, Blount, TN 47011, Bradley, TN 47013, Campbell, TN 47015, Cannon, TN 47017, Carroll, TN 47019, Carter, TN 47021, Cheatham, TN 47023, Chester, TN 47025, Claiborne, TN 47027, Clay, TN 47029, Cocke, TN 47031, Coffee, TN 47033, Crockett, TN 47035, Cumberland, TN 47037, Davidson, TN 47039, Decatur, TN 47041, De Kalb, TN 47043, Dickson, TN 47045, Dyer, TN 47047, Fayette, TN 47049, Fentress, TN 47051, Franklin, TN 47053, Gibson, TN 47055, Giles, TN 47057, Grainger, TN 47059, Greene, TN 47061, Grundy, TN 47063, Hamblen, TN 47065, Hamilton, TN 47067, Hancock, TN 47069, Hardeman, TN 47071, Hardin, TN 47073, Hawkins, TN 47075, Haywood, TN 47077, Henderson, TN 47079, Henry, TN 47081, Hickman, TN 47083, Houston, TN 47085, Humphreys, TN 47087, Jackson, TN 47089, Jefferson, TN 47091, Johnson, TN 47093, Knox, TN 47095, Lake, TN 47097, Lauderdale, TN 47099, Lawrence, TN 47101, Lewis, TN 47103, Lincoln, TN 47105, Loudon, TN 47107, McMinn, TN 47109, McNairy, TN 47111, Macon, TN
47113, Madison, TN 47115, Marion, TN 47117, Marshall, TN 47119, Maury, TN 47121, Meigs, TN 47123, Monroe, TN 47125, Montgomery, TN 47127, Moore, TN 47129, Morgan, TN 47131, Obion, TN 47133, Overton, TN 47135, Perry, TN 47137, Pickett, TN 47139, Polk, TN 47141, Putnam, TN 47143, Rhea, TN 47145, Roane, TN 47147, Robertson, TN 47149, Rutherford, TN 47151, Scott, TN 47153, Sequatchie, TN 47155, Sevier, TN 47157, Shelby, TN 47159, Smith, TN 47161, Stewart, TN 47163, Sullivan, TN 47165, Sumner, TN 47167, Tipton, TN 47169, Trousdale, TN 47171, Unicoi, TN 47173, Union, TN 47175, Van Buren, TN 47177, Warren, TN 47179, Washington, TN 47181, Wayne, TN 47183, Weakley, TN 47185, White, TN 47187, Williamson, TN 47189, Wilson, TN 48000, All of Texas 48001, Anderson, TX 48003, Andrews, TX 48005, Angelina, TX 48007, Aransas, TX 48009, Archer, TX 48011, Armstrong, TX 48013, Atascosa, TX 48015, Austin, TX 48017, Bailey, TX 48019, Bandera, TX 48021, Bastrop, TX 48023, Baylor, TX 48025, Bee, TX 48027, Bell, TX 48029, Bexar, TX 48031, Blanco, TX 48033, Borden, TX 48035, Bosque, TX 48037, Bowie, TX 48039, Brazoria, TX 48041, Brazos, TX 48043, Brewster, TX 48045, Briscoe, TX 48047, Brooks, TX 48049, Brown, TX 48051, Burleson, TX 48053, Burnet, TX 48055, Caldwell, TX 48057, Calhoun, TX 48059, Callahan, TX
48061, Cameron, TX 48063, Camp, TX 48065, Carson, TX 48067, Cass, TX 48069, Castro, TX 48071, Chambers, TX 48073, Cherokee, TX 48075, Childress, TX 48077, Clay, TX 48079, Cochran, TX 48081, Coke, TX 48083, Coleman, TX 48085, Collin, TX 48087, Collingsworth, TX 48089, Colorado, TX 48091, Comal, TX 48093, Comanche, TX 48095, Concho, TX 48097, Cooke, TX 48099, Coryell, TX 48101, Cottle, TX 48103, Crane, TX 48105, Crockett, TX 48107, Crosby, TX 48109, Culberson, TX 48111, Dallam, TX 48113, Dallas, TX 48115, Dawson, TX 48117, Deaf Smith, TX 48119, Delta, TX 48121, Denton, TX 48123, De Witt, TX 48125, Dickens, TX 48127, Dimmit, TX 48129, Donley, TX 48131, Duval, TX 48133, Eastland, TX 48135, Ector, TX 48137, Edwards, TX 48139, Ellis, TX 48141, El Paso, TX 48143, Erath, TX 48145, Falls, TX 48147, Fannin, TX 48149, Fayette, TX 48151, Fisher, TX 48153, Floyd, TX 48155, Foard, TX 48157, Fort Bend, TX 48159, Franklin, TX 48161, Freestone, TX 48163, Frio, TX 48165, Gaines, TX 48167, Galveston, TX 48169, Garza, TX 48171, Gillespie, TX 48173, Glasscock, TX 48175, Goliad, TX 48177, Gonzales, TX 48179, Gray, TX 48181, Grayson, TX 48183, Gregg, TX 48185, Grimes, TX 48187, Guadalupe, TX 48189, Hale, TX 48191, Hall, TX 48193, Hamilton, TX 48195, Hansford, TX 48197, Hardeman, TX 48199, Hardin, TX 48201, Harris, TX 48203, Harrison, TX
48205, Hartley, TX 48207, Haskell, TX 48209, Hays, TX 48211, Hemphill, TX 48213, Henderson, TX 48215, Hidalgo, TX 48217, Hill, TX 48219, Hockley, TX 48221, Hood, TX 48223, Hopkins, TX 48225, Houston, TX 48227, Howard, TX 48229, Hudspeth, TX 48231, Hunt, TX 48233, Hutchinson, TX 48235, Irion, TX 48237, Jack, TX 48239, Jackson, TX 48241, Jasper, TX 48243, Jeff Davis, TX 48245, Jefferson, TX 48247, Jim Hogg, TX 48249, Jim Wells, TX 48251, Johnson, TX 48253, Jones, TX 48255, Karnes, TX 48257, Kaufman, TX 48259, Kendall, TX 48261, Kenedy, TX 48263, Kent, TX 48265, Kerr, TX 48267, Kimble, TX 48269, King, TX 48271, Kinney, TX 48273, Kleberg, TX 48275, Knox, TX 48277, Lamar, TX 48279, Lamb, TX 48281, Lampasas, TX 48283, La Salle, TX 48285, Lavaca, TX 48287, Lee, TX 48289, Leon, TX 48291, Liberty, TX 48293, Limestone, TX 48295, Lipscomb, TX 48297, Live Oak, TX 48299, Llano, TX 48301, Loving, TX 48303, Lubbock, TX 48305, Lynn, TX 48307, McCulloch, TX 48309, McLennan, TX 48311, McMullen, TX 48313, Madison, TX 48315, Marion, TX 48317, Martin, TX 48319, Mason, TX 48321, Matagorda, TX 48323, Maverick, TX 48325, Medina, TX 48327, Menard, TX 48329, Midland, TX 48331, Milam, TX 48333, Mills, TX 48335, Mitchell, TX 48337, Montague, TX 48339, Montgomery, TX 48341, Moore, TX 48343, Morris, TX 48345, Motley, TX 48347, Nacogdoches, TX

126 FIPS Codes
Sage Digital ENDEC Manual Rev 1.0
48349, Navarro, TX 48351, Newton, TX 48353, Nolan, TX 48355, Nueces, TX 48357, Ochiltree, TX 48359, Oldham, TX 48361, Orange, TX 48363, Palo Pinto, TX 48365, Panola, TX 48367, Parker, TX 48369, Parmer, TX 48371, Pecos, TX 48373, Polk, TX 48375, Potter, TX 48377, Presidio, TX 48379, Rains, TX 48381, Randall, TX 48383, Reagan, TX 48385, Real, TX 48387, Red River, TX 48389, Reeves, TX 48391, Refugio, TX 48393, Roberts, TX 48395, Robertson, TX 48397, Rockwall, TX 48399, Runnels, TX 48401, Rusk, TX 48403, Sabine, TX 48405, San Augustine, TX 48407, San Jacinto, TX 48409, San Patricio, TX 48411, San Saba, TX 48413, Schleicher, TX 48415, Scurry, TX 48417, Shackelford, TX 48419, Shelby, TX 48421, Sherman, TX 48423, Smith, TX 48425, Somervell, TX 48427, Starr, TX 48429, Stephens, TX 48431, Sterling, TX 48433, Stonewall, TX 48435, Sutton, TX 48437, Swisher, TX 48439, Tarrant, TX 48441, Taylor, TX 48443, Terrell, TX 48445, Terry, TX 48447, Throckmorton, TX 48449, Titus, TX 48451, Tom Green, TX 48453, Travis, TX 48455, Trinity, TX 48457, Tyler, TX 48459, Upshur, TX 48461, Upton, TX 48463, Uvalde, TX 48465, Val Verde, TX 48467, Van Zandt, TX 48469, Victoria, TX 48471, Walker, TX 48473, Waller, TX 48475, Ward, TX 48477, Washington, TX 48479, Webb, TX 48481, Wharton, TX 48483, Wheeler, TX 48485, Wichita, TX 48487, Wilbarger, TX 48489, Willacy, TX 48491, Williamson, TX
48493, Wilson, TX 48495, Winkler, TX 48497, Wise, TX 48499, Wood, TX 48501, Yoakum, TX 48503, Young, TX 48505, Zapata, TX 48507, Zavala, TX 49000, All of Utah 49001, Beaver, UT 49003, Box Elder, UT 49005, Cache, UT 49007, Carbon, UT 49009, Daggett, UT 49011, Davis, UT 49013, Duchesne, UT 49015, Emery, UT 49017, Garfield, UT 49019, Grand, UT 49021, Iron, UT 49023, Juab, UT 49025, Kane, UT 49027, Millard, UT 49029, Morgan, UT 49031, Piute, UT 49033, Rich, UT 49035, Salt Lake, UT 49037, San Juan, UT 49039, Sanpete, UT 49041, Sevier, UT 49043, Summit, UT 49045, Tooele, UT 49047, Uintah, UT 49049, Utah, UT 49051, Wasatch, UT 49053, Washington, UT 49055, Wayne, UT 49057, Weber, UT 50000, All of Vermont 50001, Addison, VT 50003, Bennington, VT 50005, Caledonia, VT 50007, Chittenden, VT 50009, Essex, VT 50011, Franklin, VT 50013, Grand Isle, VT 50015, Lamoille, VT 50017, Orange, VT 50019, Orleans, VT 50021, Rutland, VT 50023, Washington, VT 50025, Windham, VT 50027, Windsor, VT 51000, All of Virginia 51001, Accomack, VA 51003, Albemarle, VA 51005, Alleghany, VA 51007, Amelia, VA 51009, Amherst, VA 51011, Appomattox, VA 51013, Arlington, VA 51015, Augusta, VA 51017, Bath, VA 51019, Bedford, VA 51021, Bland, VA 51023, Botetourt, VA
51025, Brunswick, VA 51027, Buchanan, VA 51029, Buckingham, VA 51031, Campbell, VA 51033, Caroline, VA 51035, Carroll, VA 51036, Charles City, VA 51037, Charlotte, VA 51041, Chesterfield, VA 51043, Clarke, VA 51045, Craig, VA 51047, Culpeper, VA 51049, Cumberland, VA 51051, Dickenson, VA 51053, Dinwiddie, VA 51057, Essex, VA 51059, Fairfax, VA 51061, Fauquier, VA 51063, Floyd, VA 51065, Fluvanna, VA 51067, Franklin, VA 51069, Frederick, VA 51071, Giles, VA 51073, Gloucester, VA 51075, Goochland, VA 51077, Grayson, VA 51079, Greene, VA 51081, Greensville, VA 51083, Halifax, VA 51085, Hanover, VA 51087, Henrico, VA 51089, Henry, VA 51091, Highland, VA 51093, Isle of Wight, VA 51095, James City, VA 51097, King and Queen, VA 51099, King George, VA 51101, King William, VA 51103, Lancaster, VA 51105, Lee, VA 51107, Loudoun, VA 51109, Louisa, VA 51111, Lunenburg, VA 51113, Madison, VA 51115, Mathews, VA 51117, Mecklenburg, VA 51119, Middlesex, VA 51121, Montgomery, VA 51125, Nelson, VA 51127, New Kent, VA 51131, Northampton, VA 51133, Northumberland, VA 51135, Nottoway, VA 51137, Orange, VA 51139, Page, VA 51141, Patrick, VA 51143, Pittsylvania, VA 51145, Powhatan, VA 51147, Prince Edward, VA 51149, Prince George, VA 51153, Prince William, VA 51155, Pulaski, VA 51157, Rappahannock, VA 51159, Richmond, VA 51161, Roanoke, VA 51163, Rockbridge, VA 51165, Rockingham, VA 51167, Russell, VA 51169, Scott, VA 51171, Shenandoah, VA 51173, Smyth, VA 51175, Southampton, VA
51177, Spotsylvania, VA 51179, Stafford, VA 51181, Surry, VA 51183, Sussex, VA 51185, Tazewell, VA 51187, Warren, VA 51191, Washington, VA 51193, Westmoreland, VA 51195, Wise, VA 51197, Wythe, VA 51199, York, VA 51510, Alexandria, VA 51515, Bedford, VA 51520, Bristol, VA 51530, Buena Vista, VA 51540, Charlottesville, VA 51550, Chesapeake, VA 51560, Clifton Forge, VA 51570, Colonial Heights, VA 51580, Covington, VA 51590, Danville, VA 51595, Emporia, VA 51600, Fairfax, VA 51610, Falls Church, VA 51620, Franklin, VA 51630, Fredericksburg, VA 51640, Galax, VA 51650, Hampton, VA 51660, Harrisonburg, VA 51670, Hopewell, VA 51678, Lexington, VA 51680, Lynchburg, VA 51683, Manassas, VA 51685, Manassas Park, VA 51690, Martinsville, VA 51700, Newport News, VA 51710, Norfolk, VA 51720, Norton, VA 51730, Petersburg, VA 51735, Poquoson, VA 51740, Portsmouth, VA 51750, Radford, VA 51760, Richmond, VA 51770, Roanoke, VA 51775, Salem, VA 51780, South Boston, VA 51790, Staunton, VA 51800, Suffolk, VA 51810, Virginia Beach, VA 51820, Waynesboro, VA 51830, Williamsburg, VA 51840, Winchester, VA 53000, All of Washington 53001, Adams, WA 53003, Asotin, WA 53005, Benton, WA 53007, Chelan, WA 53009, Clallam, WA 53011, Clark, WA 53013, Columbia, WA 53015, Cowlitz, WA 53017, Douglas, WA 53019, Ferry, WA 53021, Franklin, WA 53023, Garfield, WA 53025, Grant, WA 53027, Grays Harbor, WA 53029, Island, WA 53031, Jefferson, WA 53033, King, WA
53035, Kitsap, WA 53037, Kittitas, WA 53039, Klickitat, WA 53041, Lewis, WA 53043, Lincoln, WA 53045, Mason, WA 53047, Okanogan, WA 53049, Pacific, WA 53051, Pend Oreille, WA 53053, Pierce, WA 53055, San Juan, WA 53057, Skagit, WA 53059, Skamania, WA 53061, Snohomish, WA 53063, Spokane, WA 53065, Stevens, WA 53067, Thurston, WA 53069, Wahkiakum, WA 53071, Walla Walla, WA 53073, Whatcom, WA 53075, Whitman, WA 53077, Yakima, WA 54000, All of West Virginia 54001, Barbour, WV 54003, Berkeley, WV 54005, Boone, WV 54007, Braxton, WV 54009, Brooke, WV 54011, Cabell, WV 54013, Calhoun, WV 54015, Clay, WV 54017, Doddridge, WV 54019, Fayette, WV 54021, Gilmer, WV 54023, Grant, WV 54025, Greenbrier, WV 54027, Hampshire, WV 54029, Hancock, WV 54031, Hardy, WV 54033, Harrison, WV 54035, Jackson, WV 54037, Jefferson, WV 54039, Kanawha, WV 54041, Lewis, WV 54043, Lincoln, WV 54045, Logan, WV 54047, McDowell, WV 54049, Marion, WV 54051, Marshall, WV 54053, Mason, WV 54055, Mercer, WV 54057, Mineral, WV 54059, Mingo, WV 54061, Monongalia, WV 54063, Monroe, WV 54065, Morgan, WV 54067, Nicholas, WV 54069, Ohio, WV 54071, Pendleton, WV 54073, Pleasants, WV 54075, Pocahontas, WV 54077, Preston, WV 54079, Putnam, WV 54081, Raleigh, WV 54083, Randolph, WV 54085, Ritchie, WV 54087, Roane, WV 54089, Summers, WV 54091, Taylor, WV 54093, Tucker, WV

FIPS Codes 127
Sage Digital ENDEC Manual Rev 1.0
54095, Tyler, WV 54097, Upshur, WV 54099, Wayne, WV 54101, Webster, WV 54103, Wetzel, WV 54105, Wirt, WV 54107, Wood, WV 54109, Wyoming, WV 55000, All of Wisconsin 55001, Adams, WI 55003, Ashland, WI 55005, Barron, WI 55007, Bayfield, WI 55009, Brown, WI 55011, Buffalo, WI 55013, Burnett, WI 55015, Calumet, WI 55017, Chippewa, WI 55019, Clark, WI 55021, Columbia, WI 55023, Crawford, WI 55025, Dane, WI 55027, Dodge, WI 55029, Door, WI 55031, Douglas, WI 55033, Dunn, WI 55035, Eau Claire, WI 55037, Florence, WI 55039, Fond du Lac, WI 55041, Forest, WI 55043, Grant, WI 55045, Green, WI 55047, Green Lake, WI 55049, Iowa, WI 55051, Iron, WI 55053, Jackson, WI 55055, Jefferson, WI 55057, Juneau, WI 55059, Kenosha, WI 55061, Kewaunee, WI 55063, La Crosse, WI 55065, Lafayette, WI 55067, Langlade, WI 55069, Lincoln, WI 55071, Manitowoc, WI 55073, Marathon, WI 55075, Marinette, WI 55077, Marquette, WI 55078, Menominee, WI 55079, Milwaukee, WI 55081, Monroe, WI 55083, Oconto, WI 55085, Oneida, WI 55087, Outagamie, WI 55089, Ozaukee, WI 55091, Pepin, WI 55093, Pierce, WI 55095, Polk, WI 55097, Portage, WI 55099, Price, WI 55101, Racine, WI 55103, Richland, WI 55105, Rock, WI 55107, Rusk, WI 55109, St. Croix, WI 55111, Sauk, WI 55113, Sawyer, WI 55115, Shawano, WI 55117, Sheboygan, WI 55119, Taylor, WI
55121, Trempealeau, WI 55123, Vernon, WI 55125, Vilas, WI 55127, Walworth, WI 55129, Washburn, WI 55131, Washington, WI 55133, Waukesha, WI 55135, Waupaca, WI 55137, Waushara, WI 55139, Winnebago, WI 55141, Wood, WI 56000, All of Wyoming 56001, Albany, WY 56003, Big Horn, WY 56005, Campbell, WY 56007, Carbon, WY 56009, Converse, WY 56011, Crook, WY 56013, Fremont, WY 56015, Goshen, WY 56017, Hot Springs, WY 56019, Johnson, WY 56021, Laramie, WY 56023, Lincoln, WY 56025, Natrona, WY 56027, Niobrara, WY 56029, Park, WY 56031, Platte, WY 56033, Sheridan, WY 56035, Sublette, WY 56037, Sweetwater, WY 56039, Teton, WY 56041, Uinta, WY 56043, Washakie, WY 56045, Weston, WY 60000, All of American Samoa 60010, Eastern, AS 60020, Manu'a, AS 60030, Rose Island, AS 60040, Swains Island, AS 60050, Western, AS 64000, All of Micronesia 64002, Chuuk, FM 64005, Kosrae, FM 64040, Pohnpeit, FM 64060, Yap, FM 66000, All of Guam 66010, Guam, GU 68000, All of Marshall Islands 68007, Ailinginae, MH 68010, Ailinglaplap, MH 68030, Ailuk, MH 68040, Amo, MH 68050, Aur, MH 68060, Bikar, MH 68070, Bikini, MH 68073, Bokak, MH 68080, Ebon, MH 68090, Enewetak, MH 68100, Erikub, MH 68110, Jabat, MH
68120, Jaluit, MH 68130, Jemot, MH 68140, Kili, MH 68150, Kwajalein, MH 68160, Lae, MH 68170, Lib, MH 68180, Likiep, MH 68190, Majuro, MH 68300, Maloelap, MH 68310, Mejit, MH 68320, Mili, MH 68330, Namorik, MH 68340, Namu, MH 68350, Rongelap, MH 68360, Rongrik, MH 68385, Toke, MH 68390, Ujae, MH 68400, Ujelang, MH 68410, Utrik, MH 68420, Wotho, MH 68430, Wotje, MH 69000, All of Northern Mariana Islands 69085, Northern Islands, MP 69100, Rota, MP 69110, Saipan, MP 69120, Tinian, MP 70000, All of Palau 70002, Aimeliik, PW 70004, Airai, PW 70010, Angaur, PW 70050, Hatoboheit, PW 70100, Kayangel, PW 70150, Koror, PW 70212, Melekeokt, PW 70214, Ngaraard, PW 70218, Ngarchelong, PW 70222, Ngardmau, PW 70224, Ngatpang, PW 70226, Ngchesar, PW 70227, Ngeremlenguit, PW 70228, Ngiwal, PW 70350, Peleliu, PW 70370, Sonsorol, PW 72000, All of Puerto Rico 72001, Adjuntas, PR 72003, Aguada, PR 72005, Aguadilla, PR 72007, Aguas Buenas, PR 72009, Aibonito, PR 72011, Anasco, PR 72013, Arecibo, PR 72015, Arroyo, PR 72017, Barceloneta, PR 72019, Barranquitas, PR 72021, Bayamon, PR 72023, Cabo Rojo, PR 72025, Caguas, PR 72027, Camuy, PR 72029, Canovanas, PR 72031, Carolina, PR 72033, Catano, PR 72035, Cayey, PR 72037, Ceiba, PR 72039, Ciales, PR 72041, Cidra, PR
72043, Coamo, PR 72045, Comeno, PR 72047, Corozal, PR 72049, Culebra, PR 72051, Dorado, PR 72053, Fajardo, PR 72054, Florida, PR 72055, Guanica, PR 72057, Guayama, PR 72059, Guayanilla, PR 72061, Guaynabo, PR 72063, Gurabo, PR 72065, Hatillo, PR 72067, Hormigueros, PR 72069, Humacao, PR 72071, Isabela, PR 72073, Jayuya, PR 72075, Juana Diaz, PR 72077, Juncos, PR 72079, Lajas, PR 72081, Lares, PR 72083, Las Marias, PR 72085, Las Piedras, PR 72087, Loiza, PR 72089, Luquillo, PR 72091, Manati, PR 72093, Maricao, PR 72095, Maunabo, PR 72097, Mayaguez, PR 72099, Moca, PR 72101, Morovis, PR 72103, Naguabo, PR 72105, Naranjito, PR 72107, Orocovis, PR 72109, Patillas, PR 72111, Penuelas, PR 72113, Ponce, PR 72115, Quebradillas, PR 72117, Rincon, PR 72119, Rio Grande, PR 72121, Sabana Grande, PR 72123, Salinas, PR 72125, San German, PR 72127, San Juan, PR 72129, San Lorenzo, PR 72131, San Sebastian, PR 72133, Santa Isabel, PR 72135, Toa Alta, PR 72137, Toa Baja, PR 72139, Trujillo Alto, PR 72141, Utuado, PR 72143, Vega Alta, PR 72145, Vega Baja, PR 72147, Vieques, PR 72149, Vilalba, PR 72151, Yabucoa, PR 72153, Yauco, PR 74000, All of Minor Outlying Islands 74050, Baker Island, UM 74100, Howland Island, UM 74150, Jarvis Island, UM 74200, Johnston Island, UM 74250, Kingman Reef, UM 74300, Midway Islands, UM 74350, Navassa Island, UM 74400, Palmyra Atoll, UM 74450, Wake Island, UM
78000, All of Virgin Islands 78010, St. Croix, VI 78020, St. John, VI 78030, St. Thomas, VI

128 FIPS Codes
Sage Digital ENDEC Manual Rev 1.0
18.2 FIPS Codes - Marine Areas
57000, All of Eastern N. Pacific 57081, Cape Flattery to Cape Lookout 57082, Cape Lookout to Point St. George 57083, Point St. George to Point Arena 57084, Point Arena to Point Conception 57085, Port Conception to Guadalupe Island 57110, Gray Harbor Bar 57130, U.S. waters of Strait of Juan de Fuca from Cape Flattery to Slip
Point 57131, U.S. waters of Strait of Juan de Fuca from Slip Point to New
Dungeness Light 57132, U.S. waters of Strait of Juan de Fuca from New Dungeness Light
to Whidbey Island between Deception Pass and Admirality Head
57133, Northern inland waters Camano Island to Pt. Roberts including San Juan Is.
57134, Admiralty Inlet from Admiralty Head to Foulweather Bluff 57135, Puget Sound and Hood Canal 57150, Coastal waters from James Island to Cape Flattery, WA
westward 20 nm 57153, Coastal waters from Pt. Grenville to James Island, WA westward
20 nm 57156, Coastal waters from Cape Shoalwater to Pt. Grenville, WA and
westward 20 nm 57170, Waters from James Island to Cape Flattery, WA extending
westward 20 nm to 60 nm 57173, Waters from Pt. Grenville to James Island, WA extending
westward 20 nm to 60 nm 57176, Waters from Cape Shoalwater to Pt. Grenville, WA, extending
westward 20nm to 60 nm 57210, Columbia River Bar 57250, Coastal waters from Cape Shoalwater, WA to Cascade Head,
OR out 20 nm 57255, Coastal waters from Cascade Head to Florence OR out 20 nm 57270, Waters from Cape Shoalwater, WA to Cascade Head, OR from
20 to 60 nm 57275, Waters from Cascade Head to Florence, OR from 20 to 60 nm 57350, Coastal waters from Florence to Cape Arago, OR out 20 nm 57353, Coastal waters from Cape Arago to Cape Blanco, OR out 20 nm 57356, Coastal waters from Cape Blanco, OR to Pt. St. George, CA out
20 nm 57370, Waters from Florence to Cape Arago, OR from 20 to 60 nm 57373, Waters from Cape Arago to Cape Blanco, OR from 20 to 60 nm 57376, Waters from Cape Blanco, OR to Pt. St. George, CA from 20 to
60 nm 57410, Humboldt Bay Bar 57450, Coastal waters from Pt. St. George to Cape Mendocino, CA out
20 nm 57455, Coastal waters from Cape Mendocino to Pt. Arena CA out 20 nm 57470, Waters from Pt. St. George to Cape Mendocino, CA from 20 to
60 nm 57475, Waters from Cape Mendocino to Pt. Arena, CA from 20 to 60 nm 57530, San Francisco, San Pablo, Suisun Bays and the West Delta 57535, Monterey Bay 57550, Coastal waters from Pt. Arena to Pigeon Pt., CA out 20 nm 57555, Coastal waters from Pigeon Pt. to Pt. Piedras Blancas, CA out
20 nm 57570, Waters from Pt. Arena to Pigeon Pt., CA from 20 to 60 nm 57575, Waters from Pigeon Pt. to Pt. Piedras Blancas, CA from 20 to 60
nm 57650, East Santa Barbara Channel from Pt. Conception to Pt. Mugu
including Santa Cruz and Anacapa Islands 57655, Inner waters from Point Mugu to San Mateo Pt. CA including
Santa Catalina and Santa Barbara Islands
57670, The Waters from Pt. Piedras Blancas to Pt. Arguello and Westward 60 nm
57673, Waters from Pt. Arguello to Santa Cruz Island, CA and westward 60 nm including San Miguel and Santa Rosa Islands
57676, Outer waters from Santa Cruz Island to San Clemente Island to 60 nm offshore including San Nicolas Island
57750, Coastal Waters from San Mateo Point to the Mexican Border and out to 30 nm
57775, Waters from San Mateo point to the Mexican Border Extending 30 to 60 nm out including San Clemente Island
58000, All of North Pacific Ocean near Alaska, and along Alaska
coastline, including the Bering Sea and the Gulf of Alaska 58011, Glacier Bay 58012, Northern Lynn Canal 58013, Southern Lynn Canal 58021, Icy Strait 58022, Cross Sound 58031, Stephens Passage 58032, Northern Chatham Strait 58033, Southern Chatham Strait 58034, Frederick Sound 58035, Sumner Strait 58036, Clarence Strait 58041, Southeast Alaska, Outside Waters from Dixon Entrance to Cape
Decision 58042, Southeast Alaska, Outside Waters from Cape Decision to Cape
Edgecumbe 58043, Southeast Alaska, Outside Waters from Cape Edgecumbe to
Cape Fairweather 58051, Eastern Gulf Coast from Cape Fairweather to Icy Cape 58052, Eastern Gulf Coast from Icy Cape to Cape Suckling 58053, Yakutat Bay 58120, North Gulf Coast Cape Suckling to Gore Point 58121, Resurrection Bay 58125, Prince William Sound 58126, Port Valdez 58127, Valdez Narrows 58128, Valdez Arm 58129, Passage Canal 58130, Barren Islands and Kamishak Bay Waters 58132, Kodiak Island Waters Gore Point to Sitkinak 58136, Chiniak Bay 58137, Marmot Bay 58138, Shelikof Strait 58140, St. Matthew Island Waters 58141, Kachemak Bay 58150, Coastal Waters South of the Alaska Peninsula Sitkinak to Castle
Cape 58155, Coastal Waters South of the Alaska Peninsula Castle Cape to
Cape Sarichef 58160, Bristol Bay Cape Newenham to Port Heiden 58165, Bristol Bay, Port Heiden to Cape Sarichef 58170, Eastern Aleutians Cape Sarichef to Nikoski 58171, Unalaska Bay 58172, Eastern Aleutians Nikolski to Adak 58175, Western Aleutians Adak to Kiska 58176, Western Aleutians , Kiska to Attu 58179, Pribilof Islands 58180, Southwest Alaska Waters Cape Newenham to Dall Point 58200, Kotzebue Sound 58205, Western Alaska Waters Wales to Cape Lisburne 58210, Arctic Coast Lisburne to Cape Halkett 58215, Arctic Coast, Cape Halkett to Demarcation Point
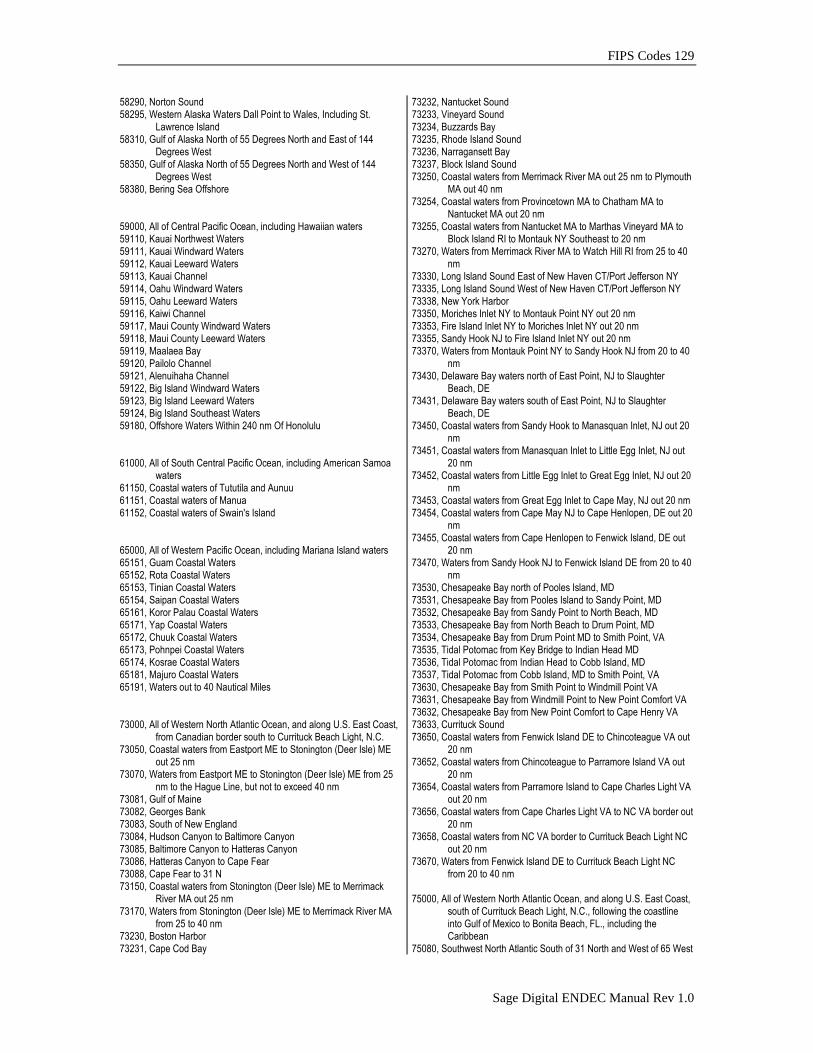
FIPS Codes 129
Sage Digital ENDEC Manual Rev 1.0
58290, Norton Sound 58295, Western Alaska Waters Dall Point to Wales, Including St.
Lawrence Island 58310, Gulf of Alaska North of 55 Degrees North and East of 144
Degrees West 58350, Gulf of Alaska North of 55 Degrees North and West of 144
Degrees West 58380, Bering Sea Offshore 59000, All of Central Pacific Ocean, including Hawaiian waters 59110, Kauai Northwest Waters 59111, Kauai Windward Waters 59112, Kauai Leeward Waters 59113, Kauai Channel 59114, Oahu Windward Waters 59115, Oahu Leeward Waters 59116, Kaiwi Channel 59117, Maui County Windward Waters 59118, Maui County Leeward Waters 59119, Maalaea Bay 59120, Pailolo Channel 59121, Alenuihaha Channel 59122, Big Island Windward Waters 59123, Big Island Leeward Waters 59124, Big Island Southeast Waters 59180, Offshore Waters Within 240 nm Of Honolulu 61000, All of South Central Pacific Ocean, including American Samoa
waters 61150, Coastal waters of Tututila and Aunuu 61151, Coastal waters of Manua 61152, Coastal waters of Swain's Island 65000, All of Western Pacific Ocean, including Mariana Island waters 65151, Guam Coastal Waters 65152, Rota Coastal Waters 65153, Tinian Coastal Waters 65154, Saipan Coastal Waters 65161, Koror Palau Coastal Waters 65171, Yap Coastal Waters 65172, Chuuk Coastal Waters 65173, Pohnpei Coastal Waters 65174, Kosrae Coastal Waters 65181, Majuro Coastal Waters 65191, Waters out to 40 Nautical Miles 73000, All of Western North Atlantic Ocean, and along U.S. East Coast,
from Canadian border south to Currituck Beach Light, N.C. 73050, Coastal waters from Eastport ME to Stonington (Deer Isle) ME
out 25 nm 73070, Waters from Eastport ME to Stonington (Deer Isle) ME from 25
nm to the Hague Line, but not to exceed 40 nm 73081, Gulf of Maine 73082, Georges Bank 73083, South of New England 73084, Hudson Canyon to Baltimore Canyon 73085, Baltimore Canyon to Hatteras Canyon 73086, Hatteras Canyon to Cape Fear 73088, Cape Fear to 31 N 73150, Coastal waters from Stonington (Deer Isle) ME to Merrimack
River MA out 25 nm 73170, Waters from Stonington (Deer Isle) ME to Merrimack River MA
from 25 to 40 nm 73230, Boston Harbor 73231, Cape Cod Bay
73232, Nantucket Sound 73233, Vineyard Sound 73234, Buzzards Bay 73235, Rhode Island Sound 73236, Narragansett Bay 73237, Block Island Sound 73250, Coastal waters from Merrimack River MA out 25 nm to Plymouth
MA out 40 nm 73254, Coastal waters from Provincetown MA to Chatham MA to
Nantucket MA out 20 nm 73255, Coastal waters from Nantucket MA to Marthas Vineyard MA to
Block Island RI to Montauk NY Southeast to 20 nm 73270, Waters from Merrimack River MA to Watch Hill RI from 25 to 40
nm 73330, Long Island Sound East of New Haven CT/Port Jefferson NY 73335, Long Island Sound West of New Haven CT/Port Jefferson NY 73338, New York Harbor 73350, Moriches Inlet NY to Montauk Point NY out 20 nm 73353, Fire Island Inlet NY to Moriches Inlet NY out 20 nm 73355, Sandy Hook NJ to Fire Island Inlet NY out 20 nm 73370, Waters from Montauk Point NY to Sandy Hook NJ from 20 to 40
nm 73430, Delaware Bay waters north of East Point, NJ to Slaughter
Beach, DE 73431, Delaware Bay waters south of East Point, NJ to Slaughter
Beach, DE 73450, Coastal waters from Sandy Hook to Manasquan Inlet, NJ out 20
nm 73451, Coastal waters from Manasquan Inlet to Little Egg Inlet, NJ out
20 nm 73452, Coastal waters from Little Egg Inlet to Great Egg Inlet, NJ out 20
nm 73453, Coastal waters from Great Egg Inlet to Cape May, NJ out 20 nm 73454, Coastal waters from Cape May NJ to Cape Henlopen, DE out 20
nm 73455, Coastal waters from Cape Henlopen to Fenwick Island, DE out
20 nm 73470, Waters from Sandy Hook NJ to Fenwick Island DE from 20 to 40
nm 73530, Chesapeake Bay north of Pooles Island, MD 73531, Chesapeake Bay from Pooles Island to Sandy Point, MD 73532, Chesapeake Bay from Sandy Point to North Beach, MD 73533, Chesapeake Bay from North Beach to Drum Point, MD 73534, Chesapeake Bay from Drum Point MD to Smith Point, VA 73535, Tidal Potomac from Key Bridge to Indian Head MD 73536, Tidal Potomac from Indian Head to Cobb Island, MD 73537, Tidal Potomac from Cobb Island, MD to Smith Point, VA 73630, Chesapeake Bay from Smith Point to Windmill Point VA 73631, Chesapeake Bay from Windmill Point to New Point Comfort VA 73632, Chesapeake Bay from New Point Comfort to Cape Henry VA 73633, Currituck Sound 73650, Coastal waters from Fenwick Island DE to Chincoteague VA out
20 nm 73652, Coastal waters from Chincoteague to Parramore Island VA out
20 nm 73654, Coastal waters from Parramore Island to Cape Charles Light VA
out 20 nm 73656, Coastal waters from Cape Charles Light VA to NC VA border out
20 nm 73658, Coastal waters from NC VA border to Currituck Beach Light NC
out 20 nm 73670, Waters from Fenwick Island DE to Currituck Beach Light NC
from 20 to 40 nm 75000, All of Western North Atlantic Ocean, and along U.S. East Coast,
south of Currituck Beach Light, N.C., following the coastline into Gulf of Mexico to Bonita Beach, FL., including the Caribbean
75080, Southwest North Atlantic South of 31 North and West of 65 West
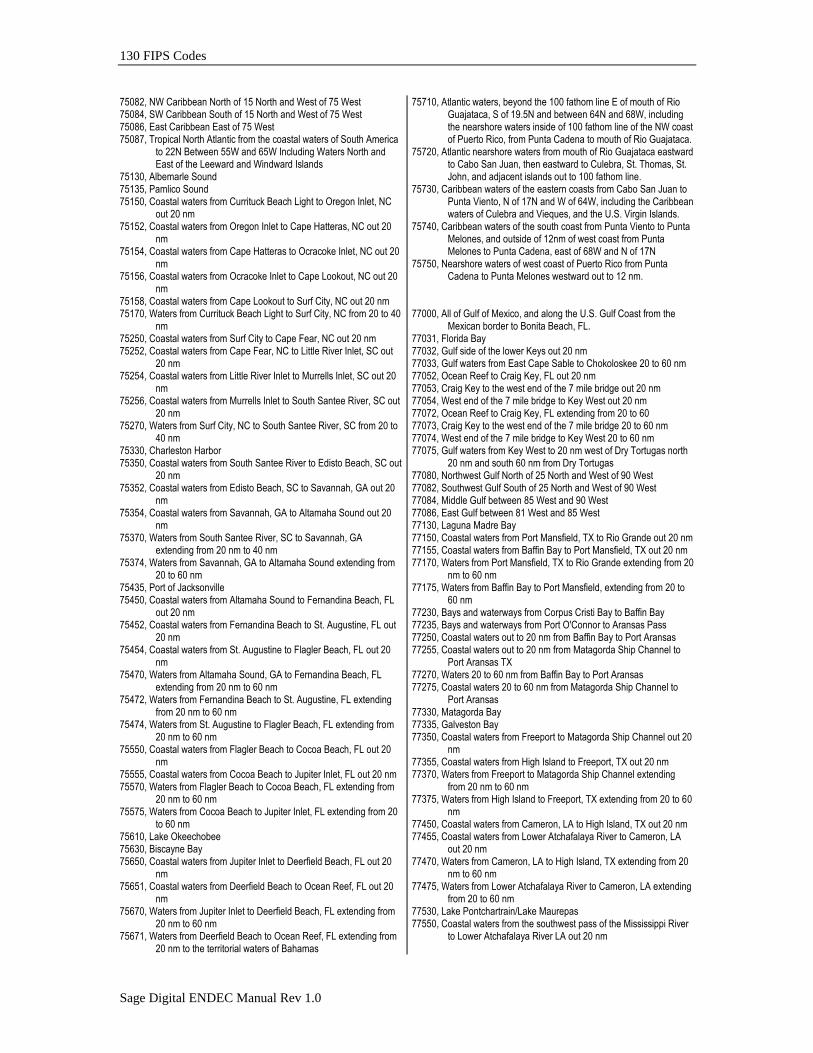
130 FIPS Codes
Sage Digital ENDEC Manual Rev 1.0
75082, NW Caribbean North of 15 North and West of 75 West 75084, SW Caribbean South of 15 North and West of 75 West 75086, East Caribbean East of 75 West 75087, Tropical North Atlantic from the coastal waters of South America
to 22N Between 55W and 65W Including Waters North and East of the Leeward and Windward Islands
75130, Albemarle Sound 75135, Pamlico Sound 75150, Coastal waters from Currituck Beach Light to Oregon Inlet, NC
out 20 nm 75152, Coastal waters from Oregon Inlet to Cape Hatteras, NC out 20
nm 75154, Coastal waters from Cape Hatteras to Ocracoke Inlet, NC out 20
nm 75156, Coastal waters from Ocracoke Inlet to Cape Lookout, NC out 20
nm 75158, Coastal waters from Cape Lookout to Surf City, NC out 20 nm 75170, Waters from Currituck Beach Light to Surf City, NC from 20 to 40
nm 75250, Coastal waters from Surf City to Cape Fear, NC out 20 nm 75252, Coastal waters from Cape Fear, NC to Little River Inlet, SC out
20 nm 75254, Coastal waters from Little River Inlet to Murrells Inlet, SC out 20
nm 75256, Coastal waters from Murrells Inlet to South Santee River, SC out
20 nm 75270, Waters from Surf City, NC to South Santee River, SC from 20 to
40 nm 75330, Charleston Harbor 75350, Coastal waters from South Santee River to Edisto Beach, SC out
20 nm 75352, Coastal waters from Edisto Beach, SC to Savannah, GA out 20
nm 75354, Coastal waters from Savannah, GA to Altamaha Sound out 20
nm 75370, Waters from South Santee River, SC to Savannah, GA
extending from 20 nm to 40 nm 75374, Waters from Savannah, GA to Altamaha Sound extending from
20 to 60 nm 75435, Port of Jacksonville 75450, Coastal waters from Altamaha Sound to Fernandina Beach, FL
out 20 nm 75452, Coastal waters from Fernandina Beach to St. Augustine, FL out
20 nm 75454, Coastal waters from St. Augustine to Flagler Beach, FL out 20
nm 75470, Waters from Altamaha Sound, GA to Fernandina Beach, FL
extending from 20 nm to 60 nm 75472, Waters from Fernandina Beach to St. Augustine, FL extending
from 20 nm to 60 nm 75474, Waters from St. Augustine to Flagler Beach, FL extending from
20 nm to 60 nm 75550, Coastal waters from Flagler Beach to Cocoa Beach, FL out 20
nm 75555, Coastal waters from Cocoa Beach to Jupiter Inlet, FL out 20 nm 75570, Waters from Flagler Beach to Cocoa Beach, FL extending from
20 nm to 60 nm 75575, Waters from Cocoa Beach to Jupiter Inlet, FL extending from 20
to 60 nm 75610, Lake Okeechobee 75630, Biscayne Bay 75650, Coastal waters from Jupiter Inlet to Deerfield Beach, FL out 20
nm 75651, Coastal waters from Deerfield Beach to Ocean Reef, FL out 20
nm 75670, Waters from Jupiter Inlet to Deerfield Beach, FL extending from
20 nm to 60 nm 75671, Waters from Deerfield Beach to Ocean Reef, FL extending from
20 nm to the territorial waters of Bahamas
75710, Atlantic waters, beyond the 100 fathom line E of mouth of Rio Guajataca, S of 19.5N and between 64N and 68W, including the nearshore waters inside of 100 fathom line of the NW coast of Puerto Rico, from Punta Cadena to mouth of Rio Guajataca.
75720, Atlantic nearshore waters from mouth of Rio Guajataca eastward to Cabo San Juan, then eastward to Culebra, St. Thomas, St. John, and adjacent islands out to 100 fathom line.
75730, Caribbean waters of the eastern coasts from Cabo San Juan to Punta Viento, N of 17N and W of 64W, including the Caribbean waters of Culebra and Vieques, and the U.S. Virgin Islands.
75740, Caribbean waters of the south coast from Punta Viento to Punta Melones, and outside of 12nm of west coast from Punta Melones to Punta Cadena, east of 68W and N of 17N
75750, Nearshore waters of west coast of Puerto Rico from Punta Cadena to Punta Melones westward out to 12 nm.
77000, All of Gulf of Mexico, and along the U.S. Gulf Coast from the
Mexican border to Bonita Beach, FL. 77031, Florida Bay 77032, Gulf side of the lower Keys out 20 nm 77033, Gulf waters from East Cape Sable to Chokoloskee 20 to 60 nm 77052, Ocean Reef to Craig Key, FL out 20 nm 77053, Craig Key to the west end of the 7 mile bridge out 20 nm 77054, West end of the 7 mile bridge to Key West out 20 nm 77072, Ocean Reef to Craig Key, FL extending from 20 to 60 77073, Craig Key to the west end of the 7 mile bridge 20 to 60 nm 77074, West end of the 7 mile bridge to Key West 20 to 60 nm 77075, Gulf waters from Key West to 20 nm west of Dry Tortugas north
20 nm and south 60 nm from Dry Tortugas 77080, Northwest Gulf North of 25 North and West of 90 West 77082, Southwest Gulf South of 25 North and West of 90 West 77084, Middle Gulf between 85 West and 90 West 77086, East Gulf between 81 West and 85 West 77130, Laguna Madre Bay 77150, Coastal waters from Port Mansfield, TX to Rio Grande out 20 nm 77155, Coastal waters from Baffin Bay to Port Mansfield, TX out 20 nm 77170, Waters from Port Mansfield, TX to Rio Grande extending from 20
nm to 60 nm 77175, Waters from Baffin Bay to Port Mansfield, extending from 20 to
60 nm 77230, Bays and waterways from Corpus Cristi Bay to Baffin Bay 77235, Bays and waterways from Port O'Connor to Aransas Pass 77250, Coastal waters out to 20 nm from Baffin Bay to Port Aransas 77255, Coastal waters out to 20 nm from Matagorda Ship Channel to
Port Aransas TX 77270, Waters 20 to 60 nm from Baffin Bay to Port Aransas 77275, Coastal waters 20 to 60 nm from Matagorda Ship Channel to
Port Aransas 77330, Matagorda Bay 77335, Galveston Bay 77350, Coastal waters from Freeport to Matagorda Ship Channel out 20
nm 77355, Coastal waters from High Island to Freeport, TX out 20 nm 77370, Waters from Freeport to Matagorda Ship Channel extending
from 20 nm to 60 nm 77375, Waters from High Island to Freeport, TX extending from 20 to 60
nm 77450, Coastal waters from Cameron, LA to High Island, TX out 20 nm 77455, Coastal waters from Lower Atchafalaya River to Cameron, LA
out 20 nm 77470, Waters from Cameron, LA to High Island, TX extending from 20
nm to 60 nm 77475, Waters from Lower Atchafalaya River to Cameron, LA extending
from 20 to 60 nm 77530, Lake Pontchartrain/Lake Maurepas 77550, Coastal waters from the southwest pass of the Mississippi River
to Lower Atchafalaya River LA out 20 nm
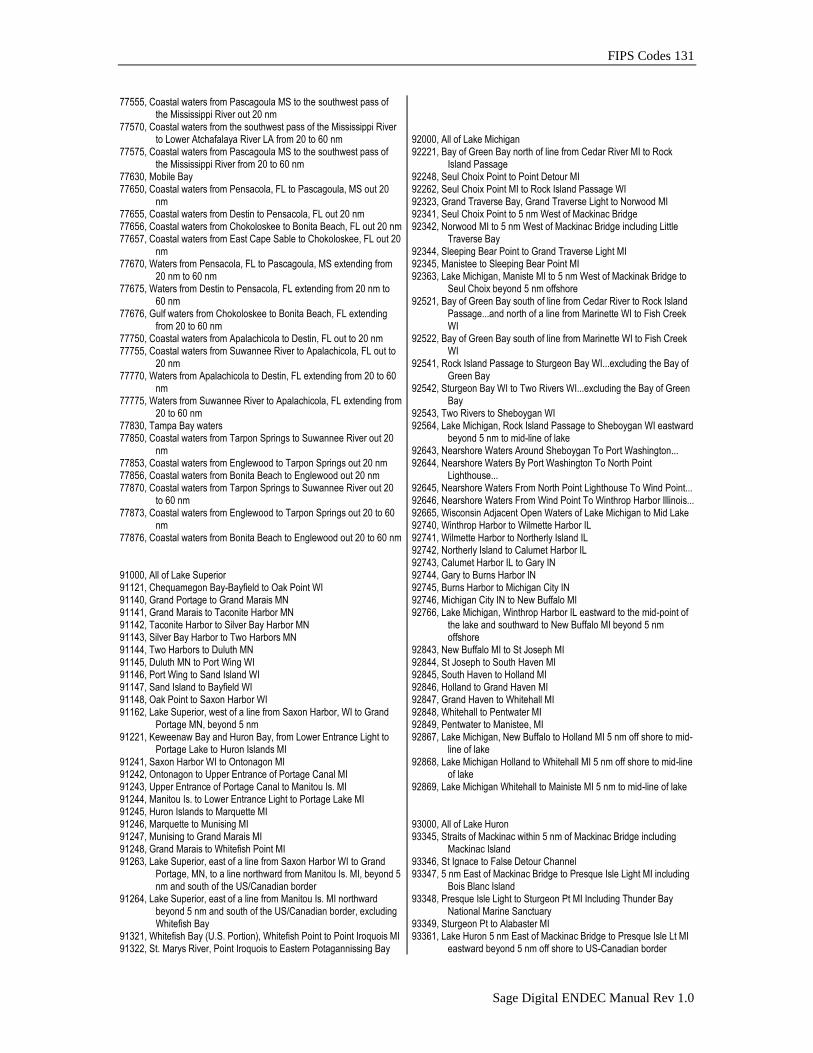
FIPS Codes 131
Sage Digital ENDEC Manual Rev 1.0
77555, Coastal waters from Pascagoula MS to the southwest pass of the Mississippi River out 20 nm
77570, Coastal waters from the southwest pass of the Mississippi River to Lower Atchafalaya River LA from 20 to 60 nm
77575, Coastal waters from Pascagoula MS to the southwest pass of the Mississippi River from 20 to 60 nm
77630, Mobile Bay 77650, Coastal waters from Pensacola, FL to Pascagoula, MS out 20
nm 77655, Coastal waters from Destin to Pensacola, FL out 20 nm 77656, Coastal waters from Chokoloskee to Bonita Beach, FL out 20 nm 77657, Coastal waters from East Cape Sable to Chokoloskee, FL out 20
nm 77670, Waters from Pensacola, FL to Pascagoula, MS extending from
20 nm to 60 nm 77675, Waters from Destin to Pensacola, FL extending from 20 nm to
60 nm 77676, Gulf waters from Chokoloskee to Bonita Beach, FL extending
from 20 to 60 nm 77750, Coastal waters from Apalachicola to Destin, FL out to 20 nm 77755, Coastal waters from Suwannee River to Apalachicola, FL out to
20 nm 77770, Waters from Apalachicola to Destin, FL extending from 20 to 60
nm 77775, Waters from Suwannee River to Apalachicola, FL extending from
20 to 60 nm 77830, Tampa Bay waters 77850, Coastal waters from Tarpon Springs to Suwannee River out 20
nm 77853, Coastal waters from Englewood to Tarpon Springs out 20 nm 77856, Coastal waters from Bonita Beach to Englewood out 20 nm 77870, Coastal waters from Tarpon Springs to Suwannee River out 20
to 60 nm 77873, Coastal waters from Englewood to Tarpon Springs out 20 to 60
nm 77876, Coastal waters from Bonita Beach to Englewood out 20 to 60 nm 91000, All of Lake Superior 91121, Chequamegon Bay-Bayfield to Oak Point WI 91140, Grand Portage to Grand Marais MN 91141, Grand Marais to Taconite Harbor MN 91142, Taconite Harbor to Silver Bay Harbor MN 91143, Silver Bay Harbor to Two Harbors MN 91144, Two Harbors to Duluth MN 91145, Duluth MN to Port Wing WI 91146, Port Wing to Sand Island WI 91147, Sand Island to Bayfield WI 91148, Oak Point to Saxon Harbor WI 91162, Lake Superior, west of a line from Saxon Harbor, WI to Grand
Portage MN, beyond 5 nm 91221, Keweenaw Bay and Huron Bay, from Lower Entrance Light to
Portage Lake to Huron Islands MI 91241, Saxon Harbor WI to Ontonagon MI 91242, Ontonagon to Upper Entrance of Portage Canal MI 91243, Upper Entrance of Portage Canal to Manitou Is. MI 91244, Manitou Is. to Lower Entrance Light to Portage Lake MI 91245, Huron Islands to Marquette MI 91246, Marquette to Munising MI 91247, Munising to Grand Marais MI 91248, Grand Marais to Whitefish Point MI 91263, Lake Superior, east of a line from Saxon Harbor WI to Grand
Portage, MN, to a line northward from Manitou Is. MI, beyond 5 nm and south of the US/Canadian border
91264, Lake Superior, east of a line from Manitou Is. MI northward beyond 5 nm and south of the US/Canadian border, excluding Whitefish Bay
91321, Whitefish Bay (U.S. Portion), Whitefish Point to Point Iroquois MI 91322, St. Marys River, Point Iroquois to Eastern Potagannissing Bay
92000, All of Lake Michigan 92221, Bay of Green Bay north of line from Cedar River MI to Rock
Island Passage 92248, Seul Choix Point to Point Detour MI 92262, Seul Choix Point MI to Rock Island Passage WI 92323, Grand Traverse Bay, Grand Traverse Light to Norwood MI 92341, Seul Choix Point to 5 nm West of Mackinac Bridge 92342, Norwood MI to 5 nm West of Mackinac Bridge including Little
Traverse Bay 92344, Sleeping Bear Point to Grand Traverse Light MI 92345, Manistee to Sleeping Bear Point MI 92363, Lake Michigan, Maniste MI to 5 nm West of Mackinak Bridge to
Seul Choix beyond 5 nm offshore 92521, Bay of Green Bay south of line from Cedar River to Rock Island
Passage...and north of a line from Marinette WI to Fish Creek WI
92522, Bay of Green Bay south of line from Marinette WI to Fish Creek WI
92541, Rock Island Passage to Sturgeon Bay WI...excluding the Bay of Green Bay
92542, Sturgeon Bay WI to Two Rivers WI...excluding the Bay of Green Bay
92543, Two Rivers to Sheboygan WI 92564, Lake Michigan, Rock Island Passage to Sheboygan WI eastward
beyond 5 nm to mid-line of lake 92643, Nearshore Waters Around Sheboygan To Port Washington... 92644, Nearshore Waters By Port Washington To North Point
Lighthouse... 92645, Nearshore Waters From North Point Lighthouse To Wind Point... 92646, Nearshore Waters From Wind Point To Winthrop Harbor Illinois... 92665, Wisconsin Adjacent Open Waters of Lake Michigan to Mid Lake 92740, Winthrop Harbor to Wilmette Harbor IL 92741, Wilmette Harbor to Northerly Island IL 92742, Northerly Island to Calumet Harbor IL 92743, Calumet Harbor IL to Gary IN 92744, Gary to Burns Harbor IN 92745, Burns Harbor to Michigan City IN 92746, Michigan City IN to New Buffalo MI 92766, Lake Michigan, Winthrop Harbor IL eastward to the mid-point of
the lake and southward to New Buffalo MI beyond 5 nm offshore
92843, New Buffalo MI to St Joseph MI 92844, St Joseph to South Haven MI 92845, South Haven to Holland MI 92846, Holland to Grand Haven MI 92847, Grand Haven to Whitehall MI 92848, Whitehall to Pentwater MI 92849, Pentwater to Manistee, MI 92867, Lake Michigan, New Buffalo to Holland MI 5 nm off shore to mid-
line of lake 92868, Lake Michigan Holland to Whitehall MI 5 nm off shore to mid-line
of lake 92869, Lake Michigan Whitehall to Mainiste MI 5 nm to mid-line of lake 93000, All of Lake Huron 93345, Straits of Mackinac within 5 nm of Mackinac Bridge including
Mackinac Island 93346, St Ignace to False Detour Channel 93347, 5 nm East of Mackinac Bridge to Presque Isle Light MI including
Bois Blanc Island 93348, Presque Isle Light to Sturgeon Pt MI Including Thunder Bay
National Marine Sanctuary 93349, Sturgeon Pt to Alabaster MI 93361, Lake Huron 5 nm East of Mackinac Bridge to Presque Isle Lt MI
eastward beyond 5 nm off shore to US-Canadian border
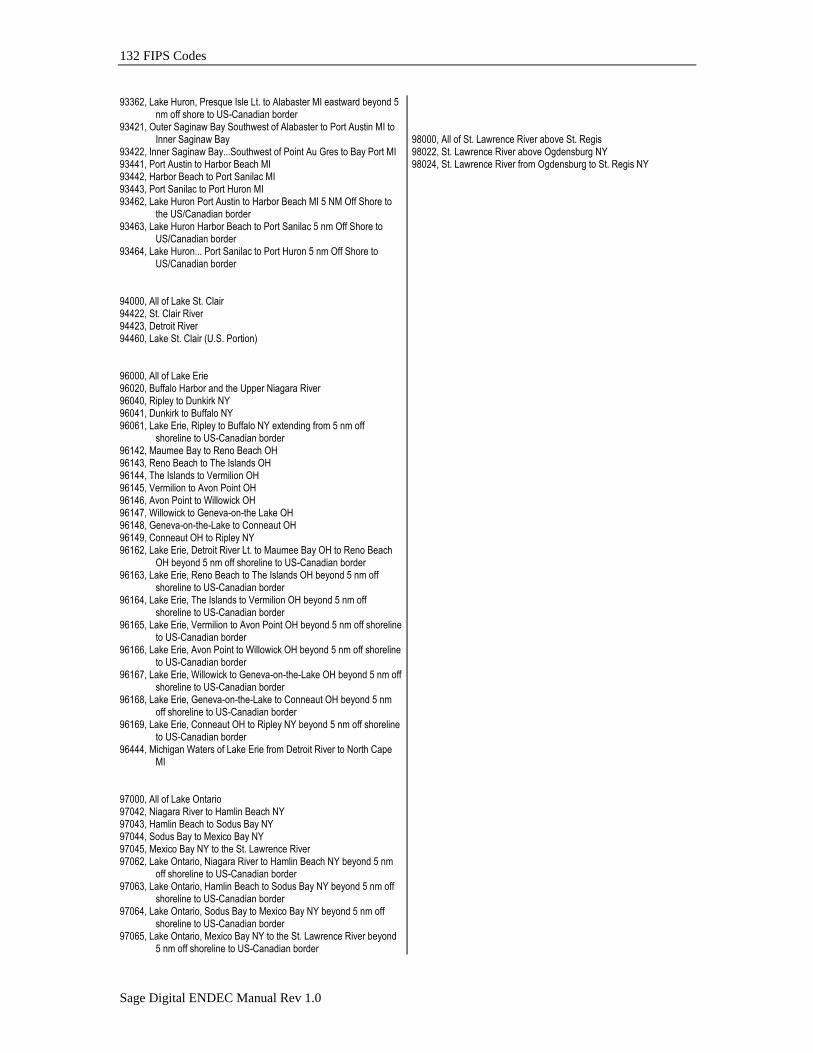
132 FIPS Codes
Sage Digital ENDEC Manual Rev 1.0
93362, Lake Huron, Presque Isle Lt. to Alabaster MI eastward beyond 5 nm off shore to US-Canadian border
93421, Outer Saginaw Bay Southwest of Alabaster to Port Austin MI to Inner Saginaw Bay
93422, Inner Saginaw Bay...Southwest of Point Au Gres to Bay Port MI 93441, Port Austin to Harbor Beach MI 93442, Harbor Beach to Port Sanilac MI 93443, Port Sanilac to Port Huron MI 93462, Lake Huron Port Austin to Harbor Beach MI 5 NM Off Shore to
the US/Canadian border 93463, Lake Huron Harbor Beach to Port Sanilac 5 nm Off Shore to
US/Canadian border 93464, Lake Huron... Port Sanilac to Port Huron 5 nm Off Shore to
US/Canadian border 94000, All of Lake St. Clair 94422, St. Clair River 94423, Detroit River 94460, Lake St. Clair (U.S. Portion) 96000, All of Lake Erie 96020, Buffalo Harbor and the Upper Niagara River 96040, Ripley to Dunkirk NY 96041, Dunkirk to Buffalo NY 96061, Lake Erie, Ripley to Buffalo NY extending from 5 nm off
shoreline to US-Canadian border 96142, Maumee Bay to Reno Beach OH 96143, Reno Beach to The Islands OH 96144, The Islands to Vermilion OH 96145, Vermilion to Avon Point OH 96146, Avon Point to Willowick OH 96147, Willowick to Geneva-on-the Lake OH 96148, Geneva-on-the-Lake to Conneaut OH 96149, Conneaut OH to Ripley NY 96162, Lake Erie, Detroit River Lt. to Maumee Bay OH to Reno Beach
OH beyond 5 nm off shoreline to US-Canadian border 96163, Lake Erie, Reno Beach to The Islands OH beyond 5 nm off
shoreline to US-Canadian border 96164, Lake Erie, The Islands to Vermilion OH beyond 5 nm off
shoreline to US-Canadian border 96165, Lake Erie, Vermilion to Avon Point OH beyond 5 nm off shoreline
to US-Canadian border 96166, Lake Erie, Avon Point to Willowick OH beyond 5 nm off shoreline
to US-Canadian border 96167, Lake Erie, Willowick to Geneva-on-the-Lake OH beyond 5 nm off
shoreline to US-Canadian border 96168, Lake Erie, Geneva-on-the-Lake to Conneaut OH beyond 5 nm
off shoreline to US-Canadian border 96169, Lake Erie, Conneaut OH to Ripley NY beyond 5 nm off shoreline
to US-Canadian border 96444, Michigan Waters of Lake Erie from Detroit River to North Cape
MI 97000, All of Lake Ontario 97042, Niagara River to Hamlin Beach NY 97043, Hamlin Beach to Sodus Bay NY 97044, Sodus Bay to Mexico Bay NY 97045, Mexico Bay NY to the St. Lawrence River 97062, Lake Ontario, Niagara River to Hamlin Beach NY beyond 5 nm
off shoreline to US-Canadian border 97063, Lake Ontario, Hamlin Beach to Sodus Bay NY beyond 5 nm off
shoreline to US-Canadian border 97064, Lake Ontario, Sodus Bay to Mexico Bay NY beyond 5 nm off
shoreline to US-Canadian border 97065, Lake Ontario, Mexico Bay NY to the St. Lawrence River beyond
5 nm off shoreline to US-Canadian border
98000, All of St. Lawrence River above St. Regis 98022, St. Lawrence River above Ogdensburg NY 98024, St. Lawrence River from Ogdensburg to St. Regis NY
Index 133
Sage Digital ENDEC Manual Rev 1.0
1
1050 Hz, 89
1050 Hz tone, 88
A
ACC Power. Accessory Power
Accessory Power, 63, 67, 75, 101, 109
Adding Locations, 45
admin password, 107
Alert
Originating, 60
Originating with templates, 60
Relaying, 59
Attention Duration, 44
Attention Signal, 88
ATTN Duration, 45
Audio Levels, 29
B
Back Panel Description, 24
Blinking LED, 97, 105
C
call sign, 37
CAP, 10, 21
Clock Rate, 34
CODI CGEN, 91
commercial tally, 71
Common Alerting Protocol. See CAP
config
attn decode, 71
Contrast
Hand Held Remote Control, 64
LCD, 92
Crawl Only
Incoming Alert, 44
Outgoing Alert, 46
D
Date, 38
daytime only station, 44
Decoder, 91
devices, 91
DHCP, 55
DNS, 55
Duration, 21, 46
E
EAN, 65, 106
EAS Header, 20
EBS, 71
email, 57
Enable Digital Audio, 33
Encoder, 91
Encoder Audio In, 27
End of Message, 21
ENDEC PRO, 91
ENDECSET, 91
ENDECSETD, 53
Enter One-Touch Key, 46
EOM, 21
Event, 21, 45
External Clock, 33
F
Filter
Adding Locations, 44
Events, 43
Incoming Filter, 43
Originators, 43
Priority, 44
Select Action, 44
Filters, 40
Flashing LED, 97, 105
Front Panel Description, 23
FTP, 57
G
GENERIC CGEN, 91
H
Hand Control, 91
Hand Held Remote Control, 63–65, 106
Changing default parameters, 64
cue key, 65, 81
monthly test key, 65
Pin Out, 102
play now key, 65
Power, 63
practice key, 96
record button, 81
record key, 65, 81
shift cue key, 65
shift key, 65
shift record button, 81
shift-cue key, 81
shift-record button, 82, 83
shift-record key, 65
weekly test key, 65
What's New, 109
Header, 20
Hold Off, 16, 71
Hold Time, 44
134 Index
Sage Digital ENDEC Manual Rev 1.0
I
ID, 21
L
LED
Blinking, 97, 105
LED sign, 81
LED SIGN, 91
Levels, 29
Local Area, 39
Locations, 21
M
Main Audio In, 27
Main Audio Out, 27
Manual Override, 16
marine location codes, 52
Menu
Annotation format explained., 15
menu,
time-out, 15
Menu.alerts.clear alert log, 81
Menu.alerts.clear led sign, 81
menu.alerts.originate alert, 45, 61, 81
menu.alerts.preview audio, 81
menu.alerts.preview nvaudio, 81
menu.alerts.record audio, 81, 82
menu.alerts.record nvaudio, 81, 82
menu.alerts.send pending, 83
menu.alerts.view alert log, 84
menu.change admin, 85
menu.change password, 85
menu.change pro pass, 85
menu.config.allow build ean, 85
MENU.CONFIG.ATTN DECODE, 47, 49, 71
menu.config.attn duration, 86
menu.config.auto start, 86
menu.config.auto start.hour, 86
menu.config.auto start.min, 86
menu.config.auto start.none, 86
menu.config.auto stop., 86
menu.config.auto stop.hour, 86
menu.config.auto stop.min, 86
menu.config.auto stop.none, 86
MENU.CONFIG.CALL SIGN, 15, 77, 86
menu.config.codi crawl speed, 86
menu.config.codi mode, 86
menu.config.crawl RWT, 86
menu.config.crawl.reps, 86
menu.config.default duration, 46, 60, 61, 65, 87
menu.config.default rec, 65, 81, 82, 87
MENU.CONFIG.HOLDOFF IGNORE, 48
menu.config.language, 87
menu.config.led sign mode, 87
menu.config.led sign sound, 87
menu.config.led sign time, 87
menu.config.menu timeout, 15, 88
MENU.CONFIG.MODE, 76, 88
menu.config.nv audio len, 44, 77, 82, 88
menu.config.nv lead-in, 77, 88
Menu.config.NWS Practice, 89
menu.config.nws select, 89
menu.config.nws.hunt time, 88
menu.config.old scan method, 89
menu.config.originator, 89
menu.config.print all alerts, 89
menu.config.print zczc, 89
menu.config.printer, 89
menu.config.pro extra stat, 89
menu.config.pro read only, 90
menu.config.processor lead, 90
MENU.CONFIG.SCAN SELECT, 48, 90
menu.config.strict time, 90
menu.config.unknown fips, 90
menu.config.VDS relay on, 90
MENU.DATE/TIME, 16, 38, 77
menu.date/time.day, 90
menu.date/time.daylight enable, 90
menu.date/time.hour, 90
menu.date/time.min, 90
menu.date/time.month, 90
menu.date/time.sec, 90
menu.date/time.utc offset, 90
menu.date/time.year, 90
MENU.DEVICES, 77
menu.devices.com2, 91
menu.devices.com3, 91
menu.devices.com4, 91
menu.devices.com5, 91
menu.devices.com6, 91
menu.devices.computer, 91
menu.devices.port, 91
menu.devices.port.baud, 34, 91
menu.devices.port.device type, 91
menu.devices.port.device type.decoder, 69
menu.devices.port.device type.encoder, 69
menu.devices.port.device type.generic cgen, 70
menu.devices.port.device type.led sign, 66
menu.devices.port.device type.news feed, 70
menu.devices.port.device type.serial printer, 69
menu.devices.port.device types, 34
menu.devices.port.station, 92
menu.devices.show, 92
menu.digital audio.Clock Rate, 34
menu.digital audio.clock source, 33
menu.digital audio.Digital Passthru, 33
menu.digital audio.enable digital, 33
menu.digital audio.relay always on, 33
menu.digital audio.simulcast, 33
menu.digital levels, 92
menu.lcd contrast, 92
menu.levels.attn high tone, 31
menu.levels.attn low tone, 31
menu.levels.attn thresh, 31
menu.levels.attn tone, 30
menu.levels.data high tone, 31
menu.levels.data low tone, 31
Index 135
Sage Digital ENDEC Manual Rev 1.0
menu.levels.data tone, 31
MENU.LEVELS.LINE OUT, 29, 30
menu.levels.mic, 30, 103
menu.levels.playback, 31
menu.levels.record mon 1, 31
menu.levels.record mon 2, 31
MENU.LEVELS.SPEAKER, 29, 30
menu.mhz sub-alert.attn duration, 78
MENU.MHZ SUB-ALERT.ENABLE, 77
menu.mhz sub-alert.mhz enable, 78
menu.mhz sub-alert.repeats, 78
Menu.mhz sub-alert.rwt mode, 78
menu.mhz sub-alert.tune to chan, 78
menu.mhz sub-alert.tune to rep, 79
menu.mhz sub-alert.user page, 79
menu.mode, 93
menu.monitor source., 93
menu.monitor source.alerts, 93
menu.monitor source.attn tone, 93
menu.monitor source.attn tone high, 93
menu.monitor source.attn tone low, 93
menu.monitor source.data tone, 93
menu.monitor source.data tone high, 93
menu.monitor source.data tone low, 93
menu.monitor source.enc aud in, 93
menu.monitor source.mic in, 93
menu.monitor source.mon 1 in, 93
menu.monitor source.mon 2 in, 93
menu.monitor source.mon 3 in, 93
menu.monitor source.mon 4 in, 93
menu.monitor source.mon 5 in, 93
menu.monitor source.mon 6 in, 93
menu.monitor source.none, 93
menu.monitor source.playback, 93
menu.msrp.assign.msrp.relay, 94
MENU.MSRP.STATION N.MODE, 76
menu.msrp.station.n.call sign, 94
menu.msrp.station-n.enable, 94
menu.msrp.station-n.mode, 94
menu.network.automation, 94
menu.network.dns1, 94
menu.network.dns2, 94
menu.network.gateway, 94
menu.network.ip address, 94
menu.network.network addr type, 95
menu.network.network mask, 95
menu.network.port base, 95
menu.network.pro/dj, 95
menu.network.restart network, 95
menu.network.show ip addr, 95
menu.network.show mac addr, 95
menu.network.web server, 95
menu.override use.hold off, 71
menu.override use.hold off night, 71
menu.practice, 96
MENU.PRESETS.INCOMING, 77, 97
MENU.PRESETS.LOCAL, 39
MENU.PRESETS.LOCAL AREA, 15, 16, 97
menu.presets.outgoing, 97
menu.printer feed, 97
MENU.RELAY, 51, 71, 97
menu.show input levels, 97
menu.test.printer test, 97
menu.test.reboot, 97
menu.test.reset.blink.error, 97
menu.test.self test, 98
menu.test.show utc, 98
menu.test.vds cgen version, 98
menu.timed rwt.edit rwt rand, 98
menu.timed RWT.enable timed RWT, 98
menu.timed rwt.print rwt rand, 99
menu.timed rwt.reset rwt rand, 99
menu.timed RWT.RWT day of week, 99
menu.timed RWT.RWT hour, 99
menu.timed RWT.RWT minute, 99
menu.timed rwt.rwt reset, 96
Menu.timed RWT.RWT reset, 99
Mic In, 28
Microphone, 28
Microphone Connector, 103
Modem, 91
monitor inputs, 27
multi station relay panel, 84
Must Carry, 9
N
National Weather Service, 89
Network, 55
news feed, 70
News Feed, 92
NOAA, 89
non volatile audio, 65
non-volatile audio, 88
Non-Volatile Audio, 77
NTP, 56
NV audio, 44
NV Lead In
Incoming Alerts, 44
Outgoing Alerts, 46
O
Originator, 21, 45
P
Pass-through, 33
Password
admin, 107
user, 107
Web Admin, 107
Web User, 107
Passwords, 15
PEND.CUE, 17
PEND.OPT.VIEW, 17
PEND.SEND, 17
power, 27
Power, 11, 25
practice mode, 106

136 Index
Sage Digital ENDEC Manual Rev 1.0
Preamble, 21
presets.local area, 105
Printer
What's New, 109
R
Random Weekly Test, 51
RC-1. See Hand Held Remote Control
RECON, 92
relay always on, 33
Relays
Assigning Programs, 50
ATTN Active, 47
ATTN Rly, 47
Dec Rly, 47
Decoder Active, 47
Encoder Active, 47
Encoder Rly, 47
Hardware Description, 35
Software Programming, 47
Remote Control. See Hand Held Remote Control
S
Save, 44, 46
Select Audio, 45
Serial Port Pin Out, 101
Serial Ports, 34, 91
What‟s New, 109
Serial Printer, 92
Simulcast, 33
Speaker Line Out, 27
Speaker Out, 27
STAR-8, 92
T
test.vds cgen version, 105
time, 56
Time, 38
Two Tone Signal, 88
two-tone, 71
U
user password, 107
UTC, 98
UTC Offset, 39
V
VDS CGEN, 92
VDS MC, 92
W
Warranty, 117
watchdog timer, 106
Web Admin password, 107
Web User password, 107
weekly test, 59