Embed Size (px)
Citation preview
Owner's anual
CRAFTSMAN°3.8 HORSEPOWER
1650 PS! 2 GPMHIGH PRESSURE WASHER
Model No,580.761652
CAUTION: Before using this
product, read this manual and
follow all Safety Rules andOperating Instructions.
HOURS: Mon. - Frt, 8 a.m. to 5 p.m. (CST)
SEARS, ROEBUCK and CO., Hoffman Estates, IL
Par_ No. B'_381 Draft I (4t23/97)
1-800-222-3136
60179 U.S.A.
SAFETY RULES ............................ 3
ASSEMBLY .............................. 4-5
OPERATION ............................ 6-t 0
MAINTENANCE ........................ 10-12
SERVICE AND ADJUSTMENTS ............... 13
STO RAG E ............................... 14
TROUBLESHOOTING ....................... 15
REPLACEMENT PARTS .................. 16-23
HOW TO ORDER PARTS ............ BACK PAGE
LIMITED ONE YEAR WARRANTY ON CRAFTSMAN HIGH PRESSURE WASHERFor one year from the date of purchase, when this Craftsman High Pressure Washer is maintained and operat-ed according to the instructions in the owner's manual, Sears will repair, free of charge, any defect in materialand workmanship.If this washer is used for commercial purposes, this warranty applies for only 90 days from the date of pur-chase. If this high pressure washer is used for rental purposes, this warranty applies for only 30 days afterdate of purchase.
This warranty does not cover:• Expendable items such as spark plugs and air filters; which become worn during normal use.
• Repairs necessary because of operator abuse or negligence, including damage resulting from no water beingsupplied to pump or failure to maintain the equipment according to the instructions contained in the owner'smanual.
WARRANTY SERVICE IS AVAILABLE BY RETURNING THE HIGH PRESSURE WASHER TO THENEAREST SEARS STORE OR OTHER CRAFTSMAN OUTLET IN THE UNITED STATES.
This warranty gives you specific legal rights and you may als0 have other rights, which vary from state tostate.
SEARS, ROEBUCK AND CO., D/817 WA, Hoffman Estates, IL 60179
CAUTION: ALWAYS DISCONNECT SPARK PLUG WIRE AND PLACE WIRE WHERE IT CAN-
,_ NOT CONTACT SPARK PLUG, TO PREVENT ACCIDENTAL STARTING WHEN SETTING UP,TRANSPORTING, ADJUSTING OR MAKING REPAIRS TO YOUR HIGH PRESSURE WASHER,
CAUTION: Before using this product, Iread this manual and follow all SafetyRules and Operating Instructions,
OPERATION:• Do not spray flammable liquids.
o Never allow any part of the body to come in contact withthe fluid stream. DO NOT come in contact with a fluid
stream created by a leak in the high pressure hose,
• High pressure stream of fluid that this equipment can pro-duce can pierce skin and its underlying tissues, leading toserious injury and possible amputation.
. Never aim the gun at people, animals or plants.
• High pressure spray can cause paint chips or other parti-cles to become airborne and fly at high speeds.
• Always wear eye protection when you use this equipment orwhen you are in the vicinity where the equipment is in use.
• Operate the pressure at no more than the PSi fluid pres-sure rated for your pressure washer.
• Never move the machine by pulling on the high pressurehose. Use the handle provided on the top of the unit.
• Always be certain the spray gun, nozzles and accessoriesare correctly attached,
o Never use a spray gun which does not have a trigger lockor trigger guard in place and in working order
• Use a respirator or mask whenever there is a chance thatvapors may be inhaled. Read all instructions with the mask
so you are certain the mask will provide the necessaryprotection against inhaiing harmfut vapors.
• High pressure spray may damage fragile items includingglass. Do not point spray gun at glass when in the jetspray mode.
• Keep the hose connected to machine or the spray gunwhile the system is pressurized. Disconnecting the hosewhife the unit is pressurized is dangerous.
• Hold the spray gun firmly in your hand before you start theunit. Faitura to do so could result in an injury from a whip_ping spray gun. Do not leave the spray gun unattendedwhife the machine is running.
• The cleaning area should have adequate slopes anddrainage to reduce the possibility of a fali due to slipperysurfaces.
. Keep water spray away from electric wiring or fatat electricshock may result.
• Do not adjust unloader valve to a pressure in excess ofmachine rating.
• Do not secure trigger gun in the pull-back (open) position.
• Do not by-pass any safety device on this machine.
• The muffler and engine heat up during operation andremain hot immediately after shutting it down. Avoid con-
tact with a hot muffler or engine or you could be severelyburned.
TRAINING:
• Engine exhaust gases contain DEADLY carbon monoxide
gas. This dangerous gas, if breathed in sufficient concen-trations, can cause unconsciousness or even death.
Operate this equipment only in the open air where ade-
quate ventifation is available.
° Gasoline is highly FLAMMABLE and its vapors are
EXPLOSIVE. Do not permit smoking, open flames, sparks
or heat in the vicinity while handling gasoline. Avoid
spilling gasoline on a hot engine. Allow unit to cool for 2
minutes before refueling. Compty with nil laws regulatingstorage and haedling of gasoiine,
= Locate this pressure washer in areas away from com-bustible materials, combustible fumes or dust.
• The high pressure equipment is designed to be used with
Sears authonzed parts onty. If you use this equipment withparts that do not comply with minimum specifications, theuser assumes all risks and liabilities.
° Some chemicals or detergents may be harmfut if inhaled
or ingested, causing severe nausea, fainting or poisoning.
The harmful efements may cause property damage orsevere injury.
• Do not allow CHILDREN to operate the Pressure Washer
at any time.
PREPARATION:• Operate engine only at governed speed. Running the
engine at excessive speeds increases the hazard of per*sonat injury. Do not tamper with parts which may increaseor decrease the governed speed.
,' Do not wear loose clothing, jewelry or anything that maybe caught in the starter or other rotating parts.
• Before starting the Pressure Washer in cold weather,check all parts of the equipment and be sure ice has notformed there.
• Units with broken or missing parts, or without protectivehousing or covers shoutd NEVER be operated.
° The muffler and air cleaner must be installed and in goodcondition before operating the Pressure Washer. These
components act as spark arrestors if the engine backfires.
• Check the fuel system for leaks or signs of deteriorationsuch as chafed or spongy hose, loose or missing ctampsor damaged tank or cap. Correct all defects before operat-ing the Pressure Washer.
MAINTENANCE AND STORAGE:* Operate and store this unit on a stable surface.
. High pressure hose can develop leaks from wear, kinking,abuse, etc. Water spraying from a leak is capable of inject-ing material into skin.Inspect hose each time before usingit. Check all hoses for cuts, ieaks, abrasions or bulging ofcover, or damage or movement of couplings. If any ofthese conditions exist, replace hose immediately. Neverrepair high pressure hose. Replace it with another hose
that meets minimum pressure rating of your pressurewasher.
iA LOOK O T"'SS OBOLTOPO'"TOOT,OPOOTANTSAFETyP°EOAOT,ONSlIT MEANS "ATTENTION!!! BECOME ALERT!!! YOUR SAFETY IS INVOLVED."
3
CARTON CONTENTS
The following parts are shipped loose with your pressurewasher:
• Main Unit -- pressure washer with wheels, guide han-dle and turbo nozzle.
• High Pressure Hose
• Manual Bag (which includes the items listed below)• Nozzle Cleaner Kit• Accessories Adaptor
• Parts Box (which includes items listed below)• Spray Gun• Wand Extension
• Hi/Lo Adjustable Nozzle.• Wire Form• Motor Oil
Become familiar with each piece before assembling thepressure washer. Check all contents against the illustra-tion on Page 6, If any parts are missing or damaged, callthe Pressure Washer Helptine at 1-800-222-3136.
TO REMOVE PRESSURE WASHER FROMCARTON
• Remove loose parts and parts box included with pres-sure washer. The high pressure hose is packed in thebottom of the carton on the guide handle end.Remove the hose.
• Slice two corners at guide handle end of carton fromtop to bottom so the panel can be folded down flat,then remove all packing material.
• Raise guide handle, secure in place and roll the pres-sure washer out the open end of the carton.
Loosen knobsto raise handle
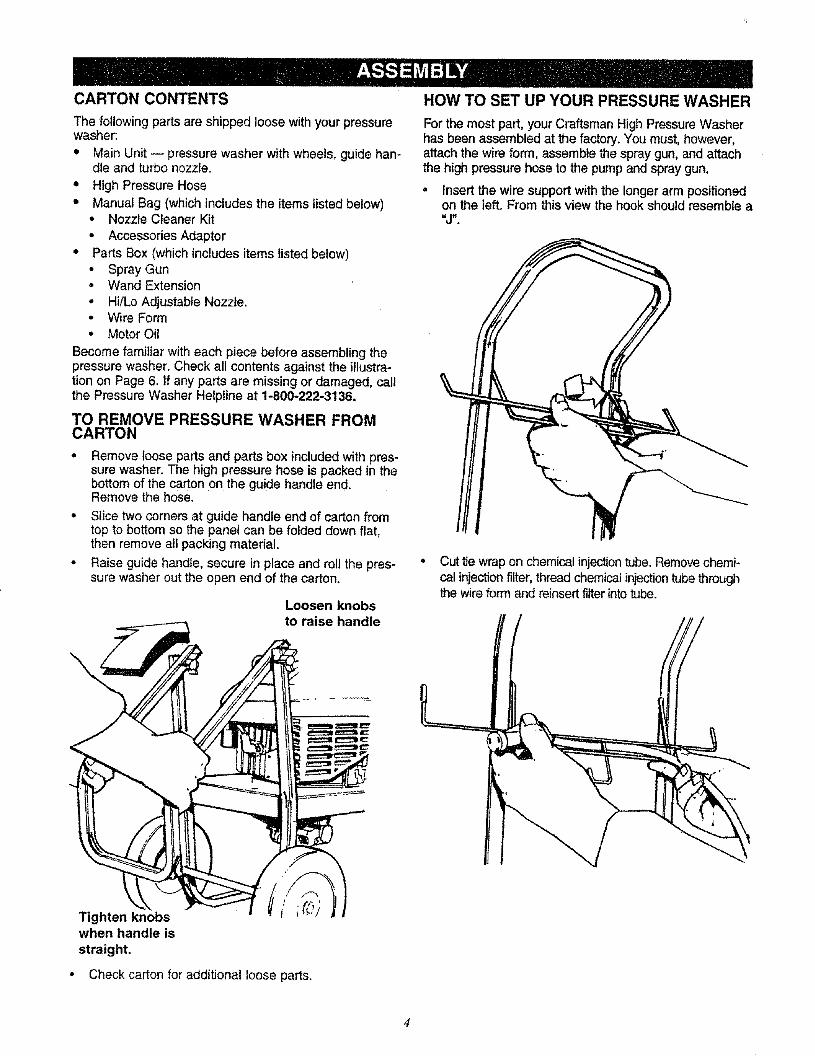
HOW TO SET UP YOUR PRESSURE WASHER
For the most part, your Craftsman High Pressure Washerhas been assembled at the factory. You must, however,attach the wire form, assemble the spray gun, and attachthe high pressure hose to the pump and spray gun,
• Insert the wire support with the longer arm positionedon the left. From this view the hook should resemble a_J_
• Cut Ue wrap on chemical injec_on tube. Remove chemi-cal injection filter, thread chemical injection tube throughthe wire form and reinsert filter into tube.
Tighten knobswhen handle isstraight,
° Check carton for additional loose parts.

Cutthetiewrapsonthehighpressurehoseandconnecthighpressurehosetogun.Tightenbyhand.
= Placeassembledspraygunonholder.
- Removeplasticcapandconnecthighpressurehosetopump.Tightenbyhand.
o
o
Screw nozzle to nozzle extension.
Connect nozzle extension to spray gun.
CHECKLIST
Before you operate your new high pressure washer,to be sure you receive the best performance and sat-isfaction from this quality product, please review thefollowing checklist:
• Al! assembly instructions have been completed.
• The high pressure hose connections to the spraygun and to the pump are tight and secure.
While learning how to use your high pressurewasher, pay extra attention to the following importantitems:
o
o
Engine oil is at proper levet
Be sure gas tank is filled properly with clean,fresh, unleaded gasoline.
Become familiar with all controls - their locationand function. Operate those controls before start-ing the engine.
,ik CAUTION: Any attempt to crank orstart the engine before it has beenproperly serviced with the recommend-ed oil may result in an engine failure.See Page 8 for instructions on addingoil and proper oil specifications,
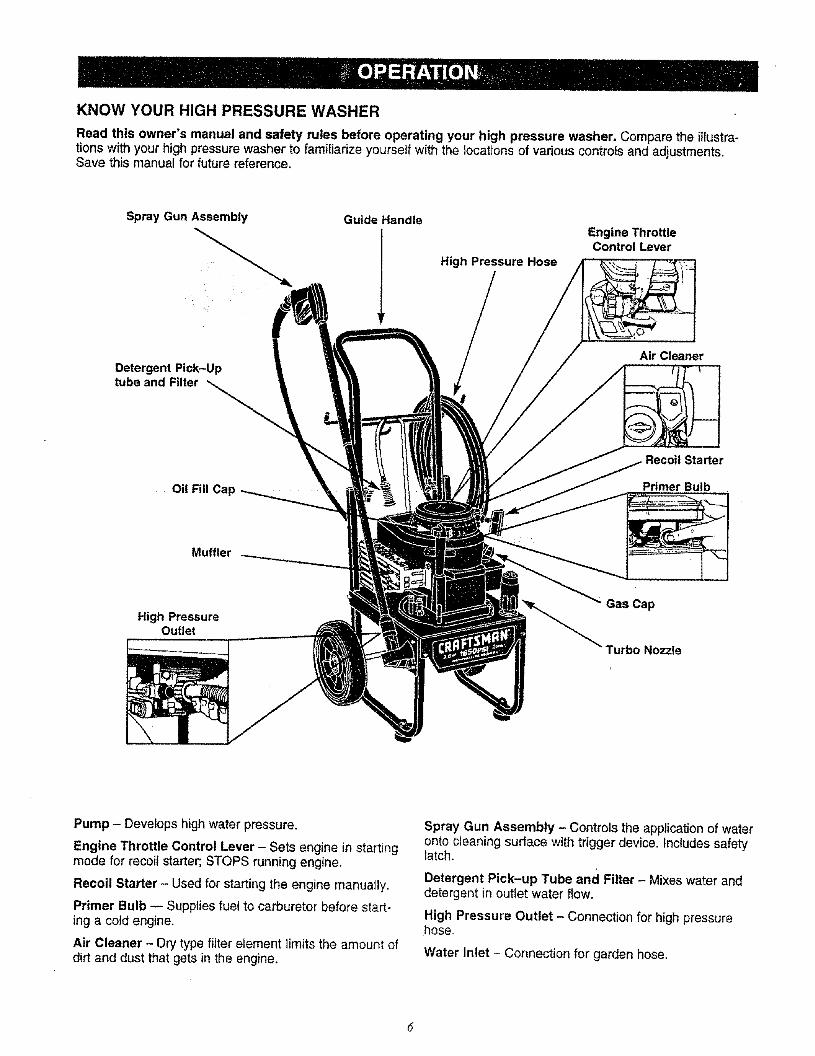
KNOW YOUR HIGH PRESSURE WASHER
Read this owner's manual and safety rules before operating your high pressure washer. Compare the iltustra-tions with your high pressurewasher to familiarize yourself with the locations of various controls and adjustments.Save this manual for future reference.
Spray Gun Assembly Guide Handle
High Pressure Hose
Engine ThrottleControl Lever
Detergent Pick-Up
tubeand Filter _
Oil Fill Cap ........
Muffler
High PressureOutlet
Air Cleaner
Primer Bulb
Gas Cap
Turbo Nozzle
Pump - Develops high water pressure.
Engine Throttle Control Lever - Sets engine in startingmode for recoil starter; STOPS running engine.
Recoil Starter - Used for starting the engine manually.
Primer Bulb -- Supplies fuel to carburetor before start-ing a cold engine.
Air Cleaner - Dry type filter element limits the amount ofdirt and dust that gets in the engine.
Spray Gun Assembly - Controls the applicationof wateronto cleaning surface with trigger device, includes safetylatch.
Detergent Pick-up Tube and Filter - Mixes water anddetergent in outlet water flow.
High Pressure Outlet - Connection for high pressurehose.
Water inlet - Connection for garden hose.
HOW TO USE YOUR PRESSURE WASHER
IF YOU HAVE ANY PROBLEMS operating your pres-sure washer, please call the pressure washer helplineat 1-800-222-3136.
A WARNING NEVER adjust spray patternwhen spraying. NEVER put hands in frontof spray nozzle to adjust spray pattern.You could be injured.
HOW TO USE THE ADJUSTABLE NO_LE
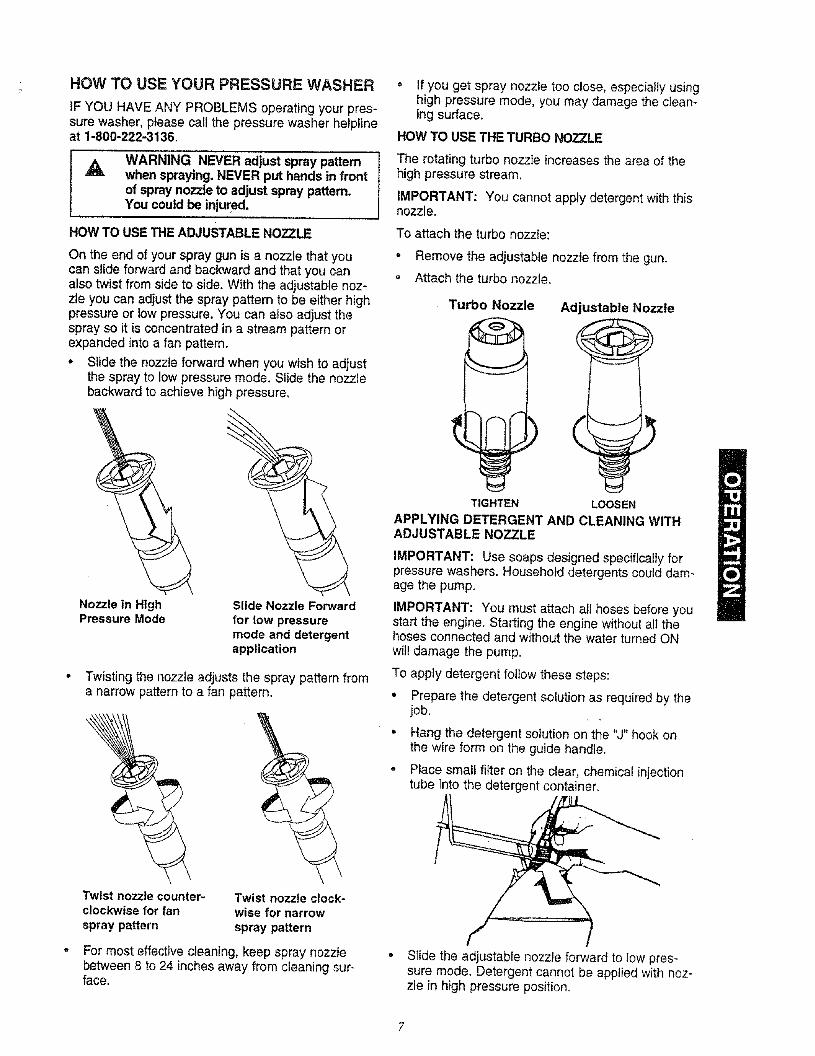
On the end of your spray gun is a nozzle that youcan slide forward and backward and that you canalso twist from side to side. With the adjustable noz-zle you can adjust the spray pattern to be either highpressure or low pressure. You can also adjust thespray so it is concentrated in a stream pattern orexpanded into a fan pattern.
• Slide the nozzle forward when you wish to adjustthe spray to low pressure mode. Slide the nozzlebackward to achieve high pressure.
Nozzle _,nHighPressure Mode
Slide Nozzle Forward
for low pressuremode and detergentapplication
Twisting the nozzte adjusts the spray pattern froma narrow pattern to a fan pattern.
Twist nozzle counter-clockwise for fanspray pattern
Twist nozzle clock-wise for narrow
spray pattern
For most effective cleaning, keep spray nozzleb_tween 8 to 24 inches away from cleaning sur-face.
= if you get spray nozzle too close, especially usinghigh pressure mode, you may damage the clean-ing surface.
HOW TO USE THE TURBO NOZZLE
The rotating turbo nozzte increases the area of thehigh pressure stream.
IMPORTANT: You cannot apply detergent with thisnozzle.
To attach the turbo nozzle:
• Remove the adjustable nozzle from the gun.
= Attach the turbo nozzle.
Turbo Nozzle Adjustable Nozzle
3
TIGHTEN LOOSEN
APPLYING DETERGENT AND CLEANING WITHADJUSTABLE NOZZLE
IMPORTANT: Use soaps designed specifically forpressure washers. Household detergents could dam-age the pump.
IMPORTANT: You must attach all hoses before youstart the engine. Starting the engine without all thehoses connected and without the water turned ONwill damage the pump.
To apply detergent follow these steps:
, Prepare the detergent solution as required by thejob.
• Hang the detergent solution on the "J" hook onthe wire form on the guide handle.
- Place small filter on the clear, chemical injectiontube into the detergent container.
• STidethe adjustable nozzle forward to low pres-sure mode. Detergent cannot be applied with noz-zle in high pressure position.
Note:Thefirststepinvolvesapplying an appropriatedetergent/solvent solution to penetrate and loosen grime.The detergent is applied at low pressure to avoid splash-ing, overspraying and waste. Leave the solution on sur-face for 3 to 5 minutes to allow solution to work.
Note: The second step involves cleaning the surface ,]ouhave prepared with the pressure washer and then rinsingit clean.
_¢ Review the use of the adjustable nozzle on Page 7.
* Connect garden hose to water inlet (see "TO STARTPRESSURE WASHER"), check that high pressurehose is connected to spray gun and pump (seeASSEMBLY), and start engine.
. For cleaning, start at lower portion of area to bewashed and work upward, using long, even overlap-ping strokes.
• Allow the detergent to soak in between 3-5 minutesbefore washing and rinsing.
RINSING WITH THE PRESSURE WASHER
o
Hook up the water supply and start your pressure
WARNING Be extremely careful if you mustuse the pressure washer from ladder, scaf-folding or any other relatively unstable loca-tion. Pressure in a running washer builds inthe wand as you climb. When you press thetrigger, the recoil from the initial spray couldforce you to fall, or if you are too close to thecleaning surface, high pressure could forceyou off a climbing apparatus.
washer (see TO START THE PRESSURE WASHER).
Slide adjustable nozzle rearward to high pressureposition and wait for detergent to clear. Detergent willnot flow when in the high pressure mode.
° When detergent has cleared you may want to expandthe spray pattern for a more gentle rinsing action.Start at top of area to be rinsed, working down withsame action as for cleaning.
You can also stop detergent from flowing by simplyremoving siphon from bottle,
HOW TO STOP YOUR PRESSURE WASHER
First, move the engine Throttle Control Lever to STOPposition.
Simply shutting OFF the engine wilt not release pres-sure in the system. Squeeze trigger on the spray gunto relieve pressure in the hose.
Note: A small amount of water will squirt out when yourelease the pressure.
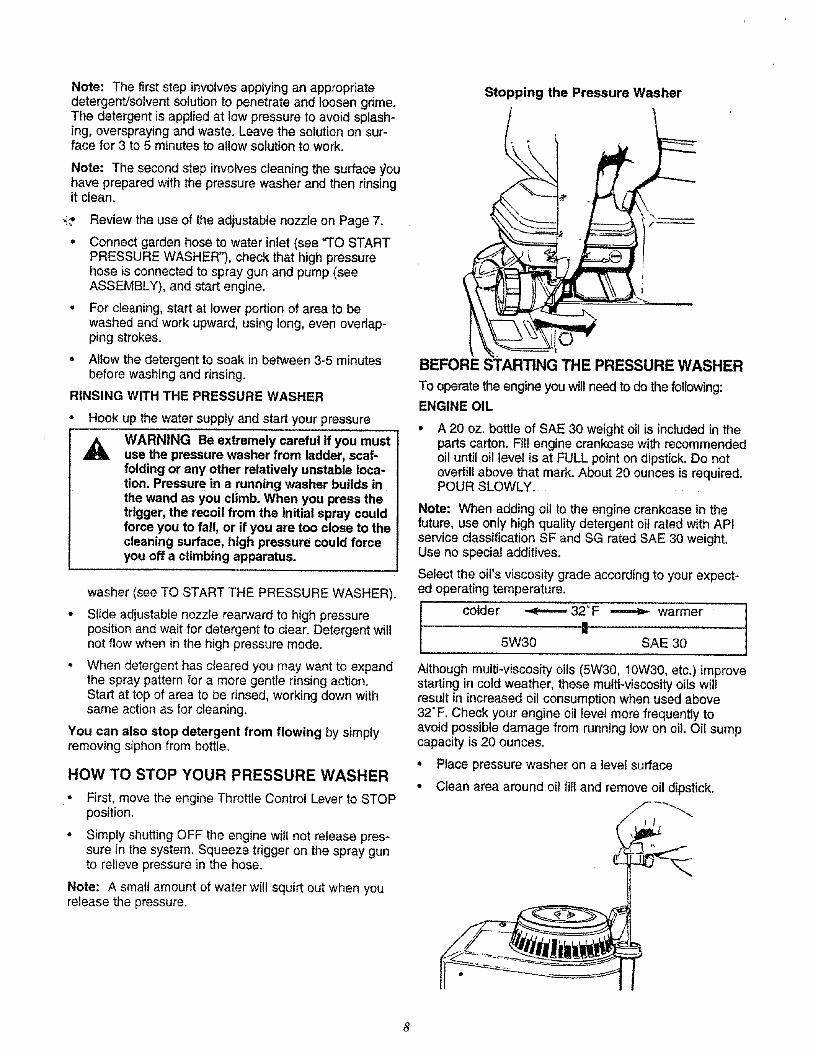
Stopping the Pressure Washer
BEFORE STARTING THE PRESSURE WASHER
To operate the engine youwillneed to do the following:ENGINE OIL
A 20 oz. bottle of SAE 30 weight oil is includedin theparts carton. Fil! engine crankcase with recommendedoil until oil level is at FULL point on dipstick. Do notoverfill above that mark. About 20 ounces is required.POUR SLOWLY .....
Note: When adding oil to the engine crankcase in thefuture, use only high quality detergent oil rated with APIservice classification SF and SG rated SAE 30 weight.Use no special additives.
Select the oil's viscosity grade according to your expect-ed operating temperature.
colder _ 32°F _ warmer!
5W30 SAE 30
Although multi-viscosity oils (5W30, 10W30, etc.) improvestarting in cold weather, these multi-viscosity oils willresult in increased oil consumption when used above32" F. Check your engine oil level more frequently toavoid possible damage from running low on oil. Oil sumpcapacity is 20 ounces.
• Place pressure washer on a level surface
• Clean area around oil fill and remove oil dipstick.
@ Wipe dipstick clean.
Pour oil from enclosed bottle into the oil fill openinguntil oil reaches FULL mark on the dipstick. Stop andcheck the oil level periodically. DO NOT OVERFILL.
Install oil dipstick, hand tighten securely.
ADD GASOLINE
WARNING NEVER fill fuel tank indoors.NEVER fill fuel ta'nk when engine is runningor hot. DO NOT light a cigarette or smokewhen filling the fuel tank.
_1_ AUTION: Do not overfill the fuel tank.Always leave room for expansion.
Use regular UNLEADED gasoline withthe pressurewasher engine. Regular leaded gasoline may also beused if UNLEADED is not availabte. Fuel tank capacityis 1 U.S. quart.
IMPORTANT: It is important to prevent gum depositsfrom forming in essential fuel system parts such as thecarburetor, fuel filter, fuel hose or tank during storage.Also, experience indicates that alcohol-blended fuels(called gasohot, ethanol or methanol) can attract moisturewhich leads to separation and formation of acids duringstorage. Acidic gas can damage the fuel system of anengine while in storage. To avoid engine problems, thefuel system should be emptied before storage of 30 daysor longer. See "Storage" on page 14. Never use engine orcarburetor cleaner products in the fuel tank or permanentdamage may occur.
• Clean area around fuel fill cap, remove cap.
• Add "UNLEADED" regutar gasoline, slowly, to fueltank.
• Install fuel cap and wipe up any spilled gasoline.
TO START YOUR PRESSURE WASHER
You have assembled your high pressure washer andhave prepared the engine for starting, You are now readyto clean your car, boat or the outside of a building orwhatever you plan to clean.
o
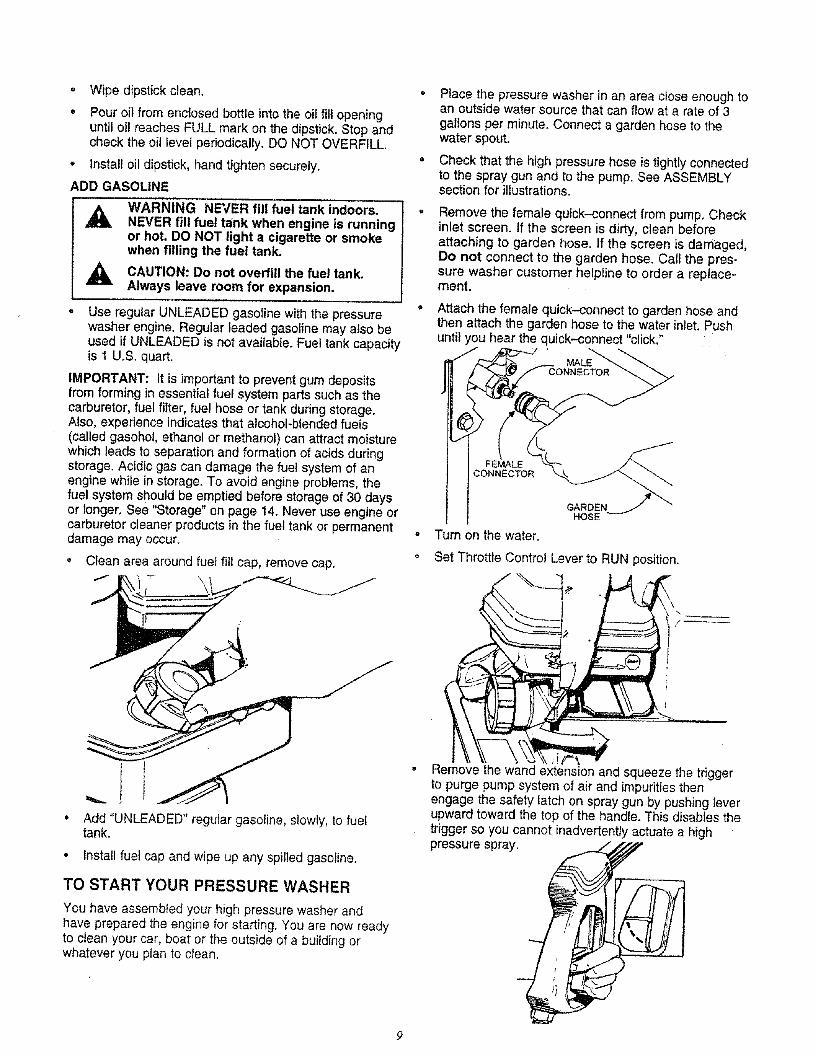
Place the pressure washer in an area close enough toan outside water source that can flow at a rate of 3gallons per minute. Connect a garden hose to thewater spout.
Check that the high pressure hose is tightlyconnectedto the spray gun and to the pump. See ASSEMBLYsection for illustrations.
Remove the female quick-connect from pump. Checkinlet screen. If the screen is dirty, clean beforeattaching to garden hose. If the screen is damaged,Do not connect to the garden hose. Call the pres*sure washer customer helpline to order a replace-ment.
Attach the female quick-connect to garden hose andthen attach the garden hose to the water inlet. Pushuntil you hear the quick-connect "click,"
MALE _.
CONNECTOR
GARDENHOSE_
Turn on the water.
Set Throttle Control Lever to RUN position.
Remove the wand extension and squeeze the triggerto purge pump system of air and impurities thenengage the safety latch on spray gun by pushing leverupward toward the top of the handle. This disables thetrigger so you cannot inadvertently actuate a high
pressure spray, z_
• Reconnectthewand extension.
Note: After reconnecting the wand extension, you mayneed squeeze trigger again on pressure washer wand torelieve the air pressure caused by water inlet supply.Water will spew out of the gun in a thin stream. This willmake it easier to pull start the engine.
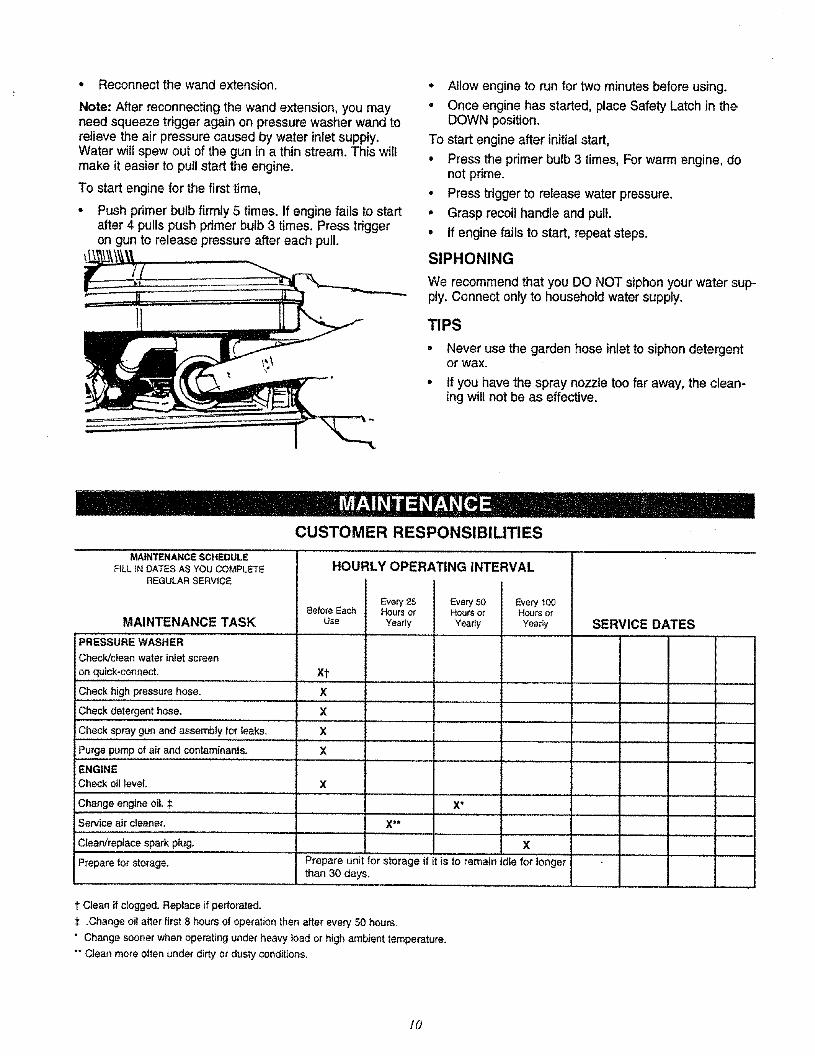
To start engine for the first time,
• Push primer bulb firmty 5 times. If engine fails to startafter 4 pulls push primer bulb 3 times. Press triggeron gun to release pressure after each pull.
• Allow engine to run for two minutes before using.
° Once engine has started, place Safety Latch in theDOWN position.
To start engine after initial start,
• Press the primer bulb 3 times, For warm engine, donot prime.
• Press trigger to release water pressure.
° Grasp recoil handle and pull.
, If engine fails to start, repeat steps.
SIPHONING
We recommend that you DO NOT siphon your water sup-ply. Connect only to household water supply.
TIPS
• Never use the garden hose inlet to siphon detergentor wax.
• tf you have the spray nozzle too far away, the clean-ing will not be as effective.
MAINTENANCE SCHEDULE
F1LLIN DATES AS YOU COMPLETEREGULAR SERVICE
MAINTENANCE TASK
PRESSURE WASHER
Check'clean water inlet screen
on quick-connect.
Check high pressure hose...... ,,, , ,
Check detergent hose.
CUSTOMER RESPONSIBILITIES
HOURLY OPERATING INTERVAL
Beiore EachUse
xfx
x
Check spray gun and assembly for ieaks, X
Purge pump of air and contam{nants, X
ENGINECheck oil level X
Change engine oil $
Service air cleaner.
Clean/replace spark ptug.
Every 25 IHours or
Yearly
Every 50Hours or
Yearly I Every t00Hours or
Yearly SERVICE DATES
,, ,,,,, ,,_
.............. ,,,,,,, ....
........... ,,,,,,, ,,,,,,
""' '"=" .............. ,w,, ,, ,, , i
X",,,, ,,, ,,,, ,
X**
x
Prepare for storage. Prepare unit for storage if it is to remain idle for longerthan 30 days.
1"Clean if c{ogged, Replace if perforated.
€ .Change oi! after first 8 hours of operation then after every 50 hours.
" Change sooner when operating under heavy load or high ambient temperature.
"" Clean more often under dirty or dusty conditions.
/0
GENERAL RECOMMENDATIONS
The warranty of the high pressure washer does notcover items that have been subjected to operatorabuse or negligence. To receive full value from thewarranty, operator must maintain high pressurewasher as instructedin this manual.
Some adjustments will need to be made periodicallyto properly maintain your high pressure washer.
All adjustments in the Service and Adjustments sec-tion of this manual should be made at least onceeach season.
o Once a year you should clean or replace thespark plug and clean or replace the air filter andcheck the gun and wand assembly for wear. Anew spark plug and clean air filter assure properfuel-air mixture and help your engine run betterand last longer.
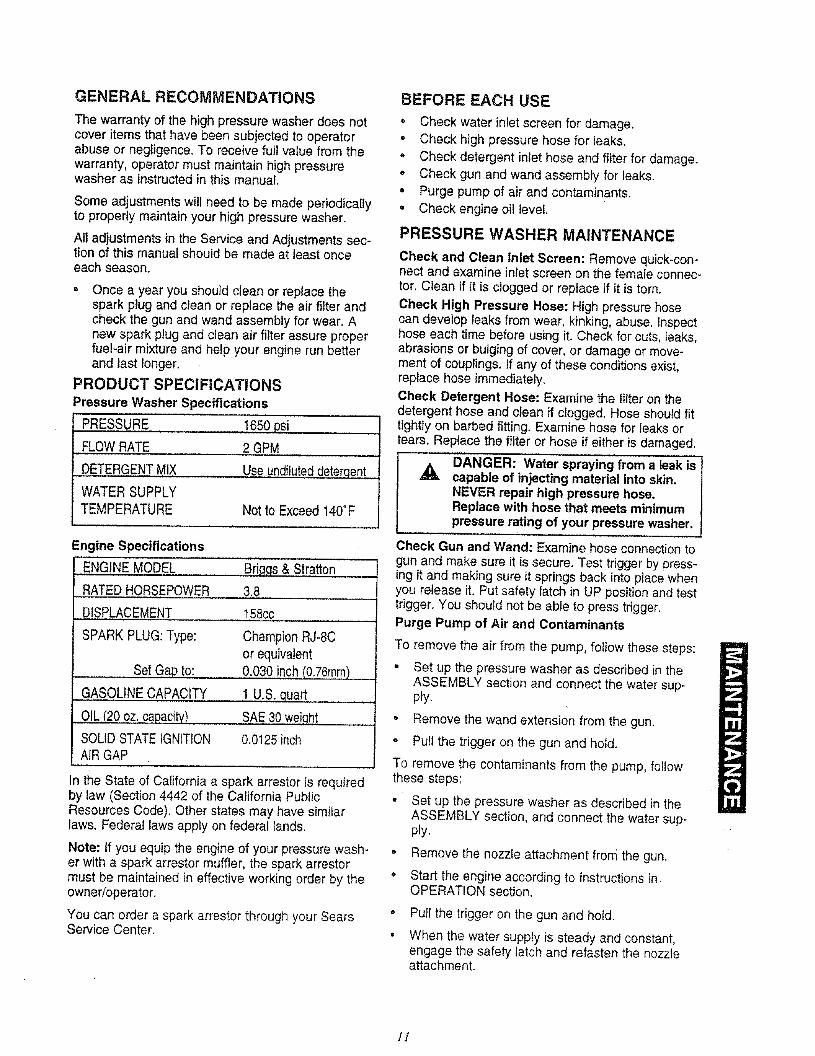
PRODUCT SPECIFICATIONS
Pressure Washer Specifications
PRESSURE 1650 psi
FLOWRATE 2 GPM
DETERGENTMIX Use undiluted deterqent....
WATER SUPPLYTEMPERATURE Not to Exceed 140°F
Engine Specifications
ENGINE MODEL Briq,qs& Stratton
,RATED HORSEPOWER 3.8
DISPLACEMENT t58cc
SPARK PLUG: Type:
Set Gap to:
: GASOLINE CAPACITY[ *"'"', .... ,
. Q!L (20 oz. capacity)
SOLID STATE IGNITIONAIR GAP
Champion RJ-BCor equivalent0,030 inch (0,76turn)
1 U.S. Quart
SAE 30 weight
0.0125 inch
In the State of California a spark arrestor is requiredby law (Section 4442 of the California PublicResources Code). Other states may have similarlaws. Federal laws apply on federal lands.
Note: If you equip the engine of your pressure wash- •er with a spark arrestor muffler, the spark arrestormust be maintained in effective working order by the °owner/operator.
You can order a spark arrestor through your Sears °Service Center. •
BEFORE EACH USE
= Check water inlet screen for damage.- Check high pressure hose for leaks.• Check detergent inlet hose and filter for damage.• Check gun and wand assembly for teaks.• Purge pump of air and contaminants., Check engine oil level.
PRESSURE WASHER MAINTENANCE
Check and Clean Inlet Screen: Remove quick-con*nect and examine inlet screen on the female connec-tor. Clean if it is clogged or replace if it is torn.
Check High Pressure Hose: High pressure hosecan develop leaks from wear, kinking, abuse. Inspecthose each time before using it. Check for cuts, leaks,abrasions or bulging of cover, or damage or move-ment of couplings. If any of these conditions exist,replace hose immediately.
Check Detergent Hose: Examine the filter on thedetergent hose and clean if clogged. Hose should fittightly on barbed fitting. Examine hose for leaks ortears. Replace the filter or hose if either is damaged.
A DANGER: Water spraying from a leak iscapable of injecting material into skin.NEVER repair high pressure hose.Replace with hose that meets minimumpressure rating of your pressure washer.
Check Gun and Wand: Examine hose connection togun and make sure it is secure. Test trigger by press-ing it and making sure it springs back into place whenyou release it. Put safety latch in UP position and testtrigger. You should not be able to press trigger.
Purge Pump of Air and Contaminants
To remove the air from the pump, follow these steps:
= Set up the pressure washer as described in theASSEMBLY section and connect the water sup-ply.
- Remove the wand extension from the gun.
- Pull the trigger on the gun and hold.
To remove the contaminants from the pump, followthese steps:
° Set up the pressure washer as described in theASSEMBLY section, and connect the water sup-ply.
Remove the nozzle attachment from the gun.
Start the engine according to instructions inOPERATION section.
Pull the trigger on the gun and hold.
When the water supply is steady and constant,engage the safety latch and refasten the nozzleattachment.
11
ENGINE MAINTENANCE
CAUTION: Disconnect spark plug wire ]from spark plug and keep wire away from ispark plug.
CHECKING OIL LEVEL
Oil level should be checked prior to each use or at leastevery 5 hours of operation. Keep oil level maintained.
CHANGING ENGINE OIL
Change oil after first 8 hours of operation. Change oilevery 50 hours thereafter. If you are using your pressurewasher under extremely dirty or dusty conditions, or inextremely hot weather, change oil more often.
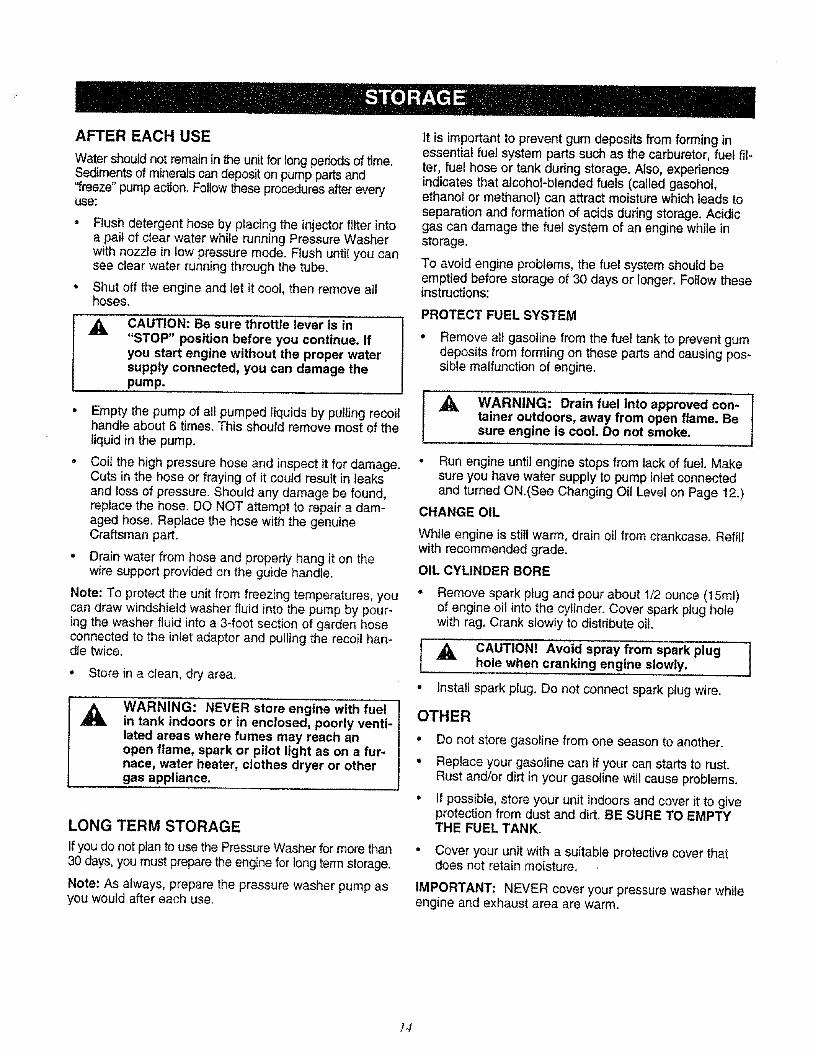
° Change oil while engine is still warm from running, asfollows:
° Before you tip the pressure washer to drain oil, drainfuel tank by running pressure washer until fuel tank isempty.
* Clean area around oil fill, remove oil fill cap/dipstick.Wipe dipstick clean.
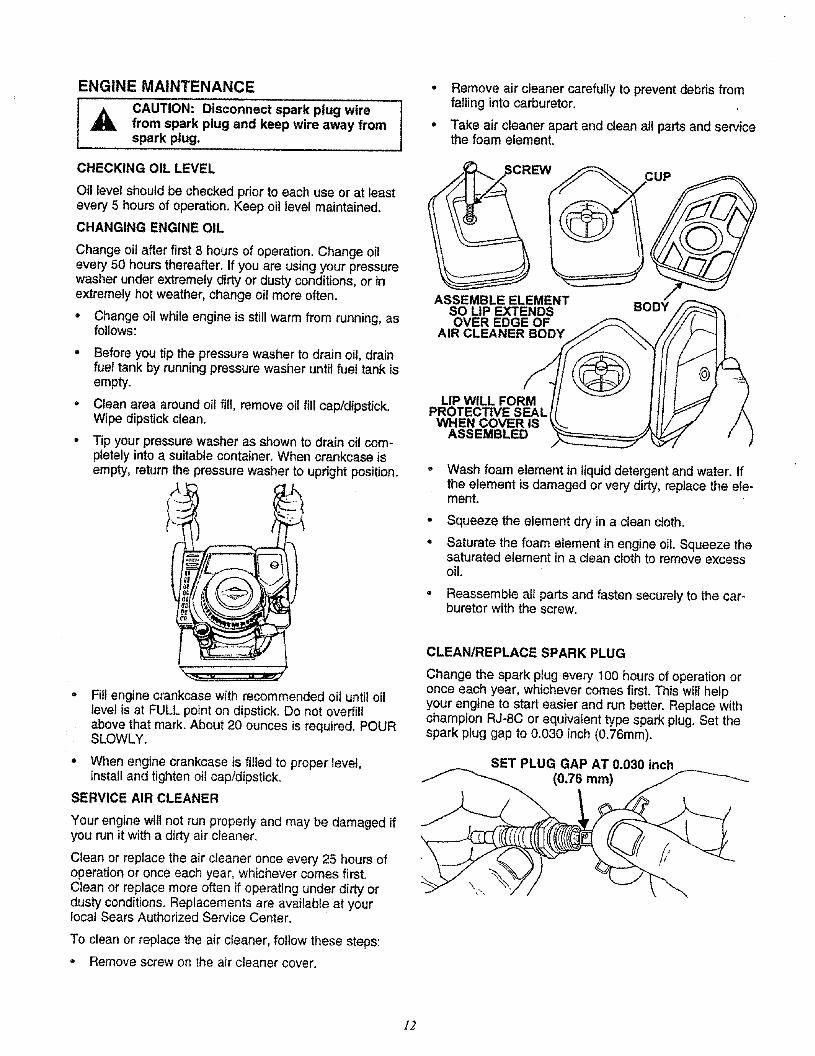
• Tip your pressure washer as shown to drain oil com-pletely into a suitable container. When crankcase isempty, return the pressure washer to upright position.
o Remove air cleaner carefully to prevent debris fromfalling into carburetor.
Take air cleaner apart and clean all parts and servicethe foam element.
_SCRE _W Ci
ASSEMBLE ELEMENTSO LIP EXTENDS BODYOVER EDGE OF
AIR CLEANER BODY
LIP WILL FORMPROTECTIVE SEAL
WHEN COVER ISASSEMBLED
Q
Wash foam element in liquid detergent and water. Ifthe element is damaged or very dirty, replace the ele-ment.
Squeeze the element dry in a clean cloth,
Saturate the foam element in engine oil. Squeeze thesaturated element in a cJean cloth to remove excessoil.
Reassemble atl parts and fasten securely to the car*buretor with the screw.
Fill engine crankcase with recommended oil until oillevel is at FULL point on dipstick. Do not overfillabove that mark. About 20 ounces is required. POURSLOWLY.
• When engine crankcase is filled to proper level,install and tighten oil cap/dipstick.
SERVICE AIR CLEANER
Your engine will not run propedy and may be damaged ifyou run it with a dirty air cleaner.
Clean or replace the air cleaner once every 25 hours ofoperation or once each year, whichever comes first.Clean or replace more often if operating under dirty ordusty conditions. Replacements are available at yourlocal Sears Authorized Service Center.
To clean or replace the air cleaner, follow these steps:
• Remove screw on the air cleaner cover.
CLEAN/REPLACE SPARK PLUG
Change the spark plug every 100 hours of operation oronce each year, whichever comes first. This will he_pyour engine to start easier and run better. Replace withchampion RJ-8C or equiva{ent type spark plug. Set thespark plug gap to 0.030 inch (0.76mm).
SET PLUG GAP AT 0.030 inch(0.76 mm)
12
CARBURETOR
If you think your carburetor needs adjusting, see yournearest Sears Service dealer. Engine performance maybe affected above 4,000 feet in altitude. To improveengine performance, see your nearest Sears Servicedealer.
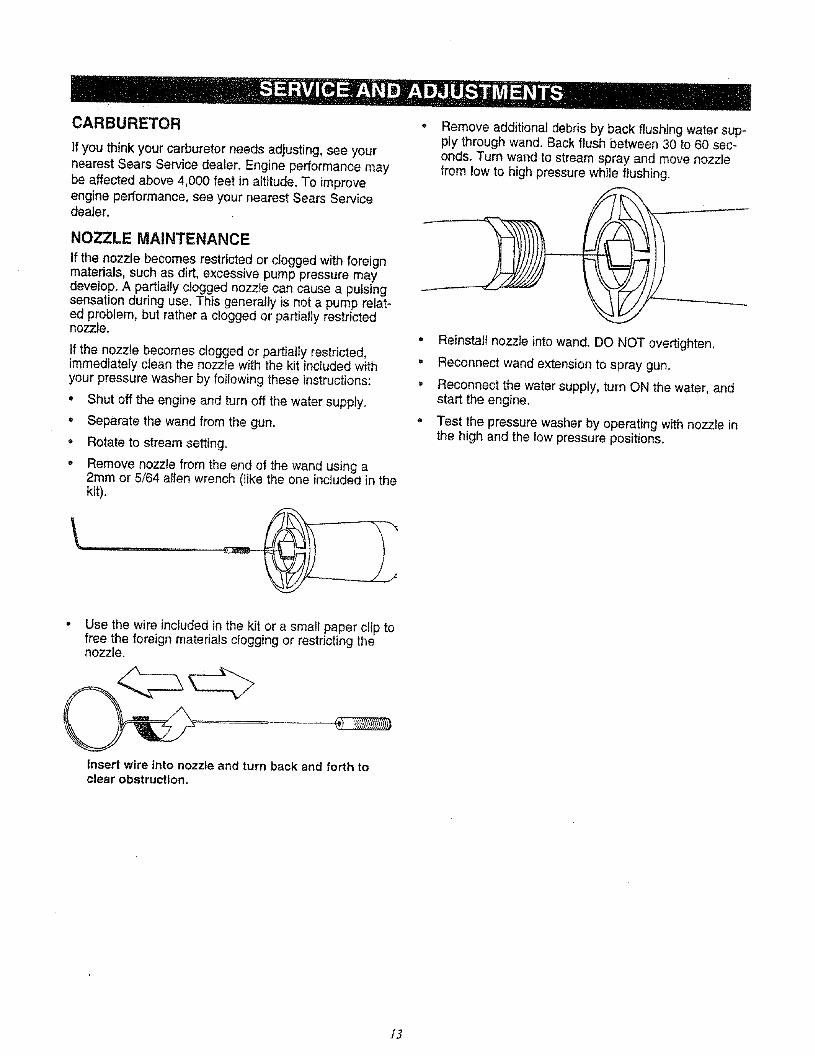
NOZZLE MAINTENANCE
If the nozzle becomes restrictedor clogged with foreignmaterials, such as dirt, excessive pump pressure maydevelop. A partially clogged nozzle can cause a pulsingsensation during use. This generally is not a pump relat*ed problem, but rather a clogged or partially restrictednozzle.
If the nozzle becomes clogged or partially restricted,immediate{y clean the nozzle with the kit includedwithyour pressure washer by following these instructions:
• Shut off the engine and turn off the water supply.
• Separate the wand from the gun.
• Rotate to stream setting.
o Remove nozzle from the end of the wand using a2ram or 5/64 allen wrench 0ike the one included in thekit).
Remove additional debris by back flushing water sup-ply through wand. Back flush between 30 to 60 sec-onds. Turn wand to stream spray and move nozzlefrom low to high pressure while flushing.
, Reinstall nozzle into wand. DO NOT overtighten,
= Reconnect wand extension to spray gun.
, Reconnect the water supply, turn ON the water, andstart the engine.
• Test the pressure washer by operating with nozzle inthe high and the low pressure positions.
• Use the wire included in the kit or a small paper clip tofree the foreign materials clogging or restricting thenozzle.
Insert wire into nozzle and turn back and forth toclear obstruction.
]3
AFTER EACH USE
Water should not remain in _e unit for longperiods of time.Sediments of minerafs can deposit on pump parts and"freeze" pump action. Follow _ese procedures after everyuse:
• Flush detergent hose by placing the injectorfilter intoa pail of clear water while running Pressure Washerwith nozzle in low pressure mode. Flush until you cansee clear water running through the tube.
• Shut off the engine and let it cool, then remove allhoses.
A CAUTION: Be sure throttle lever is in"STOP" position before you continue. Ifyou start engine without the proper watersupply connected, you can damage thepump.
Empty the pump of all pumped Iiquids by pulling recoilhandle about 6 times. This should remove most of theliquid in the pump.
Coil the high pressure hose and inspect it for damage.Cuts in the hose or fraying of it could result in leaksand loss of pressure, Should any damage be found,replace the hose. DO NOT attempt to repair a dam-aged hose. Replace the hose with the genuineCraftsman part.
• Drain water from hose and properly hang it on thewire support provided on the guide handle.
Note: To protect the unit from freezing temperatures, youcan draw windshield washer fluid into the pump by pour-ing the washer fluid into a 3-foot section of garden hoseconnected to the inlet adaptor and pulling the recoil han-dle twice.
° Store in a clean, dry area.
WARNING: NEVER store engine with fuel !in tank indoors or in enclosed, poorly venti- }lated areas where fumes may reach an Iopen flame, spark or pilot light as on a fur- Inace, water heater, clothes dryer or other Igas appliance. I
LONG TERM STORAGE
If you do not plan to use the Pressure Washer for more than30 days, you must prepare the engine for tong term storage.
Note: As always, prepare the pressure washer pump asyou would after each use_
]t is important to prevent gum deposits from forming inessential fue! system parts such as the carburetor, fuel fil-ter, fuel hose or tank during storage. Also, experienceindicates that alcohol-blended fuels (called gasohot,ethanol or methanol) can attract moisture which leads toseparation and formation of acids during storage. Acidicgas can damage the fuel system of an engine while instorage.
To avoid engine problems, the fuel system should beemptied before storage of 30 days or longer. Follow theseinstructions:
PROTECT FUEL SYSTEM
• Remove all gasoline from the fuel tank to prevent gumdeposits from forming on these parts and causing pos=sible malfunction of engine,
a WARNING: Drain fuel into approved con-tainer outdoors, away from open flame. Besure engine is cool. Do not smoke.
• Run engine until engine stops from lack of fuel. Makesure you have water supply to pump inlet connectedand turned ON.(See Changing Oil Level on Page 12.)
CHANGE OIL
While engine is still warm, drain oil from crankcase. Refiltwith recommended grade.
OIL CYLINDER BORE
• Remove spark plug and pour about I/2 ounce (15ml)of engine oil into the cylinder. Cover spark plug holewith rag. Crank slowly to distribute oil.
a CAUTION! Avoid spray from spark plug |hole when cranking engine slowly. J
• Install spark plug. Do not connect spark plug wire,
OTHER
• Do not store gasofine from one season to another.
• Replace your gasoline can if your can starts to rust.Rust and/or dirt in your gasoline will cause problems.
° If possible, store your unit indoors and cover it to giveprotection from dust and dirt. BE SURE TO EMPTYTHE FUEL TANK.
Cover your unit with a suitable protective cover thatdoes not retain moisture.
IMPORTANT: NEVER cover your pressure washer whileengine and exhaust area are warm.
]#

PROBLEM
Pump has following problems:
failure to produce pressure, erratic
pressure, chattering, loss of
pressure, low water volume.
"k
CAUSE
Nozzle in low pressure mode,
2. Water inlet is blocked.
3. Inadequate water supply
4. Inlet hose is kinked or leaking
5. Clogged inlet hose strainer.
6. Water supply is over 140'F.
7. Outlet hose is blocked.
CORRECTION
t. Putl nozzle backward for high
pressure mode.
2. Clear inlet
3. Provide adequate water flow_
4. Straighten inlet hose, patch leak.
5. Check / clean inlet hose strainer.
6. Provide cooler water suppiy.7. Clear blocks in outlet hose.
8. Outlet hose leaks.
9. Gun leaks.
10. Nozzle is obstructed.
11. Pump is faulty.
8. Replace outlet hose if leaking.
9. Replace gun.10. Clear nozzle.
11. Contact Sears Service Department.
Detergent fails to mix with.spray.
Engine runs good at no-foad
but "bogs down" when toad isadded
Enginewillnot start;or startsand runs rough
Engine shuts down during
operation
Engine lacks power.
1. Detergent line is not submerged.
2. Chemical filter is clogged.
3. Nozzte is in high pressure mode.
Engine speed _stoo slow.
1. Dirty air cleaner
2. Out of gasoline.
3. Stale gasoline.
4. Spark plug wire not connected
to spark ptug
5. Bad spark plug.
6. Water in gasoline.
7. Overchoking.
8. Excessively rich fuet mixture.
9. Intake valve stuck open or closed.
10. Engine has lost compression.
1. Out of gasoline.
1. Insert chemical tine into detergent.
2. Clean or replace filter/detergentline.
3. Push nozzleforwardfor
low pressure mode.
Contact Sears Service Department.
t. Clean or replace air cleaner.
2. FIll fuel tank.
3. Drain gas tank; fil! with fresh fuel.
4. Connect wire to spark ptug.
5. Replace spark plug.
6. Drain gas tank; filf with fresh fuel.
7. Set engine throttle control lever to
fast position.
8. Contact Sears Service Department.
9. Contact Sears Service Department.
I0. Contact Sears Service Department.
1. FIII fuel tank.
Dirty air filter. Replace air fitter.
15
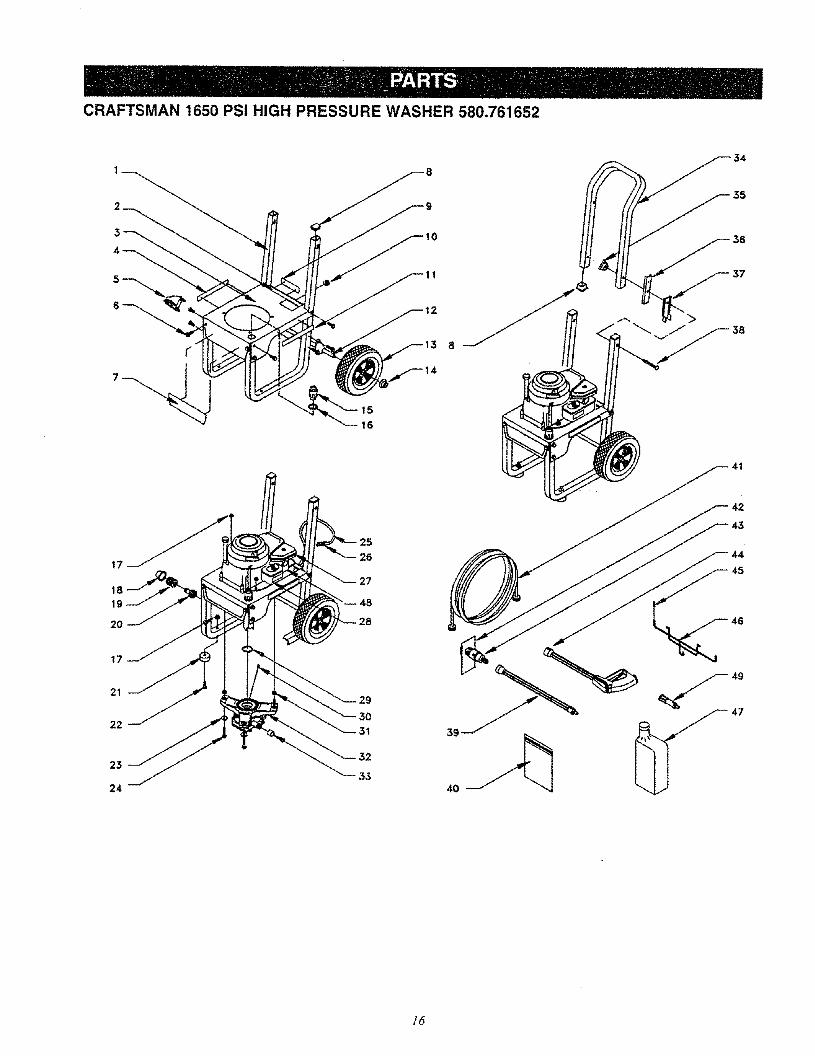
CRAFTSMAN 1650 PSI HIGH PRESSURE WASHER 580,761652
5
15
16
41
17
18
19
20
17
21
22
23
24
31
33
42
43
44
49
47
/d
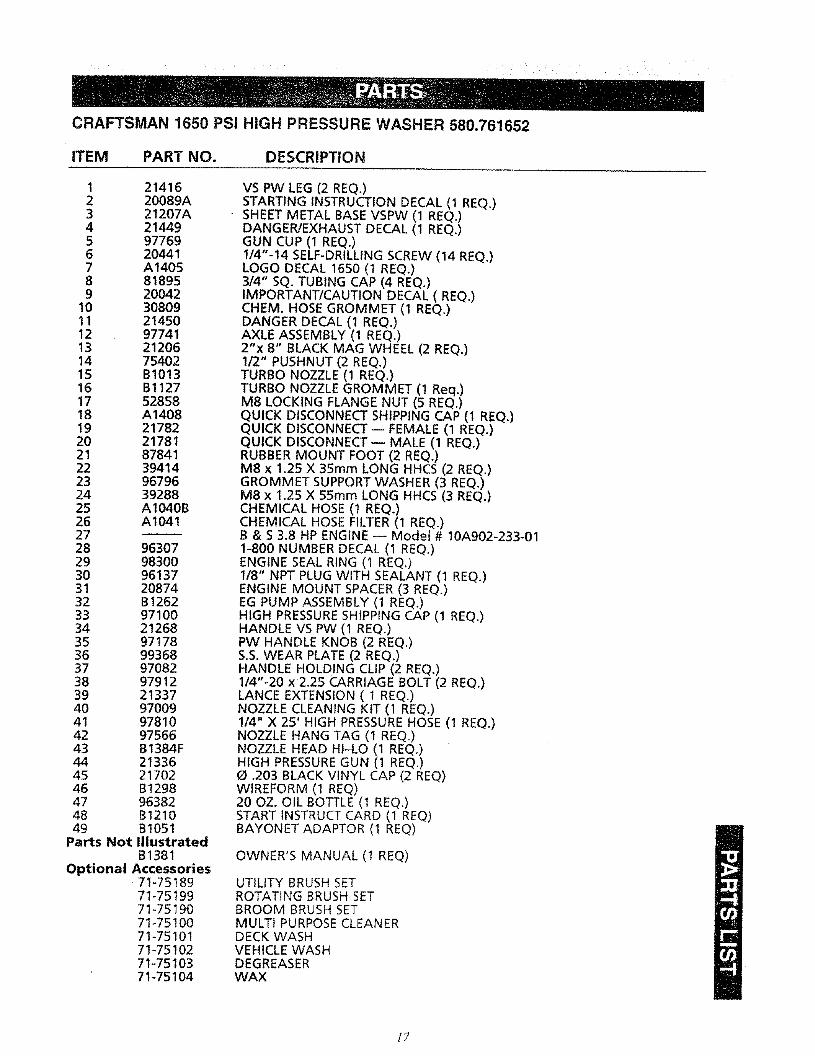
CRAFTSMAN 1650 PS1 HIGH PRESSURE WASHER 580,761652
iTEM PART NO. DESCRIPTION
123456789
10111213141516171819202t22232425262728293031323334353637383940414243444546474849
Parts Not
Optional
2141620089A21207A214499776920441A140581895200423080921450977412120675402BI013B112752858A1408217822178187841394149679639288A1040BA1041
96307983009613720874B126297100212689717899368970829791221337970099781097566B1384F2133621702B129896382B1210BI051IllustratedB1381
Accessories71-7518971-751997!-75t9071-7510071-7510171-751027!-7510371-75104
VS PW LEG (2 REQ,)STARTING INSTRUCTION DECAL (I REQ,)SHEET METAL BASE VSPW (I REQ,)DANGER!EXHAUST DECAL (I REQ.)GUN CUP (I REQ.)114"-14 SELF-DRILLING SCREW (14 REQ.)LOGO DECAL 1650 (I REQ.)314" SQ. TUBING CAP (4 REQ.)IMPORTANT/CAUTION DECAL (REQ,)CHEM, HOSE GROMMET (I REQ,)DANGER DECAL {I REQ.)AXLE ASSEMBLY (I REQ.)2"x 8" BLACK MAC WHEEL (2 REQ.)112" PUSHNUT (2 REQ,)TURBO NOZZLE (I REQ.)TURBO NOZZLE GROMMET (I Req,)M8 LOCKING FLANGE NUT (5 REQ.)QUICK DISCONNECT SHIPPING CAP (I REQ.)QUICK DISCONNECT -- FEMALE (I REQ.)QUICK DISCONNECT w MALE (I REQ.)RUBBER MOUNT FOOT (2 REQ,)M8 x 1.25 X 35ram LONG HHCS (2 REQ.)GROMMET SUPPORT WASHER (3 REQ,)M8 x 1.25 X 55mm LONG HHCS (3 REQ.)CHEMICAL HOSE (I REQ,)CHEMICAL HOSE FILTER (I REQ.)B & S 3.8 HP ENGINE -- Model # IOA902-233-011-800 NUMBER DECAL (I REQ.)ENGINE SEAL RING (I REQ,)I/8" NPT PLUG WITH SEALANT (I REQ,)ENGINE MOUNT SPACER (3 REQ,)EG PUMP ASSEMBLY (I REQ,)HIGH PRESSURESHIPPING CAP (I REQ.)HANDLE VS PW (I REQ,)PW HANDLE KNOB (2 REQ.)S,S.WEAR PLATE (2 REQ.)HANDLE HOLDING CLIP (2 REQ.)I/4"-20 x2.25 CARRIAGE BOLT (2 REQ,)LANCE EXTENSION ( I REQ.)NOZZLE CLEANING KIT (I REQ,)114" X 25' HIGH PRESSUREHOSE (I REQ,)NOZZLE HANG TAG (I REQ.)NOZZLE HEAD HI-LO (I REQ.)HIGH PRESSUREGUN (1 REQ.)O .203 BLACK VINYL CAP (2 REQ)WtREFORM (1 REQ)20 OZ. OIL BOTTLE (1 REQ.)START INSTRUCT CARD (1 REQ)BAYONET ADAPTOR (1 REQ)
OWNER'S MANUAL (! REQ)
UTILITY BRUSH SETROTATING BRUSH SETBROOM BRUSH SETMULTI PURPOSE CLEANERDECK WASHVEHICLE WASHDEGREASERWAX
/7
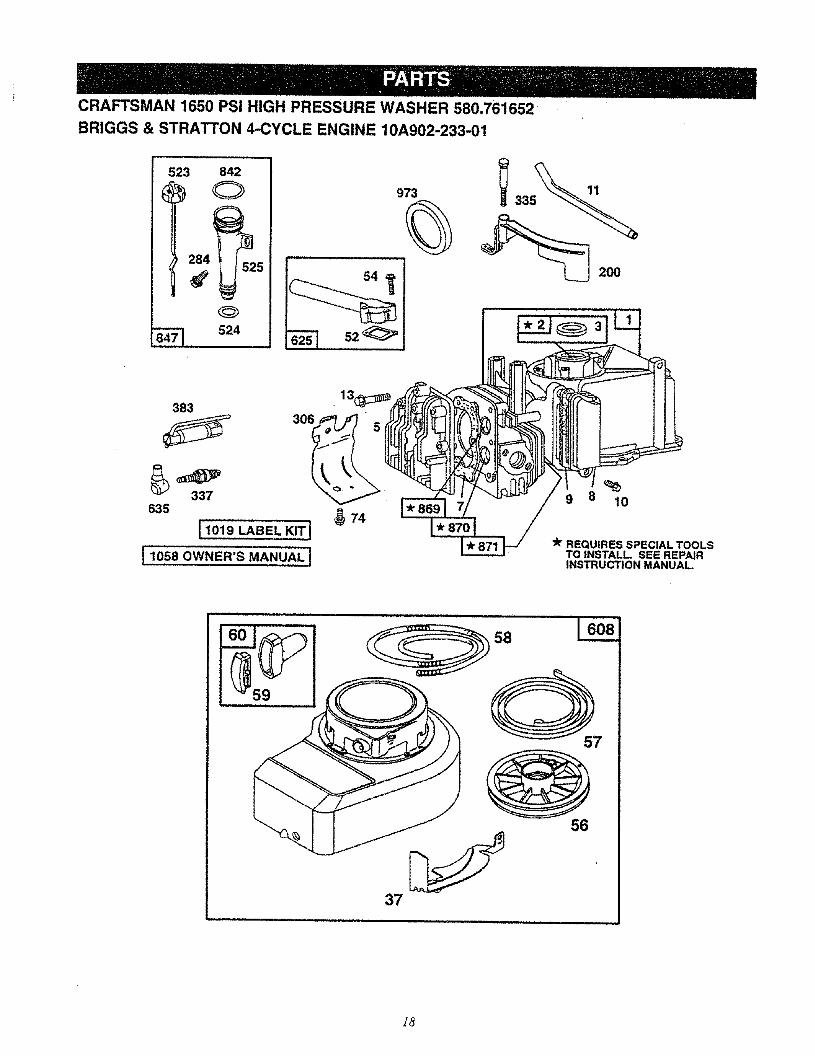
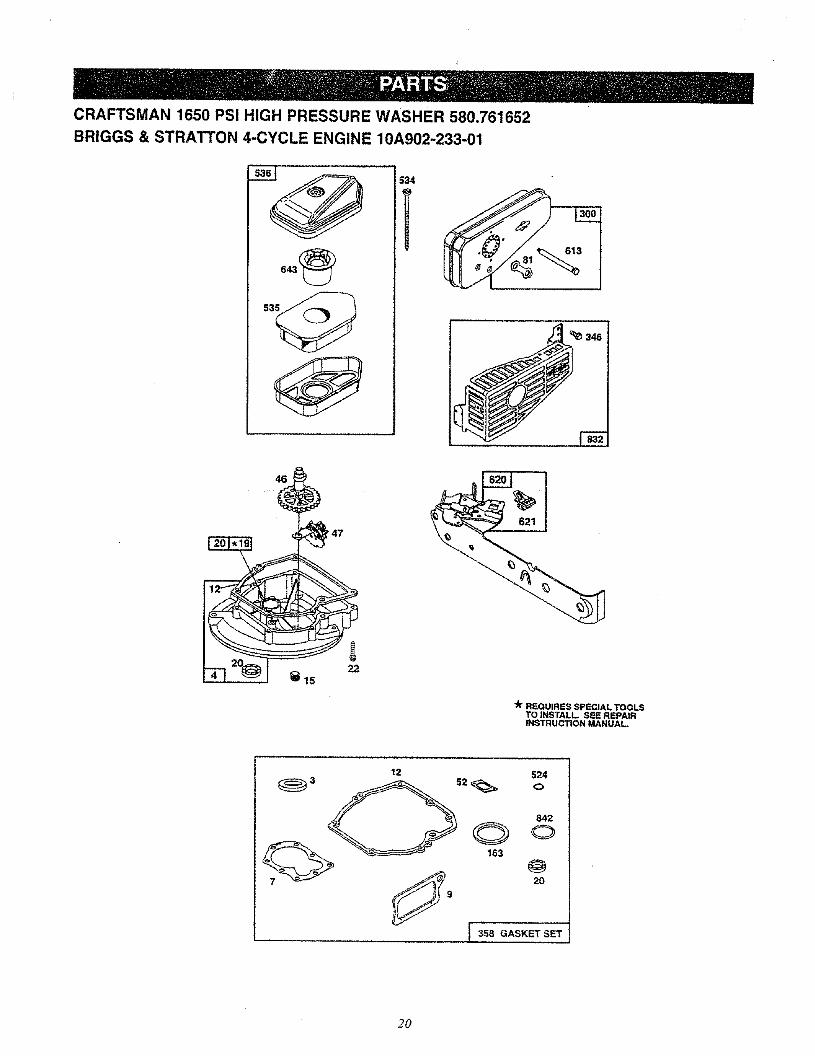
CRAFTSMAN 1650 PSI HIGH PRESSURE WASHER 580.761652
BRIGGS & STRATTON 4-CYCLE ENGINE 10A902-233-01
523 842
284_25_
524
973
383306
337635
i,1019 LABEL KITI
! 1058 OWNER'S MANUAL 1
74
9 8 10
REQUIRES SPECIAL TOOLSTO INSTALL. SEE REPAIRINSTRUCTION MANUAL.
58
59
37
18
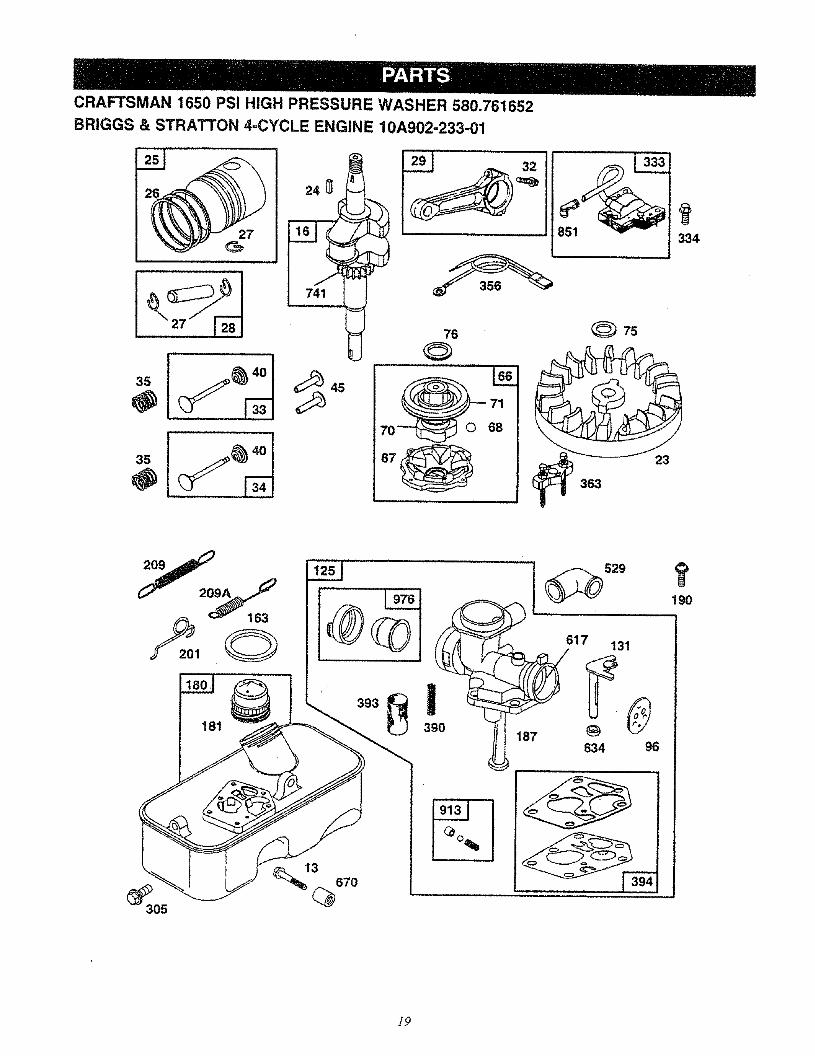
CRAFTSMAN 1650 PSI HIGH PRESSURE WASHER 580.761652
BRIGGS & STRATTON 4=CYCLE ENGINE 10A902-233-01
45
23
363
3_334
o_
393
390
529190
617 131
187634 96
_305
J9
CRAFTSMAN 1650 PSi HIGH PRESSURE WASHER 580.761652
BRIGGS & STRA_ON 4-CYCLE ENGINE 10A902-233-01
46
•47
22
_r REQUIRES SPECIAL TOOLSTO INSTALL SEE REPAIRINSTRUCTION MANUAL.
12 524
_3 _s2_ o842
9 20
|
3_S _ASKE_ * SET
L
20
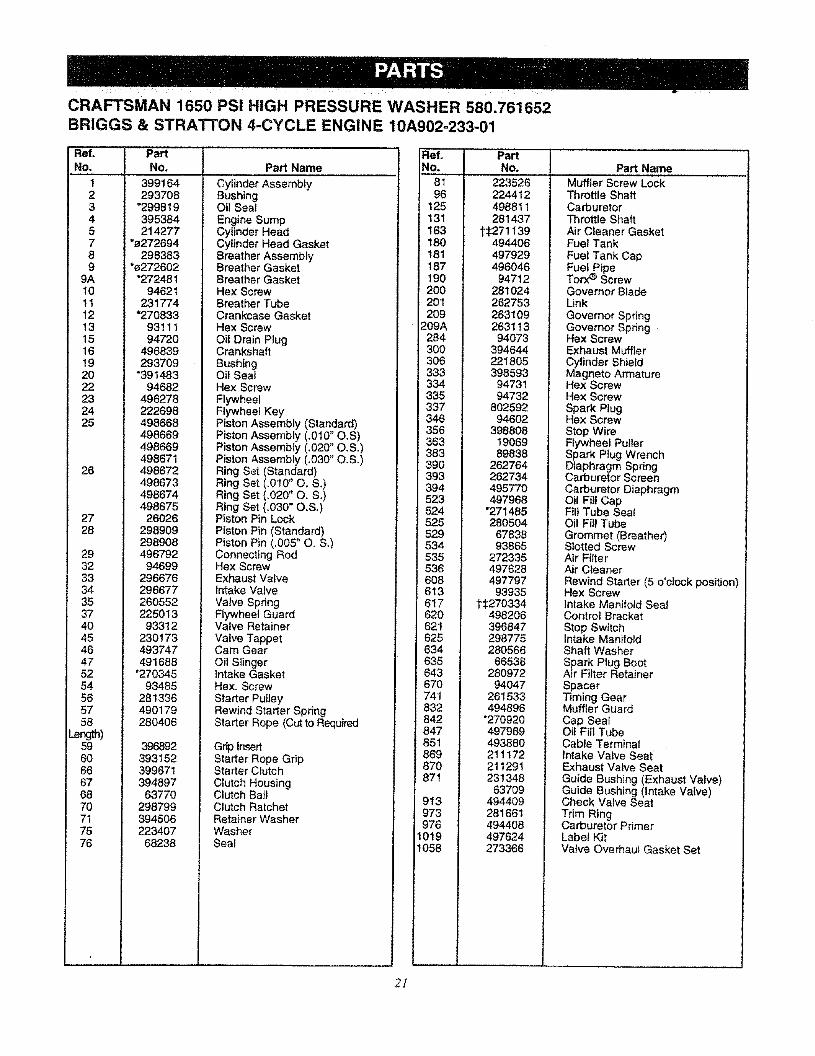
CRAFTSMAN 1650 PSI HiGH PRESSURE WASHER 580.761652
BRIGGS & STRATTON 4-CYCLE ENGINE 10A902-233-01
Ref.No.
12345789
9A101t12131516192022232425
26
2728
2932333435374O4546475254565758
Ler_)596O66676870717576
PartNo,
399164293708
"299819395384214277
*_272694298383
*_272602"272481
94621231774
*2708339311194720
496839293709
"39148394682
496278222698498668498669498669498671498672498673498674498675
26026298909298908496792
94699296676296677260552225013
93312230173493747491688
*27034593485
281336490179280406
396892393152399671394897
63770298799394506223407
68238
Part Name
Cylinder AssemblyBushingOil Seal
Engine SumpCylinder HeadCylinder Head GasketBreather AssemblyBreather GasketBreather GasketHex ScrewBreather TubeCrankcase GasketHex ScrewOil Drain PlugCrankshaftBushingOil SeatHex ScrewFtywheelFlywheel KeyPiston Assembly (Standard)Piston Assembly (.010" O.S)Piston Assembly (,020" O.S.)Piston Assembly (.030" O,S.)Ring Set (Standard)Ring Set (.010" O. S.)Ring Set (.020" O, S.)Ring Set (.030" O.S.)Piston Pin LockPiston Pin (Standard)Piston Pin (,005" O, S.)Connecting RodHex ScrewExhaust ValveIntake Valve
Valve SpdngFtywheet GuardValve RetainerValve TappetCam GearOil SlingerIntake GasketHex. ScrewStarter PulleyRewind Starter SpdngStarter Rope (Cut to Required
Gdp Inser_Starter Rope GripStarter C)utch
Clutch HousingClutch BallClutch RatchetRetainer WasherWasherSeal
Ref. PartNo. No.
8I 22352696 224412
125 498811t31 281437163 t_27!139180 4944O6181 497929187 496046190 94712200 281024201 262753209 263109
209A 263113284 94073300 394644306 221805333 398593334 94731335 94732337 802592346 94602356 398808363 19069383 89838390 262764393 262734394 495770523 497968524 *271485525 280504529 67838534 93865535 272335536 497628608 4977976t3 93935617 t_270334620 498206621 396847625 298775634 280566635 66538543 280972670 94047741 261533832 494896842 "270920847 497969851 493880869 211172870 211291871 231348
63709913 494409973 281661976 494408
1019 497624t058 273366
Part Name
Muffler Screw LockThrottle ShaftCarburetorThrottle ShaftAir Cleaner GasketFuel TankFuel Tank CapFuel PipeTorx _ ScrewGovernor BladeLink
Governor SpringGovernor SpringHex ScrewExhaust MufflerCylinder ShieldMagneto ArmatureHex ScrewHex ScrewSpark PlugHex ScrewStop WireFlywheel PullerSpark Plug WrenchDiaphragm SpringCarburetor ScreenCarburetor DiaphragmOil Fill CapFill Tube SeatOil Fill TubeGrommet (Breather)Slotted ScrewAir FilterAir CleanerRewind Starter (5 o'clock position)Hex ScrewIntake Manifold SealControl BracketStop SwitchIntake Manifo)dShaft WasherSpark Plug BootAir Filter RetainerSpacerTiming GearMuffler GuardCap SealOil Fill TubeCable TerminalIntake Valve Seat'Exhaust Valve SeatGuide Bushing (Exhaust Valve)Guide Bushing (Intake Valve)Check Valve SeatTrim RingCarburetor PrimerLabel KitValve Overhaul Gasket Set
2]
CRAFTSMAN 1650 PSI HIGH PRESSURE WASHER 580.761652
I
I
t6
22
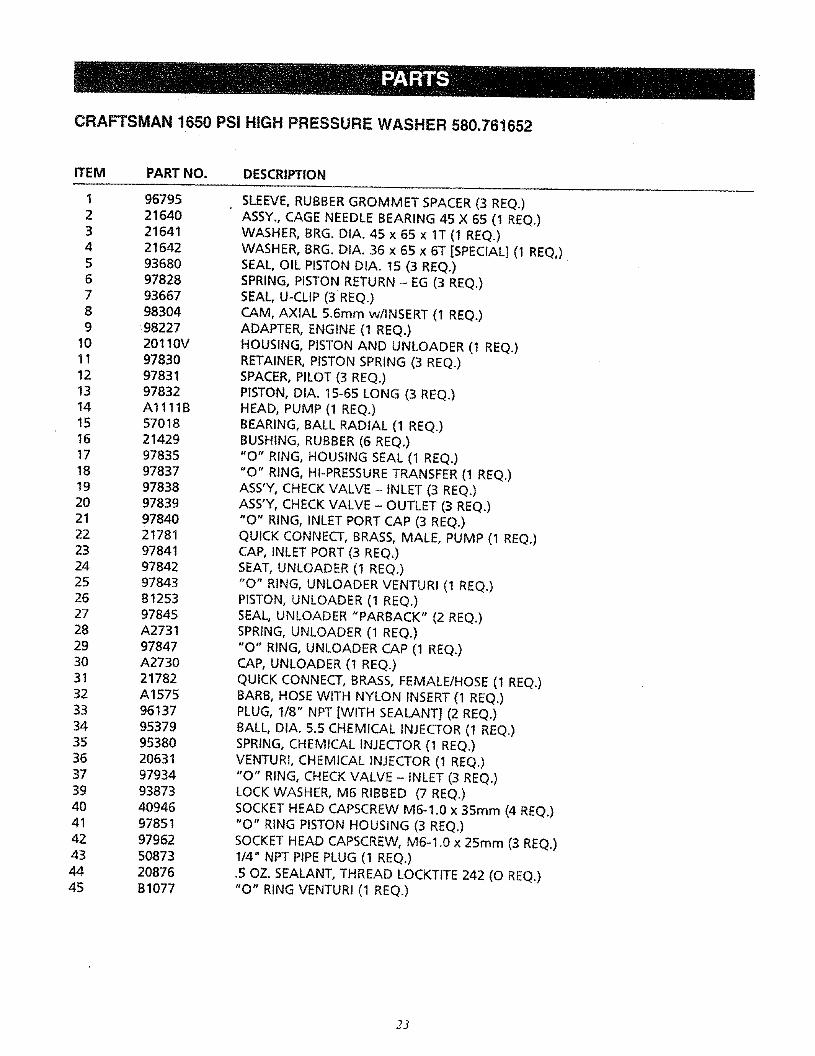
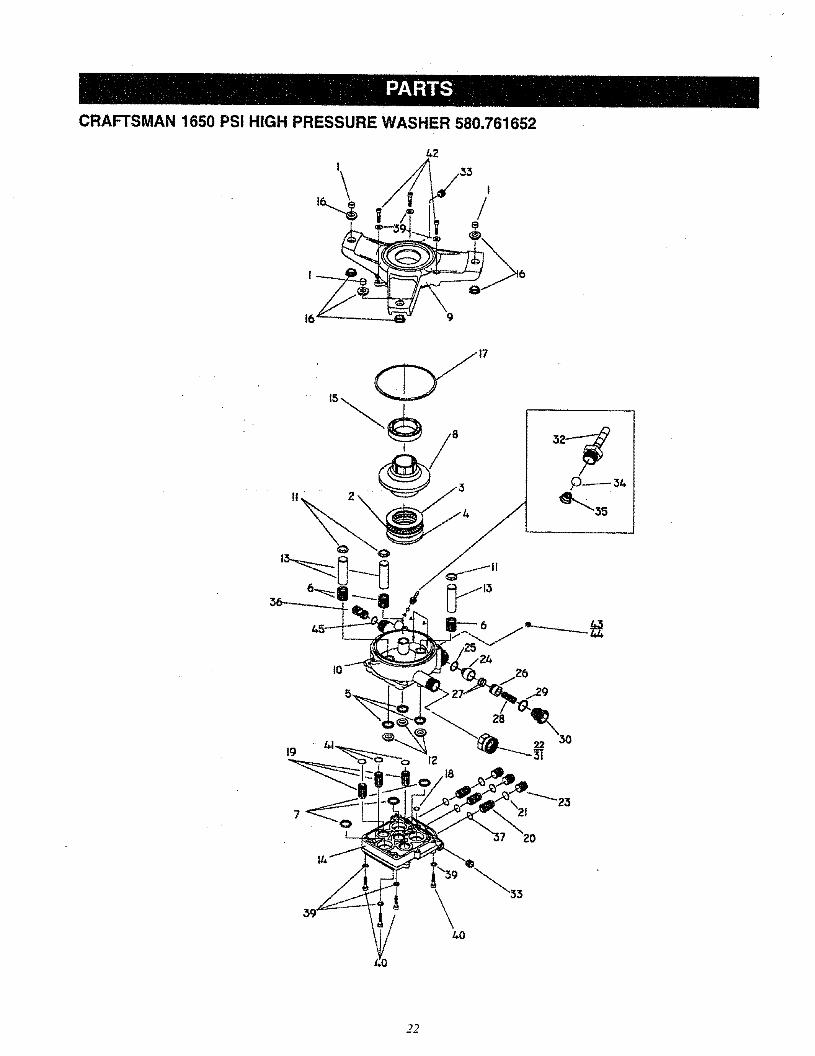
CRAFTSMAN 1650 PSi HIGH PRESSURE WASHER 580.761652
ITEM PART NO. DESCRIPTION
I 967952 216403 216414 216425 936806 978287 936678 983049 98227
10 20t10V11 9783012 9783113 9783214 At111B15 5701816 2142917 9783518 9783719 9783820 9783921 9784022 2178123 9784124 9784225 9784326 B125327 9784528 A273129 9784730 A273031 2178232 A157533 9613734 9537935 9538036 2063137 9793439 9387340 4094641 9785142 9796243 5087344 2087645 81077
SLEEVE, RUBBER GROMMET SPACER (3 REQ.)ASSY., CAGE NEEDLE BEARING 45 X 65 (1 REQ.)WASHER, BRG. DIA. 45 x 65 x IT (1 REQ.)WASHER, BRG. DIA. 36 x 65 x 6T [SPECIAL] (1 REQ,)SEAL, OIL PISTON DIA. 15 (3 REQ.)SPRING, PISTON RETURN - EG (3 REQ.)SEAL, U-CLIP (3 REQ.)CAM, AXIAL 5.6mm w/INSERT (1 REQ.)ADAPTER, ENGINE (1 REQ.)HOUSING, PISTON AND UNLOADER (1 REQ.)RETAINER, PISTON SPRING (3 REQ.)SPACER, PILOT (3 REQ.)PISTON, DIA. 15-65 LONG (3 REQ.)HEAD, PUMP (1 REQ.)BEARING, BALL RADIAL (1 REQ.)BUSHING, RUBBER (6 REQ.)"O" RING, HOUSING SEAL (1 REQ.)"O" RING, HI-PRESSURE TRANSFER (! REQ.)ASS'Y, CHECK VALVE - INLET (3 REQ.)ASS'Y, CHECK VALVE - OUTLET (3 REQ.)"O" RING, INLET PORT CAP (3 REQ.)QUICK CONNECT, BRASS, MALE, PUMP (1 REQ.)CAP, INLET PORT (3 REQ.)SEAT, UNLOADER (1 REQ.)"O" RING, UNLOADER VENTURI (1 REQ.)PISTON, UNLOADER (1 REQ.)SEAL, UNLOADER "PARBACK" (2 REQ.)SPRING, UNLOADER (1 REQ.)"0" RING, UNLOADER CAP (1 REQ.)CAP, UNLOADER (1 REQ.)QUICK CONNECT, BRASS, FEMALE/HOSE (1 REQ.)BARB, HOSE WITH NYLON iNSERT (1 REQ.)PLUG, 1/8" NPT [WITH SEALANT] (2 REQ.}BALL, DIA. 5.5 CHEMICAL INJECTOR (1 REQ.)SPRING, CHEMICAL INJECTOR (1 REQ.)VENTURI, CHEMICAL INJECTOR (1 REQ.)"0" RING, CHECK VALVE - INLET (3 REQ.)LOCK WASHER, M6 RIBBED (7 REQ.)SOCKET HEAD CAPSCREW M6-1.0 x 35ram (4 REQ.)"0" RING PISTON HOUSING (3 REQ.)SOCKET HEAD CAPSCREW, M6-1.0 x 25mm (3 REQ.)1/4" NPT PiPE PLUG (1 REQ.).5 OZ. SEALANT, THREAD LOCKT1TE 242 (O REQ.)"0" RING VENTURI (1 REQ.)
23
For the repair or replacement parts youneed delivered directly to your home
Call7 a.m.- 7 p.m.,7 daysa week
1-800-366-PART(1 =800-366-7278)
For in-home major brand repair serviceCall 24 hours a day, 7 claysa week
1-800-4-REPAIR(1-800-473-7247)
For the location of a
Sears Parts and Repair Centerin your area
Call 24 hours a day, 7 days a week
1-800-488-1222
For information on purchasing a SearsMaintenance Agreement or to inquire
about an existing agreementCall 9 a.m.- 5 p.m., Monday-Saturday
1-800-827-6655
The model number of your product is on adecal attached to the pressure washer.The model number of the engine is locatedon the blower housing of the engine.When requesting service or ordering parts,always provide the following information:
° Product Type • Part Number° Model Number ° Part Description America's Repair Specialists