Embed Size (px)
Citation preview
Robert’s CorelDRAW For The Laser ©2006 Robert Hensley
52 Chapter 3 – Mastering Text
Artistic and Paragraph Text CorelDRAW uses two text options – Artistic and Paragraph text. There are significant changes made with the release of X3. Formatting options can be accessed from the TEXT PROPERTY BAR (shown below) or from the menu TEXT ->CHARACTER FORMATTING, or TEXT ->CHARACTER FORMATTING shown in Figure 3-1.
FIGURE 3-1 Format Text Dialog Options.
Paragraph Text
Paragraph Text is similar to text objects used in desktop publish applications. Paragraph text can be used for larger bodies of text that have greater formatting requirements. It is most often used when creating columns for names on a plaque, or wrapping text around an object. When adding paragraph text, you must first create a text frame. The various options for working with paragraph text objects are shown in Figure 3-2.

©2015 Robert Hensley-5:11 CorelDRAW For The Laser
Chapter 3 – Mastering Text 53
FIGURE 3-2 The handles around the paragraph text firm are used to resize the text frame, link to other frames and adjust spacing.
Using Paragraph Text for importing a block of text In this lesson, I want to create a paragraph text frame and import the Gettysburg Address which I have saved on my hard drive as a Microsoft Word document.
1. First create the actual text frame by selecting the TEXT TOOL, and CLICK-DRAG to make the text frame.
2. Place the Text cursor inside the text frame and CLICK. From the FILE | IMPORT MENU, or the Import icon on Standard Property bar, open the import dialog and select the file. I will be using the Gettysburg address. If you get an Importing/Pasting Text dialog, select Discard fonts and Formatting. We will format the text in CorelDRAW. Note the black arrow at the bottom of the text frame. This flow marker indicates there is more text in the flow than is visible.
Robert’s CorelDRAW For The Laser ©2006 Robert Hensley
54 Chapter 3 – Mastering Text
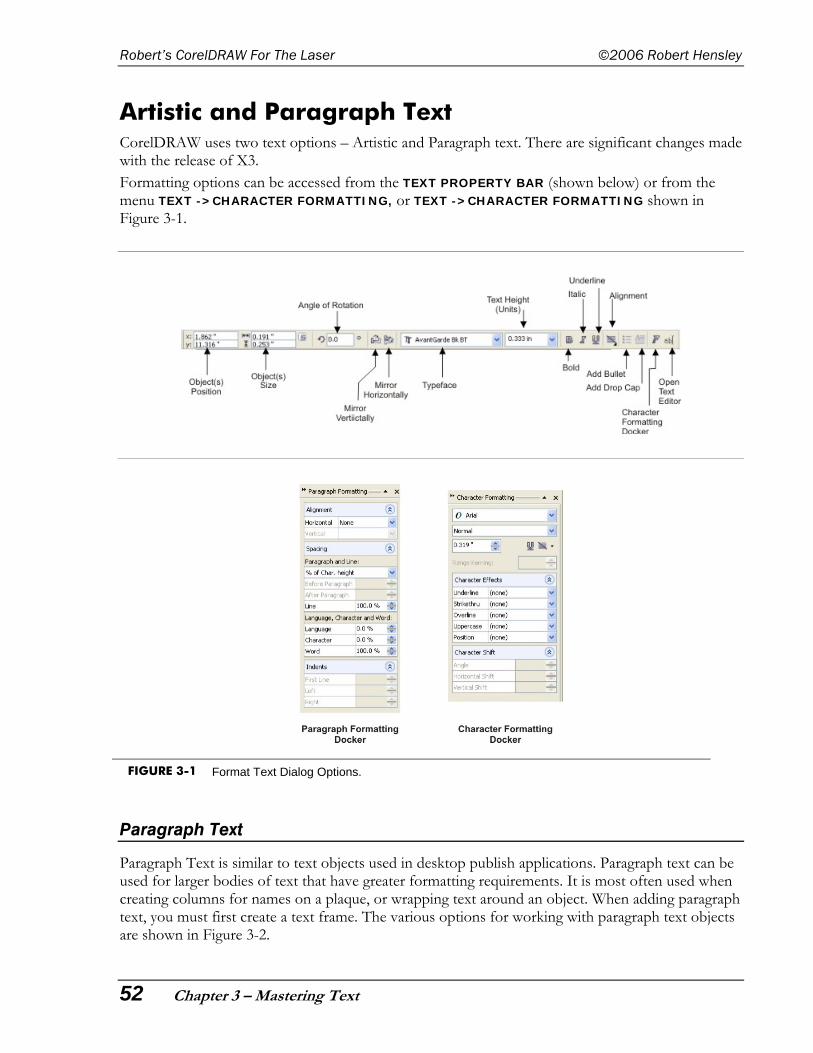
3. To view all of the text, select TEXT | PARAGRAPH TEXT FRAME | FIT TEXT TO FRAME. This option will automatically adjust the font size allowing all of the text to be viewed in text frame.
Using Paragraph Text to create columns of text In this lesson, I want to use several paragraph text frames to create columns for a series of names.
1. First create a text frame with the Text too. This is the area our columns will fit.
2. Select TEXT | COLUMNS. From the Column Settings dialog, select 4 columns, change the gutter to .35, and choose Maintain current frame width under Frame Settings. The dialog is shown.
©2015 Robert Hensley-5:11 CorelDRAW For The Laser
Chapter 3 – Mastering Text 55
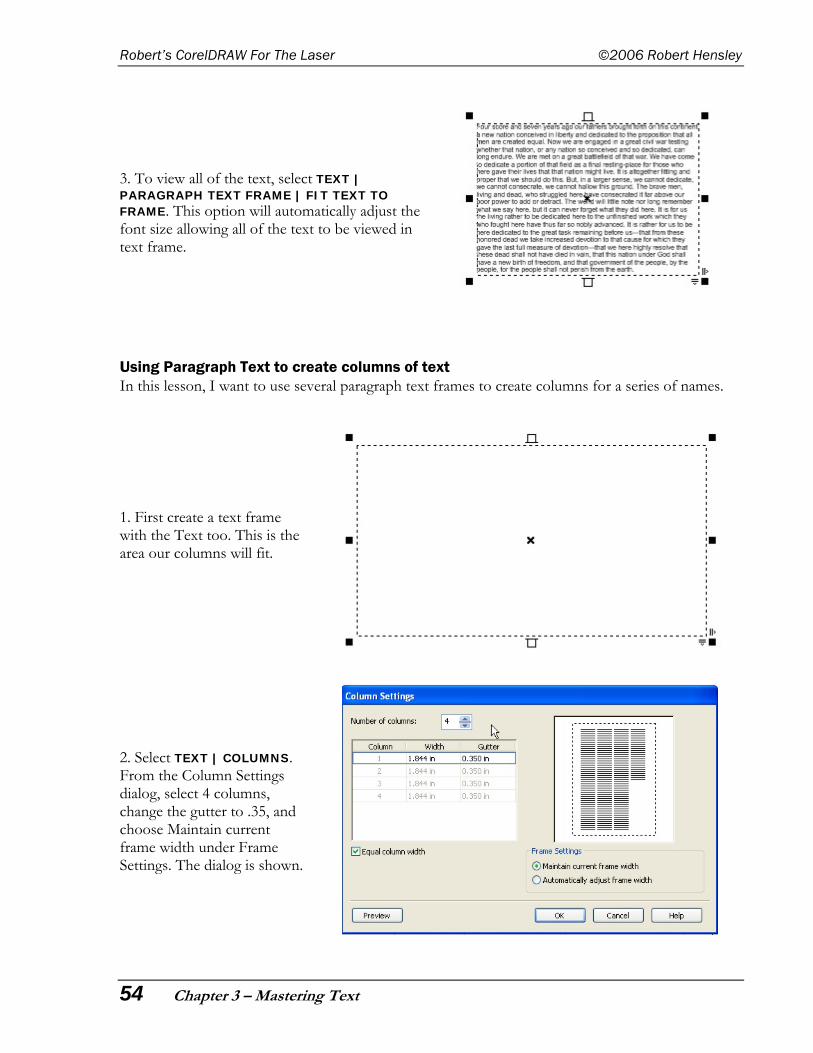
3. Place your cursor inside of the text frame and you will see the newly created columns.
4. You can type in the names or import them.
5. After using the Fit Text To Frame option, here’s how my plaque looked.
Robert’s CorelDRAW For The Laser ©2006 Robert Hensley
56 Chapter 3 – Mastering Text
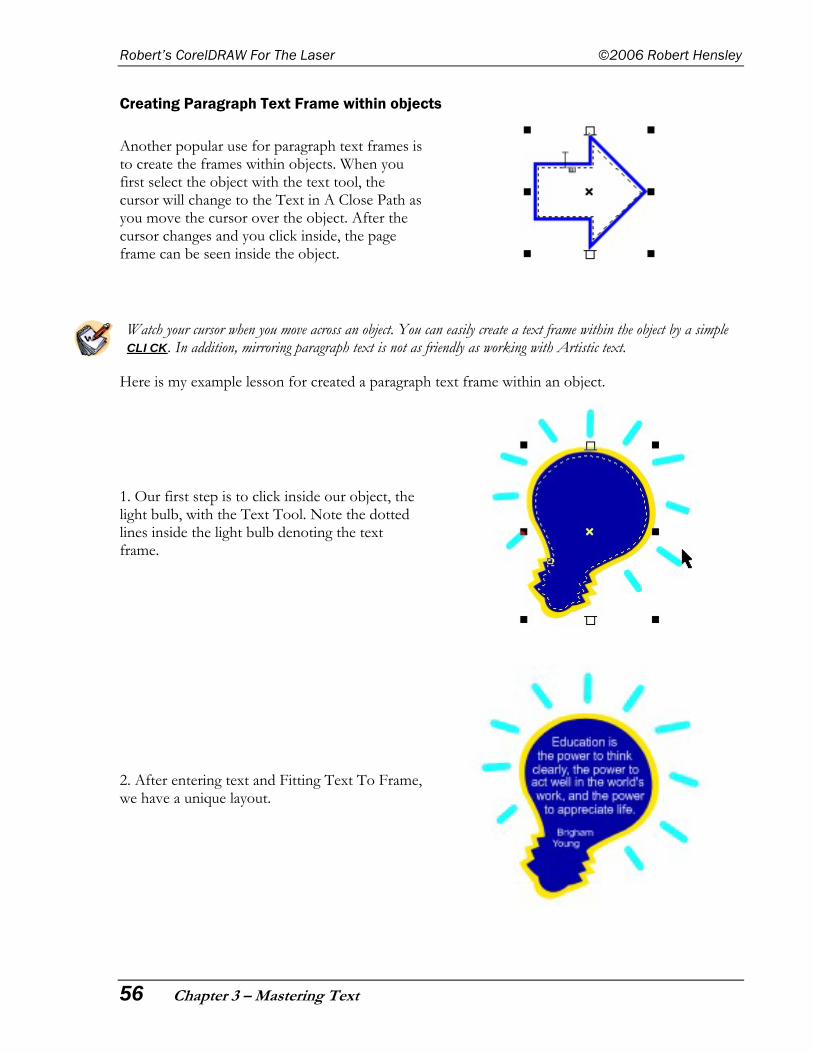
Creating Paragraph Text Frame within objects
Another popular use for paragraph text frames is to create the frames within objects. When you first select the object with the text tool, the cursor will change to the Text in A Close Path as you move the cursor over the object. After the cursor changes and you click inside, the page frame can be seen inside the object.
Watch your cursor when you move across an object. You can easily create a text frame within the object by a simple CLICK. In addition, mirroring paragraph text is not as friendly as working with Artistic text.
Here is my example lesson for created a paragraph text frame within an object.
1. Our first step is to click inside our object, the light bulb, with the Text Tool. Note the dotted lines inside the light bulb denoting the text frame.
2. After entering text and Fitting Text To Frame, we have a unique layout.
©2015 Robert Hensley-5:11 CorelDRAW For The Laser
Chapter 3 – Mastering Text 57
Artistic Text
As an engraver and laser operator, I find that 90% of my text needs are accomplished with CorelDRAW’s Artistic Text. I use artistic text to add short lines of text, such as titles, or to apply graphic effects, such as fitting text to a path, creating extrusions and blends, and creating all other special effects.
An artistic text object can contain up to 32,000 characters.
Editing Text CorelDRAW’s TEXT TOOL uses many of the same rules for editing text used by other Windows applications. To place the text cursor (also referred to s the I-beam cursor) in the text where you want to start typing, simply click with the left mouse button.
You can use the text cursor to select one character at a time, by words, or by whole paragraphs. You can also the UP, DOWN, LEFT and RIGHT arrow keys on your keyboard to select strings of sequential text, a word, a line, or a paragraph at a time.
If some text is already selected, the selection can be extended by clicking at the new endpoint of the selection while holding down the SHIFT key.
Double-clicking with the cursor selects the word in which you double-clicked.
Triple-clicking with the cursor selects the entire paragraph in which you triple-clicked.
Hold down the CTRL when you single-click to select a single sentence.
Moving Text Interactively Your can move a selection of text with the mouse by dragging-and-dropping. Simply select the word or words you want to move and then click-drag the text to the new location. Dragging with the right mouse button causes a pop-up menu to appear when you drop the text, with options of Copy or Move.
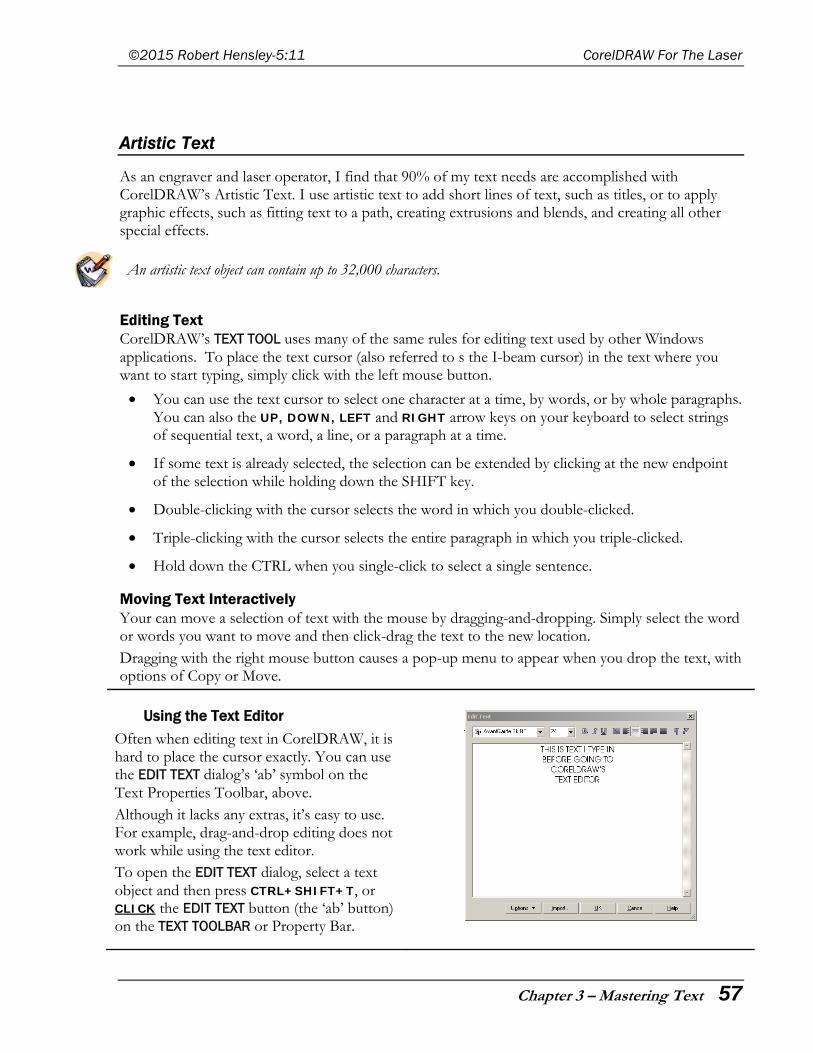
Using the Text Editor
Often when editing text in CorelDRAW, it is hard to place the cursor exactly. You can use the EDIT TEXT dialog’s ‘ab’ symbol on the Text Properties Toolbar, above. Although it lacks any extras, it’s easy to use. For example, drag-and-drop editing does not work while using the text editor. To open the EDIT TEXT dialog, select a text object and then press CTRL+SHIFT+T, or CLICK the EDIT TEXT button (the ‘ab’ button) on the TEXT TOOLBAR or Property Bar.
Robert’s CorelDRAW For The Laser ©2006 Robert Hensley
58 Chapter 3 – Mastering Text
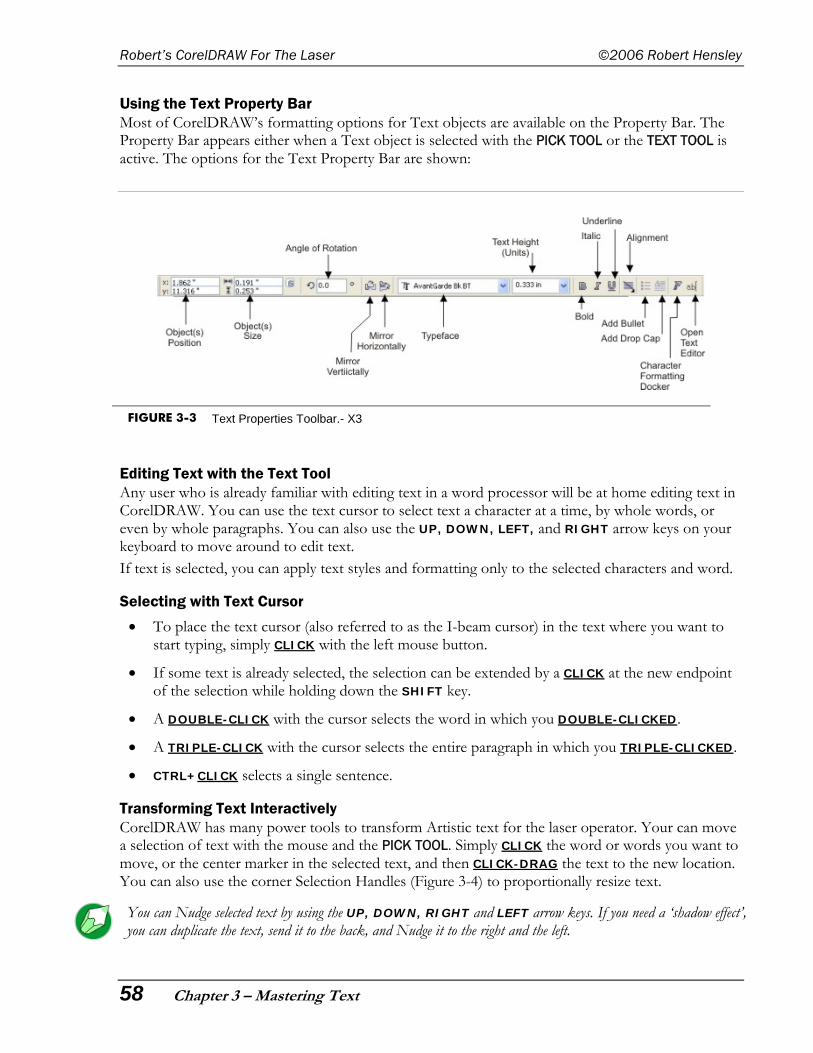
Using the Text Property Bar Most of CorelDRAW’s formatting options for Text objects are available on the Property Bar. The Property Bar appears either when a Text object is selected with the PICK TOOL or the TEXT TOOL is active. The options for the Text Property Bar are shown:
FIGURE 3-3 Text Properties Toolbar.- X3
Editing Text with the Text Tool Any user who is already familiar with editing text in a word processor will be at home editing text in CorelDRAW. You can use the text cursor to select text a character at a time, by whole words, or even by whole paragraphs. You can also use the UP, DOWN, LEFT, and RIGHT arrow keys on your keyboard to move around to edit text. If text is selected, you can apply text styles and formatting only to the selected characters and word.
Selecting with Text Cursor
To place the text cursor (also referred to as the I-beam cursor) in the text where you want to start typing, simply CLICK with the left mouse button.
If some text is already selected, the selection can be extended by a CLICK at the new endpoint of the selection while holding down the SHIFT key.
A DOUBLE-CLICK with the cursor selects the word in which you DOUBLE-CLICKED.
A TRIPLE-CLICK with the cursor selects the entire paragraph in which you TRIPLE-CLICKED.
CTRL+CLICK selects a single sentence.
Transforming Text Interactively CorelDRAW has many power tools to transform Artistic text for the laser operator. Your can move a selection of text with the mouse and the PICK TOOL. Simply CLICK the word or words you want to move, or the center marker in the selected text, and then CLICK-DRAG the text to the new location. You can also use the corner Selection Handles (Figure 3-4) to proportionally resize text.
You can Nudge selected text by using the UP, DOWN, RIGHT and LEFT arrow keys. If you need a ‘shadow effect’, you can duplicate the text, send it to the back, and Nudge it to the right and the left.
©2015 Robert Hensley-5:11 CorelDRAW For The Laser
Chapter 3 – Mastering Text 59
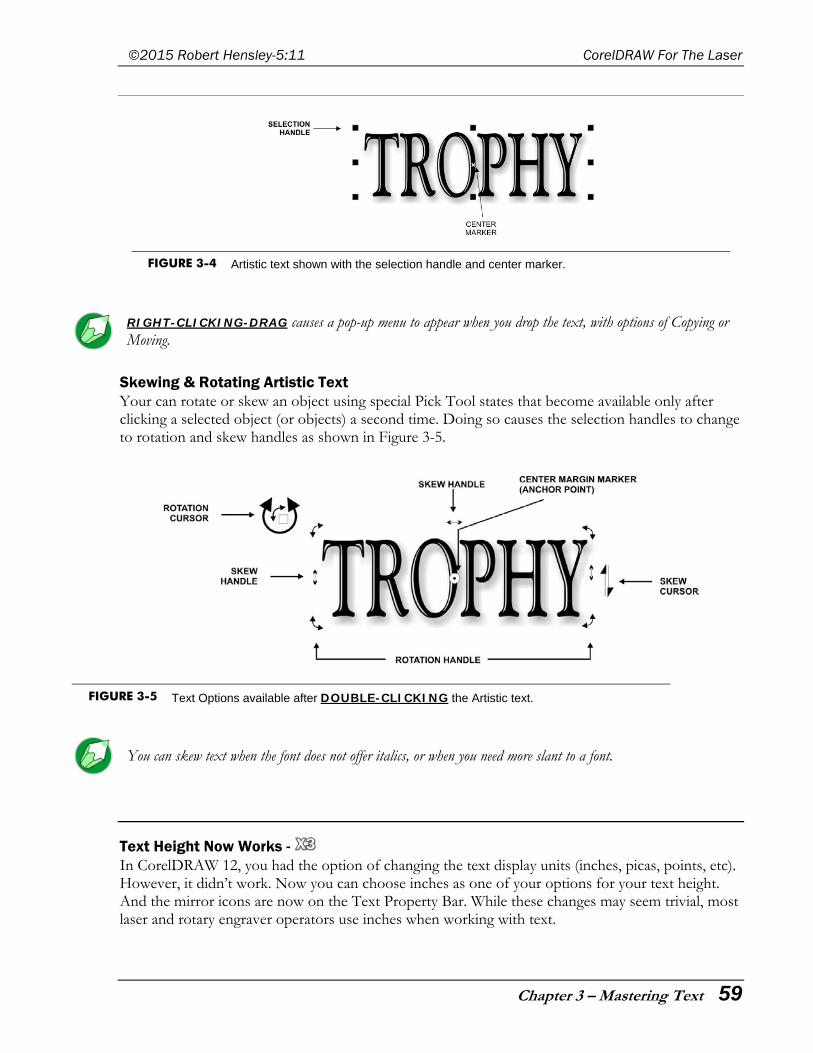
FIGURE 3-4 Artistic text shown with the selection handle and center marker.
RIGHT-CLICKING-DRAG causes a pop-up menu to appear when you drop the text, with options of Copying or Moving.
Skewing & Rotating Artistic Text Your can rotate or skew an object using special Pick Tool states that become available only after clicking a selected object (or objects) a second time. Doing so causes the selection handles to change to rotation and skew handles as shown in Figure 3-5.
FIGURE 3-5 Text Options available after DOUBLE-CLICKING the Artistic text.
You can skew text when the font does not offer italics, or when you need more slant to a font.
Text Height Now Works - In CorelDRAW 12, you had the option of changing the text display units (inches, picas, points, etc). However, it didn’t work. Now you can choose inches as one of your options for your text height. And the mirror icons are now on the Text Property Bar. While these changes may seem trivial, most laser and rotary engraver operators use inches when working with text.
Robert’s CorelDRAW For The Laser ©2006 Robert Hensley
60 Chapter 3 – Mastering Text
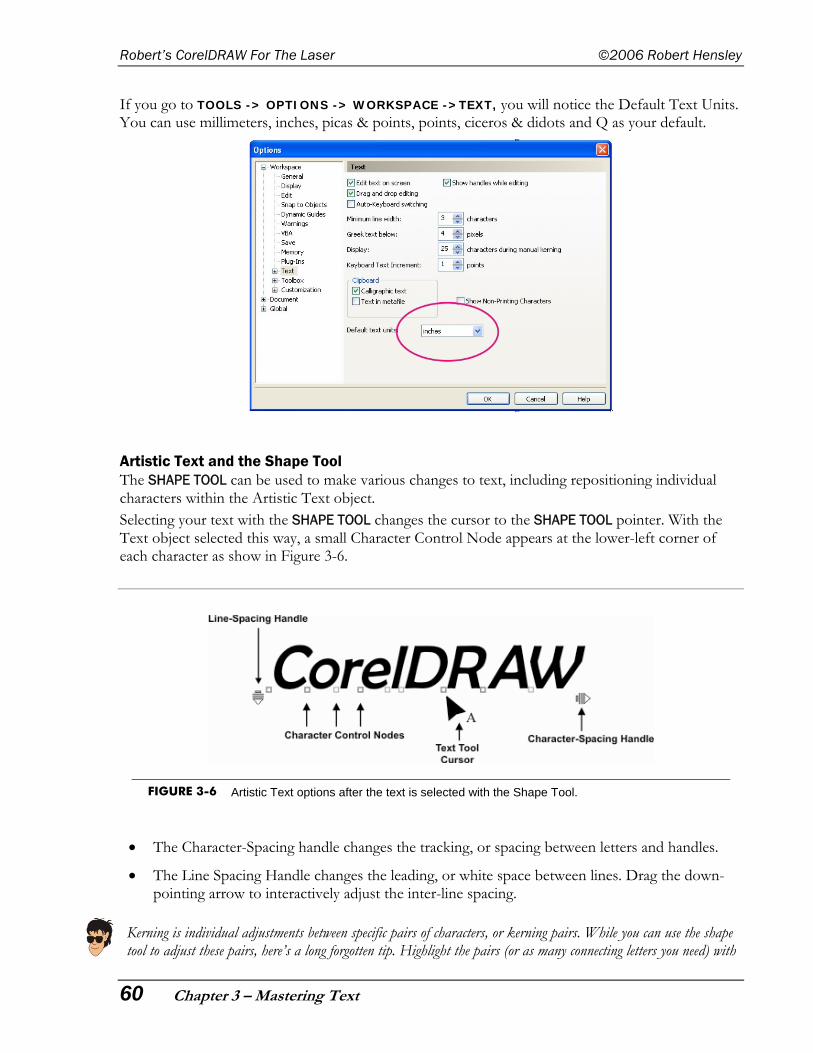
If you go to TOOLS -> OPTIONS -> WORKSPACE ->TEXT, you will notice the Default Text Units. You can use millimeters, inches, picas & points, points, ciceros & didots and Q as your default.
Artistic Text and the Shape Tool The SHAPE TOOL can be used to make various changes to text, including repositioning individual characters within the Artistic Text object. Selecting your text with the SHAPE TOOL changes the cursor to the SHAPE TOOL pointer. With the Text object selected this way, a small Character Control Node appears at the lower-left corner of each character as show in Figure 3-6.
FIGURE 3-6 Artistic Text options after the text is selected with the Shape Tool.
The Character-Spacing handle changes the tracking, or spacing between letters and handles.
The Line Spacing Handle changes the leading, or white space between lines. Drag the down-pointing arrow to interactively adjust the inter-line spacing.
Kerning is individual adjustments between specific pairs of characters, or kerning pairs. While you can use the shape tool to adjust these pairs, here’s a long forgotten tip. Highlight the pairs (or as many connecting letters you need) with
©2015 Robert Hensley-5:11 CorelDRAW For The Laser
Chapter 3 – Mastering Text 61
your Text Tool. Hold down the CTRL + SHIFT, and use the “>” key to increase spacing, or “<”key to reduce space between pairs.
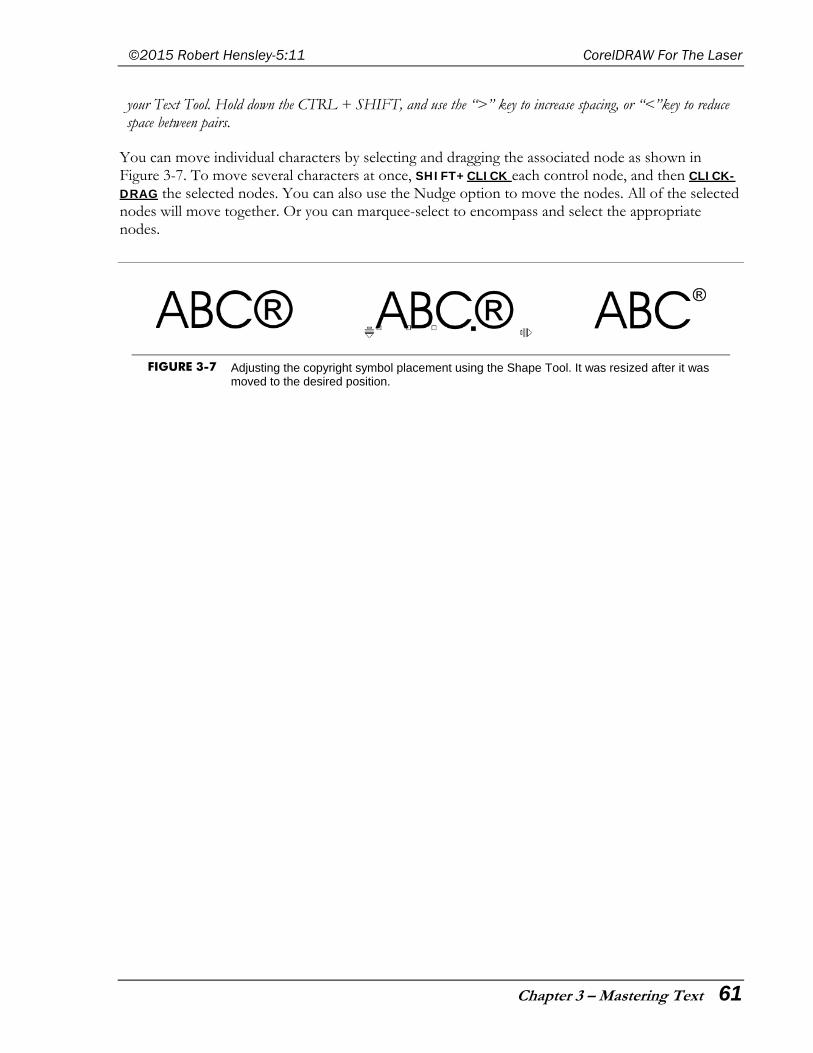
You can move individual characters by selecting and dragging the associated node as shown in Figure 3-7. To move several characters at once, SHIFT+CLICK each control node, and then CLICK-DRAG the selected nodes. You can also use the Nudge option to move the nodes. All of the selected nodes will move together. Or you can marquee-select to encompass and select the appropriate nodes.
FIGURE 3-7 Adjusting the copyright symbol placement using the Shape Tool. It was resized after it was moved to the desired position.
Robert’s CorelDRAW For The Laser ©2006 Robert Hensley
62 Chapter 3 – Mastering Text
1. Changing the Character Rotating Angle of Text within the Text Dialog
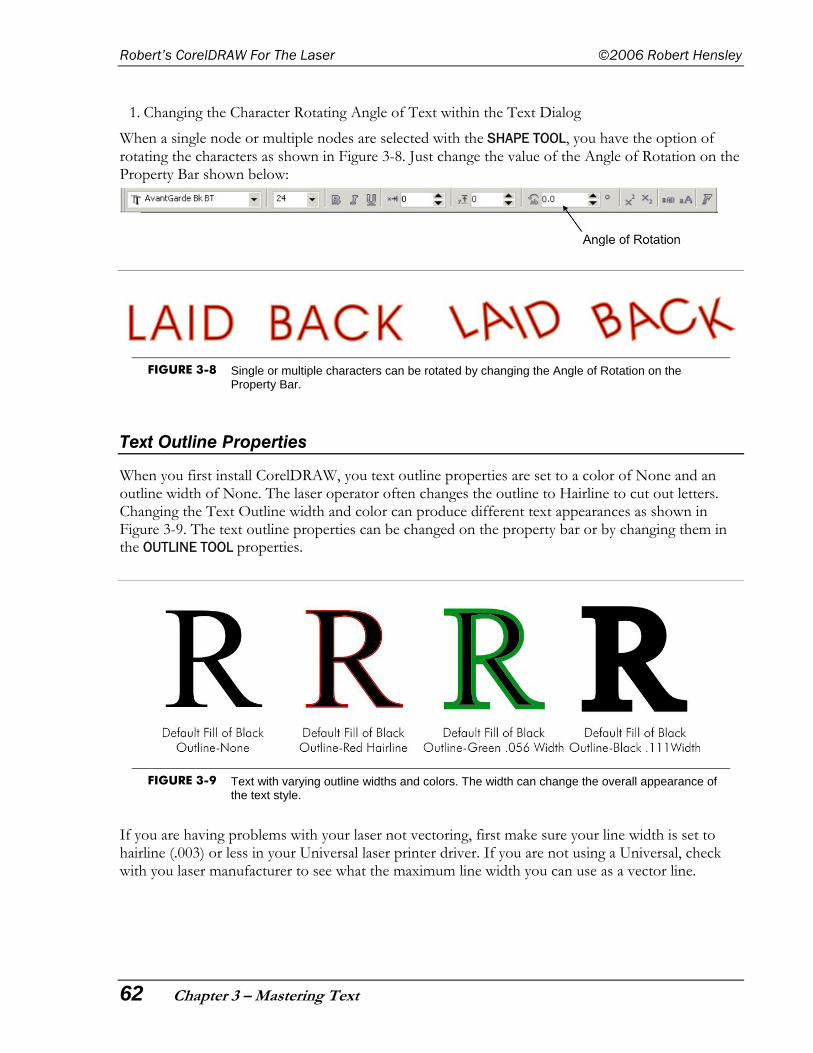
When a single node or multiple nodes are selected with the SHAPE TOOL, you have the option of rotating the characters as shown in Figure 3-8. Just change the value of the Angle of Rotation on the Property Bar shown below:
FIGURE 3-8 Single or multiple characters can be rotated by changing the Angle of Rotation on the Property Bar.
Text Outline Properties
When you first install CorelDRAW, you text outline properties are set to a color of None and an outline width of None. The laser operator often changes the outline to Hairline to cut out letters. Changing the Text Outline width and color can produce different text appearances as shown in Figure 3-9. The text outline properties can be changed on the property bar or by changing them in the OUTLINE TOOL properties.
FIGURE 3-9 Text with varying outline widths and colors. The width can change the overall appearance of the text style.
If you are having problems with your laser not vectoring, first make sure your line width is set to hairline (.003) or less in your Universal laser printer driver. If you are not using a Universal, check with you laser manufacturer to see what the maximum line width you can use as a vector line.
©2015 Robert Hensley-5:11 CorelDRAW For The Laser
Chapter 3 – Mastering Text 63
TIP The best way to test your driver’s vector capability is to put (7) 2” horizontal lines with vertical space of ½ inch apart on your CorelDRAW page. Change the line widths from .001 to .007. Turn your print driver to ‘VECTOR ONLY’ and run the job.
Did you know that hairline is actually .003 inches? You can change the line width to a width smaller than .003 and it will reflect the value you input. However, if you put in .003, it shows Hairline.
Do your screen fonts look terrible or fuzzy in CorelDRAW? See if your text outline color is set to White.
Fattening Up Script Fonts for the Laser
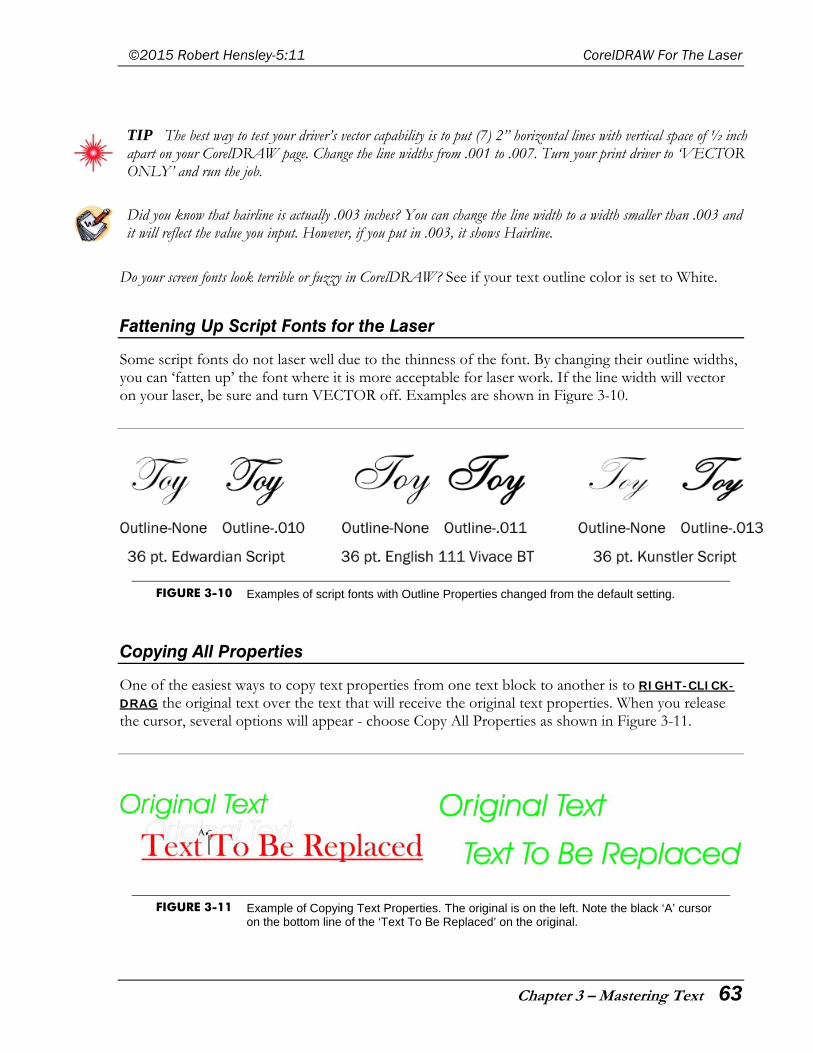
Some script fonts do not laser well due to the thinness of the font. By changing their outline widths, you can ‘fatten up’ the font where it is more acceptable for laser work. If the line width will vector on your laser, be sure and turn VECTOR off. Examples are shown in Figure 3-10.
FIGURE 3-10 Examples of script fonts with Outline Properties changed from the default setting.
Copying All Properties
One of the easiest ways to copy text properties from one text block to another is to RIGHT-CLICK-DRAG the original text over the text that will receive the original text properties. When you release the cursor, several options will appear - choose Copy All Properties as shown in Figure 3-11.
FIGURE 3-11 Example of Copying Text Properties. The original is on the left. Note the black ‘A’ cursor on the bottom line of the ‘Text To Be Replaced’ on the original.


![CorelDRAW Graphics Suite 2020product.corel.com/help/CorelDRAW/540111137/Main/ES/Quick... · 2020. 3. 9. · Guía de inicio rápido [ 1 ] CorelDRAW Graphics Suite 2020 CorelDRAW®](https://img.pdfslide.us/doc/110x75/6131b8e41ecc51586944ea31/coreldraw-graphics-suite-2020-3-9-gua-de-inicio-rpido-1-coreldraw-graphics.jpg)