Embed Size (px)
DESCRIPTION
If you like this document and you want to thank me please register here: http://www.income-web.biz?a_aid=4bd59700c7413 This is not a scam. I just want to earn money through online ads. Just click the link and register there IF you want to help me back. Thanks.
Citation preview

DTP 101 – Computer Graphics Manual CorelDraw 9
Iligan Computer Institute 1
Object OverviewObject OverviewObject OverviewObject Overview
What is an object?
In CorelDraw, an object is
any item you create or
import into your document.
It may be a rectangle, a
circle, text, a photograph. All
work in CorelDraw is done
through selecting an object.
Various effects can be
applied to an object
depending on the type of
object and the tool you have
selected. For this tutorial,
choose the Rectangle Tool
and create a rectangle. (See
Rectangle Tool tutorial in this
series.)
Pick Tool Selection
Choose the Pick Tool from
the Toolbox and click on the
rectangle. Note the 8 square
"handles" that surround the
square. These handles
indicate that the object is
active. You can resize the
rectangle proportionately by
clicking and dragging on the
corner handles. The side
handles resize only in one
direction.
DTP 101 – Computer Graphics Manual CorelDraw 9
Iligan Computer Institute 2
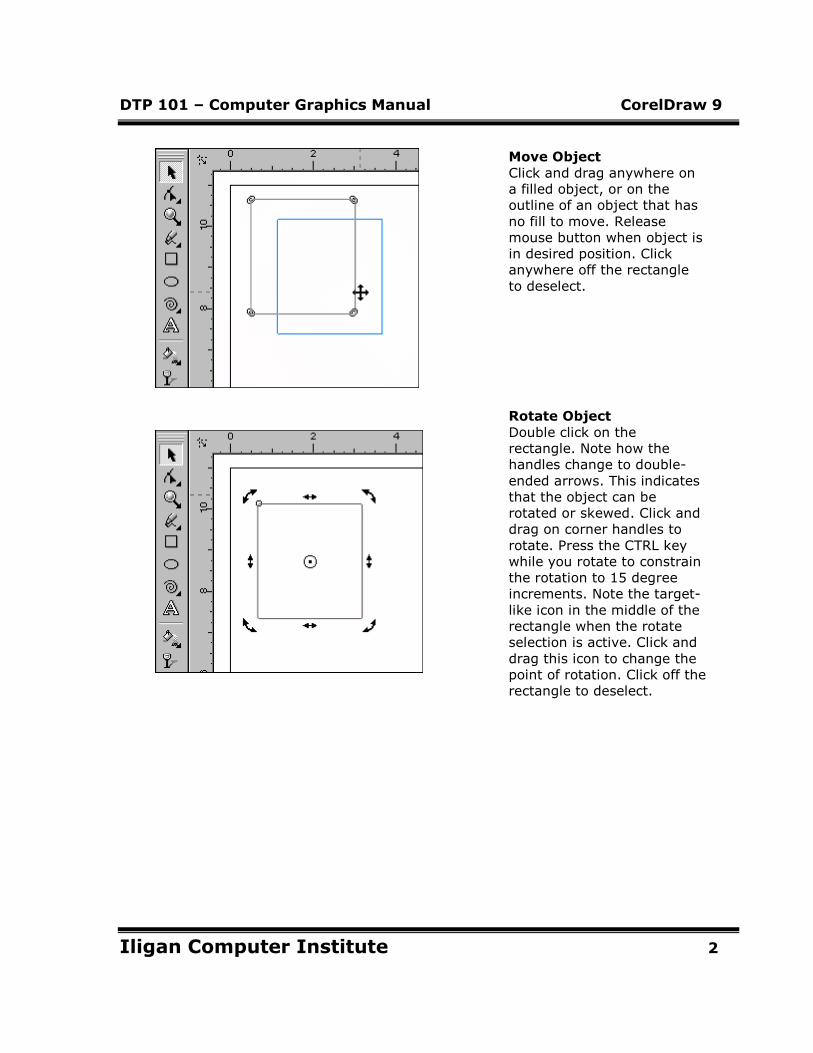
Move Object
Click and drag anywhere on
a filled object, or on the
outline of an object that has
no fill to move. Release
mouse button when object is
in desired position. Click
anywhere off the rectangle
to deselect.
Rotate Object
Double click on the
rectangle. Note how the
handles change to double-
ended arrows. This indicates
that the object can be
rotated or skewed. Click and
drag on corner handles to
rotate. Press the CTRL key
while you rotate to constrain
the rotation to 15 degree
increments. Note the target-
like icon in the middle of the
rectangle when the rotate
selection is active. Click and
drag this icon to change the
point of rotation. Click off the
rectangle to deselect.
DTP 101 – Computer Graphics Manual CorelDraw 9
Iligan Computer Institute 3
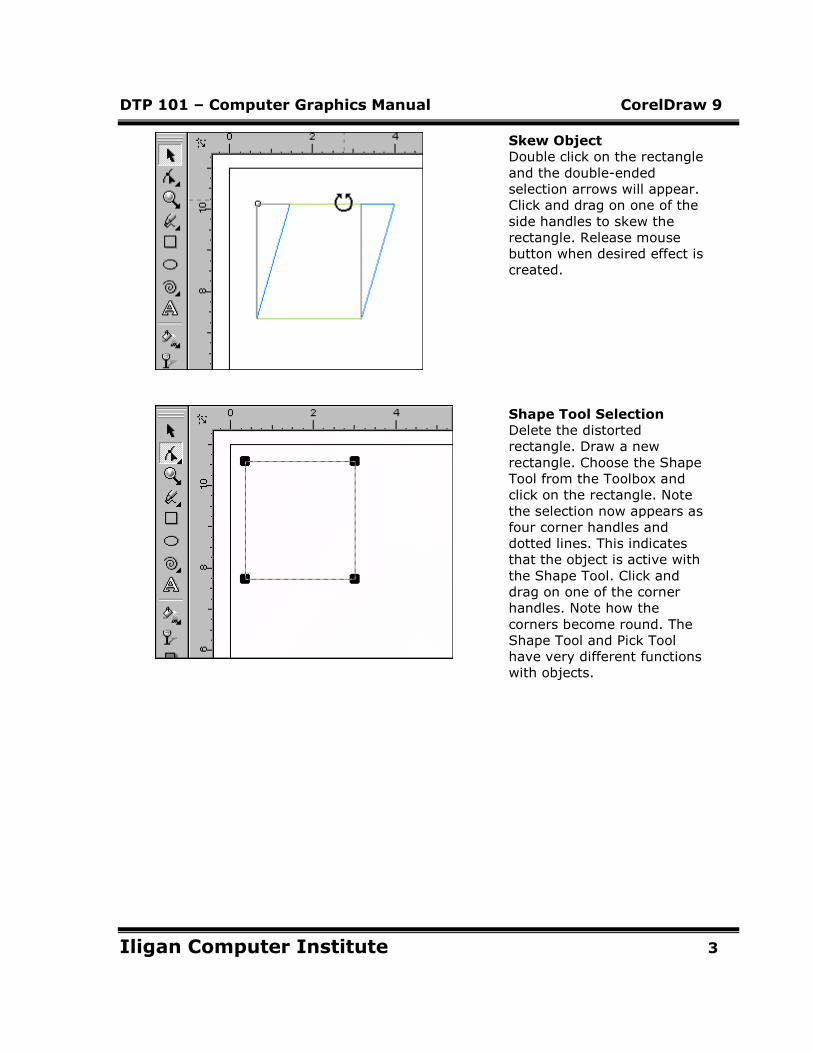
Skew Object
Double click on the rectangle
and the double-ended
selection arrows will appear.
Click and drag on one of the
side handles to skew the
rectangle. Release mouse
button when desired effect is
created.
Shape Tool Selection
Delete the distorted
rectangle. Draw a new
rectangle. Choose the Shape
Tool from the Toolbox and
click on the rectangle. Note
the selection now appears as
four corner handles and
dotted lines. This indicates
that the object is active with
the Shape Tool. Click and
drag on one of the corner
handles. Note how the
corners become round. The
Shape Tool and Pick Tool
have very different functions
with objects.
DTP 101 – Computer Graphics Manual CorelDraw 9
Iligan Computer Institute 4
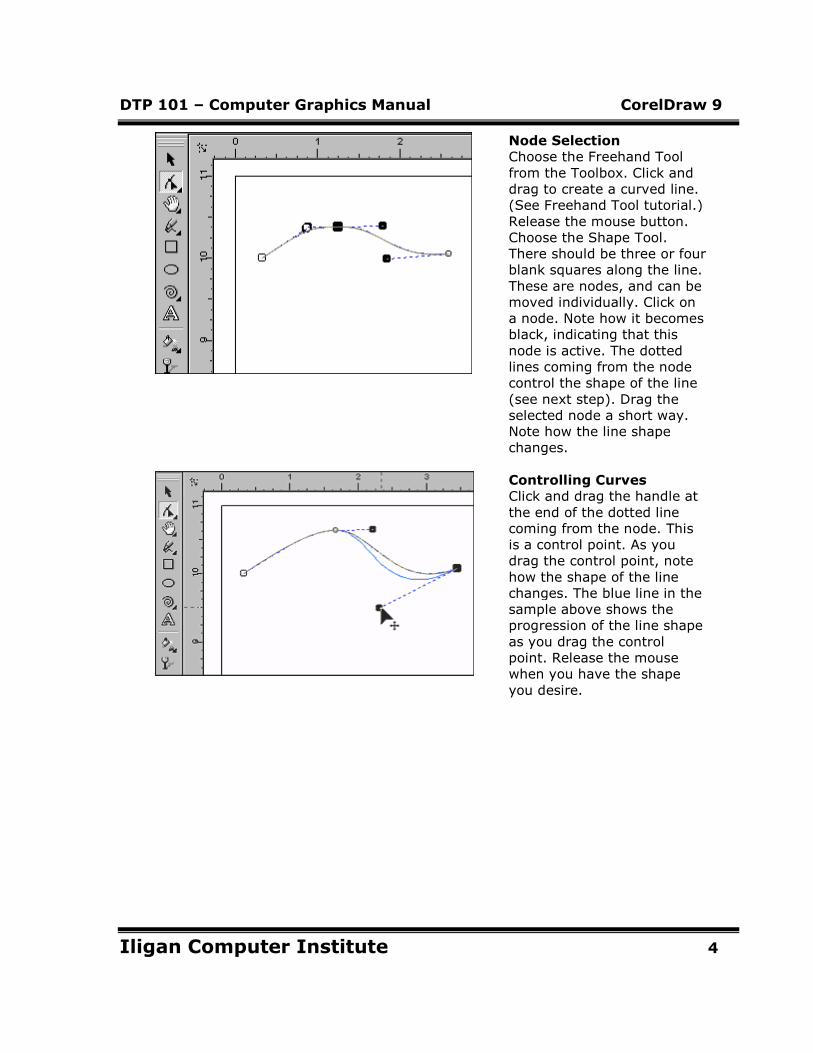
Node Selection
Choose the Freehand Tool
from the Toolbox. Click and
drag to create a curved line.
(See Freehand Tool tutorial.)
Release the mouse button.
Choose the Shape Tool.
There should be three or four
blank squares along the line.
These are nodes, and can be
moved individually. Click on
a node. Note how it becomes
black, indicating that this
node is active. The dotted
lines coming from the node
control the shape of the line
(see next step). Drag the
selected node a short way.
Note how the line shape
changes.
Controlling Curves
Click and drag the handle at
the end of the dotted line
coming from the node. This
is a control point. As you
drag the control point, note
how the shape of the line
changes. The blue line in the
sample above shows the
progression of the line shape
as you drag the control
point. Release the mouse
when you have the shape
you desire.
DTP 101 – Computer Graphics Manual CorelDraw 9
Iligan Computer Institute 5
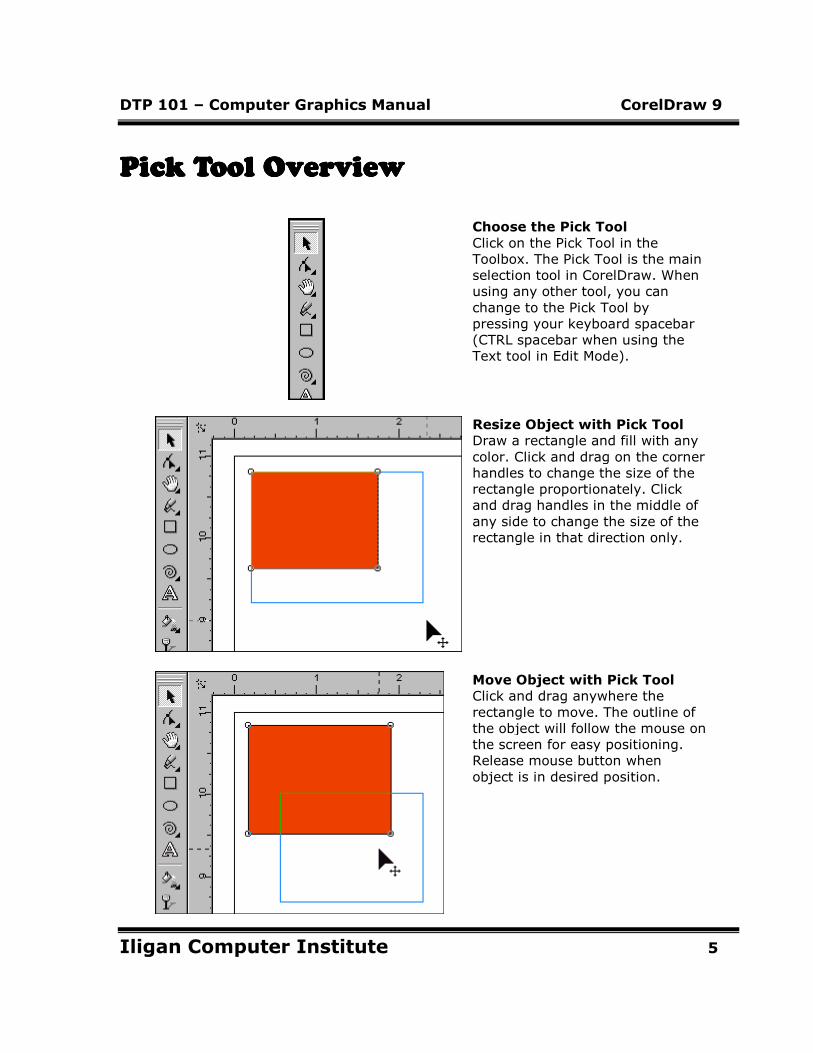
Pick Tool OverviewPick Tool OverviewPick Tool OverviewPick Tool Overview
Choose the Pick Tool
Click on the Pick Tool in the
Toolbox. The Pick Tool is the main
selection tool in CorelDraw. When
using any other tool, you can
change to the Pick Tool by
pressing your keyboard spacebar
(CTRL spacebar when using the
Text tool in Edit Mode).
Resize Object with Pick Tool
Draw a rectangle and fill with any
color. Click and drag on the corner
handles to change the size of the
rectangle proportionately. Click
and drag handles in the middle of
any side to change the size of the
rectangle in that direction only.
Move Object with Pick Tool
Click and drag anywhere the
rectangle to move. The outline of
the object will follow the mouse on
the screen for easy positioning.
Release mouse button when
object is in desired position.
DTP 101 – Computer Graphics Manual CorelDraw 9
Iligan Computer Institute 6
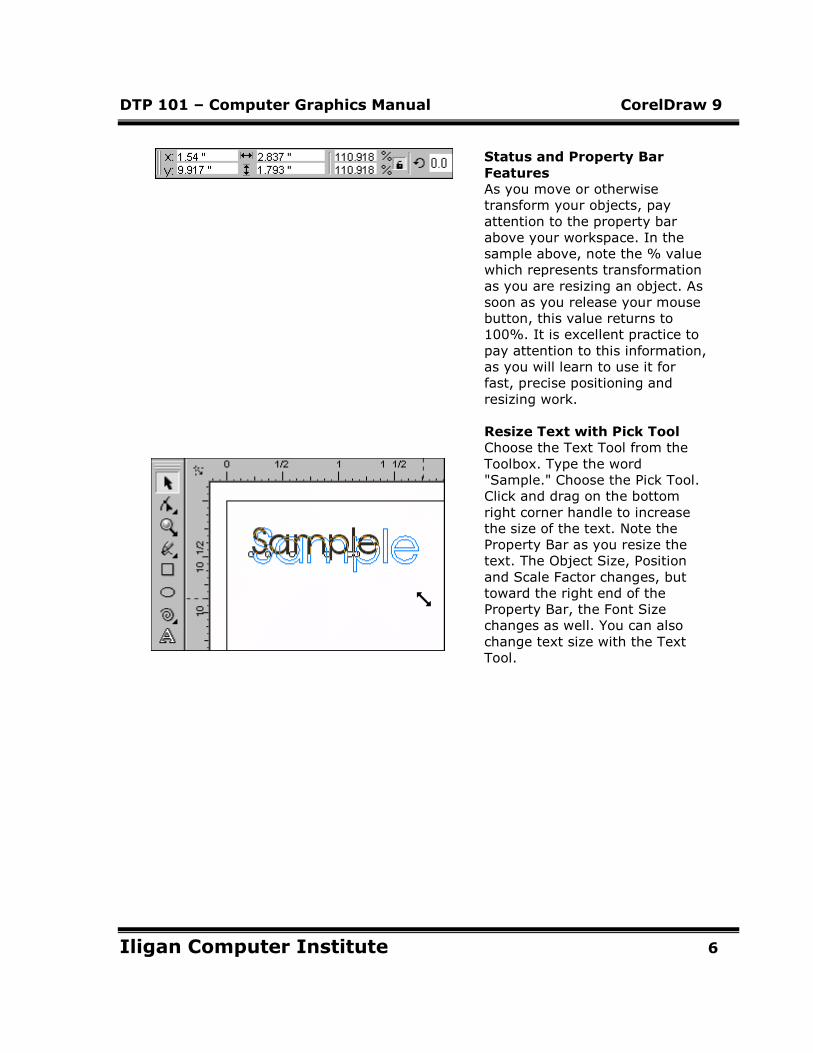
Status and Property Bar
Features
As you move or otherwise
transform your objects, pay
attention to the property bar
above your workspace. In the
sample above, note the % value
which represents transformation
as you are resizing an object. As
soon as you release your mouse
button, this value returns to
100%. It is excellent practice to
pay attention to this information,
as you will learn to use it for
fast, precise positioning and
resizing work.
Resize Text with Pick Tool
Choose the Text Tool from the
Toolbox. Type the word
"Sample." Choose the Pick Tool.
Click and drag on the bottom
right corner handle to increase
the size of the text. Note the
Property Bar as you resize the
text. The Object Size, Position
and Scale Factor changes, but
toward the right end of the
Property Bar, the Font Size
changes as well. You can also
change text size with the Text
Tool.
DTP 101 – Computer Graphics Manual CorelDraw 9
Iligan Computer Institute 7
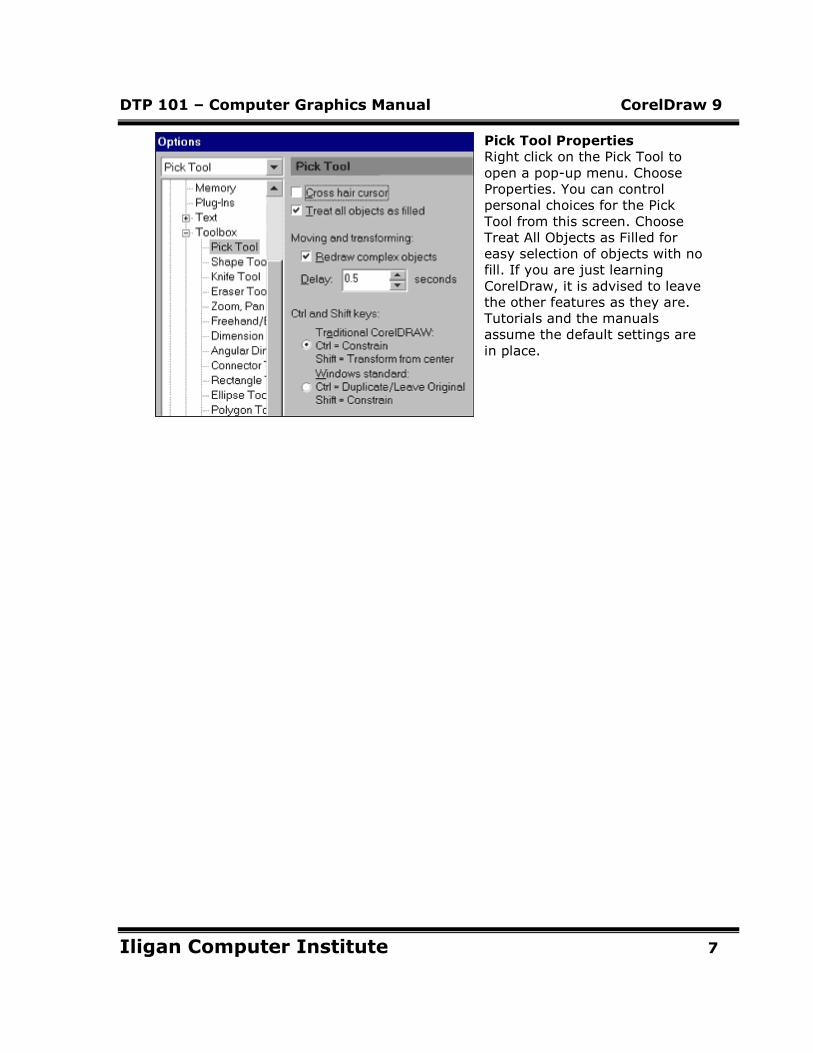
Pick Tool Properties
Right click on the Pick Tool to
open a pop-up menu. Choose
Properties. You can control
personal choices for the Pick
Tool from this screen. Choose
Treat All Objects as Filled for
easy selection of objects with no
fill. If you are just learning
CorelDraw, it is advised to leave
the other features as they are.
Tutorials and the manuals
assume the default settings are
in place.

DTP 101 – Computer Graphics Manual CorelDraw 9
Iligan Computer Institute 8
Shape Tool OShape Tool OShape Tool OShape Tool Overviewverviewverviewverview
Choose the Shape Tool
Click on the Shape Tool in the
Toolbox.
Advanced Shape Tool Features
Click on the triangle at the bottom
right corner of the Shape Tool to
open the Shape Edit Features pop-
up. This menu offers advanced
functions that will not be covered
in this basic tutorials, but you
should be familiar with the location
of all tools in the Toolbox. The
tools in the menu are Shape Tool
(default), Knife Tool, Eraser Tool
and Free Transform Tool.
Select Nodes with Shape Tool
The Shape Tool works with Nodes
within objects. Selected Nodes are
shown filled with black. You can
select more than one node by
holding down your Shift Key as you
select the second, third, etc. Or,
marquee (click and drag) select
over the nodes you wish to select.
DTP 101 – Computer Graphics Manual CorelDraw 9
Iligan Computer Institute 9
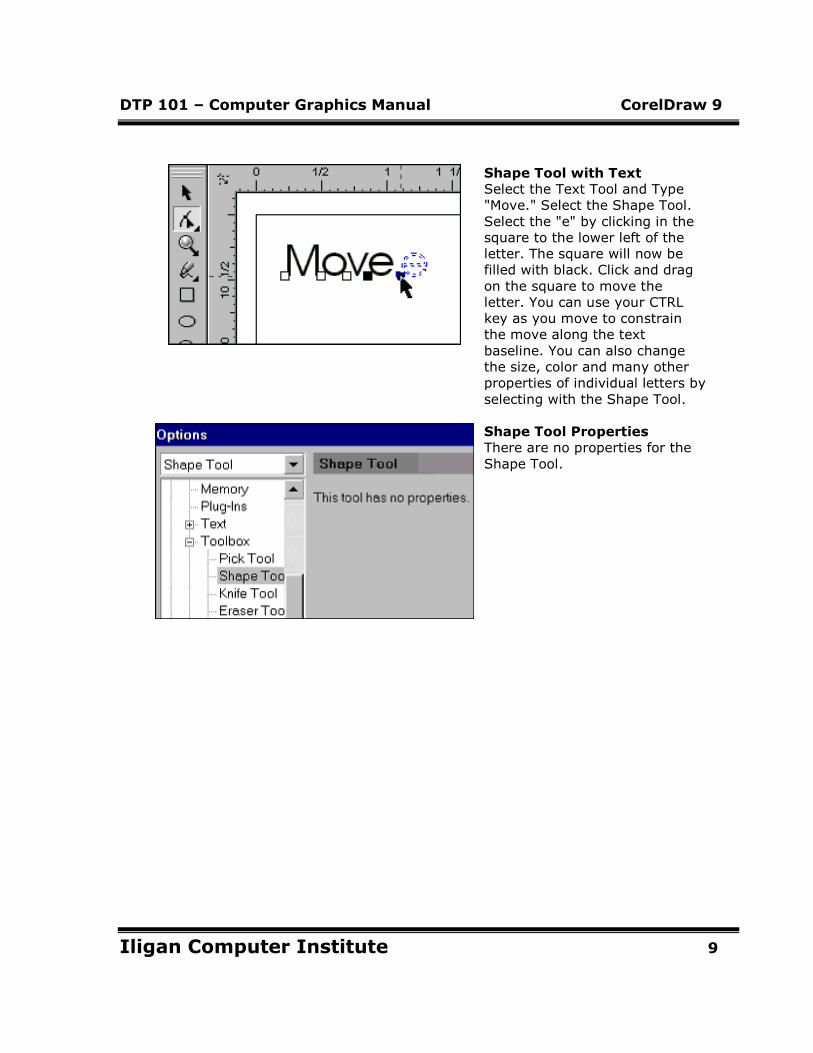
Shape Tool with Text
Select the Text Tool and Type
"Move." Select the Shape Tool.
Select the "e" by clicking in the
square to the lower left of the
letter. The square will now be
filled with black. Click and drag
on the square to move the
letter. You can use your CTRL
key as you move to constrain
the move along the text
baseline. You can also change
the size, color and many other
properties of individual letters by
selecting with the Shape Tool.
Shape Tool Properties
There are no properties for the
Shape Tool.
DTP 101 – Computer Graphics Manual CorelDraw 9
Iligan Computer Institute 10
Zoom Tool OverviewZoom Tool OverviewZoom Tool OverviewZoom Tool Overview
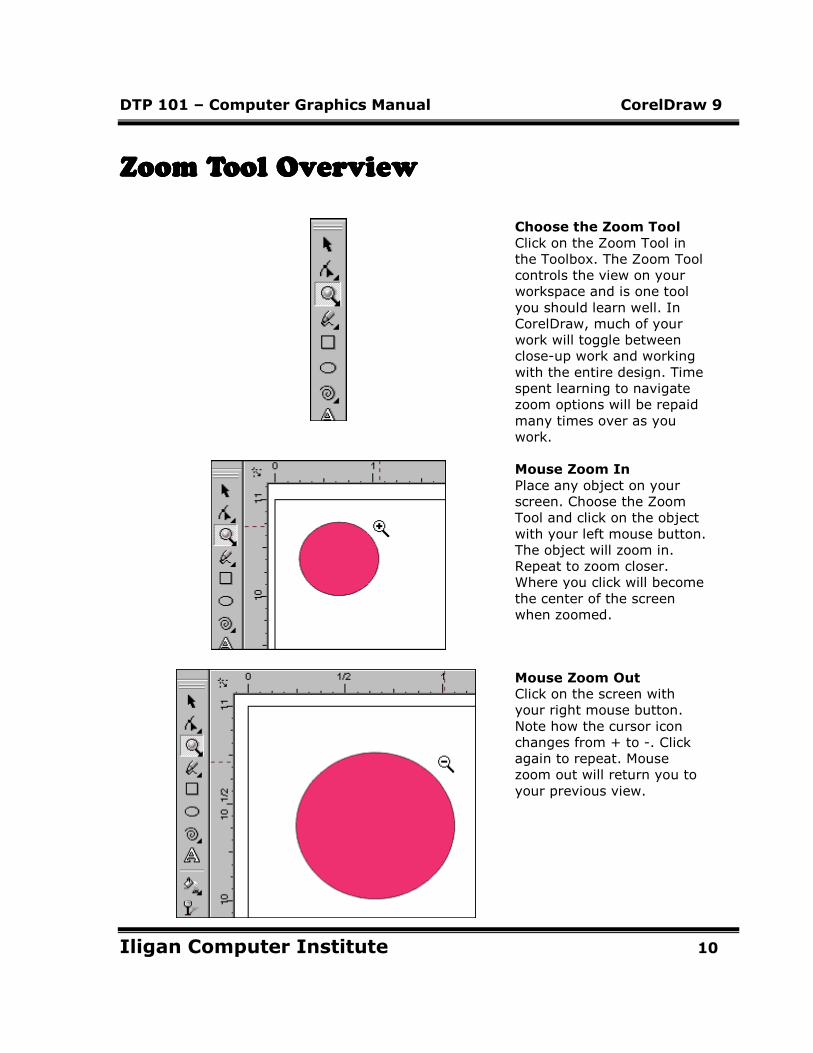
Choose the Zoom Tool
Click on the Zoom Tool in
the Toolbox. The Zoom Tool
controls the view on your
workspace and is one tool
you should learn well. In
CorelDraw, much of your
work will toggle between
close-up work and working
with the entire design. Time
spent learning to navigate
zoom options will be repaid
many times over as you
work.
Mouse Zoom In
Place any object on your
screen. Choose the Zoom
Tool and click on the object
with your left mouse button.
The object will zoom in.
Repeat to zoom closer.
Where you click will become
the center of the screen
when zoomed.
Mouse Zoom Out
Click on the screen with
your right mouse button.
Note how the cursor icon
changes from + to -. Click
again to repeat. Mouse
zoom out will return you to
your previous view.

DTP 101 – Computer Graphics Manual CorelDraw 9
Iligan Computer Institute 11
Marquee Zoom
Click and drag your mouse
over the area of the
document you would like to
have fill the screen.
Marquee selected zoom is
usually much faster when
you need to work on
sections of your document
and require a close view.
Zoom Property Bar
Select Zoom Tool. Note the
Property Bar above your
workspace. These tools
provide one click access to
the following (from left to
right): Zoom Tool, Pan Tool
(see step 7), Zoom In,
Zoom Out, Display actual
size, Zoom to Selected
object, Zoom to All Objects,
Zoom to Page, Zoom to
Page Width, Zoom to Page
Height, View Manager
Docker window.
Drop Down View
Selection
Locate the Zoom Levels fly-
out box just below the Main
Menu. This selection
provides fast access to
preset Zoom Levels. Click
on the triangle to expand
selection list and click on
desired view level.
DTP 101 – Computer Graphics Manual CorelDraw 9
Iligan Computer Institute 12
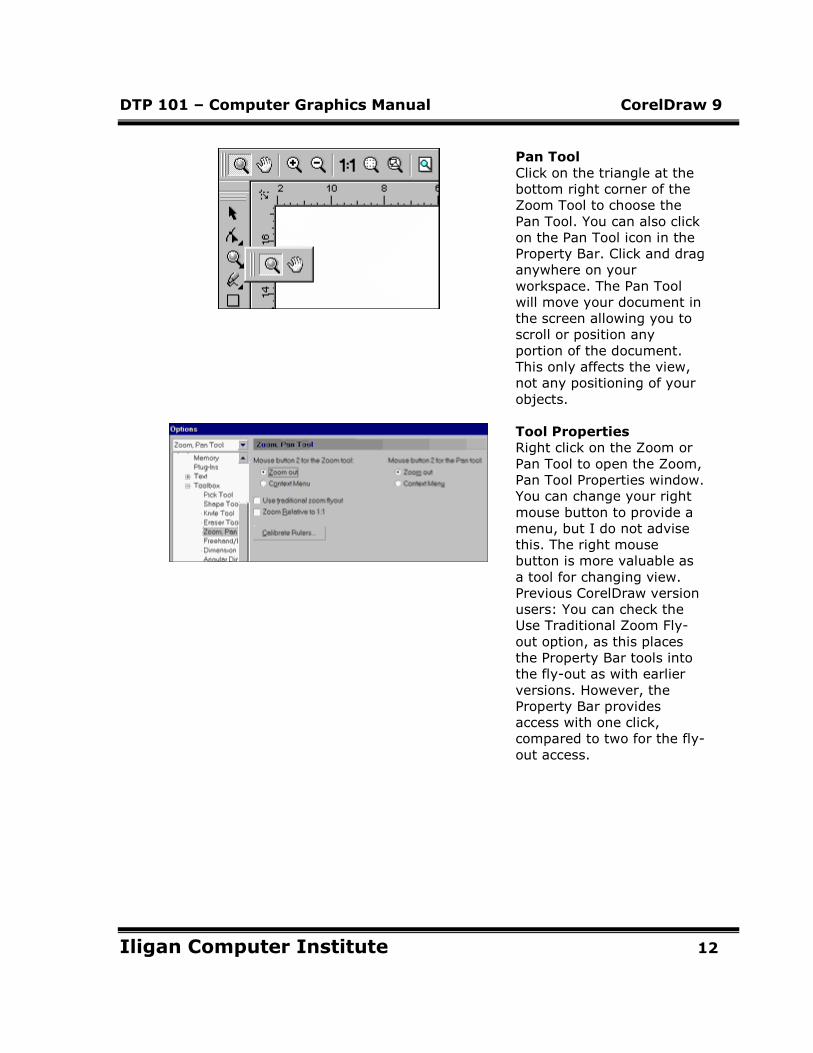
Pan Tool
Click on the triangle at the
bottom right corner of the
Zoom Tool to choose the
Pan Tool. You can also click
on the Pan Tool icon in the
Property Bar. Click and drag
anywhere on your
workspace. The Pan Tool
will move your document in
the screen allowing you to
scroll or position any
portion of the document.
This only affects the view,
not any positioning of your
objects.
Tool Properties
Right click on the Zoom or
Pan Tool to open the Zoom,
Pan Tool Properties window.
You can change your right
mouse button to provide a
menu, but I do not advise
this. The right mouse
button is more valuable as
a tool for changing view.
Previous CorelDraw version
users: You can check the
Use Traditional Zoom Fly-
out option, as this places
the Property Bar tools into
the fly-out as with earlier
versions. However, the
Property Bar provides
access with one click,
compared to two for the fly-
out access.
DTP 101 – Computer Graphics Manual CorelDraw 9
Iligan Computer Institute 13
Freehand Tool OverviewFreehand Tool OverviewFreehand Tool OverviewFreehand Tool Overview
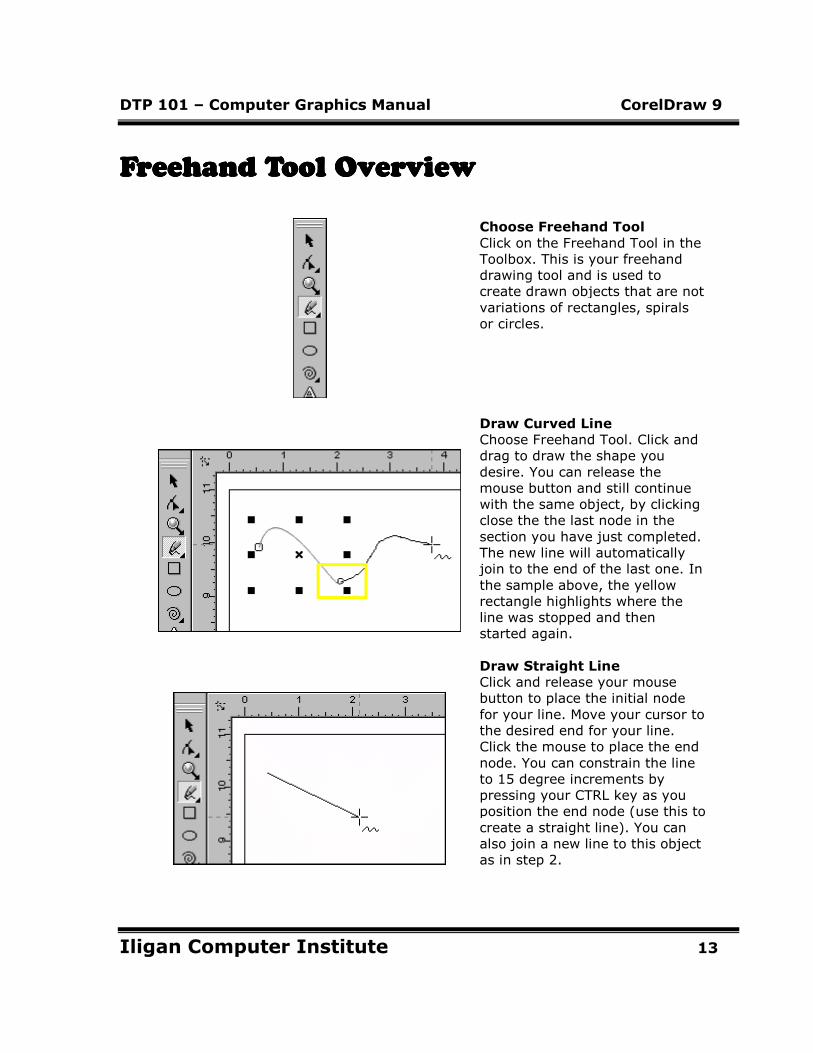
Choose Freehand Tool
Click on the Freehand Tool in the
Toolbox. This is your freehand
drawing tool and is used to
create drawn objects that are not
variations of rectangles, spirals
or circles.
Draw Curved Line
Choose Freehand Tool. Click and
drag to draw the shape you
desire. You can release the
mouse button and still continue
with the same object, by clicking
close the the last node in the
section you have just completed.
The new line will automatically
join to the end of the last one. In
the sample above, the yellow
rectangle highlights where the
line was stopped and then
started again.
Draw Straight Line
Click and release your mouse
button to place the initial node
for your line. Move your cursor to
the desired end for your line.
Click the mouse to place the end
node. You can constrain the line
to 15 degree increments by
pressing your CTRL key as you
position the end node (use this to
create a straight line). You can
also join a new line to this object
as in step 2.

DTP 101 – Computer Graphics Manual CorelDraw 9
Iligan Computer Institute 14
Create Closed Shapes: Part 1
Choose Freehand Tool. Click and
drag in an approximate circular
shape, but do not bring the end
all the way to the starting point
as in the top sample above. Click
a color in the color palette at the
right edge of the screen. This
should fill your object with color,
but since the ends are not
closed, the fill does not show.
Look at the bottom right of your
screen to note that the color
status area shows that the object
is filled.
Create Closed Shapes: Part 2
Click on the Auto-Close button in
the Property Bar above your
workspace (icon shown
highlighted with a yellow
rectangle in a cutout from the
Property Bar). Your object should
fill as the end points are joined.
Change Outline
Find the Outline section of the
Property Bar above your
workspace. Click on the fly-outs
to select desired outline size or
style.
Freehand Tool Fly-out
Click on the triangle in the
bottom right corner of the
Freehand Tool to open the fly-out
tool options. This presents other
freehand tools, but all are
outside the scope of this basic
tutorial.
DTP 101 – Computer Graphics Manual CorelDraw 9
Iligan Computer Institute 15
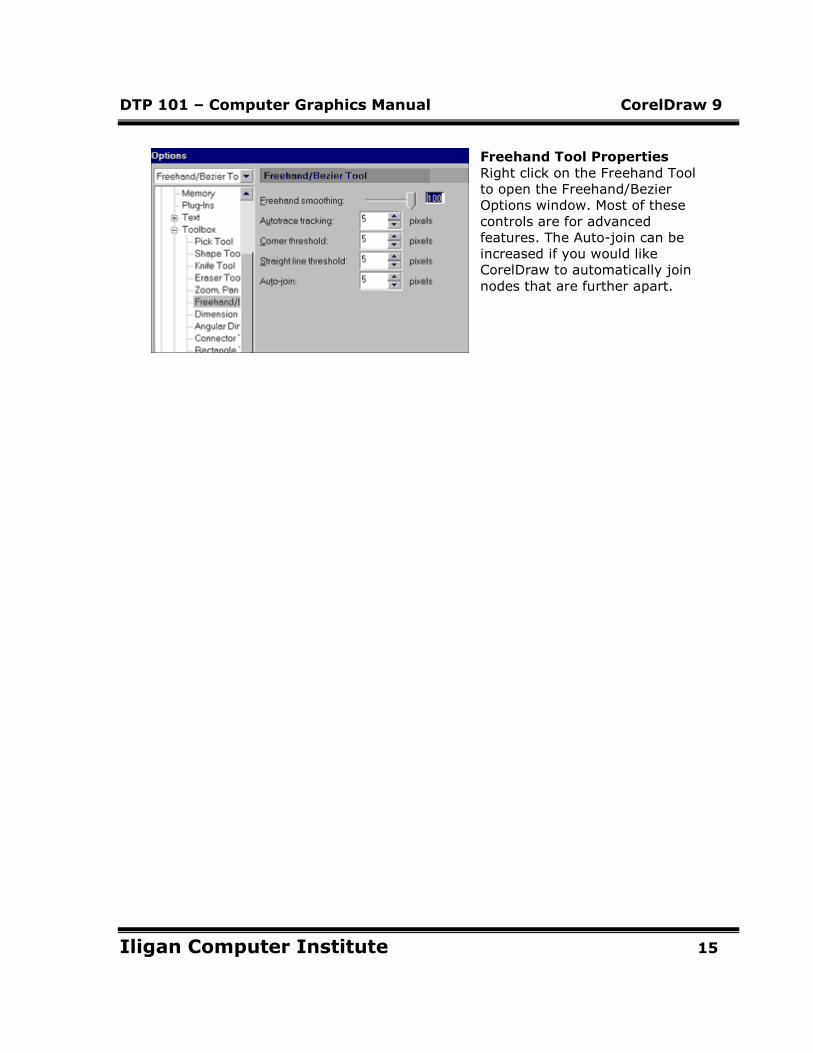
Freehand Tool Properties
Right click on the Freehand Tool
to open the Freehand/Bezier
Options window. Most of these
controls are for advanced
features. The Auto-join can be
increased if you would like
CorelDraw to automatically join
nodes that are further apart.
DTP 101 – Computer Graphics Manual CorelDraw 9
Iligan Computer Institute 16
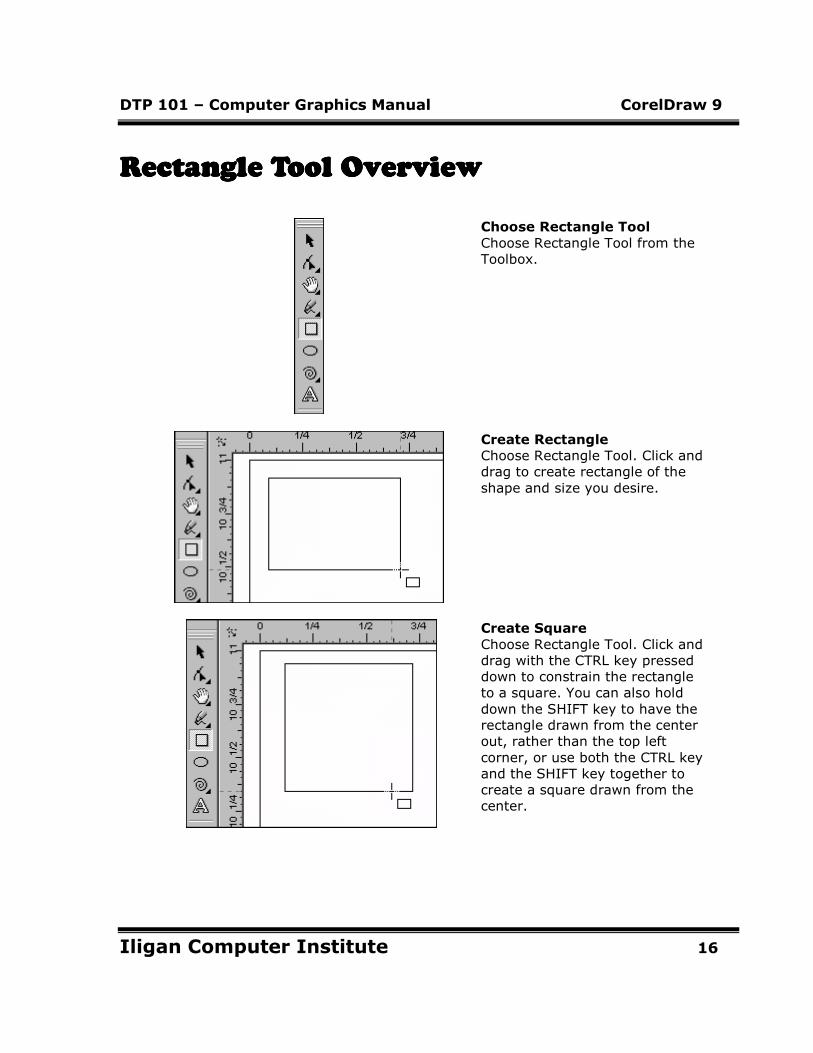
Rectangle Tool OverviewRectangle Tool OverviewRectangle Tool OverviewRectangle Tool Overview
Choose Rectangle Tool
Choose Rectangle Tool from the
Toolbox.
Create Rectangle
Choose Rectangle Tool. Click and
drag to create rectangle of the
shape and size you desire.
Create Square
Choose Rectangle Tool. Click and
drag with the CTRL key pressed
down to constrain the rectangle
to a square. You can also hold
down the SHIFT key to have the
rectangle drawn from the center
out, rather than the top left
corner, or use both the CTRL key
and the SHIFT key together to
create a square drawn from the
center.
DTP 101 – Computer Graphics Manual CorelDraw 9
Iligan Computer Institute 17
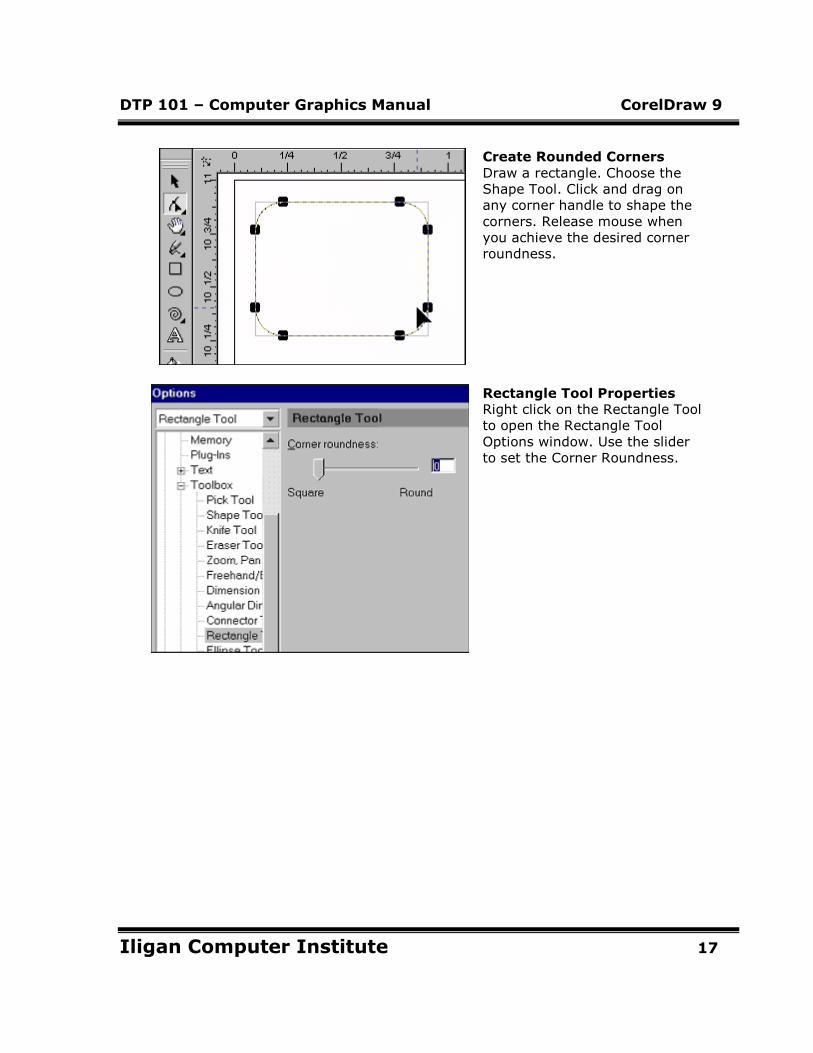
Create Rounded Corners
Draw a rectangle. Choose the
Shape Tool. Click and drag on
any corner handle to shape the
corners. Release mouse when
you achieve the desired corner
roundness.
Rectangle Tool Properties
Right click on the Rectangle Tool
to open the Rectangle Tool
Options window. Use the slider
to set the Corner Roundness.
DTP 101 – Computer Graphics Manual CorelDraw 9
Iligan Computer Institute 18
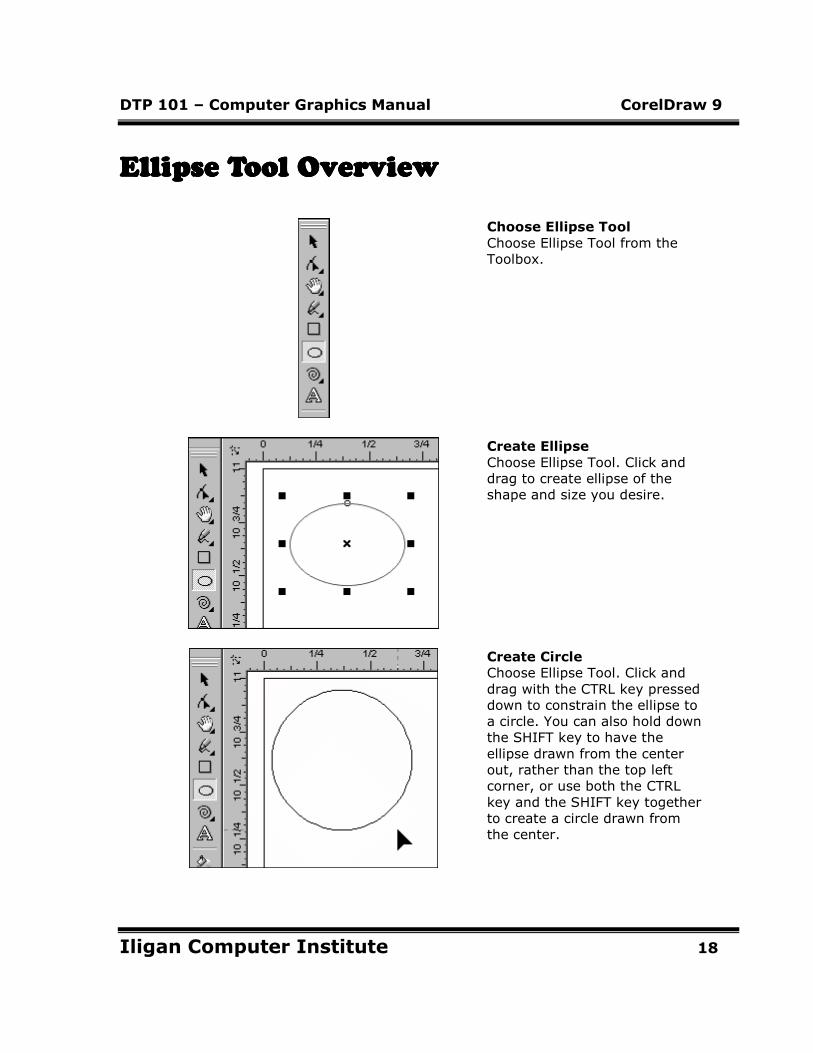
EllipsEllipsEllipsEllipse Tool Overviewe Tool Overviewe Tool Overviewe Tool Overview
Choose Ellipse Tool
Choose Ellipse Tool from the
Toolbox.
Create Ellipse
Choose Ellipse Tool. Click and
drag to create ellipse of the
shape and size you desire.
Create Circle
Choose Ellipse Tool. Click and
drag with the CTRL key pressed
down to constrain the ellipse to
a circle. You can also hold down
the SHIFT key to have the
ellipse drawn from the center
out, rather than the top left
corner, or use both the CTRL
key and the SHIFT key together
to create a circle drawn from
the center.
DTP 101 – Computer Graphics Manual CorelDraw 9
Iligan Computer Institute 19
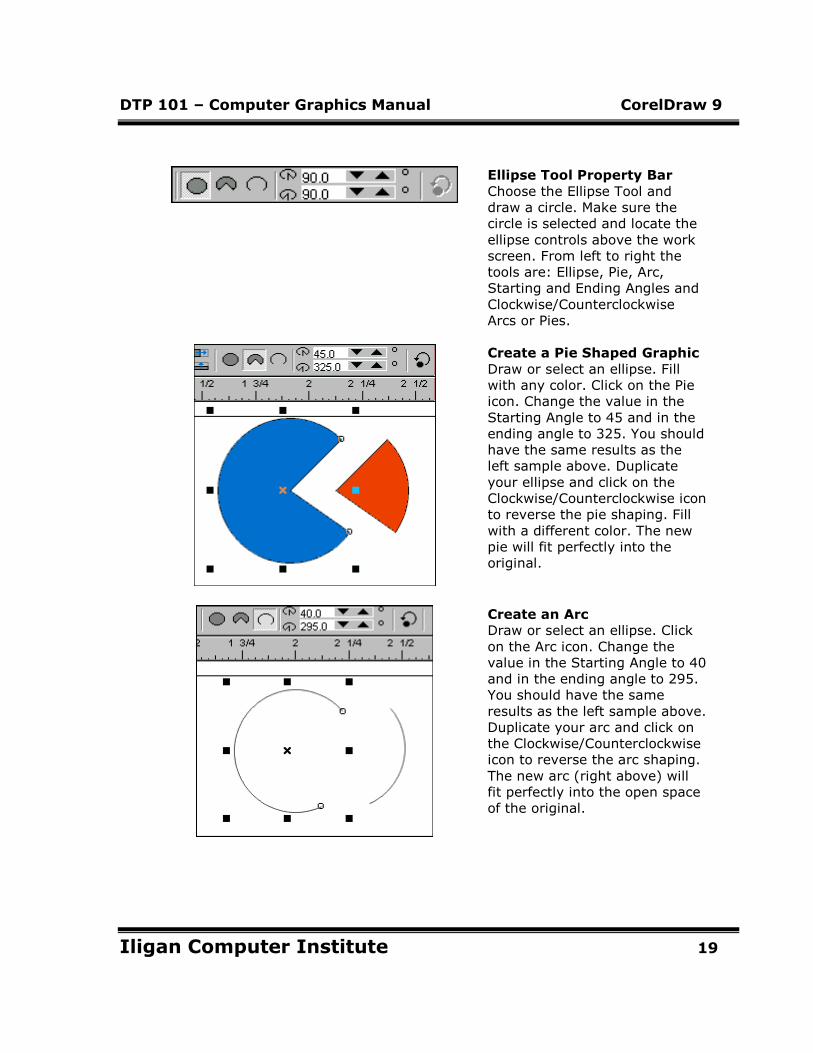
Ellipse Tool Property Bar
Choose the Ellipse Tool and
draw a circle. Make sure the
circle is selected and locate the
ellipse controls above the work
screen. From left to right the
tools are: Ellipse, Pie, Arc,
Starting and Ending Angles and
Clockwise/Counterclockwise
Arcs or Pies.
Create a Pie Shaped Graphic
Draw or select an ellipse. Fill
with any color. Click on the Pie
icon. Change the value in the
Starting Angle to 45 and in the
ending angle to 325. You should
have the same results as the
left sample above. Duplicate
your ellipse and click on the
Clockwise/Counterclockwise icon
to reverse the pie shaping. Fill
with a different color. The new
pie will fit perfectly into the
original.
Create an Arc
Draw or select an ellipse. Click
on the Arc icon. Change the
value in the Starting Angle to 40
and in the ending angle to 295.
You should have the same
results as the left sample above.
Duplicate your arc and click on
the Clockwise/Counterclockwise
icon to reverse the arc shaping.
The new arc (right above) will
fit perfectly into the open space
of the original.
DTP 101 – Computer Graphics Manual CorelDraw 9
Iligan Computer Institute 20
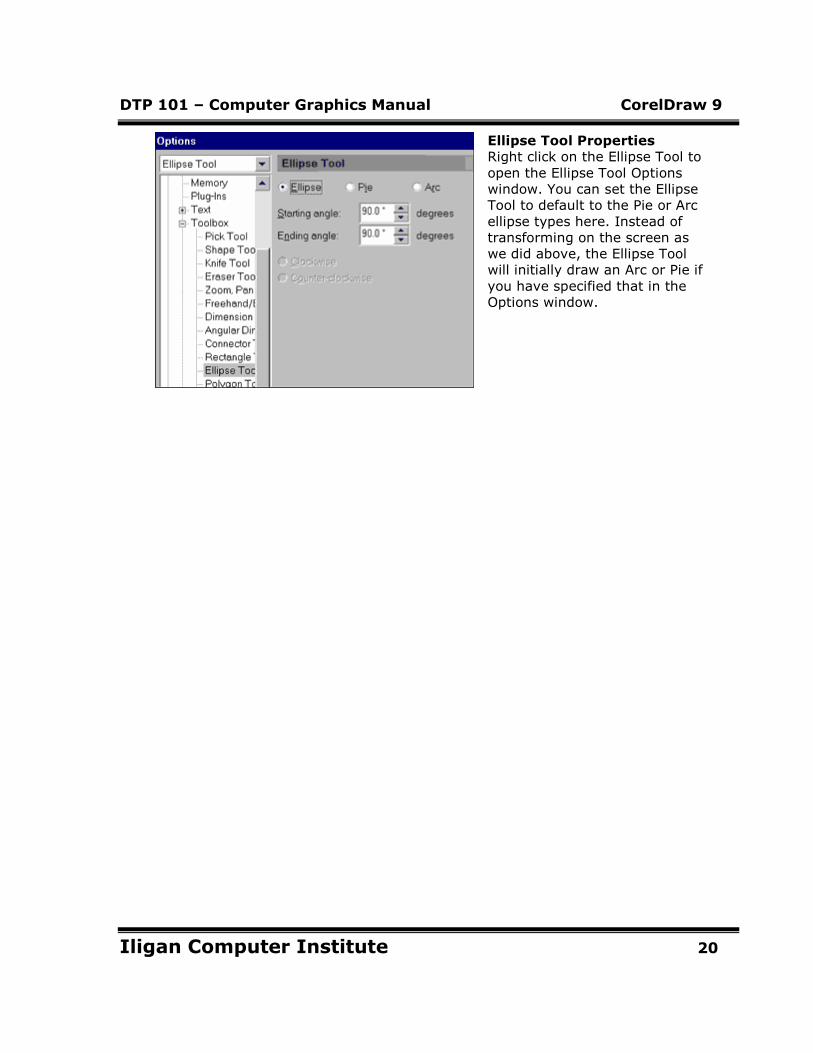
Ellipse Tool Properties
Right click on the Ellipse Tool to
open the Ellipse Tool Options
window. You can set the Ellipse
Tool to default to the Pie or Arc
ellipse types here. Instead of
transforming on the screen as
we did above, the Ellipse Tool
will initially draw an Arc or Pie if
you have specified that in the
Options window.

DTP 101 – Computer Graphics Manual CorelDraw 9
Iligan Computer Institute 21
Spiral Tool OverviewSpiral Tool OverviewSpiral Tool OverviewSpiral Tool Overview
Choose Spiral Tool
Choose the Spiral Tool from the
Toolbox. Note the position in
the Toolbox. The Polygon or
Graph Paper Tool may be
showing, and you will have to
click on the triangle in the
bottom right corner to open the
fly-out. Choose Spiral Tool.
Draw a Symmetrical Spiral
Choose Spiral Tool. Choose
number of revolutions for your
spiral from the Property bar
above the workspace. Click on
the Symmetrical icon. (A
symmetrical spiral has equal
distance between spiral
revolutions.) Click and drag on
the workspace to create spiral
of desired size. Hold your CTRL
key down as you drag to create
a spiral with a circular shape.
Hold your SHIFT key down to
have the spiral drawn from the
center.
DTP 101 – Computer Graphics Manual CorelDraw 9
Iligan Computer Institute 22
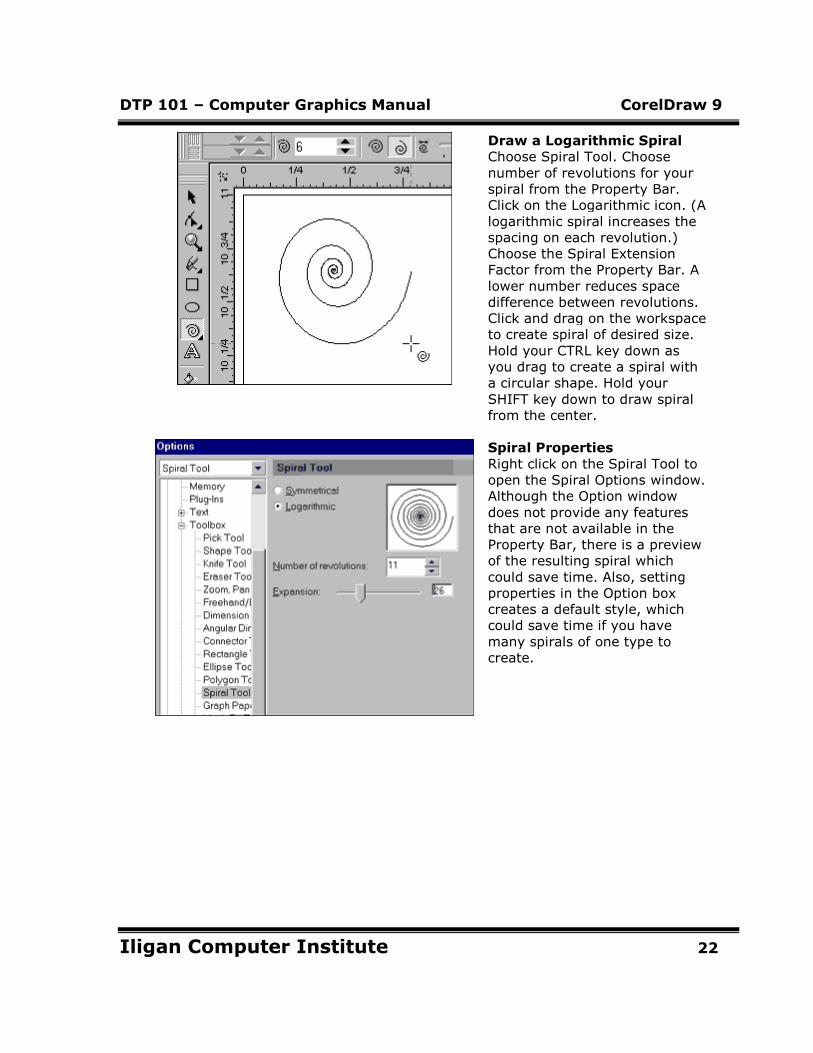
Draw a Logarithmic Spiral
Choose Spiral Tool. Choose
number of revolutions for your
spiral from the Property Bar.
Click on the Logarithmic icon. (A
logarithmic spiral increases the
spacing on each revolution.)
Choose the Spiral Extension
Factor from the Property Bar. A
lower number reduces space
difference between revolutions.
Click and drag on the workspace
to create spiral of desired size.
Hold your CTRL key down as
you drag to create a spiral with
a circular shape. Hold your
SHIFT key down to draw spiral
from the center.
Spiral Properties
Right click on the Spiral Tool to
open the Spiral Options window.
Although the Option window
does not provide any features
that are not available in the
Property Bar, there is a preview
of the resulting spiral which
could save time. Also, setting
properties in the Option box
creates a default style, which
could save time if you have
many spirals of one type to
create.
DTP 101 – Computer Graphics Manual CorelDraw 9
Iligan Computer Institute 23
Polygon Tool OverviewPolygon Tool OverviewPolygon Tool OverviewPolygon Tool Overview
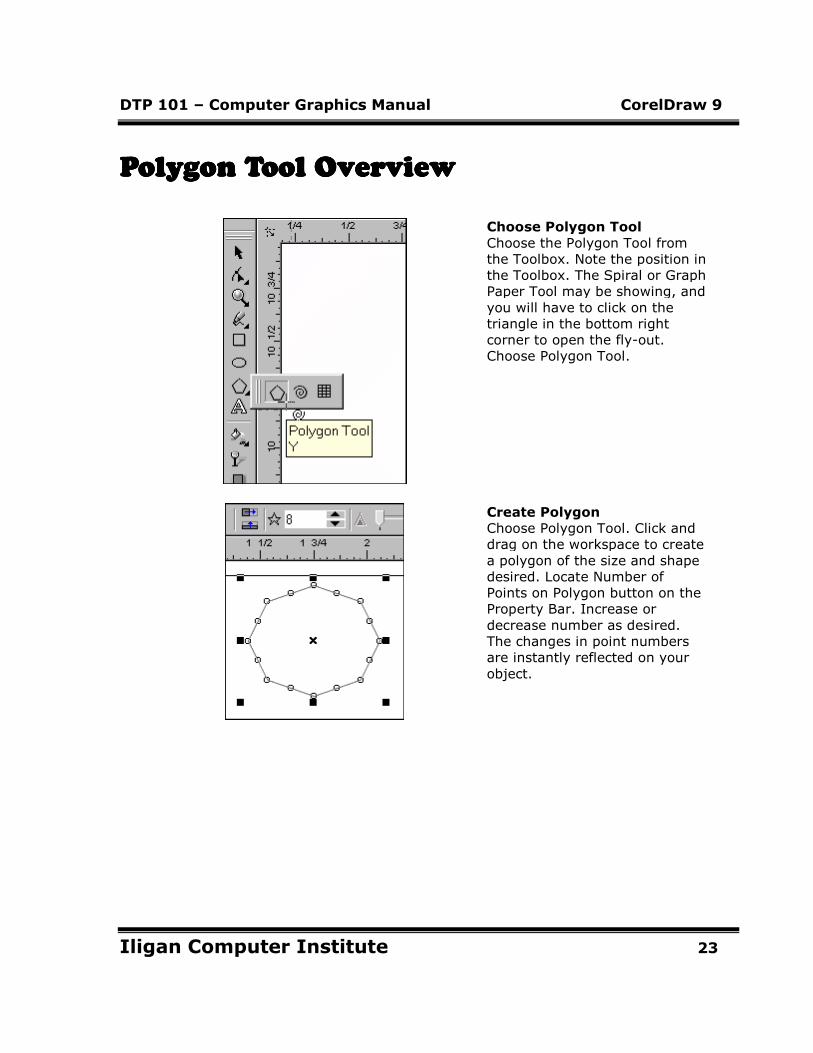
Choose Polygon Tool
Choose the Polygon Tool from
the Toolbox. Note the position in
the Toolbox. The Spiral or Graph
Paper Tool may be showing, and
you will have to click on the
triangle in the bottom right
corner to open the fly-out.
Choose Polygon Tool.
Create Polygon
Choose Polygon Tool. Click and
drag on the workspace to create
a polygon of the size and shape
desired. Locate Number of
Points on Polygon button on the
Property Bar. Increase or
decrease number as desired.
The changes in point numbers
are instantly reflected on your
object.
DTP 101 – Computer Graphics Manual CorelDraw 9
Iligan Computer Institute 24
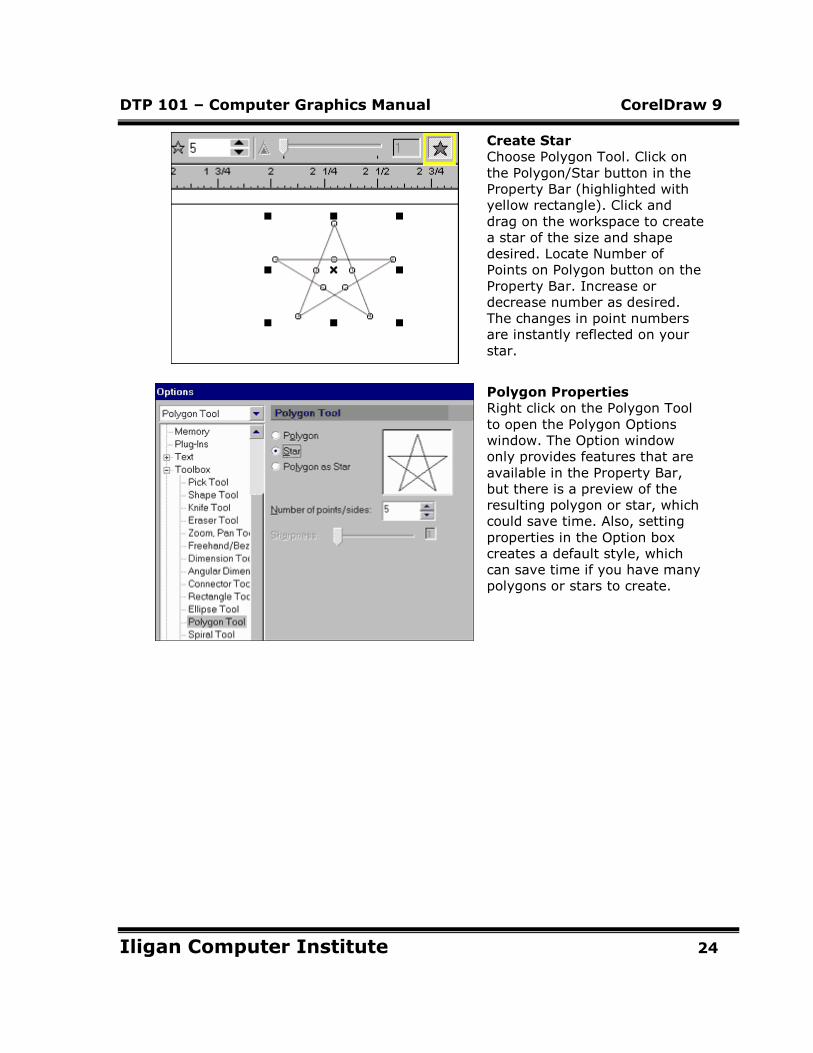
Create Star
Choose Polygon Tool. Click on
the Polygon/Star button in the
Property Bar (highlighted with
yellow rectangle). Click and
drag on the workspace to create
a star of the size and shape
desired. Locate Number of
Points on Polygon button on the
Property Bar. Increase or
decrease number as desired.
The changes in point numbers
are instantly reflected on your
star.
Polygon Properties
Right click on the Polygon Tool
to open the Polygon Options
window. The Option window
only provides features that are
available in the Property Bar,
but there is a preview of the
resulting polygon or star, which
could save time. Also, setting
properties in the Option box
creates a default style, which
can save time if you have many
polygons or stars to create.
DTP 101 – Computer Graphics Manual CorelDraw 9
Iligan Computer Institute 25
Graph Paper Tool OverviewGraph Paper Tool OverviewGraph Paper Tool OverviewGraph Paper Tool Overview
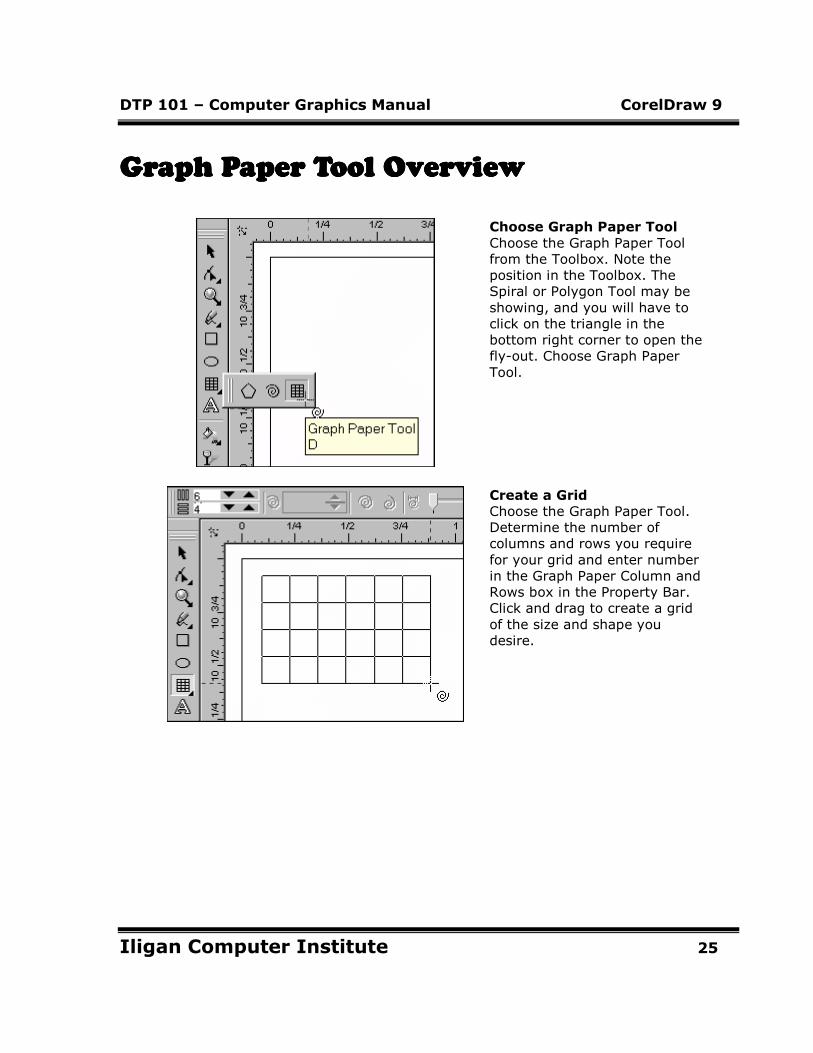
Choose Graph Paper Tool
Choose the Graph Paper Tool
from the Toolbox. Note the
position in the Toolbox. The
Spiral or Polygon Tool may be
showing, and you will have to
click on the triangle in the
bottom right corner to open the
fly-out. Choose Graph Paper
Tool.
Create a Grid
Choose the Graph Paper Tool.
Determine the number of
columns and rows you require
for your grid and enter number
in the Graph Paper Column and
Rows box in the Property Bar.
Click and drag to create a grid
of the size and shape you
desire.

DTP 101 – Computer Graphics Manual CorelDraw 9
Iligan Computer Institute 26
Color the Grid
Choose the Pick Tool from the
Toolbox. Click anywhere on the
grid to select. Click on any color
in the color palette to fill the
grid with one solid color.
Color One Cell
The grid is created from several
small rectangles grouped
together. To fill one cell, choose
the Pick Tool and, with the
CTRL key pressed, click on the
cell. Note how only one cell is
selected. Click on any color in
the color palette to fill the cell.
DTP 101 – Computer Graphics Manual CorelDraw 9
Iligan Computer Institute 27
Set Page Size/OrientationSet Page Size/OrientationSet Page Size/OrientationSet Page Size/Orientation
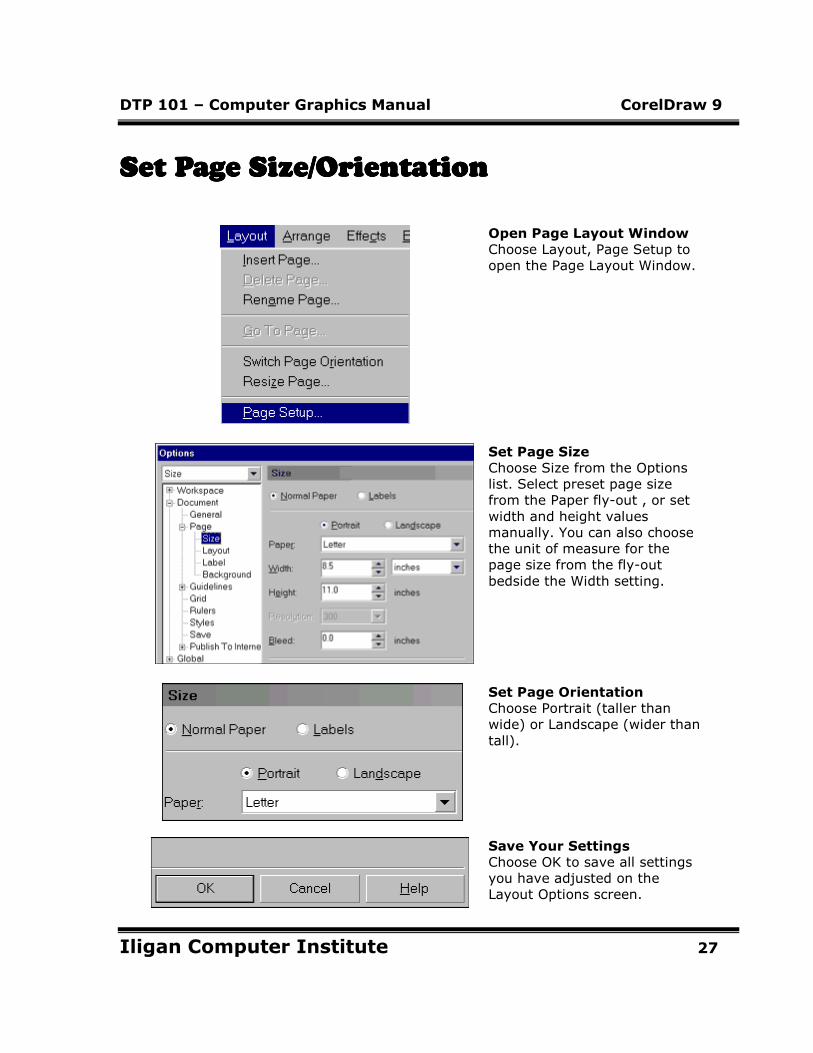
Open Page Layout Window
Choose Layout, Page Setup to
open the Page Layout Window.
Set Page Size
Choose Size from the Options
list. Select preset page size
from the Paper fly-out , or set
width and height values
manually. You can also choose
the unit of measure for the
page size from the fly-out
bedside the Width setting.
Set Page Orientation
Choose Portrait (taller than
wide) or Landscape (wider than
tall).
Save Your Settings
Choose OK to save all settings
you have adjusted on the
Layout Options screen.
DTP 101 – Computer Graphics Manual CorelDraw 9
Iligan Computer Institute 28
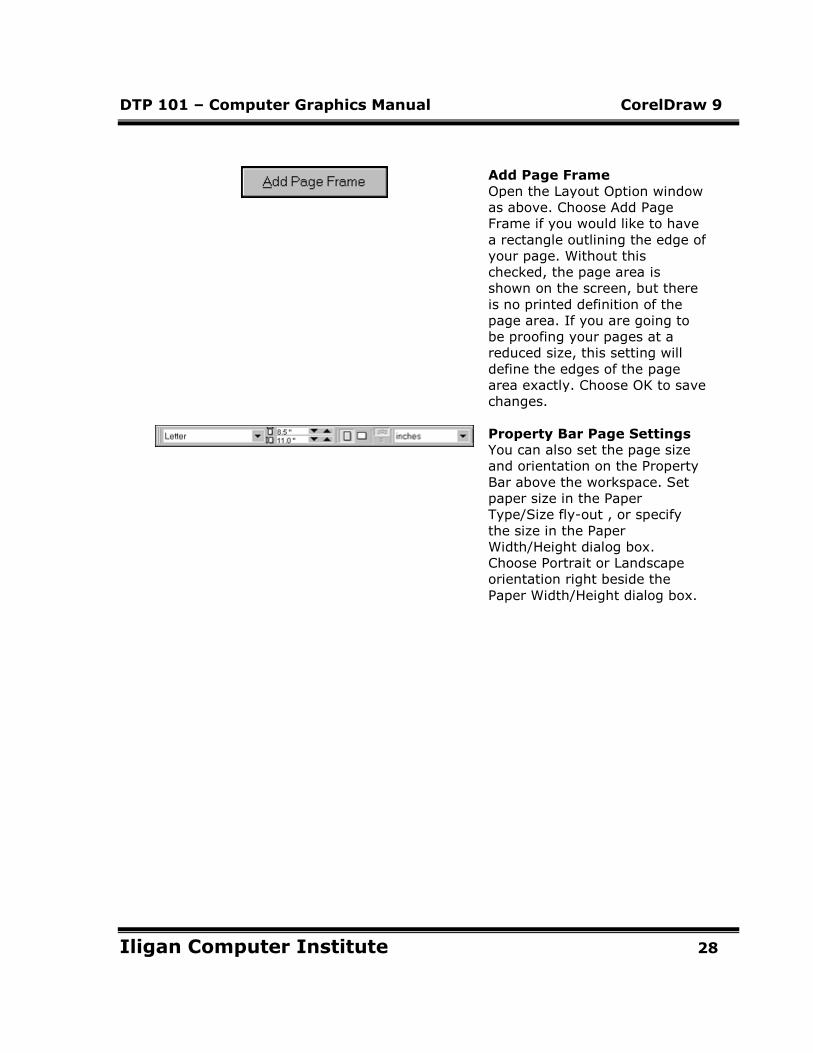
Add Page Frame
Open the Layout Option window
as above. Choose Add Page
Frame if you would like to have
a rectangle outlining the edge of
your page. Without this
checked, the page area is
shown on the screen, but there
is no printed definition of the
page area. If you are going to
be proofing your pages at a
reduced size, this setting will
define the edges of the page
area exactly. Choose OK to save
changes.
Property Bar Page Settings
You can also set the page size
and orientation on the Property
Bar above the workspace. Set
paper size in the Paper
Type/Size fly-out , or specify
the size in the Paper
Width/Height dialog box.
Choose Portrait or Landscape
orientation right beside the
Paper Width/Height dialog box.
DTP 101 – Computer Graphics Manual CorelDraw 9
Iligan Computer Institute 29
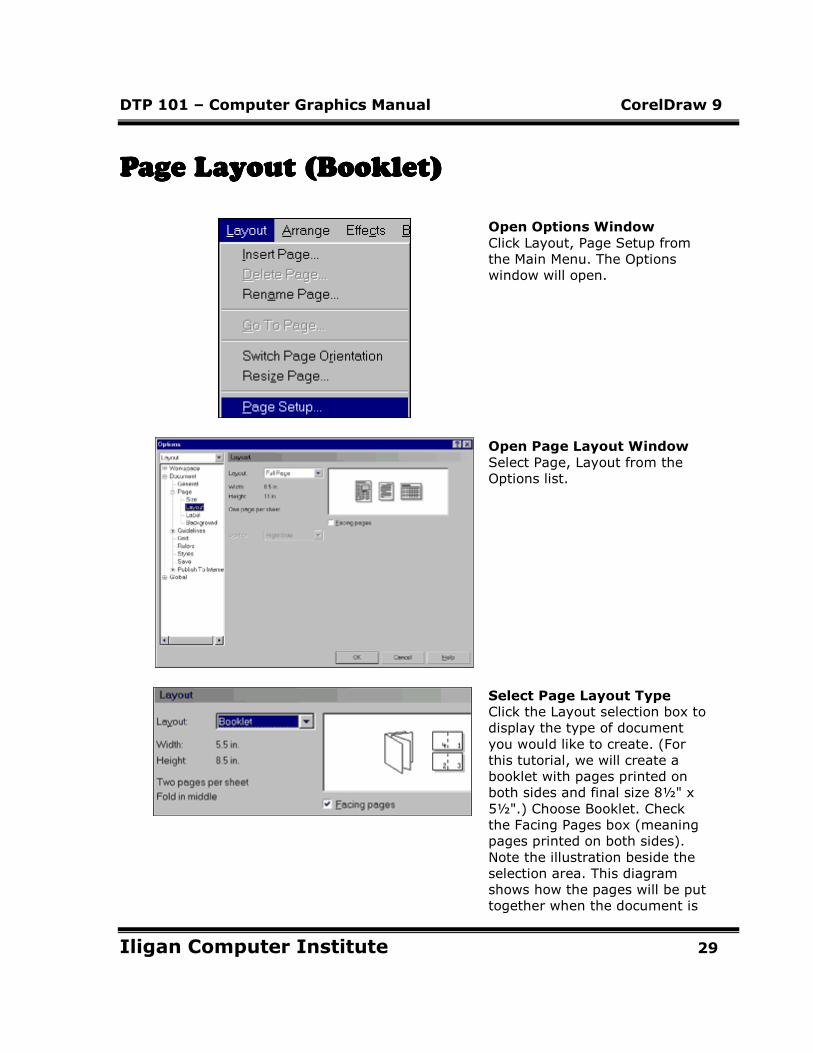
Page Layout (Booklet)Page Layout (Booklet)Page Layout (Booklet)Page Layout (Booklet)
Open Options Window
Click Layout, Page Setup from
the Main Menu. The Options
window will open.
Open Page Layout Window
Select Page, Layout from the
Options list.
Select Page Layout Type
Click the Layout selection box to
display the type of document
you would like to create. (For
this tutorial, we will create a
booklet with pages printed on
both sides and final size 8½" x
5½".) Choose Booklet. Check
the Facing Pages box (meaning
pages printed on both sides).
Note the illustration beside the
selection area. This diagram
shows how the pages will be put
together when the document is
DTP 101 – Computer Graphics Manual CorelDraw 9
Iligan Computer Institute 30
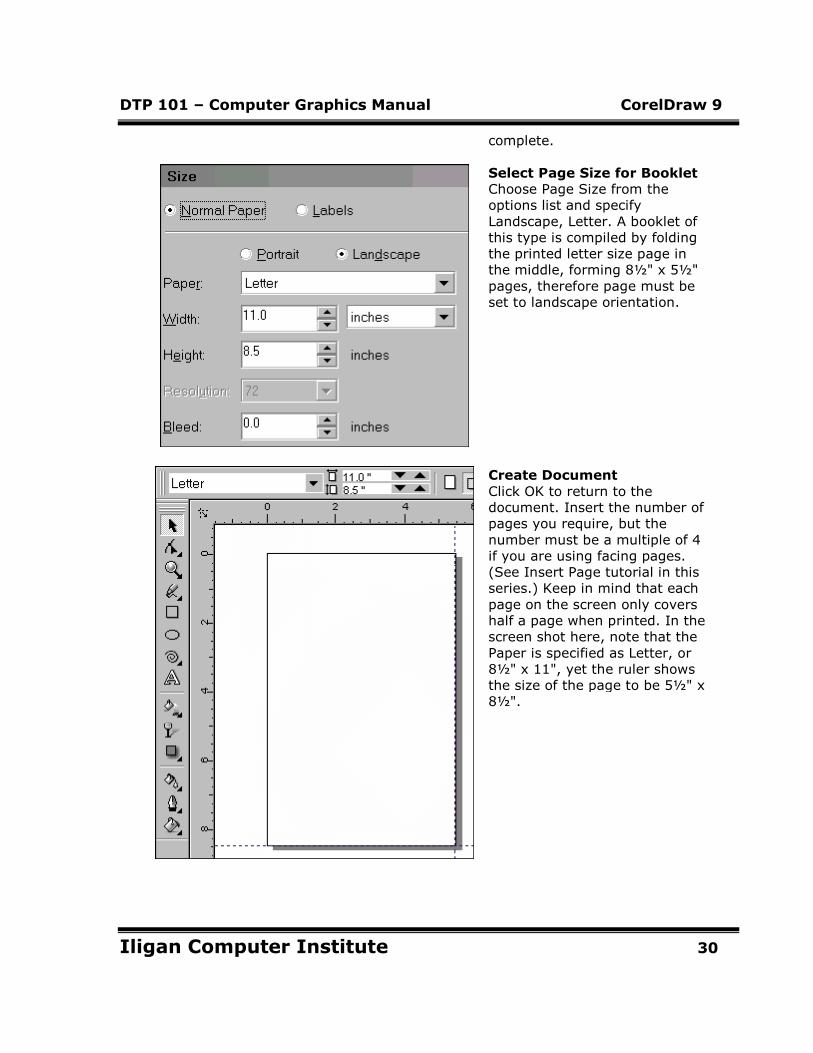
complete.
Select Page Size for Booklet
Choose Page Size from the
options list and specify
Landscape, Letter. A booklet of
this type is compiled by folding
the printed letter size page in
the middle, forming 8½" x 5½"
pages, therefore page must be
set to landscape orientation.
Create Document
Click OK to return to the
document. Insert the number of
pages you require, but the
number must be a multiple of 4
if you are using facing pages.
(See Insert Page tutorial in this
series.) Keep in mind that each
page on the screen only covers
half a page when printed. In the
screen shot here, note that the
Paper is specified as Letter, or
8½" x 11", yet the ruler shows
the size of the page to be 5½" x
8½".
DTP 101 – Computer Graphics Manual CorelDraw 9
Iligan Computer Institute 31
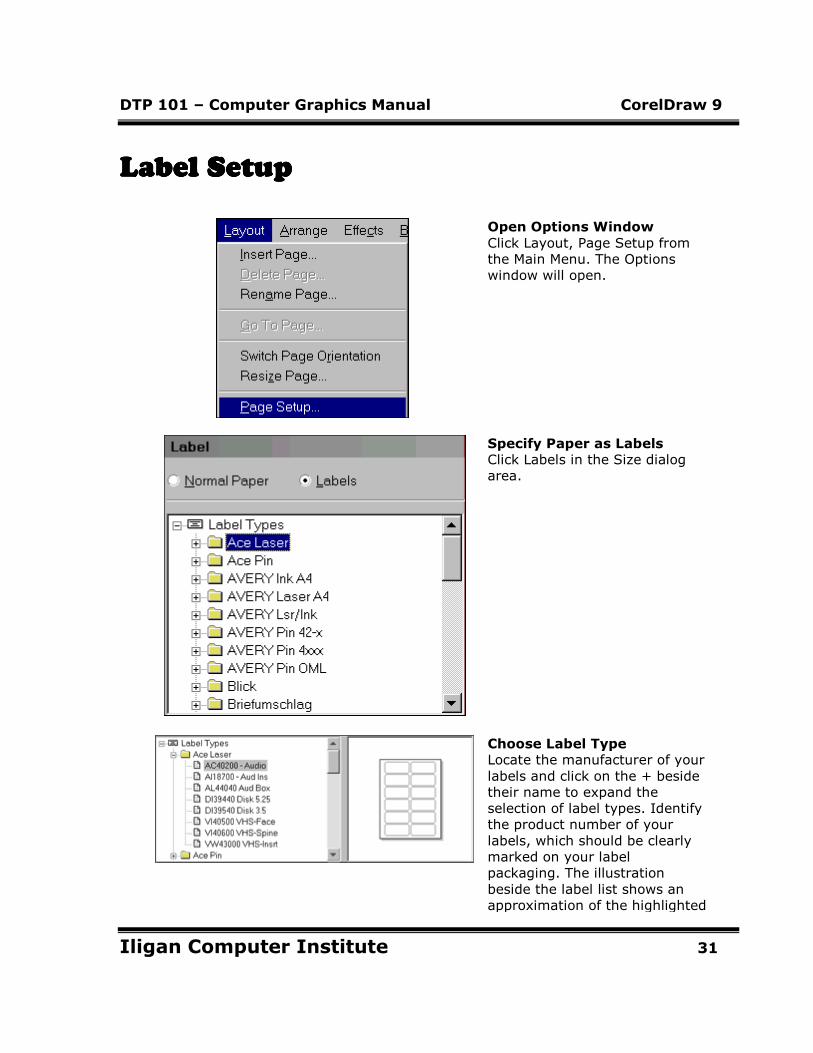
Label SetupLabel SetupLabel SetupLabel Setup
Open Options Window
Click Layout, Page Setup from
the Main Menu. The Options
window will open.
Specify Paper as Labels
Click Labels in the Size dialog
area.
Choose Label Type
Locate the manufacturer of your
labels and click on the + beside
their name to expand the
selection of label types. Identify
the product number of your
labels, which should be clearly
marked on your label
packaging. The illustration
beside the label list shows an
approximation of the highlighted
DTP 101 – Computer Graphics Manual CorelDraw 9
Iligan Computer Institute 32
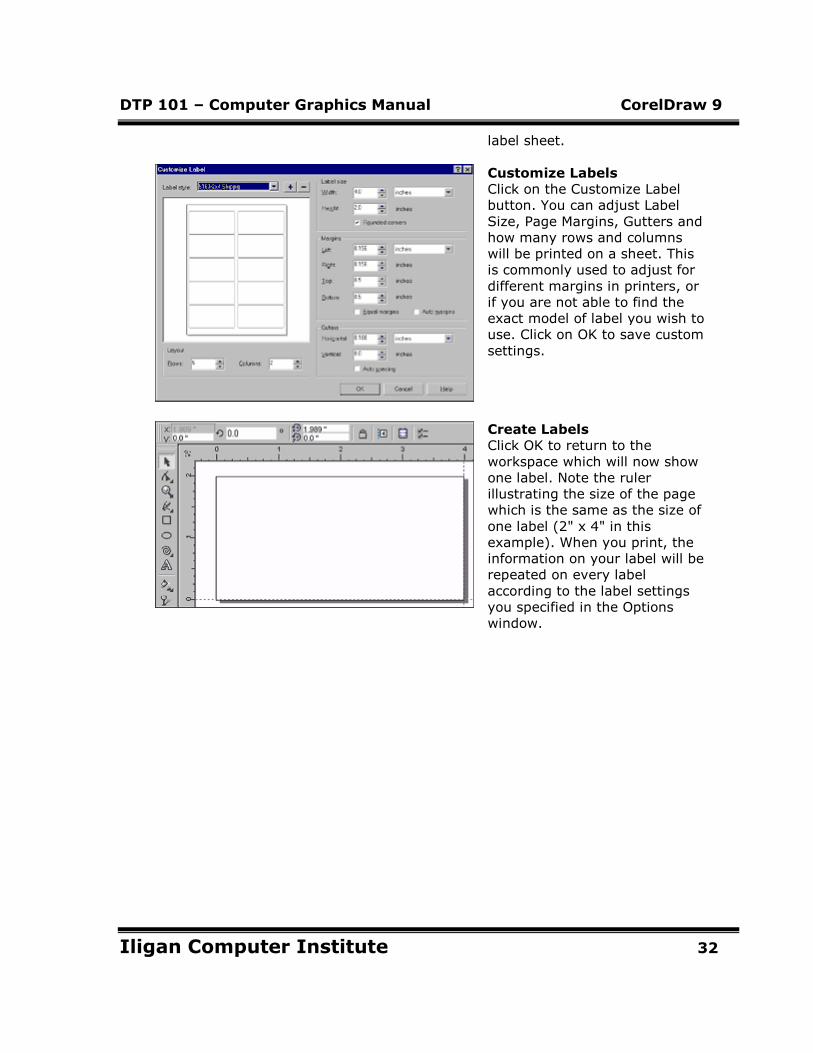
label sheet.
Customize Labels
Click on the Customize Label
button. You can adjust Label
Size, Page Margins, Gutters and
how many rows and columns
will be printed on a sheet. This
is commonly used to adjust for
different margins in printers, or
if you are not able to find the
exact model of label you wish to
use. Click on OK to save custom
settings.
Create Labels
Click OK to return to the
workspace which will now show
one label. Note the ruler
illustrating the size of the page
which is the same as the size of
one label (2" x 4" in this
example). When you print, the
information on your label will be
repeated on every label
according to the label settings
you specified in the Options
window.

DTP 101 – Computer Graphics Manual CorelDraw 9
Iligan Computer Institute 33
Setting Page BackgroundSetting Page BackgroundSetting Page BackgroundSetting Page Background
Open Options Window
Setting the page background
can simulate paper color or
pattern. You can choose
whether or not the pattern
prints and exports, or simply
represents the color your
page will be when printed.
Click Layout, Page Setup
from the Main Menu. The
Options window will open.
Choose Background
Window
Choose Background from
the Options List.
DTP 101 – Computer Graphics Manual CorelDraw 9
Iligan Computer Institute 34
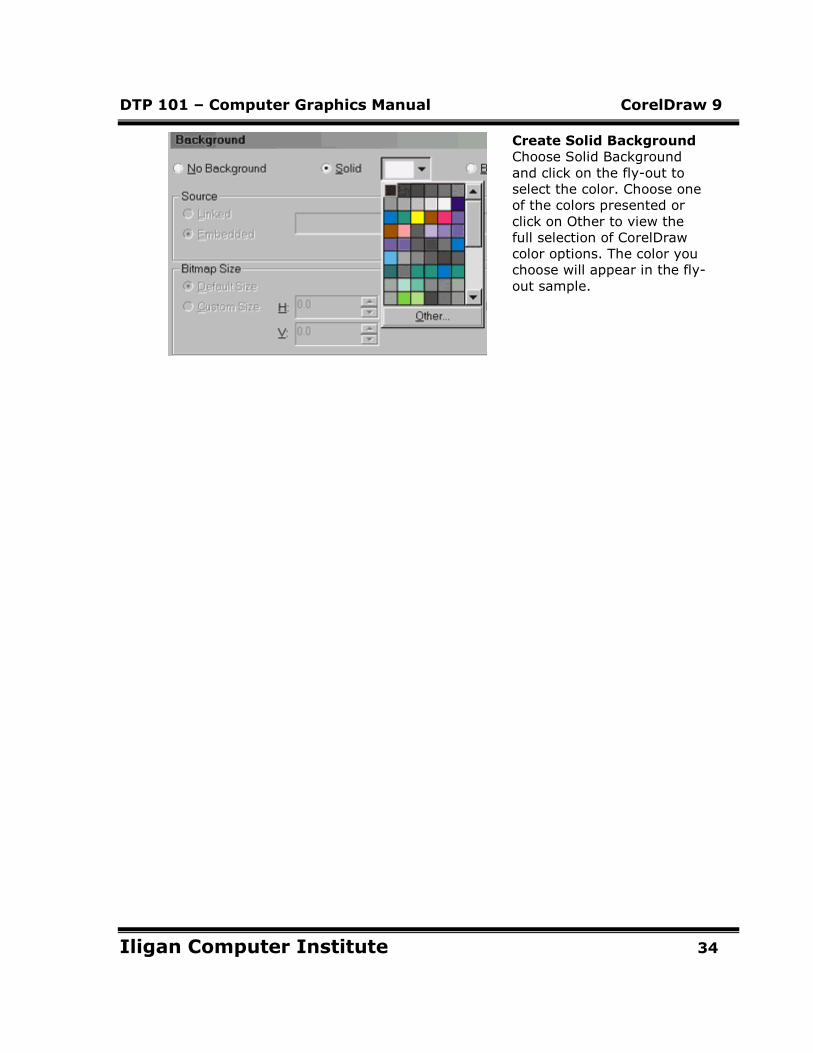
Create Solid Background
Choose Solid Background
and click on the fly-out to
select the color. Choose one
of the colors presented or
click on Other to view the
full selection of CorelDraw
color options. The color you
choose will appear in the fly-
out sample.
DTP 101 – Computer Graphics Manual CorelDraw 9
Iligan Computer Institute 35
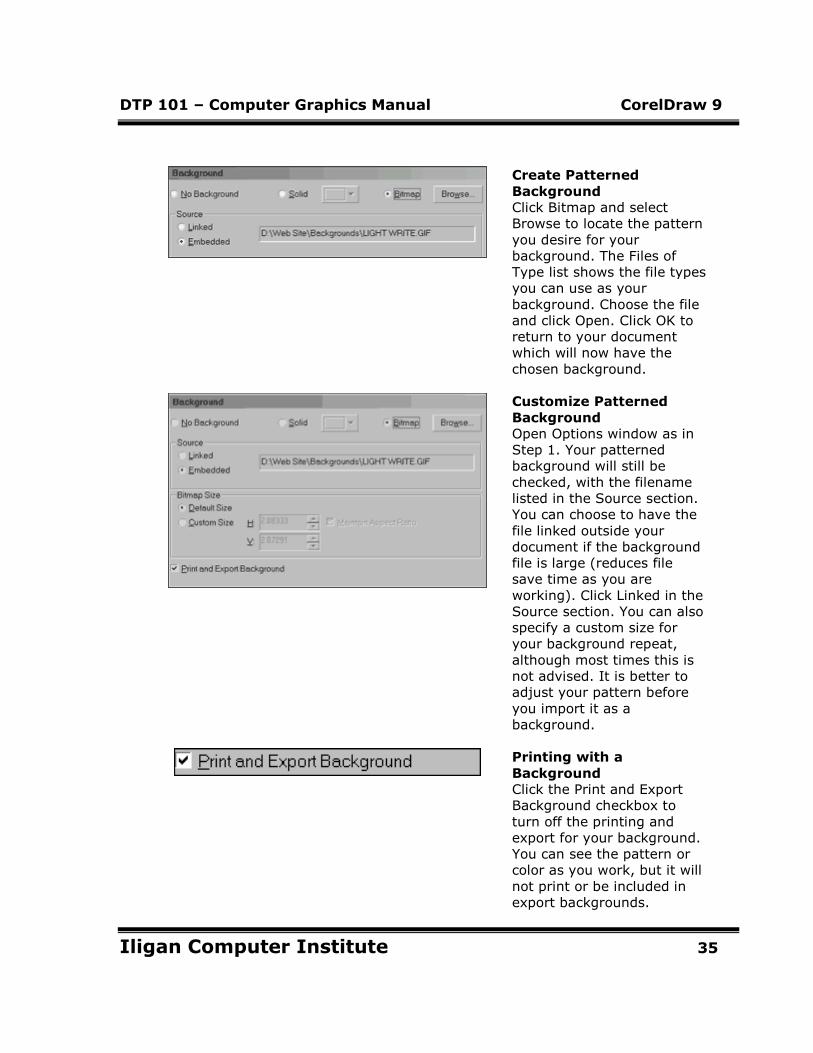
Create Patterned
Background
Click Bitmap and select
Browse to locate the pattern
you desire for your
background. The Files of
Type list shows the file types
you can use as your
background. Choose the file
and click Open. Click OK to
return to your document
which will now have the
chosen background.
Customize Patterned
Background
Open Options window as in
Step 1. Your patterned
background will still be
checked, with the filename
listed in the Source section.
You can choose to have the
file linked outside your
document if the background
file is large (reduces file
save time as you are
working). Click Linked in the
Source section. You can also
specify a custom size for
your background repeat,
although most times this is
not advised. It is better to
adjust your pattern before
you import it as a
background.
Printing with a
Background
Click the Print and Export
Background checkbox to
turn off the printing and
export for your background.
You can see the pattern or
color as you work, but it will
not print or be included in
export backgrounds.

DTP 101 – Computer Graphics Manual CorelDraw 9
Iligan Computer Institute 36
Working with
Backgrounds
When you specify a
background, it will appear
on every page in your
document. You cannot edit
the background from within
the document. The
background will not show
when you are working in
Wireframe view, and will be
jagged when working in
Draft view.
DTP 101 – Computer Graphics Manual CorelDraw 9
Iligan Computer Institute 37
Setup GuidelinesSetup GuidelinesSetup GuidelinesSetup Guidelines
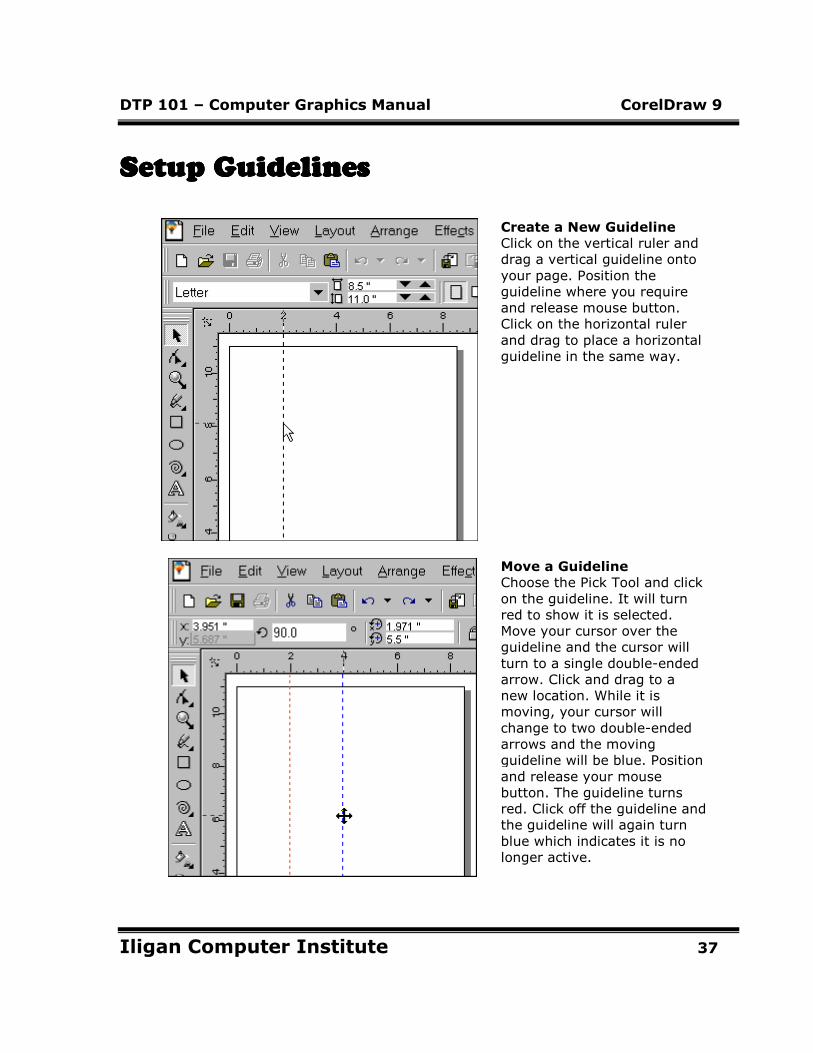
Create a New Guideline
Click on the vertical ruler and
drag a vertical guideline onto
your page. Position the
guideline where you require
and release mouse button.
Click on the horizontal ruler
and drag to place a horizontal
guideline in the same way.
Move a Guideline
Choose the Pick Tool and click
on the guideline. It will turn
red to show it is selected.
Move your cursor over the
guideline and the cursor will
turn to a single double-ended
arrow. Click and drag to a
new location. While it is
moving, your cursor will
change to two double-ended
arrows and the moving
guideline will be blue. Position
and release your mouse
button. The guideline turns
red. Click off the guideline and
the guideline will again turn
blue which indicates it is no
longer active.
DTP 101 – Computer Graphics Manual CorelDraw 9
Iligan Computer Institute 38
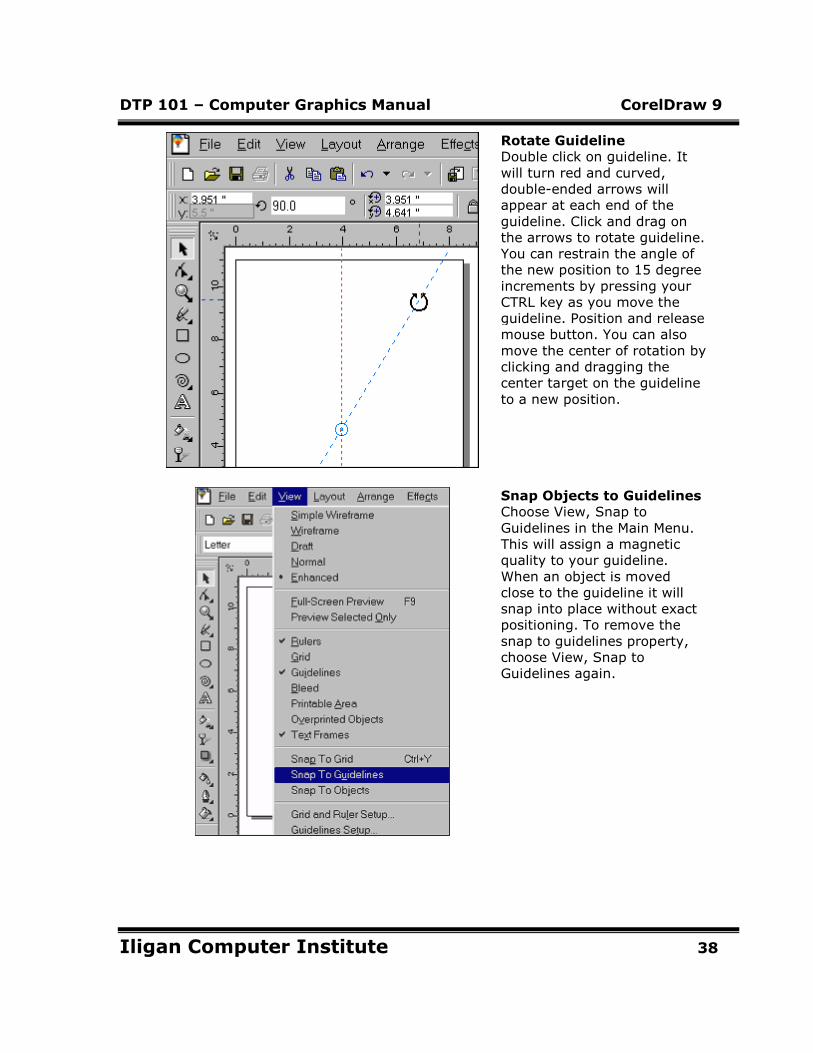
Rotate Guideline
Double click on guideline. It
will turn red and curved,
double-ended arrows will
appear at each end of the
guideline. Click and drag on
the arrows to rotate guideline.
You can restrain the angle of
the new position to 15 degree
increments by pressing your
CTRL key as you move the
guideline. Position and release
mouse button. You can also
move the center of rotation by
clicking and dragging the
center target on the guideline
to a new position.
Snap Objects to Guidelines
Choose View, Snap to
Guidelines in the Main Menu.
This will assign a magnetic
quality to your guideline.
When an object is moved
close to the guideline it will
snap into place without exact
positioning. To remove the
snap to guidelines property,
choose View, Snap to
Guidelines again.
DTP 101 – Computer Graphics Manual CorelDraw 9
Iligan Computer Institute 39
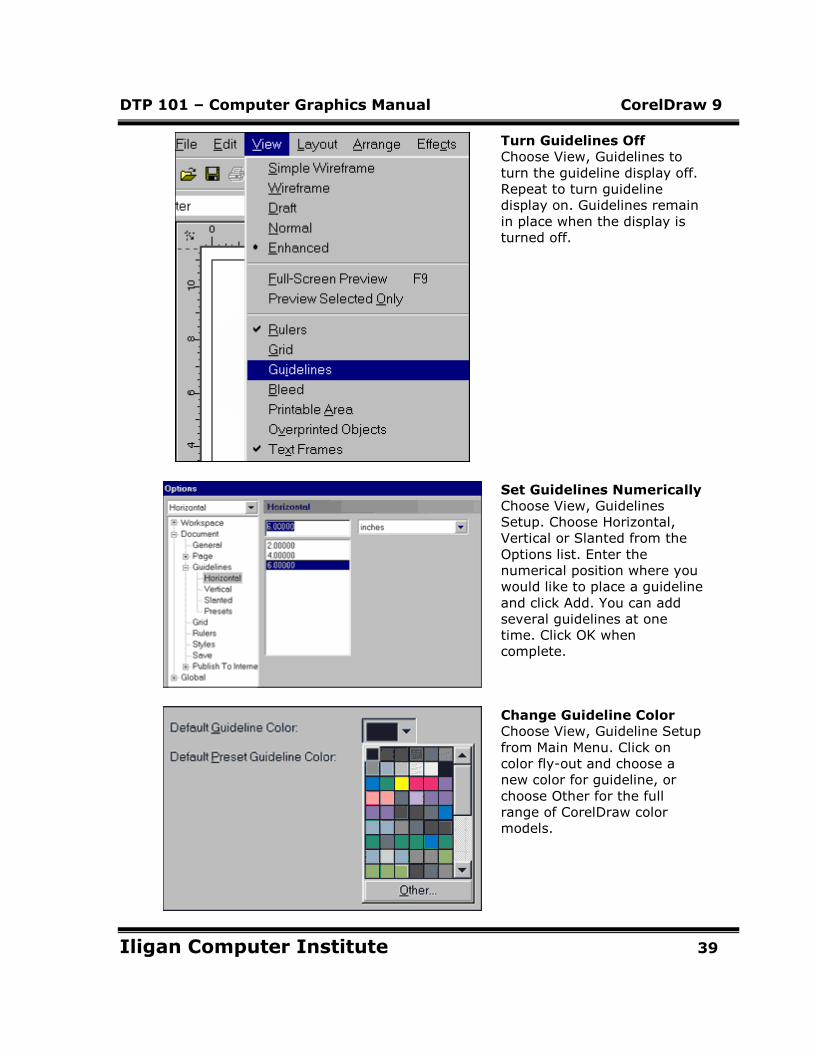
Turn Guidelines Off
Choose View, Guidelines to
turn the guideline display off.
Repeat to turn guideline
display on. Guidelines remain
in place when the display is
turned off.
Set Guidelines Numerically
Choose View, Guidelines
Setup. Choose Horizontal,
Vertical or Slanted from the
Options list. Enter the
numerical position where you
would like to place a guideline
and click Add. You can add
several guidelines at one
time. Click OK when
complete.
Change Guideline Color
Choose View, Guideline Setup
from Main Menu. Click on
color fly-out and choose a
new color for guideline, or
choose Other for the full
range of CorelDraw color
models.
DTP 101 – Computer Graphics Manual CorelDraw 9
Iligan Computer Institute 40
Create a GridCreate a GridCreate a GridCreate a Grid
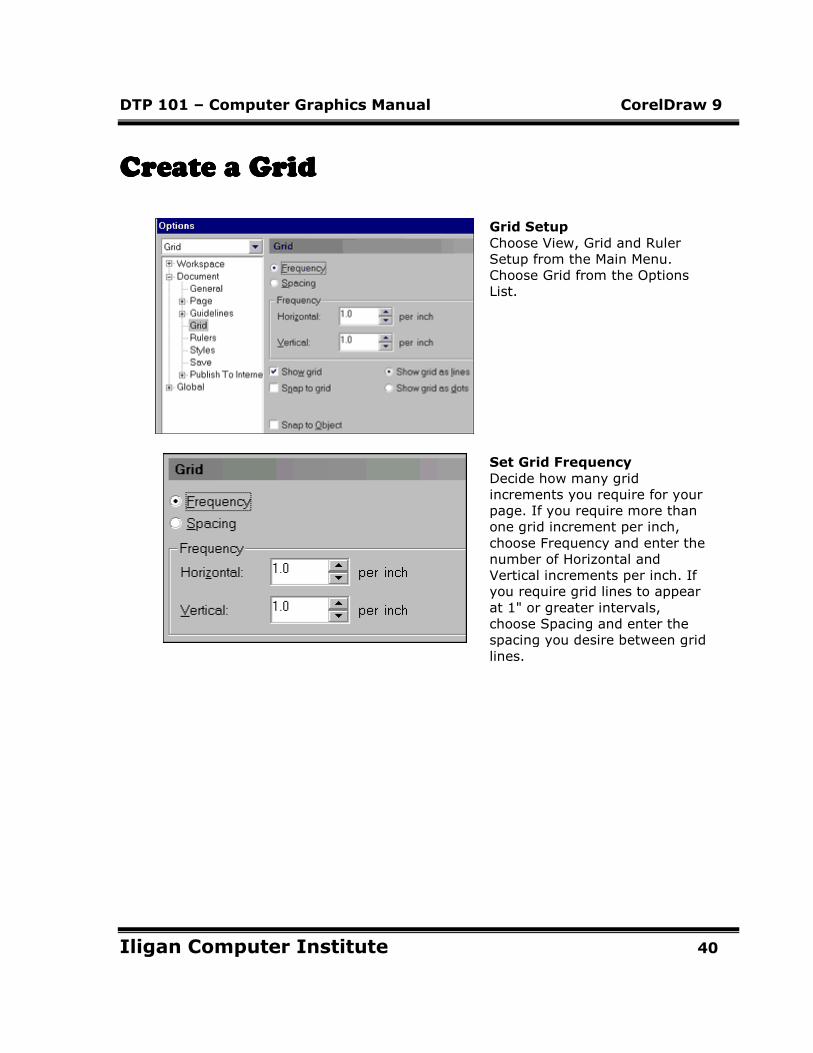
Grid Setup
Choose View, Grid and Ruler
Setup from the Main Menu.
Choose Grid from the Options
List.
Set Grid Frequency
Decide how many grid
increments you require for your
page. If you require more than
one grid increment per inch,
choose Frequency and enter the
number of Horizontal and
Vertical increments per inch. If
you require grid lines to appear
at 1" or greater intervals,
choose Spacing and enter the
spacing you desire between grid
lines.
DTP 101 – Computer Graphics Manual CorelDraw 9
Iligan Computer Institute 41
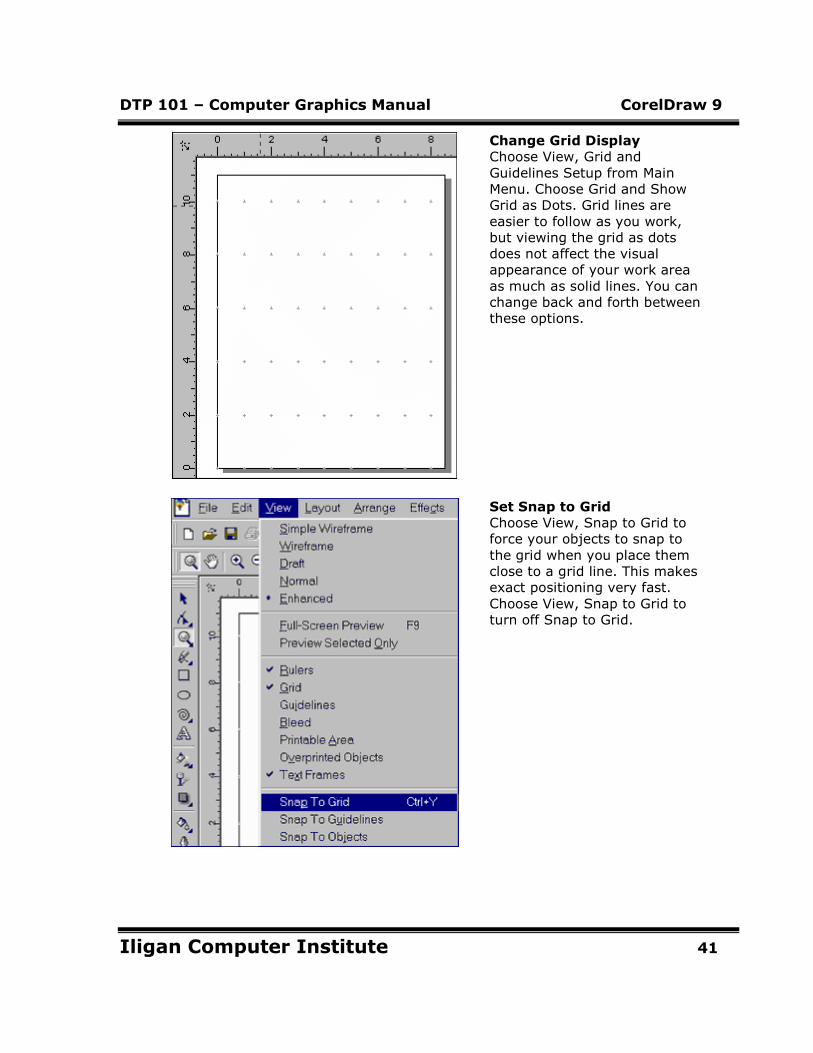
Change Grid Display
Choose View, Grid and
Guidelines Setup from Main
Menu. Choose Grid and Show
Grid as Dots. Grid lines are
easier to follow as you work,
but viewing the grid as dots
does not affect the visual
appearance of your work area
as much as solid lines. You can
change back and forth between
these options.
Set Snap to Grid
Choose View, Snap to Grid to
force your objects to snap to
the grid when you place them
close to a grid line. This makes
exact positioning very fast.
Choose View, Snap to Grid to
turn off Snap to Grid.
DTP 101 – Computer Graphics Manual CorelDraw 9
Iligan Computer Institute 42
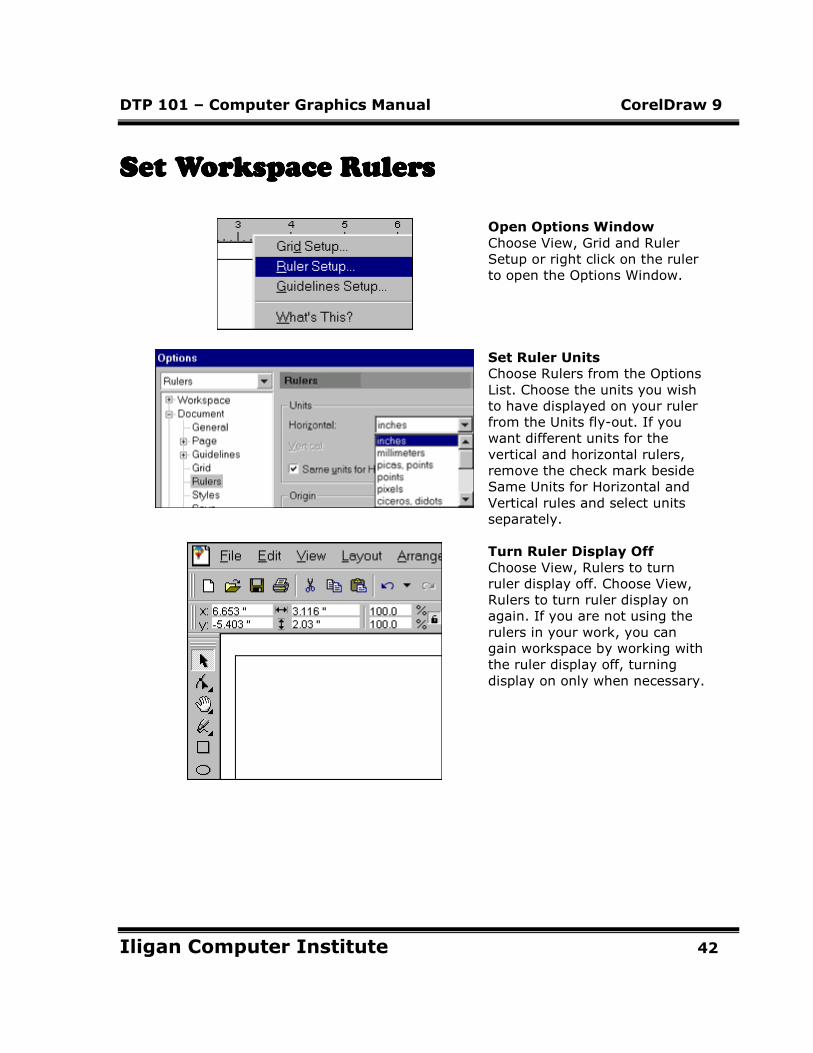
Set Workspace RulersSet Workspace RulersSet Workspace RulersSet Workspace Rulers
Open Options Window
Choose View, Grid and Ruler
Setup or right click on the ruler
to open the Options Window.
Set Ruler Units
Choose Rulers from the Options
List. Choose the units you wish
to have displayed on your ruler
from the Units fly-out. If you
want different units for the
vertical and horizontal rulers,
remove the check mark beside
Same Units for Horizontal and
Vertical rules and select units
separately.
Turn Ruler Display Off
Choose View, Rulers to turn
ruler display off. Choose View,
Rulers to turn ruler display on
again. If you are not using the
rulers in your work, you can
gain workspace by working with
the ruler display off, turning
display on only when necessary.
DTP 101 – Computer Graphics Manual CorelDraw 9
Iligan Computer Institute 43
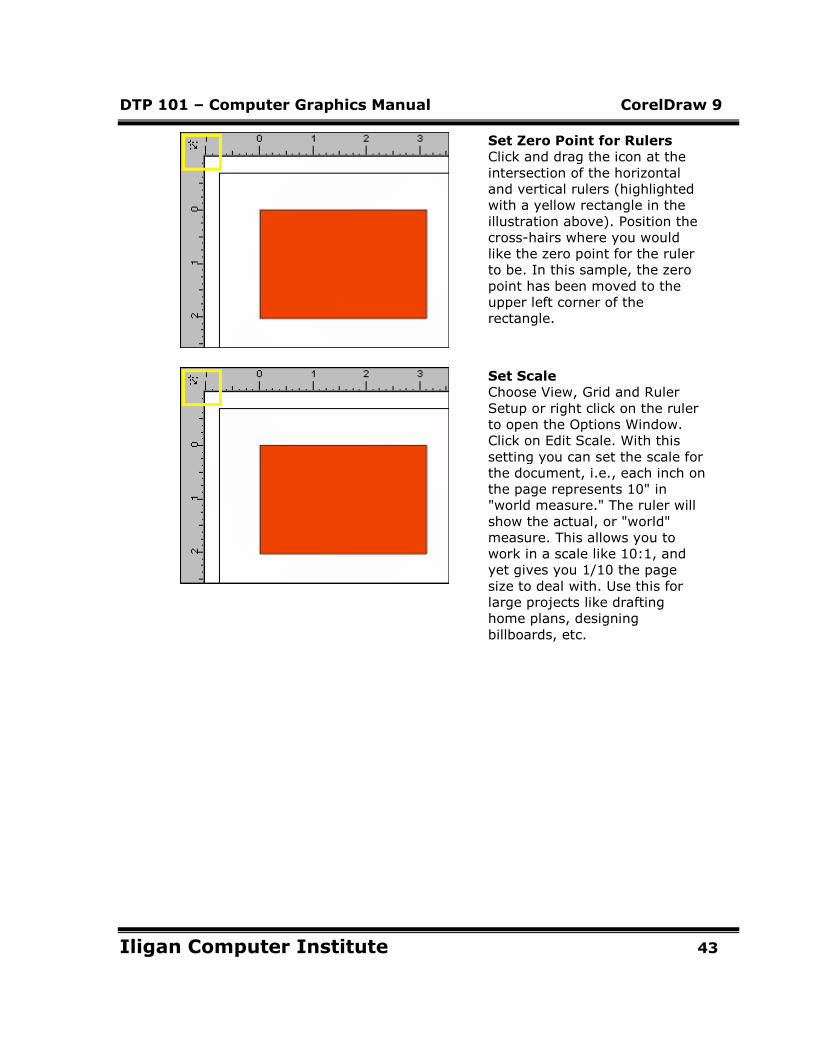
Set Zero Point for Rulers
Click and drag the icon at the
intersection of the horizontal
and vertical rulers (highlighted
with a yellow rectangle in the
illustration above). Position the
cross-hairs where you would
like the zero point for the ruler
to be. In this sample, the zero
point has been moved to the
upper left corner of the
rectangle.
Set Scale
Choose View, Grid and Ruler
Setup or right click on the ruler
to open the Options Window.
Click on Edit Scale. With this
setting you can set the scale for
the document, i.e., each inch on
the page represents 10" in
"world measure." The ruler will
show the actual, or "world"
measure. This allows you to
work in a scale like 10:1, and
yet gives you 1/10 the page
size to deal with. Use this for
large projects like drafting
home plans, designing
billboards, etc.
DTP 101 – Computer Graphics Manual CorelDraw 9
Iligan Computer Institute 44
Edit Page PropertiesEdit Page PropertiesEdit Page PropertiesEdit Page Properties
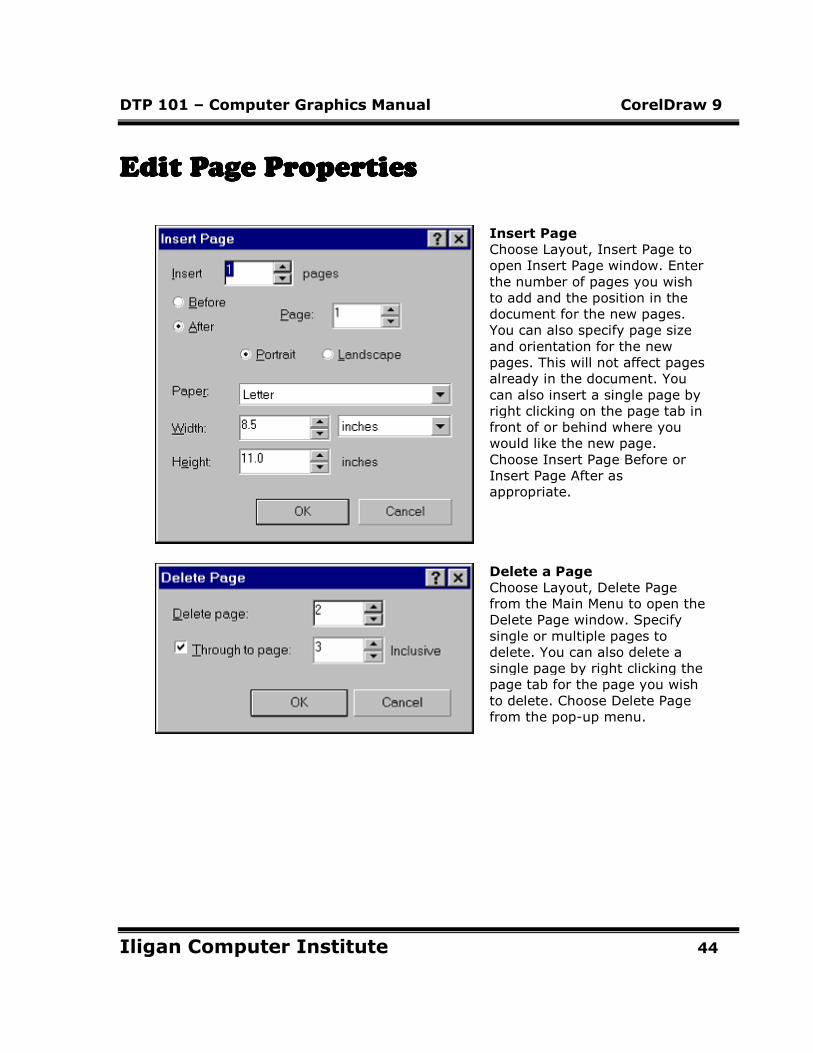
Insert Page
Choose Layout, Insert Page to
open Insert Page window. Enter
the number of pages you wish
to add and the position in the
document for the new pages.
You can also specify page size
and orientation for the new
pages. This will not affect pages
already in the document. You
can also insert a single page by
right clicking on the page tab in
front of or behind where you
would like the new page.
Choose Insert Page Before or
Insert Page After as
appropriate.
Delete a Page
Choose Layout, Delete Page
from the Main Menu to open the
Delete Page window. Specify
single or multiple pages to
delete. You can also delete a
single page by right clicking the
page tab for the page you wish
to delete. Choose Delete Page
from the pop-up menu.

DTP 101 – Computer Graphics Manual CorelDraw 9
Iligan Computer Institute 45
Name or Rename Page
Choose Layout, Rename Page
from the Main Menu. Type in
the name you wish for the
page. The CorelDraw default
page names are the page
number, i.e., Page 1, Page 2,
etc. Rename Page allows you to
enter your own names for
pages, which can help organize
your work when you are
working with multiple pages.
You can also rename a page by
right clicking on the page tab at
the bottom of the screen and
choosing Rename Page.
Resize Single Page
Choose Layout, Resize Page to
open the Resize Page window.
Choose your new page size.
This change will apply only to
the current page, and will not
affect the rest of the document.
You can also resize a page by
right clicking on the page tab at
the bottom of the screen and
choosing Resize Page.
Single Page Orientation
Choose Layout, Switch Page
Orientation to change the
orientation of the current page.
This change will apply only to
the current page, and will not
affect the rest of the document.
You can also change page
orientation by right clicking on
the page tab at the bottom of
the screen and choosing Switch
Page Orientation.
DTP 101 – Computer Graphics Manual CorelDraw 9
Iligan Computer Institute 46
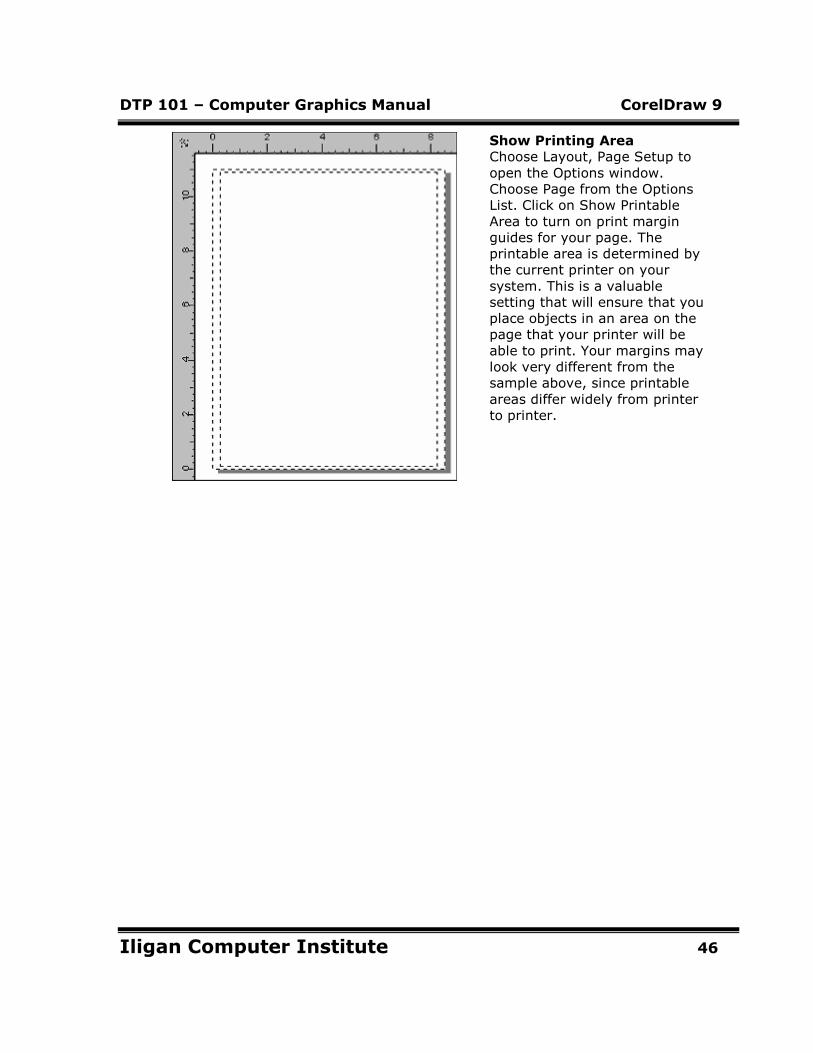
Show Printing Area
Choose Layout, Page Setup to
open the Options window.
Choose Page from the Options
List. Click on Show Printable
Area to turn on print margin
guides for your page. The
printable area is determined by
the current printer on your
system. This is a valuable
setting that will ensure that you
place objects in an area on the
page that your printer will be
able to print. Your margins may
look very different from the
sample above, since printable
areas differ widely from printer
to printer.
DTP 101 – Computer Graphics Manual CorelDraw 9
Iligan Computer Institute 47
Vectors and BitmapsVectors and BitmapsVectors and BitmapsVectors and Bitmaps
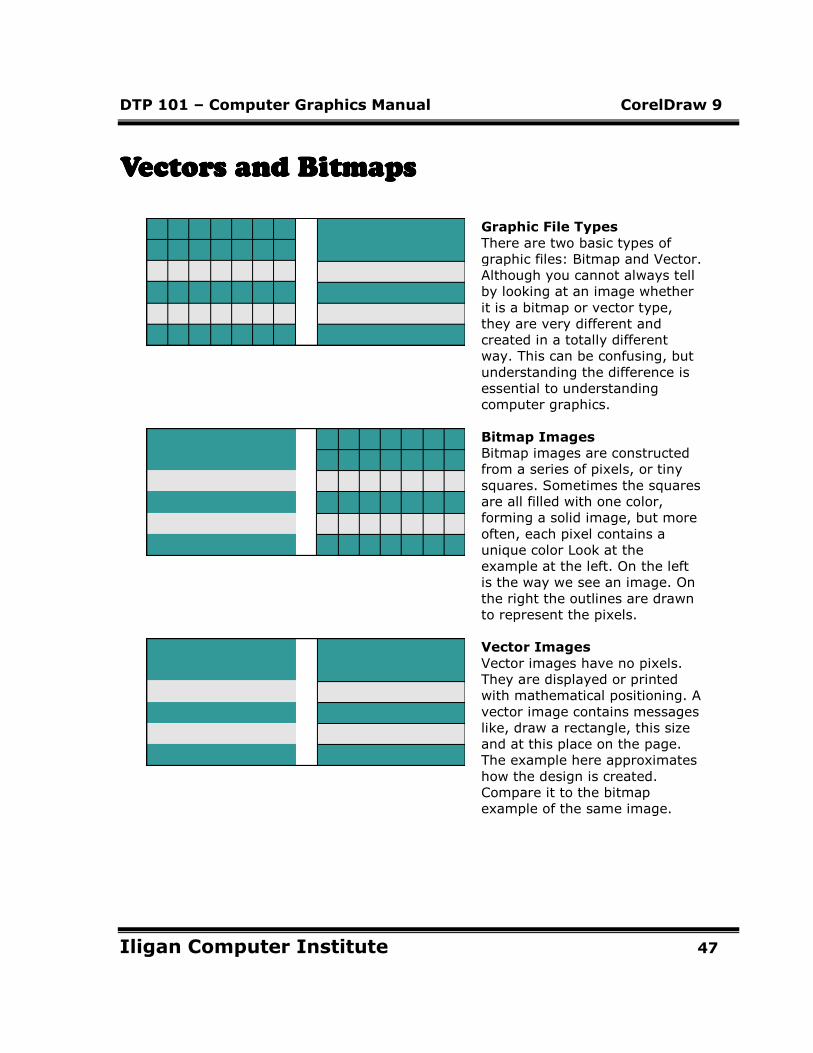
Graphic File Types
There are two basic types of
graphic files: Bitmap and Vector.
Although you cannot always tell
by looking at an image whether
it is a bitmap or vector type,
they are very different and
created in a totally different
way. This can be confusing, but
understanding the difference is
essential to understanding
computer graphics.
Bitmap Images
Bitmap images are constructed
from a series of pixels, or tiny
squares. Sometimes the squares
are all filled with one color,
forming a solid image, but more
often, each pixel contains a
unique color Look at the
example at the left. On the left
is the way we see an image. On
the right the outlines are drawn
to represent the pixels.
Vector Images
Vector images have no pixels.
They are displayed or printed
with mathematical positioning. A
vector image contains messages
like, draw a rectangle, this size
and at this place on the page.
The example here approximates
how the design is created.
Compare it to the bitmap
example of the same image.
DTP 101 – Computer Graphics Manual CorelDraw 9
Iligan Computer Institute 48
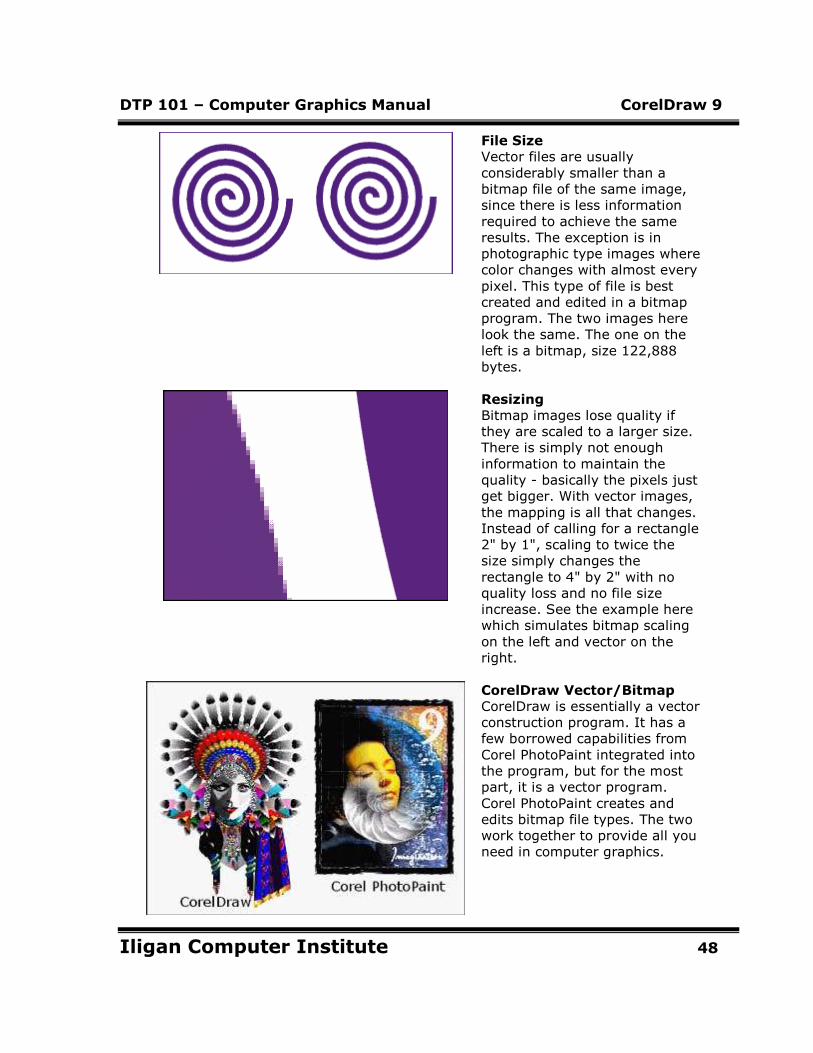
File Size
Vector files are usually
considerably smaller than a
bitmap file of the same image,
since there is less information
required to achieve the same
results. The exception is in
photographic type images where
color changes with almost every
pixel. This type of file is best
created and edited in a bitmap
program. The two images here
look the same. The one on the
left is a bitmap, size 122,888
bytes.
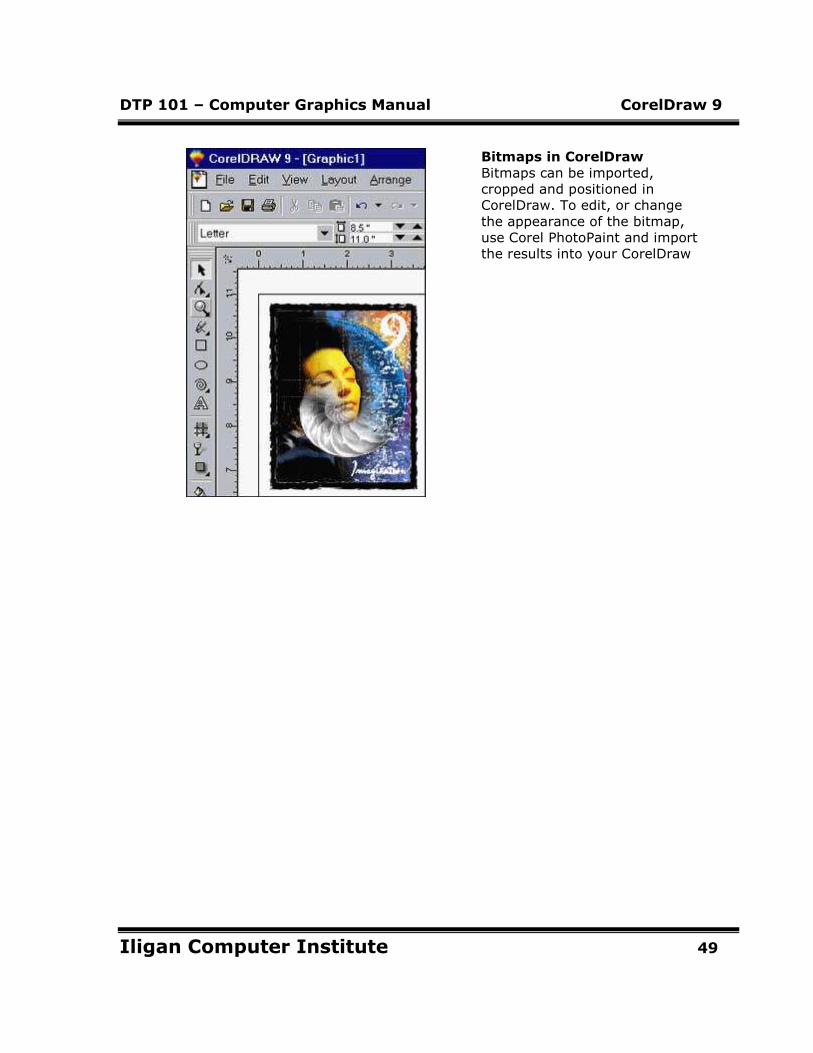
Resizing
Bitmap images lose quality if
they are scaled to a larger size.
There is simply not enough
information to maintain the
quality - basically the pixels just
get bigger. With vector images,
the mapping is all that changes.
Instead of calling for a rectangle
2" by 1", scaling to twice the
size simply changes the
rectangle to 4" by 2" with no
quality loss and no file size
increase. See the example here
which simulates bitmap scaling
on the left and vector on the
right.
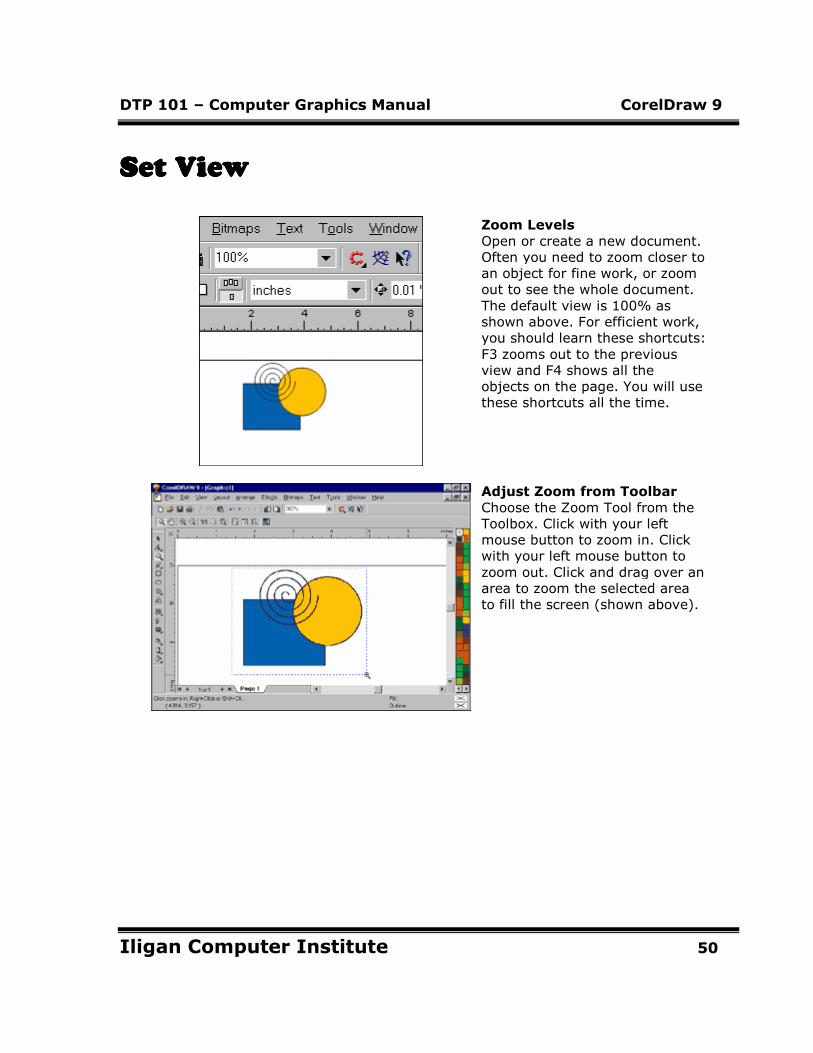
CorelDraw Vector/Bitmap
CorelDraw is essentially a vector
construction program. It has a
few borrowed capabilities from
Corel PhotoPaint integrated into
the program, but for the most
part, it is a vector program.
Corel PhotoPaint creates and
edits bitmap file types. The two
work together to provide all you
need in computer graphics.
DTP 101 – Computer Graphics Manual CorelDraw 9
Iligan Computer Institute 49
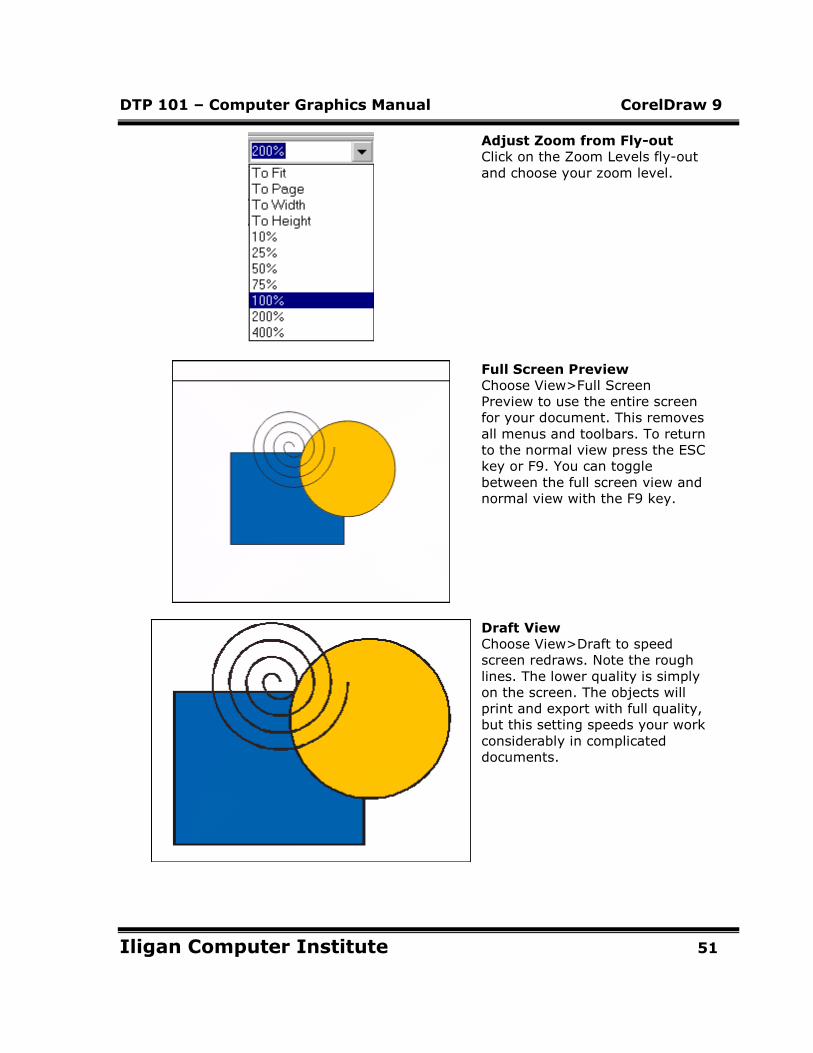
Bitmaps in CorelDraw
Bitmaps can be imported,
cropped and positioned in
CorelDraw. To edit, or change
the appearance of the bitmap,
use Corel PhotoPaint and import
the results into your CorelDraw
DTP 101 – Computer Graphics Manual CorelDraw 9
Iligan Computer Institute 50
Set ViewSet ViewSet ViewSet View
Zoom Levels
Open or create a new document.
Often you need to zoom closer to
an object for fine work, or zoom
out to see the whole document.
The default view is 100% as
shown above. For efficient work,
you should learn these shortcuts:
F3 zooms out to the previous
view and F4 shows all the
objects on the page. You will use
these shortcuts all the time.
Adjust Zoom from Toolbar
Choose the Zoom Tool from the
Toolbox. Click with your left
mouse button to zoom in. Click
with your left mouse button to
zoom out. Click and drag over an
area to zoom the selected area
to fill the screen (shown above).
DTP 101 – Computer Graphics Manual CorelDraw 9
Iligan Computer Institute 51
Adjust Zoom from Fly-out
Click on the Zoom Levels fly-out
and choose your zoom level.
Full Screen Preview
Choose View>Full Screen
Preview to use the entire screen
for your document. This removes
all menus and toolbars. To return
to the normal view press the ESC
key or F9. You can toggle
between the full screen view and
normal view with the F9 key.
Draft View
Choose View>Draft to speed
screen redraws. Note the rough
lines. The lower quality is simply
on the screen. The objects will
print and export with full quality,
but this setting speeds your work
considerably in complicated
documents.
DTP 101 – Computer Graphics Manual CorelDraw 9
Iligan Computer Institute 52
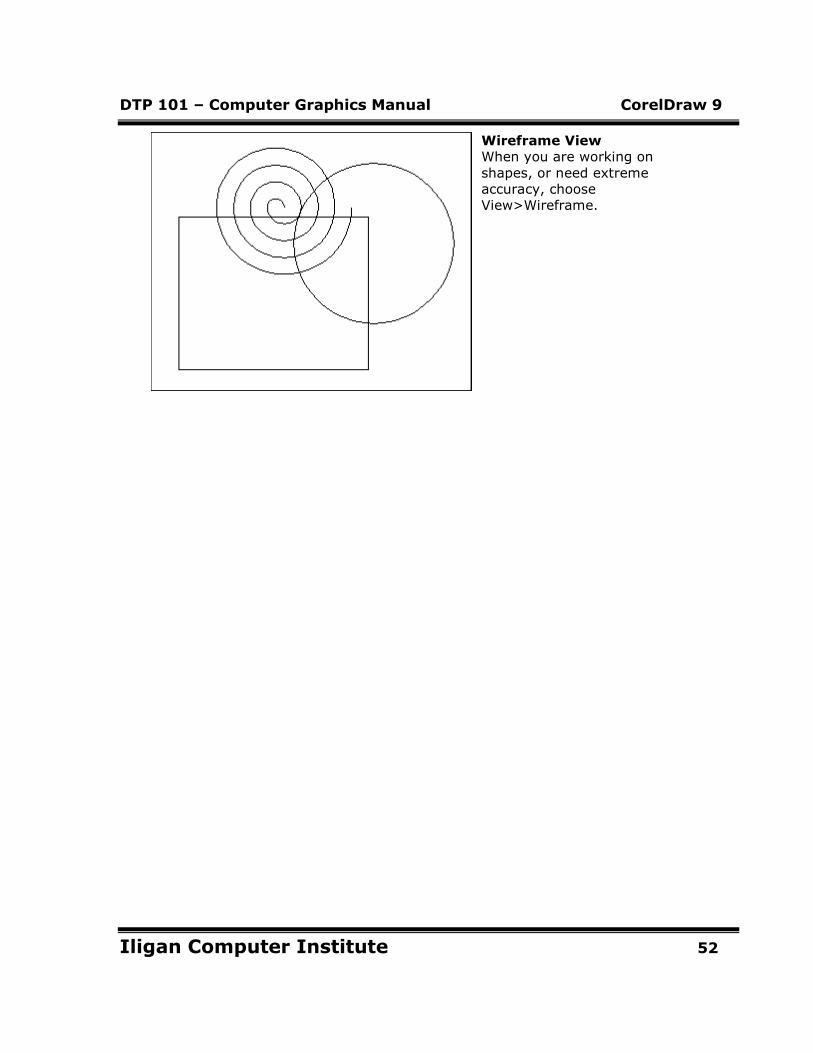
Wireframe View
When you are working on
shapes, or need extreme
accuracy, choose
View>Wireframe.

DTP 101 – Computer Graphics Manual CorelDraw 9
Iligan Computer Institute 53
Work in Wireframe ViewWork in Wireframe ViewWork in Wireframe ViewWork in Wireframe View
Set Wireframe
Choose View>Wireframe to
remove the all color and fill from
your work. This setting only
affects the screen display. Your
document will still print or
export in full color. Wireframe is
valuable for fine alignment and
working with objects that are
closely overlapping.
Preview Wireframe
Use the F9 key for full screen
preview or toggle between
Normal/Enhanced and
Wireframe View with SHIFT F9.

DTP 101 – Computer Graphics Manual CorelDraw 9
Iligan Computer Institute 54
Preview Selected Only
Choose View>Preview Selected
only to view only the item that is
actively selected in your
document. This saves screen
draw time and lets you isolate
only the part of the document
you require at one time.
Simple Wireframe View
Choose View>Simple Wireframe
for very complex documents.
This view shows only the very
basic elements without control
objects. For simple to
intermediate items, there is little
or no difference between
Wireframe and Simple
Wireframe View.
DTP 101 – Computer Graphics Manual CorelDraw 9
Iligan Computer Institute 55
Hints for Learning CorelDrawHints for Learning CorelDrawHints for Learning CorelDrawHints for Learning CorelDraw
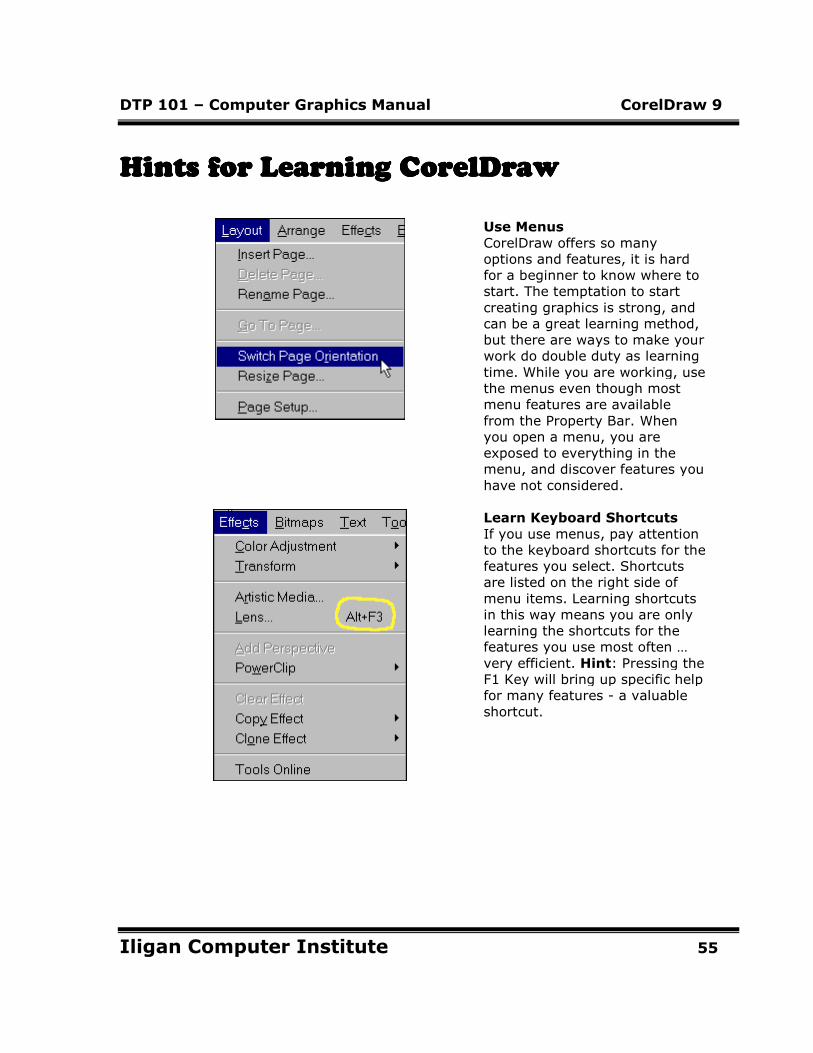
Use Menus
CorelDraw offers so many
options and features, it is hard
for a beginner to know where to
start. The temptation to start
creating graphics is strong, and
can be a great learning method,
but there are ways to make your
work do double duty as learning
time. While you are working, use
the menus even though most
menu features are available
from the Property Bar. When
you open a menu, you are
exposed to everything in the
menu, and discover features you
have not considered.
Learn Keyboard Shortcuts
If you use menus, pay attention
to the keyboard shortcuts for the
features you select. Shortcuts
are listed on the right side of
menu items. Learning shortcuts
in this way means you are only
learning the shortcuts for the
features you use most often …
very efficient. Hint: Pressing the
F1 Key will bring up specific help
for many features - a valuable
shortcut.
DTP 101 – Computer Graphics Manual CorelDraw 9
Iligan Computer Institute 56
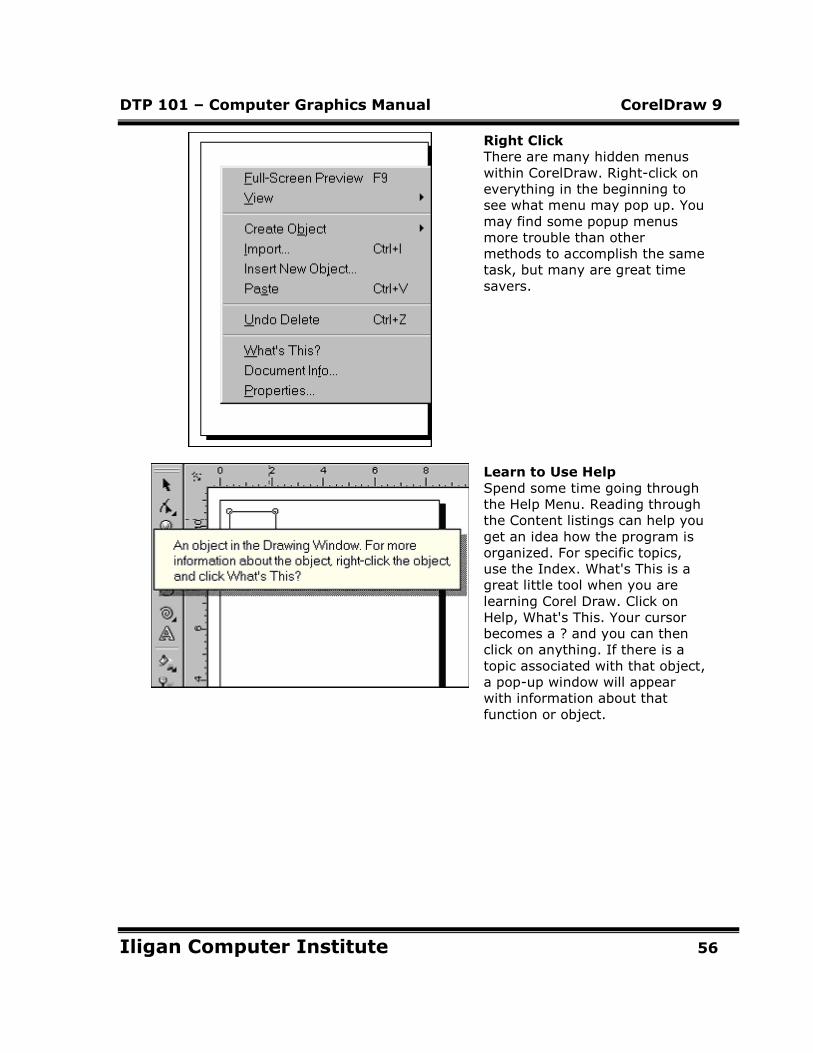
Right Click
There are many hidden menus
within CorelDraw. Right-click on
everything in the beginning to
see what menu may pop up. You
may find some popup menus
more trouble than other
methods to accomplish the same
task, but many are great time
savers.
Learn to Use Help
Spend some time going through
the Help Menu. Reading through
the Content listings can help you
get an idea how the program is
organized. For specific topics,
use the Index. What's This is a
great little tool when you are
learning Corel Draw. Click on
Help, What's This. Your cursor
becomes a ? and you can then
click on anything. If there is a
topic associated with that object,
a pop-up window will appear
with information about that
function or object.
DTP 101 – Computer Graphics Manual CorelDraw 9
Iligan Computer Institute 57
Menu Overview: Part 1Menu Overview: Part 1Menu Overview: Part 1Menu Overview: Part 1
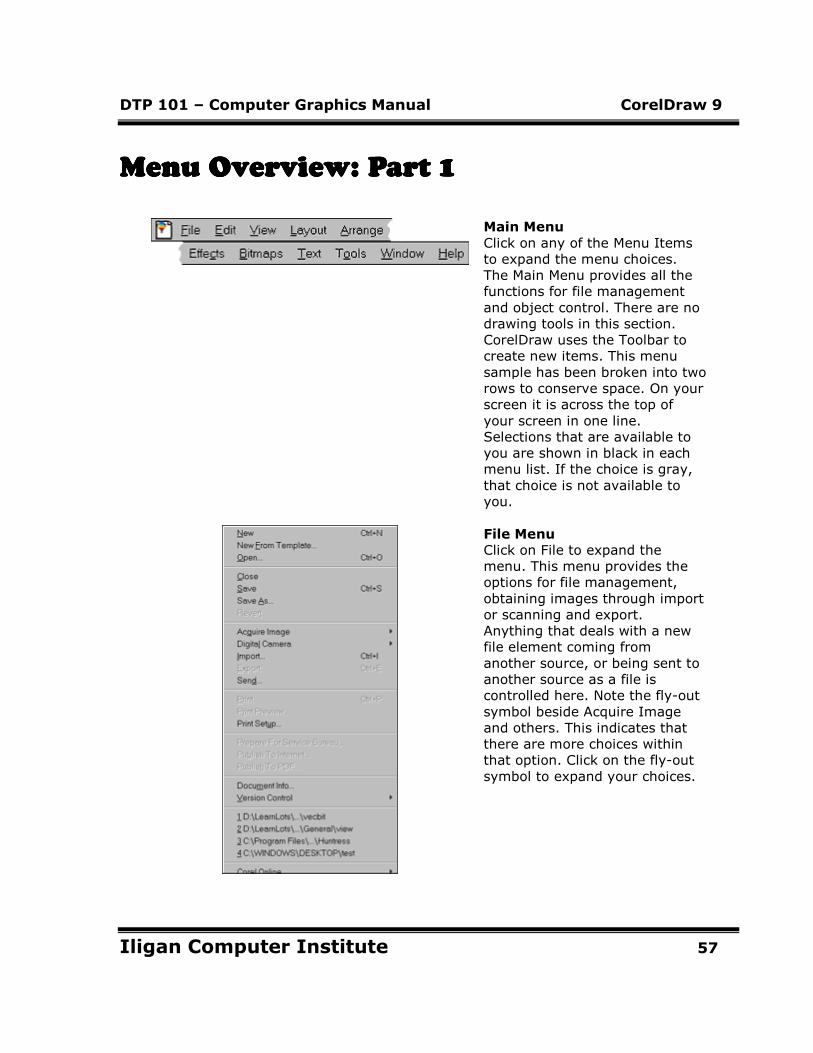
Main Menu
Click on any of the Menu Items
to expand the menu choices.
The Main Menu provides all the
functions for file management
and object control. There are no
drawing tools in this section.
CorelDraw uses the Toolbar to
create new items. This menu
sample has been broken into two
rows to conserve space. On your
screen it is across the top of
your screen in one line.
Selections that are available to
you are shown in black in each
menu list. If the choice is gray,
that choice is not available to
you.
File Menu
Click on File to expand the
menu. This menu provides the
options for file management,
obtaining images through import
or scanning and export.
Anything that deals with a new
file element coming from
another source, or being sent to
another source as a file is
controlled here. Note the fly-out
symbol beside Acquire Image
and others. This indicates that
there are more choices within
that option. Click on the fly-out
symbol to expand your choices.
DTP 101 – Computer Graphics Manual CorelDraw 9
Iligan Computer Institute 58
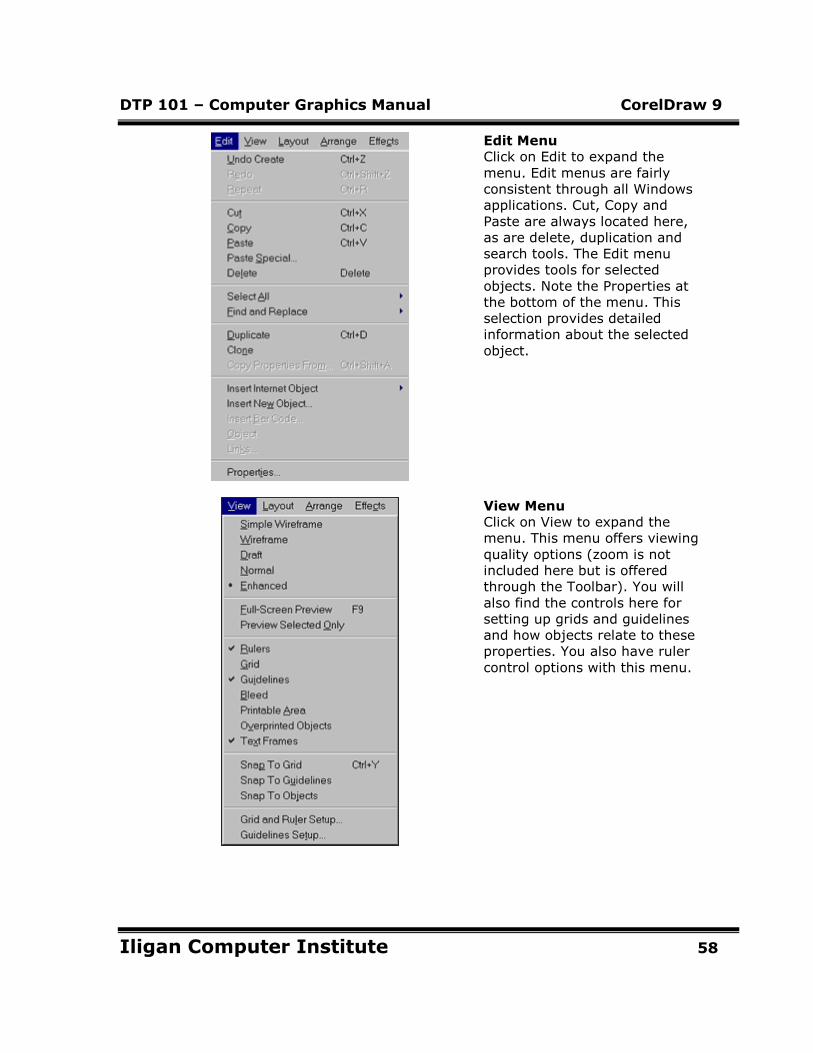
Edit Menu
Click on Edit to expand the
menu. Edit menus are fairly
consistent through all Windows
applications. Cut, Copy and
Paste are always located here,
as are delete, duplication and
search tools. The Edit menu
provides tools for selected
objects. Note the Properties at
the bottom of the menu. This
selection provides detailed
information about the selected
object.
View Menu
Click on View to expand the
menu. This menu offers viewing
quality options (zoom is not
included here but is offered
through the Toolbar). You will
also find the controls here for
setting up grids and guidelines
and how objects relate to these
properties. You also have ruler
control options with this menu.
DTP 101 – Computer Graphics Manual CorelDraw 9
Iligan Computer Institute 59
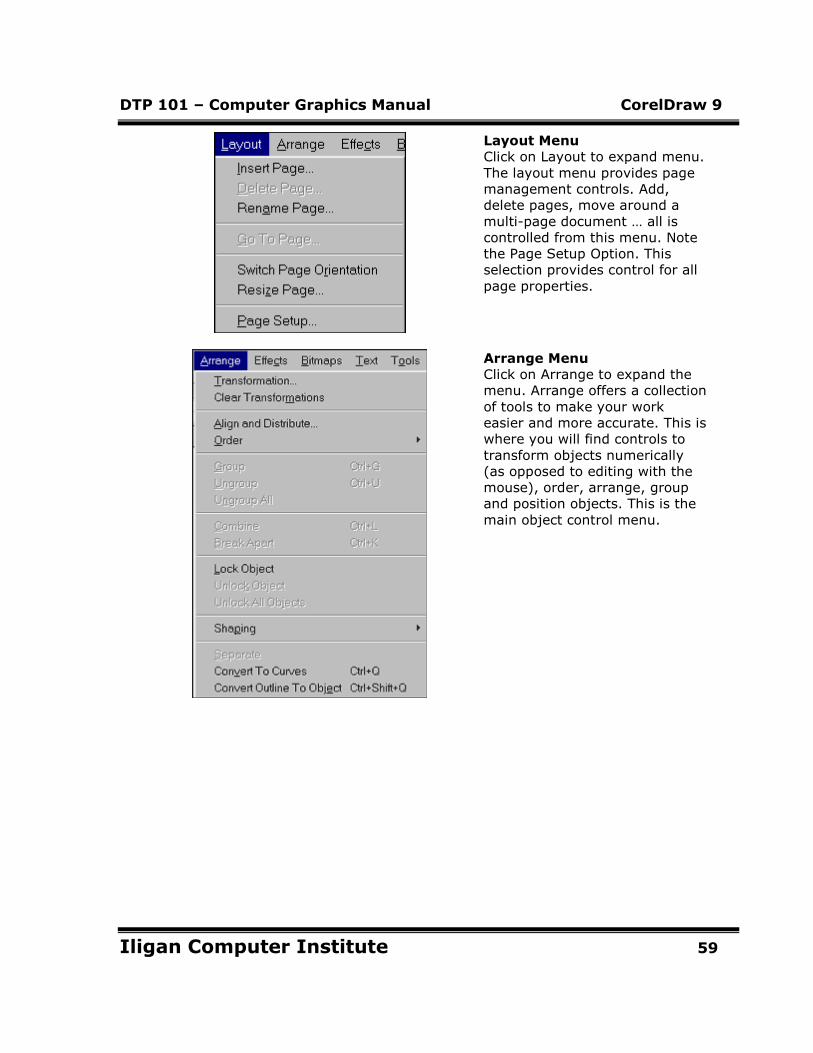
Layout Menu
Click on Layout to expand menu.
The layout menu provides page
management controls. Add,
delete pages, move around a
multi-page document … all is
controlled from this menu. Note
the Page Setup Option. This
selection provides control for all
page properties.
Arrange Menu
Click on Arrange to expand the
menu. Arrange offers a collection
of tools to make your work
easier and more accurate. This is
where you will find controls to
transform objects numerically
(as opposed to editing with the
mouse), order, arrange, group
and position objects. This is the
main object control menu.
DTP 101 – Computer Graphics Manual CorelDraw 9
Iligan Computer Institute 60
Menu Overview: Part 2Menu Overview: Part 2Menu Overview: Part 2Menu Overview: Part 2
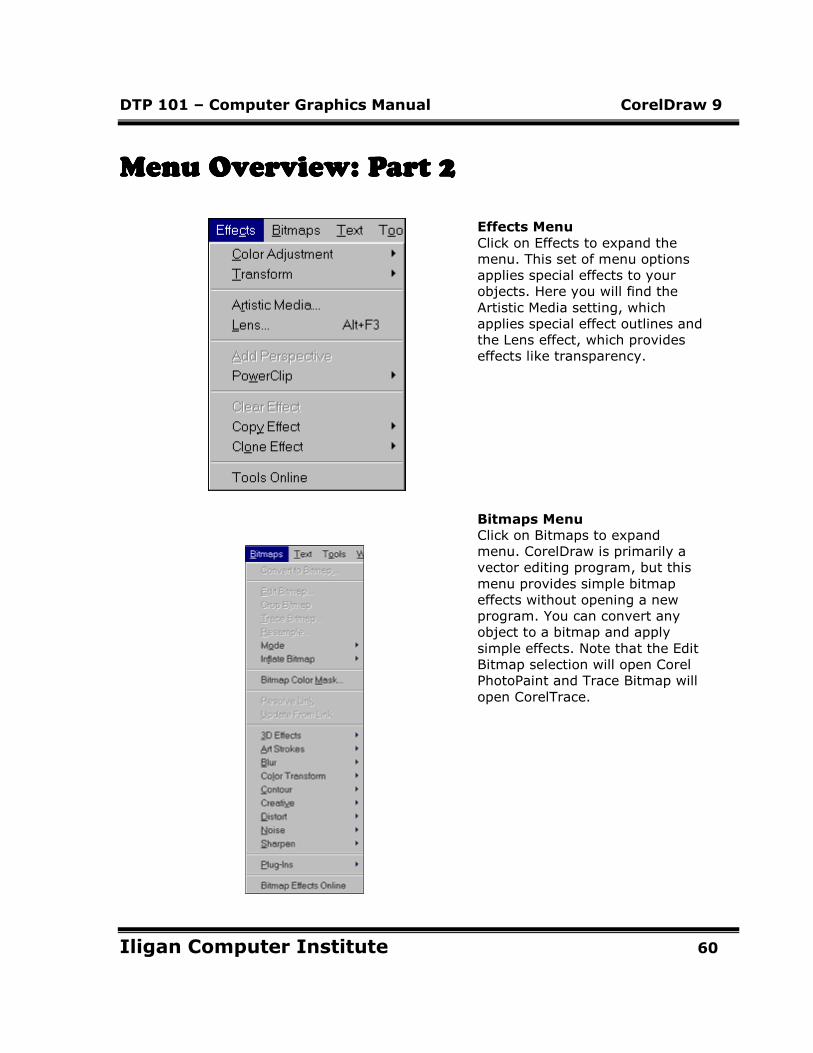
Effects Menu
Click on Effects to expand the
menu. This set of menu options
applies special effects to your
objects. Here you will find the
Artistic Media setting, which
applies special effect outlines and
the Lens effect, which provides
effects like transparency.
Bitmaps Menu
Click on Bitmaps to expand
menu. CorelDraw is primarily a
vector editing program, but this
menu provides simple bitmap
effects without opening a new
program. You can convert any
object to a bitmap and apply
simple effects. Note that the Edit
Bitmap selection will open Corel
PhotoPaint and Trace Bitmap will
open CorelTrace.
DTP 101 – Computer Graphics Manual CorelDraw 9
Iligan Computer Institute 61
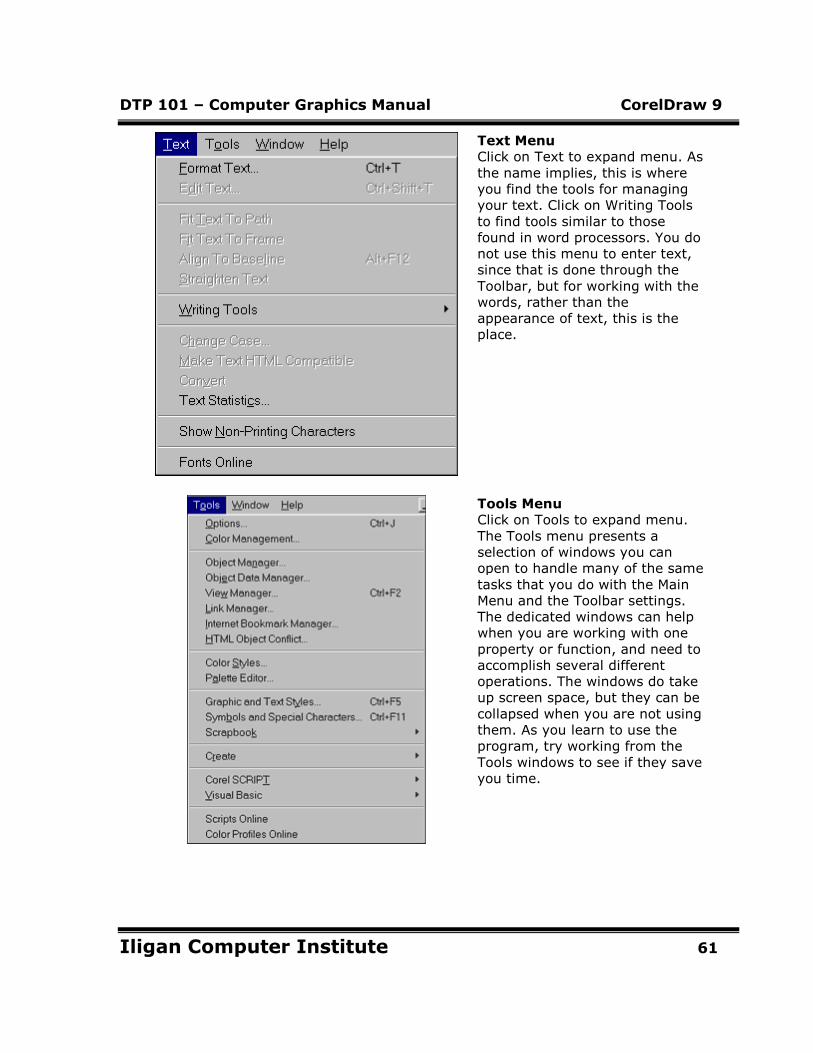
Text Menu
Click on Text to expand menu. As
the name implies, this is where
you find the tools for managing
your text. Click on Writing Tools
to find tools similar to those
found in word processors. You do
not use this menu to enter text,
since that is done through the
Toolbar, but for working with the
words, rather than the
appearance of text, this is the
place.
Tools Menu
Click on Tools to expand menu.
The Tools menu presents a
selection of windows you can
open to handle many of the same
tasks that you do with the Main
Menu and the Toolbar settings.
The dedicated windows can help
when you are working with one
property or function, and need to
accomplish several different
operations. The windows do take
up screen space, but they can be
collapsed when you are not using
them. As you learn to use the
program, try working from the
Tools windows to see if they save
you time.

DTP 101 – Computer Graphics Manual CorelDraw 9
Iligan Computer Institute 62
Window Menu
Click on Window to expand menu.
When you are working on more
than one document, but working
back and forth, this menu can
help you keep things organized.
You can tile (arrange side by side
or up and down) or cascade
(layered on top of each other)
your documents. This is also
where you control your dockers
(see Dockers) and Color Palettes.
Simply, this is the menu that will
help you make the most of
multiple windows.
Help Menu
Similar to all Windows help
menus, you have the choice of an
Index presentation of help topics
in Help Topics, Contents or index
style in Help Topics, Index. If you
need information about your copy
of CorelDraw or your system
resources, go to About
CorelDraw.
Expanding Menus
Click on and Main Menu item to
expand menu. Click on a choice
with an arrow indicating a sub
menu exists. Watch for these sub
menus as you work in CorelDraw,
since what you are seeking may
be on a second level, invisible in
the main list. CorelDraw offers so
much that it is important to gain
an understanding of where
different effects and actions are
likely to be found.
DTP 101 – Computer Graphics Manual CorelDraw 9
Iligan Computer Institute 63
Dockers OverviewDockers OverviewDockers OverviewDockers Overview
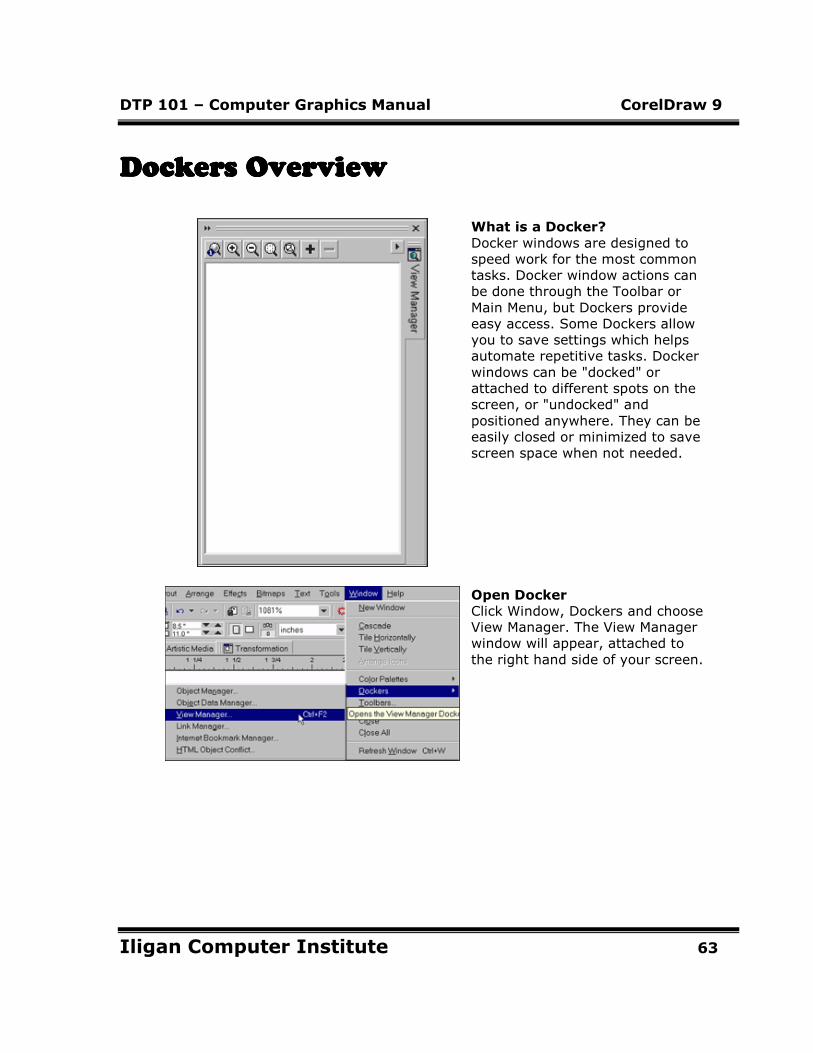
What is a Docker?
Docker windows are designed to
speed work for the most common
tasks. Docker window actions can
be done through the Toolbar or
Main Menu, but Dockers provide
easy access. Some Dockers allow
you to save settings which helps
automate repetitive tasks. Docker
windows can be "docked" or
attached to different spots on the
screen, or "undocked" and
positioned anywhere. They can be
easily closed or minimized to save
screen space when not needed.
Open Docker
Click Window, Dockers and choose
View Manager. The View Manager
window will appear, attached to
the right hand side of your screen.
DTP 101 – Computer Graphics Manual CorelDraw 9
Iligan Computer Institute 64
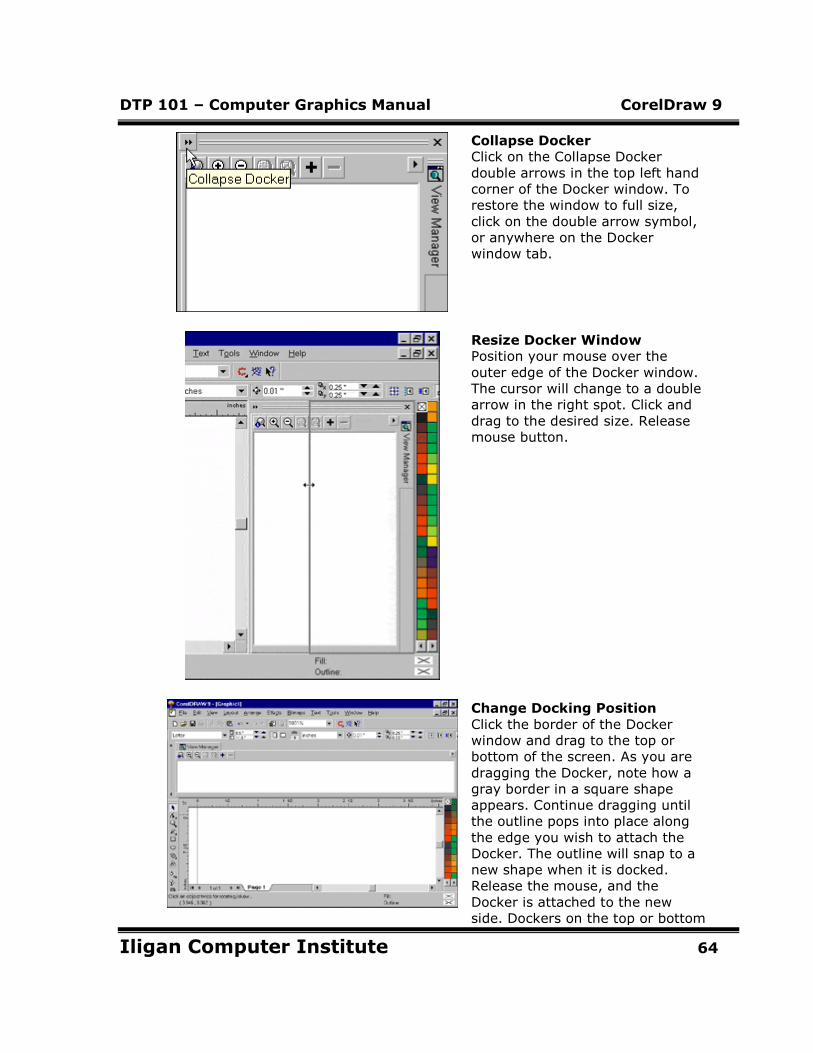
Collapse Docker
Click on the Collapse Docker
double arrows in the top left hand
corner of the Docker window. To
restore the window to full size,
click on the double arrow symbol,
or anywhere on the Docker
window tab.
Resize Docker Window
Position your mouse over the
outer edge of the Docker window.
The cursor will change to a double
arrow in the right spot. Click and
drag to the desired size. Release
mouse button.
Change Docking Position
Click the border of the Docker
window and drag to the top or
bottom of the screen. As you are
dragging the Docker, note how a
gray border in a square shape
appears. Continue dragging until
the outline pops into place along
the edge you wish to attach the
Docker. The outline will snap to a
new shape when it is docked.
Release the mouse, and the
Docker is attached to the new
side. Dockers on the top or bottom
DTP 101 – Computer Graphics Manual CorelDraw 9
Iligan Computer Institute 65
edge of the screen will be wider
than long when open, and take up
a lot of the workspace.
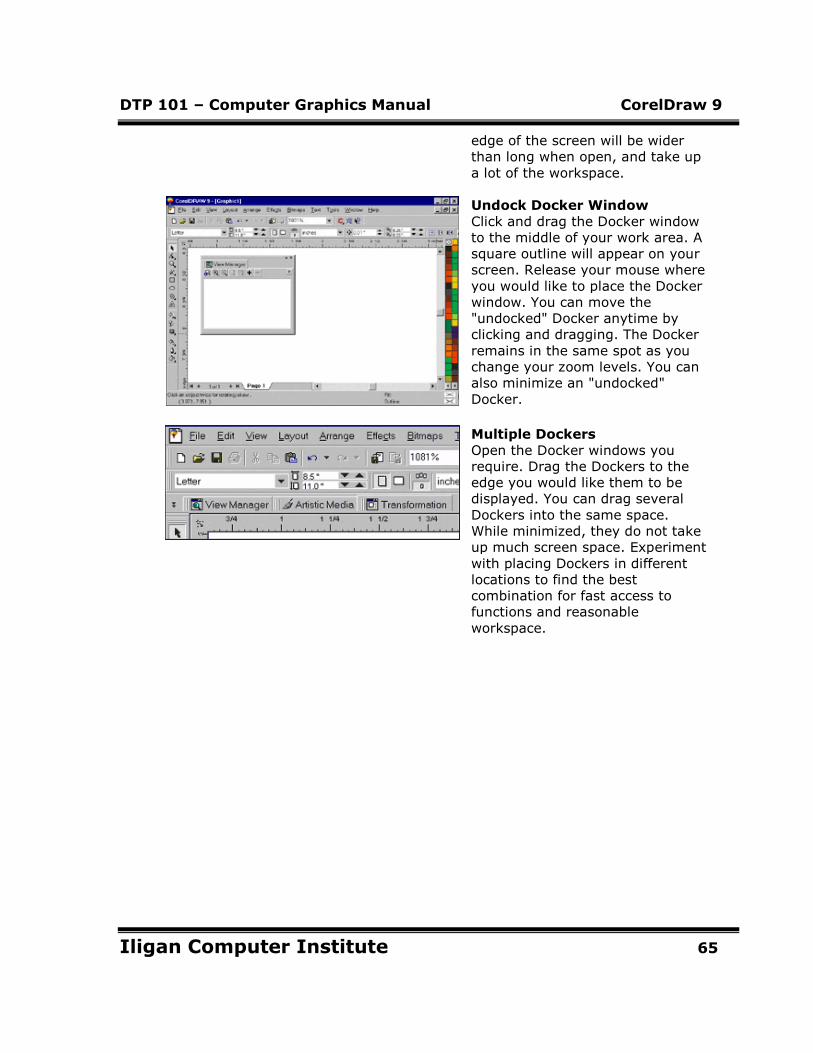
Undock Docker Window
Click and drag the Docker window
to the middle of your work area. A
square outline will appear on your
screen. Release your mouse where
you would like to place the Docker
window. You can move the
"undocked" Docker anytime by
clicking and dragging. The Docker
remains in the same spot as you
change your zoom levels. You can
also minimize an "undocked"
Docker.
Multiple Dockers
Open the Docker windows you
require. Drag the Dockers to the
edge you would like them to be
displayed. You can drag several
Dockers into the same space.
While minimized, they do not take
up much screen space. Experiment
with placing Dockers in different
locations to find the best
combination for fast access to
functions and reasonable
workspace.
DTP 101 – Computer Graphics Manual CorelDraw 9
Iligan Computer Institute 66
Text Tool OverviewText Tool OverviewText Tool OverviewText Tool Overview
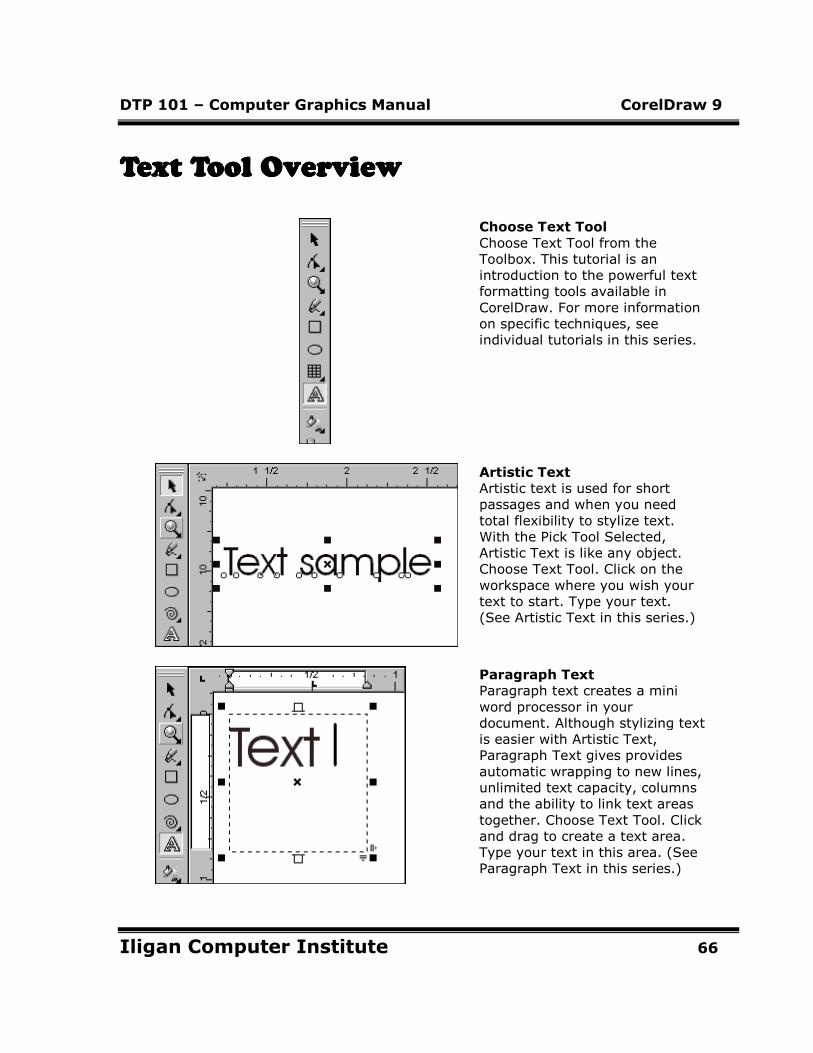
Choose Text Tool
Choose Text Tool from the
Toolbox. This tutorial is an
introduction to the powerful text
formatting tools available in
CorelDraw. For more information
on specific techniques, see
individual tutorials in this series.
Artistic Text
Artistic text is used for short
passages and when you need
total flexibility to stylize text.
With the Pick Tool Selected,
Artistic Text is like any object.
Choose Text Tool. Click on the
workspace where you wish your
text to start. Type your text.
(See Artistic Text in this series.)
Paragraph Text
Paragraph text creates a mini
word processor in your
document. Although stylizing text
is easier with Artistic Text,
Paragraph Text gives provides
automatic wrapping to new lines,
unlimited text capacity, columns
and the ability to link text areas
together. Choose Text Tool. Click
and drag to create a text area.
Type your text in this area. (See
Paragraph Text in this series.)
DTP 101 – Computer Graphics Manual CorelDraw 9
Iligan Computer Institute 67
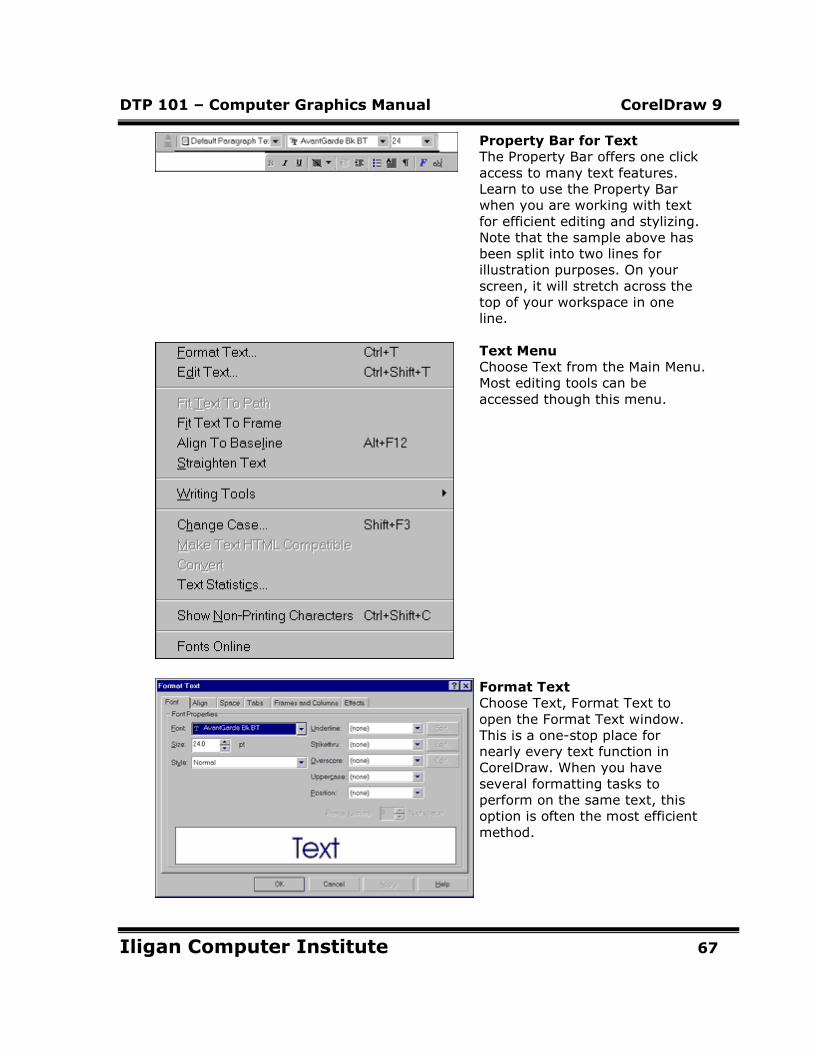
Property Bar for Text
The Property Bar offers one click
access to many text features.
Learn to use the Property Bar
when you are working with text
for efficient editing and stylizing.
Note that the sample above has
been split into two lines for
illustration purposes. On your
screen, it will stretch across the
top of your workspace in one
line.
Text Menu
Choose Text from the Main Menu.
Most editing tools can be
accessed though this menu.
Format Text
Choose Text, Format Text to
open the Format Text window.
This is a one-stop place for
nearly every text function in
CorelDraw. When you have
several formatting tasks to
perform on the same text, this
option is often the most efficient
method.
DTP 101 – Computer Graphics Manual CorelDraw 9
Iligan Computer Institute 68
Create Artistic TextCreate Artistic TextCreate Artistic TextCreate Artistic Text
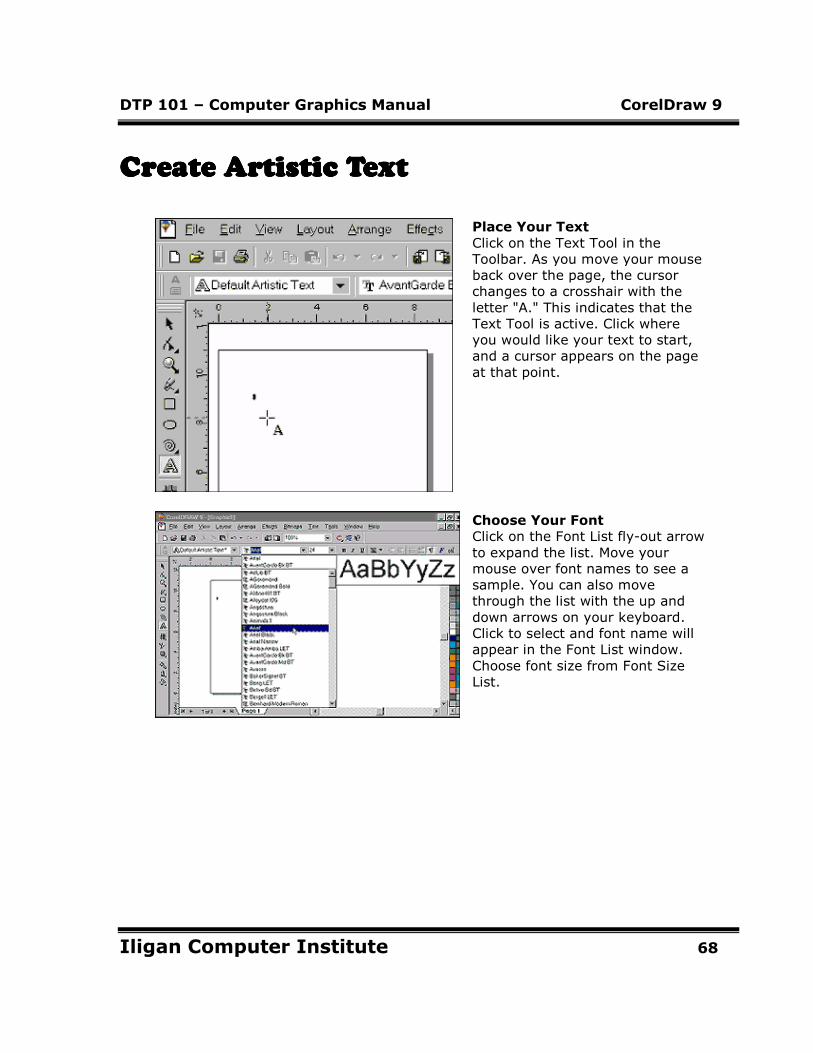
Place Your Text
Click on the Text Tool in the
Toolbar. As you move your mouse
back over the page, the cursor
changes to a crosshair with the
letter "A." This indicates that the
Text Tool is active. Click where
you would like your text to start,
and a cursor appears on the page
at that point.
Choose Your Font
Click on the Font List fly-out arrow
to expand the list. Move your
mouse over font names to see a
sample. You can also move
through the list with the up and
down arrows on your keyboard.
Click to select and font name will
appear in the Font List window.
Choose font size from Font Size
List.
DTP 101 – Computer Graphics Manual CorelDraw 9
Iligan Computer Institute 69
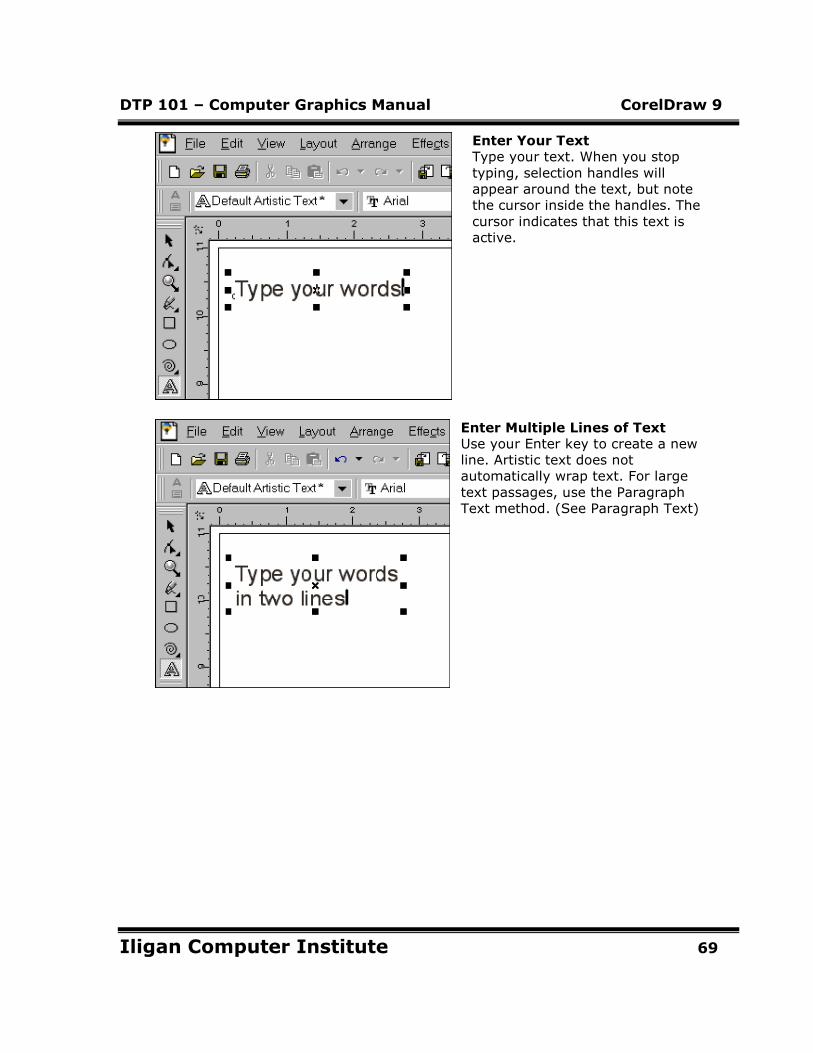
Enter Your Text
Type your text. When you stop
typing, selection handles will
appear around the text, but note
the cursor inside the handles. The
cursor indicates that this text is
active.
Enter Multiple Lines of Text
Use your Enter key to create a new
line. Artistic text does not
automatically wrap text. For large
text passages, use the Paragraph
Text method. (See Paragraph Text)
DTP 101 – Computer Graphics Manual CorelDraw 9
Iligan Computer Institute 70
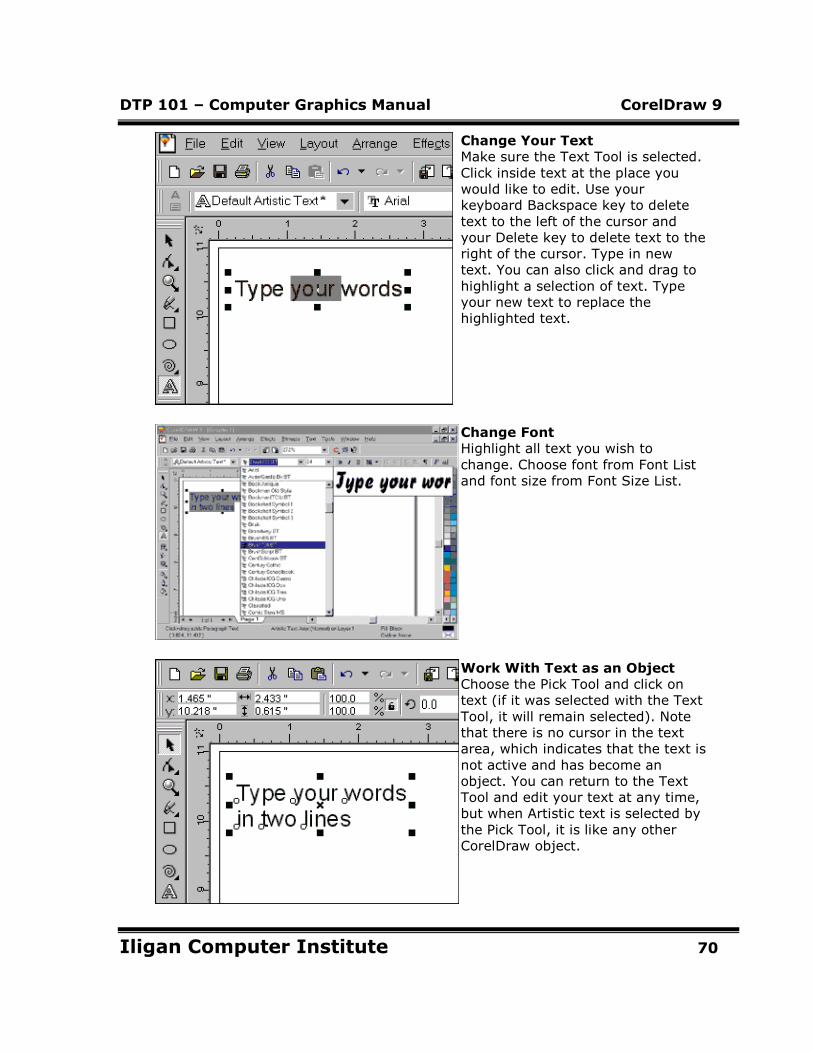
Change Your Text
Make sure the Text Tool is selected.
Click inside text at the place you
would like to edit. Use your
keyboard Backspace key to delete
text to the left of the cursor and
your Delete key to delete text to the
right of the cursor. Type in new
text. You can also click and drag to
highlight a selection of text. Type
your new text to replace the
highlighted text.
Change Font
Highlight all text you wish to
change. Choose font from Font List
and font size from Font Size List.
Work With Text as an Object
Choose the Pick Tool and click on
text (if it was selected with the Text
Tool, it will remain selected). Note
that there is no cursor in the text
area, which indicates that the text is
not active and has become an
object. You can return to the Text
Tool and edit your text at any time,
but when Artistic text is selected by
the Pick Tool, it is like any other
CorelDraw object.

DTP 101 – Computer Graphics Manual CorelDraw 9
Iligan Computer Institute 71
Change Font as an Object
Select the Pick Tool. Click on text to
select. Choose font from Font List
and font size from Font Size List.
DTP 101 – Computer Graphics Manual CorelDraw 9
Iligan Computer Institute 72
Create Paragraph TextCreate Paragraph TextCreate Paragraph TextCreate Paragraph Text
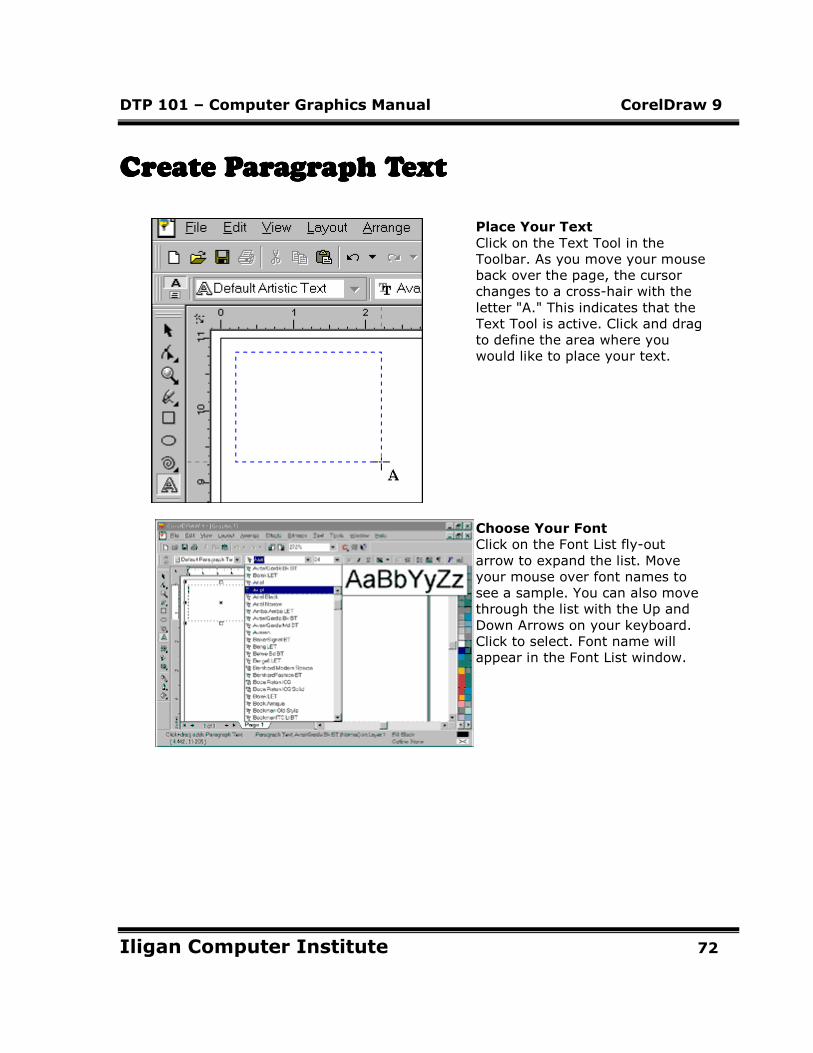
Place Your Text
Click on the Text Tool in the
Toolbar. As you move your mouse
back over the page, the cursor
changes to a cross-hair with the
letter "A." This indicates that the
Text Tool is active. Click and drag
to define the area where you
would like to place your text.
Choose Your Font
Click on the Font List fly-out
arrow to expand the list. Move
your mouse over font names to
see a sample. You can also move
through the list with the Up and
Down Arrows on your keyboard.
Click to select. Font name will
appear in the Font List window.
DTP 101 – Computer Graphics Manual CorelDraw 9
Iligan Computer Institute 73
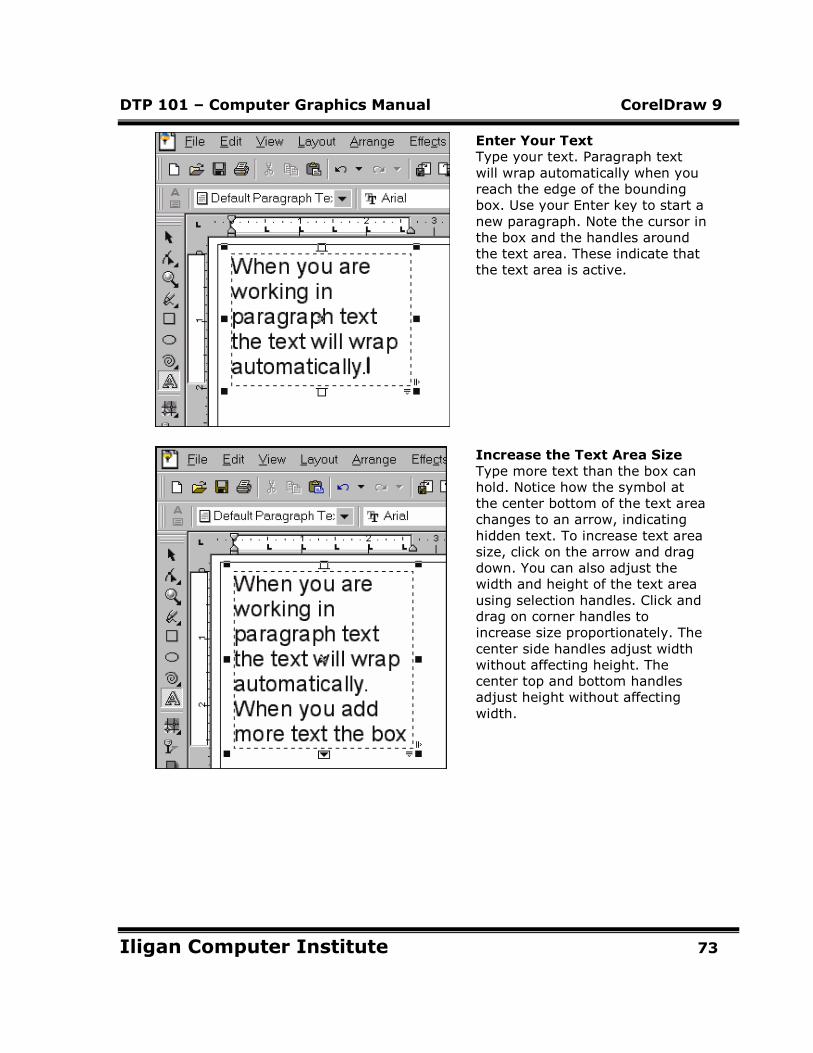
Enter Your Text
Type your text. Paragraph text
will wrap automatically when you
reach the edge of the bounding
box. Use your Enter key to start a
new paragraph. Note the cursor in
the box and the handles around
the text area. These indicate that
the text area is active.
Increase the Text Area Size
Type more text than the box can
hold. Notice how the symbol at
the center bottom of the text area
changes to an arrow, indicating
hidden text. To increase text area
size, click on the arrow and drag
down. You can also adjust the
width and height of the text area
using selection handles. Click and
drag on corner handles to
increase size proportionately. The
center side handles adjust width
without affecting height. The
center top and bottom handles
adjust height without affecting
width.

DTP 101 – Computer Graphics Manual CorelDraw 9
Iligan Computer Institute 74
Change Your Text
Make sure the Text Tool is
selected. Click inside the text at
the place you would like to edit.
Use your keyboard Backspace key
to delete text to the left of the
cursor and your Delete key to
delete text to the right of the
cursor. Type in new text. You can
also click and drag to highlight a
selection of text. Type your new
text to replace the highlighted
text.
Change Font
Highlight all text you wish to
change. Choose font from Font
List and size from Font Size List.

DTP 101 – Computer Graphics Manual CorelDraw 9
Iligan Computer Institute 75
Work With Text as an Object
Choose the Pick Tool and click on
text (if it was selected with the
Text Tool, it will remain selected).
Note that there is no cursor in the
text area, which indicates that
text is not active and has become
an object. You can return to Text
Tool and edit your text at any
time, but when Paragraph Text is
selected by the Pick Tool, it is like
any other CorelDraw object.
Note: to change font or text size,
you must use the Text Tool. Using
resize handles with the Pick Tool
changes only text area size.
Change Font as an Object
Select the Pick Tool. Click on text
to select. Choose font from Font
List and size from Font Size List.
DTP 101 – Computer Graphics Manual CorelDraw 9
Iligan Computer Institute 76
Change FontChange FontChange FontChange Font
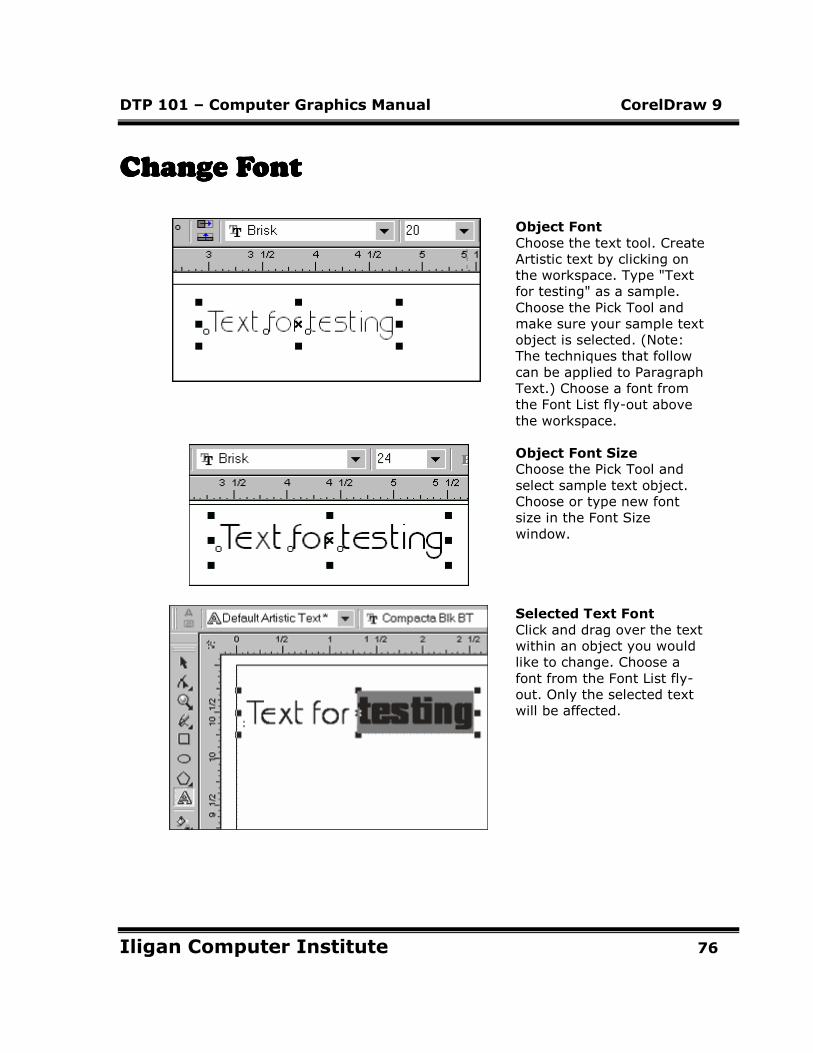
Object Font
Choose the text tool. Create
Artistic text by clicking on
the workspace. Type "Text
for testing" as a sample.
Choose the Pick Tool and
make sure your sample text
object is selected. (Note:
The techniques that follow
can be applied to Paragraph
Text.) Choose a font from
the Font List fly-out above
the workspace.
Object Font Size
Choose the Pick Tool and
select sample text object.
Choose or type new font
size in the Font Size
window.
Selected Text Font
Click and drag over the text
within an object you would
like to change. Choose a
font from the Font List fly-
out. Only the selected text
will be affected.
DTP 101 – Computer Graphics Manual CorelDraw 9
Iligan Computer Institute 77
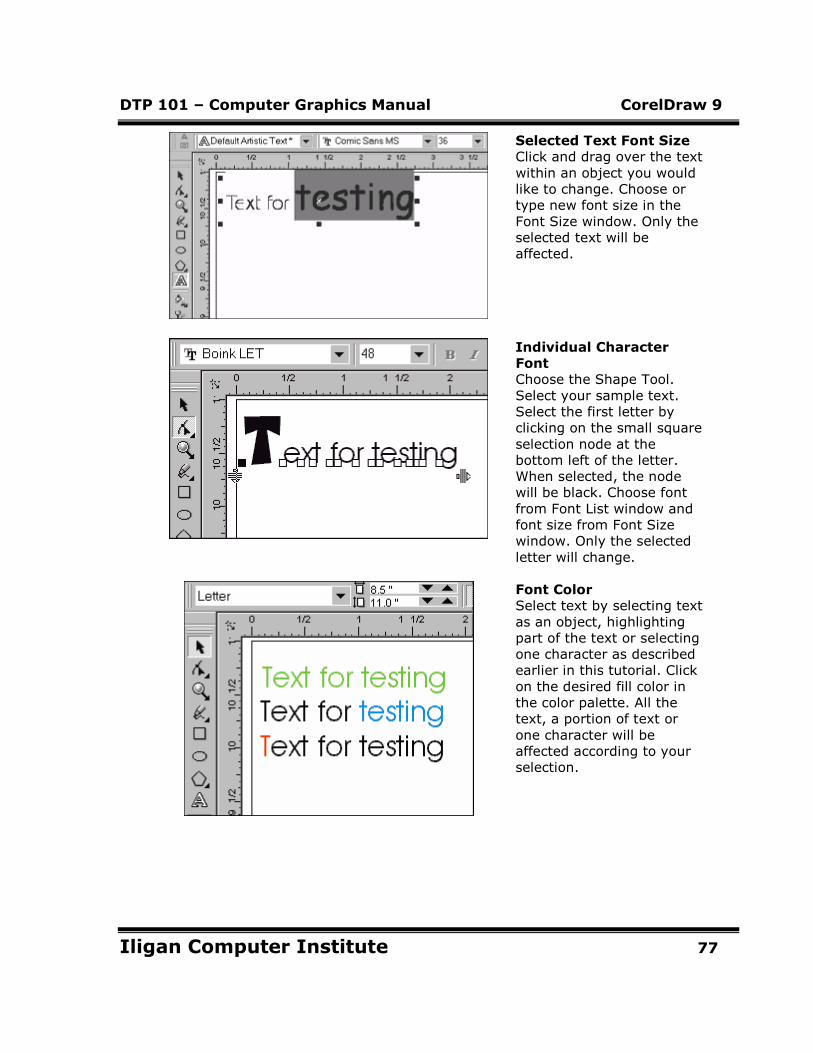
Selected Text Font Size
Click and drag over the text
within an object you would
like to change. Choose or
type new font size in the
Font Size window. Only the
selected text will be
affected.
Individual Character
Font
Choose the Shape Tool.
Select your sample text.
Select the first letter by
clicking on the small square
selection node at the
bottom left of the letter.
When selected, the node
will be black. Choose font
from Font List window and
font size from Font Size
window. Only the selected
letter will change.
Font Color
Select text by selecting text
as an object, highlighting
part of the text or selecting
one character as described
earlier in this tutorial. Click
on the desired fill color in
the color palette. All the
text, a portion of text or
one character will be
affected according to your
selection.

DTP 101 – Computer Graphics Manual CorelDraw 9
Iligan Computer Institute 78
Font Outline
Select text by selecting text
as an object, highlighting
part of the text or selecting
one character as described
earlier in this tutorial. Right
click on the desired outline
color in the color palette. All
the text, a portion of text or
one character will be
affected according to your
selection.
DTP 101 – Computer Graphics Manual CorelDraw 9
Iligan Computer Institute 79
Set Default Font and SizeSet Default Font and SizeSet Default Font and SizeSet Default Font and Size
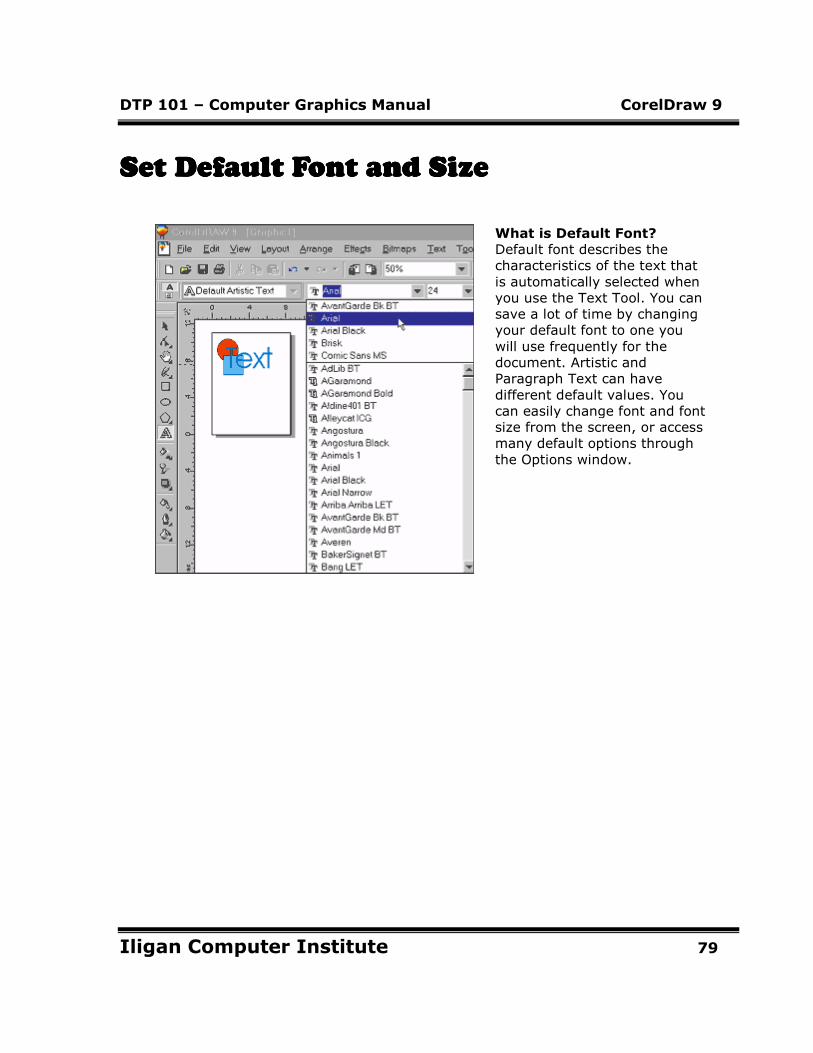
What is Default Font?
Default font describes the
characteristics of the text that
is automatically selected when
you use the Text Tool. You can
save a lot of time by changing
your default font to one you
will use frequently for the
document. Artistic and
Paragraph Text can have
different default values. You
can easily change font and font
size from the screen, or access
many default options through
the Options window.
DTP 101 – Computer Graphics Manual CorelDraw 9
Iligan Computer Institute 80
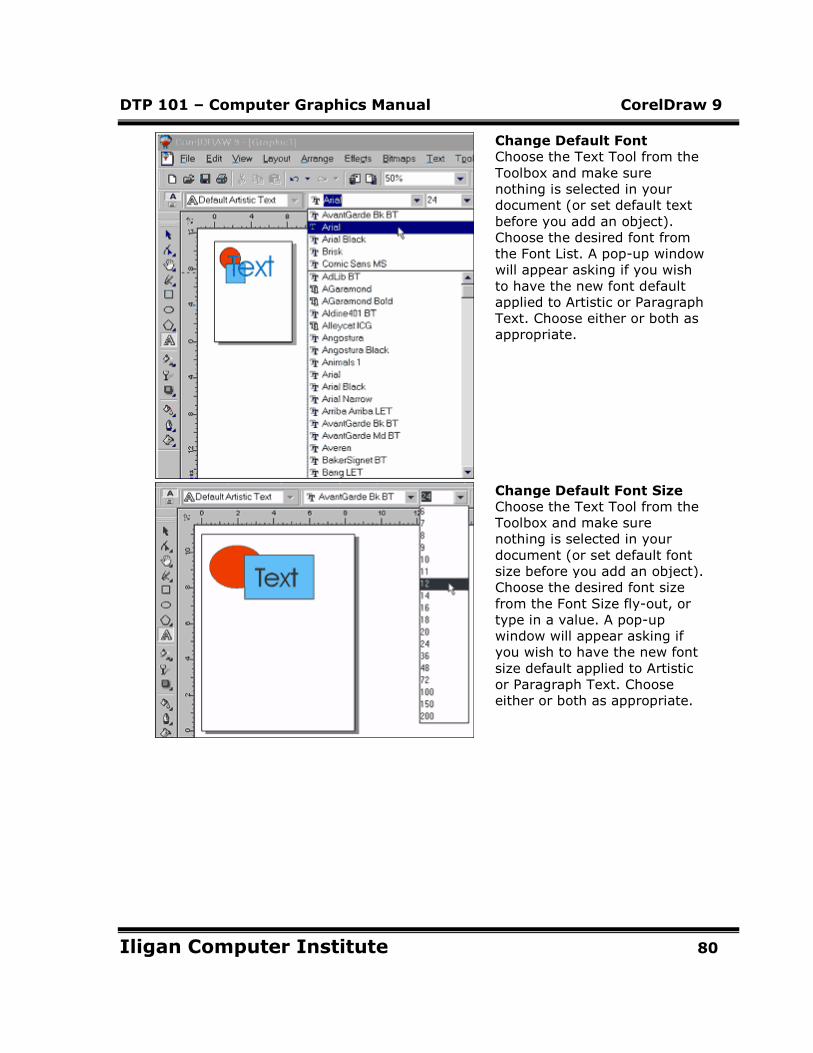
Change Default Font
Choose the Text Tool from the
Toolbox and make sure
nothing is selected in your
document (or set default text
before you add an object).
Choose the desired font from
the Font List. A pop-up window
will appear asking if you wish
to have the new font default
applied to Artistic or Paragraph
Text. Choose either or both as
appropriate.
Change Default Font Size
Choose the Text Tool from the
Toolbox and make sure
nothing is selected in your
document (or set default font
size before you add an object).
Choose the desired font size
from the Font Size fly-out, or
type in a value. A pop-up
window will appear asking if
you wish to have the new font
size default applied to Artistic
or Paragraph Text. Choose
either or both as appropriate.

DTP 101 – Computer Graphics Manual CorelDraw 9
Iligan Computer Institute 81
Open Options Window
Choose Layout, Page Setup
from the Main Menu to open
the Options window. You can
change many default text
options through this screen.
Choose Document, Styles from
the Options list.
Choose Text Defaults
Choose Default Artistic Text or
Default Paragraph Text and
click the Edit button. All text
options appear. Choose the
options you require for that
type of text. Click OK. You can
also change default text fill and
outline by clicking on the Edit
button for the Fill or Outline
sections.
DTP 101 – Computer Graphics Manual CorelDraw 9
Iligan Computer Institute 82
Align Artistic TextAlign Artistic TextAlign Artistic TextAlign Artistic Text
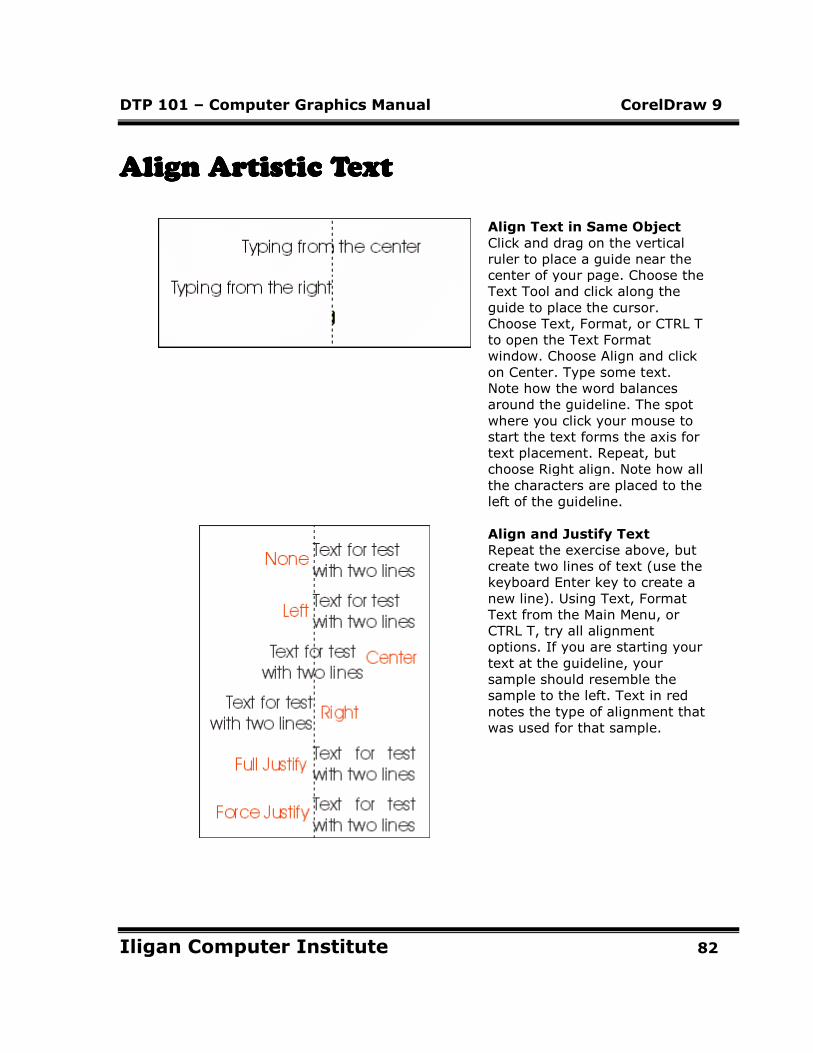
Align Text in Same Object
Click and drag on the vertical
ruler to place a guide near the
center of your page. Choose the
Text Tool and click along the
guide to place the cursor.
Choose Text, Format, or CTRL T
to open the Text Format
window. Choose Align and click
on Center. Type some text.
Note how the word balances
around the guideline. The spot
where you click your mouse to
start the text forms the axis for
text placement. Repeat, but
choose Right align. Note how all
the characters are placed to the
left of the guideline.
Align and Justify Text
Repeat the exercise above, but
create two lines of text (use the
keyboard Enter key to create a
new line). Using Text, Format
Text from the Main Menu, or
CTRL T, try all alignment
options. If you are starting your
text at the guideline, your
sample should resemble the
sample to the left. Text in red
notes the type of alignment that
was used for that sample.
DTP 101 – Computer Graphics Manual CorelDraw 9
Iligan Computer Institute 83
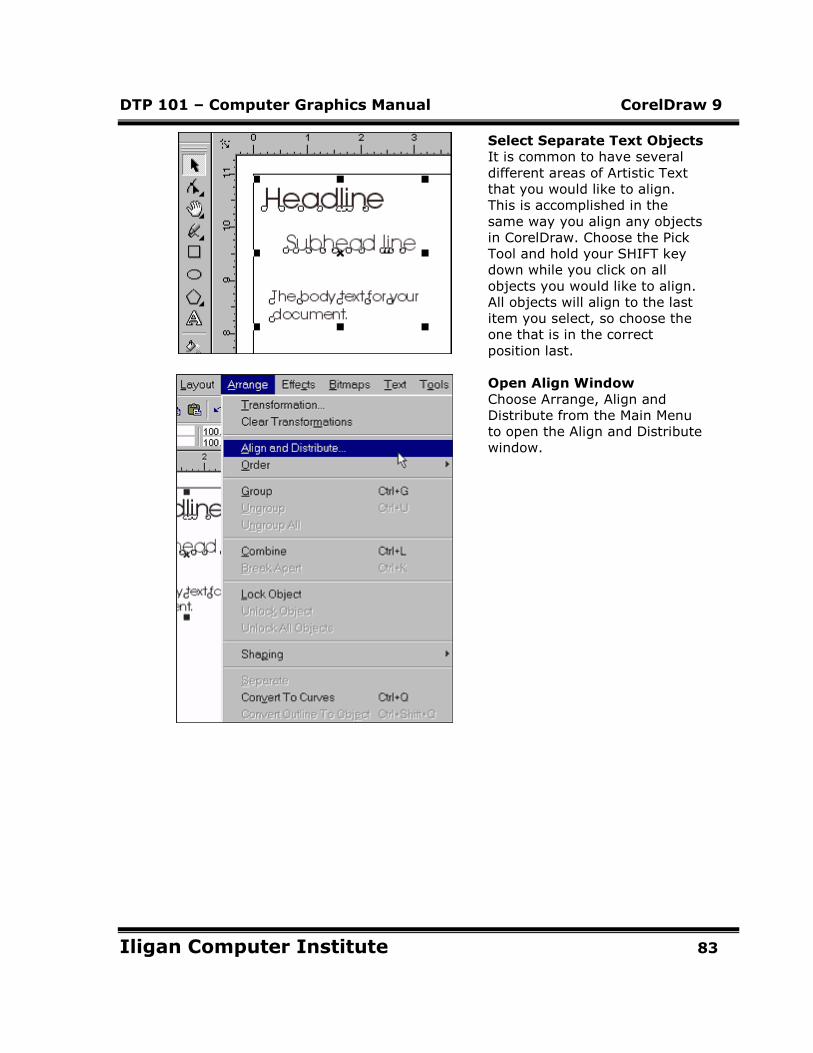
Select Separate Text Objects
It is common to have several
different areas of Artistic Text
that you would like to align.
This is accomplished in the
same way you align any objects
in CorelDraw. Choose the Pick
Tool and hold your SHIFT key
down while you click on all
objects you would like to align.
All objects will align to the last
item you select, so choose the
one that is in the correct
position last.
Open Align Window
Choose Arrange, Align and
Distribute from the Main Menu
to open the Align and Distribute
window.

DTP 101 – Computer Graphics Manual CorelDraw 9
Iligan Computer Institute 84
Choose Alignment
Choose Align Left, Center or
Right for this example. You can
preview the alignment by
clicking on the Preview button
at the bottom of this window.
(If the window blocks your view
of the objects you are working
with, click and drag on the blue
area at the top of the window to
move.) Click OK.
Alignment Results
In this sample, the Headline
was chosen last, so all other
objects align to the left position
of the headline.
Align Vertically
Select the objects you wish to
align as with the previous
example. Choose Arrange, Align
and Distribute from the Main
Menu to open the Align and
Distribute window. Choose Top,
Center or Bottom to align
vertically. In this sample, the
circle was chosen last and the
Bottom align was selected.
(Guide placed to show the
alignment for this sample and
was not used to align.)

DTP 101 – Computer Graphics Manual CorelDraw 9
Iligan Computer Institute 85
Align Paragraph TextAlign Paragraph TextAlign Paragraph TextAlign Paragraph Text
Justify Text in Text Box
Choose the Pick Tool from the
Toolbox and select the block of
Paragraph text you wish to
justify (justify is the term used
to describe how text is aligned).
Choose Text, Format Text from
the Main Menu. Click on Center.
You can preview the alignment
by clicking on the Preview
button at the bottom of this
window. (If the window blocks
your view of the objects you are
working with, click and drag on
the blue area at the top of the
window to move.) Click OK.
View Results
Note how both paragraphs now
have center justification. With
the Pick Tool Selected, changes
are applied to the entire text
box.
DTP 101 – Computer Graphics Manual CorelDraw 9
Iligan Computer Institute 86
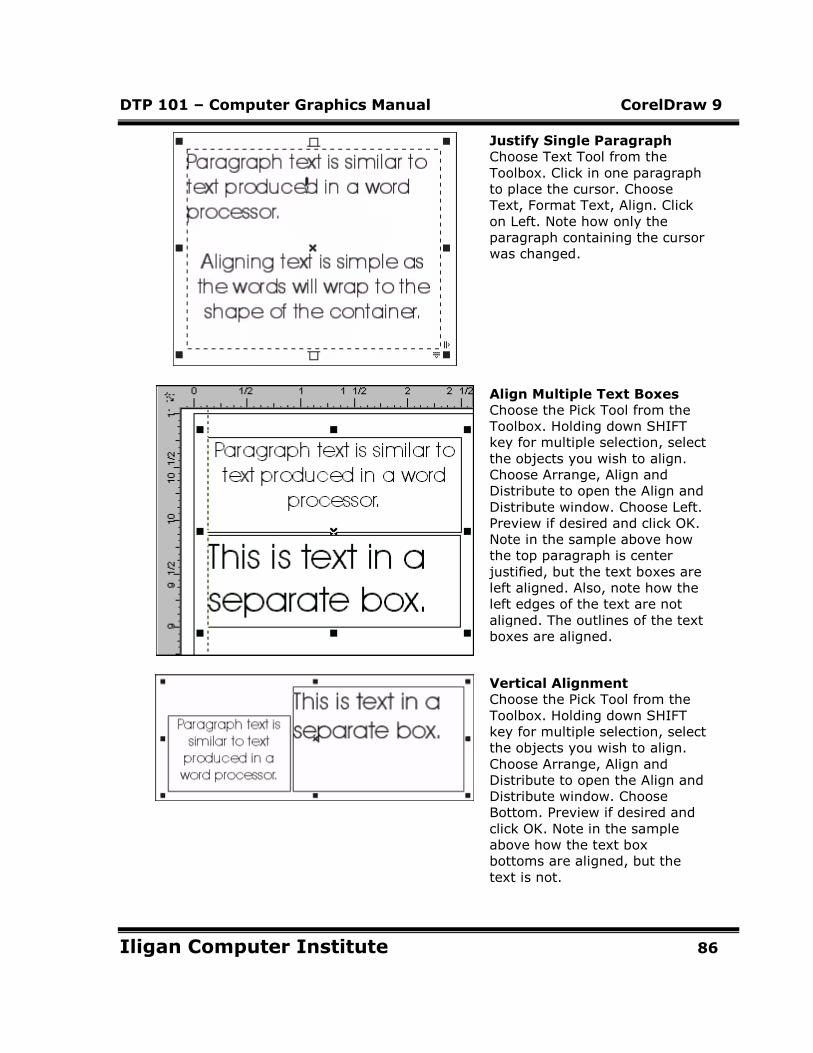
Justify Single Paragraph
Choose Text Tool from the
Toolbox. Click in one paragraph
to place the cursor. Choose
Text, Format Text, Align. Click
on Left. Note how only the
paragraph containing the cursor
was changed.
Align Multiple Text Boxes
Choose the Pick Tool from the
Toolbox. Holding down SHIFT
key for multiple selection, select
the objects you wish to align.
Choose Arrange, Align and
Distribute to open the Align and
Distribute window. Choose Left.
Preview if desired and click OK.
Note in the sample above how
the top paragraph is center
justified, but the text boxes are
left aligned. Also, note how the
left edges of the text are not
aligned. The outlines of the text
boxes are aligned.
Vertical Alignment
Choose the Pick Tool from the
Toolbox. Holding down SHIFT
key for multiple selection, select
the objects you wish to align.
Choose Arrange, Align and
Distribute to open the Align and
Distribute window. Choose
Bottom. Preview if desired and
click OK. Note in the sample
above how the text box
bottoms are aligned, but the
text is not.

DTP 101 – Computer Graphics Manual CorelDraw 9
Iligan Computer Institute 87
Outline Tool OverviewOutline Tool OverviewOutline Tool OverviewOutline Tool Overview
Create Ellipse
Choose the Ellipse Tool from the
Toolbox. Click and drag to create
an oval shape, longer than it is
wide. Choose the Pick Tool. Click
on any color in the color palette
to fill the oval. This tutorial is a
quick tour through outline
features as an overview of what
the Outline Tool will do. See
individual steps for step-by-step
instructions on techniques.
Change Outline Width
Choose Pick Tool from the
Toolbox. Select the oval. Choose
the Outline Tool from the Toolbox
and a fly-out will appear. You can
click and drag on the fly-out to
detach the the fly-out for easy
access to outline settings. The
second section of the fly-out
contains 6 preset outline widths,
including a no outline setting.
Click on several to see the result
on your oval.

DTP 101 – Computer Graphics Manual CorelDraw 9
Iligan Computer Institute 88
Change Outline Color
Choose the Pick Tool. Right click
on any color in the color palette
to set a new outline color. You
can also set the color through the
Outline Tool.
Create Calligraphy Effect
Choose Pick Tool and Select Oval.
Choose Outline Tool to open the
fly-out. Choose the Outline Pen
Dialog icon to open the Outline
Pen window. Set Stretch and
Angle in the Calligraphy section.
This sample uses a 50% stretch
and a 60-degree angle.
Calligraphy outlines add a drawn
look to objects. See Calligraphy
for step-by-step instructions and
variations.
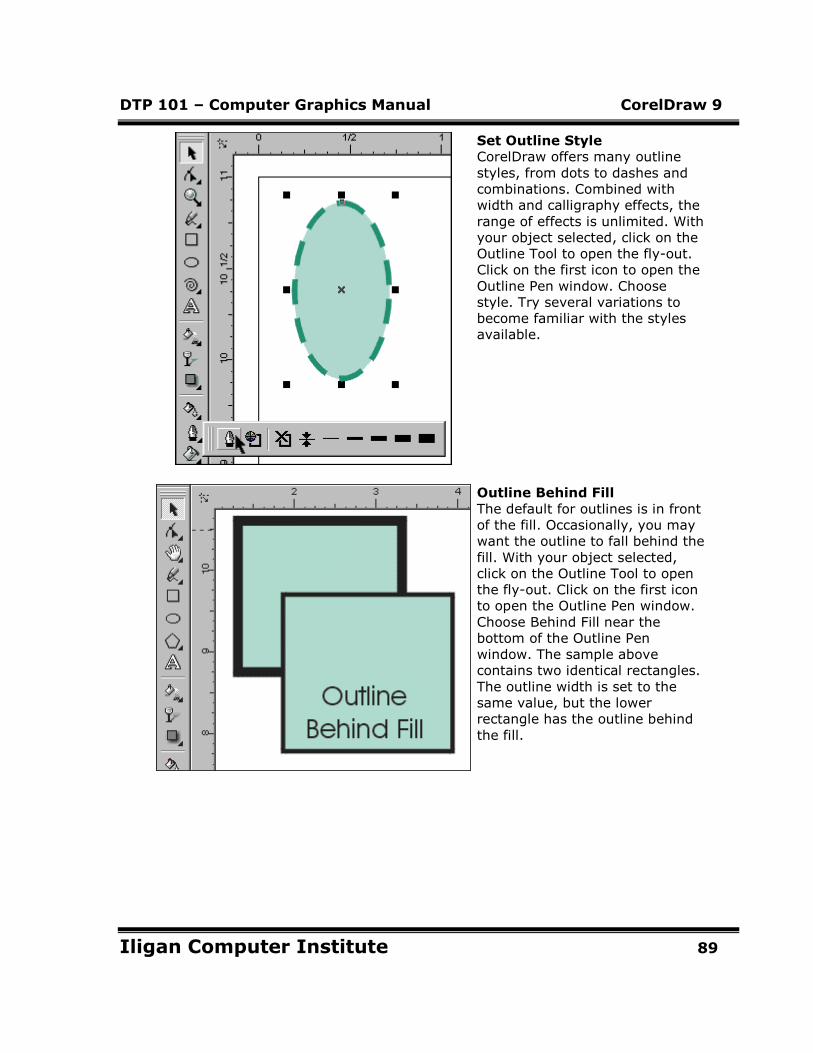
DTP 101 – Computer Graphics Manual CorelDraw 9
Iligan Computer Institute 89
Set Outline Style
CorelDraw offers many outline
styles, from dots to dashes and
combinations. Combined with
width and calligraphy effects, the
range of effects is unlimited. With
your object selected, click on the
Outline Tool to open the fly-out.
Click on the first icon to open the
Outline Pen window. Choose
style. Try several variations to
become familiar with the styles
available.
Outline Behind Fill
The default for outlines is in front
of the fill. Occasionally, you may
want the outline to fall behind the
fill. With your object selected,
click on the Outline Tool to open
the fly-out. Click on the first icon
to open the Outline Pen window.
Choose Behind Fill near the
bottom of the Outline Pen
window. The sample above
contains two identical rectangles.
The outline width is set to the
same value, but the lower
rectangle has the outline behind
the fill.
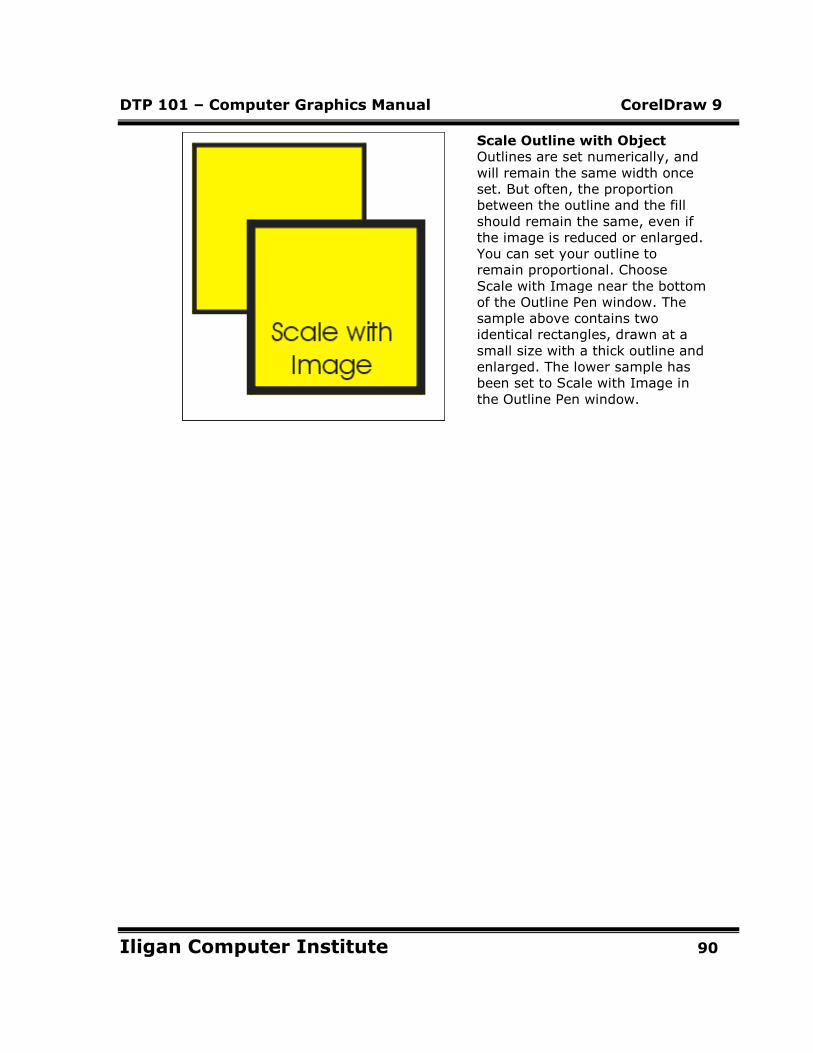
DTP 101 – Computer Graphics Manual CorelDraw 9
Iligan Computer Institute 90
Scale Outline with Object
Outlines are set numerically, and
will remain the same width once
set. But often, the proportion
between the outline and the fill
should remain the same, even if
the image is reduced or enlarged.
You can set your outline to
remain proportional. Choose
Scale with Image near the bottom
of the Outline Pen window. The
sample above contains two
identical rectangles, drawn at a
small size with a thick outline and
enlarged. The lower sample has
been set to Scale with Image in
the Outline Pen window.
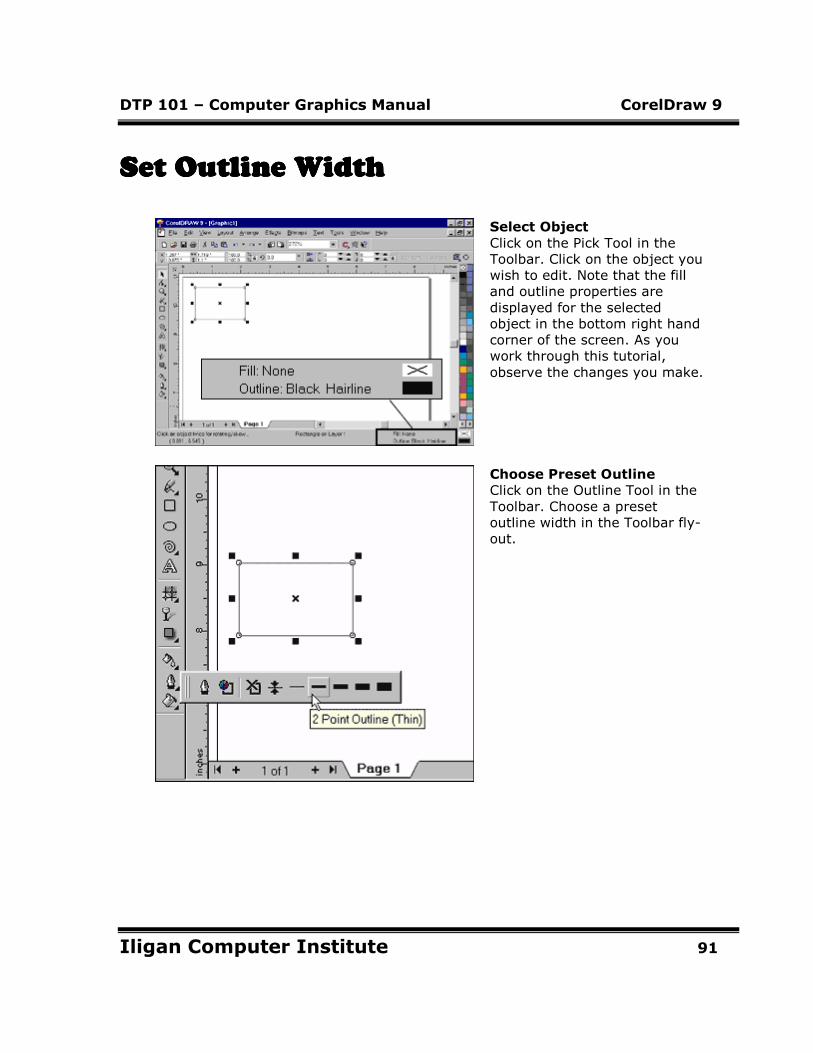
DTP 101 – Computer Graphics Manual CorelDraw 9
Iligan Computer Institute 91
Set Outline WidthSet Outline WidthSet Outline WidthSet Outline Width
Select Object
Click on the Pick Tool in the
Toolbar. Click on the object you
wish to edit. Note that the fill
and outline properties are
displayed for the selected
object in the bottom right hand
corner of the screen. As you
work through this tutorial,
observe the changes you make.
Choose Preset Outline
Click on the Outline Tool in the
Toolbar. Choose a preset
outline width in the Toolbar fly-
out.
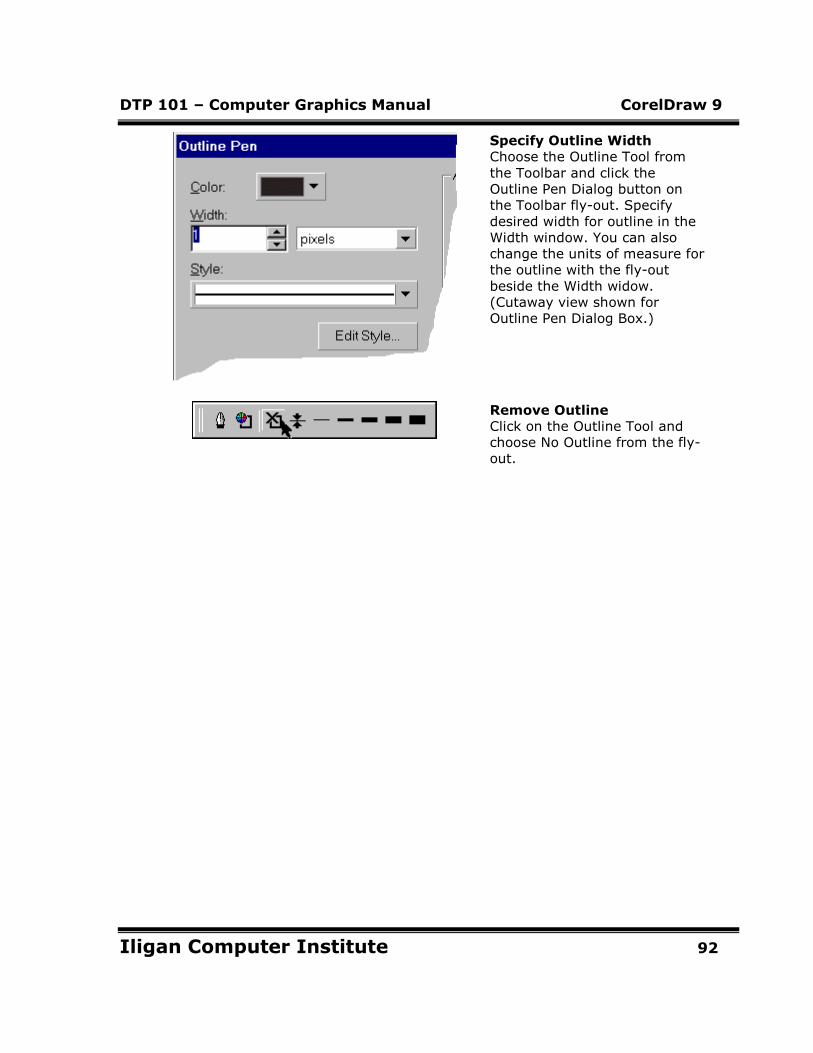
DTP 101 – Computer Graphics Manual CorelDraw 9
Iligan Computer Institute 92
Specify Outline Width
Choose the Outline Tool from
the Toolbar and click the
Outline Pen Dialog button on
the Toolbar fly-out. Specify
desired width for outline in the
Width window. You can also
change the units of measure for
the outline with the fly-out
beside the Width widow.
(Cutaway view shown for
Outline Pen Dialog Box.)
Remove Outline
Click on the Outline Tool and
choose No Outline from the fly-
out.
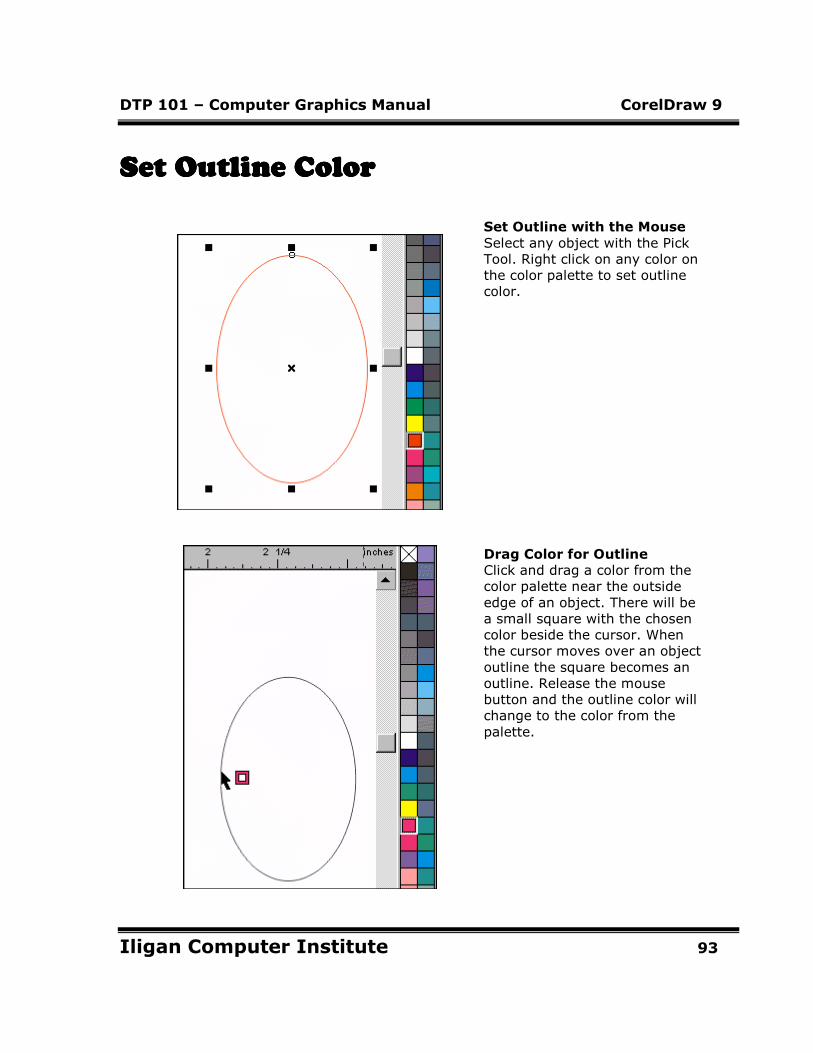
DTP 101 – Computer Graphics Manual CorelDraw 9
Iligan Computer Institute 93
Set Outline ColorSet Outline ColorSet Outline ColorSet Outline Color
Set Outline with the Mouse
Select any object with the Pick
Tool. Right click on any color on
the color palette to set outline
color.
Drag Color for Outline
Click and drag a color from the
color palette near the outside
edge of an object. There will be
a small square with the chosen
color beside the cursor. When
the cursor moves over an object
outline the square becomes an
outline. Release the mouse
button and the outline color will
change to the color from the
palette.
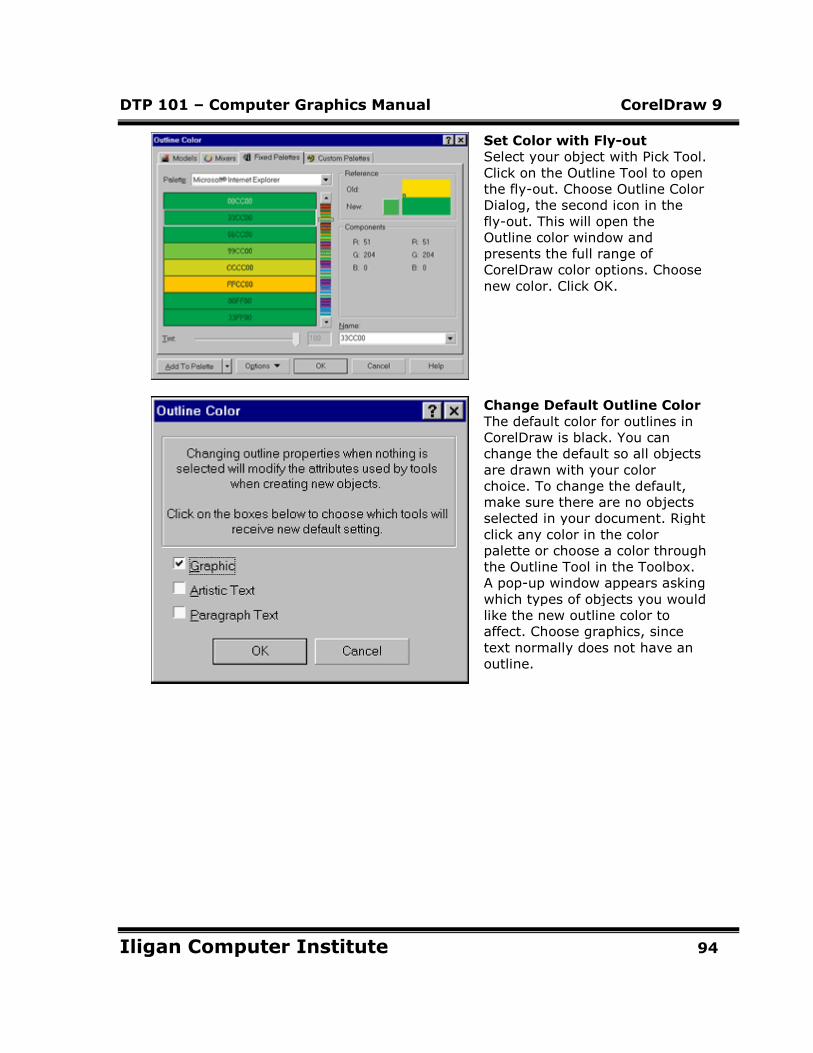
DTP 101 – Computer Graphics Manual CorelDraw 9
Iligan Computer Institute 94
Set Color with Fly-out
Select your object with Pick Tool.
Click on the Outline Tool to open
the fly-out. Choose Outline Color
Dialog, the second icon in the
fly-out. This will open the
Outline color window and
presents the full range of
CorelDraw color options. Choose
new color. Click OK.
Change Default Outline Color
The default color for outlines in
CorelDraw is black. You can
change the default so all objects
are drawn with your color
choice. To change the default,
make sure there are no objects
selected in your document. Right
click any color in the color
palette or choose a color through
the Outline Tool in the Toolbox.
A pop-up window appears asking
which types of objects you would
like the new outline color to
affect. Choose graphics, since
text normally does not have an
outline.
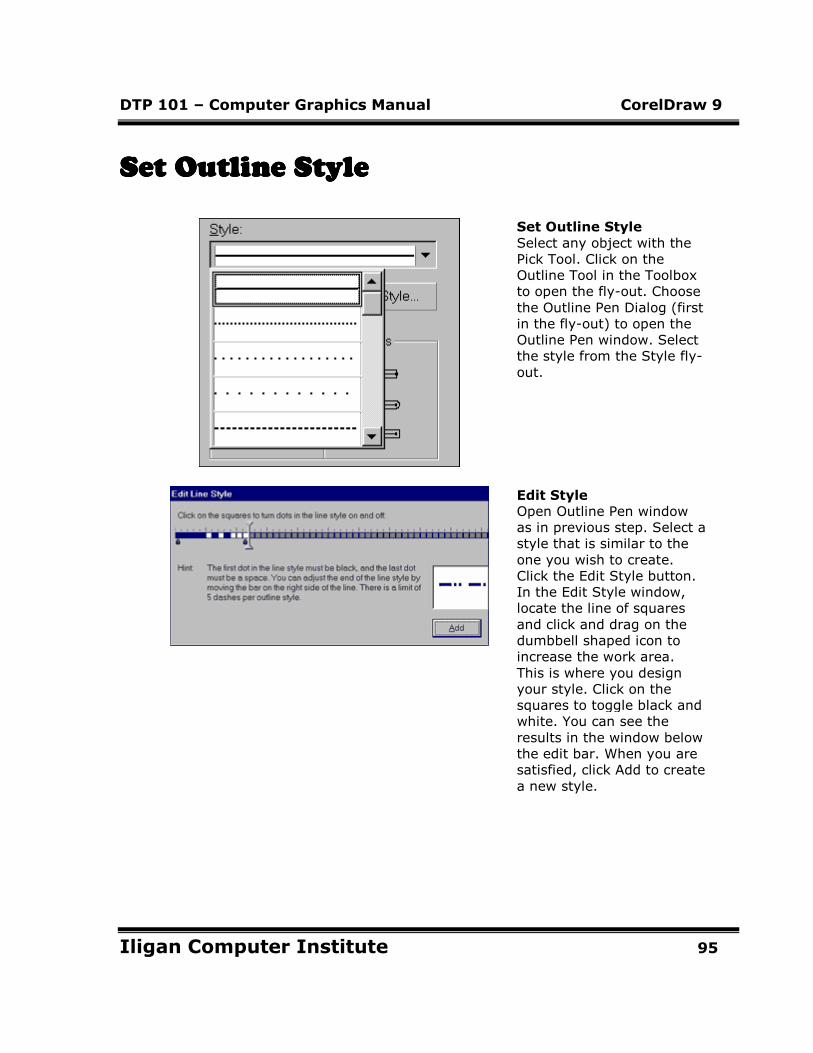
DTP 101 – Computer Graphics Manual CorelDraw 9
Iligan Computer Institute 95
Set Outline StyleSet Outline StyleSet Outline StyleSet Outline Style
Set Outline Style
Select any object with the
Pick Tool. Click on the
Outline Tool in the Toolbox
to open the fly-out. Choose
the Outline Pen Dialog (first
in the fly-out) to open the
Outline Pen window. Select
the style from the Style fly-
out.
Edit Style
Open Outline Pen window
as in previous step. Select a
style that is similar to the
one you wish to create.
Click the Edit Style button.
In the Edit Style window,
locate the line of squares
and click and drag on the
dumbbell shaped icon to
increase the work area.
This is where you design
your style. Click on the
squares to toggle black and
white. You can see the
results in the window below
the edit bar. When you are
satisfied, click Add to create
a new style.
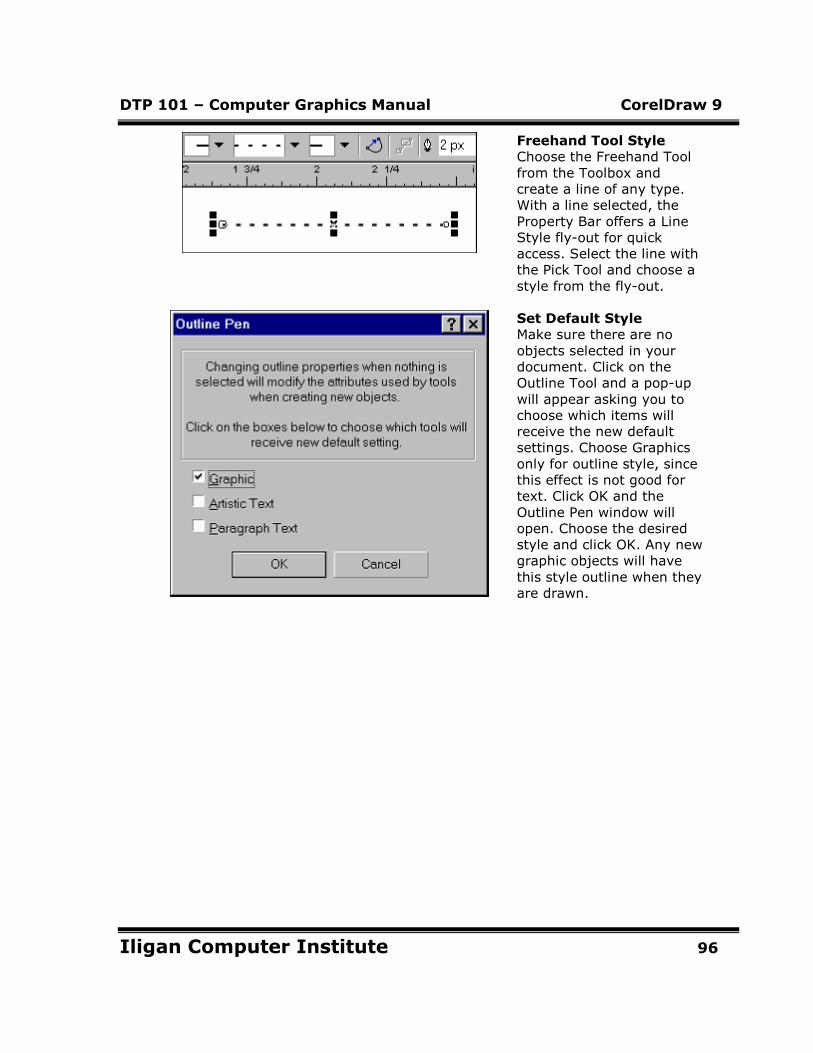
DTP 101 – Computer Graphics Manual CorelDraw 9
Iligan Computer Institute 96
Freehand Tool Style
Choose the Freehand Tool
from the Toolbox and
create a line of any type.
With a line selected, the
Property Bar offers a Line
Style fly-out for quick
access. Select the line with
the Pick Tool and choose a
style from the fly-out.
Set Default Style
Make sure there are no
objects selected in your
document. Click on the
Outline Tool and a pop-up
will appear asking you to
choose which items will
receive the new default
settings. Choose Graphics
only for outline style, since
this effect is not good for
text. Click OK and the
Outline Pen window will
open. Choose the desired
style and click OK. Any new
graphic objects will have
this style outline when they
are drawn.
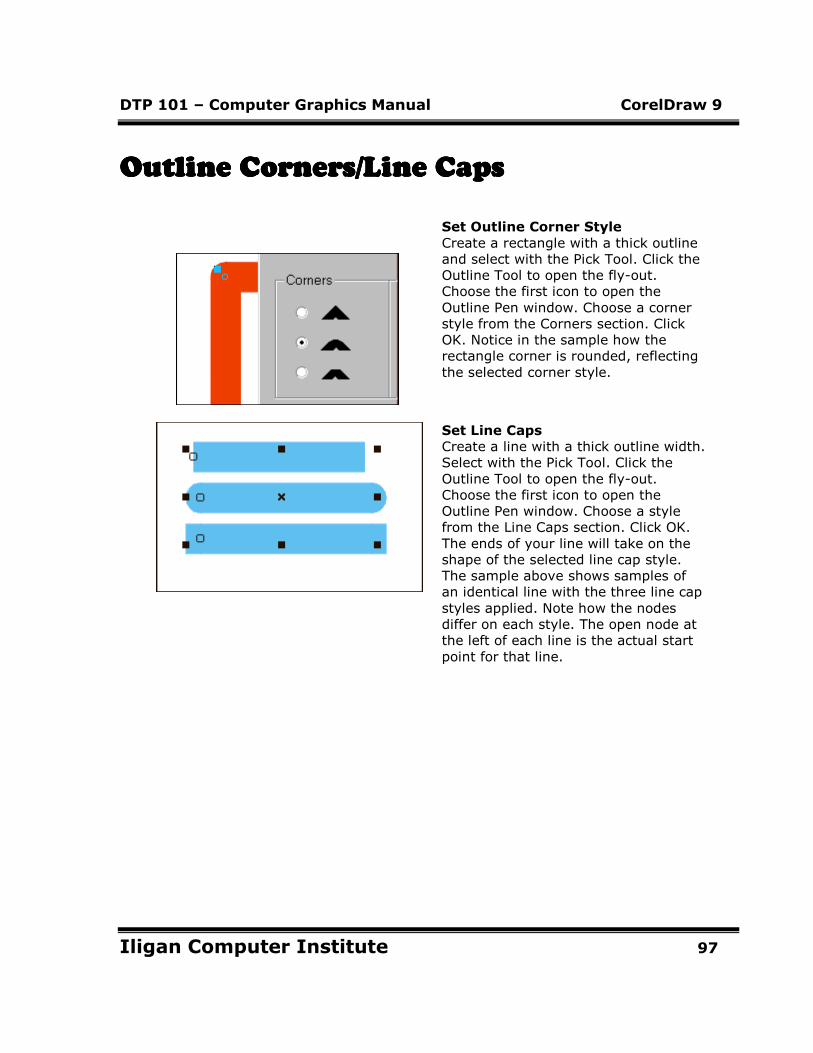
DTP 101 – Computer Graphics Manual CorelDraw 9
Iligan Computer Institute 97
Outline Corners/Line CapsOutline Corners/Line CapsOutline Corners/Line CapsOutline Corners/Line Caps
Set Outline Corner Style
Create a rectangle with a thick outline
and select with the Pick Tool. Click the
Outline Tool to open the fly-out.
Choose the first icon to open the
Outline Pen window. Choose a corner
style from the Corners section. Click
OK. Notice in the sample how the
rectangle corner is rounded, reflecting
the selected corner style.
Set Line Caps
Create a line with a thick outline width.
Select with the Pick Tool. Click the
Outline Tool to open the fly-out.
Choose the first icon to open the
Outline Pen window. Choose a style
from the Line Caps section. Click OK.
The ends of your line will take on the
shape of the selected line cap style.
The sample above shows samples of
an identical line with the three line cap
styles applied. Note how the nodes
differ on each style. The open node at
the left of each line is the actual start
point for that line.
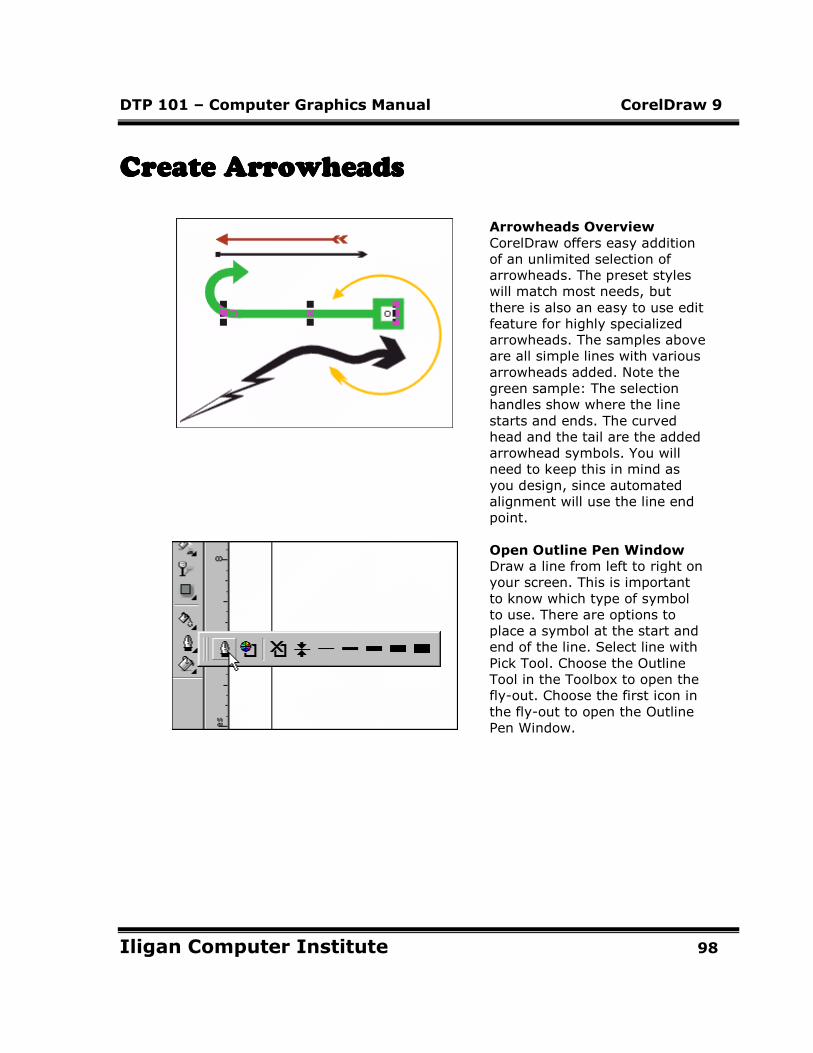
DTP 101 – Computer Graphics Manual CorelDraw 9
Iligan Computer Institute 98
Create ArrowheadsCreate ArrowheadsCreate ArrowheadsCreate Arrowheads
Arrowheads Overview
CorelDraw offers easy addition
of an unlimited selection of
arrowheads. The preset styles
will match most needs, but
there is also an easy to use edit
feature for highly specialized
arrowheads. The samples above
are all simple lines with various
arrowheads added. Note the
green sample: The selection
handles show where the line
starts and ends. The curved
head and the tail are the added
arrowhead symbols. You will
need to keep this in mind as
you design, since automated
alignment will use the line end
point.
Open Outline Pen Window
Draw a line from left to right on
your screen. This is important
to know which type of symbol
to use. There are options to
place a symbol at the start and
end of the line. Select line with
Pick Tool. Choose the Outline
Tool in the Toolbox to open the
fly-out. Choose the first icon in
the fly-out to open the Outline
Pen Window.
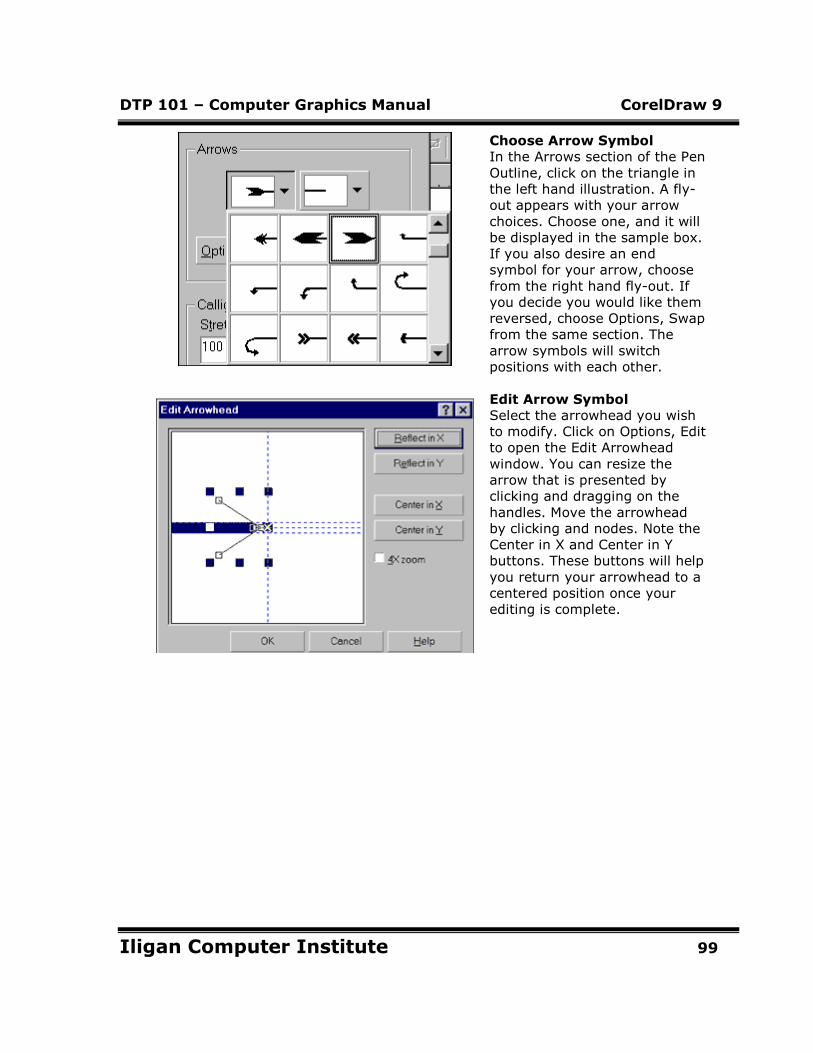
DTP 101 – Computer Graphics Manual CorelDraw 9
Iligan Computer Institute 99
Choose Arrow Symbol
In the Arrows section of the Pen
Outline, click on the triangle in
the left hand illustration. A fly-
out appears with your arrow
choices. Choose one, and it will
be displayed in the sample box.
If you also desire an end
symbol for your arrow, choose
from the right hand fly-out. If
you decide you would like them
reversed, choose Options, Swap
from the same section. The
arrow symbols will switch
positions with each other.
Edit Arrow Symbol
Select the arrowhead you wish
to modify. Click on Options, Edit
to open the Edit Arrowhead
window. You can resize the
arrow that is presented by
clicking and dragging on the
handles. Move the arrowhead
by clicking and nodes. Note the
Center in X and Center in Y
buttons. These buttons will help
you return your arrowhead to a
centered position once your
editing is complete.
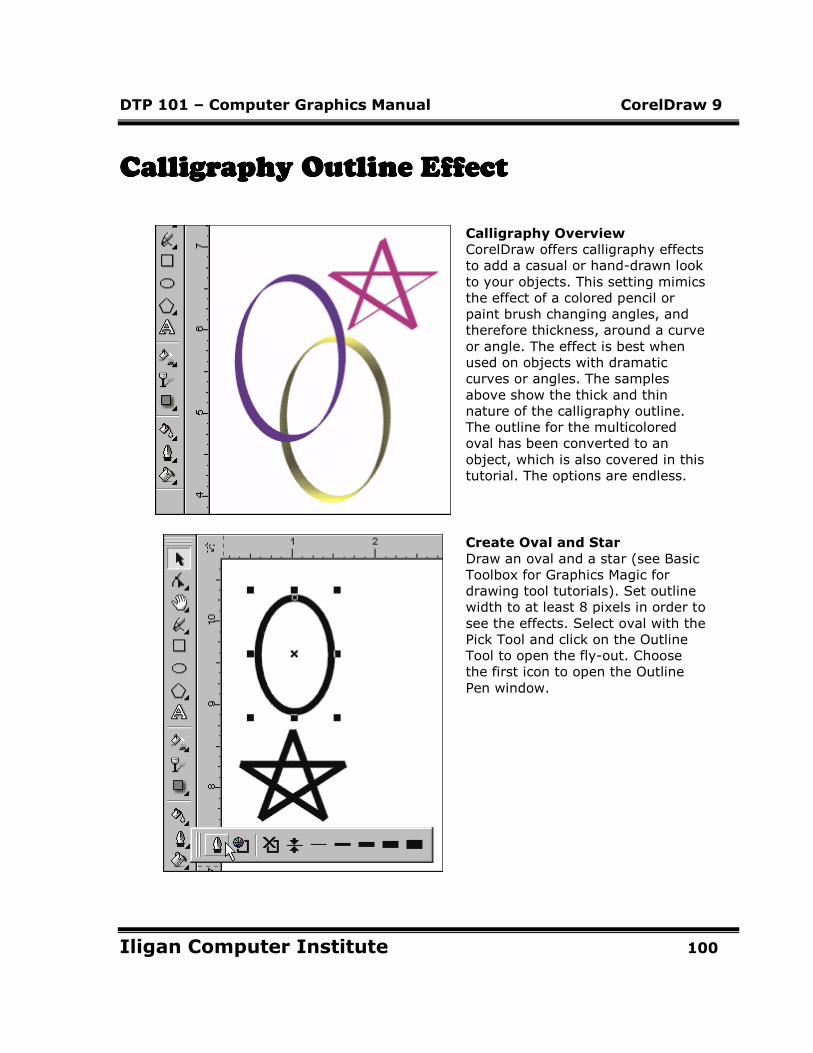
DTP 101 – Computer Graphics Manual CorelDraw 9
Iligan Computer Institute 100
Calligraphy Outline EffectCalligraphy Outline EffectCalligraphy Outline EffectCalligraphy Outline Effect
Calligraphy Overview
CorelDraw offers calligraphy effects
to add a casual or hand-drawn look
to your objects. This setting mimics
the effect of a colored pencil or
paint brush changing angles, and
therefore thickness, around a curve
or angle. The effect is best when
used on objects with dramatic
curves or angles. The samples
above show the thick and thin
nature of the calligraphy outline.
The outline for the multicolored
oval has been converted to an
object, which is also covered in this
tutorial. The options are endless.
Create Oval and Star
Draw an oval and a star (see Basic
Toolbox for Graphics Magic for
drawing tool tutorials). Set outline
width to at least 8 pixels in order to
see the effects. Select oval with the
Pick Tool and click on the Outline
Tool to open the fly-out. Choose
the first icon to open the Outline
Pen window.

DTP 101 – Computer Graphics Manual CorelDraw 9
Iligan Computer Institute 101
Choose Calligraphy Settings
Locate the Calligraphy section of the
Outline Pen window. The Stretch value
sets the shape of the brush. A square
brush, or 100%, will not vary line
thickness. A lower setting creates a more
pronounced effect. The angle value
simulates brush angle. At 0 there is no
effect. Click on the arrows to reduce and
increase both angle and stretch,
observing the sample as the numbers
change. Note: Negative angle numbers
move the brush clockwise, positive
numbers, counterclockwise. Set Stretch
to 15 and Angle to -65.
Results
Click OK to accept the settings and
observe your oval. Notice how the top
left and bottom right lines are very thin,
and opposite these points, the line is
very thick. If we had used a value of
+64, the thin lines would be at the top
right and bottom left. Repeat this
exercise with the star to see how straight
lines react.
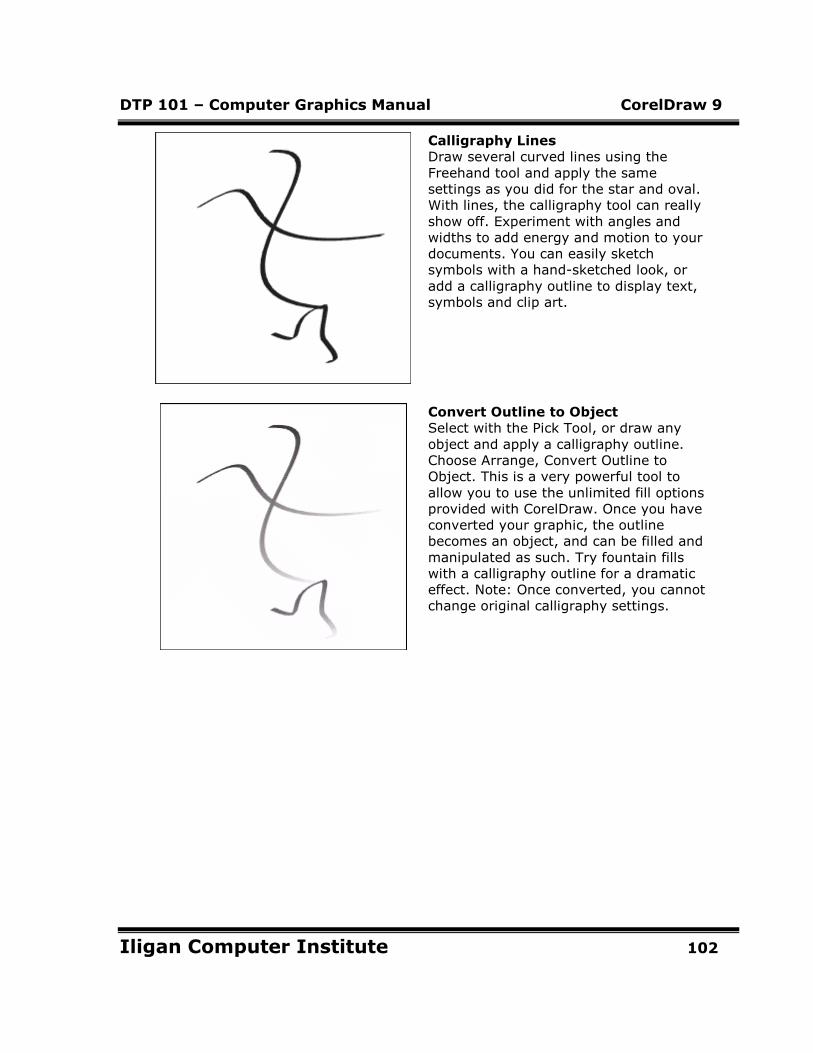
DTP 101 – Computer Graphics Manual CorelDraw 9
Iligan Computer Institute 102
Calligraphy Lines
Draw several curved lines using the
Freehand tool and apply the same
settings as you did for the star and oval.
With lines, the calligraphy tool can really
show off. Experiment with angles and
widths to add energy and motion to your
documents. You can easily sketch
symbols with a hand-sketched look, or
add a calligraphy outline to display text,
symbols and clip art.
Convert Outline to Object
Select with the Pick Tool, or draw any
object and apply a calligraphy outline.
Choose Arrange, Convert Outline to
Object. This is a very powerful tool to
allow you to use the unlimited fill options
provided with CorelDraw. Once you have
converted your graphic, the outline
becomes an object, and can be filled and
manipulated as such. Try fountain fills
with a calligraphy outline for a dramatic
effect. Note: Once converted, you cannot
change original calligraphy settings.
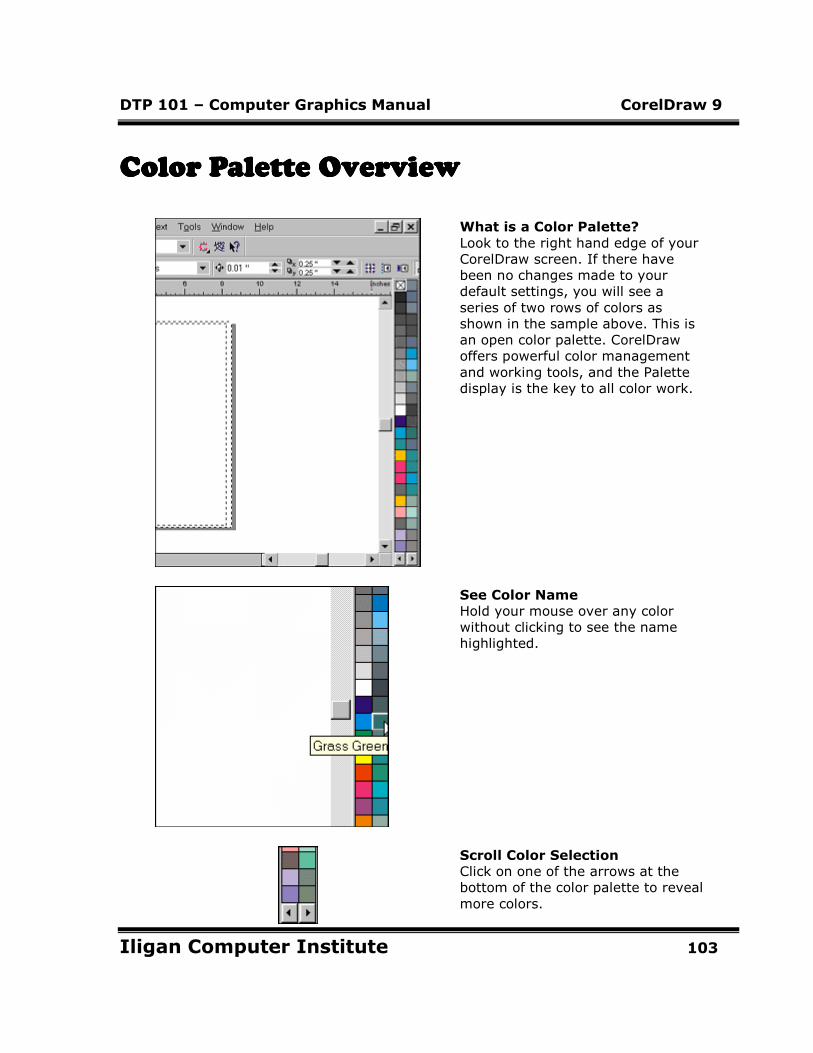
DTP 101 – Computer Graphics Manual CorelDraw 9
Iligan Computer Institute 103
Color Palette OverviewColor Palette OverviewColor Palette OverviewColor Palette Overview
What is a Color Palette?
Look to the right hand edge of your
CorelDraw screen. If there have
been no changes made to your
default settings, you will see a
series of two rows of colors as
shown in the sample above. This is
an open color palette. CorelDraw
offers powerful color management
and working tools, and the Palette
display is the key to all color work.
See Color Name
Hold your mouse over any color
without clicking to see the name
highlighted.
Scroll Color Selection
Click on one of the arrows at the
bottom of the color palette to reveal
more colors.
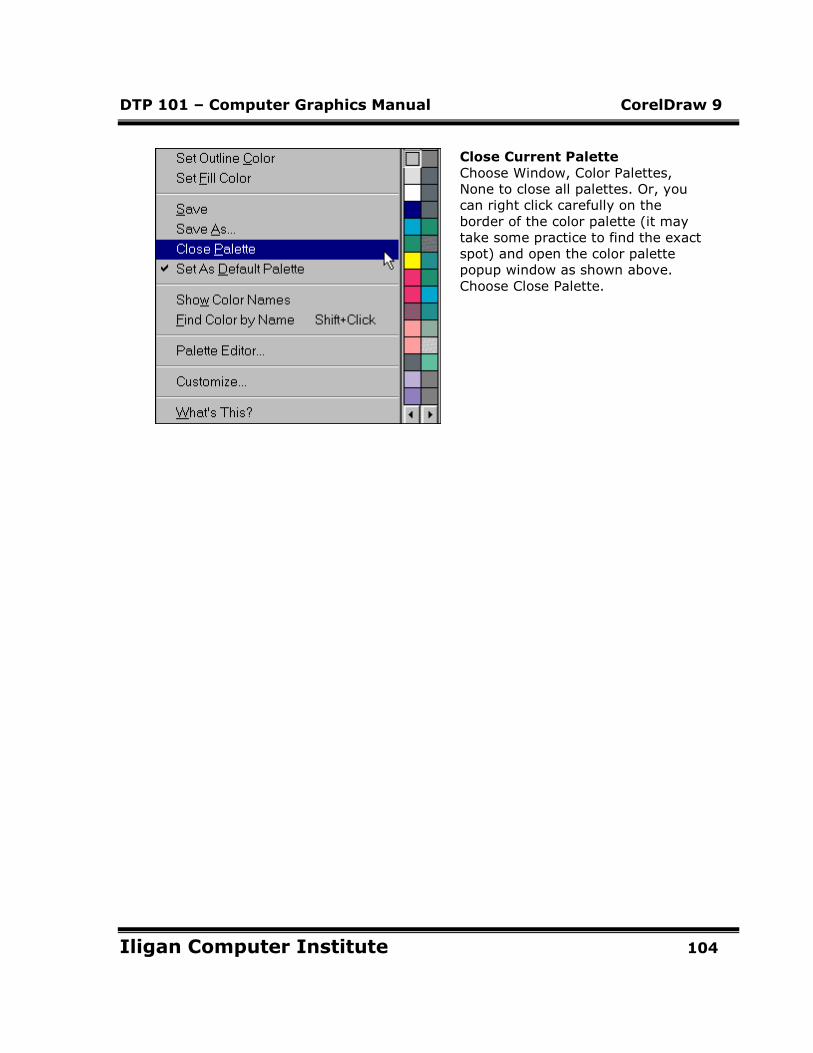
DTP 101 – Computer Graphics Manual CorelDraw 9
Iligan Computer Institute 104
Close Current Palette
Choose Window, Color Palettes,
None to close all palettes. Or, you
can right click carefully on the
border of the color palette (it may
take some practice to find the exact
spot) and open the color palette
popup window as shown above.
Choose Close Palette.
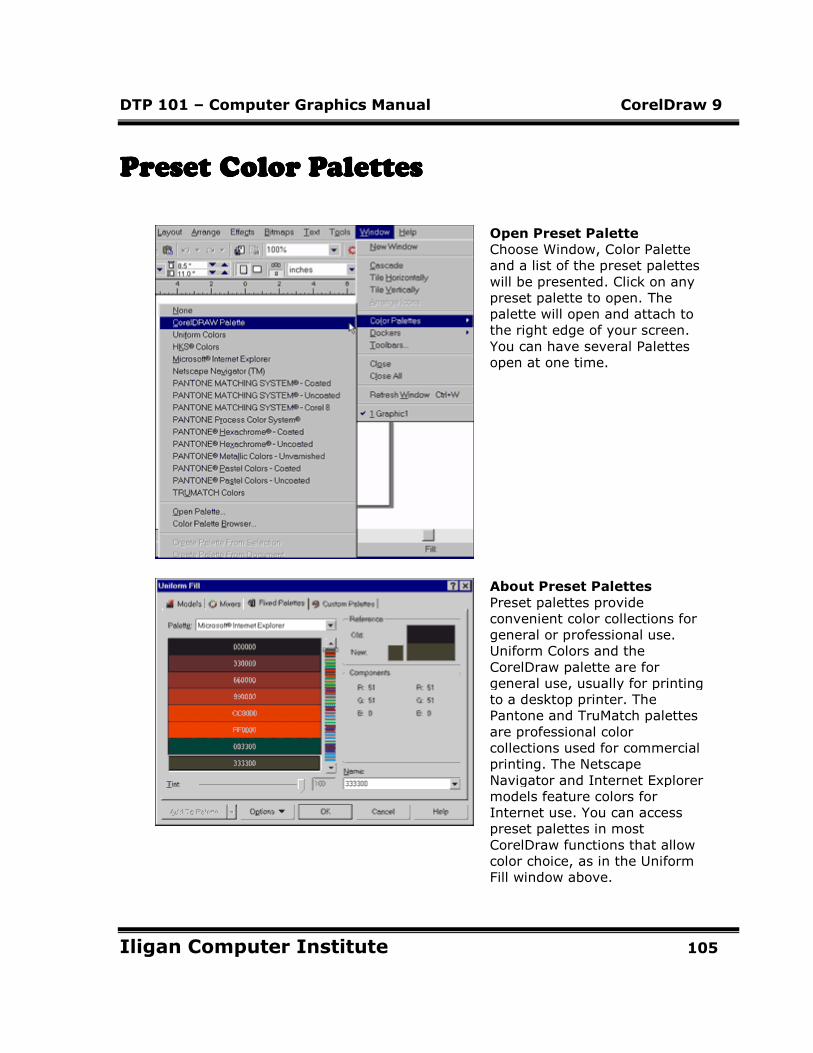
DTP 101 – Computer Graphics Manual CorelDraw 9
Iligan Computer Institute 105
Preset Color PalettesPreset Color PalettesPreset Color PalettesPreset Color Palettes
Open Preset Palette
Choose Window, Color Palette
and a list of the preset palettes
will be presented. Click on any
preset palette to open. The
palette will open and attach to
the right edge of your screen.
You can have several Palettes
open at one time.
About Preset Palettes
Preset palettes provide
convenient color collections for
general or professional use.
Uniform Colors and the
CorelDraw palette are for
general use, usually for printing
to a desktop printer. The
Pantone and TruMatch palettes
are professional color
collections used for commercial
printing. The Netscape
Navigator and Internet Explorer
models feature colors for
Internet use. You can access
preset palettes in most
CorelDraw functions that allow
color choice, as in the Uniform
Fill window above.
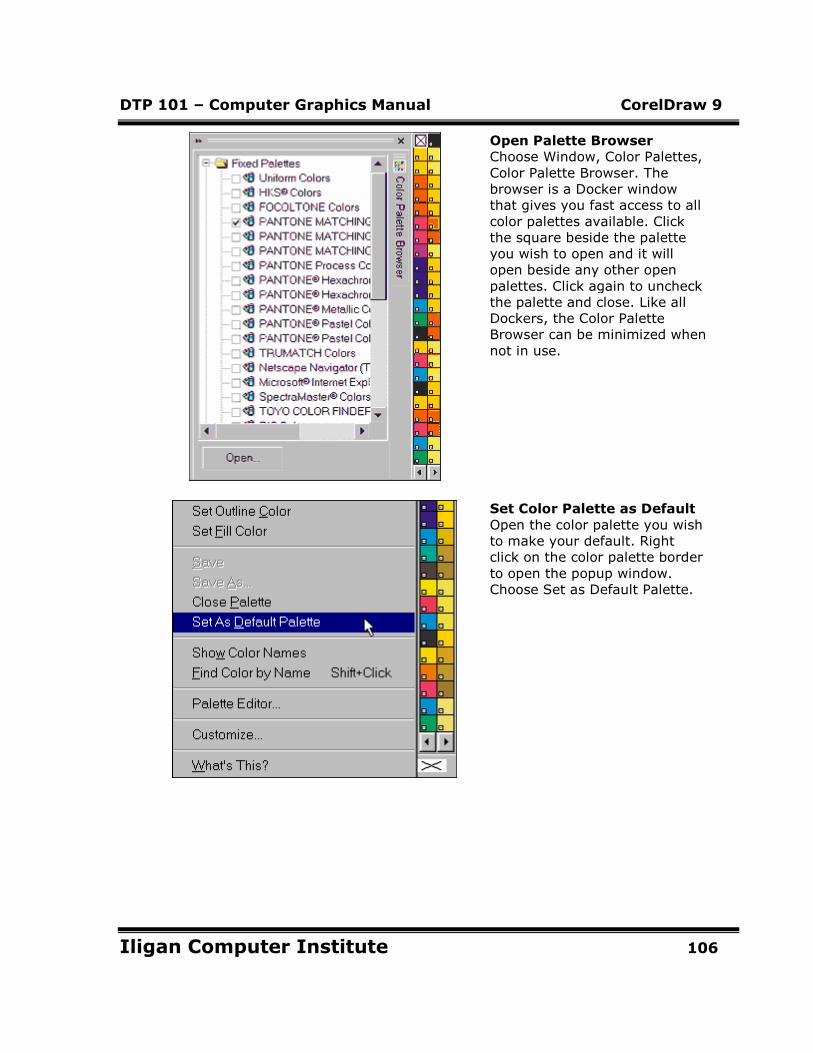
DTP 101 – Computer Graphics Manual CorelDraw 9
Iligan Computer Institute 106
Open Palette Browser
Choose Window, Color Palettes,
Color Palette Browser. The
browser is a Docker window
that gives you fast access to all
color palettes available. Click
the square beside the palette
you wish to open and it will
open beside any other open
palettes. Click again to uncheck
the palette and close. Like all
Dockers, the Color Palette
Browser can be minimized when
not in use.
Set Color Palette as Default
Open the color palette you wish
to make your default. Right
click on the color palette border
to open the popup window.
Choose Set as Default Palette.
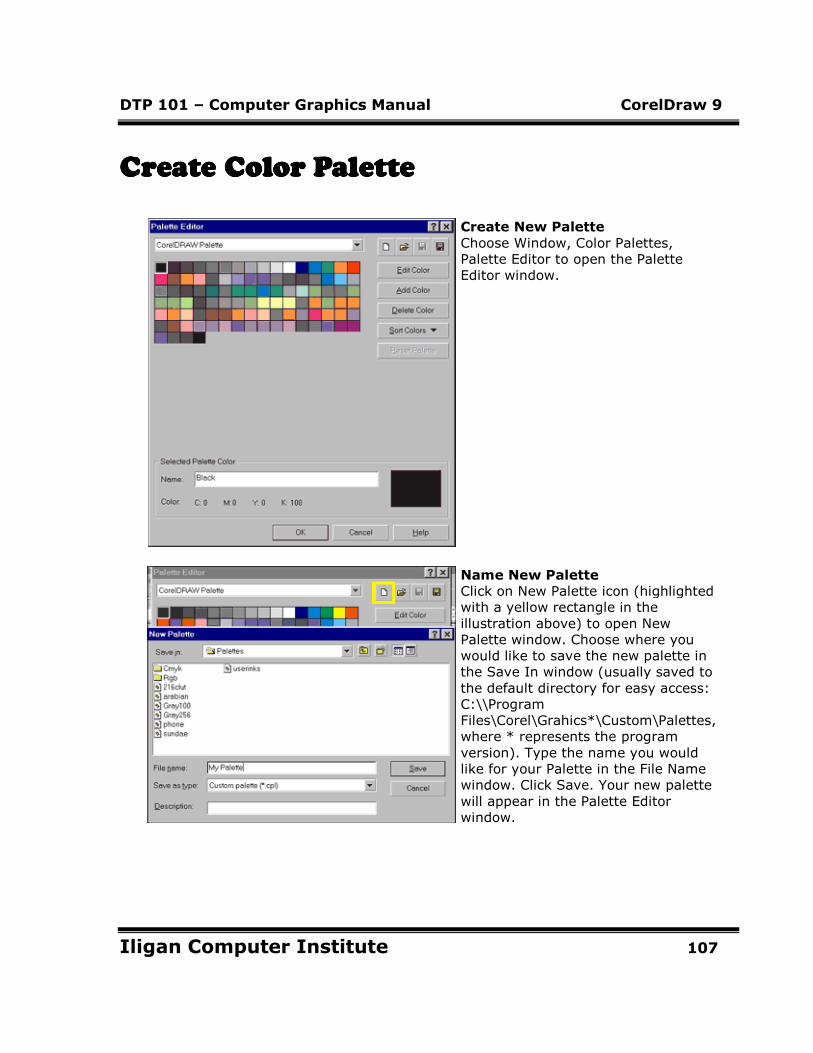
DTP 101 – Computer Graphics Manual CorelDraw 9
Iligan Computer Institute 107
Create Color PaletteCreate Color PaletteCreate Color PaletteCreate Color Palette
Create New Palette
Choose Window, Color Palettes,
Palette Editor to open the Palette
Editor window.
Name New Palette
Click on New Palette icon (highlighted
with a yellow rectangle in the
illustration above) to open New
Palette window. Choose where you
would like to save the new palette in
the Save In window (usually saved to
the default directory for easy access:
C:\\Program
Files\Corel\Grahics*\Custom\Palettes,
where * represents the program
version). Type the name you would
like for your Palette in the File Name
window. Click Save. Your new palette
will appear in the Palette Editor
window.
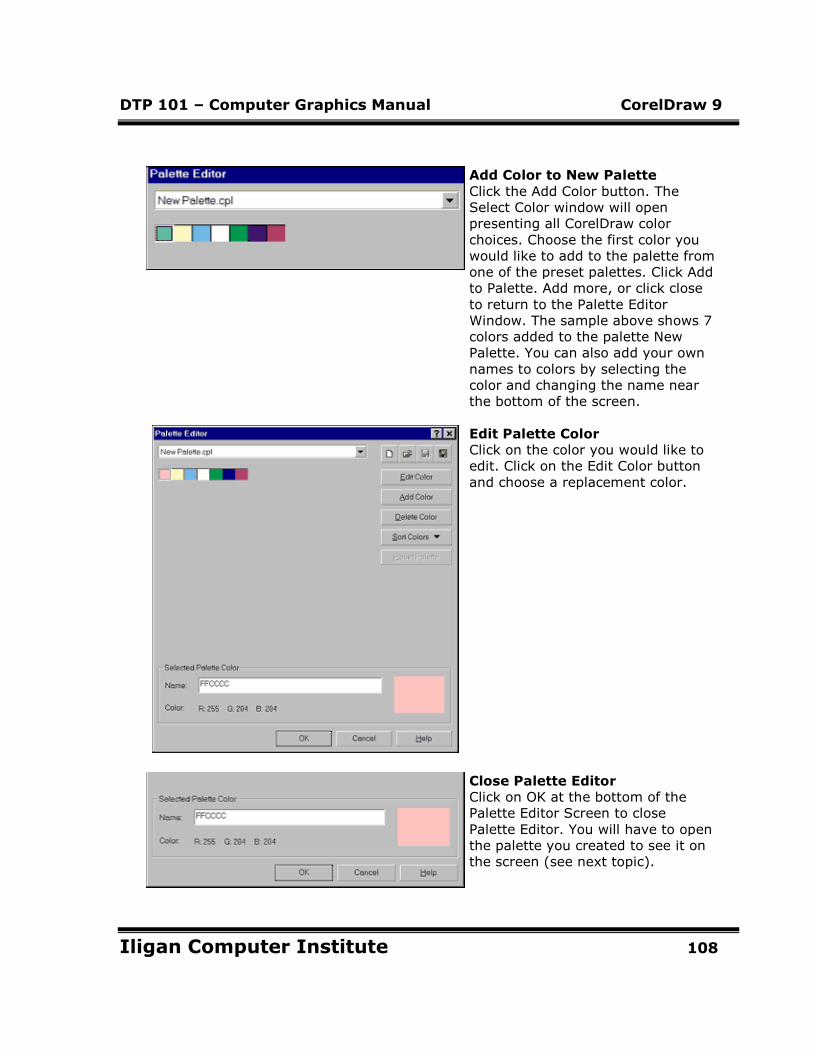
DTP 101 – Computer Graphics Manual CorelDraw 9
Iligan Computer Institute 108
Add Color to New Palette
Click the Add Color button. The
Select Color window will open
presenting all CorelDraw color
choices. Choose the first color you
would like to add to the palette from
one of the preset palettes. Click Add
to Palette. Add more, or click close
to return to the Palette Editor
Window. The sample above shows 7
colors added to the palette New
Palette. You can also add your own
names to colors by selecting the
color and changing the name near
the bottom of the screen.
Edit Palette Color
Click on the color you would like to
edit. Click on the Edit Color button
and choose a replacement color.
Close Palette Editor
Click on OK at the bottom of the
Palette Editor Screen to close
Palette Editor. You will have to open
the palette you created to see it on
the screen (see next topic).
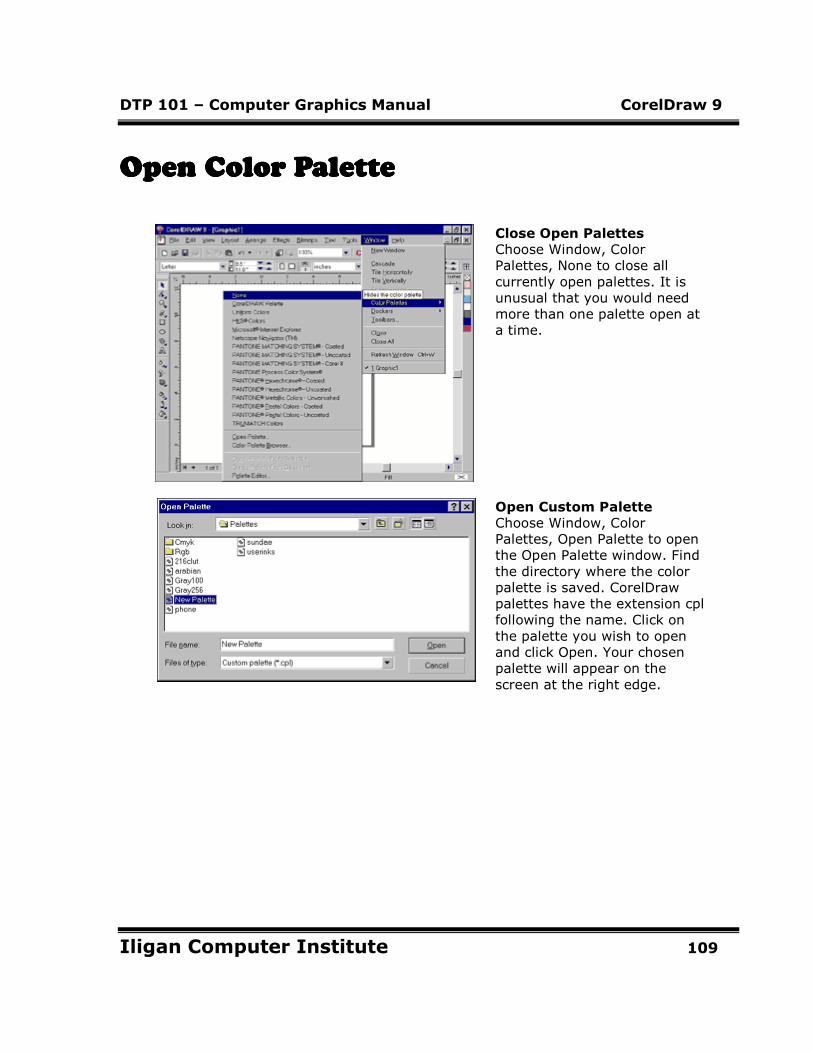
DTP 101 – Computer Graphics Manual CorelDraw 9
Iligan Computer Institute 109
Open Color PaletteOpen Color PaletteOpen Color PaletteOpen Color Palette
Close Open Palettes
Choose Window, Color
Palettes, None to close all
currently open palettes. It is
unusual that you would need
more than one palette open at
a time.
Open Custom Palette
Choose Window, Color
Palettes, Open Palette to open
the Open Palette window. Find
the directory where the color
palette is saved. CorelDraw
palettes have the extension cpl
following the name. Click on
the palette you wish to open
and click Open. Your chosen
palette will appear on the
screen at the right edge.

DTP 101 – Computer Graphics Manual CorelDraw 9
Iligan Computer Institute 110
Edit Custom Palette
Right click on the palette
border to open Palette Editor.
You can add or edit colors
easily from the screen in this
way. Add or Edit color and click
OK to close the Palette Editor.
The changes will be reflected in
your screen display.
Close Custom Palette
Right click on palette border.
Choose Close Palette. You can
also Choose Window, Color
Palettes, None to close all
palettes.
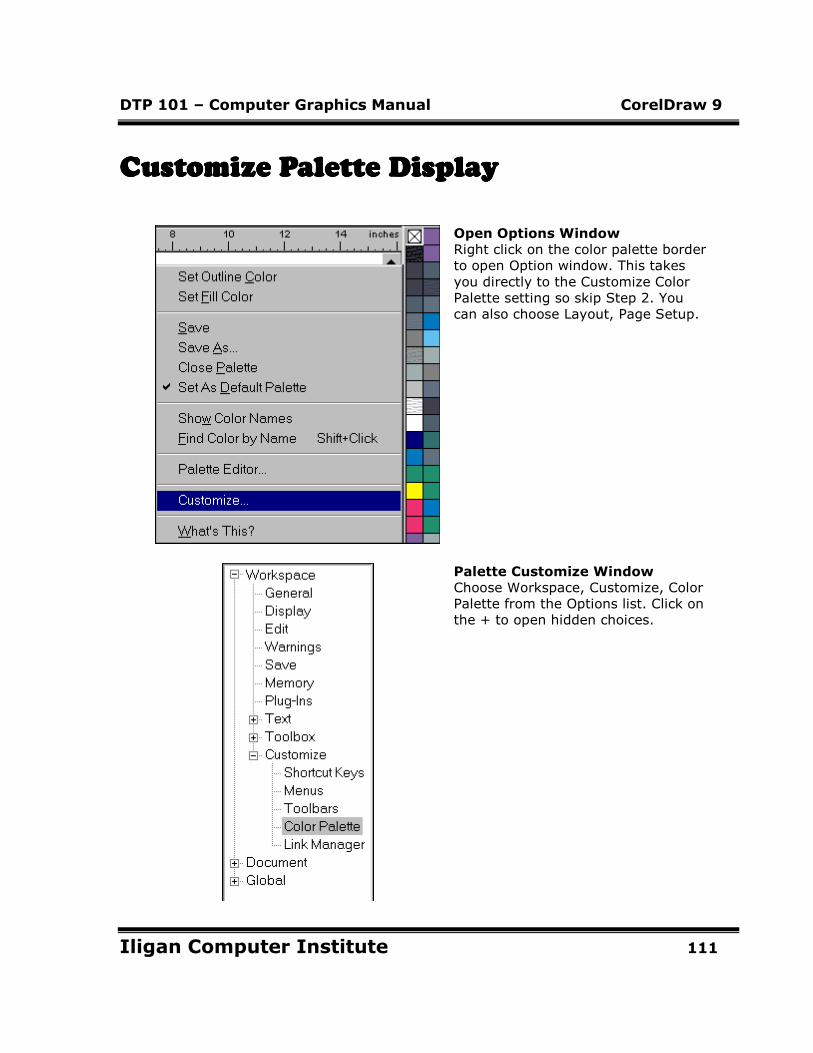
DTP 101 – Computer Graphics Manual CorelDraw 9
Iligan Computer Institute 111
Customize Palette DisplayCustomize Palette DisplayCustomize Palette DisplayCustomize Palette Display
Open Options Window
Right click on the color palette border
to open Option window. This takes
you directly to the Customize Color
Palette setting so skip Step 2. You
can also choose Layout, Page Setup.
Palette Customize Window
Choose Workspace, Customize, Color
Palette from the Options list. Click on
the + to open hidden choices.
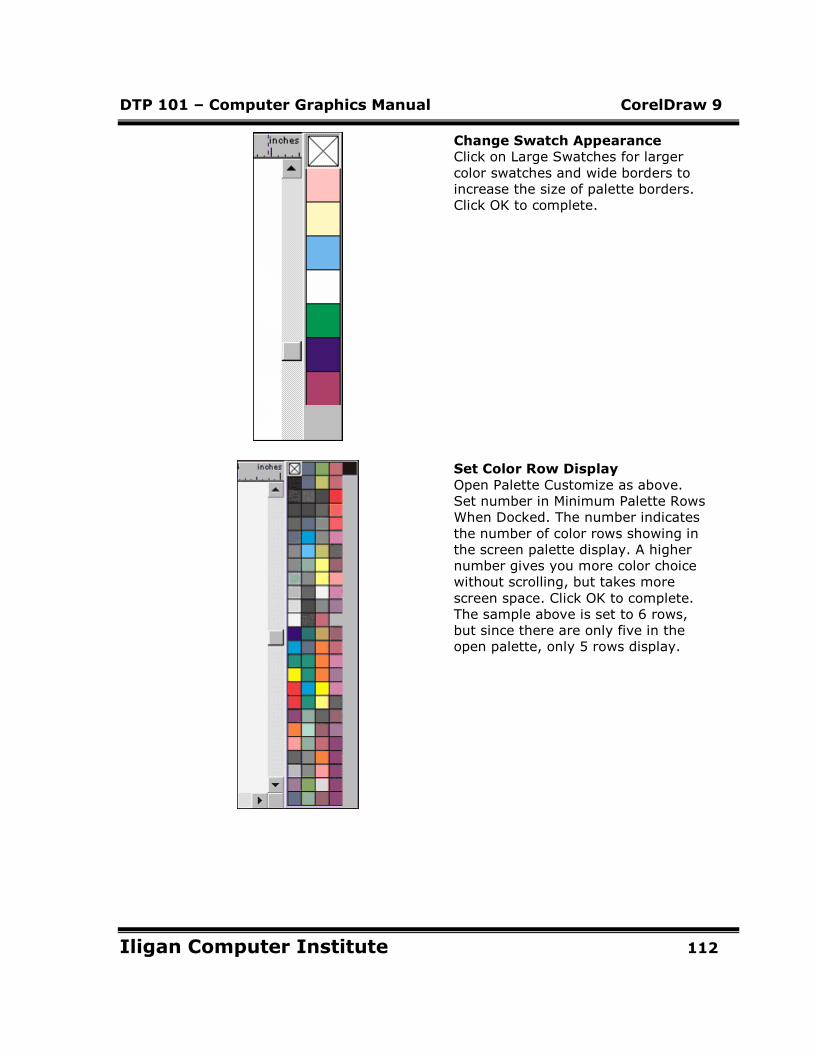
DTP 101 – Computer Graphics Manual CorelDraw 9
Iligan Computer Institute 112
Change Swatch Appearance
Click on Large Swatches for larger
color swatches and wide borders to
increase the size of palette borders.
Click OK to complete.
Set Color Row Display
Open Palette Customize as above.
Set number in Minimum Palette Rows
When Docked. The number indicates
the number of color rows showing in
the screen palette display. A higher
number gives you more color choice
without scrolling, but takes more
screen space. Click OK to complete.
The sample above is set to 6 rows,
but since there are only five in the
open palette, only 5 rows display.
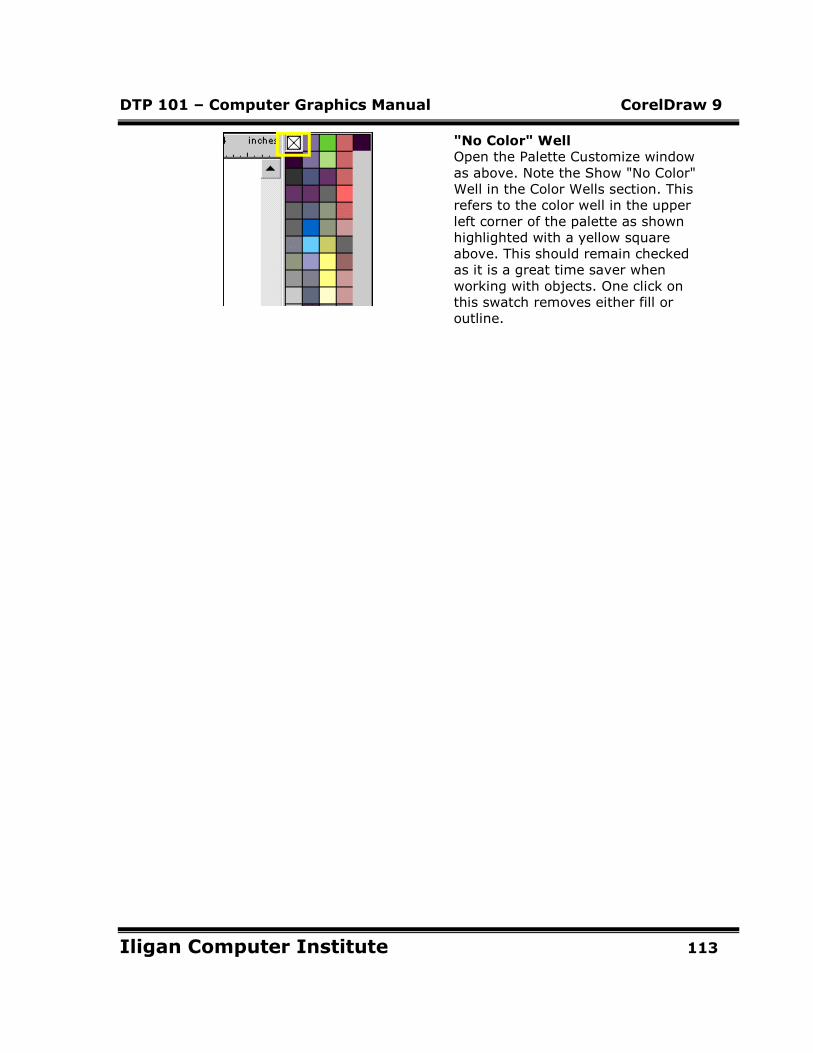
DTP 101 – Computer Graphics Manual CorelDraw 9
Iligan Computer Institute 113
"No Color" Well
Open the Palette Customize window
as above. Note the Show "No Color"
Well in the Color Wells section. This
refers to the color well in the upper
left corner of the palette as shown
highlighted with a yellow square
above. This should remain checked
as it is a great time saver when
working with objects. One click on
this swatch removes either fill or
outline.
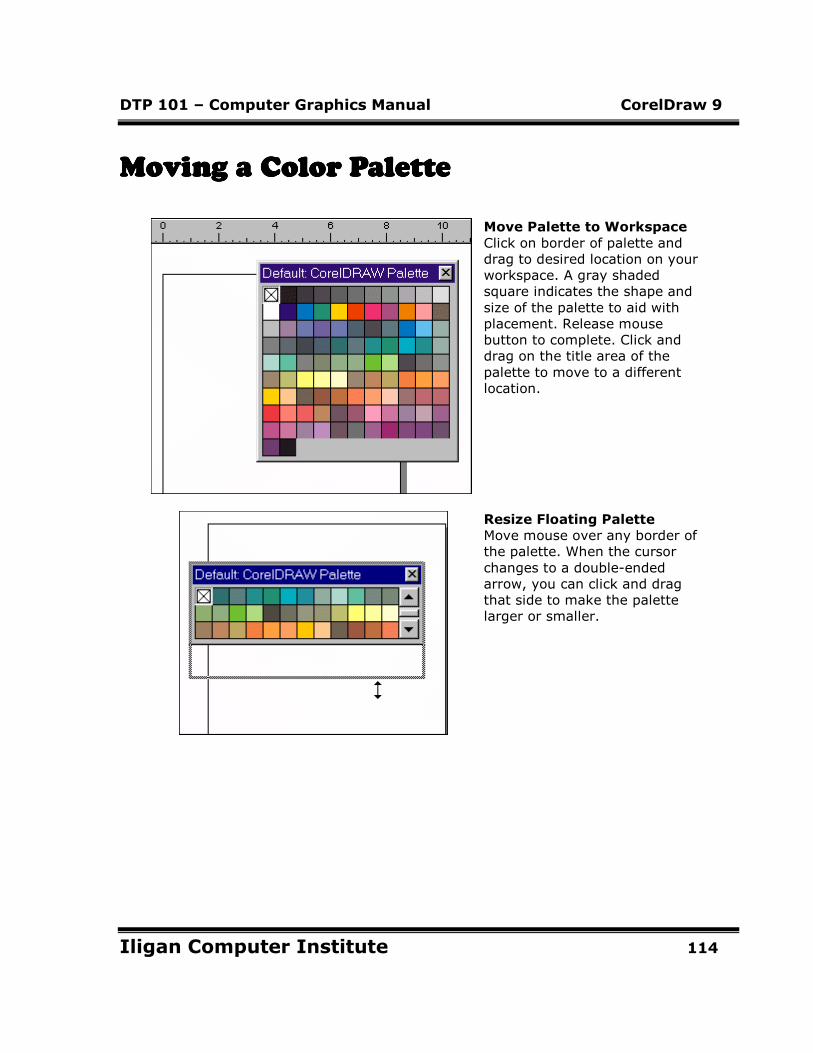
DTP 101 – Computer Graphics Manual CorelDraw 9
Iligan Computer Institute 114
Moving a Color PaletteMoving a Color PaletteMoving a Color PaletteMoving a Color Palette
Move Palette to Workspace
Click on border of palette and
drag to desired location on your
workspace. A gray shaded
square indicates the shape and
size of the palette to aid with
placement. Release mouse
button to complete. Click and
drag on the title area of the
palette to move to a different
location.
Resize Floating Palette
Move mouse over any border of
the palette. When the cursor
changes to a double-ended
arrow, you can click and drag
that side to make the palette
larger or smaller.
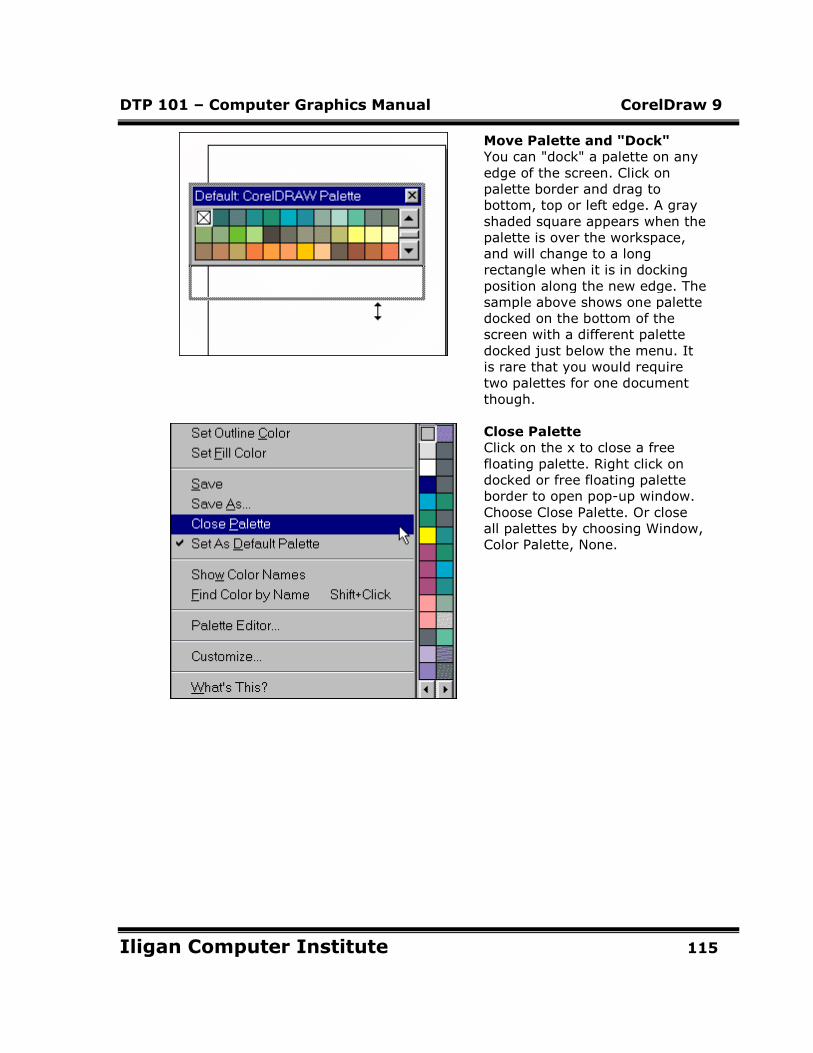
DTP 101 – Computer Graphics Manual CorelDraw 9
Iligan Computer Institute 115
Move Palette and "Dock"
You can "dock" a palette on any
edge of the screen. Click on
palette border and drag to
bottom, top or left edge. A gray
shaded square appears when the
palette is over the workspace,
and will change to a long
rectangle when it is in docking
position along the new edge. The
sample above shows one palette
docked on the bottom of the
screen with a different palette
docked just below the menu. It
is rare that you would require
two palettes for one document
though.
Close Palette
Click on the x to close a free
floating palette. Right click on
docked or free floating palette
border to open pop-up window.
Choose Close Palette. Or close
all palettes by choosing Window,
Color Palette, None.
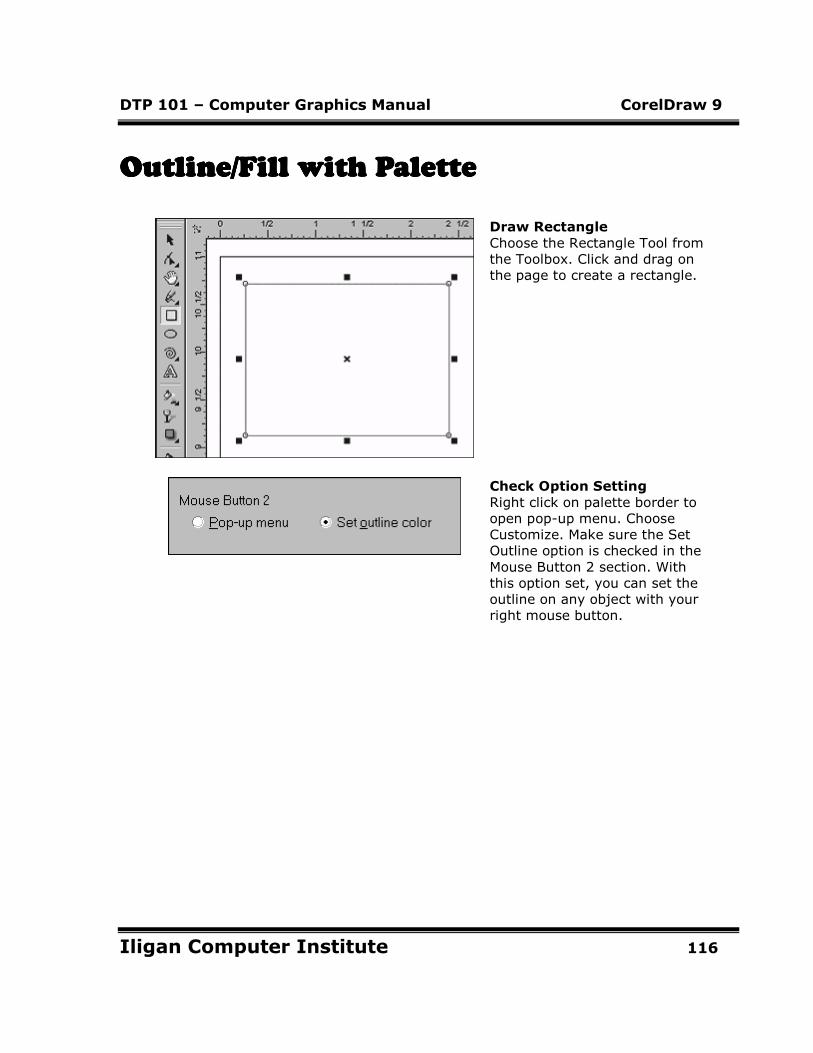
DTP 101 – Computer Graphics Manual CorelDraw 9
Iligan Computer Institute 116
Outline/Fill with PaletteOutline/Fill with PaletteOutline/Fill with PaletteOutline/Fill with Palette
Draw Rectangle
Choose the Rectangle Tool from
the Toolbox. Click and drag on
the page to create a rectangle.
Check Option Setting
Right click on palette border to
open pop-up menu. Choose
Customize. Make sure the Set
Outline option is checked in the
Mouse Button 2 section. With
this option set, you can set the
outline on any object with your
right mouse button.
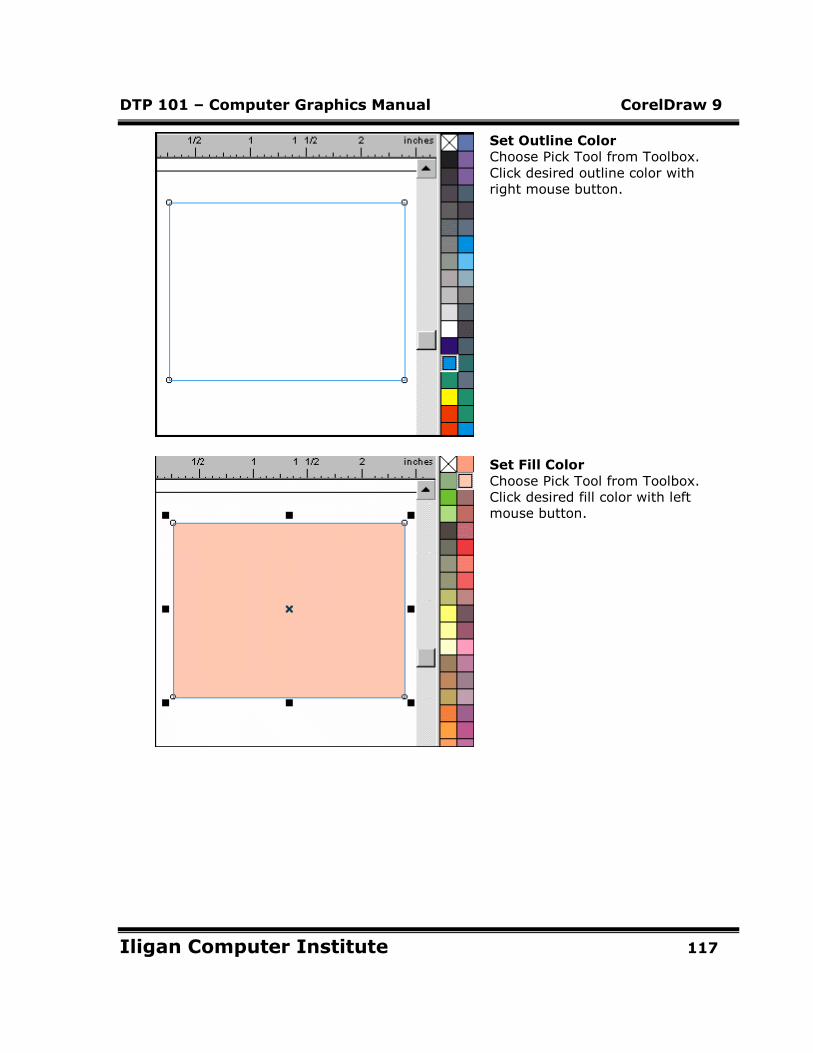
DTP 101 – Computer Graphics Manual CorelDraw 9
Iligan Computer Institute 117
Set Outline Color
Choose Pick Tool from Toolbox.
Click desired outline color with
right mouse button.
Set Fill Color
Choose Pick Tool from Toolbox.
Click desired fill color with left
mouse button.
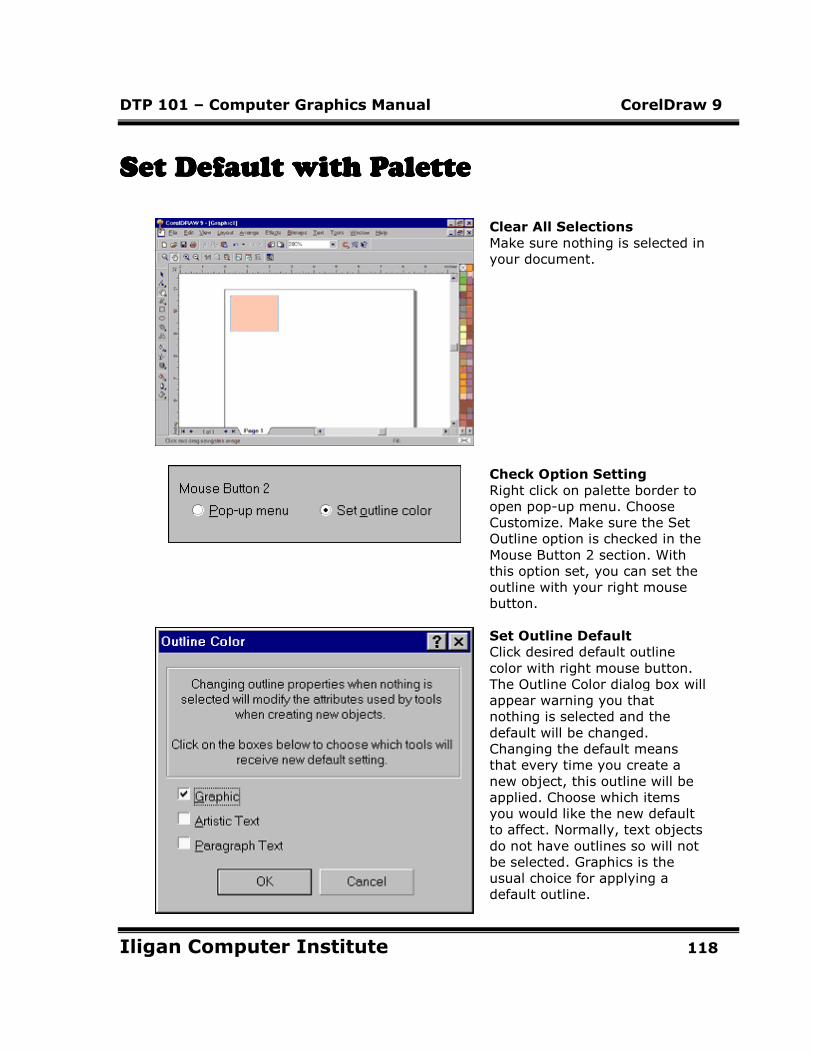
DTP 101 – Computer Graphics Manual CorelDraw 9
Iligan Computer Institute 118
Set Default with PaletteSet Default with PaletteSet Default with PaletteSet Default with Palette
Clear All Selections
Make sure nothing is selected in
your document.
Check Option Setting
Right click on palette border to
open pop-up menu. Choose
Customize. Make sure the Set
Outline option is checked in the
Mouse Button 2 section. With
this option set, you can set the
outline with your right mouse
button.
Set Outline Default
Click desired default outline
color with right mouse button.
The Outline Color dialog box will
appear warning you that
nothing is selected and the
default will be changed.
Changing the default means
that every time you create a
new object, this outline will be
applied. Choose which items
you would like the new default
to affect. Normally, text objects
do not have outlines so will not
be selected. Graphics is the
usual choice for applying a
default outline.
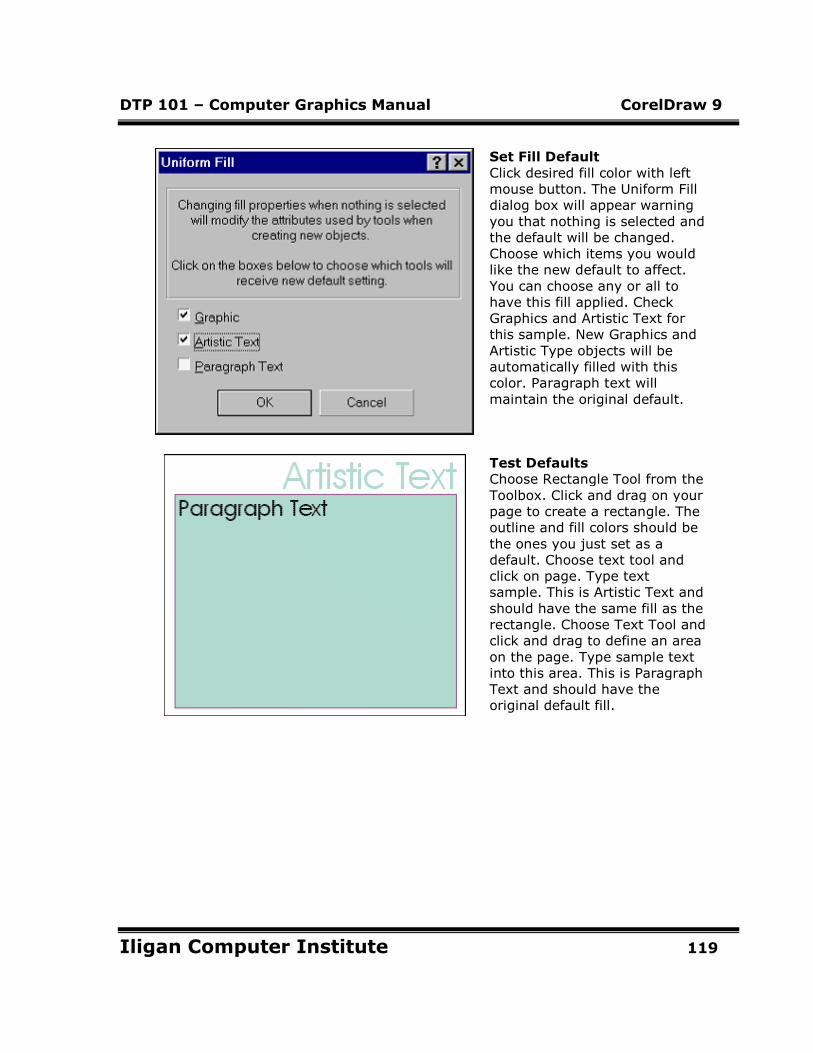
DTP 101 – Computer Graphics Manual CorelDraw 9
Iligan Computer Institute 119
Set Fill Default
Click desired fill color with left
mouse button. The Uniform Fill
dialog box will appear warning
you that nothing is selected and
the default will be changed.
Choose which items you would
like the new default to affect.
You can choose any or all to
have this fill applied. Check
Graphics and Artistic Text for
this sample. New Graphics and
Artistic Type objects will be
automatically filled with this
color. Paragraph text will
maintain the original default.
Test Defaults
Choose Rectangle Tool from the
Toolbox. Click and drag on your
page to create a rectangle. The
outline and fill colors should be
the ones you just set as a
default. Choose text tool and
click on page. Type text
sample. This is Artistic Text and
should have the same fill as the
rectangle. Choose Text Tool and
click and drag to define an area
on the page. Type sample text
into this area. This is Paragraph
Text and should have the
original default fill.
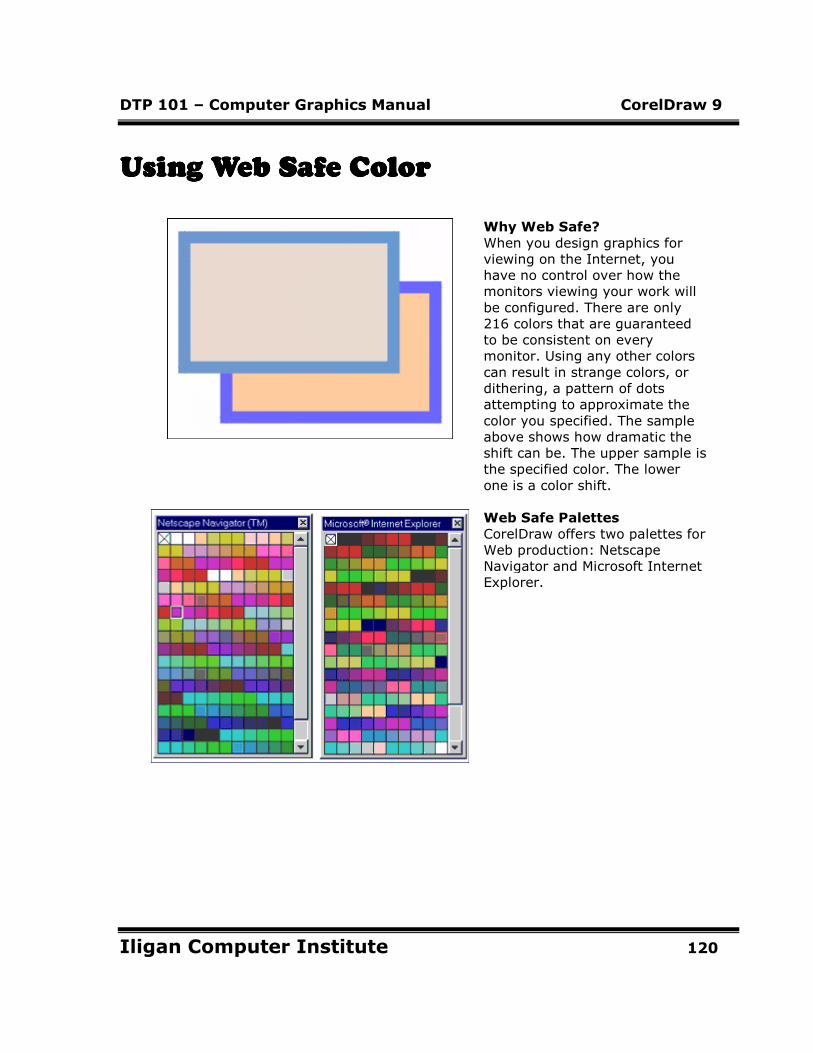
DTP 101 – Computer Graphics Manual CorelDraw 9
Iligan Computer Institute 120
Using Web Safe ColorUsing Web Safe ColorUsing Web Safe ColorUsing Web Safe Color
Why Web Safe?
When you design graphics for
viewing on the Internet, you
have no control over how the
monitors viewing your work will
be configured. There are only
216 colors that are guaranteed
to be consistent on every
monitor. Using any other colors
can result in strange colors, or
dithering, a pattern of dots
attempting to approximate the
color you specified. The sample
above shows how dramatic the
shift can be. The upper sample is
the specified color. The lower
one is a color shift.
Web Safe Palettes
CorelDraw offers two palettes for
Web production: Netscape
Navigator and Microsoft Internet
Explorer.

DTP 101 – Computer Graphics Manual CorelDraw 9
Iligan Computer Institute 121
RGB Web Safe Values
Web colors are usually defined
by Hex numbers. Only the
values of 00, 33, 66, 99, CC and
FF are Web safe. Check the
names in the two Web safe
palettes and you will find only
combinations of these values.
The equivalent RGB values are
0, 51, 102, 153, 204 and 255.
CorelDraw does offer the choice
to enter RGB values with many
color models.
Web Graphic Caution
CorelDraw offers so many
specialty fills and effects, but not
all make a smooth translation to
Web Graphics. Be careful with
graduated fills, and very fine,
complex graphics. Monitors have
a lower resolution than even
desktop printers and fine detail
is often lost when exporting.
Note the banding in the
background of the sample. This
was very smooth on the work
screen. Also note how the text is
breaking up over this
background, even with anti-
aliasing selected.
DTP 101 – Computer Graphics Manual CorelDraw 9
Iligan Computer Institute 122
Table of ContentsTable of ContentsTable of ContentsTable of Contents
Object Overview -----------------------------------------------------------1
Pick Tool Overview --------------------------------------------------------5
Shape Tool Overview ------------------------------------------------------8
Zoom Tool Overview-------------------------------------------------------10
Freehand Tool Overview---------------------------------------------------13
Rectangle Tool Overview --------------------------------------------------16
Ellipse Tool Overview------------------------------------------------------18
Spiral Tool Overview-------------------------------------------------------21
Polygon Tool Overview ----------------------------------------------------23
Graph Paper Tool Overview -----------------------------------------------25
Set Page Size/Orientation -------------------------------------------------27
Page Layout (Booklet)-----------------------------------------------------29
Label Setup ----------------------------------------------------------------31
Setting Page Background--------------------------------------------------33
Setup Guidelines-----------------------------------------------------------37
Create a Grid---------------------------------------------------------------40
Set Workspace Rulers -----------------------------------------------------42
Edit Page Properties -------------------------------------------------------44
Vectors and Bitmaps-------------------------------------------------------47
Set View--------------------------------------------------------------------50
Work in Wireframe View---------------------------------------------------53
Hints for Learning CorelDraw ---------------------------------------------55
Menu Overview: Part 1 ----------------------------------------------------57
Menu Overview: Part 2 ----------------------------------------------------60
Dockers Overview ---------------------------------------------------------63
DTP 101 – Computer Graphics Manual CorelDraw 9
Iligan Computer Institute 123
Text Tool Overview --------------------------------------------------------66
Create Artistic Text --------------------------------------------------------68
Create Paragraph Text ----------------------------------------------------72
Change Font ---------------------------------------------------------------76
Set Default Font and Size -------------------------------------------------79
Align Artistic Text----------------------------------------------------------82
Align Paragraph Text ------------------------------------------------------85
Outline Tool Overview -----------------------------------------------------87
Set Outline Width----------------------------------------------------------91
Set Outline Color ----------------------------------------------------------93
Set Outline Style-----------------------------------------------------------95
Outline Corners/Line Caps ------------------------------------------------97
Create Arrowheads --------------------------------------------------------98
Calligraphy Outline Effect -------------------------------------------------100
Color Palette Overview ----------------------------------------------------103
Preset Color Palettes ------------------------------------------------------105
Create Color Palette -------------------------------------------------------107
Open Color Palette---------------------------------------------------------109
Customize Palette Display-------------------------------------------------111
Moving a Color Palette-----------------------------------------------------114
Outline/Fill with Palette----------------------------------------------------116
Set Default with Palette ---------------------------------------------------118
Using Web Safe Color -----------------------------------------------------120
![CorelDRAW Graphics Suite 2020product.corel.com/help/CorelDRAW/540111137/Main/ES/Quick... · 2020. 3. 9. · Guía de inicio rápido [ 1 ] CorelDRAW Graphics Suite 2020 CorelDRAW®](https://img.pdfslide.us/doc/110x75/6131b8e41ecc51586944ea31/coreldraw-graphics-suite-2020-3-9-gua-de-inicio-rpido-1-coreldraw-graphics.jpg)