Embed Size (px)
Citation preview
PROBLEM:The Mini Pro EX Controller willnot connect.SOLUTION: • Confirm the USB cable is properly connected to the Xbox 360 video game console.• Confirm the inline release cable is properly connected.
PROBLEM: The Mini Pro EX controller is not functioning after connection.SOLUTION:• Confirm that the controller is assigned to channel 1. Refer to the “Controller Settings” section of your Xbox 360 user guide for instructions on how to change the selected controller channel.
For more troubleshooting refer to your Xbox 360 User Guide. For current FAQs, visit www.PowerA.com/supportFor assistance with authenticPOWER A accessories, please email [email protected] or call(888) 664-4327 from 5AM-5PM PT.
POWER A, the POWER A logo and “Amplify Your Experience” are trademarks of Bensussen Deutsch and Associates, Inc. ™ and © Bensussen Deutsch and Associates, Inc.
Xbox 360® is a registered trademark of Microsoft Corporation. This product is not designed, manufactured, sponsored or endorsed by Microsoft.
Pour les Questions fréquentes,rendez-vous sur www.PowerA.com/support
PROBLÈME :Le contrôleur ne se connecte pas.SOLUTION : • Confirmez que le câble USB est correctement connecté à votre console de jeux vidéo Xbox 360.• Confirmez que le câble de relâchement est correctement connecté.
PROBLÈME : Le contrôleur Air Flo ne fonctionne pas une fois connecté.SOLUTION :• Confirmez que le contrôleur est bien raccordé au canal numéro 1. Reportez-vous à la section « Paramètres du contrôleur » du Manuel de l’utilisateur Xbox 360 pour obtenir les instructions relatives à la modification des positions du contrôleur.
Pour des informations de dépannage supplémentaires, reportez-vous à votre Manuel de l’utilisateur Xbox 360.
Pour toute assistance avec des accessoires POWER A authentiques, veuillez envoyer un e-mail à [email protected] ou appeler le (888) 664-4327 de 5 h à 17 h (Heure du Pacifique).
Eine aktuelle Liste mit häufig gestellten Fragen finden Sie unter www.PowerA.com/support.
PROBLEM:Der Controller lässt sich nicht verbinden.LÖSUNG: • Vergewissern Sie sich, dass das USB-Kabel richtig an die Xbox 360 Videospielkonsole angeschlossen ist.• Vergewissern Sie sich, dass das Kabel mit dem Inline Release-Anschluss (Stolperschutz) richtig angeschlossen ist.
PROBLEM: Der Controller funktioniert nicht, nachdem die Verbindung aufgebaut wurde.LÖSUNG:• Vergewissern Sie sich, dass der Controller dem Kanal 1 zugeordnet ist. Weitere Hinweise zum Ändern der Controller-Nummern entnehmen Sie bitte dem Abschnitt „Controller-Einstellungen“ Ihrer Xbox 360 Bedienungsanleitung.
Weitere Hinweise zu Fehlerbehebungen finden Sie in Ihrer Xbox 360 Bedienungsanleitung.
Hilfe zu Original POWER-A-Zubehör erhalten Sie per E-Mail über [email protected] oder telefonisch unter Tel.: +1 (888) 664-4327 (5 bis 17 Uhr
Xbox 360® hardware and software sold separately.
All other trademarks are the property of their respective owners.
TouchSense® Technology Licensed from Immersion Corporation. Protected by one or more of the following patents:U.S. Patents: 5831408, 5844392, 5857986, 5907487, 5959613, 6020875, 6088017, 6104158, 6219032, 6246390, 6252583, 6271833, 6275213, 6278439, 6343349, 6400352, 6411276, 6424333, 6715045, 6801008, 7131073, 7199790, 7209117, 7299321, 7327348, 7345672, and 7502011.
POWER A, le logo POWER A let « Amplify Your Experience » sont des marques déposées de Bensussen Deutsch and Associates, Inc. ™ et de © Bensussen Deutsch and Associates, Inc.
Ce produit a été fabriqué sous licence de la Microsoft Corporation. Microsoft, Kinect, Xbox, Xbox LIVE, Xbox 360, et les logos Xbox logos sont des marques déposées du groupe de sociétés Microsoft.
TouchSense® Technology sous licence de Immersion Corporation.
Toutes les autres marques commerciales sont la propriété de leurs propriétaires respectifs
US-Pazifikzeit)
POWER A, das POWER A-Logo und „Amplify Your Experience“ sind Marken der Bensussen Deutsch and Associates, Inc.™ und © Bensussen Deutsch and Associates, Inc.
Dieses Produkt wurde unter Lizenz der Microsoft Corporation hergestellt. Microsoft, Kinect, Xbox, Xbox LIVE, Xbox 360 und die Xbox-Logos sind Marken der Unternehmen des Microsoft-Konzerns.
TouchSense®-Technologie lizenziert von der Immersion Corporation.
Alle anderen Marken sind Eigentum der jeweiligen Inhaber.
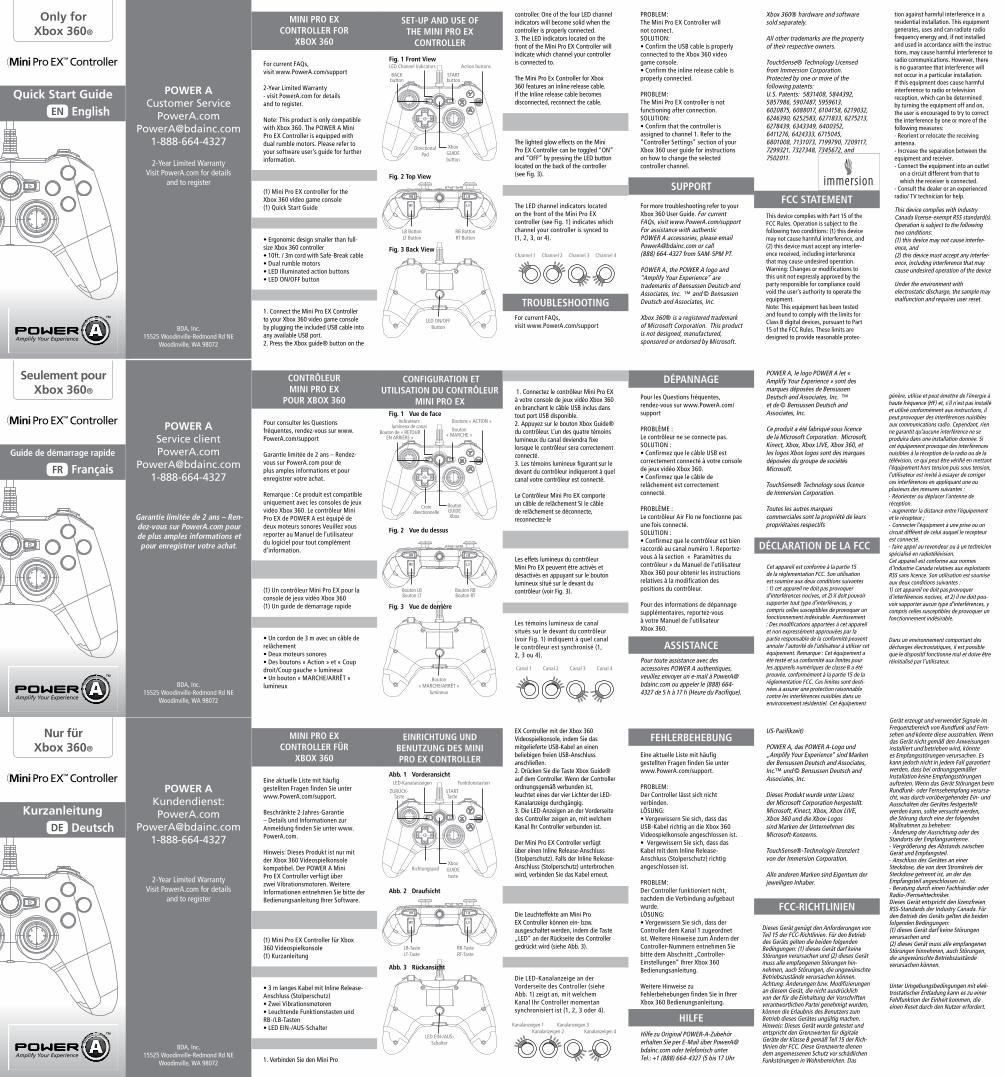
controller. One of the four LED channel indicators will become solid when the controller is properly connected.3. The LED indicators located on the front of the Mini Pro EX Controller will indicate which channel your controller is connected to.
The Mini Pro Ex Controller for Xbox 360 features an inline release cable. If the Inline release cable becomes disconnected, reconnect the cable.
TURNING THE GLOW EFFECTS ON AND OFF:
The lighted glow effects on the Mini Pro EX Controller can be toggled “ON” and “OFF” by pressing the LED button located on the back of the controller (see Fig. 3).
LED CHANNEL INDICATORS:
The LED channel indicators located on the front of the Mini Pro EX controller (see Fig. 1) indicates which channel your controller is synced to (1, 2, 3, or 4).
For current FAQs,visit www.PowerA.com/support
CONFIGURATION :
1. Connectez le contrôleur Mini Pro EX à votre console de jeux vidéo Xbox 360 en branchant le câble USB inclus dans tout port USB disponible. 2. Appuyez sur le bouton Xbox Guide® du contrôleur. L’un des quatre témoins lumineux du canal deviendra fixe lorsque le contrôleur sera correctement connecté.3. Les témoins lumineux figurant sur le devant du contrôleur indiqueront à quel canal votre contrôleur est connecté.
Le Contrôleur Mini Pro EX comporte un câble de relâchement Si le câble de relâchement se déconnecte, reconnectez-le
ACTIVATION ET DÉSACTIVATION DES EFFETS LUMINEUX :
Les effets lumineux du contrôleur Mini Pro EX peuvent être activés et désactivés en appuyant sur le bouton lumineux situé sur le devant du contrôleur (voir Fig. 3).
TÉMOINS LUMINEUX DE CANAL :
Les témoins lumineux de canal situés sur le devant du contrôleur (voir Fig. 1) indiquent à quel canal le contrôleur est synchronisé (1, 2, 3 ou 4).
EX Controller mit der Xbox 360 Videospielkonsole, indem Sie das mitgelieferte USB-Kabel an einen beliebigen freien USB-Anschluss anschließen.2. Drücken Sie die Taste Xbox Guide® auf dem Controller. Wenn der Controller ordnungsgemäß verbunden ist, leuchtet eines der vier Lichter der LED-Kanalanzeige durchgängig.3. Die LED-Anzeigen an der Vorderseite des Controller zeigen an, mit welchem Kanal Ihr Controller verbunden ist.
Der Mini Pro EX Controller verfügt über einen Inline Release-Anschluss (Stolperschutz). Falls der Inline Release-Anschluss (Stolperschutz) unterbrochen wird, verbinden Sie das Kabel erneut.
EIN- UND AUSSCHALTEN DER LEUCHTEFFEKTE:
Die Leuchteffekte am Mini Pro EX Controller können ein- bzw. ausgeschaltet werden, indem die Taste „LED“ an der Rückseite des Controller gedrückt wird (siehe Abb. 3).
LED-KANALANZEIGE:
Die LED-Kanalanzeige an der Vorderseite des Controller (siehe Abb. 1) zeigt an, mit welchem Kanal Ihr Controller momentan synchronisiert ist (1, 2, 3 oder 4).
Fig. 2 Top View
Fig. 3 Back View
For current FAQs,visit www.PowerA.com/support
2-Year Limited Warranty- visit PowerA.com for detailsand to register.
Note: This product is only compatible with Xbox 360. The POWER A Mini Pro EX Controller is equipped with dual rumble motors. Please refer to your software user’s guide for further information.
MINI PRO EX CONTROLLER INCLUDES:
(1) Mini Pro EX controller for theXbox 360 video game console(1) Quick Start Guide
MINI PRO EX CONTROLLER FEATURES:
• Ergonomic design smaller than full-size Xbox 360 controller• 10ft. / 3m cord with Safe-Break cable• Dual rumble motors• LED Illuminated action buttons• LED ON/OFF button
SET-UP:
1. Connect the Mini Pro EX Controller to your Xbox 360 video game console by plugging the included USB cable into any available USB port.2. Press the Xbox guide® button on the
Pour consulter les Questions fréquentes, rendez-vous sur www.PowerA.com/support
Garantie limitée de 2 ans – Rendez-vous sur PowerA.com pour de plus amples informations et pour enregistrer votre achat.
Remarque : Ce produit est compatible uniquement avec les consoles de jeux vidéo Xbox 360. Le contrôleur Mini Pro EX de POWER A est équipé de deux moteurs sonores Veuillez vous reporter au Manuel de l’utilisateur du logiciel pour tout complément d’information.
LE CONTRÔLEUR MINI PRO EX COMPREND :
(1) Un contrôleur Mini Pro EX pour la console de jeux vidéo Xbox 360(1) Un guide de démarrage rapide
LE CONTRÔLEUR COMPORTE :
• Un cordon de 3 m avec un câble de relâchement• Deux moteurs sonores• Des boutons « Action » et « Coup droit/Coup gauche » lumineux • Un bouton « MARCHE/ARRÊT » lumineux
Eine aktuelle Liste mit häufig gestellten Fragen finden Sie unter www.PowerA.com/support.
Beschränkte 2-Jahres-Garantie – Details und Informationen zur Anmeldung finden Sie unter www.PowerA.com.
Hinweis: Dieses Produkt ist nur mit der Xbox 360 Videospielkonsole kompatibel. Der POWER A Mini Pro EX Controller verfügt über zwei Vibrationsmotoren. Weitere Informationen entnehmen Sie bitte der Bedienungsanleitung Ihrer Software.
LIEFERUMFANG DES MINI PRO EX CONTROLLER:
(1) Mini Pro EX Controller für Xbox 360 Videospielkonsole(1) Kurzanleitung
MERKMALE DES CONTROLLER:
• 3 m langes Kabel mit Inline Release-Anschluss (Stolperschutz)• Zwei Vibrationsmotoren• Leuchtende Funktionstasten und RB-/LB-Tasten • LED EIN-/AUS-Schalter
EINRICHTUNG:
1. Verbinden Sie den Mini Pro
EnglishEN
Only forXbox 360®
Seulement pourXbox 360®
Nur fürXbox 360®
TROUBLESHOOTING
DÉPANNAGE
FEHLERBEHEBUNG
SUPPORT
ASSISTANCE
HILFE
RB ButtonRT Button
Bouton RBBouton RT
RB-TasteRT-Taste
Fig. 1 Front View
XboxGUIDEbutton
Bouton GUIDE Xbox
XboxGUIDEtaste
LED Channel Indicators
Indicateurs lumineux de canal
LED-Kanalanzeigen
BACKbutton
Bouton de « RETOUREN ARRIÈRE »
ZURÜCK-Taste
STARTbutton
Bouton « MARCHE »
STARTTaste
Action buttons
Boutons « ACTION »
Funktionstasten
LB ButtonLT Button
Bouton LBBouton LT
LB-TasteLT-Taste
Channel 1 Channel 2 Channel 3 Channel 4
DirectionalPad
Croix directionnelle
Richtungspad
LED ON/OFFButton
Bouton« MARCHE/ARRÊT »
lumineux
LED EIN-/AUS-Schalter
2-Year Limited WarrantyVisit PowerA.com for details
and to register
Quick Start Guide POWER A Customer Service
1-888-664-4327
BDA, Inc.15525 Woodinville-Redmond Rd NE
Woodinville, WA 98072
SET-UP AND USE OF THE MINI PRO EX
CONTROLLER
CONFIGURATION ET UTILISATION DU CONTRÔLEUR
MINI PRO EX
EINRICHTUNG UND BENUTZUNG DES MINI PRO EX CONTROLLER
MINI PRO EX CONTROLLER FOR
XBOX 360
CONTRÔLEURMINI PRO EX
POUR XBOX 360
MINI PRO EX CONTROLLER FÜR
XBOX 360
This device complies with Part 15 of the FCC Rules. Operation is subject to the following two conditions: (1) this device may not cause harmful interference, and (2) this device must accept any interfer-ence received, including interference that may cause undesired operation. Warning: Changes or modifications to this unit not expressly approved by the party responsible for compliance could void the user’s authority to operate the equipment. Note: This equipment has been tested and found to comply with the limits for Class B digital devices, pursuant to Part 15 of the FCC Rules. These limits are designed to provide reasonable protec-
FCC STATEMENT
tion against harmful interference in a residential installation. This equipment generates, uses and can radiate radio frequency energy and, if not installed and used in accordance with the instruc-tions, may cause harmful interference to radio communications. However, there is no guarantee that interference will not occur in a particular installation. If this equipment does cause harmful interference to radio or television reception, which can be determined by turning the equipment off and on, the user is encouraged to try to correct the interference by one or more of the following measures: - Reorient or relocate the receiving antenna. - Increase the separation between the equipment and receiver. - Connect the equipment into an outlet
on a circuit different from that to which the receiver is connected.
- Consult the dealer or an experienced radio/ TV technician for help.
This device complies with Industry Canada license-exempt RSS standard(s). Operation is subject to the following two conditions: (1) this device may not cause interfer-ence, and (2) this device must accept any interfer-ence, including interference that may cause undesired operation of the device
Under the environment with electrostatic discharge, the sample may malfunction and requires user reset.
FrançaisFR
DeutschDE
Guide de démarrage rapide
Kurzanleitung
Garantie limitée de 2 ans – Ren-dez-vous sur PowerA.com pour de plus amples informations et pour enregistrer votre achat.
2-Year Limited WarrantyVisit PowerA.com for details
and to register
POWER A Service clientPowerA.com
POWER AKundendienst:PowerA.com
BDA, Inc.15525 Woodinville-Redmond Rd NE
Woodinville, WA 98072
BDA, Inc.15525 Woodinville-Redmond Rd NE
Woodinville, WA 98072
Fig. 2 Vue du dessus
Abb. 2 Draufsicht
Fig. 3 Vue de derrière
Abb. 3 Rückansicht
Fig. 1 Vue de face
Abb. 1 Vorderansicht
Canal 1 Canal 2 Canal 3 Canal 4
Kanalanzeigen 1Kanalanzeigen 2
Kanalanzeigen 3Kanalanzeigen 4
DÉCLARATION DE LA FCC
génère, utilise et peut émettre de l’énergie à haute fréquence (HF) et, s’il n’est pas installé et utilisé conformément aux instructions, il peut provoquer des interférences nuisibles aux communications radio. Cependant, rien ne garantit qu’aucune interférence ne se produira dans une installation donnée. Si cet équipement provoque des interférences nuisibles à la réception de la radio ou de la télévision, ce qui peut être vérifié en mettant l’équipement hors tension puis sous tension, l’utilisateur est invité à essayer de corriger ces interférences en appliquant une ou plusieurs des mesures suivantes : - Réorienter ou déplacer l’antenne de réception.- augmenter la distance entre l’équipement et le récepteur ; - Connecter l’équipment à une prise ou un circuit difféent de celui auquel le recepteur est connecté. - faire appel au revendeur ou à un technicien spécialisé en radiotélévision.Cet appareil est conforme aux normes d’Industrie Canada relatives aux exploitants RSS sans licence. Son utilisation est soumise aux deux conditions suivantes : 1) cet appareil ne doit pas provoquer d’interférences nocives, et 2) il ne doit pou-voir supporter aucun type d’interférences, y compris celles susceptibles de provoquer un fonctionnement indésirable.
Dans un environnement comportant des décharges électrostatiques, il est possible que le dispositif fonctionne mal et doive être réinitialisé par l’utilisateur.
Cet appareil est conforme à la partie 15 de la réglementation FCC. Son utilisation est soumise aux deux conditions suivantes : 1) cet appareil ne doit pas provoquer d’interférences nocives, et 2) il doit pouvoir supporter tout type d’interférences, y compris celles susceptibles de provoquer un fonctionnement indésirable. Avertissement : Des modifications apportées à cet appareil et non expressément approuvées par la partie responsable de la conformité peuvent annuler l’autorité de l’utilisateur à utiliser cet équipement. Remarque : Cet équipement a été testé et sa conformité aux limites pour les appareils numériques de classe B a été prouvée, conformément à la partie 15 de la réglementation FCC. Ces limites sont desti-nées à assurer une protection raisonnable contre les interférences nuisibles dans un environnement résidentiel. Cet équipement
Dieses Gerät genügt den Anforderungen von Teil 15 der FCC-Richtlinien. Für den Betrieb des Geräts gelten die beiden folgenden Bedingungen: (1) dieses Gerät darf keine Störungen verursachen und (2) dieses Gerät muss alle empfangenen Störungen hin-nehmen, auch Störungen, die ungewünschte Betriebszustände verursachen können. Achtung: Änderungen bzw. Modifizierungen an diesem Gerät, die nicht ausdrücklich von der für die Einhaltung der Vorschriften verantwortlichen Partei genehmigt wurden, können die Erlaubnis des Benutzers zum Betrieb dieses Gerätes ungültig machen. Hinweis: Dieses Gerät wurde getestet und entspricht den Grenzwerten für digitale Geräte der Klasse B gemäß Teil 15 der Rich-tlinien der FCC. Diese Grenzwerte dienen dem angemessenen Schutz vor schädlichen Funkstörungen in Wohnbereichen. Das
FCC-RICHTLINIEN
Gerät erzeugt und verwendet Signale im Frequenzbereich von Rundfunk und Fern-sehen und könnte diese ausstrahlen. Wenn das Gerät nicht gemäß den Anweisungen installiert und betrieben wird, könnte es Empfangsstörungen verursachen. Es kann jedoch nicht in jedem Fall garantiert werden, dass bei ordnungsgemäßer Installation keine Empfangsstörungen auftreten. Wenn das Gerät Störungen beim Rundfunk- oder Fernsehempfang verursa-cht, was durch vorübergehendes Ein- und Ausschalten des Gerätes festgestellt werden kann, sollte versucht werden, die Störung durch eine der folgenden Maßnahmen zu beheben: - Änderung der Ausrichtung oder des Standorts der Empfangsantenne. - Vergrößerung des Abstands zwischen Gerät und Empfangsteil. - Anschluss des Gerätes an einer Steckdose, die von dem Stromkreis der Steckdose getrennt ist, an der das Empfangsteil angeschlossen ist. - Beratung durch einen Fachhändler oder Radio-/Fernsehtechniker.Dieses Gerät entspricht den lizenzfreien RSS-Standards der Industry Canada. Für den Betrieb des Geräts gelten die beiden folgenden Bedingungen: (1) dieses Gerät darf keine Störungen verursachen und (2) dieses Gerät muss alle empfangenen Störungen hinnehmen, auch Störungen, die ungewünschte Betriebszustände verursachen können.
Unter Umgebungsbedingungen mit elek-trostatischer Entladung kann es zu einer Fehlfunktion der Einheit kommen, die einen Reset durch den Nutzer erfordert.

Para ver las preguntas frecuentes,visita www.PowerA.com/support
PROBLEMA:El mando no se conecta.SOLUCIÓN: • Confirma que el cable USB esté debidamente conectado a la consola de videojuegos Xbox 360.• Confirma que el cable con mecanismo de liberación esté conectado adecuadamente.
PROBLEMA: El mando no funciona después de conectarlo.SOLUCIÓN:• Confirma que el mando esté asignado al canal 1. Consulta la sección “Configuración del mando” de la Guía del usuario de tu Xbox 360 para ver las instrucciones sobre cómo cambiar los números del mando.
Para obtener más información sobre resolución de problemas, consulta la Guía del usuario de tu Xbox 360.
Para recibir asistencia con accesorios POWER A auténticos, envía un correo electrónico a [email protected] o llama al (888) 664-4327, de 5 a. m. a 5 p. m, hora del Pacífico.
POWER A, el logotipo de POWER A y “Amplify Your Experience” son marcas comerciales de Bensussen Deutsch
Il controller non si avvia.SOLUZIONE: • Verificare che il cavo USB sia collegato correttamente alla console per videogiochi Xbox 360.• Verificare che il sistema di sganciamento di sicurezza sia stato collegato correttamente.
PROBLEMA: Il controller è collegato ma non sta funzionando.SOLUZIONE:• Verificare che il canale n. 1 sia stato assegnato al controller . Consultare la sezione “Impostazioni del controller” della Guida per l’utente della Xbox 360 per istruzioni su come cambiare i numeri del controller.
Per ulteriori informazioni sulla risoluzione dei problemi consultare la guida per l’utente della Xbox 360.
Per assistenza sugli accessori originali POWER A, inviare un messaggio e-mail a [email protected] o chiamare il numero +1 888 664-4327 dalle 5.00 alle 17.00 (fuso orario del Pacifico statunitense).
POWER A, il logo POWER A e “Amplify Your Experience” sono marchi di fabbrica di Bensussen Deutsch and Associates, Inc.™ e di © Bensussen Deutsch and Associates, Inc.
Il prodotto è realizzato su licenza di Microsoft Corporation. Microsoft, Kinect, Xbox, Xbox LIVE, Xbox 360 e i
and Associates, Inc. ™ y © Bensussen Deutsch and Associates, Inc.
Este producto está fabricado bajo la licencia de Microsoft Corporation. Microsoft, Kinect, Xbox, Xbox LIVE, Xbox 360, y los logotipos de Xbox son marcas comerciales de las compañías que forman parte de Microsoft.
La tecnología TouchSense® tiene la licencia de Immersion Corporation.
Todas las demás marcas comerciales son propiedad de sus respectivos dueños.
loghi Xbox sono marchi di fabbrica del gruppo Microsoft.
Tecnologia TouchSense® utilizzata su licenza di Immersion Corporation.
Tutti gli altri marchi di fabbrica appartengono ai rispettivi proprietari.
coloca el cable USB en cualquier puerto USB disponible.2. Presiona el botón Xbox Guide® que se encuentra en el mando. Uno de los cuatro indicadores de canal LED permanecerá iluminado cuando el mando esté conectado adecuadamente.3. Los indicadores LED ubicados en la parte delantera del mando indicarán el canal al que está conectado el mando.
El mando Mini Pro EX cuenta con un cable con mecanismo de liberación. Si este cable se desconecta, vuelve a conectarlo.
CÓMO ENCENDER Y APAGAR LOS EFECTOS DE BRILLO:
Los efectos de brillo iluminados en el mando Mini Pro EX pueden pasar alternativamente a la posición “ON” (Encendido) y “OFF” (Apagado) al presionar el botón LED ubicado en la parte trasera del mando (consulta la Fig. 3).
INDICADORES DEL CANAL LED:
Los indicadores de canal LED ubicados en la parte delantera del mando (consulta la Fig. 1) indican el canal al que está sincronizado el mando (1, 2, 3 o 4).
2. Premere il pulsante Xbox Guide® sul controller. Quando il controller è correttamente collegato uno dei quattro indicatori di canale a LED resta acceso in permanenza.3. Gli indicatori a LED situati sulla parte anteriore del controller indicano a quale canale il controller è collegato.
Il controller Mini Pro EX è dotato di un sistema di sganciamento di sicurezza. Se il cavo si scollega, ricollegarlo.
ATTIVAZIONE E DISATTIVAZIONE DEGLI EFFETTI LUMINOSI
Gli effetti luminosi del controller Mini Pro EX possono essere attivati (“ON”) e disattivati (“OFF”) premendo il pulsante LED situato sul retro del controller (vedere Fig. 3).
INDICATORI DI CANALE A LED
Gli indicatori di canale a LED situati sulla parte anteriore del controller (vedere Fig. 1) indicano con quale canale il controller è sincronizzato (1, 2, 3 o 4).
Per le FAQ aggiornatevisitare www.PowerA.com/support
PROBLEMA:
Para ver las preguntas frecuentes,visita www.PowerA.com/support
Garantía limitada de 2 años - Visita PowerA.com para obtener detalles y para registrarte.
Nota: Este producto sólo es compatible con la consola de videojuegos Xbox 360. El mando Mini Pro EX de POWER A está equipado con motores sonoros duales. Consulta tu guía del usuario de software para obtener más información.
EL MANDO MINI PRO EX INCLUYE LO SIGUIENTE:
(1) Mando Mini Pro EX para consola de videojuegos Xbox 360(1) Guía de inicio rápido
EL MANDO CUENTA CON LO SIGUIENTE:
• Cable de 10 pies/3 m con cable con mecanismo de liberación• Motores sonoros duales• Botones de acción y RB/LB luminosos• Botón LED de encendido/apagado
CONFIGURACIÓN:
1. Para conectar el mando Mini Pro Ex a tu consola de videojuegos Xbox 360,
Per le FAQ aggiornatevisitare www.PowerA.com/support
Garanzia limitata di 2 anni. Per ulteriori informazioni e per registrarsi visitare PowerA.com/support
Nota: questo prodotto è compatibile solo con console per videogiochi Xbox 360. Il controller POWER A Mini Pro EX è dotato di due motori dual rumble. Per ulteriori informazioni consultare la guida per l’utente del software in uso.
COMPONENTI DEL CONTROLLER MINI PRO EX:
(1) Controller Mini Pro EX per console per videogiochi Xbox 360 (1) Guida rapida
CARATTERISTICHE DEL CONTROLLER:
• Cavo da 3 m con sistema di sganciamento di sicurezza• Motori dual rumble • Pulsanti inferiori destro/sinistro e di attivazione luminosi• Pulsante ON/OFF illuminato da LED
CONFIGURAZIONE:
1. Collegare il controller Mini Pro EX alla console per videogiochi Xbox 360 inserendo il cavo USB in dotazione in una delle porte USB.
Sólo paraXbox 360®
Solo paraXbox 360®
RESOLUCIÓN DE PROBLEMAS
RISOLUZIONE DEI PROBLEMI
ASISTENCIA
ASSISTENZA
Botón RBBotón RT
Pulsante RBPulsante RT
Botón Xbox
GUIDE
Pulsante Xbox
GUIDE
Indicadores del canal LED
Indicatori di canale a LED
Botón ATRÁS
Pulsante BACK
Botón de INICIO
Pulsante START
Botones de acción
Pulsanti di attivazione
Botón LBBotón LT
Pulsante LBPulsante LT
Control de dirección
Pad direzio-nale
Botón LED de encen-dido/apagado
Pulsante ON/OFF illuminato da LED
CONFIGURACIÓNY USO DEL MANDO
MINI PRO EX
CONFIGURAZIONEE USO DEL CONTROLLER
MINI PRO EX
MANDOMINI PRO EX
PARA XBOX 360
CONTROLLERMINI PRO EX
PER XBOX 360
Garantía limitada de 2 años. Visita PowerA.com para obtener detalles y para
registrarte.
Garantie limitée de 2 ans – Ren-dez-vous sur PowerA.com pour de plus amples informations et pour enregistrer votre achat.
Assistenza clienti POWER A:
1-888-664-4327
Servicio a clientes POWER A:
1-888-664-4327
BDA, Inc.15525 Woodinville-Redmond Rd NE
Woodinville, WA 98072
BDA, Inc.15525 Woodinville-Redmond Rd NE
Woodinville, WA 98072
EspañolSP
ItalianoIT
Guía de inicio rápido
Guide Rapida
Fig. 2 Vista superior
Fig. 2 Vista dall’alto
Fig. 3 Vista trasera
Fig. 3 Vista posteriore
Fig. 1 Vista frontal
Fig. 1 Vista anteriore
Channel 1 Channel 2 Channel 3 Channel 4
Canale 1 Canale 2 Canale 3 Canale 4
apagando el equipo, se alienta al usuario a tratar de subsanar la interferencia. Para ello, puede tomar una o más de las siguientes medidas: - Cambiar la orientación o la ubicación de la antena receptora. - Aumentar la separación entre el equipo y el receptor. - Conectar el equipo a un tomacorriente que se encuentre en un circuito distinto al que está conectado el receptor. - Consultar al distribuidor o a un técnico experimen-tado en radio/televisión para obtener ayuda.Este dispositivo cumple con las normas del RRS exentas de licencia de la Industria de Canadá. Su funcionamiento está sujeto a las siguientes dos condiciones: (1) este dispositivo no puede ocasionar interferencias, y (2) este dispositivo debe aceptar cualquier interferencia, incluida aquella que pueda ocasionar funcionamiento no deseado del dicho mecanismo.
Si se produce una descarga electroestática, el dispositivo puede funcionar mal y requerir que el usuario lo reinicie.
Este dispositivo cumple con la Sección 15 de las normas de la FCC. Su funcionamiento está sujeto a las siguientes dos condiciones: (1) este dispositivo no puede ocasionar interferencias perjudiciales, y (2) este dispositivo debe aceptar cualquier interferencia recibida, incluida aquella que pueda ocasionar funcionamiento no deseado. Advertencia: todos los cambios o modificaciones que se le realicen a esta unidad y que no hayan sido expresamente aprobados por la parte responsable del cumplimiento podrían anular la autoridad del usuario para operar el equipo. Nota: Este equipo ha sido probado y se ha determi-nado que cumple con los límites establecidos para los dispositivos digitales Clase B, de conformidad con la Parte 15 de las normas de la FCC. Estos límites han sido concebidos para proporcionar una protección razonable contra las interferencias perjudiciales en instalaciones residenciales. Este equipo genera, usa y puede emitir energía de radiofrecuencia y, si no se instala y utiliza de acuerdo con las instrucciones, puede ocasionar interferencias perjudiciales en las comunicaciones por radio. Sin embargo, no se garan-tiza que no vayan a producirse las interferencias en una instalación en particular. Si este equipo causara interferencias perjudiciales en la recepción de radio o televisión, lo cual se puede determinar encendiendo y
Questo dispositivo risulta conforme alla Parte 15 delle norme FCC. Il funzionamento è soggetto alle due condizioni seguenti: (1) questo dispositivo non può provocare interferenze dannose; (2) questo dispositivo deve accettare le eventuali interferenze ricevute, comprese le interferenze che potrebbero provocare effetti indesiderati. Avvertenza: cambiamenti o modifiche al dispositivo non espressamente autorizzati dal responsabile della conformità pos-sono far decadere il diritto ad utilizzare l’apparecchiatura. Nota: questa apparecchiatura è stata collaudata ed è risultata conforme ai limiti previsti per i dispositivi digitali di Classe B, Parte 15 delle norme FCC. Tali limiti hanno lo scopo di fornire adeguata protezione dalle interferenze dannose che possono originarsi in ambienti residenziali. Questa apparecchiatura genera, usa e può emettere energia in radiofrequenza e, se non viene installata e utilizzata secondo le istruzioni, può causare interferenze dannose alle comunicazioni radio. Non è comunque garantita l’assenza di interfer-enze in determinate installazioni. Qualora questa apparecchiatura dovesse provocare interferenze nella ricezione radiotelevisiva, cosa che può essere verificata spegnendo e riaccendendo l’apparecchiatura, si consiglia di eliminare l’interferenza in uno dei seguenti modi: - modificando l’orientamento o la posizione dell’antenna ricevente; - aumentando la separazione tra
DECLARACIÓN DE LA FCC
DICHIARAZIONE FCC
l’apparecchiatura e il ricevitore; - collegando l’apparecchiatura ad una presa che si trovi su un circuito diverso da quello al quale è collegato il ricevitore; - consultando il rivenditore o un tecnico radiotelevisivo competente per ottenere assistenza.Questo dispositivo è conforme alle norme RSS sulla esenzione delle licenze per le industrie canadesi. Il funzionamento è soggetto alle due condizioni seguenti: (1) questo dispositivo non può provocare interferenze; (2) questo dispositivo deve accettare le eventuali interferenze, comprese le interferenze che potrebbero provocare effetti indesiderati.
In ambienti esposti a cariche elettro-statiche, l’unità può funzionare in modo anomalo e richiedere il reset da parte dell’utente.