Embed Size (px)
DESCRIPTION
PowerPoint Project 1. Using a Design Template and Text Slide Layout to Create a Presentation. Objectives. Start and customize PowerPoint Describe the PowerPoint window Select a design template Create a title slide and text slides with single- and multi-level bulleted lists. Objectives. - PowerPoint PPT Presentation
Citation preview

Office 2003Introductory Concepts
and Techniques
M i c r o s o f t
PowerPoint Project 1
Using a Design Template and Text Slide Layout to Create a Presentation

2PowerPoint Project 1: Using a Design Template and Text Slide Layout to Create a Presentation
Objectives
• Start and customize PowerPoint
• Describe the PowerPoint window
• Select a design template
• Create a title slide and text slides with single- and multi-level bulleted lists

3PowerPoint Project 1: Using a Design Template and Text Slide Layout to Create a Presentation
Objectives
• Change the font size and font style
• Save a presentation
• End a slide show with a black slide
• View a presentation in slide show view

4PowerPoint Project 1: Using a Design Template and Text Slide Layout to Create a Presentation
Objectives
• Quit PowerPoint and then open a presentation• Display and print a presentation in black and
white• Use the PowerPoint Help system

5PowerPoint Project 1: Using a Design Template and Text Slide Layout to Create a Presentation
Starting PowerPoint
• Click the Start button on the Windows taskbar, point to All Programs on the Start menu, point to Microsoft Office on the All Programs submenu, and then point to Microsoft Office PowerPoint 2003 on the Microsoft Office submenu
• Click Microsoft Office PowerPoint 2003• If the PowerPoint window is not maximized,
double-click its title bar to maximize it

6PowerPoint Project 1: Using a Design Template and Text Slide Layout to Create a Presentation
Starting PowerPoint

7PowerPoint Project 1: Using a Design Template and Text Slide Layout to Create a Presentation
Customizing the PowerPoint Window• If the Language bar appears, right-click it to
display a list of commands• Click the Close the Language bar command• If necessary, click the OK button in the
Language Bar dialog box• Click the Getting Started task pane Close button
in the upper-right corner of the task pane• If the Standard and Formatting toolbars are
positioned on the same row, click the Toolbar Options button on the Standard toolbar, and then click Show Buttons on Two Rows

8PowerPoint Project 1: Using a Design Template and Text Slide Layout to Create a Presentation
Customizing the PowerPoint Window

9PowerPoint Project 1: Using a Design Template and Text Slide Layout to Create a Presentation
Choosing a Design Template
• Point to the Slide Design button on the Formatting toolbar
• Click the Slide Design button and then point to the down scroll arrow in the Apply a design template list
• Click the down scroll arrow to scroll through the list of design templates until Profile appears in the Available For Use area. Point to the Profile template
• Click Profile• Click the Close button in the Slide Design task pane

10PowerPoint Project 1: Using a Design Template and Text Slide Layout to Create a Presentation
Choosing a Design Template

11PowerPoint Project 1: Using a Design Template and Text Slide Layout to Create a Presentation
Entering the Presentation Title
• Click the label, Click to add title, located inside the title text placeholder
• Type Strategies for College Success in the title text placeholder. Do not press the ENTER key

12PowerPoint Project 1: Using a Design Template and Text Slide Layout to Create a Presentation
Entering the Presentation Title

13PowerPoint Project 1: Using a Design Template and Text Slide Layout to Create a Presentation
Entering the Presentation Subtitle
• Click the label, Click to add subtitle, located inside the subtitle text placeholder
• Type Presented by and then press the ENTER key
• Type Lakemore Academic Skills Center but do not press the ENTER key

14PowerPoint Project 1: Using a Design Template and Text Slide Layout to Create a Presentation
Changing the Text Font Style to Italic• Triple-click the
paragraph, Presented by, in the subtitle text placeholder, and then point to the Italic button on the Formatting toolbar
• Click the Italic button

15PowerPoint Project 1: Using a Design Template and Text Slide Layout to Create a Presentation
Increasing Font Size
• Position the mouse pointer in the paragraph, Lakemore Academic Skills Center, and then triple-click
• Point to the Font Size box arrow on the Formatting toolbar
• Click the Font Size box arrow, click the Font Size box scroll bar, and then point to 32 in the Font Size list
• Click 32

16PowerPoint Project 1: Using a Design Template and Text Slide Layout to Create a Presentation
Increasing Font Size

17PowerPoint Project 1: Using a Design Template and Text Slide Layout to Create a Presentation
Saving a Presentation on a Floppy Disk• With a formatted floppy disk in drive A, click the
Save button on the Standard toolbar• Type College Success in the File name text
box. Do not press the ENTER key after typing the file name
• Click the Save in box arrow• Click 3½ Floppy (A:) in the Save in list• Click the Save button in the Save As dialog box

18PowerPoint Project 1: Using a Design Template and Text Slide Layout to Create a Presentation
Saving a Presentation on a Floppy Disk

19PowerPoint Project 1: Using a Design Template and Text Slide Layout to Create a Presentation
Adding a New Text Slide with a Bulleted List• Click the New Slide
button on the Formatting toolbar
• If necessary, click the Show when inserting new slides check box to remove the check mark, and then click the Close button on the Slide Layout task pane

20PowerPoint Project 1: Using a Design Template and Text Slide Layout to Create a Presentation
Entering a Slide Title
• Click the title text placeholder and then type Get Organized in the placeholder. Do not press the ENTER key

21PowerPoint Project 1: Using a Design Template and Text Slide Layout to Create a Presentation
Selecting a Text Placeholder
• Click the bulleted paragraph labeled, Click to add text

22PowerPoint Project 1: Using a Design Template and Text Slide Layout to Create a Presentation
Typing a Single-Level Bulleted List
• Type Time management skills help balance academic, work, and social events and then press the ENTER key
• Type Create a schedule each week that accounts for all activities and then press the ENTER key
• Type Plan two hours of study time for each one hour of class time but do not press the ENTER key
• Point to the New Slide button on the Formatting toolbar

23PowerPoint Project 1: Using a Design Template and Text Slide Layout to Create a Presentation
Typing a Single-Level Bulleted List

24PowerPoint Project 1: Using a Design Template and Text Slide Layout to Create a Presentation
Adding a New Slide and Entering a Slide Title• Click the New Slide
button• Type Listen Actively in the title text placeholder. Do not press the ENTER key

25PowerPoint Project 1: Using a Design Template and Text Slide Layout to Create a Presentation
Typing a Multi-Level Bulleted List
• Click the bulleted paragraph labeled, Click to add text
• Type Sit in the front row to focus attention and then press the ENTER key
• Point to the Increase Indent button on the Formatting toolbar
• Click the Increase Indent button• Type Do not tolerate distractions and
then press the ENTER key
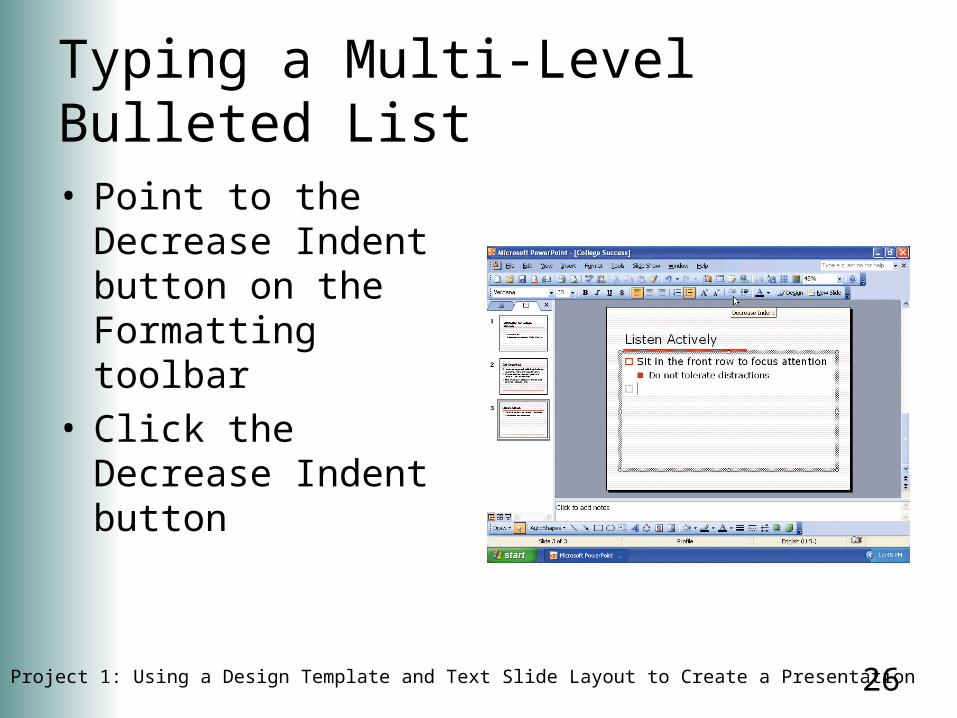
26PowerPoint Project 1: Using a Design Template and Text Slide Layout to Create a Presentation
Typing a Multi-Level Bulleted List
• Point to the Decrease Indent button on the Formatting toolbar
• Click the Decrease Indent button

27PowerPoint Project 1: Using a Design Template and Text Slide Layout to Create a Presentation
Typing the Remaining Text for Slide 3• Type Make mental summaries of material and then press the ENTER key
• Type Be prepared for class and then press the ENTER key
• Click the Increase Indent button on the Formatting toolbar
• Type Review notes from books, previous class and then press the ENTER key
• Type Preview material to be covered that day but do not press the ENTER key

28PowerPoint Project 1: Using a Design Template and Text Slide Layout to Create a Presentation
Typing the Remaining Text for Slide 3

29PowerPoint Project 1: Using a Design Template and Text Slide Layout to Create a Presentation
Creating Slide 4
• Click the New Slide button on the Formatting Toolbar
• Type Excel on Exams in the title text placeholder• Press CTRL + ENTER to move the insertion point to
the body text placeholder• Type Review test material throughout week and then press the ENTER key
• Click the Increase Indent button on the Formatting toolbar. Type Cramming before exams is ineffective and then press the ENTER key

30PowerPoint Project 1: Using a Design Template and Text Slide Layout to Create a Presentation
Creating Slide 4

31PowerPoint Project 1: Using a Design Template and Text Slide Layout to Create a Presentation
Creating a Third-Level Paragraph
• Click the Increase Indent button on the Formatting toolbar
• Type Facts remain only in short-term memory and then press the ENTER key
• Point to the Decrease Indent button on the Formatting toolbar
• Click the Decrease Indent button two times

32PowerPoint Project 1: Using a Design Template and Text Slide Layout to Create a Presentation
Creating a Third-Level Paragraph

33PowerPoint Project 1: Using a Design Template and Text Slide Layout to Create a Presentation
Typing the Remaining Text for Slide 4• Type Review entire test before answering and then press the ENTER key
• Press the TAB key to increase the indent to the second level
• Type Start with the material you know and then press the ENTER key
• Press the TAB key to increase the indent to the third level
• Type Think positively and stay focused but do not press the ENTER key

34PowerPoint Project 1: Using a Design Template and Text Slide Layout to Create a Presentation
Typing the Remaining Text for Slide 4

35PowerPoint Project 1: Using a Design Template and Text Slide Layout to Create a Presentation
Ending a Slide Show with a Black Slide• Click Tools on the menu bar and then point to
Options• Click Options• If necessary, click the View tab when the
Options dialog box appears• Verify that the End with black slide check box is
selected• If a check mark does not show, click End with
black slide, and then click the OK button

36PowerPoint Project 1: Using a Design Template and Text Slide Layout to Create a Presentation
Ending a Slide Show with a Black Slide

37PowerPoint Project 1: Using a Design Template and Text Slide Layout to Create a Presentation
Saving a Presentation with the Same File Name• Be certain your floppy disk is in drive A
• Click the Save button on the Standard toolbar

38PowerPoint Project 1: Using a Design Template and Text Slide Layout to Create a Presentation
Using the Scroll Box on the Slide Pane to Move to Another Slide• Position the mouse pointer on the scroll
box
• Press and hold down the mouse button
• Drag the scroll box up the vertical scroll bar until Slide: 1 of 4 Strategies for College Success appears in the slide indicator
• Release the mouse button

39PowerPoint Project 1: Using a Design Template and Text Slide Layout to Create a Presentation
Using the Scroll Box on the Slide Pane to Move to Another Slide

40PowerPoint Project 1: Using a Design Template and Text Slide Layout to Create a Presentation
Starting Slide Show View
• Point to the Slide Show button in the lower-left corner of the PowerPoint window above the status bar
• Click the Slide Show button

41PowerPoint Project 1: Using a Design Template and Text Slide Layout to Create a Presentation
Moving Manually through Slides in a Slide Show• Click each slide until
the Excel on Exams slide (Slide 4) is displayed
• Click Slide 4

42PowerPoint Project 1: Using a Design Template and Text Slide Layout to Create a Presentation
Displaying the Popup Menu and Going to a Specific Slide• With the black slide displaying in slide
show view, right-click the slide
• Point to Go to Slide on the Popup menu, and then point to 1 Strategies for College Success in the Go to Slide submenu
• Click 1 Strategies for College Success

43PowerPoint Project 1: Using a Design Template and Text Slide Layout to Create a Presentation
Displaying the Popup Menu and Going to a Specific Slide

44PowerPoint Project 1: Using a Design Template and Text Slide Layout to Create a Presentation
Using the Popup Menu to End a Slide Show• Right-click the title
slide and then point to End Show on the Popup menu
• Click End Show• If the Microsoft
PowerPoint dialog box appears, click the Yes button

45PowerPoint Project 1: Using a Design Template and Text Slide Layout to Create a Presentation
Quitting PowerPoint
• Point to the Close button on the PowerPoint title bar
• Click the Close button

46PowerPoint Project 1: Using a Design Template and Text Slide Layout to Create a Presentation
Starting PowerPoint and Opening an Existing Presentation• With your floppy disk in drive A, click the Start
button on the taskbar, point to All Programs, point to Microsoft Office, and then click Microsoft Office PowerPoint 2003 on the Microsoft Office submenu
• When the Getting Started task pane opens, point to the Open link in the Open area
• Click the Open link. Click the Look in box arrow, click 3½ Floppy (A:), and then double-click College Success

47PowerPoint Project 1: Using a Design Template and Text Slide Layout to Create a Presentation
Starting PowerPoint and Opening an Existing Presentation

48PowerPoint Project 1: Using a Design Template and Text Slide Layout to Create a Presentation
Checking a Presentation for Spelling Errors

49PowerPoint Project 1: Using a Design Template and Text Slide Layout to Create a Presentation
Starting the Spelling Checker
• Point to the Spelling button on the Standard toolbar
• Click the Spelling button
• When the Spelling dialog box appears, point to the Ignore button
• Click the Ignore button
• When the Microsoft Office PowerPoint dialog box appears, point to the OK button

50PowerPoint Project 1: Using a Design Template and Text Slide Layout to Create a Presentation
Starting the Spelling Checker
• Click the OK button• Click the slide to
remove the highlight from the word, Lakemore

51PowerPoint Project 1: Using a Design Template and Text Slide Layout to Create a Presentation
Displaying a Presentation in Black and White• Click the Color/Grayscale button on the
Standard toolbar and then point to Pure Black and White in the list
• Click Pure Black and White• Click the Next Slide button three times to view all
slides in the presentation in black and white• Point to the Close Black and White View button
on the Grayscale View toolbar• Click the Close Black and White View button

52PowerPoint Project 1: Using a Design Template and Text Slide Layout to Create a Presentation
Displaying a Presentation in Black and White

53PowerPoint Project 1: Using a Design Template and Text Slide Layout to Create a Presentation
Saving a Presentation Before Printing• Verify that the floppy disk is in drive A
• Click the Save button on the Standard toolbar

54PowerPoint Project 1: Using a Design Template and Text Slide Layout to Create a Presentation
Printing a Presentation
• Ready the printer according to the printer instructions
• Click the Print button on the Standard toolbar
• When the printer stops, retrieve the printouts of the slides

55PowerPoint Project 1: Using a Design Template and Text Slide Layout to Create a Presentation
Obtaining Help Using the Type a Question For Help Box• Type bullet in the Type a question for help
box on the right side of the menu bar• Press the ENTER key• When PowerPoint displays the Search Results
task pane, scroll down and then point to the topic, Change the bullet style in a list
• Click Change the bullet style in a list• When the Microsoft Office PowerPoint Help
window is displayed, double-click its title bar to maximize it

56PowerPoint Project 1: Using a Design Template and Text Slide Layout to Create a Presentation
Obtaining Help Using the Ask a Question Box• Click the Show All link
• Drag the scroll box down the vertical scroll bar until Change the bullet color is displayed
• Click the Close button on the Microsoft PowerPoint Help window title bar
• Click the Close button on the Search Results task pane

57PowerPoint Project 1: Using a Design Template and Text Slide Layout to Create a Presentation
Obtaining Help Using the Ask a Question Box

58PowerPoint Project 1: Using a Design Template and Text Slide Layout to Create a Presentation
Quitting PowerPoint
• Click the Close button on the title bar
• If prompted to save the presentation before quitting PowerPoint, click the Yes button in the Microsoft PowerPoint dialog box

59PowerPoint Project 1: Using a Design Template and Text Slide Layout to Create a Presentation

60PowerPoint Project 1: Using a Design Template and Text Slide Layout to Create a Presentation
Summary
• Start and customize PowerPoint
• Describe the PowerPoint window
• Select a design template
• Create a title slide and text slides with single- and multi-level bulleted lists

61PowerPoint Project 1: Using a Design Template and Text Slide Layout to Create a Presentation
Summary
• Change the font size and font style
• Save a presentation
• End a slide show with a black slide
• View a presentation in slide show view

62PowerPoint Project 1: Using a Design Template and Text Slide Layout to Create a Presentation
Summary
• Quit PowerPoint and then open a presentation• Display and print a presentation in black and
white• Use the PowerPoint Help system

Office 2003Introductory Concepts
and Techniques
M i c r o s o f t
PowerPoint Project 1 Complete


![Econ st. louis project powerpoint 3[1]](https://img.pdfslide.us/doc/110x75/547bcc30b4af9f3a3c8b47e7/econ-st-louis-project-powerpoint-31-5584ab268de0d.jpg)