Embed Size (px)
Citation preview

Technical data :
Power: 3V battery ( CR 2430 )Operating frequency: 433 MHzTransmission power: 10 mWOperating temperature: from -10 ˚C to +50 ˚COperating range: Determined by architectural and regulatory factors
Device characteristics:
PX 15 (15 channels)
USER MANUAL
PX15T
PORTOS drive controlling system
The remotes operateat 433 MHz frequency
UP
STOP
DOWN
LOWERING SYMBOL
TIMERCHANNELNUMBER
OPERATING MODE
DAY OF THE WEEK
CHANNEL NUMBER
CHANNEL -
CHANNEL +
BATTERYSLOT
P2
MODE
CLOCK

1. Programming the radio drive on a specific channel of any transmitter.
IMPORTANT!!!While programming, only the drive being programmed should be connected to a power supply.
A. Method one
In order to program the drive, open the inspection hatch of the roller shutter and: 1. Press the microswitch located on the lead emerging from the head of the drive for 1
second – the motor will confirm with a single beep sound and the shutter will move briefly UP and DOWN.
2. Using the CHANNEL + / - buttons, select the channel you want to program and press P2 – the motor will make a single beep sound.
3. Press P2 again, the motor will make a single beep sound again.4. To finish the programming process, press UP. You will hear 6 beeps and the roller
shutter will move briefly up and down.
B. Method two
After connecting the motor to a power supply, you will hear a long single sound and the motor will move briefly up and down (if you do not press any button within 12 seconds, the motor will quit the programming mode).
1. Using the CHANNEL + / - buttons, select the channel you wish to program:2. Press the P2 button, the motor will make a single beep sound. 3. Press P2 again, the motor will make a single beep sound again. 4. Press the UP button, the motor will make 6 beeps and move briefly up and
down, which means that the channel has been programmed.

2. Programming an external radio receiver on a specific channel of any transmitter.
3. Changing the direction of rotation of the drive.
METHOD 1:
After assigning the device to a motor, check if the running direction is correct by switching the motor on with the device. To change the running direction of the motor, you need to reprogram the channel (point 1 of this manual) by changing the programming method – if the motor was programmed following the P2 + P2 + UP method and the direction of rotation needs reversing, reprogram the motor by finishing the programming process with direction reversal, i.e. P2 + P2 + DOWN. The drive will register the direction change.
METHOD 2:
Using the microswitch located on the lead emerging from the head of the drive, you can change the drive's running direction. To do so, you should: 1. Press the microswitch down for 6 seconds. 2. After 1 second, the motor will confirm with a short beep sound and move up and
down, whereas after the next 5 seconds the motor will confirm the direction change with 3 beeps and the roller shutter will move UP and DOWN twice.
min. 6 seconds
IMPORTANT!!!If you have an external radio receiver, follow the user manual for the device (i.e. XT-R, PPKR-313 or PPKR-400).
3
x2

METHOD 1:
1. Select a previously programmed channel on the display.2. Press P2, the motor will make a single beep sound and move briefly up and
down. 3. Press STOP, the motor will make a single beep sound. 4. Press P2 again, you will hear 4 beeps and the roller shutter will move briefly up
and down.
METHOD 2:
Using the microswitch located on the lead emerging from the lead of the drive, you can delete a previously programmed transmitter channel. To do so, you should: 1. Press the microswitch down for at least 15 seconds. 2. After 1 second, the motor will make a short beep sound and move up and down, whereas after the next 5 seconds, the motor will confirm with 3 beeps and the roller shutter will move UP and DOWN twice, and finally after 15 seconds the motor will make 3 beeps and the roller shutter will move UP and DOWN once.
METHOD 3:
Reprogramming the radio drive on a given channel (point 1 of this manual) automatically deletes previous settings.
4
IMPORTANT!!!If you delete the settings of a particular channel, drives assigned to that channel will be completely deleted from other channels as well.
min. 15 seconds
4. Channel deletion (deleting all channel settings).
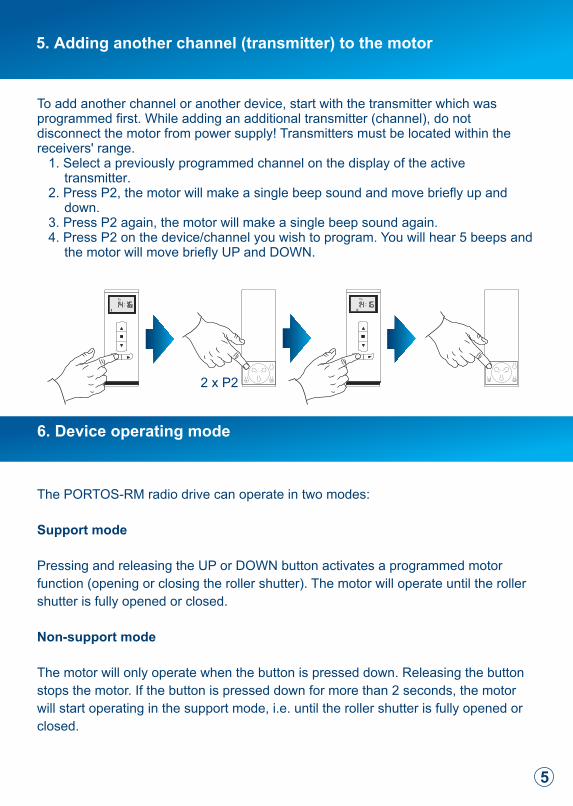
5. Adding another channel (transmitter) to the motor
To add another channel or another device, start with the transmitter which was programmed first. While adding an additional transmitter (channel), do not disconnect the motor from power supply! Transmitters must be located within the receivers' range.
1. Select a previously programmed channel on the display of the active transmitter.
2. Press P2, the motor will make a single beep sound and move briefly up and down.
3. Press P2 again, the motor will make a single beep sound again. 4. Press P2 on the device/channel you wish to program. You will hear 5 beeps and
the motor will move briefly UP and DOWN.
6. Device operating mode
The PORTOS-RM radio drive can operate in two modes:
Support mode
Pressing and releasing the UP or DOWN button activates a programmed motor
function (opening or closing the roller shutter). The motor will operate until the roller
shutter is fully opened or closed.
Non-support mode
The motor will only operate when the button is pressed down. Releasing the button
stops the motor. If the button is pressed down for more than 2 seconds, the motor
will start operating in the support mode, i.e. until the roller shutter is fully opened or
closed.
5
2 x P2
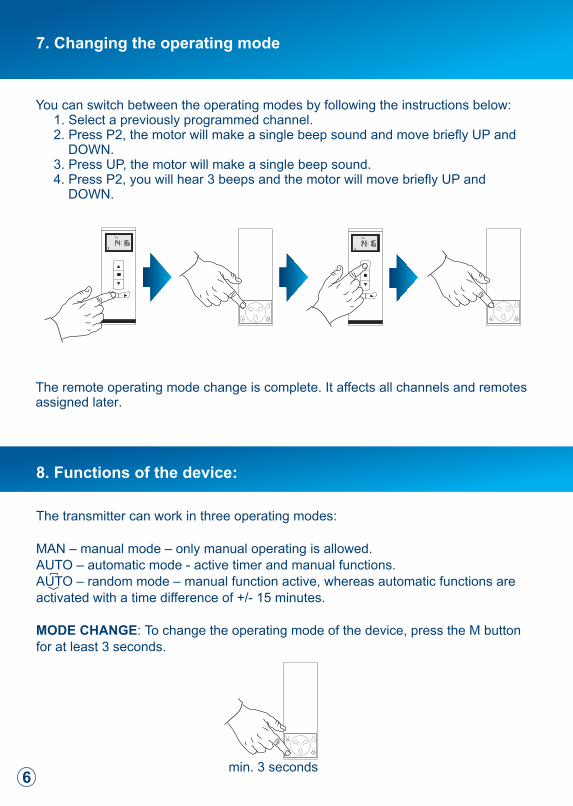
You can switch between the operating modes by following the instructions below:1. Select a previously programmed channel.2. Press P2, the motor will make a single beep sound and move briefly UP and
DOWN.3. Press UP, the motor will make a single beep sound.4. Press P2, you will hear 3 beeps and the motor will move briefly UP and
DOWN.
The remote operating mode change is complete. It affects all channels and remotes assigned later.
7. Changing the operating mode
The transmitter can work in three operating modes:
MAN – manual mode – only manual operating is allowed.AUTO – automatic mode - active timer and manual functions.AUTO – random mode – manual function active, whereas automatic functions are activated with a time difference of +/- 15 minutes.
MODE CHANGE: To change the operating mode of the device, press the M button for at least 3 seconds.
8. Functions of the device:
min. 3 seconds6
9. Device functions:
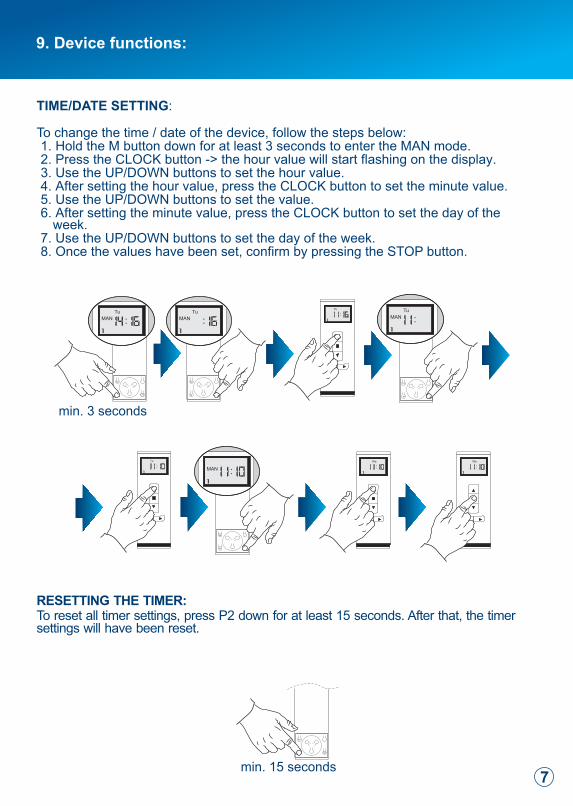
TIME/DATE SETTING:
To change the time / date of the device, follow the steps below: 1. Hold the M button down for at least 3 seconds to enter the MAN mode. 2. Press the CLOCK button -> the hour value will start flashing on the display. 3. Use the UP/DOWN buttons to set the hour value. 4. After setting the hour value, press the CLOCK button to set the minute value. 5. Use the UP/DOWN buttons to set the value. 6. After setting the minute value, press the CLOCK button to set the day of the
week. 7. Use the UP/DOWN buttons to set the day of the week. 8. Once the values have been set, confirm by pressing the STOP button.
RESETTING THE TIMER: To reset all timer settings, press P2 down for at least 15 seconds. After that, the timer settings will have been reset.
min. 3 seconds
7min. 15 seconds

TIMER SETTNG: With the PX15T device, you can set 9 automatic opening programs and 9 closing programs for any channel (1-15) based on four available time options:
A. Monday - Sunday B. Monday - Saturday C. Monday - Friday D. Single day of the week
To set the opening/closing times, follow the steps below: 1. Use the M button (holding it down for 3 seconds) to enter the AUTO mode. 2. Press the M button once -> you will see a window with the default opening value for
program 1. If the display does not show any value, use the CHANNEL +/- buttons to choose the channel for which you want to set program 1 opening and closing times.
3. Use the CHANNEL +/- buttons to select any channel for which program 1 should be used.
4. To change the opening time for program 1, press the CLOCK button – the hour value will start flashing. Use the UP/DOWN buttons to set the hour value. Press the CLOCK button again to change the minute value or the day of the week for program 1 opening operations.
5. Once all the values have been set for program 1 raising operations, press the M button to set the lowering values for program 1 and set the hour, minute and day of the week values (as described above).
6. Once all the values for program 1 opening and closing operations have been set, press the CHANNEL (+) button to set the next channel.
7. Once the values have been set, press STOP.
min. 3 seconds