Embed Size (px)
Citation preview
Revision 4Specifications subject to change without notice. Printed in the U.S.A. (June 2017) BSI, LLC
OWNER'S MANUAL & WARRANTY
Thank you for choosing products from BSI. We appreciate your business and are available to assist you with all of your needs.
This manual has been designed to help you better understand your product and its proper usage.
If you have questions that go beyond this detailed manual please contact our Customer Service Department at 1.800.662.9595.
Thank you,The BSI Team
OWNER’S MANUAL & WARRANTY
SOLERA HEATED DISPLAYS
BSI, LLC w 601 E 64th Avenue, Bldg. A w Denver, CO 80229 w Phone: 1.800.662.9595 w Fax: 303.331.8444 w Web: www.BSIdesigns.com
Revision 4Specifications subject to change without notice. Printed in the U.S.A. (June 2017) BSI, LLC
OWNER'S MANUAL & WARRANTY
NOTES
2
BSI, LLC w 601 E 64th Avenue, Bldg. A w Denver, CO 80229 w Phone: 1.800.662.9595 w Fax: 303.331.8444 w Web: www.BSIdesigns.com

Revision 4Specifications subject to change without notice. Printed in the U.S.A. (June 2017) BSI, LLC
OWNER'S MANUAL & WARRANTY
Notes ........................................................... 2 HTZ Display Unit
Contents ..................................................... 3 Components ...................................................... 7Important Owner Information ..................... 3 ZGuard Bracket Parts ........................................ 7Models ....................................................... 4 ZGuard Bracket Adjustment .............................. 8Warnings .................................................... 4 Cleaning Instructions ......................................... 8Description of Operation ............................ 4 Glass Limitations ............................................... 8Limitations ................................................... 4 Heat/Light Combo Management ....................... 9Disclaimer ................................................... 4 Heat/Light Parts and Service .............................. 10Features ...................................................... 4Installation Instructions .............................. 5 BSI, LLC Warranty .............................................. 11Operating Instructions ............................... 6
The BSI, LLC manual is an important part of your equipment. This document should be stored in a safe location, as it will be useful for the life of your product. It contains important safety information concerning the maintenance, operation and servicing of these products.
Failure to properly use this manual may result in serious injury. Do not operate this equipment unless you have read and understood the contents of this manual.
Record the model number(s) of your Solera and serial number(s), of your warming units to use as a reference when contacting your local representative or the BSI headquarters in Colorado.
BSI, LLCBusiness Hours: 8:00 a.m. to 4:30 p.m. Mountain Time
Telephone: (800) 662-9595; (303) 331-8777Fax: (303) 331-8444
Web Address: www.BSIdesigns.com
Model No.:Serial No.:
Model No.:Serial No.:
Date of Purchase:
Other:
IMPORTANT OWNER INFORMATION
TABLE OF CONTENTS
3
BSI, LLC w 601 E 64th Avenue, Bldg. A w Denver, CO 80229 w Phone: 1.800.662.9595 w Fax: 303.331.8444 w Web: www.BSIdesigns.com
Revision 4Specifications subject to change without notice. Printed in the U.S.A. (June 2017) BSI, LLC
OWNER'S MANUAL & WARRANTY
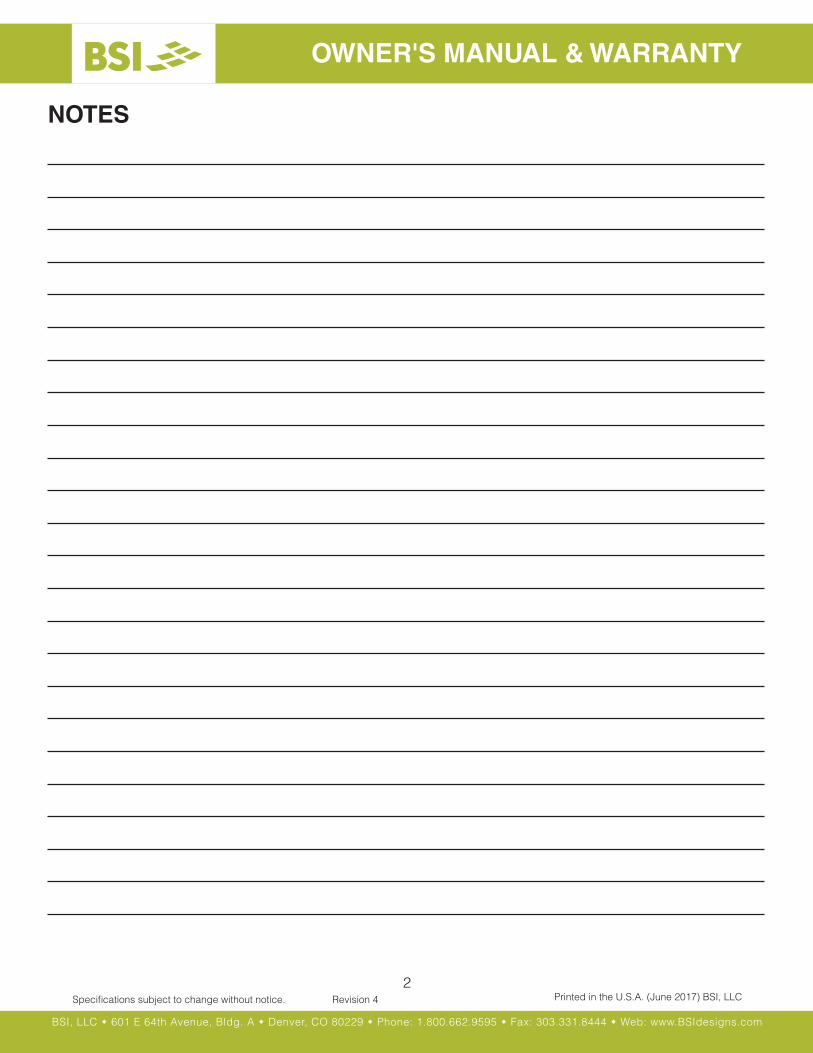
Description of OperationThis unit is designed as a food display that temporarily slows the cooling of already cooked food, not a food re-thermalizer. This unit is not designed to reheat or cook food.
SOLERA MODELS
If you have questions regarding a Solera or are interested in custom configurations please contact BSI, LLC at 1.800.662.8777.
HTC-INF HTD-INF
HTD-INF CUSTOM
HTD-INF-NF HTZ-INF
HDD-INF-NF
To prevent electrical shock that can cause severe personal injury or death, this unit must be properly grounded. Electrical grounding instructions—This unit is equipped with a grounding plug for protection against possible shock hazards. Do not cut or break off the grounding prong of the plug.
There are hot surfaces that can cause burns. Thenormal operating temperature should be between180oF and 250oF.
Limitations• The unit is only to be used for displaying pre-cooked food. The unit cannot be used as a display for uncooked food.• This unit is not an oven or cook top and will not complete the cooking process of partially cooked food.• Food is required to be pre-cooked/pre-heated to a minimum temperature of 140oF before being placed on the unit.• If the unit’s surface temperature is less than 160oF, it will not hold the food temperature at 140oF.
Disclaimer• The unit supplied is designed to hold a number of food containers. If the containers are stacked on top of one
another, the top containers may not hold the temperature of 140oF.• To reduce the risk of electric shock, do not remove or open cover. No user-serviceable parts inside. Refer servic-
ing to qualified personnel.
Features• The unit has an infinite controller to control the surface temperature of the heated base.
WARNING
WARNING
4
BSI, LLC w 601 E 64th Avenue, Bldg. A w Denver, CO 80229 w Phone: 1.800.662.9595 w Fax: 303.331.8444 w Web: www.BSIdesigns.com

Revision 4Specifications subject to change without notice. Printed in the U.S.A. (June 2017) BSI, LLC
OWNER'S MANUAL & WARRANTY
WARNING
INSTALLATION INSTRUCTIONS
Connection of this equipment to electrical power other than that specified may result in severe damage to the unit and/or fire.
Counter-Top Units Installation Instructions(HTC & HTZ)
1. Remove unit from the shipping container. Be careful not to damage the unit.
2. NSF requires units over 36” in width or weighing over 80 lbs. be raised off the installation surface with 4” legs (shipped loose). Legs screw into bottom of unit.
3. Set unit in place. Unit does not require any perimeter clearance from combustible materials.
4. Insure that the infinite controller is off before plugging unit in.
5. This unit is designed to plug into a grounded, 120 volt, 15/20-amp receptacle.
6. Plug unit into appropriate receptacle.7. Turn the unit on and set the controller to 4. Check
the function of all features.
Additional HTZ Installation Instructions - 48" Models and Larger Only
This product has two power supply cords. Connect each plug to a receptacle that is connected to an individual branch circuit. Unplug both cords before moving or servicing this unit. Do not unplug only one during movement, testing, or repair of the product.
1. Remove unit from the shipping container. Be careful not to damage the unit.
2. Cut opening into counter top per drawings.3. There is a minimum of 6" bottom clearance
required.
For HTD No Flange and HDD No Flange:• Mount frame bracket to the underside of
the counter with screws provided.• Drop remote control housing through cut
out and mounting frame.• Position unit in cut out.• Level unit. Keep flush with counter top
surface by using leveling screws in mounting frame.
• After leveling, secure lock nut on leveling screws.• Silicone perimeter of unit between counter
top and unit chassis using approved food grade (NSF) high temp silicone.
4. Set unit in place.5. Cut counter apron for remote control housing per
dimensions on print provided. Drill mounting holes using the front cover as template for hole pattern.
6. Secure remote control housing front cover in cut out in apron.
7. Secure remote control housing to front cover with screws provided.
8. Insure that the infinite controller is off before plugging unit in.
9. Turn the unit on and set the controller to 4. Check the function of all features.
Drop-In Units Installation Instructions(HTD & HDD)
5
BSI, LLC w 601 E 64th Avenue, Bldg. A w Denver, CO 80229 w Phone: 1.800.662.9595 w Fax: 303.331.8444 w Web: www.BSIdesigns.com

Revision 4Specifications subject to change without notice. Printed in the U.S.A. (June 2017) BSI, LLC
OWNER'S MANUAL & WARRANTY
Caution:
OPERATING INSTRUCTIONS
Proper Use
• Once the unit is installed. Turn the infinite controller to 4. After the controller is set to 4 the unit will need approximately 1/2 hour to reach the proper operating temperature.
• After the unit has been on for 1/2 hour, it is ready to hold the pre-heated/pre-cooked food.
• The food to be placed on the unit must already be at 140oF minimum.
• The controller can be adjusted (180oF-250oF) by turning the knob to a higher or lower setting.
• 8 being the highest temperature and 1 being the lowest.
Cleaning Instructions
Unplug power to the unit before cleaning.
• The recommended cleaner for the exterior of the unit is Cerma Bryte®. DO NOT use an abrasive cleaner; it will scratch the surface and detract from its appearance.
• Do not use excessive amounts of water when cleaning, as damage to electrical components could result.
• Do not immerse unit in water.
Troubleshooting
Warning:Serious injury or death can
occur if an unqualified person attempts to service this unit.
• If the unit does not reach operating temperature:1. Please contact BSI, LLC (1.800.662.9595).
• If the unit exceeds the normal operating temperature:1. Please contact BSI, LLC (1.800.662.9595).
• If the lighted switches do not light up when flipped to the on position:1. Check that the unit is plugged into a properly
operating receptacle.2. Please contact BSI, LLC (1.800.662.9595).
6
BSI, LLC w 601 E 64th Avenue, Bldg. A w Denver, CO 80229 w Phone: 1.800.662.9595 w Fax: 303.331.8444 w Web: www.BSIdesigns.com

Revision 4Specifications subject to change without notice. Printed in the U.S.A. (June 2017) BSI, LLC
OWNER'S MANUAL & WARRANTY
HTZ COMPONENTS
Glass Top ShelfHeat/Light Combo
Right Bracket
Left Bracket
Infinite Control
Counter-Top Solera Unit
4" Leg
1" Post
Glass Panel
Bracket Assembly - Exploded View
Location Part # Part NameA 553 Left Bracket AssemblyB 555 Right Bracket AssemblyC 321 Glass Mounting ClampD 326 Round KnobE 336 Decorative NutF 457 Oval KnobG 484 Clear Mylar SpacerH 1/4-20 x 1-1/4" Machine Screw Flat Philips
I 324 Post Clamp Insert
E
F
H
G
I
C
D
A B
ZGUARD BRACKET PARTS
7
BSI, LLC w 601 E 64th Avenue, Bldg. A w Denver, CO 80229 w Phone: 1.800.662.9595 w Fax: 303.331.8444 w Web: www.BSIdesigns.com

Revision 4Specifications subject to change without notice. Printed in the U.S.A. (June 2017) BSI, LLC
OWNER'S MANUAL & WARRANTY
ZGUARD BRACKET ADJUSTMENT
ZGuard brackets allow you to adjust food shield height and angle of glass.
Referred to as the 'home' position, bracket and glass will be in vertical position.
With the assistance from a second person, take the following steps to adjust your ZGuard.
1. To raise or lower the bracket, loosen the Oval Knob from the Post Clamp. Slide to new position and tighten. (See Illustration #1)
2. To adjust angle of the glass, loosen the Round Knob and then adjust the glass angle to desired location. (See Illustration #1)
Illustration #1: Bracket and glass in 'Home' position.
Oval Knob
Round Knob
Cleaning your new ZGuard product is key to its long life.
BSI recommends the following for keeping your product clean:
• Wipe the surface with a clean, damp cloth to remove fingerprints, dust, etc.
• Spray with a light coating of glass cleaner to remove grease or other dirt. Use a non-ammonia cleaner.
• Do not polish ZGuard with any brass polish. Your ZGuard has a durable finish and will maintain its finish for years if well maintained. (Polishing the finish with a polishing agent of any kind will destroy the coating.)
• Do not scrub the surface with any abrasive substance such as steel wool, pot scrubbers, Ajax cleanser, Comet or similar products, as it will remove the protective coating.
• If unit is fitted with a stealth warmer, don’t clean the glass or housing fixtures when warmer is hot. Cleaning when over head warmer is hot can cause staining or damage to food warmer finish.
CLEANING INSTRUCTIONS
ZGuard food shield systems that are equipped with a shelf are not intended to withstand heavy weights. Glass shelves can certainly hold small display items.
Food Shield: ZG9500 (glass panel positioned at 90
o to post)
Posts & Brackets: Brushed AluminumGlass: 36" x 14” (3/8" thick)Mounting: Above CounterTime: 24 hours
Do not exceed 75lbs. total weight of all display items across a three-foot panel of 3/8" thick glass.
GLASS LIMITATIONS TESTING PARAMETERS
RECOMMENDATIONS
8
Each BSI light, warmer or combo unit contains an Identification Sticker. This sticker provides the customer with the following information:• Serial Number• Model Number• Manufacture Date• Electrical Information
Sample Stealth Warmer Sticker with everything you need to know about your unit.
IDENTIFYING YOUR PRODUCT
BSI, LLC w 601 E 64th Avenue, Bldg. A w Denver, CO 80229 w Phone: 1.800.662.9595 w Fax: 303.331.8444 w Web: www.BSIdesigns.com

Revision 4Specifications subject to change without notice. Printed in the U.S.A. (June 2017) BSI, LLC
OWNER'S MANUAL & WARRANTY
HTZ - HEAT/LIGHT COMBO MANAGEMENT
Element
Outer Insulation
Inner Reflector
Housing Housing Reflector
Thermal Wrap
Inner Insulation
Main Reflector Light
Heat/Light Combo Section View
When a fluorescent bulb burns out and needs to be replaced you will need to do the following:
• Turn off power to all lights and warmers.• Carefully push the white lever to the opposite side,
rotating the bulb 90o.• Rotating the lever will unlock the bulb. The pins will
now be visible through the open slots at each end. Caution: At this position, bulbs are free to fall down through open slots.
• If the bulb does not easily slide out from the holders, tap lightly on housing first, then carefully use needle-nose pliers to grab the bulb, evenly pulling it down and out.
• Once the defective bulb is removed, remove the white lever end cap from the bulb prongs and proceed to place it on the new bulb prongs.
• With the new bulb in hand, evenly push the pins on both ends up and into the open slots of the lamp holders.
• Carefully push the white lever to the opposite side, rotating the bulb 90o and locking it into place. Pins will no longer be visible.
CHANGING THE FLUORESCENT BULB
Lever
Once your ZGuard has been properly installed and you have removed all zip ties from transportation, it will be im-portant to keep your heat/light combo unit clean to prolong the life of the product.
BSI recommends the following for keeping your product clean:• Be sure to turn the power on your light or warmer off
before cleaning. Only clean when stealth warmer is cool. Cleaning when the warmer is hot can cause staining or damage to food warmer finish.
• Wipe the surface with a clean, damp cloth to remove fingerprints, dust, etc.
• Spray with a light coating of glass cleaner to remove grease or other dirt. Use a non-ammonia cleaner.
• Be sure not to spray any cleaning product directly into the bulbs, fixtures or heating elements.
CLEANING INSTRUCTIONS
Do not use high-output bulbs.Use coated, shatter-proof bulbs.
BSI uses only T5 size bulbs. New light bulbs can be ordered from Grainger. Please call them direct at 1.888.361.8649 or visit their website at www.grainger.com.
Ordering New Bulbs
9
When a LED bulb burns out and needs to be replaced you will need to do the following:• Turn off power to all lights and warmers.• Carefully unscrew the end plate and slide out the
entire LED light.• If mutiple lights are connected to each other
carefully disconnect Serial Connector or Power Connector.
• Once dead light is removed, replace with new LED light. Carefully reconnect the connector and slide in the light bar.
• Replace end cover and the two screws.
CHANGING THE LED BULB
End Plate
BSI, LLC w 601 E 64th Avenue, Bldg. A w Denver, CO 80229 w Phone: 1.800.662.9595 w Fax: 303.331.8444 w Web: www.BSIdesigns.com

Revision 4Specifications subject to change without notice. Printed in the U.S.A. (June 2017) BSI, LLC
OWNER'S MANUAL & WARRANTY
Part # Description492-18 Element:_18"_120V_Heater_350W492-24 Element:_24"_120V_Heater_500W492-30 Element:_30"_120V_Heater_660W492-36 Element:_36"_120V_Heater_800W492-42 Element:_42"_120V_Heater_950W492-48 Element:_48"_120V_Heater_1100W492-54 Element:_54"_120V_Heater_1250W492-60 Element:_60"_120V_Heater_1400W492-66 Element:_66"_120V_Heater_1560W492-72 Element:_72"_120V_Heater_1725W
Part # Description496-24 Element:_24"_208V_Heater_500W496-30 Element:_30"_208V_Heater_660W496-36 Element:_36"_208V_Heater_800W496-42 Element:_42"_208V_Heater_950W496-48 Element:_48"_208V_Heater_1100W496-54 Element:_54"_208V_Heater_1250W496-60 Element:_60"_208V_Heater_1400W496-66 Element:_66"_208V_Heater_1560W496-72 Element:_72"_208V_Heater_1725W
240V Heat Elements are a Special Order Item.Contact BSI at 1.800.662.9595 to place an order.
Heat Warning Sticker Here
Heating Element
Element Clips
Wire Clip
Wire Clip
Electrical Shock Warning Sticker Here
On all three Stealth Warmer units the tubular heating element can burn out, similar to a light bulb.
Replacing the tubular heating element should be completed by a Professional Service Technician. If you have additional questions please contact BSI at 1.800.662.9595.
REPLACING THE TUBULAR HEATING ELEMENTS
ORDERING NEW HEATING ELEMENTS
10
In the event that your Lights or Warmers need service and require major repairs, contact your local installer for assistance.
If you have questions about the products or need to replace minor parts you may contact BSI, LLC at 1.800.662.9595.
Part # Description (All bulbs 4100K)508-8-C F8-T5/CW - 12" Long508-14-C F14-T5/CW - 22" Long508-21-C F21-T5/CW - 34" Long508-28-C F28-T5/CW - 46" Long508-35-C F35-T5/CW - 58" Long
512 Bulb Installation Lever
BulbBulb Installation Lever
PARTS & SERVICE
ORDERING NEW FLUORESCENT BULBS
ORDERING NEW LED LIGHTS
Part # Description16289 Kelly LED:_12"_LED_Light_Bar16290 Kelly LED:_18"_LED_Light_Bar16291 Kelly LED:_24"_LED_Light_Bar16292 Kelly LED:_36"_LED_Light_Bar16293 Kelly LED:_10'_Power_Cord_w/o_Plug16294 Kelly LED:_Serial_Connector16295 Kelly LED:_6" Power_Connector
BSI, LLC w 601 E 64th Avenue, Bldg. A w Denver, CO 80229 w Phone: 1.800.662.9595 w Fax: 303.331.8444 w Web: www.BSIdesigns.com

Revision 4Specifications subject to change without notice. Printed in the U.S.A. (June 2017) BSI, LLC
OWNER'S MANUAL & WARRANTY
11
BSI, LLC warrants its products to be free from defects in material and workmanship from the date of their original purchase for normal use and for the applicable warranty periods set forth below. BSI, LLC’s warranty extends only to original purchasers acquiring new products purchased in the United States directly from BSI, LLC, its authorized dealers or other companies specifically authorized by BSI, LLC to act as resellers of its products.
SOLERABSI, LLC warrants the Solera Heated Display units against defects in material and workmanship for a period of one year from invoice date.
ZGUARDBSI, LLC warrants the ZGuard system against defects in material and workmanship for a period of one year from invoice date. This excludes glass chipping or breakage after installation that can be explained as “use and abuse”.
STEALTH WARMERSBSI, LLC warrants the Stealth Warmer against defects in material and workmanship for a period of one year from invoice date. The warming element is warranted for two years from invoice date.
FLUORESCENT LIGHTS BALLASTThe Slimline Light warranty is for material and workmanship for the period of one year from invoice date. The fluorescent bulb itself is not covered under warranty.
THERE ARE NO WARRANTIES EXCEPT AS EXPRESSLY STATED ABOVE, WHETHER EXPRESSED OR IMPLIED, INCLUDING, BUT NOT LIMITED TO, ANY WARRANTY OF MERCHANTABILITY OR FITNESS FOR ANY PARTICULAR PURPOSE. These warranties do not apply to any products which have been altered in any way or to products which have been subject to misuse, abuse, neglect, accident, or which have been damaged in transit. Warranty is void if products are used, held or stored in an unsupervised environment. BSI, LLC’s liability for its products shall be limited to the repair or replacement of products or, at BSI, LLC’s option, to refunding the purchase price. BSI, LLC will not be liable, under any circumstances, for incidental or consequential damages (including, without limitation, to lost profits) arising in connection with the sale, use, inability to use, repair or replacement of BSI, LLC’s products. The liability of BSI, LLC arising from any cause shall not exceed the price paid for the products.
Any claim for breach of the foregoing warranties shall be deemed waived unless submitted to BSI, LLC in writing within 30 days of the date the alleged defect was discovered, or by reasonable inspection should have been discovered. The merchandise must be returned to the BSI, LLC factory from which it was purchased, freight prepaid, and will not be accepted unless prior written authorization to return the merchandise has been issued by BSI, LLC. A copy of the original invoice must accompany the returned merchandise to prove the date of original purchase and warranty entitlement. Any cause of action for breach of the foregoing warranties shall be deemed waived unless brought within one year of the date of the claim submission.
BSI, LLC WARRANTY
BSI, LLC w 601 E 64th Avenue, Bldg. A w Denver, CO 80229 w Phone: 1.800.662.9595 w Fax: 303.331.8444 w Web: www.BSIdesigns.com

BSI, LLC601 E. 64th Ave., Blvd. AD e n v e r , C O 8 0 2 2 9
1.800.662.9595www.BSIdesigns.com