Embed Size (px)
Citation preview

® Where Luxury Is Affordable
EN DO NOT RETURN MERCHANDISE TO YOUR DEALER STORE DIRECTLY. CALL MSPA AFTER SALES SERVICE CENTER FOR PRODUCT QUESTIONS OR CONTACT MSPA AT [email protected]
MSpa® Owner’s Manual and Warranty Card
www.the-mspa.com
B-091*B-100*B-110*/112*B-120*
B-121*
AlpineNest Silver CloudOasisLime/Twilight/Sapphire Castello
B-141*B-130* B-150*B-131*/B-151*B-132*/B-152*
Super CastelloCamaroSuper CamaroLuxury ExoticBirkin
Due to MSpa continuous product improvement, MSpa reserves the right to change specifications and product appearance, which may result in updates to the instruction manual without notice.

2
ENTER THE WORLD OF MSPA
Welcome, Thank you for choosing MSpa and for your confidence in our brand. We believe that you will enjoy many benefits of using MSpa products for years to come.
To guide you in your initial MSpa experience, we are pleased to present you with this instruction manual. Please carefully and thoroughly read this manual entirety before using the product for the first time.
We are delighted to welcome you to the MSpa family, and look forward to sharing with you the full spectrum of our expertise.
Enjoy your MSpa!
CONTENT
Safety precautions……………………………………………………………………………….........................................................................Specifications & product overview…………………………………………………...........................................................................………..First Use/set-up preparation…………………………………………………............................................................................……………...Spa set-up…………………………………………………...............................................................................…………………………......…Control panel operation…………………………………………........................................................................……………………..…..……Water maintenance & chemicals…………………........................................................................………………………..………………..…Drainage, cleaning and storage………………………...........................................................................……………………..………..……Disposal & environmental protection…………………………..............................................................……………………………….…...…Troubleshooting…………………………………………….........................................................................……………………….…...…...…MSpa limited warranty policy.....................................................................................................................................................................MSpa service center locations..................................................................................................................................................................MSpa warranty card…………………………...............................................................…………………................................………………
3579
1314161718192021
Scan the QR code to enter the MSpa official website

3
SAFETY PRECAUTIONS
For your own safety and that of your product, make sure to following the safety precautions below. Fail to follow the instruction may result in serious injury, property damage or death. Improper installation or operation will void the warranty.
READ, UNDERSTAND AND FOLLOW ALL INSTRUCTIONS
! DANGER
! WARNING
Risk of Accidental Drowning. Extreme caution must be exercised to prevent unauthorized access by children. To avoid accidents, ensure that children cannot use this spa unless they are supervised at all times. Risk of Drowning. Inspect the spa cover regularly for leak, premature wear and tear, damage or signs of deterioration. Never use a worn or damaged cover: it will not provide the level of protection required to prevent unsupervised access to the spa by a child. Risk of Drowning. Always lock the spa cover after each use. Risk of Injury. If the electrical cord is damaged. Replace the damaged cord immediately. Do not bury cord. Purchase a replacement cord immediately from the manufacturer or MSpa after-sales service center or contact a licensed electrician to avoid a hazard. Use only identical replacement parts when servicing. Risk of Electric Shock. Do not permit any high voltage electrical appliances, such as a light, television within 1.5m (5 feet) of a spa tub.Risk of Electric Shock. Do not use the spa when it is raining, thundering or lightning. Parts incorporating electrical components, must be located or fixed so that they cannot fall into the spa.
�
�
��
�
��
To reduce the risk of electric shock, do not use an extension cord, timers, plug adaptors or converter plugs to connect the unit to electric supply; provide a properly located outlet.The spa electrical appliance should be supplied through a residual current device (RCD) having a rated residual operating current not exceeding 30 mA. RCD must be tested before each use. Parts containing live parts, except parts supplied with safety extra-low voltage not exceeding 12V, must be inaccessible to occupants in the spa. It is important to only use a 16A (13A for UK and 10A for Australia and New Zealand) power supply. Residential electrical connection box must be located safely with a distance of at least 2m away from the spa.Electric installation should fulfill the local requirement or standards.Do not press down or uplift the control panel or put any heavy items on the control panel after installations.This product is not intended for use by persons (including children) with reduced physical, sensory or metal capabilities, or lack of experience and knowledge, unless they are under supervision or instruction concerning use of the product by a person responsible for their safety. Children shall not play with this appliance. Cleaning and user maintenance shall not be made by children without adult supervision. To reduce the risk or injury, do not permit children use this product unless they are closely supervised all times. To reduce the risk of child drowning, supervise children all times. Attach and lock spa cover after each use.Make sure the floor is capable of supporting the expected load, which you can find from the spec sheet on Pg.5, calculate the expected load of water capacity plus total weight.Adequate draining system must be provided around the spa to deal with overflow water.
�
�
�
�����
����
�

4
To reduce the risk of injury:a)
b)
c)
d)
e)f)
g)
h)
i)
People with infectious disease should not use a spa or hot tub. To avoid injury exercise care when entering or existing the spa or hot tub.Water temperature in excess of 38°C(100°F) may be injurious to your health. Never use a spa or hot tub alone or allow others to use the spa alone.Do not use a spa or hot tub immediately following strenuous exercise.Spa heat in conjunction with alcohol, drugs, or medication can cause unconsciousness.Exit immediately if uncomfortable, dizzy, or sleepy. Spa heat can cause hyperthermia and unconsciousness. Do not allow the water in the spa to freeze. Do not turn on the spa when the water is frozen. Never pour water with a temperature higher than 40°C(104°F) into the spa directly. Always unplug this product from the electrical outlet before removing, cleaning, servicing or making any adjustment to the product. Never jump or dive into a spa or any shallow body of water.No part of the electric appliance is to be located above the bath during use.Do not bury the electrical cord. Locate the cord where it will not be damaged by lawn mowers, hedge trimmers and other equipment.Do not attempt to plug in or unplug this product while standing in water or when your hands are wet.Do not use the spa if damaged in delivery and/or malfunctioning in any way. Contact the MSpa service center for further direction. Keep all pets away from the spa to avoid any damage.Do not add bath oil or bath salt to the spa water.
�
�����������������
The water in a spa should never exceed 40°C(104°F). Water temperature between 38°C(100°F) and 42°C(108°F) are considered safe for a healthy adult. Lower water temperatures are recommended for young children and when spa use exceeds 10 minutes. Since excessive water temperatures have a high potential for causing fetal damage during the early months of pregnancy, pregnant or possibly pregnant women should limit spa water temperatures to 38°C(100°F).Before entering a spa or hot tub the user should measure the water temperature with an accurate thermometer since the tolerance of water temperature regulating devices varies. The use of alcohol, drugs or medication before or during spa use may lead to unconsciousness with the possibility or drowning. The use of alcohol, drugs, or medication can greatly increase the risk of fatal hyperthermia in spas. The causes and symptoms of hyperthermia may be described as follows: Hyperthermia occurs when the internal temperature of body reaches a level several degrees above the normal body temperature 37°C(98.6°F). The symptoms of hyperthermia include an increase in the internal temperature of body, dizziness, lethargy, drowsiness, and fainting. The effect of hyperemia include failure to perceive heat; failure to recognize the need to exit spa; unawareness of impending hazard; fetal damage in pregnant women; physical inability to exit the spa; and unconsciousness resulting in the danger of drowning. Obese persons or persons with a history of heart disease, low or high blood pressure, circulatory system problem, or diabetes should consult a physician before using a spa.Persons using medication should consult a physician before using a spa since some medication may induce drowsiness while other medication may affect heart rate, blood pressure, and circulation. Check with doctor before use if pregnant, diabetic, in poor health, or under medical care.

5
4 + 2246444446666
BUBBLE SPA (EU, UK, SW & AU)Model No.
Control System SpecsHeaterMassage Air BlowerFilter PumpCord MountedTop LidPool CoverPool Material
Shape Seating Capacity
WaterCapacity
OutsideDimensions
InsideDimensions Height Weight
B-091* ALPINEB-100* NESTB-110* SILVER CLOUDB-112* SILVER CLOUDB-120* OASISB-121* CASTELLOB-130* CAMAROB-131* LUXURY EXOTICB-132* BIRKINB-141* SUPER CASTELLOB-150* SUPER CAMAROB-151* LUXURY EXOTICB-152* BIRKIN
SquareOvalRoundRoundRoundRoundRoundRoundRoundRoundRoundRoundRound
930Ltr/245gal550Ltr/145gal700Ltr/184gal930Ltr/245gal700Ltr/184gal700Ltr/184gal700Ltr/184gal700Ltr/184gal700Ltr/184gal930Ltr/245gal930Ltr/245gal930Ltr/245gal930Ltr/245gal
1.85m/73”
1.80m/71”2.04m/80”1.80m/71”1.80m/71”1.80m/71”1.80m/71”1.80m/71”2.04m/80”2.04m/80”2.04m/80”2.04m/80”
1.86m x 1.25m/73” x 49”
1.46m x 0.85m/57” x 33”
1.45m/57”
1.40m/55”1.60m/63”1.40m/55”1.40m/55”1.40m/55”1.40m/55”1.40m/55”1.60m/63”1.60m/63”1.60m/63”1.60m/63”
0.68m/27”0.68m/27”0.70m/28”0.70m/28”0.70m/28”0.70m/28”0.70m/28”0.70m/28”0.70m/28”0.70m/28”0.70m/28”0.70m/28”0.70m/28”
30kg/66lbs23kg/51lbs25kg/55lbs31kg/68lbs25kg/55lbs30kg/66lbs30kg/66lbs33kg/73lbs33kg/73lbs38kg/84lbs38kg/84lbs41kg/90lbs41kg/90lbs
B-091*/100*/110*/112*/120*1500W/2.04HP720W/1HP12V/60WEU&UK, AU: RCD plug, SW: plug + PRCDRhino-Tech™ reinforced PVCNonePremium PVC fabric
B-121*/141*/130*/150*/131*/151*/132*/152*1500W/2.04HP720W/1HP12V/60WEU&UK, AU: RCD plug, SW: plug + PRCDPremium PVC leather cover with foil insidePremium PVC tough leather, waterproof and anti-UVPremium PVC fabric
Note: The symbol * after model number (e.g. B-110*) is for purpose of lab test updating, no virtual meaning. The model number without symbol * on packaging is corresponding to the same product listed in the owner’s manual in spite of the symbol *.
SPECIFICATIONS
! CAUTION
Always add chemicals to water, never add water to chemicals. Adding water to chemicals may cause strong fumes or violent reactions and hazardous chemical spray. Maintain water chemistry in accordance with manufacture’s instructions.Do not leave or set up the spa in temperature lower than 4°C if heater is not operating. Always enter and exit the spa or hot tub slowly and cautiously. Caution of wet floor. To avoid damage to the pump, never turn on the spa or hot tubs unless it is filled with water to the minimum water line. Place the spa or hot tub only on a properly prepared site that can withstand the floor loading requirement of the spa. Do not leave the spa empty for extended period of time. Do not expose the spa under direct sunshine.Open the spa top lid when the Bubble function is on.
�
�������

C. D.B.
6
PRODUCT OVERVIEW
Packaging content
A.
G. H.F.E.
K. L.J.I.
O. P.N.M.
®
®
®
®
NOTE: Drawings for illustration purpose only. Actual product may vary. Not to scale.
®
* round or square
7
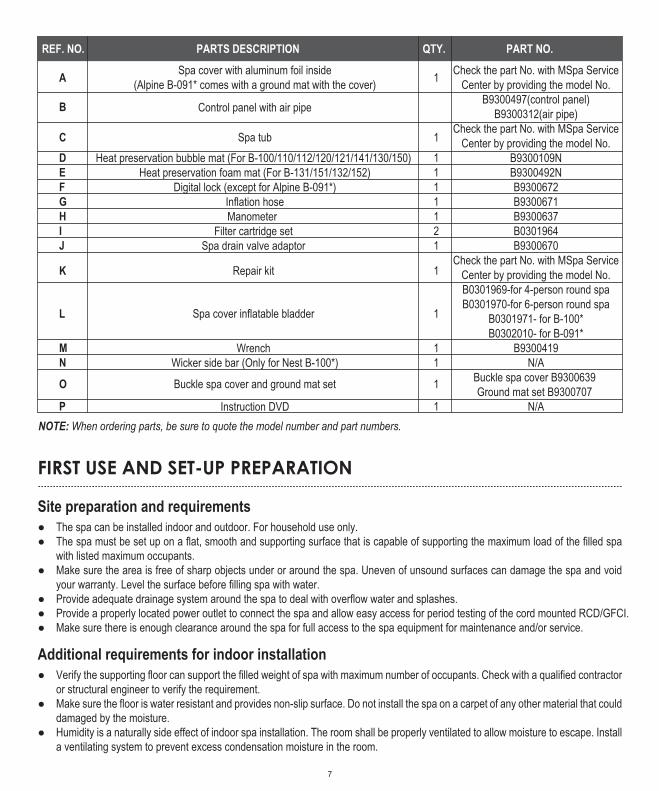
REF. NO. PARTS DESCRIPTION QTY. PART NO.
Spa cover with aluminum foil inside(Alpine B-091* comes with a ground mat with the cover)
Control panel with air pipe
Heat preservation bubble mat (For B-100/110/112/120/121/141/130/150) Heat preservation foam mat (For B-131/151/132/152)
Digital lock (except for Alpine B-091*)Inflation hoseManometer
Filter cartridge set Spa drain valve adaptor
Wrench Wicker side bar (Only for Nest B-100*)
Instruction DVD
Check the part No. with MSpa ServiceCenter by providing the model No.
B9300497(control panel)B9300312(air pipe)
Check the part No. with MSpa ServiceCenter by providing the model No.
B9300109NB9300492NB9300672B9300671B9300637B0301964B9300670
Check the part No. with MSpa ServiceCenter by providing the model No.B0301969-for 4-person round spaB0301970-for 6-person round spa
B0301971- for B-100*B0302010- for B-091*
B9300419N/A
Buckle spa cover B9300639 Ground mat set B9300707
N/A
FIRST USE AND SET-UP PREPARATION
The spa can be installed indoor and outdoor. For household use only. The spa must be set up on a flat, smooth and supporting surface that is capable of supporting the maximum load of the filled spa with listed maximum occupants. Make sure the area is free of sharp objects under or around the spa. Uneven of unsound surfaces can damage the spa and void your warranty. Level the surface before filling spa with water.Provide adequate drainage system around the spa to deal with overflow water and splashes. Provide a properly located power outlet to connect the spa and allow easy access for period testing of the cord mounted RCD/GFCI. Make sure there is enough clearance around the spa for full access to the spa equipment for maintenance and/or service.
��
�
���
NOTE: When ordering parts, be sure to quote the model number and part numbers.
Site preparation and requirements
Verify the supporting floor can support the filled weight of spa with maximum number of occupants. Check with a qualified contractor or structural engineer to verify the requirement.Make sure the floor is water resistant and provides non-slip surface. Do not install the spa on a carpet of any other material that could damaged by the moisture.Humidity is a naturally side effect of indoor spa installation. The room shall be properly ventilated to allow moisture to escape. Install a ventilating system to prevent excess condensation moisture in the room.
�
�
�
Additional requirements for indoor installation
K Repair kit
CDEFGHIJ
A
B
Spa tub
L Spa cover inflatable bladder
O
P
MN
Buckle spa cover and ground mat set
1
1
1
1
1
1
11
1111121

8
Make sure to set up the spa on a firm, level and smooth surface that is strong enough to support the full weight of the filled spa and maximum occupants.Do not set up the spa on grass or dirt, as this increases the amount of debris entering the spa, and damage the spa floor. Do not leave the spa tub exposed to direct sun light for extend period of time.It is the possible to install and leave the spa outside at a temperature not lower than 4°C(39°F) and the water inside the circulation system, pump, pipe are not frozen. Put a Heat Preservation Mat or the Electric Heating Mat (*Optional) in between the spa bottom and the ground to prevent heat loss from the bottom of the spa and to provide better heat retention.
�
���
Additional requirements for outdoor installation
RESET
TEST
Plug the machine into the mains. Press the RESET button on the RCD. The indicator turns red.Press the TEST button on the RCD. The RCD indicator should shut off. If the RCD indicator does not turn off, the RCD is faulty.Do not use the spa. Contact a qualified electrician to correct the fault.Press the RESET button on the RCD again. The indicator should turn red. If yes, the spa is ready for use.
1.2.3.
4.
RCD or PRCD Testing
! WARNINGRisk of electric shock: This product is provided with a RCD located at the end of the power cord. The RCD must tested before each use. Do not use the spa if the RCD does not function properly. Disconnect the power cord until the fault has been identified and corrected. Contact a licensed electrician to correct the fault. There are no serviceable parts in side the RCD. Opening the RCD will void the warranty.
1. 2.
RESET
3.
TEST
4.
Indicator area
PRCD For spa models of Switzerland markets, test the PRCD using the above testing steps.

9
Nest B-100: For this model, a side bar is included in the package. Set up the wicker bar and place the supporting legs underneath the spa tub before filling the water. It helps keeping the oval spa in a proper shape after water filling and inflation.
�
Alpine B-091: Spread out the square ground mat and place it to the selected site. Make sure the buckle of cover and mat is attached when spa not in use.
�
SPA SET-UP
Move the entire package to the selected site. Open the carton carefully as it can be used to store the spa during long term storage or when not in use. Lay out all the parts on the ground and make sure all parts are accounted for. Make sure the spa tube is right side up. (*For missing or damaged part, contact the MSpa Service Center)Spread the Heat Preservation Ground Mat over a cleared area. Spread out the spa liner over the ground mat. Heat Preservation Mat prevents heat loss from the bottom of the unit.
1.
2.
3.
NOTE:
1 2 3
Connect the digital cable. Find the digital cable, loose the cap on the end, and plug into the cable port on the control panel. Once the cable is connected properly, a yellow signal will light up beside the ON/OFF button on the panel.
4. 4
this sideface down

10
O-rings
Air pipe
Connect the control panel to the spa tub. Fasten and secure the rings to the pipe adapter on the spa tub. (Fig.4) Make sure the rubber O-rings are properly placed on the air pipes. CAUTION: Lost of the O-rings may result spa and the bubbling function working improperly, and also cause the air pump rusted.
NOTE: For spa models has PVC leather covers, make sure the spa cover is onto the spa tub properly before connecting the control panel. The two holes on the leather cover must be positioned correctly to the pipes of control panel air pipes.
5. 5
11
Spa Inflation.
6.1 Unscrew the air valve cap (a) on the control panel to reveal the air blower inflation outlet and connect one end of the inflation hose (b) to the outlet. See Figure 6.1 6.2 Unscrew the air valve cap on the spa pool and reveal the stem for inflation. 6.3 Connect the other end of the inflation hose (b) to the manometer (c) first and then insert to the air valve.
6.4 Press the Bubble button to inflate the spa tub until it is firm to tough.
CAUTION: Do not over inflate. Over inflation may cause spa leakage and void the warranty.6.5 Pay attention to the Manometer. The Yellow section appears when the spa is properly inflated. The Green section shows when water filling is completed. Repeat previous steps if more air is necessary.
CAUTION: The Red section shows when the spa is over inflated. Press the black button (a) on the manometer to release some air until it points the green section. IMPORTANT: During spa use, the manometer shall only shows the Green section at all times.
6.6 When inflation is completed. Press Bubble button again to turn it off. Disconnect the inflation hose on both ends. Replace the air valve cap back.
NOTE:
6.
6.1 6.2 6.3
6.4 6.5
Green
Yellow
Over Inflation
Red
Button
(a)
(b)(b)
(c)
(a)

11
Spa Bladder Inflation. 7.1 Open the air valve (a) on the bladder. Insert the inflation hose (b) into the valve. 7.2 Press the Bubble button to inflate until it is firm to touch but not hard. 7.3 Press the Bubble button again to stop inflation. Disconnect the inflation hose from the air blower outlet and the valve 7.4 Replace the air valve cap (c) back on the control panel. Close and recess the inflation valve (a).
7. 7
Water level must reach the MIN water line but not exceed the MAX. line to avoid pump failure.Never pour water with a temperature higher than 42°C(108°F) into the spa directly. To avoid control system failure, do not operate the spa until water reaches the MIN. line.
���
Spa Deflation.8.1 Unscrew the air valve cap on the spa pool to deflate the spa.8.2 Once the deflation is completed, replace the cap back.
Spa Bladder Deflation.9.1 Pull the valve cap out and squeeze the valve at its base until deflated. 9.2 Close and recess the valve back.
Water Filling 10.1 Check the spa liner is at the selected area and point the drain valve toward a suitable draining area before inflation. 10.2 Fill the spa tub with fresh water to a level between MINIMUM and MAXIMUM line marked on the inside of the spa wall. Do not over fill the spa. It is recommended to fill the spa with lukewarm water for quick heating and energy saving.
WARNING:
10.3 After water filling, double check the spa pool air pressure to makes sure the manometer points out the Green section. 10.4 Place the inflated air bladder and the zipper spa cover over the spa tub, and make sure the spa cover zipper are closed and lock the cover by the digital lock in the accessory pack.
IMPORTANT: � Inspect the spa pressure regularly for leak, premature wear or deterioration. � Check and wax the zipper regularly, to make it smooth for operation and avoid splits.
8.
9.
10.
(a)
(b)
(c)
10
10.4
The cap is designed to be screwed on and off. Never exert force as this could cause the compete internal inflation system of the valve to come loose.If over inflated, remove the inflation hose from the spa air valve side, screw the valve cap to release some air and stop until the manometer points to the right color section.
�
�
12
® ®
®
(a)
(b)
(c)
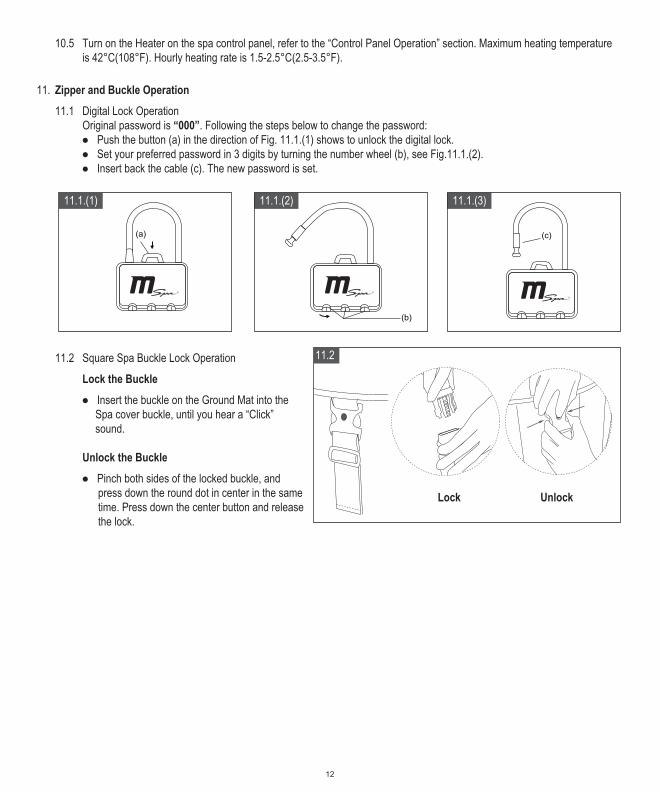
11.1.(1) 11.1.(2) 11.1.(3)
Zipper and Buckle Operation11.1 Digital Lock Operation Original password is “000”. Following the steps below to change the password:
������������������ ������������������������������� �������������������������������������������������������������������������������������������"������ �#������������ $�������%���������������� ����'��������������������
11.2 Square Spa Buckle Lock Operation
Lock the Buckle����%�������������������<������=�������������� Spa cover buckle, until you hear a “Click” sound.
Unlock the Buckle�����������������������������������#������ press down the round dot in center in the same time. Press down the center button and release the lock.
11.
Lock Unlock
11.2
10.5 Turn on the Heater on the spa control panel, refer to the “Control Panel Operation” section. Maximum heating temperature is 42°C(108°F). Hourly heating rate is 1.5-2.5°C(2.5-3.5°F).
13
ºC
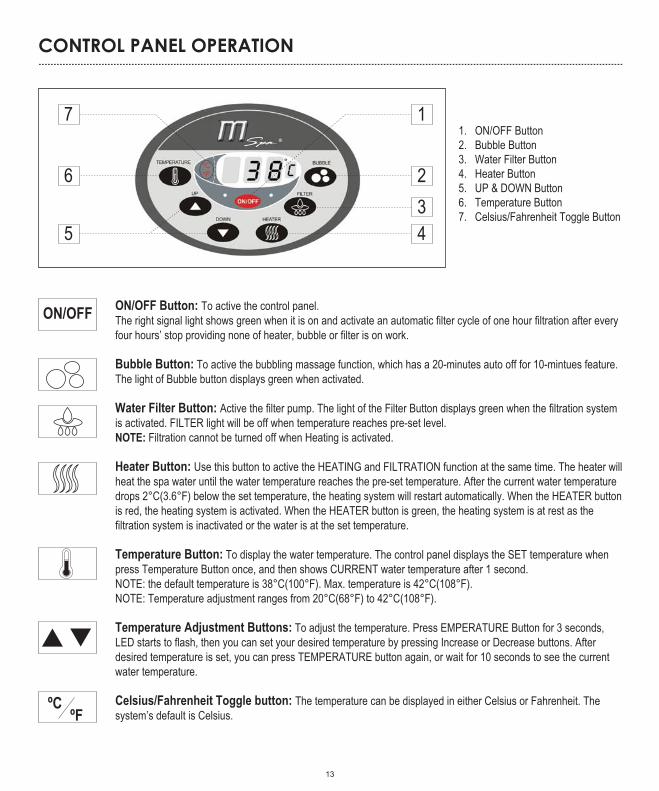
CONTROL PANEL OPERATION
1. ON/OFF Button2. Bubble Button3. Water Filter Button4. Heater Button5. UP & DOWN Button6. Temperature Button7. Celsius/Fahrenheit Toggle Button
1
2345
6
7
ON/OFF ON/OFF Button: To active the control panel.The right signal light shows green when it is on and activate an automatic filter cycle of one hour filtration after every four hours’ stop providing none of heater, bubble or filter is on work.
Bubble Button: To active the bubbling massage function, which has a 20-minutes auto off for 10-mintues feature. The light of Bubble button displays green when activated.
Water Filter Button: Active the filter pump. The light of the Filter Button displays green when the filtration system is activated. FILTER light will be off when temperature reaches pre-set level. NOTE: Filtration cannot be turned off when Heating is activated.
Heater Button: Use this button to active the HEATING and FILTRATION function at the same time. The heater will heat the spa water until the water temperature reaches the pre-set temperature. After the current water temperature drops 2°C(3.6°F) below the set temperature, the heating system will restart automatically. When the HEATER button is red, the heating system is activated. When the HEATER button is green, the heating system is at rest as the filtration system is inactivated or the water is at the set temperature.
Temperature Button: To display the water temperature. The control panel displays the SET temperature when press Temperature Button once, and then shows CURRENT water temperature after 1 second. NOTE: the default temperature is 38°C(100°F). Max. temperature is 42°C(108°F).NOTE: Temperature adjustment ranges from 20°C(68°F) to 42°C(108°F).
Temperature Adjustment Buttons: To adjust the temperature. Press EMPERATURE Button for 3 seconds, LED starts to flash, then you can set your desired temperature by pressing Increase or Decrease buttons. After desired temperature is set, you can press TEMPERATURE button again, or wait for 10 seconds to see the current water temperature.
Celsius/Fahrenheit Toggle button: The temperature can be displayed in either Celsius or Fahrenheit. The system’s default is Celsius. ºF

14
WATER MAINTAINCE AND CHEMICALS
LOCK THE SCREEN: Press “UP ” and “DOWN ” buttons together to lock the control panel to avoid any wrong operation by children. Press the two buttons together once again to unlock the.
IMPORTANT:The following conditions will lead to slow water heating ����'���"�����"���������������������>?@ [>?������\���������������������]���[^[�_"`�� {^�$"�������'�������������������������]������������������������������'�����������������������]�����������������]�����������������������
ERROR CODE CHART
LED READING CAUSE SOLUTION
HEFFEFBBFSPLSPH
Heating failureFilter failureBubble function failureWater temperaturer is lower than zero degreeWater temperature is too high
Water SanitationThe spa owner must regularly check and keep the spa water sanitized with scheduled maintenance (daily, if necessary). Adding sanitizer or other chemical will control bacteria and viruses present in the spa water. The maintenance of a proper water balance through appropriate use of sanitizers is the most important factor in maximizing the life and appearance of the spa as well as ensuring clean, healthy and safe water. Proper technique is important for water testing and treating the spa water. See your spa professional for chemical, sanitizer, test kit and testing procedures questions.
CAUTION: ����Always follow the chemical manufacturer’s direction, and the health and hazard warning. ����Do not add chemicals if the spa is occupied. This can cause skin or eye irritation. ����Concentrated chlorine solutions can damage the spa tub. Improper chemical use will void the warranty.
Maintenance of Spa Water and CartridgeProtect all the spa occupants from possible water related illness by keeping the spa water clean and sanitized. Always practice good hygiene. To ensure proper spa water quality follow these procedures:1. Inspect and clean the filter cartridge after each use, and change the filter cartridge after it works continuously 72 hours.
Unplug the spa, and plug in again. Reset the RCD/PRCD.If the spa function is still not working, contact theMSpa Service Center.
Please contact the MSpa Service Center.
Unscrew the cartridge assembly from the spa tub wall and remove the cartridge by turning it counterclockwise (Fig. 1.1)Use a garden hose to rinse off the cartridge. If the cartridge remains soiled and discolored it should be replaced. Keep spare cartridges on hand.(Fig.1.2). There are two filter cartridges from the original package, one is for use, one is spare.
��

15
Reinstall the clean or spare cartridge back onto the spa tub wall but turning it on clockwise. (Fig.1.3)�
MSpa Water Treatment kit is strongly recommended for spa use. Press the Bubble button on the spa control panel to turn on the bubble air blower and help dissolve the chemicals into the water. Never mix chemicals together. Add the chemicals to the spa water separately. Thoroughly dissolve each chemical before adding one to the water.
��
�
B0301858 MSpa Chemical Starter Kit (20 X 20g Bromine Tablets + 500ml Algaecide + Floating Dispenser)Disinfectant for water spas and pools. disinfectant, algaecide and bactericide.
B0301859 Bromine Tablets - 50 X 20g Bottle Slowly dissolve in water to provide active bromine sanitizer in the form of hypobromous acid.
B0301860 Chlorine Granules - 1Kg Bottle Adds isocyanuric acid to the spa water which resists chlorine loss from UV rays. Does not contain calcium, can be used to sanitize hard water without increasing the calcium hardness. Contains troclosene Sodium, dehydrate 100%.
B0301861 Algaecide - 1L Bottle Kills all types of algae, including green and mustard algae. Non-foaming algaecide for improving and conserving water in spas. Contains polymeric quaternary ammonium chloride 7%.
B0301862 pH Plus - 1Kg Bottle For increasing the pH in the spa water. Contains sodium Carbonate 100%.B0301863 pH Minus - 1Kg Bottle For decreasing the pH in the spa water. Contains sodium bisulphate 100%.
�
�
�
�
��
1.1 1.2 1.3
5
2. Change the spa water every 3-5 days depends on the spa use. See “Cleaning, draining and storage” section for instruction.3. Use spa chemicals to maintain proper water chemistry. Spa damage resulting from misuse of chemicals and mismanagement of spa water is not covered by the warranty. Consult with your local spa or pool retailer for more information on chemical use. 4. All occupants must shower before entering the spa.5. When spa inlet or outlet is stuck with dirt. Use the Wrench to check the problem and clean the inlet or outlet.
Water Balance Maintain the spa water pH level between 7.2 and 7.8, total alkalinity between 80 and 120ppm and free chlorine level between 3 to 5ppm. Use the *optional Test Strips to test the spa water chemistry before each use of the spa and continue to test the water no less than once a week.
The Test Strips can test the “Free Chlorine”, “pH”, and “Total Alkalinity” level at the same time:1. Dip the entire strip into the water and remove immediately2. Hold the strip level for 15 seconds. Do not shake excess water from the strip3. Compare the strip pad to the color chart on the packaging label. If necessary, adjust the chemical level in the pool waterNOTE:� Low pH will damage the spa tub and pump. Damage resulting from the chemical imbalance will void the warranty.� High pH (hard water) will result in white coagulations inside the filter pump; which may lead to pump damage.
IMPORTANT:
MSpa Water Treatment Kit MSpa Water Treatment Kit

16
DRAINAGE, CLEANING & STROAGE
1.Spa Drainage1. Turn off all the buttons (heater, filter and bubble) on the control panel unit. 2. Connect the drain valve adapter to a garden hose and point the other end of the garden hose to a suitable draining area (Fig.1.1) 3. Remove the drain valve cap from the outside of the spa tub and attach the drain valve adapter with the garden hose to the drain valve (Fig 1.2) 4. From the inside of the spa tub, open the drain valve cap, water will start following out through the garden hose (Fig 1.3)5. When the water stops draining, lift the spa tub wall from the opposite the drain, leading any remaining water to the drain and empty the spa water completely. (Fig 1.4)6. Press Bubble button to dry out any water in the piping system. Operate the bubbling function for at 15 minutes to blow out all the remaining water. (Fig 1.5)7. When the water stops draining, use a clean towel to wipe up any remaining water and moisture on the spa tub and spa control panel. (Fig. 1.6)
1.1
17
15
Spa Tub CleaningIf dirt is visible in the water or water becomes cloudy and proper water chemistry does not clear it up, change the water and clean the spa tub.
While spa water is empty, remove the cartridge from the inside of the spa tub wall, clean and /or replace the filter cartridge. Use a sponge and mild soap solution to wipe away any soil or stains on the inside of the spa wall. Rinse thoroughly before refilling with clean water. IMPROTANT: Do not use steel wool, hard brushes or abrasive cleaners.
garden hose
1.2
1.31.41.51.6

17
DISPOSAL & ENVIRONMENTAL PROTECTION
Spa Tub and Air Bladder RepairUse the enclosed repair patch to repair any puncture: 1. Clean and dry the area to be repaired thoroughly 2. Apply the glue to the PVC patch and quickly attach it onto the damaged surface. (Glue is not included)3. Smooth the surface to remove any air bubbles and allow it dry for 5-10 minutes NOTE: Glue is not included
Storage and Prepare for the Next Time Use 1. Drain and clean the spa following the “Drainage” and “Spa Cleaning” sections2. Reserve the set up instructions to deflate and disassemble the spa tub, spa control unit and air bladder 3. Make sure all the spa components and accessories are thoroughly clean and dry before storage. Air-dry the spa tub in the mild sun for an hour before folding4. Fold the spa tub loosely and avoid any sharp corners to prevent damage or leakage to the spa liner 5. Prepare new additional cartridge for next time use 6. Store the spa and accessories in a dry, temperature controlled, between 0°- 40°C (32°-104°F) storage location7. Original packaging is recommended to be used for storage
This marketing indicates this product should not be disposed with other household wastes. To prevent possible harm to the environment or human health from uncontrolled waste disposal, recycle it responsibly to promote the sustainable reuse of material resources. You can obtain information on disposal from your local authorities.
To return your used device, please use the return and collection systems or contact the retailer where the product was purchased. They can take this product for environmental safe recycling.
1 32
pin hole
TM
SUN
18
TROUBLESHOOTING
PROBLEM CAUSE SOLUTION
NO DISPLAY ON THE CONTROL PANEL
�����������������}@~`�}@~����������}@~`�}@~����������������������������������
���@�����������������}���}@~`�}@~���@�������=������]���@������@�������=������]���@����
NOT HEATING PROPERLY
���'"���������������������~����������`���`���^��������"��� failed
���������������"���������@�������=������]���@���
BUBBLE AIR BLOWER DOES NOT WORK
������"���������������������������������������������������^�����>�"����
�����������������������#���������������������@�������=������]���@�������Unplug the control box, and reset, and turn on the spa again
FILTER PUMP DOES NOT WORK
���������������������������"�������������������������������������������
���%����������������������"���~����������������������%"�����������"��������
���@��������������������@�������=������]���@���
���%�������������������"���@������������������������������������"���}�����������"�����"������������������������
SPA LOOSES AIR PRESSURE
WATER NOT CLEAN
�������]��]����������������������������������
�������������������������#�"��������������]��]����� secure, replace if necessary����������������������������������������������� seams. If there is a leak it will bubble. After you find the leak, clean and dry the leaking area, then use the repair patch comes with your spa. Check the repair section on P17
SPA HAS HOT A STRANGE SHAPE
������������������������������������
������������������������������������������� necessary
During hot weather, it recommended to check if it is necessary to release some air to avoid any possible damage to the spa pool
SPA LEAKING�����������`��������������������������� tight���~�������]��]����������������"�����
���'������������������������������������Contact MSpa Service Center, if spa is still leaking
CONTACT YOUR LOCAL MSPA DEALER FOR ANY PRODUCT RELATED QUESTIONS OR PROBLEMS.
19
MSPA LIMITED WARRANTYMSpa® has been manufactured with reliability and simplicity in mind. All products have been inspected and found free of defects prior to leaving the factory.
MSpa warrants this product against defects in material and workmanship for a period of: ONE (1) Year
The warranty period begins on the date of purchase and MSpa requires presentation of the original proof to purchase to ascertain the date. During the warranty period, MSpa will either repair or replace, at its discretion, any defective products. Replacement products or repaired parts will be warranted for only the unexpired portion of the original warranty.
Shipping PolicyConsumers are responsible for the shipping/freight when return the defect parts to MSpa authorized service center or ORPC-Oriental Recreational Products (Shanghai)Co., Ltd.
Warranty Policy����This limited warranty does not apply to any defect resulting from negligence, accident, misuse, or other reason beyond MSpa’s reasonable control, included but not limited to: normal wear and tear, negligence or failure to follow the product instructions, improper or inadequate maintenance; connection to improper power supply; chemical water damage, loss of pool water, unauthorized product modification or repair; use for commercial purpose; fire, lightening, flood or other external causes ����This warranty is valid only in the country of purchase in such countries where MSpa sells and services the same model with identical technical specifications ����Warranty service outside the country of purchase is limited to the terms and conditions of the corresponding warranty in the country of service. Where the cost of repairs or replacement is not covered by this warranty, MSpa will advise the owners and the cost shall be charged to the owner. ����This warranty only applies to the original purchaser and terminates upon any transfer of ownership. ����All repairs of which warranty claims are made must be pre-authorized by ORPC through an accredited distributor or agent provided that the defective part be returned to the distributor or agent Transportation Prepaid, if requested. ����All the authorized selling dealer is responsible for all in-field service work carried out on your MSpa product. ORPC will not be liable for results of cost of workmanship from unauthorized service person. ����Products marked with both MSpa and another producer are governed exclusively by the warranty provided by the other producer.
Warranty Registration Registration is required. Warranty Card can be only filled out by mail. All claims must be submitted to ORPC by authorized selling dealers. It is essential that all submitted claims provide all the necessary information including Customer Name, Purchase Date, Series No., Product Model, Problem, and Parts requested. Without this information the warranty will be invalid. Warranty Card must be completed and mailed to ORPC by authorized dealer within Thirty (30) days from the original purchase date.

20
Country
Belgium
Address/Tel./Fax/E-mail
ETS LA MINOUCHE S.A.Phone : +32.68.44.58.70Fax : +32.68.44.58.74E-mail : [email protected] : http://mspabelgium.comAddress : Avenue des Artisans, 35B-7822 Ghislenghien, Belgium
Country
France
Address/Tel./Fax/E-mail
MSPA Service Après-Vente [email protected] POOLSTAR FRANCE Conseils et Assistance0892 233 089 (0.34€/min)
Switzerland
GWM AGENCY MSpa ServiceRäffelstrasse 25 CH-8045 Zürich - SwitzerlandE-mail: [email protected] Hotline: 0900 455 456Fax: 044 455 50 65
Sweden
Handelshuset ABAdd: Hantverkare gatan 24444 32 StenungsundSwedenTel: +46 303 80881Fax : + 46 303 80825Email: [email protected]
Spain
PL OCIOTRENDS, S.LJijona, 19 - Apartado de Correos 42403420 Castalla (Alicante) SpainTel: +34 95 556 19 58Fax: +34 96 656 10 06E-mail: [email protected]: www.themspa.es
South Africa
MEGA MASTERNo 8, Donkerhoek, Pretoria East South [email protected] Phone NO.: +27 12 802 1515
Australia
M-Spa's AustraliaPO Box 600Somerville,Victoria 3912Service Phone NO: 1800-SPAHELPEmail: [email protected]: www.spasales.com.au
New ZealandmSpa New Zealand296 Trig Road, Whitford, AucklandHot line: 0800 mspa4u (0800 677248)Webpage: www.mspa4u.co.nz
Czech Republic&
Slovakia
Pro prodejn í a poprodejní servis v ���������� �����������������prosímkontaktujteHANSCRAFT, s.r.o.E-mail: [email protected].: +420 774 055 672
Poland
Pro-Wellness Sp. J. UL.MORAWA 48 40-353,KATOWICEPOLANDContact: MarcinTEL: +48 (32)353 0881Email: [email protected] http://www.the-mspa.pl
UK
Stour Valley Spas LtdUnit C, Woodhall House, Woodhall Business Park Sudbury, SuffolkCO10 1WHPhone: 01787882000
Norway
MSPA NORGE AS Sjøskogenveien 5 1407 Vinterbro tlf: +47 64977330email: [email protected]
Germany&
Austria
Steinbach VertriebsgmbH,Aistingerstrasse 2, 4311 Schwertberg,ÖsterreichTel. für Österreich: (0820) 200 100 150(0,145€ pro Minute aus allen Netzen)Tel. für Deutschland: (0180) 5 405 100 150(0,14€ pro Min. aus dem Festnetz,Mobilfunk max. 0,42€ / Min.)e-mail: [email protected]
®
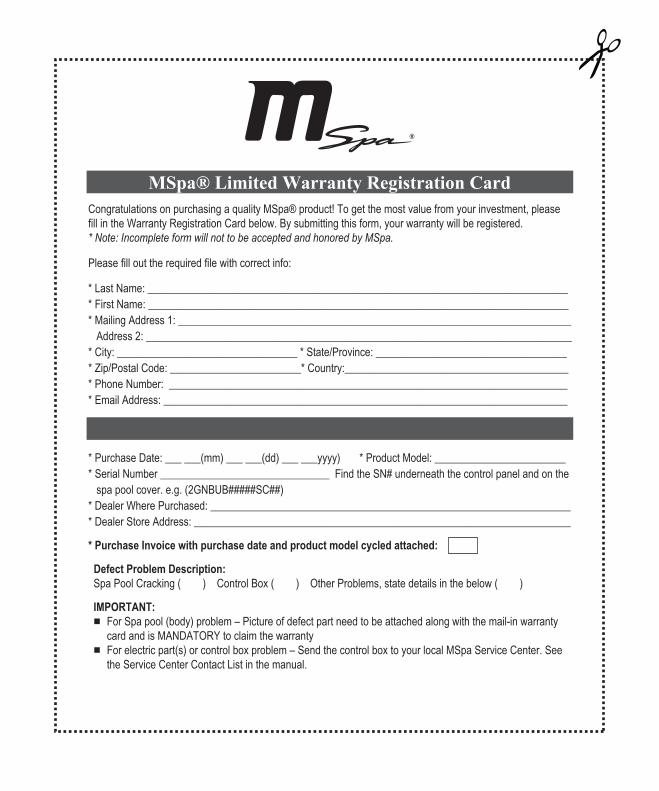
MSpa® Limited Warranty Registration CardCongratulations on purchasing a quality MSpa® product! To get the most value from your investment, please fill in the Warranty Registration Card below. By submitting this form, your warranty will be registered.* Note: Incomplete form will not to be accepted and honored by MSpa.
Please fill out the required file with correct info:
* Last Name: _____________________________________________________________________________* First Name: _____________________________________________________________________________* Mailing Address 1: ________________________________________________________________________ Address 2: ______________________________________________________________________________* City: _________________________________ * State/Province: ___________________________________* Zip/Postal Code: ________________________* Country:_________________________________________* Phone Number: _________________________________________________________________________* Email Address: __________________________________________________________________________
* Purchase Date: ___ ___(mm) ___ ___(dd) ___ ___yyyy) * Product Model: ________________________* Serial Number _______________________________ Find the SN# underneath the control panel and on the spa pool cover. e.g. (2GNBUB#####SC##)* Dealer Where Purchased: __________________________________________________________________* Dealer Store Address: _____________________________________________________________________
* Purchase Invoice with purchase date and product model cycled attached:
Defect Problem Description:Spa Pool Cracking ( ) Control Box ( ) Other Problems, state details in the below ( )
IMPORTANT:For Spa pool (body) problem – Picture of defect part need to be attached along with the mail-in warranty card and is MANDATORY to claim the warrantyFor electric part(s) or control box problem – Send the control box to your local MSpa Service Center. See the Service Center Contact List in the manual.
�
�