Embed Size (px)
Citation preview

COMMERCIAL PELLET GRILL This Grill Protected Under Patent Numbers: 4,823,684 & 4,619,209
FOR OUTDOOR USE ONLY!
OWNER’S MANUALCOM200
WARNING!DO NOT STORE OR USE NEAR GASOLINE OR OTHERFLAMMABLE OR COMBUSTABLE LIQUIDS IN THE VACINITY OFTHIS UNIT! USE ONLY TRAEGER BRAND BBQ PELLETS IN THEOPERATION OF THIS UNIT.


CONGRATULATIONS on your purchase of the Traeger COM200. With proper set-up, operation and maintenance, your Traeger grill unit will provide years of service. READ THESE INSTRUCTIONS CAREFULLY BEFORE ATTEMPTING TO ASSEMBLE THIS UNIT. SET-UP: Your Traeger COM200 comes partially assembled. You will need to complete the assembly by:
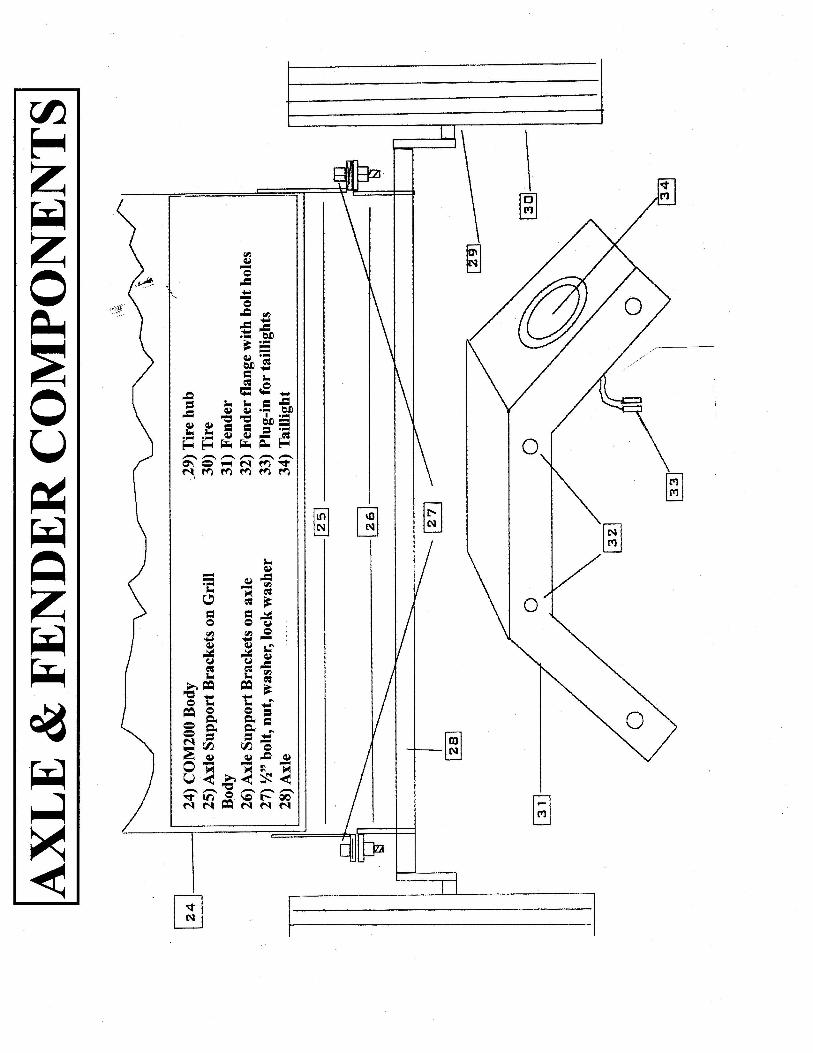
1. Uncrating the unit 2. Removing the grease drain pan (14) 3. Installing the axle (28) (see axle and fender components page) 4. Installing the trailer hitch assembly (25) 5. Installing the fenders (22) 6. Plugging in the taillights (33) 7. Installing the grease bucket 8. Attaching the wheels (30) 9. Installing the grills and baffle plate 10. Attaching the hotel pan holder
NOTE: THE ASSEMBLY OF THE COM200 IS A TWO PERSON OPERATION! Tools Required For The Assembly Process: (2) 3/4” open end wrenches or a 3/4” ratchet set (1) 7/16” nut driver or 7/16” ratchet set (1) Tire iron or lug bolt wrench (1) Claw hammer (1) Vice grips (1) Phillips screwdriver or screw-gun STEP 1 - UNCRATING THE UNIT: Remove all of the staples from around the bottom of the cardboard box that holds it to the pallet. A claw hammer and pair of vise grips works well for this task. With two people, one on each side of the box, grab hold of the bottom of the box and lift it up and over the top of the unit. The axle is secured to the shipping pallet with bolts . Remove the two bolts and move the axle to an area where you will not trip over it. Do the same thing with the trailer tongue. Roll open the front door of the COM200 and remove everything that is inside the unit. Pull-out and set aside the porcelain grills and the Drip pan and move them to a safe place where you will not accidentally step on them.

Complete a parts check to make sure all the parts are present. Spend a few minutes familiarizing yourself with the parts. The following parts should be included with your unit:
(1) Main COM200 body (1) Trailer hitch and tongue assembly (2) Tires (2) Fenders (1) Axle (1) Grease drain pan (2) Grease buckets (1) Box of bolts, nuts and assorted parts (4) Porcelain coated cooking grills
STEP 2 - INSTALLING THE TRAILER AXLE: Raise one side of the barbecue body approximately 6 inches and block in place. Then, raise the other end of the barbecue body and do the same thing to that end. This should provide you with enough room to slide the axle into place and bolt the axle support bracket (25) to the barbecue body. Bolt in place using the ½” bolts, washers and lock-washers supplied. STEP 3 – INSTALLING THE WHEELS: Using the same procedure as above, block each side the barbecue body and then bolt the wheels on to the axle with the lug nuts provided. STEP 4 – INSTALLING WHEEL FENDERS: The fenders mount over each wheel. There are four nut insert holes on each side of the barbecue body. Line up the holes in the fender with the nut inserts. Insert one of the 1/4" bolts into the fender hole (32) and bolt into place. Make sure that the taillights (34) are pointing to the rear of the barbecue. STEP 5 – INSTALLING THE WIRING: Thread the wiring through the Trailer hitch tongue assembly and attach the white wire, with the ring connector, to the hex screw installed below the hitch. STEP 6 – REMOVE COM200 OFF THE PALLET The next step is to roll the unit off the pallet. This can be done by putting a board under each wheel and rolling it off the back of the pallet. Use the trailer hitch to steer the unit. Put the jack stand down to help you move the unit.

STEP 7 – INSTALLING THE GRILLS & BAFFLE PAN Cover the Grease drain pan with heavy-duty aluminum foil, making sure you don’t block the grease drain ports (15). Apply foil starting at the back of the Grease drain pan, covering the surface completely from side to side. Assure that Grease drain ports(15) are not blocked. Overlap additional strips of foil to cover the entire Grease drip pan top surface. Using foil will make clean-up easier for you. Slide the Grease drain pan (14) back into place making sure that the grease drain ports (15) slide through the wall of the grill body. Hang the Grease buckets on the hooks above the Grease drain ports (15) THERMOSTAT CONTROL FUNCTIONS 1) L.E.D. Temperature Read-Out-- This is the temperature taken inside the barbecue by the RTD sensor (20). The temperature displayed on the L.E.D. read-out will be within 5 degrees F. (+/-) of the actual temperature inside the barbecue. 2) Temperature Dial—When you turn the dial from OFF to one of the temperature settings on the thermostat dial, the barbecue burner will start and run until it reaches the temperature where the dial is set. The unit will remain cooking at that set temperature. If you turn the dial to SMOKE on start-up, the burner will run for approximately four (4) minutes and then the barbecue will go into the SMOKE mode. SMOKE SETTING The Smoke setting is not controlled by a temperature setting. It is controlled by a time setting. The auger runs for fifteen (15) seconds and is off for sixty-five (65) seconds. This cycle will create wood smoke. The Smoke setting can also be used as a “holding” temperature of approximately 150 degrees F. AUTO-START Your COM200 has three separate burners. Each burner has a firepot with a hot rod igniter mounted directly under the auger tube. The hot rod is activated when you turn the power switch ON. The hot rod becomes cherry red hot when the unit is in ignition mode. Barbecue pellets are fed into the firepot over the top of the glowing hot rod. The heat given off by the hot rod causes the pellets to combust. After approximately four (4) minutes, the hot rod shuts off and the burners run until they reach the pre-set temperature you’ve selected on the thermostat dial. The digital temperature displayed is the temperature inside the unit where the food is cooking, plus or minus five degrees F.
IMPORTANT NOTICE! Licensing requirements vary from state to state. You should check with the appropriate licensing authorities to determine if your unit needs to be licensed as a trailer or similar licensing and/or whether it needs to be licensed if used for commercial food preparation. If required, please contact the factory for Proof of Origin certificate to assist you with the licensing of your unit.

STARTING YOUR GRILL FOR THE FIRST TIME
Roll up the door (18), remove the grills (3) and grease drain pan (14). Open the pellet hopper lid (4) and look down into the hopper to make sure there is no foreign material in the hopper or in the auger tube Rotate the rotary thermostat dial to 400 degrees F. (19) Look into the pellet hopper and confirm that the augers are turning. The draft inducer fans should also be running. (Place your hand over the firepots to feel for air blowing.) By looking into the firepots, you should be able to watch the hotrods turn red-in approximately one minute. (UNDER NO CIRCUMSTANCES SHOULD YOU ATTEMPT TO TOUCH THE HOT RODS WHILE THE UNIT IS TURNED ON OR HOT! You could sustain severe burns ) Rotate the dial to “off”. If you do not see or hear the fans running, IMMEDIATELY turn the thermostat dial to “off” and look under the grill. Locate the fan blades on the BBQ drive motors and muffin fans and make sure the various wires under the barbecue are not blocking the fan blades. With the power turned “off” and the unit un-plugged from the electrical outlet, gently turn the fan blades two or three times with your finger. After rotating the fan blades, plug the unit back into the outlet, turn the power switch on and check the fans for proper operation. Fill the pellet hopper (4) with Traeger brand Barbecue Pellets. Rotate the thermostat dial (19) to 450 degrees F. The augers (10) will begin transferring the barbecue pellets into the firepots (12). When you begin to see the pellets dropping into the firepots, turn the thermostat dial to “off”. Now, turn the unit back “on” and wait for the pellets to ignite. This will take approximately five (5) minutes. Turn the thermostat dial to “off” after the pellets ignite. Replace the grease pan (14) and grills (3) into their correct positions. Turn the power switch “on”. Set the temperature dial to 350 degrees F. The pellets should begin to ignite and the barbecue should reach the set temperature and continue to run. Visually assure that all 3 of the firepots ignite. NOTE: Before cooking on your COM200 for the very first time, you will need to season the unit. Fill the hopper with Traeger Barbecue Pellets. Set the temperature dial to 400 degrees F, and run the unit for one hour. We recommend that you lightly coat the cooking grills with vegetable or olive oil before cooking on them for the first time. The grills should be oiled on a regular basis to help keep food from sticking to them.

OPERATING TIPS
Your COM200 should never be moved when it is hot. If you are transporting your grill after cooking on it, make sure the fire is completely out and the unit is completely cold before moving it. NEVER put water in the firepots this will jam the augers. The COM200 is designed to operate with the DOOR CLOSED. Cooking with the door open will dramatically lengthen your cooking time. NEVER add pellets by hand to a hot firepot. This is dangerous and you may get seriously burned. If you run out of fuel and lose your fire while cooking, let the unit completely cool and start all over again with auto-start or manual lighting procedure. After starting the grill, make sure the baffle plate (13) is properly seated in its support brackets. If not seated properly, direct heat and flame could come up out of the firepot and cause a grease fire in your grill. When estimating cooking times, remember that the outside temperature will dramatically alter your cooking times. If it is hot outside, it will take less time for food to cook. If it is cold, wet or windy, it will take longer for food to cook. Grease fires are caused by not properly maintaining your grill, or failing to clean your angled drip pan on a consistent basis. In the unlikely event you experience as grease fire while cooking, keep the lid closed. Never open the cooking chamber lid during a grease fire. If it does not go out, lightly sprinkle baking soda on the fire. Be careful not to burn yourself. If this does not work, then carefully remove the food from the unit (being careful not to burn yourself), turn the power switch off and shut the lid until the fire is completely out. When completely cool, remove the grill, replace the foil on the drip pan, reset the drip pan and cooking grill and resume cooking your food.

MAINTAINING YOUR TRAEGER GRILL
Change the aluminum foil on the drip pans after every use. On a regular basis, clean the grease off the baffle pan, interior surfaces and grease drain port. It is easier to clean off the accumulated grease while the grill is warm. Be careful to not burn yourself. If grease is allowed to build up in the grease drain pan, a grease fire may result! We recommend checking your pan and the grease catcher on a daily basis. Outside surfaces should be cleaned ONLY with mild soap and warm water. NEVER use abrasive cleaning pads, abrasive cleaners or oven clean on the exterior of your Grill If the unit is stored outdoors during the rainy season, make sure that water does not get into the pellet hopper. When wood pellets become wet or damp, they greatly expand and will jam your auger. We recommend that you use a tarp and bungee cords to keep the grill covered when not in use. Put the tarp over the grill ONLY WHEN IT IS COLD! Spare Parts: Your COM200 is one of the most reliable cooking appliances that you will ever use. Because you cannot run down to the hardware store to pick up spare parts for your unit, it is recommended that you have spare parts available. Traeger Industries recommends that you purchase an extra hot rod (11), auger motor (7), combustion blower (9) for emergency repairs. It is cheap insurance. On a weekly basis, vacuum out the pellet ash which has accumulated in the firepots and under the baffle pan. Make sure the fire in the firepots is COMPLETELY OUT before you vacuum up the ash. We recommend that you keep a long-handled grill brush near the grill. Use it to clean the porcelain coated cooking grills (3) immediately after removing the food from the unit. A quick brushing takes only a couple of minutes and will ensure that your COM 200 is ready for the next use. Be careful not to burn yourself when brushing the grills. Check the grease reservoirs daily and dispose of the accumulated grease accordingly. If you need to repaint the exterior of your grill, you may purchase matching paint from Traeger Industries. (see parts section).

PARTS AND SERVICE Part names are given in the front of this manual on the COMPONENT DIAGRAM PAGE. To order parts: Find the part name on the component diagram page. Call or write your Authorized Traeger Commercial reseller, distributor or Traeger Pellet Grills. Please provide your name, phone number, address, model and serial number of your unit.vTo order parts directly from the factory, contact:
PARTS DEPARTMENT TRAEGER PELLET GRILLS, LLC PO BOX 829, Mt.Angel, OR 97362 (503) 845-9234 1-800-872-3437 Fax: (503) 845-6366 Email: [email protected] Website: www.traegercommercial.com