Embed Size (px)
Citation preview

OWNER’S MANUALASSEMBLY & OPERATING INSTRUCTIONS
Deluxe Outdoor Charcoal/Wood Smoker & Grill™
WARNINGREAD AND FOLLOW ALL WARNINGS AND
INSTRUCTIONS IN THIS MANUAL TO AVOIDPERSONAL INJURY OR PROPERTY DAMAGE.

IMPORTANT SAFEGUARDSWE WANT YOU TO ASSEMBLE AND USE YOUR SMOKER AS SAFELY AS POSSIBLE.
THE PURPOSE OF THIS SAFETY ALERT SYMBOLIS TO ATTRACT YOUR ATTENTION TO POSSIBLE HAZARDS AS YOU ASSEMBLE AND USE YOUR SMOKER.
WHEN YOU SEE THE SAFETY ALERT SYMBOL, PAY CLOSE ATTENTION TO THE INFORMATION WHICH FOLLOWS!
READ ALL SAFETY WARNINGS AND INSTRUCTIONS CAREFULLYBEFORE ASSEMBLING AND OPERATING YOUR SMOKER.
1
WARNING• Only use this smoker on a hard, level, noncombustible, stable surface (concrete, ground, etc.) capable of supporting the weight of
the smoker. Never use on wooden or other surfaces that could burn.
• Proper clearance of 10 feet between the smoker and combustible material (bushes, trees, wooden decks, fences, buildings, etc.)or construction should be maintained at all times when smoker is in use. Do not place smoker under a roof overhang or otherenclosed area.
• For household use only. Do not use this smoker for other than its intended purpose.
• For outdoor use only. Do not operate smoker indoors or in an enclosed area.
• Use caution when assembling and operating your smoker to avoid scrapes or cuts from sharp edges of metal parts.
• We recommend the use of a Charcoal Chimney Starter to avoid the dangers associated with charcoal lighting fluid. If you chooseto use charcoal lighting fluid, only use lighting fluid approved for lighting charcoal. Carefully read manufacturer’s warnings andinstructions on the charcoal lighting fluid and charcoal prior to the use of their product. Store charcoal lighting fluid safely awayfrom smoker.
• When using charcoal lighting fluid, allow charcoal to burn with smoker lids and dampers open until covered with a light ash(approximately 20 minutes). This will allow charcoal lighting fluid to burn off. Failure to do this could trap fumes from charcoallighting fluid in smoker and may result in a flash fire or explosion when lid is opened.
• Never use charcoal that has been pre-treated with lighter fluid. Use only a high grade plain charcoal or charcoal/wood mixture.
• Do not use gasoline, kerosene or alcohol for lighting charcoal. Use of any of these or similar products will cause an explosionpossibly leading to severe bodily injury.
• Never add charcoal lighting fluid to hot or even warm coals as flashback may occur causing severe burns.
• Never add charcoal and/or wood through firebox side door or firebox air vent.
• Do not place glass, plastic or other containers that will break or melt on hot warming tray. Only use metal or oven-safe cookwareon warming tray.
• The warming tray and firebox lid will be extremely hot during use. Use caution and always wear oven mitts/gloves to protect yourhands from burns when handling cookware on warming tray.
• Place smoker in an area where children and pets cannot come into contact with unit. Close supervision is necessary when smokeris in use.
• Do not leave smoker unattended when in use.
• When adding charcoal and/or wood, use extreme caution and follow instructions in “Adding Charcoal/Wood During Cooking”section of this manual.
• Never move smoker when it is in use or when it contains hot coals or ashes.
• Do not store or use smoker near gasoline or other flammable liquids, gases or where flammable vapors may be present.
• When grilling in the large cooking chamber, grease hole should be closed with the ash-guard shield to contain ashes and embers.When smoking, grease hole should be open to allow grease to drip into a metal bucket or tin can. Whether smoking or grilling, ametal bucket or tin can must be kept under the grease hole at all times to catch grease drippings and or hot embers.
2
WARNING
• Check grease and/or ash level in metal bucket or tin can often and empty or change when w full. Use extreme caution as thesmoker, metal bucket or tin can and its contents will be hot.
• When grilling, grease from meat may drip into the charcoal and cause a grease fire. If this should happen close lid, air vent anddamper to suffocate the flame. Do not use water to extinguish grease fires.
• Use caution since flames can flare-up when fresh air suddenly comes in contact with fire. When opening the lids, keep hands,face and body a safe distance from hot steam and flame flare-ups.
• Do not exceed a temperature of 400°F in cooking chamber. Do not allow charcoal and/or wood to rest on the walls of the fireboxand cooking chamber. Doing so will greatly reduce the life of the metal and finish of your smoker.
• Do not wear loose clothing or allow hair to hang freely while using smoker.
• Use caution when reaching into or under smoker. Always wear oven mitts or gloves to protect your hands from burns. Avoidtouching hot surfaces.
• When opening lid, make sure it is pushed all the way back so it rests against the lid support bracket. If lid is not resting againstthe bracket, it could fall back to a closed position and cause bodily injury.
• In windy weather, place smoker in an outdoor area that is protected from the wind.
• Close lids and all dampers to suffocate flame.
• Never leave coals and ashes in smoker unattended. Before smoker can be left unattended, remaining coals and ashes must beremoved from smoker. Use caution to protect yourself and property. Carefully place remaining coals and ashes in anoncombustible metal container and saturate completely with water. Allow coals and water to remain in metal container 24 hoursprior to disposing.
• Extinguished coals and ashes should be placed a safe distance from all structures and combustible materials.
• With a garden hose, completely wet the surface beneath and around smoker to extinguish any ashes, coals or embers which mayhave fallen during the cooking or cleaning process.
• After each use, clean the smoker thoroughly and reapply a light coat of oil to interior to prevent rusting. Cover the smoker toprotect it from the weather.
• Use caution when lifting or moving smoker to prevent strains and back injuries.
• We advise that a fire extinguisher be on hand. Refer to your local authority to determine proper size and type of fire extinguisher.
• Accessory attachments not manufactured by The Brinkmann Corporation for this particular product are not recommended andmay lead to personal injury or property damage.
• Store the smoker out of reach of children and in a dry location when not in use.
• Do not attempt to service smoker other than normal maintenance as explained in “After-Use Safety” and “Proper Care &Maintenance” sections on page 16 of this manual. Repairs should be performed by The Brinkmann Corporation only.
• Properly dispose of all packaging material.
USE CAUTION AND COMMON SENSE WHEN OPERATING YOUR SMOKER.
FAILURE TO ADHERE TO SAFETY WARNINGS AND GUIDELINES IN THIS MANUAL COULD RESULTIN BODILY INJURY OR PROPERTY DAMAGE.
SAVE THIS MANUAL FOR FUTURE REFERENCE.
ASSEMBLY INSTRUCTIONSREAD ALL SAFETY WARNINGS & ASSEMBLY INSTRUCTIONS CAREFULLY
BEFORE ASSEMBLING OR OPERATING YOUR SMOKER.
FOR MISSING PARTS, PLEASE CALL CUSTOMER SERVICE AT 1-800-527-0717.(Proof of purchase will be required.)
3
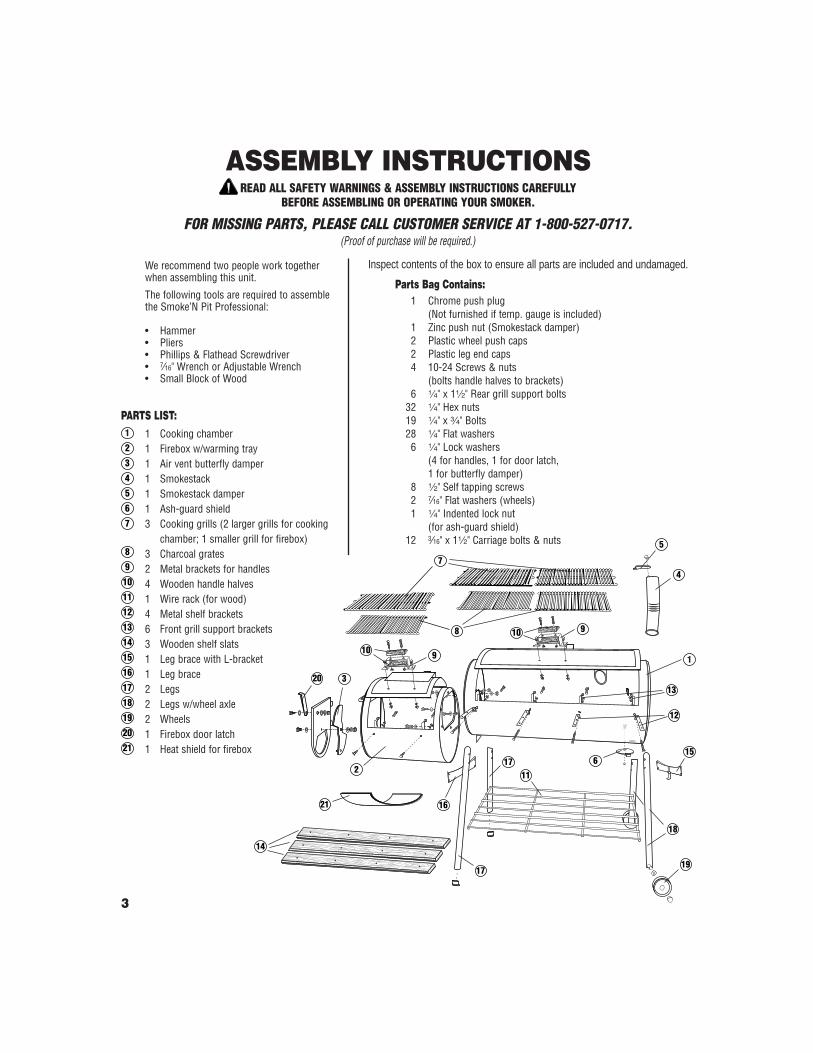
We recommend two people work togetherwhen assembling this unit.
The following tools are required to assemblethe Smoke’N Pit Professional:
• Hammer• Pliers• Phillips & Flathead Screwdriver• 7⁄16" Wrench or Adjustable Wrench• Small Block of Wood
Inspect contents of the box to ensure all parts are included and undamaged.
Parts Bag Contains:1 Chrome push plug
(Not furnished if temp. gauge is included)1 Zinc push nut (Smokestack damper)2 Plastic wheel push caps2 Plastic leg end caps4 10-24 Screws & nuts
(bolts handle halves to brackets)6 4" x 12" Rear grill support bolts
32 4" Hex nuts19 4" x w" Bolts28 4" Flat washers6 4" Lock washers
(4 for handles, 1 for door latch,1 for butterfly damper)
8 2" Self tapping screws2 7⁄16" Flat washers (wheels)1 4" Indented lock nut
(for ash-guard shield)12 3⁄16" x 12" Carriage bolts & nuts
1
2
3
4
5
6
7
8
9
10
11
12
13
14
15
16
17
18
19
20
21
9
10
17
PARTS LIST:1 Cooking chamber1 Firebox w/warming tray1 Air vent butterfly damper1 Smokestack1 Smokestack damper1 Ash-guard shield3 Cooking grills (2 larger grills for cooking
chamber; 1 smaller grill for firebox)3 Charcoal grates2 Metal brackets for handles4 Wooden handle halves1 Wire rack (for wood)4 Metal shelf brackets6 Front grill support brackets3 Wooden shelf slats1 Leg brace with L-bracket1 Leg brace2 Legs2 Legs w/wheel axle2 Wheels1 Firebox door latch1 Heat shield for firebox
1
2
3
4
5
6
7
8
9
10
11
12
13
14
15
16
17
18
19
20
21
4
Ash-GuardShield
Grease Hole
Leg w/o Axle
Wire Rack
CookingChamber
4" Flat Washer4" Hex Nut
Top View
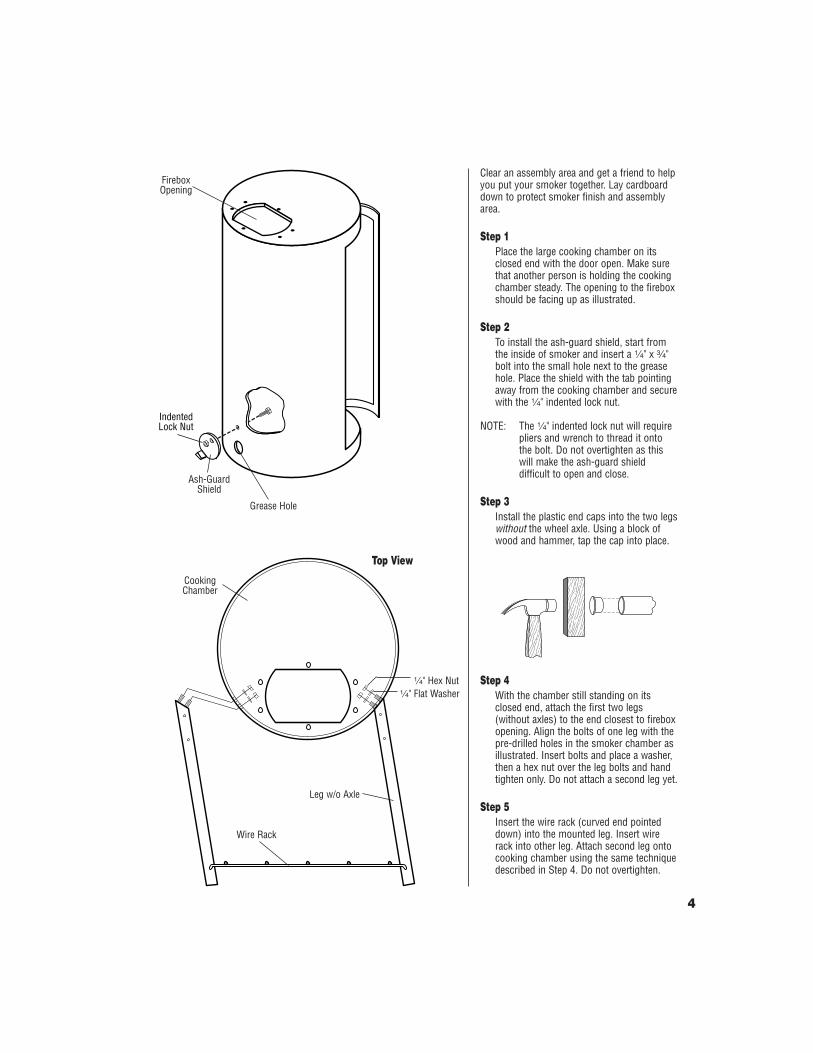
Clear an assembly area and get a friend to helpyou put your smoker together. Lay cardboarddown to protect smoker finish and assemblyarea.
Step 1Place the large cooking chamber on itsclosed end with the door open. Make surethat another person is holding the cookingchamber steady. The opening to the fireboxshould be facing up as illustrated.
Step 2To install the ash-guard shield, start fromthe inside of smoker and insert a 4" x w"bolt into the small hole next to the greasehole. Place the shield with the tab pointingaway from the cooking chamber and securewith the 4" indented lock nut.
NOTE: The 4" indented lock nut will requirepliers and wrench to thread it ontothe bolt. Do not overtighten as thiswill make the ash-guard shielddifficult to open and close.
Step 3Install the plastic end caps into the two legswithout the wheel axle. Using a block ofwood and hammer, tap the cap into place.
Step 4With the chamber still standing on itsclosed end, attach the first two legs(without axles) to the end closest to fireboxopening. Align the bolts of one leg with thepre-drilled holes in the smoker chamber asillustrated. Insert bolts and place a washer,then a hex nut over the leg bolts and handtighten only. Do not attach a second leg yet.
Step 5Insert the wire rack (curved end pointeddown) into the mounted leg. Insert wirerack into other leg. Attach second leg ontocooking chamber using the same techniquedescribed in Step 4. Do not overtighten.
FireboxOpening
IndentedLock Nut
5
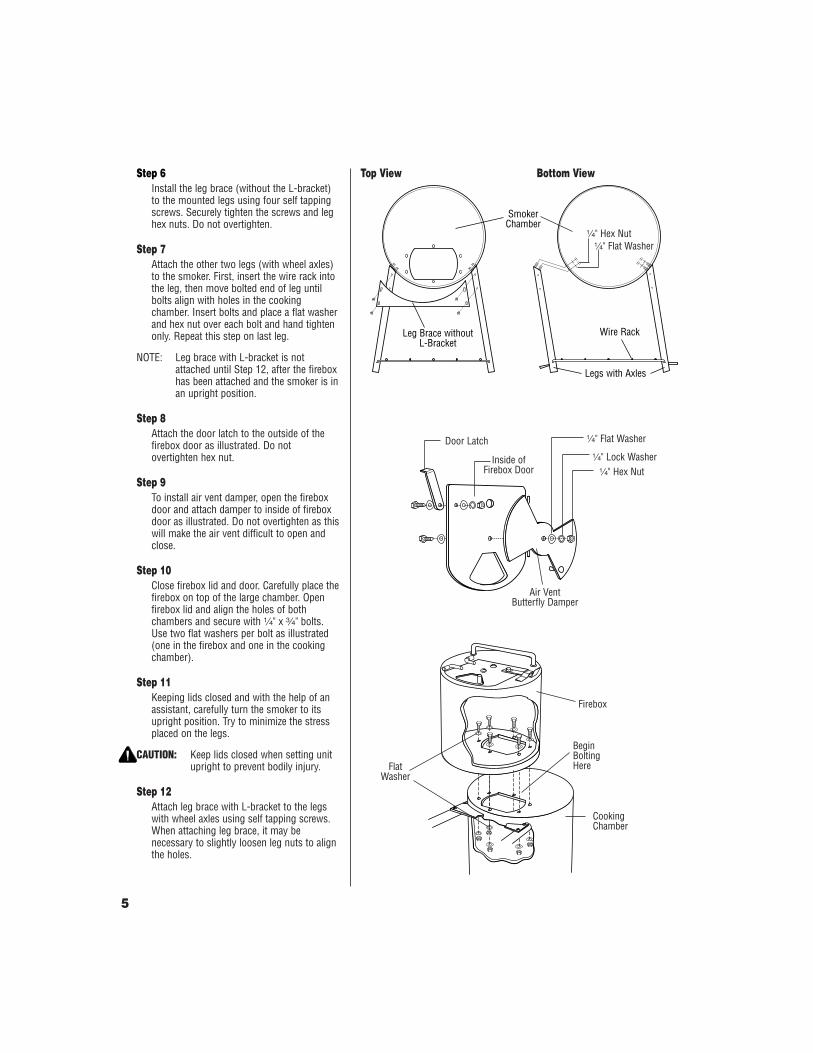
Step 6Install the leg brace (without the L-bracket)to the mounted legs using four self tappingscrews. Securely tighten the screws and leghex nuts. Do not overtighten.
Step 7Attach the other two legs (with wheel axles)to the smoker. First, insert the wire rack intothe leg, then move bolted end of leg untilbolts align with holes in the cookingchamber. Insert bolts and place a flat washerand hex nut over each bolt and hand tightenonly. Repeat this step on last leg.
NOTE: Leg brace with L-bracket is notattached until Step 12, after the fireboxhas been attached and the smoker is inan upright position.
Step 8Attach the door latch to the outside of thefirebox door as illustrated. Do notovertighten hex nut.
Step 9To install air vent damper, open the fireboxdoor and attach damper to inside of fireboxdoor as illustrated. Do not overtighten as thiswill make the air vent difficult to open andclose.
Step 10Close firebox lid and door. Carefully place thefirebox on top of the large chamber. Openfirebox lid and align the holes of bothchambers and secure with 4" x w" bolts.Use two flat washers per bolt as illustrated(one in the firebox and one in the cookingchamber).
Step 11Keeping lids closed and with the help of anassistant, carefully turn the smoker to itsupright position. Try to minimize the stressplaced on the legs.
CAUTION: Keep lids closed when setting unitupright to prevent bodily injury.
Step 12Attach leg brace with L-bracket to the legswith wheel axles using self tapping screws.When attaching leg brace, it may benecessary to slightly loosen leg nuts to alignthe holes.
CookingChamber
BeginBoltingHere
Firebox
4" Hex Nut
4" Flat WasherDoor Latch
Air VentButterfly Damper
4" Lock Washer
Leg Brace withoutL-Bracket
SmokerChamber
Wire Rack
Legs with Axles
Top View Bottom View
Inside ofFirebox Door
FlatWasher
4" Hex Nut4" Flat Washer
6
Smokestack
Damper
Smokestack
ZincPush Nut
Smokestack Pilot(to tighten the fit, spread slit
with large screwdriver).
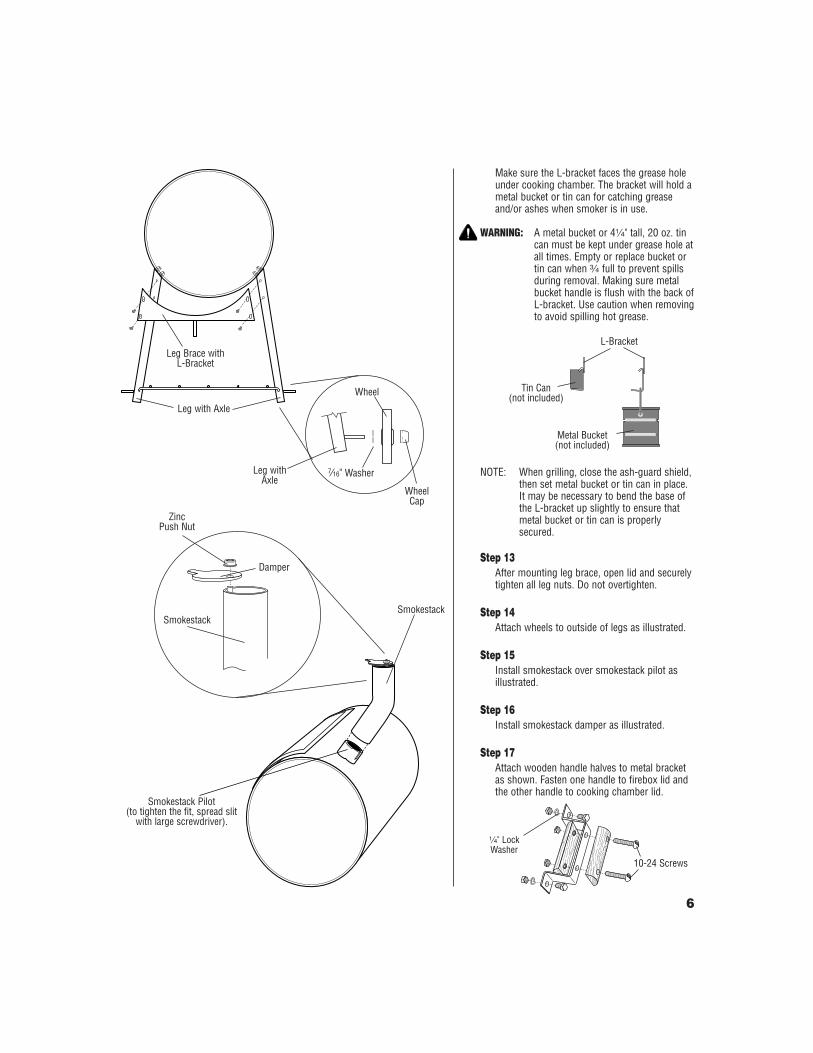
Make sure the L-bracket faces the grease holeunder cooking chamber. The bracket will hold ametal bucket or tin can for catching greaseand/or ashes when smoker is in use.
WARNING: A metal bucket or 44" tall, 20 oz. tincan must be kept under grease hole atall times. Empty or replace bucket ortin can when w full to prevent spillsduring removal. Making sure metalbucket handle is flush with the back ofL-bracket. Use caution when removingto avoid spilling hot grease.
NOTE: When grilling, close the ash-guard shield,then set metal bucket or tin can in place.It may be necessary to bend the base ofthe L-bracket up slightly to ensure thatmetal bucket or tin can is properlysecured.
Step 13After mounting leg brace, open lid and securelytighten all leg nuts. Do not overtighten.
Step 14Attach wheels to outside of legs as illustrated.
Step 15Install smokestack over smokestack pilot asillustrated.
Step 16Install smokestack damper as illustrated.
Step 17Attach wooden handle halves to metal bracketas shown. Fasten one handle to firebox lid andthe other handle to cooking chamber lid.
7⁄16" Washer
Wheel
WheelCap
Leg Brace withL-Bracket
Leg with Axle
Leg withAxle
Tin Can (not included)
Metal Bucket (not included)
L-Bracket
4" LockWasher
10-24 Screws
7
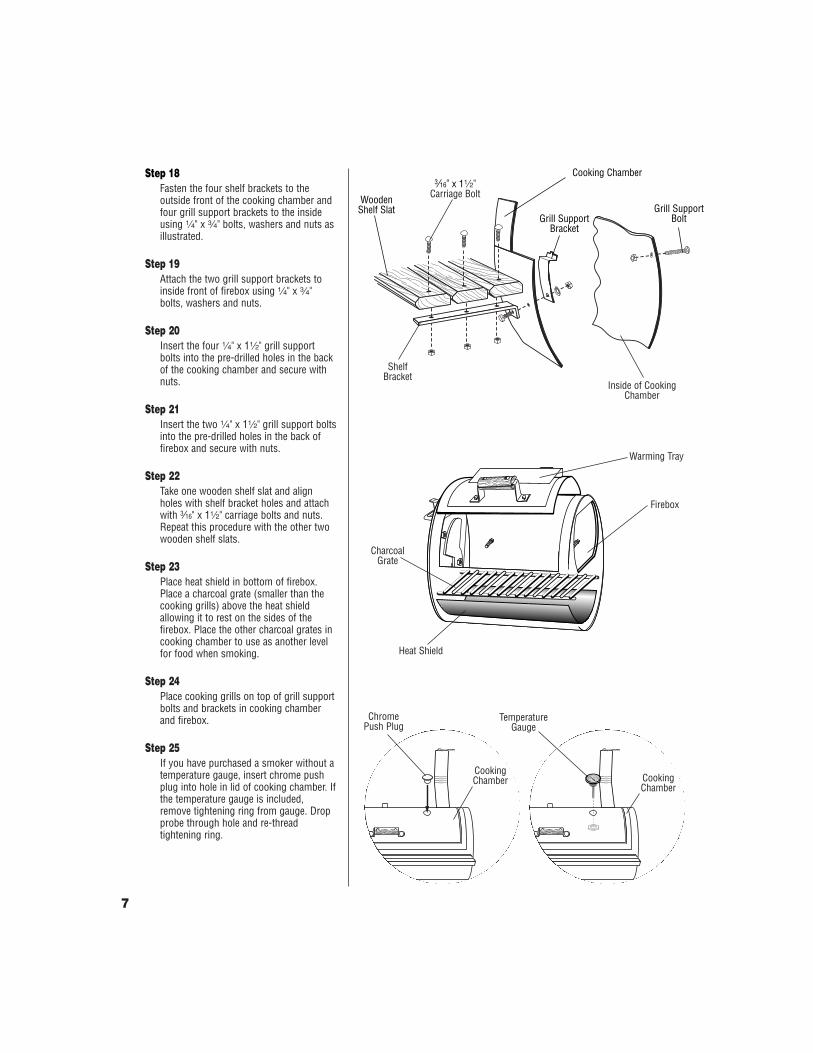
Step 18Fasten the four shelf brackets to theoutside front of the cooking chamber andfour grill support brackets to the insideusing 4" x w" bolts, washers and nuts asillustrated.
Step 19Attach the two grill support brackets toinside front of firebox using 4" x w"bolts, washers and nuts.
Step 20Insert the four 4" x 12" grill supportbolts into the pre-drilled holes in the backof the cooking chamber and secure withnuts.
Step 21Insert the two 4" x 12" grill support boltsinto the pre-drilled holes in the back offirebox and secure with nuts.
Step 22Take one wooden shelf slat and alignholes with shelf bracket holes and attachwith 3⁄16" x 12" carriage bolts and nuts.Repeat this procedure with the other twowooden shelf slats.
Step 23Place heat shield in bottom of firebox.Place a charcoal grate (smaller than thecooking grills) above the heat shieldallowing it to rest on the sides of thefirebox. Place the other charcoal grates incooking chamber to use as another levelfor food when smoking.
Step 24Place cooking grills on top of grill supportbolts and brackets in cooking chamberand firebox.
Step 25If you have purchased a smoker without atemperature gauge, insert chrome pushplug into hole in lid of cooking chamber. Ifthe temperature gauge is included,remove tightening ring from gauge. Dropprobe through hole and re-threadtightening ring.
CookingChamber
CookingChamber
ChromePush Plug
TemperatureGauge
Cooking Chamber
Grill SupportBracket
Grill SupportBolt
WoodenShelf Slat
3⁄16" x 12" Carriage Bolt
ShelfBracket
Inside of CookingChamber
Firebox
CharcoalGrate
Heat Shield
Warming Tray
8
PREPARATION FOR USE& LIGHTING INSTRUCTIONS
PLACE THE SMOKER OUTDOORS ON A HARD, LEVEL, NON-COMBUSTIBLE SURFACEAWAY FROM ROOF OVERHANG OR ANY COMBUSTIBLE MATERIAL. NEVER USE ON WOODEN OR OTHER SURFACES THAT
COULD BURN. PLACE THE SMOKER AWAY FROM OPEN WINDOWS OR DOORS TO PREVENT SMOKE FROM ENTERING YOURHOUSE. IN WINDY WEATHER, PLACE THE SMOKER IN AN OUTDOOR AREA THAT IS PROTECTED FROM THE WIND.
READ ALL SAFETY WARNINGS AND INSTRUCTIONS CAREFULLYBEFORE OPERATING YOUR SMOKER.
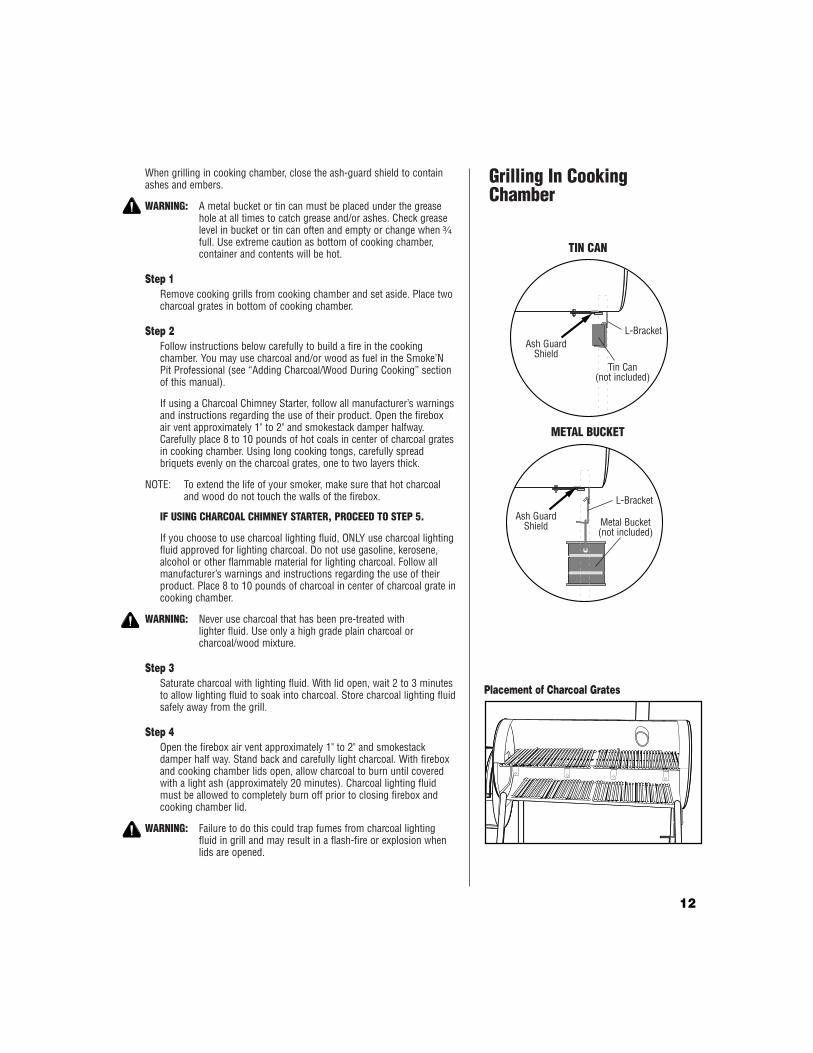
TIN CAN
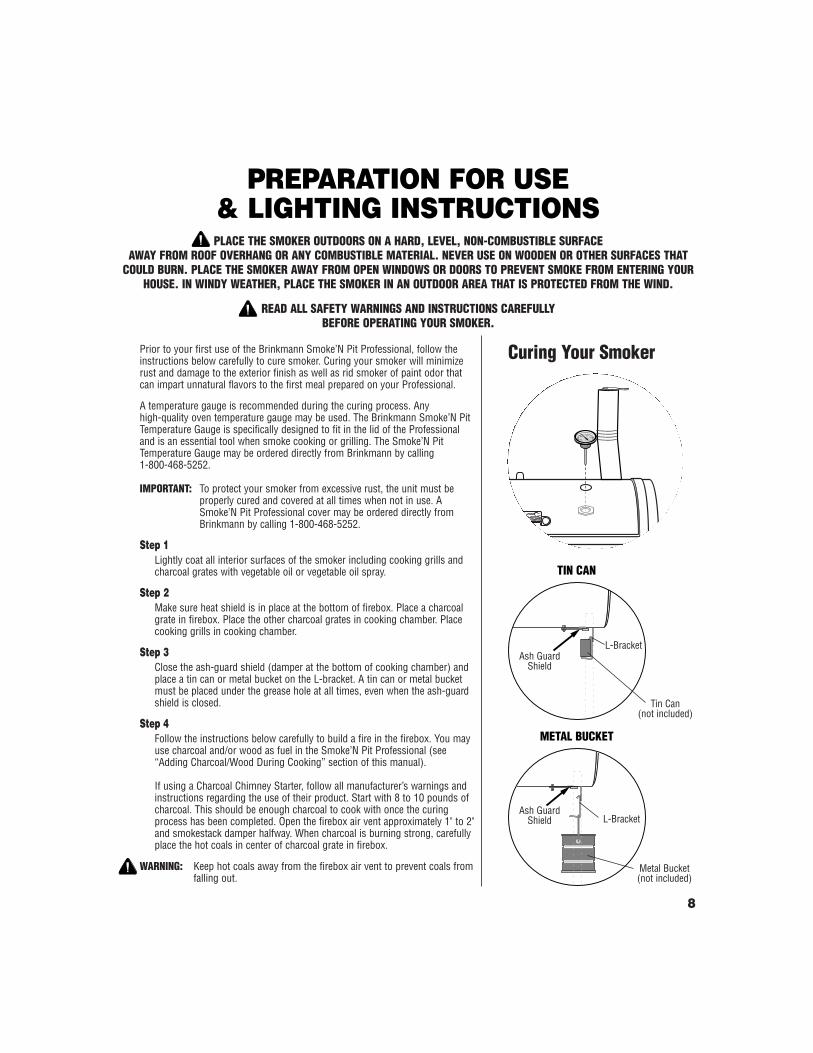
Prior to your first use of the Brinkmann Smoke’N Pit Professional, follow the instructions below carefully to cure smoker. Curing your smoker will minimizerust and damage to the exterior finish as well as rid smoker of paint odor thatcan impart unnatural flavors to the first meal prepared on your Professional.
A temperature gauge is recommended during the curing process. Any high-quality oven temperature gauge may be used. The Brinkmann Smoke’N PitTemperature Gauge is specifically designed to fit in the lid of the Professionaland is an essential tool when smoke cooking or grilling. The Smoke’N PitTemperature Gauge may be ordered directly from Brinkmann by calling 1-800-468-5252.
IMPORTANT: To protect your smoker from excessive rust, the unit must beproperly cured and covered at all times when not in use. ASmoke’N Pit Professional cover may be ordered directly fromBrinkmann by calling 1-800-468-5252.
Step 1Lightly coat all interior surfaces of the smoker including cooking grills andcharcoal grates with vegetable oil or vegetable oil spray.
Step 2Make sure heat shield is in place at the bottom of firebox. Place a charcoalgrate in firebox. Place the other charcoal grates in cooking chamber. Placecooking grills in cooking chamber.
Step 3Close the ash-guard shield (damper at the bottom of cooking chamber) andplace a tin can or metal bucket on the L-bracket. A tin can or metal bucketmust be placed under the grease hole at all times, even when the ash-guardshield is closed.
Step 4Follow the instructions below carefully to build a fire in the firebox. You mayuse charcoal and/or wood as fuel in the Smoke’N Pit Professional (see“Adding Charcoal/Wood During Cooking” section of this manual).
If using a Charcoal Chimney Starter, follow all manufacturer’s warnings andinstructions regarding the use of their product. Start with 8 to 10 pounds ofcharcoal. This should be enough charcoal to cook with once the curingprocess has been completed. Open the firebox air vent approximately 1" to 2"and smokestack damper halfway. When charcoal is burning strong, carefullyplace the hot coals in center of charcoal grate in firebox.
WARNING: Keep hot coals away from the firebox air vent to prevent coals fromfalling out.
Curing Your Smoker
METAL BUCKET
Ash GuardShield L-Bracket
Metal Bucket (not included)
Ash GuardShield
L-Bracket
Tin Can (not included)
9
NOTE: To extend the life of your smoker, make sure that hot coals andwood do not touch the walls of the firebox.
IF USING CHARCOAL CHIMNEY STARTER, PROCEED TO STEP 7.
If you choose to use charcoal lighting fluid, ONLY use charcoal light-ing fluid approved for lighting charcoal. Do not use gasoline,kerosene, alcohol or other flammable material for lighting charcoal.Follow all manufacturer’s warnings and instructions regarding the useof their product. Start with 8 to 10 pounds of charcoal. This shouldbe enough charcoal to cook with, once the curing process has beencompleted. Place the charcoal in center of charcoal grate in firebox.
WARNING: Never use charcoal that has been pre-treated with lighter fluid. Use only a high grade plain charcoal orcharcoal/wood mixture.
Step 5Saturate charcoal with lighting fluid. With lid open, wait 2 to 3minutes to allow lighting fluid to soak into charcoal. Store charcoallighting fluid safely away from the smoker.
Step 6Open the firebox air vent approximately 1" to 2" and smokestackdamper half way. With firebox lid open, stand back and carefully lightcharcoal and allow to burn until covered with a light ash (approximately 20 minutes). Charcoal lighting fluid must be allowed to completely burn off prior to closing firebox lid.
WARNING: Failure to do this could trap fumes from charcoal lightingfluid in smoker and may result in a flash-fire or explosionwhen lid is opened.
Step 7With coals burning strong in the firebox, close the lid. Use a temperature gauge to monitor temperature. A temperature ofapproximately 250°F in the cooking chamber is desired. Maintain thistemperature for 1 to 2 hours.
Step 8Increase the temperature to approximately 350°F to 400°F. This canbe achieved by opening the firebox air vent and smokestack damperand adding more charcoal and/or wood (see “Adding Charcoal/WoodDuring Cooking” section of this manual). Maintain this temperaturefor 1 hour then allow unit to cool completely.
NOTE: Never exceed a temperature of 400°F in cooking chamber. It isimportant that the exterior of the smoker is not scraped orrubbed during the curing process.
IMPORTANT: Cure your smoker periodically throughout the year toprotect against excessive rust.
YOUR SMOKE’N PIT PROFESSIONAL IS NOW CUREDAND READY FOR USE.
10
When smoking, open the ash-guard shield to allow grease to drain.
WARNING: A metal bucket or tin can must be placed under the greasehole at all times to catch grease and/or ashes. Check greaselevel in bucket or tin can often and empty or change when w full. Use extreme caution as bottom of cooking chamber,container and contents will be hot.
Step 1Make sure heat shield is in place at the bottom of firebox. Place acharcoal grate in firebox. Store the other charcoal grates or place incooking chamber for food if desired. Place cooking grills in cookingchamber on low or middle cooking level.
Step 2Follow instructions below carefully to build a fire in the firebox. You may use charcoal and/or wood as fuel in the Smoke’N Pit Professional(see “Adding Charcoal/Wood During Cooking” section of this manual).
If using a Charcoal Chimney Starter, follow all manufacturer’s warningsand instructions regarding the use of their product. Open the fireboxair vent approximately 1" to 2" and smokestack damper halfway.Carefully place 8 to 10 pounds of hot coals in center of charcoal gratein firebox.
WARNING: Keep hot coals away from the firebox air vent to preventcoals from falling out.
NOTE: To extend the life of your smoker, make sure that hot charcoaland wood do not touch the walls of the firebox.
IF USING CHARCOAL CHIMNEY STARTER, PROCEED TO STEP 5.
If you choose to use charcoal lighting fluid, ONLY use charcoal lighting fluid approved for lighting charcoal. Do not use gasoline,kerosene, alcohol or other flammable material for lighting charcoal.Follow all manufacturer’s warnings and instructions regarding theuse of their product. Place 8 to 10 pounds of charcoal in center ofcharcoal grate in firebox.
WARNING: Never use charcoal that has been pre-treated with lighter fluid. Use only a high grade plain charcoal orcharcoal/wood mixture.
Step 3Saturate charcoal with lighting fluid. With lid open, wait 2 to 3 minutesto allow lighting fluid to soak into charcoal. Store charcoal lighting fluidsafely away from the smoker.
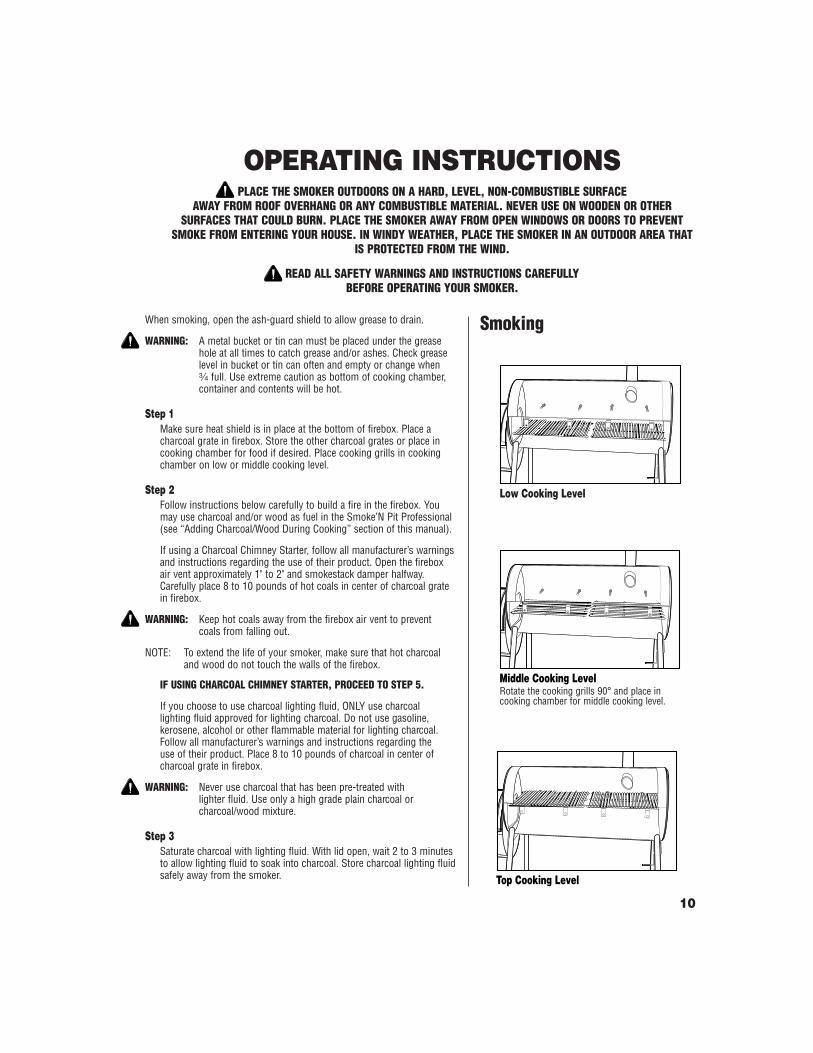
Smoking
Low Cooking Level
Top Cooking Level
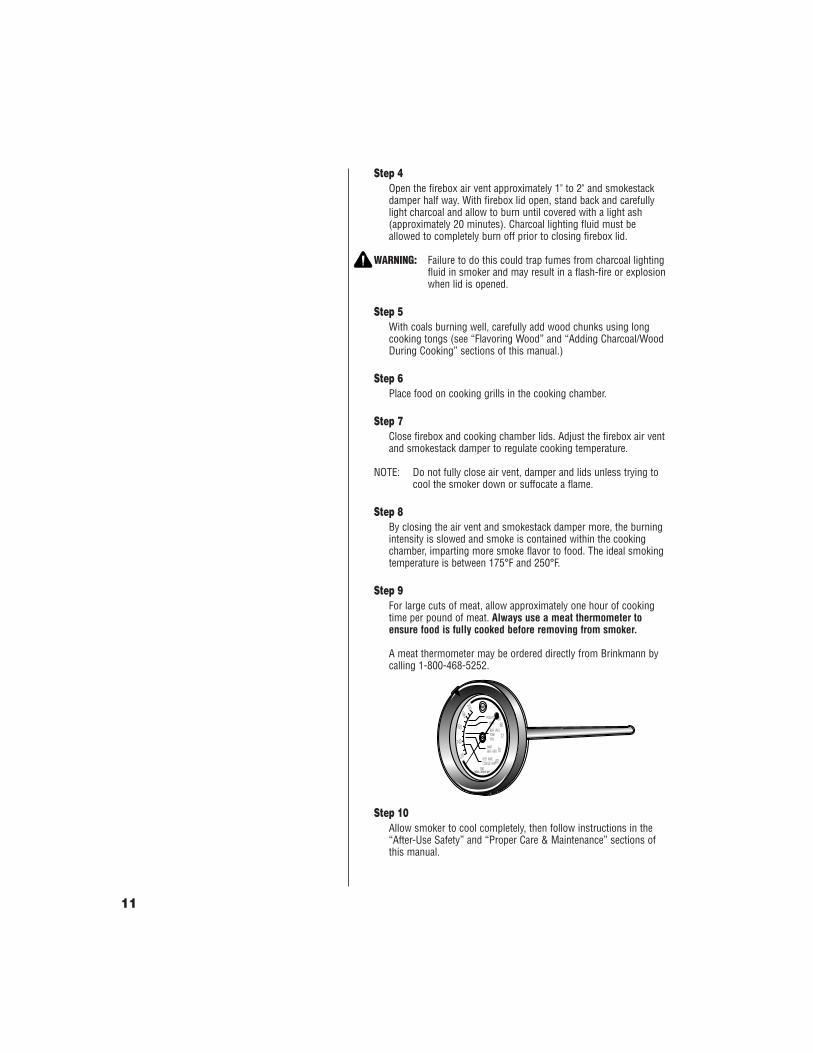
Middle Cooking LevelRotate the cooking grills 90° and place incooking chamber for middle cooking level.
OPERATING INSTRUCTIONSPLACE THE SMOKER OUTDOORS ON A HARD, LEVEL, NON-COMBUSTIBLE SURFACE
AWAY FROM ROOF OVERHANG OR ANY COMBUSTIBLE MATERIAL. NEVER USE ON WOODEN OR OTHERSURFACES THAT COULD BURN. PLACE THE SMOKER AWAY FROM OPEN WINDOWS OR DOORS TO PREVENT
SMOKE FROM ENTERING YOUR HOUSE. IN WINDY WEATHER, PLACE THE SMOKER IN AN OUTDOOR AREA THATIS PROTECTED FROM THE WIND.
READ ALL SAFETY WARNINGS AND INSTRUCTIONS CAREFULLYBEFORE OPERATING YOUR SMOKER.
Step 4Open the firebox air vent approximately 1" to 2" and smokestackdamper half way. With firebox lid open, stand back and carefullylight charcoal and allow to burn until covered with a light ash (approximately 20 minutes). Charcoal lighting fluid must be allowed to completely burn off prior to closing firebox lid.
WARNING: Failure to do this could trap fumes from charcoal lightingfluid in smoker and may result in a flash-fire or explosionwhen lid is opened.
Step 5With coals burning well, carefully add wood chunks using longcooking tongs (see “Flavoring Wood” and “Adding Charcoal/WoodDuring Cooking” sections of this manual.)
Step 6Place food on cooking grills in the cooking chamber.
Step 7Close firebox and cooking chamber lids. Adjust the firebox air ventand smokestack damper to regulate cooking temperature.
NOTE: Do not fully close air vent, damper and lids unless trying tocool the smoker down or suffocate a flame.
Step 8By closing the air vent and smokestack damper more, the burningintensity is slowed and smoke is contained within the cookingchamber, imparting more smoke flavor to food. The ideal smokingtemperature is between 175°F and 250°F.
Step 9For large cuts of meat, allow approximately one hour of cookingtime per pound of meat. Always use a meat thermometer toensure food is fully cooked before removing from smoker.
A meat thermometer may be ordered directly from Brinkmann bycalling 1-800-468-5252.
Step 10Allow smoker to cool completely, then follow instructions in the “After-Use Safety” and “Proper Care & Maintenance” sections ofthis manual.
11
When grilling in cooking chamber, close the ash-guard shield to containashes and embers.
WARNING: A metal bucket or tin can must be placed under the greasehole at all times to catch grease and/or ashes. Check greaselevel in bucket or tin can often and empty or change when wfull. Use extreme caution as bottom of cooking chamber,container and contents will be hot.
Step 1Remove cooking grills from cooking chamber and set aside. Place twocharcoal grates in bottom of cooking chamber.
Step 2Follow instructions below carefully to build a fire in the cookingchamber. You may use charcoal and/or wood as fuel in the Smoke’NPit Professional (see “Adding Charcoal/Wood During Cooking” sectionof this manual).
If using a Charcoal Chimney Starter, follow all manufacturer’s warningsand instructions regarding the use of their product. Open the fireboxair vent approximately 1" to 2" and smokestack damper halfway.Carefully place 8 to 10 pounds of hot coals in center of charcoal gratesin cooking chamber. Using long cooking tongs, carefully spreadbriquets evenly on the charcoal grates, one to two layers thick.
NOTE: To extend the life of your smoker, make sure that hot charcoaland wood do not touch the walls of the firebox.
IF USING CHARCOAL CHIMNEY STARTER, PROCEED TO STEP 5.
If you choose to use charcoal lighting fluid, ONLY use charcoal lightingfluid approved for lighting charcoal. Do not use gasoline, kerosene,alcohol or other flammable material for lighting charcoal. Follow allmanufacturer’s warnings and instructions regarding the use of theirproduct. Place 8 to 10 pounds of charcoal in center of charcoal grate incooking chamber.
WARNING: Never use charcoal that has been pre-treated with lighter fluid. Use only a high grade plain charcoal orcharcoal/wood mixture.
Step 3Saturate charcoal with lighting fluid. With lid open, wait 2 to 3 minutesto allow lighting fluid to soak into charcoal. Store charcoal lighting fluidsafely away from the grill.
Step 4Open the firebox air vent approximately 1" to 2" and smokestackdamper half way. Stand back and carefully light charcoal. With fireboxand cooking chamber lids open, allow charcoal to burn until coveredwith a light ash (approximately 20 minutes). Charcoal lighting fluidmust be allowed to completely burn off prior to closing firebox andcooking chamber lid.
WARNING: Failure to do this could trap fumes from charcoal lightingfluid in grill and may result in a flash-fire or explosion whenlids are opened.
Grilling In CookingChamber
Placement of Charcoal Grates
12
TIN CAN
METAL BUCKET
Ash GuardShield
L-Bracket
Metal Bucket (not included)
Ash GuardShield
L-Bracket
Tin Can (not included)
Step 5When charcoal is burning well, use long cooking tongs to carefully spreadbriquets evenly on the charcoal grates, one to two layers thick. If desired,add wood chunks using long cooking tongs (see “Flavoring Wood” and“Adding Charcoal/Wood During Cooking” sections of this manual.)
Step 6Wearing oven mitts/gloves, place the two larger cooking grills on the toplevel in cooking chamber. Place food on cooking grills.
Step 7Close firebox and cooking chamber lids. Adjust the firebox air vent andsmokestack damper to regulate cooking temperature.
NOTE: Do not fully close air vent, damper and lids unless trying to cool thesmoker down or suffocate a flame.
Step 8By closing the air vent and smokestack damper more, the burning intensityis slowed and smoke is contained within the cooking chamber, impartingmore smoke flavor to food. Always use a meat thermometer to ensure foodis fully cooked before removing from smoker.
Step 9Allow smoker to cool completely, then follow instructions in the “After-UseSafety” and “Proper Care & Maintenance” sections of this manual.
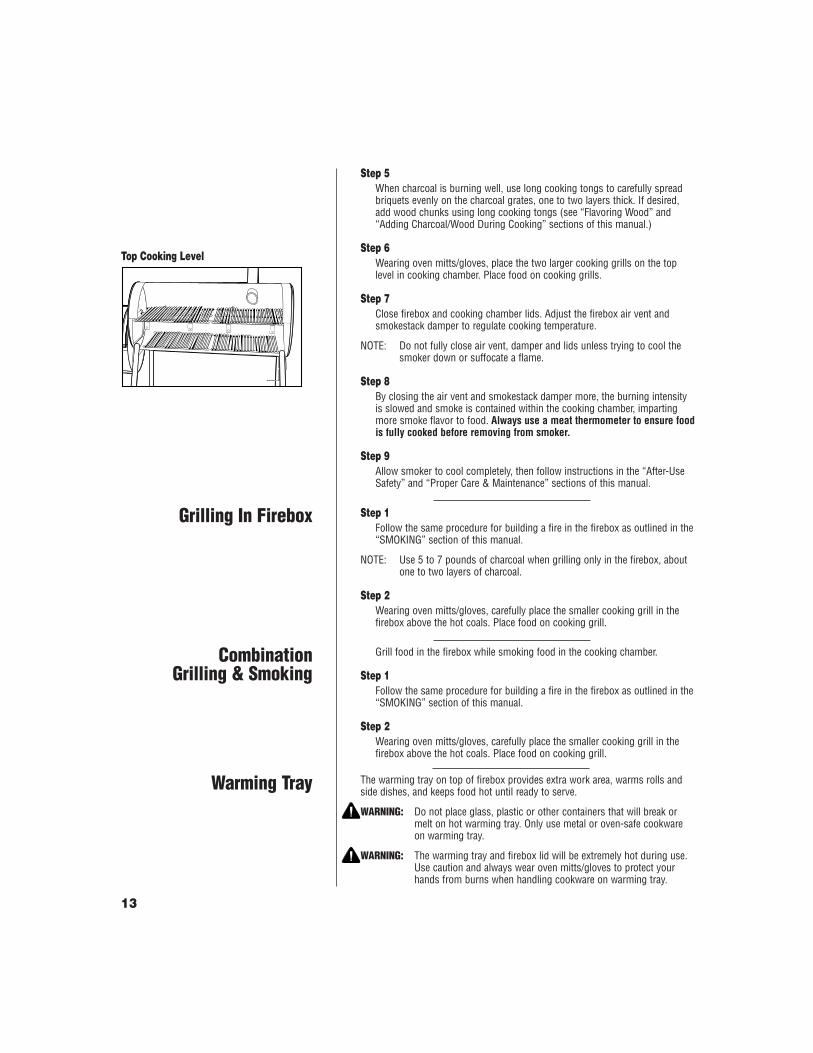
Top Cooking Level
Grill food in the firebox while smoking food in the cooking chamber.
Step 1Follow the same procedure for building a fire in the firebox as outlined in the“SMOKING” section of this manual.
Step 2Wearing oven mitts/gloves, carefully place the smaller cooking grill in thefirebox above the hot coals. Place food on cooking grill.
CombinationGrilling & Smoking
Grilling In Firebox Step 1Follow the same procedure for building a fire in the firebox as outlined in the“SMOKING” section of this manual.
NOTE: Use 5 to 7 pounds of charcoal when grilling only in the firebox, aboutone to two layers of charcoal.
Step 2Wearing oven mitts/gloves, carefully place the smaller cooking grill in thefirebox above the hot coals. Place food on cooking grill.
13
Warming Tray The warming tray on top of firebox provides extra work area, warms rolls andside dishes, and keeps food hot until ready to serve.
WARNING: Do not place glass, plastic or other containers that will break ormelt on hot warming tray. Only use metal or oven-safe cookwareon warming tray.
WARNING: The warming tray and firebox lid will be extremely hot during use.Use caution and always wear oven mitts/gloves to protect yourhands from burns when handling cookware on warming tray.
• During the smoking process, avoid the temptation to open lid to check food.Opening the lid allows heat and smoke to escape, making additional cookingtime necessary.
• Food closest to the firebox will cook and brown faster. Rotate food midwaythrough the cooking cycle. If food is excessively browned or flavored withsmoke, wrap food in aluminum foil after the first few hours of smoking. Thiswill allow food to continue cooking without further browning or smokeflavoring.
• When cooking fish or extra lean cuts of meat, you may want to try watersmoking to keep the food moist. Before starting a fire in firebox, place theother charcoal grate on low cooking level in cooking chamber. Use a flatbottom metal pan that is shallow enough to fit between the charcoal grateand cooking grill as a water pan. Set the metal pan on charcoal grate underfood and cooking grill and fill with water or marinade until q full.
CAUTION: Always use oven mitts/gloves to protect your hands. Liquid inwater pan will be extremely hot and can scald or burn. Alwaysallow liquid to cool completely before handling. Do not allow liquidto completely evaporate from water pan.
• Always use a meat thermometer to ensure food is fully cooked beforeremoving from smoker. A meat thermometer may be ordered directly fromBrinkmann by calling 1-800-468-5252.
Smoke Cooking Tips
Regulating HeatTo increase heat and air circulation, fully open firebox air vent and smokestackdamper. If increased air circulation does not raise temperature sufficiently, morewood and/or charcoal may be needed. Follow instructions in “AddingCharcoal/Wood During Cooking” section of this manual.
To maintain the temperature, more wood and/or charcoal may need to be addedduring the cooking cycle.
NOTE: Dry wood burns hotter than charcoal, so you may want to increase theratio of wood to charcoal to increase the cooking temperature.Hardwood such as oak, hickory, mesquite, fruit and nut wood are anexcellent fuel because of their burning rate. When using wood as fuel,make sure the wood is seasoned and dry. DO NOT use resinous woodsuch as pine as it will produce an unpleasant taste.
To obtain your favorite smoke flavor, experiment by using chunks, sticks orchips of flavor producing wood such as hickory, pecan, apple, cherry, ormesquite. Most fruit or nut tree wood may be used for smoke flavoring. Do notuse resinous wood such as pine as it will produce an unpleasant taste.
Wood chunks or sticks 3" to 4" long and 1" to 2" thick work best. Unless thewood is still green, soak the wood in water for 30 minutes or wrap each piece infoil and tear several small holes in the foil to produce more smoke and preventthe wood from burning too quickly. A lot of wood is not required to obtain agood smoke flavor. A recommended amount for the Smoke’N Pit Professional is5 to 6 wood chunks or sticks. Experiment by using more wood for strongersmoke flavor or less wood for milder smoke flavor.
Additional flavoring wood should not have to be added during the cookingprocess. However, it may be necessary when cooking very large pieces of food.Follow instructions and cautions in the “Adding Charcoal/Wood During Cooking”section of this manual to avoid injury while adding wood.
Flavoring Wood
14
Additional charcoal and/or wood may be required to maintain orincrease cooking temperature.
Adding Charcoal/Wood in Firebox
Step 1Stand back and carefully open firebox lid. Use caution since flamescan flare-up when fresh air suddenly comes in contact with fire.
Step 2Wearing oven mitts/gloves, stand back a safe distance and use longcooking tongs to lightly brush aside ashes on hot coals. Use cookingtongs to add charcoal and/or wood, being careful not to stir-upashes and sparks. If necessary, use your Charcoal Chimney Starterto light additional charcoal and/or wood and add to existing fire.
WARNING: Never add charcoal lighting fluid to hot or even warm coalsas flashback may occur causing severe burns.
Step 3When charcoal is burning strong again, close the firebox lid.
Adding Charcoal/Wood in Cooking Chamber
Step 1Stand back and carefully open cooking chamber lid. Use cautionsince flames can flare-up when fresh air suddenly comes in contactwith fire.
Step 2Wearing oven mitts/gloves, remove food and cooking grills.
Step 3Stand back a safe distance and use long cooking tongs to lightlybrush aside ashes on hot coals. Use cooking tongs to add charcoaland/or wood, being careful not to stir-up ashes and sparks. Ifnecessary, use your Charcoal Chimney Starter to light additionalcharcoal and/or wood and add to existing fire.
WARNING: Never add charcoal lighting fluid to hot or even warm coalsas flashback may occur causing severe burns.
Step 4When charcoal is burning strong again, wear oven mitts/gloves andcarefully replace cooking grill and food.
Step 5Close the cooking chamber lid and allow food to continue cooking.
Adding Charcoal/WoodDuring Cooking
15
• Always allow smoker and all components to cool completely before handling.
• Never leave coals and ashes in smoker unattended. Make sure coals and ashes are completely extinguished beforeremoving.
• Before smoker can be left unattended, remaining coals and ashes must be removed from smoker. Use caution to protectyourself and property. Place remaining coals and ashes in a noncombustible metal container and completely saturate withwater. Allow coals and water to remain in metal container 24 hours prior to disposing.
• Extinguished coals and ashes should be placed a safe distance from all structures and combustible materials.
• With a garden hose, completely wet surface beneath and around the smoker to extinguish any ashes, coals or emberswhich may have fallen during the cooking or cleaning process.
• Allow metal bucket or tin can and its contents to cool completely before removing. Dispose of contents properly.
• Cover and store smoker in a protected area away from children and pets.
• Cure your smoker periodically throughout the year to protect against excessive rust.
• To protect your smoker from excessive rust, the unit must be properlycured and covered at all times when not in use. A Smoke’N PitProfessional cover may be ordered directly from Brinkmann by calling1-800-468-5252.
• Wash cooking grills and charcoal grates with hot, soapy water, rinse well and dry. Lightly coat grills and grates with vegetable oil or vegetable oil spray.
• Clean inside and outside of smoker by wiping off with a damp cloth.Apply a light coat of vegetable oil or vegetable oil spray to the interiorsurface to prevent rusting.
• If rust appears on the exterior surface of your smoker, clean and buffthe affected area with steel wool or fine grit emery cloth. Touch-up witha good quality high-temperature resistant paint.
• Never apply paint to the interior surface. Rust spots on the interiorsurface can be buffed, cleaned, then lightly coated with vegetable oil orvegetable oil spray to minimize rusting.
AFTER-USE SAFETYWARNING
Proper Care& Maintenance
16
17
LOOK FOR THESE AND OTHER BRINKMANN ACCESSORIES AT YOUR LOCAL RETAILER WHERESMOKERS ARE SOLD, OR ORDER DIRECT BY CALLING 1-800-468-5252.
ACCESSORIES
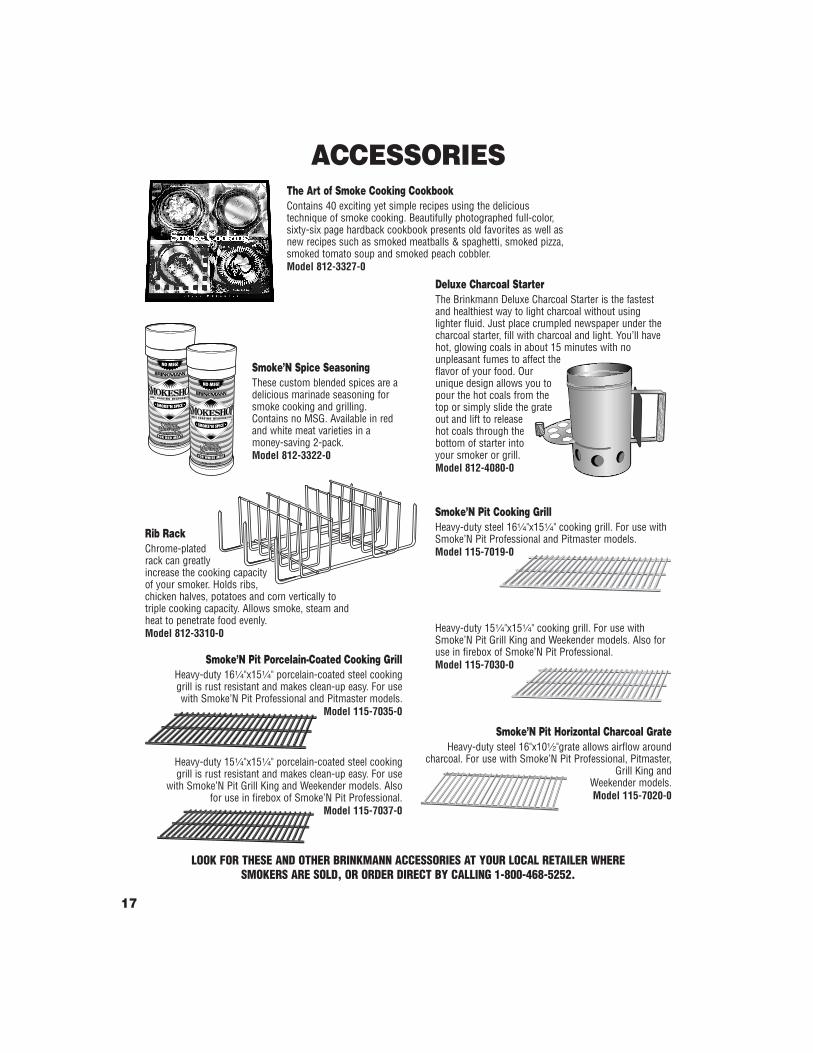
Rib RackChrome-platedrack can greatlyincrease the cooking capacityof your smoker. Holds ribs,chicken halves, potatoes and corn vertically totriple cooking capacity. Allows smoke, steam andheat to penetrate food evenly.Model 812-3310-0
Smoke’N Spice SeasoningThese custom blended spices are adelicious marinade seasoning forsmoke cooking and grilling.Contains no MSG. Available in redand white meat varieties in amoney-saving 2-pack.Model 812-3322-0
The Art of Smoke Cooking CookbookContains 40 exciting yet simple recipes using the delicioustechnique of smoke cooking. Beautifully photographed full-color,sixty-six page hardback cookbook presents old favorites as well asnew recipes such as smoked meatballs & spaghetti, smoked pizza,smoked tomato soup and smoked peach cobbler.Model 812-3327-0
Deluxe Charcoal StarterThe Brinkmann Deluxe Charcoal Starter is the fastestand healthiest way to light charcoal without usinglighter fluid. Just place crumpled newspaper under thecharcoal starter, fill with charcoal and light. You’ll havehot, glowing coals in about 15 minutes with nounpleasant fumes to affect theflavor of your food. Ourunique design allows you topour the hot coals from thetop or simply slide the grateout and lift to releasehot coals through thebottom of starter intoyour smoker or grill.Model 812-4080-0
Smoke’N Pit Cooking GrillHeavy-duty steel 164"x154" cooking grill. For use withSmoke’N Pit Professional and Pitmaster models.Model 115-7019-0
Heavy-duty 154"x154" cooking grill. For use withSmoke’N Pit Grill King and Weekender models. Also foruse in firebox of Smoke’N Pit Professional.Model 115-7030-0
Smoke’N Pit Horizontal Charcoal GrateHeavy-duty steel 16"x102"grate allows airflow around
charcoal. For use with Smoke’N Pit Professional, Pitmaster,Grill King and
Weekender models.Model 115-7020-0
Smoke’N Pit Porcelain-Coated Cooking GrillHeavy-duty 164"x154" porcelain-coated steel cookinggrill is rust resistant and makes clean-up easy. For usewith Smoke’N Pit Professional and Pitmaster models.
Model 115-7035-0
Heavy-duty 154"x154" porcelain-coated steel cookinggrill is rust resistant and makes clean-up easy. For use
with Smoke’N Pit Grill King and Weekender models. Alsofor use in firebox of Smoke’N Pit Professional.
Model 115-7037-0
18
LOOK FOR THESE AND OTHER BRINKMANN ACCESSORIES AT YOUR LOCAL RETAILER WHERESMOKERS ARE SOLD, OR ORDER DIRECT BY CALLING 1-800-468-5252.
R
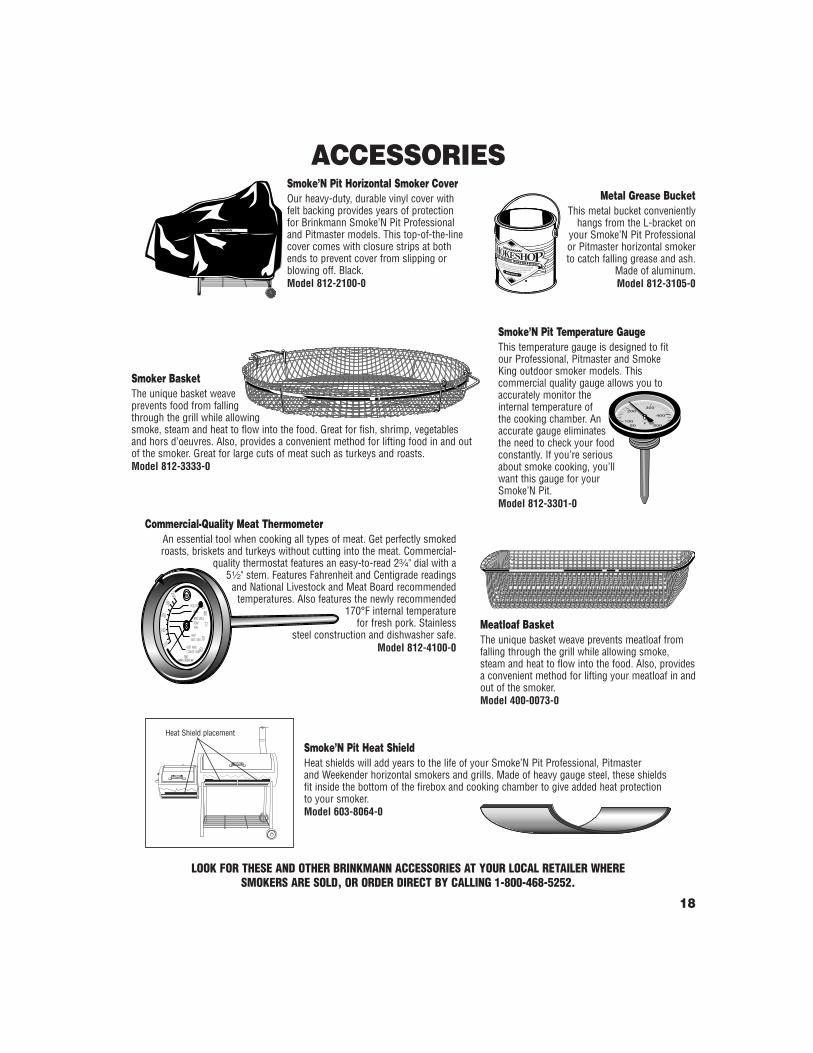
ACCESSORIESSmoke’N Pit Horizontal Smoker CoverOur heavy-duty, durable vinyl cover withfelt backing provides years of protectionfor Brinkmann Smoke’N Pit Professionaland Pitmaster models. This top-of-the-linecover comes with closure strips at bothends to prevent cover from slipping orblowing off. Black. Model 812-2100-0
Smoke’N Pit Heat ShieldHeat shields will add years to the life of your Smoke’N Pit Professional, Pitmaster and Weekender horizontal smokers and grills. Made of heavy gauge steel, these shields fit inside the bottom of the firebox and cooking chamber to give added heat protectionto your smoker.Model 603-8064-0
Meatloaf BasketThe unique basket weave prevents meatloaf fromfalling through the grill while allowing smoke,steam and heat to flow into the food. Also, providesa convenient method for lifting your meatloaf in andout of the smoker.Model 400-0073-0
Smoke’N Pit Temperature GaugeThis temperature gauge is designed to fitour Professional, Pitmaster and SmokeKing outdoor smoker models. Thiscommercial quality gauge allows you toaccurately monitor theinternal temperature ofthe cooking chamber. Anaccurate gauge eliminatesthe need to check your foodconstantly. If you’re seriousabout smoke cooking, you’llwant this gauge for yourSmoke’N Pit.Model 812-3301-0
Heat Shield placement
Commercial-Quality Meat ThermometerAn essential tool when cooking all types of meat. Get perfectly smokedroasts, briskets and turkeys without cutting into the meat. Commercial-
quality thermostat features an easy-to-read 2w" dial with a52" stem. Features Fahrenheit and Centigrade readings
and National Livestock and Meat Board recommendedtemperatures. Also features the newly recommended
170°F internal temperaturefor fresh pork. Stainless
steel construction and dishwasher safe.Model 812-4100-0
Metal Grease BucketThis metal bucket conveniently
hangs from the L-bracket onyour Smoke’N Pit Professionalor Pitmaster horizontal smokerto catch falling grease and ash.
Made of aluminum.Model 812-3105-0
Smoker BasketThe unique basket weaveprevents food from fallingthrough the grill while allowingsmoke, steam and heat to flow into the food. Great for fish, shrimp, vegetablesand hors d’oeuvres. Also, provides a convenient method for lifting food in and outof the smoker. Great for large cuts of meat such as turkeys and roasts.Model 812-3333-0

Owner’s Manual for Model805-2101-P
140-2102-012/98
For one year from date of purchase, The Brinkmann Corporation warrants the Smoke’N Pit Professional against defects due toworkmanship or materials to the original purchaser. The Brinkmann Corporation’s obligations under this warranty are limited tothe following guidelines:
• This warranty does not cover smokers that have been altered, or damaged due to: normal wear, rust, abuse, impropermaintenance, improper use, disassembly of parts and/or attempted repair by anyone other than an authorized employee ofThe Brinkmann Corporation.
• This warranty does not cover surface scratches or heat damage to the finish, which is considered normal wear.
• The Brinkmann Corporation may elect to repair or replace damaged parts covered by the terms of this warranty.
• This warranty extends to the original purchaser only and is not transferable or assignable to subsequent purchasers.
The Brinkmann Corporation requires reasonable proof of purchase. Therefore, we strongly recommend that you retain your salesreceipt or invoice. To obtain replacement parts for your Smoke’N Pit Professional under the terms of this warranty, please callCustomer Service Department at 800-527-0717. A receipt will be required. The Brinkmann Corporation will not be responsiblefor any cookers forwarded to us without authorization. Smoke’N Pit Professional must be returned to the original place ofpurchase for replacement of the unit.
EXCEPT AS ABOVE STATED, THE BRINKMANN CORPORATION MAKES NO OTHER EXPRESS WARRANTY.
THE IMPLIED WARRANTIES OF MERCHANTABILITY AND FITNESS FOR A PARTICULAR PURPOSE ARE LIMITED IN DURATIONTO ONE YEAR FROM THE DATE OF PURCHASE. SOME STATES DO NOT ALLOW LIMITATIONS ON HOW LONG AN IMPLIEDWARRANTY LASTS, SO THE ABOVE LIMITATION MAY NOT APPLY TO YOU.
ANY LIABILITY FOR INDIRECT, INCIDENTAL OR CONSEQUENTIAL DAMAGES ARISING FROM THE FAILURE OF THE SMOKE’NPIT PROFESSIONAL TO COMPLY WITH THIS WARRANTY OR ANY IMPLIED WARRANTY IS EXCLUDED. CUSTOMERACKNOWLEDGES THAT THE PURCHASE PRICE CHARGED IS BASED UPON THE LIMITATIONS CONTAINED IN THE WARRANTYSET OUT ABOVE. SOME STATES DO NOT ALLOW THE EXCLUSION OR LIMITATION OF INCIDENTAL OR CONSEQUENTIALDAMAGES, SO THE ABOVE LIMITATION OR EXCLUSION MAY NOT APPLY TO YOU. THIS WARRANTY GIVES YOU SPECIFICLEGAL RIGHTS, AND YOU MAY ALSO HAVE OTHER RIGHTS WHICH VARY FROM STATE TO STATE.
ONE YEAR LIMITED WARRANTY