Embed Size (px)
Citation preview

MONEX BOOM eFutures Trading System
2 Part 1 - Getting Started Power by
Contents
PART 1 - GETTING STARTED .............................................................................................................................. 3
1.1 LOGIN AND LOGOUT OF EFUTURES ................................................................................................................. 3
PART 2 - MARKET ............................................................................................................................................. 6
2.1 UNDERLYER PRICE ....................................................................................................................................... 6
2.2 PRICE DEPTH .............................................................................................................................................. 8
2.3 MARKET STATUS ......................................................................................................................................... 9
2.4 CLOCK..................................................................................................................................................... 10
2.5 FX RATIO................................................................................................................................................. 11
PART 3 - ORDER TICKET .................................................................................................................................. 12
3.1 ORDER TICKET .......................................................................................................................................... 12
PART 4 - ORDER.............................................................................................................................................. 13
4.1 ORDER BOOK ........................................................................................................................................... 13
4.1.1 ORDER BOOK MENU ................................................................................................................................ 13
4.1.2 ORDER BOOK FILTER ................................................................................................................................ 14
4.1.3 ORDER BOOK FUNCTION MENU .................................................................................................................. 17
4.2 ORDER STATUS ......................................................................................................................................... 18
4.3 CANCEL OR CHANGE ORDER ........................................................................................................................ 19
4.3.1 CHANGE ORDER ...................................................................................................................................... 19
4.3.2 CANCEL ORDER ....................................................................................................................................... 20
4.3.3 ORDER HISTORY ....................................................................................................................................... 21
PART 5 - STATISTICS AND REPORTS ................................................................................................................. 22
5.1 REPORTS ................................................................................................................................................. 22
5.1.1 TRADE REPORT ....................................................................................................................................... 22
5.1.2 ORDER REPORT ....................................................................................................................................... 23
PART 6 - ACCOUNT ......................................................................................................................................... 24
6.1 ACCOUNT INFORMATION ............................................................................................................................ 24
6.2 POSITION VIEW ........................................................................................................................................ 25
6.3 ESTATEMENT ............................................................................................................................................ 26
PART 7 - USER SETTINGS ................................................................................................................................ 27
7.1 PREFERENCE ............................................................................................................................................ 27
7.2 DESKTOP MANAGEMENT AND SHORTCUTS ..................................................................................................... 28
7.2.1 LOAD AND SAVE DESKTOP ......................................................................................................................... 28
MONEX BOOM eFutures Trading System
3 Part 1 - Getting Started Power by
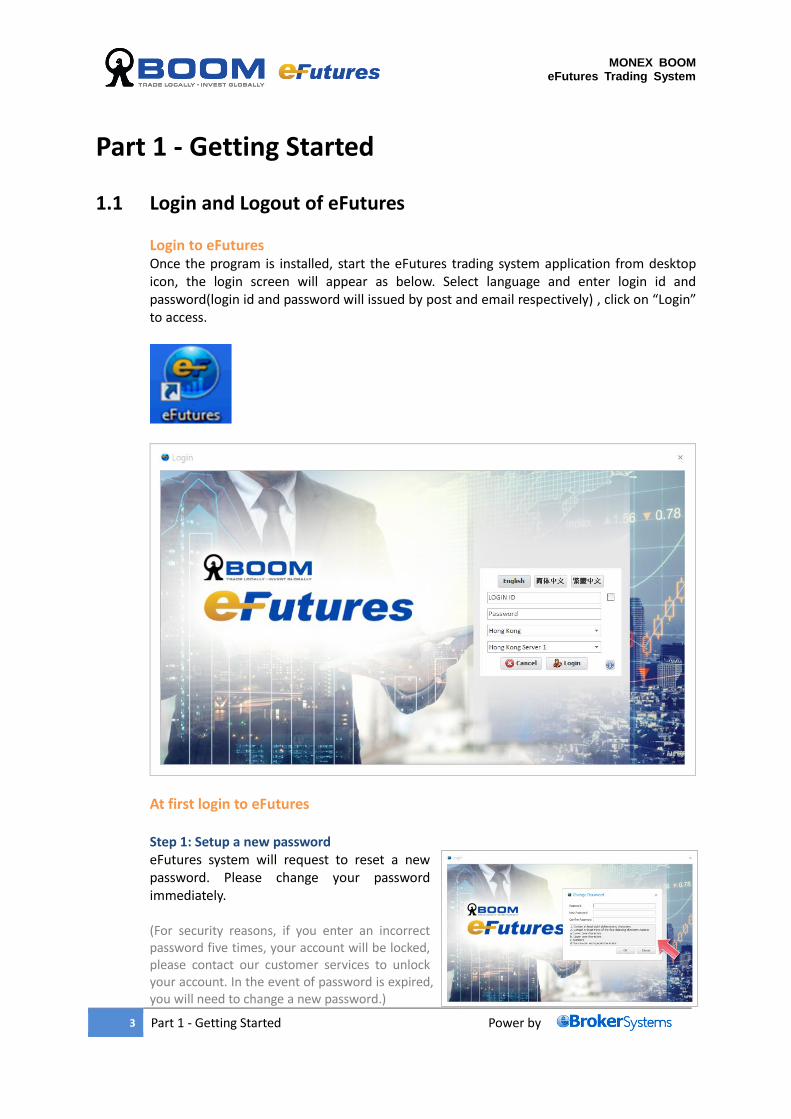
Part 1 - Getting Started 1.1 Login and Logout of eFutures
Login to eFutures Once the program is installed, start the eFutures trading system application from desktop icon, the login screen will appear as below. Select language and enter login id and password(login id and password will issued by post and email respectively) , click on “Login” to access.
At first login to eFutures Step 1: Setup a new password eFutures system will request to reset a new password. Please change your password immediately. (For security reasons, if you enter an incorrect password five times, your account will be locked, please contact our customer services to unlock your account. In the event of password is expired, you will need to change a new password.)
MONEX BOOM eFutures Trading System
4 Part 1 - Getting Started Power by
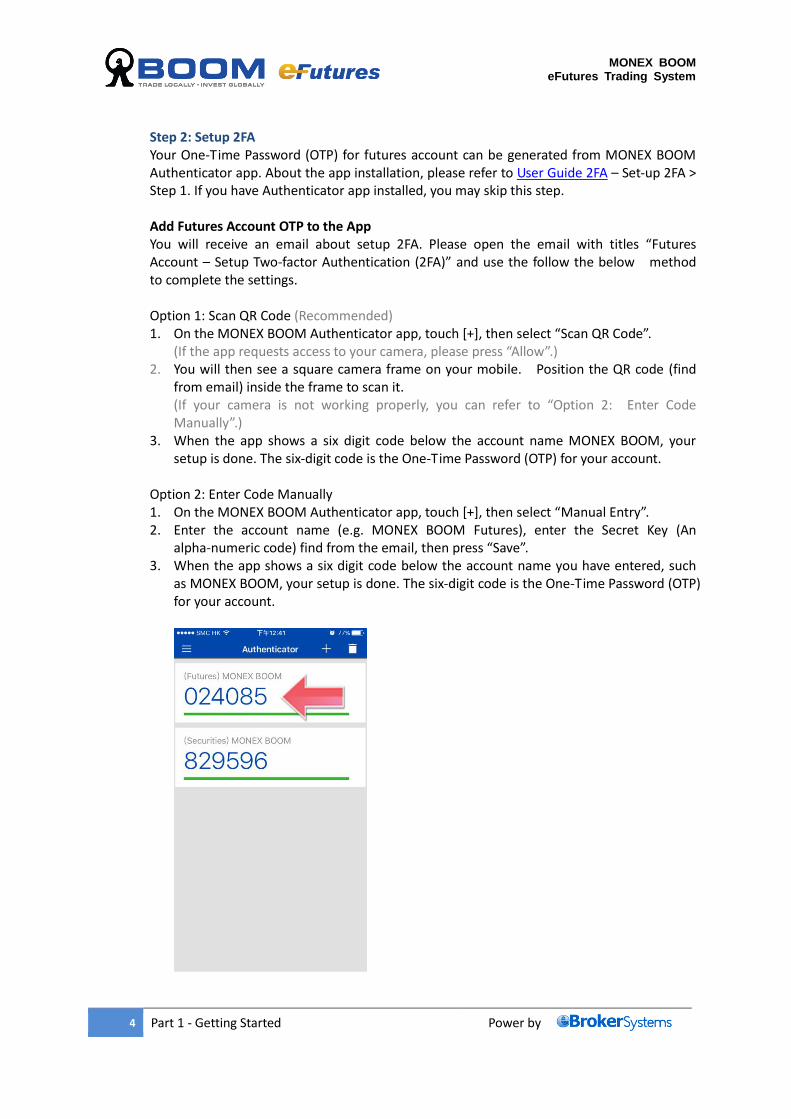
Step 2: Setup 2FA Your One-Time Password (OTP) for futures account can be generated from MONEX BOOM Authenticator app. About the app installation, please refer to User Guide 2FA – Set-up 2FA > Step 1. If you have Authenticator app installed, you may skip this step. Add Futures Account OTP to the App You will receive an email about setup 2FA. Please open the email with titles “Futures Account – Setup Two-factor Authentication (2FA)” and use the follow the below method to complete the settings. Option 1: Scan QR Code (Recommended) 1. On the MONEX BOOM Authenticator app, touch [+], then select “Scan QR Code”.
(If the app requests access to your camera, please press “Allow”.) 2. You will then see a square camera frame on your mobile. Position the QR code (find
from email) inside the frame to scan it. (If your camera is not working properly, you can refer to “Option 2: Enter Code Manually”.)
3. When the app shows a six digit code below the account name MONEX BOOM, your setup is done. The six-digit code is the One-Time Password (OTP) for your account.
Option 2: Enter Code Manually 1. On the MONEX BOOM Authenticator app, touch [+], then select “Manual Entry”. 2. Enter the account name (e.g. MONEX BOOM Futures), enter the Secret Key (An
alpha-numeric code) find from the email, then press “Save”. 3. When the app shows a six digit code below the account name you have entered, such
as MONEX BOOM, your setup is done. The six-digit code is the One-Time Password (OTP) for your account.
MONEX BOOM eFutures Trading System
5 Part 1 - Getting Started Power by
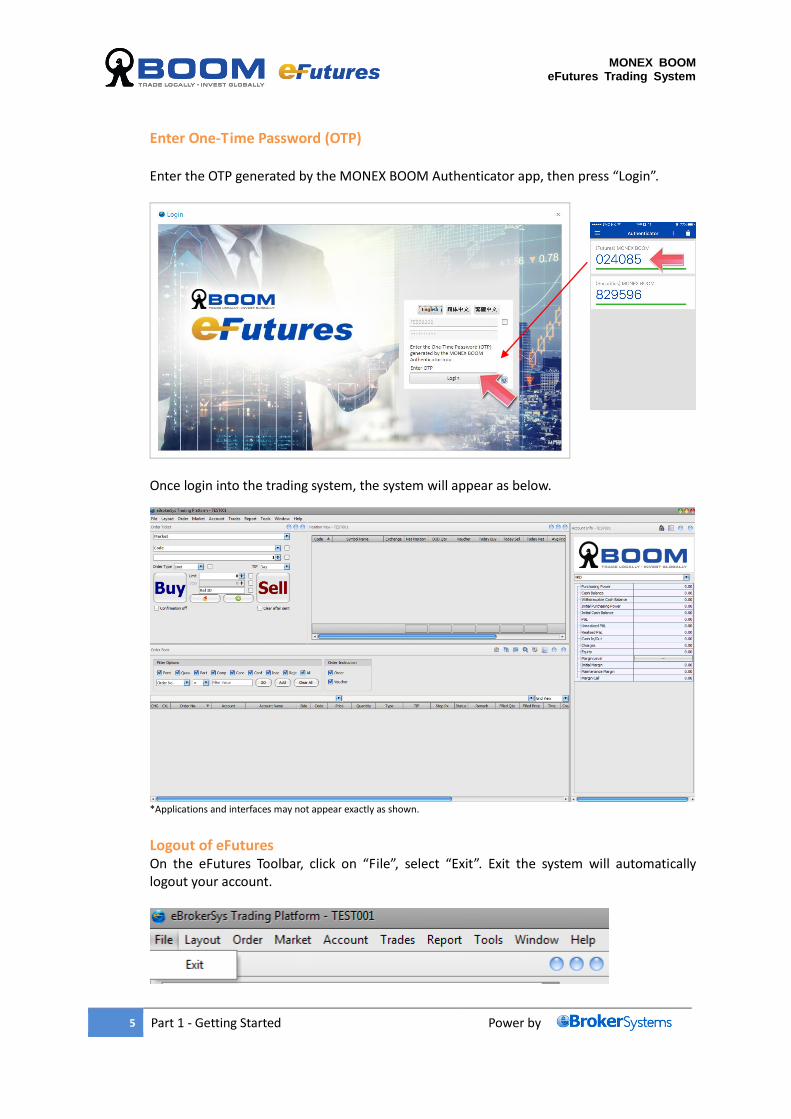
Enter One-Time Password (OTP) Enter the OTP generated by the MONEX BOOM Authenticator app, then press “Login”.
Once login into the trading system, the system will appear as below.
*Applications and interfaces may not appear exactly as shown.
Logout of eFutures On the eFutures Toolbar, click on “File”, select “Exit”. Exit the system will automatically logout your account.
MONEX BOOM eFutures Trading System
6 Part 2 - Market Power by
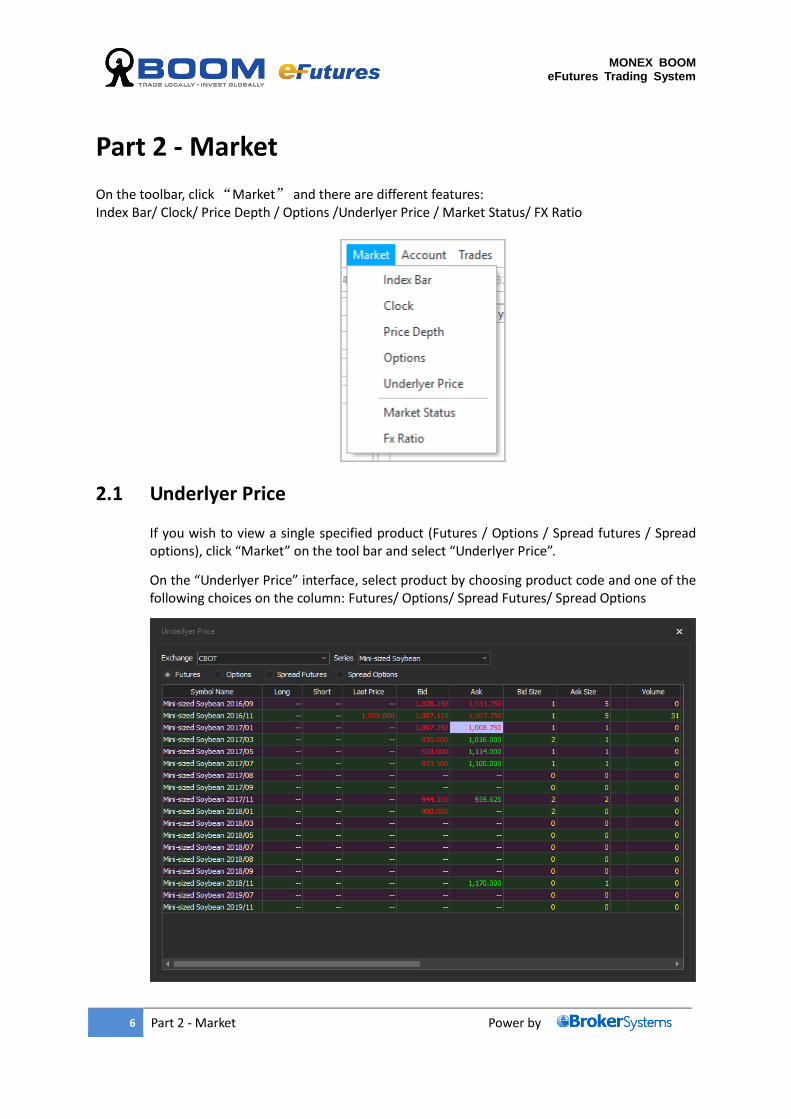
Part 2 - Market
On the toolbar, click “Market” and there are different features: Index Bar/ Clock/ Price Depth / Options /Underlyer Price / Market Status/ FX Ratio
2.1 Underlyer Price If you wish to view a single specified product (Futures / Options / Spread futures / Spread options), click “Market” on the tool bar and select “Underlyer Price”.
On the “Underlyer Price” interface, select product by choosing product code and one of the following choices on the column: Futures/ Options/ Spread Futures/ Spread Options
MONEX BOOM eFutures Trading System
7 Part 2 - Market Power by
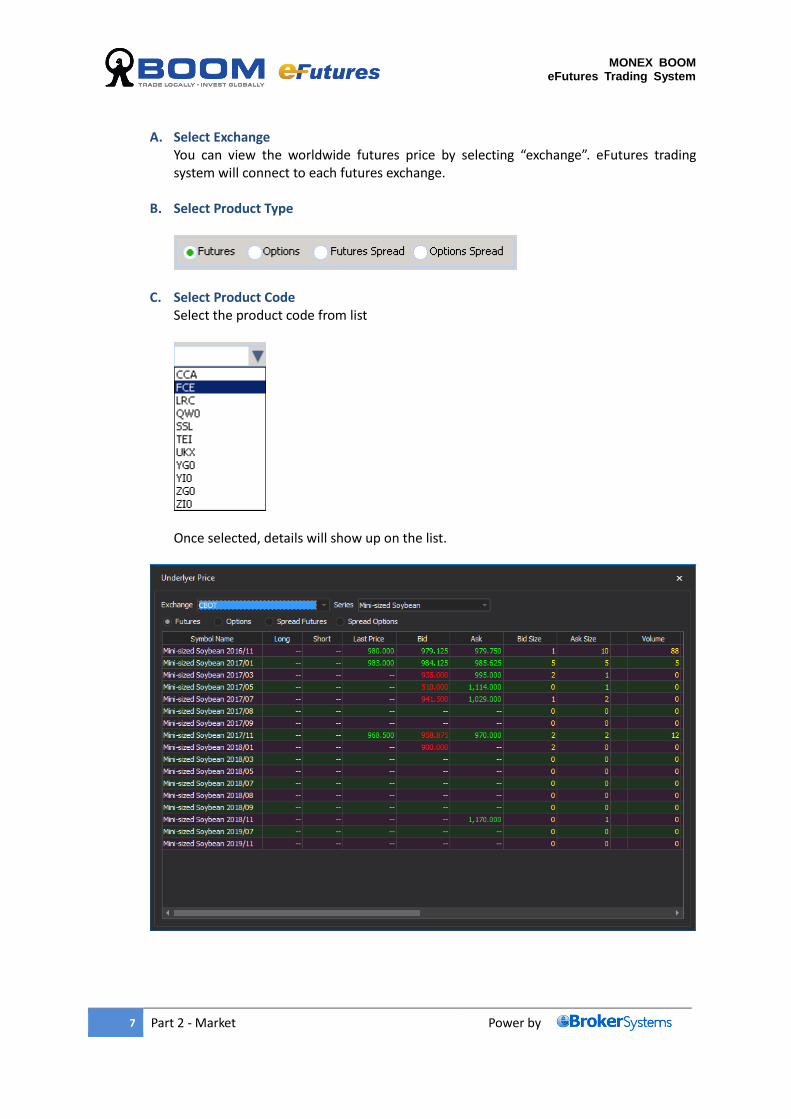
A. Select Exchange You can view the worldwide futures price by selecting “exchange”. eFutures trading system will connect to each futures exchange.
B. Select Product Type
C. Select Product Code Select the product code from list
Once selected, details will show up on the list.
MONEX BOOM eFutures Trading System
8 Part 2 - Market Power by
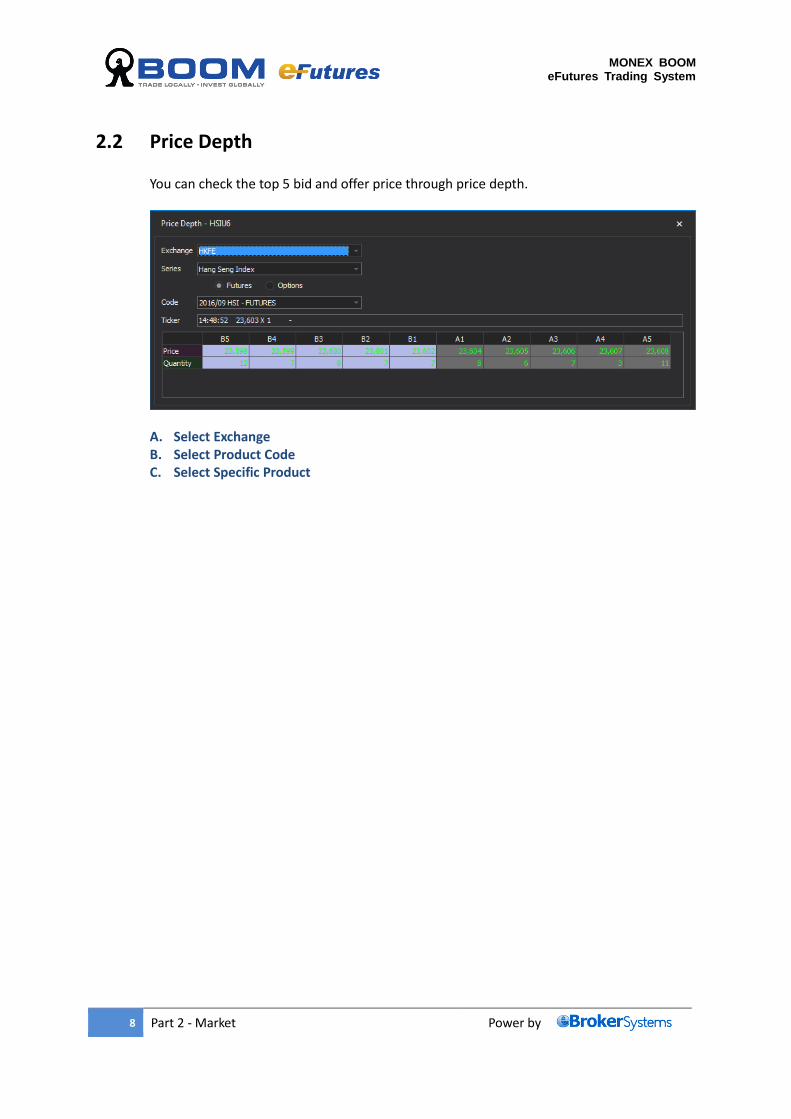
2.2 Price Depth
You can check the top 5 bid and offer price through price depth.
A. Select Exchange B. Select Product Code C. Select Specific Product

MONEX BOOM eFutures Trading System
9 Part 2 - Market Power by
2.3 Market Status
Select “Market” and click “Market Status” from the function list to view the status of market.
MONEX BOOM eFutures Trading System
10 Part 2 - Market Power by
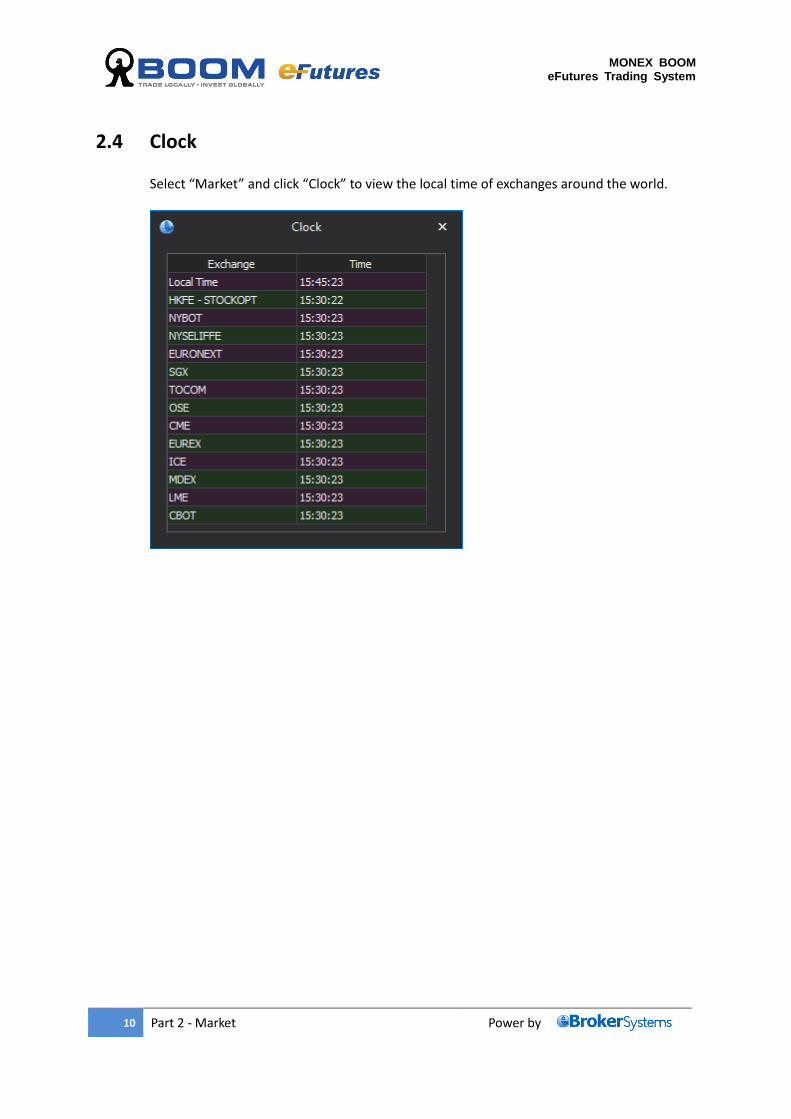
2.4 Clock
Select “Market” and click “Clock” to view the local time of exchanges around the world.
MONEX BOOM eFutures Trading System
11 Part 2 - Market Power by
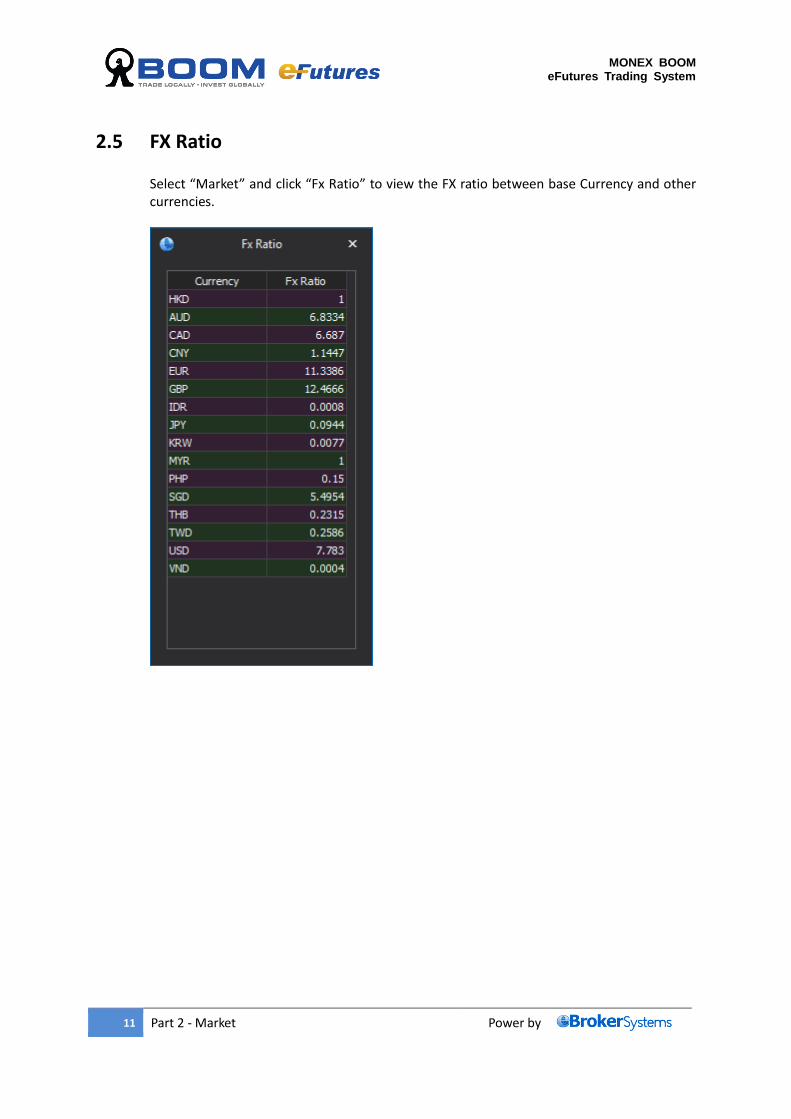
2.5 FX Ratio
Select “Market” and click “Fx Ratio” to view the FX ratio between base Currency and other currencies.
MONEX BOOM eFutures Trading System
12 Part 3 - Order Ticket Power by
Part 3 - Order Ticket
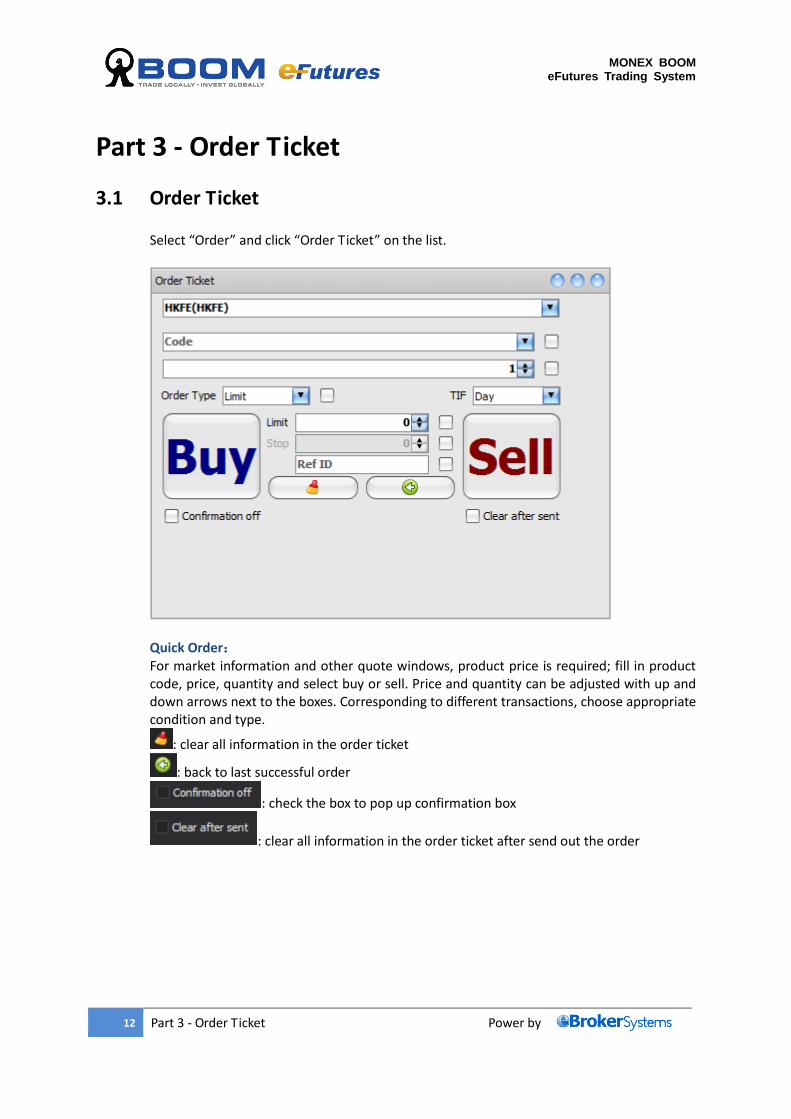
3.1 Order Ticket
Select “Order” and click “Order Ticket” on the list.
Quick Order: For market information and other quote windows, product price is required; fill in product code, price, quantity and select buy or sell. Price and quantity can be adjusted with up and down arrows next to the boxes. Corresponding to different transactions, choose appropriate condition and type.
: clear all information in the order ticket
: back to last successful order
: check the box to pop up confirmation box
: clear all information in the order ticket after send out the order
MONEX BOOM eFutures Trading System
13 Part 4 - Order Power by
Part 4 - Order
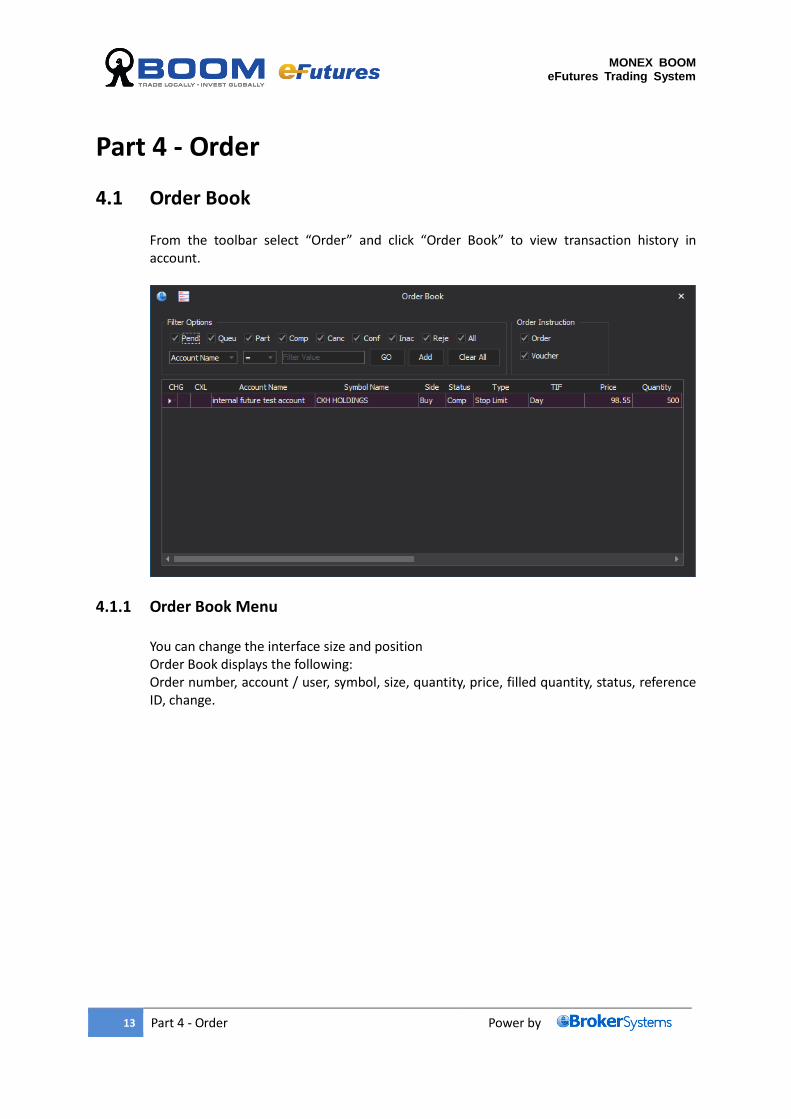
4.1 Order Book
From the toolbar select “Order” and click “Order Book” to view transaction history in account.
4.1.1 Order Book Menu
You can change the interface size and position Order Book displays the following: Order number, account / user, symbol, size, quantity, price, filled quantity, status, reference ID, change.
MONEX BOOM eFutures Trading System
14 Part 4 - Order Power by
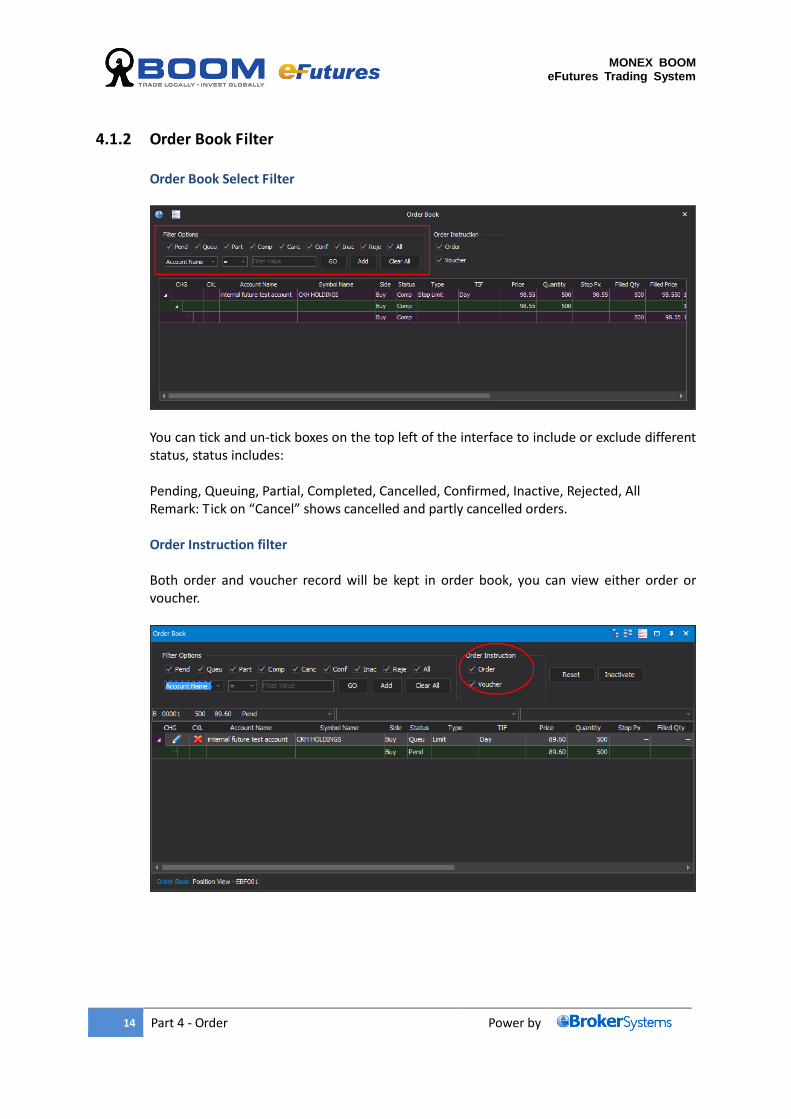
4.1.2 Order Book Filter
Order Book Select Filter
You can tick and un-tick boxes on the top left of the interface to include or exclude different status, status includes: Pending, Queuing, Partial, Completed, Cancelled, Confirmed, Inactive, Rejected, All Remark: Tick on “Cancel” shows cancelled and partly cancelled orders. Order Instruction filter
Both order and voucher record will be kept in order book, you can view either order or voucher.
MONEX BOOM eFutures Trading System
15 Part 4 - Order Power by
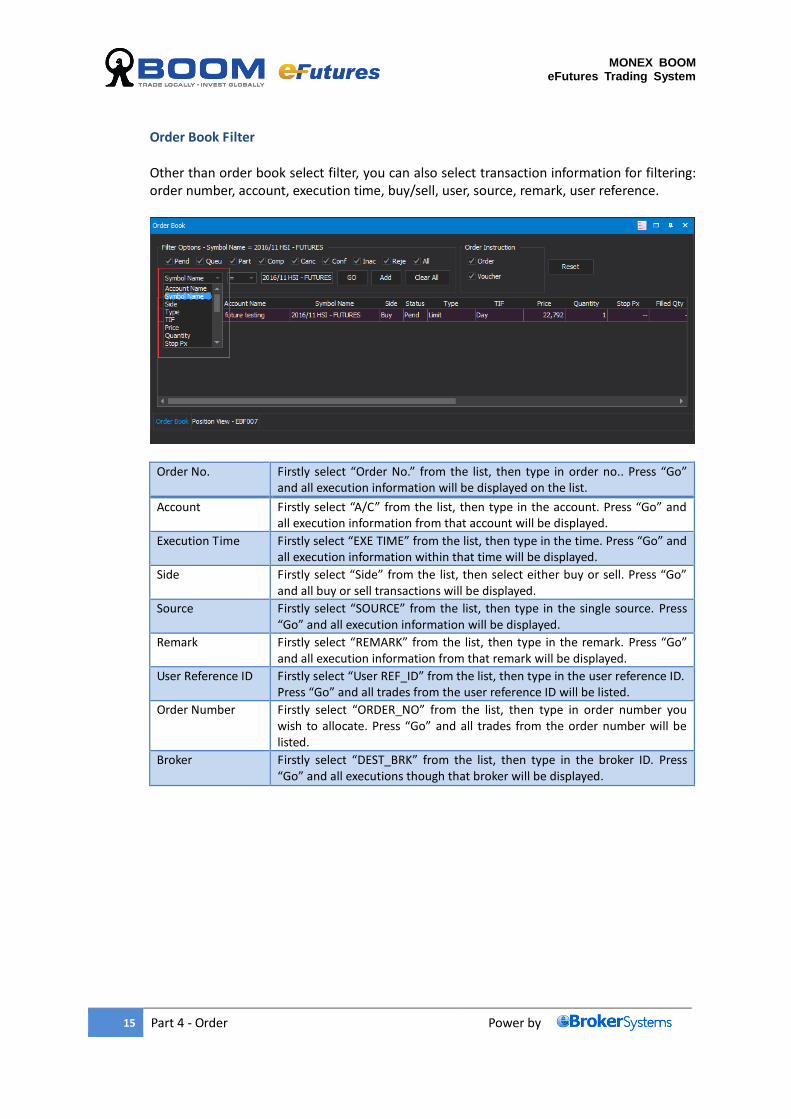
Order Book Filter
Other than order book select filter, you can also select transaction information for filtering: order number, account, execution time, buy/sell, user, source, remark, user reference.
Order No. Firstly select “Order No.” from the list, then type in order no.. Press “Go” and all execution information will be displayed on the list.
Account Firstly select “A/C” from the list, then type in the account. Press “Go” and all execution information from that account will be displayed.
Execution Time Firstly select “EXE TIME” from the list, then type in the time. Press “Go” and all execution information within that time will be displayed.
Side Firstly select “Side” from the list, then select either buy or sell. Press “Go” and all buy or sell transactions will be displayed.
Source Firstly select “SOURCE” from the list, then type in the single source. Press “Go” and all execution information will be displayed.
Remark Firstly select “REMARK” from the list, then type in the remark. Press “Go” and all execution information from that remark will be displayed.
User Reference ID Firstly select “User REF_ID” from the list, then type in the user reference ID. Press “Go” and all trades from the user reference ID will be listed.
Order Number Firstly select “ORDER_NO” from the list, then type in order number you wish to allocate. Press “Go” and all trades from the order number will be listed.
Broker Firstly select “DEST_BRK” from the list, then type in the broker ID. Press “Go” and all executions though that broker will be displayed.
MONEX BOOM eFutures Trading System
16 Part 4 - Order Power by
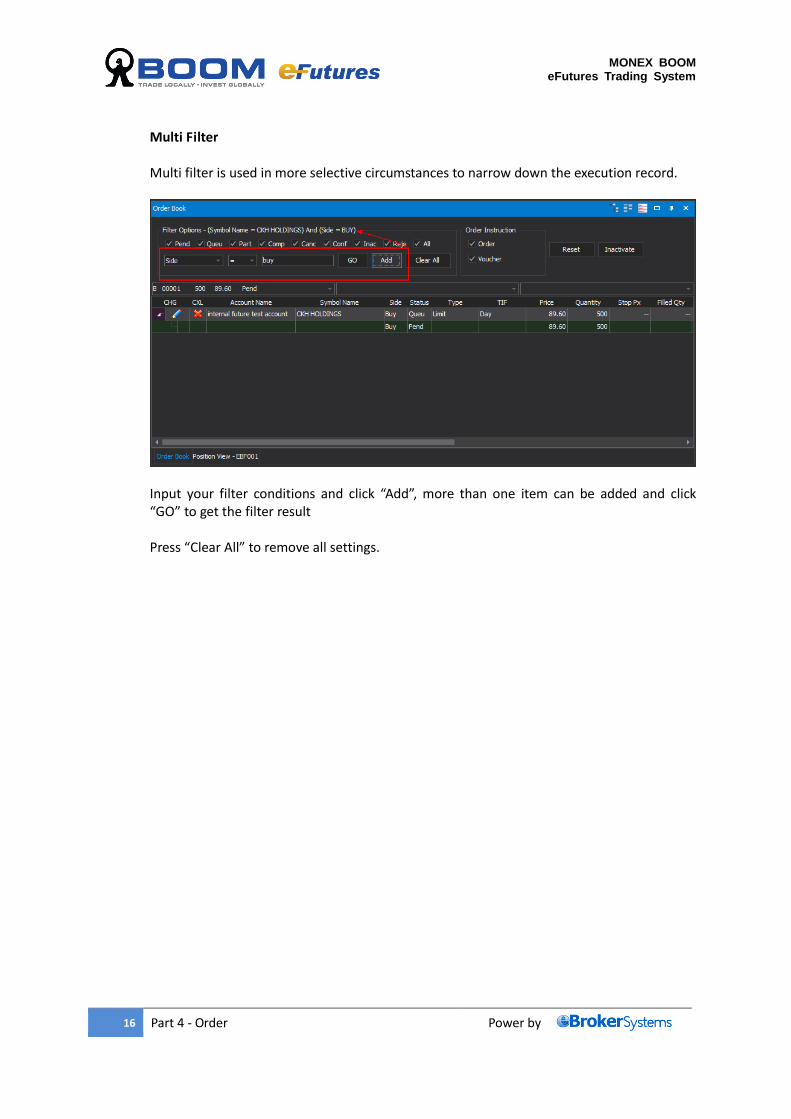
Multi Filter
Multi filter is used in more selective circumstances to narrow down the execution record.
Input your filter conditions and click “Add”, more than one item can be added and click “GO” to get the filter result Press “Clear All” to remove all settings.
MONEX BOOM eFutures Trading System
17 Part 4 - Order Power by
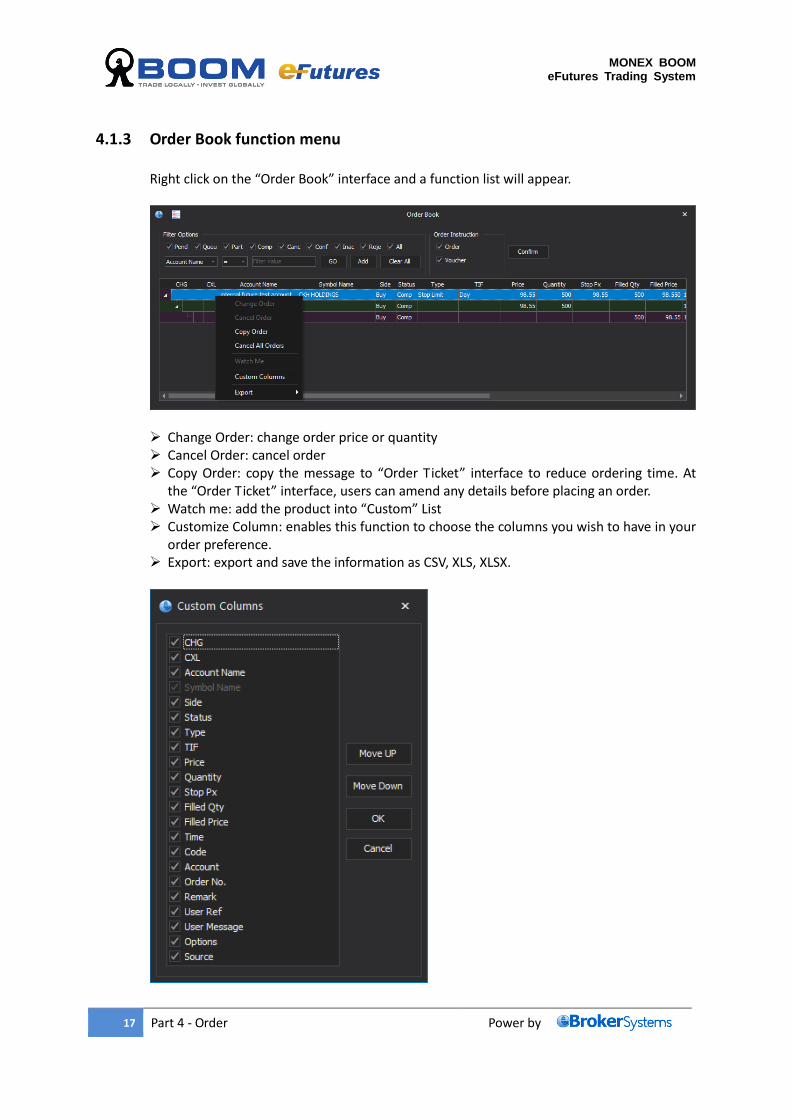
4.1.3 Order Book function menu
Right click on the “Order Book” interface and a function list will appear.
Change Order: change order price or quantity Cancel Order: cancel order Copy Order: copy the message to “Order Ticket” interface to reduce ordering time. At
the “Order Ticket” interface, users can amend any details before placing an order. Watch me: add the product into “Custom” List Customize Column: enables this function to choose the columns you wish to have in your
order preference. Export: export and save the information as CSV, XLS, XLSX.
MONEX BOOM eFutures Trading System
18 Part 4 - Order Power by
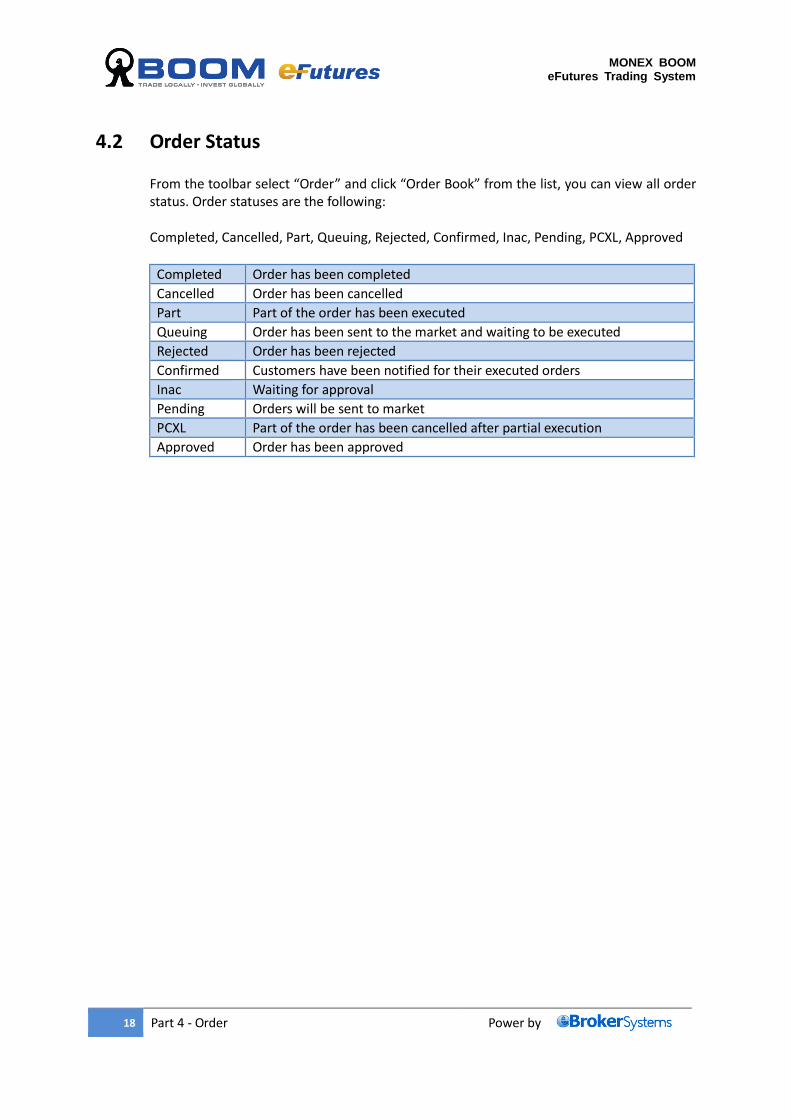
4.2 Order Status
From the toolbar select “Order” and click “Order Book” from the list, you can view all order status. Order statuses are the following: Completed, Cancelled, Part, Queuing, Rejected, Confirmed, Inac, Pending, PCXL, Approved
Completed Order has been completed
Cancelled Order has been cancelled
Part Part of the order has been executed
Queuing Order has been sent to the market and waiting to be executed
Rejected Order has been rejected
Confirmed Customers have been notified for their executed orders
Inac Waiting for approval
Pending Orders will be sent to market
PCXL Part of the order has been cancelled after partial execution
Approved Order has been approved
MONEX BOOM eFutures Trading System
19 Part 4 - Order Power by
4.3 Cancel or Change Order
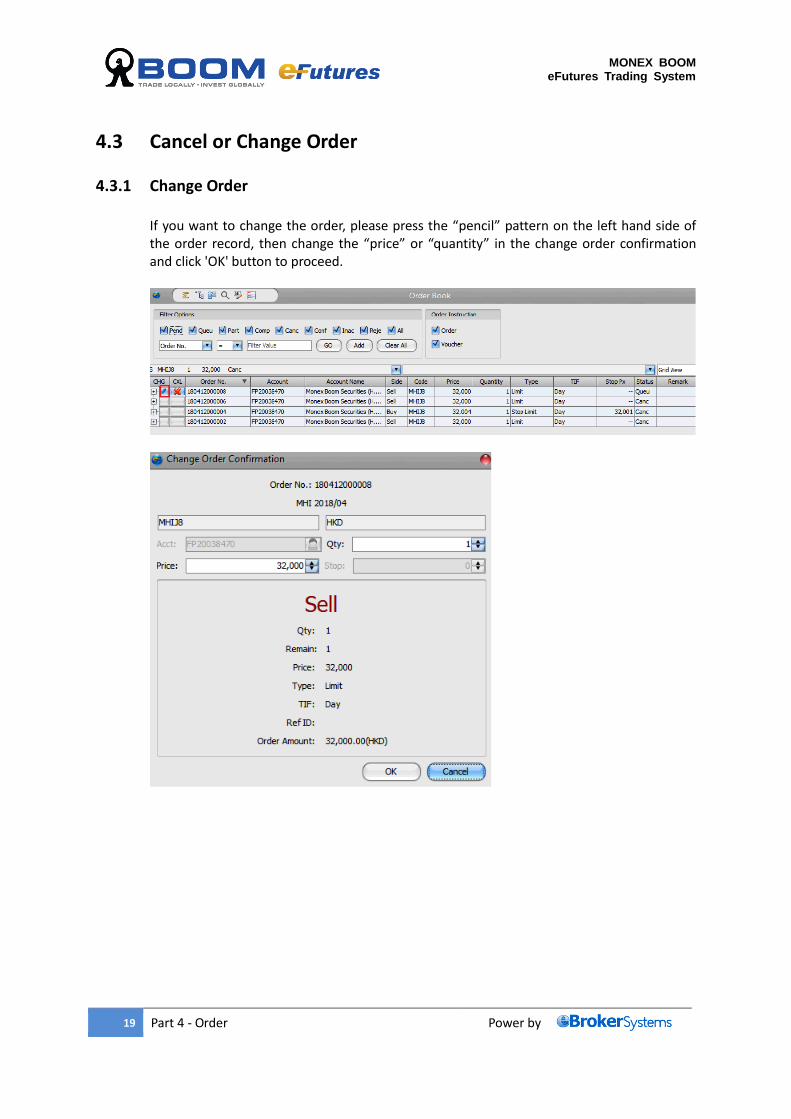
4.3.1 Change Order
If you want to change the order, please press the “pencil” pattern on the left hand side of the order record, then change the “price” or “quantity” in the change order confirmation and click 'OK' button to proceed.
MONEX BOOM eFutures Trading System
20 Part 4 - Order Power by
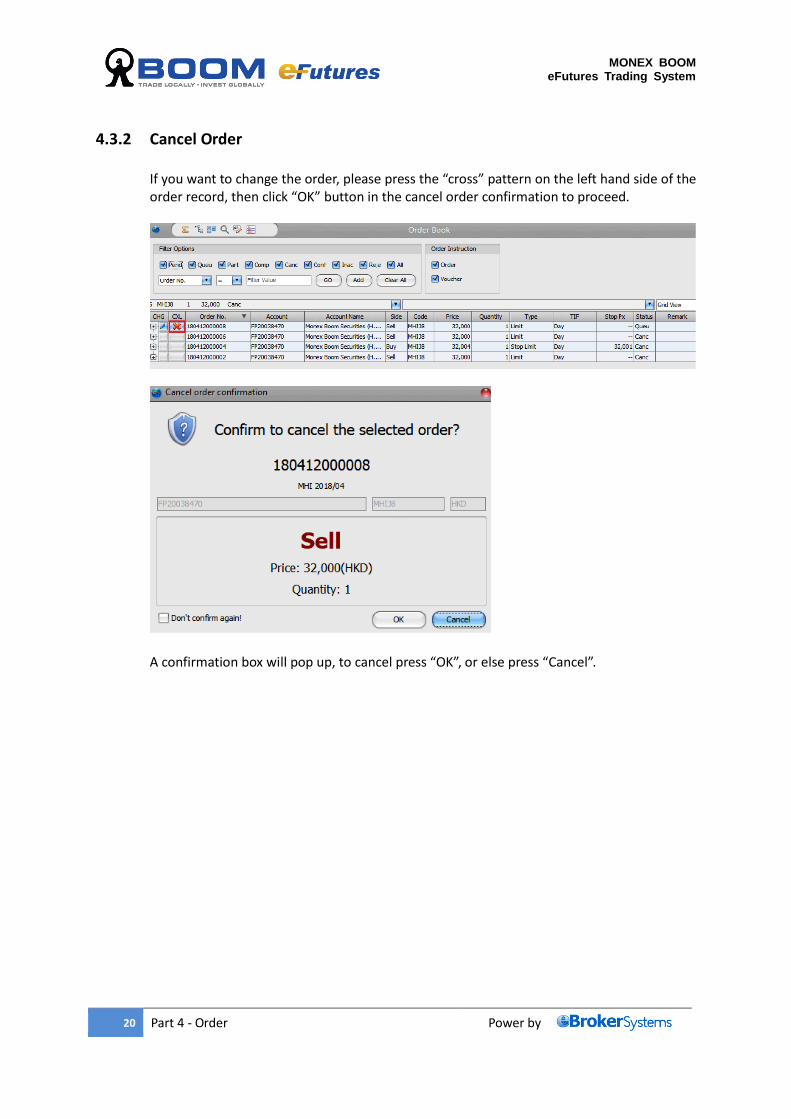
4.3.2 Cancel Order
If you want to change the order, please press the “cross” pattern on the left hand side of the order record, then click “OK” button in the cancel order confirmation to proceed.
A confirmation box will pop up, to cancel press “OK”, or else press “Cancel”.
MONEX BOOM eFutures Trading System
21 Part 4 - Order Power by
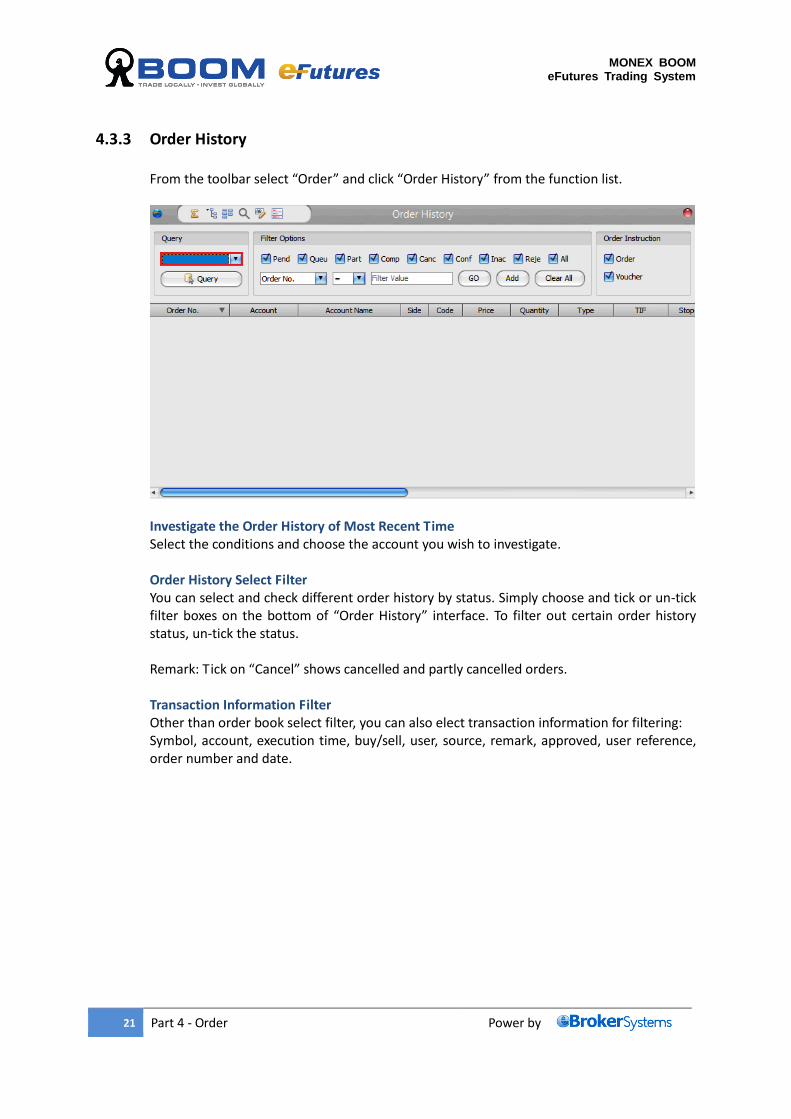
4.3.3 Order History
From the toolbar select “Order” and click “Order History” from the function list.
Investigate the Order History of Most Recent Time Select the conditions and choose the account you wish to investigate.
Order History Select Filter You can select and check different order history by status. Simply choose and tick or un-tick filter boxes on the bottom of “Order History” interface. To filter out certain order history status, un-tick the status. Remark: Tick on “Cancel” shows cancelled and partly cancelled orders.
Transaction Information Filter Other than order book select filter, you can also elect transaction information for filtering: Symbol, account, execution time, buy/sell, user, source, remark, approved, user reference, order number and date.
MONEX BOOM eFutures Trading System
22 Part 5 - Statistics and Reports Power by
Part 5 - Statistics and Reports
5.1 Reports
5.1.1 Trade Report
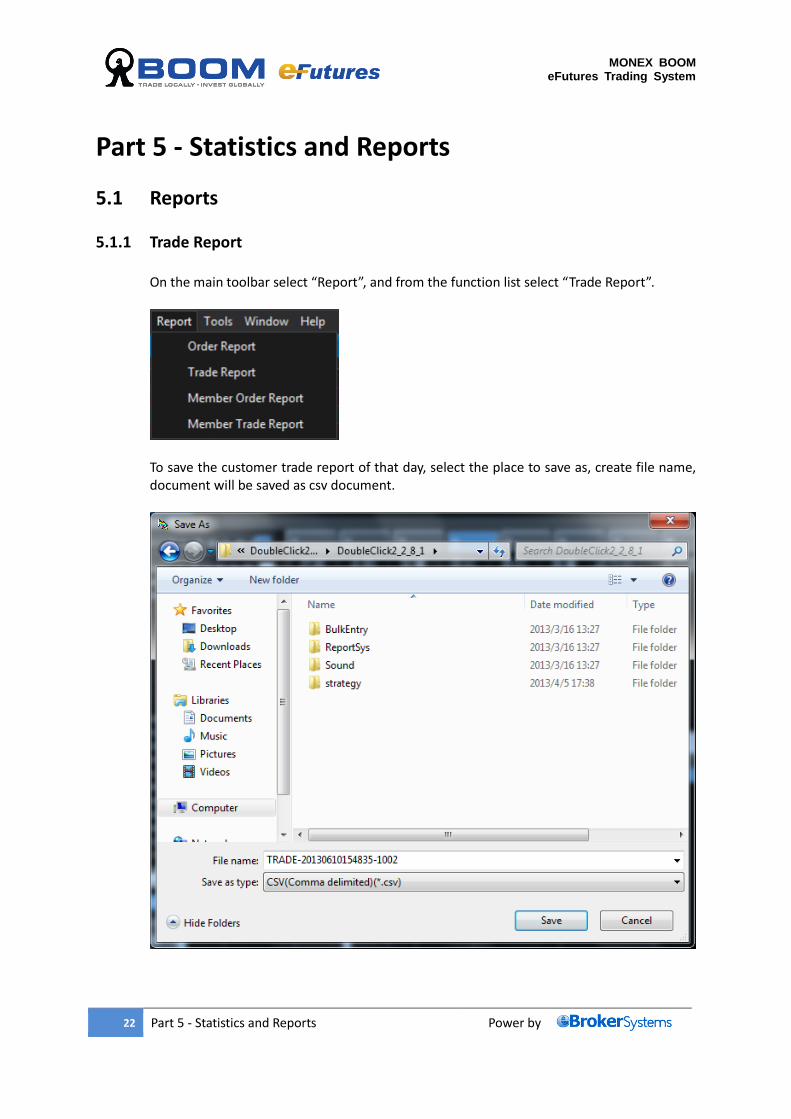
On the main toolbar select “Report”, and from the function list select “Trade Report”.
To save the customer trade report of that day, select the place to save as, create file name, document will be saved as csv document.
MONEX BOOM eFutures Trading System
23 Part 5 - Statistics and Reports Power by
5.1.2 Order Report
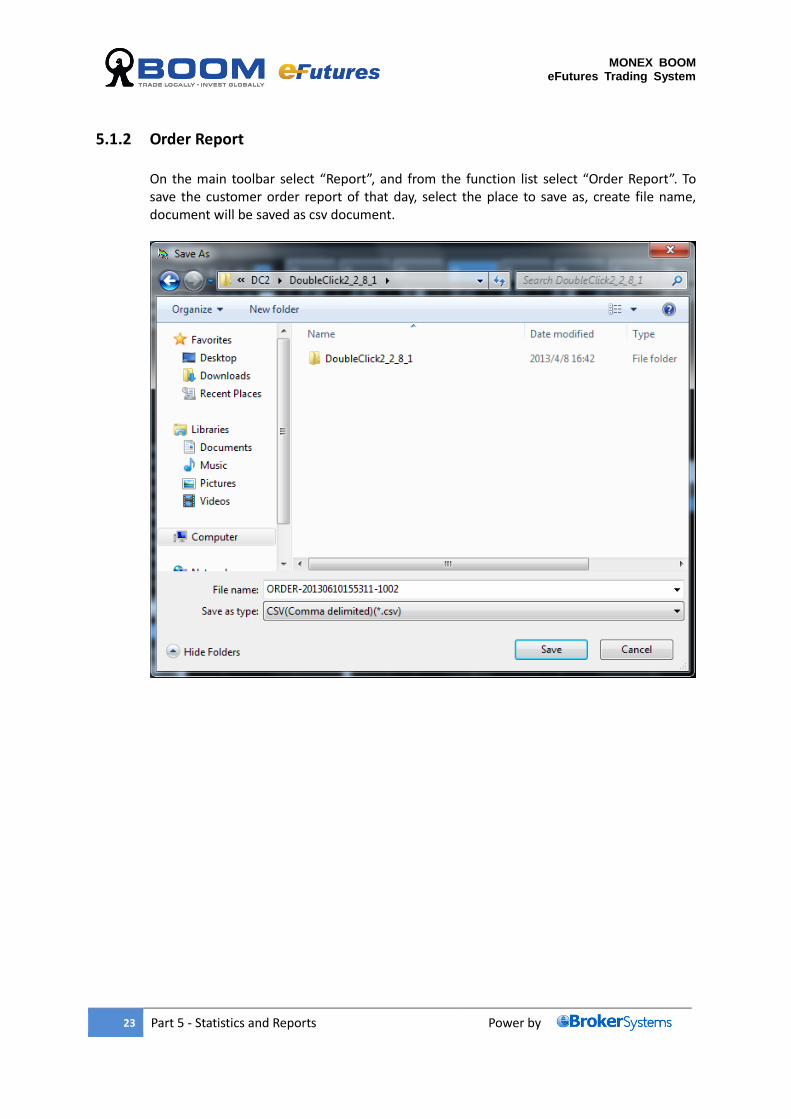
On the main toolbar select “Report”, and from the function list select “Order Report”. To save the customer order report of that day, select the place to save as, create file name, document will be saved as csv document.
MONEX BOOM eFutures Trading System
24 Part 6 - Account Power by
Part 6 - Account
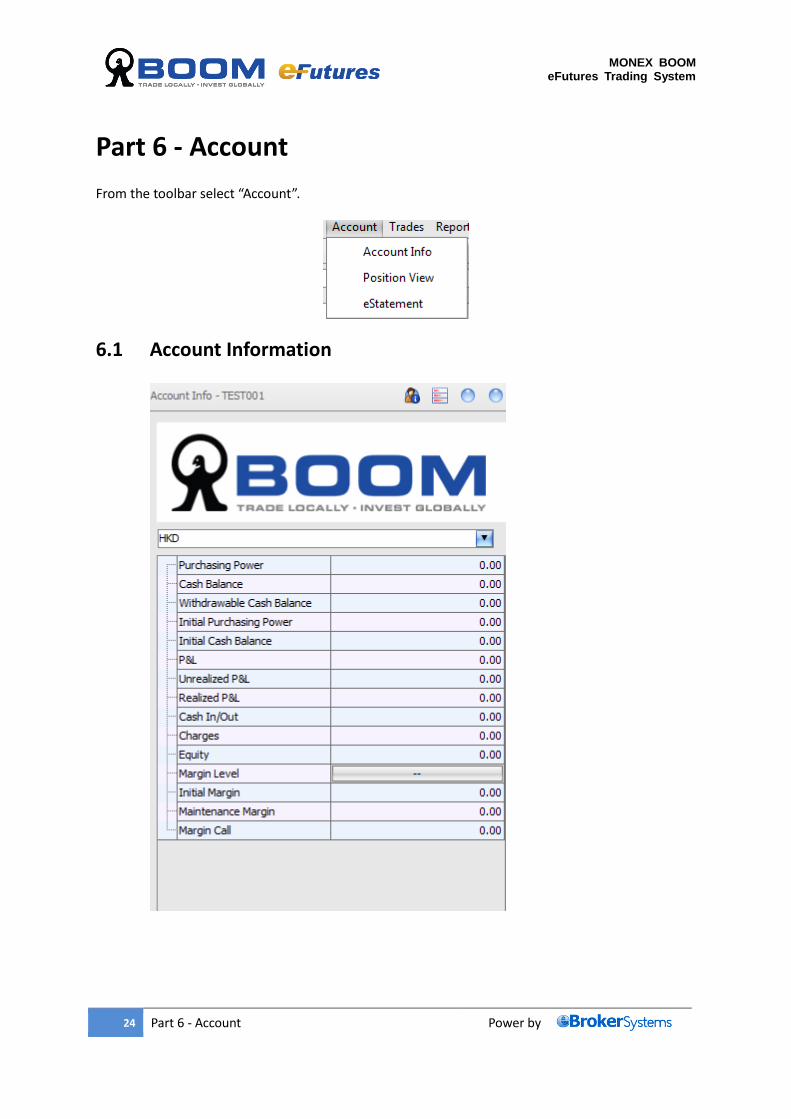
From the toolbar select “Account”.
6.1 Account Information
MONEX BOOM eFutures Trading System
25 Part 6 - Account Power by
Account Summary Details
Purchasing Power Available purchasing power Cash Balance Total amount of cash Initial Purchasing Power
Purchasing power at the beginning of the day
Initial Cash Balance Cash balance at the beginning of the day Cash In/Out Cash In-Cash Out Charges Commission and Fees (reference value) Equity Cash balance + Unrealized Profit and Loss Margin Call The amount of margin top up
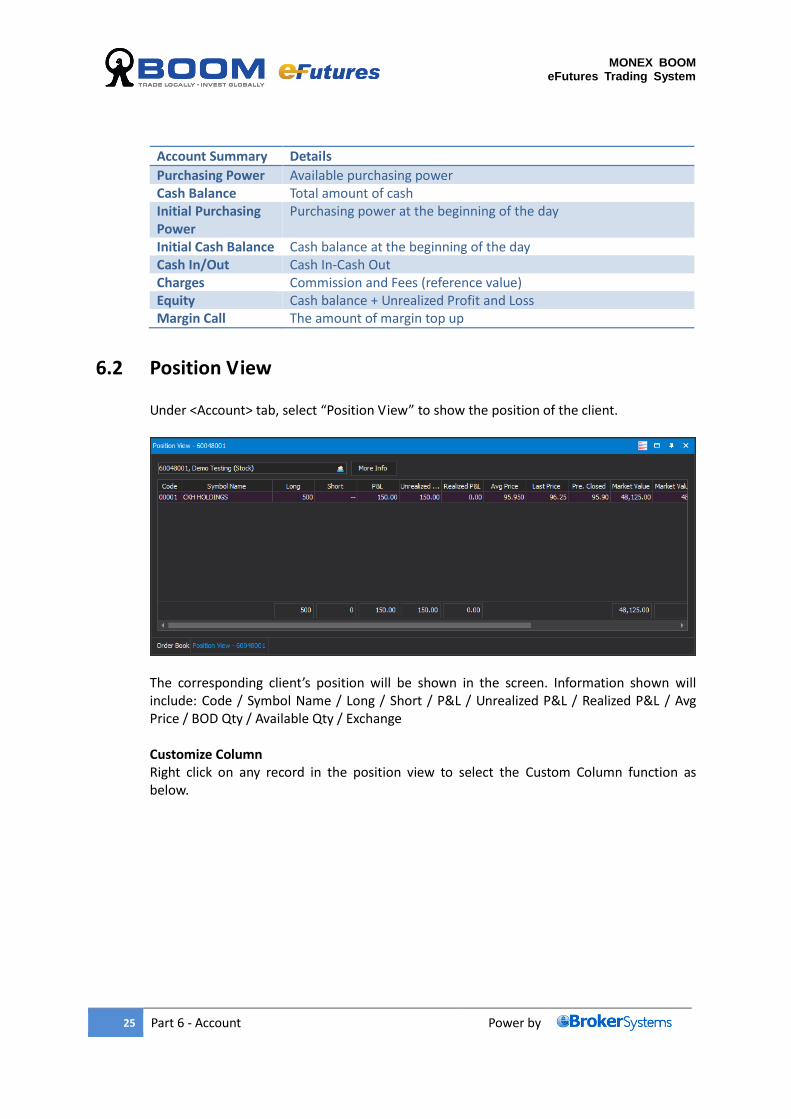
6.2 Position View
Under <Account> tab, select “Position View” to show the position of the client.
The corresponding client’s position will be shown in the screen. Information shown will include: Code / Symbol Name / Long / Short / P&L / Unrealized P&L / Realized P&L / Avg Price / BOD Qty / Available Qty / Exchange
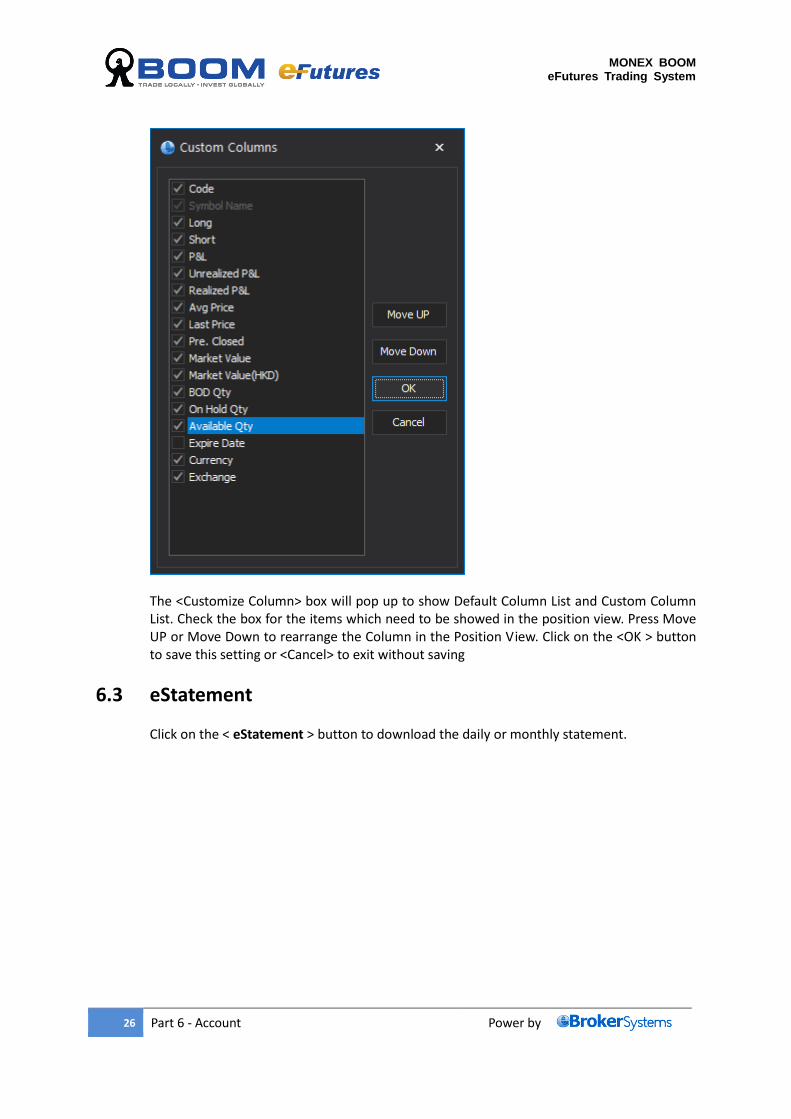
Customize Column Right click on any record in the position view to select the Custom Column function as below.
MONEX BOOM eFutures Trading System
26 Part 6 - Account Power by
The <Customize Column> box will pop up to show Default Column List and Custom Column List. Check the box for the items which need to be showed in the position view. Press Move UP or Move Down to rearrange the Column in the Position View. Click on the <OK > button to save this setting or <Cancel> to exit without saving
6.3 eStatement
Click on the < eStatement > button to download the daily or monthly statement.
MONEX BOOM eFutures Trading System
27 Part 7 - User Settings Power by
Part 7 - User Settings
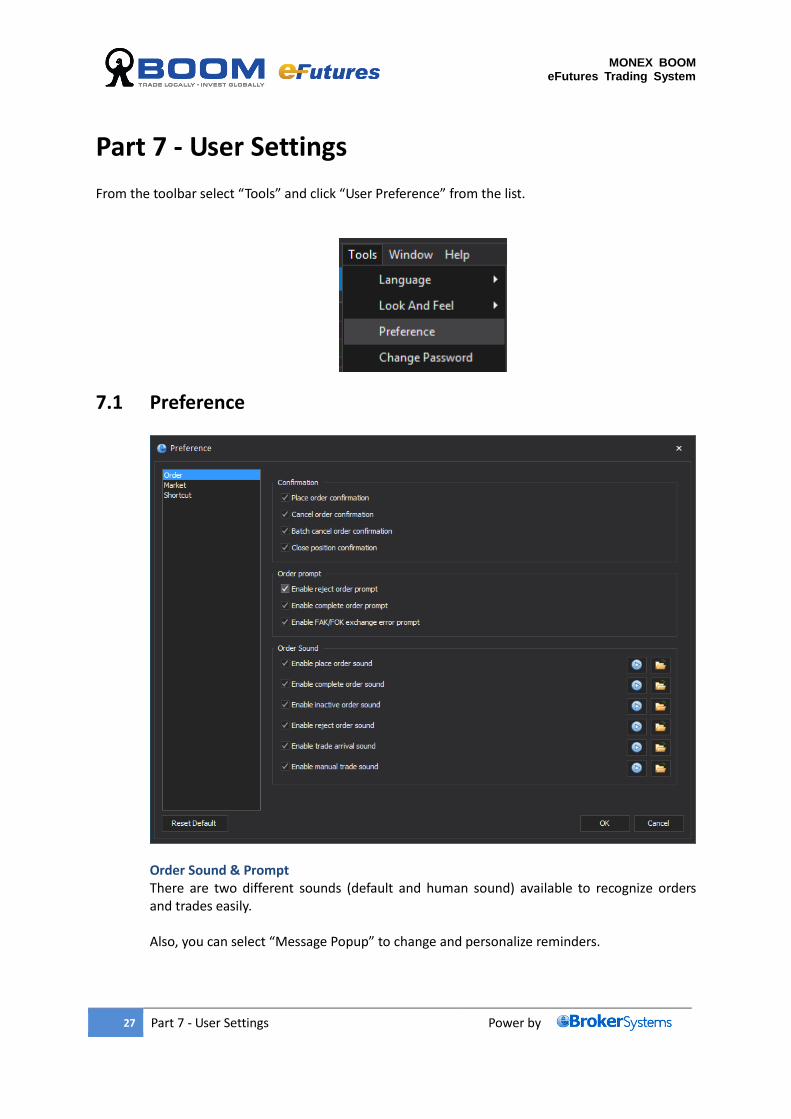
From the toolbar select “Tools” and click “User Preference” from the list.
7.1 Preference
Order Sound & Prompt There are two different sounds (default and human sound) available to recognize orders and trades easily. Also, you can select “Message Popup” to change and personalize reminders.
MONEX BOOM eFutures Trading System
28 Part 7 - User Settings Power by
7.2 Desktop Management and Shortcuts
7.2.1 Load and Save Desktop
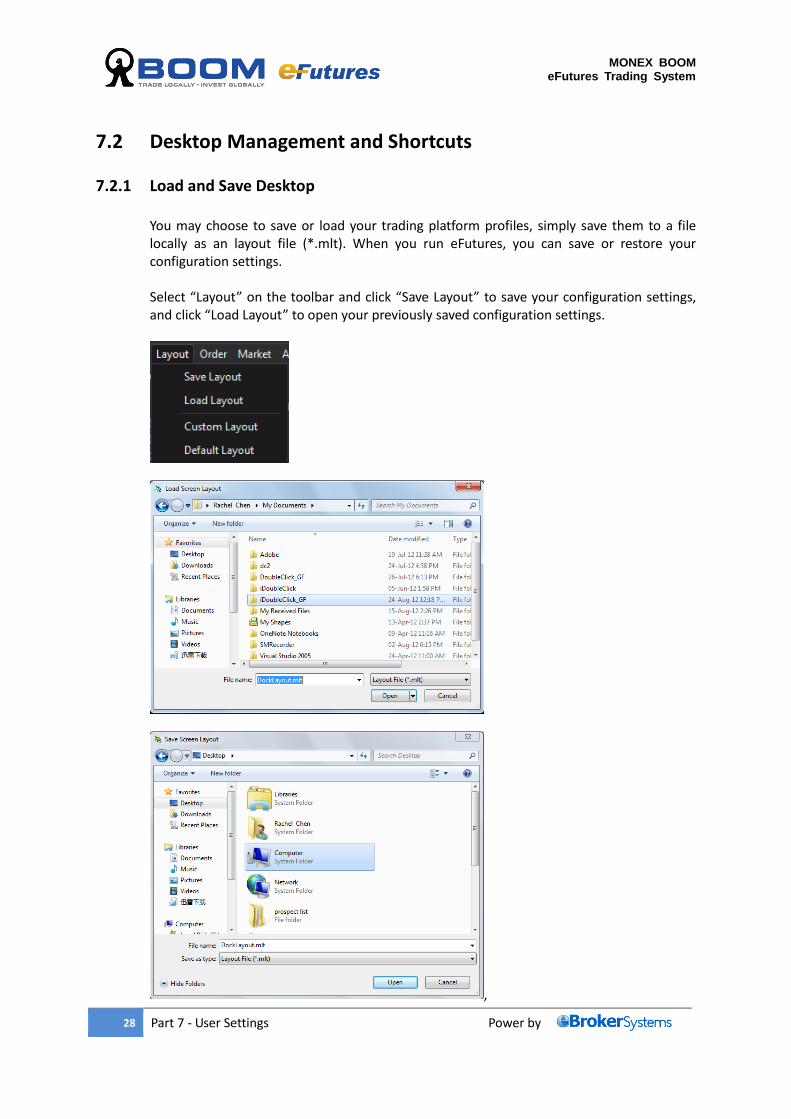
You may choose to save or load your trading platform profiles, simply save them to a file locally as an layout file (*.mlt). When you run eFutures, you can save or restore your configuration settings. Select “Layout” on the toolbar and click “Save Layout” to save your configuration settings, and click “Load Layout” to open your previously saved configuration settings.
,