Embed Size (px)
Citation preview

Optitex Installation Guide
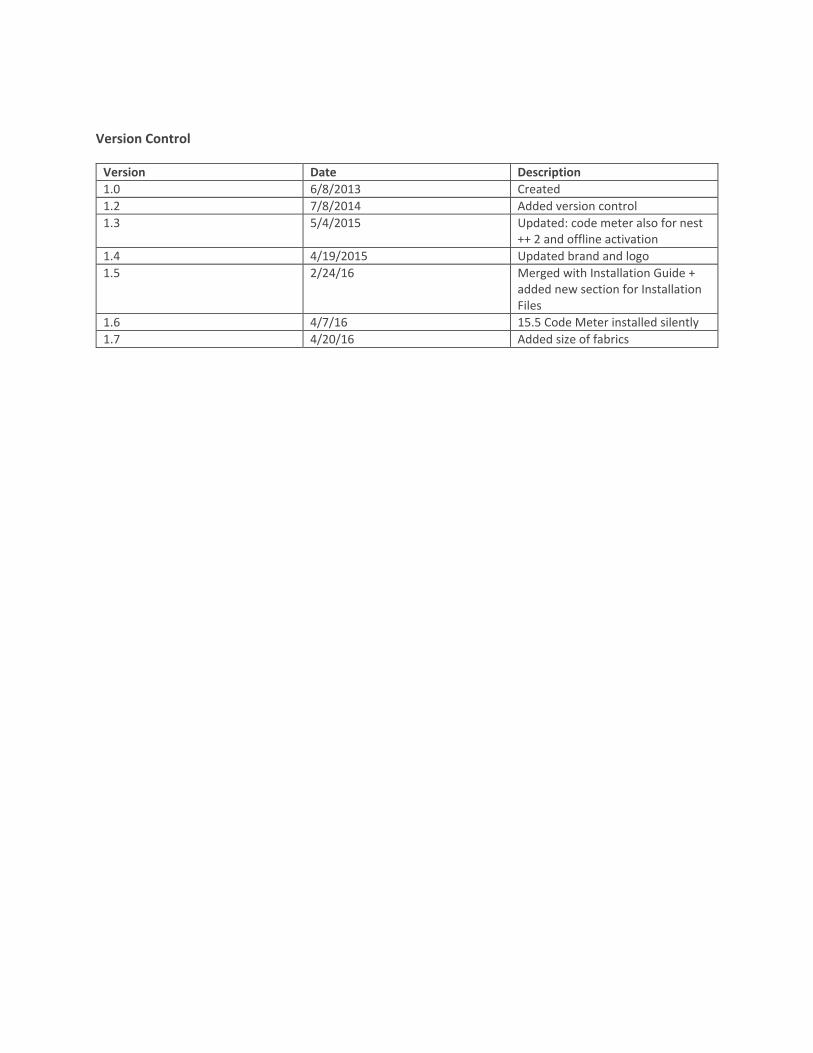
Version Control
Version Date Description
1.0 6/8/2013 Created
1.2 7/8/2014 Added version control
1.3 5/4/2015 Updated: code meter also for nest ++ 2 and offline activation
1.4 4/19/2015 Updated brand and logo
1.5 2/24/16 Merged with Installation Guide + added new section for Installation Files
1.6 4/7/16 15.5 Code Meter installed silently
1.7 4/20/16 Added size of fabrics
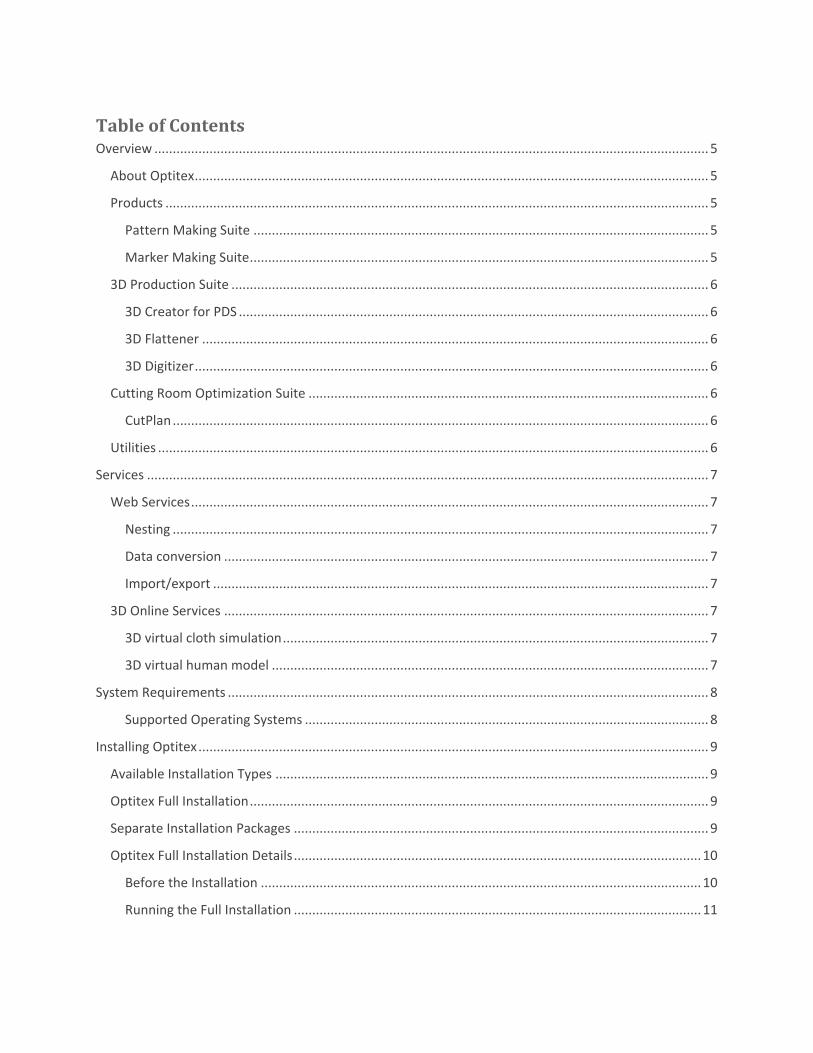
Table of Contents Overview ....................................................................................................................................................... 5
About Optitex ............................................................................................................................................ 5
Products .................................................................................................................................................... 5
Pattern Making Suite ............................................................................................................................ 5
Marker Making Suite ............................................................................................................................. 5
3D Production Suite .................................................................................................................................. 6
3D Creator for PDS ................................................................................................................................ 6
3D Flattener .......................................................................................................................................... 6
3D Digitizer ............................................................................................................................................ 6
Cutting Room Optimization Suite ............................................................................................................. 6
CutPlan .................................................................................................................................................. 6
Utilities ...................................................................................................................................................... 6
Services ......................................................................................................................................................... 7
Web Services ............................................................................................................................................. 7
Nesting .................................................................................................................................................. 7
Data conversion .................................................................................................................................... 7
Import/export ....................................................................................................................................... 7
3D Online Services .................................................................................................................................... 7
3D virtual cloth simulation .................................................................................................................... 7
3D virtual human model ....................................................................................................................... 7
System Requirements ................................................................................................................................... 8
Supported Operating Systems .............................................................................................................. 8
Installing Optitex ........................................................................................................................................... 9
Available Installation Types ...................................................................................................................... 9
Optitex Full Installation ............................................................................................................................. 9
Separate Installation Packages ................................................................................................................. 9
Optitex Full Installation Details ............................................................................................................... 10
Before the Installation ........................................................................................................................ 10
Running the Full Installation ............................................................................................................... 11

Advanced Nesting License Keys Installation ............................................................................................... 15
Nest ++ Pro License key Installation, Code Meter .................................................................................. 16
Nest ++ 2 License Key Installation, Sentinel Protection Installer ............................................................ 19
Settings & User Preferences Location ..................................................................................................... 24
Windows XP Folder Location .............................................................................................................. 24
Windows 7/8 folder location .............................................................................................................. 24
Uninstalling Optitex ................................................................................................................................ 24
Service Pack Installation Guidelines ........................................................................................................ 25
Command Line Installation ..................................................................................................................... 26
Before the Installation ........................................................................................................................ 26
Installation Files .......................................................................................................................................... 27
Fabric Files............................................................................................................................................... 27
Shaders .................................................................................................................................................... 30
Props ....................................................................................................................................................... 49
Adding Samples into the PDS .............................................................................................................. 49
Button Shapes ..................................................................................................................................... 51
Bag Handles ......................................................................................................................................... 54
Buttons ................................................................................................................................................ 57
Segment Shapes ...................................................................................................................................... 63
Binding ................................................................................................................................................ 64
Decorations ......................................................................................................................................... 65
Pipes .................................................................................................................................................... 66
Seam Bumps ........................................................................................................................................ 67
Stitch Flat Lock .................................................................................................................................... 68
Stitch Lock ........................................................................................................................................... 69
Stitch Overlock .................................................................................................................................... 70
Welting ................................................................................................................................................ 71
Zippers ................................................................................................................................................. 72
Fur ....................................................................................................................................................... 73
Proprietary information of Optitex ©2015 |5|
Overview This document provides descriptions and details of the whole range of Optitex products, components
and services. It includes information about the different installation packages and installation modes.
This documented is intended for IT personnel, trainers, or for anyone who is interested in Optitex.
About Optitex
Optitex is a leading provider of 3D Virtual Prototyping & 2D CAD/CAM software solutions for the
apparel, automotive, aeronautics, industrial fabrics and upholstery industries. Optitex presents these
industries with innovative, open and easy to use products that are designed to facilitate collaboration
among the various partners throughout the manufacturing process. Optitex allows its customers to
significantly lower costs, quicken time to market, and become more competitive.
Since its founding in 1988, Optitex software solutions have been sold and supported around the world
through certified distributors and OEMs. Optitex solutions are available in over 20 languages and
integrate seamlessly into most operating environments.
Products
Optitex offers a number of products that can be used during the various stages of pattern making,
grading, marking, etc. All of the Optitex products are divided into suites:
Pattern Making Suite
Pattern Design System (PDS)
Optitex’s powerful Pattern Design System (PDS) allows you to easily create new styles, or use existing
patterns to design your patterns. PDS provides a full suite of features and functions that are designed
with sewing product manufacturers in mind.
Grading
Optitex unique intuitive, automatic, and manual Grading software, combined with sophisticated
features, makes even the most difficult grading task swift and accurate.
Digitizer
Optitex exceptional interactive Digitizer software allows you to see your patterns on screen while they
are being digitized.
Marker Making Suite
Marker
Optitex’s textile Mark Module is designed to maximize productivity and minimize labor and material
costs. Offering a highly developed and evolved interface, including customizable toolbars, Marker can
save you time and money while cutting down on wasted fabric.
Proprietary information of Optitex ©2015 |6|
Nest++ 2
Advanced Automatic Nesting. Optimize your materials with Optitex’s Nest++2. Nest++2 Incorporates an
intelligent algorithm for nesting, thus delivering comparable and better results than those achieved
manually.
Match++
Match++ is a fully automatic Matched Fabric Nesting System for manufacturers of upholstery, apparel
and industrial fabrics who routinely work with striped, plaid, railroaded and flow-matched fabrics. The
extraordinary speed and accuracy of Match++ makes it beneficial for use in both manual and automated
cutting.
3D Production Suite
3D Creator for PDS
Directly in PDS, you can easily drape your patterns on one of the several models included in the software
or on your own model.
3D Flattener
Enables on-screen transformation of three-dimensional objects’ surface into two-dimensional patterns
that make up the draped object. Use 3D Flattening to reduce Time-to-Market.
3D Digitizer
Allows the user to digitize in 3D view and see the results on the 2D pieces.
Cutting Room Optimization Suite
CutPlan
Optitex’s CutPlan optimizes cutting-room operations by automatically creating a cut order from input
data, and by grouping sizes that should be placed within the same marker and cut together. The
required number of plies is computed to fulfill the order requirements for each marker.
Utilities
Direct Converters: The Converters read and convert CAD files, such as the Gerber, Lectra,
Investronica and Microdynamics native formats, directly into an Optitex format, while maintaining
piece, model and order data. Direct Converters save precious time by eliminating data transfer
difficulties that can occur while using standard transfer formats, such as DXF and AAMA, even when
used by inexperienced operators.
Import/Export: Ten different file formats are importable, while over twenty formats are exportable.
Whether using automatic cutting machinery, plotting devices, or other software applications,
Proprietary information of Optitex ©2015 |7|
Optitex will generate a file format acceptable to that system. Supported file formats include: DXF,
AAMA, ASTM, NC, HPGL, HPGL-2, MicroJet and more.
3D Viewer: The Optitex Viewer utility allows anyone to open and view 3D content without the need
to install the full Optitex package. The Viewer works on all Windows environments, namely
Windows XP, Windows 7 and Windows 8.
2D Viewer: View and plot or cut PDS and marker files.
Services
Web Services
Optitex web services allow anyone to use the advanced functionality on demand.
For more information, see https://ws.optitex.com/OptiTexWebApplication/Pages/Homepage.aspx
Nesting
Use the powerful nesting capabilities to optimize your markers.
Data conversion
Convert common CAD system files directly to Optitex formats.
Import/export
Import and export standard data exchange formats.
3D Online Services
3D virtual cloth simulation
http://3dvirtualclothing.optitex.com/
3D virtual human model
https://ws.optitex.com/optitexwebapplication/demo/snapmodel.aspx

Proprietary information of Optitex ©2015 |8|
System Requirements You must make sure your machine meets the minimum requirements to ensure a clean installation and
better performance.
For more information see, Optitex System Requirements.
Supported Operating Systems
Since new operating systems are released constantly, check this list to see which operating systems are
supported.
For more information, see Supported Operating Systems.
Note: Installation must be carried out by a user with administrative permissions.
Proprietary information of Optitex ©2015 |9|
Installing Optitex
Available Installation Types
When installing Optitex, you can either install a full version or a service pack. You should use the full
installations when starting from scratch or when upgrading entire versions, for example from version
11.4 to version 12.0.You should use service packs to apply minor upgrades or fixes, for example from
version 11.2 to version 11.4.
Optitex Full Installation
The Optitex full installation should be used for new main versions, or when installing from scratch.
The installation packages should also be downloaded.
The following components are available when using the full installation: (Some of the components have
individual installation packages; see the section below for more information)
1. PDS: Pattern Design System
2. Marker: Marker making & nesting system
3. Direct converters: Covert commonly used CAD system files directly to Optitex format, or export from
Optitex to other formats
4. Data Exchange: Import and export universal data exchange format
5. Optitex 2D Viewer: View and plot 2D files
6. Runway Viewer: View 3D files interactively
7. Utilities
1. License Manager
2. HASP RUS Network license key update utility
3. Select language
4. Remote support utility (using Team Viewer)
5. Optitex Batch Creator: batch utility
8. Output utilities: used to configure and manage plotting and cutting
1. Outman
2. OCC
Separate Installation Packages
Cut Plan: Optimize cutting operations (requires additional license key)
Sample Pack: Containing a large variety of 2D & 3D samples (this is separate from the samples that
are included by default.
Plugins
Proprietary information of Optitex ©2015 |10|
Optitex Full Installation Details
The full installation package should be executed using the EXE file (and not the MSI file).
The Optitex installation requires the following Microsoft components:
Microsoft .NET Framework 4 Client Profile
Microsoft .NET Framework 4 Extended
Microsoft Visual C++ 2005 redistributable
Microsoft Visual C++ 2008 redistributable –X86
Microsoft Visual C++ 2010 X86 redistributable
If your system is missing one or more of these components, they will be installed prior to the Optitex
package.
Important: The available MSI installation file should only be used in command line
installations. It does not supply the above Microsoft components. Installing the MSI on a system
missing one or more of the prerequisites will result in a non-usable Optitex installation.
Before the Installation
1. Verify that your system specifications are within the Recommended System Requirements.
2. Download and unzip the installation file and have them ready.
3. Don’t plug-in your license keys before the installation. The installation package contains the license
key drivers.
Note: Older versions may be left intact. You may use them for as long as needed before you
remove them.
Proprietary information of Optitex ©2015 |11|
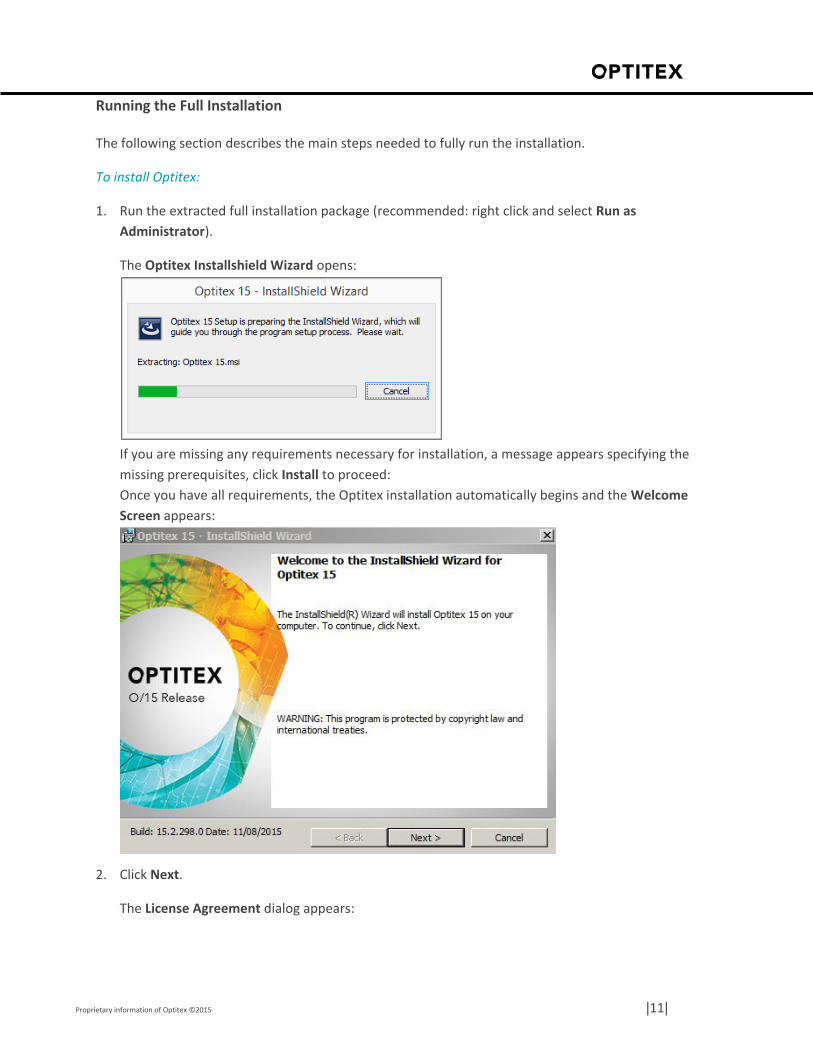
Running the Full Installation
The following section describes the main steps needed to fully run the installation.
To install Optitex:
1. Run the extracted full installation package (recommended: right click and select Run as
Administrator).
The Optitex Installshield Wizard opens:
If you are missing any requirements necessary for installation, a message appears specifying the
missing prerequisites, click Install to proceed:
Once you have all requirements, the Optitex installation automatically begins and the Welcome
Screen appears:
2. Click Next.
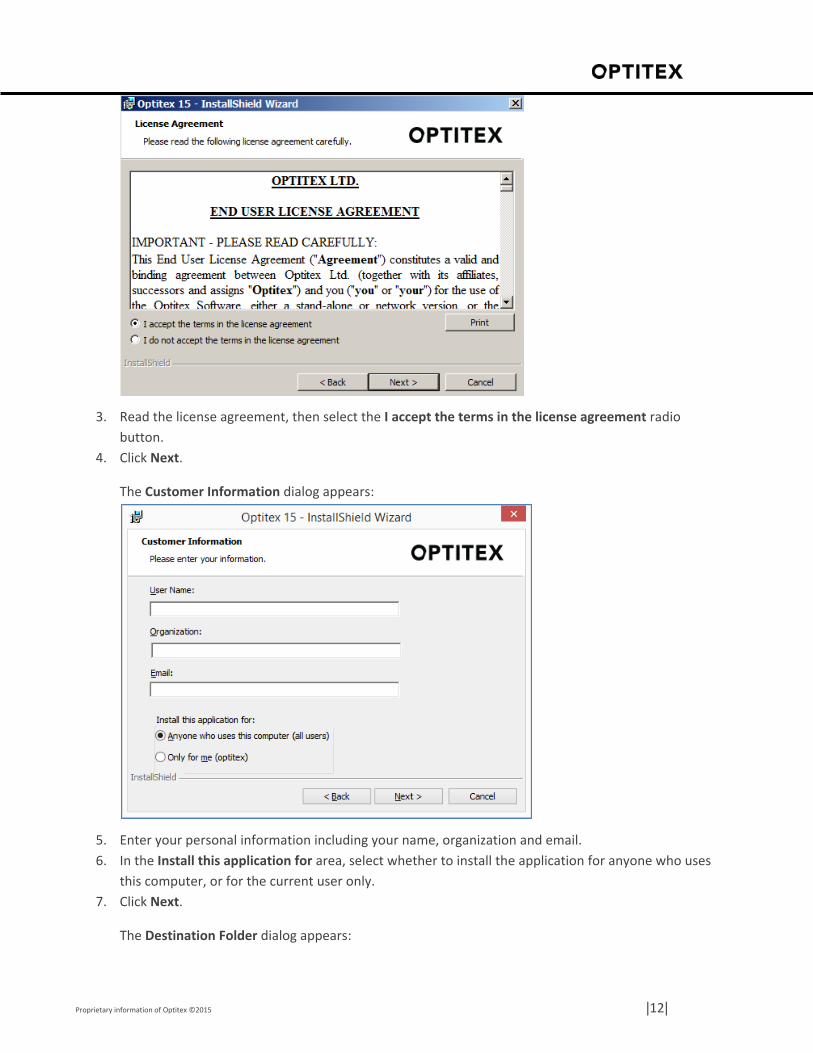
The License Agreement dialog appears:
Proprietary information of Optitex ©2015 |12|
3. Read the license agreement, then select the I accept the terms in the license agreement radio
button.
4. Click Next.
The Customer Information dialog appears:
5. Enter your personal information including your name, organization and email.
6. In the Install this application for area, select whether to install the application for anyone who uses
this computer, or for the current user only.
7. Click Next.
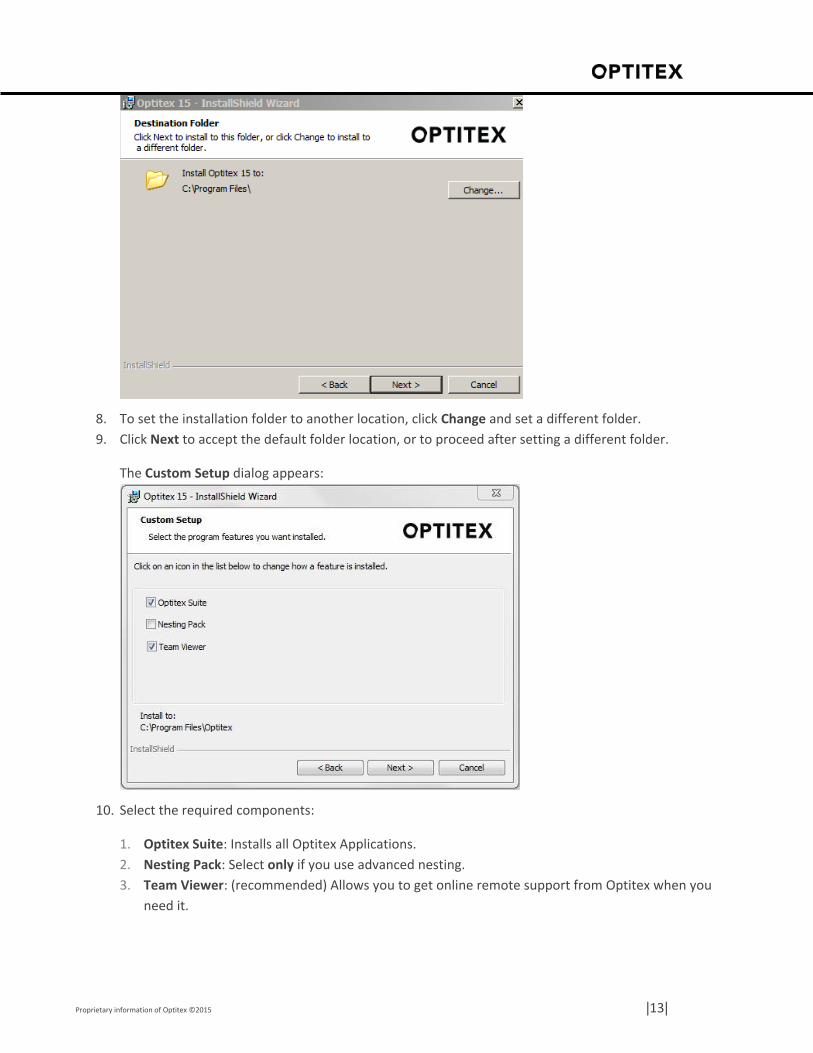
The Destination Folder dialog appears:
Proprietary information of Optitex ©2015 |13|
8. To set the installation folder to another location, click Change and set a different folder.
9. Click Next to accept the default folder location, or to proceed after setting a different folder.
The Custom Setup dialog appears:
10. Select the required components:
1. Optitex Suite: Installs all Optitex Applications.
2. Nesting Pack: Select only if you use advanced nesting.
3. Team Viewer: (recommended) Allows you to get online remote support from Optitex when you
need it.
Proprietary information of Optitex ©2015 |14|
Note: If you need to add a component later (e.g. nesting pack), you can run the same installation
package again, chose Modify, and select the required component.
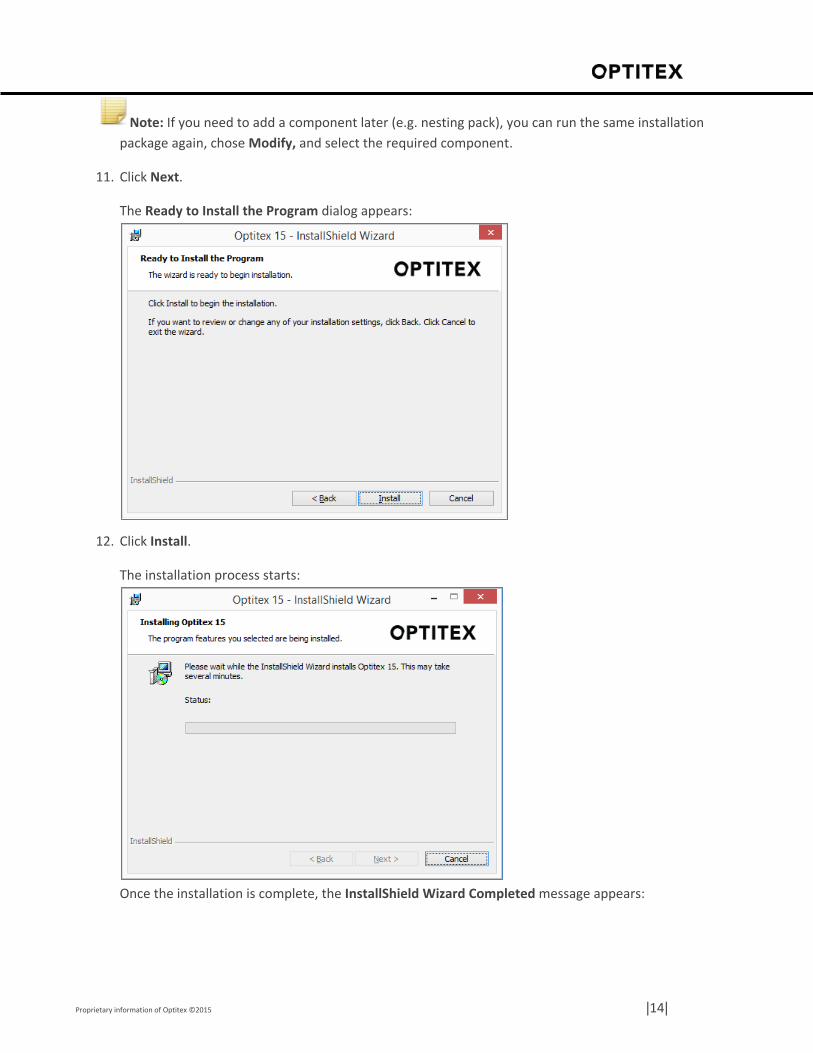
11. Click Next.
The Ready to Install the Program dialog appears:
12. Click Install.
The installation process starts:
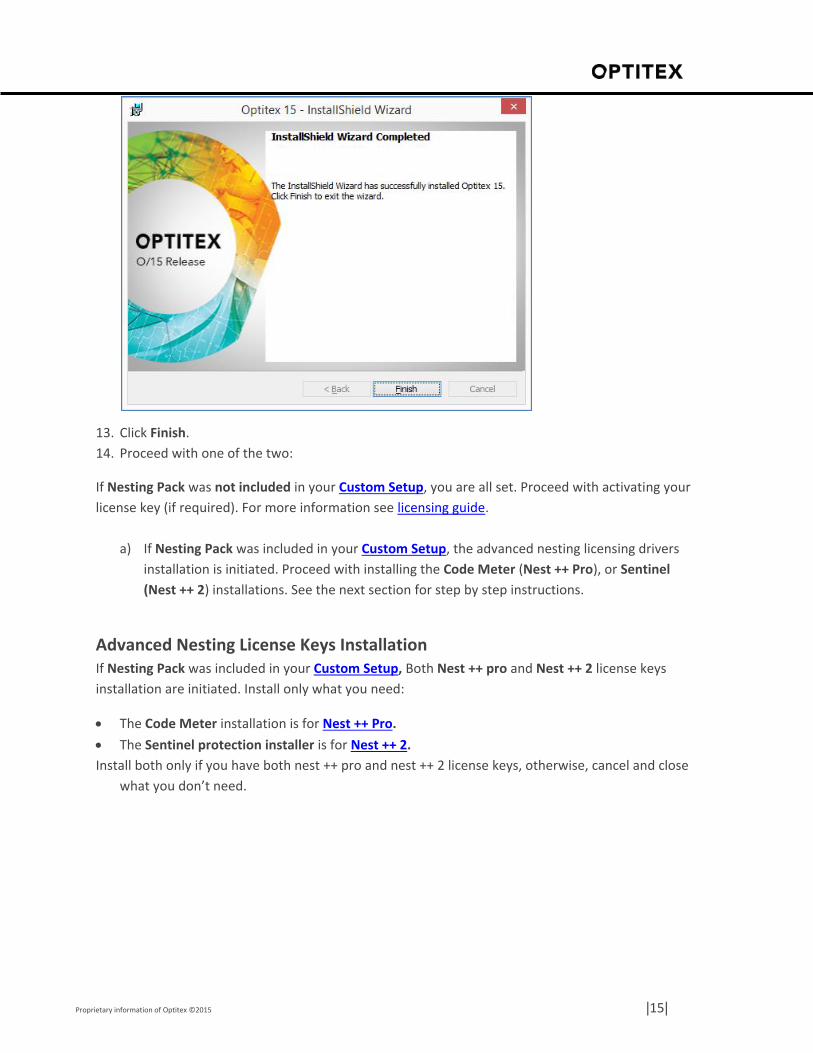
Once the installation is complete, the InstallShield Wizard Completed message appears:
Proprietary information of Optitex ©2015 |15|
13. Click Finish.
14. Proceed with one of the two:
If Nesting Pack was not included in your Custom Setup, you are all set. Proceed with activating your
license key (if required). For more information see licensing guide.
a) If Nesting Pack was included in your Custom Setup, the advanced nesting licensing drivers
installation is initiated. Proceed with installing the Code Meter (Nest ++ Pro), or Sentinel
(Nest ++ 2) installations. See the next section for step by step instructions.
Advanced Nesting License Keys Installation If Nesting Pack was included in your Custom Setup, Both Nest ++ pro and Nest ++ 2 license keys
installation are initiated. Install only what you need:
The Code Meter installation is for Nest ++ Pro.
The Sentinel protection installer is for Nest ++ 2.
Install both only if you have both nest ++ pro and nest ++ 2 license keys, otherwise, cancel and close
what you don’t need.
Proprietary information of Optitex ©2015 |16|
Nest ++ Pro License key Installation, Code Meter
Note: Starting from O/15.5 you no longer need to install the Code Meter separately; it will be
automatically installed silently if the Nesting Pack has been selected. It will be available several minutes
after the installation completes.
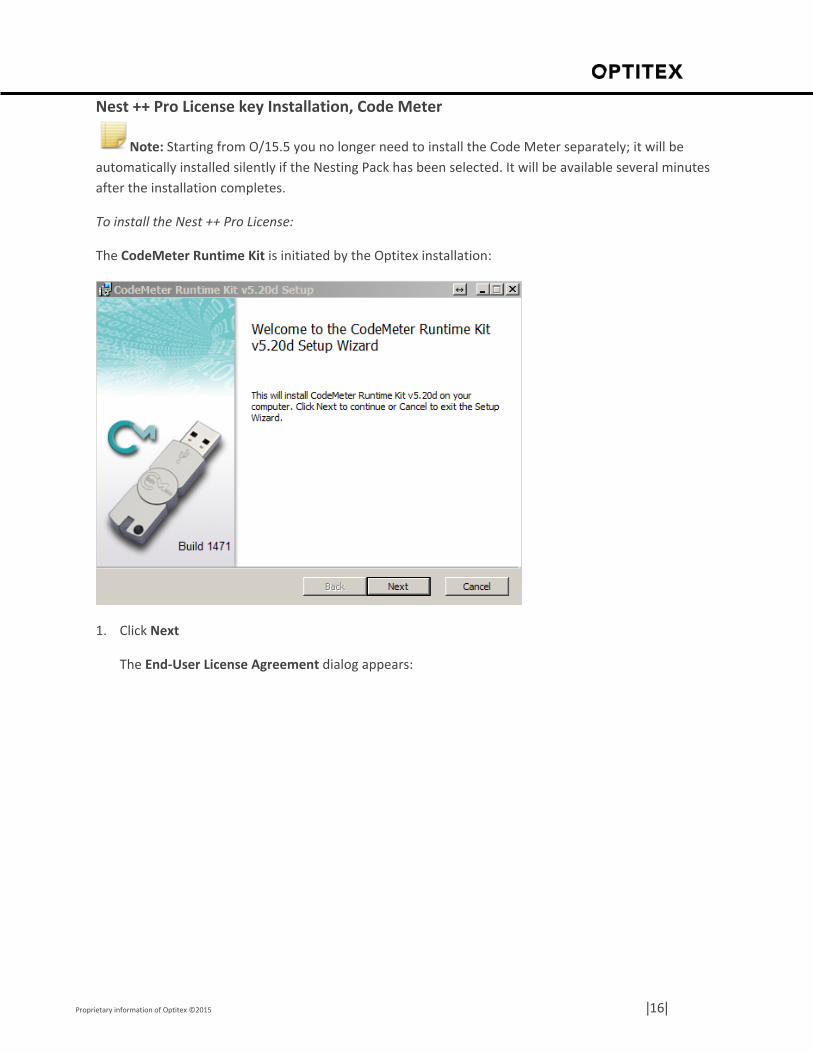
To install the Nest ++ Pro License:
The CodeMeter Runtime Kit is initiated by the Optitex installation:
1. Click Next
The End-User License Agreement dialog appears:
Proprietary information of Optitex ©2015 |17|
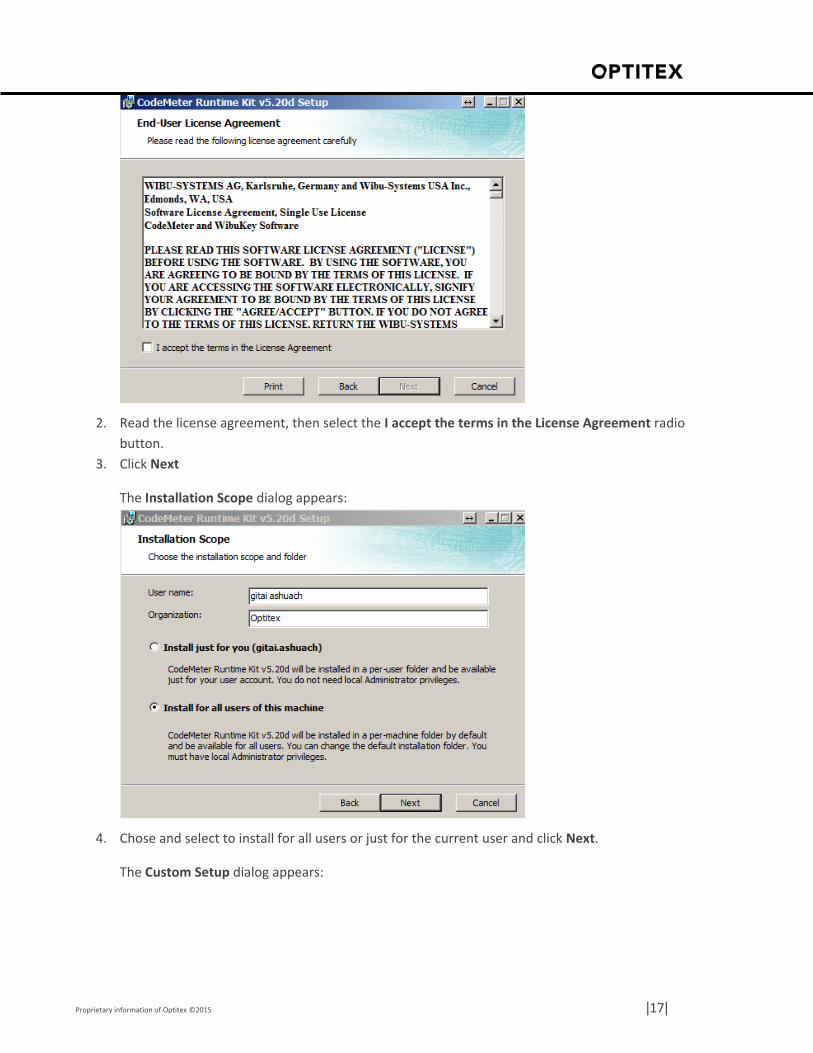
2. Read the license agreement, then select the I accept the terms in the License Agreement radio
button.
3. Click Next
The Installation Scope dialog appears:
4. Chose and select to install for all users or just for the current user and click Next.
The Custom Setup dialog appears:
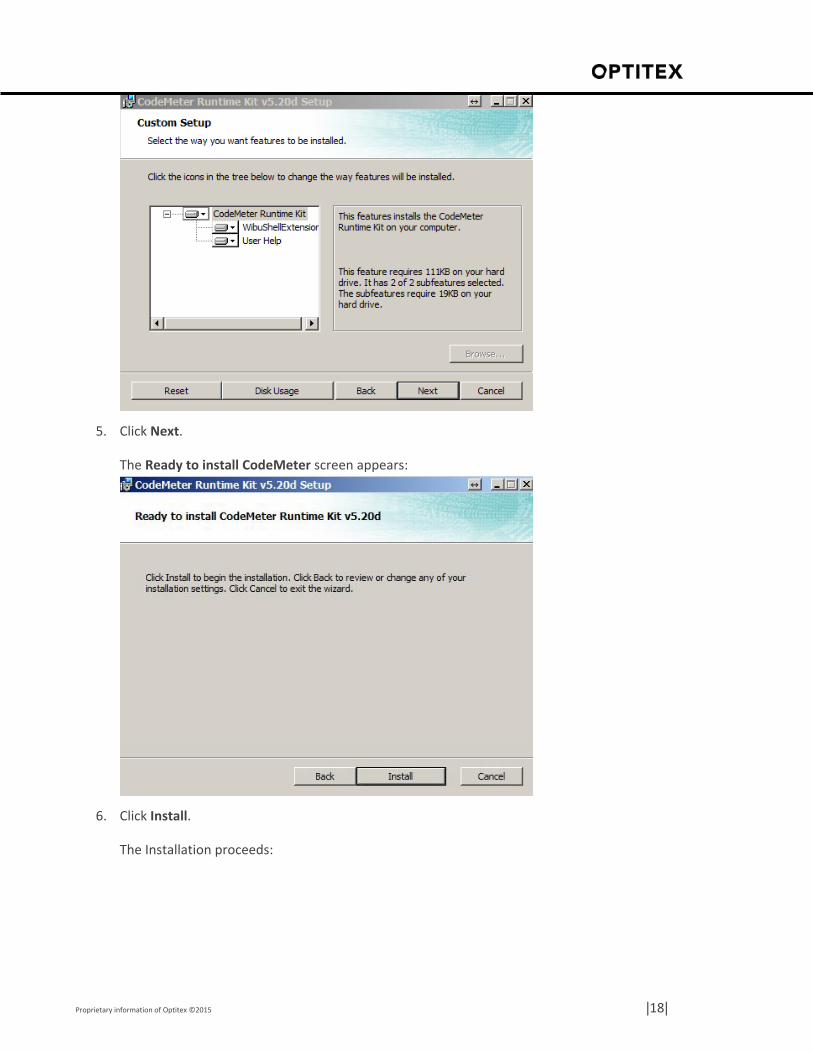
Proprietary information of Optitex ©2015 |18|
5. Click Next.
The Ready to install CodeMeter screen appears:
6. Click Install.
The Installation proceeds:
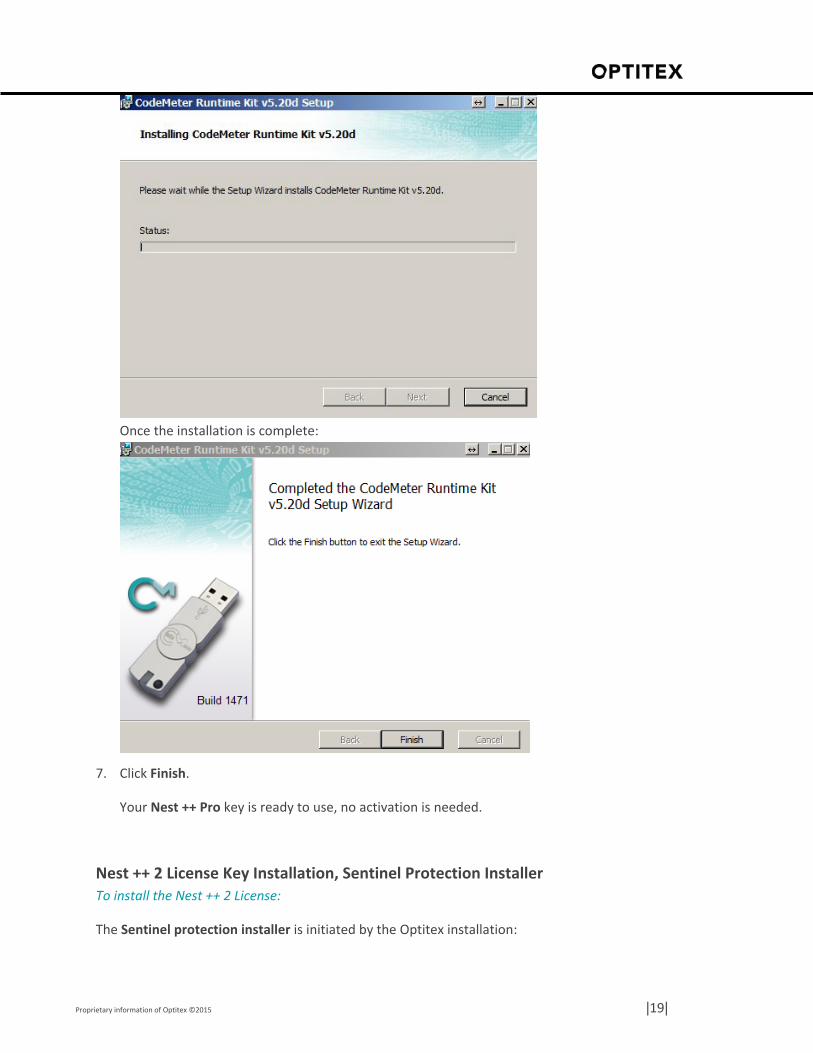
Proprietary information of Optitex ©2015 |19|
Once the installation is complete:
7. Click Finish.
Your Nest ++ Pro key is ready to use, no activation is needed.
Nest ++ 2 License Key Installation, Sentinel Protection Installer
To install the Nest ++ 2 License:
The Sentinel protection installer is initiated by the Optitex installation:
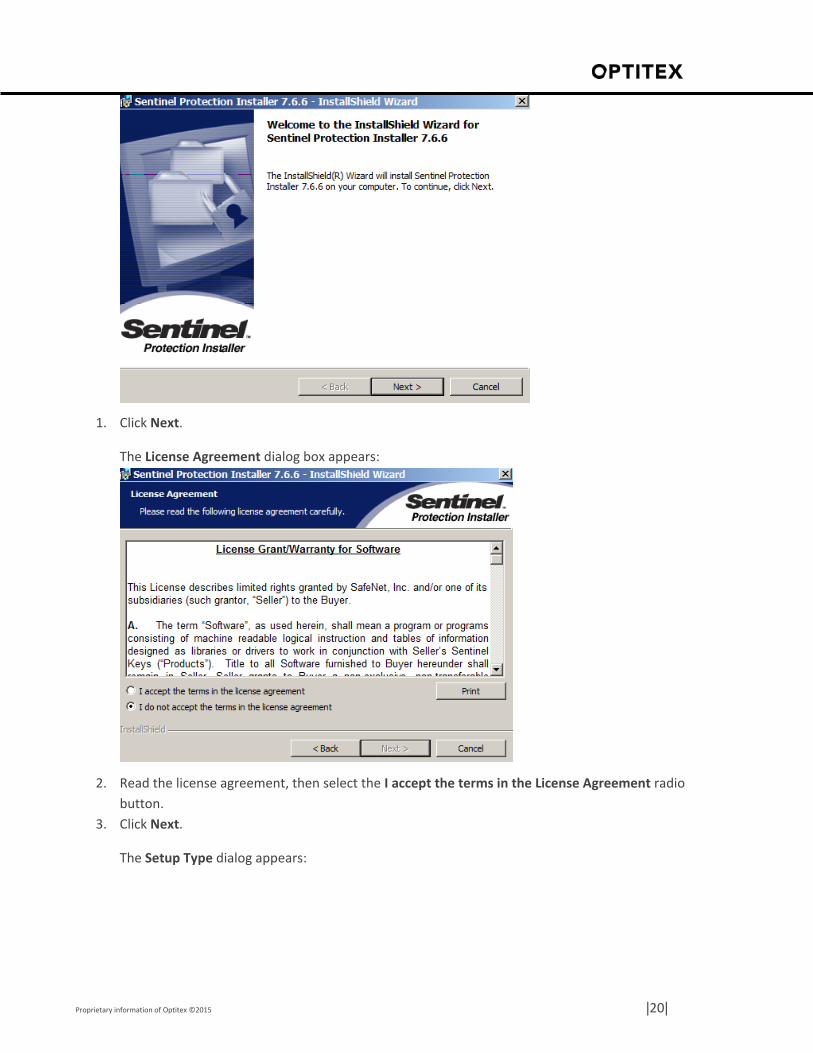
Proprietary information of Optitex ©2015 |20|
1. Click Next.
The License Agreement dialog box appears:
2. Read the license agreement, then select the I accept the terms in the License Agreement radio
button.
3. Click Next.
The Setup Type dialog appears:
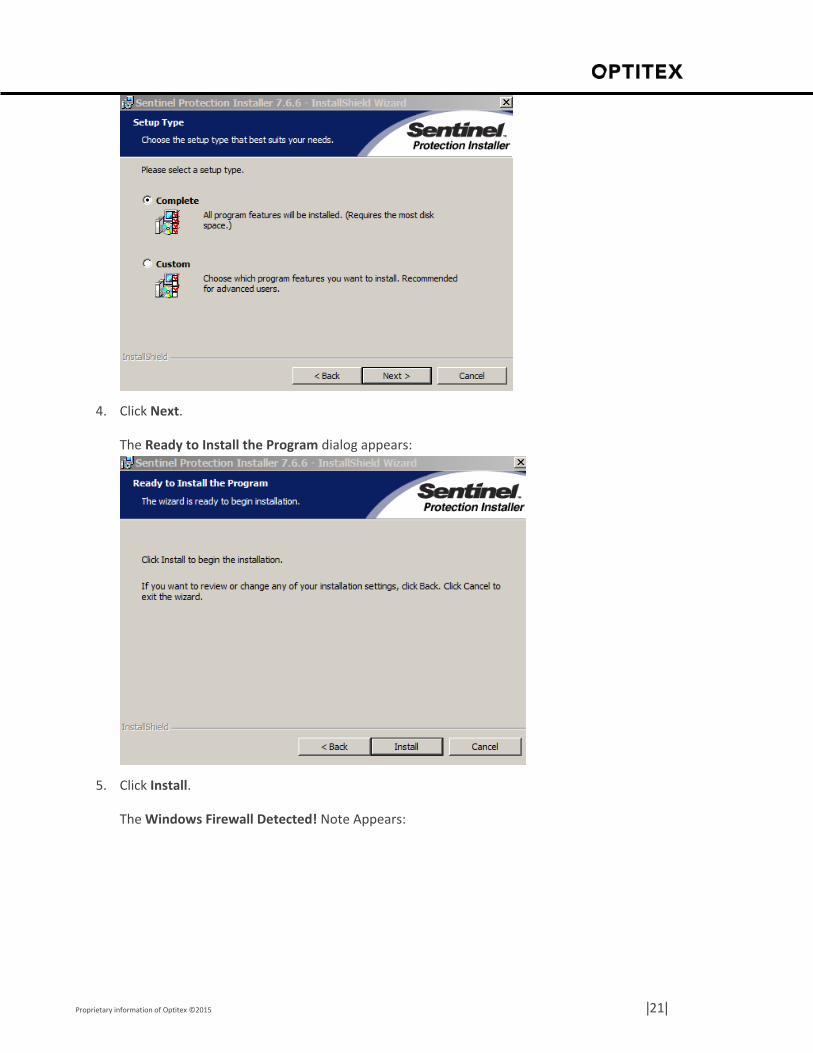
Proprietary information of Optitex ©2015 |21|
4. Click Next.
The Ready to Install the Program dialog appears:
5. Click Install.
The Windows Firewall Detected! Note Appears:
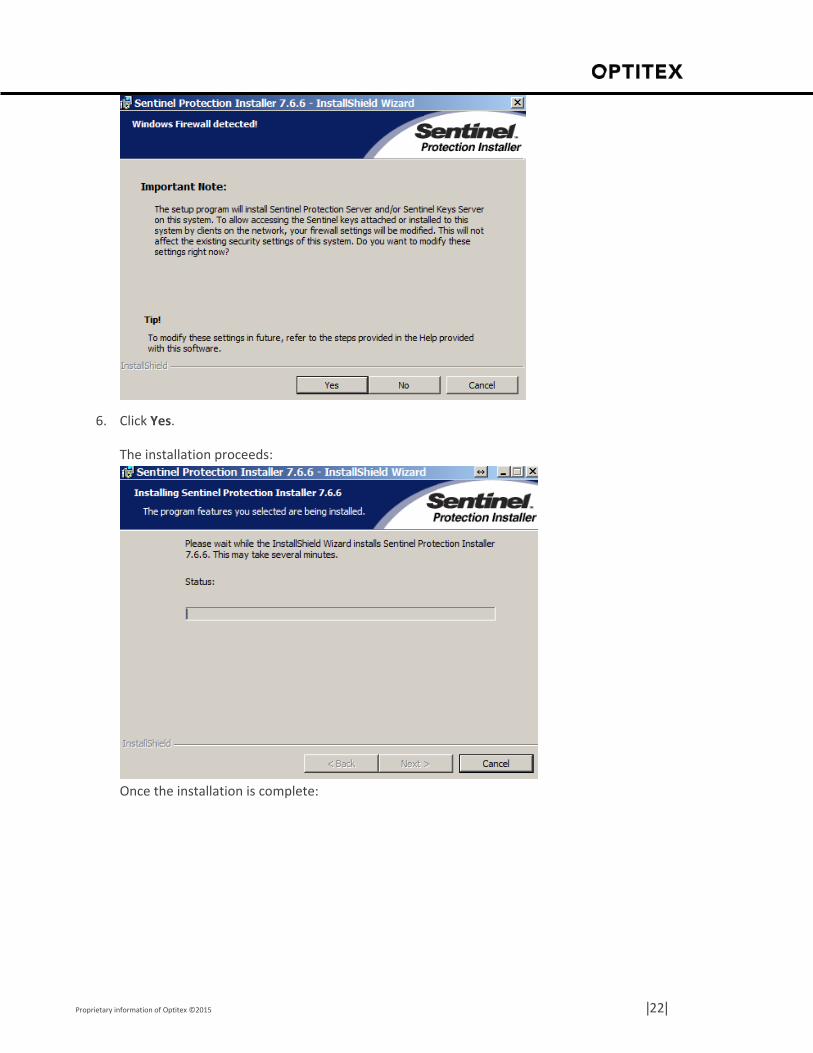
Proprietary information of Optitex ©2015 |22|
6. Click Yes.
The installation proceeds:
Once the installation is complete:
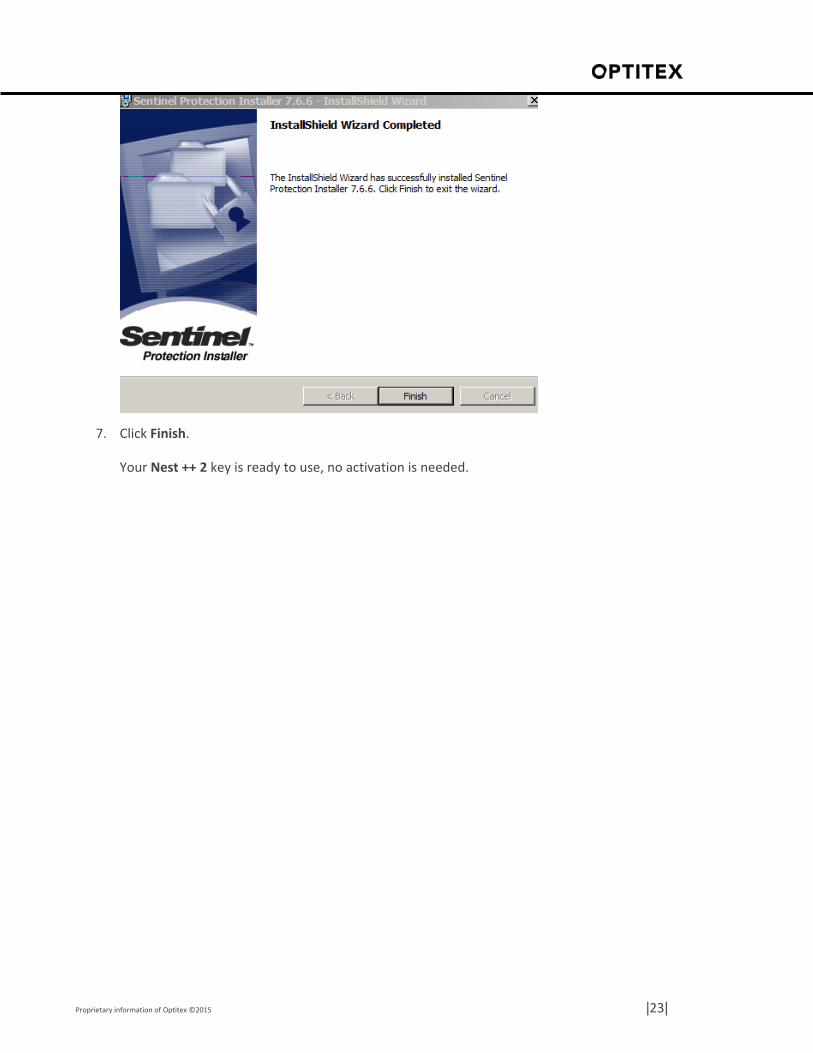
Proprietary information of Optitex ©2015 |23|
7. Click Finish.
Your Nest ++ 2 key is ready to use, no activation is needed.
Proprietary information of Optitex ©2015 |24|
Settings & User Preferences Location
The location of the user preferences, settings and customizations depends on the operating system and
on the level of the Windows User Account Control (UAC). Some of this information is saved in files, for
example changes made by the user to Tools > Preferences are written to the Optitex[version#].ini file.
Windows XP Folder Location
The preference files in windows XP are located in: C:\Documents and Settings\All Users\Application
Data\ Optitex
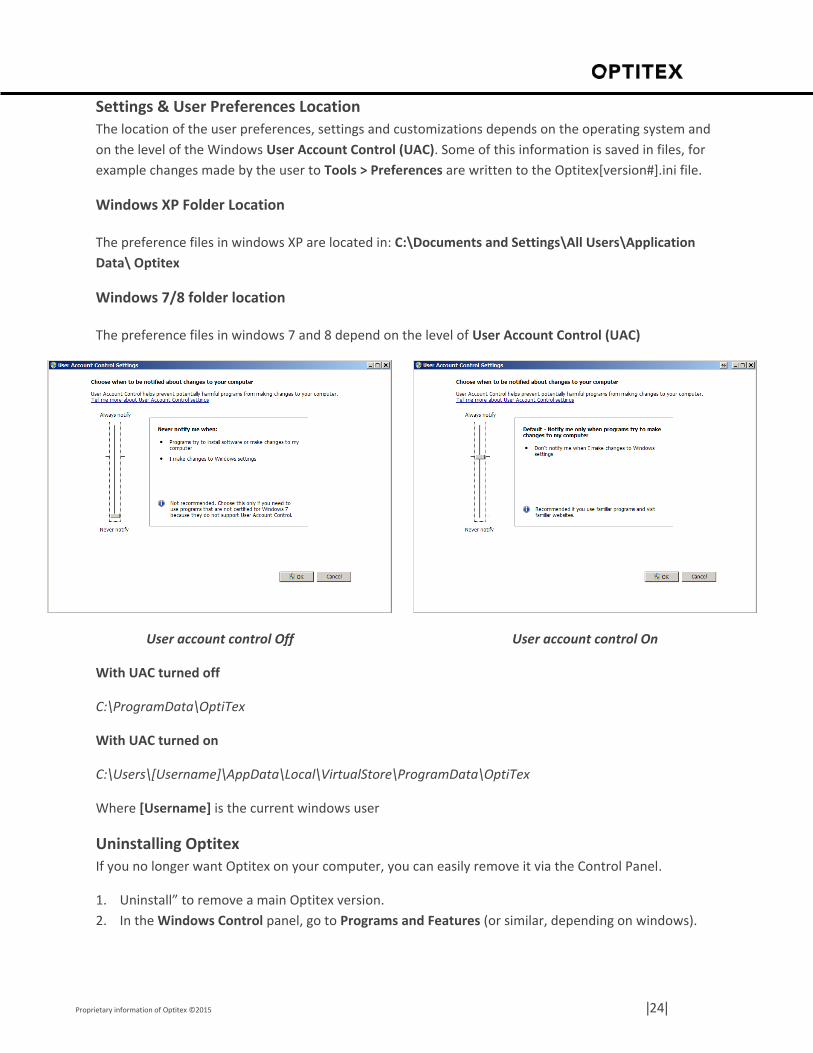
Windows 7/8 folder location
The preference files in windows 7 and 8 depend on the level of User Account Control (UAC)
User account control Off User account control On
With UAC turned off
C:\ProgramData\OptiTex
With UAC turned on
C:\Users\[Username]\AppData\Local\VirtualStore\ProgramData\OptiTex
Where [Username] is the current windows user
Uninstalling Optitex
If you no longer want Optitex on your computer, you can easily remove it via the Control Panel.
1. Uninstall” to remove a main Optitex version.
2. In the Windows Control panel, go to Programs and Features (or similar, depending on windows).
Proprietary information of Optitex ©2015 |25|
The Uninstall or Change a Program dialog opens.
3. From the Installed Versions list, select the Optitex version you want to uninstall.
4. On the menu, select Uninstall.
A confirmation message appears.
5. Click Yes to proceed. The program is removed.
Notes:
Alternatively, you can select Uninstall Optitex [Version] in the Optitex group in the Start menu.
Removing one version will not interfere with other installed versions.
Some elements need to be removed manually.
Service Pack Installation Guidelines
The Optitex service packs should be used to upgrade minor versions (e.g. 15.0 to 15.1) or to apply
certain fixes to the current version.
The service pack installation package should be downloaded.
Notes:
1. Service packs can be applied only to existing installations of the same main version number.
e.g., 11.4 to 11.2. A service pack version 12.1 cannot be applied to an existing installation
version 11.4.
2. Applying a service pack is appended to the current installation of the same main version.
3. As opposed to full versions, different service pack installations cannot be run alongside each
other.
4. The service pack installation overwrites part of the previous installation.
5. If you want to uninstall (O/15.3 SP1) when upgrading, you will receive an error. Ignore this
error by clicking Ok. The Service Pack will be uninstalled in any case.
Proprietary information of Optitex ©2015 |26|
Command Line Installation
This section describes how to install Optitex without user intervention, using the msiexec.exe syntax.
The MSI installation package should be downloaded.
All prerequisites must be available beforehand.
Before the Installation
1. Verify that your system specifications are within the recommended system requirements.
2. Check that all prerequisites are installed.
3. Download and unzip the MSI file and have it ready.
You can install Optitex via command line (MSI) when you want to run a "silent" installation. This means
that Optitex will install in the background without any dialogs or messages. Once the installation is
complete desktop icons will appear along with the Optitex installation folder with all the appropriate
files.
To install Optitex via MSI:
1. Open CMD (run CMD as Administrator)
Or
Go to Run
2. To run Optitex enter the following command line:
msiexec /i "path to file" /qn
3. To add the Nesting pack, enter the following command line:
"msiexec /i "path to file" /qn NESTINGPACK_FEATURE=1".
4. To add TeamViewer, enter the following command line:
msiexec /i "path to file" TV_FEATURE=1 /qn
5. To add the Optitex log file, enter the following command line:
/v"/l*v \"path_to_file.log\"
Note: Run Msiexec /help for a list of the available parameters and options.
Proprietary information of Optitex ©2015 |27|
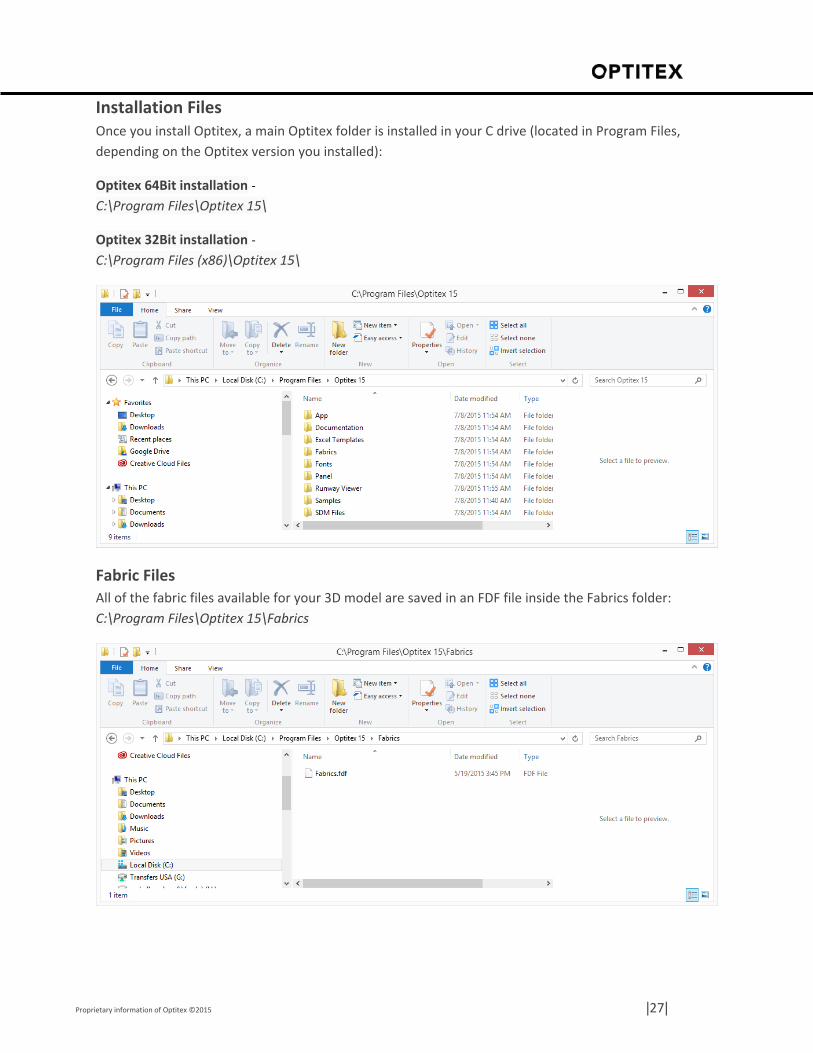
Installation Files Once you install Optitex, a main Optitex folder is installed in your C drive (located in Program Files,
depending on the Optitex version you installed):
Optitex 64Bit installation -
C:\Program Files\Optitex 15\
Optitex 32Bit installation -
C:\Program Files (x86)\Optitex 15\
Fabric Files
All of the fabric files available for your 3D model are saved in an FDF file inside the Fabrics folder:
C:\Program Files\Optitex 15\Fabrics
Proprietary information of Optitex ©2015 |28|
Note: By default you receive an FDF file with the default fabrics. If you want to add you own fabric, you
can do so via the Optitex Fabric Editor, a separate Optitex application. For more information, contact
your Optitex representative.
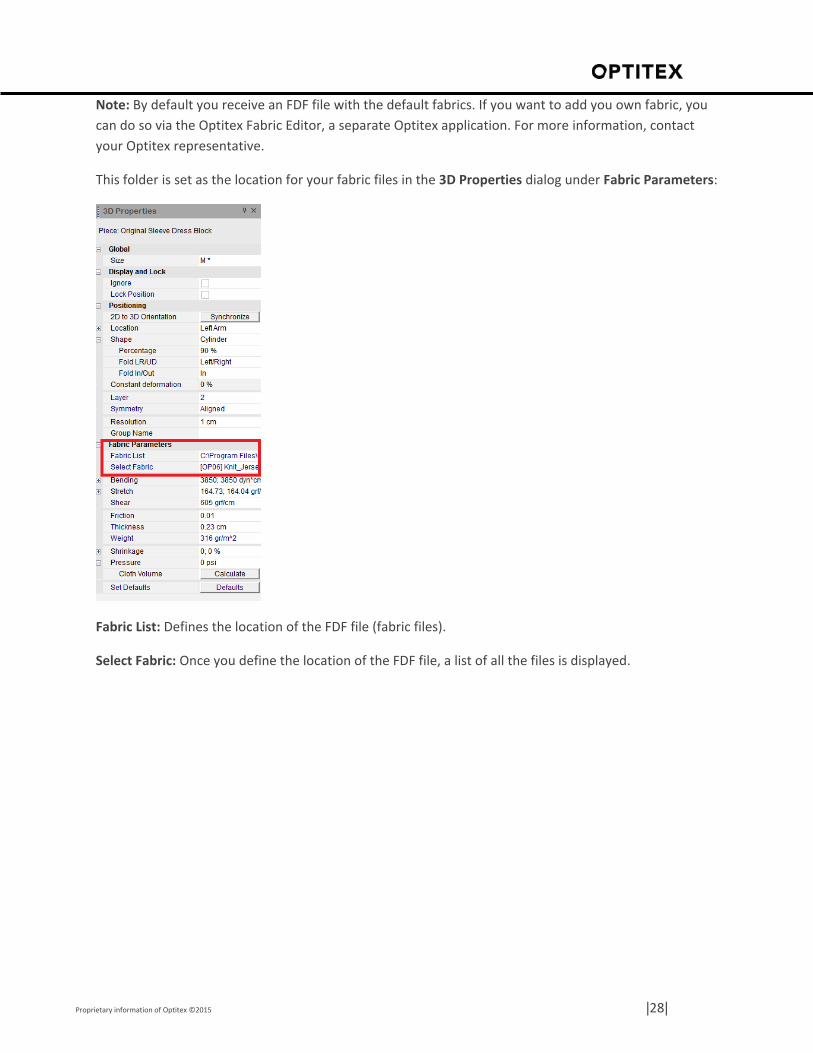
This folder is set as the location for your fabric files in the 3D Properties dialog under Fabric Parameters:
Fabric List: Defines the location of the FDF file (fabric files).
Select Fabric: Once you define the location of the FDF file, a list of all the files is displayed.
Proprietary information of Optitex ©2015 |29|
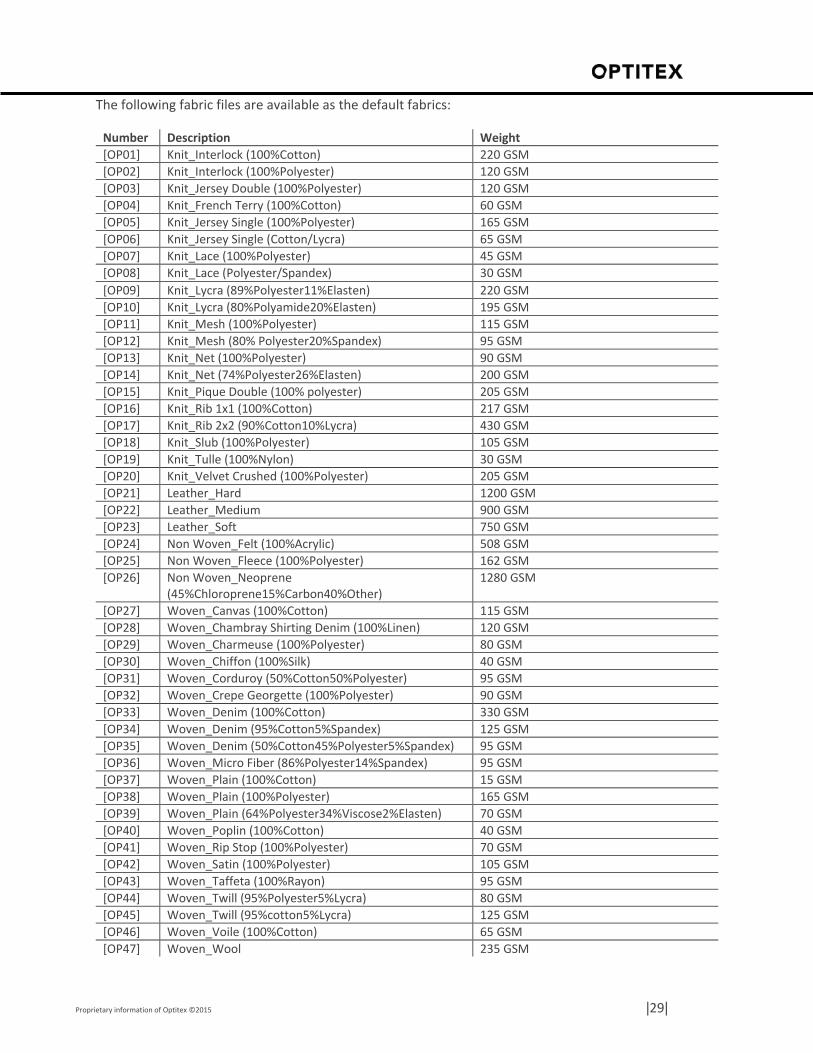
The following fabric files are available as the default fabrics:
Number Description Weight
[OP01] Knit_Interlock (100%Cotton) 220 GSM
[OP02] Knit_Interlock (100%Polyester) 120 GSM
[OP03] Knit_Jersey Double (100%Polyester) 120 GSM
[OP04] Knit_French Terry (100%Cotton) 60 GSM
[OP05] Knit_Jersey Single (100%Polyester) 165 GSM
[OP06] Knit_Jersey Single (Cotton/Lycra) 65 GSM
[OP07] Knit_Lace (100%Polyester) 45 GSM
[OP08] Knit_Lace (Polyester/Spandex) 30 GSM
[OP09] Knit_Lycra (89%Polyester11%Elasten) 220 GSM
[OP10] Knit_Lycra (80%Polyamide20%Elasten) 195 GSM
[OP11] Knit_Mesh (100%Polyester) 115 GSM
[OP12] Knit_Mesh (80% Polyester20%Spandex) 95 GSM
[OP13] Knit_Net (100%Polyester) 90 GSM
[OP14] Knit_Net (74%Polyester26%Elasten) 200 GSM
[OP15] Knit_Pique Double (100% polyester) 205 GSM
[OP16] Knit_Rib 1x1 (100%Cotton) 217 GSM
[OP17] Knit_Rib 2x2 (90%Cotton10%Lycra) 430 GSM
[OP18] Knit_Slub (100%Polyester) 105 GSM
[OP19] Knit_Tulle (100%Nylon) 30 GSM
[OP20] Knit_Velvet Crushed (100%Polyester) 205 GSM
[OP21] Leather_Hard 1200 GSM
[OP22] Leather_Medium 900 GSM
[OP23] Leather_Soft 750 GSM
[OP24] Non Woven_Felt (100%Acrylic) 508 GSM
[OP25] Non Woven_Fleece (100%Polyester) 162 GSM
[OP26] Non Woven_Neoprene (45%Chloroprene15%Carbon40%Other)
1280 GSM
[OP27] Woven_Canvas (100%Cotton) 115 GSM
[OP28] Woven_Chambray Shirting Denim (100%Linen) 120 GSM
[OP29] Woven_Charmeuse (100%Polyester) 80 GSM
[OP30] Woven_Chiffon (100%Silk) 40 GSM
[OP31] Woven_Corduroy (50%Cotton50%Polyester) 95 GSM
[OP32] Woven_Crepe Georgette (100%Polyester) 90 GSM
[OP33] Woven_Denim (100%Cotton) 330 GSM
[OP34] Woven_Denim (95%Cotton5%Spandex) 125 GSM
[OP35] Woven_Denim (50%Cotton45%Polyester5%Spandex) 95 GSM
[OP36] Woven_Micro Fiber (86%Polyester14%Spandex) 95 GSM
[OP37] Woven_Plain (100%Cotton) 15 GSM
[OP38] Woven_Plain (100%Polyester) 165 GSM
[OP39] Woven_Plain (64%Polyester34%Viscose2%Elasten) 70 GSM
[OP40] Woven_Poplin (100%Cotton) 40 GSM
[OP41] Woven_Rip Stop (100%Polyester) 70 GSM
[OP42] Woven_Satin (100%Polyester) 105 GSM
[OP43] Woven_Taffeta (100%Rayon) 95 GSM
[OP44] Woven_Twill (95%Polyester5%Lycra) 80 GSM
[OP45] Woven_Twill (95%cotton5%Lycra) 125 GSM
[OP46] Woven_Voile (100%Cotton) 65 GSM
[OP47] Woven_Wool 235 GSM
Proprietary information of Optitex ©2015 |30|
[OP48] Knit_Wool (100% wool) 180 GSM
[OP49] Knit_Jersey_Viscose (98%viscose2%elastane) 105 GSM
[OP50] Knit_Rib_Viscose 160 GSM
[OP51] Non_Woven_FeltCashmere(100%cashmere) 400 GSM
[OP52] Leather_StretchPlonge 340 GSM
[OP53] Knit_Interlock(94%ployamide6%elastane) 369 GSM
[OP54] Woven_Twill(89%ployester11%elastane) 320 GSM
[OP55] Woven_Crepe( %98 viscose2%elastane) 217 GSM
[OP56] Woven_Twill(100%Linen) 240 GSM
[OP57] Woven_Nylon Taslon stretch(85%nylon15%spandex) 150 GSM
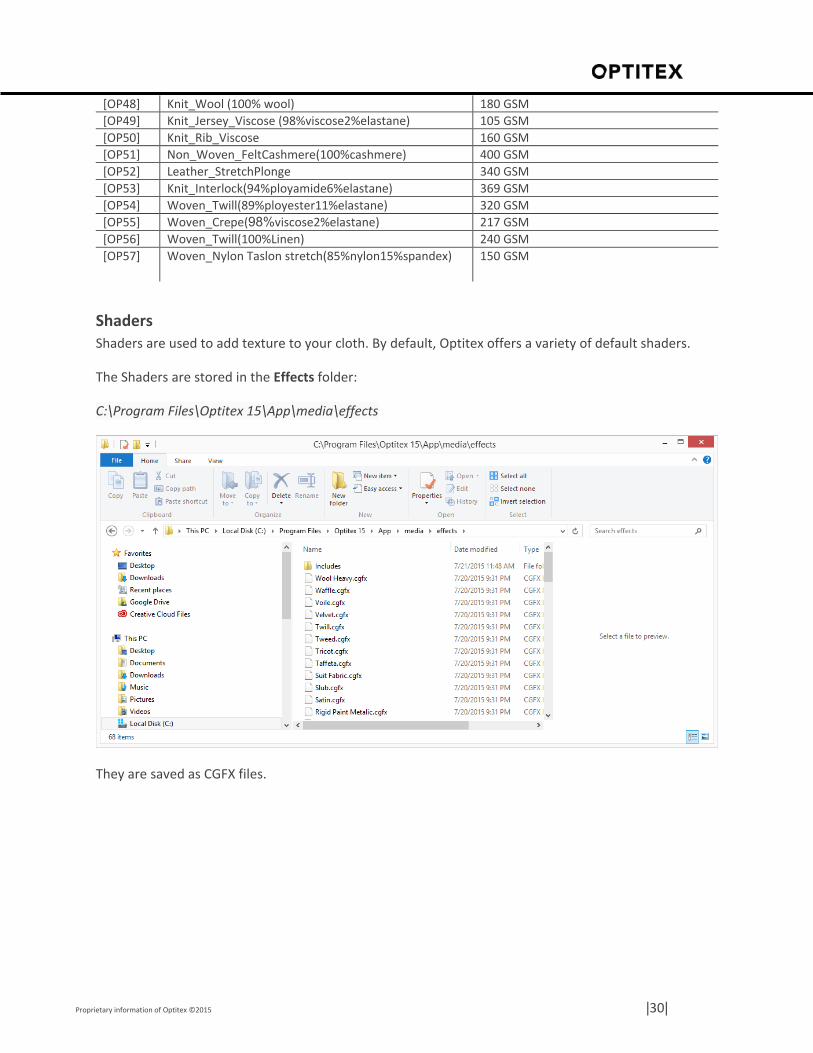
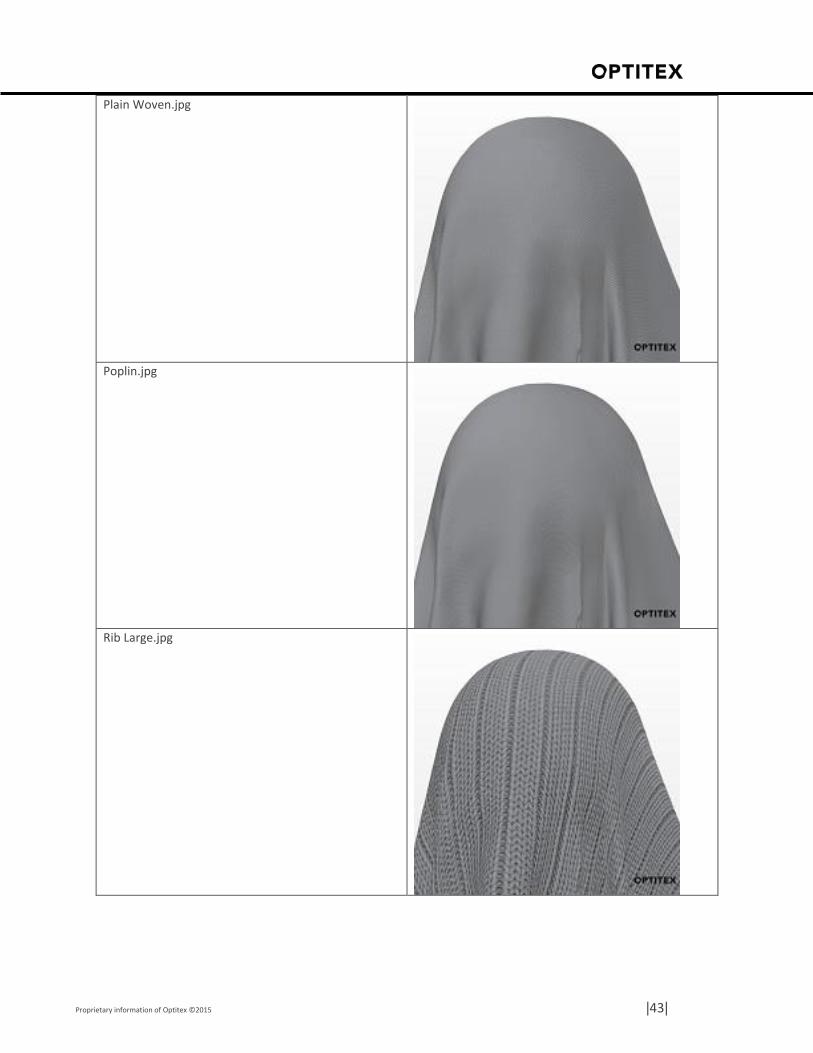
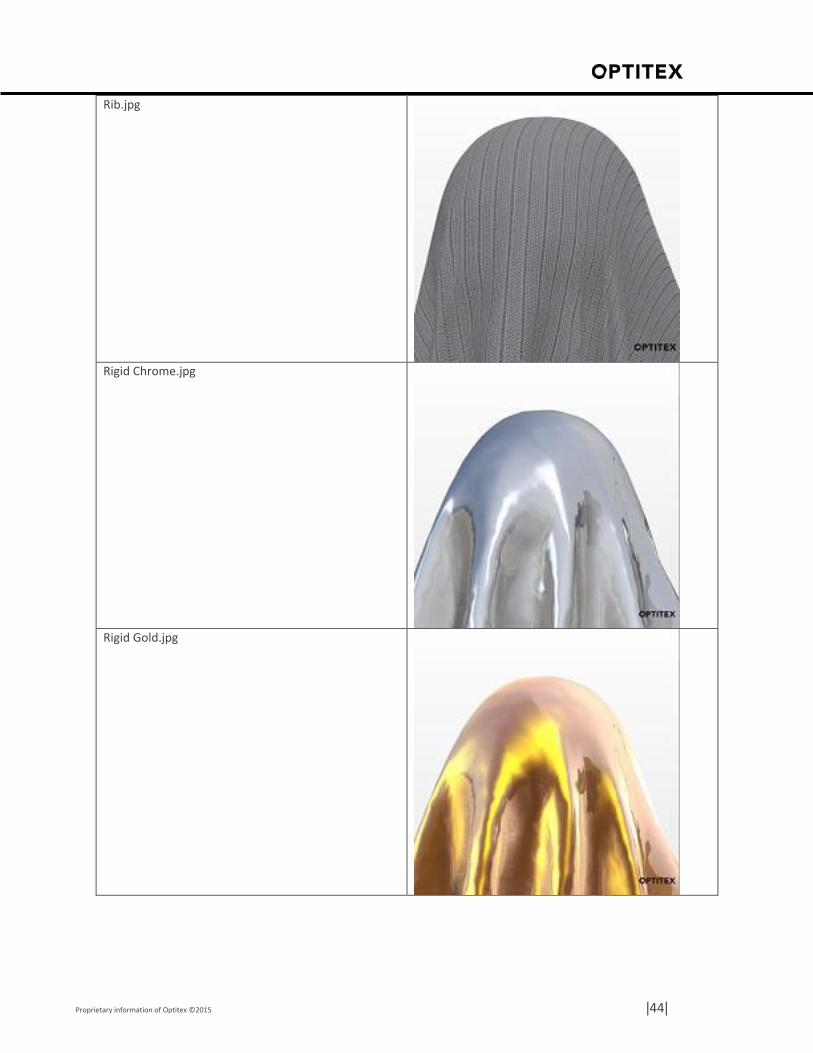
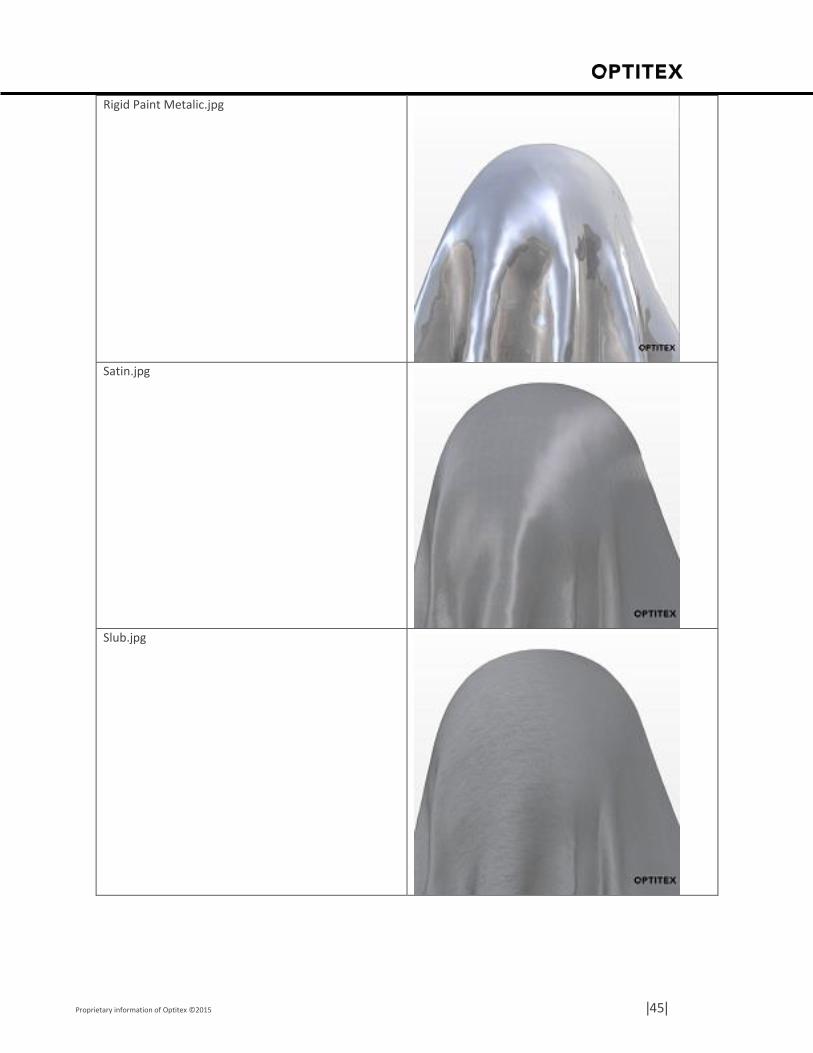
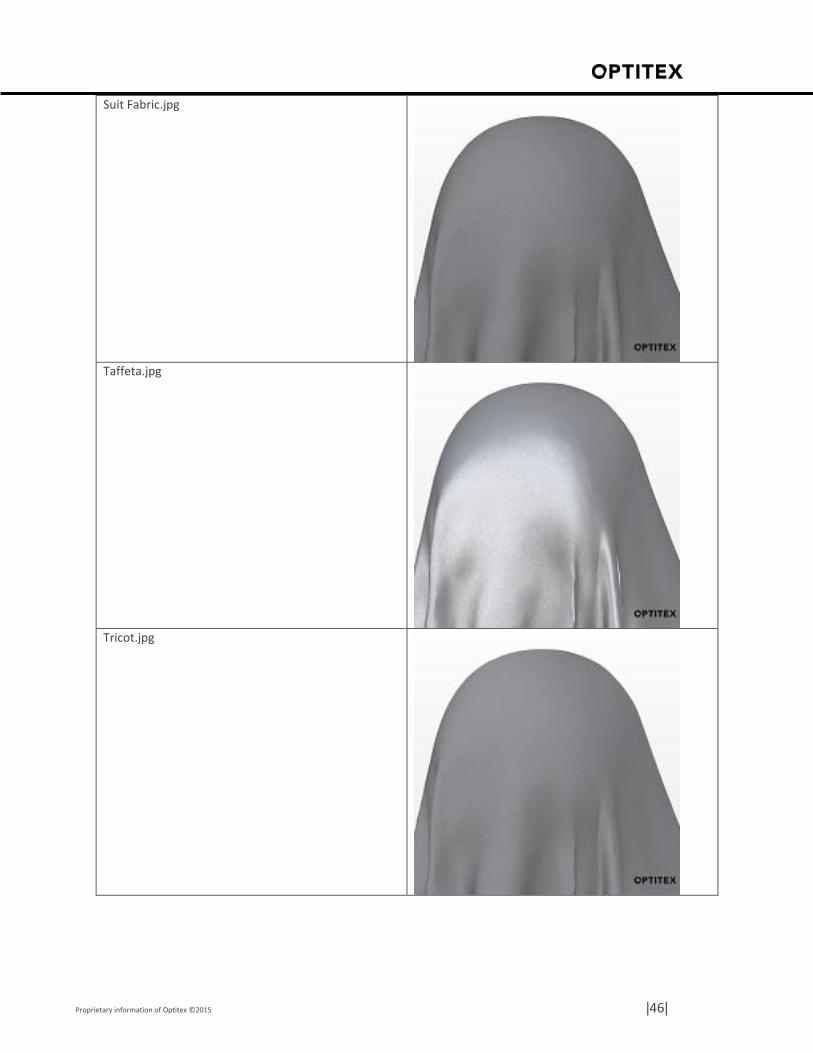
Shaders
Shaders are used to add texture to your cloth. By default, Optitex offers a variety of default shaders.
The Shaders are stored in the Effects folder:
C:\Program Files\Optitex 15\App\media\effects
They are saved as CGFX files.
Proprietary information of Optitex ©2015 |31|
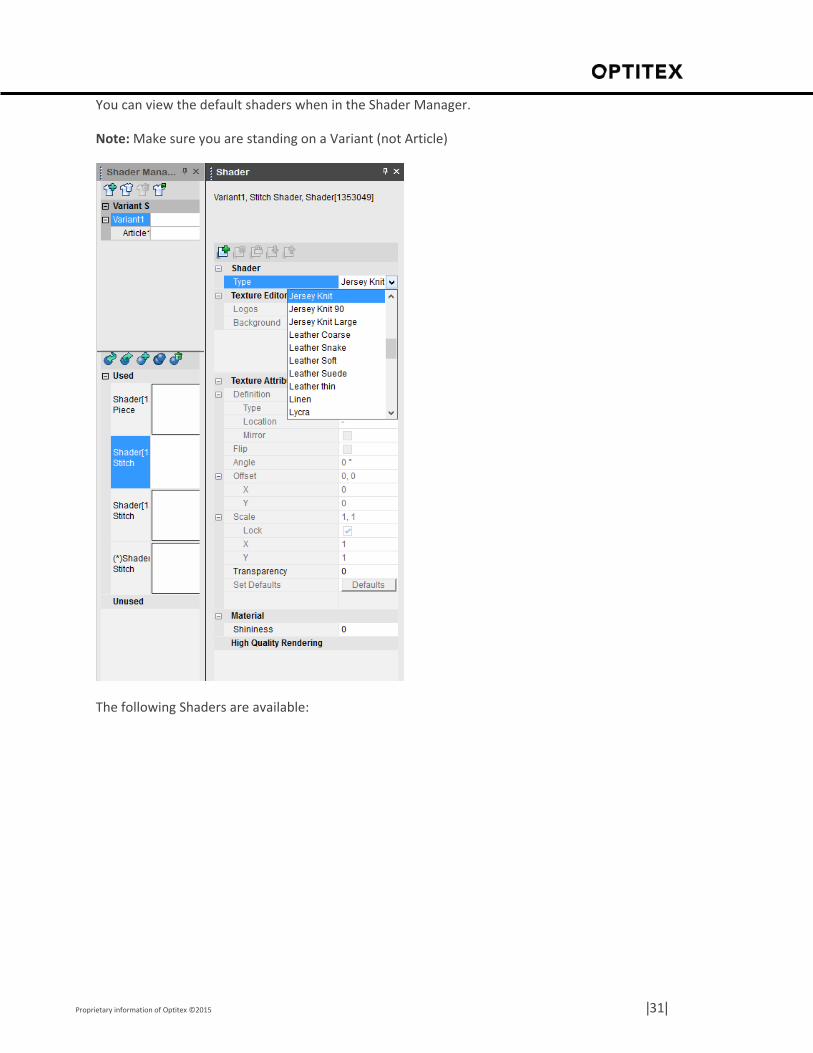
You can view the default shaders when in the Shader Manager.
Note: Make sure you are standing on a Variant (not Article)
The following Shaders are available:
Proprietary information of Optitex ©2015 |32|
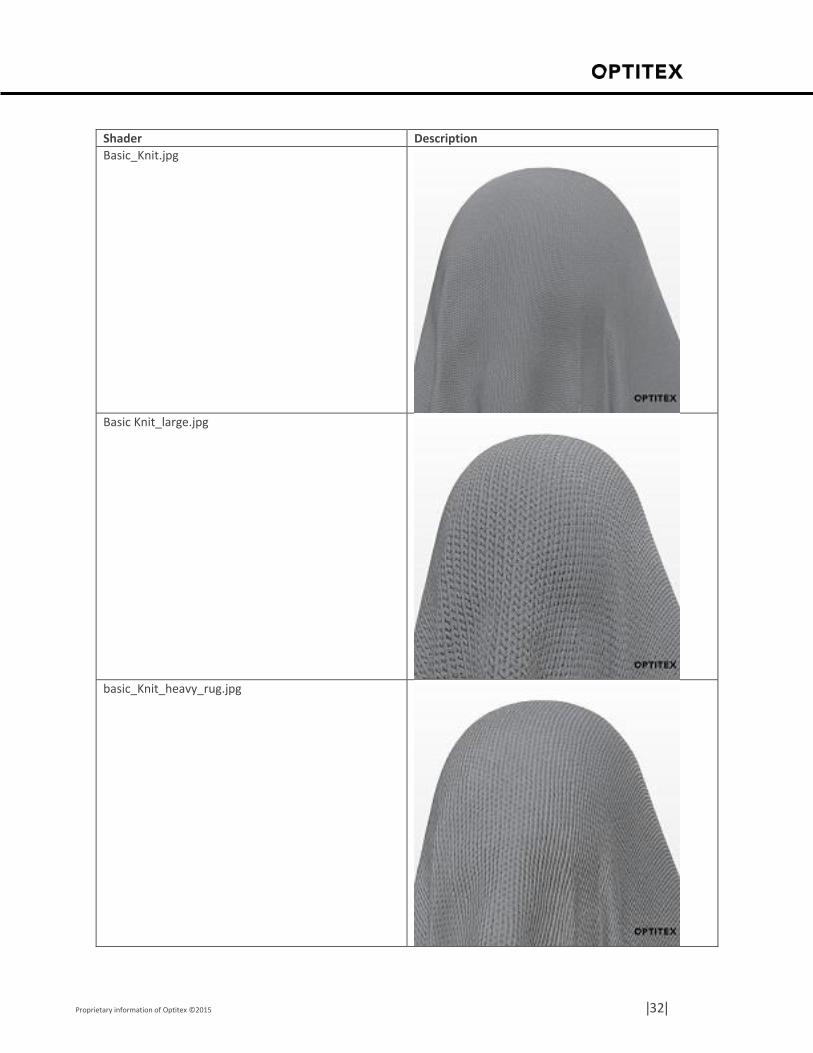
Shader Description
Basic_Knit.jpg
Basic Knit_large.jpg
basic_Knit_heavy_rug.jpg
Proprietary information of Optitex ©2015 |33|
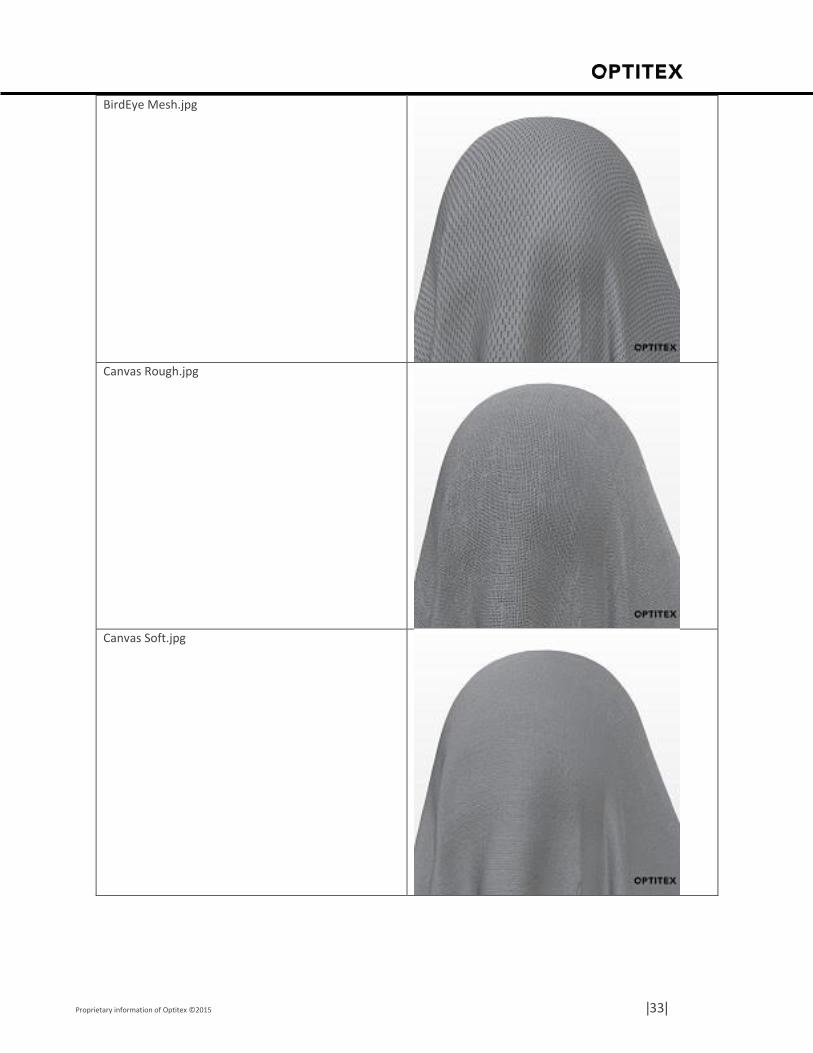
BirdEye Mesh.jpg
Canvas Rough.jpg
Canvas Soft.jpg
Proprietary information of Optitex ©2015 |34|
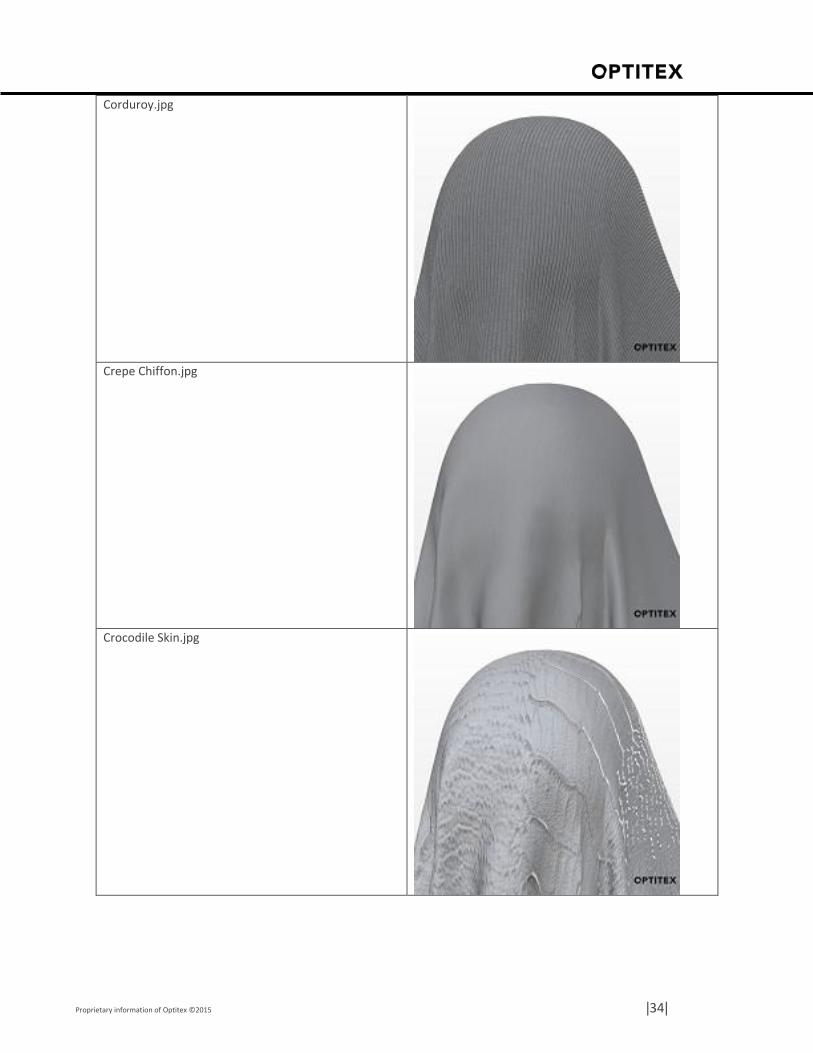
Corduroy.jpg
Crepe Chiffon.jpg
Crocodile Skin.jpg
Proprietary information of Optitex ©2015 |35|
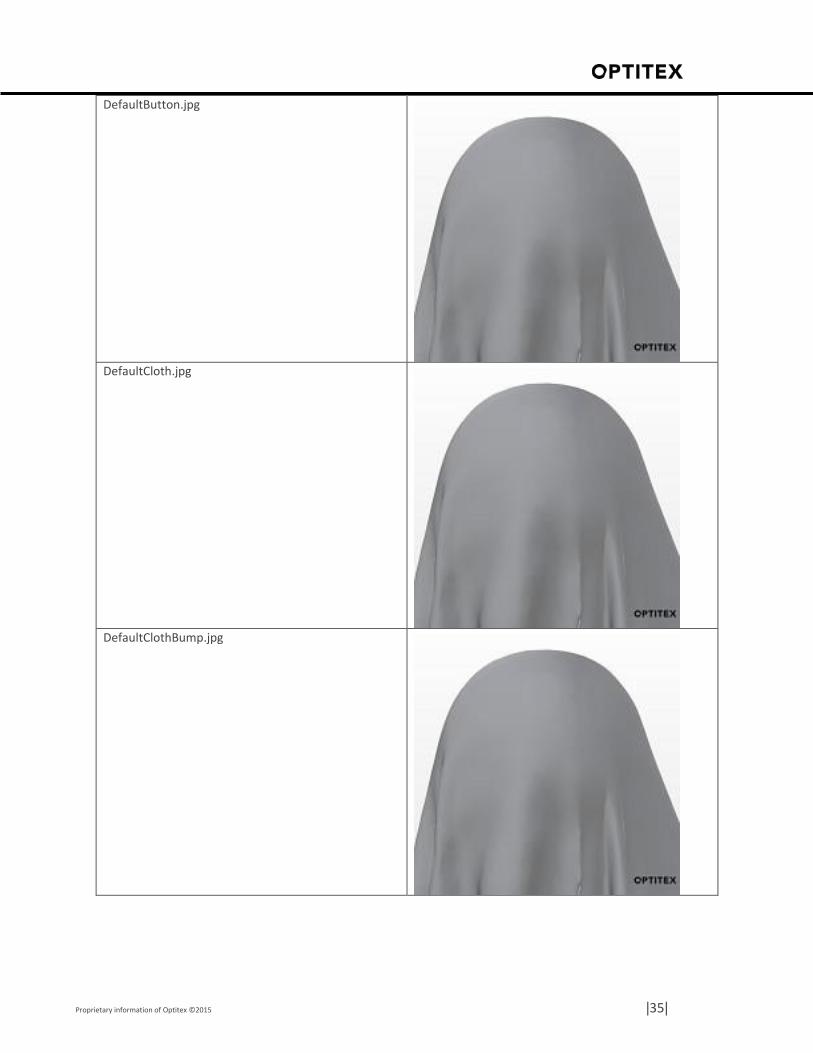
DefaultButton.jpg
DefaultCloth.jpg
DefaultClothBump.jpg
Proprietary information of Optitex ©2015 |36|
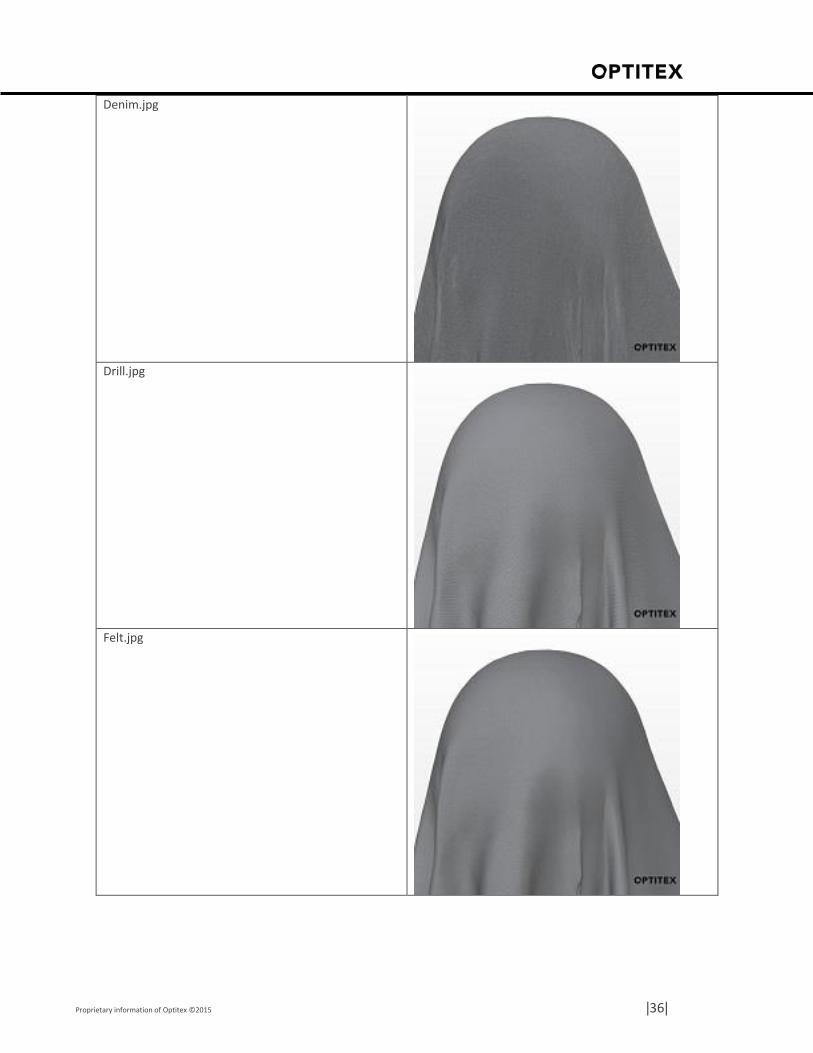
Denim.jpg
Drill.jpg
Felt.jpg
Proprietary information of Optitex ©2015 |37|
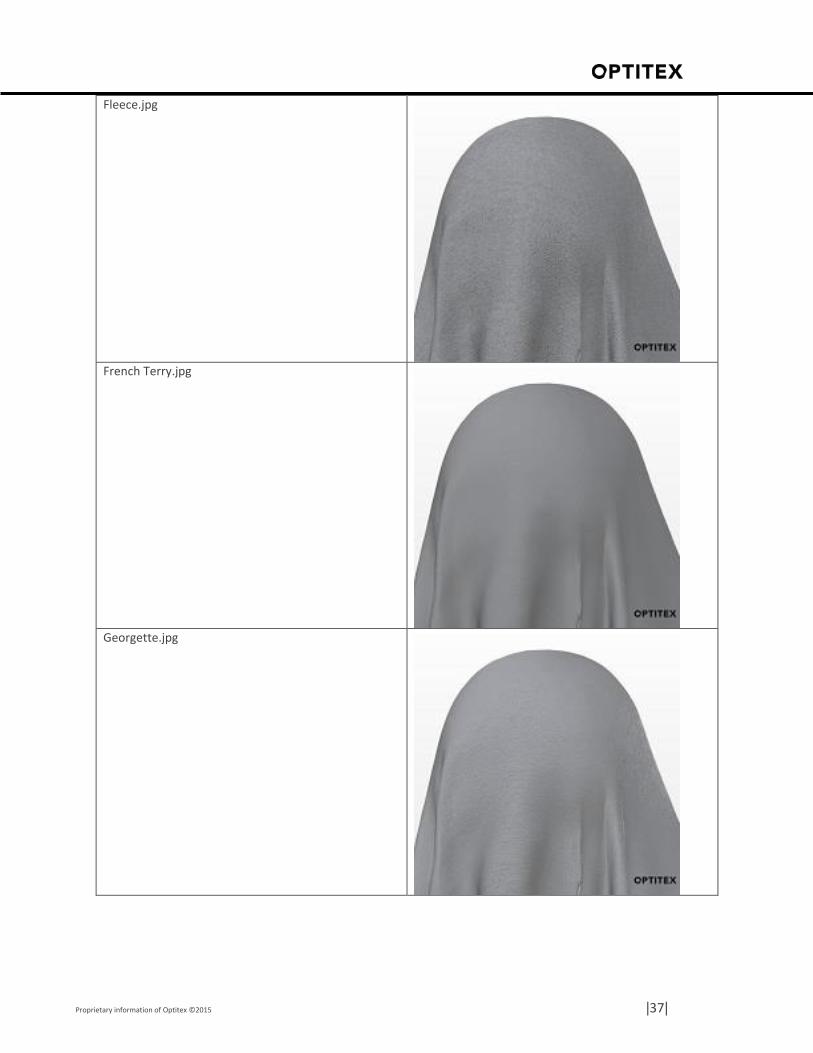
Fleece.jpg
French Terry.jpg
Georgette.jpg

Proprietary information of Optitex ©2015 |38|
Jersey Knit 90.jpg
Jersey Knit Large.jpg
Jersey Knit.jpg
Proprietary information of Optitex ©2015 |39|
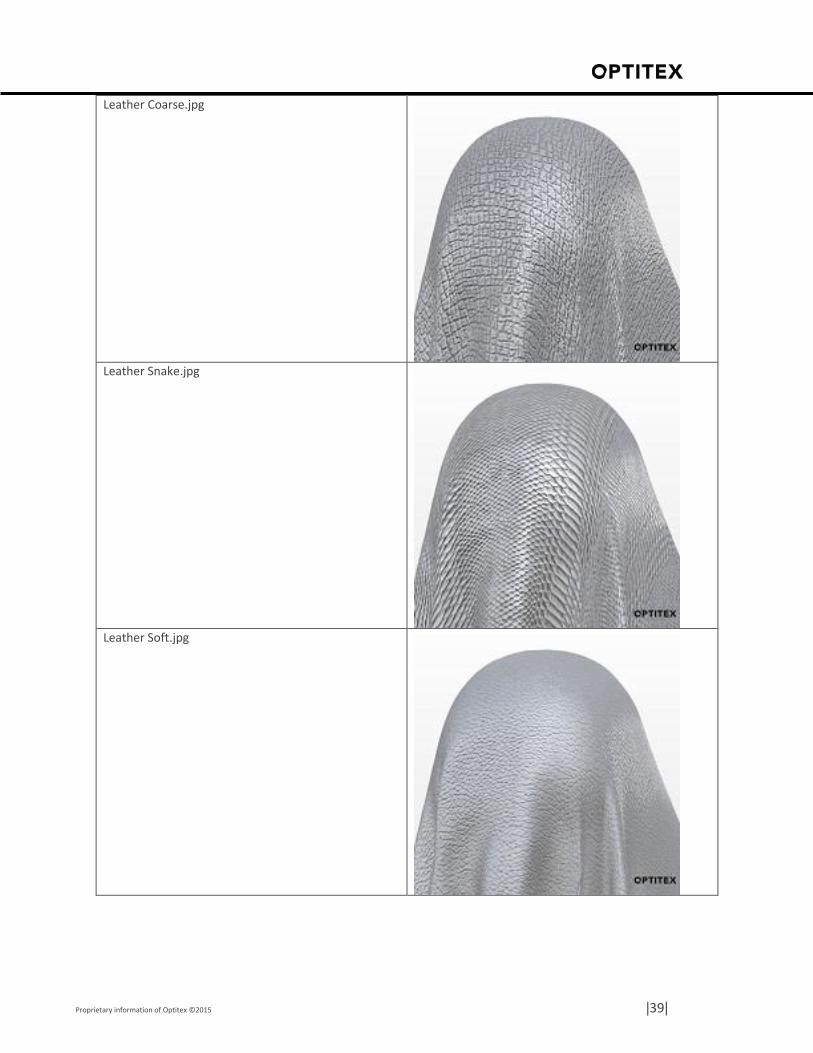
Leather Coarse.jpg
Leather Snake.jpg
Leather Soft.jpg
Proprietary information of Optitex ©2015 |40|
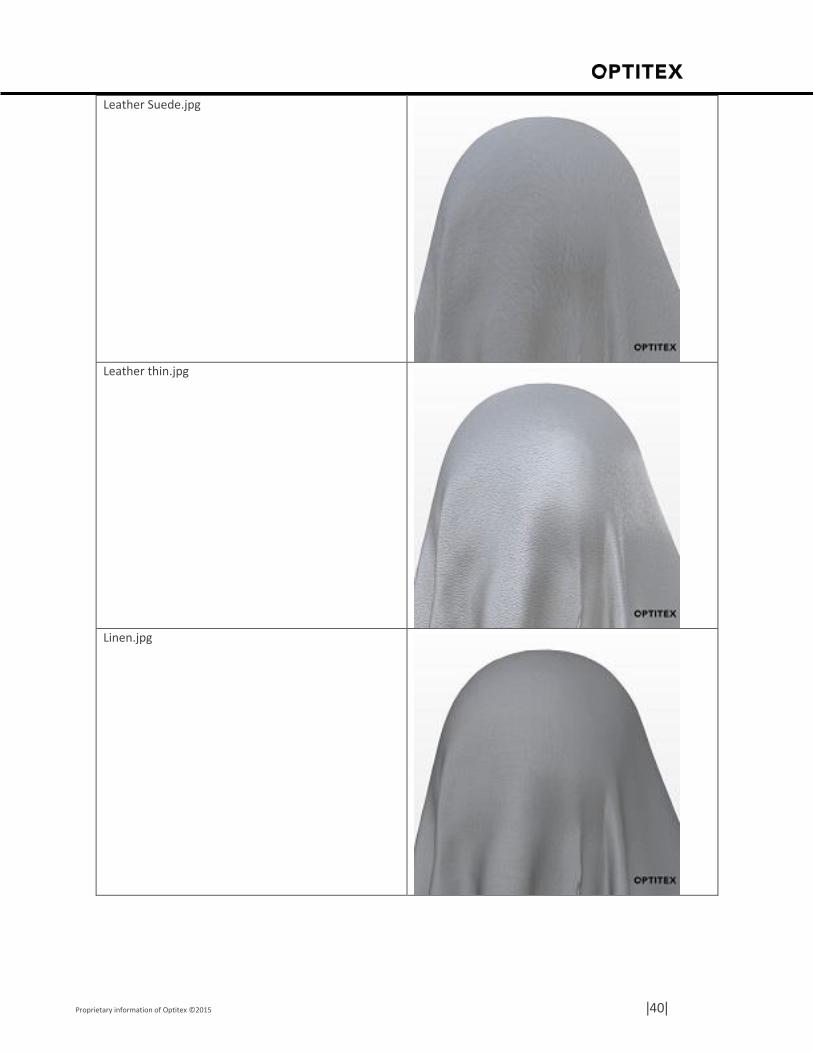
Leather Suede.jpg
Leather thin.jpg
Linen.jpg
Proprietary information of Optitex ©2015 |41|
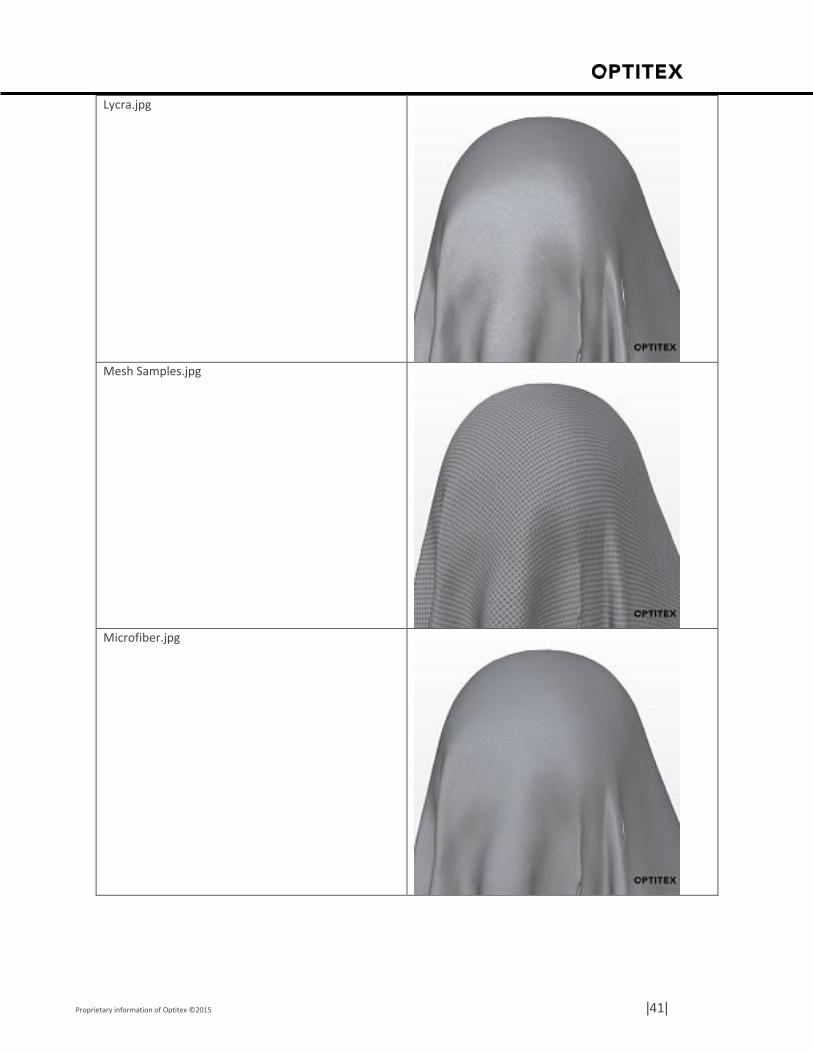
Lycra.jpg
Mesh Samples.jpg
Microfiber.jpg
Proprietary information of Optitex ©2015 |42|
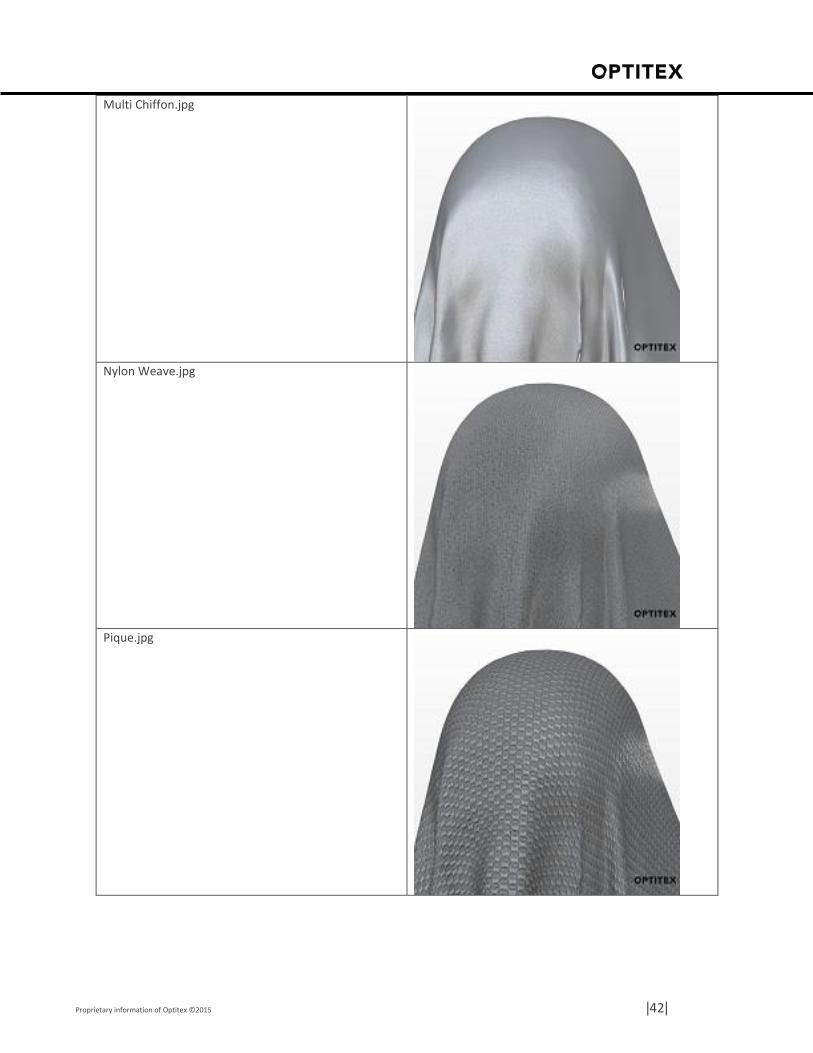
Multi Chiffon.jpg
Nylon Weave.jpg
Pique.jpg
Proprietary information of Optitex ©2015 |43|
Plain Woven.jpg
Poplin.jpg
Rib Large.jpg
Proprietary information of Optitex ©2015 |44|
Rib.jpg
Rigid Chrome.jpg
Rigid Gold.jpg
Proprietary information of Optitex ©2015 |45|
Rigid Paint Metalic.jpg
Satin.jpg
Slub.jpg
Proprietary information of Optitex ©2015 |46|
Suit Fabric.jpg
Taffeta.jpg
Tricot.jpg

Proprietary information of Optitex ©2015 |47|
Tweed.jpg
Twill.jpg
Velvet.jpg
Proprietary information of Optitex ©2015 |48|
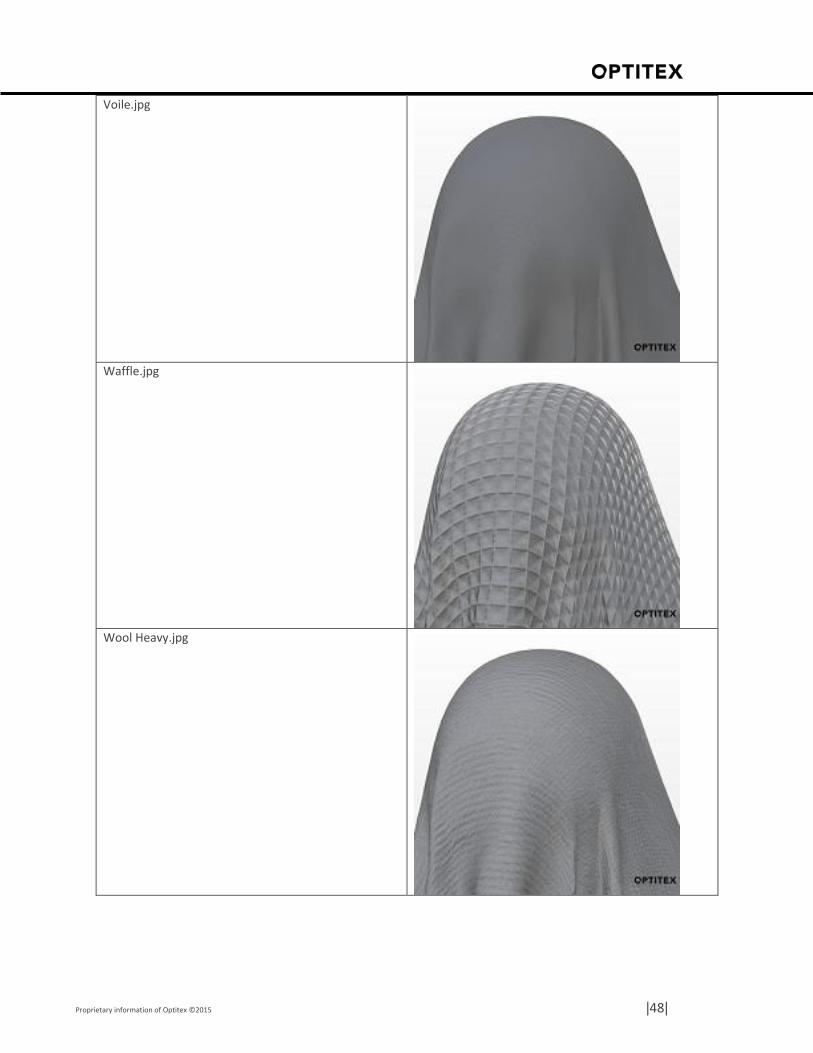
Voile.jpg
Waffle.jpg
Wool Heavy.jpg
Proprietary information of Optitex ©2015 |49|
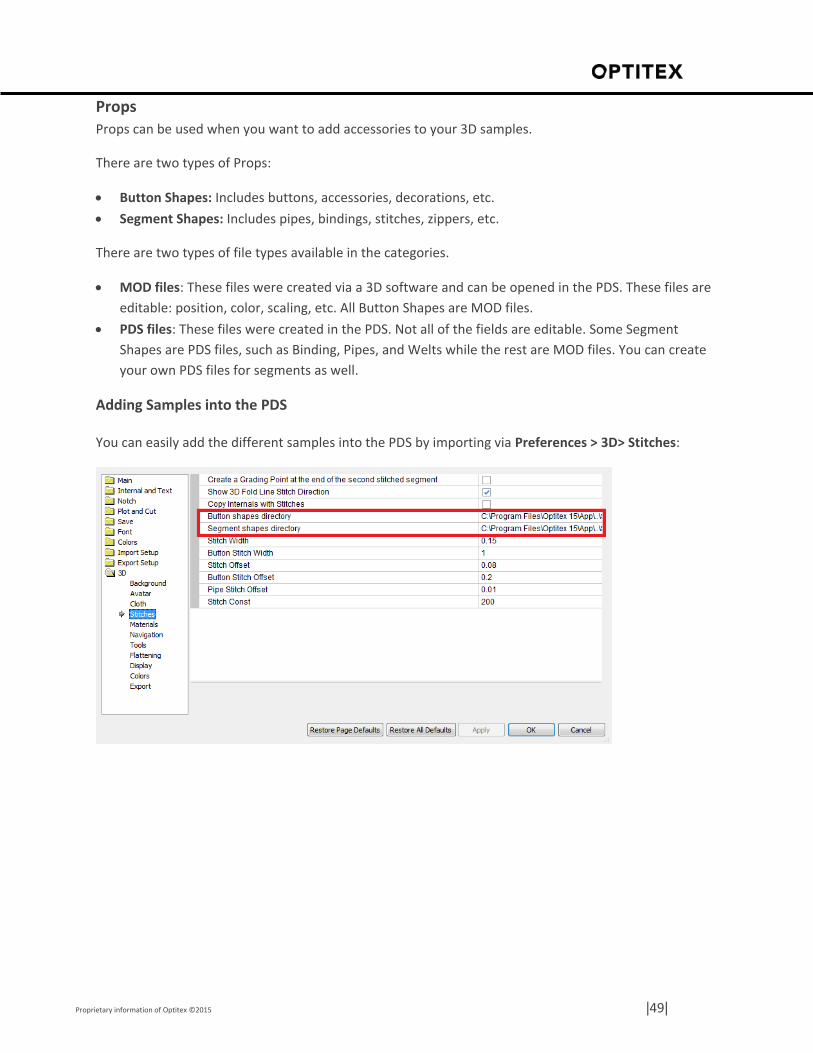
Props
Props can be used when you want to add accessories to your 3D samples.
There are two types of Props:
Button Shapes: Includes buttons, accessories, decorations, etc.
Segment Shapes: Includes pipes, bindings, stitches, zippers, etc.
There are two types of file types available in the categories.
MOD files: These files were created via a 3D software and can be opened in the PDS. These files are
editable: position, color, scaling, etc. All Button Shapes are MOD files.
PDS files: These files were created in the PDS. Not all of the fields are editable. Some Segment
Shapes are PDS files, such as Binding, Pipes, and Welts while the rest are MOD files. You can create
your own PDS files for segments as well.
Adding Samples into the PDS
You can easily add the different samples into the PDS by importing via Preferences > 3D> Stitches:
Proprietary information of Optitex ©2015 |50|
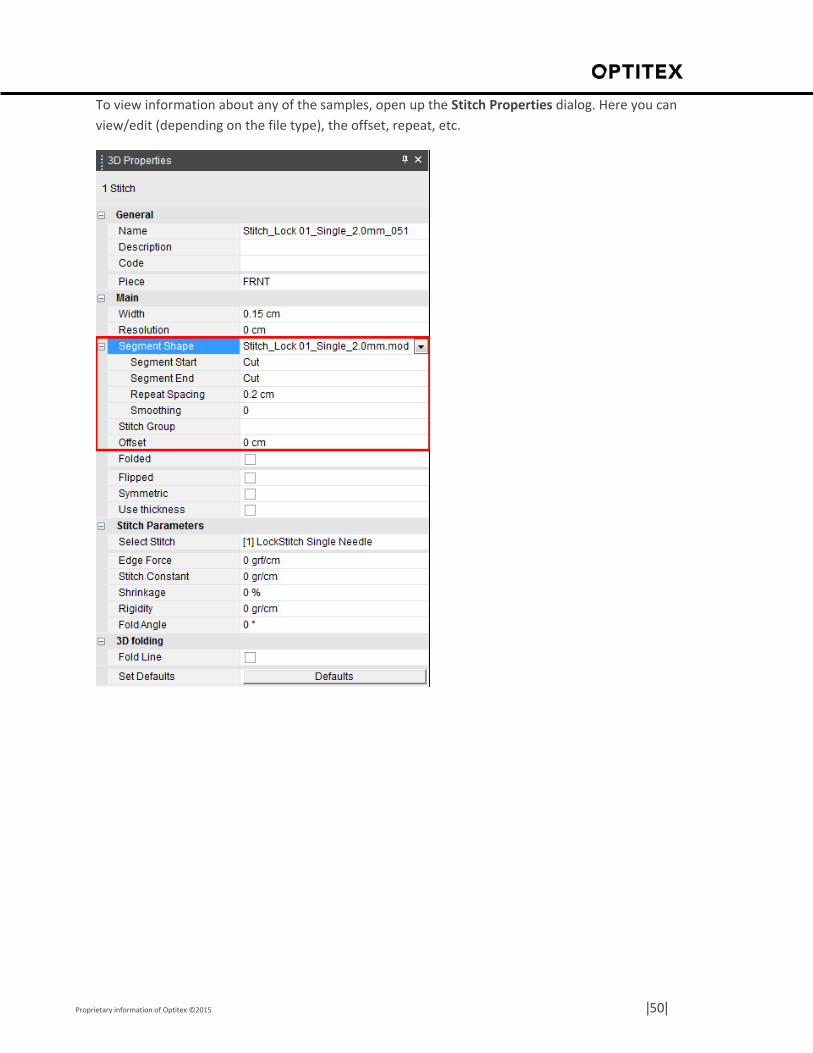
To view information about any of the samples, open up the Stitch Properties dialog. Here you can
view/edit (depending on the file type), the offset, repeat, etc.
Proprietary information of Optitex ©2015 |51|
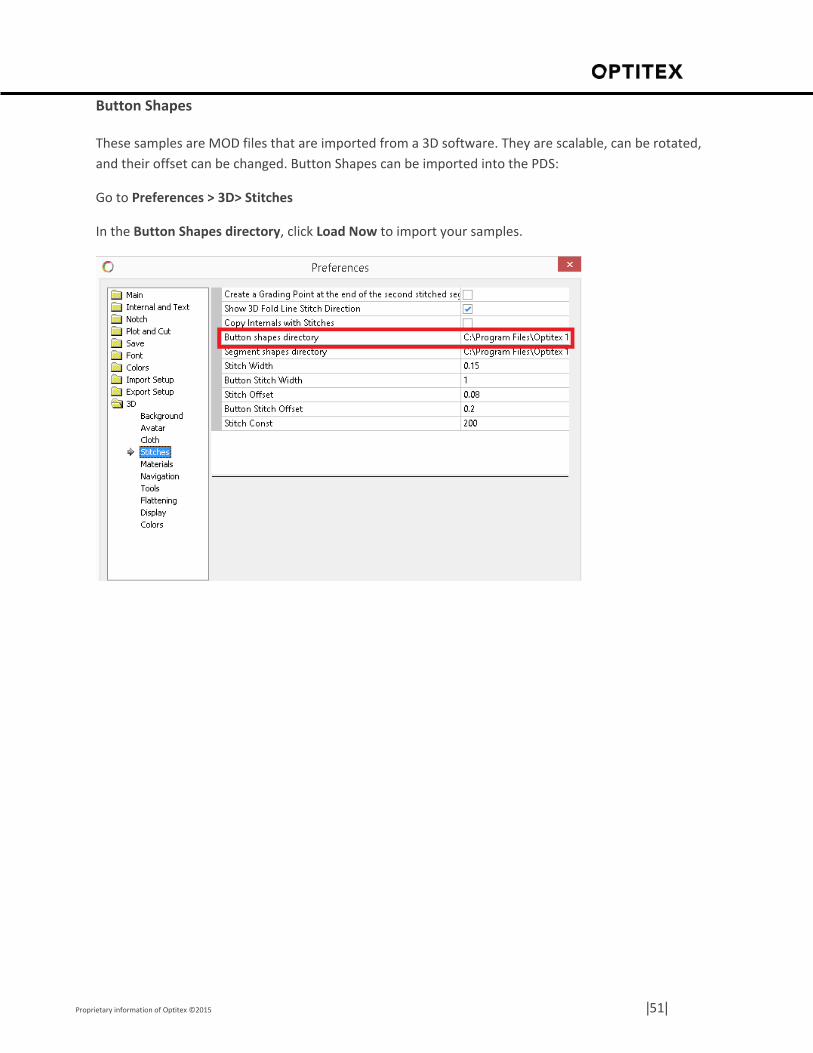
Button Shapes
These samples are MOD files that are imported from a 3D software. They are scalable, can be rotated,
and their offset can be changed. Button Shapes can be imported into the PDS:
Go to Preferences > 3D> Stitches
In the Button Shapes directory, click Load Now to import your samples.
Proprietary information of Optitex ©2015 |52|
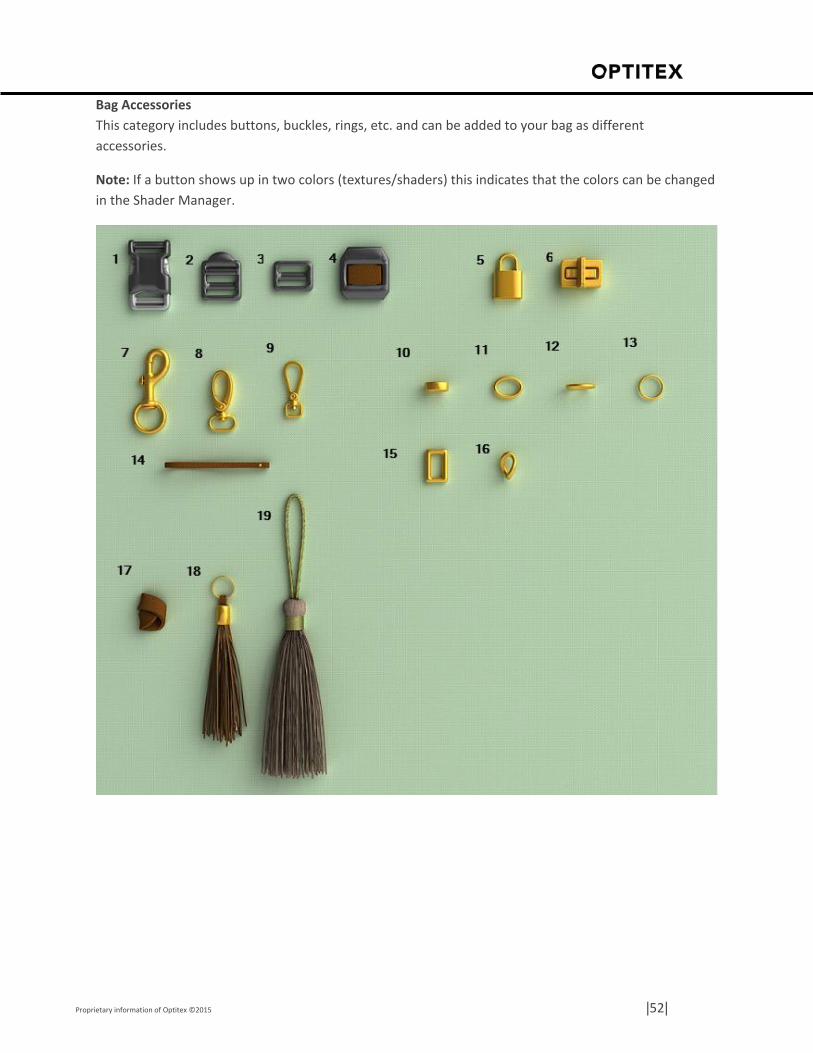
Bag Accessories
This category includes buttons, buckles, rings, etc. and can be added to your bag as different
accessories.
Note: If a button shows up in two colors (textures/shaders) this indicates that the colors can be changed
in the Shader Manager.
Proprietary information of Optitex ©2015 |53|
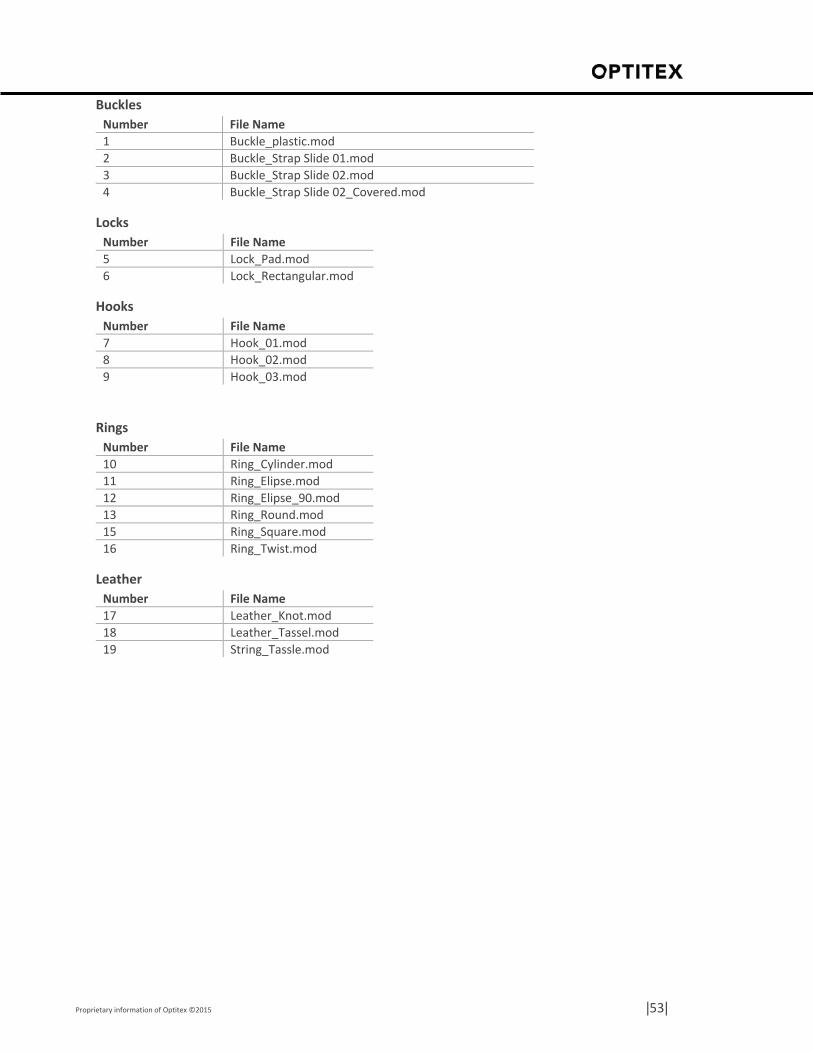
Buckles
Number File Name
1 Buckle_plastic.mod
2 Buckle_Strap Slide 01.mod
3 Buckle_Strap Slide 02.mod
4 Buckle_Strap Slide 02_Covered.mod
Locks
Number File Name
5 Lock_Pad.mod
6 Lock_Rectangular.mod
Hooks
Rings
Number File Name
10 Ring_Cylinder.mod
11 Ring_Elipse.mod
12 Ring_Elipse_90.mod
13 Ring_Round.mod
15 Ring_Square.mod
16 Ring_Twist.mod
Leather
Number File Name
17 Leather_Knot.mod
18 Leather_Tassel.mod
19 String_Tassle.mod
Number File Name
7 Hook_01.mod
8 Hook_02.mod
9 Hook_03.mod
Proprietary information of Optitex ©2015 |54|
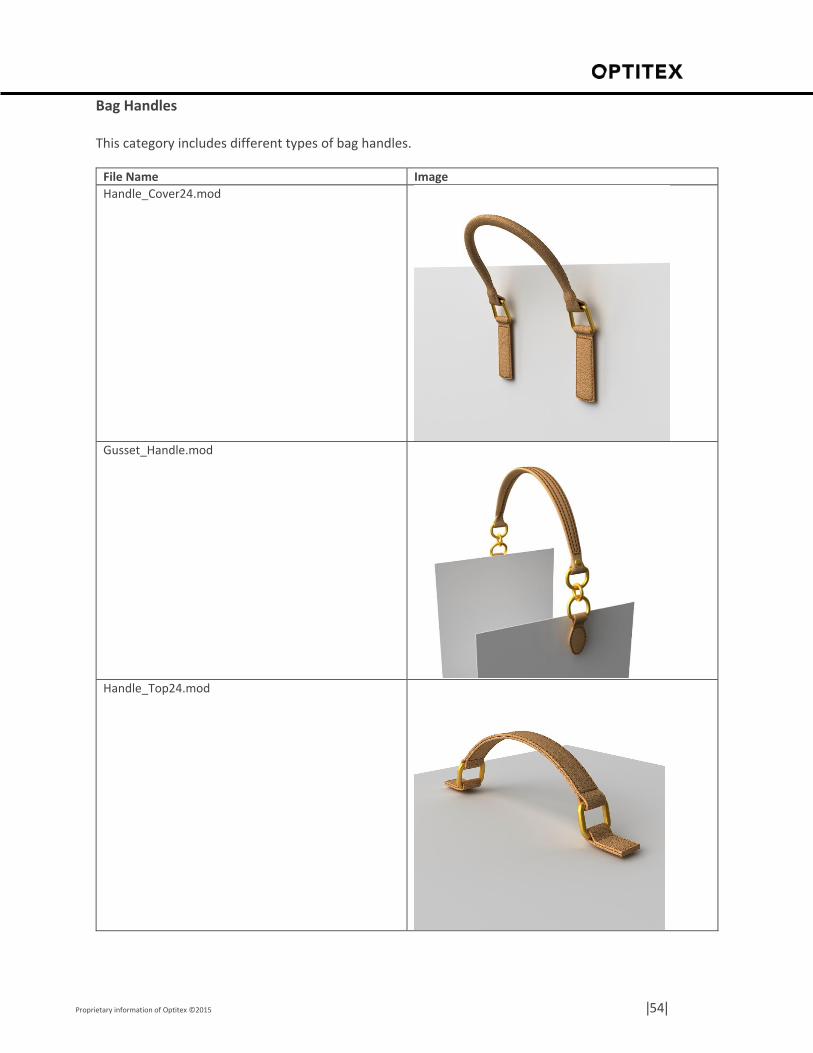
Bag Handles
This category includes different types of bag handles.
File Name Image
Handle_Cover24.mod
Gusset_Handle.mod
Handle_Top24.mod
Proprietary information of Optitex ©2015 |55|
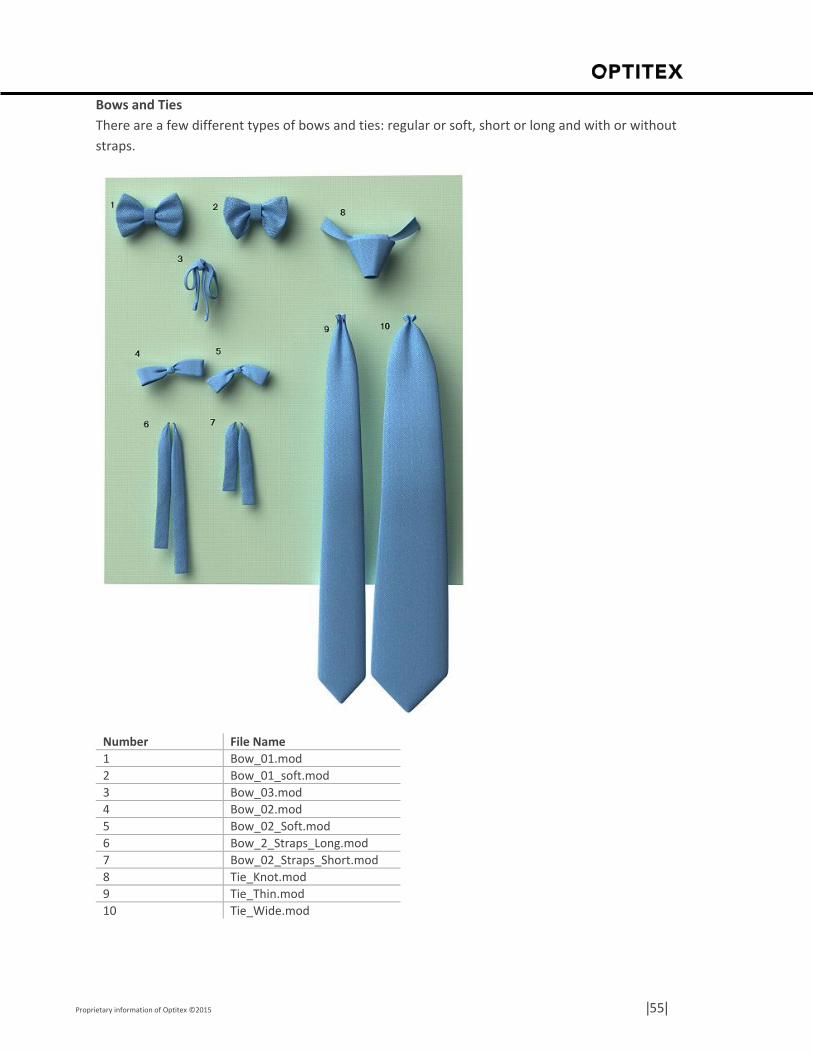
Bows and Ties
There are a few different types of bows and ties: regular or soft, short or long and with or without
straps.
Number File Name
1 Bow_01.mod
2 Bow_01_soft.mod
3 Bow_03.mod
4 Bow_02.mod
5 Bow_02_Soft.mod
6 Bow_2_Straps_Long.mod
7 Bow_02_Straps_Short.mod
8 Tie_Knot.mod
9 Tie_Thin.mod
10 Tie_Wide.mod
Proprietary information of Optitex ©2015 |56|
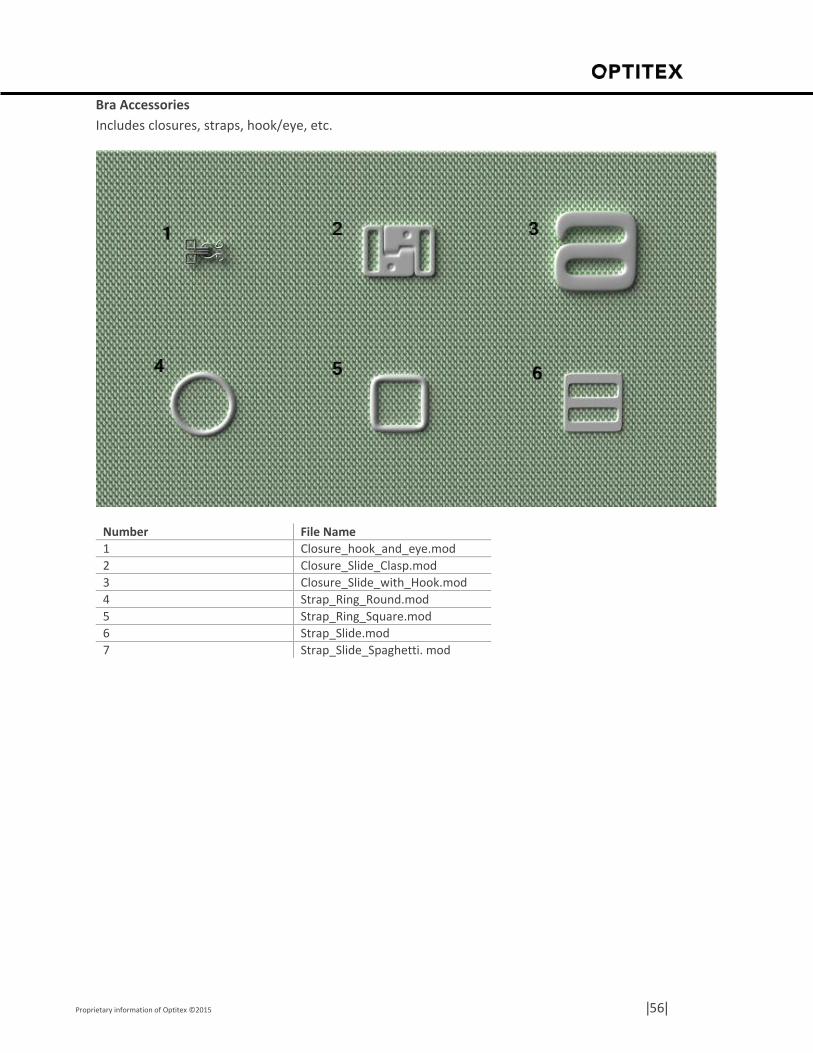
Bra Accessories
Includes closures, straps, hook/eye, etc.
Number File Name
1 Closure_hook_and_eye.mod
2 Closure_Slide_Clasp.mod
3 Closure_Slide_with_Hook.mod
4 Strap_Ring_Round.mod
5 Strap_Ring_Square.mod
6 Strap_Slide.mod
7 Strap_Slide_Spaghetti. mod
Proprietary information of Optitex ©2015 |57|
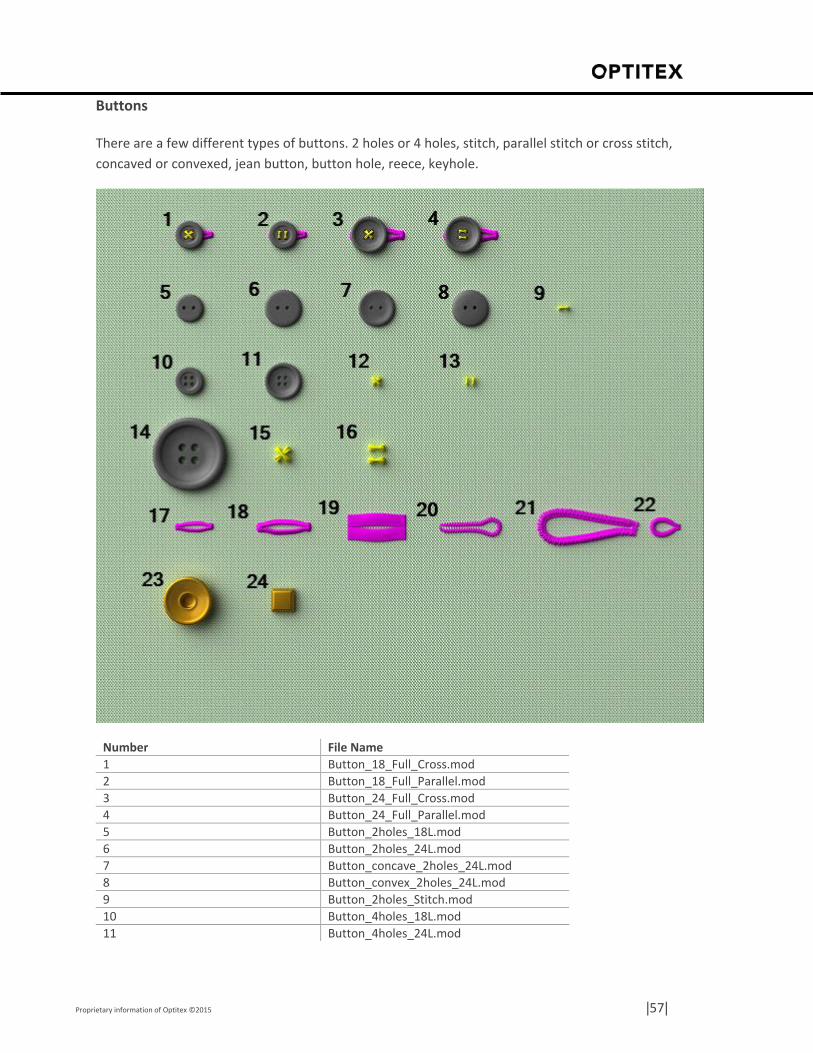
Buttons
There are a few different types of buttons. 2 holes or 4 holes, stitch, parallel stitch or cross stitch,
concaved or convexed, jean button, button hole, reece, keyhole.
Number File Name
1 Button_18_Full_Cross.mod
2 Button_18_Full_Parallel.mod
3 Button_24_Full_Cross.mod
4 Button_24_Full_Parallel.mod
5 Button_2holes_18L.mod
6 Button_2holes_24L.mod
7 Button_concave_2holes_24L.mod
8 Button_convex_2holes_24L.mod
9 Button_2holes_Stitch.mod
10 Button_4holes_18L.mod
11 Button_4holes_24L.mod
Proprietary information of Optitex ©2015 |58|
12 Button_4holes_Stitch_Cross.mod
13 Button_4holes_Stitch_Parallel.mod
14 Button_4Holes_30mm.mod
15 Button_4Holes_30mm_Sttich_Cross.mod
16 Button_4Holes_30mm_Sttich_Parallel.mod
17 Button_Hole_18L.mod
18 Button_Hole_24L.mod
19 Button_Hole_Reece.mod
20 Button_Keyhole_1Inch.mod
21 Button_Keyhole_1.5Inch.mod
22 Button_Loop.mod
23 Button_Jeans_30L.mod
24 Button_Square.mod
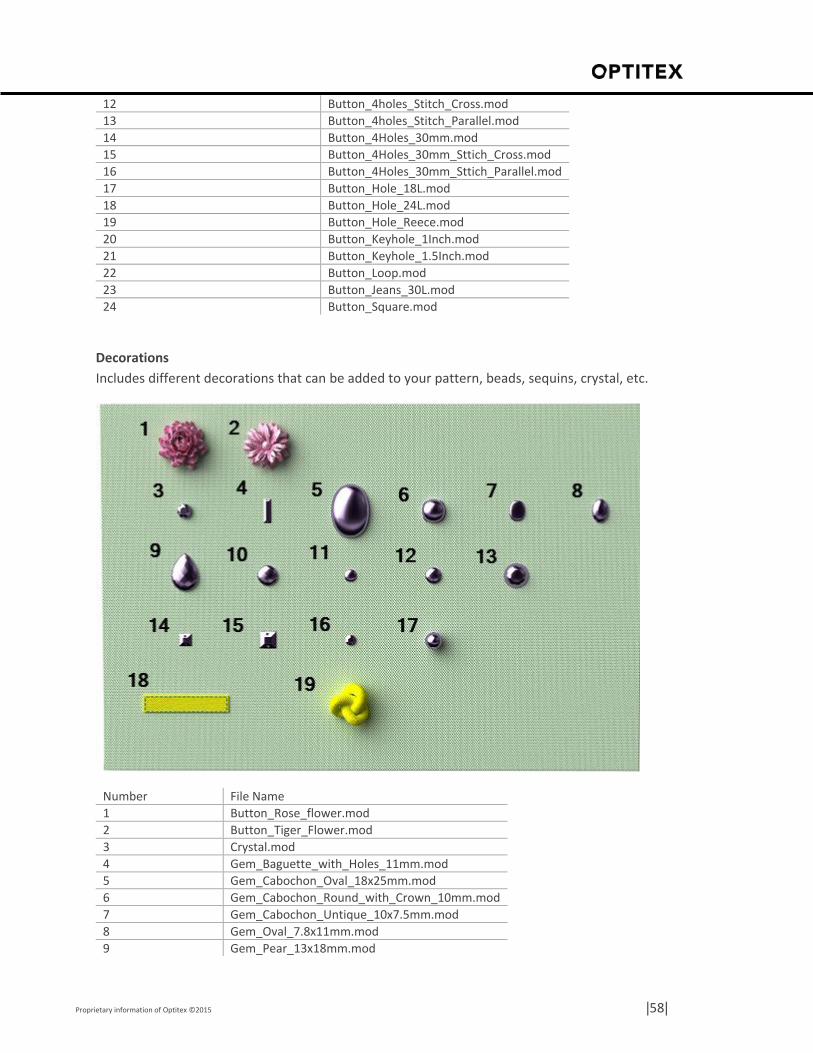
Decorations
Includes different decorations that can be added to your pattern, beads, sequins, crystal, etc.
Number File Name
1 Button_Rose_flower.mod
2 Button_Tiger_Flower.mod
3 Crystal.mod
4 Gem_Baguette_with_Holes_11mm.mod
5 Gem_Cabochon_Oval_18x25mm.mod
6 Gem_Cabochon_Round_with_Crown_10mm.mod
7 Gem_Cabochon_Untique_10x7.5mm.mod
8 Gem_Oval_7.8x11mm.mod
9 Gem_Pear_13x18mm.mod
Proprietary information of Optitex ©2015 |59|
10 Gem_Round_10mm.mod
11 Gem_Round_6mm.mod
12 Gem_Round_8mm.mod
13 Gem_Round_Cut_12mm.mod
14 Gem_Square_with_Holes_6mm.mod
15 Gem_Square_with_Holes_8mm.mod
16 Sequin.mod
17 Bead.mod
18 Label_(40x8mm).mod
19 Three_Knot.mod
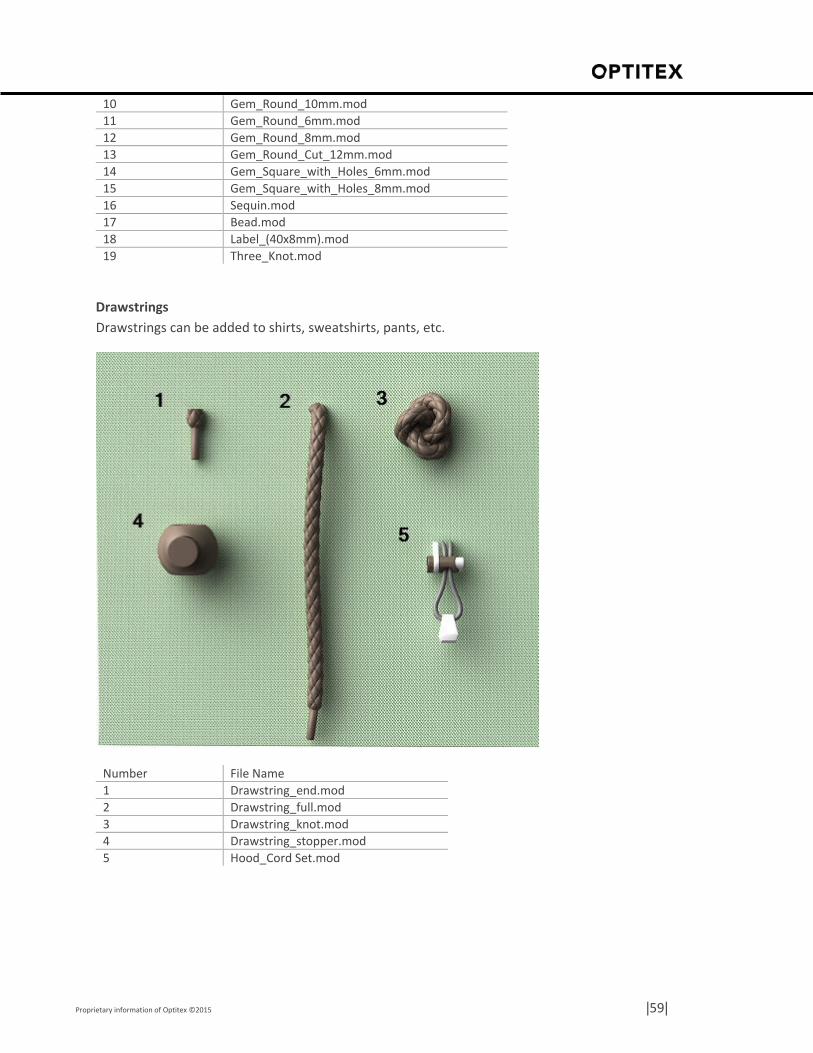
Drawstrings
Drawstrings can be added to shirts, sweatshirts, pants, etc.
Number File Name
1 Drawstring_end.mod
2 Drawstring_full.mod
3 Drawstring_knot.mod
4 Drawstring_stopper.mod
5 Hood_Cord Set.mod
Proprietary information of Optitex ©2015 |60|
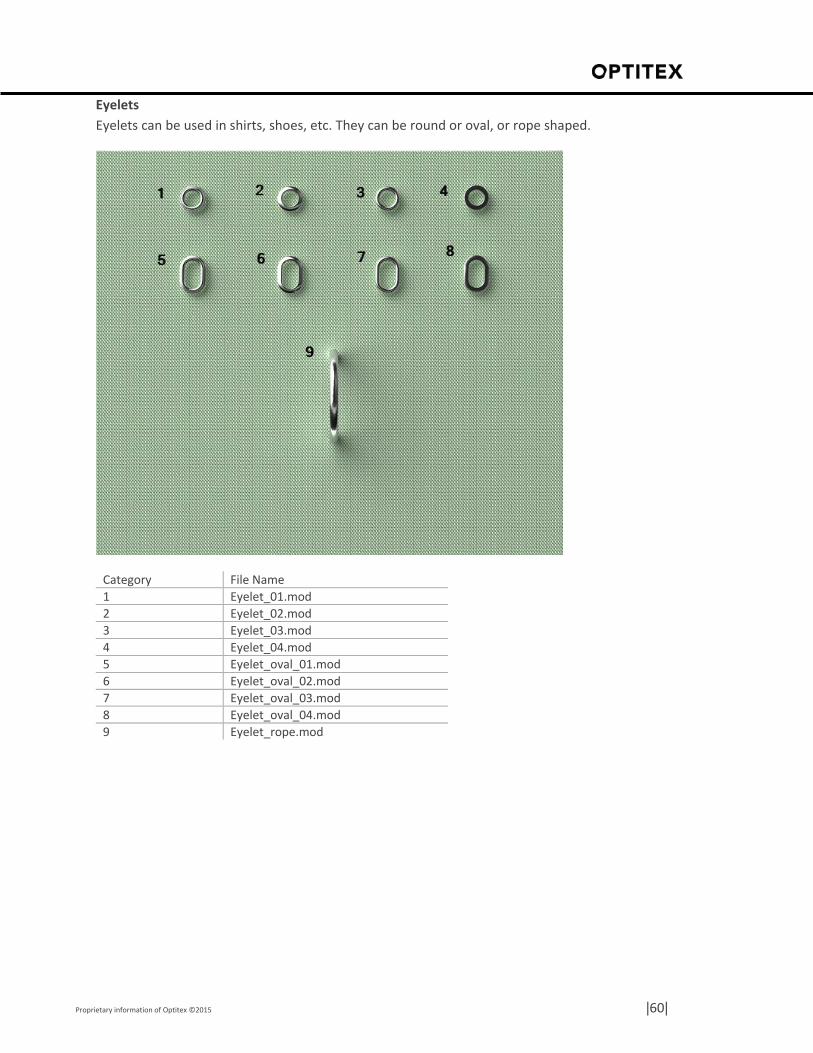
Eyelets
Eyelets can be used in shirts, shoes, etc. They can be round or oval, or rope shaped.
Category File Name
1 Eyelet_01.mod
2 Eyelet_02.mod
3 Eyelet_03.mod
4 Eyelet_04.mod
5 Eyelet_oval_01.mod
6 Eyelet_oval_02.mod
7 Eyelet_oval_03.mod
8 Eyelet_oval_04.mod
9 Eyelet_rope.mod
Proprietary information of Optitex ©2015 |61|
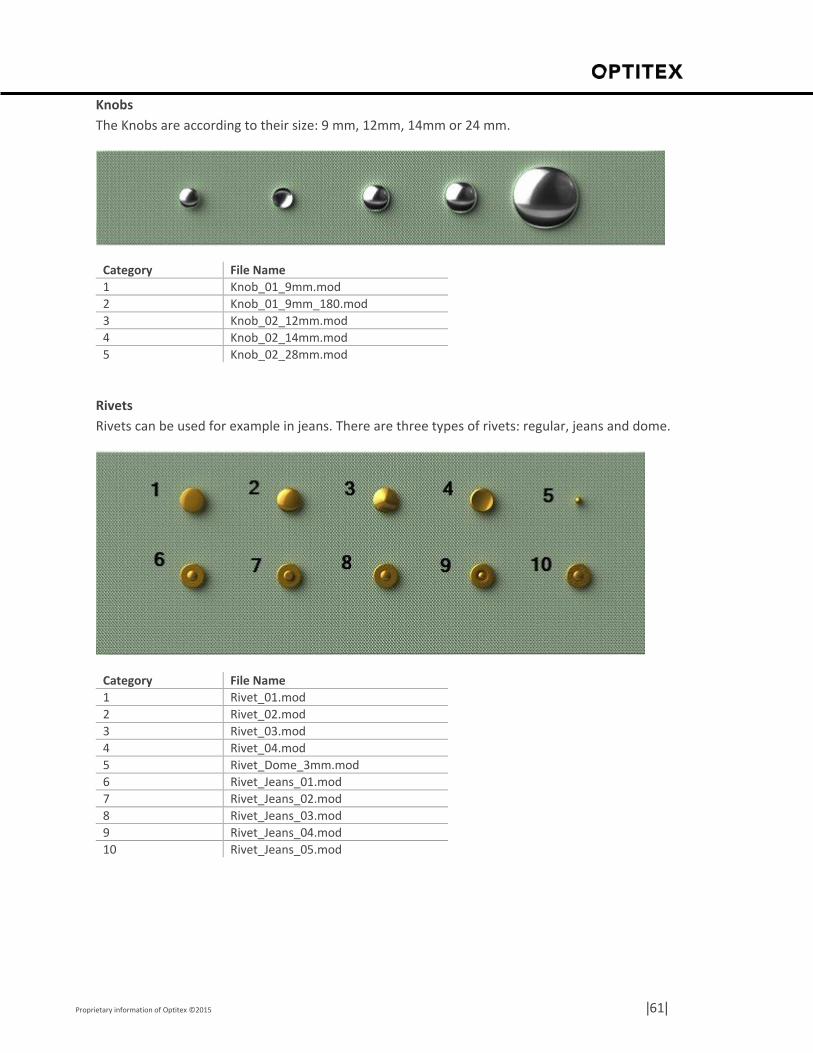
Knobs
The Knobs are according to their size: 9 mm, 12mm, 14mm or 24 mm.
Category File Name
1 Knob_01_9mm.mod
2 Knob_01_9mm_180.mod
3 Knob_02_12mm.mod
4 Knob_02_14mm.mod
5 Knob_02_28mm.mod
Rivets
Rivets can be used for example in jeans. There are three types of rivets: regular, jeans and dome.
Category File Name
1 Rivet_01.mod
2 Rivet_02.mod
3 Rivet_03.mod
4 Rivet_04.mod
5 Rivet_Dome_3mm.mod
6 Rivet_Jeans_01.mod
7 Rivet_Jeans_02.mod
8 Rivet_Jeans_03.mod
9 Rivet_Jeans_04.mod
10 Rivet_Jeans_05.mod
Proprietary information of Optitex ©2015 |62|
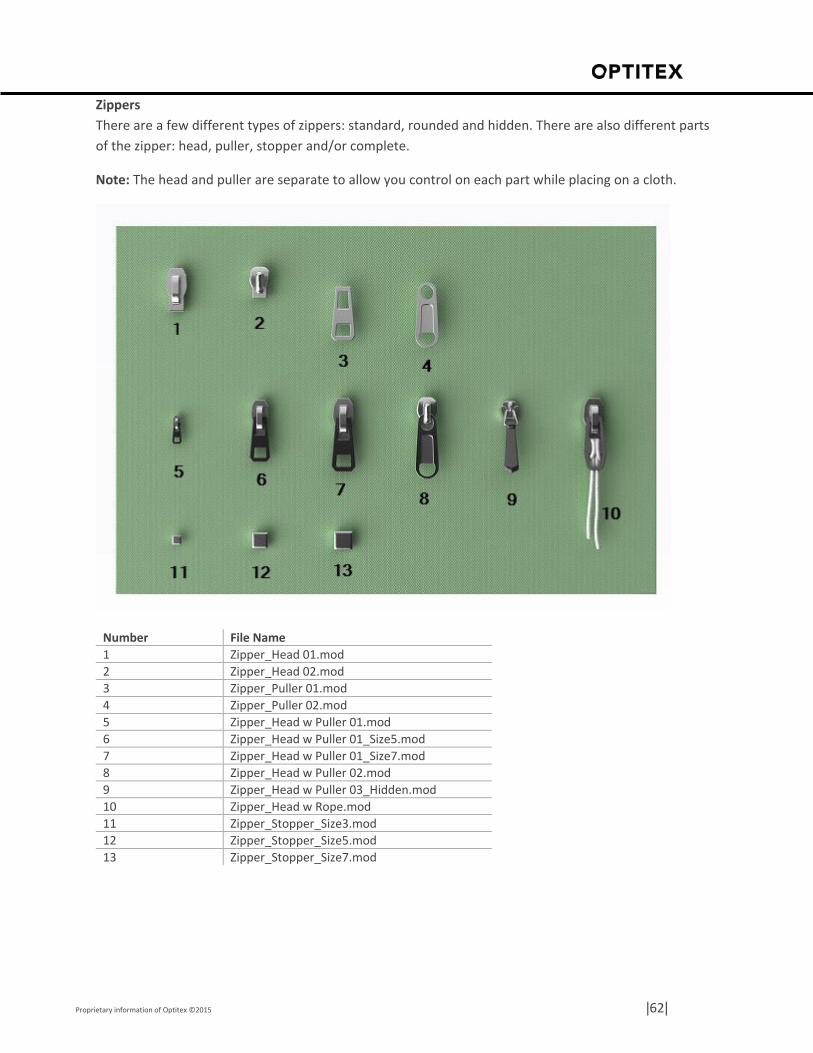
Zippers
There are a few different types of zippers: standard, rounded and hidden. There are also different parts
of the zipper: head, puller, stopper and/or complete.
Note: The head and puller are separate to allow you control on each part while placing on a cloth.
Number File Name
1 Zipper_Head 01.mod
2 Zipper_Head 02.mod
3 Zipper_Puller 01.mod
4 Zipper_Puller 02.mod
5 Zipper_Head w Puller 01.mod
6 Zipper_Head w Puller 01_Size5.mod
7 Zipper_Head w Puller 01_Size7.mod
8 Zipper_Head w Puller 02.mod
9 Zipper_Head w Puller 03_Hidden.mod
10 Zipper_Head w Rope.mod
11 Zipper_Stopper_Size3.mod
12 Zipper_Stopper_Size5.mod
13 Zipper_Stopper_Size7.mod
Proprietary information of Optitex ©2015 |63|
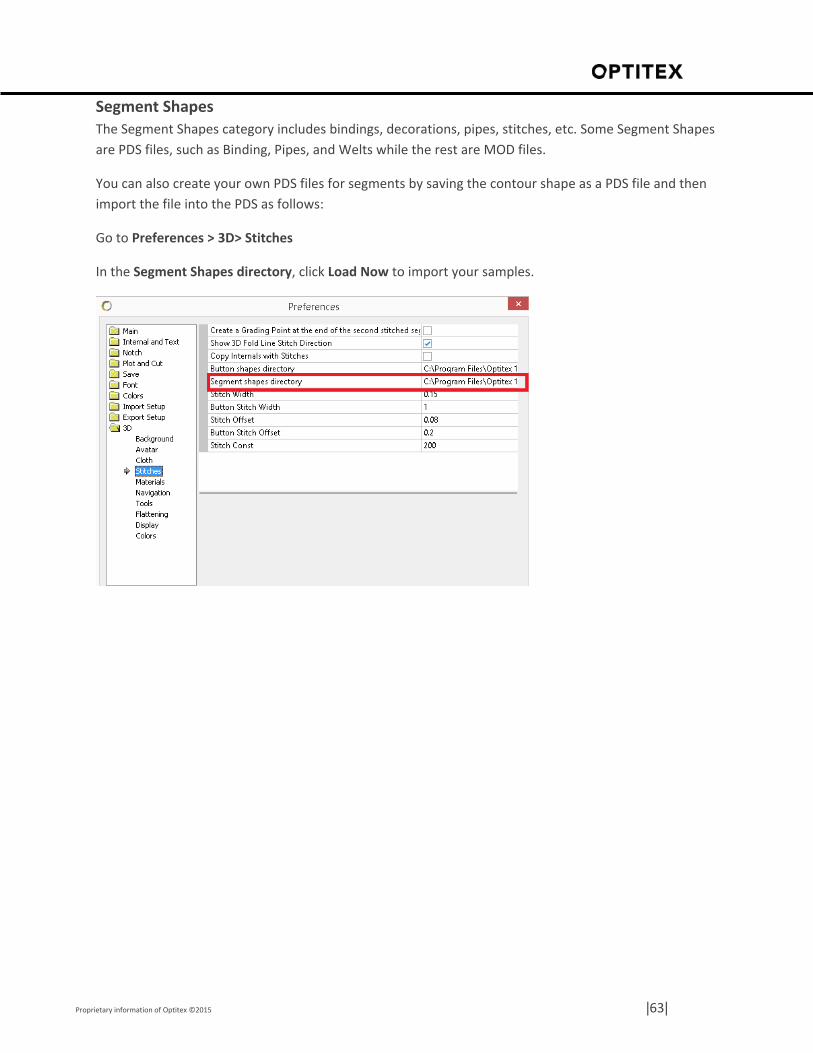
Segment Shapes
The Segment Shapes category includes bindings, decorations, pipes, stitches, etc. Some Segment Shapes
are PDS files, such as Binding, Pipes, and Welts while the rest are MOD files.
You can also create your own PDS files for segments by saving the contour shape as a PDS file and then
import the file into the PDS as follows:
Go to Preferences > 3D> Stitches
In the Segment Shapes directory, click Load Now to import your samples.
Proprietary information of Optitex ©2015 |64|
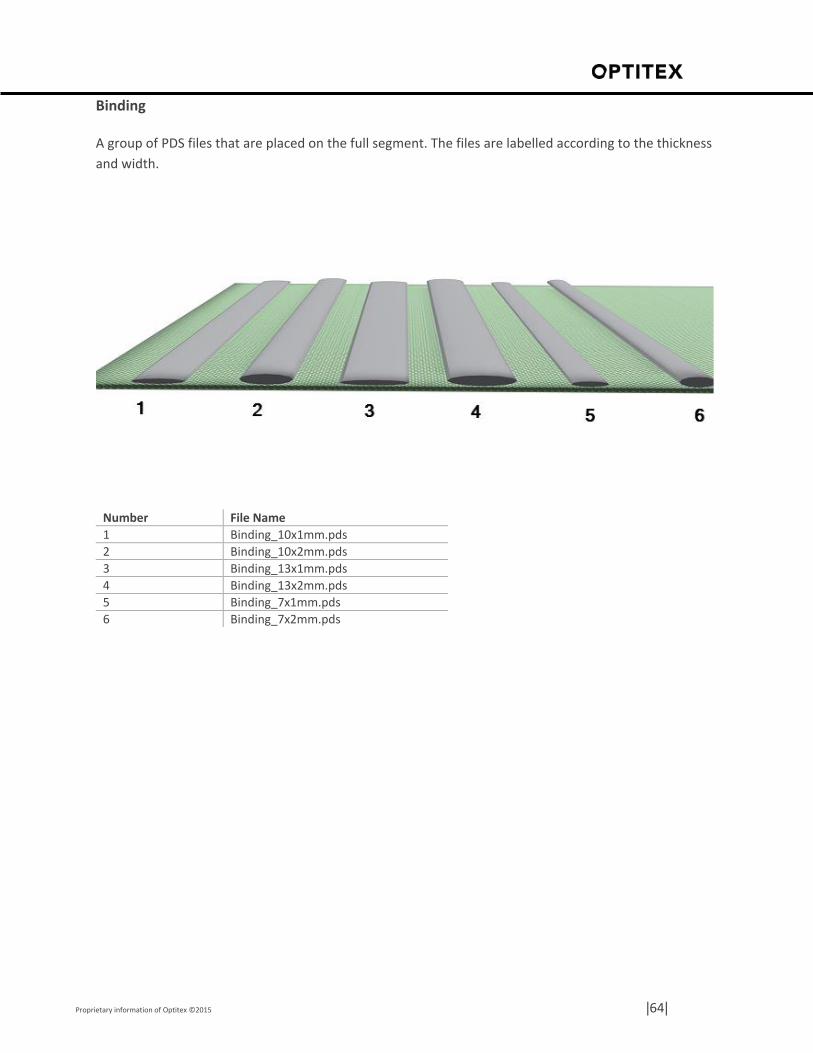
Binding
A group of PDS files that are placed on the full segment. The files are labelled according to the thickness
and width.
Number File Name
1 Binding_10x1mm.pds
2 Binding_10x2mm.pds
3 Binding_13x1mm.pds
4 Binding_13x2mm.pds
5 Binding_7x1mm.pds
6 Binding_7x2mm.pds
Proprietary information of Optitex ©2015 |65|
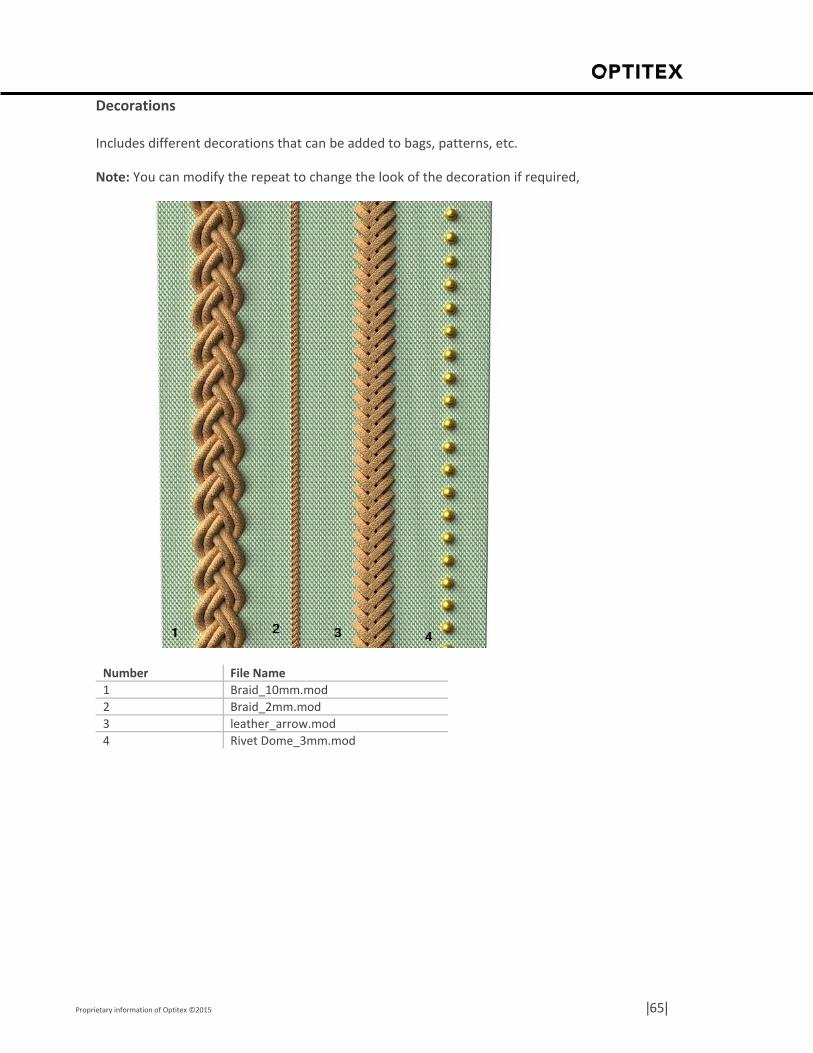
Decorations
Includes different decorations that can be added to bags, patterns, etc.
Note: You can modify the repeat to change the look of the decoration if required,
Number File Name
1 Braid_10mm.mod
2 Braid_2mm.mod
3 leather_arrow.mod
4 Rivet Dome_3mm.mod
Proprietary information of Optitex ©2015 |66|
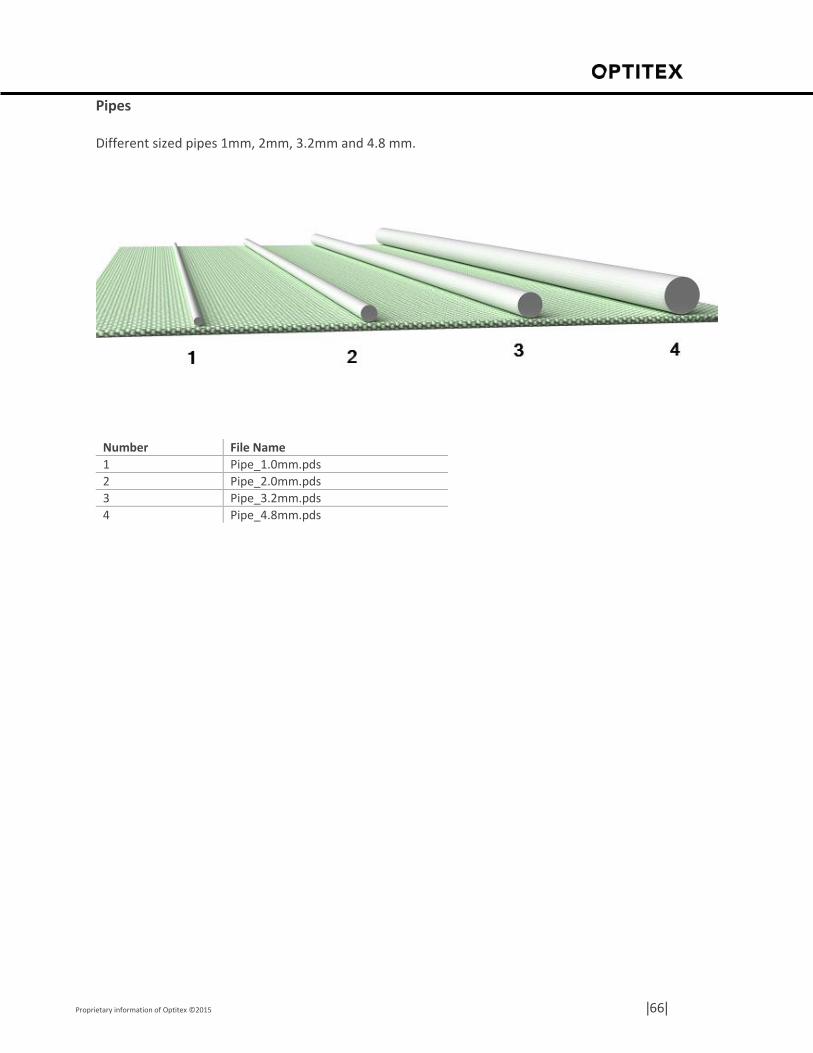
Pipes
Different sized pipes 1mm, 2mm, 3.2mm and 4.8 mm.
Number File Name
1 Pipe_1.0mm.pds
2 Pipe_2.0mm.pds
3 Pipe_3.2mm.pds
4 Pipe_4.8mm.pds
Proprietary information of Optitex ©2015 |67|
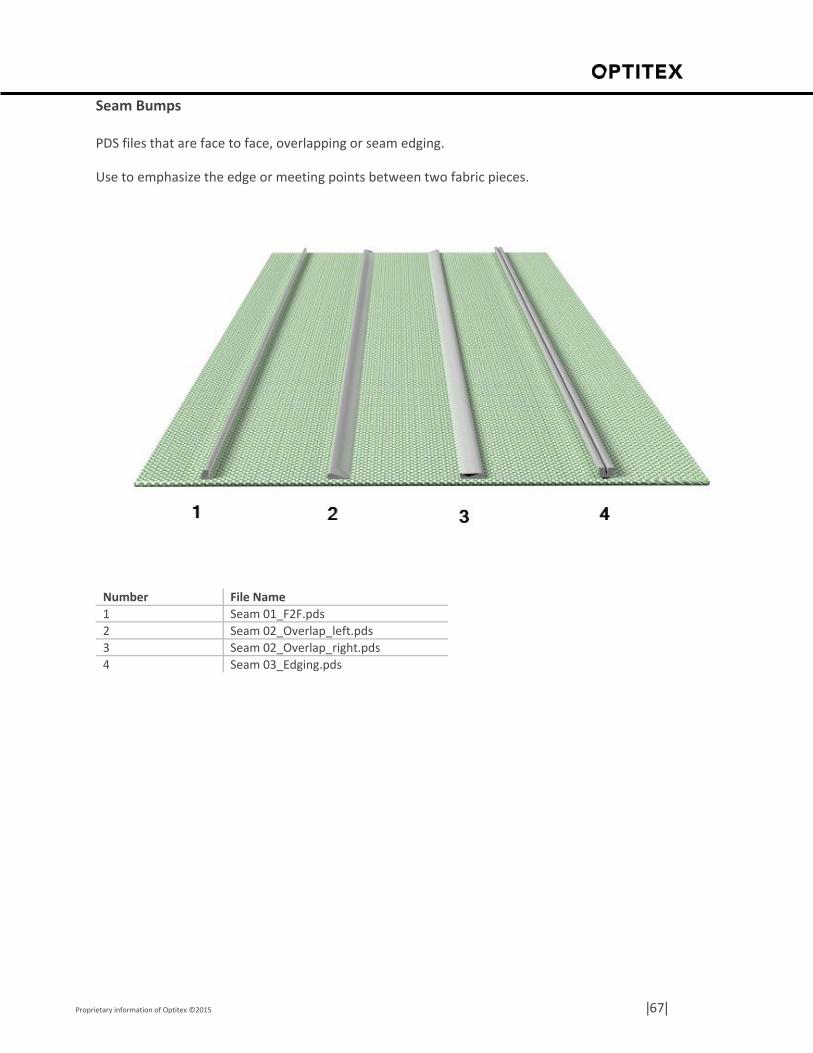
Seam Bumps
PDS files that are face to face, overlapping or seam edging.
Use to emphasize the edge or meeting points between two fabric pieces.
Number File Name
1 Seam 01_F2F.pds
2 Seam 02_Overlap_left.pds
3 Seam 02_Overlap_right.pds
4 Seam 03_Edging.pds
Proprietary information of Optitex ©2015 |68|
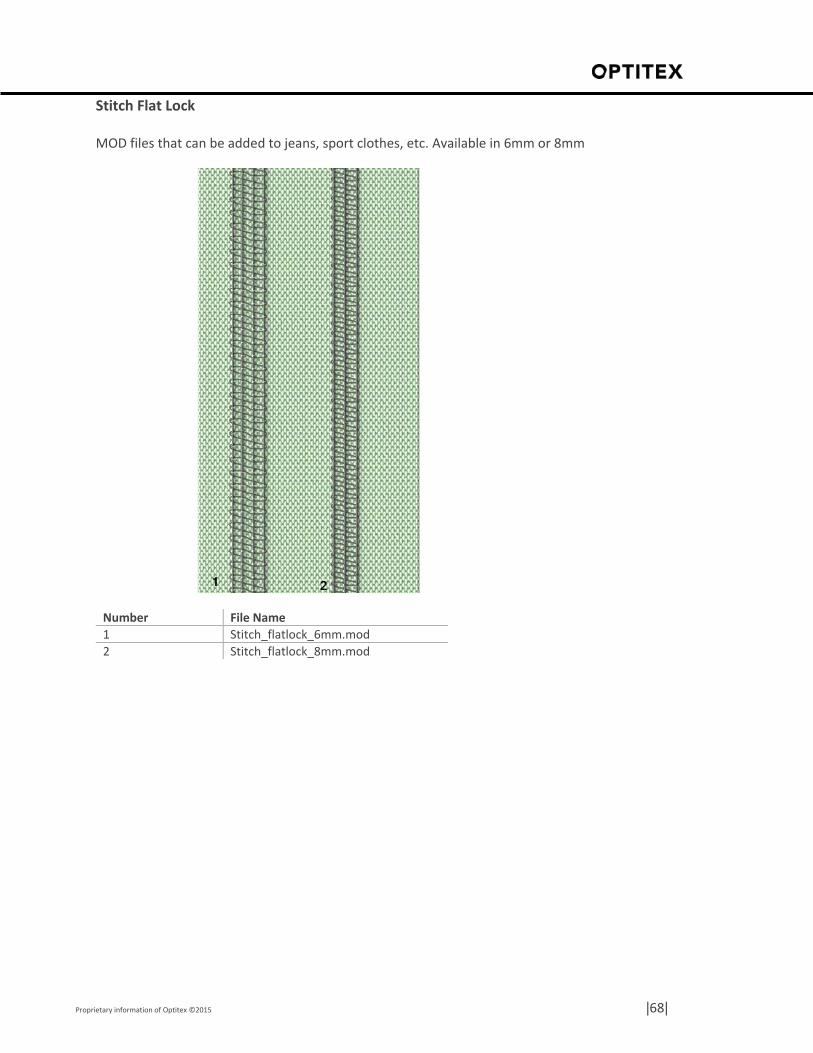
Stitch Flat Lock
MOD files that can be added to jeans, sport clothes, etc. Available in 6mm or 8mm
Number File Name
1 Stitch_flatlock_6mm.mod
2 Stitch_flatlock_8mm.mod
Proprietary information of Optitex ©2015 |69|
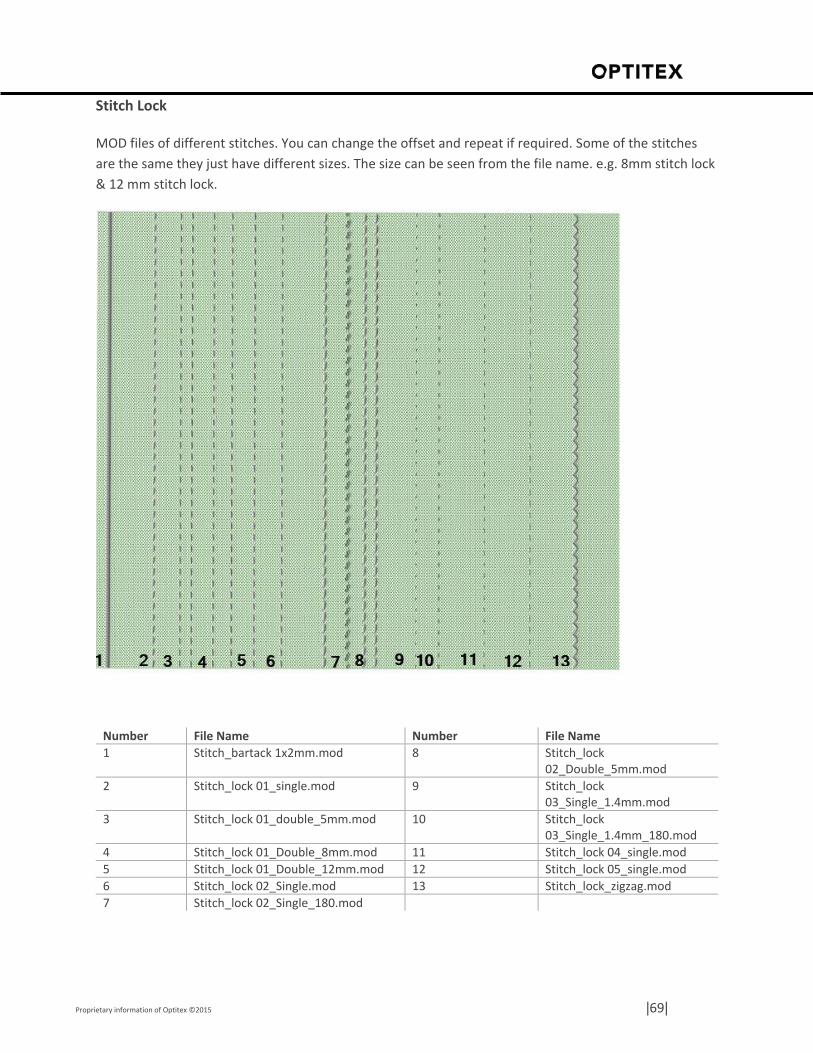
Stitch Lock
MOD files of different stitches. You can change the offset and repeat if required. Some of the stitches
are the same they just have different sizes. The size can be seen from the file name. e.g. 8mm stitch lock
& 12 mm stitch lock.
Number File Name Number File Name
1 Stitch_bartack 1x2mm.mod 8 Stitch_lock 02_Double_5mm.mod
2 Stitch_lock 01_single.mod 9 Stitch_lock 03_Single_1.4mm.mod
3 Stitch_lock 01_double_5mm.mod 10 Stitch_lock 03_Single_1.4mm_180.mod
4 Stitch_lock 01_Double_8mm.mod 11 Stitch_lock 04_single.mod
5 Stitch_lock 01_Double_12mm.mod 12 Stitch_lock 05_single.mod
6 Stitch_lock 02_Single.mod 13 Stitch_lock_zigzag.mod
7 Stitch_lock 02_Single_180.mod
Proprietary information of Optitex ©2015 |70|
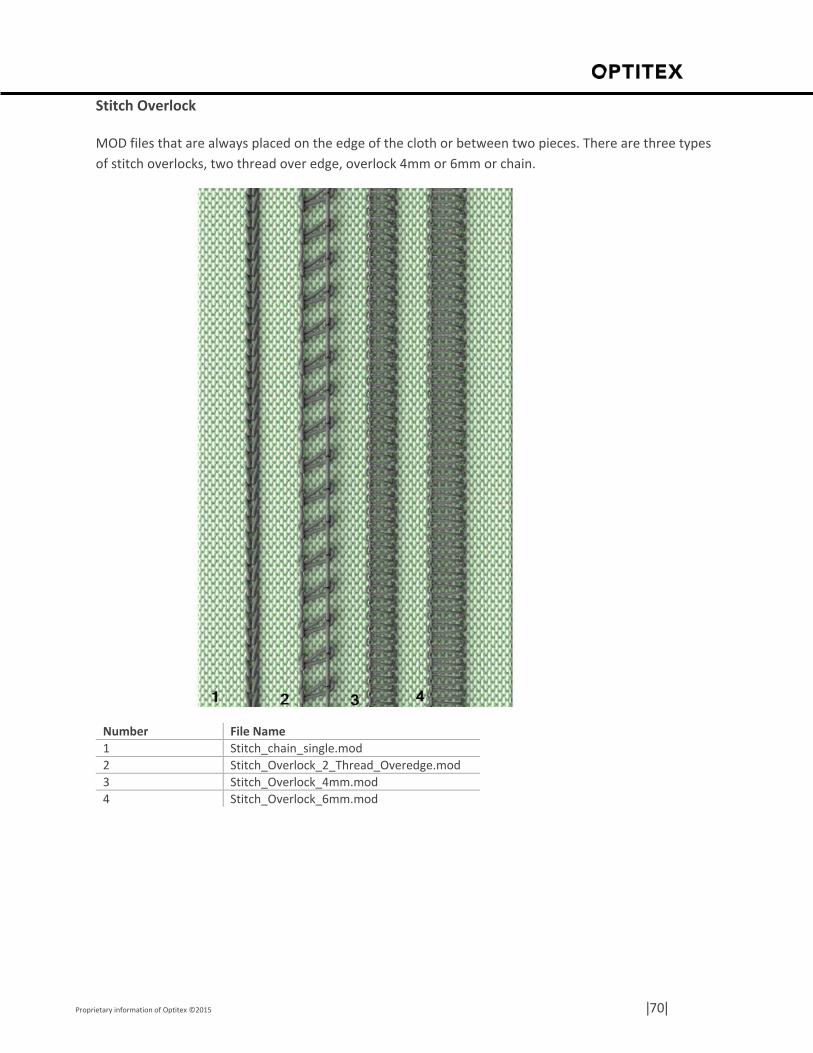
Stitch Overlock
MOD files that are always placed on the edge of the cloth or between two pieces. There are three types
of stitch overlocks, two thread over edge, overlock 4mm or 6mm or chain.
Number File Name
1 Stitch_chain_single.mod
2 Stitch_Overlock_2_Thread_Overedge.mod
3 Stitch_Overlock_4mm.mod
4 Stitch_Overlock_6mm.mod
Proprietary information of Optitex ©2015 |71|
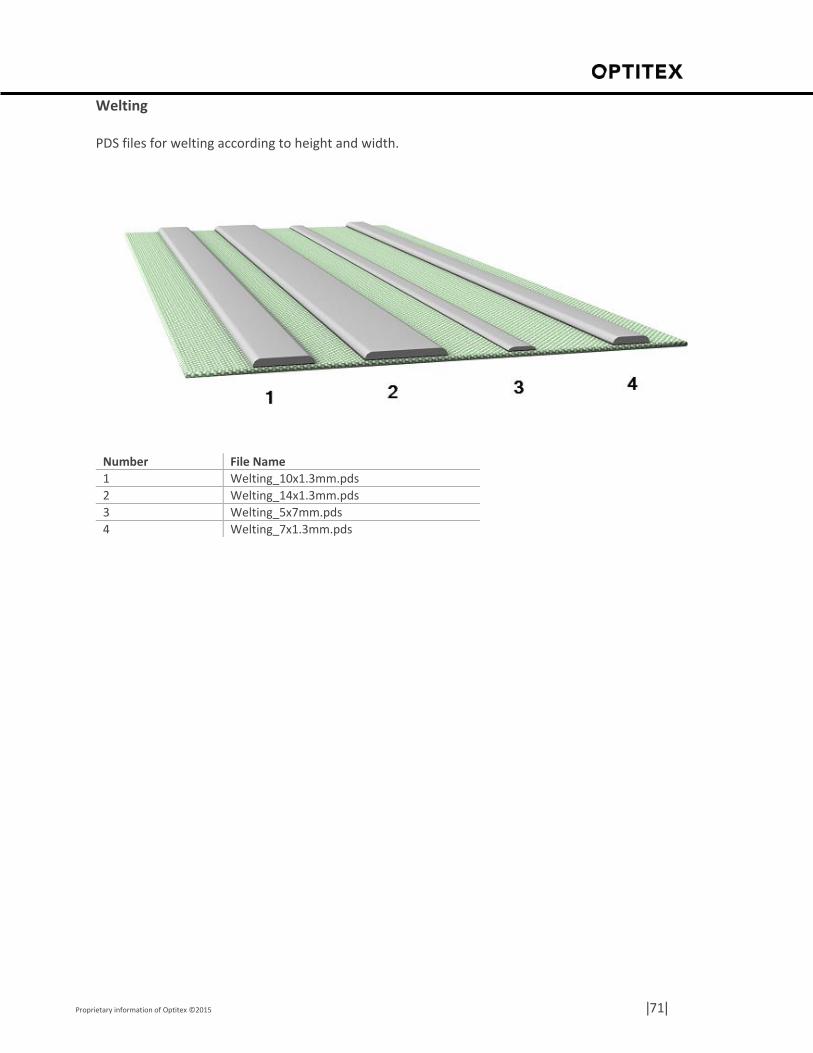
Welting
PDS files for welting according to height and width.
Number File Name
1 Welting_10x1.3mm.pds
2 Welting_14x1.3mm.pds
3 Welting_5x7mm.pds
4 Welting_7x1.3mm.pds
Proprietary information of Optitex ©2015 |72|
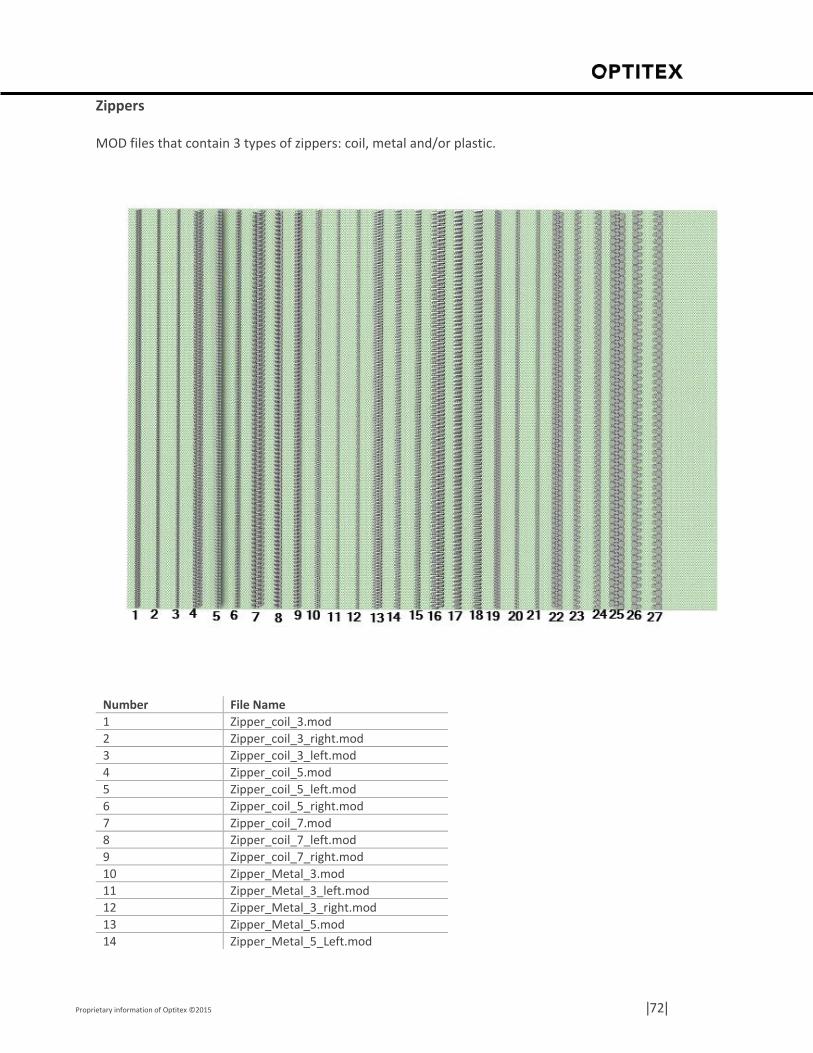
Zippers
MOD files that contain 3 types of zippers: coil, metal and/or plastic.
Number File Name
1 Zipper_coil_3.mod
2 Zipper_coil_3_right.mod
3 Zipper_coil_3_left.mod
4 Zipper_coil_5.mod
5 Zipper_coil_5_left.mod
6 Zipper_coil_5_right.mod
7 Zipper_coil_7.mod
8 Zipper_coil_7_left.mod
9 Zipper_coil_7_right.mod
10 Zipper_Metal_3.mod
11 Zipper_Metal_3_left.mod
12 Zipper_Metal_3_right.mod
13 Zipper_Metal_5.mod
14 Zipper_Metal_5_Left.mod
Proprietary information of Optitex ©2015 |73|
15 Zipper_Metal_5_Right.mod
16 Zipper_Metal_7.mod
17 Zipper_Metal_7_Left.mod
18 Zipper_Metal_7_Right.mod
19 Zipper_Plastic_3.mod
20 Zipper_Plastic_3_Left.mod
21 Zipper_Plastic_3_Right.mod
22 Zipper_Plastic_5.mod
23 Zipper_Plastic_5_Left.mod
24 Zipper_Plastic_5_Right.mod
25 Zipper_Plastic_7.mod
26 Zipper_Plastic_7_Left.mod
27 Zipper_Plastic_7_Right.mod
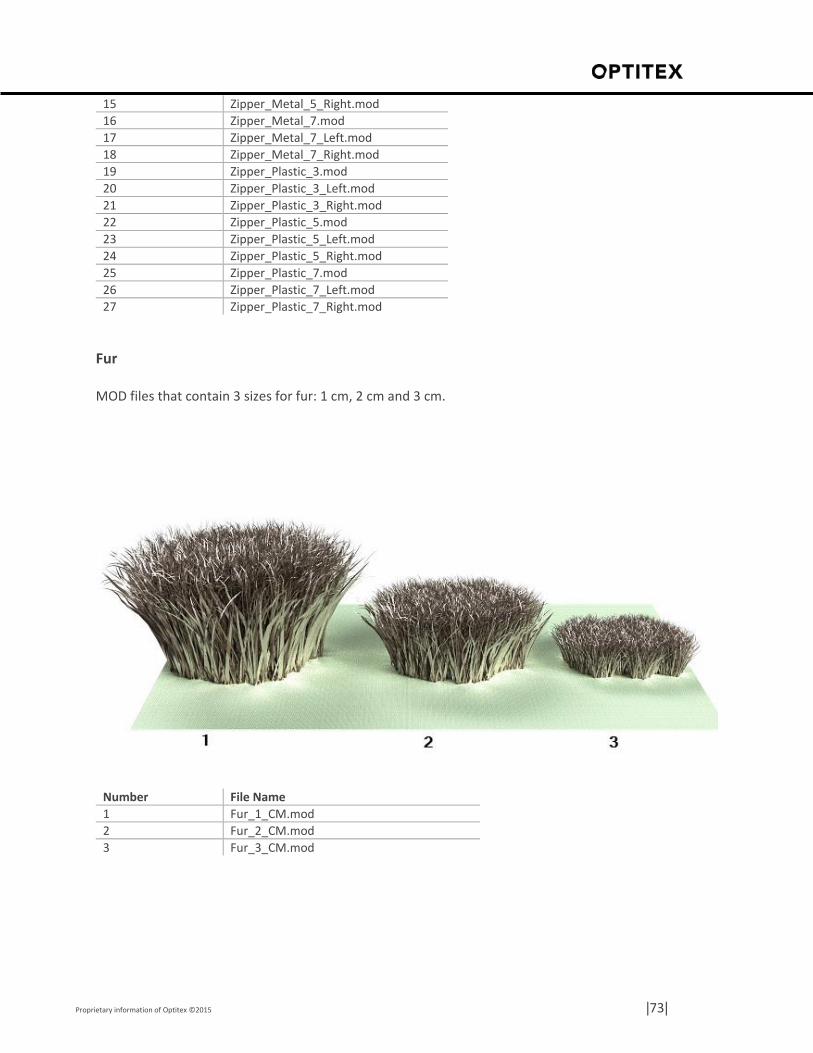
Fur
MOD files that contain 3 sizes for fur: 1 cm, 2 cm and 3 cm.
Number File Name
1 Fur_1_CM.mod
2 Fur_2_CM.mod
3 Fur_3_CM.mod

© Copyright 1988-2016 by Optitex.
All rights reserved. All text and figures included in this publication are the exclusive property of Optitex,
and may not be copied, reproduced, or used in any way without the express permission in writing from
Optitex. Information in this document is subject to change without notice and does not present a
commitment on the part of Optitex.