Embed Size (px)
Citation preview
Frymaster, a member of the Commercial Food Equipment Service Association, recommends using CFESA Certified Technicians.
24-Hour Service Hotline
1-800-551-8633
NOVEMBER 2003
M2000 C
omputer
Operation M
anual
*8195833*

M2000 Computer
Table of Contents
Overview 1-1 Quick Reference
Basic Operation 2-1 Cooking With Multi-Product Display 2-2 Cooking With Dedicated Display 2-3 Changing from Breakfast to Lunch 2-4 Changing from Lunch to Breakfast 2-5
Computer Initial Setup/Language Selection 3-1 Programming Fry Station 4-1 Programming Multi-Product Fryer 5-1 Adding New Menu Items 6-1 Add Boil Out 7-1 Select Boilout 7-1 Programming and Test Codes 8-1 Programming 8-1 Set Up 8-1 Recovery Check 8-2 Loading Default Settings 8-2 Choosing Sound Level, Language 8-3 Change from Fahrenheit to Celsius 8-3 Hi-Limit Check 8-4 Moving Computer 8-5 Distress Codes 9-1
M2000 Overview
1- 1
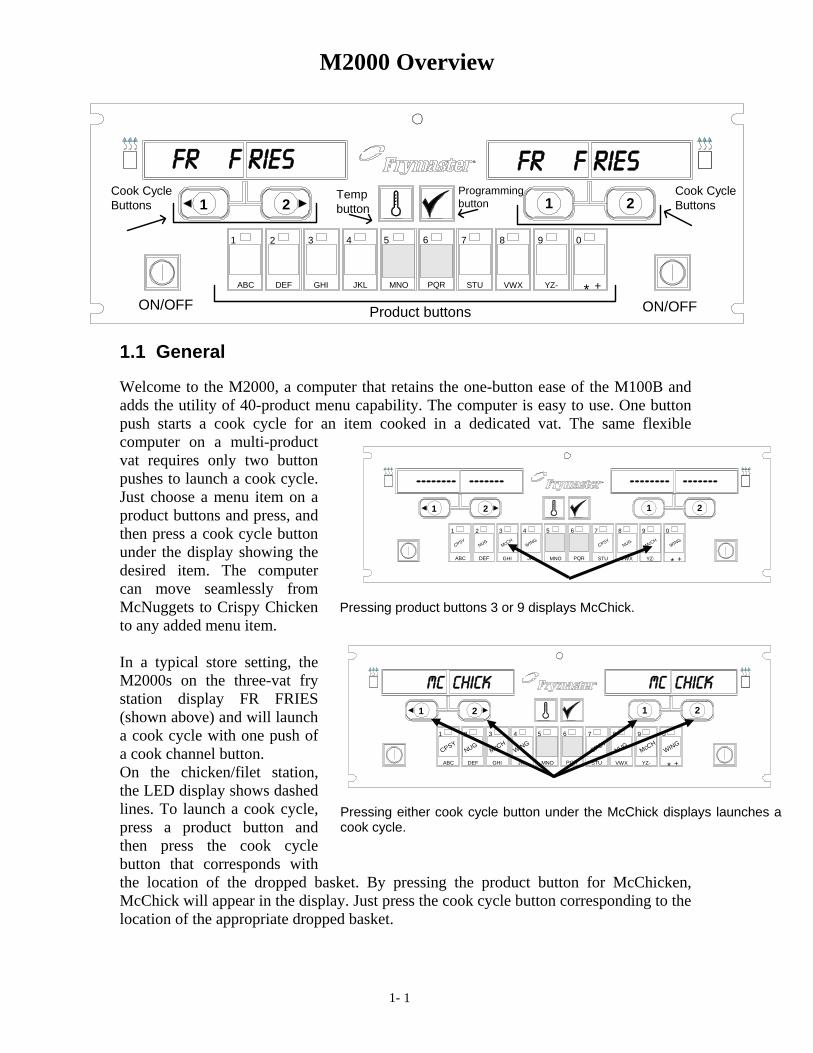
1.1 General Welcome to the M2000, a computer that retains the one-button ease of the M100B and adds the utility of 40-product menu capability. The computer is easy to use. One button push starts a cook cycle for an item cooked in a dedicated vat. The same flexible computer on a multi-product vat requires only two button pushes to launch a cook cycle. Just choose a menu item on a product buttons and press, and then press a cook cycle button under the display showing the desired item. The computer can move seamlessly from McNuggets to Crispy Chicken to any added menu item. In a typical store setting, the M2000s on the three-vat fry station display FR FRIES (shown above) and will launch a cook cycle with one push of a cook channel button. On the chicken/filet station, the LED display shows dashed lines. To launch a cook cycle, press a product button and then press the cook cycle button that corresponds with the location of the dropped basket. By pressing the product button for McChicken, McChick will appear in the display. Just press the cook cycle button corresponding to the location of the appropriate dropped basket.
2 3 4
DEF GHI JKL MNO PQR STU VWX
5 6 7 8
ABC
1
YZ-
09
+*
1 2 2
FR F Ries FR F Ries1
Product buttonsON/OFF ON/OFF
Cook CycleButtons
Cook CycleButtons
Tempbutton
Programmingbutton
2 3 4
DEF GHI JKL MNO PQR STU VWX
5 6 7 8
ABC
1
YZ-
09
+*
1 2 2
-------- -------
1
-------- -------
CPSYNUG
McCHWING
CPSYNUG
McCHWING
Pressing product buttons 3 or 9 displays McChick.
2 3 4
DEF GHI JKL MNO PQR STU VWX
5 6 7 8
ABC
1
YZ-
09
+*
1 2 21
Mc chick
CPSYNUG
McCHWING
CPSYNUG
McCHWING
Mc chick
Pressing either cook cycle button under the McChick displays launches a cook cycle.
M2000 Overview
1- 2
The M2000 will operate with electric and gas fryers, both full- and split-pot. 1.2 Service Information Call the “800” number on the cover of this manual for the location of your nearest maintenance & repair center. When requesting service assistance, always give the model and serial numbers of your cooking computer and the type of fryer this cooking computer is installed on.
To assist you more efficiently, the following information will be needed: Model Number Serial Number Type of Fryer Nature of the Problem
Any other information which may be helpful in solving your service problem.
M2000 Computer
2-1
2 4
DEF JKL MNO PQR VWX
5 6 8
YZ-
09
+*
2 1
STU
7
1
ABC
1
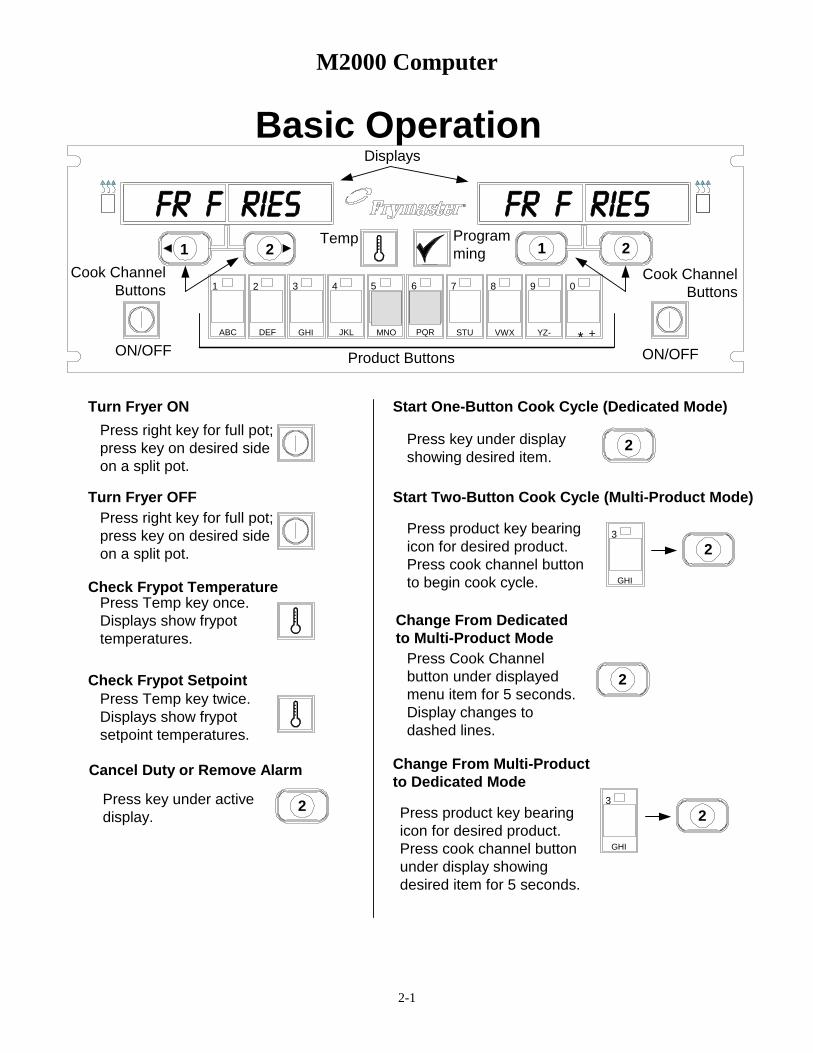
Basic Operation
Fr F ries Fr F ries
Product ButtonsON/OFF ON/OFF
Cook ChannelButtons
Cook ChannelButtons
Temp Programming
Displays
Turn Fryer ONPress right key for full pot;press key on desired sideon a split pot.
Turn Fryer OFFPress right key for full pot;press key on desired sideon a split pot.
Check Frypot TemperaturePress Temp key once.Displays show frypottemperatures.
Check Frypot SetpointPress Temp key twice.Displays show frypotsetpoint temperatures.
Start One-Button Cook Cycle (Dedicated Mode)
Press key under displayshowing desired item.
2
2
Start Two-Button Cook Cycle (Multi-Product Mode)
Press product key bearingicon for desired product.Press cook channel buttonto begin cook cycle.
2
3
GHI
3
GHI
Cancel Duty or Remove Alarm
Press key under activedisplay.
2
Change From Dedicatedto Multi-Product Mode
Press Cook Channelbutton under displayedmenu item for 5 seconds.Display changes todashed lines.
2
Change From Multi-Productto Dedicated Mode
Press product key bearingicon for desired product.Press cook channel buttonunder display showingdesired item for 5 seconds.
23
GHI
M2000 Computer
2-2
2 3 4
DEF GHI JKL MNO PQR STU VWX
5 6 7 8
YZ-
09
+*
2 2
- - - - - - - - - -
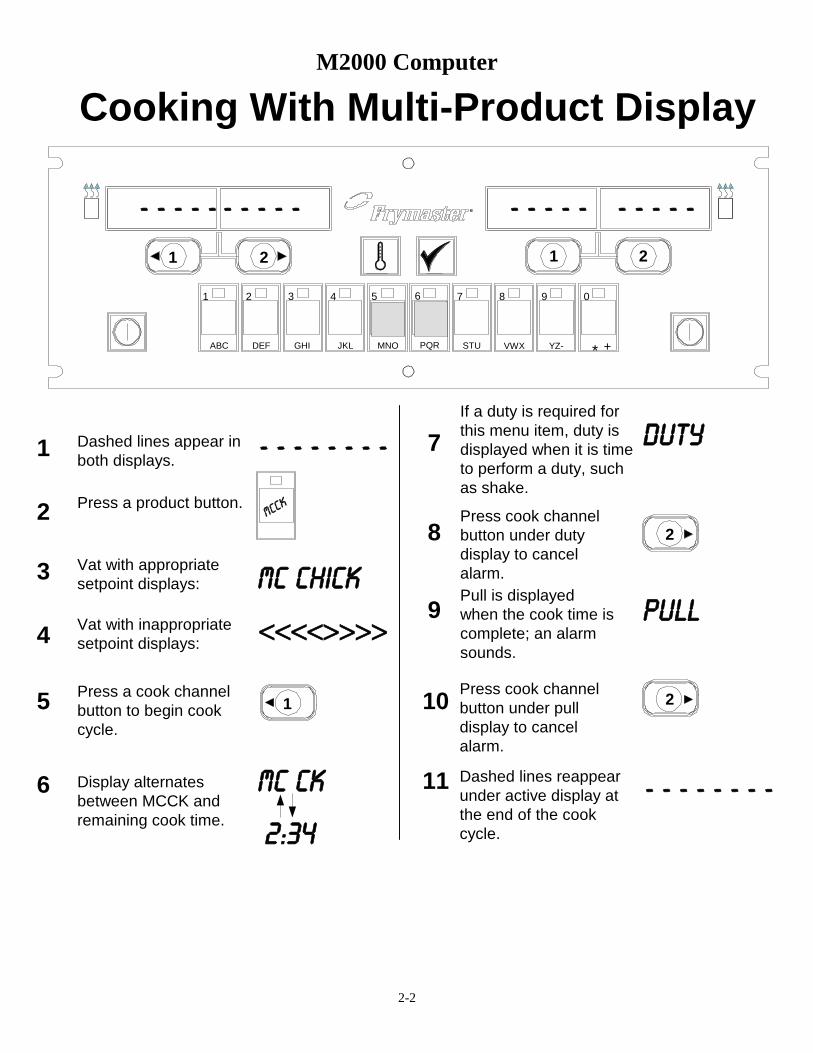
Cooking With Multi-Product Display
Press a product button.
Vat with appropriatesetpoint displays:
If a duty is required forthis menu item, duty isdisplayed when it is timeto perform a duty, suchas shake.
duty
Pull is displayedwhen the cook time iscomplete; an alarmsounds.
pullMc chick
1
Press a cook channelbutton to begin cookcycle.
1
2
3
4
5
6
7
8
9
- - - - -- - - - -
ABC
1
Vat with inappropriatesetpoint displays: <<<<>>>>
1
1
Display alternatesbetween MCCK andremaining cook time.
Dashed lines appear inboth displays. - - - - - - - -
Dashed lines reappearunder active display atthe end of the cookcycle.
- - - - - - - -
Press cook channelbutton under dutydisplay to cancelalarm.
10
Mc cK
2:34
Press cook channelbutton under pulldisplay to cancelalarm.
11
McCK
2
2
M2000 Computer
2-3
2 3 4
DEF GHI JKL MNO PQR STU VWX
5 6 7 8
ABC
1
YZ-
09
+*
1 2 2
FR F Ries FR F Ries
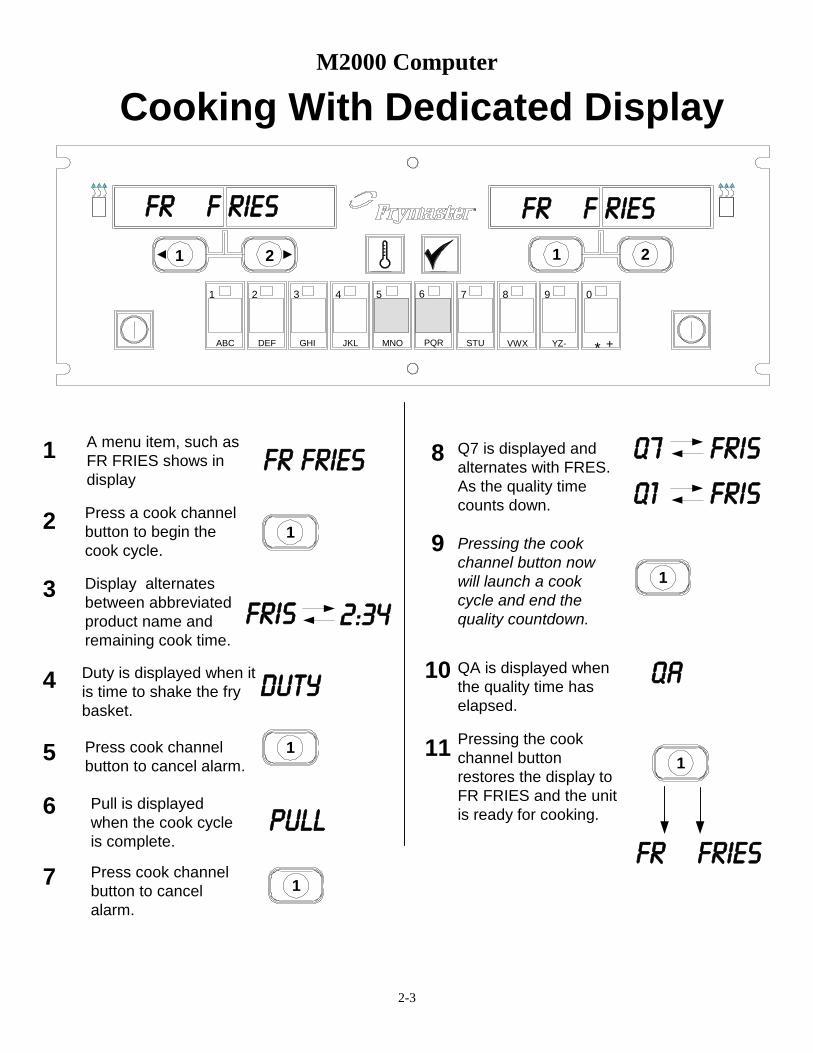
Cooking With Dedicated Display
QA is displayed whenthe quality time haselapsed.
QA
Pressing the cookchannel buttonrestores the display toFR FRIES and the unitis ready for cooking.
FR FRies
Pressing the cookchannel button nowwill launch a cookcycle and end thequality countdown.2:34
1
1
9
10
111
Press a cook channelbutton to begin thecook cycle.
12
Display alternatesbetween abbreviatedproduct name andremaining cook time.
3FRis
Duty is displayed when itis time to shake the frybasket.
duty4
1Press cook channelbutton to cancelalarm.
6
5
Pull is displayedwhen the cook cycleis complete.
pull
Press cook channelbutton to cancel alarm.
1
7
A menu item, such asFR FRIES shows indisplay
1 fr fries Q7 is displayed andalternates with FRES.As the quality timecounts down.
Q7 Fris
Q1 Fris
8
M2000 Computer
2-4
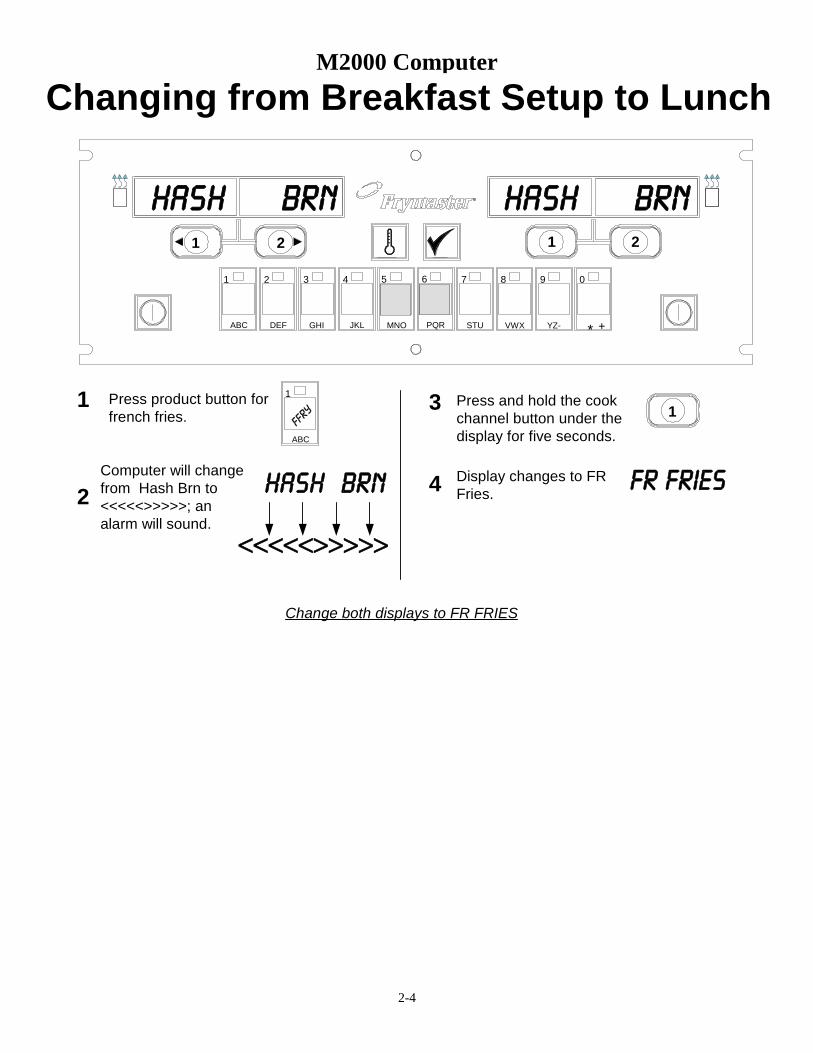
Press product button forfrench fries.
<<<<<>>>>>
1ABC
1
Computer will changefrom Hash Brn to<<<<<>>>>>; analarm will sound.
Press and hold the cookchannel button under thedisplay for five seconds.
Display changes to FRFries. fr frieshash brn
2 3 4
DEF GHI JKL MNO PQR VWX
5 6 8
YZ-
09
+*
2 1 2
hash brn
STU
7
1
hash brn
ABC
1
Changing from Breakfast Setup to Lunch
1
2
3
4
Change both displays to FR FRIES
FFRY
M2000 Computer
2-5
p
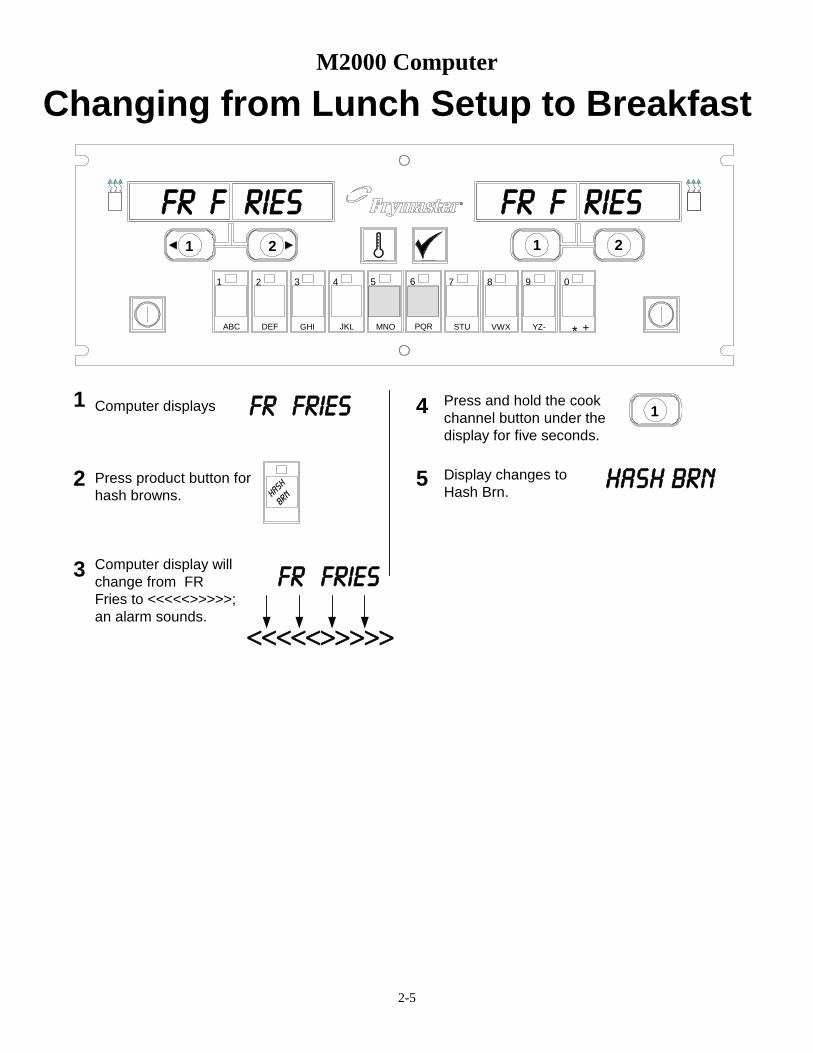
Press product button forhash browns.
<<<<<>>>>>
1
Computer display willchange from FRFries to <<<<<>>>>>;an alarm sounds.
Press and hold the cookchannel button under thedisplay for five seconds.
Display changes toHash Brn. hash brn
fr fries
2 3 4
DEF GHI JKL MNO PQR VWX
5 6 8
YZ-
09
+*
2 1 2
STU
7
1
ABC
1
Changing from Lunch Setup to Breakfast
1
2
3
4
Fr F ries Fr F ries
Computer displays FR FRies
5Ha
sh
brn
M2000 Installation/Setup
3- 1
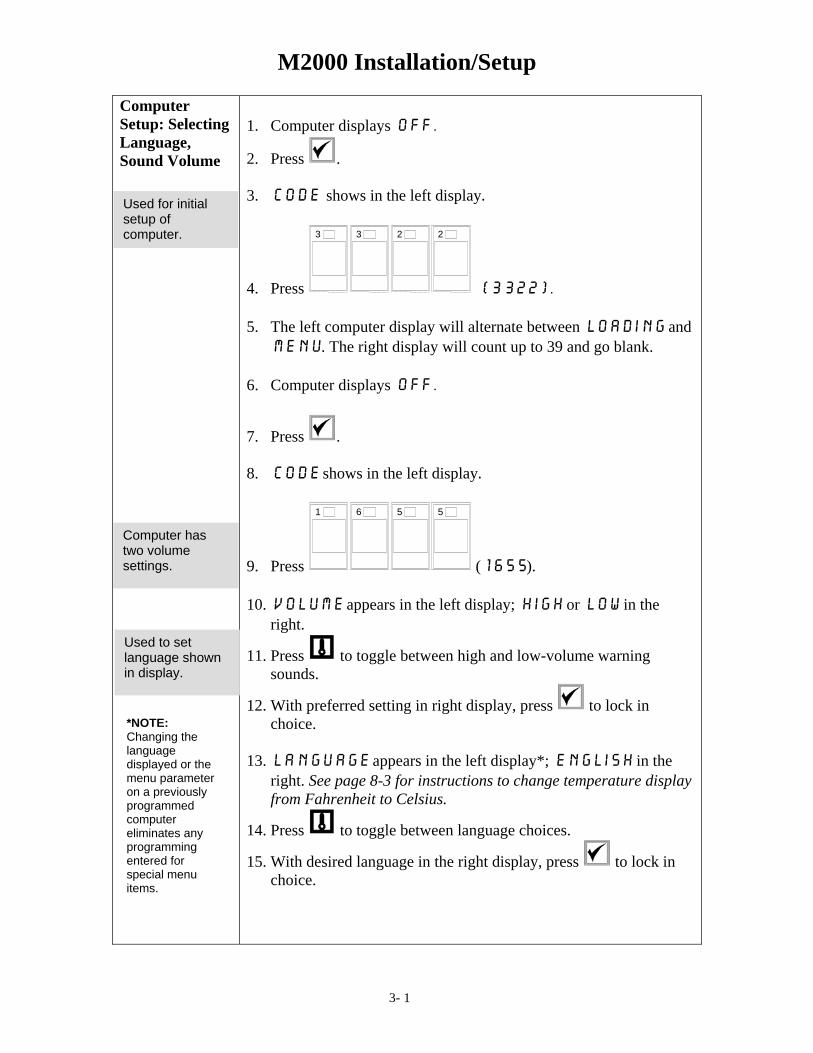
Computer Setup: Selecting Language, Sound Volume
1. Computer displays OFF.
2. Press . 3. code shows in the left display.
4. Press
3 3 2 2
(3322). 5. The left computer display will alternate between loading and
menu. The right display will count up to 39 and go blank. 6. Computer displays OFF.
7. Press . 8. code shows in the left display.
9. Press
1 6 5 5
(1655). 10. VOLUME appears in the left display; HIGH or LOW in the
right.
11. Press to toggle between high and low-volume warning sounds.
12. With preferred setting in right display, press to lock in choice.
13. Language appears in the left display*; English in the
right. See page 8-3 for instructions to change temperature display from Fahrenheit to Celsius.
14. Press to toggle between language choices.
15. With desired language in the right display, press to lock in choice.
Used for initial setup of computer.
Computer has two volume settings.
Used to set language shown in display.
*NOTE: Changing the language displayed or the menu parameter on a previously programmed computer eliminates any programming entered for special menu items.
M2000 Installation/Setup
3- 2
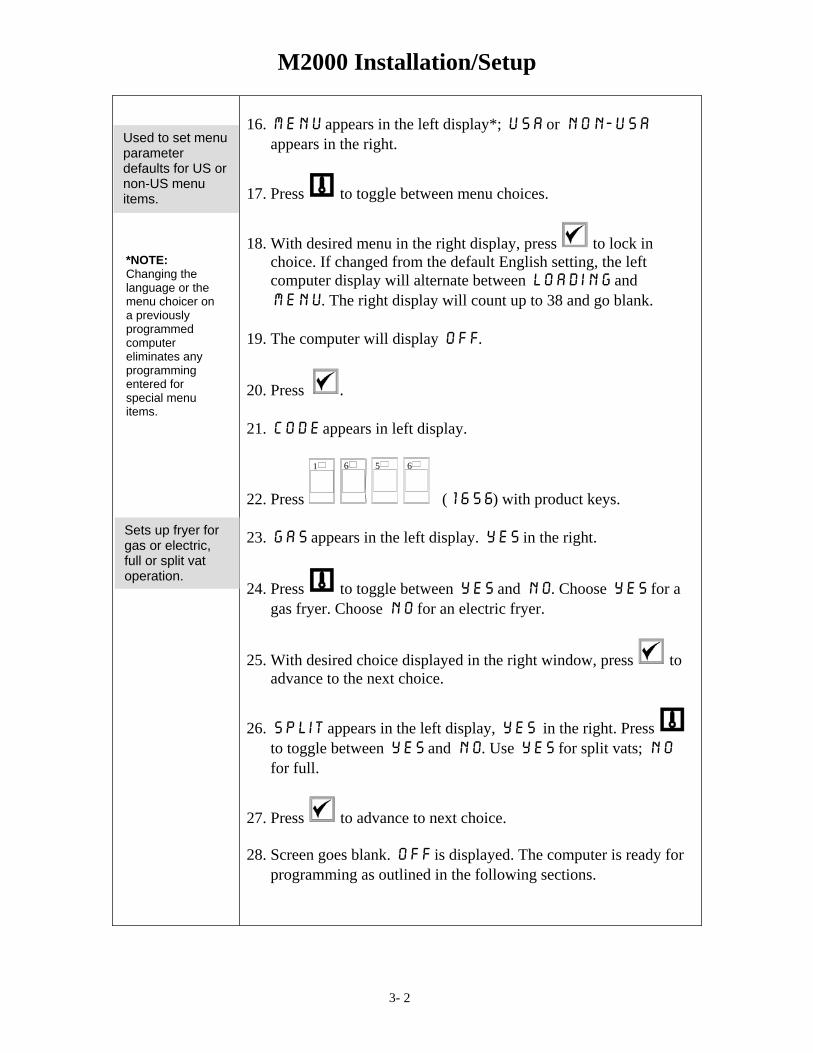
16. Menu appears in the left display*; USA or Non-USA
appears in the right.
17. Press to toggle between menu choices.
18. With desired menu in the right display, press to lock in choice. If changed from the default English setting, the left computer display will alternate between loading and menu. The right display will count up to 38 and go blank.
19. The computer will display Off.
20. Press . 21. Code appears in left display.
22. Press
1
6
5
6
(1656) with product keys. 23. GAS appears in the left display. YES in the right.
24. Press to toggle between YES and NO. Choose YES for a gas fryer. Choose NO for an electric fryer.
25. With desired choice displayed in the right window, press to advance to the next choice.
26. Split appears in the left display, Yes in the right. Press to toggle between YES and NO. Use Yes for split vats; NO for full.
27. Press to advance to next choice. 28. Screen goes blank. OFF is displayed. The computer is ready for
programming as outlined in the following sections.
Sets up fryer for gas or electric, full or split vat operation.
Used to set menu parameter defaults for US or non-US menu items.
*NOTE: Changing the language or the menu choicer on a previously programmed computer eliminates any programming entered for special menu items.
Programming for Dedicated Product Operation
4-1
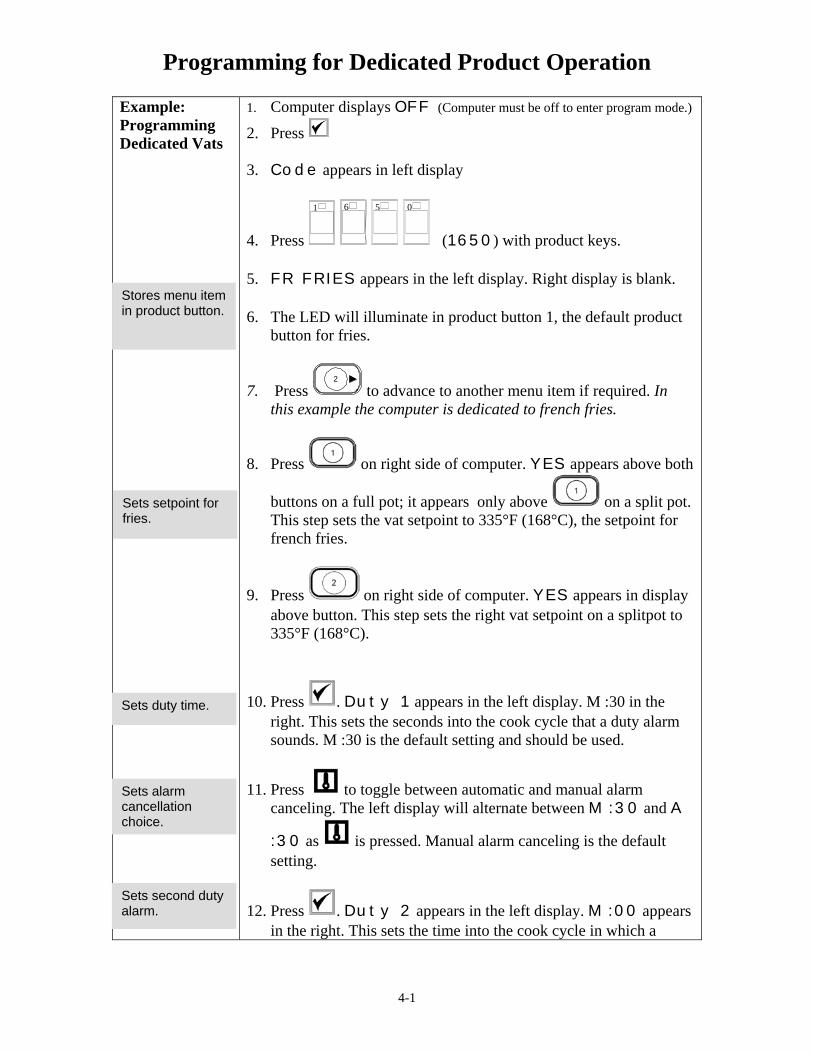
Example: Programming Dedicated Vats
1. Computer displays OFF (Computer must be off to enter program mode.)
2. Press 3. Code appears in left display
4. Press
1
6
5
0
(1650) with product keys. 5. FR FRIES appears in the left display. Right display is blank. 6. The LED will illuminate in product button 1, the default product
button for fries.
7. Press 2
to advance to another menu item if required. In this example the computer is dedicated to french fries.
8. Press on right side of computer. YES appears above both
buttons on a full pot; it appears only above on a split pot. This step sets the vat setpoint to 335°F (168°C), the setpoint for french fries.
9. Press on right side of computer. YES appears in display above button. This step sets the right vat setpoint on a splitpot to 335°F (168°C).
10. Press . Duty 1 appears in the left display. M :30 in the right. This sets the seconds into the cook cycle that a duty alarm sounds. M :30 is the default setting and should be used.
11. Press to toggle between automatic and manual alarm canceling. The left display will alternate between M :30 and A
:30 as is pressed. Manual alarm canceling is the default setting.
12. Press . Duty 2 appears in the left display. M :00 appears in the right. This sets the time into the cook cycle in which a
Stores menu item in product button.
Sets setpoint for fries.
Sets duty time.
Sets alarm cancellation choice.
Sets second duty alarm.
Programming for Dedicated Product Operation
4-2
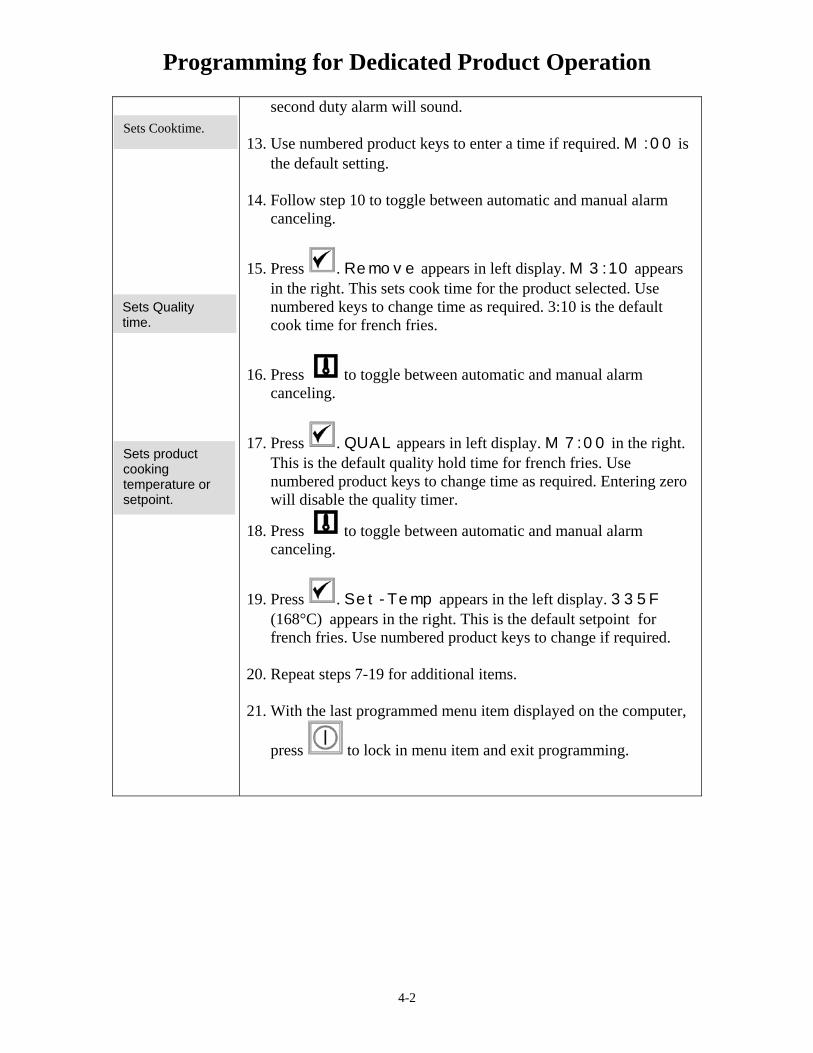
second duty alarm will sound. 13. Use numbered product keys to enter a time if required. M :00 is
the default setting. 14. Follow step 10 to toggle between automatic and manual alarm
canceling.
15. Press . Remove appears in left display. M 3:10 appears in the right. This sets cook time for the product selected. Use numbered keys to change time as required. 3:10 is the default cook time for french fries.
16. Press to toggle between automatic and manual alarm canceling.
17. Press . QUAL appears in left display. M 7:00 in the right. This is the default quality hold time for french fries. Use numbered product keys to change time as required. Entering zero will disable the quality timer.
18. Press to toggle between automatic and manual alarm canceling.
19. Press . Set-Temp appears in the left display. 335F (168°C) appears in the right. This is the default setpoint for french fries. Use numbered product keys to change if required.
20. Repeat steps 7-19 for additional items. 21. With the last programmed menu item displayed on the computer,
press to lock in menu item and exit programming.
Sets Cooktime.
Sets Quality time.
Sets product cooking temperature or setpoint.
Programming Multi-Product Operation
5-1
Programming Multi-Item Vat
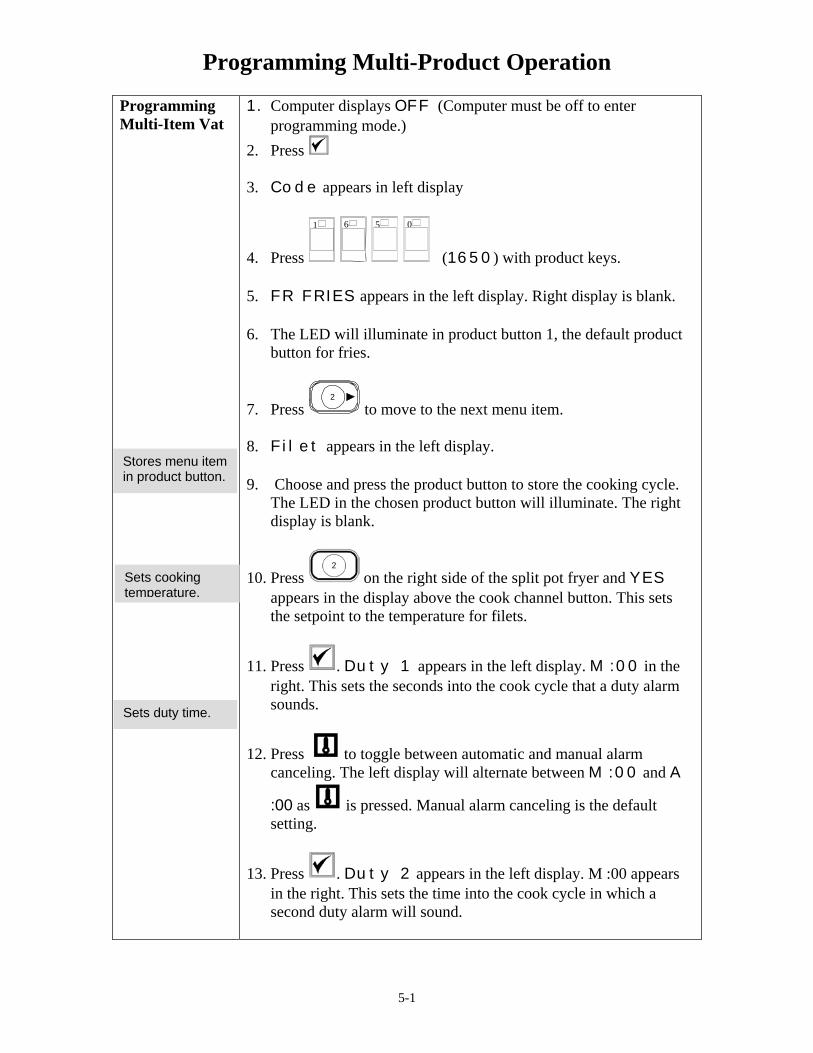
1. Computer displays OFF (Computer must be off to enter programming mode.)
2. Press 3. Code appears in left display
4. Press
1
6
5
0
(1650) with product keys. 5. FR FRIES appears in the left display. Right display is blank. 6. The LED will illuminate in product button 1, the default product
button for fries.
7. Press 2
to move to the next menu item. 8. Filet appears in the left display. 9. Choose and press the product button to store the cooking cycle.
The LED in the chosen product button will illuminate. The right display is blank.
10. Press on the right side of the split pot fryer and YES appears in the display above the cook channel button. This sets the setpoint to the temperature for filets.
11. Press . Duty 1 appears in the left display. M :00 in the right. This sets the seconds into the cook cycle that a duty alarm sounds.
12. Press to toggle between automatic and manual alarm canceling. The left display will alternate between M :00 and A
:00 as is pressed. Manual alarm canceling is the default setting.
13. Press . Duty 2 appears in the left display. M :00 appears in the right. This sets the time into the cook cycle in which a second duty alarm will sound.
Stores menu item in product button.
Sets duty time.
Sets cooking temperature.
Programming Multi-Product Operation
5-2
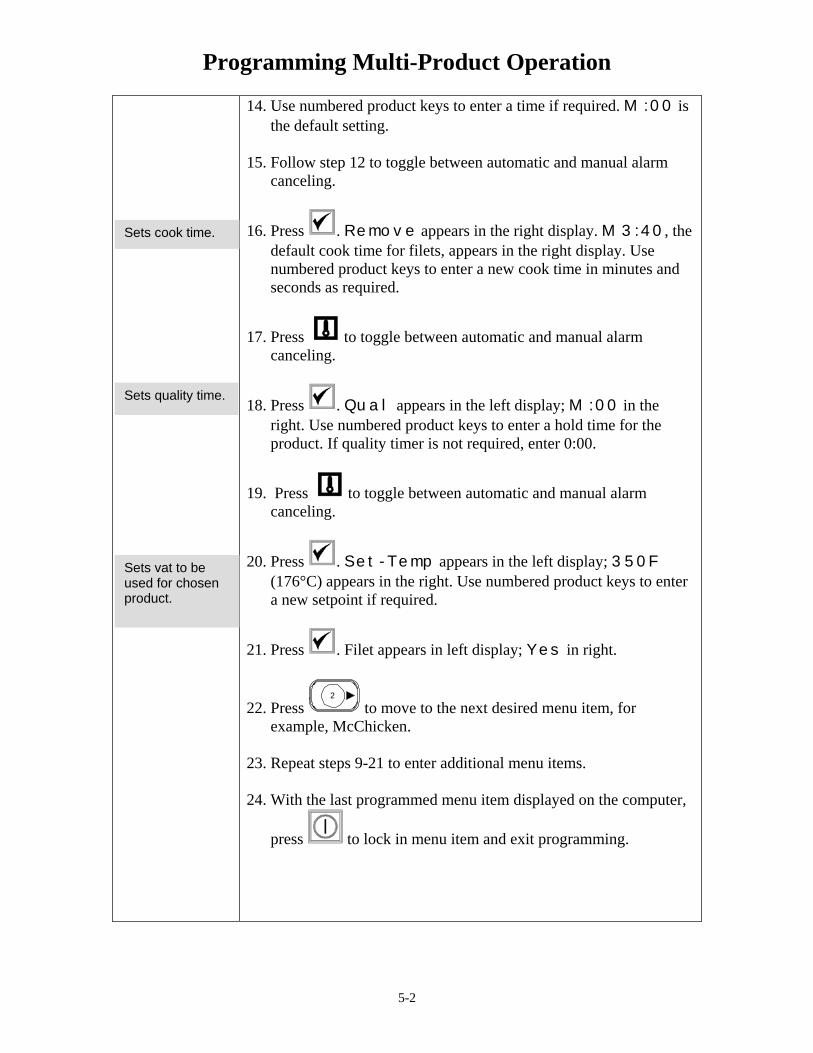
14. Use numbered product keys to enter a time if required. M :00 is the default setting.
15. Follow step 12 to toggle between automatic and manual alarm
canceling.
16. Press . Remove appears in the right display. M 3:40, the default cook time for filets, appears in the right display. Use numbered product keys to enter a new cook time in minutes and seconds as required.
17. Press to toggle between automatic and manual alarm canceling.
18. Press . Qual appears in the left display; M :00 in the right. Use numbered product keys to enter a hold time for the product. If quality timer is not required, enter 0:00.
19. Press to toggle between automatic and manual alarm canceling.
20. Press . Set-Temp appears in the left display; 350F (176°C) appears in the right. Use numbered product keys to enter a new setpoint if required.
21. Press . Filet appears in left display; Yes in right.
22. Press 2
to move to the next desired menu item, for example, McChicken.
23. Repeat steps 9-21 to enter additional menu items. 24. With the last programmed menu item displayed on the computer,
press to lock in menu item and exit programming.
Sets vat to be used for chosen product.
Sets cook time.
Sets quality time.
Programming New Menu Items
6-1
Adding New Menu Items
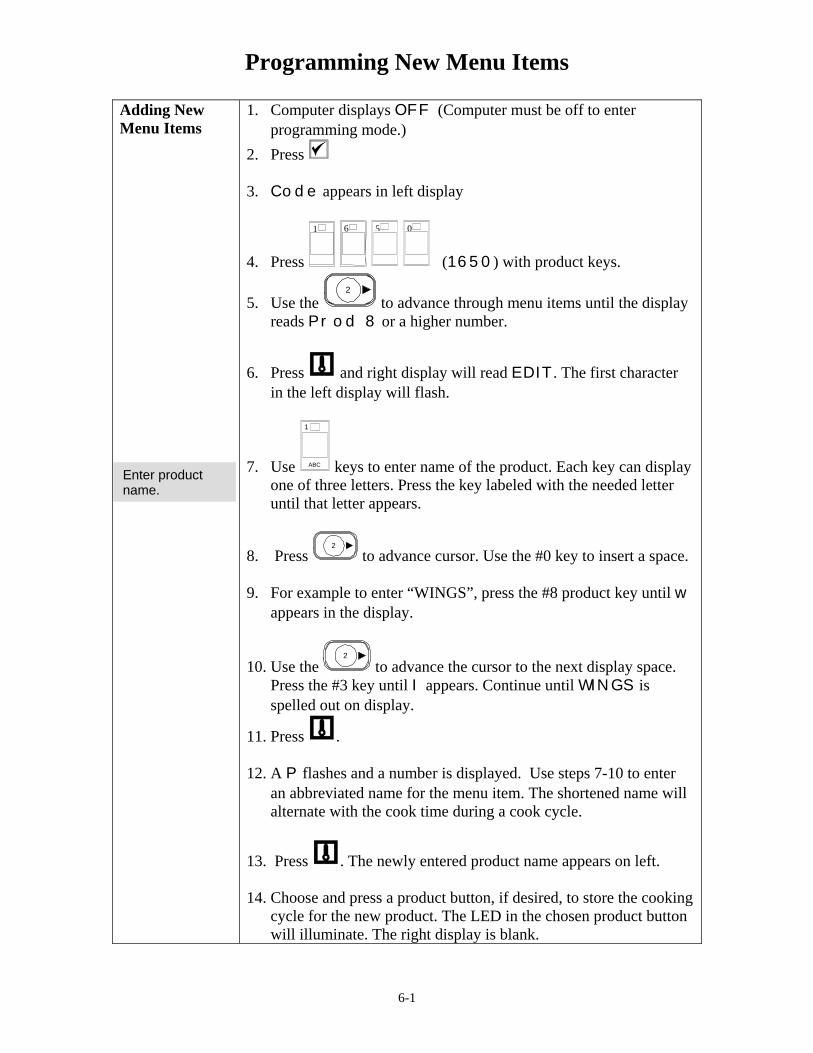
1. Computer displays OFF (Computer must be off to enter programming mode.)
2. Press 3. Code appears in left display
4. Press
1
6
5
0
(1650) with product keys.
5. Use the 2
to advance through menu items until the display reads Prod 8 or a higher number.
6. Press and right display will read EDIT. The first character in the left display will flash.
7. Use
1
ABC keys to enter name of the product. Each key can display one of three letters. Press the key labeled with the needed letter until that letter appears.
8. Press 2
to advance cursor. Use the #0 key to insert a space. 9. For example to enter “WINGS”, press the #8 product key until w
appears in the display.
10. Use the 2
to advance the cursor to the next display space. Press the #3 key until I appears. Continue until WINGS is spelled out on display.
11. Press . 12. A P flashes and a number is displayed. Use steps 7-10 to enter
an abbreviated name for the menu item. The shortened name will alternate with the cook time during a cook cycle.
13. Press . The newly entered product name appears on left. 14. Choose and press a product button, if desired, to store the cooking
cycle for the new product. The LED in the chosen product button will illuminate. The right display is blank.
Enter product name.
Programming New Menu Items
6-2
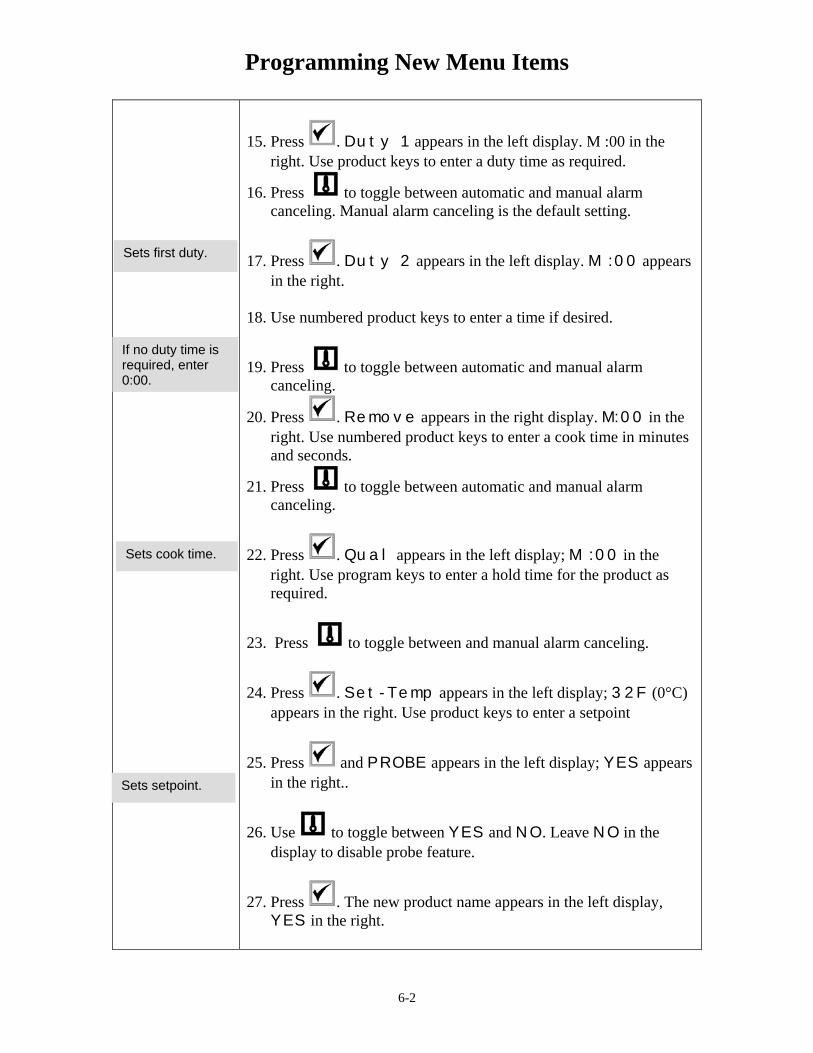
15. Press . Duty 1 appears in the left display. M :00 in the right. Use product keys to enter a duty time as required.
16. Press to toggle between automatic and manual alarm canceling. Manual alarm canceling is the default setting.
17. Press . Duty 2 appears in the left display. M :00 appears in the right.
18. Use numbered product keys to enter a time if desired.
19. Press to toggle between automatic and manual alarm canceling.
20. Press . Remove appears in the right display. M:00 in the right. Use numbered product keys to enter a cook time in minutes and seconds.
21. Press to toggle between automatic and manual alarm canceling.
22. Press . Qual appears in the left display; M :00 in the right. Use program keys to enter a hold time for the product as required.
23. Press to toggle between and manual alarm canceling.
24. Press . Set-Temp appears in the left display; 32F (0°C) appears in the right. Use product keys to enter a setpoint
25. Press and PROBE appears in the left display; YES appears in the right..
26. Use to toggle between YES and NO. Leave NO in the display to disable probe feature.
27. Press . The new product name appears in the left display, YES in the right.
Sets first duty.
Sets cook time.
Sets setpoint.
If no duty time is required, enter 0:00.
Programming New Menu Items
6-3
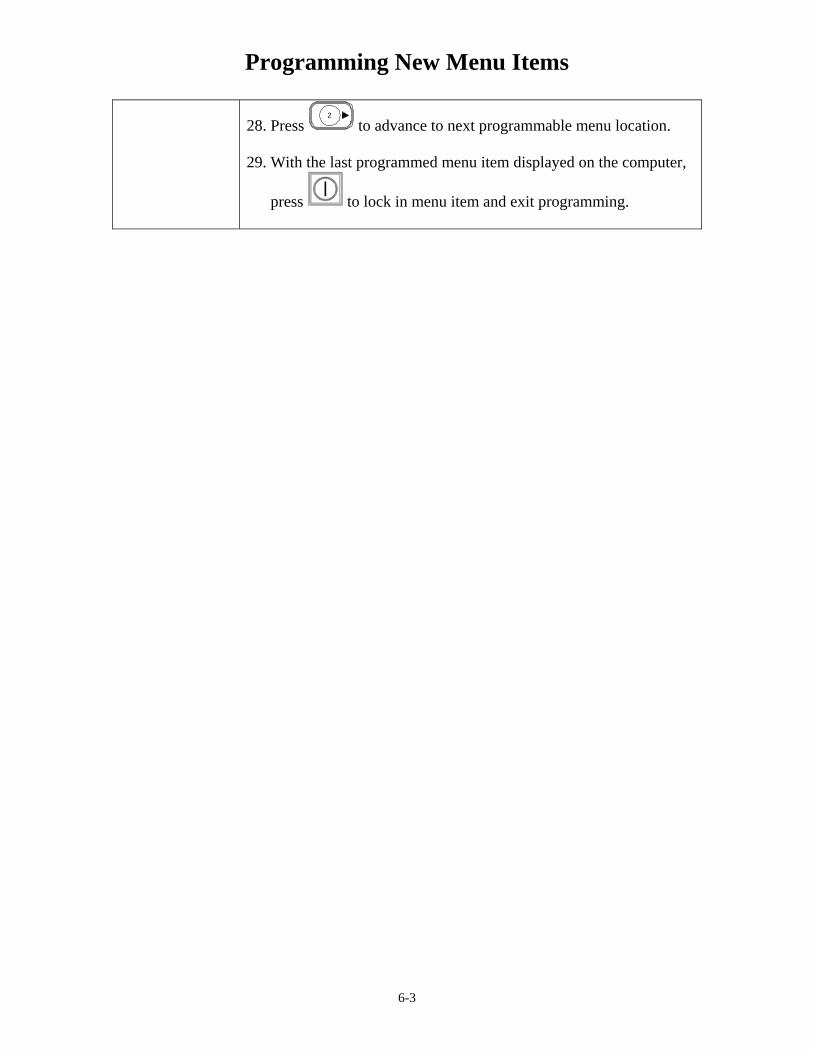
28. Press 2
to advance to next programmable menu location. 29. With the last programmed menu item displayed on the computer,
press to lock in menu item and exit programming.
M2000 Adding/ Selecting Boilout
7-1
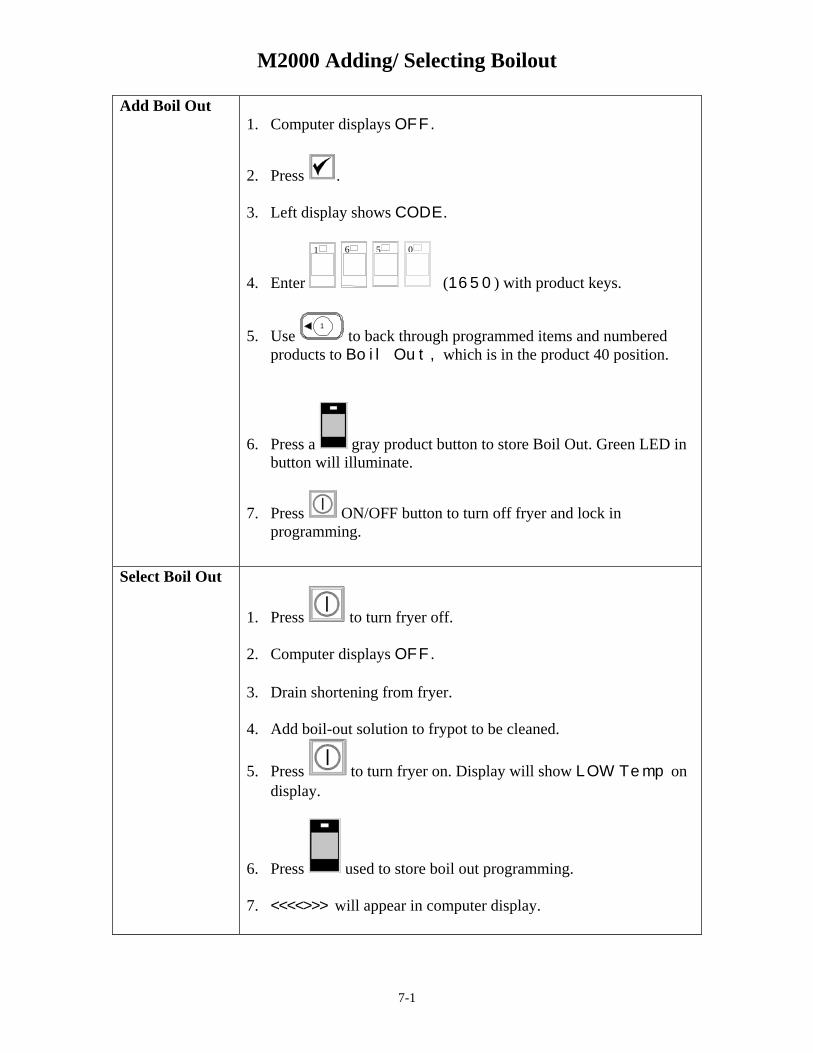
Add Boil Out 1. Computer displays OFF.
2. Press . 3. Left display shows CODE.
4. Enter
1
6
5
0
(1650) with product keys.
5. Use 1
to back through programmed items and numbered products to Boil Out, which is in the product 40 position.
6. Press a gray product button to store Boil Out. Green LED in button will illuminate.
7. Press ON/OFF button to turn off fryer and lock in programming.
Select Boil Out
1. Press to turn fryer off. 2. Computer displays OFF. 3. Drain shortening from fryer. 4. Add boil-out solution to frypot to be cleaned.
5. Press to turn fryer on. Display will show LOW Temp on display.
6. Press used to store boil out programming. 7. <<<<>>> will appear in computer display.
M2000 Adding/ Selecting Boilout
7-2
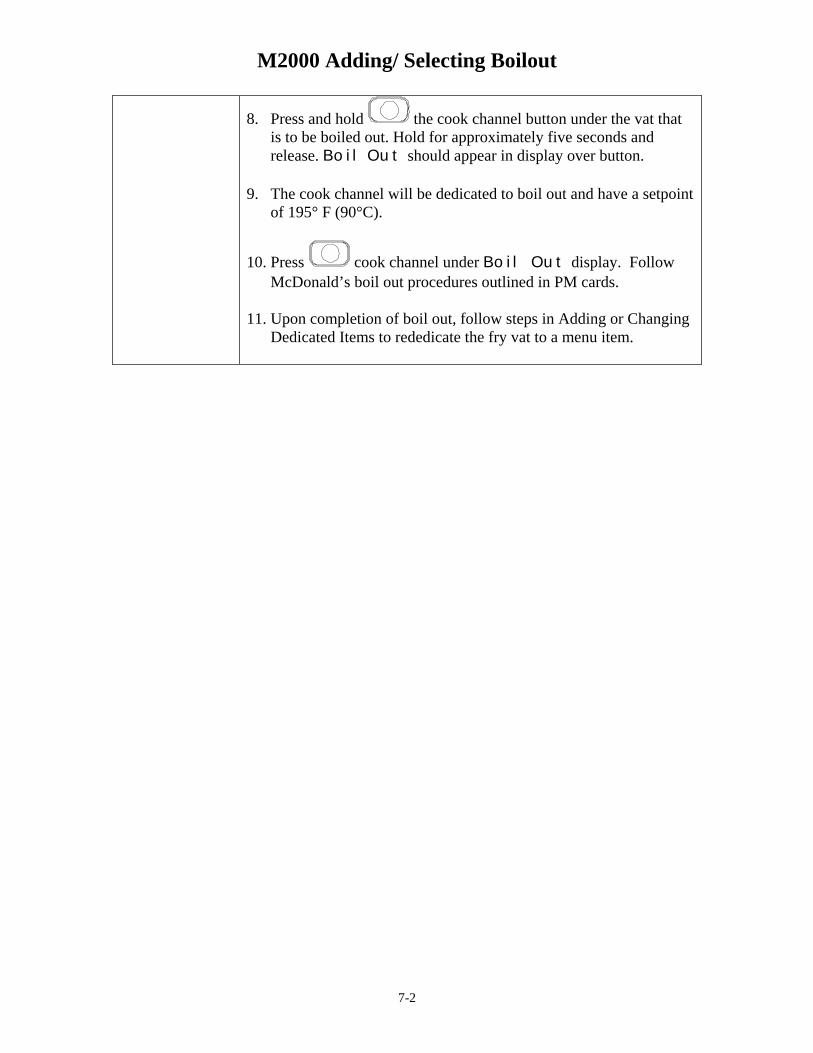
8. Press and hold the cook channel button under the vat that is to be boiled out. Hold for approximately five seconds and release. Boil Out should appear in display over button.
9. The cook channel will be dedicated to boil out and have a setpoint
of 195° F (90°C).
10. Press cook channel under Boil Out display. Follow McDonald’s boil out procedures outlined in PM cards.
11. Upon completion of boil out, follow steps in Adding or Changing
Dedicated Items to rededicate the fry vat to a menu item.
Quick Reference For Programming Codes
8-1
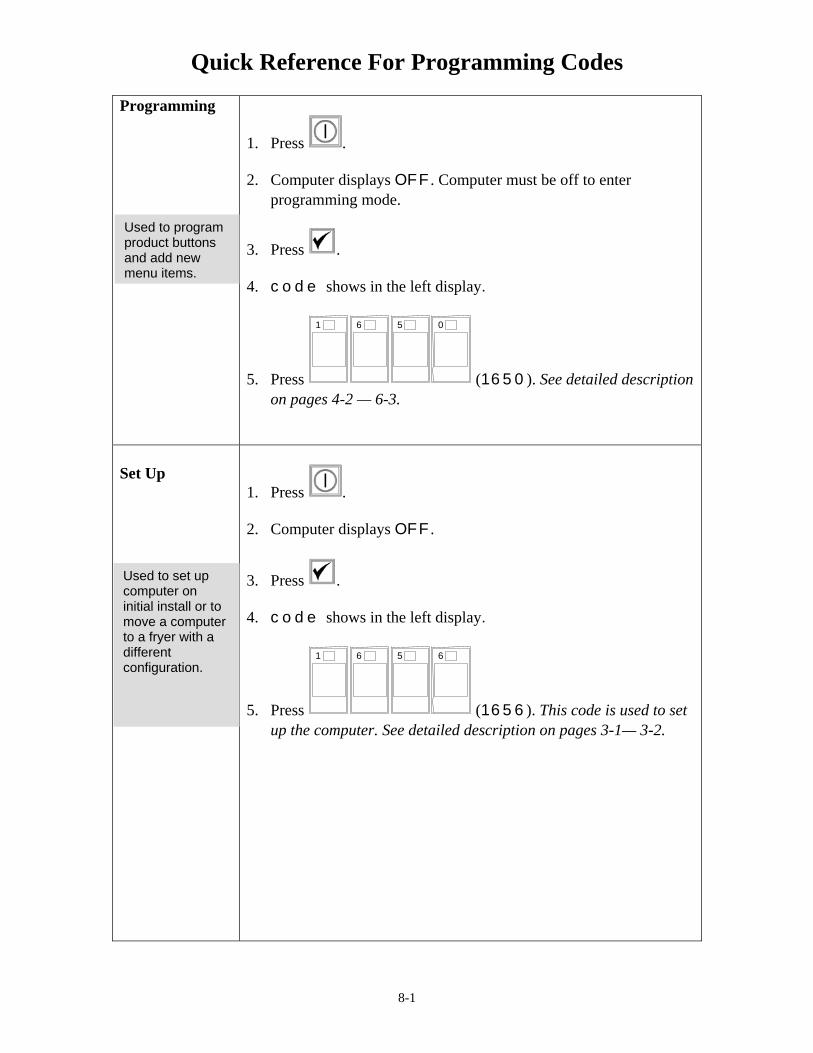
Programming
1. Press . 2. Computer displays OFF. Computer must be off to enter
programming mode.
3. Press . 4. code shows in the left display.
5. Press
1 6 5 0
(1650). See detailed description on pages 4-2 — 6-3.
Set Up
1. Press . 2. Computer displays OFF.
3. Press . 4. code shows in the left display.
5. Press
1 6 5 6
(1656). This code is used to set up the computer. See detailed description on pages 3-1— 3-2.
Used to program product buttons and add new menu items.
Used to set up computer on initial install or to move a computer to a fryer with a different configuration.
Quick Reference For Programming Codes
8-2
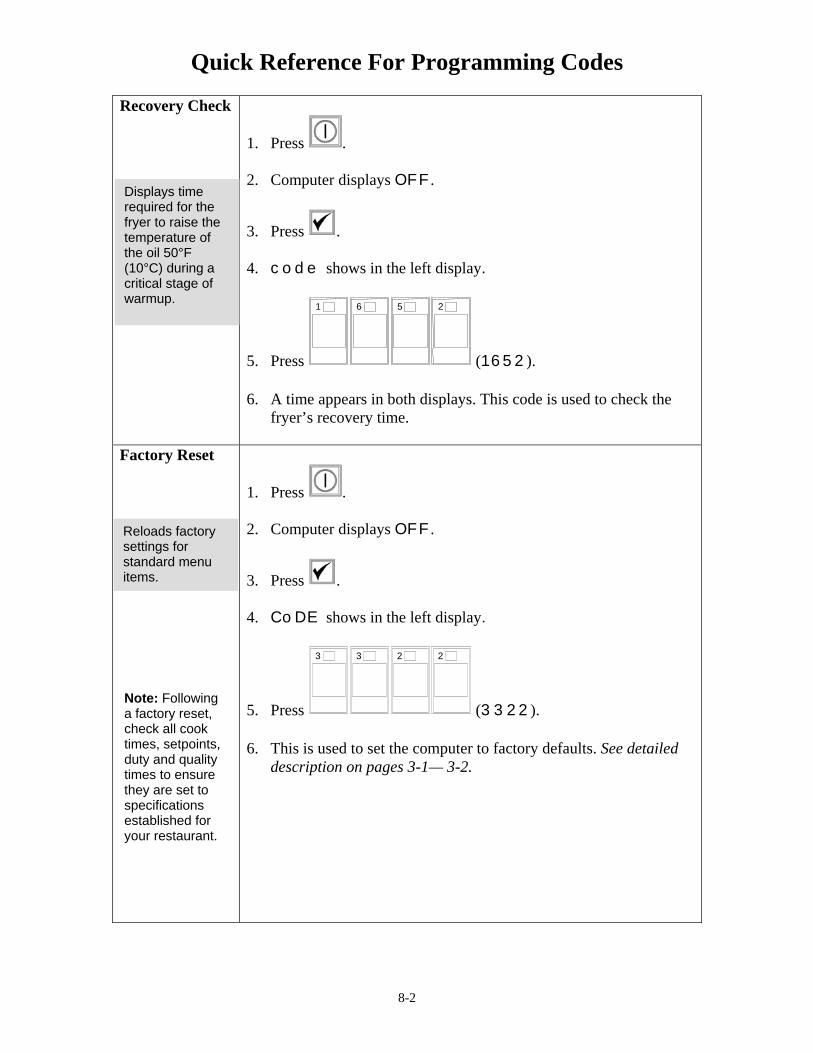
Recovery Check
1. Press . 2. Computer displays OFF.
3. Press . 4. code shows in the left display.
5. Press
1 6 5 2
(1652). 6. A time appears in both displays. This code is used to check the
fryer’s recovery time.
Factory Reset
1. Press . 2. Computer displays OFF.
3. Press . 4. CoDE shows in the left display.
5. Press
3 3 2 2
(3322). 6. This is used to set the computer to factory defaults. See detailed
description on pages 3-1— 3-2.
Displays time required for the fryer to raise the temperature of the oil 50°F (10°C) during a critical stage of warmup.
Reloads factory settings for standard menu items.
Note: Following a factory reset, check all cook times, setpoints, duty and quality times to ensure they are set to specifications established for your restaurant.
Quick Reference For Programming Codes
8-3
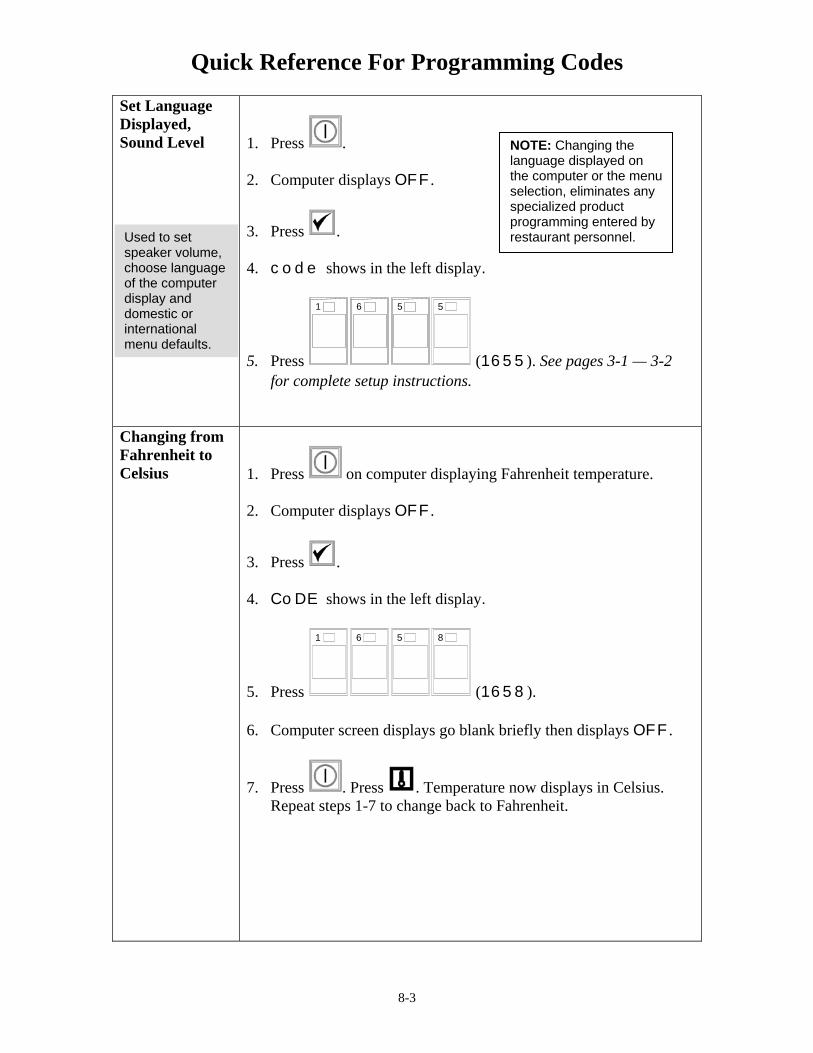
Set Language Displayed, Sound Level
1. Press . 2. Computer displays OFF.
3. Press . 4. code shows in the left display.
5. Press
1 6 5 5
(1655). See pages 3-1 — 3-2 for complete setup instructions.
Changing from Fahrenheit to Celsius
1. Press on computer displaying Fahrenheit temperature. 2. Computer displays OFF.
3. Press . 4. CoDE shows in the left display.
5. Press
1 6 5 8
(1658). 6. Computer screen displays go blank briefly then displays OFF.
7. Press . Press . Temperature now displays in Celsius. Repeat steps 1-7 to change back to Fahrenheit.
Used to set speaker volume, choose language of the computer display and domestic or international menu defaults.
NOTE: Changing the language displayed on the computer or the menu selection, eliminates any specialized product programming entered by restaurant personnel.
Quick Reference For Programming Codes
8-4
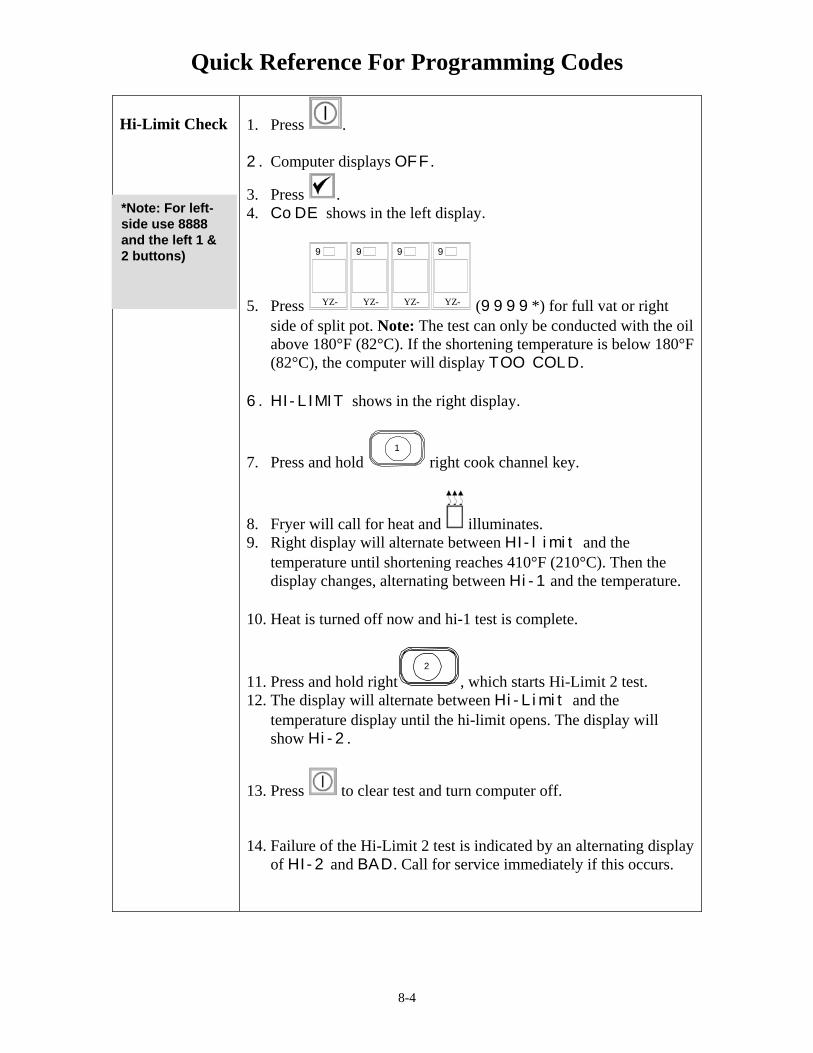
Hi-Limit Check
1. Press . 2. Computer displays OFF.
3. Press . 4. CoDE shows in the left display.
5. Press
9
YZ-
9
YZ-
9
YZ-
9
YZ- (9999*) for full vat or right side of split pot. Note: The test can only be conducted with the oil above 180°F (82°C). If the shortening temperature is below 180°F (82°C), the computer will display TOO COLD.
6. HI-LIMIT shows in the right display.
7. Press and hold 1
right cook channel key.
8. Fryer will call for heat and illuminates. 9. Right display will alternate between HI-limit and the
temperature until shortening reaches 410°F (210°C). Then the display changes, alternating between Hi-1 and the temperature.
10. Heat is turned off now and hi-1 test is complete.
11. Press and hold right2
, which starts Hi-Limit 2 test. 12. The display will alternate between Hi-Limit and the
temperature display until the hi-limit opens. The display will show Hi-2.
13. Press to clear test and turn computer off. 14. Failure of the Hi-Limit 2 test is indicated by an alternating display
of HI-2 and BAD. Call for service immediately if this occurs.
*Note: For left-side use 8888 and the left 1 & 2 buttons)
Quick Reference For Programming Codes
8-5
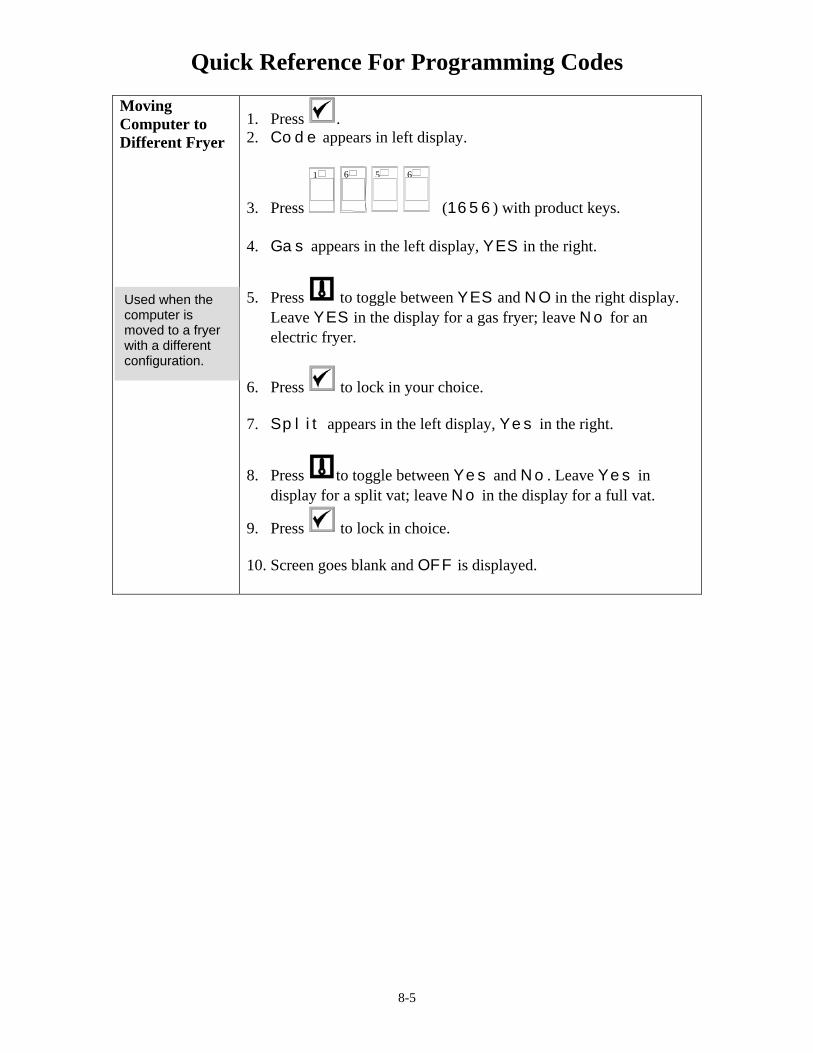
Moving Computer to Different Fryer
1. Press . 2. Code appears in left display.
3. Press
1
6
5
6
(1656) with product keys. 4. Gas appears in the left display, YES in the right.
5. Press to toggle between YES and NO in the right display. Leave YES in the display for a gas fryer; leave No for an electric fryer.
6. Press to lock in your choice. 7. Split appears in the left display, Yes in the right.
8. Press to toggle between Yes and No. Leave Yes in display for a split vat; leave No in the display for a full vat.
9. Press to lock in choice. 10. Screen goes blank and OFF is displayed.
Used when the computer is moved to a fryer with a different configuration.
Distress Displays
9-1
2 3 4
DEF GHI JKL MNO PQR STU VWX
5 6 7 8
ABC
1
YZ-
09
+
*
1 2 2
HI1
HI
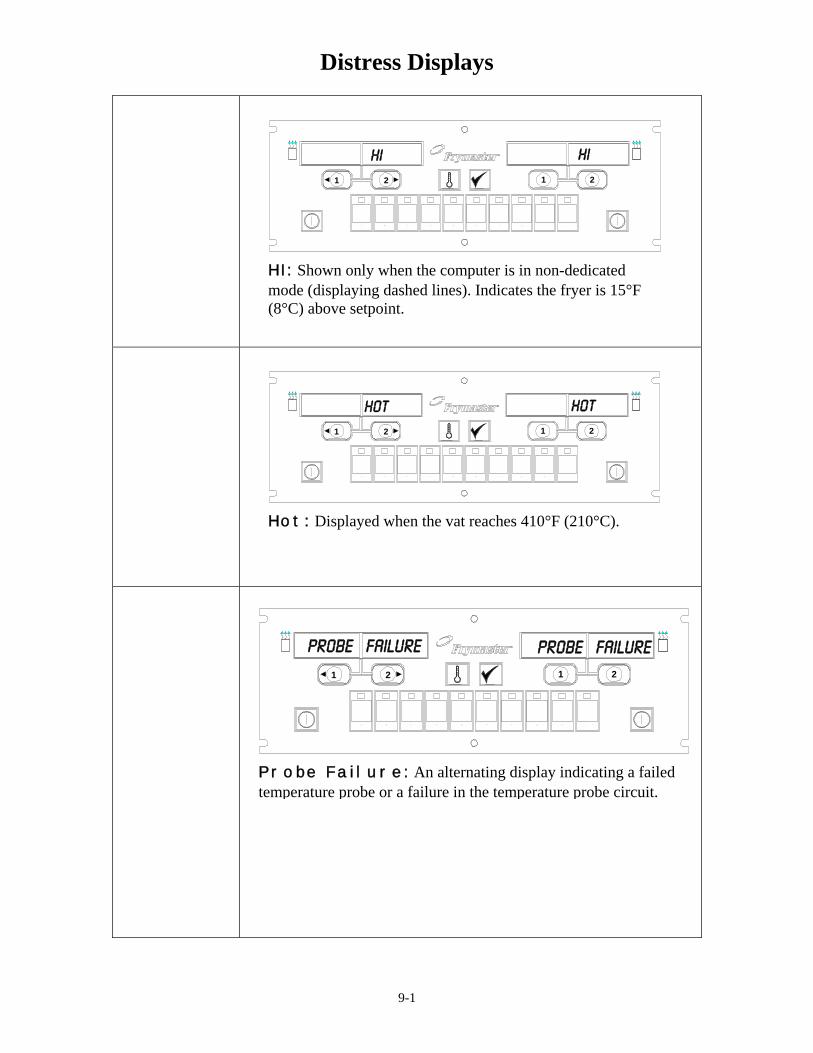
HI: Shown only when the computer is in non-dedicated mode (displaying dashed lines). Indicates the fryer is 15°F (8°C) above setpoint.
2 3 4
DE F GHI JKL MNO P QR S TU V WX
5 6 7 8
AB C
1
Y Z-
09
+
*
1 2 2
HOT1
HOT
Hot: Displayed when the vat reaches 410°F (210°C).
2 3 4
DEF GHI JKL MNO PQR STU VWX
5 6 7 8
ABC
1
YZ-
09
+
*
1 2 21
Probe failure Probe failure
Probe Failure: An alternating display indicating a failed temperature probe or a failure in the temperature probe circuit.
Distress Displays
9-2
2 3 4
DEF GHI JKL MNO PQR ST U VWX
5 6 7 8
ABC
1
YZ-
09
+
*
1 2 21
ignition Failure ignition Failure
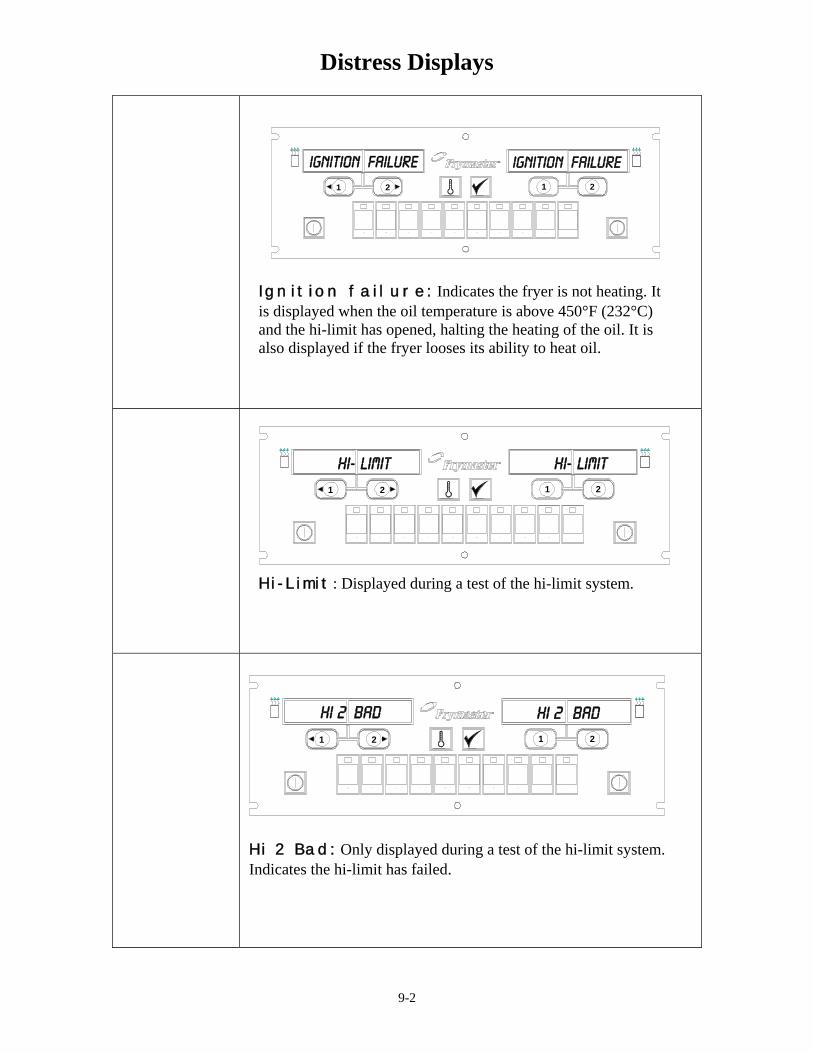
Ignition failure: Indicates the fryer is not heating. It is displayed when the oil temperature is above 450°F (232°C) and the hi-limit has opened, halting the heating of the oil. It is also displayed if the fryer looses its ability to heat oil.
2 3 4
DEF GHI JKL MNO PQR STU VWX
5 6 7 8
ABC
1
YZ-
09
+
*
1 2 21
Hi- limit Hi- limit
Hi-Limit: Displayed during a test of the hi-limit system.
2 3 4
DEF GHI JKL MNO PQR STU VWX
5 6 7 8
ABC
1
YZ-
09
+
*
1 2 21
Hi 2 bad Hi 2 bad
Hi 2 Bad: Only displayed during a test of the hi-limit system. Indicates the hi-limit has failed.
Distress Displays
9-3
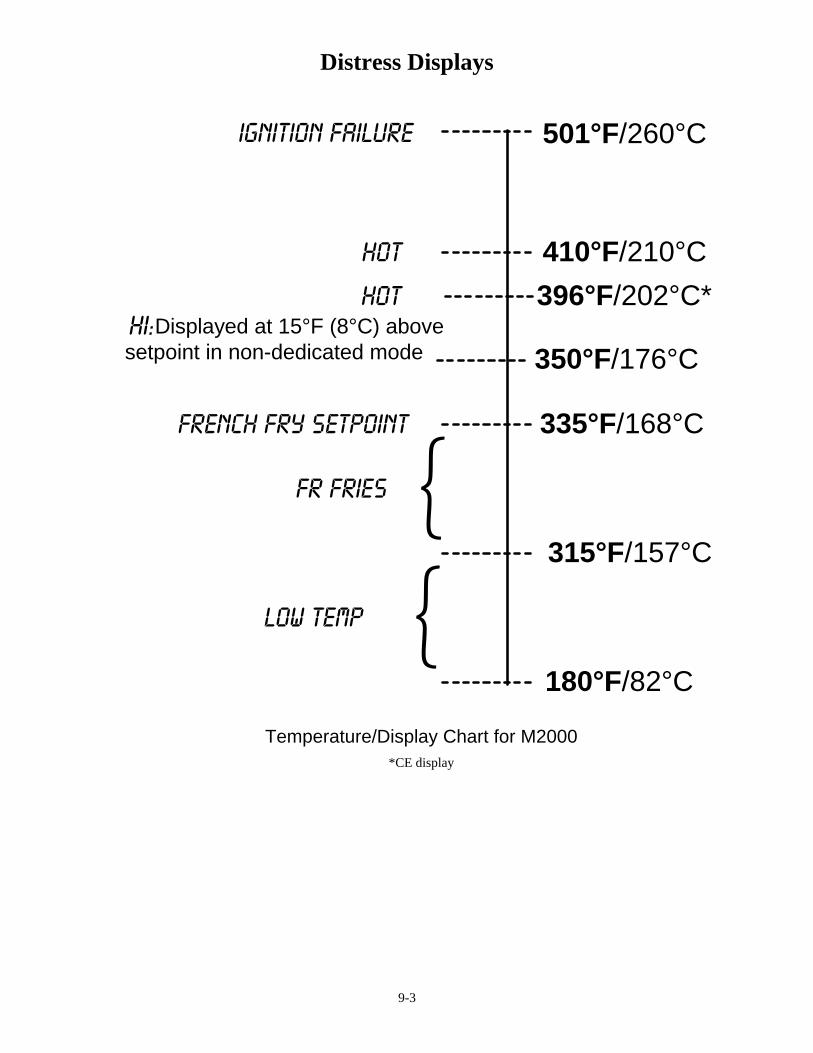
410°F/210°C
315°F/157°C
335°F/168°C
180°F/82°C
Hot
French Fry Setpoint
{Low Temp
{Fr Fries
ignition Failure 501°F/260°C
350°F/176°C Displayed at 15°F (8°C) abovesetpoint in non-dedicated modehi:
396°F/202°C*Hot
Temperature/Display Chart for M2000 *CE display
Frymaster, L.L.C.
8700 Line Avenue, Shreveport, Louisiana USA 71106 Service Center (800) 551-8633 or (318) 865-1711
Printed in the United States of America 819-5833English NOVEMBER 2003